DIGITAL Standard Runoff Reference Manual
- Operating System and Version:
- VSI OpenVMS x86-64
Preface
1. About VSI
VMS Software, Inc. (VSI) is an independent software company licensed by Hewlett Packard Enterprise to develop and support the OpenVMS operating system.
2. Intended Audience
This manual is intended for users of the VMS operating system who need to format documents. Users are expected to have some familiarity with VMS system concepts and to know how to use a text editor (such as EDT).
3. Document Structure
This manual contains six chapters and two appendixes.
Chapter 1, "Introduction" provides an overview of DSR, describes terms and conventions used in DSR, and gives some simple examples to introduce the user to a few DSR commands and flags.
Chapter 2, "DSR Commands" describes all of the DSR commands.
Chapter 3, "DSR Flags" describes all of the DSR flags.
Chapter 4, "RUNOFF Command Qualifiers" explains how to run DSR and describes all of the command line qualifiers.
Chapter 5, "The DSR Table of Contents Utility" describes the features of the Table of Contents utility and how to produce a table of contents and contains the
RUNOFF/CONTENTScommand qualifiers and command line examples.Chapter 6, "The DSR Indexing Utility" describes the features of the DSR indexing utility, shows how to produce an index, and contains the
RUNOFF/INDEXcommand qualifiers and command line examples.Appendix A, "DSR Commands Organized by Function" contains a list of DSR commands organized by function.
Appendix B, "Requirements for Printing LNI Files on an LN01 Laser Printer " describes to system managers the requirements for printing an LNI file on an LN01 or an LN01E Laser Printer.
4. OpenVMS Documentation
The full VSI OpenVMS documentation set can be found on the VMS Software Documentation webpage at https://docs.vmssoftware.com.
5. VSI Encourages Your Comments
You may send comments or suggestions regarding this manual or any VSI document by sending electronic mail to the following Internet address: <docinfo@vmssoftware.com>. Users who have VSI OpenVMS support contracts through VSI can contact <support@vmssoftware.com> for help with this product.
6. Conventions
| Convention | Meaning |
|---|---|
|
Ctrl/x |
A sequence such as Ctrl/x indicates that you must hold down the key labeled Ctrl while you press another key or a pointing device button. |
|
PF1 x |
A sequence such as PF1 x indicates that you must first press and release the key labeled PF1 and then press and release another key or a pointing device button. |
| Return |
In examples, a key name enclosed in a box indicates that you press a key on the keyboard. (In text, a key name is not enclosed in a box.) |
... |
A horizontal ellipsis in examples indicates one of the following possibilities:
|
. . . |
A vertical ellipsis indicates the omission of items from a code example or command format; the items are omitted because they are not important to the topic being discussed. |
|
( ) |
In command format descriptions, parentheses indicate that you must enclose the options in parentheses if you choose more than one. |
|
[ ] |
In command format descriptions, brackets indicate optional choices. You can choose one or more items or no items. Do not type the brackets on the command line. However, you must include the brackets in the syntax for VSI OpenVMS directory specifications and for a substring specification in an assignment statement. |
|
[ | ] |
In command format descriptions, vertical bars separate choices within brackets or braces. Within brackets, the choices are options; within braces, at least one choice is required. Do not type the vertical bars on the command line. |
|
{ } |
In command format descriptions, braces indicate required choices; you must choose at least one of the items listed. Do not type the braces on the command line. |
|
bold text |
This typeface represents the introduction of a new term. It also represents the name of an argument, an attribute, or a reason. |
|
italic text |
Italic text indicates important information, complete titles of manuals, or variables. Variables include information that varies in system output (Internal error number), in command lines (/PRODUCER= name), and in command parameters in text (where dd represents the predefined code for the device type). |
|
UPPERCASE TEXT |
Uppercase text indicates a command, the name of a routine, the name of a file, or the abbreviation for a system privilege. |
|
|
Monospace type indicates code examples and interactive screen displays. In the C programming language, monospace type in text identifies the following elements: keywords, the names of independently compiled external functions and files, syntax summaries, and references to variables or identifiers introduced in an example. |
- |
A hyphen at the end of a command format description, command line, or code line indicates that the command or statement continues on the following line. |
|
numbers |
All numbers in text are assumed to be decimal unless otherwise noted. Nondecimal radixes—binary, octal, or hexadecimal—are explicitly indicated. |
Chapter 1. Introduction
This chapter gives an overview of DIGITAL Standard Runoff (DSR) and describes the following:
DSR command format
Entering DSR commands
DSR command defaults
Printing DSR output files
1.1. Overview of DIGITAL Standard Runoff
DIGITAL Standard Runoff (DSR) is a text-formatting facility consisting of DSR
commands, DSR flags, the DCL command RUNOFF, the DSR Table of
Contents Utility, and the DSR Indexing Utility. You enter DSR commands and flags in a
file along with the text you want to format. The output file that results from DSR
processing is a formatted document. Neither the DSR commands nor the DSR flags appear in
the final document.
The following steps summarize the process of producing a document with DSR:
Use a text editor such as EDT to create or edit a file that contains DSR commands, DSR flags, and text.
Use the
RUNOFFcommand to process your file and format the text according to DSR defaults and DSR commands that you enter.Print the formatted document.
- DSR commands
Allow you to specify many formatting items, among them: the size of pages, uneven or justified right margins, the amount of spaces to appear between lines, and the arrangement of items in lists. The procedure for entering DSR commands in your file is described later in this section. Each DSR command is described in detail in Chapter 2, "DSR Commands".
- DSR flags
Special characters that you enter to specify emphasis of text, case of characters, spacing of text, and other formatting details. Chapter 3, "DSR Flags" describes the procedure for using flags and gives a detailed description of each individual flag.
- RUNOFF command
A DCL (DIGITAL Command Language) command whose qualifiers allow you to adjust the amount of text on a page, process all or a part of your file, create an intermediate binary file for indexes and tables of contents, among other functions. The
RUNOFFcommand and its qualifiers are described in Chapter 4, "RUNOFF Command Qualifiers".- DSR Table of Contents Utility
Formats a table of contents from the structural commands (
.CHAPTER,.HEADER LEVEL, and so on) that you enter in your document. This utility is described in Chapter 5, "The DSR Table of Contents Utility".- DSR Indexing Utility
Formats an index from the indexing commands (
.INDEX,.ENTRY) that you enter in your document. This utility is described in Chapter 6, "The DSR Indexing Utility".
1.2. DSR Command Format
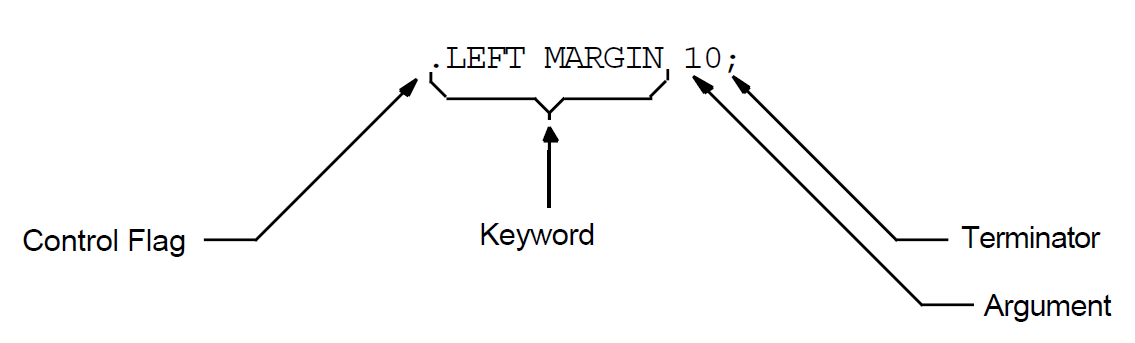
A DSR command consists of the following parts:
- Control flag ( . )
Introduces a DSR command. Begin a command in column 1 unless it follows other DSR commands on the same line.
- Keyword
Immediately follows the Control flag to specify the command function. A keyword can be a single word or several words separated by spaces. The letters of a keyword may be entered in uppercase, lowercase, or both. Keywords may be abbreviated to uniqueness.
- Argument
Provides additional information for some commands. Use commas or spaces to separate multiple arguments (for example,
.LAYOUT 1,3).Many commands have optional arguments. If you do not enter a value for the argument, DSR supplies a predetermined standard numeric or alphabetic value. This standard value is known as a default.
- Terminator
Ends the command or string of commands. Commands are most commonly terminated by the end of the line. However, you can terminate a command with a semicolon ( ; ). You can terminate a command and begin a comment with an exclamation point ( ! ). Or you can terminate a command and begin another one with a period ( . ).
Figure 1.1, ''DSR Command Format'' shows the parts of a DSR command.
1.3. Entering DSR Commands
You can put each DSR command on a separate line or you can put several DSR commands on the same line. You must always type the Control flag ( . ) in column 1 of a line. The following example shows a single command on each line:
.BLANK
.LEFT MARGIN 0
.INDENT 10
To put more than one DSR command on a line, you must follow these rules:
You must type the first command in column 1 of a line.
You can put one command after another if all commands on the line either take no values or take numeric values.
You can (except where explicitly disallowed) include a command that takes an alphabetic argument, as long as it is the last command on the line.
You must precede each command with a Control flag ( . ).
The following example shows multiple commands on a single line:
.BLANK.LEFT MARGIN 0.INDENT 10
There are exceptions to these rules. Some commands that take alphabetic values (such
as the .DISPLAY commands) can appear anywhere in a line of commands.
Other commands take text, but they must be followed by a semicolon ( ; ) for another
command to follow on the same line. Some commands that take text after them
(.TITLE and .CHAPTER) cannot be followed by
any other commands. Chapter 2, "DSR Commands" describes the formats of the individual
commands.
To terminate a command or line of commands, you usually enter a carriage return. However, you can terminate a command by typing a semicolon if you want to enter text on the same line with the command. The text must immediately follow the semicolon. For example:
We sail the ocean blue,
.BLANK;And our saucy ship’s a beauty.
In the preceding example, the semicolon after the .BLANK command
tells DSR that the command is terminated and that text now follows. DSR inserts a blank
line between the two lines of text, as shown in the following output:
We sail the ocean blue,
And our saucy ship’s a beauty.
1.3.1. Separating Command Arguments
There are rules for separating command arguments from keywords and for separating arguments from other arguments. The rule for separating arguments from keywords is as follows:
if the leading character of the first argument is not a letter, no separator is required
if the leading character is a letter, the letter must be separated from the final keyword by at least one space or tab.
For example:
.TITLE Runoff
is acceptable, whereas
.TITLERunoff
is not, because DSR cannot differentiate between the argument and the keyword.
The rule for separating arguments from other arguments is: if more than one argument is required, you may insert a space or a comma as a separator between arguments; but, if you have adjacent letters or numbers in your argument sequence, you must insert a separator. A space separator consists of a SPACE or TAB character. A comma separator consists of a single comma, alone or within any number of spaces and tabs.
You must enter separators in the following example because there are adjacent numbers in the argument sequence:
.TAB STOPS 10,20,30,40
1.3.2. Entering Null Arguments
If you wish to use a default value when you are entering a sequence of arguments, use a comma to indicate a null argument. DSR assigns the appropriate default value to the null argument.
In the following example, the .TAB STOPS command uses default
values for the first and second arguments, and uses the value supplied by the user
(30) for the third argument:
.TAB STOPS ,,30
The result of this command is that the user has tab stops of 8, 16, and 30.
1.3.3. Abbreviating DSR Commands
Most DSR commands have standard abbreviations. It is often convenient to enter the abbreviation instead of the full command. The standard abbreviations for DSR commands are given in Chapter 2, "DSR Commands". The abbreviations for DSR flags are given in Chapter 3, "DSR Flags".
You can use your own short form of a DSR command instead of the standard
abbreviations. However, your short form cannot match any other command name or
similarly shortened form of any other command name. For example, the standard
abbreviation of the .NO CONTROL CHARACTERS command is:
.NCC
Two possible short forms of the same command are:
.NOCON CHA
.NO CO CH
Standard abbreviations are preferred over your own short forms because the latter cannot be guaranteed to be unique in future versions of DSR.
1.4. DSR Command Defaults
Even if you have not included any DSR commands in your input file, you will see formatting differences between the input file and the output file after processing the input file with DSR. The reason for the changed appearance of the output file is that DSR uses certain basic or default formats when processing a file. These defaults are as follows:
A standard typewriter page size of 8 1/2 x 11 inches; that is, a width of 70 character positions and a length of 58 lines of text per page (
.PAGE SIZE 58,70)Sequential page numbering for every page but the first (
.PAGING)A left margin setting of 0 (ju st before the first character position of a line) and a right margin setting of 70 (ju st after the 70th character position of a line) (
.LEFT MARGIN 0and.RIGHT MARGIN 70)Line spacing equivalent to the single-space setting on a typewriter (
.SPACING 1)A tab setting every eighth character position on a line (
.TAB STOPS 8,16,24...)Filling (
.FILL)Justification (
.JUSTIFY)
These default commands and all the other DSR commands are described in Chapter 2, "DSR Commands".
1.5. Printing DSR Output Files
After you have used DSR to produce a formatted output file, use the DCL command
PRINT to send the file to an output device. On most systems, the
print devices are set so that you will get the output that you specified with DSR
formatting commands.
However, since the print symbiont, the printer driver, and print devices such as the LN01 can all insert form feeds that cause page breaks in your file, you may not get the output you expect. In case the printed output file has page breaks different from those you specified with DSR, the following sections describe when form feeds are inserted and how to control the number of form feeds that are inserted in your file.
You may also notice a difference in the number of lines per inch on a page, depending upon the device you use. The vertical line spacing LN01 font is 5.73 lines per inch, the LN03 font is 6 lines per inch.
1.5.1. DSR Form Feeds
DSR inserts a form feed at the end of a page, based on the page length specified
with the .PAGE SIZE command and the value associated with the
/FORM_SIZE qualifier. Both .PAGE SIZE and
/FORM_SIZE have default values that you can override by
specifying a different value.
The RUNOFF command line qualifier /FORM_SIZE
allows you to adjust your DSR file to allow for page breaks that are generated by
other software programs or hardware devices. The /FORM_SIZE
qualifier suppresses form feeds at the line number that you use as a value for
/FORM_SIZE = n. Follow these guidelines when printing a DSR
output file:
If you use the
/SIMULATEqualifier on the command line, make the value of/FORM_SIZEequal to the physical size of the form on which the document will be printed.- If you do not use
/SIMULATEon the command line, make the value of/FORM_SIZEequal to one of the following:200 (the maximum value for
/FORM_SIZE) — this causes DSR to suppress form feeds only when there are exactly 200 lines on the output page; in other words, you want DSR to insert form feeds in the file.The number of lines that the physical device will print before it inserts a page break — this causes DSR to suppress form feeds at the point where the hardware device inserts them. If you then use the
/NOFEEDqualifier on the DCL commandPRINTto prevent the print symbiont and the printer driver from inserting form feeds, then only the hardware device inserts form feeds.
1.5.2. Print Symbiont Form Feeds
The print symbiont inserts a form feed at the end of a page, based on a form that
is associated with the DCL command PRINT. Someone with OPER
privilege must define a form with the DEFINE /FORM command. The
following is a sample form definition for an LN01 laser printer (elements required
for DSR output are so marked):
DEFINE  /FORM DSR$LN01 2         ! pick a name and number
        /MARGIN = BOTTOM = 0     ! *** required ***
        /NOWRAP                  ! *** required ***
        /NOTRUNCATE              ! *** required ***
        /STOCK = DEFAULT
        /DESCRIPTION = "DSR/LN01 forms definition"
Associate a defined form with the PRINT command in the
following way:
PRINT /FORM=form-name filespec
Since the command that associates a defined form with the PRINT
command may be quite long, you can equate this command to a global symbol in your
LOGIN.COM file. A sample symbol definition follows (LN01$QUEUE is the name of a
generic queue for the LN01):
$ DSRLN01PRINT == "PRINT/NOFEED/FORM=DSR$LN01/QUEUE=LN01$QUEUE"
1.5.3.
Printer Driver Form Feeds
The printer driver may insert a form feed at the end of a page, based on the value
of the /PAGE qualifier on the SET PRINTER
command. You need LOG_IO privilege to use the SET PRINTER
command.
A printer that is to receive DSR output should have the following setting:
SET PRINTER /NOTRUNCATE /NOWRAP
1.5.4.
Printer Device Form Feeds
Create a sample DSR input file that starts with the
.NO PAGINGcommand.The following input file puts a unique line number on each line of the output file when processed with DSR:
.NO PAGING
.lm+3.b;.PAGE SIZE 200
.NO FILL
1
2
3
 .
 .
 .
197
198
199
200
Process your sample file with the
RUNOFFcommand.If you intend to use the
/DOWNqualifier when you process your file, use/DOWNto process the sample file also. The/DOWNqualifier affects how many lines of text a printer will put on a page.If you are trying to determine how many lines an LN01 will put on a page, use the
/DEVICE=LN01qualifier with theRUNOFFcommand to produce an LNI file to print on the LN01. (See Chapter 4, "RUNOFF Command Qualifiers" for information on the/DEVICE=LN01qualifier.)Check the setting of the print symbiont (
SHOW QUEUE/FORM
                                ...
) and the printer driver (SHOW PRINTER) to ensure that they do not insert unwanted page breaks.Print the file with the following command:
PRINT /NOFEED filespec
Use any other qualifiers for the DCL command
PRINT(for example,/FORM=) that you will be using when you print your DSR output file.Examine the printed output to see how many lines there are on the first page.
The printed output of the sample file allows you to determine how many lines the
printer puts on a physical page. Use the number of lines per page as the value for
the /FORM_SIZE qualifier and also as the upper limit for the
length parameter you specify for the .PAGE SIZE command in your
input file.
There is information in Appendix B, "Requirements for Printing LNI Files on an LN01 Laser Printer " for system managers about setting an LN01[E] laser printer to print LNI files.
Chapter 2. DSR Commands
This chapter contains an alphabetical list of all DSR commands with a description of each command. The command descriptions are divided, as applicable, into the following parts:
Overview paragraph
Format
Description
Related Commands
Default
Examples
Standard abbreviations for the commands are included in the Format sections. Under Description you can find any side effects of the command, other commands that may be required, and other commands that may be executed by that command.
For a list of DSR commands according to function, see Appendix A, "DSR Commands Organized by Function".
.APPENDIX
.APPENDIX — The .APPENDIX command specifies the beginning of an
appendix, assigns an identifying letter to it, and allows you to supply a title.
Successive .APPENDIX commands assign identifying letters in
alphabetical order. (See also .NUMBER APPENDIX and .DISPLAY APPENDIX.)
Format
.APPENDIX [text]
.AX [text]
Parameter
text
The title you give the appendix
Description
.APPENDIXexecutes a.BREAKcommand before doing its main task..APPENDIXexecutes.LEFT MARGIN 0and.SPACING 1commands..APPENDIXexecutes.FILLand.JUSTIFYcommands unless you have entered a.NO AUTOJUSTIFYcommand. (However, note that if.JUSTIFYwas in effect before you entered.APPENDIX,.NO AUTOJUSTIFYdoes not cancel.JUSTIFY.).APPENDIXexecutes the.PAGINGcommand..APPENDIXexecutes.PAGEand inserts 12 blank lines..APPENDIXprints and centers the word APPENDIX, following it with a space and a letter identifying the appendix. After printing a blank line,.APPENDIXprints the title in uppercase letters unless you have specified otherwise with case flags. Three blank lines follow the title.If you enter the
.APPENDIXcommand after or instead of the.TITLEcommand, the appendix title becomes the running-head title and any.SUBTITLEcommand in effect before the.APPENDIXcommand is blanked.
.AUTOJUSTIFY, .NO AUTOJUSTIFY
.AUTOJUSTIFY, .NO AUTOJUSTIFY — When you enter .AUTOJUSTIFY, the following commands
automatically execute .JUSTIFY (as well as
.FILL) commands: .APPENDIX,
.CHAPTER, .HEADER LEVEL,
.NOTE. If you disable automatic justification by entering
.NO AUTOJUSTIFY, DSR does not disturb either the
justify/no-justify or the fill/no-fill states that are in effect (whether by default
or as a result of a previous .JUSTIFY or .NO
JUSTIFY command) at the time you use one of these commands. Whichever
state is in effect remains in effect when you enter .NO
AUTOJUSTIFY. (See also .JUSTIFY, .NO JUSTIFY and .FILL, .NO FILL.)
Format
.AUTOJUSTIFY
.NO AUTOJUSTIFY
.AJ
.NAJ
Default
.AUTOJUSTIFY
.AUTOPARAGRAPH, .NO AUTOPARAGRAPH
.AUTOPARAGRAPH, .NO AUTOPARAGRAPH — The .AUTOPARAGRAPH and .NO
AUTOPARAGRAPH commands turn the automatic paragraph capability on and
off. If .AUTOPARAGRAPH is in effect, you do not have to insert
.PARAGRAPH commands each time you want to format a paragraph.
When you start a line with a space or tab or insert a blank line, DSR automatically
formats a new paragraph, using the values of .PARAGRAPH or
.SET PARAGRAPH. You can specify values for
.PARAGRAPH or you can use the default values (see
.PARAGRAPH). .AUTOPARAGRAPH functions the same way
.AUTOTABLE does, except that .AUTOTABLE
starts a new paragraph each time a line does not start with a
space or tab (see .AUTOTABLE, .NO AUTOTABLE).
Format
AUTOPARAGRAPH
.NO AUTOPARAGRAPH
.AP
.NAP
Description
The
.FILLcommand must be in effect for a space or tab to start a new paragraph.If you enter either
.AUTOPARAGRAPHor.NO AUTOPARAGRAPH, you cancel.AUTOTABLE.
Related Commands
If you enter .AUTOTABLE or .NO AUTOTABLE,
you cancel .AUTOPARAGRAPH.
Default
If you have not entered .PARAGRAPH or .SET
PARAGRAPH, DSR executes .TEST PAGE 2 followed by
.SKIP 1 and .INDENT 5.
Example
The following example illustrates the use of the .AUTOPARAGRAPH
command.
Input
The input text format before it is processed by DSR:
.AUTOPARAGRAPH
-------------------------------------------------
---------------------------------------------
-----------------------------------------------
-------------------------------------------------
TAB--------------------------------------------
----------------------------------------------
------------------------------------------------Output
The output text format looks like this:
--------------------------------------------------
--------------------------------------------------
--------------------------------------------------
--------------------------------------------------
---------------------------------------------
--------------------------------------------------
--------------------------------------------------.AUTOSUBTITLE, .NO AUTOSUBTITLE
.AUTOSUBTITLE, .NO AUTOSUBTITLE — The .AUTOSUBTITLE command causes DSR to use
.HEADER LEVEL titles for running-head subtitles. Subtitles
therefore can change according to the section title that applies to a given page.
The .NO AUTOSUBTITLE command cancels the
.AUTOSUBTITLE function. (See .HEADERS ON, .NO HEADERS,
.SUBTITLE, .NO SUBTITLE, and .HEADER LEVEL.)
Format
.AUTOSUBTITLE [[+/-]n]
.NO AUTOSUBTITLE
.AST [[+/-]n]
.NAST
Parameters
- n
The highest numbered header level whose title will be used as a subtitle. For example, if you enter
.AUTOSUBTITLE 2, the titles of header levels 1 and 2 appear as running-head subtitles. Header levels 3, 4, 5, and 6 do not appear as running-head subtitles.- +n
Increases the current highest numbered header level by n.
- –n
Decreases the current highest numbered header level by n.
Description
You must enter the
.SUBTITLEcommand for.AUTOSUBTITLEto work.If the text of the header level that is used as a subtitle is wider than the page size currently in effect, the subtitle is truncated and an ellipsis ( . . . ) is appended to it.
Related Commands
The .DATE command causes the current date to be placed to the
right of each subtitle.
Default
If you do not enter
.AUTOSUBTITLEor.NO AUTOSUBTITLE, the default is.AUTOSUBTITLE 1.If you enter
.AUTOSUBTITLEwith no value, the default is the value you specified with a previous.AUTOSUBTITLEcommand. If no.AUTOSUBTITLEcommand was previously entered, the default value is 1.
.AUTOTABLE, .NO AUTOTABLE
.AUTOTABLE, .NO AUTOTABLE — The .AUTOTABLE and .NO AUTOTABLE
commands turn the automatic paragraph capability on and off. If
.AUTOTABLE is in effect, DSR formats a new paragraph for each
line that does not start with a space or tab. It is formatted according to
.PARAGRAPH or .SET PARAGRAPH values,
whether they are specified or supplied by default (see .PARAGRAPH).
.AUTOTABLE functions the same way that
.AUTOPARAGRAPH does, except that
.AUTOPARAGRAPH starts a new paragraph for each line that
starts with a space or tab (see .AUTOPARAGRAPH, .NO AUTOPARAGRAPH).
Format
.AUTOTABLE
.NO AUTOTABLE
.AT
.NAT
Description
The
.FILLcommand must be in effect for a line without a space or a tab at the beginning to start a new paragraph.If you enter either
.AUTOTABLEor.NO AUTOTABLE, you cancel.AUTOPARAGRAPH.
Related Commands
If you enter .AUTOPARAGRAPH or .NO
AUTOPARAGRAPH, you cancel .AUTOTABLE.
Default
If you have not entered .PARAGRAPH or .SET
PARAGRAPH, the default is .TEST PAGE 2 followed by
.SKIP 1 and an .INDENT 5.
Example
The following example illustrates the use of the .AUTOTABLE
command.
Input
The input text before it is processed by DSR:
.AUTOTABLE ------------------------------------------------ TAB--------------------------------------------- SPACE--------------------------------------------------- -------------------------------------------------------- SPACE----------------------------------------- ----------------------------------------------------- TAB-------------------------------------------------- TAB------------------------------------------------
Output
The output text format looks like this:
----------------------------------------------------
---------------------------------------------------------
---------------------------------------------------------
----------------------------------------------------
---------------------------------------------------------
----------------------------------------------------
---------------------------------------------------------
---------------------------------------------------------.BLANK
.BLANK — The .BLANK command inserts exactly the number of blank
lines that you specify. It is different from .SKIP, which inserts
a multiple of the number of blank lines specified in the .SPACING
command (see .SKIP and .SPACING).
Format
.BLANK [[-]n]
.B [[-]n]
Parameters
- n
The number of blank lines you want to insert.
- –n
Specifies that the next line will begin exactly n lines from the bottom of the current page.
Description
The
.BLANKcommand executes.BREAKbefore doing its main task..BLANK ndoes not work at the top of a page, that is, immediately following.PAGEor just after.PAGE SIZElength has been exceeded. However,.BLANK –npushes the next line to the bottom of the page, minus n lines, under such conditions. (Use the.FIGUREcommand to insert blank lines at the top of a page.)If there is not enough room on the current page for
.BLANKto do exactly as you specified,.BLANKdoes as much as it can on that page. It finishes on the next page only if you enter.BLANK –nand.SPACINGhas a value greater than n.If DSR encounters a footnote while executing
.BLANK, it considers the line directly above the footnote to be the bottom of the page.
Default
If you enter .BLANK without a value, you get .BLANK
1.
.BREAK
.BREAK — The .BREAK command ends the current line immediately,
without filling or justifying. Enter .BREAK when
.FILL is in effect and you want a few short lines of text
with no blank lines in between.
Format
.BREAK
.BR
RET
Description
The .BREAK command immediately after
.PARAGRAPH, .INDENT, .LEFT
MARGIN, .AUTOPARAGRAPH, or
.AUTOTABLE cancels the indentation you just requested. This
also occurs with most of the commands that execute the .BREAK
command automatically.
Related Commands
The following DSR commands execute the .BREAK command before
doing their main tasks:
| .APPENDIX | .LIST and .END LIST |
| .BLANK | .LIST ELEMENT |
| .CENTER | .PAGE |
| .CHAPTER | .PAGE SIZE |
| .DISPLAY APPENDIX | .PAPER SIZE |
| .DISPLAY CHAPTER | .PARAGRAPH |
| .DISPLAY ELEMENTS | .RIGHT |
| .DISPLAY LEVELS | .RIGHT MARGIN |
| .DISPLAY NUMBER | .SET DATE |
| .DISPLAY SUBPAGE | .SKIP |
| .FIGURE | .SPACING |
| .FIGURE DEFERRED | .STYLE HEADERS |
| .FILL and .NO FILL | .SUBPAGE and .END SUBPAGE |
| .HEADER LEVEL | .TEST PAGE |
| .INDENT | .TITLE |
| .LAYOUT |
.CENTER (.CENTRE)
.CENTER (.CENTRE) — The .CENTER command centers a single line of text around
a character position on a line (compare with
.RIGHT).
Format
.CENTER [[+/-]n]; text
.CENTER [[+/-]n] text
.CENTRE [[+/-]n]; text
.CENTRE [[+/-]n] text
.C [[+/-]n]; text
.C [[+/-]n] text
Parameters
- n
Twice the value of the character position that you want to center the text around. (Absolute character positions on a line always start with 0 at the leftmost position on the page.)
If you center the line of text between settings of the left and right margins, then n is equal to the value specified by the most recent
.LEFT MARGINcommand added to the value specified by the most recent.RIGHT MARGINcommand.- +n
Moves the character position around which the text is centered to the right by n/2 character positions. This value normally is used to adapt
.CENTERto a new setting specified by the.LEFT MARGINcommand.- -n
Moves the character position around which the text is centered to the left by n/2 character positions. This value normally is used to adapt
.CENTERto a new setting specified by the.RIGHT MARGINcommand.- text
The text you want to center. You must enter this text on one line.
Description
The
.CENTERcommand executes.BREAKbefore doing its main task.The line of text being centered can extend past margin settings and even beyond the width setting established by the
PAGE SIZEcommand, but it cannot go to the left of character position 0.You can type the text to be centered on the same line following the
.CENTERcommand. If you end the line after the.CENTERcommand, the text on the following line is centered.No commands will be recognized on the line following the
.CENTERcommand (or if that line is blank, on the next line). The Control flag ( . ) is not honored while.CENTERis collecting text to center. Other DSR flags are recognized, however — the Bold and Underline flags, for example.
Default
If you enter .CENTER without specifying n,
the text is centered between the current left and right margins.
.CHAPTER
.CHAPTER — The .CHAPTER command specifies the beginning of a
chapter, numbers it, and allows you to supply a chapter title. Successive
.CHAPTER commands number the chapters sequentially. (See also
.NUMBER CHAPTER and .DISPLAY CHAPTER.)
Format
.CHAPTER [text]
.CH [text]
Parameters
text
The title of the chapter.
Description
.CHAPTERexecutes.BREAKbefore doing its main task..CHAPTERexecutes.LEFT MARGIN 0and.SPACING 1..CHAPTERexecutes.FILLand.JUSTIFY, unless you have entered.NO AUTOJUSTIFY. (However, note that if.JUSTIFYwas in effect before you entered.CHAPTER,.NO AUTOJUSTIFYdoes not cancel.JUSTIFY.).CHAPTERexecutes the.PAGINGcommand..CHAPTERexecutes.PAGEand inserts 12 blank lines..CHAPTERprints and centers the word CHAPTER and a number identifying the chapter. After printing a blank line,.CHAPTERprints the title in uppercase letters unless you have specified otherwise with case flags. Three blank lines follow the title.If you include
.CHAPTERafter or instead of.TITLE, the chapter title becomes the running-head title and any.SUBTITLEcommand in effect before the.CHAPTERcommand is blanked.
.CONTROL CHARACTERS, .NO CONTROL CHARACTERS
.CONTROL CHARACTERS, .NO CONTROL CHARACTERS — The .CONTROL CHARACTERS command causes DSR to accept
control characters as normal text in your input file. The characters that are
affected by this command are the characters in the DEC Multinational Character set
with the following decimal values; 1-31, 128-159, and 255. The control characters 0
(NULL) and 127 (DEL) can only be inserted into a document by using the accept flag
(_). A form feed (ASCII 12) must be preceded by the accept flag if used in column 1.
The .NO CONTROL CHARACTERS command does not accept control
characters as normal text.
Format
.CONTROL CHARACTERS
.CC
.NO CONTROL CHARACTERS
.NCC
Default
.NO CONTROL CHARACTERS
Example
The following example shows how you might use the .CONTROL
CHARACTERS and .NO CONTROL CHARACTERS commands in a
command file.
.! .IF DIABLO .! Switch the Diablo printer to horizontal 12-pitch (12 char/in.) .! and vertical 7-pitch (7 char/in.). The codes are as follows: .! .! Codes Decimal values .! Horizontal: <ESC><US><VT> 27 - 31 - 11 .! Vertical: <ESC><RS><BS> 27 - 30 - 08 .! .CONTROL CHARACTERS <ESC>^_<VT> <ESC>^^^H .NO CONTROL CHARACTERS .ENDIF DIABLO .!
This command file allows device-dependent information to pass through DSR to the
device (a DIABLO terminal). Without the .CONTROL CHARACTERS
command, DSR would send error messages and would then delete the control
characters.
.DATE, .NO DATE
.DATE, .NO DATE — The .DATE and .NO DATE commands
control whether the current date appears in running heads. The date appears in the
following format: 22 August 1988. The .SUBTITLE command must be
included for .DATE to be effective. (See also .HEADERS ON, .NO HEADERS and .SET DATE, .SET TIME.)
Format
.DATE
.NO DATE
.D
.ND
Description
The date appears on the right-hand side of the subtitle line.
Related Commands
.DATEis not effective if either.LAYOUT 1or.LAYOUT 2is in effect.You can specify a different date with the
.SET DATEcommand.
Default
.NO DATE
.DISPLAY APPENDIX
.DISPLAY APPENDIX — The .DISPLAY APPENDIX command allows you to specify the
form that the lettering (or numbering) of appendixes will take. The form you specify
appears in the title, the page numbers, and the first character of header level
numbers throughout the appendix. This command does not change any values; it only
affects the way the values are displayed. (See also .APPENDIX and
.NUMBER APPENDIX.)
Format
.DISPLAY APPENDIX y
.DAX y
Parameters
y
One of the following one- or two-letter codes:
| Code | Form of Sequence and Case |
|---|---|
| D | Decimal Numbers |
| O | Octal Numbers |
| H | Hexadecimal Numbers |
| RU | Roman Uppercase Numerals |
| RL | Roman Lowercase Numerals |
| RM | Roman Mixed Case Numerals—only first numeral is uppercase |
| LU | Letters, Uppercase |
| LL | Letters, Lowercase |
| LM | Letters, Mixed Case—only first letter is uppercase |
Description
The
.DISPLAY APPENDIXcommand executes.BREAKbefore doing its main task.Enter
.DISPLAY APPENDIXbefore the.APPENDIXcommand you want to affect.
Default
Uppercase letters (LU)
Example
The following example illustrates the use of the .DISPLAY
APPENDIX command.
Input
The input text format before it is processed by DSR:
.RIGHT MARGIN 60 .DISPLAY APPENDIX RU .NUMBER APPENDIX 5 .APPENDIX This is the beginning of the fifth appendix in a book. The appendix identifiers are displayed as Roman Uppercase Numerals.
Output
The output text format looks like this:
APPENDIX V This is the beginning of the fifth appendix in a book. The appendix identifiers are displayed as Roman Uppercase Numerals.
.DISPLAY CHAPTER
.DISPLAY CHAPTER — The .DISPLAY CHAPTER command allows you to specify the
form that the numbering (or lettering) of chapters will take. The form you specify
appears in the title, the page numbers, and the first character of header level
numbers throughout the chapter. This command does not change any values; it only
affects the way the values are displayed. (See also .CHAPTER and
.NUMBER CHAPTER.)
Format
.DISPLAY CHAPTER y
.DCH y
Parameters
y
One of the following one- or two-letter codes:
| Code | Form of Sequence and Case |
|---|---|
| D | Decimal Numbers |
| O | Octal Numbers |
| H | Hexadecimal Numbers |
| RU | Roman Uppercase Numerals |
| RL | Roman Lowercase Numerals |
| RM | Roman Mixed Case Numerals—only first numeral is uppercase |
| LU | Letters, Uppercase |
| LL | Letters, Lowercase |
| LM | Letters, Mixed Case—only first letter is uppercase |
Description
The
.DISPLAY CHAPTERcommand executes.BREAKbefore doing its main task.Enter
.DISPLAY CHAPTERbefore the.CHAPTERcommand you want to affect.
Default
Decimal numbers (D)
Example
The following example illustrates the use of the .DISPLAY
CHAPTER command.
Input
The input text format before it is processed by DSR:
.DISPLAY CHAPTER RL .NUMBER CHAPTER 7 .CHAPTER This is the beginning of the seventh chapter in a book. The chapter identifiers are displayed as Roman Lowercase Numerals.
Output
The output text format looks like this:
CHAPTER vii This is the beginning of the seventh chapter in a book. The chapter identifiers are displayed as Roman Lowercase Numerals.
.DISPLAY ELEMENTS
.DISPLAY ELEMENTS — The .DISPLAY ELEMENTS command allows you to specify the
form that sequential numbering or lettering of items in a list will take. This
command does not change any values; it only affects the way the values are
displayed. (See also .LIST, .END LIST and .NUMBER LIST.)
Format
.DISPLAY ELEMENTS ["x",] y [,"z"] (or [’x’,] y [,’z’])
.DLE ["x",] y [,"z"] (or [’x’,] y [,’z’])
Parameters
x
A character, such as a left parenthesis or bracket, that you can specify to precede the number or letter. You must enclose the character within quotation marks ( "" ) or apostrophes ( " ).
y
One of the following one- or two-letter codes:
| Code | Form of Sequence and Case |
|---|---|
| D | Decimal Numbers |
| O | Octal Numbers |
| H | Hexadecimal Numbers |
| RU | Roman Uppercase Numerals |
| RL | Roman Lowercase Numerals |
| RM | Roman Mixed Case Numerals—only first numeral is uppercase |
| LU | Letters, Uppercase |
| LL | Letters, Lowercase |
| LM | Letters, Mixed Case—only first letter is uppercase |
z
A character, such as a right parenthesis or bracket, that you can specify to follow the number or letter. You must enclose the character within quotation marks (" ") or apostrophes (’ ’).
Description
The
.DISPLAY ELEMENTScommand executes.BREAKbefore doing its main task.You must enter
.DISPLAY ELEMENTSbefore the first.LIST ELEMENTcommand that you want to affect, but after the.LISTcommand.The
.DISPLAY ELEMENTScommand remains in effect only for a particular list. A list is defined by the.LISTcommand and its paired.END LISTcommand. Other lists, similarly defined, can exist within it and are unaffected by the.DISPLAY ELEMENTScommand entered for outer lists (or any other lists).If you omit a value from
.DISPLAY ELEMENTS, the current setting remains unchanged, but you must retain any comma that would have followed it. (The final value present, however, need not have a comma after it.)
Default
A space for x, decimal numbers for y, and a period ( . ) for z
Example
The following example shows how to specify special numbering of the items in a list.
Input
The input specifies that the list has Roman lowercase numerals set off with a right parenthesis.
.LIST .DISPLAY ELEMENTS RL,")" .LE;First .LE;Second .END LIST
Output
When the input file is processed with DSR the items in the list are numbered in the following way:
i) First ii) Second
.DISPLAY LEVELS
.DISPLAY LEVELS — The .DISPLAY LEVELS command allows you to specify the
form that sequential numbering (or lettering) of section headers will take. You can
control the form of individual numbers within a section number for a header (that
is, those numbers preceding or following a dot). This command does not change any
values; it only affects the way the values are displayed. (See also .HEADER LEVEL, .NUMBER LEVEL, and .STYLE HEADERS.)
Default Header Level Numbering
| Nonchapter | Chapter n | Appendix A | |
|---|---|---|---|
| .HEADER LEVEL 1 | 1 | n.1 | A.1 |
| .HEADER LEVEL 2 | 1.1 | n.1.1 | A.1.1 |
| .HEADER LEVEL 3 | 1.1.1 | n.1.1.1 | A.1.1.1 |
Format
.DISPLAY LEVELS [y1] [,y2]...[,y6]
.DHL [y1][,y2]...[,y6]
Parameters
y
One of the following one- or two-letter codes; 1,2, . . . 6 indicate positions of numbers (or letters) for a section header. The commas correspond to the dots in a printed section number. See the example under Description. (See also .NUMBER LEVEL.)
| Code | Form of Sequence and Case |
|---|---|
| D | Decimal Numbers |
| O | Octal Numbers |
| H | Hexadecimal Numbers |
| RU | Roman Uppercase Numerals |
| RL | Roman Lowercase Numerals |
| RM | Roman Mixed Case Numerals—only first numeral is uppercase |
| LU | Letters, Uppercase |
| LL | Letters, Lowercase |
| LM | Letters, Mixed Case—only first letter is uppercase |
Description
The
.DISPLAY LEVELScommand executes.BREAKbefore doing its main task.If you have entered the
.DISPLAY LEVELS RU,,LLcommand, for example, and if you now enter the.HEADER LEVELcommand that normally would produce a section number of 2.2.1, the section header number would appear as follows:For a document with no chapters,
.HEADER LEVEL 3produces II.2.a.For a document with chapters,
.HEADER LEVEL 3produces 1.II.2.a., if you entered it in Chapter 1.Note that this command does not affect the chapter number. However,
.CHAPTER,.NUMBER CHAPTER, and.DISPLAY CHAPTERdo affect it.
y1,y2,...y6 are displaced one position to the right if you have entered
.CHAPTERor.APPENDIX.
Default
Decimal numbers (D)
.DISPLAY NUMBER
.DISPLAY NUMBER — The .DISPLAY NUMBER command allows you to specify the
form that sequential numbering (or lettering) of pages will take. This command does
not change any values; it only affects the way the values are displayed. (See also
.HEADERS ON, .NO HEADERS, .NUMBER PAGE, .NO NUMBER, .LAYOUT, .NUMBER RUNNING, and .PAGING, .NO PAGING.)
Format
.DISPLAY NUMBER y
.DNM y
Parameters
y
One of the following one- or two-letter codes:
| Code | Form of Sequence and Case |
|---|---|
| D | Decimal Numbers |
| O | Octal Numbers |
| H | Hexadecimal Numbers |
| RU | Roman Uppercase Numerals |
| RL | Roman Lowercase Numerals |
| RM | Roman Mixed Case Numerals—only first numeral is uppercase |
| LU | Letters, Uppercase |
| LL | Letters, Lowercase |
| LM | Letters, Mixed Case—only first letter is uppercase |
Description
The
.DISPLAY NUMBERcommand executes.BREAKbefore doing its main task.Enter
.DISPLAY NUMBERbefore the page you want to affect. However, note that if you are using.LAYOUT 1or.LAYOUT 2(where the page number appears at the bottom of the page), the.DISPLAY NUMBERcommand might affect the page on which you enter that command when you are trying to affect the next page.
Default
Decimal numbers (D)
.DISPLAY SUBPAGE
.DISPLAY SUBPAGE — The .DISPLAY SUBPAGE command allows you to specify the
form that sequential lettering (or numbering) of subpage characters will take.
Subpage characters are the characters that are appended to the page numbers of
subpages. This command does not change any values; it only affects the way the
values are displayed. (See also .SUBPAGE, .END SUBPAGE and .NUMBER SUBPAGE.)
Format
.DISPLAY SUBPAGE y
.DSP y
Parameters
y
One of the following one- or two-letter codes:
| Code | Form of Sequence and Case |
|---|---|
| D | Decimal Numbers |
| O | Octal Numbers |
| H | Hexadecimal Numbers |
| RU | Roman Uppercase Numerals |
| RL | Roman Lowercase Numerals |
| RM | Roman Mixed Case Numerals—only first numeral is uppercase |
| LU | Letters, Uppercase |
| LL | Letters, Lowercase |
| LM | Letters, Mixed Case—only first letter is uppercase |
Description
The
.DISPLAY SUBPAGEcommand executes.BREAKbefore doing its main task.Enter
.DISPLAY SUBPAGEbefore the subpage you want to affect.
Default
Uppercase letters (LU) appended to the page number preceding the subpage
.ENABLE BAR, .DISABLE BAR, .BEGIN BAR, .END BAR
.ENABLE BAR, .DISABLE BAR, .BEGIN BAR, .END BAR — The bar commands control the insertion of vertical bars ( | ) at the beginning of lines of text. The bars (usually called change bars) are normally inserted to indicate where changes in text have occurred since the previous edition of a document. You can specify a character other than the default character (vertical bars) to indicate changes. (See the description of /CHANGE_BARS[="character"]—/NOCHANGE_BARS.)
Additional Information
The .ENABLE BAR command shifts all text following it three
spaces to the right to make room for the bars on the left. The width of the lines of
actual text is not altered.
The .BEGIN BAR command causes DSR to start inserting vertical
bars at the beginning of lines.
The .END BAR command causes DSR to stop putting vertical bars
at the beginning of lines.
The .DISABLE BAR command disables the bar commands but does not
shift the lines of text back to their original position.
Format
.ENABLE BAR
.DISABLE BAR
.EBB
.DBB
.BEGIN BAR
.END BAR
.BB
.EB
Default
.DISABLE BAR — Operation of the change bar function is not
initially enabled. By default, there are no change bars and text is not
indented.
Example
The following example shows how to use the bar commands.
Input
The input file with bar commands before it is processed by DSR:
.RIGHT MARGIN 50 A .BEGIN BAR command follows this text. The word "Here" is placed between .BEGIN BAR and .END BAR commands. However, you should not see change bars in the output file (unless this file is processed with the /CHANGE_BARS qualifier) because you have not entered an .ENABLE BAR command. .BLANK .BEGIN BAR Here. .END BAR .BLANK No change bars appeared. .BLANK Following this sentence, you enter an .ENABLE BAR command. .BLANK .ENABLE BAR The .ENABLE BAR command shifts all text following it three spaces to the right to prepare for change bars in the left margin. .ENABLE BAR does not put change bars in the output file until .BEGIN BAR is specified. .BLANK Enter the .BEGIN BAR command. .BLANK .BEGIN BAR This text is barred because it is between .BEGIN BAR and .END BAR commands when the bar commands are enabled. .END BAR .BLANK Following this sentence, you turn off recognition of the bar commands with a .DISABLE BAR command. .BLANK .DISABLE BAR Notice that the left margin does not change. It was offset 3 spaces to the right when bars were enabled (either with the /CHANGE_BARS qualifier on the command line or with the .ENABLE BAR command in the input file). Disabling the recognition of bar commands with the .DISABLE BAR command does not cause the margin to go back to its original setting.
Output
When the input file is processed with DSR (without the
/CHANGE_BAR qualifier), the output file is this:
A .BEGIN BAR command follows this text. The word "Here" is placed between .BEGIN BAR and .END BAR commands. However, you should not see change bars in the output file (unless this file is processed with the /CHANGE_BARS qualifier) because you have not entered an .ENABLE BAR command. Here. No change bars appeared. Following this sentence, you enter an .ENABLE BAR command. The .ENABLE BAR command shifts all text following it three spaces to the right to prepare for change bars in the left margin. .ENABLE BAR does not put change bars in the output file until .BEGIN BAR is specified. Enter the .BEGIN BAR command. | This text is barred because it is between .BEGIN | BAR and .END BAR commands when the bar commands | are enabled. Following this sentence, you turn off recognition of the bar commands with a .DISABLE BAR command. Notice that the left margin does not change. It was offset 3 spaces to the right when bars were enabled (either with the /CHANGE_BARS qualifier on the command line or with the .ENABLE BAR command in the input file). Disabling the recognition of bar commands with the .DISABLE BAR command does not cause the margin to go back to its original setting.
.ENABLE BOLDING, .DISABLE BOLDING
.ENABLE BOLDING, .DISABLE BOLDING — The .ENABLE BOLDING and .DISABLE
BOLDING commands enable and disable the bolding function. You can
perform bolding only if recognition of the Bold flag ( * ) is turned on and the bold
function is enabled. See the description of The Bold Flag ( * ) and the
description of .FLAGS BOLD, .NO FLAGS BOLD.
Format
.ENABLE BOLDING
.DISABLE BOLDING
.EBO
.DBO
Default
Operation of the Bold function is initially enabled (.ENABLE
BOLDING), but recognition of the Bold flag ( * ) is not turned on
(.NO FLAGS BOLD).
.ENABLE HYPHENATION, .DISABLE HYPHENATION
.ENABLE HYPHENATION, .DISABLE HYPHENATION — The .ENABLE HYPHENATION and .DISABLE
HYPHENATION commands enable and disable the hyphenation function. You
can use hyphenation to close up excessive spacing between words. Extra spaces often
are placed between words when margins are narrow and a line contains several long
words. See the description of The Hyphenate Flag ( = ) and the description of
.FLAGS HYPHENATE, .NO FLAGS HYPHENATE.
Format
.ENABLE HYPHENATION
.DISABLE HYPHENATION
.EHY
.DHY
Default
Operation of the hyphenation function is initially enabled (.ENABLE
HYPHENATION), but recognition of the Hyphenate flag ( = ) is not
turned on (.NO FLAGS HYPHENATE).
.ENABLE INDEXING, .DISABLE INDEXING
.ENABLE INDEXING, .DISABLE INDEXING — These commands enable and disable the operation of the indexing commands
(.INDEX and .ENTRY), and the Index flag (
> ). See the description of The Index Flag (>) and the description of
.FLAGS INDEX, .NO FLAGS INDEX. Chapter 6, "The DSR Indexing Utility" has information about the
DSR indexing utility.
Format
.ENABLE INDEXING
.DISABLE INDEXING
.EIX
.DIX
Default
Operation of the index function is initially enabled (.ENABLE
INDEXING), but recognition of the Index flag ( > ) is not turned on
(.NO FLAGS INDEX).
.ENABLE OVERSTRIKING, .DISABLE OVERSTRIKING
.ENABLE OVERSTRIKING, .DISABLE OVERSTRIKING — The .ENABLE OVERSTRIKING and .DISABLE
OVERSTRIKING commands enable and disable the overstrike function. You
use the Overstrike flag ( % ) to create special characters that are not available on
the terminal by overstriking any printing character with another. For example, you
can overstrike a 7 with a hyphen to create a European 7. See the description of
The Overstrike Flag ( % ) and .FLAGS OVERSTRIKE, .NO FLAGS OVERSTRIKE in this
chapter.
Format
.ENABLE OVERSTRIKING
.EOV
.DISABLE OVERSTRIKING
.DOV
Default
Operation of the overstrike function is initially enabled (.ENABLE
OVERSTRIKING), but recognition of the Overstrike flag ( % ) is not
turned on (.NO FLAGS OVERSTRIKE).
.ENABLE TOC, .DISABLE TOC
.ENABLE TOC, .DISABLE TOC — These commands enable and disable DSR’s collection of information for the table of contents. Chapter 5, "The DSR Table of Contents Utility" has information on the DSR table of contents utility.
Format
.ENABLE TOC
.DISABLE TOC
.ETC
.DTC
Default
Operation of the table of contents function is initially enabled (.ENABLE
TOC).
.ENABLE UNDERLINING, .DISABLE UNDERLINING
.ENABLE UNDERLINING, .DISABLE UNDERLINING — The .ENABLE UNDERLINING and .DISABLE
UNDERLINING commands enable and disable the underline function. You
can perform underlining only if recognition of the Underline flag ( & ) is
turned on and the underline function is enabled. See the description of The Underline Flag ( & ) and .FLAGS UNDERLINE, .NO FLAGS UNDERLINE in this
chapter.
Format
.ENABLE UNDERLINING
.DISABLE UNDERLINING
.EUN
.DUL
Default
Operation of the underline function is initially enabled (.ENABLE
UNDERLINING) and recognition of the Underline flag (&) is turned
on (.FLAGS UNDERLINE).
.ENTRY
.ENTRY — The .ENTRY command creates an index entry without a page
number reference. It is usually used for "See . . . " or "See also . . . " index
entries. Chapter 6, "The DSR Indexing Utility" has a description of the DSR indexing
utility.
Format
.ENTRY topic [>subtopic1... >subtopicn]
.Y topic [>subtopic1... >subtopicn]
.FIGURE DEFERRED, .FIGURE
.FIGURE DEFERRED, .FIGURE — The .FIGURE DEFERRED command leaves room on a page for
you to insert a figure later. You specify the number of blank lines you need, and
DSR leaves that amount of space on the current page if there is enough room. If
there is not enough room on the current page, .FIGURE DEFERRED
first adds enough text to complete the page and then puts the required number of
blank lines at the top of the next page. The .FIGURE command is
the same as .FIGURE DEFERRED except that, if there is not enough
room on the current page, DSR ends the page immediately and then puts the blank
lines at the top of the next page.
Format
.FIGURE DEFERRED [n]
.FIGURE [n]
.FGD [n]
.FG [n]
Parameters
n
The number of blank lines needed. Values of 0 or less are not valid and
n cannot exceed the number of lines of text allowed on a
page (this would be the page- length value associated with the .PAGE
SIZE command minus any header lines, any forced blank spaces after the
header information, and any bottom of the page information specified by
.LAYOUT 1, .LAYOUT 2, or .LAYOUT
3).
Description
The
.FIGURE DEFERREDand.FIGUREcommands both execute the .BREAK command before doing their main tasks..FIGURE DEFERREDavoids short pages (a large amount of white space at the bottom of the page).You should not enter two
.FIGURE DEFERREDcommands in a row. You should enter at least one line of text before executing a second.FIGURE DEFERREDcommand.You can enter
.FIGUREand.PAGEalternately to produce consecutive blank pages. (A series of.PAGEcommands alone does not accomplish this action. See also .SKIP and .BLANK.)For a figure ending a page, you can cause a caption to be printed at the bottom of the page by entering the following commands after
.FIGURE:.SKIP -1.CENTER;figure caption
Default
.FIGURE 1
.FIGURE DEFERRED 1
Example
The following examples show how to use the .FIGURE and
.FIGURE DEFERRED commands.
Input
The input file before it is processed by DSR:
.PAGE SIZE 25,55 .RIGHT MARGIN 55 .LAYOUT 1,2 .FLAGS BOLD Here are examples of using .FIGURE and .FIGURE DEFERRED. The results are clearer if you use the /SEQUENCE qualifier when running off this file. The page length for this example is 25 lines. The width is 55 characters. .BLANK The following is Figure 1, a 3-line figure: .BLANK .CENTER;^*Title for Figure 1\* .FIGURE 3 .SUBTITLE ^*Title for Figure 2\* The next figure will be deferred to the following page. It will be seven lines long and will occur at the top of page 2. .FIGURE DEFERRED 7 .BLANK This text occurs after Figure 1, still on page 1. It demonstrates that text will continue to fill the previous page after a .FIGURE DEFERRED command is processed, but before it is triggered. .PAGE Now we are on page 2 after the occurrence of Figure 2. We are about to set up Figure 3 to occur on page 3. This time, we will use .PAGE followed by .FIGURE 4. Page 2 will be left short. .SUBTITLE ^*Title for Figure 3\* .PAGE .FIGURE 4 .SUBTITLE And here is the text following Figure 3. It appears physically after the figure on Page 3. This is in contrast to the .FIGURE DEFERRED behavior we saw for Figure 2; the text was not pulled up to fill page 2.
Output
The output file is this:
Here are examples of using .FIGURE and .FIGURE
DEFERRED. The results are clearer if you use the
/SEQUENCE qualifier when running off this file. The
page length for this example is 25 lines. The width is
55 characters.
The following is Figure 1, a 3-line figure:
Title for Figure 1
The next figure will be deferred to the following page.
It will be seven lines long and will occur at the top
of page 2.
This text occurs after Figure 1, still on page 1. It
demonstrates that text will continue to fill the
previous page after a .FIGURE DEFERRED command is
processed, but before it is triggered.
1
Title for Figure 2
Now we are on page 2 after the occurrence of Figure 2.
We are about to set up Figure 3 to occur on page 3.
This time, we will use .PAGE followed by .FIGURE 4.
Page 2 will be left short.
2
Title for Figure 3
And here is the text following Figure 3. It appears
physically after the figure on Page 3. This is in
contrast to the .FIGURE DEFERRED behavior we saw for
Figure 2; the text was not pulled up to fill page 2.
3.FILL, .NO FILL
.FILL, .NO FILL — The .FILL command causes DSR to treat line endings
exactly like spaces (see also .NO SPACE). Line-filling is the
accumulation of words on a line until the addition of one more word would exceed the
right margin. If .NO FILL is in effect, line endings in the input
file are duplicated in the output file (see also .KEEP, .NO KEEP).
Format
.FILL
.NO FILL
.F
.NF
Description
Both
.FILLand.NO FILLexecute the.BREAKcommand before doing their main tasks.The
.NO FILLcommand suspends both line-filling and justification.The
.FILLcommand restores line-filling and normally restores the most recent.JUSTIFYor.NO JUSTIFYsetting that was in effect. A no-justify state that was set as a result of a.NO FILLcommand is not considered when DSR is determining the most recent setting. In other words,.NO FILLturns off both filling and justification, and.FILLrestores them..NO FILLsuspends any.AUTOPARAGRAPHor.AUTOTABLEthat has been executed;.FILLrestores it.You can create an uneven right margin (ragged right text format) by having both
.FILLand.NO JUSTIFYin effect.If you want justification of text without lines being filled, you must enter
.NO FILLbefore you enter.JUSTIFY. Under these conditions, the same words appear on each line of the output file as were present in the input file. DSR inserts as much space between words as it needs to expand the lines to the right margin.
Related Commands
- The following commands execute
.FILLcommands unless you have entered.NO AUTOJUSTIFY:.APPENDIX.CHAPTER.HEADER LEVEL
.NOTEalso executes.FILL, but.END NOTErestores the setting to what it was before you entered the.NOTEcommand.
Default
.FILL
.FIRST TITLE
.FIRST TITLE — The .FIRST TITLE command allows running-head information
to appear on the first page of a document with no chapters. (See also .HEADERS ON, .NO HEADERS, .LAYOUT, .TITLE, .SUBTITLE, .NO SUBTITLE, and .AUTOSUBTITLE, .NO AUTOSUBTITLE.)
Format
.FIRST TITLE
.FT
Description
Insert the .FIRST TITLE command before any text on the first
page.
Related Commands
If you enter .CHAPTER or .APPENDIX,
.FIRST TITLE does not work; but, if
.LAYOUT is set to print page numbers (of any kind) at the
bottom of pages (.LAYOUT 1 or 2 or
3), you get a page number on the first page, even if you did
not enter .FIRST TITLE.
Default
No running-head information on the first page
.FLAGS ACCEPT, .NO FLAGS ACCEPT
.FLAGS ACCEPT, .NO FLAGS ACCEPT — The .FLAGS ACCEPT and .NO FLAGS ACCEPT
commands turn on and turn off recognition of the Accept flag character ( _ ). See
the description of The Accept Flag ( _ ).
Format
.FLAGS ACCEPT [k]
.NO FLAGS ACCEPT
.FL ACCEPT [k]
.NFL ACCEPT
Parameters
k
Specifies a character to replace the current flag character.
Default
.FLAGS ACCEPT — Recognition of the Accept flag character ( _ )
is turned on.
.FLAGS ALL, .NO FLAGS ALL
.FLAGS ALL, .NO FLAGS ALL — The .FLAGS ALL and .NO FLAGS ALL
commands function as master switches for all other
.FLAGS/.NO FLAGS flag-name command
settings, except the .FLAGS/.NO FLAGS COMMENT
and .FLAGS/.NO FLAGS CONTROL commands. The
.FLAGS ALL and .NO FLAGS ALL commands turn
on and turn off recognition of all flags without disturbing other flag command
settings. (An analogy for flag recognition is turning on a master switch [entering
.FLAGS ALL] — those lights whose switches are in the ON
position will go on and those whose switches are in the OFF position will not go
on.) See also .ENABLE BOLDING, .DISABLE BOLDING, .ENABLE HYPHENATION, .DISABLE HYPHENATION,
.ENABLE INDEXING, .DISABLE INDEXING, .ENABLE OVERSTRIKING, .DISABLE OVERSTRIKING, and
.ENABLE UNDERLINING, .DISABLE UNDERLINING commands.
Format
.FLAGS ALL
.NO FLAGS ALL
.FLAGS
.NO FLAGS
.FL
.NFL
Default
.FLAGS ALL
.FLAGS BOLD, .NO FLAGS BOLD
.FLAGS BOLD, .NO FLAGS BOLD — The .FLAGS BOLD and .NO FLAGS BOLD
commands turn on and turn off recognition of the Bold flag character ( * ). See the
description of The Bold Flag ( * ) and the description of .ENABLE BOLDING, .DISABLE BOLDING in this chapter.
Format
.FLAGS BOLD [k]
.NO FLAGS BOLD
.FL BOLD [k]
.NFL BOLD
Parameter
k
Specifies a character to replace the current flag character.
Default
.NO FLAGS BOLD — Recognition of the Bold flag character ( * )
is turned off.
.FLAGS BREAK, .NO FLAGS BREAK
.FLAGS BREAK, .NO FLAGS BREAK — The .FLAGS BREAK and .NO FLAGS BREAK
commands turn on and turn off recognition of the Break flag character ( | ). See the
description of The Break Flag ( | ).
Format
.FLAGS BREAK [k]
.NO FLAGS BREAK
.FL BREAK [k]
.NFL BREAK
Parameter
k
Specifies a character to replace the current flag character.
Default
.NO FLAGS BREAK — Recognition of the Break flag character ( | )
is turned off.
.FLAGS CAPITALIZE, .NO FLAGS CAPITALIZE
.FLAGS CAPITALIZE, .NO FLAGS CAPITALIZE — The .FLAGS CAPITALIZE and .NO FLAGS
CAPITALIZE commands turn on and turn off recognition of the Capitalize
flag character ( < ). See the description of The Capitalize Flag (<).
Format
.FLAGS CAPITALIZE [k]
.NO FLAGS CAPITALIZE
.FL CAPITALIZE [k]
.NFL CAPITALIZE
Parameter
k
Specifies a character to replace the current flag character.
Default
.NO FLAGS CAPITALIZE — Recognition of the Capitalize flag
character ( < ) is turned off.
.FLAGS COMMENT, .NO FLAGS COMMENT
.FLAGS COMMENT, .NO FLAGS COMMENT — The .FLAGS COMMENT and .NO FLAGS COMMENT
commands turn on and turn off recognition of the Comment flag character (
! ). See the description of The Comment Flag ( ! ).
Format
.FLAGS COMMENT [k]
.NO FLAGS COMMENT
.FL COMMENT [k]
.NFL COMMENT
Parameter
k
Specifies a character to replace the current flag character.
Default
.FLAGS COMMENT — Recognition of the Comment flag character ( !
) is turned on.
.FLAGS CONTROL, .NO FLAGS CONTROL
.FLAGS CONTROL, .NO FLAGS CONTROL — These commands control recognition of the Control flag character (the dot
that begins a DSR command). You can enter .FLAGS CONTROL to
change the character that precedes the commands from a dot to a character of your
choice. You can enter .NO FLAGS CONTROL to turn off recognition
of the Control flag character.
Note
There is no way to reenable recognition of the Control flag once you enter the
.NO FLAGS CONTROL command.
Format
.FLAGS CONTROL [k]
.NO FLAGS CONTROL
.FL CONTROL [k]
.NFL CONTROL
Parameter
k
Specifies a character to replace the current Control flag character.
Default
.FLAGS CONTROL — Recognition of the Control flag character ( .
) is turned on.
.FLAGS HYPHENATE, .NO FLAGS HYPHENATE
.FLAGS HYPHENATE, .NO FLAGS HYPHENATE — The .FLAGS HYPHENATE and .NO FLAGS
HYPHENATE commands turn on and turn off recognition of the Hyphenate
flag character ( = ). See the description of The Hyphenate Flag ( = ) and
.ENABLE HYPHENATION, .DISABLE HYPHENATION.
Format
.FLAGS HYPHENATE [k]
.NO FLAGS HYPHENATE
.FL HYPHENATE [k]
.NFL HYPHENATE
Parameter
k
Specifies a character to replace the current flag character.
Default
.NO FLAGS HYPHENATE — Recognition of the Hyphenate flag
character ( = ) is turned off.
.FLAGS INDEX, .NO FLAGS INDEX
.FLAGS INDEX, .NO FLAGS INDEX — These commands respectively turn on and turn off recognition of the Index flag character ( > ). See the description of The Index Flag (>) and .ENABLE INDEXING, .DISABLE INDEXING in this chapter.
Format
.FLAGS INDEX [k]
.NO FLAGS INDEX
.FL INDEX [k]
.NFL INDEX
Parameter
k
Specifies a character to replace the current flag character.
Default
.NO FLAGS INDEX — Recognition of the Index flag character (
> ) is turned off.
.FLAGS LOWERCASE, .NO FLAGS LOWERCASE
.FLAGS LOWERCASE, .NO FLAGS LOWERCASE — The .FLAGS LOWERCASE and .NO FLAGS
LOWERCASE commands turn on and turn off recognition of the Lowercase
flag character ( \ ). See the description of The Lowercase Flag ( \ ).
Format
.FLAGS LOWERCASE [k]
.NO FLAGS LOWERCASE
.FL LOWERCASE [k]
.NFL LOWERCASE
Parameter
k
Specifies a character to replace the current flag character.
Default
.FLAGS LOWERCASE — Recognition of the Lowercase flag character
( \ ) is turned on.
.FLAGS OVERSTRIKE, .NO FLAGS OVERSTRIKE
.FLAGS OVERSTRIKE, .NO FLAGS OVERSTRIKE — The .FLAGS OVERSTRIKE and .NO FLAGS
OVERSTRIKE commands enable and disable recognition of the Overstrike
flag character ( % ). See the description of The Overstrike Flag ( % ) and
.ENABLE OVERSTRIKING, .DISABLE OVERSTRIKING.
Format
.FLAGS OVERSTRIKE [k]
.NO FLAGS OVERSTRIKE
.FL OVERSTRIKE [k]
.NFL OVERSTRIKE
Parameter
k
Specifies a character to replace the current flag character.
Default
.NO FLAGS OVERSTRIKE — Recognition of the Overstrike flag
character ( % ) is turned off.
.FLAGS PERIOD, .NO FLAGS PERIOD
.FLAGS PERIOD, .NO FLAGS PERIOD — The .FLAGS PERIOD and .NO FLAGS PERIOD
commands turn on and turn off recognition of the Period flag character ( + ). See
the description of The Period Flag (+).
Format
.FLAGS PERIOD [k]
.NO FLAGS PERIOD
.FL PERIOD [k]
.NFL PERIOD
Parameter
k
Specifies a character to replace the current flag character.
Default
.NO FLAGS PERIOD — Recognition of the Period flag character ( +
) is turned off.
.FLAGS SPACE, .NO FLAGS SPACE
.FLAGS SPACE, .NO FLAGS SPACE — The .FLAGS SPACE and .NO FLAGS SPACE
commands turn on and turn off recognition of the Space flag character ( # ). See the
description of The Space Flag (#).
Format
.FLAGS SPACE [k]
.NO FLAGS SPACE
.FL SPACE [k]
.NFL SPACE
Parameter
k
Specifies a character to replace the current flag character.
Default
.FLAGS SPACE — Recognition of the Space flag character ( # ) is
turned on.
.FLAGS SUBINDEX, .NO FLAGS SUBINDEX
.FLAGS SUBINDEX, .NO FLAGS SUBINDEX — The .FLAGS SUBINDEX and .NO FLAGS
SUBINDEX commands turn on and turn off recognition of the Subindex
flag ( > ). You can also use the .FLAGS SUBINDEX command to
change the Subindex flag to another character. If you enter .NO FLAGS
SUBINDEX, the command will cause a right angle bracket ( > ) to be
printed as part of your indexed text, instead of causing subindexing. See the
description of The Subindex Flag (>). Chapter 6, "The DSR Indexing Utility" has
information on the DSR indexing utility.
Format
.FLAGS SUBINDEX [k]
.NO FLAGS SUBINDEX
.FL SUBINDEX [k]
.NFL SUBINDEX
Parameter
k
Specifies a character to replace the current flag character.
Default
.FLAGS SUBINDEX — Recognition of the Subindex flag character (
> ) within .INDEX or .ENTRY commands is
turned on. The Subindex flag character is always taken as normal text outside an
.INDEX or .ENTRY command.
.FLAGS SUBSTITUTE, .NO FLAGS SUBSTITUTE
.FLAGS SUBSTITUTE, .NO FLAGS SUBSTITUTE — The .FLAGS SUBSTITUTE and .NO FLAGS
SUBSTITUTE commands turn on and turn off recognition of the Substitute
flag character ( $ ). The default Substitute flag character ( $ ) or any replacement
character you specify must be used in pairs. See the description of The Substitute Flag Pair ( $$ ).
Format
.FLAGS SUBSTITUTE [k]
.NO FLAGS SUBSTITUTE
.FL SUBSTITUTE [k]
.NFL SUBSTITUTE
Parameter
k
Specifies a character to replace the current flag character.
Default
.NO FLAGS SUBSTITUTE — Recognition of the Substitute flag
character ( $ ) is turned off.
.FLAGS UNDERLINE, .NO FLAGS UNDERLINE
.FLAGS UNDERLINE, .NO FLAGS UNDERLINE — The .FLAGS UNDERLINE and .NO FLAGS
UNDERLINE commands turn on and turn off recognition of the Underline
flag character ( & ). See the description of The Underline Flag ( & ) and
.ENABLE UNDERLINING, .DISABLE UNDERLINING.
Format
.FLAGS UNDERLINE [k]
.NO FLAGS UNDERLINE
.FL UNDERLINE [k]
.NFL UNDERLINE
Parameter
k
Specifies a character to replace the current flag character.
Default
.FLAGS UNDERLINE — Recognition of the Underline flag character
( & ) is turned on.
.FLAGS UPPERCASE, .NO FLAGS UPPERCASE
.FLAGS UPPERCASE, .NO FLAGS UPPERCASE — The .FLAGS UPPERCASE and .NO FLAGS
UPPERCASE commands turn on and turn off recognition of the Uppercase
flag ( ^ ). See the description of The Uppercase Flag ( ^ ).
Format
.FLAGS UPPERCASE [k]
.NO FLAGS UPPERCASE
.FL UPPERCASE [k]
.NFL UPPERCASE
Parameter
k
Specifies a character to replace the current flag character.
Default
.FLAGS UPPERCASE — Recognition of the Uppercase flag character
( ^ ) is turned on.
.FOOTNOTE, .END FOOTNOTE
.FOOTNOTE, .END FOOTNOTE — The .FOOTNOTE command places the text following it at the
bottom of the current page if there is room. If there is not enough room on the
current page for the entire footnote, DSR places the entire note at the bottom of
the next page. The .END FOOTNOTE command ends the footnote and
restores any case, fill, justify, spacing, or margin settings that you might have
changed within the footnote. The right margin of the footnote will be the same as
the right margin in effect for the document at the time the footnote is created. If
you change the right margin of the document but want the right margin of all
footnotes to be the same, enter the .RIGHT MARGIN command
immediately after each .FOOTNOTE command to set the same right
margin for each footnote. The left margin setting of the footnote is defaulted to
0.
Format
.FOOTNOTE [n]
.END FOOTNOTE
.FN [n]
.EFN
Parameters
n
The number of lines the footnote will occupy. This argument is included only for
compatibility with older versions of RUNOFF and is not necessary
or recommended.
Description
.FOOTNOTEdoes not provide a footnote symbol, such as * or (1), or any separation from the main text just above the footnote.- You can create a separator of 15 hyphens ( - ) as follows:
.FOOTNOTE.REPEAT 15"-".BREAK
- You can put an asterisk ( * ) before the text of the footnote as follows:
.LEFT MARGIN 2.INDENT –2;_*#text.END FOOTNOTE
DSR tries to put all footnotes at the bottom of the page on which they occur. If this is not possible — that is, if a footnote reference occurs too near the bottom of the page, or if you enter more footnotes than there is room for — DSR puts one or more of the footnotes at the bottom of the following page.
DSR does not split a single footnote over two pages.
Related Commands
If you have entered a .NO PAGING command, all footnotes appear
at the end of your document.
.HEADER LEVEL
.HEADER LEVEL — The .HEADER LEVEL command allows you to specify both a
section number and a section title.
Additional Information
Successive .HEADER LEVEL commands of the same value (all
.HEADER LEVEL 1’s for example) cause the section numbers to
increase sequentially. This happens at all six levels of headers. If your current
section is in Chapter 2 and is numbered 2.5.2.4, then the following numbering would
result depending upon the .HEADER LEVEL command you used:
.HL3 (or .HL without a value) would number the next section 2.5.2.5
.HL2 would number the next section 2.5.3
.HL1 would number the next section 2.6
See also .DISPLAY LEVELS, .NUMBER LEVEL, .SET LEVEL, and .STYLE HEADERS.
Following is a summary of default header level numbering for three levels of three different types of documents:
Default Header Level Numbering
| Nonchapter | Chapter n | Appendix A | |
|---|---|---|---|
| .HEADER LEVEL 1 | 1 | n.1 | A.1 |
| .HEADER LEVEL 2 | 1.1 | n.1.1 | A.1.1 |
| .HEADER LEVEL 3 | 1.1.1 | n.1.1.1 | A.1.1.1 |
Format
.HEADER LEVEL [[+/-]n] [title]
.HL [[+/-]n] [title]
Parameters
n
A number from 1 to 6 that specifies the level of the header. Do not confuse the level numbers with the header numbers that are printed in your document just to the left of the header title.
+n
Adds n to the current header level number.
-n
Subtracts n from the current header level number.
title
The name of the section you are now starting. Do not precede the title with a semicolon ( ; ).
Description
The
.HEADER LEVELcommand executes.BREAKbefore doing its main task..HEADER LEVELexecutes.TEST PAGEusing seven more than the.PARAGRAPHor.SET PARAGRAPHvalue (you can change the test-page value by using the.STYLE HEADERScommand). If the required number of lines is not available on the current page, DSR puts the header at the beginning of the next page. Note that these paragraph commands take into account the.SPACINGvalue when they interpret the test-page value..HEADER LEVELexecutes.FILLand.JUSTIFYunless you have entered.NO AUTOJUSTIFY. (However, note that, if.JUSTIFYwas in effect before you entered.HEADER LEVEL,.NO AUTOJUSTIFYdoes not cancel.HEADER LEVEL 1text is normally printed in all uppercase letters, regardless of how it is typed. All other levels are normally printed with only the first letter of each word in uppercase. You can override the initial capitalization of words like of and the by preceding any of them with a Lowercase flag ( \ ). Alternatively, you can have the letters printed exactly as you type them by preceding the title with the flag pair ^^. (See also .STYLE HEADERS.)Header levels 3 through 6 are normally run into the text but separated from it by a hyphen ( - ). You can suppress the hyphen by not entering the header level title on the same line as the
.HEADER LEVELcommand. (See also .STYLE HEADERS.)If the title you specify for the header is wider than the current margins, it is filled (and justified, if justification is in effect) between the right margin and the header level number.
Related Commands
If
.AUTOSUBTITLEis in effect, titles of specified header levels are used as running subtitles at the tops of pages.You can enter the
.SET LEVELcommand to preset the level of the next section head without entering a previous.HEADER LEVEL.
Default
If you enter .HEADER LEVEL without specifying a level number,
you get the current header level. All header levels, .HEADER LEVEL
1 to .HEADER LEVEL 6, begin their numbering with 1
unless you specify another value with .NUMBER LEVEL.
Examples
The following examples show how header levels number the sections in a chapter-oriented document.
Input
The input produces the section numbers and titles for Chapter 5:
.NUMBER CHAPTER 5 .CHAPTER FIFTH CHAPTER .HEADER LEVEL1 This is the first header level 1 .HEADER LEVEL1 This is the second header level 1 .HEADER LEVEL2 This is the first header level 2 .HEADER LEVEL2 This is the second header level 2 .HEADER LEVEL3 This is the first header level 3 .HEADER LEVEL3 This is the second header level 3
Output
When the input file is processed with DSR, the sections in the chapter are numbered and titled in the following way:
CHAPTER 5
FIFTH CHAPTER
5.1 THIS IS THE FIRST HEADER LEVEL 1
5.2 THIS IS THE SECOND HEADER LEVEL 1
5.2.1 This Is The First Header Level 2
5.2.2 This Is The Second Header Level 2
5.2.2.1 This Is The First Header Level 3 -
5.2.2.2 This Is The Second Header Level 3 -The following example illustrates the use of the .HEADER LEVEL
command with a long title.
Input
The input text before it is processed by DSR:
.RIGHT MARGIN 40 .HEADER LEVEL 2 long header level that exceeds the margins More text, which will revert to Column 1.
Output
The output format looks like this:
2.3 Long Header Level That Exceeds The
Margins
More text, which will revert to Column
1..HEADERS ON, .NO HEADERS
.HEADERS ON, .NO HEADERS — The .HEADERS ON and .NO HEADERS
commands restore and cancel, respectively, the capability of having one or two lines
of information at the top of a page. These lines indicate the content of the page
and the page number. They are called running heads, which you should not confuse
with section heads (specified with .HEADER LEVEL
commands).
Format
.HEADERS [ON]
.NO HEADERS
.HD [ON]
.NHD
.HD
Description
Standard running-head information consists of a title at the top left of the page and the page number preceded by the word page at the top right (flush with the page width established by the
.PAGE SIZEcommand, not with the right margin). A subtitle normally appears on the second line of the page immediately below the title. You can also have the current date appear on the right, immediately below the page number.Note that you can cause information to appear in positions other than these by entering the
.LAYOUTcommand.No running heads appear on the first page unless you enter the
.FIRST TITLEcommand. However, if you have entered the.LAYOUTcommand that puts page numbers at the bottom of pages, the first page will have a number even if you do not enter.FIRST TITLE.If you are using
.CHAPTERcommands in your document and if headers are on, DSR uses the title of the current chapter as the running-head title. You can, however, override this function by entering a.TITLEcommand after the.CHAPTERcommand. If you are not using.CHAPTERcommands, you must enter a.TITLEcommand to get a running-head title.Use the
.SUBTITLEcommand to specify a subtitle for running heads or to make it possible for you to enter a valid.AUTOSUBTITLEor.DATEcommand..AUTOSUBTITLEuses titles of.HEADER LEVELcommands (down to whatever level you specify) as subtitles in running heads.If you are using
.CHAPTERor.APPENDIXcommands, page numbers appear in the form c-p, where c is the chapter number and p is the page number within the chapter. If your document has no chapters, you get page numbers of the form n, where n is a running page number. You can control the case of the word page by entering the.HEADERS LOWER,.HEADERS UPPER, or.HEADERS MIXEDcommand. You can suppress page numbers in the running heads by entering.NO NUMBER.You can cause the current date to appear in the running heads by entering the
.DATEcommand. You must also have entered.SUBTITLEfor.DATEto work.
Default
.HEADERS ON
.HEADERS UPPER, .HEADERS LOWER, .HEADERS MIXED
.HEADERS UPPER, .HEADERS LOWER, .HEADERS MIXED — The .HEADERS
UPPER/LOWER/MIXED commands
specify the case of the word page that precedes the page
number. The commands produce, respectively, PAGE, page, and Page. In an index, these
commands also affect the word index that is part of the page
number, for example, Page Index-3. The command normally takes effect on the next
page.
Format
.HEADERS UPPER
.HEADERS LOWER
.HEADERS MIXED
.HD UPPER
.HD LOWER
.HD MIXED
Default
.HEADERS MIXED
.IF, .IFNOT, .ELSE, .ENDIF
.IF, .IFNOT, .ELSE, .ENDIF — The .IF, .IF NOT,
.ELSE, and .ENDIF commands (also known as
the conditional commands) cause portions of a DSR file to be processed or not
processed, according to conditions that you specify. The commands refer to the
/VARIANT qualifier that you specify on the DSR command line.
(See also /DEBUG[=(option[,...])]—/NODEBUG and .VARIABLE.)
Format
.IF name
.ELSE name
.ENDIF name (or .EI name)
.IFNOT name (or .IN name)
Parameters
name
A word that is common to the conditional commands that make up a single
.IF or .IFNOT block of text.
Description
The command line qualifier /VARIANT is of the form
/VARIANT=x or /VARIANT="x1,x2,...xn"
where x is a name you give to a portion, or to separate portions, of a DSR file to be processed.
In the following definitions, A is a name that may have been
specified in a /VARIANT qualifier.
| Command | Meaning |
|---|---|
| .IF A |
If A was specified in If A was not specified in |
| .IFNOT A |
If A was not specified in If A was specified in |
| .ELSE A |
If DSR processed the portion of the file following the most
recent If DSR ignored the portion of the file following the most
recent |
| .ENDIF |
A DSR terminates the most recent |
Note
Each of the conditional commands must begin in column one; therefore, each command must be entered on a separate line.
You can have
.IF/.ELSE/.ENDIFblocks (or.IFNOT/.ELSE/.ENDIFblocks) within other such blocks, as shown in Table 2–1. (See similar discussion in description of .LIST, .END LIST and .LIST, .END LIST.)You are not required to use the
.ELSEcommand in the.IFor.IFNOTblock.You cannot have
.IFand.IFNOTwith the same name in the same block.For purposes of debugging or analysis, you can distinguish those portions that would normally be processed from those that would not normally be processed. See .VARIABLE and /DEBUG[=(option[,...])]—/NODEBUG.
If
/VARIANTand/DEBUGare both present in the command line,/DEBUGoverrides/VARIANT.
Related Commands
If you enter a .VARIABLE command in your text file and
/DEBUG=CONDITIONALS in the DSR command line (or just
/DEBUG if you do not want to limit debugging to
conditionals), all the segments in the preceding example will be processed. In
addition, you can enter .VARIABLE commands in your text file to
distinguish between the portions of text generated by the various segments.
Example
Table 2.1, ''Conditional Commands'' shows an example of how you enter three groups of conditional commands (A, B, C) with groups B and C nested within group A. This table explains what DSR does when it encounters each entry. Segment refers to a block of text.
| Entry | Explanation |
|---|---|
| .IF A | Begin segment A. |
| A1 Segment | Process A1 if A was specified. |
| .IF B | Begin segment B. |
| B1 Segment | Process B1 if both A and B were specified. |
| .ELSE B | Alternative segment B. |
| B2 Segment | Process B2 if A was specified and B was not. |
| .ENDIF B | End segment B. |
| A2 Segment | Process A2 if A was specified. |
| .ELSE A | The following segment is processed only if A was not specified. |
| A3 Segment | Process A3 if A was not specified. |
| .IF C | Begin segment C. |
| C1 Segment | Process C1 if A was not specified and C was. |
| .ELSE C | Alternative segment C. |
| C2 Segment | Process C2 if neither A nor C was specified. |
| .ENDIF C | End segment C. |
| A4 Segment | Process A4 if A was not specified. |
| .ENDIF A | End segment A. |
.INDENT
.INDENT — The .INDENT command causes the first line of text
following it to begin at a position relative to the left margin.
Format
.INDENT [[-]n]
[[-]n]
Parameters
n
Specifies how many character positions to the right of the left margin setting the first line of text will begin.
-n
Specifies how many character positions to the left of the left margin setting the
first line of text will begin. .INDENT cannot begin to the left
of character position 0.
Description
The .INDENT command executes .BREAK before
doing its main task.
Related Commands
If you enter a .BREAK immediately after
.INDENT, you will cancel the indentation just requested.
(This effect occurs with most of the commands that execute .BREAK
commands.)
Default
If you enter .INDENT without a number, you get the indent value
that you specified with .PARAGRAPH or .SET
PARAGRAPH. If you did not enter either of these paragraph commands,
you get an indentation of 5.
.INDEX
.INDEX — The .INDEX command creates an index entry with a page
number reference. See Chapter 6, "The DSR Indexing Utility" for information on the DSR indexing
utility.
Format
.INDEX topic [>subtopic1... >subtopicn]
.X topic [>subtopic1... >subtopicn]
Example
The following example illustrates the use of the .INDEX
command.
Input
The input text before it is processed by DSR and the DSR indexing utility:
.PAGE text text text text text text text text text text text text .INDEX Parameters >Description .PAGE text text text text text text text text text text text text .INDEX Parameters >Examples .PAGE text text text text text text text text text text text text .INDEX Parameters >Types >Strings .INDEX Parameters >Types >Integers
Output
The following shows the output after the file has been processed with DSR and the DSR indexing utility (see Chapter 6, "The DSR Indexing Utility").
Page Index-1
INDEX
.
.
.
Parameters
Description, 1
Examples, 2
Types
Integers, 3
Strings, 3
.
.
..JUSTIFY, .NO JUSTIFY
.JUSTIFY, .NO JUSTIFY — The .JUSTIFY command causes DSR to insert exactly enough
space between words so that the last character reaches the right margin. The
.NO JUSTIFY command disables justification.
Format
.JUSTIFY
.NO JUSTIFY
.J
.NJ
Description
Both
.JUSTIFYand.NO JUSTIFYexecute.BREAKbefore doing their main tasks.You can create an uneven right margin (ragged right text format) by using the
.NO JUSTIFYcommand and the.FILLcommand.If you want text justified without lines being filled, you must enter
.JUSTIFYafter you enter.NO FILL.
Related Commands
.NO FILLsuspends justification as well as line-filling..FILLnormally restores the most recent.JUSTIFYor.NO JUSTIFYsetting that was in effect. A.NO JUSTIFYstate that was set as a result of.NO FILLis not considered when DSR is determining the most recent setting. In other words,.NO FILLturns off both filling and justification, and.FILLrestores them.- The following commands execute
.JUSTIFYcommands unless you have entered.NO AUTOJUSTIFY:.APPENDIX.CHAPTER.HEADER LEVEL.NOTE
If you have entered
.NO AUTOJUSTIFYand if.JUSTIFYis in effect at the time you enter any of the above four commands,.JUSTIFYis not canceled (see .AUTOJUSTIFY, .NO AUTOJUSTIFY).
Default
.JUSTIFY
Example
The following example illustrates the use of the .JUSTIFY
command.
Input
The input file before it is processed by DSR:
.RIGHT MARGIN 55 .NO JUSTIFY .FILL This paragraph demonstrates how to use the .NO JUSTIFY and .FILL commands. This paragraph will not be justified to the right margin, but will be filled. .BLANK .JUSTIFY This second paragraph demonstrates how to use the .JUSTIFY and .FILL commands. This paragraph will be both filled and justified to the right margin.
Output
The text after the file has been processed with the DSR:
This paragraph demonstrates how to use the .NO JUSTIFY and .FILL commands. This paragraph will not be justified to the right margin, but will be filled. This second paragraph demonstrates how to use the .JUSTIFY and .FILL commands. This paragraph will be both filled and justified to the right margin.
.KEEP, .NO KEEP
.KEEP, .NO KEEP — The .KEEP command allows you to keep in the output file
blank lines that are present in the input file when .NO FILL is
in effect. Normally, multiple blank lines in the input file are discarded in the
output file while .NO FILL is in effect. .NO
KEEP also discards blank lines when .NO FILL is in
effect. (See also .LITERAL.)
Format
.KEEP
.NO KEEP
.K
.NK
Description
The combination of the .KEEP and .NO FILL
commands differs from .LITERAL in that it allows you to enter
commands and flags while .KEEP and .NO FILL
are in effect. For example, you can enter a .REQUIRE command
after .KEEP and .NO FILL, whereas after
.LITERAL no commands are recognized until after an
.END LITERAL command.
Default
.NO KEEP
Example
The following example shows how to use the .KEEP
command.
Input
The input text format, without the .KEEP
command, before it is processed by DSR:
------------------------------------ ----------------------------------- ------------------------------------- .BLANK -------------------------------------- ------------------------------------- .BLANK.NO FILL ------------------------------ ---------------------------------- ------------------------------- .BLANK.FILL --------------------------------------
Output
The output text format. Note that the .NO FILL command does not
cause DSR to keep the blank lines as they appear in the input text:
------------------------------------------- ------------------------------------------- ------------------------------------------- ------------------------------------------- ------------------------------------------- ------------------------------ ---------------------------------- ------------------------------- -------------------------------------------
Input
Here is the same input file, with the .KEEP command added,
before it is processed by DSR:
.KEEP ------------------------------------ ----------------------------------- ------------------------------------- .BLANK -------------------------------------- ------------------------------------- .KEEP .BLANK.NO FILL ------------------------------ ---------------------------------- ------------------------------- .BLANK.FILL -------------------------------------------
Output
The output file is this:
------------------------------------------- ------------------------------------------- ------------------------------------------- ------------------------------------------- ------------------------------------------- ------------------------------ ---------------------------------- ------------------------------- -------------------------------------------
Note that the .KEEP command causes DSR to keep the blank lines
as they appear in the input file.
.LAYOUT
.LAYOUT — The .LAYOUT command rearranges running-head and
running-foot information on pages. (See the .HEADERS ON, .NO HEADERS command.)
When the default .LAYOUT operates, page numbering is not
displayed on the first page, it starts on page 2.
Format
.LAYOUT n1 [,n2]
.LO n1 [,n2]
Parameters
n1
A number from 0 to 3 that specifies one of the following arrangements of running head information:
- .LAYOUT 0
Restores the standard arrangement of title and subtitle in the upper left of a page, and page number and date in the upper right.
- .LAYOUT 1
Titles and subtitles are centered at the tops of pages. Page numbers are centered at the bottom. No date is output.
- .LAYOUT 2
Titles and subtitles appear at the top right of right-hand (odd-numbered) pages and at the top left of left-hand (even- numbered) pages. Page numbers are centered at the bottom. No date is output.
- .LAYOUT 3
Gives the standard page arrangement for title and subtitle (as in
.LAYOUT 0), but with the addition of running-page numbers centered at the bottom of pages between two hyphens (for example, - 23 -). Running-page numbers are consecutive through the entire document rather than within chapters; they are not affected by the.NO NUMBERor.NUMBER PAGEcommands. (But see .NUMBER RUNNING.)
n2
Specifies how many lines below the last line of text on a page the number will appear. You must specify n2 if n1 is 1, 2, or 3. If n1 is 0, you cannot specify a value for n2.
Description
The
.LAYOUTcommand executes.BREAKbefore doing its main task.The page length (
.PAGE SIZE) is not affected by this command.
Default
.LAYOUT 0
Example
The following examples show the output of page 2 using different parameters with
the .LAYOUT command. The .DATE command has
been entered. The title is "INTRODUCTION TO DSR"; the subtitle is "DSR COMMAND
FORMAT."
.LAYOUT 0 (Default)
INTRODUCTION TO DSR Page 2
DSR COMMAND FORMAT 11 December 1988
.
.
.
[text of page 2]
.
.
..LAYOUT 1,2
INTRODUCTION TO DSR
DSR COMMAND FORMAT
.
.
.
[text of page 2]
.
.
.
2.LAYOUT 2,2 (Even Page)
INTRODUCTION TO DSR
DSR COMMAND FORMAT
.
.
.
[text of page 2]
.
.
.
2.LAYOUT 2,2 (Odd Page)
INTRODUCTION TO DSR
DSR COMMAND FORMAT
.
.
.
[text of page 3]
.
.
.
3.LAYOUT 3,2
INTRODUCTION TO DSR Page 2
DSR COMMAND FORMAT 11 December 1988
.
.
.
[text of page 2]
.
.
.
- 2 -.LEFT MARGIN
.LEFT MARGIN — The .LEFT MARGIN command sets the left margin to the
specified position.
Format
.LEFT MARGIN [[+/-]n]
.LM [[+/-]n]
Parameters
n
Specifies the number of the character position of the left margin. For example,
.LEFT MARGIN 0 sets the left margin just to the left of the
first character position.
-n
Sets the left margin n character positions to the right of the current left margin.
+n
Sets the left margin n character positions to the left of the current left margin.
Description
.LEFT MARGINexecutes.BREAKbefore setting the left margin.The value for the left margin must be smaller than the value for the right margin.
If you want a left margin value that is larger than 70 (the default for
.RIGHT MARGIN), you must enter a.RIGHT MARGINcommand with a value greater than the left margin value before you enter the.LEFT MARGINcommand.The resulting value for +n must be smaller than the right margin value (see .RIGHT MARGIN).
The resulting value for –n cannot be less than 0.
Related Commands
.LIST and .NOTE change the left margin;
.END LIST and .END NOTE restore it.
Default
.LEFT MARGIN 0
.LIST, .END LIST
.LIST, .END LIST — The .LIST command specifies the beginning of a list by
resetting the left margin farther to the right, by setting a
.SKIP command value to take effect before each item in the
list, and by executing .TEST PAGE. Use the .LIST
ELEMENT command to specify each item in the list. .LIST
ELEMENT commands also give you numbers or letters in sequence in the
left margin or let you substitute a single character of your choice for each of the
numbers or letters (for example, the lowercase letter o, which is known as a
"bullet"). (See also .DISPLAY ELEMENTS and .NUMBER LIST.) The .END LIST command ends a list,
restoring any fill, justify, case, margin, or spacing settings that were in effect
before you entered the most recent .LIST command. You can also
specify a value with .END LIST that puts blank lines after the
last item in the list (as with .SKIP).
Format
.LIST [[-]n] ["x"]
.END LIST [[-]n]
.LIST [[-]n] [’x’]
.END LIST [[-]n]
.LS [[-]n] ["x"]
.ELS [[-]n]
.LS [[-]n] [’x’]
.ELS [[-]n]
Parameters
n
With .LIST, specifies the number of blank lines to appear
before each item, but each blank line can result in additional blank lines if the
.SPACING setting is greater than 1. (See .SKIP.)
With .END LIST, behaves the same as n with
.LIST. However, the blank lines appear after the final item
in the current list.
-n
With .LIST, pushes the next line of list text to within
n lines of the bottom of the current page by inserting
blank lines. (See .SKIP and .BLANK.)
With .END LIST, pushes the next line of current list text to
within n lines of the bottom of the current page by inserting blank lines. (See
.SKIP and .BLANK.)
x
A character enclosed in quotation marks ("x") or apostrophes
(’x’) that you can specify to appear at
the beginning of each list item.
Description
A list is defined by
.LISTand a paired.END LIST. Other lists, similarly defined, can exist within it. You can nest lists up to 14 levels..LISTindents the text (not the numbers) of each list element 9 places when.LEFT MARGINis set to zero..LISTindents the text of each list element 4 places when any other left margin setting operates. For each list element, the period following the number is positioned three places to the left of the text..LISTexecutes.TEST PAGE, adding 2 to the test-page value from either the most recently executed.PARAGRAPHor.SET PARAGRAPHcommand or from its default value. Paragraph commands take into account the.SPACINGvalue that is in effect when they interpret the test-page value.You can enter
.LISTwithout having to enter.LIST ELEMENTfor it.- You must pair every
.LISTyou enter with an.END LIST. It is important to know how the pairing works if you want to make lists within other lists:While you are in a list, you can enter a new
.LISTcommand without having entered.END LISTfor the previous.LIST.When you enter the next
.END LIST, you end only the new inner.LIST.You can then add more items to the main outer
.LISTby entering more.LIST ELEMENTcommands. All attributes of the outer list will be restored, including the resumption of any sequence of numbers or letters that was in effect. For example:- .LIST (main)
- .LIST ELEMENT
- .LIST ELEMENT
- .LIST (new)
- .LIST ELEMENT
- .LIST ELEMENT
- .END LIST (new)
- .LIST ELEMENT
- .LIST ELEMENT
- .END LIST (main)
You can also enter another
.END LISTto end the main list immediately after the.END LISTcommand that ends the new inner list.
Default
If you omit n from either
.LISTor.END LIST, you get the.SKIPvalue associated with.PARAGRAPHor.SET PARAGRAPHor 1 (if you have not specified such a value).If you omit "x," you get a sequence of decimal numbers beginning with 1, or you get another kind of sequence if you enter the
.DISPLAY ELEMENTScommand after the.LIST.
Example
The following example illustrates the use of the .LIST
command.
Input
The input file before it is processed by DSR:
A list of names of some of the French Impressionists: .LIST .LIST ELEMENT;Renoir .LIST ELEMENT;Manet .LIST ELEMENT;Monet .LIST ELEMENT;Seurat .END LIST
Output
The formatted text after the file has been processed with the DSR:
A list of names of some of the French Impressionists:
1. Renoir
2. Manet
3. Monet
4. Seurat.LIST ELEMENT
.LIST ELEMENT — The .LIST ELEMENT command specifies the beginning of each
item in a list. If you specify a character in a .LIST command, it
appears, followed by two spaces, before each item. Otherwise, a sequence of numbers
or letters, as defined in the .DISPLAY ELEMENTS command, appears
when you enter successive .LIST ELEMENT commands. If you have not
entered the .DISPLAY ELEMENTS command, you will get a sequence of
decimal numbers, each followed by a period and two spaces. (See .LIST, .END LIST, .DISPLAY ELEMENTS, and .NUMBER LIST.)
Format
.LIST ELEMENT; text
.LE; text
Parameters
text
The text that will appear after the list element delimiter.
Description
The
.LIST ELEMENTcommand executes.BREAKbefore doing its main task.You can specify the number of the next element in the sequence by entering
.NUMBER LIST.A sequence is interrupted by the next occurrence of
.LISTor.END LIST.If you have not yet ended the current list, a new
.LISTcommand temporarily suspends all the attributes of the old one. The next.END LISTcommand ends only the new.LISTcommand and restores all the attributes of the old.LISTcommand. You can nest lists up to 14 levels.If you have entered the
.LISTcommand, both the number of blank lines before each.LIST ELEMENTitem and the left margin setting for the list of items are as noted in the.LISTdescription.You can enter
.LIST ELEMENTwithout having entered.LIST. If you have not entered a.LISTcommand, you will get the left margin setting that was in effect before you entered.LIST ELEMENT. If an item is more than one line long, the character or number normally printed in the left margin will be merged with the text of the item instead.
Default
If you have not entered the
.LISTcommand with a specified character to appear in the left margin, you will get the kind of sequence that you specified in.DISPLAY ELEMENTS.If you have not entered the
.DISPLAY ELEMENTScommand, you will get decimal numbers, each followed by a period and two spaces.
Example
See the example for the .LIST command, which also illustrates
the use of the .LIST ELEMENT command.
.LITERAL
.LITERAL — The .LITERAL command allows you to have your text
formatted exactly as you have typed it. This means that you will get a blank line in
the output file wherever a blank line occurs in the input file. (If the value
specified by the .SPACING command is anything other than one, you
will get the spacing value that you specified.) Commands are not recognized when
.LITERAL is in effect and are treated as ordinary text if you
enter them. DSR flags are also treated as normal text. Tab stops set prior to the
.LITERAL command, however, are still in effect within the
block of .LITERAL text (see .TAB STOPS). You must
enter .END LITERAL when you want DSR to resume normal
formatting.
Format
.LITERAL [n]
.END LITERAL
.LT [n]
.EL
Parameters
n
The number of lines to be produced. This argument is included only for
compatibility with older versions of RUNOFF and is not necessary
or recommended.
Description
.LITERALexecutes.BREAKbefore doing its main task..LITERALexecutes.RIGHT MARGIN 150.If
.LITERALis in effect, a blank line occurs in the output file wherever one occurs in the input file. If.LITERAL(or.KEEP) is not in effect, you cannot produce blank lines by putting them in the input file, even if.NO FILLis in effect.Between
.LITERALand.END LITERAL, all recognition of commands and flags is suspended. In addition, nearly all commands and flags that were in effect before you entered.LITERALare disabled. For example, previously specified case, fill, and justify operations are disabled. If you want to be able to use commands and flags and still get all the benefits of.LITERAL, you can use the.KEEPand.NO FILLcommands instead of.LITERAL.- The settings that were in effect for the following commands and flags prior to the
.LITERALcommand remain in effect for the.LITERALtext:- .LEFT MARGIN
- .SPACING
- .TAB STOPS
- ^& (Underlining)
- ^* (Bolding)
.NO SPACE
.NO SPACE — The .NO SPACE command prevents the insertion of the
end-of-line space for one line of text only, causing the characters at the end of
one line and the beginning of the next to be adjacent. Without the .NO
SPACE command, when .FILL is in effect, DSR treats
the end of an input line exactly like a space. That is, it inserts a space in the
output file at the place where each input line ended (this is the meaning of "fill\
nospace"). If you ever have occasion to use this command, you should enter it
immediately after the end-of-line space that you want to affect.
Format
.NO SPACE
.NSP
Description
You cannot enter .NO SPACE either directly before or directly
after a .BREAK command or any command that executes a
.BREAK command. In other words, you can only use .NO
SPACE between two pieces of text.
Default
You get the normal space when you press the RETURN key unless you execute
.NO SPACE.
Example
The following example illustrates the use of the .NO SPACE
command. The example contains two files.
Input
The input of the first file, in which there are no .NO SPACE
commands:
The following diagram illustrates the 16 -bit, bit-slice, byte-encoded configuration:
Output
It produces the following output file:
The following diagram illustrates the 16 -bit, bit-slice, byte-encoded configuration:
Input
Notice the space between "16" and "-bit." To avoid having this space, use the
.NO SPACE command.
The following diagram illustrates the 16 .NO SPACE -bit, bit-slice, byte-encoded configuration:
Output
The processed output file looks like this:
The following diagram illustrates the 16-bit, bit-slice, byte-encoded configuration:
Notice that now there is no space between "16" and "-bit."
.NOTE, .END NOTE
.NOTE, .END NOTE — The .NOTE command highlights a portion of text by
narrowing the margin settings, centering the text on the page, and printing a title
centered over the text. The .END NOTE command restores the fill,
justify, case, margin, and spacing settings that were in effect just before you
entered the .NOTE.
Format
.NOTE [text]
.END NOTE [[-]n]
.NT [text]
.EN [[-]n]
Parameters
n
Specifies the number of blank lines to follow the note. If
.SPACING has a value greater than 1, you will get more lines
than you specified. (See also .SKIP.)
-n
Specifies that the next line of text be pushed to within n lines of the bottom of the current page by the insertion of blank lines. (See also .SKIP and .BLANK.)
text
A title for the note. If omitted, you get the word NOTE.
Description
The
.NOTEcommand executes.BREAKbefore doing its main task..NOTEexecutes.TEST PAGE, taking the test-page value from the most recently executed.PARAGRAPHor.SET PARAGRAPHcommand and adding 4 to it. Paragraph commands take into account the.SPACINGvalue when they interpret the test-page value. (See also .SKIP.).NOTEthen executes.SKIP 1above the title and.SKIP 1below the title.If the left margin is set to 0,
.NOTEexecutes.LEFT MARGIN +8and.RIGHT MARGIN –8. Otherwise, the margins are set +4 and –4, respectively. (See .LEFT MARGIN and .RIGHT MARGIN.).NOTEexecutes.FILL. It also executes.JUSTIFYunless you have entered.NO AUTOJUSTIFY. (However, note that if.JUSTIFYwas in effect before you entered.NOTE,.NO AUTOJUSTIFYdoes not cancel the.JUSTIFY.).END NOTEexecutes.SKIP 1after the text and then restores all settings that were in effect before the.NOTEcommand was entered.
Default
The word NOTE appears over the text if you do not specify a title. The
.END NOTE command leaves 1 blank line after the note.
.NUMBER APPENDIX
.NUMBER APPENDIX — The .NUMBER APPENDIX command allows you to specify an
identifying letter with which a sequence of appendixes will begin. The next
.APPENDIX command starts the sequence. Subsequent
.APPENDIX commands cause appendixes to be lettered in
alphabetic order. See also .DISPLAY APPENDIX.
Format
.NUMBER APPENDIX [[+/-]n]
.NMAX [[+/-]n]
Parameters
n
The character that specifies what the next appendix letter will be. You can specify the letter itself ( A ) or you can specify a number corresponding (in order) to the letter that will identify the appendix. For example, 1=A, 26=Z, 27=AA, 28=AB.
+n
Specifies how many alphabetically ordered letters past the current appendix letter
the next .APPENDIX character will be. For example, if the current
appendix is APPENDIX B, then .NUMBER APPENDIX +2 will cause the
next .APPENDIX to produce APPENDIX D.
-n
Specifies how many alphabetically ordered letters before the current appendix
letter the next .APPENDIX letter will be.
Description
You can specify a string of up to five characters instead of a single character. An appendix of examples, for instance, could be numbered EXAM and appear in a running head as Page EXAM-1, EXAM-2, . . . .
Default
Sequential uppercase lettering, beginning with A.
.NUMBER CHAPTER
.NUMBER CHAPTER — The .NUMBER CHAPTER command allows you to specify the
number with which a sequence of chapters will begin. The next
.CHAPTER command starts the sequence. Subsequent
.CHAPTER commands will cause each chapter to be numbered one
higher than the previous chapter. (See also .DISPLAY CHAPTER.)
Format
.NUMBER CHAPTER [[+/-]n]
.NMCH [[+/-]n]
Parameters
n
The number that the next .CHAPTER will have. Entering .NMCH
without an argument gives Chapter 1.
+n
Adds n to the number of the most recently issued
.CHAPTER. The result is the number that the next
.CHAPTER will have.
-n
Subtracts n from the number of the most recently entered
.CHAPTER. The result is the number that the next
.CHAPTER will have.
Default
Sequential decimal numbering, beginning with 1.
.NUMBER LEVEL
.NUMBER LEVEL — The .NUMBER LEVEL command allows you to specify the
beginning number of a sequence of headers. Enter this command immediately before the
first .HEADER LEVEL command that you want to affect. Subsequent
.HEADER LEVEL commands will each be one higher than the
preceding one according to its level (see .HEADER LEVEL). (See also
.STYLE HEADERS and .DISPLAY LEVELS.)
Default Header Level Numbering
| Nonchapter | Chapter n | Appendix A | |
|---|---|---|---|
| .HEADER LEVEL 1 | 1 | n.1 | A.1 |
| .HEADER LEVEL 2 | 1.1 | n.1.1 | A.1.1 |
| .HEADER LEVEL 3 | 1.1.1 | n.1.1.1 | A.1.1.1 |
Format
.NUMBER LEVEL [[+/-]n1] [,[+/-]n2]...[,[+/-]n6]
.NMLV [[+/-]n1] [,[+/-]n2]...[,[+/-]n6]
Parameters
n1,n2,...n6
.HEADER
LEVEL to 3.5.2.4, you would enter the following commands:.NUMBER LEVEL 3,5,2,4.HEADER LEVEL
+n1
Adds n to the current value of n1.
-n1
Subtracts n from the current value of n1.
Description
When you enter the first .HEADER LEVEL after .NUMBER
LEVEL, do not specify a level number for it (note preceding example).
If you specify a level number that does not correspond to the level you indicated in
the .NUMBER LEVEL command, you will get unexpected
results.
Default
Sequential decimal numbering, beginning with 1.
.NUMBER LIST
.NUMBER LIST — The .NUMBER LIST command allows you to specify, anywhere
in a list, the number with which a sequence of items in a list will begin. Enter
this command just before the .LIST ELEMENT command that you want
to affect. Subsequent list elements will each have a number that is one greater than
the number for the preceding .LIST ELEMENT command. (See also
.DISPLAY ELEMENTS, with which you can specify the form the
number will take.)
Format
.NUMBER LIST n
.NMLS n
Parameters
n
Specifies a string of characters or the number with which a following sequence of
items in a list will begin. You must enter .LIST ELEMENT
following the .NUMBER LIST command.
Description
A list is defined by .LIST and a paired .END
LIST and has .LIST ELEMENTS within it. Lists can be
"nested"; that is, lists can exist within other lists. Each list must be defined by
a .LIST, .END LIST pair of commands.
Default
Sequential decimal numbering, beginning with 1.
.NUMBER PAGE, .NO NUMBER
.NUMBER PAGE, .NO NUMBER — The .NO NUMBER command suspends normal page numbering.
The .NUMBER PAGE command resumes normal page numbering, having
kept track of the numbering while .NO NUMBER was in effect; or it
allows you to specify the beginning of a new number sequence by specifying a number
for the next page. (See also .NUMBER RUNNING, .DISPLAY NUMBER, .PAGING, .NO PAGING, and .HEADERS ON, .NO HEADERS.)
Format
.NUMBER PAGE [[+/-]n]
.NO NUMBER
.NMPG [[+/-]n]
.NNM
Parameters
n
The number that the next page will have.
+n
Sets the number of the next page to n more than the number of the current page.
-n
Sets the number of the next page to n less than the number of the current page.
Description
If you are using
.CHAPTERor.APPENDIXcommands, page numbers appear as chapter-oriented (2-15, 5-5) or appendix-oriented (A-30, C-10) numbers. If your document has no chapters, page numbers appear as running numbers (77,102)..NO NUMBERand.NUMBER PAGEdo not affect running-page numbers (that is, the numbering you get by entering.LAYOUTwith an n1 value of 3). (See also .NUMBER RUNNING.)
Default
Sequential decimal numbering, beginning with 1 or chapter number-1 or appendix letter-1.
.NUMBER RUNNING
.NUMBER RUNNING — The .NUMBER RUNNING command allows you to specify the
beginning of a new sequence of running page numbers. This command affects page
numbers only if you have entered a .LAYOUT command with an
n1 value of 3. (See .LAYOUT, .HEADERS ON, .NO HEADERS, and .NUMBER PAGE, .NO NUMBER.)
Format
.NUMBER RUNNING [[+/-]n]
.NMR [[+/-]n]
Parameters
n
The running number that the next page will have.
+n
Sets the running number of the next page to n more than the running number of the current page.
-n
Sets the running number of the next page to n less than the running number of the current page.
Description
Running page numbers appear at the bottom of pages, are enclosed in hyphens (– n –), and run consecutively throughout the entire document.
Running page numbers are produced only by
.LAYOUT 3,n. (Note that you can get similar numbering [without hyphens], if you are not using.CHAPTERcommands and if you enter.LAYOUT 1,nor2,n. This type of numbering is not affected by the.NUMBER RUNNINGcommand.)
Default
No running page numbers.
.NUMBER SUBPAGE
.NUMBER SUBPAGE — The .NUMBER SUBPAGE command allows you to specify the
beginning of a new sequence of subpage numbers, for example, 1-16A, 1-16B, 1-16C,
and so on. This command affects only the letters that the
.SUBPAGE command appends to the normally numeric page number.
.NUMBER SUBPAGE takes effect on the next page. (See also
.SUBPAGE, .END SUBPAGE and .DISPLAY SUBPAGE.)
Format
.NUMBER SUBPAGE [[+/-]n]
.NMSPG [[+/-]n]
Parameters
n
The subpage letter that will be appended to the number of the next page. You can specify the letter itself ( A ) or you can specify a number corresponding (in order) to the letter that the subpage will have. For example, 1=A, 26=Z, 27=AA, 28=AB.
+n
Specifies how many alphabetically ordered letters past the current subpage letter
the next subpage letter will be. For example, if the current subpage is page 3-12E,
then .NUMBER SUBPAGE +2 will cause the next subpage to be
numbered 3-12G.
-n
Specifies how many alphabetically ordered letters before the current subpage letter the next subpage letter will be.
Description
.NUMBER SUBPAGE turns on .SUBPAGE if it was
not previously in effect.
Default
Sequential uppercase lettering, beginning with A.
.PAGE
.PAGE — The .PAGE command starts a new page.
Format
.PAGE
.PG
Description
The
.PAGEcommand executes.BREAKbefore doing its main task.The current page must have at least one line of text for
.PAGEto work, so you cannot use.PAGEto generate a series of blank pages.You can generate a series of blank pages by alternately entering
.PAGEand.FIGUREcommands.If
.NO PAGINGis in effect, you can still enter.PAGEsuccessfully, but you will not get additional pages as you normally would if the text on a page exceeds the page length associated with.PAGE SIZE.
.PAGE SIZE
.PAGE SIZE — The .PAGE SIZE command sets the page "frame" by
specifying the page length (the maximum number of lines of text on a page) and the
page width for the running heads. (Compare with .RIGHT MARGIN,
which sets the text width.) The width component of .PAGE SIZE and
the value established by .RIGHT MARGIN are separate
values.
Format
.PAGE SIZE [[+/-]n1] [,[+/-]n2]
.PS [[+/-]n1] [,[+/-]n2]
Parameters
n1
(Length) is the maximum number of lines on a page; n1 cannot be smaller than 13.
+n1
Increases the current page length by n1 lines.
-n1
Decreases the current page length by n1 lines.
n2
(Width) is the maximum number of characters on a line for running heads; n2 cannot be larger than 150.
+n2
Increases the current page width by n2 characters.
-n2
Decreases the current page width by n2 characters.
Description
The
.PAGE SIZEcommand executes.BREAKbefore doing its main task.Running heads line up on the right with the page-width setting.
Page numbers in
.LAYOUT 1,2, and3are centered between 0 and the width set by thePAGE SIZEcommand. All other centering takes place between the left margin and the right margin.If you have entered the
.NO PAGINGcommand,.PAGE SIZErestores the.PAGINGstate.
Related Commands
The width value of
.PAGE SIZEand the value of.RIGHT MARGINdo not affect each other. However, they are generally the same value.The
.CENTERcommand uses the.RIGHT MARGINvalue rather than the.PAGE SIZEvalue to center text on a line.
Default
.PAGE SIZE 58,70
.PAGING, .NO PAGING
.PAGING, .NO PAGING — The .PAGING command enables paging. The .NO
PAGING command disables it.
Format
.PAGING
.NO PAGING
.PA
.NPA
Description
.PAGINGexecutes.BREAKbefore doing its main task.If you have entered
.NO PAGING, the document is not split into numbered pages and space is not reserved for running heads. Any mechanical page breaks that a print device causes still occur.If
.NO PAGINGis in effect and if you want to start a new page after some lines of text, you can use the.PAGINGcommand.If your input file has a file type of RNH (Help file), paging is turned off and the
.PAGINGcommand has no effect.
Related Commands
If you enter
.CHAPTER,.APPENDIX, or.PAGE SIZE, you get.PAGING(unless your input file type is RNH).You can temporarily override a
.NO PAGINGstate by entering.PAGE, but unless you enter.PAGING, you will not get additional pages as you normally would if the text on a page exceeded the page-length value of.PAGE SIZE.
Default
.PAGING
.PARAGRAPH
.PARAGRAPH — The .PARAGRAPH command controls spacing and page
placement associated with the creation of paragraphs. It executes .TEST
PAGE, followed by .SKIP and
.INDENT. (See also .SET PARAGRAPH.)
Format
.PARAGRAPH [[-]n1 [,[-]n2 [,n3]]]
.P [[-]n1 [,[-]n2 [,n3]]]
The parameters n1, n2, and n3
are identical to the values of the .SET PARAGRAPH
command. If you choose not to use one of these optional parameters, you must use a
comma as a placeholder for the missing parameter in the parameter list.
Parameters
n1 = spaces indented (The default is 5.)
Specifies (like .INDENT) how many character positions to the
right of the left margin setting the first line of text will begin.
-n1
Specifies how many character positions to the left of the left margin setting the first line of text will begin; –n1 cannot, however, cause the text to begin to the left of character position 0.
n2 = vertical spacing (The default is 1.)
Specifies (like .SKIP) the number of blank lines you want
inserted before the paragraph. You get additional blank lines if the
.SPACING value is greater than 1 (see .SKIP,
.SPACING).
-n2
Specifies that the next line of text be pushed to within n2
lines of the bottom of the current page by the insertion of blank lines.
Every line but the last one retains the line spacing (.SPACING
value) that follows it.
n3 = test page lines (The default is 2.)
Specifies (like .TEST PAGE) the number of lines of text
required to be on one page. This parameter, unlike the .TEST PAGE
command, takes into account any blank lines that the .SPACING
command is routinely inserting after each line of text. If there is not enough room
on the current page to accommodate that many lines, DSR puts the text on the next
page. You can cancel this function by specifying 0 for
n3.
Description
The .PARAGRAPH command executes .BREAK
before doing its main task.
Default
.PARAGRAPH 5,1,2If you enter
.PARAGRAPHwithout one or more of the n values, you get the corresponding setting from the previous.PARAGRAPHor.SET PARAGRAPHthat you entered.- If you enter
.PARAGRAPHwithout one or more of the n values and if you have not set values in any previous.PARAGRAPHor.SET PARAGRAPHthat you might have entered, you get one or more of the following:- n1=5
- n2=1
- n3=2
The following table shows how to change the default values from 5 for spaces indented, 1 for vertical spaces, and 2 for test page lines:
| Format | Actual Arguments |
|---|---|
| .PARAGRAPH | 5,1,2 |
| .PARAGRAPH ,,4 | 5,1,4 |
| .PARAGRAPH 3 | 3,1,2 |
| .PARAGRAPH ,2 | 5,2,2 |
.PERIOD, .NO PERIOD
.PERIOD, .NO PERIOD — DSR normally adds an extra space after any of the following punctuation
marks in your text: period ( . ), colon ( : ), question mark ( ? ), and exclamation
point ( ! ). The .NO PERIOD command cancels the extra space that
DSR inserts after any of the punctuation marks listed above. The .NO
PERIOD command is used to differentiate between punctuation used in
the syntax of a sentence and punctuation used for other purposes. The
.PERIOD command restores the routine insertion of an extra
space following any of the punctuation marks listed above.
Format
.PERIOD
.NO PERIOD
.PR
.NPR
Description
The
.PERIODcommand works as described only if.FILLis in effect and if the punctuation mark is followed by either a space or the end of the line.You can override the effects of
.PERIODat any time by using the Accept flag ( _ ) in front of a punctuation mark.
Related Commands
The Period flag (the plus sign [+] by default) allows you to specify extra space after any character other than the ones mentioned above (see the description of The Period Flag (+)).
Default
.PERIOD
Example
The following example illustrates the use of the .PERIOD and
.NO PERIOD commands.
The following shows an input file before it is processed by DSR:
.FILL.NO JUSTIFY Mr. Jones, the ratio of 5! (factorial) to 6! is 5 : 6 but we will not use the ? character. Wait a minute! The answers are: yes and no. However, what if you are not sure? Try not to confuse things. Be more explicit.
The following shows the output of the same file with the
.PERIOD command used throughout:
Mr. Jones, the ratio of 5! (factorial) to 6! is 5 : 6 but we will not use the ? character. Wait a minute! The answers are: yes and no. However, what if you are not sure? Try not to confuse things. Be more explicit.
Notice that there are two spaces after each punctuation mark (except the commas).
The following shows the output of the same file with the .NO
PERIOD command used throughout:
Mr. Jones, the ratio of 5! (factorial) to 6! is 5 : 6 but we will not use the ? character. Wait a minute! The answers are: yes and no. However, what if you are not sure? Try not to confuse things. Be more explicit.
Notice that there is one space after each punctuation mark.
.REPEAT
.REPEAT — The .REPEAT command allows you to specify up to 150
characters to be printed a specified number of times, either horizontally or
vertically.
Format
.REPEAT n "x" (or n ’x’)
.RPT n "x" (or n ’x’)
Parameters
n
The number of times you want the characters printed.
x
A string of up to 150 characters. You must enclose the characters within
apostrophes (’ ’) or quotation marks ("
").
Description
If you enter
.REPEATwith.FILLin effect, the characters are repeated horizontally. If you want the repetitions separated by a space, you must include a space at the end of the string of characters to be repeated.If you enter
.REPEATwith.NO FILLin effect, the characters are repeated vertically, beginning at the left margin.
.REQUIRE
.REQUIRE — The .REQUIRE command allows you to process several DSR
files at the same time and merge them in an output file.
Format
.REQUIRE "filespec" (or 'filespec')
.REQ "filespec" (or 'filespec')
Parameters
filespec
A file specification enclosed in quotation marks or apostrophes. If you just
specify a file name, the default file type is RNO. If you do not supply a full file
specification, DSR uses your default device and directory. If you want to include
(.REQUIRE) files from other devices or directories, you must
specify the full file specification.
Description
The
.REQUIREcommand must be the last command on the line if you are putting multiple DSR commands on a line.You can have several
.REQUIREcommands in a single file or you can have one or more.REQUIREcommands in files that are themselves specified in.REQUIREcommands. The maximum depth for "nesting".REQUIREfiles in this manner is 10.If you plan to use the
.REQUIREcommand in several files that might be required in various combinations, you should consider using.SET LEVEL. The.SET LEVELcommand causes the section heads in files to be adjusted to the right level in any context. See .HEADER LEVEL and .SET LEVEL.
.RIGHT
.RIGHT — The .RIGHT command positions a single line of text
relative to the right margin. (See also .CENTER (.CENTRE).)
Format
.RIGHT [[-]n]; text
.RIGHT [[-]n]
.R [[-]n]; text
.R [[-]n]
Parameters
n
Specifies how many character positions to the left of the right margin setting the line will be indented.
-n
Specifies the number of character positions to the right of the right margin setting that the line will extend to.
text
The text to be positioned relative to the right margin. No other DSR commands can follow this text on a line.
Description
The
.RIGHTcommand executes.BREAKbefore doing its main task.The line of text being positioned can extend past margin settings and even beyond the
.PAGE SIZEwidth setting, but it cannot go to the left of character position 0.You can enter the text to be positioned on the same line following the
.RIGHTcommand, or you can end the line after the.RIGHTcommand, in which case the next line of text is positioned.No commands will be recognized on the line following a
.RIGHTcommand (or if it is blank, on the next line). The Control flag ( . ) is not honored while.RIGHTis collecting text to position. Other DSR flags are recognized, for example, the Bold and the Underline flags.
Default
If you enter .RIGHT without a value, you get a 0, which will
push the line of text to the right margin.
.RIGHT MARGIN
.RIGHT MARGIN — The .RIGHT MARGIN command sets the right margin to the
position that you specify. This is the position to which a line of text normally
extends. If .JUSTIFY is in effect, the .RIGHT
MARGIN value is the position against which text is justified. If
.NO JUSTIFY is in effect, the .RIGHT
MARGIN value specifies the maximum number of characters on any text
line. (Compare with .PAGE SIZE, which sets the page width for
running heads.)
Format
.RIGHT MARGIN [[+/-]n]
.RM [[+/-]n]
Parameters
n
Specifies the character position of the new right margin; n
must be greater than the value for the left margin. (For example,
.RIGHT MARGIN 60 sets the right margin just to the right of
the 60th character position.) The maximum value of n is
150.
+n
Sets the right margin n character positions to the right of the current right margin.
-n
Sets the right margin n character positions to the left of the current right margin.
Description
The .RIGHT MARGIN command executes .BREAK
before setting the right margin.
Related Commands
.LITERALexecutes.RIGHT MARGIN 150, and.END LITERALrestores the previous right margin setting..CENTERuses the.RIGHT MARGINsetting as the value on which to center text on a page.
Default
If you do not enter the
.RIGHT MARGINcommand, you get.RIGHT MARGIN 70.If you enter
.RIGHT MARGINwithout a value, you get the default value of 70.
.SAVE, .RESTORE
.SAVE, .RESTORE — These commands maintain the formatting context of a document for the user.
The files produced by the DSR utilities make changes to the formatting context. In
order not to disturb the user’s context, the RNT and RNX files execute
.SAVE and .RESTORE commands.
.SAVE stores information about the current
RUNOFF formatting context; this includes DSR defaults and DSR
commands and flags issued by the user. .RESTORE restores the
formatting information saved by the last-issued .SAVE
command.
Format
.SAVE
.RESTORE
.SA
.RE
Description
You must balance a
.SAVEcommand with a.RESTOREcommand. A warning message results from a.RESTOREcommand without a preceding.SAVEcommand, and no restore is done in this case. Similarly, a warning message results if pending.SAVEcommands are not matched by.RESTOREcommands by the end of a file.You can nest
.SAVEand.RESTOREcommands to a depth of 20.- The
.SAVEcommand preserves the following items of formatting context:- Case of the word Page that precedes the page number and the word Indexthat precedes index page numbers
- Date (On or Off)
- Fill
- Flags
- Justify
- Keep
- Margins
- Page numbering (On or Off)
- Page size
- Paging (On or Off)
- Paragraph parameters
- Spacing
- Subtitles (On or Off)
- Tab stops
.SEND TOC
.SEND TOC — The .SEND TOC command allows you to insert DSR commands,
DSR flags, and text into the table of contents (RNT) file. The items that you insert
affect the appearance of the table of contents. For example, you can send emphasis
flag characters to cause bolding and underlining in the table of contents. Chapter 5, "The DSR Table of Contents Utility" has information on the DSR Table of Contents
Utility.
Format
.SEND TOC text
.STC text
Parameters
text
Specifies the DSR command, DSR flag, or text that you are sending to the table of contents.
Example
The following example illustrates the use of the .SEND TOC
command.
Input
The input file before it has been processed with DSR and the DSR Table of Contents Utility:
.HEADER LEVEL 1 1st Section text,text,text .PAGE .HEADER LEVEL 1 2nd Section text,text,text .PAGE .SEND TOC .BLANK 2 .HEADER LEVEL 1 3rd Section(.SEND TOC command before this section) text,text,text .PAGE .HEADER LEVEL 1 4th Section text,text,text .PAGE .HEADER LEVEL 1 5th Section text,text,text
The preceding commands will cause the RNT file to have the .BLANK
2 command in it and the table of contents file (MEC) will have the two
blank lines before the header level entry for the third section.
Output
The table of contents produced when you process the input file with DSR and the DSR Table of Contents Utility:
CONTENTS 1 1ST SECTION . . . . . . . . . . . . . . . . . . . . 1 2 2ND SECTION . . . . . . . . . . . . . . . . . . . . 2 3 3RD SECTION(.SEND TOC COMMAND BEFORE THIS SECTION) . 3 4 4TH SECTION . . . . . . . . . . . . . . . . . . . . 4 5 5TH SECTION . . . . . . . . . . . . . . . . . . . . 5
.SET DATE, .SET TIME
.SET DATE, .SET TIME — The .SET DATE and .SET TIME commands
let you specify a date and time to be inserted in your file when you issue the
Substitute flag pair, $$, with any of the appropriate date or time parameters.
.SET DATE also sets the date for the .DATE
command, which causes the date to appear in running heads. (See .DATE, .NO DATE and the description of The Substitute Flag Pair ( $$ ).)
Format
.SET DATE d1 ,d2 ,d3
.SET TIME t1 ,t2 ,t3
.SDT d1 ,d2 ,d3
.STM t1 ,t2 ,t3
Parameters
d1
A number specifying the day of the month
d2
A number specifying the month of the year
d3
A number specifying the year (either four digits or the last two digits of the year)
t1
A number specifying the hour of the day
t2
A number specifying minutes past the hour
t3
A number specifying seconds past the minute
If you precede any of these values with + or –, you will change the corresponding current value by adding to or subtracting from it the value following the + or –.
Description
The
.SET DATEand.SET TIMEcommands execute.BREAKcommands before doing their main tasks.The date or time that you specify or that is in effect by default remains in effect until you enter another
.SET DATEor.SET TIME.
Default
If you do not enter
.SET DATEor.SET TIME, entering a $$time, $$date, or any of the appropriate date or time parameters with the substitute flag pair ($$) will give you the date or time that DSR began processing the file.If you enter either of these
.SETcommands, you can retain a previous value by omitting its value from the command. You must, however, type any comma that would have followed it.If you enter either command without specifying any values for it, you will get the current date or the time as of the second the command is executed.
.SET LEVEL
.SET LEVEL — The .SET LEVEL command allows you to preset the level of
the next section head without entering a .HEADER LEVEL command
(see .HEADER LEVEL).
Format
.SET LEVEL [+/-]n
.SL [+/-]n
Parameters
n
Specifies the level for the next .HEADER LEVEL command.
+n
Makes the level for the next .HEADER LEVEL command n
more than the current level.
-n
Makes the level for the next .HEADER LEVEL command n
less than the current level.
Description
The .SET LEVEL command can be helpful when you are using the
.REQUIRE command to combine several text files that are to be
processed and output as a single file. By using the .SET LEVEL
command, you can "require" your files in different combinations without having to
modify them, and without having to make adjustments to .HEADER
LEVEL commands throughout any document involved. When using
.SET LEVEL in .REQUIRE files, note the
following:
You should enter all
.HEADER LEVELcommands in.REQUIREfiles with +n or –n values rather than with n values. Alternatively, you can enter no value with the.HEADER LEVELcommand, always specifying the level with.SET LEVEL.At the end of the
.REQUIREfile, you can enter.SET LEVELwith a –n or +n to reset the header level to its value before you entered the current.REQUIREfile.
Example
The following example illustrates the use of the .SET LEVEL
command. The file in the example requires the following file, called
SL3.EXA.
SL3.EXA file
.HEADER LEVEL FIRST HEADER IN SL3.EXA Here is text following the first header. Now increment the header level by entering ".SET LEVEL +1": .SET LEVEL +1 .HEADER LEVEL second header in SL3.EXA Text following the second header. Again increment the header level: .SET LEVEL +1 .HEADER LEVEL third header in SL3.EXA This is the last text in SL3.EXA. At the end of it, set the header level back to where it started by entering ".SET LEVEL -2". .SET LEVEL -2
.SET LEVEL example
Input
The input file before it is processed by DSR:
One reason for using this command is that it allows modularization of an RNO source file or a set of .REQUIRE files. .BLANK Soon you are going to require a file (SL3.EXA) that has 3 levels of headers. They appear the first time as header levels 1, 2, and 3 (numbered 1, 1.1, and 1.1.1). Following that, you enter a .SET LEVEL +1 command here and then require the 3-level file again. This time, the same headers appear as header levels 2, 3, and 4 (numbered 1.2, 1.2.1, and 1.2.1.1). .BLANK You also pull in the left margin for SL3.EXA to make it stand out. .LEFT MARGIN +3 .REQUIRE ’SL3.EXA’ .BLANK.LEFT MARGIN -3 Enter a .SET LEVEL +1 command here at the top level: .SET LEVEL +1 You need the file SL3.EXA again: .LEFT MARGIN +3 .REQUIRE ’SL3.EXA’ .LEFT MARGIN -3
Output
The output is this:
One reason for using this command is that it allows modularization of an RNO source file or a set of require files. Soon you are going to require a file (SL3.EXA) that has 3 levels of headers. They appear the first time as header levels 1, 2, and 3 (numbered 1, 1.1, and 1.1.1). Following that, you enter a .SET LEVEL +1 command here and then require the 3-level file again. This time, the same headers appear as header levels 2, 3, and 4 (numbered 1.2, 1.2.1, and 1.2.1.1). You also pull in the left margin for SL3.EXA to make it stand out. 1 FIRST HEADER IN SL3.EXA Here is text following the first header. Now you increment the header level by entering ".SET LEVEL +1": 1.1 Second Header In SL3.EXA Text following the second header. Again increment the header level: 1.1.1 Third Header In SL3.EXA -- This is the last text in SL3.EXA. At the end of it, you set the header level back to where it started by entering ".SET LEVEL --2." Enter a .SET LEVEL +1 command here at the top level: Now you Require the file SL3.EXA again: 1.2 First Header In Sl3.exa Here is text following the first header. Now you increment the header level by entering ".SET LEVEL +1": 1.2.1 Second Header In SL3.EXA -- Text following the second header. Now you again increment the header level: 1.2.1.1 Third Header In SL3.EXA -- This is the last text in SL3.EXA. At the end of it, you set the header level back to where it started by entering ".SET LEVEL --2."
.SET
                    PARAGRAPH
.SET PARAGRAPH — The .SET PARAGRAPH command allows you to set values for
.PARAGRAPH without entering .PARAGRAPH.
The .SET PARAGRAPH command can be especially useful if you plan
to execute .AUTOPARAGRAPH or .AUTOTABLE. (See
.PARAGRAPH.)
Format
.SET PARAGRAPH [[-]n1 [,[-]n2 [,n3]]]
.SPR [[-]n1 [,[-]n2 [,n3]]]
The parameters n1, n2, and n3
are identical to the values of the .PARAGRAPH command.
If you choose not to use one of these optional parameters, you must use a comma as a
placeholder for the missing parameter in the parameter list.
Parameters
n1 = spaces indented (The default is 5.)
Specifies (like .INDENT) how many character positions to the
right of the .LEFT MARGIN setting the first line of text will
begin.
-n1
Specifies how many character positions to the left of the .LEFT
MARGIN setting the first line of text will begin; –n1
cannot, however, cause the text to begin to the left of character
position 0.
n2 = vertical spacing (The default is 1.)
Specifies (like .SKIP) the number of blank lines you want
inserted before the paragraph. You get additional blank lines if the
.SPACING value is greater than 1.
-n2
Specifies that the next line of text be pushed to within n2
lines of the bottom of the current page by the insertion of blank lines.
Every line but the last one retains the line spacing (.SPACING
value) that follows it.
n3 = test page lines (The default is 2.)
Specifies (like .TEST PAGE) the number of lines of text
required to be on one page. Unlike the .TEST PAGE command itself,
n3 takes into account any blank lines that
.SPACING routinely inserts after each line of text. If there
is not enough room on the current page to accommodate that many lines, DSR puts the
text on the next page. You can cancel this function by specifying 0 for
n3.
.SKIP
.SKIP — The .SKIP command inserts a multiple of the number of
blank lines that has been specified by the .SPACING command.
Contrast this with .BLANK, which inserts only the number of blank
lines specified with the .BLANK command itself. (See .BLANK.)
Format
.SKIP [[-]n]
.S [[-]n]
Parameters
n
The number of .SPACING lines you want to be inserted. For
example, if you have specified a .SPACING value of two lines and
you enter .SKIP without an n value, DSR will
insert two blank lines (the .SPACING value) by default. If you
enter .SKIP 2, DSR will insert four blank lines (2 times the
.SPACING value), and so on.
-n
Specifies that the next line of text be pushed to within n
lines of the bottom of the current page by the insertion of blank lines.
Every line but the last one retains the line spacing (.SPACING
value) that follows it.
Description
The
.SKIPcommand executes.BREAKbefore executing its main task..SKIP ndoes not work at the top of a page, that is, right after a.PAGEor just after.PAGE SIZElength has been exceeded, but.SKIP –ndoes work under such conditions.If there is not enough room on the current page for
.SKIPto do exactly as you specified, the.SKIPdoes as much as it can on that page. It does not finish on the next page.If DSR encounters a footnote while executing
.SKIP, it considers the line directly above the footnote to be the bottom of the page.
Default
If you enter no value for .SKIP, you get .SKIP
1.
.SPACING
.SPACING — The .SPACING command changes the amount of spacing
between lines of text.
Format
.SPACING n
.SP n
Parameters
n
The amount of spacing that you want between lines of text. For example, 1 denotes single spacing (no blank lines between lines of text) — as the text in this manual normally appears. You must specify n, which must be in the range of 1 through 5.
Description
The
.SPACINGcommand executes.BREAKbefore doing its main task.The
.SPACINGsetting affects the action of.SKIP.The
.SPACINGsetting affects the action of.LITERAL.The
.SPACINGsetting affects the skip values and the test-page values of.PARAGRAPH,.SET PARAGRAPH,.AUTOPARAGRAPH, and.AUTOTABLE.
Default
If you do not enter a .SPACING command, you get single spacing
(.SPACING 1).
.STYLE HEADERS
.STYLE HEADERS — The .STYLE HEADERS command changes the formats of the
various levels of section heads (.HEADER LEVEL n). Do not confuse
the numbers that identify the header level (in the range of 1 through 6) with the
numbers that get printed just to the left of the header title (3.5.2, for example).
See .HEADER LEVEL. (See also .NUMBER LEVEL and .DISPLAY LEVELS.)
Default Header Level Numbering
| Nonchapter | Chapter n | Appendix A | |
|---|---|---|---|
| .HEADER LEVEL 1 | 1 | n.1 | A.1 |
| .HEADER LEVEL 2 | 1.1 | n.1.1 | A.1.1 |
| .HEADER LEVEL 3 | 1.1.1 | n.1.1.1 | A.1.1.1 |
Format
.STYLE HEADERS [n1] [,n2]...[,n9]
.STHL [n1] [,n2]...[,n9]
Parameters
n1 (The default is 3.)
Specifies the lowest-numbered header level to have a run-in title format. Run-in
means that the text immediately follows the header on the same line instead of
beginning on a new line. All higher-numbered levels also have run-in formats. If
n1=4, then .HEADER LEVEL 4,
5, and 6 titles are run into the main
text.
n2 (The default is 1.)
Specifies the highest-numbered header level to have its title printed entirely in
uppercase. All lower-numbered levels will also have titles entirely in uppercase. If
n2=4, then .HEADER LEVEL 1,
2, 3, and 4 will have
titles in uppercase.
n3 (The default is 6.)
Specifies the highest-numbered header level to have only the first letter of each word capitalized in the title. All lower-numbered levels will also have titles in mixed format. If n3=6, all levels will have this case format. All uppercase takes precedence over initial capital letters, if there is a conflict.
n4 (The default is 7.)
Specifies the lowest-numbered header level not to have a section number to the left of its title. All higher-numbered levels will also not have section numbers to the left of their titles.
n5 (The default is 7.)
Specifies the lowest numbered non-run-in header level to have its title centered. All higher-numbered non-run-in levels will also have their titles centered.
n6 (The default is 3.)
Specifies the number of blank lines you want before section heads.
n7 (The default is 1.)
Specifies the number of blank lines you want after section heads.
n8 (The default is 9.)
Specifies the number of lines you want to have available on the current page for
the test page issued by .HEADER LEVEL. Note that n8
takes into account any blank lines that .SPACING
routinely inserts after each line of text (unlike .TEST PAGE).
(See also .SKIP.)
n9 (The default is 2.)
Specifies the number of spaces you want between the section number and the section title. The maximum value is 75.
Description
The
.STYLE HEADERScommand executes.BREAKbefore doing its main task.You can type 0 or 7 for n1, n2, n3, n4, or n5 to affect all levels of headers, even though both 0 and 7 exceed the range of allowable levels.
In a conflict between n2 and n3 caused by an overlapping range, n2 (all uppercase) takes precedence.
Default
- n1=3
Run-in titles for header levels 3 through 6.
- n2=1
Titles in all uppercase for header level 1 only.
- n3=6
Titles with only the first letter of every word in uppercase for header level 2 through header level 6.
- n4=7
A sequence of numbers (or letters) preceding the section title. (See .DISPLAY LEVELS.)
- n5=7
Titles printed starting at the left margin (flush left), not centered. n6=3 Three blank lines before each header.
- n7=1
One blank line after each header.
- n8=9
Seven more than the test-page value of the most recent
.PARAGRAPHor.SET PARAGRAPHcommand you have entered. If you have not specified such a value, you get 7 plus the.PARAGRAPHdefault of 2. (See the description of n8 above for note on.SPACINGadjustment.)- n9=2
Two spaces between the section number of the header and the header itself (section title).
.SUBPAGE, .END SUBPAGE
.SUBPAGE, .END SUBPAGE — The .SUBPAGE command begins a new page and a new format
for page numbering. It numbers the new page by keeping the previous page number and
appending the letter A to it. For example, if the previous page is 10, the first
subpage is 10A and the next page becomes 10B unless you have entered an
.END SUBPAGE in the meantime. (See also .NUMBER SUBPAGE, .DISPLAY SUBPAGE, .HEADERS ON, .NO HEADERS, .LAYOUT, and .PAGE.)
The .END SUBPAGE command begins a new page and goes back to
normal page numbering. If you entered the .END SUBPAGE command on
page 2-8D, for example, the next page would be numbered 2-9.
Format
.SUBPAGE
.END SUBPAGE
.SPG
.ES
Description
Both the
.SUBPAGEand the.END SUBPAGEcommands execute.BREAKcommands before doing their main tasks.You can use the
.SUBPAGEcommand if you are changing parts of a document you are reprinting and if you do not want to have to renumber the pages in the rest of a chapter (or possibly the rest of the document). You can thus avoid a severe disruption of your index and table of contents.
Default
.SUBPAGE is not in effect.
.SUBTITLE, .NO SUBTITLE
.SUBTITLE, .NO SUBTITLE — The .SUBTITLE command allows you to specify a subtitle
for a running head (see .HEADERS ON, .NO HEADERS). When using the default
.LAYOUT command, the subtitle appears on the second line of
every page (except page 1) at the leftmost position on a line (character position
0), regardless of the left margin setting. The .NO SUBTITLE
command cancels the .SUBTITLE command. (See also .AUTOSUBTITLE, .NO AUTOSUBTITLE, .TITLE, .FIRST TITLE,
and .LAYOUT.)
Format
.SUBTITLE [text]
.NO SUBTITLE
.ST [text]
.NST
Parameters
text
The title of the running head you want to appear on the second line of the page.
Description
The
.SUBTITLEcommand executes.BREAKbefore doing its main task.A
.SUBTITLEcommand must be the last command on the line.You must enter
.SUBTITLEif you want.AUTOSUBTITLEor.DATEto work.Once you enter the
.SUBTITLEcommand, the running head will occupy four lines at the top of each page (title, subtitle, and two blank lines.) If you never enter.SUBTITLE, or if you enter.NO SUBTITLE, the running head will occupy three lines at the top of each page.
Related Commands
You can change the position of a running-head subtitle on pages by entering a
.LAYOUTcommand.If
.AUTOSUBTITLEis in effect, it will override the effects of a.SUBTITLEcommand you have entered. That is, DSR will use.HEADER LEVELtitles for running-head subtitles. Any subtitle you have specified in a.SUBTITLEcommand will be overridden when the first applicable.HEADER LEVELis encountered..NO HEADERSsuppresses running heads and therefore the subtitle does not appear at the top of the page. DSR remembers the subtitle, however, and it will appear in the running head if you enter.HEADERS ON.
Default
If you do not enter either
.SUBTITLEor.NO SUBTITLE, you get.NO SUBTITLE.If you enter the
.SUBTITLEcommand without specifying subtitle text for it, you will get the effects of.AUTOSUBTITLE(provided you have not entered.NO AUTOSUBTITLE).If
.AUTOSUBTITLEis in effect and if the text picked up from an applicable.HEADER LEVELcommand is wider than the margins in effect when the subtitle is displayed, the subtitle is truncated and an ellipsis ( . . . ) is appended to the end of it.
.TAB STOPS
.TAB STOPS — The .TAB STOPS command changes the current positions of
tab stops. Each tab character in the input file advances the print carriage to the
right to the next tab stop.
Format
.TAB STOPS [[+/-]n1] [,[+/-]n2]...[,[+/-]n32]
.TS [[+/-]n1] [,[+/-]n2]...[,[+/-]n32]
Parameters
n1,n2,...n32
Character positions that you are defining as new tab stops. They are absolute positions not related to margin settings and start at 0 (the leftmost position). The highest number of tab stop positions you can have is 32.
n
Specifies the character position for a tab stop.
1,2,...32
The 1st,2nd,...32nd tab stops on a line. Tab stops are defined as such by the commas that follow them.
+n
Changes a given position by adding n to its value rather than by directly specifying the value.
-n
Changes a position by subtracting n from its value.
Description
If you enter
.TAB STOPSbut do not want to change all the settings, you need not specify those you want to keep. You must, however, retain the commas that would have followed because omissions alter or cancel previous settings. In particular, the previous tab stop settings located after the last number or comma in a.TAB STOPScommand are canceled.Each
.TAB STOPScommand suspends the use of the previous tab stop settings.Tab stop values must increase from left to right to work properly, and each must have a value that is at least two higher than that of the preceding tab stop. Tabs encountered when either of these conditions is not in effect cause DSR to ignore the improper tab setting and bring you to the next valid setting.
You can delete a tab stop by setting it to a value that is less than the tab stop just preceding the one you are deleting. For example, if you have entered
.TAB STOPS 10,15,20,25,30and you want to delete the tab stop at position 20, you can enter the following:.TAB STOPS ,,12,,
If text overflows past a tab stop, a following tab brings you to the next valid setting.
If DSR encounters a tab character after passing beyond all tab stops, it treats the tab as a space.
Tabs work properly inside a
.LITERALblock of text..TAB STOPScommands are not affected by.JUSTIFY.
Default
If you enter the
.TAB STOPScommand without number or comma specifications, the use of all tab stops is suspended and the tab character is equivalent to a space.If you do not enter the
.TAB STOPScommand, successive tab characters work as if you had set a tab stop every eight positions, that is, as if you had entered.TAB STOPS 8,16,24, and so on. Note, though, that because.PAGE SIZEhas a width limit of 150, 149 is the practical limit for.TAB STOPS.
.TEST PAGE
.TEST PAGE — The .TEST PAGE command allows you to keep a specified
amount of text entirely on a single page. If there is not enough room on the current
page to accommodate that amount, DSR ends the current page and puts the entire text
on the next page.
Format
.TEST PAGE n
.TP n
Parameters
n
The number of lines required to be on one page. This number cannot be omitted and must be positive.
Description
The .TEST PAGE command executes .BREAK
before doing its main task.
Related Commands
.TEST PAGE commands:.FIGURE.FIGURE DEFERRED.HEADER LEVEL.LIST.NOTE.PARAGRAPH.SET PARAGRAPH
Unlike .TEST PAGE, however, these commands all take the
.SPACING value into account when interpreting
n. (See also .SKIP.)
Example
The following example illustrates the use of the .TEST PAGE
command.
Suppose there are exactly four lines left on the current page.
| Example A | Example B |
|---|---|
| .TEST PAGE 5 | [no .TEST PAGE command] |
| Line one | Line one |
| Line two | Line two |
| Line three | Line three |
| Line four | Line four |
| Line five | Line five |
| Produces: | Produces |
|---|---|
| [new page] | Line one |
| Line one | Line two |
| Line two | Line three |
| Line three | Line four |
| Line four | [new page] |
| Line five | Line five |
.TITLE
.TITLE — The .TITLE command allows you to specify a title for a
running head (see .HEADERS ON, .NO HEADERS). This title normally appears at the
top of every page but the first, at the leftmost position on the line (character
position 0), regardless of the .LEFT MARGIN setting. (See also
.FIRST TITLE, .SUBTITLE, .NO SUBTITLE, and .LAYOUT.)
Format
.TITLE [text]
.T [text]
Parameters
text
The title of the main running head you want to appear.
Description
The
.TITLEcommand executes.BREAKbefore doing its main task.A
.TITLEcommand must be the last command on the line.
Related Commands
You can change the position of a running-head title on pages by entering a
.LAYOUTcommand..NO HEADERSsuppresses running heads and therefore the title does not appear at the top of the page. DSR remembers the title, however, and it will appear in the running head if you enter.HEADERS ON.If you enter
.CHAPTER(or.APPENDIX) after or instead of a.TITLE, the chapter or appendix title becomes the running-head title.If your document does not begin with a
.CHAPTERcommand, you can have running heads on the first page by entering the.FIRST TITLEcommand.
Default
If you do not enter the .TITLE command, you get the title you
specified in any .CHAPTER command that is in effect (unless you
have entered .NO HEADERS).
.VARIABLE
.VARIABLE — The .VARIABLE command allows you to specify a character
that corresponds to the name you have given the commands and text in an
.IF (or .IFNOT) block. This identifying
character is placed in the left margin when you process your file with the
/DEBUG or /DEBUG=CONDITIONALS command line
qualifier.
Format
.VARIABLE name [t ,f]
.VR name [t ,f]
Parameters
name
The name you have given to the commands and text in an .IF (or
.IFNOT) block.
t
(True) is a single character of your choice that appears in front of lines of text
to indicate that they will be processed (.IF block) if you
specify /VARIANT, instead of /DEBUG, in the
command line.
f
(False) is a single character of your choice that appears in front of lines of
text to indicate that they will not be processed (.IFNOT block)
if you specify /VARIANT, instead of /DEBUG, in
the command line.
Description
.VARIABLEcommands must occur before conditional commands of the same name.You can enter the
.VARIABLEcommand for as many.IFor.IFNOTblocks as you want, but you should have unique t,f characters for each unique.VARIABLE"name." You can then tell which block will be processed or not processed.If you issue
/VARIANTin the command line, only "true" text will appear.
Example
The following example illustrates the use of the .VARIABLE
command and also the conditional commands (.IF, .IF
NOT, .ELSE, and .ENDIF).
Input
The input file before it is processed by DSR:
.VARIABLE COMPLETED c ,0 .VARIABLE USER u ,0 .VARIABLE PASSED p ,0 .VARIABLE DIAG d ,0 .CENTER;Known Bugs and Deficiencies .BLANK .CENTER;PCLS Version V1.1-002 .BLANK 2 This file should be processed with the qualifier /DEBUG in order to get the benefit of the coded information in the left-hand margin. The key to the marginal coding is: .BLANK.LEFT MARGIN 8.TAB STOPS 14 .BREAK;d TABDiagnostic notes. .BREAK;c TABCompleted --- closed. .BREAK;p TABPassed to another group --- closed. .BREAK;u TABUser errors or misunderstandings --- closed. .LEFT MARGIN 0.BLANK .LIST .LEFT MARGIN 6 .IF COMPLETED .LIST ELEMENT;[1122] (submitted by Adams) Found in V1.0-004; VMS only. .BLANK PCLS miscounts input records if the /RETRY qualifier is used. .BLANK Fixed in 1.0-005, 10-June-1988. .ENDIF COMPLETED .BLANK # .IF USER .LIST ELEMENT;[1131] (submitted by Clark) Found in V1.0-006; all operating systems. .BLANK Closed: User error. .BLANK Reports sometimes print over the line printer page perforation when the NEWPAGE command is used. .ENDIF USER .BLANK # .IF PASSED .LIST ELEMENT;[1149] (submitted by AUSTIN::PRINE) Found in V1.0-010; VMS only. .BLANK PCLS incurs an access violation upon trying to create a filein a version-limited directory. .BLANK Passed to the I/O group on 6-July-1988. .BLANK Fixed in V1.0-011. .IF DIAG .BLANK A problem with the I/O system. It did not properly handle the message from VMS that notifies the user that the oldest version was deleted. .ENDIF DIAG .ENDIF PASSED .BLANK # .LIST ELEMENT;[1211] (submitted by Clark) Found before V1.0-012; VMS only. .BLANK PCLS access-violates when trying to open the fourth output file in a user-defined sequence of output files. .IF DIAG .BLANK Problem is likely to be in the EXTOUT module or in something it calls. .ENDIF DIAG .END LIST 0 .BLANK [End of BUGLIST.RND]
Output
The output file, processed with RUNOFF/DEBUG, is this:
Known Bugs and Deficiencies
PCLS Version V1.1-002
This file should be run off with the qualifier /DEBUG in order to get
the benefit of the coded information in the left-hand margin. The key
to the marginal coding is:
d Diagnostic notes.
c Completed --- closed.
p Passed to another group --- closed.
u User errors or misunderstandings --- closed.
c
c 1. [1122] (submitted by Adams) Found in V1.0-004; VMS
c only.
c
c PCLS miscounts input records if the /RETRY qualifier
c is used.
c
c Fixed in 1.0-005, 10-June-1988.
u 2. [1131] (submitted by Clark) Found in V1.0-006; all
u operating systems.
u
u Closed: User error.
u
u Reports sometimes print over the line printer page
u perforation when the NEWPAGE command is used.
u
p
p 3. [1149] (submitted by AUSTIN::PRINE) Found in V1.0-010;
p VMS only.
p
p PCLS incurs an access violation upon trying to create
p a file in a version-limited directory.
p
p Passed to the I/O group on 6-July-1988.
p
p Fixed in V1.0-011.
d
d A problem with the I/O system. It did not properly
d handle the message from VMS that notifies the user
d that the oldest version was deleted.
4. [1211] (submitted by Clark) Found before V1.0-012;
VMS only.
PCLS access-violates when trying to open the fourth
output file in a user-defined sequence of output
files.
d Problem is likely to be in the EXTOUT module or in
d something it calls.
[End of BUGLIST.RND].XLOWER, .XUPPER
.XLOWER, .XUPPER — The .XLOWER command allows you to control the case of
index entries specified by the .INDEX and the
.ENTRY commands, or by the Index flag ( > ). The case of
the index entries will match exactly the case that you enter when you make the index
entry. The .XUPPER command lets DSR control the case of index
entries. If .XUPPER is in effect (as it is by default), DSR
capitalizes the first character of every index entry, and drops everything else in
the entry to lowercase. Chapter 6, "The DSR Indexing Utility" has information on the DSR indexing
utility.
Format
.XLOWER
.XUPPER
.XL
.XU
Default
.XUPPER
Chapter 3. DSR Flags
This section describes the DSR flags. Flags are special characters that you insert in your text to specify, for example, emphasis of text, case of characters, and spacing of characters.
3.1. DSR Flag Characters
Table 3.1, ''DSR Flags'' lists all the flags, the default characters associated with the flags, and the function of each flag.
| Flag Name | Char. | Purpose |
|---|---|---|
|
Accept |
_ |
Treat next character as ordinary text |
|
Bold |
* |
Make next character boldface |
|
Break |
| |
Allow DSR to break word here if at end of line |
|
Capitalize |
< |
Capitalize all characters in next word |
|
Comment |
! |
Begin comment |
|
Control |
. |
Start DSR command |
|
Hyphenate |
= |
Allow hyphenation of word here if at end of line |
|
Index |
> |
Index next word |
|
Lowercase |
\ |
Make next character lowercase |
|
Overstrike |
% |
Overstrike previous character with next character |
|
Period |
+ |
Insert extra interword space after character |
|
Space |
# |
Insert unexpandable space |
|
Subindex |
> |
Subindex next word or phrase if in a |
|
Substitute |
$$ |
Insert date or time |
|
Underline |
& |
Underline next character |
|
Uppercase |
^ |
Make next character uppercase |
3.1.1. Entering Flag Characters
Enter flag characters in your text file to specify the character or strings of text that you want to underline, bold, capitalize, index, and so on. The following example shows an input file with emphasis flags:
^&A Manual of Style\& by the University of Chicago Press is a source of information on index entries. .BLANK .FLAGS BOLD Do ^*NOT\* remove this book from the reference room.
After processing this file with the RUNOFF command, you get the
following output:
- A Manual of Style by the University of Chicago Press is a source of information on index entries.
- Do NOT remove this book from the reference room.
3.1.2. Using Multiple Flag Characters
The following flags can be used alone or with another flag (except as specified):
- Accept (can be used with any flag, including itself)
- Bold
- Capitalize
- Comment
- Lowercase
- Substitute (can be paired only with itself)
- Underline
- Uppercase
The following flags are used alone (except for pairing with the Accept flag):
- Break
- Hyphenate
- Index
- Overstrike
- Period
- Space
- Subindex
3.2. DSR Commands That Control Flags
Two DSR commands affect the DSR flag characters: the .FLAGS
flag-name command turns the recognition of a flag character on or off, and
the .ENABLE / .DISABLE flag-action command enables
or disables the action of certain flags. The following sections discuss the use of these
two DSR commands with the flag characters. There are detailed descriptions in Chapter 2, "DSR Commands" of the DSR commands that control flags. The commands are listed
alphabetically under .ENABLE BOLDING, HYPHENATION,
OVERSTRIKING, UNDERLINING, and .FLAGS
flag-name.
3.2.1. Recognition of Flag Characters
Recognition of flag characters means only that the flag characters will not be
taken as text. If a flag is recognized by DSR, it does not appear in output text. A
recognized flag may or may not perform its flag task. For example, the Underline
flag might be recognized as a flag, but not cause underlining, because you specified
the /NOUNDERLINE qualifier on the DSR command line (see Chapter 4, "RUNOFF Command Qualifiers").
If a flag is not recognized by DSR, it appears as output text, and it does not perform its flag task.
You cause a flag to be recognized by entering the following .FLAGS
flag-name command:
.FLAGS BOLD
You turn off recognition of a flag character with the following .NO FLAGS
flag-name command:
.NO FLAGS BOLD
You can suspend recognition of all flags simultaneously (except for the Comment
flag and the Control flag) by entering .NO FLAGS ALL. If you
enter this "master switch" command, even those flags with recognition turned on
(either by default or because you entered the .FLAGS flag-name
commands for those flags) will not be recognized. If you later enter .FLAGS
ALL, flag recognition will be restored for all flags previously turned
on. If recognition of a flag character is individually turned off, (for example,
.NO FLAGS BOLD), the subsequent recognition of all flag
characters (by .FLAGS ALL) will not cause recognition of the
individually turned off flag.
For a flag to perform its task, its recognition must be turned on both collectively and individually.
3.2.2. Enabling of Flag Actions
Enabling of flag actions means that their tasks will be performed if the flags are
recognized. All flag actions are enabled by default. Therefore, it is not usually
necessary to enter .ENABLE flag-action commands.
You can disable the operation of some flags without affecting their recognition.
See .ENABLE BOLDING, .DISABLE BOLDING, .ENABLE HYPHENATION, .DISABLE HYPHENATION, .ENABLE INDEXING, .DISABLE INDEXING, .ENABLE OVERSTRIKING, .DISABLE OVERSTRIKING, and .ENABLE UNDERLINING, .DISABLE UNDERLINING. Once you have disabled the action of a flag in
this way, you can reenable it with the corresponding .ENABLE
command.
(See Chapter 2, "DSR Commands" if you want more information on .ENABLE
BOLDING, .ENABLE HYPHENATION, .ENABLE
INDEXING, .ENABLE OVERSTRIKING, and
.ENABLE UNDERLINING.)
3.2.3. Redefining Flag Characters
You can change a flag from the default character to another character. You
redefine a flag character by turning off recognition of the current flag character
with .NO FLAGS flag-name and then specifying a new character with
the appropriate .FLAGS flag-name command. You might want to do
this if, for example, you are frequently using a default flag character as regular
text. By redefining the flag as another character, you avoid having to place an
Accept flag before the character each time you use it. (The Accept flag allows flag
characters to be accepted by DSR as regular text characters.)
For example, suppose you wanted to move files from a RSTS system, which uses the RNO text-formatting program, to a VMS system, which uses DSR. In RNO, the ampersand ( & ) is the bold flag, and the percent sign ( % ) is the underline flag. The RNO flags cannot be redefined. In DSR, the asterisk ( * ) is the bold flag and the ampersand is the underline flag, but they CAN be redefined. Therefore, in order to avoid having to change all the ampersands and percent signs in your RNO file to asterisks and ampersands, respectively, you can simply redefine the flags at the beginning of your DSR file as follows:
.NO FLAGS UNDERLINE.FLAGS BOLD &.FLAGS UNDERLINE %
In this example, you must first enter .NO FLAGS UNDERLINE to
disable the use of the ampersand, the default flag character for underlining. You
must enter the .NO FLAGS flag-name command for any flag character
that you want to redefine whose recognition is currently turned on.
You can replace a flag character with an ASCII control character, but you must precede the replacement control character with an Accept flag ( _ ). Otherwise, the flag will not be recognized. Note that the operating system may make it difficult for you to input some control characters directly.
In the following example, the Overstrike flag ( % ) is redefined as the ASCII backspace control character CTRL/H :
.FLAGS OVERSTRIKE CTRL/H
In this example, you do not need to enter the .NO FLAGS
OVERSTRIKE command, since recognition of the Overstrike flag is not
turned on by default.
The following section has detailed descriptions of the individual DSR flags. The flags are listed in alphabetical order.
The Accept Flag ( _ )
The Accept Flag ( _ )
Description
The Accept flag causes any character that directly follows it to be accepted as text.
If the character is a punctuation mark after which DSR normally inserts an extra space (for example, a period), you can precede it with the Accept flag to cancel the extra space. You might want to cancel the extra space when you enter terms in which a period does not necessarily end a sentence, for example:
Mr_. or Mrs_.
The output would be:
Mr. or Mrs.
rather than:
Mr. or Mrs.
If you want to insert a flag character into your text, the easiest way is to precede it with the Accept flag. For example, to insert & (the Underline flag), you would type _&.
For underlining purposes, you can use the Accept flag to cause the acceptance of an expandable space (one you produce by pressing the SPACE bar), because DSR normally does not underline spaces between words.
Default
Recognition is turned on.
The Bold Flag ( * )
The Bold Flag ( * )
Description
The single character occurrence of the Bold flag causes the next character
to be printed in boldface, that is, to be overstruck once. You can cause
characters to be overstruck more than once by using the
/BOLD=number qualifier when processing the file with
the RUNOFF command.
Default
Recognition is turned off. To turn on recognition, you must use the
.FLAGS BOLD command.
Example
Input
.FLAGS BOLD Use Types *A and *C
Output
Use Types A and C
In addition, the operation performed by this flag (as opposed to the
flag’s recognition) can be disabled and reenabled by the .DISABLE
BOLDING and .ENABLE BOLDING commands or by
the /BOLD and /NOBOLD command line
qualifiers.
You can pair the Bold flag with the Uppercase flag ( ^* ) to turn bolding on and pair it with the Lowercase flag ( \* ) to turn bolding off. For example:
Input
^*These words are in boldface.\*
Output
These words are in boldface.The Break Flag ( | )
The Break Flag ( | )
Description
The Break flag tells DSR where it may break a word that occurs at the end of a line. You might want DSR to be able to break a word after a slash ( / ) or a hyphen ( - ) that is part of the word (for example, "a yes/no response"). The Break flag allows a line to end where the flag occurs; no hyphen is ever inserted because of it.
If the flag is turned on and inserted at break points, DSR is able to break the word at any of the specified points. If more than one Break flag is present in a word that DSR is breaking at the end of a line, DSR leaves as much of the word as possible on the line, that is, it breaks the word at the last possible Break flag.
The Break flag works the same whether .JUSTIFY or
.NO JUSTIFY is in effect.
Default
Recognition is turned off. To turn on recognition, you must use the
.FLAGS BREAK command.
Example
Input
.FILL.RIGHT MARGIN 40 .FLAGS BREAK .BLANK;This is an example of a phrase (end-|of-|line) with break points.
Output
This is an example of a phrase (end-of- line) with break points.
The Capitalize Flag (<)
The Capitalize Flag (<)
Description
The Capitalize flag causes all the letters in the word directly following it to be capitalized, except for letters that may be preceded by an Accept ( _ ) or Lowercase ( \ ) flag.
Capitalization continues until one of the following is encountered:
- An expandable space
- A Break flag ( | )
- A Hyphenate flag ( = )
- Another Capitalize flag
- A pair of Uppercase flags ( ^^ )
- A pair of Lowercase flags ( \ \ )
- The end of the line
You can pair the Capitalize flag with the Uppercase flag ( ^< ) to capitalize all following text up to the next case flag.
Default
Recognition is turned off. To turn on recognition, you must use the
.FLAGS CAPITALIZE command.
The Comment Flag ( ! )
The Comment Flag ( ! )
Description
The Comment flag is used to insert comments in the RNO file. You type the comment text immediately after the Comment flag. Comments do not appear in the output file.
Default
Recognition is turned on.
Examples
Input
.LEFT MARGIN 0.RIGHT MARGIN 60!Place comment here.
You can use the flag wherever you use a command, except after a semicolon ( ; ) or at the very beginning of a line (character position 0). Because a semicolon terminates a comment, you cannot include one in your comment. You can, however, include a semicolon in regular text without using an Accept flag.
A semicolon can also be used as a comment flag but only when it is paired with a control flag at the beginning of a line:
.;This is a comment.When not used as a comment flag, a semicolon can be used to terminate a comment or a string of DSR commands. In this case, text that you type after the semicolon will appear in the output file.
- With a dot ( .! ), to introduce a comment at the beginning of a line:
.!Place comment here.
With an Accept flag ( _! ), which allows the character to be taken as ordinary text.
The Control Flag ( . )
The Control Flag ( . )
Description
The Control flag is placed at the left margin to begin a string of DSR commands. When you want a dot to be accepted as a text character, you do not need to precede it with an Accept flag ( _ ) as long as the dot is not placed at the left margin. If you do need to have a dot in the 0 character position (and it is not part of a DSR command), you must precede it with an Accept flag. Alternatively, you can use two dots at the beginning of a line; the effect is the same as if you had used an Accept flag. (See also .FLAGS CONTROL, .NO FLAGS CONTROL.)
Default
Recognition is turned on.
Examples
Input
.INDENT 5 The word "indent" is taken as a command by DSR when it is preceded by a dot in the left margin.
Output
The word "indent" is taken as a command by DSR when it is preceded by a dot in the left margin.
(Note that the period at the end of the sentence does not need an Accept flag.)
Input
_.FLAGS BOLD enables recognition of the Bold flag.
Output
.FLAGS BOLD enables recognition of the Bold flag.
(Here an Accept flag is needed in the input text because the period is placed at the left margin.)
Input
..FLAGS BOLD enables recognition of the Bold flag.
Output
.FLAGS BOLD enables recognition of the Bold flag.
(Using two dots has the same effect as using the Accept flag.)
The Hyphenate Flag ( = )
The Hyphenate Flag ( = )
Description
When the Hyphenate flag is turned on and inserted between syllables of a word, DSR knows where the word can be broken at the end of a line. DSR inserts a hyphen where the break occurs. If DSR does not find it necessary to break the word, however, the hyphen does not appear.
The action of this flag (as opposed to the recognition of the flag) can be
disabled or reenabled by the .DISABLE HYPHENATION and
.ENABLE HYPHENATION commands.
Default
Recognition is turned off. To turn on recognition, you must use the
.FLAGS HYPHENATE command.
Examples
Input
.FLAGS HYPHENATE This is an example of a hy=phen=at=ed word.
Output
This is an example of a hy- phenated word.
The Index Flag (>)
The Index Flag (>)
Description
With the Index flag you can mark words in the text of your document as
index entries. Using the .INDEX command instead of the
Index flag is a more common way of marking index entries. Chapter 6, "The DSR Indexing Utility" has information on creating indexes.
Default
Recognition is turned off. To turn on recognition, you must use the
.FLAGS INDEX command.
The Lowercase Flag ( \ )
The Lowercase Flag ( \ )
Description
The Lowercase flag causes the letter that directly follows it to appear in lowercase. The flag has no effect if the character following it is not a letter.
The Lowercase flag can be paired as follows:
With the Underline flag ( \& ) to stop underlining text.
With the Bold flag ( \* ) to stop bolding characters.
With itself ( \ \ ) to cause the characters following it to be printed in lowercase by default. If you have a file that is in all uppercase, you can put a paired lowercase flag ( \ \ ) at the beginning of the file and then, as needed, override the temporary lowercase default by using a circumflex ( ^ ) to capitalize the letter following it.
Default
Recognition is turned on.
The Overstrike Flag ( % )
The Overstrike Flag ( % )
Description
When the Overstrike flag is turned on and inserted between two characters, it causes the first of the two characters to be overstruck by the following one.
This capability allows the printing of characters not normally available, for example, a European 7 , a 7 overstruck with a dash.
Three or more characters can be overstruck, but only if you specify the
/BACKSPACE qualifier in the DSR command line.
Otherwise, only the first and last characters in an overstrike sequence will
appear.
The action performed by this flag (as opposed to the flag’s recognition)
can be disabled and reenabled by the .DISABLE
OVERSTRIKING and .ENABLE OVERSTRIKING
commands.
Default
Recognition is turned off. To turn on recognition, you must use the
.FLAGS OVERSTRIKE command.
Examples
Input
.FLAGS OVERSTRIKE Overstrike this 7%-.
Output
Overstrike this 7.
The Period Flag (+)
The Period Flag (+)
Description
DSR routinely inserts an extra expandable space after a period, colon, question mark, or exclamation point that is followed by the usual end-of-word space.
The Period flag lets you specify the extra space for other characters.
If the flag is turned on and .FILL is in effect, an extra space occurs when the flag ( + ) is inserted directly after the character. You must, however, insert the end-of-word space after the flag if it is to be effective.
For example, if you have a complete sentence enclosed in quotation marks or parentheses, you may want an extra space after the closing quotation mark or parenthesis. (See also .PERIOD, .NO PERIOD.)
Default
Recognition is turned off. To turn on recognition, you must use the
.FLAGS PERIOD command.
Examples
Input
.FLAGS PERIOD "What do you mean?"+ There was no response.
Output
"What do you mean?" There was no response.The Space Flag (#)
The Space Flag (#)
Description
The Space flag produces one unexpandable space (not affected by justification) in the output file for every flag character inserted in the input file. If you insert the flag between two words, DSR treats them as one word (although they will appear as separate words in the output file). Therefore, you should not type any spaces before or after typing the Space flag.
The flag can directly follow an Underline flag (&#) to cause the underlining of an unexpandable space.
Default
Recognition is turned on.
The Subindex Flag (>)
The Subindex Flag (>)
Description
This flag works as a subindex entry flag only if you have issued an
.INDEX or .ENTRY command. Subindex
entries marked with this flag are collected and alphabetized below the
primary entry to which they refer. The Subindex flag indicates that the next
word or phrase will be placed on the following line of the index, indented
two characters to the right of the preceding entry. For more information on
indexing, see Chapter 6, "The DSR Indexing Utility".
Default
Recognition is turned on only within .INDEX and
.ENTRY commands.
Examples
The following example shows how to produce an index with subindex entries.
Input
The input file with index entries and subindex flags:
.PAGE text text text text text text text text text text text text .INDEX Parameters >Description .PAGE text text text text text text text text text text text text .INDEX Parameters >Examples .PAGE text text text text text text text text text text text text .INDEX Parameters >Types >Strings .INDEX Parameters >Types >Integers
Output
The index with the subindex entries:
Page Index-1
INDEX
.
.
.
Parameters
Description, 1
Examples, 2
Types
Integers, 3
Strings, 3
.
.
.The Substitute Flag Pair ( $$ )
The Substitute Flag Pair ( $$ )
Description
This is the only flag that must be paired with itself. When the flag is turned on, it causes either a date or a time to be output. The output is determined by the word you associate with the flag pair; for example, $$Date. See the output in the following example.
When the Substitute flag is turned on, any dollar sign character ( $ ), even if it is not paired, must be preceded by an Accept flag if it is to be taken as normal text by DSR. (See also .SET DATE, .SET TIME.)
Default
Recognition is turned off. To turn on recognition, you must use the
.FLAGS SUBSTITUTE command.
Examples
The following example shows the use of the substitute flag. The output file will contain the date and time that DSR processing of the file began.
Input
.FLAGS SUBSTITUTE $$Date $$Time $$Year $$Month $$Day $$Hours $$Minutes $$Seconds $$Month#$$Day,#$$Year
Output
10 November 1988 10:55:00 1988 November 10 10 55 00 November 10, 1988
The Underline Flag ( & )
The Underline Flag ( & )
Description
The Underline flag causes the next character to be underlined.
The operation performed by this flag (as opposed to the flag’s
recognition) can be disabled and reenabled by the .DISABLE
UNDERLINING and .ENABLE UNDERLINING
commands.
With the Uppercase flag ( ^& ) to turn underlining on and with the Lowercase flag ( \& ) to turn underlining off.
With the Space flag ( &# ) to cause the underlining of unexpandable spaces.
Default
Recognition is turned on.
Examples
You can produce underlined text by placing the begin ( ^& ) and end ( \& ) underline flag pairs before and after the words you want to underline. The output will not have a solid underline, DSR does not normally underline spaces between words.
Input
^&To be or not to be\&
Output
To be or not to be
You can underline between-word expandable spaces (spaces produced by pressing the space bar) by putting the Accept flag ( _ ) before the spaces.
Input
^&To_be_or_not_to_be\&
Output
To be or not to beYou can underline between-word unexpandable spaces (spaces produced with the space flag [#]) by putting the underline flag ( & ) before the space flag.
Input
^&To&#be&#or&#not&#to&#be\&
Output
To be or not to beThe Uppercase Flag ( ^ )
The Uppercase Flag ( ^ )
Description
The Uppercase flag serves the same purpose as a typewriter SHIFT key when you use it just before typing a letter. The flag capitalizes any single letter that directly follows it. It has no effect if the character following it is not a letter.
With a Capitalize flag ( ^< ) to turn on the capitalization of the text that follows (the same as using SHIFT-LOCK on a typewriter).
With an Underline flag ( ^& ) to turn on underlining of the text that follows.
With a Bold flag ( ^* ) to turn on bolding for the text that follows.
With itself ( ^^ ) if you want to ensure that the case of letters in your input file is maintained in your output file. You can use this flag pair with those commands that control uppercasing and lowercasing (such as
.HEADER LEVELor.CHAPTER). When you specify a title, precede it with ^^.
Default
Recognition is turned on.
Chapter 4. RUNOFF Command Qualifiers
4
To run DSR, use the DIGITAL Command Language (DCL) RUNOFF command. The
DSR command line consists of the RUNOFF command, input file
specifications, and optional qualifiers. Do not confuse the RUNOFF
command qualifiers with the DSR formatting commands, which are part of your input text file.
/BOLD is a command qualifier, .FLAGS BOLD is a DSR
command.
4.1. Input and Output File Specifications
To specify the input file for the RUNOFF command, you must enter
the complete file name and file type, unless the file type is RNO. If the input file
type is RNO, you can omit it from the command line. Wildcards are not allowed as part of
the input file specification.
The output file name will be the same as the input file name. The output file type will depend on what the input file type is. The following list names various input file types and the corresponding output file types:
| Input | Output |
|---|---|
| RNB | BLB |
| RNC | CCO |
| RND | DOC |
| RNE | ERR |
| RNH | HLP |
| RNL | PLM |
| RNM | MAN |
| RNO | MEM |
| RNO/DEVICE=LN01 | LNI |
| RNO/DEVICE=LN03 | LNI |
| RNP | OPR |
| RNS | STD |
| RNT | MEC |
| RNX | MEX |
| None | MEM |
| Other | MEM |
4.2. How to Run DSR
With the DCL command RUNOFF, you can instruct DSR to access an
input file, produce a formatted output file, and direct the output either to the disk
(for storage and printing) or to the terminal (for display).
To run DSR, you type the word RUNOFF and the name of the input file
after the DCL dollar sign prompt:
$ RUNOFF TEST.RNO RETYou can also just enter RUNOFF. In this case, DSR prompts for the
file name:
$ RUNOFF RET
_File: If your file type is RNO (the default file type in DSR), you can omit it when you specify the file name.
4.2.1. Output to Disk
When DSR processes the RNO file, it outputs a MEM file to the disk.
If no errors are detected, the program returns to the VMS command level, as in the following example:
$ RUNOFF TEST $
If an error is detected, the program responds by printing an error message and a summary of errors when finished, as in the following:
%RUNOFF-W-CJL, Can’t justify line on output page 1; on input line 8 of page 1 of file "_DBB5:[GILBERT]TEST.RNO;1" DIGITAL Standard Runoff Version V3.2: 1 diagnostic message reported 1 page written to _DBB5:[GILBERT]TEST.MEM;1 $
4.2.2. Output to Terminal
If you want to display the processed output file on the terminal instead of saving it in a file, enter the following:
$ RUNOFF TEST.RNO/OUTPUT=SYS$OUTPUT
(TEST.MEM is displayed on the terminal)
$
4.2.3. Input from Terminal
If you want to insert additional commands before processing, specify the terminal as the input device, as in the following:
$ RUNOFF SYS$INPUT/OUTPUT=TEST.MEM .FLAGS BOLD~ .REQUIRE "TEST.RNO" ^Z $
Note that you terminate input from the terminal by pressing CTRL/Z (which VMS displays as Exit). If errors are detected, the program prints messages as the errors are encountered.
4.2.4. Terminal Input and Output
If you want to test individual DSR commands, flags, or qualifiers by checking them on the terminal, you can specify the terminal as both the input device and the output device. For example, enter the following:
$ RUNOFF SYS$INPUT/OUTPUT=SYS$OUTPUT .FLAGS CAPITALIZE <capitalize the first word .RET
The result is the following display:
CAPITALIZE the first word.
To terminate the session, press CTRL/Z.
4.3. Rules for Command Qualifiers
The RUNOFF command qualifiers allow you to alter the position of
the text on all pages of the document, to specify emphasis such as underlining and
bolding, and to otherwise control the appearance of printed output.
You can use RUNOFF qualifiers to override DSR commands or flags
included in the input file. For example, the following command line would suppress any
bolding you may have specified in the input file:
$ RUNOFF /NOBOLD MYFILE.RNO
The following rules apply to the use of command qualifiers:
A command line can include as many qualifiers as you want as long as no operational conflicts occur. The command line can be continued on the next line if you specify a hyphen ( - ) as the last character in the first line.
You can enter qualifier names in uppercase, lowercase, or both.
You can enter qualifier names in a truncated form. For example,
/BACKis equivalent to/BACKSPACE. VMS looks only at the first four characters of a command or qualifier. Thus, all commands and qualifiers can be abbreviated to four characters or to the shortest unique abbreviation.No spaces are allowed between the qualifier symbol ( / ) and a qualifier name, or between a qualifier name and a numerical or text value (for example,
/FORM_SIZE=58).The qualifiers can follow either the
RUNOFFcommand or an individual file specification. Qualifiers placed after theRUNOFFcommand will affect all files listed on the command line; qualifiers placed after a file specification will affect only that file. Exceptions are/FORM_SIZE,/SIMULATE,/PAUSE, and/LOG, which affect all files listed in the command line, regardless of whether the qualifier is placed after theRUNOFFcommand or after a file specification.When you are using the Table of Contents and Indexing Utilities, you must place the name of the utility directly after the
RUNOFFcommand. For example, to invoke the Table of Contents Utility, enter the following command:RUNOFF/CONTENTS
Any qualifiers that you want to add to the command line to affect the processing of the Table of Contents Utility must come after the qualifier that invokes the Table of Contents Utility. The following command invokes the Table of Contents Utility and specifies that section numbers are not displayed in the table of contents file:
RUNOFF/CONTENTS/NOSECTION_NUMBERS
4.4. Command Qualifiers
This section describes RUNOFF command qualifiers. The qualifiers
are of two types: command qualifiers and positional qualifiers. Both types of qualifiers
are merged into a single alphabetized list in the description section.
| Command Qualifiers | Defaults |
|---|---|
|
/FORM_SIZE=n | /FORM_SIZE=66 |
|
/[NO]LOG | /NOLOG |
|
/[NO]PAUSE | /NOPAUSE |
|
/[NO]SIMULATE | /NOSIMULATE |
| Positional Qualifiers | Defaults |
|---|---|
| /BACKSPACE | None. |
| /[NO]BOLD[=n] | /BOLD=1 |
| /[NO]CHANGE_BARS[="character"] | None. |
| /CONTENTS | See Chapter 5, "The DSR Table of Contents Utility". |
| /[NO]DEBUG[=(option[,...])] | /NODEBUG |
| /DEVICE=(option[,...]) | See text. |
| /[NO]DOWN[=n] | /NODOWN |
| /INDEX | See Chapter 6, "The DSR Indexing Utility". |
| /[NO]INTERMEDIATE[=filespec] | /NOINTERMEDIATE |
| /MESSAGES=(option[,...]) | /MESSAGES=(OUTPUT,USER) |
| /[NO]OUTPUT[=filespec] | See text. |
| /PAGES=string | All pages output. |
| /REVERSE_EMPHASIS | None. |
| /[NO]RIGHT[=n] | /NORIGHT |
| /SEPARATE_UNDERLINE[="character"] | None. |
| /[NO]SEQUENCE | /NOSEQUENCE |
| /[NO]UNDERLINE_CHARACTER[="character"] | /UNDERLINE_CHARACTER="_" |
| /VARIANT=string | None. |
/BACKSPACE
/BACKSPACE
Description
/BACKSPACE qualifier directs DSR to use the Backspace
character to produce three special effects:Bolding flagged text (see The Bold Flag ( * )) by backspacing and overstriking each character as it is printed.
Overstriking flagged characters (see The Overstrike Flag ( % )) by backspacing and overstriking each character as it is printed.
Underlining flagged text (see The Underline Flag ( & )) by backspacing and underlining each character as it is printed. The default underlining character is an underscore ( _ ).
The /BACKSPACE qualifier generally gives more exact
underlining and bolding for files output on letter-quality printers.
Most line printers do not recognize or act on the Backspace character, so the
/BACKSPACE qualifier is not recommen ded for line printer
output.
Using /BACKSPACE allows you to overstrike three or more
characters by use of the Overstrike flag (see Chapter 3, "DSR Flags").
If you do not issue the /BACKSPACE qualifier, the printer
produces the above effects by issuing a carriage return without a line feed,
then printing additional lines that contain only underscores or only the
overstruck or bolded text.
Example
$ RUNOFF TEST.RNO/BACKSPACE
/BOLD[=number]—/NOBOLD
/BOLD[=number]—/NOBOLD
Description
The /NOBOLD qualifier disables the bolding function. The
/BOLD=n qualifier specifies the number of times the text
is to be overstruck. Neither qualifier affects recognition of the Bold flag; you
must turn on recognition of the Bold flag with .FLAGS
BOLD.
The default is /BOLD=1. Specifying
/BOLD=0 is equivalent to using
/NOBOLD. /BOLD=3 gives good results on
most line printers.
If you use /NOBOLD to disable bolding, you cannot reenable
bolding within that DSR run. The DSR command, .ENABLE
BOLDING, is ignored if /NOBOLD is specified.
Examples
$ RUNOFF MYFILE/BOLD=4 $ RUNOFF/BOLD=0 SOURCE.1 $ RUNOFF CHAPTER5.V02/NOBOLD
/CHANGE_BARS[="character"]—/NOCHANGE_BARS
/CHANGE_BARS[="character"]—/NOCHANGE_BARS
Description
The /CHANGE_BARS and /NOCHANGE_BARS
qualifiers enable and disable the appearance of change bars ( | ) in the output
file.
Using /CHANGE_BARS to enable change bars for an output file
is equivalent to entering an .ENABLE BAR command at the
beginning of your input file (see .ENABLE BAR, .DISABLE BAR, .BEGIN BAR, .END BAR). The
/CHANGE_BARS qualifier can also specify a replacement for
the change bar character:
/CHANGE_BARS="x"
The specified replacement can be a character that takes up space (such as * or ?) or a character that does not take up space (such as CTRL/G). A nonspacing character code can be used:
/CHANGE_BARS=%O7/OUTPUT=SYS$OUTPUT
In this example, the octal code 7 causes the terminal bell to ring every time an altered line of output is encountered.
The change bar qualifier can be disabled by using
/NOCHANGE_BARS.
/NOCHANGE_BARS overrides any .ENABLE BAR
command in the file.
Examples
$ RUNOFF YOURFILE/CHANGE_BARS=%O7 $ RUNOFF TESTS/CHANGE_BARS="*" $ RUNOFF A.RNT/NOCHANGE_BARS
/DEBUG[=(option[,...])]—/NODEBUG
/DEBUG[=(option[,...])]—/NODEBUG
Description
The /DEBUG qualifier traces the operation of certain DSR
commands by causing the commands to appear in the output file. The commands that
are associated with each of the following option words will appear in the output
file if you use the option word as a value for /DEBUG= (for
example, /DEBUG=INDEX).
- CONDITIONALS
Specifying
CONDITIONALScauses DSR to ignore all con ditional commands (.IF,.IFNOT,.ELSE,.ENDIF) in the input file and to include the conditional commands in the output file. (See .VARIABLE.)- FILES
Specifying
FILEScauses DSR to print the.REQUIREcommand in the output file, in addition to the text of the.REQUIREfiles.- INDEX
Specifying
INDEXcauses all indexing commands in the input file to be printed in the output file. Each indexing command appears before the line of text with which it is associated.All index entries specified with the
.INDEXcommand or an Index flag are labeled with the word.INDEX, while the entries specified with.ENTRYcommands are labeled with the word.ENTRY.- CONTENTS
Specifying
CONTENTScauses all.SEND TOCcommands in the input file to be printed in the output file.- SAVE_RESTORE
Specifying
SAVE_RESTOREcauses all.SAVEand.RESTOREcommands in the input file to be printed in the output file.- ALL
Specifying
ALLcauses all five of the above actions.
If you specify more than one option, separate them with commas and enclose the list in parentheses.
If you do not specify /DEBUG, the default is
/NODEBUG. If you specify /DEBUG
without a qualifier, the default is /DEBUG=ALL.
Examples
$ RUNOFF HERFILE/DEBUG=CONDITIONALS $ RUNOFF/DEBUG=INDEX CHAPTER6 $ RUNOFF SURVEY.DAT/DEBUG=(CONTENTS,INDEX) $ RUNOFF LIST/DEBUG $ RUNO A./DEB=FILES
/DEVICE=(option[,...])
/DEVICE=(option[,...])
Description
This qualifier can be used to produce an LNI file that is suitable for printing on an LN01 or LN03 laser printer. You must supply at least one option word (LN01, LN01E, or LN03) to specify whether the file will be printed on a standard LN01, on a European LN01E, or on an LN03. The paper size for the European LN01E printers is A4.
/DEVICE=option qualifier with any of the
following DSR command qualifiers:/BACKSPACE/SEPARATE_UNDERLINE/UNDERLINE_CHARACTER
In addition to the required option word (LN01, LN01E, or LN03), you can use other option words to specify the layout of the text on the page (PORTRAIT or LANDSCAPE) or the type of emphasis for characters marked with the DSR underline flag (ITALIC or UNDERLINE). If you specify more than one option, separate them with commas and enclose the list in parentheses.
All of the option words are described in the following list:
- LN01
This option specifies that the output device is a standard LN01 laser printer. The paper size is 8 1/2 by 11 inches. The default orientation is PORTRAIT and the default emphasis is ITALIC.
- LN01E
This option specifies that the output device is a European LN01E laser printer, and the paper size is the European A4. The default orientation is PORTRAIT and the default emphasis is ITALIC.
- LN03
This option specifies that the output device is a standard LN03 laser printer. The paper size is 8 1/2 by 11 inches. The default orientation is PORTRAIT. The LN03 laser printer recognizes the flags for UNDERLINE or ITALIC. If the font currently loaded in the laser printer has an ITALIC attribute, the text flagged for emphasis is italicized. If the current font does not have an ITALIC attribute, the default emphasis is underlining.
- LANDSCAPE
This option specifies that the text will be arranged on the page with the long dimension of the paper (11 inches) at the top of the page. You can use this option to print files that contain wide examples or tables that will be fold-out pages in your document.
- PORTRAIT
This option specifies that the text will be arranged on the page as it is in a standard business letter. The short dimension of the paper (8 1/2 inches) is the top of the page.
PORTRAIT is the default mode for the page orientation.
- ITALIC
ITALIC is the default type of emphasis for LNI files produced for the LN01 and LN01E. You do not have to specify this option for LN01 and LN01E printers, since it is the default. However, you may want to use the option word ITALIC to override a previously specified UNDERLINE option.
The LN03 requires no loading of fonts since default fonts are present. Text flagged for emphasis is printed ITALIC if the font currently loaded on the printer has the Italic attribute otherwise, the default emphasis is underlining. There are four fonts available for LNI files for the LN01 or LN01E laser printers: text, bold, italic, and bold-italic. By default, all four fonts are loaded into the printer. Characters flagged for emphasis with the DSR underline flag ( & ) will be italicized by default. Since you can nest emphasis flags in DSR, you might have a character or a string of text that is flagged with both the Bold ( * ) and the Underline ( & ) flags.
You have the option of using the default fonts already present on the LN03 or down-line loading the fonts of your choice.
- UNDERLINE
This option causes the characters flagged with the DSR underline flag (&) to be underlined rather than italicized. The text and bold fonts are used for this option.
The LN01 allows only 63 underline segments per line. You create an LNO1 underline segment each time there is a break in the underlining. If you are not underlining spaces, each underlined word is an underline segment. If you do underline the spaces between words, then the underlined words and spaces make up one segment. For example, the following would be six segments:
To be or not to be
The following would be one underline segment:
To be or not to beDSR does not report an error if the user exceeds the underline segment limit of the hardware.
If you are not getting the output that you expect when you print an LNI file on the LN01 laser printer, check with your system manager. Appendix B, "Requirements for Printing LNI Files on an LN01 Laser Printer " contains information for system managers on setting an LN01 to print LNI files.
On an LN03, if you have specified underlining and choose this option in the file you are printing, the LN03 does underline the flagged text. It does not default to italic even if the font has the ITALIC attribute.
Examples
$ RUNOFF/DEVICE=LN01 TEXT.RNO $ RUNOFF/DEVICE=(LN01,LANDSCAPE) MEMO.RNO $ RUNOFF CHAPTER1.RNO/DEVICE=(LN01,LANDSCAPE,UNDERLINE)
/DOWN=number
/DOWN=number
Description
The /DOWN qualifier lets you specify the number of blank
lines to be inserted at the top of each page, preceding any header information.
The number of blank lines you specify does not affect in any way the number of
text lines on a page. For example, if you enter /DOWN=10 with
a .PAGE SIZE of 58 lines, up to 58 lines of text will be
output after 10 blank lines.
If you do not enter /DOWN, no blank lines are inserted
except those associated with the print device. If you enter
/DOWN with no value, you get
/DOWN=5.
Examples
$ RUNOFF HISFILE.RNO/DOWN=10 $ RUNOFF/DOWN HISTORY
/FORM_SIZE=number
/FORM_SIZE=number
Description
The /FORM_SIZE qualifier helps control the number of lines
that can be accommodated per page of output, including all running heads and
feet. When used with the /SIMULATE qualifier,
/FORM_SIZE determines the physical size of the page by
putting out line feeds to equal the number you use as n.
When used with /NOSIMULATE, /FORM_SIZE
causes DSR to suppress the form feed it would put out at the line number you
specify as a value for n. If the number of lines that DSR
is going to put on any given page does not match the value of
n, a form feed character will be written into the
output file.
The default value for n is derived from the RTL routine
LIB$LP_LINES. This will default to 66 unless the logical SYS$LP_LINES is
defined, in which case, the assigned value will be used. You can override the
default value for /FORM_SIZE by specifying a different value
for n.
DSR normally starts each new page by writing a form feed character to the output file. However, if the number of lines on a page exactly equals the form size, DSR assumes that the output device (line printer) will advance to the next page under hardware or system control. DSR does not write a form feed in this case, because to do so would leave a blank page.
If you are generating output for a device with other than 66 lines per page,
use the /FORM_SIZE qualifier.
You can use the /FORM_SIZE qualifier with the
/DEVICE=(LN01,LN01E,LN03) qualifier to specify a page
size larger than the default paper size of 8 1/2 by 11 inches.
/INTERMEDIATE[=filespec]—/NOINTERMEDIATE
/INTERMEDIATE[=filespec]—/NOINTERMEDIATE
Description
This qualifier causes DSR to generate an intermediate binary file with the default file type of BRN. This file can be used as input to the DSR table-of-contents utility and the DSR indexing utility. See Chapter 5, "The DSR Table of Contents Utility" and Chapter 6, "The DSR Indexing Utility" for information on producing tables of contents and indexes.
If you use /INTERMEDIATE without specifying a value for
filespec, DSR creates an output file that has the same file name as the input
file and a file type of BRN. You can rename the output file by supplying a file
specification that is different from the default values. If you specify more
than one input file, a separate intermediate file is produced for each
one.
/NOINTERMEDIATE is the default.
Examples
$ RUNOFF MANUAL/INTERMEDIATE $ RUNOFF/INTERMEDIATE BOOK.REQ
/LOG—/NOLOG
/LOG—/NOLOG
Description
/LOG and /NOLOG qualifiers allow you
to control whether DSR writes a termination message to the terminal. The
termination message includes the following:The version number of DSR
The number of diagnostic messages reported
The number of output pages generated
The output file specification
/INTERMEDIATE, the following
information will be included in the message:The number of index records written to the intermediate file specification
The number of table-of-contents records written to the intermediate file specification
The default is /NOLOG.
If DSR detects errors in processing a file, it writes the termination message
to the terminal even if you specify /NOLOG.
Examples
$ RUNOFF PAYROLL/LOG DIGITAL Standard Runoff Version V3.2: No errors detected 3 pages written to "DBA1:[WHITNEY]PAYROLL.MEM;1" $ $ RUNOFF ERRORS.RNO/NOLOG/MESSAGES=USER RUNOFF-I-CJL, Can’t justify line on output page 1; on input line 15 of page 1 of file "DBA1:[WHITNEY] ERRORS.MEM;1" DIGITAL Standard Runoff Version V3.2: 1 diagnostic message reported 3 pages written to "DBA1:[WHITNEY]ERRORS.MEM;1" $
/MESSAGES=option
/MESSAGES=option
Description
The /MESSAGES qualifier lets you specify where you want DSR
to display error messages. The options are the following:
| OUTPUT | Sends error messages only to the output file |
| USER | Sends error messages only to the terminal |
The default is /MESSAGES=(OUTPUT,USER), which sends
messages to the output file and displays them on the terminal. You can cause
error messages to go only to the output file or only to the terminal, but you
cannot suppress them entirely.
Examples
$ RUNOFF OURFILE/MESSAGES=OUTPUT $ RUNOFF DATA.2/MESSAGES=USER
/OUTPUT=filespec—/NOOUTPUT
/OUTPUT=filespec—/NOOUTPUT
Description
The /OUTPUT and /NOOUTPUT qualifiers let
you specify where the output from DSR processing should go. The default
directory is the user directory, the default file name is the name of the input
file, and the default file type depends on the input file type (see Section 4.1, ''Input and Output File Specifications'').
The /OUTPUT qualifier is a positional qualifier. If you
enter /OUTPUT=filespec after an input file specification, the
file specification you supply applies only to that input file. If you enter
/OUTPUT=filespec directly after the
RUNOFF command, the filespec you supply applies to all
input files (except any that have their own /OUTPUT=name
qualifiers).
You can specify /OUTPUT=directory-spec or
/OUTPUT=logical-name to send the output file to another
directory.
/NOOUTPUT tells DSR not to create an output file. Use
/NOOUTPUT with the /INTERMEDIATE
qualifier if you want to generate only a BRN file (see Chapter 5, "The DSR Table of Contents Utility"
and Chapter 6, "The DSR Indexing Utility"). You can also use /NOOUTPUT to
check an input file for errors without creating a formatted output file.
Examples
$ RUNOFF FINAL/OUTPUT=SYS$OUTPUT $ RUNOFF/OUT=CHI::DBA2:[SULLIVAN]MONTHLY.RPT DRAFT.TXT
/PAGES=string
/PAGES=string
Description
The /PAGES qualifier lets you specify one or more pages or
groups of pages to be output. If you don’t specify certain page numbers, they do
not appear in the output. The string is of the form:
start[:end]
or
"start:end[,...],start[:end]"
If you omit :end from the last page range, all pages from the start of that page range to the end of the document are output.
Specify multiple page ranges in a quoted string, separating them by commas:
/PAGES="start1:end1,start2:end2,...start5:end5"
The maximum number of ranges that you may specify is five.
If you want only one page, start and end must be the same number:
/PAGE=5-30:5-30
To specify output from Chapter 4, page 12, through a single page of the appendix and five pages of the index, enter the following:
/PAGES="4-12:A-1,Index-1:Index-5"
You must specify page numbers in their default form even if you have a
.DISPLAY command in your input file that specifies a
different form. For example, for Appendix B, Page B-6, you would specify
/PAGE="B-6"; for Chapter V, Page V-13 (the result of a
.DISPLAY command specifying uppercase roman numerals),
you would specify /PAGE="5-13".
For an entire appendix, only the letter is required (for example,
/PAGES="A"). For an entire index, only the word "Index"
is required (/PAGE S="Index").
Examples
$ RUNOFF ITSFILE/OUTPUT=SYS$OUTPUT/PAGE=12 $ RUNOFF REPORT.TMP/OUTPUT=SYS$OUTPUT/PAGE=2-12 $ RUNOFF DOCUMENT/PAGES="2-9:2-9,A-1:A-5c"
/PAUSE—/NOPAUSE
/PAUSE—/NOPAUSE
Description
The /PAUSE qualifier controls whether DSR pauses after
printing each page of output. Pausing allows you to insert single sheets of
paper or reproduction masters into the output device. This qualifier is intended
for use with hardcopy output devices such as "daisy-wheel" printers. Do not use
/PAUSE if output for the named device is spooled.
The /PAUSE qualifier temporarily halts output and the
terminal bell rings to remind the operator to insert a new form. Processing
resumes after the operator presses the space bar. The default condition is
/NOPAUSE.
Examples
$ RUNOFF NEWFILE.RNO/PAUSE/OUT=SYS$OUTPUT/FORM_SIZE=60
/REVERSE_EMPHASIS
/REVERSE_EMPHASIS
Description
The /REVERSE_EMPHASIS qualifier directs DSR to change the
order of underlining the flagged text on an output device. If you use this
qualifier, the printer first prints the characters to be underlined, issues a
carriage return without a linefeed, and then prints the underscores to underline
the flagged material. If you view your file on the terminal, the flagged
characters are overwritten by the underline character.
Some lineprinters require that you use the
/REVERSE_EMPHASIS qualifier to process your file to
enable the underlining function.
If you do not issue the /REVERSE_EMPHASIS qualifier, the
printer first prints the underscores, issues a carriage return without a
linefeed, then prints the flagged text above the underscores. If you view your
file on the terminal, the flagged characters are visible.
If /DEVICE= LN0x (any laser printer) is specified, the
/REVERSE_EMPHASIS qualifier is ignored.
Examples
$ RUNOFF TEST.RNO/REVERSE_EMPHASIS
/RIGHT[=number]—/NORIGHT
/RIGHT[=number]—/NORIGHT
Description
The /RIGHT qualifier causes the text on each page
(including header information) to be shifted to the right by the number of
spaces specified. These characters are not deducted from the page width
specified in the input file.
If you issue /RIGHT without a value, you get
/RIGHT=5. If you issue /RIGHT=0, no
shift occurs. If you omit the /RIGHT qualifier, the default
is /NORIGHT.
If you specify /DEVICE=LN01,
/DEVICE=LN01E, or /DEVICE=LN03, the
default values for /RIGHT depend upon the orientation of the
text on the page. Table 4.1, ''/RIGHT Default Values with /DEVICE=LN01[E],LN03'' gives the default values for PORTRAIT
and LANDSCAPE:
| LNO1 | LNO1E | LN03 | |
|---|---|---|---|
| PORTRAIT | 2 | 2 | 2 |
| LANDSCAPE | 9 | 13 | 9 |
You can override the default values by specifying /RIGHT=n
or /NORIGHT.
Examples
$ RUNOFF OLDFILE/RIGHT=8 $ RUNOFF X.2/RIGHT $ RUNOFF/DEVICE=(LNO1,LANDSCAPE) REPORT.RNO
The default for /RIGHT in the above example is 9.
/SEPARATE_UNDERLINE[="character"]
/SEPARATE_UNDERLINE[="character"]
Description
The /SEPARATE_UNDERLINE qualifier causes underlining with
separate characters on the next line instead of overprinting with underscores on
the same line. The character may be expressed as a quoted character or as an
octal, decimal, or hexadecimal value. The default separate underlining character
is the hyphen ( - ).
Do not use this qualifier with /UNDERLINE_CHARACTER.
Examples
$ RUNOFF NEWFILE/SEPARATE_UNDERLINE $ RUNOFF CHAPTER4/SEPARATE_UNDERLINE="*" $ RUNOFF CALENDAR.LIS/SEPARATE_UNDERLINE=%O75
/SEQUENCE—/NOSEQUENCE
/SEQUENCE—/NOSEQUENCE
Description
The /SEQUENCE qualifier controls whether DSR outputs line
numbers from the input file. Line numbers show the input lines that generated
each output line to assist debugging. If the input file is not line-sequenced,
DSR uses sequential numbering.
The default is /NOSEQUENCE, which produces output without
line numbers.
Examples
$ RUNOFF MAILFILE.RNO/SEQUENCE
/SIMULATE—/NOSIMULATE
/SIMULATE—/NOSIMULATE
Description
The /SIMULATE qualifier controls whether blank lines or
form feeds are used to advance to the top of each page. The default is
/NOSIMULATE, which uses form feeds.
Normally, DSR skips to the top of a page by means of a form feed. If you use
/SIMULATE, DSR does not generate form feeds. Instead, it
leaves enough blank lines to cause a skip to the top of each new page.
/SIMULATE also causes a pause before the first page (but
before the first page only, whereas /PAUSE causes a pause
before every page). To continue after the pause, press the space bar.
You normally use /SIMULATE with hardcopy output devices
such as "daisy- wheel" printers.
/UNDERLINE_CHAR[="character"]—/NOUNDERLINE
/UNDERLINE_CHAR[="character"]—/NOUNDERLINE
Description
The /UNDERLINE_CHARACTER qualifier allows you to specify
the character to be used for normal (over print) underlining of flagged text.
The character may be expressed as a quoted character or as an octal, decimal, or
hexadecimal value. The default underlining character is the underscore ( _
).
The /NOUNDERLINE qualifier allows you to disable all
underlining. If this qualifier is used, the DSR command .ENABLE
UNDERLINING has no effect.
Note
Do not use this qualifier with
/SEPARATE_UNDERLINE.You may also use the
/BACKSPACEqualifier to specify how underlining is accomplished.
Examples
$ RUNOFF DOCFILE/UNDERLINE_CHARACTER="." $ RUNOFF DOC.DAT/NOUNDERLINE
/VARIANT=string
/VARIANT=string
Description
The /VARIANT qualifier controls the execution of the
conditional commands (.IF, .IFNOT,
.ELSE, .ENDIF) by specifying the names
of the segments to be processed. (See Chapter 2, "DSR Commands" for descriptions
of the conditional commands.) If you specify multiple names in a string, you
must separate them by commas and enclose the string in quotation marks.
All variant names must be alphanumeric and must begin with a letter; the maximum length of a variant name is 31 characters. You can specify a total of 20 different variants.
Examples
$ RUNOFF LASTFILE/VARIANT=A $ RUNOFF TEST.TMP/VARIANT=BETA $ RUNOFF T4.2/VARIANT="A,B,C"
Chapter 5. The DSR Table of Contents Utility
The DSR Table of Contents Utility produces tables of contents for documents created with
DSR. The input file for the Table of Contents Utility can be either a BRN file (from Version
3 of DSR) or a BTC file (produced by previous versions of DSR). The output from the Table of
Contents Utility is an RNT file that can be processed with the RUNOFF
command to produce a formatted table of contents.
Features of the DSR Table of Contents Utility
Producing a Table of Contents
RUNOFF/CONTENTSCommand QualifiersRUNOFF/CONTENTSCommand Line Examples
5.1. Features of the Table of Contents Utility
Control of the display of bolding and underlining for header titles
Control of the format of page numbers
Control of the levels of page number references displayed
Control of the display of section numbers
5.2. Producing a Table of Contents
The DSR Table of Contents Utility creates a formatted table of contents file from the
chapter, section, and appendix titles specified by .CHAPTER,
.APPENDIX, .HEADER LEVEL, and .SEND
TOC commands in your RNO file.
Process the RNO file with
RUNOFF/INTERMEDIATEto produce an intermediate binary file (BRN).Process the resulting BRN file with
RUNOFF/CONTENTSto produce an RNT file.Process the RNT file with
RUNOFFin one of the following ways:Process the RNT file with the
RUNOFFcommand to produce a MEC file that contains the formatted table of contents.Include the RNT file in a master file that uses
.REQUIREcommands to include all parts of your document. When you process the master file with theRUNOFFcommand, the formatted table of contents will be placed in the MEM file where you "require" it.
Use the DCL command
PRINTon either the MEC or MEM file to get a copy of your table of contents.
These steps are described more fully in the following sections.
5.2.1. Process the RNO file with RUNOFF/INTERMEDIATE
Process the RNO file with RUNOFF/INTERMEDIATE to produce an
intermediate binary file that has a default type of BRN. The following command line
generates two output files: MANUAL.MEM and MANUAL.BRN.
$ RUNOFF/INTERMEDIATE MANUAL.RNO
You can process the RNO file using the /NOOUTPUT qualifier,
along with the /INTERMEDIATE qualifier. The
/NOOUTPUT qualifier suppresses the MEM file and saves
processing time. The following command line generates only a BRN file:
$ RUNOFF/INTERMEDIATE/NOOUTPUT MANUAL.RNO
Use the resulting BRN file as input for the Table of Contents Utility.
5.2.2. Process the BRN file with the Table of Contents Utility
The RUNOFF/CONTENTS command, which invokes the DSR Table of
Contents Utility, follows the same format as other VMS DCL commands.
$ RUNOFF/CONTENTS[/qualifiers...] filespec[,...] [/qualifiers...]
or
$ RUNOFF/CONTENTS[/qualifiers...] filespec[+...] [/qualifiers...]
There can be one or more input files for CONTENTS. For single
input files, the DSR Table of Contents Utility produces an output file having the
same file name as the input file. The output file type is RNT.
If you separate multiple input files with commas, the Table of Contents Utility produces a separate RNT file for each input file. If you separate multiple input files with plus signs, the Table of Contents Utility produces a single RNT file that contains contents information for all of the input files. The default output file name is the same as the first input file name and the default file type is RNT.
Processing multiple files with plus signs is the only way to correctly concatenate
BRN files. The DCL commands APPEND and COPY
may not accurately concatenate BRN files.
If you do not specify a file type for the input file, the default types are BRN (from Version 3 of DSR) and BTC (from previous versions of DSR). The DSR Table of Contents Utility searches first for a BRN file type and then for a BTC file. You can process both BRN and BTC files in the same run of the DSR Table of Contents Utility.
No wildcard characters are supported as input for
RUNOFF/CONTENTS.
5.2.3. Process the RNT file with RUNOFF
RUNOFF/CONTENTS produces must be processed
with the RUNOFF command to get a formatted table of contents.
There are two ways of processing the RNT file:You can process the RNT file separately. Process the RNT file with
RUNOFFto produce a MEC file. Use the DCL commandPRINTto get a copy of the formatted table of contents.You can process the table of contents along with the text files that were used to create the table of contents. Include the RNT file as a "require" file in a RNO file. The RNT file is usually placed after the title page. When you process the RNO file, the table of contents will be placed in the document where you "require" it. (See .REQUIRE.) Use the DCL command
PRINTto get a copy of your table of contents.
5.3. RUNOFF/CONTENTS Command Qualifiers
The RUNOFF/CONTENTS command qualifiers are used to specify how you
want to format the table of contents. You can use the following qualifiers:
| Command Qualifiers | Defaults |
|---|---|
| /[NO]BOLD | /NOBOLD |
| /DEEPEST_HEADER=n | /DEEPEST_HEADER=6 |
| /[NO]IDENTIFICATION | /NOIDENTIFICATION |
| /[NO]INDENT | /NOINDENT |
| /[NO]LOG | /NOLOG |
| /OUTPUT=filespec | See text. |
| /PAGE_NUMBERS=(option[,...]) | /PAGE_NUMBERS=(NORUNNING,LEVEL=6) |
| /[NO]REQUIRE=filespec | /NOREQUIRE |
| /[NO]SECTION_NUMBERS | /SECTION_NUMBERS |
| /[NO]UNDERLINE | /NOUNDERLINE |
Command Qualifiers
- /BOLD
/NOBOLD Controls the bolding of header titles in the table of contents. Bolding is often used to emphasize headers within the text; however, bolding and/or underlining of the same headers within the table of contents may not be desirable. Both types of emphasis are suppressed in the table of contents by default, but you have the option of turning them back on with the
/BOLDand /UNDERLINEqualifiers.The default is
/NOBOLD.- /DEEPEST_HEADER=n
Displays header levels up to and including level n.
The default is
/DEEPEST_HEADER=6(all headers displayed).- /IDENTIFICATION
/NOIDENTIFICATION Reports the current version number of the DSR Table of Contents Utility.
The default is
/NOIDENTIFICATION.- /INDENT
/NOINDENT Controls the indentation of header-level numbers and header-level titles after level 1.
If you do not use the qualifier or if you specify
/NOINDENT, all header levels after header level 1 will be indented the same two spaces.If you specify
/INDENT, each header level after header level 1 will be indented two spaces beyond the preceding header level.The default is
/NOINDENT.- /LOG
/NOLOG Controls whether the DSR Table of Contents Utility reports the name of each BRN or BTC input file as it is being processed and after it has been processed, plus the name of each output file that is created.
If there are any errors in processing, the DSR Table of Contents Utility will send messages to the terminal even if
/NOLOGis in effect.The default is /NOLOG.
- /OUTPUT[=filespec]
/NOOUTPUT Controls where the DSR Table of Contents Utility sends the output.
If you specify the
/OUTPUTqualifier without a file specification or if you omit the qualifier entirely, the Table of Contents Utility creates a file with the same file name as the input file. The default output file type is RNT.You can change the name of the output file by supplying a file specification for the value filespec. You can change the directory of the output file by supplying a file specification with a directory name for the value filespec.
The
/NOOUTPUTqualifier suppresses the creation of an output file. You can use/NOOUTPUTto check an input file for errors without using system resources to generate an output file.- /PAGE_NUMBERS=(option[,...])
Controls the display of page number references and also controls how many levels of headers have page references listed in the table of contents. The following example shows the syntax of the qualifier:
$ RUNOFF/CONTENTS/PAGE_NUMBERS=option[,...]
You can choose option words from the following list to specify the type of formatting you want:
Option Purpose NORUNNING Specifies chapter-oriented page numbers (such as 1-4 or 10-42). You can specify chapter-oriented numbers for the table of contents even if you displayed the numbers another way in the document. NORUNNING is the default. RUNNING Specifies running page numbers (such as 4 or 42). Running page numbers can be specified in the table of contents even if you displayed the page numbers a different way in the document.
LEVEL=n Specifies the display of page numbers up to and including header level n . The default displays page numbers for all six levels of headers. To turn off page numbers in the table of contents, use LEVEL=0.
- /REQUIRE=filespec
/NOREQUIRE Allows you to change the heading on the first page of a table of contents. The default heading is the word CONTENTS, centered on the page, followed by one blank line. You can substitute another word as a heading or not have any heading.
To change the heading, do one of the following:
If you do not want any heading, merely specify a null file as the filespec for
/REQUIRE:$ RUNOFF/CONTENTS/REQUIRE=nl:
If you want to change the heading, create or edit a file that specifies the heading that you want. Use the file that you create as the filespec for
/REQUIRE.
When you use the
/REQUIREqualifier, the default heading for the first page of the contents is not generated. The file that you specify with the/REQUIREqualifier must provide the heading. The file can contain DSR commands that change the format of the first page and the text that you want to appear at the top of the page. Or the file can contain only DSR commands to format the first page of the contents. For example, you can put the command.FIGURE 10in the file. This command generates 10 blank lines at the top of the first page of the table of contents. You can use these blank lines for later pasteup.- /SECTION_NUMBERS
/NOSECTION_NUMBERS Controls whether the DSR Table of Contents Utility displays section numbers in the table of contents.
The
/SECTION_NUMBERSqualifier displays section numbers for all header levels in the table of contents./NOSECTION_NUMBERSsuppresses the display of section numbers for all header levels.The default is
/SECTION_NUMBERS.- /UNDERLINE
/NOUNDERLINE Controls whether the underlining specified in chapter and header titles in the input file appears in the table of contents.
If you specify
/UNDERLINE, the text flagged for underlining in the body of the document is underlined in the table of contents.If you specify
/NOUNDERLINE, the text flagged for underlining in the body of the document is not underlined in the table of contents. Underlining is often used to emphasize headers within the text. However, underlining and/or bolding of the same headers within the table of contents may not be desirable. For this reason, both types of emphasis are suppressed in the table of contents by default.
5.4. RUNOFF/CONTENTS Command Line Examples
The following examples show three command lines that would format the same table of contents differently.
Enter the following command line to produce an RNT file with the default format:
$ RUNOFF/CONTENTS BOOKNAME.BRN
Enter the following command line to produce an RNT file in which each header level is indented two more than the previous header level. The DSR Table of Contents Utility searches for a BRN file and uses BOOKNAME.BRN by default.
$ RUNOFF/CONTENTS/INDENT BOOKNAME
Enter the following command line to produce an RNT file in which the bolding and underlining used in the chapter titles and header level titles in the body of the document are used in the table of contents:
$ RUNOFF/CONTENTS/BOLD/UNDERLINE BOOKNAME
Chapter 6. The DSR Indexing Utility
The DSR Indexing Utility produces indexes for documents created with DSR. The input file
is either a BRN file (from Version 3 of DSR) or a BIX file (produced by previous versions of
DSR). The output from the Indexing Utility is an RNX file that can be processed with the
RUNOFF command to produce a formatted index.
If you do not know how to design an index, see The Chicago Manual of Style (University of Chicago Press). If you do not know how to enter indexing commands in an RNO file, see Example 6.1, ''Input File with Indexing Commands'' for a sample input file.
Features of the DSR Indexing Utility
Producing an Index
RUNOFF/INDEXCommand qualifiersRUNOFF/INDEXCommand line examples
6.1. Features of the DSR Indexing Utility
The DSR Indexing Utility formats an index in the ways described in the following sections.
6.1.1. Punctuation of Index Entries
The DSR Indexing Utility places a comma between an index entry and the page reference. For example:
Command qualifiers, 4-10
If a top-level index entry is followed by an index subentry rather than a page reference, there is no comma after the top-level entry. The comma is placed after the index subentry to set off the page reference. For example:
Command qualifiers description, 4-10 examples, 4-12
6.1.2. Case Control of Index Entries
The DSR commands, .XUPPER and .XLOWER,
determine the case of index entries:
The
.XLOWERcommand ensures that index entries are printed exactly as they were in the input file.The
.XUPPERcommand capitalizes the first letter of the first word of each index entry and lowercases all subsequent text in the index entry. (This is the default condition.)
You should specify .XLOWER at the top of the file you want to
index. Then you can enter the text for the index entries as you want it to appear in
the finished index, rather than using case control flags in index entries.
The following example shows the format of an index entry when
.XLOWER is used:
| Input | Index Entry |
|---|---|
| .XLOWER | |
| .X COMMAND QUALIFIERS | COMMAND QUALIFIERS, 4-10 |
The following example shows the format of the same index entry when
.XUPPER is used:
| Input | Index Entry |
|---|---|
| .XUPPER | |
| .X COMMAND QUALIFIERS | Command qualifiers, 4-10 |
The explicit use of the Uppercase flag or the Capitalize flag in a .INDEX
(.X) or .ENTRY (.Y) command (or after the Index
flag) can override the .XUPPER command.
6.1.3. Merging of Index Entries
Index entries merge with other index entries having identical spelling, spacing, punctuation, and emphasis. The following sections discuss the rules for merging entries when the entries are different in case and/or emphasis.
6.1.3.1. Case Merging
If .XLOWER is in effect, entries with differing case will
not merge and uppercase characters will sort before lowercase characters. For
example:
| Input | Index Entry |
|---|---|
| .XLOWER | |
| .X Command Qualifiers | COMMAND QUALIFIERS, 4-2 |
| .PAGE | Command Qualifiers, 4-1 |
| .X COMMAND QUALIFIERS |
If .XUPPER is in effect, the DSR Indexing Utility merges
entries that are identical in every way except for case. The
.XUPPER command causes the first word of the index entry
to be uppercase and all subsequent text to be lowercase. For example:
| Input | Index Entry |
|---|---|
| .XUPPER | |
| .X Command Qualifiers | Command Qualifiers, 4-1, 4-2 |
| .PAGE | |
| .X COMMAND QUALIFIERS |
6.1.3.2. Emphasis Merging
- Bolded and underlined
- Bolded
- Underlined
- No emphasis
6.1.4. Merging of Page Number References
Page number references merge only if they refer to the same page and have identical characteristics.
- Bolded and underlined
- Bolded
- Underlined
- No emphasis
The Indexing Utility does not merge entries on adjacent pages into a page range.
6.1.5. Sorting of ENTRY (.Y) Entries
Index entries generated by .Y commands are sorted at the top of each subindex level. This is done on the assumption that .Y is used to generate "See" and "See also" information in the index, and that the place for this information is at the top of each subindex level.
6.2. Producing an Index
Use the following steps to produce an index:
Enter indexing commands (
.Xor.Y) in the RNO file.Process the RNO file with
RUNOFF/INTERMEDIATEto generate an intermediate binary file (BRN).Process the resulting BRN file with
RUNOFF/INDEXto generate an RNX file.Process the RNX file with
RUNOFFin one of the following ways:Process the RNX file with
RUNOFFto produce a MEX file that contains a formatted index.Include the RNX file in a master file that uses
.REQUIREcommands to include all parts of your document. When you process the master file with theRUNOFFcommand, the formatted index will be placed in your document where you "require" it.If the document is not made up of chapters, the index should be placed at the end of the document.
Use the DCL
PRINTcommand on either the MEX or MEM file to see a copy of your index.
These steps are described more fully in the following sections.
6.2.1. Entering Indexing Commands in the RNO File
The following example shows a sample RNO file that contains .X
and .Y indexing commands.
.FLAGS BOLD
.NUMBER CHAPTER 4
.CHAPTER MANIPULATING A CMS LIBRARY
This chapter contains conceptual information about
manipulating a CMS library and its elements. It describes
how and when to
.
.
.
.HEADER LEVEL 1 CONCURRENT RESERVATIONS AND REPLACEMENTS
.X Concurrent reservation
When creating an element generation, you reserve an element,
.
.
.
A reservation that is in effect for an element at a given
time is called a current reservation.
.X Current reservation
.
.
.
Unusual occurrence
Occurrence, unusual >see Unusual occurrence
.PAGE
The following figure shows the structure of a typical
library.
.FIGURE 10
.CENTER;Figure 4-1:##Sample Library
.X Library >example
.X Library >structure
.PAGE
.HEADER LEVEL 1 UNUSUAL OCCURRENCES
.X Unusual occurrence > definition
An unusual occurrence results from the execution of a CMS
command that may be necessary or helpful in some cases, but
that might have undesirable consequences. The following
actions cause an unusual occurrence:
.X Unusual occurrence > cause The following example shows the index that these entries create.
Page Index-1
INDEX
.
.
.
Concurrent reservation, 4-1 Occurrence, unusual
Current reservation, 4-1 see unusual occurrence
Library Unusual occurrence, 4-1
example, 4-2 cause, 4-3
structure, 4-2 definition, 4-3
.
.
.6.2.2. Processing the RNO file with RUNOFF/INTERMEDIATE
Process the RNO file with RUNOFF/INTERMEDIATE to produce an
intermediate binary file that has a default type of BRN. The following command line
generates two output files: USERGUIDE.MEM and USERGUIDE.BRN.
$ RUNOFF/INTERMEDIATE USERGUIDE.RNO
You can process the RNO file using the /NOOUTPUT qualifier,
along with the /INTERMEDIATE qualifier. The
/NOOUTPUT command suppresses the MEM file and saves
processing time. The following command line generates only a BRN file:
$ RUNOFF/INTERMEDIATE/NOOUTPUT USERGUIDE.RNO
Use the BRN file as input for the Indexing Utility.
6.2.3. Processing the BRN file with the Indexing Utility
The RUNOFF/INDEX command, which invokes the DSR Indexing
Utility, follows the same format as other VMS DCL commands:
$ RUNOFF/INDEX[/qualifiers...] filespec[,...] [/qualifiers...]
or
$ RUNOFF/INDEX[/qualifiers...] filespec[+...] [/qualifiers...]
There can be one or more input files for INDEX. For single
input files, the DSR Indexing Utility produces an output file having the same file
name as the input file. The output file type is RNX.
If you separate multiple input files with commas, the Indexing Utility produces a separate RNX file for each input file. If you separate multiple input files with plus signs, the Indexing Utility produces a single RNX file that contains indexing information for all of the input files. The default output file name is the same as the first input file name and the default file type is RNX.
Processing multiple files with plus signs is the only way to concatenate BRN files
correctly. The DCL APPEND and COPY commands
may not accurately concatenate BRN files.
If you do not specify a file type for the input file, the default types are BRN (from Version 3 of DSR) and BIX (from previous versions of DSR). The DSR Indexing Utility searches first for a BRN file type and then for a BIX file. You can process both BRN and BIX files in the same run of the DSR Indexing Utility.
No wildcard characters are supported as input for
RUNOFF/INDEX.
6.2.4. Processing the RNX file with RUNOFF
The RNX file that RUNOFF/INDEX produces must be processed with
RUNOFF to get a formatted index. There are two ways of
processing the RNX file:
You can process the index separately. Process the RNX file with
RUNOFFto generate a MEX file. Then print a copy of the MEX file using the DCL commandPRINT.You can process the index along with the text files that were used to create the index. Insert the RNX file as a "require" file in your RNO file. The RNX file is usually placed at the end of the RNO file. When the RNO file is processed with
RUNOFF, the index is placed at the end of the MEM file, provided the.REQUIREcommand is at the end of the RNO file. Use the DCL commandPRINTto obtain a copy.
6.3. RUNOFF/INDEX Command Qualifiers
This section describes the RUNOFF/INDEX command qualifiers that are
used to produce an index. These qualifiers are listed in alphabetical order.
| Command Qualifiers | Defaults |
|---|---|
| /[NO]IDENTIFICATION | /NOIDENTIFICATION |
| /LINES_PER_PAGE=n | /LINES_PER_PAGE=55 |
| /[NO]LOG | /NOLOG |
| /OUTPUT[=filespec] | See text. |
| /PAGE_NUMBERS=option | /PAGE_NUMBERS=NORUNNING |
| /[NO]REQUIRE=filespec | /NOREQUIRE |
| /[NO]RESERVE=n | /NORESERVE |
Command Qualifiers
- /IDENTIFICATION
/NOIDENTIFICATION Controls whether the DSR Indexing Utility identifies itself by reporting its current version number during processing. The default is
/NOIDENTIFICATION.- /LINES_PER_PAGE=n
The value n specifies the number of lines of index entries on each page. The default is 55 lines of index entries. This number does not include the number of lines required for running heads and feet.
The default of 55 lines of index entries is designed to work properly in the default formatting environment for DSR. You must calculate and specify a different value for n in any of the following cases:
Subtitles are in use in the document that requires the RNX file.
Normally three lines are reserved at the top of each page as the running-head area for DSR. The title appears flush left on the first line, the page number is flush right on the first line, and the title line is followed by two blank lines. However, if you issue the
.SUBTITLEcommand, the running-head area expands to four lines.The page length in effect is anything other than 58 lines per page.
If you change the page-length value (the first parameter of the
.PAGE SIZEcommand) from the default value of 58, you must adjust the/LINES_PER_PAGEvalue to conform to the new page size.Any layout other than zero is being used.
The three alternate layouts, specified by the commands
.LAYOUT 1,.LAYOUT 2, and.LAYOUT 3, require a second parameter that specifies how many lines to reserve at the bottom of each page. You must take these lines into account when you calculate/LINES_PER_PAGEforINDEX. Frequently users wish to provide 3 blank lines between the last line of text and the page number./LINES_PER_PAGE=52would be used with a.LO1,3,.LO2,3, or.LO3,3.
To calculate the correct value for
/LINES_PER_PAGE, follow this formula:/LINES_PER_PAGE=n n = .PAGE SIZE (the first parameter is length value) minus 4 if subtitles are used, 3 if no subtitles minus the number of lines reserved for .LO1,.LO2, or .L03- /LOG
/NOLOG Controls whether
INDEXreports the file specification of each input file as it is being processed and after it is processed, and the name of the generated output file.The default is
/NOLOG.- /OUTPUT[=filespec]
NOOUTPUT Controls where the DSR Indexing Utility sends the output.
If you specify the
/OUTPUTqualifier without a file specification or if you omit the qualifier entirely, the output file name is the same as the input file name. The default file type is RNX.You can change the name or the directory of the output file by supplying a file specification for the value filespec.
The
/NOOUTPUTqualifier suppresses the creation of an output file. You can use/NOOUTPUTto check an input file for errors without using system resources to generate an output file.- /PAGE_NUMBERS=option
/NOPAGE_NUMBERS Controls whether the page number references in the index are running page numbers or chapter-oriented page numbers.
To specify the type of page numbers you want, select from the following options:
Option Purpose NORUNNING Specifies chapter-oriented page numbers (such as 1-2, 1-3). You can specify chapter-oriented numbers for the index even if you did not display the page numbers that way in the body of the document. NORUNNING is the default.
RUNNING Specifies running page numbers (such as 2, 3). You can specify running page numbers for the index even if you did not display the page numbers that way in the body of the document.
Use the
/NOPAGE_NUMBERSto turn off the display of page numbers.The default is
/PAGE_NUMBERS=NORUNNING.- /REQUIRE=filespec
/NOREQUIRE Allows you to change the heading on the first page of an index. The default heading is the word
INDEX, centered on the page, followed by three blank lines. You can substitute a preface or a foreword to explain how to interpret special formatting of the index (for example, how the entries are sorted or why certain references are bolded).To change the heading, do the following:
Create or edit a file that specifies the format and the text that you want to use as the heading on the first index page.
Use the file you create as the filespec for
/REQUIRE.
When you use the
/REQUIREqualifier, the default heading for the first page of the index is not generated. The file that you are "requiring" must provide the heading. The file can contain both DSR commands that change the format of the first page and the text that you want to appear at the top of the page. Or the file can contain only DSR commands to format the first page of the index. For example, you can put the command .FIGURE 10 in the file. This command generates 10 blank lines at the top of the first page of the index. You can use these blank lines for later pasteup.If you are adding lines of text or blank space to the heading on the first page of the index, you must provide space for this addition. Use the
/RESERVE=nqualifier to provide the space you need. See /RESERVE=n for more information.The default is
/NOREQUIRE.- /RESERVE=n
/NORESERVE Allows you to reserve space at the top of the first page of the index for text or blank space that you want to include with the
/REQUIRE=filespecqualifier. Determine how many lines of text or blank space you want to add to the top of the first page of the index, and use this number as the value n.The default is
/NORESERVE.
6.4. RUNOFF/INDEX Command Line Examples
The following examples show how to use the DSR Indexing Utility to produce draft or finished indexes. Enter the following command line to produce an RNX file with the default index format:
$ RUNOFF/INDEX BOOKNAME.BRN
Enter the following command line to produce an RNX file with 52 lines of index entries
per page rather than the default of 55 lines per page. The /LINES_PER_
PAGE=52 qualifier has to be used because .LAYOUT 1,3
was specified.
$ RUNOFF/INDEX/LINES_PER_PAGE=52 BOOKNAME
Enter the following command line to change the default heading on the first page of the index:
$ RUNOFF/INDEX/RESERVE=10/REQUIRE=INDEX_HEADER BOOKNAME
Appendix A. DSR Commands Organized by Function
This appendix contains a list of DSR commands grouped according to function. These commands are described in Chapter 2, "DSR Commands", where they are listed alphabetically. The flags are described in Chapter 3, "DSR Flags".
A.1. Page-Formatting Commands
The size of the text area relative to the size of the paper on which it is printed
The appearance and format of running heads
The appearance and format of page numbering
Optional subpaging
A.1.1. Page Size and Running Heads
- .AUTOSUBTITLE and .NO AUTOSUBTITLE
- .DATE and .NO DATE
- .FIRST TITLE
- .HEADERS ON and .NO HEADERS
- .HEADERS UPPER, .HEADERS LOWER, and .HEADERS MIXED
- .LAYOUT
- .PAGE SIZE
- .SUBTITLE and .NO SUBTITLE
- .TITLE
A.1.2. Paging and Page-Number Control
- .DISPLAY NUMBER.
- NUMBER PAGE and .NO NUMBER
- .NUMBER RUNNING
- .PAGING and .NO PAGING
A.1.3. Subpaging
- .DISPLAY SUBPAGE
- .NUMBER SUBPAGE
- .SUBPAGE and .END SUBPAGE
A.2. Text-Formatting Commands
Margin settings
The amount of spacing between lines of text
Filling and justification of text
Indent and tab stop settings
Paragraph formation
The appearance of figures, lists, notes, and footnotes
Text emphasis (for example, bolding or underlining)
A.2.1. Margin Setting
- .LEFT MARGIN
- .RIGHT MARGIN
A.2.2. Filling and Justifying
- .AUTOJUSTIFY and .NO AUTOJUSTIFY
- .FILL and .NO FILL
- . JUSTIFY and .NO JUSTIFY
A.2.3. Vertical Spacing
- .BLANK
- .BREAK
- .KEEP and .NO KEEP
- .SKIP
- .SPACING
- .PAGE
- .TEST PAGE
A.2.4. Horizontal Spacing
- .CENTER
- .INDENT
- .PERIOD and .NO PERIOD
- .RIGHT
- .TAB STOPS
A.2.5. Paragraph Formatting
- .AUTOPARAGRAPH and .NO AUTOPARAGRAPH
- .AUTOTABLE and .NO AUTOTABLE
- .PARAGRAPH
- .SET PARAGRAPH
A.2.6. Text Emphasis
- .ENABLE BAR, .DISABLE BAR, .BEGIN BAR, and .END BAR
- .ENABLE BOLDING and .DISABLE BOLDING
- .ENABLE HYPHENATION and .DISABLE HYPHENATION
- .ENABLE OVERSTRIKING and .DISABLE OVERSTRIKING
- .ENABLE UNDERLINING and .DISABLE UNDERLINING
A.2.7. Figures
- .FIGURE DEFERRED and .FIGURE
- .LITERAL and .END LITERAL
A.2.8. Lists
- .DISPLAY ELEMENTS
- .LIST and .END LIST
- .LIST ELEMENT
- .NUMBER LIST
A.2.9. Notes and Footnotes
- .FOOTNOTE and .END FOOTNOTE
- .NOTE and .END NOTE
A.3. Section-Formatting Commands
Section formatting commands allow you to divide your document into chapters or sections and to include tables of contents, appendixes, and indexes.
A.3.1. Appendixes and Chapters
- .APPENDIX
- .CHAPTER
- .DISPLAY APPENDIX
- .DISPLAY CHAPTER
- .NUMBER APPENDIX
- .NUMBER CHAPTER
A.3.2. Sections
- .DISPLAY LEVELS
- .HEADER LEVEL
- .NUMBER LEVEL
- .SET LEVEL
- .STYLE HEADERS
A.3.3. Indexes
- .ENABLE INDEXING and .DISABLE INDEXING
- .ENTRY
- .FLAGS INDEX and .NO FLAGS INDEX
- .FLAGS SUBINDEX and .NO FLAGS SUBINDEX
- .INDEX
- .XLOWER and .XUPPER
A.3.4. Tables of Contents
- .ENABLE TOC and .DISABLE TOC
- .SEND TOC
A.4. Flag-Recognition Commands
- .FLAGS ACCEPT and .NO FLAGS ACCEPT
- .FLAGS ALL and .NO FLAGS ALL
- .FLAGS BOLD and .NO FLAGS BOLD
- .FLAGS BREAK and .NO FLAGS BREAK
- .FLAGS CAPITALIZE and .NO FLAGS CAPITALIZE
- .FLAGS COMMENT and .NO FLAGS COMMENT
- .FLAGS HYPHENATE and .NO FLAGS HYPHENATE
- .FLAGS LOWERCASE and .NO FLAGS LOWERCASE
- .FLAGS OVERSTRIKE and .NO FLAGS OVERSTRIKE
- .FLAGS PERIOD and .NO FLAGS PERIOD
- .FLAGS SPACE and .NO FLAGS SPACE
- .FLAGS SUBSTITUTE and .NO FLAGS SUBSTITUTE
- .FLAGS UNDERLINE and .NO FLAGS UNDERLINE.
- FLAGS UPPERCASE and .NO FLAGS UPPERCASE
A.5. Miscellaneous Commands
- .CONTROL CHARACTERS and .NO CONTROL CHARACTERS
- .IF, .IFNOT, .ELSE, and .ENDIF
- .NO SPACE
- .REPEAT
- .REQUIRE
- .SET DATE and .SET TIME
- .VARIABLE
Appendix B. Requirements for Printing LNI Files on an LN01 Laser Printer
This appendix is for system managers. The following sections describe the requirements for
printing an LNI file (produced with the RUNOFF /DEVICE=LN01[E] command)
on an LN01 or LN01E Laser Printer.
Install an LN01 font kit with a character set that is appropriately sized and that has the proper emphasis characters.
Put the modules that contain DSR font definitions in the device control library.
Use the command
SET PRINTER/NOTRUNCATEso that the printer driver does not truncate long lines of text. Some lines of text in the DSR LNI file contain complex escape sequences that make them longer than the buffer size of the device.Initialize the LN01 queue with
/NOFEEDso that the print symbiont and the printer driver don’t insert unwanted form feeds.Define a form to use with the
DCL PRINT /FORM=command when printing LNI files on an LN01[E]. The following is a sample form definition:$ DEFINE / FORM DSR$LN01 2 /MARGIN=BOTTOM=0 /NOWRAP - $_ /NOTRUNCATE /STOCK=DEFAULT /DESCRIPTION="DSR/LN01 form definition"
The following sections describe items 1 and 2, font kits and font definitions. For more information on items 3 - 5, see Section 1.5, ''Printing DSR Output Files'', and the system documentation on these DCL commands and command qualifiers.
B.1. B.1 LN01 Font Kits for LNI Files
- Size of the characters
- Special emphasis characters
DSR is designed to format files with fixed-width characters. The default margin settings and page-size dimensions for DSR are calculated for character sets that have 10 characters to an inch.
Any LN01 font kits with fixed-width characters that are 30 pixels wide (10 characters to an inch) should print LNI files with the spacing normally expected in DSR output files.
RUNOFF/DEVICE=LN01[E] command allows the user to specify
emphasis for characters in an LNI file. To provide for all the options that
RUNOFF /DEVICE=LN01[E] allows, an LN01 font kit used for printing
LNI files must have characters of the following types:- Text
- Bold
- Italic
- Bold italic
Any LN01 font kits that have a character set of the proper size and that have fonts for the types of emphasis that DSR supports can be used to print LNI files. The Courier (10 pitch) font kit is used in the examples in this appendix.
B.1.1. Directory Listing of Font Files
The appropriate font kit must be installed on the system. The LN01 Font Kit Installation Guide has complete information on installing font kits.
When you install a font kit, you create a directory named LN01$ROOT:[DOC] that has font files in it. The following example shows the LN01 listing for the Courier (10 pitch) character set.
LN01$ROOT:[FNT.96]961001.SIX;1 002782L10F010001C landscape fixed 5.769 lines/in 10.000 chars/in COURIER 10 BASIC ASCII (GL) 10 point 13062 bytes LN01$ROOT:[FNT.96]961002.SIX;1 002782L10F010002C landscape fixed 5.769 lines/in 10.000 chars/in COURIER 10 MULTINATIONAL (GR) 10 point 12958 bytes LN01$ROOT:[FNT.96]961011.SIX;1 002782P10F010001C portrait fixed 5.769 lines/in 10.000 chars/in COURIER 10 BASIC ASCII (GL) 10 point 10896 bytes LN01$ROOT:[FNT.96]961012.SIX;1 002782P10F010002C portrait fixed 5.769 lines/in 10.000 chars/in COURIER 10 MULTINATIONAL (GR) 10 point 12420 bytes LN01$ROOT:[FNT.96]961021.SIX;1 002791L10F010001C landscape fixed 5.769 lines/in 10.000 chars/in COURIER BOLD 10 BASIC ASCII (GL) 10 point 13516 bytes LN01$ROOT:[FNT.96]961022.SIX;1 002791L10F010002C landscape fixed 5.769 lines/in 10.000 chars/in COURIER BOLD 10 MULTINATIONAL (GR) 10 point 13712 bytes LN01$ROOT:[FNT.96]961031.SIX;1 002791P10F010001C portrait fixed 5.769 lines/in 10.000 chars/in COURIER BOLD 10 BASIC ASCII (GL) 10 point 10888 bytes LN01$ROOT:[FNT.96]961032.SIX;1 002791P10F010002C portrait fixed 5.769 lines/in 10.000 chars/in COURIER BOLD 10 MULTINATIONAL (GR) 10 point 12556 bytes LN01$ROOT:[FNT.96]961041.SIX;1 002810L10F010001C landscape fixed 5.769 lines/in 10.000 chars/in COURIER IT 10 BASIC ASCII (GL) 10 point 13522 bytes LN01$ROOT:[FNT.96]961042.SIX;1 002810L10F010002C landscape fixed 5.769 lines/in 10.000 chars/in COURIER IT 10 MULTINATIONAL (GR) 10 point 13396 bytes LN01$ROOT:[FNT.96]961051.SIX;1 002810P10F010001C portrait fixed 5.769 lines/in 10.000 chars/in COURIER IT 10 BASIC ASCII (GL) 10 point 11030 bytes LN01$ROOT:[FNT.96]961052.SIX;1 002810P10F010002C portrait fixed 5.769 lines/in 10.000 chars/in COURIER IT 10 MULTINATIONAL (GR) 10 point 12542 bytes LN01$ROOT:[FNT.96]961061.SIX;1 002811L10F010001C landscape fixed 5.769 lines/in 10.000 chars/in COURIER BD IT 10 BASIC ASCII (GL) 10 point 13630 bytes LN01$ROOT:[FNT.96]961062.SIX;1 002811L10F010002C landscape fixed 5.769 lines/in 10.000 chars/in COURIER BD IT 10 MULTINATIONAL (GR) 10 point 13530 bytes LN01$ROOT:[FNT.96]961071.SIX;1 002811P10F010001C portrait fixed 5.769 lines/in 10.000 chars/in COURIER BD IT 10 BASIC ASCII (GL) 10 point 11212 bytes LN01$ROOT:[FNT.96]961072.SIX;1 002811P10F010002C portrait fixed 5.769 lines/in 10.000 chars/in COURIER BD IT 10 MULTINATIONAL (GR) 10 point 12790 bytes
Notice that there are two character sets listed in the example, (GL)
and (GR). The font files identified as BASIC ASCII (GL)
are the files that you should use when you load the DSR font definitions in the
device control library. The (GL) character set consists of the standard
ASCII character set. The (GR) character set is a supplemental set that
has the multinational characters that are supported on 8-bit terminals. If you need
to provide font definitions for the full multinational character set, see the
LN01 Font Utility User’s Guide for instructions on
combining two character sets.
When you create the DSR font definition modules in the device control library, you will need to use the internal font name that is in the LN01 listing. The internal font name is printed in boldface in the following example:
LN01$ROOT:[FNT.96]961001.SIX;1
002782L10F010001C landscape fixed 5.769 lines/in 10.000 chars/in
COURIER 10 BASIC ASCII (GL) 10 point 13062 bytesInternal font names are case sensitive. When you use the internal font name, you must enter it exactly as it appears in the LN01 listing.
B.2. DSR Font Definitions for LNI Files
DSR font definition modules in the device control library allow you to specify the character set that will be used to print LNI files. The print symbiont looks in the device control library for the modules that DSR specifies before printing an LNI file. DSR may specify any of the definition modules listed in the following example.
Section B.2.1, ''Loading DSR Font Definitions into the Device Control Library'' explains how to load the modules that DSR may require into the device control library.
These modules should contain the LN01 escape sequences that do the following: DSR$FONT_LOAD (Initiate loading of fonts) ST (Designate the end of a string of characters) DSR$PAGE_SIZE (Override the default LN01 setting) Module names for standard fonts: DSR$FONT_TP Portrait text font DSR$FONT_BP Portrait bold font DSR$FONT_IP Portrait italic font DSR$FONT_BIP Portrait bold italic font DSR$FONT_TL Landscape text font DSR$FONT_BL Landscape bold font DSR$FONT_IL Landscape italic font DSR$FONT_BIL Landscape bold italic font Module names for European sized fonts: DSR$FONT_TPE Portrait text font DSR$FONT_BPE Portrait bold font DSR$FONT_IPE Portrait italic font DSR$FONT_BIPE Portrait bold italic font DSR$FONT_TLE Landscape text font DSR$FONT_BLE Landscape bold font DSR$FONT_ILE Landscape italic font DSR$FONT_BILE Landscape bold italic font Module names for escape sequences that define standard fonts: DSR$FONT_DEFINE_TP Portrait text font DSR$FONT_DEFINE_BP Portrait bold font DSR$FONT_DEFINE_IP Portrait italic font DSR$FONT_DEFINE_BIP Portrait bold italic font DSR$FONT_DEFINE_TL Landscape text font DSR$FONT_DEFINE_BL Landscape bold font DSR$FONT_DEFINE_IL Landscape italic font DSR$FONT_DEFINE_BIL Landscape bold italic font Module names for escape sequences that define European fonts: DSR$FONT_DEFINE_TPE Portrait text font DSR$FONT_DEFINE_BPE Portrait bold font DSR$FONT_DEFINE_IPE Portrait italic font DSR$FONT_DEFINE_BIPE Portrait bold italic font DSR$FONT_DEFINE_TLE Landscape text font DSR$FONT_DEFINE_BLE Landscape bold font DSR$FONT_DEFINE_ILE Landscape italic font DSR$FONT_DEFINE_BILE Landscape bold italic font
B.2.1. Loading DSR Font Definitions into the Device Control Library
Use the VMS Librarian Utility to load the modules that DSR may require into the device control library. You can use the Librarian Utility at DCL level or you can create a command procedure to load the modules. The following example shows a sample command procedure that loads DSR modules for standard portrait fonts for Courier (10 pitch).
$ ! This sample command file adds a set of four fonts to the VMS V4
$ ! system device control library, SYS$LIBRARY:SYSDEVCTL.TLB, for
$ ! use with DSR. This sample file shows how to load standard portrait
$ ! fonts.
$ !
$ if p1.eqs."" then inquire/nopunc p1 "Text font?"
$ if p2.eqs."" then inquire/nopunc p2 "Bold font?"
$ if p3.eqs."" then inquire/nopunc p3 "Italic font?"
$ if p4.eqs."" then inquire/nopunc p4 "Bold italic font?"
$ !
10: if f$loc(".six",p1).eqs.f$len(p1) then p1 := ’p1’.six
$ if f$loc(".six",p2).eqs.f$len(p2) then p2 := ’p2’.six
$ if f$loc(".six",p3).eqs.f$len(p3) then p3 := ’p3’.six
$ if f$loc(".six",p4).eqs.f$len(p4) then p4 := ’p4’.six
$ !
$ ! Insert sixel files into library
$ !
$ lib/rep/text/log sys$library:sysdevctl ’p1’/mod=dsr$font_tp
$ lib/rep/text/log sys$library:sysdevctl ’p2’/mod=dsr$font_bp
$ lib/rep/text/log sys$library:sysdevctl ’p3’/mod=dsr$font_ip
$ lib/rep/text/log sys$library:sysdevctl ’p4’/mod=dsr$font_bip
$ !
$ type sys$input:
You will now be prompted to enter the internal names
of the font files inserted in the library. These names
can be found in the file FKnnm.DOC that comes with DIGITAL
supplied font kits, or by using the LN01 Font Utility.
The internal names are case sensitive. You must enter the
names exactly as they appear in the directory listing.
$ !
$ ! Text portrait
$ !
$ inquire/nopunc fontname "Internal font name of TEXT font?"
$ open/write tmp tmp.tmp
$ write tmp "<ESC>P1;12}’’fontname’<ESC>\"
$ ! Press the ESC key on the terminal twice to enter the ESC character
$ clo tmp
$ lib/rep/text/log sys$library:sysdevctl tmp.tmp/mod=dsr$font_define_tp
$ !
$ ! Bold
$ !
$ if f$sea("tmp.tmp").nes."" then delete tmp.tmp;
$ open/write tmp tmp.tmp
$ inquire/nopunc fontname "Internal font name of BOLD font?"
$ write tmp "<ESC>P1;13}’’fontname’<ESC>\"
$ clo tmp
$ lib/rep/text/log sys$library:sysdevctl tmp.tmp/mod=dsr$font_define_bp
$ !
$ ! Italic
$ !
$ if f$sea("tmp.tmp").nes."" then delete tmp.tmp;
$ inquire/nopunc fontname "Internal font name of ITALIC font?"
$ open/write tmp tmp.tmp
$ write tmp "<ESC>P1;14}’’fontname’<ESC>\"
$ clo tmp
$ lib/rep/text/log sys$library:sysdevctl tmp.tmp/mod=dsr$font_define_ip
$ !
$ ! Bold Italic
$ !
$ if f$sea("tmp.tmp").nes."" then delete tmp.tmp;
$ inquire/nopunc fontname "Internal font name of BOLD ITALIC font?"
$ open/write tmp tmp.tmp
$ write tmp "<ESC>P1;15}’’fontname’<ESC>\"
$ clo tmp
$ lib/rep/text/log sys$library:sysdevctl tmp.tmp/mod=dsr$font_define_bip
$ !
$ ! Define Font Load sequence, in module DSR$FONT_LOAD
$ !
$ if f$sea("tmp.tmp").nes."" then delete tmp.tmp;
$ open/write tmp tmp.tmp
$ write tmp "<ESC>P1;1y"
$ clo tmp
$ lib/rep/text/log sys$library:sysdevctl tmp.tmp/mod=dsr$font_load
$ !
$ ! Add String Terminator, module ST
$ !
$ if f$sea("tmp.tmp").nes."" then delete tmp.tmp;
$ open/write tmp tmp.tmp
$ write tmp "<ESC>\"
$ clo tmp
$ lib/rep/text/log sys$library:sysdevctl tmp.tmp/mod=st
$ if f$sea("tmp.tmp").nes."" then delete tmp.tmp;
$ !
$ open/write tmp tmp.tmp
$ write tmp "<ESC>[3300t"
$ clo tmp
$ lib/rep/text/log sys$library:sysdevctl tmp.tmp/mod=dsr$page_size
$ if f$sea("tmp.tmp").nes."" then delete tmp.tmp;*
$ exitThe numbers that are associated with font names can be found in the LN01 Font Kit Installation Guide . If you need more information on the LN01 escape sequences, see the LN01 Programmer Reference Manual .
When an appropriate LN01 font kit is installed on your system and the required font definition modules are in the device control library, LNI files should print on the LN01 Laser Printer with the proper spacing and emphasis.