Distributed Queuing Service Installation Guide
- Software Version:
- The Distributed Queuing Service Version 1.3
- Operating System and Version:
- VSI OpenVMS IA-64 Version 8.4-1H1 or higher
VSI OpenVMS Alpha Version 8.4-2L1 or higher
Preface
The Distributed Queuing Service (DQS) for OpenVMS Systems software enables you to print files on devices that are attached to remote DECnet systems on your network. DQS software also allows you to display the status of your jobs at any time during their processing and to delete or modify your print jobs.
The Distributed Queuing Service Version 1.3 for OpenVMS systems software product replaces the following products:
VAX Distributed Queuing Service Version 1.2 software
Distributed Queuing Service for OpenVMS AXP Version 1.2 software
This product is based on a client/server design, where two components of software (client and server) cooperate to make the print service function.
1. About VSI
VMS Software, Inc. (VSI) is an independent software company licensed by Hewlett Packard Enterprise to develop and support the OpenVMS operating system.
2. Intended Audience
This part describes how to install the DQS software on OpenVMS AXP and OpenVMS VAX systems using either the POLYCENTER Software Installation (PCSI) utility or the VMSINSTAL installation utility. The Installation Guide is intended for the network or system manager who is responsible for installing the software.
3. Related Documents
Refer to the following documents for additional information:
Distributed Queuing Service System Manager's Guide
Distributed Queuing Service for OpenVMS Systems User's Guide
4. VSI Encourages Your Comments
You may send comments or suggestions regarding this manual or any VSI document by sending electronic mail to the following Internet address: <docinfo@vmssoftware.com>. Users who have VSI OpenVMS support contracts through VSI can contact <support@vmssoftware.com> for help with this product.
5. OpenVMS Documentation
The full VSI OpenVMS documentation set can be found on the VMS Software Documentation webpage at https://docs.vmssoftware.com.
6. Conventions
Table 1, ''Conventions'' lists the conventions used in this guide.
| Convention | Meaning |
|---|---|
|
OpenVMS system |
Means both the OpenVMS AXP operating system and the OpenVMS VAX operating system. |
|
UPPERCASE TEXT |
Indicates the name of a command, a file, a parameter, a procedure, or utility. |
|
$ PRODUCT |
In interactive examples, prompts or displayed text appears in a monospace font. User input appears in a bold monospace font. |
|
lowercase italics |
Indicates variables in command syntax or examples for which the user supplies a value. |
|
Ctrl/x |
In interactive examples, a sequence such as Ctrl/x indicates that you must hold down the Ctrl key while you press another key or a pointing device button; for example, Ctrl/C or Ctrl/Z. |
|
Return |
Indicates the Return key. |
|
[ ] |
In command formats, square brackets encloses optional values. (Do not type the brackets.) In installation prompts, square brackets enclose a default value. In a file specification, square brackets serve as delimiters for a directory name. |
Chapter 1.
This part describes how to install the DQS software on OpenVMS AXP and OpenVMS VAX systems using either the POLYCENTER Software Installation (PCSI) utility or the VMSINSTAL installation utility. The Installation Guide is intended for the network or system manager who is responsible for installing the software.
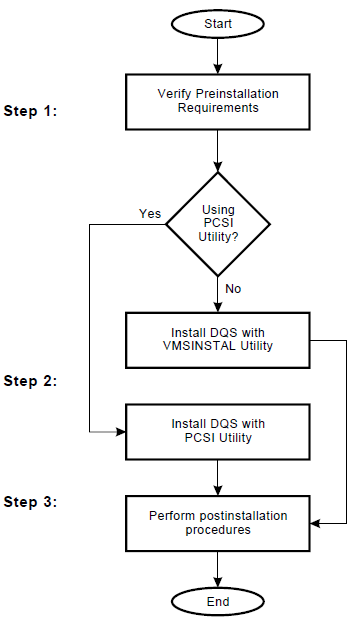
You can use either the PCSI utility or the VMSINSTAL utility to install the software.
Refer to the following flowchart to determine which sections of this guide are relevant to the installation utility that you are using.
1.1. What You Need to Know
This chapter describes what you need to know before installing the Distributed Queuing Service for OpenVMS Systems (DQS) software on an OpenVMS AXP or OpenVMS VAX system. Table 1.1, ''Summary: What You Need to Know'' lists the topics included.
| Topic | Title |
|---|---|
|
1 |
Required hardware and software |
|
2 |
Licensing |
|
3 |
Processes created |
|
4 |
First-time installation considerations |
|
5 |
Upgrade considerations |
|
6 |
Time required to install |
Related Information
Chapter 2, "Do This First" describes what you need to do before you install the DQS software.
Chapter 3, "Using the PCSI Utility" describes how to install the DQS client and server software with the PCSI utility. Chapter 4, "Using the VMSINSTAL Utility" describes how to install the DQS client and server software with the VMSINSTAL utility.
Refer to Distributed Queuing Service System Manager's Guide, for information on how to set up and manage DQS software on client and server nodes after installation.
For Information on Terms
This guide refers to DQS server nodes, client nodes, remote queues, and client queues. For a definition of these terms and concepts, refer to Chapter "Understanding the Distributed Queuing Service" in Distributed Queuing Service System Manager's Guide.
1.2. Required Hardware and Software
Hardware Required
DQS software can be installed on any Alpha AXP or VAX processor.
Operating System Versions
Installation of Distributed Queuing Service Version 1.3 for OpenVMS systems software requires one of the following:
OpenVMS VAX Operating System, Version 5.5-2 or higher
OpenVMS AXP Operating System, Version 6.1 or higher
Future Distributed Queuing Service for OpenVMS Systems releases may require higher versions of the operating system, as described in the online release notes or the product cover letter.
OpenVMS Tailoring Classes
The OpenVMS operating system comes with a variety of support options, or tailoring classes. Tailoring classes include such features as networking and RMS journaling. For full functionality of this layered product, the following tailoring classes are required:
OpenVMS Required Saveset
Network Support
Secure User's Environment
Prerequisite Products
Table 1.2, ''Summary: What You Need to Know'' provides information on the software you must have installed on your system before installing DQS software.
| Prerequisite Products | Purpose |
|---|---|
|
DECnet for OpenVMS Systems,V5.5 (Phase IV) or DECnet/OSI for OpenVMS Systems, V5.6 (Phase V) |
Networking software; Required for DQS client to server and server to client communication |
For a complete list of the supported hardware configurations, required operating system components and software, see the DQS Software Product Description (SPD) included with your distribution kit. In addition, the SPD contains a complete list of prerequisite and optional software and their required version numbers.
1.3. Licensing
Requirements
The DQS product supports the OpenVMS License Management Facility (LMF) provided by OpenVMS systems. Before you can start the DQS software, LMF requires that you register a License Product Authorization Key (License PAK) for the product. The License PAK is shipped with the kit if you ordered a license and media together; otherwise, it is shipped separately to a location specified by your license order. Use the LMF utility to register and load the information from your License PAK into your system’s license database.
Traditionally, each node that executes the DQS software requires a license.
Refer to the Distributed Queuing Service for OpenVMS Systems Software Product Description (SPD) for more information on DQS licensing. For information on how to license DQS software after it is installed, see the OpenVMS License Management Utility Manual .
1.4. Processes Created
Client Nodes
On a client node, every client queue you create that is not a generic or logical queue, creates one process. Also, the system creates a temporary process when the DQS software notifies the user of a print job completion.
Server Nodes
On server nodes, every incoming connection from a client node results in the creation of a process. Also, the notification process on a server node uses one permanent process.
1.5. First-time Installation Considerations
Registration of Products with PCSI
If you are installing the DQS product with the PCSI utility, then any software product required for DQS installation must also be registered in the PCSI product database. Products installed with installation procedures other than the PCSI utility, such as the VMSINSTAL utility, cannot be registered in the PCSI product database.
For information on how to determine if products are registered in the PCSI database and how to register products in the database, see the section titled Perform First-Time Installation Activities in Chapter 2, "Do This First".
1.6. Upgrade Considerations
New Startup File
Version 1.3 of the DQS software provides a new DQS$STARTUP.COM command procedure. Your older version of DQS$STARTUP.COM file is copied to DQS$STARTUP.COM_OLD. The new startup procedure does not contain DQS queue definitions or definitions for logical names that you can change. Instead an editable file, SYS$MANAGER:DQS$SYSTARTUP.TEMPLATE, is provided where you can make changes to DQS logical name definitions and define client queues. You copy this file by changing .TEMPLATE to .COM and making your changes.
Whenever, you execute the DQS startup procedure SYS$STARTUP:DQS$STARTUP.COM, it invokes the site-specific startup procedure SYS$MANAGER:DQS$SYSTARTUP.COM.
New Security and Queue Access System
Version 1.3 of the DQS software provides a new method to define a set of accessible server queues and to control access to these queues.
During the installation procedure, the DQS software attempts to use information from the currently running system to convert your server queue definitions into the new security and queue access system. This conversion may not be correct even though it is successful. After the installation you need to validate that your server queue definitions are correct.
Note
Make sure that the DQS software is running on the server node when you are installing server software. Conversion of your current server queue definitions into the new security and queue access system requires this. If DQS software is not running you have the following options:
Stopping the installation, executing the startup procedure, and restarting the installation
Manually entering your server queue definitions and client access information after the installation is complete.
|
For more information on . . . |
Refer to . . . |
|---|---|
|
Validating the conversion of server queue definitions | |
|
Adding or changing DQS logical name definitions |
Distributed Queuing Service System Manager's Guide, chapter "Configuring and Managing a DQS Server", Defining Server System Logical Names |
|
Setting up client node access to remote queues on server nodes |
Distributed Queuing Service System Manager's Guide, chapter "Configuring and Managing a DQS Server", Setting Up Remote Queues |
1.7. Time Required to Install
Depending on your type of media and your system configuration, DQS installation takes:
About 10 minutes, if you are installing using the VMSINSTAL utility
About 5 minutes, if you are installing using the PCSI utility
Chapter 2. Do This First
This chapter describes what you need to do before installing the Distributed Queuing Service for OpenVMS Systems (DQS) software on an OpenVMS AXP or OpenVMS VAX system.
Table 2.1, ''Preinstallation Task Summary'' summarizes the preinstallation tasks described in this chapter.
| Task | Description |
|---|---|
|
1 |
Inspect the distribution kit |
|
2 |
Review the DQS installation |
|
3 |
Prepare for VMScluster installation |
|
4 |
Log in to a privileged account |
|
5 |
Access the online release notes |
|
6 |
Determine process account quotas |
|
7 |
Determine disk space |
|
8 |
Set up an alternate working device |
|
9 |
Register your license |
|
10 |
Perform system maintenance procedures |
|
11 |
Perform first-time installation activities |
|
12 |
Back up your system disk |
2.1. Inspect the Distribution Kit
DQS for OpenVMS AXP Kit
For OpenVMS AXP systems, the distribution kit contains:
DQS software on a layered-product com pact disc (CD-ROM).
DQS documentation in text and Post Script format, provided with the software on the layered product CD-ROM.
Software Product Description (SPD)
Distributed Queuing Service for OpenVMS Systems Cover Letter
Distributed Queuing Service for OpenVMS Systems Documentation Set
Software Performance Report (SPR)
DQS documentation in an online format, provided on the software layered products documentation CD-ROM. (Hardcopy documentation can be ordered separately.)
DQS for OpenVMS VAX Kit
For OpenVMS VAX systems, the distribution kit contains:
Bill of materials (BOM) and indented bills report (BIL)
Media containing the DQS client and server software
TK50 streaming tape
9-track 1600 BPI magnetic tape
Hardcopy Documentation
Software Product Description (SPD)
Distributed Queuing Service for OpenVMS Systems Cover Letter
Distributed Queuing Service for OpenVMS Systems Documentation Set
Software Performance Report (SPR)
Contact your VSI representative if any of the components of your kit are missing.
The DQS client and server software and documentation are also available online on the Consolidated Distribution CD-ROM.
2.2. Review DQS Installation
Before Starting
Before you begin the installation, review the installation procedure.
See Chapter 3, "Using the PCSI Utility" for the PCSI procedure.
See Chapter 4, "Using the VMSINSTAL Utility" for the VMSINSTAL procedure.
Options
You can select to set up your system as:
A DQS server and client
A DQS client
A DQS server system can accept print requests from DQS client systems. DQS client systems initiate remote print requests.
When you select the DQS server option, the installation procedure also provides client support.
2.3. Prepare for VMScluster Installation
Overview
The DQS software operates in VMScluster environments. Printing within the VMScluster system does not require the DQS software. However, printing between VMScluster systems requires that you install the DQS software on each VMScluster.
VMScluster Considerations
When installing the DQS software on a VMScluster system, plan for the following:
All DQS software files are placed in the clusterwide system directories by the installation procedure.
The DQS software startup file SYS$STARTUP:DQS$STARTUP.COM must be executed during system startup on each node within the VMScluster system where you want DQS software to run.
The DQS installation procedure defines the DQS network object on the cluster member that you are logged into when installing the DQS software. The definition of the network object enables the cluster member to:
Receive notification messages from the DQS$NOTIFIER indicating the completion status of a particular print request.
Act as a DQS server if you choose the DQS server option.
2.4. Log In to a Privileged Account
Privileges Needed
To install DQS software, you must be logged in to an account that has SETPRV or at least the following privileges:
CMKRNL
WORLD
SYSPRV
SYSNAM
OPER
NETMBX
TMPMBX
VSI recommends that you use the system manager account, SYSTEM. This account provides the privileges necessary to register your Product Authorization Key (PAK) and install the DQS software.
Determine Account Privileges
Determine your account privileges as follows:
|
Step |
Action |
|---|---|
|
1 |
Check the default privileges of the installation account. Log in and enter this DCL command: $ SHOW PROCESS/PRIVILEGES Return
If the account lacks the SETPRV privilege, proceed to step 2. |
|
2 |
Do either of the following:
|
|
3 |
To activate the change in privileges, log out and then log in again. |
2.5. Access Online Release Notes
The DQS product provides online release notes. You should review the release notes because they describe new features and differences among multiple versions of the DQS software, as well as changes in the installation procedure.
For information on how to access the release notes before or after a PCSI installation, see Chapter 3, "Using the PCSI Utility".
For information on how to access the release notes during or after a VMSINSTAL installation, see Chapter 4, "Using the VMSINSTAL Utility".
2.6. Determine Process Account Quotas
Minimum Requirements
| Task | Description |
|---|---|
|
ASTLM |
24 |
|
BIOLM |
18 |
|
BYTLM |
18,000 |
|
DIOLM |
18 |
|
ENQLM |
30 |
|
FILLM |
20 |
To Verify and Change Values
Use the OpenVMS Authorize utility to verify and change process quotas for the installation account in the user authorization file (SYSUAF.DAT). (Some sites may restrict the use of the OpenVMS Authorize utility to certain accounts or people.)
Example
To verify and then change the BYTLM quota for the account- name installation account, you might enter the following command sequence:
|
To . . . |
Enter . . . |
|---|---|
|
Invoke the Authorize utility |
$ RUN SYS$SYSTEM:AUTHORIZE Return
|
|
Show the account quotas |
UAF> SHOW account-name Return
|
|
Modify the BYTLM quota |
UAF> MODIFY account-name /BYTLM = 18000 Return
|
|
Exit the Authorize utility |
UAF> EXIT Return
|
|
Log out |
$ LOGOUT Return
|
|
Log in to activate the new quotas |
Perform the login procedure for your system. |
For more information on modifying account quotas, see the description of the Authorize utility in the OpenVMS System Management documentation subkit.
2.7. Determine Disk Space
Requirements
DQS requirements for free disk storage space are different during installation than after installation. Table 2.3, ''Disk Space Requirements'' summarizes the storage requirements. The numbers provided are approximate. Installation and use of the DQS software should not require more than the number of blocks listed in Table 2.3, ''Disk Space Requirements''.
| Operating System |
Blocks During Installation |
Blocks After Installation |
|---|---|---|
|
OpenVMS AXP |
4500 | 2300 |
|
OpenVMS VAX |
2700 |
1300 |
Extra for Server Account Directory
In addition, the disk where the server account directory is located requires extra space for temporary storage of files queued for printing. Disk space for storing files to be printed does not have to be on the system disk. See Distributed Queuing Service System Manager's Guide, chapter "Configuring and Managing a DQS Server" for information on how to move the server account directory to another device.
Procedure
To determine the number of free disk blocks on the current system disk, enter the following command at the DCL prompt:
$ SHOW DEVICE SYS$SYSDEVICE Return
If you need to create free disk space, refer to the the OpenVMS Upgrade and Installation Manual or the OpenVMS DECwindows Motif Installation Guide.
If you need to move the server account to another disk, refer to Chapter 5, "After Installing DQS Software", the section entitled Move the Server Account Directory to Another Device.
2.8. Set Up an Alternate Working Device
Reason
The DQS software installation requires fewer blocks of free disk space if you create a temporary working directory on an alternate device.
Before You Begin
You have the option of creating the working directory on the alternate device before you begin the installation. For example, to create the working directory [INSTALL] on the alternate device DUA2, enter:
$ CREATE/DIRECTORY DUA2:[INSTALL] Return
Options
Consider the following when deciding whether to specify a temporary working directory when installing the DQS software.
|
If you . . . |
Then the installation utility . . . |
|---|---|
|
Specify a directory |
Creates a working subdirectory for the product and then deletes the working subdirectory after the installation completes. |
|
Do not specify a directory |
Creates the working subdirectory on the specified device with a directory specification of [000000. facvvu], where facvvu represents the facility name and version number of the product. The installation utility deletes the working subdirectory after the installation completes. |
|
Specify a nonexistent directory |
Creates the directory that you specify and the working subdirectory. After the installation completes, the installation utility deletes the working subdirectory but does not delete the directory. |
Examples
You can enter the following command to install the DQS software using an alternate working directory:
With PCSI utility
$ PRODUCT INSTALL DQS/VERSION=1.3 /WORK=DUA2:[INSTALL] Return
With VMSINSTAL utility
$ @SYS$UPDATE:VMSINSTAL DQS013 MUA0: OPTIONS AWD=DUA2:[INSTALL] Return
|
Where . . . |
Is . . . |
|---|---|
|
DUA2: |
The alternate working device name, for this example. |
|
[INSTALL] |
For this example, the name of the directory on the alternate working device in which the installation utility creates the product subdirectory. |
Using a DFS-mounted Disk
You can specify a DFS-mounted disk as your alternate working device. However, the DFS client (installation procedure) is unable to determine available disk space on the DFS-mounted disk and incorrectly reports a total of -1 free blocks.
Before using a DFS-mounted disk, determine its free disk space. Log in to the system on which the disk is locally mounted and enter the command:
$ SHOW DEVICE Return
Refer to Table 2.3, ''Disk Space Requirements'' for the amount of free disk space that must be on the DFS-mounted disk to complete the DQS installation.
2.9. Register Your License
Requirement
The DQS product supports the License Management Facility (LMF) provided by the OpenVMS systems. Before you can run the DQS IVP and start the DQS software, LMF requires that you register a License Product Authorization Key (License PAK) for the product. License PAK information is provided with the DQS product. Register and load this information into your system’s license database using the LMF utility.
Procedure
To register your license:
|
Step |
Action |
|---|---|
|
1 |
Log in to the system manager’s account, SYSTEM. |
|
2 |
You then have a choice of two ways to perform the registration:
|
For complete information on using the LMF utility, see the OpenVMS License Management Utility Manual.
2.10. Perform System Maintenance Procedures
Overview
This section explains how to use the System Generation utility (SYSGEN) and the AUTOGEN utility to prepare your system for installation of the DQS software. AUTOGEN uses system configuration data to automatically set system parameters.
Required Values
Table 2.4, ''Minimum Required System Parameter Values'' lists the minimum required system parameters for the installation. These values do not represent the number required to run your system and other software.
| System Parameters |
OpenVMS AXP Values |
OpenVMS VAX Values |
|---|---|---|
|
GBLPAGES |
1500 | 600 |
|
GBLSECTIONS |
10 |
5 |
If your your system does not have the necessary global pages and global section SYSGEN parameters, the installation fails.
Check Global Pages and Sections Parameters
To install and run DQS software, you must have sufficient free global pages and global sections. First find out how many free global pages and sections you have on your system. Then use AUTOGEN if you need to increase the global pages and global sections system parameters.
To check the values of the global pages and global sections parameters, use the DCL WRITE command with the F$GETSYI lexical function as follows:
$ WRITE SYS$OUTPUT F$GETSYI("CONTIG_GBLPAGES")
7578
$ WRITE SYS$OUTPUT F$GETSYI("FREE_GBLSECTS")
143
If the SYSGEN values displayed by the system are greater than the values listed in Table 2.4, ''Minimum Required System Parameter Values'', you do not need to increase them. If the values of the global pages and global sections parameters displayed by the system are less than the values listed in Table 2.4, ''Minimum Required System Parameter Values'', you must increase their values. Proceed to the next section.
Change Global Pages and Sections Parameters
Use the AUTOGEN command procedure to change system parameters. AUTOGEN automatically adjusts values for parameters that are associated with the values you reset manually.
|
Step |
Action |
|---|---|
|
1 |
Edit the SYS$SYSTEM:MODPARAMS.DAT file. |
|
2 |
Modify incremental parameters, such as these, by typing ADD_parameter in the file, where parameter is GBLPAGES or GBLSECTIONS. For example, to increase the global pages parameter by 2000, add this line in the MODPARAMS.DAT file: ADD_GBLPAGES = 2000
|
|
3 |
After making your changes, exit from the editor. |
|
4 |
Execute the AUTOGEN procedure to recalculate your system parameters. The following command recalculates your system parameters and reboots the system: $ @SYS$UPDATE:AUTOGEN GETDATA REBOOT Return When you specify REBOOT, AUTOGEN performs an automatic system shutdown and then reboots the system. Any users logged on to the system are immediately disconnected during the shutdown. The automatic reboot puts the new parameter values into effect. |
The AUTOGEN utility automatically adjusts some of the SYSGEN parameters based on the consumption of resources since the last reboot. If you do not want to take advantage of this automatic adjustment, include the NOFEEDBACK qualifier on the AUTOGEN command line. For example,
$ @SYS$UPDATE:AUTOGEN GETDATA REBOOT NOFEEDBACK Return
For more information about using the AUTOGEN utility, see the OpenVMS System Manager’s Utilities Reference Manual.
2.11. Perform First-Time Installation Activities
PCSI Utility
These activities apply if you are installing the DQS software with the PCSI utility.
Register Products in PCSI Database
The PCSI utility checks for software products required for installation and use of the DQS software. These products need to be registered in the PCSI product database.
For example, DQS installation requires either of the following:
OpenVMS VAX operating system, Version 5.5-2 or higher
OpenVMS AXP operating system, Version 6.1 or higher
To determine if the required operating system software is registered and to register the product, if required, do the following:
Using the Motif Interface
Perform the following steps to check the operating system software on Motif:
|
Step |
Action |
|---|---|
|
1 |
Enter the PRODUCT command at the DCL prompt. $ PRODUCT Return
The PCSI Main menu displays the Show Product List window by default. |
|
2 |
Scroll through the list of installed products. Search for AXPVMS VMS V6.1 or higher or VAXVMS VMS V5.5- 2 or higher. If your operating system (or other required software) is not in the list, you must register the product. See Step 3. |
|
3 |
Pull down the Mode menu and select the REGISTER PRODUCT command. Enter the product name and version of the product to register. |
Using the DCL Command Line Interface
Perform the following steps to check the operating system software from DCL:
|
Step |
Action |
|---|---|
|
1 |
Enter the PRODUCT SHOW PRODUCT product-name command at the DCL prompt. $ PRODUCT SHOW PRODUCT *VMS Return |
|
2 |
Search the list for AXPVMS VMS V6.1 or higher or VAXVMS VMS V5.5-2 or higher. If the required operating system (or other required software) is not in the SHOW PRODUCT list, then you need to register the product. See Step 3. |
|
3 |
Enter the PRODUCT REGISTER PRODUCT product-name command at the DCL prompt. For example, to register OpenVMS VAX Version 6.0, enter: $ PRODUCT REGISTER PRODUCT - _$ VMS/VERSION=6.0 /SOURCE=SYS$UPDATE: Return |
2.12. Back Up Your System Disk
Overview
Near the beginning of the installation, the installation utility asks if you completed the pre-installation tasks. VSI recommends that you do a system disk backup before installing any software. Use the backup procedures that are established at your site.
For details on performing a system disk backup, see the section on the Backup utility in the OpenVMS System Management documentation subkit.
Before proceeding with the installation of the software, refer to the flowchart in Distributed Queuing Service for OpenVMS Systems Installation Guide.
Chapter 3. Using the PCSI Utility
This chapter provides information about the POLYCENTER Software Installation utility (PCSI) and the procedure for installing the Distributed Queuing Service for OpenVMS Systems software. Table 3.1, ''PCSI Installation Task Summary'' lists the tasks described in this chapter.
| Task | Description |
|---|---|
|
1 |
Accessing release notes |
|
2 |
Starting the installation: DCL interface |
|
3 |
Obtaining DCL Help |
|
4 |
Determining installation defaults: DCL interface |
|
5 |
Verifying preinstallation tasks: DCL interface |
|
6 |
Stopping and restarting: DCL interface |
|
7 |
Responding to questions: DCL interface |
|
8 |
Determining installation progress: DCL interface |
|
9 |
Starting the installation: Motif interface |
|
10 |
Obtaining Motif Help |
|
11 |
Selecting product options: Motif interface |
|
12 |
Stopping and restarting: Motif interface |
|
13 |
Recovering from errors |
3.1. Accessing Release Notes
Procedure
To extract a copy of the release notes for the DQS product to an online disk, enter:
$ PRODUCT EXTRACT RELEASE_NOTES DQS /VERSION=Vn.n /FILE=output-file-name Return
Where:
The Vn.n represents the version number. For example, V1.3 stands for Version 1.3.
The output-file-name is the name you provide for the release notes file.
By default the PCSI utility searches the location defined by
PCSI$SOURCE. If the software kit is in another location, this location must be specified with the /SOURCE qualifier on the command line.
$ PRODUCT EXTRACT RELEASE_NOTES DQS /VERSION=Vn.n /SOURCE=location /FILE=output-file-name Return
After extracting the release notes to a file, you can print or view the file. You do not need to install the software before you extract the release notes.
After the Installation
After you install DQS software, type or print the release notes file from:
SYS$HELP:DQSnnn.RELEASE_NOTES
The nnn represents the version number. For example, 013 stands for Version 1.3.
3.2. Starting the Installation: DCL Interface
Command To Use
To start the installation of the DQS software, enter the PRODUCT INSTALL command at the DCL prompt.
If this is the first time you are installing the DQS software, include the /HELP qualifier on the command line. /HELP provides detailed explanations about the product and product options. When you perform subsequent installations or upgrades, you can choose to bypass the explanations to save time.
The following command installs Version 1.3 of the DQS software with detailed explanations:
$ PRODUCT INSTALL DQS/VERSION=1.3 /HELP Return
The installation utility displays messages like the following and asks if you want to continue:
$ PRODUCT INSTALL DQS/VERSION=1.3 /HELP Return
The following product has been selected:
DEC [AXP|VAX]VMS DQS Vn.n [Available]

Do you want to continue [YES] Return
*** DEC [AXP][VAX]VMS DQS Vn.n: DEC [AXP][VAX]VMS DQS Vn.n for OpenVMS

    Requires from nnn to nnn disk blocks depending upon configuration.
    The DEC Distributed Queuing Service for OpenVMS Systems uses the
    DECnet networking system to extend the standard OpenVMS queue
    system to enable users to print jobs connected to other systems
    than their own, and to show the status of, cancel, and change the
    specifications of their jobs on those systems.

   Copyright © 1994 Digital Equipment Corporation
   All Rights Reserved. Unpublished rights reserved under the copyright
   laws of the United States.
.
.
.
Specifying Kit Location
You can specify the location (source) of the DQS kit in one of two ways:
If you install your product kits from a location defined by the PCSI$SOURCE logical name, make sure that the DQS kit is in this location. By default, the PCSI utility searches the location defined by the PCSI$SOURCE logical name.
For example, this command defines DISK$:[LOCAL_KITS] as the device and directory that contains products to be installed:
$ DEFINE PCSI$SOURCE DISK$:[LOCAL_KITS] Return
For this example, the DQS kit should reside in DISK$:[LOCAL_KITS] to use the default location. You do not need to include the location on the command line:
$ PRODUCT INSTALL DQS/VERSION=n.n Return
If the DQS kit is not in the default location, include the /SOURCE qualifier on the PRODUCT INSTALL command line:
$ PRODUCT INSTALL/SOURCE=MUA0: DQS/VERSION=1.3 Return
For this example, MYDISK$:[NEW_PRODUCTS] contain s the DQS kit for installation.
Command Line Features
You can also request features like purging files and running the installation verification procedure (IVP) by adding appropriate qualifiers to the PRODUCT INSTALL command line. Table 3.2, ''Features You Can Request When Starting an Installation'' lists features you can control with command qualifiers.
| Feature | Qualifier |
|---|---|
|
Display full descriptions of all product installation options and information |
/HELP |
|
Display log messages on your terminal |
/LOG |
|
Save previous versions of product files during an upgrade |
/KEEP |
|
Include a remark in the product database |
/REMARK |
|
Specify where the distribution kit is located |
/SOURCE= dev:[dir] |
|
Choose not to run the installation verification procedure (IVP) |
/NOTEST |
|
Specify a work area for temporary files |
/WORK= device |
For more detailed information on all features that you can request when starting an installation, refer to DCL help for the PRODUCT INSTALL command.
3.3. Obtaining DCL Help
DCL HELP Options
The following DCL help options are available:
|
Step |
Action |
|---|---|
|
1 |
Include the /HELP qualifier on the PRODUCT INSTALL command line. |
|
2 |
During the installation, press the Help key or enter a question mark in response to a question from the PCSI utility. |
|
3 |
Type the DCL command HELP PRODUCT, followed by the name of a PCSI command (for example, HELP PRODUCT INSTALL). |
3.4. Determining Installation Defaults: DCL Interface
Overview
During installation, the PCSI utility allows you to accept or change the defaults. Default values are enclosed in brackets ([ ]).
DQS Default Values
The DQS software offers you the option to install or not install the server software on the system. The client software is always installed. The initial installation default is to install client software only.
The DQS client software will be installed automatically on this node
Do you want to install the DQS server software on this node? [NO]
If you are installing the DQS software on a system that has a printer that you want to make available to clients on other systems, then you enter YES and press the Return key.
This action changes the default value for this question to YES. The next time you install the DQS software, the question is:
The DQS client software will be installed automatically on this node
Do you want to install the DQS server software on this node? [YES]
3.5. Verifying Preinstallation Tasks: DCL Interface
Verify Tasks
During the installation procedure, you are asked if you completed the preinstallation tasks for the DQS software.
You need to complete the pre-installation tasks to install the DQS software.
 Do you want to continue [YES]
Tasks Checked by PCSI Utility
The PCSI utility might verify that any or all of the following is true, depending on your product:
You are logged in to a privileged account.
It is good practice to install software from the system manager’s account with your default device and directory set to SYS$UPDATE.
Disk space for installation is adequate. If sufficient disk space is not foun d, the installation procedure provides the following options:
You can restart the installation and specify another disk to use as an alternate working device for the temporary working directory. See Chapter 2, "Do This First" for information about how to use an alternate working device.
You can abort the installation and then create more disk space on the system disk. The OpenVMS Upgrade and Installation Manual and OpenVMS DECwindows Motif Installation Guide describe how to use tailoring utilities so that you can delete files and create more disk space.
If you lack sufficient free disk space for installation or have no other disk to use as an alternate working device, the installation procedure aborts.
OpenVMS AXP Version 6.1 or higher is installed.
OpenVMS VAX Version 5.5-2 or higher is installed.
When the PCSI utility detects a problem in any of these areas, it asks if you want to terminate the installation. If you want to stop the installation, press the Return key. If you want to continue, enter NO.
Not Checked by PCSI Utilty
The PCSI utility does not check process quotas or system parameters. You need to make sure that these values are sufficient.
You must also make sure that the DQS software is running if you are upgrading from a version of the software before Version 1.3 and you are installing server software.
3.6. Stopping and Restarting: DCL Interface
To stop and restart the installation:
|
Step |
Action |
|---|---|
|
1 |
To stop the procedure at any time press Ctrl/Y or if you are asked if you want to continue, answer NO. |
|
2 |
To retry the installation procedure, enter the PRODUCT INSTALL command as described in the section titled Starting the Installation: DCL Interface. |
3.7. Responding to Questions: DCL Interface
Valid Responses
The following are valid responses to questions asked during an installation:
Press the Help key or enter a question mark to request additional information provided by the product.
Enter your own value and press the Return key.
Press the Return key to accept a default value.
Questions You Are Asked
While installing the DQS software with the DCL interface, you might be asked the following questions. (Refer to Appendix B, "Sample Installations" to see sample installation dialogs.)
If you want to continue:
Verify the product(s) being installed
The following product has been selected:
DEC VAXVMS DQS V1.3 [Available]
Do you want to continue? [YES]
Verify that you completed all preinstallation tasks
You need to complete the pre-installation tasks to install the DQS software.
Do you want to continue? [YES]
If you want to accept the default values for the product:
Do you want all the default values for this product? [YES]
If you want to install the DQS server software (that is, does this node have an attached printer that you want to set up to accept print jobs from users on nodes in other systems):
Do you want to install the DQS server software on this node? [NO]
Client software is automatically installed.
If you want to view your choices:
Do you want to view the values? [NO]
If you want to view your answers to the quesions asked during the installation, answer YES and press the Return key.
Do you want to view the values [NO] YES Return

DEC VAXVMS DQS V1.3: DEC VAXVMS DQS V1.3 for OpenVMS    [Available]
    DEC VAXVMS VMS V6.0    [Available]
    Do you want to install the DQS server software on this node: YES
    Are you satisfied with the values [YES]
If you are satisfied with your selections, answer YES and press the Return key. The installation of the DQS software continues.
If you are not satisfied with your selections, answer NO to this question. You now have the opportunity to make new selections or to end the installation.
Are you satisfied with the values [YES] NO Return
Do you want to re-enter the values [YES] YES Return
       *** DEC VAXVMS VMS V6.0 [Available]
Did you complete the pre-installation tasks for DQS
Do you want to continue [YES]
.
.
.
3.8. Determining Installation Progress: DCL Interface
Progress
As an installation procedure progresses, the system displays a percentage to indicate how much of the installation is done. For example:
Portion Done: 10%...20%...30%...40%...50%...70%...80%...90%...100%
The following product has been installed:
DEC VAXVMS DQS V1.3
.
.
.
If you started the installation using the /LOG qualifier, the system displays details of the installation.
3.9. Starting the Installation: Motif Interface
To start the installation of the DQS software, enter the SET DISPLAY and PRODUCT commands at the DCL prompt.
$ SET DISPLAY/CREATE/NODE=mynode
$ PRODUCT Return
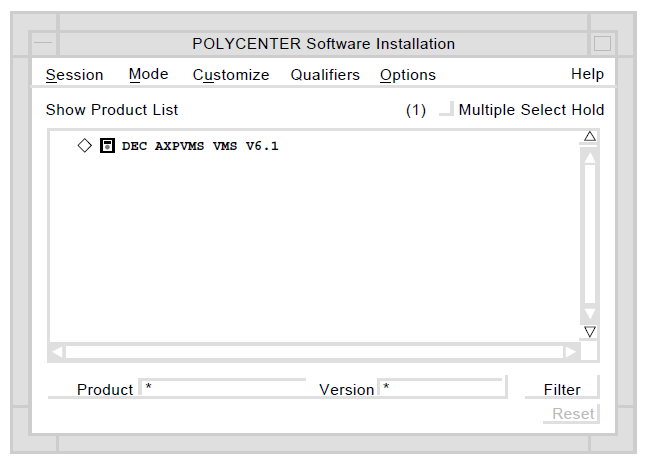
PCSI Main Window
The PCSI main window opens (see Figure 3.1, ''PCSI Main Window''). The items in this window include the following:
|
This Item... |
Displays... |
|---|---|
|
Title bar |
The name of the window |
|
Menu bar |
The menu names for the PCSI utility |
|
The Product List box |
The list of software products available for installation |
|
The Product and Version fields |
An asterisk (*) wildcard, which indicates all versions of all products are displayed in the Product List box |
Procedure to Install
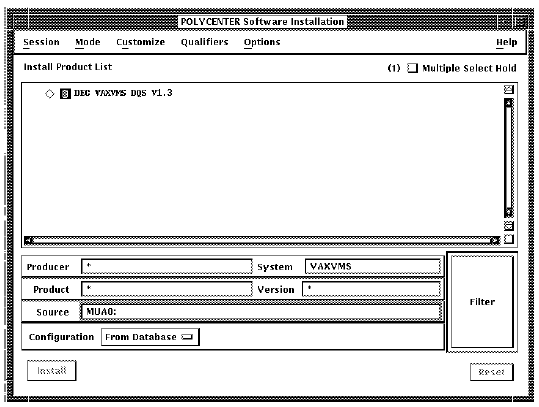
Use the following procedure to install the DQS software using the Motif interface (see Figure 3.2, ''PCSI Installation Window'').
From the Main Menu, pull down the Mode menu and click on Installation The software installation window displays.
Double-click on the button to the left of DEC AXPVMS DQS Vn.n (for OpenVMS AXP systems) or DEC VAXVMS DQS Vn.n (for OpenVMS VAX systems). (You may have to scroll to find the product name.)
The Selected Product list box then displays either DEC AXPVMS DQS V n.n or DEC VAXVMS DQS V n.n to be installed.
If the DQS distribution kit is located in a place other than the default (that is, other than a directory pointed to by the PCSI$SOURCE logical name), enter the device and directory in the Source field and click on the Filter button.
Click on the Install box at the bottom of the screen to install the DQS software.
When the installation is complete, you can return to the Install Product List screen by clicking on the Start New Operation box in the Work in Progress window.
3.10. Obtaining Motif Help
Motif Help Options
The following Motif help options are available:
|
Option |
Action |
|---|---|
|
1 |
Choose On Context from the Help menu. For a description of objects and labels in the main window, move the resulting ? to a screen object or label and click MB1. |
|
2 |
Choose On Window from the Help menu. For a description of how fonts are used to convey different types of information, double click on the Display Conventions topic. Double click on other help topics for information on how to perform a specific task. |
|
3 |
Double click on option names that are preceded by a right arrow -=> in the Selected Products to be Installed list box. For a full description of suboptions (if provided), continue clicking on the resulting right arrow -=> that precedes each suboption. |
|
4 |
Choose On Help from the Help menu to learn more about using the online help system. |
Motif help topics
Motif help describes how to get started performing a task from the Motif interface.
|
Option |
Help Topic |
|---|---|
|
1 |
Select the task. |
|
2 |
Select one or more products. |
|
3 |
Select product options. |
|
4 | Start the task. |
For information about how you can customize menus by adding and removing menu items, refer to the Customize help topic for each menu.
3.11. Selecting Product Options: Motif Interface
How to Select
After you select the product, you can select and display information about product options by clicking on icons or by choosing items from the Options menu. You can also double-click on the options name to get a full description of the option.
Available Options
The DQS product offers these options:
Install the client software only
Install the client and server software
The client software is always installed, but does not need to be configured for a server node. Choose to install the server software if your node has a printer that you want to make available to clients on other systems in the network.
3.12. Stopping and Restarting: Motif Interface
Procedure
To stop and restart the installation:
|
Option |
Help Topic |
|---|---|
|
1 |
To stop the procedure at any time press Ctrl/Y or click on the Cancel button. |
|
2 |
To retry the installation procedure, select Installation from the PCSI utility Mode pull-down menu as described in the section titled Starting the Installation: Motif Interface. |
3.13. Recovering from Errors
How to Recover
This section describes how to recover from errors during product installation.
If the installation procedure fails for any reason, the following message is displayed:
%PCSI-E-OPFAILED, operation failed
Terminating is strongly recommended.
Do you want to terminate? [YES]
An error during the installation can occur if one or more of the following conditions exist:
The operating system version is incorrect.
Disk space is not sufficient.
The OpenVMS Help library is currently in use.
System parameters are not set to the correct values.
If you receive any error message beginning with %PCSI-, refer to OpenVMS System Messages and Recovery Procedures Reference Manual for an explanation and possible solution to the problem.
Most Distributed Queuing Service for OpenVMS Systems software messages have the same format as standard OpenVMS system messages: %DQS-E-ident, text.
If the installation fails, you must restart the installation procedure. If the installation fails due to an IVP failure, contact a VSI Services representative.
Chapter 4. Using the VMSINSTAL Utility
This chapter provides information about the VMSINSTAL installation utility and the procedure for installing the Distributed Queuing Service for OpenVMS Systems software. Table 4.1, ''VMSINSTAL Installation Task Summary'' lists the tasks described in this chapter.
| Task | Description |
|---|---|
|
1 |
Accessing release notes |
|
2 |
Starting the installation procedure |
|
3 |
Stopping and restarting the installation procedure |
|
4 |
Responding to installation questions |
|
5 |
Following installation progress |
4.1. Accessing Release Notes with VMSINSTAL
During the Installation
You can read or print the DQS release notes before installating the DQS software. To do this, you must include OPTIONS N on the command line when you invoke the VMSINSTAL procedure:
$ @SYS$UPDATE:VMSINSTAL DQS013 MUA0: OPTIONS N Return
OPTIONS N allows you to select release notes options:
Release notes included with this kit are always copied to SYS$HELP.

Additional Release Notes Options:
   1. Display release notes
   2. Print release notes
   3. Both 1 and 2
   4. None of the above
* Select option [3]: Return|
Enter . . . |
VMSINSTAL . . . |
|---|---|
|
1 or 3 |
Displays the release notes at your terminal. |
|
2 oe 3 |
Prompts you for a print queue name for printing the release notes, as follows:
Queue name [SYS$PRINT]: ReturnEnter a queue name or press the Return key. Remember, to print the release notes, you must have a printer attached to the system on which you are installing the DQS software. (You cannot use the DQS software to print the release notes until after the software is installed.) VMSINSTAL queues a copy of the release notes to print and displays a message such as the following: Job DQS013 (queue queue, entry nnn) started on device |
|
4 |
Copies the product release notes to SYS$HELP. Release notes are neither displayed or printed. |
VSI recommends that you read the release notes before installing the DQS software for the first time.
After you have answered the questions regarding the release notes, this message is displayed:
* Do you want to continue the installation [N]? YES ReturnEnter YES or NO, as appropriate. If you enter YES and press the Return key, the procedure continues with this message:
%VMSINSTAL-I-RELMOVED, The products release notes have been successfully moved to SYS$HELP.
After the Installation
After the installation procedure completes, release notes are available from the following location:
SYS$HELP:DQSnnn.RELEASE_NOTES
The nnn represents the version number. For example, 013 stands for Verison 1.3.
4.2. Starting the Installation Procedure
Before You Start
Before you start the installation of the DQS software, log in to the system manager account. The system manager account has the necessary privileges to run the VMSINSTAL utility.
Logging Your Installation Procedure
If you want to save a copy of your VMSINSTAL session for future reference, you can enter the SET HOST 0 /LOG command at the system prompt before starting the installation of the software. This creates the log file SETHOST.LOG in your current default directory.
Command Line
To start the installation of the DQS software, enter the following command at the DCL prompt:
$ @SYS$UPDATE:VMSINSTAL DQSnnn dev: [OPTIONS N,AWD=dev:[dir]] Return
@SYS$UPDATE:VMSINSTAL invokes the VMSINSTAL procedure. In addition, you can supply the following information in the command line:
|
DQSnnn |
Refers to the Distributed Queuing Service for OpenVMS Systems saveset. The nnn represents the version number. For example, 013, stands for Version 1.3. |
|
dev: |
Is the device where your distribution media is mounted. |
|
OPTIONS N |
Causes VMSINSTAL to ask you about displaying or printing the release notes. VSI recommends that you review the release notes before you proceed with the installation of the software in case they contain information about the installation. If you are restarting the installation and have already reviewed the release notes, you do not need to specify OPTIONS N. Refers to the Distributed Queuing Service for OpenVMS Systems saveset. The nnn represents the version number. For example, 013, stands for Version 1.3. |
|
OPTIONS AWD=dev:[dir] |
Lets you specify an alternate working directory for the temporary working directory used by VMSINSTAL during installation. With this option, fewer free blocks are required on the system disk. The dev:[dir] names the alternate working device and directory under which VMSINSTAL creates its working directory. Specifying a directory name is optional. If you do not specify this option, VMSINSTAL creates the following temporary working directory: SYS$SPECIFIC:[SYSUPD.DQS$nnn] |
In response to the VMSINSTAL command, a banner like the following may be displayed on the screen:
OpenVMS VAX Software Product Installation Procedure Vx.x

It is 11-JUN-1994 at 15:47.
Enter a question mark (?) at any time for help.
4.3. Stopping and Restarting the VMSINSTAL Procedure
To stop the installation procedure at any time, press Ctrl/Y. The installation procedure deletes all files it has created up to that point and exits.
If you want to retry the installation procedure after you press Ctrl/Y, you must invoke VMSINSTAL again, as shown in the section titled Starting the Installation Procedure.
4.4. Responding to Installation Questions
Valid Responses
The VMSINSTAL utility asks a series of questions to which you must provide answers. The following are valid responses to questions asked during an installation:
Press the Return key to accept a default value.
In most cases, a default response appears in square brackets ([]) at the end of the question or prompt.
Enter your own value and press the Return key.
Enter a question mark ( ? ) to request additional information provided by the product.
Questions You Are Asked
During the installation of the DQS software with the VMSINSTAL utility, you are asked the following questions:
If you want to continue:
After warnings about the environment:
%VMSINSTAL-W-NOTSYSTEM, You are not logged in to the SYSTEM account.
%VMSINSTAL-W-ACTIVE, The following processes are still active:
      DECW$SERVER_0
      _FTA13:
      VUE$DAVIES_3
      DECW$TE_005C
* Do you want to continue anyway [NO]?
This display is informational. The default is NO. If you answer NO or only press the Return key, the installation terminates and you are returned to the system command level. If you answer YES and press the Return key, the installation continues.
After selecting a release notes option:
* Do you want to continue the installation [NO]?
Enter YES or NO, as appropriate. If you enter YES and press the Return key, the procedure continues with this message:
%VMSINSTAL-I-RELMOVED, The products release notes have been successfully moved to SYS$HELP.
If you are satisfied with the backup of your system disk:
* Are you satisfied with the backup of your system disk [YES]?
You are reminded that you should back up your system disk before you install the software.
Where the distribution volumes are mounted:
* Where will the distribution volumes be mounted:
If you did not indicate the device where the distribution volumes are mounted when you invoked VMSINSTAL, you are asked this question. Enter the name of the device where you loaded the media.
To select a release notes option, if you entered OPTIONS N on the command line:
Release notes included with this kit are always copied to SYS$HELP.
Additional Release Notes Options:
    1. Display release notes
    2. Print release notes
    3. Both 1 and 2
    4. None of the above
* Select option [3]:
VSI recommends that you read the release notes before installing the software for the first time.
To enter a print queue name for printing the release notes, if you selected release notes options 2 or 3:
Queue name [SYS$PRINT]:
Enter a queue name or press the Return key. Remember, to print the release notes, you must have a printer attached to the system on which you are installing the DQS software. (You cannot use the DQS software to print the release notes until after the software is installed.)
If you want to install the server software:
The DQS client will be installed automatically on this node.
* Do you want to install the DQS server software on this node [NO]?
The DQS software offers you the option to install or not install the server software on the system. The client software is always installed. The installation default is to install client software only.
If you are installing the DQS software on a system that has a printer that you want to make available to clients on other systems, then you enter YES and press the Return key.
If you want to proceed (after selecting to install the server software):
     *** PLEASE NOTICE ***
If you are upgrading DQS server software from an earlier version
to DQS V1.3, the earlier version of the DQS server software must
be running. This allows the DQS V1.3 installation procedure to read
the existing DQS server configuration information and create a
new DQS V1.3 server configuration file. Otherwise, after the
installation, you must manually update your DQS V1.3 server
configuration file.

The directory and name of the DQS V1.3 configuration file is:
      SYS$MANAGER:DQS$SERVER_CONFIG.TXT
Digital recommends that you review the new DQS V1.3 server
configuration file after this installation. Refer to the section
on server management in the DQS System Manager’s Guide for more
information.

The DQS client configuration is not automatically updated. Refer
to the section on client management in the DQS System Manager’s
Guide for more information.

* Do you want to proceed [YES]?
If you want to run the Installation Verification Procedure (IVP):
* Do you want to run the IVP after the installation [YES]?
VSI recommends that you answer YES to this question.
If you want to purge files replaced during the installation process:
* Do you want to purge files replaced by this installation [YES]?
If you want to retain the old copies, answer NO and press the Return key. Otherwise, answer YES or press the Return key. (Remember, once the files are purged, they are erased and cannot be accessed.)
If you have loaded and registered an authorization key:
Product:   DQS
Producer:   DEC
Version:   1.3
Release Date:   07-MAR-1994
* Does this product have an authorization key registered and loaded?
The DQS product supports the License Management Facility (LMF). Before starting the DQS software on an OpenVMS system, LMF requires that you register a License Product Authorization Key (License PAK) for the DQS product.
You must load the DQS License PAK on each node in an OpenVMS cluster. For information on registering and loading your License PAK, see the OpenVMS License Management Utility Manual.
Getting Help on VMSINSTAL Questions
To get help on any of the VMSINSTAL questions, enter a question mark ( ? ) in response to the question.
4.5. Following Installation Progress
After validating that you have loaded the DQS License PAK, VMSINSTAL asks no more questions.
No further questions.
Status Messages
The DQS installation procedure then creates the DQS$SERVER account and directory, installs the client software, installs the server software if selected, and creates the DQS network object. VMSINSTAL displays informational messages about the status of the installation, like the following:
%VMSINSTAL-I-RESTORE, Restoring product saveset B...
%VMSINSTAL-I-ACCOUNT, This installation creates an ACCOUNT named DQS$SERVER.
%UAF-I-ADDMSG, user record successfully added
%UAF-I-RDBADDMSGU, identifier DQS$SERVER value: [000300,000311] added to rights database

       DQS$SERVER account is created.
%VMSINSTAL-I-ACCOUNT, This installation updates an ACCOUNT named DQS$SERVER.
%UAF-I-MDFYMSG, user record(s) updated
%VMSINSTAL-I-SYSDIR, This product creates system disk directory
                                                      SYS$COMMON:[DQS$SERVER].
[DQS$SERVER] directory is created in SYS$COMMON: area.

Installing DQS SERVER software . .
 .
Installing DQS CLIENT software . .
.
DQS network object is created.
Informational Messages
VMSINSTAL displays the following informational messages that concern system parameter requirements and postinstallation procedures:
******************************************************************
*              Instructions for completing DQS installation *
******************************************************************
   o Please follow the post installation instructions which have
     been outlined in the DQS V1.3 Installation Guide.
   o Please be sure to edit your OpenVMS System Startup Procedure
     and add the following line to invoke the DQS Startup Procedure:
            $ @SYS$STARTUP:DQS$STARTUP.COM
   o Once you have completed the DQS post installation procedures
     you can invoke the DEC DQS installation verification procedure
     to test your customizations. To invoke this file start DQS
     and type:
            $ @SYS$TEST:DQS$IVP.COM
   o This installation has updated the DCL Tables. Therefore
     users must log out and then back in, in order to use the
     QSHOW, QDELETE, and QSET commands for displaying, deleting,
     and modifying jobs on the remote server queues.
   o Please read the DQS V1.3 release notes located in the file
     SYS$HELP:DQS013.RELEASE_NOTES .
%VMSINSTAL-I-MOVEFILES, Files will now be moved to their target directories...
Verification Messages
If you indicated that you want to run the IVP as part of the installation, the following messages are displayed; otherwise, this step is skipped:
Beginning of the DQS V1.3 Installation Verification Procedure.
  Copyright Digital Equipment Corporation 1994. All rights reserved.

  Restricted Rights: Use, duplication, or disclosure by the U.S. Government
  is subject to restrictions as set forth in subparagraph (c)(1)(ii) of
  DFARS 252.227-7013, or in FAR 52.227-19, or in FAR 52.227-14 Alt. III, as
  applicable.

  This software is proprietary to and embodies the confidential technology
  of Digital Equipment Corporation. Possession, use, or copying of this
  software and media is authorized only pursuant to a valid written license
  from Digital or an authorized sublicensor.
  %DQS-I-QUESUCCESS IVP test successful
End of the DEC DQS for OpenVMS V1.3 Installation Verification Procedure
The IVP checks to see if files are installed in the correct locations. Then, the IVP displays the following message:
%DQS-I-QUESUCCESS IVP test successful
Procedure Ending Messages
Once installation is completed, this message appears:
Installation of DQS Vn.n completed at hh:mm
VMSINSTAL procedure done at hh:mm
The message from VMSINSTAL means that the installation and verification (if selected) of the DQS software has com pleted successfully. If VMSINSTAL reports a failure, review the installation prerequisites.
You can run the IVP at any time to check the DQS software.
Refer to Chapter 5, "After Installing DQS Software" for more information on postinstallation procedures, including:
Editing the system startup file to include DQS startup command
Running the IVP independent of the installation
Setting up DQS software to run in a VMScluster environment
For details on setting up the DQS queues, see Distributed Queuing Service System Manager's Guide.
Chapter 5. After Installing DQS Software
This chapter describes tasks that you need to do after installing the DQS software (see Table 5.1, ''Task Summary'').
| Task | Description |
|---|---|
|
1 |
Postinstallation Tasks: New Server Installation |
|
2 |
Postinstallation Tasks: New Client Installation |
|
3 |
Postinstallation Tasks for All Systems: New Installation |
|
4 |
Postinstallation Tasks: Upgrade Server Installation |
|
5 |
Postinstallation Tasks: Upgrade Client Installation |
|
6 |
Postinstallation Tasks for All Systems: Upgrade Installation |
|
7 |
Postinstallation Tasks: VMScluster Nodes |
If you find software problems while performing the postinstallation procedures, report the problem to VSI. Refer to Appendix C, "DQS Installation Messages" for instructions on how to report problems.
5.1. Postinstallation Tasks: New Server Installation
This section describes the tasks you may need to perform if this is a new installation of the DQS software on a DQS server node and tells you where to look for more information, if needed.
Move DQS Server Account Directory
The DQS server uses a directory to temporarily store copies of the files that it is printing for DQS clients. These print files vary in size. Depending on the requirements of your environment, you may need to move this directory to an alternate device. DQS software provides a command procedure that enables you to change or move this directory to a different device.
If needed, move the DQS server account default directory to another device.
Reference
See the section titled Move the Server Account Directory to Another Device in Distributed Queuing Service System Manager's Guide, chapter "Configuring and Managing a DQS Server" for details.
Define Server Queues
Before client nodes can access remote queues on your server node using the DQS software, define the set of queues on a DQS server node that may be made accessible to remote queues.
Reference
See the section titled Setting Up Remote Queues in Distributed Queuing Service System Manager's Guide, chapter "Configuring and Managing a DQS Server" for details.
Customize Server Software
If you need to change DQS server logical definitions that relate to the behavior of the server software, do the following:
Copy SYS$COMMON:[SYSMGR]DQS$SYSTARTUP.TEMPLATE to SYS$COMMON:[SYSMGR]DQS$SYSTARTUP.COM.
Edit SYS$COMMON:[SYSMGR]DQS$SYSTARTUP.COM and make the required changes for your environment.
Reference
See Distributed Queuing Service System Manager's Guide, chapter "Configuring and Managing a DQS Server" for details on managing a DQS server.
5.2. Postinstallation Tasks: New Client Installation
The next sections describe the tasks you may need to perform if this is a new installation of the DQS software on a DQS client node and tells you where to look for more information, if needed.
Customize Client Software
Customize the DQS client software for your specific environment.
If you need to change DQS client logical definitions that relate to the behavior of the client software, do the following:
If you have not already done so, copy SYS$COMMON:[SYSMGR]DQS$SYSTARTUP.TEMPLATE to SYS$COMMON:[SYSMGR]DQS$SYSTARTUP.COM.
Edit SYS$COMMON:[SYSMGR]DQS$SYSTARTUP.COM and make the required changes for your environment.
See the Distributed Queuing Service System Manager's Guide, chapter "Configuring and Managing a DQS Client" for details on managing a DQS client.
5.3. Postinstallation Tasks for All Systems: New Installation
This section describes the tasks you may need to perform on all sytems if this is a new installation of the DQS software.
Edit System Startup File
Edit the system startup file and add the command line that starts the DQS software.
|
Operating System |
Name of Startup File |
|---|---|
|
OpenVMS AXP and OpenVMS VAX Version 6.n |
SYSTARTUP_VMS.COM |
|
OpenVMS VAX Version 5.n |
SYSTARTUP_V5.COM |
DECnet Phase IV systems
With DECnet Phase IV networking software, the DQS software must start after the network has started. You must position this new command line after the line that invokes the network startup command procedure. The following is a sample portion of a system startup file that has been edited to start the DQS software:
$ @SYS$MANAGER:STARTNET.COM    ! Start DECnet software
    .
    .
    .
$ @SYS$STARTUP:DQS$STARTUP.COM    ! Then start DQS software
Some installations use a batch job to start the network. With DECnet Phase IV networking software, the job that starts the network must complete before the DQS software can be started. The following portion of a system startup file shows one way to ensure that the network starts before the DQS software:
$ SUBMIT -
 SYS$MANAGER:STARTNET.COM, - ! Start DECnet software, first
    .
    .
    .
 SYS$STARTUP:DQS$STARTUP.COM ! Then, start DQS software
DECnet Phase V systems
These examples do not apply to the networks running the DECnet/OSI Phase V networking software. DECnet Phase V software is started automatically. Check system startup requirements for any restrictions on the placement of the DQS startup command.
Start DQS Software
The installation procedure does not start the DQS software. On all nodes that you want to run the DQS software, execute this command:
$ @SYS$STARTUP:DQS$STARTUP.COM Return
You can also use the SYSMAN utility to start DQS software in a VMScluster environment.
Running IVP
To run the IVP independently of the installation procedure, enter the following command at the DCL prompt:
$ @SYS$TEST:DQS$IVP.COM Return
The DQS IVP is a command procedure that verifies that the DQS files are installed correctly. The installation procedure places the IVP command file, DQS$IVP.COM, in the SYS$TEST directory.
To troubleshoot a failed IVP, you can verify that each directory contains its proper file names by entering the following command at the DCL prompt:
$ DIRECTORY SYS$COMMON:[SYS*]*DQS* Return
Activate DCL Command Table
The installation procedure modifies the DCL command table so that the DQS commands are recognized and processed.
Users who are logged on during the installation process can use the DQS PRINT command immediately. However, other DQS commands: QSHOW, QDELETE/ENTRY, QSET/ENTRY are not available.
Notify all logged-in users who want to use the QSHOW, QDELETE/ENTRY, QSET/ENTRY commands that they need to do either of the following:
Log out and log back in again
Enter the following DCL command:
$ SET COMMAND /TABLES=SYS$LIBRARY:DCLTABLESYou can also use the SYSMAN utility to activate the DCL tables in a VMScluster environment.
5.4. Postinstallation Tasks: Upgrade Server Installation
This section describes the tasks you may need to perform if this is an upgrade installation of the DQS software on a DQS server node and tells you where to look for more information, if needed.
Move DQS Server Account Directory
The DQS server uses a directory to temporarily store copies of the files that it is printing for DQS clients. These print files vary in size. Depending on the requirements of your environment, you may need to move this directory to an alternate device. DQS software provides a command procedure that enables you to change or move this directory to a different device.
Reference
See the section titled Move the Server Account Directory to Another Device in Distributed Queuing Service System Manager's Guide, chapter "Configuring and Managing a DQS Server" for details.
Verify Queue Access Definitions
If your DQS server system is running the DQS software during the installation procedure, the procedure converts the Version 1.n server queue access definitions to the new format provided with DQS Version 1.3 software. The installation procedure creates the following file, which should contain the queue access definitions for your environment:
SYS$MANAGER:DQS$SERVER_CONFIG.TXT
The queue access definitions are specified in your DQS$STARTUP.COM file. The installation procedure renames your previous DQS$STARTUP.COM to DQS$STARTUP.COM_OLD.
Please review your DQS$STARTUP.COM_OLD file and compare it to the queue access definitions in the new .TXT file
Check the following log file for any issues encountered during the conversion of your queue definitions to the new security and access format:
$ TYPE SYS$UPDATE:DQS$CONVERT_SECURITY.LOG Return
Remove Rightslist IDs
After DQS Version 1.3 software has been running on your system for a few weeks and you are satisfied with the operation of the new queue access mechanism, you may want to remove all the DQS$NODE_xxxx rightslist identifiers from your rightslist database. Do not do this until you are sure that you do not want to go back to a DQS Version 1.2 environment.
Use the OpenVMS Authorize utility to remove the rightslist identifiers that were used prior to DQS version 1.3.
The DQS V1.3 rightslist identifiers have the form DQS$NODE_nodename, where nodename is a 6-character DECnet node name.
Procedure
Use the following procedure to remove a rightslist identifier:
$ MCR AUTHORIZE
UAF> REMOVE/IDENTIFIER DQS$NODE_nodename
UAF> EXIT
Example
The following example removes DQS$NODE_SMEDLY and DQS$NODE_JON JON from the rights list database:
$ MCR AUTHORIZE
UAF> REMOVE/IDENTIFIER DQS$NODE_SMEDLY
Identifier DQS$NODE_SMEDLY value: %X800100A2 removed from rights data base
UAF> REMOVE/IDENTIFIER DQS$NODE_JONJON
Identifier DQS$NODE_JONJON value: %X800100A3 removed from rights data base
UAF> EXIT
Customize Server Software
With DQS Version 1.3, the DQS startup procedure is divided into two files:
SYS$STARTUP:DQS$STARTUP.COM: Used to invoke SYS$MANAGER:DQS$SYSTARTUP.COM.
SYS$MANAGER:DQS$SYSTARTUP.COM: Used to customize DQS logical names.
DQS$STARTUP.COM invokes SYS$MANAGER:DQS$SYSTARTUP.COM, which contain s all the customizations.
A site-specific startup template that you can customize is provided your convenience:
SYS$COMMON:[SYSMGR]DQS$SYSTARTUP.TEMPLATE
Procedure
To change server logical definitions, perform the following:
Copy SYS$COMMON:[SYSMGR]DQS$SYSTARTUP.TEMPLATE to SYS$COMMON:[SYSMGR]DQS$SYSTARTUP.COM.
Edit SYS$COMMON:[SYSMGR]DQS$SYSTARTUP.COM and add the server related changes that were previously defined in DQS$STARTUP.COM. These can be foun d in DQS$STARTUP.COM_OLD.
DQS server queue access is no longer defined by adding logical definitions to the startup procedure. Do not copy the following logicals to your DQS$SYSTARTUP.COM file:
DQS$CONTROLLED_ACCESS
DQS$DENY_ACCESS
DQS$QUEUE_xxxx (where xxxx is a queue-name)
See Distributed Queuing Service System Manager's Guide, chapter "Configuring and Managing a DQS Server" for details on customizing a DQS server.
5.5. Postinstallation Tasks: Upgrade Client Installation
This section describes the tasks you may need to perform if this is an upgrade installation of the DQS software on a DQS client node and tells you where to look for more information, if needed.
Customize Client Software
Customize the DQS client software for your specific environment.
With DQS Version 1.3, the startup procedure is divided into two files:
SYS$STARTUP:DQS$STARTUP.COM: Used to invoke SYS$MANAGER:DQS$SYSTARTUP.COM.
SYS$MANAGER:DQS$SYSTARTUP.COM: Used to customize the client logical names.
DQS$STARTUP.COM invokes SYS$MANAGER:DQS$SYSTARTUP.COM, which contains all the definitions.
A site specific startup template that you can customize is provided your convenience:
SYS$COMMON:[SYSMGR]DQS$SYSTARTUP.TEMPLATE
To change client logical definitions perform the following:
If you have not already done so, copy SYS$COMMON:[SYSMGR]DQS$SYSTARTUP.TEMPLATE to SYS$COMMON:[SYSMGR]DQS$SYSTARTUP.COM.
Edit SYS$COMMON:[SYSMGR]DQS$SYSTARTUP.COM and make the client-related changes that were previously defined in DQS$STARTUP.COM. These can be foun d in DQS$STARTUP.COM_OLD.
See Distributed Queuing Service System Manager's Guide, chapter "Configuring and Managing a DQS Client" for details on customizing a client.
5.6. Postinstallation Tasks for All Systems: Upgrade Installation
This section describes the tasks you may need to perform on all sytems if this is an upgrade installation of the DQS software.
Edit System Startup File
|
Operating System |
Name of Startup File |
|---|---|
|
OpenVMS AXP and OpenVMS VAX Version 6.n |
SYSTARTUP_VMS.COM |
|
OpenVMS VAX Version 5. n |
SYSTARTUP_V5.COM |
Look in the system startup procedure for the one of the following lines:
@SYS$MANAGER:DQS$STARTUP.COM
@SYS$STARTUP:DQS$STARTUP.COM
DQS Version 1.3 software requires that the DQS software start from the SYS$STARTUP directory. Change the command to the following if it was not already changed:
@SYS$STARTUP:DQS$STARTUP.COM
Do this on each node of a cluster that you want to run the DQS software. DQS software then starts automatically when the node reboots.
Start DQS Software
The installation procedure does not start the DQS software. On all nodes that you want to run the DQS software, execute this command:
$ @SYS$STARTUP:DQS$STARTUP.COM Return
You can also use the SYSMAN utility to start DQS software in a VMScluster environment.
Run IVP
To run the IVP independently of the any installation procedure, enter the following command at the DCL prompt:
$ @SYS$TEST:DQS$IVP.COM Return
The DQS IVP is a command procedure that verifies that the DQS files are installed correctly. The installation procedure places the IVP command file, DQS$IVP.COM, in the SYS$TEST directory.
To troubleshoot a failed IVP, you can verify that each directory contains its proper file names by entering the following command at the DCL prompt:
$ DIRECTORY SYS$COMMON:[SYS*]*DQS* Return
Update Server Queues
After the DQS software is running, if you installed the DQS software on a server node, execute the following command procedure:
$ @SYS$MANAGER:DQS$SERVER_UPDATE_QUEUE_DEFNS Return
DQS Version 1.3 software does not require DQS queues to have the /RETAIN queue attribute. This command procedure allows you to change the definitions of your DQS queues to eliminate these attributes.
Activate DCL Command Table
The installation procedure modifies the DCL command table so that the DQS commands are recognized and processed.
Users who are logged on during the installation process can use the DQS PRINT command immediately. However, other DQS commands: QSHOW, QDELETE/ENTRY, QSET/ENTRY are not available.
Notify all logged-in users who want to use the QSHOW, QDELETE/ENTRY, QSET/ENTRY commands that they need to do either of the following:
Log out and log back in again
Enter the following DCL command:
$ SET COMMAND /TABLES=SYS$LIBRARY:DCLTABLESYou can also use the SYSMAN utility to activate DCL tables a VMScluster environment.
5.7. Postinstallation Tasks: VMScluster Nodes
This section describes the tasks you may need to perform on a VAXcluster system.
Edit System Startup File
Edit the system startup file and add the following line to start the DQS software for each cluster member where the DQS software is to execute:
$ @SYS$STARTUP:DQS$STARTUPReplace DCL Tables
If you install DQS client software on a VMScluster member, the DCL tables are updated to include the DQS QSHOW, QDELETE /ENTRY, and QSET/ENTRY commands on that member only. To include these commands in the DCL tables of other cluster members, either execute the SYSMAN utility or issue the following commands from the system manager’s account on each cluster member:
$ INSTALL Return
INSTALL> REPLACE SYS$SHARE:DCLTABLES Return
INSTALL> EXIT Return
$
Define Network Object
The DQS network object must be defined on each node within the VMScluster where you want to run DQS software.
On DECnet Phase IV systems, use the Network Control Program. On DECnet/OSI Phase V systems, use the Network Control Language (NCL).
NCP Commands
To define the DQS object using NCP, execute the SYSMAN utility or follow these steps:
Obtain the randomly generated password, created during the installation procedure, for the DQS client/server account. From a privileged account on the node where you installed the software, enter the following commands:
$ RUN SYS$SYSTEM:NCP Return
NCP> SHOW OBJECT DQS Return
The system returns the password for the DQS client/server account in the Password field. In the following example, TESTING123 is the randomly generated client/server account password.
Object  Volatile  Summary  as  of   5-JAN-1994 10:42:14
  Object   Number   File/PID   User Id   Password
DQS   66   DQS$SERVER.EXE   DQS$SERVER   TESTING123
NCP>
Enter the following NCP commands on each of the other nodes in the VMScluster environment to define the DQS object (using the returned password for password in the commands):
$ RUN SYS$SYSTEM:NCP Return
NCP> DEFINE OBJECT DQS NUMBER 66 FILE DQS$SERVER.EXE - Return
_ USER DQS$SERVER PASSWORD password Return
NCP> SET OBJECT DQS NUMBER 66 FILE DQS$SERVER.EXE - Return
_ USER DQS$SERVER PASSWORD password Return
NCP> EXIT Return
$
NCL Commands
To define the DQS object using NCL, execute the SYSMAN utility or enter the following NCL commands on each of the other nodes in the VMScluster environment:
s>(NCL>) CREATE SESSION CONTROL APPLICATION DQS
NCL> SET SESSION CONTROL APPLICATION DQS, -
_NCL> ADDRESS = {NUMBER=66}, IMAGE NAME = DQS$SERVER.EXE, -
_NCL> INCOMING PROXY = FALSE, OUTGOING PROXY=FALSE, -
_NCL> NODE SYNONYM=FALSE, USER NAME = "DQS$SERVER"
Node 0 Session Control Application dqs
at 1994-03-16-13:34:58.193-05:00I1.614
Characteristics
Addresses =
{
number = 66
}
Image Name = DQS$SERVER.EXE
Incoming Proxy = False
Outgoing Proxy = False
Node Synonym = False
User Name = "DQS$SERVER"
NCL> EXIT
Appendix A. Files Installed or Modified on the System
This appendix describes the files produced or changed during the DQS installation. This information is organized as follows:
|
Section |
Topic |
|---|---|
|
1 |
Files installed on server nodes |
|
2 |
Files installed on client-only nodes |
|
3 |
Existing files modified by the installation |
|
4 |
Accounts and processes added by the installation |
|
5 |
Installed images |
Unless otherwise specified, all files are copied from the DQS savesets.
For more information on using and modifying DQS files, refer to theDistributed Queuing Service System Manager's Guide.
A.1. Files Installed on Server Nodes
Table A.1, ''Files Installed on DQS Server Nodes'' lists the files that are installed on server nodes.
| File Name | Description |
|---|---|
| Added to SYS$MANAGER: | |
|
DQS$CLEANSRV.COM |
Deletes lost files in the DQS server account. There are a few conditions where files may be "lost" in the directory. |
|
DQS$DEFINE.COM |
Defines DQS client queues. Invoked by the DQS$IMPORT, DQS$IVP, and the DQS$SYSTARTUP command files. |
|
DQS$IMPORT.COM |
Allows you to Add another client queue to the current DQS configuration on a client node. |
|
DQS$SERVER_CHANGE_DEFAULT_ DEVICE.COM |
Allows you to move the default server account directory to a device other than the system device. |
|
DQS$SERVER_CONFIG.TEMPLATE |
Allows you to define a set of server queues accessible over the network and to control access to these queues. |
|
DQS$SERVER_CONFIG.TXT |
Provides information about client node access to server queues. |
|
DQS$SERVER_UPDATE_CONFIG.COM |
Allows you to enable changes to the DQS$SERVER_CONFIG.TXT file. |
|
DQS$SERVER_UPDATE_QUEUE_ DEFNS.COM |
Allows you to update server queues by removing the /RETAIN qualifier for DQS Version 1.3. |
|
DQS$SYSTARTUP.TEMPLATE |
Allows you to modify server sitespecific logical definitions that affect the behavior of the DQS software. |
| Added to SYS$STARTUP: | |
|
DQS$STARTUP.COM |
Defines DQS defaults and logical names and invokes the site-specific DQS$SYSTARTUP.COM. This new startup procedure is provided by the installation. Do not edit this file. |
| Added to SYS$MESSAGE: | |
|
DQS$MSG.EXE |
Provides the text for DQS-specific error messages. |
| Added to SYS$SYSTEM: | |
|
DQS$CLIENT.EXE |
The user command execution program. Executes the QSHOW, QSET, and QDELETE commands. |
|
DQS$NOTIFIER.EXE |
A detached process that runs on the server node. Sends print job notification to client users. |
|
DQS$PRTSMB.EXE |
Replaces the standard print symbiont on the server node. Places DQS-specific information on the FLAG, BURST, and TRAILER pages of print output. Use this symbiont if you do not like how the standard print symbiont handles information on the banner pages. |
|
DQS$SERVER.EXE |
The DQS server program. Receives incoming requests from client nodes and processes them. Processes all DQS commands (PRINT, QSHOW, QDELETE, and QSET). If notification is requested, also performs notification on the client node. |
|
DQS$SERVER_CONGFIG.DAT |
Private DQS server configuration data file. This file is created by the DQS$SERVER_UPDATE_CONFIG.COM procedure. Do not edit this file. |
|
DQS$SERVER_UPDATE_CONFIG.EXE |
Server configuration update program. |
|
DQS$SMB.EXE |
The DQS symbiont. Transfers print jobs and files from the client system to the server. |
| Added to SYS$TEST: | |
|
DQS$IVP.COM |
Verifies that the DQS software installation completed successfully. |
| Added to SYS$HELP: | |
|
DQSnnn.RELEASE_NOTES |
The release notes for the DQS product. The nnn represents the version number; for example, 013 for Version 1.3. |
Table A.2, ''Files Installed on DQS Client-Only Nodes'' lists the files installed on a DQS client node.
| File Name | Description |
|---|---|
| Added to SYS$MANAGER: | |
|
DQS$DEFINE.COM |
Defines DQS client queues. Invoked by the DQS$IMPORT, DQS$IVP, and the DQS$SYSTARTUP command files. |
|
DQS$IMPORT.COM |
Allows you to Add another client queue to the current DQS configuration on a client node. |
|
DQS$SYSTARTUP.TEMPLATE |
Allows you to modify client sitespecific logical definitions that affect the behavior of the DQS software. |
| Added to SYS$STARTUP: | |
|
DQS$STARTUP.COM |
Starts the DQS client queues. Invokes the site-specific DQS$SYSTARTUP.COM. Do not edit this file. |
| Added to SYS$MESSAGE: | |
|
DQS$MSG.EXE |
Provides the text for DQS-specific error messages. |
| Added to SYS$SYSTEM: | |
|
DQS$CLIENT.EXE |
The user command execution program. Executes the QSHOW, QSET, and QDELETE commands. |
|
DQS$SERVER.EXE |
If print job notification is requested, performs notification on the client node. |
|
DQS$SMB.EXE |
The DQS symbiont. Transfers print jobs and files from the client system to the server. |
| Added to SYS$TEST: | |
|
DQS$IVP.COM |
Verifies the DQS software installation completed successfully. |
| Added to SYS$HELP: | |
|
DQSnnn.RELEASE_NOTES |
The release notes for the DQS product. The nnn represents the version number, for example, 013 for Version 1.3. |
A.2. Files Modified by the Installation
The DQS software modifies the following files during installation:
SYS$HELP:HELPLIB.HLB — Help library
SYS$LIBRARY:DCLTABLE S.EXE — DCL command definition tables
DQS$STARTUP.COM_OLD — Older version of the startup command file renamed by the Version 1.3 installation. Defines DQS defaults and all DQS logical names for previous version software.
A.3. Accounts and Processes Added
The DQS installation adds the following accounts and processes:
A DQS client/server account, DQS$SERVER, is added to both server and client nodes.
The DQS$SERVER account is given the following OpenVMS privilges:
TMPMBX
NETMBX
No proxies are added by the installation.
The following are created on both server and client nodes:
Object: DQS
Number: 66
File/PID: DQS$SERVER.EXE
User ID: DQS$SERVER
Proxy access: none
The default user ID is DQS$SERVER; the password is randomly generated during the installation procedure.
On clients, each newly created client queue (that is not a generic or logical queue) results in a process being created. Also, while print job notification is returned to a client user, a temporary process is created.
On servers, each logical link to a client node creates a process. Also, the notification process on a server uses one permanent process.
A.4. Installed Images
The following executables are installed as known images when DQS is started:
|
Product Logical Name |
Description, Value, Default, and Image |
|---|---|
|
DQS$NOTIFIER |
CMKRNL, ALTPRI, OPER, TMPMBX, NETMBX, WORLD |
|
DQS$SERVER |
SYSPRV, CMKRNL, ALTPRI, OPER, TMPMBX, NETMBX, WORLD |
|
DQS$MSG | |
|
DQS$SMB |
Appendix B. Sample Installations
This appendix contains sample installation dialogs of the Distributed Queuing Service for OpenVMS Systems.
|
Section |
Topic |
|---|---|
|
1 |
Sample PCSI installations on OpenVMS VAX systems |
|
2 |
Sample VMSINSTAL installations on OpenVMS VAX and AXP systems |
B.1. Sample PCSI Installation on an OpenVMS System
Client Installation
Example B.1, ''Sample PCSI Client Installation on an OpenVMS System'' shows a sample DQS PCSI client installation on an OpenVMS VAX system. The DQS software resides in a directory pointed to by the PCSI$SOURCE logical name.
$ DEFINE PCSI$SOURCE NODEA$MKA500: Return
$ PRODUCT INSTALL DQS Return
The following product has been selected:
DEC VAXVMS DQS V1.3
Do you want to continue? [YES] Return
*** DEC VAXVMS DQS V1.3: DEC VAXVMS DQS V1.3 for OpenVMS
    Copyright © 1994 Digital Equipment Corporation
    Digital Equipment Corporation

    This product uses the PAKs: DEC DQS V1.3.
Do you want all the default values for this product? [YES] Return
Do you want to view the values? [NO] Return
Execution phase starting
The following product will be installed:
DEC VAXVMS DQS V1.3
Estimated space information for volume DISK$OPENVMS060
710 required; 64060 available; 63350 net
Portion Done: 0%...10%...20%...40%...60%...70%...90%...100%
The following product has been installed:
DEC VAXVMS DQS V1.3
Start of test procedure
End of test procedure; completed with no errors
*** DEC VAXVMS DQS V1.3: DEC VAXVMS DQS V1.3 for OpenVMS
    [DQS$SERVER] directory is created in SYS$COMMON: area.
    DQS$SERVER account is created.

This product requires the following SYSGEN parameters:
    GBLPAGES minimum 600
This product requires the following SYSGEN parameters:
    GBLSECTIONS minimum 5
The client installation is complete.
DQS network object is created.
Perform post-installation before using DQS.
$
PCSI Installation of Server Software
Example B.2, ''Sample PCSI Server Installation on OpenVMS VAX System'' shows a sample DQS server installation on an OpenVMS VAX system. The DQS software resides in a directory pointed to by the PCSI$SOURCE logical name.
$ DEFINE PCSI$SOURCE NODEA$MKA500: Return
$ PRODUCT INSTALL DQS Return
The following product has been selected:
DEC VAXVMS DQS V1.3 [Available]
Do you want to continue? [YES] Return
*** DEC VAXVMS DQS V1.3: DEC VAXVMS DQS V1.3 for OpenVMS
    Copyright © 1994 Digital Equipment Corporation
    Digital Equipment Corporation
    This product uses the PAKs: DEC DQS V1.3.
    Do you want all the default values for this product? [YES] NO
       *** DEC VAXVMS VMS V6.1 [Available]
You need to complete the pre-installation tasks to install DQS software.
Do you want to continue? [YES] Return
The DQS client software will be installed automatically on this node.
Do you want to install the DQS server software on this node [NO] YES Return
Do you want to view the values? [NO] Return
Execution phase starting
The following product will be installed:
DEC VAXVMS DQS V1.3
Estimated space information for volume DISK$OPENVMS060
1018 required; 64248 available; 63230 net
Portion Done: 0%...10%...20%...30%...40%...50%...70%...80%...90%...100%
The following product has been installed:
DEC VAXVMS DQS V1.3
Start of test procedure
End of test procedure; completed with no errors
*** DEC VAXVMS DQS V1.3: DEC VAXVMS DQS V1.3 for OpenVMS
    [DQS$SERVER] directory is created in SYS$COMMON: area.
    DQS$SERVER account is created.
    This product requires the following SYSGEN parameters:
        GBLPAGES minimum 600
    This product requires the following SYSGEN parameters:
        GBLSECTIONS minimum 5
    The client installation is complete.
    The server installation is complete.
    DQS network object is created.
    Perform post-installation before using DQS.
$
B.2. Sample VMSINSTAL Installation on an OpenVMS AXP System
Example B.3, ''Sample VMSINSTAL Client Installation on an OpenVMS AXP System'' shows a sample installation of DQS client software on an OpenVMS AXP system, using the VMSINSTAL utility.
Username: SYSTEM Return
Password: Return
$ @SYS$UPDATE:VMSINSTAL DQS013 MKA500: Return
OpenVMS AXP Software Product Installation Procedure V6.1
It is 22-MAR-1994 at 13:57.
Enter a question mark (?) at any time for help.
%VMSINSTAL-W-ACTIVE, The following processes are still active:
   DQS$NOTIFIER
* Do you want to continue anyway [NO]? YES Return
* Are you satisfied with the backup of your system disk [YES]? Return
Please mount the first volume of the set on MKA500:.
* Are you ready? YES Return
%MOUNT-I-MOUNTED, DQS mounted on _AXPPD$MKA500:
The following products will be processed:
   DQS V1.3
     Beginning installation of DQS V1.3 at 14:06
%VMSINSTAL-I-RESTORE, Restoring product save set A ...
%VMSINSTAL-I-RELMOVED, Product’s release notes have been moved to SYS$HELP.
          The DQS client will be installed automatically on this node.
* Do you want to install the DQS server software on this node [NO]? Return
* Do you want to run the IVP after the installation [YES]? Return
* Do you want to purge files replaced by this installation [YES]? Return
   Product: DQS
   Producer: DEC
   Version: 1.3
   Release Date: 7-MAR-1994
* Does this product have an authorization key registered and loaded? YES Return

      No further questions.
%VMSINSTAL-I-RESTORE, Restoring product save set B ...
%VMSINSTAL-I-ACCOUNT, This installation updates an ACCOUNT named DQS$SERVER.
%UAF-I-MDFYMSG, user record(s) updated
%VMSINSTAL-I-ACCOUNT, This installation updates an ACCOUNT named DQS$SERVER.
%UAF-I-MDFYMSG, user record(s) updated
%VMSINSTAL-I-ACCOUNT, This installation updates an ACCOUNT named DQS$SERVER.
%UAF-I-MDFYMSG, user record(s) updated
      Installing DQS CLIENT software . . .

   Checksum file updated last by WEBER on 22-MAR-1994 09:40:50.30
%NET$CONFIGURE-I-VERCHECKSUM, verifying checksums
%NET$CONFIGURE-I-MODCHECKSUM, checksumming NCL management scripts modified by
NET$CONFIGURE
%NET$CONFIGURE-I-CONFIGCOMPLETED, DECnet/OSI for OpenVMS configuration completed
   Checksum file updated last by SYSTEM on 22-MAR-1994 14:08:08.73
%NET$CONFIGURE-I-VERCHECKSUM, verifying checksums
%NET$CONFIGURE-I-MAKEACCOUNT, this procedure creates user account DQS$SERVER
$NCL @SYS$SYSROOT:[SYSMGR]NET$APPLICATION_STARTUP.NCL-TEMP;

Node 0 Session Control Application DQS
at 1994-03-22-14:08:16.150-05:00I0.649
Characteristics
    Addresses =
      {
         number = 66
      }
    Client = <Default value>
    Incoming Alias = False
    Incoming Proxy = False
    Outgoing Alias = False
    Outgoing Proxy = False
    Node Synonym = False
    Image Name = SYS$SYSTEM:DQS$SERVER.EXE
    User Name = "DQS$SERVER"
    Incoming OSI TSEL = <Default value>

$vef = F$verify(vef)
%NET$CONFIGURE-I-MODCHECKSUM, checksumming NCL management scripts modified by
NET$CONFIGURE
%NET$CONFIGURE-I-CONFIGCOMPLETED, DECnet/OSI for OpenVMS configuration completed
%VMSINSTAL-I-ACCOUNT, This installation updates an ACCOUNT named DQS$SERVER.
%UAF-I-MDFYMSG, user record(s) updated
    DQS network object is created.
******************************************************************
*      Instructions for completing DQS installation *
******************************************************************
o Please follow the post installation instructions which have
been outlined in the DQS V1.3 Installation Guide.
o Please be sure to edit your OpenVMS System Startup Procedure
and add the following line to invoke the DQS Startup Procedure:
       $ @SYS$STARTUP:DQS$STARTUP.COM
o Once you have completed the DQS post installation procedures
you can invoke the DEC DQS installation verification procedure
to test your customizations. To invoke this file start DQS
and type:
       $ @SYS$TEST:DQS$IVP.COM
o This installation has updated the DCL Tables. Therefore
users must log out and then back in, in order to use the
QSHOW, QDELETE, and QSET commands for displaying, deleting,
and modifying jobs on the remote server queues.
o Please read the DQS V1.3 release notes located in the file
SYS$HELP:DQS013.RELEASE_NOTES .

%VMSINSTAL-I-MOVEFILES, Files will now be moved to their target directories...
Beginning of the DQS V1.3-0 Installation Verification Procedure.
   Copyright Digital Equipment Corporation 1994. All rights reserved.
   Restricted Rights: Use, duplication, or disclosure by the U.S. Government
   is subject to restrictions as set forth in subparagraph (c)(1)(ii) of
   DFARS 252.227-7013, or in FAR 52.227-19, or in FAR 52.227-14 Alt. III, as
   applicable.

   This software is proprietary to and embodies the confidential technology
   of Digital Equipment Corporation. Possession, use, or copying of this
   software and media is authorized only pursuant to a valid written license
   from Digital or an authorized sublicensor.
%DQS-I-QUESUCCESS IVP test successful
End of the DEC DQS for OpenVMS V1.3-0 Installation Verification Procedure
       Installation of DQS V1.3 completed at 14:08
    Adding history entry in VMI$ROOT:[SYSUPD]VMSINSTAL.HISTORY
    Creating installation data file: VMI$ROOT:[SYSUPD]DQS013.VMI_DATA
    VMSINSTAL procedure done at 14:08
$
Server Installation
Example B.4, ''Sample VMSINSTAL Server Installation on OpenVMS VAX System'' shows a sample installation of a DQS server on an OpenVMS VAX system using the VMSINSTAL installation procedure.
Username: SYSTEM Return
Password: Return
$ @SYS$UPDATE:VMSINSTAL DQS013 MUA0: Return
      OpenVMS VAX Software Product Installation Procedure T6.1-5Y3
It is 18-MAR-1994 at 09:51.
Enter a question mark (?) at any time for help.
%VMSINSTAL-W-ACTIVE, The following processes are still active:
      _FTA13:
      DAVIES
      _FTA6:
* Do you want to continue anyway [NO]? YES Return
* Are you satisfied with the backup of your system disk [YES]? Return
The following products will be processed:
      DQS V1.3
             Beginning installation of DQS V1.3 at 9:53
%VMSINSTAL-I-RESTORE, Restoring product save set A ...
%VMSINSTAL-I-RELMOVED, Product’s release notes have been moved to SYS$HELP.
             The DQS client will be installed automatically on this node.
* Do you want to install the DQS server software on this node [NO]? YES

                                *** PLEASE NOTICE ***
       If you are upgrading DQS server software from an earlier version
       to DQS V1.3, the earlier version of the DQS server software must
       be running. This allows the DQS V1.3 installation procedure to read
       the existing DQS server configuration information and create a
       new DQS V1.3 server configuration file. Otherwise, after
       installation, you must manually update your DQS V1.3 server
       configuration file.

       The directory and name of the DQS V1.3 configuration file is:
                 SYS$MANAGER:DQS$SERVER_CONFIG.TXT
       Digital recommends that you review the new DQS V1.3 server
       configuration file after this installation. Refer to the section
       on server management in the DQS System Manager’s Guide for more
       information.

       The DQS client configuration is not automatically updated. Refer
      to the section on client management in the DQS System Manager’s
      Guide for more information.
* Do you want to proceed [YES]? RETURN
* Do you want to run the IVP after the installation [YES]? RETURN
* Do you want to purge files replaced by this installation [YES]? RETURN
      Product:     DQS
      Producer:    DEC
      Version:     1.3
      Release Date:  7-MAR-1994
* Does this product have an authorization key registered and loaded? YES
         No further questions.
%VMSINSTAL-I-RESTORE, Restoring product save set B ...
%VMSINSTAL-I-ACCOUNT, This installation creates an ACCOUNT named DQS$SERVER.
%UAF-I-ADDMSG, user record successfully added
%UAF-I-RDBADDMSGU, identifier DQS$SERVER value [000300,000311] added to rights d
atabase
      DQS$SERVER account is created.
%VMSINSTAL-I-ACCOUNT, This installation updates an ACCOUNT named DQS$SERVER.
%UAF-I-MDFYMSG, user record(s) updated
%VMSINSTAL-I-ACCOUNT, This installation updates an ACCOUNT named DQS$SERVER.
%UAF-I-MDFYMSG, user record(s) updated
%VMSINSTAL-I-ACCOUNT, This installation updates an ACCOUNT named DQS$SERVER.
%UAF-I-MDFYMSG, user record(s) updated
%VMSINSTAL-I-SYSDIR, This product creates system disk directory SYS$COMMON:[DQS
$SERVER].
       [DQS$SERVER] directory is created in SYS$COMMON: area.

     Installing DQS SERVER software . . .
     Installing DQS CLIENT software . . .
    Checksum file updated last by CHO on 17-MAR-1994 09:48:25.61

%NET$CONFIGURE-I-VERCHECKSUM, verifying checksums
%NET$CONFIGURE-I-MODCHECKSUM, checksumming NCL management scripts modified by NE
T$CONFIGURE
%NET$CONFIGURE-I-CONFIGCOMPLETED, DECnet/OSI for OpenVMS configuration completed
    Checksum file updated last by CHO on 18-MAR-1994 09:56:48.11
%NET$CONFIGURE-I-VERCHECKSUM, verifying checksums
%NET$CONFIGURE-I-MAKEACCOUNT, this procedure creates user account DQS$SERVER
$NCL @SYS$SYSROOT:[SYSMGR]NET$APPLICATION_STARTUP.NCL-TEMP;
Node 0 Session Control Application DQS
at 1994-03-18-09:57:00.327-05:00I0.289

Node 0 Session Control Application DQS
at 1994-03-18-09:57:00.947-05:00I0.289
  Characteristics
      Addresses      =
          {
               number = 66
          }
      Client                   = <Default value>
      Incoming Alias           = False
      Incoming Proxy           = False
      Outgoing Alias           = False
      Outgoing Proxy           = False
      Node Synonym             = False
      Image Name               = SYS$SYSTEM:DQS$SERVER.EXE
      User Name                = "DQS$SERVER"
      Incoming OSI TSEL        = <Default value>

$vef = F$verify(vef)
%NET$CONFIGURE-I-MODCHECKSUM, checksumming NCL management scripts modified by NE
T$CONFIGURE
%NET$CONFIGURE-I-CONFIGCOMPLETED, DECnet/OSI for OpenVMS configuration completed
%VMSINSTAL-I-ACCOUNT, This installation updates an ACCOUNT named DQS$SERVER.
%UAF-I-MDFYMSG, user record(s) updated
          DQS network object is created.
******************************************************************
*          Instructions for completing DQS installation *
******************************************************************
     o Please follow the post installation instructions which have
       been outlined in the DQS V1.3 Installation Guide.
     o Please be sure to edit your OpenVMS System Startup Procedure
       and add the following line to invoke the DQS Startup Procedure:
              $ @SYS$STARTUP:DQS$STARTUP.COM
     o Once you have completed the DQS post installation procedures
       you can invoke the DEC DQS installation verification procedure
       to test your customizations. To invoke this file start DQS
       and type:
              $ @SYS$TEST:DQS$IVP.COM
      o This installation has updated the DCL Tables. Therefore
        users must log out and then back in, in order to use the
        QSHOW, QDELETE, and QSET commands for displaying, deleting,
        and modifying jobs on the remote server queues.
      o Please read the DQS V1.3 release notes located in the file
        SYS$HELP:DQS013.RELEASE_NOTES .
  %VMSINSTAL-I-MOVEFILES, Files will now be moved to their target directories...
Beginning of the DQS V1.3 Installation Verification Procedure.
       Copyright Digital Equipment Corporation 1994. All rights reserved.

       Restricted Rights: Use, duplication, or disclosure by the U.S. Government
       is subject to restrictions as set forth in subparagraph (c)(1)(ii) of
       DFARS 252.227-7013, or in FAR 52.227-19, or in FAR 52.227-14 Alt. III, as
       applicable.

       This software is proprietary to and embodies the confidential technology
       of Digital Equipment Corporation. Possession, use, or copying of this
       software and media is authorized only pursuant to a valid written license
       from Digital or an authorized sublicensor.

%DQS-I-QUESUCCESS IVP test successful
End of the DEC DQS for OpenVMS V1.3 Installation Verification Procedure
            Installation of DQS V1.3 completed at 09:57
            VMSINSTAL procedure done at 09:57
$
Appendix C. DQS Installation Messages
This appendix describes error messages that you might encounter when you install or verify the installation of DQS software. Suggestions for error recovery are included, as well as instructions for reporting problems to VSI for irrecoverable errors. Refer to the following sections for information on these topics:
|
Section |
Topic |
|---|---|
|
1 |
Installation error messages |
|
2 |
IVP error messages |
|
3 |
Error reporting |
All DQS error messages begin with this prefix:
%DQS-l-ident,
The messages in this appendix are listed alphabetically by their message ident (or identification).
Refer to the OpenVMS System Messages and Recovery Procedures Reference Manual for an explanation of the following:
The format of OpenVMS system messages and their severity levels
Error messages beginning with %PCSI and possible solutions to these problems
For a description of any errors returned by the License Management Facility (LMF), refer to the OpenVMS License Management Utility Manual .
C.1. Installation Error Messages
This section describes error messages that you might encounter while you are installing DQS software.
C.1.1. Message Section
NOSPACE, there is not enough free space on the system disk to install DQS Vn.n
Explanation: There is not enough free space on the system disk for the installation.
User Action: Delete some files and try again.
VERSION, DQS Vn.n requires OpenVMS Version V n.n or later to install
Explanation: The installed version of the OpenVMS operating system is not the prerequisite one.
User Action: Install or upgrade to the appropriate version of the OpenVMS operating system and reinstall the DQS software.
C.2. IVP Error Messages
This section describes error messages that you might encounter when you run the DQS Installation Verification Procedure (IVP).
IVP Messages
FILENOTFOUND file-name is not found
Explanation: The IVP could not find the file file-name. The file-name may be one of the following:
SYS$MANAGER:DQS$CLIENT.EXE
SYS$MANAGER:DQS$SMB.EXE
SYS$MANAGER:DQS$SERVER.EXE
SYS$MANAGER:DQS$MSG.EXE
Refer to Appendix A, "Files Installed or Modified on the System" for information about these files.
User Action: Reinstall the DQS software. If you still get this message, report your problem to VSI.
C.3. Error Reporting
If an error occurs while you are using the DQS software and you have followed the suggestions in this section and the troubleshooting section in the Distributed Queuing Service System Manager's Guide and still have reason to believe that the error is a problem with the DQS sofware, report the problem to VSI.
Actions
Depending on the nature of the problem and the type of support you have, you can take one of the following actions:
Call VSI if your software contract or warranty agreement entitles you to telephone support.
Determine whether the problem is a result of a defective media. If so, contact your VSI Services representative for a replacement copy. If the requirements for installing the DQS software have been met, and the media is not defiective, then submit a Software Performance Report (SPR). When you prepare to submit an SPR, please do the following:
Provide as complete a description of the problem as possible, trying not to overlook any details. Include in the description the version numbers of the DQS software and operating system (both server and client).
Reduce the problem to as simple a case as possible, preferably to a single command.
Include listings of all output from the DQS software (if any) and any relevant SYS$MANAGER:OPERATOR.LOG entries and NETSERVER.LOG files. The DQS$NETSERVER.LOG files are located in the DQS server account default directory.
Provide the following:
A SHOW LOGICAL listing of all the DQS logical definitions on both the server and client nodes
A SHOW QUEUE/FULL/ALL listing of the queue on both the server and client nodes
A SHOW PROCESS/ALL listing of the server DQS process
Fill out and submit a Reader’s Comments form if the problem has to do with the DQS documentation. There are Reader’s Comments forms at the back of each manual. Use the form from the manual in which you foun d the error. Include the section and page number.
Review the current Software Product Description (SPD) and Warranty Addendum. If you encounter a problem during the warranty period, report the problem as indicated above or follow alternate instructions provided by VSI for reporting SPD nonconformance problems.