VSI Enterprise Directory Management
- Operating System and Version:
- VSI OpenVMS Alpha Version 8.4-2L1 or higher
VSI OpenVMS IA-64 Version 8.4-1H1 or higher
Preface
1. About VSI
VMS Software, Inc. (VSI) is an independent software company licensed by Hewlett Packard Enterprise to develop and support the OpenVMS operating system.
2. Purpose of this Guide
This guide introduces the VSI Enterprise Directory product. It explains how to plan an Enterprise Directory for your organization, and how to configure and maintain it.
3. Related Documentation
Enterprise Directory managers also need VSI Enterprise Directory Problem Solving.
The DXIM utility help and the Directory module help of the NCL director both provide useful information about managing directory information and services.
4. VSI Encourages Your Comments
You may send comments or suggestions regarding this manual or any VSI document by sending electronic mail to the following Internet address: <docinfo@vmssoftware.com>. Users who have VSI OpenVMS support contracts through VSI can contact <support@vmssoftware.com> for help with this product.
5. OpenVMS Documentation
The full VSI OpenVMS documentation set can be found on the VMS Software Documentation webpage at https://docs.vmssoftware.com.
6. Abbreviations and Acronyms
| ACIitem | Access Control Information Item |
| ASN.1 | Abstract Syntax Notation 1 |
| CCITT | International Telegraph and Telephone Consultative Committee |
| DIB | Directory Information Base |
| DIT | Directory Information Tree |
| DSA | Directory System Agent |
| DUA | Directory User Agent |
| DXIM | X.500 Information Management Utility |
| EMA | Enterprise Management Architecture |
| ISO | International Organization for Standardization |
| ITU-T | International Telephone Union - Telecommunications |
| LDAP | Lightweight Directory Access Protocol |
| MTA | Message Transfer Agent |
| NCL | Network Control Language |
| RDN | Relative Distinguished Name |
7. Typographical Conventions
monospace text | Screen displays, command lines, and X.500 schema definitions. For example,
commonName. |
| bold italics | New terminology. For example, distinguished name. |
| [ ] | Indicates an optional clause in a schema definition. Encloses record data types in NCL commands. |
| <> | In DXIM syntax examples, to indicate a variable to be supplied by the user. For
example: show <name> attributes <attr> |
| ... | In DXIM syntax examples, to indicate that an argument can be repeated. For
example: attributes <attr> [, ...] |
Part I. Introduction
This part provides an overview of VSI Enterprise Directory product, and a tutorial, to enable you to experiment with the product before trying to implement an Enterprise Directory.
Chapter 1, "Directory Information and Enterprise Directories" introduces important concepts and features of the product. This chapter is not essential, but you are strongly recommended to read it before trying to implement a Enterprise Directory.
Chapter 2, "Single Node X.500 Implementation Tutorial" provides a tutorial in which you are told how to set up a single-node Enterprise Directory. This chapter is not essential, but it does provide a step-by-step example to get you started. It enables you to set up a very simple service.
Chapter 3, "Multi-Node X.500 Implementation Tutorial" provides a tutorial in which you are told how to set up a two-node Enterprise Directory complete with replication, access controls, and directory applications. This chapter is not essential, but it does provide a step-by-step example of the tasks involved in setting up an Enterprise Directory. It enables you to gain expertise before committing yourself to a real implementation.
Chapter 1. Directory Information and Enterprise Directories
VSI Enterprise Directory product is an implementation of the ISO and ITU-T? series of standards and recommendations for Enterprise Directories. ISO and ITU-T define models and protocols for Enterprise Directories that enable software vendors to build products that can work together to provide a single, scalable, networked Enterprise Directory.
The Enterprise Directory product is an Lightweight Directory Access Protocol (LDAP) enabled directory, and implements the LDAP V2 and V3 protocols.
The purpose of such an Enterprise Directory is to store and provide access to information about objects such as people, computers, printers, and applications. Such information could be used, for example, by a messaging application to store information that enables it to route messages across a network. This chapter explains the X.500 concepts that will help you plan and configure VSI Enterprise Directory product for your organization.
This chapter divides the X.500 concepts into two categories:
- Directory information
You need to understand the way information is represented in an X.500 Enterprise Directory, so that you can plan how best to use the Enterprise Directory to meet your organization’s information requirements.
- Enterprise Directories
You need to understand the services that the Enterprise Directory product provides to its users, and how the software components of the product cooperate to provide answers to requests for information. This will help you to plan how to configure your Enterprise Directory.
1.1. Directory Information
The Enterprise Directory stores information as directory entries, each entry representing an object, such as a person, a place, an organization, or a computer.
The entries are organized into a Directory Information Tree (DIT), such that some entries are subordinate to others. The figure below illustrates the DIT structure, showing a number of directory entries forming a hierarchy beneath a root. Note that, by convention, the root of the DIT is at the top of the picture.
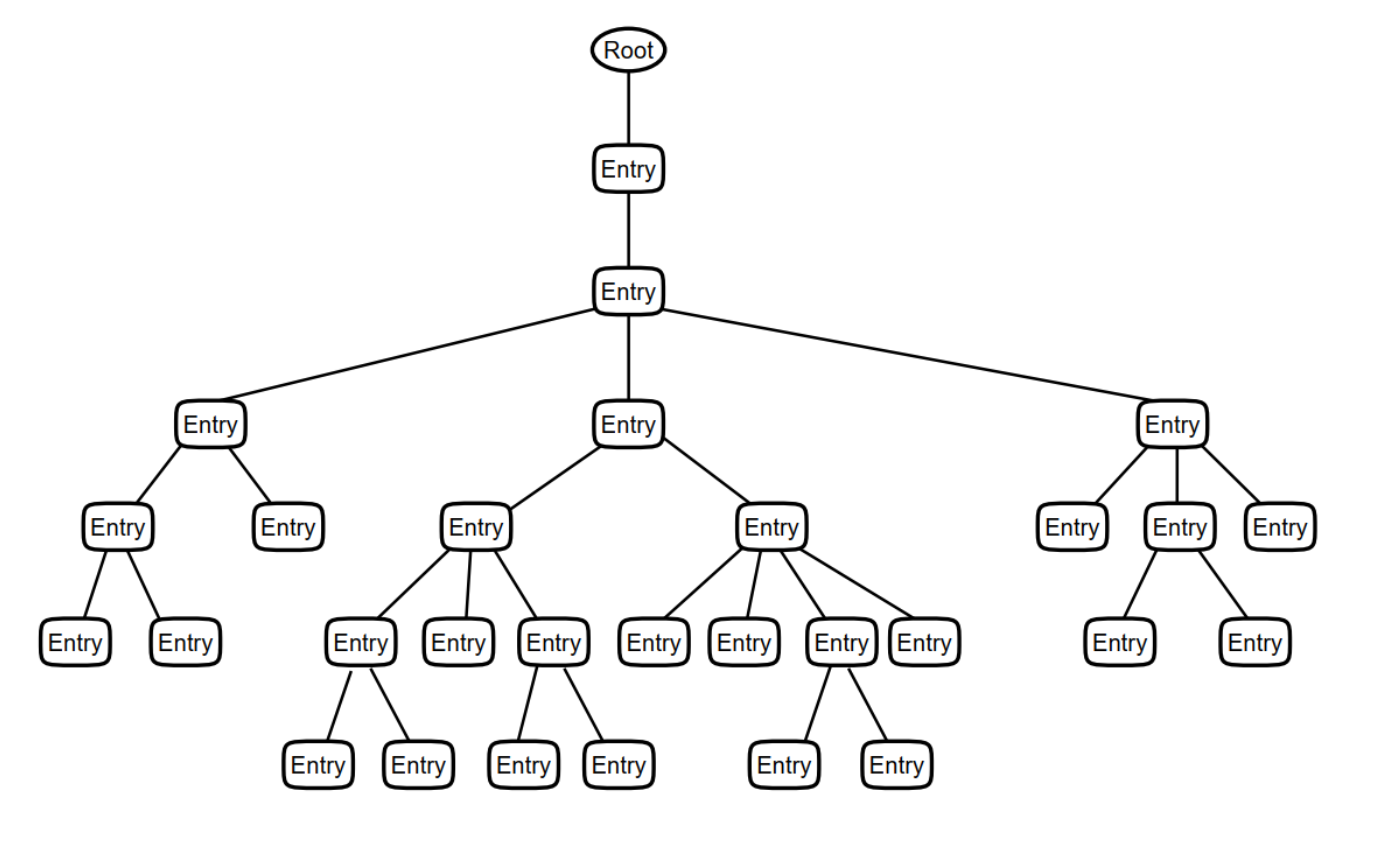 |
The position of entries in the hierarchy should be based on the relationships between the objects they represent in the real world. For example, an entry representing a person might be positioned beneath an entry representing the organization the person works for. The hierarchical structure is the basis of each entry’s name, as described in Section 1.1.2, ''Entry Names''. The structure also enables the DIT to be divided into subtrees which can be distributed and replicated amongst multiple servers, as described in Section 1.2.2, ''Distributing Directory Information''. This means that the DIT is scalable to any size.
1.1.1. Entries
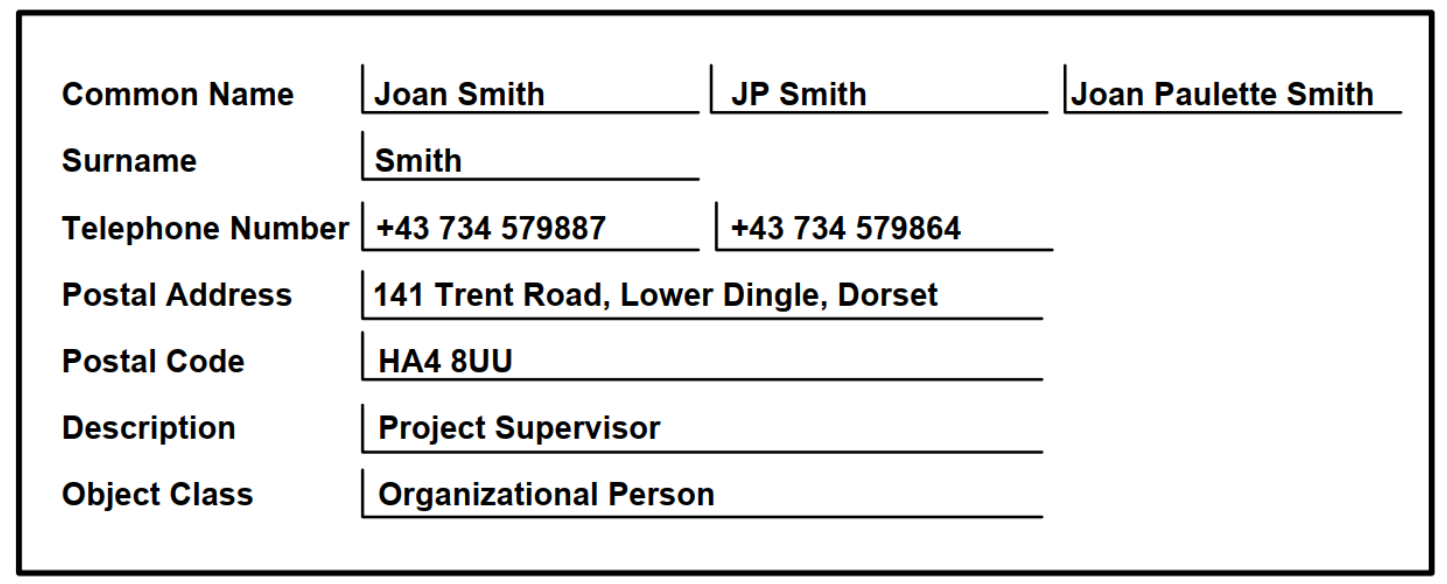
Within the Enterprise Directory, objects are represented as directory entries. There should be one directory entry for each object that you want to represent. Each entry is made up of a set of attributes, each of which has one or more values. Figure 1.2, ''A Typical Directory Entry'' illustrates how an application might display a typical entry representing a person.
 |
1.1.1.1. Attributes
An attribute is
information of a particular type about an entry. Every attribute has an
attribute type
and at least one attribute
value. For example, the entry in Figure 1.2, ''A Typical Directory Entry'' includes an attribute of the type
commonName? with three values, each of which is a variation of the name of
the person that the entry represents.
The definition of each attribute type specifies whether the attribute can have more than one value, and whether there are any constraints on the length or the range of the value. Section 1.2.1, ''The Schema'' explains how these definitions are enforced and managed. Note that the values of a multi-valued attribute are not ordered.
Every attribute type is associated with an attribute syntax which defines the format of
its value. For example, the telephoneNumber attribute type uses
the telephoneNumberSyntax.
Each attribute type is also associated with one or more
matching
rules. A matching rule specifies how the Enterprise
Directory will compare attribute values with each other for certain user
requests. For example, some matching rules are insensitive to the case of
characters, such that a user searching for
commonName="JOANSMITH" would find an entry with the value
commonName="JoanSmith".
Each attribute type may be associated with matching rules that support exact matching, substring matching, approximate (phonetic) matching, and ordering of values. Later chapters of this guide explain how to define your own attributes as extensions to the product.
1.1.2. Entry Names
As Figure 1.2, ''A Typical Directory Entry'' illustrates, a typical entry can have several attribute values that represent names by which the object is known, such as surnames and common names. However, so that the Directory Service can unambiguously identify an individual entry, each entry also has a directory name.
A directory name identifies an individual entry in terms of that entry’s position in the hierarchy of the DIT (illustrated in Figure 1.1, ''The Hierarchical or Tree Structure of Directory Information'').
There are two types of directory name:
Distinguished names
Alias names
Every directory entry has only one distinguished name, but can also have several alias names. Section 1.1.2.1, ''Distinguished Names'' and Section 1.1.2.2, ''Alias Names'' describe distinguished names and alias names in detail.
1.1.2.1. Distinguished Names
Every entry has one distinguished name. A distinguished name is made up of a sequence of terms, each of which is called a relative distinguished name (RDN).
Each RDN in an entry’s distinguished name represents one of the entries that forms the path from the root of the DIT to the entry.
Each RDN is an attribute type and value chosen from the attributes of the
entry that it names. If the attribute type you use for naming has more than
one value, then you must choose which value is to serve as the RDN. For
example, for the typical entry illustrated in Figure 1.2, ''A Typical Directory Entry'',
if the commonName attribute type is used for naming, then you
need to choose one of the three values of commonName. Any other
values are still present in the entry, but do not form part of the entry’s
distinguished name.
It is possible for an RDN to contain more than one attribute type and
value from an entry. For example, a typical RDN would be
commonName="JoanSmith", but it is also possible to have an
RDN such as commonName="JoanSmith", locality="Lower
Dingle". Typically, using more than one attribute in an RDN makes
directory names less user friendly.
Note
Most directory applications use abbreviations for attribute types. For
example, commonName is often abbreviated to
CN. Thus, commonName="JoanSmith" is
abbreviated to CN="Joan Smith".
Most examples in this guide use the default abbreviations to shorten entry names. You can customize VSI directory applications to suit local conventions or language.
No two entries that have the same immediately superior entry can have the same attribute type and value or combination of attribute types and values chosen to be the RDN. Thus, each RDN is unique amongst the subordinates of a given entry.
One of your planning tasks will be to decide how to resolve name clashes, for example, if you have two Joan Smiths in the same part of your organization. Chapter 4, "Planning Your Directory Information Tree" explains name planning.
Figure 1.3, ''Distinguished Names'' shows how RDNs are used to form unambiguous distinguished names.
The entry representing Joan Smith (at the bottom left of the illustration) has a distinguished name made up of four RDNs. The first three RDNs represent the three entries that form a path from the root of the DIT to Joan’s entry. The fourth RDN is that of Joan’s entry itself. Since each RDN is unique relative to its superior entry, the distinguished name is also guaranteed to be unique.
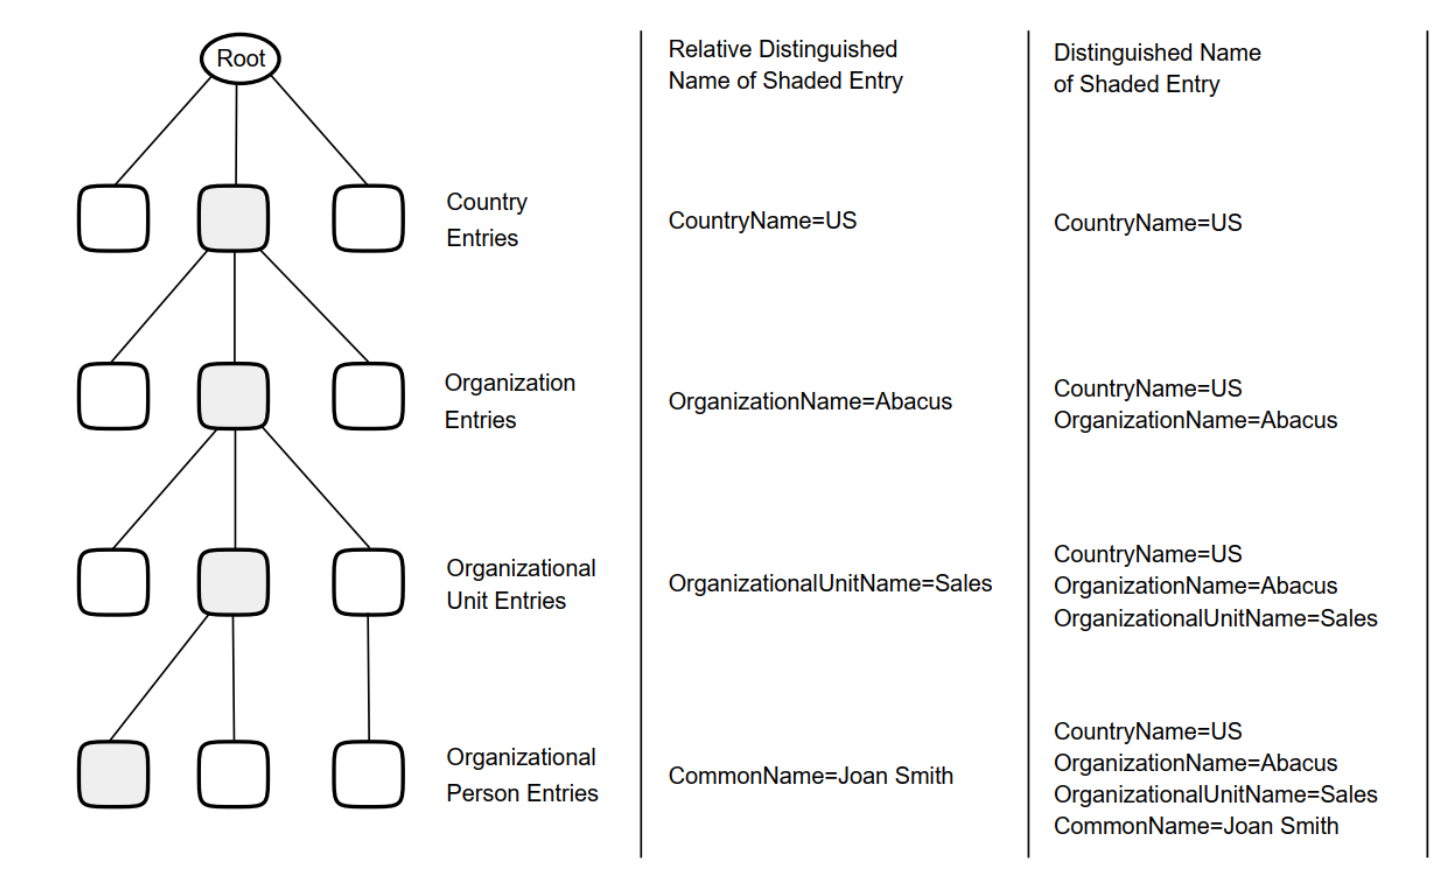 |
A typical directory application would display Joan’s distinguished name (using abbreviations) as follows:
/C=US/O=Abacus/OU=Sales/CN="Joan Smith"
The abbreviation C means countryName,
O means organizationName, OU
means organizationalUnitName, and CN means
commonName. The four RDNs in the distinguished name are
separated by the / character, and are listed in order of
hierarchical superiority, with the RDN of the entry closest to the root of
the DIT listed first.
The exact conventions used to display a distinguished name vary between
applications. The conventions shown are the ones used byte X.500 Information
Management (DXIM) utility. The LDAP convention is CN="Joan Smith",
OU=Sales, O=Abacus, C=US.
1.1.2.2. Alias Names
Although an entry has only one distinguished name, there can be many alias names for an entry. This means that an entry can be referred to using either its distinguished name, or any one of its alias names.
An alias name looks just like a distinguished name. However, an alias name does not represent the direct path from the root of the DIT to the entry. Instead, as the Enterprise Directory follows the path from the root, it finds that the path leads to an alias entry. The alias entry has an attribute that contains the directory name of the entry to which the alias refers.
For example, if Joan Smith (see Figure 1.3, ''Distinguished Names'') has recently
married, and might still be known by her unmarried name Joan Meredith, then
you could create an alias entry called
/C=US/O=Abacus/OU=Sales/CN="Joan Meredith". Any user
request that specifies this alias name is automatically redirected.
1.1.3. Classes
Every entry is classified according to the characteristics of the object that
it represents. When you create an entry, you have to specify what
class of entry it
is. To do this, you use the objectClass attribute.
VSI Enterprise Directory provides several different classes, such as
organizationalPerson and residentialPerson. See
Appendix A, "Default Schema Definitions" for details of the classes provided by the VSI
Enterprise Directory. Later chapters of this guide also explain how to define
classes of your own.
Each class definition specifies mandatory attributes and optional for entries of that class. Most classes also have name forms and structure rules defined for them. The following sections explain each of these in more detail.
1.1.3.1. Mandatory Attributes
Most classes of entry have mandatory attributes. When you create an entry, you must supply values for each of the mandatory attributes, or the creation will fail. Also, any attempt to modify a mandatory attribute so as to remove all of its values will fail unless a replacement value is specified.
For example, for the organizationalPerson class, the
mandatory attributes are objectClass, commonName,
and surname. So, when you create an entry of this class, you
must supply values for these three attributes.
Appendix A, "Default Schema Definitions" details the mandatory attributes of all classes provided with the VSI Enterprise Directory product.
1.1.3.2. Optional Attributes
Most classes of entry have optional attributes. You can add and remove optional attributes at any time. However, even though an attribute may be optional, some directory users might be depending on its presence. Therefore, you should be careful not to remove or modify attributes without making sure that you are not inconveniencing other directory users.
Appendix A, "Default Schema Definitions" details the optional attributes of all classes provided with the VSI Enterprise Directory product.
1.1.3.3. Name Forms
Classes have name forms. A name form states that the attribute value that is used in the RDN of an entry must be chosen from a particular attribute or set of attributes.
For example, when you choose the RDN of an organization
entry, you must use organizationName attribute. If you try to
use any other attribute in the RDN of an organization entry,
the Enterprise Directory returns an error and does not create the
entry.
These name forms encourage managers of different parts of the DIT to use consistent styles of naming for their entries. Consistent naming improves the usability of the directory, especially for non-technical users. Appendix A, "Default Schema Definitions" details the name forms of all classes provided with the VSI Enterprise Directory product.
1.1.3.4. Structure Rules
Structure rules state that entries of a given class must be subordinate to an entry of another specified class (or one of a set of classes).
For example, the structure for the organizationalUnit class
states that the immediate superior of an organizationalUnit
entry must be an organization entry or a locality
entry, or another organizationalUnit entry. If you try to
create an organizationalUnit entry as a subordinate of any
other class of entry, the Enterprise Directory returns an error and does not
create the entry.
These structure rules encourage managers of different parts of the DIT to design similar naming trees for their entries. Consistent tree structures improve the usability of the directory, especially for non-technical users. Appendix A, "Default Schema Definitions" details the structure rules of all classes provided with the VSI Enterprise Directory product.
1.2. Enterprise Directories
Section 1.1, ''Directory Information'' described the information that is stored in the directory. This section explains the services that the VSI Enterprise Directory product provides to its users.
Directory System Agents (DSAs)
Directory User Agents (DUAs)
A DSA is a server. It is responsible for storing directory entries, and for providing access to them. A DSA is also responsible for redirecting requests for information that it does not store. You can install one DSA per node (or one DSA per VMS cluster).
A DUA forms part of a client application. A DUA enables users to formulate requests for directory information, such as a request to create or view an entry. A DUA uses a standard protocol to pass requests to a DSA, and to receive answers back from the DSA. There might be many different client applications installed on a single system.
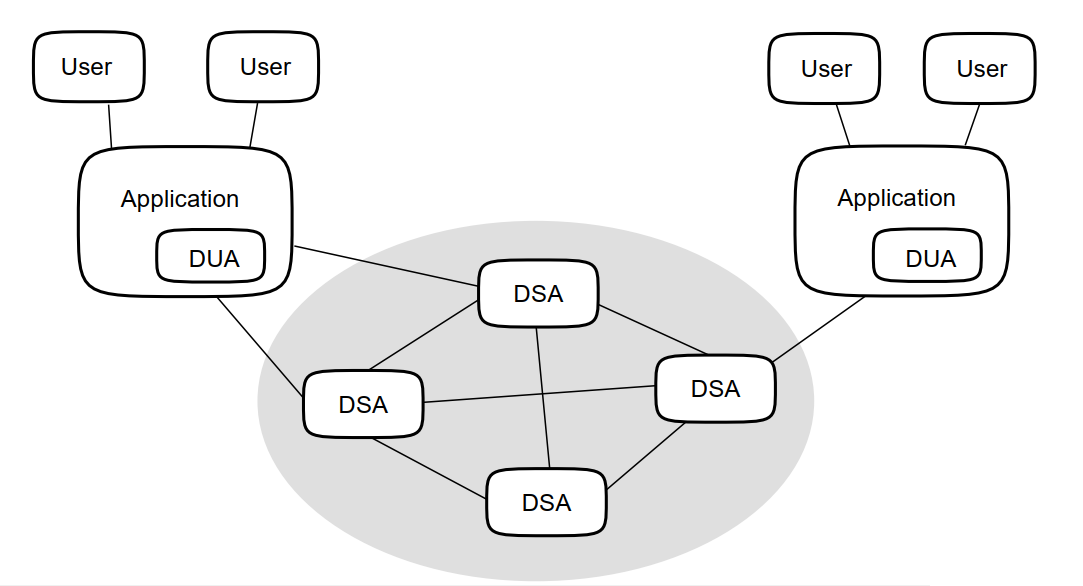 |
Figure 1.4, ''The X.500 Model of Enterprise Directories'' illustrates the X.500 model of directory components, showing how a number of DSAs serve a number of directory applications. Each directory application includes a DUA. The directory applications serve a number of users, which can be human users or other applications.
The VSI Enterprise Directory product provides a DSA and and the X.500 Information Management utility (DXIM). DXIM is an example of an application that includes a DUA. DXIM uses the standard protocol to communicate with DSAs.
Because HP’s DSAs and directory applications use standard protocols, they can interwork with other vendors’ X.500 conformant DSAs and directory applications. For example, you can use DXIM to manage entries in another vendor’s DSA, or use another vendor’s application to manage entries in a HP DSA.
Interrogations of the directory information
Modifications of the directory information
The interrogation services provide different ways of looking at the information in the directory, such as inspecting particular attributes of an entry, or searching for entries that have a specified set of attributes. The modification services allow you to create new entries, remove entries, and modify the attributes of entries.
To provide an efficient and consistent service to users, DSAs can provide a set of services that are not necessarily visible to the user. These are:
Schema enforcement
Distribution of directory information
Replication of directory information
Distribution of user requests to multiple DSAs
Control of access to directory information
Accounting for the use of the Enterprise Directory
These services are described in the following sections.
1.2.1. The Schema
Whenever you create or modify a directory entry, the Enterprise Directory ensures that the entry and its attributes conform to their definitions.
For example, when you create an entry, the Enterprise Directory ensures that you have supplied all of the mandatory attributes, that all the attribute values are of the correct syntaxes, and that the entry conforms to the structure rules and name forms defined for its class.
If an entry you are creating or modifying does not satisfy the rules, then the Enterprise Directory returns an error and does not create or modify the entry.
The Enterprise Directory can provide this service because each DSA has a set of rules, called the schema. Each DSA has a copy of the schema that applies to all entries that it holds. It is possible for different DSAs to apply different sets of rules.
The VSI Enterprise Directory product provides a schema that you can use as it is, or edit to suit your particular needs. For ease of management, VSI recommends that all DSAs use the same schema.
Some VSI applications also use the schema. For example, DXIM uses the abbreviations and window definitions that are defined in the schema.
1.2.2. Distributing Directory Information
The amount of directory information a DSA can hold depends on the resources available on the DSA’s node. You can install one DSA per node or VMS cluster. A single DSA can hold tens or even hundreds of thousands of entries, depending on its resources.
To enable the DIT to exceed the capacity of a single DSA, the VSI Enterprise Directory product enables you to distribute directory information so that each DSA only holds part of the DIT.
You can divide your organization’s DIT into subtrees, each of which is called a naming context, and each DSA holds one or more naming contexts. Thus, although you can only have one DSA per node, that DSA can hold more than one naming context.
Figure 1.5, ''A DIT Divided and Distributed Amongst Four DSAs'' shows a DIT that is divided into four naming contexts, which are distributed amongst four DSAs. In this example, each DSA holds only one naming context.
 |
Part II,''Planning'' explains how to plan the distribution of directory information so that each DSA holds the naming contexts that are most useful to the DSA’s local users.
The ability to distribute directory information means that there is no limit to the total amount of information that can be stored. You can always add new DSAs to increase capacity.
However, the distribution of the DIT does not mean that a user needs to know which DSA to ask for a particular piece of information. Instead, each DSA keeps knowledge information that helps it redirect requests (see Section 1.2.4, ''Distributing Requests for Information'').
Using this knowledge information, DSAs cooperate so that the user receives a response regardless of which DSA they originally contact. HP’s DSAs can have knowledge information about other vendors’ DSAs, as well as about other HP DSAs.
1.2.3. Replicating Directory Information
The VSI Enterprise Directory product not only enables you to distribute directory information (see Section 1.2.2, ''Distributing Directory Information''), but it also enables you to copy information amongst your HP DSAs. This is known as replicating or shadowing information.?
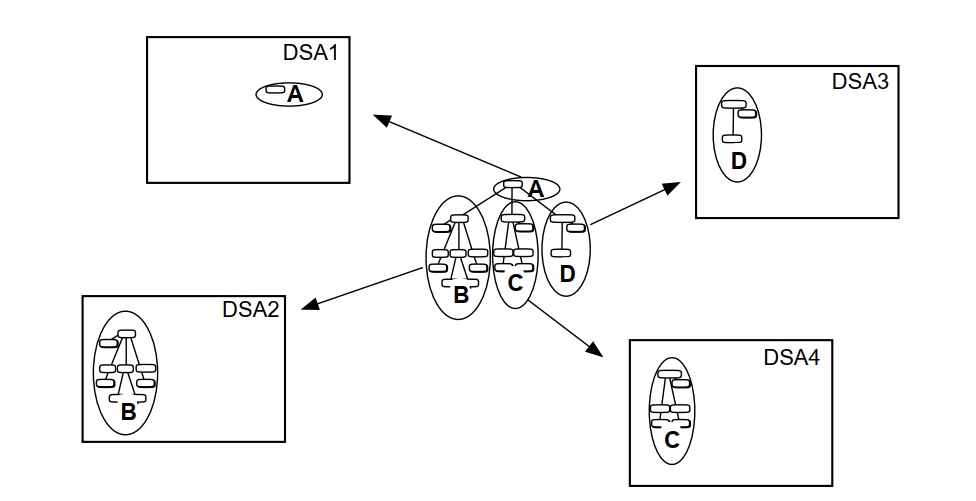
This means that you can have copies of information in several locations, improving response times, and increasing the availability of information. Figure 1.6, ''A DIT Distributed and Replicated Amongst Four DSAs'' shows a DIT that is divided into four naming contexts that are distributed and replicated amongst four DSAs. The arrows show the source and destination of each replicated naming context.
 |
The ability to replicate information makes the Enterprise Directory suitable for organizations that want users and applications in many locations to have efficient access to a large amount of directory information.
HP DSAs use standard protocols to ensure that copies of entries are kept up to date without manual intervention.
1.2.4. Distributing Requests for Information
The distribution and replication of information across many DSAs means that each DSA needs to know what to do with a request for information that it does not hold. For this reason, every DSA has some knowledge information which tells the DSA how to locate entries held by other DSAs.
Some knowledge information has to be set up manually, and the planning considerations for those setup tasks are discussed in Part II,''Planning''. Some knowledge information is set up automatically during replication.
When a DSA cannot satisfy a request itself, it can automatically pass the request on to one or more other DSAs which, according to its knowledge information, are likely to hold the requested information. This process is called chaining.
If a DSA finds that it cannot chain a request, for example, because of network problems or security problems, then it can send information called referrals or continuation references back to the directory application that made the request. These references contain the network address of the DSA that could not be contacted. This enables an application or user to decide whether to attempt a direct connection to that DSA.
1.2.5. Controlling Access to Directory Entries
VSI Enterprise Directory product provides access controls which enable you to prevent different groups of users from inspecting or modifying some of your directory entries, and to require users to specify a password before gaining certain types of access.
The product allows you to control access to entries, and to particular attributes.
For ease of management, VSI Enterprise Directory product provides a template file that you can use to set up access controls for your directory information. The template file is documented so that you know what controls it imposes. Your task is simply to edit the template file to fill in the names of your directory information managers.
If the controls defined by the template file are not suitable, you can customize the template file, or create one of your own. Chapter 7, "Controlling Access to Your Directory Information and Services" provides a full description of access control, and the defaults supplied by the template file. Chapter 11, "Using the Access Control Template File" describes how to use the template file.
1.2.6. Accounting for Enterprise Directory Use
HP DSAs can be configured to provide accounting records. Each accounting record provides details of one user request. When accounting is enabled, records for all user requests are written to an accounting log file.
Accounting reduces the performance of a DSA, and the accounting log file can grow very rapidly, consuming disk space. Therefore, VSI recommends that you only enable accounting if you have a requirement to charge for the use of the Enterprise Directory.
If you enable accounting, you will need to build an application that can process the accounting records. Details of the accounting records, and how to enable accounting are provided in VSI Enterprise Directory Problem Solving.
1.3. Managing the VSI Enterprise Directory Product
There are two types of management task for an X.500 Enterprise Directory, and VSI Enterprise Directory product divides the management functions accordingly. The management tasks reflect the division between the two sets of concepts:
Directory information
Directory services
1.3.1. Managing Directory Information
For the management of information in the DIT, such as entry creation, modification, removal, and display, VSI Enterprise Directory product provides DXIM (the X.500 Information Management utility). DXIM has two interfaces; a command line interface and a windows interface.
If you prefer, you can use an X.500 conformant directory application or an LDAP application from another vendor.
1.3.2. Managing the Enterprise Directory
The software components of VSI Enterprise Directory product conform to HP’s Enterprise Management Architecture (EMA).
EMA is based on the director/entity model in which a management system, called a director, controls one or more objects, called entities. HP’s NCL is an example of a director that you can use to manage the entities in your network.
In the case of VSI Enterprise Directory product, there is a management entity representing the DSA, with subentities representing the knowledge information of the DSA.
By managing the DSA entity and its subentities, you can control the behaviour of the DSA, and configure it to carry out its role as part of your Directory Service as a whole.
You should now have an understanding of the important features of directory information and the enterprise directories. Chapter 3, "Multi-Node X.500 Implementation Tutorial" provides a simple tutorial that enables you to experiment with the product. Part II,''Planning'' provides detailed advice on designing your directory information.
Chapter 2. Single Node X.500 Implementation Tutorial
This chapter provides a simple tutorial of how to set up a single DSA. The tutorial requires one node running OpenVMS Alpha.
There are no variables in this tutorial apart from the operating system you use. Type all commands relevant to your operating system exactly as shown.
Note that setting up a single DSA is much easier than setting up a multi-node Enterprise Directory. This tutorial does not demonstrate how to distribute or replicate information across multiple DSAs, and it does not demonstrate how to set up access controls, or how to set up DSAs to interwork securely.
When you have experimented with this simple tutorial, see Chapter 3, "Multi-Node X.500 Implementation Tutorial" for a more complex tutorial that sets up a multi-node Enterprise Directory.
Destroy the single node Enterprise Directory before attempting the multi-node tutorial. The two tutorials are not designed to be compatible.
2.1. Install the Product
Install the product, and do the post installation task(s), as documented on the installation card relevant to your system’s operating system.
2.2. Configure the DSA
Configure the DSA as follows:
Run the DSA configuration utility.
You need SYSPRV and OPER privileges to run the configuration utility. To run the utility, type:
$ @SYS$STARTUP:DXD$DSA_CONFIGURE
From a privileged account, type:
$ RUN SYS$SYSTEM:NCL
Type the following NCL commands exactly as shown:
ncl> CREATE DSA
ncl> CREATE DSA NAMING CONTEXT "/C=US/O=Abacus"
ncl> ENABLE DSA
ncl> EXIT
2.3. Configure Application Defaults
From a privileged account, type:
$ @SYS$STARTUP:DXD$DUA_CONFIGURE.COM
Accept all defaults.
2.4. Create Some Directory Entries
- Invoke the X.500 information management utility (DXIM), as follows:
$ DXIM /INTERFACE=CHARACTER_CELL
- Type the following DXIM commands exactly as shown:
dxim> create /C=US/O=Abacus attributes objectclass=organization
dxim> create /C=US/O=Abacus/OU=Sales attributes -
_dxim> objectclass=organizationalunit
dxim> create /C=US/O=Abacus/OU=Sales/CN="Francis Black" attributes -
_dxim> objectclass=(organizationalperson,person), surname=black
2.5. Experiment with the Example Enterprise Directory
You now have a single node Enterprise Directory in which one DSA holds three directory entries. The entries represent Abacus, Sales, and Francis Black respectively. You can now experiment with these entries. For example:
dxim> search where surname=black all attributes
dxim> search where surname=b* all attributes
dxim> set /C=US/O=Abacus/OU=Sales/CN="Francis Black" -
_dxim> attribute telephone=123456
dxim> search where surname=black attributes telephone, commonName
Refer to the DXIM online help for details of all commands. The help contains descriptions and examples of all DXIM commands.
2.6. Destroy the Example Enterprise Directory
When you have finished experimenting with the example Enterprise Directory, you must delete it from your system.
To delete the example Enterprise Directory configuration, log in to a privileged account, and use the NCL director to disable and delete the DSA on each node, as follows:
NCL> DISABLE DSA
NCL> DELETE DSA
Then delete the database files and the defaults files on both systems, as follows:
$ DELETE DXD$DIRECTORY:DSA-INFORMATION-TREE.*;*
$ DELETE DXD$DIRECTORY:DXD$DUA_DEFAULTS.DAT;*
Deleting the database files means that the DSA is returned to its unconfigured state, as it was when you first installed the software. The DSA stores its configuration information and its entries in these files.
Chapter 3. Multi-Node X.500 Implementation Tutorial
This chapter provides a simple tutorial for setting up a multi-node Enterprise Directory. The tutorial demonstrates all of the key features of the product; the distribution and replication of information, the use of access controls, and setting up DSAs to interwork securely.
See Chapter 2, "Single Node X.500 Implementation Tutorial" for a single-node tutorial. If you have already tried the single node tutorial, make sure you delete it before trying this tutorial.
This tutorial creates a simple directory information tree containing eight directory entries. The tree represents a fictional organization called Abacus.
For the purposes of this tutorial, you are advised to use these fictional names rather than use real names. This enables you to type the commands exactly as documented, reducing the possibility of confusion.
The aim of this tutorial is for you to experiment with the product, and gain familiarity with some of the functionality, concepts, and tasks involved. You can then approach your Enterprise Directory planning tasks with confidence.
This tutorial might contain terms that are not yet familiar to you. However, understanding all of the terms is not a requirement for being able to complete all of the tasks described.
Completing this example does not mean that you do not need to read other parts of this book. You will not succeed in implementing an efficient and appropriate Enterprise Directory for your organization if you do not plan in some detail. This tutorial does not aim to provide an ideal Enterprise Directory, only a working example.
3.1. The Characteristics of the Example Enterprise Directory
The tasks described in this chapter provide an Enterprise Directory with two DSAs on two nodes. The two DSAs hold different parts of the same directory information tree. Figure 3.1, ''Structure and Distribution of the Example DIT'' illustrates the example tree, and its distribution across the two DSAs.
 |
The two DSAs are installed on nodes referred to as NODE_1 and NODE_2. You need to decide which of your two nodes is to play the role of NODE_1, and which is to be NODE_2, and then apply the tutorial commands as appropriate.
The two DSAs are referred to as CN=DSA1 and CN=DSA2
respectively. Use these exact names for your DSAs. The abbreviation CN means
commonName, which is the attribute type used for naming DSAs in the
directory.
The tutorial includes two entries representing people: Francis Black and Janice
White. Francis’ entry is held on CN=DSA1 within a Sales organizational
unit, and Janice’s entry is held on CN=DSA2 within an Accounts
organizational unit.
Access control for the example tree is provided by the CN="Access Controls" entry shown in Figure 3.1, ''Structure and Distribution of the Example DIT''. The access control entry states that Francis Black is a directory information manager, and that Janice White is an ordinary directory user. The tutorial will show how access rights for these two users differ because of the access controls.
3.2. Install the Product
Install the product on the two systems, as described in the installation documentation for the appropriate operating systems. Complete all post installation tasks.
The two systems need be able to connect to each other using DECnet-Plus networking or TCP/IP RFC1006 networking.
This version of the Enterprise Directory provides a new user application; the X.500 Lookup Client. The Lookup Client, an optional feature of this tutorial, makes it possible to complete the tasks in Section 3.12, ''Using the Lookup Client''.
3.3. Run the DSA Configuration Utility on Both Systems
This section uses the DSA configuration utility to give each DSA a basic configuration.
Run the DSA configuration utility on NODE_1. You need SYSPRV and OPER privileges to run the configuration utility. To run the utility, type:
$ @SYS$STARTUP:DXD$DSA_CONFIGURE
Make a note of the presentation address set by the utility. The utility displays the presentation address before exiting. Presentation addresses are case sensitive, so make an exact note. Cutting and pasting the address to a file might be the most convenient solution.
Repeat steps 1 and 2 for NODE_2.
3.4. Complete the Configuration for CN=DSA1
This section completes the configuration for CN=DSA1 on your NODE_1.
Type all commands exactly as shown, with the exception of the
<address> variable.
From a privileged account on your NODE_1, invoke the NCL director:
$ RUN SYS$SYSTEM:NCL
Type the following NCL commands:
NCL> CREATE DSA
NCL> SET DSA AE TITLE = "/C=US/O=Abacus/CN=DSA1"
NCL> SET DSA PASSWORD = "MYSTERY"
Use upper case for the password, as shown. The password attribute is case-sensitive.
Type the following NCL command to create a Naming Context entity:
NCL> CREATE DSA NAMING CONTEXT "/C=US/O=Abacus"
Type the following NCL command to create a Subordinate Reference entity:
NCL> CREATE DSA SUBORDINATE REFERENCE "/C=US/O=Abacus/OU=Accounts" -
_NCL> ACCESS POINT = {[ AE TITLE="/C=US/O=Abacus/CN=DSA2", -
_NCL>                   PRESENTATION ADDRESS=’<address>’ ]}
where
<address>is the presentation address of NODE_2, which you made a note of in Section 3.3, ''Run the DSA Configuration Utility on Both Systems''. Use exactly the same case as was displayed by the configuration utility.Note that you must quote the presentation address using
’’characters, as shown.You can now enable
CN=DSA1, and exit the NCL director:NCL> ENABLE DSA NCL> EXIT
3.4.1. Notes About the Configuration of CN=DSA1
The password specified in step 2 is required later in this tutorial when you
implement replication between the DSAs. The DSA will use its password when
communicating with CN=DSA2.
The Naming Context entity created in step 3 means that CN=DSA1 is
configured to hold entries representing the fictional Abacus organization. If a
DSA has no Naming Context entities, then you cannot create any entries on it. A
DSA can have more than one Naming Context entity, but this tutorial creates only
one for each DSA.
The Subordinate Reference entity created in step 4 means that entries for the
Accounts division are not part of the Abacus naming context. The Subordinate
Reference entity marks the boundary between the two naming contexts in this
tutorial. The Access Point attribute of the entity identifies the name and
presentation address of CN=DSA2. CN=DSA2 will hold a
Naming Context entity that represents the Accounts division.
The Subordinate Reference entity enables CN=DSA1 to redirect
requests for information in the Accounts division, and informs
CN=DSA1 that it is not responsible for the entries representing
the Accounts division of the Abacus organization.
The ENABLE DSA command enables the DSA to listen for requests from directory applications or other DSAs. If you do not enable the DSA, applications and other DSAs will be unable to connect to it.
3.5. Complete the Configuration for CN=DSA2
This section completes the configuration of CN=DSA2 on your
NODE_2.
Type all commands exactly as shown, with the exception of the
<address> variable.
From a privileged account on your NODE_2, invoke the NCL director:
$ RUN SYS$SYSTEM:NCL
Type the following NCL commands:
NCL> CREATE DSA
NCL> SET DSA AE TITLE = "/C=US/O=Abacus/CN=DSA2"
NCL> SET DSA PASSWORD = "MYTHICAL"
Use uppercase for the password, as shown. The password attribute is case-sensitive.
Type the following command to create a Naming Context entity:
NCL> CREATE DSA NAMING CONTEXT "/C=US/O=Abacus/OU=Accounts"
Type the following command to create a Superior Reference entity:
NCL> CREATE DSA SUPERIOR REFERENCE -
_NCL> ACCESS POINT = {[ AE TITLE="/C=US/O=Abacus/CN=DSA1",
_NCL>                   PRESENTATION ADDRESS=’<address>’ ]}
where
<address>is the presentation address of NODE_1, which you made a note of in Section 3.3, ''Run the DSA Configuration Utility on Both Systems''. Use exactly the same case as was displayed by the configuration utility.Note that you must quote the presentation address using
’’characters, as shown.- You can now enable
CN=DSA2, and exit the NCL director:NCL> ENABLE DSA NCL> EXIT
3.5.1. Notes About the Configuration of CN=DSA2
The password specified in
step
2 of Section 3.5, ''Complete the Configuration for CN=DSA2'' is required later in this
tutorial when you implement replication between the DSAs. The DSA will use its
password when communicating with CN=DSA1.
The Naming Context entity configured in step 3 means that the DSA is configured to hold entries representing the Accounts division, and any entries representing objects within the Accounts division.
The Superior Reference entity configured in step 4 means that any requests
that this DSA cannot satisfy are to be passed to CN=DSA1, which
holds hierarchically superior information. For example, a request for the Abacus
entry will be passed to CN=DSA1 because CN=DSA2 does
not hold that information. CN=DSA2 will pass on any requests that
do not refer to information within the Accounts subtree.
Note that CN=DSA2 does not have a Subordinate Reference entity,
because in this example there are no naming contexts subordinate to the Accounts
naming context. If there were another naming context subordinate to the Accounts
naming context, a Subordinate Reference entity would be required, specifying
which DSA holds the subordinate naming context.
The ENABLE DSA command enables the DSA to listen for requests from directory applications or other DSAs. If you do not enable the DSA, applications and other DSAs will be unable to connect to it.
3.6. Configure Application Defaults on Both Systems
This section configures application defaults on both systems. The defaults provide directory applications with information about how to connect to their local DSA.
On each system, log in to a privileged account and type:
$ @SYS$STARTUP:DXD$DUA_CONFIGURE.COM
Accept all defaults suggested by the utility.
Run the utility on both systems.
3.6.1. Configure Lookup Client Defaults on Both Systems
If you installed the Lookup Client (see Section 3.2, ''Install the Product''), you need to configure it. It cannot use the defaults configured in Section 3.6, ''Configure Application Defaults on Both Systems'' because it connects via LDAP to the DSA.
Run the Lookup Client configuration utility, as follows:
$ @SYS$STARTUP:DXD$LUC_CONFIGURE.COM
Specify the name of the system that runs the DSA.
When the utility prompts for a search base, type: O=Abacus,
C=US
Note the different conventions for expressing directory names, for example,
/C=US/O=Abacus is expressed as O=Abacus,
C=US.
The utility asks whether you want to specify another search base. Type
n. The utility exits.
3.7. Create Some Entries
This section describes how to create the entry representing the Abacus organization and its subordinate entries, as shown in Figure 3.1, ''Structure and Distribution of the Example DIT''.
Type all commands exactly as shown with the exception of the
<address> variable.
The X.500 information management (DXIM) utility commands shown are not case sensitive, with the exception of passwords and presentation addresses. In this tutorial, passwords are always specified in upper case, and presentation addresses must be copied exactly from the output of the DSA configuration utility (see Section 3.3, ''Run the DSA Configuration Utility on Both Systems'').
Log in to an account on either system. No privileges are required.
Invoke the DXIM utility, as follows:
$ DXIM /INTERFACE=CHARACTER_CELL
Create the entry that represents Abacus, as follows:
dxim> create /C=US/O=Abacus - _dxim> attributes objectClass=organization, - _dxim> description="Blue Chip Corporation", - _dxim> telephone="+44 0022 77755"
Create the entry to represent the Sales division:
dxim> create /C=US/O=Abacus/OU=Sales - _dxim> attributes objectClass=organizationalUnit, - _dxim> telephone="+44 0022 65524", - _dxim> description="Sales and Services"
Create the entry to represent Francis Black:
dxim> create /C=US/O=Abacus/OU=Sales/CN="Francis Black" - _dxim> attributes objectClass=(organizationalPerson,person), - _dxim> surname=Black, telephoneNumber="647 1515", - _dxim> password=TANGERINE
All of the above entries are created on
CN=DSA1, because they are part of the naming context called/C=US/O=Abacus. This succeeds even if you are using DXIM on NODE_2, becauseCN=DSA2has a Superior Reference that enables it to pass the requests on toCN=DSA1.
The next two tasks shown in this section create entries on CN=DSA2.
Again, the commands will succeed even if you are using DXIM on NODE_1, because
CN=DSA1 has a Subordinate Reference that enables it to pass the
requests on to CN=DSA2.
Create the entry to represent the Accounts division:
dxim> create /C=US/O=Abacus/OU=Accounts - _dxim> attributes objectClass=organizationalUnit, - _dxim> telephone="+44 0022 91182", - _dxim> description="Financial Services"
Create the entry to represent Janice White:
dxim> create /C=US/O=Abacus/OU=Accounts/CN="Janice White" - _dxim> attributes objectClass=(organizationalPerson,person), - _dxim> surname=White, telephone="+44 0022 12299", - _dxim> password=CLEMENTINE
The remaining commands create entries to represent the two DSAs themselves.
Create entries to represent
CN=DSA1andCN=DSA2dxim> create /C=US/O=Abacus/CN=DSA1 - _dxim> attributes objectClass=(decDSA,DSA,applicationEntity), - _dxim> trustedDSAname="/C=US/O=Abacus/CN=DSA1", - _dxim> password=MYSTERY, - _dxim> presentationAddress=’<address>’ dxim> create /C=US/O=Abacus/CN=DSA2 - _dxim> attributes objectClass=(decDSA,DSA,applicationEntity), - _dxim> trustedDSAname="/C=US/O=Abacus/CN=DSA2", - _dxim> password=MYTHICAL, - _dxim> presentationAddress=’<address>’
where, in each case, the password matches the password specified in Section 3.4, ''Complete the Configuration for CN=DSA1'' or Section 3.5, ''Complete the Configuration for CN=DSA2'' as appropriate, and the presentation addresses match the ones you made a note of in Section 3.3, ''Run the DSA Configuration Utility on Both Systems'' for each DSA.
3.8. Summary of the Tasks Completed in Previous Sections
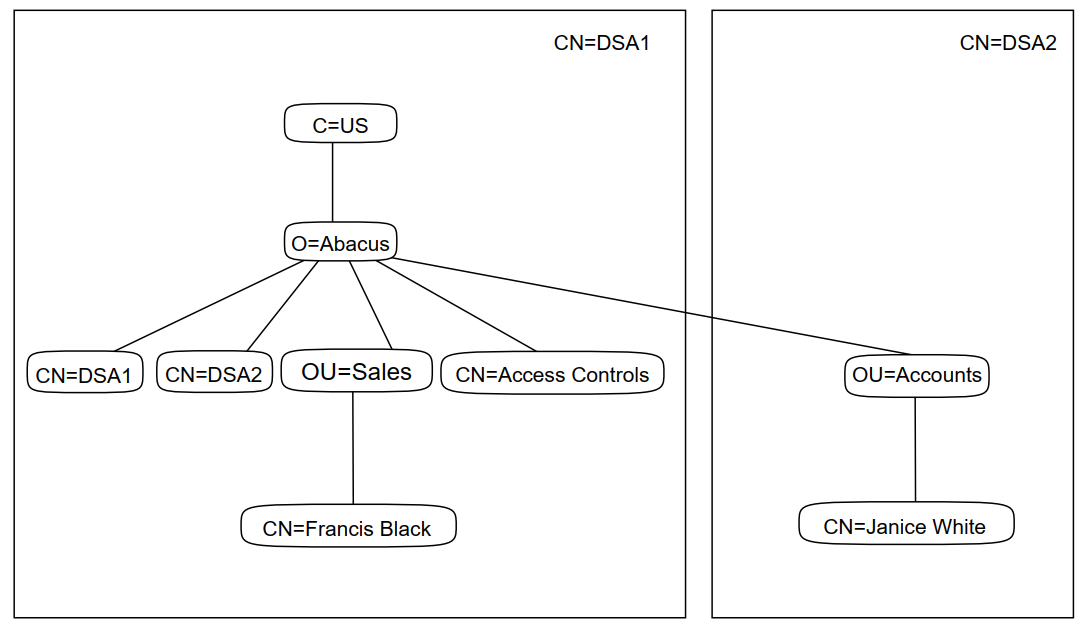
The steps completed so far create a distributed directory shown in Figure 3.2, ''Structure and Distribution of the Example DIT''. If you compare this picture to Figure 3.1, ''Structure and Distribution of the Example DIT'', you can see that the only entry that has not yet been created is the Access Controls entry (see Section 3.9, ''Setting Up Access Controls'').
 |
Note that the DSA entries are both held by CN=DSA1;
CN=DSA2 does not contain its own directory entry. The physical
location of a directory entry is determined by its name, and both of the DSA entries
have names that cause them to be created within the /C=US/O=Abacus
naming context, which is held on CN=DSA1. There is no requirement for a
DSA to hold its own directory entry.
The remaining tasks in this tutorial implement access controls, replication, and Lookup Client. There is also a section showing you how to experiment with the example Enterprise Directory, showing how access controls affect your ability to see and modify directory information.
3.9. Setting Up Access Controls
By default, all users of the Enterprise Directory can modify entries and read information from entries. Indeed, in Section 3.7, ''Create Some Entries'' you created several entries. The only restriction enforced by the two DSAs, by default, is that they do not allow you to display password attributes.
Typically, you will want to set up some additional access controls. This section shows how to set up access controls that make Francis Black a directory manager with the right to modify all entries.
Note that system or superuser privileges do not provide privileged access to directory information. The Enterprise Directory uses its own mechanism for determining what access rights a user has, and applies this mechanism regardless of the account or operating system the user is using, or whether the user is remote or local to the DSA.
To help you set up some simple access controls, the Directory Service provides the following access control template file.
DXD$DIRECTORY:DXD$ACI_TEMPLATE.DXIM
The template file contains two incomplete DXIM commands. Make a copy of the file so that when you have completed this tutorial, you can return it to its original state.
In order to set up the access controls, you need to complete the commands in the template file, and then use DXIM to execute them, as follows:
- Use the search function of your editor to locate the following string in the template file:
create entry
Edit that line, as follows:
create entry /C=US/O=Abacus/CN="Access Controls" -
Note
Do not delete the
-character from the end of the line; it is a command continuation character that permits a command to be specified over several lines.Locate the following string:
set entry
Edit that line, as follows:
set entry /C=US/O=Abacus/CN="Access Controls" -
Be careful not to delete the
-character from the end of the line.Locate the following string:
user names
Edit that line as follows:
user names /C=US/O=Abacus/OU=Sales/CN="Francis Black" -
Be careful not to delete the
"-"character from the end of the line.This is the line that declares Francis Black to be a directory manager. Only the name specified in this clause will be recognized by the DSAs as being the name of a directory manager. The absence of Janice White’s name from this clause means that she will not have the same access rights as Francis Black.
Execute the template file, as follows:
$ DXIM DO DXD$DIRECTORY:DXD$ACI_TEMPLATE.DXIM
Section 3.11, ''Experimenting with the Example Enterprise Directory'' shows how the access controls affect the ability of Francis Black and Janice White to access information in the DIT.
3.10. Replicating Information Between the Two DSAs
This section describes how to implement replication, so that both DSAs have copies of each other’s information.
The NCL commands need to be issued from a privileged account. See previous sections for details of how to invoke the NCL director.
Implement replication of the naming context called
/C=US/O=AbacusfromCN=DSA1toCN=DSA2.Configure the
/C=US/O=Abacusnaming context so thatCN=DSA2is listed as a consumer, as follows:NCL> ADD DSA NAMING CONTEXT "/C=US/O=Abacus" - _NCL> CONSUMER ACCESS POINT={[ AE TITLE="/C=US/O=Abacus/CN=DSA2", - _NCL> PRESENTATION ADDRESS=’<address>’ ]}where
<address>is the presentation address of NODE_2, which you made a note of in Section 3.3, ''Run the DSA Configuration Utility on Both Systems''. Note that you must quote the presentation address using’’characters, as shown.Adding the Consumer Access Point attribute causes
CN=DSA1to attempt to replicate the naming context toCN=DSA2. However, at this point,CN=DSA2rejects this attempt because it cannot verify the identity ofCN=DSA1. This rejection not a problem. It would be insecure to accept replicated information from a DSA whose identity cannot be verified.Use the following NCL command on NODE_2:
NCL> UPDATE DSA SUPPLIER ’<address>’
where
<address>is the presentation address ofCN=DSA1, which you made a note of in Section 3.3, ''Run the DSA Configuration Utility on Both Systems''.This causes
CN=DSA2to connect toCN=DSA1and initiate the first update. This can succeed becauseCN=DSA1can verify the identity ofCN=DSA2because it holds a copy of the directory entry representingCN=DSA2.CN=DSA1can compare the password provided byCN=DSA2with the password in the directory entry. If you completed the configuration accurately, the passwords match, andCN=DSA1is satisfied that the replication request really does come fromCN=DSA2.Having checked the password,
CN=DSA1providesCN=DSA2with a copy of the/C=US/O=Abacusnaming context. This naming context includes the two entries representing the two DSAs. This means that the two DSAs can now verify each other’s identities.
Implement replication of the
/C=US/O=Abacus/OU=Accountsnaming context fromCN=DSA2toCN=DSA1.Configure the
/C=US/O=Abacus/OU=Accountsnaming context so thatCN=DSA1is listed as a consumer, as follows:NCL> ADD DSA NAMING CONTEXT "/C=US/O=Abacus/OU=Accounts" - _NCL> CONSUMER ACCESS POINT={[ AE TITLE="/C=US/O=Abacus/CN=DSA1", - _NCL> PRESENTATION ADDRESS=’<address>’ ]}where
<address>is the presentation address ofCN=DSA1, which you made a note of in Section 3.3, ''Run the DSA Configuration Utility on Both Systems''. Note that the presentation address must be quoted using’’characters, as shown.Adding the Consumer Access Point to the Naming Context entity causes
CN=DSA2to attempt to replicate the naming context toCN=DSA1. This succeeds becauseCN=DSA1holds the entry representingCN=DSA2, and can therefore checkCN=DSA2’s password, and verify its identity.CN=DSA2therefore providesCN=DSA1with a copy of the/C=US/O=Abacus/OU=Accountsnaming context.No UPDATE DSA command is required in this case.
Now that replication has been implemented, and the two DSAs are able to verify each other’s identities, future replications happen without management intervention. Every twelve hours the two DSAs automatically communicate to keep the replicated information up to date.
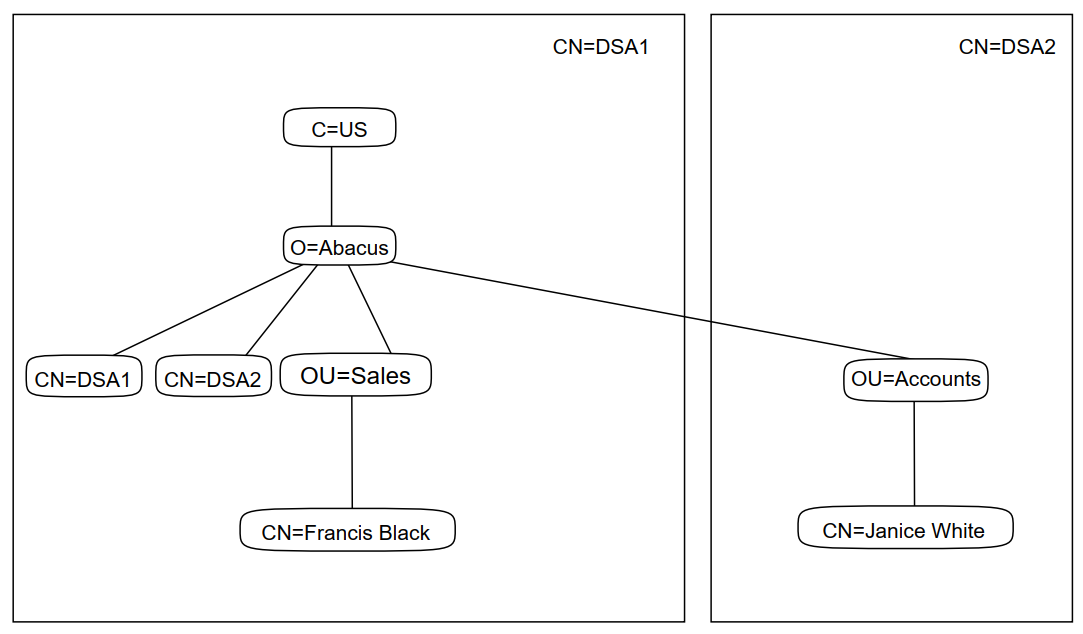
You now have a simple, secure, distributed and replicated Enterprise Directory
provided by two DSAs. Figure 3.3, ''DSA1 After All Tasks Are Completed'' shows CN=DSA1 after
all of the tasks described above are completed. The shading indicates which
information is a copy of information from CN=DSA2.
 |
Figure 3.4, ''DSA2 After All Tasks Are Completed'' shows CN=DSA2 after all the of tasks
described above are completed. The shading indicates which information is a copy of
information from CN=DSA1.
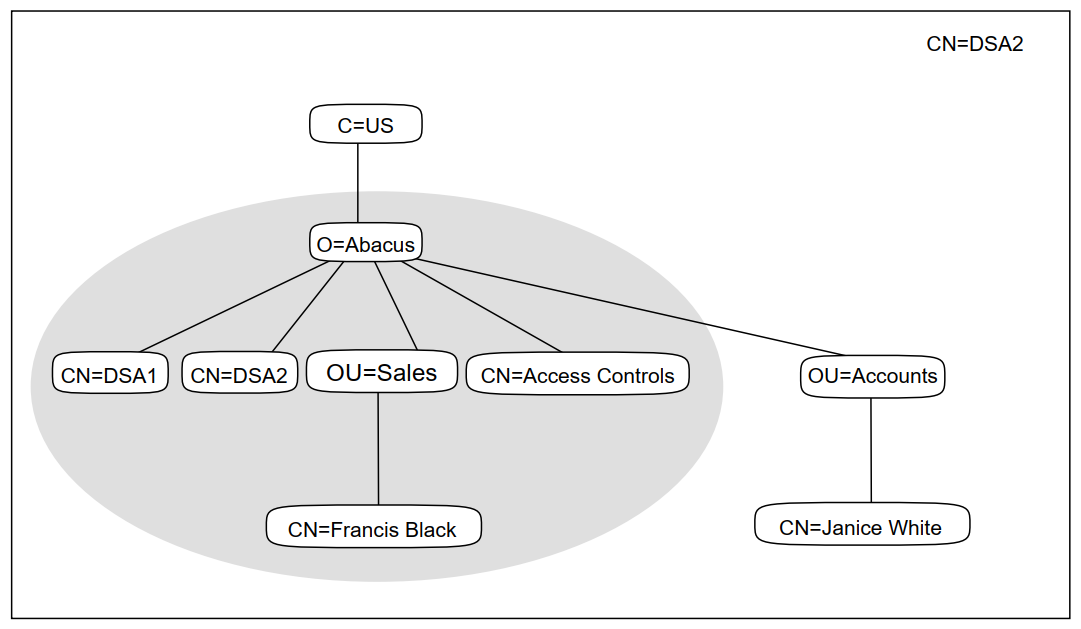 |
Note that the entry called /C=US is not included in the shaded area.
This is because that entry is not part of the Abacus information tree. An
organization such as Abacus should not claim ownership of entries representing
countries. Such entries form part of the global directory infrastructure, and should
be owned and managed by national authorities. This is explained in more detail in
Chapter 4, "Planning Your Directory Information Tree".
3.11. Experimenting with the Example Enterprise Directory
This section shows how to use DXIM to access information in the example Enterprise Directory. It demonstrates some of the commands available to the user, and shows how access is controlled for different users.
Invoke DXIM from an account on either system. No privileges are required.
$ DXIM /INTERFACE=CHARACTER_CELL
Type the following commands, and look at their output:
dxim> show /C=US/O=Abacus/OU=Sales/CN="Francis Black" dxim> search where surname=Black all attributes dxim> search where surname=White all attributes
Note that the password attribute is never displayed. That attribute is protected by access controls.
Type the following command:
dxim> modify /C=US/O=Abacus/OU=Sales/CN="Francis Black" - _dxim> add attribute title=Manager
The access controls set up in Section 3.9, ''Setting Up Access Controls'' cause this command to return an error. The entry is not modified.
This is because the access controls state that the ability to modify entries is restricted to particular users. So far, you have not authenticated, that is, you have not specified a name and password, so the Enterprise Directory does not know who you are.
Use the following command to make a new, authenticated connection to the Enterprise Directory:
dxim> bind Link2 name /C=US/O=Abacus/OU=Sales/CN="Francis Black" password Password> TANGERINE
Link2 becomes the default binding. Remember to use uppercase for the password.
Now repeat the MODIFY command as follows:
dxim> modify /C=US/O=Abacus/OU=Sales/CN="Francis Black" - _dxim> add attribute title=Manager
This time, the command should succeed, because the DSA recognizes you as being a directory manager, with permission to modify entries. Similarly, try the following command:
dxim> modify /C=US/O=Abacus/OU=Sales/CN="Francis Black" - _dxim> add attribute description="Directory Manager"
This succeeds as well, demonstrating that Francis Black can modify both the description and title attributes. In fact, Francis Black can modify all attributes in all entries. You can even create and delete entries when you are authenticated as Francis Black.
Use the following command to make another new connection to the Directory Service:
dxim> bind Link3 name /C=US/O=Abacus/OU=Accounts/CN="Janice White" - _dxim> password Password> CLEMENTINEIf you specified the name and password correctly, the BIND command succeeds. If not, try again. Remember to use upper case for the password.
Now that you have authenticated as Janice White, try another modification, as follows:
dxim> modify /C=US/O=Abacus/OU=Accounts/CN="Janice White" - _dxim> add attribute description="Accountant"
This succeeds. However, the following command fails, even though you are authenticated as Janice.
dxim> modify /C=US/O=Abacus/OU=Accounts/CN="Janice White" - _dxim> add attribute title=Accountant
This demonstrates that, even when authenticated, Janice has less access than Francis. Janice can change her description, but not her title. Furthermore, Janice’s ability to modify descriptions applies only to her own entry. If she attempts to change Francis’ description, she would fail. Meanwhile, Francis can modify descriptions in any entry, not just his own.
So, Janice has limited modification access to her own entry, and no other entry, whereas Francis has unlimited modification access to all entries.
There are now three connections between DXIM and the Enterprise Directory.
Link1 is an anonymous link; no name or password was specified.
Link1 was created by default when you issued the first DXIM command.
Link2 is an authenticated link; the name and password of Francis Black are associated with this link.
Link3 is an authenticated link; the name and password of Janice White are associated with this link.
DXIM maintains all three links, and allows you to switch between them. Each link has a different level of access to directory information. For example, you can make Link2 the default link as follows:
dxim> set default binding Link2
You can display a list of current bindings using the SHOW BINDING command. The list shows information about each binding, including the address of the DSA, the name supplied by the user, and whether the user supplied a password.
Use the DXIM help to see what other commands are possible, and experiment with those. For example, use the CREATE and DELETE commands.
Note
Do not delete the Francis Black entry. It represents the only user who can manage entries in this example. If you accidentally delete the entry, recreate it immediately using Link2.
Note how creations and deletions only succeed if you are using Link2.
- Use the DXIM windows interface to view the entries. To invoke the DXIM windows interface, type:
$ dxim
DXIM displays the Find window. A Browse window is also available from the Directory menu. Use these two windows to display entries in the Abacus DIT.
Note that if you try to modify entries, you are prevented by access controls.
Use the Authenticate option of the Directory menu to specify the name and password of Francis Black.
Now that you are authenticated as Francis Black, modifications are possible.
When you have finished experimenting with the DXIM interfaces, exit from them and proceed to the next section of this tutorial.
3.12. Using the Lookup Client
To start the Lookup Client graphical interface, type the following command:
$ RUN SYS$SYSTEM:DXD$LOOKUP_MOTIF.EXE
Type Francis Black into the input field and press Return to invoke a
search. The Lookup Client displays the entry representing Francis Black. Refer to
the Help menu for further details on how to use the Lookup Client.
3.13. Deleting the Example Enterprise Directory
Now that you have some experience of the tasks involved in setting up an Enterprise Directory, delete the example configuration, and read the planning and implementation chapters of this book.
NCL> DISABLE DSA NCL> DELETE DSA
Then delete the database files and the defaults files on both systems, as follows:
$ DELETE DXD$DIRECTORY:DSA-INFORMATION-TREE.*;* $ DELETE DXD$DIRECTORY:DXD$DUA_DEFAULTS.DAT;* $ DELETE SYS$SYSTEM:DXDLU.DEFAULTS;*
Deleting the database files means that the DSA is returned to its unconfigured state, as it was when you first installed the software. The DSA stores its configuration information and its entries in these files.
You should also delete the access control template file you created in Section 3.9, ''Setting Up Access Controls'', and copy back into the correct position the original template file. If you no longer have an original copy of the template file, you can copy it from another system, or reinstall the X.500 Base subset, or edit the file back to its original state.
Part II. Planning
This part explains the planning tasks required to design your directory information and to establish your Enterprise Directory.
Chapter 4, "Planning Your Directory Information Tree" describes how to plan your directory information tree, and how to plan entries to represent your HP DSAs. This chapter is essential reading.
Chapter 5, "Planning DSAs to Hold Your Directory Information Tree" describes how to plan the distribution and replication of directory information for your DSAs. This chapter is essential reading, although if you only have one DSA you might be able to miss some sections.
Chapter 6, "Customizing the Schema" describes how to plan customizations for your schema. This chapter is not required if the default schema meets your requirements. Some types of schema change can be planned and implemented after you have created your directory information. However, some cannot, so if you think that you might ever need to customize the schema, you are advised to read this chapter before creating directory information.
Chapter 7, "Controlling Access to Your Directory Information and Services" describes how to plan access control for your information. This chapter is not required if you do not need to control access. Access controls can be implemented at any time, so you might decide not to read this chapter until some time after planning and implementing the features described in Chapter 4, "Planning Your Directory Information Tree", Chapter 5, "Planning DSAs to Hold Your Directory Information Tree", and Chapter 6, "Customizing the Schema".
Chapter 4. Planning Your Directory Information Tree
This chapter explains how to approach the task of designing a Directory Information Tree (DIT) for your organization. Planning a DIT in advance is advisable for implementing a usable and efficient Enterprise Directory.
VSI strongly recommends that your organization sets up a management team to design your DIT. Over time, your Enterprise Directory will affect more and more users and applications, and X.500 directory names will become increasingly common in user interfaces.
When you are planning what information to represent in the directory, remember to consider any data protection legislation that might influence your choices. This is especially important if you intend to store information about people. Many countries have laws that restrict your right to store information about people.
Note
Some Enterprise Directory applications might have very specific information requirements. For example, some applications require directory names to conform to certain naming conventions. Ideally, applications should not impose such requirements on directory information, they should simply accept whatever names you assign to entries.
However, if you have such an application, treat it as a special case, and refer to that application’s documentation for details of how to plan X.500 information. The MAILbus 400 Message Transfer Agent (MTA) is an example of an application that requires very specific directory information, and that product includes documentation explaining what you need to do. If the only reason you are using X.500 is to support the MTA, then all the directory information planning tasks are described in the MTA documentation.
If you build an X.500 application, do not implement dependencies on specific naming conventions. For advice on implementing X.500 applications, refer to any available X.500 documentation.
The advice in this chapter explains how to design information that is of general use. Most importantly, this guide explains how to design information for use by your organization’s employees. For this reason, the advice in this guide encourages you to design a user friendly naming scheme, so that when your users search the directory for information, they will not need to learn special naming conventions first.
Your goal is to plan a DIT that represents the hierarchy and geography of your organization, and enables you to name anything within your organization, and to provide each entry with the range of attributes that it requires. A good DIT design is one that gives each entry a name that is relatively easy to remember and use, and that is consistent with other entry names.
Note
The advice in this chapter helps you represent objects within
your organization. You should not attempt to represent objects that are not within
your organization and do not belong to you. Specifically, you should not try to
represent countries using the country class. Such entries do not belong
in your organization’s DIT.
Your task is to design a DIT that has an entry representing your organization at its root. It may be that your DIT is itself going to be a subtree of a larger DIT; but if so, any entries that are hierarchically superior to your organization are not your responsibility. Such superior entries are the responsibility of a national or regional naming authority such as ANSI or the British Standards Institute.
The advice in this chapter applies regardless of whether such superior entries exist. Section 4.3, ''Positioning Your Directory Information Tree into a Global Context'' describes extra tasks that you need to do after the planning described in this chapter if such entries do exist.
Your first planning task is to design a structure similar to one of Figure 4.1, ''A DIT Based on Organizational Units'' or Figure 4.2, ''A DIT Based on Geographical Distribution'' or Figure 4.3, ''A DIT Based on Geographical and Organizational Elements''. Figure 4.1, ''A DIT Based on Organizational Units'' illustrates a structure based on the organizational hierarchy of a fictional organization. The fictional Abacus organization is used throughout this guide to illustrate planning tasks.
Figure 4.2, ''A DIT Based on Geographical Distribution'' illustrates a structure based on geographical distribution, and Figure 4.3, ''A DIT Based on Geographical and Organizational Elements'' illustrates a structure that combines both geographical and organizational elements.
Which of these structures you use depends on your organization, and you can use different structures for different parts of your organization if that seems most appropriate.
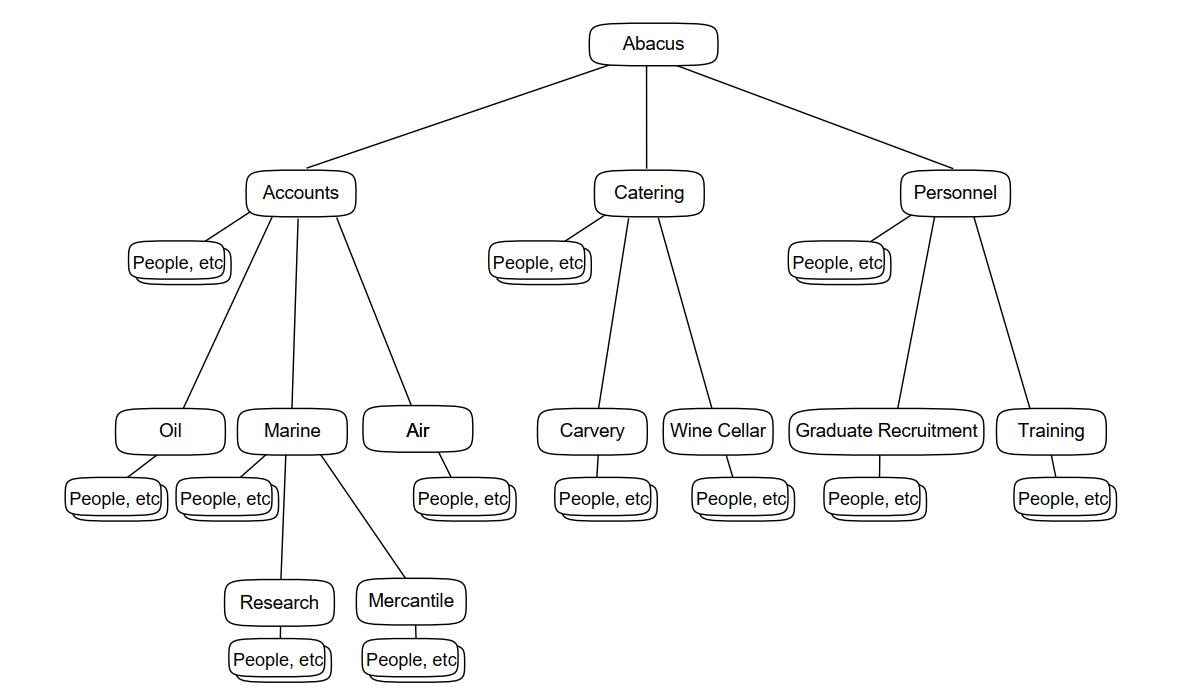 |
Figure 4.1, ''A DIT Based on Organizational Units'' illustrates a DIT that includes the following entries:
An entry representing the whole organization (Abacus).
Many entries representing the groups or divisions within your organization (Accounts, Oil, Catering, and so on).
In some parts of the DIT there are two or three levels of organizational unit. A unit that is represented beneath another unit is a subdivision of that unit, or a dependent group. In this way, the DIT reflects the hierarchical structure of your organization.
Many other entries representing employees, computers, and other resources (shown as "People, etc.").
These entries are subordinate to the organizational units that own or control them.
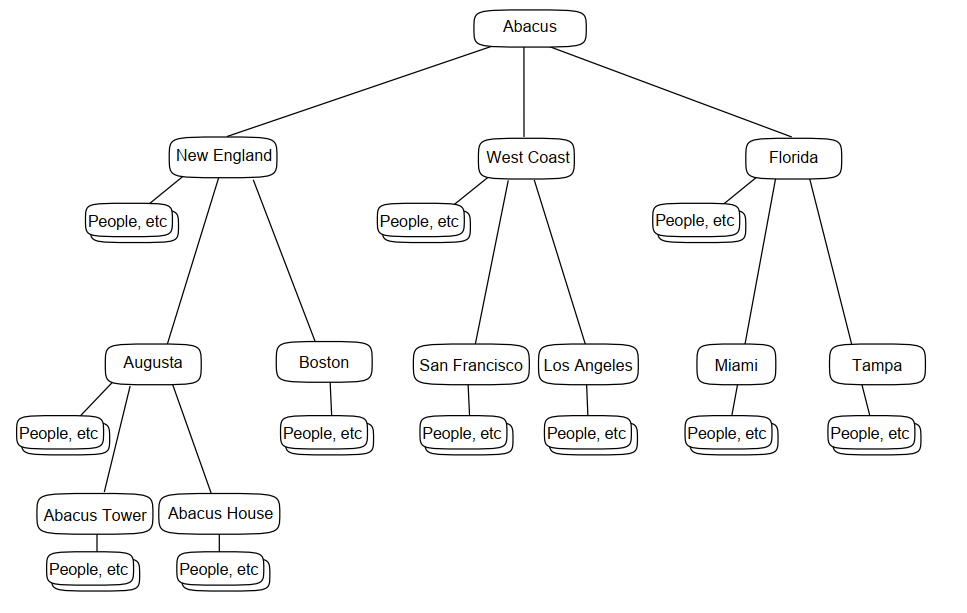 |
Figure 4.2, ''A DIT Based on Geographical Distribution'' illustrates a DIT that includes the following entries:
An entry representing the whole organization (Abacus).
Many entries representing the geographical localities in which the organization is based.
The localities could be cities, states, provinces, or buildings depending on the size of the organization and the familiarity of those localities to users. Localities can be subdivided into further localities. For example, New England is subdivided into Boston and Augusta, the latter being further subdivided into Abacus Tower and Abacus House, the two major office developments that the organization has in Augusta.
Many entries representing employees, computers, and other resources.
These entries are subordinate to the localities that own or control them.
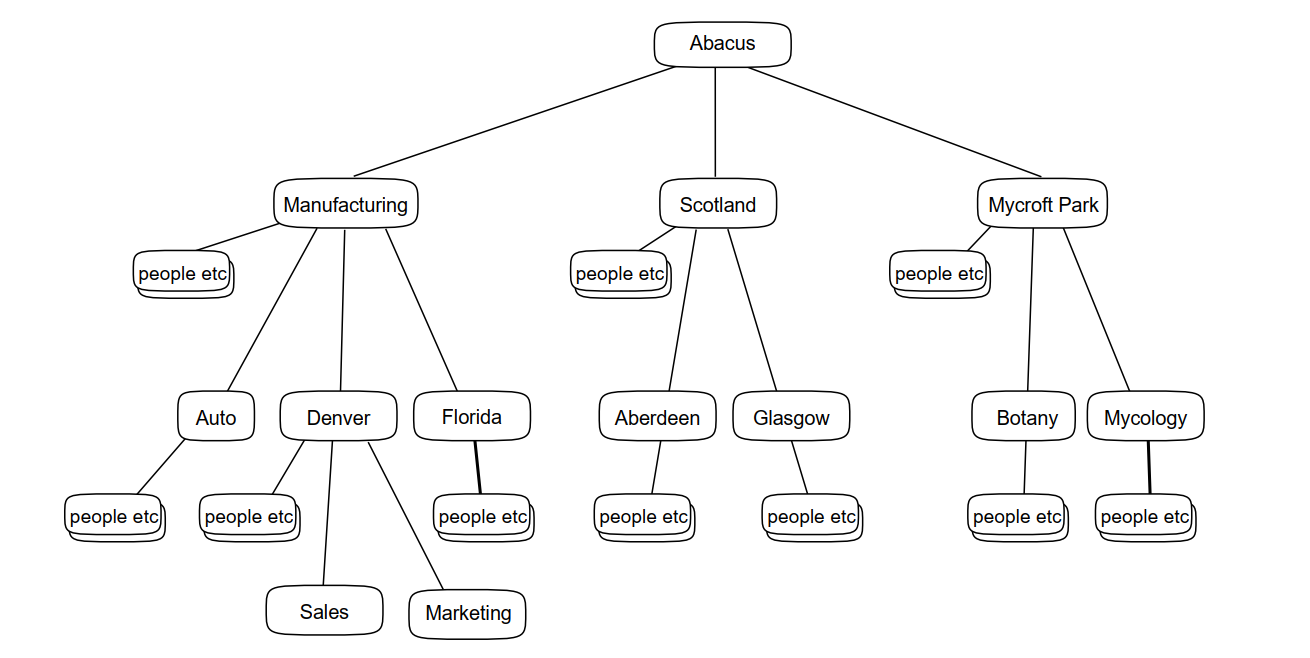 |
Figure 4.3, ''A DIT Based on Geographical and Organizational Elements'' illustrates a DIT that includes the following entries:
An entry representing the whole organization (Abacus).
Many entries representing localities in which parts of the organization are based.
Some localities are subordinate to entries representing groups or divisions within the organization, indicating that those groups are based in more than one locality.
Many entries representing the groups or divisions within the organization.
Some of these groups and divisions are subordinate to locality entries, representing that they are based in the relevant locality.
Many entries representing employees, computers, and other resources.
These entries are subordinate to the organizational units or localities that own or control them.
You need to analyze your organization to decide how best to represent it. Note that at this stage, you do not need to consider what classes of entry you will use to represent the various entries; you simply need to sketch a structure that divides your organization into manageable groupings of resources.
Section 4.1, ''DIT Planning Considerations'' describes the factors that influence this design task, and helps you decide what DIT structure to use.
4.1. DIT Planning Considerations
Designing your organization’s DIT is the most important of the planning tasks, because it is difficult to restructure your DIT once you have implemented it. The following sections describe several factors that you must consider when planning the DIT, some of which might tend to conflict with each other. Some sections indicate that the advice conflicts with the advice in other sections. Your task is to design a DIT that provides the best compromise, for your organization, of all the conflicting considerations.
Use a Familiar Structure
Try to represent your organization in a way that is familiar to the human users of the Enterprise Directory (assuming you intend to allow your employees to use the directory).
By using a familiar hierarchy, you make it easier for users to use the service efficiently, as they can direct their requests towards particular subtrees. For example, a user searching for another user’s entry could be aided by the fact that the directory divides the organization into geographical localities, with which the user is familiar.
Names based on a familiar hierarchy will also be easier to remember from one occasion to the next. If your organization already has a naming scheme for identifying resources and employees, then you can use that scheme as input to the DIT design, although organizational charts are often far more detailed than your DIT needs to be.
Existing naming policies or organizational charts might influence whether you decide to use organizational or geographical elements in your DIT. Also, if you are considering using a mixture of geographical and organizational elements, then bear in mind that this tends to conflict with user friendliness, as users have to guess which type of element is actually being used in the part of the DIT that they are trying to search. Your users will find names easier to use and remember if they are constructed of a predictable and consistent set of components.
Use a Stable Structure
Try to represent your organizational structure in a way that is unlikely to change.
Once you have implemented a naming tree, it is difficult to revise it (although you could delete all entries and start again, or use alias entries to give the appearance of a different structure). Also, any redesign of the DIT changes the names of entries, so your users will be less likely to remember them, or to know where in the tree to look for particular information. Therefore, if your organization often reorganizes its structure, try to use structural features of your organization that are least likely to change.
The need for DIT stability might influence whether you use geographical and/or organizational elements in your DIT. In some organizations it might be common for employees to change group many times without having to relocate, in which case it makes sense to name people according to their location rather than their organizational unit. In other organizations, it might be more common for organizational units to relocate such that the organizational structure is stable, but the location of its groups is unstable. In that case, geographical details are of little lasting use in your DIT.
Use a Structure that Accommodates Resource Mobility
Try to divide your organization into subdivisions in which resources tend to stay for long periods.
If your employees and other resources move from group to group or location to location frequently, then there is a danger that you will need to do a lot of modifications to their entries. If you use units that resources stay in, you can reduce the amount of management required to keep the information up to date. One way to achieve this objective is to avoid dividing your organization into too many subdivisions.
For example, an engineer can be expected to remain in the Engineering part of the business, but to move between different engineering projects. If you use a structure that need frequent modification. If you simply place all engineers beneath an entry representing Engineering as a whole, the engineer’s entry need not be modified after each move.
Figure 4.4, ''Accommodating Resource Mobility'' illustrates part of a DIT in which an Engineering unit is subdivided into a number of smaller units, whereas a Sales unit is not subdivided. There is an engineer called Jane working for the hardware engineering group, and a salesman called Bill working for the hardware sales group. If Jane moves from hardware engineering to software engineering and then to office products engineering she would require her directory entry to be moved from unit to unit accordingly. However, if Bill moves from hardware sales to software sales and then to office products sales he would not require any modification to his entry, because it simply identifies him as an employee of Sales generally.
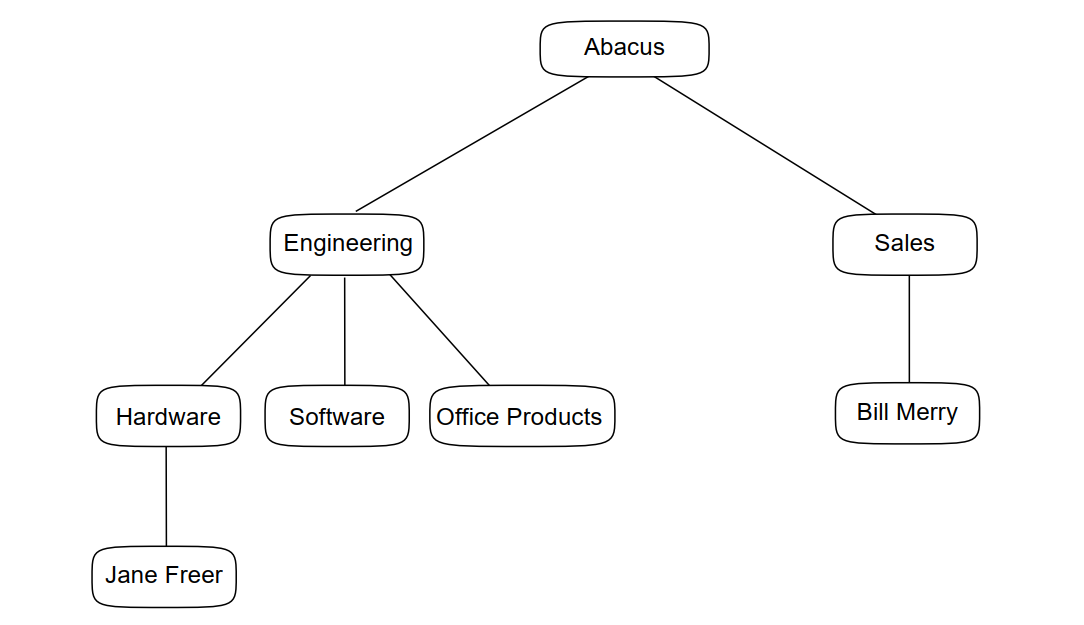 |
The part of the DIT representing Sales therefore minimizes the effect of resource movement within the organization. Bill’s entry would only need modification if Bill left the Sales unit altogether. However, note that this advice tends to conflict with the advice about avoiding name clashes, as well as the advice about dividing the DIT into manageable portions (as described in the following subsections).
Note
Limiting the amount of detail in your DIT hierarchy does not prevent you from representing further organizational and geographical detail in another way.
Any organizational or geographical details that you exclude from the DIT
hierarchy can be represented as attributes within each entry, as described in
Section 4.1.1, ''Representing Hierarchy as Attributes of an Entry''. Thus, Bill’s entry could include an
organizationalUnitName attribute that indicates which part of
Sales he works for. Modifying such an attribute within an entry is far easier
than amending the structure of the DIT itself, or moving an entry from one part
of the DIT to another.
Use a Structure that Divides the DIT into Manageable Portions
The easiest way to divide the management responsibility for the DIT is to assign managers to particular subtrees of the DIT. For example, to manage the DIT shown in (Figure 4.4, ''Accommodating Resource Mobility''), you could have two DIT management teams; one for the Engineering entry and all of its subordinates, and the other for the Sales entry and all of its subordinates. Alternatively, you could have one management team for each of the three engineering subdivisions and one for the Sales unit.
Dividing your DIT into manageable portions may conflict with the advice about using few levels of hierarchy and about coping with resource mobility.
Use a Structure that Minimizes Name Clashes
Try to design a DIT that divides your organization into groupings of entries that cause as few name clashes as possible.
A name clash occurs when two or more entries require the same directory name. Every distinguished name must be unique, so, for example, if you have several John Smiths working for the same organizational unit, you have a name clash to resolve. Try to divide your organization so that organizational units are small enough for such clashes to be rare. (You can never completely avoid the possibility of name clashes, and Section 4.4.1, ''Resolving Naming Clashes'' explains how to resolve them when they occur.)
Dividing your organization into small units to reduce the chance of name clashes might conflict with the advice about using few levels of hierarchy and trying to cope with resource mobility.
Use Few Levels of Hierarchy
Try to use as few levels of hierarchy as possible. Each entry’s distinguished name is made up of the RDNs of all the entries directly above it in the DIT. Therefore, entries a long way down the hierarchy tend to have very long distinguished names. The most useful entries tend to be the ones at the lowest levels of the DIT, and therefore are the ones with the longest names. Long names are hard to remember and use, so a shallow hierarchy tends to be more usable.
You should avoid representing your organization in too much detail, with many levels of organizational or geographical unit. A common mistake is to design DITs which have many levels of organizational entry, so that entries’ names are useful information in their own right. This approach makes names longer, harder to memorize, less stable, and requires more processing for each attempt to find entries. A hierarchy with few levels provides shorter names that are likely to be more stable and manageable, and easier to remember.
Therefore, when you are analyzing your organizational structure and distribution, avoid including every tiny detail. Only subdivide a given unit if it will make the DIT more manageable or help minimize the probability of name clashes.
Note
Limiting the amount of detail in your DIT structure does not prevent you from representing further organizational or geographical details in another way. Section 4.1.1, ''Representing Hierarchy as Attributes of an Entry'' explains how to represent details of a resource’s organizational and geographical position without creating several levels of entry.
When deciding how many levels of entry to implement, there is no requirement for your DIT to be symmetrical: one part of your DIT can have more levels of entry than another.
Avoid Using a Confidential Structure
Remember that if you connect your organization’s X.500 Enterprise Directory to other X.500 Directory Services, the names of your entries will be visible to people outside of your organization.
Therefore, use an organizational structure that you do not mind being exposed to external organizations. For example, if you have a design department that includes groups working on sensitive projects, you might prefer not to subdivide your DIT beyond the level of the design department.
4.1.1. Representing Hierarchy as Attributes of an Entry
When you design your DIT, you might want to include several levels of organizational unit or geographical division so that an entry’s position in the DIT is fully representative of a resource’s position in your organization. However, as Section 4.1, ''DIT Planning Considerations'' explains, there are several reasons why you should not represent your organizational hierarchy in too much detail. Instead, you can use attributes of a given entry to represent organizational or geographical details.
For example, instead of creating a detailed hierarchy of entries representing
organizational units or geographical areas as superiors of an entry representing
an employee, you could use the optional organizationalUnitName and
localityName attributes within the employee’s entry itself. The
effect of this would be to reduce the depth of your DIT, as illustrated in Figure 4.5, ''Two Ways to Represent Organizational and Geographical Details''.
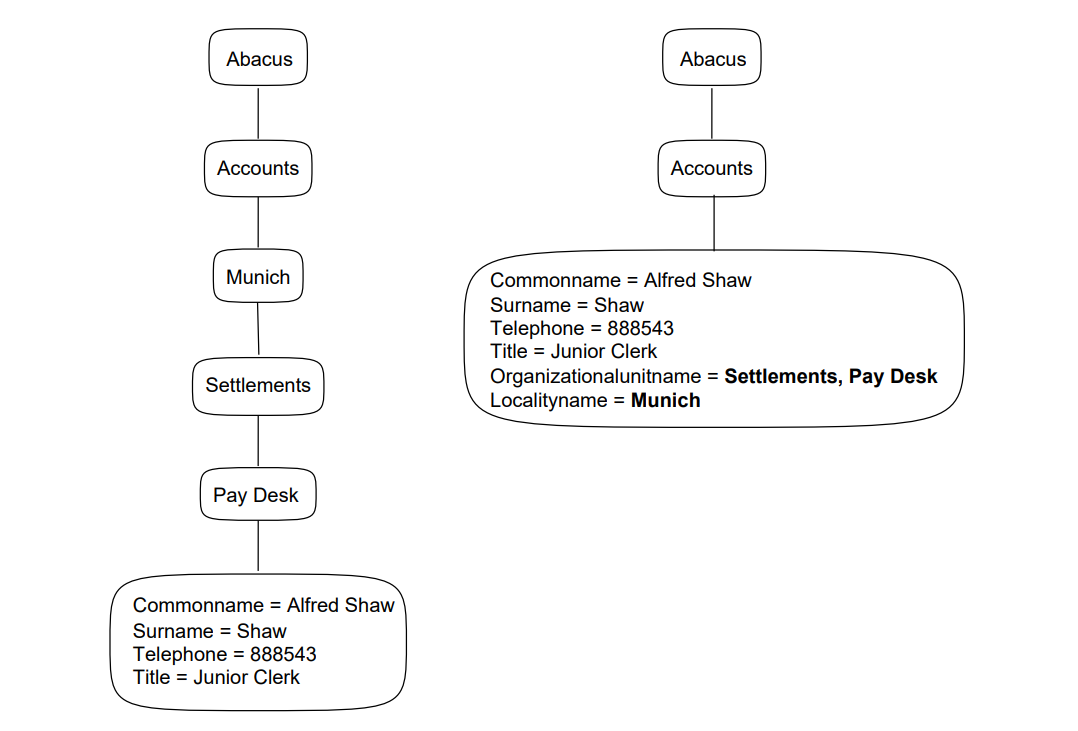 |
The example on the left represents all organizational units and localities as entries in their own right, and the entry representing Alfred Shaw includes attributes for his surname, title, and telephone number. The example on the right places Alfred’s entry beneath only one organizational unit entry, and all the other details are represented as attributes of his entry, along with his surname, telephone number, and title. In the example on the left, Alfred’s entry has five superior entries, whereas on the right, Alfred’s entry has only two superior entries. Therefore, the distinguished name of the entry on the left would be longer than that of the entry on the right.
VSI recommends that you follow the example on the right, so that you can implement a DIT with as few levels of hierarchy as possible. When you have made a rough plan of how to represent your organization, review it to see whether all of the levels of hierarchy and geography are really necessary.
Remember that not all users are equally familiar with the hierarchical structure of different parts of your organization. Avoid using levels of hierarchy that are unfamiliar to users, since this does not help them to find information.
4.2. Choosing Classes to Represent Objects
Having decided how to represent your organizational hierarchy, you need to plan exactly how to represent the organizational divisions and resources as X.500 directory entries. When you create an entry, you must specify what class of entry it is. The class of an entry determines what attributes it can have.
You need to choose a structural class that provides the attributes appropriate to each type of object. A structural class is a class that provides the basis of an entry. All entries must belong to a structural class, and once created cannot be modified to belong to any other structural class.
Your planning task is to decide which of the structural class definitions in the schema best represents each of your objects. If there is no structural class suitable for a given type of object, then you need to define a new structural class. However, for several types of object, the international standards bodies have provided useful definitions. By using these predefined structural classes, you improve your ability to interwork with other organizations’ Enterprise Directories.
The predefined structural classes are probably not perfect matches for the information that you require, but they provide a good foundation. You can then define auxiliary classes which enable you to use extra attributes that are not defined for the structural classes. An entry can belong to more than one auxiliary class, in addition to its structural class.
For example, the predefined structural class organizationalPerson
permits you to use several attributes that the standards bodies considered would be
useful. However, it is likely that your organization has some information that it
would like to store about people, for which this structural class does not allow.
You can therefore define an auxiliary class that permits the use of those extra
items, and use the auxiliary class with the structural class. Chapter 6, "Customizing the Schema" explains this option in more detail.
The following list explains which structural class from the default schema is most suitable for a given type of object:
Your organization as a whole can be based on the
organizationclass.Geographical areas can be based on the
localityclass.Groups and divisions within your organization can be based on the
organizationalUnitclass.Your employees can be based on the
organizationalPersonclass.Computer hardware can be based on the
deviceclass.Open system application processes and entities can be based on the
applicationProcessandapplicationEntityclasses.VSI strongly recommends that you represent your DSAs using entries of the
decDSAclass.You need to represent all of your HP DSAs as directory entries. Entries representing DSAs are used for Enterprise Directory security, and for distributed directory operations.
Some organizations might find that the
residentialPersonclass is useful for representing employees who work from home, or perhaps for representing customers. For example, a telephone company might represent subscribers using this class.
If you have objects that do not fall into any of the above categories of object, then you will need to define some completely new structural classes. Defining structural classes is a complex task, so use standard definitions if at all possible. Chapter 6, "Customizing the Schema" describes how to define a structural class.
When you choose classes to represent your objects, refer to the schema definitions
for details of permitted structural rules between classes of entry. For example,
there is a structure rule that states that an organizationalPerson
entry is only permitted beneath entries of the organizationalUnit,
locality, or organization classes.
If you have planned your DIT according to the advice at the beginning of this chapter, then you should find that the definitions do permit the hierarchy that you want. If not, you need to reassess your DIT hierarchy so that it does not conflict with the structure rules, or else to redefine the schema so that a different set of structural rules is allowed. For ease of implementation, VSI recommends that you use the structural rules permitted by the default schema, because redefining structure rules is complicated.
Figure 4.6, ''The Most Frequently Used Default Structure Rules'' illustrates the structure rules that VSI recommends you to use within your organization’s DIT. There are further possible relationships between these classes, which are illustrated in Appendix A, "Default Schema Definitions". However, you should find that the relationships illustrated below are sufficient.
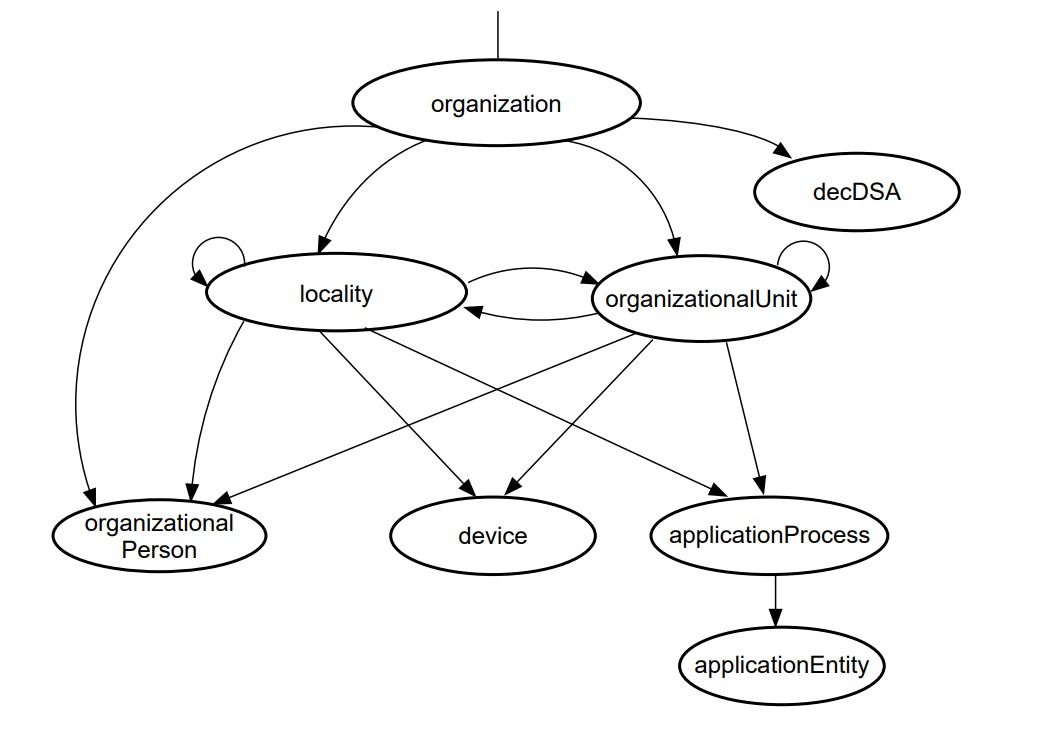 |
Each arrow in Figure 4.6, ''The Most Frequently Used Default Structure Rules'' represents a permitted relationship
between entries, such that the arrow points from a class of entry to a permitted
subordinate of that class of entry. For example, an
organizationalPerson entry is permitted as a subordinate of an
organization entry, or an organizationalUnit entry, or
a locality entry. There are no permitted subordinates of an
organizationalPerson entry.
Note that organizationalUnit and locality have arrows
that loop back to themselves. This represents the ability of entries of those
classes to be superior to further entries of the same classes, permitting
distinguished names such as /C=US/O=Abacus/OU=Sales/OU=Metals/CN="Jo
Brownly".
4.3. Positioning Your Directory Information Tree into a Global Context
The DIT that you plan for objects within your organization is (or will become) part of a larger, global DIT.
By contacting a national or regional authority that is responsible for assigning names within the region in which your organization is based, you can make your DIT part of a global DIT. The role of the authority is to ensure that no two organizations have the same name. All entry names within your organization’s DIT can then be guaranteed to be globally unique, and it becomes possible for different organizations to refer to each other’s entries without ambiguity.
Note
Many countries do not have national or regional authorities. If your organization is based in an area that has no such authority, then all you can do is make a simple guess as to where your DIT will eventually fit into the global context. It is possible, although inconvenient, to set up your DIT without positioning it in a global DIT, and then amend your DIT. However, if an authority is available, you should refer to it.
If your organization is international, you should refer to the authority that is responsible for the naming in the area in which your organization has its headquarters. You do not need to refer to the authority of every region in which your organization has any interest, although you can do so if you prefer.
When you refer to such an authority, they will tell you how your DIT should fit into the global DIT. It is likely that the position of your DIT within the global DIT will mean that your directory entries are all subordinate to an entry representing your country, and perhaps an entry representing a region or state within your country. This means that the distinguished names of all of your organization’s entries will include relative distinguished names that are not planned by you.
The names of these superior entries form a global prefix to the names of your entries, and you need to know this prefix before you configure your Enterprise Directory.
For example, the highest entry in the Abacus DIT is called
organizationName=Abacus. The Abacus organization is based in the
United States. The Abacus organization contacts the authority responsible for
assigning names in the United States, and are told that the Abacus DIT must be
subordinate to an entry called countryName=US. Thus, the distinguished
name of every entry in the Abacus DIT includes the relative distinguished name
countryName=US. Figure 4.7, ''The Abacus DIT with its Global Prefix'' shows the relationship
between that country entry and the DIT planned by the Abacus organization.
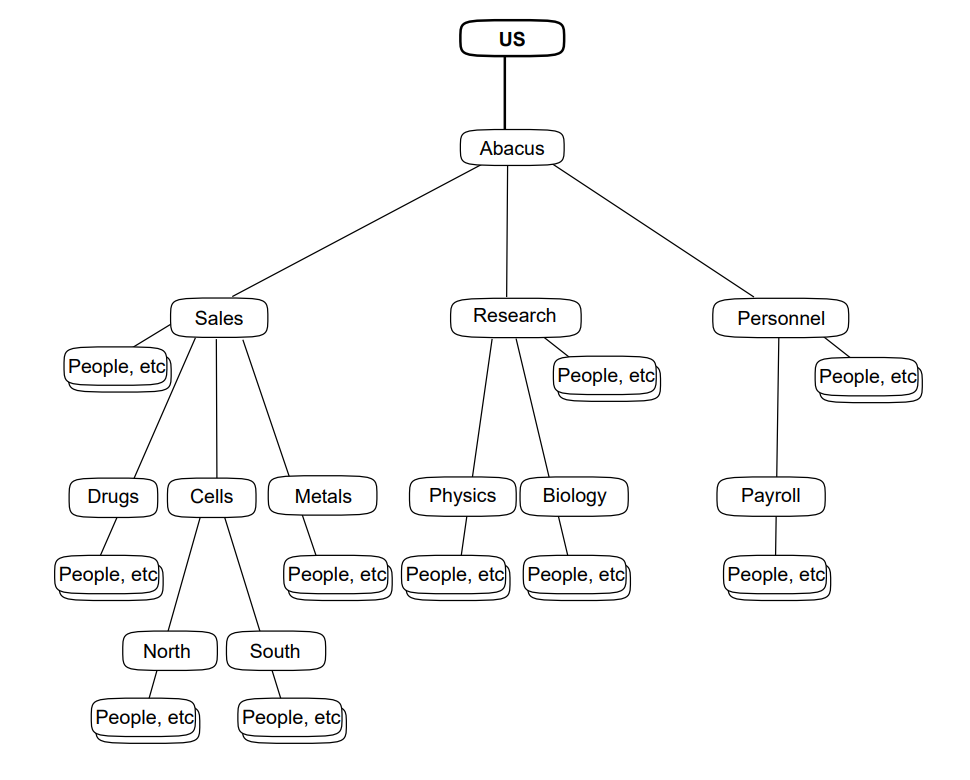 |
It is important to understand that the country entry is not part of the Abacus DIT, it is only a prefix. When the Abacus organization creates entries, it does not create any entries that are part of the prefix.
In this example, there is only one superior entry to the Abacus DIT, but there
could be more. Some authorities will subdivide their country into regions, in the
same way as Abacus divided its organization into organizational units and
localities. For example, Abacus might have discovered that its DIT was subordinate
to an entry called /C=US/locality=Florida. Thus, the names of all
Abacus entries would include those two relative distinguished names.
When you refer to an authority, you also need confirmation that no other organization in your region has already registered the same organization name.
Note
Becoming part of a global DIT is, of course, optional. You could decide that your organization does not need any connection to other directories. Even so, VSI recommends that you refer to a naming authority anyway.
By registering with a naming authority, you make it much easier to become part of a larger DIT later. If you create your DIT without reference to a naming authority, and later decide to join a larger DIT, then it is likely that your entire DIT will have to be renamed.
Planning how your DIT fits into a larger DIT does not force you to become part of the larger DIT immediately.
Once you have planned how your organization’s DIT fits into the global DIT, and what your DIT’s prefix is, you are ready to proceed to Section 4.4, ''Naming Your Entries'', which explains how to name the entries in your DIT.
4.4. Naming Your Entries
Having defined a policy for the representation of all types of entry, and planned any new class and attribute definitions that you need, the final task is to define a policy for naming entries as you create them.
When you create an entry, you must specify at least one attribute value to form the entry’s RDN.?
The chosen attribute becomes the RDN of the entry. When you choose the RDN for an entry, there are several things to consider.
Firstly, the definition of the entry’s object class states that the RDN must be
chosen from particular attributes. For example, the schema’s naming rule for the
locality object class states that the RDN must be a value of the
localityName attribute. If you try to use any other attribute of
the entry, the attempt to create the entry fails.
For most standard classes of entry, the attribute that you use for naming is the
commonName attribute. Table 4.1, ''Naming Attributes of Commonly Used Classes'' lists the most
frequently used exceptions.
Secondly, because the value that you choose is used as part of the distinguished name of the entry, and appears as part of the distinguished name of any entry subordinate to it, you should choose a value that is short and familiar to users. For example, if you want to create an entry to represent the locality Massachusetts, you need to decide whether to use the value Massachusetts, or the accepted abbreviation MA as the RDN.
Similarly, if your organization is international, you need to decide which
language to use for the naming of some entries. For example, if you have an office
in Munich, you need to decide whether to use the value Munich or München. The
localityName attribute can be multivalued, and therefore can have
both of the values, but only one of them can be used as the RDN. You should try to
choose the value that you think users are most likely to use, recognize, and
remember.
Figure 4.8, ''The Abacus DIT with its Entries Named'' shows the Abacus DIT plan after names have been chosen for entries.
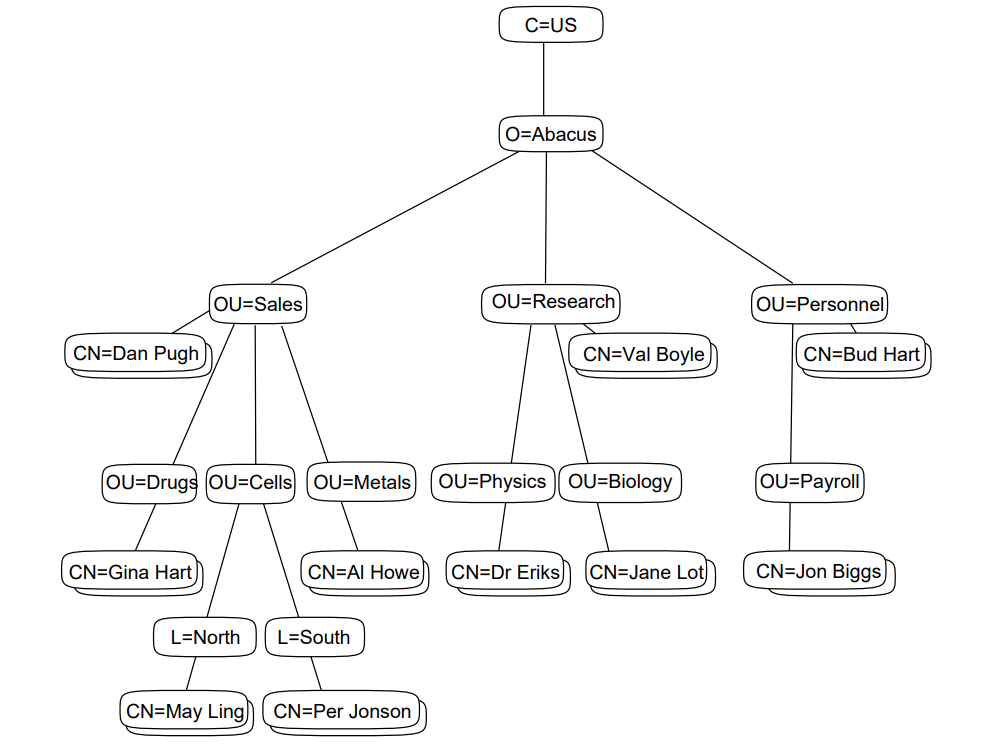 |
4.4.1. Resolving Naming Clashes
No two entries can have the same distinguished name. Thus, if the Accounts division of the Abacus organization has two people called Alfred Shaw, then there is a naming collision that must be resolved before you create the two Alfreds’ entries.
If a naming collision occurs, then there are three possible solutions, as demonstrated by a clash between two people called Alfred Shaw who work in Accounts.
You could use some other value for each entry’s name.
For example, you could use each man’s middle initial to differentiate between their names, giving "Alfred J. Shaw" and "Alfred P. Shaw".
The disadvantages of this solution are that users may not know the middle initials of the two Alfreds, so the names resolve the clash, but fail to make the names any more informative. Users would have to look at other attributes of the two Alfreds’ entries to try to determine which one they are actually interested in.
However, this solution is probably the most user friendly of the three.
You could use a second naming attribute in the entries’ RDNs. For example, you could call one of the entries
commonName="Alfred Shaw",organizationalUnitName=Settlementsand the othercommonName="Alfred Shaw",organizationalUnitName=Expenses.Users searching for Alfred Shaw’s entry will find both entries, and can decide which one they actually want by noting what organizational unit they are attached to. For example, in a DXIM window, these two entries would be displayed as
Alfred Shaw, SettlementsandAlfred Shaw, Expenses.The disadvantages of this solution are that it only applies to classes of entry that permit multipart RDNs, and that the entries’ distinguished names become longer and more complicated. Users might have difficulty specifying the distinguished name correctly. End users might not have to use distinguished names often, but if they do, having some names inconsistent with the style of others might be confusing.
You could add an extra level of organizational hierarchy to separate the clashing entries from each other.
For example, if one of the Alfreds works in Munich and the other in Madrid, then you could divide the Accounts division into two geographical subdivisions by creating two locality entries beneath the Accounts entry. The entries representing the two Alfreds can then both have the RDN
commonName=Alfred Shawbecause that value is unique relative to their respective localities.However, the disadvantages of this solution are that it interferes with your hierarchy planning (which you may already have completed and agreed), and might actually make the entries harder to find. It also makes the entries’ distinguished names longer and more complicated.
You need to decide which solution to apply to any name clashes that arise in your directory. VSI recommends that when you design your DIT, you try to divide your organization into small enough divisions to minimize naming clashes, and then for the few clashes that still occur, use the first of the three proposed solutions.
Note
Because most naming attributes are multivalued, entries can still have
their most obvious value as well as having a value that is unique for naming
purposes. Thus, the two Alfred Shaws entries can both have the value
commonName="Alfred Shaw", but they cannot both have that
value as their relative distinguished name.
Most end user requests for information will be in the form of directory
searches. Directory searches for commonName="Alfred Shaw" will
succeed regardless of whether that value is the distinguished value. Thus
the three methods of resolving naming clashes described in this section do
not necessarily decrease the usability of the directory for end users. Only
services that require the specification of an entry’s distinguished or
relative distinguished name are likely to be made less usable.
The first of the three proposed solutions is probably the most user friendly method of resolving naming clashes, because it does not lengthen an entry’s distinguished name as much as the other two methods.
4.5. Planning Entries to Represent DSAs
VSI recommends that you represent your HP DSAs as directory entries of the
decDSA class. This is recommended for four main reasons:
When chaining user requests to another DSA, a HP DSA often needs to check the security details of that DSA.
If a DSA is acting for a user who has specified a name and password (authenticated), then chaining might require the DSA to specify its password to the other DSA. However, a HP DSA will only specify its password to a DSA that it trusts . If there is no trust, a HP DSA might return partial results or a continuation reference to the user instead of chaining a request. Chaining of requests for authenticated users can therefore be severely restricted if there is no trust between DSAs. The
decDSAentries enable you to establish this trust. A DSA that is represented by adecDSAentry with certain attributes is said to be a trusted DSA.Similarly, when receiving a chained request from another DSA, a HP DSA often needs to check the security details of the other DSA.
If the other DSA claims to be acting on behalf of an authenticated user, a HP DSA must decide whether it trusts the other DSA. If the HP DSA trusts the other DSA, then it assumes that the user has authenticated adequately, and honours that user’s access rights. If the HP DSA does not trust a DSA that passes such a request, then it rejects the request because it would be a security risk to assume that the user really has authenticated adequately.
If a HP DSA is asked to receive replicated information from another DSA, it always checks the security details of that other DSA.
A HP DSA will only receive replicated information from a trusted DSA. An untrusted DSA might try to send replicated information that compromises security. A HP DSA rejects such information.
HP DSAs can use the directory to find network addressing information and protocol information about other HP DSAs.
For these reasons, it is strongly recommended that you create decDSA
entries, so that your DSAs cooperate openly with each other, yet provide a service
that is adequately protected against certain types of request from unknown or
untrusted DSAs and their users.
The decDSA class can also be used to represent other vendors’ DSAs.
If you follow the same guidelines when creating entries to represent other vendors’
DSAs, then it becomes possible for your HP DSAs to consider other vendors’ DSAs to
be trusted.
There is an alternative method for implementing security for your Directory Service. You can use NCL commands to configure trust. However, that method has some disadvantages. See Section 7.7, ''Alternative Method of Controlling Access to DSAs'' for details of the alternative method of configuring trust, and its disadvantages.
Even if you decide to use the alternative method, you should still plan DSA
entries, because they also contain protocol and addressing information. The
following sections describe how to plan these decDSA entries.
4.5.1. Recommended Position of DSA Entries in Your DIT
For ease of management, VSI recommends that you represent your DSAs as
subordinates of the highest entry in your organization’s DIT. For example, the
Abacus organization would create its DSA entries as subordinates of the
directory entry called /C=US/O=Abacus.
The reason for this recommendation is that it simplifies the task of making the entries easily accessible to all DSAs. It is not essential that you name your DSA entries as immediate subordinates of your highest entry, but it greatly simplifies configuration, and improves the performance of security checking during normal DSA operation. This documentation set assumes that you accept this recommendation.
The class of the DSA entries is decDSA. The naming attribute of
decDSA entries is the commonName attribute. You
can use any policy for choosing common names for DSAs, but VSI suggests that you
incorporate the DSA’s node name, so that managers can easily see which DSA is
installed on which node.
For example, the Abacus organization might have six DSAs, called:
/C=US/O=Abacus/CN="NodeA DSA" /C=US/O=Abacus/CN="NodeB DSA" /C=US/O=Abacus/CN="NodeC DSA" /C=US/O=Abacus/CN="NodeD DSA" /C=US/O=Abacus/CN="NodeE DSA" /C=US/O=Abacus/CN="NodeF DSA"
For the purposes of the examples used in this manual, the naming convention for DSAs is simplified, as follows:
/C=US/O=Abacus/CN=DSA1 /C=US/O=Abacus/CN=DSA2 /C=US/O=Abacus/CN=DSA3 /C=US/O=Abacus/CN=DSA4 /C=US/O=Abacus/CN=DSA5 /C=US/O=Abacus/CN=DSA6
These DSA distinguished names are also known as application entity titles (AE
titles). When you configure each DSA using NCL commands, the DSA’s distinguished
name is specified using the AETitle attribute of the DSA
entity.
Figure 4.9, ''DSA Entries Beneath the Organization Entry'' shows the position of DSA entries in the Abacus
DIT, as subordinates of the organization entry. The DSA entry called
/C=US/O=Abacus/CN=DSA1 is shown, and the other five DSA entries
are created in the same position relative to the organization entry.
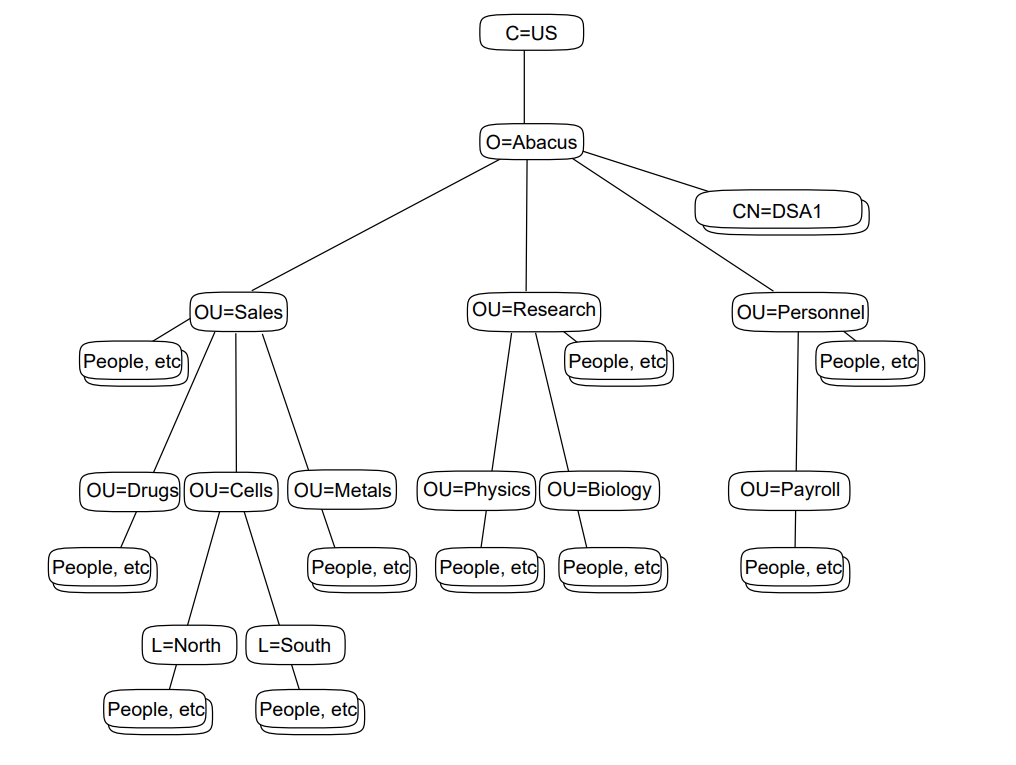 |
Chapter 5, "Planning DSAs to Hold Your Directory Information Tree" includes an explanation of how to plan the DXIM commands that will create entries to represent your DSAs, and Chapter 8, "Configuring DSAs" explains when to use the commands. As with all directory entries, the ability to create the DSA entries depends on other configuration tasks described in Chapter 8, "Configuring DSAs".
If you implement replication as recommended in Chapter 5, "Planning DSAs to Hold Your Directory Information Tree" and Chapter 8, "Configuring DSAs", all DSAs will receive copies of the entries that represent DSAs. This enables all DSAs to interwork securely, because they use the attributes in the DSA entries to verify each other’s identities.
Chapter 5. Planning DSAs to Hold Your Directory Information Tree
After planning a Directory Information Tree (DIT) for your organization, and positioning it in a global context if possible (Chapter 4, "Planning Your Directory Information Tree"), you need to consider how to distribute and replicate it across your network. This requires you to plan DSAs to hold all or part of your DIT.
You have to choose between placing your entire DIT on a single DSA, or dividing your DIT into subtrees and spreading the information across several DSAs. Each subtree of your DIT that you make for distribution (or your entire DIT if you do not divide it into subtrees) is called a naming context.
If your entire DIT is quite small, then you might decide to put it on one DSA as one naming context. If you have a large DIT, then for performance reasons you need to divide your DIT into several naming contexts, and distribute them so that no single DSA holds the entire DIT.
Dividing a DIT also means that particular parts of the DIT can be located for the convenience of different directory managers. All modifications of directory information rely on access to the particular DSA where the information was created. You can access DSAs remotely, but depending on your network, remote access can be less efficient than local access. Being able to distribute your directory information therefore also enables you to place particular information close to its manager.
Figure 5.1, ''Dividing a DIT into Naming Contexts'' illustrates a DIT that has been divided into four naming contexts, and shows that each naming context is a subtree of the DIT as a whole. There is no limit to the size of a naming context, apart from the practical limit imposed by the capacity of your DSAs. (Note that a naming context can be as small as a single entry.) The DSA on which you create a naming context is called the master DSA for that naming context and for all entries within it.
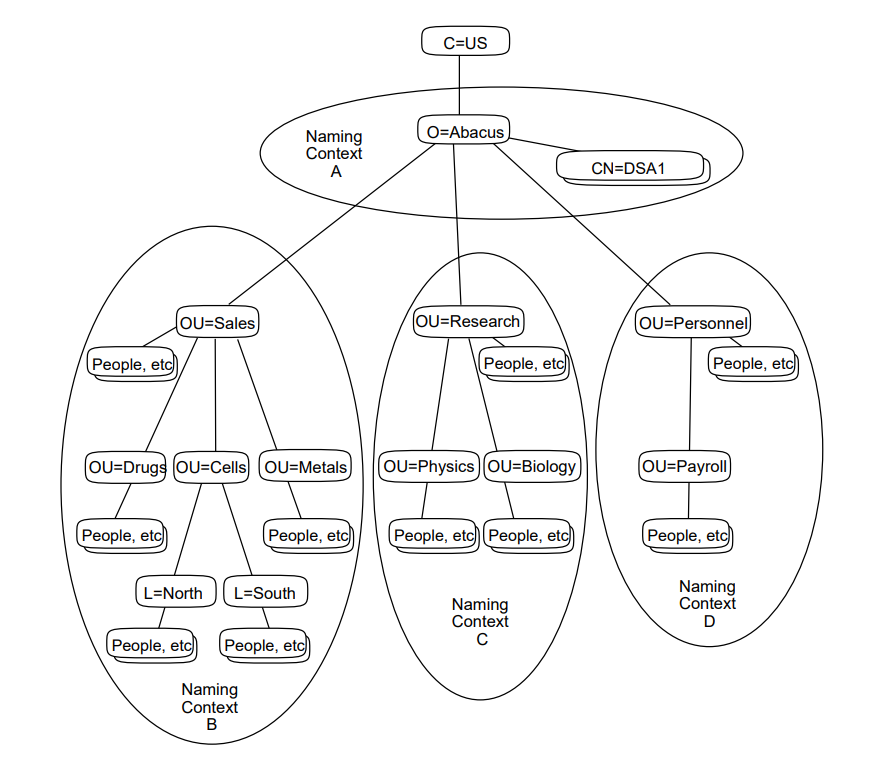 |
Note
The Abacus organization excludes the country entry from its naming contexts. The Abacus organization does not own the country entry, and does not include that entry in its plans for distribution and replication. The division of a DIT into naming contexts starts with the organization entry, that is, the first entry that belongs to the organization, and the first entry that is not part of the organization’s global prefix (see Section 4.3, ''Positioning Your Directory Information Tree into a Global Context'').
You also need to decide whether to replicate the DIT. However you divide your DIT for distribution, you can create copies of each naming context so that it is not always necessary to contact the master DSA for a given entry. Copies of entries within a replicated naming context are called shadow copies, and a DSA that holds shadow copies is called a shadow DSA for that naming context. A given DSA can be a shadow DSA for one or more naming contexts at the same time as being the master DSA for one or more other naming contexts. A DSA can hold any number of naming contexts.
This chapter recommends two models of distribution of entries across master DSAs, and then recommends a model of replication that provides good performance for directory users.
5.1. Dividing Your Directory Information Tree into Naming Contexts
VSI recommends two ways of dividing your DIT into naming contexts, which are described in the following sections.
5.1.1. Implementing Your DIT as One Naming Context
You can decide not to divide your DIT at all. Your entire DIT can be managed as just one naming context.
This is suitable for organizations whose entire DIT is small enough to be supported by a single DSA. You would implement one DSA to hold the naming context, and a number of other DSAs to hold shadow copies of the entire naming context. If you have systems available that are large enough to hold your entire DIT, then you might consider this option.
If your organization is geographically distributed, then each part of the organization can have a DSA that holds a shadow copy of the entire DIT. Users in each part of the organization can contact the most convenient DSA for all requests, giving greater availability of directory information. This means that your organization may have more than one DSA, but the configuration of each DSA is relatively simple.
Note
The unit of replication is the naming context. You should only implement your entire DIT as one naming context if all of your DSAs are to be installed on systems that are large enough to hold the entire DIT.
5.1.2. Implementing Your DIT as Several Naming Contexts
You can decide to divide your DIT into several naming contexts so that you can distribute those naming contexts such that no single DSA holds the entire DIT.
The advantages of having several naming contexts and distributing them to several DSAs is that each part of your organization can be given good access to the information that is most useful to it, and the processing cost of responding to user requests for directory information is shared by all of the DSAs.
However, this solution requires considerable planning and configuration, because each DSA needs to be configured to know what information it is responsible for, how that information fits into the DIT as a whole, and which DSAs to refer to for other parts of the DIT.
Despite the greater complexity of the configuration tasks required to implement a distributed and replicated DIT, VSI recommends that you do implement your DIT as several naming contexts. To minimize the complexity of configuring a distributed DIT, VSI recommends that you divide your DIT as shown in Figure 5.1, ''Dividing a DIT into Naming Contexts''. The entry representing your organization as a whole is the top of a small naming context: Naming Context A.
This small naming context contains the entries representing your HP DSAs and any other resources that need to be represented as immediate subordinates of the organization as a whole. For example, an entry representing the chairman of the organization might be created as a subordinate of the organization entry, and be included in the same naming context.
Beneath the organization, each immediate subordinate entry that represents a geographical or organizational subdivision of the organization becomes the top of another naming context. Thus, for the Abacus organization, there are three other naming contexts: Naming Context B, Naming Context C, and Naming Context D.
These three other naming contexts are much larger than Naming Context A, and between them comprise most of the Abacus DIT. If any of these naming contexts contains too many entries to be maintained on a single system, then further subdivisions are possible. However, further subdivisions make configuration of the DSAs increasingly complicated, and can reduce the efficiency of the Enterprise Directory. VSI therefore recommends that you keep the subdivision of the DIT as simple as possible.
5.1.3. Assigning Names to Naming Contexts
Whether you decide to have one or several naming contexts, every naming context has a name.
The name of a naming context is the same as the distinguished name of the entry at its root. For example, in Figure 5.1, ''Dividing a DIT into Naming Contexts'' the naming contexts have the following names:
Naming context A is called
/C=US/O=AbacusNaming context B is called
/C=US/O=Abacus/OU=SalesNaming context C is called
/C=US/O=Abacus/OU=ResearchNaming context D is called
/C=US/O=Abacus/OU=Personnel
Make a note of the name of each of the naming contexts that form your organization’s DIT. When you set up your DSAs, you will need to specify the names of the naming contexts they are to hold.
Note
Particular applications, such as HP’s MAILbus 400 MTA, might require you to design dedicated subtrees in addition to the organizational DIT described in this book. If so, you can consider each such dedicated subtree to be a naming context. Such a naming context should be "built in" to your main DIT beneath the organization entry.
In the illustrated example, you might have a fifth naming context called
/C=US/O=Abacus/mts="abacus domain" which is the name of the
naming context that contains all routing information used by a messaging
application. The RDN mts="abacus domain" is the RDN of the
highest entry designed according to the requirements of the messaging
application, and fits immediately beneath the organization entry.
All information within that naming context is then replicated in exactly the same way as any other naming context. You should consult with the managers of the application to find out whether and where they want their naming context to be replicated.
5.1.4. Distributing Naming Contexts
When you have divided your DIT, choose a master DSA for each naming context. A DSA can hold more than one naming context, but the total size of all naming contexts held on a DSA must not exceed its disk or memory capacity. Each DSA is responsible for responding to all requests to change any information for which it is the master DSA. Therefore, by assigning naming contexts to different master DSAs, you share the processing cost of keeping naming contexts up to date. On the other hand, by making one DSA the master DSA for all naming contexts, you centralize the management of the information. You need to decide where you want the master copy of each naming context to be.
Figure 5.2, ''Distributing Naming Contexts to Their Master DSAs'' shows how the four naming contexts from Figure 5.1, ''Dividing a DIT into Naming Contexts'' are distributed to four DSAs. This leaves some DSAs without a naming context. Those empty DSAs are to hold shadow copies of naming contexts only (see Section 5.1.5, ''Replicating Naming Contexts'').
When you are distributing naming contexts to DSAs, consider the following factors:
Try to put each naming context on a DSA that is easily accessible to the managers responsible for the directory entries they contain.
Although the Enterprise Directory supports remote management of directory information, response times are best if the manager can connect directly to the master DSA that holds the relevant entries.
Try to choose DSAs that are hosted by reliable systems.
All modifications to directory entries require access to the master DSA that holds them. If the master DSA for a given entry is temporarily unavailable, attempts to modify the entry fail.
The master DSA for your organization’s highest naming context (such as Naming Context A) needs to be installed on a node with good network accessibility.
If you follow VSI’s recommendations, then that naming context contains the entries representing your DSAs. Those entries need to be accessible because HP’s DSAs refer to them and modify them automatically as part of normal operation. The efficiency of your Enterprise Directory depends on the accuracy of the information in your DSA entries.
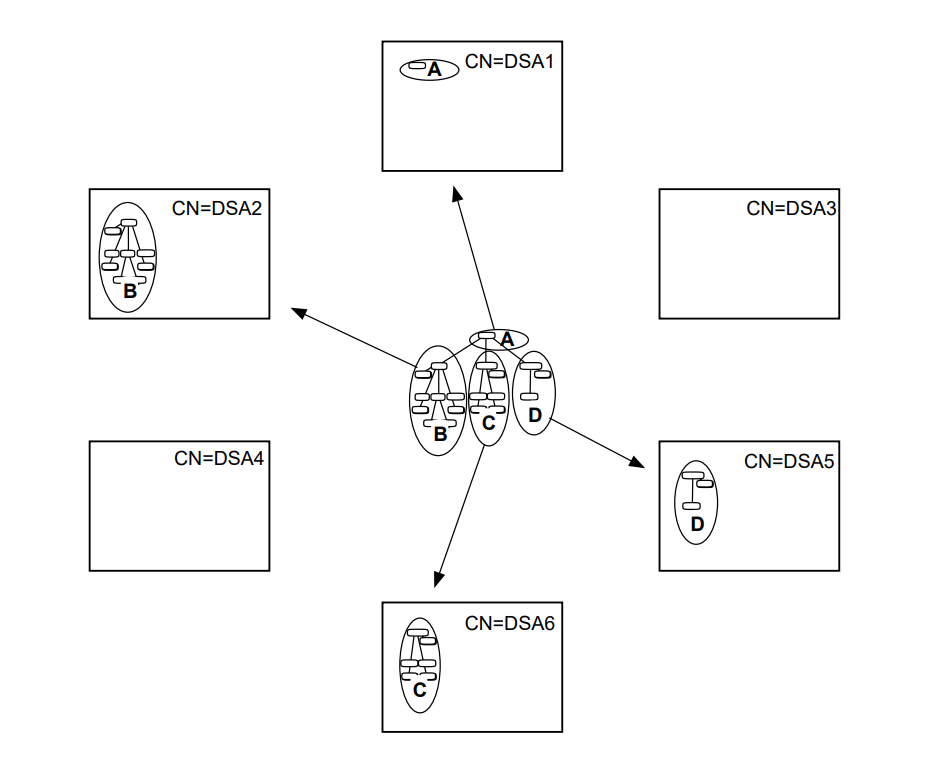 |
For clarity, in Figure 5.2, ''Distributing Naming Contexts to Their Master DSAs'' and in all examples in this
chapter, DSAs are identified by their last RDN, for example
CN=DSA1. Real DSAs would have distinguished names such as
/C=US/O=Abacus/CN=DSA1, but such names would make the following
examples difficult to read and understand.
5.1.5. Replicating Naming Contexts
Having chosen master DSAs to hold each of your naming contexts (or your single naming context if your DIT is small enough), you can then choose any number of other DSAs to hold shadow copies of one or more of those naming contexts.
The purpose of replication is to place read-only copies of entries as near as possible to the users who require them most frequently, and to provide backup in case the DSA holding the master copy of a naming context becomes temporarily unavailable.
Your network could have many DSAs, most of which hold shadow copies only. You can have any number of shadow copies of a given naming context, although a given DSA only holds one copy of a given naming context.
Note
VSI strongly recommends that you give every DSA a shadow copy of the naming context that contains the highest entry in your organization’s DIT. This simplifies the configuration requirements of your DSAs (described in Section 5.2, ''Planning DSA Configuration Information''), and improves the performance of search requests.
It also ensures that all of your DSAs have a local copy of the directory entries representing DSAs. This improves the performance of Enterprise Directory security checks, and ensures that each DSA has the information it requires for communicating openly with your other DSAs.
If you decide not to implement replication of decDSA entries
to all of your DSAs, then you need to implement some additional DSA
configuration to enable your DSAs to trust each other. Without either a copy
of all decDSA entries or some additional management attributes,
your users will find that requests that involve more than one DSA might
fail. If you do not intend to implement replication as recommended, see
Section 7.7, ''Alternative Method of Controlling Access to DSAs'' for details of the additional tasks.
A shadow copy of a naming context can be copied from the master DSA for that naming context, or from another shadow DSA for it. Thus, you can take shadow copies of entries (called primary shadowing), or shadow copies of shadow copies (called secondary shadowing).
Secondary shadowing enables you to spread the communication and processing costs of keeping shadow copies up to date. This is because each shadow DSA communicates with its supplier to ask for an update of the relevant naming context. Supplying shadow naming contexts requires considerable resources, depending on the size of the naming contexts being supplied. It also temporarily prevents the supplying DSA from answering some user requests, reducing the availability of directory information to end users. If the only supplier is the master DSA, then the master DSA spends a lot of its time communicating with shadow DSAs (consumers) simply to help them keep their shadow copies up to date. By allowing shadow DSAs to act as suppliers to further shadow DSAs, the processing cost of keeping shadow copies up to date is shared.
Figure 5.3, ''Primary and Secondary Shadowing of Naming Contexts'' illustrates how CN=DSA2 is a consumer
of a naming context from CN=DSA1 (the master DSA of the illustrated
naming context). However, CN=DSA2 is also a supplier of that naming
context to CN=DSA3. The arrow leading from the naming context on
CN=DSA1 means that the naming context has a consumer, and
likewise for the arrow leading from the naming context on CN=DSA2.
Thus, CN=DSA2 relieves CN=DSA1 of the cost of keeping
CN=DSA3 up to date. The naming context held by
CN=DSA3 is a secondary shadow copy.
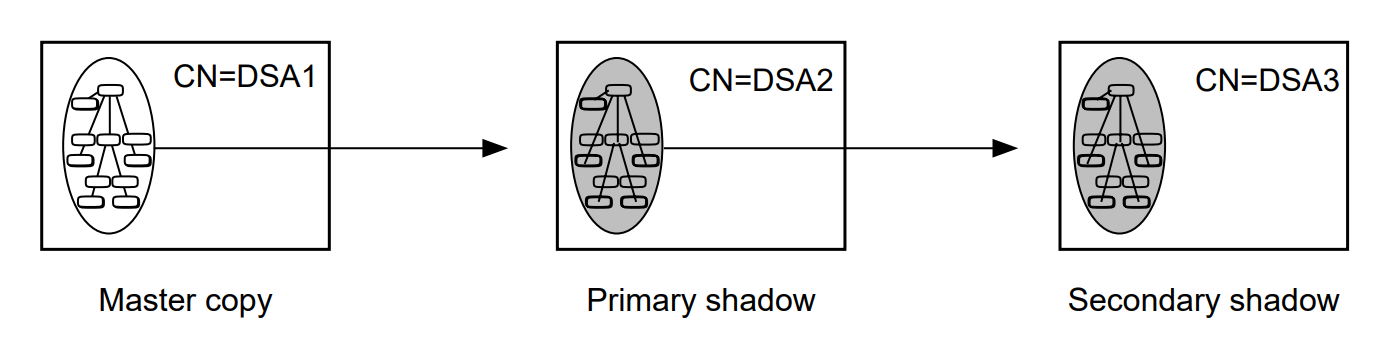 |
Note
HP’s DSAs can only replicate directory information to and from other HP DSAs. You can have other vendors’ DSAs in your Enterprise Directory, but they cannot hold the same naming contexts as your HP DSAs.
Figure 5.4, ''Replicating Naming Contexts to Their Shadow DSAs'' shows how the four naming contexts from Figure 5.2, ''Distributing Naming Contexts to Their Master DSAs'' are replicated to other DSAs. The small naming context
that is to contain the organization entry and the DSA entries is replicated to
all DSAs. Each of the other naming contexts is replicated at least once
according to the needs of the user communities near the various DSAs. Some of
the DSAs have only shadow naming contexts, and some have a mixture of shadow
naming contexts and master naming contexts. Some DSAs have more naming contexts
than others, depending on DSA system capacity and the needs of the users local
to each DSA. Note also that CN=DSA5 and CN=DSA6 have
secondary shadows of the naming context containing the organization entry,
supplied by CN=DSA3 rather than CN=DSA1.
Note that there are no empty DSAs. All DSAs now have at least one naming context.
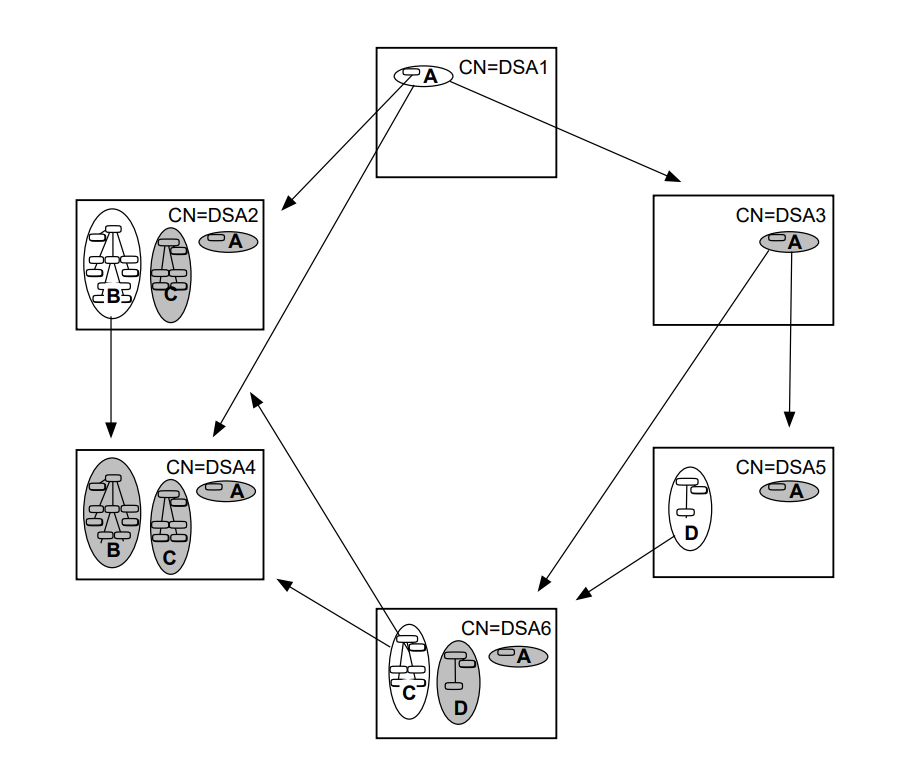 |
5.2. Planning DSA Configuration Information
To help you configure your DSAs to meet your distribution and replication requirements, VSI suggests that you create a worksheet for each system that is to host a DSA.
The following sections tell you how to fill out the worksheet. You might also find it useful to have an illustration like Figure 5.4, ''Replicating Naming Contexts to Their Shadow DSAs'' showing where you want each naming context to be, and with arrows showing the intended replication.
Having planned how to distribute and replicate your DIT across one or more DSAs, you need to plan the configuration details for each of your DSAs so that they fulfill their intended role within your Enterprise Directory.
Every DSA needs to know the following:
its own application entity title (AE title), its own presentation addresses, and its own password;
what entries it holds;
whether it is the master DSA or a shadow DSA for those entries;
if the DSA holds shadow copies, it needs to know which DSA is its supplier, and which DSA is the master DSA for the entries;
which DSAs, if any, are to consume copies of naming contexts from this DSA;
where to go for information that it does not hold.
These items of information are called knowledge information, and many of them are manually configured. Knowledge information is represented using characteristic attributes of the DSA entity and its subentities. The different requirements are met by the following entities:
The DSA entity
The Naming Context entity
The Superior Reference entity
The Subordinate Reference entity
For each DSA, you need to plan which of these entities are required, and fill out a worksheet which will help you to configure them.
5.2.1. DSA AE Titles
You need to plan each DSA’s application entity title (AE title). This is
represented by the AETitle attribute of the DSA entity, and you
configure it using NCL commands.
A DSA’s AE title is exactly the same as the distinguished name of the
directory entry that represents the DSA. For example, a valid DSA AE title is
/C=US/O=Abacus/CN=DSA1. See Section 4.5, ''Planning Entries to Represent DSAs'' for
details of how to plan names for DSA entries.
This version of the Enterprise Directory provides a DSA configuration utility
that sets an AE title for a DSA, but it only sets a temporary AE title based on
the DSA system name, for example, /CN="mynode.abacus.com". You need
to plan an AE title that conforms to your naming policy, and set that value
using NCL.
The
real benefit of the configuration utility is that it sets a DSA’s presentation
address.
Figure 5.5, ''Worksheet for CN=DSA1 Listing AE Title and Password'' shows the worksheet for CN=DSA1 with
the AE title filled in.
5.2.2. DSA Passwords
You need to choose a password for each of your DSAs. A DSA uses its password when communicating with other DSAs. For example, a DSA uses its password when it asks a supplier DSA to update its shadow copies, and when chaining a request on behalf of an authenticated user.
Note
DSA passwords are represented in two places: the Password attribute of the
DSA entity in NCL, and the userPassword attribute of the
decDSA entry that represents the DSA in the DIT.
When a DSA wants to make a secure connection to another DSA, it quotes the
value of the Password characteristic attribute. The target DSA checks this
value against the userPassword attribute of the
decDSA entry. It is essential, therefore, that the two
representations always match. If you ever change a DSA’s password, always
change it in both the DSA entity and the decDSA entry.
The illustration below shows the worksheet for CN=DSA1 with the
password filled in.
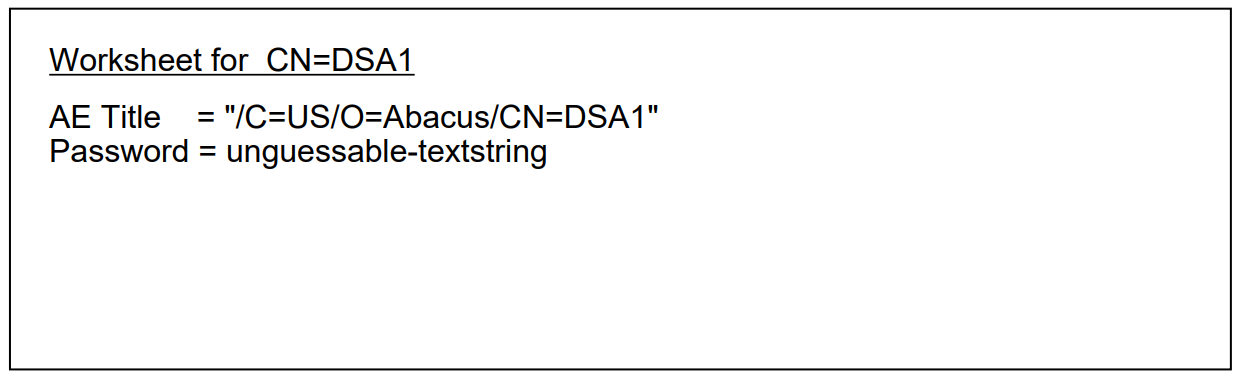 |
5.2.3. DSA Presentation Addresses
This version of the Enterprise Directory provides a DSA configuration utility that sets a DSA’s Presentation Address attribute. This saves you from having to plan and set the attribute manually.
You need SYSPRV and OPER privileges to run the configuration utility. To run the utility, type:
$ @SYS$STARTUP:DXD$DSA_CONFIGURE
If your privileges are insufficient, the utility displays an error message and exits.
A DSA’s presentation address is required not only by the DSA itself, but also as part of the knowledge information of other DSAs. For example, when you implement replication, you will need to specify the presentation address of a consumer DSA in an attribute held by the supplier DSA. You are therefore recommended to add the presentation address to the DSA’s worksheet so that you can refer to it easily later. The utility displays the presentation address before exiting.
5.2.4. DSA LDAP Port
The Enterprise Directory listens for LDAP requests on the port where the DSA is enabled. To configure the DSA, set up the LDAP port as follows:
ncl> SET DSA LDAP PORT 389
The LDAP port number must be non-zero for the DSA to start listening for LDAP requests when the DSA is enabled. The standard TCP/IP port number for LDAP is 389. The DSA configure script in Section 5.2.3, ''DSA Presentation Addresses'' sets the LDAP port to 389.
5.2.5. Naming Context Entities
A naming context is a subtree of the DIT. Each naming context held by a DSA is represented by a Naming Context entity. Without one or more Naming Context entities, a DSA would not know what entries it is expected to hold, and you would be unable to create the relevant part of your DIT.
Each DSA has one Naming Context entity for each naming context that it holds,
either as a shadow DSA or as a master DSA. For example, CN=DSA2 in
Figure 5.4, ''Replicating Naming Contexts to Their Shadow DSAs'' needs three Naming Context entities, although it
is only the master of one naming context.
Amend your worksheets to list the naming contexts that each DSA is to hold. Section 5.1.3, ''Assigning Names to Naming Contexts'' explains how to determine the names of your naming contexts.
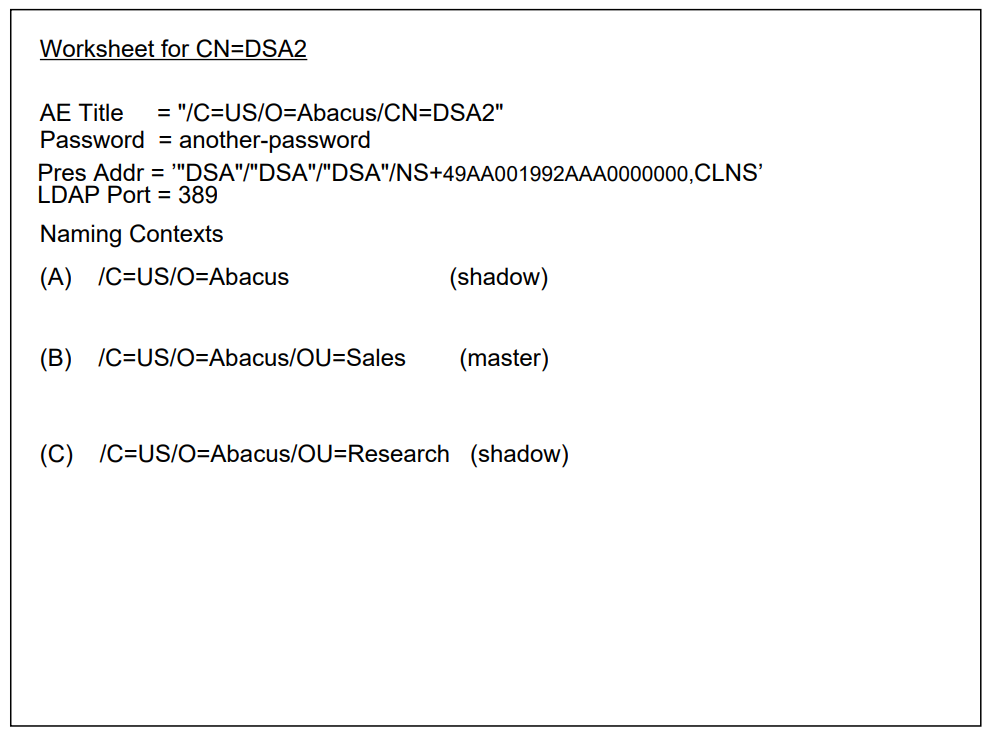 |
Figure 5.6, ''Worksheet for CN=DSA2 Listing Naming Contexts'' illustrates the worksheet for CN=DSA2
in Figure 5.1, ''Dividing a DIT into Naming Contexts''. It indicates whether the DSA is the master DSA
or a shadow DSA for each of its naming contexts.
The Naming Context entities for the master DSAs of naming contexts have to be created manually. The Naming Context entities for shadow DSAs of naming contexts are created automatically as a result of the replication process.
5.2.5.1. Planning Primary and Secondary Consumer Information
If you are not implementing replication, you do not need to read this section.
Having planned a Naming Context entity, you need to identify any consumers of that naming context (see Section 5.1.5, ''Replicating Naming Contexts'' for a discussion of consumers).
For example, CN=DSA1’s Naming Context entity (representing
Naming Context A) requires consumer information that identifies each of
CN=DSA2, CN=DSA3, and CN=DSA4.
Each of those three DSAs is to be a consumer of that naming context directly
from CN=DSA1 (see Figure 5.4, ''Replicating Naming Contexts to Their Shadow DSAs''). They are
primary shadows of the naming context.
Note that CN=DSA1 does not need to know about its secondary
shadows; CN=DSA5 and CN=DSA6. Instead,
CN=DSA5 and CN=DSA6 are consumers from
CN=DSA3, so CN=DSA3 needs the consumer
information.
When CN=DSA3 gets a copy of the Naming Context entity as a
result of replication, you can add consumer access points to it. This is how
you implement secondary shadowing.
Fill out your worksheets for each DSA to indicate the AE titles and presentation addresses of the DSAs that are to be consumer of each of its naming contexts (master or shadow).
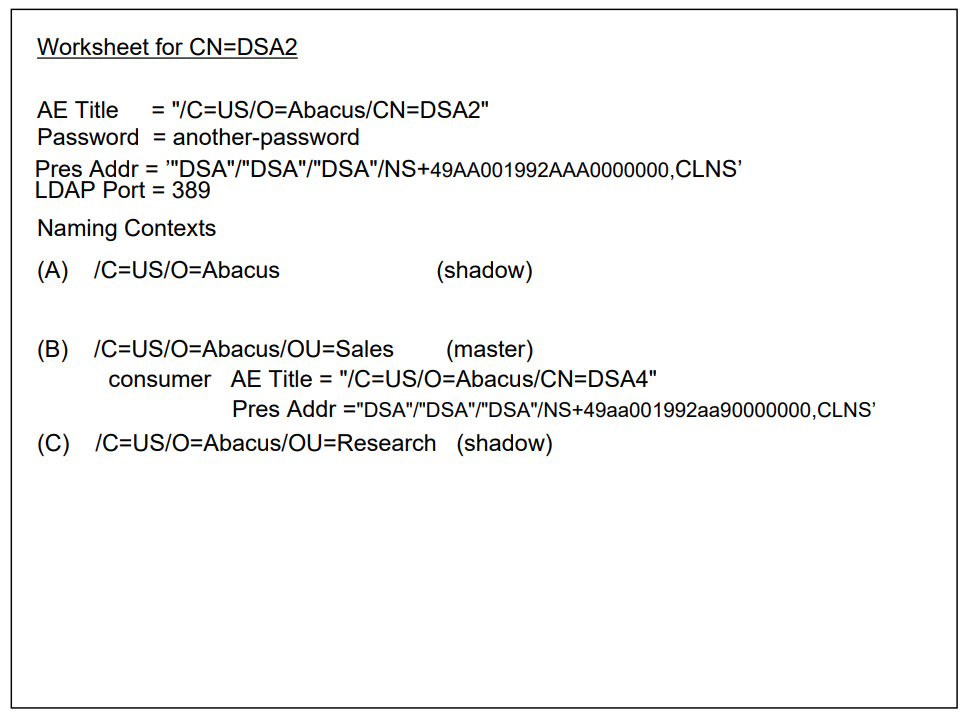 |
Figure 5.7, ''Worksheet for CN=DSA2 Listing Consumers'' illustrates the worksheet for
CN=DSA2 after information about one consumer DSA has been
added.
In Figure 5.4, ''Replicating Naming Contexts to Their Shadow DSAs'' there is an arrow leading from each naming
context to each of its shadows. Each arrow means that its naming context has
a consumer, so you need as many items of consumer information for a given
naming context as there are arrows. For CN=DSA2, only one of
its naming contexts is consumed by another DSA (CN=DSA4
consumes a copy of naming context B), so it requires one item of consumer
information for that naming context only.
Cross-check your DSA worksheets to ensure that each shadow DSA is listed
as a consumer by each of its suppliers. For example, CN=DSA2 is
a consumer of two naming contexts, so you would check the worksheets for
CN=DSA1 and CN=DSA6 to ensure that they each
list CN=DSA2 as a consumer of the relevant naming
context.
The worksheets could also specify the details of each DSA’s suppliers.
However, supplier details are automatically created on a consumer DSA during
replication, so adding them to the worksheets is not essential. However, you
do use the presentation address of a supplier when you replicate for the
first time, so it is useful to make a note of them. Figure 5.8, ''Worksheet for CN=DSA2 Listing Consumers'' shows the worksheet for CN=DSA2 with
the supplier details filled in for reference purposes.
|
5.2.6. Subordinate Reference Entities
If you are implementing your entire DIT as one naming context, you do not need to read this section.
Subordinate references serve two purposes:
They provide DSAs with the information they need to locate naming contexts that they do not hold.
They mark the boundaries between naming contexts, such that a DSA does not claim ownership of entries that actually belong in a naming context held by another DSA.
Your planning task is to identify which DSAs require the manual creation of Subordinate Reference entities. Subordinate references that mark the lower boundary of a naming context are always replicated with that naming context. Therefore, you only need to create the subordinate references on the master DSA for that naming context. Section 5.2.6.1, ''Identifying Which DSAs Require Manually Created Subordinate References'' explains how to identify which DSAs need the manual creation of Subordinate Reference entities.
5.2.6.1. Identifying Which DSAs Require Manually Created Subordinate References
Firstly, only master DSAs require the manual creation of Subordinate Reference entities. Any DSA that holds only shadow information requires no manual intervention.
For each master DSA, you need to consider each of its master naming contexts. Each master naming context that is immediately superior to another naming context requires a Subordinate Reference entity to that subordinate naming context. A given naming context may require multiple Subordinate Reference entities because it is immediately superior to several naming contexts.
This requirement applies regardless of whether the immediately subordinate naming contexts are held locally or remotely.
If you have followed VSI’s advice for dividing your DIT into naming contexts, you have only one naming context that has subordinate naming contexts.
The master DSA for that naming context requires you to create Subordinate Reference entities to mark the boundaries between the superior naming context and each of the subordinate naming contexts.
To return to the example DIT illustrated in Figure 5.1, ''Dividing a DIT into Naming Contexts'',
Naming Contexts B, C, and D are all immediately subordinate to Naming
Context A. Therefore, CN=DSA1, the master DSA for Naming
Context A (see Figure 5.4, ''Replicating Naming Contexts to Their Shadow DSAs''), needs three Subordinate
Reference entities that identify where naming contexts B, C, and D are
held.
If you divided your DIT in a more complicated way, then you must consider the requirements of each master naming context that is superior to further naming contexts. For example, Figure 5.9, ''A Multi-Layered Division of a DIT'' illustrates a DIT that is divided into many layers of naming contexts. In this example, there are several naming contexts that have subordinate naming contexts, and therefore need subordinate references.
The disadvantage of this way of dividing your DIT is that you increase the amount of configuration that you need to do to ensure that all DSAs have a complete set of knowledge information. If any DSA has incomplete knowledge, it is likely that user requests for information will not be satisfied efficiently.
It is also possible that DSAs will not realise that some naming contexts exist, and that some entries will be created on the wrong DSA as part of the wrong naming context. To reduce the chance of having incomplete knowledge and to optimize performance, VSI recommends the simpler division of your DIT illustrated in Figure 5.1, ''Dividing a DIT into Naming Contexts''.
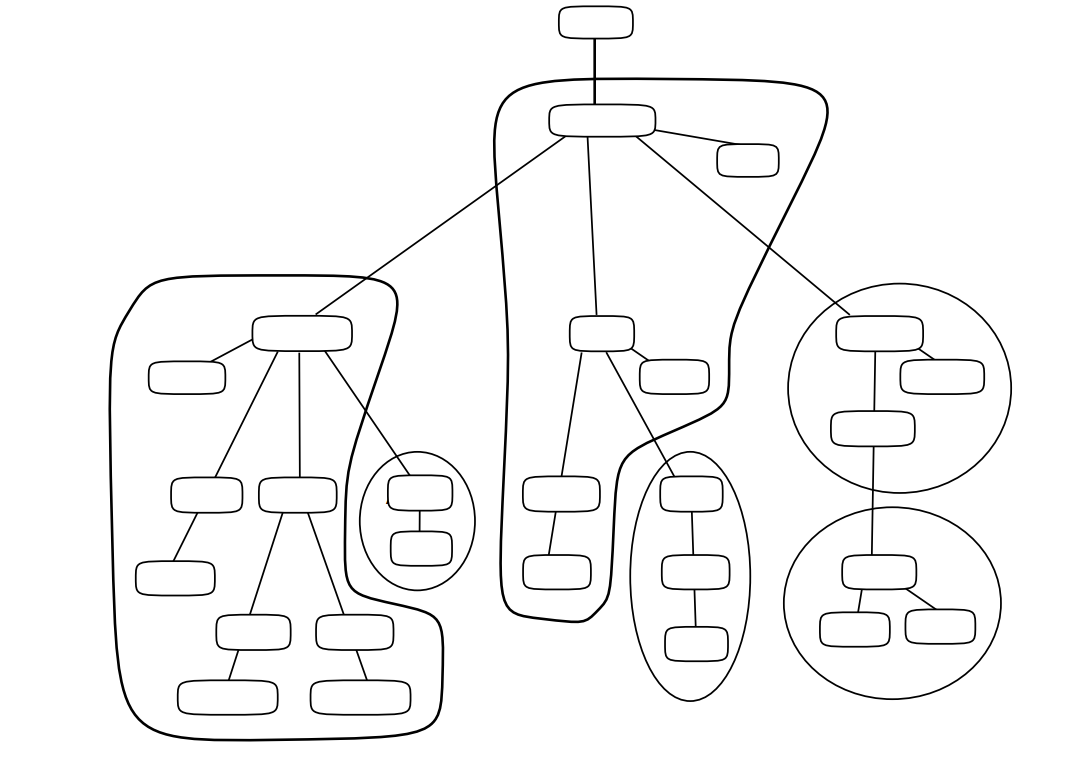 |
Amend your worksheets to reflect your Subordinate Reference requirements. For each Subordinate Reference entity, make a list of the AE titles and the presentation addresses of the DSAs that hold a master or shadow copy of the naming context? to which the subordinate reference refers. Indicate whether each DSA referred to is the master DSA or a shadow DSA for the relevant naming context.
Figure 5.10, ''Worksheet for CN=DSA1 Listing Subordinate Naming Contexts'' illustrates the worksheet for
CN=DSA1 after this information has been added.
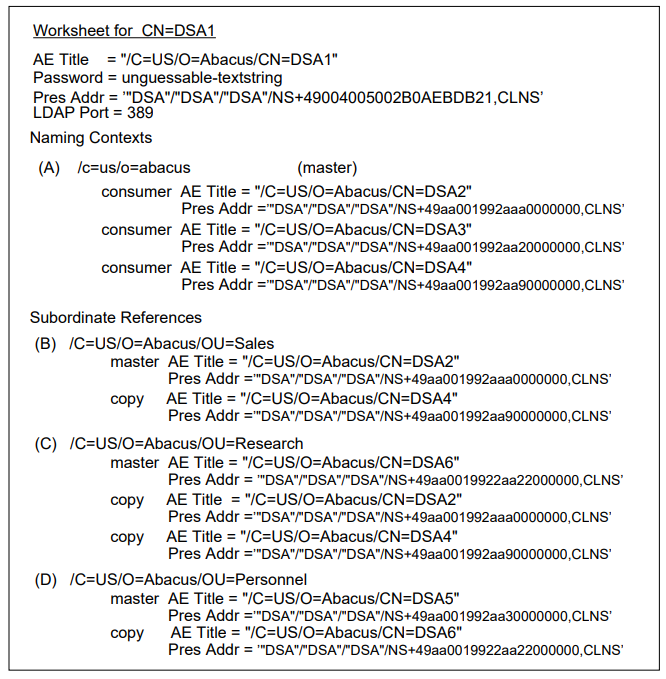 |
5.2.7. Superior Reference Entities
You only need to plan superior references if either or both of the following are true:
Some DSAs do not have a copy of your highest naming context.
Any such DSA needs a superior reference to a DSA that does hold that context. For example, all DSAs in Figure 5.4, ''Replicating Naming Contexts to Their Shadow DSAs'' could have a superior reference to
CN=DSA1, the master DSA for naming context A. However, since they all have a copy of naming context A, this is optional.Your DIT is connected to a global Enterprise Directory.
In this case, DSAs that hold a copy of your highest naming context require a reference to one external DSA that holds an even higher naming context.
DSAs that do not hold a copy of your highest naming context need a superior reference to one that does.
If you follow VSI’s recommendation for dividing and replicating your DIT, none of your DSAs will need one, unless your Enterprise Directory is connected to a global service.
A superior reference ensures that if a DSA receives a request for which none of its other knowledge information is helpful, it can pass the request to a DSA that holds hierarchically superior information. A DSA with high level naming contexts often knows about parts of the DIT that a lower DSA does not know about.
A superior reference is represented by a Superior Reference entity, and contains the AE title and presentation address of a superior DSA.
If any of your DSAs require a superior reference, add the AE title and presentation address of a superior DSA to the relevant worksheets. In the example, none of the Abacus DSAs require a superior reference.
Note that Superior Reference entities are not replicated. You need to create a Superior Reference manually on each DSA that requires one.
5.2.8. Using the Worksheets
When you have filled out the DSA worksheets, you have the information required to configure your DSAs after installation. See Chapter 8, "Configuring DSAs" for details of how to use the worksheets to configure DSAs.
5.2.9. Attributes of DSA Entries
Chapter 4, "Planning Your Directory Information Tree" explained that you need to represent your DSAs using directory entries, and explained how to plan names for those entries. This section explains how to plan the DXIM commands that you will use to create the entries that represent your DSAs. You will use these DXIM commands as part of your configuration, as described in Chapter 8, "Configuring DSAs".
When you create an entry to represent one of your HP DSAs, you must specify values for each of the following attributes:
objectClasscommonName(specified as part of the entry’s distinguished name)presentationAddressuserPasswordtrustedDSAname
During normal operation, a HP DSA automatically modifies its own entry to add more attributes. Indeed, it is possible that a DSA will create its entry before you do. In that case, your task is to ensure that all of the above attributes are present, and to modify the entry to add any that are not present.
The following subsections discuss these attributes.
Object Class
Use the decDSA class. This is a subclass of dSA and
applicationEntity.
Common Name
A DSA’s common name is planned as described in Section 4.5.1, ''Recommended Position of DSA Entries in Your DIT'',
for example, CN=DSA1.
When you create a DSA entry, the common name is actually specified as part of
the entry’s distinguished name, for example,
/C=US/O=Abacus/CN=DSA1.
Presentation Address
The value of the presentationAddress attribute is planned in
Section 5.2.3, ''DSA Presentation Addresses''.
User Password
The userPassword attribute must match the Password characteristic
attribute of the DSA entity (see Section 5.2.1, ''DSA AE Titles''). The password
is case sensitive.
If the values do not match, other DSAs will be unable to verify the DSA’s identity. This restricts the DSA’s ability to interwork with other DSAs.
Trusted DSA Name
The trustedDSAname attribute must specify the distinguished name
of the decDSA entry, for example,
/C=US/O=Abacus/CN=DSA1.
5.2.9.1. Planning the DXIM Command to Create DSA Entries
Plan the DXIM command line that you will use to create each DSA entry. For example, the following example would create an entry to represent one of the Abacus DSAs:
dxim> create /C=US/O=Abacus/CommonName=DSA1 - _dxim> attributes objectClass=(applicationEntity,dSA,decDSA), - _dxim> trustedDSAname="/C=US/O=Abacus/CN=DSA1", - _dxim> userPassword=unguessable-textstring, - _dxim> paddr=’"DSA"/"DSA"/"DSA"/NS+49004005002B0AEBDB21,CLNS’
This command will create the DSA entry to represent CN=DSA1.
The name of the entry is the one planned in Section 4.5.1, ''Recommended Position of DSA Entries in Your DIT'',
and is identical to the AE Title attribute of the DSA entity. The values of
the various attributes match the values planned in this chapter. To reduce
line length, the abbreviated keyword paddr is used for the
presentationAddress attribute.
Plan a similar DXIM command line for each of your HP DSAs. These commands will be used when you configure your Enterprise Directory, as described in Chapter 8, "Configuring DSAs".
There are alternative methods of configuring DSAs to be able to recognize each other, using characteristic attributes and subentities of the DSA entity. That alternative method has several management disadvantages, but if you want to consider it, see Section 7.7, ''Alternative Method of Controlling Access to DSAs''.
Chapter 6. Customizing the Schema
Chapter 4, "Planning Your Directory Information Tree" explained how to plan a DIT and choose classes and names for your entries. If you were able to choose a standard class for each type of object that you want to represent, and the default rules for those classes meet your needs, then you do not need to customize the schema and do not need to read this chapter.
This chapter explains how to customize the schema so that it is possible to store information that is not permitted by the default schema definitions. For example, this chapter describes how to:
Define new attribute types
Define auxiliary classes that enable you to increase the range of attributes that you can store in an entry
Define structural classes that enable you to represent objects for which no standard class is suitable
Defining a structural class also requires the definition of the following:Rules for naming entries of the new class (a name form)
Rules for where such entries may be created in the hierarchy (structure rules)
If you make customizations, you can also define how the new information is to be displayed in DXIM. For example, for new attributes you can specify user friendly descriptive names, and for classes you can specify the order in which attributes are displayed. Such rules for displaying directory information can also be defined in the schema.?
New attributes and auxiliary classes can be defined at any time either before or after you create directory entries. You can make an entry a member of an auxiliary class at any time, which means you do not need to do it immediately. However, if you need to define a structural class, you must do so before you attempt to create the entries of that class. You cannot change an entry’s structural class once an entry has been created.
6.1. Schema Text Files
VSI’s schema is provided as a set of text files? with the file extension .SC.
DEC.SC
DIT.SC
DUA.SC
DXD$SCHEMA.SC
COSINE.SC
QUIPU.SC
MTS.SC
X400.SC
X500.SC
IDS.SC
ENTRUST.SC
To customize the schema, create a file with the file extension .SC in the relevant directory, for example, CUSTOMER.SC. Use this file to contain all of your definitions. Edit DXD$SCHEMA.SC, as appropriate, to make sure that your file is included whenever you run the schema compiler.
If you need to edit any of the schema files provided with the Directory Service, always make a copy of the file first, so that you can undo any mistakes easily. Ideally, you should experiment with the schema on a test system rather than on a production system.
The DSA and DXIM read the compiled schema during startup, so if you change the schema you need to stop and restart them.
6.1.1. Notes About VSI's Schema Files
This section contains useful notes about VSI’s schema files.
Every time you reinstall the Enterprise Directory on OpenVMS systems the procedure saves any schema files it finds on the system. Every installation leads to a default set of schema files being created. If you customize your schema, then after any reinstallation, you need to retrieve your schema files and copy them over the newly installed defaults.
The schema files are saved in a subdirectory of DXD$DIRECTORY, called DXD$DIRECTORY:[DXD$SERVER.SAVn], where n is a unique number. After reinstalling the Enterprise Directory, you can retrieve your schema files from that subdirectory, and start the DSA.
If you are upgrading from a previous version of the Enterprise Directory software, then you need to combine your customizations with the newly installed schema source files. You must not use old versions of the default schema files with the new Enterprise Directory. The newly installed schema files contain important amendments. See Read Before Installing for further details.
If you want to make notes in your schema file, you can use two hyphens (--) as comment characters. For example:
-- this line is ignored during schema compilation
Some of the default schema definitions are required for the operation of the Enterprise Directory. You must therefore edit the default schema files with great care, and keep records of all changes you make. Specifically, many of the definitions in the DEC.SC file are required by the Enterprise Directory, and must not be changed. Also, the definitions in MTS.SC are required by HP’s MAILbus 400 MTA, and must not be changed. If you ever change the schema in ways that prevent the Enterprise Directory or the MAILbus 400 MTA from working, you must undo the relevant changes, or reinstall the Enterprise Directory and start your customizations again.
All schema definitions are case sensitive. Whenever you edit the text files,
make sure that all references from one definition to another are consistent in
case. For example, if you define an attribute type called
employeeNumber, then all references to that attribute type must
use that same combination of uppercase and lowercase letters.
The encoding of VSI’s schema files is not portable to another vendor’s DSA or directory application. If you want another vendor’s DSA to support definitions from VSI’s schema files, refer to the other vendor’s documentation for details of how their product supports schema customization.
6.1.2. Conventions Used to Document Schema Definitions
This chapter contains several statements of the syntax that you use to specify new schema definitions. This section explains the conventions used.
Schema definitions are case sensitive. Schema keywords are all in uppercase letters. For example, the following is an example of an attribute definition:
commonName ATTRIBUTE
WITH ATTRIBUTE-SYNTAX stringSyntax (SIZE(1..64))
EQUALITY MATCHING RULE caseIgnoreStringMatch
ORDERING MATCHING RULE caseIgnoreStringMatch
SUBSTRING MATCHING RULE caseIgnoreSubstringMatch
APPROXIMATE MATCHING RULE initialWordApproximateMatch
STORE NORMALIZED
::= {attributeType 3}The sequence of the arguments of a definition is significant. For example, if you rearrange the order of the lines of a definition, the schema compiler returns errors.
If you use lowercase letters for keywords, such as ATTRIBUTE, the
schema fails to compile. Other parts of the definitions are also case sensitive,
such that all references to the attribute commonName must use that
combination of lowercase and uppercase characters. The same applies to the names
of syntaxes, classes, matching rules, and so on.
To clarify which parts of a definition are optional, this chapter uses square
brackets [] to enclose optional parts. For example, the following
is the syntax of an attribute definition:
attributeName ATTRIBUTE
WITH ATTRIBUTE-SYNTAX syntaxName [constraint]
[EQUALITY MATCHING RULE matchingRuleName]
[ORDERING MATCHING RULE matchingRuleName]
[SUBSTRING MATCHING RULE matchingRuleName]
[APPROXIMATE MATCHING RULE matchingRuleName]
[SINGLE VALUED]
STORE NORMALIZED | STORE ORIGINAL
::= {attributeType n}In this case, the constraint argument is optional, and so are
each of the lines that declare a matching rule, and the line that states whether
an attribute is single-valued.
To clarify parts of a syntax that are a choice, this chapter uses the |
character. For example, in the above syntax definition, there is a choice of
STORE NORMALIZED and STORE ORIGINAL. You must
specify one of the listed choices.
The letter n specified on its own indicates that an integer is
required.
Variable parts of the syntax are shown in mixed case, and are explained in the
text that accompanies the example. For example, attributeName is a
variable, and the accompanying text explains that this is where you specify the
name of the attribute for which this is the definition.
6.2. Compiling the Schema
The schema compiler reads the files included by
DXD$SCHEMA.SC, and creates a single data file called
DXD$SCHEMA.DAT. The schema file is required by the DSA and the DXIM
utility.
During installation, a compiled version of the default schema data file is installed. The default schema contains standard object classes and attributes defined by international standards bodies and Enterprise Directory providers. If the default schema meets your requirements, you never need to use the schema compiler.
If you customize the schema, for example to define a new class, you need to recompile the schema, as follows.
$ SET DEFAULT DXD$DIRECTORY $ RUN SYS$SYSTEM:DXD$SCHEMA_COMPILER.EXE
The compiled schema is created in the DXD$DIRECTORY directory.
If the schema compiler finds any errors in the schema text files, such as duplicate definitions or references to non-existent definitions, the compilation fails, and an error is displayed. Edit the files to fix any errors, and recompile.
After compiling the schema successfully, stop and restart the DSA as follows:
RUN SYS$SYSTEM:NCL NCL> DISABLE DSA NCL> DELETE DSA NCL> CREATE DSA NCL> ENABLE DSA
If the new schema is incompatible with the entries already in the DSA, the CREATE DSA directive fails, and issues a message identifying the definition that is missing from the schema. In this case, check your customizations carefully, correct any problems, recompile the schema, and repeat the sequence of commands as shown above for the relevant operating system.
If you want to run the DSA while you review and fix your customizations, copy the old schema data file back into position, and continue to use that. When reviewing your customizations, remember that the customized schema must continue to support all existing entries, as well as supporting the new classes and attributes that you define. If you really want to retire some definitions that are in use in the database, you need to delete any entries that are based on those definitions.
When you have customized the schema and restarted the DSA successfully, you should also stop and restart any DXIM processes so that they also read the new schema. If DXIM uses the same schema as your DSAs, then they can display information consistently, and allow you to create and modify entries based on the new definitions.
Note
VSI recommends that all Enterprise Directory nodes use the same schema, especially if you intend to replicate directory information between DSAs. Therefore, if you customize the schema, edit the schema text files on one node, verify that they compile without error and are compatible with the existing DIT, and then copy those text files to every DSA node and to every DXIM node. Compile the schema text files on each node before restarting the DSA and DXIM on that node.
Note that you cannot copy the compiled schema data file across nodes. You must copy the text files, and recompile on each node. The text files are platform independent.
6.3. Assigning Object Identifiers to New Definitions
Many of the definitions you can make in the schema require a unique object identifier. The definitions that require object identifiers are:
Attribute definitions
Class definitions
Name Forms
Structure rule definitions have integer identifiers, but these are not required to be globally unique. Structure rule identifiers need only be unique within your schema. Other definitions have no identifier, or are not customer definable.
This section describes how to define an object identifier that uniquely identifies your organization’s schema customizations, and then a set of object identifiers for your organization’s attributes, classes, and name forms. If you do not ensure that your organization uses unique object identifiers for its schema customizations, there is a possibility that your definitions will clash with those of other organizations, causing interworking problems.
If there is a Enterprise Directory naming authority already established for your country or region, then you can refer to them and ask them to assign a unique object identifier to your organization’s schema customizations. If no such naming authority exists, then VSI’s schema files include an object identifier that you can use as the basis for unique object identifiers.
The schema file DEC.SC contains the following definitions:
customerSQMfacility OBJECT-IDENTIFIER ::= {dec-osi-directory 10}
customerIntTelNumber OBJECT-IDENTIFIER ::= {dec-osi-directory 11}You use one of these definitions as follows:
If your organization has a Software Quality Management facility code, assigned by VSI, then you can use that code in conjunction with the
customerSQMfacilitydefinition.For example, the Abacus organization has the SQM facility code 97887. The Abacus directory manager could therefore create the following definition in the schema file CUSTOMER.SC:
abacusId OBJECT-IDENTIFIER ::= {customerSQMfacility 97887}You can use the international telephone number of your organization in conjunction with the
customerIntTelNumberdefinition.For example, the Abacus organization has the international telephone number 1 123 5554444. This includes all of the country and regional codes. The Abacus directory manager could therefore create the following definition in the schema file CUSTOMER.SC:
abacusId OBJECT-IDENTIFIER ::= {customerIntTelNumber 11235554444}
You need to define either one of the above definitions. In either case, you can then use the unique identifier of your organization to make three further definitions, as follows:
abacusAttributeType OBJECT-IDENTIFIER ::= {abacusId 1}
abacusObjectClass OBJECT-IDENTIFIER ::= {abacusId 2}
abacusNameForm OBJECT-IDENTIFIER ::= {abacusId 3}Having defined these three object identifiers, you can then use their descriptive names in your schema definitions of attributes, classes, and name forms. For example:
employeeNumber ATTRIBUTE
WITH ATTRIBUTE-SYNTAX numericSyntax
EQUALITY MATCHING RULE numericStringMatch
SUBSTRING MATCHING RULE numericSubstringMatch
STORE NORMALIZED
::= {abacusAttributeType 1}
abacusEmployee OBJECT-CLASS SUBCLASS OF top AUXILIARY
MUST CONTAIN {
employeeNumber}
MAY CONTAIN {
birthDate,
hireDate,
tmServer}
::= {abacusObjectClass 1}
dogNameForm NAME-FORM
NAMES dog
WITH ATTRIBUTES commonName
::= {abacusNameForm 100}These object identifiers are guaranteed to be unique to your organization’s schema, and therefore will never clash with schema definitions of other organization’s whose Enterprise Directory you might connect to.
6.4. Planning to Customize the Schema
Having chosen a standard structural class, such as
organizationalPerson to represent an object, and perhaps created
entries using that class, you might decide that the class does not enable you to
represent all of the information that you would like. Indeed, you might find that
there is no standard structural class suitable for one of your types of
object.
The following sections use case studies to illustrate how to plan extra information requirements, and then how to implement those plans.
Section 6.5, ''Planning an Auxiliary Class'' uses the example of employees to illustrate how to
plan extra information for organizationalPerson entries.
Section 6.7, ''Planning a Structural Class'' explains how to plan a completely new structural class to represent an object for which there is no standard structural class.
Those two sections also describe any customizations you need to make to the schema files to provide user friendly displays of your new definitions in the DXIM utility.
In addition, Section 6.9, ''Defining Search Filters and Filter Fields for the Windows Utility'' describes how to customize or define user friendly search filters for use in the DXIM Find window. The purpose of the filter definitions is to reduce the amount of information that end users need to understand when they are searching the directory. If you do not intend to use the DXIM windows utility, then you do not need to read Section 6.9, ''Defining Search Filters and Filter Fields for the Windows Utility''.
6.5. Planning an Auxiliary Class
The Abacus organization wants to create X.500 entries to represent each of its
employees. It has a list of information that it wants to represent in those entries,
and has chosen the organizationalPerson class as a starting
point.
The organizationalPerson class provides many useful attributes, but
Abacus wants to represent a range of other information which is not provided for by
that class. The list of other information that Abacus wants to represent is:
The unique employee number by which Abacus identifies each of its employees
The date that an employee was originally hired by Abacus
The date of birth of an employee
A name of the time management server that an employee uses
The personnel department stated a requirement for the first few attributes so that they could monitor employment trends; the time management application developers stated the requirement for the time management server name.
Note
The list of requirements is used to illustrate the planning process only. VSI does not suggest that these particular attributes are useful or appropriate for your organization.
None of the attributes provided by the default schema meet these particular
requirements. The Abacus planning team therefore has to plan how to extend the
default schema so that the required information can be stored, and so that the newly
defined attributes are permitted within entries of the
organizationalPerson structural class.
To meet this requirement, the Abacus team define an auxiliary class called
abacusEmployee. The auxiliary class can be used with all entries of
the organizationalPerson structural class. The
abacusEmployee class is to have four attributes, all of which are
defined by Abacus.
For each of the new attributes, the planning team make a number of decisions, as follows:
They define an
employeeNumberattribute.They decide that the
employeeNumberattribute is a single-valued attribute with an integer syntax. Each employee has only one employee number, so it would be incorrect to permit multiple values. They also decide that the attribute is mandatory so that all employee entries must include it.They define a
birthDateattribute.The
birthDateattribute is to be single-valued, with a numeric string syntax, such as "12 12 1962". The attribute is optional.The team agree that every date should be in the sequence "<month> <day> <year>". They also agree that the numbers 1 to 9 inclusive should be denoted by 01 to 09. These policy decisions (which are not enforced by the Enterprise Directory) mean that values can be ordered accurately. For example, the date "05 08 1963" is earlier than "12 31 1963".
The team discussed using the generalized time syntax for this attribute, but decided that syntax required too much precision, and was not user friendly enough.
They define a
hireDateattribute.This is similar to the
birthDateattribute. It is to be optional, single- valued, with a numeric string syntax, for example, "01 06 1989".They define a
tmServerattribute.The
tmServerattribute is single-valued with the distinguished name syntax. The value of the attribute is the X.500 distinguished name of an entry that represents a time management server. The attribute is optional.
Having planned the four new attributes that they want to use in employee entries, the Abacus team have to define the new attributes in the schema text files.
Section 6.5.1, ''Defining an Auxiliary Class'' describes how to edit the schema files to define an auxiliary class, and Section 6.5.3, ''Defining Attributes'' explains how to define new attributes.
6.5.1. Defining an Auxiliary Class
An auxiliary class definition must conform to the following syntax:
classname OBJECT-CLASS SUBCLASS OF top AUXILIARY
MUST CONTAIN {attribute [, attribute, ...]}
MAY CONTAIN {attribute [, attribute, ...]}
::= {object-identifier}where:
classnameis the name of the class for which this is the definition.attributeis the name of an attribute type.Specify each attribute that is to be permitted for this auxiliary class in the appropriate line according to whether it is mandatory or optional. If there are no mandatory attributes, omit that line, and similarly, if there are no optional attributes, omit that line.
object-identifieruniquely identifies this class, for example,customerObjectClass 1.See Section 6.3, ''Assigning Object Identifiers to New Definitions'' for details of how to define your equivalent of the
customerObjectClassidentifier. The integer must be unique amongst definitions that use that identifier.
For example, the Abacus organization planned an auxiliary class called
abacusEmployee in Section 6.5, ''Planning an Auxiliary Class''. The following
example shows the class definition for that new class:
abacusEmployee OBJECT-CLASS SUBCLASS OF top AUXILIARY
MUST CONTAIN {
employeeNumber}
MAY CONTAIN {
birthDate,
hireDate,
tmServer}
::= {abacusObjectClass 1}Every attribute must also be defined in the schema (see Section 6.5.3, ''Defining Attributes''). The list of attributes is case sensitive; you
must use exactly the same string as you use when defining the attribute. For
example, if the above list included the string BirthDate, the
schema compiler displays an error, because the attribute definition uses a
lowercase b.
You should also define a label for your new auxiliary class (see Section 6.6, ''Defining a Label'').
The example auxiliary class shown here states that it is a subclass of
top, which means the definition inherits the attributes of that
class. It is also possible to define an auxiliary class as a subclass of another
auxiliary class. For example, having defined the abacusEmployee
class, you could define a subclass of abacusEmployee. In that case,
the subclass definition specifies that it is a SUBCLASS OF
abacusEmployee.
6.5.2. DXIM Restrictions on the Use of Auxiliary Classes
The DXIM windows utility does not fully support the management of entries that are members of an auxiliary class. The Create and Modify windows only display attributes that are present in an entry because they are defined in the structural class definition. Any attributes that are defined in an auxiliary class are not displayed in those windows.
The DXIM command line utility does support management of auxiliary classes.
For example, the following command modifies an existing
organizationalPerson so that it is a member of the
abacusEmployee auxiliary class (see Section 6.5.1, ''Defining an Auxiliary Class''). The command adds the name of the auxiliary class
as a value of the objectClass attribute, and also specifies the
mandatory employeeNumber attribute.
dxim> modify /c=us/o=abacus/ou=sales/cn="Jon Low" - _dxim> add value objectclass=abacusEmployee - _dxim> add attribute employeeNumber=1390921
You can also specify membership of an auxiliary class when you create an entry, as long as you also specify all attributes that are mandatory for all classes. For example:
dxim> create /c=us/o=abacus/ou=sales/cn="Jon Low" - _dxim> attributes objectclass=(person,organizationalPerson,abacusEmployee), - _dxim> surname=Low, employeeNumber=1390921
Although the DXIM windows utility only supports the creation and modification of attributes that are defined in an entry’s structural class, it does display all attributes when you expand an entry in the Browse and Find windows.
6.5.3. Defining Attributes
An attribute type definition must conform to the following syntax:
attributeName ATTRIBUTE
WITH ATTRIBUTE-SYNTAX syntaxName [constraint]
[EQUALITY MATCHING RULE matchingRuleName]
[ORDERING MATCHING RULE matchingRuleName]
[SUBSTRING MATCHING RULE matchingRuleName]
[APPROXIMATE MATCHING RULE matchingRuleName]
[SINGLE VALUED]
STORE NORMALIZED | STORE ORIGINAL
::= {attributeType n}where:
attributeNameis a descriptive name for your new attribute.The mixture of uppercase and lowercase letters that you use in this descriptive name is the mixture that you must use in all references to this attribute type in other schema definitions.
syntaxis the name of the syntax to be used for the attribute.You must specify one of the syntaxes documented in Section A.4, ''Syntaxes'', using the correct mixture of uppercase and lowercase letters. When choosing a syntax, consider what matching rules the syntax supports. The choice of syntax and matching rule determines whether the DSA can maintain an index for your new attribute (see Section 6.5.4, ''Planning to Index Attribute Values'').
If none of the default syntaxes is suitable for your new attribute, you can use the
undefinedSyntax. The only syntactic checking the DSA applies to this syntax is to ensure that the value is encoded in valid ASN.1.This syntax might be useful if, for example, you develop an application that has a particular syntax requirement not provided for by the other default syntaxes. However, because the DSA only checks the validity of the encoding, it is up to the application to monitor such attribute values for compliance with the intended format. Whenever possible, use a syntax for which the DSA can provide fuller support.
constraintis an optional statement of a constraint on the size or range of a value.For example, for string syntaxes, you can constrain values to be no more than 10 characters long by specifying
(SIZE(1..10)). You can specify that a string must be exactly a certain length by specifying a single integer, for example,(SIZE(10)).For integer syntaxes, you omit the
SIZEkeyword and the outermost parentheses. For example, you can constrain integer values to a range by specifying the lower and upper bounds of the range, for example,(18..30).If a constraint is specified for a list syntax, the constraint applies to each element of the list rather than to the list as a whole. For example, if you define an attribute that uses
integerListSyntaxand specify a range constraint of(1..10), then each integer is constrained to that range.matchingRuleNameis the name of a matching rule that is supported for the syntax of this attribute for the relevant type of matching: equality, substring, ordering, or approximate.For example, for
stringSyntax, an appropriate equality matching rule iscaseIgnoreStringMatch, whereas an appropriate substring matching rule iscaseIgnoreSubstringMatch.Each matching rule must be defined elsewhere in the schema. Section A.4, ''Syntaxes'' lists the matching rules supported for each syntax, and Section A.5, ''Matching Rules'' specifies which types of matching the matching rules are suitable for.
It is advisable to specify at least an equality matching rule, even if you leave out the other types of matching rule. Without an equality matching rule, the DSA has no way of testing whether one value matches another.
This makes it difficult to modify attributes, because the DSA cannot tell whether a value you try to add is already present in the entry, or whether a value you try to remove is present. This greatly complicates the management of the attribute.
If you use the
undefinedSyntax, specify theexactEncodingMatchas an equality matching rule. This enables the DSA to provide simple matching of values even though the syntax is undefined.See Section 6.5.4, ''Planning to Index Attribute Values'' for notes about choosing matching rules, especially if you are defining an attribute that you intend to use for naming entries.
SINGLE VALUEDmeans that the attribute can have only one value.The absence of this clause means that the attribute can have any number of values.?
STORE NORMALIZEDmeans that the DSA should normalize values of this attribute.Normalizing an attribute involves optimizing its values so as to improve the performance of matching functions.
A typical effect of normalization is that multiple spaces embedded in a value specified by a user are reduced to one space. Thus, the value
" John Smith "is normalized to"John Smith".If a value is not stored normalized, then the DSA must normalize it every time it needs to compare it with a value specified by the user. This reduces the performance of the DSA for most user requests.
The decision to normalize or not also affects DXIM displays. If a value is stored normalized, then it is displayed in normalized form. However, if a value is stored in original form, then DXIM displays it accordingly.
The only reason to specify STORE ORIGINAL would be so that displays of attribute values exactly represent those values as they were originally entered by the user who added them to the directory. For example, if you consider it useful for embedded spaces to be preserved in the value, and displayed to users, then you can specify STORE ORIGINAL for the relevant attribute type. It is unlikely that this will be a useful choice.
See also Section 6.5.4, ''Planning to Index Attribute Values'' which explains that normalization improves the performance of an index of attribute values, which greatly improves the performance of searches, as well as most other requests.
nis a unique number that identifies this attribute type.For example, your first new attribute definition could be given the following object identifier:
::= {customerAttributeType 1}Section 6.3, ''Assigning Object Identifiers to New Definitions'' explains how to assign a value to
customerAttributeTypeso that your definitions are guaranteed to be globally unique.
The following example illustrates a typical attribute definition, taken from the default schema:
commonName ATTRIBUTE
WITH ATTRIBUTE-SYNTAX stringSyntax (SIZE(1..64))
EQUALITY MATCHING RULE caseIgnoreStringMatch
ORDERING MATCHING RULE caseIgnoreStringMatch
SUBSTRING MATCHING RULE caseIgnoreSubstringMatch
APPROXIMATE MATCHING RULE initialWordApproximateMatch
STORE NORMALIZED
::= {attributeType 3}When you define a new attribute, you can also define a label. A label specifies what the descriptive name of the attribute should be for the purposes of display in applications (see Section 6.6, ''Defining a Label'').
6.5.3.1. Defining Primary and Secondary Attributes
It is important to understand that multi-valued attributes are stored by the DSA as sets rather than sequences. The order in which values are added to an attribute cannot be guaranteed to be the order in which they are returned when you read the attribute. Furthermore, the order in which values are returned on one occasion is not guaranteed to be used on another occasion.
This can influence your strategy for defining new attribute types. If a given attribute has one value that is particularly important for some reason, then you might consider defining an attribute type specifically for that value, and another attribute type for other values. For example:
favouriteSport ATTRIBUTE
WITH ATTRIBUTE-SYNTAX stringSyntax (SIZE(1..64))
EQUALITY MATCHING RULE caseIgnoreStringMatch
ORDERING MATCHING RULE caseIgnoreStringMatch
SUBSTRING MATCHING RULE caseIgnoreSubstringMatch
APPROXIMATE MATCHING RULE initialWordApproximateMatch
SINGLE VALUED
STORE NORMALIZED
::= {attributeType 10007}
Sport ATTRIBUTE
WITH ATTRIBUTE-SYNTAX stringSyntax (SIZE(1..64))
EQUALITY MATCHING RULE caseIgnoreStringMatch
ORDERING MATCHING RULE caseIgnoreStringMatch
SUBSTRING MATCHING RULE caseIgnoreSubstringMatch
APPROXIMATE MATCHING RULE initialWordApproximateMatch
STORE NORMALIZED
::= {attributeType 10008}In this example, the favouriteSport attribute is defined as
single-valued. The Abacus organization could use this attribute to identify
the sport that an employee most enjoys, while the multi-valued
Sport attribute lists all sports that the employee
participates in. In this way, each employee’s favourite sport can be easily
recognized by users and applications.
You might think of an attribute such as favouriteSport as a
primary attribute, and Sport as a secondary attribute. It is up
to the directory manager to ensure that such attributes are used for the
purpose they are defined for; the DSA does not recognize the logical
connection between such attributes.
6.5.4. Planning to Index Attribute Values
The DSA can create indexes of attribute values. When you define new attribute types, you should consider whether you want the DSA to maintain an index for that attribute’s values.
You can also consider whether you want the DSA to maintain indexes of the attributes defined in the default schema. The following sections explain the purpose of indexes, and how to make the DSA create and maintain an index of a given attribute’s values.
6.5.4.1. The Purpose of Indexes
If a DSA does not maintain an index for a given attribute, then when a user attempts to search for entries containing that attribute value, the DSA must check each possible entry in turn to see whether the attribute value matches. This requires the DSA to do a lot of processing. However, if a DSA maintains an index for the attribute, then the DSA can refer to the index to determine what entries have the relevant value. This is considerably faster than checking each entry in turn.
The use of indexing therefore greatly improves search performance, and is also useful for other user requests. However, indexing requires the DSA to use extra memory to store its attribute indexes. If your DSA system has limited resources, you need to decide whether to use indexing, or whether to use it only for certain attributes. An attribute value that is indexed is approximately 20 bytes larger than if it is not indexed.
The DSA can maintain two types of index for a given attribute, depending on what matching rules the attribute uses. Some attribute types cannot be indexed at all. See Section 6.5.4.2, ''Making a DSA Index a Given Attribute’s Values'' for more details.
6.5.4.2. Making a DSA Index a Given Attribute’s Values
Not all attributes can be indexed. The ability to index a given attribute depends on which matching rules the attribute uses for equality matching and/or for approximate matching.
If the equality matching rule supports indexing, then the DSA can maintain an index that improves the performance of equality matching. Likewise, if an attribute has an approximate matching rule which supports indexing, then the DSA can maintain a separate index that improves approximate matching performance.
Although it is not possible to specify that you want an index for the purposes of substring matching or ordering matching, the DSA automatically uses the equality matching index if it is suitable. This depends on how complex the syntax is; for simple syntaxes, such as strings, it is often possible for the DSA to use an equality matching index for substring and ordering matching as well.
Consider the example of the surname attribute type from the
default schema:
surname ATTRIBUTE
WITH ATTRIBUTE-SYNTAX stringSyntax (SIZE(1..64))
EQUALITY MATCHING RULE caseIgnoreStringMatch
ORDERING MATCHING RULE caseIgnoreStringMatch
SUBSTRING MATCHING RULE caseIgnoreSubstringMatch
APPROXIMATE MATCHING RULE initialWordApproximateMatch
STORE NORMALIZED
::= {attributeType 4}The equality matching rule is caseIgnoreStringMatch, and the
approximate matching rule is
initialWordApproximateMatch.
To determine whether indexing is possible for the surname
attribute, you need to refer to the definitions of these two matching rules.
The definitions are as follows:
caseIgnoreStringMatch MATCHING-RULE
WITH INDEX
APPLIES TO
stringSyntax, printableStringSyntax, countryNameSyntax
::= {matchingRule 21}
initialWordApproximateMatch MATCHING-RULE
WITH INDEX
APPLIES TO
stringSyntax, printableStringSyntax
::= {decMatchingRule 3}Both of the matching rule definitions include the keywords WITH
INDEX. This indicates that those rules both support indexing, and
therefore that it is possible to index the surname attribute
for both types of matching.
When you choose the matching rules to be used for a new attribute type, check whether those matching rules support indexing. This may modify your choice of syntax.
To make a DSA actually index a given attribute type, having determined
that one or both of the rules support indexing, you need to add the
attribute’s name to the INDEX FOR EQUALITY MATCHING and/or
INDEX FOR APPROXIMATE MATCHING lists in X500.SC. For
example, by default the surname attribute is specified in both
lists. Therefore, by default the DSA creates an index of
surname attribute values for both types of matching.
6.5.4.3. Notes About Indexing Attribute Values
This section provides a list of factors to consider when deciding whether to use attribute indexes. By default, the schema specifies that all possible attribute types are indexed, because the performance gains are so great.
If you want to use an attribute type as a naming attribute (see Section 4.4, ''Naming Your Entries''), then its equality matching rule must support indexing.
It is not necessary to actually use indexing, as long as indexing is possible for that attribute type. It does not matter whether the approximate matching rule, if any, supports indexing.
If an attribute definition includes the
STORE ORIGINALclause, then the advantages of indexing that attribute’s values are reduced.If an index contains values that are in original form (see Section 6.5.3, ''Defining Attributes''), the DSA must normalise each index entry to determine whether it matches the value specified by the user. An index is far more efficient if it contains normalized attribute values.
An indexed attribute value requires approximately 20 bytes more memory than if it is not indexed.
If a DSA system has limited resources, you might decide to edit the
INDEX FOR EQUALITY MATCHINGand/orINDEX FOR APPROXIMATE MATCHINGlists in X500.SC. By removing attributes from those lists you reduce the amount of memory required by the DSA. However, you also impact the performance of search and some other operations.There is no requirement for all DSAs to index the same set of attributes.
For example, the decision to index attribute values on one DSA does not require any other DSA to index the same attribute values, even if the other DSA holds some of the same directory entries.
There is no requirement for a given attribute to be indexed for both equality matching and approximate matching.
If you expect that users will not use approximate matching frequently, then you might decide not to index any attributes for that purpose.
The decision to index a given attribute applies to all directory entries held on the DSA.
6.6. Defining a Label
A label specifies alternative names for attributes, classes, and for DXIM windows (see Section 6.7.4, ''Defining Window Definitions'').
Note that these labels affect DXIM and LDAP clients.
The alternative names improve the DXIM user interface, so that users and managers
are not exposed to unfriendly, unpunctuated attribute names, such as
stateOrProvinceName. A label can specify abbreviations and user
friendly alternatives for long and unfriendly descriptive names. You can also use
labels to provide foreign language support within DXIM.
The default schema includes labels for all attributes. Most labels are defined in DUA.SC, and you can customize them as much as you like.
The syntax of a label definition is as follows:
LABEL labelName
[KEYWORD "keyword", "keyword", ...] [MENU "text"]
[DESCRIPTION "text"]
ENDAll parts of a label are optional. You can specify more than one keyword, but only one menu label and one description label. Keywords must not contain spaces, and must use the printable string character set only.
Note
If the schema files contain more than one label definition for an attribute, then the last definition takes effect, and all others are ignored. The schema compiler does not warn you that multiple label definitions have been found.
Menu labels and description labels can contain spaces, but must also use the printable string character set.
The following example shows the label definition for the commonName
attribute.
LABEL commonName
KEYWORD "CN", "common", "Name"
MENU "Name"
DESCRIPTION "Common Name"
ENDwhere:
KEYWORDspecifies keywords that will be accepted in DXIM command line input to meancommonName.The name of the attribute definition is always accepted as a keyword. For example,
commonNameis a valid keyword even though it is not listed.The first listed keyword is the one that DXIM uses for the attribute if it appears in an entry’s name and if information is being written to a script file. For example, DXIM would display
CN="John Smith"rather thancommonName="John Smith". Choose a short first keyword so that displays of distinguished names are short.With LDAP requests, the DSA tries to return attributes with the same name as used in the request. If all user attributes are requested, then the first keyword is used to return attributes.
A keyword is not required for window labels, because you never refer to windows in command lines.
MENUspecifies the string that is used by the DXIM windows interface whenever this attribute, class, or window appears on a menu.Specify only one text string for display on menus. The string can contain spaces, and is case sensitive.
The
DESCRIPTIONline specifies the string that is used by DXIM when displaying information in a window.For example, the description is displayed when you show the attributes of an entry using the DXIM show command, or expand an entry in a DXIM window. Specify only one text string for display as a description. The string can contain spaces, and is case sensitive.
If you do not specify a label for an attribute type, DXIM uses the string that
uniquely identifies the attribute type definition. For example, if there is no label
for the commonName attribute type, such as Common Name, DXIM uses the
string commonName. This behaviour also applies to any other schema
definitions that are displayed in the user interface, such as object class names,
window names, filter names, and so on. Most definitions in the default schema have
labels. You can modify these labels if you do not like the defaults, or if English
is not your users’ first language.
6.7. Planning a Structural Class
This section demonstrates how to plan a new structural class when no existing classes are suitable for a given type of object that you want to represent.
Note
Defining a new structural class is the most complicated of the possible schema customizations, requiring a detailed understanding of the X.500 model of information. For ease of implementation, it is better to use a standard structural class if possible, and to use auxiliary classes to extend the usefulness of the structural class (see Section 6.5, ''Planning an Auxiliary Class'').
The Abacus organization decides that it wants to represent dogs as directory entries. Many of the organization’s security guards own a guard dog, and the organization decides that it will be useful to have directory entries representing them.
No existing structural class is suitable for representing a dog, so Abacus decides to define a new class, and several new attributes.
The organization decide to define a structural class called dog. The
dog class is not derived from any other class except
top (from which all classes are derived). Its only inherited
attribute is therefore the objectClass attribute (all classes inherit
the mandatory and optional attributes of the classes from which they are
derived).
Note
You can define a structural class as a
subclass of an existing structural class.
In this case, the new subclass inherits the attributes permitted for its
superclass.
However, if there is a structural class that is suitable for this approach, then defining an auxiliary class is easier and more flexible than defining a subclass. Section 6.5, ''Planning an Auxiliary Class'' describes how to plan an auxiliary class.
The organization decide that the attributes of each dog are
commonName, breed, birthDate, and
handler.
The commonName attribute is a standard attribute provided by the
default schema. It therefore requires no further planning, except to state that it
is mandatory for a dog to have a common name.
The breed attribute is a new attribute. It is to be single-valued,
mandatory, and have a printable string syntax.
The birthDate attribute is the same as the one planned in Section 6.5, ''Planning an Auxiliary Class'', and requires no further planning except to state that it
is optional for dogs.
The handler attribute is a new attribute. It is to be single-valued,
optional, and have a distinguished name syntax. It is to contain the distinguished
name of the security guard who is responsible for the dog.
Note that the organization deliberately reuses existing attribute definitions where possible, so that the amount of planning and implementation required is kept to a minimum, and so that information is represented as consistently as possible, even for different classes of entry. Defining new attributes for use with a structural class is the same as for an auxiliary class. Section 6.5.3, ''Defining Attributes'' explains how to define a new attribute.
The planners decide that all dog entries must be named using the
commonName attribute. They need to define a name form for this
rule. Section 6.7.2, ''Defining Name Forms'' explains how to define a name form for a new
structural class.
The organization also decide that dog entries are to be created as
subordinates of organizationalUnit or locality entries.
They need to define some structure rules in the schema. Section 6.7.3, ''Defining Structure Rules'' explains how to define structure rules for a new structural class.
Section 6.7.1, ''Defining a Structural Class'' explains how to edit the schema text files to
define a new structural class, such as dog. Section 6.7.4, ''Defining Window Definitions'' explains how to define a window definition for a new
structural class.
Defining a label for a structural class is the same as for an auxiliary class. Section 6.6, ''Defining a Label'' explains how to define a label.
6.7.1. Defining a Structural Class
A structural class definition must conform to the following syntax:
classname OBJECT-CLASS SUBCLASS OF superclass STRUCTURAL
MUST CONTAIN {attribute [, attribute, ...]}
MAY CONTAIN {attribute [, attribute, ...]}
::= {object-identifier}where:
classnameis the name of the class for which this is the definition.superclassis the name of the immediate superclass of this class.For example, most classes are immediate subclasses of
top, but theorganizationalPersonclass is a subclass ofperson. If you define a class as a subclass of another class, then list the immediate superclass only. The superclass of a new structural class must itself be either a structural class or an abstract class. You cannot define a structural class to be a subclass of an auxiliary or alias class.It is also possible for a class to be a subclass of two or more different classes. Only one of the immediate superclasses can be a structural class. All but one of the specified superclasses must be abstract classes. An abstract class is defined to provide a common basis for the definition of further classes. For example, you could define a
mammalabstract class, to provide a common basis for defining structural classes such ascatanddog. For most purposes, this additional complexity is probably unnecessary.If you want to define a class as a subclass of more than one superclass, list each immediate superclass from which your new class is derived, using commas as separators. For example:
classname OBJECT-CLASS SUBCLASS OF superclass,superclass STRUCTURAL
Note
Do not confuse the concept of superclasses with the concept of permitted superiors in the DIT. The former helps to define classes in the schema, while the latter helps to define permitted relationships in the DIT.
For example, the
organizationalPersonclass has the superclassperson. That superclass hierarchy is different from the rules that specify thatorganizationalPersonentries can haveorganization,locality, ororganizationalUnitentries as permitted superiors in the DIT.attributeis the name of an attribute type.object-identifieruniquely identifies this class, for example,customerObjectClass 1.See Section 6.3, ''Assigning Object Identifiers to New Definitions'' for details of how to define your equivalent of the
customerObjectClassidentifier. The integer must be unique amongst definitions that use that identifier.
All of the specified superclasses and attribute types must also be defined in the schema.
The planner’s task is to write such a definition for each new structural
class. The following example shows the class definition for the new
dog class:
dog OBJECT-CLASS SUBCLASS OF top STRUCTURAL
MUST CONTAIN {
commonName,
breed}
MAY CONTAIN {
birthDate,
handler}
::= {abacusObjectClass 100}6.7.2. Defining Name Forms
When you define a structural class, you must also define a name form. A name form specifies what attribute is to be used for naming entries of a given class.
The syntax of a name form is as follows:
nameFormName NAME-FORM
NAMES class
WITH ATTRIBUTES attribute_list
[AND OPTIONALLY attribute_list]
::= {object-identifier}where:
nameFormNameis a unique name for this name form.classis the name of the class to which this name form applies.attribute_listis a list of one or more attributes.All attributes used for naming must support storage optimization (see Section 6.5.4, ''Planning to Index Attribute Values'').
object-identifieruniquely identifies this name form, for example,customerNameForm 1.See Section 6.3, ''Assigning Object Identifiers to New Definitions'' for details of how to define your equivalent of the
customerNameFormidentifier. The integer must be unique amongst definitions that use that identifier.
For example, in Section 6.7, ''Planning a Structural Class'' the Abacus organization decided
that entries of the dog class would be named using the
commonName attribute. The following example shows the name form
that defines this rule.
dogNameForm NAME-FORM
NAMES dog
WITH ATTRIBUTES commonName
::= {abacusNameForm 100}It is possible to specify more than one naming attribute. To specify a set of
attributes that must be used in naming, list the attributes, using commas to
separate them. For example, the following WITH ATTRIBUTES clause
would specify that each of commonName and handler must
always be used in naming dog entries:
dogNameForm NAME-FORM
NAMES dog
WITH ATTRIBUTES commonName, handler
::= {abacusNameForm 100}It is also possible to specify that a naming attribute is optional for the
purposes of naming, using the AND OPTIONALLY clause. For example,
the following name form specifies that commonName is required in
names of dog entries, but that handler and breed are
both optional:
dogNameForm NAME-FORM
NAMES dog
WITH ATTRIBUTES commonName
AND OPTIONALLY handler, breed
::= {abacusNameForm 100}Note that an attribute can be listed as mandatory or optional for naming, regardless of whether the attribute is mandatory or optional according to the class definition.
The last line of the name form definition assigns an object identifier that uniquely identifies this name form within the schema.
6.7.3. Defining Structure Rules
When you define a structural class you must also define one or more structure rules.
Alias classes (see Section 6.8, ''Planning Alias Classes'') also have structure rules, which are defined in the same way. Auxiliary classes do not have structure rules.
Conceptually, there are two types of structure rule:
Those that permit entries to be created immediately beneath the root of the DIT.
Those that permit entries to be created beneath other specified classes of entry.
If you do not define any structure rules for your new classes, then your DSA does not allow you to create entries of those classes. You must define rules that specify where entries are permitted in the DIT, as well as defining what attributes they have.
6.7.3.1. Structure Rules for Entries Immediately Beneath the Root
The syntax of a structure rule that permits entries to be created immediately beneath the root of the DIT is as follows:
structureRuleName STRUCTURE-RULE
NAME FORM nameFormName
::= integerwhere:
structureRuleNameis the name of the rule that you are defining.nameFormNamespecifies a name form for all entries that use this structure rule.integeris a number that uniquely identifies this rule.Note that structure rules do not have object identifiers, unlike most definitions. Specify an integer that is unique within your schema. See Section 6.7.3.3, ''Assigning Structure Rule Identifiers'' for advice about assigning structure rule identifiers.
For example, the following structure rule permits
organization entries to be created immediately beneath the
root:
organizationRootStructureRule STRUCTURE-RULE
NAME FORM organizationNameForm
::= 3Note that it is unlikely that you will need to define classes of entry that can be created immediately beneath the root, because that will probably exceed your authority to create and name entries.
Note that this rule does not permit organization entries to
be created anywhere else in the DIT. Any class that can be created beneath
other entries needs a slightly different structure rule (see Section 6.7.3.2, ''Structure Rules for Entries Beneath Other Entries''). Some classes of entry therefore have two
structure rules, so that they can be created beneath the root or created
beneath other classes of entry.
6.7.3.2. Structure Rules for Entries Beneath Other Entries
The syntax of a structure rule that permits entries to be created beneath other classes of entry is as follows:
structureRuleName STRUCTURE-RULE
NAME FORM nameFormName
SUPERIOR RULES ruleName [, ruleName, ...]
::= integerwhere:
structureRuleNameis the name of the rule that you are defining.nameFormNamespecifies a name form for all entries that use this structure rule.ruleNameis the name of a structure rule that enables the existence of entries that are to be immediately superior to the entries for which this is the structure rule.integeris a number that uniquely identifies this rule.
For example, the following rule permits an
organizationalPerson entry to be created beneath
organization, organizationalUnit, and
locality entries:
organizationalPersonStructureRule STRUCTURE-RULE
NAME FORM organizationalPersonNameForm
SUPERIOR RULES
organizationStructureRule, organizationRootStructureRule,
localityStructureRule, localityRootStructureRule,
organizationalUnitStructureRule
::= 7Note that the list of superior rules includes the rule that permits
organization entries beneath the root, and the rule that
permits organization entries beneath other classes of entry.
This means that an organizationalPerson entry can be created
beneath any organization entry regardless of what superiors the
organization may or may not have. If only one of the two
rules is listed, it is only possible to create an
organizationalPerson entry beneath
organization entries that conform to the one rule
listed.
Similarly, the list of superior rules includes the rule that permits
locality entries beneath the root, as well as the rule that
permits locality entries beneath other entries.
See Section 6.7.3.4, ''Structure Rule Definitions: An Example'' for an example of the definition of structure rules for a new structural class.
Note
If you define a structural class, you might want to be able to create
entries of a standard class beneath entries of your new class. For
example, you might define a team class, and then want to be
able to create standard organizationalPerson entries
beneath team entries.
To achieve this, you need to amend the structure rule of the
organizationalPerson class to add the
teamStructureRule as one of its SUPERIOR
RULES. Structure rules for default classes are defined in
DIT.SC.
This ability to amend the structure rules of existing definitions is
particularly important for the decDSA class, which is
required for the implementation of security. If you intend to use a
customer-defined class of entry as the immediate superior of
decDSA entries, then you must amend the structure rule
for the decDSA class to make this possible. If you do not
make this amendment, you will be unable to create decDSA
entries in the intended position, and will be unable to implement
security in the recommended way.
6.7.3.3. Assigning Structure Rule Identifiers
Every structure rule requires an identifier that is unique within your schema. You need to assign an identifier to each structure rule you define.
There is a danger that future versions of the Enterprise Directory might include new rules with identifiers that clash with your customizations. For this reason, VSI reserves integers in the range 10000 to 19999 for your use. You are advised to assign integers from within that range, and thereby avoid any danger of clashing with future additions to the default schema.
The upper limit to the integer values that you use for structure rules is 231-1.
6.7.3.4. Structure Rule Definitions: An Example
This section provides an example of how to define structure rules for a new structural class.
The Abacus organization in Section 6.7, ''Planning a Structural Class'' defined a
structural class called dog. They therefore need to define one
or two structure rules that enable dog entries to be created in
the required positions in the DIT.
The Abacus organization wants to be able to create dog
entries beneath organizationalUnit entries, and
locality entries. They do not want to be able to create
dog entries immediately beneath the root of the DIT. (That
latter requirement would be unusual.) They therefore need to define one
structure rule, as follows:
dogStructureRule STRUCTURE-RULE
NAME FORM dogNameForm
SUPERIOR RULES
organizationalUnitStructureRule,
localityStructureRule, localityRootStructureRule
::= 10001Note that the superior rules list actually specifies three superior rules.
This is because the locality class is an example of a class
that can be created beneath the root of the DIT as well as beneath other
entries. The locality class therefore has two structure rules,
and both are listed. If either of the two rules for the
locality class are not specified, then dog
entries cannot be created beneath any locality entries that
conform to the unspecified rule.
Note that the list of superior rules cannot include any structure rules defined for alias classes. Alias classes cannot have subordinate entries.
6.7.4. Defining Window Definitions
When you define a new class, you also need to create a window definition (assuming that you want to use the DXIM windows interface to create and modify entries of this class).
A window definition specifies the appearance of the DXIM Create and Modify windows. If you do not define a window definition for a new class, then the DXIM windows interface will not have a Create or Modify window for that class. The DXIM support of the class is therefore limited to browsing and finding, rather than creating and modifying.
In Section 6.7, ''Planning a Structural Class'', the Abacus organization planned a
dog class. Section 6.7.1, ''Defining a Structural Class'' explains how to
implement the dog class in the schema, and the following example
shows the window definition.
dogWindow WINDOW
FOR CLASS dog NAMING ATTRIBUTES {
commonName}
ATTRIBUTES {
breed, handler, birthDate}
ENDwhere:
The
FOR CLASSline specifies what class of entry this definition is for.The
NAMING ATTRIBUTESline specifies the attributes that are used for naming entries of this class, and must correspond to the name form for this class. Do not put any other attributes here.The
ATTRIBUTESline specifies a list of attributes that are not used for naming.The list must include all mandatory attributes for the class, except for the
objectClassattribute. If you do not include all other mandatory attributes, then you will be unable to create entries of the class.You do not have to list all optional attributes for the class if there are some attributes that you never use, or that are too technical and application- specific to display. However, a class’s window should display all attributes that you are likely to use and manage, and in particular, the naming attributes must always be specified in the
NAMING ATTRIBUTESline.Do not list any attributes that are not displayable because of access controls (see Chapter 7, "Controlling Access to Your Directory Information and Services"). For example, do not list the
userPasswordattribute, because DXIM will be unable to display it, and attempts to modify it will fail. Such attributes can only be managed using the command line interface.
If you define a class as a subclass of another class, then remember that the subclass inherits the attributes of its superclass. Therefore, you need to consider which inherited attributes you want to display. You can list the attributes in any order, regardless of whether they are inherited. The order that you list them in determines their order of display in Create and Modify windows. Remember that if an attribute is mandatory for a superclass, then it is also mandatory for all subclasses, and needs to be included in the list.
6.8. Planning Alias Classes
If you define a new structural class, then you might also want to define an alias class that mimics it.
For example, the default schema contains an alias class called
organizationalPersonAlias which is designed to mimic the
organizationalPerson structural class. This enables you to create
alias entries that look as though they are organizationalPerson
entries, but which are actually alias entries. The alias class is defined to have
the same name form and structure rules as the structural class that it
mimics.
The syntax of an alias class definition is as follows:
classname OBJECT-CLASS SUBCLASS OF alias ALIAS
MUST CONTAIN {attribute [, attribute, ...]}
MAY CONTAIN {attribute [, attribute, ...]}
::= {object-identifier}where:
classnameis the name of the class for which this is the definition.attributeis the name of an attribute type.Specify each attribute that is to be permitted for this alias class in the appropriate line according to whether it is mandatory or optional.
nis a unique number that identifies this class.object-identifieruniquely identifies this class, for example,customerObjectClass 1.See Section 6.3, ''Assigning Object Identifiers to New Definitions'' for details of how to define your equivalent of the
customerObjectClassidentifier. The integer must be unique amongst definitions that use that identifier.
For example:
dogAlias OBJECT-CLASS SUBCLASS OF alias ALIAS
MUST CONTAIN {commonName}
::= {abacusObjectClass 5}The attribute commonName is specified because that is the attribute
that is defined as the naming attribute of the dog structural class
(see Section 6.7.1, ''Defining a Structural Class''). The dogAlias definition could
specify other attributes as mandatory or optional, but the purpose of an alias entry
is only to provide an alternative name for another entry; not to hold information in
its own right.
Because the alias class is defined as a subclass of the alias class,
it inherits the aliasedObjectName attribute. This is the attribute that
you use to hold the distinguished name of the entry for which you have created a
given alias entry.
If you define an alias class, you need to define a name form and one or more structure rules. The definitions for these are the same as the name forms and structure rules of structural classes, and are described in Section 6.7, ''Planning a Structural Class''.
There is no requirement for an alias class to have the same naming attributes as
the class of entry that it is intended to provide an alias for. Similarly, there is
no requirement for an alias class to have the same structure rules. In fact, there
is no defined relationship between an alias class and any other class, and you could
use an alias to provide an alias name for any other entry, regardless of class. For
example, you could create a roleAlias class which you use to provide
aliases for both organizationalPerson entries and
organizationalRole entries.
Finally, when you define a new alias class, you need to define a window definition for it, so that the DXIM windows utility can display entries of this class consistently (see Section 6.7.4, ''Defining Window Definitions''). You can also define labels for the alias class so that when its name appears on menus and screen displays, it looks user friendly (see Section 6.6, ''Defining a Label'').
For example, the set of definitions required for an alias class that mimics the
dog structural class (see Section 6.7, ''Planning a Structural Class''), is as
follows:
dogAlias OBJECT-CLASS SUBCLASS OF alias ALIAS
MUST CONTAIN {
commonName}
::= {abacusObjectClass 5}
dogAliasNameForm NAME-FORM
NAMES dogAlias
WITH ATTRIBUTES commonName
::= {abacusNameForm 5}
dogAliasStructureRule STRUCTURE-RULE
NAME FORM dogAliasNameForm
SUPERIOR RULES
organizationalUnitStructureRule,
localityStructureRule, localityRootStructureRule
::= 10002
dogAliasWindow WINDOW
FOR CLASS dogAlias
NAMING ATTRIBUTES {commonName}
ATTRIBUTES {
aliasedObjectName
}
END
LABEL dogAlias
KEYWORD "dogAlias"
MENU "Dog Alias"
DESCRIPTION "Dog Alias"
ENDNote that the integer specified for the structure rule is in the range 10000 to 19999, as recommended in Section 6.7.3, ''Defining Structure Rules''.
See Section 6.7.4, ''Defining Window Definitions'' for further details of window definitions. See Section 6.6, ''Defining a Label'' for further details of labels. See Section 6.7.2, ''Defining Name Forms'' for further details of name forms. See Section 6.7.3, ''Defining Structure Rules'' for further details of structure rules.
6.9. Defining Search Filters and Filter Fields for the Windows Utility
The DXIM Find window provides a simplified interface to the search services provided by the Enterprise Directory.
The purpose of the simplifications is to minimize the amount of X.500 knowledge required by end users of DXIM, making the windows utility suitable for end users as well as managers. A typical end user of the Directory Service might know a person’s name, but might not understand that a name can be represented using several different attributes.
The schema provided with the product includes user friendly filters for all of the classes defined in the default schema. If you define any new classes or attributes, then you probably need to customize the filters so that they support those new definitions.
All filters are defined in the schema file DUA.SC. There are actually two sets of definitions:
Filter definitions
Filter field definitions
Depending on what customizations you make to the schema, you might want to create new filter definitions and/or new filter field definitions, or you might want to amend existing definitions.
Section 6.9.1, ''Search Filter Definitions'' explains the syntax and significance of filter definitions, and Section 6.9.2, ''Filter Field Definitions'' explains the syntax and significance of filter field definitions.
6.9.1. Search Filter Definitions
A search filter provides a template for search requests that users are most likely to want to make. For example, a search filter might be designed to simplify the task of searching for entries representing people.
Each search filter specifies a list of fields which can be presented to the user as suitable things to search for, such as names. The user does not need to know exactly what X.500 attributes these fields map onto, and does not need to understand the semantics of the X.500 search service.
The syntax of a filter definition is as follows:
filtername FILTER
WITH FIELDS {fieldname, fieldname, ...}
[ AND VALUES
{ATTRIBUTE attribute = "value", "value", ...}
]
ENDwhere:
filternameis the name of this filter definition.The
WITH FIELDSargument specifies which filter fields are to be available to the user when using this filter (see Section 6.9.2, ''Filter Field Definitions'').If the user fills in a field, then the search only finds entries that match the details they specify. If the user fills in several fields, then the search only finds entries that match all the specified details. See Section 6.9.2, ''Filter Field Definitions'' for an explanation of what constitutes a match for a given field.
The
AND VALUESargument enables you to specify attribute values that are always to be included in searches using this filter. The search only finds entries that match all of the details specified.The
ATTRIBUTEargument enables you to specify one or more attribute values that are to be included in all searches using this filter.For example, you could specify that all searches include the specification that
objectClass=person. This means that when the user uses this filter, the search only returns entries of that class. Entries that match the details provided by the user are excluded from the search if they are not also of thepersonclass.You can specify the
ATTRIBUTEargument more than once, to specify a list of attribute values that must be included in all searches using this filter. If you specify more than oneATTRIBUTEargument, then the search must match all of the attribute values listed.
For example, the default schema contains an
organizationalPerson-filter, as follows:
organizationalPerson-filter FILTER
WITH FIELDS {
nameField,
descriptionField,
locationField
}
AND VALUES
{ATTRIBUTE objectClass = "organizationalPerson" }
ENDThe filter specifies that three filter fields are available to the user. The
filter also specifies that all searches using this filter must include the
attribute value objectClass=organizationlPerson.
Thus, if the user uses the nameField in the DXIM Find window, and
specifies "Jones", then DXIM actually invokes a search that looks for entries of
the organizationalPerson class in which at least one of the
attributes listed in the nameField has the value Jones.
6.9.1.1. Customizing Search Filter Definitions
The most likely customizations to make to search filter definitions are as follows:
To include another object class in an existing filter.
For example, if you define an object class such as
abacusEmployee, (see Section 6.5.1, ''Defining an Auxiliary Class''), then you could simply amend theorganizationalPerson-filterdefinition, to specify that all searches using that filter include that new class.Thus, the filter becomes:
organizationalPerson-filter FILTER WITH FIELDS { nameField, descriptionField, locationField } AND VALUES { ATTRIBUTE objectClass = "organizationalPerson", "abacusEmployee" } ENDTo create a new filter definition.
If you create a new class, for which no existing filter is suitable, you can define a new filter. The new filter appears on the menu of options presented on the left side of the DXIM Find window. The filters are listed in the order that they are defined in the schema.
If you define a new filter, then you should also define a label for the filter, to give it a user friendly appearance on the menu.
To delete a filter definition.
If some of the filters in DUA.SC are designed for classes of entry that you do not use in your DIT, or classes that you do not want end users to search for, you can delete or comment out the filter definition. This removes the option from the menu of options in the Find window.
If you remove a filter, you must also remove the corresponding label.
To specify a particular attribute value that must be present in all entries returned by a search using a given filter.
You can also change the label definition of each filter so that it
presents the search option in a way that your users will understand. For
example, you could change the label of the
organizationlPerson-filter to be Employee
instead of organizationalPerson, or similarly, if you only use
the organizationalRole class to represent managers, then you
could change the label of the organizationalRole-filter to be
Manager instead.
6.9.2. Filter Field Definitions
A filter field provides a user friendly interface to X.500 attribute types. A single filter field can map onto any number of attribute types, giving them the appearance of being one attribute. The end user therefore does not need to know exactly which attribute type is being used to store a particular item of information.
For example, the nameField maps onto a number of attributes:
commonName, surname, title,
organizationName, and organizationalUnitName. As
far as the end user is concerned, all they need to specify is a "name".
If a user fills in a filter field, then the search only finds entries which
have the specified value in at least one of the attribute types specified as
being part of the filter field. For example, if the user specifies
Name=Smith, then entries with a commonName and/or
surname and/or title and/or
organizationName and/or organizationalUnitName
with the value Smith are found.
A filter field appears to the user as an input field on the right side of the DXIM Find window. Whatever the user types into that input field is processed by DXIM into a search request. The value specified by the user is searched for in all of the attributes listed in the filter field definition. Figure 6.1, ''DXIM Find Window Showing Filter Fields'' shows the DXIM Find window with several fields displayed. Each of the fields is listed within the filter definition for the Person filter.
 |
The syntax of a filter field definition is as follows:
fieldname FILTER-FIELD
ATTRIBUTES {attribute, attribute, ...}
ENDwhere attribute is the name of an attribute that is included in
this filter field.
For example, the default schema contains a nameField filter
field:
nameField FILTER-FIELD
ATTRIBUTES {commonName,
surname,
title,
organizationName,
organizationalUnitName}
ENDTo make the filter field name appear user friendly in the window, the schema also contains a label definition:
LABEL nameField
MENU "Name"
ENDSee Section 6.6, ''Defining a Label'' for details of label definitions.
The definition of the filter field means that when a user supplies the value Jones, DXIM generates a search request that looks for entries that have the value Jones in any of the above attributes. This means that the user does not need to understand about different attribute types, and does not have to know which particular attribute to specify. As far as the user is concerned, the entry they are searching for simply has the name Jones, and DXIM supports this user expectation.
6.9.2.1. Customizing Filter Field Definitions
The most likely customizations to filter fields are as follows:
To add another attribute to an existing filter field.
If you define a new attribute (see Section 6.5.3, ''Defining Attributes'') you might want to include it in an appropriate filter field.
To create a new filter field.
If you define a new filter field, you also need to define a search filter that uses it, or add the filter field to the list of filter fields for an existing search filter.
To remove an attribute from a filter field.
If a filter field contains attributes that you never use in your DIT, or that you do not want users to search on, then you can remove the attribute from the list. DXIM always searches for all of the listed attributes, so by reducing the list you can improve the performance of searches.
Note that a given filter field can be used by more than one search filter. If you decide to delete an attribute from a filter field, remember that the lack of that attribute might reduce the usefulness of the filter field in some of the search filters that use it.
Chapter 7. Controlling Access to Your Directory Information and Services
This chapter describes how to plan access controls for your DIT. Access controls enable you to control the interrogation and modification of directory information.
This chapter also describes a method of controlling access to DSAs (rather than to the
information they hold). If you have implemented decDSA entries and
replication in the ways recommended by Chapter 4, "Planning Your Directory Information Tree" and Chapter 5, "Planning DSAs to Hold Your Directory Information Tree", then controlling access to DSAs is not required, and its
disadvantages outweigh its advantages. However, if you have not implemented the
recommended method, or you have a strong requirement to control access to a specific
DSA, this chapter explains an alternative method.
7.1. The Default Access Control
Implementing access control is not mandatory; nor does access control have to be implemented immediately. HP DSAs have a default access control configuration that applies to all information until you decide to implement something different.
By default, HP’s DSAs allow everyone all access to all information except for the
userPassword attribute. Users are not allowed to display passwords
or search for them. For example, you cannot search for all entries with a specific
password.
If this default level of access control is sufficient for your needs, then you do not need to read this chapter.
However, it is likely that you will eventually want to implement more restrictive controls, especially if other organizations will have access to your Enterprise Directory. If so, proceed to Section 7.2, ''The Access Control Template File''.
7.2. The Access Control Template File
To simplify the task of implementing non-default access control, VSI provides a template file. The template file contains two DXIM commands that, when completed and executed, create an access control subentry in your DIT. Your task is to specify the name of the access control subentry, and the directory names of the users who are to have management privileges.
If the template file does not meet your needs, you can customize it. You can change and execute the template more than once, if you decide that you need to change the access controls.
You can set up access control at the same time as you populate your DIT, or at any time afterwards.
To plan the name of the access control subentry, see Section 7.3, ''Planning the Name of the Access Control Subentry''. If you want an overview of the access controls defined in the template file, see Section 7.4, ''What the Access Control Template File Does''.
7.3. Planning the Name of the Access Control Subentry
This section recommends a simple way to implement access controls. It assumes that you have planned your DIT as described in Chapter 4, "Planning Your Directory Information Tree" and illustrated in Figure 7.1, ''Recommended Position for Creating an Access Control Subentry''.
Figure 7.1, ''Recommended Position for Creating an Access Control Subentry'' also shows the recommended position for the access control subentry. It is positioned immediately subordinate to the highest entry in the Abacus DIT. As such, the access control subentry is replicated as part of Naming Context A. Chapter 5, "Planning DSAs to Hold Your Directory Information Tree" recommends that your equivalent of Naming Context A is replicated to all DSAs.
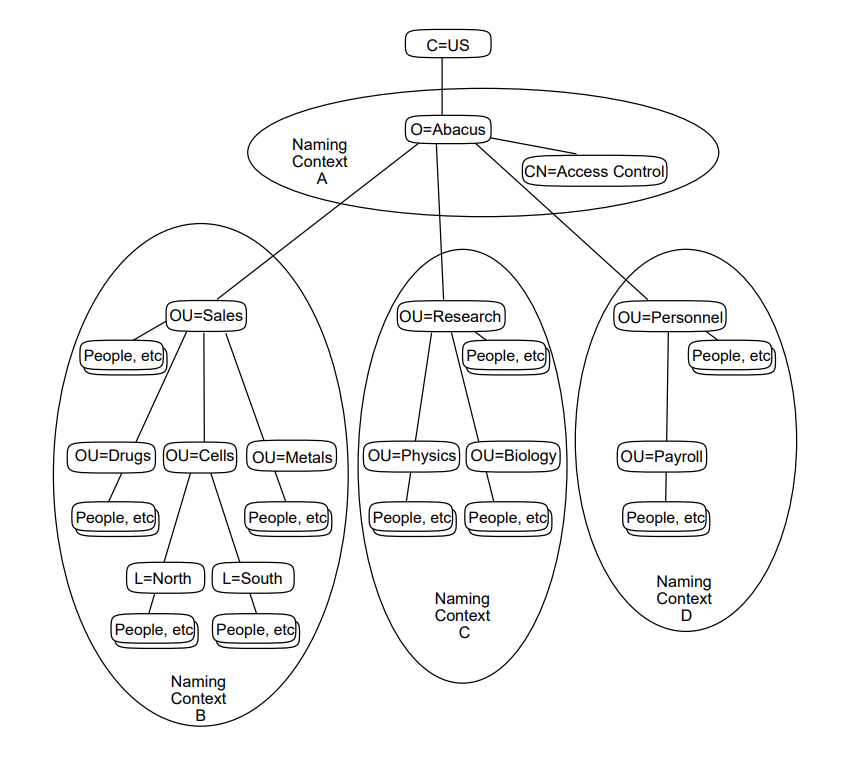
The name of the access control subentry shown in Figure 7.1, ''Recommended Position for Creating an Access Control Subentry'' is
C=US/O=Abacus/CN="Access Control".
Note
Subentries are a special class of entry to which normal structure rules do not apply.? A subentry must be created as an immediate subordinate of an entry that is at the top of a naming context. Unlike other classes, it does not matter what class of entry the superior is, as long as it is at the top of a naming context.
In this example, none of the other three naming contexts contain an access control subentry. Any naming context that has no access control subentry can inherit? the access controls specified for a superior naming context that is held on the same DSA. Therefore, by replicating your equivalent of Naming Context A to all DSAs, you can ensure that all the other naming contexts inherit the same access controls.
Thus, creating one access control subentry entry in the recommended position has the following advantages:
You have consistent access controls for your entire DIT.
You change access controls for your entire DIT by managing that single subentry.
You can analyze access control problems by reference to that single subentry.
Note that you could implement independent access controls for each naming context, but unless there is a security requirement to do this, or you have not followed VSI’s recommended replication model, it merely complicates the management of access control.
When you have decided where you need to create your access control subentry, and
what its name will be, the only other thing that you need to plan is which users are
to be information managers. Each directory information manager needs to be
represented by a directory entry, and each of those entries needs a
userPassword attribute. When you have all of this planned, you can
complete and execute the template file as described in Chapter 11, "Using the Access Control Template File".
If you want to know what access controls the file defines, see Section 7.4, ''What the Access Control Template File Does''.
7.4. What the Access Control Template File Does
This section provides an overview of the access controls defined in the template file.
If these controls are suitable for your directory information, then all you need to do is insert the name of the access control subentry that the template file creates, and the names of people who are to have management access to the directory. You can then execute the file as described in Chapter 11, "Using the Access Control Template File".
The template defines four access control information items (ACIitems), as follows:
The
"Directory Managers"ACIitem.This gives specified users full access to all information except passwords. It indicates that the named users must provide their name and password (simple authentication) in order to be granted this access.
The
"Authenticated users"ACIitem.This applies to users who have authenticated themselves to the directory, but who are not directory managers. It enables such users to use the Compare service to check passwords. This access is required by DSAs as part of normal operation. Do not remove or override this ACIitem.
The
"Unauthenticated users"ACIitem.This applies to users who do not authenticate themselves. It grants many types of access, but excludes all forms of modification. It also explicitly denies access to the
userPasswordattribute.The
"Own entry"ACIitem.This applies to users who authenticate and then attempt to access their own entry. It grants modification access to their entry, and full access to a list of attributes. It permits a user to compare, add, and remove their own
userPasswordattribute. It does not allow a user to delete or rename their entry.It also grants a user access to their own
presentationAddress,protocolInformation, andsupportedApplicationContextattributes. These attributes are specified so that HP’s DSAs can keep their own entries up to date. Do not remove or override this aspect of the ACIitem.
VSI suggests that these four ACIitems should provide effective control to your directory information, at least until you have had time to understand the complexities of access control. Chapter 11, "Using the Access Control Template File" explains how to use the template file.
7.5. Customizing Access Controls
If the access controls specified by the template file do not meet your needs, you can customize the file, or create a completely different file.
If you want to customize access controls, you really need to understand:
Which access controls are required for the normal operation of the Enterprise Directory itself.
HP DSAs are themselves users of the Enterprise Directory. You need to ensure that they have the access that they need. This is discussed in Section 7.5.1, ''Access Controls Required for Normal Operation of the Enterprise Directory''
Which access controls are required by managers of directory information.
For example, the ability to change access controls is itself controlled by access control. A directory information manager requires certain access rights. These are discussed in Section 7.5.2, ''Access Controls Required by Directory Information Managers''.
The composition of ACIitems.
Each ACIitem is composed of three elements. This is discussed in Section 7.5.3, ''The Composition of Access Control Definitions''.
How ACIitems that contradict each other are applied.
ACIitems are ranked according to their precedence and how specific they are about the user or the directory information they refer to. You need to understand how this ranking works, so that you can assign the correct precedence to a given ACIitem. See Section 7.5.4, ''How ACIitems are Ranked According to Precedence and Specificity'' for a discussion of this topic.
The DXIM command line syntax for defining access controls.
Appendix B, "The PrescriptiveACI Attribute" documents the DXIM syntax for specifying access controls, and the template file provides an excellent example.
7.5.1. Access Controls Required for Normal Operation of the Enterprise Directory
Some of the details specified by the template file are required by HP’s DSAs themselves. If you customize the template file, you need to avoid changing those details. If you create an entirely new template file, you need to incorporate these details in it.
The "Authenticated User" ACIitem specifies that authenticated
users can check the passwords of entries. This enables DSAs to check each
other’s passwords during normal operation. If you change this permission, DSAs
might not be able to verify each other’s identities, which can result in
distributed operation failures. A DSA might reject a connection from another
DSA, or decide not to attempt a connection to another DSA. This might prevent
such routine activities as replication or the chaining of user requests.
The "Own entry" ACIitem specifies that the directory user who
owns an entry has all access to the presentationAddress,
protocolInformation, and
supportedApplicationContext attributes. If you change these
permissions, HP’s DSAs will not be able to manage their own entries, and might
stop working. Do not change these details of the "Own entry"
ACIitem.
7.5.2. Access Controls Required by Directory Information Managers
The access control template file includes some statements that are required by directory information managers. If you customize the template file, you need to avoid changing those details. If you create an entirely new template file, you need to incorporate these details in it.
The "Directory Managers" ACIitem specifies that managers have
full access to the trustedDSAname attribute. Do not change this
permission. It is important for managers to be able to add and remove this
attribute, to indicate whether a DSA is to be trusted by other DSAs.
Similarly, it is important that directory managers have full access to the
prescriptiveACI attribute, so do not change that permission. If
nobody has permission to manage the prescriptiveACI attribute, then
once you have implemented access control, you may have to refer to VSI
Enterprise Directory Problem Solving for details of how to bypass
access controls temporarily, to fix your access controls.
7.5.3. The Composition of Access Control Definitions
All access controls are specified as values of the
prescriptiveACI attribute. The prescriptiveACI
attribute is a multivalued attribute. Each value is called an access control
information item (ACIitem).
Each ACIitem states the following three sets of information:
who this ACIitem applies to;
what directory information this ACIitem applies to;
what types of request are to be granted and/or denied for those users with regard to that directory information.
For example, an ACIitem might state that a specific user is allowed to modify and read specific attributes, such as passwords.
The following sections discuss the three elements of an ACIitem in more detail.
7.5.3.1. Specifying What Users an ACIitem Applies To
This section is only required if you want to customize access controls.
When you specify an ACIitem, you must specify to whom it applies. This can
be done very specifically by means of a user’s directory name. It can also
be done less specifically, by reference to a directory subtree, to a
groupOfNames entry, or by the use of two keywords:
OWNER and ALL.
These options are known as user classes, and they are documented in detail in Appendix B, "The PrescriptiveACI Attribute".
The significance of the user classes is that when a user connects to the Enterprise Directory, they have the option of identifying (authenticating) themselves. For example, when you use the DXIM windows utility, you use the Authenticate window to specify your name and password. When you use the DXIM command line utility you can specify your name and password in a BIND command. The Enterprise Directory can then check for the user’s name in ACIitems whenever they try to access directory information.
A user who does not authenticate themselves to the Enterprise Directory, is treated as an anonymous user. Typically, an anonymous user has fewer access rights than an authenticated user.
Note
When you authenticate yourself, the DSA to which you bind provides the relevant access to the information held by that DSA. However, if the DSA needs to communicate with another DSA to satisfy your requests, then the other DSA does not necessarily believe that you have been authenticated adequately. The other DSA only believes that you have been authenticated adequately if it trusts the DSA to which you are bound and authenticated directly. If this trust does not exist between the two DSAs, then the attempt to chain the user request will probably fail.
See Section 5.2.9, ''Attributes of DSA Entries'' for full details of
decDSA entries and DSA trust.
7.5.3.2. Specifying What Information an ACIitem Applies To
This section is only required if you want to customize access controls.
When you specify an ACIitem, you must specify what directory information the ACIitem applies to.
The set of options is as follows:
You can control access to entries as a whole.
Granting access to entries is a prerequisite for most other controls. For example, having access to particular attributes is useless unless you also have access to entries as a whole.
You can control access to specific attributes.
You can control access more generally to all user attributes.
The schema makes a distinction between user attributes and operational attributes. The access control syntax provides a means of indicating that an ACIitem applies to all user attributes, such as common names, surnames, and telephone numbers.
You can control access to specific operational attributes.
Operational attributes are usually hidden from users. Typical examples are the
trustedDSAnameattribute which HP DSAs use to check each other’s security status, and theprescriptiveACIattribute. Operational attributes are not displayed unless you request them explicitly.
You can specify a combination of these options in a single ACIitem. For example, you can specify a single ACIitem that applies to entries as a whole, and to specified attributes, and to specified operational attributes. These options are known as item classes, and they are documented in more detail in Appendix B, "The PrescriptiveACI Attribute".
7.5.3.3. Specifying What Types of Request an ACIitem Applies To
This section is only required if you want to customize access controls.
When you specify an ACIitem, you must specify to what types of directory request the ACIitem applies. For example, you can specify that the ACIitem controls the use of the modify and delete services.
The definition of the different types of access to directory information is based on the X.500 services, such as search, modify, create and delete. However, the types of access are defined in more detail, such that you can give a user permission to search, but prohibit them from using a particular attribute in the search filter. Similarly, you can give a user permission to modify entries, but deny modifications to a particular attribute.
The different types of request for which access control can be defined are known as permissions, and they are documented in more detail in Appendix B, "The PrescriptiveACI Attribute".
7.5.4. How ACIitems are Ranked According to Precedence and Specificity
An access control subentry may contain several ACIitems. The access control template file, for example, defines four ACIitems (see Section 7.4, ''What the Access Control Template File Does''). For each user request for access to information, a DSA must decide which ACIitems are relevant. If multiple ACIitems appear to be relevant, the DSA must decide which ACIitem is the most important.
The DSA makes this decision based on the ACIitem precedence and how specific the ACIitem is about the operation that is being requested, and the user who is requesting it.
If you define ACIitems, you need to understand this decision making process so that you can assign the correct precedence to each ACIitem.
If a DSA finds that several ACIitems refer to a given access right for a given user, then the DSA only considers the ACIitem of the highest precedence. All other ACIitems are ignored for this request.
If the highest precedence value is shared by multiple relevant ACIitems, then the DSA has to examine those ACIitems and determine which is the most specific about the user and the user request. For example, an ACIitem that refers to "all attributes" is less specific than one that refers to a particular attribute or list of attributes. Similarly, an ACIitem that refers to "all users" is less specific than an ACIitem that refers to a particular user called John Smith.
The DSA determines which ACIitem is the most specific about the access rights and identity that are required for the operation that is being attempted, and applies that ACIitem.
VSI Enterprise Directory Problem Solving provides further information about this topic, and describes how to analyze your access controls when they do not have the intended effect.
7.6. Access Control Scope and Inheritance
This section provides an overview of how a HP DSA applies access controls to portions of its database, and how access controls are inherited from one portion to another.
The basic rules of X.500 access control supported by HP’s DSA are as follows:
The unit of access control policy is the naming context.
If you grant a user a certain level of access to a naming context, then they have that access to all entries in the naming context. Different users can have different levels of access to the same naming context.
If there are no access controls stated in a naming context, then the naming context inherits the access controls from its directly superior naming context (if there is one).
If the directly superior naming context has no access controls, then the next most superior naming context’s access controls apply. If none of the directly superior naming contexts have access controls (or there are no directly superior naming contexts), then the default access controls apply. By default, all users have all access to all information, except for user passwords, which are not readable.
Note
If you replicate a naming context that has inherited access controls, then those controls are also replicated, just as if the controls were part of the naming context.
If you replicate a naming context that has no access control and does not inherit any controls, then the shadow copy of the naming context may inherit the access controls of a superior naming context on the shadow DSA. This might mean that the same naming context can inherit different access controls on different shadow DSAs, and that the shadow copies do not have the same controls as the master copies.
To avoid having inconsistent access controls on different DSAs for the same information, VSI recommends that you set up access control as described Section 7.3, ''Planning the Name of the Access Control Subentry''.
Any naming context that has access control (that is, an
accessControlSubentryentry with aprescriptiveACIattribute) enforces that access control. It is not affected by any access control from any other naming context, and it is not affected by the default access control.As soon as any access control is specified or inherited for a given naming context, then all access to that naming context is controlled by that access control, and no other. None of the default access controls apply any longer.
If the specified or inherited access controls do not explicitly permit a particular type of access, then that type of access is denied. For example, if a naming context contains or inherits access controls that do not state that modifying information is allowed, then it is not allowed.
For example, Figure 7.2, ''Access Control in a DSA'' illustrates a DSA that holds four naming
contexts. The presence of an accessControlSubentry entry in a given
naming context is represented by an entry marked ACI.
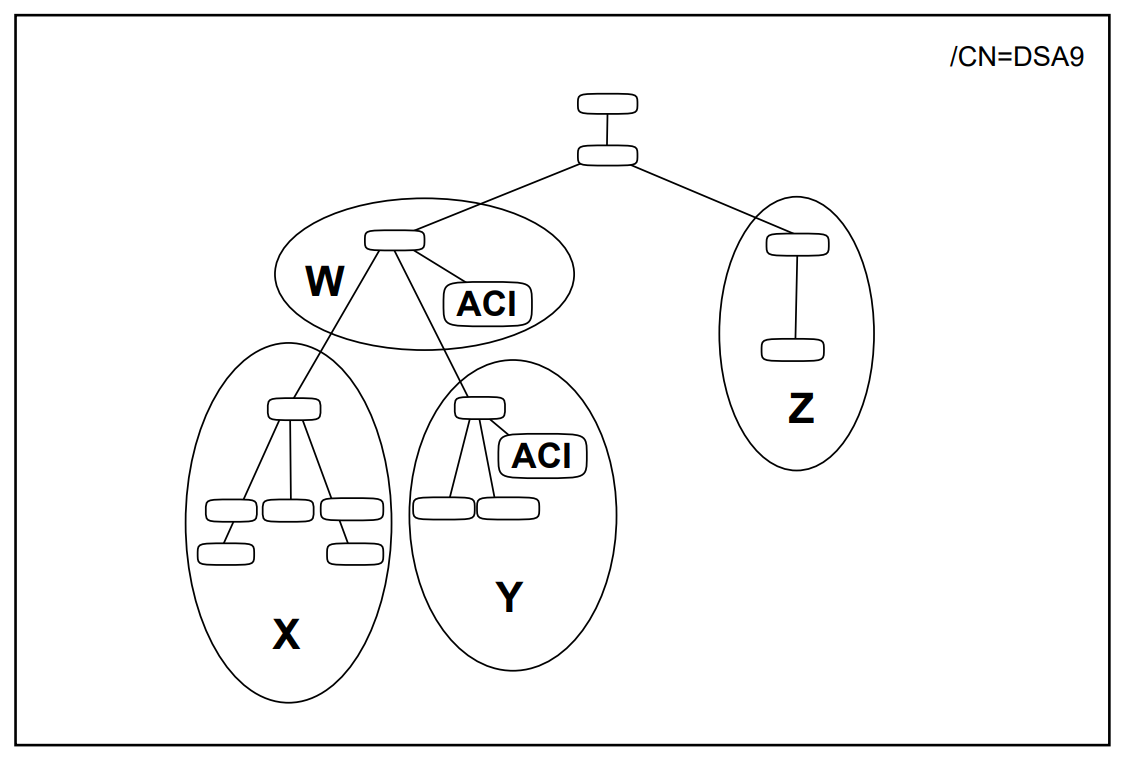 |
Naming Context W contains an accessControlSubentry entry with a
prescriptiveACI attribute. Access to Naming Context W is defined by
that entry.
Naming Context X does not contain an accessControlSubentry entry.
However, it is directly subordinate to Naming Context W. It therefore inherits the
access controls defined for Naming Context W.
Naming Context Y contains an accessControlSubentry entry. Access to
Naming Context Y is defined by that entry. The fact that Naming Context Y is
subordinate to Naming Context W has no effect on Naming Context Y because it has
access controls of its own.
Naming Context Z does not contain an accessControlSubentry entry, and
it is not subordinate to any naming context that does. Therefore, the DSA applies
the default access controls to Naming Context Z.
Note
If Naming Context Z is a shadow copy of a naming context, then it may be
controlled by access controls that are inherited on the supplier DSA and
replicated to this DSA with Naming Context Z. In this case, the
accessControlSubentry entry that controls Naming Context Z is
actually superior to that naming context (not shown in Figure 7.2, ''Access Control in a DSA'').
7.7. Alternative Method of Controlling Access to DSAs
This section explains how to implement security for accessing DSAs if you decide not to follow the recommended method.
The recommended method involves using decDSA entries as described in
Section 4.5, ''Planning Entries to Represent DSAs'', replicating them to all DSAs, as described in
Section 5.1.5, ''Replicating Naming Contexts'', and implementing access controls, as described
in Section 7.1, ''The Default Access Control''.
The advantages of implementing access controls as recommended are that:
The recommended controls are replicated with the information, and therefore apply consistently to all copies the information.
The recommended controls are far more flexible and detailed than the controls described in the following sections.
The DSA applies the recommended controls to all users as soon as they are implemented, not just to new connections.
The controls are not dependent on volatile configuration details.
The recommended controls can provide different levels of access to different parts of the DIT, whereas the controls described in the following sections apply to all information in the relevant DSA.
It is also possible to implement a mixture of the recommended method and the methods described in the following sections. However, this makes diagnosing problems more difficult, as you need to understand how the various methods of control interact. It is therefore advisable to use only one method.
7.7.1. Alternative Method of Configuring DSA Trust
To make a HP DSA trust another DSA, you can use the Trusted DSA Name characteristic attribute of the DSA entity. The attribute can contain a list of distinguished names (AE titles) of DSAs that are to be trusted by this DSA. For example, you could set the attribute as follows:
NCL> SET DSA TRUSTED DSA NAMES -
_NCL> {"/c=us/o=abacus/cn=DSA1", "/c=us/o=abacus/cn=DSA2"}Each name listed in the Trusted DSA Names attribute must match the AE Title attribute of the relevant DSA.
The DSA trusts all DSAs whose distinguished names (AE titles) are listed in that attribute. The effect of this trust is that the DSA permits these trusted DSAs to access its information, and trusts these DSAs when they claim to be acting on behalf of authenticated users. This means that a user can authenticate themselves to one DSA, and have access to information on another DSA.
In order for the DSA to trust the named DSAs, those DSAs must specify their password when they bind to this DSA. This DSA checks the password, either by reference to the entry in the directory that represents the DSA (if there is such an entry), or by reference to an Accessor entity that has the DSA’s name. For example, the following command creates an Accessor entity for a DSA:
NCL> CREATE DSA ACCESSOR "/C=US/O=Abacus/CN=DSA2"- _NCL> PASSWORD flobadob
This Trusted DSA Name characteristic attribute serves the same purpose as the
trustedDSAname attribute of decDSA entries. You
are recommended to use the attribute of decDSA entries if possible.
However, DSAs only refer to the trustedDSAname attributes of
decDSA entries that they hold locally. That method therefore
fails if you do not implement replication as discussed in Section 5.1.5, ''Replicating Naming Contexts''. Not following the recommendation for replication
is the most likely reason you would need to use this alternative method.
Note
A DSA only checks the value of the Trusted DSA Name attribute when it receives a new connection request. It either accepts or rejects the request accordingly. Any changes to the value of the Trusted DSA Name attribute have no effect on existing connections. You need to disable and re-enable the DSA to make sure that there are no existing connections benefitting from a level of access that you no longer want to provide.
7.7.2. Alternative Method of Configuring User Security
If you do not want to implement access controls, as described in Section 7.1, ''The Default Access Control'', or you want to override access controls for a specific DSA, you can use characteristic attributes of the DSA entity to specify the names of directory users who are allowed to access information. If you use either of these attributes, then any users who are not listed are not allowed access. This is therefore a very restrictive method of providing security, and probably not suitable for most DSAs.
This method is not recommended because it has to be managed manually and independently for each DSA, and because it does not provide the level of detail or flexibility that the recommended access controls provide.
The characteristic attributes only allow you to specify the names of users who can read directory information and/or users who can modify directory information. If you implement access controls as well as these attributes, then the characteristic attributes can override the access controls. For example, if you set up a list of users who are allowed to modify information, then any user who is not on that list is unable to modify information regardless of the permissions defined for them using ACIitems.
The following examples show how to configure these two attributes:
NCL> SET DSA WRITER NAMES -
_NCL> {"/c=us/o=abacus/ou=sales/cn=Jon Mole" , -
_NCL> "/c=us/o=abacus/ou=sales/cn=Betty Hughes"}
NCL> SET DSA READER NAMES -
NCL> {"/c=us/o=abacus/ou=sales/cn=Jan Thorp" , -
_NCL> "/c=us/o=abacus/ou=sales/cn=Dave Hemmingly"}The two users listed in the first command are allowed to modify information (for example, using DXIM MODIFY, RENAME, CREATE, DELETE, and SET commands), subject to the provision of a password and to the access controls defined for them using ACIitems. Other users are not allowed to modify information, regardless of any ACIitems defined for them. Being listed as a writer automatically enables these two users to read information as well, subject to any ACIitems. These two users are therefore implicit members of the reader list as well.
Similarly, the two users listed in the second command are allowed to read information on this DSA (for example, using DXIM SHOW, SEARCH, and COMPARE commands), subject to the provision of a password and to the access controls defined for them using ACIitems. These two users cannot modify information, regardless of any permissions specified for them in ACIitems. Their absence from the Writer Names attribute prevents them from modifying information. Other users are not allowed to read information (except for those listed as writers), regardless of any ACIitems defined for them.
Note that these attributes do not allow you to specify detailed access controls; they simply allow you to identify "readers" and "writers".
In order for the DSA to permit the named writers and readers the relevant access to information, the users must provide their name and password when they bind to the DSA. The DSA checks the password, either by reference to the entry in the directory that has the user’s name, or by reference to an Accessor entity that has the user’s name. For example, the following command creates an Accessor entity for Jon Mole:
NCL> CREATE DSA ACCESSOR "/C=US/O=Abacus/OU=Sales/CN=Jon Mole"- _NCL> PASSWORD flimflam
You need to use a similar command for every writer and reader who requires access to a given DSA, but who is not represented by a directory entry.
Note that the Accessor entity is specific to a single DSA. Such entities would have to be created manually on each DSA that uses this method of controlling access to DSAs. Furthermore, the Accessor entity is volatile information.
When you use the NCL DELETE DSA command, all Accessor entities are lost, and must be reconfigured when you next start the DSA. If a user’s password changes, then all Accessor entities that represent the user must be modified independently to reflect the change.
Note also that a DSA only checks these attributes and entites when it receives a new connection request. It either accepts or rejects a connection accordingly. Any changes to the configuration have no effect on existing connections. You need to disable and re-enable the DSA to make sure that there are no existing connections benefitting from a level of access that you no longer want to provide, or to make sure that a user gains the benefit of an increased level of access from reader to writer.
For further details about the Writer Names and Reader Names attributes, and the Accessor entity, refer to the online help for the Directory Module within the NCL director.
The management overhead of this method of controlling access to DSAs is considerably greater than the recommended method.
This method of controlling access might be suitable for DSAs that hold very sensitive information. You can ensure that only the named users have access. Note that these controls are DSA-specific, unlike the ACIitems described in Section 7.1, ''The Default Access Control''.
This method might also be useful if you want to temporarily restrict access to a DSA, without having to amend the access controls implemented according to VSI’s advice.
The configuration of these attributes on one DSA has no effect on access to any other DSA. A user might be able to read the sensitive information from some other DSA that holds a copy of it and does not have these characteristic attributes configured.
Part III. Set Up
This part describes how to set up your directory information and Enterprise Directory according to your plan.
Chapter 8, "Configuring DSAs" describes how to configure a DSA to hold naming contexts and to replicate them to and from other DSAs. This chapter is essential reading, although the sections about replication might not be relevant to all readers.
Chapter 9, "Configuring and Running Directory Applications" describes how to configure VSI directory applications so that they can connect to a DSA. This chapter is essential reading unless you do not want to use VSI directory applications.
Chapter 10, "Creating Directory Entries" describes how to use VSI directory applications to create directory entries. This chapter is not essential. VSI directory applications provide online help, which might be all you require. If you do not want to use VSI directory applications, then you need to refer to the documentation provided with your preferred application.
Chapter 11, "Using the Access Control Template File" describes how to use the access control template file.
This chapter is only required if you want to control access to your directory information, and you want to use the template file rather than develop your own.
Chapter 8. Configuring DSAs
This chapter explains how to configure each of your DSAs. It assumes that you have completed the planning described in Part II,''Planning''.
Section 8.1, ''Notes on Configuring a DSA'' documents some important restrictions and recommendations that will help you when you configure your DSA.
Section 8.2, ''Running the DSA Configuration Utility'' describes how to use the new DSA configuration utility to configure a presentation address and a temporary AE title for your DSA. You may have used the DSA configuration utility already as described in Section 5.2, ''Planning DSA Configuration Information'', because it is an easy way to generate presentation addresses you need for your worksheets. If so, you do not need to use the utility again.
Section 8.3, ''Creating DSAs'' describes how to create a DSA and explains what happens during creation. Section 8.3.1, ''Setting DSA AE Titles'' describes how to set the planned AE title for a DSA. The DSA configuration utility only sets a temporary AE title; you need to set the AE title as planned in Section 5.2, ''Planning DSA Configuration Information''.
Section 8.3.2, ''Setting DSA Passwords'' and Section 8.3.3, ''Setting DSA Volatile Modifications'' describe how to set a DSA’s Password and the Volatile Modifications attributes, which are both recommended.
Section 9.8, ''Running the Lookup Client'' describes how to set DSA Presentation Addresses. Section 8.3.5, ''Setting DSA LDAP Port'' describes the level of support for LDAP protocols, and how to set up the LDAP port.
Section 8.4, ''Creating a Naming Context Entity'' to Section 8.7, ''Enabling DSAs'' describe how to implement the planned DIT structure and distribution, and how to enable a DSA, and Section 8.8, ''Creating Directory Entries to Represent Your DSAs'' shows how to create directory entries to represent your DSAs. The commands are documented in the order that you are most likely to use them the first time you configure a DSA. Section 8.9, ''Summary of Configuration'' provides a summary and example of these tasks. You will need your planning worksheets (see Chapter 5, "Planning DSAs to Hold Your Directory Information Tree").
Section 8.10, ''Implementing Replication'' explains how to implement replication. It also describes how you can customize replication, which was not supported in previous versions.
Section 8.11, ''Disabling DSAs'' and Section 8.12, ''Deleting DSAs'' describe how to disable and delete a DSA.
Section 8.13, ''Starting the DSA as Part of OpenVMS System Startup'' explains how to automate the startup and shutdown of a DSA on OpenVMS systems.
8.1. Notes on Configuring a DSA
The following sections explain some restrictions and requirements that you need to be aware of when you configure a DSA entity and its subentities, such as Naming Context entities and Subordinate Reference entities.
8.1.1. Management Entities Must Be Created in Order of Superiority
When you configure a given DSA, you must create its Naming Context and Subordinate Reference entities in their order of superiority in the DIT (top down).
For example, a Naming Context or Subordinate Reference called
/C=US/O=Abacus must be created before a Naming Context or
Subordinate Reference called /C=US/O=Abacus/OU=Sales.
This restriction helps to prevent you from configuring your DSAs in ways that can cause problems during Enterprise Directory operation.
8.1.2. Configuring Entities of Different Types with the Same Name
If you need to create a Naming Context and a Subordinate Reference with the same name on the same DSA, you must create the Subordinate Reference first.
This situation applies to a DSA that is to hold contiguous master naming contexts, as shown in Figure 8.1, ''Contiguous Naming Contexts''.
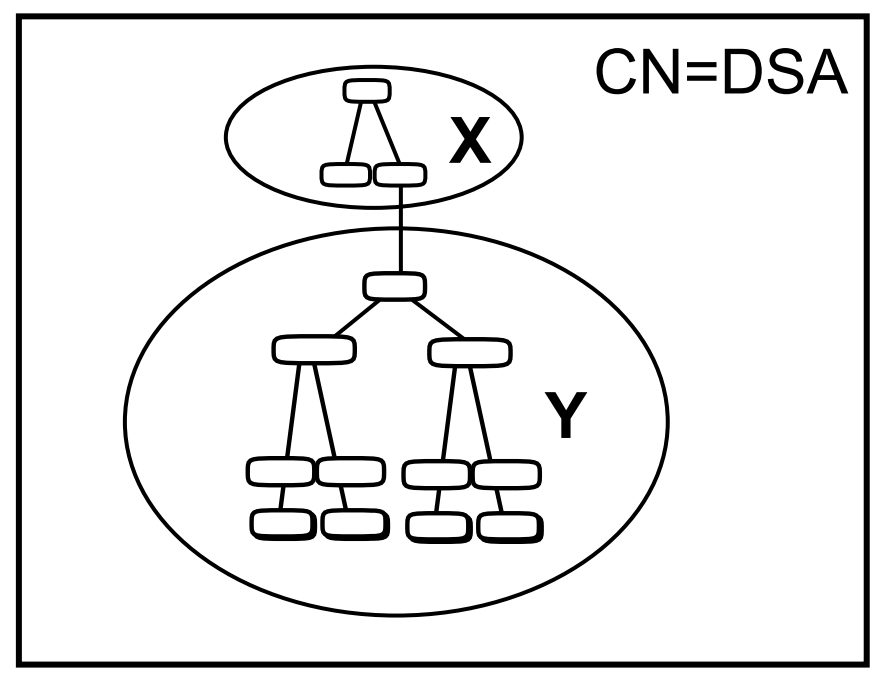 |
The DSA requires a subordinate reference to naming context Y, even though Y is to be held locally. The subordinate reference has the same name as the naming context to which it refers.
In such cases, you need to create the Subordinate Reference entity before you create the Naming Context entity of the same name. This restriction helps you to remember the requirement for the Subordinate Reference.
8.1.3. Configuring a DSA that Already Holds Information
If you configure a DSA in stages, adding new naming contexts at different times, you might find that you have created them in the wrong hierarchical order (see Section 8.1.1, ''Management Entities Must Be Created in Order of Superiority''). Also, the presence of entities created automatically during replication prevents the creation of directly superior entities.
If a DSA already holds information subordinate to an entity you attempt to create, the DSA returns the following messages:
REASON: Has subordinates. Description: The DSA already holds entries or entities subordinate to the entity being created.
Refer to VSI Enterprise Directory Problem Solving for details of how to identify the relevant subordinates, identify whether they are master or shadow information, and remove them so that you can create the entities you require above them. Alternatively, you might decide to create the new naming context on some other DSA, bypassing the problem.
Because of the inconvenience of having to remove existing information before creating superior information, it is highly advisable to implement your information in order of superiority, and to implement replication only after configuring as many DSAs as possible.
8.1.4. Configuring a DSA Remotely
In the following sections, it is assumed that you manage each DSA entity from an account on that entity’s local system.
You can use NCL commands remotely. However, for most commands this requires proxy access to a privileged account on the remote system, or the specification of a name and password on each NCL command. See the NCL documentation for details of specifying management access controls in NCL commands if you want to manage entities remotely.
Also, if you want to use NCL on a system that does not run DECnet-Plus to manage a remote HP DSA, then you may need to use the following NCL command:
NCL> SET NCL TRANSPORT TCPIP
8.1.5. DSA Configuration Details are Permanent
The configuration tasks described in this chapter only need to be done once for each DSA. For example, a DSA’s AE Title attribute needs to be configured when you first create a DSA, but only the first time. The DSA stores its configuration details in its database files, and configures itself every time you create it.
Once a DSA has been configured, the only commands that need to be repeated are CREATE DSA, ENABLE DSA, DISABLE DSA, and DELETE DSA. These are normally executed automatically during system startup and shutdown. Section 8.13, ''Starting the DSA as Part of OpenVMS System Startup'' explains what you need to do to provide automatic startup and shutdown of DSAs on OpenVMS systems.
The only exception to this behaviour is the Accessor entity, which is not used for any of the configuration described in this chapter. The Accessor entity is deleted when you delete a DSA, and has to be manually recreated when you recreate the DSA, assuming you still need the entity.
8.1.6. NCL Command Line Help is Available Online
This chapter does not attempt to provide a full description of all NCL commands that you can use for the DSA. It concentrates on the commands you need to configure a typical Enterprise Directory.
If you want further details about any of the NCL commands used in this chapter, or about the other attributes of the DSA entities and subentities, or about the events and messages generated by the DSA, refer to the NCL online help. To access the Enterprise Directory help, use the following command:
NCL> HELP DIRECTORY_MODULE
The help module for the Enterprise Directory provides full details of all entities, attributes, directives, events, and errors of the OpenVMS Enterprise Directory. VSI Enterprise Directory Problem Solving also provides information about the NCL interface to the DSA, and explains how to respond to the various error messages.
8.2. Running the DSA Configuration Utility
This version of the Enterprise Directory provides a DSA configuration utility.
The main benefit of this utility is that it configures a DSA’s presentation address, and sets the DSA’s LDAP port number to 389, rather than requiring you to plan and configure this manually.
The utility also sets a temporary AE title for a DSA, but you need to replace this temporary value with the value you planned in Section 5.2, ''Planning DSA Configuration Information''. The temporary value enables you to start the DSA and experiment with it even before you have planned your final configuration properly.
If you have already used the DSA configuration utility, as described in Section 5.2.3, ''DSA Presentation Addresses'', then there is no need to use it again.
You need SYSPRV and OPER privileges to run the configuration utility. To run the utility, type:
$ @SYS$STARTUP:DXD$DSA_CONFIGURE
The utility only sets an AE title for your DSA if the DSA does not already have one. It never overwrites an existing AE title. If the DSA has no AE title, the utility sets one based on the name of the DSA system.
If your privileges are insufficient, the utility displays an error message and exits.
8.3. Creating DSAs
Create a DSA entity on each system that is to host a DSA.
NCL> CREATE DSA
If the command fails, see VSI Enterprise Directory Problem Solving.
A created DSA can be configured, but needs to be enabled before it can receive connections from directory applications and other DSAs. Before you enable the DSA for the first time, you need to configure the planned AE Title and Password attributes. The DSA configuration utility (see Section 8.2, ''Running the DSA Configuration Utility'') sets a temporary AE title which you need to replace with the planned value. You are also recommended to set the Volatile Modifications attribute to True. See Section 8.3.1, ''Setting DSA AE Titles'', Section 8.3.2, ''Setting DSA Passwords'', and Section 8.3.3, ''Setting DSA Volatile Modifications'' for details.
This version of the DSA uses memory image files rather than the snapshot files of previous versions. Memory image files provide superior startup and shutdown times, especially for very large databases.
Snapshot files are only supported for a small number of reasons:
So that you can upgrade from a previous version.
So that you can load a new schema file (see Chapter 6, "Customizing the Schema").
So that you can upgrade to a future version of the Enterprise Directory.
Different versions of the DSA may use different memory structures. A memory image file cannot, therefore, be supported through an upgrade.
For those occasions when you need snapshot files, the CREATE DSA and DELETE DSA commands support new options:
NCL> CREATE DSA FROM SNAPSHOT NCL> DELETE DSA TO SNAPSHOT
If a given task requires a snapshot file, the documentation tells you what to do.
8.3.1. Setting DSA AE Titles
This version provides a DSA configuration utility that sets an AE title for your DSA. However, the utility only sets a temporary AE title which you need to replace with the value that you planned to conform to your naming policy (see Section 4.5, ''Planning Entries to Represent DSAs'').
You do not need to set the planned AE title immediately. You can enable a DSA and experiment with it using the temporary AE title set by the DSA configuration utility. However, you need to set the planned AE titles before DSAs can interwork properly, for example, for replication.
The DSA must be in state OFF when you set its AE Title. The syntax is:
SET DSA AE TITLE "<AEtitle>"
where <AEtitle> is the AE Title for this DSA, specified in
quotation marks. For example:
NCL> SET DSA AE TITLE "/C=US/O=Abacus/CN=DSA1"
Remember that a DSA’s AE Title is identical to the distinguished name of the
decDSA entry that represents (or will represent) the
DSA.
8.3.2. Setting DSA Passwords
The DSA can be either ON or OFF when you set its Password. The syntax is:
SET DSA PASSWORD "password"
where password is the password of this DSA. The password can be
up to 128 characters long, and is case-sensitive.
The value of the Password attribute of the DSA entity must match the value of
the userPassword attribute of the decDSA entry that
represents this DSA.
If the values do not match, then this DSA will not be able to prove its identity to other DSAs. This prevents replication, and restricts the distribution of user requests.
If you ever change a DSA’s password, remember to configure that change using
NCL SET PASSWORD command, so that the value in the
DSA’s directory entry always matches the Password attribute of the
DSA entity.
8.3.3. Setting DSA Volatile Modifications
This is an optional DSA configuration task, but one that is recommended for performance reasons.
By default, a DSA always writes modifications to disk immediately, and delays sending a success response to the user until this has been done. This behaviour ensures that modifications are not lost in the event of an unexpected shutdown.
However, VSI suggests that you configure the DSA to allow volatile modifications. This means that changes are written to disk after a delay of up to fifteen seconds. During this brief delay there is a possibility of an unexpected shutdown causing some loss of recent modifications. However, there is a significant performance advantage in allowing volatile modifications.
Unless your DSA has a strong requirement to guarantee no loss of modifications, VSI recommends that you configure the DSA as follows:
ncl> SET DSA VOLATILE MODIFICATIONS TRUE
8.3.4. Setting DSA Presentation Addresses
DSA presentation addresses are most easily configured using the DSA configuration utility (see Section 8.2, ''Running the DSA Configuration Utility''). There should never be any need to configure them manually. However, it is possible to use NCL to set a DSA’s presentation address, using the following syntax:
SET DSA PRESENTATION ADDRESS ’<paddr>’
where <paddr> is the presentation address for this DSA,
specified in single quotation marks. For example:
NCL> SET DSA PRESENTATION ADDRESS ’"DSA"/"DSA"/"DSA"/NS+49200190400012,CLNS’
The DSA must be in state OFF when you set its Presentation Address.
If a DSA has multiple network addresses, for example for RFC1006, X.25, and CLNS, separate each network address with the | character, for example:
NCL> SET DSA PRESENTATION ADDRESS ’"DSA"/"DSA"/"DSA"/NS+490011AA0000021,CL NS|NS+37102251220021,CONS|RFC1006+11.22.33.44,RFC1006’
Do not attempt to break a presentation address across multiple command lines; simply wrap the address as shown, or use a wider terminal window.
Note that the display conventions that NCL uses for presentation addresses are not the same as the input conventions, and are not consistent across all platforms. If you want to cut and paste an address from a display into a command, be careful to select only the address itself, and to enclose the address in single quotes. NCL supports the use of single quotes in commands, as shown in the example above, consistently on all platforms.
8.3.5. Setting DSA LDAP Port
The X.500 DSA supports both the LDAP V2 and V3 protocols. This allows LDAP clients to access the X.500 directory.
The Enterprise Directory listens for LDAP requests on that port when the DSA is enabled. The following command is used to set up an LDAP port:
NCL> SET DSA LDAP PORT 389
8.4. Creating a Naming Context Entity
A DSA can be either ON or OFF when you create a Naming Context entity. Remember that you must only create Naming Context entities for the naming contexts for which the DSA is the master DSA. Any naming contexts that are to be held as replicated copies are represented by entities that are created automatically during replication.
The syntax is:
CREATE DSA NAMING CONTEXT "<distinguished-name>"
where <distinguished-name> is the name of a naming context, in
quotation marks. For example:
NCL> CREATE DSA NAMING CONTEXT "/C=US/O=Abacus"
Refer to the DSA worksheet to find out what naming contexts to specify for a given DSA. Remember that you must create subentities of the DSA in their order of hierarchical superiority (see Section 8.1, ''Notes on Configuring a DSA'').
If the command fails, see VSI Enterprise Directory Problem Solving.
8.4.1. Configuring Consumer Access Points on Naming Contexts
It is possible to specify the Consumer Access Point attribute in a CREATE DSA NAMING CONTEXT command, to indicate which DSAs are primary consumers of a naming context. However, it is advisable to wait until the relevant consumer DSAs are actually ready to respond to replication requests. This prevents the supplier DSA from attempting to supply information before the consumers are ready to receive it.
If you want to specify the attribute in the CREATE command, the syntax is as follows:
CREATE DSA NAMING CONTEXT "<distinguished_name>" -
CONSUMER ACCESS POINT -
{[AE TITLE = "<AEtitle>", PRESENTATION ADDRESS = ’<paddr>’]}where <distinguished-name> is the name of a naming context in
quotation marks, <AEtitle> is the AE title of a consumer DSA in
quotation marks, and <paddr> is a presentation address of a
consumer DSA in single quotation marks.
If the Naming Context is to be supplied to more than one primary consumer DSA, details of each consumer can be specified, as follows:
CREATE DSA NAMING CONTEXT "<distinguished_name>" -
CONSUMER ACCESS POINT -
{[AE TITLE = "<AEtitle>", PRESENTATION ADDRESS = ’<paddr>’], -
[AE TITLE = "<AEtitle>", PRESENTATION ADDRESS = ’<paddr>’]}The {} characters enclose a comma separated list, with each
access point enclosed by [] characters.
If you do not specify the Consumer Access Point on the CREATE command, then you use the SET DSA NAMING CONTEXT command when you are ready to implement replication, as shown in Section 8.10, ''Implementing Replication''. Section 8.10, ''Implementing Replication'' also shows an example of how to implement secondary shadowing, which always requires the use of the SET command, because shadow naming contexts are never created manually.
8.5. Creating a Subordinate Reference Entity
To create a Subordinate Reference entity, use the following command syntax.
CREATE DSA SUBORDINATE REFERENCE "<distinguished-name>" -
ACCESS POINT -
{[AE TITLE = "<AEtitle>", PRESENTATION ADDRESS = ’<paddr>’]}, -
COPY ACCESS POINT -
{[AE TITLE = "<AEtitle>", PRESENTATION ADDRESS = ’<paddr>’]}where <distinguished-name> is the name of a subordinate naming
context in quotation marks, <AEtitle> is an application entity title
in quotation marks of a DSA that holds the naming context, and
<paddr> is the presentation address of a DSA that holds the
naming context.
For example, the following command sets up a Subordinate Reference entity that
provides a reference to the naming context called
/C=US/O=Abacus/OU=Sales:
NCL> CREATE DSA SUBORDINATE REFERENCE "/C=US/O=Abacus/OU=Sales" -
_NCL> ACCESS POINT -
_NCL> {[AE TITLE = "/C=US/O=Abacus/CN=DSA2", -
_NCL> PRES ADDRESS=’"DSA"/"DSA"/"DSA"/NS+49AA001992AAA00000000,CLNS’]}, -
_NCL> COPY ACCESS POINT -
_NCL> {[AE TITLE = "/C=US/O=Abacus/CN=DSA4", -
_NCL> PRES ADDRESS=’"DSA"/"DSA"/"DSA"/NS+49AA001992AA900000000,CLNS’]}The keywords PRESENTATION ADDRESS are abbreviated in this example, to
save space.
The Access Point attribute contains information about the master DSA of the naming context for which this is a reference. The Copy Access Point attribute contains information about a shadow DSA for the subordinate naming context.
If you want to specify more than one Copy Access Point, because you know of more than one shadow DSA for the subordinate naming context, use the following syntax:
CREATE DSA SUBORDINATE REFERENCE "<distinguished-name>" -
ACCESS POINT -
{[AE TITLE = "<AEtitle>", PRESENTATION ADDRESS = ’<paddr>’]}, -
COPY ACCESS POINT -
{[AE TITLE = "<AEtitle>", PRESENTATION ADDRESS = ’<paddr>’], -
[AE TITLE = "<AEtitle>", PRESENTATION ADDRESS = ’<paddr>’], -
[AE TITLE = "<AEtitle>", PRESENTATION ADDRESS = ’<paddr>’]}You need to specify at least one attribute for each subordinate reference, although it can be either an Access Point attribute or a Copy Access Point attribute.
Refer to the worksheet to find out what Subordinate Reference entities to create for a given DSA, and what presentation addresses and AE titles to specify for the attributes.
If the command fails, see VSI Enterprise Directory Problem Solving.
You can use the NCL SET, ADD, REMOVE, and SHOW directives to manage the access point information for the Subordinate Reference entity. For example, if a Subordinate Reference entity has a Copy Access Point attribute that contains an incomplete list of DSAs that hold copies of the naming context, you can use the ADD command to add further access points. Similarly, you can use the REMOVE command to remove access points from the list.
8.6. Creating a Superior Reference Entity
To create a Superior Reference entity, use the following command syntax:
CREATE DSA SUPERIOR REFERENCE -
ACCESS POINT -
{[AE TITLE = "<AEtitle>", -
PRESENTATION ADDRESS = ’<paddr>’]}where <AEtitle> is an application entity title, and
<paddr> is a presentation address of a superior DSA.
For example, the following command sets up a superior reference for a DSA to a
superior DSA called "/C=US/CN=National DSA":
NCL> CREATE DSA SUPERIOR REFERENCE -
_NCL> ACCESS POINT -
_NCL> {[AE TITLE = "/C=US/CN=National DSA", -
_NCL> PRESENTATION ADDRESS = ’"DSA"/"DSA"/"DSA"/NS+12341234123414,CLNS’]}You only specify details of one superior DSA; multiple access points are not permitted. The superior DSA can be either a master DSA or a shadow DSA.
Refer to your worksheet DSA to find out what Superior Reference entity, if any, a given DSA requires.
If the command fails, see VSI Enterprise Directory Problem Solving.
8.7. Enabling DSAs
The ENABLE DSA directive puts a DSA into state ENABLING. When the DSA has finished enabling, it goes into state ON. You cannot enable a DSA unless the AE Title and Presentation Address attributes are configured.
The command syntax is:
NCL> ENABLE DSA
When in state ON, a DSA can receive connections from directory applications and other DSAs. For example, you can use DXIM to bind to the DSA and create and display directory entries. In state ON, the DSA can also receive replication requests from other DSAs.
If the command fails, see VSI Enterprise Directory Problem Solving.
8.8. Creating Directory Entries to Represent Your DSAs
When you have configured the DSA that holds your organization’s highest naming context, you can create the directory entries that represent your DSAs. If you follow VSI’s recommendations, these entries are part of your highest naming context.
The DSA entries were planned in Section 4.5, ''Planning Entries to Represent DSAs'' and the DXIM commands that you use to create them were planned in Section 5.2.9.1, ''Planning the DXIM Command to Create DSA Entries''. You can now create those entries, although you need to create their parent entry as well. For example:
Configure application defaults on the system that runs the DSA that holds your highest naming context.
Section 9.1, ''Using the DUA Configuration Utility'' describes the DUA configuration utility.
Invoke the DXIM command line utility, as follows:
$ DXIM /INTERFACE=CHARACTER_CELL
Create the entry at the top of the highest naming context. For example, the Abacus directory manager types:
dxim> create /C=US/O=Abacus attributes objectClass=Organization
Create the entries to represent your DSAs. For example, the Abacus manager uses the following command to create the entry for
CN=DSA1.dxim> create /C=US/O=Abacus/CN=DSA1 - _dxim> attributes - _dxim> objectClass=(decDSA,DSA,applicationEntity), - _dxim> trustedDSAName="/C=US/O=Abacus/CN=DSA1", - _dxim> userPassword=unguessable-textstring, - _dxim> presentationAddress=’"DSA"/"DSA"/"DSA"/NS+49004005002B0AEBDB21,CLNS’
Use a sequence of DXIM commands like this to create entries to represent each of your HP DSAs. Remember that the
userPasswordattribute is case sensitive, so you need to specify the same case as you used in NCL SET DSA PASSWORD command.
If one or more of the DSA entries already exist, this is because HP DSAs attempt to create them automatically. This is not a problem.
8.9. Summary of Configuration
When you have created all of the Naming Context entities and Subordinate References for a DSA, then the DSA is ready to be populated. Section 8.8, ''Creating Directory Entries to Represent Your DSAs'' shows how to begin populating your highest naming context to create the entries to represent your DSAs.
It is possible to configure and populate one naming context at a time, if you prefer. It is not advisable to populate a naming context before configuring the subordinate references related to that naming context.
The commands described in Section 8.3, ''Creating DSAs'' to Section 8.7, ''Enabling DSAs'' provide a distributed Enterprise Directory. Note that consumer information has not yet been configured, so replication is not yet implemented.
Also, only your equivalent of CN=DSA1 has a full set of knowledge
about naming contexts held by other DSAs. The other DSAs are going to get these
references automatically when they consume copies of the Naming Context called
/C=US/O=Abacus. Section 8.10, ''Implementing Replication'' explains how to
implement replication.
If you do not want to implement replication, then the alternative solution is to
give each DSA a Superior Reference entity that identifies your equivalent of
CN=DSA1. However, that solution greatly increases the workload of
CN=DSA1, and if that DSA is unavailable for any reason, the
usefulness of your whole Enterprise Directory is greatly reduced. By implementing
replication as recommended, the workload of your Directory Service is shared by your
DSAs, and performance is improved.
The example in Section 8.9.1, ''Examples of Configuring DSAs'' shows how the worksheet for
CN=DSA1 (see Chapter 5, "Planning DSAs to Hold Your Directory Information Tree") translates into a sequence
of configuration commands.
8.9.1. Examples of Configuring DSAs
This section shows how the worksheets for CN=DSA1 (see Chapter 5, "Planning DSAs to Hold Your Directory Information Tree") translates into a sequence of configuration commands.
The completed worksheet for CN=DSA1 is shown in Figure 8.2, ''Worksheet for CN=DSA1''.
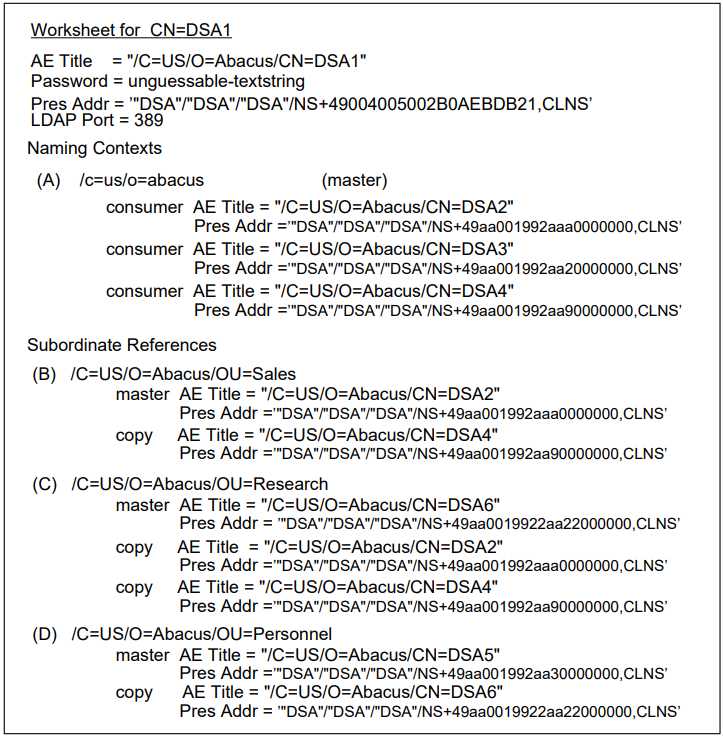 |
This DSA will be the master DSA for the highest naming context in the Abacus DIT. It will supply copies of that naming context to three other DSAs. However, consumer details will not be specified yet (see Section 8.10, ''Implementing Replication'').
The DSA will have three subordinate references. Each of these includes details of the master DSA and all shadow DSAs for the three subordinate naming contexts.
The following sequence of NCL commands configures the DSA to implement these plans.
NCL> CREATE DSA
NCL> SET DSA AE TITLE "/C=US/O=Abacus/CN=DSA1"
NCL> SET DSA PRESENTATION ADDRESS -
_NCL> ’"DSA"/"DSA"/"DSA"/NS+49004005002B0AEBDB21,CLNS’
NCL> SET DSA LDAP PORT 389
NCL> SET DSA PASSWORD "unguessable-textstring"
NCL> CREATE DSA NAMING CONTEXT "/C=US/O=Abacus"
NCL> CREATE DSA SUBORDINATE REFERENCE "/C=US/O=Abacus/OU=Sales" -
_NCL> ACCESS POINT -
_NCL> {[AE TITLE="/C=US/O=Abacus/CN=DSA2", -
_NCL> PRES ADDRESS=’"DSA"/"DSA"/"DSA"/NS+49AA001992AAA00000000,CLNS’], -
_NCL> [AE TITLE="/C=US/O=Abacus/CN=DSA4", -
_NCL> PRES ADDRESS=’"DSA"/"DSA"/"DSA"/NS+49AA001992AA900000000,CLNS’]}
NCL> CREATE DSA SUBORDINATE REFERENCE "/C=US/O=Abacus/OU=Research" -
_NCL> ACCESS POINT -
_NCL> {[AE TITLE="/C=US/O=Abacus/CN=DSA6", -
_NCL> PRES ADDRESS=’"DSA"/"DSA"/"DSA"/NS+49AA001992AA220000000,CLNS’]} -
_NCL> COPY ACCESS POINT -
_NCL> {[AE TITLE="/C=US/O=Abacus/CN=DSA2", -
_NCL> PRES ADDRESS=’"DSA"/"DSA"/"DSA"/NS+49AA001992AAA00000000,CLNS’], -
_NCL> [AE TITLE="/C=US/O=Abacus/CN=DSA4", -
_NCL> PRES ADDRESS=’"DSA"/"DSA"/"DSA"/NS+49AA001992AA900000000,CLNS’]}
NCL> CREATE DSA SUBORDINATE REFERENCE "/C=US/O=Abacus/OU=Personnel" -
_NCL> ACCESS POINT -
_NCL> {[AE TITLE="/C=US/O=Abacus/CN=DSA5", -
_NCL> PRES ADDRESS=’"DSA"/"DSA"/"DSA"/NS+49AA001992AA300000000,CLNS’]} -
_NCL> COPY ACCESS POINT -
_NCL> {[AE TITLE="/C=US/O=Abacus/CN=DSA6", -
_NCL> PRES ADDRESS=’"DSA"/"DSA"/"DSA"/NS+49AA001992AA220000000,CLNS’]} -The above commands provide CN=DSA1 with all of its knowledge
information configuration. CN=DSA1 can now be enabled, as
follows:
NCL> ENABLE DSA
DXIM can then bind to CN=DSA1, and populate the naming context
for which it is the master DSA. See Chapter 9, "Configuring and Running Directory Applications" for details of
configuring DXIM to bind to a DSA automatically.
When you populate your equivalent of the /C=US/O=Abacus naming
context, remember to create decDSA entries, as described in Section 8.8, ''Creating Directory Entries to Represent Your DSAs''.
8.10. Implementing Replication
This section describes how to implement replication for a typical Enterprise Directory. Note that replication cannot be guaranteed to succeed between DSAs with different schema. If you have customized the schema of any DSA, check that the same customizations have been applied to all DSAs (see Chapter 6, "Customizing the Schema").
Figure 8.3, ''Planned Replication of Naming Contexts'' shows the planned replication between the six DSAs in the example Enterprise Directory discussed in Chapter 5, "Planning DSAs to Hold Your Directory Information Tree".
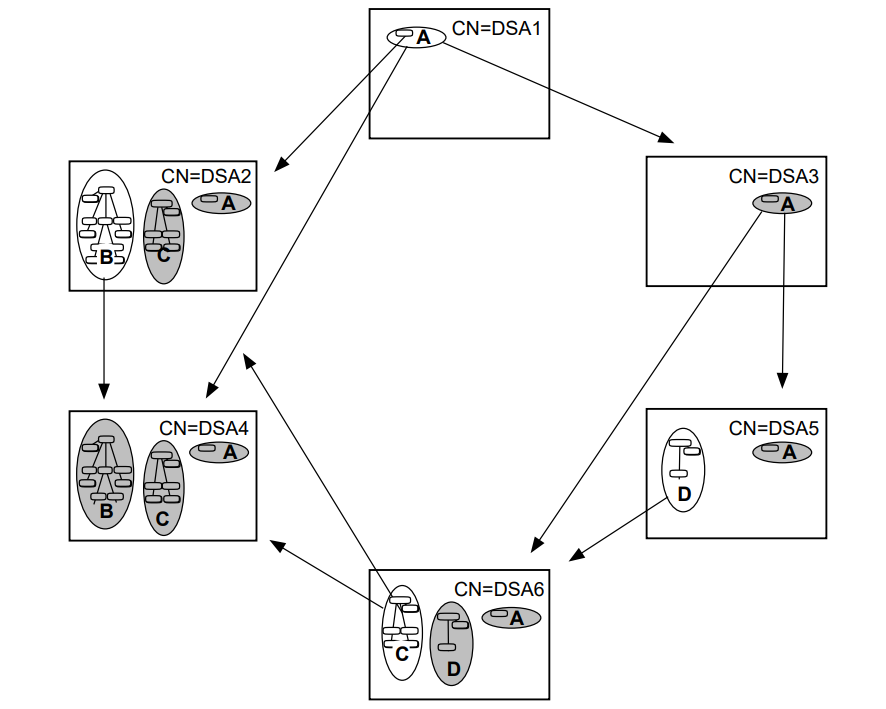 |
The plan includes examples of primary and secondary shadowing.
When this plan is fully implemented, the following will all be true:
Each DSA will be configured with details of the DSAs that are to consume each of its naming contexts.
Each DSA will be able to verify the password of every other DSA in the example service.
This is because each DSA will hold a local copy of the naming context that contains the
decDSAentries.
VSI recommends that the simplest way to reach that final state is to implement all of the replication plans for your equivalent of Naming Context A first.
Naming Context A contains the entries that represent your DSAs. As soon each DSA receives a copy of that naming context, it can verify the identities of all other DSAs, making further replication plans much easier to implement. This is one of the reasons why that naming context is replicated to all DSAs.
For the example shown in Figure 8.3, ''Planned Replication of Naming Contexts'', the simplest sequence of tasks is as follows:
Use NCL on
CN=DSA1to add the Consumer Access Point attribute to Naming Context A (/C=US/O=Abacus), as follows:NCL> SET DSA NAMING CONTEXT "/C=US/O=Abacus" - _NCL> CONSUMER ACCESS POINT - _NCL> {[AE TITLE="/C=US/O=Abacus/CN=DSA2", - _NCL> PRES ADDRESS=’"DSA"/"DSA"/"DSA"/NS+49aa001992a000000000,CLNS’]} - _NCL> [AE TITLE="/C=US/O=Abacus/CN=DSA3", - _NCL> PRES ADDRESS=’"DSA"/"DSA"/"DSA"/NS+49aa001992aa20000000,CLNS’]} - _NCL> [AE TITLE="/C=US/O=Abacus/CN=DSA4", - _NCL> PRES ADDRESS=’"DSA"/"DSA"/"DSA"/NS+49aa001992aa90000000,CLNS’]}The keywords
PRESENTATION ADDRESSare abbreviated in these examples.CN=DSA1reacts to this command by trying to communicate with each of the three listed consumer DSAs. However, this fails because those three DSAs cannot yet verifyCN=DSA1’s password. (They could refer toCN=DSA1to verify the password, but clearly that would be a security risk).Use the following UPDATE DSA directive on
CN=DSA2(which must be in state ON):NCL> UPDATE DSA SUPPLIER ’"DSA"/"DSA"/"DSA"/NS+49004005002B0AEBDB21,CLNS’
where the specified presentation address is that of
CN=DSA1.The command creates a connection to
CN=DSA1, and causes a shadowing agreement to be created between this DSA andCN=DSA1. Replication happens automatically almost immediately afterwards. See Section 8.10.1, ''Managing Shadowing Agreement Subentries'' for some important notes about shadowing agreements.Repeat step 2 for each of
CN=DSA3andCN=DSA4.When these tasks are completed,
CN=DSA1,CN=DSA2,CN=DSA3, andCN=DSA4will all have local access to thedecDSAentries. This means that further replications between them do not require you to use the UPDATE DSA directive as shown in step 3. Each of the three consumer DSAs will periodically connect toCN=DSA1to ask for any updates to the replicated naming context.This has implemented the primary shadowing of Naming Context A to three consumers, as shown in Figure 8.3, ''Planned Replication of Naming Contexts''.
CN=DSA5andCN=DSA6are to use secondary shadowing to replicate copies of the/C=US/O=Abacusnaming context fromCN=DSA4.Add a Consumer Access Point attribute to the shadow naming context on
CN=DSA4:NCL> SET DSA NAMING CONTEXT "/C=US/O=Abacus" - _NCL> CONSUMER ACCESS POINT - _NCL> {[AE TITLE = "/C=US/O=Abacus/CN=DSA5", - _NCL> PRES ADDR ’"DSA"/"DSA"/"DSA"/NS+49aa001992aa30000000,CLNS’]} - _NCL> {[AE TITLE = "/C=US/O=Abacus/CN=DSA6", - _NCL> PRES ADDR ’"DSA"/"DSA"/"DSA"/NS+49aa0019922aa2200000,CLNS’]}Use the following UPDATE DSA directive on
CN=DSA5(which must be in state ON):NCL> UPDATE DSA SUPPLIER ’"DSA"/"DSA"/"DSA"/NS+49aa001992aa90000000,CLNS’
where the specified presentation address is that of
CN=DSA4.The command creates a connection to
CN=DSA4, and causes a shadowing agreement to be created between this DSA andCN=DSA4. Replication happens automatically almost immediately afterwards.Repeat step 5 for
CN=DSA6.
Replication of Naming Context A is now complete for all DSAs in the example
Enterprise Directory. This means that all six DSAs can verify each other’s
passwords, because they all hold copies of the decDSA entries.
All remaining replication can be implemented simply by adding the relevant Consumer Access Point attributes to Naming Contexts. Now that the DSAs can verify each other’s passwords, there is no need to use the UPDATE DSA directive to make DSAs replicate.
For example, to implement the replication plans for Naming Context B in Figure 8.3, ''Planned Replication of Naming Contexts'', use NCL on CN=DSA2 to add a Consumer Access
Point attribute with details of the planned consumer: CN=DSA4. When you
add this attribute, CN=DSA2 automatically connects to
CN=DSA4 and replication takes place almost immediately afterwards.
There is no need to use the UPDATE DSA command on CN=DSA4.
Note
Once replication is established, consumer DSAs and supplier DSAs communicate periodically (every 12 hours by default) to make sure the shadow copies are kept up to date.
The UPDATE DSA command is used only for the following reasons:
To implement replication for the first time, when DSAs cannot verify each other’s identities.
To help solve certain problem situations, as described in VSI Enterprise Directory Problem Solving
8.10.1. Managing Shadowing Agreement Subentries
This section describes how to customize some aspects of replication. There is no need to read this section if you are satisfied with the default behaviour of replication.
Every shadowing agreement between a pair of DSAs is represented by two subentries; one held by the supplier DSA, and the other by the consumer DSA. Subentries are a special class of entry that represent aspects of Enterprise Directory configuration, and that are normally hidden from users.
In the case of shadowing agreement subentries, the configuration information in a given subentry is specific to the DSA that holds it. The two subentries relating to a shadowing agreement between two DSAs are not identical. For example, the one held by the supplier identifies the consumer DSA, and indicates that this is the supplier’s part of the agreement, while the one held by the consumer identifies the supplier, and indicates that this is the consumer’s part of the agreement. The two subentries are not, therefore, copies of each other. They are an example of DSA specific subentries , that is, they represent configuration information that is specific to the DSA that holds them.
Because the information in these subentries is relevant to only one DSA, these subentries are not replicated like normal entries, and other DSAs have no knowledge that the subentries exist. In order to manage a shadowing agreement subentry, it is therefore necessary to bind directly to the DSA that holds it. This is explained in more detail for those tasks that involve management of the subentries.
Each pair of shadowing agreement subentries defines the style and frequency of replication for the naming context to which they apply. The supplier DSA creates a default shadowing agreement subentry automatically soon after you configure the Consumer Access Point attribute of a Naming Context entity.
The supplier DSA instructs the consumer DSA to create a corresponding subentry just before replication takes place for the first time. The subentries are, therefore, always created automatically. The only reason why you might ever need to create a shadowing agreement subentry manually is if you are trying to configure replication between a HP DSA and another vendor’s DSA.
Default shadowing agreements specify that the consumer DSA initiates replication for a given naming context at twelve hour intervals, and that only the entries that have changed since the last successful replication are replicated (as opposed to replicating the entire naming context every time).
The two types of amendment to these defaults that you can consider are:
To amend the frequency and specific schedule of replication attempts
To amend the style of replication, such that replication happens as soon as changes occur, rather than after scheduled intervals
One additional management control is the ability to force an immediate replication attempt, rather than wait for the next scheduled attempt.
The following sections describe how to implement these options, if you consider them preferable to the defaults.
There is no requirement to manage these subentries manually. The defaults are designed to give efficient replication that should suit most customers. Certainly, you should never delete a shadowing agreement subentry manually.
8.10.1.1. Notes About Modifying Shadowing Agreement Subentries
Any amendments you make to an agreement apply only to that agreement. This means that, for example, you can configure different replication schedules for different agreements.
If you implement secondary shadowing for a given naming context, you might consider coordinating the replication schedules of the primary and secondary agreements. For example, you might arrange secondary replication to occur shortly after the relevant primary replication should have completed.
If a shadowing agreement is deleted for any reason, and then recreated by the DSA, the new shadowing agreement may be a default agreement, and any modifications you made to the schedule or the style of replication may need to be implemented again. For example, if the Consumer Access Point is deleted, the relevant shadowing agreement subentries are deleted. If the Consumer Access Point is added again, a new, default agreement is created.
8.10.1.2. Identifying the Subentries for a Given Shadowing Agreement
If you want to display and manage shadowing agreement subentries, you first need to find them in the directory. Each agreement is actually represented by two shadowing agreement subentries; one held by the supplier and one held by the consumer.
Note
The agreement subentries held by the consumer DSA and supplier DSA are slightly different from each other, and are not replicated along with the other entries held in a naming context.
The consumer DSA does not hold a shadow copy of the subentry, as you might expect, but holds a slightly different subentry that represents its view of the agreement.
When modifying agreements, it is important to know whether you need to modify the subentry held by the consumer or the supplier, and to be able to tell the difference between the two.
The agreement subentries pertaining to a given naming context are created immediately beneath the highest entry in the naming context. If a given naming context is replicated to several DSAs, there will be several agreement subentries. You need to identify the subentries that represent the particular agreement you want to modify.
Shadowing agreement subentries have a naming convention that helps you identify which ones apply to which agreement. For example, suppose that you want to identify the subentries that represent an agreement between DSA1 and DSA2 for the naming context called /C=US/O=Abacus, for which DSA1 is the consumer DSA, and DSA2 is the supplier.
To identify the consumer’s subentry, bind directly to the consumer DSA, DSA1, and use the DXIM SEARCH SUBORDINATES command, as follows:
dxim> search subordinates /C=US/O=Abacus - _dxim> where objectClass=shadowingAgreement subentries local scope
The SEARCH SUBORDINATES command should cause one or more subentry names to be listed, including the following:
/C=US/O=Abacus/CN="Consumer /C=US/O=Abacus/CN=DSA2 1"
The common name of the subentry confirms that it is the agreement held by the consumer DSA, and that the other DSA supporting this agreement is DSA2.
If you bind directly to the supplier DSA and do the same search command, you should see a list of names including the following:
/C=US/O=Abacus/CN="Supplier /C=US/O=Abacus/CN=DSA1 1"
There may be several agreements whose common names include the word
"Supplier", but only one that also includes the name
/C=US/O=Abacus/CN=DSA1. DSA2 may supply the naming context
to several consumers, but only one of its agreement subentries relates to
the agreement with DSA1.
The next task is to identify which of the two DSAs is the initiator of replication. This is explained in Section 8.10.1.3, ''Identifying the Initiatior of Replication''.
8.10.1.3. Identifying the Initiatior of Replication
Having identified the two subentries that represent the two halves of the agreement you want to modify (see Section 8.10.1.2, ''Identifying the Subentries for a Given Shadowing Agreement''), you need to identify which of the two DSAs is the initiator of replication for this agreement.
By default, the consumer DSA is the initiator of replication, but it is advisable to confirm this before attempting to modify the agreement.
To confirm that the consumer DSA is the initiator of replication, bind directly to the consumer DSA (DSA1), and show the shadowingFlags attribute of the shadowing agreement subentry. For example:
dxim> show /C=US/O=Abacus/CN="Consumer /C=US/O=Abacus/CN=DSA2 1" -
_dxim> attribute shadowingFlags local scope
/C=US/O=Abacus/CN="Consumer /C=US/O=Abacus/CN=DSA2 1"
shadowingFlags = UseDOP+ConsumerInitiated+OtherTimesYou can also confirm that the consumer DSA is the initiator of replication by binding to the supplier DSA, and showing the shadowingFlags attribute of its shadowing agreement subentry. For example:
dxim> show /C=US/O=Abacus/CN="Supplier /C=US/O=Abacus/CN=DSA1 1" -
_dxim> attribute shadowingFlags local scope
/C=US/O=Abacus/CN="Supplier /C=US/O=Abacus/CN=DSA1 1"
shadowingFlags = IsSupplier+UseDOP+ConsumerInitiated+OtherTimesIn both cases, the shadowingFlags attribute confirms that the
agreement is consumer initiated. If the agreements do not include the
ConsumerInitiated flag, then they have already been modified by someone. In
this case, the agreements should have one of the SupplierInitiated or
OnChange flags.
The important point to remember is that if an agreement is consumer initiated, then you should modify the subentry held on the consumer DSA, and if it is supplier initiated, you should modify the subentry held on the supplier DSA. If the agreement has the OnChange flag, you should modify the subentry held by the supplier DSA. If you disregard this advice, some modifications may not have the required effect.
8.10.1.4. Configuring the Replication Schedule
To configure a specific replication schedule, modify the
shadowingBeginTime attribute and
shadowingEndTime attributes.
The following example schedules replication for four specific times each day, and within one hour windows of those times.
dxim> set <shadowingAgreement name> attributes -
_dxim> shadowingBeginTime=("0 010000", "0 070000", "0 130000", "0 190000"), -
_dxim> shadowingEndTime=("0 020000", "0 080000", "0 140000", "0 200000")where the times are expressed in the format d hhmmss, such
that "0 010000" is 1 a.m. Universal Time, "0 070000" is 7 a.m., "0 130000"
is 1 p.m., and so on. Remember to specify universal times (GMT), not local
times. (The d field in each value can be used to specify a day
of the week. You could, therefore, configure a schedule with different times
and frequencies for different days of the week.)
In this way, you can ensure that replication occurs when the network is least busy, and you can schedule different agreements to be processed at different times.
Note
You must make these schedule modifications to the shadowing agreement subentry held by the DSA that initiates replication. If you modify the agreement subentry of the DSA that is not the initiator of replication, then the modification does not have the required effect. Section 8.10.1.3, ''Identifying the Initiatior of Replication'' explains how to identify which DSA is the initiator of a given agreement.
Note also that schedules are ignored if OnChange replication is in force. See Section 8.10.1.6, ''Configuring Replication to Occur Only When Information Changes'' for details of how to implement OnChange replication.
8.10.1.5. Forcing Replication to Happen Immediately
In certain situations, you might want to force an immediate replication attempt as an exception to the normal schedule.
The usual way to do this is to use the NCL UPDATE DSA command. However,
that method forces a total update, which is not very efficient. If you want
to force an immediate incremental update, you can set the
shadowingNextUpdate attribute to the any time in the past.
You must modify the attribute in the agreement held by the DSA that
initiates replication. For example, if today is July 6th 1995, you can cause
replication to happen immediately using the following command:
dxim> set <shadowingAgreement name> - _dxim> attribute shadowingNextUpdate=19950705000000Z
This time represents the beginning of July 5th, which causes an immediate, replication attempt. Once this attempt is complete, the configured schedule is resumed.
Section 8.10.1.3, ''Identifying the Initiatior of Replication'' explains how to identify the initiator
of replication for a given agreement. If you modify the
shadowingNextUpdate attribute of the DSA that is not the
initiator of replication, then the modification has no effect.
8.10.1.6. Configuring Replication to Occur Only When Information Changes
An alternative to scheduled replication is OnChange replication. OnChange replication causes the supplier DSA to initiate replication whenever a change occurs in the relevant naming context. If no change occurs, the two DSAs do not communicate at all. If you use scheduled replication, the two DSAs communicate according to the schedule even when there are no changes to replicate.
To configure OnChange replication, use the following command to change the agreement held by the supplier DSA:
dxim> set <shadowingAgreement name> attributes - _dxim> shadowingFlags=UseDOP+IsSupplier+Onchange+OtherTimes
Note that it is important that you apply this combination of shadowing flags to the subentry held by the supplier, because it includes the IsSupplier flag. That flag must never be specified in the consumer DSA’s agreement.
Note that when OnChange replication is in use, the attributes that configure the shadowing schedule are ignored, so there is no reason to modify them.
8.10.1.7. Configuring Replication Back to the Default Behaviour
If you change a shadowing agreement to OnChange, but then decide that this style of replication is unsuitable for that agreement, you can configure the style of replication back to the default behaviour.
The default behaviour is defined by the following value for the
shadowingFlags attribute in the agreement held by the
consumer DSA:
shadowingFlags=UseDOP+ConsumerInitiated+OtherTimes
To return to this setting, identify the relevant shadowing agreement subentry, and use DXIM to modify it as shown in the following example:
dxim> set <shadowingAgreement name> attributes - _dxim> shadowingFlags=UseDOP+ConsumerInitiated+OtherTimes
This combination of flags means that replication is scheduled, and initiated by the consumer DSA. If the schedule interval has been customized, you might also want to reconfigure a 12 hour schedule using the attributes described in Section 8.10.1.4, ''Configuring the Replication Schedule''.
Another way to reinstate a default agreement is to use NCL to remove the details of the consumer DSA from the relevant Consumer Access Point held by the supplier DSA, and then add it back again after a few minutes. This causes the agreement to be terminated, and then recreated. The newly created agreement will be a default agreement. However, this method is inefficient because it causes the consumer DSA to delete its copy of the replicated naming context, and requires a complete new copy to be supplied when the agreement is recreated. This method is suitable if you decide that replication needs to be completely restarted for some reason.
8.10.2. Terminating Replication Agreements
If you decide that a consumer DSA no longer requires a given shadow naming context, you can simply remove the details of that DSA from the Consumer Access Point attribute of the Naming Context on the supplier DSA. For example:
NCL> REMOVE DSA NAMING CONTEXT "/C=US/O=Abacus" -
_NCL> CONSUMER ACCESS POINT -
_NCL> {[AE TITLE = "/C=US/O=Abacus/CN=DSA5", -
_NCL> PRES ADDR ’"DSA"/"DSA"/"DSA"/NS+49aa001992aa30000000,CLNS’]}In this case, the DSA (the supplier) informs CN=DSA5 that it must
delete the shadow naming context, and it supplies no further updates for that
naming context to CN=DSA5. It may continue to supply updates for
other naming contexts that it supplies to CN=DSA5.
Note
Do not attempt to terminate replication by deleting the relevant shadowing agreement subentry. As part of the automated management of replication, these subentries may be recreated if deleted, such that replication continues. The supported way to terminate replication is to amend the Consumer Access Point attribute as described above.
8.11. Disabling DSAs
The DISABLE DSA directive puts a DSA into state DISABLING, in which state it closes down its activities. When all activities have been terminated, the DSA goes into state OFF. For example:
NCL> DISABLE DSA
Disabling a DSA prevents it from receiving connections from directory applications and DSAs. This means that this DSA will not respond to user requests for information, and that it will not respond to other DSAs’ attempts to replicate information or modify shadowing agreements.
In state OFF, you can use NCL commands to manage attributes of the DSA. You cannot use the UPDATE DSA directive when the DSA is in state OFF.
8.12. Deleting DSAs
The DELETE DSA directive removes a DSA from a system. For example:
NCL> DELETE DSA
A deleted DSA is no longer configurable, and is not available to respond to connections from directory applications or other DSAs.
The time taken for the DELETE DSA directive to complete depends on the amount of directory information held by the DSA.
This version of the DSA uses memory image files rather than the snapshot files of previous versions. Memory image files provide superior startup and shutdown times, especially for very large databases.
Snapshot files are only supported for a small number of reasons:
So that you can upgrade from a previous version.
So that you can load a new schema file (see Chapter 6, "Customizing the Schema").
So that you can upgrade to a future version of the Enterprise Directory.
Different versions of the DSA may use different memory structures. A memory image file cannot, therefore, be supported through an upgrade. You need to make the DSA create a snapshot file shortly before an upgrade. The deinstallation procedure reminds you of this requirement if it finds no valid snapshot of the database.
For those few occasions when you need to use snapshot files, the CREATE DSA and DELETE DSA directives support a new command option:
NCL> CREATE DSA FROM SNAPSHOT NCL> DELETE DSA TO SNAPSHOT
If a given task requires you to create a snapshot file, the documentation makes this clear, and reminds you of the command option required.
8.13. Starting the DSA as Part of OpenVMS System Startup
The installation card for OpenVMS systems explains that you can edit the system startup file to include the command that runs the Enterprise Directory startup file, SYS$STARTUP:DXD$COMMON_STARTUP.COM.
This file runs an NCL script file for starting the DSA. By default, the commands in that NCL script file are commented out. This means that the DSA is not created or enabled. This is because a DSA cannot be enabled until it has been configured, so the NCL commands would cause errors during every system startup.
After configuring a DSA, edit the DSA startup script SYS$STARTUP:DXD$DSA_STARTUP.NCL to remove the comment characters. Next time the system reboots, the DSA will start up automatically.
On clusters the file is installed in the system specific startup directory, and must be edited there.
Chapter 9. Configuring and Running Directory Applications
This chapter documents the following:
The DUA defaults file that is used by DXIM and the MAILbus 400 MTA
The DXIM initialization file
The Lookup Client defaults file that is used by the X.500 Lookup Client
How to run DXIM and the Lookup Client
The DUA defaults file and the Lookup Client defaults file are both created by configuration utilities. In both cases, the configuration utilities create a defaults file that applies to all system users. However, individual users can have a customized copy of the defaults file in their local area if they want a different set of defaults.
Note
In the case of DXIM, you can also configure some aspects of the user interface by editing the schema file DUA.SC (see Chapter 6, "Customizing the Schema"). For example, you can configure user-friendly names for attributes.
9.1. Using the DUA Configuration Utility
The DUA configuration utility communicates with a DSA to find out its presentation address and AE title.
You need to run the utility on every system that runs DXIM, or the MAILbus 400 MTA. The DSA to which you want these applications to connect must be configured before you run the DUA configuration utility (see Section 5.2.3, ''DSA Presentation Addresses''). The DSA may be on the same system as the applications, or remote.
The configuration utility contacts the relevant DSA to determine what values to use as DUA defaults. The DSA must be in state ON when you use the DUA configuration utility.
The configuration utility writes a DUA defaults file that includes the presentation address and AE title of a DSA on a specified node.
You need SYSPRV and OPER privileges to run the configuration utility. To run the utility, type:
$ @SYS$STARTUP:DXD$DUA_CONFIGURE
If your privileges are insufficient, the utility displays an error message and exits. Otherwise, the utility checks for the presence of both DECnet–Plus and RFC1006 on your system. Note that if both DECnet–Plus and RFC1006 are available, then the utility uses DECnet–Plus to connect to the DSA.
The utility then displays:
Enter the name of the node on which the DSA is located:
If the utility detects that there is a DSA installed on the local system, the local node name is offered as a default.
Specify the name of the DSA system and press RETURN. Note that there is no requirement for applications to use a local DSA, although that is more efficient. The option to use a remote DSA means that you can have applications on a system without a DSA.
When you specify a node name, the utility connects to the DSA on the specified system to find out what its presentation address and AE title are.
If DECnet-Plus is not present on your system, then the utility connects to the DSA using RFC1006. When using RFC1006 to connect to the DSA, the utility requests identifiers for the Upper Layer Selectors of the DSA’s presentation address:
Please enter the Upper Layer Selectors ["DSA"/"DSA"/"DSA"]
Note that the Upper Layer Selectors ["DSA"/"DSA"/"DSA"] are offered
as a default. If you already know that these selectors are not used by the DSA,
specify the correct selectors and press RETURN. If you do not know what selectors
the DSA uses, press RETURN. It is most likely that the DSA uses the selectors shown
by default.
Having contacted the specified DSA, the utility writes the information to DXD$DIRECTORY:DXD$DUA_DEFAULTS.DAT, displays a success message, and exits. If a file of that name already exists, a new version is created. No details from the existing version are included in the new version.
If the utility fails to contact the DSA on the specified node, or fails to obtain
the presentation address and AE title information, it displays an error message, and
asks whether you want to try a different DSA node. If you type yes, the
utility asks you to specify the name of another node, and repeats the attempt to
obtain defaults information and write a defaults file.
Having successfully used the utility to create a defaults file, you can invoke DXIM. DXIM automatically binds to the DSA whose details were written into the defaults file. This confirms that the defaults details are satisfactory.
Refer to Section 9.2, ''System-wide DUA Defaults'' for further details about the defaults file, and to Section 9.3, ''DUA Defaults for Specific Users'' for details of how an individual user can create and manage a defaults file for their own use of DXIM.
9.2. System-wide DUA Defaults
The configuration details that apply to a whole system are stored in the following file:
DXD$DIRECTORY:DXD$DUA_DEFAULTS.DAT
The file created by the configuration utility contains a number of defaults in addition to the presentation address and AE title. The following is a typical defaults file created by the utility:
DUA.KnownDSAs.paddr = "DSA"/"DSA"/"DSA"/NS+490020001122ABA0012,CLNS DUA.KnownDSAs.ae_title = /C=US/O=Abacus/CN=DSA1 #DUA.PreferChaining = true #DUA.ChainingProhibited = false #DUA.LocalScope = false #DUA.DontUseCopy = false #DUA.DontDereferenceAliases = false #DUA.ScopeOfReferral = DMD #DUA.TimeLimit = 60 #DUA.SizeLimit = 30 #DUA.Priority = Medium #DUA.DomainRoot = / #DUA.InitialEntry = /
The # character at the beginning of most lines is a comment
character. DXIM ignores lines that begin with a #
character. By default, only the presentation address and AE title defaults are
active. To use a particular default, specify the required value and remove the
comment character from the line.
In addition to the list of defaults shown above, there are two defaults that you can add to the defaults file manually. These are:
DUA.AttributeSizeLimit = integer DUA.CopyShallDO = True|False
Note that if you specify a given default more than once, only the first instance is ever used. If the first instance of a default is invalid, DXIM does not attempt to use a subsequent definition. There is no advantage in specifying more than one known DSA presentation address, for example.
Each default must be specified on a separate line, and must not wrap onto a second line.
The defaults that specify true or false are booleans,
and you can change them from one value to the other. No other value is allowed for
these defaults.
The DUA.ScopeOfReferral default specifies a restriction on any
referrals returned by a DSA. The permitted values of this control are:
DMD(meaning directory management domain)countryworld
The DUA.ScopeOfReferral default means that when your DSA cannot
satisfy a request, it can instead return a referral to the application, suggesting
further DSAs to contact, but only suggesting DSAs within the specified scope.
Note
HP’s DSAs do not support this control, and do not provide a way to define the scopes. However, other vendor’s DSAs might enable you to define scopes, in which case this control might become relevant.
The DUA.TimeLimit default specifies the number of seconds permitted
for each user request to be answered. The value must be an integer no higher than
65535. The value 0 means that there is no time limit. By default, HP’s DSA imposes
no time limit.
The DUA.SizeLimit default specifies the number of entries that can be
returned for a single user request. The value must be an integer no higher than
65535. A value of 0 means that there is no limit on the number of entries that can
be returned for a single request. By default, HP’s DSA imposes no size limit.
Note
This control applies to the number of entries returned from a given HP DSA, rather than to all DSAs. For example, a value of 10 means that each DSA that handles the request can return up to 10 entries. If five DSAs help satisfy a request, a total of 50 entries might be returned.
The DUA.Priority default specifies a default priority for all user
requests. The permitted values are:
LowMediumHigh
Note
HP’s DSAs do not prioritize user requests. Other vendors’ DSAs might, in which case this control might become relevant.
The DUA.DomainRoot default specifies a default prefix for all user
commands that include incomplete distinguished names.
Use this control to specify the name of the entry at the top of your
organization’s DIT, or of some entry within your organization’s DIT. The Abacus
organization, for example, would edit this control to specify /C=US
/O=Abacus. You can specify any valid directory name as the domain
root.
Note
If you specify the "/" character, make sure that there are no spaces after the "/" character.
If you specify a distinguished name that contains space characters, quote the
particular value(s) that contain the spaces, rather than quoting the entire
name. For example: /C=US/O="ACME Co" rather than
"/C=US/O=ACME Co".
This default enables a DXIM user to omit those terms from any distinguished name.
For example, if the domain root is /C=US/O=Abacus, a DXIM user could
use the following SHOW command:
dxim> show ou=sales/cn="Bryan Lea"
DXIM displays the entry /C=US/O=Abacus/ou=sales/cn="Bryan
Lea".
The prefixing option also applies to distinguished names specified in attribute
values. For example, you could specify an aliasedObjectName attribute
as follows:
aliasedObjectName="ou=sales/cn=Bryan Lea"
The DUA.InitialEntry default specifies the name of a directory entry
that is to be the default browse and search base for DXIM. By default, all commands
apply to the initial entry, unless the user specifies otherwise.
As with DUA.DomainRoot, specify the name of the entry at the top of
your organization’s DIT, or of an entry within your organization’s DIT.
Note
If you specify the "/" character, make sure that there are no spaces after the "/" character.
If you specify a distinguished name that contains space characters, quote the
particular value(s) that contain the spaces, rather than quoting the entire
name. For example: /C=US/O="ACME Co" rather than
"/C=US/O=ACME Co".
If you do not specify a value for this default, DXIM uses
DUA.DomainRoot as the initial entry. If neither default is
specified, DXIM defaults to /, which might prove expensive, and might
prevent the use of the DXIM Browse window.
The value of DUA.InitialEntry also provides a second prefixing
option. For example, if the initial entry is /C=US/O=Abacus, a DXIM
user could use the following command:
dxim> show ./ou=sales/cn="Bryan Lea"
DXIM displays the entry /C=US/O=Abacus/ou=sales/cn="Bryan Lea" The
period character before the leading "/" is converted into the value of initial
entry. This prefixing option cannot be used within attribute values, unlike the
domain root.
The DUA.DomainRoot and DUA.InitialEntry controls are the
ones that are most likely to need changing before you allow DXIM to be used by your
user community.
The DUA.AttributeSizeLimit control enables you to specify a limit on
the size of attribute values that you want returned in a request. This is useful if
the DSA stores very large attributes. For example, the DSA supports the
jpegPhoto attribute which can store images. If your directory
application does not support the display of images, then you can set this control to
ensure that images, which tend to be very large, are not returned. Specify the
number of bytes that is to be the attribute size limit. The DXIM command line
interface supports a maximum attribute size control that enables you to
specify a limit interactively, to override the default. If you do not use this
control, the DSA does not limit the size of attribute values it returns.
The DUA.CopyShallDo control enables you to indicate whether you want
information from partial copies of entries. HP DSAs do not support partial copies of
entries, so this control is only useful if you have another vendor’s DSA. Specify a
default of TRUE or FALSE. If you do not use this control, the default setting is
FALSE. The DXIM command line interface supports a partial information
control that enables you to specify that partial information is acceptable
interactively to override the default.
9.3. DUA Defaults for Specific Users
By default, all users are affected by the system-wide defaults file. Individual directory users might want to have their own definitions of some of the DUA defaults.
To provide an individual directory user with their own defaults for use of the directory, create a file in the user’s home or default directory, with the following name:
SYS$LOGIN:DXD$DUA_DEFAULTS.DAT
Edit the file to specify one or more of the following defaults:
DUA.DomainRoot DUA.InitialEntry DUA.Requestor DUA.KnownDSAs.paddr
Note that none of the other defaults listed in Section 9.2, ''System-wide DUA Defaults'' are
used in the user defaults file. If you specify them, they are ignored. The four
defaults listed above, if present, override the values in the system defaults file.
For example, the value of DUA.DomainRoot in a user defaults file
overrides the value in the system defaults file.
See Section 9.2, ''System-wide DUA Defaults'' describes the DUA.DomainRoot and
DUA.InitialEntry defaults.
The DUA.Requestor default specifies the distinguished name by which
the user wants to be identified to the DSA. When the user invokes DXIM, the value of
DUA.Requestor is passed to the Enterprise Directory.
Note
If you specify a distinguished name that contains space characters, quote the
particular value(s) that contain the spaces, rather than quoting the entire
name. For example: /C=US/O="ACME Co" rather than
"/C=US/O=ACME Co".
Note that although the user’s name is passed to the DSA, their password is not. If the user is using the DXIM windows interface, they can use the Authenticate window. The Name field of that window is filled in automatically, so that the user only has to supply a password to achieve simple authentication. If the user is using the DXIM command line interface, they need to use the BIND command with the Password argument.
If there is no default requestor name in user defaults, then the Enterprise Directory treats the user as an unauthenticated, unnamed user. The user can still use the Authenticate window, or the DXIM BIND command to specify their name and password.
Note that the DUA.Requestor default is not specified in the system
defaults file. DXIM only uses DUA.Requestor defaults specified in user
defaults files.
The DUA.KnownDSAs.paddr default specifies the presentation address of
a DSA. For example:
DUA.KnownDSAs.paddr = "DSA"/"DSA"/"DSA"/NS+490020001122ABA0012,CLNS
This is the presentation address of the DSA to which the DXIM windows interface binds on invocation for this user. It is also the default presentation address for the DXIM command line interface, so that when the user uses the BIND command, they do not need to type a presentation address. If there is no presentation address specified in user defaults, the default specified in the system defaults file is used.
9.4. Configuring DXIM to Use Another Vendor’s DSA
If you want to configure the DXIM utility to use another vendor’s DSA, you might need to do this manually. If the other vendor’s DSA supports RFC1006 connections, and the DSA is running, then the configuration procedure might succeed.
However, if the configuration procedure fails, you need to find out the
presentation address of the DSA, and edit the DUA.KnownDSAs.paddr
parameter in the defaults file manually.
9.5. DXIM Command Line Initialization Files
When you use the DXIM command line interface, you can use an initialization file in addition to the two defaults files. The initialization file is executed after DXIM has read the defaults files, and will override defaults specified in those files if appropriate. The initialization file must be created in your home or default directory.
The initialization file contains DXIM commands that are executed when you invoke the command line interface. For example, you could create an initialization file that contains a DXIM SET DEFAULT NO CHAINING command.
The initialization file has the following name:
SYS$LOGIN:DXD$DXIM.INI
The initialization file can contain any DXIM commands. For example:
bind to address "DSA"/"DSA"/"DSA"/NS+4900200011220000033,CLNS set current /c=us/o=abacus/ou=sales
The example file uses a bind command to establish a binding to a particular DSA.
It then defines a current entry, which overrides the value of
DUA.InitialEntry. Refer to the DXIM online help for full details of
these and other DXIM commands.
9.6. Running DXIM
To run DXIM using the Motif windows interface, type one of the following:
$ DXIM $ DXIM /INTERFACE=DECWINDOWS
To run DXIM using the command line interface, type the following:
$ DXIM /INTERFACE=CHARACTER_CELL
Note that /INTERFACE=DECWINDOWS is the default for OpenVMS systems.
You can also use DXIM from the shell or system prompt. For example, you can type:
$ DXIM SHOW /COUNTRYNAME=US ALL ATTRIBUTES
The presence of a DXIM command line means that it is not necessary to specify
/INTERFACE=CHARACTER_CELL.
9.7. Using the Lookup Client Configuration Utility
If you install the X.500 Lookup Client, then you need to run a configuration utility before you can use it.
Run the Lookup Client configuration utility, as follows:
$ @SYS$STARTUP:DXD$LUC_CONFIGURE.COM
Specify the name of the system that runs the DSA with a non-zero LDAP port.
The utility then prompts for a search base. Specify the name of an entry within
your organization’s DIT. For example, you could specify the name of the highest
entry in your organization’s DIT. Note that the Lookup Client uses a different
convention for naming directory entries, such that an entry called
/C=US/O=Abacus must be expressed as follows:
O=Abacus,
                    C=US
The utility asks whether you want to specify another search base. Multiple search bases are supported by the Lookup Client windows interface. The search bases are offered as a menu enabling users to select a particular search base. The first search base you specify is the default search base, and is the only search base available to users of the Lookup Client command line interface.
Every time you specify a search base, the utility asks whether you want to specify
another. When you have specified all of the search bases you require, type
n, and the utility will exit.
The utility writes a defaults file called:
$ @SYS$SYSTEM:DXDLU.DEFAULTS
The defaults file is self documenting. The file defines what attributes the Lookup Client can display and manage, which attributes are searchable, how the Lookup Client handles search strings, what object class is searched for, what service controls to apply, and what fonts to use. For details of all of the defaults, refer to the defaults file. You can customize the file as described in the comments.
The defaults file applies to all users of the Lookup Client on the system, although individual users can make a copy of the file in their local area if they want a different set of defaults. When you invoke the Lookup Client, it checks for a defaults file in the areas defined by the $HOME environment variable, or SYS$LOGIN.
9.8. Running the Lookup Client
You can run the Lookup Client graphical interface as follows:
$ RUN SYS$SYSTEM:DXD$LOOKUP_MOTIF.EXE
You can run the command line interface as follows:
$ RUN SYS$SYSTEM:DXD$LOOKUP_CLI.EXE
On OpenVMS systems, you can define foreign commands for running the utility, for example:
$ DXDLU :== RUN SYS$SYSTEM:DXD$LOOKUP_MOTIF.EXE $ DXDLUCLI :== RUN SYS$SYSTEM:DXD$LOOKUP_CLI.EXE
The online help for the utilities explains how to use them.
Chapter 10. Creating Directory Entries
This chapter describes how to create entries in the directory (or how to populate the directory).
Section 10.1, ''Using a Script File to Populate a Naming Context'' explains how to populate the directory using DXIM script files. Using DXIM script files to populate the directory is most useful when you are creating a DIT for the first time.
Section 10.2, ''Creating Entries Interactively'' explains how to create entries interactively, using the DXIM command line interface. Creating entries interactively is most useful when you want to add a small number of entries after the directory has been populated.
You can also create entries interactively using the DXIM windows interface. For details of how to do this, see Section 10.2, ''Creating Entries Interactively'' or refer to the DXIM windows utility online help.
Section 10.3, ''Managing Multiple Entries'' explains the DXIM facilities for managing multiple entries and reading and writing entry information to and from files. These facilities are useful if, for example, you want to make the same modification to a large number of entries, you want to delete a large number of entries, or you want to create entries based on information held in a text file.
Remember that you need to create entries to represent your HP DSAs (see Section 4.5, ''Planning Entries to Represent DSAs''). You can create your DSA entries along with all other entries, or create them as a separate task. However, you should certainly create them before allowing end users to access the directory, because they support Enterprise Directory security.
In all cases, before you start creating entries in the directory, it is important to understand the following points:
You cannot create entries unless you have configured the DSAs that are to hold them (see Chapter 8, "Configuring DSAs").
VSI suggests that when you initially populate the directory, you should do it one naming context at a time, using script files which you keep.
The most efficient way to populate the directory is to bind to the master DSA for a given naming context and use a script file to create all of the entries for that naming context, and then unbind.
Repeat this process for each master DSA until all naming contexts are populated. The script should succeed even if you bind to some other DSA, but you will be keeping two or more DSAs busy, rather than just the master DSA.
If you are absolutely sure that a script file creates entries that conform to the schema, then you can configure the DSA not to do schema checking. Commands are executed faster if no schema checks are required, but at the risk of creating invalid entries. Refer to the NCL Directory module help for details of the DSA Schema Check On Modify attribute. You should only disable schema checks for as long as it takes to run the script file.
Use the DSA Volatile Modifications characteristic attribute to specify that the DSA need not log the modifications immediately (see Section 8.3.3, ''Setting DSA Volatile Modifications'').
Within a naming context, you cannot create an entry until after you create its superior entry.
For example, you would create the entry called
/ou=Salesbefore creating the entry/ou=Sales/cn="Jon Long".It does not matter what order you populate the naming contexts in.
If access controls have already been implemented for the DSA that is to hold the entries you create, then you might need to authenticate.
If you are using the command line interface, use the DXIM BIND command with the NAME and PASSWORD arguments before creating the entries.
If you are using the windows interface, pull down the Directory menu and select the Authenticate option. Specify your distinguished name and your password, and click on OK.
10.1. Using a Script File to Populate a Naming Context
This section explains how to use a DXIM script file to populate a naming context. You do not have to populate the directory one naming context at a time, but it is a logical and efficient method. If you use script files, it may be useful to keep them for reference purposes.
Check that the master DSA for the naming context is configured correctly.
The master DSA requires a Naming Context entity. The name of the Naming Context entity must be the same as the distinguished name of the first entry that you create within that naming context.
Use the NCL SHOW command to verify the existence of the Naming Context entity, as follows:
NCL> SHOW DSA NAMING CONTEXT <name> ALL ATTRIBUTES
where
<name>is the name of the naming context and also the distinguished name of the first entry that you will create in that naming context.Also, if the naming context you intend to populate is to be superior to any other naming context, then you are advised to make sure that Subordinate Reference entities have been created for each subordinate naming context. This ensures that you cannot accidentally create entries on one DSA that should be created on another.
Use the NCL SHOW command to verify the existence of each Subordinate Reference entity, as follows:
NCL> SHOW DSA SUBORDINATE REFERENCE <name>
where
<name>is the name of a Subordinate Reference entity, and is also the name of the naming context to which the Subordinate Reference entity refers.
Create a DXIM script file containing a DXIM BIND command and a series of CREATE commands:
The BIND command specifies the presentation address of the master DSA for the naming context you are going to populate. If access controls are implemented, you can specify your distinguished name and password in the BIND command.
Binding to the master DSA for the naming context ensures optimal performance.
Each CREATE command creates one directory entry.
The first command creates the entry that has the same name as the Naming Context entity.
With the exception of that first command, each CREATE command creates an entry as a subordinate of another entry. You cannot create an entry unless its parent exists, unless, as in the case of the first command, the entry is also the root of a naming context.
Each CREATE command specifies the class of the entry being created, and includes a list of the entry’s attributes and values.
Make sure that each CREATE command specifies all of the mandatory attributes for each entry. Also, make sure that each entry is created with the planned name, using the appropriate attributes for naming.
Make sure that you do not attempt to create any entries that do not belong in the particular naming context you are populating. For example, do not create entries that belong in subordinate naming contexts. Such commands might succeed, depending on how completely you have configured your DSAs, but even if they do succeed, this is not an efficient way to populate the DIT.
The following is an extract of a DXIM script file for a typical naming context:
! bind to the DSA on node WANGLE bind to address "DSA"/"DSA"/"DSA"/NS+4900100363AB72002020,CLNS ! ! create the first entry in the naming context. ! create /c=US/o=abacus/ou=sales attributes - objectClass=organizationalUnit, - description="Sales and Marketing Group" ! ! ! use the set current command to save some typing on further ! creates, by specifying Sales to be the current entry ! set current /c=us/o=abacus/ou=sales ! ! populate the sales group with employees. ! create ./cn="Janet Gold" attributes - objectClass=(person,organizationalPerson), - surname=Gold, telephoneNumber=899090, description="Salesperson", - title="Principal Sales Coordinator", faxno=899000, - commonName=("Jan Gold","Janet Gould") ! create ./cn="Bill Marx" attributes - objectClass=(person,organizationalPerson), surname=Marx, - commonName=("William Marx","Will Marx","William Marks"), - telephoneNumber=898988 ! ! create the Drugs organizational unit underneath Sales ! create ./ou=drugs attributes objectClass=organizationalUnit ! ! use the set current command to save some typing. ! set current /c=us/o=abacus/ou=sales/ou=drugs ! ! populate the Drugs group with employees ! create ./cn="Justin Wells" attributes - objectClass=(person,organizationalPerson), - surname=Wells, telephoneNumber=894545, - description="Senior Pharmacologist" . . .
Invoke DXIM in such a way that output is directed to a file, and use the DXIM do command to execute the DXIM script file. For example:
$ DEFINE /USER SYS$OUTPUT output.lis $ DXIM /INTERFACE=CHARACTER_CELL DO SCRIPT.FILE
If the script file fails to create an entry, then it will also fail to create any subordinates of that entry.
Refer to the output file to see whether there were any errors.
If any part of the naming context was not populated, amend the script file. Discard or comment out any commands that succeeded the first time, and amend the command(s) that failed as necessary. Run the script file again, and repeat the process until the naming context is fully populated.
10.2. Creating Entries Interactively
This section explains how to create entries interactively using the DXIM management utility. Interactive entry creation is most suitable if you have a small number of entries to create.
When you create an entry interactively, it is less important that you bind directly to the master DSA for that entry. A small number of modifications can be passed to the relevant master DSA without inconveniencing the DSA to which you are bound.
If you have configured your DSAs correctly (see Chapter 8, "Configuring DSAs") then whichever DSA you bind to will pass the request to the master DSA automatically. If this fails, then you need to find out which DSA has inaccurate or insufficient configuration, and correct it. It is important that your DSAs are configured correctly because an important part of the service they provide is the ability to pass requests to the correct DSA automatically.
Invoke DXIM using the DXIM shell or DCL command (see Section 9.6, ''Running DXIM''). DXIM displays the dxim> prompt. If DXIM does not bind
automatically using defaults information (see Chapter 9, "Configuring and Running Directory Applications"), use the
DXIM bind command, for example:
dxim> bind to address <presentation_address>
where <presentation_address> is the network presentation address
of a DSA.
If access controls are implemented, then the bind command can include your distinguished name and password. For example:
dxim> bind to address <presentation_address> - _dxim> name /c=us/o=abacus/ou=sales/cn="Jon Hunter" password Password>
Having bound successfully, type a DXIM command to create an entry:
dxim> create entry <distinguished_name> attributes <attr>=<value> ...
If the command fails, DXIM displays an error message. Refer to the DXIM online help for full details of the command syntax and of DXIM error messages.
To create an entry using the DXIM windows interface, use the Browse window to find the parent of the entry that you want to create. If you cannot find the parent entry using the Browse window, then you cannot create the new entry. If the entry configured to be the Browse base is not yet created, you cannot create any entries using the windows interface. The windows interface only allows you to create a new entry if it can find the parent entry.
If access controls are implemented, pull down the Directory menu and select the Authenticate option. Specify your distinguished name and password, and click on OK.
Click on the parent of the entry you want to create, and select the Create option from the Edit menu. Select a class of entry from the Create submenu. DXIM displays a Create window for that class of entry. Add values to the various attributes. Remember to supply values for all mandatory attributes, and to specify naming attributes. When you have finished, click on the OK button. DXIM attempts to create the entry. If it fails, DXIM displays an error message explaining why. Amend the window to correct the errors, and click on OK again.
If you want to create several entries as subordinates of the same parent, all of the same class, and with several attribute values in common, you can click on the Apply button to create an entry. In this case, when DXIM creates the entry, it leaves the Create window on your screen. Amend the window to suit
the second entry you want to create, and then click on Apply again. Remember to change the naming attributes, otherwise DXIM displays an error stating that the entry already exists. You can repeat this process for any number of new entries of the same class with the same parent entry.
10.3. Managing Multiple Entries
One of the features of a very large Enterprise Directory can be that entry administration becomes a very repetitive and time consuming activity. The DXIM command line interface provides facilities for managing multiple entries much more efficiently than the basic services allow.
Typical uses of these facilities are:
Making the same modification to many entries at once
Moving entire subtrees from one position in the DIT to another
Renaming an entry that has other entries beneath it
Creating entries based on information that DXIM reads from a file
Writing entry information to a DXIM script file
Writing entry information to a file whose format you define
The key to many of these activities is the ability to select multiple entries based on a search filter. Having made a selection, you can then apply a management command to the selection. For example:
dxim> select /C=US/O=Abacus where surname=Smith Number of entries selected is 14. dxim> modify selected add value surname=Smyth
The first command selects a number of entries that match the specified search filter, and the second command applies a modification to all of those entries. This is clearly a lot easier than modifying each of the entries individually.
For full details of the activities listed above, see the online help for the DXIM command line interface.
Chapter 11. Using the Access Control Template File
This chapter describes how to use the access control template file to set up access controls for a naming context. See Chapter 7, "Controlling Access to Your Directory Information and Services" for details of how to plan access controls for your DIT.
The access control template file is called:
DXD$DIRECTORY:DXD$ACI_TEMPLATE.DXIM
The template file contains two incomplete DXIM commands. The first command creates an
entry of the accessControlSubentry class. This entry will contain the
access control information. This command only has any effect the first time you use the
template file. The second command sets the value of the prescriptiveACI
attribute of that entry. Every time you execute the template file, the command deletes
and replaces any existing value of the prescriptiveACI attribute.
To use the template file, complete the following steps:
Edit the CREATE ENTRY command line to specify the distinguished name of the
accessControlSubentry.For example:
create entry - attribute objectclass=(accessControlSubentry, subentry)
becomes:
create entry /c=us/o=abacus/cn="access control" - attribute objectclass=(accessControlSubentry, subentry)
Edit the SET ENTRY command line to specify the distinguished name of the
accessControlSubentrythat is to hold the access control information. For example:set entry -
becomes:
set entry /c=us/o=abacus/cn="access control" -
Edit the
"Directory Managers"ACIitem to specify the name of at least one user who is to have full access to all directory information.Specify the distinguished name of at least one user. Use the DXIM SHOW command to verify that the distinguished name exists. At least one of the names you specify must already exist when you execute the template file.
Use DXIM to make sure that the immediate superior entry of the
accessControlSubentryalready exists.For example, the Abacus manager checks the existence of the organization entry, as follows:
dxim> show /c=us/o=abacus
Use DXIM to execute the template file, as follows:
dxim> DO DXD$DIRECTORY:DXD$ACI_TEMPLATE.DXIM
Once you have completed these tasks, access control is implemented for the naming
context that contains the accessControlSubentry entry. The controls may
also be inherited by one or more subordinate naming contexts on the same DSA.
To ensure that all shadow copies of the naming context have the same access controls, update all shadow copies of the relevant naming context. See Section 8.10, ''Implementing Replication'' for details of the UPDATE DSA command.
Keep the template file for future reference. If you ever need to change access
controls, edit and execute the template file again (see Section 7.5.1, ''Access Controls Required for Normal Operation of the Enterprise
Directory''
for notes on customizing the access control template file). The CREATE ENTRY command
fails, but the SET ENTRY command replaces the existing value of the
prescriptiveACI attribute. You can comment out or delete the CREATE
ENTRY command if you prefer.
Appendix A. Default Schema Definitions
VSI OpenVMS Enterprise Directory provides a default schema which includes definitions agreed by the international standards organizations. The default schema also includes many definitions required by VSI applications, including the DSA itself. Do not modify any of these definitions. If you modify these definitions you may have problems interworking with other Directory Services, or problems running VSI applications. You might even prevent HP DSA from working properly. In particular, do not modify definitions in DEC.SC. Also, MTS.SC contains definitions required by the MAILbus 400 MTA product, and must not be edited.
You can, however, define extra definitions for your own use, or for use by specific applications. See Chapter 6, "Customizing the Schema" for details of customizing the schema.
This appendix describes the classes, attributes, attribute sets, and syntaxes of the default schema. Wherever possible you should use these definitions when planning entries, rather than specify new definitions of your own.
A.1. Object Classes
The following sections give details of object classes defined in VSI’s default schema for use in a typical organization’s directory information tree (DIT).
The default schema also includes many definitions for application use. Those definitions are not documented here. This section documents the definitions that you are most likely to want to use or refer to.
A.1.1. accessControlSubentry
This object class is used for entries that contain access control information. The DSA uses this information to determine what access is permitted to a given part of the directory information tree.
Note that commands that affect multiple entries, such as DXIM SHOW SUBORDINATES and SEARCH commands, do not normally display subentries. These commands provide a control that indicates whether subentries should be displayed. This prevents subentries from being seen by end users.
See Chapter 7, "Controlling Access to Your Directory Information and Services" for details of how to plan your use of this class if you want to implement access controls.
- Mandatory Attributes
objectClass commonName
- Optional Attributes
prescriptiveACI
- Naming Rules
You must use the
commonNameattribute for naming.- Structure Rules
The
accessControlSubentryis a special case. It does not have a structure rule like other classes. You can only create an entry of this class beneath an entry that is at the top of a naming context. The information in the entry defines the access controls to be applied to all entries in that naming context, and to any subordinate naming contexts that do not have anaccessControlSubentryof their own.
A.1.2. alias
This object class is used as the basis of schema definitions for specific alias classes. You cannot create entries of the alias class.
When you want to create an alias entry, use one of the subclasses of the
alias
class.
For example, to create an alias for a device, use the deviceAlias
class.
Each of the subclasses of alias permits the use of an appropriate
naming attribute so that you can create aliases that have names similar to those
of other classes.
- Mandatory Attributes
objectClass aliasedObjectName
- Optional Attributes
This object class has no optional attributes.
- Naming Rules
You cannot create an entry of the alias class itself. Therefore, there are no naming rules for this object class. Each subclass of the alias class specifies a naming rule.
- Structure Rules
You cannot create an entry of the
aliasclass itself. Therefore, there are no structure rules for this object class. Each subclass of thealiasclass specifies a structure rule.
A.1.3. applicationEntity
applicationEntity entries represent software application
entities.
An application entity is an entity within an OSI network that performs some task for an application process, for example, routing messages, locating and returning requested information. Such an application entity could be an X.400 Message Transfer Agent.
- Mandatory Attributes
objectClass commonName presentationAddress
- Optional Attributes
description organizationalUnitName organizationName localityName seeAlso supportedApplicationContext
- Naming Rules
The
commonNameattribute must be used for naming.- Structure Rules
applicationEntityentries must have an immediately superior entry of the object classapplicationProcess.This is defined in the schema file DIT.SC as
applicationEntityStructureRule.An
applicationEntityentry is not permitted immediately beneath the root of the directory information tree.- See also
applicationProcess
A.1.4. applicationEntityAlias
applicationEntityAlias entries represent aliases for software
application entities.
- Mandatory Attributes
objectClass commonName aliasedObjectName
- Optional Attributes
There are no optional attributes for this class.
- Naming Rules
The
commonNameattribute must be used for naming.- Structure Rules
A directory entry of the object class
applicationEntityAliasmust have an immediately superior entry of the following object class:applicationProcessThis is defined in the schema file DIT.SC as
applicationEntityAliasStructureRule.An
applicationEntityAliasentry is not permitted immediately beneath the root of the directory information tree.
A.1.5. applicationProcess
applicationProcess entries represent software application
processes.
An application process is an element within an open system that performs the information processing for a particular application, as defined in the CCITT X.200 Series of Recommendations.
- Mandatory Attributes
objectClass commonName
- Optional Attributes
description localityName organizationalUnitName seeAlso
- Naming Rules
The
commonNameattribute must be used for naming.- Structure Rules
A directory entry of the object class
applicationProcessmust have an immediately superior entry of one of the object classes:organization organizationalUnit locality
This is defined in the schema file DIT.SC as
applicationProcessStructureRule.An
applicationProcessentry is not permitted immediately beneath the root of the directory information tree.- See also
applicationEntity
A.1.6. applicationProcessAlias
applicationProcessAlias entries represent aliases for software
application processes.
- Mandatory Attributes
objectClass commonName aliasedObjectName
- Optional Attributes
There are no optional attributes for this class.
- Naming Rules
The
commonNameattribute must be used for naming.A directory entry of the object class
applicationProcessAliasmust have an immediately superior entry of one of the object classes:- Structure Rules
organization organizationalUnit locality
This is defined in the schema file DIT.SC as
applicationProcessAliasStructureRule.An
applicationProcessAliasentry is not permitted immediately beneath the root of the directory information tree.
A.1.7. country
This structural object class is used to define entries in the DIT that represent countries.
Note that you should only create an entry to represent a country if your organization is the Directory Administration Authority for that country. If you create a country entry without authority, you may have problems connecting to a global Directory Service in the future. You should only represent objects that are part of your organization. See Chapter 4, "Planning Your Directory Information Tree" for advice on what classes to use in your organization’s DIT.
- Mandatory Attributes
objectClass countryName
- Optional Attributes
description searchGuide
- Naming Rules
Attribute
countryNamemust be used for naming.- Structure Rules
A
countryentry must be immediately beneath the logical root of the DIT, it cannot be subordinate to an entry of any other class.This rule is defined in the schema file DIT.SC, and is called countryStructureRule.
A.1.8. countryAlias
This alias object class is used to define alias entries that represent countries.
- Mandatory Attributes
objectClass countryName aliasedObjectName
- Optional Attributes
This class has no optional attributes.
- Naming Rules
Attribute
countryNamemust be used for naming.- Structure Rules
A
countryAliasentry must be immediately beneath the logical root of the DIT, it cannot be subordinate to an entry of any other class.This rule is defined in the schema file DIT.SC, and is called
countryAliasStructureRule.
A.1.9. decDSA
This object class is used to represent HP DSAs in the DIT. Entries of this
class are required for security and optimal performance of a Directory Service
that uses HP DSAs. Chapter 4, "Planning Your Directory Information Tree" explains how to plan
decDSA entries.
This object class is a subclass of dSA and
applicationEntity. When you create an entry of this class using
the DXIM command line interface, you must specify the objectClass
as follows:
... objectClass=(decDSA,dSA,applicationEntity)
- Mandatory Attributes
objectClass commonName presentationAddress
- Optional Attributes
trustedDSAName supportedApplicationContext protocolInformation userPassword description knowledgeInformation localityName organizationName organizationalUnitName seeAlso
- Naming Rules
The
commonNameattribute must be used for naming.- Structure Rules
A directory entry of the object class
decDSAmust have an immediately superior entry of one of the following object classes:country locality organization organizationalUnit
This is defined in the schema file DIT.SC as
decDSAStructureRule.A
decDSAentry is not permitted immediately beneath the root of the directory information tree.- See also
applicationEntity dSA
A.1.10. decDSAAlias
This object class is used to represent aliases for HP DSAs in the DIT.
- Mandatory Attributes
objectClass commonName aliasedObjectName
- Optional Attributes
There are no optional attributes for this class.
- Naming Rules
The
commonNameattribute must be used for naming.- Structure Rules
A directory entry of the object class
decDSAAliasmust have an immediately superior entry of one of the following object classes:country locality organization organizationalUnit
This is defined in the schema file DIT.SC as decDSAAliasStructureRule.
A
decDSAAliasentry is not permitted immediately beneath the root of the directory information tree.
A.1.11. decALL–IN–1UA
This class represents an ALL–IN–1 user agent. Entries of this class are normally created automatically as a result of a messaging configuration task. This class of entry may have a large number of attributes, but these are normally added as required by messaging configuration. This section does not attempt to document the class fully because you should never need to create such entries manually. Use the DXIM SHOW SCHEMA CLASS decALL–IN–1UA command if you need more information, or refer to the schema directly.
A.1.12. decMailUA
This class represents a mail user agent. Entries of this class are normally created automatically as a result of a messaging configuration task. This class of entry may have a large number of attributes, but these are normally added as required by messaging configuration. This section does not attempt to document the class fully because you should never need to create such entries manually. Use the DXIM SHOW SCHEMA CLASS decMailUA command if you need more information, or refer to the schema directly.
A.1.13. decMailUser
This auxiliary class can be used to enable any entry to have the attributes that support messaging applications such as ALL–IN–1 and the MAILbus 400 MTA. Normally this class is added to such entries as a result of messaging configuration tasks, but it can be added manually also.
The attributes permitted for this auxiliary class are usually added as a result of messaging configuration tasks. This section does not attempt to document the class fully because you should never need to use the class manually. Use the DXIM SHOW SCHEMA CLASS decMailUser command if you need more information, or refer to the schema directly.
A.1.14. decX400Gateway
This class can be used to represent a MAILbus 400 Message Router Gateway. Normally this class of entry is created as a part of messaging configuration tasks, as documented by the relevant product documentation. This section does not attempt to document the class fully for this reason. Use the DXIM SHOW SCHEMA CLASS decX400Gateway command if you need more information, or refer to the schema directly.
A.1.15. device
device entries represent hardware devices.
- Mandatory Attributes
objectClass commonName
- Optional Attributes
description localityName organizationName organizationalUnitName owner seeAlso serialNumber
- Naming Rules
The
commonNameattribute must be used for naming.- Structure Rules
deviceentries must have an immediately superior entry of one of the following object classes:organization organizationalUnit locality
This is defined in the schema file DIT.SC as
deviceStructureRule.A
deviceentry is not permitted immediately beneath the root of the directory information tree.
A.1.16. deviceAlias
deviceAlias
entries represent aliases for hardware devices, such as modems or disk
drives.
- Mandatory Attributes
objectClass commonName aliasedObjectName
- Optional Attributes
There are no optional attributes for this class.
- Naming Rules
The
commonNameattribute must be used for naming.- Structure Rules
deviceAliasentries must have an immediately superior entry of one of the following object classes:organization organizationalUnit locality
This is defined in the schema file DIT.SC as
deviceAliasStructureRule.A
deviceAliasentry is not permitted immediately beneath the root of the directory information tree.
A.1.17. dSA
This object class is used to define entries in the DIT that represent Directory System Agents, as defined in CCITT Recommendation X.501.
Note
HP DSAs should be represented using the decDSA class. Use the
dSA class to represent non-HP DSAs.
This object class is a subclass of applicationEntity as well as
top. When you create an entry of this class using the DXIM
command line interface, you must specify the objectClass as
follows:
... objectClass=(dSA,applicationEntity)
- Mandatory Attributes
objectClass commonName presentationAddress
- Optional Attributes
description knowledgeInformation localityName organizationName organizationalUnitName seeAlso supportedApplicationContext
- Naming Rules
The
commonNameattribute must be used for naming.- Structure Rules
A directory entry of the object class
dSAmust have an immediately superior entry of one of the following object classes:country locality organization organizationalUnit
This is defined in the schema file DIT.SC as
dSAStructureRule.A
dSAentry is not permitted immediately beneath the root of the directory information tree.- See also
applicationEntity decDSA
A.1.18. dSAAlias
This object class is used to define aliases for entries in the DIT that represent Directory System Agents, as defined in CCITT Recommendation X.501.
- Mandatory Attributes
objectClass commonName aliasedObjectName
- Optional Attributes
There are no optional attributes for this class.
- Naming Rules
The
commonNameattribute must be used for naming.- Structure Rules
A directory entry of the object class
dSAAliasmust have an immediately superior entry of one of the following object classes:country locality organization organizationalUnit
This is defined in the schema file DIT.SC as
dSAAliasStructureRule.A
dSAAliasentry is not permitted immediately beneath the root of the directory information tree.
A.1.19. groupOfNames
groupOfNames entries represent an unordered set of directory
names that are grouped for some purpose. Each name represents either an
individual entry or is the name of another group.
The group of names can be reduced to a set of individual entry names by replacing each group with its membership. This can be carried out recursively until all constituent group names have been eliminated, and just the names of individual entries remain.
You would create an entry of this object class to describe any set or group of objects that is connected in a significant way, for example, committees, teams, distribution lists, or categories of devices.
- Mandatory Attributes
objectClass commonName member
- Optional Attributes
businessCategory description organizationName organizationalUnitName owner seeAlso
- Naming Rules
The
commonNameattribute must be used for naming.- Structure Rules
A directory entry of the object class
groupOfNamesmust have an immediately superior entry of one of the following object classes:locality organization organizationalUnit
This is defined in the schema file DIT.SC as
groupOfNamesStructureRule.A
groupOfNamesentry is not permitted immediately beneath the root of the directory information tree.
A.1.20. groupOfNamesAlias
groupOfNamesAlias entries represent aliases for
groupOfNames entries.
- Mandatory Attributes
objectClass commonName aliasedObjectName
- Optional Attributes
There are no optional attributes for this class.
- Naming Rules
The
commonNameattribute must be used for naming.- Structure Rules
A directory entry of the object class
groupOfNamesAliasmust have an immediately superior entry of one of the following object classes:locality organization organizationalUnit
This is defined in the schema file DIT.SC as
groupOfNamesAliasStructureRule.A
groupOfNamesAliasentry is not permitted immediately beneath the root of the directory information tree.
A.1.21. locality
locality entries represent a geographical locality, such as a
state, a province, a city, or a building. You can use locality entries to
represent the geographical subdivisions of your organization.
- Mandatory Attributes
objectClass
- Optional Attributes
description localityName stateOrProvinceName searchGuide seeAlso streetAddress
- Naming Rules
localityNamemust be used for naming. Therefore, although this attribute is optional according to the class definition, it is in effect mandatory.- Structure Rules
A
localityentry must have an immediately superior entry that is one of the following object classes:country locality organization organizationalUnit
This is defined in the schema file DIT.SC as
localityStructureRule.A
localityentry is also permitted immediately beneath the root of the directory information tree. This rule is defined in the schema file DIT.SC, and is calledlocalityRootStructureRule.
A.1.22. localityAlias
This alias object class is used to define alias entries that represent localities or regions
- Mandatory Attributes
objectClass aliasedObjectName
- Optional Attributes
localityName stateOrProvinceName
- Naming Rules
Attribute
localityNamemust be used for naming.- Structure Rules
A
localityAliasentry must have an immediately superior entry that is one of the following object classes:country locality organization organizationalUnit
This is defined in DIT.SC as
localityAliasStructureRule.A
localityAliasentry can also be immediately beneath the logical root of the DIT. This rule is defined in the schema file DIT.SC, and is calledlocalityRootAliasStructureRule.
A.1.23. mhs-user
This auxiliary object class can be used with directory entries to enable them to contain X.400 messaging information.
You can modify any directory entry to add this auxiliary object class. The mandatory attribute of this class then becomes mandatory for the entry.
- Mandatory Attributes
mhs-or-addresses
- Optional Attributes
This class has no optional attributes.
- Naming Rules
Auxiliary object classes do not have naming rules. The naming rule of the entry’s structural class applies.
- Structure Rules
Auxiliary object classes do not have structure rules. The structure rules of the entry’s structural class apply. The
mhs-userauxiliary class can be added to an entry in any position in the DIT. For example, you can modify anorganizationalPersonentry to make it a member of themhs-userclass. The mandatory attribute of themhs-userclass becomes mandatory for the entry.
A.1.24. organization
organization entries represent organizations.
VSI recommends that you create an organization entry as the
highest entry within your organization’s DIT. See Chapter 4, "Planning Your Directory Information Tree" for
advice about what classes of entry to use in your organization’s DIT.
- Mandatory Attributes
objectClass organizationName
- Optional Attributes
businessCategory description seeAlso searchGuide userPassword localityName stateOrProvinceName streetAddress physicalDeliveryOfficeName postalAddress postalCode postOfficeBox streetAddress destinationIndicator facsimileTelephoneNumber internationalISDNNumber preferredDeliveryMethod registeredAddress telephoneNumber teletexTerminalIdentifier telexNumber x121Address
- Naming Rules
organizationNamemust be used for naming.- Structure Rules
An
organizationentry does not need to have any superior entry. However, if it does, then the immediately superior entry must be of one of the following classes:country locality
This is defined in the schema file DIT.SC as
organizationStructureRule.An
organizationentry is also permitted immediately beneath the root of the directory information tree. This rule is defined in the schema file DIT.SC, and is calledorganizationRootStructureRule.
- See also
organizationalUnit
A.1.25. organizationAlias
This alias object class is used to define alias entries that represent organizations.
- Mandatory Attributes
organizationName objectClass aliasedObjectName
- Optional Attributes
There are no optional attributes for this class.
- Naming Rules
Attribute
organizationNamemust be used for naming.- Structure Rules
An
organizationAliasentry can have an immediately superior entry that is one of the following object classes:country locality organization organizationalUnit
This is defined in DIT.SC as
organizationAliasStructureRule.An
organizationAliasentry can also be immediately beneath the logical root of the DIT. This rule is defined in the schema file DIT.SC, and is calledorganizationRootAliasStructureRule.
A.1.26. organizationalPerson
organizationalPerson entries represent people employed by, or
associated with, an organization. VSI recommends that you use the
organizationalPerson class as the basis of entries representing
your employees.
organizationalPerson is a subclass of person. When
you create an entry of this class using the DXIM command line interface, you
must specify the objectClass as follows:
... objectClass=(organizationalPerson,person)
- Mandatory Attributes
objectClass commonName surname
- Optional Attributes
description organizationalUnitName seeAlso telephoneNumber title userPassword localityName stateOrProvinceName streetAddress physicalDeliveryOfficeName postalAddress postalCode postOfficeBox streetAddress destinationIndicator facsimileTelephoneNumber internationalISDNNumber preferredDeliveryMethod registeredAddress teletexTerminalIdentifier telexNumber x121Address
- Naming Rules
The
commonNameattribute is used for naming.- Structure Rules
organizationalPersonentries must have an immediately superior entry of one of the following object classes:organization organizationalUnit locality
This is defined in the schema file DIT.SC as
organizationalPersonStructureRule.An
organizationalPersonentry is not permitted immediately beneath the root of the directory information tree.
A.1.27. organizationalPersonAlias
This alias object class is used to define alias entries that represent people within an organization.
- Mandatory Attributes
commonName objectClass aliasedObjectName
- Optional Attributes
There are no optional attributes for this class.
- Naming Rules
Attribute
commonNamemust be used for naming.- Structure Rules
An
organizationalPersonAliasentry must have an immediately superior entry that is one of the following object classes:locality organization organizationalUnit
This is defined in DIT.SC as
organizationalPersonAliasStructureRule.An
organizationalPersonAliasentry cannot be immediately beneath the logical root of the DIT.
A.1.28. organizationalRole
This object class is used to define entries in the DIT that represent a position or a role within an organization. An organizational role is normally considered to be filled by a particular person or a software application, but over its lifetime the role could be filled by many different people or applications in succession.
- Mandatory Attributes
objectClass commonName
- Optional Attributes
description seeAlso organizationalUnitName preferredDeliveryMethod roleOccupant localityName stateOrProvinceName streetAddress physicalDeliveryOfficeName postalAddress postalCode postOfficeBox streetAddress destinationIndicator facsimileTelephoneNumber internationalISDNNumber preferredDeliveryMethod registeredAddress telephoneNumber teletexTerminalIdentifier telexNumber x121Address
- Naming Rules
The
commonNameattribute must be used for naming.- Structure Rules
A directory entry of the object class
organizationalRolemust have an immediately superior entry of one of the following object classes:organization organizationalUnit
This is defined in the schema file DIT.SC as
organizationalRoleStructureRule.An
organizationalRoleentry is not permitted immediately beneath the root of the directory information tree.
A.1.29. organizationalRoleAlias
This alias object class is used to define alias entries that represent organizational roles within an organization. For example, the entry might be used to provide an alias for an entry representing a team leader or manager.
- Mandatory Attributes
commonName objectClass aliasedObjectName
- Optional Attributes
There are no optional attributes for this class.
- Naming Rules
Attribute
commonNamemust be used for naming.- Structure Rules
An
organizationalRoleAliasentry must have an immediately superior entry that is one of the following object classes:locality organization organizationalUnit
This is defined in DIT.SC as
organizationalRoleAliasStructureRule.An
organizationalRoleAliasentry cannot be immediately beneath the logical root of the DIT.
A.1.30. organizationalUnit
organizationalUnit entries represent subdivisions of
organizations, such as departments, offices, or branches.
- Mandatory Attributes
objectClass organizationalUnitName
- Optional Attributes
businessCategory description seeAlso searchGuide userPassword localityName stateOrProvinceName streetAddress physicalDeliveryOfficeName postalAddress postalCode postOfficeBox streetAddress destinationIndicator facsimileTelephoneNumber internationalISDNNumber preferredDeliveryMethod registeredAddress telephoneNumber teletexTerminalIdentifier telexNumber x121Address
- Naming Rules
The
organizationalUnitNameattribute must be used for naming.- Structure Rules
A directory entry of the object class
organizationalUnitmust have an immediately superior entry of one of the following object classes:organization organizationalUnit locality
This is defined in the schema file DIT.SC as
organizationalUnitStructureRule.An
organizationalUnitentry is not permitted as an immediate subordinate of the root of the directory information tree.- See also
organization
A.1.31. organizationalUnitAlias
This alias object class is used to define alias entries that represent organizational units within an organization.
- Mandatory Attributes
organizationalUnitName objectClass aliasedObjectName
- Optional Attributes
There are no optional attributes for this class.
- Naming Rules
Attribute
organizationalUnitNamemust be used for naming.- Structure Rules
An
organizationalUnitAliasentry must have an immediately superior entry that is one of the following object classes:locality organization organizationalUnit
This is defined in DIT.SC as
organizationalUnitAliasStructureRule.An
organizationalUnitAliasentry cannot be immediately beneath the logical root of the DIT.
A.1.32. person
person entries represent people. However, note that the default
schema does not contain structure rules or a name form for this class, so by
default you cannot create entries of this class.
The person class is a superclass of the
organizationalPerson and residentialPerson
classes. Those two subclasses provide more attributes than the
person class, and have structure rules and name forms. VSI
recommends that you do not use the person class itself.
- Mandatory Attributes
objectClass commonName surname
- Optional Attributes
description seeAlso telephoneNumber userPassword
- Naming Rules
The
personclass has no name form and thereforepersonentries cannot be created in the DIT.See
organizationalPersonandresidentialPersonfor details of two subclasses ofperson. See Chapter 6, "Customizing the Schema" for details of how to define a name form if you want to use thepersonclass.- Structure Rules
personhas no structure rules, and thereforepersonentries cannot be created anywhere in the DIT.See
organizationalPersonandresidentialPersonfor details of two structural subclasses ofperson. See Chapter 6, "Customizing the Schema" for details of how to define structure rules if you want to use thepersonclass.- See also
organizationalPerson residentialPerson
A.1.33. residentialPerson
residentialPerson entries represent people in the residential
environment, such as the resident of a particular address.
residentialPerson is a subclass of person. When you
create an entry of this class using the DXIM command line interface, you must
specify the objectClass as follows:
... objectClass=(residentialPerson,person)
- Mandatory Attributes
objectClass commonName surname localityName
- Optional Attributes
businessCategory description preferredDeliveryMethod seeAlso telephoneNumber userPassword localityName stateOrProvinceName streetAddress physicalDeliveryOfficeName postalAddress postalCode postOfficeBox streetAddress destinationIndicator facsimileTelephoneNumber internationalISDNNumber registeredAddress telephoneNumber teletexTerminalIdentifier telexNumber preferredDeliveryMethod x121Address
- Naming Rules
The
commonNameattribute must be used for naming. You can also use thestreetAddress.- Structure Rules
residentialPersonentries must have an immediately superior entry of object classlocality.This is defined in the schema file DIT.SC as
residentialPersonStructureRule.A
residentialPersonentry is not permitted immediately beneath the root of the directory information tree.- See also
organizationalPerson person
A.1.34. residentialPersonAlias
This alias object class is used to define alias entries that represent people in a residential or domestic context as the residents of a locality.
- Mandatory Attributes
commonName objectClass aliasedObjectName
- Optional Attributes
seeAlso
- Naming Rules
Attribute
commonNamemust be used for naming. ThestreetAddressattribute can be used as an optional second naming attribute.- Structure Rules
A
residentialPersonAliasentry must have an immediately superior entry of the following object class:locality
This is defined in DIT.SC as
residentialPersonAliasStructureRule.A
residentialPersonAliasentry cannot be immediately beneath the logical root of the DIT.
A.1.35. shadowingAgreement
This object class is used by HP DSAs to represent an agreement to replicate directory information to or from another HP DSA. The shadowing agreement defines the frequency and terms of replication, and enables HP DSAs to provide automatic replication, instead of requiring manual intervention.
Note that shadowing agreements are created and managed automatically by HP DSAs. Some manual management of these subentries is supported; see Section 8.10.1, ''Managing Shadowing Agreement Subentries'' for details.
- Mandatory Attributes
objectClass commonName
- Optional Attributes
shadowingAttributes shadowingBeginTime shadowingEndTime shadowingFlags shadowingId shadowingKnowledgeType shadowingLastUpdate shadowingMaster shadowingNextUpdate shadowingPeer shadowingReference shadowingState shadowingUPDFile shadowingUPDOffset shadowingVersion subtreeSpecification
Of these, the only attribute that you should consider managing manually is the
shadowingFlagsattribute. Do not attempt to manage theshadowingFlagsattribute without referring to Section 8.10.1, ''Managing Shadowing Agreement Subentries''. Do not modify any of the other attributes of the shadowing agreement.- Naming Rules
You must use the
commonNameattribute for naming. HP DSAs assign the name of shadowing agreements automatically; do not rename a shadowing agreement subentry.- Structure Rules
The
shadowingAgreementclass is a special case. It is created automatically by a HP DSA immediately beneath the entry at the top of the naming context to which this shadowing agreement applies. You should not attempt to create these entries manually. If you delete them, replication may fail, or the DSA may automatically recreate the agreement. It is unwise to delete them.
A.1.36. subentry
This object class is used as the basis of entries that contain information that the DSA uses to determine how it manages a given part of the DIT.
Further classes are defined as subclasses of subentry, to enable the storage
of information about one aspect of information management. For example, the
accessControlSubentry subclass allows for information regarding
the control of access to directory information, and the
shadowingAgreement subclass allows for information about
replication agreements.
Note that user requests that can return multiple entries, such as searches, usually exclude subentries. Such commands provide a control that enables you to specify whether you want to see subentries, which are generally of no interest to end users.
- Mandatory Attributes
objectClass commonName
- Optional Attributes
subtreeSpecification
- Naming Rules
You must use the
commonNameattribute for naming.- Structure Rules
The
subentryclass is a special case. It does not have a structure rule like other classes. You can only create an entry of this class beneath an entry that is at the top of a naming context. In practice, you would create an entry based on a subclass ofsubentry, rather than ofsubentryitself.
A.1.37. top
top is an abstract object class.
You do not create entries of class top itself. It is a superclass
of other object class definitions. This means that other object classes inherit
the mandatory attribute objectClass.
- Mandatory Attributes
objectClass
A.2. Structure Rules Quick Reference
The illustrations in this section show the structure rules defined in the schema for the structural object classes defined in the schema provided with VSI Enterprise Directory product. (All of these definitions are customizable.)
Figure A.1, ''Structure Rules for Classes: Part I'' shows the permitted relationships between object classes that represent your organization, and its geographical and organizational subdivisions. The illustration also shows that DSA entries can be created as subordinates of a country entry.
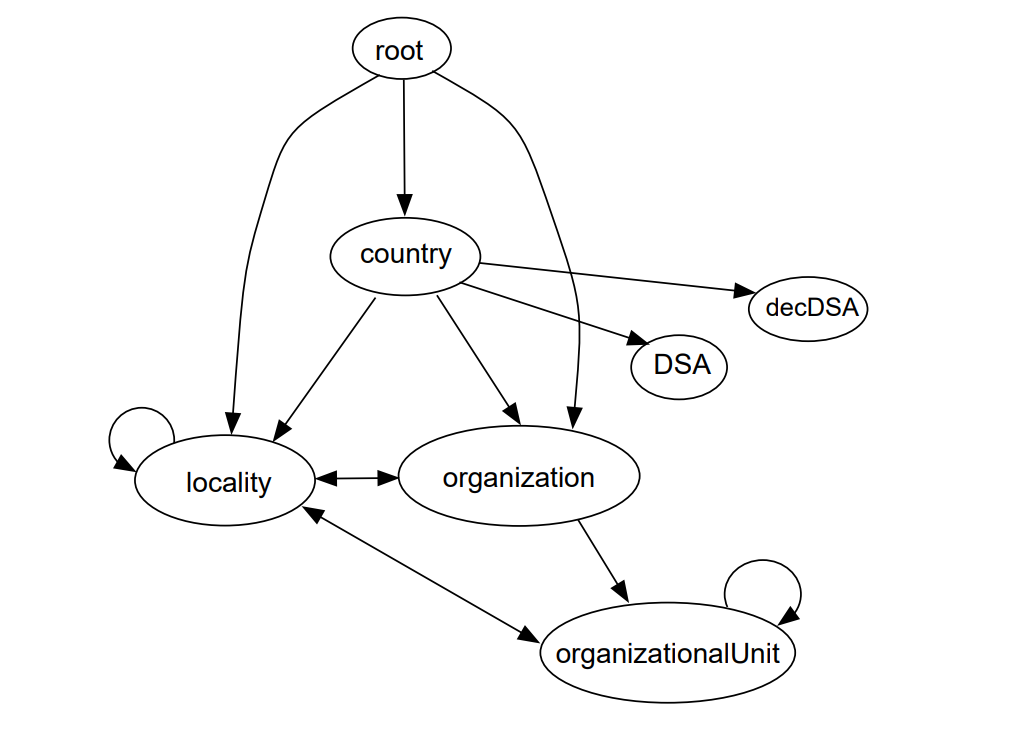 |
Each arrow represents the ability of an entry of one class to be created as the
immediate subordinate of an entry of another class, or beneath the root. For
example, a country entry can be created immediately beneath the root of
the DIT. An organization entry can be created beneath the root of the
DIT, or beneath a country or locality entry. Using these
classes, you should be able to represent the structure of your organization. Chapter 4, "Planning Your Directory Information Tree" describes in detail how to plan a DIT. Chapter 6, "Customizing the Schema" describes how to customize the schema if the default
classes and structure rules are not suitable for your organization.
Note
The dSA and decDSA class are shown as permitted
subordinates of country. However, you should only represent a DSA
as an immediate subordinate of a country if you are responsible for a national
directory service.
For example, a national PTT might be responsible for providing a directory service, and therefore decide to represent one or more
DSAs in such a position. Most organizations will only be providing a service for their own users, and should therefore create DSA entries as subordinates of the organization entry, as shown in Figure A.2, ''Structure Rules for Classes: Part II''.
You are recommended to use the decDSA class to represent HP DSAs.
You can use this class to represent other vendor’s DSAs also. The only reason
you might use the dSA class is if you have other vendors’ DSAs in
your network, and those DSAs advise or require that you use the standard
dSA class to represent them.
Chapter 4, "Planning Your Directory Information Tree" describes in detail the planning of DSA entries.
Figure A.2, ''Structure Rules for Classes: Part II'' shows the permitted relationships between the classes that represent your organization, and the classes that represent resources within your organization.
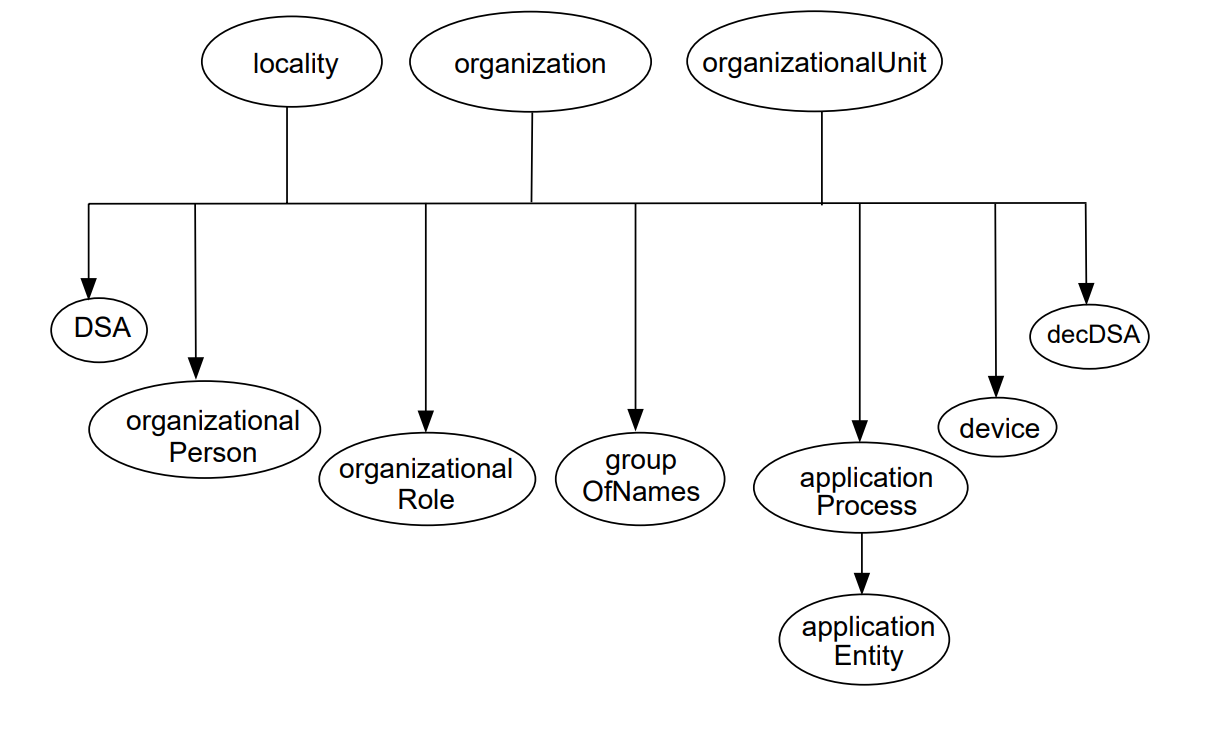 |
The default schema provided with the product specifies that all of the classes
that represent resources are permitted beneath any of the classes that you use to
represent your organizational structure. If you define a class to represent a
resource for which none of the default classes are suitable, then you probably need
to make it a permitted subordinate of all three of locality,
organization, and organizationalUnit, like all of the
classes shown at the bottom of Figure A.2, ''Structure Rules for Classes: Part II''.
The schema provided with the product also contains several alias classes. Each
alias class is designed to mimic one of the structural classes. Therefore, each
alias class has structure rules that permit entries to be created in the same DIT
positions as the entries they mimic. For example, a countryAlias entry
can be created beneath the root of the DIT, just as a country entry
can. Similarly, an organizationAlias entry can be created beneath the
root, or beneath a country or locality entry.
Note that an alias entry cannot have subordinate entries. For example, you cannot
create a localityAlias entry beneath a countryAlias entry,
because a countryAlias entry cannot have subordinates.
A.3. Attributes
The following topics each describe an attribute defined in the default schema. Each attribute definition specifies an attribute syntax, and may specify that the attribute can have more than one value. The schema also contains labels for each attribute. A label specifies permitted abbreviations or user-friendly alternatives for an attribute. These labels are used by DXIM to improve the usability of the utility.
Not all of the attributes in the default schema are documented. Specifically, attributes defined in COSINE.SC and QUIPU.SC are only likely to be relevant if you interwork with those implementations. In that case, refer to the documentation provided with those implementations.
Some of the attributes described are operational
attributes . An operational attribute is usually hidden from
users, and is often managed automatically by the DSA. A small number of operational
attributes are managed manually, such as the trustedDSAName and
prescriptiveACI attributes. However, most operational attributes
are read-only.
To display operational attributes, you can use the DXIM command line interface with the all operational attributes control, or request an attribute specifically. For example:
dxim> show /C=US/O=Abacus/OU=Sales all operational attributes
The DXIM windows interface does not support the display or management of operational attributes.
Because most operational attributes are read-only, the sections describing those attributes may be less detailed than the descriptions of other attributes.
A.3.1. administrativeRole
This is an operational attribute. HP DSAs do not use this attribute.
The attribute is intended to be created on an entry that represents the root of an administrative area of the DIT. The values of the attribute are intended to indicate what classes of subentry may be created beneath the entry. The subentries would specify information about the administrative area. Do not use this attribute unless you have DSAs that support it.
The syntax for this attribute is objectIdentifierSyntax.
A.3.2. aliasedObjectName
Every alias entry has an aliasedObjectName attribute. The
attribute specifies the name of the directory entry for which this alias entry
provides an alias name.
- Attribute Syntax
The syntax for this attribute type is
distinguishedNameSyntax. For example:aliasedObjectName="/C=US/O=Abacus/OU=Sales"
The value of this attribute should be the distinguished name of an entry in the DIT. The Directory Service does not verify that the distinguished name actually exists in the DIT until a user tries to use the alias name. If the alias name does not resolve to the distinguished name of an entry, the Directory Service returns an error.
Note
Do not specify the name of another alias entry as the value of the
aliasedObjectNameattribute. If the name specified in thealiasedObjectNameattribute is actually an alias name, then the Directory Service returns an error.- Labels
aliasedObjectName
For example:
aliasedObjectName=/c=US/o=ACME
A.3.3. businessCategory
This specifies information concerning the occupation or field of interest of an object such as a person or organization.
A business category can be up to 128 characters long.
- Attribute Syntax
The syntax for this attribute type is
stringSyntax, for example,businessCategory="Retail". This attribute specifies that it supports matching rules that are not case sensitive.- Labels
businessCategory
For example:
businessCategory=Retail
A.3.4. commonName
This specifies a name by which an object is usually known. For example, the common name of a person might be John Smith.
A common name should follow the conventions of the culture of the object represented. For example, you can use characters such as ö, à, é, and ß if they usually form part of a name for an object. Similarly, a person’s family name may be placed first or last, according to the conventions usually applied to that person’s name.
A common name can be up to 64 characters long.
- Attribute Syntax
The syntax for this attribute type is
stringSyntax, for example,commonName="John Smith". This attribute specifies that it supports matching rules that are not case sensitive.For example, a search for
commonName="John Smith"would succeed in finding an entry calledcommonName="john smith".- Labels
cn common name commonName
For example:
cn="John Smith"
A.3.5. consumerKnowledge
This is an operational attribute. HP DSAs use this attribute to store information about the replication of information.
Do not modify this attribute manually. The DSA manages the attribute automatically.
A HP DSA adds this operational attribute to the entry at the top of a naming context that is replicated from this DSA to other DSAs.
You can use the DXIM command line interface to display this attribute if you request the attribute specifically. However, it will not be displayed in a user-friendly format. DXIM does not display operational attributes if you use the All Attributes control.
You cannot display this attribute using the DXIM windows interface.
See also the supplierKnowledge attribute. See Chapter 5, "Planning DSAs to Hold Your Directory Information Tree" for details of consumer DSAs and supplier DSAs.
A.3.6. countryName
This specifies the international code that represents a country’s name. The list of codes supported by the HP DSA is as follows:
AD AE AF AG AI AL AM AN AO AQ AR AS AT AU AW AZ BA BB BD BE BF BG BH BI BJ BM BN BO BR BS BT BV BW BY BZ CA CC CF CG CH CI CK CL CM CN CO CR CU CV CX CY CZ DE DJ DK DM DO DZ EC EE EG EH ER ES ET FI FJ FK FM FO FR FX GA GB GD GE GF GH GI GL GM GN GP GQ GR GS GT GU GW GY HK HM HN HR HT HU ID IE IL IN IO IQ IR IS IT JM JO JP KE KG KH KI KM KN KP KR KW KY KZ LA LB LC LI LK LR LS LT LU LV LY MA MC MD MG MH MK ML MM MN MO MP MQ MR MS MT MU MV MW MX MY MZ NA NC NE NF NG NI NL NO NP NR NU NZ OM PA PE PF PG PH PK PL PM PN PR PT PW PY QA RE RO RU RW SA SB SC SD SE SG SH SI SJ SK SL SM SN SO SR ST SV SY SZ TC TD TF TG TH TJ TK TM TN TO TP TR TT TV TW TZ UA UG UM US UY UZ VA VC VE VG VI VN VU WF WS YE YT YU ZA ZM ZR ZW
- Attribute Syntax
The value of the
countryNameattribute must be a two-letter code chosen from International Standard 3166. For example, the value US is the correct code for the United States of America.It does not matter whether the country code is specified in uppercase or lowercase.
- Labels
c co country countryname
For example:
c=US
A.3.7. createTimeStamp
This is an operational attribute. HP DSAs use this attribute to record the time that an entry was created.
HP DSAs add this operational attribute to each entry. Do not modify this attribute manually. You can use the DXIM command line interface to display this attribute if you request the attribute specifically. DXIM does not display operational attributes if you use the All Attributes control.
You cannot display this attribute using the DXIM windows interface. The syntax
of this attribute is generalizedTimeSyntax.
See also modifyTimeStamp.
A.3.8. decALL–IN–1UAName
This attribute represents the name of the ALL–IN–1 user agent for a user.
- Attribute Syntax
The syntax for this attribute type is
distinguishedNameSyntax.- Labels
decALL--IN--1UAName
For example:
decALL--IN--1UAName="/C=US/O=Abacus/CN=A1"
A.3.9. decALL–IN–1UserName
This attribute represents the ALL–IN–1 user name of a user.
- Attribute Syntax
The syntax for this attribute type is
stringSyntax.- Labels
decALL--IN--1UserName
For example:
decALL--IN--1UserName=HOLMESJ
A.3.10. decAltMRAddress
This attribute represents alternative Message Router addresses. The alternative address might be used by a Message Router gateway when it needs to translate from one style of address to another.
- Attribute Syntax
The syntax for this attribute type is
stringSyntax.- Labels
decAltMRAddress
For example:
decAltMRAddress="colin jones@SALES"
A.3.11. decAltRFC822Mailbox
This attribute represents alternative SMTP addresses. The attribute might be used by a gateway when it needs to translate from one style of address to another.
- Attribute Syntax
The syntax for this attribute type is
iA5StringSyntax.
- Labels
decAltRFC822Mailbox
For example:
decAltRFC822Mailbox="jones@abacus.com" (jones@abacus.com)
A.3.12. decDDSID
This attribute enables a MAILbus Directory Service entry to be synchronised with an X.500 entry. Do not modify this attribute.
A.3.13. decDDSModificationTimestamp
This attribute enables a MAILbus Directory Service entry to be synchronised with an X.500 entry. Do not modify this attribute.
A.3.14. decDDSNetworkID
This attribute enables a MAILbus Directory Service entry to be synchronised with an X.500 entry. Do not modify this attribute.
A.3.15. decDECnetNodeName
This attribute represents the name of the DECnet node at which a user agent or application services DECnet requests.
- Attribute Syntax
The syntax for this attribute type is
iA5StringSyntax.- Labels
decDECnetNodeName
For example:
decDECnetNodeName=MYNODE
A.3.16. decGlobalSearchBase
This attribute defines a search base that might be supported by user agents. A user agent might present its users with the options of "global" searches and "local" searches. The user agent can determine what search base to use for global searches by referring to this attribute.
- Attribute Syntax
The syntax for this attribute type is
distinguishedNameSyntax.- Labels
decGlobalSearchBase
For example:
decGlobalSearchBase="/C=US/O=Abacus"
A.3.17. decLocalSearchBase
This attribute defines a search base that might be supported by user agents. A user agent might present its users with the options of "global" searches and "local" searches. The user agent can determine what search base to use for local searches by referring to this attribute.
- Attribute Syntax
The syntax for this attribute type is
distinguishedNameSyntax.- Labels
decLocalSearchBase
For example:
decLocalSearchBase="/C=US/O=Abacus/CN=Sales"
A.3.18. decMailDestination
This attribute represents the name of a mail destination for a user.
- Attribute Syntax
The syntax for this attribute type is
distinguishedNameSyntax.- Labels
decMailDestination
For example:
decMailDestination="/C=US/O=Abacus/CN=A1"
A.3.19. decMailNonDeliver
This attribute indicates that mail for the user should be non-delivered. The value of the attribute may be used as part of the non-delivery notification.
- Attribute Syntax
The syntax for this attribute type is
printableStringSyntax.- Labels
decMailNonDeliver
For example:
decMailNonDeliver="This user has left the company"
A.3.20. decMailworksUserName
This attribute represents the local user name for a DEC MAILworks user.
- Attribute Syntax
The syntax for this attribute type is
stringSyntax.- Labels
decMAILworksUserName
For example:
decMAILworksUserName=Hubbard
A.3.21. decMRAddress
This attribute represents the Message Router address of a user.
- Attribute Syntax
The syntax for this attribute type is
stringSyntax.- Labels
decMRAddress
For example:
decMRAddress="colin jones@SALES"
A.3.22. decMTSAltForeignAddressAttr
- Attribute Syntax
The syntax for this attribute type is
objectIdentifierSyntax.- Labels
decMTSAltForeignAddr
For example:
decMTSAltForeignAddr={2 5 10}
A.3.23. decMTSDDAType
- Attribute Syntax
The syntax for this attribute type is
printableStringSyntax. The value length is limited to eight characters.- Labels
decMTSDDAType
For example:
decMTSDDAType="XMRROUTE
A.3.24. decMTSForeignAddressAttr
This attribute identifies an attribute type that a mail gateway might use when mapping between different styles of address. The attribute is identified by its object identifier.
- Attribute Syntax
The syntax for this attribute type is
objectIdentifierSyntax.- Labels
decMTSForeignAddressAttr
For example:
decMTSForeignAddressAttr={2 5 98}
A.3.25. dec-mts-admd-name
This attribute is used in the MAILbus 400 MTA’s routing information subtree to name an administration domain.
A.3.26. dec-mts-prmd-name
This attribute is used in the MAILbus 400 MTA’s routing information subtree to name a private administration domain.
A.3.27. dec-mts-talk-other-CCITT-domain
This attribute is used in the MAILbus 400 MTA’s routing information subtree to indicate whether a user is permitted to send mail across domain boundaries.
A.3.28. decNumericUserId
This attribute represents a numeric identifier for a user. The identifier may form part of a numeric OR address for the user.
- Attribute Syntax
The syntax for this attribute type is
numericStringSyntax.- Labels
decNumericID
For example:
decNumericID=2328461
A.3.29. decOVVMAddress
This attribute represents the IBM OfficeVision address of a user. It should be in the form LOCATION.USERNAME.
- Attribute Syntax
The syntax for this attribute type is
stringSyntax.- Labels
decOVVMAddress
For example:
decOVVMAddress="LONDON.SMITH"
A.3.30. decPMAddress
This attribute represents a MAILbus Postmaster address.
- Attribute Syntax
The syntax for this attribute type is
stringSyntax.- Labels
decPMAddress
For example:
decPMAddress="postmaster@A1"
A.3.31. decPreferredMailAddress
This attributes identifies the type of attribute that contains the preferred mail address of a user. For example, it might indicate that the mhs-or-address attribute contains the preferred address. The attribute is identified by is object identifier.
- Attribute Syntax
The syntax for this attribute type is
objectIdentifierSyntax.- Labels
decPreferredMailAddress
For example:
decPreferredMailAddress={2 5 28}
A.3.32. decSNADSAddress
This attribute represents the IBM SNADS address of a user. It should be in the form LOCATION.USER.
- Attribute Syntax
The syntax for this attribute type is
stringSyntax.- Labels
decSNADSAddress
For example:
decSNADSAddress="LONDON.JONES
A.3.33. decX400DDA
This attribute represents the domain-defined attribute of a user’s X.400 OR address. The attribute is a string list, with the first list item indicating the DDA attribute type, and the second list item specifying the value.
- Attribute Syntax
The syntax for this attribute type is
stringListSyntax.- Labels
decX400DDA
For example:
decX400DDA="smith(a)A1(a)node6"
A.3.34. decX400MRGatewayName
This attribute represents the name of a MAILbus 400 Message Router Gateway used by a user agent.
- Attribute Syntax
The syntax for this attribute type is
distinguishedNameSyntax.- Labels
decX400MRGatewayName
For example:
decX400MRGatewayName="/C=US/O=Abacus/CN=XMR"
A.3.35. decX400SMTPGatewayName
This attribute represents the name of the MAILbus 400 SMTP Gateway used by a user agent.
- Attribute Syntax
The syntax for this attribute type is
distinguishedNameSyntax.
- Labels
decX400SMTPGatewayName
For example:
decX400SMTPGatewayName="/C=US/O=Abacus/CN=STMP
A.3.36. decX400Redirect
This attribute represents the X.400 OR address to which messages should be redirected.
- Attribute Syntax
The syntax for this attribute type is
mhs-or-name-syntax.- Labels
decX400Redirect
For example:
decX400Redirect="C=US;A=XYZ;P=Abacus;O=Abacus;OU1=Sales;CN=John Smith
A.3.37. description
Use the description attribute to provide descriptive information
about an object. The description can be up to 1024 characters long.
The syntax for this attribute type is stringSyntax. For example,
an entry representing a distribution list could have the associated description,
"distribution list for sales figures, forecasts, and quarterly reports".
- Attribute Syntax
This attribute specifies it supports matching rules that are not case sensitive. For example,
description=BIGmatchesdescription=Big.- Labels
description
For example:
description=Big
A.3.38. destinationIndicator
Specifies the country and city associated with the named object, the addressee, required to provide the Public Telegram Service, according to CCITT Recommendations F.1 and F.3.
- Attribute Syntax
The syntax for this attribute type is a string of alphabetical characters from the
printableStringcharacter set.- Labels
dest destinationIndicator destIndicator
For example:
dest=abc
A.3.39. dseType
This is an operational attribute. HP DSAs use this attribute on every entry to record the type of each entry.
For example, the dseType attribute indicates whether an entry is
an alias entry, and whether it is a shadow copy of an entry held by another DSA.
The attribute also indicates whether an entry is at the top of a naming context,
or contains subordinate reference information.
The DSA adds this operational attribute to every entry. Do not modify this attribute manually.
You can use the DXIM command line interface to display this attribute if you request the attribute specifically. DXIM does not display operational attributes if you use the All Attributes control.
You cannot display this attribute using the DXIM windows interface.
A.3.40. dxdUid
This is an operational attribute. HP DSAs use this attribute to uniquely identify each entry.
The DSA adds this operational attribute to every entry. Do not modify this attribute manually.
You can use the DXIM command line interface to display this attribute if you request the attribute specifically. DXIM does not display operational attributes if you use the All Attributes control.
You cannot display this attribute using the DXIM windows interface.
A.3.41. facsimileTelephoneNumber
Specifies a telephone number for a facsimile terminal associated with the named object.
- Attribute Syntax
The syntax for this attribute type is a string of numeric characters from the
printableStringcharacter set. The standard format for facsimile telephone numbers should include some optional G3 Facsimiletex Non Basic Parameters. However, HP DSAs do not support the optional parameters, so in effect, this attribute is the same as the telephoneNumber attribute, if you are using HP DSAs.- Labels
faxno faxtelephoneno facsimiletelephonenumber fax
For example:
faxno="+81 3 347 9999"
A.3.42. generationalQualifier
Specifies the generational qualifier of a person. For example, you could use this attribute to specify "Senior", "Junior", or "III".
A generational qualifier can be up to 64 characters long.
- Attribute Syntax
The syntax for this attribute type is
stringSyntax, for example,generationalQualifier=Junior. This attribute specifies that it supports matching rules that are not case sensitive.For example, a search for
generationalQualifier=Juniorwould succeed in finding an entry withgenerationalQualifier=junior.- Labels
generationalQualifier
For example:
generationalQualifier=Junior
A.3.43. givenName
Specifies a given name.
A given name should follow the conventions of the culture of the object represented. For example, you can use characters such as ö, à, é, and ß if they usually form part of a name for an object.
A common name can be up to 64 characters long.
- Attribute Syntax
The syntax for this attribute type is
stringSyntax, for example,givenName=John. This attribute specifies that it supports matching rules that are not case sensitive.- Labels
givenName
For example:
givenName=John
A.3.44. governingStructureRule
This is an operational attribute. HP DSAs use this attribute to specify which
structure rule was used when an entry was created. For example, if you create a
locality entry beneath a country entry, the DSA
automatically specifies a different value than if you create a
locality entry beneath an organization
entry.
The DSA adds this operational attribute to every entry. Do not modify this attribute manually.
You can use the DXIM command line interface to display this attribute if you request the attribute specifically. DXIM does not display operational attributes if you use the All Attributes control.
You cannot display this attribute using the DXIM windows interface.
A.3.45. initials
Specifies the initials of a person’s names.
For example, as person called John Irvin Scott might have an initials
attribute with the value J.I. If you use periods (.) to punctuate the initials,
you must quote the value. For example, initials="J.I.".
- Attribute Syntax
The syntax for this attribute type is
stringSyntax. This attribute specifies that it supports matching rules that are not case sensitive.- Labels
initials
For example:
initials="J.I."
A.3.46. internationalISDNNumber
Specifies an International ISDN Number associated with the named object. An international ISDN number can be up to 16 characters long.
- Attribute Syntax
The syntax for this attribute type is
numericStringSyntax, and should comply with the internationally agreed format for ISDN addresses, CCITT Recommendation E.164.- Labels
ISDNno internationalISDNnumber
For example:
ISDNno=12344321
A.3.47. knowledgeInformation
Specifies a human-readable description of knowledge contained in a specific DSA. This knowledge relates to the location of DSAs and the information they contain.
Note that HP DSAs do not use this attribute for any operations.
- Attribute Syntax
The syntax for this attribute type is
stringSyntax. This attribute specifies that it supports matching rules that are not case sensitive.- Labels
ki knowledgeInformation
For example:
ki="/c=FR/o=Reveco"
A.3.48. lastUpdateReceived
This is an operational attribute. HP DSAs use this attribute to record the time that a given naming context was most recently updated by replication.
The DSA adds this operational attribute to the entry at the top of a replicated naming context. Do not modify this attribute manually.
You can use the DXIM command line interface to display this attribute if you request the attribute specifically. DXIM does not display operational attributes if you use the All Attributes control.
You cannot display this attribute using the DXIM windows interface.
A.3.49. localityName
Specifies the name of a locality or region, such as a city or county. A locality name can be up to 128 characters long.
- Attribute Syntax
The syntax for this attribute type is
stringSyntax, for example,localityName="New York". This attribute specifies that it supports matching rules that are not case sensitive. For example,localityName="New York"matcheslocalityName="new york".- Labels
l loc locality localityName
For example:
l="New York"
A.3.50. member
Specifies a name or names associated with the entry of which this is an
attribute. For example, an entry representing a committee could have a
member attribute containing the names of the committee
members.
Note that there is no connection between a directory entry and any
member attributes that specify that entry’s distinguished name.
For example, if you delete an entry or rename it, the member
attribute is not updated.
- Attribute Syntax
The syntax for this attribute type is
distinguishedNameSyntax. Each distinguished name should be the name of a directory entry.- Labels
member
For example:
member="/c=FR/o=Reco/cn="Per Lebrun"
A.3.51. mhs-or-addresses
Specifies an X.400 messaging originator/recipient address.
- Attribute Syntax
The syntax for this attribute type is
mhs-or-address-syntax. For example:mhs-or-address="C=US; A=Admin; P=Abacus; G=David; S=Townsend; OU1=Sales"
- Labels
mhs-or-addresses ORAddress X400address mhsORAddresses
For example:
ORAddress="C=US; A=Admin; P=Abacus; G=David; S=Townsend; OU1=Sales"
A.3.52. modifyTimeStamp
This is an operational attribute. HP DSAs use this attribute to record the time that an entry was most recently modified.
The DSA adds this operational attribute to each entry that is modified. Do not modify this attribute manually.
You can use the DXIM command line interface to display this attribute if you request the attribute specifically. DXIM does not display operational attributes if you use the All Attributes control.
You cannot display this attribute using the DXIM windows interface.
See also createTimeStamp.
A.3.53. myAccessPoint
This is an operational attribute. HP DSAs use this attribute to store their own network access points.
Do not modify this attribute manually
You can use the DXIM command line interface to display this attribute if you request the attribute specifically. DXIM does not display operational attributes if you use the All Attributes control.
You cannot display this attribute using the DXIM windows interface.
A.3.54. objectClass
Specifies the object class and superclasses of the entry of which this is an attribute. This attribute must be present in every directory entry so that the Directory Service knows what rules to apply to an entry.
- Attribute Syntax
The syntax for this attribute type is
objectIdentifierSyntax, for example,{2 5 6 1}. DXIM uses user-friendly labels for input and output purposes, rather than object identifiers. For example, DXIM displays and allows you to use the labelorganizationrather than its object identifier.- Labels
class objectClass
For example:
class=organization
A.3.55. organizationName
Specifies the name of an organization.
Attribute values for the organizationName attribute are strings
chosen by the organization.
An organization name can be up to 64 characters long.
- Attribute Syntax
The syntax for this attribute type is
stringSyntax, for example,organizationName="Acme Shoe Company". This attribute specifies that it supports matching rules that are not case sensitive. For example,organizationName="Acme Shoe Company"matchesorganizationName="ACME shoe company".- Labels
o orgname organizationName organisationName
For example:
o="ACME Shoe Company".
A.3.56. organizationalUnitName
Specifies the name of an organizational unit, such as a team, group, department, or committee.
This attribute can be used to name an entry, for example, an entry that
represents a committee. It can also be used within an entry as background
information, for example, a person entry could include an
organizationalUnitName attribute that specifies what team they work
for. An organizational unit name can be up to 64 characters long.
- Attribute Syntax
The syntax for this attribute type is
stringSyntax, for example,organizationalUnitName=Sales. This attribute specifies that it supports matching rules that are not case sensitive. For example,organizationalUnitName=SalesmatchesorganizationalUnitName=sales.- Labels
ou orgunitname organizationalUnitName organisationalUnitName ouname
For example:
ou=sales
A.3.57. owner
Specifies the name of the owner of the object represented by the entry that contains this attribute.
For example, an entry representing a computer could have an owner
attribute which specifies the name of its system manager.
- Attribute Syntax
The syntax for this attribute type is
distinguishedNameSyntax. The distinguished name should be the name of a directory entry.- Labels
owner
For example:
owner="/c=NZ/o=THKS/cn=Jerry Thomson"
A.3.58. physicalDeliveryOfficeName
Specifies the name of the city, town, or village where the physical delivery office is situated.
An office name can be up to 128 characters long.
- Attribute Syntax
The syntax for this attribute type is
stringSyntax. For example,physicalDeliveryOfficeName="Hartman House". This attribute specifies that it supports matching rules that are not case sensitive. For example,physicalDeliveryOfficeName="Hartman House"matchesphysicalDeliveryOfficeName="hartman house".- Labels
pdoff physicalDeliveryOfficeName pdoffname
For example:
pdoff=Auckland
See also postalAddress, postalCode, and
postOfficeBox.
A.3.59. postalAddress
Specifies the address information required for the physical delivery of postal messages by the postal authority of the named object.
An attribute value is limited to a maximum of 6 lines with no more than 30 characters each. The information contained in this address normally includes an addressee’s name, street address, city, state or province name, and a postal code. A Post Office Box number could also be included.
- Attribute Syntax
The syntax for this attribute type is
postalAddressSyntax. Each line of the postal address is either a printable string or a T.61 string. Each line of the address ends with a comma.If you want a particular line to actually contain a comma, then use the single quotation marks to enclose that particular line.
- Labels
postaddr postaladdress postaddress
For example:
postaddr="F.Burn, 3 Oak St, Bram, OHIO"
The above example is an address containing four lines. The value is quoted, to clarify that this is one value. The following example is an address containing four lines, where the second line contains a comma:
postaddr="F.Burn, ’3, Oak St’, Bram, OHIO"
If ’3, Oak St’ were not quoted, DXIM would treat the address as having five lines because of the presence of the comma after the "3" character. The quotes clarify that that comma is part of the value, rather than a separator between values.
See also postalCode, physicalDeliveryOfficeName, and
postOfficeBox.
A.3.60. postalCode
Specifies a postal code or zip code. If this attribute value is present, then it forms part of the object’s postal address.
A postal code can be up to 40 characters long.
- Attribute Syntax
The syntax for this attribute type is
stringSyntax, for example,postalCode="PO21 4TG". This attribute specifies that it supports matching rules that are not case sensitive. For example,postalCode="PO21 4TG"matchespostalCode="po21 4tg".- Labels
postcode postalcode
For example:
postcode="PO21 4TG"
See also postalAddress, physicalDeliveryOfficeName,
and postOfficeBox.
A.3.61. postOfficeBox
Specifies the Post Office Box by which the object receives physical postal delivery. If this attribute value is present, then it is part of the object’s postal address.
A post office box can be up to 40 characters long.
- Attribute Syntax
The syntax for this attribute type is
stringSyntax, for example,postOfficeBox="PO Box 13". This attribute specifies that it supports matching rules that are not case sensitive. For example,postOfficeBox="PO BOX 13"matchespostOfficeBox="po box 13".
- Labels
PObox postofficebox postbox
For example:
PObox="PO box 13"
See also postalAddress, postalCode, and
physicalDeliveryOfficeName.
A.3.62. preferredDeliveryMethod
Specifies preferred methods of physical message delivery. The attribute can be multivalued, with the most preferred method of delivery being the first value.
A preferred delivery method value can be up to 9 characters long.
- Attribute Syntax
The syntax for this attribute type is a sequence of single-digit integer values, for example, "3, 4, 1, 8". These values correspond to the different delivery methods as follows:
0 any-delivery-method 1 mhs-delivery 2 physical-delivery 3 telex-delivery 4 teletex-delivery 5 g3-facsimile-delivery 6 g4-facsimile-delivery 7 ia5-terminal-delivery 8 videotex-delivery 9 telephone-delivery - Labels
prefdel preferredDeliveryMethod pdm
For example:
prefdel=0
See also facsimileTelephoneNumber, postalAddress,
telephoneNumber, telexNumber, and
teletexTerminalIdentifier.
A.3.63. prescriptiveACI
Specifies the access controls to be applied to all entries in a given naming context. See Chapter 7, "Controlling Access to Your Directory Information and Services" for further details of VSI’s support of prescriptive access controls.
- Attribute Syntax
The syntax for this attribute type is the
aciSyntax.- Labels
paci prescriptiveACI
A.3.64. presentationAddress
Specifies a network presentation address.
- Attribute Syntax
The syntax for this attribute type is four strings which correspond to the following elements of the presentation address:
A presentation selector
A session selector
A transport selector
A network address
For full details of the syntax of a presentation address see Section A.3.64.1, ''Further Syntax Details''.
- Labels
presentationaddress paddr
For example:
presentationaddress=’"A"/"B"/"C"/NS+49000000000000000000’
where "A" is the presentation selector, "B" is the session selector, "C" is the transport selector, and NS+49000000000000000000 is the network address.
A.3.64.1. Further Syntax Details
The full syntax of the presentationAddress attribute is as
follows.
Note that the numbers 1 to 12 shown to the right of this syntax description are not part of the syntax. They refer to explanations which are provided at the end of this syntax description.
<presentation-address> ::= [[[ <psel> "/" ] <ssel> "/" ]
<tsel> "/" ] <network-address-list>
<psel> ::= <selector>
<ssel> ::= <selector>
<tsel> ::= <selector>
<selector> ::= ’"’ <otherstring> ’"’  | "#" <digitstring>
  | "’" <hexstring> "’H"
| ""
<network-address-list> ::= <network-addr> [ "|" <network-addr> ]
| <network-addr>
<network-addr> ::= <network-address> ["," <network-type> ]
<network-type> ::= "CLNS" | "CONS" | "RFC1006"
| "’" <hexstring> "’H"
| ""
<network-address-list> ::= <network-addr> [ "|" <network-addr> ]
| <network-addr>
<network-addr> ::= <network-address> ["," <network-type> ]
<network-type> ::= "CLNS" | "CONS" | "RFC1006"  <network-address> ::= "NS" "+" <dothexstring>
  | <afi> "+" <idi> ["+" <dsp>]
| <idp> "+" <hexstring>
| <afi> "+" <idi> ["+" <dsp>]
| <idp> "+" <hexstring>  | RFC1006 "+" <ip> ["+" <port>]
  <idp> ::= <digitstring>
<dsp> ::= "d" <digitstring>
<idp> ::= <digitstring>
<dsp> ::= "d" <digitstring>  | "x" <dothexstring>
  | "l" <otherstring>
  | "RFC1006" "+" <prefix> "+" <ip> ["+" <port>
["+" <tset>]]
| "X.25(80)" "+" <prefix> "+" <dte>
[ "+" <cudf-or-pid> "+" <hexstring> ]
| "ECMA-117-Binary"
"+" <hexstring> "+" <hexstring>
"+" <hexstring>
| "ECMA-117-Decimal"
"+" <digitstring> "+" <digitstring>
"+" <digitstring>
<idi> ::= <digitstring>
<afi> ::= "X121" | "DCC" | "TELEX" | "PSTN" | "ISDN" | "ICD" | "LOCAL"
<prefix> ::= <digit> <digit>
<ip> ::= <domainstring>
| "RFC1006" "+" <prefix> "+" <ip> ["+" <port>
["+" <tset>]]
| "X.25(80)" "+" <prefix> "+" <dte>
[ "+" <cudf-or-pid> "+" <hexstring> ]
| "ECMA-117-Binary"
"+" <hexstring> "+" <hexstring>
"+" <hexstring>
| "ECMA-117-Decimal"
"+" <digitstring> "+" <digitstring>
"+" <digitstring>
<idi> ::= <digitstring>
<afi> ::= "X121" | "DCC" | "TELEX" | "PSTN" | "ISDN" | "ICD" | "LOCAL"
<prefix> ::= <digit> <digit>
<ip> ::= <domainstring>  <port> ::= <digitstring>
  <tset> ::= "TCP" | "IP" | <digitstring>
  <dte> ::= <digitstring>
<cudf-or-pid> ::= "CUDF" | "PID"
<decimaloctet> ::= <digit> | <digit> <digit> | <digit> <digit> <digit>
<digit> ::= [0-9]
<digitstring> ::= <digit> <digitstring>
| <digit>
<domainchar> ::= [0-9a-zA-Z-.]
<domainstring> ::= <domainchar> <otherstring>
| <domainchar>
<dotstring> ::= <decimaloctet> "." <dotstring>
| <decimaloctet> "." <decimaloctet>
<dothexstring> ::= <dotstring>
| <hexstring>
<hexdigit>:: ::= [0-9a-fA-F]
<hexoctet> ::= <hexdigit> <hexdigit>
<hexstring> ::= <hexoctet> <hexstring>
| <hexoctet>
<other> ::= [0-9a-zA-Z+-.]
<otherstring> ::= <other> <otherstring>
| <other>
<dte> ::= <digitstring>
<cudf-or-pid> ::= "CUDF" | "PID"
<decimaloctet> ::= <digit> | <digit> <digit> | <digit> <digit> <digit>
<digit> ::= [0-9]
<digitstring> ::= <digit> <digitstring>
| <digit>
<domainchar> ::= [0-9a-zA-Z-.]
<domainstring> ::= <domainchar> <otherstring>
| <domainchar>
<dotstring> ::= <decimaloctet> "." <dotstring>
| <decimaloctet> "." <decimaloctet>
<dothexstring> ::= <dotstring>
| <hexstring>
<hexdigit>:: ::= [0-9a-fA-F]
<hexoctet> ::= <hexdigit> <hexdigit>
<hexstring> ::= <hexoctet> <hexstring>
| <hexoctet>
<other> ::= [0-9a-zA-Z+-.]
<otherstring> ::= <other> <otherstring>
| <other> Value restricted to printed characters
US GOSIP requirement
Network type identifier (the default is
CLNS)
Concrete binary representation of network (NSAP)
address value
ISO 8348 compatibility
RFC 1006 preferred format
Abstract decimal format for domain specific part
(DSP)
Abstract binary for DSP
Printable character format for DSP (for local use
only)
Dotted decimal notation (e.g. 10.0.0.6) or domain
name (e.g. twg.com)
TCP port number (the default is 102)
Internet transport protocol identifier (1 = TCP
and 2 = UDP)
Keywords can be specified in either upper case or lower case. However, selector values are case sensitive. Spaces are significant.
A.3.64.1.1. Examples
The following examples illustrate the use of this data type. Note that some types of presentation address are applicable only to specific operating systems:
"DSA"/"DSA"/"DSA"/NS+490001aa000400d90621,CLNS
This is a typical presentation address for a Compaq DSA.
"my_psel"/"my_ssel"/"my_tsel"/LOCAL++x0001aa000400d90621 "my_psel"/"my_ssel"/"my_tsel"/NS+490001aa000400d90621,CLNS
These examples both specify the same presentation address. The first example uses the LOCAL authority and format identifier (AFI), which does not have an initial domain identifier (IDI). The two plus signs (++) indicate that the IDI is missing. By default, the network type is CLNS. The second example uses the value of the LOCAL AFI, which is 49.
"256"/NS+a433bb93c1,CLNS|NS+aa3106,CONS
This is a presentation address which has a transport selector, (no presentation or session selector), and two network addresses. The first network address is CLNS (for a connectionless network) and the second is CONS (for a connection-oriented network). These network addresses are specified in concrete binary form. This form can be used only when the concrete binary representation of the network address is known.
#63/#41/#12/X121+234219200300,CONS
This presentation address has presentation, session and transport selectors, and a single network address which consists of an AFI (X121) and an IDI (234219200300). There is no domain specific part.
’3a’H/TELEX+00728722+X.25(80)+02+00002340555+CUDF+"892796"
This is an network address for X.25. Note that, because CONS is not specified, the network type defaults to CLNS.
RFC1006+10.0.0.6519,RFC1006
This is an RFC1006 address. The address is not an ISO network address but the combination of an IP address and a TCP port number, which is 519 in this example. The IP address can be specified as either a DNS domain name or an IP address. For an RFC1006 address, the network type can be omitted.
A.3.65. protocolInformation
HP DSAs use this attribute in decDSA entries to specify which
protocols they support for a given network address. The attribute might also be
used by other OSI applications.
HP DSAs manage this attribute automatically, so there should never be a
requirement for you to manage it manually in decDSA entries. The
external representation of protocol information is not user-friendly.
- Attribute Syntax
The syntax for this attribute type is
protocolInformationSyntax.- Labels
protocolInformation
For example:
protocolInformation=’30 16 04 aa 00 04 06 06 2b 10 02 03 01 01’v
A.3.66. registeredAddress
Specifies an address associated with an object at a particular city location. The address is registered in the country in which the city is situated, and is used in the provision of the Public Telegram Service, according to CCITT Recommendation F.1.
- Attribute Syntax
The syntax for this attribute type is
postalAddressSyntax.Each line of the registered address is either a printable string or a T.61 string, up to 30 characters long. Each line of the address ends with a comma. If a particular line of the address includes a comma character, quote that line.
Refer to
postalAddressSyntaxfor further details.- Labels
regaddr registeredaddress regaddress
For example:
regaddr=(3 Park Road, Littletown, Downshire, LT5 6SP)
A.3.67. rfc822Mailbox
This attribute represents the RFC822 mailbox name of a user.
- Attribute Syntax
The syntax for this attribute type is
iA5StringSyntax.- Labels
RFC822Mailbox
For example:
RFC822Mailbox="jones@abacus.com" (jones@abacus.com)
A.3.68. roleOccupant
Specifies the distinguished name of an entry that represents the occupant of
an organizational role. For example, an organizationalRole entry
representing a Sales Manager could have a roleOccupant attribute
which specifies the name of the current sales manager.
- Attribute Syntax
The syntax for this attribute type is
distinguishedNameSyntax. The distinguished name should be the name of a directory entry.- Labels
role roleoccupant
For example:
roleOccupant=/c=AU/o=Schmessel/cn="Wolf Bayer"
A.3.69. searchGuide
Specifies information of suggested search criteria that could be included in an entry expected to be a convenient base-object for the search operation, for example, an organization entry.
Note that VSI Enterprise Directory applications do not use search guide attributes for any operations. The attribute is supported in case other vendor’s applications want to use it.
- Attribute Syntax
The syntax for this attribute type is
searchGuideSyntax.- Labels
searchguide
A.3.70. seeAlso
Specifies the names of other directory entries that are in some way related to
the entry of which this is an attribute. For example, an entry representing a
team could include a seeAlso attribute that specifies the names of
related teams or team leaders.
- Attribute Syntax
The syntax for this attribute type is
distinguishedNameSyntax. The distinguished names should be the names of directory entries.- Labels
seealso
For example:
seealso=/c=GH/o=Health/cn="Greta Green"
A.3.71. serialNumber
Specifies a serial number. For example, an entry representing a device such as a modem could have a serial number.
A serial number can be up to 64 characters long.
- Attribute Syntax
The syntax for this attribute type is
printableStringSyntax, for example,serialNumber=BN315-803.- Labels
serialno serialnumber
For example:
serialno=1342
A.3.72. shadowingBeginTime
This is an operational attribute. HP DSAs use this attribute in shadowing agreement subentries.
The attribute specifies when replication is expected to start. HP DSAs set two values for this attribute, to cause replication every twelve hours.
There is no need to manage this attribute manually, although manual management is possible. See Section 8.10.1, ''Managing Shadowing Agreement Subentries'' for further details.
- Attribute Syntax
The syntax for this attribute type is
deltaTimeSyntax.
A.3.73. shadowingEndTime
This is an operational attribute. HP DSAs use this attribute in shadowing agreement subentries.
There is no need to manage this attribute manually, although manual management is possible. See Section 8.10.1, ''Managing Shadowing Agreement Subentries'' for further details.
A.3.74. shadowingID
This is an operational attribute. HP DSAs manage this attribute automatically. Do not modify this attribute in any way.
The attribute specifies a unique identifier for the agreement. The same number appears in the agreement’s relative distinguished name.
A.3.75. shadowingLastUpdate
This is an operational attribute. HP DSAs manage this attribute automatically. Do not modify this attribute in any way.
The attribute specifies the time of the last successful replication attempt.
A.3.76. shadowingNextUpdate
This is an operational attribute. HP DSAs manage this attribute automatically. Do not modify this attribute in any way.
The attribute indicates the time of the next scheduled replication attempt. This is one of the two shadowing begin times.
A.3.77. shadowingState
This is an operational attribute. HP DSAs manage this attribute automatically. Do not modify this attribute in any way.
The attribute indicates the current state of the shadowing agreement. This is
usually Active.
A.3.78. shadowingMaster
This is an operational attribute. HP DSAs manage this attribute automatically. Do not modify this attribute in any way.
The attribute specifies the name of the master DSA for the naming context to which the shadowing agreement applies.
A.3.79. shadowingPeer
This is an operational attribute. HP DSAs manage this attribute automatically. Do not modify this attribute in any way.
The attribute specifies the name and network address of the other DSA to which this agreement applies.
A.3.80. shadowingKnowledgeType
This is an operational attribute. HP DSAs manage this attribute automatically. Do not modify this attribute in any way.
The attribute specifies what types of knowledge information, such as subordinate references, are to be included in the copy of the naming context.
A.3.81. shadowingUPDFile
This is an operational attribute. HP DSAs manage this attribute automatically. Do not modify this attribute in any way.
The attribute enables the DSA to identify the update log file that contain the changes to the naming context to which this agreement applies.
A.3.82. shadowingUPDOffset
This is an operational attribute. HP DSAs manage this attribute automatically. Do not modify this attribute in any way.
The attribute enables the DSA to find the information it needs to replicate. It specifies a position in an update log file.
A.3.83. shadowingVersion
This is an operational attribute. HP DSAs manage this attribute automatically. Do not modify this attribute in any way.
The attribute specifies the version of the agreement. This changes every time the agreement is amended.
A.3.84. shadowingFlags
This attribute contains flags that indicate how a HP DSA should process a shadowing agreement. For example, the attribute defines whether the agreement should be processed according to a schedule, or processed whenever information changes in the relevant naming context.
This is a single-valued attribute.
- Attribute Syntax
The syntax for this attribute type is
bitStringSyntax. However, the DXIM command line interface has a user friendly representation of the bit string. For example, for a default agreement held by a supplier DSA, the shadowingFlags are displayed as follows:UseDOP+IsSupplier+ConsumerInitiated+OtherTimes
Each of the keywords, such as
UseDOP, represents one bit setting. The list of keywords, punctuated by the "+" character, form a single attribute value. For details of the extent to which you can manage this attribute manually, see Section 8.10.1, ''Managing Shadowing Agreement Subentries''. Do not modify these flags without reading that advice.- Labels
shadowingFlags
A.3.85. specificKnowledge
This is an operational attribute. HP DSAs use this attribute to represent knowledge information.
You can use the DXIM command line interface to display this attribute if you request the attribute specifically. However, it will not be displayed in a user-friendly format. DXIM does not display operational attributes if you use the All Attributes control.
You cannot display this attribute using the DXIM windows interface.
A.3.86. stateOrProvinceName
Specifies the name of a state or province. For example, an entry representing
a person can have a stateOrProvinceName attribute indicating what
state they live or work in. A state or province name can be up to 128 characters
long.
- Attribute Syntax
The syntax for this attribute type is
stringSyntax, for example,stateOrProvinceName=Ohio. This attribute specifies that it supports matching rules that are not case sensitive. For example,stateOrProvinceName=OhiomatchesstateOrProvinceName=OHIO.- Labels
state province stateorprovincename
For example:
state=Alaska
A.3.87. streetAddress
Specifies a site for the local distribution and physical delivery in a postal address, road name and house number.
A street address can be up to 128 characters long.
- Attribute Syntax
The syntax for this attribute type is
stringSyntax, for example,"32, The Street". This attribute specifies that it supports matching rules that are not case sensitive. For example,"32, The Street"matches"32, the street"- Labels
addr streetaddress address
For example:
addr="4 Nuthatch, Banley"
A.3.88. subordinateDeletedTimeStamp
This is an operational attribute. The DSA uses this attribute to record the time of the most recent deletion of a subordinate of a given entry.
Do not modify this attribute manually.
You can use the DXIM command line interface to display this attribute if you request the attribute specifically. DXIM does not display operational attributes if you use the All Attributes control.
You cannot display this attribute using the DXIM windows interface.
A.3.89. subtreeSpecification
This is an operational attribute. The HP DSA does not currently support subtree specifications, so there is no reason to modify any instance of this attribute. This attribute is used in shadowing agreement subentries, but always has a value that specifies complete subtrees.
A.3.90. superiorKnowledge
This is an operational attribute. The DSA uses this attribute to store information about its superior reference.
Do not modify this attribute manually. You should never see this attribute, because the DSA stores it in a part of the DIT that cannot be accessed by users.
A.3.91. supplierKnowledge
This is an operational attribute. HP DSAs use this attribute to store information about the replication of information.
A HP DSA adds this attribute to naming contexts that it holds, but for which it is a shadow DSA rather than the master DSA.
You can use the DXIM command line interface to display this attribute if you request the attribute specifically. However, the attribute is not displayed in a user-friendly format. DXIM does not display operational attributes if you use the All Attributes control.
You cannot display this attribute using the DXIM windows interface.
See also the consumerKnowledge attribute.
See Chapter 5, "Planning DSAs to Hold Your Directory Information Tree" for details of consumer DSAs and supplier DSAs.
A.3.92. supportedApplicationContext
Specifies the object identifier of an application context. For example, an
application entity could have a supportedApplicationContext
attribute that specifies the contexts that the application entity
supports.
- Attribute Syntax
The syntax for this attribute type is
objectIdentifierSyntax, for example, {2 13 3 19}.- Labels
context supportedapplicationcontext
For example:
context={253 2}
A.3.93. surname
Specifies the surname, or family name, of a person. A surname can be up to 64 characters long.
- Attribute Syntax
The syntax for this attribute type is
stringSyntax, for example,surname=Stevensonorsurname=Müller. This attribute specifies that it supports matching rules that are not case sensitive. For example,surname=Stevensonmatchessurname=STEVENSON.- Labels
surname sn lastname
For example:
surname=Bloggs
A.3.94. trustedDSAName
This is an operational attribute. HP DSAs use this attribute as part of security. The presence of the attribute indicates that the DSA is part of a security domain.
The syntax of this attribute is distinguishedNameSyntax.
This operational attribute does require some manual management, for which you must use the DXIM command line interface.
You cannot display or manage this attribute using the DXIM windows interface.
See Section 4.5, ''Planning Entries to Represent DSAs'' for information about managing this attribute.
- Attribute Syntax
The syntax for this attribute type is
distinguishedNameSyntax.- Labels
trustedDSAName
For example:
trustedDSAName=/c=us/o=abacus/cn=DSA1
A.3.95. telephoneNumber
Specifies a telephone number.
- Attribute Syntax
The syntax for this attribute type is
telephoneNumberSyntax, for example,telephoneNumber="+44 582 10101".The string should comply with the internationally agreed format for showing international telephone numbers.
- Labels
tel telephonenumber
For example:
tel="+44 583 10101"
A.3.96. teletexTerminalIdentifier
Specifies the teletex terminal identifier for a teletex terminal. Optionally, this attribute type can also specify the teletex terminal parameters.
- Attribute Syntax
The syntax for this attribute type is
teletexTerminalIdentifierSyntax.An attribute value for TeletexTerminalIdentifier is a string that complies with CCITT Recommendation F.200, and an optional set that complies with CCITT Recommendation T.62.
- Labels
TTXid teletexTerminalIdentifier ttxTerminalIdentifier
For example:
TTXid="12345"
A.3.97. telexNumber
Specifies the telex number, country code, and answerback code of a telex terminal.
- Attribute Syntax
The syntax for this attribute type is a sequence of three strings of characters from the printable string character set. The strings correspond to the following:
Telex_number Answerback Country_code
For example, "12434 ABACUS US".
Note that HP DSAs do not verify that the strings are specified in the correct order.
- Labels
telexno telexnumber telex
For example:
telexno="12434 ABACUS US"
A.3.98. title
Specifies a position, function, or occupational qualification of an object. For example, a person could have a title of "manager" or "chief designer", and a device could have a title such as "disk drive".
A title can be up to 64 characters long.
- Attribute Syntax
The syntax for this attribute type is
stringSyntax, for example,title="Sales Manager". This attribute specifies that it supports matching rules that are not case sensitive. For example,title="Sales Manager"matchestitle="SALES MANAGER".- Labels
title
For example:
title=Boss
A.3.99. userPassword
Specifies a password.
Directory applications use the userPassword attribute to
authenticate users to DSAs, and DSAs use passwords to verify each other’s
identities.
A user password can be up to 128 characters long, and is case sensitive.
- Attribute Syntax
The syntax for this attribute type is
userPasswordSyntax. User passwords are stored as octet strings. A password can be up to 128 characters long.Usually, passwords are protected by access controls, so that values are not displayed. However, if there are no such controls, passwords can be displayed as text or as an octet string, depending on the application that is displaying them.
- Labels
password userpassword pwd userpwd
For example:
password=tribblet
A.3.100. x121Address
Specifies a network address of the named object. An X.121 address can be up to 15 characters long.
- Attribute Syntax
The syntax for this attribute type is a string of numeric characters that complies with CCITT Recommendation X.121.
- Labels
x121address
For example:
x121address="234273412345"
A.4. Syntaxes
This section describes the attribute value syntaxes that define the permitted format of values for the selected attribute types.
A.4.1. aciSyntax
The aciSyntax is an example of a complex syntax. It is used as
the value syntax for prescriptiveACI attributes to specify the
access controls to be applied to directory information.
Appendix B, "The PrescriptiveACI Attribute" describes the syntax in detail, and documents what keywords to use in DXIM command lines. Other vendors’ utilities are likely to support a different set of keywords. Chapter 7, "Controlling Access to Your Directory Information and Services" describes how to plan access controls for your organization’s directory information tree. The DXIM windows interface does not support the management of attributes that have this complex syntax.
The equality matching rule supported for this syntax is:
aciItemMatch
No other types of matching are supported for this syntax.
A.4.2. bitStringSyntax
This syntax allows you to store attribute values as bit strings.
There is no matching rule defined for this syntax. If you attempt to match a bit string value, the DSA only checks whether the encoding is the same. An example of a bit string value is ’010101’b.
A.4.3. booleanSyntax
This allows the attribute value to have the syntax of a boolean value, for example, 0 to represent false and 1 to represent true.
The equality matching rule for this syntax is:
booleanMatch
No other types of matching are supported.
A.4.4. countryNameSyntax
Values of this syntax must be alphabetic country codes defined in ISO 3166. Each country code is two letters long. For example, GB and US. ISO 3166 is sometimes revised to reflect political changes. The syntax reflects the revision of the standard published in February 1994.
The list of codes supported by the HP DSA is as follows:
AD AE AF AG AI AL AM AN AO AQ AR AS AT AU AW AZ BA BB BD BE BF BG BH BI BJ BM BN BO BR BS BT BV BW BY BZ CA CC CF CG CH CI CK CL CM CN CO CR CU CV CX CY CZ DE DJ DK DM DO DZ EC EE EG EH ER ES ET FI FJ FK FM FO FR FX GA GB GD GE GF GH GI GL GM GN GP GQ GR GS GT GU GW GY HK HM HN HR HT HU ID IE IL IN IO IQ IR IS IT JM JO JP KE KG KH KI KM KN KP KR KW KY KZ LA LB LC LI LK LR LS LT LU LV LY MA MC MD MG MH MK ML MM MN MO MP MQ MR MS MT MU MV MW MX MY MZ NA NC NE NF NG NI NL NO NP NR NU NZ OM PA PE PF PG PH PK PL PM PN PR PT PW PY QA RE RO RU RW SA SB SC SD SE SG SH SI SJ SK SL SM SN SO SR ST SV SY SZ TC TD TF TG TH TJ TK TM TN TO TP TR TT TV TW TZ UA UG UM US UY UZ VA VC VE VG VI VN VU WF WS YE YT YU ZA ZM ZR ZW
Refer to ISO 3166 for details of what each code stands for. The equality matching rule supported for this syntax is:
caseIgnoreStringMatch
The ordering matching rule supported for this syntax is:
caseIgnoreStringMatch
The substring matching rule supported for this syntax is:
caseIgnoreSubstringMatch
This means that the value GB matches gb, and that you can request a substring
match. For example, you can search for countryName=u* to find all
country codes beginning with the letter u.
A.4.5. deltaTimeSyntax
This syntax represents a time of day, and can indicate a specific day of the week. For example:
0 123500
This represents 12:35.00 every day. The leading zero can be replaced by an integer in the range 1 to 7, where 1 is Monday, to represent a specific day of the week.
This syntax is used by the DSA in the shadowingBeginTime and
shadowingEndTime attributes to represent a replication schedule
in a shadowing agreement subentry. See Section 8.10.1, ''Managing Shadowing Agreement Subentries'' for
further details.
The equality matching rule supported for this syntax is:
deltaTimeMatch
A.4.6. distinguishedNameSyntax
This allows the attribute value to have the syntax of a distinguished name. For example:
/countryName=US/organizationName=ACME/organizationalUnitName=Sales
See Chapter 1, "Directory Information and Enterprise Directories" or the DXIM online help for a description of the format of a distinguished name.
The equality matching rule supported for this syntax is:
distinguishedNameMatch
The ordering matching rule supported for this syntax is:
distinguishedNameMatch
A.4.7. facsimileTelephoneNumberSyntax
This syntax allows the representation of facsimile telephone numbers, formatted according to the international agreement. Currently, HP DSAs do not support the optional G3FacsimiletexNonBasicParameters.
The only matching rule supported for this syntax is
exactEncodingMatch. This means that the DSA can only check
whether the encoding of the value matches. Substring, ordering, and approximate
matches are not possible.
A.4.8. generalizedTimeSyntax
This syntax allows the representation of a time, as follows:
19931201140545.123Z
The above example represents 1993, December 1st, at 45 seconds past 2.05pm. The value also specifies fractions of a second, to three decimal places.
HP’s DSA currently requires you to specify fractions of a second, even if you only specify 000. If you define an attribute that uses this syntax, you need to make sure that your users are aware of this requirement.
The default schema contains only two attributes that use this syntax, and they are both operational attributes used only by the DSA.
The equality matching rule supported for this syntax is:
generalizedTimeEqualityMatch
The ordering matching rule supported for this syntax is:
generalizedTimeOrderingMatch
A.4.9. iA5StringSyntax
This syntax allows the representation of strings using international alphabet 5 characters. This character set includes characters that are not in the printable string character set, such as the @ character.
caseIgnoreIA5StringMatch caseExactIA5StringMatch
caseIgnoreIA5StringMatch caseExactIA5StringMatch
caseIgnoreIA5SubstringMatch caseExactIA5SubstringMatch
There is no approximate matching rule for this syntax.
The iA5StringSyntax is provided to support some attributes
defined in COSINE.SC.
A.4.10. integerListSyntax
This syntax allows the representation of integer lists. For example, "1, 2, 3, 4, 5".
This syntax is not supported by any matching rule. This means that the only matching function that the DSA can provide is an equality match of the octets used to encode a value for storage. Other matching functions are not supported.
A.4.11. integerSyntax
This allows the attribute value to have the syntax of an integer value, for example, 283.
The equality matching rule for this syntax is:
integerMatch
The ordering matching rule for this syntax is:
integerMatch
A.4.12. mhs-or-address-syntax
This allows an attribute value to have the syntax of an X.400 originator /recipient address, for example:
"C=US; A=Admin; P=Abacus; O=Abacus; G=David; S=Townsend; OU1=Legal"
The equality matching rule for this syntax is
mhs-or-address-match. There are no other matching rules for
this syntax.
A.4.13. mhs-or-name-syntax
This allows an attribute to have the value of a X.400 OR name. This may be
either an X.400 OR address (see mhs-or-address-syntax) or an X.500
directory name (see distinguishedNameSyntax).
The equality matching rule supported for this syntax is:
dec-mts-or-name-match
A.4.14. numericStringSyntax
This allows the attribute value to have the syntax of a string of numeric characters, for example, "85 14 7 40 243".
The equality matching rule supported for this syntax is:
numericStringMatch
The ordering matching rule supported for this syntax is:
numericStringMatch
The substring matching rule supported for this syntax is:
numericSubstringMatch
A.4.15. objectIdentifierSyntax
This allows the attribute value to have the syntax of an object identifier. An
object identifier is an ordered sequence of integers in braces. For example, {2
5 6 2} is the object identifier for the country object
class.
The equality matching rule supported for this syntax is:
objectIdentifierMatch
The ordering matching rule supported for this syntax is:
objectIdentifierMatch
A.4.16. octetStringSyntax
This allows the attribute value to have the syntax of a string of octets. An example of a value of this syntax is ’A1B2C3’H.
The equality matching rule supported for this syntax is:
octetStringMatch
The ordering matching rule supported for this syntax is:
octetStringMatch
A.4.17. postalAddressSyntax
This syntax allows the representation of a postal address of up to six lines. Each line of the address can contain up to 30 characters of the printable string or T.61 string character sets. The DXIM external representation of the address uses the comma character to separate lines. For example:
"The Wicket, 14 Ace Avenue, Lower Dingle, nr Tatton, Hampshire, England"
The equality matching rule supported for this syntax is:
caseIgnoreListMatch
The ordering matching rule supported for this syntax is:
caseIgnoreListMatch
The substring matching rule supported for this syntax is:
caseIgnoreListSubstringMatch
A.4.18. presentationAddressSyntax
This syntax allows the representation of a presentation address. See Section 5.2.3, ''DSA Presentation Addresses'' for details of the format of presentation addresses used by VSI Directory Service.
The equality matching rule supported for this syntax is:
presentationAddressMatch
No other types of matching are supported.
A.4.19. printableStringSyntax
This allows the attribute value to have the syntax of a string of characters from the printable string character set.
The equality matching rules supported for this syntax are:
caseIgnoreStringMatch caseExactStringMatch
The ordering matching rules supported for this syntax are:
caseIgnoreStringMatch caseExactStringMatch
The substring matching rules supported for this syntax are:
caseIgnoreSubstringMatch caseExactSubstringMatch
The approximate matching rules supported for this syntax are:
allWordApproximateMatch initialLetterApproximateMatch initialWordApproximateMatch lastWordSoundexMatch
A.4.20. protocolInformationSyntax
This syntax allows the representation of protocol information to be used by OSI applications.
The external representation of this syntax is not user-friendly. The only
matching rule supported for this syntax is exactEncodingMatch.
Substring, ordering, and approximate matching is not possible.
A.4.21. stringListSyntax
This syntax allows you to represent a list of up to six strings. The DXIM external representation of a string list uses the comma character to separate the list items. For example, "One, Two, Three, Four, Five, Six".
The equality matching rule supported for this syntax is:
caseIgnoreListMatch
The ordering matching rule supported for this syntax is:
caseIgnoreListMatch
The substring matching rule supported for this syntax is:
caseIgnoreListSubstringMatch
A.4.22. stringSyntax
This syntax allows you to represent a string using the printable character set or the T.61 character set. The T.61 character set includes characters such as é and ç.
The equality matching rules supported for this syntax are:
caseIgnoreStringMatch caseExactStringMatch
The ordering matching rules supported for this syntax are:
caseIgnoreStringMatch caseExactStringMatch
The substring matching rules supported for this syntax are:
caseIgnoreSubstringMatch caseExactSubstringMatch
The approximate matching rules supported for this syntax are:
allWordApproximateMatch initialLetterApproximateMatch initialWordApproximateMatch lastWordSoundexMatch
A.4.23. telephoneNumberSyntax
This allows the attribute value to have the syntax of a string of numeric characters from the printable string character set.
The equality matching rule for this syntax is:
telephoneNumberMatch
The ordering matching rule for this syntax is:
telephoneNumberMatch
The substring matching rule for this syntax is:
telephoneNumberSubstringMatch
A.4.24. teletexTerminalIdentifierSyntax
This syntax allows the representation of a teletex terminal identifier. The syntax is a string that complies with CCITT Recommendation F.200, followed by an optional set of characters that complies with CCITT Recommendation T.62.
The equality matching rule for this syntax is:
exactEncodingMatch
A.4.25. telexNumberSyntax
This syntax allows the representation of a telex number. A telex number comprises three printable strings: the telex number, a country code, and an answerback code. For example, "1234 ABACUS US".
The equality matching rule for this syntax is:
caseIgnoreListMatch
The ordering matching rule for this syntax is:
caseIgnoreListMatch
The substring matching rule for this syntax is:
caseIgnoreListSubstringMatch
A.4.26. undefinedSyntax
This syntax allows the representation of values that do not conform to any syntax known to the DSA, as long as they are encoded in valid ASN.1.
This syntax might be suitable for applications that have specific syntax requirements which are not met by any of the other default syntaxes. In that case, you can use this syntax. However, the simplified matching provided by the DSA means that the application must take responsibility for ensuring that values meet their syntactic requirements. The application must also be consistent in its production of ASN.1 encoding, otherwise values are unlikely to match octet for octet.
An example of the external representation of a value of this syntax is ’130142’v. The letter v signifies that the value is shown verbatim.
A.4.27. userPasswordSyntax
This syntax allows the representation of user passwords.
The equality matching rule for this syntax is:
octetStringMatch
No other types of matching are supported for this syntax.
A.4.28. uTCTimeSyntax
This allows the attribute value to have the syntax of a numeric value representing a time. An example of a value of this syntax is:
910311213922Z
That value represents 1991, March 3rd, at 22 seconds past 9.39pm. The equality matching rule for this syntax is:
uTCTimeMatch
The ordering matching rule for this syntax is:
uTCTimeMatch
A.5. Matching Rules
This section documents the matching rules supported by HP DSAs.
When you are defining new attribute types for your Directory Service, you must select a syntax for that attribute type. The DSA supports one or more matching rules for each syntax. When you define a new attribute, you must select one or more matching rules that are applicable to the chosen syntax for one or more types of matching.
For example, if you define an attribute that has stringSyntax, you
must choose matching rules from the following list of applicable rules, categorized
by the type of matching they are suitable for:
Equality Matching
caseIgnoreStringMatch caseExactStringMatch
Ordering Matching
caseIgnoreStringMatch caseExactStringMatch
Substring Matching
caseIgnoreSubstringMatch caseExactSubstringMatch
Approximate Matching
allWordApproximateMatch lastWordSoundexMatch initialLetterApproximateMatch initialWordApproximateMatch
For example, the default schema contains the definition of the
commonName attribute, as follows:
commonName ATTRIBUTE
           WITH ATTRIBUTE-SYNTAX stringSyntax (SIZE(1..64))
           EQUALITY MATCHING RULE caseIgnoreStringMatch
           ORDERING MATCHING RULE caseIgnoreStringMatch
           SUBSTRING MATCHING RULE caseIgnoreSubstringMatch
           APPROXIMATE MATCHING RULE initialWordApproximateMatch
           STORE NORMALIZED
::= {attributeType 3}Note that some matching rules are suitable for more than one type of matching. The
caseIgnoreStringMatch is specified for both equality matching and
ordering matching.
Each matching rule is listed under each of the types of matching for which it can
be used. For example, caseIgnoreStringMatch is listed as an equality
matching rule and as an ordering matching rule.
A.5.1. Equality Matching Rules
A.5.1.1. aciItemMatch
This matching rule can apply to:
aciSyntax.
For two values to be considered to match, they must have the same identification string. Case-insensitive matching is applied to the identification strings to determine whether they match. Other elements of the values cannot be matched.
Note that this means that values that look different to a user may be considered identical by the DSA. For example, any two ACIitems that have the identification string "Directory Manager’s Access Controls" are considered to match regardless of what controls are specified within them.
Note that the DXIM command line interface does not support searches for specific identification strings. For example, you cannot use the following DXIM command:
dxim> search /c=us/o=abacus - _dxim> where prescriptiveaci="Directory Manager’s" - _dxim> attribute prescriptiveaci
DXIM does allow you to find all prescriptiveACI attributes,
regardless of identification string, as follows:
dxim> search /c=us/o=abacus where prescriptiveaci=* - _dxim> attribute prescriptiveaci
You can use the COMPARE command to check for the presence of a particular identification string, and you can specify an identification string in SHOW and DELETE commands. Thus, if an attribute contains more than one value, you can specify which value you want to show or delete by reference to its identification string.
See Appendix B, "The PrescriptiveACI Attribute" for a full description of the identification string and all other elements of the syntax of an ACIitem.
A.5.1.2. booleanMatch
This matching rule can apply to:
booleanSyntax
For two values to match they must be either both TRUE, or both FALSE.
A.5.1.3. caseExactIA5StringMatch
This matching rule applies to:
iA5StringSyntax
For two values to match, corresponding characters must be identical, including being of the same case, for example "T" does not equal "t".
Consecutive space characters in either value are treated as a single space character. If the values are of different lengths, ignoring any difference caused by consecutive space characters, then the values do not match.
A.5.1.4. caseExactStringMatch
This matching rule can apply to:
stringSyntax printableStringSyntax countryNameSyntax
For two values to match, corresponding characters must be identical, including being of the same case, for example "T" does not equal "t".
Consecutive space characters in either value are treated as a single space character. If the values are of different lengths, ignoring any difference caused by consecutive space characters, then the values do not match.
A.5.1.5. caseIgnoreListMatch
This matching rule can apply to:
stringListSyntax postalAddressSyntax
For two values to match, they must contain the same number of strings, and corresponding strings must match according to the caseIgnoreStringMatch.
A.5.1.6. caseIgnoreIA5StringMatch
This matching rule applies to:
iA5StringSyntax
For two values to match, corresponding characters must be identical, except that case may vary.
Consecutive space characters in either value are treated as a single space character. If the values are of different lengths, ignoring any difference caused by consecutive space characters, then the values do not match.
A.5.1.7. caseIgnoreStringMatch
This matching rule can apply to:
stringSyntax printableStringSyntax countryNameSyntax.
For two values to match, corresponding characters must be identical, except that case may vary.
Consecutive space characters in either value are treated as a single space character. If the values are of different lengths, ignoring any difference caused by consecutive space characters, then the values do not match.
A.5.1.8. dec-mts-or-name-match
This matching rule can apply to:
mhs-or-name-syntax
If an OR name is in the format of an X.500 directory name, the matching
rules for distinguishedNameMatch apply. If an OR name is in the
format of an X.400 OR address, the matching rules for
mhs-or-address-match apply.
A.5.1.9. deltaTimeMatch
This matching rule can apply to:
deltaTimeSyntax
For two values to match, they must represent the same time and the same day of the week. If the seconds are not specified in either value being matched, the seconds are assumed to be 00.
A.5.1.10. distinguishedNameMatch
This matching rule can apply to:
distinguishedNameSyntax
For two values to be considered to match, the following must all be true:
The number of Relative Distinguished Names (RDNs) in the two Distinguished Names (DN) must be the same.
Corresponding RDNs must have the same number of attribute values.
Corresponding RDNs must be composed of the same attribute types.
Corresponding attribute values must match for equality according to the relevant matching rule.
For example, the distinguished name /countryName=US matches
the distinguished name /c=us because both names have one RDN,
both RDNs have one attribute value, the attributes are both
countryName, and the values match according to the case
insensitive matching rule that applies to the
countryNameSyntax.
A.5.1.11. exactEncodingMatch
This matching rule can apply to the following syntaxes:
undefinedSyntax facsimileTelephoneNumberSyntax protocolInformationSyntax integerListSyntax bitStringSyntax teletexTerminalIdentifierSyntax
For two values to match, their ASN.1 encoding must be identical, octet for
octet. The exactEncodingMatch matching rule provides a minimal
ability to match for syntaxes for which a specialised matching rule has not
been implemented.
A.5.1.12. generalizedTimeEqualityMatch
This matching rule can apply to:
generalizedTimeSyntax
For two values to match, they must represent exactly the same time, including the fractions of a second.
A.5.1.13. integerMatch
This matching rule can apply to:
integerSyntax
For two values to match, they must represent the same integer.
A.5.1.14. mhs-or-address-match
This matching rule can apply to:
mhs-or-address-syntax
For two values to match, the corresponding terms must be identical except for case. The terms can be specified in any order. For example, the following values match:
"C=US; A=Admin; P=Abacus; O=Abacus; G=David; S=Townsend; OU1=Legal" "C=US; A=Admin; P=Abacus; O=Abacus; OU1=Legal; G=David; S=Townsend"
If you are using this attribute to support an X.400 messaging application, refer to that application’s documentation for details of the ORaddress formats it supports.
A.5.1.15. numericStringMatch
This matching rule can apply to:
numericStringSyntax
For two values to match, the corresponding numeric characters in the strings must match exactly.
Space characters in either value are ignored. For example, "1 2 3" matches "123".
A.5.1.16. objectIdentifierMatch
This matching rule can apply to:
objectIdentifierSyntax
For two values to match, corresponding elements must match exactly. Consecutive space characters are treated as a single space.
A.5.1.17. octetStringMatch
This matching rule can apply to:
octetStringSyntax userPasswordSyntax
For two values to match, the strings must be of the same length, and corresponding octets must be identical.
A.5.1.18. presentationAddressMatch
This matching rule can apply to:
presentationAddressSyntax
For two presentation addresses to match, each selector must be identical, and the network addresses specified must be a subset of the network addresses stored in the Directory. For example, the following presentation addresses match if the second address is the one stored in the Directory.
"DSA"/"DSA"/"DSA"/NS+4900|4911 "DSA"/"DSA"/"DSA"/NS+4900|4911|4922
The two network addresses specified in the first presentation address are a subset of the ones in the second presentation address.
A.5.1.19. telephoneNumberMatch
This matching rule can apply to:
telephoneNumberSyntax
For two values to to match, the corresponding characters in each value must be identical.
Space characters and dash characters "-" are ignored For example, "44 123-456" matches "44123456".
A.5.1.20. uTCTimeMatch
This matching rule can apply to:
uTCTimeSyntax
For two values to match, the values must represent the same time. If either value omits to specify seconds, then the number of seconds is assumed to be zero.
A.5.2. Ordering Matching Rules
A.5.2.1. caseExactIA5StringMatch
This matching rule applies to:
iA5StringSyntax
Values are ordered by comparison of corresponding characters. Lower case characters are treated as higher than upper case characters, for example, smith is ordered higher than Smith. The letter A is the lowest letter, and the letter Z the highest.
A.5.2.2. caseExactStringMatch
This matching rule can apply to:
stringSyntax printableStringSyntax countryNameSyntax
Values are ordered by comparison of corresponding characters. For example, Smith is ordered lower than Trent because the first characters differ, and S is lower than T. Lower case characters are treated as higher than upper case characters. For example, smith is higher than Smith.
A.5.2.3. caseIgnoreIA5StringMatch
This matching rule applies to:
iA5StringSyntax
Values are ordered by comparison of corresponding characters. Upper case and lower case representations of the same character are considered equal, for example, smith is considered equal to SMITH. The letter A is the lowest letter, and the letter Z the highest.
A.5.2.4. caseIgnoreListMatch
This matching rule can apply to:
stringListSyntax postalAddressSyntax
Values are ordered by comparison of corresponding list elements. For example, "ABC DEF" is higher than "A B C DEF" because the first elements in the two lists differ, and ABC is higher than A.
A.5.2.5. caseIgnoreStringMatch
This matching rule can apply to:
stringSyntax printableStringSyntax countryNameSyntax
Values are ordered by comparison of corresponding characters, without regard for the case of the characters. The character "c" is equal to "C".
A.5.2.6. distinguishedNameMatch
This matching rule can apply to:
distinguishedNameSyntax
Values are ordered by comparison of corresponding RDNs. If corresponding
RDNs are formed using different attributes, then the attributes are ordered
according to their object identifiers. For example,
"/commonName=Smith" is ordered lower than
"/surname=Smith"
because the object identifier of the commonName attribute is
lower.
For RDNs formed using the same attribute, the values are ordered according to the ordering matching rule that applies to the syntax of that attribute.
A.5.2.7. generalizedTimeOrderingMatch
This matching rule can apply to:
generalizedTimeSyntax
Values are ordered according to the times that they represent.
A.5.2.8. integerMatch
This matching rule can apply to:
integerSyntax
Values are ordered according to the integers they represent.
A.5.2.9. numericStringMatch
This matching rule can apply to:
numericStringSyntax
Values are ordered by comparison of corresponding numeric characters. For example, 9 is ordered higher than 10 because the first characters differ, and 9 is higher than 1.
A.5.2.10. objectIdentifierMatch
This matching rule can apply to:
objectIdentifierSyntax
Values are ordered by comparison of corresponding elements.
A.5.2.11. octetStringMatch
This matching rule can apply to:
octetStringSyntax
Values are ordered by comparison of corresponding octets, and corresponding bits within octets. The first occurrence of a different bit determines the ordering of the octet strings. A zero is ordered before a one.
A.5.2.12. telephoneNumberMatch
This matching rule can apply to:
telephoneNumberSyntax
Values are ordered according by comparison of corresponding characters, ignoring space characters and hyphen (-) characters.
A.5.2.13. uTCTimeMatch
This matching rule can apply to:
uTCTimeSyntax
Values are ordered according to the times they represent.
A.5.3. Substring Matching Rules
Substring matching rules enable users to use wildcards when searching for entries. More than one wildcard can be specified. For example, a DXIM command line user can use the following search command:
dxim> search /c=us/o=abacus where surname=*sm*th*
The positions of the three wildcard characters means that this search might return entries with the following surname values: smith, nesmith, smithson, smythe, smallworthy.
A DXIM windows user can specify wildcards in the input fields of the Find window.
A.5.3.1. caseExactIA5SubstringMatch
This matching rule applies to:
iA5StringSyntax
The matching rule determines whether a string specified by the user matches any substring of a value in the Directory. The match is case sensitive.
A.5.3.2. caseExactSubstringMatch
This matching rule can apply to:
stringSyntax printableStringSyntax
The matching rule determines whether a string specified by the user matches any substring of a value in the Directory. The match is case sensitive.
A.5.3.3. caseIgnoreListSubstringMatch
This matching rule can apply to:
stringListSyntax postalAddressSyntax
The matching rule determines whether a string or list or strings specified by the user matches any substring or substrings of a value stored in the Directory.
For example, a DXIM command line user can use the following command:
dxim> search /c=us/o=abacus where postalAddress="*Smith, *London*"
The above request matches successfully against any
postalAddress attribute that contains a list item ending in
the substring Smith, immediately followed by a list item
containing the substring London. The substring matching uses
the Section A.5.1.7, ''caseIgnoreStringMatch''.
For example, the command might return an entry that has the following
postalAddress value:
postalAddress="John Smith, 47 London Street, Oxford, Oxfordshire"
Note that the rule does not match a substring across list items. For
example, the same request would not return the following
postalAddress value:
postalAddress="Jim Smith, 3rd Pylon, Don Street"
The above value contains the substring London, but the
substring is split across list items, and does not match.
A.5.3.4. caseIgnoreIA5SubstringMatch
This matching rule applies to.
iA5StringSyntax
The matching rule determines whether a string specified by the user matches any substring of a value stored in the Directory. Upper case and lower case representations of the same character are considered to match, for example, a search for *smith might return WORDSMITH.
A.5.3.5. caseIgnoreSubstringMatch
This matching rule applies to
stringSyntax printableStringSyntax countryNameSyntax
The matching rule determines whether a string specified by the user matches any substring of a value stored in the Directory.
The use of a wildcard character indicates that a substring match is required. More than one wildcard character may be specified.
For example, a DXIM command line user can use the following command:
dxim> search /c=us/o=abacus where surname=ad*son*
The above request matches successfully against any surname
attribute that ends with the substring beginning with the letters "ad" and
containing the letters "son". Matches might include Adson, Adamson, and
Addissons.
A.5.3.6. numericSubstringMatch
This matching rule can apply to:
numericStringSyntax
The matching rule determines whether a numeric string specified by the user matches any substring of a value in the Directory.
A.5.3.7. telephoneNumberSubstringMatch
telephoneNumberSyntax
The matching rule determines whether a string specified by the user matches any substring of a value in the Directory, ignoring any spaces or hyphen (-) characters.
A.5.4. Approximate Matching Rules
HP DSAs support a number of approximate matching rules. These rules enable users to search for entries that match a specified string phonetically. The rules are based on Soundex.
For example, a DXIM command line user can use the following search command:
dxim> search /c=us/o=abacus where surname~=jonson
The above request would match entries with surnames such as Jonson, Johnson, Jonnson, and Jansen.
The DXIM windows interface does not currently support approximate matching.
The default schema define only two attributes that support approximate
matching: commonName and surname.
The only syntaxes that support approximate matching are
stringSyntax and printableStringSyntax. If you
define an attribute that uses either of those syntaxes, then you may want to
specify that the attribute uses one of the approximate matching rules.
A.5.4.1. allWordApproximateMatch
This matching rule can apply to:
stringSyntax printableStringSyntax
The matching rule applies case-insensitive approximate matching for
strings that contain several words. For example, a DXIM user could use the
following command, where exampleAttribute is an attribute that
supports this matching rule:
dxim> search /c=us/o=abacus where exampleAttribute~="Alan Peter Moore"
The match takes each word in the specified string, and matches against any
exampleAttribute attribute in the directory that has three
strings that are phonetically equivalent to those strings. For example, the
command might return the following matches:
exampleAttribute="Ellen Peta More" exampleAttribute="Allan Peter More" exampleAttribute="Allen Peter Muir"
The rule considers spaces to be divisions between words, and considers the order and number of the words to be significant. For example, the above search would not match "John Allen Peter Moore", or "Peter Alan Moore".
A.5.4.2. initialLetterApproximateMatch
This matching rule can apply to:
stringSyntax printableStringSyntax
This matching rule applies a case-insensitive comparison to the first letter of a value, and a phonetic comparison to the last word of a value. The matching rule considers space characters to be divisions between words. A value is considered to match if the first letter is the same, and the last word matches phonetically.
For example, a DXIM command line user could use the following command to
make an approximate match using the exampleAttribute:
dxim> search /c=us/o=abacus where exampleAttribute~="Alan Michael Moore"
The request would match any exampleAttribute values that
begin with the letter A, and which phonetically match Moore. Phonetic
matches of Moore might include More, Moor, and Muir.
The string Michael, and the remaining letters of Alan are ignored by the matching rule. Only the first letter and the last word are compared with values in the Directory.
Note that none of the attributes defined in the default schema use this matching rule.
A.5.4.3. initialWordApproximateMatch
This matching rule can apply to:
stringSyntax printableStringSyntax
This rule provides phonetic matching for first and last terms of a name. Other terms are ignored. For example:
dxim> search /c=us/o=abacus where commonName~="Alan Moore"
/C=US/O=Abacus/OU=Sales/CN=Alan Moore /C=US/O=Abacus/OU=Accounts/CN=Alan Francis Moore /C=US/O=Abacus/OU=Retail/CN=Allen Muir
The second listed entry matches despite the fact that it has a middle name that the user did not specify. The matching rule only checks the first and last terms of the value. The last listed entry matches phonetically.
The commonName, givenName and
surname attributes use this approximate matching
rule.
A.5.4.4. lastWordSoundexMatch
This matching rule can apply to:
stringSyntax printableStringSyntax
The rule applies a phonetic comparison to the last word of a value in the Directory. The rule considers space characters to be the divisions between words. For example, a DXIM command line user can use the following command:
dxim> search /c=us/o=abacus where exampleAttribute~="Alan Michael Moore"
The request would match any exampleAttribute values that have
a last word that phonetically matches Moore. For example, any values ending
in the word Moore, More, Moor, and Muir are returned. The strings Alan and
Michael are ignored by the matching rule.
None of the attributes in the default schema use this matching rule.
Appendix B. The PrescriptiveACI Attribute
The prescriptiveACI attribute contains information that specifies
restrictions on user access to directory information. This attribute has a complex
syntax, which requires the use of keywords. Other vendors’ utilities might use a
different set of keywords to the ones supported by DXIM.
Each PrescriptiveACI attribute can contain several statements of access
control, each of which is called an access control information item (ACIitem). Each
ACIitem contains details of the controls that apply to specific directory users’ access
to specific directory information.
Each ACIitem can be specified in one of two ways: user-first or item-first . The choice as to which to use depends simply on which format is the most convenient for the particular control you want to specify. For example, if you want to specify an individual user’s access rights to a variety of information, then user-first is the simplest way to declare the controls.
If you want to display the value of a prescriptiveACI attribute, use the
following command:
dxim> show /c=us/o=abacus/cn="Access Control" attribute prescriptiveACI
Note that in this version of the Directory Service you cannot specify a particular
identification string as part of a search filter in a SEARCH command. The only type of
searching supported is a wildcard search for all prescriptiveACI
attributes, for example:
dxim> search /c=us/o=abacus where prescriptiveACI=* - _dxim> attributes prescriptiveACI
Refer to Section B.1, ''User-First ACIitems'' for details of the user-first ACIitem format, and to Section B.2, ''Item-First ACIitems'' for details of the item-first ACIitem format.
Refer to Section B.3, ''Item Classes'' for an explanation of the different directory information items that you can specify access controls for. Refer to Section B.4, ''User Classes'' for an explanation of the different classes of directory user that you can specify access controls for. Refer to Section B.5, ''Permissions'' for an explanation of the various types of access control you can grant or deny.
B.1. User-First ACIitems
The format of a user-first ACIitem is as follows:
<identification>
PRECEDENCE <integer>
USERS <user_list>
PERMISSIONS <grants_denials> TO <item_list> [PRECEDENCE <integer>]
[<grants_denials> TO <item_list> [PRECEDENCE <integer>]] ... AUTHENTICATION (NONE | SIMPLE | STRONG)where:
<identification> is a user friendly string that identifies this
ACIitem. For example, "Manager’s Access Rights".
<integer> is an integer. If the DSA finds that more than one
argument appears to affect a given user request, the argument with the highest
precedence integer is the one that the DSA applies.
<user_list> specifies the directory users to which this ACIitem
applies. Refer to User_list for further details.
<grants_denials> specifies what rights are permitted and/or
denied.
<item_list> specifies the directory information items to which the
<grants_denials> apply.
You can repeat the <grants_denials> TO
<item_list> [PRECEDENCE <integer>] argument. Each
permission statement can be assigned a different precedence. A high integer
indicates high precedence.
User_list,
The <user_list> argument specifies the directory users to which
this access control applies, as follows:
<user> [AND <user>] ...
The accepted parameters for the <user> argument are:
ALL OWNER NAMES <name_list> GROUPS <name_list> BEGINNING <subtree_list>
For example:
USERS NAMES /c=us/o=abacus/cn=Joan
AND BEGINNING /c=us/o=abacus/ou=sales
AND OWNERRefer to Section B.4, ''User Classes'' for details of these user classes.
Grants_Denials
The <grants_denials> parameter specifies one or more permissions
that are granted or denied.
The format of <grants_denials> is as follows:
(GRANT | DENY) <permission> [, <permission>] ... [ AND (GRANT | DENY) <permission> [, <permission>] … ]
where <permission> is one of the following:
ALL ACCESS ADD BROWSE COMPARE CREATE DELETE DISCLOSE EXPORT IMPORT MODIFY READ REMOVE RENAME RETURN NAME SEARCH
Example:
GRANT READ, CREATE, DISCLOSE, RENAME - AND - DENY EXPORT, IMPORT, DELETE - TO <item_list>
In all cases, the default state of access control is that all forms of access are denied to all users for all information. In the absence of a grant, permission is assumed to be denied. Also, denials override grants of the same precedence.
Refer to Section B.5, ''Permissions'' for details of the meaning of each permission.
Item_List
Specify a list of directory information items to which the permissions apply, as follows:
TO <item> [AND <item>]...
where <item> is one of:
ENTRY ALL TYPES TYPES <type_list> ALL ATTRIBUTES ATTRIBUTES <type_list>
Refer to Section B.3, ''Item Classes'' for details of these items.
B.2. Item-First ACIitems
The format of an item-first ACIitem is as follows:
<identification>
PRECEDENCE <integer>
ITEMS <item_list>
PERMISSIONS <grants_denials> TO <user_list> [PRECEDENCE <integer>]
[<grants_denials> TO <user_list> [PRECEDENCE <integer>]]...
AUTHENTICATION (NONE | SIMPLE | STRONG)where:
<identification> is a user-friendly string that identifies this
ACIitem. For example, "Manager’s Access Rights".
<integer> is an integer. If the DSA finds that more than one
argument appears to affect a given user request, the argument with the highest
precedence integer is the one that the DSA applies.
<item_list> is the list of directory information items to which
this access control item applies. For example, the list can state that this item
applies to certain attributes. Refer to Section B.3, ''Item Classes'' for further
details.
<grants_denials> states one or more types of access that are
granted or denied.
<user_list> specifies one of more users to whom the
<grants_denials> apply.
The <grants_denials> TO <user_list> PRECEDENCE <integer>
argument can be repeated. Each permission statement can be assigned a different
precedence.
Item_list
Use the <item_list> argument to specify a list of items to which
this access control applies, as follows:
<item> [AND <item>] ...
The permitted components of an <item_list> are:
ENTRY ALL TYPES TYPES <type_list> ALL ATTRIBUTES ATTRIBUTES <type_list>
Refer to Section B.3, ''Item Classes'' for details of the item classes that you can specify.
Grants_Denials
The format of <grants_denials> is as follows:
GRANT | DENY <permission> [, <permission>] ... [ AND GRANT | DENY <permission> [, <permission>] ... ] ...
where <permission> is one of the following:
ALL ACCESS ADD CREATE DISCLOSE READ REMOVE DELETE BROWSE EXPORT IMPORT MODIFY RENAME RETURN NAME COMPARE SEARCH
Example:
GRANT READ CREATE DISCLOSE RENAME - AND - DENY EXPORT IMPORT DELETE
Refer to Section B.5, ''Permissions'' for details of the meaning of each permission.
User List
Specify a list of users to which the <grants_denials> apply, as
follows:
<user> [AND <user>] ...
where each <user> is one of the following:
ALL OWNER NAMES <name_list> GROUPS <name_list> BEGINNING <subtree_list>
Refer to Section B.4, ''User Classes'' for details of these user classes.
Example
PrescriptiveACI = "Restriction on Access to Password" -
PRECEDENCE 100 -
ITEMS -
ATTRIBUTES userPassword -
PERMISSIONS -
DENY ALL ACCESS -
TO ALL -
AUTHENTICATION NONEB.3. Item Classes
Use the following keywords to specify the directory information items to which an access control applies:
ENTRY ALL TYPES TYPES <type_list> ALL ATTRIBUTES ATTRIBUTES <type_list>
A single ACIitem can list more than one of these keywords, and some of the keywords require arguments. Refer to the subtopics for further details of each class of directory information item.
Entry
This parameter means that the access control applies to entries, although further access rights are required to access attribute information within an entry. Access to an entry is a prerequisite for access to attribute information.
All Types
This parameter means that the access control applies to all attribute types, but
not to values of the attributes. This allows you to detect the presence of an
attribute type in an entry, without being able to read or modify any values.
ALL TYPES excludes operational attributes. To specify operational
attributes, use the TYPES parameter (see Types) .
Note that an explicit DENY READ TO ATTRIBUTE statement overrides, for the specified attributes, a GRANT READ TO ALL TYPES statement of equal precedence. If you want to conceal values of some attributes, but permit the presence of all attributes to be detected, then you need to give the GRANT READ TO ALL TYPES statement a higher precedence than the DENY READ TO ATTRIBUTE. Refer to Types for further details.
Types
This parameter enables you to specify which attribute types the access control applies to. You can specify operational attributes as well as user attributes.
Note that the TYPES parameter gives no access rights to the values of attributes,
only to the attribute type. This is useful for attributes such as
userPassword, where you might want users to be able to detect the
presence of an attribute, but not to see or modify its values.
Syntax:
TYPES <type_list>
Example:
TYPES telephoneNumber, title, commonName
Note that an explicit DENY READ TO ATTRIBUTE statement overrides a GRANT READ TO TYPES statement of equal precedence. If you want to conceal the values of an attribute, but permit the presence of the attribute to be detected, then you need to give the GRANT READ TO TYPES statement a higher precedence than the DENY READ TO ATTRIBUTE.
For an example of this, refer to the default access control template file. In both
the "Directory Managers" and "Own Entry" ACIitems, there is a GRANT READ TO TYPE
statement for the userPassword attribute. That statement has a
precedence that is slightly higher than the precedence of the rest of the relevant
ACIitem. This ensures that managers and entry owners can detect the presence of the
attribute without being able to see its value.
All Attributes
This parameter means that the access control applies to all attribute information,
including values. However, ALL ATTRIBUTES excludes operational
attributes. To specify operational attributes, use the ATTRIBUTES
<type_list> parameter (see Attributes).
Attributes
This parameter enables you to specify which attributes the access control applies
to. You can specify operational attributes as well as user attributes. This
parameter includes values of the attributes, unlike the TYPES
parameter.
Syntax:
ATTRIBUTES <type_list>
Example:
ATTRIBUTES telephoneNumber, title, commonName
Item Classes Example
The following example shows how you can use the various items together in an
access control item. The access controls apply to entries, and all user attributes.
The permissions indicate that the named user is to be allowed READ
access to these items.
"Example Access Value" - PRECEDENCE 1 - ITEMS - ENTRY - AND ALL ATTRIBUTES - PERMISSIONS - GRANT READ ACCESS TO NAME /c=us/o=abacus/ou=sales/cn="Jon Jacks" - AUTHENTICATION SIMPLE
The above example is an item-first access control item. The equivalent user-first access control item would be:
"Example Access Value" -
PRECEDENCE 1 -
USERS -
NAME /c=us/o=abacus/ou=sales/cn="Jon Jacks" -
PERMISSIONS -
GRANT READ ACCESS TO -
ENTRY -
ALL ATTRIBUTES -
AUTHENTICATION SIMPLERefer to Section B.1, ''User-First ACIitems'' for details of the syntax of a user-first access control item, and to Section B.2, ''Item-First ACIitems'' for details of the syntax of an item-first access control item.
B.4. User Classes
Use the following keywords to specify the directory users to which an access control applies:
ALL OWNER NAMES <name_list> GROUPS <name_list> BEGINNING <subtree_list>
You can specify any combination of these user classes in a single ACIitem, and some of the keywords require further arguments. Refer to the subtopics for further details of the user classes.
All
This parameter means that the access control applies to all directory users. A DSA considers all users it does not know, or for whom it has no more specific access control information, as members of the ALL category.
Owner
This parameter means that the access control applies to the directory user who has authenticated themselves using the name of the entry that they then try to access. A possible use of this parameter would be to enable users to modify the passwords of their own directory entry, whilst passwords are generally not accessible to directory users.
Names
This parameter specifies particular users to whom the access control applies. Specify each user using their distinguished name. If you specify a
distinguished name that contains the comma character, quote the distinguished name.
In order to take advantage of the access control, users must identify themselves
to the DSA (through their application) using their distinguished name. For example,
when you use DXIM to bind to a DSA, you can specify your name and password. The DSA
applies the access controls specified for your name, rather than treating you as a
member of the ALL category.
Syntax:
NAMES <name_list>
where <name_list> is a list of names separated by commas, as
follows:
NAMES /c=us/o=abacus/ou=sales/cn="Jon Jacks", -
/c=us/o=abacus/ou=research/cn="Jenny Green", -
/c=us/o=abacus/ou=personnel/cn="Paolo Ginelli" - Groups
This parameter enables you to specify the name of a
groupOfUniqueNames entry. The groupOfUniqueNames entry
contains an attribute that specifies the distinguished names of all members of the
group.
If the DSA finds that a user is a member of such a group, then the DSA applies the
access control specified for the group, rather than treating the user as a member of
the ALL category.
Note that the DSA only determines the membership of groups for which the
groupOfUniqueNames entry is held locally. If a DSA does not hold a
copy of the groupOfUniqueNames entry, it assumes that the user is not a
member of that group.
Syntax:
GROUPS <name_list>
where <name_list> is a list of names separated by commas, for
example:
GROUPS /c=us/o=abacus/ou=sales/cn="Management Team", -
/c=us/o=abacus/ou=research/cn="Management Team", -
/c=us/o=abacus/ou=personnel/cn="Management Team" - Beginning
This parameter enables you to specify the name of a directory subtree, and to specify a portion of that subtree. The DSA applies the access control to any directory users who identify themselves to the DSA using a distinguished name that is within the subtree, or the specified portion of the subtree.
Syntax:
BEGINNING <subtree_list>
where <subtree_list> is as follows:
<subtree>, <subtree>, ...
Each <subtree> is as follows:
<name> [<limits>]
where:
<name> is the name of the entry at the root of the subtree that
contains the users to be affected by this access control.
<limits> is an optional parameter that specifies what portion of
the named subtree is to be affected. The limits are specified as minimum and maximum
integers, using the MINIMUM and MAXIMUM keywords. For
example:
BEGINNING /c=us/o=abacus minimum 2 maximum 4 -
The minimum integer indicates that the access control applies to entries that are at least that many levels beneath the entry at the root of the subtree. The maximum integer indicates that the access control applies to entries that are no more than that far beneath the entry at the root of the specified subtree.
By default, the access control applies to all entries in the subtree, including the entry at its root.
Example:
BEGINNING /c=us/o=abacus - BEGINNING /c=us/o=abacus, /c=us/o=acme - BEGINNING /c=us/o=abacus minimum 2 maximum 4, /c=us/o=acme -
In the last example, the limits option is used to specify that the access control
affects entries at least two levels beneath the Abacus entry, and no more than four
levels beneath it. For example, the entry /c=us/o=abacus/ou=sales is
only one level beneath the Abacus entry, and is therefore unaffected by the access
control.
User Classes Example
The following example shows how you can use the various user classes together in
the same USERS argument. The access controls apply to anyone who meets
one of the following requirements:
Is called Jon Jacks
Is a member of the Board of Directors
Has a distinguished name that is within the research subtree
Is the owner of the entry that is currently being accessed.
"Example Access Value" - PRECEDENCE 1 -
USERS -
OWNER -
AND NAMES /c=us/o=abacus/cn="Jon Jacks" -
AND GROUPS /c=us/o=abacus/cn="Board of Directors -
AND BEGINNING /c=us/o=abacus/ou=research minimum 2 maximum 5 -
PERMISSIONS -
GRANT ALL ACCESS TO
ENTRY -
ALL ATTRIBUTES -
AUTHENTICATION SIMPLEThe above example is a user-first access control item. The equivalent item-first access control item would be:
"Example Access Value" -
PRECEDENCE 1 -
ITEMS -
ENTRY -
AND ALL ATTRIBUTES -
PERMISSIONS -
GRANT ALL ACCESS TO -
OWNER -
NAMES /c=us/o=abacus/cn="Jon Jacks" -
GROUPS /c=us/o=abacus/cn="Board of Directors -
BEGINNING /c=us/o=abacus/ou=research -
AUTHENTICATION SIMPLEB.5. Permissions
X.500 allows you to control access to entries, and to particular attributes.
The range of permissions provided by the Directory Service reflects the range of its services. You can control the ability to search the directory, to compare attribute values, to create or delete entries or attributes, to modify attributes, and rename entries. You can also control what information is returned to the user in the event that they are refused access to the information they ask for. For example, if a user is not allowed to show an entry, the Directory Service might state that the entry does not exist, rather than returning an "insufficient privileges" message.
The complete list of permissions is as follows:
ALL ACCESS ADD BROWSE COMPARE CREATE DELETE DISCLOSE EXPORT IMPORT MODIFY READ REMOVE RENAME RETURN NAME SEARCH
Refer to the following subtopics for further details.
All Access
The ALL ACCESS permission is a shorthand way of specifying all
permissions. Refer to the individual permission topics for details of each
permission.
Add
The ADD permission controls the creation of entries and
attributes.
To create an entry, you need permission to add an entry, and you also need permission to add the attributes and values of the entry. If you do not have permission to add attributes, you will be unable to create an entry even though you have permission for that aspect of the operation.
Typically, a directory manager would have permission to add entries, and to add all user attributes. A directory manager might also have permission to add operational attributes.
An end user would typically not have permission to add entries, but might have permission to add some attributes to their own entry.
Note that in order to modify existing entries, you also need the
MODIFY permission. Without the MODIFY permission, you
can only add and remove attributes and values of entries as you create them.
A manager will typically have the ADD and MODIFY
permissions for entries, as well as the ADD permission for attributes
and values. However, a user might have permission to modify only their own entry,
and permission to add and remove attributes of their own entry, but no permission to
add new entries or modify other people’s entries.
Browse
The BROWSE permission allows you to use operations that can display
more than one directory entry.
For example, the BROWSE permission is required for list operations,
such as the DXIM SHOW SUBORDINATES command. List operations also require the
RETURN NAME permission.
The BROWSE permission is also required for search operations, such as
the DXIM SEARCH command, and the Show Subordinates option of the DXIM windows
interface. Search operations also require the RETURN NAME,
READ, and SEARCH permissions. Refer to the relevant
sections for further details.
Compare
The COMPARE permission enables you to detect the existence of an
attribute value in an entry. The READ permission to entries is also
required for such operations. The COMPARE permission is useless without
READ to entry.
For example, consider the following DXIM command:
dxim> compare /c=US with description=big
In order for that command to succeed, the manager requires permission to read entries, and to compare the description attribute (or all attribute types).
For example, the following extract from an access control item provides the required permissions:
GRANT - READ TO ENTRY - AND - COMPARE TO ATTRIBUTE description
The statement COMPARE TO ATTRIBUTE description includes all values of
that attribute.
Create
The CREATE permission is identical to the ADD
permission. Refer to the ADD permission for details.
Delete
The DELETE permission is identical to the REMOVE permission. Refer to
the REMOVE permission for details.
Disclose
The DISCLOSE permission allows you to control whether the existence
of directory information is revealed in the event of an error. If the permission is
not granted, a user is told that the information does not exist, rather than being
told that they failed to access it.
For example, if a user attempts to read an attribute value for which they have no access rights, the directory can tell the user that the attribute is not present. For some directory information, the ability to detect its existence may in itself be considered a security risk.
You can grant or deny the permission to DISCLOSE for entries and
attribute types.
Note that the disclosure only applies in the case of an error. The user might have permission to read an attribute, but not have the right to modify it.
In that case, a user without the DISCLOSE permission can be told that
the attribute does not exist when they use the MODIFY command, even
though they can successfully display it using SHOW commands.
Export
The EXPORT permission enables you to control whether an entry can be
renamed from one point in the DIT to another. The IMPORT permission is
required at the new location. The EXPORT permission permits all
subordinates to the entry being renamed collectively. This enables an entire subtree
of the DIT to be moved.
Note that HP’s DSAs do not support the renaming of entire subtrees from one point in the DIT to another.
See also the IMPORT permission.
Import
The IMPORT permission enables you to control whether an entry can be
renamed to a particular point in the DIT. The EXPORT permission is
required at the old location of the entry. The IMPORT permission
enables all subordinates of an entry to be renamed collectively. This enables an
entire subtree of the DIT to be moved.
Note that HP’s DSAs do not support the renaming of entire subtrees from one point in the tree to another.
See also the EXPORT permission.
Modify
The MODIFY permission enables you to control whether entries can be
modified. If the MODIFY permission is granted, you can modify entries,
although you also need the ADD or REMOVE permissions for
the particular attributes that you intend to modify. The MODIFY
permission on its own is useless.
See also the ADD and REMOVE permissions.
Read
The READ permission enables you to control whether directory
information can be returned to the user as part of the results of directory
requests. The READ permission can be specified with regard to entries,
attribute types, and attribute values. The READ permission affects, for
example, the DXIM COMPARE, SHOW, and SEARCH commands.
The permission to read entries does not in itself permit you to read the
attributes and values of entries. You also need some combination of
READ permission TO TYPES, and/or TO
ATTRIBUTES in order to receive information from entries.
Typically, a manager would have permission to read all directory information,
except for certain exclusions stated using DENY statements. For
example, the following extract from an access control item illustrates how a manager
might be denied access to certain attribute types.
GRANT - READ TO ENTRY ALL ATTRIBUTES - DENY - READ TO TYPE userPassword
Remove
The REMOVE permission enables you to control the deletion of entries, attribute types, and attribute values.
To delete an entry, you need the REMOVE permission to entries. You
can delete an entry without necessarily having permission to remove the various
attributes and values within the entry.
To remove attributes and values within an entry, you need the appropriate
combination of REMOVE permissions TO TYPES, and/or
TO ATTRIBUTES. permissions. Note that the removal of attributes and
values also requires the MODIFY permission to entries.
REMOVE permission to entries is not a prerequisite of removing
attributes and values.
Rename
The RENAME permission enables you to control the renaming of
entries.
The RENAME permission, if granted, enables you to change the last
relative distinguished name of an entry.
The RENAME permission allows you to add attributes to an entry and
remove attributes from an entry regardless of whether you have the
MODIFY, ADD and REMOVE permissions
normally required for those operations. The permission to rename an entry even
overrides denials of permission to modify entries.
For example, the following DXIM command involves the addition of the attribute
value commonName=Jones, and the deletion of the attribute value
commonName=Smith, but does not require any permission other than
RENAME.
dxim> rename /cn=Smith to /cn=Jones remove old
The command succeeds even if there are denials of permission to modify entries, or
add commonName or remove commonName.
Return Name
The RETURN NAME permission enables you to control whether the
distinguished names of entries are returned to users as a result of directory
requests.
The permission affects read, search, and list operations, that is, DXIM SHOW, SEARCH, and SHOW SUBORDINATES commands.
For requests in which the Directory Service might return more than one entry (SEARCH and SHOW SUBORDINATES commands), denying this permission prevents the request from returning any information. This permission is therefore required for the successful use of those operations.
For operations that can only return a single entry (SHOW commands), this permission determines whether the distinguished name of the entry is returned in the event that you specify an alias name in a request. If the permission is denied, and you specify an alias name in a SHOW command, then you receive no indication that the name you specified was an alias name. If the permission is granted, then the distinguished name of the entry is displayed, regardless
of whether you specified an alias name. In either case, assuming that other
relevant permissions are granted, such as READ permission to entries,
the entry is displayed.
This permission can therefore conceal from users the distinguished names of entries. This might be suitable for external users of your information, to whom you do not want to reveal the true structure of your organizational DIT.
Search
The SEARCH permission enables you to control which attribute types
can be used in search filters, and whether values can be searched for.
The BROWSE and RETURN NAME permissions are prerequisites
for search operations.
You can specify the SEARCH permission with regard to attribute types
or to attribute values.
Granting the SEARCH permission to types enables you to include the
permitted types in a search filter, but in itself does not allow you to specify
particular values. You could only search for all entries that have, for example, a
surname attribute, regardless of its value.
Granting the SEARCH TO ATTRIBUTES permission enables you to include
types and values of the permitted attribute types.
See also the BROWSE and RETURN NAME permissions.
B.6. Access Control Template File
This
section contains the access control template file that is
suggested default for implementing access control. Note that
because there are four ACIitems, the PrescriptiveACI values are
enclosed by parentheses.
The template file is called DXD$DIRECTORY:DXD$ACI_TEMPLATE.DXIM.
### Default access control template.
###
create entry -
attribute objectClass=(accessControlSubentry, subentry)
set entry -
attribute prescriptiveACI = -
- #
- # The following ACI specifies the distinguished names of users
- # who are to act as directory managers. These users can create,
- # delete and modify entries anywhere in the subtree for which
- # the ACI applies.
- # They can also read and modify (where appropriate) certain
- # operational attributes.
- #
( -
"Directory Managers" -
precedence 200 -
user names -
permissions -
grant all access to -
entry and -
all attributes and -
attributes -
prescriptiveACI, -
dseType, -
dxdUid, -
governingStructureRule, -
-
subordinateDeletedTimestamp, -
-
trustedDSAname -
-
deny read to -
attributes userPassword -
grant read to -
type userPassword precedence 201 -
authentication simple, -
- #
- # Users can check the passwords of other users. This permission
- # is used for the security of the Directory Service itself. DSAs
- # must be able to check each other’s passwords.
- #
"Authenticated Users" -
precedence 160 -
users all -
permissions -
grant compare to attribute userPassword -
authentication simple, -
- #
- # Users are allowed to browse and search the directory tree and
- # read all user attributes except those specifically excluded.
- #
"Unauthenticated users" -
precedence 150 -
users all -
permissions -
grant read, browse, search, return name, disclose, compare -
to -
entry and -
all attributes and -
attributes -
-
createTimestamp, -
modifyTimestamp, -
governingStructureRule -
-
deny all access to attributes -
-
-
userPassword -
authentication none, -
- #
- # The following ACI specifies additional access rights a user
- # has to their own entry, provided they have authenticated to
- # the Directory Service (using their password).
- # Specifically it specifies a set of attributes that a user
- # is allowed to add to or change in their own entry.
- #
"Own entry" -
precedence 150 -
users owner -
permissions -
grant modify to entry -
grant all access to attributes -
commonName, -
description, -
presentationAddress, -
protocolInformation, -
supportedApplicationContext -
grant compare, add, remove -
to attribute userPassword -
grant read to type -
userPassword precedence 151 -
authentication simple -
)The ITU-T was formerly known as the CCITT and some of their publications still have CCITT identification material.
Throughout this guide, attribute types and other X.500 definitions
are referred to using monospace typeface.
The term shadowing in X.500 means simply "copying information", and must not be confused with concepts such as "disk shadowing".
It is possible to use more than one attribute value in an entry’s RDN,
depending on the naming rules of the entry’s class. However, multipart RDNs
are less user friendly. In the default schema, only the
residentialPerson and organizationalPerson
classes permit multipart RDNs, so examples of multipart RDNs should be
rare.
The class is included for completeness. You should not use this class in your organization’s DIT; only as part of your DIT’s global prefix (see Section 4.3, ''Positioning Your Directory Information Tree into a Global Context'').
This class enables the use of two naming attributes in the RDN. See Section 4.4.1, ''Resolving Naming Clashes''.
This class enables the use of two naming attributes in the RDN. See Section 4.4.1, ''Resolving Naming Clashes''.
Each Subordinate Reference entity can refer to the master DSA and/or to any shadow DSAs of a subordinate naming context. You are advised to provide each Subordinate Reference entity with a complete set of references to all available copies, as this increases the chances of user requests succeeding.
Rules for displaying information in the Lookup Client are defined in its defaults file. The Lookup Client does not refer to the schema. See Section 9.7, ''Using the Lookup Client Configuration Utility'' for details of customizing the Lookup Client defaults file.
MTS.SC and IDS.SC contain definitions for other VSI applications, and must not be amended. Both COSINE.SC and QUIPU.SC contain definitions for COSINE and QUIPU directory services. The COSINE definitions were defined in RFC1274 and have definitions that are used by many directories. The ENTRUST.SC schema provides directory definitions for the Entrust V5.0 product. DEC.SC contains definitions required by the DSA, and must not be amended. The inclusion of these definitions enables DXIM to handle information from those services should you make a connection. Displays of such information should be user-friendly. However, HP’s DSA does not support all of the syntaxes required by these definitions, so entries based on those definitions cannot necessarily be held by the DSA. Appendix A, "Default Schema Definitions" documents the syntaxes supported by HP’s DSA.
Note that multi-valued attributes are stored as sets rather than sequences; that is, you cannot assume that the order in which you add values will be the order in which they are returned when you read an attribute. If you are defining an attribute for which one value is more important than another, see Section 6.5.3.1, ''Defining Primary and Secondary Attributes'' for advice.
Another feature of subentries is that they are usually hidden from users of the directory unless named explicitly. For example, if you search the directory or show the subordinates of an entry, subentries are hidden by default. These two commands provide a parameter that enables you to indicate that you want to see subentries. Refer to the online help for the DXIM command line utility for further details of the subentries control.
See Section 7.6, ''Access Control Scope and Inheritance'' for a detailed discussion of the scope and inheritance of access controls.