Using DECwindows Motif for OpenVMS
- Software Version:
- DECwindows Motif for OpenVMS Version 1.7F
- Operating System and Version:
- VSI OpenVMS IA-64 Version 8.4-1H1 or higher
VSI OpenVMS Alpha Version 8.4-2L1 or higher
Preface
1. About VSI
VMS Software, Inc. (VSI) is an independent software company licensed by Hewlett Packard Enterprise to develop and support the OpenVMS operating system.
2. Intended Audience
This guide is designed to help new and experienced users learn and use VMS DECwindows Motif software.
3. Document Structure
This book is intended to cover everything a successful DECwindows user needs to know. Its task-oriented chapters describe and illustrate DECwindows features. Topics are easy to find because the book is divided into four parts:
Part I includes all the information you need to get started. It describes how to start a session, use windows, work with files, and run applications.
Part II explains how to customize your environment to suit your needs.
Part III contains advanced user information.
Part IV includes DECwindows background information, keyboard techniques, a list of system messages, other reference information, and a Glossary.
4. How to Use This Book
How you use this book depends on how you like to learn and how much you already know about DECwindows. Whether you like to explore new things on your own or learn a few concepts before experimenting, this book will help you learn DECwindows quickly and efficiently. If you use the trial and error method—looking at every menu and trying things that look interesting—this book explains what you see. If you want to understand some concepts first,this book eases you into the DECwindows environment.
If you are new to graphical user interfaces, you should read Part I. When you're comfortable with basic DECwindows techniques, you can move onto other parts of the book for customization and advanced information.
If you are familiar with graphical user interfaces,take a few minutes and look over the first page of each part. Each part page gives a quick summary of the contents of the part. You can quickly review what is familiar about DECwindows and identify the areas you want to know more about.
5. VSI Encourages Your Comments
You may send comments or suggestions regarding this manual or any VSI document by sending electronic mail to the following Internet address: <docinfo@vmssoftware.com>. Users who have VSI OpenVMS support contracts through VSI can contact <support@vmssoftware.com> for help with this product.
6. OpenVMS Documentation
The full VSI OpenVMS documentation set can be found on the VMS Software Documentation webpage at https://docs.vmssoftware.com.
7. Conventions
VMScluster systems are now referred to as OpenVMS Cluster systems. Unless otherwise specified, references to OpenVMS Cluster systems or clusters in this document are synonymous with VMScluster systems.
The contents of the display examples for some utility commands described in this manual may differ slightly from the actual output provided by these commands on your system. However, when the behavior of a command differs significantly between OpenVMS Alpha and Integrity servers, that behavior is described in text and rendered, as appropriate, in separate examples.
In this manual, every use of DECwindows and DECwindows Motif refers to DECwindows Motif for OpenVMS software.
| Convention | Meaning |
|---|---|
|
Ctrl/ x |
A sequence such as Ctrl/ x indicates that you must hold down the key labeled Ctrl while you press another key or a pointing device button. |
|
PF1 x |
A sequence such as PF1 x indicates that you must first press and release the key labeled PF1 and then press and release another key or a pointing device button. |
|
Return |
In examples, a key name enclosed in a box indicates that you press a key on the keyboard. (In text, a key name is not enclosed in a box.) |
|
… |
A horizontal ellipsis in examples indicates one of the
following possibilities:
|
|
. . . |
A vertical ellipsis indicates the omission of items from a code example or command format; the items are omitted because they are not important to the topic being discussed. |
|
( ) |
In command format descriptions, parentheses indicate that you must enclose the options in parentheses if you choose more than one. |
|
[ ] |
In command format descriptions, brackets indicate optional choices. You can choose one or more items or no items. Do not type the brackets on the command line. However, you must include the brackets in the syntax for OpenVMS directory specifications and for a substring specification in an assignment statement. |
|
[ |] |
In command format descriptions, vertical bars separate choices within brackets or braces. Within brackets, the choices are options; within braces, at least one choice is required. Do not type the vertical bars on the command line. |
|
{ } |
In command format descriptions, braces indicate required choices; you must choose at least one of the items listed. Do not type the braces on the command line. |
|
bold text |
This typeface represents the introduction of a new term. It also represents the name of an argument, an attribute, or a reason. |
|
italic text |
Italic text indicates important information, complete titles of manuals, or variables. Variables include information that varies in system output (Internal error number), in command lines (/PRODUCER= name), and in command parameters in text (where dd represents the predefined code for the device type). |
|
UPPERCASE TEXT |
Uppercase text indicates a command, the name of a routine, the name of a file, or the abbreviation for a system privilege. |
|
|
Monospace type indicates code examples and interactive screen displays. In the C programming language, monospace type in text identifies the following elements: keywords, the names of independently compiled external functions and files, syntax summaries, and references to variables or identifiers introduced in an example. |
|
- |
A hyphen at the end of a command format description, command line, or code line indicates that the command or statement continues on the following line. |
|
numbers |
All numbers in text are assumed to be decimal unless otherwise noted. Nondecimal radixes—binary, octal, or hexadecimal—are explicitly indicated. |
Part I. Getting Started with DECwindows
Chapter 1, "Introduction" introduces you to DECwindows and describes the main components of the DECwindows interface.
Chapter 2, "Opening and Closing DECwindows" describes how to start, pause, and end a DECwindows session. It also includes a section about starting the online DECwindows tutorial.
Chapter 3, "Interacting with DECwindows" describes in reference format how to use DECwindows. If you're new to DECwindows, read the chapter and practice the procedures. If you're already familiar with windowing systems, use it to read about specific tasks you want to review.
Chapter 4, "Performing Common Tasks" covers basic DECwindows tasks,such as getting help and printing files.
Chapter 5, "Using Session Manager" tells you how to use Session Manager to control your current DECwindows session.
Chapter 6, "Using FileView" describes File View, the graphical representation of the OpenVMS directory structure.
Chapter 1. Introduction
You are about to realize the full potential of your workstation.
DECwindows lets you divide your workstation screen into windows and design your own working environment. Using DECwindows,you can run multiple applications simultaneously on a single screen and switch between them. This means that you can run a program in one window, read a mail message in a second window, and write a memo in a third.
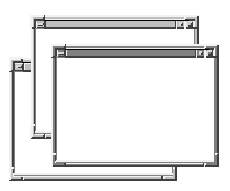
The screen for a typical DECwindows session looks like this:
1.1. What Are Windows?
Think of your workstation screen as a desktop with overlapping sheets of paper on it. You can shuffle the sheets of paper to place them in front of or behind other papers.
In DECwindows, these sheets of paper are called windows. A window is an area on your workstation screen that represents all or part of an application. For example, you can open one window that displays Bookreader. In this window, you can read online documentation. Other windows can display such applications as Mail, which enables you to send and receive electronic mail, and DECterm, which looks and functions like a VT300-series terminal.
To find out how to move, size, and arrange windows, see Chapter 3, "Interacting with DECwindows".
1.2. Interacting with DECwindows
DECwindows is an environment in which all applications look and respond in a similar way. This means that you use the same kinds of graphic objects and the same techniques to interact with each application.
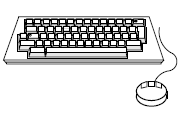
You can use either the mouse—the hand-held pointing device attached to your workstation monitor—or your keyboard to work with DECwindows applications. As you become familiar with DECwindows, you will develop a working style that fits your needs. You will find that some tasks are easier to perform with a mouse, some with the keyboard. For more details about interacting with DECwindows, see Chapter 3, "Interacting with DECwindows".
1.3. DECwindows Components
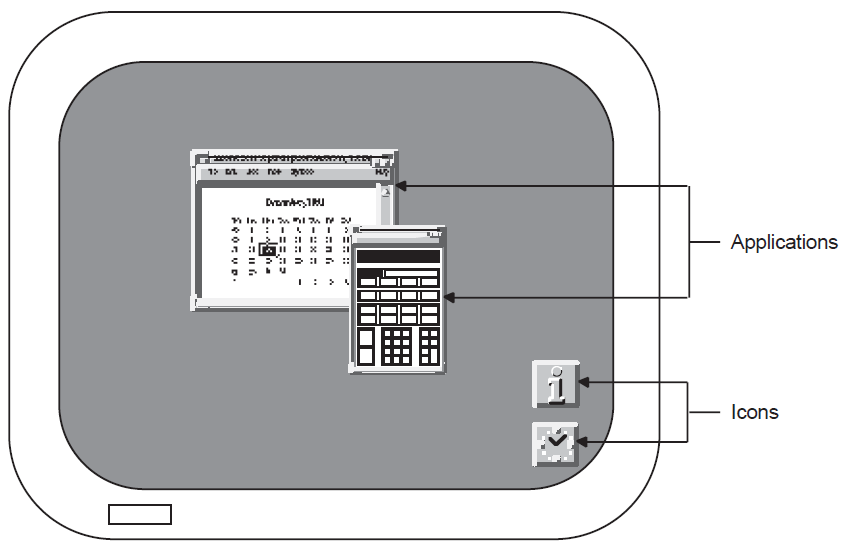
DECwindows contains several components for performing specialized tasks. Figure 1.1, ''DECwindows Components'' illustrates these components;the descriptions that follow briefly explain them. For more information about working with Session Manager,File View, and the Window Manager,refer to the appropriate chapter in Part I,''Getting Started with DECwindows''.
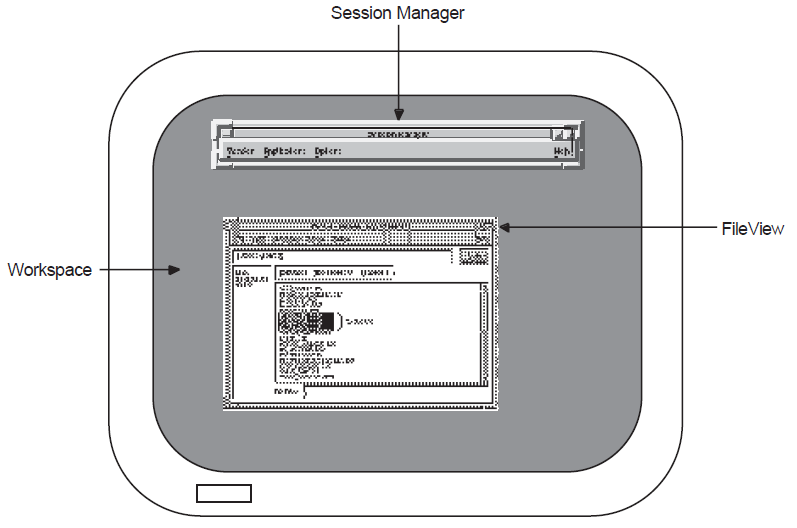
The Workspace is the screen on your workstation and is the background of your DECwindows environment. All windows and objects appear on the Workspace.
The Window Manager controls the size, placement, and operation of windows on the workspace by providing menus (Workspace and Window)that let you manage your windows. Because the Window Manager is a program, you can't see it on your screen. But you know it's there every time you open, move, or resize a window.
DECwindows includes the OSF/Motif Window Manager as the default window manager. The DECwindows X User Interface(XUI) Window Manager is also available. For more information about running the XUI Window Manager, see Chapter 10, "Customizing the Window Manager".
Session Manager helps control the look and feel of your DECwindows session. Use it to start DECwindows applications and to adjust workstation settings, such as keyboard features and pointer shape.
FileView is a graphical interface to the OpenVMS operating system,which provides commands for you to work with your files and directories.
1.4. Parts of a Window
You interact with DECwindows by finding an object on the screen that represents the task you want to perform,selecting that object, and completing the task. Typical interface objects include menu bars, resize borders, and buttons.
Figure 1.2, ''Parts of a Window'' shows the objects that you use to work with windows; the descriptions that follow briefly explain them. To find out how to use these objects to manage your windows, see Chapter 3, "Interacting with DECwindows".
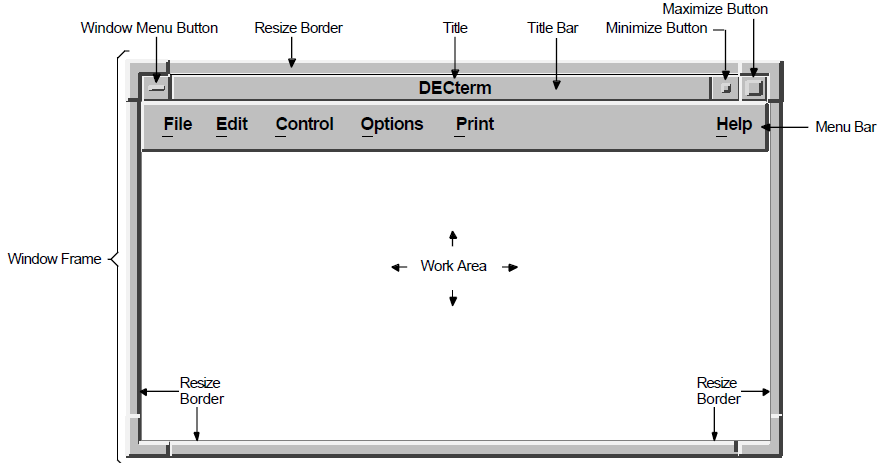
The window frame surrounds a window and usually consists of resize borders,a title bar, a window menu button, a minimize button,and a maximize button.
The resize border surrounds an application window and lets you resize the application's window.
The title bar shows the name of the application and contains window management buttons that you can use to rearrange your screen display. Most windows have a title bar.
The window title identifies the function of a window. For a main window, it usually contains the name of the application. For a dialog box, it may also contain specific information about the use of the window.
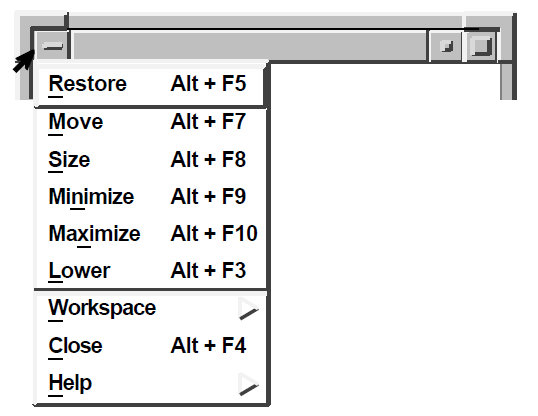
The window menu button displays the window menu,which contains menu items for working with windows.
The minimize button lets you shrink a window to an icon on the workspace. An icon is a small graphic representation of an object, usually an application.
The maximize button lets you increase the size of a window to its maximum allowable size.
The menu bar contains the names of menus you can choose from to work with the application.
The client area or work area is the area in a window where you interact with the application.
The matte is an optional decorative border between the window frame and the work area.
1.5. Applications Overview

DECwindows applications "automate," or perform automatically, basic tasks. For example, Mail automates sending and receiving interoffice mail; the Cardfiler automates creating and filing index cards.
This book doesn't include detailed instructions for using every application. Instead, it describes the techniques you use to run applications, work with windows, and manage your DECwindows environment. Once you are running an application, you can use DECwindows Help to find application-specific information. For more information about DECwindows Help, see Chapter 4, "Performing Common Tasks".
|
Application |
Use it to do this |
|---|---|
|
Bookreader |
Read online documentation on your screen. |
|
CDA Viewer |
Display the contents of compound documents and graphics,images, and text files on your screen. (May also be used to display PostScript documents on a workstation that has a Display PostScript extension.) |
|
Calculator |
Perform simple arithmetic functions, such as addition,subtraction, multiplication, division, percentages, and square roots. |
|
Calendar |
Keep track of appointments and plan your schedule. |
|
Cardfiler |
Create an electronic box of index cards for organizing information. |
|
Clock |
Display the time and date. |
|
DECsound |
Play back recorded messages, record audio messages,mail recorded messages, and include recorded messages in compound messages. |
|
DECterm |
Emulate a VT300-series terminal. From DECterm,you can then enter DCL commands or use any other command-line interface. |
|
FileView |
Work with files and directories. |
|
|
Exchange messages with other computer users. |
|
Message Window |
Display messages, such as new mail notices and warnings about problems. |
|
Notepad |
Edit text. |
|
Paint |
Create a simple picture using an assortment of art tools. |
|
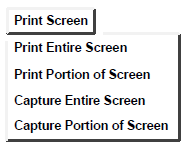
Print Screen |
Take a snapshot of an entire screen or portion of a screen and print the file containing the snapshot now or later. |
|
Puzzle |
Solve a classic, sliding-tile puzzle on your screen. |
Tip
Because DECwindows is based on the industry standard X Window System,you can use other vendors' applications as well as Digital applications. For more information about the standard X Window System, see Appendix A, "Understanding DECwindows Architecture". For more information about running other vendors' applications, see Chapter 12, "Running Applications Across the Network".
1.6. Deciding Where to Begin
The best way to learn DECwindows is to use it. You can do this by working through the online DECwindows tutorial or by working though the procedures in this book. To use the tutorial, see " Section 2.2, ''Starting the Online Tutorial''" in Chapter 2, "Opening and Closing DECwindows". To practice the procedures,read Chapter 2, "Opening and Closing DECwindows" to learn how to start a DECwindows session. Then go to Chapter 3, "Interacting with DECwindows".
Chapter 2. Opening and Closing DECwindows

To use DECwindows, you have to start a session. In this chapter you will learn how to start, pause, and end a DECwindows session. If any of the terms or techniques are new to you, refer to Chapter 3, "Interacting with DECwindows"for more information.
2.1. Starting a Session
If the system startup procedure has been successful, DECwindows displays Session Manager's Start Session screen.
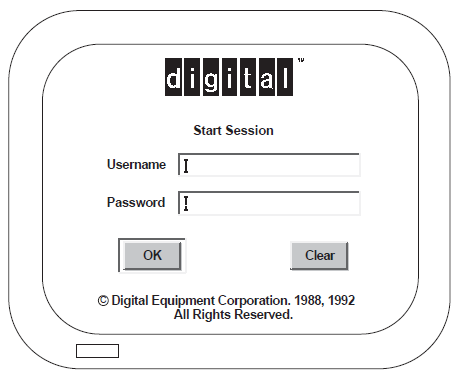
The Start Session screen is the gate through which you become authorized to use your workstation. It prompts you for your user name and password. When you or your system manager installed DECwindows, you may also have established an account for yourself with an associated user name and password. Your user name is unique and identifies you to the system. In many cases, a user name is your first or last name. Your password is for your protection. Keep it secret so that other users cannot access your account.
Type your user name.
Select the Password entry box by pointing to the Password entry box and clicking MB1.
Type your password. To preserve the secrecy of your password, the letters you type are not displayed on the screen.
Click on the OK button or press Return if you have entered your user name and password correctly.
If you provide wrong information or make a typing mistake and do not correct it, your system does not let you start a session. Instead, it displays a warning that some information is incorrect.
Press Return or click on the OK button to acknowledge the message. Then retype your information and press Return.
Tip
The DECwindows screen timeout feature periodically causes the screen to go blank. To restore the screen image, move the mouse or press any key.
If your user information is correct, your session begins and DECwindows displays Session Manager's menu bar.

To find out how to use Session Manager to run applications and manage your session, see Chapter 5, "Using Session Manager".
2.2. Starting the Online Tutorial
Now that you have started a DECwindows session, you can quickly gain some hands-on experience by running the online DECwindows tutorial.
If you don't know how to work with menus, read " Section 3.2.2, ''Choosing Items from Pull-Down Menus''" in Chapter 3, "Interacting with DECwindows".
From Session Manager's Help menu,choose Tutorial.
The online tutorial starts and gives you instructions for using it.
2.3. Pausing a Session
Tip
Before you put your session on hold, make sure you save any files. Then, if your system fails, you won't lose any information.
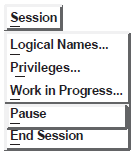
To put your current session on hold, choose Pause from Session Manager's Session menu. Your screen is cleared and the Pause Session screen is displayed.
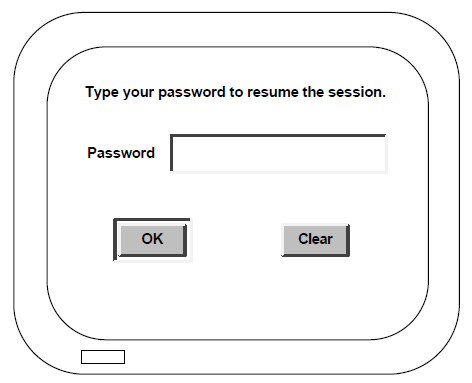
To continue your session, type your password. If you make a mistake while typing, click on the Clear button to cancel what you've entered so far. Then retype your password correctly and press Return.
Once the system verifies your password, your session resumes. If you make a typing mistake and do not correct it, DECwindows notifies you that your password is incorrect. Press Return to acknowledge the message. Then retype your password and press Return.
At this point, just as when you started a session,you may exceed the number of allowable attempts to resume it. This happens if you repeatedly make typing mistakes while typing your password. If you enter your password again and continue to make mistakes,you will exceed the number of allowable attempts. Then you won't be able to resume your session even when you enter the correct password. If you trigger this security feature, see your system manager.
2.4. Ending a Session
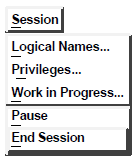
To end your session, choose End Session from Session Manager's Session menu. Even if you choose End Session, you can still return to your session. Session Manager displays a dialog box asking you to confirm that you want to end your session.
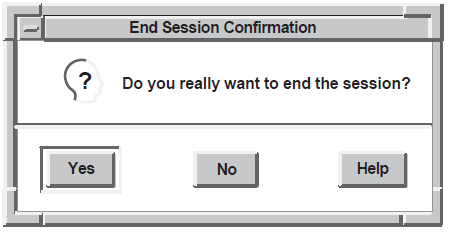
To return to your session, click on the No button. To end your session, click on the Yes button. All windows are closed. DECwindows displays the DIGITAL logo and the Start Session screen.
Chapter 3. Interacting with DECwindows
You can interact with DECwindows applications by using either a mouse or a keyboard. As you work with DECwindows, you will find that some tasks are easier to perform with a mouse and some are easier with a keyboard. Try both mouse and keyboard techniques and use each where it works best for you.
Note
Before you try any of the procedures described in this chapter, you must start a DECwindows session. If you have not started a session, see Chapter 2, "Opening and Closing DECwindows".
When you start a DECwindows session, DECwindows displays Session Manager on your screen. You can use Session Manager's window to practice the techniques you will read about in this chapter. If you want to practice with another application, read Section 5.1, ''Running Applications'' in Chapter 5, "Using Session Manager".
3.1. Using a Mouse
Traditional computing requires you to interact with your screen by typing text and pressing keyboard keys. A mouse makes using DECwindows as easy as pointing to an object on your screen and clicking a button. You can use the mouse to choose commands from a menu, to enlarge and shrink windows, and to rearrange windows on your screen.
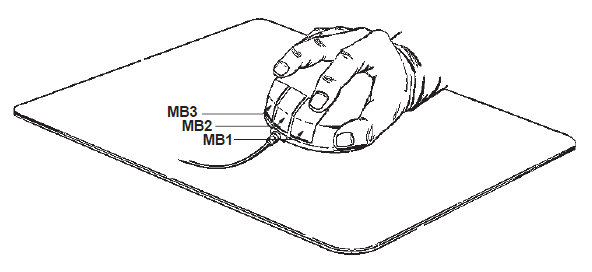
A mouse has three buttons. MB1 (for "mouse button 1") is on the left, MB2 is in the middle, and MB3 is on the right. Most often you use MB1to interact with applications. This button arrangement naturally suits right-handed users; if you are left-handed, you can easily rearrange this configuration. See Chapter 5, "Using Session Manager" for information about customizing the mouse buttons.
When you work with the mouse, make sure that the cable connecting it to the workstation is pointing away from you. Place the mouse on a smooth surface. As you move the mouse, watch your screen to see how moving the mouse moves the pointer on the screen in exactly the same way. If you are using the mouse and run out of room on your desk, just lift the mouse and put it down where you have more room. The pointer does not move when you lift the mouse.
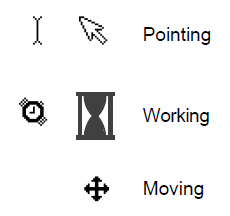
Usually the pointer is shaped like an arrow, but it can change shape to reflect the state of an application. For example, it becomes an hourglass or a wristwatch when DECwindows is performing a task that needs a little more time to complete.
3.1.1. Mouse Techniques
Point: Using the mouse, move the pointer to where you want the next action to occur.
Click: Quickly press and release MB1. You should hear and feel a faint click.
Press: Point to the menu name, to the scroll bar stepping arrow, or wherever you want the action to occur. Without moving the mouse, press and hold MB1.
Drag: Press and hold MB1 (or MB2), move the pointer, and release MB1 (or MB2).
Double click: Point to the object and click MB1 twice in quick succession. For more information about double clicking with files, see Chapter 6, "Using FileView".
Shift click: Point to the object. Press and hold the Shift key and click MB1. Release the Shift key.
3.2. Working with Menus
Menus contain items that let you tell DECwindows what you want to do or what you want to work with. To interact with DECwindows,you select a menu and choose a menu item from that menu. The names of menus available in an application appear on the menu bar.
Pull-down menus
Pop-up menus
Options menus
Each of these types of menus can contain submenus. An arrow next to a menu item indicates that DECwindows will display a submenu when you choose that menu item.
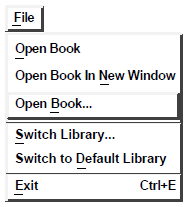
Any menu item followed by three periods (...) is your cue that a dialog box will be displayed if you choose that menu item.(More information about dialog boxes appears later in this chapter.)
The following sections describe how to work with menus and submenus.
3.2.1. Selecting Menus
On the menu bar, point to the name of the menu you want to display.
Press and hold MB1.
This highlights the menu name and displays or pulls down the menu.
If you click MB1 on the menu name, the menu will be displayed until you choose a menu item or click MB1 outside the menu.
Note
Menus contain two shortcuts that you can use with your keyboard: accelerators and mnemonics.
An accelerator is a key on your keyboard that you can use to execute a function in a menu. Accelerators are listed in the menu to the right of the function items if they are available for that function.
A mnemonic is an underlined letter in a menu name or a menu item. Mnemonics let you display menus and perform tasks by typing letters on your keyboard.
For more information about using keyboard accelerators, see "Section 3.3.9, ''Additional Ways to Manage Windows''" and Appendix C, "Using DECwindows with a Keyboard".
3.2.2. Choosing Items from Pull-Down Menus
Some pull-down menus contain commands. Others list the names of items you can work with.
On the menu bar, point to the name of the menu you want to display.
Press and hold MB1.
While holding MB1, drag to the menu item you want.
Release MB1.
Tip
Some applications, such as Mail, offer rectangular push buttonsto duplicate frequently used commands that are also available as menu items. Push buttons are usually found underneath an application's work area—where the application's text and graphics are displayed. To execute these commands quickly, click MB1 on the push button.
3.2.3. Choosing Items from Pop-Up Menus
Pop-up menus make it easier for you to work with files and applications by giving you quick, direct access to an application's commands and functions. Pop-up menus duplicate commands and functions available on pull-down menus. Unlike pull-down menus, which require you to move the pointer to the menu bar, you can display a pop-up menu anywhere in an application's work area.
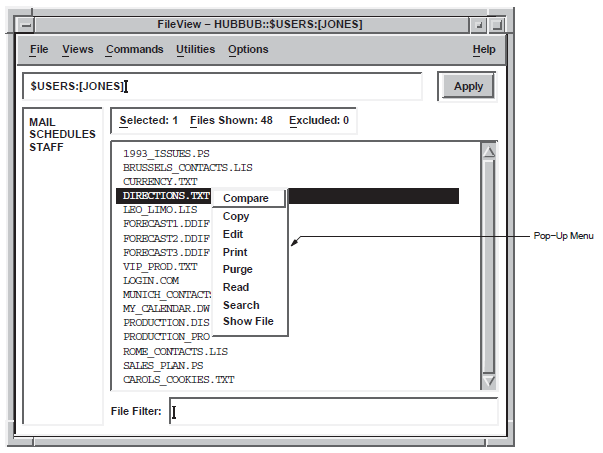
Press and hold MB3 on the application's work area.
Drag to the menu item you want.
Release MB3.
If you change your mind while looking at a pop-up menu, drag outside the menu and release MB3. The menu disappears and no action is taken.
3.2.4. Choosing Items from Options Menus
An options menu is a menu that appears in a dialog box and is represented by a graphic rectangle next to the option. An options menu allows you to choose one option from many. In the dialog box, only the current option is displayed. To see the other options from which you can choose, you display the option menu.
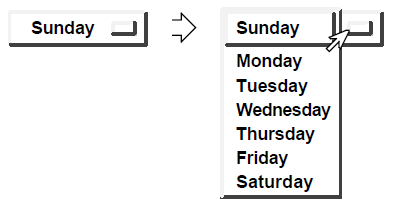
Press and hold MB1 on the current option.
The options menu is displayed.
Drag to the menu item you want.
Release MB1.
The options menu disappears. The option you chose is now the current option.
If you decide not to change the original option, drag outside the menu and release MB1. The menu disappears and no changes occur.
3.2.5. Choosing Items from Submenus

A menu item with a submenu icon—an arrow pointing to the right—indicates that a corresponding submenu is available. If you choose that menu item, the submenu is displayed and you need to refine your choice by choosing a menu item from that submenu.

On the application's menu bar, press and hold MB1 to display the pull-down menu
Drag to the menu item you want.
If the menu item has a submenu associated with it, the submenu will appear to the right of the menu.
Drag to the menu item you want to choose from the submenu.
Release MB1.
3.3. Managing Windows
When you work with DECwindows, you can have one window or many windows open at the same time. Using multiple windows lets you work with many applications and switch between them. This section explains how to move, size, and arrange windows.
If you're not familiar with the basic components of a window, see Section 1.4, ''Parts of a Window'' in Chapter 1, "Introduction".
3.3.1. Making Windows Active
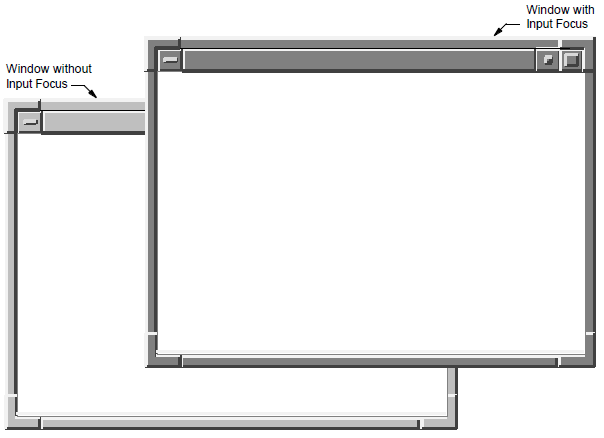
When you have more than one window open, DECwindows needs to know which one you're currently working on so that the commands you choose and the text you type end up in the right place. To work with a window,you must make it active, or give it input focus.When you make a window active, by default it moves to the front of the stack of overlapping windows and its window frame is highlighted. Any keystrokes you type appear in this window. When you make another window active, the new window is given input focus. Only one window can have input focus at a time.
Point to a location in the window or window frame.
Click MB1.
DECwindows provides two ways to give windows input focus: explicit focus and implicit focus. With an explicit-focus policy, you must move the pointer to a window and click on a mouse button or press a key on the keyboard. This is the default focus policy for DECwindows. With an implicit-focus policy, moving the pointer into a window gives the window input focus. For more information about changing your input focus policy, see Chapter 10, "Customizing the Window Manager".
3.3.2. Moving Windows
Position the pointer anywhere in the window's title bar (except on a button).

Press and hold MB1.
An outline of the window appears.
Drag the window outline to the new location.
Release MB1.
If the window was partially obscured by other windows, by default it moves to the front of the stack of windows and is given input focus.
To cancel a move operation, press the Escape key (or F11).
3.3.3. Sizing Windows
Sometimes you want to make one window very large so you can see everything in it. At other times, you want to work with small windows, such as when several applications are running simultaneously. You can change the size of your windows to suit your needs by using the window's resize borders.
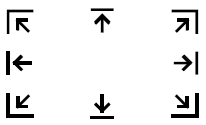
Position the pointer on one of the window's resize borders. Note that the resize operation is limited by the side or corner that you select.
The pointer changes into one of the following resize cursors:
Press and hold MB1.
Drag the resize cursor to the size you want.
To make the window larger, drag the resize cursor beyond the window border. To make the window smaller, drag the resize cursor inside the window border. The outline stops moving when the window is as small as it can get.
Release MB1.
To cancel the operation, press the Escape key (or F11).
3.3.4. Minimizing Windows
If you have several applications running at the same time,you can "free up" space on your screen to run another application by minimizing a window, which means that you shrink the window to an icon.An icon is a symbol on your screen that represents an application or window.
When you minimize a window, the application it represents continues to run and remains easily accessible. All processes continue to execute while the application is stored as an icon.
Point to the window's minimize button.
Click MB1.
The window closes and its icon appears on the Workspace.
Tip
You can also minimize a window by double clicking MB1on the window's title.
3.3.5. Restoring Icons to Windows
When you restore an icon, you open a window for that application. If you have more than one window open and restore an icon to a window, by default the new window is placed at the front of the stack of overlapping windows.
Point to the icon on the Workspace.
Double click MB1.
The window opens, is given input focus, and is available for your use.
3.3.6. Maximizing Windows
If you are working with only one application,you might want to maximize (enlarge) the application window so that it fills your screen. When you maximize a window, your other windows and icons stay on the screen,but they are covered by the maximized window.
Point to the window's maximize button.
Click MB1.
The window expands to its maximum allowable size.
3.3.7. Restoring Maximized Windows
Point to the window's maximize button.
Click MB1.
The window returns to its original size.
3.3.8. Storing Icons in an Icon Box
By default, icons are displayed as separate windows on the lower right side of the screen. You can move them anywhere on your screen.
If you want to display your icons in one central place,you can store them in an icon box. An icon box is a window that contains the icons for all the windows on the screen. To find out how to create an icon box, see Chapter 10, "Customizing the Window Manager".
In an icon box, if you double click on any icon,the window becomes active by default and is raised to the top of the screen. Using the keyboard, you can press Return on a highlighted icon to make the window active. If you Shift+double click on any icon, it will minimize that window.
Tip
If you store your icons in an icon box, as you close windows your icon box develops gaps where the icons used to be. To rearrange the icons in the icon box to fill in these gaps,choose Pack Icons from the Workspace menu.
Packing icons can also help you to locate icons that are obscured by windows.
3.3.9. Additional Ways to Manage Windows
The preceding sections describe how to manage your windows by using the buttons and resize borders on the window frame. You can also access many of these window features by using the Window menu and the Workspace menu.
The Window menu contains menu items for working with windows. To display the Window menu, click on the Window Menu button on the left corner of the title bar.
The Workspace menu contains general information for arranging windows and customizing the Window Manager. To display the Workspace menu, click MB1 or MB3 on the Workspace. You can also display the Workspace menu by choosing Workspace... from the Window menu.
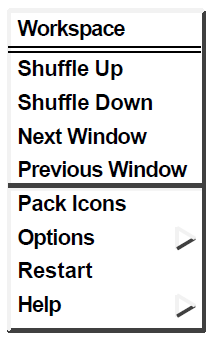
3.3.10. Arranging Windows
When you are working with stacked windows and select a window, it moves to the front of the stack and is given input focus. But if a larger window obscures a smaller window, you can't select that small window without moving the larger window out of the way. If you use the title bar to move the larger window, you disrupt your work arrangement.
|
To |
Do this |
|---|---|
|
Raise the bottom-most window to the top of the screen |
Choose Shuffle Up from the Workspace menu. |
|
Lower the top-most window to the bottom of the screen |
Choose Shuffle Down from the Workspace menu. |
|
Give input focus to a previously active window |
Choose Next Window from the Workspace menu. |
|
Give input focus in the reverse order of Next Window |
Choose Previous Window from the Workspace menu. |
The Shuffle Up and Shuffle Down menu items are useful if you are working in a large window and want to refer to a window that is obscured. You can shuffle the windows on the screen until the hidden window is displayed and then continue to type in the large window. If no windows are obscuring other windows, then shuffling the windows has no effect.
Next Window and Previous Window are useful if you want to circulate through all the windows on the screen. Using these options differs from shuffling windows. Next Window always brings you to the next window even if it is not obscured and always makes that window active.
Tip
To raise a window that you lowered or shuffled, click on the title bar.
3.3.11. Customizing Your Windows
The DECwindows Motif Window Manager controls the way your windows look(for example, the style and contents of the title bar) and the way they behave when you are working with them. By using the Window Manager's customize menu options,you can customize your workspace and windows to suit your working needs and style. For more information about using the Window Manager's customize options, see Chapter 10, "Customizing the Window Manager".
3.4. Working with Dialog Boxes
DECwindows displays a dialog box whenever it needs additional information from you to carry out a task. Sometimes you need to type text; at other times, you need only click on a button to change a setting.
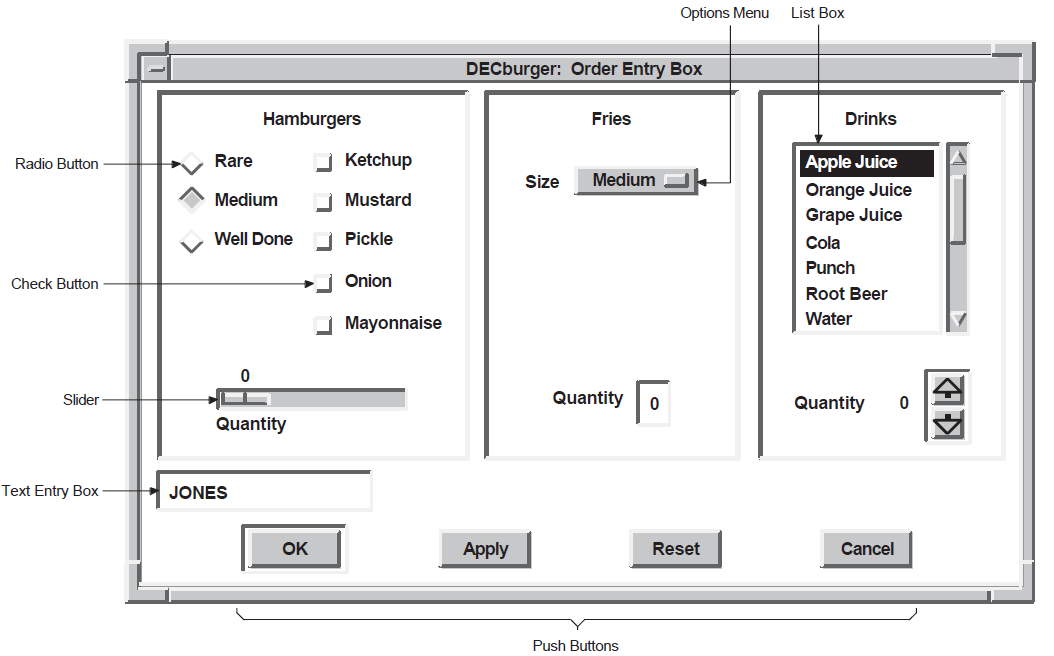
3.4.1. Supplying Information in Dialog Boxes
By typing text in a text-entry box. A text-entry box is a box in a dialog box where you type information that DECwindows needs to perform a specific task.
A text insertion cursor is visible in each entry box. The text cursor, which blinks when an entry box has input focus,shows you where the text you type will appear. What you type appears to the left of the text cursor. Use the key to correct typing mistakes.
By clicking on diamond-shaped radio buttons or square check buttons. Radio buttons let you select one option from many. Check buttons let you turn a setting on or off.
By dragging the slider in a scale. Dialog boxes often contain a scale and slider when you need to supply a numeric value. The arrow in the slider points to the current value.
By selecting choices (for example, file names) from a list box. Scroll bars appear if the choices do not fit in the list box.
- By clicking on push buttons. Push buttons, such as OK, Apply, and, Cancel,let you tell DECwindows what to do with the information you supplied in the dialog box.
Tip
A double border around a push button indicates that it is the defaultoption. Default options are those you will choose most frequently. Usually the OK button is the default option in a dialog box. Whenever you see a button with a double border, pressing the Return key achieves the same result as clicking on that button.
3.4.2. Moving and Changing Settings in a Dialog Box
|
To |
Do this |
|---|---|
|
Move forward between text-entry boxes |
Press the Tab key, or point to the text entry box to which you want to move and click MB1. |
|
Move backward between text-entry boxes |
Press Shift+Tab, or point to the text-entry box to which you want to move and click MB1. |
|
Move the text cursor within a text-entry box |
Point where you want the text inserted and click MB1, or use the right and left arrow keys to move the text cursor right or left. New characters push existing ones to the right. |
|
Change the numeric value on a scale |
Drag the slider on the scale right or left, or point to another location on the scale and click MB1. |
|
Change a radio or check button setting |
Point to the radio or check button and click MB1. Or press Return or the space bar. |
|
Arrow keys |
Use the arrow keys to move between items in the same group of objects, such as radio buttons. |
3.4.3. Saving Your Settings
Once you change the settings you want, click on either the OK or the Apply button and the new settings will take effect. If you decide not to change the settings, click on the Cancel button. Some applications save or apply settings in different ways. For more information about saving your Session Manager, File View,or Window Manager settings, refer to the appropriate chapter in Part II,''Customizing Your DECwindows Environment''.
3.4.4. Making Selections from List Boxes
A list box is part of a dialog box that contains a list of items,often file names, from which you can choose. Many applications display a list box when you open or save a file.
To select an item from a list box, point to the item and click MB1. The item you select is highlighted.
3.4.5. Using File Selection Boxes
If an application needs a file name to complete a task, it displays a file selection box. A file selection box contains a list box that displays a list of files in the current directory.
If you select a file name in the list box,you can click on OK to open the file. DECwindows also gives you a shortcut for opening files from list boxes: Double clicking on the file name produces the same results as selecting that file name and clicking on OK.
If you want to work with a file that does not appear in the list box, type the name of the file in the Selection entry box and click on OK. Alternatively, use the File Filter entry box to list a subset of files that you can then select from. For example, to list all the files in another directory with the file type TXT, enter the complete directory specification—[JONES.LETTERS]*.TXT—in the File Filter entry box and click on the Filter button. The list of files that meet the qualifications is displayed. Double click on the name of the file you want to open.
3.5. Scrolling
Some application windows display scroll bars, which let you view the text that does not fit in a single window. Some windows have both horizontal and vertical scroll bars.
A scroll bar consists of stepper arrows at either end of the scroll region. The slider is the thicker box that overlays some of the scroll region. If the slider is at the top of the scroll region, the beginning of the file or list is visible. If the slider is at the bottom of the scroll region, the end of the file or list is visible.
The length of the slider is relative to the total amount of text in the document and indicates how much more text remains to be displayed. For example, a short slider indicates that much text remains to be displayed. A long slider that completely fills the scroll bar indicates that all the text is currently displayed.
|
To scroll |
Do this |
|---|---|
|
One line at a time |
Click MB1 on the stepper arrows. |
|
Forward one window of text at a time |
Point to the scroll region below the slider and click MB1. |
|
Back one window of text at a time |
Point to the scroll region above the slider and click MB1. |
|
Continuously through the list or file one line at a time |
Press and hold MB1 on either stepper arrow. |
|
Continuously through the list or file one window of text at a time |
Press and hold MB1 in the scroll region. |
|
Move slider to a particular position |
Press MB2 in the scroll region. |
|
To another location in the list or file |
Drag the slider to a position in the scroll region that corresponds to the general location you want to see. If the slider is at the top of the scroll region, you are viewing the beginning of the list or file. If the slider is in the middle of the scroll region, you are viewing the middle of the list or file. Cancel the drag by clicking another mouse button before releasing MB1. |
Chapter 4. Performing Common Tasks
DECwindows applications let you perform many basic tasks the same way. For example, Mail and File View display the same dialog boxes for printing files and mixing colors. This chapter describes such commonly used DECwindows tasks as getting help, editing text, printing files, and mixing colors.
4.1. Getting Help
You can get help in DECwindows applications by using the application's Help menu,the Help button in a dialog box, or the Help key on the keyboard (for some applications).
Double-clicking on hotspots in the text. (See "Section 4.1.1, ''Invoking Help''.")
Selecting Search Book from the Search menu to search for a particular string in the help text.
Scanning through the topics using the screen or topic arrow buttons in the Help window.
Scanning through the topics by selecting Next or Previous Topic from the View menu.
Viewing the full list of topics by selecting Open Navigation Window from the File menu.
Retracing any of your steps by selecting the Go Back button in the Help window or from the View menu.
You can also copy help text and paste it in another window, save help information in a file, and print help text.
4.1.1. Invoking Help
For general information about the application, choose On Window.
For product information such as the version, choose On Version.
To look up terms specific to the application, choose Glossary.
For context-sensitive help, choose On Context.
Although the items in the Help menu may vary, all applications should contain On Window and On Version menu items.
When you select On Window, a Help window opens with general help for the application. Additional topics are often listed at the end of each help topic or in the help text. These topics are called hotspots and are highlighted when you move the pointer over the text. To select these topics, point to them and double click MB1. To highlight all the hotspots, choose Hotspots from the View menu.
Use the Screen arrow buttons to move to the next or previous window.
If there are no more windows, Help automatically moves to the next or previous topic.
Use the Topic arrow buttons to move to the next or previous topic.
To view a topic in a separate window, click on the topic in the help text and choose Open Topic in New Window from the File menu.
Use the Go Back button to return to any help topic that you already displayed.
You can continue to use Go Back until you have reached your first help topic.
To view a list of all the help topics,choose Open Navigation Window from the File menu.
Help displays a new window with the topic list. Double click on a topic to display the help text. Some topics contain subtopics,which are displayed with right arrows or down arrows before the topic name. Double-click on the right arrow to view the subtopics. Double-click on the down arrow to remove the sub-topics from the view. You can also select one or more topics and then choose Expand or Collapse from the View menu.
Choose On Context from the Help menu.
The pointer changes to a question mark.
Click on the screen object.
The Help window displays information about the object you selected.
4.1.2. Exiting Help
To exit Help, click on Close in the Help window or choose Close Topic from the File menu.
For more information about Help, choose Using Help from the Help menu in the Help window.
4.2. Editing Text
From one place in a window to another.
From one window to another window. For example, you can copy text from one Create–Send window in Mail to another.
From one application to another application. For example, you can move a picture from Paint onto a Cardfiler card.
In addition, most applications provide an Edit menu that allows you to cut,copy, and paste text and graphics.
Finally, most applications define specific keys to let you perform basic text editing. These keys, described in " Section 4.2.5, ''Text Editing Key Definitions''," let you move the cursor and delete small amounts of text efficiently.
4.2.1. Selecting Text
Before you can copy or move text to other locations within a window or between windows, you must select the text. You can copy text in increments of any size, including a word, a line, or a paragraph at a time. Repeatedly clicking MB1increases the amount of text you select. In other words, every time you press MB1, you select more text.
|
To |
Do this |
|---|---|
|
Position the cursor where you want the selection to start |
Point to the location and click MB1. |
|
Select a word |
Point to the word and double click MB1. |
|
Select a line |
Point to the line and triple click MB1. |
|
Select continuous text, from the original selection point to the point where the button is released |
Press and hold MB1 and drag the pointer through the text. |
|
Extend the current selection |
Simultaneously press and hold the Shift key and MB1 while dragging the pointer through the additional text. |
|
Extend the current selection to where the pointer is positioned |
Press and hold the Shift key and click MB1. |
In addition, some applications provide a way for you to select larger blocks of text at a time. For example, you can select an entire mail message by pointing to the text and clicking MB1 five times.
You can select only one piece of text at a time. By selecting text in one application, you cancel any other text selection established in the same window or in another application.
4.2.2. Copying Text
If you can type text in a window, you can select and copy that text from one place to another in the same window, between windows of the same application(between Mail's main window and the Create–Send window, for example), or between different applications.
You can also copy text from a FileView window—including FileView's file list—into an application that supports text entry.
Select the text you want to copy, using the text selection techniques described in Section 4.2.1, ''Selecting Text''.
Position the cursor where you want the text copied by pointing and clickingMB1.
Click MB2.
The text is copied to the new location.
Some applications use different methods for copying text. See each application's manual for an explanation of how to copy text in that application.
The window from which you selected the text takes input focus. If you copied that text back to the window you were working in, you had to reestablish input focus for that window. Sometimes, however, you just want to grab a piece of text from another window without worrying about which window has input focus. That's where the QuickCopy feature comes in handy: You can quickly copy text from another window to your current window without losing input focus in your current window.
In the current window, position the cursor where you want the text to be copied to by pointing and clicking MB1.
In the other window, point to the text you want to copy.
Press and hold MB2.
Drag across the text you want to copy.
The text is highlighted as you drag across it.
Release MB2.
The text is copied to the new location in your current window.
4.2.3. Moving Text Between Windows
DECwindows also lets you work in one window, select text from another, and move that text to the current window without losing input focus in your current window. The text is deleted from its original location.
In the current window, position the cursor where you want the text pasted by pointing and clicking MB1.
Make sure the window has input focus.
In the other window, point to the text you want to move.
Press and hold Ctrl+MB2.
Drag across the text you want to move.
The text is highlighted as you drag across it.
Release Ctrl+MB2.
The text is moved to the new location and deleted from the old.
Some applications use different methods for moving text. See each application's manual for an explanation of how to move text in that application.
4.2.4. Deleting Text with Pending Delete
When you mark text for pending delete, you can delete large blocks of text with one keystroke instead of pressing the key repeatedly. You mark text for pending delete by selecting it as described in " Section 4.2.1, ''Selecting Text''." The selected text is deleted when you press the once. You can then type new text.
To cancel a pending delete selection (once you select the text but before you press a key), point to the selected text and click MB1.
4.2.5. Text Editing Key Definitions
|
To |
Press |
|---|---|
|
Move the cursor to the next word |
Shift+right arrow keys. |
|
Move the cursor to the previous word |
Shift+left arrow keys. |
|
Move the cursor to the beginning of the line |
F12 key or Ctrl+H keys. |
|
Move the cursor to the end of the line |
Shift+F12 keys or Ctrl+E keys. |
|
Move the cursor forward between entry boxes |
Tab key. |
|
Move the cursor backward between entry boxes |
Shift+Tab keys. |
|
Delete the characters to the left of the cursor up to and including the beginning of the word |
F13 key or Ctrl+J keys. |
|
Delete the characters to the right of the cursor up to and including the end of the word |
Shift+F13 keys. |
|
Delete the character to the left of the cursor and move all text to the right of the deleted character one space to the left |
|
|
Delete the character after the cursor and move all text to the right of the deleted character one space to the left |
Shift+ |
|
Delete all characters to the start of the line |
Ctrl+U keys. |
|
Refresh the window |
Ctrl+R keys. |

4.3. Printing Files
DECwindows allows you to print the files that you create and work with in applications. For example, you can print a mail message or a drawing you created in Paint. This section describes how to print files.
Whenever you choose the Print command in an application, the application creates a file that it then sends to the printer. You can also specify further printing instructions if you want to execute more sophisticated printing tasks. While your job is being printed, you can continue to work in your current application or go on to other tasks.
4.3.1. Printing Files from Applications
To print something currently being displayed on your screen—for example,a mail message—choose Print from the application's menu options. The file is sent to a print queue,which holds jobs that are waiting to be printed. Your print job is sent to the next available printer that can accept print jobs from that application.
DECwindows also lets you provide additional information about how you want your job printed. For example, you can specify the print queue to which you want your job sent and how many copies you want printed.
To provide this additional printing information, choose Print... from the application's File menu. The application displays a dialog box.
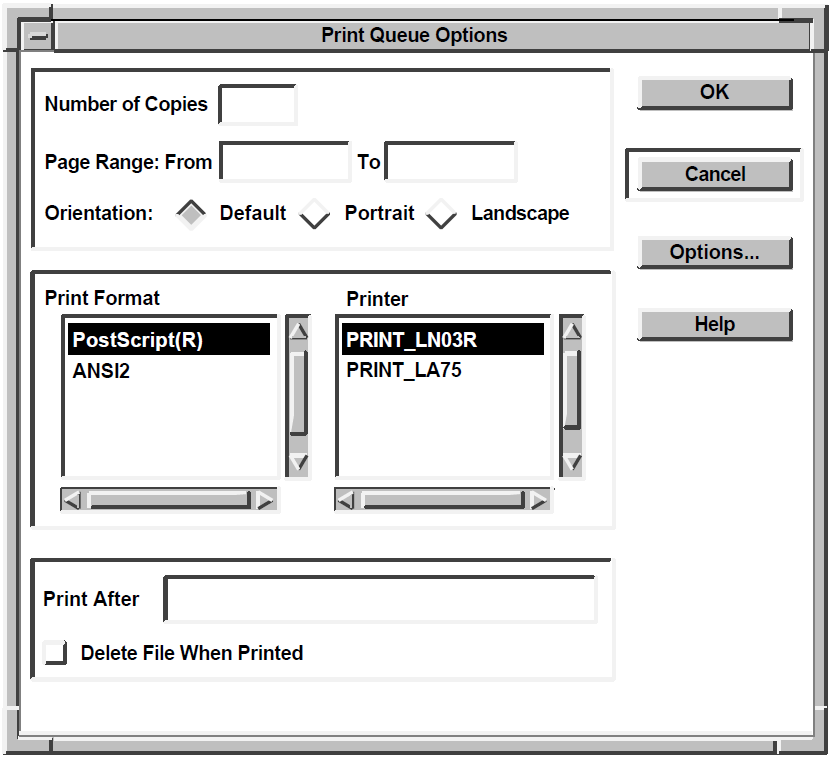
From the Print dialog box, you can change any of the following settings: By default, one copy of a job is printed. To print more copies, type the number of copies you want. When you print a file, the entire file is printed. However, if you want to see page 2 of a five-page mail message, you can save paper by printing only that page. To change the page number at which the file starts printing, type a number in the From entry box. Do the same in the To entry box. For example, to print only page 2 of a five-page mail message, type a 2 in both entry boxes. The Print Format list box contains the file formats produced by the current application for printing. These formatted files can be printed only on printers that recognize the specific format.
If your system manager assigned the appropriate print queues to each print format, the Printer list box displays only those printers that can support the chosen print format. If you choose another print format, the Printer list box changes its display accordingly.
For example, card files you create with Cardfiler are formatted as text files. Every print queue that can accept text files—from line printers to sophisticated laser printers—is listed in the Printer list box. Paint,however, produces files formatted for PostScript and ANSI2 output. If the chosen print format is PostScript, the Printer list box displays LN03Rand LPS40 print queues. If the chosen print format is ANSI2, only LN03,LN03R, and LPS40 print queues are displayed.
Note that FileView and Mail display all print formats that are supported by DECwindows, no matter what the file type of the file you selected for printing. Neither FileView nor Mail converts files from one format to the print format you choose. For example, if you select a TXT file in FileView,choose the Print command from FileView's Files menu, click on the Show Queue Options button in the Print dialog box, and click on OK, the Print Format list box displays all print formats, not just the text format.
The first print format in the list is the default option. If your system manager assigned the appropriate print queues to each print format, the Printer list box lists the print queues that can accept the chosen print format.
If the queue defined on your system as SYS$PRINT can accept print jobs in the chosen print format, that queue is listed first. The first print queue in the list is the default option; your print job is sent to the chosen queue. To change the print queue to which your print job is sent, select another print queue. Use the scroll bars to view the list of available print queues. All printers except line printers can print pages in two different page orientations—portrait and landscape. In portrait orientation,characters print parallel to the short edge of the paper. For example, this page is printed in portrait orientation. In landscapeorientation, characters print parallel to the long edge of the paper. Note that the definitions of portrait and landscape can be altered if you choose advanced print settings.
Your system manager has assigned each printer a default orientation. The printer uses this default orientation when it prints your job. To change the orientation for your print job, point to the portrait or landscape option and click MB1. Once you choose your print settings, your job is immediately submitted to the chosen print queue. You can change the time at which your job is actually printed by changing the information in the Print After entry box. By requesting that a print job be held until a specific time, you can ensure that a large print job is printed after hours, when fewer users are sharing printers.
19-APR-1993 14:32
This print job will be held for printing until 2:32 p.m. on April 19, 1993.When you tell DECwindows to print a text or graphics file, it sends a copy of that file to the printer. These print files are not deleted once they are printed. This setting is indicated by an unshaded button. If you want to delete the print file after it is printed, click on the Delete File When Printed button.
This button might not be displayed in all applications.
4.3.2. Using Advanced Print Settings
Click on the Options... button in the Print dialog box to display another print dialog box that lets you specify advanced print settings for your print job.
Some of these settings, including File Start Sheet and Message Log, correspond to qualifiers available from the DCL command PRINT. Other settings, including Sides and Layup Definition, correspond to options available on certain PostScript printers. See the manual that accompanies your printer for more information about specifying these settings.
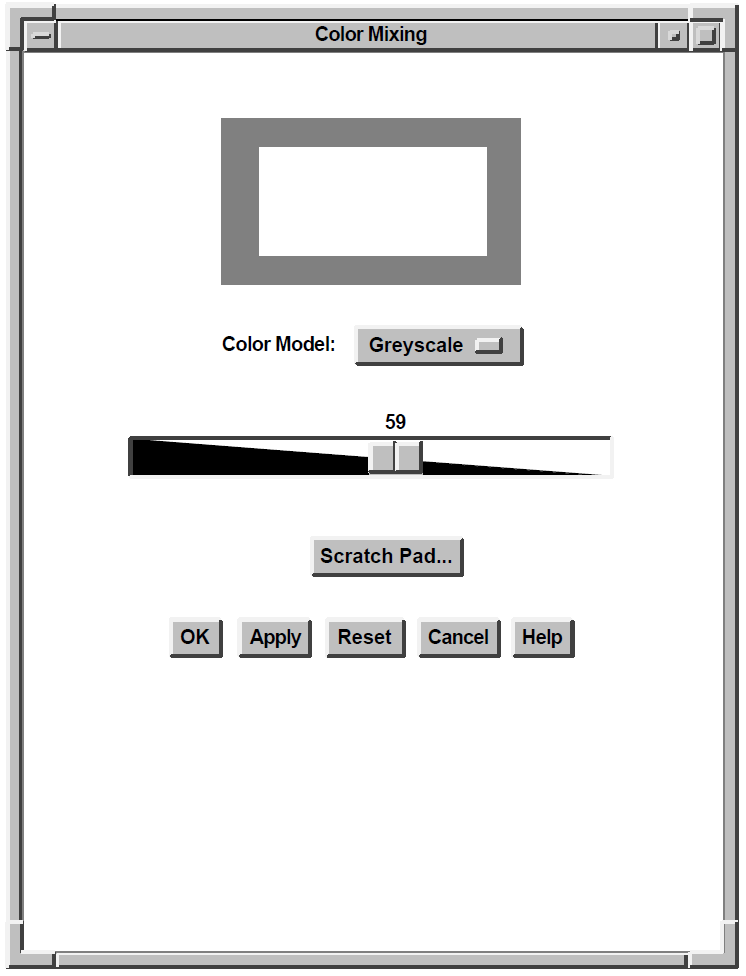
4.4. Mixing Colors
Many applications let you change default colors by choosing your own colors. If an application provides this option, it displays a color-mixing dialog box when you choose certain settings.
This section describes color-mixing dialog boxes and explains how to use them to specify your own colors.
4.4.1. Color Models
Picker color model
Hue, Lightness, Saturation (HLS) color model
Red, Green, Blue (RGB) color model
Browser color model
Greyscale color model
You can use each of these models alone, or you can use them in any combination. For example, you can use any color model to select a color and then use the Picker color model to blend the selected color.
The following subsections describe how to use each of the color models to choose your own colors.
4.4.1.1. Picker
The Picker is the default color model for the color mixer. It contains the following components:
The color display box displays colors as you mix them.
The color spectrum is a static collection of colors.
"Rainbow" spectrum (white, red, orange, yellow,green, blue, blue-violet, violet, brown, and black)
Pastels
Vivids
Earthtones
These four color palettes provide a wide variety of colors from which you can choose. The Spectrum options menu also includes any palettes specific to an application.
When you click MB1 on a spectrum tile or interpolator tile,that color becomes the new color. The tile also becomes highlighted, which identifies it as the currently selected color.
Use the interpolator to smear (blend) the selected color into various shades.
Use the arrow buttons to make the color lighter or darker,warmer or cooler.
Switch to another color model and use the features of that model to modify the current selection.
Click MB1 on a spectrum tile or interpolator tile.
The color display box displays the color of that tile.
Click on a paint bucket, which fills the interpolator end tile below it with the selected color.
Fill both interpolator end tiles or only one; the color of the empty interpolator end tile defaults to white.
As an alternative to the paint buckets, you can use the eyedropper to load the interpolator. Clicking and holding MB1 on a spectrum or interpolator tile, the original-color tile, or the new-color tile causes the pointer to become an eyedropper filled with the color of that tile.
You can move this eyedropper to the interpolator and use it to fill one of the two end tiles by clicking MB1 on one of the tiles. If you do not position the eyedropper directly on one of the two end tiles, the tile closest to the end is filled with the eyedropper color. Note that the cursor must be inside the interpolator.
Use the Undo button to reverse the last interpolator action, which can be a smear, the filling of an end tile, or the activation of one of the warmth or lightness adjustment buttons.
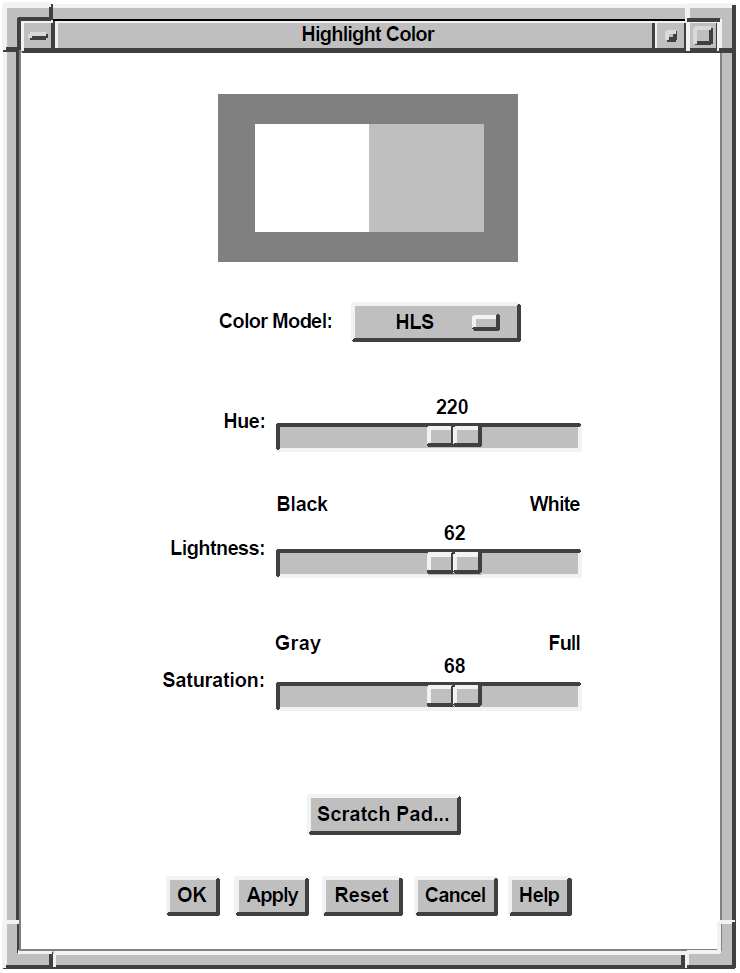
4.4.1.2. Hue, Lightness, Saturation (HLS)
Hue is color.
Lightness is color intensity—that is, the amount of the color.
Saturation is the purity of the color, or how much the color is diluted by white.
The HLS color model contains three scales that represent the ranges of hue, lightness, and saturation.
4.4.1.3. Red, Green, Blue Color Model
In the RGB color model, you specify a color as a mixture of different intensities of red, green, and blue.
The RGB color model contains three scales that represent the ranges of intensity of red, green, and blue.
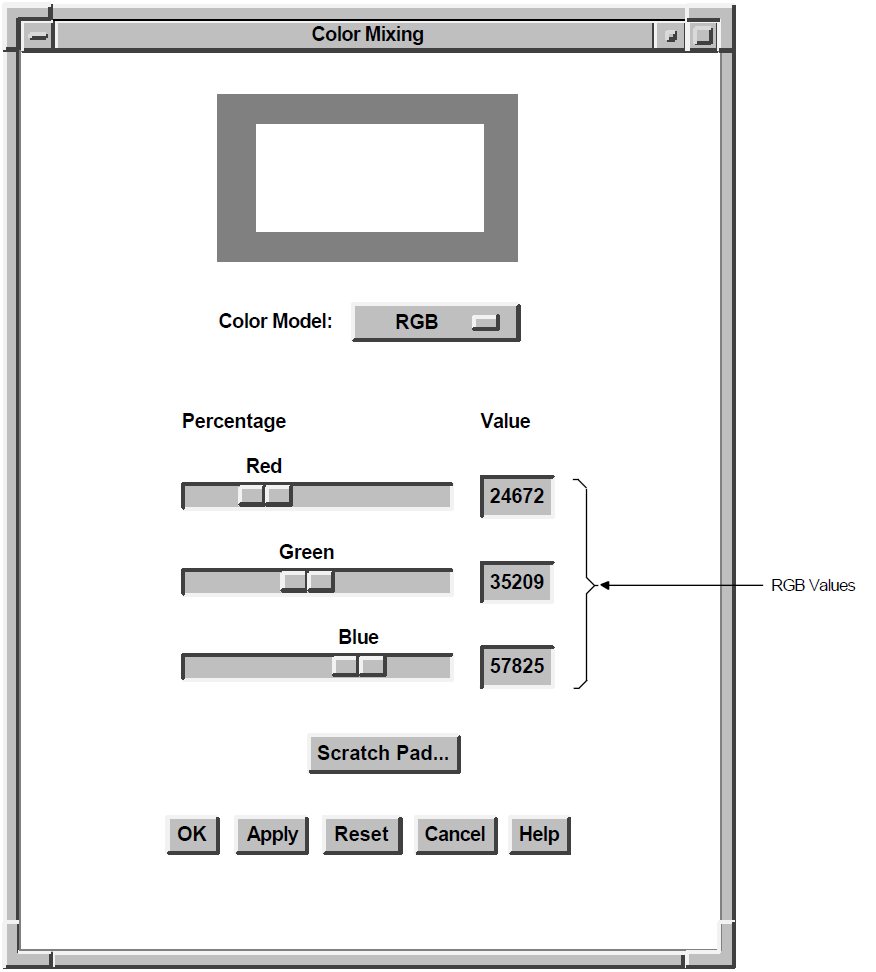
The RGB color model is the default color model on monochrome systems.
4.4.1.4. Browser
The Browser color model is a scrolled window that displays a list of X11 named colors. Each button in the scrolled window shows the name of anX11 color. Use the scroll bar to scroll through this color list.
When you click MB1 on a color in the list, the color display box becomes filled with that color.

The color browser is available on all systems.
4.4.1.5. Greyscale
The Greyscale color model contains a scale that lets you mix gray shades ranging from black to white. Note that switching to the Greyscale color model converts the current new color to gray.
4.4.2. Scratch Pad
The scratch pad lets you store intermediate colors for later use in color mixing.
To access the scratch pad, click on the scratch pad button in any of the color models.
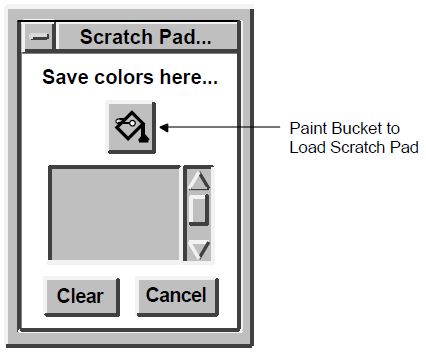
To store the currently selected color in the scratch pad, click on the paint bucket above the scratch pad color tile. The scratch pad adds that color to its list of stored colors. You can scroll through the list with the scroll bar.
Use the Clear button to cancel this list and return the scratch pad to its initial state.
Note that the currently selected color can be one of many color tiles on the Picker model. When using other color models, however, you can select only the new-color and original-color tiles.
To set the new-color tile to a scratch pad color, scroll to the new color and click on the scratch pad color tile. The new-color tile changes, and the scratch pad tile is highlighted. In the Picker model, this highlighting indicates that you can now dump the scratch pad color into one of the interpolator end tiles by using the paint bucket buttons.
Chapter 5. Using Session Manager
Session Manager is the key to using DECwindows. After you start a DECwindows session, you use Session Manager to manage your session and your workstation environment.
When you start a session, DECwindows displays Session Manager's menu bar.

This chapter describes how you can use Session Manager to run applications,keep track of work in progress,define logical names, and set process privileges.
For information about how to start, pause, and end a session, see Chapter 2, "Opening and Closing DECwindows".
5.1. Running Applications
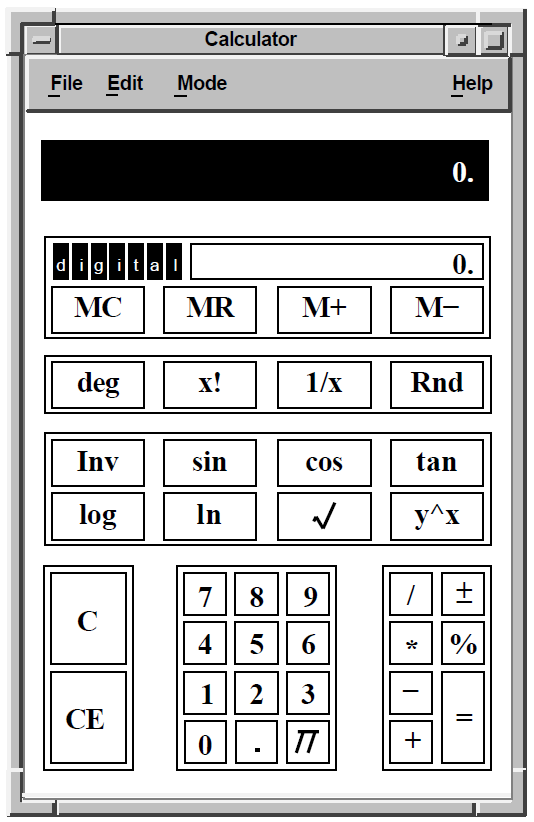
Click MB1 on Session Manager's Applications menu to display the applications available on your system.
From Session Manager's Applications menu,choose the application you want to use.
DECwindows displays the application in a window. For example, if you choose Calculator from Session Manager's Applications menu, DECwindows displays the following window:
As noted in Chapter 1, "Introduction", you can get help on any DECwindows application by using DECwindows Help. For more information about DECwindows Help, see Chapter 4, "Performing Common Tasks".
5.2. Using Application Qualifiers
By default, Session Manager runs applications by using a set of default qualifiers. To change theway DECwindows runs an application,choose the ellipsis (...) next to the application on Session Manager's Applications menu. Session Manager displays the application's Qualifiers dialog box.
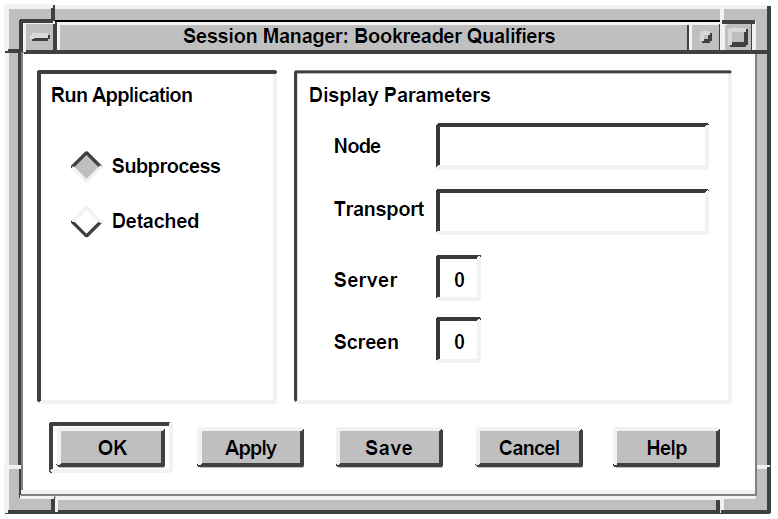
From the application's qualifier dialog box, you can change the following settings: When you start an application, the application automatically runs as a subprocess of Session Manager's process or as a detached process. A subprocess of Session Manager's process shares Session Manager's quotas and environment. A detached process is a fully independent process.
Node
Transport
Server
Screen
For more information about using the Screen display parameter, see " Section 5.2.1, ''Running an Application on a Multiscreen System''."
By default, an application runs with the same display parameters as Session Manager. For more information about using display parameters to run remote applications, see Chapter 12, "Running Applications Across the Network".
5.2.1. Running an Application on a Multiscreen System
If you are using a workstation that supports more than one screen, you can display applications on any of the available screens. To do this, enter the screen number in the Screen entry box in the application's Qualifiers dialog box.
DECwindows displays the application on the screen you specified.
5.3. Keeping Track of Work in Progress
Session Manager keeps track of your currently running applications and FileView tasks in a Work in Progress dialog box.
To display the Work in Progress dialog box, choose Work in Progress... from Session Manager's Session menu.
Session Manager displays the Work in Progress dialog box.
The Work in Progress dialog box remains open until you close it.
|
Status |
Meaning |
|---|---|
|
Starting |
Application is starting but is not yet displayed. |
|
Active |
Task is currently executing. |
|
Pending |
Task cannot execute because you have exceeded the number of tasks—called subprocesses—you are allowed to execute. If several other tasks are executing, this status changes to Active when those tasks are completed. |
|
Error |
Session Manager cannot execute the task successfully. |
|
Done |
Task is complete. |
|
Stopped |
Task has been requested to exit, but it is not terminated. When the task stops, Session Manager removes the task entry in the Work in Progress box, unless the task produces output. |
|
Show Output |
Task has produced output. To display task output,click on the Show Output button. |
5.3.1. Canceling a Task
To cancel a task while it is pending or executing,select it in the Work in Progress dialog box and click on the Stop Task button. If the task does not respond immediately,it will be put in the stopped state. To remove a task entry that is stopped,click on the Remove Task button.
5.3.2. Looking at Task Output
Tip
If an application fails to start or terminates unexpectedly, you can use task output windows to read application error messages.
5.4. Defining Logical Names
Logical names let you give frequently used files, directories, and devices meaningful names that are easier to remember and type than the full file specifications. For example, you can define WORK as the logical name for your device DUA0, or STAFF as the logical name for the file specification $USERS:[JONES.STAFF].
This section describes how to use Session Manager to define logical names. For more information about how you can use logical names, see Appendix D, "Understanding Files, Directories, and Devices".
Choose Logical Names... from Session Manager's Session menu.
Session Manager displays a dialog box.
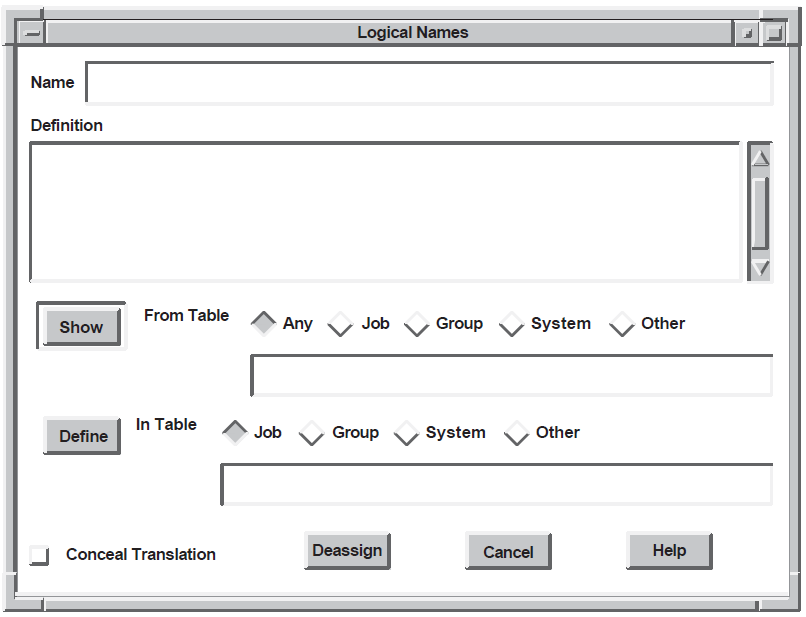
Type the logical name in the Name entry box.
Type the definition you want to assign to the logical name in the Definition entry box.
For example, define STAFF as the logical name for the file specification $USERS:[JONES.STAFF].
To define the logical name as concealed, click on the Conceal Translation check button.
Click on Define to add the logical name to your job logical-name table.
Click on another option button to add the logical name to another table. To add the logical name to another logical-name table, click on the Other option button, type the name of the logical-name table, and click on Define.
5.4.1. Displaying a Logical-Name Definition
In the Name entry box, type the logical name whose definition you want to display.
If you do not know the logical-name table in which the logical name is stored, click on the Any button next to the From Table label. Click on the Job, Group,or System button if you want to see the definition in a specific table. Click on the Other button and type the name of the logical name in the text-entry box provided to display a logical-name definition from another table.
Click on Show.
Session Manager displays the definition of the logical name and the name of the table in which it is stored.
If you choose the Any option, Session Manager searches the logical-name tables specified by the logical name LNM$FILE_DEV. If the logical name exists in more than one logical-name table, Session Manager displays the logical-name definition and the name of the logical-name table in which the definition was first encountered.
5.4.2. Deleting a Logical Name
In the Name entry box, type the logical name you want to delete.
Click on Deassign.
Session Manager deletes the logical-name definition.
If you choose the Any option and the logical-name definition is not found in any logical-name table, Session Manager reports that the logical name is not defined.
5.5. Setting Process Privileges
Your process privileges determine what commands and functions you are authorized to execute from your account. Your system manager authorized these privileges when your account was created.
Some tasks require more powerful privileges. You can see which privileges are currently authorized by choosing Privileges... from Session Manager's Session menu.
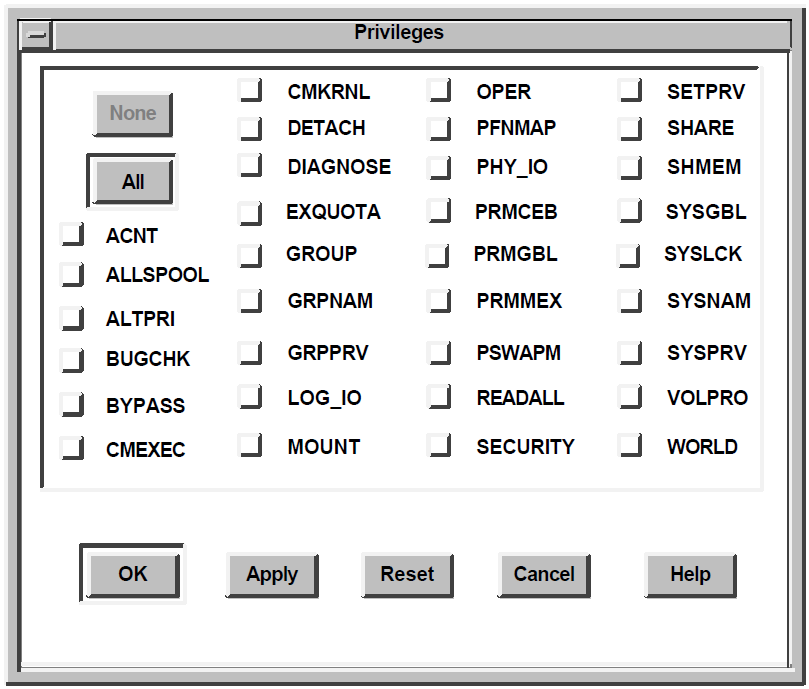
Click on the privileges you need to perform a specific task. You are granted only those privileges you are authorized to hold; privileges that you are not authorized to hold are dimmed.
5.6. Customizing Your Session
You can use Session Manager's Options menu to customize your DECwindows environment. To find out how to do this, see Chapter 7, "Customizing Session Manager".
Chapter 6. Using FileView
FileView is a graphical representation of the OpenVMS operating system that lets you use a mouse to work with files and directories.
This chapter describes how you can use FileView to work with files, display information about files,and create, and use directories to organize your files.
The FileView window looks like this:
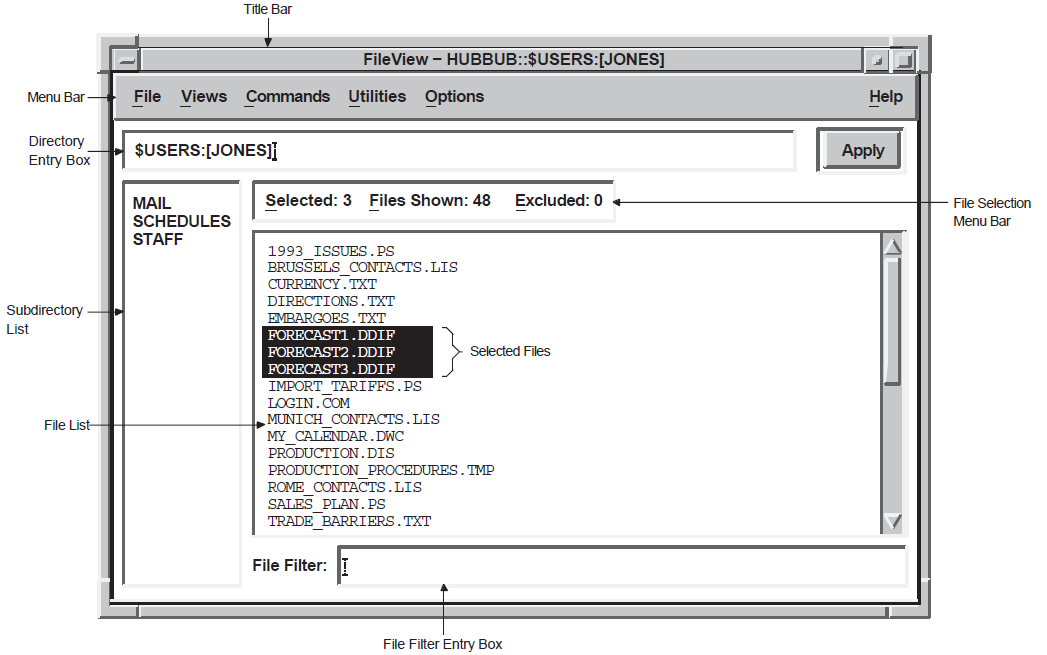
The title bar displays the name of the window.
The menu bar displays FileView's menu names.
The Directory entry box displays the name of the current, or default, device and directory. Unless you specify otherwise, FileView places you in your top-level directory whenever you start FileView.
The Parent Directory button lets you navigate your directory structure. This button appears when you select a file in the subdirectory list. As you navigate through your subdirectories,this button label changes to reflect the name of the parent directory.
The subdirectory list displays your subdirectories. Using the subdirectory list, you can descend the directory structure in the current window.
The File Selection menu bar contains menus you can use to select and filter files.
The Apply button lets you renew your file list according to the contents of the File Filter entry box and the Directory entry box.
The file list can contain different kinds of information, such as the creation date or size, about the files in the current directory or those specified by the File Filter. The first time you start FileView, the file list contains the names of the files in your top-level directory only.
The File Filter entry box lets you list a subset of files—for example, all *.TXT files—in the current file list.
FileView displays the number of files you filter on the File Selection menu bar next to the Files Filtered menu.
6.1. Updating the File List
When you use the Apply button to create a new file list,you can use a wildcard in the File Filter or in another directory specification in the Directory entry box. For example, to list only the TXT files in your current directory, type *.TXT in the File Filter entry box and click on the Apply button. The file list displays the files you requested.
The Apply button changes to an Update button when you make changes to the contents of the current directory. If that change affects your file list,clicking on the Update button displays the altered version of the file list. For example, if you rename or delete a file in the file list, the Apply button changes to an Update button to remind you to update the file list. You can continue to work with other files and perform other tasks, updating the file list at your convenience.
When you start an update operation, the Apply or Update button becomes a Cancel button. Clicking on the Cancel button stops the file search as soon as possible. FileView displays whatever file information was already collected, along with a pop-up message box that indicates what information is missing.
6.2. Selecting and Filtering Files
To perform a FileView task, you must select the file with which you want to work. FileView highlights the selected file, and the next command you choose affects that file. When you select or filter files,FileView displays the number of currently selected and filtered files on the File Selection menu bar.

If you do not select a file name before choosing a FileView command, FileView displays a dialog box that asks you to type the name of the file or files on which you want to perform the command.
6.2.1. Selecting a File from Your File List
Point to the file you want to select.
Click MB1.
The file name is highlighted.
Selecting one file at a time cancels the previous file selection.
6.2.2. Selecting Adjacent Files
Point to the first file in the range.
Drag the pointer through the files you want to select.
The files are highlighted. FileView displays the number of files selected on the File Selection menu bar.
6.2.3. Selecting Scattered Files
Point to the first file you want to select and click MB1.
Press and hold the Ctrl key while you click MB1 on the other files you want to select.
Release the Ctrl key.
6.2.4. Selecting All Files in the Current Directory
To select all the files in the current directory, choose Select All from the Selected menu on the File Selection menu bar. You can then remove individual files from the selection by pointing to them,pressing and holding the Ctrl key, and clicking MB1. You can remove multiple files from the selection by pointing to them, pressing and holding the Ctrl key and MB1, and dragging the pointer over them.
To cancel your file selection, choose Select None from the Selected menu on the File Selection menu bar.
6.2.5. Selecting File Names in Other Windows
You can also select file names that appear in other windows by either dragging the pointer through the file name or double clicking on it. For more information about selecting text, see Chapter 3, "Interacting with DECwindows".
6.2.6. Displaying a Partial File List
Sometimes you want to screen some files out of the full file list and display only a subset of files. Perhaps you want to display only those files with a LOG file type or those whose version number is 1. By using the File Filter entry box, you can limit the list of files displayed.
Click on the File Filter entry box.
Type the file or files you want listed.
For example, to list all LOG files in your current directory, type *.LOG. When you use the asterisk wildcard, FileView lists only the files that match the characters you specified.
Click on Apply.
Tip
You can also use the Exclude filter to display a partial file list. To do this, choose Show Exclude Text Field from the Excluded menu on the File Selection Menu Bar. FileView displays an Exclude File Filter entry box below the File Filter entry box.
6.3. Working with Files
When you choose a command from FileView's Commands menu, you can execute the command immediately or you can choose to display a command dialog box. From a command's dialog box you can choose options to tailor the file operation. For example, you can request that the Copy command display a confirmation prompt each time you copy a file.
To execute a command without displaying a dialog box,select a file and choose the command you want to use from FileView's Commands menu.
Note
The procedures in the following sections describe how to use FileView's commands by displaying command dialog boxes.
6.3.1. Applying Your Settings
|
Click on |
To |
|---|---|
|
OK |
Start a task and dismiss the dialog box. |
|
Apply |
Start a task without dismissing the dialog box. Note that when you use the Apply button,the OK, Apply, and Cancel buttons are disabled until the task has been completed. When the task is complete,FileView re-enables the OK, Apply, and Cancel buttons. You can then perform another operation of the same type from the same box. For example, you can choose Search to search repeatedly for different strings on the selected file list without choosing Search again. |
|
Save |
Save your new settings until you change them. |
|
Cancel |
Dismiss the dialog box without changing any settings. If you made any changes without applying them, clicking on the Cancel button cancels those changes. |
|
Help |
Display help about the command. |
6.3.2. Comparing the Contents of Files
Select the first file you want to compare.
Choose the ellipsis (...) next to the Compare command on the Commands menu.
FileView displays a dialog box.
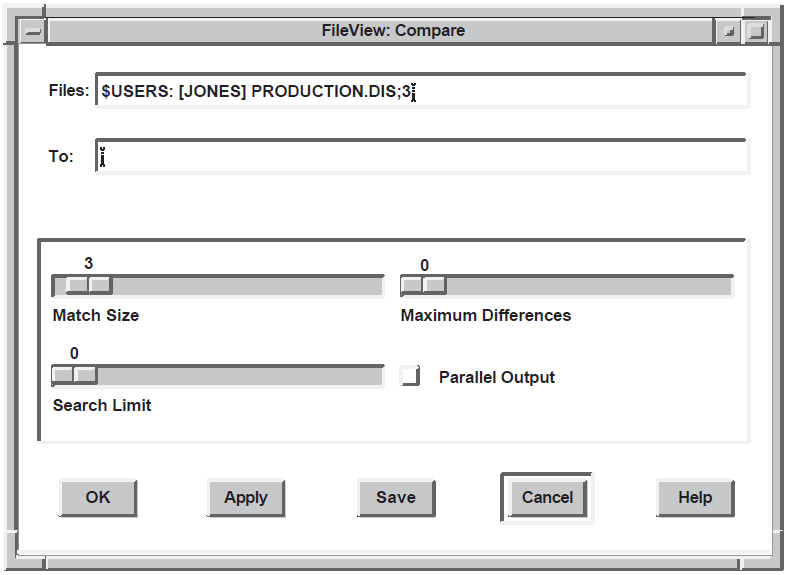
By default, the selected file will be compared with its previous version. To compare the selected file with a file other than its previous version, double click on the text in the To entry box and type another file specification.
To perform a simple compare operation, click on OK.
To alter the way each compare operation matches lines, choose any of the following options and click on OK.Enable this option
To
Parallel Output
List the lines with differences side by side.
Match Size
Specify the number of lines that should again indicate matching data after differences are found. Once the Compare command finds unmatched lines, it considers the files matching once again after it finds three sequential lines that match. Use the Match slider to override the match size of 3.
Maximum Differences
Terminate the compare operation after the specified number of unmatched lines is found. This number can be from 0 to100, where 0 indicates no maximum.
Search Limit
Specify how many lines should be searched before aline is considered unmatched. Unless you specify otherwise, the Compare command searches to the ends of both files being compared before it lists aline as unmatched. This number can be from 0 to 100, where 0 indicates no maximum.
If you choose the Compare command without first selecting a file, type the names of the file you want to compare with its previous version.
The following example shows the results of an operation in which the files PROJECTIONS.LIS;2 and PROJECTIONS.LIS;1 are compared.
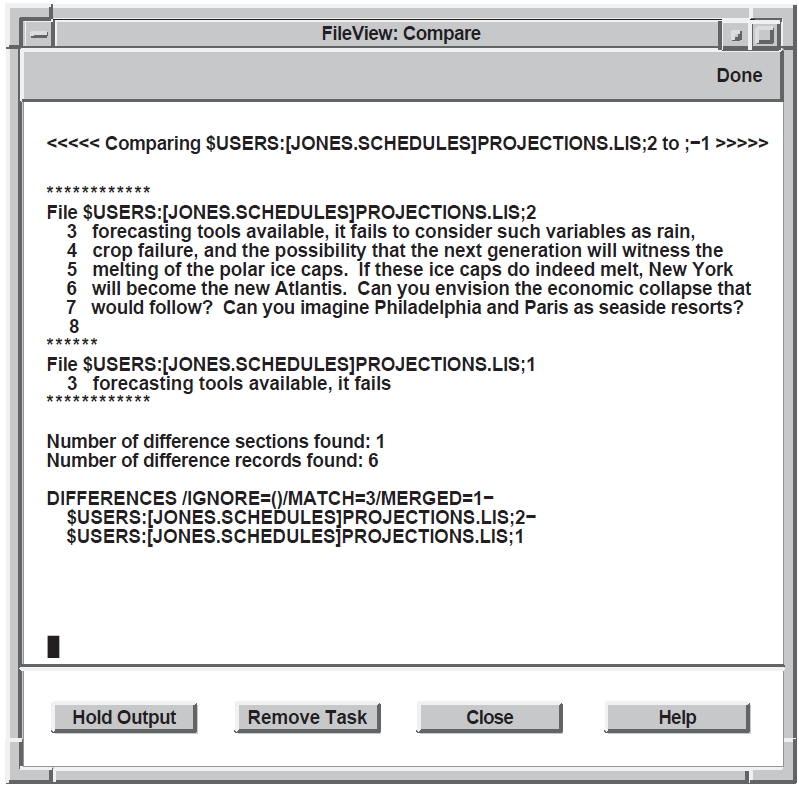
6.3.3. Copying Files
You can make a copy of a file to create a file with a new file name, concatenate two or more files into a single file, or copy a group of files to a group of new files. You can also enhance a copy operation by choosing several options from the Copy dialog box.
When you copy a file, the original file remains unchanged.
6.3.3.1. Copying One File to Another File or Directory
Select the file you want to copy.
Choose the ellipsis (...) next to the Copy command on the Commands menu.
FileView displays a dialog box.
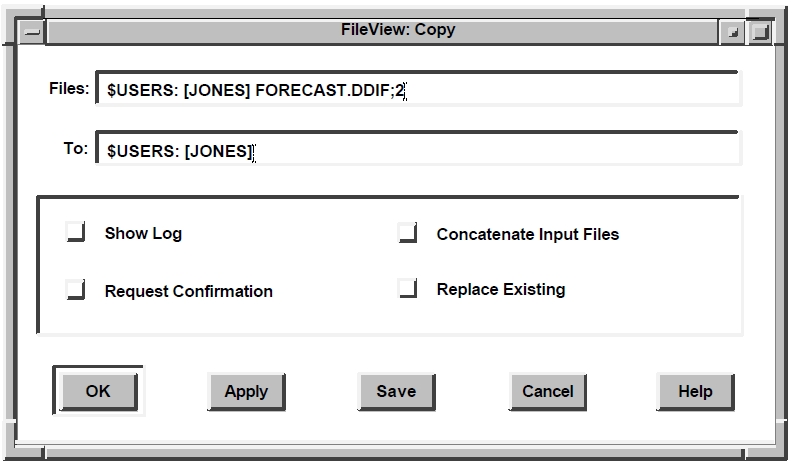
Type the new file name or the name of the device and directory to which you want to copy the file.
To perform a simple copy operation, click on OK.
To alter the way a copy operation is performed, choose any of the following options and click on OK.Enable this option
To
Show Log
Display the name of each copied file. This check button is especially helpful for checking whether multiple input files were copied to multiple output files as you intended.
Request Confirmation
Display prompts asking whether to copy each selected file.
Concatenate Input Files
Create one output file from multiple input files if wildcard characters are not used in the output file specification.
Replace
Replace the file that already exists with the output file specification you entered. The copied file receives that file specification because two files cannot have exactly the same file specification; that is, at least the version number must be different.
6.3.3.2. Copying Groups of Files
You can concatenate two or more files into a single file, and you can copy multiple input files to multiple output files. To copy a group of files at the same time, you select the files and then copy them in one operation. You can also tailor this copy operation by choosing options from the Copy dialog box.
Select the files you want to copy.
Choose the ellipsis (...) next to the Copy command on the Commands menu.
FileView displays the Copy dialog box.
Type the new file name or names or the name of the device and directory to which you want to copy the files.
Click on OK.
An asterisk wildcard in the output directory, file name, file type, or version number entry box
Only a directory specification as the output file specification
The version number of the input file
A version number one greater than the highest version number of an existing file that has the same file name and file type
If you specify a version number in the output file specification, the Copy command uses that number for the output file specification. If a higher version of the output file already exists, a warning message appears in the Task Output window, but the file is still copied. If an equal version of the output file already exists, a message is issued and the file is not copied.(Click on the Replace button in the Copy dialog box to overwrite the existing file.)
From:$USERS:[JONES]DIRECTIONS.TXT;1,$USERS:[JONES]PROVISIONS.LIS;1To:$USERS:[JONES]HOLIDAY.*;*
6.3.4. Deleting Files
By using the Delete command to delete the files you no longer need, you make room on your disk for other files.
You can also delete a subdirectory if it does not contain files. See " Section 6.6.2, ''Deleting a Subdirectory''" for more information.
Select the files you want to delete.
Choose the ellipsis (...) next to the Delete command on the Commands menu.
FileView displays a dialog box.
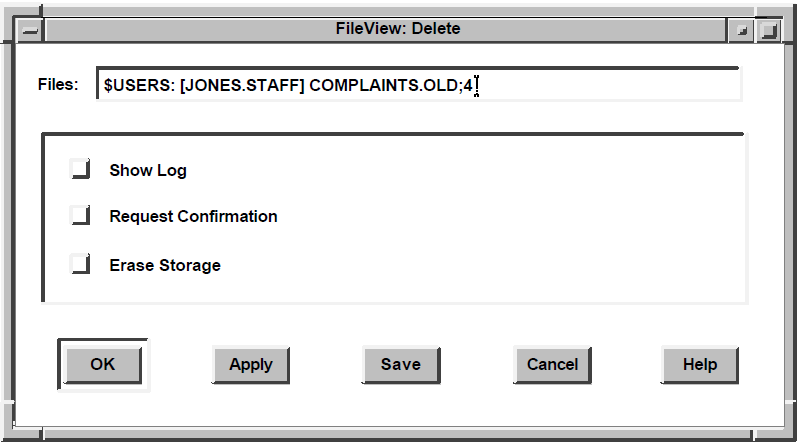
To perform a simple delete operation, click on OK.
To alter the way a delete operation is performed, choose any of the following options and click on OK.Enable this option
To
Show Log
Display the file specification of each file as it is deleted.
Request Confirmation
Display a prompt asking whether to delete the file.
Erase Storage
Erase the selected files from your disk so that the deleted data no longer physically exists.
If your file list does not include version numbers and you select a file for deletion, FileView deletes all versions of the file.
Files:FORECAST1.DDIF;*,FORECAST2;*,FORECAST3;*
6.3.5. Editing Files
Select the file you want to edit.
Choose the ellipsis (...) next to the Edit command on the Commands menu.
FileView displays a dialog box.
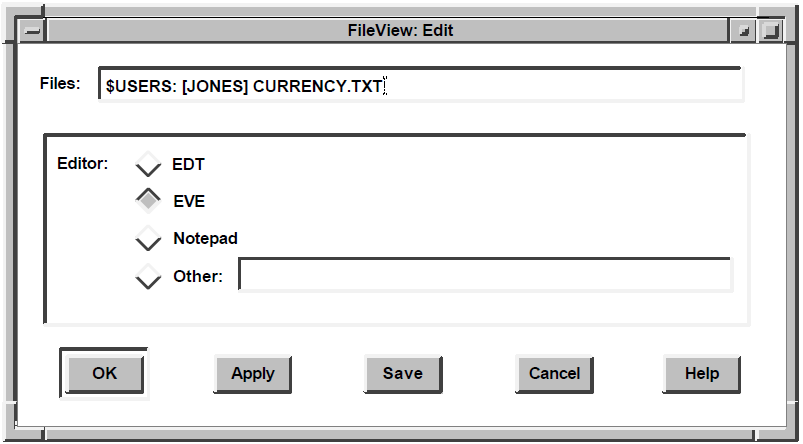
Click on the editor you want to use.
To use an editor other than those listed, type the appropriate DCL command for invoking the editor in the entry box provided. FileView appends the file name of each selected file to this Edit command.
Click on OK.
If you clicked on EVE, FileView starts the DECwindows EVE editor. If you clicked on EDT, FileView opens a Task Output window where you can edit your file using EDT. If you clicked on Notepad, a Notepad window opens.
6.3.6. Printing Files
Select the files you want to print.
Choose the ellipsis (...) next to Print command on the Commands menu.
FileView displays two dialog boxes.
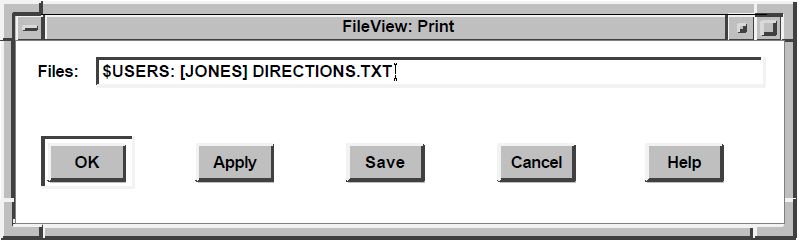
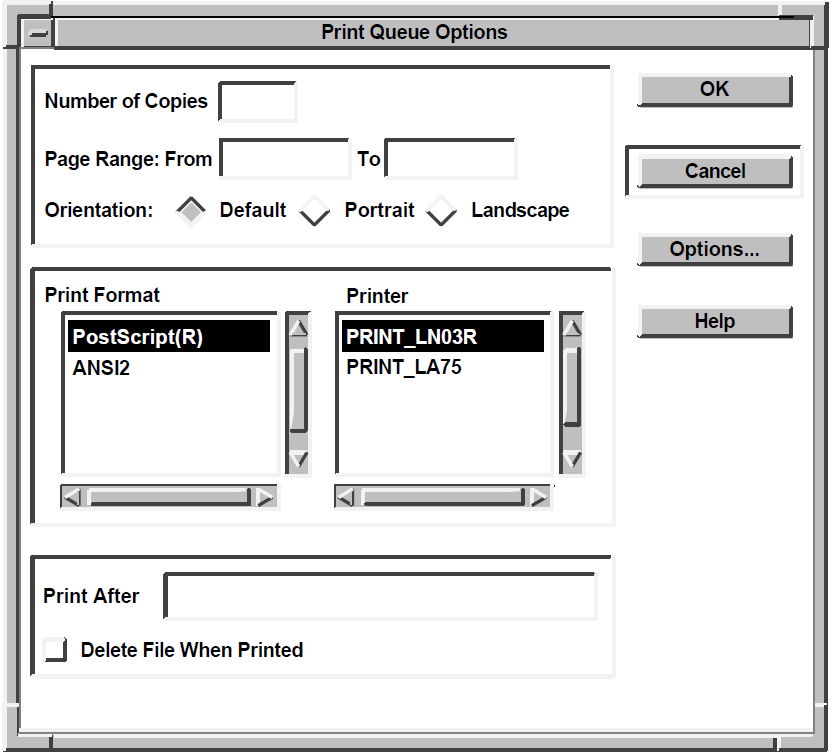
In the Print Queue Options dialog box, you can provide additional information about how you want to print your file. This information might include the print queue to which you want to send your file and how many copiesyou want to print. For a detailed description of these print options, see " Section 4.3.1, ''Printing Files from Applications''" in Chapter 4, "Performing Common Tasks".
If the Work in Progress dialog box is open, FileView reports that your print job has been sent to the printer. Session Manager displays a message when your job is printed.
Files:DIRECTIONS.TXT,CURRENCY,*.COM
For more information about printing files, see Chapter 4, "Performing Common Tasks".
6.3.7. Protecting Files
Select the files you want to protect.
Choose the ellipsis (...) next to the Protection command on the Commands menu.
FileView displays a dialog box.
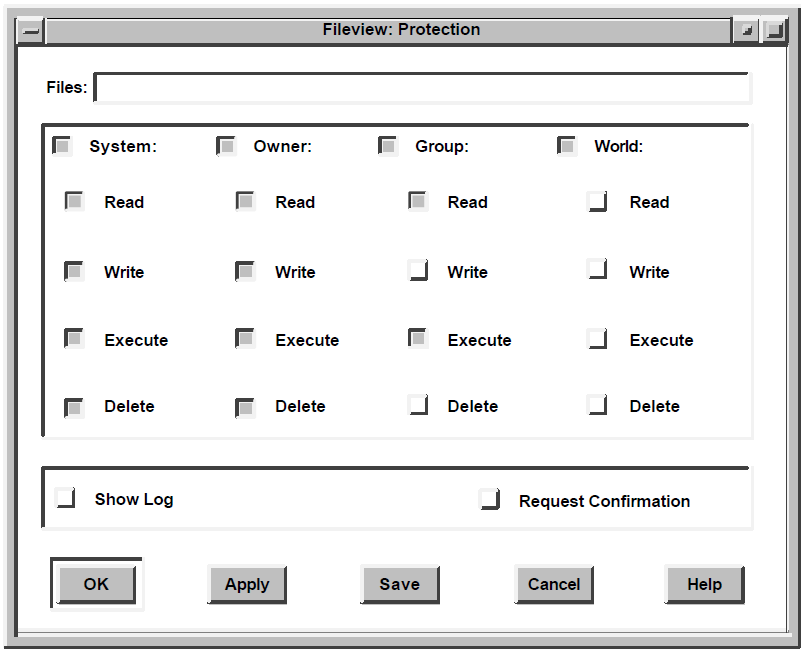
Note that the protection settings displayed in the Protection dialog box reflect a user's default protections, not the files' protections.
Set and clear the check buttons in the Protection dialog box to change the file protection on the selected files.
6.3.8. Purging Files
Every time you modify a file, another version of the file is added to your directory. If you find yourself with multiple versions of a file, use the Purge command to delete all older versions. Purging your directory makes room on your disk for other files.
By default, the file list displays only the highest version of each file. If you have not changed this setting, you can purge your entire directory in one operation by selecting all the files. If your file list displays all versions of your files, you must select only the highest versions of each file for purging.
Select the files you want to purge.
Choose the ellipsis (...) next to the Purge command on the Commands menu.
FileView displays a dialog box.
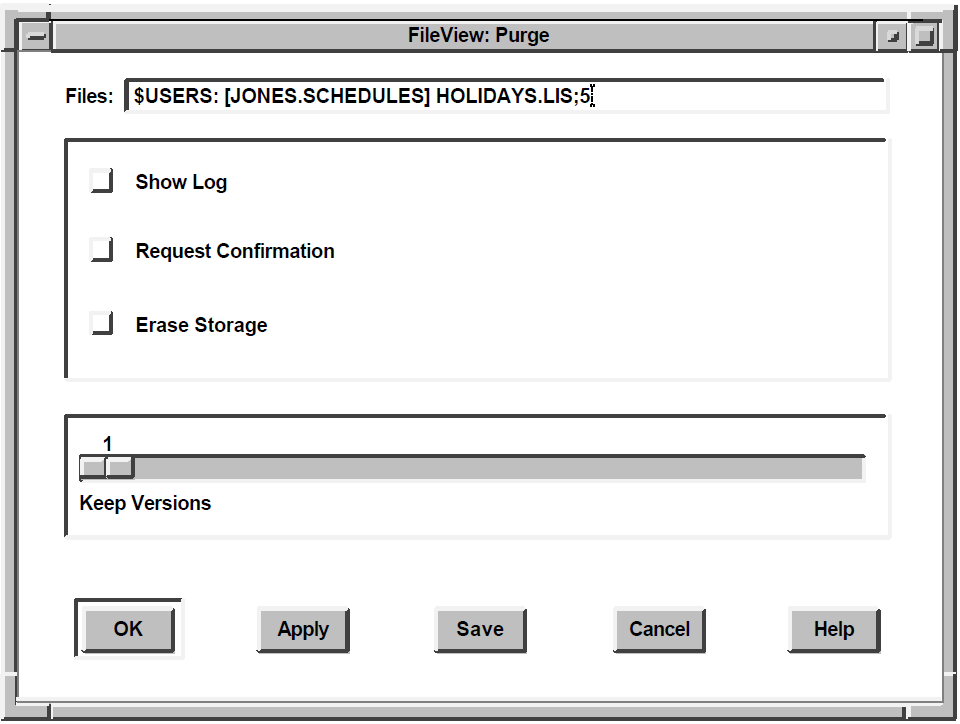
To perform a simple purge operation, click on OK.
To alter the way a purge operation is performed, choose any of the following options and click on OK.Enable this option
To
Show Log
Display the file specifications of each file as it is deleted.
Request Confirmation
Display a prompt asking whether to purge the file.
Erase Storage
Erase the selected files from your disk so that the purged data no longer physically exists.
Keep Versions
Retain the specified number of versions (starting with the highest) of each file. Unless you specify otherwise, all but the latest versions of the specified files are deleted. Use the Keep Versions slider to keep more than the highest version of each file.
If you choose the Purge command without first selecting the file, you are prompted to type the name of the file you want to purge.
Files:*L*.COM
6.3.9. Reading Files
Select the files you want to read.
Choose the ellipsis (...) next to the Read command on the Commands menu.
FileView displays a dialog box.
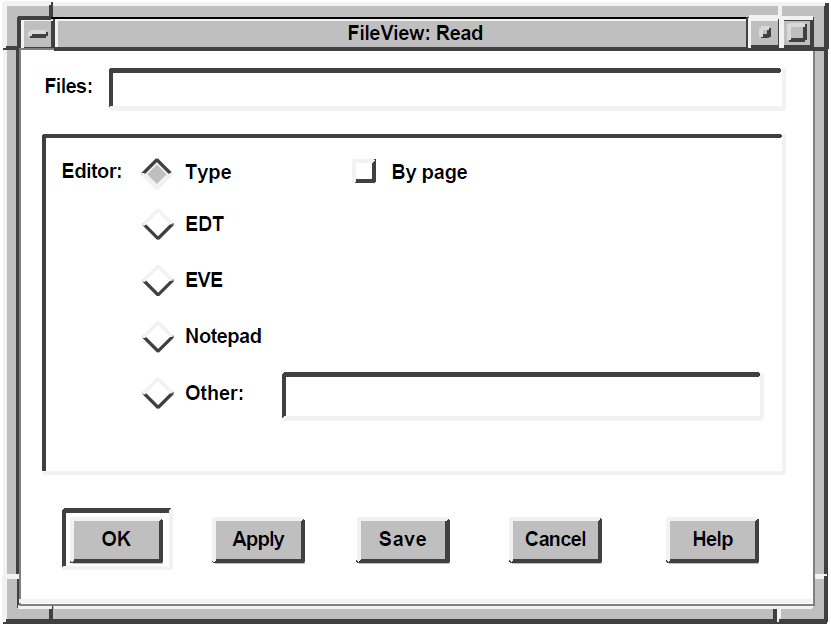
To display a file, click on OK.
To alter the way a file is displayed, choose any of the following options and click on OK.Enable this option
To
Reader
Specify the editor you want to use to read the file.
By Page
Display the file one page at a time.
Click on OK to display the selected file.
6.3.10. Changing the Name of a File
Change all or part of a file specification of one or more existing files
Rename a group of files in one operation
Change the name of the file or keep the same file name and move the file to another directory
You cannot, however, use the Rename command to change the device on which a file is located. When you rename a file, a copy of that file no longer exists under its original name.
6.3.10.1. Renaming a File
Select the file you want to rename.
Choose the ellipsis (...) next to the Rename command on the Commands menu.
FileView displays a dialog box.
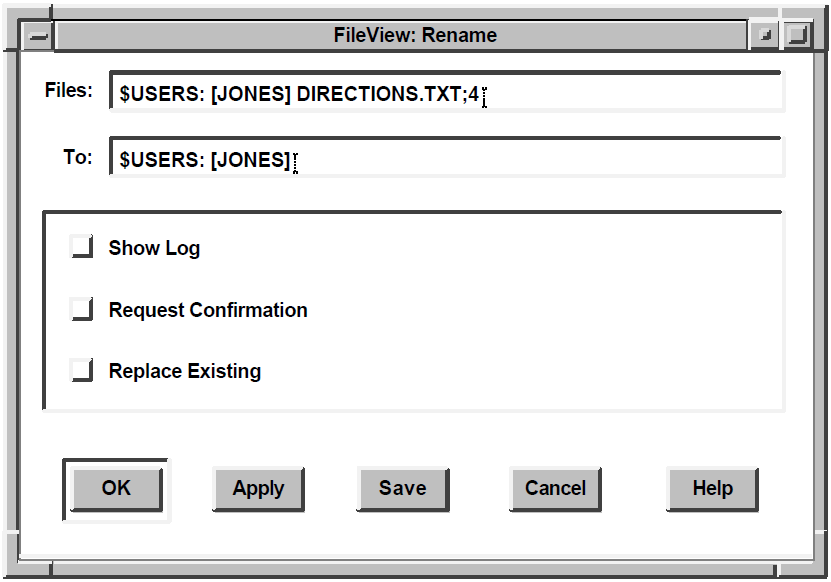
Type the new file name.
To perform a simple rename operation, click on OK.
To alter the way a rename operation is performed, choose any of the following options and click on OK:Enable this option
To
Show Log
Display the file specification of each file as it is renamed. This check button is especially helpful for verifying whether multiple input files were renamed to multiple output files as you intended.
Request Confirmation
Display a prompt asking whether to rename the file.
Replace Existing Files
Replace the file that already exists with the output file specification you entered. The renamed file is given that file specification because two files cannot have exactly the same file specification.
If you choose the Rename command without first selecting a file, type the name of the file you want to rename in the Rename dialog box.
If FileView cannot rename the file, it displays the word Error in the Work in Progress dialog box. To open the Task Output window to see the error message, click on the Show Output button. Click on the OK button in the Task Output window when you finish viewing the message.
From:DIRECTIONS.TXTTo:[.SCHEDULES]
6.3.10.2. Renaming Groups of Files
You can rename multiple files in one operation. The simplest way to rename multiple files is to select them in your file list and rename them as you would rename one file.
You can also rename multiple input files to multiple output files by specifying wildcard characters in corresponding entry boxes of the input and output file specifications. Just as when you renamed one file, you can tailor this operation by choosing options from the Rename dialog box.
If entry boxes in the output file specification are omitted or are replaced by wildcard characters, the Rename command uses the device, directory, file name,and file type of the input file specification to name the corresponding fields in the output file specification.
If you specify an explicit version number in the output file specification,that version number is used.
If you specify a wildcard as the version number in the output file specification, the version number of the input file is used.
If you specify a wildcard as the version number in the input file specification, the version number of each input file is used to name a corresponding output file.
If no file exists with the same file name and type as the output file, aversion number of 1 is used.
If a file already exists with the same file name and type as the output file, the next higher version number is used.
Choose the ellipsis (...) next to the Rename command on the Commands menu.
FileView displays a dialog box.
Type the file specifications of the files you want to rename.
Separate them with commas.
Type the file specification to which you want the files renamed.
Click on OK.
From:*.TXT;*To:$USERS:[JONES]*.OLD;*
6.3.11. Running Programs
You can use the Run command to run a program or to invoke a DCL command file. A program usually has an EXE file type. A DCL command file has a COM file type.
Select the file you want to run.
Choose the ellipsis (...) next to the Run command on the Commands menu.
FileView displays a dialog box.
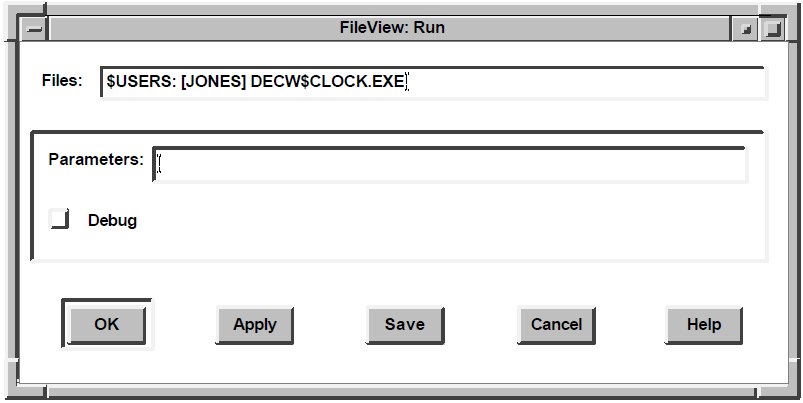
To run a file, click on OK. If you want to add a parameter to the RUN command, type the parameter in the text-entry box provided. If the file you want to run is a DCL command file,these parameters are passed to it.
To alter the way a file is run, choose any of the following options and click on OK.Enable this option
To
Parameters
Add any parameter to the Run command. Type the parameter in the text-entry box provided. If the file you want to run is a DCL command file, these parameters are passed to it.
Debug
Run the program under the control of the OpenVMS Debugger. To run without the debugger an image that has been linked with DEBUG, be sure this button is disabled.
Click on OK.
If the Work in Progress dialog box is displayed, it reports that the file is being run.
Files:[.SCHEDULES]MORTGAGE.EXE
6.3.12. Searching Files for Text Strings
Select the files you want to search.
Choose the ellipsis (...) next to the Search command on the Commands menu.
FileView displays a dialog box.
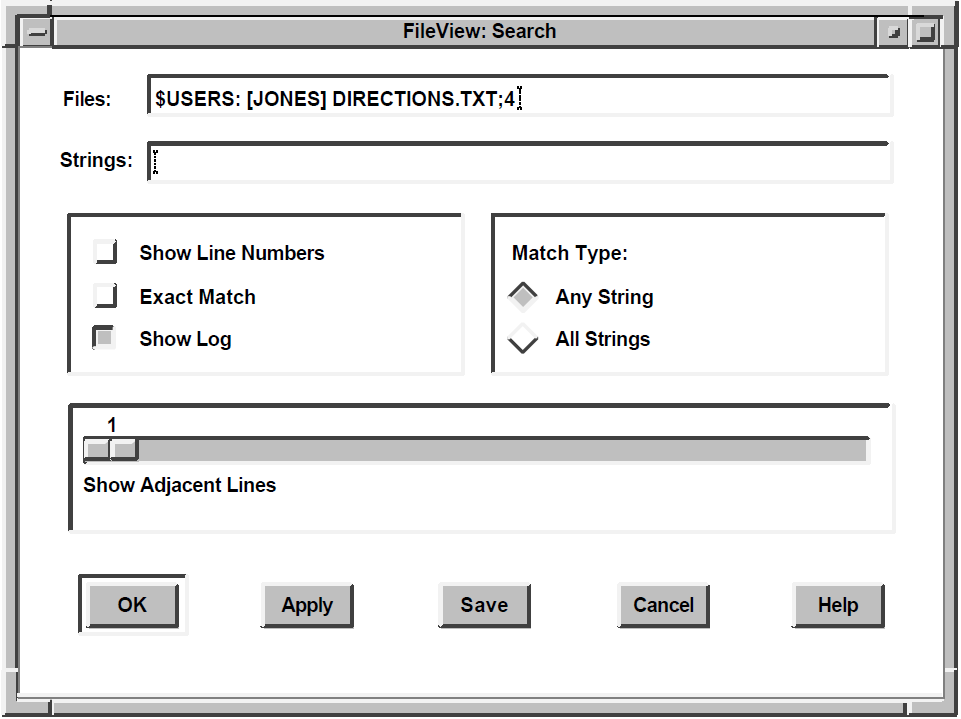
Enter the text string for which you want to search.
To perform a simple search operation, click on OK.
To alter the way a search operation is performed, choose any of the following options and click on OK.Enable this option
To
Exact Match
Find only those strings that exactly match the string you specified. Use this option if you want the Search command to differentiate between upper-case and lower-case letters.
Show Log
Display the file specification of each file as it is searched.
Match Type
Produce output only if the line contains all the strings when you specify multiple search strings. Click on the Any String button to produce output if the line contains any of the strings.
Show Line Numbers
Display the line number on which the text string is located in the file being searched.
Show Adjacent Lines
Specify the number of lines to be displayed with the search string. By default, only the line containing the search string is displayed.
Files:*.COMStrings:WRITE
6.3.13. Displaying Information About Files
You can obtain information about a file or group of files by using the Show File command. This information can include the file's size, creation date,protection settings, and last backup date.
Choose the ellipsis (...) next to the Show File command on the Commands menu.
Type the name of the file about which you want information.
FileView displays a dialog box.
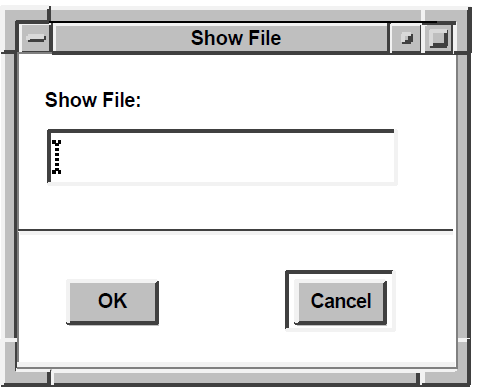
Show File:$USERS:[JONES]*.PS
Output from the Show File command looks similar to this:

6.4. Opening a New View
You can open a new FileView window that maintains the file and directory context of the current FileView window. When you choose New View... from FileView's File menu, FileView copies the display from the current FileView window into the new window and updates it, leaving the current FileView window in its original state. Any changes you make to the current FileView window(such as deleting a file or changing the information in the File Filter entry box)without applying them are reflected in the new FileView window.
Edit the File Filter or Directory entry box to reflect the information you want to display in the new FileView window.
Choose New View... from the File menu.
Do not click on the Apply button.
A new FileView window is opened that reflects the new file and directory information you specified. The File Filter and Directory entry boxes in the current FileView window are reset to the original text.
6.5. Accessing Files and Applications Quickly
FileView gives you two shortcuts for accessing files and applications quickly: pop-up menus and double-click commands.
6.5.1. Using Pop-Up Menus to Execute Commands
You probably execute the same few commands on each specific type of file. For example, you might edit, type, or copy a TXT file, but you would never run it. To help you perform file tasks more quickly, each file type has a corresponding pop-up menu that contains the commands you are most likely to use on that kind of file.
To see the contents of a pop-up menu for a specific type of file, press and holdMB3 on a file name in your file list. Choose the command you want to execute on that file. The next time you display this pop-up menu, the command that you last chose will be positioned under the pointer.
If you don't like the pop-up menu that is defined for a specific file type, you can change it. See Chapter 9, "Customizing FileView" for information about customizing pop-up menus.
6.5.2. Using Double-Click Commands
FileView executes a predefined command when you double click on some types of files. By using double-click commands, you can start file tasks quickly. For example, double clicking on a CARD file opens Cardfiler. Double clicking on an EXE file runs that program.
Choose File Types... from the Options menu.
FileView displays the File Types dialog box, which is described in detail in Chapter 9, "Customizing FileView".
Click on a file type in the File Types list box.
The double-click command defined for that file type is displayed below the File Types list box.
If you don't like the double-click command that is defined for a specific file type,you can change it. See Chapter 9, "Customizing FileView" for information about changing a double-click command definition.
6.6. Working with Directories
To access files on your system, you need to work with and navigate the directory structure. You might alsoneed to work with devices other than your default device.
You can access your own and other directory structures that have been set up to allow public access. With the correct process privileges, you can access files and directories on other devices or nodes. Your privilege classification controls what commands and functions you are authorized to execute from your account. For more information about setting process privileges, see Chapter 5, "Using Session Manager".
Create a directory
Delete a directory
Change directories
Change devices
Search a directory structure with wildcards
6.6.1. Creating a Directory
You can do all your work—including using files and running applications—in your top-level directory and never move from it. However, by creating and using subdirectories, you can organize your files into groups.
If you have the SYSPRV privilege, you can also create a top-level directory. See " Section 5.5, ''Setting Process Privileges''" for more information.
Choose Create Directory from the Utilities menu.
FileView displays a dialog box.
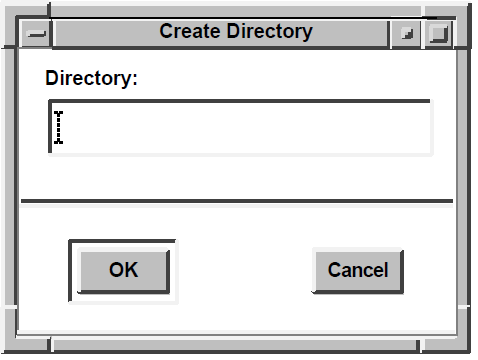
Type the name of the directory you want to create.
For example, to create a subdirectory from the top-level directory [JONES] with the directory specification [JONES.TRAVEL], type TRAVEL. To create a subdirectory from[JONES] with the directory specification [JONES.TRAVEL.MILEAGE], type TRAVEL.MILEAGE.
Click on OK.
6.6.2. Deleting a Subdirectory
In the subdirectory list, move up one level in the directory structure.
Select the subdirectory file you want to delete from the file list.
The subdirectory file has a file type of DIR.
Choose Delete from the Commands menu.
FileView displays the dialog box described in " Section 6.3.4, ''Deleting Files''."
Click on OK.
If the subdirectory is empty, FileView displays another dialog box that asks you to confirm that you want to delete the subdirectory file.
Click on OK.
6.6.3. Navigating a Directory Structure
If you have subdirectories, FileView displays a subdirectory list that lets you move up and down your directory structure to access your subdirectories and the files they contain. By setting default to another directory, you change your current directory.
FileView appends the subdirectory name to the directory name in the Directory entry box and displays the contents of that subdirectory in the current file list.
If you have subdirectories in your new default directory,they are now displayed in the subdirectory list. The subdirectories that were previously displayed are displayed in a sibling directory list to the left of the subdirectory list.
6.6.4. Using Wildcards in the File Filter
From any point in a directory structure, you can search a subdirectory in that structure or another directory by using the ellipsis (...)or hyphen (-) wildcard character.
You do not have to change directories to search the contents of another directory. By entering a full file specification (including a directory and device name, if appropriate) in the File Filter entry box, you can search the contents of that directory without changing directories. Any output produced by a FileView command continues to be directed to your current directory.
6.6.4.1. Using the Ellipsis (...) Wildcard
Use the ellipsis wildcard to search down the directory structure. You can list the contents of directories or search for one file in a directory. Using the ellipsis wildcard allows you to conduct a broad search of an entire directory structure.
File Filter:[JONES...]Directory:$USERS:[JONES.STAFF]
File Filter:[JONES...]DIRECTIONS.TXTDirectory:$USERS:[JONES.STAFF]
File Filter:[...PROJECT]SALARIES.LISDirectory:$USERS:[JONES]
File Filter:[...]HOLIDAYS.LISDirectory:$USERS:[JONES]
File Filter:[.LETTERS]OFFER.TXTDirectory:$USERS:[JONES]
File Filter:[*...]Directory:$USERS:[JONES]
6.6.4.2. Using the Hyphen (-) Wildcard
When you learned how to navigate a directory structure, you saw how to use the hyphen wildcard to move up the directory structure one level at a time. By using the hyphen wildcard in a file specification in the File Filter entry box, you can list the contents of a directory or search for a file within a directory structure. Each hyphen refers to the directory one level up from the current one. You can follow the hyphens with directory and subdirectory names to move up and down the directory structure on another path.
Unlike the ellipsis wildcard, the hyphen wildcard limits your search to one level of the directory structure at a time.
File Filter:[-]Directory:$USERS:[JONES.STAFF]
File Filter:[-.STAFF]FUNDING.TXTDirectory:$USERS:[JONES.SCHEDULES]
File Filter:[–]Directory:$USERS:[JONES.SCHEDULES.CURRENT]
If you enter so many hyphens that you point above the master file directory(MFD), FileView displays an error message.
6.7. Executing a DCL Command
You can execute a DCL command directly from FileView by choosing DCL Command from the Utilities menu. FileView opens a DCL Command window and displays the DCL prompt ($). Any DCL command you enter is executed in the context of the current directory.
To close the DCL Command window temporarily, shrink the window to an icon by clicking MB1on the window's minimize button. By continuing to choose DCL Command from FileView's Utilities menu, you create additional Task Output windows that you can close and reopen.
Part II. Customizing Your DECwindows Environment
DECwindows provides many preset options that you are invited to change. You can work successfully with DECwindows and never change these options, but by using DECwindows customization options, you can design an environment to fit your own working style.
Chapter 7, "Customizing Session Manager" describes how to customize your session and your DECwindows environment.
Chapter 8, "Customizing Menus and Menu Bars" describes how to customize Session Manager's and FileView's menus and menu bars.
Chapter 9, "Customizing FileView" describes how to customize FileView.
Chapter 10, "Customizing the Window Manager" describes how to customize the DECwindows Window Manager.
Chapter 7. Customizing Session Manager
Session Manager's Options menu includes menu items for customizing session features such as your keyboard, language, window colors, and security settings.
This chapter describes how to customize your session. Where appropriate, it also explains how to customize the screen display for three types of workstations: the monochrome system, which supports black-and-white output only;the intensity system, which supports shades of gray;and the color system, which supports a full spectrum of colors.
7.1. Applying Your Settings
|
Click on |
To |
|---|---|
|
OK |
Save new settings and dismiss the dialog box. |
|
Apply |
Save new settings without dismissing the dialog box. |
|
Defaults |
Reinstate the system default settings defined when you installed the DECwindows software. (Note that the Defaults button does not save your changes. You must click on the OK or Apply button to save the default settings.) |
|
Cancel |
Dismiss the dialog box without changing any settings. If you made any changes without applying them, clicking on the Cancel button cancels those changes. |
|
Help |
Display help about the specific option dialog box. |
7.2. Starting Applications Automatically
If you begin every workday by logging in and starting the same few applications—perhaps DECterm, Calendar, and Mail—you can save yourself the effort of re-creating that environment by customizing Session Manager to start them for you.
Choose Automatic Startup... from Session Manager's Options menu.
Session Manager displays the Automatic Startup Options dialog box.
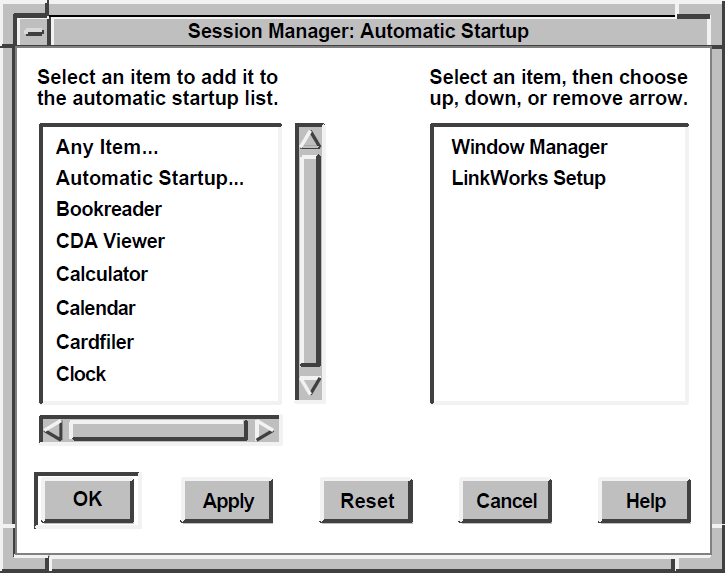
Click on an item in the left-hand list box to add it to your automatic startup list.
The item is displayed in the list box on the right, and arrows appear between the two list boxes.
Click on the up and down arrows to move the item up or down on the list in the right-hand list box.
The applications are executed in the order in which they appear in this list.
If you want to start one application several times, click on the application to add it repeatedly to the Automatic Startup list. For example, click on DECterm three times to open three DECterm windows at the start of every session.
To remove the item from the automatic startup list, click on the middle arrow.
Note
The Window Manager is a main component of your DECwindows working environment. Do not remove the Window Manager from your automatic startup list unless you are replacing it with another window manager.
7.3. Changing Your Keyboard Settings
To change your keyboard settings, choose Keyboard... from Session Manager's Options menu. Session Manager displays the Keyboard Options dialog box.
From the Customize Keyboard dialog box, you can change any of the following settings:
Bell Volume
A warning bell sounds to alert you to system messages. Adjust the bell's volume by dragging the arrow in the Percent Volume slider right or left, or move the pointer to a location on the slider and click MB1. Click on the Disable button to disable the bell.Keyclick Volume
Each time you press a key, the keyboard makes a clicking sound. This setting is indicated by a shaded button. Adjust the clicking volume by dragging the arrow in the Percent Volume slider right or left, or move the pointer to a location on the slider and click MB1. To disable the keyclick sound,click on the Disable button.Cursor Blink
DECwindows displays a blinking insertion cursor in every text-entry box. This setting is indicated by a shaded radio button. Adjust the cursor blink rate by dragging the arrow in the Milliseconds slider right or left, or move the pointer to a location on the slider and click MB1. To disable the blinking cursor, click on the disable button.Auto Repeat
When a key is pressed longer than normal, it repeats until it is released. This setting is indicated by a shaded button. To disable Auto Repeat,click on the Disable button.Lock Key State
Normally, you can produce capital letters but not shifted number keys when you press the Lock key on your keyboard. You can, however, make your keyboard work just like a typewriter keyboard by clicking on the Shift Lock button. Choosing the Shift Lock option means that pressing the Lock key produces both capital letters and shifted number keys.Operator Window Keys
Normally, you press Ctrl+F2 to open the operator window. You might, however,want to assign other definitions to those keys. To change how you open the operator window,click on any combination of the Ctrl or Shift and F2 or F1 buttons.Keyboard Type
The location of specific characters on the keyboard varies depending on the keyboard model. Selecting the keyboard type that matches your keyboard model allows the system to display the correct character when you press the corresponding key.The system default keyboard type is North American. When you installed DECwindows, you might have chosen another keyboard type, such as French, to correspond to your keyboard model. This keyboard type became the new system default. This means that every DECwindows session that is started on that workstation uses the French keyboard type.
If the keyboard on your workstation does not match the keyboard type that was specified when DECwindows was installed, you must set the keyboard type to match the keyboard model. This changes the keyboard type temporarily without permanently changing the system default keyboard type. (For example, you might plug an Austrian German keyboard into a workstation whose system default keyboard type,specified when DECwindows was installed, is French.)
To find your keyboard model number, turn the keyboard upside down and look fora label that specifies the model number. The model number should be in a format similar to LK201- xx. (The model number might also be listed as simplyLK201. In this case, the xx you need is in another place on the label. Look for a number similar to nn-nnnnn-xx.) Use this number to select a keyboard type from the Keyboard Type list box. For example, if you are using an Austrian German keyboard and your keyboard model is LK201-NG, select the Austrian German LK201-NG keyboard type.
For any language other than North American or U.S., you can also specify whether you want your keyboard to act as a data processing (DP) or typewriter (TW)keyboard. Selecting a data processing keyboard type enables the characters on the right half of the keycaps. Selecting a typewriter keyboard enables the characters on the left half of the keycaps.
To use this new keyboard type for subsequent sessions, you must save the new setting before you end the current session. The new keyboard type is in effect for your sessions only after DECwindows verifies your password at the start of each new session.
7.4. Setting Another Session Language
DECwindows applications are displayed in American English,but they are available in multiple languages. If you have the correct language support installed on your system, you can use DECwindows in another language.
To set another session language, choose Language... from Session Manager's Options menu. Session Manager displays the Language Options dialog box.
Scroll through the list of languages and select the one you want. The next application you start is displayed in that language. If your system does not support the selected language, the application is displayed in American English.
Language capabilities might vary between systems. For example, your system might have the language support required to display applications in French. If you select French as your session language, any applications you run on your workstation are displayed in French. However, if you run an application on a remote node that does not support French, and you direct the display to your workstation with the SET DISPLAY command, the application is displayed in American English.
To find out whether an application is available in another language, see the documentation for that application.
7.5. Changing Your Pointer Settings
You can change the shape and color of the pointer, as well as certain mouse characteristics. To change your mouse and pointer settings, choose Pointer... from Session Manager's Options menu. Session Manager displays the Pointer Options dialog box, which looks like this on a monochrome system:
The Customize Pointer dialog box looks like this on intensity and color systems:
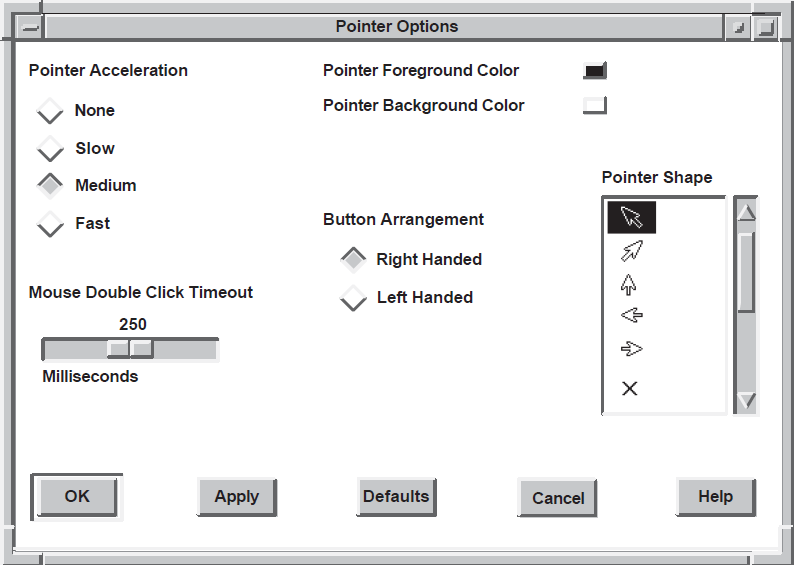
From the Pointer Options dialog box, you can change any of the following settings.
Pointer Acceleration
Click on one of the four options to vary the rate at which the pointer moves in relation to the mouse. The None setting keeps the pointer speed constant. The Fast setting makes the pointer move farther as you move the mouse faster. Thus you can move the pointer to another part of the screen without moving the mouse the same relative distance. The preset option is Medium.Mouse Double-Click Timeout
DECwindows can distinguish between two successive single clicks and a double click. To change the speed by which DECwindows expects one click to follow another in a double-click sequence, drag the arrow in the Mouse Double Click Timeout scale to the right to increase the speed. Drag the arrow to the left to decrease the speed. You can also move the pointer to a location on the scale and click MB1.Pointer Foreground Color
The pointer consists of an outline and a filled center.On a monochrome system, the pointer's filled area is white with a black outline by default. Click on the Black On White button to reverse the fill and outline colors.
On intensity and color systems, the pointer's filled area or foreground is black by default. To change this setting, click on the Pointer Foreground Color button. Session Manager displays a color-mixing dialog box. For more information about mixing colors, see Chapter 4, "Performing Common Tasks".
To see your changes, click on Apply or OK in the Pointer dialog box.
Pointer Background Color
This setting applies to color and intensity systems only. To change the default pointer background color,click on the Pointer Background Color button. Session Manager displays a color-mixing dialog box. For more information about mixing colors, see Chapter 4, "Performing Common Tasks".To see your changes, click on Apply or OK in the Pointer dialog box.
Button Arrangement
The preset mouse button arrangement—MB1 on the left and MB3 on the right—is natural for a right-handed user. You can switch the mouse button arrangement by clicking on the Left Handed radio button. The right mouse button becomes MB1 and the left mouse button becomes MB3. MB2 stays the same.
Pointer Shape
By default, the pointer is a left arrow. To change the pointer shape, scroll through the list of shapes and select the one you want.
7.6. Changing Your Session Manager Window Settings
You can change Session Manager's icon name and window name as well as its startup state. To change your Session Manager window, choose Window... from Session Manager's Options menu. Session Manager displays a Window dialog box.
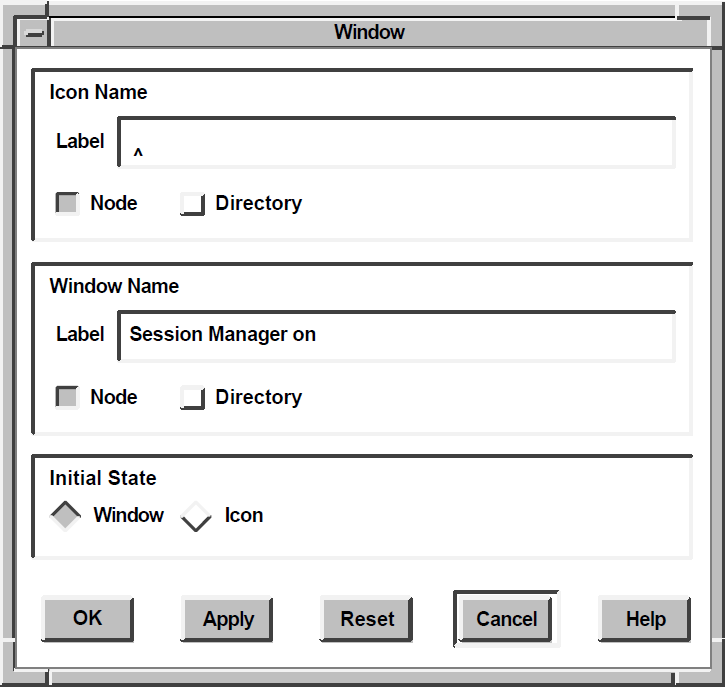
From the Window dialog box, you can change the following settings.
Icon Name
To change Session Manager's icon label,type the new label name in the Icon Name entry box. By default, Session Manager's icon label includes the name of your node. To append a directory specification to the icon name, click on the Directory button.Window Name
To change Session Manager's window label,type the new window name in the Window Name entry box. By default, Session Manager's window label includes the name of your node. To append a directory specification to the window name, click on the Directory button.
Initial State
Session Manager is displayed as a window at the start of each session. Click on the Icon button in the Initial State entry box to specify that Session Manager be stored as an icon at the start of every session.
7.7. Changing Your End Session Prompts
When you end your session,Session Manager executes several procedures. To alter this sequence, choose End Session Prompts... from Session Manager's Options menu. Session Manager displays the End Session Prompts Options dialog box.
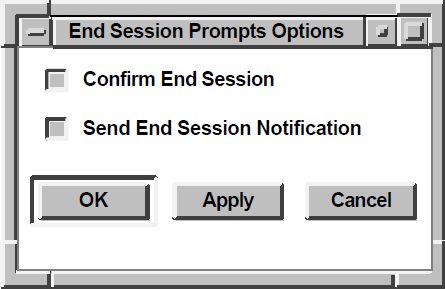
From the End Session Prompt Options dialog box, you can change the following settings.
Confirm End Session
When you end a session, Session Manager asks you for confirmation. This setting is indicated by the shaded radio button. To disable the confirmation message, click on the Confirm Quit Session button. You do not receive a confirmation message when you end your session.
Send End Session Notification
When you end a session, Session Manager notifies every current DECwindows application. Some applications respond to this message and save important data. This setting is indicated by the shaded radio button. To prevent Session Manager from sending an end session message, click on the Send End Session Notification radio button.
7.8. Writing Your Own Pause Screen Messages
When you put your session on hold and lock your workstation, the Session Manager clears your screen and displays the Pause Session dialog box. You are prompted as follows: "Type your password to resume the session." To change this message,choose Pause Screen... from Session Manager's Options menu. Session Manager displays the Pause Screen Options dialog box.
Type your new Pause Screen text in the text-entry box in this dialog box. Click on OK or Apply.
To see your new message, choose Pause from Session Manager's Session Menu.
7.9. Changing Your Screen Background Settings
To change your screen background, choose Screen Background... from Session Manager's Options menu. Session Manager displays the Screen Background Options dialog box.
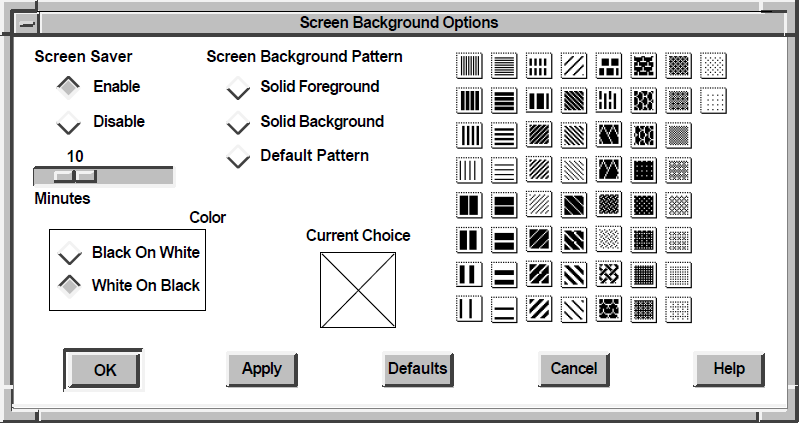
From the Screen Background Options dialog box, you can change any of the following settings.
Screen Saver
Screen Saver extends the life of your monitor by shutting off its display after a specified time. By default, the monitor shuts off its display after 10minutes of keyboard or mouse inactivity. To vary the amount of time that Screen Saver waits before shutting down the display, drag the arrow in the slider right or left,or move the pointer to a specific location on the slider and click MB1. Click on the Disable button to keep the display on indefinitely. Click on Apply or OK to see your change.
Screen Background Pattern
To change the default background pattern, click on a pattern in the dialog box. The selected pattern is displayed in the pattern viewer. Click on OK or Apply to see your selection in effect.
To create a solid background or foreground, click on the Solid Foreground or Solid Background button. To display the default pattern, click on the Default Pattern button.
Solid Foreground
The screen pattern, when set to anything other than the default pattern,consists of a screen foreground (the filled area in the pattern) and a screen background (the pattern's outline). The selected pattern is displayed in the pattern viewer.
To change the default screen color on a monochrome system, click on the White On Black radio button to reverse the fill and outline colors.
To change the default screen color on intensity and color systems,click on the Solid Foreground button. The Session Manager displays a color-mixing dialog box. For more information about mixing colors, see Chapter 4, "Performing Common Tasks".
To see your new setting, click on Apply or OK.
Solid Background
This setting applies to intensity and color systems only. To change the default screen background color, click on the Solid Background button. Session Manager displays a color-mixing dialog box. For more information about mixing colors, see Chapter 4, "Performing Common Tasks".
7.10. Changing Your Window Color Settings
Whether you have a monochrome, intensity, or color system, you can change the look of your DECwindows display. For example, you can alter the background and foreground patterns and the window and screen colors. If you have a color system, you can choose from a wide palette of colors to design a visually pleasing display.
To change your Window color settings, choose Window Colors... from Session Manager's Options menu. Session Manager displays the Window Color Options dialog box.
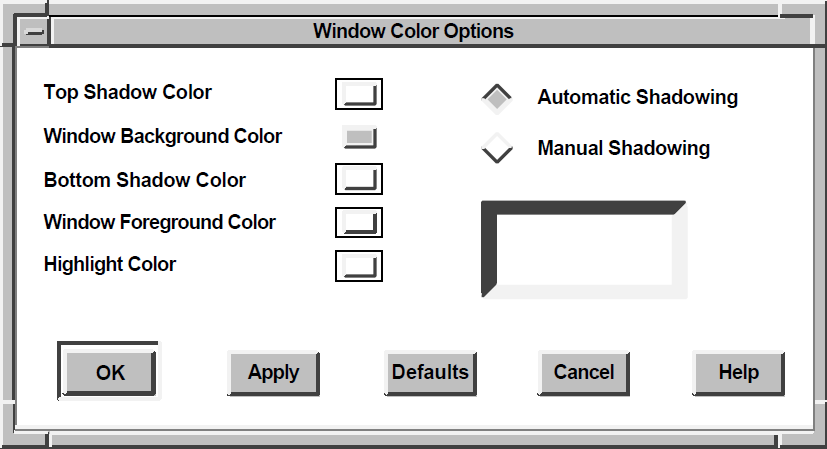
Note
Window color changes do not take effect immediately. They apply to applications started after you save your changes.
From the Window Color Options dialog box, you can change any of the following settings. For more information about mixing colors, see Chapter 4, "Performing Common Tasks".
Top Shadow Color
Window top and bottom shadow colors have to be well matched to present the three-dimensional look of DECwindows Motif. DECwindows helps you to do this by automatically determining top and bottom shadow colors when you change the window color.
Click on the Manual Shadowing radio button to disable Automatic Shadowing.
Click on the Top Shadow Color button.
Session Manager displays a color-mixing dialog box.
Window Background Color
To change the default window background color,click on the Window Background Color button. Session Manager displays a color-mixing dialog box.
If you save your changes by clicking on Apply or OK in the Window Colors Options dialog box, your new setting takes effect when you start your next session or start applications.
Bottom Shadow Color
Window top and bottom shadow colors have to be well matched to present the three-dimensional look of DECwindows Motif. DECwindows helps you to do this by automatically determining top and bottom shadow colors when you change the window color.
Click on the Manual Shadowing radio button to disable Automatic Shadowing.
Click on the Bottom Shadow Color button.
Session Manager displays a color-mixing dialog box.
Window Foreground Color
Changing the Window Foreground Color setting in a window that contains text also changes the color of that text. If the window contains graphics, the color of the graphics changes.
To change the default window foreground color,click on the Window Foreground Color button. Session Manager displays a color-mixing dialog box.
If you save your changes by clicking on Apply or OK in the Window Colors Options dialog box, your new setting takes effect when you start your next session or start applications.
Highlight Color
To change the default color of the location cursor used in keyboard traversal,click on the Highlight Color button. Session Manager displays a color-mixing dialog box.
If you save your changes by clicking on Apply or OK in the Window Colors Options dialog box, your new setting takes effect when you start your next session or start applications.
Note that you can also change the pattern used for highlighting. This is especially useful on monochrome and 4-plane color systems.
7.11. Changing Your Security Settings
DECwindows software allows you to run applications from another computer for display on your workstation monitor. By default, your workstation monitor can display only those applications that are running on your workstation. This prevents users on other systems in the network from displaying applications on your workstation monitor and from capturing and displaying your keystrokes (including your password) on another monitor.
From Session Manager's Security Options dialog box, you can authorize yourself or others to use your monitor to display applications that are running on other systems. See Chapter 12, "Running Applications Across the Network" for information about supplying this authorization.
7.12. Changing Message Window Settings
Choose Message Window from Session Manager's Applications menu.
Session Manager displays the Message Window.
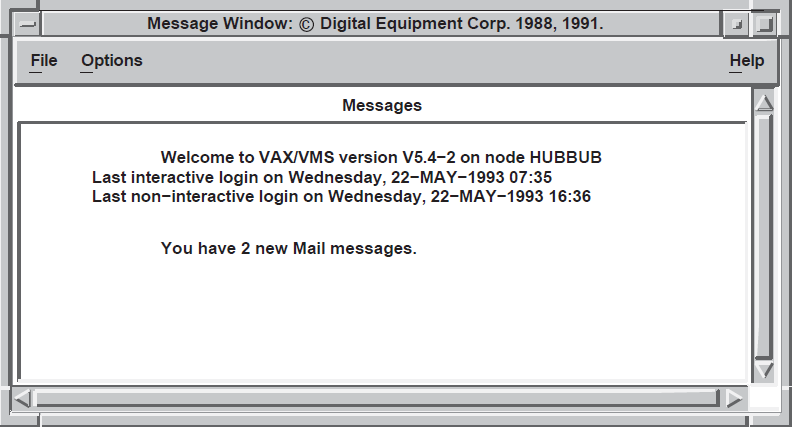
Choose Message Window... from the Message Window's Options menu.
The Message Window Options dialog box is displayed.
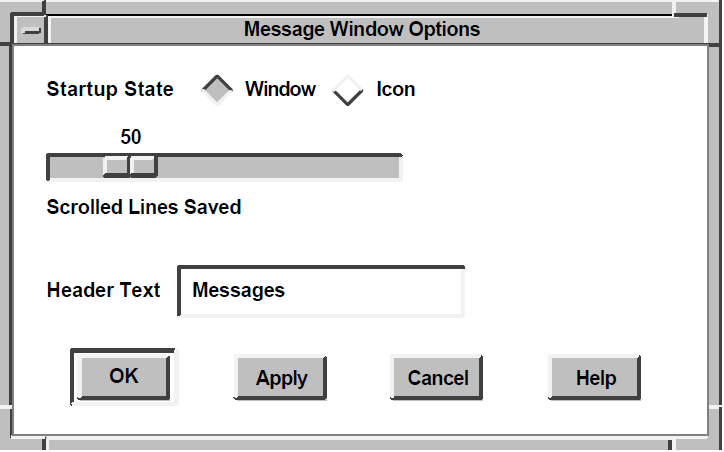
From the Message Window Options dialog box, you can change the following settings.
Startup State
Click on the Icon radio button to specify that the Message Window be displayed as an icon when you start it.
Scrolled Lines Saved
By default, you can scroll through the last 50 lines of text in Session Manager's message area to view messages you may have missed. The Scrolled Lines Saved slider lets you vary the number of lines that Session Manager saves.
Header Text
Session Manager message area is labeled Messages. To change this heading,type a new heading in this text-entry box.
Chapter 8. Customizing Menus and Menu Bars
You can change Session Manager's and FileView's menus and menu bars by deciding what to include on a menu bar,adding menu items to menus, and defining your own menu items. For example, if you write your own application, you can add it to Session Manager's Applications menu and invoke it just as you would any other DECwindows application.
This chapter describes how to add a menu item to a pull-down menu,remove a menu item from a pull-down menu,define your own menu item definitions,modify menu bars, and change Session Manager's menu bar so that it looks and behaves like FileView.
8.1. Customizing Menus
You can customize Session Manager's and FileView's menus by changing the menu items they contain.
By displaying the Menus dialog box, you can see how a pull-down menu is created and what happens when you choose a menu item from a Session Manager or FileView menu. Once you understand the components of menus, you can modify them and the menu items they contain.
To display the Menus dialog box, choose Menus... from Session Manager's or FileView's Options menu. The following dialog box is displayed.
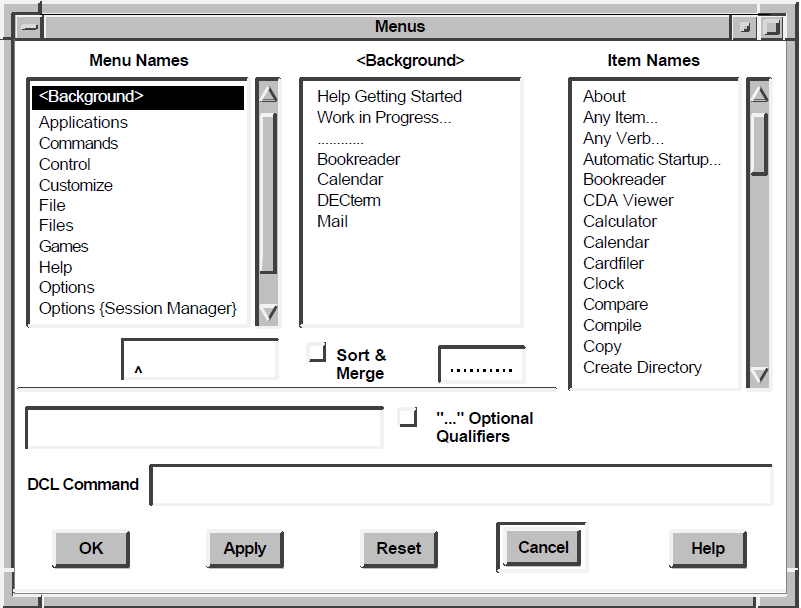
The Menu Names list box displays currently defined menu names.
The menu name entry box is located below the Menu Names list box. Use it when you define your own menu names.
The items-in-menu list box displays the menu items on the currently selected menu in the Menu Names list box. The name of the menu you select is displayed above this list box.
The Item Names list box displays available menu items that you can add to Session Manager and FileView menus.
The Item Name entry box displays the item name that you select in the Item Names list box. You can use this entry box to define your own menu items, as described in " Section 8.1.2, ''Adding an Item to a Menu''."
The DCL Command entry box displays the DCL command or command file associated with the menu item that is currently selected in the Item Names list box.
8.1.1. Looking at the Contents of a Menu
In the Menu Names list box, select the menu name whose contents you want to display.
The items-in-menu list box displays the menu items in the selected menu. For example, if you select Applications from the Menu Names list box, the menu name (Applications) appears above this list box. This list box displays all of the menu items on the Applications menu.
Select each menu name in turn to display the corresponding pull-down menu in the items-in-menu list box.
8.1.2. Adding an Item to a Menu
In the Menu Names list box, select the menu name to which you want to add an item.
The items-in-menu list box displays the menu items on the menu you selected. The name of the menu you selected is displayed above the list box.
In the Item Names list box, select the item that you want to add to the menu.
Click on the arrow button that appears. The item is added to the menu you selected.
Use the up and down arrows that appear in order to change the location of the item on the menu.
Click on OK or Apply to see your changes.
Or click on Reset or Cancel to retain the original settings.
Note
Enabling the Sort & Merge setting ensures that the private customization file that you create when you customize FileView is merged with any other system or public customization files that FileView reads. If you disable the Sort & Merge setting,FileView cannot merge your new definition with the public and system definitions for that menu. A menu also becomes unsorted if you rearrange its contents.
For more information about how FileView uses private, public, and system customization files, see Chapter 14, "Sharing Customization Files".
8.1.3. Removing an Item from a Menu
In the Menu Names list box, select the menu name that contains the menu item you want to remove.
In the items-in-menu list box, select the menu item you want to remove.
Click on the Trashcan button that appears.
The menu item is deleted from the list.
Click on Apply or OK to save your change.
Or click on Reset or Cancel to retain the original settings.
Note
When you remove a built-in menu item from a pull-down menu, you create a copy of that menu in your private customization file. Any subsequent changes made to the public customization file (for example, adding a new menu item to a pull-down menu) are not reflected in your private Session Manager or FileView. For more information about how Session Manager and FileView use private, public, and system customization files, see Chapter 14, "Sharing Customization Files".
8.1.4. Looking at a Menu Item Definition
Each item on a Session Manager or FileView menu has a corresponding DCL command definition or command file that executes when you choose that item. You can replace a menu item's current command definition with a new command definition that executes a different series of commands. For example, when you choose the Type menu item from FileView's Commands menu, the command file VUE$LIBRARY:VUE$TYPE runs. By designing a new command file and associating it with the Type menu item, you can run a different series of commands when you choose Type from FileView's Commands menu.
To see the name of the DCL command file that is associated with a particular menu item,select that menu item in the Item Names list box in the Menus dialog box. The associated command file is displayed in the DCL Command entry box.
8.1.5. Changing a Menu Item Definition
In the Item Names list box, select the menu item that you want to change.
Delete the name of the current command in the DCL Command entry box.
Type the name of the new command or command file.
If you want to make changes to a built-in (predefined) FileView command file, you can use the command file for that menu item as a template.
To modify a command file that executes a built-in FileView command, copy the command file from the VUE$LIBRARY directory and edit it. You can recognize the contents of the command files by their file names. For example,the FileView command file that executes the Type command is named VUE$TYPE.
Give your command file a name that identifies the task it performs and a file type of COM—for example, EDIT.COM. Do not delete the command files in the VUE$LIBRARY directory that execute FileView's built-in menu items. Also, do not give your command file the same name as an existing FileView command file.
If you delete your new menu item definition, FileView uses the original command file to execute the built-in menu item.
To see a sample command file, see Chapter 15, "Using Task Messages".
8.1.6. Adding a User-Defined Menu Item
Click on the text-entry box above the DCL Command entry box.
Type the name of the new menu item exactly as you want it to appear.
For example, type SHOW USERS.
In the DCL Command entry box, type the DCL command you want to associate with your new menu item.
For example, type the command SHOW USERS. To associate your menu item with a command file, type$@command_file_name.COMClick on the up arrow button that appears below the Item Names list box.
If you want to add your new menu item to a menu, see " Section 8.1.2, ''Adding an Item to a Menu''."
8.1.7. Deleting a User-Defined Menu Item
In the Item Names list box, select the menu item that you want to delete.
Click on the Trashcan button that appears.
8.1.8. Defining a New Menu Name
Click on the text-entry box below the Menu Names list box.
Type, exactly as you want it to appear on the menu, the name of the menu you want to add.(Note that any text you enter within { } is not displayed in the menu bar.)
For example, type PERSONAL.
Click on the up arrow button that appears below the Menu Names list box.
If you want to add menu items to this new menu, see " Section 8.1.2, ''Adding an Item to a Menu''."
Click on Apply or OK to see your change.
Or click on Reset or Cancel to retain the original settings.
8.1.9. Deleting a User-Defined Menu Name
In the Menu Names list box, select the menu name that you want to delete.
A Trashcan button appears below the Menu Names list box.
Click on the Trashcan button.
8.2. Customizing Menu Bars
Once you create a new menu, you must add it to a menu bar. You can also remove menus that you do not need.
Choose Menu Bar... from Session Manager's or FileView's Options menu.
The Menu Bar dialog box is displayed.
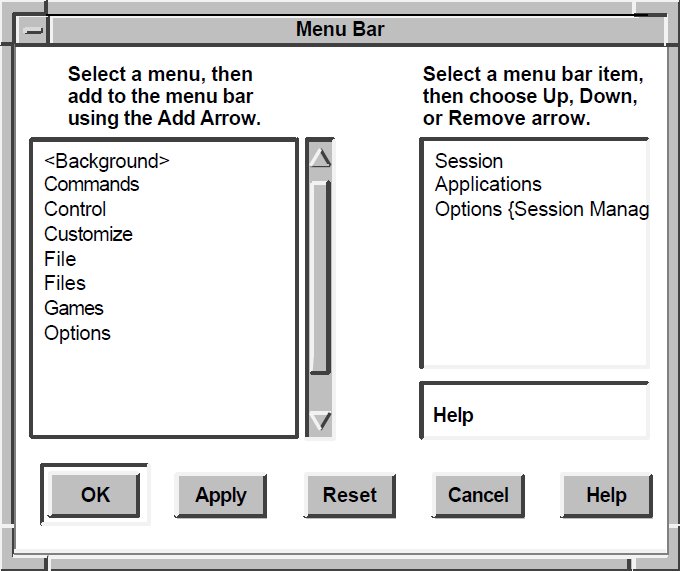
Existing menu names appear in the right-hand list box. New menu names appear in the left-hand list box.
In the left-hand list box, select the menu name you want to add to a menu bar.
Click on the arrow button that appears in order to move the menu name to the right-hand list box.
Click on Apply or OK to see your change.
Choose Menu Bar... from Session Manager's or FileView's Options menu.
The Menu Bar dialog box is displayed.
In the right-hand list box, select the menu name that you want to remove from the menu bar.
Click on the arrow button that appears.
Click on OK or Apply to see your change.
Note
Any changes you make to a menu bar affect only the current Session Manager or FileView window. If you want different menu bars for different tasks—for example, one for system management tasks and another for text-processing tasks—you can create multiple menu bars and save them as views, as described in Chapter 9, "Customizing FileView".
8.3. Combining Session Manager and FileView
By adding the Session Manager as FileView menu item to Session Manager's Options menu, you can combine Session Manager's and FileView's features into one window.
Choose Menus... from Session Manager's menu.
Session Manager displays the Menus options dialog box.
In the Menu Names list box, select the Options {Session Manager}menu name.
The items-in-menu list box displays Session Manager's Options menu.
In the Item Names list box, select the Session Manager as FileView item.
Click on the left arrow button that appears.
Session Manager as FileView is displayed on Session Manager's Options menu.
Click on OK or Apply to see your changes.
Or click on Reset or Cancel to retain the original settings.
Choose Session Manager as FileView from Session Manager's Options menu.
Your Session Manager menu bar is now displayed as a FileView window.
To reset your Session Manager to its original form,choose Session Manager from the Views menu.
Tip
You can also make Session Manager's menu bar look and behave like a FileView window by adding the Show/Hide Work Area menu item to one of Session Manager's menus.
Chapter 9. Customizing FileView
In addition to customizing FileView's menus and menu bar,you can change other FileView features. For example,you can change the look of your file list,build your own pop-up menus, and create a customized FileView window.
This chapter describes how to use FileView's Options menu to customize FileView.
9.1. Changing the Look of Your File List
The file name
The file type
You can change the way the files in your current and subsequent file lists are listed. For example, you might want to list each file by its size or by the date it was created or to change the order in which the files are listed.
To change the way files are listed, choose Layout... from FileView's Options menu. FileView displays a dialog box:
The settings in the Layout dialog box are divided into groups. Some settings are preset and are already in effect. When you choose a setting from the Layout dialog box, it affects every subsequent file list until you change the setting again.
9.1.1. Changing the Fields in Your File List
|
Field |
Information Displayed |
|---|---|
|
Node |
DECnet node name of the file |
|
Device |
Device on which the file is stored |
|
Directory |
Directory in which the file is stored |
|
Type |
File type of the file |
|
Version |
Version number of the file |
|
Size Used |
Size, in blocks, used in the file |
|
Size Allocated |
Size, in blocks, allocated to the file |
|
Create Date |
Date and time the file was created |
|
Modify Date |
Date and time the file was last modified |
|
Backup Date |
Date and time the file was last backed up |
|
Expire Date |
Date the file expires |
|
File Owner |
Owner, in numeric or text format, of the file |
|
Protection |
Protection settings for the file |
|
File ID Number |
Unique file identification for the file |
|
Sort/Filter Key |
Displays the sort key field |
9.1.2. Displaying File Version Numbers
In the Layout dialog box, the Show Highest Version option is enabled by default. This setting is indicated by the shaded radio button,and only the highest version of each file in your current directory is displayed. Every version number of a file is not shown.
To display all versions of the files in your current directory, click on the Show All Versions radio button.
9.1.3. Changing the File Order in Your File List
By default, the files in your file list are listed in the order in which they appear in the directory structure. This order is alphabetical unless your file list includes files from more than one directory. To list files alphabetically, even if multiple directories are shown,click on the By Name radio button under the Order column. To list files alphabetically by file type,click on the By Type radio button. You can choose only one radio button at a time from the Order column.
|
Option |
Sorts files in file list by |
|---|---|
|
Size Used |
Blocks used |
|
Size Allocated |
Blocks allocated to the file |
|
Create Date |
Date and time each file was created |
|
Modify Date |
Date and time each file was most recently changed |
|
Backup Date |
Date and time each file was most recently backed up |
|
Expire Date |
Expiration date |
9.1.4. Saving Your File List Changes
|
Choose |
To |
|---|---|
|
OK |
Save new settings and dismiss the dialog box. |
|
Apply |
Save new settings without dismissing the dialog box. |
|
Reset |
Redisplay the current settings if you changed settings without applying them. |
|
Cancel |
Dismiss the dialog box without changing any settings. |
9.2. Changing Your FileView Window Settings
You can change FileView's icon name and window name as well as its startup state. To change your FileView window settings, choose Window... from FileView's Options menu. FileView displays the Window dialog box.
From the Window dialog box,you can change the following settings.
Icon Name
To change FileView's icon label,type the new label name in the Icon Name entry box.
Window Name
To change FileView's window label,type the new window name in the Window Name entry box.
Initial State
When you start FileView, it is displayed as a window. If you want it to appear as an icon when you start it,click on the Icon button in the Initial State entry box.
9.3. Building Pop-Up Menus and Defining Double-Click Commands
As described in Chapter 6, "Using FileView", FileView provides pop-up menus and double-click command definitions to make it easier for you to work with files. Using the File Types dialog box, you can modify the pop-up menus and double-click command definitions associated with each file type.
To display the File Types dialog box, choose File Types... from FileView's Options menu.
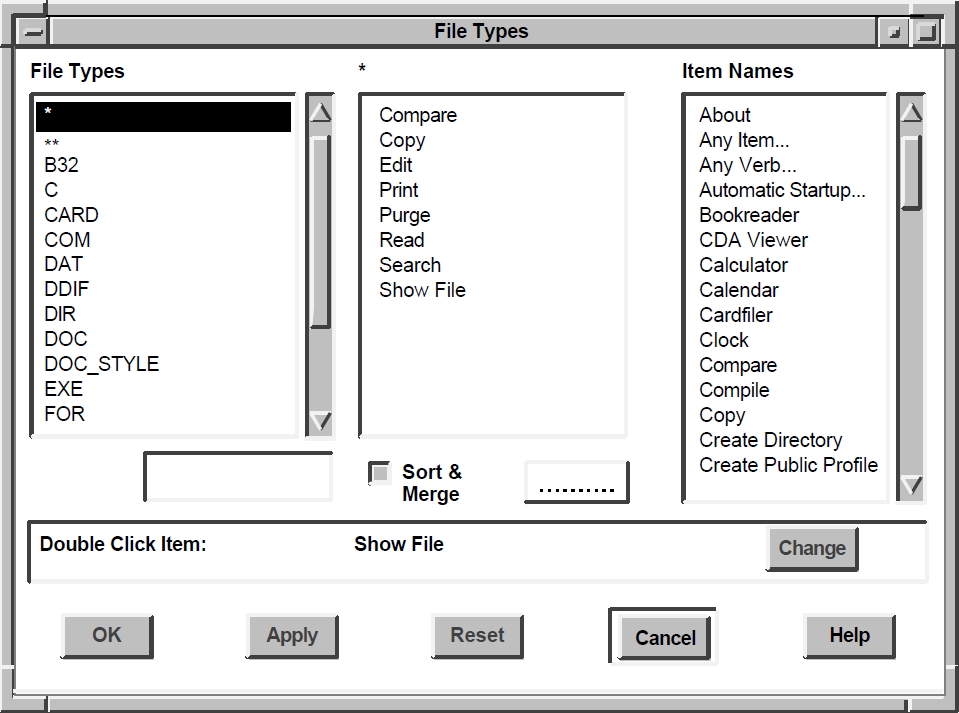
The File Types list box displays the file types for which double-click menu items and pop-up menus are currently defined.
The pop-up menu (labeled with an asterisk [*])list box displays the currently defined menu items on the pop-up menu of the selected file type. The name of the pop-up menu is displayed above this list box (in place of the asterisk).
The Item Names list box displays the menu items currently defined in FileView.
The Double-Click Item entry box displays the menu item that executes when you double click on a file of the selected type.
9.3.1. Looking at Pop-Up Menu Definitions
When you press and hold MB3 on any file name, FileView displays the pop-up menu defined for that file type.
Select the * file type in the File Types list box. The asterisk refers to all file types not specifically listed in the File Types list box—for example,ANL and SDML files. If you press MB3 while pointing to a file in your file list for which no pop-up menu is defined, the pop-up menu defined for * is used.
FileView displays the corresponding pop-up menu in the pop-up menu list box.
Select the ** file type in the File Types list box. The double asterisk does not refer to a specific file type. If you click MB3at the bottom of the file list,FileView displays the ** pop-up menu.
In turn, select each file type in the File Types list box.
As you select a file type, its corresponding pop-up menu is displayed in the pop-up menu list box.
9.3.2. Adding a Menu Item to a Pop-Up Menu
In the File Types list box, select the file type whose corresponding pop-up menu you want to change.
In the Item Names list box, select the menu item you want to add to the pop-up menu.
Click on the arrow button that appears between the pop-up menu and Item Names list boxes.
The menu item is added to the pop-up menu list box. New menu items are added alphabetically if the Sort & Merge button is shaded. The menu items you add always appear in boldface to identify what you have customized.
To move the menu item within the list, click on the up or down arrow button that appears between the pop-up menu and Item Names list boxes.
To delete the menu item, click on the Trashcan button.
Click on Apply or OK to see your change.
Or click on Reset or Cancel to retain the original settings.
Note
Enabling the Sort & Merge setting ensures that the private customization file created when you customize FileView is merged with any other system or public customization files that FileView reads. If you disable the Sort & Merge setting,FileView cannot merge your new definition with the public and system definitions for that menu. This means that you would not see any changes (for example, a new pull-down menu) made to a public customization file. A menu also becomes unsorted if you rearrange its contents by using the up or down arrows.
For more information about how FileView uses private, public, and system customization files, see Chapter 14, "Sharing Customization Files".
9.3.3. Removing a Menu Item from a Pop-Up Menu
In the File Types list box, select the file type whose corresponding pop-up menu you want to change.
In the pop-up menu list box, select the menu item you want to remove.
Click on the Trashcan button next to the pop-up menu list box.
The menu item is removed from the list.
Click on OK or Apply to see your change.
Or click on Reset or Cancel to retain the original settings.
Note that when you remove a built-in menu item from a pop-up menu, you create a copy of that menu in your private customization file. Any subsequent changes made to the public customization file are not reflected in your private FileView. See Chapter 14, "Sharing Customization Files" for more information about how FileView uses private, public, and system customization files.
9.3.4. Looking at Double-Click Menu Item Definitions
As described in Chapter 6, "Using FileView", FileView executes a predefined command when you double click on a specific file type. In the File Types dialog box, you can change the double-click menu item defined for a file type and execute a different command.
Select the * file type in the File Types list box. (The asterisk refers to all file types not specifically listed in the File Types list box—for example,ANL and SDML files. If you double click on a file type in your file list for which no double-click menu item is defined, the double-click menu item defined for * is used.)
The corresponding double-click menu item is displayed in the Double Click Item entry box.
Select each file type in turn to see its corresponding double-click menu item.
As you select a file type, its corresponding double-click menu item is displayed.
9.3.5. Changing a Double-Click Menu Item Definition
In the File Types list box, select the file type whose corresponding double-click menu item you want to change.
In the Item Names list box, select the menu item that you want FileView to execute when you double click on a file.
Click on the Change button.
The double-click menu item definition is changed. The file types whose double-click definitions you have changed always appear in boldface to identify what you have customized.
Click on Apply or OK to see your change.
Or click on Reset or Cancel to restore the original settings.
9.3.6. Adding a File Type
Type the file type (for example, COM) that you want to add in the text-entry box below the File Types list box.
Click on the up arrow button that appears.
The file type is added to the list. The file types you add always appear in boldface to identify what you have customized.
Add menu items to the new file type's pop-up menu as described in " Section 9.3.2, ''Adding a Menu Item to a Pop-Up Menu''."Or define a double-click menu item for the new file type as described in " Section 9.3.5, ''Changing a Double-Click Menu Item Definition''."
Click on OK or Apply to see your change.
Or click on Reset or Cancel to retain the original settings.
9.3.7. Removing a File Type
Select the file type in the File Types list box.
Click on the Trashcan button.
The file type is deleted from the list.
Click on OK or Apply to see your change.
Or click on Reset or Cancel to retain the original settings.
9.3.8. Saving Your File Types Changes
|
Click on |
To |
|---|---|
|
OK |
Save new settings and dismiss the dialog box. |
|
Apply |
Save new settings without dismissing the dialog box. |
|
Reset |
Redisplay the current settings if you changed settings without applying them. |
|
Cancel |
Dismiss the dialog box without changing any settings. If you made any changes without applying them, clicking on the Cancel button cancels those changes. |
9.4. Working with Views
FileView provides two ways to work with your customized FileView settings. You can use options dialog boxes to make changes and save them, as described in the previous sections of this chapter. You can also create FileView windows with different sets of customized settings that you can name and switch between. These customized FileView windows are called views.
The following sections describe how to design and save your own views and how to use predefined views.
9.4.1. Designing a View
As described in Chapter 6, "Using FileView",the FileView window contains several components.
To design a view, you choose different combinations of FileView's components from the Save View dialog box. To display the Save View dialog box,choose Save View... from FileView's Options menu. The dialog box is displayed.
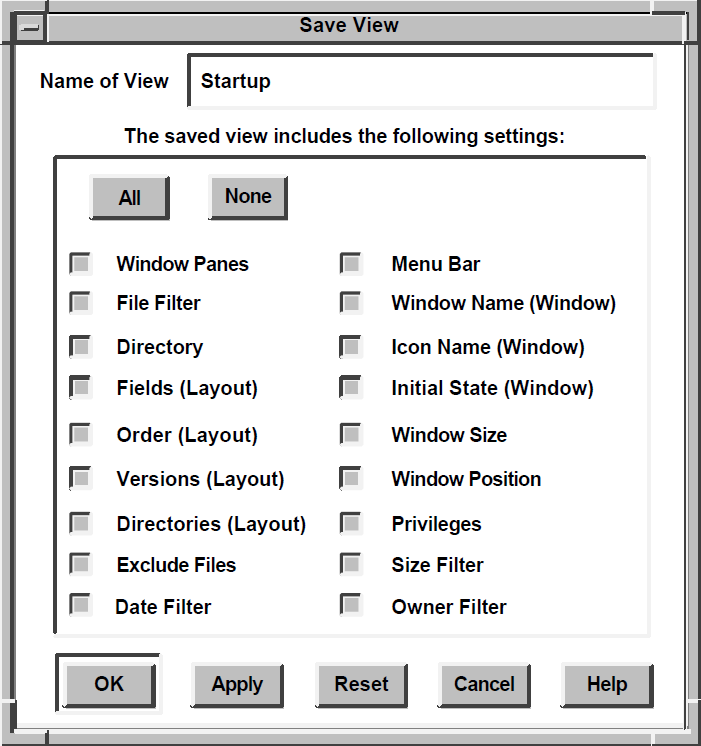
|
Component Setting |
Information Preserved |
|---|---|
|
Window Panes |
Areas displayed in a FileView window. For example, you can use the Show/Hide Work Area menu item to display or not display FileView's work area. |
|
File Filter |
Text you specify in the File Filter entry box in the FileView window. |
|
Directory |
Name of the directory that you specify in the Directory entry box. |
|
Fields |
Field settings—such as Create Date and Size Used—that you specify in the Layout dialog box(Options menu). |
|
Order |
Order settings—such as Unsorted or By Name—that you specify in the Layout dialog box(Options menu). |
|
Versions |
Version number settings—either Show All or Show Highest—that you specify in the Layout dialog box (Options menu). |
|
Directories |
Directories that you specify in the subdirectory list. |
|
Date Filter |
Date-filter that settings you specify in the Filter by Date dialog box (Options menu). |
|
Exclude Files |
Text that you specify in the Exclude entry box in the FileView window. |
|
Menu Bar |
Any menu names that you added to the menu bar (Options menu). This setting allows you to have different menu bars for different tasks.(See Chapter 8, "Customizing Menus and Menu Bars" for more information about adding menu names to the menu bar.) |
|
Window Name |
Name of the FileView window that you specify in the Window dialog box (Options menu). |
|
Icon Name |
Name of the FileView icon that you specify in the Window dialog box (Options menu). |
|
Initial State |
Initial state of FileView window—icon or window—that you specify in the Window dialog box (Options menu). |
|
Window Size |
Size of the FileView window on your screen. |
|
Window Position |
Location of the FileView window on your screen. |
|
Privileges |
Process privileges that you specify in the Privileges dialog box (Session menu in Session Manager). |
|
Size Filter |
Size-filter settings that you specify in the Filter by Size dialog box (Options menu). |
|
Owner Filter |
Owner-filter settings that you specify in the Filter by Owner dialog box (Options menu). |
If you enable all the component settings,your saved view is a snapshot of the current FileView window. For example, you might want to save a view of a subdirectory you frequently access. When you restore the view, the current FileView display changes to reflect the components of the view you saved. Because you saved every component, the FileView window changes to display a view of that subdirectory. By using a saved view in this way, you establish a shortcut for ascending and descending the directory structure.
When you enable only some component settings and save the current FileView display, only those components you specified are saved. When you restore that saved view, only those components you saved are changed; those components that were not saved are obtained from the current FileView display. For example, you might always want your FileView window to appear in the upper left-hand corner of your screen. By moving the FileView window to the upper left-hand corner, enabling only the window position setting in the Save View dialog box and saving it as a view called "Corner FileView," you save only one component from the current FileView. You can continue to work with and change your FileView display. When you restore the Corner FileView saved view, no information in your current FileView display changes, but the FileView window moves to the upper left-hand corner of your screen.
9.4.2. Saving a View
Customize the FileView window the way you want it saved.
Choose Save View... from FileView's Options menu.
FileView displays the Save View dialog box.
Type the name of the view you want to save in the Name of View entry box.
Give it a name meaningful to you—for example, "Sales Project" or "C file sizes."
Click on the components you don't want to save in the view.(All the components are saved by default.)
Click on OK or Apply.
The view is saved.
9.4.3. Looking at Built-In Views
Several commonly used views have already been saved for you. To see the list of the built-in views that DECwindows provides, click on FileView's Views menu. As you save additional views, FileView adds them to this list.
9.4.4. Saving Your Startup View
You can save the view you want to see whenever you start FileView. For example, you might want to display your SCHEDULES subdirectory when you start FileView. To save a startup view, customize the FileView window the wayyou want it saved. Choose Save Startup from FileView's Options menu. The next time you start FileView,your customized FileView is displayed.
9.4.5. Replacing a Saved View
Choose Save View... from the Options menu.
FileView displays the Save View dialog box.
In the Name of View entry box, type the name of the view you want to supersede.
Give the new view exactly the same name as the view you want to supersede,preserving the same upper-case and lower-case letters.
Choose the components you want saved.
Click on OK.
The new view replaces the previous one.
9.4.6. Restoring a Saved View
When you restore a saved view, those components not saved are obtained from the current view. By saving only some components of a view, such as the fields and order, you can quickly change the look of your current FileView display.
To restore a saved view in the current FileView window, choose the saved view you want from FileView's Views menu.
Press and hold Shift.
Choose the view you want to restore from FileView's Views menu.
The saved view is restored in a new FileView window.
9.4.7. Deleting a Saved View
Choose Unsave View... from FileView's Options menu.
FileView displays the Unsave View dialog box.
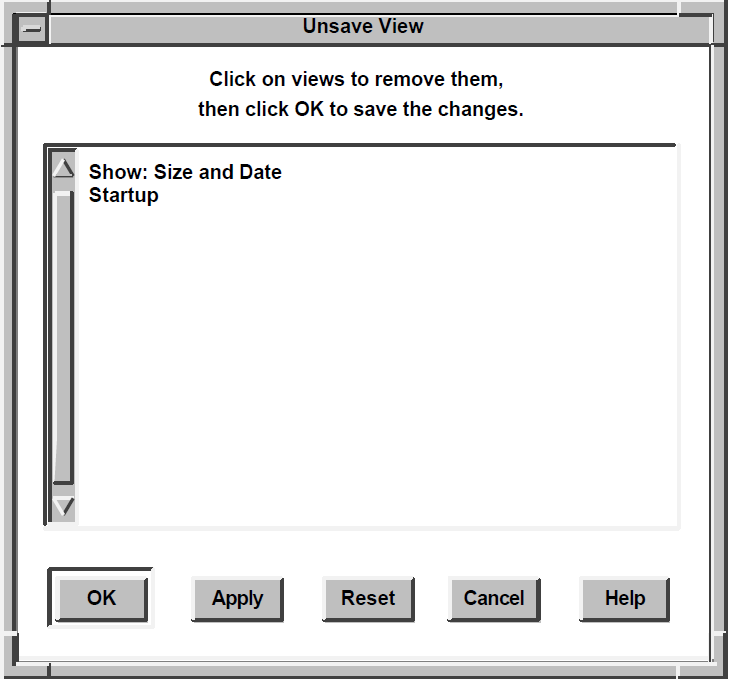
Point to the view you want to delete and double click MB1.
Click on OK.
The view is deleted. If you deleted a view that you had created to supersede a built-in view, the original view is restored.
Tip
If you want to work with views from Session Manager, add the Views menu to Session Manager's menu bar. For more information about adding a menu to a menu bar, see Chapter 8, "Customizing Menus and Menu Bars".
9.5. Using FileView as a Menu Bar
If you want to conceal FileView's work area that displays files and display only FileView's menu bar,choose Show/Hide Work Area from FileView's Options menu. FileView is displayed as a menu bar.
To display FileView's work area again, choose Show/Hide Work Area from FileView's Options menu.
Chapter 10. Customizing the Window Manager
By using the Window Manager's customization options,you can change the way your windows look and behave. The Window Manager provides a customization submenu that contains menu items for customizing the following window features: workspace, borders, border colors, icons, icon colors, and matte.
Tip
Although the procedures in this chapter describe how to use the Window Manager's Options submenu from the Workspace menu, you can access the same Options submenu from every application's Window menu.
Choose Workspace from an application's Window Menu.
The Window Manager displays the Workspace submenu.
Choose the Options submenu from the Workspace submenu.
10.1. Applying Your Changes
|
Click on |
To |
|---|---|
|
OK |
Save new settings and dismiss the dialog box. |
|
Reset |
Redisplay the settings in the dialog box since the last time you applied the settings. |
|
Default |
Reinstate the system default settings. |
|
Cancel |
Dismiss the dialog box without changing any settings. |
To see your changes, choose Apply Current settings from the Options submenu. This restarts the Window Manager.
Another way to restart the Window Manager is to choose Restart... from the Workspace menu. This is useful for customizing Window Manager information that is not provided through the Options dialog boxes. For more information about making Window Manager changes that are not available through options dialog boxes, see " Section 10.9, ''Advanced Customization''."
10.2. Customizing Your Workspace
You can change the way to make a window active,when a window automatically becomes active, and other Workspace features by changing your Workspace settings.
To change your Workspace settings, choose Workspace... from the Workspace Options submenu. The Window Manager displays the Workspace Options dialog box.
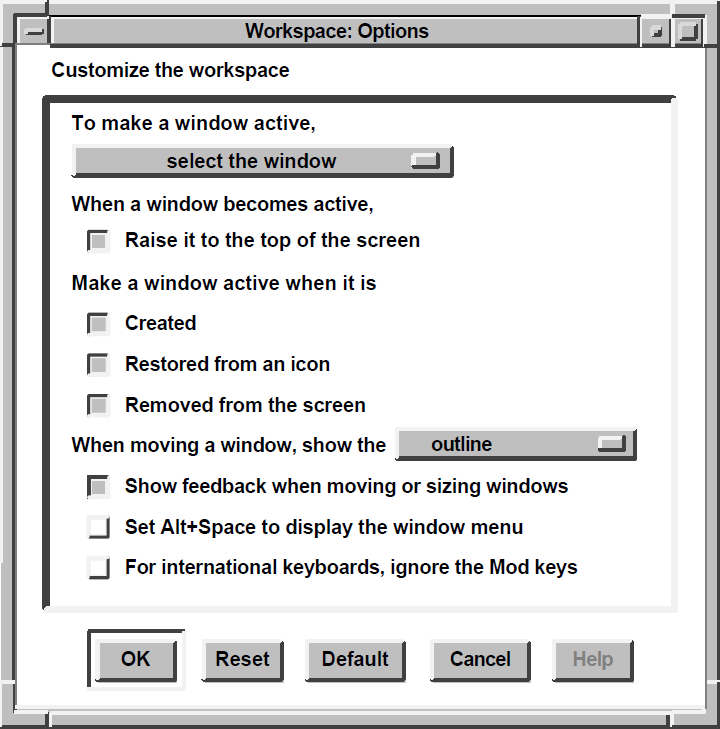
Note
Change the Moving a Window setting from outline to entire window on higher-performance workstations only.
To improve performance when moving and sizing windows,disable the Show feedback setting.
If you enable the Alt+Space setting, you can use compose sequences only on keyboards that have both Alt and Compose keys.
10.3. Customizing Your Window Borders
To change your window borders, choose Border... from the Workspace Options submenu. The Window Manager displays the Border Options dialog box.
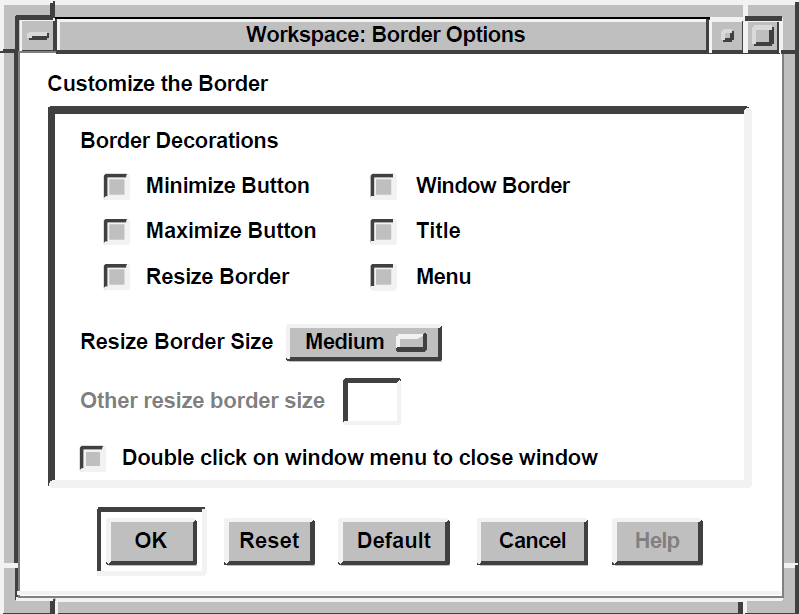
From the Customize Border dialog box, you can change the following settings.
Border decorations
Click on a border decoration to add or remove it from all your window frames.
Resize border size
The resize border is the border around the window that you drag to resize a window. To change the size of the border,choose one of the default sizes from the Options menu, or choose the Other menu item to enter your own border size.
Other resize border size
If you choose the Other menu item from the Resize Border Size options menu,the Other Resize Border Size entry box receives input focus. Enter a value in this box to define your own border size.
Double click on window menu to close window
Click on this setting to enable or disable the close menu item when you double click on the window menu.
10.4. Customizing Your Window Border Colors
To change your window border colors, choose Border Colors... from the Workspace Options submenu. The Window Manager displays the Border Color Options dialog box.
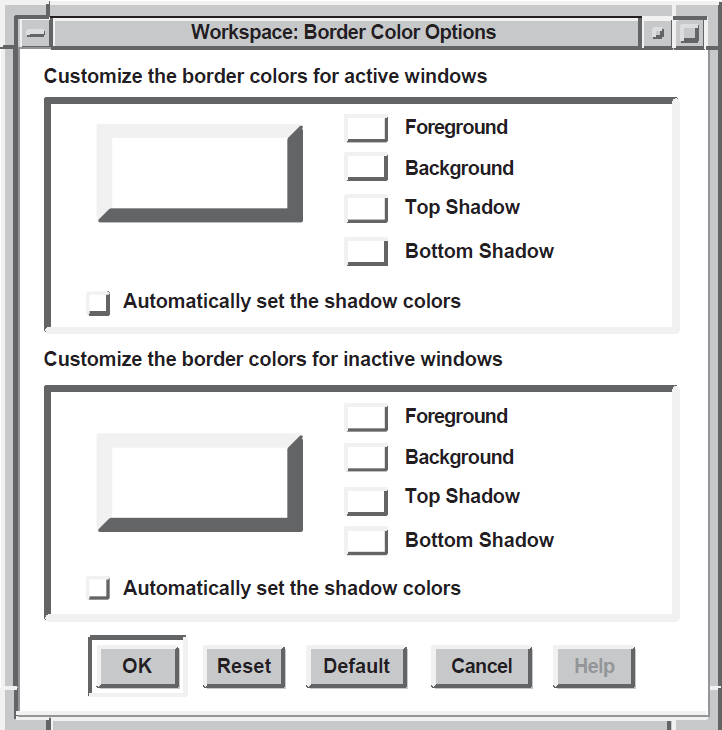
From the Border Color Options dialog box, you can change the following settings for active or inactive windows. You should create distinct active and inactive background colors so that it is easy to see which window is active.
Foreground
To change the Window Border Foreground color(that is, the color of the title), click on the Foreground button. DECwindows displays the Color Mixing dialog box, which lets you choose the border foreground color you want.
Background
To change the Window Border Background Color(that is, the color behind the title), click on the Background button. DECwindows displays the Color Mixing dialog box, which lets you choose the border background color you want.
Top Shadow
Window border top and bottom shadow colors (that is, colors on the top and left sides of the border)have to be well matched to present the three-dimensional look of DECwindows Motif. DECwindows helps by automatically determining top and bottom shadow border colors when you change the background color. This setting is indicated by the shaded Automatic shadow check button.
Click on the Automatic shadow check button.
This action disables the setting.
Click on the Top Shadow button.
DECwindows displays the Color Mixing dialog box, which lets you select the top shadow color you want. You should use the HLS model in the Color Mixing dialog box to choose a top shadow color that is lighter and less saturated than the background color.
Bottom Shadow
Window border top and bottom shadow colors (that is, colors on the bottom and right sides of the border) have to be well matched to present the three-dimensional look of DECwindows Motif. DECwindows helps by automatically determining top and bottom shadow colors when you change the background color. This setting is indicated by the shaded Automatic shadow check button.Click on the Automatic shadow check button.
This action disables the setting.
Click on the Bottom Shadow button.
DECwindows displays the Color Mixing dialog box, which lets you select the Bottom Shadow color you want. You should use the HLS model in the color mixing dialog box to choose a bottom shadow color that is darker and more saturated than the background color.
10.5. Customizing Icons
To customize the appearance and placement of your icons on the Workspace, choose Icons... from the Workspace Options submenu. The Window Manager displays the Icon Options dialog box.
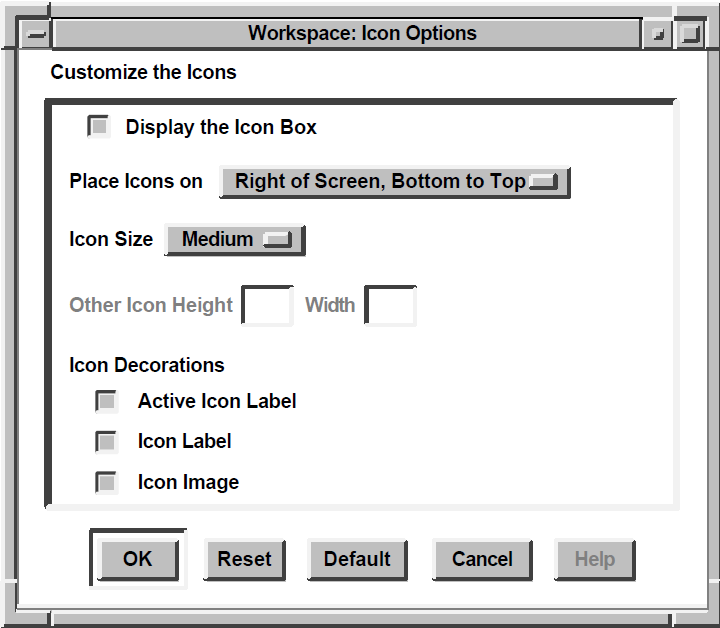
Display an icon box
Icon placement
Icon size
Icon decorations
10.6. Customizing Icon Colors
To change your icon colors, choose Icon Colors... from the Workspace Options submenu. The Window Manager displays the Icon Color Options dialog box.
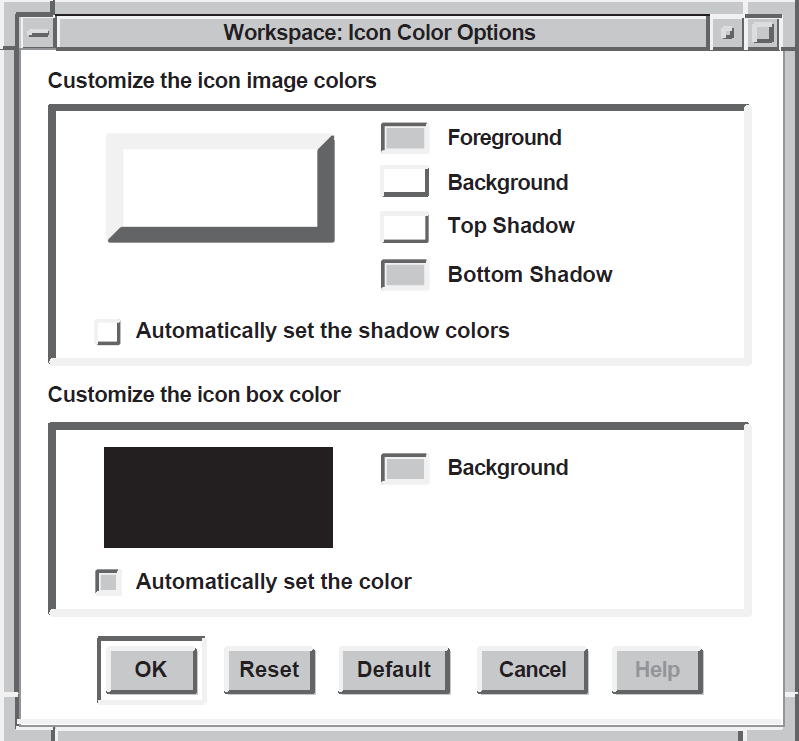
|
Icon Image Colors |
Icon Box Color |
|---|---|
|
Foreground | |
|
Background |
Background |
|
Top Shadow | |
|
Bottom Shadow |
Foreground
To change the icon foreground color, click on the Foreground button. DECwindows displays the Color Mixing dialog box, which lets you select the icon foreground color you want.
Background
To change the icon background color, click on the Background button. DECwindows displays the Color Mixing dialog box, which lets you select the icon background color you want.
Top Shadow
Icon top and bottom shadow colors have to be well matched to present the three-dimensional look of DECwindows Motif. DECwindows helps by automatically determining top and bottom shadow border colors when you change the icon background color. This setting is indicated by the shaded Automatic shadow check button.
Click on the Automatic shadow check button.
This action disables the setting.
Click on the Top Shadow button.
DECwindows displays the Color Mixing dialog box, which lets you select the top shadow color you want. You should use the HLS model in the Color Mixing dialog box to choose a top shadow color that is lighter and less saturated than the background color.
Bottom Shadow
Icon top and bottom shadow colors have to be well matched to present the three-dimensional look of DECwindows Motif. DECwindows helps by automatically determining top and bottom shadow colors when you change the icon background color. This setting is indicated by the shaded Automatic shadow check button.
Click on the Automatic shadow check button.
This action disables the setting.
Click on the Bottom shadow button.
DECwindows displays the Color Mixing dialog box, which lets you select the bottom shadow color you want. You should use the HLS model in the Color Mixing dialog box to choose a bottom shadow color that is darker and more saturated than the background color.
Icon Box Colors
Click on the Automatic color button.
This action disables the setting.
Click on the Background button. DECwindows displays the Color Mixing dialog box, which lets you select the icon background color you want.
10.7. Customizing the Matte
To change your matte features, choose Matte... from the Workspace Options submenu. The Window Manager displays the Matte Options dialog box.
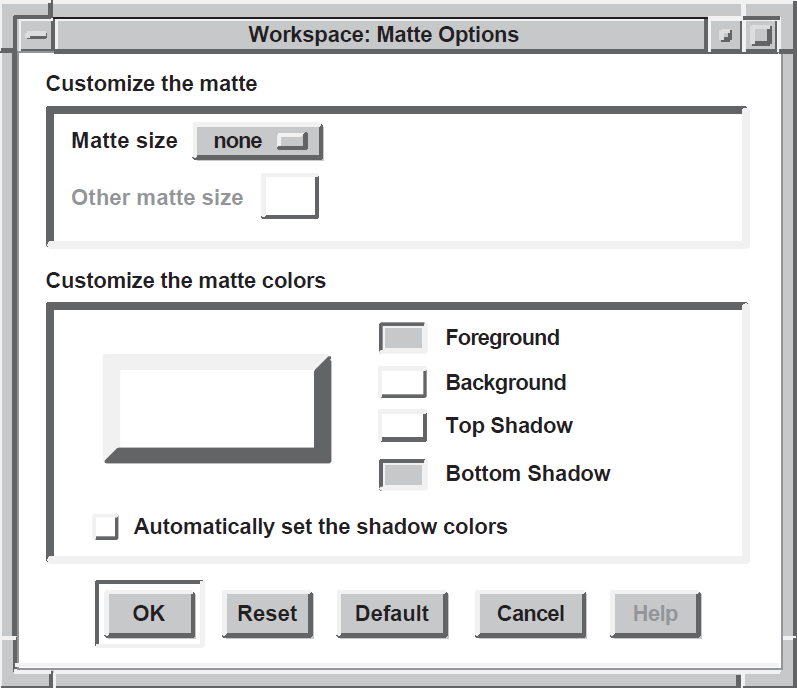
From the Matte Options dialog box,you can change your matte size and color settings.
10.8. Running the XUI Window Manager
Choose Automatic Startup... from Session Manager's Options menu.
Session Manager displays the Automatic Startup dialog box.
Select XUI Window Manager from the left-hand list box.
The XUI Window Manager item is displayed in the right-hand list box.
Click on the up arrow button to move the XUI Window Manager item to the top of your Automatic Startup list.
Select Window Manager from the right-hand list box.
Click on the left arrow button to remove the Motif Window Manager from your Automatic Startup list.
Click on OK.
Choose Save Session Manager from Session Manager's Options menu.
Choose End Session from Session Manager's Session menu and end your session.
When you start a new session, DECwindows will use the XUI Window manager.
For more information about adding and removing items from your automatic startup list, see Chapter 7, "Customizing Session Manager".
10.9. Advanced Customization
In addition to the menu items available from the Customize submenu, you can change the appearance and behavior of windows by specifying values for elements known as resourcesin resource configuration files. The Window Manager gets information from these files each time you start a session, an application,or the Window Manager.
For information about modifying resource files, see Chapter 17, "Changing DECwindows X Window System Resources".
Part III. Advanced User Techniques
Chapter 11, "Using Hyperapplications" explains how to use hyperapplications to link information and to follow links.
Chapter 12, "Running Applications Across the Network" describes how to run applications on remote processors for display on your workstation,and how to run applications on your workstation for display on other workstations.
Chapter 13, "Changing the Startup Environment" explains the DECwindows startup environment and includes procedures for modifying it.
Chapter 14, "Sharing Customization Files" describes how several users can share the same customized files.
Chapter 15, "Using Task Messages" lists task messages and describes how to use them in menu-item command files to make your custom menu items appear better integrated with Session Manager and FileView. This chapter also contains a sample command file that show these task messages are used.
Chapter 16, "Using MIT Utilities" briefly describes the MIT Utilities available with DECwindows.
Chapter 17, "Changing DECwindows X Window System Resources" contains information about DECwindows X Windows system resources.
Chapter 11. Using Hyperapplications
Hyperapplication features enable you to make links between information that is stored and accessed by DECwindows applications. A hyperapplication is an application that, in addition to its regular features (for example, reading online books), allows you to link information and to follow links. You can tell that an application is a hyperapplication if it has the Link menu in its menu bar,as illustrated in the following figure.

Creating links (Start Link, Complete Link...)
Following links (Visit, Go To, Go Back)
Adjusting the highlighting (Turn Highlight On/Off, Highlight...)
Showing and deleting links (Show Links...)
Other features (Show History..., Step Forward)
Note
The LinkWorks Setup application or the LinkWorks Manager application must have been started before you can use any hyperapplication features. By default, LinkWorks Setup is automatically started by Session Manager when you begin a session.
LinkWorks Manager allows you to perform certain advanced LinkWorks functions that are not covered in this chapter.
11.1. A Simple Example
Assume that you use DECwindows Mail to send and receive electronic messages and that you use DECwindows Calendar to keep track of your appointments.
With the Mail message selected, pull down the Link menu in Mail and choose Start Link.
With the timeslot selected, pull down the Link menu in Calendar and choose Complete Link.
With the timeslot selected, pull down the Link menu in Calendar.
- Choose one of the following:
Visit — Displays the information to which this timeslot is linked but keeps Calendar on the screen.
Go To — Shrinks Calendar to an icon and displays the information to which the timeslot is linked.
In either case, the appropriate application (in this case, Mail) is automatically invoked and the linked information is displayed. You do not need to remember that the linked information was a Mail message, who sent the message, when the message was sent, or the like.
11.2. Linkable Objects
Linkable objects are pieces of information in hyperapplications that you can link together.
Information from any hyperapplication can be linked to information from the same hyperapplication or from any other hyperapplication. For example, a Calendar timeslot for a seminar could be linked to a Bookreader topic for a chapter that covers material to be discussed at the seminar. You can also link the Bookreader topic to a related topic in the same manual or in a different manual.
The linking possibilities are rich, and you can make themas complex as you want: for example, links between a Calendar timeslot and Bookreader topics and Cardfiler cards, with the topics and cards being linked to still other pieces of information. You can allow others to see and follow your links, and you can see and follow links made by others. We'll see later how you can progress from the simple uses of hyperapplication features to more complex and powerful uses.
On the basis of the importance and granularity of objects,each hyperapplication determines which of its objects are linkable objects. For example, a Cardfiler card is a linkable object, but a part of a word within a card is not.
To use the features described in the chapter, you should be familiar with one or more hyperapplications and should know how to select objects using those applications. (As a general rule, clicking on an object selects it; however, the method of selection can vary depending on the application and the object. For example, some objects are selected by clicking and dragging.)
11.3. The Link Menu
The presence of the Link menu (see the following figure) indicates that an application is a hyperapplication. You use the Link menu to take advantage of the hyperapplication features described in this chapter.
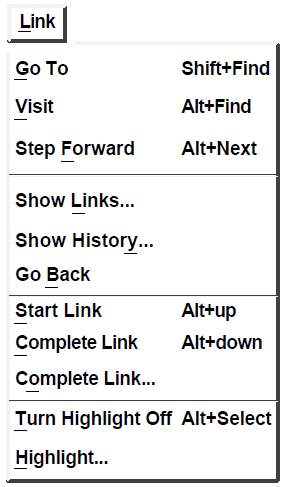
11.4. Creating Links
Each link involves two hyperapplication objects. One of these objects becomes the source for the link,and the other becomes the target.
Do not become confused by these terms, because for any given link it does not matter which object is the source and which is the target — unless you choose to make it matter. You can selectively enable and disable highlighting(discussed later) for sources and targets, and some displays of link information use these two terms. However, when you select an object and retrieve the information to which it is linked, it does not matter whether the object you select was designated as a source or a target: the linked information is still retrieved.
For each pair of objects to be linked, the object selected for Start Link is made the source, and the object selected for Complete Link... is made the target. You might want to make the object you were initially viewing the source and the other object the target. For example, you might make the source a Calendar timeslot about a seminar and the target a Bookreader table-of-contents entry about the seminar's subject. However, the choice of source and target designations for each link is up to you.
Select an object.
Use the Link menu of the hyperapplication for that object to choose Start Link. The selected object becomes the source when you complete the link.
Select the second object.
- Use the Link menu of the hyperapplication for that object to choose either the Complete Link item or the Complete Link... item. In either case, the selected object becomes the target in the link.
The Complete Link item uses LinkWorks default values to create the link.
The Complete Link... item displays the following dialog box.
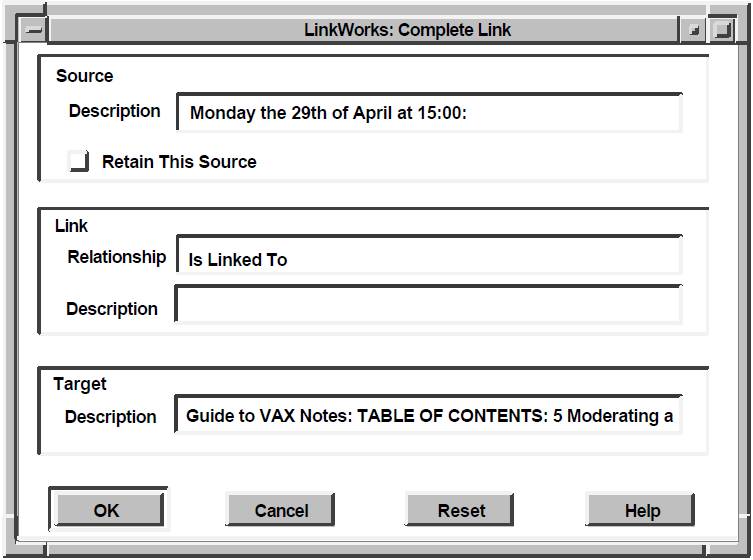
You can edit the descriptions of the source, the target, and their relationship, and you can enter a word or phrase to describe the relationship. You can enter any text you like in these entry boxes.
The Retain This Source button enables you to create multiple links to the same object conveniently. By default (button set off), the source is no longer considered pending (for use in the next link) after the link is created; to create another link you would have to select two objects, one for the Start Link and one for the Complete Link... operation. However, if you want to make another link using the same source, set the Retain This Source button on; then select the target object for the next link and choose the Complete Link... item.
11.5. Following Links
When you have selected one end of a link (the source or the target),you can follow the link to see the information at the other end. However, you must first be able to see which objects are linked and which are not. Objects that are linked are highlighted, unless you disable highlighting (as explained in " Section 11.6, ''Adjusting the Highlighting''").
The method of highlighting varies depending on the application.
Visit
Visit invokes the appropriate hyperapplication and displays the linked information, but it keeps your current hyperapplication window open and keeps input focus in this window. This menu item is useful if you want to continue working with the current hyperapplication after you finish viewing the linked information.
Go To
Go To minimizes (shrinks to an icon) your current hyperapplication window and then invokes the appropriate hyperapplication and displays the linked information. This menu item is useful if you want to shift your work to the invoked hyperapplication or if you want to reduce clutter on the screen.
Select a highlighted object.
If you cannot tell which objects are linked and which are not,enable highlighting (see "Adjusting the Highlighting").
Choose the Go To or Visit menu item from the Link menu.
If the selected object is involved (as source or target) in only one link, then the Visit or Go To operation is performed immediately.
If the selected object is involved in multiple links,the Links dialog box appears, presenting you with a list of links from which you can make a selection. The following figure illustrates the Links dialog box showing a Bookreader topic linked to two objects: a Calendar timeslot and a Cardfiler card.
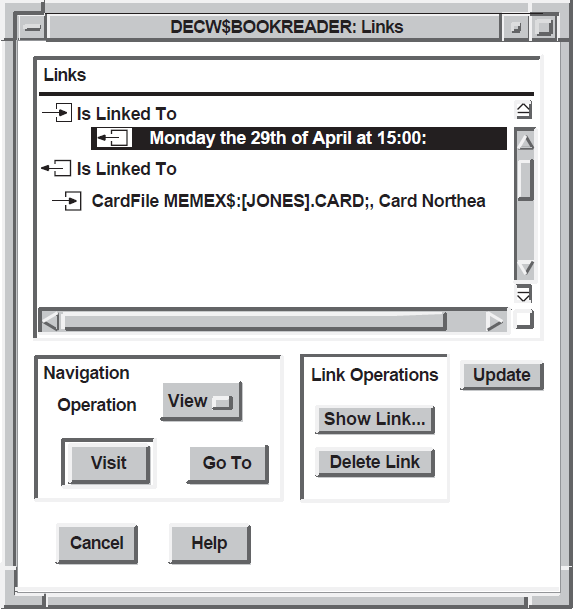
The direction of the arrows indicates whether the object is a source (right arrow) or a target (left arrow). In the preceding figure, a chapter in the Guide to VAX Notesis the target in a link to a Calendar entry for a seminar on advanced Notes topics at Northeastern University, and the chapter is the source in a link to a card with directions for driving to the university.
Select one of the links. The first link in the list is selected by default.
Choose an operation. The operation that is visible in the Operation options menu is selected by default.
Click on Go To or Visit to follow the selected link to the destination object and to perform the specified operation.
Click on Update to update the display of link information. This choice is useful if you have made or modified any links after displaying the dialog box.
Click on Show Link... to display a dialog box with information about the link. You can edit this information, as explained in " Section 11.7, ''Showing and Deleting Links''."
Click on Delete to delete the selected link. This action does not delete the object; rather, it simply makes the object no longer the source or target of the link. See " Section 11.7, ''Showing and Deleting Links''"for more information about deleting links.
Click on Cancel to dismiss the dialog box without following any link.Note
Double clicking on a link is the same as choosing the default menu item (Visit) with the default destination operation on that link. You can use this shortcut if you want to accept the defaults.
To reverse the effect of the most recent Visit or Go To operation, use the Go Back menu item. Go Back is useful if you "change your mind" after performing a Visit or Go To operation and want to return to where you were. The Go Back operation does not delete or otherwise affect any actual links.
11.6. Adjusting the Highlighting
For each hyperapplication, you can enable or disable the highlighting of linked objects; that is, the fact that these objects are linked can be made visible or not visible, depending on whether or not you want to use the features described in this chapter. You can also control which kinds of linked objects are highlighted when highlighting is enabled.
Use the Turn Highlight On/Off menu item to enable and disable highlighting. The wording of this item depends on the current state: if highlighting is enabled(the initial default), this item says Turn Highlight Off; if highlighting is disabled, this choice says Turn Highlight On. Disabling highlighting does not disable the use of hyperapplication features. However, it makes their use impractical because you are unable to see which objects have links.
The Highlight... menu item allows you to specify the kinds of objects to be highlighted. This item displays the Highlighting dialog box.
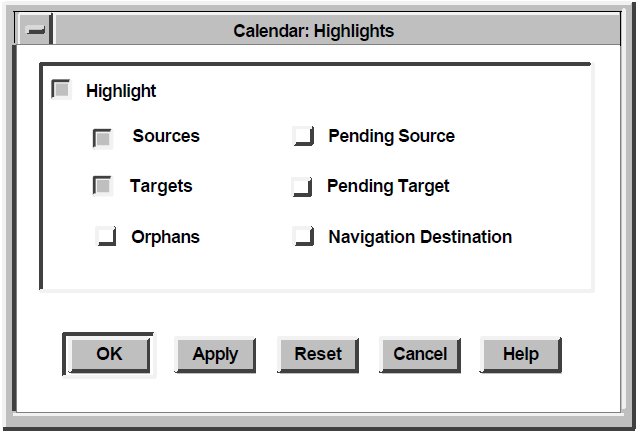
Source or target
One end of a link between two objects. You can make either end of a link the source and the other end the target,depending on your personal preferences or on conventions.
The object selected for the Start Link item becomes the source. The object selected for the Complete Link item or the Complete Link... item becomes the target.
Orphan
Either(1) an object that was linked to another object but is not linked to that object anymore, or (2) an object that has been selected as a source and a Start Link operation has been performed, but the link has not yet been completed.
For example, assume that a Cardfiler card is the source of a link and a Calendar timeslot is the target. You select the timeslot and delete the link(using the dialog box generated by the Show Links... menu item).The timeslot and the card are now orphans.
If an object is involved in multiple links, it can be an orphan in some links and a source or target in others. Using the example in the preceding paragraph, if the Calendar timeslot is the source and a Bookreader topic is the target in a separate link, deleting the timeslot's link to the card does not affect its link to the book topic. In this case, the timeslot is both a source (in relation to the topic)and an orphan (in relation to the card).
Pending source or target
The source or target that is used when you create a link. (See " Section 11.4, ''Creating Links''" earlier in this chapter for a further explanation.)
Only one source and one target can be pending at any one time.
Navigation destination
The destination of the most recent Go To or Visit operation. The navigation destination can be a source or target object, because you can follow links in either direction (source to target or target to source).
Click on the Highlight check button to enable or disable highlighting. If you enable highlighting, you can also specify one or more kinds of objects to highlight. If you disable highlighting,no linked objects are highlighted, and you cannot specify the kinds of objects to highlight (these choices are dimmed).
The Turn Highlight On/Off menu item performs the same function as toggling the Highlight button.
Click on the button for each kind of object (Sources, Targets, and so on), depending on whether you want those linked objects to be highlighted.
Note that some kinds of objects include other kinds: for example, Sources includes Pending Source. Thus, if you want to see all sources,you need only to set Sources on. However, if you want to see only the pending source, you must set only Pending Source on (and not Sources or any other kind of object).
Click on OK to apply your selections and dismiss the dialog box.
Click on Apply to apply your selections and keep the dialog box on your screen.
Click on Reset to restore the button settings to their state at the last Apply or OK. This "deletes" your recent settings and keeps the dialog box on your screen.
Click on Cancel to restore the button settings to their state at the last Apply or OK and dismiss the dialog box.
11.7. Showing and Deleting Links
You can see the characteristics of a link and can delete a link by using the Show Links... menu item. This menu item displays the Links dialog box, which is illustrated in " Section 11.5, ''Following Links''."
If you click on the Show Link... button, a dialog box appears with detailed information about the selected link. This dialog box contains the same information as shown in the Complete Link... dialog box, illustrated earlier in " Section 11.4, ''Creating Links''",except that the Retain This Source button does not appear. You can edit the Relationship and Description entry boxes.
To delete a link, click on the Delete button in the Links dialog box. As soon as you delete a link, the object becomes an orphan; to make it no longer an orphan, delete the link by selecting the object to which it is linked and then using the Delete button in the Show Links... dialog box in the appropriate hyperapplication.
11.8. Using Other Hyperapplication Features
Whenever you perform a Visit or Go To operation, the LinkWorks history is updated to reflect your operations. To see the history of your navigation operations, choose the Show History... menu item, which displays the following dialog box.
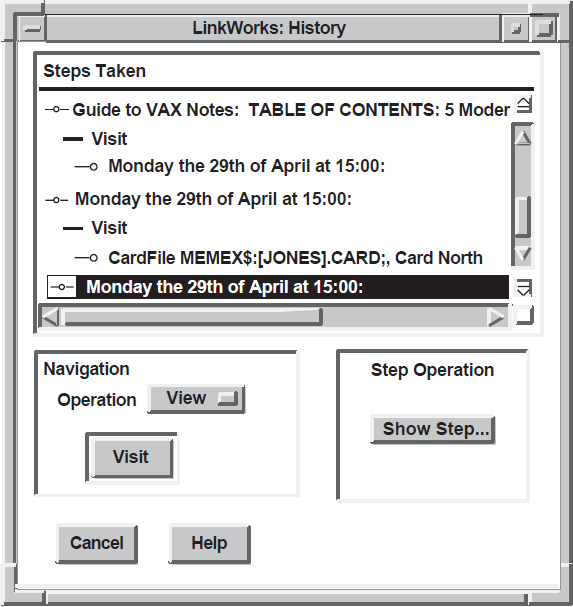
To visit an object in the history list, select it and click on Visit.
To modify history information, select an object to be modified and click on the Show Step... button to display the Step dialog box:
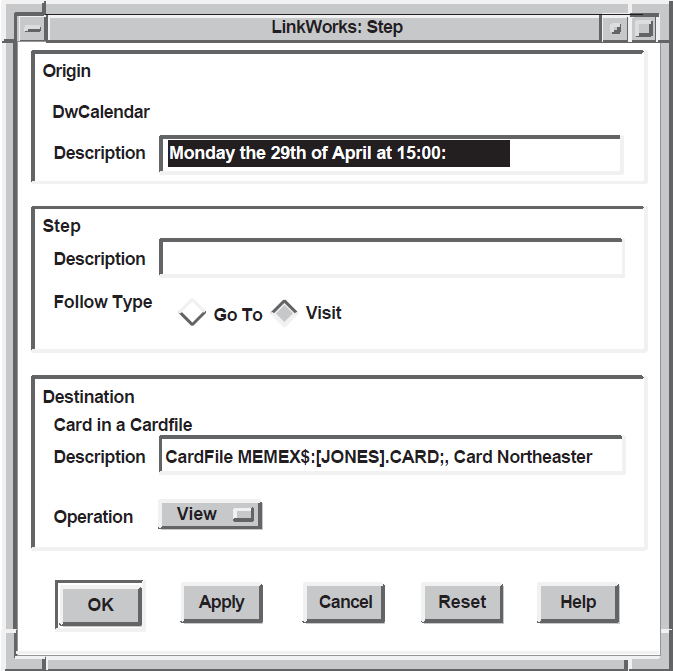
You can edit any of the Description entries, and you can change the Follow Type and Operation settings. The ability to modify history information becomes important when you want to create or modify a path. (See " Section 11.9, ''Advanced LinkWorks Concepts''"for more information on paths.)
The Go Back menu item, described earlier in " Section 11.5, ''Following Links'',"removes the last step from the history and performs a Go To operation to the previous step. Thus, Go Back lets you step backward through the history list while deleting steps.
The Step Forward menu item moves to the next step in the currently active path and performs the step. Thus, Step Forward lets you step forward through the current active path.
11.9. Advanced LinkWorks Concepts
Information about links that you make and follow is stored in a hyperinformation linkbase. By default, you have a linkbase named LWK_PERSONAL in your login default directory. However, you can cause LinkWorks to use another linkbase as your default personal linkbase by defining the logical name LWK_PERSONAL to point to that linkbase file. Although you probably will not need to create additional linkbases, you can create them by using the LinkWorks Manager application.
Each linkbase contains a number of hyperinformation objects. These objects let you organize your links as they become more numerous and complex. The same principle is included in many software applications. For example, in Mail you begin with one folder (MAIL) in one drawer (your primary mail file). As you receive more and more messages, you organize them into folders. If the number of folders grows sufficiently, you might decide to create new drawers, each with several folders.
Linknets
Any time you make a link, information about that link (such as identification of its source and target) is recorded in a linknet. Initially you have only one linknet, called Personal Links, but you can create additional linknets.
By analogy, Mail allows you to store messages in folders, and LinkWorks allows you to store link information in linknets.
You can control two operations that LinkWorks performs with linknets: recording and activating.Recording determines the linknet in which links are stored. You can record into only one linknet at a time. If you disable all recording,no link information is stored in the linkbase.
Activating controls which links you can follow and, if highlighting is enabled, which links are visible. If highlighting is enabled, links for all active linknets are highlighted. You can activate or deactivate linknets, depending on which links you want to be able to follow.
Linknet lists
A linknet list can contain linknets and linknet lists. A common use of a linknet list is to organize related linknets so that you can activate and deactivate all the linknets in the list with a single operation. A linknet or linknet list can be a member of several linknet lists.
As a partial analogy, Mail drawers contain folders, and you can create additional drawers, as well as folders within those drawers. Linknet lists can contain linknets, and you can create multiple linknet lists, each of which can contain several linknets. However, linknet lists differ from Mail drawers in that a linknet list can contain other linknet lists(drawers cannot contain drawers) and in that a linknet can be in several linknet lists (a folder cannot be in multiple drawers).
Paths
A path is a historical record of links that have been followed. You can create a path, and then you and others can follow the path without having to re-create the links. Paths can make certain tasks convenient, and they have great potential as teaching tools (when, for example, a teacher or manager provides a path through information for others to follow).
Path lists
A path list is a collection of paths. You might create path lists if the paths you want to keep track of become very numerous or complex.
Chapter 12. Running Applications Across the Network
DECwindows expands your computing opportunities by letting you run applications across a network. Distributing applications in this way means that they can run on another computer and be displayed on your workstation. Although the application runs on another system, it looks the same as any other application running on your workstation. So, you can take advantage of larger computers that may be better suited to a specific computing task. You can run applications on an ULTRIX system as well as on other vendors' systems for display on your OpenVMS workstation if the systems share a common transport mechanism.
By default, however, your workstation monitor can display only those applications that are running on your workstation under your user name. This prevents unauthorized users on other systems in the network from displaying applications on your workstation monitor or from capturing and displaying your keystrokes (including your password) on another monitor.
Authorize the remote system and user on your workstation to display output from applications that run on the remote system.
Log in to the remote system and direct the display to your workstation with the DCL command SET DISPLAY for an OpenVMS system or the equivalent command on other operating systems.
Enter the command line that runs the application.
The sections that follow describe these steps in more detail.
12.1. Enabling Network Access to Your Workstation Display
Initially, you are authorized to run applications only from your workstation, where your current session is running. This means that you cannot log in to another system and run applications for display on your workstation unless you authorize that node and user name to do so.
From Session Manager, you can give users access to your workstation display by specifying their node names and user names. By default, you give access to users on systems that are connected by DECnet software. DECnet is one transport by which nodes in a network communicate. (The transport passes information between the application and the display.) You can also give access to users on systems running other transports, such as TCP/IP.
The user name, node name, and transport information you provide act as filters to screen out all except a selected class of users. For example, you can give access to your workstation to user JOE on node BLINKN, which is a node on a system that is running DECnet software. By giving access only to JOE on node BLINKN, you deny access to another user JOE on node NOD.
12.1.1. Authorizing Workstation Access in a DECnet Network
Choose Security... from Session Manager's Options menu.
Session Manager displays the Security dialog box.
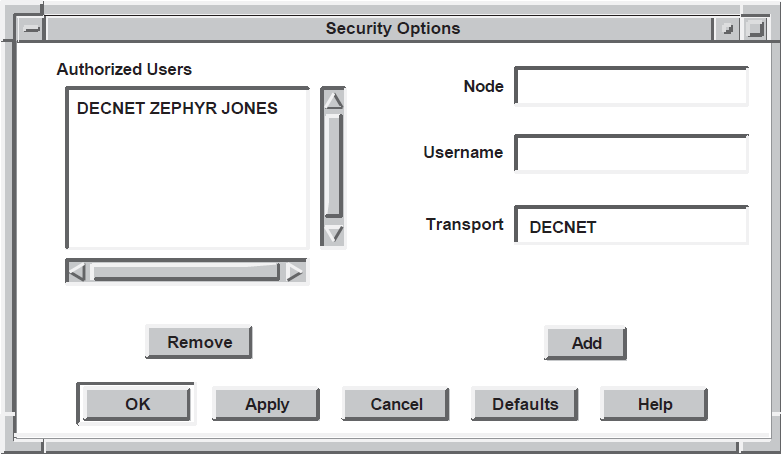
In the Node entry box, type the node name of the user you want to authorize.
The node name cannot be a cluster alias (a name that represents multiple nodes configured in a VMScluster); it must identify an actual node. To authorize your own node, you must enter a zero (0).
- In the Username entry box, type the user name of the user you want to authorize.
Note
If you are running an application on an ULTRIX system, you should authorize the user a second time, but this time type the user identification number (UID) of the user you want to authorize. This is necessary because some applications identify the user with the user name, and some with the UID. (The UID is a small number—less than 3200.)
The transport information is already supplied. The default transport, DECnet,allows connections from one node to another.
Click on Add.
The user name (or UID), node name, and transport are added to the list of authorized users.
Click on OK or Apply.
The following example shows how to add your name to the list of authorized users of your display, thereby ensuring that you can display DECwindows applications on your workstation from system ZEPHYR.
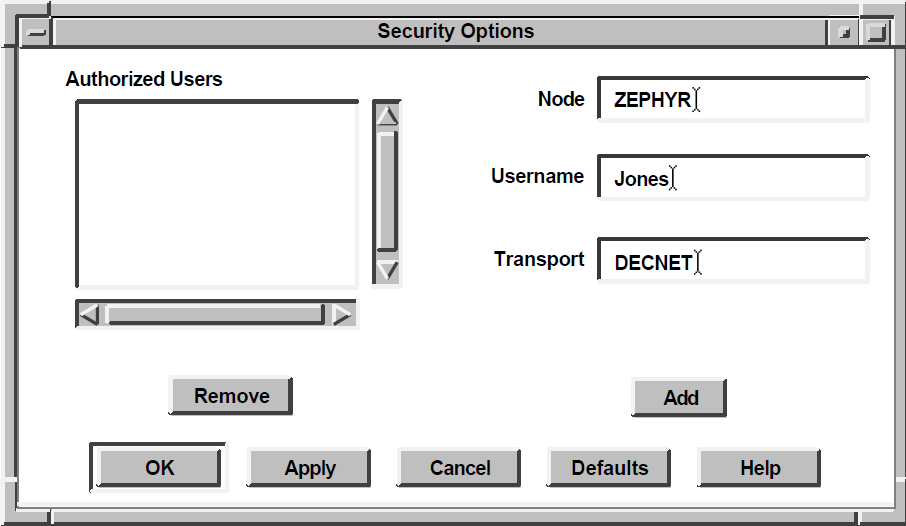
Note
Be aware that each node, both source and destination, must be defined in each other's network node database. For example, to display applications on node HUBBUB from ZEPHYR, HUBBUB must be entered in ZEPHYR's network node database,and ZEPHYR must be defined in HUBBUB's network node database.
Tip
It's a good idea to give access to only those users who you know require it. Giving access to an indeterminate number of users is not recommended because this practice can compromise the security of your system.
12.1.2. Authorizing Workstation Access in an Internet (TCP/IP) Network
If your system is part of an Internet (TCP/IP) network, you can run applications across the network by using TCP/IP as a DECwindows transport. (Most vendors supply TCP/IP as an X Window System Transport.)
Note
Different vendors' implementations of TCP/IP transports use different call interfaces. Because of this, the TCP/IP transport interface included in DECwindows is compatible only with the DEC TCP/IP Services for OpenVMS software.
Choose Security... from Session Manager's Options menu.
Session Manager displays the Security dialog box, as illustrated in the preceding section.
In the Node entry box, type the node name of the user you want to authorize.
In the Username entry box, type an asterisk (*).
You cannot authorize individual users in a TCP/IP network because TCP/IP does not provide remote user information,only node information. The asterisk indicates that every user on the node you specify can display application output on your workstation.
Delete the text in the Transport entry box and type TCPIP.(Be sure to type TCPIP, not TCP/IP.)
If you're using another vendor's transport, type the name of that transport in this entry box.
Click on Add.
The asterisk, node name, and transport name are added to the list of authorized users. The node name is displayed in upper-case letters,but it matches any lowercase letters in the node name.
Click on OK or Apply.
The following example shows how to make sure that users on system ZEPHYR can display DECwindows or X Window System applications on your workstation.
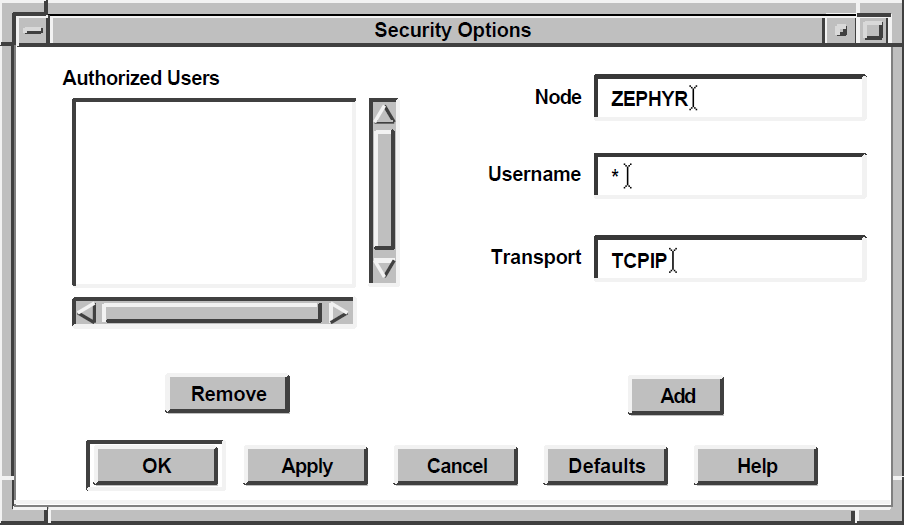
12.1.3. Disabling Workstation Access
In the Authorized Users list box, select the item (for example, transport name, node name, or user name) you want to remove.
Click on Remove.
The entry is removed from the list of authorized users.
Click on OK or Apply.
12.2. Displaying Remote Applications on Your Workstation Monitor
Once you are authorized to display applications on your workstation from another system, you can log in to other systems and direct the display to your workstation by using the DCL command SET DISPLAY or the equivalent command on other operating systems. Although DECwindows or other X Window System implementations must be available on these systems, they need not be workstations.
The SET DISPLAY/CREATE command affects only those applications running in the window from which you issue the command. This means that,although you might be running one application on your workstation and displaying it on another workstation, you can continue to run applications on your workstation for display in other windows on your monitor.
12.2.1. Enabling a Remote Display
$SET DISPLAY/CREATE/NODE=display_node
In this command, display_node is the workstation on which you want to display the application. You specify the /CREATE qualifier the first time you want to run an application and direct the display. If you subsequently direct the display to another system, omit this qualifier.
Device:       WSA2:
Node:         HUBBUB
Transport:    DECNET
Server:       0
Screen:       0
Device is your workstation device and might vary each time you use SET DISPLAY and SHOW DISPLAY. Node is the network system to which the display is now pointing. Transportrefers to the transport (DECNET, LOCAL, or TCPIP) that passes information between the application and the display. Server and Screen are usually 0.
You can now run your application on ZEPHYR for display on HUBBUB if you are authorized to do so. See " Section 12.3, ''Running Applications from a DCL Command Line''" for more information.
When you finish running the application, you can either disable the remote display or direct the display to a third system, as described in the next two sections.
12.2.2. Disabling a Remote Display
$SET DISPLAY/DELETE
Any applications you run on ZEPHYR are no longer displayed on HUBBUB.
12.2.3. Directing a Remote Display to a Third System
$SET DISPLAY/CREATE/NODE=ROMA
Enter the command SHOW DISPLAY to see that the display now points to ROMA.
$SET DISPLAY/CREATE/TRANSPORT=TCPIP/NODE="pluto"
Quotation marks are optional for a node name that contains all upper-case characters.
12.2.4. Directing a Remote Display to Your Own System
$SET DISPLAY/CREATE/TRANSPORT=LOCAL/NODE=0
Using the /TRANSPORT=LOCAL qualifier increases the performance of applications running and displaying on your system. Zero (0) is the standard shorthand notation for representing your system.
By default, your own node is authorized to display on your system using either the LOCAL or the DECNET transport, but not TCPIP. To authorize your own node using TCPIP, you must enter a zero (0) for the node name.
12.3. Running Applications from a DCL Command Line
|
To run this application |
Enter this command |
|---|---|
|
Bookreader |
RUN SYS$SYSTEM:DECW$BOOKREADER |
|
Calculator |
RUN SYS$SYSTEM:DECW$CALC |
|
Calendar |
RUN SYS$SYSTEM:DECW$CALENDAR |
|
Cardfiler |
RUN SYS$SYSTEM:DECW$CARDFILER |
|
Clock |
RUN SYS$SYSTEM:DECW$CLOCK |
|
CDA Viewer |
VIEW/INTERFACE=DECWINDOWS filename |
|
DECsound |
RUN SYS$SYSTEM:DECSOUND |
|
DECterm |
CREATE/TERMINAL=DECTERM |
|
EVE |
EDIT/TPU/DISPLAY=DECWINDOWS |
|
FileView |
RUN SYS$SYSTEM:VUE$MASTER |
|
|
RUN SYS$SYSTEM:DECW$MAIL |
|
Message Panel |
RUN SYS$SYSTEM:DECW$MESSAGEPANEL |
|
Notepad |
RUN SYS$SYSTEM:DECW$NOTEPAD |
|
Print Screen |
RUN SYS$SYSTEM:DECW$PRINTSCREEN |
|
Paint |
RUN SYS$SYSTEM:DECW$PAINT |
|
Puzzle |
RUN SYS$SYSTEM:DECW$PUZZLE |
You can also use these command lines to run the desktop applications from DECterm or from FileView's DCL Command window on your workstation. To run multiple applications simultaneously from a single DECterm or FileView DCL Command window, add SPAWN/NOWAIT/INPUT=NL: to the beginning of each command line.
Chapter 13. Changing the Startup Environment
When you enter a correct user name and password in the Start Session dialog box, DECwindows runs several command and executable files. If you manage your own system or if you have system privileges,you can customize this startup sequence.
This chapter describes the DECwindows startup sequence and explains how to customize it.
13.1. The Startup Sequence
The DECwindows DECW$LOGINOUT.EXE image modifies the security list, allowing the current user to run clients to the server.
The DECW$LOGINOUT.EXE image starts a process running DECW$WAITFORSM.EXE that holds a connection to the server during the startup process.
The DECW$LOGINOUT.EXE image exits and DCL takes control.
DCL takes commands from Session Manager's DCL command file. By default, this file is called SYS$MANAGER:DECW$STARTSM.COM.
The SYLOGIN.COM file executes.
The user's LOGIN.COM file executes. A user can redefine the DECW$USER_DEFAULTS file at this time.
The workstation initialization procedure executes. By default, this file is called SYS$SYSTEM:DECW$WSINIT.EXE.
If the user is logging in to VMS DECwindows Motif for the first time, DECwindows scans the user's DECwindows XUI resource files and creates new ones for Motif.
The DECW$SYLOGIN.COM file executes.
The DECW$LOGIN.COM file executes.
DCL runs the Session Manager image. By default, this file is called SYS$SYSTEM:DECW$SESSION.EXE.
13.2. Customizing the System Startup Environment
Directory used by Bookreader to find online books
Directory for FileView command files
Directory for Keymap files
Directory for DECwindows example programs
Directory for XDPS example programs
Directory for Session Manager menu bar command files
Program that runs when DECwindows startup is complete
Login logo
Parameters to the SET DISPLAY command
Command procedure that runs after user authorization is complete
DECwindows SYLOGIN command procedure
Command that initializes the workstation with the correct user resource values
Command that runs a session
Command that resets a session
Log file for DECwindows login
Use of multiple connections during login
Log file for Session Manager can be turned off
The remaining sections in this chapter contain examples for customizing the DECwindows client environment.
13.3. Changing Your Logo
When you start a DECwindows session,the default login screen featuring the DIGITAL logo and the Start Session screen is displayed. For an example of the login screen, see Chapter 2, "Opening and Closing DECwindows".
You must use the Start Session screen for logging in to DECwindows, but you can substitute your own logo for the DIGITAL logo by running an application that displays your logo.
Create a command procedure (like SYS$MANAGER:MYLOGO.COM).
Define the global symbol DECW$LOGINLOGO in SYS$MANAGER:DECW$PRIVATE_APPS_SETUP.COM, with its value set to the name of your command file. Note that this command procedure is run by the system account.
- If the SYS$MANAGER directory does not contain the setup command procedure,copy the template file to the setup command procedure:
$COPY SYS$MANAGER:DECW$PRIVATE_APPS_SETUP.TEMPLATE -_$SYS$MANAGER:DECW$PRIVATE_APPS_SETUP.COM/LOG Edit the setup command procedure and define the symbol DECW$LOGINLOGO to point to the command procedure that displays your custom logo.
Add the following line:$ DECW$LOGINLOGO == "SYS$MANAGER:MYLOGO.COM"
Create the command procedure that displays your logo. This needs to be the file name and directory specified in step 2. Note that the command procedure will run as a detached process under the SYSTEM account. Be careful not to give users access to the system through your custom logo. For example, you should not run such applications as FileView or DECterm as a custom logo.
For example, the file SYS$MANAGER:MYLOGO.COM could contain this command to display the icosahedron that is shipped as an example program:$RUN DECW$EXAMPLES:ICORestart DECwindows by running SYS$MANAGER:DECW$STARTUP.COM with the RESTART parameter, or reboot your workstation. Ending the session does not display the logo unless you execute the DECW$STARTUP command procedure that starts DECwindows.
To return to the DIGITAL logo, you need to remove the definition of DECW$LOGINLOGO from your DECW$PRIVATE_APPS_SETUP.COM file and reboot your workstation.
If you don't want to reboot your workstation,enter the following commands:$DEASSIGN/SYSTEM/EXEC DECW$LOGIN_BACKGROUND$@SYS$MANAGER:DECW$STARTUP RESTART
13.4. Creating Dedicated Accounts
If you are a system manager, you can set up user accounts to run only certain applications. For example, you might want users to use only the Bookreader application.
Modifying the Session Manager command procedure
Modifying the Session Manager executable file
Modifying the Session Manager profile file
13.4.1. Modifying the Session Manager Command Procedure
You can define the global symbol DECW$SESSIONCOM in the SYS$MANAGER:DECW$PRIVATE_APPS_SETUP.COM file so that when a user logs in, LOGINOUT runs a command procedure other than DECW$STARTSM.COM. This action bypasses Session Manager altogether.
In the following example,DECW$SESSIONCOM is a logical name that determines the command procedure that starts Session Manager. The default command procedure is SYS$MANAGER: DECW$STARTSM.COM. You can run a private command procedure instead of this file by defining the global symbol DECW$SESSIONCOM in SYS$MANAGER:DECW$PRIVATE_APPS_SETUP.COM. If this symbol is defined, SYS$MANAGER:DECW$STARTAPPS.COM defines the DECW$SESSIONCOM logical name in the system logical name table.
Because DECW$SESSIONCOM is defined in the system logical name table, it affects Session Manager startup for every user. Your private command file must check the user name under which it is running and run the normal DECW$STARTSM.COM procedure for non-dedicated accounts.
Note that with this method, startup command procedures that normally start from DECW$STARTSM.COM are not run. These include SYLOGIN.COM, LOGIN.COM,DECW$SYLOGIN.COM, and DECW$LOGIN.COM.
- Create the command procedure.
$ CREATE SYS$MANAGER:PRIVATE_SESSIONCOM.COM
$!
$! Check to see if this is the dedicated DECwindows account.
$! If it isn't, run the normal procedure to start the
$! Session Manager.
$!
$ username = F$USER()
$ IF F$LOCATE("BOOK_READER", username) .NE. F$LENGTH-
  (username) THEN GOTO dedicated
$!
$! Normal, nondedicated DECwindows login
$!
$ @SYS$MANAGER:DECW$STARTSM
$ EXIT
$!
$! Dedicated DECwindows login.
  Run Bookreader and then exit.
$!
$ dedicated:
$!
$ RUN SYS$SYSTEM:DECW$WSINIT
$ display = F$TRNLNM("decw$display")
$ RUN/DETACHED/OUTPUT='display' SYS$SYSTEM:DECW$MWM
$ RUN SYS$SYSTEM:DECW$BOOKREADER
$ endsession := $DECW$ENDSESSION
$ endsession -noprompt
$ STOP/ID=0
^Z
The DECW$WSINIT program reads in resource files and changes the input cursor from the watch cursor to the arrow cursor. DECW$MWM is the Motif window manager. Its SYS$OUTPUT needs to be set to the translation of DECW$DISPLAY so that DECW$DISPLAY is defined correctly in the detached process. DECW$ENDSESSION resets the server and displays a Start Session dialog login box. The -noprompt qualifier prevents DECW$ENDSESSION from asking the user to confirm whether to end the session. (If the user cancels the End Session operation, the workstation will be unusable, because Bookreader will exit and the login box will not be displayed.) STOP/ID=0 logs out the process without writing an error message to SYS$OUTPUT.
Define the DECW$SESSIONCOM symbol in DECW$PRIVATE_APPS_SETUP.COM.
If SYS$MANAGER:DECW$PRIVATE_APPS_SETUP.COM does not already exist,create it as follows from the template file:$COPY SYS$MANAGER:DECW$PRIVATE_APPS_SETUP.TEMPLATE -_$SYS$COMMON:[SYSMGR]DECW$PRIVATE_APPS_SETUP.COMThen edit this command procedure as follows to define DECW$SESSIONCOM.$ DECW$SESSIONCOM :== SYS$MANAGER:PRIVATE_SESSIONCOM.COM
- Restart DECwindows by entering the following command.
$@SYS$MANAGER:DECW$STARTUP RESTARTThis step is necessary in order for the changes to DECW$PRIVATE_APPS_SETUP.COM to take effect.
Log in to the dedicated account on a DECwindows system.
After entering the user name and password of the dedicated account,Bookreader starts and Session Manager is not displayed. When the user exits from Bookreader, the PRIVATE_SESSIONCOM.COM procedure performs an end session operation and then logs out. The End Session command displays the Start Session screen.
13.4.2. Modifying the Session Manager Executable File
You can define DECW$SESSIONMAIN in the SYS$MANAGER:DECW$PRIVATE_APPS_SETUP.COM file so that DECW$STARTSM.COM runs the specified command file instead of DECW$SESSION.EXE. Session Manager reads resource files and executes login command files but does not display Session Manager's menu bar. With this method, you must also ensure that the End Session command does not prompt for confirmation.
When DECW$STARTSM.COM starts (that is, if DECW$SESSIONCOM has its default value), it starts Session Manager by executing the DCL command that is stored in the logical name DECW$SESSIONMAIN. To define this logical name, edit SYS$MANAGER:PRIVATE_APPS_SETUP.COM so that it defines the global symbol DECW$SESSIONMAIN as the DCL command to execute.
This method is similar to the one described in the preceding section,except that with this method, DECW$STARTSM.COM executes the SYLOGIN.COM, LOGIN.COM, DECW$SYLOGIN.COM, and DECW$LOGIN.COM command procedures. Also, DECW$STARTSM.COM executes DECW$WSINIT.COM, so the private command procedure does not need to do so.
By default, DECW$STARTSM.COM executes STOP/ID=0 after the DECW$SESSIONMAIN command has exited. In this case, however, you must end the session by running DECW$ENDSESSION.EXE, and you must make sure that End Session does not prompt for confirmation.(If the user cancels an end session operation,the workstation will be unusable).The private command procedure in the following example explicitly runs DECW$ENDSESSION with the -noprompt switch.
- Create the command procedure.
$ CREATE SYS$MANAGER:PRIVATE_SESSIONMAIN.COM
$!
$! Check to see whether this is the dedicated DECwindows account.
$! If it isn't, run the normal procedure to start the
$! Session Manager.
$!
$ username = F$USER()
$ IF F$LOCATE("BOOK_READER", USERNAME) .NE. F$LENGTH(USERNAME) -THEN GOTO dedicated
$!
$! Normal, nondedicated DECwindows login
$!
$ RUN SYS$SYSTEM:DECW$SESSION
$ EXIT
$!
$! Dedicated DECwindows login.  Run Bookreader and then exit.
$!
$ dedicated:
$!
$ display = F$TRNLNM("decw$display")
$ RUN/DETACHED/OUTPUT='display' SYS$SYSTEM:DECW$MWM
$ RUN SYS$SYSTEM:DECW$BOOKREADER
$ endsession := $DECW$ENDSESSION
$ endsession -noprompt
$ STOP/ID=0
^Z
DECW$MWM is the Motif Window Manager. Its SYS$OUTPUT needs to beset to the translation of DECW$DISPLAY so that DECW$DISPLAY is defined correctly in the detached process. DECW$ENDSESSION resets the server and displays a new Start Session screen. The -noprompt qualifier prevents DECW$ENDSESSION from displaying the End Session prompt. (If the user cancels the End Session prompt, the workstation will be unusable because Bookreader will exit and the Start Session screen will not be displayed.)STOP/ID=0 logs out the process without writing a message to SYS$OUTPUT.
Define the DECW$SESSIONMAIN symbol in DECW$PRIVATE_APPS_SETUP.COM.
If SYS$MANAGER:DECW$PRIVATE_APPS_SETUP.COM doesn't already exist,create it as follows from the template file.$COPY SYS$MANAGER:DECW$PRIVATE_APPS_SETUP.TEMPLATE -_$SYS$COMMON:[SYSMGR]DECW$PRIVATE_APPS_SETUP.COMThen edit this command procedure to define DECW$SESSIONMAIN. Note that the symbol must be defined as a DCL command (unlike DECW$SESSIONCOM, which is defined as the name of a command procedure).$ DECW$SESSIONMAIN :== @SYS$MANAGER:PRIVATE_SESSIONMAIN.COM
- Restart DECwindows by entering the following command:
$@SYS$MANAGER:DECW$STARTUP RESTARTThis step is necessary in order for the changes to DECW$PRIVATE_APPS_SETUP.COM to take effect.
Log in to the dedicated account on a DECwindows system.
After entering the user name and password of the dedicated account,Bookreader starts and Session Manager's menu bar is displayed. When the user exits Bookreader, the PRIVATE_SESSIONMAIN.COM procedure performs an End Session operation and then logs out. The End Session command displays a DECwindows Start Session screen.
13.4.3. Modifying the Session Manager Profile File
This method starts Session Manager normally, but the system manager customizes its menus to remove any applications that are not started automatically. By removing certain applications,a system manager can limit user access to applications.
With this method, Session Manager's menu bar is displayed,and the user can interact with whatever dialog boxes the system manager does not disable.
Log in to the dedicated account on a DECwindows system.
When you enter the user name and password of the dedicated account,Session Manager starts.
Add the applications to the automatic startup list that you want to be displayed when a user logs in.
Choose Automatic Startup... from Session Manager's Options menu. Session Manager displays the Automatic Startup dialog box.
Use this dialog box to remove any undesired applications, such as FileView, from the automatic startup list.(For more information about using the Automatic Startup dialog box, see Chapter 7, "Customizing Session Manager".) Do not remove Window Manager from the automatic startup list.
Add Bookreader (for this example) to the list and click on OK.
Remove Applications from Session Manager's menu bar.
Choose Menu Bar... from Session Manager's Options menu. Session Manager displays the Menu Bar dialog box.
Use this dialog box to remove the applications you don't want to be displayed.(For more information about using the Menus dialog box, see Chapter 8, "Customizing Menus and Menu Bars".)
Click on OK to save your changes and to dismiss the dialog box.
Remove any menu items that you don't want to be displayed on the Options menu.
Choose Menus... from Session Manager's Options menu, and remove the following menu items from Session Manager's Options menu:- Automatic Startup...
- Menus...
- Menu Bar...
You should also remove any other menu items that you don't want users to have access to in the dedicated account, such as Security.
After removing the items, click on OK to dismiss the dialog box and to save your menu settings.
Choose End Session from Session Manager's Session menu.
Session Manager logs you out of the dedicated account and displays the DECwindows login box.
Log back in to the dedicated account.
To test your changes, log in to the dedicated account from the DECwindows login box. Bookreader and Session Manager should start up by default, and you should not be able to start any other application. To log out, choose End Session from the Session menu.
If you decide to make the account non dedicated again, or if you want to make changes in a dialog box that you have removed from the system menu bar, you must delete or rename the file VUE$PROFILE.VUE$DAT in the dedicated account's SYS$LOGIN directory.
Chapter 14. Sharing Customization Files
As described in Part II, you can customize Session Manager and FileView and save views you use frequently. When you customize Session Manager and FileView, you create a private customization file that your system reads every time you start an application.
You can share your custom file with other users. For example, you might want to share a custom pull-down menu with co-workers. When several users share a public customization file, they have access to a common custom file that can include custom menu items or pull-down menus.
This chapter describes how to create and manage private, public, and system customization files.
14.1. Using Shared Customization Files
When you start Session Manager or FileView, these applications read and merge the contents of the customization files to create your environment. First, they read the system customization file. The system customization file shipped with DECwindows contains definitions that produce the menu bar, menu items, and saved views you saw when you first started Session Manager or FileView. Next, Session Manager and FileView read the public customization files, if any exist. The public customization file contains any definitions that you share with other users (for example, a shared pull-down menu). Finally, they read your private customization file, which contains your personal definitions.
When Session Manager and FileView try to find the system customization file, they look first in the location defined by the logical name VUE$SYSTEM_PROFILE. If no translation is found, they use the file specification DECW$SYSTEM_DEFAULTS:VUE$SYSTEM_PROFILE.VUE$DAT to locate the system customization file. (The system customization file is placed in the DECW$SYSTEM_DEFAULTS directory when you install DECwindows.)
When Session Manager and FileView try to locate the public customization file, they look first in the location defined by the logical name VUE$PUBLIC_PROFILE. You can equate this logical name with a file specification to point to directories containing public customization files. (VUE$PUBLIC_PROFILE can be a search list that points to a list of directories containing customization files that you share with other users.) If no translation is found, Session Manager and FileView read all the files that match the file specification VUE$LIBRARY:*.VUE$DAT. As the files are read, their specifications are added to a list in memory. This ensures that no two files with the same name are loaded.
Finally, Session Manager and FileView find your private customization file by using the logical name VUE$PROFILE. You can equate this logical name with a file specification to point to your private customization file. If no translation is found, Session Manager and FileView use the file specification DECW$USER_DEFAULTS:VUE$PROFILE.VUE$DAT. This normally translates to your SYS$LOGIN directory, but you can redefine it to translate to any other directory.
When you rearrange the order of menu items on a menu in a public customization file or remove a built-in menu item from it, you create a copy of that menu in your private customization file. Because Session Manager and FileView read your private customization file last, any subsequent changes made to the public customization file will not be reflected in your private customization file. For example, if new menu items are added to a menu in the public customization file, you will not see those additions. Your private customization file will override the public file. Adding more menu items to a sorted menu does not make a private copy of the public menu definition.
14.2. Creating Shared Customization Files
You can use the Create Public Profile File command to create a file that contains customized Session Manager or FileView components.
Add the Create Public Profile File command to a menu.
By default,the Create Public Profile File menu item does not appear on any of the Session Manager or FileView menus. For more information about adding menu items to pull-down menus, see Chapter 8, "Customizing Menus and Menu Bars".
Choose Create Public Profile File from the menu.
When you choose Create Public Profile File, you are prompted for a name for the profile file. By default, the file extension is VUE$DAT. The profile file that is created is placed in the directory pointed to by the logical VUE$LIBRARY_WRITE. By default, VUE$LIBRARY_WRITE points to SYS$COMMON:[VUE$LIBRARY.USER].
This default allows Session Manager or FileView to merge your profile file automatically with the system and user profile files. When Session Manager and FileView start, they read all files with the extension VUE$DAT from the directory pointed to by the logical VUE$PUBLIC_PROFILE. By default, the logical name VUE$PUBLIC_PROFILE points to the same directories as VUE$LIBRARY_WRITE.
After you fill in the profile file name, a new FileView is created. This FileView uses only the system definitions and does not have any of your private definitions.
Add any items you want to appear in the public profile file.
For more information about defining menu items or adding items to menus, see Chapter 8, "Customizing Menus and Menu Bars". For more information about working with file types and views, see Chapter 9, "Customizing FileView".Note
Any changes you make are saved in the new profile, so do not move the FileView or Session Manager window or save settings in any built-in dialog boxes that you do not intend to be part of the user environment. These settings will be saved in the public profile you are creating.
If you are adding items to existing pull-down or pop-up menus, using the Sort & Merge setting automatically merges your changes. For more information about using the Sort & Merge setting, see Chapter 8, "Customizing Menus and Menu Bars".
When you finish making changes,exit the new FileView. The new profile file is ready for you to use the next time you use Session Manager or FileView.
Chapter 15. Using Task Messages
When you define your own menu items and add them to Session Manager's or FileView's menus,your menu items can invoke simple DCL commands(for example, SHOW USERS) or command files that execute any number of commands. However, if you want to make your menu items work more like built-in menu items, you can include task messages into your command files. Task messages are special symbols that you use the same way you use DCL commands. For example, you can use task messages to create a menu item that displays a corresponding dialog box.
This chapter describes Session Manager and FileView task messages and explains how to use them. It also includes a sample command file that shows how task messages work.
15.1. Using Task Messages in Command Files
Some built-in menu items invoke command files to execute a series of commands. Each command file uses task messages to pass information between Session Manager or FileView and the VMS subprocesses that process tasks. This information includes files currently selected in the file list and the status of the current task. Task messages also instruct Session Manager and FileView to display a corresponding dialog box or error message.
Task messages consist of text strings that are sent on I/O channels called VUE$INPUT and VUE$OUTPUT. Subprocesses write messages to VUE$OUTPUT, which Session Manager or FileView reads. For some message types, Session Manager or FileView responds by writing messages to VUE$INPUT, which the subprocess reads. For each task message,Session Manager or FileView defines a DCL symbol that command files can use to send the message. When DCL encounters this symbol in a command file, it writes the message flag and any parameters you specify to VUE$OUTPUT. The VUE$INPUT and VUE$OUTPUT channels are already opened in the subprocess when your command file is invoked. You don't need to open or close them.
You do not need to open SYS$INPUT and SYS$OUTPUT channels in your command files. Specifically, your command files can prompt you by including the DCL command INQUIRE, if necessary, or can run programs that perform terminal I/O. When Session Manager and FileView detect that text has been written to SYS$OUTPUT, they respond by assigning and displaying a Task Output box that behaves like a terminal.
The maximum length of any task message is 255 characters.
If the task message includes a single parameter with no spaces, such as a symbol name or a number, do not enclose it in quotation marks ( " ").If the parameter is a text string, such as message text, enclose the string in quotation marks. For task messages that include two parameters, enclose both in one set of quotation marks; do not enclose each parameter individually in quotation marks. VUE$INQUIRE, which includes two parameters that might contain spaces, is an exception to this rule. In this case, enclose each parameter individually in quotation marks, and enclose them together within quotation marks.
15.2. Task Messages
VUE$EXIT_COMMAND_LOOP
The VUE$EXIT_COMMAND_LOOP message notifies Session Manager or FileView that the command procedure is about to exit the normal DCL command loop by executing the DCL command STOP. If a command procedure executes the DCL command STOP without first sending a VUE$EXIT_COMMAND_LOOP message, the subprocess is not properly reused. The combination of VUE$EXIT_COMMAND_LOOP and STOP is used only to obtain a Task Output window in which you can interact directly with the DCL command line.
DCL format: VUE$EXIT_COMMAND_LOOP
VUE$GET_ALL_SELECTIONS
The VUE$GET_ALL_SELECTIONS message requests that Session Manager or FileView return the names of all selected files in the current view as a list whose components are separated by commas. Follow VUE$GET_ALL_SELECTIONS with VUE$READ to allow the subprocess to receive the returned file name list.
DCL format: VUE$GET_ALL_SELECTIONS
VUE$GET_NEXT_SELECTION
The VUE$GET_NEXT_SELECTION message requests that Session Manager or FileView return the name of the next selected file in the current view. VUE$GET_NEXT_SELECTION can be used iteratively to get the name of each file that was selected when the task began. After the last file name is returned, Session Manager or FileView returns an empty string. Follow VUE$GET_NEXT_SELECTION with VUE$READ to allow the subprocess to receive the returned file name.
DCL format: VUE$GET_NEXT_SELECTION
VUE$GET_QUALIFIERS
The VUE$GET_QUALIFIERS message requests that Session Manager or FileView return a SET DISPLAY command with the parameters for the current item to the subprocess. If a user selects Detached,the subprocess terminates, and Session Manager or FileView re-executes the command file in a new detached process.
DCL format: VUE$GET_QUALIFIERS
VUE$GET_SELECTION_COUNT
The VUE$GET_SELECTION_COUNT message requests that Session Manager or FileView return the number ofselected files in the current view. Follow VUE$GET_SELECTION_COUNT with VUE$READ to allow the subprocess to receive the returned count.
DCL format: VUE$GET_SELECTION_COUNT
VUE$GET_SYMBOL
The VUE$GET_SYMBOL message requests that Session Manager or FileView return the value of the specified symbol previously set by VUE$SET_SYMBOL. Follow VUE$GET_SYMBOL with VUE$READ to allow the subprocess to receive the returned value.
You can also use VUE$GET_SYMBOL to query the special DCL symbol VUE$SHOW_HIDDEN_DIALOGS. Many built-in commands allow you to hide the associated dialog box by highlighting the Hide this Dialog check button in the command's dialog box. You can then force the box to appear by choosing the command while pressing and holding the Shift key. If you began the task while pressing and holding the Shift key, VUE$GET_SYMBOL returns TRUE for the value of VUE$SHOW_HIDDEN_DIALOGS. This allows your command files to provide a similar ellipsis feature that you can override when you choose the command from a menu while pressing the Shift key.
DCL format: VUE$GET_SYMBOL symbol
Example: VUE$GET_SYMBOL MY_LIBRARY
VUE$HIGHLIGHT_UPDATE
The VUE$HIGHLIGHT_UPDATE message requests that Session Manager or FileView highlight the Apply button in the Session Manager or FileView window by changing its label from Apply to Update. (The Update button is used to remind you that there might have been a change to the files in the current file list.) When you click on the Update button, the label returns to Apply.
DCL format: VUE$HIGHLIGHT_UPDATE
VUE$INQUIRE
The VUE$INQUIRE message requests that Session Manager or FileView display a dialog box prompting you for input text. The message includes the prompt to be used, as well as the initial value to be placed in the text-entry box. When you click on the OK button in the dialog box, the text is returned to the subprocess in VUE$INPUT. If you click on the Cancel button in the dialog box, a null string is returned. Follow VUE$INQUIRE with VUE$READ to allow the subprocess to receive the returned text string.
Because the prompt parameter might contain spaces, be sure to enclose both the prompt parameter and the initial text string in quotation marks.
DCL format: VUE$INQUIRE prompt initial-text
Example: VUE$INQUIRE " " "Showfile: " " " " ’ ’current_default ’ " " "
VUE$INQUIRE_SYMBOL
The VUE$INQUIRE_SYMBOL message requests that Session Manager or FileView display a dialog box prompting you for input text. The message includes the prompt to be used and a symbol name. The symbol is translated by Session Manager or FileView, and the current value is used as the initial value in the text-entry box. When you click on the OK button in the dialog box, the symbol is redefined using the text you entered,and the text is returned to the subprocess in VUE$INPUT. If you click on the Cancel button in the dialog box, a null string is returned and the task exits. Follow VUE$INQUIRE_SYMBOL with VUE$READ to allow the subprocess to receive the returned text string.
DCL format: VUE$INQUIRE_SYMBOL symbol prompt
Example: VUE$INQUIRE_SYMBOL "MY_LIBRARY Library:"
VUE$POPDOWN
The VUE$POPDOWN message instructs Session Manager or FileView to pop down the Task Output box forthis task, if it is displayed.
DCL format: VUE$POPDOWN
VUE$POPUP
The VUE$POPUP message instructs Session Manager or FileView to display the Task Output box for this task, if it is not already displayed. The Task Output box does not take input focus when it appears. Note that the Task Output box pops up automatically when output is written to SYS$OUTPUT. You can use this task message to force the box to appear sooner.
DCL format: VUE$POPUP
VUE$POPUP_CONFIRM
The VUE$POPUP_CONFIRM message requests that Session Manager or FileView pop up a confirmation box containing the specified text. The box contains two command buttons labeled Yes and No, which allow you to respond appropriately. Session Manager or FileView then returns either "YES" or "NO" in VUE$INPUT. Follow VUE$POPUP_CONFIRM with VUE$READ to allow the subprocess to receive the returned text string. You may separate the text on multiple lines by including the line-feed (ASCII 10)character.
DCL format: VUE$POPUP_CONFIRM message
Example: VUE$POPUP_CONFIRM "File was not found. Continue?"
VUE$POPUP_FOCUS
The VUE$POPUP_FOCUS message instructs Session Manager or FileView to pop up the Task Output box for this task, if it is not already displayed. The Task Output box takes input focus when it appears. Though the Task Output box pops up automatically when output is written to SYS$OUTPUT, it does not normally take input focus.
Note that this task message is incompatible with the Interclient Communications Conventions manual (ICCCM)and should not be used with an ICCCM window manager such as the Motif Window Manager.
DCL format: VUE$POPUP_FOCUS
VUE$POPUP_HELP
The VUE$POPUP_HELP message requests that Session Manager or FileView pop up a Help dialog box displaying help text from the specified library on the specified topic. If Session Manager or FileView cannot open the file or if the topic is not found, an error message dialog box is displayed.
DCL format: VUE$POPUP_HELP library topic
Example: VUE$POPUP_HELP "SYS$HELP:DECW$SESSION.HLB Overview"
VUE$POPUP_MESSAGE
The VUE$POPUP_MESSAGE message requests that Session Manager or FileView pop up a message box containing the specified text. The box also contains an Acknowledge button,which allows you to dismiss the box. You can separate the text on multiple lines by including the line-feed (ASCII 10) character.
DCL format: VUE$POPUP_MESSAGE message
Example: VUE$POPUP_MESSAGE "Library build is complete."
VUE$POPUP_QUALIFIERS
The VUE$POPUP_QUALIFIERS message requests that Session Manager or FileView pop up a dialog box containing text-entry boxes to change the display and an option box to change how applications run. The current settings for the command are shown in the dialog box.
When you click on OK or Apply, a SET DISPLAY command with the selected parameters is returned to the subprocess. If a user selects Detached, the subprocess terminates,and Session Manager or FileView re-executes the command file in a new detached process. If a user selects Detached and then clicks on Apply,the string DETACHED_APPLY is returned instead of the SET DISPLAY command.
DCL format: VUE$POPUP_QUALIFIERS
VUE$POPUP_PROGRESS_BOX
The VUE$POPUP_PROGRESS_BOX message requests that Session Manager or FileView pop up the Work in Progress dialog box, if it is not already displayed. This box allows an optional time value, representing a number of seconds, to be specified. If this task message is included, the box is displayed only for the specified number of seconds and then is automatically dismissed, unless some other entry prevents it. Also, the task status is shown as "Starting" in the Work in Progress dialog box if the timer is included.
You can use this task message to provide feedback that a task is starting before the task produces any visible results. If a time value is not included,the Work in Progress dialog box is automatically dismissed when the current task is completed, unless another entry prevents it.
DCL format: VUE$POPUP_PROGRESS_BOX optional-time
Example: VUE$POPUP_PROGRESS_BOX 10
VUE$READ
VUE$READ is the mechanism for receiving a value that Session Manager or FileView returns as a result of a previous message you sent. It reads the next record from VUE$INPUT into a symbol you specify.
For example, VUE$READ is used to read the file name returned after a VUE$GET_NEXT_SELECTION message is sent.
DCL format: VUE$READ symbol
Example: VUE$READ NEXT_SELECTION
VUE$RESET_SELECTIONS
VUE$RESET_SELECTIONS instructs Session Manager or FileView to reset its internal pointers to the selected file list. Normally, a task command file iterates through the list of selected files by repeatedly calling VUE$GET_NEXT_SELECTION.VUE$RESET_SELECTIONS allows the task to iterate through the list again.
DCL format: VUE$RESET_SELECTIONS
VUE$SET_DONE_LABEL
The VUE$SET_DONE_LABEL message requests that Session Manager or FileView change the label for this task to the specified text when the task is complete. This message has no effect until the task completes.
DCL format: VUE$SET_DONE_LABEL label
Example: VUE$SET_DONE_LABEL "Library build complete"
VUE$SET_ERROR_STATUS
The VUE$SET_ERROR_STATUS message requests that Session Manager or FileView set the "Error"flag in the Work in Progress dialog box entry for the current task.
DCL format: VUE$SET_ERROR_STATUS
VUE$SET_OUTPUT_TITLE
VUE$SET_OUTPUT_TITLE allows the task to specify a new title for its Task Output box. By default, Session Manager or FileView uses as the title the menu item name that invoked the task.
DCL format: VUE$SET_OUTPUT_TITLE
VUE$SET_SYMBOL
The VUE$SET_SYMBOL message requests that Session Manager or FileView store a value for the specified symbol in order to reuse it later. This mechanism allows Session Manager or FileView tasks, which are run as subprocesses, to share the same value for a symbol or to preserve a symbol across invocations of the same menu item. Defining a DCL symbol in your command file does not have the same effect, because it might be run in a different subprocess the next time the command file is invoked.
DCL format: VUE$SET_SYMBOL symbol-value
Example: VUE$SET_SYMBOL "MY_LIBRARY WORK:[JONES.LIBRARY]"
VUE$SET_TASK_LABEL
The VUE$SET_TASK_LABEL message requests that Session Manager or FileView change the label for this task in the Work in Progress dialog box and in the Task Output box, if one exists.
DCL format: VUE$SET_TASK_LABEL label
Example: VUE$SET_TASK_LABEL "Copying ’ ’current_file ’ "
VUE$SUPPRESS_FILE_LABEL
VUE$SUPPRESS_FILE_LABEL allows a task to specify that the file labels be omitted from its Task Output box, even if the task has requested information about the file list.
DCL format: VUE$SUPPRESS_FILE_LABEL
VUE$SUPPRESS_OUTPUT_POPUP
The VUE$SUPPRESS_OUTPUT_POPUP message requests that Session Manager or FileView not automatically display a Task Output box when the task produces terminal output. You can use this task message for graphical applications that are expected to produce output only in case of errors.
DCL format: VUE$SUPPRESS_OUTPUT_POPUP
VUE$UPDATE_FILEVIEW
The VUE$UPDATE_FILEVIEW message requests that Session Manager or FileView automatically update the Session Manager or FileView window, as though you had clicked on the Apply button. Use this task message with caution because it might disrupt any interaction in progress, such as extending a file selection.
DCL format: VUE$UPDATE_FILEVIEW
15.3. Creating a Command File
$!+
$! This FileView command file will prompt the user for a library name,
$! create the library, and insert all currently selected files
$! into it.
$!
$! If an error occurs, go to the handler, which displays Error status.
$!
$ on warning then goto error_occurred
$!
$! First, get the number of selected files. If none, pop up a
$! message box, then exit.
$!
$ vue$get_selection_count
$ vue$read element_count
$ if element_count .ne. 0 then goto get_library_name
$ vue$popup_message "You must select files first!"
$ exit
$!
$! Get the library name. Use a symbol so that this name can be
$! remembered across invocations of this menu item. If the library
$! already exists, prompt for confirmation that it should be used.
$!
$get_library_name:
$ vue$inquire_symbol "my_library_name  Library name:"
$ vue$read my_library_name
$ vue$popup_progress_box
$ if "''f$search(my_library_name)'" .eqs. "" then goto create_library
$ vue$popup_confirm "Library already exists. Create new version?"
$ vue$read response
$ if "''response'" .eqs. "NO" then goto file_loop
$!
$! Create a new library. Set the task label indicating action, and
$! highlight the Apply button showing a new file has been created.
$!
$create_library:
$ vue$set_task_label "Creating library ''my_library_name'"
$ library/create 'my_library_name
$ vue$highlight_update
$!
$! Get the list of selected files, and insert each into the library.
$!
$file_loop:
$ vue$get_next_selection
$ vue$read insert_file
$ if "''insert_file'" .eqs. "" then goto task_exit
$ vue$set_task_label "Inserting ''f$parse(insert_file,,,"NAME")'"
$ library 'my_library_name 'insert_file
$ goto file_loop
$!
$error_occurred:
$ vue$set_error_status
$!
$! Exit from the command procedure
$!
$task_exit:
$ exit
15.4. Adding Target Screen Options to Application Menu Items
To add Target Screen options to a user-defined menu item, modify the command procedure that invokes the application as shown in the following example. Your application must be invoked from a command file to use the qualifier dialog box feature.
$ vue$get_symbol vue$show_hidden_dialogs$ vue$read show_hidden_dialogs $ $ if show_hidden_dialogs then goto select_qualifiers
$ $ select_qualifiers:
$ vue$get_qualifiers $ goto do_bookreader $ select_qualifiers: $ vue$popup_qualifiers
$ $ do_bookreader: $ vue$read vue$common
$ $ if "''vue$command'".eqs. "DETACHED_APPLY" then goto - $ select_qualifiers $ 'vue$command
$ bookreader:=sys$system:decw$bookreader.exe $ vue$get_next_selection
$ vue$read selection $ bookreader 'selection $ vue$check_verb_loop
$ vue$read loop $ if "''loop'" .eqs. "TRUE" then goto select_qualifiers
| The symbol VUE$SHOW_HIDDEN_DIALOGS is true if the ellipsis after an item is selected; otherwise it is false. |
| If the user chose the ellipsis, the dialog box is displayed. |
| The user did not choose the ellipsis; retrieve any saved values and execute the command. |
| Display the dialog box and wait for the user to click on OK or Apply. |
| Have the command returned to FileView. |
| Execute the SET DISPLAY command. |
| If a file is selected, get it from FileView and pass it to Bookreader. |
| If the user clicked on Apply, then VUE$CHECK_VERB_LOOP is true. In this case, the command procedure wants to return control to the dialog box. If the user chooses the Detached setting and then clicks on Apply, control is returned to the dialog box. |
Chapter 16. Using MIT Utilities
If you have used the X Window System on other vendors' platforms,you might be familiar with several utilities distributed from the Massachusetts Institute of Technology (MIT). With DECwindows,you can access these utilities from FileView's Utilities menu.
To invoke an MIT utility from FileView's Utilities menu, choose the utility you want to use. If you want to enter optional parameters, choose the ellipsis (...) next to the utility. FileView displays a Command Options dialog box.
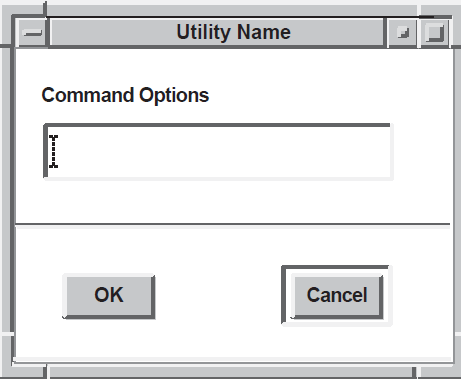
If you invoke a utility that requires certain parameters or additional information,FileView displays a task output dialog box that contains help text. To use the utility, choose the ellipsis next to the utility and provide the missing parameters in the command options dialog box.
This chapter briefly describes the MIT utilities and includes tables of utility options.
16.1. Bitmap Utility
The Bitmap Utility creates and edits rectangular images that are made up of 1s and 0s. Bitmaps are used to define clipping regions, cursor shapes,icon shapes, and tile and stipple patterns.
Bitmap displays a grid in which each square represents a single bit in the picture being edited. Squares can be set, cleared, or inverted with the mouse buttons, and a menu of higher-level operations is provided to the side of the grid. Actual-size versions of the bitmap, as it would appear normally and inverted, are displayed below the menu.
If the bitmap is used to define a cursor, one of the squares in the images can be designated as the hotspot, which determines where the cursor is pointing. For cursors with sharp tips, such as arrows and fingers, it is usually at the end of the tip. For symmetric cursors, such as crosses and bullseyes, it is usually at the center.
Bitmaps are stored as small C code fragments that are suitable for including in applications. They provide an array of bits and symbolic constants that give width, height, and hotspot, which can be used to create cursors, icons, and tiles. See the X Window System Toolkit for more information.
bitmap [-options ...]
filename [
width x
height]
|
Option |
Description |
|---|---|
|
-help |
Creates a brief description of allowable options and parameters to be printed. |
|
-display |
Specifies the X server to use. |
|
-geometry |
Specifies the placement and size of the bitmap window on the screen. |
|
-nodashed |
Indicates that the grid lines in the work area should not be drawn with dashed lines. Dashed lines can be slower on some servers. |
|
-name variable_name |
Specifies the variable name to use for writing out the bitmap file. The default is to use the base name of the file name command line argument. |
|
-bw number |
Specifies the border width of the main window in pixels. |
|
-fn font |
Specifies the font used for text in the buttons. |
|
-fg color |
Specifies the foreground color. |
|
-bg color |
Specifies the background color. |
|
-hl color |
Specifies the highlight color. |
|
-bd color |
Specifies the border color. |
|
-ms color |
Specifies the mouse color. |
The default WIDTHxSIZE is 16x16.
16.1.1. Changing Grid Squares
MB1—used to set one or more squares. The corresponding bit or bits in the bitmap are turned on (set to 1) and the square is filled.
MB2—used to invert one or more squares. The corresponding bit or bits in the bitmap are flipped, so 1s become 0s and 0s become 1s.
MB3—used to clear one or more squares. The corresponding bit or bits in the bitmap are turned off (set to 0) and the square is emptied.
You can change multiple squares simultaneously by holding the button down and dragging the cursor across the squares.
The bmtoa and atobm filters convert bitmap files to and from ASCII strings. They are most commonly used to print out bitmaps and generate versions to include in text files.
16.2. Convert ASCII to Bitmap Utility
 atobm [-options ...] [
filename]
|
Option |
Description |
|---|---|
|
-chars cc |
Specifies the pair of characters to use when converting string bitmaps into arrays of numbers. The first character represents a 0 bit, and the second character represents a 1 bit. The default is to use dashes for 0s and the number sign (#) for 1s. |
|
-name variable |
Specifies the variable name to be used when writing out the bitmap file. The default is to use the base name of the file name command line argument or leave it blank if the standard input is read. |
|
-xhot number |
Specifies the x coordinate of the hotspot. Only positive values are allowed. By default, no hotspot information is included. |
|
-yhot number |
Specifies the y coordinate of the hotspot. Only positive values are allowed. By default, no hotspot information is included. |
16.3. Convert Bitmap to ASCII Utility
bmtoa [-options ...] [
filename]
|
Option |
Description |
|---|---|
|
-chars cc |
Specifies the pair of characters to use in the string version of the bitmap. The first character is used for 0 bits, and the second character is used for 1 bits. The default is to use dashes for 0s and the number sign (#)for 1s. |
16.4. Display Information Utility
 xdpyinfo [-display
display]
16.5. Event Monitoring Utility
The Event Monitoring Utility (xev)Utility creates a window and writes output for each event that is generated. These events include pointer motion, and they enter and leave on the window.
xev [-options ...]
|
Option |
Description |
|---|---|
|
-displayname |
Specifies the X server to contact. |
|
-geometry geom |
Specifies the size and location of the window. |
|
-bw pixels |
Specifies the border width in pixels. |
|
-bs {NotUseful, WhenMapped,Always} |
Specifies the backingstore attribute. |
|
-s |
Sets save-unders attribute. |
16.6. List Atoms Utility
The List Atoms (xlsatoms) Utility lists the interned atoms. By default, all atoms starting from 1 (the lowest atom value defined in the protocol) are listed until the unknown atom is found. If an explicit range is given, xlsatoms tries all atoms in the range, regardless of whether they are undefined.
xlsatoms [-options...]
|
Option |
Description |
|---|---|
|
-display display |
Specifies the X server to which to connect. |
|
-format string |
Specifies the print-style format to use to list each atom
|
|
-range [ low]-[ high] |
Specifies the range of atom values to check. If low is not given,a value of 1 is assumed. If high is not given, xlsatoms stops at the first undefined atom at or above low. |
|
-name string |
Specifies the name of the single atom to list. If the atom does not exist, a message is printed. |
16.7. List Fonts Utility
The List Fonts (xlsfonts) Utility lists the fonts that match the given pattern. The wildcard character (*) can be used to match any sequence of characters. The question mark (?) can be used to match any single character. If no pattern id is given, the wildcard character is assumed.
 xlsfonts [-options] [-fn
pattern]
|
Option |
Description |
|---|---|
|
-l[l[l]] |
Indicates that medium, long, and very long listings should be generated for each font. |
|
-m |
Specifies that long listings should also print min and max bounds. |
|
-C |
Specifies that listings should use multiple columns. This is the same as -n0. |
|
-1 |
Forces a single column. This is the same as -n1. |
|
-u |
Keeps output unsorted. |
|
-w width |
Specifies the maximum width in characters that should be used to determine the number of columns to print. The default is 79. |
|
-n columns |
Specifies the number of columns in which to display the output. By default, xlsfonts attempts to fit as many columns of font names as possible into the number of characters based on the number of characters that is specified by -w width. |
|
-display display |
Specifies the X server to contact. |
16.8. List Windows Utility
The List Windows (xlswins) Utility lists the window tree. By default, the root window is used as the starting point, although a specific window can be specified with the -id option. If a window is not specified on the command line, the root window is used.
 xlswins [-options ...] [
window_id] ...
|
Option |
Description |
|---|---|
|
-display display |
Specifies the X server to contact. |
|
-format {hex, decimal, octal} |
Specifies the radix used to the print window id. The default is hex. |
|
-indent number |
Specifies the number of spaces to indent per level in the window tree. The default is 2. |
|
-l |
Specifies that a long listing should be generated for each window. This includes a number indicating the depth, the geometry relative to the parent, and the location relative to the root window. |
|
-resources |
Prints a listing of widget resources. |
16.9. Magnify Portion of Screen Utility
The Magnify Portion of Screen(xmag) Utility allows you to magnify the screen. If the explicit region is not specified, a square centered around the pointer is displayed, indicating the area to be enlarged. Once a region is selected, a window pops up showing an enlargement of the region, in which each pixel in the source image is represented by a small square of the same color. Clicking MB1 in the enlarged window pops up a small window that displays the position, number, and RGB value of the pixel under the pointer for as long as MB1 is depressed. Pressing the space bar or any other pointer button removes the enlarged image, and another region can be selected. Pressing q, Q, or Ctrl/C in the enlarged window exits the program.
xmag [-options ...]
|
Option |
Description |
|---|---|
|
-display display |
Specifies the X server to use for both reading the screen and displaying the enlarged version of the image. |
|
-geometry geom |
Specifies the size and location of the enlargement window. By default,the size is computed from the size of the source region and the desired magnification. Only one -source and -mag option can be specified if the window size is given with this option. |
|
-source geom |
Specifies the size and location of the source region on the screen. By default, a 64x64 square centered about the pointer is provided for the user to select an area of the screen. The size of the source is used with the desired magnification to compute the default enlargement window size. Only one-geometry and -mag option can be specified if a source size is given with this option. |
|
-mag magfactor |
Specifies the integral amount by which the source region is enlarged. The default magnification is 5. This is used with the size of the source to compute the default enlargement window size. Only one -geometry and -source option can be specified if a magnification factor is given with this option. |
|
-bw pixels |
Specifies the border width in pixels of the border surrounding the enlargement window. |
|
-bd color |
Specifies the border color. |
|
-bg color pixel_value |
Specifies the name of the color to be used as the background of an enlargement window. If the name begins with a percent size(%), it is interpreted as an absolute pixel value. This is useful when displaying large areas, because pixels that are the same color as the background do not need to be painted in the enlargement. The default is BlackPixel. |
|
-fn font_name |
Specifies the name of the font used for examining enlarged pixels when MB1 is pressed in the enlargement window. |
|
-z |
Grabs the server during dynamics and the call to XGetImage. This is useful for ensuring that clients do not change their state as the result of entering or leaving them with the pointer. |
Options may be abbreviated to the shortest unambiguous prefix.
16.10. Modify Keymap Utility
The Modify Keymap (xmodmap) Utility edits and display the keyboard modifier map and keymap table, which are used by client applications to convert events and keycodes into keysyms. This utility is usually run at session startup to customize the keyboard.
This is a global change that affects all applications connected to the server.
 xmodmap [-options ...] [
filename]
|
Option |
Description |
|---|---|
|
-display display |
Specifies the host and server to use. |
|
-verbose |
Indicates that xmodmap should print logging information as it parses the input. |
|
-quiet |
Turns off the verbose logging. This is the default. |
|
-n |
Indicates that xmodmap should not change the mappings but should display what it would do. |
|
-e expression |
Specifies an expression to be executed. Any number of expressions can be specified from the command line. |
|
-pm |
Prints the current modifier map to SYS$OUTPUT. |
|
-pk |
Prints the current keymap table to SYS$OUTPUT. |
|
-pp |
Prints the current pointer map to SYS$OUTPUT. |
|
-grammar |
Indicates that a help message that describes the expression grammar used in the files and with -e expressions should be printed out to SYS$OUTPUT. |
|
- |
Specifies that SYS$INPUT should be used as the input file. |
16.11. Display Properties Utility
The Display Properties (xprop) Utility displays window and font properties in an X server. You select one window or font by using the command line arguments or (in the case of a window)by clicking on the desired window. A list of properties with formatting information is then given.
 xprop [-help] [-grammar] [-id
id] [-root][-name
name] [-frame] [-font
font][-display
display] [-len
n] [-notype][-fs
file] [-remove
property_name][-spy] [-f
atom
format [
dformat]]... [
format [
dformat]
atom]...
|
Option |
Description |
|---|---|
|
-help |
Prints out a summary of command line options. |
|
-grammar |
Prints out the full grammar for command line options. |
|
-display display |
Specifies the X server to contact. |
|
-id id |
Selects the window id on the command line instead of using the pointer to select the target window. This is useful in debugging X applications where the target window is not mapped to the screen or where the use of the pointer might interfere with the application. |
|
-name name |
Specifies that the window named name is the target window on the command line instead of using the pointer to select the target window. |
|
-font font |
Specifies that the properties of the font font should be displayed. |
|
-remove property_name |
Specifies the name of a property to be removed from the indicated window. |
|
-root |
Specifies that X's root window is the target window. This option is useful when the root window is completely obscured. |
|
-len n |
Displays or reads at most n bytes of any property. |
|
-notype |
Specifies not to display the type field for each property. |
|
-fs filename |
Specifies where to look for property formats. |
|
-frame |
Specifies that when selecting a window by hand (that is; if -name, -root, or -id is not given), look at the window manager frame instead of the client window. |
|
-f property_name format [ dformat] |
Specifies that the format for name should be
format and that the dformat for name
should be dformat. If dformat is
missing,=$0+ |
|
-spy |
Examines window properties forever, looking for property change events. |
For each of these properties, the value on the selected window or font is printed using the supplied formatting information, if it exists. If no formatting information is supplied, internal defaults are used. If a property is not defined on the selected window or font, "not defined" is printed as the value for that property. If no property list is given, all the properties possessed by the selected window or font are printed.
If the desired window is the root window, the -root argument can be used.
If the desired window is not the root window, it can be selected in either of two ways on the command line: by id number or (if the window possesses a name) by name. The -id argument selects a window by id number in either decimal or hex (must start with 0x), whereas the -name argument selects a window by name.
If none of -font, -id, -name, and -root are specified, a crosshairs cursor is displayed and you can choose any visible window by clicking any mouse button in the desired window. If you want to display properties of a font as opposed to a window, you must use the -font argument.
Other than these four arguments and the -help and -grammar arguments, all the other command line arguments are used to specify both the format of the properties to be displayed and how to display them. The -len n argument specifies that at most n bytes of any given property will be read and displayed. This argument is useful when displaying the cut buffer on the root window, which could be several pages long if displayed in full.
Usually each property name is displayed by printing the property name then its type (if it has one) in parentheses, followed by its value. The -notype argument specifies that property types should not be displayed. The -fs argument specifies a file containing a list of formats for properties; the -f argument specifies the format for one property.
The formatting information for a property consists of two parts,a format and a dformat. The format specifies the formatting of the property, and the dformat specifies how the property should be displayed.
16.11.1. Constructing Formats and Deformats
The defaults contain the formats and dformats required to display all the standard properties. You should have to specify formats and dformats only if you have a new property or if you want to change the standard display format. It is recommended that new users not specify formats and dformats.
A format consists of one of 0, 8, 16, or 32 followed by a sequence of one or more format characters. The 0, 8, 16, or 32 specifies how many bitsper field there are in the property. Zero means to use the field size information associated with the property itself. The zero is needed onlyfor such unique cases as type INTEGER, which can be one of three different types depending on the size of the fields of the property.
A value of 8 means that the property is a sequence of bytes, and a value of 16 means that the property is a sequence of words. The difference between the two is that when it is read by a machine of the opposite byte from the machine that originally wrote the property, the sequence of words is byte swapped, whereas the sequence of bytes is not. For more information on how properties are formatted and stored, consult the Xlib manual.
a—The field holds an atom number. A field of this type should be of size 32.
b—The field is a Boolean value. A 0 means FALSE, and anything else means TRUE.
c—The field is an unsigned number, a cardinal number.
i—The field is a signed integer.
m—The field is a set of bit flags, 1 meaning On.
s—This field and the following ones up to either a 0 or the end of the property represent a sequence of bytes. This format character is usable only with a field size of 8 and is most often used to represent a string.
x—The field is a hex number (such as 'c' but displayed in hex). It is most useful for displaying window ids.
16.12. Modify Resource Database Utility
The Modify Resource (xrdb) Utility gets or sets the contents of the RESOURCE_MANAGER property on the root window of screen 0.
The X Toolkit uses the RESOURCE_MANAGER property to get user preferences about color and about fonts for applications. For compatibility, if no RESOURCE_MANAGER property is defined,the resource manager looks for a file called DECW$XDEFAULTS.DAT in DECW$USER.DEFAULTS.
BITS_PER_RGB= num—number of significant bits in an RGB color specification. This is the log base 2 of the number of distinct shades of each primary that the hardware can generate. It is not usually related to PLANES.
CLASS= visual_class—one of StaticGray, GrayScale, StaticColor, PseudoColor, TrueColor, and DirectColor. This is the visual class of the root window of the default screen.
COLOR—defined only if CLASS is StaticColor, PseudoColor, TrueColor, or DirectColor.
HEIGHT= num—the height of the default screen in pixels.
SERVERHOST= host_name—the host name portion of the display to which you are connected.
HOST= host_name—the same as SERVERHOST.
CLIENTHOST= host_name—the name of the host on which xrdb is running.
PLANES= num—the number of bit planes (the depth) of the root window of the default screen.
RELEASE= num—the vendor release number for the server. The interpretation of this number varies depending on VENDOR.
REVISION= num—the X protocol minor version supported by this server (currently 0).
VERSION= num—the X protocol major version supported by this server (should always be 11).
VENDOR= vendor—a string specifying the vendor of the server.
WIDTH= num—the width of the default screen in pixels.
X_RESOLUTION= num—the x resolution of the default screen in pixels per meter.
Y_RESOLUTION= num—the y resolution of the default screen in pixels per meter.
Lines that begin with an exclamation mark (!) are ignored and can be used as comments.
 xrdb [-options ...] [
filename]|
Option |
Description |
|---|---|
|
-help |
Causes a brief description of the allowable options and parameters to be printed. |
|
-display display |
Specifies the X server to use. |
|
-n |
Indicates that changes to the property (when used with -load) or to the resource file (when used with -edit) should be shown on the standard output but should not be performed. |
|
-symbols |
Indicates that the symbols that are defined for the preprocessor should be printed onto the standard output. It can be used in conjunction with -query, but not with the options that change the RESOURCE_MANAGER property. |
|
-query |
Indicates that the current contents of the RESOURCE_MANAGER property should be printed onto the standard output. Because preprocessor commands in the input resource file are part of the input file, not part of the property, they do not appear in the output from this option. The -edit option can be used to merge the contents of the property back into the input resource file without damaging preprocessor commands. |
|
-load |
Indicates that the input should be loaded as the new value of the RESOURCE_MANAGER property, replacing whatever was there (that is, the old contents are removed). This is the default action. |
|
-merge |
Indicates that the input should be merged with, instead of replacing, the current contents of the RESOURCE_MANAGER property. Because xrdb can read SYS$INPUT, this option can be used to the change the contents of the RESOURCE_MANAGER property directly from a terminal or from a shell script. This option performs a lexicographic sorted merge of the two inputs to ensure backwards compatibility. |
|
-edit filename |
Indicates that the contents of the RESOURCE_MANAGER property should be edited into the given file, replacing any values already listed there. This allows you to put changes that you have made to your defaults back into your resource file, preserving any comments or preprocessor lines. |
|
-backup string |
Specifies the backup suffix for -edit [.bak]. |
|
-remove |
Removes the RESOURCE_MANAGER from its window. |
|
-retain |
Indicates that server reset should be avoided if xrdb is the first client. |
|
-quiet |
Indicates that warnings about duplicate entries should not be displayed. |
16.13. Refresh Utility
The Refresh (xrefresh) Utility causes all or part of your screen to be repainted. Xrefresh maps a window on top of the desired area of the screen and then immediately unmaps it, causing refresh events to be sent to all applications. By default, a window without a background is used to provide faster repainting. Various options can be used to indicate that a solid background of any color,or the root window background, should be used instead.
xrefresh [-options] [
geometry] [
display]
|
Option |
Description |
|---|---|
|
-display display |
Specifies the server and screen to refresh. |
|
-geometry Wx H+X+Y |
Specifies the portion of the screen to be repainted. |
|
-black |
Indicates to use a black background. This can be disorienting, because everything goes black for a moment. |
|
-white |
Indicates to use a white background. The screen appears to flash and then repaint. |
|
-solid color |
Indicates to use a solid background of the specified color—for example,green. |
|
-root |
Indicates to use the root background. |
|
-none |
Indicates to repaint all of the windows. This is the default. |
The default is xrefresh -none.
16.14. Set Options Utility
The Set Options (xset) Utility customizes various user preference options of the display. These values are global to the X server and affect other applications.
 xset [-display
display] [-b] [b
on/off] [b
volume pitch duration] [[-]bc] [-c] [c
on/off] [c
 volume] [[-+]fp[-+=]
path[,
path[,...]]] [fp
default] [fp
rehash] [[-]led
integer] [led
on/off] [m[ouse] [acceleration [threshold]]] [m[ouse] default] [p pixel color][[-]r] [r
on/off] [s [length
period]] [s
blank/noblank] [s
expose/noexpose][s
on/off] [s
default] [q]
|
Option |
Description |
|---|---|
|
-display |
Specifies the server to use. |
|
b |
Controls the bell volume, pitch, and duration. This option accepts up to three numerical parameters, a preceding dash (-), or an on/off flag. If no parameters are given or the on flag is used, the system defaults are used. If the dash or the off flag is used, the bell is turned off. If only one numeric parameter is given, the bell volume is set to that value, as a percentage of its maximum. The second numeric parameter specifies the bell pitch, in hertz, and the third numeric parameter specifies the duration in milliseconds. The X server sets the characteristics of the bell as closely as possible to your specifications. |
|
c |
Controls the key click. This option can take an option value, a preceding dash (-), or an on/off flag. If no parameter or the on flag is given, the system defaults are used. If the dash or the off flag is used, the keyclick is disabled. If a value from 0 to 100 is given, it is used to indicate volume as a percentage of the maximum. The X server sets the volume to the nearest value that the hardware can support. |
|
fp= path[, path...] |
Sets the font path to the directories specified in the path argument. The directories are interpreted by the server, not by the client, and are server-dependent. |
|
fp default |
Causes the font path to be reset to the server's default. |
|
fp rehash |
Causes the server to reread the font databases in the current font path. This is generally used only when adding new fonts to a font directory. |
|
-fp path[, path...] |
Removes elements to the current font path. It must be followed by a comma-separated list of directories. |
|
fp- path[, path...] |
Removes elements to the current font path. It must be followed by a comma-separated list of directories. |
|
+fp path[, path...] |
Prepends elements to the current font path. It must be followed by a comma-separated list of directories. |
|
fp+ path[, path...] |
Appends elements to the current font path. It must be followed by a comma-separated list of directories. |
|
led |
Controls the keyboard LEDs. This option controls the turning on or off of the LEDs. It accepts an optional integer, a preceding dash (-), or an on/off flag. If no parameters or the on flag is given, all LEDs are turned on. If a preceding dash or the off flag is given, all LEDs are turned off. If a value between 1 and 32 is given, that LED is turned on or off, depending on the existence of a preceding dash. A common LED that can be controlled is the Caps Lock LED. Xset LED 3 turns LED number 3 on, whereas xset -LED 3 turns it off. The specific LED values can refer to different LEDs on different hardware. |
|
m |
Controls the mouse parameters. The parameters for the mouse are acceleration and threshold. The mouse, or whatever pointer is used, travels "acceleration" times as fast when it travels more than "threshold" pixels in a short time. The mouse can then be used for precise alignment when it is moved slowly, yet it can be set to travel across the screen rapidly when desired. One or both parameters for this option can be omitted, but if only one is given, it is interpreted as the acceleration. If no parameters are given or if the flag default is used, the system defaults are used. |
|
p |
Controls the pixel color values. The parameters are the color map entry number, in decimals, and a color specification. The root background colors may be changed on the same servers by altering the entries for BlackPixel and WhitePixel. These do not have to be set to 0 or 1. A server can also choose to allocate those colors privately, but an error is generated. The map entry must not be a read-only color, or an error is generated. |
|
r |
Controls the autorepeat. If a preceding dash is given or the off flag is used, autorepeat is disabled. If no parameters are given or the on flag is used, autorepeat is enabled. |
|
s |
Lets you set the screen saver parameters. This option accepts up to two numeric parameters, a blank/noblank flag, an expose/noexpose flag, anon/off flag, or the default flag. If no parameters are given or the default flag is used, the system is set to the default screen saver characteristics. The on/off flags turn the screen saver functions on or off. The blank flag sets the preference to blank the video (if the hardware can do so) instead of displaying a background pattern, whereas noblank sets the preference to display a pattern instead of a blank video. The expose flag sets the preference to allow window exposures, whereas the noexpose flag sets the preference to disable screen saver unless the server can regenerate the screens without causing exposure events. The length parameter for the screen saver function determines how long the server must be inactive for screen saving to activate. The period parameter determines how soon you must change the background pattern to avoid burn in. The arguments are specified in seconds. If only one numeric parameter is given,it is used for the length. |
|
q |
Gives you information on the current settings. |
16.15. Set Root Window Options Utility
The Set Root Window Options (xsetroot)Utility allows you to tailor the appearance of the background root window on a workstation display running X. If no options are specified or if-def is specified, the window is reset to the default state. The -def option can be specified with other options, and only the nonspecified characteristics are reset to the default state.
Only one of the background color or tiling options (-solid, -gray, -grey, -bitmap, and -mod) can be specified at a time.
 xsetroot [-help] [-def] [-display
display][-cursor
cursor_file mask_file] [-cursor_name
cursor_name] [-bitmap
filename] [-mod
x
y] [-gray] [-grey] [-fg
color][-bg
color] [-rv] [-solid
color] [-name
string]
|
Option |
Description |
|---|---|
|
-help |
Prints a usage message and exit. |
|
-def |
Resets unspecified attributes to the default values. Restores the background to the familiar gray mesh and the cursor to the hollow x shape. |
|
-cursor cursor_file mask_file |
Lets you change the pointer cursor to whatever you want when the pointer cursor is outside of any window. Cursor and mask files are bitmaps and can be created with the bitmap program. You may want the mask file to be all black until you become familiar with the way masks work. |
|
-cursor_name cursor_name |
Lets you change the pointer cursor to one of the standard cursors from the cursor font. See the X Window Systemfor more information. |
|
-bitmap filename |
Indicates to use the bitmap specified in the file to set the window pattern. You can make your own bitmap files using the bitmap program. The entire background is made up of repeated tiles of the bitmap. |
|
-mod x y |
Indicates to use a plaid-like grid pattern on your screen. X and Y are integers ranging from 1 to 16. |
|
-gray |
Makes the entire background gray. |
|
-grey |
Makes the entire background grey. |
|
-fg color |
Indicates to use color as the foreground color. Foreground and background colors are meaningful only in combination with -cursor, -bitmap, or -mod. |
|
-bg color |
Indicates to use color as the background color. |
|
-rv |
Exchanges the foreground and background colors. Normally the foreground color is black and the background color is white. |
|
-solid color |
Sets the background of the root window to the specified color. This option is useful only on color servers. |
|
-name string |
Sets the name of the root window to string. |
|
-display display |
Specifies the server to connect to. |
16.16. Window Dump Utility
The Window Dump (xwd) Utility allows you to store window images in a specially formatted dump file. This file can then be read by other X utilities for redisplay, printing, editing, formatting, archiving, and image processing. The target window is selected by clicking MB1 in the desired window. The keyboard bell rings once at the beginning of the dump and twice when the dump is completed.
 xwd [-display host:dpy] [-debug]
[-help][{-root|-id id|-font font|-name
name}]
[-nobdrs] [-out file] [-xy] [-add value] [-frame]|
Option |
Description |
|---|---|
|
-display display |
Specifies the server to connect to. |
|
-help |
Prints out the usage command syntax summary. |
|
-nobdrs |
Specifies that the window dump should not include the pixels that compose the window border. This is useful when you want to include the window contents in a document illustration. |
|
-out file |
Specifies the output file on the command line. The default is to output to SYS$OUTPUT. |
|
-xy |
Selects XY format dumping instead of the default Z format. It applies to color displays only. |
|
-add value |
Specifies a signed value to be added to every pixel. |
|
-frame |
Indicates that you should include the window manager frame when manually selecting a window. |
16.17. Display Window Information Utility
The Display Window Information (xwininfo) Utility displays information about a window on an X server. The information displayed depends on which options are selected. If no options are chosen, -stats is assumed.
You have the option of selecting the target window with the mouse (by clicking any mouse button in the desired window) or by specifying the window ID on the command line with the -id option. You can also use the -name option to specify by name which window is desired. There is also a special -root option for quickly obtaining information about the root window.
xwininfo [-options...]
|
Option |
Description |
|---|---|
|
-help |
Prints the command syntax summary. |
|
-display display |
Specifies the X server to contact to. |
|
-root |
Indicates to use the root window. |
|
-id window_id |
Indicates to use the window with the specified id. |
|
-name window_name |
Indicates to use the window with the specified name. |
|
-int |
Prints the window id in decimal. The default is hexadecimal. |
|
-tree |
Displays the root, parent, and children windows' ids and names for the selected window. |
|
-stats |
Displays various attributes pertaining to the location and appearance of the selected window. Information displayed includes the location of the window, its width and height, its depth, border width, class, colormap ID if any, map state, backing-store hint, and location of the corners. |
|
-bits |
Displays various attributes pertaining to the selected window's raw bits and how the selected window is to be stored. Displayed information includes the selected window's bit gravity, window gravity, backing-store hint, backing-planes value, backing pixel, and whether or not the window has save-under set. |
|
-events |
Displays the selected window's event masks. Both the event mask of events wanted by some client and the event mask of events not to propagate are displayed. |
|
-size |
Displays the selected window's sizing hints. Displayed information includes, for both the normal-size hints and the zoom-size hints, the user-supplied location, if any; the program-supplied location, if any; the user-supplied size, if any; the program-supplied size, if any; the minimum size, if any; the maximum size, if any; the resize increments, if any; and the minimum and maximum aspect ratios, if any. |
|
-wm |
Displays the selected window's window manager hints. Information displayed may include whether or not the application accepts input, what the window's icon window number and name are, where the window's icon should go, and what the window's initial state should be. |
|
-shape |
Prints out the shape extents. |
|
-frame |
Causes the window manager frames not to be ignored when manually selecting windows. |
|
-english |
Causes all individual height, width, and x and y positions to be displayed in inches (and feet, yards, and miles if necessary), as well as in number of pixels. The -metric and -english options can both be enabled at the same time. |
|
-metric |
Causes all individual height, width, and x and y positions to be displayed in millimeters, as well as in number of pixels, based on what the server thinks the resolution is. Geometry specifications that are in +x+y form are not changed. |
|
-all |
Prints -tree, -stats, -bits, -events, -size, -wm, and -shape information. |
16.18. Window Undump Utility
The Window Undump (xwud) Utility displays an image saved in a specially formatted dump file produced by xwd.
 xwud [-in file] [-noclick] [-geometry geom]
[-display display] [-new] [-std map_type] [-raw]
[-vis vis_type] [-help] [-rv] [-plane number]
[-fg color] [-bg color]
|
Option |
Description |
|---|---|
|
-bg color |
If a bitmap image (or a single plane of an image) is displayed, this option can be used to specify the color to display for the 0 bits in the image. |
|
-display display |
Specifies the server to connect to. |
|
-fg color |
If a bitmap image (or a single plane of an image) is displayed, this option can be used to specify the color to display for the 1 bits in the image. |
|
-geometry geom |
Specifies the size and position of the window. Typically, you should specify the position and let the size default to the actual size of the image. |
|
-help |
Prints out a short description of the allowable options. |
|
-in file |
Specifies the input file on the command line. If no input file is given, the standard input is assumed. |
|
-new |
Forces the creation of a new colormap for displaying the image. Matching the image characteristics to those of the display can get the image on the screen faster, but at the cost of using a new colormap (which on most displays causes other windows to become Technicolor). |
|
-noclick |
Unless this option is specified,clicking any mouse button in the window terminates the application. Termination can always be achieved by typing q, Q, or Ctrl+C. |
|
-plane number |
Selects a single bit plane of the image to display. Planes are numbered, zero being the least significant bit. |
|
-raw |
Forces the image to be displayed with whatever color values currently exist on the screen. This option is most useful when undumping an image back onto the same screen that the image originally came from while the original windows are still on the screen. It results in getting the image on the screen faster. |
|
-rv |
If a bitmap image (or a single plane of an image) is displayed,this option forces the foreground and background colors to be swapped. Swapping may be needed when you are displaying a bitmap image that has the color sense of pixel values 0 and 1 reversed from what they are on your display. |
|
-std map_type |
Displays the image using the specified standard colormap. The property name is obtained by converting the type to upper case, prepending RGB_, and appending _MAP. Typical types are best, default, and gray. |
|
-vis vis_type or vis_id |
Specifies a particular visual or visual class. The default is to pick the best one. A particular class can be specified: StaticGray, GrayScale, StaticColor, PseudoColor, DirectColor, or TrueColor. Match can be specified to use the same class as the source image. Alternatively, an exact visual ID (specific to the server) can be specified, either as a hexadecimal number (prefixed with 0x) or as a decimal number. The default can be specified to use the same class as the colormap of the root window. Case is not significant in any of these strings. |
Chapter 17. Changing DECwindows X Window System Resources
Most DECwindows applications provide dialog boxes that contain options for customizing your DECwindows environment and saving your settings. For example, using Session Manager's Options menu, you can look at many predefined settings and then choose and save new settings.
Note
Options dialog boxes cannot be used to change settings that are specified in the DECW$XDEFAULTS.DAT file.
In future DECwindows releases, application dialog boxes might contain the options you have added to your .Xdefaults file. You will have to modify your DECW$XDEFAULTS.DAT file to reflect these changes.
Error handling for resources is not available in this version of DECwindows. Syntax errors in resource files might cause DECwindows to fail without providing error messages.
To use resources to change application settings,create a file (DECW$XDEFAULTS.DAT)in the directory specified by the logical name DECW$USER_DEFAULTS. In this file, specify the resources for the application settings you want to change. Any changes you make to the DECW$XDEFAULTS.DAT file do not take effect until you restart your DECwindows session,and they affect all applications on the X11 Display Server. Adding many resources to your DECW$XDEFAULTS.DAT file can slow down application startup time.
Most applications have a system application resource file in the directory pointed to by the logical name DECW$SYSTEM_DEFAULTS. You can also create a user application-specific resource file in the directory pointed to by the logical name DECW$USER_DEFAULTS. Any changes you make to an application-specific resource file affect only the specific application and take effect when you restart an application. Adding resources to an application-specific resource file does not slow down application startup time. If possible,you should specify resources in an application-specific resource file.
Each resource specification in any resource file follows explicit syntax rules. Be as specific as possible when you specify resources.
|
Application |
Application-specific resource file name |
|---|---|
|
Bookreader |
DECW$BOOKREADER.DAT |
|
Calculator |
DECW$CALC.DAT |
|
Calendar |
DECW$CALENDAR.DAT |
|
Cardfiler |
DECW$CARDFILER.DAT |
|
Clock |
DECW$CLOCK.DAT |
|
|
DECW$MAIL.DAT |
|
Motif Window Manager |
DECW$MWM.DAT |
For more information about using resources to change DECwindows settings, see the OSF/Motif Programmer's Guide.For more information about the X11 Resource Manager and the syntax for specifying resources, see the X Window System (The Complete Reference to Xlib, X Protocol, ICCCM, XLFD).
Bookreader
Bookreader
Class Names
BookreaderNavigation [Specifies resources for the Navigation window (that is, the window that
displays the table of contents and the index).]BookreaderLibrary [Specifies resources for the library window (that is, the window that displays
libraries, bookshelves, and book titles).]BookreaderTopic [Specifies resources for the Topic window (that is, the window that displays
topic information).]Description
(Additional Information) For this version of DECwindows,Bookreader does not use options dialog boxes to save resources. You can specify them in your resource files.
Examples
!*****************************************************************
! Note! in all cases, .mm_width and .mm_height are specified in
! millimeters.
! also, .x_offset and .y_offset specifies the relative placement of
! subsequent instances of the same type of window.
!*****************************************************************
!
!------------------------------------------------------------
! Library window resources
!------------------------------------------------------------
!BookreaderLibrary.x: 3BookreaderLibrary.y: 25BookreaderLibrary.mm_width: 98BookreaderLibrary.mm_height: 100
!
! start iconified.
!BookreaderLibrary.initialState: 3
!
! specifies which if any shelves should be opened at application startup
! valid values are: none, first, all
!BookreaderLibrary.shelf_to_open_on_startup: first
!
!------------------------------------------------------------
! Navigation window resources
!------------------------------------------------------------
!
BookreaderNavigation.x: 3
BookreaderNavigation.y: 80
BookreaderNavigation.mm_width: 101
BookreaderNavigation.mm_height: 145
BookreaderNavigation.x_offset: 0
BookreaderNavigation.y_offset: 35
!
!------------------------------------------------------------
! Topic window resources
!------------------------------------------------------------
!
BookreaderTopic.x: 408
BookreaderTopic.y: 75
BookreaderTopic.mm_width: 159
BookreaderTopic.mm_height: 178
BookreaderTopic.x_offset: 35
BookreaderTopic.y_offset: 35
!
! max_default_topic dimensions specify the largest size that Bookreader
! will use for a topic window, by default
!
BookreaderTopic.max_default_topic_width: 765
BookreaderTopic.max_default_topic_height: 645
!
! .show_hot_spots specifies whether Bookreader has hot-spot highlighting
! turned on by default. this resources corresponds to the 'show hot spots'
! option in the view menu of the topic window.
!
! similarly, .show_extensions specifies extension highlighting
!
! valid values are: true, false
!
BookreaderTopic.show_hot_spots: false
BookreaderTopic.show_extensions: true
Calculator
Calculator
Class Name
Calc []Description
(Additional Information)Calculator automatically saves x, y, width, height, and initial window state.Do not specify these resources in your resource file.
Examples
See the examples in DECW$SYSTEM_DEFAULTS:DECW$CALC.DAT.
Calendar
Calendar
Class Name
DECW$CALENDAR []Description
(Additional Information)Calendar stores height, width, x and y, and initial window state in the Calendar data file. These are saved when you save other customizations. Calendar ignores these resources if they are specified in resource files.
A number of calendar-specific color resources are mentioned in DECW$SYSTEM_DEFAULTS:DECW$CALENDAR.DAT.
Examples
See the examples in DECW$SYSTEM_DEFAULTS:DECW$CALENDAR.DAT.
Cardfiler
Cardfiler
Class Names
Cardfiler [ The index window of the cardfiler.]CardfilerCard [The card window of cardfiler. ]Description
(Additional Information)Cardfiler automatically saves x, y, width, height, and initial window state.Do not specify these resources in your resource file.
Example
See the examples in DECW$SYSTEM_DEFAULTS:DECW$CARDFILER.DAT.
CDA Viewer
CDA Viewer
Class Name
Viewer []Description
(Additional Information)For this version of DECwindows,CDA Viewer does not use options dialog boxes to save resources. You can specify them in your resource files.
Clock
Clock
Class Name
Clock []Description
(Additional Information)Clock automatically saves x, y, width, height, and initial window state.Do not specify these resources in your resource file.
Examples
See the examples in DECW$SYSTEM_DEFAULTS:DECW$CLOCK.DAT.
DECterm
DECterm
Class Name
DECW$TERMINAL.Main.DECTERM Resource Names
Specifies the font used for the "big" font set. The default is -*-Terminal-*-*-*–18-*-*-*-*-*-*-*.
Specifies the width of the logical display in columns. The default is 80.
Specifies that the condensed font should be used. The default is to display the normal font (Off).
Specifies which font is used. Specify 1 for little and 0 for big. The default is 1.
Specifies the font used for the "little" font set. The default is -*-Terminal-*-*-*–14-*-*-*-*-*-*-*.
Specifies the height of the logical display in rows. The default is 24.
Specifies the number of lines scrolled before DECterm synchronizes with the display server. This number limits the rate of scrolling. The higher the number, the faster DECterm scrolls. The default is 10.
Examples
See the examples in DECW$SYSTEM_DEFAULTS:DECW$TERMINAL.DAT.
FileView and Session Manager
FileView and Session Manager
Class Name
VUE$MASTER []Description
(Additional Information)
FileView and Session Manager save options settings and window positions in a private profile file. You can use options dialog boxes to change menu names and menu contents.
FileView and Session Manager do not ship an application Xdefaults file.
LinkWorks Manager
LinkWorks Manager
Class Name
DECW$LWK_MANAGER []Description
(Additional Information) LinkWorks Manager has a primary main window (the Environment window)and secondary windows (LinkBase windows). LinkWorks Manager automatically saves x, y, width, height, and initial window statefor the Environment window. Do not specify these resources in your resource file.
Class Names
Mail [ Anything to do with the main window]MailSend [Anything to do with the send window]MailRead [Anything to do with the read window]Description
(Additional Information)Mail saves x, y, width, height, foreground, background, and initial window state automatically or through options dialog boxes. Do not specify these resources in your resource file.
Examples
! These are the font specifictions for the SVN interface in Mail
! Level 0 will be the drawer name fonts; level 1 the folders; and
! level 2 the messages.
!
Mail*svnArea*DXmfontListDefault:       -*-Menu-Medium-R-Normal--*-120-*-*-P-*-IS
O8859-1
Mail*svnArea*DXmfontListLevel0:        -*-Menu-Medium-R-Normal--*-120-*-*-P-*-IS
O8859-1
Mail*svnArea*DXmfontListLevel1:        -*-Menu-Medium-R-Normal--*-120-*-*-P-*-IS
O8859-1
Mail*svnArea*DXmfontListLevel2:        -Adobe-Courier-Medium-R-Normal--*-120-*-*
-M-*-ISO8859-1

! Pane main window fonts
! This is the messages font
!
Mail*messageArea*DXmfontListLevel0:     -Adobe-Courier-Medium-R-Normal--*-120-*-
*-M-*-ISO8859-1
!
! This is the folder/drawer name font
!
Mail*Item.fontList:                     -*-Menu-Medium-R-Normal--*-120-*-*-P-*-I
SO8859-1
!
! Read window fonts
!
MailRead*readWindow*envelopeText.fontList:              -Adobe-Courier-Medium-R-
Normal--*-120-*-*-M-*-ISO8859-1
MailRead*readWindow*messageText.fontList:               -Adobe-Courier-Medium-R-
Normal--*-120-*-*-M-*-ISO8859-1
!
! Send window fonts
!
! This is the font for any text area you can enter (subject, to etc)
!
MailSend*sendWindow*workArea*XmText.fontList:   -Adobe-Courier-Medium-R-Normal--
*-120-*-*-M-*-ISO8859-1
!
! This is the font for any remaining areas in the send window like labels.
!
MailSend*sendWindow*workArea.fontList:          -Adobe-Courier-Medium-R-Normal--
*-120-*-*-M-*-ISO8859-1
P
Motif Window Manager
Motif Window Manager
Description
Only the most common resources are customizable through the Window Manager's Options menus. However, you can perform advanced customization of many Window Manager features by directly editing resources in the Motif Window Manager (MWM)resources files or application resource files.
- Place the resource
Mwm*fontList: -*-Helvetica-Bold-R-Normal–*-180-*-*-P-*-ISO8859-1
in your MWM resource file.
Save the file.
All the titles, icon names, and MWM menus and dialog boxes will have a larger font.
From the Workspace menu, choose Restart.
Most of the resources are located in the system MWM resource file and have comments to help you review them.
The system default resources are located in DECW$SYSTEM_DEFAULTS for OpenVMS and in /usr/lib/X11/app-defaults for other systems. For OpenVMS, the MWM resource file is called DECW$MWM.DAT. On other systems, this file is ~/Mwm. For color-specific resources on monochrome or gray-scale systems,this file is DECW$MWM_BW.DAT or DECW$MWM_GRAY.DAT on OpenVMS and is ~/Mwm_bw and ~/Mwm_gray on other systems.
Do not modify this file directly unless you want to change the default resources for everyone on the system. Instead, you should copy the file to your local directory and modify it. For OpenVMS, the user location for this file is DECW$USER_DEFAULTS,which is usually your login directory. For other systems, the files are placed in your home directory. Note that the location of these files can vary depending on language settings and other logical names or environment variables.
Customizing MWM Resources for an Application
- For OpenVMS systems, add to your MWM resource file
Mwm*DECW$TERMINAL*background: Slate Blue
For other systems, addMwm*DXterm*background: Slate Blue
Restart MWM.
All DECterm borders will be slate blue when they are inactive and will be easier to distinguish from other windows.
Mwm*className*iconImage
Create an image, decterm.xbm, using DECpaint.
Place the file in the DECW$USER_DEFAULTS for OpenVMS or/usr/include/X11/bitmaps for other systems.
You can modify the default location using the Mwm*bitmapDirectoryresource.
- For OpenVMS systems, add to your MWM resource file
Mwm*DECW$TERMINAL*iconImage: DECTERM.XBM
For other systems, addMwm*DXterm*iconImage: decterm.xbm
Restart MWM.
The icon for all DECterm windows will contain the icon image that you created.
- Add the following to the clock resource file:
*clientDecorations: 1
Start the clock.
Note that in this case, you could achieve the same result by addingMwm*Clock*clientDecorations: border
to the MWM resource file. See Motif toolkit include file, MwmUtil.h, for the resource values.
Here are more resources of interest. To control the border decorations or MWM functions, modify the clientDecorations resource or the clientFunctions resource. To specify the location of an icon when an icon box is not used, modify the iconX and iconY resources. Note that this works only when iconAutoPlace is off.
*initialState: 3
to the clock resource file.
Customizing MWM Menus
You can modify any of the MWM menus (such as the window menu) and change the menu names or accelerators or add other items.
! Default Window Menu
! Menu associated with window border
Menu DefaultWindowMenu
{
    "Restore"   _R  Alt F5   f.normalize
    "Move"      _M  Alt F7   f.move
    "Size"      _S  Alt F8   f.resize
    "Minimize"  _n  Alt F9   f.minimize
    "Maximize"  _x  Alt F10  f.maximize
    "Lower"     _L  Alt F3   f.lower
    no-label                 f.separator
    "Workspace" _W           f.menu WorkspaceMenu
    "Close"     _C  Alt F4   f.kill
    "Help"      _H           f.menu MwmHelpMenu
}
"Start DECterm" _D Alt F17
  f.exec "run/detached sys$system:decw$terminal"
Menu MenuName
{
    "Menu Item"    [_mnemonic]   [accelerator]   f.function [argument]
    ...
}
Keyname. The mnemonic and accelerator are
optional. For your convenience, the MWM functions are listed at the top of the
resource configuration file.
f.beep,
f.circle_down [icon|transient|window], f.circle_up [icon|transient|window],
f.exec "Command",
f.dec_customize DialogBox, f.dec_help Topic,
f.focus_color, f.focus_key, f.kill, f.lower,
f.maximize, f.menu MenuName, f.minimize, f.move,
f.next_cmap, f.next_key [icon|transient|window], f.pass_key,
f.prev_cmap, f.prev_key [icon|transient|window],
f.nop, f.normalize, f.normalize_and_raise,
f.pack_icons, f.post_smenu, f.quit_mwm,
f.raise, f.refresh_win
f.refresh, f.resize,
f.restart, f.restore,
f.send_msg id, f.separator, f.set_behavior, f.title Title,
MWM Keyboard and Mouse Accelerators
Buttons DefaultButtonBindings
{
    <Btn1Down>            root               f.menu RootMenu
    <Btn1Click2>          title              f.minimize
    Shift <Btn1Click2>    icon               f.minimize
}Keys DefaultKeyBindings
{
Shift<Key>Escape window|icon f.post_wmenu
Alt<Key>Tab root|icon|window f.next_key
Alt Shift<Key>Tab root|icon|window f.prev_key
}
Buttons BindingName
{
    Modifier<Button>      Context            Function [Argument]
}Keys BindingName
{
Modifier<Key>KeyName Context Function [Argument]
}Alt<Key><Btn3Click> root|window|frame|icon f.exec "run/detached sys$system:decw$terminal"
Alt<Key><Btn3Click> root|window|frame|icon
 f.exec "/usr/bin/dxterm &"
Alt<Key>F18 root|window|frame|icon
 f.exec "run/detached sys$system:decw$terminal"
Alt<Key>F18 root|window|frame|icon
 f.exec "/usr/bin/dxterm &"
Mwm*clientclass*windowMenu: windowName
Modifying the MWM Resource Configuration File
MWM retrieves the contents of the window and workspace menus and the bindings from the configuration file. The default resource configuration file is DECW$SYSTEM_DEFAULTS:DECW$MWM_RC.DAT on OpenVMS and is /usr/lib/X11/app-defaults/system.mwmrc on other systems.
Copy the file to DECW$USER_DEFAULTS:DECW$MWM_RC.DAT for OpenVMS or to ~/.mwmrc for other systems.
Change a menu or binding.
From the Workspace menu, choose Restart.
Note that unlike the MWM resource file, the contents are not merged with the system resources but are replaced. Thus the entire resource configuration file must be copied.
*configFile: MYDEFAULTS:MWM_CONFIG_FILE.TXT
*configFile: ~/mydefaults/MwmConfigFile
Part IV. Appendixes
Part IV,''Appendixes'' contains several appendixes, which give additional information about DECwindows.
Appendix A, "Understanding DECwindows Architecture" provides an overview of DECwindows architecture. Read this appendix if you want to know more about how DECwindows works.
Appendix B, "Differences Between the XUI and Motif Interfaces" briefly explains the differences between the XUI and Motif interfaces.
Appendix C, "Using DECwindows with a Keyboard" includes tables and procedures for using DECwindows with your keyboard.
Appendix D, "Understanding Files, Directories, and Devices" reviews files,directories, devices, and their place in the OpenVMS directory structure.
Appendix E, "System Messages" lists error messages that might appear when you are starting a session, working with Session Manager, or running applications on remote systems.
Appendix A. Understanding DECwindows Architecture
You don't need to understand its architecture or inner workings, to use DECwindows successfully. But if you're the kind of person who often takes things apart to see how they work, then this appendix is for you. It defines the DECwindows Motif OpenVMS environment and describes the layers of software and standards that make DECwindows one of the most open systems available today.
A.1. DECwindows OpenVMS Environment
DECwindows Motif for OpenVMS is based on MIT's specification for the X Window System, Version 11, Release 4 and OSF/Motif V1.1.3.OSF/Motif is widely acknowledged as the industry standard.
DECwindows Motif for OpenVMS provides support for both OSF/Motif,an open standard that is the default user interface, and the X User Interface in a single run-time and development environment. Because both the Motif and XUI interfaces are based on MIT's X Window System, applications written to either toolkit continue to run regardless of which environment a user selects.
MIT, Digital, and other groups have used earlier versions of the X Window System since 1984. The first available release of Version 11 (V11R1)was available on September 15, 1987.For more information about the history of the X Window System, see X Window System (The Complete Reference to Xlib, X Protocol, ICCCM, XLFD). The groups that developed the X Window System created a windowing system that met their needs by designing an architecture that allows the execution and display of applications to be independent. Specific components of the architecture control the display of applications. Different components determine how applications run.
Graphics-oriented interaction with the OpenVMS operating system.
Consistent user interfaces.
DECwindows user interfaces consist of graphic objects that look and function the same, regardless of the application you are using.
A library of desktop applications.
Availability of a wide range of third-party applications.
Because DECwindows incorporates the industry standard X Window System, an extensive selection of third-party applications is available for OpenVMS DECwindows systems.
Powerful libraries of routines that simplify the development of graphics-oriented applications.
These routines perform functions such as drawing and window management. Applications using these routines run on all supported hardware without modifications. For example, an application designed for the VAXstation 3200 looks and functions the same on a DEC 3000 AXP series workstation.
Libraries for creating and accessing documents containing text, graphics,and scanned images.
Network transparent application interface.
The DECwindows architecture lets you run an application on a remote node while displaying and inputting data on a local workstation. The network functions that make this possible are transparent; the application appears to run locally.
Network transparency allows workstations to access the power and resources of other systems on the network.
Compatibility with ULTRIX.
Because OpenVMS and ULTRIX DECwindows use the same set of programming libraries,you can easily write applications that are portable between OpenVMS and ULTRIX or other systems.
Extensible architecture.
The DECwindows architecture has been designed to accommodate new technology,such as three-dimensional graphics, as it becomes available.
A.2. DECwindows Architecture
Applications
OSF/Motif Toolkit
X User Interface (XUI) Toolkit
X Window System Intrinsics (XT)
Xlib Programming Library
Network transport
X11 Display Server
Device drivers
In addition to these basic components, DECwindows includes the Compound Document Architecture (CDA) Toolkit. The CDA Toolkit allows applications to create and access documents containing text, graphics, and scanned images. Figure A.1, ''DECwindows Architecture'' illustrates the relationships among the components of the DECwindows architecture. The sections that follow explain the components.
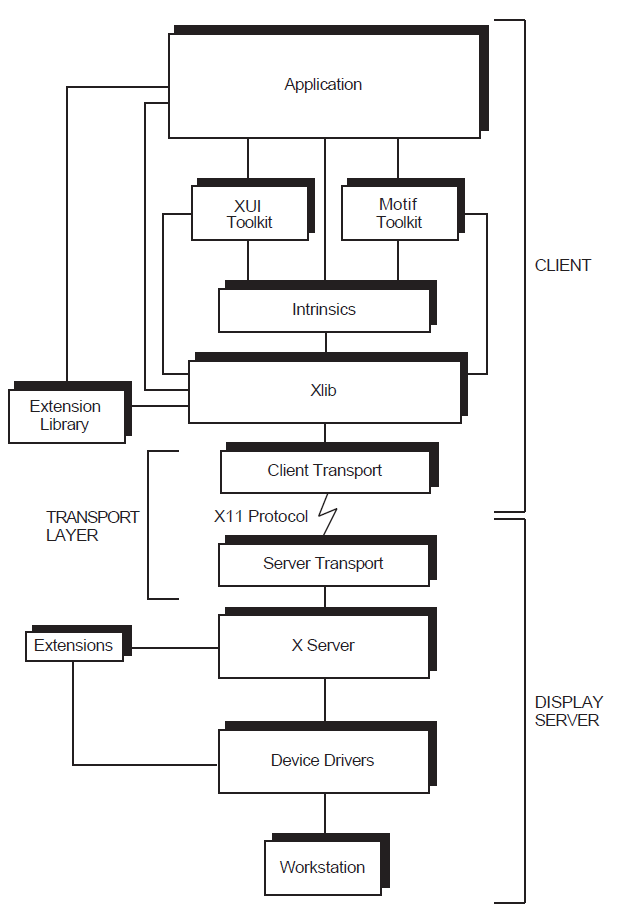
A.2.1. Applications
To perform windowing and graphics functions or to get input from the mouse and keyboard, applications call routines from the Motif Toolkit,the XUI Toolkit, the Intrinsics, or the XLIB programming libraries. Applications can call library routines from any language using the OpenVMS calling conventions or from the C language using the MIT C calling conventions.
A.2.2. Motif Toolkit
OSF/Motif widgets and gadgets for implementing common user interface objects such as scroll bars, menus, and push buttons.
Utility routines that provide applications with functions for performing common tasks such as cuttting and pasting text.
Resource manager routines for loading user interface definition files and creating widgets and gadgets based on the contents of the definition files.
A.2.3. XUI Toolkit
The XUI Toolkit consists of high-level library routines that allow applications to create and manage a user interface. Using XUI Toolkit routines,applications can create, modify, and control interface objects such as menus,scroll bars, and buttons. The XUI Toolkit includes Digital's implementation of the X Window System's X Toolkit. XUI Toolkit routines call Xlib routines to perform fundamental input and output functions.
DECwindows Motif continues to provide the XUI Toolkit. The XUI Toolkit is based on the MIT R4 Xtoolkit intrinsics. This toolkit implements the XUI user interface style used by previous versions of OpenVMS DECwindows. New applications should be written to OSF/Motif, however, because Motif is the open standard user interface adopted by a wide variety of vendors.
A.2.4. X Window System Intrinsics
DECwindows provides a library that contains both the MIT Release 3 (R3) and the MIT Release 4 (R4) X Window System Intrinsics (Xtoolkit). The Xtoolkit provides low-level routines allowing the creation of user interface objects called widgets. The R3 intrinsics are included in the library to provide binary compatibility for images created by using previous versions of DECwindows.
A.2.5. Xlib Programming Library
The Xlib programming library is Digital's implementation of the X Window System's graphics programming library. Xlib provides low-level routines for creating windows, managing windows, and performing graphic functions.
Xlib routines handle application requests by generating and sending X11protocol requests through the network to another component of the architecture called the display server; the display server runs locally on the displaying workstation. The X11 protocol defines the common language through which an application and workstation communicate.
Xlib processes requests from applications in an asynchronous manner. Xlib processes some application requests (for example, queries about the characteristics of text) within the library; it sends other requests(for example, requests to display graphics) to the display server.
When a user enters data by means of the keyboard or mouse, Xlib passes data back to the application.
A.2.6. Transport Layers
The network transport mechanism uses the network to handle communication, in the form of X11protocol packets, between Xlib and the display server.
The implementation of DECnet and the X11 protocol allows the application and the user interface to be physically separated across the network. In other words, you can run an application on a remote node while displaying the window locally on a workstation. The window accepts input and displays output for the application. The application appears to run on the workstation.
DECwindows also provides an optimized, shared-memory transport mechanism. When an application runs on the same sworkstation that displays the interface, the optimized transport reduces the time required to transfer a protocol packet to or from the display server.
A.2.7. X11 Display Server
The X11 Display Server is the component of the architecture that allows application interfaces to interact with all supported systems in the same way. Residing on the displaying system, the display server receives protocol requests from the transport layers and performs the functions required to fulfill the request for a specific device. In essence, the display server converts the data that represent the request into a command that can be executed by the appropriate device drivers.
When the user of an application enters data, the display server receives input from the device drivers and passes protocol packets back through the transport layers to Xlib and XUI Toolkit routines.
The display server supports asynchronous input from the user to the application and asynchronous output from the application to a display.
A.2.7.1. Display Server Components
Initializing the display server
Scheduling requests
Interpreting and dispatching protocol requests
The kernel also performs device-independent graphic and windowing functions.
The second component of the display server performs all device-dependent functions related to the request. These functions include device-dependent drawing and windowing functions, graphics attribute management, and the execution of drawing requests.
A.2.8. Device Drivers
Port input drivers
Class input drivers
Common driver
Output driver
The port input drivers service hardware interrupts from input devices. With the exception of the keyboard and mouse, each device has its own port input driver; the keyboard and mouse share a port driver. The port input drivers pass byte-stream input to the class input drivers.
The class input drivers decode the byte streams provided by the port input drivers and translate the data to a format the display server can interpret.
The common driver is the interface between the display server and drivers. It passes input to the display server from the class input drivers, and it passes output requests from the display server to the output driver.
After receiving directions from the common driver, the output driver sends device-specific output to the workstation.
A.2.9. Extending the Architecture
One of the most important features of the DECwindows architecture is its extensibility. The programming libraries,X11 protocol, and display server can be extended to support new hardware or to implement new features.
Developing a new library of routines to create and manage three-dimensional images
Adding protocol requests that correspond to the new routines
Extending the display server so that it can interpret and execute the requests
The DECwindows architecture is also designed to support optional libraries that layer on top of Xlib and the toolkits, such as the GKS programming library. These libraries do not require extensions to the protocol or display server.
A.2.10. Architecture Summary
The following example provides an overview of the DECwindows architecture:
A customer runs a DECwindows application on a DEC 3000 AXP series workstation. Using the mouse, the customer selects a menu option to create a window. Input from the mouse passes from the device drivers to the display server and then to Xlib, the toolkits, and the application. The application then calls toolkit routines to perform high-level windowing functions. Toolkit routines call low-level Xlib and Xtoolkit routines to perform specific windowing and graphic functions. Xlib converts the calls to protocol requests that DECnet sends to the display server. The server performs the translations required to create the window on the DEC 3000 AXP series workstation. Finally, the device drivers send the translated request to the workstation display, creating the window.
Appendix B. Differences Between the XUI and Motif Interfaces
If you have been using DECwindows since 1988, you might be looking at your screen and wondering what happened to some familiar screen objects. This appendix illustrates and summarizes the major differences between the XUI and Motif interfaces.
B.1. Comparing Window Components
Figure B.1, ''XUI and Motif Windows'' shows an example of a DECterm window with XUI and Motif window components. Table B.1, ''XUI and Motif Windows Equivalents'' summarizes the differences between XUI and Motif windows.
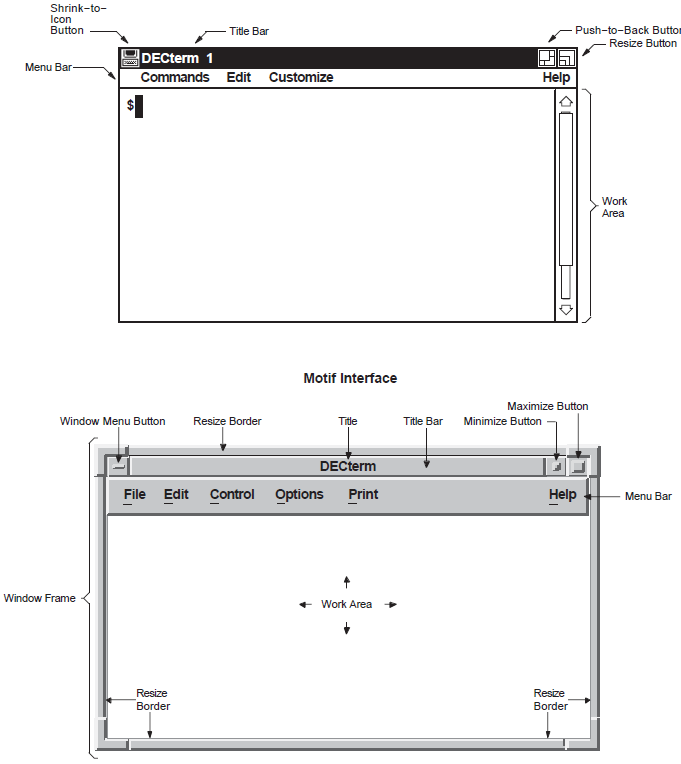
XUI | Motif |
|---|---|
Shrink-to-icon button | Minimize button |
Push-to-back button | Window menu button (From Window menu, choose Lower) |
Title bar | Title bar |
Resize button | Window menu button or resize borders |
Menu bar | Menu bar |
Work area | Work area |
B.2. Comparing Interface Objects
Figure B.2, ''XUI and Motif Objects''shows an example of a DECburger window with XUI and Motif interface objects. Table B.2, ''XUI and Motif Object Equivalents'' summarizes the differences between XUI and Motif objects.
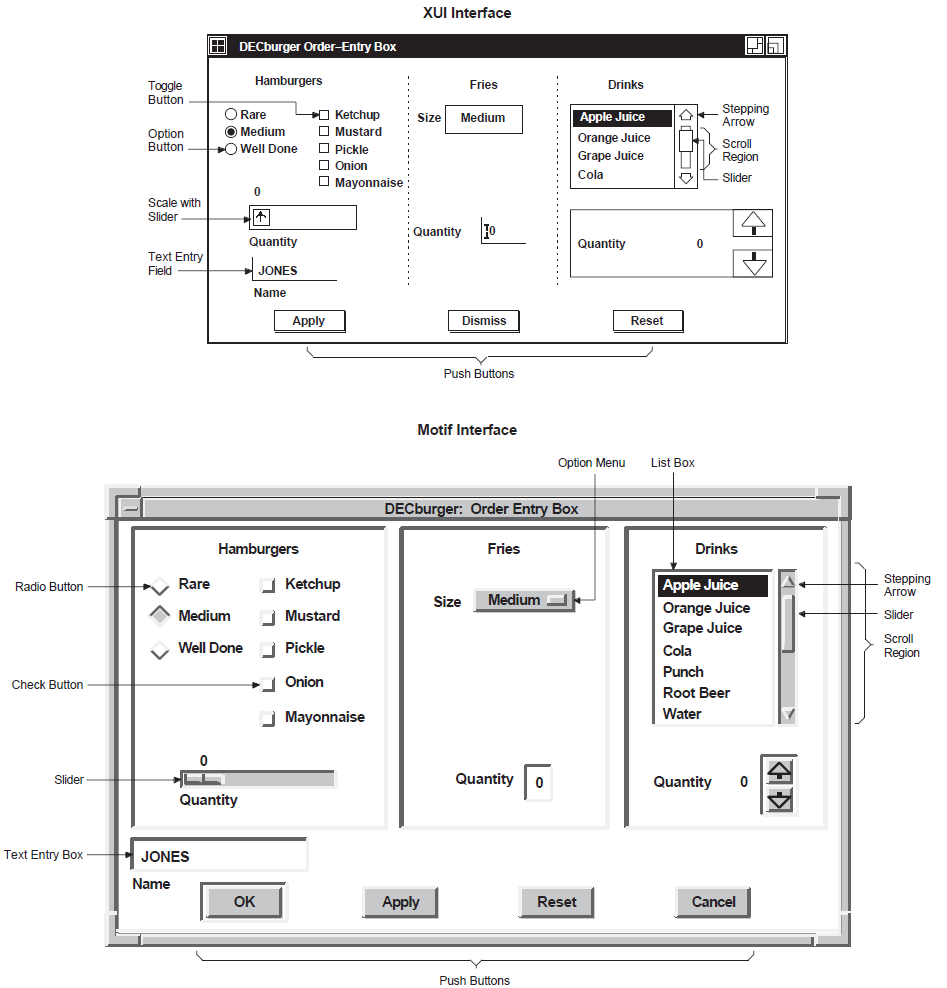
XUI | Motif |
|---|---|
Toggle button | Check button |
Option button | Radio button |
Scale with slider | Slider |
Text entry field | Text entry box |
Push buttons | Push buttons |
List box | List box |
Appendix C. Using DECwindows with a Keyboard
Note
If there is no Alt key on your keyboard, use the Compose key instead.
C.1. Traversing Menu Bars and Pull-Down Menus
|
To |
Press |
Example or Explanation |
|---|---|---|
|
Move to first menu in menu bar |
F10 | |
|
Pull down a menu from the menu bar |
Alt+ mnemonic |
Pulls down the menu from the menu bar that is associated with that mnemonic. |
|
Move to next menu item in a pull-down menu |
|
Moves the location cursor up or down; it cycles (wraps) at the top and bottom. |
|
Move to another pull-down menu in the menu bar |
|
Moves the location cursor left or right;it cycles (wraps) at each end |
|
Activate menu item |
Return, Ctrl+Return, or Enter |
Activates the highlighted menu item. |
|
Remove menu from screen and move cursor to button used to pull down the menu |
F11 (ESC) |
When a menu is pulled down. |
|
Move location cursor from menu bar to where it was before you started using the menu bar |
F11 (ESC) |
Works only with an explicit focus policy. With an implicit focus policy, the location cursor moves from the menu bar to wherever the pointer is located. |
|
Dismiss all menus |
F10 |
If you are using an explicit focus policy, the cursor goes to where it was before you started using the menus. With an implicit focus policy, the focus moves to wherever the pointer is situated. |

|
To |
Press |
Example or Explanation |
|---|---|---|
|
Display the pop-up menu |
F4 |
When the location cursor is on a control that has a pop-up menu associated with it. |
|
Move to next menu item in a pop-up menu |
|
A menu item should be highlighted as you move up or down the menu. |
|
Display a submenu from a pop-up menu item |
|
Moves you to a submenu if there is one (in left-to-right environments). |
|
Activate menu item |
Return, Ctrl+Return, or Enter |
Activates the highlighted menu item. |
|
Remove menu from screen |
F11 (ESC) |
With explicit focus, makes a pop-up menu disappear and moves the location cursor to the control from which the menu popped up. With implicit (pointer) focus, the focus returns to wherever the pointer is situated on the screen. |
|
Dismiss the menu |
F4 |
When you are using an explicit focus policy, the cursor goes back to where it was before the menu popped up. In implicit focus, the focus returns to wherever the pointer is located. |
|
To |
Press |
Example or Explanation |
|---|---|---|
|
Display a submenu |
|
Pressing any of the keys listed makes the menu appear. |
|
Activate a menu item in a submenu |
Return, Ctrl+Return, or Enter | |
|
Move to another menu item in a submenu |
|
These keys move up and down within the submenu; they cycle at the top or bottom. |
|
Move to the pull-down menu item from which the submenu came |
|
Makes the submenu menu disappear and highlights the menu item from which the submenu menu came. |
|
Select the default entry in a submenu menu |
Alt+ mnemonic of the submenu item |
The mnemonic you press is the one associated with the parent menu. |
|
To |
Press |
Example or Explanation |
|---|---|---|
|
Move the location cursor from any submenu item to the parent menu |
| |
|
Move the location cursor from a menu item to the default menu item in the menu just to the left of the current cursor location |
|
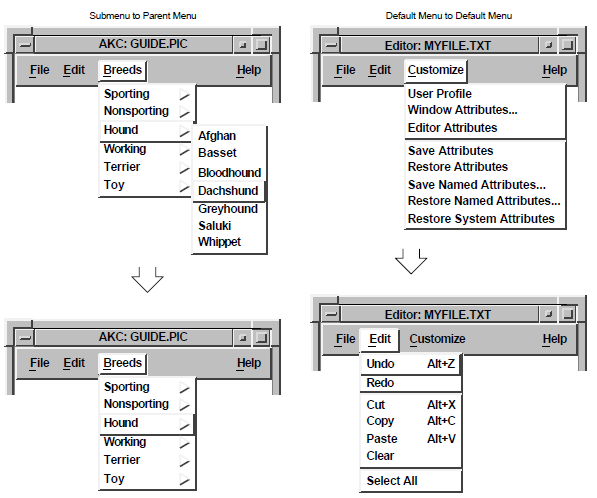
|
To |
Press |
Example or Explanation |
|---|---|---|
|
Move the location cursor from a menu item in a pull-down menu tothe default menu item in the associated submenu |
| |
|
Move the location cursor from a menu item in a pull-down menu tothe default menu item in the pull-down menu just to the right of the current location cursor |
|
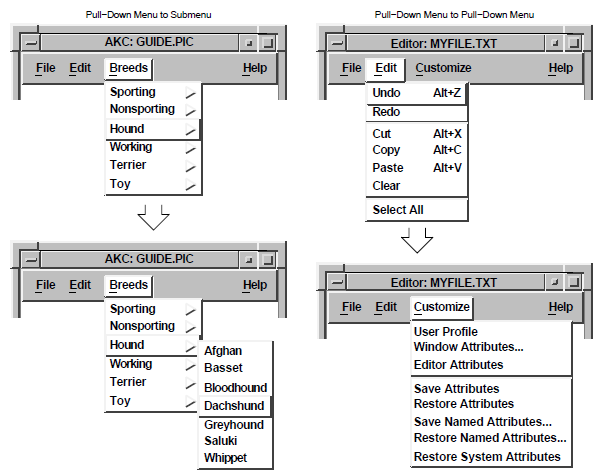
C.2. Traversing Windows
The following sections describe how to use your keyboard to move between and within windows.
C.2.1. Moving Between Windows
Press Alt+Tab or Alt+F11 to move from one group of windows to another.
You can also use Alt+Tab or Alt+F11 to move from one minimized window to another when the minimized windows are not in an icon box. When a minimized window has input focus, its window menu appears, and the first menu item (Restore) is highlighted. (To move from one minimized window to another in an icon box, use the arrow keys.)
Press Alt+F6 to move within a group of windows.
For example, in the following figure, if window C.1 had input focus and you wanted to change focus to window C.2, you would press Alt+F6. Pressing Alt+F6 would cycle through all of the secondary windows (C.1, C.2, and C.3) and primary window C. The input focus would move backwards through the windows in the order in which they last had focus.
Press Alt+Shift+F11 or Alt+Shift+Tab to move to the previous group of windows.
Press F4 to pop up the window menu of a minimized window when that window is in an icon box.
Press the arrow keys to move between minimized windows that are in an icon box.
Press Alt+F5 or Return to restore a minimized icon box.
C.2.2. Moving Within Windows
Press F10 to focus on the menu bar.
Press Alt+space bar or Shift+F11 (on some keyboardsF11 is marked ESC) to pull down the window menu.
Press Tab to move from one tab group to another.
Use the accelerators for menu items in the window menu.
|
To |
Press |
|---|---|
|
Move a window |
Alt+F7 |
|
Size a window |
Alt+F8 |
|
Minimize a window |
Alt+F9 |
|
Restore a minimized window |
Alt+F5 |
|
Maximize a window |
Alt+F10 |
|
Lower a window to the bottom of the window stack |
Alt+F3 |
|
Close (not minimize) a window |
Alt+F4 |
- Press Alt+F7, or
Press Alt+space bar or Shift+F11 to pull down the window menu.
Press
 until the Move menu item is
highlighted.
until the Move menu item is
highlighted.Press Return or Ctrl+Return to activate the menu item.
Press the arrow keys to move the window in the direction you want it to go. You can also press Ctrl+arrow keys to move the window several pixels at a time.
Press Return or Ctrl+Return to finish the operation.
- Press Alt+F8, or
Press Alt+space bar or Shift+F11 to pull down the window menu.
Press
until the Size menu item is
highlighted.Press Return or Ctrl+Return to activate the menu item.
Press one arrow key to indicate which side of the window to size. For example, press
 for the top of the window,
  for the left side, and so on. You can also press
two arrow keys, one after the other, to indicate which corner to size.
For example, press and then to indicate the upper left corner, and so
on.
for the left side, and so on. You can also press
two arrow keys, one after the other, to indicate which corner to size.
For example, press and then to indicate the upper left corner, and so
on.Once you have indicated which side or corner of the window to size, press the arrow keys to size the window in the direction that you want the window to be sized. You can also press Ctrl+arrow keys to size the window several pixels at a time.
Press Return or Ctrl+Return to finish the operation.
C.3. Traversing Dialog Boxes
|
To |
Press |
|---|---|
|
Move forward from tab group to tab group (field to field) |
Tab or Ctrl+Tab |
|
Move backward from tab group to tab group |
Shift+Tab or Ctrl+Shift+Tab |
|
Move from item to item within a tab group (field) |
Arrow keys |
|
Activate a selection in a group of radio boxes, check boxes, or list boxes, or to pop up an options menu |
Select, space bar, or Ctrl+space bar |
|
Activate an item in a group of push buttons |
Enter, Select, space bar, Return, Ctrl+space bar, or Ctrl+Return |
|
Activate an item in an Options menu or the default action of the dialog box |
Return, Ctrl+Return, or Enter |
|
Cancel a dialog box or an Options menu |
F11 (ESC) |
|
To |
Press |
Example or Explanation |
|---|---|---|
|
Move cursor from button to button |
Arrow keys |
Sets of check buttons, push buttons, or radio buttons a reconsidered one tab group (a single button is not a tab group).Use the arrow keys to move the location cursor from one item to another. |
|
For example, if the buttons are arranged vertically,you can
press | ||
|
In some cases, buttons are not arranged in a primarily
vertical or horizontal manner. Rather, they might be arranged in
a box format, as the following numbers
show:
           1        2
           3        4
| ||
|
Pressing the arrows keys moves through the buttons in the
following manner (starting at 1):
| ||
|
Insert one space in an entry box |
Space bar |
Pressing Ctrl+space bar does nothing. |
|
Move to another options menu item or another list box item |
| |
|
Move left or right one character |
|
Use these arrow keys in list boxes to display more text—for example, to display the end of a long file name. |
|
Move up one screen (page) |
Prev Screen | |
|
Move down one screen (page) |
Next Screen | |
|
Move left one screen |
Ctrl+Prev Screen | |
|
Move right one screen |
Ctrl+Next Screen | |
|
Go to the top of the list or file |
Ctrl+Alt+ | |
|
Go to the bottom of the list or file |
Ctrl+Alt+ | |
|
Display leftmost character (go to the beginning of aline) |
Alt+ | |
|
Display rightmost character (go to the end of aline) |
Alt+ | |
|
Cancel |
F11 (ESC) |
Pressing F11 (ESC) cancels any action in the entire dialog box and makes the dialog box disappear. |
|
To |
Press |
Example or Explanation |
|---|---|---|
|
Activate check or radio buttons |
Select, space bar or Ctrl+space bar |
Radio buttons can be either toggled or set. |
|
Activate an options menu |
Select, space bar or Ctrl+space bar |
You do not need to keep the key pressed to keep the menu visible. Press the key once and the menu remains. |
|
Activate an options menu item |
Return, Ctrl+Return, or Enter |
Once you have chosen a menu item, the Options menu disappears. |
|
Activate push buttons |
Select, space bar, Ctrl+space bar, Return, Ctrl+Return, or Enter |
Return or Ctrl+Return activates the default push button. If you have more than one tab group of push buttons, Return and Ctrl+Return activate only the default buttons and do not activate any buttons in the other tab group. |
Appendix D. Understanding Files, Directories, and Devices
Although DECwindows is an interface to the OpenVMS operating system, you do not need to know much about the OpenVMS directory structure to use DECwindows. For example, you can be a successful DECwindows user and never leave your own directory. This appendix is designed for new users of OpenVMS as well as for those who need are fresher about files and directories and their place in the OpenVMS directory structure.
D.1. Understanding the OpenVMS Directory Structure
In the OpenVMS operating system, information is stored hierarchically. At the top of this hierarchy is the master file directory. Your userfile directory and those belonging to other users on your system are listed in this master file directory. Your user file directory—generally called username.DIR—is a file that points to your top-level directory. This top-level directory contains the files and subdirectories that you have created or that have been created for you. You perform most of your daily online tasks from your top-level directory.
Your directory structure resembles a family tree. Your top-level directory branches off to files and to subdirectories, which branch still further. Subdirectories let you organize files into meaningful groups. By ascending and descending the directory structure, you can list the contents of your directory and subdirectories and work with the files they contain.
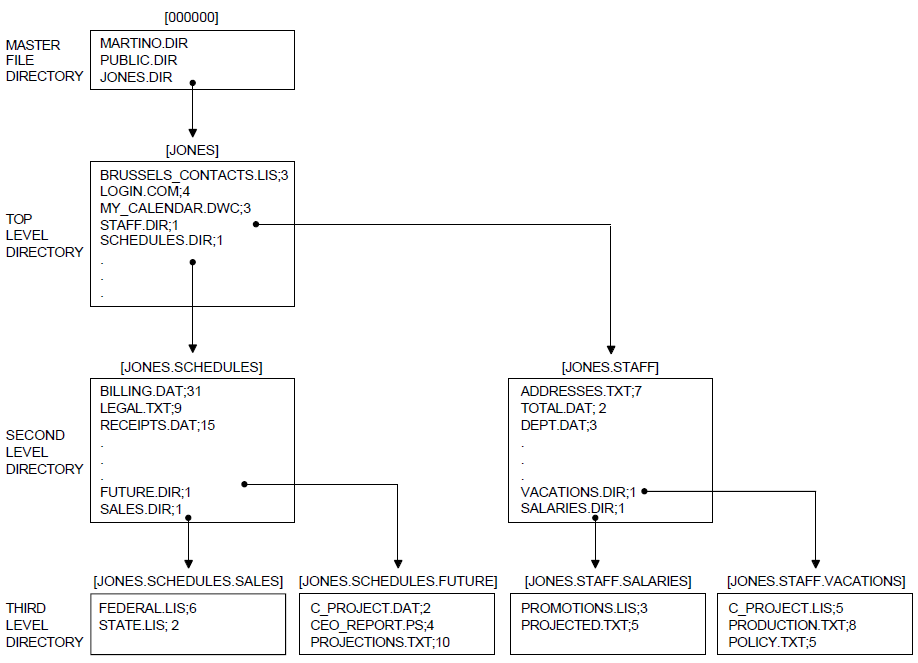
The top-level directory, subdirectories, and files that make up your directory structure are stored on a physical device called a disk. The access path to a file is through the node and device,through a top-level directory, through any subdirectories, and then to the file. If your computer system is part of a network, you can access other directory structures on other nodes.
D.2. About Files
A file can be a document, a program written in a language such as C or Pascal,or a list of street addresses. Among other things, you can view, edit, print,compile, and delete these files. In DECwindows, you use FileView to perform tasks with files.
Every file has a file name or file type to identify it. When you create a file, give it a file name that is meaningful to you. A file name can contain up to 39 characters chosen from the letters A through Z(upper case or lower case), the numbers 0 through 9, an underscore (_), a hyphen (-), and a dollar sign ($).
A file type identifies the nature of a file. For example, a file that contains text might have the file type TXT. A program that you can run—or execute—often has the file type EXE.
A file also has a version number. You can have many versions of a file. When you modify that file, the system saves the original file and produces a modified output file. This output file has the same name and type as the original, but the version number is increased by 1. Unless you specify aversion number, FileView uses the highest existing version number of that file when it executes a command.
filename.type;versionD.3. About Directories and Devices
Files are stored in directories. The file name, type, and version of the files in a directory are recorded in a special kind of file called a directory file. When you list the contents of a directory, the system reads the directory file to obtain the names of the files in that directory.
directory.DIR;1Because you cannot edit a directory file, all directory files have a version number of 1.
When you started your first DECwindows session, you were placed in your top-level directory. Your top-level directory, which contains all your files and subdirectories, is stored on a device. Your system manager probably gave your device a name you can easily remember, such as WORK or DISK$. The device, directory, and file information together comprise a filespecification. You use this file specification to identify the path to a file. If you want to access a file located on your device, you can omit the device name from the file specification. If you want to access a file son another node, you must include the node name in the file specification. (You specify a node only if your computer system is part of a network.)
$USERS:[MCGREGOR]RABBIT.TXT
$USERS:[MCGREGOR.GARDEN]RABBIT.TXT
FLOPSY::$PUBLIC:[PETER]COTTONTAIL.TXT
D.4. Using Wildcards in File Specifications
FileView provides commands that let you work with files. The asterisk (*) and percent sign (%) wildcards allow you to apply commands to multiple files rather than to one file at a time. When you use wildcards in a file specification, the command applies to all files whose fields match those of the file specification you enter. (Fields are the individual elements, such as the file name and file type, of a file specification.)
If you choose a command that accepts wildcards, the asterisk (*)and percent sign (%) wildcards can be used in the directory name,file name, and file type fields of a file specification. See Chapter 6, "Using FileView" for more information about using wildcards in FileView commands.
D.4.1. Using the Asterisk (*) Wildcard
You can use the asterisk wildcard to represent all or part of a directory name,file name, and file type. You can also use an asterisk to match the entire version number, but not a part of it.
Files:STAFF*.*;*
When you select the file you want the command to act on, you give FileView an input file specification. For commands that produce output, such as the Copy command,you must also provide the name of the output file specification created as a result of the command. Use the asterisk in the file name, file type, and version number fields in the output file specification when you want the output file specification to match the corresponding fields in the input file specification.
From:*.TXTTo:$USERS:[JONES]*.SAV
D.4.2. Using the Percent Sign (%) Wildcard
The percent sign wildcard can be used as a substitute for any single character in the directory, file name, and file type fields. You cannot, however, use the percent sign wildcard in the version number field.
Files:DISTRICT%.TXT
The files DISTRICT1.TXT, DISTRICT2.TXT, and DISTRICT3.TXT are displayed. The file DISTRICT33.TXT is not be displayed because it has more than one character after DISTRICT; nor is DISTRICT.TXT. The percent sign replaces only one character position, but there must be a character to replace.
D.5. Using Wildcards in Directory Specifications
You can also use two other wildcards, the ellipsis (...)and hyphen (-), to refer to another directory or subdirectory in a directory structure. The ellipsis wildcard allows you to search down the directory hierarchy. The hyphen wildcard permits you to move up the directory structure one level at a time. See Chapter 6, "Using FileView" for more information about using the ellipsis and hyphen wildcards.
D.6. About Logical Names
A logical name usually represents a complete or partial file specification, a device name, or another logical name. You can give frequently used files, directories, and devices meaningful logical names that are easier to remember and to type than the full file specifications. For example, you can define WORK as a logical name for your device DUA0 or define STAFF as a logical name for the file specification $USERS:[JONES.STAFF].
Logical names also let you keep your programs and command procedures independent of physical file specifications. For example, if a command procedure uses the logical name ACCOUNTS, you can equate ACCOUNTS to any file on any disk before executing the command procedure.
The job table, which contains logical names available to all your processes and subprocesses.
Your group table, which contains logical names available to all users with the same user identification code (UIC) group number. Your UIC code identifies the name of the group to which you belong and your unique name within the group.
The system table, which contains logical names available to all users of the system.
You can also create your own logical-name table that is private to your processor that others can share.
When you enter a logical name as part of a command line, the system translates the logical name. It does this by searching the job, group, system, and any other logical-name tables specified by the logical name LNM$FILE_DEV. (LNM$FILE_DEV is a special system logical name defined in the LNM$SYSTEM_DIRECTORY table. It specifies the search order that FileView and all other OpenVMS components use to translate logical names.)
You can specify that a logical name be defined as concealed. You can conceal logical names that refer to devices or directories.
When you assign a logical name to a device, concealing the logical name allows you to write programs and command procedures and to perform other operations without being concerned about which physical device actually holds the disk or tape.
When you assign a logical name to a directory or subdirectory, concealing the logical name can make the directory or subdirectory appear as the master file directory for the current device. This directory or subdirectory to which you assign a concealed logical name is called the root directory. You can then use this root directory as the base from which to access directories beneath it. For example, the top-level directory [JONES] on device DUA0contains the subdirectory [JONES.STAFF]. If you assign the logical name ME toDUA0:[JONES], you can then refer to the subdirectory [JONES.STAFF] by typing ME:[STAFF].
Appendix E. System Messages
This appendix describes messages that might appear when you are starting a session, working with Session Manager, or running applications on remote systems.
Many of the messages appear in dialog boxes with an OK button. Click on the OK button to make the dialog box and the message disappear before you proceed.
For each message, the text of the message appears in italicsand is followed by an explanation of why the message occurred and, where applicable, what you should do to correct the problem.
An item in a message that appears in single quotation marks (for example, ’filename ’) represents an item that varies indifferent occurrences of the message.
DECwindows applications run as one or more OpenVMS processes or subprocesses. Some system messages report insufficient process quotas. Process quotas determine the number or size of system resources that you and your processes are authorized to use. This information is stored in your entry in the User Authorization File (UAF). Some DECwindows messages described in this appendix report operations that cannot go to completion because a process quota has been exceeded. For example, your subprocess quota (PRCLM)determines the maximum number of applications you can run simultaneously. For information about increasing your process quotas, consult with your system manager.
Client is not authorized to access server
Context
Running an application on a remote system
You are trying to run an application on a system on which you are not an authorized user.
Remedy
Authorize yourself to run applications on the other system by following the procedure outlined in Chapter 12, "Running Applications Across the Network". Be sure that the node name you provide in Session Manager's Security options dialog box represents areal node and not a cluster alias. Also note that each node—source and destination—must be defined in the other's network node database. For example, to display applications on node HUBBUB from ZEPHYR, HUBBUB must be entered in ZEPHYR's network node database, and ZEPHYR must be defined in HUBBUB's network node database.
Decw-e-cnxabort, connection aborted
Context
Running an application on a remote system
While you tried to run a program from DCL, the server on the other end of the line aborted, or the network link was broken.
Remedy
Wait for the connection to be reestablished before you try to run the program again.
Error opening system defaults file. Using factory defaults.
Context
Using Session Manager
There were problems reading both local and system default resource files. There should always be a set of system resource files in the directory pointed to by the logical name DECW$SYSTEM_DEFAULTS. If these files have been deleted or damaged, Session Manager uses its own defaults.
Remedy
Examine the system resource files and determine why Session Manager cannot access them.
Error writing resource file
Context
Using Session Manager
Note that this message is followed by the resource file name.
Session Manager could not save the Customize settings.
Remedy
Use the DCL command DIRECTORY/FULL to check the version limits on files in your SYS$LOGIN directory and ensure that there are no problems accessing this directory. This error might also be related to disk quotas set up by your system manager.
Problem report
Context
Starting a session
Note that an OpenVMS error message is displayed below this DECwindows message.
Licensing—Logging in through Session Manager counts as one licensed login. If you have logged in to your workstation through the DCL command SETHOST, you might have exceeded the limit of logged-in users as specified by your OpenVMS license. To log in through Session Manager, log out of one of your other terminal sessions so that the limit of the OpenVMS license is not exceeded.
User authorization failure—The user name or password you entered does not match an authorized user for this system. You might have made a typing mistake. Try entering your user name and password again. If you are not logged in, see your system manager.