VSI Console Management for OpenVMS Administration Guide
- Software Version:
- V3.1
Preface
1. About VSI
VMS Software, Inc. (VSI) is an independent software company licensed by Hewlett Packard Enterprise to develop and support the OpenVMS operating system.
2. Intended Audience
This guide is intended for users who want to:
Set up and manage Console Manager on the host system
Monitor events on the systems being managed through Console Manager (the serviced systems) and perform system management tasks on those systems.
Write event notification routines additional to those supplied with Console Manager
The following table shows you where the tasks you wish to complete are described, and the type of experience you should have before attempting any of them:
| Task | Required Experience | See the chapter |
|---|---|---|
| Setting up and managing Console Manager on the host system. |
System management, and at least a working knowledge of the operating system. |
Introduction through Managing Console Manager. |
| Monitoring events on the systems being managed by Console Manager (the serviced systems), and performing system management tasks on those systems. |
System management of a serviced system. |
Introduction and Using Console Manager From the C3 Interface, if using workstations; Introduction and Using Console Manager From the Command Line Interface, if using character cell terminals. |
| Writing event notification action routines additional to those supplied with Console Manager. |
High level language, shell programming, or writing DCL command procedures. | Setting up the ENS Components. |
3. Document Structure
5. VSI Encourages Your Comments
You may send comments or suggestions regarding this manual or any VSI document by sending electronic mail to the following Internet address: <docinfo@vmssoftware.com>. Users who have VSI OpenVMS support contracts through VSI can contact <support@vmssoftware.com> for help with this product.
6. OpenVMS Documentation
The full VSI OpenVMS documentation set can be found on the VMS Software Documentation webpage at https://docs.vmssoftware.com.
Chapter 1. Introduction
This chapter gives a brief description of Console Manager, how it works, and its software components. At the end of the chapter there is an outline of the steps needed to set up Console Manager, which are then expanded in the next two chapters.
If you are using Console Manager, as opposed to setting it up, and you do not wish to read the introductory material, go to the chapter Using Console Manager From the Command Line Interface if you are using the command line interface or to the chapter Using Console Manager From the C3 Interface, if you are using the X Window System (referred to as DECwindows Motif interface).
This section contains the following topics:
1.1. Welcome
Welcome to VSI Console Management for OpenVMS (Console Manager).
Console Manager is a layered product that brings together output from a number of consoles that meet certain requirements onto a single point of control. It provides a central point for monitoring the console activity of multiple systems, as well as for connecting directly to those systems to perform management tasks.
Previously, a system's local console terminal was the only location from which you could perform console functions for that system. Console Manager eliminates the need to monitor and manage physically separate system consoles. By connecting any system you wish to manage (the serviced system) to the system running Console Manager (the host system), you can perform system management task from any terminal or workstation connected to the host system.
When you run Console Manager, it establishes a connection from the host system to all serviced systems stored in the configuration database. When the link to a serviced system is established, all console data received is time-stamped and logged to a file on the Console Manager host. This lets you see and react to the live console data as it occurs and also review the data at a later date. In this situation, Console Manager is simply logging all the data from the consoles of your serviced systems.
If you want to be alerted when something particular happens on the console of a serviced system, you can use Event Notification Services (ENS). This facility performs an action or actions when predefined patterns of console text occur on the consoles of the serviced systems. An action can run any host platform utility or applications, such as mail, broadcast, and Motif applications.
When text passes through Console Manager, ENS scans it for predefined data strings, called events. Event reporting frees you from the need to constantly observe the console. Console messages that you would normally need to search for or wait for a user to find can be set up to create an event. In this way, some problems may be corrected before the user's work is affected.
VSI strongly recommends that you use ENS to maximize the benefits of Console Manager. ENS is discussed in chapters Understanding ENS and Setting up the ENS Components.
To support wide area networks, you can use VSI TCP/IP Services, Process Software MultiNet, or Process Software TCPware. See the VSI Console Management for OpenVMS Installation Guide for supported versions of each TCP/IP stack.
Console Manager allows you to monitor the console activity of multiple systems without having to be present at those system's consoles. You can do this either locally or remotely, and also perform management tasks on these systems from a single or multiple point of control. Management can be from either a workstation, or a character cell terminal.
If you have not yet installed Console Manager, refer to the VSI Console Management for OpenVMS Installation Guide for hardware and software requirements.
1.2. Serviced Systems You Can Monitor and Manage
Serviced systems can be any device that meets the following requirements:
Provides ASCII data over an RS-232C or compatible line
Has an EIA console port
Supports XON/XOFF and I/O buffering
Examples of these devices include the following:
VAX computer systems
DECsystem computers
Workstations
Networking hardware
Alpha servers and stations
VSI Integrity servers
Any devices meeting these requirements available from other vendors
Alternatively, the serviced system may be a software application that runs on the Console Manager host and interfaces with a pseudo-terminal device.
1.2.1. Management and Monitoring Tasks
When you connect to a serviced system, your workstation or terminal acts as the console of that system, and from it, you can perform any management tasks you can normally perform from the local console, such as the following:
Shut down or reboot the serviced system
Run standalone diagnostics
Perform standalone backup operations
Install and upgrade layered products
You are not limited by the operating system you are running.
Console Manager lets you monitor console activity and do the following:
View current console output remotely
Review historical console output
Search for console data based on time stamps, events, and text strings
Retrieve historical console data from archive for printing
Scan console data for text strings that denote events of specific interest (if using Event Notification Services)
Information about serviced systems must be stored in the configuration database; otherwise, you will not be able to access them. The configuration database is discussed in chapter Modifying the Configuration Database.
1.2.2. Parent Console Controller
The parent console controller is the process that starts the child console controllers and monitors their availability, as well as notifying its children of shutdown and reconfigure request.
The process name for the parent console controller is:
Console Daemon
1.2.3. Child Console Controller
The child console controllers:
Manage the console lines for which the parent console controller has made them responsible. Up to 16 serviced systems can be handled by a child console controller.
Log all data received on these lines to a set of files on disk.
Scan the data received on the console for predefined text strings (events).
Provide access to the console lines for user interaction via the user interfaces.
Check for logging or archive file system availability and utilization.
There are two types of child console controller processes. One manages primary serviced systems and the other manages secondary serviced systems.
The process name for each primary child console controller is:
Console Ctrl nnThe process name for each secondary child console controller is:
Console Fctl nn1.2.4. Event Notification Services
Event Notification Services (ENS) is a flexible mechanism used to dispatch as predefined action or series of actions to notify you when an event occurs on the console of a serviced system.
The process name for the ENS controller is:
Console Notify
1.2.5. User Interfaces
Console Manager provides the following user interfaces shown in the following table:
| Interface |
Description |
|---|---|
| Command line interface |
An interface that provides commands for monitoring and responding to console activity on serviced systems. It also provides access to the monitor and connect interfaces. |
| C3 (Central Control Coordinator) interface |
A DECwindows Motif interface that provides a graphical representation of your serviced systems for monitoring and responding to console activity. It also provides access to the monitor and connect interfaces. |
| Eventlist interface |
A DECwindows Motif interface that displays Console Manager events and events that occur on serviced systems as they happen. The interface can be started when the Multi-Line Window action is executed (see the chapter Supplied Action Routines) or interactively from the command line or C3 interface. |
| Monitor interface |
An interface that displays multiple windows of information for monitoring and responding to console activity. It has its own set of monitor interface commands and provides access to the connect interface. It can be invoked from either the command line or the C3 interface. |
| Connect interface |
An interface that provides direct access to the consoles of serviced systems, making your terminal the dedicated console for the selected system. It also provides access to the monitor interface. This interface can be invoked from the monitor interface, the C3 interface, or the command line. |
| Watch interface |
An interface that lest you output all console activity to a file or to a printer in real-time. |
| Extract interface |
An interface that lets you examine historical console data based upon its date and time or its event name. |
| Configuration editor |
A tool to set up and edit the configuration database. It has both a DECwindows Motif interface and a command line interface. The Configuration database is a binary file containing all the setup information (such as user access rights, types of serviced systems, connection mechanisms, and event notification definitions) for the Console Manager serviced systems. A default configuration database is provided by Console Manager. |
1.3. Directories Used by Console Manager
The following table shows the directories used by Console Manager on OpenVMS systems.
| Directory |
Use |
|---|---|
| CONSOLE$USER_ACTIONS |
The location of action routines that you create. |
| CONSOLE$SYSTEM_ACTIONS |
The location of the action routines supplied by Console Manager. |
| CONSOLE$ACTIONS |
This logical name is a search list of the following directories:
Console Manager searches CONSOLE$USER_ACTIONS first. |
| CONSOLE$APP_DEFAULTS |
Used by eventlist to store default values. |
| CONSOLE$ARCHIVE |
Used during archiving of the log files for serviced systems. |
| CONSOLE$DATA |
Contains the configuration database files. |
| CONSOLE$EXAMPLES |
Contains sample action routines. |
| CONSOLE$USER_ICONS |
The location of icons that you create. |
| CONSOLE$SYSTEM_ICONS |
The location of the icons supplied by Console Manager. |
| CONSOLE$ICONS |
This logical name is a search list of the following directories:
Console Manager searches CONSOLE$USER_ICONS first. |
| CONSOLE$LOGFILES |
Contains the log files. |
| CONSOLE$TMP |
Used as a temporary work area. |
| CONSOLE$USER_DEFAULTS |
A logical name that points to a user's default settings, which may be different from the user's login directory. |
| CONSOLE$IMAGE |
Contains the Console Manager executable images. |
| CONSOLE$TEMPLATES |
Contains the template files. |
| CONSOLE$CREDENTIALS |
Contains the certificates and key files specific to the Console client. Note: This is for future use. |
1.4. Online Help
Console Manager provides the following online help from the command line interface:
DCL help library
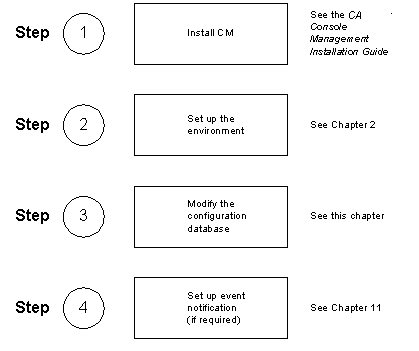
1.5. Steps for Setting up Console Manager
The following figure shows the steps to take. Steps 1, 2, and 3 are mandatory; step 4 is optional.
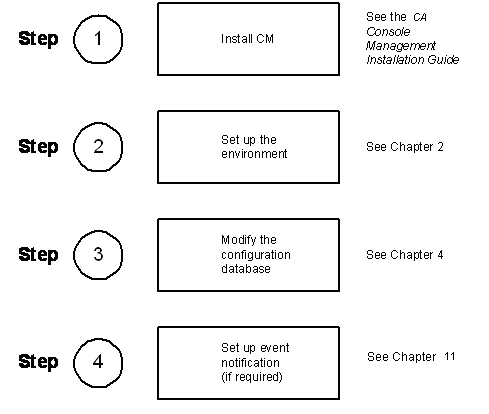
See the chapters Set up the Environment through Managing Console Manager for instructions on setting up Console Manager on your host system.
See the chapters Using Console Manager From the Command Line Interface through Customizing Console Manager for instructions on using Console Manager.
Chapter 2. Set up the Environment
Do not follow the instructions in this chapter until you have installed the Console Manager software on your host system. When you have installed it you are ready to follow the instructions in this chapter for connecting the host system to the serviced systems.

This section contains the following topics:
2.1. Hardware Requirements
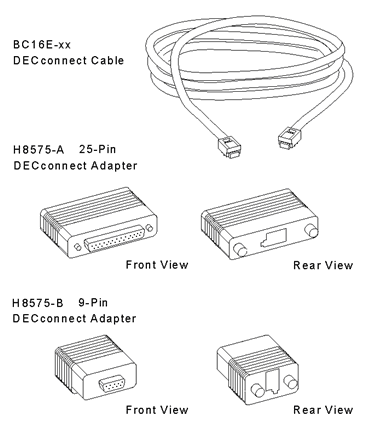
You need one BC16E-xx DECconnect cable (where xx denotes cable length) or equivalent for each serviced system.
Depending on the type of connection you are using, as well as the type of system you are managing, you may require one or more of the following DECconnect adapters:
H8575-A 25-pin DECconnect adapter
H8575-B 9-pin DECconnect adapter
H8571-J 9-pin DECconnect adapter
You may need a DECconnect adapter for your terminal or console server as well. For example, the DECserver 90TL terminal server needs a H8584-AC DECconnect adapter.
The following figure shows the H8576-A and the H8575-B adapters in detail.
Connect the cable between the terminal or console port of the serviced system and the host port of the terminal server using DECconnect adapters where required.
The cables and adapters are the same for whichever method of connection you choose.
Note
Some managed devices such as a Digital Alphastation 200 need firmware console commands to be executed before they can be managed by Console Manager. For example:
>>> set console serial
>>> init
Please see your specific hardware user guide for information on utilizing its console subsystems.
See the section Identifying and Solving Connection Problems if you have any problems when using the cables and adapters.
2.2. Transport Types
There are six types of transport you can use to connect the host system to the serviced systems:
Direct–where cables plug directly from the host system into the console of the serviced system.
LAT–where the console cables plug into a LAT terminal or console server for use on a Local Area Network (LAN) only or Extended LAN (ELAN).
TELNET–where the console cables plug into a TELNET terminal or console server for use in a TCP/IP network. This transport may be used for LAN or for Wide Area Network (WAN) connections.
Pseudo-terminals–where the output from a software application running on the Console Management host is fed to a pseudo-terminal, which then relays information to the Console Management host servers.
SSH–where the console cables plug into an SSH capable terminal or console server for use in a TCP/IP network. This transport may be used for LAN or for Wide Area Network (WAN) connections.
2.2.1. Choose Transport Types
The choice of transport type is based on the type of hardware system you are using for the Console Manager host system and the network infrastructure, as shown in the table below:
|
Hardware System |
Use the Transport Type… |
See Section |
|---|---|---|
|
Local computer room connections |
Direct LAT TELNET SSH |
Connecting Using Direct Transport Connecting Using LAT Transport |
|
LAN or ELAN connections |
LAT TELNET SSH |
Connecting Using LAT Transport |
|
WAN connections |
TELNET SSH | |
|
Devices without consoles that are managed by a remote management program |
Pseudo-terminal |
The following sections explain the connections in detail. See the section Identifying and Solving Connection Problems if you experience any connection problems.
When you have set up the connections you require, review the chapter Modifying the Configuration Database.
2.3. Connect Using Direct Transport
This type of connection consists of a host system with a DECconnect cable and up to two adapters connecting to each serviced system. The number of serviced systems using this method is limited by the number of serial ports on the host system.
The following figure shows a direct connection:
2.3.1. Set up a Direct Connection
To set up a direct connection:
Connect one end of the cable to an unused port on the host system processor bulkhead, using adapters where necessary.
Connect the other end of the cable to the console port of the serviced system, using adapters where necessary.
2.4. Connect Using LAT Transport
This connection consists of a host system connected to the same Ethernet network as the terminal or console servers used to connect to serviced systems. The serviced systems connect to the terminal or console server using DECconnect cables and adapters where necessary. Console Manager then uses host initiated LAT to connect to the terminal or console server. The following figure shows a LAT connection:
2.4.1. Configure for LAT
To configure your LAT connection:
Ensure that both the host system and the terminal or console server to be used reside on the same LAN or ELAN.
Define the appropriate terminal server characteristics. To do this, see the manual for your terminal or console server. Set the characteristics the same as for a printer connection.
Define the appropriate LAT group codes on the terminal or console server and on the host system's LAT configuration.
To set up the terminal server characteristics on a terminal or console server, refer to the documentation from your terminal or console server.
2.4.2. Creating Terminal Devices on the Host System
If your host system is running the OpenVMS operating system, terminal devices are created automatically for you.
2.5. Connect Using TELNET Transport
This type of connection consists of a host system connected to an Internet network. The serviced system connects to a terminal or console server using DECconnect cables and adapters or the equivalent. Console Manager then uses TELNET to connect to the terminal servers. Ensure you use a terminal server that supports TELNET protocol. The following figure shows a TELNET connection.
Note
In order for you to be notified if your TELNET connection is disconnected, and for the console controller to detect this state, your chosen terminal server must support the TELNET STATUS option as described in RFC859.
2.5.1. Setting up a TELNET Connection
To set up a connection using a terminal or console server with the TELNET protocol:
Install the terminal or console server using the documentation provided with the terminal server.
Connect one end of the cable to an unused port on the terminal or console server, using a DECconnect adapter where necessary.
Connect the other end of the cable to the console port of the serviced system, using an adapter where necessary.
2.5.2. Configure for TELNET
To configure your TELNET connection:
Ensure that both the host system and the terminal server to be used support TELNET and both participate in the same WAN.
Define the appropriate terminal server characteristics. To do this, see the manual for your terminal or console server. Set the characteristics the same as for a printer connection.
Ensure the terminal server has its Internet Protocol (IP) address registered on the Console Manager host or in the BIND server (where used).
Note
VSI recommends that you register the terminal server IP address on the Console Manager host. Otherwise, if the BIND server is unavailable, Console Manager will be unable to connect to the terminal server.
To set up the terminal server characteristics on a terminal or console server, refer to the documentation from your terminal or console server.
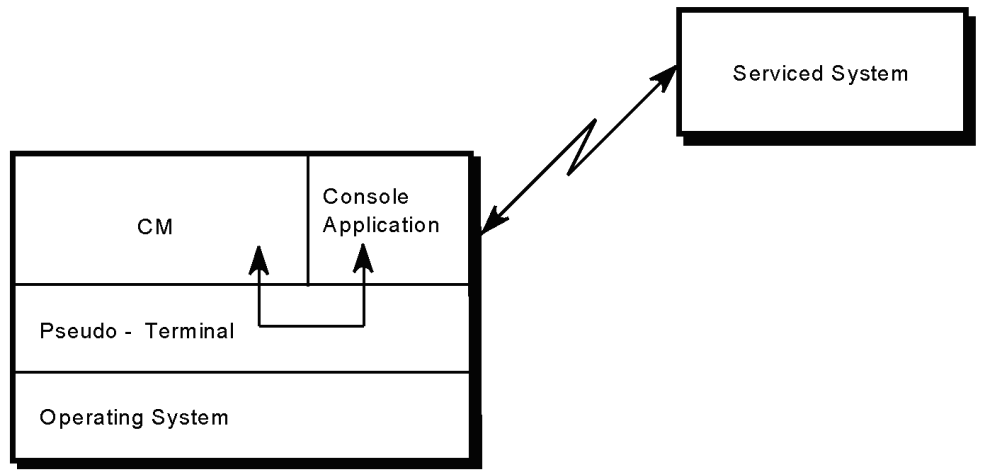
2.6. Connect Using Pseudo-terminals
This type of connection enables applications running on the Console Manager host system to be managed by Console Manager. The pseudo-terminal mechanism lets the output from an application be fed to a pseudo-terminal, which then relays the information to the Console Manager software. The Console Manager user can then use the pseudo-terminal interface to connect back and provide input to the application. AN example of this mechanism is the control software for LPS20 Printservers.
The following figure shows a pseudo-terminal connection:
Note
If pseudo-terminals are being used, do not use SET TERMINAL/INQUIRE from either the system login command procedure SYS$MANAGER:SYSLOGIN.COM or the SYSTEM account login command procedure SYS$MANAGER:LOGIN.COM.
Add the following lines to your login command procedures in order to use SET TERMINAL/INQUIRE:
$ tt_devname = F$TRNLNM (“TT”)
$ If F$LOCATE (“FTA”, tt_devname) EQ.F$LENGTH (tt_devname_
$ Then
$ SET TERMINAL/INQUIRE
$ EndIf
2.6.1. Configure Pseudo-terminals
If your host system is running the OpenVMS operating system, pseudo-terminal devices are created automatically for you.
2.7. Connect Using SSH Transport
This type of connection consists of a host system connected to an Internet network. The serviced system connects to a terminal or console server using DECconnect cables and adapters or the equivalent, or, for those systems so equipped, the console can be connected directly to the network. Console Management then uses SSH to connect to the terminal or console servers, or directly to the network console. If using terminal or console servers, ensure you use a terminal or console server that supports SSH protocol.
2.7.1. Set up an SSH Connection using a Terminal or Console Server
To set up a connection using a terminal or console server using the SSH protocol:
Install the terminal or console server and define the appropriate terminal server characteristics. To do this, see the manual for your terminal or console server.
Connect one end of the cable to an unused port on the terminal or console server, using a DECconnect adapter where necessary.
Connect the other end of the cable to the console port of the serviced system, using an adapter where necessary.
To configure your SSH connection:
Ensure that both the Console Manager host system and the terminal or console server to be used support SSH and both participate in the same WAN.
Define the appropriate terminal server characteristics. To do this, see the manual for your terminal or console server. Set the characteristics the same as for a printer connection.
Ensure the terminal or console server has its Internet Protocol (IP) address registered on the Console Manager host or in the BIND server (where used).
Prepare your Console Manager host for SSH access according to the TCP/IP stack documentation, for the chosen type of SSH authentication method. The Console Manager configuration supports SSH v2 password, publickey and host based authentication methods. This typically entails using SSH_KEYGEN to generate host or Identity key pairs, and in some instances a manual exchange of public keys.
Note
VSI recommends that you register the terminal server IP address on the Console Manager host. Otherwise, if the BIND server is unavailable, Console Manager will be unable to connect to the terminal server.
Use the SSH verbose option or debug level 5 to identify any basic connectivity issue, as documented for your IP stack (VSI TCPIP Services SSH client: option –v or –d 5. Process Software SSH client: /VERBOSE or /DEBUG=5).
In the event of a key fingerprint mismatch, remove any obsolete key file(s) from the directory SYS$SYSROOT:[SYSMGR.ssh2.hostkeys]. Next try to establish the connection to the managed system using the SSH client command from DCL prompt (in other words, repeat Step 5 above.
This step allows the first host key exchange to occur and the terminal or console server’s public host key to be stored.
VSI proves ahead of time that your SSH setup is good and valid and works at the DCL command line. If your connection is successful, you are now ready to configure the configuration database to make use of this connection. See the chapter Modifying the Configuration Database.
2.7.2. Set up an SSH Connection using a network console
The examples in this section involve using an VSI Integrity Server with an MP/iLO.
Note
For MP/iLO equipped VSI Integrity Servers these steps may have been done when the system was installed.
To setup a connection to a network console using the SSH protocol:
Connect the network console to your network with an appropriate cable.
Configure the network console. To do this, see the manual for your hardware.
Verify the network console is reachable from the Console Manager host system.
To configure your SSH connection using a network console:
Ensure that both the Console Manager host system and the network console support SSH and both participate in the same WAN.
Configure the network console for SSH. To do this, see the manual for your hardware. If you want to use SSH to connect to the MP/iLO of your VSI Integrity servers, it may be necessary to upgrade the system firmware. Depending upon the system model and configuration, you may also require an MP/iLO Advanced Pack license in order to enable SH on the MP/iLO. Contact your VSI support representative for further assistance.
Ensure the network console has its Internet Protocol (IP) address registered on the Console Manager host or in the BIND server (where used).
Prepare your Console Manager host for SSH access as per the TCP/IP stack documentation, for the chosen type of SSH authentication method. The Console Manager configuration supports SSH v2 password, publickey and host based authentication methods. This typically entails using SSH_KEYGEN to generate host or Identity key pairs, and in some instances a manual exchange of public keys.
Verify the SSH connectivity at DCL prompt before configuring it in the Console Manager database. For example, to do this, with VSI TCP/IP Services to a LAN base VSI Integrity MP named myMPiLo:
$ @sys$startup:tcpip$define_commands.com
$! ssh “username@hostname#port”
$ ssh “Admin@myMPiLo#22”
This step allows the first host key exchange to occur and the network console’s public host key to be stored.
VSI proves ahead of time that your SSH setup is good and valid and works at the DCL command line. If your connection is successful, you are now ready to configure the configuration database to make use of this connection. See the chapter Modifying the Configuration Database.
Note
VSI recommends that you register the network console IP address on the Console Manager host. Otherwise, if the BIND server is unavailable, Console Manager will be unable to connect to the terminal server.
Use the SSH verbose option or debug level 5 to identify any basic connectivity issue, as documented for your IP stack (VSI TCPIP Services SSH client: option –v or –d 5. Process Software SSH client: /VERBOSE or /DEBUG=5).
In the event of a key fingerprint mismatch, remove any obsolete key file(s) from the directory SYS$SYSROOT:[SYSMGR.ssh2.hostkeys]. Next try to establish the connection to the managed system using the SSH client command from DCL prompt (in other words, repeat Step 5 above).
2.7.3. Establish Security Credentials for a System
Prior to using Console Manager to connect to a system in a secure network environment, you must establish security credentials. This is a two step process in Console Manager. In the configuration editor, create a security profile and set security settings for a system.
To create a security profile record, use the commands
ADD SECURITY_PROFILEorMODIFY SECURITY_PROFILEand then specify the fields'values. Not all fields are required for all connection types.Item Description
Name A unique name for the security profile
Information Description to clarify name
User User account name
Password Password for user account (stored encrypted, displays as all *'s).
Required for password-based authentication; Ignored for publickey authentication
Pass-phrase Passphrase for the certificate (stored encrypted, displays as all *'s).
Required if you have protected your private key(s) with a passphrase
Key/Identity file Optional.
The logical name that equates to the file specification of the key/identity file. If you not specify a logical name, the default file specification of SYS$SYSROOT:[SYSMGR.SSH2]IDENTIFICATION. will be used.
For more information about this logical name see the chapter Set up the Environment.
To add a security profile to the system record, set security settings for a system. Use the command
ADD SYSTEMorMODIFY SYSTEM, specifying values for the following fields:Field Description
Security Profile Name of security profile
Connection type Set connection type to SSH
2.8. Identifying and Solving Connection Problems
This section lists the common symptoms associated with connection problems and provides some possible solutions:
2.8.1. Common Symptoms
You have a connection problem if any of the following occurs:
No console data is logged for an active system.
The console data is garbled.
The line is disabled by Console Manager as shown by the output from the status command.
An SSH connection can be established at DCL prompt but Console Manager fails to establish the connection. This is seen by entering the DCL command
$ SHOW
                SYSTEM/PROCESS=SSH
, where the resulting output includes process names prefixed with the string “ssh”.
When connecting to the console of an VSI Integrity server, you are given the MP/iLO command menu instead of a login or CLI prompt from the operating system.
2.8.2. Possible Solutions
If the connection is not working correctly, check the following:
The LAT status is correct by using the LATCP utility.
The DECconnect adapter is seated correctly.
The DECconnect cable ends are connected correctly.
The baud rates of the devices at each end of the cable are the same.
The host system and terminal or console servers are using the same LAT group codes.
The TELNET listeners on the terminal or console server are correctly configured.
The port and server names in the configuration database match those set up on the terminal or console server (this includes case sensitivity of names).
The terminal device assigned is of the appropriate type for the connection method being used.
The PING utility, supplied as part of the TCP/IP Services for OpenVMS software shows that the TELNET terminal or console server is available on the network.
The terminal server port is set up for remote access.
The terminal server ports are correctly configured for XON/XOFF flow control.
Before attempting to connect to a console with Console Manager using SSH, first validate the SSH configuration from DCL.
Be sure the TCP/IP stack commands are initialized. Execute one of the following commands:
TCPIP Services
@sys$manager:tcpip$define_commands
TCPware
$ @TCPware:TCPWARE_COMMANDS
MultiNet
$ SET COMMAND MULTINET:USER.CLD
For best results, run this command in system-wide login procedure SYLOGIN.COM.
Validate the SSH connection to your terminal/console server:
$ ssh <username>@<terminal/console-server>#<port number>
Security settings external to the Console Manager database were changed. One example: the contents of an identity file used by CM for SSH connections. In this case, you need to shut down and then restart Console Manager in order to use the new settings for all affected connections.
Examine your SYS$STARTUP:SYLOGIN.COM for any command that might interfere with the SSH connection. Typically, terminal setup commands such as
SET TERMINAL/INQUIREor terminal output commands such asWRITE SYS$OUTPUTcan cause these processes to abort shortly after their creation, before pseudo terminal characteristics are finalized. To avoid this, insert the following instructions at the top of the SYLOGIN.COM file:$ if f$locate(“ssh “,f$getjpi(“”,”prcnam”)) .eq. 0 then exit 1
When connecting to the MP/iLO of an VSI Integrity server, you need to execute the necessary commands on the MP/iLO in order to interface with the operating system console. For example, enter the “CO” command at the MP/iLO command prompt after executing the
CONSOLE CONNECTcommand to interface with it. Execute the necessary commands to access the OS console at least once after:Startup of Console Manager
Executing the
RECONFIGUREcommand
Chapter 3. Modifying the Configuration Database
You should now have connected your host system to the various serviced systems. Your next task is to modify the default configuration database using the configuration editor, which has a DECwindows Motif interface and a command line interface.
The chapter explains how to modify the default configuration database using the configuration editor. It does not cover setting up Console Manager to scan for and notify users of events. See chapters Understanding ENS through Create Your Own Action Routines for instructions about how to do this.
This section contains the following topics:
3.1. The Configuration Database
Information about your Console Manager environment and your serviced systems is stored in the configuration database. The configuration database containing a number of mandatory characteristics with predefined defaults is created when you install Console Manager. You may keep these characteristics, or change them to suit your own requirements using the configuration editor (see The Configuration Editor, later in this chapter).
The configuration database is a binary file stored as follows:
CONSOLE$DATA:CONSOLE_CFG.DAT
This file contains:
Descriptions of serviced systems and physical connection details.
A record of users and their Console Manager privileges.
Information about the Event Notification Services (ENS) (if you are using ENS).
Note
You must use the configuration editor to edit this binary file; you cannot edit it directly. However, you can save the configuration database in a text file using the export feature (see the chapter Managing Console Manager), and edit this text file.
For Console Manager to work, you must add information about the serviced systems being managed, and the users managing them, to the configuration database. If you are using the command line interface, see Using the Command Line Interface to the Configuration Database. If you are using the DECwindows Motif interface, see Using the DECwindows Motif Interface to the Configuration Database. Each of these sections contains information about:
Setting default characteristics, under the Setting Console Manager Characteristics subsection
Editing the configuration database, under the subsections, Modifying the Contents of the Configuration Database and Deleting From the Configuration Database.
You can edit the configuration database at any time while using Console Manager, but the information is not updated until you reconfigure the software. Further details on reconfiguring Console Manager can be found in the chapter Managing Console Manager.
Note
When you start the Console Manager software, the startup procedure verifies the configuration database. If any verification errors are found for a system, the Console Manager software will not start. You must fix these errors using the configuration editor.
3.2. The Configuration Editor
The configuration editor is a tool to let you make changes to the configuration database. As described earlier, it has both a command line and a DECwindows Motif interface.
Console Manager does not allow multiple users to edit the configuration database at the same time. For users with privilege to modify the configuration database, the first user to run the configuration editor is allowed to modify the database. Any user who runs the editor while the first user is still editing the database will have read-only access to the database.
If a user is already editing the configuration database when you run the configuration editor, the following messages are displayed:
Database currently locked by another user
No access to modify database, Read-Only mode enabled
To be able to modify the configuration database, you must exit the configuration editor, and restart it when no other user is modifying the database.
If you are running Console Manager on more than one node in a OpenVMS Cluster, then only one, cluster-wide instance of the configuration editor can modify the configuration database. This is the case even if two different instances of the database are being edited. The first privileged user to run the configuration editor in the cluster will be the one who can modify the configuration database.
When you invoke the configuration editor, the configuration database file is read. If the configuration database file does not exist in the default directory, the editor automatically creates a configuration database with default characteristics for you. Any updated characteristics are saved as the new configuration database file when you exit the editor.
To use a configuration database file created with a different name, you must rename it to the default configuration database file name, and reconfigure Console Manager.
VSI recommends that you:
Make regular backups of the configuration database using your normal backup procedures.
Make regular exports of the configuration database and also back these up as shown in the chapter Managing Console Manager.
3.2.1. What You Can Do from the Configuration Editor
The configuration editor enables you to:
Get online help to assist your use of the configuration editor.
Add serviced systems.
Add groups.
Add users.
Add security profiles.
Set Console Management characteristics.
Modify the contents of the configuration database.
Delete entries from the configuration database.
Verify the contents of the configuration database.
Save the new configuration information to:
A binary file that is different from the standard configuration database.
A text file, using the export and import functions.
If you are using ENS, then you can also create and maintain the events, scans, filters and actions that are required for event notification. See the chapters Understanding ENS, through Create Your Own Action Routines.
Note
Entries in the configuration database may have mixed case names. All Console Manager commands which expect a name perform case-insensitive comparisons.
3.3. Setting Up Your Configuration Database for the First Time
If this is the first time you are using Console Manager, then you must create entries in the configuration database in the following order:
Add the serviced systems.
Add groups, if you intend to place your serviced systems in groups.
Add users who are to be allowed access to the serviced systems and groups. Entries for SYSTEM need not be created, as Console Manager does not require an entry for these users. If they are created, Console Manager will override the user attributes that are set in the configuration database, and they will still have full Console Manager privileges.
Add security profiles if you are using secure console connections with SSH.
Create scans, filters and actions you require to handle failover events.
3.4. Using the Command Line Interface to the Configuration Editor
This section explains how to use the command line interface to the configuration editor to modify your configuration database. See the section, Using the DECwindows Motif Interface to the Configuration Editor, for instructions on how to do the same using the DECwindows Motif interface.
3.4.1. Starting the Configuration Editor
To start the configuration editor, enter:
$ CONSOLE EDIT/INTERFACE=CHARACTER_CELL
This takes you into the configuration editor, which informs you whether or not there are any verification errors (in this example, there are no verification errors):
CA Console Management
Character Cell Editor version Vn.n-mmyy
Copyright (c) 2001, 2004, 2009 CA. All Rights Reserved.

Database contains NO verification errors
CM Edit>
If there are any verification errors, then the following message is be displayed, where num_errors is the number of errors:
Database contains num_errors verification errors To find out what the verification errors are, enter:
CM Edit> verify
Also, if another user is currently editing the configuration database, the following messages will be displayed, and you will only have read access to the database:
Database currently locked by another user
No access to modify database, Read-Only mode enabled
3.4.2. Configuration Editor Commands
The following table lists the commands that are available in the configuration editor.
|
Command |
Arguments |
|---|---|
|
add |
action, event, scan, system, user, filter, group, security profile |
|
modify |
action, event, scan, system, user, filter, group, security profile |
|
delete |
action, event, scan, system, user, filter, group, security profile |
|
set |
archive, filespace, timeout |
|
show |
actions, archive, events, filespace, summary, systems, scans, timeout, users, version, filters, groups, classes, subsystems, terminal_servers, security profile |
|
verify |
no arguments required |
|
use |
filename |
|
save |
filename |
|
import? |
filename |
|
export |
filename |
|
exit |
no arguments required |
|
quit |
no arguments required |
|
help |
no arguments required |
|
@? |
filename |
The arguments used in the table are case-insensitive.
See the chapters Understanding ENS through Create Your Own Action Routines for information about adding, modifying and deleting actions, events, scans and filters.
3.4.3. Getting Help in the Configuration Editor
To display a list of the commands online, enter help or ? at the
CM Edit> prompt.
For more information about a command, enter help followed by the command. For example,
CM Edit> help add

add, modify, or delete the following record types:
action - Script or program to be run when filter
 criteria has been met. Specify action in
 filter record.
event - Description of console text string to search for.
filter - Defines what actions to take for specific events.
scan - List of events and/or other scan definitions.
system - Name of system having the console to monitor.
group - Logical grouping of systems. user - Who can do what.
3.4.4. Add Serviced Systems
To add serviced systems to your configuration database, use the add system command. The following example shows the steps using the LAT connection
Start the configuration editor as described in the section Starting the Configuration Editor, earlier in this chapter.
Enter the following command:
CM Edit> add system
Enter the name of the system. The name cannot contain spaces or tabs. For systems using pseudo-terminals, the system name must be unique in the first 15 characters.
System name: salt
Enter a description of the system:
Information: Part of the Cruet Group
Enter the primary host:
Primary Host (): SALT
Enter the secondary host:
Failover Host (): PEPPER
Enter the type of connection
Connection type [1=LAT, 2=TELNET, 3=Direct, 4=Pseudo-Terminal, 5=SSH] (1):
Depending on what you chose for step 7, enter further information about the connection:
If you chose a connection type of LAT,
Enter the name for the remote terminal or console server:
Terminal server:
Enter the name of the terminal server port:
Terminal server port:
If you chose a connection type of TELNET,
Enter the name for the remote terminal or console server:
Terminal server:
Enter the number of the TELNET listener:
TELNET Listener Number:
If you chose a connection type of Direct,
Enter the name for the direct terminal device:
Terminal device:
Enter the desired terminal speed:
Terminal speed [1=300,2=1200,3=2400,4=4800,5=9600,6=19200,7=38400] (5)
If you chose a connection type of Pseudo-terminal,
Enter the command for the pseudo-terminal to execute:
Pseudo-terminal command:
If you chose a connection type of SSH,
Enter the name for the remote terminal or console server:
Terminal server:
Enter the number of the TELNET listener:
TELNET Listener Number:
Enter the security profile name:
Security profile name (?=list):
Enter the name of the event or events you wish to scan for:
Scan name (?=list): HSC70
You are prompted for the default halt key and the halt sequence for the system.
The halt key is a single control key, for example CTRL_P. This is the default key the user will enter to halt the system. The halt key is also a user preference that may be set when using the MONITOR, CONNECT or C3 interfaces.
The halt sequence can be up to eight ASCII characters. These are the actual characters that will be sent to halt the system. To generate a break signal, enter the reserved keyword BREAK.
Note
The halt sequence field may accept more than 8 ASCII characters, however only the first 8 characters will be recognized.
If your system does not require the settings, take the default selection, which is Control-P for each:
Enter the default halt key for the system:
Halt key (CTRL_P):
Enter the halt sequence for the system:
Halt sequence – Press Enter or type “\16” to use CTRL_P (\16):
Enter the name of the icon to use for the system:
Icon filename (?=list (Generic.xbm)): rx7620.xbm
You are asked whether you want to log console data. If you do, enter a location:
Log console data? [Y/N] (Y): y
Log directory (CONSOLE$LOGFILES):
You are asked whether the console should be enabled:
Enable Console? [Y/N] (Y): y
You are asked whether or not you wish to add the system.
OK to add? [Y/N] (Y): y
The following is an example of what you see on your screen:
Database contains NO verification errors

CM Edit> add sys system
System name: salt
Information: Part of the Cruet Group
Connection type [1=LAT, 2=TELNET, 3=Direct, 4=Pseudo-Terminal, 5=SSH] (1): 1
Terminal server: CMSRV1
Terminal server port: CM01
Scan name (?=list): HSC70
Icon filename (?=list (Generic.xbm)): VAX_8250.xbm
Log console data? [Y/N] (Y): y
Log directory (CONSOLE$LOGFILES):
Enable Console? [Y/N] (Y): y
OK to add? [Y/N] (Y): y
If you attempt to add a system that already exists in the configuration database, a message is displayed and the system is not added.
3.4.5. Add Groups
A group is a subset of the defined systems in the Console Manager configuration database. For example, the New York group consists of all systems in the New York branch office. A system can be a member of multiple groups.
To add groups to your configuration database, use the add group command:
Start the configuration editor as described in the section, Starting the Configuration Editor.
Enter:
CM Edit> add group
Enter a name for the group:
Group name: New York
Enter a description of the group:
Information: All New York Systems
You are asked if all systems are members of this group:
Are all systems members of the group? [Y/N] (Y): n
Enter the names of the systems belonging to the group:
Enter the systems which are members of this group: (?=list)
System (CR=end): pepper
System (CR=end): salt
System (CR=end):
You are asked if it is all right to add the group:
OK to add? [Y/N] (Y): y
The following is an example of what you see on your screen:
Database contains NO verification errors

CM Edit> add group
Group name: New York
Information: All New York Systems
Are all systems members of the group? [Y/N] (Y): n
Enter the systems which are members of this group (?=list)
System (CR=end): pepper
System (CR=end): salt
System (CR=end):

OK to add? [Y/N] (Y): y
3.4.6. Add Users
To give users access to serviced systems and grant them Console Manager privileges, use the add user command. This displays a series of questions about which privileges should be granted, along with a list of systems and/or groups of systems the user is going to be allowed access to.
You can press Enter to accept the default. However, this results in a user having no privileges or access.
The username given must match the user's account name.
Start the configuration editor as described in the section, Starting the Configuration Editor:
Enter:
CM Edit> add user
Enter the name of the user to whom you are granting privileges:
User Name: smithj
Enter a description of this user:
Information: John Smith, System Management
Enter the privileges the user will have:
Can user perform startup from the C3 interface? [Y/N] (N):
Can user perform reconfigure? [Y/N] (N):
Can user perform shutdown? [Y/N] (Y):
Can user edit database? [Y/N] (N):
Can user unlock consoles? [Y/N] (N):
Can user halt the system? [Y/N] (N):
Can user perform archive? [Y/N] (Y):
Can user exit C3? [Y/N] (N):
Can user edit C3? [Y/N] (N):
You are asked if the user has access to all systems:
Can user access all systems? [Y/N] (N):
Note
If you grant access to a subset of the serviced systems defined in the configuration database, then a group definition is also required. However, granting a user access to all groups overrides the subset of systems, and provides the user with full access.
You are asked if the user has access to all groups:
Can user access all groups? [Y/N] (N):
You are asked if it is all right to add the user:
OK to add? [Y/N (Y)):
The following is an example of what you see on your screen:
Database contains NO verification errors
CM Edit> add user
User Name: smithj
Information: John Smith, System Management
Can user perform startup from the C3 interface? [Y/N] (N):
Can user perform reconfigure? [Y/N] (N):
Can user perform shutdown? [Y/N] (Y):
Can user edit database? [Y/N] (N):
Can user unlock consoles? [Y/N] (N):
Can user halt the system? [Y/N] (N):
Can user perform archive? [Y/N] (Y):
Can user exit C3? [Y/N] (N):
Can user edit C3? [Y/N] (N):
Can user access all systems? [Y/N] (N):
Can user access all groups? [Y/N] (N):
OK to add? [Y/N (Y)):
3.4.6.1. Granting Privileges
The root or system account (depending on the operating system you are using) has all the Console Manager privileges by default. You cannot change this information as there is no entry in the configuration database for this account. If you do create an entry for user root or system, Console Manager will ignore it, and use the default.
Unless a user has an entry in the configuration database, they are not allowed to perform any of the Console Manager functions.
Note
It is important to realize that granting a user privileges to edit the configuration database allows that user to set all other privileges for both themselves and any other user.
Note the following rule regarding usernames:
Console Manager automatically uppercases the username when a user starts the various interfaces in order to check for a match against the user authorization file entry.
3.4.7. Add Security Profiles
You will need to create security profiles if any of the following apply to your configuration:
You have configured your terminal/console servers with a specific username and/or password.
You have configured your terminal/console servers to use publickey authentication and you want to use a unique identity.
You have protected the private key with a passphrase.
To define a security profile, use the Add Security_Profile command.
To add a security profile:
Start the configuration editor as described in the section, Starting the Configuration Editor:
Type:
CM Edit> add security_profile
Type the name of the security profile you are creating:
Security profile name: JSMITHsecure
Type a description of the security profile:
Information: John Smith, System Manager
Type the name of the account username:
Username (): SMITHJ
Type the password for the user on the system:
Password ():
Type the passphrase for the security profile:
Passphrase ():
Type the logical name that equates to the file specification of the key/identity file. If you do not specify a logical name, the default file specification of SYS$SYSROOT:[SYSMGR.SSH2]IDENTIFICATION. will be used.
For more information about this logical name see the chapter Set up the Environment.
You are asked if it is okay to add the security profile:
OK to add? [Y/N (Y)):
3.4.8. Setting Console Manager Characteristics
The following table shows the Console Manager characteristics and their default values in your configuration database when Console Manager is installed.
|
Characteristic |
Description |
|---|---|
|
Timeout |
The period in seconds that ENS, if enabled, waits for an action before declaring it inoperative. The default value is 60. |
|
Failover |
The secondary host's polling frequency of the primary host and the number of seconds after which poll requests time out if they do not receive a response. There are two parameters:
|
|
File space |
The disk space thresholds at which a warning message is issued and an automatic archive is initiated, and the frequency at which the space checks are made. The thresholds indicate the amount of disk space used. There are three parameters:
|
|
Archiving |
The period to archive, and the location of the archive files. The two parameters are:
|
Note
The default values for Console Manager characteristics will be correct for most environments.
These defaults should be correct for your environment when you set up Console Manager for the first time. You may change them at any time to suit your requirements.
Use one of the set commands shown in the table in the section Configuration Editor Commands, earlier in this chapter, appropriate to the characteristics you want to change.
3.4.8.1. Setting Timeout
Timeout is the period ENS waits for an action routine to connect to it and request events. If an action has been dispatched and does not communicate with ENS within this period, a new instance of the action is created. This only applies to the image type action routine. See the chapter Setting up the ENS Components for more information about image routines.
To set timeout for action routines, enter:
CM Edit> set timeout
Action routine timeout seconds (60): 30
To keep the default value, press Enter. To set your own value, enter the number of seconds you require.
In this example, the default is being changed to 30 seconds.
3.4.8.2. Setting Failover
The Failover attributes determine the intervals at which the secondary host polls the primary host and also when the poll requests time out if they do not receive a response. After you define the primary and secondary hosts, the secondary host polls the primary host on a fixed interval. If the secondary host cannot communicate with the primary host, it attempts to take over the serviced systems for which it is designated the secondary host.
To set Failover:
CM Edit> set failover
To change the intervals:
Keepalive timer interval (120): 90
Polling timeout (60): 45
In the above example the Keepalive Timer default is being changed to 90 seconds and the Polling Timeout default is being changed to 45 seconds.
3.4.8.3. Setting File Space Checking and Thresholds
The file space checking attributes determine the frequency at which each system's logging area is checked to see if it has exceeded the defined warning and critical space used thresholds. These thresholds are entered as a percentage of total available logging space. If the warning threshold is exceeded, an event is generated. If the critical threshold is exceeded, an event is generated and an archive process is activated.
To set filespace, enter:
CM Edit> set filespace
To keep the default value, press Enter. To set your own values, enter the number you require.
You can set the interval at which the file space is checked. In this example the number of seconds is set to 25.
Check disk capacity interval (600): 25
You can set the warning and critical thresholds:
Warning [1-99] (80): 75
Critical [1-99] (95): 90
In this example, the default warning value is being changed to 75 and the default critical value to 90.
3.4.8.4. Setting Archiving
When an automatic archive is activated, the value corresponding to the number of hours to archive is used to determine the amount of log data that will be moved from the active log file to the archive area specified in the archive directory field.
To set the time limit on the files to be archived and to set the directory where they will be archived, enter:
CM Edit> set archive
Number of hours to archive (12): 24
Archive directory (CONSOLE$ARCHIVE): CONSOLE$STORE:
To keep the default values, press Enter. To set your own values, enter the new values you require. In the previous example, the default number of hours to archive data is being changed to 24 and the default archive directory to CONSOLE$STORE.
3.4.9. Modifying the Contents of the Configuration Database
Use the modify command to change entities in the configuration database. For example, to change the user smithj entry in the database, enter:
CM Edit> modify user smithj
You can also change the values of actions, events, filters and scan profiles. This is discussed in the Setting up the ENS Components.
To clear a field in the configuration database, enter only the \ character. If the field you are clearing is a required field, you are prompted for a value, with the current value listed as the default response.
3.4.10. Deleting From the Configuration Database
You can delete entries from the configuration database. For example, to delete a user, enter:
CM Edit> delete user
User name:
If you wish, you can enter delete user followed by the name of the user you wish to delete from the configuration database. For example,
CM Edit> delete user smithj
If you try to delete an unknown entity, a message is displayed to advise you that the entity has not been found in the database.
When you delete an entity that is referenced by another entity, then the reference to the deleted entity is removed. The following table shows the entities for which any references are removed when a referenced entity is deleted.
| Entity Removed |
Reference Removed From... |
|---|---|
| System |
All Groups All Users All Filters |
| Group |
All Users All Filters |
| Event |
All Filters All Scans |
| Scan |
All Systems All Scans |
| Action |
All Filters |
| Security profile |
All Systems |
3.4.11. Verifying the Contents of the Configuration Database
When you have finished modifying the configuration database you can verify that the data you have changed is valid. To do so, use the verify command. For example:
CM Edit> verify
Verified successfully
If you have entered any inappropriate information, you receive a verification warning message.
3.4.12. Saving the Configuration Database
To save the configuration database, use the save command. Enter:
CM Edit> save
Filename (CONSOLE$DATA:CONSOLE_CFG.DAT):
Alternatively, you can save your configuration database by leaving the editor using the exit command. This automatically verifies the data and writes out the database file.
3.4.13. Saving the Contents of the Configuration Database In Another Binary File
To avoid accidentally starting Console Manager with an incomplete configuration database, the configuration editor allows you to redirect updated information to a file other than the standard configuration database. It also allows you to resume editing this file if it is only partially complete.
To save updates to the configuration database in a binary file with a name other than that of the default configuration database, enter:
CM Edit> save cm.dat
3.4.13.1. Editing the Contents of a Saved Binary File
You can edit the configuration database that you have saved as a binary file with a different name. To do this, use the use command. For example,
CM Edit> use cm.dat
3.4.14. Saving the Contents of the Configuration Database in Text Format
You can save the contents of your configuration database to a text file and read the edited file back into Console Manager. There are two functions to do this:
Export
Import
This allows you to edit the contents of the configuration database using a text editor of your choice.
Also, you can import a file that was exported from a previous version of Console Manager. This allows you to quickly recreate your configuration database in the new version.
Note
Binary files are not compatible across product versions, but import/export files are forward compatible, for example, an import/export file created on Console Manager r3 or V3.0 is compatible with r3.1. If you wish to use the configuration database from a system running either r3 or V3.0, export the database, copy the exported file to the system running r3.1, manually edit any platform specific changes (for example, logging directories), and then use the import command. This feature is especially useful when you need to combine, in whole or part, configuration databases from multiple Console Management systems.
Note
If you are upgrading a system from either r3 or V3.0, the database is converted during the upgrade; it is not necessary to perform import/export to migrate your configuration database.
3.4.14.1. Exporting the Contents of the Configuration Database
To export the contents of the configuration database, enter:
CM Edit> export
Export filename (console_cfg.PORT): cfg_new.PORT
The example shown saves your database in the file cfg_new, and displays the text file on your screen for you to edit manually using the editor of your choice.
The configuration editor also lets you export the contents of the database to a text file for editing, and then import them back into the database. For example,
CM Edit> export new_db.PORT
3.4.14.2. Importing the Contents of the Configuration Database
The import routine only adds new records to an existing database. VSI recommends that you delete or rename the default database file using the appropriate rename command for your operating system before importing an edited text file. This ensures all changed records are updated.
To import a configuration database text file, enter:
CM Edit> import
Import filename (console_cfg.PORT): cfg_new.PORT
This reads the file CFG_NEW and adds its contents to your current database.
Do not use the copy command as this leaves the old database in place. Any import of records which already exist in the database will fail.
When you have modified the default configuration database, reconfigure Console Manager to activate the changes you have made. Instructions can be found in the section, Activating Your Configuration Database Changes.
3.4.15. Leaving the Configuration Editor
There are two ways to leave the configuration editor:
Exit - this saves and verifies any changes you have made to the database prior to exiting.
Quit - this exits without saving any changes since your last save.
3.4.15.1. Consequences of Saving With Verification Errors
If there are verification errors for a system, then the editor disables the system in the configuration database, warns you, and asks if you want to continue to exit. This has the following consequences:
If you continue to exit, then the next time you attempt to start, or restart, the Console Manager software, the startup procedure will abort.
You can reconfigure Console Manager, but you will be unable to connect to the console of the serviced system that has been disabled.
3.4.16. Activate Your Configuration Database Changes
When you have modified your configuration database you must activate the changes that you have made. You can do this either by reconfiguring, or restarting the Console Manager software. See the chapter Managing Console Manager for more information.
Note
You are now ready to use Console Manager. It will run without any event notification services (ENS) being set up. See the chapters Understanding ENS through Create Your Own Action Routines if you want to set up notification services. VSI recommends that you do set up ENS in order to make best use of the features of Console Manager.
3.5. Using the DECwindows Motif Interface to the Configuration Editor
This section explains how to use the DECwindows Motif interface to the configuration editor to modify your configuration database. See the section Using the Command Line Interface to the Configuration Editor for instructions on how to do the same using the command line interface.
3.5.1. Starting the Configuration Editor
Before starting the configuration editor
Make sure that your DECwindows Motif transport is set up (see the appendix Setting Up the DECwindows Motif Transport for the DECwindows Interface)
Ensure that the session manager security for the system you are setting the display from is enabled on your local workstation.
You can start the DECwindows Motif interface to the configuration editor from the command line interface (see Starting the Configuration Editor from the Command Line Interface) or the C3 interface (see Starting the Configuration Editor from the C3 Interface).
3.5.1.1. Starting the Configuration Editor from the Command Line Interface
To start the DECwindows Motif interface to the configuration editor from the command line, enter:
$ CONSOLE EDIT/INTERFACE=DECWINDOWS
The section, Configuration Editor Messages on Startup, describes the possible messages that the configuration editor displays when it is started.
3.5.1.2. Starting the Configuration Editor from the C3 Interface
You can start the DECwindows Motif interface to the configuration editor from the C3 interface in two ways:
Pull down the Commands menu, choose Console Manager, then select the Editor … option.
Click the right mouse button on the window background, choose Console Manager then select the Editor … option.
The section Configuration Editor Messages on Startup describes the possible messages that the configuration editor displays when it is started.
3.5.2. Configuration Editor Messages on Startup
On startup, the configuration editor informs you whether or not there are any verification errors.
If there are no verification errors, then the following message is displayed:
Database contains NO verification errors
If there are any verification errors, then the following message is be displayed, where num_errors is the number of errors:
Database contains num_errors verification errors
To find out what the verification errors are, pull down the File menu and choose Verify. The errors are displayed in the Status window.
Also, if another user is currently editing the configuration database, the following messages will be displayed, and you will only have read access to the database:
Database currently locked by another user
No access to modify database, Read-Only mode enabled
3.5.3. What the Configuration Editor Window Looks Like
When you start the configuration editor, the configuration editor main window is displayed as shown in the following figure.
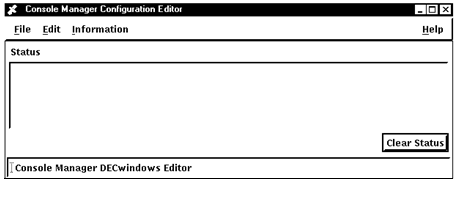
There are four menus in this window:
File - used to export, import and save files, verify the configuration database, and leave the configuration editor.
Edit - used to create, modify, and delete information in the database.
Information - used to get information about classes and subsystems set up in your environment.
Help - used to get help on using the editor.
3.5.4. Add Serviced Systems
To add a serviced system:
Start the configuration editor.
Pull down the Edit menu and choose the System/Create submenu. This displays the System Name dialog box.
Click the space provided for the name of the system and enter the name of the system you need to add (for example, salt).
Note
The name cannot contain any spaces or tabs. For systems using pseudo-terminals, the system name must be unique in the first 15 characters.
Click OK. This displays the System dialog box as shown in the following figure.
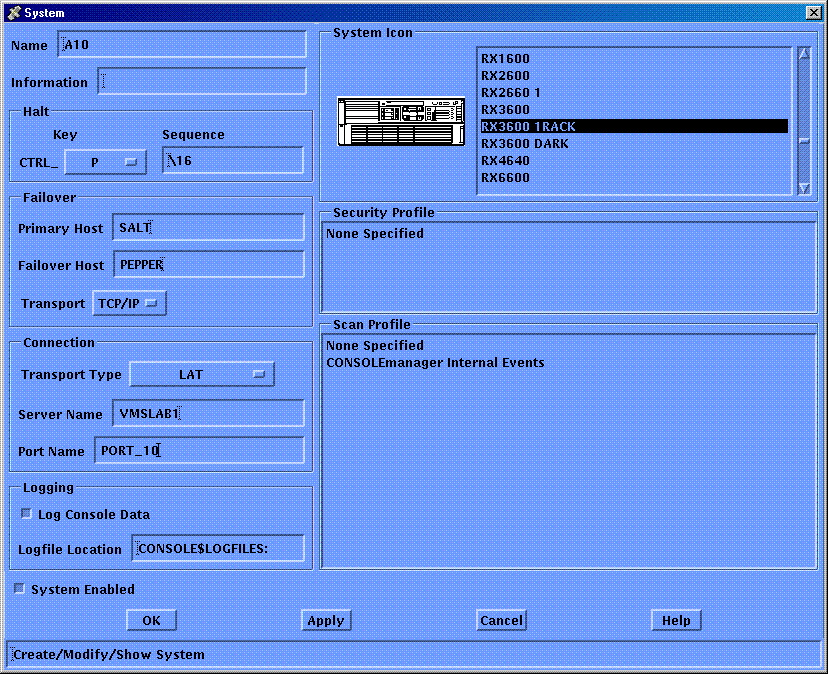
Complete the fields in the dialog box using the following table to help you.
Enter a description of the system in the Information field. For example, Part of the Cruet Group.
Enter the default Halt key and the Halt sequence. The default values are CTRL_P for the default Halt key, and \16 (octal for CTRL_P) for the Halt Sequence.
The halt key is a single control key, for example CTRL_P. This is the default key the user will enter to halt the system. The halt key is also a user preference that may be set when using the MONITOR, CONNECT, or C3 interfaces.
The halt sequence can be up to eight ASCII characters. These are the actual characters that will be sent to halt the system. To generate a break signal, enter the reserved keyword BREAK.
Note
The halt sequence field may accept more than 8 ASCII characters, however only the first 8 characters will be recognized.
Enter the names of the primary and secondary hosts.
Choose a connection type by clicking on the small button to the right of the Transport Type box. For example, LAT.
Enter the LAT name for the remote terminal or console server (for example, VMSLAB1) and the LAT port name on the remote terminal server (for example, PORT_10). The table at the end of this section describes the required fields for the chosen transport for each operating system.
Deselect the Log Console Data check button if you do not want to log incoming data to disk.
Enter the name of the directory where you want the log files to be placed if you do not want to use the default logging directory.
Click the list of available system icons from the list provided. For example, BL860c Server Blade. This displays the selected icon in System Icon.
Choose the scan or set of scans for which you want to scan.
When you have finished, click OK.
Continue to add other serviced systems, if needed.
The following table explains what to enter in the fields in the System dialog box.
| Item |
Description |
|---|---|
| Name? |
A unique name for the system |
| Information |
A description of the system |
| Halt Key |
The default key to enter to halt the system |
| Halt Sequence |
The sequence of characters to be transmitted to halt the system, or BREAK to transmit a break signal. |
| Failover |
The names of the primary and failover hosts |
| Connection |
The physical connection attributes (see the table in the section, Setting Console Manager Characteristics, earlier in this chapter.) |
| Log Console Data |
Indicates whether to log incoming data to disk |
| Logfile Location |
Where logging is required, this specifies the directory in which to place the log files for this system |
| System Enabled |
Indicates whether or not to allow the daemon to manage the console |
| System Icon |
The iconic representation of CM when displaying the DECwindows Motif interface |
|
Scan Profile |
The event or set of events for which to scan the console data (see the chapter Understanding ENS) |
The following table expands on the Connection attribute shown in the previous table. It shows you which fields to complete for the Direct, LAT, TELNET, and Pseudo-terminal transport types.
|
Connection Attribute |
Meaning | Direct |
LAT |
TELNET |
Pseudo |
SSH |
|---|---|---|---|---|---|---|
|
Command |
The program whose output is being monitored | N |
N |
N |
Y |
N |
|
Speed |
The baud rate for the connection between the host and the console of the serviced system | Y |
N |
N |
N |
N |
|
Server Name |
The LAT or TCP/IP name for the remote terminal or console server used to connect to the console of the serviced system | N |
Y |
Y |
N |
Y |
|
Port Name |
The LAT port name on the remote terminal or console server to which the console of the serviced system is connected | N |
Y |
N |
N |
N |
|
Listener Number |
The TCP listener port number on the remote terminal or console server | N |
N |
Y |
N |
Y |
3.5.5. Add Groups
A group is a subset of the defined systems in the Console Manager configuration database. For example, the New York group consists of all systems in the New York branch office. A system can be a member of multiple groups.
To add a group:
Start the configuration editor.
Pull down the Edit menu and choose the Group/Create submenu. This displays the Group Name dialog box.
Click the space provided for the name of the group and enter a name. For example, New York.
Click OK. This displays the Group dialog box, as shown in the following figure.
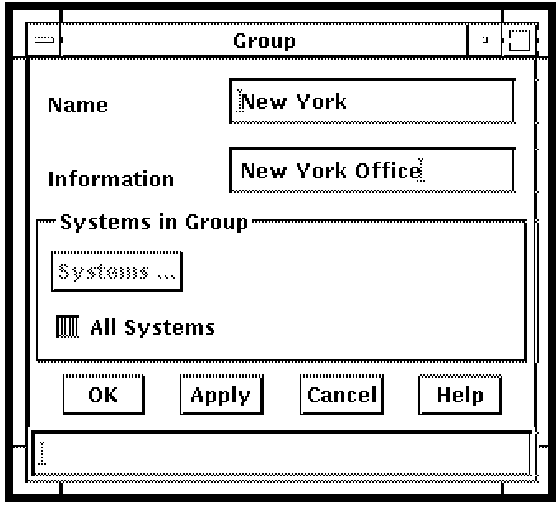
Complete the fields in the dialog box, using the following table to help you.
Enter a description for the group in Information. For example, New York Office.
Deselect the All Systems check button if you do not want all systems to belong to the group, which is set as the default. This makes Systems ... active. Then click Systems. This displays a selection box with two columns: Selected Systems and Available Systems. Click the systems you need to add to the group from the list of available systems on the right side of the dialog box. For example salt and pepper. These system names will then be transferred into the column displaying the selected systems on the left side of the dialog box.
Click OK, and then OK in the Group dialog box.
Continue to enter other groups, if you need.
The following table explains what to enter in the fields on the Group dialog box.
| Item |
Description |
|---|---|
| Name |
A unique name for the group |
| Information |
Description to clarify name |
| Systems in group |
Lists the systems which are members of this group |
| All Systems |
Indicates whether or not to add all systems to the group |
3.5.6. Add Users
To allow users access to serviced systems and to define the privileges they have within Console Manager:
Start the configuration editor.
Pull down the Edit menu and choose the User/Create submenu.
This displays the User Name dialog box. You must enter the user's account name here. For example, smithj.
Click the space provided for the name of the user and enter the person's user account name.
Click OK. This displays the User dialog box, as shown in the following figure.
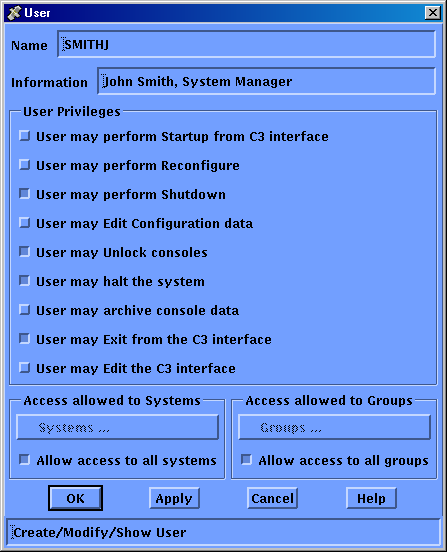
Complete the fields in the User dialog box, using the following table to help you.
Enter a description to clarify the user's name already given. For example, John Smith, System Manager.
Click the appropriate check button to select the privileges you want to grant to this user's account.
Select the systems the user is going to have access to. The default is to allow the user access to all systems. Deselect the "Allow access to all systems" check box if you do not want the user to access all systems. This makes Systems ... active.
Click Systems ....
This displays a selection box with two columns: Selected Systems and Available Systems. Click the systems you need to the user to be granted privileges for from the list of available systems on the right side of the dialog box. For example salt and pepper. These system names will then be transferred into the column displaying the selected systems on the left side of the dialog box.
Note
If you grant access to a subset of the serviced systems defined in the configuration database, then a group definition is also required. However, granting a user access to all groups overrides the subset of systems, and provides the user with full access.
Click OK.
If you wish to give access to specific groups, follow the instructions just given for systems.
Click OK in the User dialog box.
Continue to add other users, if you need.
The following table explains what to enter in the fields on the User dialog box.
| Item |
Description |
|---|---|
| Name |
A unique account name for the user. |
| Information |
Description to clarify name. |
| Startup |
Indicates if user has privilege to start Console Manager from the C3 interface. |
| Reconfigure |
Indicates if user has privilege to reconfigure Console Manager. |
| Shutdown |
Indicates if user has privilege to shut down Console Manager. |
| Edit Configuration Data |
Indicates if user has privilege to edit the configuration database. |
| Can Halt System |
Indicates if user has privilege to halt a system. |
| Archive Console Data |
Indicates if user has privilege to archive console data. |
| Exit from C3 Interface |
Indicates if user has privilege to exit from the C3 interface. |
| Edit the C3 Interface | Indicates if user has privilege to edit the C3 interface. |
| Access Allowed to Systems | Indicates whether or not access to all systems is allowed. |
| Access Allowed to Groups | Indicates whether or not access to all groups is allowed. |
3.5.6.1. Granting Privileges
The root or system account has all the Console Manager privileges by default. You cannot change this information as there is no entry in the configuration database for this account. If you do create an entry for user root or system, Console Manager will ignore it, and use the default.
Unless a user has an entry in the configuration database, they are not allowed to perform any of the Console Manager functions.
Note
It is important to realize that granting a user privileges to edit the configuration database allows that user to set all other privileges for both themselves and any other user.
Note
Note that the username is automatically uppercased by the user interfaces in order to check for a match against the user authorization file entry.
3.5.7. Add Security Profiles
You will need to create security profiles if any of the following apply to your configuration:
You have configured your terminal/console servers with a specific username and/or password.
You have configured your terminal/console servers to use publickey authentication and you want to use a unique identity.
You have protected the private key with a passphrase.
To define a security profile:
Start the configuration editor.
Pull down the Edit menu and choose the Security Profile submenu.
This displays the Security Profile dialog box. You must enter the security profile name here. For example, JSMITHsecure.
Click the space provided for the name of the security profile and enter the security profile name.
Click OK. This displays the Security Profile dialog box, as shown in the following figure.

| Item |
Description |
|---|---|
| Name |
A unique name for the security profile |
| Information |
Description to clarify name |
| User |
User account name |
| Password |
Password for user account (stored encrypted, displays as all *'s). Required for password-based authentication; Ignored for publickey authentication |
| Pass-phrase |
Passphrase for the certificate (stored encrypted, displays as all *'s). Required if you have protected your private key(s) with a passphrase |
| Key/Identity file |
Optional. The logical name that equates to the file specification of the key/identity file. If you not specify a logical name, the default file specification of SYS$SYSROOT:[SYSMGR.SSH2]IDENTIFICATION. will be used. For more information about this logical name see the the chapter Set up the Environment. |
3.5.8. Setting Console Manager Characteristics
The following table shows the Console Manager characteristics and their default values in your configuration database when Console Manager is installed.
| Characteristic |
Description |
|---|---|
| Timeout |
The period in seconds that ENS, if enabled, waits for an action before declaring it inoperative. The default value is 60. |
| Failover |
The secondary host's polling frequency of the primary host and the number of seconds after which poll requests time out if they do not receive a response. There are two parameters:
|
| File space |
The disk space thresholds at which a warning message is issued and an automatic archive is initiated, and the frequency at which the space checks are made. The thresholds indicate the amount of disk space used. There are three parameters:
|
| Archiving |
The period to archive, and the location of the archive files. The two parameters are:
|
These defaults should be correct for your environment when you set up Console Manager for the first time. You may change them at any time to suit your requirements.
To change any of the characteristics:
Pull down the Edit menu and choose the Characteristics Show/Modify submenu. This displays the Characteristics dialog box as shown in the following figure.
Make the necessary changes using the information in the next three sections to help you.
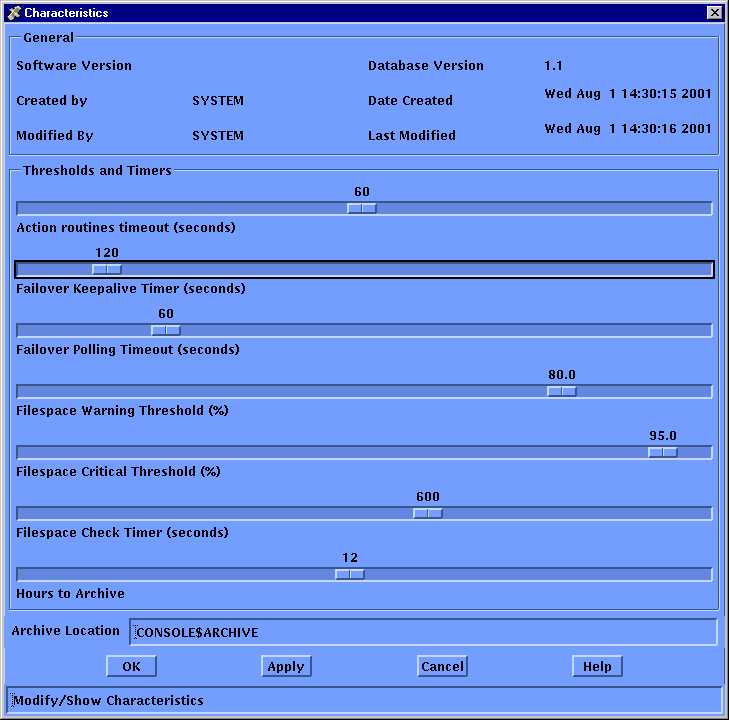
To change a characteristic, click the appropriate box or drag the slider bar. Sometimes you may need to type in the appropriate information in the space provided. To do this, click the space provided and then enter your information. When you have finished, confirm your choices by clicking OK.
Note
The default values for Console Manager characteristics will be correct for most environments.
The following sections explain the Characteristics dialog box in more detail.
3.5.8.1. Setting Timeout
Timeout is the period ENS waits for an action routine to connect to it and request events. If an action has been dispatched and does not communicate with ENS within this period, a new instance of the action is created. This only applies to the image type action routine. See the chapters Understanding ENS through Create Your Own Action Routines for more information about image routines.
To set your own value, drag the slider bar to the number of seconds you require.
In the example illustrated in the previous figure, the default is being changed to 60 seconds.
3.5.9. Setting Failover
The Failover attributes determine the intervals at which the secondary host polls the primary host and also when the poll requests time out if they do not receive a response. After you define the primary and secondary hosts, the secondary host polls the primary host on a fixed interval. If the secondary host cannot communicate with the primary host, it attempts to take over the serviced systems for which it is designated the secondary host.
To set your own value, drag the slider bar to the number of seconds you require.
In the example illustrated in the previous figure, the default for the keep-alive timer is 120 seconds and the polling timeout is 60 seconds.
3.5.10. Setting File Space Checking and Thresholds
The file space checking attributes determine the frequency at which each system's logging area is checked to see if it has exceeded the defined filespace warning and filespace critical thresholds. These thresholds are entered as a percentage of total available logging space. If the warning threshold is exceeded, an event is generated. If the critical threshold is exceeded, an event is generated and an archive process is activated.
To set your own values, drag the slider bar to the number you require. In the example in the figure in the section, Setting Console Manager Characteristics, the default warning value is being changed to 80 and the default critical value to 95.
3.5.11. Setting the Filespace Interval
You can set the interval at which the file space is checked. In the example in the section Setting Console Manager Characteristics, the number of seconds is set to 600.
3.5.12. Setting Archiving
When an automatic archive is activated, the value corresponding to the number of hours to archive is used to determine the amount of log data that will be moved from the active log file to the archive area specified in the archive directory field.
To set your own values, drag the slider bar to the number require. In the example in the section Setting Console Manager Characteristics, system the default number of hours' data to archive is being changed to 12 and the default archive directory to console$archive.
Use either the default archive directory, or a directory of your choice.
Note
Automatic archiving is a failsafe, and should not be relied on for archiving your log files. VSI recommends that you archive your log files regularly.
3.6. Modifying the Contents of the Configuration Database
To modify entries in the configuration database, you must have the Edit Configuration data privilege set in your user entry.
After you have established the configuration database, you can change the values of characteristics, users, systems and groups that you have already stored.
To clear a field in the configuration database, delete the value and click Apply or OK. If the field you are clearing is a required field, a warning will display, with the current value restored to the field.
The following steps describe how to modify an existing user in the database, but the steps also apply to characteristics, systems and groups:
Pull down the Edit menu and choose the User Show/Modify submenu. This displays the Select User dialog box.
Choose the user whose entry you want to change, then click OK. This displays the User dialog box.
Make the required changes and click OK.
If you want to modify more than one user entry, then click Apply instead of OK. This displays the User dialog box, but does not close the Select User dialog box. When you have changed the first user entry, you can now select another user from the Select User dialog box.
You can also change the values of the actions, events, filters and scan profiles. This is discussed in the chapter Setting up the ENS Components.
3.7. Deleting From the Configuration Database
Before you can modify or delete entries in the configuration database, you must have the Edit Configuration data privilege set in your user entry.
For example, to delete a user:
Pull down the Edit menu and choose the User / Delete... submenu item from the User menu. This displays the Select User dialog box.
Click the user you wish to delete from the list, and then click OK.
If you want to delete more than one user, then click Apply instead of OK. The Select User dialog box is not closed, and you can now select another user to delete.
Note
VSI recommends that you do not remove the predefined Console Manager events (prefixed with CMGR) from the database. However, you may redefine the priorities of these events if you wish.
Also, any changes you make to the predefined event or action definitions may not be preserved when your Console Manager installation is upgraded with new releases.
When you delete an entity that is referenced by another entity, then the reference to the deleted entity is removed. The following table shows the entities for which any references are removed when a referenced entity is deleted.
|
Entity Removed |
Reference Removed From... |
|---|---|
|
System |
All Groups All Users All Filters |
|
Group |
All Users All Filters |
|
Event |
All Filters All Scans |
|
Scan |
All Systems All Scans |
|
Action |
All Filters |
|
Security Profile |
All Systems |
3.8. Verifying the Contents of the Configuration Database
When you have finished modifying the configuration database you can verify that the data you have changed is valid. To do this, pull down the File menu and choose the Verify menu item. Messages are displayed in the Status box to let you know whether or not verification has been successful. You can clear the Status box by clicking on Clear Status.
When you exit from this editor using Exit, verification is done for you automatically.
3.9. Saving the Configuration Database
To save the contents of the configuration database without exiting, pull down the File menu and choose the Save menu item. The information is saved in the configuration database file (see the section The Configuration Database.
You can save the configuration database file to another binary file or a text file, and you can edit the contents of a saved binary file.
3.10. Saving the Contents of the Database in Another Binary File
To avoid accidentally starting Console Manager with an incomplete configuration database, the configuration editor allows you to redirect updated information to a file other than the standard configuration database. It also allows you to resume editing this file if it is only partially complete.
To save updates to the configuration database in a binary file with a name different to the default configuration database:
Pull down the File menu and choose the Save as ... menu item.
Complete the required file name in the dialog box.
Click OK.
3.10.1. Editing the Contents of a Saved Binary file
You can edit the configuration database that you have saved as a binary file with a different name. To do this, pull down the File menu and choose the Use... menu item.
3.11. Saving the Contents of the Configuration Database in Text Format
You can save the contents of your configuration database to a text file and read the edited file back into Console Manager. There are two functions to do this:
Export
Import
This allows you to edit the contents of the configuration database using a text editor of your choice.
Also, you can import a file that was exported from a previous version of Console Manager This allows you to quickly recreate your configuration database in the new version.
Note
Binary files are not compatible across product versions, but import/export files are forward compatible, for example, an import/export file created on Console Manager r3 or V3.0 is compatible with r3.1. If you wish to use the configuration databasefrom a system running either r3 or V3.0, export the database, copy the exported file to the system running r3.1, manually edit any platform specific changes (for example, logging directories), and then use the Import... menu item. This feature is especially useful when you need to combine, in whole or part, configuration databases from multiple Console Management systems.
Note
If you are upgrading a system from either r3 or V3.0, the database is converted during the upgrade; it is not necessary to perform import/export to migrate your configuration database.
3.11.1. Exporting the Contents of the Configuration Database
To export the contents of the configuration database into a text file
Pull down the File menu and choose the Export... menu item. This displays the Export dialog box.
Enter a name for the export file. It is usual to give the file the .PORT extension.
Click OK to save export the file.
You can edit the file using an editor of your choice. See the following section, “Importing the Contents of the Configuration Database” for more information about editing this file.
Note
In order to use the same configuration file on all Console Manager systems, the SCSNODE name must match the TCP name for each system. To verify, ping the OpenVMS system by name.
3.11.2. Importing the Contents of the Configuration Database
The import routine only adds new records to an existing database. It ignores any records that already exist. VSI recommends that you delete or rename the default configuration database file before importing an edited text file. This ensures all changed records are updated.
Do not copy the configuration database as this leaves the old definitions in place. Any import of records which already exist in the configuration database will fail.
3.11.2.1. To import a file
Run the configuration editor.
Pull down the File menu.
Choose the Import... menu item.
Enter the name of the file to import in the Selection field.
Click OK to accept the file. The file is then imported.
To make the changes active, you must reconfigure Console Manager (see the chapter Managing Console Manager)․
When you have modified the default configuration database, reconfigure Console Manager to activate the changes you have made (see the section, Activating Your Configuration Database Changes).
3.12. Leaving the Configuration Editor
There are two ways to leave the configuration editor, by choosing one of the following items from the File menu:
Exit - this saves and verifies any changes you have made to the database prior to exiting.
Quit - this exits without saving any changes since your last save.
3.12.1. Consequences of Saving With Verification Errors
If there are verification errors for a system, then the editor disables the system in the configuration database, warns you, and asks if you want to continue to exit. This has the following consequences:
If you continue to exit, then the next time you attempt to start, or restart, the Console Manager software, the startup procedure will abort.
You can reconfigure Console Manager, but you will be unable to connect to the console of the serviced system that has been disabled.
3.13. Activate Your Configuration Database Changes
When you have modified the default configuration database, you must activate the choices that you have made. You can do this either by reconfiguring, or restarting the Console Manager software. See the chapter Managing Console Manager for more information.
Note
You are now ready to use Console Manager. It will run without any event notification services being set up. See the chapters Understanding ENS through Create Your Own Action Routines if you want to set up notification services. VSI recommends that you do set up ENS to maximize the benefits of Console Manager.
3.14. Recreating the Console Manager Configuration Database
You may need to create a new template configuration database file (for example, if the file already exists because you are reinstalling Console Manager).
To create a new template configuration database, delete your current configuration database file and build a new file as follows:
Run the configuration editor interactively and import the installation template file:
$ DELETE CONSOLE$DATA:CONSOLE_CFG.DAT;*
$ CONSOLE EDIT/INTERACTIVE=CHARACTER_CELL IMPORT -
CONSOLE$TEMPLATES:CONSOLE$CONFIG.PORT
Chapter 4. Setting Up Failover
Failover support is new to Console Manager beginning with version 3.0. You can designate both a primary and a secondary host for each serviced system or device. By defining the same configuration on all primary hosts and all secondary hosts, you are assured of full coverage of your serviced systems.
Once defined, the secondary host polls the primary host on a fixed interval ensuring its ability to manage the systems assigned to it.
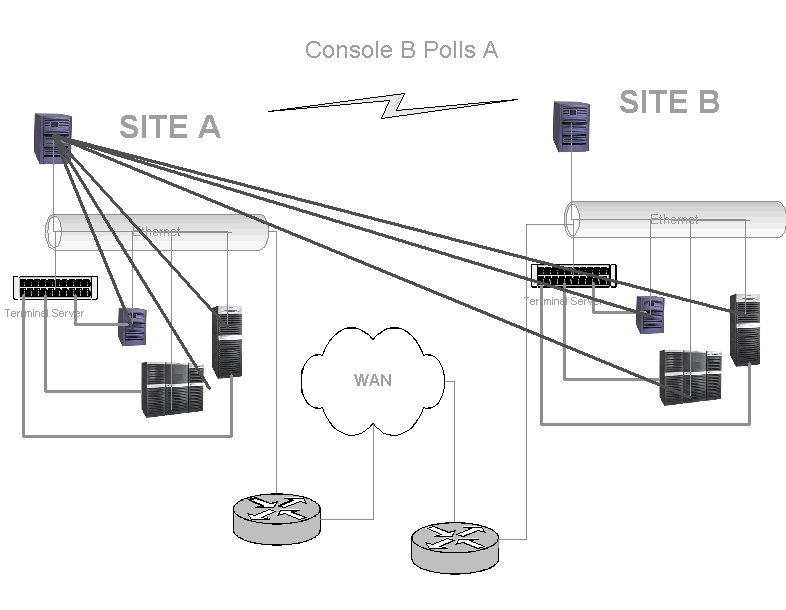
Whenever a secondary host cannot reach a primary host, it attempts to take control of the serviced systems for which it is designated the secondary host.
While in control, the secondary host continues to poll the primary host. Once the secondary host restores communication with the primary host, it releases control of the appropriate systems.
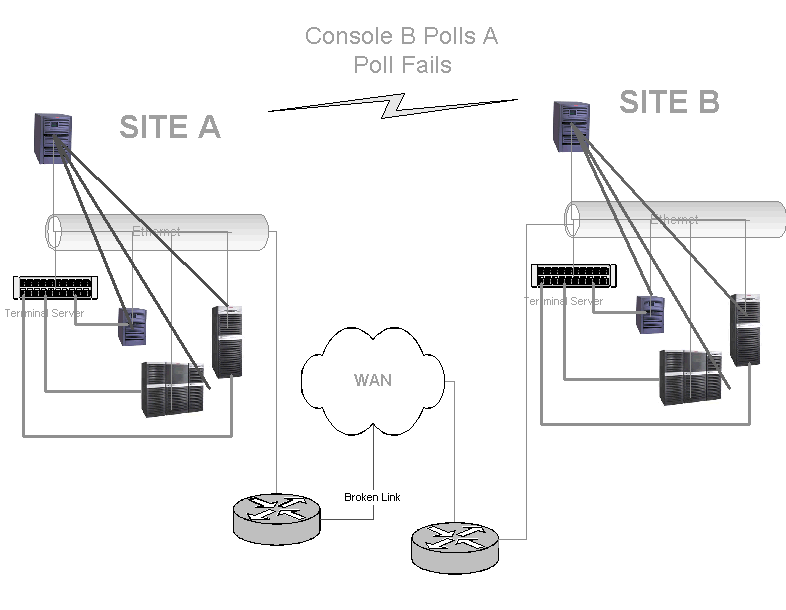
This section contains the following topics:
4.1. Establishing the Configuration
Before you use failover you need to configure your system. The configuration is a three-step process. The steps are as follows:
Creating the configuration
Exporting the configuration to a file
Copying and importing the configuration file to the hosts
Follow the procedure.
To create the configuration, perform the following steps:
Decide what system you want as the primary host, and what system you want as the secondary host.
Define or modify the system definition to specify the primary and secondary hosts for each serviced system:
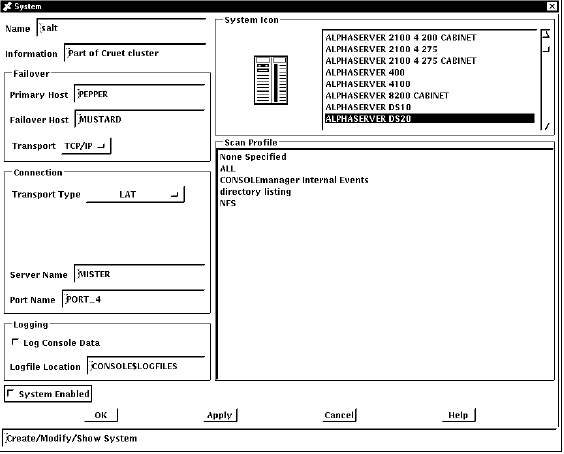
Set characteristics for failover:
Failover keep-alive timer specifies the polling frequency. Under normal circumstances, polling occurs using this frequency. The default is 120 seconds. When a poll fails, the polling interval decreases to half the keep-alive timer value.
Failover polling timeout is the number of seconds after which poll requests time out if they do not receive a response. The default is 60 seconds.
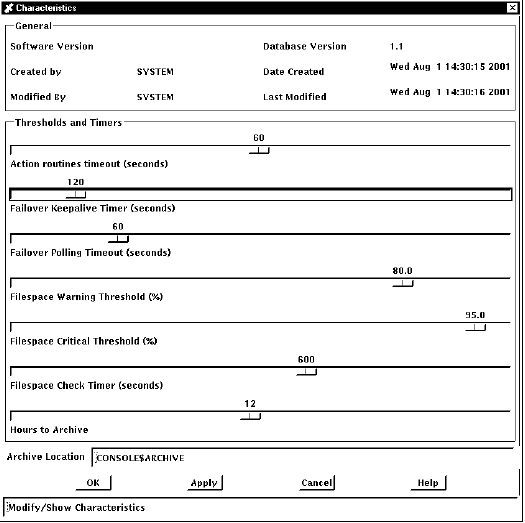
Create scans, filters and actions you require to handle failover events. For more information on creating scans and filters, see the chapter Setting up the ENS Components.
TCP/IP is the transport supported for polling between the secondary and primary hosts.
To export the contents of the configuration into a text file:
Pull down the File menu and choose the Export... menu item. This displays the Export dialog box.
Enter a name for the export file. Usually the file receives the .PORT extension.
Click OK to save and export the file.
You can edit the file using an editor of your choice.
See the section Using the Command Line Interface to the Configuration Editor for instructions on how to do this process using the command line interface.
Note
In order to use the same configuration file on all Console Manager systems, the SCSNODE name must match the TCP name for each system. To verify, ping the OpenVMS system by name.
You need to copy and import the configuration file to the primary and secondary hosts.
The import routine adds new records to an existing database and replaces objects that have the same name and type. This action may not be what you intend. VSI recommends that you backup the default configuration database file (rename or copy to a different name) before importing the edited text file.
Do not copy the configuration database as this leaves the old definitions in place. Any import of records which already exist in the configuration database will fail.
To import a file:
Run the configuration editor.
Pull down the File menu.
Choose the Import... menu item.
Enter the name of the file to import in the Selection field.
Click OK to accept the file. The file is then imported.
To make the changes active, you must reconfigure Console Manager (see the chapter Managing Console Manager)
After you modify the default configuration database, review the changed objects. When you are satisfied with the results, reconfigure Console Manager to activate the changes you have made. For more information on activating you changes, see the section Activating Your Configuration Database Changes.
See the section Using the Command Line Interface to the Configuration Editor for instructions on how to do this process using the command line interface.
If you would like failover to communicate using IPv6 addressing, you must use this configuration on OpenVMS:
Dual-stack environment
In a dual-stack environment, the default address family for Console Manager failover is IPv4. To enable IPv6 addressing, define the system logical CONSOLE$ENABLE_IPV6 with a value of 1, as in the following example:
$ define/system CONSOLE$ENABLE_IPV6 1
When this logical name is defined, Console Manager will attempt to resolve host names to either an IPv4 or an IPv6 address (whichever comes first) for the primary and secondary host.
Testing IPv6 addressing (For testing only)
To verify that your IPv6 CM connection is working properly, for your convenience you can define the following logical name on the primary and secondary nodes:
$ define/system CONSOLE$USE_IPV6_ONLY 1
When this logical name is defined, Console Manager attempts to resolve host names to an IPv6 address. If an IPv6 address is not available and an IPv4 address is available, the IPv4-mapped IPv6 address is used.
Note
For information on how to configure IPv6 using SSH, see the section "Configuring SSH".
4.2. Events
Console Manager has added new internal events to inform you of key failover activity. The following table lists these events:
| Event |
Meaning |
|---|---|
| CMgr Poll to Primary Host Failed |
A poll to the primary host failed. |
| CMgr Failover Control Success |
The secondary host has taken control. |
| CMgr Failover Release Control |
The secondary host has successfully released control. |
| CMgr Failover Control Failed |
The secondary host has failed to take control. |
| CMgr Poll to Primary Success |
A poll to the primary host has succeeded. This message is not normally seen. It is used to indicate success after a period of failed polls. |
| CMgr Failover Taking Control |
The secondary host is taking control. |
The following figure shows a sequence of events displayed when failover takes place:
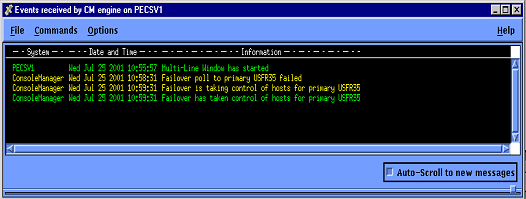
The following figure shows a sequence of events displayed when the secondary host releases control:
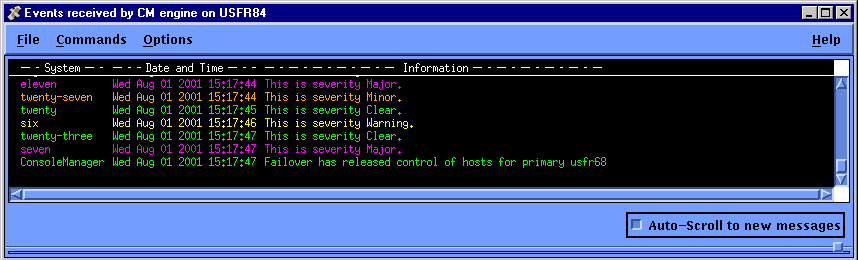
4.3. Logical Names
Additional logical names have been created to tune your failover environment:
| Logical Name |
Use |
|---|---|
| CONSOLE$FAIL_LISTEN_PORT |
The port number used by a primary host to listen for poll requests from a secondary host. Default: 9999 |
| CONSOLE$SUSPECT_NODE_LIMIT |
The number of consecutive failed or “suspect” polls for the secondary host to allow before taking control from the primary host. Default: 4 |
4.4. Failover Systems
4.4.1. Console Status
The console status on a secondary host lists all serviced systems, whether the secondary host controls them or not.
When the secondary host is in control, the actual status of the serviced system displays. Systems that are not currently controlled by the secondary host have a process id of zero, and an unknown state of PY?:
------SYSTEM--- ---PID--- --STATE ---BYTES- -LINES- EVENTS ----USER----
 1  A10         00000000     PY?         0       0       0
 2  A11         00000000     PY?         0       0       0
 3  A12         00000000     PY?         0       0       0
 4  A13         00000000     PY?         0       0       0
 5  A14         00000000     PY?         0       0       0
 6  A15         00000000     PY?         0       0       0
 7  A16         00000000     PY?         0       0       0
 8  A17         00000000     PY?         0       0       0
4.4.2. Console C3
Systems that have failover configured appear in the C3 interface on the secondary host as disabled or grayed out. When the secondary host is in control of these systems, they display with the actual system status.
4.5. Console Manager Failover Configurations
Console Manager supports more complex failover configurations. You can set up Console Manager with the following configurations:
4.5.1. Peer-to-Peer Loading Balancing with Fail over
In this configuration, the load is split between two Console Managers. Each Console Manager is defined as the secondary Console Manager for those serviced systems for which it is not a primary.
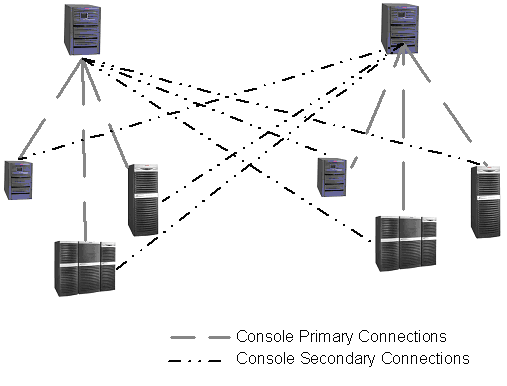
4.5.2. Load Balancing with dedicated Fail over Console Manager
In this configuration, a 3rd Console Manager is deployed. This Console Manager acts as secondary for all serviced systems.
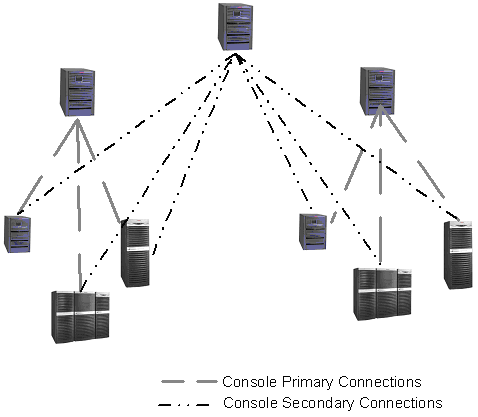
4.6. Best Practices
The following best practices assure proper notification of console activity:
Be sure that the primary and the secondary hosts are different.
No serviced system should be defined as its own primary or secondary host.
Use one primary host and one secondary host.
Chapter 5. Managing Console Manager
This chapter describes how to manage Console Manager after you have installed and set it up on the host system. You can do all tasks from the command line, or from the C3 interface provided that you have the necessary Console Manager privileges.
The chapter also describes the management tasks you need to perform outside the scope of Console Manager to ensure the smooth running of the product.
This section contains the following topics:
5.1. Background Information on Archiving Log Files
The size of the event log files depends on the number of serviced systems you are managing, and the number of events that are generated by these systems; Console Manager appends its log files continuously. Therefore, you should archive your log files on a regular basis, so that the live log files (those to which Console Manager writes data as it is received) do not get too large.
If you want to keep the archived information, but want to free up disk space, you can copy the archives to tape, or other backup medium, before deleting them.
Note
You cannot archive directly to tape.
When you archive the log files, they are stored in the same format as live files, in either the default archive directory, or a directory that you specify. During the archive temporary files are created in archive area for both the new live log files, and the archive files. The new live log files are copied back to the log file directory, to replace the older versions. The archive log files remain in the archive directory. However, if you specify that you want to delete the archived data, only the temporary new live log files are written to the archive area, which are then copied back to the log file directory.
Event Notification Services provides an archive cleanup action routine (see the chapter Supplied Action Routines). This routine automatically deletes all files in the archive area that are more than a set number of hours old (the default is 24), when the archive area gets full. This feature is a failsafe option; you should have a regular archive strategy, and copy the archive files to backup media if you intend to keep them.
You must have the archive privilege granted to your username in the configuration database to be able to use this command.
To archive the Console Manager log files, you must first shut down Console Manager.
5.1.1. Hints on Archiving
Ensure you have enough disk space in your archive directory to store the Log, Timestamp and Event files for each serviced system being archived. If disk space is limited, VSI recommends that you archive one system at a time, removing the archived files from the directory before continuing with the next system.
You cannot archive directly to a non-disk device. However, you can copy or move the files to a non-disk device, such as a magnetic tape, after archiving your data. If you choose to move them out of the archive directory, ensure that you keep the original filenames, otherwise the
EXTRACTcommand, and the monitor interfaceREVIEWcommand will not operate correctly. The file names have the system and dates embedded in them and these are used to concatenate the data for review.You cannot archive in the following situations:
If a user is connected to the console of a system that you want to archive. In this case, Console Manager generates an Archive aborted event, which includes the name of the user who is connected to the console.
If a user is reconfiguring. In this case, Console Manager generates an Archive aborted event, indicating that a reconfigure is in progress.
If another archive operation is in progress.
If you do not want to keep your archived data, you can delete them as part of the archiving process.
The keyword ALL used as a system name archives all files.
The keyword CONSOLEMANAGER used as a system name archives the Console Manager log file. You must shut down Console Manager before you can archive the Console Manager log file.
You must also archive the files used to log Console Manager events as they grow continuously (see the section, Archiving Log Files, later in this chapter for instructions on how to do this).
You can archive the system log files while Console Manager is running. However, if you want to archive the Console Manager log files, you must shut down Console Manager first.
By default the archive directory CONSOLE$ARCHIVE resides on the same volume as the log files. You can redefine this logical name using the SYS$STARTUP:CONSOLE$PRIVATE_SETUP.COM procedure. If you wish to do this, copy the template file SYS$STARTUP:CONSOLE$PRIVATE_SETUP.TEMPLATE to SYS$STARTUP:CONSOLE$PRIVATE_SETUP.COM and edit it to reflect your individual requirements. The Console Manager startup checks to see if SYS$STARTUP:CONSOLE$PRIVATE_SETUP.COM exists and executes it automatically.
You can only archive files to a local directory on the Console Manager host system. That is, you cannot include a system name in the directory specification. For example, you cannot have SALT::CONSOLE$ARCHIVE:.
Automatic archiving is provided as a failsafe option. VSI recommends that you do not rely on this for archiving your log files, and manually archive at regular intervals; depending on the number of events being logged this could be daily or weekly.
To read data you have placed from the archive directory, follow the instructions in the section, Reading Archived Data, later in this section
For more archiving examples and information, see the
HELP CONSOLE
                ARCHIVE
command.
5.2. Managing Disk Space
Console Manager continually appends the console data and event information to the appropriate log files for the serviced systems. Also, Console Manager events are appended to the Console Manager log files. Console Manager will always log console data from your serviced systems, and Console Manager events, even if you do not set up ENS to monitor events on those systems.
If you are managing many systems, the log and archive files may take up large amounts of disk space, depending on the amount of data received and the number of events being generated by those systems.
You can decrease the size of the log files by archiving on a regular basis (see the section Background Information on Archiving Log Files earlier in this chapter). If you do not want to keep the archive files, you can delete them either manually after an archive operation, or as part of the archive operation.
VSI recommends that you use an archive strategy for Console Manager. For example, archive once a day, or once a week, depending on the amount of data and number of events being logged.
Unless you archive the log files on a regular basis, the disk containing your log files will start to get full. Console Manager provides two filespace thresholds for this situation, each specified as a percentage of the total available logging space:
Warning, which causes only an event to be generated.
Critical, which causes both an event to be generated and an archive process to be activated. This process archives all the systems which log to the disk or partition in question.
You can change the percentage value for these thresholds (see the chapter Modifying the Configuration Database for more information). If the critical threshold is reached, you can also set the number of hours of log data that the archive process is to archive (see the chapter Modifying the Configuration Database for more information).
Also, if the disk containing the archive area becomes full, then Console Manager activates an archive cleanup process. By default, this process deletes archive log files that are older than a 24 hours. You can change the action routine that performs this activity. See the chapter Supplied Action Routines for details on how to do this.
Note
VSI strongly recommends that you keep your archive area, and the area for the live log files, on separate disks or partitions.
The following figure shows an example of using multiple disks for log and archive files. It also shows what happens when the critical threshold level is reached, and the archive area becomes full. The main stages in the process, as depicted in the figure, are as follows:
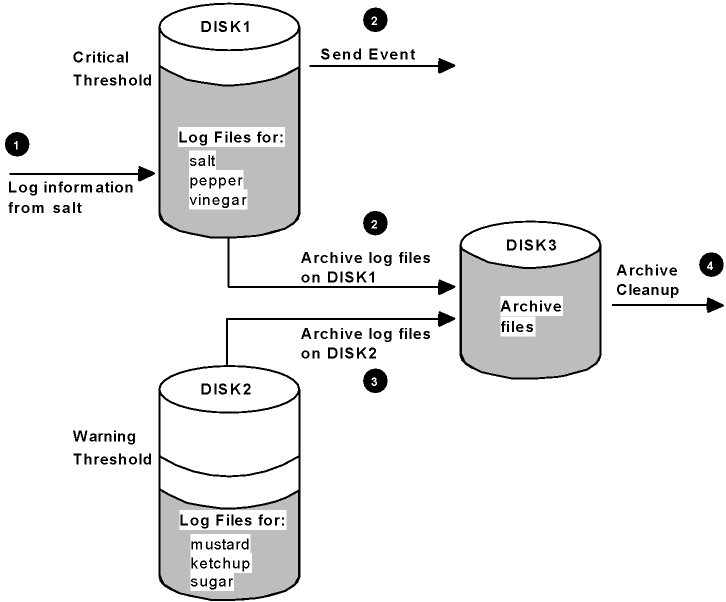
Log information for system salt is received, which causes the disk space used on DISK1 to reach the critical threshold.
The Console Manager event CMgr Disk Critical is generated, and the log files on DISK1 are archived.
At a later time, the user archives the log files on DISK2. This causes the archive area on DISK3 to become full.
Console Manager generates a CMgr Archive Area Full event, and invokes the archive cleanup procedure, which deletes any archive files older than 24 hours.
5.3. Managing Console Manager from the Command Line Interface
This section describes how to use the command line interface to manage Console Manager.
5.3.1. Console Manager Management Functions
This section summarizes the management functions of Console Manager.
The following table lists all the Console Manager management functions available from the operating system command line.
| Command |
What It Does |
|---|---|
| CONSOLE ARCHIVE |
Archives log files |
| CONSOLE STATUS |
Displays the status of Console Manager components and serviced systems |
| CONSOLE RECONFIGURE |
Reconfigures the running Console Manager software |
|
@SYS$STARTUP:CONSOLE$ MANAGER$SHUTDOWN or CONSOLE SHUTDOWN |
Shuts down the Console Manager software |
| @SYS$STARTUP:CONSOLE$ MANAGER$STARTUP.COM |
Starts the Console Manager software |
| CONSOLE VERIFY |
Verifies the integrity of the log and archive files for the serviced systems, and optionally repairs them. |
For additional information about each of the Console Manager management commands
available from your operating system command line, and further examples, see the
HELP CONSOLE command.
5.3.2. Starting the Console Manager Software
To start Console Manager on your host system from your operating system command line, log in to an account with system privileges and enter:
$ @SYS$STARTUP:CONSOLE$MANAGER$STARTUP.COM
Note
When you start the Console Manager software, the startup procedure verifies the configuration database. If any verification errors are found, the Console Manager software will not start. You must fix these errors using the configuration editor.
If the Console Manager processes are already running, then the startup command informs you and exits. You can use the restart command to restart the Console Manager software as described in the section Restarting Console Manager, later in this chapter.
The startup procedure also invokes one or more child console controllers (see the chapter Introduction for more information), depending on the number of serviced systems you have. A child console controller can handle up to 16 serviced systems. If you have more than 16 serviced systems, then multiple child console controllers are started. For example, if you have 20 serviced systems, the first child console controller started handles the first 16 systems you have defined in the configuration database. The second handles the remaining four systems.
Each child console controller writes its own log file. The primary child console controller writes to:
CONSOLE$TMP:CONTROLLER_nn.LOG where nn is a number that identifies the child console
controller.
The failover child console controller writes to:
CONSOLE$TMP:FAIL_CONTROLLER_primary_nn.LOG where primary is the name of the primary host for serviced systems.
5.3.2.1. Restarting Console Manager
If you use the restart parameter to the startup command, this stops any Console Manager processes that are running and restarts the software.
To start Console Manager on your host system when processes are already running, log in to an account with system privileges and enter:
$ @SYS$STARTUP:CONSOLE$MANAGER$STARTUP.COM RESTART
5.3.3. Stopping the Console Manager Software
To stop Console Manager on your host system from your operating system command line:
Log in to an account that has been granted the shutdown privilege in the configuration database, and enter:
$@SYS$STARTUP:CONSOLE$MANAGER$SHUTDOWN
The shutdown command shuts down Console Manager in an orderly manner:
All current log files are closed.
All Console Manager processes are halted, except for the ENS action routines. However, you can set up your action routines to respond to shutdown events.
Historical log data remains available to the monitor and C3 interfaces.
If users are connected to the consoles of serviced systems when you shut down the Console Manager software, they will be disconnected from the console and be placed in the monitor interface.
5.3.4. Reconfiguring the Console Manager Software
To reconfigure Console Manager on your host system from your operating system command line, log in to an account that has been granted the reconfigure privilege in the configuration database, and enter
$ CONSOLE RECONFIGURE
The reconfigure command forces the running software to reread the configuration database, and incorporate any changes you have made to it. You must reconfigure the Console Manager software whenever you make any changes to the configuration database, otherwise the changes will not be activated. Switches to this command are shown in the following table.
| Switch |
What It Does |
|---|---|
| /NOCONFIRM |
Assumes a yes response to the confirmation question in the reconfigure command |
| /CONFIRM |
Prompts the user for confirmation (default) |
5.3.5. Reconfiguring SSH Connections
The Reconfigure command is a complex database reconfiguration. Some actions are run in
the background; these might continue after the Console Manager Reconfigure command returns
to the prompt. This is pertinent to SSH connections, which are highly asynchronous. For
SSH connections, allow at least three minutes for the connections to change from unopened
state (HYU) to begin opening (HYO state) as shown by the CONSOLE
STATUS/ALL command. When the connection succeeds (HYE) or fails (HYF), the
connection has completed.
5.3.5.1. Archive Log Files
To archive log files from your operating system command line, use:
$ CONSOLE ARCHIVE
The system name ALL is reserved for Console Manager. If you use ALL as the system name, all files on all systems you have access to in the configuration database are archived.
The following table shows the switches available to the archive command.
| Switch |
What It Does |
|---|---|
| /NOCONFIRM |
Assumes a yes response to the confirmation question in the archive command |
| /CONFIRM |
Prompts the user for confirmation (default) |
| /HOURS=n |
Archives the oldest n hours of data from the beginning of the log data |
| /KEEP=n |
Archives all data except the most recent n hours of data |
| /BEFORE=time |
Archives all data up to time specified |
| /DIRECTORY=directory |
Archives data to specified archive directory. You can only archive files to a local directory on the Console Manager host system. That is, you cannot include a system name in the directory specification. |
| /DELETE |
Deletes the archived data |
If the file space used in the logging directory exceeds the critical threshold set in the configuration database, Console Manager automatically archives data on all serviced systems which are logging data to the directory that is short of space.
You cannot start an archive if another archive operation is already in progress. If you attempt to archive when another archive operation is already in progress, the following message is displayed:
VSI Console Manager is already archiving a system.
Archive not performed
5.3.5.2. Archiving the Console Manager Event Log Files
To archive the log files used to log Console Manager events, you must first shut down Console Manager. Then, use the archive command with the keyword CONSOLEMANAGER as its system argument:
Enter:
$ CONSOLE ARCHIVE CONSOLEMANAGER
5.3.5.3. Archiving the Oldest Data
To archive the oldest data, use the -h or /HOURS switch (depending on your operating system) to the archive command. This stores the files in the same format as the live log files in either the default archive directory, or a directory of your choice.
For example, to archive the oldest 24 hours of data for the system SALT, enter:
$ CONSOLE ARCHIVE SALT/HOURS=24
5.3.5.4. Archiving All But The Most Recent Data
To archive all but the most recent 12 hours of data for the system PEPPER, enter:
$ CONSOLE ARCHIVE/NOCONFIRM ALL
5.3.5.5. Archive Data On All Systems
To archive all data, use ALL with the -h or/HOURS switch. For example, to archive the oldest 24 hours of data for all the serviced systems in your configuration database, enter:
$ CONSOLE ARCHIVE ALL/HOURS=24
5.3.5.6. Archive Data Without Confirmation
To archive the oldest n hours of data (where n is the default archive period defined in the configuration database) for all systems to the default archive directory, without the confirmation question being asked, enter:
$ CONSOLE ARCHIVE/NOCONFIRM ALL
5.3.5.7. Archive Data Up To a Specified Time
To archive the data on PEPPER up to 13.00 on 27 July 2009, enter:
$ CONSOLE ARCHIVE PEPPER/BEFORE="27-JUL-2009 13:00"
5.3.5.8. Deleting the Archived Data
You can delete the archived information by using the command:
$ CONSOLE ARCHIVE system-name/DELETE
5.3.5.9. Change the Archive Directory
You can change the directory on the Console Manager host system to which the archive files are written. To do this, enter:
$ CONSOLE ARCHIVE/DIRECTORY=directory system-name Note
You can only archive files to a local directory on the Console Manager host system. That is, you cannot include a system name in the directory specification.
5.3.5.10. Reading Archived Data
To be able to view archived console logs, you need to place the archive files in the default archive directory as specified in the configuration database.
You can view archived logs by using the command:
$ CONSOLE EXTRACT
You can also use the monitor interface REVIEW command (see the
chapter Using the Monitor Interface).
These commands concatenate the archive files for the required system into a temporary file in the default archive directory. and displays the file on the user's terminal. Therefore, there must be sufficient space in the default archive directory before attempting to review the archive data. The amount of space required is equal to the sum of all the available archive files for the system being reviewed.
Note
Do not rename archive files, as the Monitor REVIEW and
EXTRACT commands use the file names to correctly concatenate the
files for chronological review.
5.3.6. Finding the Status of Console Manager Components
You can display the following types of status from Console Manager:
Information About Console Manager in General
Information Specific to a Particular Serviced System
Information on Users Connected to Consoles of Serviced Systems
Information on Events
Note
If you delete or rename systems and then reconfigure them, the number of bytes or lines recorded in the statistics may decrease.
The following table shows the switches available to the status command. If no switch is specified, then a summary screen is displayed.
| Switch |
What It Does |
|---|---|
| /ALL |
Display all connected serviced systems |
| /CONTINUOUS |
Display status every 5 seconds (default) |
| /CONTINUOUS/ INTERVAL=20 |
Display status at intervals of your choice, for example, 20 seconds (the interval qualifier is not valid unless combined with the continuous qualifier |
| /SYSTEM=SALT |
Display status of specified system, for example, salt |
| /USERS |
Display users connected to consoles of serviced systems |
For more examples relating to Console Manager status, see the DCL HELP
CONSOLE STATUS command.
5.3.6.1. Information About Console Manager in General
To find out the current status of Console Manager components, use the status command:
$ CONSOLE STATUS
For more information, see the DCL HELP CONSOLE STATUS command.
5.3.6.2. Information Specific to a Particular Serviced System
To display the status of a specified serviced system, use:
$ CONSOLE STATUS/SYSTEM=system-name For more information, see the DCL HELP CONSOLE STATUS command.
5.3.6.3. Information on Users Connected to Consoles of Serviced Systems
To display information on users connected to the consoles of serviced systems, use:
$ CONSOLE STATUS/USERS
For more information, see the DCL HELP CONSOLE STATUS
command.
5.3.6.4. Information on Events
To display information on events, use either:
$ CONSOLE STATUS
or
$ CONSOLE STATUS/ALL
CONSOLE STATUS State Values
The CONSOLE STATUS list for all systems includes a three character field representing the system state. Each character is a column representing a specific state
Column 1, Transport type
D = Direct
H = SSH
L = LAT
P = Pseudo-terminal
T = TELNET
Column 2, Enabled state
N = Not enabled
Y = Enabled
Column 3: Current state
E = OK
F = Open failed
L = Link lost
O = Opening
U = Unopened
? = Unknown
Example:
PYE pseudo-terminal is enabled and state is OK.
For more information, see the DCL HELP CONSOLE STATUS command.
5.4. Managing Console Manager from the C3 Interface
This section describes how to use the C3 interface to manage Console Manager.
Use the appropriate pull down menus for startup, shutdown, archive and reconfigure. If a menu item is grayed out, it means that you do not have the privileges to use it, or that the operation is not available due to the status of the running software.
To find out status information, the procedure is slightly different. See the section Finding the Status of Console Manager Components for a detailed explanation.
5.4.1. Starting the Console Manager Software
To start Console Manager on your host system from the C3 interface:
Make sure that your DECwindows Motif transport is set up (see Setting Up the DECwindows Motif Transport for the DECwindows Interface).
Ensure that the session manager security for the system you are setting the display from is enabled on your local workstation.
Pull down the Commands menu and choose the Startup item from the Console Manager submenu.
Note
When you start the Console Manager software, the startup procedure verifies the configuration database. If any verification errors are found, the Console Manager software will not start. You must fix these errors using the configuration editor.
If the Startup option is grayed out, then you can restart the Console Manager software as described in Restarting Console Manager at the C3 interface, later in this chapter.
The startup procedure also invokes one or more child console controllers (see Introduction), depending on the number of serviced systems you have. A child console controller can handle up to 16 serviced systems. If you have more than 16 serviced systems, then multiple child console controllers are started. For example, if you have 20 serviced systems, the first child console controller started handles the first 16 systems you have defined in the configuration database; the second handles the remaining four systems.
Each child console controller writes to its own log file. The primary child console controller writes to:
CONSOLE$TMP:CONTROLLER_nn.LOG where nn is a number that identifies the child console controller.
The failover child console controller writes to:
CONSOLE$TMP:FAIL_CONTROLLER_primary-host-name_nn.LOG where primary-host-name is the name of the primary host for serviced systems.
5.4.1.1. Restarting Console Manager at the C3 Interface
Unlike the command line interface, there is no restart command in the C3 interface. Instead, do the following:
Pull down the Commands menu and choose the Console Manager submenu.
From the Console Manager submenu, choose the Shutdown option. Then click Yes to confirm shutdown. This enables the Startup option and changes the color of the two icons at the bottom of the main window to red.
Repeat step 1, then choose the Startup option to start the Console Manager software. The color of the two icons at the bottom of the main window changes to green.
If you are using ENS, and the Events window is displayed, you must reconnect Console Manager to ENS. To do this, pull down the File menu on the Events window, and select the Connect to ENS menu option. The Events window title changes.
5.4.2. Stopping the Console Manager Software
To stop Console Manager on your host system from the C3 interface:
Pull down the Commands menu and choose the Shutdown item from the Console Manager submenu.
This displays the Console Manager Shutdown confirmation box.
Click Yes in the dialog box.
5.4.3. Reconfiguring the Console Manager Software
To reconfigure Console Manager on your host system from the C3 interface:
Pull down the Commands menu and choose the Reconfigure item from the Console Manager submenu.
This displays the Console Manager Reconfigure confirmation box.
Click Yes in the dialog box.
5.4.4. Archive Log Files
To archive log files from the C3 interface:
Pull down the Commands menu and choose the Archive... item from the Console Manager submenu.
Complete the information in the dialog box (see the following figure).
Some examples are shown in the sections, Archiving the Oldest Data through Archiving Data Up to a Specified Time. If you want to delete the archived data as part of the archive process, then click Do not save archive data.
If you want to archive the data to a different directory, then change the Archive Directory field to the directory required.
When you have set up the archive parameters to the required values, click OK. The log files are archived as requested.
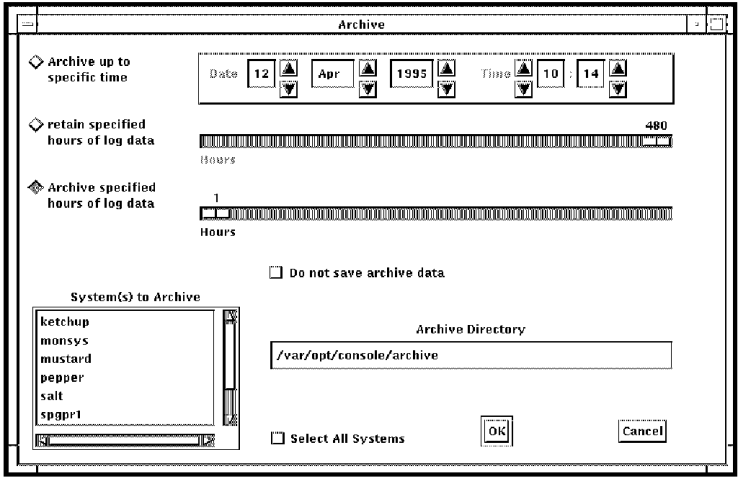
You cannot start an archive if another archive operation is already in progress. If you attempt to archive when another archive operation is already in progress, the following message is displayed:
Archive already in progress
5.4.4.1. Archive the Console Manager Event Log Files
To archive the log files used to log Console Manager events, you must shut down Console Manager first, and use the command line interface command described in Archiving the Console Manager Event Log Files earlier in this chapter.
5.4.4.2. Archive the Oldest Data
To archive the oldest data:
Go to the Archive dialog box (see Archiving Log Files earlier in this chapter).
Click Archive specified hours of log data.
Click OK to accept the changes.
Note
The maximum period for which you can archive data using the C3 interface is up to the previous 480 hours. However, VSI recommends that you archive your log files at regular intervals (see Background Information on Archiving Log Files, earlier in this chapter).
5.4.4.3. Archive All But The Most Recent Data
To archive all but the most recent 12 hours of data on PEPPER:
Go to the Archive dialog box (see Archiving Log Files, earlier in this chapter).
In the System(s) to Archive list, select pepper.
Click retain specified hours of log data.
Move the slider until the value 12 is displayed above the slider.
Click OK to accept the changes.
5.4.4.4. Archive Data On All Systems
To archive data on all systems:
Go to the Archive dialog box (see Archiving Log Files, earlier in this chapter).
Click the Select All System option.
Click OK to accept the changes.
5.4.4.5. Archive Data Up To a Specified Time
To archive the data on PEPPER up to 12.02 on 27 March 2009:
Go to the Archive dialog box (see Archiving Log Files, earlier in this chapter).
In the System(s) to Archive list, select pepper. Click Archive up to specific time.
Change the Date and Time fields to read 27 Mar 2009 12:02
Click OK to accept the changes.
5.4.4.6. Deleting the Archived Data
To delete the archived data:
Go to the Archive dialog box (see Archiving Log Files, earlier in this chapter).
Choose the archive setup you require.
Click Do not save archive data.
Click OK to accept the changes.
5.4.4.7. Change the Archive Directory
To change the directory on the Console Manager host system to which the archive files are written:
Go to the Archive dialog box (see Archiving Log Files, earlier in this chapter).
In the Archive Directory field, change the directory to that required.
Click OK to accept the changes.
5.4.4.8. Reading Archived Data
To be able to view archived console logs, you need to place the archive files in the default archive directory as specified in the configuration database.
To read archived log files you must use the Monitor interface see the chapter Using the Monitor Interface.
5.4.5. Finding the Status of Console Manager Components
You can display the following types of status from Console Manager:
Information About Console Manager in General
Information Specific to a Particular Serviced System
Information Specific to a Particular Group
Information on Users Connected to Consoles of Serviced Systems
Information on Events
Note
If you delete or rename systems, then the number of bytes or lines recorded in the statistics may decrease.
5.4.5.1. Information About Console Manager in General
You can display information about Console Manager on the C3 interface:
Click the Info... button on the Main C3 Interface window.
This displays a dialog box containing a snapshot of Console Manager status (see the following figure). For example, it shows the number of serviced systems connected, the connection types and the total number of bytes logged.
Dismiss the dialog box when you have finished with the information.
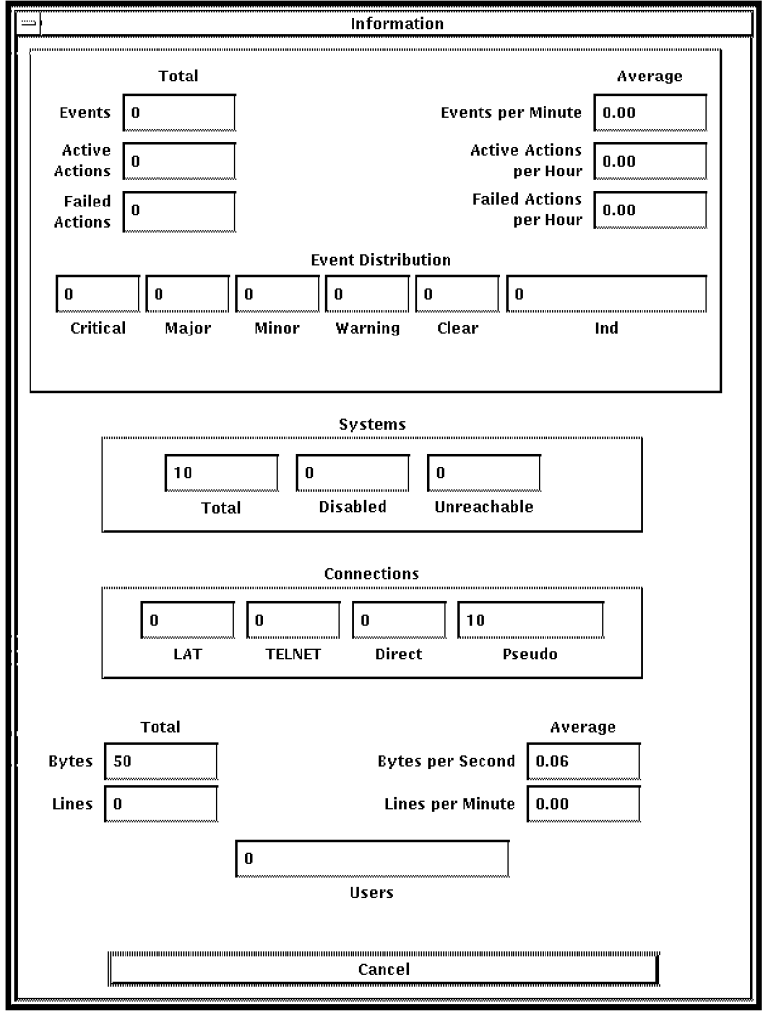
5.4.5.2. Information Specific to a Particular Serviced System
To display the status of a specified serviced system:
Click the right mouse button on the icon representing the serviced system.
Choose the Information... item from the pop-up menu.
This displays information for that system, including details of the control keys and the person who is using the system (if applicable), as shown in the figure below.
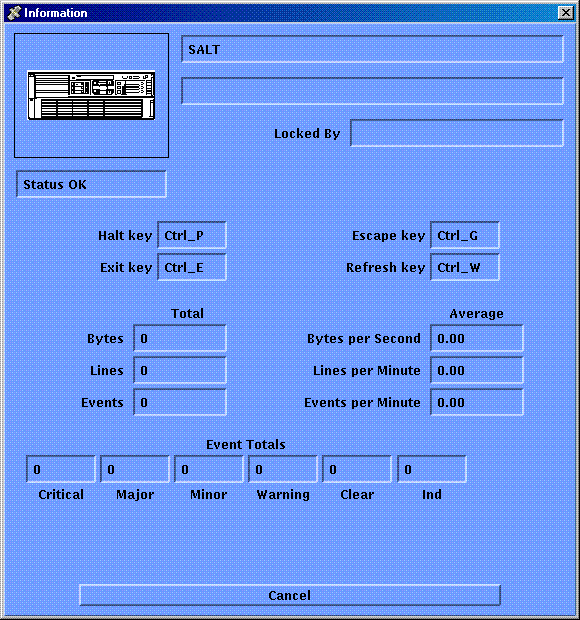
5.4.5.3. Information Specific to a Particular Group
To display the status information for a particular group:
Click the right mouse button on the icon representing the group.
Choose the Information... item from the pop-up menu. The group status information is displayed as shown in the next figure.
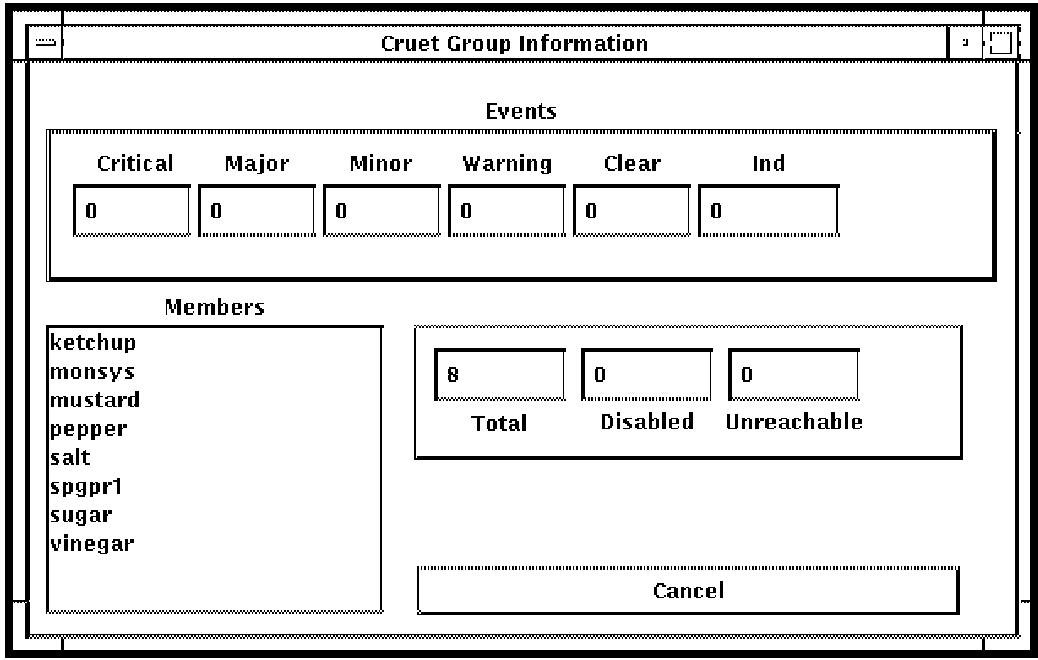
5.4.5.4. Information on Users Connected to Consoles of Serviced Systems
To display information on Users Connected to Consoles of Serviced Systems, you must use the command line interface (see Information on Users Connected to Consoles of Serviced Systems, earlier in this chapter). However, you can find out the number of users that are using Console Manager by clicking the Info... button on the main C3 window.
5.4.5.5. Information on Events
You can get information on events from various places, by:
Clicking on the Info... button on the main C3 window. This gives details for all systems of:
total events received so far
average events received per minute
the total events received for each priority - the event distribution
Clicking the Info... button on the group window. This gives the event totals for each priority for the group.
Right-clicking a system icon and selecting Information... from the pop-up menu. This gives the event totals for each priority for that system.
5.5. Back Up the Configuration Database
VSI recommends that you export the configuration database at regular intervals. Use the export command from within the configuration editor to do this as described in the chapter Modifying the Configuration Database.
Store this file offline as part of your regular Console Manager host backup strategy. You may also wish to export the database before and after you make any changes. This is discussed fully in the chapter Modifying the Configuration Database.
5.6. Verifying the Integrity of Log and Archive Files
To verify the integrity of the log and archive files, enter:
$ CONSOLE VERIFY system-name Caution
Before you can verify the integrity of the log and archive files of your serviced systems, you must shut down the Console Manager software. This is to ensure that these files are not updated by Console Manager during the verification.
By default, Console Manager produces a summary report. If you require a full report, then use the following command:
$ CONSOLE VERIFY system-name /FULL
5.7. Repairing Log and Archive Files
If verify reports any problems with the log or archive files for your serviced systems, you can repair the files. You must use the verify option when repairing the files.
To repair the files, enter:
$ CONSOLE VERIFY system-name /REPAIR
Caution
Before you can repair the log and archive files of your serviced systems, you must shut down the Console Manager software. This is to ensure that these files are not updated by Console Manager during the repair. You must use the verify command with the repair qualifier in order to repair the log and archive files. Therefore, you can produce a verification report and repair the files in the same operation. If you want a full report while repairing the files, then enter:
$ CONSOLE VERIFY system-name /REPAIR /FULL
Chapter 6. Using Console Manager from the Command Line Interface
This chapter explains how to invoke and use Console Manager at a character cell terminal. When you use Console Manager at a character cell terminal, all tasks are called from the operating system prompt.
This section contains the following topics:
6.1. Getting Online Help
You can view the documentation on the product CD/DVD using a web browser or PDF viewer. You can also obtain help from the DCL command prompt.
6.2. Console Manager Console Commands
The following table lists the Console Manager commands you can use from the command line interface. This table does not include the commands used to manage Console Manager (see the chapter Managing Console Manager).
| Command |
What It Does |
|---|---|
| CONSOLE CONNECT |
Starts the connect interface from the shell, or system prompt |
| CONSOLE C3 |
Starts the C3 interface on workstations |
| CONSOLE DIALOG |
Performs a dialog with a specified serviced system |
|
CONSOLE EDIT/INTERFACE=DECWINDOWS |
Starts the configuration editor using the C3 interface |
| CONSOLE EVENTLIST |
Starts an Eventlist interactively |
| CONSOLE MONITOR |
Starts the monitor interface on character cell terminals |
| CONSOLE WATCH |
Logs console data to hardcopy devices |
| CONSOLE EXTRACT |
Outputs console log data for a specific period of time to a file, or the default output device, for examination |
|
CONSOLE EDIT /INTERFACE= CHARACTER_CELL |
Starts the configuration editor on character cell terminals |
6.3. Connect to the Console of a Serviced System
The connect interface provides direct access to the consoles of serviced systems so that you can perform management tasks on these systems from your own terminal.
To connect to the console of a serviced system, enter:
$ CONSOLE CONNECT system-name For example, to connect to the system called PEPPER from the command line, enter:
$ CONSOLE CONNECT PEPPER
Connecting to a serviced system lets you do all types of system management tasks on that system as though you were on the local console: for example, rebooting the system or installing software. To be able to connect to a serviced system's console, you must have been granted access by means of a system name or group name in the Console Manager configuration database.
Once you are connected to your specified serviced system, all keystrokes except for the defined halt, escape, exit and refresh keys are transmitted directly to the console of the system to which you are connected. While you are connected you have normal console behavior.
You can also connect to a serviced system using the monitor interface. See the chapter Using the Monitor Interface for more information.
6.3.1. Exiting the Console of a Serviced System
To exit from the console of the serviced system to which you are connected, press the control sequence you have defined for the Exit key (the default is CTRL_E).
6.3.2. Entering the Monitor Interface
To get to the monitor interface from the connect interface, press the control sequence you have defined for the Escape key (the default is CTRL_G).
6.3.3. Locking and Unlocking Consoles
When you connect to the console of a serviced system that is not currently locked by another user, then that system is locked by you, and you can write to the console of that system. Any users who subsequently connect to this console will have read-only access, and receive a message to this effect on their terminal; they can only observe what is happening on the console. This prevents the confusion that would arise if two or more users attempted to issue commands to the same console.
If you receive a message stating you are in read-only mode, you must unlock the serviced system's console (as described in the chapter Using the Monitor Interface before you are allowed to do any tasks on the serviced system's console. You must have the unlock privilege to do this.
6.4. Writing Console Activity Output to a File, Printer, or Terminal
To output live console data to a printer or terminal connected to an asynchronous device, or to a file, use the watch option to the console command. This invokes the watch interface which allows you to output console activity to a file, printer or terminal in real-time.
The system name ALL is reserved for Console Manager. If you use ALL as the system name, you can output the console activity of all systems you have access to in the configuration database.
To print the log data for the systems SALT and PEPPER to a printer connected to TTA3, enter:
$ CONSOLE WATCH/OUTPUT=TTA3: SALT,PEPPER
You can also direct the output to a text file on disk. To direct log data for SALT and PEPPER to the file LOGFILE.TXT, enter:
$ CONSOLE WATCH /OUTPUT=LOGFILE SALT, PEPPER
To stop the watch interface, use either CTRL_C or the
STOP/ID command.
Note
See the chapter Using the Monitor Interface for additional system name options for Monitor Interface.
For more information, enter HELP CONSOLE WATCH.
If you attempt to start a watch for a system that is currently being archived, then the following messages are displayed:
Archive in progress on system-name ????
If an archive is started for a system that is currently being watched, then the watch output is suspended while the archive is in progress, and the following messages are displayed:
Archive started on system-name - Watch output suspended.
Archive completed on system-name - Watch output resuming.
6.4.1. Change the Behavior of the Terminal Device
You can change the behavior of the terminal device being used as the destination of the watch command through the use of command line switches. The following table describes them in detail.
| Switch |
Description |
|---|---|
| /ALL |
Specifies that input from all the enabled systems will be output to the specified device or file. |
|
/OUTPUT={filename | device} |
Specifies the file or device to which the log data will be sent. |
| /SPEED=n1 |
Sets the speed of the terminal server between 300 and 9600 baud rate. |
| /PARITY=value |
Sets the parity: ODD, EVEN, MARK, SPACE and NONE. |
| /EIGHTBIT |
Sets the device to 8-bit ASCII text. |
| /PAGE |
Controls the display of information on the screen. |
| /HOLD |
Provides final message: End of requested output - Press Enter to exit |
| /WIDTH={80 | 132} |
Sets the width for the device. |
6.4.2. Memory Constraints When Using Watch
The watch command buffers all data to be sent to the output device. If a large number of systems are being watched on the same output device, and the output device is not fast enough to keep up with the rate of console data, the watch command will use large amounts of system memory to buffer the console messages. In extreme cases, the Console Manager host may suffer memory shortages. This will have adverse effects on the other Console Manager components.
To avoid this, ensure that the output device can accommodate the data rate for the systems being watched. Where possible, use multiple output devices.
Note
Where you specify more than one system, lines of text will be interlaced in the output.
6.5. Extracting Historical Log Data for Review
The extract command searches the live log files and archived log files for events that match the selection criteria specified as part of the command. You can select events based on the following criteria:
All events logged after a specified time.
All events logged before a specified time.
Events logged between one time and another.
Events within a range of priorities.
The extracted information can be directed to either a file or your default output device. You can choose to display only the event name and context, and include timestamps in the output.
To extract historical log data for review, use:
$ CONSOLE EXTRACTThe following table describes the switches to the extract command.
| Switch |
Description |
|---|---|
| /BEFORE=time1 |
Extracts all the log and archive data for the named system which was logged before the specified date or time. |
| /EVENT/NOEVENT (default) |
Displays only the event names and their associated context in the output. |
| /OUTPUT=file |
Specifies the output file into which the extracted log data will be written. |
|
/PRIORITY[=(MINIMUM =minpri, MAXIMUM=maxpri)] |
Valid only when used with the event qualifier. This displays only those events within the specified range of priorities. The value for minpri and maxpri can be one of the following priorities:
The minimum and maximum priority can have the same value. If you use a minimum priority value that is higher than the maximum priority value, then the result is undefined. |
| /SINCE=time1 |
Extracts all the log and archive data for the named system which was logged since the specified date or time. |
|
/TIME /NOTIME (default) |
Displays the timestamps in the output |
6.5.1. Extracting Events Based on Priority
To extract events in a system's log and archive files, based on a minimum and maximum priority, use:
$ CONSOLE EXTRACT/EVENT/PRIORITY
[=(MINIMUM=minpri,MAXIMUM=maxpri)] system-name
For example, to extract events with priorities in the range WARNING to CRITICAL, enter:
$ CONSOLE EXTRACT/EVENT/PRIORITY=MINIMUM=WARNING system-name 6.6. Invoking the Monitor Interface for a Serviced System
To invoke the Monitor interface for a serviced system, enter:
$ CONSOLE MONITOR
6.7. Performing a Dialog With a Serviced System
A dialog is a set of commands contained within a file that is used to interact with serviced systems repetitively. If you want to perform an interactive dialog, then use the monitor interface (see the chapter Using the Monitor Interface).
To use the dialog command, you must provide a file containing the dialog commands to be executed on the named serviced system. Place the dialog file in CONSOLE$USER_DEFAULTS or, if it is not defined, SYS$LOGIN.
If you do not specify a directory as part of the filename for the command, dialog searches for the file in the following order: the user defaults directory, your home directory and, finally, your current working directory. If the dialog file is not in one of these directories, you can include directory as part of the file name on the command line.
The section Creating a Dialog Script describes the commands you can include in a dialog procedure.
To perform a dialog with a serviced system, enter:
$ CONSOLE DIALOG/FILE=filename/QUIET system The quiet qualifier is optional, and suppresses the output from the dialog command. For example, to shut down the serviced system PEPPER using the dialog file shutdown.dialog:
$ CONSOLE DIALOG/FILE=SHUTDOWN.DIALOG PEPPER
6.7.1. Status Values Returned by the Dialog Command
The dialog command does not display a status value when it exits. To find the status value returned, and its meaning, do the following:
Examine the status value:
$ SHOW SYMBOL $STATUS
Refer to the following table for the meaning of the status value.
| Status Value (Hex.) |
Meaning of the Status |
|---|---|
| 10000065 |
Success |
| 10000066 |
A bad dialog file was specified |
| 10000068 |
A bad system name was specified |
| 1000006A |
Unable to connect to the serviced system |
| 1000006C |
The system console is locked by another user |
| 1000006E |
You do not have UNLOCK privilege |
| 10000070 |
You do not have BREAK privilege |
| 10000072 |
Invalid syntax for WAIT command |
| 10000074 |
Timeout of WAIT command |
| 10000076 |
Dialog file has syntax error |
| 10000078 |
Unable to read the Console Manager configuration file |
| 1000007A |
The serviced system is being archived |
| 1000007C |
Dialog could not check the status of the serviced system |
6.7.2. Creating a Dialog Script
You can use one or more of the commands shown in the following table in a dialog script.
| Command |
Description |
|---|---|
| BREAK |
Sends the halt sequence or a break signal to the console. |
| HALT |
Sends the halt sequence or a break signal to the console. |
| RATE |
Sets the period of time in seconds between which the dialog should pause before executing the next SEND command. |
| SEND |
Sends a specified string to the console. |
| SPEED |
Sets the time, in milliseconds, that the dialog is to pause before sending the next character. |
| UNLOCK |
Disconnects a user currently connected to the system the dialog procedure is running on. |
| WAIT |
Stalls for a timeout number of seconds, or until the quoted string occurs on the console line. If a WAIT times out without the string being seen, the dialog procedure exits. |
The qualifiers below let DIALOG work correctly on some systems. By default, the string transmitted by a SEND command is terminated by a carriage Enter/new line pair.
- /NORETURN
Specifies that the string transmitted by a SEND command should not be terminated by a carriage Enter (CR).
- /NONEWLINE
Specifies that the string transmitted by a SEND command should not be terminated by a new line (LF) character.
See the appendix Sample DIALOG File for an example of dialog procedure.
6.8. Unlocking a Console Being Used by Another User
Unlocking a console places the user currently connected to a console into read only mode. This means that this person cannot use Console Manager for managing the serviced system, or systems they are connected to.
You must have the UNLOCK privilege given to you in the configuration database to be able to unlock a console. Your Console Manager host system manager can give you this privilege if you do not already have it.
To unlock the console of a system being used by another user, enter:
$ CONSOLE MONITOR
command: UNLOCK system-name
To find out who has locked the console for a system, enter:
$ CONSOLE STATUS/USERS
Alternatively, if you are currently using the monitor interface, enter:
command: show systems
6.9. Using Eventlist Interactively
To start an interactive Eventlist, enter:
$ CONSOLE EVENTLIST
See the chapter Using the Eventlist Interface for information about the how to use the Eventlist interface.
Chapter 7. Using Console Manager from the C3 Interface
This chapter describes how to use the graphical user interface to Console Manager, known as the C3 interface. From this interface, you can:
Display a graphical representation of your systems and networks.
Monitor the state of the console lines of serviced systems.
Connect directly to the consoles of serviced systems.
The chapter does not explain how to manage the Console Manager software and environment. For this information, see the chapters Introduction through Managing Console Manager of this guide.
Note
The C3 interface is not supported on monochrome screens. This section contains the following topics:
7.1. What You Can Do from the C3 Interface
You can do the following tasks from the C3 interface:
Connect to a serviced system's console in order to do routine management tasks on that serviced system
Examine events in the current log file for several serviced systems
Display configuration and status information for serviced systems
Obtain console activity output in hardcopy
Extract historical log data from an archive
Perform a dialog with a serviced system
Log on to a serviced system using the appropriate DECnet or TCP/IP commands.
Invoke the monitor interface
Unlock a console being used by another user
Locate specific serviced systems
Reset all system icons to their default neutral color
Look at C3 messages
Restart the eventlist window
Use eventlist interactively
You can also customize your C3 display. See the chapter Customizing Console Manager for details.
Note
The C3 interface receives events in real time. Therefore, if an event occurs when the C3 interface is not running, then the interface will not register that event. However, the event will be logged by Console Manager, and may be reviewed by extracting the event information (see Extracting Historical Log Data, later in this chapter, for details of how to do this).
If there are certain events that require immediate action, then you can use an action routine such as Mail to notify users. This does not rely on any user being logged in to Console Manager.
7.2. Entering and Leaving the C3 Interface
The destination for your DECwindows Motif display must be set up before you start the C3 interface. See the appendix Entering and Leaving the C3 Interface for instructions on how to do this.
Also, ensure that the session manager security for the system you are setting the display from is enabled on your local workstation.
If the destination for your DECwindows Motif display is already set up, start the interface using the command described in Starting the C3 Interface.
7.2.1. Starting the C3 Interface
To start the C3 interface, use the following command:
$ CONSOLE C3
The command has two switches, which are shown in the following table.
| Switch |
What the command does |
|---|---|
| /READ_ONLY |
Prevents users from performing remote management tasks |
| /NO_EDIT |
Prevents users from customizing the display |
7.2.2. Leaving the C3 Interface
You can leave the C3 interface by using one of the following options on the File menu:
Exit - this saves any changes you have made to the display.
Quit - this exits without saving any changes you have made to the display.
To be able to exit or quit from the C3 interface, your username entry in the configuration database must have the privilege to exit C3.
7.3. What the C3 Interface Looks Like
The main window to the C3 interface gives you an overall picture of the environment you are managing and monitoring. It uses the information supplied in the configuration database for your user entry to create the display. It displays icons that represent groups, systems, or a mixture of both groups and systems that you have the privilege to access.
7.3.1. The Main C3 Window
The first time you start the C3 interface the main window is displayed, as shown in the following figure.
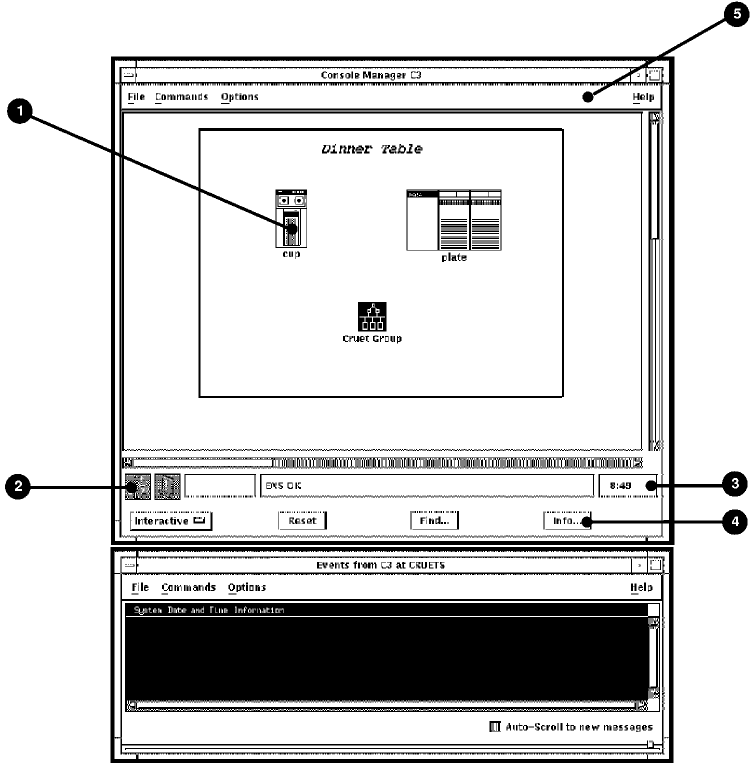
You can customize this display if you wish. See the chapter Customizing Console Manager for more information.
The previous figure also shows an Eventlist window, which can be started automatically when you start the C3 interface. This eventlist displays events for those systems that you have access to in the configuration database. If you do not want to display the Eventlist window, customize the C3 display accordingly. See the chapter Using the Eventlist Interface for more information on using the Eventlist interface.
Note
If ENS is not running when the C3 interface starts up, the Eventlist window does not appear even if you have chosen to have it start up automatically when starting the C3 interface. The window will not appear until ENS is running. See the chapter Supplied Action Routines for detailed information about the eventlist routine.
7.3.1.1. Contents of the C3 Window
The C3 main window (see the figure in the section, The Main C3 Window, earlier in this chapter) contains:
One of the following:
A matrix of icons representing each group to which you have access, if you have groups set up, and all your systems are in one or more groups.
A matrix of icons representing each system to which you have access, if you do not have any groups set up.
A mixture of group and system icons, if only a subset of the systems to which you have access are in groups.
You cannot have a group within a group, so only the main window can contain group icons. The group and system icons are created or removed on your C3 display when you reconfigure Console Manager.
The groups and systems that appear on the C3 display are those defined and stored in the Console Manager configuration database and which you are authorized to monitor and manage. To display any additional groups or systems, you must be granted access to them in the configuration database using the configuration editor as described in the chapter Modifying the Configuration Database.
When you move the cursor to an icon, the group or system name is displayed at the position you specified for the label in the configuration database (for example, below the group's icon).
Two icon status boxes to the bottom left of the window:
The left one displaying the Console Manager icon. This icon changes color to indicate the status of Console Manager.
The right one displaying the ENS icon. This icon changes color to indicate the priority of the most recent event delivered by ENS.
Three message boxes to the right of the status boxes. From left to right, they display:
The system on which the most recent event occurred
The name of the most recent event
The current time
Four buttons at the bottom of the display. From left to right, they are:
A mode change button, which allows you to change between Interactive and Edit mode.
A Reset... button, which resets the icon colors of all systems to their neutral color.
A Find... button, which allows you to find a particular serviced system. If the serviced system is in a group, then the group window is displayed.
An Info... button, which you can use to display information about Console Manager.
Four pull down menus across the top of the window:
File - lets you leave the C3 interface.
Commands - gives you access to the functionality available for managing your environment.
The functionality available from this menu is also available by clicking the right mouse button anywhere on the C3 interface background display, when the mode is set to Interactive.
Options - gives you access to the functionality for changing various features of the C3 display. These features include audio/visual settings for indicating events, the visibility of labels, color options, and startup options.
Help - lets you get online help.
7.3.1.2. Displaying the Systems in a Group
To display the systems for a particular group, double click the left mouse button on the group icon. This displays the group window (see The Group Window in the following section).
7.3.2. The Group Window
The group window uses the information supplied in the configuration database for your user entry to create the display. It displays icons that represent serviced systems for the group to which you have access. It also alerts you to events happening on the consoles of those systems by changing the color of the icons according to the priority of the events.
Color priorities are discussed in the chapter Understanding ENS through Create Your Own Action Routines.
The following figure shows an example of a group window in the C3 display.
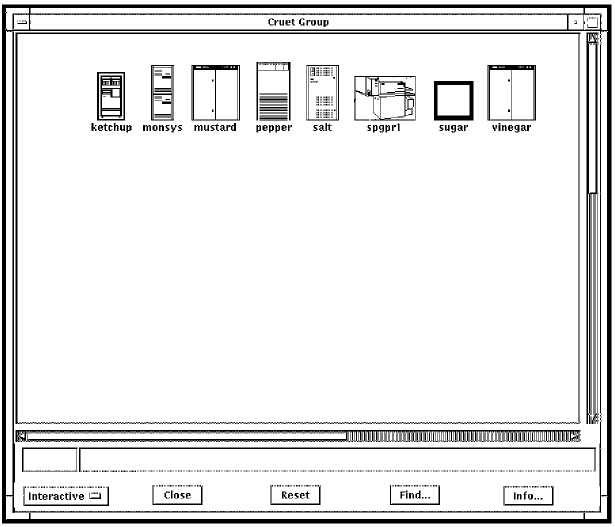
7.3.2.1. Contents of the Group Window
The group window contains:
A matrix of icons representing each serviced system in a group.
Two message boxes at the bottom of the display. From left to right, they display:
The name of the system on which the most recent event occurred in this group.
The name of the most recent event in this group.
Five buttons at the bottom of the display. From left to right, they are:
A mode change button, which allows you to change between Interactive and Edit mode.
A Close button, which closes the group window.
A Reset... button, which resets the icon colors of all systems in this group to their neutral color.
A Find... button, which allows you to find a particular serviced system in this group.
An Info... button, which you can use to display information about Console Manager.
7.3.4. Help from Within a Dialog Box
Click Help from the dialog box in which you are working to get online help. Help topics are displayed in a Help topic window. If a topic is longer than the Help window, use the scroll bars, or resize the window to display the rest of the topic.
In addition, a line of help appears along the bottom of the dialog box. This information changes depending on the location of your mouse pointer in the dialog box. It gives a brief overview of what you are meant to do in each area of the dialog box.
To exit from Help, click the Close button.
7.4. Connect to the Console of a Serviced System
The connect interface provides direct access to the consoles of serviced systems so that you can perform management tasks on these systems from your own terminal.
To connect directly to the console of a serviced system:
Click the right mouse button on the icon representing the required serviced system. This displays a pop-up menu listing each of the tasks you can do.
Then choose the Connect to Console menu item. This invokes a DECterm window that is connected to the console of the selected system. Any text you type in this window is transmitted to the serviced system's console, and any data output to the console by the serviced system is displayed on the console window.
Alternatively, double click the left mouse button on the icon representing the required serviced system. You can only do this if you have set up this facility for connecting to a console as part of your customized setup. The chapter Customizing Console Manager explains how to do this.
Connecting to a serviced system lets you do all types of system management tasks on that system as though you were on the local console: for example, rebooting the system or installing software. To be able to connect to a serviced system's console, you must have been granted access by means of a system name or group name in the Console Manager configuration database.
Once you are connected to your specified serviced system, all keystrokes except for the defined halt, escape, exit and refresh keys are transmitted directly to the console of the system to which you are connected. While you are connected you have normal console behavior.
You can also connect to a serviced system using the monitor interface. See the chapter Using the Monitor Interface for more information.
7.4.1. Exiting the Console of a Serviced System
To exit from the console of the serviced system to which you are connected, press the control sequence you have defined for the Exit key (the default is CTRL_E).
7.4.2. Entering the Monitor Interface
To get to the monitor interface from the connect interface, press the control sequence you have define for the Escape key (the default is CTRL_G).
7.4.3. Locking and Unlocking Consoles
When you connect to the console of a serviced system, that is not currently locked by another user, then that system is locked by you, and you can write to the console of that system. A lock icon is displayed over the icon of the serviced system's icon on the C3 display of all users who have access to that system.
Any users who subsequently connect to this console will have read-only access, and receive a message to this effect on their terminal; they can only observe what is happening on the console. This prevents the confusion that would arise if two or more users attempt to enter commands on the same console.
If you receive a message stating you are in read-only mode, you must unlock the serviced system's console (as described in Unlocking a Console Being Used by Another User, later in this chapter) before you are allowed to do any tasks on the serviced system's console. You must have the unlock privilege to do this.
7.5. Writing Console Activity Output to a File, Printer or Terminal
Pull down the Commands menu and choose the Console Manager item. The Console Manager menu is displayed.
Choose the Watch... submenu item then select Start... on the Watch menu. The Watch dialog box is displayed (see the figure later in this section).
Select the systems to watch.
If you want to watch a subset of systems, then make sure the Select All Systems option is deselected, and click the systems you want to watch from the list available.
If you want to watch all systems, select the Select All Systems option.
Select the destination to which the watch output is to be sent:
If you want to output to a... Then...
File Do the following:Select the Output to File: option.
Enter the file name in the Output Filename field.
Port or terminal device Do the following:
Select the Output to Port: option.
Enter the port name or terminal device in the Port Name field.
Select the appropriate Port Speed.
Select the appropriate Port parity.
Select or deselect the 8-bit ASCII option.
Select the Column Width required for the watch output (80 or 132 columns).
Click OK.
This invokes the watch interface.
To cancel this operation, choose the Stop submenu item from the Watch... submenu on the Console Manager menu.
If you start a watch for a system that is currently being archived, then there will be no output from the system until the archive finishes. When the archive finishes, the following message is displayed:
Archive completed on system-name - Watch output resuming. If an archive is started for a system that is currently being watched, then the watch output is suspended while the archive is in progress, and the following messages are displayed:
Archive started on system-name - Watch output suspended.
Archive completed on system-name - Watch output resuming.
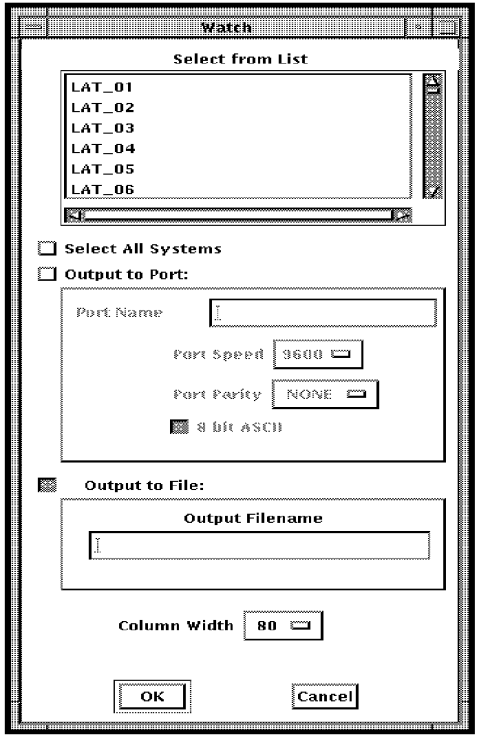
7.6. Examining Events for a Specific System
To examine events that have already occurred on a specific serviced system:
Click the right mouse button on the icon representing the serviced system whose events you want to review. Then choose the Events ... menu item from the pop-up menu. This resets the system's icon color to the default neutral color and displays an event history window containing the most recent events for the system.
Alternatively, double click the left mouse button on the icon representing the required serviced system. You can only do this if you have set up this facility for showing event history as part of your customized setup. The the chapter Customizing Console Manager explains how to do this.
Scroll through the current set of events using the vertical scroll bar.
To access the previous or new set of events from the log file, click the Up or Down Arrow buttons as required.
The system's icon is automatically reset to the default neutral color.
Click the left mouse button on an event for the console log window to appear, showing the context of the selected event in the color for that event's priority as defined in the configuration database.
If you attempt to view events for a system that is currently being archived, then the following messages are displayed:
Archive already in progress

If an archive is started for a system that for which you are currently viewing the
event history, then the event context window is cleared, and the following message
is displayed:

System is being archived
7.7. Extracting Historical Log Data
The extract option searches the live log files and archived log files for events that match the selection criteria that you specify. You can select events based on the following criteria:
All events logged after a specified time.
All events logged before a specified time.
Events logged between one time and another.
The extracted information can be directed to either a file or your default output device.
You can also choose to display only the event name and context, and include timestamps in the output.
You set the selection criteria using the Console Manager Extract dialog box, which is shown in the following figure. By default, no options are selected on the dialog box, initially, which means that all events will be extracted.
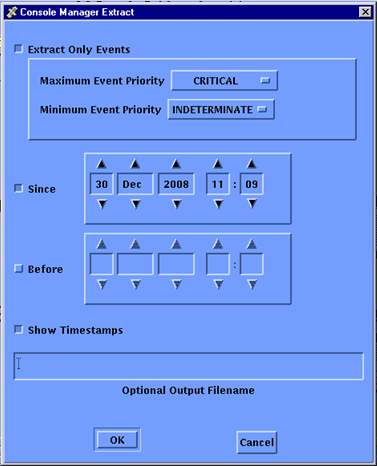
To extract log data for review:
Click the right mouse button on the icon representing the serviced system you require, and choose the Extract/Review item from the pop-up menu. The Console Manager Extract dialog box is displayed (see the previous figure).
Set the selection criteria you require:
If you want to…
Then…
Extract all events
Deselect all options on the dialog box.
Extract all events logged since a specified date and time
Do the following:Select Since, and deselect Before if set
Set the Since date using the arrow buttons
Extract all events logged before a specified date and time
Do the following:Select Before, and deselect Since if set
Set the Before date and time using the arrow buttons
Extract events logged between one time and another
Do the following:Select Before
Set the Before date and time using the arrow buttons
Select Since
Set the Since date and time using the arrow buttons
Display timestamps
Select Show Timestamps Display events within a range of priorities
Do the following:select Extract Only Events
set the Minimum Event Priority
set the Maximum Event Priority
Output the extracted information to a file
Enter the name of the file in the Optional Output Filename field When you have finished, click OK.
7.8. Logging On To a Serviced System
To log on to a serviced system:
Click the right mouse button on the system that you want to log into.
Choose Login from the popup menu.
Choose the connection type you want to use to perform the login.
If you want to log on using the command... Then choose...
telnet telnet
rlogin rlogin
SET HOST Set Host
When the DECterm window appears, log on in the usual way.
The node name of the serviced system is appended to the end of the command before it is executed. The node name can be different from the system name defined in the configuration database. To specify the node names for your serviced systems, see the chapter Customizing Console Manager.
The Login option uses the following logical names to determine the command that is to be executed:
CONSOLE$SETHOST_COMMAND, which specifies the DECnetSET HOSTcommand to be executed. The default isSET HOST.CONSOLE$TELNET_COMMAND, which specifies theTELNETcommand to be executed. The default isTELNET.CONSOLE$RLOGIN_COMMAND, which specifies theRLOGINcommand to be executed. The default isRLOGIN.You can change these logical names. For example, you could change
CONSOLE$SETHOST_COMMANDtoSET HOST/LOG.To redefine these logical names copy the template file
SYS$STARTUP:CONSOLE$PRIVATE_SETUP.TEMPLATE
to
CONSOLE$PRIVATE_SETUP.COM
and edit it to reflect your individual requirements. The Console Manager startup procedure checks to see if
CONSOLE$PRIVATE_SETUP.COM
exists and executes it automatically.
7.9. Invoking the Monitor Interface for a Serviced System
To invoke the Monitor interface for a serviced system, click the right mouse button on the system's icon, and select Monitor Interface from the popup menu.
7.10. Performing a Dialog with a Serviced System
To perform a dialog with a serviced system, you must use the Monitor Interface:
Click the right mouse button on the system's icon, and select Monitor Interface from the popup menu.
The Monitor window is displayed.
Refer to the chapter Using the Monitor Interface for instructions on performing a dialog.
7.11. Unlocking a Console Being Used by Another User
Unlocking a console places the user currently connected to a console into read only mode. This means that this person cannot use Console Manager for managing the serviced system, or systems they are connected to.
You must have the UNLOCK privilege given to you in the configuration database to be able to unlock a console. Your Console Manager host system manager can give you this privilege if you do not already have it.
To unlock a console being used by another user
Click the right mouse button on the icon representing the console of the serviced system you wish to access. This displays a pop-up menu.
Choose the Unlock Console menu item from this pop-up menu. This disconnects the user currently connected to this serviced system, puts their terminal into read only mode and displays a message to that effect on their screen the next time they type on the keyboard. At the same time, the lock symbol previously placed over the icon on the C3 display to signify that someone is connected to the system disappears.
Connect to the console as previously described in Connecting to the Console of a Serviced System earlier in this chapter.
If you want to find out who has locked a particular console, click the right mouse button on the system and choose the Information ... menu item from the popup menu. This displays the Information dialog box. The name of the person who has locked the console is displayed in the Locked By field.
7.12. Locating a Serviced System
To locate a particular system on your C3 display:
Click the Find... button on either the main window or the group window. The Locate System dialog box is displayed (see the following figure).
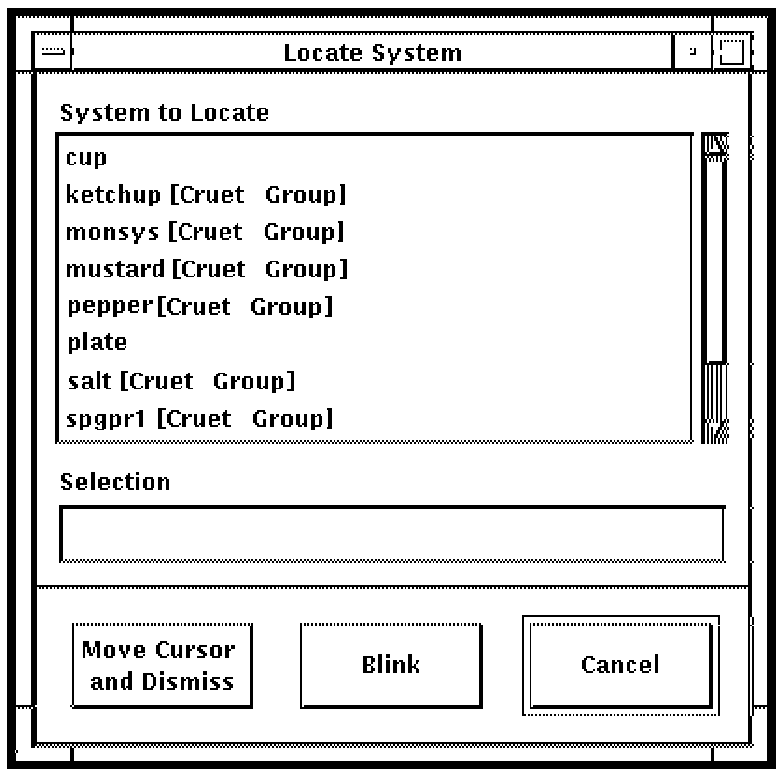
If you use the button on the main window, Console Manager displays a list of all serviced systems, followed by the group they are in, if any. For example, salt [Cruet Group].
If you use the button on the group window, Console Manager displays a list of the serviced systems in that group, without the group name. For example, pepper.
Click the serviced system you require from the list displayed, or enter its name in the space provided.
Click either Move Cursor and Dismiss, or Blink:
Blink moves the field of view so that the specified icon is visible in your window. The selected system icon blinks several times on the display to highlight where it is located.
Move Cursor and Dismiss moves the field of view so that the specified icon is visible in your window. The selected system icon blinks several times on the display to highlight where it is located, the dialog box is dismissed and the cursor becomes positioned over the selected system icon.
If you use the Find... button on the main window, and the group containing that system is not currently displayed, then Console Manager opens the group window before indicating the chosen system.
7.13. Resetting the Color of Icons
To reset the icons of all the serviced systems on your display to their default color, click the Reset... button on the main window.
To reset the icons of all the serviced systems in a specific group to their default color, click the Reset... button on the group window.
To reset individual icons, either connect to the system's console, or click the icon representing the specific system and choose Events from the pop-up menu.
7.14. Looking at C3 Messages
The C3 interface keeps a log of messages containing information about the status of the C3 interface during your session.
To view the this log:
Choose C3 Messages from the Commands menu. This displays the message log showing console messages as they arrive from all your serviced systems.
Scroll through them vertically and horizontally using the scroll bars.
Note
This file increases in size over a period of time as new messages are added to it. VSI recommends that you purge this file periodically. To do this, click Purge Logfile.
7.15. Using Eventlist Interactively
To start an interactive eventlist from the C3 interface, pull down the Commands menu and choose the Restart Eventlist menu item.
If you want the Eventlist window to appear automatically every time you invoke the C3 interface, you need to set up this option on your C3 interface.
To set the option on your C3 interface:
Pull down the Options menu and choose the General ... menu item.
This displays the C3 General Options dialog box.
Click the Display Eventlist Window at Startup check button.
Click OK.
See the chapter Using the Eventlist Interface for information about how to use the Eventlist interface.
Chapter 8. Using the Monitor Interface
This chapter explains how to invoke and use the monitor interface.
The monitor interface is the same whether it is used from the C3 interface or from the command line interface.
Note
You cannot execute any of the monitor interface commands described in this chapter while connected to a console. To execute these commands, you need to leave the connect interface using the defined escape key and execute the commands from the monitor interface.
This section contains the following topics:
8.1. What You Can Do from the Monitor Interface
You can monitor console output from the monitor interface. This interface displays multiple windows of information for monitoring and responding to console activity.
You can do the following tasks from the monitor interface:
Connect to the console of a serviced system.
Unlock a console in use by another user.
View current console output in real time.
Move up and down the log data in the active log files.
Display log data for one or more serviced systems.
Switch between active log windows using the NEXT and PREVIOUS commands.
Cycle through current console output for the serviced systems being monitored.
Find historical log data.
Read previously archived log data.
Transmit a halt sequence or break signal on a console line.
Display timestamps with log data for all serviced systems displayed.
Perform a dialog with specified serviced systems.
You can do these tasks for any system you specify. If you do not specify any, the first system in the configuration database for which you have been granted access will be displayed.
The monitor interface has its own set of commands with which to perform the tasks (see the section Monitor Interface Commands).
Although you are informed when events occur, if you want to view the context for events on serviced systems, you must do this from the C3 interface. See Using Console Manager From the C3 Interface for information about how to perform this task.
You can scroll through log data using the keys described in the section, Reading Current Console Log Data.
8.2. What the Monitor Interface Looks Like
When using this interface, you will see the following set of windows on your screen:
Console log display area - where the most recent log data for the system specified in the command line is placed. On a VT200-compatible terminal screen, the console log display area contains 19 lines for the data. This area expands or shrinks to fit the available lines on other types of terminals.
Banner line - where the name of the system, the date of the console data and the status of the connection to the serviced system are displayed in bold reverse video.
The event/message area - where the event summary for this system and any other specified systems is displayed as an event occurs. This area occupies the two lines reserved above the command line. Upon receipt of the first event the area expands to five lines.
The command line - where you enter the monitor interface commands described in the section, Monitor Interface Commands.
The following figure shows what the monitor interface looks like using a workstation window.
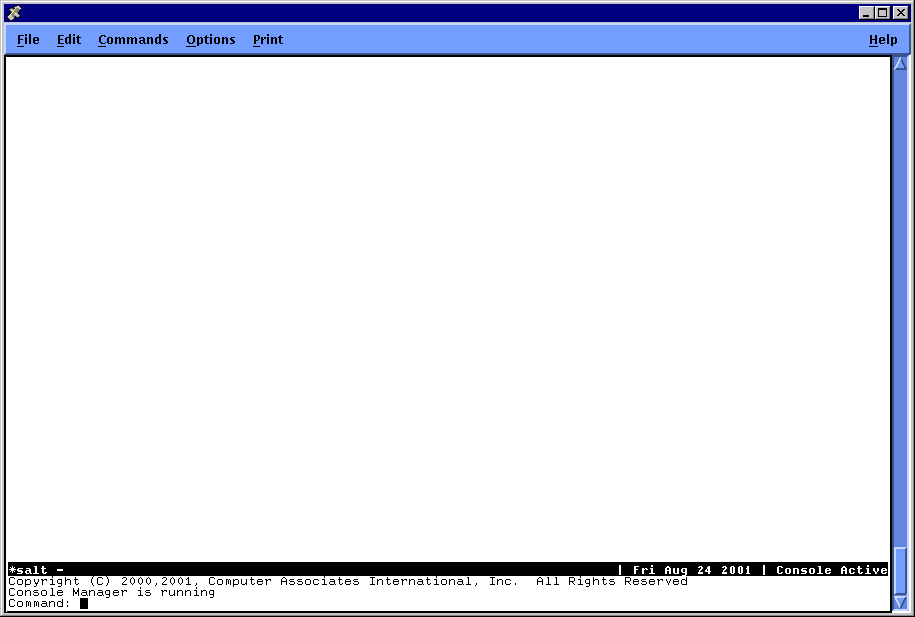
The default screen layout is one log window. The default system displayed is either the first system specified on the command line which invoked the monitor interface, or if no system is specified, the first one you have access to in the configuration database. See Manipulating Screen Layout for more information about manipulating the screen layout.
8.3. Starting the Monitor Interface
You can start the monitor interface from either the command line interface, or the C3 interface.
8.3.1. Starting the Monitor Interface from the Command Line
To start the monitor interface use the monitor option to the console command. For example, to start the monitor interface for the systems SALT and PEPPER:
Enter:
$ CONSOLE MONITOR SALT, PEPPER
The system specified in the command to the monitor interface may be a groupname as defined in the configuration database. If so, the group is translated and each member of that group is made available for you to look at using the VIEW command. For more information about the VIEW command, see the section, Displaying a Different System.
Any system-name specified on the command line is tested to see if it is a symbol or logical name on the OpenVMS operating system. If it is, the system-name is translated into a list of systems to monitor. For this translation to occur correctly, the definition of the environment variable, symbol or logical name must be a list of valid systems (or other environment variables) separated by spaces. For example, to monitor the ALPHA system set, which consists of systems A, B, C and D, do the following:
Enter:
$ DEFINE ALPHA "A B C D"
$ CONSOLE MONITOR ALPHA
Or, alternatively enter:
$ ALPHA :== "A B C D"
$ CONSOLE MONITOR ALPHA
If no system-name is specified on the command line, all systems to which the user has been granted access in the configuration database are available to look at using the VIEW command.
Note
When a system name is specified on the command line, Console Manager checks to see if it is a logical name or symbol, and if so, translates it. However, Console Manager does not translate the following names: HOME, USER, TERM, SHELL, MAIL, EXINIT and PATH.
8.3.2. Starting the Monitor Interface from the C3 Interface
To start the monitor interface from the C3 interface, do one of the following:
Click the right mouse button on a system icon and then choose Monitor Interface from the popup menu.
If the left mouse button is set up accordingly, double-click the left mouse button on a system icon, and then press your control key definition for the Escape key (the default is CTRL_G).
8.3.3. The Monitor Initialization Command File
You can create a monitor initialization command file to run a sequence of monitor commands on startup. Put your commands in the file:
CONSOLE$USER_DEFAULTS:CONSOLE$MONITOR_INIT.DAT
or, if this logical name is not defined, put your commands in the file:
SYS$LOGIN:CONSOLE$MONITOR_INIT.DAT
See the chapter Customizing Console Manager for more information on creating the initialization file.
8.4. Getting Help on the Monitor Interface
Online help is available by using the HELP command which creates a special log window in which help is displayed.
8.5. Leaving the Monitor Interface
To leave the monitor interface, use either the EXIT or the
QUIT command from the monitor interface. These commands are synonymous.
Alternatively, use the defined exit key from the connect interface. All of these commands
access the operating system command line, or close the monitor window if you are using the
C3 interface.
8.6. Monitor Interface Commands
The commands shown in the following table are available from the monitor interface. They allow you to view log data about serviced systems while you continue to monitor events in the event/message area.
The prompt used in the monitor interface is Command:, and it appears
at the bottom of your screen as shown in the following figure.

Note
If a command takes system-name as an optional argument, and you do not specify the name of a system when executing, the command performs the requested operation on the system with its banner line highlighted in bold reverse video and bearing an asterisk (*) to the left of its system name.
|
Command |
Arguments |
Description |
Example |
|---|---|---|---|
| BOTTOM | Moves you to the end of the log data for the currently displayed system. | BOTTOM | |
| BREAK |
[system-name] | Sends the halt sequence or a break signal. The behavior of the serviced system depends on its type. | BREAK DANCE |
| CONNECT |
[system-name] | Connects your terminal to the system you specify and allows you to communicate with it as though you were on its local console. | CONNECT SALT |
| CYCLE |
Interval | Switches you to one log window mode, and cycles the one log window displaying each of the systems being monitored in turn at intervals in seconds that you specify | CYCLE 20 |
| DIALOG |
dialog_filename [system-name, system-name…] | Performs a predefined interaction with the specified system or systems according to the information you supply in the dialog file. This command has a further subset of commands. See the section, Performing a Dialog with a Serviced System, later in this chapter |
DIALOG SHUTDOWN.DAT SALT,PEPPER |
| DOWN |
[lines] | Displays the next screen of console log data. | DOWN |
| EXIT | Exits the monitor interface, and returns you to the operating system command line. This command is synonymous with the quit command. | EXIT | |
| FIND |
One of TIME, TEXT, EVENT, direction FORWARD or BACKWARD. See Finding Historical Console Log Data, later in this chapter. | Finds and displays the portion of the log with the specified time, text or event, starting the search in the specified direction. The default direction is BACKWARD. | FIND TIME +2 |
| HALT |
[system-name] | Sends the halt sequence or a break signal. The behavior of the serviced system depends on its type. | HALT SALT |
| HELP | Displays the monitor interface help. | HELP | |
| NEW | Creates a new log window. You can use this command to view the log of multiple systems concurrently. The number of windows that can be depends on the number of rows on the display terminal. Once created, use the VIEW command to display the required system. | NEW | |
| NEXT | Changes the selected log window to the next log window when you are using multiple log windows | NEXT | |
| ONE |
Changes from viewing multiple system's log data to a single systems log data. | ONE | |
| OUTPUT | “string” |
Outputs the specified quoted text string to the console of the currently highlighted system. No action results if you do not specify a string. | OUTPUT “logout” |
| PREVIOUS |
Changes the selected log window to the previous log window when you are using multiple log windows. | PREVIOUS | |
| QUIT |
Exits the monitor interface, and returns you to the operating system command line. This command is synonymous with the EXIT command. | QUIT | |
| REMOVE |
Removes the currently highlighted log window from the display. No action results from this command if only one log window is visible. | REMOVE | |
| REVIEW | [system-name] [pathname] |
Allows you to view previously archived log data for the named system. If the pathname is specified, the data will be found in that location. If not, it will be found in the default archive directory. This command does not extract the information. If you want to extract the information, use the EXTRACT command (see the chapter Using Console Manager From the Command Line Interface and chapter Using Console Manager From the C3 Interface). | REVIEW SALT |
| scriptname |
A pseudo-command used to invoke a file containing valid monitor interface commands. | See Using Scripts, later in this chapter. | |
| SELECT | [system-name] |
Place the cursor into the log window of the specified system. All subsequent commands are executed on that serviced system. This is the same as using the CONNECT command, except that all other log windows remain on the screen and are updated in real time. Escape sequences in the selected log window are not interpreted. | SELECT SALT |
| SET HALT_KEY | key |
Allows you to change the Halt (Break) key. This is the keystroke that will indicate you wish to halt the system. | SET HALT_KEY CTRL_P |
| SET BREAK_KEY | key |
Allows you to change the default Break key. | SET BREAK_KEY CTRL_P |
|
SET ESCAPE_ KEY | key |
Allows you to change the default Escape key from CTRL_G to the control character of your choice. | Key |
|
SET EXIT_ KEY | key |
Allows you to change the default Exit key from CTRL_E to the control character of your choice | SET EXIT_KEY CTRL_A |
|
SET REFRESH_ KEY | Key |
Allows you to define the default Refresh key to repaint the screen after an interruption | SET REFRESH_KEY CTRL_W |
|
SET TIMESTAMPS | {ON | OFF} |
Allows you to specify whether or not timestamps associated with each line of console data are displayed at the left side of the log window. | SET TIMESTAMPS ON |
|
SET WIDTH | Width |
Sets the column width of the screen to the specified value. Valid values are 80 and 132. | SET WIDTH 132 |
|
SHOW | [{keys| systems}] |
Creates a special log window which displays either the current Halt, Escape, Exit and Refresh key definitions, or a list of the systems being monitored by this user session. | SHOW KEYS |
|
TOP |
Moves you to the beginning of the log data for the currently displayed system. | TOP | |
|
TWO |
Allows you to view the log data for two of your serviced systems at the same time. | TWO | |
|
UNLOCK | [system-name] |
Places the user currently connected into read only mode. | UNLOCK SALT |
|
UP | [lines] |
Displays the previous screen of console log data. | UP |
|
VIEW | [system-name] |
Places the latest console log data for the specified serviced system in the currently selected console log display area | VIEW SALT |
8.7. Connect to the Console of a Serviced System
You can connect to a serviced system's console from the monitor interface, in order to perform management tasks on these systems from your own terminal.
There are two commands you can use:
SELECTCONNECT
To connect to the console of SALT using the SELECT command, enter:
Command: SELECT SALT
This places the cursor into the log window of the specified system. This is similar to
using the CONNECT command except that:
All the log windows you currently have displayed remain on the screen and are updated in real time
ANSI escape sequences in the selected log window are not interpreted. Therefore, programs used for screen manipulation do not work correctly using
SELECT.
Using the CONNECT command is the same as connecting from the operating system command line. For more information see the chapter Using Console Manager From the Command Line Interface.
Connecting to a serviced system lets you do all types of system management tasks on that system as though you were on the local console: for example, rebooting the system or installing software. To be able to connect to a serviced system's console, you must have been granted access by means of a system name or group name in the Console Manager configuration database.
Once you are connected to your specified serviced system, all keystrokes except for the defined halt, escape, exit and refresh keys are transmitted directly to the console of the system to which you are connected. While you are connected you have normal console behavior.
Note
Using the monitor interface command OUTPUT allows you to send text
to a serviced system's console as though you had typed the text while connected to that
console.
8.8. Unlocking a Console Being Used by Another User
To access a console being used by another user, use the UNLOCK
command. For example, to unlock the console of the system SALT, enter:
Command: UNLOCK SALT
This command:
Disconnects the user currently connected to SALT
Puts their terminal into read only mode, which means they cannot perform management tasks on the serviced systems, and displays a message to that effect on their screen the next time they type on the keyboard
You must have the UNLOCK privilege granted to your username in the configuration database to be able to do this. Your Console Manager host system manager can grant you this privilege.
You, or another user, can now connect to the console as described in the previous section, Connecting to the Console of a Serviced System. See also the chapter Using Console Manager From the Command Line Interface for more information.
To find who is connected to the console of a serviced system, enter:
Command: SHOW SYSTEMS
A list of the serviced systems is displayed, together with the users connected to them.
8.9. Setting the Halt Key
Console Manager allows you to define both a halt key and halt sequence for each managed system in the configuration database.
Note
BREAK_KEY is now an alias for HALT_KEY.
The halt key can be the same on all systems or might be different. The halt key might also be set to your preference using one or more of the following methods:
Specify a preferred halt key on the command line by using
/HALT_KEY(or/BREAK_KEY) with theCONSOLE MONITORandCONSOLE CONNECTcommands.Customize the C3 interface such that each system has a custom halt key. To customize, toggle the C3 from Interactive to Edit mode. Right-click the system icon to bring up the customization window. Repeat for each system.
Specify a preferred halt key in a
CONNECT/MONITORinitialization file using theSET HALT_KEYcommand.Set a preferred halt key at the MONITOR Command: prompt with the
SET
              HALT_KEY
command.
Important
The output of the SHOW KEYS command will change depending on
whether or not you have specified a preferred halt key.
When using the CONSOLE MONITOR interface SHOW KEYS command, the Halt
key might be shown as “Undefined”. This happens when you are not viewing a managed system
and have not executed the SET HALT_KEY command. In this situation, when
you enter the CONNECT command the halt key is set to the key defined in
the configuration database for the system that you are connecting to.
8.10. Reading Current Console Log Data
To read currently selected console log data that has passed from view on your screen, scroll through the data using the keystrokes shown in the following table.
| Use this keystroke |
To... |
|---|---|
| Next Screen |
Scroll the log data forwards by one log window full of data |
| Prev Screen |
Scroll the log data backwards by one log window full of data |
| PF1 Up Arrow |
Display the message list if one does not already exist, or scroll the message list up by one line if it does |
| PF1 Down Arrow |
Display the message list if one does not already exist, or scroll the message list down by one line if it does |
When using a terminal that does not have arrow keys, use the monitor interface commands shown in the following table.
| Use this command |
To... |
|---|---|
| UP [lines]? |
Move up the log data the specified number of lines for the currently selected system |
| DOWN [lines]? |
Move down the log data the specified number of lines for the currently selected system |
| TOP |
Move to the top of the log data for the currently selected system |
| BOTTOM |
Move to the bottom of the log data for the currently selected system |
When using multiple log windows, you can switch between them using the keystrokes or commands shown in the following table.
8.11. Manipulating Screen Layout
When you use the monitor interface, the default screen layout is one log window. The default system displayed is either the first system specified on the command line which invoked the monitor interface; or, if no system is specified, the first one you have access to in the configuration database.
You can:
Display a different system in the log window.
Display multiple systems concurrently.
Enter to a single log window.
Display systems at set intervals.
8.11.1. Displaying a Different System
To see the log data of a different system, use the VIEW command.
For example, if you are displaying the system SALT and want to change to the system PEPPER, enter:
Command: VIEW pepper
This makes the system PEPPER the currently selected system. If you have not been given access to this system in the configuration database, you cannot view this system.
8.11.2. Displaying Multiple Systems Concurrently
To display the log data of multiple systems at the same time on your screen, use the
NEW command. For example,
Command: NEW
When you use the NEW command, the screen splits horizontally adding
a new log window. The currently selected log window is indicated by its banner being in
bold reverse video and by having an asterisk (*) to the left of the system name, as shown
in the following figure. To select another log window, use the Up or Down arrow keys as
described in Reading Current Console Log Data, earlier in this chapter, or the
NEXT or PREVIOUS commands.
You can then use the VIEW command to change the system being
displayed in the currently selected area. If you have not been given access to this system
in the configuration database, you cannot view this information.
If your keyboard does not have the Up Arrow and
Down Arrow keys, use the NEXT and
PREVIOUS commands, shown in the table in the section Monitor
Interface Commands, earlier in this chapter.
At any time you may use the TWO command. This causes your monitor
interface session to be split between two log windows.
The following figure shows what multiple log windows look like using a workstation log window.
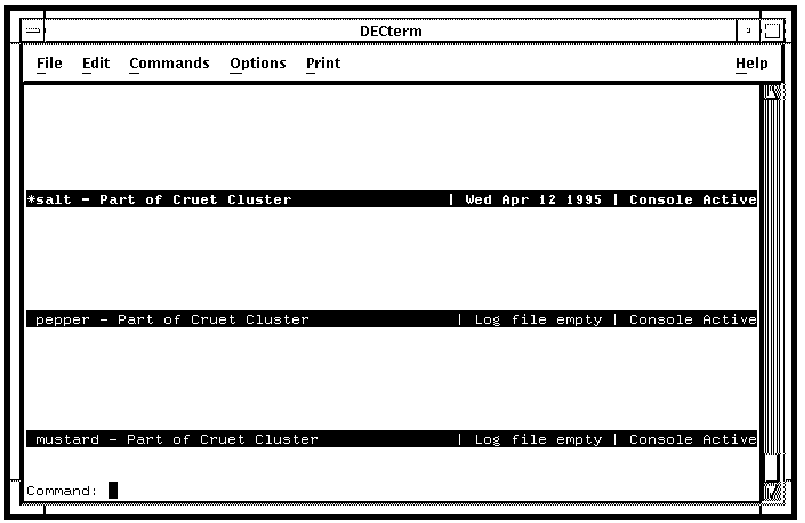
8.11.3. Returning to a Single Log Window
To enter to a single log window, use the ONE command once, or the
REMOVE command for each extra log window displayed. The
REMOVE command removes the currently highlighted log window.
8.11.4. Displaying Systems at Set Intervals
With only one log window displayed, you can observe the log data for all of the
serviced systems you are monitoring at selected intervals, by using the
CYCLE command. For example, to set the cycle at 20 second intervals,
enter:
Command: CYCLE 20
Enter any character to finish displaying systems at set intervals.
8.12. Finding Historical Console Log Data
You can find historical data in log files by searching by:
Time
Specific text strings
Specific events
The syntax is:
FIND {TIME {timestamp | deltatime} | TEXT string | EVENT eventname} [BACKWARD | FORWARD]
The FIND command starts searching from the log of the currently
selected system. To find text strings or events, set the direction of the search using the
FORWARD or the BACKWARD parameters. The default is
BACKWARD.
8.12.1. By Time
To find a piece of historical data in the log files by time, use the FIND
TIME command. This lets you move through the log data without having
repeatedly to use the scrolling keys. The default direction is backwards.
You can specify the time in any of the following ways:
DD-MMM-YYYY:HH:MM - causes the log file to be scrolled to the date and time specified
hhmm - causes the log file to be scrolled to the time specified for the date shown in the banner log window for the currently selected system
+h or -h - causes the log file to be scrolled forwards (+h) or backwards (-h) hours. You can omit the (+) sign for one or two digit numbers. Numbers larger than 99 are interpreted as a date or a time as appropriate - for example, 836 is interpreted as the time 08.36 rather than scroll forward by 836 hours. If you omit the (+) or (-), larger numbers are treated as absolute time.
To scroll to the log data for 09.00 on 8 September 2009 for the currently selected system, enter:
Command: FIND TIME 08-SEP-2009 09:00
To scroll to the log data for 09.00 for the date shown in the banner log window for the currently selected system, enter:
Command: FIND TIME 0900
To scroll forward by two hours in the log data for the currently selected system, enter:
Command: FIND TIME +2
To scroll backwards by two hours through the log data for the currently selected system, enter:
Command: FIND TIME -2
When you have log files for two systems on your screen, the FIND
command works on the currently selected system.
If your time specification falls outside the range of the historical data available on your Console Manager host, then Console Manager scrolls to the beginning or end of the log data for that system as appropriate. You receive the following message to inform you of this:
Target time falls beyond beginning/end of current log data
In this case, use the REVIEW command to examine archived data to see data collected before the time specified. See the section Reading Previously Archived Log Data for more information.
8.12.2. By Text String
To find a piece of text in the log for a serviced system, use the FIND
TEXT command. But, first of all, view the system using the
VIEW command. For example, to find the string "fatal
bugcheck" on the system SALT, enter:
Command: VIEW SALT
followed by:
Command: FIND TEXT "fatal bugcheck"
8.12.3. By Event
To find a particular event, use the FIND EVENT command. But, first
of all, view the system using the VIEW command. For example, to find
the occurrences of the event WRNING forward in time displayed from the
current position in the log file on the system PEPPER, which is the currently displayed
log, enter:
Command: VIEW PEPPER
followed by:
Command: FIND EVENT WRNING FORWARD
8.13. Reading Previously Archived Log Data
To read log data that has been previously archived and that is available in the default
archive directory, use the REVIEW command. This lets you read the data
and scroll through it using the scrolling keys described in the section, Reading Current
Console Log Data, earlier in this chapter, or using the FIND command
described in the section, Finding Historical Console Log Data.
There may be several sets of files for a given system covering different time spans. The
REVIEW command concatenates them in chronological order and then
displays the data in the currently selected log area.
You must have enough free disk space, equal to the sum of the sizes of all the archive files present in the archive directory for the specified system.
To review all the available archive data in the default archive area for the system SALT, and display it in the currently selected log window, enter:
Command: REVIEW SALT
8.14. Transmitting a Break Signal on a Console Line
To transmit a break signal on the console line as though you were using the Break key
directly on the console of the serviced system, use the HALT or
BREAK command. The system record must be configured with the Halt
Sequence set as “BREAK”.
Note
Not all terminal and console servers support the transmission of the break signal. If in doubt about whether your terminal or console server supports the transmission of a break signal, check the documentation provided with it.
For example, to transmit a break signal on the console line for the serviced system, SALT, enter:
Command: BREAK SALT
Do you want to halt the system? [Y/N]?
You are asked to verify that you want to halt the system.
If you do not specify a system in the command, the break signal is transmitted to the system in the currently selected area.
8.15. Transmitting a Break Signal with Connection Type of SSH
There is no standard character sequence required by all terminal/console servers in order to generate a break signal on their serial ports. Each vendor may have their own default sequence. The user may also modify this sequence.
Because Console Manager has a limit of eight characters for the halt sequence, you must configure the break sequence on your servers to be no more than eight characters. Choose a sequence that is unlikely to be used by any application that you execute while logged in to your system consoles. If you use the ~ (tilde) character as the starting character, you must avoid using one of the typical SSH client sequences, such as ~. (tilde-period) so that you do not terminate the SSH client application being used by Console Management.
VSI recommends you use the same sequence on all your terminal/console servers. Once you have chosen a sequence, use the same sequence for all systems connected to the same terminal server and that require a break in order to halt.
Note
This is an exception from other connection types such as LAT, TELNET or Direct. For those connection types, continue to enter the keyword “BREAK” when prompted for the halt sequence.
8.16. Halting a System
To halt a system, use the HALT or BREAK command.
Console Manager will direct the terminal or console server to transmit the halt sequence to
the serviced system.
See the section Transmitting a Break Signal on a Console Line for details about configuring the system record to transmit a break signal.
For example, to halt the serviced system, SALT, enter:
Command: HALT SALT
Do you want to halt the system? [Y/N]?
You are asked to verify that you want to halt the system.
If you do not specify a system in the command, the halt sequence is transmitted to the system in the currently selected area.
8.17. Displaying Timestamped Console Log Data
To display the time, or to stop displaying the time at which Console Manager logged the
console data, use the SET TIMESTAMPS command. This displays timestamps at
the left side of the log window for each line of console data. For example, to view the
timestamps for data being received from your serviced systems, enter:
Command: SET TIMESTAMPS ON
You cannot set timestamps on data for individual systems.
If you do not use the ON/OFF argument, then the command toggles the display of timestamps.
8.18. Performing a Dialog with a Serviced System
A dialog is a set of commands contained within a file that is used to interact with serviced systems repetitively.
Use the DIALOG command to perform a dialog with a serviced system or
systems. To do this, you must provide a text file containing the dialog commands needed to
do your selected task. The following section describes how to create a dialog script.
8.18.1. Creating a Dialog Script
The dialog script can use one or more of the commands shown in the following table.
| Command |
Description |
|---|---|
| BREAK |
Sends a halt sequence or break signal to the console. |
| HALT |
Sends a halt sequence or break signal to the console. |
| RATE |
Sets the period of time in seconds between which the dialog should pause
before executing the next |
| SEND |
Sends a specified string to the console. |
| SPEED |
Sets the time, in milliseconds, that the dialog is to pause before sending the next character. |
| UNLOCK |
Disconnects a user currently connected to the system the dialog script is running on. |
| WAIT |
Stalls for a timeout number of seconds, or until the quoted string occurs on
the console line. If a |
If you do not specify a system, the one with its banner line highlighted will be used.
This is the same as performing a dialog from your operating system command line. See the chapter Using Console Manager From the Command Line Interface for more information.
See Sample DIALOG File for an example dialog procedure.
8.19. Using Scripts
A script is a sequence of monitor commands designed to perform a specific function. It allows a file containing valid monitor interface commands to be invoked at the monitor interface command line. You may want to set up scripts for use on several serviced systems. When you enter a command in the monitor interface that is not one of the valid monitor interface commands shown in the table in Monitor Interface Commands, earlier in this chapter, a file search is performed for a script file with the name you have entered. If a script file is found, each monitor interface command contained in it is executed as if you had entered it directly at the monitor interface command line.
The filename used for the script file is as follows:
CONSOLE$command.SCRIPT Where command is the name you give to the file, and enter at the monitor interface command line.
The following example executes the file CONSOLE$SETUP.SCRIPT on a Console Manager host:
Command: SETUP
In this example, the CONSOLE$SETUP.SCRIPT could contain the following set of commands:
ONE (1)
VIEW PEPPER (2)
NEW (3)
VIEW SALT (4)
DIALOG DIALOG.TXT SALT (5)
Set the monitor interface up with one log window.
View the system PEPPER in the log window.
Add a new log window to the display.
View the system SALT in the new log window.
Perform the dialog contained in the file dialog.txt to the system, SALT.
Chapter 9. Understanding ENS
This chapter explains how Event Notification Services (ENS) works to notify you of events detected on the consoles of serviced systems. Although you can use Console Manager without event notification, VSI recommends that you set up ENS to make the best use of the features of the product.
This section contains the following topics:
9.1. What is ENS?
ENS is a flexible mechanism used to dispatch a predefined action, or series of actions, to notify you when an event occurs on the console of a serviced system.
Console Manager defines events as a specific series of characters that appear at the console of the serviced system. You must put the definitions for any events you wish to be detected into the configuration database, using the configuration editor.
When Console Manager detects an event, such as a fatal bug check, it runs an action, for example, an electronic mail message, to notify you. This enables monitoring of the system console output data without the need for an operator to be constantly viewing the system console.
9.2. Overview of the ENS Components
ENS is made up of the following components:
| Component |
Description |
See Section... |
|---|---|---|
| Events |
Predefined series of characters received on the console line of the serviced system. |
Events |
| Scans |
Collections of related events, or other scans. |
Scans |
| Actions |
Command procedures or executable images that are dispatched when ENS is passed an event for which there is a matching filter record. | Actions |
| Filters |
Definitions of the conditions which must be met when an event is detected so that actions can be dispatched. | Filters |
For ENS to work, you must define the events, scans, filters and actions in the configuration database.
The chapter Setting up the ENS Components explains how to use the configuration editor to set up the ENS components in your configuration database to notify you of events.
The remaining sections in this chapter describe these components.
The following figure gives an overview of the ENS components.
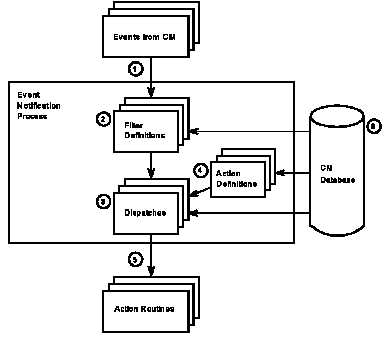
ENS receives an event from one of the Console Controllers.
The event is checked against the filter definitions in the configuration database. If no match is found, the event is discarded. If matches are found, the dispatches associated with the matching filters are invoked.
The dispatches for the filter definition are checked for times of day and day of the week.
Action definitions are coupled with dispatches to determine how the action routines are invoked.
The action routines are invoked, and notification takes place.
9.3. Events
An event is a predefined string of characters received on the console line of the serviced system. You must add one definition in the configuration database for each event you want to be detected. See the chapter Setting up the ENS Components for an explanation of how to do this using the command line interface or the DECwindows Motif interface to the configuration editor.
Note
A set of Console Manager internal events is supplied with the product. If you require any other events, you must set them up yourself.
All event strings are case and white space sensitive.
One event definition can be used by many systems. You must define the series of characters as either a literal string or a regular expression.
9.3.1. Literal Strings and Regular Expressions in Events
A literal string is a string of characters where each individual character takes on its own alphanumeric value.
A regular expression is a string of characters where certain characters have special meanings that affect the way the text is interpreted. These characters are called metacharacters.
The regular expression metacharacters you can use are listed in the following table.
| Expression |
Description | Example |
|---|---|---|
| ^ |
Matches one or more of CR, LF or FF | Event Text to scan for^ |
| . |
Matches any single character | Disk USER. offline |
| \ |
Uses the following character literally |
SALT$DKA0: \[SYS0\.SYSCOMMON\.\] \[SYSEXE\]LOGINOUT\.EXE |
| [] |
Matches a range of characters specified within the brackets |
[@%$] |
| * |
Matches 0 or more characters on the same line of console output |
Disk*offline |
| # |
Matches on 0 or more whitespace characters on the same line of console output |
Event#Text to scan for |
Note
When using the “[]” operators, the following special meaning is given to the “^” and “-” symbols:
“^” denotes the complement of the rest of the bracketed string. For example, [^ABCD] matches any character except A, B, C or D.
“-” denotes a range of characters. For example, [A - Z] matches any character in the range A to Z.
An example of the difference between a literal and a regular expression would be matching the text FRED*JONES:
Literal string - the event text "FRED*JONES" matches on the ASCII text string "FRED*JONES"
Regular expression the event text "FRED*JONES" matches on the ASCII string "FRED" followed by any number of characters terminated by the ASCII string "JONES", all occurring on the same line of console output
Note
Console Manager does not support the matching of text over multiple lines through the use of the “^” metacharacter. The beginning and end of the line on which the match is found bound all event matches.
When you specify the text that is used to generate an event, ENS examines the console line of the serviced system(s) for which the event is defined. As soon as the specified text is matched, ENS sends the event immediately.
To ensure that you receive the complete line of text for the event, then add the metacharacters “*^” to the end of the text for the event, for example:
Security alarm on*^
This will trigger an event when the text "Security alarm on" is found, followed by any number or combination of characters terminated by either carriage Enter, line feed or form feed. All action routines will now receive the complete line of text that triggered the event.
9.3.2. Event Attributes
Each event has attributes as described in the following table.
| Attribute |
Description |
Example |
|---|---|---|
| Name |
A unique name for the event. |
Login Warning |
| Class |
Identifier used to group similar events together. |
Security |
| Subsystem |
The part of the serviced system being referred to. |
Logins |
|
Information |
Description to clarify what the event means. | Login attempt failed |
|
Text to Scan for 1 |
The literal or regular expression to be scanned for, and is sensitive to the case of the console data. | Remote interactive login failure |
|
Event Text Type |
Whether the event is a literal or regular expression. | Literal |
|
Event Priority |
The event priority from critical to indeterminate, which is used to modify the appearance of the event within some user interfaces (See the following table). | WARNING |
|
Context Count1 |
The number of lines of console output which comprise the full event context. | 14 |
|
Context Start? |
The line of console text which signifies the start of the event context. For example, if the context count is 14 and the event text match is on line 4, then the context start for the event will be 3 (context always begins at line 0). | 3 |
| Priority |
Color |
|---|---|
| CRITICAL |
Red |
| MAJOR |
Magenta |
| MINOR |
Orange |
| WARNING |
Yellow |
| CLEAR |
Green |
| INDETERMINATE |
Light blue |
You can change the default colors from the C3 interface. See the chapter Customizing Console Manager for more information.
The following figure shows an example of an event using the context attributes.
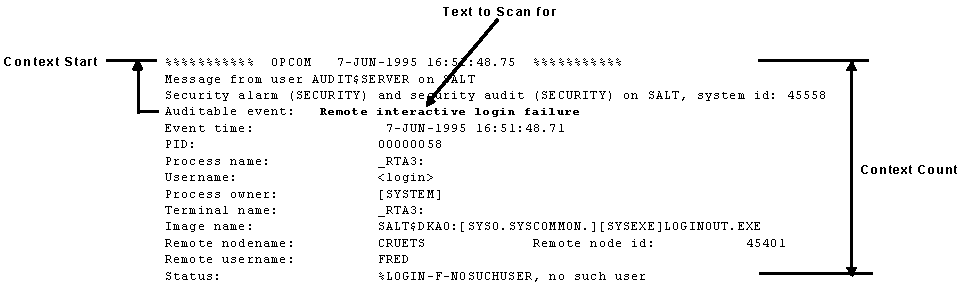
9.3.3. Events Generated by Console Manager
The default set of events are the Console Manager class of events. These events are generated by the Console Manager software, and not by a serviced system's console. They are shown in the following table.
| Event |
Meaning |
|---|---|
| CMgr Connect |
A user has connected to a console. |
| CMgr Unlock |
A user has unlocked a console. |
| CMgr Disconnect |
A user has disconnected from a console. |
| CMgr Disk Warning |
The logging disk for a system has exceeded the Warning threshold. |
| CMgr Disk Critical |
The logging disk for a system has exceeded the Critical threshold. |
| CMgr Console OK |
A connection between Console Manager and the serviced system has been established. |
| CMgr Console NOT Found |
A connection could not be established between Console Manager and the console for the serviced system. |
| CMgr Console Lost |
The link between Console Manager and the serviced system has been broken. |
| CMgr Console Lost Disabled |
The system uses TELNET as its transport, but the terminal server or console does not support the TELNET STATUS option. Therefore, Console Manager is unable to detect the loss of connections to the terminal server, so the automatic detection mechanism has been disabled for this system only. |
| CMgr Shutdown |
Console Manager has been shut down. |
| CMgr Reconfigure Started |
Console Manager reconfiguration has started. |
| CMgr Reconfigure Failed |
Console Manager reconfiguration has failed. |
| CMgr Reconfigure Completed |
Console Manager reconfiguration has completed. |
| CMgr Archive Aborted |
The archive was stopped because either the serviced system is disabled, or a user is connected to it. |
| CMgr Archive Started |
An archive has been started. |
| CMgr Archive Completed |
An archive has completed. |
| CMgr Archive Area Full |
The archive area is full. |
| CMgr Child Exited |
Child Console Controller has exited. |
| CMgr Child Restarted |
Child Console Controller has been restarted. |
| CMgr Poll to Primary Host Failed |
A poll to the primary host failed. |
| CMgr Failover Taking Control |
The secondary host is taking control. |
| CMgr Failover Control Success |
The secondary host has taken control. |
| CMgr Failover Release Control |
The secondary host has successfully released control. |
| CMgr Failover Control Failed |
The secondary host has failed to take control. |
| CMgr Poll to Primary Success |
A poll to the primary host has succeeded. This message is not normally seen. It is used to indicate success after a period of failed polls. |
For Console Manager events, the Event Text and Information attributes contain further information about the event. The Console Manager software completes this information when the event occurs, rather than being extracted from the database. For example, CMgr Connect contains information about the user who has connected to the serviced systems.
A copy of the default set of Console Manager events supplied with Console Manager is in:
CONSOLE$TEMPLATES: CONSOLE$CONFIG.PORT
You must add your own events to the database to let Console Manager scan for specific messages:
From the command line interface (see the chapter Setting up the ENS Components)
From the DECwindows Motif interface (see the chapter Setting up the ENS Components)
9.4. Scans
A scan is a collection of related events and other scans. It is the mechanism used to associate a set of events with a particular serviced system. You will need to detect many events on a particular system. In order to assign a set of events to a serviced system, you need to group these events into scans. This enables the same group of events (that is, the scan) to be used on many different systems.
You need to define scans and their associated events in the configuration database. See the chapter Setting up the ENS Components for more information about how to do this.
A copy of the default Console Manager scan supplied with Console Manager is in:
CONSOLE$TEMPLATES: CONSOLE$CONFIG.PORT
9.4.1. Scan Attributes
Each scan has attributes as described in the following table.
| Attribute |
Description |
Example |
|---|---|---|
| Name |
A unique name for the scan. |
OpenVMS 8970 |
| Information |
Description to clarify what the scan does. |
VAXcluster 8970 series OpenVMS scan profile |
| Events |
Valid event names as defined in the configuration database. |
CRASH |
| Scans |
Valid scan names as defined in the configuration database. |
VAX 8700 Hardware, OpenVMS Version 6.0 |
9.4.2. Relationship Between Events and Scans
The following figure shows the relationship between events and scans. They are all read from the configuration database by the console controller daemons, which look at incoming text for events. When an event is found, it is forwarded on to the ENS daemon for dispatch.
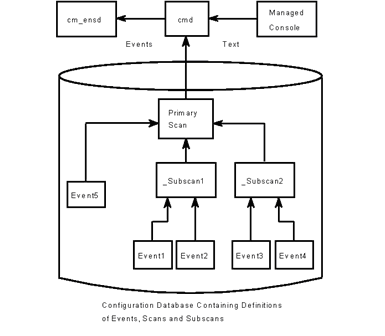
9.5. Filter
A filter defines the conditions that must be met when an event is detected in order for an action or set of actions to be dispatched. In order to notify users of events, you must define who is to be notified, how, when, and about which events. These criteria are defined as filters in the configuration database.
A copy of the default set of Console Manager filters supplied with Console Manager is in:
CONSOLE$TEMPLATES: CONSOLE$CONFIG.PORT
9.5.1. Filter Attributes
Each filter has attributes as described in the following table.
| Attribute |
Description | Example |
|---|---|---|
| Name |
Filter name as stored in the configuration database. This name must be unique for each filter. | Archive directory cleanup |
| Information |
Description to clarify what the filter does. | Clear out archive directory when full |
| Interval |
The period within which subsequent events matching the filter definition are ignored. | 60 (duplicate events are ignored for 60 seconds) |
| Event Interval |
The period within which all events matching the filter and event name are ignored. | 0 (no events are ignored) |
| Events? |
Event names that must match the detected event's name before it is allowed to be dispatched to the action routines. | CMgr Archive Area Full |
| Classes? |
Class names, which must match the detected event's class before it can dispatch to the action routines. | CONSOLEmanager |
| Systems? |
Systems that the event must come from before can dispatch to the action routines. | All |
| Subsystems |
Events whose subsystems match the definition list. | Console |
| Groups? |
Group of systems that events must come from before they are dispatched to the routines. | GROUP1 |
|
Priorities |
The individual priority levels that the events selected for the filter must match for the dispatch entries to be invoked. | Critical |
|
Dispatches |
Actions to which the event is dispatched when the filter criteria are met. | Archive Cleanup |
9.5.2. Dispatches
Dispatches consist of a set of actions that will be dispatched along with some associated userdata. ENS passes this userdata to the action. In addition to the userdata, each dispatch includes the times of day (for each day of the week) when the event should be sent to that action. This allows you to specify different actions for the same filter to be dispatched depending on the time of day and the day of the week.
Dispatches have attributes as described in the following table.
| Attribute |
Description | Example |
|---|---|---|
| Action to dispatch |
The name of the action to dispatch. The Console Manager supplied actions are: Archive Clean-up Broadcast Multi-Line Window Single-Shot Window | Multi-Line Window |
| Information |
Description to clarify what the dispatch does. | Events on systems to pepper |
| Userdata |
Values to be specified. | Salt 0 0 tcpip |
| Dispatch hours |
The times of the day when the action is to be dispatched. Clicking on this button invokes the Dispatch Hours dialog box |
Before 8.00 and after 17.30 |
The following figures show how filters and dispatches work.
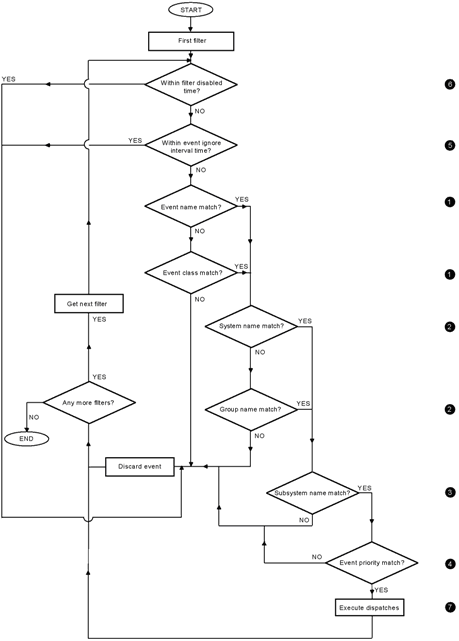
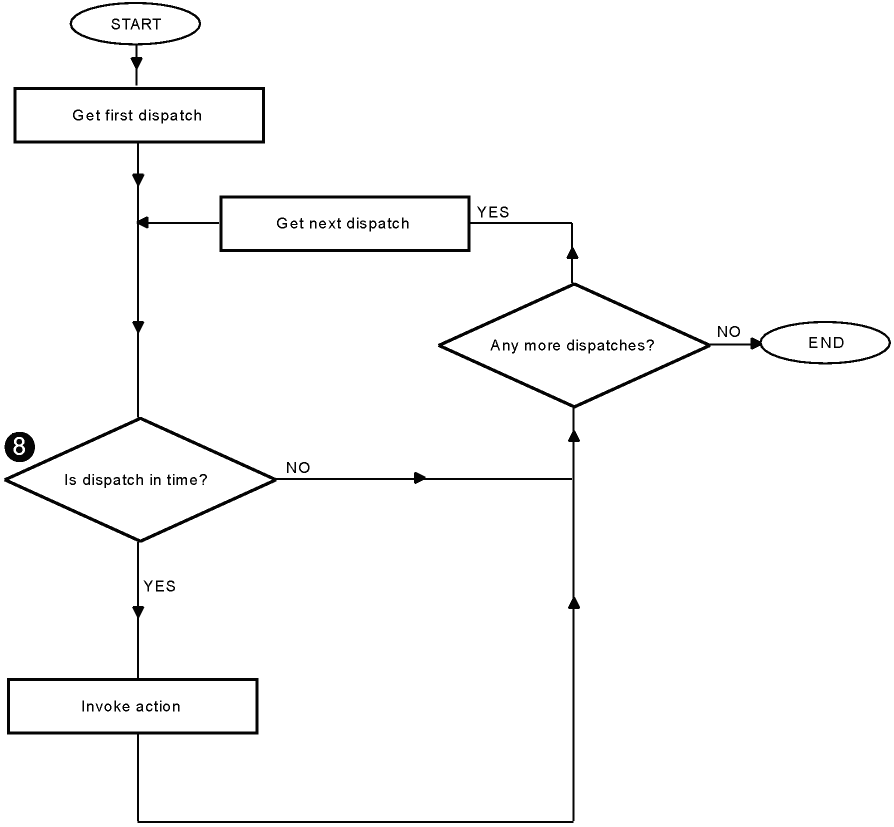
The following table describes how a new event is processed when you choose a subset for Events, Classes, Systems, Groups, Subsystems and Priorities.
|
Filter Mechanism |
Figure Reference? | |
|---|---|---|
| IF |
the new event matches… one of the EVENTS selected one of the CLASSES selected |
1 |
| AND |
the new event matches one of the SYSTEMS selected one of the GROUPS selected |
2 |
| AND |
the new event matches one of the SUBSYSTEMS selected |
3 |
| AND |
the new event matches one of the priorities selected |
4 |
|
AND |
the new event is not one which previously occurred within the event interval set |
5 |
|
AND |
the new event is not within the interval set |
6 |
|
THEN |
dispatch all the actions listed |
7 |
|
BUT ONLY IF |
they are within their individual hours for the current day of the week |
8 |
The AND and OR parts are significant.
If you want to be notified of events A and B, which are members of class X, then on the Filter dialog box, you need only select the class X; deselect the "All events" button but do not select any events in the "Events..." dialog. Therefore, an event will match if its name matches one which is selected (in this example, none are selected), or its class matches one of the classes selected (in this case class X).
9.6. Actions
An action is a procedure that is dispatched when ENS is passed an event for which there is a matching filter record. The action then performs the task it was designed to do, such as notifying you of an event occurring on a specified serviced system.
A set of actions is supplied with Console Manager and already in the default database. See the chapter Supplied Action Routines for more information. You may use these if you wish.
Note
If the supplied actions do not fulfill your requirements, you can write your own and then add them to the configuration database. See the chapter Create Your Own Action Routines.
A copy of the default set of Console Manager action definitions supplied with Console Manager is in:
CONSOLE$TEMPLATES:CONSOLE$CONFIG.PORT
These definitions are automatically loaded into the default configuration database at installation time. They reference the following procedures:
Eventlist
Eventsingle
Mail
Broadcast
Archive Cleanup
These procedures are stored in one of two directories - one is reserved for use by Console Manager, and the other for user-defined actions. The two directories are linked via the logical name CONSOLE$ACTIONS. Place any actions you create in CONSOLE$USER_ACTIONS:. This directory is searched first by the ENS daemon for actions.
9.6.1. Action Attributes
Each action has attributes as described in the following table.
| Attribute |
Description |
|---|---|
| Name |
A unique name for the action. It is selected when creating dispatch entries in filter records. |
| Information |
Description of what the action does. |
| Command |
The name of the command procedure or image residing in the default actions directory. The directory specification must not be specified when entering this item. |
| Action Type |
One of:
|
| Parameters to Pass to Action |
In the case of actions treated as scripts and command procedures (that is, parameters are passed on the command line) each item of the event which is required by the action must be selected. |
9.6.2. Invoking Actions
Actions can be invoked each time an event occurs, or they can be dispatched once and then be passed many events. The type of action being used determines the data passing method ENS uses to inform the action of the event or events destined for it.
There are two data passing methods: using the command line or an interprocess communication (IPC). The following table explains them in detail.
| Data Passing Method |
Description |
Action Type |
|---|---|---|
| Command line |
All event details are passed on the command line used to dispatch the action. This method is used for actions requiring only details of the single event they were dispatched for. |
Shell script, command procedure or image |
| IPC |
All event details are passed to the action through a UNIX domain socket or OpenVMS mailbox. This method is used for actions that are to be sent multiple events. |
Image |
The values you give to the Action Type attribute determines the data passing method. The possible values are shown in the following table.
| Action Type |
Data Passing Method |
Dispatch Behavior |
|---|---|---|
| Command procedure |
Command line |
One instance of the action is dispatched for each event and each userdata item. |
| Image |
IPC |
One instance of the action is dispatched for all events and all userdata items. |
| Image |
IPC |
One instance of the action is dispatched for all events and each userdata item. |
9.6.2.1. Command Line Data Passing
For the command line data passing method, the attributes of an event (the Event Name, Information and so on) are passed to the action routine as parameters on the command line in the order they appear in the configuration editor. The data to be passed is set up using the Action dialog box (see the figure in the section, Adding Actions, in the chapter Setting up the ENS Components.
If you deselect an item in the configuration editor indicating that it is not required, then it will not appear on the command line invoking the script, nor will a zero length string be passed. This means that the parameter numbers for each item will change in the script depending upon what is being passed. For example, if the definition for action X specifies that it requires the Event Name, Class and Information only, then these will be passed as the first, second and third parameters respectively. If action Y requires only the Event Name and the Information, these will be passed as the first and second parameters respectively.
9.6.2.2. IPC Data Passing
For the IPC data passing method, if a dispatch is created for an action, all events from all filters which specify that action will be passed to the running action. If separate instances of the action are required for each filter, then you must create different actions in the configuration database with different names, but which call the same image name in the command attribute.
Note
If you select any of the individual parameters to pass to action as well as the IPC method, then these parameters will be passed to the action routine on the command line for only the first event delivered to the action. For example, the eventlist action routine expects the display information to be on the command line, and so has the userdata toggle button set. The userdata contains the display information for eventlist. See the chapter Supplied Action Routines for more information.
9.7. Hints on Filtering Events and Dispatching Actions
You need to be aware of the following points when creating filters, dispatches and action routines:
A filter determines what events to report.
A dispatch determines how an event is to be reported, and when.
A filter can have more than one dispatch. Therefore, you can dispatch an action for an event to more than one destination, and that dispatch can depend on the time of the day and the day of the week.
See the scenario described in Filtering Duplicate Events in a Group of Systems Depending on the Time, in the chapter Scenarios for Filtering Events for an example of how this can be done.
You can prevent duplicate events being sent within a specified time. There are two controls that allow you to do this:
Filter interval, which allows you to prevent any further events from being dispatched within the specified time
Event interval, which allows you to prevent recurrences of the same event from being dispatched within the specified time.
You can use these controls individually or both together. See the scenario described in the section, Filtering Duplicate Events in a Group of Systems, in the chapter Scenarios for Filtering Events for an example of how this can be done.
The action name determines the instance for a dispatched event.
If an action handles only a single event at a time, then you can use that action for more than one filter (the supplied action Mail is an example).
If an action handles multiple events, then do not use that action name in more than one filter. This will cause ENS to mix up the different, filtered, events.
However, you can use the same action routine in more than one action.
For example, if you have two filters that report a different class of events using eventlist, then the action name for each filter must be different. In this case, you would get one class of events reported in one eventlist window, and the second class reported in the other window. If you used the same action name for both filters, then you would get both classes of events reported in the same eventlist window.
When deciding how to report events, follow these steps:
Decide on what events you need to be reported, such as: all events of a specific class; all events of a certain priority from a specific system; and so on.
This determines the number of filters that you need to create.
Decide on how you want the different events to be reported (the amount of information and the destination), and when (time of day and day of week).
This determines the number of dispatches that you need to create for each filter.
Decide on whether or not the supplied action routines can do what you require.
If you need to create an action routine, you must decide on whether the action routine is to handle a single event, or multiple events.
Chapter 10. Customizing Console Manager
This chapter describes how to customize Console Manager. The chapter assumes that you are familiar with DECwindows and DECwindows Help.
This section contains the following topics:
10.1. The Customization File
The C3 interface maintains a text file in your home directory (SYS$LOGIN) that stores customized display information such as background color, icon placement and text, so that you are able to customize your own C3 display. This file is known as the C3 configuration file, and is automatically generated and updated when you choose the Save menu item from the Options pulldown menu. This file is stored given the following name:
CONSOLE$C3.DAT
Note
Modifying this file from anything other than the C3 interface will prevent the C3 interface from working. However, if you want to revert to your default settings, you can delete this file.
10.2. Customizing the Monitor and Connect Interfaces
You can influence what the monitor and connect interfaces do on startup, and change the control key settings for the monitor interface.
10.2.1. Creating an Initialization File
You can specify a sequence of monitor interface commands to be executed automatically when you invoke either the monitor or connect interfaces. Put the commands in an initialization file named as follows:
CONSOLE$USER_DEFAULTS:CONSOLE$MONITOR_INIT.DAT
Or, if this logical name is not defined, use:
SYS$LOGIN:CONSOLE$MONITOR_INIT.DAT
Note that you can only use the following commands in the initialization file:
ONE
NEW
NEXT
PREVIOUS
VIEW
SET HALT_KEY
SET BREAK_KEY
SET ESCAPE_KEY
SET EXIT_KEY
SET REFRESH_KEY
You must start each command on a new line in the initialization file. For example:
10.2.1.1. Example
SET ESCAPE_KEY CTRL_F
SET EXIT_KEY CTRL_B
NEW
NEW
NEW
In this example, the escape key is set to CTRL_F and the exit key is set to CTRL_B.
When you enter a monitor session, four log windows will be available: the original, plus
three others. They will display the console log data for the same system, as the
VIEW command is not used in the initialization file.
If you have an initialization file and you do not want to invoke it when connecting to the system Pepper, or running a monitor interface session, specify the following switch on the connect command line:
Enter:
$ CONSOLE CONNECT PEPPER/NOINIT
Alternatively, specify the following switch on the monitor interface command line:
$ CONSOLE MONITOR/NOINIT
10.2.2. Setting Control Keys
You can redefine the default control keys shown in the following table if you wish.
If you do redefine the keys, you need to repeat the process each time you use the monitor command, as changes made to key definitions are not stored.
Alternatively, use the initialization facility described in Customizing the Monitor and Connect Interfaces, earlier in this chapter.
| Control Key |
Default |
Default Action |
|---|---|---|
| Exit |
CTRL_E |
Takes you out of the connect interface and returns you to the command line. |
| Escape |
CTRL_G |
Disconnects your session from the serviced system's console and returns you to the monitor interface, where all the monitor interface commands are available |
| Halt |
CTRL_P |
Sends the halt sequence or break signal to the serviced system |
| Break |
CTRL_P |
Sends the halt sequence or break signal to the serviced system. |
| Refresh |
CTRL_W |
Repaints the screen after an interruption. |
For example, to change the defined Exit key from E to A:
Enter:
Command: SET EXIT_KEY CTRL_A
10.3. Customizing Your C3 Display
When you add systems and groups to your configuration database, and reconfigure Console Manager, the related icons are positioned in rows on your C3 display in the order they appear in the configuration database.
Note
You cannot add or remove system and group icons directly on the C3 interface. This is done automatically by Console Manager when you reconfigure after editing the configuration database. However, you must have the privilege to edit the configuration database.
To edit the C3 display, you must have the Edit C3 privilege. You can customize the default C3 display by:
Moving icons representing serviced systems, groups and peripherals.
Adding and moving icons representing peripherals.
Drawing lines to represent the connections between the systems, groups and peripherals.
Adding and moving text.
Changing the background color and adding a background bitmap.
To do this select edit mode, and then click the left mouse button on an icon or text object to move it, or click the right mouse button on the background to display a popup menu. This menu includes options to add peripherals, add text, draw lines, and change the window background.
The icons are X11 bitmaps, and you or your Console Manager host system manager can create additional icons if required. See Creating Your Own Icons, later in this chapter, for more information.
10.3.1. How To Set Up a Common Console Management C3 View
By default, each user's C3 display can be customized independently of other users' displays. Each user's settings are stored in their copy of the customization file (see The Customization File, earlier in this chapter).
You can set up a common interface for all users as follows:
Before starting the C3 interface, define the logical name CONSOLE$USER_DEFAULTS to point to a directory that contains the common CONSOLE$C3.DAT resource file. The logical definition may be placed in the LOGIN.COM file for each user sharing a C3 configuration view:
$ DEFINE CONSOLE$USER_DEFAULTS directory_specification
Various files used by other user interfaces must also be moved to the common directory as listed in the following table.
|
Interface |
Files Affected |
|---|---|
|
C3 |
CONSOLE$C3.DAT CONSOLE$C3_username_MSG.LOG |
|
Connect and Monitor |
CONSOLE$MONITOR_INIT.DAT CONSOLE$command.SCRIPT |
|
Eventlist? |
CONSOLE$EVENTLIST.DAT |
10.3.2. Setting Startup Options
You can set up your C3 display to do any of the following at startup:
Start the event list window.
Iconify the C3 display.
Set the double click action on a system icon to either start a connect to console session, or perform a show history.
Set the icon color change to either the latest event or the highest event priority received.
To set startup options:
Choose the General ... menu item from the Options pull down menu. This displays the C3 General Options dialog box.
Click the items you require, and then on OK.
To save your edits, pull down the Options menu and choose the Save menu item to save the changes you have made.
10.3.3. Setting Control Keys
You can redefine the default control keys shown in the following table if you wish.
If you do redefine the keys, you need to repeat the process each time you use the monitor command, as changes made to key definitions are not stored.
Alternatively, use the initialization facility described in the section, Customizing the Monitor and Connect Interfaces, earlier in this chapter.
| Control Key |
Default |
Default Action |
|---|---|---|
| Exit |
CTRL_E |
Takes you out of the connect interface and returns you to the command line. |
| Escape |
CTRL_G |
Disconnects your session from the serviced system's console and returns you to the monitor interface, where all the monitor interface commands are available. |
| Halt |
CTRL_P |
Sends the halt sequence or break signal to the serviced system |
| Break |
CTRL_P |
Sends the halt sequence or break signal to the serviced system. |
| Refresh |
CTRL_W |
Repaints the screen after an interruption. |
For example, to change the defined Exit key from CTRL_E to CTRL_A, on system pepper:
Click the mode change button to change to Edit mode.
Click the right mouse button on the system icon for pepper, and select Modify from the popup menu. The Modify System dialog box is displayed (see the figure in Setting Control Keys, earlier in this chapter).
Press the left mouse button on the Exit Key button, move the cursor to , or CTRL_A, and release the left mouse button.
Click OK to accept the change.
Click the mode change button to change back to Interactive mode.
To save your edits, pull down the Options menu and choose the Save menu item to save the changes you have made.
Note
Each control key must have a different value. If you attempt to set a control key to the same value as one already defined, the control key has no definition.
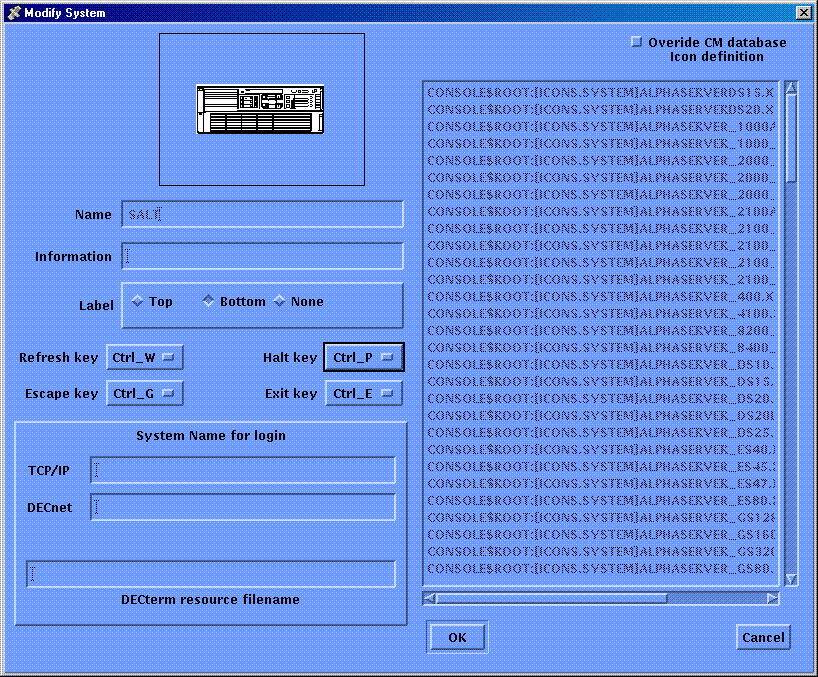
10.3.4. Setting the DECnet Node Name and TCP/IP Host Name
The name of your serviced systems as specified in the configuration database can be different from the node name or host name. The node and host names are needed if you want to log in to a serviced system (see the chapter Using Console Manager From the C3 Interface).
To set the node and host names for your serviced systems, do the following:
Click the mode change button to change to Edit mode.
Click the right mouse button on the system icon, and select Modify from the popup menu. The Modify System dialog box is displayed (see the figure in Setting Control Keys, earlier in this chapter).
Enter the System Name for Login information:
Enter the TCP/IP host name for the serviced system in the TCP/IP field.
Enter the DECnet node name for the serviced system in the DECnet field.
Click OK.
Click the mode change button to change back to Interactive mode.
To save your edits, pull down the Options menu and choose the Save menu item to save the changes you have made.
10.3.5. Setting the DECterm Resource File Name for a Serviced System
You can specify a DECterm resource file for each serviced system, to be used when you:
Connect to the console of the serviced system
Run the monitor interface for the serviced system
Log in to the serviced system from the C3 interface
To set the DECterm resource file for a serviced system:
Click the mode change button to change to Edit mode.
Click the right mouse button on the system icon, and select Modify from the popup menu. The Modify System dialog box is displayed (see the figure in Setting Control Keys, earlier in this chapter).
Enter the name of the DECterm resource file you want to use in the DECterm resource filename field.
Click OK.
Click the mode change button to change back to Interactive mode.
To save your edits, pull down the Options menu and choose the Save menu item to save the changes you have made.
10.3.6. Moving Icons
To move the icons representing the serviced systems and peripherals on your display:
Click the mode change button to change to Edit mode.
Press and hold the left mouse button on the icon you wish to move, drag it to its new position and release the left mouse button.
To move one icon behind another, click the right mouse button on the icon you wish to move, then choose Push from the pop-up menu displayed.
To move one icon in front of another, click the right mouse button on the icon you wish to move, then choose Pop from the pop-up menu.
After finishing all your edits, click the mode change button to change back to Interactive mode.
To save your edits, pull down the Options menu and choose the Save menu item to save the changes you have made.
Compare the figure in the section, How to Set Up a Common Console Manager C3 View, earlier in this chapter with the figure found in section, The Group Window, in the chapter Using Console Manager From the Command Line Interface to see how icons can be repositioned.
![]()
10.3.7. Add Icons Representing Peripherals
Icons representing the peripherals connected to your serviced systems as part of your Console Manager environment are not included on the default C3 display.
To add them:
Click the mode change button to change to Edit mode.
Click the right mouse button in the background area of the screen where you want the peripherals icon to be. This displays a pop-up menu.
Choose Add Peripheral from the menu. This displays the Peripheral Icon dialog box, as shown in the following figure, for you to complete.
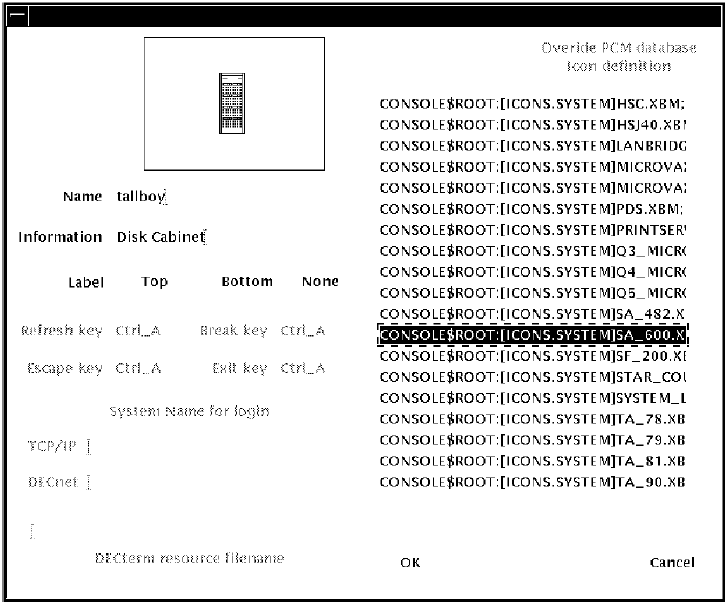
Choose a name for your icon, and click an icon from the list displayed, and the icon is displayed in the upper left corner of the dialog box. You can choose where to put labels on your display using the Label placement field.
Click OK.
After finishing all your edits, click the mode change button to change back to Interactive mode.
To save your edits, pull down the Options menu and choose the Save menu item to save the changes you have made.
Note
You can cause a peripheral icon to change its color if you call the CMUserSendEvent routine using the name of the peripheral as the system name. However, these events cannot be viewed in any way, and are not logged by Console Manager.
The following figure shows the peripheral, SA600, added to the display.
![]()
10.3.8. Modifying Icons Representing Peripherals
To change the icon's picture, name, and description:
Click the mode change button to change to Edit mode.
Click the right mouse button on the icon representing the peripheral you want to change.
Choose Modify from the menu displayed. This displays the Peripheral Icon dialog box.
Change the required fields in the dialog box and click OK.
After finishing all your edits, click the mode change button to change back to Interactive mode.
To save your edits, pull down the Options menu and choose the Save menu item to save the changes you have made.
You can delete icons representing peripherals from the display by clicking on Delete instead of Modify.
10.3.9. Modifying Icons Representing Serviced Systems
The serviced systems you have access to in the configuration database are shown on the C3 display.
To change the icon outline, name, or description:
Click the mode change button to change to Edit mode.
Click the right mouse button on the icon representing the serviced system you want to change.
Choose Modify from the menu displayed. This displays the System Icon dialog box.
Change the required fields in the dialog box.
You can override the system icon defined in the configuration database for the system, without having to reconfigure your C3 interface. To do this:
Select Override Console Manager database icon definition.
Choose the new icon for the system.
This change does not affect the system icon on the displays of other users.
After finishing all your edits, click OK.
Click the mode change button to change back to Interactive mode.
To save your edits, pull down the Options menu and choose the Save menu item to save the changes you have made.
Note
You cannot change the Name field for a serviced system on your display.
10.3.10. Modifying Icons Representing Groups
The groups you have access to in the configuration database are shown on the C3 display.
To change the icon outline or description:
Click the mode change button to change to Edit mode.
Click the right mouse button on the icon representing the group you want to change.
Choose Modify from the popup menu displayed. This displays the Group Icon dialog box.
Change the required fields in the dialog box.
After finishing all your edits, click OK.
Click the mode change button to change back to Interactive mode.
To save your edits, pull down the Options menu and choose the Save menu item to save the changes you have made.
10.3.11. Displaying the Group, System and Peripheral Labels
You can automatically display the name of your groups, systems or peripherals on the C3 interface. The position of the label is determined by the Label Placement selection in the System Icon dialog box.
To display labels on your C3 interface:
Click the mode change button to change to Edit mode.
Pull down the Options menu and choose the On submenu item from the All Labels menu. This displays the labels to all the icons representing the groups, serviced systems and peripherals.
To hide all labels on the display, pull down the Options menu and choose the Off submenu item from the All Labels menu.
After finishing all your edits, click the mode change button to change back to Interactive mode.
To save your edits, pull down the Options menu and choose the Save menu item to save the changes you have made.
10.3.11.1. Displaying and Hiding Labels for Individual Icons
If you have all labels switched on, you can turn off the labels for individual group, system and peripheral icons.
To turn off the labels for individual group, system and peripheral icons:
Click the mode change button to change to Edit mode.
Click the right mouse button on the icon and select Modify from the popup menu. The Modify System dialog box is displayed (see the figure in the section, Setting Control Keys, earlier in this chapter).
Set the Label placement field to None.
Alternatively, if you have all labels switched off, you can turn on the labels for individual group, system and peripheral icons.
To turn on the labels for individual group, system and peripheral icons:
Click the mode change button to change to Edit mode.
Click the right mouse button on the icon and select Modify from the popup menu. The Modify System dialog box is displayed (see the figure in the section, Setting Control Keys, earlier in this chapter).
Set the Label placement field to whichever position you want (Top or Bottom).
10.3.12. Drawing Lines
To show the connections between the various pieces of hardware in your Console Manager environment by drawing lines on the C3 display:
Click the mode change button to change to Edit mode.
Click the right mouse button on the display background, and choose the Line Drawing menu / On submenu. This displays the C3 Line Characteristics dialog box where you can adjust your line characteristics. This dialog box will remain on the screen until you turn off this facility, and dismiss the C3 Line Characteristics dialog box.
If you dismiss the C3 Line Characteristics dialog box, you can get it back by clicking the right mouse button on the display background, and choosing set characteristics menu option.
In the C3 Line Characteristics dialog box, set the line width by dragging the slider bar.
Set the color by clicking on that color. To create your own color, double-click the Custom button, and set the color you desire from the C3 Line Color dialog box.
Click OK.
To draw a line, do the following:
Click and hold the left mouse button where you want the line to start.
Move your cursor to the point where you want the line to end, and release the left mouse button.
To cancel the current line, press the right mouse button while drawing with the left mouse button.
If you make a mistake after you have drawn a line or lines and want to delete any of those you have drawn, click the right mouse button on the line and then click Delete Line. You cannot move or stretch lines.
To end your line drawing session, click Line Drawing Off from the same pop-up menu.
After finishing all your edits, click the mode change button to change back to Interactive mode.
To save your edits, pull down the Options menu and choose the Save menu item to save the changes you have made.
You cannot change the width or color of lines already drawn on the display. to make changes, delete the line, change the line characteristics and redraw the line.
The following figure shows lines added to the display to represent the network connections.
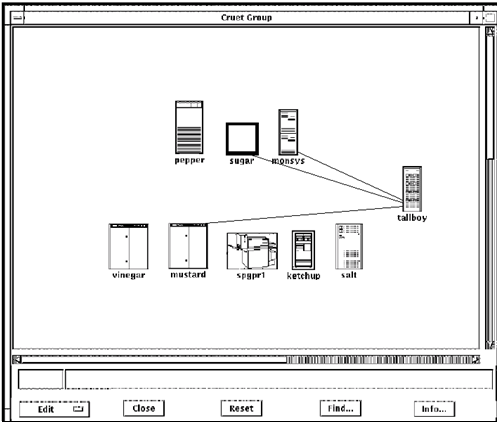
10.3.13. Add Text to the Display
To add text other than the icon labels to the display:
Click the mode change button to change to Edit mode.
Click the right mouse button where you want to add text.
Choose Add Text from the pop-up menu displayed. This displays the C3 Text dialog box. From here you can add text, display it in any color available in the colors palette and change its font.
Enter the text, choose a new color for the text if you wish, change the font if you wish and then click OK.
To position the text on your C3 display, click and hold the left mouse button over the text, drag it to the required position and release the left mouse button.
After finishing all your edits, click the mode change button to change back to Interactive mode.
To save your edits, pull down the Options menu and choose the Save menu item to save the changes you have made.
The following figure shows text added to the display.
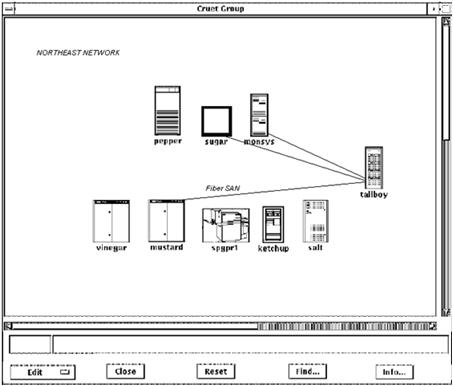
10.3.14. Add a Background Bitmap
You can use bitmaps for the backgrounds of the main and group windows. Bitmaps for use as a window background have the .bg_xbm extension.
To add a bitmap to the background:
Click the mode change button to change to Edit mode.
Click the right mouse button on the window background.
Choose Background ... from the popup menu. The background dialog box is displayed (see the following figure).
Select Bitmap background, and choose the bitmap you require from the list.
Click OK.
Click the mode change button to change back to Interactive mode.
To save your edits, pull down the Options menu and choose the Save menu item to save the changes you have made.
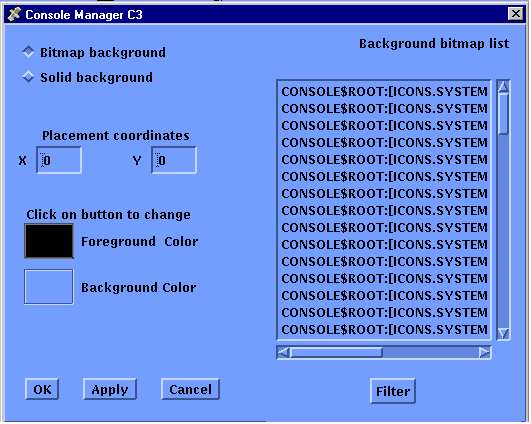
10.3.15. Change Icon, Window and Label Colors
You can change the color of:
The icons representing the groups, serviced systems and peripherals.
The screen background color of your display.
The color of labels.
Note
The icons for all groups, serviced systems and peripherals are displayed in their respective colors. You cannot, for example, have a group icon in a different color from the remaining group icons.
10.3.15.1. Change the Color of Group Icons
To change the color of group icons:
Pull down the Options menu, and choose the Colors, Group Forground submenu. This displays the Group Foreground dialog box.
Select the color you require, then click OK.
Choose Save from the Options menu to save the modified display.
10.3.15.2. Change the Color of Serviced System Icons
To change the color of serviced system icons:
Pull down the Options menu, and choose the Colors, System Foreground submenu. This displays the System Foreground dialog box.
Select the color you require, then click OK.
Choose Save from the Options menu to save the modified display.
10.3.15.3. Change the Color of Peripheral Icons
To change the color of peripheral icons:
Pull down the Options menu, and choose the Colors, Peripheral Foreground submenu. This displays the System Foreground dialog box.
Select the color you require, then click OK.
Choose Save from the Options menu to save the modified display.
10.3.15.4. Change the Color of Labels
To change the color of labels:
Pull down the Options menu and choose the Colors, Labels submenu.
Select the color you require, then click OK.
Choose Save from the Options menu to save the modified display.
10.3.15.5. Change the Console Manager Display Background
You can change the color of the display background, and place an X11 bitmap on the background.
To change the Console Manager display background color:
Click the mode change button to change to Edit mode.
Click the right mouse button on the display background, and choose Background... from the popup menu.
Click the left mouse button on the Background Color field. This displays the Background dialog box.
Select the color you require, then click OK.
Click the mode change button to change back to Interactive mode.
To save your changes, pull down the Options menu and choose the Save menu item to save the modified display.
10.3.16. Change Audio/Visual Indicators for Event Notification
You can change the following audio/visual indicators to determine how the priority of events is shown on the C3 display:
Bell count - the number of times the workstation bell rings.
Volume - the loudness of the bell.
Icon color - the color of the system on the C3 display that signifies an event has occurred. You can have a different color for each event priority.
For example, you may set your display so that when a critical event occurs, the bell rings five times at its highest pitch and the affected system icon turns red.
10.3.16.1. Change the priority bell counts for major events
To change the priority bell counts for major events:
Pull down the Options menu and choose the Event Characteristics... menu item. This displays the Event Priority Attributes dialog box.
To change the color indicator for the priority (for example, major), click the left mouse button on the button for that priority. The color palette dialog box is displayed.
Set the color you want to give to the priority, and click OK.
To change the bell count and volume for a priority, drag the corresponding slider bars for that priority.
Setting the bell count to 0 turns the bell off.
Click OK.
By default the C3 interface displays the most recent events received from a serviced system. To change this, click the left mouse button on the Keep highest priority until cleared button - the C3 interface subsequently displays the latest highest priority event received so far for each serviced system.
10.3.17. Creating Your Own Icons
The icons used by the Console Manager software are in X11 bitmap format and can be created using any of the available bitmap editors. For example:
RUN SYS$SYSTEM:DECW$PAINT MYICON.XBM
When you create your own icons, ensure that you, or your system manager, place them in:
There are two directories - one is reserved for use by Console Manager, and the other for user-defined icons. The two directories are linked via the logical name CONSOLE$ICONS. Place any icons you create in CONSOLE$USER_ICONS.
When displaying a list of available icons, both interfaces to the configuration editor replace any underscore (_) characters with spaces. This is for aesthetic purposes.
The file extensions recognized by Console Management for the various bitmaps are listed in the following table.
| Bitmap Type |
Extension |
|---|---|
| Serviced system icons |
.XBM |
| Peripheral icons |
.XBM |
| Group icons |
.GROUP_XBM |
| Background icons |
.BG_XBM |
10.4. Customizing SSH
To customize the SSH client command verb for use with Console Manager, define the
logical name CONSOLE$SSH_COMMAND. This logical provides the ability to set
SSH command options and use the correct command for the IP stack
installed on the system. By default, the command verb used by Console Manager is
ssh.
For example, verbose mode can be turned on by defining the logical name:
$ DEFINE/SYSTEM CONSOLE$SSH_COMMAND "ssh –v".
In the same way, you can enable IPv6 by defining the logical name:
$ DEFINE/SYSTEM CONSOLE$SSH_COMMAND "ssh –6".
Chapter 11. Setting Up the ENS Components
This chapter explains how to set up the components of ENS using the configuration editor to let Console Manager notify you of events detected on the consoles of serviced systems.
See the chapter Understanding ENS for a detailed description of events, scans, filters and actions. If you need only a quick reminder of the main points in creating filters and dispatches, then review the hints given in the chapter Understanding ENS.
If you need expert assistance in setting up ENS for your particular environment, contact the VSI OpenVMS support.
This section contains the following topics:
11.1. Steps in Creating Filters, Dispatches and Actions
To create the filters, dispatches and actions for reporting events, follow these steps:
Decide on what events you need to be reported, such as: all events of a specific class; all events of a certain priority from a specific system; and so on.
This determines the number of filters that you need to create.
Decide on how you want the different events to be reported (the amount of information and the destination), and when (time of day and day of week).
This determines the number of dispatches that you need to create for each filter.
Decide on whether or not the supplied action routines can do what you require.
If you need to create an action routine, you must decide on whether the action routine is to handle a single event, or multiple events. You must create your action routines before you can set up the appropriate dispatches.
Decide on what scans you need to create. To associate the events to be reported with a serviced system, you must create one or more scans. A scan can contain one or more events, as well as other scans.
Add the events to be reported.
Add the scans containing the appropriate events.
For each event, add the filter and dispatch criteria. If you need to use an action routine you have created, then this must be created before you can set up the appropriate dispatch.
11.2. Using the Command Line Interface to the Configuration Editor
This section describes how to use the command line interface to the configuration editor to set up ENS. The section contains:
Adding Events
Modifying and Deleting Events
Adding Scans
Modifying and Deleting Scans
Adding Filters and Dispatches
Modifying and Deleting Filters
Adding Actions
Modifying and Deleting Actions
11.2.1. Add Events
See the chapter Understanding ENS for information about events.
To add an event:
Start the configuration editor:
$ CONSOLE EDIT /INTERFACE=character_cell
Enter:
CM Edit> add event
Enter the name of the event:
Event name: Login Warnings
You are prompted for the class identifier. Enter a name only if you intend to place several similar events in the same category. For example, all events relating to logins could have the class Security:
Class (DEFAULT:) Security
You are prompted for the subsystem identifier. This is the part of the serviced system being referred to. For example, if the event refers to Logins, the subsystem could be Logins:
Subsystem (:) Logins
- Enter a fuller description of the event:
Information: Login attempt failed
Enter the text to be scanned for on the console:
Text: Remote interactive login failure
If you do not enter a metacharacter signifying that the string is a regular expression, the editor assumes your text is a literal string (see the chapter Understanding ENS).
If you enter a metacharacter to signify that the string is a regular expression, for example Remote*login failure, then you are asked if you want to match the text exactly:
Exactly match text? [Y/N] (Y:) Y
Enter Y for a literal string match, or N for a regular expression.
Enter information about where the event starts:
Start [0-999] (0:) 3
For example, a start of 3 means that the event starts 3 lines before the text Login attempt failed.
Enter information about how long the event lasts:
Count [1-1000] (1:) 14
For example, a count of 14 means that the event continues from the start for 14 lines.
Enter the priority you wan to assign to the event.
Priority [1=Critical, 2=Maj, 3=Min, 4=Warn, 5=Clear, 6=Indet] (5:) 4
For example, if it is warning, enter the number 4.
The configuration editor asks you to confirm that you wish to enter the event:
OK to add? [Y/N] (Y:) Y
The following is an example of what you see on your screen:
Database contains NO verification errors
CM Edit> add event
Event name: Login Warnings
Class (DEFAULT:) Security
Subsystem (:) Logins
Information: Login attempt failed
Text: Remote interactive login failure
Start [0-999] (0:) 3
Count [1-1000] (1:) 14
Priority [1=Critical, 2=Maj, 3=Min, 4=Warn, 5=Clear, 6=Indet] (5:) 4
OK to add? [Y/N] (Y:) Y
Continue to add further events in the same way.
11.2.2. Modifying and Deleting Events
Before you can modify or delete entries in the configuration database, you must have the Edit Configuration data privilege set in your user entry.
To modify an event, use the modify event command. To delete an event, use the delete event command.
Note
VSI recommends that you do not remove the predefined Console Manager events (prefixed with CMGR) from the database. However, you may redefine the priorities of these events if you wish. Any changes you make to these event definitions may not be preserved when your Console Manager installation is upgraded with new releases.
11.2.3. Add Scans
See the chapter Understanding ENS for information about scans.
To add a scan:
Start the configuration editor:
$ CONSOLE EDIT /INTERFACE=character_cell
Enter:
CM Edit> add scan
Enter the name of the scan:
Scan name:
Enter the information for the scan:
Information:
Enter the names of events to be added to the scan:
Enter event names to be scanned for. (? = list)
Event name (CR=end:) un*x security
Event name (CR=end:)
Enter the names of additional scans to be added to the scan:
Enter the names of additional scan definitions. (?=list)
Scan (CR=end:) Interactive Logins
Scan (CR=end:) Non-interactive Logins
Scan (CR=end:)
You are asked whether you wish to add the scan:
OK to add? [Y/N] (Y:) Y
The following is an example of what you see on your screen:
Database contains NO verification errors

CM Edit> add scan
Scan name: u*ix security
Information: u*ix security events
Enter event names to be scanned for. (? = list) crash
Enter name (CR=end:) un*x security
Enter name (CR=end:)
Enter the names of additional scan definitions. (?=list)
Scan (CR=end:) Interactive Logins
Scan (CR=end:) Non-interactive Logins
Scan (CR=end:)
OK to add? [Y/N] (Y:) Y
Continue to add further scans in the same way.
11.2.4. Modifying and Deleting Scans
Before you can modify or delete entries in the configuration database, you must have the Edit Configuration data privilege set in your user entry.
To modify a scan, use the modify scan command.
To delete a scan, use the delete scan command.
11.2.5. Add Filters and Dispatches
See the chapter Understanding ENS for information about filters and dispatches.
To add the filter information:
Start the configuration editor:
$ CONSOLE EDIT /INTERFACE=character_cell
Enter:
CM Edit> add filter
Enter the name of the filter:
Event name: security
Enter a description of what the filter does:
Information: security events on the systems managed by John Smith
- Enter the period within which subsequent events matching the filter definition are ignored:
Interval [0-999] (0:) 0
A 0 means that this check will always pass and is the normal setting for this field.
Enter the period within which all events matching the filter and event names are ignored:
Event Interval [0-999] (0:) 0
A 0 means that this check will always pass and is the normal setting for this field.
You are asked whether you want the filter to pass all events (this is the default), or not:
Filter all events? [Y/N] (Y:) Y
You are asked whether you want the filter to pass all event classes:
Filter all Event classes? [Y/N] (Y:) Y
You are asked whether you want the filter to pass all systems:
Filter all systems? [Y/N] (Y:) N
Enter the name of each system to be filtered:
System (CR=end:) salt
System (CR=end:) pepper
System (CR=end:)
You are asked whether you want to filter all subsystems:
Filter all subsystems? [Y/N] (Y:) Y
You are asked whether you want to filter all groups:
Filter all groups? [Y/N] (Y:) Y
- You are asked whether you want to notify all event priorities:
Notify ALL event priorities [Y/N] (Y:) Y
You are asked whether you want to add a dispatch?
Assign an action [Y/N]: Y
To add the dispatch information:
Enter the action name:
Action name (?=list:) Mail
Enter information describing what this dispatch does:
Information (:) Security events to Administrator
This field is useful if the filter has multiple entries for the same action, as the field is used in the filter dialog to distinguish between the dispatches.
You are asked when the action will be run:
Run action at any time on any day? [Y/N] (Y:) n
If you wish to select your own particular times, answer No.
Enter the days and times when you want the action to run. For example, if you want the action to run between 09.00 and 17.00 on each working day, complete those times in the field for each day of the week:
Run on Sunday after (00:00:) 00:00
Run on Sunday before (23:59:) 00:00
Run on Monday after (00:00:) 09:00
Run on Monday before (23:59:) 17:00
Run on Tuesday after (00:00:) 09:00
Run on Tuesday before (23:59:) 17:00
Run on Wednesday after (00:00:) 09:00
Run on Wednesday before (23:59:) 17:00
Run on Thursday after (00:00:) 09:00
Run on Thursday before (23:59:) 17:00
Run on Friday after (00:00:) 09:00
Run on Friday before (23:59:) 17:00
Run on Saturday after (00:00:) 00:00
Run on Saturday before (23:59:) 00:00
Enter the userdata to pass to the action:
User data to pass to action (CR=end:)
<admin@admin.reo.dec.com>
To complete the filter and dispatch information:
You are asked if it is all right to assign the action to the filter record:
OK to assign action to filter record? [Y/N] (Y:)Y
If you reply No, the dispatch definition will be discarded.
You are asked if you want to assign another action:
Assign another action [Y/N]: N
You are asked if it is all right to add the filter to the configuration database:
OK to add filter [Y/N] (Y:) Y
The following is an example of what you see on your screen:
Database contains NO verification errors
CM Edit> add filter
Filter name: security
Information: security events on the system managed by
  john smith
Interval [0-999] (0:) 0
Event Interval [0-999] (0:) 0
Filter all events? [Y/N] (Y:) Y
Filter all Event classes? [Y/N] (Y:) Y
Filter all systems? [Y/N] (Y:) N
Enter systems to filter. (?=list)
  System (CR=end:) salt
  System (CR=end:) pepper
  System (CR=end:)
Filter all Subsystems? [Y/N] (Y:) Y
Filter all groups? [Y/N] (Y:) Y
Notify ALL event priorities? [Y/N] (Y:) Y
Assign an action [Y/N]: Y
Action name (?=list:) Mail
Information (:) Security event to administrator
Run action at any time on any day? [Y/N] (Y:) N
Run on Sunday after (00:00:) 00:00
Run on Sunday before (23:59:) 00:00
Run on Monday after (00:00:) 09:00
Run on Monday before (23:59:) 17:00
Run on Tuesday after (00:00:) 09:00
Run on Tuesday before (23:59:) 17:00
Run on Wednesday after (00:00:) 09:00
Run on Wednesday before (23:59:) 17:00
Run on Thursday after (00:00:) 09:00
Run on Thursday before (23:59:) 17:00
Run on Friday after (00:00:) 09:00
Run on Friday before (23:59:) 17:00
Run on Saturday after (00:00:) 00:00
Run on Saturday before (23:59:) 00:00
User data to pass to action (CR=end:) <admin@admin.reo.dec.com>
User data to pass to action (CR=end:)
OK to assign action to filter record? [Y/N] (Y:)Y
Assign another action [Y/N]: N
OK to add filter? [Y/N] (Y:) Y
Continue to add further filters in the same way.
11.2.6. Modifying and Deleting Filters
Before you can modify or delete entries in the configuration database, you must have the Edit Configuration data privilege set in your user entry.
To modify a filter, use the modify filter command. You can change
only a subset of the filter attributes. The attributes that can be modified are:
Information
Interval
Event Interval
System names
Group names
Event names
Class names
Event priorities
Action names
The steps for modifying a filter are similar to those described in the previous section, Adding Filters and Dispatches.
To delete a filter, use the delete filter command.
11.2.6.1. Modifying and Deleting Dispatches for Filters
If you want to modify the dispatch for a filter, you must delete the filter, and recreate the filter with the new dispatch (see the previous section, Adding Filters and Dispatches.)
If you want to delete the dispatch for a filter, then modify the filter, and enter the name of the action to be removed at the following prompt:
Enter action names to remove. (?=list)
Remove Action (CR=end:)
Accept the defaults for all other prompts.
11.2.7. Add Actions
See the chapter Understanding ENS for information about actions.
To add an action:
Start the configuration editor:
$ CONSOLE EDIT /INTERFACE=character_cell
Enter:
CM Edit> add action
Enter the name of the action. For example, your action:
Action name: your action
Enter a description of what the action does. For example, your description:
Information: your description
Enter the command name:
Command: your_action.com
Note
You must include the appropriate file extension on the corresponding action routine, for example YOUR_ACTION.COM for a command file.
You are asked to choose an action type to determine how the action will be executed, and the way in which ENS will communicate events to it:
Action types may be one of the following :-
1 = Activate once for EACH event and EACH userdata item
2 = Activate once for ALL events and ALL userdata items
3 = Activate once for ALL events and EACH userdata item
Action Type ? (1:) 1
You are asked if you want to pass all arguments to the action:
Pass all Arguments? [Y/N] (Y:) N
You are asked if you want to pass an event name:
Pass Event Name? [Y/N] (Y:) Y
You are asked if you want to pass an event time:
Pass Event Time? [Y/N] (Y:) N
You are asked if you want to pass an event class:
Pass Event Class? [Y/N] (Y:) N
- You are asked if you want to pass the event information:
Pass Event Information? [Y/N] (Y:) Y
You are asked if you want to pass event text:
Pass Event Text? [Y/N] (Y:) N
You are asked if you want to pass an event priority:
Pass Event Priority? [Y/N] (Y:) N
You are asked if you want to pass the system that generated the event:
Pass system that generated event? [Y/N] (Y:) N
You are asked if you want to pass the subsystem that generated the event:
Pass subsystem that generated event? [Y/N] (Y:) N
You are asked if you want to pass the source of the event:
Pass source of event (application? [Y/N] (Y):) N
You are asked if you want to pass user-defined data:
Pass User-defined data? [Y/N] (Y:) N
You are asked if it is all right to add the action:
OK to add? [Y/N] (Y:) Y
The following is an example of what you see on your screen:
Database contains NO verification errors
CM Edit> add action
Action name: your action
Information: your description
Command: your_action.com
Action types may be one of the following :-
1 = Activate once for EACH event and EACH userdata item
2 = Activate once for ALL events and ALL userdata items
3 = Activate once for ALL events and EACH userdata item
Action Type ? (1:) 1
Pass all Arguments? [Y/N] (Y:) N
Pass Event Name? [Y/N] (Y:) Y
Pass Event Time? [Y/N] (Y:) N
Pass Event Class? [Y/N] (Y:) N
Pass Event Information? [Y/N] (Y:) Y
Pass Event Text? [Y/N] (Y:) Y
Pass Event Priority? [Y/N] (Y:) N
Pass system which generated event? [Y/N] (Y:) N
Pass subsystem which generated event? [Y/N] (Y:) N
Pass source of event (application? [Y/N] (Y):) N
Pass User-defined data? [Y/N] (n:) N
OK to add? [Y/N] (Y:) Y
11.2.8. Modifying and Deleting Actions
Before you can modify or delete entries in the configuration database, you must have the Edit Configuration data privilege set in your user entry.
To modify an action, use the modify action command.
To delete an action, use the delete action command.
Note
Any changes you make to the predefined action definitions may not be preserved when your Console Manager installation is upgraded with new releases.
11.3. Using the DECwindows Interface to the Configuration Editor
This section describes how to use the DECwindows interface to the configuration editor to set up ENS.
11.3.1. Add Events
See the chapter Understanding ENS for information about events.
To add an event:
Start the configuration editor as shown in the chapter Modifying the Configuration Database.
Pull down the Edit menu and choose the Edit / Create Event submenu. This displays the Event Name dialog box.
Click the space provided for the name of the event and enter the name you want to give the event. For example, Login Warnings.
Click OK. This displays the Event dialog box as shown in the following figure.
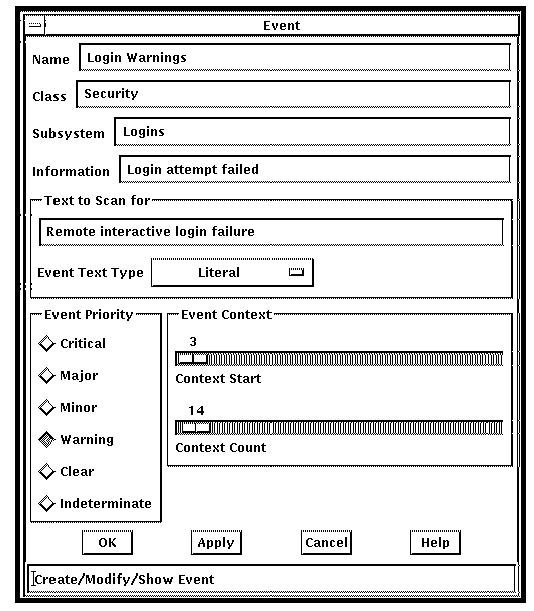
Complete the fields in the dialog box as follows, using the table in section Relationship Between Events and Scans in the chapter Understanding ENS, to help you.
Enter an identifier in Class only if you intend to place several similar events in the same category. For example, all events relating to logins could have the class Security.
Enter the part of the serviced system being referred to in Subsystem. For example, if the event refers to login attempts, the subsystem could be Logins.
Enter a fuller description of the event in Information. For example, Login attempt failed.
Enter the text to be scanned for on the console in Text to Scan for. For example, Remote interactive login failure.
Click the small button to the right of the Event Text Type field to choose whether the event is a literal or regular expression (see the chapter Understanding ENS, for a description of regular expressions). In the example, Literal is chosen.
Click the priority you want to give the event in the Event Priority box. For example, Warning.
Use the slider bar on Context Start to choose where the event starts, and on Context Count to determine how long it will last. For example, a start of 3 and a count of 14 means that the event starts 3 lines before the text Remote interactive login failure and continues on from the start for 14 lines.
When you have finished, click OK.
Continue to enter other events, if you need.
11.3.2. Modifying and Deleting Events
Before you can modify or delete entries in the configuration database, you must have the Edit Configuration data privilege set in your user entry.
Note
VSI recommends that you do not remove the predefined Console Manager events (prefixed with CMGR) from the database. However, you may redefine the priorities of these events if you wish. Any changes you make to these event definitions may not be preserved when your Console Manager installation is upgraded with new releases.
11.3.2.1. Modifying Events
To modify an event, choose the Edit Event menu, Show/Modify submenu and then complete the Event dialog box shown in the figure in the section, Adding Events, earlier in this chapter.
If you want to modify more than one event, then click Apply instead of OK. This displays the Events dialog box, but does not close the Select Event dialog box. When you have changed the event, you can now select another event from the Select Event dialog box.
11.3.2.2. Deleting Events
To delete an event, choose the Edit Event menu, Delete submenu. select the Event to delete, then click OK.
If you want to delete more than one event, then click Apply instead of OK. The Select Event dialog box is not closed, and you can now select another event to delete.
11.4. Add Scans
See the chapter Understanding ENS for information about scans.
To add a scan:
Start the configuration editor as shown in the chapter Understanding ENS.
Pull down the Edit menu and choose the Scan Profile / Create submenu. This displays the Scan Name dialog box.
Click the space provided for the name of the scan and enter a name. For example, un*x security.
Click OK. This displays the Scans dialog box as shown in the following figure.
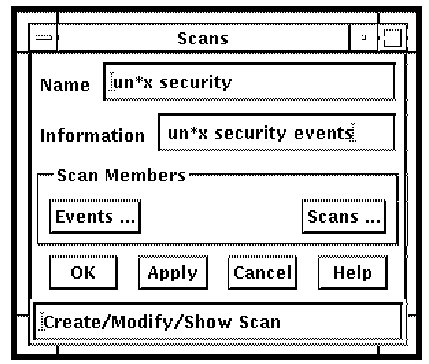
Complete the fields in the dialog box as follows using the following table to help you.
Enter a description of what the scan does in Information. For example, un*x security events.
To add events to the scan, click Events .... This displays a selection box with two columns, Selected Events and Available Events, as shown in the following figure. Click the events you wish to add to the scan from the list of available events on the right side of the dialog box. For example, un*x security. These events will then be transferred into the column displaying the selected events on the left side of the dialog box.
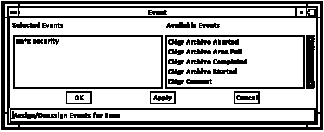
Click OK.
To add additional scans to the scan, click Scans .... This displays a selection box with two columns, Selected Scans and Available Scans, as shown in the following figure. Click the scans you want to add from the list of available scans on the right side of the dialog box. For example, Interactive Logins and Non-interactive Logins. These scans will then be transferred into the column displaying the selected events on the left side of the dialog box.
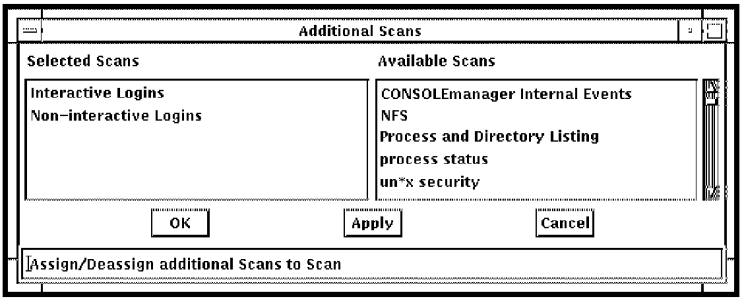
Click OK.
When you have finished, click OK in the Scans dialog box.
Continue to enter other scans, if you need.
11.5. Modifying and Deleting Scans
Before you can modify or delete entries in the configuration database, you must have the Edit Configuration data privilege set in your user entry.
11.5.1. Modifying Scans
To modify a scan, choose the Edit Event menu, Scan Profile Show/Modify submenu. and then follow the instructions for adding a scan shown in the section Adding Scans, earlier in this chapter.
If you want to modify more than one scan, then click Apply instead of OK. This displays the Scans dialog box, but does not close the Select Scan dialog box. When you have changed the scan, you can now select another scan from the Select Scan dialog box.
11.5.2. Deleting Scans
To delete a scan, choose the Delete ... submenu item from the Scan menu, select the scan to delete, then click OK.
If you want to delete more than one scan, then click Apply instead of OK. The Select Scan dialog box is not closed, and you can now select another scan to delete.
11.6. Add Filters
See the chapter Understanding ENS for information about filters.
To add a filter:
Start the configuration editor as shown in the chapter Modifying the Configuration Database
Pull down the Edit menu and choose the Edit Filter Create submenu. This displays the Filter Name dialog box.
Click the space provided for the name of the filter and enter a name. For example, security.
Click OK. This displays the Filter dialog box as shown in the following figure.
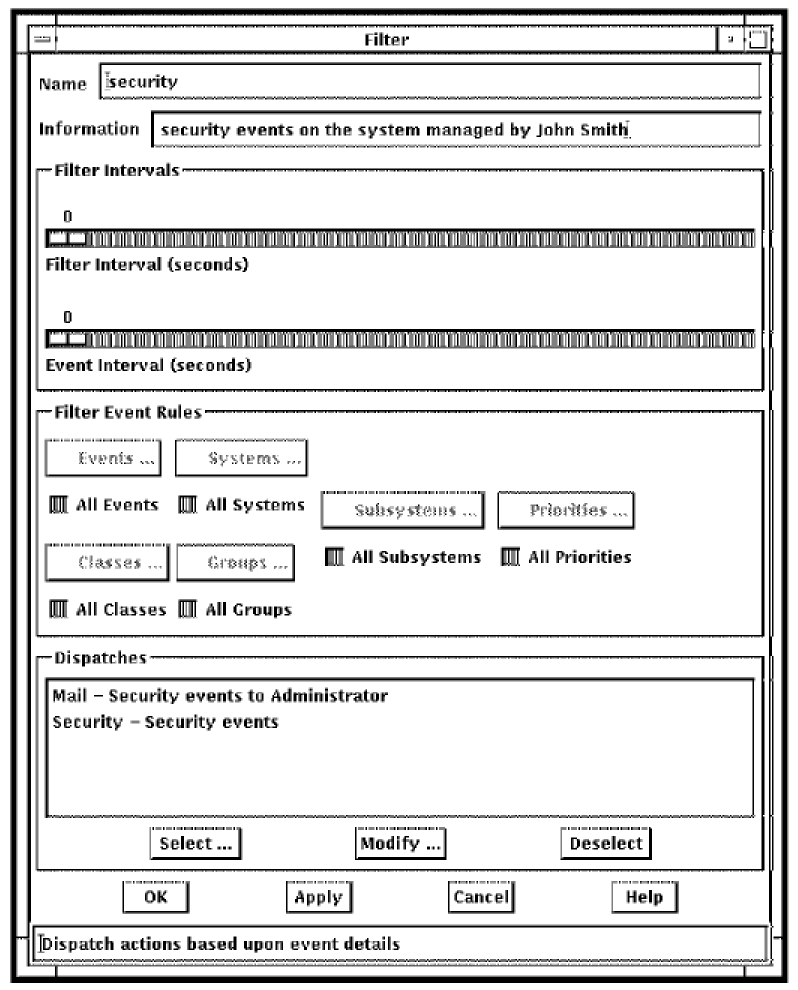
Complete the fields in the dialog box as follows using the table in the section, Filters, in the chapter Understanding ENS to help you.
Enter a description of what the filter does in Information. For example, security events on the system managed by John Smith.
Use the slider bar on Interval to choose the period within which all events after the first one that matches the filter definition are ignored. For example, (0). This means that this check will always pass and is the normal setting for this field.
Use the slider bar on Event Interval to choose the period within which all events after the first one that matches the filter and event name are ignored. For example, (0). This means that this check will always pass and is the normal setting for this field.
The default is to filter based on all event names, systems, subsystems, priorities and classes. But, if you wish to select individual event priorities to filter, deselect the appropriate All xxx where xxx equals event, system, subsystem, class or group and click the required xxx ....This displays a selection box applicable to the attribute you have chosen.
For example, if you want to select a particular set of systems, deselect All Systems. This makes Systems ... active. Then click Systems .... A selection box is displayed which has two columns, Selected Systems and Available Systems. Click the system you wish to be filtered from the list of available systems on the right side of the dialog box. These system names will then be transferred into the column displaying the selected systems on the left side of the dialog box. When you have finished, click OK.
If you need to dispatch actions based on the criteria set in the previous steps, click Select ... in the Filter dialog box. This displays the Dispatch dialog box.
Click OK in the Filter dialog box when you have completed the definition.
11.6.1. Add Dispatches for Your Actions
See the chapter Understanding ENS for information about dispatching.
The dispatch dialog box is shown in the following figure.

To add dispatches for your actions:
Click the Action to dispatch button and select the action you want to be dispatched from the list displayed. For example, to mail the event to a user, select Mail.
Enter information particular to that action. For example, Security events to Administrator.
This field is useful if the filter has multiple entries for the same action, as the field is used in the filter dialog to distinguish between the dispatches.
Userdata is required for Mail (see Supplied Action Routines). Therefore, click Add ... and fill in the required userdata in the popup dialog box that appears.
Click OK.
To invoke this action at specific times of the day, for example, during working hours between 09.00 and 17.00 each day, deselect Execute at all Times on all Days, and click Dispatch Hours .... This displays the Dispatch Hours dialog box as shown in the following figure.
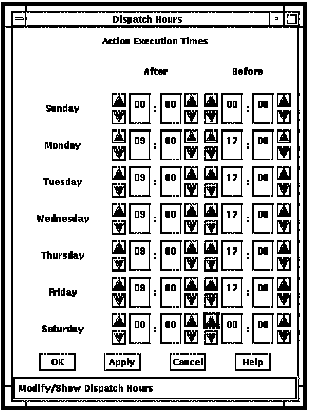
For Saturday and Sunday, select 00:00 for both the After and Before times.
Select 09:00 in the After column, and 17:00 in the Before column for each working day, using the arrows in the dialog box. Click OK.
Click OK in the Dispatch dialog box. Your selected action will now appear in the Actions to dispatch box on the Filter dialog box.
11.7. Modifying and Deleting Filters
Before you can modify or delete entries in the configuration database, you must have the Edit Configuration data privilege set in your user entry.
11.7.1. Modifying Filters
To modify a filter, choose the Edit, Filter Show/Modify submenu, and then follow the instructions for adding a filter shown in the section, Adding Filters, earlier in this chapter. You can modify only a subset of the filter attributes. The attributes that can be modified are:
Information
Interval
Event Interval
System names
Group names
Event names
Class names
Event priorities
Action names
If you want to modify more than one filter, then click Apply instead of OK. This displays the Filter dialog box, but does not close the Select Filter dialog box. When you have changed the filter, you can now select another filter from the Select Filter dialog box.
11.7.2. Deleting Filters
To delete a filter, choose the Edit, Filter Delete submenu, select the filter to delete, then click OK.
If you want to delete more than one filter, then click Apply instead of OK. The Select Filter dialog box is not closed, and you can now select another filter to delete.
11.7.3. Modifying and Deleting Dispatches for Filters
If you want to modify the dispatch for a filter, you must delete the filter, and recreate the filter with the new dispatch (see the section, Adding Filters, earlier in this chapter).
To delete a dispatch for a filter, click the left mouse button on the filter to be deleted, and then click the Deselect button.
11.8. Add Actions
See the chapter Understanding ENS for information about actions.
To add an action:
Start the configuration editor as shown in the chapter Modifying the Configuration Database.
Pull down the Edit menu and choose the Edit, Action/Create submenu. This displays the Action Name dialog box.
Click the space provided for the name of the action and enter a name. For example, your action name.
Click OK. This displays the Action dialog box as shown in the following figure.
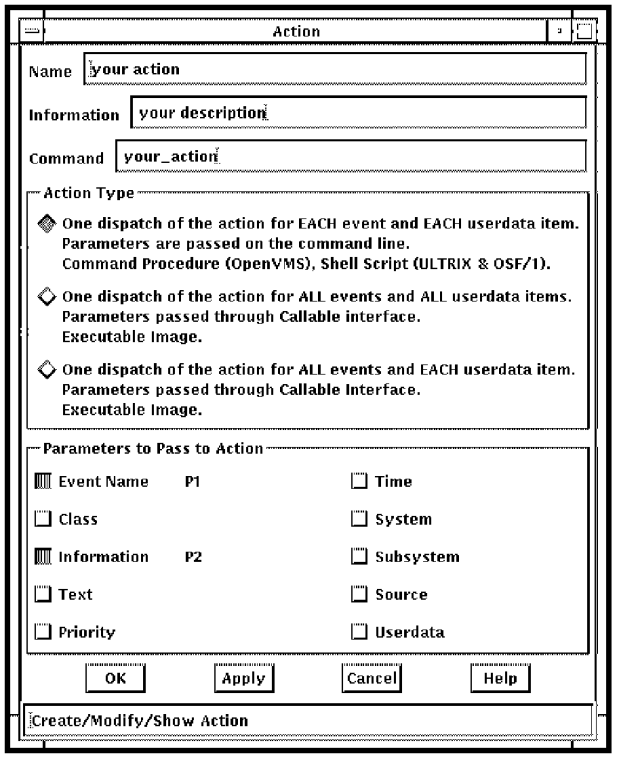
Complete the fields in the dialog box as follows, using the table in section Action Attributes, in the chapter Understanding ENS to help you.
Enter a description of what the action does in Information. For example, your description.
Enter the name of the command procedure or image in Command. For example, your_action.com
Note
On OpenVMS, you must include the appropriate file extension on the corresponding action routine, for example YOUR_ACTION.COM for a command file.
Click the required checkbox in Action Type to determine how the action will be executed, and the way in which ENS will communicate events to it. For example, one dispatch for each event and each userdata item.
Click the required checkboxes in the Parameters to Pass to Action box. Use the tables in the section Invoking Actions in the chapter Understanding ENS to help you. For example, if your action is a command procedure and you wish to pass to your action event name and text, click Event Name followed by Text.
When you have finished, click OK.
Continue to add other actions, if you need.
11.9. Modifying and Deleting Actions
Before you can modify or delete entries in the configuration database, you must have the Edit Configuration data privilege set in your user entry.
Note
Any changes you make to the predefined action definitions may not be preserved when your Console Manager installation is upgraded with new releases.
11.9.1. Modifying Actions
To modify an action, choose the Show/Modify ... submenu item from the Action Profile menu and then follow the instructions for adding an action shown in the section, Adding Actions, earlier in this chapter.
If you want to modify more than one action, then click Apply instead of OK. This displays the Actions dialog box, but does not close the Select Action dialog box. When you have changed the action, you can now select another action from the Select Action dialog box.
11.9.2. Deleting Actions
To delete an action, choose the Edit, Action/ Delete submenu, select the Action to delete, then click OK.
If you want to delete more than one action, then click Apply instead of OK. The Select Action dialog box is not closed, and you can now select another action to delete.
11.10. Example of How to Set Up a System to Scan for an Event
This section takes you quickly through the steps required to set up ENS to notify a user, using electronic mail, of a login warning on a serviced system.
The example enables Console Manager to scan for this event occurring on the console of the serviced system you selected, and for ENS to send an electronic mail message to the specified user when the event is detected.
Verify this by using the monitor interface. When an event occurs, it appears in the event window at the bottom of the screen.
To quickly test your event setup, you can generate an artificial occurrence of the event by typing the text string which represents the event on the managed console, or by broadcasting this message to the system's console using a terminal session on the serviced system.
Add the event to the database as shown in the section, Adding Events, earlier in this chapter. The following figure shows you the completed dialog box.
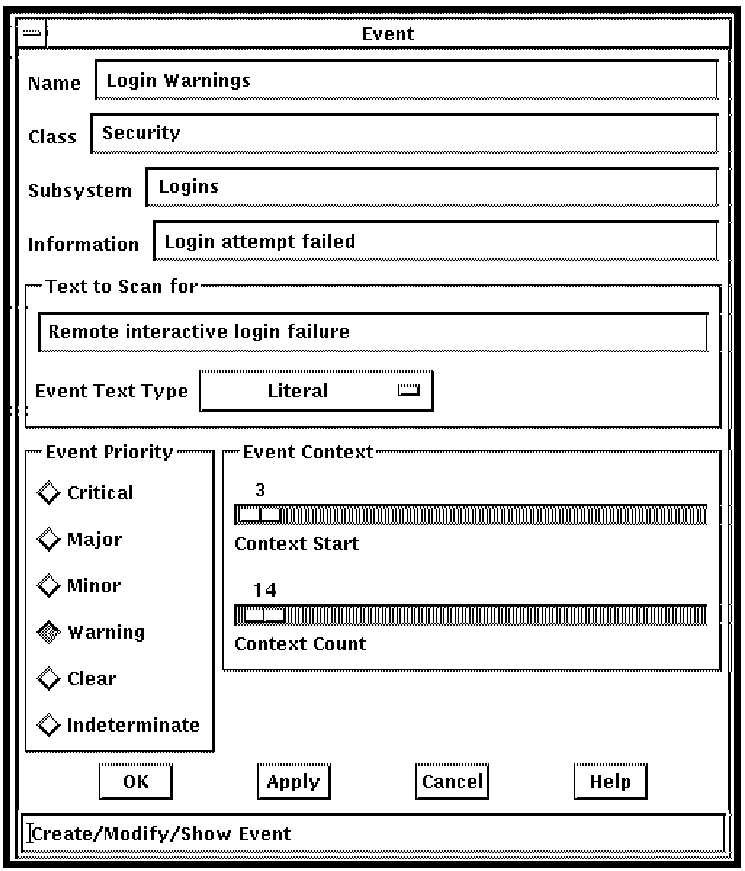
Add the event to an existing scan, or add a scan to the database as shown in the section Adding Scans, earlier in this chapter, and then add the event. The following figures show you the completed dialog boxes.


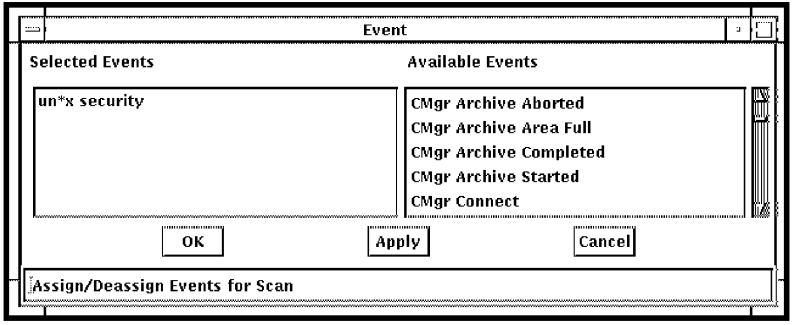
Update the definition for the system on which this event is expected to occur, to show that you are interested in this event. To do this, modify the system definition as shown in the chapter Modifying the Configuration Database and choose Scan Profile from the list shown in the following figure.
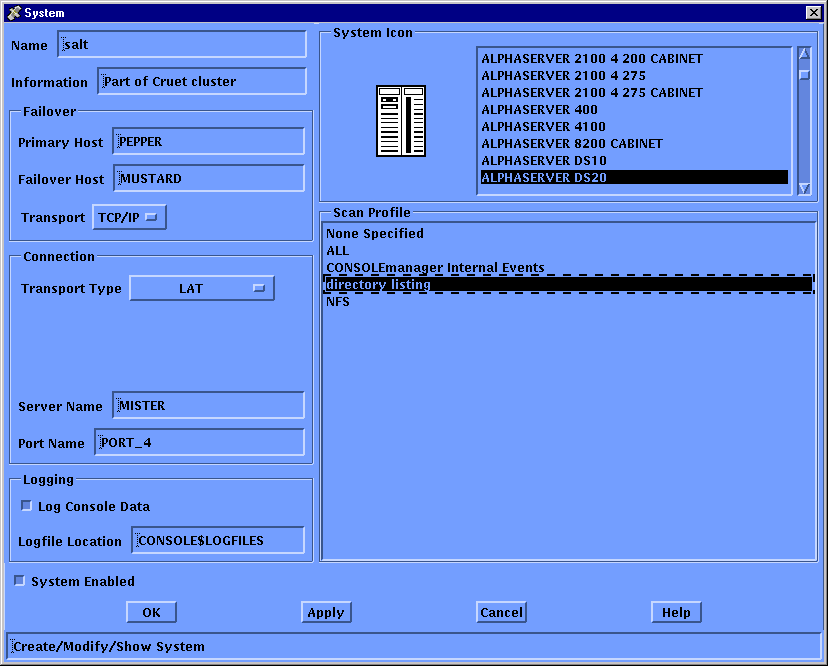
Add a filter consisting of the event names, the class of the events or the event priorities you are interested in, and the systems and/or groups which you expect to see the events from, as shown in the section, Adding Filters, earlier in this chapter. The following tables show you the completed dialog boxes:
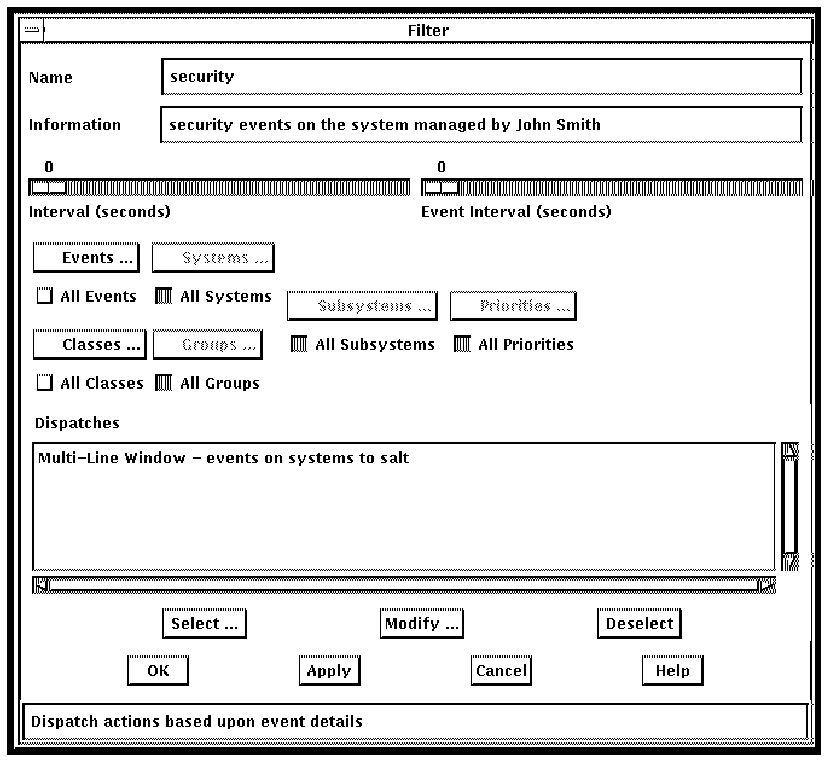
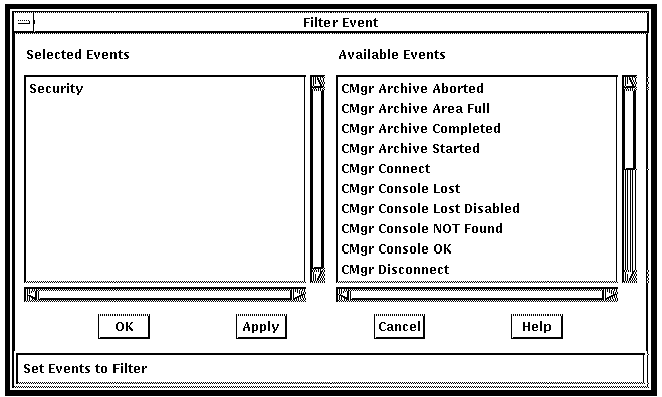
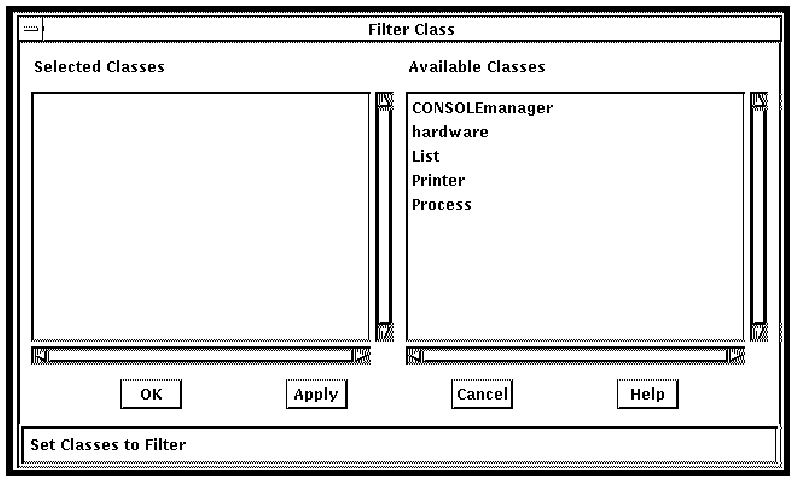
Create the dispatch records detailing the action you want to do when an event is detected as shown in the section, Adding Filters, earlier in this chapter. The following tables show you the completed dialog boxes.
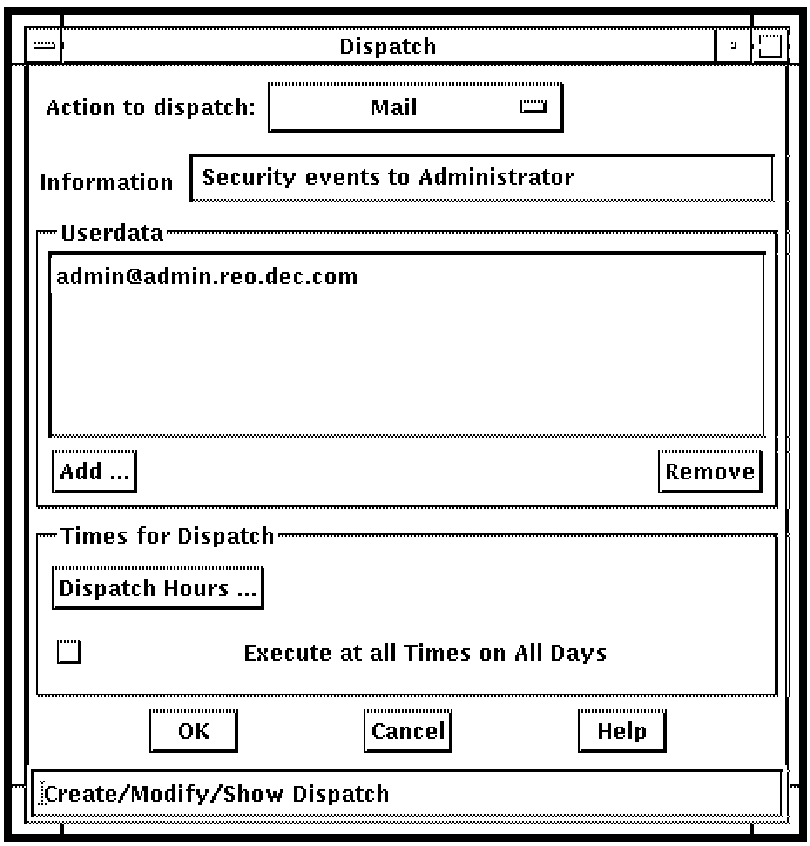
Reconfigure the Console Manager software as shown in the chapter Managing Console Manager.
Chapter 12. Scenarios for Filtering Events
This chapter describes some scenarios for filtering events, and shows you how to set up the actions, filters and dispatches in each case.
Note
These scenarios are examples only. This section contains the following topics:
12.1. Filtering for a Specific Event Class
This scenario describes how to receive events of a specific class.
12.1.1. The Scenario
A security administrator needs to know about all events that have the class Security on all systems. The administrator wants the events to be sent by an eventlist to the workstation admin.reo.dec.com.
One action, one filter and one dispatch are required. The action will use the eventlist action routine to dispatch the events.
Assume that the events, classes and serviced systems have already been created in the configuration database, and that the DECwindows Motif transport is TCP/IP.
12.1.2. The Solution
To set up the filtering mechanism for a specific event class, you would do the following:
|
Step |
Action |
For Command Line Interface |
For C3 Interface |
|---|---|---|---|
|
1. |
Start the configuration editor |
Starting the Configuration Editor in the chapter Modifying the Configuration Database |
Starting the Configuration Editor in the chapter Modifying the Configuration Database |
|
2. |
Create an action with the following attributes: Name Enter Security Information Enter Security events on all systems Command Enter: CONSOLE$EVENTLIST Action Type Select the “ALL events and EACH userdata item” option Parameters To Pass Select Userdata only, deselect all others To Action | Setting up the ENS Components | |
| 3. |
Create a filter with the following attributes: Name Enter Security Information Enter Security events on all systems Events Deselect All Events Classes? Deselect All Classes, and select only the Security class Systems Select All Systems Groups Select All Groups Subsystems Select All Subsystems Priorities Select All Priorities |
Adding Filters and Dispatches in the chapter Setting up the ENS Components |
Adding Filters in the chapter Setting up the ENS Components |
|
4. |
Create a dispatch for the filter with the following attributes: Action to Enter Security dispatch Information Enter Security events Userdata Enter admin.reo.dec.com 0 0 tcpip Select Execute at all Times on All Days |
Adding Filters and Dispatches in the chapter Setting up the ENS Components |
Adding Dispatches for Your Actions in the chapter Setting up the ENS Components |
12.2. Filtering for a Specific Event Priority
This scenario describes how to receive events of a specific priority.
12.2.1. The Scenario
A managing director needs to know about all critical events. The MD wants the events to be sent by an eventlist to the workstation theboss.reo.dec.com.
One action, one filter and one dispatch are required. The action will use the eventlist action routine to dispatch the events.
Assume that the events, classes and serviced systems have already been created in the configuration database, and that the DECwindows Motif transport is TCP/IP.
12.2.2. The Solution
To set up the filtering mechanism for a specific event priority, do the following:
|
Step |
Action |
For Command Line Interface | For C3 Interface |
|---|---|---|---|
|
1. |
Start the configuration editor |
Starting the Configuration Editor in the chapter Modifying the Configuration Database | Starting the Configuration Editor in the chapter Modifying the Configuration Database |
|
2. |
Create an action with the following attributes: Name Enter Critical Information Enter Critical events on all systems Command Enter: CONSOLE$EVENTLIST Action Type Select the “ALL events and EACH userdata item” option Parameters To Pass Select Userdata only, deselect all others To Action |
Adding Actions in the chapter Setting up the ENS Components |
Adding Actions in the chapter Setting up the ENS Components |
|
3. |
Create a filter with the following attributes: Name Enter Critical Information Enter Critical events on all systems Events Select All Events Classes? Select All Classes, Systems Select All Systems Groups Select All Groups Subsystems Select All Subsystems Priorities Deselect All Priorities. In the Priorities dialog box, select Critical, and deselect all the other priorities |
Adding Filters and Dispatches in the chapter Setting up the ENS Components |
Adding Filters in the chapter Setting up the ENS Components |
|
4. |
Create a dispatch for the filter with the following attributes: Action to Enter Critical dispatch Information Enter Critical events Userdata Enter.theboss reo.dec.com 0 0 tcpip Select Execute at all Times on All Days |
Adding Filters and Dispatches in the chapter Setting up the ENS Components |
Adding Dispatches for Your Actions in the chapter Setting up the ENS Components |
12.3. Filtering Events from a Group of Systems Depending on the Time
This scenario describes how to receive events from a group of systems at a remote site, both during working hours and during non-working hours.
12.3.1. The Scenario
An operations supervisor based in London, England, needs to know about all events on the systems in the Sydney Datacentre in Australia. The supervisor needs to be notified in two ways, depending on the day and time:
Between 9am and 5pm on Monday to Friday, notify using an eventlist on workstation opsmgr.lon.dec.com
Between 5pm and 9am on Monday to Friday, and all day Saturday and Sunday, notify by sending electronic mail to the account
<opsmgr@opsmgr.lon.dec.com>
Two actions, one filter and two dispatches are required. However, only one action need be created, since the existing Mail action can be used for dispatching events during non-working hours.
Assume that the events, classes and serviced systems have already been created in the configuration database, and that the systems are in a group called Sydney. Also, the DECwindows Motif transport is TCP/IP.
12.3.2. The Solution
To set up the filtering mechanism for specific times of the day, do the following:
|
Step |
Action | For Command Line Interface | For C3 Interface |
|---|---|---|---|
|
1. |
Start the configuration editor | Starting the Configuration Editor in the chapter Modifying the Configuration Database | Starting the Configuration Editor in the chapter Modifying the Configuration Database |
|
2. |
Create an action with the following attributes: Name Enter Sydney Information Enter Events from the Sydney Datacentre Command Enter: CONSOLE$EVENTLIST Action Type Select the “ALL events and EACH userdata item” option Parameters To Pass Select Userdata only, deselect all others To Action |
Adding Actions in the chapter Setting up the ENS Components |
Adding Actions in the chapter Setting up the ENS Components |
|
3. |
Create a filter with the following attributes: Name Enter Sydney Information Enter Events from the Sydney Datacentre Events Select All Events Classes? Select All Classes Systems Deselect All Systems Groups Deselect All Groups, and select only the group Sydney Subsystems Select All Subsystems Priorities Select All Priorities. |
Adding Actions in the chapter Setting up the ENS Components |
Adding Actions in the chapter Setting up the ENS Components |
|
4. |
Create a dispatch for the working hours with the following attributes: Action to Enter Sydney dispatch Information Enter Events from the Sydney Datacentre Userdata Enter opsmgr.lon.dec.com 0 0 tcpip Deselect Execute at all Times on All Days Dispatch See the following figure Hours... for settings |
Adding Filters and Dispatches in the chapter Setting up the ENS Components |
Adding Dispatches for Your Actions in the chapter Setting up the ENS Components |
| 5. |
Create a dispatch for the non-working hours with the following attributes: Action to Enter Mail dispatch Information Enter Events from the Sydney Datacentre Userdata Enter opsmgr@opsmgr.lon.dec.com
( Deselect Execute at all Times on All Days Dispatch See the last figure in this section for the Hours... settings |
Adding Filters and Dispatches in the chapter Setting up the ENS Components |
Adding Dispatches for Your Actions in the chapter Setting up the ENS Components |
The following figure shows the settings for dispatching events during working hours.

The following figure shows the settings for dispatching events during non-working hours.
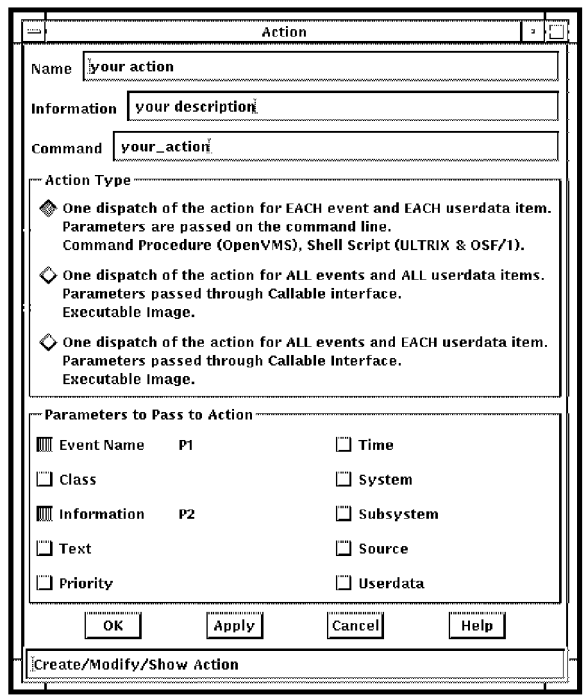
12.4. Filtering Duplicate Events in a Group of Systems
This scenario describes how to receive events from a group of systems, but avoiding multiple notifications of the same event when that event occurs within a specified time.
12.4.1. The Scenario
A security administrator needs to know about all events that have the class Security from the Cruet group. The administrator wants the events to be sent by an eventlist to the workstation admin.reo.dec.com. However, if the same event recurs within 60 seconds, it is to be ignored. Notification begins again when that event occurs more than 60 seconds from the original notification.
One action, one filter and one dispatch are required. The action will use the eventlist action routine to dispatch the events.
Assume that the events, classes and serviced systems have already been created in the configuration database, and that the systems are in a group called Cruet. Also, the DECwindows Motif transport is TCP/IP.
12.4.2. The Solution
To set up the filtering mechanism for duplicate events from a group of systems, do the following:
| Step |
Action |
CLI |
C3 |
|---|---|---|---|
| 1. |
Start the configuration editor |
Starting the Configuration Editor in the chapter Modifying the Configuration Database |
Starting the Configuration Editor in the chapter Modifying the Configuration Database |
| 2. |
Create an action with the following attributes: Name Enter Security Information Enter Security events on the Cruet Group Command Enter: CONSOLE$EVENTLIST Action Type Select the “ALL events and EACH userdata item” option Parameters To Pass Select Userdata only, deselect all others To Action |
Adding Actions in the chapter Setting up the ENS Components |
Adding Actions in the chapter Setting up the ENS Components |
|
3. |
Create a filter with the following attributes: Name Enter Security Information Enter Security events on the Cruet Group Event Set to 60 seconds Interval Events Deselect All Events Classes1 Deselect All Classes, and select only the Security class Systems Deselect All Systems Groups Deselect All Groups, and select only the Cruet Group Subsystems Select All Subsystems Priorities Select All Priorities. |
Adding Filters and Dispatches in the chapter Setting up the ENS Components |
Adding Filters in the chapter Setting up the ENS Components |
|
4. |
Create a dispatch for the filter with the following attributes: Action to Enter Security Dispatch Information Enter Security events Userdata Enter admin.reo.dec.com 0 0 tcpip Select Execute at all Times on All Days |
Adding Filters and Dispatches in the chapter Setting up the ENS Components |
Adding Dispatches for Your Actions in the chapter Setting up the ENS Components |
Chapter 13. Using the Eventlist Interface
This chapter describes how to use the Eventlist interface.
Note
Eventlist receives events in real time. Therefore, if an event occurs when Eventlist is not running, then Eventlist will not register that event. However, the event will be logged by Console Manager, and may be reviewed by extracting the event information. See the chapter Using Console Manager From the Command Line Interface, or the chapter Using Console Manager From the C3 Interface for details of how to do this.
If there are certain events that require immediate action, then you can use the Mail action (see the chapter Supplied Action Routines) to send mail either to your account, or to other users. This does not rely on any user being logged in to Console Manager.
This section contains the following topics:
13.1. Starting Eventlist
You can start Eventlist in one of two ways:
As an ENS action routine that is executed as a result of a filter definition (that is, Multi-Line Window) in the configuration database (see the chapter Supplied Action Routines).
As an interactive process that you start from the operating system command line (see the section, Starting Eventlist from the Command Line Interface, later in this chapter) or the C3 interface (see the section, Starting Eventlist from the C3 Interface, later in this chapter).
The Eventlist title bar reflects the name of the Console Manager host it is receiving events from.
Note
You must set the system's SYSGEN parameter SCSNODE in order for the system name to be displayed in the title bar.
When you iconify Eventlist, the icon changes color to represent the highest priority event that has occurred since iconification.
13.1.1. Starting Eventlist from the Command line Interface
To start Eventlist from the command line interface:
Enter:
$ CONSOLE EVENTLIST
Available options are /NODE=, /SERVER=, /SCREEN= and /TRANSPORT=. For an explanation of them, see the following table.
| Value |
Description |
|---|---|
| /NODE=display- name |
The DECwindows Motif display you wish the window to appear on. |
| /SERVER=numb er |
The number of the server on the HOST display, normally 0. |
|
/SCREEN= number |
The screen on which the window should appear. For single head workstations this is 0 and for dual head workstations it may 0 or 1. |
|
/TRANSPORT= {LAT | TCPIP | DECNET} |
The DECwindows Motif transport which your X-Windows client and server support. This routine supported TCP/IP, DECnet and LAT transports. |
13.1.2. Starting Eventlist from the C3 Interface
To start Eventlist from the C3 interface, pull down the Commands menu and choose the Restart Eventlist menu item. If you want the Eventlist window to appear automatically every time you invoke the C3 interface, you need to set up this option on your C3 interface.
13.1.2.1. To start the eventlist from the C3 Interface
Pull down the Options menu and choose the General... menu item.
This displays the General Settings dialog box.
Click the Display Eventlist Window at startup checkbox.
Click OK.
Pull down the Options menu and choose Save Options to save your settings.
13.2. What the Eventlist Interface Looks Like
The Eventlist window lists the events generated by Console Manager and the serviced systems that you are managing. The events are displayed as they happen, with one line for each event. The lines are colored according to the priority of the event.
The following figure shows the Eventlist window, which contains:
A list of the events received so far.
An Auto-Scroll to new messages option.
Four pull down menus across the top of the window:
File - lets you connect to ENS, disconnect from ENS, restart the Eventlist window, and exit Eventlist. The connect and disconnect options are available only when Eventlist is started interactively.
Commands - lets you manipulate the events displayed in the window.
Options - lets you customize the appearance of the Eventlist window, change the way Eventlist works, filter out various events, and save your changes. The filter option is available only when Eventlist is started interactively.
Help - lets you get online help.
It also i`he distribution of event priorities for the events currently in the list (see the lower view in the following figure).
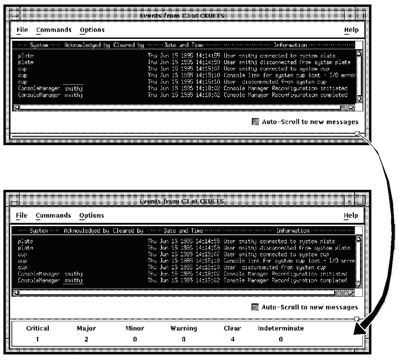
13.3. What You Can Do With Eventlist
The tasks you can do with Eventlist depend on how it is started. The shows the tasks available depending on the method used to start Eventlist.
| Task | Available Interactively |
As An Action |
See Section |
|---|---|---|---|
| Restart Eventlist to make use of any customizations you have made | YES |
NO |
Restarting Eventlist |
| Disconnect Eventlist from ENS to prevent new events being displayed | YES |
NO |
Disconnecting Eventlist from ENS |
| Reconnect Eventlist to ENS to continue to receive events | YES |
NO |
Reconnecting Eventlist to ENS |
| Customize Eventlist |
YES |
YES |
Customizing Eventlist |
| Manipulate the displayed events |
YES |
YES |
Manipulating Events |
| Stop events from being displayed based on a filter or event priority |
YES |
NO |
Stopping Events From Being Displayed in the Eventlist Window |
| View the distribution of event priorities |
YES |
YES |
Viewing the Distribution of Event Priorities |
| Save changed options |
YES |
YES |
Saving Your Changes to Eventlist |
| Restore default option |
YES |
YES |
Restoring the Default Options |
By default, the list of events scrolls automatically when a new event is received. If you have scrolled to previous events in the list, and you do not want the list to scroll, deselect the Auto-Scroll to new messages option to turn this function off.
When a task is not available, then the corresponding menu option is grayed out.
13.4. Restarting Eventlist
When you make changes to Eventlist, you must restart Eventlist for those changes to take effect.
To restart Eventlist, pull down the File menu and choose the Restart window menu item.
13.5. Disconnecting Eventlist from ENS
When you disconnect Eventlist from ENS, the Eventlist window remains displayed. However, any events received by Console Manager will not be displayed in the window. For example, you may want to disconnect Eventlist from ENS when you go home from work, and reconnect to Eventlist when you Enter to work the next day.
To disconnect Eventlist from ENS, pull down the File menu and choose the Disconnect from ENS menu item.
13.6. Reconnecting Eventlist to ENS
When you reconnect Eventlist to ENS, Eventlist displays events starting with the next one received by Console Manager after the reconnection is made.
To reconnect Eventlist to ENS, pull down the File menu and choose the Connect to ENS menu item.
13.7. Customizing Eventlist
The Eventlist can be customized to:
Modify the appearance on startup.
Change the bell volume settings of event priorities.
Change the background color.
Change the way Eventlist works.
After customizing Eventlist, you must save the new settings to ensure that they are activated the next time the Eventlist is started. See Saving Your Changes to Eventlist, later in this chapter, for the location of the file to which these settings are saved.
13.7.1. Modifying the Appearance of the Eventlist Interface on Startup
To modify the appearance of the Eventlist interface when it is started:
Pull down the Options menu and choose the Startup ... menu item.
The Startup Settings dialog box is displayed (see the following figure).
Change the required setting. You can:
Make Eventlist start up as an icon, or start up at a screen position of your choice.
Note
If you deselect the Center Horizontal and Center Vertical options, and then save the settings, the current position of the Eventlist window is saved.
Specify which event fields are to be included in the Eventlist window.
Specify the font for the text of the events.
Specify a bitmap for Eventlist that will appear in place of the scroll bitmap on the C3 interface.
After you have made the changes you require, click OK.
You are informed that the settings have been changed, and that you will need to save your settings and restart the window. Click OK.
Note
You must save the settings before you restart the Eventlist window, otherwise the changes will not take effect.
Pull down the Options menu and choose Save Options to save your settings.
To restart the Eventlist window, pull down the File menu and choose the Restart Window menu item.
Click OK to confirm that you want to restart the window.
Note
If you choose to display the event Text field, there will be a performance impact. This is because Console Manager retrieves the text by opening, reading and closing the event and log files for the system which generated the event.
Also, not all the text will appear on the text line if it is not available in the log when Eventlist receives it. To ensure the text is available, the event definition should have a text type of regular, and the characters *^ appended to the end of the text (see the chapter Understanding ENS).

13.7.2. Change the Bell Volume Settings of Event Priorities
To change the bell volume for the various event priorities:
Pull down the Options menu and choose the Volume ... menu item.
The Volume Options dialog box is displayed.
Move the slider bar for the event priority until the required volume setting is displayed. The setting is in the range 0 to 100.
Click OK.
Pull down the Options menu and choose Save Options to save your settings.
13.7.3. Change the Eventlist Background Color
To change the Eventlist background color:
Pull down the Options menu and choose the Background ... menu item.
The Color Mixing dialog box is displayed.
Set the color you want for the background, then click OK.
Pull down the Options menu and choose Save Options to save your settings.
13.7.4. Change the Way Eventlist Works
There are various changes you can make to the way Eventlist works. You can:
Specify the text for an acknowledged event.
Specify the text for a cleared event.
Set a limit on the number of events received.
Change the event priority that determines the ENS icon color.
Add user-defined actions to event-specific command menus.
Indicate that Eventlist is to exit when Console Manager is shut down.
You can restore the default options by choosing Restore Default Options from the Options menu.
All of these tasks, except for adding actions to the command menus, are available from the General Settings dialog box, which is shown in the following figure. For instructions on adding actions to command menus see the section Add User-defined Actions to Event Command Menus.
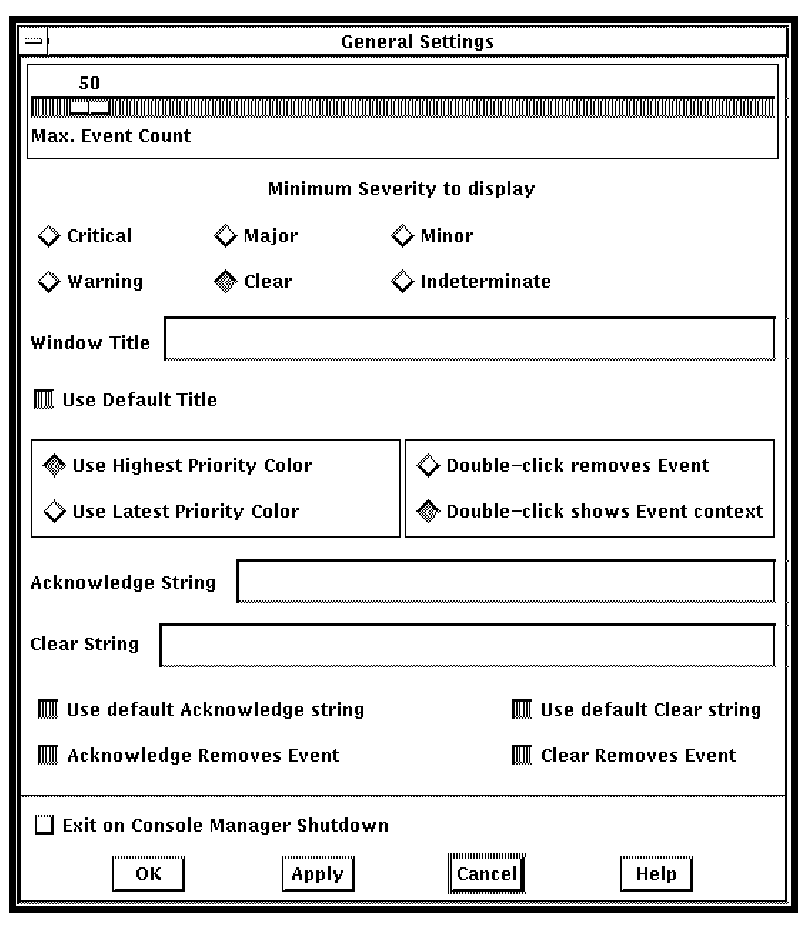
13.7.4.1. Specifying Text for Acknowledged Events
You can specify text to be used when an event is acknowledged. To do this:
Pull down the Options menu and choose the General ... menu item.
The General Settings dialog box is displayed (see the previous figure).
Deselect Use default Acknowledge string.
Type the text for acknowledged events in the Acknowledge String field.
Click OK.
Pull down the Options menu and choose Save Options to save your settings.
13.7.4.2. Specifying Text for Cleared Events
You can specify text to be used when an event is cleared. To do this:
Pull down the Options menu and choose the General ... menu item.
The General Settings dialog box is displayed (see the previous figure).
Deselect Use default Clear string.
Type the text for cleared events in the Clear String field.
Click OK.
Pull down the Options menu and choose Save Options to save your settings.
13.7.4.3. Setting a Limit on the Number of Events Received
To set a limit on the number of events that are to be received by Eventlist:
Pull down the Options menu and choose the General ... menu item.
The General Settings dialog box is displayed (see the previous figure).
Move the slider on the Max. Event Count bar until the desired number is indicated (1000 maximum).
Click OK.
Pull down the Options menu and choose Save Options to save your settings.
13.7.4.4. Change the Event Priority That Sets the ENS Icon Color
The ENS icon is the scroll icon on the C3 interface. When an event is received by Eventlist, this icon changes color to that of either the highest priority of event received so far, or the latest event received.
To change the event priority that determines the color of the ENS icon, do the following:
Pull down the Options menu and choose the General ... menu item.
The General Settings dialog box is displayed (see the previous figure).
Select one of the following:
Use Highest Priority Color
Use Latest Priority Color
Click OK.
Pull down the Options menu and choose Save Options to save your settings.
13.7.4.5. Add User-defined Actions to Event Command Menus
In the Eventlist, you can right-click an event and choose from a menu of event-specific commands:
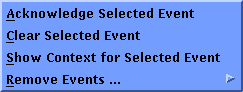
You can create a file, CONSOLE$EVENTLIST_POPUP.DAT, to add your own actions to this menu. This adds the entry “Action” to the bottom of the pop-up menu, which lists a sub-menu with the commands you define:
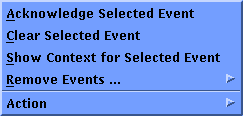
Console Manager looks in the current default directory used to start the Eventlist for a file named CONSOLE$EVENLIST_POPUP.DAT. Alternatively, you can place the file in the directory defined by the optional logical name CONSOLE$USER_DEFAULTS. The location of the interactive Eventlist settings may be customized through the use of this environment variable or logical name.
For example, to save your interactive Eventlist setting in the subdirectory Console Manager from your login directory, first create the Console Manager subdirectory, and then enter the following in your login script:
DEFINE/JOB CONSOLE$USER_DEFAULTS
SYS$LOGIN_DEVICE:[home_directory.CONSOLE]
To define additional Eventlist user actions, create the file CONSOLE$EVENTLIST_POPUP.DAT of the form:
MENU_ENTRY: non-visible-menu-name
MENU_NAME: visible-entry-name
MENU_COMMAND: command-file
MENU_END:
Visible-entry-name is the text that appears in the menu and command-file is the name of a DCL command file. Do not include an “@” in the command. You may specify the directory; the default is the current default directory. You do not need to add the “.COM” to the end of the file name.
For example:
MENU_ENTRY: MENU1
MENU_NAME: Show device space
MENU_COMMAND: DISK$USER:[FRED.UTIL]SHOW_DEVICES
MENU_END: MENU_ENTRY: MENU2
MENU_NAME: Show queues
MENU_COMMAND: DISK$USER:[FRED.UTIL]SHOW_QUEUES
MENU_END:
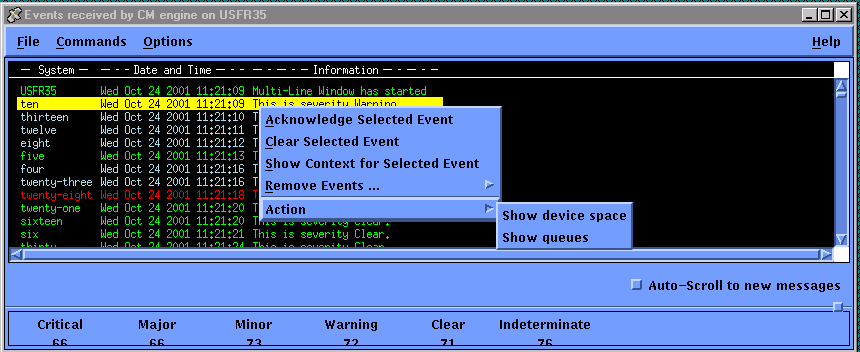
13.7.4.6. Indicating That Eventlist is to Exit When Console Manager is Shut Down
To indicate that Eventlist is to exit when Console Manager is shut down:
Pull down the Options menu and choose the General ... menu item.
The General Settings dialog box is displayed (see the previous figure).
Select Exit on Console Manager Shutdown.
Click OK.
Pull down the Options menu and choose Save Options to save your settings.
13.8. Manipulating Events
You can manipulate the events displayed in the Eventlist window as follows:
Acknowledge a selected event
Clear a selected event
Show the context for a selected event
Remove events by priority or by selection
These options are available from the Commands menu or the popup menu displayed when the right mouse button is clicked on an event in the Eventlist window.
13.8.1. Acknowledging Events
To acknowledge an event:
Click the event to be acknowledged to select that event.
Pull down the Commands menu, and then choose the Acknowledge Selected Event menu item.
Alternatively, click the right mouse button on the event to be acknowledged, then choose the Acknowledge Selected Event from the popup menu.
Acknowledging an event resends that event to all running actions using the IPC mechanism. See the chapter Understanding ENS for more information about the IPC mechanism.
If you are running Eventlist interactively, the event's source field is changed to “user” when the event is acknowledged. At the same time, the Acknowledged by field in your Eventlist window is updated with your username. If the event is also sent to other users, and they are displaying the Acknowledged by field in their Eventlist window, then your username will also be displayed in that window.
If Eventlist is running as an action routine, then the display name is used instead of the username to update the Acknowledged by field.
You can also set up Eventlist so that the event is removed from the display when it is acknowledged (see the section Change the Way Eventlist Works).
13.8.2. Clear Events
Before you can clear an event, you must first acknowledge that event (see Acknowledging Events, in the previous section).
To clear an event, do the following:
Click the event to be cleared to select that event.
Pull down the Commands menu, and then choose the Clear Selected Event menu item.
Alternatively, click the right mouse button on the event to be cleared, then choose the Clear Selected Event from the popup menu.
Clearing a selected event changes the event priority to CLEAR.
If you are running Eventlist interactively, the event's source field is changed to “user” when the event is cleared. At the same time, the Cleared by field in your Eventlist window is updated with your username. If the event is also sent to other users, and they are displaying the Cleared by field in their Eventlist window, then your username will also be displayed in that window.
If Eventlist is running as an action routine, then the display name is used instead of the username to update the Cleared by field.
You can also set up Eventlist so that the event is removed from the display when it is cleared. See Using the Eventlist Interface for more information.
13.8.3. Displaying an Event Context
To view the context for an event, pull down the Commands menu, and choose the Show Context for Selected Event menu item.
You can also change the function of the left mouse button so that when you double-click the left mouse button on an event in the window the context for the event is displayed (see the chapter Change the Way Eventlist Works).
13.8.4. Removing Events by Priority or by Selection
You can remove all events of a specific priority, all events displayed, or a single event from the Eventlist window.
To remove events:
Pull down the Commands menu, or click the right mouse button on an event.
Choose Remove Events ....
From the Remove Events menu:
Choose Selected to remove the selected event.
Choose the Priority (for example, Warning) to remove all events of that priority.
Choose ALL to remove all events.
By default, you can double-click the left mouse button on an event to remove it. You can change the operation of the left mouse button as described in Change the Way Eventlist Works, earlier in this chapter.
13.9. Stopping Events From Being Displayed in the Eventlist Window
You can stop events from being displayed in two ways:
By defining a filter based on one or more of the following:
The name of the event that occurred
The class of the event that occurred
The system on which the event occurred
See Filtering Out Events in the next section for more information.
By selecting a minimum priority to be displayed (see Stopping Events Below a Specific Priority, later in this chapter for more information).
13.9.1. Filtering Out Events
Eventlist provides a filter mechanism separate from the filter mechanism used by ENS. Eventlist does not use the Console Manager database, so Eventlist must already have received events from ENS. Using the Eventlist filter, you can stop events from being displayed in the Eventlist window, by selecting one or more of Events, Classes and Systems.
Note
If run as an action routine, the Eventlist filter option is not available.
To set up the Eventlist filter, do the following:
Pull down the Options menu and choose the Filter menu item.
From the Filter submenu, choose Define ....
The Filter Settings dialog box is displayed (see the following figure).
The Events, Classes and Systems for the Eventlist are listed in the appropriate Selected menu items on the right.
Click the Event, Class or System, or any combination, for which you do not require further events to be displayed. Click OK.
Save the filter as follows:
Pull down the Options menu and choose the Filter menu item.
From the Filter submenu, choose Save.
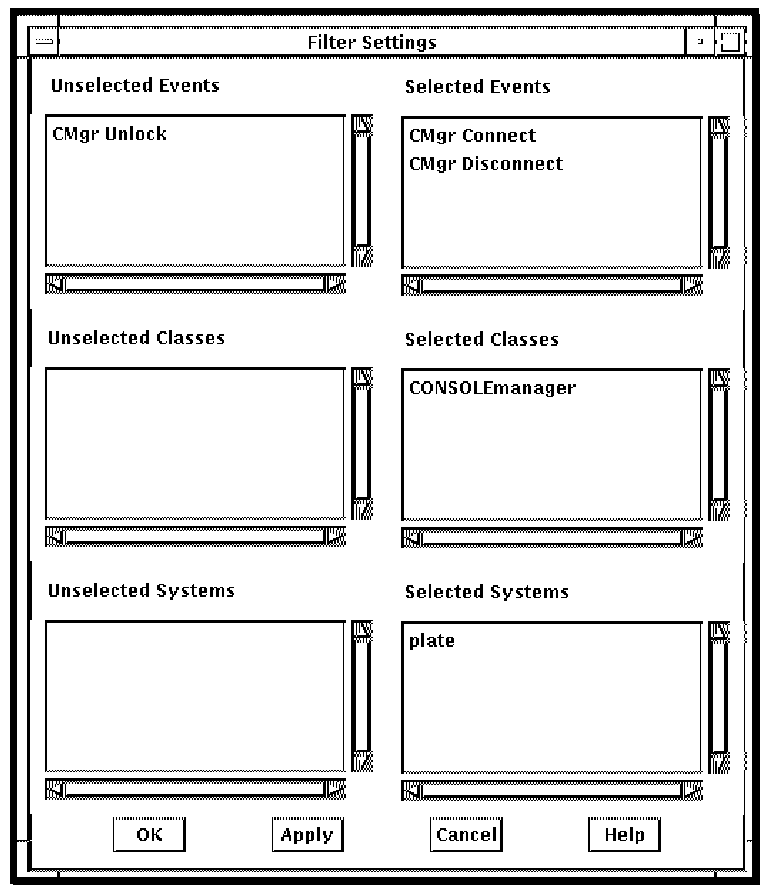
13.9.1.1. File Location of Saved Eventlist Filters
Your filter settings are saved in the file:
CONSOLE$EVENTLIST.EXCLUDE
The location of this file depends on how you started Eventlist:
If you start Eventlist from the command line, then the file is saved in either
CONSOLE$USER_DEFAULTS
If this logical name is defined, or
SYS$LOGIN
If you start Eventlist from the C3 interface, then the file is saved in
CONSOLE$APP_DEFAULTS
13.9.2. Stopping Events Below a Specific Priority
To stop all events below a specific priority from being displayed, do the following:
Pull down the Options menu and choose the General... menu item.
This displays the General Settings dialog box.
Click the minimum severity to display.
For example, click Warning if you do not want Clear of Indeterminate priorities to be displayed.
Click OK.
Pull down the Options menu and choose Save Options to save your settings.
13.10. Viewing the Distribution of Event Priorities
As events are received, Eventlist keeps a count of each event priority received. These counts are not normally visible when Eventlist is started.
To view the counts, you can do one of the following:
Click the square at the bottom right of the window, and drag it upwards until the counts are visible.
Drag the bottom window border downwards until the counts are visible.
The figure in the section, What the Eventlist Interface Looks Like, earlier in this chapter, shows the Eventlist window with the priority counts visible.
13.11. Saving Your Changes to Eventlist
After you make any changes, you must save the changes so that they can be implemented when you restart Eventlist.
To save your changes, pull down the Options menu and choose then Save Options menu item.
The file location for your saved settings depends on how Eventlist was started:
If Eventlist was started as an action routine, see Action Routines.
If Eventlist was started interactively from the command line, see The Command Line Interface.
If Eventlist was started interactively from the C3 interface, see The C3 Interface.
13.11.1. Action Routines
When Eventlist is started as an action routine, your customizations are saved in the following directory:
CONSOLE$APP_DEFAULTS:
The saved file name follows the convention:
CONSOLE$EVENTLIST.DAT_display_server_screen 13.11.2. The Command Line Interface
When Eventlist is started from the command line, your customizations are saved in the following locations:
SYS$LOGIN:
The filename is CONSOLE$EVENTLIST.DAT
The location of the interactive Eventlist saved settings may be customized through the use of the following environment variable or logical name:
CONSOLE_USER_DEFAULTS
For example, to save your interactive Eventlist setting in the subdirectory Console Manager from your login directory, first create the Console Manager subdirectory, and then enter the following in your login script:
DEFINE/JOB CONSOLE$USER_DEFAULTS
SYS$LOGIN_DEVICE:[home_directory.CONSOLE]
13.11.3. The C3 Interface
When Eventlist is started from the C3 interface, your customizations are saved in the following file:
CONSOLE$APP_DEFAULTS:
The saved file name follows the convention:
CONSOLE$EVENTLIST.DAT_username_c3 13.12. Restoring the Default Options
To restore the default options for Eventlist, pull down the Option menu and choose the Restore Default Options menu item.
Chapter 14. Supplied Action Routines
This chapter describes the set of action routines that are supplied with Console Manager and used for event notification. The supplied action routines, and the actions to which they are associated, are:
| Action Routine |
Description | Related Action |
See Section |
|---|---|---|---|
| Eventlist |
Displays a window listing multiple events as they happen | Multi-Line Window |
Eventlist |
| Eventsingle |
Displays a window showing only the event that dispatched it | Single-Shot Window |
Eventsingle |
|
Sends an electronic mail message containing the event that dispatched it to specified users |
| ||
| Broadcast |
Writes a message containing the event that dispatched it to one or more terminal screens or users | Broadcast |
|
| Archive Cleanup |
Automatically deletes all files more than 24 hours old in the archive area when it gets full | Archive Clean-Up |
|
Note
If you make any changes to these action routines, they might not work. However, you may want to make changes to the Archive Cleanup action routine (see the chapter Customizing the Archive Cleanup Action Routine, later in this chapter).
These routines are stored in:
CONSOLE$ACTIONS:
If these actions do not fulfill your requirements, you can write your own. See the chapter Create Your Own Action Routines.
This section contains the following topics:
14.1. Eventlist
Eventlist is a DECwindows Motif routine which places a window on an DECwindows display device when you invoke it.
If Eventlist is invoked as part of an event action, then only those events that match the associated filter are listed in the window.
If you invoke Eventlist interactively, then the window lists all events for the systems to which you have access, as well as any events generated by Console Manager.
The Multi-Line Window action invokes Eventlist.
The remainder of this section describes the Eventlist action routine. See the chapter Using the Eventlist Interface for a description of how to use and customize the Eventlist interface.
14.1.1. Action Definition
The following figure shows the action definition for the Eventlist routine. The
Command field is CONSOLE$EVENTLIST.
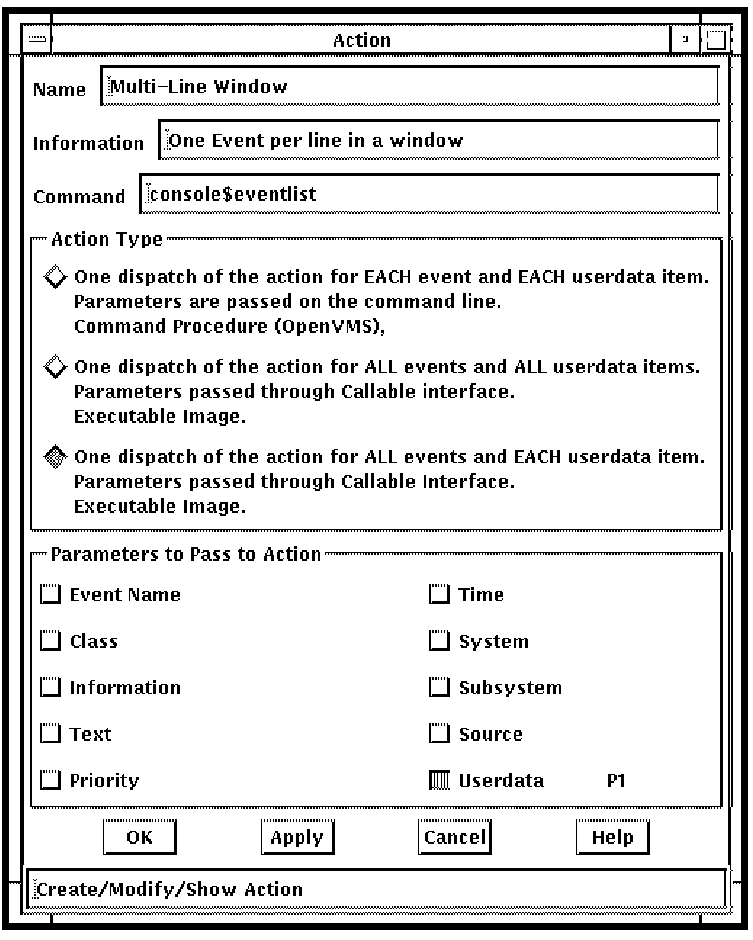
The following table shows the image name for the Eventlist action routine, and its name in the configuration database.
| Information |
OpenVMS |
|---|---|
| Image Name |
CONSOLE$EVENTLIST.EXE |
| Database Name |
Multi-Line Window |
14.1.2. Userdata as Specified in Filter Dispatch
You must specify values for the following items, otherwise the action will fail:
| Value |
Description |
|---|---|
| HOST |
The DECwindows display you wish the window to appear on. |
| SERVER_NUM |
The number of the server on the HOST display, normally 0. |
| SCREEN_NUM |
The screen on which the window should appear. For single head workstations this is 0 and for dual head workstations it may be 0 or 1. |
| TRANSPORT |
The DECwindows transport which your DECwindows client and server support. This routine supports TCP/IP, DECnet and LAT transports. |
For example:
SALT 0 1 TCPIP
This places the Eventlist window on the system SALT, X-Server 0, screen 1, using TCP/IP as the transport.
14.2. Eventsingle
Eventsingle is a DECwindows action that places a window on an DECwindows display device when you invoke it. The window contains a single event, the one that dispatched it. If you do not dismiss this window by clicking on Dismiss, the window automatically closes after 10 minutes. You may change this interval if you wish.
The Single-Shot Window action invokes Eventsingle.
14.2.1. Action Definition
The following figure shows the action definition for the Eventsingle routine. The Command field is CONSOLE$EVENTSINGLE.
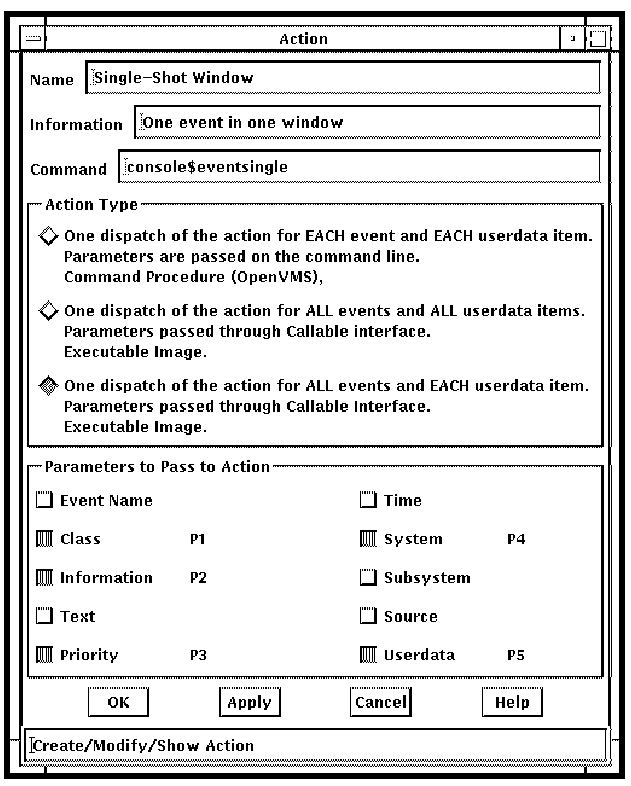
The following table shows the image name for the Eventsingle action routine, and its name in the configuration database.
| Information |
OpenVMS |
|---|---|
| Image Name |
CONSOLE$EVENTSINGLE.COM |
| Database Name |
Single-Shot Window |
14.2.2. Userdata as Specified in Filter Dispatch
You must specify the following values, otherwise the routine will fail:
| Value |
Description |
|---|---|
| HOST |
The DECwindows display you wish the window to appear on. |
| SERVER_NUM |
The number of the server on the HOST display, normally 0. |
| SCREEN_NUM |
The screen on which the window should appear. For single head workstations this is 0 and for dual head workstations it may be 0 or 1. |
| TRANSPORT |
The DECwindows transport which your DECwindows client and server support. This routine supports TCP/IP, DECnet and LAT transports. |
| INTERVAL |
The time for which the window will display on a remote workstation. After this period has expired the window will be closed. This parameter is optional. If specified it should take the form HH:MM:SS where HH is the number of hours to wait, MM the number of minutes and SS the number of seconds. |
Separate all values by one or more spaces.
For example:
SALT 0 1 TCPIP 00:00:10
This shows that the window will close after ten seconds.
14.2.3. Change the Eventsingle DECwindows Settings
You can change the DECwindows settings for Eventsingle as follows:
Modify DECW$XDEFAULTS.DAT in your DECW$USER_DEFAULTS directory (the default location for this is SYS$LOGIN) on the system where you want the window to appear. This is the userdata parameter in the dispatch entry.
The following table describes the DECwindows resources, default values and value ranges for you to customize the Eventsingle routine. For example, the entry for the Eventlist Background might be:
Console EventSingle.Background: Magenta
Note
DECwindows resources are case-sensitive, and there is a space character between “Console” and “EventSingle.”
| DECwindows Resource |
Default Value |
Value Range |
|---|---|---|
| Console EventSingle.Foreground |
White |
Any valid DECwindows color |
| Console EventSingle.Background |
Black |
Any valid DECwindows color |
| Console EventSingle.PriorityCritical |
Red |
Any valid DECwindows color |
| Console EventSingle.PriorityMajor |
Magenta |
Any valid DECwindows color |
| Console EventSingle.PriorityMinor |
Orange |
Any valid DECwindows color |
| Console EventSingle.PriorityWarning |
Yellow |
Any valid DECwindows color |
| Console EventSingle.PriorityClear |
Green |
Any valid DECwindows color |
| Console EventSingle.PriorityIndeterminate |
Light blue |
Any valid DECwindows color |
| Console EventSingle.X |
Center |
”Center” or any valid screen pixel value |
| Console EventSingle.Y |
Center |
”Center” or any valid screen pixel value |
| Console EventSingle.Width |
800 |
Any valid screen pixel value |
| Console EventSingle.Height |
200 |
Any valid screen pixel value |
| Console EventSingle.DisplayNode |
True |
True or false |
| Console EventSingle.DisplayPriority |
True |
True or false |
| Console EventSingle.DisplayName |
True |
True or false |
| Console EventSingle.Font |
Fixed |
Any font valid for your server |
| Console EventSingle.DisplayText |
True |
True or false |
| Console EventSingle.Bell |
26 |
Any value in the range 0 to 100 |
You must log out of your current session on the system where you want the window to appear and then log back in to activate your new DECwindows window settings.
14.3. Mail
Mail is a command procedure. It sends an electronic mail message to a specified user or mail distribution list, with the details of the event that dispatched it.
14.3.1. Action Definition
The following figure shows the action definition for the Mail routine. The Command
field is CONSOLE$MAIL.
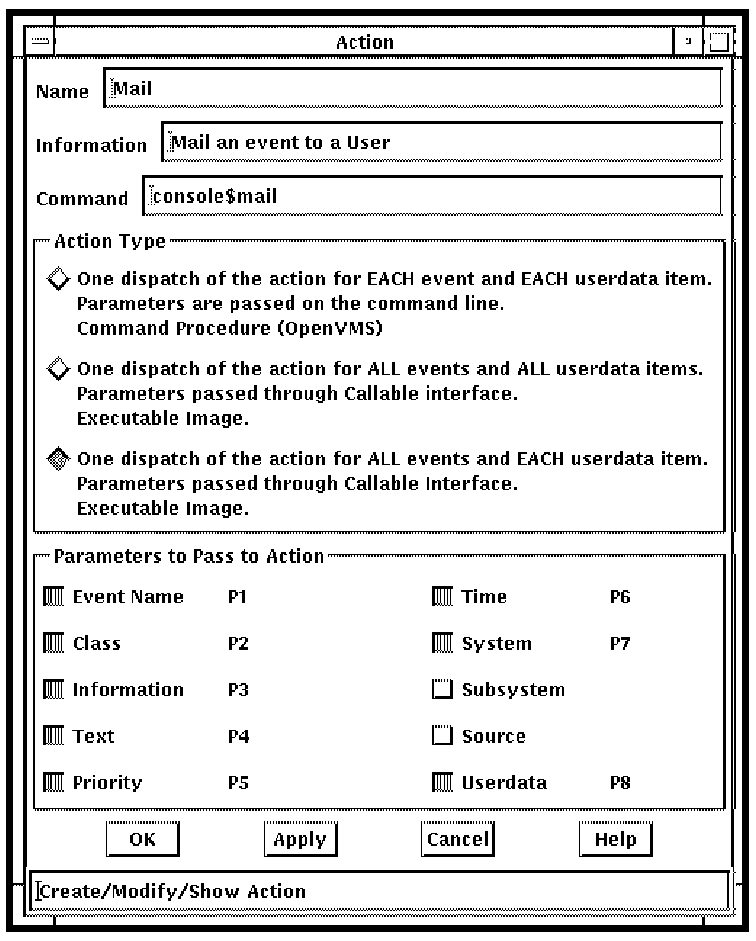
The following table shows the name of executable file for the Mail action routine, and its name in the configuration database.
| Information |
OpenVMS |
|---|---|
| Executable File Name |
CONSOLE$MAIL.COM |
| Database Name |
|
14.3.2. Userdata as Specified in Filter Dispatch
You must specify values for the following items, otherwise the routine will fail:
| Value |
Description |
|---|---|
| MAIL_ADDRESS |
A valid address string. When presented to the mail utility, this address may be a single user, list of users, or a mail distribution list. |
For example:
smithj@salt
PEPPER::FBLOGGS
This sends mail to user smithj on the system SALT using SMTP, and to user FBLOGGS on the system PEPPER using OpenVMS mail.
14.4. Broadcast
Broadcast is an image on the operating system. It writes a message containing the information field of the event which dispatched it, on either a single terminal, or all the terminals into which a specified user is logged.
14.4.1. Action Definition
The following figure shows the action definition for the Broadcast routine. The
Command field is CONSOLE$BROADCAST.
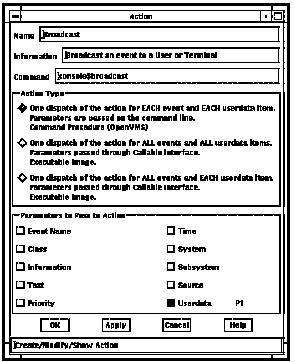
The following table shows the name of the executable file for the Broadcast action routine, and its name in the configuration database.
| Information |
OpenVMS |
|---|---|
| Executable File Name |
CONSOLE$BROADCAST.EXE |
| Database Name |
Broadcast |
14.4.2. Userdata as Specified in Filter Dispatch
You must specify values for the following items, otherwise the routine will fail:
| Value |
Description |
|---|---|
| TYPE |
Indicates the type of value for DESTINATION: U indicates a username |
|
DESTINATION |
Either the terminal, or the user to which the event will be broadcast. |
Separate all values by one or more spaces, for example:
U SMITHJ
This broadcasts a message to all the terminals that smithj is logged into.
14.5. Archive Cleanup
Archive cleanup is a command procedure. If there are any files older than 24 hours on the system, they are automatically deleted. If there are no files to match this criteria, all files are deleted.
If you want some other action to be performed instead of deleting the files, you can edit the shell script or command procedure to perform whatever tasks are necessary to free space in the archive directory, such as backing up the files to tape before removing them.
14.5.1. Action Definition
The following figure shows the action definition for the Archive Cleanup routine. The
Command field is CONSOLE$ARCHIVE_CLEANUP.

The following table shows the name of the executable file for the Archive Cleanup action routine, and its name in the configuration database.
| Information |
OpenVMS |
|---|---|
| Executable File Name |
CONSOLE$ARCHIVE_CLEANUP.COM |
| Database Name |
Archive Cleanup |
14.5.2. Userdata as Specified in Filter Dispatch
No user data is required by this action, unless you have modified the command procedure so as to require it.
14.5.3. Customizing the Archive Cleanup Action Routine
You can modify this routine yourself to free space in the archive area after you have backed up the old data. Some changes you might want to make are as follows:
Change the length of time that the archive files are kept (default is previous 24 hours).
Back up existing archive files to tape before they are deleted.
Note
If you customize this action routine, place your version in the user action directory (CONSOLE$USER_ACTIONS). Otherwise, if you replace the supplied action routine that is in the system action directory, your customizations will be lost if you upgrade Console Manager.
The following example shows the archive cleanup command procedure:
$!
$! COPYRIGHT NOTICE
$!
$! Copyright (C) 1997, VSI, Inc. All Rights
$! Reserved.
$!
$! This computer software program is proprietary and confidential informa-
$! tion owned by VSI, Inc. Use of this soft-
$! ware is authorized only pursuant to a valid written license agreement
$! from VSI. This computer software program is protected by $! the copyright laws of the United States and by international treaty and
$! may not be disclosed, reproduced or duplicated in whole or in part with- $! out the express written authorization of VSI.
$!
$! This computer program and documentation is provided with "Restricted
$! Rights." Use, duplication or disclosure by the U.S. Government is
$! subject to the restrictions set forth in 48 CFR 52.227-19(c)(1) and (2)
$! or DFARS 252.227-7013(c)(1)(ii) or applicable successor provisions. The
$! manufacturer is VSI, Inc.
$!
$ verify = 'F$VERIFY(0)' $ $ ON SEVERE_ERROR THEN EXIT "Archive cleanup failed" $
$!++
$! Facility:
$! {~tbs~}
$!
$! Abstract:
$! {~tbs~}
$! $! Author: $! {~tbs~}
$!
$! Creation Date: 18-NOV-1993
$!
$! Modification History:
$!--
$!
$ $ TimeNow = F$TIME() + " -2-00:00:00.00"
$ TimeNow = F$CVTIME("''TimeNow'", "COMPARISON", )
$
$ Archive_Location = "''P1'"
$ If Archive_Location .EQS. ""
$ Then
$ Archive_Location = "CONSOLE$ARCHIVE:*.*;*"
$ Else
$ Archive_Location = Archive_Location + "*.*;*"
$ EndIf
$
$ Start:
$ Archive_File = F$SEARCH("''Archive_Location'")
$ If Archive_File .EQS. "" Then Goto End_Procedure
$ Created = F$FILE_ATTRIBUTES(Archive_File, "CDT")
$
$ Created = F$CVTIME("''Created'", "COMPARISON", )
$ If Created .LES. TimeNow
$ Then
$ Delete 'Archive_File $ EndIf
$
$ Goto Start
$
$ End_Procedure:
$ verify = F$VERIFY(verify)
$ EXIT 1
Checks to see if this archive file is older than the specified time.
If the file is older than the specified time, then delete it.
Chapter 15. Create Your Own Action Routines
If you require action routines additional to those supplied with Console Manager, this chapter describes how to create them. Once created, you must then add them to the configuration database as described in the chapter Setting up the ENS Components.
This section contains the following topics:
15.1. Types of Action Routines
You can write your own action routines in order to receive notification of events in ways other than those supplied with Console Manager. For example, you may want to log events to a call handling system.
There are two types of action routines:
Command procedures
Images
ENS searches for all actions in the default actions directory on the host system:
CONSOLE$ACTIONS
There are two directories - one is reserved for use by Console Manager, and the other for user-defined action routines. The two directories are linked via the logical name CONSOLE$ACTIONS. Place any actions you create in CONSOLE$USER_ACTIONS:.
15.2. Creating Command Procedure Actions
Command procedures are the simplest and easiest mechanism to use to get notification of an event. Any command procedure can be dispatched when the rules specified by a filter definition are met. The only requirement is a correctly defined entry for the action in the configuration database. Event attributes are passed as arguments on the command line. For example, P1, P2... Pn.
The following example shows the command procedure for the Mail action routine supplied with Console Manager.
 $ !
$ ! COPYRIGHT (c) 1997 BY
$ ! VSI, Inc.
$ ! ALL RIGHTS RESERVED.
$ !
$ ! THIS COMPUTER SOFTWARE PROGRAM IS PROPRIETARY AND
$ ! CONFIDENTIAL INFORMATION OWNED BY COMPUTER
$ ! ASSOCIATES INTERNATIONAL, INC. USE OF THIS
$ ! SOFTWARE IS AUTHORIZED ONLY PURSUANT TO A VALID
$ ! LICENSE AGREEMENT FROM VSI. THIS
$ ! COMPUTER SOFTWARE PROGRAM IS PROTECTED BY THE
$ ! COPYRIGHT LAWS OF THE UNITED STATES AND THE
$ ! INTERNATIONAL TREATY AND MAY NOT BE DISCLOSED,
$ ! REPRODUCED, OR DUPLICATED IN WHOLE OR IN PART
$ ! WITHOUT THE EXPRESS WRITTEN AUTHORIZATION
$ ! OF VSI.
$ !
$ ! THIS COMPUTER PROGRAM AND DOCUMENTATION IS
$ ! PROVIDED WITH RESTRICTED RIGHTS. USE, DUPLICATION
$ ! OR DISCLOSURE BY THE U.S. GOVERNMENT IS SUBJECT TO
$ ! THE RESRTICTIONS SET FORTH IN 48 CFR 52.227-19
$ ! (C) (1)AND (2) OR DFARS 252.227-7013 (C) (1) (ii)
$ ! OR APPLICABLE SUCCESSOR PROVISIONS. THE
$ ! MANUFACTURER IS VSI INTERNATIONAL,
$ ! INC.
$ !
$ !
$ ! Console Manager action routine to deliver a mail
$ ! message to a person or a distribution list
$ !
Create Image Actions
$ CM_HOST == F$GETSYI("NODENAME")
$ UNIQUE == F$GETJPI("","PID")
$ FILENAME == "CONSOLE$TMP:''UNIQUE'.TMP"
$ open/write mailfile 'FILENAME'
$ write mailfile " Message from Console Manager host ''CM_HOST' "
$ write mailfile " "
$ write mailfile " An event occurred on the console for system ''P7'"
$ write mailfile " "
$ write mailfile " The details for this event are as follows :- "
$ write mailfile " "
$ write mailfile " Event : ''P1'"
$ write mailfile " Class : ''P2'"
$ write mailfile " Info : ''P3'"
$ write mailfile " Text : ''P4'"
$ write mailfile " Priority : ''P5'"
$ write mailfile " Time : ''P6'"
$ write mailfile " "
$ close mailfile
$ !
$ !
$ MAIL/SUBJECT="Console Manager Event Notification" - 'FILENAME' "''P8'"
$ DELETE 'FILENAME';*
$ exit
15.3. Create Image Actions
This section assumes that you are familiar with the style of the C programming language and the concepts used.
There are two ways in which to write an action routine as an image:
The routine behaves in the same way as a command procedure; that is, event attributes are passed on the command line.
The routine receives the information about an event and all subsequent events that satisfy the filter definition through the interprocess communications (IPC) mechanism.
See the chapter Understanding ENS for more information about the data passing methods used for invoking actions.
Appendix A. Setting Up the DECwindows Motif Transport for the DECwindows Interface
Before you can start the DECwindows interfaces to various parts of Console Management, you must set up the DECwindows transport.
This section contains the following topics:
A.1. Setting the DECwindows Destination for TCP/IP Transport
To set the DECwindows destination for the system SALT using TCP/IP as your transport:
Enter:
$ SET DISPLAY/CREATE/NODE=SALT/SCREEN=0/SERVER=0/TRANSPORT=TCPIP
A.2. Setting the DECwindows Destination for DECnet Transport
To set the DECwindows destination for the system SALT using DECnet as your transport:
Enter:
$ SET DISPLAY/CREATE/NODE=SALT/SCREEN=0/SERVER=0/TRANSPORT=DECNET
Appendix B. Console Manager Commands Quick Reference
The following table lists of all the commands used by Console Manager from the command line. Commands shown in bold are used for managing Console Manager.
| Command |
What It Does | See |
|---|---|---|
| CONSOLE ARCHIVE |
Archives log files | Managing Console Manager |
| CONSOLE CONNECT |
Starts the connect interface from the shell or system prompt | Using Console Manager From the Command Line Interface |
| CONSOLE C3 |
Starts the C3 interface on workstations | |
| CONSOLE STATUS |
Displays the status of Console Manager components and serviced systems | Managing Console Manager |
| CONSOLE DIALOG |
Performs a dialog with a specified serviced system | Using Console Manager From the Command Line Interface |
|
CONSOLE EDIT /INTERFACE= DECWINDOWS |
Starts the configuration editor using the C3 interface | Modifying the Configuration Database |
|
CONSOLE EDIT /INTERFACE= CHARACTER_CELL |
Starts the configuration editor using the character cell interface | Modifying the Configuration Database |
| CONSOLE EVENTLIST |
Starts an Eventlist interactively | Supplied Action Routines |
| CONSOLE MONITOR |
Starts the monitor interface on character cell terminals | Using the Monitor Interface |
| CONSOLE RECONFIGURE |
Reconfigures the running Console Manager software | Managing Console Manager |
|
@SYS$STARTUP: CONSOLE$MANAGER$ SHUTDOWN or CONSOLE SHUTDOWN |
Shuts down the Console Manager software | Managing Console Manager |
| @SYST$STARTUP: CONSOLE$STARTUP.C OM |
Starts the Console Manager software | Managing Console Manager |
| CONSOLE VERIFY |
Verifies the integrity of the log and archive files for the serviced systems and optionally repairs them | |
| CONSOLE WATCH |
Logs console data to hardcopy devices | |
| CONSOLE EXTRACT |
Outputs console log data for a specific period of time to a file or the default output device |
Appendix C. Console Manager Callable Interface
This appendix describes the callable interface routines in Console Manager you can use to create your own action routines for event notification.
The routines described in this appendix adhere to the C language rules. Native OpenVMS routines are not provided.
This section contains the following topics:
C.1. Callable Routines
This section describes the Console Manager supported callable routines. This section does not cover the lower-level routines that are called by these supported routines. Your programs should not have to call these lower-level routines directly.
Each routine description includes the following:
Routine name
Format
Arguments
Possible Enter values
Environment
C.1.1. CMActionName
Returns the name of the action as defined in the configuration database. Do not free the returned value.
C.1.1.1. Format
#include <console.h>
char *CMActionName ()
C.1.1.2. Description
Returns the name of the action as defined in the configuration database. Do not free the returned value.
C.1.1.3. Possible Return Values
Returns the name of the action routine.
C.1.1.4. Environment
When linking your routine's object modules, you must also link against the Xt and X11 libraries, regardless of whether the routine is actually using X11.
C.1.2. CMEventXxxx
Miscellaneous routines that Enter event parameters.
C.1.2.1. Format
#include <console.h>
void CMEventXxxx (event)
CMEvent event;
C.1.2.2. Description
Miscellaneous routines that Enter event parameters.
C.1.2.3. Arguments
event
Specifies the address of the event structure for which the data specified by Xxxx is to be returned.
CMEventXxxx routines Enter specific details about the event they are passed. Most of these routines are macros and you should use them as the preferred mechanism for accessing the internal structure of an event. This mechanism provides protection if the event structure changes in future releases.
The following table shows the valid values for CMEventXxxx routines.
| Xxxx Value |
Enter Type |
Returns |
|---|---|---|
| Name |
char * |
The name of the event as stored in the Console Manager database. |
| Class |
char * |
The class of the event as stored in the Console Manager database. |
|
Info |
char * |
The information for the event as stored in the Console Manager database. |
|
Text |
char * |
The line of console output which activated the event. |
|
Context |
int |
The full context for the event as logged in the host's log file, and count of the lines retrieved, -1 on error. Obtain the context data using the CMEventContextYyyy routines. |
|
Time |
time_t |
The time at which the event occurred. |
|
Type |
int |
The type of event, one of CMEventTypeEvent, CMEventTypeAck or CMEventTypeClear. |
|
Logtime |
time_t |
The timestamp of the event in the log file for the host on which the event occurred. |
|
Count |
int |
The number of context lines for the event as stored in the Console Manager database. |
|
Priority |
int |
The priority of the event as stored in the Console Manager database. |
|
Source |
char * |
The source of the event, which is typically the name of the detector of the event. |
|
Start |
int |
The start line of the event relative to the line on which the event occurred as stored in the Console Manager database. |
|
SubSystem |
char * |
The subsystem for the event as stored in the database. |
|
Host |
char * |
The hostname of the system on which the event occurred. |
|
System |
char * |
The hostname of the system on which the event occurred. |
|
Userdata |
char * |
The userdata value from the dispatch record which caused this event to arrive at the action. |
Returned values should not be freed by the caller. They are freed by a call to CMFreeEvent().
C.1.2.4. Environment
When linking your routine's object modules, you must also link against the Xt and X11 libraries, regardless of whether the routine is actually using X11.
C.1.3. CMEventContextYyyy
Retrieves log data for an event's context.
C.1.3.1. Format
#include <console.h>
CMEventContextYyyy (event, eventlinenum)
CMEvent event;
int eventlinenum;
C.1.3.2. Description
Retrieves log data for an event's context.
C.1.3.3. Arguments
event
Specifies the address of the event structure received from the Event Notification Services daemon.
eventlinenum
Specifies the line number within the context obtained for whichever data is required.
C.1.3.4. Possible Enter Values
The CMEventContextYyyy routines Enter specific details about the context of the event they are passed. Most of these routines are macros and are the preferred mechanism for accessing the internal structure of an event's context. This mechanism provides protection if the event context structure changes in future releases.
The following table shows the valid values for CMEventContextYyyy routines.
| Yyyy Value |
Enter Type |
Returns |
|---|---|---|
| Line |
char * |
A pointer to the line of context required. |
| LineLength |
int |
The length in characters of the line of context specified. |
| LineTime |
time_t |
The log file time for the line of context specified. |
Returned values should not be freed by the caller. They are freed by a call to CMFreeEvent().
C.1.3.5. Environment
When linking your routine's object modules, you must also link against the Xt and X11 libraries, regardless of whether the routine is actually using X11.
C.1.4. CMFreeEvent
Deallocates memory allocated by CMUserMainLoop and by CMUserGetEventContext.
C.1.4.1. Description
CMFreeEvent frees the memory allocated by CMUserMainLoop when an event is received from the Event Notification Services daemon. This routine should be called at the end of the readroutine procedure in order to eliminate memory exhaustion over time.
C.1.4.2. Format
#include <console.h>
CMFreeEvent (event)
CMEvent event;
C.1.4.3. Arguments
event
Specifies the address of the event structure for which the memory is to be freed.
C.1.4.4. Environment
When linking your routine's object modules, you must also link against the Xt and X11 libraries, regardless of whether the routine is actually using X11.
C.1.5. CMGetEventContext
Retrieves the event context from the serviced system's log files.
C.1.5.1. Format
#include <console.h>
CMGetEventContext (event)
CMEvent event;
C.1.5.2. Description
CMGetEventContext retrieves the full event context for the event from the log files associated with the system on which the event occurred. (When the context is no longer required by the action routine, you should free it via a call to CMFreeEventContext.)
C.1.5.3. Arguments
event
Specifies the address of the event structure for which context is required. The address can be received from the Event Notification Services daemon via a call to CMUserGetEvent, or as a parameter in the readroutine for the action.
C.1.5.4. Environment
When linking your routine's object modules, you must also link against the Xt and X11 libraries, regardless of whether the routine is actually using X11.
C.1.6. CMRetrieveEventText
Retrieves the console data text which caused the specified event to occur.
This routine is obsolete. Event text is returned with all calls. This routine description has been retained for compatibility with older action routines.
Note
You should free the value returned after use.
C.1.6.1. Format
#include <console.h>
char *CMRetrieveEventText (event)
CMEvent event;
C.1.6.2. Description
CMRetrieveEventText retrieves the console data text which caused the specified event to occur.
If the whole line is not available, then no text is returned. To ensure that the complete line of text for an event is logged, you need to use a regular expression with the metacharacters *^ after the text to be matched.
C.1.6.3. Arguments
event
Specifies the address of the event structure for which the console data is required. The address can be received from the Event Notification Services daemon via a call to CMUserGetEvent, or as a parameter in the readroutine for the action.
C.1.7. CMUserAcknowledgeEvent
Acknowledges a specified event.
C.1.7.1. Format
#include <console.h>
int CMUserAcknowledgeEvent(context, event, who)
CMContext *context;
CMEvent event;
char *who;
C.1.7.2. Description
CMUserAcknowledgeEvent acknowledges a specified event.
Note
Console Manager V1.7 does not log Acknowledge events in any of the log files. If logging of Acknowledge events is required, then the issuer of the call to CMUserAcknowledgeEvent must perform this logging in their own private files.
C.1.7.3. Arguments
context
Specifies the Console Manager context. This value should be the same as the one returned from a previous call to CMUserInit or CMUserPPInit. If no previous call to either of these two routines was made, then a context block will be created, initialized and returned to you upon successful completion of this routine.
event
An event that has been received from ENS.
who
A NULL terminated string describing the person or application which has performed the acknowledge.
C.1.8. CMUserClearEvent
Clears a specified event.
C.1.8.1. Format
#include <console.h>
int CMUserClearEvent(context, event, who)
CMContext *context;
CMEvent event;
char *who;
C.1.8.2. Description
Clears a specified event.
Note
Console Manager V1.6 does not log Clear events in any of the Log files, if logging of clear events is required, then the issuer of the call to CMUserClearEvent must perform this logging in their own private files.
C.1.8.3. Arguments
context
Specifies the Console Manager context. This value should be the same as the one returned from a previous call to CMUserInit or CMUserPPInit. If no previous call to either of these two routines was made, then a context block will be created, initialized and returned to you upon successful completion of this routine.
event
An event which has been received from ENS.
who
A NULL terminated string describing the person or application which has performed the clear.
C.1.9. CMUserGetEvent
Synchronously reads an event from the Event Notification Services daemon.
C.1.9.1. Format
#include <console.h>
CMEvent CMUserGetEvent (context)
CMContext *context;
C.1.9.2. Description
CMUserGetEvent retrieves an event from the Event Notification Services. If the readroutine is omitted from the call to CMUserInit, it is assumed that the user is providing their own version of CMUserMainLoop, in which case you should use the CMUserGetEvent routine to obtain all events. If no event is available, this routine stalls until one is delivered from the Event Notification Services.
If you are using a readroutine you need not use or call CMUserGetEvent as the event is passed to readroutine. When you have finished with the event, use CMFreeEvent to free the memory.
C.1.9.3. Arguments
event
Specifies the address of the event structure received from the Event Notification Services daemon.
C.1.9.4. Environment
When linking your routine's object modules, you must also link against the Xt and X11 libraries, regardless of whether the routine is actually using X11.
C.1.10. CMUserInit
Initializes the link between the action routine and Event Notification Services (ENS).
C.1.10.1. Format
#include <console.h>
int CMUserInit (context, readroutine, errorroutine, X11appcontext)
CMContext *context;
void (*readroutine)();
void (*errorroutine)();
AppCtx X11appcontext;
C.1.10.2. Description
CMUserInit initializes the link between the Event Notification Services daemon and your action routine. The readroutine is called whenever an event destined for the action routine occurs. Exceptions and errors are notified via the errorroutine. In an X-Windows environment, the use of the CMUserMainLoop call is preferable to XtAppMainLoop. In this situation, supply the X11appcontext value, otherwise it must be NULL. The Console Manager context for use in all the other calls will be returned in context.
A call to this routine is mandatory for all action routines. The action routine must also make this call within the action timeout period defined in the Console Manager database. Otherwise, the Event Notification Services daemon assumes the action is not going to start and it attempts to start another instance of the action when the next event occurs.
C.1.10.3. Arguments
context
Specifies the Console Manager context. This value is returned by the call to CMUserInit for use by other interface routines.
readroutine
Specifies the address of the routine to be called when an event is received from the Event Notification Services daemon.
errorroutine
Specifies the address of the routine to be called when an error occurs while communicating with the Event Notification Services daemon.
X11appcontext
Specifies the X-Toolkit application context.
C.1.10.4. Environment
When linking your routine's object modules, you must also link against the Xt and X11 libraries, regardless of whether the routine is actually using X11.
C.1.10.5. Possible Return Values
CM_NORMAL is returned by the CMUserInit call. All other values indicate a failure to connect to the Event Notification Services daemon.
C.1.10.6. See Also
The Xlib routine XtCreateApplicationContext.
C.1.11. CMUserMainLoop
Loops and waits for events.
C.1.11.1. Format
#include <console.h>
CMUserMainLoop (context)
CMContext context;
C.1.11.2. Description
CMUserMainLoop causes the application to read each event from the Event Notification Services and dispatch it to the registered readroutine. This constitutes the main loop of an action routine, and, as such, it does not Enter.
C.1.11.3. Arguments
context
Specifies the Console Manager context used by this action. This value is obtained when performing a call to the CMUserInit routine.
C.1.11.4. Environment
When linking your routine's object modules, you must also link against the Xt and X11 libraries, regardless of whether the routine is actually using X11.
C.1.12. CMUserPPInit
Initializes the event preprocessor.
C.1.12.1. Format
#include <console.h>
int CMUserPPInit(context, readroutine, errorroutine, X11appcontext)
CMContext *context;
void (*readroutine)();
void (*errorroutine)();
AppCtx X11appcontext;
C.1.12.2. Description
Initializes the event preprocessor.
C.1.12.3. Arguments
context
Specifies the Console Manager context. This value is returned by CMUserPPInit for use by the other preprocessor routines.
readroutine()
The routine to call when an event is posted to the program by the ENS.
errorroutine()
The routine to be called when an error occurred communicating with ENS. This routine should perform any cleanup operations required by your program, and then disconnect the link to ENS.
X11appcontext
Specifies the X-Toolkit application context.
C.1.13. CMUserPPSendEvent
Sends an event for backend processing to ENS.
C.1.13.1. Format
#include <console.h>
int CMUserPPSendEvent(context, event)
CMContext *context;
CMEvent event;
C.1.13.2. Description
Sends an event for backend processing to ENS.
C.1.13.3. Arguments
context
Specifies the Console Manager context. This value should be the same as the one returned from a previous call to CMUserInit or CMUserPPInit.
event
An event which has been received from ENS. Any event field may be modified before sending the event back to ENS. However, to prevent memory leaks, any of the fields which are pointers must be freed using the C routine free. In addition, your replacement values for these fields must not be freed. They will be freed by the API when you call CMFreeEvent.
C.1.14. CMUserSendEvent
Sends an event from an application to Event Notification Services.
C.1.14.1. Format
#include <console.h)
int CMUserSendEvent (context, system, name, class, info, text,
time, priority, subsystem, source)
CMContext *context;
char * system;
char * name;
char * class;
char * info;
char * text;
time_t time;
int priority;
char * subsystem;
char * source;
C.1.14.2. Description
CMUserSendEvent constructs an event packet and transmits it to the Event Notification Services daemon for processing. This call may be used by a user application to feed events external to Console Manager into Event Notification Services for action.
If the routine only sends events to Event Notification Services and no received events are expected, the CMUserInit call is not required.
C.1.14.3. Arguments
system
Specifies the name of the system from which the event originates.
name
Specifies the name of the event.
class
Specifies the class of the event.
info
Specifies information describing the event.
text
Specifies the condition causing the event.
time
Specifies the time of the event.
priority
Specifies the priority. This is one of the priority codes as defined in <console.h>.
subsystem
Specifies the subsystem on which this event has occurred.
source
Specifies the source of the event, which is typically the name of the detector of the event.
C.1.14.4. Environment
When linking your routine's object modules, you must also link against the Xt and X11 libraries, regardless of whether the routine is actually using X11.
C.1.15. CMUserShutdown
Disconnects the link between Event Notification Services and the action routine or preprocessor.
C.1.15.1. Format
#include <console.h>
CMUserShutdown (*context)
CMContext *context;
C.1.15.2. Description
CMUserShutdown terminates the connection with the Event Notification Services, causing the application to exit the CMUserMainLoop procedure. Once an action has called this routine, it is not possible for that instance of the action to reconnect to the Event Notification Services.
C.1.15.3. Arguments
context
Specifies the Console Manager context used by this action or preprocessor. This value is obtained when performing a call to the CMUserInit or CMUserPPInit routines.
C.1.15.4. Environment
When linking your routine's object modules, you must also link against the Xt and X11 libraries, regardless of whether the routine is actually using X11.
Appendix D. Sample DIALOG File
The following example shows an example dialog procedure.
Note
VSI does not recommend embedding passwords in command procedures. It is a potential security risk. This example serves to show only the principles behind DIALOG.
 !
 ! This is an example dialog file. It may be
 ! invoked from the monitor interface using the
 ! command:
 !
 ! DIALOG filename [system]
 !
 !
 !
 ! The command connects to the console of the
 ! specified system or systems then sends the
 ! specified strings and awaits the specified
 ! responses as though it were a user typing on the
 ! connected console.
 !
 ! Valid commands within a dialog file are UNLOCK,
 ! SEND and WAIT. They are described in the example
 ! below. Lines with a ! or # in the first
 ! character position are treated as comments.
 !
 ! This example dialog logs a user into a OpenVMS
 ! system.
 !
 ! The RATE command sets the interval the DIALOG waits
 ! between SEND commands.
 ! This allows systems that are not able to do flow
 ! control properly to work.
 ! Set the interval in this example to 5 seconds. RATE 5
 !
 ! The UNLOCK command forces the console upon which
 ! the dialog is being
 ! executed to be unlocked i.e. any other connected
 ! users are placed into
 ! read-only mode. This command should be executed
 ! before the first SEND command. Otherwise the SEND
 ! command will fail if another user is connected to
 ! the console.
 ! UNLOCK
 !
 ! The SEND command sends the characters in quotes to
 ! the connected console
 ! as though a connected user had typed them. The send
 ! command always appends a carriage Enter to the
 ! quoted string. The command below is, therefore
 ! sending a carriage Enter to the OpenVMS console to
 ! get a username prompt up.
 !
 SEND ""
 !
 ! The WAIT command causes the dialog to wait until a
 ! specified regular expression is seen on the
 ! connected console line. The first argument is
 ! a timeout in seconds after which the WAIT will
 ! terminate with an error causing the whole dialog
 ! sequence to terminate as well. A timeout value
 ! of zero causes an indefinite wait.
 !
 ! The quoted string is the awaited regular
 ! expression. In this case we are waiting for the
 ! username prompt from OpenVMS.
 !
 WAIT 20 "Username:"
 !
 ! Now send our username.
 !
 SEND "SMITHJ"
 !
 ! Await the password prompt.
 !
 WAIT 20 "Password:"
 !
 ! Send our password
 !
 Callable Routines
 SEND "SMITHJS_PASSWORD"
 !
 ! Await the DCL prompt - give it plenty of time to get logged in.
 !
 WAIT 40 "$"
 !
 ! Send any DCL commands you want executed here
 !
 SEND "SHOW TIME"
 !
 ! This particular dialog exits leaving you logged in to the console.
 !
Appendix E. Console Manager Tuning
In some environments, the standard Console Manager system and process quotas may not be sufficient. This appendix provides some suggestions to improve the performance of Console Manager.
This section contains the following topics:
E.1. Customize Logicals
The following logicals are not normally defined. If they are defined as Console specific logicals when Console Manager is started, then the associated actions will take place. Use the following command to define these logicals:
$DEFINE /TABLE=CONSOLE$LOGICAL_NAMES
          logical_from_table
| Logical |
Function |
|---|---|
| CONSOLE$NOT_TRUNCATE_LOGS |
Disables truncation of logs being copied during archiving. |
| CONSOLE$NOVERIFY_DB |
Disables database verification. |
| CONSOLE$MULTILINE_PROC_NUM |
Enables definition of maximum number of created multiline windows (Default 3). |
| CONSOLE$DEBUG |
Enables debug mode. |
| CONSOLE$ENS_WRITE_NOW |
Enables appropriate write mode in ENS. If this logical was defined, this write mode completes synchronous I/O operation immediately without waiting for another process to read the mailbox message. |
| CONSOLE$ENS_WRITE_NORSWAIT |
Enables appropriate write mode in ENS. If this logical was defined and if the mailbox is full, then synchronous I/O operation fails with a status Enter of SS$_MBFULL instead of placing the process in resource wait mode. |
|
CONSOLE$QUEUEING_ENABLED |
Enables queuing of the events occurred during archiving. |
|
CONSOLE$NOEIGHTBIT |
Enables terminal to use 7-bit ASCII code. |
|
CONSOLE$PARITY |
Enables set input parity. (ODD, EVEN, and NONE). |
|
CONSOLE$FAIL_LISTEN_PORT |
The port number used by a primary console manager to listen for poll requests from a secondary manager. Default: 9999 |
|
CONSOLE$SSH_COMMAND |
Provides the ability to set SSH command options and use the correct command for the IP stack installed on the system. For example, verbose mode can be turned on by defining the logical name, DEFINE/SYSTEM CONSOLE$SSH_COMMAND "ssh –v". |
|
CONSOLE$SUSPECT_NODE_LIMIT |
The number of failed or “suspect” polls for the secondary console manager to allow before taking control from the primary console manager. Default: 4 |
E.2. Assign CONSOLE DAEMON and CONSOLE CTRLs Quotas
For most situations, the process quotas for console processes are adequate. However, under conditions of very high stream of events, very large number of remote connections (100+), or a very high number of interface actions, the following console logicals can be set to improve performance. These values should only be used after consultation with VSI. Use the following command to define these logicals:
$DEFINE /TABLE=CONSOLE$LOGICAL_NAMES logical_from_table
| Logical | Function |
Value |
|---|---|---|
| CONSOLE$DAEMON_ASTLM |
Assign ASTLM quota |
Recommended: 8192 (AXP) (Default 1024) |
| CONSOLE$DAEMON_BIOLM | Assign BIOLM quota |
Recommended: 1000000 (AXP) (Default 1024) |
| CONSOLE$DAEMON_BYTLM | Assign BYTLM quota |
Recommended: 1000000 (AXP) (Default 655350) |
| CONSOLE$DAEMON_CPULM | Assign CPULM quota |
(Default 0) |
| CONSOLE$DAEMON_DIOLM | Assign DIOLM quota |
Recommended: 100000 (AXP) (Default 1024) |
| CONSOLE$DAEMON_FILLM | Assign FILLM quota |
Recommended: 2048 (AXP) (Default 1024) |
| CONSOLE$DAEMON_PGFLQUOTA | Assign PGFLQuota |
Recommended: 1280000 (AXP) (Default 30000) |
| CONSOLE$DAEMON_PRCLM | Assign PRCLM quota |
Recommended: 2048 (AXP) (Default 64) |
| CONSOLE$DAEMON_TQELM | Assign TQELM quota |
Recommended: 8192 (AXP) (Default 1024) |
| CONSOLE$DAEMON_WSQUOTA | Assign WSQUOTA quota |
Recommended: 32568 (AXP) (Default 2048) |
| CONSOLE$DAEMON_WSDEFAULT | Assign WSDEFAULT quota |
Recommended: 16284 (AXP) (Default 512) |
| CONSOLE$DAEMON_ENQLM | Assign ENQLM quota |
Recommended: 4096 (AXP) (Default 1024) |
| CONSOLE$DAEMON_WSEXTENT | Assign WSEXTENT quota |
Recommended: 65136 (AXP) (Default 8192) |
| CONSOLE$DAEMON_JTQUOT A | Assign JTQUOTA quota |
Recommended: 4096 (AXP) (Default 1024) |
| CONSOLE$PAUSE_BEFORE_ RECONFIG_MULTIPLE |
Assign number of seconds to wait before reconfiguration. This is used in conjunction with the child controller ID to prevent reconfigurations of all controllers at the same time. |
Reconfiguration of an individual controller is (idx value) seconds. |
Use the following logicals to assign the initial size and extension size of the associated files. This is normally done when the user knows there will be a very high number of entries. This will help prevent the files from being extended multiple times, thereby reducing the efficiency of the system.
| Logical |
Function |
|---|---|
| CONSOLE$TIMES_INITIAL_ ALLOCATION |
Assign initial allocation of the SYSTEM_NAME.TIMES files. |
| CONSOLE$TIMES_EXTENSION_ QUANTITY |
Assign extension quantities to the SYSTEM_NAME.TIMES files. |
| CONSOLE$EVENTS_INITIAL_ ALLOCATION |
Assign initial allocation of the SYSTEM_NAME.EVENTS files. |
| CONSOLE$EVENTS_EXTENSION_ QUANTITY |
Assign extension quantities to the SYSTEM_NAME.EVENTS files. |
| CONSOLE$LOG_INITIAL_ ALLOCATION |
Assign initial allocation of the SYSTEM_NAME.LOG files. |
| CONSOLE$LOG_EXTENSION_ QUANTITY |
Assign extension quantities to the SYSTEM_NAME.LOG files. |
Use these logicals when there is high burst events traffic to prevent loss of data.
| Logical |
Function | Value |
|---|---|---|
| CONSOLE$IPC_DATA_ MAILBOX_SIZE |
Enables enlargement of the data mailbox | (Default 5 mailbox messages ) |
| CONSOLE$IPC_MAILBOX_SIZE |
Enables enlargement of the mailbox size | (Default 5 mailbox messages ) |
| CONSOLE$IPC_CONNECT_ TIMEOUT |
Assign the timeout value during the connection | (Default 30 sec) |
| CONSOLE$ENS_GC_INTERVAL |
Assign the time interval to clear out any old event records from our queued events and reset the entries for our running processes where appropriate | (Default 30 sec) |
| CONSOLE$BUFFER_FLUSH_INT ERVAL |
Assign the time interval for buffers' flushing | (Default 30 sec) |
These values are used under conditions of high stream of events, very large number of remote connections, or many interface actions to the ENS process.
| Logical | Function |
Value |
|---|---|---|
| CONSOLE$NOTIFY_ASTLM | Assign ASTLM quota |
Recommended: 1600 (Default 200) |
| CONSOLE$NOTIFY_BIOLM | Assign BIOLM quota |
Recommended: 100000 (Default 1000) |
| CONSOLE$NOTIFY_BYTLM | Assign BYTLM quota |
Recommended: 1000000 (Default 200000) |
| CONSOLE$NOTIFY_CPULM | Assign CPULM quota |
Recommended: 0 (Default 0) |
| CONSOLE$NOTIFY_DIOLM | Assign DIOLM quota |
Recommended: 20000 (Default 200) |
| CONSOLE$NOTIFY_FILLM | Assign FILLM quota |
Recommended: 200 (Default 100) |
| CONSOLE$NOTIFY_PGFLQUOTA | Assign PGFLQUOTA |
Recommended: 1280000 (Default 10000) |
| CONSOLE$NOTIFY_PRCLM | Assign PRCLM quota |
Recommended: 2048 (Default 20) |
| CONSOLE$NOTIFY_TQELM | Assign TQELM quota |
Recommended: 4086 (Default 512) |
| CONSOLE$NOTIFY_WSQUOTA | Assign WSQUOTA quota |
Recommended: 4086 (Default 2000) |
| CONSOLE$NOTIFY_WSDEFAULT | Assign WSDEFAULT quota |
Recommended: 10000 (Default 100) |
| CONSOLE$NOTIFY_ENQLM | Assign ENQLM quota |
Recommended: 2096 (Default 500) |
|
CONSOLE$NOTIFY_WSEXTENT |
Assign WSEXTENT quota |
Recommended: 65136 (Default 5000) |
|
CONSOLE$NOTIFY_JTQUOTA |
Assign JTQUOTA quota |
Recommended: 4096 (Default 1024) |
E.2.1. Tracing Error Callbacks
Additional tracing for error callbacks:
CONSOLE$LISTENER_TRACE
CONSOLE$SOCKET_TRACE
E.2.2. Auto Starting Console Controllers
There are two logical names for auto-starting the console controllers and ENS after stop/id command:
ENS - Autorestart
DEFINE/TABLE=CONSOLE$LOGICAL_NAMES CONSOLE$RESTART_ENS TRUE
Child - Controllers' Autorestart:
DEFINE/TABLE=CONSOLE$LOGICAL_NAMES CONSOLE$RESTART_CHILD TRUE
E.2.3. Console Manager Components BYTLM Consumption
Table of Rates showing the Console Manager Components consumption from the BYTLM quota (in bytes):
|
Component |
Console Daemon Process |
User Console Process |
Ctrl C3 Process |
|---|---|---|---|
|
C3 |
5,500 |
20,000 | |
|
Monitor from C3 |
5,500 |
20,000 | |
|
Monitor from DCL |
5,500 |
5,500 |
E.3. Set C3 Interface Account Quotas
Accounts running the C3 interface should have the following quotas:
BYTLM = 100000+
PGFLQUOTA = 40000+
PRCLM = 30+
E.4. Set Global Sections and Global Pages
Console Manager requires 300 free global sections and 12,000 free global pages. If the Console Manager host has not been adjusted for running Console Manager, add the following two lines to SYS$SYSTEM:MODPARAMS.DAT:
ADD_GBLSECTIONS = 300
AD_GBLPAGES = 12000
E.5. Accommodate High-Data Rates
To accommodate high-data rates from the consoles managed by Console Manager when LAT and Direct connections are used, it is necessary to increase the size of the alternate type-ahead buffer and the XOFF threshold for the alternate type-ahead buffer. Add the following two lines to SYS$SYSTEM:MODPARAMS.DAT:
TTY_ALTYPAHD = 2000
TTY_ALTALARM = 640
Note
The above two parameters may be increased, but the 3-to-1 ratio should be maintained.
E.6. Execute AUTOGEN and Reboot
After making changes to the system via the MODPARAMS.DAT file, the user should execute the AUTOGEN procedure and reboot the system so that the above parameter changes take effect:
@SYS$UPDATE:AUTOGEN GETDATA REBOOT”
Appendix F. Typical SSH Configuration on OpenVMS
In the following example, vi6401 is the OpenVMS station running Console Manager, rx8642mp is the IP name of MP/iLO of a managed VSI Integrity system and lantscs1 is the IP name of a secure console server connected to a number of remotely managed consoles. The IP stack being used in the example is TCPIP Services for OpenVMS. Users of Process Software IP stacks are directed to the notes at the end of this section to learn the default locations for the security keys and other files.
$ set default SYS$MANAGER:
$ directory/columns=1 [.ssh2...]

Directory SYS$SYSROOT:[SYSMGR.ssh2]

AUTHORIZATION.;2
hostkeys.DIR;1
IDENTIFICATION.;2
random_seed.;1
system_vi6401_rsa_512.;1
system_vi6401_rsa_512.pub;1
root-lantscs1_ca_com.pub

Total of 7 files.

Directory SYS$SYSROOT:[SYSMGR.ssh2.hostkeys]

key_22_rx8642mp.pub;1
key_22_lantscs1_ca_com.pub;1

Total of 2 files.

Grand total of 2 directories, 8 files.

$ type SYS$SYSROOT:[SYSMGR.ssh2]AUTHORIZATION.
KEY root-lantscs1_ca_com.pub

$ type SYS$SYSROOT:[SYSMGR.ssh2]IDENTIFICATION.
IdKey system_vi6401_rsa_512

$ type SYS$SYSROOT:[SYSMGR.ssh2]system_vi6401_rsa_512.pub
---- BEGIN SSH2 PUBLIC KEY ----
Subject: system
Comment: "512-bit rsa, system@vi6401.ca.com, (system@vi6401.ca.com) Fri Jan 22 2010 22:44:26"
AAAAB3NzaC1yc2EAAAADAQABAAAAQQCnPkUp38XDn6auF1tstpjtDVLundrt/0OnrCM4cR
8Pzhf9JyWOeSiCNHZDKCCLxMefl7Ms45SnMFS857xQvz0B
---- END SSH2 PUBLIC KEY ----

$ type root-lantscs1_ca_com.pub ssh-dss
AAAAB3NzaC1kc3MAAABBAMMAkLPbbSqMr/iY+ja9Y1BLtjo2jHYPQ0C65na4DpXGQSdVlx15xQ+eGKE4k
5AMuYF0cWnz1x/3lHOgKDEvKS8AAAAVAJ8VGuq3tap1BHJBRXKw4BSwzOr3AAAAQCRb7WbSqXQfK55kd8
b1Cq4skplQGFBVss+R6AwaILN8f3Ocp+392KSoPJnW5vM0sDYx6JbrvFSeLa8E5EdMZkQAAABAIdV1ndT
BLDhx/pKxm0hrDiM3Whr2RqOPG1TGnAiNwZY3DBBYznjfADSQSfRH5S9dpjz9fvhhegL8spp2hLovTw== root@lantscs1
|
File | Purpose | Creation | Comment |
|---|---|---|---|
|
SYS$SYSROOT: [SYSMGR.SSH2] AUTHORIZATION. | List of public key files. Contains an entry for each user public key copied from the console servers. The matching private key remains on the console server. | Text editor | Used for publickey authentication only. Contains an entry for each user public key copied from the console servers. |
|
SYS$SYSROOT: [SYSMGR.SSH2] IDENTIFICATION. |
Identify file that is a list of private keys belonging to the SYSTEM user on the Console Management system. Contains one entry for each private key whose matching public key was uploaded to the console servers. | Text editor | Used for publickey authentication only. The Identity file is then referenced from Security Profile via logical name. |
|
SYS$SYSDEVICE : [TCPIP$SSH.SSH 2] SSH2_CONFIG. |
Default ssh client configuration for the Console Management system. Contains configuration details such as the allowed authentication methods, name of the authorization file and identification file. | Text editor |
Contains the default ssh client configuration. A user may have a private copy in the [.SSH2] sub-directory under their login directory. |
|
SYS$SYSROOT: [SYSMGR.SSH2] system_vi6401_r sa_512.pub | Public half of the user key for the SYSTEM account on the VSI Console Management system. | Generated once using the ssh_keygen utility. |
Mandatory for the public key authentication method. Generated once. For publickey authentication, this needs to be copied to the appropriate directory on terminal/console servers for them to accept connections. (Note: the VSI MP/iLo does not support publickey authentication at this time.) |
|
SYS$SYSROOT: [SYSMGR.SSH2] system_vi6401_r sa_512. | Private half of the user key for the SYSTEM account on the VSI Console Management system. | Generated once using the ssh_keygen utility. |
Mandatory for the public key authentication method. May be encrypted using a passphrase, which then must be entered in the Security Profile. |
|
SYS$SYSROOT: [SYSMGR.SSH2] root-lantscs1_ca_com.pub | Public half of the user key for the "root" account on the console server named lantscs1. | Generated by the console server, typically during its installation and setup. |
Mandatory for the public key authentication method. Must be copied from the console server to SYS$SYSROOT:[SYSMGR.SSH2] using an appropriate name. An entry for this key will be made into the file named [.SSH2] AUTHORIZATION (described later). |
|
SYS$SYSROOT: [SYSMGR.SSH2.hostkeys] key_22_lantscs1_ca_com.pub | Public half of the hostkey for the terminal server named lantscs1. | Received from consoler server at first handshake (may not be present before that.) |
Needed for any authentication method. May be deleted if stale (e.g. after T.S. host keys were regenerated) |
|
SYS$SYSROOT: [SYSMGR.SSH2.hostkeys] key_22_rx8642 mp.pub | Public half of the hostkey from the VSI Integrity MP/iLo. | Received from the MP/iLO during first handshake (may not be present before that.) |
Needed for any authentication method. May be deleted if stale (e.g. after MP/iLO host keys are regenerated) |
Notes
Locations of files:
The following shows the location of the default client configuration file, SSH2_CONFIG. or SSH_CONFIG., for each of the supported IP stacks:
TCPIP Services for OpenVMS – SYS$SYSDEVICE:[TCPIP$SSH.SSH2]
TCPware - TCPWARE_SPECIFIC:[TCPWARE.SSH2]SSH2_CONFIG.
MULTINET - MULTINET_SPECIFIC_ROOT:[MULTINET.SSH2]SSH2_CONFIG.
OpenSSH - SSH$ROOT:[ETC]SSH_CONFIG.
A private copy of the client configuration file may be located in SYS$SYSROOT:[SYSMGR.SSH2], and if it is present, it will override the default client configuration file.
All three IP stacks use the same locations for the user public/private keys as well as using the same default names for the identity and authorization files.
The following lines in the ssh client configuration should be configured as noted:
AuthenticationSuccessMsg
yes – commented out or set to yes
PasswordPrompt
“%U’s password: “ – must contain the string “password:”
Users of Process Software IP stacks that are connecting directly to VSI Integrity Server MP/iLO’s should include the following line in the ssh client configuration file to avoid authentication errors:
SendKexGuess
No
Import is synonymous with @
@ is synonymous with import
There is no restriction on the length of a system name, but you cannot use spaces as part of the name. Names can be of mixed case, but you cannot have two systems with the same name, even if the case is mixed. You cannot use the keyword ALL or CONSOLEMANAGER as a name for a serviced system.
If the number of lines is not specified, the log data is scrolled by one log window full of data.
If the number of lines is not specified, the log data is scrolled by one log window full of data.
The Up and Down arrow keys are used for command line recall
The Up and Down arrow keys are used for command line recall
The use of these attributes is shown in the table in the section, Literal Strings and Regular Expressions in Events, earlier in this chapter.
Also, if a subset of Events is selected, and All Classes is also selected, then All Classes overrides the intended subset of Events definitions.
Also, if a subset of Events is selected, and All Classes is also selected, then All Classes overrides the intended subset of Events definitions.
If a subset of Systems is selected, and All Groups is also selected, then All Groups overrides the intended subset of Systems definitions.
If a subset of Systems is selected, and All Groups is also selected, then All Groups overrides the intended subset of Systems definitions.
See the preceding figures for figure references.
When you run Eventlist from the command line.
Compare these fields with the corresponding fields in the scenario described in the following section, Filtering for a Specific Event Priority. These two fields are the major functional differences between this scenario and the scenario described in Filtering for a Specific Event Priority.
Compare these fields with the corresponding fields in the scenario described in Filtering for a Specific Event Class. These two fields are the major functional differences between this scenario and the scenario described in Filtering for a Specific Event Priority.
Compare these fields with the corresponding fields in the scenario described in the following section, Filtering for a Specific Event Priority. These two fields are the major functional differences between this scenario and the scenario described in Filtering for a Specific Event Priority.