VSI DECforms Guide to Converting FMS Applications
- Software Version:
- DECforms Version 4.0
- Operating System and Version:
- VSI OpenVMS IA-64 Version 8.4-1H1 or higher
VSI OpenVMS Alpha Version 8.4-2L1 or higher
Preface
This manual describes how to convert VAX Forms Management System(VAX FMS) and DEC Forms Management System (DEC FMS)applications to DECforms applications. It explains some of the differences between FMS and DECforms; describes how to run the FMS Converter, which is an automated conversion utility provided with DECforms; and explains how to modify output from the FMS Converter to create a working application.
VSI DECforms software is called DECforms.
VAX FMS software and DEC FMS software are called FMS.
Oracle CDD/Plus software is called CDD/Plus.
VSI Graphical Kernel System software is called VSI GKS.
1. About VSI
VMS Software, Inc. (VSI) is an independent software company licensed by Hewlett Packard Enterprise to develop and support the OpenVMS operating system.
2. Intended Audience
This manual is intended for programmers who want to convert their existing FMS applications to DECforms applications. FMS Converter is available only for Alpha and not for I64. Readers of this manual are expected to understand the concepts of FMS and to be familiar with using that product.
3. Document Structure
|
Provides an overview of converting FMS applications to DECforms. | |
|
Explains DECforms concepts by comparing and contrasting them with FMS concepts. | |
|
Explains how to use the FMS Converter and how to modify the output from the Converter. | |
|
Explains how to modify your program and run your converted application. | |
|
Describes converting the sample FMS application to DECforms. | |
|
Explains how to use the DECforms Form Development Environment (FDE) and Panel Editor to perform the tasks you perform using the FMS Form Editor. | |
|
Explains how to use advanced DECforms features. | |
|
Appendix A, "Comparison of FMS Form Language Statements and DECforms IFDL Statements" |
Compares FMS Form Language statements to DECforms Independent Form Description Language (IFDL) statements. |
|
Summarizes converting each FMS call to DECforms. | |
|
Explains the messages the FMS Converter writes to the output IFDL source file in the form of IFDL comments. |
4. Associated Documents
VSI DECforms Installation Guide for OpenVMS Systems—Describes how to install DECforms software on processors that are running the OpenVMS operating system.
VSI DECforms IFDL Reference Manual—Describes the syntax of the DECforms Independent Form Description Language.
VSI DECforms Style Guide for Character-Cell Devices—Describes how to develop user interfaces for character-cell terminals.
VSI DECforms Programmer's Reference Manual—Describes how DECforms software operates at run time and how to call the DECforms requests from an application program.
VSI DECforms Guide to Developing an Application—Part I explains to the beginning DECforms programmer how to create a DECforms application, including both the form and the program. Part II contains additional guidelines and examples for more experienced DECforms programmers.
VSI DECforms Guide to Demonstration Forms and Applications—Describes how to use various demonstration forms and applications. This guide is contained in online files named forms$demo_guide.txt and forms$demo_guide.ps in the FORMS$EXAMPLES directory. If you cannot find this document, ask your system manager to install it in the appropriate directory.
For information about displaying these forms, see the VSI DECforms Guide to Developing an Application.
Oracle CDD/Repository documentation set for information on Oracle CDD/Repository definitions
ISO IS 11730:1994 for information on the standard of which DECforms is an implementation (see the Acknowledgment section)
5. OpenVMS Documentation
The full VSI OpenVMS documentation set can be found on the VMS Software Documentation webpage at https://docs.vmssoftware.com.
6. VSI Encourages Your Comments
You may send comments or suggestions regarding this manual or any VSI document by sending electronic mail to the following Internet address: <docinfo@vmssoftware.com>. Users who have VSI OpenVMS support contracts through VSI can contact <support@vmssoftware.com> for help with this product.
7. Conventions
| Convention | Meaning |
|---|---|
|
Ctrl/ x |
A sequence such as Ctrl/ x indicates that you must hold down the key labeled Ctrl while you press another key or a pointing device button. |
|
PF1 x |
A sequence such as PF1 x indicates that you must first press and release the key labeled PF1 and then press and release another key or a pointing device button. |
|
Return |
In examples, a key name enclosed in a box indicates that you press a key on the keyboard. (In text, a key name is not enclosed in a box.) |
... |
A horizontal ellipsis in examples indicates one of the
following possibilities:
|
. . . |
A vertical ellipsis indicates the omission of items from a code example or command format; the items are omitted because they are not important to the topic being discussed. |
|
( ) |
In command format descriptions, parentheses indicate that you must enclose the options in parentheses if you choose more than one. |
|
[ ] |
In command format descriptions, brackets indicate optional choices. You can choose one or more items or no items. Do not type the brackets on the command line. However, you must include the brackets in the syntax for OpenVMS directory specifications and for a substring specification in an assignment statement. |
|
[ |] |
In command format descriptions, vertical bars separate choices within brackets or braces. Within brackets, the choices are options; within braces, at least one choice is required. Do not type the vertical bars on the command line. |
|
{ } |
In command format descriptions, braces indicate required choices; you must choose at least one of the items listed. Do not type the braces on the command line. |
|
bold text |
This typeface represents the introduction of a new term. It also represents the name of an argument, an attribute, or a reason. |
|
italic text |
Italic text indicates important information, complete titles of manuals, or variables. Variables include information that varies in system output (Internal error number), in command lines (/PRODUCER= name), and in command parameters in text (where dd represents the predefined code for the device type). |
|
UPPERCASE TEXT |
Uppercase text indicates a command, the name of a routine, the name of a file, or the abbreviation for a system privilege. |
|
|
Monospace type indicates code examples and interactive screen displays. In the C programming language, monospace type in text identifies the following elements: keywords, the names of independently compiled external functions and files, syntax summaries, and references to variables or identifiers introduced in an example. |
|
- |
A hyphen at the end of a command format description, command line, or code line indicates that the command or statement continues on the following line. |
|
numbers |
All numbers in text are assumed to be decimal unless otherwise noted. Nondecimal radixes—binary, octal, or hexadecimal—are explicitly indicated. |
Chapter 1. Introduction to Converting FMS Applications
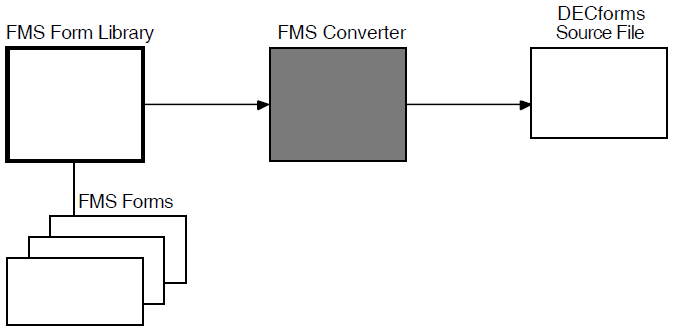
The FMS Converter is a software tool for converting forms created for VAX FMS and DEC FMS (Forms Management System) to forms suitable for use with DECforms. It accepts an FMS form or form library as input and writes a DECforms source file as output. The FMS Converter does not convert your application program, so you must modify your program to use DECforms instead of FMS.
An overview of important DECforms features that you may want your application to use
A description of the capabilities and limitations of the Converter
A list of steps in the conversion process
1.1. What Features Are Available in DECforms?
Device-independent programs
Sophisticated screen control
Ability to move between active panels without returning to the program
Beneficial help model
Program subroutine calls in the form
1.1.1. Device-Independent Programs
One of the most important features provided by DECforms is that it makes your application program device-independent. No application program written for a DECforms application needs to be rewritten to support new devices. This feature of DECforms helps reduce the cost of maintaining your application.
1.1.2. Sophisticated Screen Control
DECforms offers sophisticated screen control capabilities. For example, you can overlap objects on the display and conceal or reveal the contents of a field depending on the value of a variable. You can display different information for novice operators than for experienced operators. You control whether field contents are concealed and whether novice information is displayed in the form, instead of in the program.
1.1.3. Ability to Move Between Active Panels Without Returning to the Program
You can get operator input to a number of panels (a panel is similar to an FMS form) without returning control to the program. You can also display more than one panel at a time. You determine how and when the panels are displayed with statements you specify in the form.
1.1.4. Beneficial Help Model
DECforms provides a beneficial model for providing online help to your operators. You can provide help when the operator asks for it, as you can in FMS, and you can provide help that is displayed automatically. DECforms can display help automatically before the operator begins a task to provide the operator with hints on completing the task. This type of help can increase the productivity of your operators.
1.1.5. Program Subroutine Calls in the Form
You can call a program subroutine from your form during form processing. (During form processing DECforms uses the form to control the display, control operator input, validate data and pass data between the form and program.) This capability is similar to that provided by VAX FMS user action routines (UARs). The ability to call program subroutines allows you to perform such tasks as mathematical calculations and database updates between, for example, the operator ending input in one field and beginning input in the next field. You can also call a subroutine at several other points during form processing.
1.2. Capabilities and Limitations of the FMS Converter
The FMS Converter accepts an FMS Version 2.0 or higher form or form library as input. It converts the appearance-related syntax in the FMS form or form library to DECforms syntax. Figure 1.1, ''The Automated Conversion Process'' illustrates the automated conversion process.
In most cases, FMS syntax corresponds to DECforms syntax, so the Converter output contains complete and correct form-appearance syntax. However, a form in DECforms contains more processing code than an FMS form, so you may need to add form processing code to the converted form. (The form processing code you add replaces form processing done by the FMS application program.) Also, data transfer in DECforms is done on a record-by-record basis, so you must declare records in your form and program transfer data.
The FMS Converter cannot create DECforms syntax to call your FMS pre-help and post-help UARs. If you want to call a program subroutine during help processing, you must add DECforms syntax to the Converter output. Section 6.2.8, ''Calling Escape Routines to Emulate Pre-Help, Post-Help, and Function Key UARs'' describes the DECforms syntax to add. The FMS Converter creates DECforms syntax to call other UARs you use in your FMS application. See Section 7.7, ''Using Escape Routines'' for information on calling program subroutines in a DECforms application.
Because the FMS Converter accepts only your form or form library as input, it does not convert your program. You must modify your program manually during the conversion process. When you modify your program, you move much of the form processing logic out of the program and into the form. Chapter 4, "Modifying Your Program" provides you with guidelines to make this process easier.
You should use the FMS Converter to help you convert your application,even if you want to change the appearance of your forms. Output from the Converter gives you a good place to start for developing a DECforms application that replaces a current FMS application.
1.3. Steps in the Conversion Process
Prepare your application for conversion.
Run the FMS Converter to change the appearance-related syntax to DECforms syntax.
- Modify output from the Converter:
Add form processing code
Declare records to be passed between the form and program
- Modify your application program:
Declare records to be passed between the form and program
Move some program code to the form
Rewrite FMS calls to DECforms calls
Rewrite UARs as necessary
Compile, link, and run the new application.
Test the new application.
Chapter 2. DECforms Concepts for FMS Users
DECforms shares many concepts with FMS. For example, DECforms and FMS define an application as a form and a program. Both have a special language for defining forms, and both have a special run-time component.
However, some concepts of the two products differ. DECforms separates form processing from the program by putting form processing logic in the form. Thus, a program that uses DECforms contains less code to specify form appearance, data validation, and form processing than a program that uses FMS. Also, the form language provided by DECforms contains syntax that describes not only form appearance but also terminal management, data validation, and form processing.
This chapter explains the elements of a DECforms application. It also introduces two of the major components of DECforms: the Independent Form Description Language(IFDL) and the Form Manager.
2.1. The DECforms Application
As in FMS, a DECforms application consists of a form and a program. However, the contents of a DECforms program and form are different from the contents of an FMS program and form. Figure 2.1, ''Comparison of DECforms and FMS Applications'' illustrates this difference.
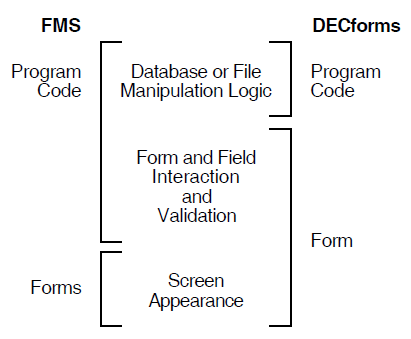
As shown in Figure 2.1, ''Comparison of DECforms and FMS Applications'', in addition to controlling form appearance, the form in DECforms controls all form processing and most data validation. A program that uses DECforms controls what data is passed to and from the form, but it does not control how that data is displayed or how operator input is accepted. In fact, the same program can be used to control a form that is displayed on a VT100 terminal, a VT200 terminal,or a printer. Unlike FMS, all form appearance code is specified in the form.
The sections that follow describe more about DECforms applications by describing the contents of the form and the program.
2.1.1. What's in a Form?
In FMS, the term "form" refers to a screen image and the binary file that describes that image. The screen image is the visual representation of the binary file; that is, the screen image is the form appearance. The binary file is the description of the screen that you create with FMS components like the Form Editor.
In DECforms, the term form refers to a structured interface to an application. The structured interface describes what is displayed on a terminal, how data used on the display is validated and stored,and how operator input is accepted.
In FMS, a form can be stored independently or in a form library. In DECforms, each form is a separate file. This file can be either an IFDL source file or a binary image file,called a form file.
The IFDL source file is similar to the sum of all your FMS form descriptions and form processing logic for a single application. It is an ASCII file that contains IFDL statements describing form appearance, data validation, form processing, and data transfer. Section 2.3, ''Introduction to the IFDL'' describes the IFDL in more detail.
The form file is similar to your FMS form library. It is the file accessed by your program at run time. DECforms makes the parts of it that are needed during application execution memory resident, which helps your application execute efficiently. (You can combine form files into a shareable image if you need better performance. See the VSI DECforms Programmer's Reference Manual for more information.)
Form data
Form records
Layouts
Functions
Viewports
Panels
Text literals
Panel fields
Responses
2.1.1.1. Form Data
Form data is the set of variables associated with the form. Although it has no FMS equivalent, the concept of form data is similar to the concept of variable program data. Form data persists throughout application execution. If you store the value "10" in an item of form data and never change that value, the form data item stores that value until the form is no longer in use. (Each individual form variable is called a form data item.) You declare a form data item to have a unique name, and you assign it a data type. You can also as sign a default value to a form data item.
The form data item is the only means of storage in the form. You use form data items to store values you send from your program to the form and to store operator input. You can display the value of a form data item or return the value of a form data item to the program. You can also use a form data item internally in the form, which means you never display its value or pass its value to the program. For example, you could store the value "TRUE" in a form data item and compare the value of that form data item to the value of other form data items during form processing.
Form data can contain groups. A form data group is a collection of form data items that DECforms treats as a single entity. Items in the data group can occur multiple times to create one-dimensional arrays. Groups with multiple occurrences can be nested to create two-dimensional arrays.
2.1.1.2. Form Records
Form records are structures that control data transfer between the program and the form. They define a relationship between the program record and form data items. Form records do not store data. Form records act as a map that shows DECforms how to transfer data between form data items and the program record.(The Form Manager is the run-time component of DECforms. It is similar to the FMS Form Driver. See Section 2.2, ''Introduction to the Form Manager'' for more information.)
DECforms transfers data record by record between the program and form. The name of each form record field is significant. If you name a form record field the same as a form data item, DECforms makes a default data transfer association between the two entities. This association causes DECforms to always store data passed to a form record field in the form data item that has the same name, if one exists. See Section 4.2, ''Changing Form Driver Calls to DECforms Calls'' for more information on this association.
A form record must be logically equivalent to a program record. This means that it must have the same number of fields as the program record, the fields must have the same length, and the fields must have matching data types. You can declare groups within records to pass arrays to and from form data items.
2.1.1.3. Layouts
Layouts are the device-dependent part of the form description. DECforms allows you to display information on many types of terminals. To take advantage of different terminal features, you can organize or present information differently on each device. You can use a different layout for each terminal class. DECforms decides which layout to use, depending on which terminal class you use.
In a layout, you can designate what size the display is. (The displayis the rectangular area that is available to your application. It may or may not be as large as the terminal screen.) You can adjust the size of the display depending on the number of lines and columns on the screen, how much of the screen your application can access, and so on. You canal so determine layout-wide attributes that change the appearance of your application for different terminals.
You can also use layouts to define different natural languages for a form. For example, you can have two different layouts in a form, one for English-speaking operators and one for French-speaking operators. At run time, DECforms chooses one of the layouts based on a value you specify the first time you call DECforms from your program.
2.1.1.4. Functions
Functions are names that you bind to physical terminal keys. The binding is made by a function declaration, which has an effect similar to the DFKBD (Define Keyboard) Form Driver call.
DECforms provides a set of predefined built-in functions that are associated with terminal keys by default. You can associate built-in functions with non-default terminal keys and remove the default association. You can also create your own functions and associate them with keys.
When the operator presses a key bound to a function, DECforms executes a function response. DECforms provides default function responses for the built-in functions. You can write new function responses for the built-in functions and for functions you create. Function responses cause, for example, the cursor to move to the next field or input to the current panel to be transmitted to the program. Responses are discussed later in Section 2.1.1.9, ''Responses''.
2.1.1.5. Viewports
Viewports are rectangular windows that you use to divide the display. You can divide the display into one or more, possibly overlapping, viewports. Each viewport must have a name. You use the viewport name in a panel declaration. The viewport name in a panel declaration controls where DECforms displays that panel.
DECforms provides a default viewport that is as large as the display if you do not define any viewports. If you do not name a viewport in a panel declaration, DECforms displays that panel in the default viewport.
2.1.1.6. Panels
Panels are the images you see on the display. They are similar to FMS forms.
You declare the background text and fields that appear on the panel within a panel declaration. If you want to display a data group, you declare a panel group. For example, you can use a panel group to display a two-dimensional data group. You can also specify form processing that is done when the panel is active, and you can define function responses that are specific to a panel.
You position a panel on the display inside a viewport. All the objects on the panel must fit inside the viewport.
2.1.1.7. Text Literals
Text literals are constant strings that appear on a panel. They are similar to FMS background text. You cannot change text literals while the application is running.
Literals can have display attributes, so you can specify that a literal be bold or underlined, for example. You can also specify a set of default literal attributes. These default attributes are applied to all literals on a panel unless you turn them off for a particular literal or set of literals.
2.1.1.8. Panel Fields
Panel fields show the contents of form data. A panel field is similar to an FMS form field. It displays data and accepts operator input. Like an FMS form field, a panel field has an associated picture that describes how data is to appear in it and what data the operator can enter in it.
Unlike an FMS form field, a panel field is bound by name to one form data item. Each panel field must have the same name as a form data item. Each panel field is used only to display the value in the form data item that shares its name. The operator may or may not be able to change that value. If the program sends a value to a form data item that is displayed in a panel field, the value in the field changes,too.
You can assign display attributes to a field, so you can cause a panel field to blink or be bold. You can also specify validation of operator input. For example, you can specify that DECforms compare the input value to a list. If the value matches one of the list elements, it is valid, but if it does not match, it is invalid.
2.1.1.9. Responses
Responses are named sets of instructions. The instructions are called response steps. You define a response to control form processing. If you define no responses in your form, DECforms performs default form processing. You use responses to alter and enhance this default form processing.
DECforms performs responses, for example, when it displays a new panel, when the operator presses a function key, and when the operator completes entry in a field. When it performs a response, DECforms executes response steps in the order you specify them in the response. You can include conditional instructions in a response, but you cannot define a loop within a response. You can calla program subroutine from a response.
Remove and display panels
Assign values to form data items
Control the order in which the operator enters data
Apply highlighting to fields
Reposition the cursor to a particular field when a function key is pressed
Based on the value of a field just completed, display one set or another of follow-up questions
Call a program subroutine to verify that the data entered by the operator is valid for entry into a database
2.1.2. Elements of the Program
The second element of a DECforms application, the program, is similar to a program in an FMS program. For example,a DECforms program can be written in any language that supports the OpenVMS Calling Standard. Also, a DECforms program can contain subroutines that are called from the form and that are similar to the UARs found in an FMS program. The DECforms program performs all the input and output to file storage or a database that needs to be done by the application, and it calls requests. Requests are DECforms routines that perform form processing; they are functions that return a status value and parameters.
FORMS$ENABLE
FORMS$SEND
FORMS$RECEIVE
FORMS$TRANSCEIVE
FORMS$CANCEL
FORMS$DISABLE
These request calls are the only entry points to DECforms that are available to the program. All other DECforms activity must be specified in the form.
Unlike FMS applications, DECforms applications pass only whole records between the program and form. Thus, the program must contain a declaration of the record to be passed, and this record must match the declaration of a record in the form. Unlike an FMS program, the DECforms program does not have direct field-level control of operator input. That control is in the form in DECforms.
You can interrupt form processing and call a subroutine in your program. This interruption is called a procedural escape, and the program subroutine is called an escape routine.
The sections that follow introduce DECforms request calls and escape routines. They do not explain how you perform input and output to file storage or a database because you access your files and databases just as you do when you use FMS. For more information on the requests and on procedural escapes, see the VSI DECforms Programmer's Reference Manual.
2.1.2.1. FORMS$ENABLE Request Call
FORMS$ENABLE calls the ENABLE request, which attaches the terminal, finds the form to be used, chooses a layout, and returns a session identification stringto your program. The session identification string identifies the channel;it has meaning only to DECforms. DECforms does not have the concept of current terminal that FMS has, so you must pass the session identification string in subsequent calls to indicate which terminal you are using.
You must specify the FORMS$ENABLE call before other DECforms calls in your program.
By default, DECforms clears the display in response to the ENABLE request. You can define an enable response in the form to override the default form processing. For example, you could create an ENABLE response that causes DECforms to initialize data or display a panel that introduces your application.
2.1.2.2. FORMS$SEND Request Call
FORMS$SEND calls the SEND request, which passes data from the program to form data items. DECforms takes no other action by default. You can define a SEND response in the form to display the data you send to the form, for example. You must pass a record in the FORMS$SEND call.
You pass a record from the program to the form.
2.1.2.3. FORMS$RECEIVE Request Call
FORMS$RECEIVE calls the RECEIVE request, which passes data from form data items to the program. By default, DECforms gets input from the operator into panel fields before it passes data from form data items to the program. DECforms gets input for the panel fields that correspond to form record fields. DECforms returns that input to your program through the form record. You can define a response in the form to perform other actions. For example, you can specify the order of operator input in a RECEIVE response.
DECforms returns a record to your program.
2.1.2.4. FORMS$TRANSCEIVE Request Call
FORMS$TRANSCEIVE calls the TRANSCEIVE request, which combines the functions of the SEND and RECEIVE requests. By default, the TRANSCEIVE request passes data from the program to form data items. DECforms then gets input from the operator and returns that input to your program.
In the form, you can define a response that overrides the default and causes DECforms to perform other actions. For example, you could write a TRANSCEIVE response that displays the data you send to the form before DECforms gets operator input.
You pass a record to the form and receive a record from the form during the processing of this request.
2.1.2.5. FORMS$CANCEL Request Call
FORMS$CANCEL calls the CANCEL request, which cancels all active requests for the session you specify.
You cannot specify a response for the CANCEL request.
2.1.2.6. FORMS$DISABLE Request Call
FORMS$DISABLE calls the DISABLE request, which detaches the terminal and form for the session you specify. DECforms takes no other action by default. You can specify a DISABLE response in the form to clear the display, for example.
2.1.2.7. Escape Routines
A procedural escape occurs when you interrupt the procedural portion of forms processing (the response) to call an escape routine (program subroutine).An escape routine is similar to an FMS UAR. You can use procedural escapes for a variety of purposes, including accessing databases, performing calculations, and canceling request processing.
Escape routines are not associated with entities on the form in the same manner as UARs. You call escape routines from within responses with the CALL response step. Because you can define several types of responses, including request responses, you can call escape routines at the same points during application execution that you can call UARs. That is, you can cause escape routines to be executed when the operator completes entry into a panel field, before or after help processing,or after the operator presses a function key.
You can transfer data between the form and the escape routine, and you can call requests from within an escape routine. (However, you cannot call the DISABLE request for the session that called the escape routine.) With the exception of calling the DISABLE request for the calling session, you can do anything in an escape routine that you can do in any other part of your program. Also, you can use any subroutine of your program that can be called from outside your program as an escape routine.
2.2. Introduction to the Form Manager
The Form Manager is the run-time component of DECforms. It is similar to the FMS Form Driver because it contains the requests that you call from your program. Like the Form Driver, the Form Manager requests are stored in a shareable image and linked automatically with your program.
Processes requests
Controls the appearance of the display
Controls operator input
Manipulates data
The sections that follow explain more about these functions of the Form Manager. The VSI DECforms Programmer's Reference Manual fully describes the Form Manager.
2.2.1. Response to Request Calls
Initializes the request
Distributes data from the program into form data items (SEND and TRANSCEIVE requests only)
Processes the request response
Accepts operator input
Collects data from form data items to return to the program (RECEIVE and TRANSCEIVE requests only)
Terminates the request
As shown in the list, the Form Manager performs a request response during the processing of a request. The response is either one of the default responses DECforms provides or a response that you declare in the form.
|
Request |
Description |
Associated Response |
|---|---|---|
|
ENABLE |
Creates a session for the application. |
ENABLE response |
|
SEND |
Sends data from the program to the FORM. |
SEND response |
|
RECEIVE |
Passes data from the form to the program. |
RECEIVE response |
|
TRANSCEIVE |
Combines the effects of the SEND and RECEIVE requests. |
TRANSCEIVE response |
|
CANCEL |
Cancels all currently active requests for the specified session. |
None |
|
DISABLE |
Disables the specified session. |
DISABLE response |
The Form Manager also performs responses when it accepts operator input. During operator input, the Form Manager performs entry responses, function responses, validation responses, and exit responses.
2.2.2. Control of the Display
When processing most requests, the Form Manager modifies the terminal display. The Form Manager determines how to modify the display by following instructions in the form.
The Form Manager can control a display that is 1 to 511 columns and 1 to 255 lines. The actual number of columns and lines available to you depends on your display device. For example, if you are using a VT200 terminal, the display can be from 1 to 132 columns and from 1 to 24 lines.
The Form Manager can display more than one panel at a time, and it can display more than one viewport at a time. Which panel and viewport the Form Manager displays is controlled by what data entry the operator needs to perform. You use responses in the form to control what panel fields are available for operator entry.
The Form Manager can also use more than one form at a time. It determines which form it should use by checking the session identification number you pass as a parameter in request calls.
Displaying lines and rectangles
Bolding, blinking, underlining, and reversing the video attributes of text and graphics
Printing part or all of the display
Overlapping images on the display
Scrolling part or all of the display
Redisplaying hidden images when they are needed for operator input or when overlaid images are removed
If the Form Manager needs to write a message (such as an error message or a help message) to the terminal, it displays the message in a special area called a message panel. You can declare a message panel in the form and control its size and position on the display. If you do not declare a message panel,the Form Manager creates a default, one-line message panel. When it needs to display a message,the Form Manager displays the message panel on the last line of the display. The Form Manager can scroll text within the message panel, so messages can be any length. You can send text to the message panel from either the program or the form.
2.2.3. Control of Operator Input
In addition to controlling what is displayed, the Form Manager controls the order of operator input. To do this, it maintains a list of items that need input, called an activation list.
By default, the Form Manager builds an activation list during the processing of each RECEIVE and TRANSCEIVE request. You use response steps to determine what items the Form Manager adds to the activation list. If you do not specify what items to add to the list, the Manager builds a default activation list. The Form Manager builds the default activation list by activating form data items that correspond to the record fields in the receive form record.
- FIELD_THREE
- FIELD_TWO
- FIELD_ONE
After it builds the activation list, the Form Manager processes it. By default, the Form Manager begins with the first unprotected item on the activation list. In this case, the Form Manager displays the FIELD_THREE panel field and accepts and validates operator input. If the operator presses the key bound to the default NEXT ITEM function and the input into FIELD_THREE passes validation, the Form Manager accepts operator input into the FIELD_TWO panel field, and so on.
You control the order in which the Form Manager processes activation items using the POSITION response step. Most built-in functions, such as the NEXT ITEM and PREVIOUS ITEM functions, contain the POSITION response step. For example, the NEXT ITEM function contains the POSITION TO NEXT ITEM response step. This response step makes the next item on the activation list into the current item (the one in which the operator enters data).If you use the built-in functions, the order in which items appear on the activation list and the function keys the operator presses control the order of operator input.
The Form Manager continues activation list processing until the operator gives valid input to all items on the list, you interrupt request processing in a response, or you call the CANCEL request to cancel outstanding requests.
For more information on the activation list and the POSITION response step, see the VSI DECforms Programmer's Reference Manual.
2.2.4. Data Manipulation
The Form Manager manipulates data when it responds to request calls, controls the display, and controls operator input. Specifically, the Form Manager performs data type conversions, formats data for display and storage in form data items, and checks the validity of data.
When the Form Manager displays data, it converts the data from its original data type to a character string. Likewise, the operator enters a character string, which the Form Manager converts to the proper data type before storing it in the form. When necessary, the Form Manager also converts data that it passes between the form and program or between two data items. Notice that this means your program does not have to perform data type conversions; the Form Manager handles that task for you. However, you must be sure the Form Manager can convert data from its original data type to another data type. For example, if you use two data items in an assignment statement, you must be sure that the Form Manager can convert the data type of the data in the source data item to the data type of the object data item. See the VSI DECforms Programmer's Reference Manual for information on how the Form Manager converts the data type of data.
To make sure data displayed or stored by the Form Manager is valid, DECforms allows you to specify input pictures and output pictures. An output picture describes editing that the Form Manager performs when moving a value from storage to the display. It specifies details such as where a decimal point appears, what sign character should be used, and so forth. The input picture specifies what input is valid in a particular field. It also specifies how a value is edited when the Form Manager moves it from the display to storage.
You can specify input validation beyond that provided by the input picture in the form. For example, you can have the Form Manager verify that input is within a particular range of values. If the input is outside the range, it is invalid and the Form Manager prompts the operator to input a valid value in that field.
2.3. Introduction to the IFDL
The Independent Form Description Language (IFDL) is a special language for defining forms. Like the FMS Form Language, it is not intended to be used as a general programming language. The FMS Converter converts your FMS form to IFDL statements. Because form processing is done in the form in DECforms, instead of in the program, you may need to convert some statements in your program to IFDL statements.
The appearance of information on the display
Form processing that occurs during application execution
How data is transferred to and from the form, and within the form
Reserved words, which are words such as "END FORM" that are reserved for use by DECforms.
Literals, which are character strings whose value is implicit in the characters themselves.
Separators, which are flags that divide or organize pieces of information, such as tab characters, carriage returns, commas, parentheses,and so on.
Identifiers, which are names for form elements. Identifiers are similar to the names you assign to variables, records, and routines in a program.
Comments, which consist of explanatory text delimited by special characters (either /* and */ or { and }).
/*****************************************************/
/* This sample IFDL syntax describes a form.         */
/* If you develop a program that uses this form,     */
/* you can display it and exchange data with it.     */
/*                                                   */
/* Identifiers are shown in capital letters.         */
/* Reserved words are shown in mixed case.           */
/*****************************************************/

Form EMPLOYEE

Form Data
     NAME        Character(30)
     ID_NUMBER   Integer(7)
     CHANGE      Character(3)
     ADDRESS     Character(30)  Tracked
     CITY        Character(30)  Tracked
     STATE       Character(2)   Tracked
     ZIP         Integer(5)     Tracked
     End Data

     Form Record EMPLOYEE_RECORD
          Copy EMPLOYEE_RECORD From Dictionary End Copy
     End Record

     Layout VT_Layout
     Device
       Terminal
       Type %VT200
     End Device
     Size 5 Lines By 80 Columns

          Panel DECIDE_WHETHER_TO_CHANGE

                Literal Text
                        Line 2 Column 2
                        Value "Name: "
                End Literal

                Field NAME
                      Same Line Next Column
                End Field

                Literal Text
                        Line 2 Column 60
                        Value "ID Number: "
                End Literal

                Field ID_NUMBER
                      Same Line Next Column
                End Field

                Literal Text
                        Line 4 Column 2
                        Value "Has this employee's address changed? "
                End Literal

                Field CHANGE
                      Same Line Next Column
                      Use Help Message "Please answer 'yes' or 'no'"
                End Field
          End Panel
     End Layout
End Form
You can use any OpenVMS text editor to create or modify an IFDL source file. For example, you can use the DECforms templates provided for the DEC Language-Sensitive Editor (LSE). The DECforms templates help you create and correct IFDL source code conveniently. In addition, DECforms provides a utility called the Panel Editor that allows you to edit the appearance of panels in a "what you see is what you get" manner. You can invoke the Panel Editor either from the DCL command line or from within the Form Development Environment (FDE). The FDE provides an interface to all the components of DECforms. It allows you to assign various form-level, layout-level,and panel-level attributes and guides you through the form development process.
To display the panels declared in an IFDL source file, you must translate the source file into a binary form file. You translate an IFDL source file into a binary form file using the IFDL Translator. If you have syntax or other errors in your source file, the Translator may not be able to translate it. The Translator issues error messages and writes a listing file, similar to a compiler listing file, to help you find errors in your source file.
The Panel Editor allows you to modify the binary form file. To see the modifications you make as source statements, you back translate the form file. The Back Translator reverses translation and changes a form file into an IFDL source file.
See the VSI DECforms Guide to Commands and Utilities for more information on the capabilities of the IFDL Translator and Back Translator. The VSI DECforms IFDL Reference Manual completely describes the syntax of the IFDL.
Chapter 3. Converting Your Form or Form Library
Prepare your form or form library for conversion
Invoke the FMS Converter
Merge the output from several forms into a single IFDL source file
Modify the converted IFDL source file
Optimize the converted IFDL source file
Chapter 4, "Modifying Your Program" gives information on modifying your program and running your converted application.
3.1. Preparing Your FMS Form or Form Library for Conversion
Before you convert your FMS form or form library, you should ensure that it is free of errors (or as free of errors as possible).The Converter is most helpful to you when the input it receives is error-free.
FMS/LIBRARY/CREATE form-library-spec form-list-spec
Replace form-library-spec with the name of the form library you are creating. List the form files or form library files that you want inserted into the new library in place of form-list-spec.See the FMS documentation for more information on creating form libraries.
FMS/UPGRADE V1-file-spec
Replace V1-file-spec with the name of your Version 1.0 FMS form. See the FMS documentation for information on upgrading Version 1.0 forms.
3.2. Invoking the FMS Converter
The FMS Converter accepts an FMS Version 2.0 or higher Form Library File or form file as input, and it creates an IFDL source file as output. The IFDL source file contains one form, one layout, and a panel for each form in the input file. If you input a Form Library File, the output IFDL source file contains a panel for each form in your form library. If you input an FMS form file, the output IFDL source file contains a single panel.
You invoke the FMS Converter with the FORMS CONVERT FMS command. This command has the following syntax:
Parameters
Specifies the file specification of an FMS binary form file or form library. You need not specify a file type ifthe input to the FMS Converter is a form file because .FRM is the default file type. To specify an FMS form library in this parameter, give the file name of the library and specify the .FLB type.
Qualifiers
- /OUTPUT=[output-file-spec]
Specifies a name for the IFDL source file created by the Converter. If you omit the file type, the Converter uses the .IFDL file type.
- /[NO]LOG
Controls whether the FMS Converter informs you of successful conversions. If you specify /LOG, the Converter writes a message to SYS$OUTPUT when it successfully completes the conversion. If you specify /NOLOG, the Converter does not write this message to SYS$OUTPUT. Error messages, if any, are written to SYS$OUTPUT regardless of whether you specify /LOG or /NOLOG.
The default is /NOLOG.
3.3. Merging the Output from Several FMS Forms
When you convert each form for your application separately, the FMS Converter creates a number of IFDL source files. Each source file contains a DECforms panel and a set of form data items corresponding to one of your FMS forms. You may want to merge these source files into a single source file. The most efficient way to use DECforms is to have your program open one form and use only that form for the duration of the application. (However, you may find some cases in DECforms where you want to use more than one form file. For example, if your form file is large, enabling the form may cause too much delay when your application starts executing. In this case, you may want to use more than one form file to spread the time the Form Manager spends enabling forms to different points in the execution of your application. You probably would use fewer forms than the FMS Converter creates when you convert each FMS form in your application separately, so merging IFDL source files is still a good idea.)
Using only one form is efficient because enabling forms is a relatively expensive process. The less forms you need to enable, the more efficient your application can be. Merging forms can also make your application smaller because information required in each form can be specified once in a merged form. For example,each IFDL source file the Converter creates contains its own FORM DATA statement. In some cases, the Converter declares the same data item in more than one source file. For example, if two FMS forms contain a form field that has the same name, the Converter declares the same form data item twice. If you merge the source files, you can remove duplicate form data item declarations. Removing duplicate form data item declarations makes your IFDL source file smaller and reduces the amount of memory your form uses at run time.
To merge the source files, use a text editor. It may be convenient to use a text editor that can split the screen into two windows. You can then read one output IFDL source file (probably the largest produced by the Converter) into the top window. Consider this IFDL source file the master source file into which you move all the IFDL statements you need in your converted application. Read other source files into the bottom window and move syntax from the bottom window into the master IFDL source file in the top window.
You may want to exit from the editor periodically and translate the master source file. This can help you discover and correct syntactical errors a few at a time. Alternatively, you can use the DEC Language-Sensitive Editor(LSE) support for DECforms. If you use LSE to merge your source files, you can use its COMPILE/REVIEW command to find and correct syntax errors. See the VSI DECforms IFDL Reference Manual for information on using LSE.
/* DECforms Version 1.0 */
/* FMS Form Converter Utility */
Form EXPERIENCE_FORM  Form Data /* Form data for panel EXPERIENCE_PANEL */
  PREVIOUS_EMPLOYER Character (10)
BEGIN_DATE Character (12)
.
.
.
End Data
Layout FMS_Cnv
Device
PREVIOUS_EMPLOYER Character (10)
BEGIN_DATE Character (12)
.
.
.
End Data
Layout FMS_Cnv
Device  Terminal
Type %VT200
End Device
Units Characters
Size 24 Lines By 80 Columns
Viewport EXPERIENCE_VP
Terminal
Type %VT200
End Device
Units Characters
Size 24 Lines By 80 Columns
Viewport EXPERIENCE_VP  Lines 1 Through 24
Columns 1 Through 80
END VIEWPORT
Panel EXPERIENCE_PANEL
Lines 1 Through 24
Columns 1 Through 80
END VIEWPORT
Panel EXPERIENCE_PANEL  Viewport EXPERIENCE_VP
Literal Text
Line 3 Column 9
Value "Work Experience"
Display
Font Size Double High
End Literal
.
.
.
End Panel
End Layout
End Form
Viewport EXPERIENCE_VP
Literal Text
Line 3 Column 9
Value "Work Experience"
Display
Font Size Double High
End Literal
.
.
.
End Panel
End Layout
End Form
| The FORM statement names the form. The Converter creates the form name using the FMS form name. It appends "_FORM" to the name to avoid naming conflicts. |
| The FORM DATA statement declares form data items to be used in this converted form. The Converter creates each form data item from an FMS form field. See Section 3.5.1, ''Form Data Item Data Types'' for information on how the Converter assigns a data type to form data items. |
| The layout specifies that panels in it are for use on VT200 terminals and are 24 or less lines by 80 columns. |
| The viewport for the panel is 24 lines by 80 columns. |
| The panel that generates a screen appearance similar to the input FMS form is displayed in the EXPERIENCE_VP viewport. It is named the same as the input form with "_PANEL" appended to the name. |
Your master source file should contain only one FORM statement, so do not move a FORM statement from other source files into the master source file.
To merge the FORM DATA statement from one of the source files produced by the Converter into the master source file, move the entire FORM DATA statement;that is, move the FORM DATA statement, all the form data item declarations,and the END DATA statement. Do not nest FORM DATA statements.
You need not move any LAYOUT statements into the master source file. Each LAYOUT statement created by the Converter is identical, so your master source file needs only one LAYOUT statement.
You may be able to avoid moving some viewports into the master source file. Many of the viewports output by the Converter are identical. You need not move identical viewports into the master source file. However,each panel contains a VIEWPORT clause that names the viewport on which it is to be displayed. If you do not move a viewport into the master source file, you must modify the VIEWPORT clause in the panel that names that viewport. Change the VIEWPORT clause to name one of the viewports that does exist in the master source file.
If you need to move a viewport declaration, insert the VIEWPORT statement near the top of the layout directly following existing viewport statements. If any viewports in your source file contain 132 columns, you may need to modify the LAYOUT statement in the master source file. The LAYOUT statement must define a display size that is at least as long and as wide as your largest viewport.
Move each panel into the master IFDL source file. Move the statements between the PANEL statement and the END PANEL statements by inserting them into the layout statement in the master source file. You should add panels to the master source file following existing panels.
Form EXPERIENCE_FORM
| The FORM statement is the one created for the EXPERIENCE FMS form. |
| The first FORM DATA statement is the one created for the EXPERIENCEFMS form. The second FORM DATA statement was moved in from another source file. |
| The LAYOUT statement allows viewports of 24 lines or less and 132 columns or less. |
| The CURRJOB_FORM_VP viewport is moved into the master source file from another source file to allow wide panels to be displayed. |
| CURRJOB_PANEL has been moved into the master source file. It must be displayed on a wide viewport because elements of its panel appear outside column 80. Therefore, this panel's VIEWPORT clause names the CURRJOB_FORM_VP viewport. |
3.4. Modifying the Converted IFDL Source File
Most of your FMS form or form library can be converted directly to IFDL syntax. However, you may need to modify the output from the Converter before you can use it. Also, you must add record declarations to the source file before you can transfer data to the form at run time.
Renaming panel fields and form data items
Examining form data items created from Named Data
Declaring form records
Modifying help syntax
You may also need to add form processing code before you use the form at run time. Chapter 4, "Modifying Your Program" explains moving form processing logic from your program to the form.
3.4.1. Renaming Panel Fields and Form Data Items
You may need to rename panel fields and form data items created by the FMS Converter. More than one form data item in the IFDL source file the Converter creates may have the same name. Also, if you used Named Data in an FMS form, the Converter output may need modification.
The Converter converts each FMS form field to a DECforms panel field. If two form fields in your FMS application have the same name, the Converter creates two panel fields that have the same name. The Converter also creates a form data item for each panel field it creates. Therefore, if two panel fields have the same name, two form data items have the same name. DECforms requires that each form data item have a unique name,so you must rename or remove one of the form data items. (If you convert form libraries, the Converter flags duplicate names in form data with a message, so you can find them easily.)
DECforms requires that panel fields have the same name as the form data items to which they correspond. Therefore, you should verify that the form data items you rename correspond to a panel field by either creating a new panel field with the new name or renaming an existing panel field.
Because the FMS Converter creates a panel field and form data item for each field on each of your FMS forms, you may have duplicate fields and data items that are not necessarily named the same. For example, suppose your FMS application displays a customer account number on three forms. Suppose that you call each field that displays the account number a different name on each form. In this case, the Converter creates three panel fields and three data items to store and display the customer account number. In DECforms you usually would need only one data item to store the customer account number. Therefore, you should remove all but one account number form data item. You must then rename the panel fields that display the account number so that they match the name of the form data item that stores the account number.
Section 5.3, ''Modifying the Converted IFDL Source File'' shows examples of renaming and removing duplicately named data items and panel fields.
3.4.2. Examining Form Data Items Created from Named Data
The FMS Converter converts each Named Data item to a form data item. To store particularly long values in a Named Data item, you may have created several Named Data items and given them the same name. The FMS Converter declares a single form data item to correspond to these Named Data items. The FMS Converter declares the form data item to be as long as the sum of the lengths of the Named Data items.
If your application contains duplicately named Named Data items associated with different forms, the FMS Converter declares separate form data items to replace those Named Data items. Thus, if you have Named Data with the same name on different forms in a form library, the Converter may have declared form data items with duplicate names. You must rename or remove one of the duplicately named form data items.
FMS allows you to use any characters in any format for the name of a Named Data item. DECforms allows only the characters A to Z, a to z, 0 to 9, dollar sign ($), and underscore (_) in the names of identifiers. DECforms identifiers must begin with an alphabetic character and be fewer than 32 characters in length. When the Converter encounters a name it cannot change to a valid DECforms identifier name, it writes the invalid name to the output IFDL source file. The Converter also writes a message indicating that the invalid name cannot be used in DECforms. You must change any invalid names to valid DECforms names.
3.4.3. Declaring Form Records
DECforms data transfer is done on a record-by-record basis. To allow record-by-record data transfer, you must declare form records. The form records you declare show the Form Manager how to distribute data that comes from your program into form data items and how to collect data from form data items before it is sent to your program. Your form records should associate related form data. For example, you may find that the form data items displayed on one panel are related and make a reasonable form record. On the other hand,you may find that you need only one form record because you can pass all the data the form needs to it at once.
Did you pass any records in your FMS application?
If you pass any records in your FMS application, you can probably retain those records in your DECforms application program. Declare an equivalent form record to correspond to the program record.
Do a set of form data items always need to be passed together between the form and the program?
If you pass 10 data items only once and pass other data items four times during the execution of your program, it is probably more efficient to group the 10 data items in a record separately from the other data items. In this way, you avoid transferring data items needlessly.
How much of the logic of your program can be moved to the form?
Because the IFDL is more powerful than the FMS Form Language, you may be able to move much of your program logic into the form. This change can allow you to reduce the number of times you return control to the program. For example, you maybe able to pass all data to the form at the beginning of application execution. The data is then kept in the form and updated by the operator;near the end of application execution, it is returned to the program. The more you can do during a single request call, the more efficient your application can be.
You should declare form records that allow you to perform a number of operations without returning to the program.
When does the form need the data?
It might not make sense to group data needed early in application execution with data needed later in application execution. Passing data too early can cause changes made by the program not to be communicated to the form.
You must also decide what data type to assign to the fields in the form record. DECforms can store data of several different types inform data items. This allows you, for example, to pass a LONGWORD INTEGER between the form and program. DECforms converts the integer into a string for display and then converts operator input to a LONGWORD INTEGER that is returned to your program. Eventually, you may want to take advantage of this DECforms feature and declare form record fields that have data types appropriate to the data that is passed.
Initially, however, it is probably best to use the CHARACTER data type for all your record fields. Passing character strings is somewhat easier than passing atomic data. When you use character strings, you must be sure that the length of each program record field matches the length of its corresponding form record field. When you pass atomic data, you must be sure that not only the length, but also the data type, of the form record fields and program record fields match. Because you must be aware of how data is stored internally by your programming language and DECforms, passing atomic data can be more difficult than passing character strings. Also, passing atomic data may require that you change the data read into your program from string data to atomic data. You must plan any data type changes carefully. Section 3.5.2, ''Form Record Field and Program Record Field Data Types'' describes how to modify your application to pass numeric data to the form.
Form PERSONNEL_FORM . . . Form Record EMPLOYEE_RECORD
| The FORM RECORD statement declares a form record named EMPLOYEE_RECORD. The record has 10 fields. The data type of these fields matches the data type of the program record fields (which are all data type CHARACTER) and of form data items, which are all declared to be text data types. |
| The COPY statement copies the declaration of ORGANIZATION_RECORD from CDD/Plus. CDD/Plus stores record declarations that can be used by DECforms and many OpenVMS programming languages. |
Once you declare form records, you must declare logically equivalent program records. Logically equivalent records have the same number of fields, the fields create the same OpenVMS internal data type, and the fields have the same length. You then pass data between the form record and program record using the DECforms FORMS$SEND, FORMS$RECEIVE, and FORMS$TRANSCEIVE calls. See Section 4.2.3, ''Sending Data to the Form'' and Section 4.2.4, ''Getting Data from the Form'' for information on declaring program records and transferring data using DECforms.
3.4.4. Modifying Help Syntax
The FMS Converter creates USE HELP MESSAGE clauses in the panel fields it creates to emulate the messages associated with the form fields in your FMS application. It also converts your FMS help forms to DECforms help panels. However, the Converter cannot distinguish FMS data entry forms from FMS help forms. Therefore, it converts all FMS help forms into DECforms panels. Also, the Converter creates IFDL syntax to associate help panels with data entry panels, but it creates that syntax inside comment characters. The comments are needed to allow your converted IFDL source file to translate correctly before you modify help. This section explains the Converter's output for help and how you must modify it.
3.4.4.1. Conversion of FMS Help Messages
For each help message that you specify for an FMS field, the FMS Converter creates a USE HELP MESSAGE clause in the panel field that replaces an FMS form field. The FMS Converter specifies the text of the FMS message in the USE HELP MESSAGE clause. Thus, your FMS messages are automatically converted to DECforms.
3.4.4.2. Conversion of FMS Help Panels
Panel HELP_ACCOUNT_DATA_PANEL
  Viewport HELP_ACCOUNT_DATA_VP
  Display %Keypad_application
  Literal Rectangle
   .
   .
   .
End Panel
Help Panel HELP_ACCOUNT_DATA_PANEL
  Viewport HELP_ACCOUNT_DATA_VP
  Display %Keypad_application
  Literal Rectangle
   .
   .
   .
End Panel
3.4.4.3. Modifying the USE HELP PANEL Clause Created by the FMS Converter
The FMS Converter creates a USE HELP PANEL clause in each DECforms data entry panel that should be associated with a help panel. The FMS Converter can determine which DECforms data entry panel should be associated to which help panel because your FMS application associates help forms to FMS forms. The Converter creates USE HELP PANEL statements to maintain the FMS association.
You should remove the comments surrounding the USE HELP PANEL clause in each data entry panel. Thus, the help panel named in the USE HELPPANEL clause can be displayed after any help message for a field is displayed.
The FMS Converter may also have created the USE HELP PANEL clause inside help panels to maintain the relationship that existed between two FMS help forms. DECforms does not allow you to specify the USE HELP PANEL clause within help panels, so you must remove any USE HELP PANEL clauses within help panels.
You can write function responses to allow more than one help panel to be displayed for the operator. Section 5.3.4, ''Modifying the Help Syntax'' contains an example of one way to write help function responses. See Section 7.3, ''Providing Help for Operators''for information on the DECforms help model.
3.4.4.4. Emulating Pre-Help and Post-Help UARs
If your FMS application contains pre-help or post-help UARs, you can use those UARs as DECforms escape routines. To do so, you must add responses containing the CALL response steps to the converted DECforms IFDL source file. Section 6.2.8, ''Calling Escape Routines to Emulate Pre-Help, Post-Help, and Function Key UARs'' describes how to write responses that emulate pre-help and post-help UARS. You must also pass certain parameters to the FORMS$ENABLE call and link your application with a vector to use escape routines. See Section 7.7, ''Using Escape Routines'' for information on using escape routines.
3.5. Optimizing the Converted IFDL Source File
The data types of form data items
Form record and program record field data types
The order of panel fields in a panel field declaration
Responses that call UARs
3.5.1. Form Data Item Data Types
The FMS Converter creates a form data item to match each panel field it creates to replace an FMS form field. The Converter assigns a data type to each form data item it creates. The Converter assigns the INTEGER data type to a form data item it creates to correspond to an FMS field picture of all 9s. If the FMS form field picture contains a decimal point, the FMS Converter creates a form data item that has the DECIMAL data type. If the field is one of the FMS predefined DATE fields, the Converter assigns the DATE or TIME data type. Otherwise, the Converter assigns the CHARACTER data type to the form data item.
|
Date/Time Data Types |
Atomic Data Types |
Text Data Types |
|---|---|---|
|
ADT |
UNSIGNED BYTE |
CHARACTER |
|
DATE |
BYTE INTEGER |
INTEGER |
|
TIME |
UNSIGNED WORD |
DECIMAL |
|
WORD INTEGER |
FLOAT | |
|
UNSIGNED LONGWORD | ||
|
LONGWORD INTEGER | ||
|
QUADWORD INTEGER | ||
|
FFLOATING | ||
|
DFLOATING | ||
|
GFLOATING | ||
|
HFLOATING |
You can use any of these data types for your form data items. The data type of a data item does not have to match the data type of its corresponding form record field. If the record field declaration creates a different OpenVMS data type in internal storage than the form data item declaration, the data is converted from the record field data type to the form data item data type when it is stored in the form data item. The data is converted from the form data item data type to the form record field data type when it is passed to the program.
Converting data from one data type to another is less efficient than passing between variables that have matching data types. You should limit the number of data type conversions that are performed during data transfer.
3.5.2. Form Record Field and Program Record Field Data Types
Because your FMS program passed only CHARACTER data to FMS, your program may be converting data from the CHARACTER data type to an atomic data type. You can make your program more efficient by using atomic data types to store this data. Also, you may want to make the data type of form record fields atomic to match the data type of corresponding form data items. When the data type of a form record field matches the data type of a form data item, the Form Manager does not have to convert the data to a new data type, which makes your application more efficient. To avoid converting data between the CHARACTER data type to an atomic data type, you can exchange atomic data with your form.
To store and use atomic data, program record fields must have atomic data types. Remember that the data the record fields store must also be atomic. You may need to modify the data itself if it is initially loaded into your program from a file or database. The file or database may store string data, which you must modify to be numeric data.
To pass atomic data to the form, your form record fields must have atomic data types. For your program and form to exchange data, the data in fields that correspond to each other must have the exact same data type internally. All OpenVMS products store data using OpenVMS data types. Each product has its own syntax for declaring data, which means that you cannot compare data declarations in two languages to determine if data matches internally. For example, you cannot assume that a DEC COBOL data item declared PIC 9(9) is stored the same internally as a DECforms data item declared as INTEGER(9). To see if the data is stored the same internally, you must determine how DEC COBOL and DECforms represent data items using OpenVMS data types. The VSI DECforms IFDL Reference Manual contains a table that describes how DECforms stores data internally. You can use that table and the documentation for your programming language to be sure that the data type of corresponding form record fields and program record fields match.
DATA DIVISION. * * Declare a record that passes numeric data. * WORKING-STORAGE SECTION.
| The COBOL record declaration contains three fields. The PAYTO_NAME field has the CHARACTER data type. The CHECK_AMOUNT field has the INTEGER data type of length 5 that is COMPUTATIONAL. Internally, COBOL represents this field as an OpenVMS LONGWORD INTEGER data type. The MEMO_FIELD field has the CHARACTER data type. |
| The SEND request sends the data in the GET_CHECK record to the form. |
/* Declare a form record to pass */
/* numeric data.                 */
Form Record GET_CHECK
    PAYTO_NAME                Character (30)
    CHECK_AMOUNT              Longword Integer
    MEMO                      Character  (35)
End Record
The form record contains three fields. The first field has the CHARACTER data type; its length matches the length of the first program record field. The second field has the LONGWORD INTEGER data type. DECforms represents data items with the LONGWORD INTEGER data type as a VMS LONGWORDINTEGER internally. This data type matches the internal representation of the program record field data type. The third field has the CHARACTER data type and appropriate length.
3.5.3. Reordering Panel Fields
When the FMS Converter creates panel fields in your IFDL source file, it writes them to the source file in the order you specified using the ORDER phase of the FMS Form Editor or the ORDER statement of the FMS Form Language. The order in which panel field declarations appear in the converted IFDL source file can be significant for operator input.
If you use the ACTIVATE CORRESPONDING RECEIVE ALL or the ACTIVATE CORRESPONDING SEND ALL response step, the Form Manager activates panel fields. The Form Manager activates panel fields that correspond to the record fields in the form record you name in a request call.
When the Form Manager activates a panel field, it adds an item to the activation list. Unless you explicitly name panel fields to activate, the order of panel field declaration in a panel controls the order in which the Form Manager adds activation items to the activation list. The first item the Form Manager adds to the activation list corresponds to the first field declared in the panel. The second item corresponds to the second field, and so on.(See the VSI DECforms Programmer's Reference Manual for more information on the ACTIVATE response step.)
By default, the Form Manager begins operator input by getting input to the first unprotected item on the activation list. If the operator presses the key bound to the default NEXT ITEM function and the input to the first activation item passes validation, the Form Manager gets input to the second activation item. If the operator continues to give input by entering datain fields and pressing the key bound to the NEXT ITEM function, operator input proceeds in the order in which items appear on the activation list. The order in which items appear on the activation list is controlled by the order in which you declare panel fields (when you use response steps that do not explicitly name panel fields). Thus, the order of panel field declaration can control the order of operator input.
You may need to change the order in which panel fields appear in your IFDL source file if you plan to use ACTIVATE CORRESPONDING RECEIVE ALL. Be sure the panel field order reflects the order you want to be used for operator input.
3.5.4. Rewriting Responses that Call UARs
If your FMS form calls UARs other than pre-help or post-help UARs, the FMS Converter creates responses in your converted IFDL source file that contains the CALL response step. The CALL response step names your UAR. You can use your UAR as a DECforms escape routine, so the CALL response step can call the same code as was called in your FMS application.(You must pass certain parameters to the FORMS$ENABLE call and link your application with a vector to use a UAR as an escape routine. See Section 7.7, ''Using Escape Routines'' for more information.)
Although DECforms allows you to continue to use your UARs as DECforms escape routines, you may not need to do so. The IFDL allows you to specify more form processing than the FMS Form Language, so you may be able to perform tasks you used to perform in UARs in your DECforms form. If you can avoid calling DECforms escape routines, your application is more efficient.
To determine whether you can perform the UAR's task in a response, see the description of the effect of each response step in the VSI DECforms Programmer's Reference Manual.
Chapter 4. Modifying Your Program
Remove Form Driver calls that have no equivalent in DECforms
Change some Form Driver calls to DECforms calls
Move the logic for some Form Driver calls to the form
This chapter explains how to perform these tasks.
4.1. Removing Form Driver Calls
Some FMS Form Driver calls have no equivalent in DECforms. DECforms does not provide a call to perform the same function as these calls, and you cannot easily get the effect of the call using statements in the form. In many cases, DECforms does not supply an equivalent of an FMS call because you need not perform the call's task in DECforms.
The sections that follow list FMS calls that have no DECforms equivalent and explain why no DECforms equivalent exists. Where possible, they suggest ways to redesign your application to perform the same function using DECforms.
4.1.1. The AFCX Call
The FMS AFCX (Alter Field Context) call alters the default input mode fora field. It allows you to change the Insert/Overstrike mode of the field and the cursor position in the field.
DECforms does not allow you to modify the editing mode of a field or the position of the cursor in a field. ( DECforms calls Insert/Overstrike mode editing mode.) DECforms gives the operator control over the editing mode and the position of the cursor.
The operator can change the editing mode by invoking the built-in INSERT OVERSTRIKE function. The operator can move the cursor using the built-in functions, such as the CURSOR LEFT and CURSOR RIGHT functions. See the VSI DECforms IFDL Reference Manual for information on what built-in functions DECforms provides.
Remove all AFCX calls from your program.
4.1.2. The CLEAR_VA and FIX_SCREEN Calls
The CLEAR_VA (Clear Video Attributes) call clears the screen of video attributes and sets certain other terminal attributes. The FIX_SCREEN (Repair Overwritten Lines of Terminal Screen) call allows you to repair lines you overwrote with direct terminal output. These calls are useful primarily for modifying the screen and resetting terminal attributes before or after you use software other than FMS to modify the display.
DECforms does not allow you to directly refresh particular lines on the screen because DECforms operates on viewports and panels. You can clear the area occupied by a viewport, but you cannot specify clearing lines 10 through 15. DECforms does not have a call or procedural form statement to reset terminal attributes.
You should remove FMS CLEAR_VA and FIX_SCREEN calls from your program. You may be able to modify the screen and reset video attributes using a screen management tool other than DECforms before you return control to DECforms. Alternatively, you could separate the screen into parts and use one part only for DECforms and another part for screen management you do outside of DECforms. See Section 4.3.15, ''Refreshing a Shared Screen'' for information on refreshing a shared screen.
4.1.3. The DEL and READ Calls
The DEL (Remove Form from Memory-Resident Form List) and READ (Read Form Into Memory) calls maintain a memory-resident form list. In DECforms, all panels are memory resident if they belong to the layout selected for use at the beginning of application execution. Therefore, you need not maintain a memory-resident form list from your DECforms application program, and you should remove all DEL and READ calls from your program.
4.1.4. The FCHAN and TCHAN Calls
The FCHAN (Return Free Channel) call allows you to determine which I/O channel is available. The TCHAN (Set Terminal Channel) call allows you to specify a physical terminal channel that FMS uses for the current terminal. DECforms does not allow you to use physical channel numbers because they are device specific. Therefore, you should remove all FCHAN and TCHAN calls from your program.
4.1.5. The LEDON and LEDOF Calls
The LEDON (Turn Terminal LED On) and LEDOF (Turn Terminal LED Off) Form Driver calls allow you to control the LEDs on aVT100 terminal. Because most terminals do not have the same LEDs as VT100terminals, DECforms does not provide a way to control them. You should remove LEDON and LEDOF calls from your program.
Instead of lighting LEDs, you can signal the operator by displaying a message on the message line or by changing the appearance of the screen. See Section 4.3.4, ''Controlling Output to and Input from a Terminal Line'' for one way of displaying a message.
4.1.6. The RETFO and RETLE Calls
When you use the GETAL call, you get data from all fields on the form. The data is concatenated and returned to a variable in your program. To allow you to determine the contents of the variable, FMS supplies two calls:RETFO and RETLE. The RETFO (Return Field Names in Order) call returns the name of the first field on the form, the second field on the form, and so on. The RETLE call (Return Length of Specified Field) is similar, except that it returns the lengths of fields, instead of their names.
Because you always exchange records between the form and the program in DECforms, you do not need the RETFO and RETLE calls. The program always knows the structure of data it receives. Therefore, remove all RETFO and RETLE calls from your program.
4.1.7. The SCR_LENGTH and SCR_WIDTH Calls
The SCR_LENGTH (Set Screen Length) and SCR_WIDTH (Set Screen Width) calls allow you to adjust the terminal attributes table for a terminal. DECforms does not allow you to modify the attributes of a specific terminal. Instead of modifying the attributes of the device to fit your form in DECforms, you modify the form to fit different devices. You should remove SCR_LENGTH and SCR_WIDTH calls from your program.
4.1.8. The SSRV and STAT Calls
The SSRV (Specify Status Reporting Variables) call allows you to specify a location in which FMS stores the I/O status and completion status of each subsequent call. The STAT (Return Status from Last Call) call returns the status code for the previous call. In DECforms, you call the Form Manager like you call a function. Each DECforms call returns a LONGWORD INTEGER value that gives its status. Therefore, you need not tell the Form Manager where to store status or when to return status. Remove SSRV and STAT calls from your program.
4.2. Changing Form Driver Calls to DECforms Calls
Open the form environment
Send data to the form
Get data from the form
Cancel other calls
Close the form environment
|
DECforms Call |
FMS Calls |
DECforms Call Action |
|---|---|---|
|
FORMS$ENABLE |
ATERM (Attach Terminal) AWKSP (Attach Workspace) LOAD (Load Form Without Display) LCHAN (Set Channel for Form Library File) LOPEN (Open Form Library) |
Selects a form and terminal. Creates session. |
|
FORMS$SEND |
PUT (Output Value to Specified Field) PUTAL (Output Values to All Fields) PUTSC (Output Data to Current Line of Scrolled Area) |
Sends data from the program to the form. |
|
FORMS$RECEIVE |
GET (Get Value for Specified Field) GETAF (Get Value for Any Field) GETAL (Get All Field Values) GETSC (Get Current Line of Scrolled Area) |
Passes data from the form to the program. |
|
FORMS$CANCEL |
CANCL (Cancel Call) |
Cancels currently active requests. |
|
FORMS$DISABLE |
LCLOSE (Close Form Library) DWKSP (Detach Workspace) DTERM (Detach Terminal) |
Disables the session. |
The sections that follow explain using the DECforms calls to perform the functions for which you used the corresponding FMS calls. See the VSI DECforms Programmer's Reference Manual for more information on the DECforms calls and requests.
4.2.1. DECforms Call Parameters
Each DECforms call has a defined format, including a number of parameters. The parameters appear in the calls in the order defined by the format of the call. Some parameters have a slightly different purpose,depending on which call they appear in. The following list describes the parameters you need to open your form environment, exchange data with the form, and close your form environment.
form-object-address
Required argument that is either the FORMS$AR_FORM_TABLE symbol name or 0. The FORMS$AR_FORM_TABLE symbol name is defined in an object module stored in a system library. The symbol is a pointer to the address of a special object module, called a form object. The form object module contains the addresses of escape routines and forms that are linked with the application. Until you are ready to use escape routines, you can pass 0 in this parameter. See Section 7.7, ''Using Escape Routines'' for more information on using escape routines.(Passed by value.)
display-device-specification
Name of the display device to be used. You should pass SYS$INPUT in this parameter. This parameter serves the same general purpose as ATERM. (Passed by descriptor.)
session-id
Sixteen-character string that identifies the session.
The Form Manager returns the session identification string to your program during the ENABLE request. When used in a call to the ENABLE request, this parameter is similar to LCHAN and AWKSP. It causes the Form Manager to request a physical channel and create a session identification string. The session identification string associates the display device with the currently loaded form.
When used to call the SEND or RECEIVE request, this parameter is similar to the FMS STERM(Set Current Terminal) call. It controls what session (and therefore what terminal) the request effects. If you are using more than one session, you switch between them by passing a different session identification string for each session.
When used in a call to the DISABLE request, this parameter is similar to LCLOS and DWKSP in that it identifies the form that the Form Manager closes. It also resembles DTERM because it identifies the terminal to be detached. (Passed by descriptor.)
file-specification
File specification for the form file to be used. This parameter is similar to the LOAD call because it identifies the set of panels to be moved into memory. (Passed by descriptor.)
form-specification
Name of the form as specified in the IFDL FORM statement. You should pass the name of the form only if your form is linked with your program or stored in a shareable image. See the VSI DECforms Programmer's Reference Manual for more information on linking forms and storing them in shareable images.
record-identifier
Name of the form record or record list that matches the program record you are passing. The Form Manager uses this parameter to determine which form record or record list to use for this request and which request response (if any) to perform during the processing of this request.(Passed by descriptor.)
record-count
Specifies the number of records you are passing. (Passed by reference.)
timeout
Specifies the number of seconds the operator has to enter data to fields. DECforms resets the timer between each operator keystroke. When used in a call that requires operator input, this parameter is similar to the FMS STIME (Set Field Entry Timeout) call. (Passed by reference.)
record-message
Data you are passing. (Passed by descriptor.)
Receive special status information from the Form Manager in receive control text
Invoke send control text responses during the processing of this request
Identify the parent request identification string, which is a string the Form Manager uses when you call a request from within an escape routine
Specify options for this request
Pass a shadow record ( Section 7.6, ''Determining What Changed During Operator Input'' describes using a receive shadow record)
You can omit these parameters from the calls without losing any of the functions that you use in FMS.
If you omit a required parameter, you may, depending on your programming language, need to supply a placeholder for the parameter. For example,you can use the DEC COBOL OMITTED phrase to indicate that you have omitted a required parameter from a request call in a DEC COBOL program.
4.2.2. Opening the Form Environment
DECforms provides a single call to open your form environment—the FORMS$ENABLE call. The FORMS$ENABLE call invokes the ENABLE request, which causes the Form Manager to initialize the current session. To initialize a session, the Form Manager finds the form to be used and selects a layout from that form. The Manager also attaches the display device and performs other internal tasks to set up the form environment. If you do not define an ENABLE response, the Form Manager performs the default ENABLE response, which causes it to clear the display.
The format of the call follows (optional parameters are shown in brackets):
FORMS$ENABLE  form-object-address, display-device-specification,
              session-id [file-specification,]
              [form-specification, receive-control-text,
              receive-control-text-count],
              [send-control-text, send-control-text-count], [timeout],
[parent-request-id], [request-options]01 SAMP_FORM PIC X(21) GLOBAL VALUE "SAMP.FORM".
| These variable declarations create storage for the FORMS$ENABLE call parameters and the return value. |
| The COPY statement copies declarations for the DECforms routine names and symbols. |
| This FORMS$ENABLE call enables a form that does not use procedural escapes. In response to this call the ENABLE request loads SAMP.FORM, attaches the device that corresponds to SYS$INPUT, and returns a string in the session identification string. |
| The FORMS_STATUS variable holds status information that DECforms returns after the function call is complete. You should test this variable for success after each DECforms call. |
Once you modify your program, you may want to add an ENABLE response to your form. Position the response in your IFDL source file directly following any function declarations. You can specify only one ENABLE response per layout.
4.2.3. Sending Data to the Form
To pass data to the form in DECforms, you use the FORMS$SEND call. This call invokes the SEND request. The SEND request causes the Form Manager to pass data from the program record to form data items. The Form Manager determines which form data items are to store the data by looking at the form record name you pass in the request call. Using that form record name, the Form Manager determines the names of form records fields in that form record. The Form Manager distributes the program data into form data items that have the same name as fields in the form record.
You can specify a SEND response in the form to specify, for example, that the Form Manager signal the operator when the new data is displayed. The Form Manager does not contain a default SEND RESPONSE.
Figure 4.1, ''Default Send Transfer in DECforms'' shows how data is transferred when you call the SEND request and do not specify as end response.
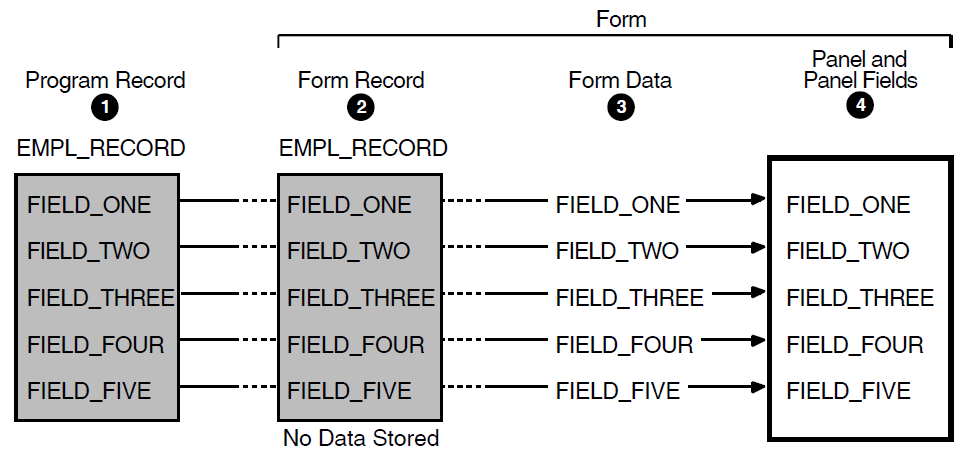
- 1
The program passes the data in EMPL_RECORD to the form, and it passes the name "EMPL_RECORD" to the Form Manager.
- 2
The Form Manager reads the form record named EMPL_RECORD to determine what names are assigned to its record fields.
- 3
The Form Manager distributes the data from the program into the form data items FIELD_ONE, FIELD_TWO, and so on; these form data items have the same name as fields in the form record.
- 4
The Form Manager updates the data in panel fields named FIELD_ONE,FIELD_TWO, and so on. These panel fields were on the display when the program called the SEND request.
The following shows the format of the FORMS$SEND call (optional parameters are shown in brackets):
FORMS$SEND   session-id, send-record-name, send-record-count,
             [receive-control-text, receive-control-text-count],
             [send-control-text, send-control-text-count],
             [timeout], [parent-request-id], [request-options],
[[send-record-message], [send-shadow-record],]* . . . 01 RECORD_COUNT PIC 9(2) COMP GLOBAL VALUE 1.
| The RECORD_COUNT variable stores the number of records being passed in the SEND call. |
| The ACCOUNT record stores the data that is sent to the form. |
| The FORMS$SEND call sends data to the form. Notice that you must indicate omitted parameters that fall between parameters you use. You need not indicate omitted parameters that fall after the last parameter in the call you use. |
After you modify the program, declare a form record that is logically equivalent to your program record (unless one already exists). Logically equivalent records have the same number of fields, corresponding fields have the same length and matching data types. Matching data types are data types that create the same OpenVMS data type in internal storage.
You should name the fields in the form record the same name as the form data items into which you want the Form Manager to move data from the program. The form record field and form data item do not have to have the same data type.
If you write a SEND response, you name the SEND response the same as the form record name you specify in the send-record-name parameter of the FORMS$SEND call. This causes the Form Manager to perform that response when you call the SEND request and name that form record.
Form Data
| The form data items store the data that is sent from the program. |
| The ACCOUNT form record is logically equivalent to the ACCOUNT program record. The form record fields are declared to be of the CHARACTER data type to match the program record data type. |
| The SEND response sets the ACCOUNT_PASSWORD form data item equal to the SECRET_FIELD form data item. The value in the SECRET_FIELD form data item came from the program. Position SEND responses in your IFDL source file directly following function declarations. |
4.2.4. Getting Data from the Form
To get data from the form in DECforms, you use the FORMS$RECEIVE call. This call invokes the RECEIVE request. The RECEIVE request causes the Form Manager to pass data from form data items to the program record. To determine what values to pass to the program, the Form Manager reads the form record name you pass in the record identifier parameter. The Form Manager passes data from the form data items that have the same name as fields in that form record.
You can specify a RECEIVE response in the form to control some aspects of RECEIVE request processing. If you do not specify a RECEIVE response for the request, the Form Manager performs the ACTIVATECORRESPONDING RECEIVE ALL response step. This response step causes the Form Manager to activate each panel field that corresponds to the form record named in the record-identifier parameter. The Form Manager gets input to each of those panel fields and stores that input in form data items. Finally, it returns the input to the program.
Figure 4.2, ''Default Receive Transfer in DECforms'' shows how data transfer occurs when you call the RECEIVE request and accept the default response.

- 1
The program passes the name "EMPL_RECORD" to the Form Manager. The Form Manager reads the form record named EMPL_RECORD to determine what names are assigned to its record fields. Then, the Form Manager displays the panel that contains fields that correspond to record fields in the receive record and accepts operator input.
- 2
The Form Manager stores operator input in the form data items that correspond by name to the panel fields.
- 3
The Form Manager collects the data in the form data items that correspond to fields in the form record.
- 4
The Form Manager returns the data to the program.
The following shows the format of the FORMS$RECEIVE call (optional parameters are shown in brackets):
FORMS$RECEIVE  session-id, receive-record-name, receive-record-count,
               [receive-control-text, receive-control-text-count],
               [send-control-text, send-control-text-count],
               [timeout], [parent-request-id], [request-options],
[[receive-record-message], [receive-shadow-record],]PROCEDURE DIVISION.
0.
*
* Get account data from the form
*
CALL "forms$receive" USING BY DESCRIPTOR SESSION_ID
"ACCOUNT"
BY REFERENCE RECORD_COUNT
OMITTED
OMITTED
OMITTED
OMITTED
OMITTED
OMITTED
OMITTED
BY DESCRIPTOR ACCOUNT
GIVING FORMS_STATUS.
CALL "SRVCHK" USING FORMS_STATUS.This call gets data from the form data items that correspond to the ACCOUNT form record.
Once you have modified the program, declare a form record that is logically equivalent to your program record (unless one already exists). The record must have the same number of fields as your program record, the fields must be the same length, and the fields must have matching data types. Data types are matching when they create the same OpenVMS data type internally. Name the fields in the form record the same as the form data items from which you want the Form Manager to collect data to return to your program.
You can write a response to the RECEIVE request if you want an effect other than what is given by the ACTIVATE CORRESPONDING RECEIVE ALL response step. Specify the form record name you pass in the receive-record-name parameter to the FORMS$RECEIVE call. The Form Manager performs the receive response that is named the same as the receive-record-name parameter. Position the response in your IFDL source file directly following function declarations.
   .
   .
   .
    Function NEXT_ITEM Is %HORIZONTAL_TAB End Function
    Receive Response ACCOUNT
        Activate Field LAST_FIELD on ACCOUNT_PANEL
        Activate Field FIRST_FIELD on ACCOUNT_PANEL
        Activate Field MIDDLE_FIELD on ACCOUNT_PANEL
        Activate Field STREET_FIELD on ACCOUNT_PANEL
        Activate Field CITY_FIELD on ACCOUNT_PANEL
        Activate Field STATE_FIELD on ACCOUNT_PANEL
        Activate Field ZIP_FIELD on ACCOUNT_PANEL
        Activate Field HOMEPH_FIELD on ACCOUNT_PANEL
        Activate Field WORKPH_FIELD on ACCOUNT_PANEL
        Activate Field ACCOUNT_PASSWORD on ACCOUNT_PANEL
    End Response
This response activates a number of the panel fields that correspond to the ACCOUNT form record. Because only certain fields need to be activated for input, the default response that activates all panel fields corresponding to form record fields is inappropriate.
4.2.5. Canceling Requests
To cancel a DECforms request, you use the FORMS$CANCEL call,which invokes the CANCEL request. The CANCEL request causes the Form Manager to cancel currently active requests for the session identified by the session identification string you pass in the call. It differs from the FMS CANCL call in that it does not cancel any requests you call after you call the CANCEL request.
When you use it to cancel the SEND request, RECEIVE request, or TRANSCEIVE request, the CANCEL request cancels pending input and output. Therefore, form data items and the display may be in an unexpected state after you invoke the CANCEL request. When the Form Manager is finished processing the CANCEL request, you can repair form data by sending a new copy of the record being exchanged. A canceled TRANSCEIVE request or RECEIVE request may return a record to the program if the Form Manager has already collected data to return to the program when it cancels the request. The Form Manager does not validate the data before returning it to the program. The Form Manager restores the screen to a known state the next time it does screen management.
The format of the FORMS$CANCEL call follows:
FORMS$CANCEL session-id [,request-options]
PROCEDURE DIVISION.
0.
*
* Fatal error in database update. Cancel outstanding requests.
*
        CALL "forms$cancel" USING BY DESCRIPTOR SESSION_ID
                             GIVING FORMS_STATUS.
You cannot write a response for the CANCEL request.
4.2.6. Closing the Form Environment
DECforms provides a single call, FORMS$DISABLE, to close your form environment. The FORMS$DISABLE call invokes the DISABLE request, which causes the Form Manager to end the current session. To end a session, the Form Manager detaches the display device and form that are associated with the session identification string,and it performs other internal tasks.
You should call the DISABLE request only when you have finished exchanging data with a form. You need not disable a form before you use another form, perform database updates, or make calls to another product, such as the Graphical Kernel System (GKS). (See the GKS documentation for more information about that product.)
The format of the FORMS$DISABLE call follows (optional parameters are shown in brackets):
FORMS$DISABLE  session-id [receive-control-text,receive-control-text
               -count], [send-control-text, send-control-text-count],
[timeout], [parent-request-id], [request-options]PROCEDURE DIVISION.
0.
*
* Done using DECforms. Disable form environment.
*
CALL "Forms$disable" USING BY DESCRIPTOR SESSION_ID_STRING
GIVING FORMS_STATUS.
.
.
.. . . Disable Response
| The Form Manager performs the DISABLE response each time you call the DISABLE request. Position the response in your IFDL source file directly following any function declarations. You can specify only one DISABLE response per layout. |
| The REMOVE ALL response step causes the Form Manager to remove all the viewports for the current layout. Note that if the current layout's viewports do not cover the entire screen, the Form Manager does not clear the entire screen. The Form Manager clears only the portion covered by the viewports. If no viewports for the current layout are on the display,this response step has no effect. |
4.3. Moving the Logic for Form Driver Calls to the Form
Altering field video attributes
Assigning default values to fields
Clearing the screen
Controlling output to and input from a terminal line
Controlling supervisor mode
Defining the decimal point as comma
Defining keys
Determining form context
Displaying forms
Marking forms as undisplayed
Modifying the keypad mode
Printing forms
Processing field terminators
Refreshing the screen
Refreshing a shared screen
Returning data from the form workspace
Returning Named Data by index and name
Setting the current workspace
Signaling the operator
Trapping illegal field terminators
Waiting for the operator
The sections that follow describe how to get the effect most similar to FMS behavior. Because the sections describe emulating FMS, they may not always describe the most efficient way to perform tasks in DECforms.See the VSI DECforms IFDL Reference Manual for more information on the IFDL syntax discussed here.
4.3.1. Altering Field Video Attributes
The FMS AFVA (Alter Field Video Attributes) call changes the video attributes of a field. The attributes change immediately and remain in effect until either you redisplay the form or modify them with another AFVA call. This call cancels input highlighting for a field.
In DECforms, you use the HIGHLIGHT WHEN clause to change the video attributes of a field. This clause allows you to apply highlight to a field based on a conditional expression. The attributes change immediately after the condition becomes true and remain in effect until the condition is no longer true.
Attributes specified in the DISPLAY clause
Attributes specified in the ACTIVE HIGHLIGHT clause
Attributes specified in the HIGHLIGHT WHEN clause
   Field EMPLOYEE_NAME
     Next Line Same Column
     Active Highlight Bold
     Highlight Reverse When Error = "TRUE"
     Exit Response
        Call "CHECK_DATA_BASE" Using By Reference EMPLOYEE_NAME_1
                               Giving STATUS
        If STATUS <> 1
         Then
           Let Error = "TRUE"
           Invalid
         Else
           Position to Next item
        End If
     End Response
   End Field
| The ACTIVE HIGHLIGHT statement specifies the video attributes applied by the Form Manager when the operator is entering data in the field. |
| The HIGHLIGHT WHEN statement specifies what video attributes the Form Manager applies when the form data item ERROR is equal to "TRUE." If this field is active when the ERROR form data item equals "TRUE," the Form Manager applies the reverse attribute and the bold attribute. |
| The exit response calls an escape routine named CHECK_DATA_BASE. The escape routine verifies that the employee name exists in the employee database. If the employee name is not in the database, the Form Manager sets the ERROR form data item to "TRUE" and continues input into the EMPLOYEE_NAME field as specified by the INVALID response step. Otherwise, the operator begins input to the next field, as specified by the POSITION response step. |
You should remove all AFVA calls from your program. For each call you remove,add a HIGHLIGHT WHEN statement to the form. Be sure to position the HIGHLIGHTWHEN statement in the field declaration for the field you altered with a particular AFVA call.
4.3.2. Assigning Default Values to Fields
Two FMS calls reset fields on your form to their default values. These calls are PUTD (Output Default to a Specified Field) and PUTDA (Output Default Values to All Fields). PUTD outputs the default value to the field you specify. If the field does not have a default value, it is filled with the fill character in the workspace and with spaces on the form. PUTDA causes the default values to be restored to all fields on the form. If any fields do not have default values, they are filled with the fill character in the workspace and with spaces on the form.
In DECforms, you reset form data items to their default value,instead of resetting the value of fields. Because form data items store the values displayed in fields, resetting them has the effect of resetting the field value. In other words, when you reset a form data item to its default value, the default value is displayed when the panel field is displayed.
   Field  ACCOUNT_NUMBER
      Line 10 Column 5
      Input Picture 999'-'99999'-'999
      Input Required

      Validation Response
        Call "CHECK_DIGIT_VALIDATION" Using By Reference ACCOUNT_NUMBER
                                      Giving STATUS
        If STATUS <> 1 Then
            Invalid
            Reset ACCOUNT_NUMBER
        Else
           Position To Next Item
        End If
      End Response
   End Field
| The CALL response step calls an escape routine named CHECK_DIGIT_VALIDATION that verifies that the account number entered by the operator is valid. |
| The Form Manager tests the value stored in the STATUS form data item. If the STATUS form data item contains a 1 indicating success, the operator continues input with the next field on the panel. If the return status indicates failure, the Form Manager performs the INVALID response step. This response steps causes the Form Manager to begin operator entry to this field again. The Form Manager resets the ACCOUNT_NUMBER form data item to its default value as specified by the RESET response step. |
4.3.3. Clearing the Screen
The FMS CLEAR (Clear Screen) call erases the contents of all or part of the screen. You use it in FMS to erase all or part of the screen. For example, you could clear the screen directly before your application exits. You also use the CLEAR call to "break" parts of the screen. When you call another screen management tool, such as GKS, from an FMS application, the other tool modifies the screen independent of FMS. When control is returned to FMS, FMS operates as if the screen had not been modified; FMS does not redraw forms that were overwritten by the other screen management tool. To make FMS repair lines that were modified by another screen management tool, clear those lines. Then, you can use the RFRSH call to make FMS refresh the screen and repair the lines you have "broken" with the CLEAR call.
DECforms does not have a call that clears all or part of the screen. However, it does supply the REMOVE response step that clears parts of the screen and the REFRESH response step that redraws parts of the screen. Therefore, you can cause the Form Manager to erase parts of the screen and repair lines that have been written over by another screen management tool.
The difference between the REMOVE and REFRESH response steps and the FMSCLEAR call is that REMOVE and REFRESH operate on viewports. You specify the name of a viewport in the REMOVE or REFRESH response step to determine which viewport the Form Manager clears or redraws. You can specify the REMOVE ALL or REFRESH ALL to clear or redraw the display.
Remove FMS CLEAR calls from your program. Replace them with REMOVE or REFRESH response steps that are performed at times similar to when the CLEAR call was performed.
See Section 4.3.15, ''Refreshing a Shared Screen'' for information on refreshing a shared screen. See the VSI DECforms IFDL Reference Manual for more information on the REMOVE response step.
4.3.4. Controlling Output to and Input from a Terminal Line
The PUTL (Output Line to Screen) call allows you to write a line of data to the terminal. You can use it to send messages to the operator. The message you send can appear on any line of the terminal. You can apply video attributes to the message using the ADLVA (Alter Data Line Video Attributes) call. The ADLVA call allows you to make a data line blink, be bolded, appear in reverse video, and so on.
The GETDL (Get Data Line from Terminal) call allows you to get a data line from the operator. You can display a prompt to let the operator know what input is required. Again, you can determine what video attributes that line has by calling ADLVA.
Form EMPLOYEE_FORM
  Form Data
     PROMPT_FIELD                      Character (10)
     DATA_LINE_FIELD                   Character (70)
  End Data

  Form Record PROMPT_RECORD
     PROMPT_FIELD                      Character (10)
  End Record  Form Record DATA_LINE_RECORD
     DATA_LINE_FIELD                   Character (70)
  End Record
   .
   .
   .
  Viewport FOR_DATA_LINES
     Lines 6 Through 6
     Column 1 Through 80
  End Viewport

  Panel DATA_LINE_PANEL
      Viewport FOR_DATA_LINES
      Display Underlined
        Field PROMPT_FIELD
          Line 1 Column 1
          No Data Input
        End Field
        Field DATA_LINE_FIELD
          Line 1 Column 11
        End Field
   End Panel
 End Layout
End Form
Line 1 Column 11
End Field
End Panel
End Layout
End Form
| This FORM RECORD declaration creates a form record you can use to pass a prompt from the program to the form. |
| This FORM RECORD declaration creates a form record you can use to return operator input from the data line to the program. |
| The VIEWPORT statement declares a 1-line, 80-column viewport that appears on line 6 on the display. |
| The PANEL statement declares the DATA_LINE PANEL. The VIEWPORT clause positions the panel in the FOR_DATA_LINES viewport. The DISPLAY clause specifies that fields and literals on the panel are underlined. |
| PROMPT_FIELD is a field that begins on line1 in column 1 of this panel. The field NO DATA INPUT protects the field from operator input. The prompt is stored in the PROMPT_FIELD form data item and may have been passed from the program. You can use a literal prompt if you do not need to vary the prompt. |
| DATA_LINE_FIELD is a field that appears beside PROMPT_FIELD and gets input from the operator. |
WORKING-STORAGE SECTION.
*01      PROMPT_RECORD                         GLOBAL.
         05  PROMPT_FIELD     PIX X(10).

 01      DATA_LINE_RECORD                      GLOBAL.
         05 DATA_LINE_FIELD   PIX X(70).

        CALL "forms$transceive" USING BY DESCRIPTOR SESSION_ID
                                                    "PROMPT_RECORD"
                                      BY REFERENCE  RECORD_COUNT
                                      BY DESCRIPTOR "DATA_LINE_RECORD"
                                      BY REFERENCE  RECORD_COUNT
                                      OMITTED
                                      OMITTED
                                      OMITTED
                                      OMITTED
                                      OMITTED
                                      OMITTED
                                      OMITTED
                                      BY DESCRIPTOR PROMPT_RECORD
                                      OMITTED
                                      BY DESCRIPTOR DATA_LINE_RECORD
                                GIVING FORMS_STATUS.
        CALL "SRVCHK" USING FORMS_STATUS.
This request call sends the data in the PROMPT_RECORD program record field to the form, and it receives the data in the DATA_LINE_FIELD form data item in the program.
4.3.5. Controlling Supervisor Mode
FMS allows you to protect some fields from operator entry with supervisor-only mode. The operator cannot enter data in fields with the supervisor-only attribute unless you turn supervisor-only mode off from the program. You control supervisor-only mode with the SPOFF (Turn Supervisor-Only Mode Off)and SPON (Turn Supervisor-Only Mode On) calls.
     Field EMPLOYEE_SALARY
      Line 15 Column 20
      Protected When OPERATOR_NUMBER <> SUPERVISOR_NUMBER
     End Field
The PROTECTED WHEN clause makes this field display-only unless the OPERATOR_NUMBER form data item is equal to the SUPERVISOR_NUMBER form data item. While the condition is true, the operator can enter data into the field.
Remove SPON and SPOFF calls from your program. Add the PROTECTED WHEN clause to fields that need to be protected from operator entry at certain times during application processing.
4.3.6. Defining the Decimal Point as Comma
The DPCOM (Define Comma as Decimal Point) FMS call defines the comma or redefines the period as the decimal point for signed numeric fields. The decimal point is returned to your program as part of the field value.
The DECIMAL POINT IS clause controls the decimal point character in DECforms. You specify this clause as an editing clause on an OUTPUT PICTURE field. The character not used as the decimal point may be used as an insertion literal. The character that is used as a decimal point is not stored with the value in form data. By default, the decimal point is a period.
  Field EMPLOYEE_SALARY
    Line 20 Column 40
    Output  Picture 999.99999
      Decimal Point Is Comma
    Input Picture XXX.XXXXX
  End Field
The DECIMAL POINT IS clause specifies that the decimal point for this field is a comma. The decimal point for other fields could be a period.
Remove the DPCOM call from your program. Add the DECIMAL POINT IS clause to fields in which you want the decimal point to be a comma. If you want a number of fields to have a comma as the decimal point, you can apply a field default to a group, panel, or layout. The APPLY FIELD DEFAULT clause specifies the default characteristics of fields that follow it in a group,panel, or layout declaration.
4.3.7. Defining Keys
You define keys in FMS with the DFKBD (Define Keyboard) call. You define keys in DECforms with functions.
FMS and DECforms provide default definitions (called bindings in DECforms) for some keys. Also like FMS, DECforms provides defaults for what the Form Manager does when the operator presses a key. You can change the default effect of a key by defining a function response for the function bound to the key.
To move your FMS key definitions to DECforms, remove all DFKBD calls from your program. Define keys using the FUNCTION and FUNCTION RESPONSE statements in the form. Section 7.1, ''Defining Keys''discusses defining keys and writing function responses for keys.
4.3.8. Determining Form Context
- RETCX (Return Current Context), which returns:
Address of the current terminal control area (TCA)
Address of the current workspace
Name of the form being processed
Value of the associated UAR text, if one is defined
Cursor position
Last field terminator entered by the operator
Mode (Insert or Overstrike) in effect for a field
Number of times the operator has pressed the help key
RETFN (Return Current Field Name), which returns the name of the current field.
You use these calls, for example, when the operator enters an invalid value. With them you determine what state the terminal was in when the operator entered a field terminator. You can then put the form into a context that make sit easy for the operator to correct input and issue another GET-type call.
In DECforms, you can do little to modify the operator's context. For example, you cannot control cursor position or editing mode from the form. In DECforms, the operator is given this control.
SESSION—set to the session identification string the Form Manager returned to your session during an ENABLE request. The session identification string identifies the connection to a terminal similar to the way the current TCA and current workspace do in FMS.
FORMNAME—set to the name of the form currently in use.
FUNCTIONAME—set to the name of the last function entered by the operator. (Function names are similar to field terminators.)
CURRENTITEM—set to the name of the current field activation item or wait activation item.
Form EMPLOYEE_FORM Form Data SESSION Character (16)
| The SESSION built-in form data item is declared to be 16 characters because all session identification strings are 16 characters. |
| The other built-in form data items may vary in size. Each of them must be declared to be either CHARACTER or CHARACTER VARYING. |
See the VSI DECforms Programmer's Reference Manual for more information about the built-inform data items.
4.3.9. Displaying Forms
FMS and DECforms use different algorithms to display forms and panels. They have different methods of determining the width of what they display, and they have different methods of dealing with overlaid images on the display. Also, while you display forms with program calls in FMS,you use response steps in the form to display panels in DECforms. The sections that follow discuss how the Form Manager determines the terminal width setting it should use and how it overlays panels. It also explains how to get the effect of the three FMS calls that display forms.
4.3.9.1. Terminal Width Determination
The Form Manager determines how to set the terminal width using an aggregate of the widths of all viewports on the display for a particular session. If the first viewport requires80 columns, the Form Manager sets the terminal width to 80 columns. The terminal remains 80 columns wide until the Form Manager displays a viewport that requires 132 columns. Once the Form Manager displays a viewport that requires 132 columns, the terminal width is 132 columns until the Form Manager removes all viewports that require 132 columns from the display.
If a panel specifies a DISPLAY VIEWPORT clause, the width specified in the DISPLAY VIEWPORT clause determines the terminal width requirements of the viewport.
If no DISPLAY VIEWPORT clause exists in the panel declaration, the DISPLAYVIEWPORT clause in the viewport declaration determines the width requirements of the viewport.
If no DISPLAY VIEWPORT clause exists in either the panel or the viewport,the layout-level DISPLAY VIEWPORT clause determines the width requirements of the viewport.
Finally, if the Form Manager finds no DISPLAY VIEWPORT clause, the COLUMNS clause in the viewport declaration determines the width requirements of the viewport.
The Form Manager may change terminal width when it displays a panel or removes a viewport.
4.3.9.2. Panel Overlays
When the Form Manager displays a panel, it displays the panel over any other panels that it displayed previously.
If the operator requests a screen refresh, the Form Manager displays the active panel (the one requiring operator input) over any other panels on the display.
If the operator uses a function key to move from one panel to another,the Form Manager displays the panel to which the operator is moving over any other panels on the display.
4.3.9.3. Getting the Effect of the DISP and DISPW Calls
The DISP (Display Form) and DISPW (Display Loaded Form) FMS calls display forms. FMS clears the area specified by the Screen Area to Clear form attribute and overlays any remaining screen contents. You can specify an offset with these calls to determine where on the screen the form appears. For the DISP call, the form fields are empty when they are displayed, or they contain their default value. For the DISPW call, the form fields contain the values assigned to them in the workspace.
DECforms contains a response step that has an effect similar to the DISP and DISPW calls—the DISPLAY response step. Using this response step, you can display a particular panel. You can specify a viewport name in the response step to determine where the panel appears on the display. The Form Manager clears the area on the screen that corresponds to the viewport before it displays the panel.
When a DECforms panel is displayed, the values in the panel fields are the values of the corresponding form data items. The first time a panel is displayed, the form data item may be empty. In this case, the panel field is also empty. Otherwise, panel fields always contain the most recent data stored in the form data item, whether that data came from the data declaration (default value), the operator, or your program. Therefore, the DISPLAY response step is most similar to the FMS DISPW call.
Remove DISPW calls from your program and use the DISPLAY response step in ENABLE, SEND, and RECEIVE responses to perform similar tasks.
Also remove DISP calls from your program and use the DISPLAY response step. To get the effect of the DISP call, you may need to clear values out of form data items before the DISPLAY response step is executed. One way to clear the values in form data is to use the VALUE clause to assign spaces as the default value of form data items. Then, use the RESET response step toreset the form data items to their default value before you use the DISPLAY response step.
4.3.9.4. Getting the Effect of the CDISP Call
The CDISP (Clear Screen and Display Form) call allows you to clear the screen and display a form. Its purpose is to erase the effects of any screen management not done by FMS and then display an FMS form. It combines the effect of the CLEAR call and the DISPLAY call.
Form EMPLOYEE_FORM . . . Send Response EMPLOYEE_CHANGE_RECORD
| The SEND response causes the Form Manager to display the CHANGE_NAME panel when the program sends form record named EMPLOYEE_CHANGE_RECORD to the form. |
| The VIEWPORT statement declares a viewport that is 24 lines by80 columns. This viewport is the size of the screen on VT100 and VT200 series terminals. You may need to use different line and column clauses for other devices. |
| The VIEWPORT clause specifies that the Form Manager display the CHANGE_NAME panel in the WHOLE_SCREEN viewport. |
4.3.10. Marking Forms as Undisplayed
In FMS, you use the NDISP (Mark Form in Current Workspace as Not Displayed)call to mark a form as undisplayed. After you issue the call, the form is not redisplayed on a refresh operation and subsequent GET-type calls to the form are invalid.
DECforms does not have a concept like NDISP because all panels in a form are available for display at all times during application execution. Thus, displaying a DECforms panel is an efficient operation because it does not involve memory allocation,and you can display any number of panels in sequence without damaging performance.
Although you need not mark panels as undisplayed in DECforms,you may need to remove a panel from the display. To do this, use the REMOVE response step. The REMOVE response step causes the Form Manager to clear the viewport you specify, which removes the panel from the display.
Form PERSONNEL_FORM
   .
   .
   .
  Panel PERSONAL_INFO
   .
   .
   .
     Field MARITAL_STATUS
      Line 2 Column 6
        Exit Response
          If MARITAL_STATUS = "S" Then
            Activate Panel SINGLE_PANEL
            Position Immediate To Panel SINGLE_PANEL
          Else
            Activate Panel MARRIED_PANEL
            Position Immediate To Panel MARRIED_PANEL
          End If
       End Response
      End Field
 End Panel

Panel SINGLE_PANEL
 Viewport SMALL_VIEWPORT

 Exit Response
   Remove SMALL_VIEWPORT
 End Response
   .
   .
   .
  End Panel

  Panel MARRIED_PANEL
   Viewport SMALL_VIEWPORT

   Exit Response
     Remove SMALL_VIEWPORT
   End Response
   .
   .
   .
  End Panel
End Form
| The field exit response causes the Form Manager to conditionally activate and position to SINGLE_PANEL or MARRIED_PANEL. This Form Manager performs this response when the operator finishes entering data in the MARITAL_STATUS panel field. |
| SINGLE_PANEL is displayed in SMALL_VIEWPORT. |
| The exit response for SINGLE_PANEL causes the Form Manager to remove SMALL_VIEWPORT. When the Form Manager removes SMALL_VIEWPORT, it also removes SINGLE_PANEL. Notice that the REMOVE response step operates on viewports, not on panels. You supply the name of the viewport to be removed with this response step. This Form Manager performs this response when the operator finishes entering data in MARRIED_PANEL. |
| The Form Manager displays MARRIED_PANEL in SMALL_VIEWPORT and removes it from the display when it executes the exit response. |
4.3.11. Modifying the Keypad Mode
FMS allows you to modify the mode (numeric or application) of the terminal keypad using the SPADA (Set Keypad to Application Mode) call.
Form PERSONNEL_FORM
   .
   .
   .
     Panel EMPLOYEE_PERSONAL_INFO

       Display  %Keypad_application
       Field EMPLOYEE_NAME
         Line 3 Column 10
       End Field

       Field EMPLOYEE_PHONE_NUMBER
         Line 5 Same Column
         Display %Keypad_numeric
       End Field
   .
   .
   .
End Form
| The DISPLAY clause causes keypad keys to be treated as function keys. The keypad mode is application for all fields on the panel, unless the field overrides the mode in its own display clause. |
| The keypad mode for the EMPLOYEE_NAME field is application. |
| The DISPLAY clause for the EMPLOYEE_PHONE_NUMBER field specifies %KEYPAD_NUMERIC. The%KEYPAD_NUMERIC attribute specifies that keypad keys send the characters inscribed on them. |
4.3.12. Printing Forms
The RETFL (Return Form Line) and PRINT_SCREEN (Write Screen to Print File)calls print FMS forms. Using either call you can write form lines to a file for subsequent printing. You can also use RETFL to return the form line you specify to your program. You can then print that line.
To print a DECforms panel, you use the PRINT response step. This response step causes the Form Manager to write a panel to a file. You can then print the file. By default, the Form Manager writes the current display to a file. To specify that the Form Manager print a specific panel, you name the panel in the PRINT response step.
Each PRINT response step starts a new page in the printed output. You can close the current input file and open anew version of it by specifying PRINT IMMEDIATE. Otherwise, the Form Manager writes the output from the PRINT response step to the same file.
The Form Manager writes the output from the PRINT response step to your current default node, device, and directory. The Manager names the print file the same as your form file with the .TXT file type. You can specify a different file specification by defining the FORMS$PRINT_FILE logical name. You can specify a node, device, directory, file name, and file type in the logical name definition.
The file created by the Form Manager is an ASCII file. You can print it on a line printer.
4.3.13. Processing Field Terminators
The PFT (Process Field Terminator) call processes a field terminator that you pass to the Form Driver or, if you omit the terminator parameter, the last field terminator the operator entered. If necessary, the Form Driver changes the current field in the workspace; it returns the name of the new current field in one of the call parameters.
|
FMS Field Terminator |
Comparable DECforms Function |
DECforms Function Response |
|---|---|---|
|
FDV$K_FT_NTR |
TRANSMIT |
Terminates operator input, validates each field on the panel, and returns data to the program. |
|
FDV$K_FT_NXT |
NEXT ITEM |
Makes the activation item that is to be processed next the current activation item. If the activation item corresponds to a field, moves the cursor to that field. If no next activation item exists, displays a message. |
|
FDV$K_FT_PRV |
PREVIOUS ITEM |
Makes the activation item most recently processed the current activation item. If the previous activation item corresponds to a field, moves the cursor to that field. If no previous activation item exists, displays a message. |
|
FDV$K_FT_ATB |
AUTOSKIP attribute |
Behaves like NEXT ITEM |
|
FDV$K_FT_XBK |
EXIT GROUP PREVIOUS |
Makes the most recently processed field activation item that is not a member of the current group the current activation item. If no previous field activation item exists, issues an error message. Because a field can be in a group and not be in a scrolled region, this function works outside of scrolled regions in addition to inside them. |
|
FDV$K_FT_XFW |
EXIT GROUP NEXT |
Makes the field activation item that is not a member of the current group and that is to be processed next the current activation item. If no next activation item exists, issues an error message. Because a field can be in a group and not be in a scrolled region, this function works outside of scrolled regions in addition to inside them. |
|
FDV$K_FT_SNX FDV$K_FT_SFW |
UP OCCURRENCE |
Makes the next activation item that corresponds to a field in a vertically occurring group the current activation item. Scrolls the data on the display if necessary. |
|
FDV$K_FT_SPR FDV$K_FT_SBK |
DOWN OCCURRENCE |
Makes the previous activation item that corresponds to a field in a vertically occurring group the current activation item. Scrolls the data on the display if necessary. |
You should remove all PFT calls from your program. Because your DECforms form traps the functions that correspond to FMS terminators by default, you need not modify your form for the functions to be trapped. DECforms binds the functions to default keys, so you may want to change the key bindings for the functions. For example, if your operator uses the F20 key to move to a new field in your FMS application,you should bindF20 to the NEXT ITEM function. Section 7.1, ''Defining Keys'' explains how you do this.
4.3.14. Refreshing the Screen
To refresh the screen from your program in FMS, you call the RFRSH (Refresh Screen) call. This call redisplays all forms currently marked as being displayed. If more than one form is on the screen, the Form Driver redisplays the forms in the order in which their workspaces were attached. The Form Driver displays the current workspace's form last (on top of the other forms). In addition,the Form Driver may reset the keypad mode if your program previously called the SPADA call.
To refresh the screen in DECforms, you use the REFRESH response step. This response step causes the Form Manager to repaint the contents of all viewports in the current layout, a specific viewport, or the default viewport. To emulate the RFRSH call, you should specify REFRESH ALL because it repaints all viewports. This response step causes the Form Manager to refresh the entire screen if your viewports fill the entire screen.
The REFRESH response step behaves differently from the RFRSH call in that it does not remove inactive panels. In FMS, if a form's workspace is inactive and you call RFRSH, that form is not repainted during the refresh operation. A DECforms panel that does not correspond to any items on the activation list is roughly equivalent to a form that corresponds to an inactive workspace. The Form Manager removes an inactive panel from the display when the operator leaves the panel, unless you specify RETAIN in the panel's post display clause. If you specify RETAIN, the panel remains on the display after the operator leaves it. You can remove inactive panels with the REMOVE response step, but you cannot erase them with the REFRESH response step.
Another difference between the REFRESH response step and the RFRSH call is that the response step does not refresh the keypad mode or the terminal LEDs. The keypad mode in DECforms is controlled by the %KEYPAD_NUMERIC, %KEYPAD_APPLICATION, and %KEYPAD_UNCHANGED implement or attributes. Because most terminals do not have VT00 LEDs, you cannot affect the LEDs from the form or program.
To move your program to DECforms, remove all RFRSH calls. Use the REFRESH response step to refresh the screen and the elementary attributes to control the keypad mode.
4.3.15. Refreshing a Shared Screen
FMS provides the USER_REFRESH (Set up User Refresh Routine) call that allows a routine you write to refresh parts of the screen. The Form Driver calls your refresh routine any time it needs to refresh the screen. This call,then, gives you control over what the Form Driver displays when it refreshes the screen. If you did not have this control over the refresh operation, the Form Driver would clear any data you display independent of FMS. This effect occurs because FMS assumes that it "owns"the entire screen. It clears and repaints the entire screen during each refresh operation.
  Layout SMALL_LAYOUT
    Device
      Terminal Type %VT200
    End Device
    Units Characters
    Size 17 Lines By 80 Columns

    Viewport TOP_PART
      Lines 1 Through 15 Columns 1 Through 80
    End Viewport

    Viewport MESSAGE_LINE
      Lines 16 Through 17 Columns 1 Through 80
    End Viewport

    Panel NAME_PANEL
      Viewport TOP_PART
   .
   .
   .
    End Panel

    Panel MESSAGE_PANEL
      Viewport MESSAGE_LINE

      Field MESSAGE_FIELD
          Line 1 Column 1
           No Data Input
      End Field
    End Panel
   .
   .
   .
End Form
| The SIZE clause determines the size of the layout. All layouts must begin at Line 1 and Column 1. |
| The VIEWPORT declarations declare two viewports —one for data entry and one for messages. Combined, they occupy the entire area reserved for the layout. |
| The PANEL declarations declare two panels. The Form Manager displays NAME_PANEL in the TOP_PART viewport as specified by that panel's VIEWPORT clause. The Form Manager displays MESSAGE_PANEL in the MESSAGE_LINE viewport. |
You may want to refresh the entire screen when the operator requests a screen refresh. The operator usually requests that the screen be refreshed when it has been corrupted, for example, by operating system messages. If these messages could corrupt the part of the screen controlled by DECforms and the part not under DECforms control, you should refresh the entire screen.
Form EMPLOYEE_FORM
   .
   .
   .
    Viewport MESSAGE_LINE
      Lines 16 Through 17 Columns 1 Through 80
    End Viewport

    Function USER_REFRESH Is %Control_R End Function

    Function Response USER_REFRESH
       Call 'USER_REFRESH_ROUTINE'
       Refresh All
    End Response
   .
   .
   .
End Form
| The FUNCTION declaration binds the USER_REFRESH function to CTRL/R. |
| The USER_REFRESH_ROUTINE escape routine repaints lines 17 through24, columns 1 through 80. |
| The REFRESH ALL response step repaints lines 1 through 17. You should specify the REFRESH response step after the call to USER_REFRESH_ROUTINE because this allows DECforms to put the display device in a known state. For example, if your refresh routine sets the cursor to underline, the DECforms REFRESH response step can reset the cursor to normal before it is used by DECforms. |
4.3.16. Returning Data from the Form Workspace
To get data from the form workspace in FMS, you call either the RET (Return Value for Specified Field) or RETAL (Return Values for All Fields) call. The RET call returns the value of the field you specify from the current workspace. The RETAL call returns the values of all non-scrolled fields from the current workspace. The fields are returned in the order specified in the form description.
Although DECforms does not have the concept of a form workspace,it does maintain values in form data items. You can get data from form data items without displaying them or accepting operator input. To do so,you call the RECEIVE request and write a response for the request that specifies returning values to the program.
*
* The following call requests a record from form data.
* This call appears in the program.
*
    CALL "forms$receive"      USING BY DESCRIPTOR  SESSION_ID
                                                   "EMPLOYEE_UPDATE"
                                    BY REFERENCE    RECORD_COUNT
                                    OMITTED
                                    OMITTED
                                    OMITTED
                                    OMITTED
                                    OMITTED
                                    OMITTED
                                    OMITTED
                                    BY DESCRIPTOR  EMPLOYEE_UPDATE
GIVING FORMS_STATUS./* /*
/* The following response returns data to the program. /*
/* This response appears in the form inside the LAYOUT /*
/* statement. /*
Receive Response EMPLOYEE_UDPATE
Return
End Response
.
.
.The RETURN response step causes the Form Manager to collect the data from form data items that correspond to the EMPLOYEE_UPDATE form record and return them to the program.
The call and response shown in Example 4.21, ''FORMS$RECEIVE Call to Return Data from Form Data Items'' and Example 4.22, ''RECEIVE Response That Returns Data from Form DataItems'' do not exactly match either the FMS RET or RETAL call. The group of data returned to your program in this case is controlled by the fields in the form record, not the fields on the display. However, by declaring a form record and program record that contain the appropriate fields, you can cause the Form Manager to return the same data to your DECforms application program as the Form Driver did to your FMS application program.
You can get data from a form data array that corresponds to a scrolled region with the RETURN response step. To do so, you include the array in the form record and program record declarations. Section 7.5, ''Creating Scrolled Regions'' describes using scrolled regions.
4.3.17. Returning Named Data by Index and Name
FMS allows you to declare constant data that is associated with a form. You can reference the data by index or, if you supplied a name when you declared it, by name. This constant data is called Named Data. You get values from Named Data in your program with the RETDI (Return Named Data by Index) and RETDN (Return Named Data by Name) calls.
In DECforms you can create data items that serve the same function as named data by declaring form data items. Form data items can contain pre-defined constant values, which need not be displayed on the screen. Unlike Named Data, form data items must each have a unique name.
Form PERSONNEL_FORM

  Form Data
     VERSION_INFO       Character (10)     Value "VERSION 2"
     CREATION_DATE      Character (12)     Value "JANUARY 29"
   .
   .
   .
  End Data
Because most form processing is done in the form in DECforms,you may be able to move code that uses Named Data from your program to your form. However, if you need the information in your program, you must declare a form record that contains fields that correspond to the form data items. To get the data in your program, call the RECEIVE request.
Form PERSONNEL_FORM . . . Form Record CONSTANT_DATA_RECORD
| The form record declaration declares a record named CONSTANT_DATA_RECORD that contains fields corresponding to the VERSION_INFO and CREATION_DATE form data items. |
| The RECEIVE response controls what happens when you call the RECEIVE request and name the CONSTANT_DATA_RECORD in the receive-record-name parameter of the request call. |
| The RETURN IMMEDIATE response step causes the Form Manager to return control to the program without validating form data item values. The Form Manager returns the values in the VERSION_INFO and CREATION_DATE form data items to the program. |
To get the constant data in the program, use the FORMS$RECEIVE call and pass the CONSTANT_DATA_RECORD in the receive-record-identifier parameter.
4.3.18. Setting the Current Workspace
An FMS workspace maintains form context from one call to another. You can use more than one workspace in an application. To switch between workspaces, you attach the workspaces and then call the SWKSP (Set Current Workspace) call. This call makes the attached workspace you specify the current workspace. The current workspace is eligible for input.
Form PERSONNEL_FORM
   .
   .
   .
    Receive Response EMPLOYEE_RECORD
      Activate Panel  EMPLOYEE_PERSONAL_INFO
      Position To Panel EMPLOYEE_PERSONAL_INFO
    End Response
| The Form Manager performs the RECEIVE response when the program calls the RECEIVE request to get data from the form data items that correspond to the form record named EMPLOYEE_RECORD. |
| The ACTIVATE response step causes the Form Manager to add an item to the activation list for each panel field on the EMPLOYEE_PERSONAL_INFO panel. |
| The POSITION response step causes the Form Manager to display the EMPLOYEE_PERSONAL_INFO panel. The Form Manager gets input to the first field on that panel. (The first field in this case is determined by the order in which the fields are declared in your IFDL source file. An explicit POSITION response step to one of the fields could determine which field is processed first.) When the operator completes input to the first field and invokes the built-in NEXT ITEM function, input to the second field begins,and so on. The Form Manager returns data to the program in EMPLOYEE_RECORD when it finishes processing the RECEIVE request. |
4.3.19. Signaling the Operator
In FMS, you signal the operator from your program with the BELL (Ring Terminal Bell) and SIGOP (Signal Operator)calls. You can determine whether a visual or audible signal is used for the SIGOP call with the SSIGQ (Set Signal to Quiet Mode) call.
SIGNAL %BELL specifies that an audio signal (ringing the terminal bell) is given.
SIGNAL %REVERSE specifies that a visual signal (reversing the display) is given. The screen video attributes remain reversed (complemented) until the operator enters the next character. After that, the video attributes return to their original appearance.
SIGNAL %BELL is the default.
Form EMPLOYEE_FORM Function SELECT Is %Kp_3
| This function declaration binds the SELECT function to the KP3 key. |
| The function response specifies that the Form Manager display a message and ring the terminal bell if the operator's checking account balance is zero. Otherwise, the Form Manager activates the panel that allows the operator to write a check. |
The SIGNAL %REVERSE response step is inefficient on a VT241 terminal. Also, reversing the screen is not implemented on most terminal emulators, such as those for workstations. When your display device is a VT241 terminal or terminal emulator, use SIGNAL %BELL.
4.3.20. Trapping Illegal Field Terminators
The ILTRM (Return Illegal Terminators) call allows your program to receive terminators that are normally illegal in the current context. For example,a Next Field terminator is illegal when the current field is the last field on the form. Using ILTRM, you cause this terminator to be translated into a special terminator and sent to either the form's function key UAR or the program.
DECforms traps field terminators in the form with functions. You determine what action is taken when the operator presses a key using a function response. You can declare a response to a special function called the UNDEFINED FUNCTION to determine what occurs when the operator presses an undefined function key.
Section 7.1, ''Defining Keys'' gives more information on functions and function responses. See the VSI DECforms IFDL Reference Manual for more information on the UNDEFINED FUNCTION.
4.3.21. Waiting for the Operator
To synchronize the program with the pace of the operator, you can call the FMS WAIT (Wait for Operator) call. This call moves the cursor to the bottom right-hand of the screen and waits for the operator to enter a field terminator. Once the operator enters a field terminator, the wait is terminated and processing proceeds.
In DECforms, you use the ACTIVATE WAIT response step to create a wait activation item. When the wait activation item becomes the current activation item, the Form Manager moves the cursor to the bottom right corner of the screen and waits for the operator to enter a function. Once the operator enters a function, the Form Manager terminates the wait and processing proceeds.
You can position to the wait activation item with the POSITION TO WAIT response step.
Remove FMS WAIT calls from your program. Use the ACTIVATE WAIT response step to synchronize application control with operator input.
4.4. Running and Debugging the Converted DECforms Application
Once you have modified the output from the FMS Converter, you can translate the IFDL source file to a binary form file. Once you have rewritten your application program,you can compile and link it. You are then ready to run and debug your converted application.
FORMS TRANSLATE input-file-spec
You should replace input-file-spec with the file name of your IFDL source file. You can use qualifiers to the FORMS TRANSLATE command to control, for example, whether or not the IFDL Translator creates a log file during translation. You must translate each form your application uses into a binary form file. See the VSI DECforms Guide to Commands and Utilities for more information on the IFDL Translator.
Before you can run your application, you must compile and link yourprogram. You compile and link a program that calls DECforms the same as any other program. For example, to compile and link a COBOLprogram, you might issue the following commands:
$COBOL MY_PROGRAM.COB$LINK MY_PROGRAM.OBJ
You may also want to turn tracing on before you run your application. The Form Manager provides a Trace Facility that writes a message to a file. The messages indicate what tasks the Form Manager is performing. The trace file can be helpful to you when you are correcting problems that cause run-time errors.
To turn tracing on, define the FORMS$TRACE logical name to Y. The default trace file is named the same as the form file with the .TRACE type.
To change the default trace file name, define the FORMS$TRACE_FILE logical name to be the name of a file or the terminal. The following shows define commands that define FORMS$TRACE to on and FORMS$TRACE_FILE to file that does not have the default name:
$DEFINE FORMS$TRACE Y$DEFINE FORMS$TRACE_FILE TRACE_WITH_CHANGES.TRACE_FILE
Once you have successfully translated all necessary source files into form files, compiled and linked your program, and turned tracing on if you need it, you can use the DCL RUN command to run your application.
After you correct any errors that occur at run time, your conversion from FMS to DECforms is complete. You should turn tracing off to make your application run more efficiently. The following command turns tracing off:
$DEFINE FORMS$TRACE N
You may want to create, from your IFDL source files, object modules that you can link directly with your program, or you may want to store forms in a shareable image. The VSI DECforms Programmer's Reference Manual describes linking form object modules and storing forms in shareable images.
Chapter 5. Converting the FMS Sample Application
FMS provides a sample application on each distribution kit that demonstrates many FMS features. The sample application is a checking account application that lets an operator write checks on the checking account, make deposits into the account, see the transactions recorded in the check register, and view account information.
This chapter contains step-by-step instructions for converting the FMS sample application to DECforms; it assumes that you are familiar with the application. You may want to take time to look over the FMS sample before you begin the conversion.
The FMS sample application can be converted in a number of ways. The sections that follow show one way to convert the application so that the operator interface is maintained. This conversion would allow operators to use the resulting DECforms application after relatively little retraining.
5.1. Preparing to Convert the FMS Sample Application
BASIC
BLISS
C
COBOL
FORTRAN
Pascal
PL/I
You should copy the sample program you intend to convert to a private area. This chapter explains converting the COBOL version of the program. Although you can convert any of the programs, you can follow the instructions in this chapter best if you use the COBOL version program, too.
$SET DEFAULT [MYAREA.PRIVATE]$COPY FMS$EXAMPLES:SAMPCOB.COB, SAMPCOB.LIB, SAMPCOBUAR.LIB *.*
This command copies the source file for the COBOL program (SAMPCOB.COB),the library file for the main program (SAMPCOB.LIB), and the library file for UARs (SAMPCOBUAR.LIB). If you receive messages indicating that the directory or files cannot be found, the sample may not be installed on your system. Ask your system manager to copy the sample to your system from the latest FMS distribution kit available at your site.
$FMS/DESCRIPTION FMS$EXAMPLES:SAMP.FLB/OUTPUT=[MYAREA.PRIVATE]SAMP.LIS$PRINT SAMP.LIS
5.2. Invoking the FMS Converter
Before you invoke the FMS Converter, be sure you have set your default directory to one of your private directories. The Converter writes output to your current directory.
$FORMS CONVERT FMS FMS$EXAMPLES:SAMP.FLB/LOG
This command specifies that you want the FMS Converter to convert an FMS form library. The /LOG qualifier causes the Converter to issue a message each time it converts an FMS form to DECforms. The Converter also issues a message indicating that it has successfully converted 13 FMS forms.
In response to this command, the Converter creates an IFDL source file named SAMP.IFDL in your default directory.
5.3. Modifying the Converted IFDL Source File
Modify form data items
Rename panel fields
Add record declarations
You should add and modify comments in the IFDL source file as you convert the application. The sections that follow explain how to perform these tasks.
5.3.1. Modifying Form Data Items
The FMS Converter creates a panel field for each of the fields in the FMS form library for the sample application. Because DECforms requires that each panel field correspond to a form data item, the FMS Converter creates a form data item to match each panel field it creates. The FMS Converter gives the form data item the same name as the panel field.
The FMS form library in the sample application contains several fields that share the name of other fields. The duplicate names in the FMS form library cause the FMS Converter to create form data items that have the same name. DECforms does not allow duplicately named form data items, so you must delete or rename duplicate form data items. Notice that the FMS Converter creates comments that highlight data items that are duplicates.
Also, some form data items that the Converter declares are not needed in the DECforms application, so you can remove them.
Delete the second declaration of the STREET_FIELD form data item.
The STREET_FIELD form data item is created from the FMS form field STREET. The STREET field is used on the Account_data form and on the Check form in the FMS application. If you look at each of those forms,you notice that the street address of the account owner is displayed in the STREET field. Because the account owner has only one street address that is always the same, you need only one form data item to store that street address. To verify this,look in the program. The program stores the street address that it passes to both the Check FMS form and the Account_data FMS form in the ACCT_STREET variable.
Modify the declaration of the DATE_FIELD form data items.
In the FMS application, the date is displayed on the Account_data form, the Check form, the Deposit form, and the Register form. On the Account_data form, the date is the date on which the account was opened. On the Check form and the Deposit form, the date is the current date (today's date). On the Register form,the date is a scrolled field that displays the date of a number of transactions. Clearly, these dates have different purposes and more than one data item for storing dates is needed in the DECforms application. Follow these steps to create the needed date data items:Rename the first declaration of the DATE_FIELD form data item to OPEN_DATE. This form data item stores the date the account is opened.
Add the CURRENT clause to the declaration of the DATE_FIELD form data item.
You can use the DATE_FIELD form data item to display the current date on CHECK_PANEL and DEPOSIT_PANEL. Specify the CURRENT clause following the data type specification for this form data item.
Delete the declaration of DATE_FIELD that appears in the form data declaration for DEPOSIT_PANEL.
Retain the DATE_FIELD data item in the group. This data item stores a number of dates that are displayed in a scrolled region, so it must be a member of a group. Because the data item is in a group, its name is and it is, therefore, uniquely named with respect to non-group data items named DATE_FIELD. You must fully qualify all references to this data item; that is, you must include the group name in all references to the data item.
Delete the second declarations of the HOMEPH_FIELD and ACCTNO_FIELD form data items.
The HOMEPH_FIELD and ACCTNO_FIELD data items are similar to the STREET_FIELD data item. Both store values that are relative constants during application execution. The HOMEPH_FIELD stores the account owner's home phone number and the ACCTNO_FIELD stores the account number for the account. You need only one data item to store these values. Again, you can verify this by checking the program and seeing that the program stores each value in a single program variable.
Delete the second declaration of the MEMO_FIELD form data item.
The FMS Converter creates the MEMO_FIELD form data item from fields on the FMS Check form and the FMS Deposit form. The MEMO field on the Check form allows the operator to enter a memo that FMS prints on the check. The FMS application does not store the memo with other check information. On the Deposit form, the MEMO field allows the operator to indicate the source of the funds being deposited. The FMS application stores this memo with the deposit amount.
The purpose of the MEMO field on the FMS Deposit form is similar to the purpose of the PAYTO field on the FMS Check form. Both store information about funds being transferred. You can use the PAYTO_FIELD form data item to store deposit memos as well as information for checks. By using PAYTO_FIELD for checks and deposits, you eliminate the need for the second MEMO_FIELD form data item.
Retain the NUMBER_FIELD, AMTPAY_FIELD and BALANCE_FIELD declarations.
The NUMBER_FIELD, AMTPAY_FIELD, and BALANCE_FIELD form data items are generated by the FMS Converter from fields that are displayed on the Check form and the Register form in the FMS application. The NUMBER field displays the check number. The AMTPAY field displays the check amount. The BALANCE field displays the account balance. On the Check form, all three are simple fields. On the Register form, all three are scrolled fields that display a number of values. To create a scrolled field in DECforms,you declare a group of form data items. You then declare a panel group to match the group of form data items. You cannot display data stored in simple form data items in a scrolled region. You must declare a group of form data items to create a scrolled region. Therefore, you need two data items to store the check number, check amount, and account balance. One must be a simple form data item and one must be a group form data item.
In this case, the Converter output is exactly what is needed. The Converter creates three simple form data items, NUMBER_FIELD, AMTPAY_FIELD,and BALANCE_FIELD. The Converter also creates three form data items that are group members, .Notice that these form data items are uniquely named. You must fully qualify all references to the group data items.
Retain the DEPOSIT_FIELD form data items.
The DEPOSIT_FIELD form data item is generated by a field that appears on both the Deposit form and the Register form in the FMS application. On the Deposit form, the DEPOSIT field displays the deposit amount. On the Register form the DEPOSIT field is a scrolled field that displays the amount of a number of deposits. Therefore, you need two form data items to store deposit amounts.
Delete the FIRST_ND and LAST_ND data item declarations.
The Converter declares the FIRST_ND and LAST_ND form data items because the FMS application contains the FIRST and LAST Named Data items. These Named Data items store the first and last lines of the check form. The FMS application uses this information when it prints checks. In DECforms, you need not store the location of the first and last lines of a panel that you want to print.
Delete the NSCROL_ND form data item declaration.
The FMS Converter generates this item because the FMS application contains Named Data named NSCROL. This Named Data stores the number of lines in the scrolled region on the form. In DECforms, you need not store the number of lines in a scrolled region in a variable. The Form Manager controls scrolling for you, so your program does not have to keep track of how large scrolled regions are.
Delete the SUMMARY_FIELD_4 form data item.
The Converter creates the SUMMARY_FIELD_4 form data item from an FMS field that displays the current balance. In the DECforms application, the CURBAL_FIELD form data item stores the current balance. You need not replicate that storage in the SUMMARY_FIELD_4 data item.
Delete the FAKE_FIELD form data item declaration.
The FMS Converter creates the FAKE_FIELD form data item because of a field on the FMS Register form that gets a field terminator from the operator and allows the cursor to appear on each line of the scrolled region. The FAKE field is needed in the FMS application because each field in the scrolled region has the DISPLAY ONLY attribute. In DECforms, you can assign the NO DATA INPUT attribute to fields to protect them from data input, but allow function key input. The Form Manager can position the cursor to fields with the NO DATA INPUT attribute.
Delete the messages that mark the duplicately named items.
The FMS Converter creates IFDL comments that mark duplicately named form data items. You can remove the comments now that each form data item is uniquely named.
Form Data       /* Form data for panel ACCOUNT_DATA_PANEL */
    ACCTNO_FIELD                      Integer (5)
    OPEN_DATE                         Character (7)
    LAST_FIELD                        Character (20)
    FIRST_FIELD                       Character (15)
    MIDDLE_FIELD                      Character (15)
    STREET_FIELD                      Character (30)
    CITY_FIELD                        Character (20)
    STATE_FIELD                       Character (2)
    ZIP_FIELD                         Integer (5)
    HOMEPH_FIELD                      Integer (10)
    WORKPH_FIELD                      Integer (10)
    SECRET_FIELD                      Character (12)
    Supervisor_Only                   Integer(1)  Value 1
End Data

Form Data       /* Form data for panel CHECK_PANEL */
    NAME_FIELD                        Character (39)
    NUMBER_FIELD                      Integer (4)
    CSZ_FIELD                         Character (30)
    DATE_FIELD                        Date     CURRENT
    PAYTO_FIELD                       Character (35)
    AMTPAY_FIELD                      Decimal (6,2)
    MEMO_FIELD                        Character (35)
    BALANCE_FIELD                     Decimal (6,2)
End Data

Form Data       /* Form data for panel DEPOSIT_PANEL */
    CURBAL_FIELD                      Decimal (6,2)
    DEPOSIT_FIELD                     Decimal (6,2)
    NEWBAL_FIELD                      Decimal (6,2)

/* The following data items are a simulation of the FMS named_data for */
/* form DEPOSIT */

    DONE_ND                           Character (48)  Value 'Deposit made.
                                                             Press RETURN
                                                             or ENTER to
                                                             continue.'
End Data

Form Data       /* Form data for panel MENU_PANEL */
    OPTION_FIELD                      Integer (1)  Value 2
End Data

Form Data       /* Form data for panel REGISTER_PANEL */
  Group REGISTER_PANEL_GROUP_1
     Occurs  6
    NUMBER_FIELD                      Character (4)
    DATE_FIELD                        Character (7)
    PAYMEM_FIELD                      Character (35)
    DEPOSIT_FIELD                     Character (6)
    AMTPAY_FIELD                      Character (6)
    BALANCE_FIELD                     Character (6)
  End Group
    SUMMARY_FIELD_1                   Decimal (6,2)
    SUMMARY_FIELD_2                   Decimal (6,2)
    SUMMARY_FIELD_3                   Decimal (6,2)
End Data

Layout FMS_Cnv
   .
   .
   .
5.3.2. Renaming Panel Fields
The FMS Converter creates panel fields for each of the fields in the FMS form library. These panel fields are bound by name to the form data items that the FMS Converter creates. Each panel field displays data and accepts input for the form data item that shares its name. Because you deleted or renamed some of the form data items the Converter created, you must remove or rename the panel fields that corresponded to those data items.
The FMS Converter creates form data items with names that end in "_ND"to replace FMS Named Data. Because Named Data is not displayed, the Converter assumes that you do not need to display the contents of these data items. Therefore, the Converter does not create panel fields to correspond to these data items. You need not remove or rename panel fields to adjust for removing the FIRST_ND, LAST_ND, and NSCROLL_ND data items.
Rename the DATE_FIELD panel field on ACCOUNT_DATA_PANEL to OPEN_DATE.
You must change the date panel field on the ACCOUNT_DATA_PANEL from the name DATE_FIELD to the name OPEN_DATE. This change makes the panel field match the form data item that stores the date on which the account was opened.
Rename the MEMO_FIELD form data item on DEPOSIT_PANEL to PAYTO_FIELD.
The data input as a memo to DEPOSIT_PANEL should be stored and returned to the program with the deposit amount. The best form data item to use for this purpose is PAYTO_FIELD, which has been created to perform a similar purpose for check writing.
Rename the SUMMARY_FIELD_4 panel field to CURBAL_FIELD.
The SUMMARY_FIELD_4 panel field is designed to display the current account balance. The current account balance is stored in the CURBAL_FIELD form data item. If you rename SUMMARY_FIELD_4 to CURBAL_FIELD, the data in CURBAL_FIELD is displayed on REGISTER_PANEL.
Delete the FAKE_FIELD panel field on REGISTER_PANEL.
The FAKE_FIELD panel field is not needed in the DECforms application.
- ACCOUNT_DATA_PANEL
- ACCNTNO_FIELD
- OPEN_DATE
- LAST_FIELD
- FIRST_FIELD
- MIDDLE_FIELD
- STREET_FIELD
- CITY_FIELD
- STATE_FIELD
- ZIP_FIELD
- HOMEPH_FIELD
- WORKPH_FIELD
- SECRET_FIELD
- CHECK_PANEL
- NAME_FIELD
- NUMBER_FIELD
- STREET_FIELD
- CSZ_FIELD
- DATE_FIELD
- HOMEPH_FIELD
- PAYTO_FIELD
- AMTPAY_FIELD
- MEMO_FIELD
- ACCTNO_FIELD
- BALANCE_FIELD
- DEPOSIT_PANEL
- DATE_FIELD
- DEPOSIT_FIELD
- CURBAL_FIELD
- NEWBAL_FIELD
- PAYTO_FIELD
- MENU_PANEL
- OPTION_FIELD
- REGISTER_PANEL
- REGISTER_PANEL_GROUP_1.NUMBER_FIELD
- REGISTER_PANEL_GROUP_1.DATE_FIELD
- REGISTER_PANEL_GROUP_1.PAYMEM_FIELD
- REGISTER_PANEL_GROUP_1.DEPOSIT_FIELD
- REGISTER_PANEL_GROUP_1.AMTPAY_FIELD
- REGISTER_PANEL_GROUP_1.BALANCE_FIELD
- SUMMARY_FIELD_1
- SUMMARY_FIELD_2
- SUMMMARY_FIELD_3
- CURBAL_FIELD
Notice that although you removed form data items from the FORM DATA statement for CHECK_PANEL, you need not rename any of the fields on CHECK_PANEL. Each of the form data items that you removed from the form data item declaration for CHECK_PANEL was a duplicate form data item. A form data item by the same name exists elsewhere in the form data declaration and stores the appropriate value to be displayed in fields on CHECK_PANEL.
Also, you need not rename the DATE_FIELD panel field on DEPOSIT_PANEL, despite the fact that you deleted the form data item named DATE_FIELD from the form data items for DEPOSIT_PANEL. A form data item named DATE_FIELD appears in the form data declaration and the Form Manager displays its value in the DATE_FIELD panel field.
5.3.3. Adding Record Declarations
After you modify form data items and rename panel fields, you can add record declarations to your IFDL source file and your program. The records you declare allow your program to exchange data with the form. To determine what records are needed, you must determine what data needs to be exchanged between the form and the program and when the data needs to be exchanged. You must also know the data type of the data being passed.
To determine what records are needed for the sample application, step through the program. Determine when the sample program passes data and what data it passes by examining the FMS PUT-type and GET-type calls in the program. You may be able to use existing records in the program to pass data in the converted application.
The data type of all the data items the FMS sample program passes to FMS forms is the CHARACTER data type. Therefore, you can create all your form record fields in DECforms with the CHARACTER data type. Later, as you modify the program, you may want to change some of the data types to match how you use the data and avoid converting numeric data to and from character strings. However, it is best to begin transferring character string data.
Create a form record and program record to pass the current balance to the form.
The sample program reads the current account balance from a data file and passes it to the form. In the DECforms application, you can pass the current balance only once during application execution. Once the current balance is stored in the form, you can maintain it in the form.
Add the following form record declaration following the last FORM DATA statement in your IFDL source file:. . . SUMMARY_FIELD_2 Decimal (6,2) SUMMARY_FIELD_3 Decimal (6,2) End Data Form Record CURRENT_BALANCE CURBAL_FIELD Character (6) End RecordDeclare a program record to pass the current balance. Add the following program record declaration to the Working-Storage Section of the SAMP program:IDENTIFICATION DIVISION.PROGRAM-ID. SAMP. . . . WORKING-STORAGE SECTION. . . . * * Record to pass the current balance * 01 CURRENT_BALANCE GLOBAL. 05 CURBAL_FIELD PIC 9(6).
The CURBAL_FIELD program variable and form data item store the current balance.
Declare records to pass formatted check data to the form.
During the initialization of program data, the INACCT subprogram calls the FMTCHK subprogram, which formats account data and sends the formatted data to the form. The FMS program formats the account data because it is too long to be displayed in the fields on the FMS Check form. This formatting must be done in the DECforms application, too, and you need to declare a form record and program record that pass the formatted values. You must also pass a check number to the form, and you can pass it in the same record.
Add the declaration of the CHECK_FORMAT form record following the CURRENT_BALANCE form record in the IFDL source file, as shown:. . . CURBAL_FIELD Character (6) End Record Form Record CHECK_FORMAT CHECK_NUMBER Character (4) NAME_FIELD Character (39) CSZ_FIELD Character (30) End RecordAdd the CHECK_FORMAT program record to the Working-Storage Section of the FMTCHK subprogram:IDENTIFICATION DIVISION. PROGRAM-ID. FMTCHK IS COMMON. *+ * Format account data so that it can be displayed on CHECK_PANEL *+ DATA DIVISION. WORKING-STORAGE SECTION. * * Record to pass formatted check data * 01 CHECK_FORMAT 05 NEW_CHECK_NUMBER PIC 9(4). 05 NAME_CONDENSED PIC X(39). 05 CSZ_CONDENSED PIC X(30). 01 FIRST_LEN PIC 9(4) COMP. 01 CITY_LEN PIC 9(4) COMP. 01 UNUSED_STRING PIC X(80).
The NEW_CHECK_NUMBER program variable stores the check number. The NAME_CONDENSED program variable and the NAME_FIELD form data item store the formatted account owner name. The formatted city, state, zip code information is stored in CSZ_CONDENSED in the program and CSZ_FIELD form data item. (You can pass other check information that need not be formatted in another record, as explained later in this section.)
You must declare a form data item to correspond to the CHECK_NUMBER form record field. Declare the form data item to appear as follows:Form Data /*Form data for panel CHECK_PANEL*/ CHECK_NUMBER Integer (4) NAME_FIELD Character (39) NUMBER_FIELD Integer (4) . . .You must also rename the panel field that displays the check number on CHECK_PANEL. Rename the NUMBER_FIELD panel field to CHECK_NUMBER.
Do not rename the panel field. The use of that panel field is explained later in this section.
Create a form record and program record to get a choice from the operator.
The first value that the FMS sample program gets from the form is the operator choice. The operator enters a value to indicate what task (write a check,make a deposit, and so on) is desired.
In the DECforms application, the operator enters the choice value in a panel field named OPTION_FIELD. The Form Manager stores input to that field in the OPTION_FIELD form data item. To move data from the OPTION_FIELD to the program, you need a form record and a program record.
Declare the form record following the CHECK_FORMAT form record in the IFDL source file:. . . NAME_FIELD Character (39) CSZ_FIELD Character (30) End Record Form Record GET_CHOICE OPTION_FIELD Character (1) End RecordAdd the program record to the Working-Storage Section of the MENU subprogram:IDENTIFICATION DIVISION. PROGRAM-ID. MENU. . . . WORKING-STORAGE SECTION. *+ * Record to get a choice from the operator *- 01 GET_CHOICE. 05 D-MENU-OPTION PIC X(1). *
The D-MENU-OPTION program variable and the OPTION_FIELD form data item store the operator's choice.
Add a form record and a program record to get check data from the operator.
If the operator chooses to write a check, the program calls the WRITCH subprogram. The operator can write a number of checks during the execution of the WRITCH subprogram. One way to allow this in DECforms is to put a loop in the program and call the RECEIVE request a number of times until the operator finishes writing checks. Another way is to declare a group of form data items. A group of form data items creates an array and can store a number of occurrences of the same type of data. If you use a group of form data items, the program can call the RECEIVE request once to get data on a number of checks.
Add a form record that contains a group to the IFDL source file following the GET_CHOICE record, as shown:. . . Form Record GET_CHOICE OPTION_FIELD Character (1) End Record Form Record COLLECT_DATA TRANSACTION_COUNT Longword Integer Group TRANSACTION_DATA Occurs 50 NUMBER_FIELD Character (4) DATE_FIELD Character (7) PAYTO_FIELD Character (35) AMTPAY_FIELD Character (6) BALANCE_FIELD Character (6) End Group End RecordAdd the program record to the SAMP routine, as shown:IDENTIFICATION DIVISION. PROGRAM-ID. SAMP. . . . WORKING-STORAGE SECTION. . . . * * Record to get check data * 01 COLLECT_DATA GLOBAL. 05 TRANSACTION_COUNT PIC 9(8) COMP. 05 TRANSACTION_DATA OCCURS 50. 10 NUMBER_FIELD PIC X(4). 10 DATE_FIELD PIC X(7). 10 PAYMEM_FIELD PIC X(35). 10 AMTPAY_FIELD PIC 9(6). 10 BALANCE_FIELD PIC X(6).The TRANSACTION_COUNT program record field and form data item store the number of checks written. The program uses this number when it updates the check register record. The TRANSACTION_DATA group stores the check number, date, person to whom the check is written, amount of the check, and new account balance for each check written.
You must modify form data to make it match the declaration of this form record. Change the CHECK_PANEL form data declaration by adding form data item declarations and group declarations; the FORM DATA statement for CHECK_PANEL must appear as follows:Form Data /* Form data for panel CHECK_PANEL */ CHECK_NUMBER Integer (4) NAME_FIELD Character (39) CSZ_FIELD Character (30) MEMO_FIELD Character (35) Value " " TRANSACTION_COUNT Longword Integer Group TRANSACTION_DATA Occurs 50 NUMBER_FIELD Integer (4) DATE_FIELD Date Current PAYTO_FIELD Character (35) Value " " AMTPAY_FIELD Decimal (6,2) Value 0 BALANCE_FIELD Decimal (6,2) Value 0 End Group End DataAdd the VALUE clauses to ensure that each form data item contains spaces or zeros the first time it is displayed. The Form Manager initializes the data items using the VALUE clause during the processing of the ENABLE request.
In addition, you must modify the panel fields displayed on CHECK_PANEL. You must create a panel group containing the panel fields that correspond to the form data items in the TRANSACTION_DATA group. The following example shows how the panel fields for CHECK_PANEL must appear:Panel CHECK_PANEL . . . Field NAME_FIELD Line 3 Column 5 Output Picture X(39) Protected End Field Field STREET_FIELD Line 4 Column 5 Output Picture X(30) Protected End Field Field CSZ_FIELD Line 5 Column 5 Output Picture X(30) Protected End Field Field HOMEPH_FIELD Line 6 Column 13 Output Picture '('999')'999'-'9999 Protected End Field Field CHECK_NUMBER Line 3 Column 72 Display Underlined Justification Right Output Picture 9(4) Protected End Field Group TRANSACTION_DATA Vertical Displays 1 Field NUMBER_FIELD Line 3 Column 72 Display Underlined Justification Right Output Picture 9(4) Protected End Field Field DATE_FIELD Line 5 Column 64 Display Underlined Output Picture 99'-'AAA'-'99 Protected End Field Field PAYTO_FIELD Line 8 Column 12 Display Underlined Minimum Length 1 Output Picture X(35) Use Help Message 'The person/company who is the recipient of your beneficence' End Field Field AMTPAY_FIELD Line 8 Column 66 Display Underlined Justification Right Replace Leading '*' Minimum Length 1 Output Picture 9999R'.'99 Use Help Message 'Enter amount of check' Exit Response Call 'CHKCHK' Call 'RANGE' Using '100, This bank doesn''t issue such small checks. Send cash.' End Response End Field Field BALANCE_FIELD Line 16 Column 44 Justification Right Output Picture 9999R'.'99 Protected End Field End Group Field MEMO_FIELD Line 10 Column 12 Display Underlined Output Picture X(35) Use Help Message '(Optional) A reminder of why you and your money are parting' End Field Field ACCTNO_FIELD Line 13 Column 71 Justification Right Output Picture X(5) Protected End Field End PanelModify the COLLECT_DATA record so that you can use it to get deposit data, in addition to check data.
If the operator chooses to make a deposit in the FMS application, the program sends the current balance to the form twice. First,the program sends the current balance for FMS to display before the operator makes a deposit. Then, the program sends an updated balance that FMS displays after the operator makes a deposit. After the deposit transaction is complete, FMS returns the deposit date, memo of why the deposit is made, and deposit amount to the program. The program updates the check register with this information.
Because DECforms can store values between several requests, the before-deposit balance does not need to be sent to the form in DECforms. That balance is stored in the CURBAL_FIELD data item. You can calculate the after-deposit balance in an escape routine that you call from the form, so you do not need a record to transfer the after-deposit balance between the program and form.
The other information that the form and program need to exchange is similar to the information they exchange during check writing. The program needs to get the date of the deposit, memo of where the funds for the deposit came from, and amount of the deposit. The program also needs to get the new account balance from the form.
Because this data is similar to the check-writing data, you can use the COLLECT_DATA record to get deposit data. Modify that record to appear as follows:. . . NAME_FIELD Character (39) CSZ_FIELD Character (30) End Record Form Record COLLECT_DATA TRANSACTION_COUNT Longword Integer Group TRANSACTION_DATA Occurs 50 NUMBER_FIELD Character (4) DATE_FIELD Character (7) PAYTO_FIELD Character (35) AMTPAY_FIELD Character (6) DEPOSIT_FIELD Character (6) BALANCE_FIELD Character (6) End Group End RecordYou must also modify the program record as follows:IDENTIFICATION DIVISION.PROGRAM-ID. SAMP. . . . WORKING-STORAGE SECTION. . . . * * Record to get check and deposit data * 01 COLLECT_DATA GLOBAL. 05 TRANSACTION_COUNT PIC 9(8) COMP. 05 TRANSACTION_DATA OCCURS 50. 10 NUMBER_FIELD PIC X(4). 10 DATE_FIELD PIC X(7). 10 PAYMEM_FIELD PIC X(35). 10 AMTPAY_FIELD PIC 9(6). 10 DEPOSIT_FIELD PIC 9(6). 10 BALANCE_FIELD PIC X(6).The form record field and program record field allow this record to get the deposit amount. The form record field and the program record field exchange the memo for a deposit. The and record fields exchange the date of the deposit and balance after the deposit, respectively. The other fields in these records are not used during deposits.
You must modify form data by moving the declaration of the DEPOSIT_FIELD form data item from the FORM DATA statement for DEPOSIT_PANEL to the declaration of the TRANSACTION_DATA group. Form data should appear as follows after you make this change:Form Data /* Form data for panel CHECK_PANEL */ CHECK_NUMBER Integer (4) NAME_FIELD Character (39) CSZ_FIELD Character (30) MEMO_FIELD Character (35) Value " " TRANSACTION_COUNT Longword Integer Group TRANSACTION_DATA Occurs 50 NUMBER_FIELD Integer (4) DATE_FIELD Date Current PAYTO_FIELD Character (35) Value " " AMTPAY_FIELD Decimal (6,2) Value 0 DEPOSIT_FIELD Decimal (6,2) Value 0 BALANCE_FIELD Decimal (6,2) Value 0 End Group End Data Form Data /* Form data for panel DEPOSIT_PANEL */ CURBAL_FIELD Decimal (6,2) NEWBAL_FIELD Decimal (6,2) End Data . . .Add the VALUE clause to the DEPOSIT_FIELD form data item to be sure that it is empty the first time you use it.
Modify the panel fields declared on DEPOSIT_PANEL and create a panel group containing the panel fields that correspond to the form data items in the TRANSACTION_DATA group. The following example shows how the panel fields for DEPOSIT_PANEL must appear:Panel DEPOSIT_PANEL . . . Group TRANSACTION_DATA Vertical Displays 1 Field DATE_FIELD Line 2 Column 55 Output Picture 99'-'AAA'-'99 Protected End Field Field DEPOSIT_FIELD Line 6 Column 42 Display Underlined Replace Leading '0' Minimum Length 1 Output Picture 9999R'.'99 Use Help Message 'Enter amount of deposit' End Field Field PAYTO_FIELD Line 11 Column 28 Display Underlined Minimum Length 1 Output Picture X(35) Use Help Message 'Enter the origin of the deposit' End Field End Group Field CURBAL_FIELD Line 4 Column 42 Justification Right Output Picture 9999R'.'99 Protected End Field Field NEWBAL_FIELD Line 8 Column 42 Justification Right Output Picture 9999R'.'99 Protected End Field End PanelDeclare one form record and program record for viewing the check register.
The check register in the FMS application is an array of data items that shows all transactions made on the account. The form that displays the check register also shows a summary of the current session. That form shows the starting balance of the session,the deposits made, the checks written, and the new balance.
In the DECforms application, only the array of data items needs to be sent to the form when the operator asks to see the check register. You can maintain the session summary information in the form using escape routines.
The following example shows the record you must declare to pass check register data to the form:. . . DEPOSIT_FIELD Character (6) BALANCE_FIELD Character (6) End Group End Record Form Record REGISTER TRANSACTION_COUNT Longword Integer Group REGISTER_PANEL_GROUP_1 Occurs 50 NUMBER_FIELD Character (4) DATE_FIELD Character (7) PAYMEM_FIELD Character (35) DEPOSIT_FIELD Character (6) AMTPAY_FIELD Character (6) BALANCE_FIELD Character (6) End Group End RecordDelete the FILLER field from the REGISTER program record and move the declaration of the program record field from the FOUND-IN-REGISTER record to the REGISTER record. You can then use the REGISTER record to pass register information to the form. The record must appear as follows:IDENTIFICATION DIVISION.PROGRAM-ID. SAMP. . . . WORKING-STORAGE SECTION. . . . *+ * Register data format of 2nd thru n records in SAMP.DAT *+ 01 REGISTER GLOBAL. 05 LAST_REGISTER_NUM PIC 9(4). 05 REGISTER_ITEM OCCURS 50 TIMES. 10 REG_ITEM_NUMBER PIC 9(4). 10 REG_ITEM_DATE PIC X(7). 10 REG_ITEM_MEMO_PAY_TO PIC X(35). 10 REG_ITEM_DEPOSIT_AMT PIC 9(6). 10 REG_ITEM_PAY_AMT PIC 9(6). 10 REG_ITEM_BALANCE PIC 9(6). *Change the group declaration in the FORM DATA statement to allow it to store 50 items as follows:Form Data /* Form data for panel REGISTER_PANEL */ Group REGISTER_PANEL_GROUP_1 Occurs 50 NUMBER_FIELD Character (4) . . .Create one form record for viewing the account data.
When the operator chooses to view and change account data, the FMS application displays account data previously sent to the form. If the operator chooses to change the account information, FMS returns the new information to the program.
In the DECforms application, the account data must be sent to the form and may be returned to the program. The COBOL source file contains a program record that you can use for both these purposes. Declare a logically equivalent form record to allow the data to be passed.
Add the form record declaration following the declaration of the REGISTER form record, as shown:. . . AMTPAY_FIELD Character (6) BALANCE_FIELD Character (6) End Group End Record Form Record ACCOUNT ACCTNO_FIELD Character (5) OPEN_DATE Character (7) LAST_FIELD Character (20) FIRST_FIELD Character (15) MIDDLE_FIELD Character (15) STREET_FIELD Character (30) CITY_FIELD Character (20) STATE_FIELD Character (2) ZIP_FIELD Character (5) HOMEPH_FIELD Character (10) WORKPH_FIELD Character (10) SECRET_FIELD Character (12) End Record Layout FMS_Cnv . . .
5.3.4. Modifying the Help Syntax
The help provided in the FMS sample application is consistent throughout the application. When the cursor is on a field and the operator presses the HELP key, FMS displays a message that explains how to give input to that field. If the operator presses the HELP key again, FMS displays a help form that gives information about the form on which the FMS field appears. If the operator presses the HELP key three times, FMS displays a help form that explains the keys defined in the sample application.
Change the PANEL statement to the HELP PANEL statement for each panel in the DECforms IFDL source file that is a help panel.
The FMS Converter cannot distinguish between help panels and data entry panels. It declares all panels in the converted form using the PANEL statement. DECforms requires that panels you use as help panels(that is, panels you name in a USE HELP PANEL clause) be declared with the HELP PANEL statement. The converted DECforms application contains the following help panels:HELP_ACCOUNT_DATA_PANEL
HELP_CHECK_PANEL
HELP_DEPOSIT_PANEL
HELP_KEYS_PANEL
HELP_MENU_PANEL
HELP_WELCOME_PANEL
The following example shows how the FMS Converter declares:Panel HELP_ACCOUNT_DATA_PANEL Viewport HELP_ACCOUNT_DATA_VP Display %Keypad_application Literal Rectangle . . . End Panel
Modify this declaration to appear as follows:Help Panel HELP_ACCOUNT_DATA_PANEL Viewport HELP_ACCOUNT_DATA_VP Display %Keypad_application Literal Rectangle . . . End Panel
Delete the comments around the USE HELP PANEL clause in the data entry panels.
The FMS Converter creates a USE HELP PANEL clause in each DECforms data entry panel that should be associated with a help panel. The Converter determines which data entry panels should relate to help panels by using information in the sample FMS application. Each of the FMS help forms is related to an FMS data entry form or help form. The Converter relates the DECforms help panel created from each FMS help form to the data entry panel created from the data entry form or help form.
You should remove the comments surrounding the USE HELP PANEL clause in each data entry panel. The USE HELP PANEL clause appears in the following data entry panels in the converted application:ACCOUNT_DATA_PANEL
CHECK_PANEL
CHECK_DONE_PANEL
DEPOSIT_PANEL
MENU_PANEL
WELCOME_PANEL
Delete the USE HELP PANEL clause from help panels.
The FMS Converter also creates the USE HELP PANEL clause inside of help panels to maintain the relationship that existed between two FMS help forms. DECforms does not allow you to specify the USE HELP PANEL clause within help panels, so you must remove it. The following help panels contain USE HELP PANEL clauses:HELP_ACCOUNT_DATA_PANEL
HELP_CHECK_PANEL
HELP_DEPOSIT_PANEL
HELP_MENU_PANEL
HELP_WELCOME_PANEL
Add a function response to help panels to display the HELP_KEYS_PANEL.
DECforms provides a function named NEXT HELP that the Form Manager performs when the operator presses the HELP key. You can define a function response for this function inside help panels to override its default actions. By default, when the operator presses the HELP key while positioned on a help panel, the Form Manager displays a message indicating that no more help is available. Add the following function response to the help panels (other than the HELP_KEYS_PANEL) in the sample application:Function Response NEXT HELP Activate Wait On HELP_KEYS_PANEL Position To Wait On HELP_KEYS_PANEL End Response
This function response causes the Form Manager to add a wait activation item to the activation list for the HELP\_KEYS\_PANEL. The Form Manager makes that item the current item, as specified by the POSITION response step. When the wait activation item becomes the current activation item, the Form Manager displays the HELP\_KEYS\_PANEL. The operator can press a function key to satisfy the activation item.
Add this response immediately following the VIEWPORT statement in the help panels other than the HELP\_KEYS\_PANEL.
Add a function response to terminate help to the HELP\_KEYS\_PANEL.
Once the HELP\_KEYS\_PANEL is displayed, no more help is available. In the FMS application, the operator terminates help by pressing the RETURN key. Add the following function response to the HELP\_KEYS\_PANEL:Panel HELP_KEYS_PANEL Viewport HELP_KEYS_VP Display %Keypad_application Function Response NEXT_STEP Exit Help End ResponseThis response causes the Form Manager to set the HELP ACTIVE condition to false and return processing to the item that was active when the operator invoked help.
5.4. Rewriting the Application Program
During the conversion process you must modify the program that drives the sample application to use DECforms, instead of FMS. To do this, you change FMS calls to DECforms calls, move program logic into the form,and rewrite parts of the application to use DECforms more efficiently. One way to approach these tasks is to start at the point in the program where execution begins. You can then convert each statement in the program by following the flow of execution through the program. The sections that follow explain one way of modifying the FMS sample program.
5.4.1. Converting the SAMP Program
The main program of the sample program, SAMP, declares much of the data used in the application. It also attaches and detaches FMS by attaching and detaching a terminal and workspaces, opening and closing the form library, and setting the keypad mode and signal mode. The sections that follow explain how to convert the SAMP program.
5.4.1.1. Converting the Working-Storage Section
- Delete the data items named in Table 5.1, ''Data Items That Can Be Removed from the Sample Program''.
Table 5.1. Data Items That Can Be Removed from the Sample Program Data Item
Explanation
TERM_CONTROL_AREA
Stores the name of the Terminal Control Area (TCA). DECforms does not store a TCA name.
WORKSPACE
CHECK_WORKSPACE
Stores the location of the workspace. DECforms does not use workspaces.
MENU_FORM
CHECK_FORM
DPOSIT_FORM
Store the locations of memory-resident forms. In DECforms, the panels in the active layout are automatically memory resident.
KEY_PAD_MODE
Stores a value that determines the setting of the keypad mode: application or numeric mode. You control the keypad mode in the form in DECforms.
SIGNAL_BELL
Stores a value that controls the signal mode: audio or visual. You control the signal mode in the form in DECforms.
LOGICAL_UNIT
LOGICAL_UNIT_TT
Store the channel number for the form library and terminal. In DECforms, you use a session identification number instead of a channel number.
RMS_STATUS
Stores status from RMS (Record Management Services). In DECforms, all status is returned to a single variable.
TERMINATOR
Stores terminators used by the operator. In DECforms, you trap terminators (called functions) in the form,instead of in the program.
TERM_CONTROL_AREA_SIZE
Stores the size of the TCA. OpenVMS does not need this value.
WORKSPACE_SIZE
CHECK_WORKSPACE_SIZE
Store the estimated sizes of workspaces. DECforms does not use workspaces.
MENU_FORM_SIZE
CHECK_FORM_SIZE
DPOSIT_FORM_SIZE
UNUSED_TRUE_SIZE
Store the sizes of the forms to be added to the dynamic memory-resident list. DECforms determines the size of panels in memory automatically.
FIELD_INDEX
Stores the index of the SUMMARY indexed field. DECforms does not use indexed fields.
CUR_LINE
MIN_WINDOW
MAX_WINDOW
Store values that allow the program to control scrolling in the application's scrolled region. In DECforms, the Form Manager controls scrolling.
- Delete the following COPY statement:
COPY "SAMPCOB"
The SAMPCOB library file declares the FMS field name variables. Your DECforms program does not need to know the names of panel fields.
Rename the SAMP\_FORM\_LIB data item and change its initial value. The SAMP\_FORM\_LIB contains the name of the form library for the application. You should change the name of this variable to SAMP_FORM and change its value to "SAMP.FORM".
Rename the FMS_STATUS variable to FORMS_STATUS.
Delete the DEPOSIT record. The COLLECT_DATA record gets information for deposit transactions.
Modify the LAST_CHECK_NUM record field and the ACCT_BALANCE record field.
Make the LAST_CHECK_NUM field and the ACCT_BALANCE field variables, instead of record fields. Remove the FOUND-IN-REGISTER record because it is not needed in the converted application.
Modify the COPY statement for the FMS definitions file.
The FDVDEF.LIB file is copied to give the program access to FMS declarations. Change the definitions file name to SYS$LIBRARY:FORMS$COB_DEFINITIONS.LIB to copy DECforms definitions.
- Add the following three variables that are needed by DECforms:
SESSION_ID, which must be declared to be a 16-character string.
RECORD_COUNT, which you can declare as a numeric string. You must also assign a value of 1 to the variable using the COBOL VALUE clause.
DISPLAY_DEVICE, which you can declare to hold the name of a device. You can store SYS$INPUT in this variable to make it general-purpose.
Declare each of these variables as global variables.
IDENTIFICATION DIVISION.PROGRAM-ID.  SAMP.
   .
   .
   .
WORKING-STORAGE SECTION.
01      SAMP_FORM             PIC X(21)      VALUE "FORMS$EXAMPLES:SAMP.FORM".
01      TOTAL_DEPOSIT         PIC 9(6)          GLOBAL.
01      TOTAL_PAYMENTS        PIC 9(6)          GLOBAL.
01      MAX_DEPOSIT           PIC 9(6)          GLOBAL VALUE 999999.
01      MAX_PAYMENT           PIC 9(6)          GLOBAL VALUE 999999.
01      FORMS_STATUS          PIC S9(9) COMP    GLOBAL.
01      SESSION_ID            PIC X(16)         GLOBAL.
01      RECORD_COUNT          PIC 9(1)          GLOBAL  VALUE 1.
01      DISPLAY_DEVICE        PIC X(10)         VALUE "SYS$INPUT".
*
*     Record to pass current balance
*
01      CURRENT_BALANCE       PIC 9(6)          GLOBAL.
   05         CURBAL_FIELD       PIC 9(6).
*
*    Record to get check and deposit data
*
01     COLLECT_DATA                             GLOBAL.
       05       TRANSACTION_COUNT      PIC 9(8) COMP.
       05       TRANSACTION_DATA OCCURS 50.
                10 NUMBER_FIELD        PIC 9(4).
                10 DATE_FIELD          PIC X(7).
                10 PAYMEM_FIELD        PIC X(35).
                10 AMTPAY_FIELD        PIC 9(6).
                10 DEPOSIT_FIELD       PIC 9(6).
                10 BALANCE_FIELD       PIC 9(9).
*
*    Account Record format of first record in SAMP.DAT
*
01      ACCOUNT                                 GLOBAL.
        05      ACCT_NUMBER      PIC X(5).
        05                       PIC X(7).
        05      ACCT_NAME.
                10       LAST_NAME       PIC X(20).
                10       FIRST_NAME      PIC X(15).
                10       MIDDLE_NAME     PIC X(15).
        05      ACCT_STREET              PIC X(30).
        05      CITY-STATE-ZIP.
                10      CITY             PIC X(20).
                10      STATE            PIC X(2).
                10      ZIP              PIC X(5).
        05      ACCT_HOME_PHONE          PIC X(10).
        05                               PIC X(10).
        05      ACCT_PASSWORD            PIC X(12).
*
*     Register data format of 2nd thru n records in SAMP.DAT
*
01      REGISTER                                GLOBAL.
        05      LAST_REGISTER_NUM               PIC 9(4).
        05      REGISTER_ITEM            OCCURS 50 TIMES.
                10      REG_ITEM_NUMBER         PIC 9(4).
                10      REG_ITEM_DATE           PIC X(7).
                10      REG_ITEM_MEMO_PAY_TO    PIC X(35).
                10      REG_ITEM_DEPOSIT_AMT    PIC 9(6).
                10      REG_ITEM_PAY_AMT        PIC 9(6).
                10      REG_ITEM_BALANCE        PIC 9(6).
01      REGISTER_MAX                     PIC 9999       GLOBAL VALUE 50.
01      LAST_CHECK_NUM                   PIC 9(4)       GLOBAL.
01      ACCT_BALANCE                     PIC 9(6)       GLOBAL.
*
*       Forms SYMBOLS*COPY "SYS$LIBRARY:FORMS$DEFINITIONS_COBOL".
   .
   .
   .
5.4.1.2. Converting the Procedure Division
Delete the first 14 calls in the program, including the calls to the GETSTAT subprogram.
These calls set up the FMS form environment. In DECforms, you use the ENABLE call for this purpose.
One of these calls sets the signal mode for the application to ring the terminal bell. DECforms does not contain the concept of signal mode. It does contain a SIGNAL response step that you can use to signal the operator. You specify that the signal ring the terminal bell in the response step; that is, by specifying SIGNAL %BELL.
Add the FORMS$ENABLE call.
Add the FORMS$ENABLE call as the first statement in the Procedure Division:PROCEDURE DIVISION.0.*+* Initialize DECforms * Choose form for this session * Attach terminal * Open channel * Put up welcome form and wait for response *- CALL "forms$enable" USING BY VALUE FORMS$AR_FORM_TABLE BY DESCRIPTOR DISPLAY_DEVICE SESSION_ID SAMP_FORM GIVING FORMS_STATUS.This call attaches the terminal, selects the form to be used, and returns a session identification string. The form to be used is named in SAMP_FORM. The display device is named in DISPLAY_DEVICE, and SESSION_ID returns the session identifications string. The FORMS\$AR\_FORM\_TABLE symbol stores the address of escape routines.
Add a DISPLAY clause to each panel in the form to set the keypad mode.
The FMS application also sets the keypad mode. To perform this task in the DECforms application, you specify a DISPLAY clause in a panel declaration. Add the DISPLAY clause following the VIEWPORT clause in each panel declaration:Panel ACCOUNT_DATA_PANEL Viewport ACCOUNT_DATA_VP Display %Keypad_applicationThis DISPLAY clause sets the keypad to application mode throughout the panel.
Delete the CDISP and WAIT Form Driver calls in the program that display the welcome panel and wait for operator input from the program. Also remove the SRVCHK subprogram call. These calls are not needed in the converted application.
Add an ENABLE response to display the welcome panel and wait for operator input.
The following example shows how to add the ENABLE response following the VIEWPORT declarations in the IFDL source file:. . . Viewport REGISTER_VP Lines 1 Thru 23 Columns 1 Thru 80 End Viewport Viewport WELCOME_VP Lines 2 Thru 23 Columns 1 Thru 80 End Viewport Enable Response Activate Wait On WELCOME_PANEL End Response
This response causes the Form Manager to activate the WELCOME_PANEL and the Form Manager to process the wait activation item associated with WELCOME_PANEL. To process the activation item, the Manager displays WELCOME_PANEL and waits for valid function key input from the operator.
Add the NEXT_STEP function and function response at the layout level.
The operator presses the RETURN key or ENTER key in the FMS application to signify that the application should proceed beyond the WELCOME form.
To emulate this in DECforms, add a function declaration to bind a function named NEXT_STEP to the RETURN and ENTER keys. Add a function response to that function that returns control to the application program(so that processing can proceed beyond WELCOME_PANEL).
Add the FUNCTION declaration immediately following the LAYOUT declaration:. . . Size 23 Lines By 80 Columns Function NEXT_STEP Is %Carriage_return %Kp_Enter End Function Viewport ACCOUNT_DATA_VP Lines 1 thru 23 Columns 1 Thru 80 End ViewportAdd the FUNCTION RESPONSE statement following the ENABLE responseyou added to the source file, as shown:. . . Reset REGISTER_PANEL_GROUP_1 End Response Function Response NEXT_STEP Return End ResponseThe combination of the function and function response cause the Form Manager to return control to the program when the operator presses the RETURN or ENTER key. You can override the function response at lower levels (such as panel level or field level) in the form.
Add the REMOVE clause to WELCOME_PANEL.
When the operator completes input to this panel, the Form Manager should remove it from the display. The REMOVE clause causes the Form Manager to remove the panel.
Add the REMOVE clause directly following the DISPLAY VIEWPORT clause:Panel WELCOME_PANEL Viewport WELCOME_VP Display %Keypad_application Display Viewport Background Color BLACK Remove . . . End Panel
Delete the last six FMS calls in the program and the MOVE statement. These calls disable the FMS form environment, including resetting the keypad mode. In DECforms, the Form Manager automatically restores the keypad mode to its initial state when you disable it.
Add the FORMS$DISABLE call.
In DECforms you disable the form environment using the FORMS$DISABLE call. Add the FORMS$DISABLE call preceding the EXIT PROGRAM statement in the SAMP program, as shown:CALL "forms$disable" USING BY DESCRIPTOR SESSION_ID GIVING FORMS_STATUS. EXIT PROGRAM. IDENTIFICATION DIVISION. PROGRAM-ID. INACCT. . . .This call detaches the terminal and unloads the form.
IDENTIFICATION DIVISION.
PROGRAM-ID.   SAMP.
   .
   .
   .
PROCEDURE DIVISION.
0.
*+
* Initialize DECforms
*   Choose form for this session
*   Attach terminal
*   Open channel
*   Put up welcome form and wait for response
*
     CALL "forms$enable" USING BY VALUE      FORMS$AR_FORM_TABLE
                               BY DESCRIPTOR DISPLAY_DEVICE
                                             SESSION_ID
                                             SAMP_FORM
                         GIVING FORMS_STATUS.
*+
* Initialize account information
*-
     CALL "INACCT".
*+
* Process all menu requests
*-
     CALL "MENU".
*+
* Clean up and leave:
*   Detach session
*   Unload form
*   Detach terminal
*   Close channel
*
     CALL "forms$disable"  USING SESSION_ID
                         GIVING FORMS_STATUS.
     EXIT PROGRAM.
The converted SAMP program controls the flow of execution for the entire application. The SAMP program enables DECforms, initializes account information,and begins a loop that gets menu choices from the operator. Once the operator is done using the application, the other programs in the application return control to the SAMP program. The SAMP program then disables the form environment.
5.4.2. Converting FMS Status Checking
Remove the GETSTAT subprogram.
The GETSTAT subprogram in the FMS application gets status information from FMS. In DECforms, status conditions are returned to each call,so you do not need a subprogram to get status from DECforms.
Modify the SRVCHK subprogram to test an OpenVMS condition value.
The SRVCHK subprogram tests the status returned from FMS.
You test DECforms status differently than you test FMS status values because DECforms returns an OpenVMS condition value. Replace the statements in the SRVCHK subprogram's Procedure Division with the Procedure Division in the following example:IDENTIFICATION DIVISION. PROGRAM-ID. SRVCHK IS COMMON. *+ * Check DECforms status by looking at the status recording variable. *+ DATA DIVISION. WORKING-STORAGE SECTION. LINKAGE SECTION. 01 FORMS_STATUS PIC S9(9) COMP. PROCEDURE DIVISION USING FORMS_STATUS. 0. IF FORMS_STATUS IS FAILURE THEN CALL "LIB$SIGNAL" USING BY VALUE FORMS_STATUS STOP RUN END-IF. END PROGRAM SRVCHK.- Call the new status checking subprogram following the FORMS$ENABLE and FORMS$DISABLE calls in the SAMP program. For example:
   .
   .
   .
* Put up welcome panel and wait for response
*     CALL "forms$enable" USING BY VALUE       FORMS$AR_FORM_TABLE
                                BY DESCRIPTOR DISPLAY_DEVICE
                                              SESSION_ID
                                              SAMP_FORM
                          GIVING FORMS_STATUS.
      CALL "SRVCHK" USING FORMS_STATUS.
Include the call to the SRVCHK subprogram after each DECforms call that you add to the program.
5.4.3. Converting the INACCT Subprogram
The INACCT subprogram in the sample FMS program reads data from a data file into the ACCOUNT record and the REGISTER record. This subprogram also stores the appropriate check number and account balance in the appropriate variables. The subprogram contains some error handling, a call to another subprogram named FMTCHK, and it closes the data file. Each of these tasks must be performed in the converted application,so you need not modify the existing statements in this subprogram.
Because the INACCT subprogram's purpose is to initialize storage of the account data, you should call the SEND request from that subprogram to send the account data to the form. You should also send the current balance to the form. The form needs to keep a copy of the account data and current balance in form data items,so it makes sense to initialize those form data items at the same time you initialize the ACCOUNT and CURRENT_BALANCE records in the program.
WORKING-STORAGE SECTION.
01      EOF-FLAG                PIC S9(9)       COMP.

PROCEDURE DIVISION.
0.
*+
* Open file, get account data.  The first record in the file is the
* account data. The 2nd thru n records are the check register data.
* The last record has the current balance data.
*-
        OPEN INPUT SAMP-FILE.
        READ SAMP-FILE INTO ACCOUNT\
                AT END  DISPLAY "Error on SAMP.DAT"
                        STOP RUN.
*+
* Send account data to the form
*+
        CALL "forms$send" USING BY DESCRIPTOR SESSION_ID
                                              "ACCOUNT"
                                BY REFERENCE  RECORD_COUNT
                                OMITTED
                                OMITTED
                                OMITTED
                                OMITTED
                                OMITTED
                                OMITTED
                                OMITTED
                                BY DESCRIPTOR ACCOUNT
                          GIVING FORMS_STATUS.
        CALL "SRVCHK" USING FORMS_STATUS.
*+
*  Read the remaining records into the check register, counting them.
   .
   .
   .
The FORMS$SEND call that sends the ACCOUNT record causes the Form Manager to initialize form data items with the account owner's name, address, and telephone number. The Form Manager also initializes information about the account, such as the account number.
         END-EVALUATE.
*+
* Send current balance to the form.
*-
        CALL "forms$send" USING BY DESCRIPTOR SESSION_ID
                                             "CURRENT_BALANCE"
                               BY REFERENCE  RECORD_COUNT
                               OMITTED
                               OMITTED
                               OMITTED
                               OMITTED
                               OMITTED
                               OMITTED
                               OMITTED
                               BY DESCRIPTOR CURRENT_BALANCE
                         GIVING FORMS_STATUS.
        CALL "SRVCHK" USING FORMS_STATUS.
*+
* Set up the check workspace once so we don't have to do it every time.
   .
   .
.. . . Reset REGISTER_PANEL_GROUP_1 End Response Send Response CURRENT_BALANCE Let SUMMARY_FIELD_1 = CURBAL_FIELD End Response
When it executes this response, the Form Manager stores the current (beginning) account balance in the SUMMARY_FIELD_1 form data item. You must initialize the SUMMARY_FIELD_1 form data item at the beginning of application execution because the SUMMARY_FIELD_1 panel field must display the beginning account balance when the operator asks to see a summary of the transactions made on the account.
5.4.4. Converting the FMTCHK Subprogram
Delete the SWKSP and LOAD Form Driver calls from the program. The DECforms application need not set the workspace or LOAD the form.
Group all the STR$TRIM calls and STRING statements together near the top of the Procedure Division.
Replace the PUT calls and the SWKSP call with the FORMS$SEND call.
The FMS application puts values to each field in the workspace one at a time. In the DECforms application, you can send all the formatted data to the form at once, in a record.
Move the ADD statement for the variable from the ONECHK subprogram to the FMTCHK subprogram.
In the FMS sample program, the INACCT subprogram contains the following ADD statement:ADD 1, LAST_CHECK_NUM GIVING NEW_CHECK_NUMBER.
This ADD statement increments the check number so that each check has anew number. You should pass in the new check number in the CHECK_FORMAT record,so you should increment it in this subprogram, which passes the CHECK_FORMAT record to the form. Place the ADD statement following the STR$TRIM calls and STRING statements.
Add the FORMS$SEND call for the CHECK_FORMAT form record following the ADD statement.
IDENTIFICATION DIVISION.
PROGRAM-ID.     FMTCHK IS COMMON.
*+
*       Format account data to be displayed on the check panel.
*-
DATA DIVISION.
WORKING-STORAGE SECTION.
01      CHECK_FORMAT
        05      NEW_CHECK_NUMBER      PIC 9(4).
        05      NAME_CONDENSED        PIC X(39).
        05      CSZ_CONDENSED         PIC X(30).
01      CITY_LEN                PIC 9(4) COMP.
01      FIRST_LEN               PIC 9(4) COMP.
01      RECORD_COUNT            PIC  9(2).
01      UNUSED_STRING           PIC X(80).
PROCEDURE DIVISION.
0.
*+
* Need to trim trailing blanks - use the OpenVMS RTL routine to find out
* how long the trimmed string is, then do explicit moves.
* Put only middle initial in, not full middle name.
*-
        CALL "STR$TRIM" USING   BY DESCRIPTOR   UNUSED_STRING
                                BY DESCRIPTOR   FIRST_NAME
                                BY REFERENCE    FIRST_LEN.
        STRING  FIRST_NAME(1:FIRST_LEN) " "
                MIDDLE_NAME(1:1) ". "
                LAST_NAME DELIMITED BY SIZE INTO NAME_CONDENSED.

        CALL "STR$TRIM" USING   BY DESCRIPTOR   UNUSED_STRING
                                BY DESCRIPTOR   CITY
                                BY REFERENCE    CITY_LEN.
        STRING  CITY(1:CITY_LEN) ", "
                STATE " "
                ZIP             DELIMITED BY SIZE INTO CSZ_CONDENSED.
*
        ADD 1, LAST_CHECK_NUM GIVING NEW_CHECK_NUMBER.
*+
* Send condensed check data to the form
*+
        CALL "forms$send" USING BY DESCRIPTOR SESSION_ID
                                              "CHECK_FORMAT"
                                BY REFERENCE  RECORD_COUNT
                                OMITTED
                                OMITTED
                                OMITTED
                                OMITTED
                                OMITTED
                                OMITTED
                                OMITTED
                                BY DESCRIPTOR CHECK_FORMAT
                           GIVING FORMS_STATUS.
        CALL "SRVCHK" USING FORMS_STATUS.
        EXIT PROGRAM.
END PROGRAM FMTCHK.
END PROGRAM SAMP.
5.4.5. Converting the MENU Subprogram
Delete the CDISP Form Driver call that displays the MENU form.
DECforms automatically displays MENU_PANEL when operator input is needed to that panel.
Replace the MOVE statement and PUT call in the RESET response step in the form.
The MOVE statement and the PUT call in the FMS application send a default value to the workspace for the OPTION field on the FMS MENU form. To display a default value in OPTION_FIELD on the DECforms panel, add a RECEIVE response to reset the OPTION_FIELD form data item. Specify the RESET response step in the RECEIVE response.
The FMS Converter declares the OPTION_FIELD form data items with a VALUE clause that specifies a default value of 2. The VALUE clause controls what value the Form Manager stores in the OPTION_FIELD form data item when it performs the RESET response step.
The following example shows the RECEIVE response that resets the OPTION_FIELD form data item. Add the GET_CHOICE RECEIVE response following the CURRENT_BALANCE RECEIVE response.Let SUMMARY_FIELD_1 = CURBAL_FIELD End Response Receive Response GET_CHOICE Reset OPTION_FIELD Activate Field OPTION_FIELD On MENU_PANEL End ResponseThe Form Manager performs the GET_CHOICE RECEIVE response when the program calls the RECEIVE request to get data in the GET_CHOICE record; that is, each time operator input to the OPTION_FIELD form data item is needed.
The ACTIVATE response step causes the Form Manager to request operator input to the OPTION_FIELD form data item.
Replace the GET call in the FMS program with the FORMS$RECEIVE call.
The FMS program contains a GET call to get the operator's choice from the workspace. In DECforms, you use the FORMS$RECEIVE call to get the operator's choice from the form.
Add the FORMS$RECEIVE call as first statement in the subprogram, and be sure to specify the GET_CHOICE record in the call, as shown:* 4 => View register * 5 => View account data *- *DATA DIVISION. 01 GET_CHOICE. 05 D-MENU-OPTION PIC X(1). WORKING-STORAGE SECTION. PROCEDURE DIVISION. 0. CALL "forms$receive" USING BY DESCRIPTOR SESSION_ID "GET_CHOICE" BY REFERENCE RECORD_COUNT OMITTED OMITTED OMITTED OMITTED OMITTED OMITTED OMITTED BY DESCRIPTOR GET_CHOICE GIVING FORMS_STATUS. CALL "SRVCHK" USING FORMS_STATUS. EVALUATE D-MENU-OPTION WHEN "1" GO TO FINI WHEN "2" CALL "WRITCH" WHEN "3" CALL "MAKDEP" WHEN "4" CALL "VUEREG" WHEN "5" CALL "VUEACT" END-EVALUATE. GO TO 0.FINI. EXIT PROGRAM.The call gets data into the D-MENU-OPTION program variable. The value in that variable determines which subprogram is called.
Add the RANGE clause to the OPTION_FIELD panel field declaration to replace the VALID1 UAR.
During operator input to the FMS MENU form, the FMS calls the VALID1 UAR. The VALID1 UAR verifies that the input from the operator is a single-character value between 1 and 5, inclusive.
In DECforms you can verify this using the RANGE clause in the field declaration. Add a RANGE clause to the OPTION_FIELD panel field declaration as shown:. . . Value 'To continue, press keypad 1-5.' End Literal Field OPTION_FIELD Line 6 Column 61 Display Font Size Double wide Underlined Minimum Length 1 Range 1 through 5 Message "Illegal value" Output Picture 9 Use Help Message "Enter one of the numbers 1, 2, 3, 4, or 5" End Field End PanelIf the operator enters a value that is not in the range specified by the RANGE clause the Form Manager displays the "Illegal value" message.
Remove the exit response that calls the VALID1 UAR from this field declaration. Also, remove the VALID1 UAR from the program. That UAR is not needed in the converted application.
Declare functions bound to the keypad keys and write function responses for the functions to replace the TAKE15 UAR.
FMS also calls the TAKE15 UAR during operator input to the MENU form. The TAKE15 UAR translates terminators the operator enters into values that the program can use to make a decision. Once the UAR is finished,FMS displays the value the operator enters and then returns control to the program.
In DECforms you trap functions in the form. You can assign a value to a form data item and return control to the program in a function response. Add the following functions to define the keys used in the FMS application:. . . Viewport WELCOME_VP Lines 1 Thru 23 Columns 1 Thru 80 End Viewport Function OPERATOR_CHOICE_1 Is %KP_1 End Function Function OPERATOR_CHOICE_2 Is %KP_2 End Function Function OPERATOR_CHOICE_3 Is %KP_3 End Function Function OPERATOR_CHOICE_4 Is %KP_4 End Function Function OPERATOR_CHOICE_5 Is %KP_5 End Function Function OPERATOR_CHOICE_PERIOD Is %KP_PERIOD End FunctionThe FUNCTION statements bind the KP1 key to the OPERATOR_CHOICE_1function; the KP2 key to the OPERATOR_CHOICE_2 function, and so on.
Then, add the following function responses to the OPTION_FIELD declaration. Place them after the LINE and COLUMN clauses and before the DISPLAY clause:Field OPTION_FIELD Line 6 Column 61 Function Response OPERATOR_CHOICE_1 Let OPTION_FIELD=1 Return End Response Function Response OPERATOR_CHOICE_2 Let OPTION_FIELD=2 Return End Response Function Response OPERATOR_CHOICE_3 Let OPTION_FIELD=3 Return End Response Function Response OPERATOR_CHOICE_4 Let OPTION_FIELD=4 Return End Response Function Response OPERATOR_CHOICE_5 Let OPTION_FIELD=5 Return End Response Function Response OPERATOR_CHOICE_PERIOD Let OPTION_FIELD=1 Return End Response Display Font Size Double wide Underlined . . .The function responses assign the appropriate value to OPTION_FIELD and return control to the program. For example, the OPERATOR_CHOICE_1 function response moves 1 into the OPTION_FIELD form data item and returns control to the program.
Add the REMOVE clause to MENU_PANEL.
When the operator completes input to this panel, the Form Manager should remove it from the display. The REMOVE clause causes the Form Manager to remove the panel. Add it to the panel following the DISPLAY VIEWPORT clause,as shown:Panel MENU_PANEL Viewport MENU_VP Display %Keypad_application Display Viewport Background Color WHITE Remove . . . End Panel
Delete the function response that calls the TAKE15 UAR and the TAKE15UAR code in the program.
MENU_PANEL contains a function response created by the FMS Converter that calls the TAKE15 UAR. Because you have added functions and function responses to replace that UAR, the function response that calls it is no longer needed. Likewise, you can remove the TAKE15 UAR from the program.
5.4.6. Converting the WRITCH Subprogram
Delete the LEDON, the LEDOFF call and the declaration of the LED-NUMBER-3 variable.
DECforms does not contain a call or IFDL statement to control LEDs. This application turns the LED on and off as an illustration. Lighting the LED serves no real purpose and need not be emulated in the DECforms application.
Delete the NDISP, SWKSP, and DISPW calls.
These workspace management calls are not needed in DECforms because DECforms does not have the concept of workspaces.
Delete the PUT call.
The PUT call sends the current balance to the FMS form. In the DECforms application, you can maintain the current balance in the form, so you need not send it from the program.
Delete the PERFORM statement and the SWKSP call.
The PERFORM statement processes checks in a loop to allow the operator to write a number of checks. In the DECforms application, you need not process checks in a loop because a single call can get inputto a number of checks. The form data that stores check information is group data. The Form Manager can get input to an entire group of form data items during the processing of a single request.
The workspace management call is not needed in DECforms.
Remove the EXIT PROGRAM statement and the IDENTIFICATION DIVISION for the ONECHK subprogram.
Because the WRITCH subprogram contains no procedural statements, you can move the procedural statements from the ONECHK subprogram into the WRITCH subprogram. This saves calling the ONECHK subprogram from the WRITCH subprogram.
To merge the WRITCH and ONECHK subprograms, remove the Data Division and Procedure Division for the WRITCH subprogram. Also, remove the Identification Division of the ONECHCK subprogram.
You can use the Data Division and Procedure Division for the ONECHK subprogram with the Identification Division of the WRITCH subprogram. This forms a new WRITCH subprogram that contains the statements from the ONECHK subprogram.
IDENTIFICATION DIVISION.
PROGRAM-ID.    WRITCH.
*+
*       Write one or more checks.
*-
*       If input is terminated by kpd period, return with no action
*       Else deduct from balance and enter into register.
   .
   .
   .
DATA DIVISION.WORKING-STORAGE SECTION.
01      REG-FULL-MSG           PIC X(35)  VALUE "Register full, can't  enter check."
01      TMP                    PIC X (207) VALUE SPACE.
01      TMP_REG_PAY_ITEM_AMT   PIC 9(6).
01      NUM_REG_ITEM_PAY_AMT   PIC 9(6)           COMP.
   .
   .
   .
5.4.7. Converting the ONECHK Subprogram
The procedural statements from the ONECHK subprogram calculate a new check number and register number. The statements send the new check number to the workspace and get input to each field on the FMS Check form. The operator can quit by pressing the KP_PERIOD key. If the operator does not quit, the IF statement compares the number of checks that have already been written to the maximum number of checks for which the check register can store information. If the check register is full, the subprogram issues a message and stops getting input to the Check form. Otherwise, the subprogram updates the check register with values returned from the workspace, sends a new current balance to the form, and increments the check number. The subprogram also increments the variable that determines whether the register has more room to store information about transactions.
Remove the ADD statements.
Because control does not return to the program between each check the operator writes in the converted application, you cannot maintain the register pointer in the program. You must store the register pointer in the form.
Remove the PUT call that sends the new check number. You send the check number to the form in the FMTCHK subprogram and maintain it in the form.
Replace the GETAL call with the FORMS$RECEIVE call.
The GETAL call gets check data. Replace it with a FORMS$RECEIVE call that asks for data in the COLLECT_DATA record. The following example shows the FORMS$RECEIVE call to add:IDENTIFICATION DIVISION. PROGAM-ID. WRITCH. . . . PROCEDURE DIVISION. 0. CALL "forms$receive" USING BY DESCRIPTOR SESSION_ID "COLLECT_DATA" BY REFERENCE RECORD_COUNT OMITTED OMITTED OMITTED OMITTED OMITTED OMITTED OMITTED BY DESCRIPTOR COLLECT_DATA GIVING FORMS_STATUS. CALL "SRVCHK" USING FORMS_STATUS.The COLLECT_DATA record contains a group of record fields to pass check information. The Form Manager can, potentially, get input into each group member (allow the operator to write 50 checks) during the processing of the request. The COLLECT_DATA record also passes a housekeeping variable called TRANSACTION_COUNT, which stores the number of checks the operator writes during the processing of this RECEIVE request.
Write a RECEIVE response for the COLLECT_DATA record.
When the Form Manager processes the RECEIVE response for the COLLECT_DATA record, it must perform some tasks that are not part of the default processing of a RECEIVE request. Add the following RECEIVE response following the RECEIVE response for the GET_CHOICE record:. . . Activate Field OPTION_FIELD On MENU_PANEL End Response Receive Response COLLECT_DATA Reset TRANSACTION_DATA Let TRANSACTION_COUNT = 1 Activate Group TRANSACTION_DATA(TRANSACTION_COUNT) On CHECK_PANEL Activate Field MEMO_FIELD On CHECK_PANEL End ResponseThis response causes the Form Manager to clear the TRANSACTION_DATA group. (The VALUE clause specifies spaces for these form data items.) The Form Manager then activates the fields that are both in the TRANSACTION_DATA group and displayed on CHECK_PANEL. Some fields in the TRANSACTION_DATA group are displayed on DEPOSIT_PANEL. The Form Manager does not activate these fields for input. The Form Manager also activates MEMO_FIELD for input.
Add a function and function responses to allow the operator to move around CHECK_PANEL.
In the FMS application, the operator uses the TAB key to move forward in the CHECK form. To allow the operator to use the TAB key in DECforms, add the following function definition following the function declaration for the function.. . . Is %KP_PERIOD End Function Function NEXT ITEM Is %HORIZONTAL_TAB End FunctionBy default, the NEXT ITEM function causes the Form Manager to move the cursor to the next item. If no next item exists, the Form Manager writes a message to the message panel. In most cases, this is what should occur when the operator is using CHECK_PANEL; that is, this default response has the same effect as the TAB key has in the FMS application. However, in certain cases, you must add special function responses for the NEXT ITEM function.
Add a function response for the NEXT ITEM function in AMTPAY_FIELD. The operator enters the check amount in this field. When the operator presses the TAB key to leave the field, the Form Manager must validate the contents of the field. The Form Manager must ensure that the check amount does not exceed the account balance. Add the following function response to AMTPAY_FIELD to test the value the operator enters:Field AMTPAY_FIELD Line 8 Column 66 Function Response NEXT ITEM If TRANSACTION_DATA(TRANSACTION_COUNT).AMTPAY_FIELD > CURBAL_FIELD Then Invalid Message "Your balance doesn't cover that much. Re-enter amount" Else Position To Field MEMO_FIELD On CHECK_PANEL End if End Response No Active Highlight Display Underlined Output Picture 9999'.'99R Replace Leading '*' Justification Right Minimum Length 1 Message "Input Required" Protected When OPTION_FIELD="3" End FieldThe function response tests the value the operator enters in AMTPAY_FIELD to be sure it is less than the current balance. If it is greater than the current balance, the INVALID response step causes the Form Manager to continue accepting input from AMTPAY_FIELD. The Manager also writes a message to the message line.
If the value the operator enters in AMTPAY_FIELD is less than the value stored in CURBAL_FIELD, the Form Manager moves the cursor to the next field on the panel.
You must also add a function response for NEXT ITEM to MEMO_FIELD. In this field, pressing the TAB key should cause the Form Manager to write a message to the message line that says "No Next Field On Form." The following function response causes the TAB key to have this effect:Field MEMO_FIELD Line 10 Column 12 Function Response Next Item Message "No Next Field On Form" End Response Display Underlined Output Picture X(35) End FieldAdd function responses for the NEXT_STEP function.
In most cases, the Form Manager should return control to the program when the operator presses the RETURN key. The layout-level response for the NEXT_STEP function causes this to occur. However, when the operator is entering data in CHECK_PANEL, the NEXT_STEP function should cause the Form Manager to display and wait for further input. The following example shows the panel-level function response for NEXT_STEP to add:Panel CHECK_PANEL . . . Function Response NEXT_STEP Activate Wait On CHECK_DONE_PANEL Position To Wait On CHECK_DONE_PANEL End Response Apply Field Default Of Active Highlight Bold . . . End PanelAlthough pressing the RETURN or ENTER key in most fields should terminate input to CHECK_PANEL, when the cursor is on PAYTO_FIELD and the operator presses the RETURN or ENTER key, input should not terminate. Instead, the Form Manager should move the cursor to the AMTPAY_FIELD to get the check amount. This movement does not happen automatically in DECforms because DECforms waits until input to a request is complete to validate all fields. DECforms allows the operator to move freely around a panel until it is ready to return control to the program. To emulate the FMS behavior, add the following function response to PAYTO_FIELD:Field PAYTO_FIELD Line 8 Column 12 Function Response NEXT_STEP Position To Next Item Message "Input Required" End Response Display Underlined . . . End FieldThis response causes the Form Manager to move the cursor to AMTPAY_FIELD and write the "Input Required" message to the message panel.
Finally, you must add a function response for the NEXT_STEP function to AMTPAY_FIELD. When the operator presses the RETURN key while the cursor is in the AMTPAY_FIELD, the Form Manager should verify that the amount the operator entered is less than the current balance. If the check amount is greater than the current balance, the Form Manager should continue to accept input in AMTPAY_FIELD because the check amount is invalid. If the amount is valid, however,the Form Manager should activate and display CHECK_DONE_PANEL.
The following shows the function response to add to AMTPAY_FIELD:Field AMTPAY_FIELD . . . Position To Field MEMO_FIELD On CHECK_PANEL End if End Response Function Response NEXT_STEP If TRANSACTION_DATA(TRANSACTION_COUNT).AMTPAY_FIELD > CURBAL_FIELD Then Invalid Message "Your balance doesn't cover that much. Re-enter amount" Else Activate Wait on CHECK_DONE_PANEL Position to Wait on CHECK_DONE_PANEL End if End Response No Active Highlight Display Underlined Output Picture 9999'.'99R Replace Leading '*' Justification Right Minimum Length 1 Message "Input Required" Protected When OPTION_FIELD="3" End FieldModify the exit response for CHECK_PANEL.
The FMS Converter creates an exit response for CHECK_PANEL. The exit response calls two UARS that perform validation on data entered in the check. The CALL response steps are not needed in the converted DECforms application, so you can remove them.
Instead of performing extra validation, the exit response should update the current balance and check number and perform other tasks. The following shows the exit response you should use in the converted application:Panel CHECK_PANEL Viewport CHECK_VP Display %Keypad_Application Exit Response Let TRANSACTION_DATA(TRANSACTION_COUNT).NUMBER_FIELD = CHECK_NUMBER Call 'DIFFERENCE' Using By Reference CURBAL_FIELD TRANSACTION_DATA(TRANSACTION_COUNT).AMTPAY_FIELD Let TRANSACTION_DATA(TRANSACTION_COUNT).BALANCE_FIELD = CURBAL_FIELD Call 'CALCULATE' Using By Reference SUMMARY_FIELD_3 TRANSACTION_DATA(TRANSACTION_COUNT).AMTPAY_FIELD Deactivate Group TRANSACTION_DATA(TRANSACTION_COUNT) On CHECK_PANEL Call 'INCREMENT' Using By Reference TRANSACTION_COUNT Activate Group TRANSACTION_DATA(TRANSACTION_COUNT) On CHECK_PANEL End ResponseThe first LET response step causes the Form Manager to store the check number for the check the operator just completed in the TRANSACTION_DATA group. Next, the Form Manager calls an escape routine to subtract the amount of the check from the current balance. (Writing the escape routine is explained in Section 5.4.9, ''Writing Escape Routines to Maintain a Balance, Summary Total, and Check Number''.) The Form Manager stores the new balance in the TRANSACTION_DATA group, and it calls an escape routine to update the SUMMARY_FIELD_3 form data item, which stores the total number of checks written.
Once control returns from the escape routine, the Form Manager deactivates the group of data items into which the operator enters check data. The exit response specifies deactivating used groups to ensure that the operator cannot move back to checks that were written previously. (Each field on the check panel is a 1-line scrolled region. This DEACTIVATE response step ensures that the operator can never scroll back to checks written previously.)
Next the Form Manager calls an escape routine to increment the TRANSACTION_COUNT variable. Finally, the Form Manager activates the next group of data items so that the operator can write another check.
Add one function and three function responses to control the effect of function key input in the CHECK_DONE_PANEL.
After the operator completes input to the Check form in the FMS application,FMS displays the Check_done form. The operator then has the option of writing another check, printing the check, or returning to the main menu. To allow the operator to have these choices in DECforms, you must add another function. You must also add three function responses to CHECK_DONE_PANEL.
Add the function declaration for the PRINT_CHECK function immediately following the function declaration of the NEXT ITEM function:Function NEXT ITEM Is %HORIZONTAL_TAB End Function Function PRINT_CHECK Is %KP_0 End Function . . .
This function declaration binds the PRINT_CHECK function to the KP_0 key.
Add three function responses following the DISPLAY clause in the CHECK_DONE_PANEL:Panel CHECK_DONE_PANEL Viewport CHECK_DONE_VP Display %Keypad_application Function Response PRINT_CHECK Print CHECK_PANEL End Response Function Response NEXT_STEP Reset MEMO_FIELD Message " " Position To Group TRANSACTION_DATA(TRANSACTION_COUNT) On CHECK_PANEL End Response Function Response OPERATOR_CHOICE_PERIOD Return End Response . . . End PanelWhen the operator presses the KP_0 key while positioned in CHECK_DONE_PANEL,the Form Manager writes CHECK_PANEL to a file.
If the operator presses the RETURN key to invoke the NEXT_STEP function,the Form Manager resets the MEMO_FIELD data item and displays spaces in the message panel. These two response steps have the effect of clearing the MEMO_FIELD panel field and the message panel. In addition, the Form Manager displays the next occurrence of the data items in the TRANSACTION_DATA group. The Manager moves the cursor to the PAYTO_FIELD panel field, so the operator can write another check.
When the operator presses KP_PERIOD, the Form Manager returns control to the program. The operator has finished writing checks.
Add an exit response for CHECK_DONE_PANEL.
Each time the operator satisfies the wait activation item associated with CHECK_DONE_PANEL and the Form Manager transfers control out of that panel,the Form Manager should deactivate the wait item. The operator must not be able to move back to using the PREVIOUS ITEM function. Also, the Form Manager should call an escape routine to increment the check number when the operator leaves CHECK_DONE_PANEL.
Add an exit response following the DISPLAY clause in CHECK_DONE_ PANEL, as shown:Panel CHECK_DONE_PANEL Viewport CHECK_DONE_VIEWPORT Display %Keypad_application Exit Response Deactivate Wait on CHECK_DONE_PANEL Call 'INCREMENT' Using By Reference CHECK_NUMBER End Response . . .See Section 5.4.9, ''Writing Escape Routines to Maintain a Balance, Summary Total, and Check Number'' for information on writing the INCREMENT escape routine.
Add the REMOVE clause to CHECK_DONE_PANEL.
When the operator completes input to CHECK_DONE_PANEL, the Form Manager should remove it from the display. The REMOVE clause causes the Form Manager to remove the panel. The following example shows how to add this statement:Panel CHECK_DONE_PANEL Viewport CHECK_DONE_VP Display %Keypad_application Remove . . . End Panel
Delete the function response for UNDEFINED FUNCTION that calls the PASSKY escape routine from CHECK_PANEL and CHECK_DONE_ PANEL. Also, delete the PASSKY subprogram from the COBOL source file.
The PASSKY UAR is not needed in the DECforms application. The escape routine's purpose is to determine if the terminator the operator entered is a valid terminator in the context of this application. For example, the application allows the operator to use all the predefined FMS terminators, the KP_PERIOD key, and the KP_0 key as terminators. The operator should not be able to use any other keys. The PASSKY UAR ensures that other keys are recognized as undefined terminators.
In DECforms, you trap keys in the form. The only keys that have any effect are those for which you define a function response and those for which DECforms defines a function response. All others are undefined keys.
Delete the IF statement from the COBOL source file.
An IF statement immediately follows the FORMS$RECEIVE call for the COLLECT_DATA record in the COBOL source file. In the FMS application, the IF statement tests the terminator that identifies the key pressed by the operator. If the operator presses the KP_PERIOD key, the program transfers control to FINI procedure and no more checks can be written. In DECforms, you do not trap terminators in the program, so you must remove the IF statement.
Add a function response to CHECK_PANEL to allow the operator to quit writing checks by pressing the KP_PERIOD key.
To allow the operator to quit while writing a check, add the following function response after the response to the NEXT_STEP function in CHECK_PANEL:Panel CHECK_PANEL . . . Position To Wait On CHECK_DONE_PANEL End Response Function Response OPERATOR_CHOICE_PERIOD Let TRANSACTION_COUNT = 0 Return End Response Apply Field Default Of Active Highlight Bold . . . End PanelThe response causes the Form Manager to assign zero to the TRANSACTION_COUNT form data item. This assignment indicates that no transactions were made during the processing of the current request. The RETURN response step causes the Form Manager to return control to the program.
- Add an IF statement to the program to test the value of TRANSACTION_COUNTand transfer control to the FINI procedure if TRANSACTION_COUNT is zero. Add the IF statement following the FORMS$RECEIVE call that getsdata in the COLLECT_DATA record, as shown:
IDENTIFICATION DIVISION.
PROGRAM-ID.  WRITCH.
   .
   .
   .
                                     OMITTED
                                     BY DESCRIPTOR COLLECT_DATA
                               GIVING FORMS_STATUS.
        CALL "SRVCHK" USING FORMS_STATUS.
         IF TRANSACTION_COUNT = 0 THEN
                GO TO FINI.
*+
* If the check wouldn't fit in the register, don't process, just
* give error message, wait for acknowledgement, and return
*-
   .
   .
   .
Notice that the effect of quitting with KP_PERIOD is different in the converted application than it is in the FMS application. In the FMS application,the program enters each check into the register as it is written. In the DECforms application, the program enters each check into the check register after the operator writes a number of checks. In the FMS application, if the operator quits while writing a check, the data on that check is lost. In DECforms, if the operator quits while writing a check, the data on all checks written during the processing of that request is lost. PressingKP_PERIOD causes the program to not update the register.
Rename the variable NEW_LAST_REGISTER_NUM.
Change the name of the NEW_LAST_REGISTER_NUM variable to END_ REGISTER_NUM. The variable stores the total number of transactions made on the account throughout the life of the account. (Note that in the sample application, new transactions are not stored in the data file. Therefore,this number is reset each time you run the application.)Add this declaration to the Working-Storage Section of the WRITCH subprogram,as shown:01 END_REGISTER_NUM PIC 9(4).
- Write an ADD statement to add the number of transactions the Form Manager returns and the variable LAST_REGISTER_NUM, as follows:
ADD TRANSACTION_COUNT LAST_REGISTER_NUM GIVING END_REGISTER_NUM.
This ADD statement updates END_REGISTER_NUM. That variable now contains the total number of transactions on the account.
Replace the variable in the IF statement that tests to see if the register should be updated. Also, replace the PUT call with the FORMS$SEND call.
The contains the total number of transactions made on the account. If that variable contains a value that is higher than the maximum number of transactions the register can store, the program cannot update the register. When this occurs, the program sends a message to the operator to tell the operator that the register is full.
The following example shows the logic that should be in the DECforms application for determining if the check register is full and signaling the operator if it is:*+ * If the check won't fit in the register, don't process, just * give error message, wait for acknowledgement, and return. *+ ADD TRANSCATION_COUNT LAST_REGISTER_NUM GIVING END_REGISTER_NUM. IF END_REGISTER_NUM NOT LESS THAN REGISTER_MAX THEN CALL "forms$send" USING BY DESCRIPTOR SESSION_ID "REG_FULL_MSG" BY REFERENCE RECORD_COUNT OMITTED OMITTED OMITTED OMITTED OMITTED OMITTED OMITTED BY DESCRIPTOR REG_FULL_MSG GIVING FORMS_STATUS CALL "SRVCHK" USING FORMS_STATUS END-IF.The FORMS$SEND call sends a message to the form if the register is full.
Modify the declaration of the REG_FULL_MSG program variable to make it a record.
You must modify the REG_FULL_MSG variable to be a record, instead of a simple variable, to send it to the form. You must also declare a corresponding form record and name the form record field MESSAGEPANEL. When the Form Manager reads a form record field named MESSAGEPANEL, it writes the contents of that record field directly to the message panel.
Modify the program record to appear as follows:WORKING-STORAGE SECTION. 01 REG_FULL_MSG. 05 MESSAGE_PANEL PIC X(35) VALUE "Register full, can't enter check.".Add the following form record after the declaration of the REGISTER form record:Form Record REG_FULL_MSG MESSAGEPANEL Character (35) End Record
Remove the WAIT call in the program and add a SEND response for the REG_FULL_MSG record to the form.
When the FMS program displays the message that indicates the register is full,it makes the WAIT call to give the operator time to read the message and decide what to do next. To wait for the operator at this time in the DECforms application, add a SEND response following the RECEIVE response for the COLLECT DATA record:Activate Field MEMO_FIELD On CHECK_PANEL End Response Send Response REG_FULL_MSG Activate Wait End ResponseThis response causes the Form Manager to wait for function key input from the operator.
Delete the RET calls and the statements to calculate a new balance and summary check total.
The FMS application contains a RET call, two MOVE statements, an INSPECT statement, a SUBTRACT statement, an ADD statement, and a PUT call that updates the current balance and the total amount of all checks written during this session.
In the DECforms application, you maintain the current balance and the total amount of all checks written during this session in the form. The statements in the program are not needed.
Delete the RET calls and the statements that get check data from the workspace.
The program contains four MOVE statements and three RETURN statements that get check data from the workspace. The FORMS$RECEIVE call returns this data to the DECforms application program, so these statements are no longer needed.
Add an ADD statement and a PERFORM statement to the program to update the check register.
Once control returns to the DECforms program after the operator has written checks, the program must update the check register. The check register should be updated as soon as the program determines that it is not full. Therefore, add the ADD and PERFORM statements following the FORMS$SEND call for the REG_FULL_MSG record:IDENTIFICATION DIVISON. PROGRAM-ID. WRITCH. . . . BY DESCRIPTOR REG_FULL_MSG GIVING FORMS_STATUS. CALL "SRVCHK" USING FORMS_STATUS. END-IF. *+ * Update the check register *- ADD 1 TO LAST_REGISTER_NUM PERFORM VARYING LAST_REGISTER_NUM FROM LAST_REGISTER_NUM BY 1 UNTIL LAST_REGISTER_NUM IS GREATER THAN END_REGISTER_NUM ADD 1 TO COUNTER MOVE NUMBER_FIELD(COUNTER) TO REG-ITEM-NUMBER(LAST_REGISTER_NUM) MOVE DATE_FIELD(COUNTER) TO REG_ITEM_DATE(LAST_REGISTER_NUM) MOVE PAYMEM_FIELD(COUNTER) TO REG_ITEM_MEMO_PAY_TO (LAST_REGISTER_NUM) MOVE AMTPAY_FIELD(COUNTER) TO REG_ITEM_PAY_AMT(LAST_REGISTER_NUM) MOVE BALANCE_FIELD(COUNTER) TO REG_ITEM_BALANCE(LAST_REGISTER_NUM) END-PERFORM.The ADD statement increments so that it points to the first empty position in the register. The PERFORM statement updates the register by filling an empty position in the register, incrementing to point to the next empty position, filling that position, and so on. The COUNTER variable is needed because the data returned to the program always begins in the first field in the COLLECT_DATA record. The first MOVE statement moves to REG-ITEM-NUMBER(4) (because three transactions are already stored in the register).
Declare the COUNTER variable in the Working-Storage Section of the WRITCH subprogram as follows:Working-Storage Section.01 COUNTER PIC 9(2) Value Zero. 01 REG_FULL_MSG . . .
Replace the MOVE statements that were used to update the register previously with a statement that moves the value in to LAST_REGISTER_NUM.
The FMS application contains three MOVE statements to update the register and array counters. As shown in the following example, delete these MOVE statements and create a new one. Add the new MOVE statement following the PERFORM statement that updates the check register.. . . MOVE AMTPAY_FIELD(COUNTER) TO REG_ITEM_PAY_AMT(LAST_REGISTER_NUM) MOVE BALANCE_FIELD(COUNTER) TO REG_ITEM_BALANCE(LAST_REGISTER_NUM) END-PERFORM. *+ * Update register counter *- MOVE END_REGISTER_NUM TO LAST_REGISTER_NUM. FINI. EXIT PROGRAM.This MOVE statement moves the last position in the register to the variable, , that stores the current location in the check register.
Delete the END PROGRAM statement for the ONECHK subprogram.
The ONECHK subprogram no longer exists in the converted application. Ithas become the WRITCH subprogram. Delete the END PROGRAM statement forONECHK, but retain the END PROGRAM statement for WRITCH.
PROGRAM-ID.     WRITCH.
*+
*       If input is terminated by kpd period, return with no action
*       Else deduct from balance and enter into register.
*       Note that a UAR in the form guarantees that the amount of
*       the check is always less than or equal to the balance.
*       Note that the form function key UAR allows only kpd period
*       as terminator (other than FDV$K_FT_NTR).
*-
*
DATA DIVISION.

WORKING-STORAGE SECTION.
01    REG_FULL_MSG.
      05  MESSAGEPANEL  PIC X(35)  VALUE "Register full, can't enter
                                          check.".
01    TMP                  PIC X(207) VALUE SPACE.
01    TMP_REG_ITEM_PAY_AMT    PIC X(6).
01    NUM_REG_ITEM_PAY_AMT    PIC 9(6)       COMP.
01    NEW_CHECK_NUMBER        PIC 9(4) VALUE ZERO.
01    END_REGISTER_NUM        PIC 9(4).
01    COUNTER                 PIC 9(2) VALUE ZERO.

PROCEDURE DIVISION.
0.
        CALL "forms$receive" USING BY DESCRIPTOR SESSION_ID
                                                   "COLLECT_DATA"
                                     BY REFERENCE  RECORD_COUNT
                                     OMITTED
                                     OMITTED
                                     OMITTED
                                     OMITTED
                                     OMITTED
                                     OMITTED
                                     OMITTED
                                     BY DESCRIPTOR COLLECT_DATA
                               GIVING FORMS_STATUS.
        CALL "SRVCHK" USING FORMS_STATUS.

        IF TRANSACTION_COUNT = 0 THEN
               GO TO FINI.
        ADD TRANSACTION_COUNT LAST_REGISTER_NUM GIVING END_REGISTER_NUM.
*+
* If the check wouldn't fit in the register, don't process, just
* give error message, wait for acknowledgement, and return
*-

         IF END_REGISTER_NUM  NOT LESS THAN REGISTER_MAX THEN
             CALL "forms$send" USING    BY DESCRIPTOR   SESSION_ID
                                                        "REG_FULL_MSG"
                                        BY REFERENCE    RECORD_COUNT
                                        OMITTED
                                        OMITTED
                                        OMITTED
                                        OMITTED
                                        OMITTED
                                        OMITTED
                                        OMITTED
                                        BY DESCRIPTOR   REG_FULL_MSG
                                  GIVING FORMS_STATUS
                CALL "SRVCHK" USING FORMS_STATUS
                GO TO FINI
         END-IF.
*+
* Update values in register.
*+
        PERFORM
          ADD 1 TO LAST_REGISTER_NUM.
          VARYING LAST_REGISTER_NUM FROM LAST_REGISTER_NUM BY 1
          UNTIL LAST_REGISTER_NUM IS GREATER THAN END_REGISTER_NUM
          ADD 1 TO COUNTER
           MOVE NUMBER_FIELD(COUNTER) TO REG-ITEM-NUMBER(LAST_REGISTER_NUM)
           MOVE DATE_FIELD(COUNTER) TO REG_ITEM_DATE(LAST_REGISTER_NUM)
           MOVE PAYMEM_FIELD(COUNTER) TO REG_ITEM_MEMO_PAY_TO
                                         (LAST_REGISTER_NUM)
           MOVE AMTPAY_FIELD(COUNTER) TO REG_ITEM_PAY_AMT
                                         (LAST_REGISTER_NUM)
           MOVE BALANCE_FIELD(COUNTER) TO REG_ITEM_BALANCE
                                          (LAST_REGISTER_NUM)
        END-PERFORM.
*+
* Update register counter
*-
        MOVE END_REGISTER_NUM TO LAST_REGISTER_NUM.
FINI.
        EXIT PROGRAM.
END PROGRAM WRITCH.
This subprogram calls the RECEIVE request to get check data. The check data is returned in the COLLECT_DATA record. The subprogram determines whether any checks were written. If not, it exits. If checks were written, the subprogram determines if they can be entered in the check register. If the register is full, the subprogram exits and sends a message to the operator. Otherwise, it enters the checks in the check register.
5.4.8. Converting the ENDCHK and PRICHK Subprograms
The ENDCHK subprogram in the FMS application displays a form called FORM_CHKDON. This form allows the operator to press one of three keys to indicate what is to be done next. The operator can choose to write another check, print the check just written,or stop writing checks and return to the menu. If the operator chooses to print the current check, the FMS program calls the PRICHK subprogram. This subprogram writes each of the lines in the check form to a field for subsequent printing.
Remove both of these subprograms. The tasks they perform are now performed in the form using responses.
5.4.9. Writing Escape Routines to Maintain a Balance, Summary Total, and Check Number
During check processing, the form calls three escape routines. The first one subtracts the amount entered on checks from the current balance. The second one adds the amount entered on checks to the running check total. The running check total is the total of all checks written during this session. Finally,the last one increments a number—either the check number or the transaction counter.
END PROGRAM FMTCHK.
END PROGRAM SAMP.
IDENTIFICATION DIVISION.
PROGRAM-ID.     DIFFERENCE.
**************************************************************************
*   General escape routine to subtract one value from another.           *
**************************************************************************
DATA DIVISION.
WORKING-STORAGE SECTION.
LINKAGE SECTION.
01         NUMBER_1           PIC 9(9)  COMP.
01         NUMBER_2           PIC 9(9)  COMP.

PROCEDURE DIVISION USING NUMBER_1 NUMBER_2.
0.
*+
* Perform subtraction.
*+
        SUBTRACT NUMBER_2 FROM NUMBER_1.
*
        EXIT PROGRAM.
END PROGRAM DIFFERENCE.

IDENTIFICATION DIVISION.
PROGRAM-ID.     CALCULATE.
**************************************************************************
*   General purpose escape routine to add two values.                    *
**************************************************************************
DATA DIVISION.
WORKING-STORAGE SECTION.

LINKAGE SECTION.
01         NUMBER_1             PIC 9(9) COMP.
01         NUMBER_2             PIC 9(9) COMP.

PROCEDURE DIVISION USING NUMBER_1 NUMBER_2.
0.
*+
* Perform addition.
*+
        ADD NUMBER_2 TO NUMBER_1.
*
        EXIT PROGRAM.
END PROGRAM CALCULATE.

IDENTIFICATION DIVISION.
PROGRAM-ID.     INCREMENT.
**************************************************************************
*   General escape routine to increment a value.                         *
**************************************************************************
DATA DIVISION.
WORKING-STORAGE SECTION.

LINKAGE SECTION.
01         COUNT_KEEPER     PIC 9(9)    COMP.
PROCEDURE DIVISION USING COUNT_KEEPER.
0.
*+
* Add one.
*+

        ADD 1 to COUNT_KEEPER.
*
        EXIT PROGRAM.
END PROGRAM INCREMENT.
Add the escape routines to the COBOL source file following the END PROGRAM statement for the SAMP program.
The DIFFERENCE escape routine subtracts NUMBER_2 from NUMBER_1, and stores the result in NUMBER_1. The Form Manager passes both parameters to the PROCEDURE DIVISION header and the escape routine returns both parameters to the form. The data type of the parameters to the CALL response step must match the data type of the PROCEDURE DIVISION parameters.
The CALCULATE escape routine adds NUMBER_2 to NUMBER_1. The result is stored in NUMBER_1.
The INCREMENT escape routine adds 1 to COUNT_KEEPER and stores the result in COUNT_KEEPER.
5.4.10. Converting the MAKDEP Subprogram
The MAKDEP subprogram in the FMS sample application allows the operator to make deposits into the account. The subprogram initially displays the current balance and prompts the operator to enter a deposit amount. The operator must also enter a deposit memo. Once the deposit is complete, the program verifies that it can be entered in the register, enters the deposit into the register,and displays an updated balance to the operator.
Delete the first three calls in the subprogram, including the call to the SRVCHK subprogram.
The CDISP call clears the display and displays the DEPOSIT form. The DECforms Form Manager automatically clears a viewport and displays a panel when it gets input to fields on that panel. The PUT call sends the current balance to the FMS form. In the DECforms application, you store the current balance in the form,so you need not pass it from the program.
Replace the GETAL call with the FORMS$RECEIVE call to get the deposit data.
The GETAL call gets data from each field on the DEPOSIT form. Delete the GETAL call and replace it with the FORMS$RECEIVE call to pass the COLLECT_DATA record, as shown:*+ * Get deposit amount and memo from operator. * Abort on kpd period. *+ CALL "forms$receive" USING BY DESCRIPTOR SESSION_ID "COLLECT_DATA" BY REFERENCE RECORD_COUNT OMITTED OMITTED OMITTED OMITTED OMITTED OMITTED OMITTED BY DESCRIPTOR COLLECT_DATA GIVING FORMS_STATUS. CALL "SRVCHK" USING FORMS_STATUS.This FORMS$RECEIVE call gets data in the COLLECT_DATA record. The COLLECT_DATA record contains a group of record fields to pass deposit information.
Modify the RECEIVE response for the COLLECT_DATA record.
The RECEIVE response for the COLLECT_DATA record performs tasks that are specific to writing checks. For example, that response activates the panel fields in the TRANSACTION_DATA group that appear on CHECK_PANEL. You must modify this response so that it controls deposit processing as well.
To rewrite this response, add an IF response step that tests whether the operator is writing a check or making a deposit and add an ACTIVATE response step that activates the appropriate fields for deposit processing. Finally,add a request exit response that performs deposit specific tasks,such as clearing the message panel. The following example shows how the RECEIVE response for the COLLECT_DATA record appears after you modify it:Receive Response COLLECT_DATA Reset TRANSACTION_DATA Let TRANSACTION_COUNT = 1 If OPTION_FIELD = "2" Then Activate Group TRANSACTION_DATA(TRANSACTION_COUNT) On CHECK_PANEL Activate Field MEMO_FIELD on CHECK_PANEL Else Activate Group TRANSACTION_DATA(1) On DEPOSIT_PANEL End If Request Exit Response If OPTION_FIELD = "3" Then Let CURBAL_FIELD = NEWBAL_FIELD Reset NEWBAL_FIELD Remove DEPOSIT_VP Message " " Call 'INCREMENT' Using By Reference TRANSACTION_COUNT End If End Response End ResponseThe first IF response step tests OPTION_FIELD. If OPTION_FIELD is 2, check processing should begin and the ACTIVATE response step causes the Form Manager to activate fields on CHECK_PANEL. Otherwise, a deposit should be made, so the Form Manager activates fields on DEPOSIT_PANEL, as specified by the ACTIVATE response step in the ELSE clause.
When the operator is making a deposit, the ACTIVATE response step causes the Form Manager to activate the first occurrence of the TRANSACTION_DATA group on DEPOSIT_PANEL. Fields in the TRANSACTION_DATA group on CHECK_PANEL are not activated by this response step. The response step explicitly specifies the first occurrence of TRANSACTION_DATA because only one deposit can be made during this request. The program expects deposit data to be stored in the first occurrence of the group when the Form Manager returns data to the program. Explicitly activating only the first occurrence of the group ensures the Form Manager stores operator input in the first occurrence.
The Form Manager performs the request exit response when operator input is complete. The IF response step in the request exit response ensures that the Form Manager performs the response steps that follow only when the operator is making deposits.
DEPOSIT_PANEL displays the current account balance, which is stored in the CURBAL_FIELD form data item, at all times during the deposit process. That panel also displays the new balance,with the deposit amount added in the NEWBAL_FIELD. Once the deposit is complete, the LET response step causes the Form Manager to update the current balance stored in the CURBAL_FIELD form data item. The Form Manager moves the value stored in the NEWBAL_FIELD form data item to the CURBAL_FIELD form data item.
The Form Manager resets the NEWBAL_FIELD to zero as specified by the RESET response step. NEWBAL_FIELD is, therefore, empty the next time the Form Manager displays it. Add the VALUE clause to NEWBAL_FIELD to assign zero to the field as follows:Form Data /* Form data for panel DEPOSIT_PANEL*/\ CURBAL_FIELD Decimal (6,2) NEWBAL_FIELD Decimal (6,2) Value 0 . . . End DataThe Form Manager must clear the DEPOSIT_VP viewport when the deposit is complete. By causing the Form Manager to clear the DEPOSIT_VP viewport,you ensure that the DEPOSIT_VP viewport does not appear behind the MENU_VP viewport when the Form Manager redisplays the MENU_VP viewport. The REMOVE response step causes the Form Manager to remove DEPOSIT_VP.
The CALL response step calls the INCREMENT escape routine. This escape routine adds 1 to TRANSACTION_COUNT. When this step is complete, TRANSACTION_COUNT contains a 1.
The MESSAGE response step causes the Form Manager to clear the message panel of messages issued during the deposit process.
Copy the function response for from CHECK_PANEL to DEPOSIT_PANEL.
When the operator presses the KP_PERIOD key during a deposit, the program should exit without completing the deposit. The function response for causes the Form Manager to assign zero to the TRANSACTION_COUNT form data item and returns that value to the program in the COLLECT_DATA record. When TRANSACTION_COUNT is zero, the program does not complete the deposit.
Modify the IF statement in the program to test the value of TRANSACTION_COUNT, instead of testing the TERMINATOR variable.
The FMS application tests the value of the TERMINATOR variable to determine if the operator pressed the KP_PERIOD key. In the DECforms application, the program should test the TRANSACTION_COUNT variable to determine if the operator pressed the KP_PERIOD key. If the TRANSACTION_COUNT variable is zero, the program should transfer control to the FINI statement. Change the IF statement that tests the TERMINATOR variable to appear as follows:IDENTIFICATION DIVISION. PROGRAM-ID. MAKDEP. . . . BY DESCRIPTOR COLLECT_DATA GIVING FORMS_STATUS. CALL "SRVCHK" USING FORMS_STATUS. IF TRANSACTION_COUNT = 0 THEN GO TO FINI.Change the PUTL call that sends the message that indicates the register is full to the FORMS$SEND call and remove the WAIT call.
The FMS program contains a PUTL call that sends a message to the form in the event that it cannot enter the deposit in the register because the register is full. You must use the FORMS$SEND call in the DECforms program.
Delete the PUTL call and the WAIT call and add the following FORMS$SEND call after the IF statement that tests for room in the register:*+ * Have deposit information now. * If no room in check register must abort. *- IF LAST REGISTER_NUM NOT LESS THAN REGISTER MAX THEN CALL "forms$send" USING BY DESCRIPTOR SESSION_ID "REG_FULL_MSG" BY REFERENCE RECORD_COUNT OMITTED OMITTED OMITTED OMITTED OMITTED OMITTED OMITTED BY DESCRIPTOR REG_FULL_MSG GIVING FORMS_STATUS. CALL "SRVCHK" USING FORMS_STATUS. GO TO FINI. END-IF. . . .A SEND response already exists in the form for the REG_FULL_MSG record. That SEND response, which causes the Form Manager to activate and position to a wait on the message panel,performs the tasks needed in response to this call.
Modify the declaration of the REG_FULL_MSG program variable to make it a record.
To pass a message to the form, declare a REG_FULL_MSG program record by modifying the REG_FULL_MSG variable. You have already declared a corresponding form record,which is named REG_FULL_MSG. Modify the REG_FULL_MSG variable as follows:WORKING-STORAGE SECTION. 01 REG_FULL_MSG. 05 MESSAGE_PANEL PIC X(80) VALUE "Register full, can't enter deposit."Add a function response for the NEXT_STEP function and include it in the PAYTO_FIELD panel field on DEPOSIT_PANEL.
Once the operator enters the deposit amount and the deposit memo in the FMS application, the program updates the current balance. The FMS program also updates a running total of deposits made during this session, updates the check register, and displays a message for the operator.
In the DECforms application, the current balance and deposit summary are maintained in the form. The message can also be displayed from the form. Each of these tasks can be performed in a function response for the NEXT_STEP function.
To make the application more efficient, the order of these tasks is changed in the DECforms application. Before the program can update the check register, control must return to the program. However, once control returns to the program, you must call DECforms to display the message for the operator. Calling DECforms for the sole purpose of displaying a message is inefficient. Therefore, the DECforms application displays the message before control returns to the program.
Add the following function response after the LINE and COLUMN clauses for PAYTO_FIELD.Field PAYTO_FIELD Line 11 Column 28 Function Response NEXT_STEP Let NEWBAL_FIELD = CURBAL_FIELD Call 'CALCULATE' Using By Reference NEWBAL_FIELD TRANSACTION_DATA(1).DEPOSIT_FIELD If NEWBAL_FIELD > 999999 Then Call 'DIFFERENCE' Using By Reference NEWBAL_FIELD BANK_SHARE Message "Overflow, only 6 digits allowed." Activate Wait End If Let TRANSACTION_DATA(1).BALANCE_FIELD = NEWBAL_FIELD Call 'CALCULATE' Using By Reference SUMMARY_FIELD_2 TRANSACTION_DATA(1).DEPOSIT_FIELD Message "Deposit made, press RETURN or ENTER to continue." Activate Wait Position To Wait End Response Display Underlined . . . End FieldIn the response, the LET response step stores the current balance in the NEWBAL_FIELD form data item. Instead of displaying the current balance,the NEWBAL_FIELD must display the balance after the deposit is made.
The first CALL response step that calls the CALCULATE escape routine passes the current balance stored in the NEWBAL_FIELD form data item and the deposit amount to an escape routine. The escape routine adds the two values, giving a new balance.
If the new balance stored in NEWBAL_FIELD is greater than 999,999, the second CALL response step calls an escape routine to subtract 1,000,000 from NEWBAL_FIELD. The variables in the program that store the current balance can store only 6 or less characters. Therefore, no value greater than 999,999 is allowed for an account balance. This is an arbitrary limit set by the application. Like the FMS application,this application subtracts 1,000,000 from the new current balance to get an acceptable balance.
If an overflow occurs, the Form Manager displays a message in the message panel and waits for function key input from the operator before proceeding.
You must declare the BANK_SHARE form data item. Add the following to the FORM DATA statement from DEPOSIT_PANEL:Form Data /* Form data for panel DEPOSIT_PANEL*/ BANK_SHARE Integer (7) Value 1000000 CURBAL_FIELD Decimal (6,2)The TRANSACTION_DATA group returns deposit information to the program in the COLLECT_DATA record. The second LET response step in this response causes the Form Manager to move the new current balance into a data item that the Form Manager returns to the program.
The second CALL response step for the CALCULATE escape routine calls an escape routine to add the deposit amount to the summary of deposits for this session.
The Form Manager writes a message to tell the operator that the deposit is complete when it encounters the MESSAGE response step. The ACTIVATE and POSITION response steps cause the Form Manager to wait for the operator to recognize that the deposit has been made (by pressing a function key).
Delete the declaration of the OVERFLOW_MSG variable from the program. The message is now stored in the form (in the MESSAGE response step).
Add a function response for the NEXT_STEP function to DEPOSIT_FIELD.
In the FMS application, the operator must give input to the deposit memo before the FMS program calculates the new balance. To require input to the PAYTO_FIELD on DEPOSIT_PANEL in the DECforms application, add the following function response after the LINE and COLUMN clauses in DEPOSIT_FIELD:Field DEPOSIT_FIELD Line 6 Column 42 Function Response NEXT_STEP Position to Next Item Message "Input required." End Response Display Underlined . . . End FieldWhen the operator invokes the NEXT_STEP function, this response causes the Form Manager to make PAYTO_FIELD the current item and display the message "Input required."
Delete the INSPECT statement, the two ADD statements (including the error handling statements), and the PUT call from the program.
The FMS program contains an INSPECT statement that changes the deposit from a character string to a number. This change allows the program to add the deposit amount to the current balance and modify the current balance if it is greater than 999,999. In the DECforms application, these tasks are performed in escape routines.
Modify the MOVE statements in the MAKDEP subprogram that move data into the register.
In the program, a group of MOVE statements move data that came from the FMS form into the register. Modify these to appear as follows:ADD 1 TO LAST_REGISTER_NUM MOVE ZEROS TO REGISTER_ITEM_NUMBER(LAST_REGISTER_NUM) REG_ITEM_PAY_AMT(LAST_REGISTER_NUM). MOVE DATE_FIELD(1) REG_ITEM_DATE(LAST_REGISTER_NUM). MOVE DEPOSIT_FIELD(1) REG_ITEM_DEPOSIT_AMT(LAST_REGISTER_NUM). MOVE BALANCE_FIELD(1) REG_ITEM_BALANCE(LAST_REGISTER_NUM). MOVE PAYMEM_FIELD(1) REG_ITEM_MEMO_PAY_TO(LAST_REGISTER_NUM).These move statements move data from the first occurrence of items in the TRANSACTION_DATA group to the appropriate position in the register.
Delete the RET, RETDN, PUTL, and WAIT calls from the program.
The last five calls in the FMS program return the new balance to the program and display a message stored in the form that indicates that the deposit has been made. The FMS application then waits for the operator to enter a terminator before it continues.
In the DECforms application, the Form Manager returns the current balance in the COLLECT_DATA record and displays the message stored in the form. The RET, RETDN, PUTL, and WAIT calls are not needed.
Delete variables that are no longer needed.
The FMS application declares four variables in the MAKDEP subprogram that are not needed in the converted application. The following lists the variables and explains why they are not needed:TMP is used to get a message from named data in the FMS form. In the converted application, the message is output with the MESSAGE response step and need not be stored in a variable.
BANK_SHARE stores 10,000.00 to be subtracted from the current balance when it is greater than 9999.99 (stored in cents). In the converted application, the BANK_SHARE form data item stores this value and ensures that no value greater than 9999.99 is returned to the program.
FORM-DONE stores the name of the FMS Named Data item that stores the message displayed to the operator when the deposit is complete. The converted application displays the message using DECforms features and this variable is no longer needed.
Delete the function response for UNDEFINED FUNCTION that calls the PASSKY escape routine.
A function response appears in DEPOSIT_PANEL that calls the PASSKY UAR. The PASSKY UAR is not needed in the DECforms application. The UAR's purpose is to determine if the operator entered a valid terminator.
In DECforms, you trap keys in the form. The only keys that have any effect are those for which you define a function response and those for which DECforms defines a function response. All others are undefined keys.
IDENTIFICATION DIVISION.
PROGRAM-ID. MAKDEP.
*+
* Make a deposit, enter into check register
* Cancel on keypad period.
* Note that the form function key UAR allows only kpd period.
*+
DATA DIVISION.
WORKING-STORAGE SECTION.
01 REG_FULL_MSG.
05 MESSAGE_PANEL PIC X(80) VALUE "Register full, can't enter
deposit.".
PROCEDURE DIVISION.
0.
*+
* Get deposit amount and memo from operator.
* Abort on kpd period.
*-
CALL "forms$receive" USING BY DESCRIPTOR SESSION_ID
"COLLECT_DATA"
BY REFERENCE RECORD_COUNT
OMITTED
OMITTED
OMITTED
OMITTED
OMITTED
OMITTED
OMITTED
BY DESCRIPTOR COLLECT_DATA
GIVING FORMS_STATUS.
CALL "SRVCHK" USING FORMS_STATUS.
IF TRANSACTION_COUNT = 0 THEN
GO TO FINI.
*+
* Have deposit information now.
* If no room in check register must abort.
*-
IF LAST_REGISTER_NUM NOT LESS THAN REGISTER_MAX THEN
CALL "forms$send" USING BY DESCRIPTOR SESSION_ID
"REG_FULL_MSG"
BY REFERENCE RECORD_COUNT
OMITTED
OMITTED
OMITTED
OMITTED
OMITTED
OMITTED
OMITTED
BY DESCRIPTOR REG_FULL_MSG
GIVING FORMS_STATUS
CALL "SRVCHK" USING FORMS_STATUS GO TO FINI END-IF.
*+
* Make entry in register.
*-
ADD 1 TO LAST_REGISTER_NUM.
MOVE ZEROS TO REG_ITEM_NUMBER(LAST_REGISTER_NUM),
REG_ITEM_PAY_AMT(LAST_REGISTER_NUM).
MOVE DATE_FIELD(1) TO REG_ITEM_DATE(LAST_REGISTER_NUM).
MOVE DEPOSIT_FIELD(1) TO REG_ITEM_DEPOSIT_AMT(LAST_REGISTER_NUM).
MOVE BALANCE_FIELD(1) TO REG_ITEM_BALANCE(LAST_REGISTER_NUM).
MOVE PAYMEM_FIELD(1) TO REG_ITEM_MEMO_PAY_TO(LAST_REGISTER_NUM).
FINI.
EXIT PROGRAM.
END PROGRAM MAKDEP.This subprogram calls the RECEIVE request to get deposit data from the operator. The Form Manager returns deposit data in the COLLECT_DATA record. The subprogram then determines whether the deposit data can be entered into the check register. If the data cannot be entered, the subprogram aborts the deposit and sends a message to the operator. If the data can be entered, the subprogram enters the data in the register and exits.
5.4.11. Converting the VUEREG Subprogram
Delete the CDISP and SRVCHK calls from the program.
The FMS application makes the CDISP call to display the form. In the DECforms application, the Form Manager displays the panel that contains the register when it becomes the current panel.
Delete the MOVE statements, IF statements, and PUT calls that update the summary fields.
Four fields on the FMS REGISTER form display summary information about this session. These fields display the beginning account balance,the total amount of deposits made during the session, the total amount of the checks written during the session, and the current account balance. You maintain this information in the SUMMARY_FIELD_1, SUMMARY_FIELD_2, SUMMARY_FIELD_3,and CURBAL_FIELD form data items in the DECforms application,so you need not send data from the program.
The IF statements in the FMS application ensure that only values less than10,000 are sent to the form. Because of the size of the form data items that store the summary values, you cannot store a value greater than 10,000 in those form data items.
Replace the rest of the statements in the subprogram with the FORMS$SEND call.
The other statements in the VUEREG subprogram perform tasks that let the program control scrolling in the FMS scrolled region. In DECforms,the Form Manager controls scrolling, so the program can pass the data to the form and let the Form Manager display it. Add the following call to the SEND request as the first statement in the Procedure Division of the VUEREG subprogram:IDENTIFICATION DIVISION. PROGRAM-ID. VUEREG. . . . PROCEDURE DIVISION. 0. *+ * Put up register panel and summary of this session. *- CALL "forms$send" USING BY DESCRIPTOR SESSION_ID "REGISTER" BY REFERENCE RECORD_COUNT OMITTED OMITTED OMITTED OMITTED OMITTED OMITTED OMITTED BY DESCRIPTOR REGISTER GIVING FORMS_STATUS. CALL "SRVCHK" USING FORMS_STATUS. . . .This call passes the REGISTER record, which contains the date, check number (if any), memo, and amount for each check and deposit. The record also contains the account balance as it appears after each transaction on the account.
The Form Manager displays this information in a scrolled region on REGISTER_PANEL.
Add a SEND response in the form to display the check register data on REGISTER_PANEL.
Add the following SEND response after the SEND response for the REG_FULL_MSG record:Activate Wait End Response Send Response REGISTER Activate Group REGISTER_PANEL_GROUP_1 On REGISTER_PANEL Position To Group REGISTER_PANEL_GROUP_1(1) On REGISTER_PANEL End ResponseThis response causes the Form Manager to activate the group that corresponds to the scrolled region and make that group active for operator input.
Remove the SCRFWD and SCRBAK subprograms from the FMS application.
The SCRFWD and SCRBAK subprograms allow the operator to scroll through the FMS scrolled region. In DECforms, the Form Manager controls scrolling.
Delete the declarations of program variables that are no longer needed.
The FMS application declares four variables in the VUEREG subprogram. None of these variables is needed in the converted application. The following lists the variables and explains why they are not needed:OVERFLOW_MSG stores a message to be displayed when a number larger than9999.99 is stored in a program variable that corresponds to a summary variable. In the converted application, numbers greater than 9999.99 are truncated and no message is needed.
TMP is used to get input from the fake field the FMS application uses to control scrolling. In the converted application, the operator can input functions to fields protected from data entry, and no fake field is needed.
RETURNED_NUM_LINES is used in controlling scrolling. The Form Manager controls scrolling in the DECforms application.
NUM_LINES_IN_SCROLL is used in controlling scrolling. The Form Manager controls scrolling in the DECforms application.
Bind the UP OCCURRENCE and DOWN OCCURRENCE functions to the UP ARROW and DOWN ARROW keys, respectively, in a function declarations.
The UP OCCURRENCE and DOWN OCCURRENCE built-in DECforms functions allow the operator to scroll through a scrolled region. By default, DECforms binds these functions to thePF4-UP key sequence and the PF4-DOWN key sequence, respectively. Add the following function declarations to change the default key binding:. . . Is %KP_0 End Function Function UP OCCURRENCE Is %Up End Function Function DOWN OCCURRENCE Is %Down End FunctionChange the PROTECTED attribute on each field in the scrolled region to the NO DATA INPUT attribute.
The FMS Converter assigns the PROTECTED attribute to each field in the scrolled region because the fields on the FMS form have the DISPLAY ONLY attribute. The PROTECTED attribute is equivalent to the FMS DISPLAY ONLY attribute.
Another DECforms attribute, NO DATA INPUT is more appropriate for the fields in a scrolled region. The NO DATA INPUT attribute allows the operator to position the cursor on a field and enter a function key,but not modify the data in the field. Using this attribute instead of the PROTECTED attribute saves you from defining a fake field to get input from the operator.
Change the PROTECTED attribute to NO DATA INPUT in declaration of the following fields:- REGISTER_PANEL_GROUP_1.NUMBER_FIELD
- REGISTER_PANEL_GROUP_1.DATE_FIELD
- REGISTER_PANEL_GROUP_1.PAYMEM_FIELD
- REGISTER_PANEL_GROUP_1.DEPOSIT_FIELD
- REGISTER_PANEL_GROUP_1.AMTPAY_FIELD
- REGISTER_PANEL_GROUP_1.BALANCE_FIELD
Add the REMOVE clause to the panel declaration.
When the operator completes input to this panel, the Form Manager should remove it from the display. The REMOVE clause causes the Form Manager to remove the panel. Add the REMOVE clause following the DISPLAY clause in REGISTER_PANEL:Panel REGISTER_PANEL Viewport REGISTER_VP Display %Keypad_application Remove . . . End Panel
Delete the function response for UNDEFINED FUNCTION that calls the PASSKY escape routine.
The PASSKY UAR is not needed in the DECforms application.
Delete the comments created by the FMS Converter in DEPOSIT_FIELD,AMTPAY_FIELD, and BALANCE_FIELD on DEPOSIT_PANEL.
DEPOSIT_FIELD, AMTPAY_FIELD, and BALANCE_FIELD contain messages created by the Converter that appear as follows:/* Clear character ignored for character type field */
This message is informational and indicates that the FMS Converter did not create IFDL syntax to specify a blank for the clear character in this field. A blank is the default clear character for character type fields,so the syntax is not needed.
IDENTIFICATION DIVISION.
PROGRAM-ID.     VUEREG.
*+
*       View the check register and scroll through it.
*       Also display totals for current session.
*

DATA DIVISION.
WORKING-STORAGE SECTION.

PROCEDURE DIVISION.
0.
* Put up register panel.
* Display summary of this session.
*-

        CALL "forms$send" USING BY DESCRIPTOR SESSION_ID
                                              "REGISTER"
                                BY REFERENCE  RECORD_COUNT
                                OMITTED
                                OMITTED
                                OMITTED
                                OMITTED
                                OMITTED
                                OMITTED
                                OMITTED
                                BY DESCRIPTOR REGISTER
                          GIVING FORMS_STATUS.
        CALL "SRVCHK" USING FORMS_STATUS.
        EXIT PROGRAM.
END PROGRAM VUEREG.
This subprogram calls the SEND request to display data on the REGISTER panel. The subprogram passes the check register data in the REGISTER record.
5.4.12. Converting the VUEACT Subprogram
Delete the first four calls in the subprogram, including the calls to the SRVCHK subprogram.
The CDISP and PUTAL calls display the form and account data in the FMS application. In the DECforms application, the data is stored in the form and displayed in when input to that panel is needed.
Delete the PUTD call.
The PUTD call restores the default value to the field in which the operator enters the password. This ensures that the field is empty before operator entry begins. The field can be reset from the form in the DECforms application.
Replace the GETAL call with the FORMS$RECEIVE call.
The GETAL call gets input to all unprotected fields on the FMS form. The DECforms equivalent of the GETAL call is the FORMS$RECEIVE call. In this case, the FORMS$RECEIVE call should request input to the ACCOUNT record. Delete the GETAL call and add the following call as the first statement of the Procedure Division:IDENTIFICATION DIVISION.PROGRAM-ID. VUEACT. . . . PROCEDURE DIVISION. 0. CALL "forms$receive" USING BY DESCRIPTOR SESSION_ID "ACCOUNT" BY REFERENCE RECORD_COUNT OMITTED OMITTED OMITTED OMITTED OMITTED OMITTED OMITTED BY DESCRIPTOR ACCOUNT GIVING FORMS_STATUS. CALL "SRVCHK" USING FORMS_STATUS. . . .Add the FORMS$RECEIVE call so that it is the first statement in the VUEACT subprogram.
Add a RECEIVE response in the form to reset the field into which the operator enters the password and activate that field. Also, add a VALUE clause to determine to what value the field is reset.
To be sure the operator can enter the appropriate password into the field,reset the SECRET_FIELD form data item in a response to the RECEIVE request. Because the field is no longer automatically activated (by the default RECEIVE response),you must also activate that field in the response.
Add the following RECEIVE response for the account record after the SEND response for the REGISTER record:. . . Position To Group REGISTER_PANEL_GROUP_1(1) On REGISTER_PANEL End Response Receive Response ACCOUNT Reset SECRET_FIELD Activate Field SECRET_FIELD On ACCOUNT_DATA_PANEL End ResponseThe RESET response step resets SECRET_FIELD to spaces,and the ACTIVATE response step activates SECRET_FIELD for input.
Add the following VALUE clause to the SECRET_FIELD form data item:Form Data /* Form data for panel ACCOUNT_DATA_PANEL */ . . . SECRET_FIELD Character (12) Value " " SUPERVISOR_ONLY Integer (1) Value 1 End DataThe VALUE clause indicates that spaces are the default value for SECRET_FIELD.
Add a function response for the NEXT_STEP function to test the password entered by the operator and unprotect and activate fields if the password is correct.
When the is displayed by the DECforms application, the Form Manager prompts the operator for a password. If the password the operator enters is the correct password,the Form Manager allows the operator to change the account data. Otherwise, the Form Manager displays the main menu. The operator indicates that input into the password field is complete in the FMS application by pressing the RETURN key. To allow the operator to terminate field input with the RETURN key in the DECforms application, add the following function response to the declaration of SECRET_FIELD after the LINE and COLUMN clauses:Field SECRET_FIELD Line 18 Column 60 Function Response NEXT_STEP If SECRET_FIELD = PASSWORD_STORAGE Then Let SUPERVISOR_ONLY = 0 Let ACCTNO_FIELD_TMP = ACCT_NO_FIELD Let OPEN_DATE_TMP = OPEN_DATE Let LAST_FIELD_TMP = LAST_FIELD Let FIRST_FIELD_TMP = FIRST_FIELD Let MIDDLE_FIELD_TMP = MIDDLE_FIELD Let STREET_FIELD_TMP = STREET_FIELD Let CITY_FIELD_TMP = CITY_FIELD Let STATE_FIELD_TMP = STATE_FIELD Let ZIP_FIELD_TMP = ZIP_FIELD Let HOMEPH_FIELD_TMP = HOMEPH_FIELD Let WORKPH_FIELD_TMP = WORKPH_FIELD Activate Panel ACCOUNT_DATA_PANEL Deactivate Field SECRET_FIELD On ACCOUNT_DATA_PANEL Position To Field ACCTNO_FIELD On ACCOUNT_DATA_PANEL Else Return End If End Response . . .The function response controls what happens when the operator invokes the NEXT_STEP function by pressing the RETURN key. The IF statement compares operator input to SECRET_FIELD to a value stored in PASSWORD_STORAGE. You must declare the PASSWORD_STORAGE form data item as follows:Form Data /* Form data for panel ACCOUNT_DATA_PANEL */ . . . PASSWORD_STORAGE Character (12) Value "SAMP" End DataBe sure to specify the word "SAMP" in all capital letters in the VALUE clause to emulate the FMS application.
If the operator enters the correct password, the first LET response step assigns zero to the SUPERVISOR_ONLY form data item. The other fields on the are protected when SUPERVISOR_ONLY equals one. When SUPERVISOR_ONLY equals zero, these fields are no longer protected from operator input.
The rest of the LET response steps in the function response keep a copy of the current account data before the operator begins making changes. If the operator chooses to quit without saving the changes made to the account data, a copy of the original data is needed. You must add the following form data item declarations to the FORM DATA statement for the ACCOUNT_DATA_PANEL:Form Data /* Form data for panel ACCOUNT_DATA_PANEL */ ACCTNO_FIELD_TMP Integer (5) OPEN_DATE_TMP Character (7) LAST_FIELD_TMP Character (20) FIRST_FIELD_TMP Character (15) MIDDLE_FIELD_TMP Character (15) STREET_FIELD_TMP Character (30) CITY_FIELD_TMP Character (20) STATE_FIELD_TMP Character (2) ZIP_FIELD_TMP Integer (5) HOMEPH_FIELD_TMP Integer (10) WORKPH_FIELD_TMP Integer (10) . . . End DataThe ACTIVATE response step that follows the LET response step causes the Form Manager to activate all fields on ACCOUNT_DATA_PANEL, so the operator can give input to them. These fields are not on the activation list before the Form Manager performs this response step because they were protected until the SUPERVISOR_ONLY form data item became equal to zero.
The DEACTIVATE response step causes the Form Manager to remove the activation item for SECRET_FIELD from the activation list. Now that the operator has entered the password,there is no reason for further input to this field.
The POSITION response step begins operator input to the other fields on ACCOUNT_DATA_PANEL.
If the operator enters an incorrect password, control returns to the program and no account data is changed.
Add the REMOVE clause to the panel declaration.
When the operator completes input to this panel, the Form Manager should remove it from the display. The REMOVE clause causes the Form Manager to remove the panel. Add the REMOVE clause to the following the DISPLAY clause:Panel ACCOUNT_DATA_PANEL Viewport REGISTER_VP Display %Keypad_application Remove End Panel
Add a function response for the function at the panel level in to allow the operator to quit.
As in other FMS forms, the operator can quit giving input to the ACCOUNT_DATAFMS form by pressing the KP_PERIOD key. To emulate this in DECforms, add the following function response to ACCOUNT_ DATA_PANEL:Panel ACCOUNT_DATA_PANEL Viewport ACCOUNT_DATA_VIEWPORT Display %Keypad_application Remove Function Response OPERATOR_CHOICE_PERIOD If SUPERVISOR_ONLY = 0 Then Let ACCTNO_FIELD = ACCT_NO_FIELD_TMP Let OPEN_DATE = OPEN_DATE_TMP Let LAST_FIELD = LAST_FIELD_TMP Let FIRST_FIELD = FIRST_FIELD_TMP Let MIDDLE_FIELD = MIDDLE_FIELD_TMP Let STREET_FIELD = STREET_FIELD_TMP Let CITY_FIELD = CITY_FIELD_TMP Let ZIP_FIELD = ZIP_FIELD_TMP Let HOMEPH_FIELD = HOMEPH_FIELD_TMP Let WORKPH_FIELD = WORKPH_FIELD_TMP Return Else Return End If End ResponseIn function response, if the SUPERVISOR_ONLY form data item equals zero, the operator may have to change values in the account data items. In this case, the original values in the account data items must be restored. The LET response steps restore each of the items in the account data to their original value. Control returns to the program.
If the SUPERVISOR_ONLY form data item is not equal to zero, the operator could not have changed any account data. Control is returned to the program without the values in the account form data items being changed.
Delete the IF statements in the program that tests the terminator and get input from the operator in the account data fields on the FMS form.
The tasks performed by the rest of the statements in the VUEACT subprogram are performed in the DECforms form.
Delete the READAL subprogram.
The READAL subprogram shows how to get data from all fields on an FMS form without using the GETAL call. This demonstration is not needed in the converted application.
Delete the function response for UNDEFINED FUNCTION that calls the PASSKY escape routine.
The PASSKY UAR is not needed in the DECforms application. Its purpose is to determine if the terminator entered by the operator is a valid terminator in the context of this application. The PASSKY UAR ensures that other keys are recognized as undefined terminators.
In DECforms, you trap keys in the form. The only keys that have any effect are those for which you define a function response and those for which DECforms defines a function response. All others are undefined keys.
IDENTIFICATION DIVISION.
PROGRAM-ID.     VUEACT.
*+
*       View the account data.
*       If operator knows the secret word, let operator change
*       the account data for this session.
*-
DATA DIVISION.
WORKING-STORAGE SECTION.
PROCEDURE DIVISION.
0.
        CALL "forms$receive" USING BY DESCRIPTOR SESSION_ID
                                                   "ACCOUNT"
                                   BY REFERENCE  RECORD_COUNT
                                   OMITTED
                                   OMITTED
                                   OMITTED
                                   OMITTED
                                   OMITTED
                                   OMITTED
                                   OMITTED
                                   BY DESCRIPTOR ACCOUNT
                             GIVING FORMS_STATUS.
      CALL "SRVCHK" USING FORMS_STATUS.
      EXIT PROGRAM.
END PROGRAM VUEACT.
This subprogram requests input to the ACCOUNT record. If the operator knows the correct password, the account data can be changed. Otherwise,the Form Manager displays the account data and then returns control to the program.
5.5. Compiling, Linking, and Running the Converted Application
Once you have finished modifying the IFDL source file and program, you should compile,link, and run the application. You may encounter syntax errors, linker errors, or run-time errors. If you do, compare the changes you made to the instructions in this chapter. Correct the errors as you find them.
$COBOL/LIST=SAMPCOB.LIS SAMPCOB.COB
The COBOL compiler creates a listing file that indicates syntax errors. The file is named SAMPCOB.LIS and is written to your current default directory. When you have corrected syntax errors and recompiled, the compiler creates SAMPCOB.OBJ in your current default directory.
$FORMS TRANSLATE/LIST=SAMP.LIS SAMP.IFDL
The Translator creates a listing file that highlights syntax errors in your IFDL source file. The file is named SAMP.LIS and is written to your default directory. When you have corrected all syntax errors and retranslated, the Translator creates a form file, named SAMP.FORM, in your default directory.
$FORMS EXTRACT OBJECT SAMP.FORM/OUTPUT=SAMP_OBJ.OBJ
The EXTRACT utility creates a file named SAMP_OBJ.OBJ in your default directory. The file contains vectors to the escape routines.
$LINK SAMPCOB.OBJ, SAMP_OBJ.OBJ
$RUN SAMPCOB
Chapter 6. Creating and Modifying Forms
DECforms provides an interactive environment for developing forms, called the Form Development Environment (FDE). The FDE allows you to create,modify, and store form definitions. The interface to the FDE is menu-driven,so it guides you through the form development process by allowing you to make choices from the menus. The FDE allows you to use most features of DECforms without memorizing IFDL statements.
You can access several DECforms components from within the FDE. For example, you can access an interactive editor called the Panel Editor. Like the Layout phase of the FMS Form Editor, the Panel Editor allows you to create the appearance of panels. Unlike the FMS Form Editor, the Panel Editor is object-oriented, which means that it contains a set of commands that operate on objects instead of on lines and characters as the FMS Form Editor does.
Form
Layout
Assign
Order
Test
See the VSI DECforms Guide to Commands and Utilities for a complete description of using the FDE and Panel Editor.
6.1. Invoking the FDE and the Panel Editor
To invoke the FDE, use the FORMS DEVELOP command, which has the following format:
FORMS DEVELOP input-file-spec
Replace input-file-spec with the name of an IFDL source file or a form file. The FDE displays its main menu in response to this command. Figure 6.1, ''FDE Main Menu'' shows the FDE main menu. To leave the FDE, select the Exit option. (Select an option by using the arrow keys to move the cursor to the option. Then, press either the SELECT key or the KEYPAD PERIOD key.)

If you invoke the FDE to create a new form, it displays a panel that you can use to cause the FDE to create a layout for you automatically. Each form must have a layout, so the FDE provides the ability to create a 24line by 80 column character cell layout automatically. To specify that the FDE create the layout, select the YES option.
You can enter the Panel Editor either by selecting the Panel Editor option on the FDE main menu, or by issuing the following DCL command:
FORMS EDIT input-file-spec
Replace input-file-spec with the name of a form file. The Panel Editor displays its screen display when you invoke it. Figure 6.2, ''CCPED Screen Display''shows the Panel Editor's screen display. To leave the Panel Editor, press Ctrl/Z.

The panel shown in the screen display is one of the panels in the DECforms sample application.
See the VSI DECforms Guide to Commands and Utilities for information on the complete syntax of the FORMS DEVELOP and FORMS EDIT commands.
6.2. Using FMS Form Phase Features in DECforms
Form name, which you use to identify the form you want the Form Driver to use
Help form name, to name a help form that you want associated with a data entry form
Screen background, to control whether the screen is black or white when FMS displays a form
Screen width, to control whether the screen contains 80 or 132 columns
Screen character set, to control what character set appears on a form at run time
Screen area to clear, to specify how many lines on the screen should be cleared before FMS displays a form
Field highlighting, to highlight a field when it is open for input at run time
Function key and help user action routine (UAR) names and the names of data items you use with them
Initial field attributes to apply attributes to all new fields you create
Because each FMS form is equivalent to one DECforms panel assigning a DECforms attribute to a panel has the same effect as assigning an attribute to an FMS form.
Invoke the FDE.
Select the Choose, Create option from the panel level on the FDE main menu. The FDE displays the panel shown in Figure 6.3, ''FDE Choose, Create Panel'' on top of the Main Menu panel.
Figure 6.3. FDE Choose, Create Panel 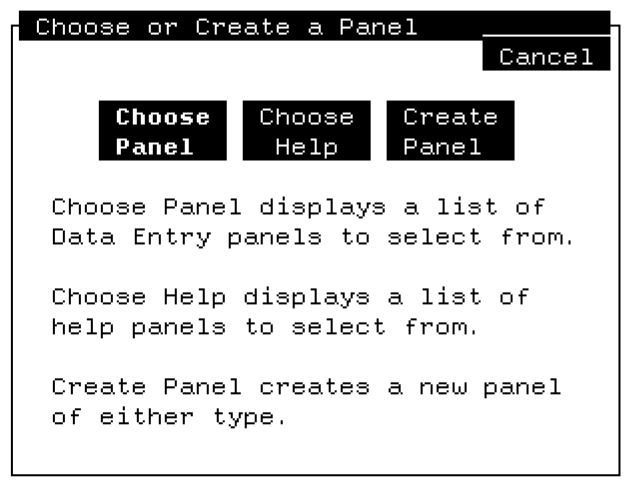
Select the Create Panel option. When you choose this option, the FDE displays the Create Panel that lets you specify the name of the panel you are creating, attributes about that panel, and the viewport on which the Form Manager displays the panel. The Create panel appears as shown in Figure 6.4, ''FDE Create Panel''.
Figure 6.4. FDE Create Panel 
To exit from the Create Panel, select the Ok or Cancel option.
Use this panel to assign panel-wide attributes as described in the sections that follow.
6.2.1. Assigning a Panel Name
The panel name in DECforms identifies a set of panel fields and literals. Unlike an FMS form name, you do not pass a panel name in a request call. You use it within the form when you need to refer to a particular panel.
To assign a panel name, type the name in the Panel Name field on the Create Panel.
6.2.2. Associating a Help Panel with Another Panel
Like FMS, you can associate a DECforms help panel with data entry panels. To associate a help panel with a data entry panel,specify the name of the help panel in the Help Panel field.
You may need to define certain functions and function responses to have your help operate correctly. See Section 7.3, ''Providing Help for Operators''for information on providing help for the operator.
6.2.3. Assigning Background Color
The DECforms background color attribute is equivalent to the FMS Screen Background attribute. The background color of a panel can be, depending on the capabilities of your terminal, BLACK, WHITE, BLUE, GREEN, CYAN, RED, MAGENTA, YELLOW or UNCHANGED. UNCHANGED is the same as the FMS AS IS screen background.
Use the arrow keys to move to the Colors section of the Create Panel.
Select the BACK: option in the color list. The FDE displays the menu shown in Figure 6.5, ''FDE Color Choice Panel''.
Figure 6.5. FDE Color Choice Panel 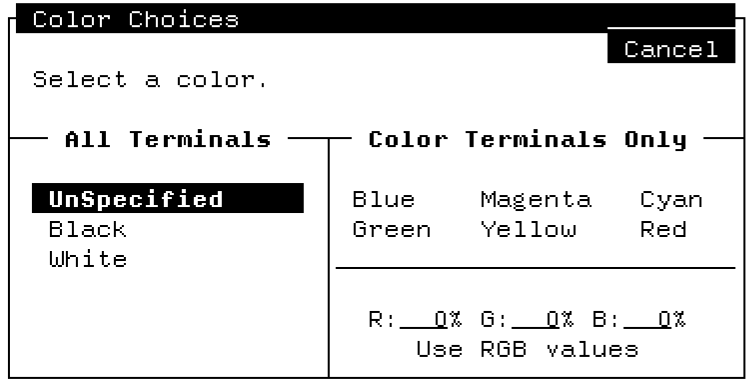
Use the arrow keys to move the cursor to the color you want for the background of your panel.
Press the SELECT key.
You can also use an RGB color specification to define your own colors. See the description of the MODIFY PANEL display-attribute COLOR command in the VSI DECforms Guide to Commands and Utilities for information on using RGB color specifications.
6.2.4. Assigning the Terminal Width
The terminal can be set to a width of 80 columns, 132 columns, or UNCHANGED.UNCHANGED means that the run-time terminal width setting is used. UNCHANGED is the same as the FMS AS IS screen width.
Use the arrow keys to move to the Terminal Width section of the Create Panel.
Use the arrow keys to position the cursor on your choice for terminal width.
Press the SELECT key.
6.2.5. Assigning a Character Set to the Panel
In DECforms, the character set used on a panel is a display attribute. You can display each object on the panel (each field or literal) using a different character set. Use the Panel Editor to choose a character set for all objects on a panel. Section 6.2.9, ''Assigning Default Attributes to All New Fields'' explains using the Panel Editor's Display Attribute Menu to choose a character set.
6.2.6. Creating a Viewport to Control Clearing the Screen
You must display each panel in DECforms in a viewport. The viewport controls how much of the screen the Form Manager clears when it displays a panel. To specify that the Form Manager clear 14 lines when it displays a panel, create a 14-line viewport and specify that the Form Manager display the panel in that viewport.
Type a viewport name in the Viewport Name field.
Specify the lines and columns that you want the viewport to include in the Lines and Columns fields. For example, you could have a viewport from line 3 to line 23 and from column2 through column 56.
6.2.7. Applying Active Highlight to Fields
If you want the Form Manager to highlight a field when it is open for input, or active, you can specify that in the field declaration. You can use the IFDL ACTIVE HIGHLIGHT clause to specify that the field is BOLD, BLINKING, REVERSE, or UNDERLINED.
Return to the FDE Main Menu by selecting the OK option.
Select the Edit IFDL option from panel level of the FDE main menu.
- Add the ACTIVE HIGHLIGHT clause to fields. For example, the followingfield contains an ACTIVE HIGHLIGHT clause:
Field EMPLOYEE_NAME
  Line 5 Column 10
  Active Highlight Bold
  Input Required
  End Field
(You can create fields using the Panel Editor as described in Section 6.3.1, ''Creating Panel Fields and Applying Field Defaults''.)
Return to the FDE by pressing Ctrl/Z to exit from the text editor.
You can apply the same active highlight to all fields on a panel by creating an APPLY FIELD DEFAULT clause in the panel declaration. See Section 6.3.1, ''Creating Panel Fields and Applying Field Defaults'' for information on using the APPLY FIELDDEFAULT clause.
6.2.8. Calling Escape Routines to Emulate Pre-Help, Post-Help, and Function Key UARs
FMS allows you to specify three UARs that are associated with a form: a pre-help UAR, a post-help UAR, and a function key UAR. DECforms allows you to call escape routines from your form. You can call an escape routine before help messages are displayed, after help messages are displayed, and when an undefined function key is pressed. In DECforms, you call escape routines from responses.
The sections that follow explain more about calling escape routines to emulate pre-help, post-help, and function key UARs.
6.2.8.1. Getting the Effect of Pre-Help and Post-Help UARs
To specify a pre-help procedural escape, define an entry response for the help panel that the Form Manager displays when the operator presses the HELP key. In the entry response, specify the CALL response step to call the escape routine.
To specify a post-help procedural escape, define an exit response for that same panel. Again, use the CALL response step to call the escape routine.
Select the Choose, Create option from the panel level FDE main menu.
Choose the help panel to which you want to add responses or create a help panel.
Select the Edit IFDL option at the panel level on the FDE main menu.
The FDE displays the IFDL source code for the current panel, and you can add the syntax for the response.
Form Data
   HELP_REQUESTED       CHARACTER (2)
   HELP_TERMINATING     CHARACTER (2)
End Data
   .
   .
   .
Help Panel FOR_FIELD_ACCOUNT
   Entry Response
      Call 'ENTRY_PROCEDURAL_ESCAPE' Using HELP_REQUESTED
   End Response
   .
   .
   .
   Exit Response
      Call 'EXIT_PROCEDURAL_ESCAPE' Using HELP_TERMINATING
   End Response
End Panel
END PANEL
See Section 7.7, ''Using Escape Routines'' for more information on using escape routines.
You may be able to perform the tasks specified in your UAR in an entry response or an exit response. You can improve your application's performance by not calling an escape routine. Therefore, use response steps when possible. See the VSI DECforms Programmer's Reference Manual for information on all the available response steps.
6.2.8.2. Getting the Effect of an Undefined Function Key UAR
To specify what actions are taken when the operator presses an undefined function key, create a function response for a special function called UNDEFINED FUNCTION. You can call an escape routine from this response to get the effect of your undefined function key UAR.
Select the Choose, Create option from the panel level on the FDE Main Menu.
Choose the panel from which you call the escape routine.
Select the Edit IFDL option at the panel level on the FDE Main Menu.
The FDE displays the IFDL source code for the current panel.
Add a function response for UNDEFINED FUNCTION.
Panel ACCOUNT_PANEL

Function Response UNDEFINED FUNCTION
   Call 'ESCAPE_ROUTINE' Using NO_KEY_DEFINITION
End Response
   .
   .
   .
End Panel
If you want the Form Manager to execute this function response each time the operator presses an undefined function key (as opposed to only when the operator is in ACCOUNT_PANEL), define the function response at the layout level.
See Section 7.1, ''Defining Keys'' for more information on defining keys. See Section 7.7, ''Using Escape Routines'' for more information on using escape routines.
You may be able to perform the tasks specified in your undefined function key UAR in the function response for UNDEFINED FUNCTION. You can improve your application's performance by not calling an escape routine. Therefore, use response steps when possible. See the VSI DECforms Programmer's Reference Manual for information on all the available response steps.
6.2.9. Assigning Default Attributes to All New Fields
|
DECforms Display Attribute |
FMS Video Attribute |
Description of the DECforms Display Attribute |
|---|---|---|
|
BACKGROUND COLOR |
Screen Background |
Specifies the background color (BLACK, WHITE, BLUE, GREEN, CYAN, RED, MAGENTA, YELLOW or UNCHANGED) of a panel or a viewport. You can also use an RGB color specification to define your own colors. See the VSI DECforms IFDL Reference Manual for information on using RGB color specifications. Your terminal must be capable of displaying the colors you choose. |
|
[NO]BLINKING |
Blink |
Causes the object to flash on and off. |
|
[NO]BOLD |
Bold |
Displays the object in a bold-faced font. |
|
CHARACTER SET |
Character Set |
Specifies the character set used to display an object. See the VSI DECforms IFDL Reference Manual for information on which character sets are available. |
|
FONT SIZE |
Double High Double Wide |
Specifies the font characteristics for an object. SINGLE or NORMAL indicate that each character in an object occupies one character cell. DOUBLE HIGH indicates that each character in an object is two character cells high. DOUBLE WIDE indicates that each character in an object is two character cells wide. |
|
FOREGROUND COLOR |
None |
Specifies the color (BLACK, WHITE, BLUE, GREEN, CYAN, RED, MAGENTA, YELLOW or UNCHANGED) of literals and fields. You can also use an RGB color specification to define your own colors. See the VSI DECforms IFDL Reference Manual for information on using RGB color specifications. Your terminal must be capable of displaying the colors you choose. |
|
LINE WIDTH |
None |
Specifies the width of lines. SINGLE or NORMAL indicate a thin line. DOUBLE HIGH indicates that horizontal lines are heavier than NORMAL. DOUBLE WIDE indicates that vertical lines are heavier than NORMAL. |
|
[NO]NEGATIVE |
Reverse |
Changes the background color to the foreground color, and the foreground color to the background color. |
|
[NO]REVERSE |
Reverse |
Equivalent to NEGATIVE. |
|
[NO]UNDERLINED |
Underline |
Underlines the object. |
Return to the FDE Main Menu by exiting from the Create Panel.
Select the Panel Editor option from the panel level on the FDE Main Menu.
Press the DO key to receive the Panel Editor's Command> prompt and issue the SET command. The Panel Editor displays the menu shown in Figure 6.6, ''Panel Editor Display Attributes Menu'' that lets you choose which attributes to set.
Figure 6.6. Panel Editor Display Attributes Menu 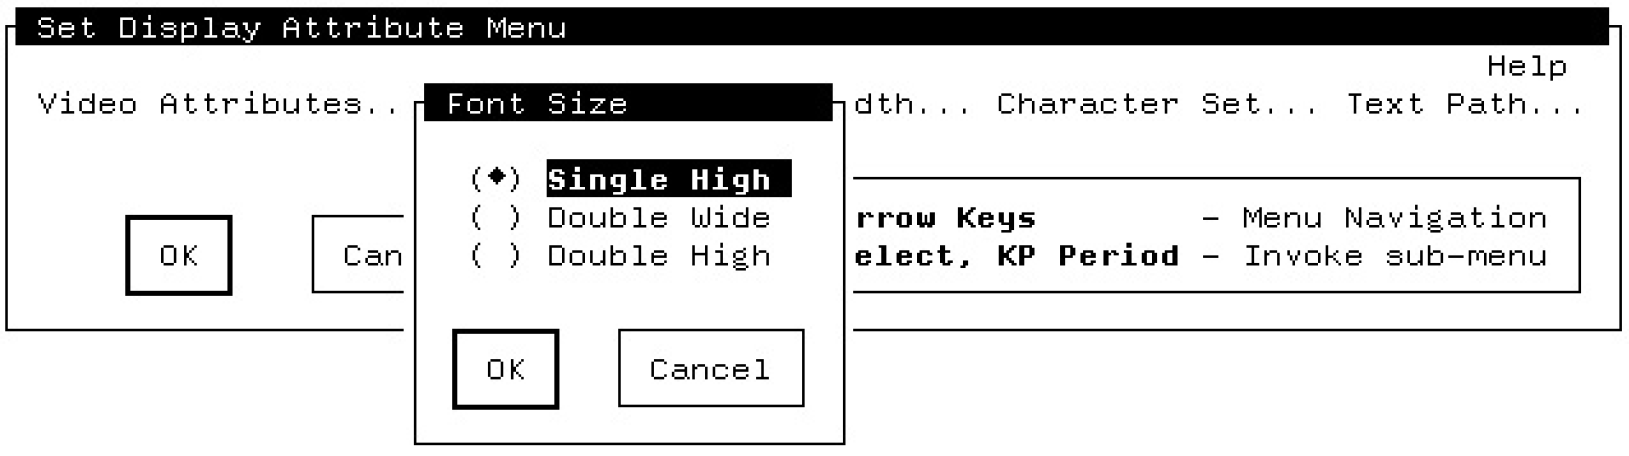
Use the arrow keys to move around the menu and the SELECT key to invoke sub-menus and choose attributes.
The Panel Editor applies the attributes you choose to all new objects you create on this panel. You can set different attributes at any time.
To assign the clear character or a help message to each field in a panel at once, you create an APPLY FIELD DEFAULT clause. Section 6.3.1, ''Creating Panel Fields and Applying Field Defaults'' describes creating that clause.
To assign a default value to a field, you assign a default value to the form data item associated with the field.
6.3. Using FMS Layout Phase Features in DECforms
Create fields and background text
Create solid lines and rectangles
Apply video highlights to the fields you create
Create special fields, such as DATE fields
Create scrolled regions and indexed fields
The sections that follow explain how to perform these tasks in DECforms.
6.3.1. Creating Panel Fields and Applying Field Defaults
Invoke the Panel Editor.
Press the KP8 key.
When you press this key, the Panel Editor displays a panel that prompts you for the following:Field name
You must supply a name for each field you create.
Data type (of the form data item associated with the field)
The Panel Editor prompts you for a data type because it automatically creates a form data item to match each field you create. The Panel Editor gives this form data item the same name as the panel field you are creating. If you have already declared a form data item for a field you are creating,you can omit the data type. Remember that the name of the form data item must be the same as the name of the panel field.
Output picture
If you omit the output picture, the Panel Editor creates one for you. The Panel Editor creates the output picture so that it matches the data type of the form data item that corresponds to the panel field you are creating.
To save you from specifying the same set of attributes for each field you create,you can add an APPLY FIELD DEFAULT clause to a panel. In the clause, you specify the attributes you want the Panel Editor to apply to each field. The Panel Editor applies attributes to all fields on the panel.
You can override a default attribute by specifying a conflicting attribute in the field declaration. If a field specifies an attribute that conflicts with a default attribute, the attribute specified in the field definition takes precedence for that field.
Exit from the Panel Editor by pressing Ctrl/Z.
Select the Edit IFDL option from the panel level on the FDE main menu.
- Add the APPLY FIELD DEFAULT clause to the panel as follows:
Panel EMPLOYEE_PANEL
   Display Viewport
       %Terminal_Width_Unchanged
   Display
       %Keypad_application
   Remove
   Apply Field Default Of
       Active Highlight Bold
   End Default
   .
   .
   .
End Panel
Press Ctrl/Z to exit from the text editor.
6.3.2. Creating Text Literals
To create a text literal, enter the Panel Editor and move the cursor to the position where you want the literal to appear. Type the text of the literal exactly as you want it to appear on the panel.
To modify existing text literals, put the cursor on them and either type new text (to modify the literal) or press the DELETE key (to delete characters in the literal).
6.3.3. Drawing Points, Lines, Rectangles, and Polylines
Move the cursor to the position on the panel where you want the point to appear.
Press the KP_HYPHEN key.
Move the cursor to the point where you want the line to begin.
Press KP9 to mark the beginning point.
Move the cursor to the point where you want the line to end.
Press KP9 to mark the end point.
Press KP_HYPHEN to draw the line.
(Because of the restrictions of the character cell display device, you cannot create diagonal lines with the Panel Editor)
If you mark more than two points, the Panel Editor creates a polyline by connecting each mark in the order in which you create them.
Move the cursor to the point where you want one corner of the rectangle,for example upper left corner.
Press KP9 to mark this corner.
Move the cursor to the point where you want the opposite corner of the rectangle, for example the lower right corner.
Press KP9 to mark this corner.
Press KP_HYPHEN to draw the rectangle.
6.3.4. Applying Display Attributes to Fields and Literals
CHARACTER SET defaults to User Preference.
FONT SIZE defaults to NORMAL.
LINE WIDTH defaults to NORMAL.
- Video attribute defaults are as follows:
NOBLINKING
NOBOLD
NOREVERSE
NOUNDERLINED
You can change the list of display attributes the Panel Editor uses for newly created items using the Panel Editor's Set Display Attribute Menu. You access the Set Display Attribute Menu using the Panel Editor SET command as described in Section 6.2.9, ''Assigning Default Attributes to All New Fields''.
6.3.5. Creating Date and Time Fields and Adjacent Fields
DECforms does not distinguish between DATE and TIME fields and other fields. Also, because the Panel Editor is object-oriented, it can create adjacent fields the same way it creates fields separated by one or more spaces.
To create a DATE or TIME field, enter the Panel Editor. Issue the CREATEFIELD command and specify a DATE or TIME data type for the data item associated with the field. For example, to create a DATE field, enter the Panel Editor. Press the DO key and issue the following command:
Command>CREATE FIELD DATE_ONLY TYPE DATE
To create an adjacent field, create two fields that have no spaces between them. For example, press the DO key and issue the following commands to create two adjacent fields containing an area code and a telephone number:
Command>CREATE FIELD AREA_CODE (5,10) TYPE CHARACTER(3) PICTURE "'('CCC')'"Command>CREATE FIELD PHONE_NUMBER (5,15) TYPE CHARACTER(6) PICTURE"CCC'-'CCCC"
6.3.6. Creating Groups
DECforms uses panel groups to display arrays and create scrolled regions. You can create groups in the Panel Editor with the CREATE GROUP command. To create a group, press the DO key and issue the following command:
Command>CREATE GROUP CHILD_GROUP OCCURS 3 HORIZONTALCommand>CREATE FIELD CHILD_GROUP.CHILD_NAME (2,5) TYPE CHARACTER(20)
The CREATE GROUP command creates the group declaration. The CREATE FIELD command creates one member for that group.
You can also create nested groups using the Panel Editor. To do so, create the outer group first, then the inner group, and then group members. The following example shows commands that create a nested group:
Command>CREATE GROUP CHILD_INFO OCCURS 3 VERTICALCommand>CREATE GROUP CHILD_INFO.SPECIFIC.CHILD OCCURS 4 HORIZONTALCommand>CREATE FIELD CHILD_INFO.SPECIFIC.CHILD.CHILD_FACT (2,5) TYPE CHAR(10)
Section 7.4, ''Displaying Arrays'' gives more information on DECforms groups. Section 7.5, ''Creating Scrolled Regions'' gives more information on creating scrolled regions.
6.4. Using FMS Assign Phase Features in DECforms
In FMS, you apply field attributes during the Assign phase of the Form Editor. During this phase, you specify what the name of the field is, what help message is associated with the field, a number of field attributes, and what field completion UARs are associated with a field.
How you associate a help message with a field
How you apply field attributes
How you apply field validators
The difference between DECforms field attributes and validators and their FMS equivalents
How to call an escape routine when a field is complete
6.4.1. Specifying Help for Fields
Help messages in DECforms are the same as they are in FMS. Help messages give the operator information. The only difference between a help message in DECforms and a help message in FMS is that in DECforms, help messages can be any length.
Select the Choose, Create option from panel level on the FDE Main Menu.
Choose the panel that contains the field to which you want to add a help message.
Select the Edit IFDL option from the panel level on the FDE main menu.
- Move to the field for which you want to specify help, and add the USE HELP MESSAGE clause. For example:
Field EMPLOYEE_NAME
  Line 5 Column 10
  Active Highlight Bold
  Input Required
  Use Help Message "You must enter an employee's name in this field."
End Field
For more information on providing help to your operator, see Section 7.3, ''Providing Help for Operators''.
6.4.2. Assigning Field Attributes and Field Validators
|
DECforms Field and Validation Attributes and Clauses |
FMS Equivalent |
Description of DECforms Field or Validation Attribute |
|---|---|---|
|
ACTIVE HIGHLIGHT |
Input field highlighting |
Specifies the display attributes that the Form Manager applies to the field when it is open for input. You can specify any of the display attributes described in Table 6.1, ''Comparison of DECforms Display Attributes and FMS Video Attributes''. |
|
AUTOSKIP |
Autotab |
Specifies that when the operator enters the character that fills the field, the Form Manager automatically moves the cursor to the next field. |
|
Comment text |
None |
A 1-line comment associated with the field. |
|
CONCEALED |
No Echo |
Specifies that the Form Manager not display the value of the field's associated form data item, nor does the Form Manager display operator input. However,the Form Manager does store data the operator enters in the form data item associated with the field. |
|
HIGHLIGHT WHEN |
None |
Specifies display attributes that the Form Manager applies to the field while the WHEN condition is true. |
|
INPUT PICTURE |
Field validation picture |
In conjunction with the editing clause, specifies what data the operator can enter in the field and how the Form Manager stores that data in a form data item. |
|
INPUT REQUIRED |
Response Required |
Specifies that the operator must enter data in this field. |
|
JUSTIFICATION DECIMAL |
None |
Specifies that operator input begin at the decimal point. The Form Manager inserts new characters to the left of the decimal point to form the whole part of the number. After the operator enters a decimal point, the Form Manager displays subsequent characters to the right of the decimal point to form the fractional part of the number. |
|
JUSTIFICATION LEFT |
Left Justify |
Specifies that operator input begins at the left end of the field. |
|
JUSTIFICATION RIGHT |
Right Justify |
Specifies that operator input begins at the right end of the field. |
|
MINIMUM LENGTH |
Must Fill |
Specifies the number of characters that the operator must enter into the field for input to be valid. MINIMUM LENGTH is different from Must Fill in that you can specify a value that is less than the number of characters the field can hold. |
|
NO DATA INPUT |
None |
Specifies that no data can be entered into a field, but if the operator presses a function key while in the field, the Form Manager performs its function response. |
|
OUTPUT PICTURE |
Fixed Decimal, Zero Fill, Zero Suppress, Clear Character |
In conjunction with the editing clause, specifies how the Form Manager displays data in a panel field. |
|
OUTPUT WHEN |
None |
Specifies a value that the Form Manager displays in the field if the WHEN condition is true. |
|
PROTECTED [WHEN] |
Display Only Supervisor Only |
Specifies that the operator cannot enter data in the field. If WHEN is specified, the field is protected only while the WHEN condition is true. |
|
RANGE |
None |
Allows you to specify two values between which the input value must fall. |
|
REQUIRE |
None |
Specifies a condition that must be satisfied before input is valid. |
|
SEARCH [NOT] |
None |
Specifies the name of a list of values to which the Form Manager compares input. If you specify NOT, the input value must not match one of the values on the list. Otherwise, the input value must match a value on the list. You create the named list with the IFDL LIST statement. |
|
TIMEOUT |
None |
Specifies the amount of time the operator can take to complete input to the field. |
|
UPPERCASE |
Uppercase |
Specifies that the Form Manager echo input and display output only in uppercase characters. |
|
USE HELP MESSAGE |
Help Text |
Specifies the text fora help message for this field. |
|
USE HELP PANEL |
Help forms |
Specifies a panel of help information associated with the field. |
DECforms does not have the concept of index value, so index value does not appear in Table 6.2, ''Comparison of DECforms Field Attributes and Field Validators and FMS Field Attributes and Validation Attributes''.
Select the Choose, Create option from the panel level on the FDE Main Menu.
Select the Choose option.
Choose the panel that contains fields to which you want to add attributes.
Select the Panel Editor option from the panel level of the FDE Main Menu.
Move the cursor to the field you want to modify.
Press the PF1-Enter key sequence. The Panel Editor displays the panel shown in Figure 6.7, ''Panel Editor Field Description Panel''.
Figure 6.7. Panel Editor Field Description Panel 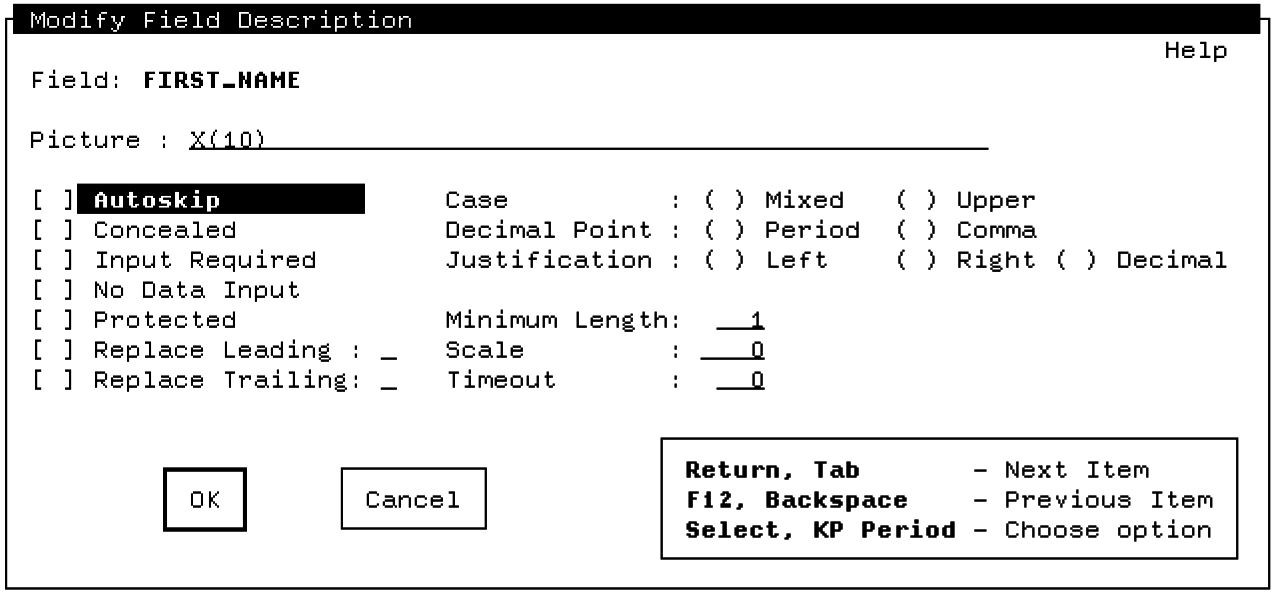
Move the cursor to the attributes you want and press the SELECT key. Supply values when they are needed.
Exit from this panel by selecting the OK option.
Exit from the Panel Editor by pressing Ctrl/Z.
Specify attributes not on the Field Description Panel by selecting the Edit IFDL option from panel level of the FDE Main Menu.
- Add attributes to fields. For example:
Field EMPLOYEE_NAME
  Line 5 Column 10
  Active Highlight Bold
  Input Required
  Range 1 through 10
  Use Help Message "You must enter an employee's name in this field."
End Field
See the discussion of Field Description Entry in the VSI DECforms IFDL Reference Manual for the correct syntax needed to add each attribute.
6.4.3. DECforms Field Picture Characters
DECforms uses picture characters to describe panel fields. Like FMS field validation characters, these characters determine the picture type and length of the field. In DECforms, two types of picture strings can exist for a field:an output picture and an input picture.
Output pictures identify how data appears when the Form Manager displays it. Input pictures identify what input is valid for a field. The output picture for a field can be the same as its input picture, or it can be different. However, the output picture and the input picture must specify an image that the Form Manager can convert from or to the data type of the form data item to which the field corresponds. For example, an output picture must not describe a FLOATING POINT data type if the form data item's data type is DATE.
In addition to the output picture and input picture, DECforms allows you to specify an editing clause. In the editing clause, you specify information like whether the decimal point is a period (.) ora comma (,) and whether scale is applied to a value. You also specify the character used for leading or trailing zero replacement, currency, and sign. When the Form Manager displays a value, it uses the output picture and the editing clause to determine how the value should appear. When the Form Manager stores a value in form data,it uses the input picture and the editing clause to determine whether or not the input value is valid and how to store that value.
|
DECforms Picture Character |
FMS Equivalent |
Description |
|---|---|---|
|
Picture Characters for Numeric and Character Data Types | ||
|
9 |
9 |
Position that contains a numeric digit. |
|
A |
A |
Position that contains an alphabetic digit. |
|
C |
C |
Position that contains an alphanumeric digit. |
|
X |
X |
Position that contains any displayable character. |
|
R |
None |
Position before which any leading zeros are replaced with the character specified in the editing clause. |
|
W |
None |
Position of a currency character. Depending on where the W appears, this position is fixed or floats. |
|
S |
None |
Position of a sign character. Depending on where the S appears, this position is fixed or floats. |
|
V |
None |
Position of the decimal point. |
|
E |
None |
Position that begins the exponent in a floating point number. |
|
. |
None |
Either the same as V or a literal period, depending on what the editing clause specifies as the decimal point character. |
|
, |
None |
Either the same as V or a literal comma, depending on what the editing clause specifies as the decimal point character. |
|
' |
None |
Delimits literals. |
|
() |
None |
Positive integer representing the number of consecutive occurrences of the preceding 9, X, C, or A symbol. |
|
Picture Characters for DATE and TIME Data Types | ||
|
C |
None |
Position that contains a digit representing fractions of a second. |
|
S |
None |
Position that contains a digit representing a second. |
|
I |
None |
Position that contains a digit representing a minute. |
|
H |
None |
Position that contains a digit representing an hour in a 12-hour clock. |
|
G |
None |
Position that contains a digit representing an hour in a 24-hour clock. |
|
L |
None |
Lowercase designator. |
|
U |
None |
Uppercase designator. |
|
Q |
None |
Space removal designator. |
|
R |
None |
Replace leading designator. |
|
D |
None |
Position that contains a digit in the number of a day. |
|
N |
None |
Position that contains a digit in the number of a month. |
|
M |
None |
Position that contains a character in the name of a month. |
|
A |
None |
Position that contains a character in an abbreviated month name. |
|
Y |
None |
Position that contains a digit in a year. |
|
P |
None |
Position that contains a character of the meridian indicator, for example "AM" or "PM." |
|
- |
None |
Literal hyphen. |
|
/ |
None |
Literal slash. |
|
: |
None |
Literal colon. |
|
, |
None |
Literal comma. |
|
. |
None |
Literal period. |
Select the Choose, Create option from the panel level on the FDE Main Menu.
Select the Choose option.
Choose the panel that contains fields to which you want to add an output picture and input picture.
Select the Edit IFDL option from panel level of the FDE Main Menu.
- Add the pictures to the field. For example, the following field declaration contains an output and input picture:
Field EMPLOYEE_NAME
  Line 5 Column 10
  Active Highlight Bold
  Output Picture XXXXXXXXXXR' 'X' 'XXXXXXXXXXXX
  Input Picture XXXXXXXXXXR' 'X' 'XXXXXXXXXXXX
  Replace Leading " "
  Input Required
  Use Help Message"You must enter an employee's name in this field."
End Field
If you do not specify an output picture for a field, DECforms generates it automatically from the data type of the field's associated form data item. If you do not specify an input picture for afield, it is the same as that field's output picture.
See the description of picture strings in the VSI DECforms IFDL Reference Manual for more information about picture characters.
6.4.4. Emulating Field Completion UARs
In FMS, you use field completion UARs to validate operator input and perform other operations on field completion. FMS performs field completion UARs when the operator fills an Autotab field or presses a field terminator key.
In DECforms, you can call an escape routine on field completion.(See Section 7.7, ''Using Escape Routines'' for information on escape routines.) You call the escape routine from either a validation response or an exit response.
The Form Manager performs a validation response for a field directly after input to the field is complete. The operator signals that input to a field is complete by either filling a field with the AUTOSKIP attribute or pressing a function key. A validation response should contain response steps that either validate operator input or call escape routines that validate operator input. Notice that you may be able to perform tasks in a validation response that you used to perform in a field completion UAR. Your application is more efficient if you can validate data in a response, instead of calling an escape routine.
The Form Manager performs exit responses directly after it finishes processing validation responses. You should define an exit response to perform tasks that should be done after field completion. For example, you could print the screen from an exit response. You may be able to perform tasks in an exit response that you used to perform in a field completion UAR. Using exit responses,instead of escape routines, makes your application more efficient.
Select the Choose, Create option from the panel level on the FDE Main Menu.
Choose the panel to which you want to add responses.
Select the Edit IFDL option at the panel level on the FDE Main Menu.
The FDE displays the IFDL source code for the current panel.
Add the responses.
   Field  ACCOUNT_NUMBER
      Line 10 Column 5
      Validation Response
        Call 'CHECK_DIGIT_VALIDATION'
           Using By Reference ACCOUNT_NUMBER Giving SUCCESS
        If SUCCESS = 0 Then Invalid End If
      End Response

      Exit Response
        Call WRITE_TO_DATABASE
           Using By Reference ACCOUNT_NUMBER Giving SUCCESS
        If SUCCESS = 0 Then
          Message "WARNING–Database update failed."
          Return Immediate
        End If
      End Response
      Input Picture 999'-'99999'-'999
      Input Required   End Field
| The CALL response step calls an escape routine called CHECK_DIGIT_VALIDATION that verifies that the account number just entered by the operator is valid. |
| The IF response step then tests the value returned from the CHECK_DIGIT_VALIDATION escape routine, which is stored in the form data item SUCCESS. If the SUCCESS form data item contains a 1, the response ends normally. If SUCCESS contains a 0, the Form Manager performs the INVALID response step. This response step causes the Form Manager to begin operator input to this field again. |
| The exit response calls an escape routine called WRITE_TO_DATABASE. The CALL response step passes the account number input by the operator to the escape routine, which stores it in the database. |
| The IF response step tests the escape routine's return value. If the SUCCESS form data item contains a 1, the response ends normally. If SUCCESS contains a 0, the Form Manager displays the message"WARNING–Database update failed" and returns control to the program. |
The VSI DECforms Programmer's Reference Manual contains more information about the response steps.
6.5. Using FMS Order Phase Features in DECforms
In FMS, you control the order of operator input in two ways. You can request input explicitly in your program using the FDV$GET, FDV$GETDL,or FDV$GETSC call. In this case, you cannot change the order of operator input without modifying your program. You can also use a more general input model using FDV$GETAL which gets values from all fields on the form. If you use this call, you control the order of operator input by entering the Order phase of the Form Editor. During this phase, you specify the order that the cursor moves through the fields when the operator is entering data. Once the order is set, you cannot change it without entering the Order phase again and respecifying it. When you add new fields to the form, the cursor moves to them last during data entry unless you change the order. In DECforms, the order of operator input is controlled by the POSITION response step and the activation list.
You use the POSITION response step to explicitly control which activation item the Form Manager processes first,second, third, and so on. For example, you could include the POSITION response step in a request response to control what activation item the Form Manager processes first. You could redefine the NEXT ITEM function in a function response that explicitly controls what activation item the Form Manager processes second, third, and so on. By controlling when the Form Manager processes each activation item, you control the order in which panel fields receive input.
When you use default function responses and your operator uses the NEXTITEM function to move around a panel, the Form Manager processes the activation list from top to bottom. The Form Manager processes the activation list in top to bottom order because it always begins activation list processing at the topmost, unprotected activation item. The default NEXT ITEM function response contains the POSITION TO NEXT ITEM response step, which causes the Form Manager to move down through the activation list. In this case, you control the order of operator input by controlling the order of items on the activation list. You control what items are on the activation list with the ACTIVATE response step.
If you prefer not to activate items explicitly, you can use a more general-purpose ACTIVATE response step, such as ACTIVATECORRESPONDING RECEIVE ALL. This response step causes the Form Manager to activate each panel field that corresponds to a field in the form record currently being used. When you use this response step, the Form Manager adds panel fields to the activation list in the order in which they appear in the IFDL source file. Therefore, if your operator uses the default NEXT ITEM function to move around the panel, the order in which you declare panel fields in your IFDL source file affects the order of operator input. The Panel Editor writes fields to the source file in the order in which you create them.
You can change the order in which the fields appear in the IFDL source file list by using the ORDER SELECTED Panel Editor command. To use this command,enter the Panel Editor and select the objects that you want to order. Then,issue the ORDER SELECTED command. The Panel Editor orders the objects as you selected them, so the first object you selected is first in order, the second object you selected is second in order,and so on.
If you add a new field to the center of a panel, and you want to reorder all the fields in a left-to-right, top-to-bottom order, press the DO key or thePF1-KP7 key sequence and issue the following commands:
COMMAND>DESELECT ALL; SELECT ALL; ORDER SELECTED
6.6. Using FMS Test Phase Features in DECforms
The TEST phase of the FMS Form Editor allows you to display the current form and type data into fields to test field validation. In DECforms,you can test panels using the DECforms Test Utility. To do this, enter the Panel Editor. Press the DO key and enter the TEST command at the Panel Editor Command> prompt.
After you issue this command, the Tester displays the current panel. You can enter data into fields on the panel. The Tester compares data you enter to the field's input picture, so you can determine whether each field is prepared to accept the data you expect operators to enter. For example, if entering a date into what you expect to be a date field causes an error,you know that you need to change the input picture for that field.
Press Ctrl/Z to exit from the Tester. See the VSI DECforms Guide to Commands and Utilities for more information on the Form Tester.
Chapter 7. Using Advanced DECforms Features
Although the FMS Form Editor is powerful, you cannot access every FMS feature using the Form Editor. To take advantage of some features you must modify your program. Using these features requires more effort than, for example, applying video attributes to fields or naming a form. These are the advanced features of FMS.
Defining keys
Moving between panels
Providing help for your operator
Displaying arrays
Creating scrolled regions
Determining what changed during operator input
Using escape routines
For information on using other features of DECforms see the VSI DECforms Guide to Commands and Utilities.
7.1. Defining Keys
Like FMS, DECforms allows you to bind functions to keyboard keys. Operators can use these keys to perform tasks with a single keystroke. In DECforms, you define keys in the form,not in the program. The sections that follow explain how to bind functions to keys and how to write responses for function keys. Function responses allow you to tailor what happens when the operator presses a function key.
7.1.1. Binding Functions to Keys
When you want to allow the operator to press a key to perform a particular task, you first bind a key to a function name in a function declaration. The function name can be either a pre-defined, DECforms built-in function name or any other name that follows OpenVMS naming conventions and does not conflict with other names in the form.
DECforms provides a set of built-in functions that are bound to keys by default. (See the VSI DECforms IFDL Reference Manual for information on what those functions are and to which keys they are bound.)When you bind one of the DECforms built-in function names to a key in a function declaration, you replace the previous, default key binding with the binding you specify.
You can bind more than one key to a function by naming more than one key in the function declaration. For example, if you want to allow the operator to invoke a function using a default key and another key, name the default key and the other key in a function declaration.
You can bind keys to functions only at the layout level.
Form EMPLOYEE_FORM

  Layout FOR_NON_DEFAULT_KEY_BINDINGS
      Device
        Terminal Type %VT200
      End Device
      Size 24 Lines By 80 Columns

      Function Transmit
            Is %KP_1
               %F10
               %Control_Z
      End Function
   .
   .
   .
  End Layout
End FormForm EMPLOYEE_FORM
Layout FOR_NON_DEFAULT_KEY_BINDINGS
.
.
.
Function CHANGE_EMPLOYEE Is %KP_Enter End Function
.
.
.
End Layout
End Form
This function declaration binds a function named CHANGE_EMPLOYEE to the Enter key. This function is undefined unless you define a function response for CHANGE_EMPLOYEE.
7.1.2. Writing Function Responses
To control what occurs when the operator presses a function key, you define a function response. You can write a function response for any function, including most of the DECforms built-in functions. You determine what function invokes a function response by naming the function response the same as the function. For example,when the operator presses the key bound to the CHANGE_EMPLOYEE function, the Form Manager performs the CHANGE_EMPLOYEE function response.
If the current activation item corresponds to a field and the field contains a function response, the Form Manager performs that function response.
If the current activation item corresponds to a field and no function response is at the field level, the Form Manager performs the function response at the group level.
If the current activation item corresponds to a field and no function response is at the group level (or if the field is not a group member), the Form Manager performs the function response at the panel level.
If the current activation item is a wait activation item that is associated with a panel, the panel-level function response is performed.
If the panel does not contain a function response or if the current activation item is a wait activation item that is not associated with a panel, the Form Manager performs the function response at the layout level.
If the layout does not contain a function response, the Manager performs the DECforms built-in function response.
If no built-in function response exists, the Form Manager displays a message.
You can write a special function response, called an UNDEFINED FUNCTION response, that controls what occurs when the operator presses an undefined key. The VSI DECforms Guide to Developing an Application describes writing a function response for UNDEFINED FUNCTION.
Form EMPLOYEE_FORM

  Layout FOR_NON_DEFAULT_KEY_BINDINGS
   .
   .
   .
    Function Response NEXT ITEM
        If Last Item Then
             Position to First Item
        Else
             Position to Next Item
        End If
    End Response
   .
   .
   .
   End Layout
End Form
The response in Example 7.3, ''New Definition for the NEXT ITEM Function'' tests the elementary condition LAST ITEM. Elementary conditions are predefined conditions that indicate the state of activation item processing. See the VSI DECforms Programmer's Reference Manual for more information on elementary conditions. If the condition is true, activation list processing proceeds with the first item on the activation list. Otherwise, activation list processing proceeds with the next item on the activation list. You do not have to declare the NEXT ITEM function for this function response to work. The built-in functions are declared by default, and you only declare them when you want to bind them to keys other than the default keys.
Form EMPLOYEE_FORM
   .
   .
   .
   Panel EMPLOYEE_PANEL
    Function Response CHANGE_EMPLOYEE
      Position To Next Panel
    End Response
The function response causes the Form Manager to display the panel that corresponds to the next panel activation item on the activation list. The Form Manager positions the cursor to the first field in that panel.
The FUNCTION RESPONSE declaration appears inside the declaration of EMPLOYEE_PANEL, so the Form Manager performs the response when the operator presses the ENTER key while entering data in that panel. When the operator is entering data in other panels, the CHANGE_EMPLOYEE function has no effect(unless you define other function responses).
7.2. Moving Between Panels
When you use FMS, you display a form, get input from it, and then return to the program. You can then display another form. FMS does not allow you to move directly from one form to another.
DECforms, on the other hand, does allow you to move between panels without returning to the program. Thus, you can get data from any number of panels during the processing of a single request. It also means that you may be able to process decision-making data (for example,choices the operator makes from a menu while performing tasks) in the form, rather than the program.
Form Data CHOICE_ITEM Integer(1)
| The FORM DATA statement declares an integer of length 1 to hold the operator's choice. The statement also declares the built-in FUNCTIONNAME data item and two form data items to store employee names. The GET\_EMPLOYEE\_NAME form data item stores existing employee names. The NEW\_EMPLOYEE\_DATA\.NEW\_EMPLOYEE\_NAME form data item stores new employee names. |
| The EXIT RESPONSE statement determines what occurs when the operator completes entry into the CHOICE_ITEM panel field. |
| If the operator presses the key bound to the NEXT ITEM function when the CHOICE_ITEM form data item equals 1, the Form Manager activates a group on the NEW_EMPLOYEE panel. The Form Manager displays the NEW_EMPLOYEE panel and gets input to the first field on that panel. |
| If the CHOICE_ITEM form data item contains a 2 when the operator invokes the NEXT ITEM function, the Form Manager activates the GET\_EMPLOYEE\_NAME field. The POSITION response step causes the Form Manager to process the activation item for the GET\_EMPLOYEE\_NAME field. |
| If CHOICE_ITEM contains a 3, the Form Manager returns control to the program. The third choice provides the operator with a way to exit from the application. |
The ACTIVATE response steps puts items on the activation list for input. In Example 7.5, ''Menu Panel with Choice Processing'', if the operator always enters the NEXT ITEM function, the Form Manager processes the activation list from top to bottom. If the Form Manager encounters no POSITION response steps in any response it performs when the operator completes entry in afield, the Form Manager does not move the cursor. The Form Manager moves the cursor only when it executes a POSITION response step.
When the Manager gets input to satisfy an item, it displays the panel on which the item is displayed, unless that panel is already displayed.
7.3. Providing Help for Operators
FMS allows you to provide help messages and help forms. Each help message is associated with a field on your form and each help form is associated with a form. By default, when the operator presses the HELP key, FMS displays the help message. If the operator presses the HELP key again, FMS displays the help form.
You can alter this default processing by writing pre-help and post-help UARs. If you write a pre-help UAR, FMS performs that UAR before it displays any help message. If you write a post-help UAR, FMS performs that UAR after it displays the help form. Section 6.2.8, ''Calling Escape Routines to Emulate Pre-Help, Post-Help, and Function Key UARs''explains emulating pre-help and post-help UARs.
The Form Manager displays DECforms help messages in the message panel. You associate each help message with a field, group, data-entry panel, or field default.
DECforms help panels are special panels you declare with the HELP PANEL statement. You also associate help panels with fields, groups, data-entry panels, or field defaults.
By default, when the operator presses the HELP key, the Form Manager displays the help message at the lowest level of the form hierarchy. That is, if you specified a help message for the current field, the Form Manager displays that message. If no help message is specified for the current field, but you specified one for the group that contains that field, the Form Manager displays the message associated with the group.
You can alter default help processing by writing new function responses for the DECforms built-in help functions, NEXT HELP, PREVIOUS HELP, and TERMINATE HELP. The sections that follow explain how to create help messages and help panels. See the VSI DECforms Guide to Developing an Application for additional information on creating help.
7.3.1. Creating Help Messages
Panel NEW_EMPLOYEE_PANEL

   Use Help Message "Enter the employee's name and previous
                     work experience."

   Group NEW_EMPLOYEE_DATA

     Field NEW_EMPLOYEE_NAME
        Line 2 Column 2
     End Field

   Group PREVIOUS_EMPLOYER_INFORMATION
     Use Help Message "Enter information about the employee's
                       previous jobs"
     Field EMPLOYER_NAME
        Line 5 Column 2
        Use Help Message "Enter the previous employer's name"
     End Field

     Field EMPLOYER_STREET
        Same Line Column 34
     End Field

     Field YEARS_EMPLOYED
        Same Line Column 66
        Use Help Message "Enter the number of years spent with
                          this employer."
     End Field
   End Group
End Panel
| When the cursor is positioned on the NEW\_EMPLOYEE\_DATA\.NEW\_EMPLOYEE\_NAME field and the operator presses the HELP key, the Form Manager displays the message "Enter the employee's name and previous work experience." Since that field does not have a specific help message, the Form Manager uses the help message at the panel level. |
| When the cursor is positioned on the PREVIOUS_EMPLOYER_INFORMATION.EMPLOYER_NAME field and the operator presses the HELP key, the Form Manager displays the message "Enter the previous employer's name." This message is specified in the USE HELP MESSAGE clause of that field declaration. |
| When the cursor is on the PREVIOUS_EMPLOYER_INFORMATION.EMPLOYER_STREET field and the operator presses the HELP key, the Form Manager displays the message "Enter information about the employee's previous jobs." Since this field does not have a specific help message, the Form Manager displays the message specified for the panel group. |
| When the cursor is positioned on the PREVIOUS_EMPLOYER_INFORMATION.YEARS_EMPLOYED field and the operator presses the HELP key, the Form Manager displays the message "Enter the number of years spent with this employer." This message is specified in the USE HELP MESSAGE clause of that field declaration. |
You only have to specify a message with the USE HELP MESSAGE clause to have help messages available for your operator.
You can specify only one help message for each field. The message can be of any length because the Form Manager wraps and scrolls messages that are too long to fit in the message panel. Note that this may cause long messages to scroll off the message panel before the operator has a chance to read the entire message.
You can specify only one help message for each field, panel group, data-entry panel, or field default.
7.3.2. Creating Help Panels
Help Panel HELP_EMPLOYEE_INFO
| The HELP_EMPLOYEE_INFO and the HELP_EMPLOYEE_NAME panels contain text and fields that explain how to use the EMPLOYEE\_INFORMATION panel and the NEW\_EMPLOYEE\_DATA\.EMPLOYEE\_NAME field. |
| When the operator presses the HELP key while the cursor is on the NEW\_EMPLOYEE\_DATA\.EMPLOYEE\_NAME field, the Form Manager displays the message "Enter the employee's name and previous work experience." If the operator presses the HELP key again, the Form Manager displays the HELP_EMPLOYEE_NAME panel,as specified by the USE HELP PANEL clause for that field. |
| When the operator presses the HELP key while the cursor is on the PREVIOUS_EMPLOYER_INFORMATION.EMPLOYER_NAME field,the Form Manager displays the "Enter the previous employer's name" message. If the operator presses the HELP key again, the Form Manager displays the HELP_EMPLOYEE_INFO panel. This field does not contain a USE HELP PANEL clause, so the Form Manager displays the help panel named in the USE HELP PANEL clause for this data-entry panel. |
| When the operator presses the HELP key while the cursor is on the PREVIOUS_EMPLOYER_INFORMATION.EMPLOYER_STREET field, the Form Manager displays the message "Enter information about the employee's previous jobs." If the operator presses the HELP key again, the Form Manager displays HELP_EMPLOYEE_INFO panel. |
| Pressing the HELP key while on the PREVIOUS_EMPLOYER_INFORMATION.YEARS_EMPLOYED causes the Form Manager to displays the same message and help panel as it displays for the PREVIOUS_EMPLOYER_INFORMATION.EMPLOYER_STREET field. |
You need not do anything beyond declaring help panels and associating them with fields, groups, and data-entry panels with the USE HELP PANEL clause to have help panels available to your operator.
You can create special viewports for help panels. This allows you to position them anywhere on the display. Also, the RETAIN clause allows you to specify that the panel is not removed from the display when the operator terminates help. This allows the help text to be displayed while the operator is entering data in the field on which help was needed. See the description of the POSTDISPLAY clause in the VSI DECforms IFDL Reference Manual for more information on the RETAIN clause.
7.4. Displaying Arrays
In FMS, you use arrays mainly with scrolled regions. In DECforms, you use arrays with scrolled regions, and you may want to use arrays to organize your data. You create DECforms arrays using groups. A data item group is a set of form data items that are related to each other. You can also declare panel groups that contain literals and panel fields to display data, and you can declare form record field groups to pass group data to the program.
The sections that follow explain how to store data in form data groups, how to activate panel groups, how to display groups on panels, and how to pass group data between the form and program. Section 7.5, ''Creating Scrolled Regions'' describes creating scrolled regions.
7.4.1. Storing Array Data in the Form
A data group can be a simple group, which is a collection of form data items. Each group can include an OCCURS clause, which designates that each form data item in the group occurs multiple times. Group declarations that include an occurs clause create one-dimensional arrays. To create a two-dimensional array, you nest one multiple-occurrence group inside another. You can nest multiple-occurrence groups only one level. However, you can nest simple groups any number of levels.
You can use a group name to perform operations on a group, or you can name a single member of a group to perform the operation only on that member. To refer to a member of a multiple-occurrence group, you use a subscript. You must fully qualify all references to group members.
   Form Data
        EMPLOYEE_NAME Character(30)
        EMPLOYEE_ID_NUMBER Integer(10)
        Group EMPLOYEE_ADDRESS
            STREET_ADDRESS Character(30)
            CITY Character(15)
            STATE Character(2)
            ZIP_CODE Integer(9)
        End Group

        Group SPOUSE
            Occurs 2
            NAME Character(15)
        End Group

        Group DEPENDENT
            Occurs 4
            Group CHILDREN
                Occurs 2
                CHILD_NAME Character(15)
            End Group
        End Group
    End Data
| The group EMPLOYEE_ADDRESS is a collection of four form data items. You refer to the first item in this group by the name EMPLOYEE_ADDRESS.STREET_ADDRESS |
| The SPOUSE group contains one form data item that occurs twice. The group stores the spouse's first name in the SPOUSE(1).NAME form data item and the spouse's second name in the SPOUSE(2).NAME form data item. The SPOUSE group is a one-dimensional array. |
| The CHILDREN group contains one data item that occurs two times,representing first and second names. The DEPENDENT group contains four occurrences of the CHILDREN group. This group stores the full name of four children. The CHILDREN group is a one-dimensional array. The DEPENDENT group is a two-dimensional array. You refer to an item of the DEPENDENT group using subscripts. For example, DEPENDENT(1).CHILDREN(1).CHILD_NAME refers to the first occurrence of the CHILD_NAME form data item in the CHILDREN group and the first occurrence of the CHILD_NAME form data item in the DEPENDENT group. Because the CHILDREN group is nested in the DEPENDENT group, you cannot refer to items in the CHILDREN GROUP without naming the DEPENDENT group. For example,CHILDREN(1).CHILD_NAME is an unqualified reference. You must use a reference like DEPENDENT(2).CHILDREN(1).CHILD_NAME. |
7.4.2. Displaying Data Stored in Form Data Groups
To display form data items that are declared in a group, you must declare a panel group that corresponds by name to that form data group. You can include literals in the panel group. The panel fields in the panel group must be named the same as the form data items in the form data group.
For fields or literals within multiple-occurrence panel groups, the line and column clause in the field or literal declaration determines the position of the first occurrence of that field or literal on the display. The appearance of subsequent occurrences is controlled by the VERTICAL and HORIZONTAL clauses. If you specify VERTICAL, subsequent occurrences of items in the group appear below the first occurrence. If you specify HORIZONTAL, subsequent occurrences of the group appear to the right of the first occurrence.
Horizontal groups of panel fields must occur the same number of times as the form data group to which they correspond (that is, they cannot scroll). Vertical groups of panel fields that are the outermost multiple-occurrence group can occur fewer times than their corresponding data groups. The Form Manager scrolls data in the group of panel fields when necessary to show all data stored in the data group. A vertical multiple-occurrence group nested inside another multiple-occurrence group must occur the same number of times as its related data group. You determine how many times a vertical group occurs with the DISPLAYS clause. Section 7.5, ''Creating Scrolled Regions'' describes using the DISPLAYS clause.
Panel GROUP_PANEL
    Literal Text
        Line 3
        Column 5
        Value "Employee Information"
        Display
            Font Size Double High
    End Literal

    Group EMPLOYEE_ADDRESS
        Literal Text
            Line 6
            Column 5
            Value "Street:"
        End Literal

        Field STREET_ADDRESS
            Same Line
            Next Column +1
            Display
                Underlined
        End Field

        Literal Text
            Next Line
            Column 5
            Value "City:"
        End Literal

        Field CITY
            Same Line
            Next Column +3
            Display
                Underlined
        End Field

        Literal Text
            Next Line
            Column 5
            Value "State:"
        End Literal

        Field STATE
            Same Line
            Next Column +2
            Display
                Underlined
        End Field

        Literal Text
            Same Line
            Next Column +3
            Value "Zip code:"
        End Literal

        Field ZIP_CODE
            Same Line
            Next Column +1
            Display
                Underlined
        End Field
    End Group

     Literal Text
         Line 10
         Column 5
         Value "Spouse:"
     End Literal

     Group SPOUSE
        Horizontal
        Field NAME
            Line 10
            Column 13
            Display
                Underlined
            Input Picture XXXXXXXXXXXXXXX' '
        End Field
     End Group

     Literal Text
        Line 12
        Column 5
        Value "Dependent children:"
     End Literal

    Group DEPENDENT
        Vertical
        Group CHILDREN
            Horizontal
            Field CHILD_NAME
                Line 13
                Same Column
                Display
                    Underlined
                Input Picture XXXXXXXXXXXXXXX' '
            End Field
         End Group
    End Group
End Panel
| Declaration of a literal with a double high font that labels the panel. |
| Declaration of a panel group that contains literal and fields. This group corresponds to the form data item group EMPLOYEE_ADDRESS, which is a simple group. |
| Declaration of a text literal to label the next group on the panel. The literal is not declared inside the SPOUSE panel group because the NAME form data group occurs twice, so the NAME panel group must be displayed twice. If the literal declaration is placed inside the panel group declaration, the literal appears twice on the panel. In this case, the literal should appear only once on the panel, so it is declared outside the panel group. |
| Declaration of a panel group that corresponds to the SPOUSE form data item group. The Form Manager displays the NAME field twice and underline sit. |
| Declaration of a literal to label the DEPENDENT group. Once again, the literal is needed only once on the panel and so is declared outside the panel group. |
| Declaration of the panel group that displays the form data group DEPENDENT. The Form Manager displays the DEPENDENT group vertically; the second, third, and fourth occurrences appear below the first occurrence. The Form Manager displays the CHILDREN group horizontally. The first occurrence of that group appears on line 13 in column 5. The second occurrence appears to the right of the first occurrence. |
Figure 7.1, ''Appearance of Groups on the Display'' illustrates how the panel in the Example 7.9, ''Declaration of Panel Fields to Display a Form Data Item Group'' is displayed.
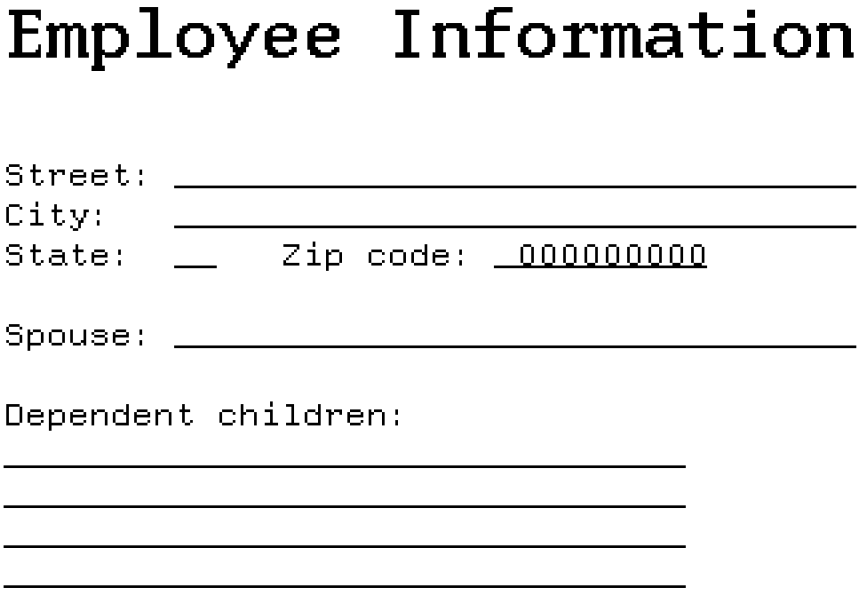
7.4.3. Activating Panel Groups for Input
To activate a panel field, you specify the ACTIVATE response step and name the panel field. If you want to activate an entire panel group, you specify the GROUP clause with the ACTIVATE response step. You name the group you want the Form Manager to activate in the ACTIVATE GROUP response step. You must specify the panel on which the Form Manager displays the panel group or panel field in the ACTIVATE response step.
ACTIVATE GROUP EMPLOYEE_ADDRESS On GROUP_PANEL
- STREET_ADDRESS
- CITY
- STATE
- ZIP_CODE
Activate Field EMPLOYEE_ADDRESS.STREET_ADDRESS On GROUP_PANEL
This response step causes the Form Manager to activate only the first panel field in the EMPLOYEE_ADDRESS group.
Activate Group SPOUSE On GROUP_PANEL
- SPOUSE(1).NAME
- SPOUSE(2).NAME
Activate Group DEPENDENT On GROUP_PANEL
- DEPENDENT(1).CHILDREN(1).CHILD_NAME
- DEPENDENT(1).CHILDREN(2).CHILD_NAME
- DEPENDENT(2).CHILDREN(1).CHILD_NAME
- DEPENDENT(2).CHILDREN(2).CHILD_NAME
- DEPENDENT(3).CHILDREN(1).CHILD_NAME
- DEPENDENT(3).CHILDREN(2).CHILD_NAME
- DEPENDENT(4).CHILDREN(1).CHILD_NAME
- DEPENDENT(4).CHILDREN(2).CHILD_NAME
Activate Field DEPENDENT(2).CHILDREN(1).CHILD_NAME On GROUP_PANEL
Activate Field DEPENDENT(1).CHILDREN(2).CHILD_NAME On GROUP_PANEL
- DEPENDENT(2).CHILDREN(1).CHILD_NAME
- DEPENDENT(1).CHILDREN(2).CHILD_NAME
7.4.4. Passing Group Data Between the Program and Form
To pass data between form data groups and the program, you must declare a form record that contains a group that corresponds to the form data group. You must also declare a program record that is logically equivalent to the form record and contains a structure that is logically equivalent to the form record field group.
Form EMPLOYEE_FORM

  Form Record EMPLOYEE_DATA
    Group EMPLOYEE_ADDRESS
        STREET_ADDRESS      Character (30)
        CITY                Character (15)
        STATE               Character(2)
        ZIP_CODE            Integer(9)
    End Group

    Group SPOUSE   Occurs 2
        NAME                Character (15)
    End Group
    Group DEPENDENT Occurs 4
       Group CHILDREN Occurs 2
        CHILD_NAME          Character (15)
       End Group
    End Group

END RECORD
| The record fields in the EMPLOYEE_ADDRESS group have a default data transfer association with the form data items in the EMPLOYEE_ADDRESS group. The names of the form record fields match the names of the form data items. |
| The SPOUSE.NAME record field is associated with the SPOUSE.NAME form data item for data transfer. |
| The DEPENDENT form record field group is associated with the DEPENDENT form data item group. |
IDENTIFICATION DIVISION.
PROGRAM ID.  Employee_program.

DATA DIVISION.
WORKING STORAGE SECTION.
*—
* This COBOL record is logically equivalent to the preceding
* form record.
*–
01   GROUP_RECORD                                           GLOBAL.
     03 STREET_ADDRESS                            PIC X(30).
     03 CITY                                      PIC X(15).
     O3 STATE                                     PIC X(2).
     03 ZIP_CODE                                  PIC 9(9) COMP.

     03 SPOUSE                                   OCCURS 2.
        05 NAME                       PIC X(15).
     03 DEPENDENT                                 OCCURS 4.
        05 CHILDREN                               OCCURS 2.
           07 CHILD_NAME              PIC X(15).
PROCEDURE DIVISION.
   .
   .
   .
END PROGRAM Employee_program.
7.5. Creating Scrolled Regions
In DECforms, a scrolled region is a section of a panel with one or more identical, contiguous fields and (optionally) literals. The region allows the operator to enter and read many lines of data on a panel. You can create a scrolled region that contains one line or many lines, up to the number of lines on the panel. Scrolled regions can include double-wide and double-size lines.
The sections that follow explain how you display arrays in a scrolled region and how yougive the operator control of the scrolled region.
7.5.1. Displaying Scrolled Data
In DECforms, you use a scrolled region to display groups. Therefore,to create a scrolled region, you declare a form data group and a panel group that correspond to each other. You then include a VERTICAL DISPLAYS clause in the panel group declaration to specify the number of times the panel group occurs on the display. The Form Manager displays as much data as fits in the group on the display. If the operator requests to see more of the data, the Form Manager scrolls the data, either by line or by page,depending on what you specify. Figure 7.2, ''Operation of a Scrolled Region'' shows how a scrolled region works.
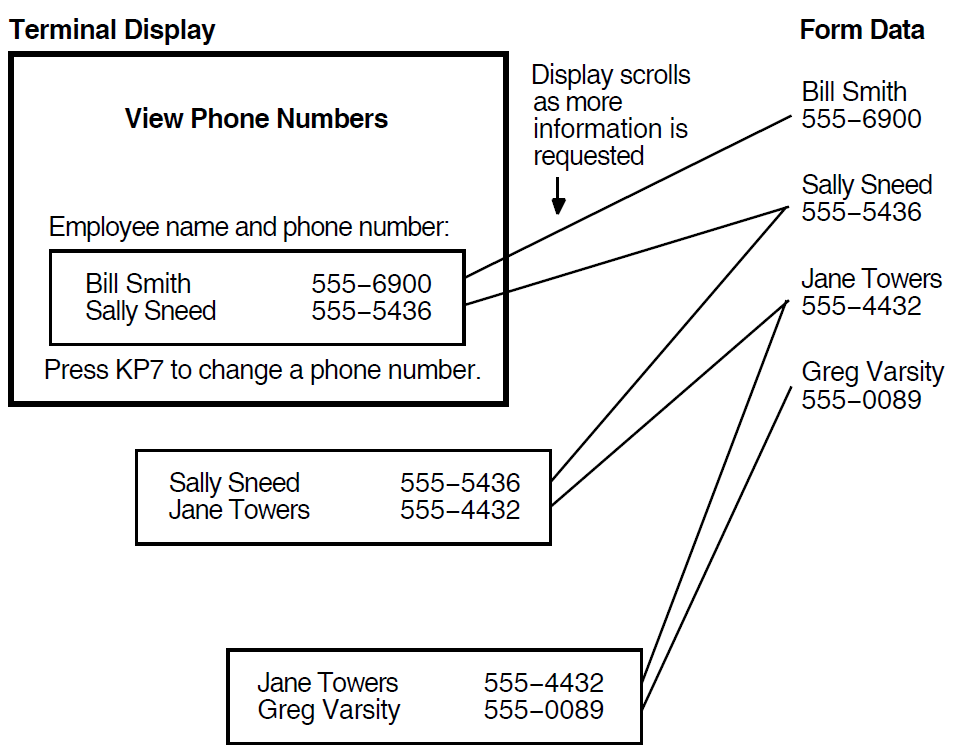
In Figure 7.2, ''Operation of a Scrolled Region'', the form data group occurs four times. The panel group is displayed twice, so two occurrences of the form data group can be displayed at once.
Form EMPLOYEE_FORM Form Data
| The NAME_AND_NUMBER form data item group stores the group data for the scrolled region. This group contains only four occurrences, which is an arbitrary limit. The form data item group could contain hundreds of data items, and scrolling works the same. |
| The EMPLOYEE_PHONE_NUMBERS form record allows the form to exchange phone number data with the program. |
| The function declaration binds the KP7 key to the CHANGE_ITEM function. |
| The CHANGE_ITEM function response activates the CHANGE_ITEM_PANEL for input. |
| The NAME_AND_NUMBER panel group corresponds to the NAME_AND_NUMBER form data item group. The Form Manager displays two occurrences of the group vertically, which means that the field declaration specifies the position of the first item. The Form Manager displays another item directly below that item. Data in the EMPLOYEE_NAME and EMPLOYEE_PHONE panel fields scrolls because the panel fields are displayed fewer times than the data group occurs. |
7.5.2. Setting Up the Operator's Control of a Scrolled Region
The UP OCCURRENCE function is bound to the PF4-Up Arrow key sequence.
This function causes the data in the scrolled region to move down. If you specify SCROLL BY PAGE in the panel group declaration, the Form Manager displays a new page of data on the display. The VERTICAL DISPLAYS clause controls the length of the page. The page is as long as the number of vertical occurrences of the field. If you omit SCROLL BY PAGE, the Form Manager scrolls the region smoothly, one line at a time.
The DOWN OCCURRENCE function is bound to the PF4-Down Arrow sequence.
This function causes the data in the scrolled region to move up. If you specify SCROLL BY PAGE in the panel group declaration, a new page of data is output to the display. The length of the page is controlled by the VERTICAL DISPLAYS clause. The page is as long as the number of vertical occurrences of the field. If you omit SCROLL BY PAGE, the region scrolls smoothly, one line at a time.
You can change the keys to which these functions are bound by declaring the function in your IFDL source file. You can write a function response for these functions if you need actions other than those given by default. See Section 7.1, ''Defining Keys'' for information on declaring functions and writing function responses.
7.6. Determining What Changed During Operator Input
You may need to determine whether the operator changed the value of a form data item. Determining this can be difficult because you may pass large amounts of data between your program and your form. In particular, you can pass all the data needed for a scrolled region to the form in a single call, instead of passing the data a little at a time,as you do in FMS. In DECforms, you can use tracked form data items and receive shadow records to help your program determine what the operator changed.
7.6.1. Tracking Form Data Items
The last value passed from the program to the form data item
The last value passed from the form data item to the program
In other words, the last known value is the last value the program "knows." The second copy of the form data item stores the current value of the form data item.
Directly before the Form Manager returns the current value of the form data item to your program, it compares the current value to the last known value. If the current value and last known value are different, the Form Manager returns information to your program in the shadow record that indicates the form data item has changed.
Form EMPLOYEE_FORM

  Form Data
    EMPLOYEE_NAME           Character (30)   Tracked
    EMPLOYEE_ID_NUMBER      Integer (10)
    HIRE_DATE               Date
    CURRENT_JOB_TITLE       Character (10)   Tracked
  End Data

  Form Record EXPERIENCE_RECORD
    EMPLOYEE_NAME           Character (30)
    EMPLOYEE_ID_NUMBER      Integer (10)
    HIRE_DATE               Date
    CURRENT_JOB_TITLE       Character (30)
  End Record
   .
   .
   .
End Form
The EMPLOYEE_NAME and the CURRENT_JOB_TITLE form data items are tracked. You should use the TRACKED clause only where you need it. It doubles the amount of storage needed for a data item, and it may degrade performance.
The example also shows a form record that can be used to pass data to and from the form data items.
7.6.2. Using Receive Shadow Records
WORKING STORAGE SECTION.
*-----
*  COBOL record declaration for a shadow record
*-----
01     EXPERIENCE_RECORD_SHADOW                     GLOBAL.
       03 RECORD_SHADOW                  PIC X.
       03 EMPLOYEE_NAME_SHADOW           PIC X.
       03 EMPLOYEE_ID_NUMBER_SHADOW      PIC X.
       03 HIRE_DATE_SHADOW               PIC X.
03 CURRENT_JOB_TITLE_SHADOW PIC X.|
Shadow Character |
Meaning for Entire Record |
Meaning for a Specific Field |
|---|---|---|
|
1 |
One or more fields in the record have been modified |
The record field has changed |
|
X |
Either no tracked form data items have been changed or no fields in the record correspond to form data items that are tracked. |
The form data item to which this shadow record field corresponds is not tracked |
|
0 |
All fields in the record are unchanged |
The record field is unchanged |
|
Shadow Record Contents | ||||
|---|---|---|---|---|
|
First Character |
Second Character |
Third Character |
Fourth Character |
Fifth Character |
|
1 |
1 |
X |
X |
0 |
This shadow record indicates that one or more fields in EXPERIENCE_RECORD have changed because a 1 is the first character of the shadow record. The second character of the shadow record indicates that new input changed the EMPLOYEE_NAME field in EXPERIENCE_RECORD. The next two characters in the shadow record indicate that the Form Manager did not maintain tracking information for the form data items that correspond to those record fields. Finally, the 0 indicates that the CURRENT_JOB_TITLE field is unchanged.
Pass the receive shadow record in the receive-shadow-record parameter to the FORMS$RECEIVE call or the FORMS$TRANSCEIVE call. See the VSI DECforms Programmer's Reference Manual for information on the receive-shadow-record parameter.
7.7. Using Escape Routines
An escape routine is an application program subroutine that you call from the form. It is similar to an FMS user action routine (UAR). You use an escape routine when you need to do something you cannot do in a response in the form. For example, you might write an escape routine that performs arithmetic calculations or one that performs a file operation.
This section explains what to do in your program to use escape routines,how to use the CALL response step, and how to link a program that uses escape routines.
7.7.1. Writing a Program That Uses Escape Routines
You can write an escape routine in any of the programming languages that DECforms supports. You must follow the syntax rules of the programming language for creating a subroutine. The only difference between an escape routine and other subroutines in your program is that you call an escape routine from the form, instead of from another part of your program. You must write the escape routine so that it can be called from code external to your program.
You can call a request from an escape routine, but you cannot call a DISABLE request that terminates the session from which you called the escape routine. (See the description of using escape routines in the VSI DECforms Programmer's Reference Manual for information on calling DECforms requests from escape routines.)
IDENTIFICATION DIVISION.
PROGRAM-ID.     INCREMENT.
**************************************************************************
*   General escape routine to increment a value.                         *
**************************************************************************
DATA DIVISION.
WORKING-STORAGE SECTION.
LINKAGE SECTION.
01         COUNT_KEEPER     PIC 9(9)    COMP.
PROCEDURE DIVISION USING COUNT_KEEPER.
0.
*+
* Add one.
*+
        ADD 1 to COUNT_KEEPER.
*
        END PROGRAM INCREMENT.
In addition to writing the escape routines, you must include the FORMS$AR_FORM_TABLE symbol in your FORMS$ENABLE call. This symbol allows the Form Manager to find the escape routines. The symbol is a declared DECforms-supplied definitions file that is stored in SYS$LIBRARY. The definitions file also declares the DECforms request calls. DECforms provides the file for most programming languages. You should copy the definitions file into your program.
*
* Copy statement for COBOL definitions
*
COPY "SYS$LIBRARY:FORMS$COB_DEFINITIONS.LIB".
*
* Enable call for escape routines
*
        CALL "forms$enable" USING BY VALUE  FORMS$AR_FORM_TABLE
                                  BY DESCRIPTOR DISPLAY_DEVICE
                                  BY DESCRIPTOR SESSION_ID
                                  BY DESCRIPTOR SAMP_FORM
                            GIVING FORMS_STATUS.
7.7.2. Writing Responses That Call Escape Routines
To transfer control to an escape routine, write a response that contains the CALL response step. This response step calls your escape routine. You can pass data items to the escape routine as parameters to this response step. You can use the GIVING phrase of the response step to get status from the procedural escape. You must declare the variable into which Form Manager writes status as a LONGWORD INTEGER.
Operator entry to a field is complete.
A panel, group, or field is entered or exited.
The Form Manager is validating a field.
You call a request.
The operator presses a function key.
Exit Response
  Call 'Increment' Using By Reference TRANSACTION_COUNT
End Response
The EXIT RESPONSE in Example 7.17, ''CALL Response Step'' calls the INCREMENT escape routine shown in Example 7.15, ''Escape Routine in a COBOL Program''. The CALL response step passes the form data item TRANSACTION_COUNT to the escape routine. The escape routine increments the value it receives from the form and returns it to the TRANSACTION_COUNT form data item.
You must be aware of the data type and length of form data items that you pass to escape routines. The data type of the form data item must create the same internal OpenVMS data type as the variable declared in your program. For example, suppose you declare a form data item to be the DECforms INTEGER data type. DECforms represents the INTEGER data type as an OpenVMS numeric string with a left separate sign. The variable in your program that is to receive the data must also create an OpenVMS numeric string with a left separate sign in internal storage. See the VSI DECforms IFDL Reference Manual for information on what OpenVMS data types DECforms uses to represent IFDL data types. The lengths of the form data item and program variable must also match.
Each programming language has different rules for how you pass external variables to a routine written in the programming language. You must use the appropriate passing mechanism in the CALL response step so that your escape routine can use the value you pass to it. See the documentation for your programming language for information on passing external variables to your program.
See the VSI DECforms IFDL Reference Manual for more information about the CALL response step and defining responses.
7.7.3. Linking Applications That Use Escape Routines
To link your application when it contains escape routines, first create a form object module. A form object module contains a list of the escape routines that you call from the form. You create a form object module using the Extract Object Utility.
To create an object module using the Extract Object Utility, issue the FORMS EXTRACTOBJECT command, which has the following format:
FORMS EXTRACT OBJECT input-file-specification[,input-file-specification...]
Substitute the file name of your form file for input-file-specification. The default file type for the input file is the .FORM type.
You can specify several input files. Separate the file names with a comma. The Extract Object Utility generates one object file, which contains an object module for each form listed on the command line. The default name of the output file is the same as the input file name with the .OBJ file type. (See the VSI DECforms Guide to Commands and Utilities for more information on the FORMS EXTRACT OBJECT command.)
After you create an object module, link it with your program using the DCL LINK command. For example, to link a vector object module called VECTOR_NAME.OBJ to a program object module name PROGRAM_NAME.OBJ, issue the following command:
$LINK PROGRAM_NAME.OBJ, VECTOR_NAME.OBJ
If you store your escape routines in a separate file from the rest of your program, you must also link the escape routines to the program. You may also want to store escape routines in shareable images. See the documentation on escape routines in the VSI DECforms Programmer's Reference Manual for information on linking escape routines stored in shareable images.
Appendix A. Comparison of FMS Form Language Statements and DECforms IFDL Statements
|
FMS Form Language Statement |
Corresponding DECforms IFDL Statement |
Description |
|---|---|---|
|
ATTRIBUTE_DEFAULTS |
FIELD DEFAULT LITERAL DEFAULT |
Specifies default characteristics for fields and literals. |
|
DRAW |
LITERAL POLYLINE LITERAL RECTANGLE LITERAL POINT |
Describes an object to be drawn on the display at or between the specified coordinates. |
|
END_OF_FORM |
END FORM |
Marks the end of the form. |
|
FIELD |
FIELD |
Specifies the characteristics of a particular field within a panel. |
|
FORM |
FORM |
Specifies the syntactical beginning of the form definition. |
|
NAMED_DATA |
Form data items that are not displayed |
Form data items specify all variable or constant storage in the form. They are not displayed if no corresponding panel field is declared. |
|
ORDER |
POSITION and ACTIVATE |
You control the order of operator input using the POSITION response step. This response step allows you to explicitly name what activation item the Form Manager processes first, second, third,and so on. If you use default function responses, the Form Manager processes the activation list by executing the POSITION TO NEXT ITEM response step. In this case, the Form Manager processes activation items in the order in which they appear on the activation list. You control the order of items on the activation list using the ACTIVATE response step. If you specify ACTIVATION CORRESPONDING RECEIVE ALL, the Form Manager adds items to the activation list in the order in which you declare panel fields in the IFDL source file. |
|
SCROLL |
Panel group with a VERTICAL DISPLAYS clause that specifies fewer occurrences than the form data group to which the panel group corresponds. |
When a panel group occurs fewer times than its corresponding form data item group, the panel group is a scrolled region. The Form Manager displays as much data as it can from the form data group in the panel group. If the operator asks to see more data, the Form Manager scrolls the data in the panel group. |
|
TEXT |
LITERAL TEXT |
Describes a text object to be written on the display at the specified coordinates. |
|
VIDEO |
DISPLAY |
Applies DECforms display attributes and attributes you define to fields and panels. |
Appendix B. FMS Call Conversion Summary
|
FMS Call |
Emulating in DECforms |
|---|---|
|
ADLVA |
To create a data line in DECforms, create a one-line panel. Apply video attributes to the panel using the DISPLAY clause at the panel level. See Section 4.3.4, ''Controlling Output to and Input from a Terminal Line'' for more information. |
|
AFCX |
No DECforms equivalent. See Section 4.1.1, ''The AFCX Call''for more information. |
|
AFVA |
Use the HIGHLIGHT WHEN clause within a field. See Section 4.3.1, ''Altering Field Video Attributes'' for more information. |
|
ATERM |
Specify which display device to use in the display-device-specification parameter to the ENABLE request. Usually, you can specify SYS$INPUT in this argument. See Section 4.2.2, ''Opening the Form Environment'' for more information. |
|
AWKSP |
Relate a form with a terminal by calling the ENABLE request. The session identification string returned from this request identifies the form and terminal. Use the session identification string to determine which session each call you make affects. See Section 4.2.2, ''Opening the Form Environment''for more information. |
|
BELL |
Use the SIGNAL %BELL response step to ring the terminal bell. See Section 4.3.19, ''Signaling the Operator'' for more information. |
|
CANCEL |
Use the FORM$CANCEL call to cancel outstanding requests for a specified session. See Section 4.2.5, ''Canceling Requests'' for more information. |
|
CDISP |
Clear the terminal screen before you display a panel by declaring a viewport as large as the terminal screen. Use the VIEWPORT clause within the panel to designate displaying the panel on the full screen viewport. Display the panel with the DISPLAY response step. See Section 4.3.9, ''Displaying Forms'' for more information. |
|
CLEAR |
Clear the part or all of the terminal screen with the REMOVE ALL response step. Redraw parts of the screen using the REFRESH response step. See Section 4.3.3, ''Clearing the Screen'' for more information. |
|
CLEAR_VA |
No DECforms equivalent. See Section 4.1.2, ''The CLEAR_VA and FIX_SCREEN Calls'' for more information. |
|
DEL |
No DECforms equivalent. See Section 4.1.3, ''The DEL and READ Calls'' for more information. |
|
DFKBD |
Define keys with the FUNCTION and FUNCTION RESPONSE statements. See Section 7.1, ''Defining Keys'' for more information. |
|
DISP |
Display panels with the DISPLAY response step. If you need the initial values of form data items to appear in the panel fields,specify the initial value with the VALUE clause. Use the RESET response step to reset form data items to their initial values. See Section 4.3.9, ''Displaying Forms'' for more information. |
|
DISPW |
Display panels with the DISPLAY response step. See Section 4.3.9, ''Displaying Forms'' for more information. |
|
DPCOM |
Control what character is used as the decimal point with the DECIMAL POINT IS clause in the OUTPUT PICTURE for a field. See Section 4.3.6, ''Defining the Decimal Point as Comma'' for more information. |
|
DTERM |
To detach the terminal, call the DISABLE request. This request also closes the form. See Section 4.2.6, ''Closing the Form Environment'' for more information. |
|
DWKSP |
To close the form, call the DISABLE request. This request also detaches the terminal. See Section 4.2.6, ''Closing the Form Environment'' for more information. |
|
FCHAN |
No DECforms equivalent. See Section 4.1.4, ''The FCHAN and TCHAN Calls'' for more information. |
|
FIX_SCREEN |
No DECforms equivalent. See Section 4.1.2, ''The CLEAR_VA and FIX_SCREEN Calls'' for more information. |
|
GET GETAF GETAL GETSC |
Get data from the form by calling the RECEIVE request. The RECEIVE request gets a record from the form. See Section 4.2.4, ''Getting Data from the Form'' for more information. |
|
GETDL |
Get data from a data line using the RECEIVE request. To emulate the data line, declare a one-line panel and viewport into which the operator can enter data. Position the viewport and panel on the display where you want the data line to appear. See Section 4.3.4, ''Controlling Output to and Input from a Terminal Line''for more information. |
|
ILTRM |
Trap invalid functions by writing a function response for functions that are invalid in a particular context. For example, the NEXT FIELD function is invalid when the operator is positioned on the last field on the panel. Determine what occurs when the operator invokes the NEXT FIELD function by defining a function response for that function within the last field on the panel. The function response is executed only when the operator is positioned on the last field on the panel. See Section 7.1, ''Defining Keys'' for more information about writing function responses. |
|
LCHAN |
Request that the Form Manager choose an I/O channel by calling the ENABLE request. The session identification string returned from this request identifies the channel opened. See Section 4.2.2, ''Opening the Form Environment'' for more information. |
|
LCLOS |
To close the channel, call the DISABLE request. This request also detaches the terminal. See Section 4.2.6, ''Closing the Form Environment'' for more information. |
|
LEDOF |
No DECforms equivalent. See Section 4.1.5, ''The LEDON and LEDOF Calls'' for more information. |
|
LOAD |
Identify which form should be used during a session by naming the form in the form-specification parameter to the ENABLE request. See Section 4.2.2, ''Opening the Form Environment'' for more information. |
|
LOPEN |
The form is opened (made ready to use) during the processing of the ENABLE request. See Section 4.2.2, ''Opening the Form Environment'' for more information on the ENABLE request. |
|
NDISP |
No DECforms equivalent for marking forms as not displayed. However, to remove a panel from the display, use the REMOVE response step. This response step clears the contents of a viewport and removes the viewport from the display. See Section 4.3.10, ''Marking Forms as Undisplayed'' for more information. |
|
PFT |
Standard DECforms functions are trapped in the form by default. If you want new keys to invoke the functions or different actions to occur in response to the functions, use the FUNCTION and FUNCTIONRESPONSE statements to redefine the functions and respecify the actions they cause. See Section 4.3.13, ''Processing Field Terminators'' for more information. |
|
PRINT_SCREEN |
Print panels using the PRINT response step. This response step writes the contents of the named panel to a file. See Section 4.3.12, ''Printing Forms'' for more information. |
|
PUT PUTAL PUTSC |
Put data to the form by calling the SEND request. The SEND request sends a record to the form. See Section 4.2.3, ''Sending Data to the Form'' formore information. |
|
PUTD PUTDA |
Assign form data items a default value using the VALUE clause with the FORM DATA statement. If the value in the form data item changes, reset it to the default value using the RESET response step. You can reset particular form data items or all form data items. |
|
PUTL |
Put data to a data line using the SEND request. To emulate the data line, declare a one-line panel and viewport into which the operator can enter data. Position the viewport and panel on the display where you want the data line to appear. See Section 4.3.4, ''Controlling Output to and Input from a Terminal Line''for more information. |
|
READ |
No DECforms equivalent. See Section 4.1.3, ''The DEL and READ Calls'' for more information. |
|
RET RETAL |
Return data from the form to the program by calling the RECEIVE request and writing a RECEIVE response in the form. Use the RETURN response step to specify returning control to the program without getting operator input. See Section 4.3.16, ''Returning Data from the Form Workspace'' for more information. |
|
RETCX |
Get information about the operator's current context by examining the values in built-in form data items. See Section 4.3.8, ''Determining Form Context''for more information. |
|
RETDI RETDN |
Declare constant information in the form by declaring form data items and using the VALUE clause to assign a value to them. If you need the constant information stored in the form data items in your program, use the FORMS$RECEIVE call to get the data from the form. See Section 4.3.17, ''Returning Named Data by Index and Name'' for more information. |
|
RETFL |
Print panels using the PRINT response step. This response step writes the contents of a panel to a file. See Section 4.3.12, ''Printing Forms'' for more information. |
|
RETFN |
Determine the current field name by examining the contents of the CURRENTITEM built-in form data item. See Section 4.3.8, ''Determining Form Context''for more information. |
|
RETFO |
No DECforms equivalent. See Section 4.1.6, ''The RETFO and RETLE Calls'' for more information. |
|
RETLE |
No DECforms equivalent. See Section 4.1.6, ''The RETFO and RETLE Calls'' for more information. |
|
RFRSH |
Refresh the viewports on the display using the REFRESH response step. Specify REFRESH ALL to refresh all viewports. See Section 4.3.14, ''Refreshing the Screen'' for more information. |
|
SCR_LENGTH |
No DECforms equivalent. See Section 4.1.7, ''The SCR_LENGTH and SCR_WIDTH Calls'' for more information. |
|
SCR_WIDTH |
No DECforms equivalent. See Section 4.1.7, ''The SCR_LENGTH and SCR_WIDTH Calls'' for more information. |
|
SIGOP |
Use the SIGNAL %BELL response step to ring the terminal bell. Use the SIGNAL %REVERSE response step to reverse the video attributes of the screen. See Section 4.3.19, ''Signaling the Operator'' for more information. |
|
SPADA |
Modify the keypad mode using the DISPLAY clause. The%KEYPAD_APPLICATION attribute sets the keypad to application mode. The%KEYPAD_NUMERIC attribute sets the keypad to numeric mode. The%KEYPAD_UNCHANGED attribute allows the operator to control the keypad mode. See Section 4.3.11, ''Modifying the Keypad Mode'' for more information. |
|
SPON |
Use the PROTECTED WHEN clause to conditionally protect fields from operator entry. Make the WHEN condition true to protect the field. See Section 4.3.5, ''Controlling Supervisor Mode'' for more information. |
|
SPOFF |
Use the PROTECTED WHEN clause to conditionally protect fields from operator entry. Make the WHEN condition false to unprotect the field. See Section 4.3.5, ''Controlling Supervisor Mode'' for more information. |
|
SSIGQ |
Signal the operator with the SIGNAL %BELL or SIGNAL %REVERSE response steps. Choose the signal mode with each response step. See Section 4.3.19, ''Signaling the Operator'' for more information. |
|
SSRV |
No DECforms equivalent. See Section 4.1.8, ''The SSRV and STAT Calls'' for more information. |
|
STAT |
No DECforms equivalent. See Section 4.1.8, ''The SSRV and STAT Calls'' for more information. |
|
STERM |
Determine what session is affected by a DECforms call using the session identification string. See Section 4.2, ''Changing Form Driver Calls to DECforms Calls'' for more information. |
|
STIME |
Specify the number of seconds the operator has to enter data in a field using the timeout parameter to one of the request calls. See Section 4.2, ''Changing Form Driver Calls to DECforms Calls'' for more information. |
|
SWKSP |
Switch operator entry to a new panel using the ACTIVATE and POSITION response steps. The ACTIVATE response step makes fields on a panel eligible for input. The POSITION response step causes the Form Manager to process the items. See Section 4.3.18, ''Setting the Current Workspace'' for more information. |
|
TCHAN |
No DECforms equivalent. See Section 4.1.4, ''The FCHAN and TCHAN Calls'' for more information. |
|
USER_REFRESH |
Use the CALL response step to call an escape routine that refreshes parts of the screen that are not maintained by the Form Manager. You should specify the REFRESH ALL response step to be performed after control returns to the form. This allows the Form Manager to reset the terminal. |
|
WAIT |
Synchronize form processing with the pace of the operator using the WAIT response step. See Section 4.3.21, ''Waiting for the Operator'' for more information. |
Appendix C. Comments Created by the FMS Converter
The FMS Converter creates comments in the IFDL source file. These comments give information about the Converter output, highlight IFDL source code that may need to be changed, or indicate that syntax to create a default DECforms attribute has not been written to the source file. This appendix explains each of the comments written by the Converter.
Message
/**Change the panel named in this USE HELP PANEL clause from a data entry panel to a help panel. Then, remove the comments that surround the USE HELP PANEL clause.**/
Explanation
The FMS Converter writes this message when it creates a USE HELP PANEL statement to maintain the relationship between an FMS help form and data entry form. The DECforms USE HELP PANEL statement appears in the data entry panel in the converted source file and names the help panel that the FMS Converter created from the FMS help form.
The Converter cannot distinguish between help panels and data entry panels,so it declares all panels as if they are data entry panels.
DECforms help panels cannot contain the USE HELP PANEL statement.
User Action
To convert help, modify the panel declaration for the help-panel-name to make it a help panel declaration. A help panel is declared with the HELP PANEL statement. Be sure the help panel contains no USE HELP PANEL statements. Then, delete the comment characters that surround the USE HELP PANEL statement in the data entry panel.
Message
/**Default clear character attribute not specified for this CHARACTER field.**/
Explanation
You specified an explicit blank clear character for an FMS field. The data to be displayed in the converted panel field is a character string. The DECforms default for character string data is to display a blank for the clear character. The Converter does not output IFDL syntax to explicitly state this default.
User Action
None; this is an informational message.
Message
/**If possible, convert the UAR this function response calls to response steps.**/
Explanation
The FMS Converter creates a function response for the UNDEFINE FUNCTION to call undefined function key UARs.
User Action
Examine the UAR. If you can perform the same task using response steps,remove the UAR from your program. Write response steps in the UNDEFINEDFUNCTION response to replace the UAR.
Message
/**Modify the character set clause in this field to name a valid &CIRCLE; character set. **/
Explanation
Of the character sets FMS supports, the FMS Converter supports converting only the Private_Rule character set and the US character set.
When the Converter encounters a character set in the FMS application that it does not convert to DECforms, it creates an invalid field. The Converter creates a field with the CHARACTER SET clause that names the FMS character set.
User Action
You must modify the CHARACTER SET clause in the field. Substitute one of the valid DECforms character set names for the character set name written to the source file by the Converter. See the documentation on elementary attributes in the VSI DECforms IFDL Reference Manual for information on what character sets DECforms supports.
Message
/**The CHARACTER SET clauses in this panel name invalid character sets. Modify the clauses to name a &CIRCLE; character set. **/
Explanation
Of the character sets FMS supports, the FMS Converter converts only the Private_Rule character set and the US character set.
When the Converter converts FMS form-wide attributes to DECforms,it creates text literals or field default declarations. If the FMS form-wide attributes specify a character set that the FMS Converter does not convert,the Converter creates an invalid literal or field default declaration. The Converter writes the name of the FMS character set to the CHARACTER SET clause in the literal or field default declaration.
User Action
You must modify CHARACTER SET clauses in this panel. Substitute one of the valid DECforms character set names for any invalid character set names written to the source file by the Converter. See the documentation on elementary attributes in the VSI DECforms IFDL Reference Manual for information on what character sets DECforms supports.
Message
/**The FMS Converter truncated the length of this form data item.**/
Explanation
FMS allows Named Data items to have any length. DECforms allows form data items to be 2048 bits in length. The FMS Converter truncates any Named Data items that are longer than 2048.
User Action
Examine the resulting form data item. Divide data and create new data items as necessary.
Message
/**These data items simulate the FMS Named Data for form form-name.**/
Explanation
When the FMS Converter encounters Named Data items in the FMS application,it creates form data items to correspond to the FMS Named Data. The Converter identifies the data items it creates to replace Named Data with this message.
The FMS Converter does not create a panel field to correspond to form data items that replace FMS Named Data. FMS Named Data is not displayed, so the Converter assumes that the form data items should not be displayed.
User Action
None; this message is informational.
Message
/**This field is also declared on a previous panel.**/
Explanation
The field declaration following the message appears in another panel in this IFDL source file. The other panel field is declared before this one.
User Action
Verify that this panel field displays the same data as other panel fields that have the same name. Only one form data item of that name can exist,so this field must always display the same data as other fields that share its name.
If this field displays unique data, rename it and create a form data item to store the data. Otherwise, you need not modify the panel field declaration.
Message
/**This form data item is declared previously. You must rename either this item or the previous one.**/
Explanation
The form data item that immediately follows this message is declared more than once. Other declarations appear before this one in the IFDL source file.
User Action
Remove or rename form data items so that each data item has a unique name. If you rename a form data item,you may also need to rename the panel field that displays the data stored in that data item.
Message
/**This form data item's name is invalid. You must rename it.**/
Explanation
FMS allows you to use any characters in any format for the name of a Named Data item. DECforms allows only the characters A to Z, a to z, 0 to 9, dollar sign ($), and underscore (_) in the names of identifiers. When the Converter encounters a name it cannot change to a valid DECforms name, it writes the invalid name to the output source file.
User Action
Rename form data items that have invalid names.
Message
/** This literal creates a character that is not in the line drawing character set or that replaces an FMS single character DRAW literal.**/
Explanation
The FMS Converter creates text literals to draw shapes other than polylines and rectangles using the Private_Rule character set. For example, an FMS DRAW statement may contain characters that are not in the line drawing character set. The Converter declares text literals that contain the same characters as the FMS DRAW statement. The appearance of the resulting form is identical.
The Converter may also create text literals with the Private_Rule character set when the FMS application contains a single character draw literal. The FMS and DECforms defaults for single character literals differ;FMS uses a vertical or horizontal line, while DECforms uses across. To emulate the FMS draw literal, the Converter creates a single-character text literal, using the Private_Rule character set that creates the appropriate line.
User Action
None; this is an informational message.