VSI DECforms Guide to Developing an Application
- Software Version:
- DECforms Version 4.0
- Operating System and Version:
- VSI OpenVMS IA-64 Version 8.4-1H1 or higher
VSI OpenVMS Alpha Version 8.4-2L1 or higher
Preface
This guide explains how to create a DECforms software application.
Chapters 1-7 introduce DECforms and contain a tutorial for creating a simple sample application that includes both a form and a program. The program is written in both the C and FORTRAN programming languages. The application described in this tutorial is a portable application, created for display on VSI VT-series devices.
Chapters 8-13 and appendix contain additional guidelines and examples for creating forms and programs.
1. About VSI
VMS Software, Inc. (VSI) is an independent software company licensed by Hewlett Packard Enterprise to develop and support the OpenVMS operating system.
2. Intended Audience
This guide is intended for programmers who have little or no previous experience with DECforms. It also contains guidelines and examples for more experienced DECforms programmers.
Programming in either the C or the FORTRAN language
Using OpenVMS
Using a text editor, such as DECTPU
3. Document Structure
This guide contains 13 chapters, and 1 appendix.
|
Summarizes the concepts and process for creating a DECforms application. | |
|
Describes the planning of a sample application. The sample application is a mileage reimbursement form that is used throughout chapters 1-7 of this guide to show the complete development cycle for a DECforms application. | |
|
Steps through the process of creating the initial form file, creating the panel appearance of the character-cell layout, and testing the appearance of the panels. | |
|
Chapter 4, "Adding Functions, Responses, Display Actions,and Validations to the IFDL File" |
Describes the specification in the IFDL file of functions, responses, special display characteristics, and validation for the application. |
|
Describes the specification of the form records in the IFDL file and the corresponding data in the program. | |
|
Chapter 6, "Completing the Application Program for the Character-Cell Layout" |
Describes how to write the rest of the program: the request calls to the DECforms Form Manager and the escape routines. |
|
Chapter 7, "Building and Testing the Application for Character-Cell Devices" |
Explains how to build and test the application. |
|
Describes the structure of a form. | |
|
Contains additional information on declaring, displaying, and tracking data in a form. | |
|
Discusses ways to control form processing. | |
|
Provides additional information concerning basic features (such as viewports, scrolled regions,functions, keypad mode, operator signalling, messages, and online help)related to the operator interface. | |
|
Contains hints for getting the best performance from a form. | |
|
Chapter 13, "Demonstration and Sample Forms and Applications" |
Explains how to display the DECforms demonstration forms that are available on line and examines the DECforms sample applications that are also available on line. |
|
Contains the complete IFDL form and programs (in C and FORTRAN) for the mileage reimbursement application described in this guide. |
4. Associated Documents
See the online help, the online release notes, or the following documents for more information about DECforms:
VSI DECforms Installation Guide for OpenVMS Systems—Describes how to install DECforms software on Alpha and IA-64 systems that are running the OpenVMS operating system.
VSI DECforms Guide to Commands and Utilities—Describes the DECforms
formscommands and utilities.VSI DECforms IFDL Reference Manual—Describes the DECforms syntax information of the Independent Form Description Language (IFDL).
VSI DECforms Style Guide for Character-Cell Devices—Describes how to develop user interfaces with a Motif style for DECforms applications for character-cell terminals.
VSI DECforms Programmer's Reference Manual—Describes how DECforms software operates at run time and how to call the DECforms requests from an application program.
VSI DECforms Guide to Converting FMS Applications—Describes how to convert a VAX FMS or DEC FMS application to a DECforms application.
VSI DECforms Guide to Demonstration Forms and Applications—Describes how to use various demonstration forms and applications. This guide is contained in online files.
If you cannot find this document, ask your system manager to install it in the appropriate directory.
For information about displaying these forms, see Chapter 13, "Demonstration and Sample Forms and Applications".
DECforms also provides demonstration and sample applications that you can use when developing your own applications. For more information about these applications, see Chapter 13, "Demonstration and Sample Forms and Applications".
DEC LSE documentation for information on how to use the DEC Language Sensitive Editor (LSE)
Oracle CDD/Repository documentation set for information on Oracle CDD/Repository definitions
The CODASYL Form Interface Management System Journal of Development
5. OpenVMS Documentation
The full VSI OpenVMS documentation set can be found on the VMS Software Documentation webpage at https://docs.vmssoftware.com.
6. VSI Encourages Your Comments
You may send comments or suggestions regarding this manual or any VSI document by sending electronic mail to the following Internet address: <docinfo@vmssoftware.com>. Users who have VSI OpenVMS support contracts through VSI can contact <support@vmssoftware.com> for help with this product.
7. Conventions
| Convention | Meaning |
|---|---|
|
Ctrl/ x |
A sequence such as Ctrl/ x indicates that you must hold down the key labeled Ctrl while you press another key or a pointing device button. |
|
PF1 x |
A sequence such as PF1 x indicates that you must first press and release the key labeled PF1 and then press and release another key or a pointing device button. |
|
Return |
In examples, a key name enclosed in a box indicates that you press a key on the keyboard. (In text, a key name is not enclosed in a box.) |
... |
A horizontal ellipsis in examples indicates one of the
following possibilities:
|
. . . |
A vertical ellipsis indicates the omission of items from a code example or command format; the items are omitted because they are not important to the topic being discussed. |
|
( ) |
In command format descriptions, parentheses indicate that you must enclose the options in parentheses if you choose more than one. |
|
[ ] |
In command format descriptions, brackets indicate optional choices. You can choose one or more items or no items. Do not type the brackets on the command line. However, you must include the brackets in the syntax for OpenVMS directory specifications and for a substring specification in an assignment statement. |
|
[ |] |
In command format descriptions, vertical bars separate choices within brackets or braces. Within brackets, the choices are options; within braces, at least one choice is required. Do not type the vertical bars on the command line. |
|
{ } |
In command format descriptions, braces indicate required choices; you must choose at least one of the items listed. Do not type the braces on the command line. |
|
bold text |
This typeface represents the introduction of a new term. It also represents the name of an argument, an attribute, or a reason. |
|
italic text |
Italic text indicates important information, complete titles of manuals, or variables. Variables include information that varies in system output (Internal error number), in command lines (/PRODUCER= name), and in command parameters in text (where dd represents the predefined code for the device type). |
|
UPPERCASE TEXT |
Uppercase text indicates a command, the name of a routine, the name of a file, or the abbreviation for a system privilege. |
|
|
Monospace type indicates code examples and interactive screen displays. In the C programming language, monospace type in text identifies the following elements: keywords, the names of independently compiled external functions and files, syntax summaries, and references to variables or identifiers introduced in an example. |
|
- |
A hyphen at the end of a command format description, command line, or code line indicates that the command or statement continues on the following line. |
|
numbers |
All numbers in text are assumed to be decimal unless otherwise noted. Nondecimal radixes—binary, octal, or hexadecimal—are explicitly indicated. |
Chapter 1. Introduction
The purpose of DECforms
DECforms architecture
DECforms utilities and facilities
The major steps in creating a DECforms application
1.1. DECforms Purpose
Use DECforms to create and run software applications that display online forms containing text, data, and simple graphics on workstations and terminals. An operator using your DECforms application can read or enter form data and manipulate the data as required or allowed by your program.
Possibilities for applications are as numerous as you can imagine. For example, you might create an application to keep track of employee expenses or inventory, to maintain data about work accomplished, to look up phone numbers and addresses, to handle employee travel expenses, to make hotel or restaurant reservations, to interact with large databases of constantly changing data, and so on.
Chapters 1-7 of this guide explains how to develop a simple application that gets and manipulates employee data for business-related travel expenses. Once you have stepped through the basic process of creating this application,you can go on to developing increasingly complex applications.
1.2. DECforms Architecture
The DECforms programmer creates two basic application components:the form and the program. Figure 1.1, ''DECforms Form and Program'' shows their relationship.
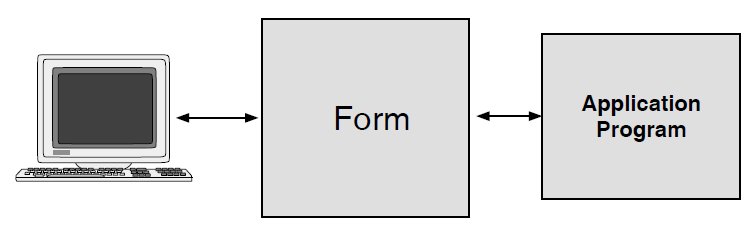
1.2.1. The Form
The form governs the complete user interface to the application program. It is a specification that completely describes all screens that are to be shown on the display device,the data that is to be transferred between the form and the application program, and all form processing that is to occur. The form controls all details of the interaction with the operator.
A DECforms form is loaded by the Form Manager at execution time under the direction of an application program. The form contains data that can be viewed and modified by both the operator and the application program. The form also contains control information relating to overall control of the user interaction.
Form Data—the set of variables contained within the form for the purpose of storing data (called form data items) during the time the program is using the form
Form Records—definitions of how the form data is organized(in form record fields) when it is transferred to and from the program
Form record descriptions do not store data. Each form record field corresponds with a form data item.
Layouts—descriptions of specific display devices such as a VT100 terminal, a VT400 terminal.
You can have more than one layout in a form. DECforms uses the layout associated with the current display device and ignores the other layouts.Viewports—rectangular areas on the screen used as areas for display
You specify viewport coordinates (lines and columns) in relationship to the upper-left corner of the device.
Functions—optional declarations that associate specific non-alphanumeric keyboard keys with tasks that you want the operator to be able to perform; for example, pressing F8 to perform a function response called QUIT
Whether or not you define your own functions, the Form Manager supplies default functions called built-in functions, which you can override.
Responses—optional procedures (consisting of lists of instructions called response steps) that you declare to be executed at certain times; for example a response called QUIT that returns control from the form to the program
Whether or not you define your own responses, the Form Manager provides default responses, which you can override. Each response contains a list of response steps for the Form Manager to perform. The CALL response step calls a subroutine (an escape routine) that you supply.
Panels—containers for the items that will be displayed
You associate a panel with a viewport for screen display. You specify the location (line and column values) of the items in the panel in relation to the upper-left corner of the viewport.
Figure 1.2, ''Multiple Layouts, Viewports, and Panels'' shows multiple panels and viewports supporting multiple layouts.
Figure 1.2. Multiple Layouts, Viewports, and Panels 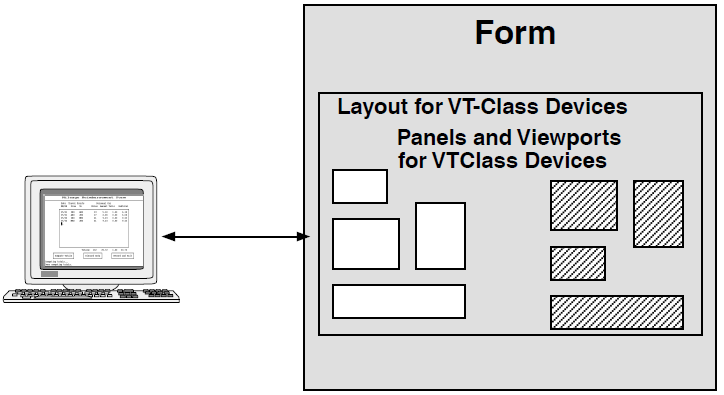
A form can contain many panels, and the display can be divided into several viewports. A panel must be associated with a viewport to be visible. Multiple viewports can be displayed simultaneously, and they can overlap one another. Several panels can be associated with the same viewport, but only one panel can be displayed in a viewport at a time. One panel can occupy different viewports at different times. A single panel cannot be displayed in multiple viewports simultaneously.
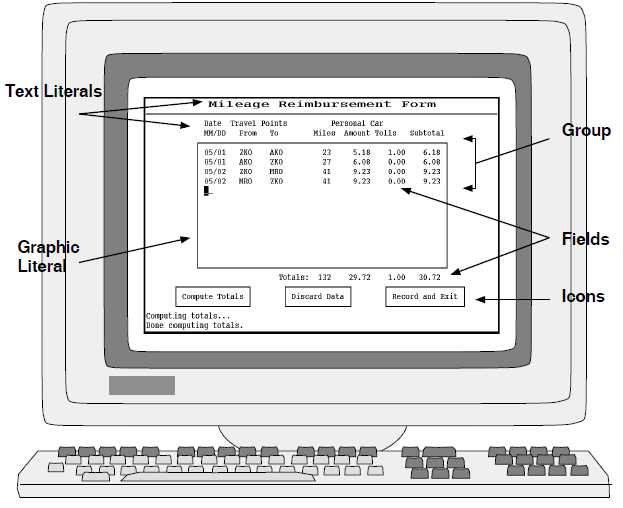
Panel items (objects) fall into the following categories:Literals—fixed text and graphics(such as lines, polylines, or rectangles)that do not change in appearance as the operator uses the form
Fields—representations of data that the operator can read or manipulate
There are two kinds of fields: one-line picture fieldsand text fields. You can assign a format (known as a picture string) to a picture field. Text fields can use one or more lines.
Icons—special areas for character-cell terminals that an operator can select to make something happen
Groups—collections of panel items that occur multiple times; for example, the names and addresses of several people
Figure 1.3, ''Panel Objects'' shows an example of a panel with objects.
Chapter 8, "Form Structure" contains additional details concerning form structure.
1.2.2. The Program
The program takes care of the data processing and computational aspects of the application, and interactswith the operator through the form by using the Form Manager.
Figure 1.4, ''DECforms Interfaces'' shows the basic DECforms interfaces.

1.2.2.1. Requests
ENABLE—connects to a specified form and which creates a session.
SEND—sends data from the application program to the form.
RECEIVE—allows data to be returned from the form to the application program.
TRANSCEIVE—sends data from the application program to the form, performs any necessary operator interaction, and allows data to be returned from the form to the program.
This is particularly important for efficiency in a network environment where two-way transfer of data can occur in a single network operation.
DISABLE—terminates a form session.
CANCEL—cancels any outstanding requests.
The SEND, RECEIVE, and TRANSCEIVE requests can all transfer one or more records at a time.
Form data remains in the form throughout the application session—from the time the form is enabled until the disable request is completed. During the session, however, the values of the form data items can change, depending on how the data is manipulated by the form or the program.
1.2.2.2. Calls to Escape Routines
In addition to the DECforms requests to the application program that go through the Form Manager, you can call escape routines written in third-generation language (3GL) procedural code. You can pass data directly to the routines; you do not need to use form records.
1.2.2.3. Phases in Processing Requests
DECforms run-time processing of requests is primarily event-driven. Events are caused either by requests made by the application program to the Form Manager or by actions of the terminal or workstation operator. The Form Manager responds to these events with default actions. You can override these defaults by declaring in the form your own set of responses to selected events.
The Form Manager, when processing a request, follows a series of run-time phases, shown in Figure 1.5, ''Run-Time Processing Phases''.
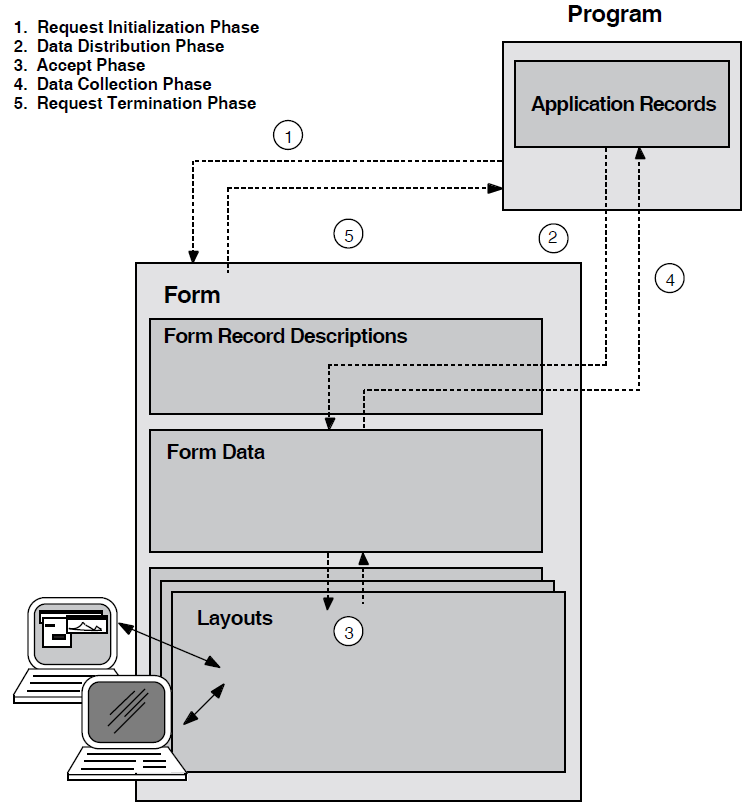
Request Initialization Phase
During this phase, the Form Manager gets the names of any form record descriptions, identifies the data areas for the form records, and identifies the session. The SEND and RECEIVE requests each use one name for the form record description, whereas the TRANSCEIVE request uses two: one for the send part and one for the receive part.
Data Distribution Phase
For SEND and TRANSCEIVE requests, the Form Manager moves the data from application program record fields to form data items by using the appropriate form record description.
Accept Phase
During this phase, the screen becomes active and the operator can interact with the form. Form data is displayed to the operator within fields, and new data can be entered and validated.
The Form Manager maintains an internal list (the activation list)of form elements (such as fields or icons) that are available for input. Only the current active item can accept input. When the text cursor is on a field, that field is the currently active item.
By default, a RECEIVE request activates panels that contain the data required for the fields in the form record description named in the request. A TRANSCEIVE request activates the fields named by the form record description for the receive part of the TRANSCEIVE request. Mechanisms are available for overriding these default actions and manipulating the activation list explicitly within the form.
Data Collection Phase
For RECEIVE and TRANSCEIVE requests, the Form Manager moves data from form data items to application program record fields by using the appropriate form record description.
Request Termination Phase
For each request, the Form Manager sets a value in the return status variable, and returns control to the application program.
The activation list is emptied at the completion of each request;at the beginning of each request, the activation list has no items in it.
For a more detailed description of the run-time phases, see the VSI DECforms Programmer's Reference Manual.
1.3. DECforms Utilities and Facilities
Form Development Environment (FDE)—supports the creation of forms for character-cell layouts.
The FDE is an interactive, menu-driven tool, created with DECforms, that runs on character-cell terminals or terminal emulators. From the FDE, you can access some of the other utilities(CCPED, Test, Extract Appearances, and Extract Object)as well as your text editor.
Character-Cell Panel Editor (CCPED)—allows you to create panels for character-cell layouts in an interactive,menu-driven way.
CCPED runs on character-cell terminals or terminal emulators.
Test Utility—checks the appearance of form panels by displaying them on the screen so that you can see the position and visual attributes of panel objects such as fields, literals, and icons.
IFDL Translator—translates an IFDL source file to a binary form file.
Back Translator—translates a binary form file back to an IFDL source file.
Object Utility—creates a form object file from a binary form file, so that you can use the form object in building your application program.
You can create the following two types of object files:Form object and vectors (pointers to escape routines)—for use when you want to link the form into the program executable image
Vectors only—for use in linking the program when you need to call escape routines from the form, but do not need a linked form
Extract Appearances Utility—extracts panels from a form, creating a text or DDIF output file that you can print or convert and print to verify panel appearance.
FMS Converter—converts a VAXFMS or DEC FMS form file or form library file to a DECforms IFDL source file, as described in the VSI DECforms Guide to Converting FMS Applications.
Trace Facility—logs form processing information at run time to help you in understanding how your application is working.
Event Log—logs only errors or unusual events that occur during run time to aid you in debugging your application.
To run the FDE, the panel editors, translators, converters, and the other utilities, you issue DECforms commands, as described in the VSI DECforms Guide to Commands and Utilities.
TDMS Converter
A VAX TDMS to DECforms Converter and VAX TDMS Emulator are available from Praxa Limited of South Melbourne, Australia. This feature is supported only on VAX.
The VAX TDMS to DECforms Converter V2.0 is a migration tool that converts the forms and requests in a VAX TDMS Request Library Definition into DECforms IFDL source files. This tool is available from VSI as a separately or derable third-party product developed by Praxa Limited. It consists of two major utilities: the Converter, which generates the IFDL source files from VAX TDMS .RLB files and associated Oracle CDD/Repository objects; and the COBOL Translator, which processes application sources and copy libraries,converting most TSS$ calls in COBOL applications to appropriate FORMS$calls with supporting logic and data definitions. Contact your local VSI sales office for more information on this tool (specify the Unique Product Identifier (UPI) of "270").
1.4. Developing a DECforms Application
Decide what the application should do.
In this step, you determine the screens the operator should see,how the operator will interact with the application, and what functions the program will perform. You establish the kinds of data that the operator will use, the names to use for the data, and how the data should flow.
Create and test the form.
This step is the major task in creating a DECforms application. The approach you take for this step depends on the number of layouts you require.
The procedure for creating a form with a single layout is as follows:Create the form file and the initial part of the layout specification.
Use the FDE for just character-cell layouts or a text editor for any layout.
Create the form viewports, panels, and data items.
This step involves using one of the DECforms panel editors---CCPED for character-cell displays —to create viewports and panels for the form. When you create the panel fields, the panel editor automatically creates the form data items.
Another approach is to use LSE or any chosen text editor to create the IFDL code. You can also use Oracle CDD/Repository data definitions to supply form data.
Check the panel appearance.
This step involves using DECforms utilities to check the appearance of the panel and its input fields.
Create the form functions and responses.
This step involves using the FDE (for character-cell layouts only),LSE, or a chosen text editor to create any desired user-defined functions and responses in the IFDL file.
Add any additional desired display characteristics and validations to the form.
This step involves further editing of the IFDL file to add such items as highlighting for active fields or search lists for data validation.
Specify the form records for the form and corresponding data in the program.
Translate the IFDL source file to a binary form file, either automatically through the FDE or by using the DECforms FORMS TRANSLATE command.
Create the program and test the application.
This step involves writing the application program in the programming language of choice. The VSI DECforms Programmer's Reference Manual explains the possibilities for programming languages and Application Program Interfaces (APIs) for use with DECforms.
Writing the program breaks down into the following basic tasks:Define the program data and create any required header files.
Write the DECforms request calls in the program.
Write any additional subroutines or functions required by the application.
Compile, link, and test the application, using DECforms tools to help fix any problems.
1.5. What Comes Next
Chapters 2-7 go through the above steps in detail to create a sample portable application.
Chapter 2. Planning the Application
The paper form on which the application is based
The data that the form will contain
The platforms on which the application will run
What the operator will see on the screen
How the operator will interact with the form on the screen
What functions the program will perform
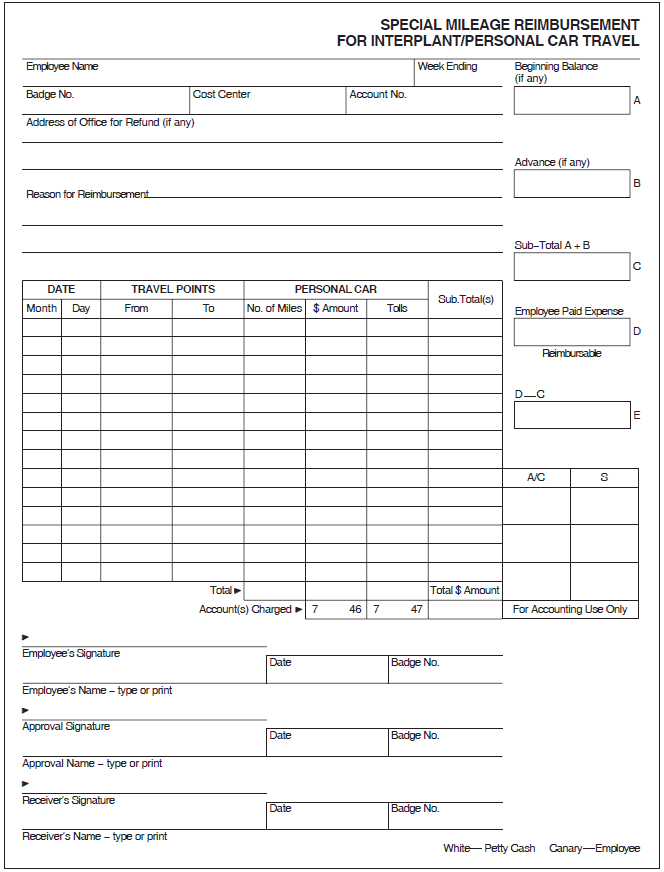
2.1. The Paper Form
The sample application implements an electronic version of the paper form shown in Figure 2.1, ''Paper Version of the Mileage Reimbursement Form''.
2.2. Planning the Data to Capture
|
Data Description |
Data Type |
Data Size |
|---|---|---|
|
Employee name |
Character |
32 |
|
Employee badge number |
Integer |
6 |
|
Employee cost center |
Character |
3 |
|
Employee address |
Character |
120 |
|
Reason for reimbursement |
Character |
64 |
|
Date |
Datetime |
8 |
|
Travel from location code |
Character |
3 |
|
Travel to location code |
Character |
3 |
|
Number of miles traveled for each from/to item |
Longword Integer ? | |
|
Amount (pennies) calculated for number of miles traveled for each from/to item |
Longword Integer ? | |
|
Amount for tolls (pennies) for each from/to item |
Longword Integer ? | |
|
Subtotal amount for each from/to item |
Longword Integer ? | |
|
Total miles |
Longword Integer ? | |
|
Total amount calculated for total miles |
Longword Integer ? | |
|
Total tolls |
Longword Integer ? | |
|
Total of subtotals |
Longword Integer ? |
The three characters used for location are for location codes, and assume that your business already uses known location codes.
2.3. Planning the Platforms and Layouts for the Application
The mileage reimbursement application that you will create will be a portable application;it will be designed to run on more than one platform. The term platform refers to the hardware and operating system. You can run DECforms Version 4.0 applications on the character-cell terminals on OpenVMS systems. For this example, you choose all the supported platforms.
Character-cell layout—for terminal devices
PRINTER layout—for printing devices
Additional Information
You should choose the platforms for your own applications based on the equipment and software used in your organization.
2.4. Planning the User Interface
The next step is to plan the appearance of each screen display and the interactions between the operator and the form.
2.4.1. Planning Panel Size
Because the form contains a lot of information to display on one screen, you will divide the form into two parts: one part for employee data and reason for reimbursement, and a second part for the trips data.
For the character-cell layouts, the electronic display will use two screens to display the form. You will create one main viewport and use it to display first a panel for header information, and then a panel for trips information.
In planning displays, it is important to keep in mind that the display must fit in the display area. For character-cell terminals, the display area is typically 24 lines and80 columns. For this example, you will use 22 lines for each of the two main panels, leaving 2 lines for displaying dynamic messages. You will use all 80 columns.
For DDIF layouts, you must consider the size and orientation of the paper you plan to use for printing. If you plan to use an online display facility such as the CDA Viewer, you might want to use the default size of the view area. The mileage reimbursement application will use standard A size paper (8 and a half inches by 11 inches) with portrait orientation.
2.4.2. Planning Panel Relationships
Related panels
This is the only style available for character-cell layouts. In this style, all viewports maintain fixed relationships to each other. When the operator displays different panels in the viewports, the panels remain in fixed relationships to each other.
The VSI DECforms Style Guide for Character-Cell Devices describes how to design character-cell user interfaces.
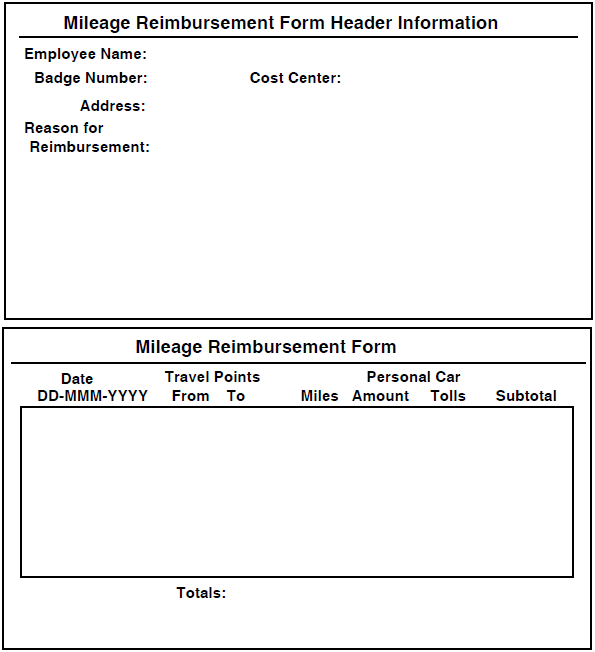
The next step is to sketch out the overall look of the two displays, as shown in Figure 2.2, ''Preliminary Sketch of Online Forms''.
When planning the user interface, you need to consider such aspects as the order of the display of each panel and what tasks the operator will perform. This requires a closer look at each panel.
2.4.3. The Header Panel
In the mileage reimbursement application, the header panel will appear first, followed by the trips panel.
2.4.3.1. The Header Panel Data
Additional Information
To keep this example as simple as possible, this application does not use an existing database,handle data validation against an external database, or use Oracle CDD/Repository data definitions. In your own applications, you might choose to use these methods of handling your data.
|
Data |
Action on Data |
Data Item Name |
|---|---|---|
|
Employee name |
Received by program |
EMPLOYEE_NAME |
|
Badge Number |
Received by program |
BADGE_NUMBER |
|
Cost Center |
Received by program |
COST_CENTER |
|
Address |
Received by program |
ADDRESS |
|
Reason for reimbursement |
Received by program |
REASON |
2.4.3.2. Operator Interaction with the Header Panel
You will create one field on the panel for each data item to be displayed. In addition to the fields on each panel,you need to be aware of what the operator will be doing and the default actions that DECforms provides.
The operator must navigate through the displayed panel from one field to another, entering data in each field. The cursor must appear at the correct locations on the screen, and the form must accept the data as it is input. When the operator has completed entering the data for all data items(each field is filled out), the operator will indicate that input is complete.
DECforms provides default key bindings for commonly used operations(called built-in functions) on the panel. DECforms also creates an internal activation list that determines how the cursor moves from field to field when the operator presses the function key.
For example, for the character-cell display,pressing Tab, Return, or Enter moves the cursor to the next item; this is called the NEXT ITEM built-in function. More specifically, pressing the function keys Tab, Return, or Enter causes the Form Manager to perform a built-in function response that moves the cursor to the next item on the activation list.
TRANSMIT is another built-in function. When the operator presses the appropriate function key for the TRANSMIT built-in function, TRANSMIT indicates that input is complete.
Additional Information
By default, the order of the activation list (which is the order in which the NEXT ITEM built-in function moves to the next item)is the order in which the fields are listed in the form. In CCPED, this means the order in which they are created.
You can change this order later if necessary.
For a complete list of built-in functions, see the appendix on built-in functions in the VSI DECforms IFDL Reference Manual.
You can override built-in functions. For example, PF1-Return is the default key binding for the INSERT LINE built-in function for the character-cell layout. This function controls how the operator moves to the next line of the multiline ADDRESS field. For ease of use, you will use Return instead of PF1-Return.
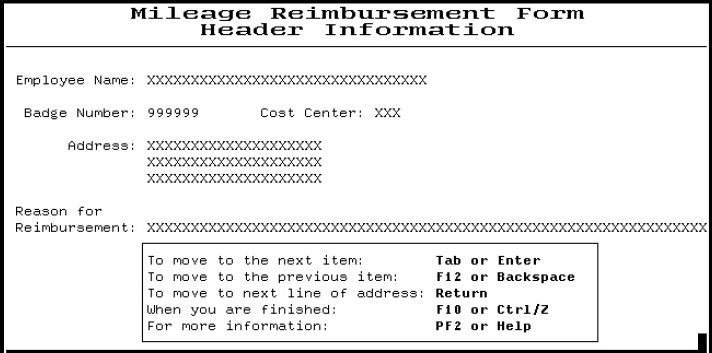
Figure 2.3, ''Final Header Panel Sketch for Character-Cell Display'' shows the header panel for the character-cell display with the additional instructional information.
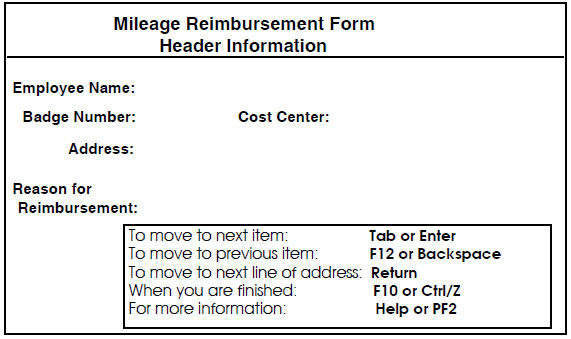
Additional Information
Notice that some of the text literals on the header panel are right-aligned (the colons (:) line up on the same column). In your own applications, left alignment is recommended for fields and text literals if you plan to use default fonts.
2.4.4. The Trips Panel
The trips panel allows the operator to enter specific trip data. The design for this panel demonstrates more DECforms features than the design for the header panel. First, consider the trip data in more detail, and then think about how the operator will interact with the panel.
2.4.4.1. Organizing the Trip Data
Consider how a typical user would use the mileage reimbursement form. There may be many times when the user would want to record more than one trip on a single form. The user might want to submit only one voucher per week with several trips recorded, or might visit more than one destination in one trip, or might simply make a round trip from the home facility to the destination and back again.
The date of the trip
The starting location
The ending location
The number of miles traveled
The mileage reimbursement amount
The cost of tolls during the trip
The subtotal reimbursement amount (mileage + tolls)
|
Data |
Action on Data |
Data Item Name | |
|---|---|---|---|
|
Group |
Received by program |
TRIP | |
|
Date |
Received by program |
TRIP_DATE | |
|
Travel From |
Received by program |
TRIP_FROM | |
|
Travel To |
Received by program |
TRIP_TO | |
|
Miles |
Received by program |
MILES | |
|
Amount |
Received by program |
AMOUNT | |
|
Tolls |
Received by program |
TOLL | |
|
Subtotal |
Received by program |
SUBTOTAL | |
|
Total miles |
Received by program |
TOTAL_MILES | |
|
Total amount |
Received by program |
TOTAL_AMOUNT | |
|
Total tolls |
Received by program |
TOTAL_TOLLS | |
|
Total reimbursement |
Received by program |
FORM_TOTAL | |
Additional Information
A group of data need not be an array only. For example, a group can contain one field, a set of fields, a field and an array, a set of fields and one or more arrays, and so on.
You might want to create groups to match group names with record names used in your program.
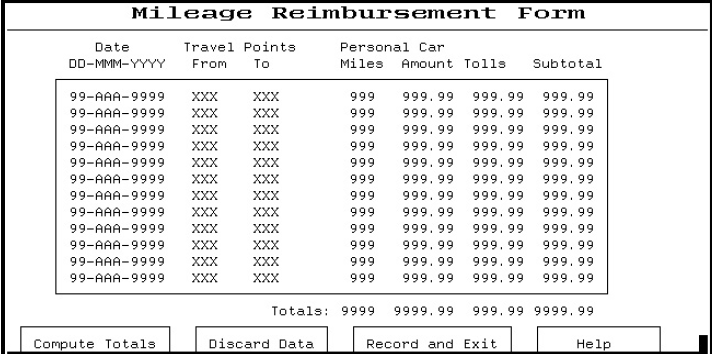
2.4.4.2. Operator Interaction with the Trips Panel
On the trips screen display, the operator navigates through the fields,entering data for date, from, to, miles, and toll. The application computes the amounts and the subtotals,displaying them in the appropriate fields on the display:the operator cannot enter data into the amount and subtotal fields.
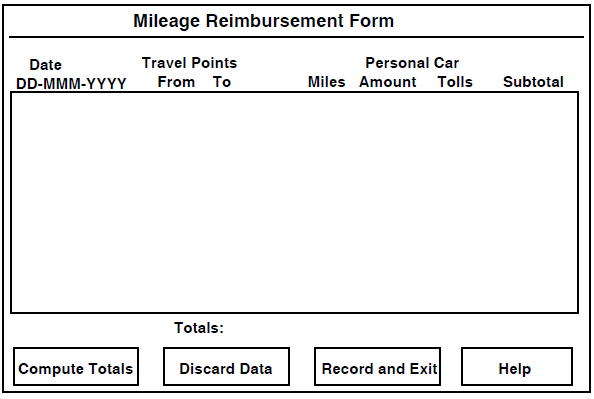
When the data is entered, the operator moves the cursor to buttons at the bottom of the panel. These buttons are icons on character-cell layouts. When the text cursor is on any one of the icons, pressing the Select key will cause the operation to proceed.
You will also provide some function keys for performing the operations elicited by pressing the buttons. The operator uses the buttons to compute totals, discard data if necessary, and, finally, record the data and exit the application. The operator can also display help information at any time.
Figure 2.4, ''Final Sketch of Trips Panel'' shows the final sketch of the trips panel with the additional buttons.
2.4.4.3. Understanding User-Defined Functions
You can define your own keys or key sequences for built-in functions, and you can also create your own, user-defined functions that use other function keys or key sequences. For the trips panel, you will create both kinds of user-defined functions.
Design Approaches for User-Defined Functions
Customized approach
In this approach, you use function keys commonly used for each platform. For example, use the PF1 (Gold) key sequences on character-cell terminals.
This is the approach used in the mileage reimbursement application.
Common approach
In this approach, you use the same function keys on each platform. For example, use the F5, F6, and F7 keys, which are available on all platforms with extended keyboards.
Use this approach if you expect that the same operators will be using a mixture of terminals and workstations. The common approach makes it easier for an operator to go from one platform to another once the function keys are learned.
Key Sequences for Character-Cell Functions
When designing the user interface, how function key sequences work on character-cell devices.
With DECforms applications on character-cell devices,an operator can perform a function by pressing first one key and then another (for example, PF1-down arrow). The first key pressed is called the introducer key.
Using the Numeric Keypad for User-Defined Functions
To enable the operator to use the numeric keypad for user-defined functions on character-cell devices, you must specify the application keypad implementor attribute. When the application keypad is specified, you can bind any numeric keypad key or key sequence to a user-defined function.
For more information about the keypad keys, see the appendix on built-in functions in the VSI DECforms IFDL Reference Manual.
2.4.4.4. Functions for the Trips Panel
|
Built-in Function Name |
Task |
VT terminals |
|---|---|---|
|
EXIT GROUP NEXT |
Move the cursor to the first button on the trips panel. |
PF4-Tab PF4-Return PF4-Enter |
|
TRANSMIT |
Record data and exit. |
Ctrl/Z Ctrl/D F10 |
|
Built-in Function Name |
VT terminals |
|---|---|
|
EXIT GROUP NEXT |
PF1-down arrow |
|
Function Name |
Task |
VT terminals |
|---|---|---|
|
DO_TOTALS |
Calculate the totals. |
Do PF1-KPperiod |
|
DISCARD |
Erase the current data on panel and start over. |
F8 PF1-KP8 |
|
MOVE_UP |
Move the cursor up and display a message if the cursor is at the top of the group or panel. |
Up arrow |
|
MOVE_DOWN |
Move the cursor down and display a message if the cursor is at the bottom of the group or panel. |
Down arrow |
|
SELECT |
Choose an option. |
Select KPperiod |
|
PRINT_FILE |
Create a printable picture of the trips panel. |
Ctrl/P |
2.4.5. Support for Printing
- Give the operator the option to print a picture of the trips panel by pressing Ctrl/P when the panel is displayed. Pressing Ctrl/P has the following results:
Character-cell terminals—creates a text file containing a picture of the trips panel. The operator can print this file using the DCL PRINT command.
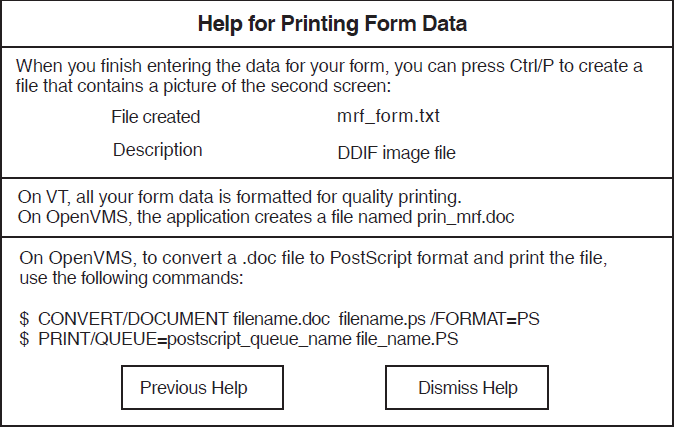
The operator can use an OpenVMS system command to convert this file to a format such as PostScript ®, and then print it. For details on the commands, see Figure 2.6, ''Sketch of Second Help Panel''.
- When the application is exited, create or print a copy of the form containing all the data input by the operator.
On OpenVMS, a .doc file is created. The operator can convert this file to a format such as PostScript, and then print it.
2.4.6. Message and Help Panels
In addition to the two main panels, you need a message panel for displaying any error or brief informational messages.
You will also create two help panels for displaying additional information to help the operator.
DECforms supports one message panel for each layout and creates a default message panel and message viewport. By default, this message panel is located on the lowest line of the layout display. You will modify this message viewport so that it occupies the two lowest lines of the character-cell layout display.
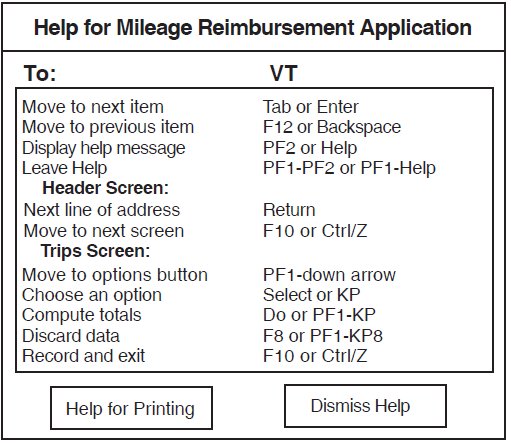
The help panels will contain the information shown in Figure 2.5, ''Sketch of First Help Panel'' and Figure 2.6, ''Sketch of Second Help Panel''. The first help panel, accessible from both the header and trips panels,describes the most important built-in and user-defined functions for the character-cell platforms. The second help panel, accessible from the first help panel, provides help on print files.
Additional Information
For the sake of simplicity, the help panel will contain information for all platforms. A better approach might be to create different help panels for each platform. To do this, you need to create a separate layout for each display device, giving each layout different help panels.
2.5. Planning the Program Style
Keep control in the application program, and use DECforms SEND, RECEIVE, and TRANCEIVE requests as the primary method for transferring data back and forth between the form and the program.
Keep control in the form, use only ENABLE and DISABLE requests, and use calls to escape routines as the primary method for transferring data.
The mileage reimbursement application uses the first style, but also includes two calls to escape routines. The sample applications, described in Chapter 13, "Demonstration and Sample Forms and Applications", use this first style also.
When keeping control in the application program, because the activation list is emptied after each request, you might need to maintain control data about the current state of the application at the time each request is initiated. This control data might include such information as what key was pressed, what icon was selected, what field the cursor was in, and so on.
With DECforms, you can create menu-like structures consisting of panels containing icons such as those used in some of the demonstration applications described in Section 13.1, ''Displaying the Demonstration Forms''.To keep information about the state of these "menus" in terms that the application can understand, you would use an integer array containing data describing the menu tree. If you later change your "menu" organization, you must also reorganize the data structures containing the menu data.
Keeping control in the form is useful when you have a complex or frequently changing user interface containing many levels of "menus". With this style, you use only ENABLE and DISABLE requests. DECforms maintains the same activation list until the DISABLE call ends the session. For a good example of this style, see the Track and Field application in Appendix B of the VSI DECforms Style Guide for Character-Cell Devices.
2.6. What Comes Next
You have finished planning the application. The next step is to create the form file and the form layouts.
Chapter 3. Creating the Character-Cell Layout
Creating the form file
Creating the character-cell layout
Creating the character-cell panels using the character-cell panel editor, CCPED
Testing the appearance of the panels
Note
The final source files for the mileage reimbursement form and programs described in this book are listed in Appendix A, "The Mileage Reimbursement Application" and are also available on line in the DECforms example directories.
3.1. Creating the Form Using the Form Development Environment
- Invoke the FDE with the following command:
$FORMS DEVELOP MRF_FORMAdditional Information
If the DEC Language-Sensitive Editor (LSE) is installed on your OpenVMS system, you can use it for text-editing functions in the FDE by entering this command:$FORMS DEVELOP MRF_FORM/TEXT_EDITOR=LSEAlternatively, you can define the logical name FORMS$TEXT_EDITOR to be CALLABLE_LSE.
You can also specify other editors, for example, EDT. For details on specifying other editors, see the FORMS DEVELOP command description in the VSI DECforms Guide to Commands and Utilities.
LSE provides additional DECforms support (creating templates, compiling, debugging, and so on). By default,LSE uses EDT-keypad mode, but you can change it to use the EVE keypad. LSE also provides an interface to DECTPU.
If you do not specify a text editor, the FDE uses the DECTPU editor by default.
Because MRF_FORM does not yet exist, the FDE will create it. This form must contain at least one layout to be valid, so the FDE will prompt you for information about the new layout to be created. The FDE displays the Main Menu and overlays it with the panel for a new form, as shown in Figure 3.1, ''FDE Main Menu Appearance for New Forms''.
Figure 3.1. FDE Main Menu Appearance for New Forms 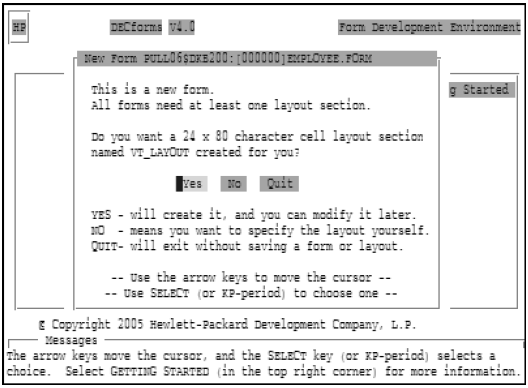
Press Select (or KPperiod) to choose Yes and have the FDE create the layout.
The FDE creates the layout and displays the Main Menu again ( Figure 3.2, ''FDE Main Menu''), showing the choicesfor the FDE functions.
Figure 3.2. FDE Main Menu 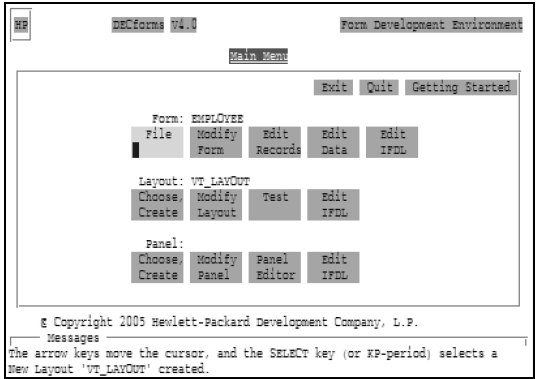
The name of the form, MRF_FORM, appears at the form level (the top row of choices), and the name of the layout, VT_LAYOUT, appears at the layout level (the middle row of choices).
To select a choice, use the arrow keys to move the cursor to your choice and press either the Select key or KPperiod (the period key on the numeric keypad).You can get help at any time by pressing Help.
To see the IFDL statements created for your form, select Edit IFDL at the form level on the Main Menu.
The FDE invokes your text editor and displays the following IFDL statements:Form MRF_FORM Layout VT_LAYOUT Device Terminal Type %VT100 End Device Size 24 Lines by 80 Columns End Layout End FormThe VT100 is the default terminal type in a layout created by the FDE because the layout works on VT100 (except those without the advanced video option), and VT100-, VT200-, VT300-, VT400-, and VT500-series terminals.
Quit the text editor to return to the Main Menu.
3.2. Modifying the Default Layout
Select Modify Layout at the layout level of the Main Menu.
The FDE displays the Modify LAYOUT panel as shown in Figure 3.3, ''FDE Modify LAYOUT Panel''.
Figure 3.3. FDE Modify LAYOUT Panel 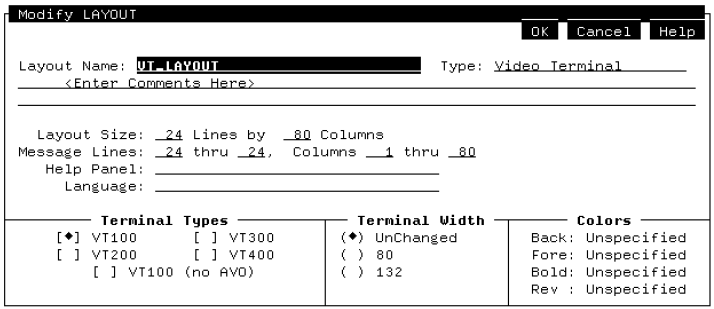
- Move the cursor to the Message Lines field and replace the first number24 with the following:
23This specifies a two-line message viewport.
- Move the cursor to the Help Panel field and enter the following name for the help panel:
HELP_PANEL Select OK or press the F10 key to return to the Main Menu.
The FDE displays a message saying that HELP_PANEL cannot be found and will be created.
When the Main Menu reappears,the FDE has created the first panel, named HELP_PANEL. Because it is declared at the layout level, this help panel will be associated with all data panels that you will create in the layout.
3.3. Creating Panels
Move the cursor to the panel level on the Main Menu and select the Choose, Create choice.
The FDE displays the menu in Figure 3.4, ''FDE Choose or Create a Panel Menu''on top of the Main Menu.
Figure 3.4. FDE Choose or Create a Panel Menu 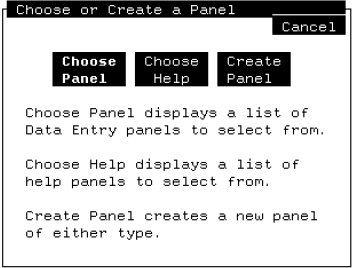
Select the Create Panel choice.
The FDE displays the Create PANEL panel as shown in Figure 3.5, ''FDE Create PANEL Panel''.
Figure 3.5. FDE Create PANEL Panel 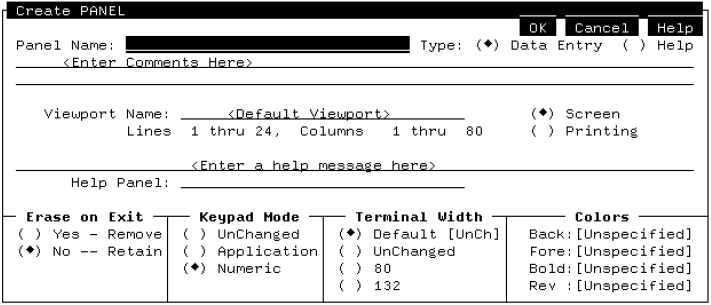
- Enter the following panel name:
HEADER_INFO_PANEL - Move the cursor to the Viewport Name field and enter the following viewport name:
MAIN_VIEWPORT Move the cursor to the line just below the viewport name to the field containing the number 24.
- Delete the number 24 and enter the following number:
22This specifies that the viewport height will be from line 1 to line 22.Leave the viewport width as the default size of columns 1 to 80.
Select Application Keypad Mode.
This allows the operator to use the keypad keys (in addition to the keyboard and other function keys)to perform functions.
Select OK or press F10 to indicate you have finished creating the panel and return to the Main Menu.
The FDE creates a panel named HEADER_INFO_PANEL (using defaults for the rest of the options on the Create Panel panel) and a viewport named MAIN_VIEWPORT. The FDE also associates MAIN_VIEWPORT with HEADER_INFO_PANEL.Additional Information
Throughout the FDE, pressing F10 is the same action as pressing Select on the OK icon.
An alternative method for creating panels is to create them directly in CCPED using the
create panelcommand. Later in this chapter, you will get experience using CCPED commands.Repeat steps 1 to 4 and 7 to 8 to create a second panel named TRIPS_INFO_PANEL.
Create a second help panel named SECOND_HELP_PANEL. Use the Tab and Select keys to set the panel type to Help and use a viewport named HELP_VIEWPORT that is the same size as MAIN_VIEWPORT. You do not need to change the keypad mode.
3.4. Modifying the Help Panel
Select Modify Panel from the Main Menu at the panel level.
DECforms displays the Modify PANEL panel, which is similar to the Create Panel panel.
- Move the cursor to the Viewport Name field, and enter the following viewport name:
HELP_VIEWPORT
If you do not specifically assign a viewport to a panel, DECforms uses the default viewport, which is 24 lines long. In this case, you will use a 22-line HELP_VIEWPORT, reserving the bottom two lines for messages.
3.5. Choosing Panels
Select the Choose, Create choice at the panel level.
The Choose or Create a Panel menu is displayed.
Select the Choose Panel choice.
The FDE displays a list of the two data entry panels you just created as shown in Figure 3.6, ''FDE Select a Data Entry Panel Menu''.
Figure 3.6. FDE Select a Data Entry Panel Menu 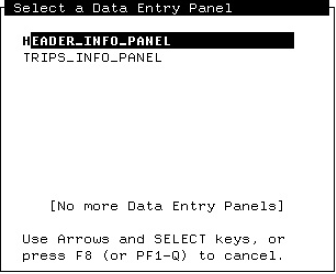
Select a data entry panel.
The Main Menu is redisplayed, with name of the panel appearing as the name of the current panel.
To display a help panel, select Choose Help from the Choose or Create a Panel menu, and then select the help panel from the Help Panel Menu.
3.6. Creating the Appearance of the First Panel
The procedures in this section explain how to use the character-cell panel editor CCPED to create the appearance of HEADER_INFO_PANEL. When you complete these procedures, the HEADER_INFO_PANEL in CCPED should look like Figure 3.7, ''Appearance of HEADER_INFO_PANEL in CCPED''.
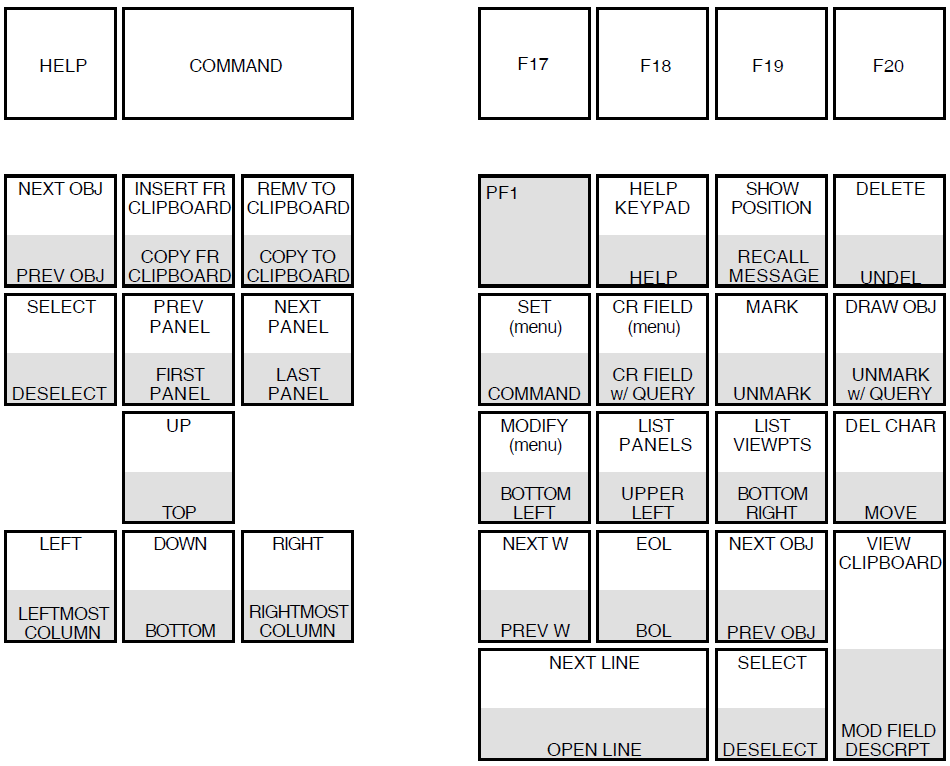
You will use some CCPED commands and several of the keys on the CCPED default keypad. For a diagram of this keypad, see Figure 3.8, '' CCPED Default Keypad''.Press PF2 to display this keypad within CCPED.
|
Key Sequence |
Default Function |
|---|---|
|
PF1-E |
Exit |
|
PF1-H |
Double-high font size and line width |
|
PF1-M |
Modify (menu) |
|
PF1-N |
Normal font size and line width |
|
PF1-O |
Order objects in the IFDL file and activation list in the same order in which they appear on the panel display from left to right and top to bottom |
|
PF1-Q |
Quit, save journal |
|
PF1-T |
Test appearance |
|
PF1-S |
Single font size and line width |
|
PF1-V |
Show version |
|
PF1-W |
Double-wide font size and line width |
Case does not matter when entering the CCPED alphabetic function keys. For example, you can enter either PF1-h or PF1-H.
3.6.1. Invoking the Panel Editor CCPED
Select the HEADER_INFO_PANEL data entry panel, following the steps in Section 3.5, ''Choosing Panels''.
Select the Panel Editor choice at the panel level on the Main Menu.
The FDE invokes CCPED, which displays HEADER_INFO_PANEL (currently empty) and some copyright information at the bottom of the screen.
Press Do.
The Command prompt (
Command>) is displayed at the bottom of the screen.- Enter the following command (case does not matter) at the prompt to specify the cursor position on the panel:
Command>POSITION TO (1,15)Then press Return. The cursor is displayed at the specified position (line 1, column 15) on the panel.
3.6.2. Specifying Text Display Attributes
Press Set (KP7 on the PED keypad).
CCPED displays the Set Display Attribute Menu as shown in Figure 3.9, '' CCPED Set Display Attribute Menu''.
Figure 3.9. CCPED Set Display Attribute Menu 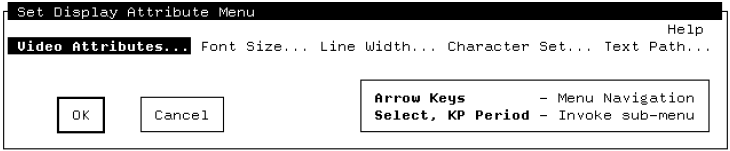
Select the Font Size option to display the Font Size submenu.
Select the Double Wide option.
Select OK (or press F10) to return to the Set Display Attribute Menu.
Select OK (or press F10) to return to the current panel and to cause the changes you made in steps 3 and 4 to take effect.
- Enter the following text:
Mileage Reimbursement FormThe text appears in double-wide characters.
- Press down arrow to move the cursor one line below the line you just typed.
Important Note
Do not use the space bar, Backspace, or Return keys to move the cursor or you will create literal spaces on the panel.
Press left arrow to move the cursor under the letter a in the word Mileage.
- Enter the following text:
Header Information - Press PF1-N (the PF1 keypad key and the N keyboard key)to return the font size and line width to normal.
Additional Information
Alternatively, as you did with the panel title, you can press Set (KP7)and use the Set Display Attribute Menu to return the font size and line width to normal.
3.6.3. Creating a Graphic Literal
A graphic literal is a graphic object such as a line, polyline, or rectangle that forms part of the background for a panel.
Press down arrow once to move the cursor to the third line in the panel.
Press left arrow as many times as necessary to reach the leftmost column (column 1).
OR
Press PF1-KP2 to go automatically to the beginning of the line.
Press Mark (KP9) to mark one end of the line at the cursor position.
- Do one of the following:
Press right arrow to move the cursor to the rightmost column (column 80) of line 3.
Press KP2 to go automatically to the end of the line.
Press Mark (KP9) to mark the other end of the line.
Press Draw Object (KPhyphen) to draw the line.
Additional Information
Command>CREATE POLYLINE (3,1) (3,80)
3.6.4. Specifying Text Literals and Picture Fields for User Input
Next you are going to create text literals and picture fields for the employee name, badge number, and cost center. A picture fieldis a one-line data field. You have the option of specifying input,output, or both formats for the picture field.
Press Do and enter the following command:
Command>POSITION TO (5,2)Enter the following text:
Employee Name:
Press right arrow once to leave a space between "Employee Name:" and the picture field.
Press Create Field (KP8).
The Panel Editor displays the Create Field Menu, shown filled-in in Figure 3.10, ''CCPED Create Field Menu''.
- In the Field Name field, enter the following name:
EMPLOYEE_NAME Move the cursor to the Data Type field, and press Select to display the Choose Data Type Menu.
Move the cursor to the Character data type and select it.
CCPED displays a panel for entering the size of the field (the number of occurrences of the character).
- Enter the following number and select OK to return to the Create Field Menu:
32The Create Field Menu should look like Figure 3.10, ''CCPED Create Field Menu''.
Figure 3.10. CCPED Create Field Menu 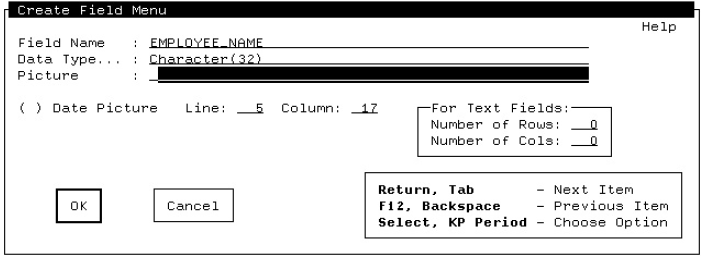
Select OK—skipping over the Picture field—to return to the panel.
CCPED creates a default field picture based on the data type you specified. The field picture, 32 X characters, appears on the panel. The character X indicates that the operator can enter any allowable character from the device's character set in this field.
When creating this field, CCPED also creates the form data type EMPLOYEE_NAME, using the information you supplied through the Choose Data Type Menu.
Create a text literal called "Badge Number:" at Line 7,Column 3.
Use the arrow keys to position the cursor, or use the following CCPED command:Command>POSITION TO (7,3)- Press Do and enter the following command to specify the picture field:
Command>CREATE FIELD Badge_Number (7,17) TYPE INTEGER(6) PICTURE "999999R" With the cursor on the BADGE_NUMBER field, press Select to select the field.
CCPED highlights the field to show that it is selected.
- Press Do and enter the following command:
Command>MODIFY FIELD JUSTIFICATION RIGHT Press PF1-KPperiod to deselect the field.
These commands create a picture field called BADGE_NUMBER at line 7, column 17.The data type for this field is integer. The size is 6 digits. The output picture (output format) is 6 digits,represented by 9s in the output picture string. The letter R tells DECforms to replace any leading zeros in front of the R with blank spaces. For example, on the badge number field with the output picture of 999999R,if the operator entered the badge number 36, DECforms would output
####36on the display instead of000036.The output for the field is also specified to be right justified.If you do not specify a picture string, DECforms uses a default format.Additional Information
If you want to know more about picture string formats, see the Picture String section in the VSI DECforms IFDL Reference Manual.
Create a text literal called "Cost Center:" at line 7,column 30.
- Press Do and enter the following command:
Command>CREATE FIELD COST_CENTER (7,43) TYPE CHARACTER(3)CCPED creates the picture field and the form data item. The panel should display a series of three capital Xs at the field location.
With the cursor on the same field, select the field.
- Press Do and enter the following command:
Command>MODIFY FIELD AUTOSKIP UPPERCASEThe AUTOSKIP clause causes the cursor to automatically skip to the next entry when the operator finishes filling out this field. The UPPERCASE clause displays operator input in uppercase.
Deselect the field.
3.6.5. Specifying a Text Literal and Text Field for User Input
The address field will allow the operator to enter an address of up to three lines. For this field, you will create a text literal followed by a multiline text field.
Create a text literal called "Address:" at line 9,column 8.
Press right arrow to move the cursor to the same column as the beginning of the picture field for the badge number.
Press Create Field (KP8).
The Panel Editor displays the Create Field Menu.
- In the Field Name field, enter the following name:
ADDRESS Move the cursor to the Data Type field, and press Select to display the Choose Data Type Menu.
Move the cursor to the Character data type and select it.
CCPED displays the Data Type Character box.
- Enter the following number in the Size field in the Data Type Character box:
120 Select OK.
- Enter the following number in the Number of Rows field:
3 - Enter the following number in the Number of Columns field:
40This number creates a three-line text field. The operator can enter up to 120 characters of text. To move to the next line of the field, the operator presses the Return key.
The operator can enter more than three lines of text or more than 40 characters per line as long as the total number of characters does not exceed 120.If the operator enters more than three lines of text, or more than 40 characters of text in aline, DECforms scrolls the text within the display area.
Notice that you cannot enter data in the Picture field, because you cannot specify input or output picture strings for text fields.Additional Information
An alternative method of specifying this field is to press Do and enter the following command:Command>CREATE FIELD Address (9,17) TYPE CHAR(120) ROWS 3 COLUMNS 40The form data type does not have to be the same size as the field. For more details, see the description of the TEXTFIELD declaration in the VSI DECforms IFDL Reference Manual.
Select OK.
3.6.6. Specifying More Text Literals and a Picture Field
Create a text literal called "Reason for" at line 13,column 2.
Create another text literal called "Reimbursement:" at line14, column 2.
- Press Do and enter the following command:
Command>CREATE FIELD Reason (14,17) TYPE CHARACTER(64)You do not need to specify a picture for this field. DECforms provides a default format for you.
Additional Information
If you accidentally place a panel object in the wrong position, you can change the position by selecting the object, moving the cursor to the desired location, and then pressing PF1 Move (PF1-KPcomma).
Recall previous CCPED commands by pressing up arrow.
Edit the command line and press Return to execute the new command.
3.6.7. Creating Informational Text on the Header Panel
|
Line |
Column |
Text |
|---|---|---|
|
16 |
17 |
To move to the next item: |
|
17 |
17 |
To move to the previous item: |
|
18 |
17 |
To move to next line of address: |
|
19 |
17 |
When you are finished: |
|
20 |
17 |
For more information: |
|
16 |
50 |
Tab or Enter |
|
17 |
50 |
F12 or Backspace |
|
18 |
50 |
Return |
|
19 |
50 |
F10 or Ctrl/Z |
|
20 |
50 |
PF2 or Help |
Move the cursor on the panel display with arrow keys ( notthe space bar), counting the lines and columns, and then enter the text literal.
Press Do, enter the
position tocommand,and then enter the literal text.
3.6.8. Modifying Text Display Attributes
You now need to make boldface some of the text literals. When you created the title for the header panel, you learned how to set display attributes before creating the text literal. The following task shows you how to modify display attributes after creating the text literals.
Place the cursor on each object and press Select.(Pressing KP3 moves the cursor to the next object.)
This action places each object on the selection list(the list of selected objects).
Press Modify (KP4 on the keypad).
CCPED displays the Modify Display Attribute Menu.
Select the Video Attributes option to display the Video Attributes submenu.
Select the Bold attribute.
Select OK (or press F10) to return to the Modify Display Attribute Menu.
Select OK (or press F10) to return to the current panel.
This action automatically deselects all selected objects.
3.6.9. Creating a Rectangle Literal
Position the cursor at line 15, column 16.
Press Mark (KP9).
Position the cursor at line 21, column 68.
Press Mark (KP9).
- Press Draw Object (KP-).
Additional Information
Another way of creating the rectangle literal (replacing the previous five steps) is to press Do and enter the following CCPED command:Command>CREATE RECTANGLE (16,16) (22,68)
Note
If you want to stop now and continue the exercises later, press F10twice to exit CCPED and the FDE. If you do this, you must reenter the FDE and select the Panel Editor before continuing.
3.7. Creating the Appearance of the Second Panel
The procedures in this section allow you to develop further the skills that you learned in the previous section. In addition, you will practice using your text editor within the FDE. When you complete this section, the trips panel in CCPED should look like Figure 3.11, ''Appearance of TRIPS_INFO_PANEL in CCPED''.
3.7.1. Creating Background Text and Graphics
If you did not exit the FDE, the panel you just completed remains displayed in CCPED. If you exited and reentered the FDE, and then selected the Panel Editor,the blank help panel, HELP_PANEL, appears on the screen.
Press Next Panel (Next Screen) until the empty TRIPS_INFO_PANEL is displayed and becomes the current panel.
Press PF1-W to set the font size to double width.
CCPED displays messages about the font size at the bottom of the screen.
Press Do and enter a command to position the cursor to line 1,column 15.
Enter the text "Mileage Reimbursement Form" on the panel display.
Press PF1-N to return the font size and line width to normal.
Use the Mark (KP9) and Draw Object (KP-) keypad keys to create a horizontal line across line 2 of the panel.
If you need help, see Section 3.6.3, ''Creating a Graphic Literal'' on creating a graphic literal for the header panel.
- Create the following text literals:
Line
Column
Value
3
11
Date
3
21
Travel Points
3
39
Personal Car
4
8
DD-MMM-YYYY
4
22
From
4
29
To
4
39
Miles
4
46
Amount
4
53
Tolls
4
61
Subtotal
3.7.2. Specifying a Group
The trip data requires a multiply occurring set of data fields(for the date, from, to, miles, amount, tolls, and subtotal data).Before you can create the fields for this data, you must create a group to contain the set of data.
Command>CREATE GROUP TRIP OCCURS 36 VERTICAL DISPLAYS 12
This command specifies that you want to create a group containing36 instances (trips), 12 of which are displayed at a time vertically on the panel. The operator can scroll the display to enter information for more than12 trips. From the program's perspective, the group is a data structure containing an array of trip data.
3.7.3. Specifying Picture Fields for the Group
Press Do and enter the
exitcommand to return to the FDE Main Menu.When you exit CCPED, the FDE uses a DECforms utility called the Back Translator to create an IFDL source file.Additional Information
Until you exit the FDE, DECforms creates temporary files in your current directory.
Press right arrow and select the Edit IFDL choice at the Main Menu panel level.
The FDE opens the IFDL source file and places the cursor at the current panel declaration.
- If you like, move the cursor up and down through the source file to see the form data items, layout, viewport, and panels that you have created so far.
Additional Information
If you made any errors in the size or attributes of data or fields,you can correct them while in editing mode.
Create an empty line at the bottom of the file, below
Displays 12and aboveEnd Group.- Using the text editor, enter the code for the TRIP_DATE field as follows:
    Field TRIP_DATE
        Line 6
        Column 8
        Autoskip
        Output ""
           When (TRIP(**).TRIP_DATE = BLANK_DATE)
        Input Picture FOR DATE DD-AAA-YYYY
    End Field
Additional Information
DECforms does not require that you indent or capitalize the IFDL code as shown in the examples here. When you exit from the text editor, the FDE uses a DECforms utility called the IFDL Translator to translate the IFDL source into a form file before returning to the Main Menu.
If you then use CCPED to edit the form file, when you exit CCPED,the FDE uses the DECforms Back Translator to convert the file back to an IFDL file. This Back Translator automatically formats the text for you, providing indents and capitalization according to a set of internal rules.
You can also invoke the IFDL Translator and the Back Translator from the command line. If you choose not to use the FDE, you must use the Translator or the LSE COMPILE/REVIEW command to convert your source file to a binary, form file format. For more information about the translators, see the VSI DECforms Guide to Commands and Utilities.
The IFDL code for TRIP_DATE specifies a picture field at line 6,column 8. The AUTOSKIP clause specifies that when the operator finishes filling in this field, DECforms will move the input cursor to the next field automatically.
The OUTPUT "" WHEN (TRIP(**).TRIP_DATE = BLANK_DATE)clause causes blank spaces to be displayed for the date when TRIP_DATE has a zero-date value. This reduces screen clutter by making the date field blank until the operator enters a date.Additional Information
It is useful to compare the OUTPUT WHEN clause with two other clauses—the PROTECTED WHEN and CONCEALED WHEN clauses. The PROTECTED WHEN clause prevents placing the cursor on the field or entering data into the field when the stated condition is true. The CONCEALED WHEN clause prevents viewing the contents of the field when the stated condition is true.
BLANK_DATE is a form data item that you will define only within the form. Because the date is initialized to a zero-date by default, you can use BLANK_DATE in the expression to signify the condition under which no date has been entered.
The asterisks (**) designate corresponding subscripts, which you can use in array expressions. These indicate that the index for the field in the OUTPUT clause is the same index as for this field (the occurrence of the field in the OUTPUT clause corresponds with the occurrence of the field containing the clause).Additional Information
For more information on groups, see Section 9.4, ''Declaring and Displaying Groups and Arrays'' as well as the appendix on arrays in the VSI DECforms IFDL Reference Manual.
DECforms supports validation for dates if you use the date data types as specified in the DATETIME DATA clause described in the VSI DECforms IFDL Reference Manual. The Form Manager checks the date to make sure it is a valid date, and, if not, displays an error message, so you do not have to perform date validation in your program. For example, 30-FEB-1994 is not a valid date. The DATETIME data type is the only date data type that is portable across all devices supported by DECforms.
The INPUT PICTURE DD-AAA-YYYY clause describes the acceptable format for inputting the date. AAA designates the standard three-letter abbreviation for the month name. For example, 10-JUN-1994 is acceptable,but JUN-10-94 and 10-JUNE-1994 are not acceptable. Because an output picture is not specified, the Form Manager will use the input picture format for displaying the output on the panel and for validating the input.
- Enter the code for the TRIP_FROM field as follows:
    Field TRIP_FROM
        Line 6
        Column 22
        Autoskip
        Uppercase
        Protected
            When (TRIP(**).TRIP_DATE = BLANK_DATE)
    End Field
The UPPERCASE clause specifies that the operator input will appear on the screen in uppercase. The PROTECTED WHEN(TRIP(**).TRIP_DATE = BLANK_DATE) clause specifies that the operator cannot enter data or move the cursor into this field when the value of field TRIP(**).TRIP_DATE is a zero-date.Additional Information
You can specify fields in groups from within CCPED by entering the field name in the format groupname.fieldname.You can also add certain clauses by pressing PF1-Enter and selecting items in the Modify Field Description panel, described in Section 3.7.5, ''Specifying Picture Fields for the Totals''.
You might find this an easier way to work when creating your own applications.
- Enter the code for the TRIP_TO field as follows:
Field TRIP_TO Line 6 Column 29 Autoskip Uppercase Protected When (TRIP(**).TRIP_DATE = BLANK_DATE) End Field - Enter the code for the MILES field as follows:
    Field MILES
        Line 6
        Column 40
        Output ""
            When (TRIP(**).TRIP_DATE = BLANK_DATE)
        Output Picture 999R
        Justification Right
        Protected
            When (TRIP(**).TRIP_DATE = BLANK_DATE)
    End Field
The OUTPUT PICTURE clause specifies an output display of three numeric characters. The R will cause the leftmost places to be replaced by blank spaces if the operator enters only one or two numbers. The number will be right justified.
- Enter the code for the AMOUNT field as follows:
    Field AMOUNT
        Line 6
        Column 46
        Output ""
            When (TRIP(**).TRIP_DATE = BLANK_DATE)
        Output Picture 99R9.99
        Scale -2
        Protected
    End Field
The SCALE clause allows you to use integer values in your program and form, but display the values as floating point values. The SCALE –2 clause specifies that the displayed value of the data on the screen will be the actual data value divided by 100 (multiplied by 10 -2). This is done so that you can store the form and program data values as an integer value of pennies rather than dollars, thus avoiding the problems of floating point rounding, truncation, and inaccuracies.
The PROTECTED clause ensures that the operator cannot enter data into this field. The application will calculate and enter this data.
- Enter the code for the TOLL field as follows:
    Field TOLL
        Line 6
        Column 54
        Output ""
            When (TRIP(**).TRIP_DATE =  BLANK_DATE)
        Output Picture 99R9.99
        Scale -2
        Justification Decimal
        Protected
            When (TRIP(**).TRIP_DATE =  BLANK_DATE)
    End Field
This IFDL code is similar to that for previous fields. The OUTPUT PICTURE 99R9.99 clause and the JUSTIFICATION DECIMAL clause ensure that the amount will be displayed and justified properly around a decimal point. The operator enters the dollar amount, presses the period key, and then enters the cents value.
- Enter the code for the SUBTOTAL field as follows:
    Field SUBTOTAL
        Line 6
        Column 62
        Output ""
            When (TRIP(**).TRIP_DATE = BLANK_DATE)
        Output Picture 99R9.99
        Scale -2
        Protected
    End Field
3.7.4. Completing the Form Data
You have completed specifying the fields for the TRIP group. Now you must specify the form data for these fields. When you use CCPED to create fields, CCPED creates form data for you. If you use a text editor, you must enter the IFDL code for the form data items (if it does not exist already)in addition to the code for the fields in the panel.
You also need to specify two local form data items: N, which represents the current occurrence of the TRIP group, and BLANK_DATE, which represents a zero-date. N is a numeric form data item that, during the accept phase, will receive the index of the occurrence of the group that is the current activation item. BLANK_DATE has a DATETIME(8) data type, corresponding with the data type for TRIP_DATE.
Move the cursor to the beginning of the IFDL file and look at the form data that CCPED created for you already.
- Create an empty line just below
REASONCharacter(64)and enter the following lines:N Unsigned Longword BLANK_DATE Datetime(8)
- Move the cursor just above
EndGroupin the Form Data section and just belowOccurs36, create an empty line, and enter the following code:Current N TRIP_DATE Datetime(8) TRIP_FROM Character(3) TRIP_TO Character(3) MILES Longword Integer AMOUNT Longword Integer TOLL Longword Integer SUBTOTAL Longword IntegerThe CURRENT N clause specifies the current occurrence of the TRIP group.
Exit the editor and return to the FDE Main Menu.
When you exit the editor, the FDE uses the IFDL Translator to translate the IFDL source into a form file before returning to the Main Menu. If translation errors occur, the FDE displays a panel(shown in Figure 3.12, ''Correcting IFDL Syntax Errors in the FDE'') to notify you and gives you the option of correcting the errors.
Figure 3.12. Correcting IFDL Syntax Errors in the FDE 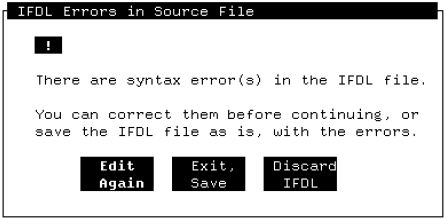
Additional Information
On OpenVMS, DECforms creates a TPU buffer called FORMS$LIST that contains a list of errors encountered by the IFDL Translator.
If you are using LSE, press DO, and then use the COMPILE/REVIEW command to list any errors. If errors occur, use Ctrl/G to move to the line at which the first error occurred, and correct the error. Then use Ctrl/F to move back to the next error in the list.
3.7.5. Specifying Picture Fields for the Totals
To create the final three picture fields for the trips panel, you will reenter CCPED to get more practice with that tool.
From the FDE Main Menu panel level, select the Choose, Create option,then Choose Panel from the resulting dialog box, and choose the TRIPS_INFO_PANEL.
Select the Panel Editor option.
Position the cursor at line 19, column 39.
Press Create Field (KP8).
Create a field named TOTAL_MILES.
Move the cursor to the Data Type field and press Select.
CCPED displays the Choose Data Type Menu.
Select Longword Integer and select OK.
- Move the cursor to the Picture field and enter the specification for the output picture string as follows:
999R9 Select OK to return to the panel display.
Select the TOTAL_MILES field by pressing the Select key.
Press PF-1 Modify Field Description (PF1-Enter).
CCPED displays the Modify Field Description panel as shown in Figure 3.13, ''CCPED Modify Field Description Panel''.
Figure 3.13. CCPED Modify Field Description Panel 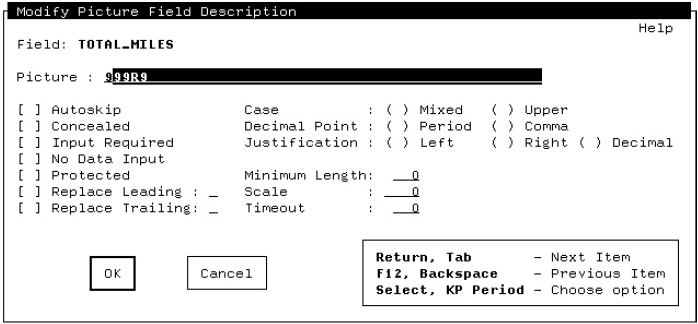
Select Protected to specify that the operator cannot enter data in this field.
Select OK in the Modify Field Description panel.
Create a field named TOTAL_AMOUNT at line 19, column 45 using CCPED keypad operations or commands.
Give this field the Longword Integer data type.
Specify an output picture of 999R9.99, Scale –2 and make it a protected field.
You can use the Modify Field Description panel to specify picture,protection, and scale.
Create another field named TOTAL_TOLLS at line 19, column 54.
Give this field the same data type, scale, and protection as the TOTAL_AMOUNT field and an output picture of 999R.99.
3.7.6. Creating a Rectangle Literal for the TRIP Group
When you have a group, it is a good idea to draw a rectangle around the fields in the group to connect them visually.
Create a rectangle around the TRIP group by using either KP9 and KPminus or a CCPED command. If you need help, see Section 3.6.9, ''Creating a Rectangle Literal''.
3.7.7. Creating Text Literals and the Final Picture Field for the Totals
Position the cursor at line 19, column 31.
- Enter the following text:
Totals: Create a picture field named FORM_TOTAL at line 19, column 61.
Give this field the Longword Integer data type.
Give this field the output picture 999R9.99, a scale of –2, and make it a protected field.
3.7.8. Specifying Icons
An icon can consist of text, graphic literals, or both, associated with a function response, so that when the operator presses a key(usually the Select key), the application causes something to happen.
- Create an icon named COMPUTE_TOTALS by entering the following series of commands from CCPED:
Command>CREATE RECTANGLE (20,2) (22,19)Command>CREATE TEXT "Compute Totals" (21,4)Command>SELECT AT (20,2)Command>SELECT AT (21,4)Command>CREATE ICON Compute_totalsCommand>DESELECT ALL - Create an icon named DISCARD_DATA by entering the following series of commands from CCPED:
Command>CREATE RECTANGLE (20,22) (22,37)Command>CREATE TEXT "Discard Data" (21,24)Command>SELECT AT (20,22) ; SELECT AT (21,24)Command>CREATE ICON Discard_data ; DESELECT ALLNotice that you can combine commands on one line by separating them with semicolons (;).
- Create an icon named RECORD_AND_EXIT by entering the following series of commands from CCPED:
Command>CREATE RECTANGLE (20,40) (22,58)Command>CREATE TEXT "Record and Exit" (21,42)Command>SELECT AT (20,40) ; SELECT AT (21,42)Command>CREATE ICON Record_and_exit ; DESELECT ALL Create an icon named HELP_ICON containing the text literal "Help" to the right of the "Record and Exit" icon.
Exit the editor and return to the FDE Main Menu.
Additional Information
Keypad operations in CCPED
Commands in CCPED
Editing the IFDL file with a text editor
In addition to these methods, you can create command scripts and you can define your own CCPED keys. For a complete description of CCPED, see the VSI DECforms Guide to Commands and Utilities.
3.8. Creating the Appearance of the Help Panels
Select the Choose Help option from the Choose or Create a Panel menu.
Select HELP_PANEL from the Select a Help Panel menu.
Select the Panel Editor option.
Enter the text and create the icons for the help shown in Figure 2.5, ''Sketch of First Help Panel''. Name the icons MORE_HELP and LEAVE_HELP. When you finish, the panel display should appear similar to Figure 3.14, ''Appearance of HELP_PANEL in CCPED''.
Figure 3.14. Appearance of HELP_PANEL in CCPED 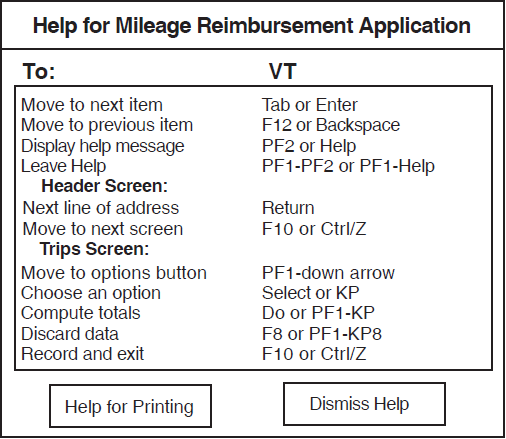
Press Next Screen and create the second help panel. Name the icons PREV_HELP and LEAVE_SECOND_HELP. When you finish, the panel display should appear similar to Figure 3.15, ''Appearance of SECOND_HELP_PANEL in CCPED''.
Figure 3.15. Appearance of SECOND_HELP_PANEL in CCPED 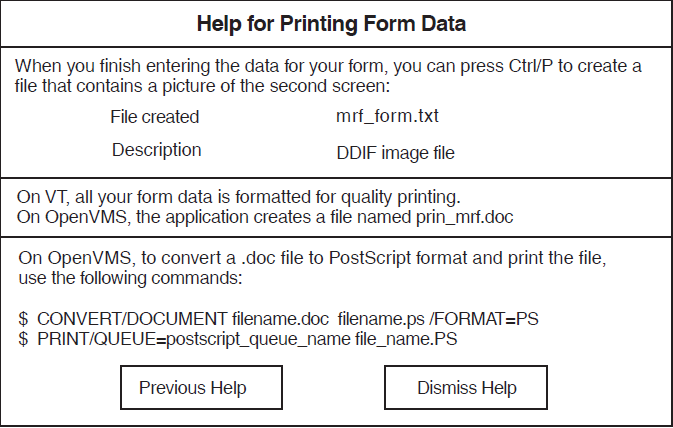
Exit the editor and return to the FDE Main Menu.
3.9. Testing the Appearance of the Panels
To see how your form will look from the operator's point of view,select Test from the Main Menu, and then select Test All.
The FDE displays each panel in the order in which it is declared in the IFDL file.
Press the Return or Tab key to move from one input field to another in the order in which they are declared in the IFDL file (or the order in which you created them in CCPED). If you want to input data, you can; the data will not remain with the form. To move the cursor to the next line of the ADDRESS field, pressPF1-Return. If you want to change the panel (for example, to rearrange the order of the fields), you must edit the IFDL file or return to the Panel Editor.
Press Next Screen to move to the next panel.
This test does not check the complete functioning of the panels; it tests only the panel appearance.
When you are finished, press F10 to return to the FDE, and then exit the FDE.
3.10. What Comes Next
You have completed creating the visual appearance of the panels for the character-cell layout for the mileage reimbursement application. The next step is to create user-defined functions and responses for the operator interaction with the application.
Chapter 4. Adding Functions, Responses, Display Actions,and Validations to the IFDL File
Creating user-defined functions and function responses
Creating other types of responses
Overriding user-defined functions
Creating active highlighting
Adding validations to fields
4.1. Understanding User-Defined Functions and Function Responses
To understand user-defined functions better, review the following information about how functions work.
As described in Section 1.2.2.3, ''Phases in Processing Requests'', the accept phase is the time during which the operator can interact with the form. During this phase,the Form Manager keeps an activation list containing items such as the fields or icons for the current display. For example, a field becomes active, accepting operator input, when the operator moves the text entry cursor on it. Only one active item can accept input at any one time (only one item on the activation list is current at any time).
To complete the processing of an activation item, the Form Manager typically performs an action called a function response that the Form Manager takes when an operator presses a certain key or key sequence (for example, the operator presses the Next Screen key, causing the cursor to move to the next screen). An operator-entered key or key sequence is called a functionwhen it is associated with a specific function response that DECforms makes.
DECforms provides built-in functions with default key bindings and responses. For example, when an operator presses Tab, Return, or Enter, DECforms moves the cursor to the next item(field or icon) in the activation list. For a complete list of these built-in functions, seethe appendix on built-in functions in the VSI DECforms IFDL Reference Manual.
If you need a different function for your form, you can override the built-in functions, and you can also define your own functions. Functions that you create in your form file are called user-defined functions. It is not necessary to create user-defined functions: you do it only if you want the operator to interact with your form in a different way than that provided by default.
In character-cell layouts only, you can use a wait activation item in an ACTIVATE response step to cause the Form Manager to pause until the operator enters a function. Once the operator enters the function key or key sequence, the Form Manager performs the function response associated with that function. In portable applications, use icons to create the same effect.
4.2. Creating User-Defined Functions and Function Responses
|
Function Name |
Key or Keys |
Task |
|---|---|---|
|
DO_TOTALS |
Do PF1-KP. |
Compute the totals. |
|
DISCARD |
F8 PF1-KP8 |
Delete data and start over. |
|
MOVE_UP |
UP ? |
Move the cursor up one item or one occurrence; display a message if the cursor is at the topmost item or occurrence. This overrides the built-in function CURSOR UP. |
|
MOVE_DOWN |
DOWN ? |
Move the cursor down one item or one occurrence; display a message if the cursor is at the bottommost item or occurrence. This overrides the built-in function CURSOR DOWN. |
|
SELECT |
SELECT |
Perform a specific function relating to each icon. |
|
PRINT_FILE |
Ctrl/P |
Create a text file that is a picture of the trips panel. |
|
Function Name |
Key or Keys |
Purpose of Function Response |
|---|---|---|
|
INSERT LINE |
CARRIAGE RETURN |
Move the cursor to the next line of a text field, in this case the ADDRESS field. |
|
EXIT GROUP NEXT |
PF1-DOWN |
Move the cursor from a field in a group to the next activation item outside the group, in this case to the buttons on the trips panel. |
4.2.1. Declaring the Functions in the Layout
When declaring functions, you associate particular keys or key sequences with a particular function name. Key names begin with the percent ( % ) sign, and key sequences, such asPF1-KP., are enclosed in parentheses.
Open the mrf_form.ifdl file, either by choosing Edit IFDL from the layout level of the FDE Main Menu or by invoking a text editor from the OpenVMS command line.
Place the cursor just after the last END VIEWPORT statement and before the USE HELP PANEL declaration.
- Enter the following code:
Function DO_TOTALS Is %DO (%PF1 %KP_PERIOD) End Function Function DISCARD Is %F8 (%PF1 %KP_8) End Function Function INSERT LINE Is %CARRIAGE_RETURN End Function Function EXIT GROUP NEXT Is (%PF4 %HORIZONTAL_TAB) (%PF4 %CARRIAGE_RETURN) (%PF4 %KP_ENTER) (%PF1 %DOWN) End Function Function MOVE_UP Is %UP End Function Function MOVE_DOWN Is %DOWN End Function Function SELECT Is %SELECT %KP_PERIOD End Function Function PRINT_FILE Is %CONTROL_P End Function
For the complete list of DECforms key names, see the appendix on key names in the VSI DECforms IFDL Reference Manual.
You do not need to indent and capitalize as shown in the example. The Back Translator formats the text for you when you exit the FDE or when you explicitly invoke it with a FORMS command.
4.2.2. Where to Declare Function Responses
The operator triggers a function response by performing a function; for example, by pressing the Select key.
If you want the response to occur any time the operator performs the function, place the function response delaration at the layout level( after the function declarations and before the panel declarations).
If you want the response to occur only for a particular panel, field, or icon,place the function response within the panel, field, or icon declaration. A function response at a lower level supersedes a response for the same function at a higher level.
Section 4.3.2, ''Order of Functions and Responses '' provides further information about the order of functions and responses.
4.2.3. Creating Function Responses at the Layout Level
Insert an empty line after the last
End Functionand beforeUse Help Panel.- Enter the following code:
Function Response DISCARD Include RESET_DATA End Response Function Response MOVE_UP If ( NOT UPPERMOST ITEM) Then Position to Up Item Else Include BORDER_PATROL End If End Response Function Response MOVE_DOWN If ( NOT LOWERMOST ITEM) Then Position to Down Item Else Include BORDER_PATROL End If End Response Function Response PRINT_FILE Message "Preparing the print file..." Print TRIPS_INFO_PANEL Message "Print file completed." End Response
The DISCARD function response calls an internal response called RESET_DATA,described later in this chapter.
The MOVE_UP function response specifies that if the cursor is not at the uppermost item on the panel, MOVE_UP moves the cursor up one item. Otherwise, MOVE_UP calls another response called BORDER_PATROL, described in Section 4.3.3, ''Creating the Other Responses at the Layout Level''.
The MOVE_DOWN function response is similar to MOVE_UP, except that it moves the cursor down one item.
The PRINT_FILE function specifies a PRINT response step, which causes the Form Manager to create a print file or to print a file containing the trip data from the trips panel. In the character-cell layout, the Form Manager will create a text file called mrf_form.txt.
4.2.4. Creating Function Responses at the Panel Level
Move the cursor down to the TRIPS_INFO_PANEL declaration just below Viewport MAIN_VIEWPORT, and insert an empty line.
- Enter the following code:
Function Response TRANSMIT Include UPDATE_TOTALS Include RECORD_DATA End Response Function Response DO_TOTALS Include UPDATE_TOTALS End ResponseWhen the operator presses the F10, Ctrl/Z, or Ctrl/D key or key sequence(for the built-in TRANSMIT function) while the TRIPS_INFO_PANEL is displayed, the Form Manager calls RECORD_DATA.(RECORD_DATA is another response that is described in Section 4.3.3, ''Creating the Other Responses at the Layout Level''.)
The DO_TOTALS function response tells the Form Manager to call UPDATE_TOTALS when the operator presses any of the function keys associated with the DO_TOTALS user-defined function.
Move the cursor to the HELP PANEL declaration, and insert a line above the first
Literal Textstatement.- Enter the following function response:
Function Response Next Help Activate panel SECOND_HELP_PANEL Position to panel SECOND_HELP_PANEL End ResponseThis function response causes the second help panel to be displayed if the operator presses help while the first help panel is active.
4.2.5. Creating Function Responses at the Group Level
The next task is to create specific MOVE_UP and MOVE_DOWN function responses for the TRIP group. These responses support moving up and down among group occurrences (instead of moving up and down among panel items), and they override those at the layout level.
Move the cursor down to the
Group TRIPdeclaration just belowDisplays 12, and insert an empty line.- Enter the following code:
Function Response MOVE_UP If ( NOT FIRST OCCURRENCE VERTICAL) Then Position to Up Occurrence Else Include BORDER_PATROL End If End Response Function Response MOVE_DOWN If ( NOT LAST OCCURRENCE VERTICAL) Then Position to Down Occurrence Else Include BORDER_PATROL End If End Response
4.2.6. Creating Function Responses at the Icon Level
In our form, the terminal operator selects an icon by pressing the Select key with the cursor on the icon. The Select key triggers a different action on each icon. Each icon must have a function response describing the specific action.
Move the cursor just below
Icon COMPUTE_TOTALS, and insert an empty line aboveLiteral Rectangle.- Enter the following code:
Function Response SELECT Include UPDATE_TOTALS End ResponseThis response calls another response, UPDATE_TOTALS, described in Section 4.3.3, ''Creating the Other Responses at the Layout Level''.
- Insert an empty line just below
Icon DISCARD_DATA, and enter the following code:Function Response SELECT Include RESET_DATA End ResponseThis response calls another response, RESET_DATA, described in Section 4.3.3, ''Creating the Other Responses at the Layout Level''.
- Insert an empty line just below
Icon RECORD_AND_EXIT, and enter the following code:Function Response SELECT Include UPDATE_TOTALS Include RECORD_DATA End ResponseThis response calls two other responses,
UPDATE_TOTALSandRECORD_DATA, described in Section 4.3.3, ''Creating the Other Responses at the Layout Level''. - Insert an empty line just below
Icon HELP_ICON, and enter the following code:Function Response SELECT ENTER HELP End ResponseThis response contains the ENTER HELP response step, which displays the help panel.
You will now create function responses for the four help panel icons.
- Add the following response in the MORE_HELP icon declaration:
Function Response SELECT Activate panel SECOND_HELP_PANEL Position to panel SECOND_HELP_PANEL End ResponseThis response causes the Form Manager to display the second help panel and activate the first icon in the panel.
- Add the following response in the LEAVE_HELP and LEAVE_SECOND_HELP icon declarations:
Function Response SELECT Exit Help Remove Help End ResponseThis function response causes the display to return to the data panel that was active when the operator invoked help.
- Add the following response in the PREV_HELP icon declaration:
Function Response SELECT Activate panel HELP_PANEL Position to panel HELP_PANEL End ResponseThis function response allows the operator to move from the second help panel back to the first help panel.
4.3. Creating Other Responses
External responses—triggered by an external event such as an application request or the receipt of control text.
Accept responses—triggered by accept phase events such as function key events, validation events, or the entry or exit from a form element (panel, field, icon, and so on).
Internal responses—called from another response.
4.3.1. Summary of Responses and Response Steps
|
External Responses | |
|
Response |
Description |
|
Enable response |
Triggered when an ENABLE request is performed. |
|
Disable response |
Triggered when a DISABLE request is performed. |
|
Send response record-name |
Triggered when a SEND request to the specified record is performed. |
|
Receive response record-name |
Triggered when a RECEIVE request from the specified record is performed. |
|
Transceive response record-name-1 record-name-2 |
Triggered when a TRANSCEIVE request to and from the specified records is performed. |
|
Control text response text |
Triggered when control text matching the specified text is received on a request. |
|
Accept Responses | |
|
Response |
Description |
|
Entry response |
Triggered when the form element within which the response is declared is entered (before the operator is allowed to enter input). |
|
Exit response |
Triggered when the form element within which the response is declared is exited (when the operator leaves a panel field, icon, panel group, or panel). |
|
Function response function-name |
Triggered when the specified function is performed (when the operator presses the associated function key or key sequence). |
|
Validation response |
Triggered when the field is undergoing its validation phase (when the operator finishes entering input). |
|
Internal Response | |
|
Response |
Description |
|
Internal response response-name |
Specifies a response that can be included within other responses. |
Responses contain response steps, which are similar to programming statements. The response steps direct the action of the Form Manager while the response is being evaluated.
|
Response Step |
Description |
|---|---|
|
ACTIVATE |
Adds items to the activation list. |
|
CALL |
Executes an escape routine (user-written 3GL code). |
|
DEACTIVATE |
Removes items from the activation list. |
|
DISPLAY |
Causes panels to be displayed. |
|
ENTER HELP |
Causes the Form Manager to display the help panel specified in the Use Help Panel clause that applies to the current activation item. |
|
EXIT HELP |
Causes the Form Manager to switch from the help activation item to the current activation item on the main activation list. |
|
IF-THEN-ELSE |
Specifies conditional response step processing. |
|
INCLUDE |
Causes an internal response to be executed (similar to a subroutine call). |
|
INVALID |
Specifies that the field is to be marked invalid. |
|
LET |
Assigns values to form data items (which can update fields on the screen). |
|
MESSAGE |
Causes a message to appear in the message panel. |
|
POSITION |
Modifies which item is the current activation item (where the cursor goes next). |
|
|
Causes panels or the current screen to be printed to a file. |
|
REFRESH |
Repaints the screen. |
|
REMOVE |
Removes one or more viewports from the screen. |
|
RESET |
Resets data items to their initial value. |
|
RETURN |
Causes the accept phase to terminate. This does not cause the containing response to terminate. Response steps following the RETURN are still executed. |
|
SIGNAL |
Signals the user via the bell or by reversing the screen. |
|
VALIDATE |
Validates items on the activation list. |
4.3.2. Order of Functions and Responses
The order of functions and responses in the IFDL file is important. You declare functions after the VIEWPORT declarations and before any response declarations. You declare layout level responses immediately after any function declarations.
Use the VSI DECforms IFDL Reference Manual, the TPU Help Forms command, or the LSE expand feature to determine the correct order of any declarations you use.
4.3.3. Creating the Other Responses at the Layout Level
- Move the cursor just above
Function ResponseDISCARD(note that this is the declaration of the function response and not of the function), and enter the following INTERNAL RESPONSE declarations:Internal Response BORDER_PATROL Message "No items in that direction." Signal End Response Internal Response RESET_DATA Reset All Message "Data discarded." Signal Position To Panel TRIPS_INFO_PANEL End Response Internal Response RECORD_DATA Message "Data received. Program exiting." Signal Return Immediate End Response Internal Response UPDATE_TOTALS Message "Computing totals..." Call "DO_TOTALS" Using By Reference TRIPS_RECORD By Reference TOTAL_MILES By Reference TOTAL_AMOUNT By Reference TOTAL_TOLLS By Reference FORM_TOTAL Message "Done computing totals." Signal End ResponseThe
BORDER_PATROLinternal response displays a message and signals the operator with an audio signal (beep or bell) to the display device when the operator attempts to move the cursor higher than the topmost item or occurrence, or lower than the bottommost item or occurrence.The
RESET_DATAinternal response resets the values of all form data items to their values at the time the form was enabled, displays a message,signals the operator, and positions the cursor to the first input field for theTRIPS_INFO_PANEL.When the operator chooses the Record and Exit option, theRECORD_DATAinternal response displays the message "Data received. Program exiting.", signals the operator, and returns control to the application as soon as the current activation item is completed. The IMMEDIATE clause specifies that the Form Manager should return control to the program without doing any more validation.Additional Information
To move the data to an external database, you could display a message such as "Recording data..." in this internal response,and then use a CALL response step to call an escape routine. Follow the call with the exit message.
When the operator chooses the Compute Totals or Record and Exit option,the UPDATE_TOTALS internal response displays a message and calls the escape routine DO_TOTALS, passing the addresses of the trip data to the routine. When the routine completes, the response displays the message "Done computing totals." and signals the operator. For more information about the escape routine,see Section 6.4, ''Creating the Escape Routines''.
- Immediately following the internal responses, enter the following DISABLE REPONSE and RECEIVE RESPONSE declarations:
Disable Response Remove All End Response Receive Response HEADER_INFO_RECORD Activate Panel HEADER_INFO_PANEL Position To Panel HEADER_INFO_PANEL End Response Receive Response TRIPS_RECORD Activate Panel TRIPS_INFO_PANEL Position To Panel TRIPS_INFO_PANEL End ResponseThe disable response removes all panels from the display when the program disables the form.
When the Form Manager performs a RECEIVE request (as requested by the program) to receive the header data, the receive response for the HEADER_INFO_RECORD record activates the HEADER_INFO_PANEL panel and places the cursor on the first input field. Similarly, when the Form Manager performs a RECEIVE request to receive the trips data, the receive response for the TRIPS_RECORD record activates the TRIPS_INFO_PANEL panel and places the cursor on the first input field.
4.3.4. Creating Responses at the Panel Level
- In the PANEL declaration for the HEADER_INFO_PANEL just below
Display %Keypad_Application, enter the following ENTRYRESPONSE declaration:Entry Response Message "Press Help for information" " on how to use this application." End ResponseThis entry response causes the Form Manager to display the message just before the first field on the panel becomes the current activation item.
Enter the same entry response for the TRIPS_INFO_PANEL panel.
- Just after the entry response for the HEADER_INFO_PANEL panel, enter the following EXIT RESPONSE declaration:
Exit Response Message "Displaying next screen..." End ResponseThis exit response causes the Form Manager to display the message after the last field on the HEADER_INFO_PANEL panel has been exited.
4.3.5. Creating Exit Responses at the Field Level
- In the MILES field, just above the OUTPUT "" WHEN clause, enter the following code:
Exit Response Call "UPDATE_ROW" Using By Reference TRIP_ROW_RECORD End ResponseThis exit response calls an escape routine in the application program called UPDATE_ROW.
For this escape routine, a form record called TRIP_ROW_RECORD describes the data passed to the program. The data is the value for the current occurrence of the TRIP group. You will learn more about form records in Chapter 5, "Specifying Form Records and Program Data".
The routine calculates the reimbursement amount for the trip. The resulting amount will appear in the AMOUNT field display. For more information about the escape routine,see Section 6.4, ''Creating the Escape Routines''.
DECforms allows you to perform integer arithmetic in the form itself without having to call an escape routine. This example is provided only to show how to send one row of data from an array back to the program, saving the overhead of passing the entire array.
- In the TOLL field, just above the OUTPUT "" WHEN clause, enter the following code:
Exit Response Let TRIP(N).SUBTOTAL = TRIP(N).AMOUNT + TRIP(N).TOLL End ResponseThis exit response calculates the subtotal for the trip by adding the toll amount to the reimbursement amount. The resulting amount will appear in the SUBTOTAL field display. N, which was previously declared as a form data item, is the index to the current occurrence of the TRIP group.
4.4. Declaring a Built-In Function Response
As a result of the user-defined function responses MOVE_UP and MOVE_DOWN at the layout level, the up arrow (%UP) and down arrow (%DOWN)keys are defined to move to the previous and next items on the current panel. This user-defined function overrides the built-in function CURSOR UP and CURSOR DOWN for %UP and %DOWN for character-cell devices.
The result of the override by the user-defined functions MOVE_UP and MOVE_DOWN is that DECforms performs a PREVIOUS ITEM or NEXTITEM function response when the operator presses up arrow or down arrow. Unfortunately, this also means that the operator cannot move the cursor up and down within the multiline ADDRESS field by using the arrow keys.
To remove the user-defined override and reinstate the priority of the DECforms built-in function response at any level, you can declare a built-in function response.
End Field:Builtin Function Response CURSOR UP Builtin Function Response CURSOR DOWN
Additional Information
In your own applications, you might prefer to create FIELDDEFAULT declarations and apply them to specific fields in the form,rather than use BUILTIN FUNCTION RESPONSE declarations. Section 4.5, ''Creating Active Highlighting '' explains field defaults.
4.5. Creating Active Highlighting
The next task is to specify special display characteristics (such as boldface or reverse video) to occur when a field or icon is the current activation item during the accept phase (when the operator places the cursor over the icon).
You can apply default active highlighting or other characteristics for all fields at the layout, panel, group, icon, or field level. These applied characteristics are called field defaults.A default at a lower level overrides one at a higher level.
As an additional shortcut, you can declare named field defaults. At the layout level, you give a name to a display specification that you plan to use in several different places. You can then refer to that name in specific fields, panels, groups, or icons.
- Create an empty line just below
Use Help Panel HELP_PANELand just aboveMessage Panel DEFAULT_MESSAGE_PANELand enter the following code:Apply Field Default Of Active Highlight Underlined End DefaultThis FIELD DEFAULT application contains an ACTIVE HIGHLIGHT UNDERLINED clause, which specifies that all fields in the layout are underlined by default when active.
- Place the cursor just before the field default you just created, and add the following FIELD DEFAULT declaration:
Field Default BOLD_ICON Active Highlight Bold End DefaultThe ACTIVE HIGHLIGHT BOLD clause specifies that the Form Manager will bold the icon when the icon becomes the current activation item.
You must specify FIELD DEFAULT declarations beforeany FIELD DEFAULT applications.
- For each icon on the trips panel and the help panels (there are a total of eight), enter the following code just after the first line of each icon declaration:
Apply Field Default BOLD_ICON
4.6. Validating Data
DECforms performs a certain amount of data validation automatically. For example, if the operator enters field data that does not correspond with the form data type for that field, DECforms displays an error message.
In addition you can further validate operator input within the form,in the main program, or by calling a separate escape routine. For example,you can create a search list in the form or in a separate routine. If the operator input does not match an item in the search list, you can display an error message. You can also perform mathematical operations on values entered to determine if they fall within a desired range (for example, greater than zero).
In the mileage reimbursement form, you will add a search list for location codes. You will also make sure that the miles entered is between 1 and 100. The codes and miles listed here are arbitrary: you can create your own codes to suit your own purposes, or you can skip to the last step.
- Move the cursor just below the line
Size 24 Lines by80 Columnsin the layout declaration, and add the following code:List location_codes "ACT" "BXB" "LTN" "MKO" "ZKO"End List - Enter the following code after the PROTECTED WHEN clauses in the declarations of the TRIP_FROM and TRIP_TO fields:
Search location_codes Message "Must be a valid code: ACT, BXB, LTN, MKO, or ZKO" Move the cursor to the TRIP_TO field, and enter the same code again.
- Move the cursor to the MILES field, and enter the following code after the PROTECTED WHEN clause:
Range 1 Through 100 Message "You cannot get reimbursed for more " "than 100 miles per trip!" Exit your editing session.
If you are using the FDE, the IFDL Errors in the Source File message will be displayed, because you have not yet specified the form records in the form. In this case, choose the Exit, Save option.
4.7. What Comes Next
You have completed the creation of the functions, responses, highlight specifications, and validations for the character-cell layout. In the next chapter, you will create the form records and begin to create the program.
Chapter 5. Specifying Form Records and Program Data
Comparing the portable and OpenVMS application programming interfaces(APIs)
Understanding form record descriptions
Creating the form records in the form
Creating the structure format declarations for the C program
Creating the structure declarations for the FORTRAN program
5.1. Comparing the Portable and OpenVMS APIs
Both APIs use the six programming requests summarized in Chapter 1, "Introduction".
Both APIs support the use of disk-based and linked forms.
- The APIs support the use of escape routines as follows:
Portable API on OpenVMS—link escape routines with the application program.
OpenVMS API—link escape routines with the application program or use shareable libraries.
Both APIs use the same information for form name, form file name, device name, session ID, send record name, and receive record name parameters.
Both APIs use request option structures (explained later in this chapter). However, structures can vary and cannot be used interchangeably.
There are fewer parameters in each portable API request than in each OpenVMS API request.
The portable API uses request option structures to pass many of the values used as parameters in the OpenVMS API requests.
A request options structure is designed by DECforms for the portable API; the OpenVMS API uses an OpenVMS item list to pass request options.
The portable API cannot use shareable images for escape routines.
The portable API supports C and FORTRAN languages,using different subroutine names for the two languages; the OpenVMS API supports all languages that use the OpenVMS Calling Standard and uses the same subroutine names for all languages.
The OpenVMS API passes most parameters by descriptor; the portable API uses the passing mechanisms natural to the language used.
The OpenVMS API request calls return OpenVMS status codes; the portable API request calls return FIMS and DECforms portable status values.
5.2. Understanding Form Record Descriptions
Form record descriptions define how data is organized in records for transfer between a data record defined within an application program and form data items defined within the form.
The form record descriptions do not store data. The form record descriptions merely define the organization of the data for the transfer process. Once data transfer is completed, all data is resident in application records or form data, or both.
5.2.1. Form Records
The term form record describes the data as formatted according to a form record description. You transfer the data either to or from the form. A SEND request moves data to the form, whereas a RECEIVE request moves data from the form. A TRANSCEIVE request moves data to the form, and moves data back again. The form record for each direction in a TRANSCEIVE request can be the same or different form records.
Unless specified differently, a request refers to one form record. A request can, however, reference multiple form records in a single transfer. In this case, a single name refers to a list of form record descriptions in the form. Such a list is called a form record list.Form record lists are useful when you want to use different combinations of records at different times.
5.2.2. Form Record Fields and Groups
Individual elements of a form record description are form record fields or groups.
Implicitly declare the correspondence by using the same name for a form field or group record as for the corresponding data item.
Explicitly declare a correspondence by using a transfer clause (as described in the TRANSFER Clause section of the VSI DECforms IFDL Reference Manual).
Substitute a COPY statement for the record description (as described in the COPY Statement section of the VSI DECforms IFDL Reference Manual).
The COPY statement can include a record definition from Oracle CDD/Repository.
Note
The order and size of the form record fields mustbe the same as the order and size of the application program record fields.
5.3. Forms_Record_Data Structure
formsdef.h for C programs
formsdef.f for FORTRAN programs
data_record
data_length
shadow_record
shadow_length
You use shadow records to track data. The mileage reimbursement program does not use shadow records. If you want to know more about shadow records,see Section 9.6.1, ''Using Tracked Form Data Items'' and the VSI DECforms Programmer's Reference Manual.
5.4. Creating the Form Record Descriptions
The mileage reimbursement application contains four form record descriptions: the first for the header data; the second for the current occurrence of the trip data; the third for the entire group of trip data; and the fourth for the totals for all trips.
Using LSE or a text editor, open the IFDL file that you created in the previous chapter.
Move the cursor just below
EndDataand just aboveLayoutVT_LAYOUT.- Insert an empty line and enter the following code for the HEADER_INFO_RECORD:
Form Record HEADER_INFO_RECORD EMPLOYEE_NAME Character(32) BADGE_NUMBER Character (6) COST_CENTER Character(3) ADDRESS Character(120) REASON Character(64) End Record - Enter the following code for the TRIP_ROW_RECORD:
Form Record TRIP_ROW_RECORD Group TRIP TRIP_DATE Datetime(8) Using TRIP(N).TRIP_DATE TRIP_FROM Character(3) Using TRIP(N).TRIP_FROM TRIP_TO Character(3) Using TRIP(N).TRIP_TO MILES Longword Integer Using TRIP(N).MILES AMOUNT Longword Integer Using TRIP(N).AMOUNT TOLL Longword Integer Using TRIP(N).TOLL SUBTOTAL Longword Integer Using TRIP(N).SUBTOTAL End Group End RecordThe TRIP_ROW_RECORD form record is used when the operator exits the MILEAGE field. To calculate the mileage reimbursement amount for the array element containing the current activation item, the Form Manager passes only the array element containing the current activation item(the MILEAGE field) to an escape routine that will perform the calculations and update the data items.
This strategy avoids having to pass the entire array—something that can seriously impact performance. N contains the index of the current array element and specifies the use of only that current element.
For information about the escape routine that receives this record, see Section 6.4, ''Creating the Escape Routines''.Additional Information
Because DECforms supports integer arithmetic within the form itself,it is not necessary to use this escape routine. The primary reason for including this routine in our application is to demonstrate how to send a subset of array data from a form to a program.
You can also specify ranges of array data by using subscript ranges, as described in the appendix on arrays in the VSI DECforms IFDL Reference Manual.
- Enter the code for the TRIPS_RECORD and TOTALS_RECORD:
Form Record TRIPS_RECORD Group TRIP Occurs 36 TRIP_DATE Datetime(8) TRIP_FROM Character(3) TRIP_TO Character(3) MILES Longword Integer AMOUNT Longword Integer TOLL Longword Integer SUBTOTAL Longword Integer End Group End Record Form Record TOTALS_RECORD TOTAL_MILES Longword Integer TOTAL_AMOUNT Longword Integer TOTAL_TOLLS Longword Integer FORM_TOTAL Longword Integer End RecordThe Form Manager uses the TRIPS_RECORD form record to send the data for the entire array (group) from the form to the application program. The program then calculates the totals for all the trips on the form. For information about the escape routine that receives this record, see Section 6.4, ''Creating the Escape Routines''.
The Form Manager uses the TOTALS_RECORD to send the totals to the program, so that the program can send them to the print session for the DDIF print file.
- If you are using LSE, press DO and enter the following command until you get no errors:
LSE>COMPILE/REVIEWIf you are using another text editor, exit the editor and enter the following command until you get no errors:$FORMS TRANSLATE /LIST MRF_FORMThis step produces the final form file for the character-cell version of the application.
If you get any error messages, check to make sure that you entered the code exactly as shown. If necessary, check the
mrf_form.lisfile created in your current directory to see all error messages. As a final resort, compare your file with that in Appendix A, "The Mileage Reimbursement Application".
5.5. Creating Header Information and Data Declarations for the Program
formsdef.h (for C) and formsdef.f (for FORTRAN) contain
all the definitions that you need for the DECforms portable API bindings. For each
request, DECforms requires particular routine parameters. These parameters include the following:Session identification (Forms_Session_Id)—the name that you give to the session
Form object name (Forms_Form_Object)—the name of the form object file, used if you have a linked form or linked object vectors for escape routines
Record structure (Forms_Record_Data)—the name of a form record or of a list of form records that a SEND, RECEIVE, or TRANSEIVE request will handle
Request options (Forms_Request_Options)—the name that you give to a data array that contains requests for optional processing
In addition to these parameters, DECforms provides a Forms_Status variable, which contains the status of the request. VSI highly recommends (although not done in the mileage reimbursement program) that you check status after each request.
When you enter these parameter names in your program, you must use exact case.
Sending and receiving multiple records in one request
Sending and receiving control text
Setting up trace files for particular sections of your form
Trace files are used to debug problems. For more information about trace files, see Chapter 7, "Building and Testing the Application for Character-Cell Devices".
Setting up escape routines that exist in separate files
Setting up print file characteristics
Suppressing terminal I/O
Section 6.1, ''Enabling the Form'' contains more details about request options.
The names you will use for the data in the HEADER_INFO_RECORD and TRIPS_RECORD structure definitions are the sameas the data item and form record names in the form file; the correspondence between the form and the program data will be declared implicitly.
5.5.1. Creating the Data Declarations and Header Information for the C Program
mrf_c.c and enter the following code for the header
information, structure format declarations, and DECforms parameter
definitions:#include <stdio.h> /* C standard input output header file */
#include <formsdef.h> /* DECforms header file for portable API */
#define EMPNAME 32
#define EMPBADGE 6
#define EMPCC 3
#define EMPADDRESS 120
#define EMPREASON 64
#define TRIPDATE 8
#define TRIPFROM 3
#define TRIPTO 3
#define TRIPRECORD 36
/*
* Structure format declarations for records that will be sent to the form
*/
typedef struct {
char employee_name[EMPNAME], badge_number[EMPBADGE], cost_center[EMPCC],
address[EMPADDRESS], reason[EMPREASON];
} Hdr_Info_Record;
typedef struct {
char trip_date[TRIPDATE], trip_from[TRIPFROM], trip_to[TRIPTO];
unsigned long miles, amount, toll, subtotal;
} Trip_Record;
typedef struct {
unsigned long total_miles, total_amount, total_tolls, form_total;
} Totals_Record;
/*
* Static storage
*/
Hdr_Info_Record header_info_record; /* The header info record */
Trip_Record trips_record[TRIPRECORD]; /* Array of trip records */
Totals_Record totals_record; /* totals for all trips */
/*
* Create instances from data types in formsdef header file
*/
Forms_Session_Id session_id;
Forms_Form_Object MRF_FORM; /* linked form name */
Forms_Status status;
Forms_Record_Data header_info_record_descr; /* record */
Forms_Record_Data trips_record_descr; /* record */
Forms_Record_Data totals_record_descr; /* record */
Forms_Request_Options request_options[2]; /*form object for linked form*/
You will define the request options and form record descriptors in Chapter 6, "Completing the Application Program for the Character-Cell Layout".
5.5.2. Creating the Data Declarations and Header Information for the FORTRAN Program
- Create a file called
mrf_def.forand enter the following code for the structure declarations for the form records:!+ ! Symbolic constants !- Integer EMPNAME, EMPBADGE, EMPCC, EMPADDRESS, EMPREASON Integer TRIPDATE, TRIPFROM, TRIPTO, TRIPRECORD Parameter(EMPNAME=32) Parameter(EMPBADGE=6) Parameter(EMPCC=3) Parameter(EMPADDRESS=120) Parameter(EMPREASON=64) Parameter(TRIPDATE=8) Parameter(TRIPFROM=3) Parameter(TRIPTO=3) Parameter(TRIPRECORD=36) !+ ! Structure declarations for the form records !- Structure /header_info_struct/ Character employee_name*(EMPNAME) Character badge_number*(EMPBADGE) Character cost_center*(EMPCC) Character address*(EMPADDRESS) Character reason*(EMPREASON) End Structure Structure /trip_struct/ Character trip_date*(TRIPDATE) ! date of the trip Character trip_from*(TRIPFROM) ! start facility Character trip_to*(TRIPTO) ! end facility Integer*4 miles ! miles travelled Integer*4 amount ! mileage amount Integer*4 toll ! toll amount Integer*4 subtotal ! total for trip End Structure Structure /totals_struct/ Integer*4 total_miles ! total miles travelled Integer*4 total_amount ! total mileage amount Integer*4 total_tolls ! total toll amount Integer*4 form_total ! total for all trips End StructureBoth the program and the escape routines include this file containing the structure declarations.
- Create a file called
mrf_for.forand enter the following header information and variable declarations:Program MRF_FOR Implicit None Include 'Sys$Library:formsdef.f' Include 'Mrf_Def'!! Variables! Record /trip_struct/ trips_record(TRIPRECORD) Record /header_info_struct/ header_info_record Record /totals_struct/ totals_record Record/Forms_Record_Data/header_info_record_descr Record/Forms_Record_Data/trips_record_descr Record/Forms_Record_Data/totals_record_descr Integer MRF_FORM External MRF_FORM Character*16 session_id Integer status Record/Forms_Request_Options/request_options(2)
You will define the request options and record descriptors in Chapter 6, "Completing the Application Program for the Character-Cell Layout".
5.6. What Comes Next
You have now completed the form records for the application, and you have declared the corresponding data in your program. You have also set up the required header information in the program. The next step is to complete the program requests and escape routines.
Chapter 6. Completing the Application Program for the Character-Cell Layout
Enabling the form (ENABLE request)
Receiving the form data (RECEIVE request)
Disabling the form (DISABLE request)
Creating the escape routines
DECforms supports six requests. The three requests not described in this chapter are SEND, TRANSCEIVE, and CANCEL. For detailed information on all the DECforms programming requests, see the VSI DECforms Programmer's Reference Manual. The chapter on request processing of the VSI DECforms Programmer's Reference Manual describes in detail how the Form Manager processes programming requests.
6.1. Enabling the Form
Returns a session ID that is used in all subsequent calls to the form and device.
Tells the Form Manager the user device.
Tells the Form Manager the location of the form.
Loads the form into memory and creates run-time data structures.
Names the request options structure, if one exists.
For portable applications, leave out the device name. On OpenVMS systems, the operator or system manager can set the logical name FORMS$DEFAULT_DEVICE at run time. If there is no device name, and no logical name is used at run time, the Form Manager uses the default output device SYS$INPUT for OpenVMS systems.
Additional Information
Performance of the ENABLE request on OpenVMS is somewhat better with linked forms than with disk-based forms.
Disk-based forms are useful when you have one application that will be used with different forms at different times or places. For example, you might have several forms that are alike, except that each uses a different language.
With separate disk-based forms, you can make small, cosmetic changes to the form (such as moving fields or correcting spelling errors) without having to rebuild the entire application.
formsdef.h and formsdef.f header files define the request
options structure. You represent request options in an array of structures, each element
of which contains:- A request option type code, such as:
- forms_c_opt_send_record
- forms_c_opt_receive_record
- forms_c_opt_trace
- forms_c_opt_print
- forms_c_opt_form
- One or more fields, containing such variables as:
- count
- file_name
- object
- flag
The first field of each request options structure is always .option.
In the mileage reimbursement application program, the request options allow the programmer to
link the form into the application, so that the operator does not need to keep track of
a separate disk-based form. The request options specify the forms_c_opt_form option and
the form object file mrf_form.obj. You will create the form object file in
Chapter 7, "Building and Testing the Application for Character-Cell Devices".
6.1.1. Creating the C ENABLE Request and Request Options Structure
mrf_c.c, after the code you entered in Chapter 5, "Specifying Form Records and Program Data", declare the main program and enter the enable
request as
follows:/*
* Routine: main
*/
int main (void)
{
/*
* Set up the request options for linking the form object file and
* enable the form.
*/
request_options[0].option = forms_c_opt_form;
request_options[0].form.object = MRF_FORM;
request_options[1].option = forms_c_opt_end;
status = forms_enable (session_id, /* session id returned */
NULL, /* current device */
NULL, /* name of form file */
"MRF_FORM", /* name of the form */
request_options); /* request options */
NULL indicates a null parameter.
6.1.2. Creating the FORTRAN ENABLE Request and Request Options Structure
mrf_for.for, after the code you entered in Chapter 5, "Specifying Form Records and Program Data", enter the FORTRAN request options as
follows:!
! Request options for linked form
!
request_options(1).option = forms_c_opt_form
request_options(1).form_object = %loc (MRF_FORM)
request_options(2).option = forms_c_opt_end
!
! Enable the form
!
status = forms_enable_for(
1 session_id,
2 , !current device
3 , !name of form file
4 'MRF_FORM', !form name
5 request_options)You must use four commas to separate the five parameters, even when a parameter is optional or unsupplied. You must use a tab at the beginning of each continuation line in a request.
6.2. Receiving the Form Data
Displays panels containing fields that match the form record.
Prompts the operator for each field that matches a form data item in the record being received.
Validates field values (can check a field's value against a range,a list of values, the values of other fields, and so on).
Collects form data and passes the record to the program.
The form record name parameter represents the name of the form record in the IFDL file. As discussed in Chapter 5, "Specifying Form Records and Program Data", the contents of this record must correspond with the record structure in the program, which is named in the program record parameter. In other words, the program record data matches the form record groups and fields, and the form record groups and fields match form data groups and fields.
- pointer to the data record
- pointer to the length of the data record
- pointer to the shadow record, if any exists
- pointer to the length of the shadow record
Because the mileage reimbursement program does not use shadow records, these fields must be set to zero. (For examples of using shadow records, see Chapter 9, "Declaring, Displaying, and Tracking Data".)
6.2.1. Creating the C RECEIVE Requests and Form Record Data Definitions
mrf.c, enter the following code for the RECEIVE requests and form
record data
definitions:/*
* Obtain the employee header information – structure must contain the
* length and address of the record being received from DECforms.
*/
header_info_record_descr.data_record = &header_info_record;
header_info_record_descr.data_length = sizeof(header_info_record);
header_info_record_descr.shadow_record = NULL;
header_info_record_descr.shadow_length = 0;
status = forms_receive (session_id, /* session id */
"header_info_record", /* form record name in IFDL*/
&header_info_record_descr, /* record in program*/
NULL); /* no request options*/
/*
* Obtain the information on all the trips made.
*/
trips_record_descr.data_record = &trips_record;
trips_record_descr.data_length = sizeof(trips_record);
trips_record_descr.shadow_record = NULL;
trips_record_descr.shadow_length = 0;
status = forms_receive (session_id,
"trips_record",
&trips_record_descr,
NULL);
/*
* Obtain totals for the form.
*/
totals_record_descr.data_record = &totals_record;
totals_record_descr.data_length = sizeof(totals_record);
totals_record_descr.shadow_record = NULL;
totals_record_descr.shadow_length = 0;
status = forms_receive (session_id,
"totals_record",
&totals_record_descr,
NULL);6.2.2. Creating the FORTRAN RECEIVE Requests and Form Record Data Definitions
for_mrf.for, enter the following code for the RECEIVE requests and
form record data definitions:
!
! Structure must contain the length and address of the record being sent
! or received from DECforms
!
header_info_record_descr.data_length = sizeof(header_info_record)
header_info_record_descr.data_record = %loc(header_info_record)
header_info_record_descr.shadow_record = 0
header_info_record_descr.shadow_length = 0
trips_record_descr.data_length = sizeof(trips_record)
trips_record_descr.data_record = %loc(trips_record)
trips_record_descr.shadow_record = 0
trips_record_descr.shadow_length = 0
totals_record_descr.data_length = sizeof(totals_record)
totals_record_descr.data_record = %loc (totals_record)
totals_record_descr.shadow_record = 0
totals_record_descr.shadow_length = 0
!
! Obtain the header information
!
status = forms_receive_for(
1 session_id,
2 'header_info_record', !form record name
3 header_info_record_descr, !program record
4 ) ! no request options
!
! Obtain information on all trips
!
status = forms_receive_for(
1 session_id,
2 'trips_record',
3 trips_record_descr,
4 )
!
! Obtain totals for all trips (to send to print session)
!
status = forms_receive_for(
1 session_id,
2 'totals_record',
3 totals_record_descr,
4 )6.3. Disabling the Form
The DISABLE request ends the session for a form. This request detaches the display device and the form that are associated with the session ID string. The DISABLE request takes one required parameter(session ID) and several optional parameters (described in the VSI DECforms Programmer's Reference Manual).
6.3.1. Creating the C DISABLE Request
mrf.c, enter the following code for the DISABLE
request:/* * Disable the form and exit */ status = forms_disable (session_id, NULL); }
6.3.2. Creating the FORTRAN DISABLE Request
for_mrf.for, enter the following code for the DISABLE
request:!
! Disable the form and exit
!
status = forms_disable_for (
1 session_id,)
End6.4. Creating the Escape Routines
An escape routine is a call from the form to an external routine such as a subroutine or a system service. Typically, data passes to the escape routine in the routine's arguments,the routine processes the data in some way, and resulting data passes to the form in the routine's arguments.
In the mileage reimbursement application, the escape routine UPDATE_ROW calculates a reimbursement amount for mileage for a single trip. The escape routine DO_TOTALS calculates the total mileage, total mileage amount, total toll amount, and total reimbursement amount.
|
BY VALUE |
The argument contains the data value (for BYTE,WORD, LONGWORD, FFLOATING, and SHORT FLOAT form data items only). The Form Manager converts BYTE and WORD values to LONGWORD before passing them by value to escape routines. |
|
BY REFERENCE |
The argument contains the address of the data value. This is the recommended passing mechanism for portable applications. |
|
BY DESCRIPTOR |
The argument contains the address of an OpenVMS descriptor containing the length, data type, and address of the data to the escape routine for each subsequent argument. The escape routine should not modify the descriptor itself—only the data pointed to by the descriptor's pointer field. |
|
BY DEFAULT |
The Form Manager uses the default passing mechanism according to the type of form data item. On OpenVMS, the default passing mechanism for strings is by descriptor. The Form Manager also passes CHARACTER, DATETIME,INTEGER, DECIMAL, and FLOAT form data items by descriptor. The default passing mechanism for form records, for CHARACTER NULLTERMINATED form data items, and for all other form data items is by reference. If you do not specify a passing mechanism, the default is BY DEFAULT. |
Call "ROUTINE_X" Using
By Value A B C D Call "ROUTINE_X" Using
A
By Value B
By Default C DChapter 4, "Adding Functions, Responses, Display Actions,and Validations to the IFDL File" describes the function responses in the mileage reimbursement application form that call escape routines.
For the DO_TOTALS escape routine, the form passes the address of the form record TRIPS_RECORD as well as the addresses of four LONGWORD INTEGER values. For more information about the call to this routine, see Section 4.3.3, ''Creating the Other Responses at the Layout Level''.
For the UPDATE_ROW escape routine, the form passes the address of the form record TRIP_ROW_RECORD. For more information about this call, see Section 4.3.5, ''Creating Exit Responses at the Field Level''.For information about the form records,see Section 5.4, ''Creating the Form Record Descriptions''.
You can create escape routines in the same file as your main program. The mileage reimbursement application uses this approach.
If you want to use an escape routine from more than one program by using the portable API, you can create it in a separate file, and then link it directly with your program, as described in the VSI DECforms Programmer's Reference Manual.
6.4.1. Creating the Escape Routines for the C Program
mrf.c:/*
* Routine: update_row
*
* Functional Description:
*
* Updates the information in the row of a trip record. The mileage
* reimbursement amount is calculated from the number of miles travelled
* (using 22 per mile).
*
* Formal Parameters:
*
* trip-record - a pointer to the trip record
*
* Routine Value:
*
* none
*
*/void update_row (Trip_Record
*trip)
{
/*
* Type cast trip miles to unsigned float, multiply by 22.5, add .5
* to round off, and then recast to unsigned integer.
*/
trip->amount = (unsigned long)(((float)trip->miles * 22.5) + 0.5);
return;
}
/*
* Routine: do_totals
*
* Functional Description:
*
* Computes and updates the totals given the entire collection of trip
* records.
*
* Formal Parameters:
*
* trips-record
* total-miles
* total-amount
* total-tolls
* form-total
*
* Routine Value:
*
* none
*
*/
void do_totals (Trip_Record (*trips)[TRIPRECORD],
unsigned long *miles, unsigned *amount,
unsigned long *tolls, unsigned *total)
{
unsigned n;
/*
* Initialize counters to zero
*/
*miles = *amount = *tolls = *total = 0;
/*
* For each entry with a nonzero mileage, accumulate the trips values into
* the counters.
*/
for (n = 0; n < TRIPRECORD; n++) {
if ((*trips)[n].miles != 0) {
*miles = *miles + (*trips)[n].miles;
*amount = *amount + (*trips)[n].amount;
*tolls = *tolls + (*trips)[n].toll;
*total = *total + (*trips)[n].subtotal;
}
}
return;
}6.4.2. Creating the Escape Routines for the FORTRAN Program
mrf_for.for:!+
! Routine: Update_Row
!
! Functional Description:
!
! Updates the information in the row of a trip record. The mileage
! reimbursement amount is calculated from the number of miles travelled
! (using 22 per mile)
!
! Formal Parameters:
!
! trip-record - the trip record
!
!-
Subroutine Update_Row (trip)
Include 'sys$library:formsdef.f'
Include 'Mrf_Def'
Record /trip_struct/ trip
trip.amount = Int((trip.miles * 22.5)+0.5)
Return
End
!+
! Routine: Do_Totals
!
! Functional Description:
!
! Computes and updates the totals given the entire collection of trip
! records.
!
! Formal Parameters:
!
! trips-record
! total-miles
! total-amount
! total-tolls
! form-total
!-
Subroutine Do_Totals (trips, miles, amount, tolls, total)
Include 'sys$library:formsdef.f'
Include 'Mrf_Def'
Record /trip_struct/ trips(TRIPRECORD)
Integer miles, amount, tolls, total, n
!
! Initialize counters to zero
!
miles = 0
amount = 0
tolls = 0
total = 0
!
! For each entry with a nonzero mileage, accumulate the trips values into! the counters.
!
Do n = 1,TRIPRECORD
If (trips(n).miles .ne. 0) Then
miles = miles + trips(n).miles
amount = amount + trips(n).amount
tolls = tolls + trips(n).toll
total = total + trips(n).subtotal
End If
End Do
Return
End6.5. What Comes Next
You have now completed the application for the character-cell layout. The next step is to compile, link, and test the application.
Chapter 7. Building and Testing the Application for Character-Cell Devices
Translating the form and extracting an object file
Building the portable API program
Testing the application
For more details on all these topics, see the VSI DECforms Programmer's Reference Manual.
7.1. Translating the Form and Extracting an Object File
Translating the IFDL source file creates a form file with the default extension .form.
$FORMS TRANSLATE/LIST MRF_FORM.IFDL
This command produces a file called mrf_form.lis, listing any errors.
If you are in IFDL editing mode in the FDE, DECforms translates your IFDL file automatically.
LSE>COMPILE/REVIEW
Use the standard LSE process for reviewing and correcting errors. For more information, see the LSE documentation or online help.
When you are using escape routines in a portable API application, you must link them with the application program. To resolve references in your form, you need to create a form object file using the Forms Extract Object utility, and link the form object with your escape routines and application program.
$FORMS EXTRACT OBJECT /PORTABLE_API /FORM_LOAD MRF_FORM.FORM
The /FORM_LOAD qualifier causes the object file to contain both the form object and the names of all escape routines called from the form.
The /PORTABLE_API qualifier configures the object file to support the portable API.
Additional Information
You can use the File option on the FDE Main Menu to create form object files. However, the FDE does not create form object files that are configured for the DECforms portable API;therefore, you should use the FORMS EXTRACT OBJECT command instead.
External global variable (declared using the form name)
In C, use the data type Forms_Form_Object. In FORTRAN, use EXTERNALINTEGER.
Form object options in Forms_Request_Options using the global variable
This global variable is also defined when you link your program and the form object file.
Form object request option in the ENABLE call
7.2. Building the Portable API Program
Because the source file for the mileage reimbursement program contains the escape routines, you can compile these with one command. If an escape routine is in a separate file, you must compile it separately and link it with the program.
$CC MRF_C
$FORTRAN MRF_FOR
LSE>COMPILE/REVIEW
For portable API programs on OpenVMS, the shareable image forms$portable_api.exe
in SYS$LIBRARY contains all entry points for the portable bindings. The DECforms
run-time system is in FORMS$MANAGER in SYS$LIBRARY.
- Create a file named
mrf_opt.optthat contains the following line:SYS$LIBRARY:FORMS$PORTABLE_API.EXE/SHARE
This tells the linker to link in the shareable image that contains the portable API entry points to the Form Manager.
- For C programs, define the logical name LNK$LIBRARY, as follows:
$DEFINE LNK$LIBRARY SYS$LIBRARY:VAXCRTLThis links in the C run-time library that defines the C forms calls.
- To link the C program, form, and the link option file, enter the following command:
$LINK MRF_C, MRF_FORM, MRF_OPT/OPTTo link the FORTRAN program, form, and the link option file,enter the following command:$LINK MRF_FOR, MRF_FORM, MRF_OPT/OPT
7.3. Testing the Application
- Define the logical name FORMS$DEFAULT_DEVICE to SYS$INPUT, as follows:
$DEFINE FORMS$DEFAULT_DEVICE SYS$INPUT - Turn on the DECforms Trace facility by defining the following logical name on OpenVMS systems:
$DEFINE FORMS$TRACE TWhen you run the application, the Trace facility automatically creates a log file describing each action taken during the course of the application session. The log file also describes any errors that occurred.Additional Information
You can log all errors within the Form Manager by setting the logical name FORMS$LOG_EVENTS to 1. If an error occurs in your form sessions, a log file named FORMS$EVENT_LOG.LOG,containing just the errors, appears in your working directory.
For more information on the Trace and Event Log Facilities, see the VSI DECforms Programmer's Reference Manual.
- Run the C mileage reimbursement application on OpenVMS systems by entering the following command:
$RUN MRF_CRun the FORTRAN mileage reimbursement application on OpenVMS systems, by entering the following command:$RUN MRF_FORIf your application does not run, check the trace file for error conditions, fix the errors, and try again.
Try all the features and functions of the application,including Ctrl/P to print the trips panel.
Look at the online help and fill out each form. When you exit the program, DECforms creates two files:mrf_form.txt—the text file containing a printable copy of the trips panelmrf_form.trace—the log file containing a listing showing the program and form behavior at run time
Type each file at the terminal or print each one out on a printer.
Examine the trace file, comparing it with the program and the form.
Begin trace output to USERI$:[JONES]MRF_FORM.TRACE;18 at 16-APR-1997 14:14:57.61.
Begin ENABLE request.
Begin Initialize request phase.
Validate the arguments for this request.
Open form file named 'MRF_FORM'.
Read form file named 'MRF_FORM'.
Begin selecting a layout.
Specified enable device is a Character-Cell Terminal.
Character-cell terminal is a VT300 Color. Width of 132. Height of 24.
No layout with a matching language clause was found.
Now searching layouts without language clauses for a suitable device match.
Selected layout VT_LAYOUT.
End selecting a layout.
Begin reset all data items.
Resetting data item EMPLOYEE_NAME.
Resetting data item BADGE_NUMBER.
Resetting data item COST_CENTER.
Resetting data item ADDRESS.
Resetting data item REASON.
Resetting data item N.
Resetting data item BLANK_DATE.
Resetting data item TRIP(1).TRIP_DATE.
Resetting data item TRIP(1).FROM.
Resetting data item TRIP(1).TO.
Resetting data item TRIP(1).MILES.
Resetting data item TRIP(1).AMOUNT.
Resetting data item TRIP(1).TOLL.
Resetting data item TRIP(1).SUBTOTAL.
.
.
.
Resetting data item TRIP(36).TRIP_DATE.
Resetting data item TRIP(36).FROM.
Resetting data item TRIP(36).TO.
Resetting data item TRIP(36).MILES.
Resetting data item TRIP(36).AMOUNT.
Resetting data item TRIP(36).TOLL.
Resetting data item TRIP(36).SUBTOTAL.
Resetting data item TOTAL_MILES.
Resetting data item TOTAL_AMOUNT.
Resetting data item TOTAL_TOLLS.
Resetting data item FORM_TOTAL.
Resetting data item TRIP_DATE.
End reset all data items.
End Initialize request phase.
Begin External Response phase.
Begin external responses for this request.
Begin interpreting default response for this request.
End default response for this request.
End external responses for this request.
End External Response phase.
End request.Begin RECEIVE request.
Begin Initialize request phase.
Validate header_info_record record name for this request.
Record header_info_record found in this form.
Validate the arguments for this request.
End Initialize request phase. Begin External Response phase.
Begin external responses for this request.
Begin ACTIVATE response step.
Begin activate panel HEADER_INFO_PANEL.
Activated field or icon EMPLOYEE_NAME on panel HEADER_INFO_PANEL.
Activated field or icon BADGE_NUMBER on panel HEADER_INFO_PANEL.
Activated field or icon COST_CENTER on panel HEADER_INFO_PANEL.
Activated field or icon ADDRESS on panel HEADER_INFO_PANEL.
Activated field or icon REASON on panel HEADER_INFO_PANEL.
End activate panel HEADER_INFO_PANEL.
End response step.
Begin POSITION response step.
Begin position to panel HEADER_INFO_PANEL.
End position to panel HEADER_INFO_PANEL.
End response step.
End external responses for this request.
End External Response phase.
Begin Accept Input phase.
The activation list is:
Field EMPLOYEE_NAME on panel HEADER_INFO_PANEL.
Field BADGE_NUMBER on panel HEADER_INFO_PANEL.
Field COST_CENTER on panel HEADER_INFO_PANEL.
Field ADDRESS on panel HEADER_INFO_PANEL.
Field REASON on panel HEADER_INFO_PANEL.
End activation list. Begin input from panel field TRIP(1).TRIP_DATE on panel TRIPS_INFO_PANEL.
%FORMS-I-CONVERR, error while converting from one data type to another.
-STR-W-TRU, truncation
Returning receive control text "EI003".
%FORMS-I-CONVERR, error while converting from one data type to another.
-STR-W-TRU, truncation
Returning receive control text "EI003".The VSI DECforms Programmer's Reference Manual lists the DECforms error messages.
7.4. What Comes Next
You have completed the application for the character-cell layout. The next step is to convert it to run on other devices.
Chapter 8. Form Structure
This chapter discusses the same DECforms form concepts that are summarized in Chapter 1, "Introduction", but covers the concepts in more detail.
Form elements
Responses
Methods used to create a form
The IFDL description of a form
8.1. Form Elements
Figure 8.1, ''Information Contained in a Form'' shows the information contained in a form, and the interaction between the form and the operator, and the form and the application program.
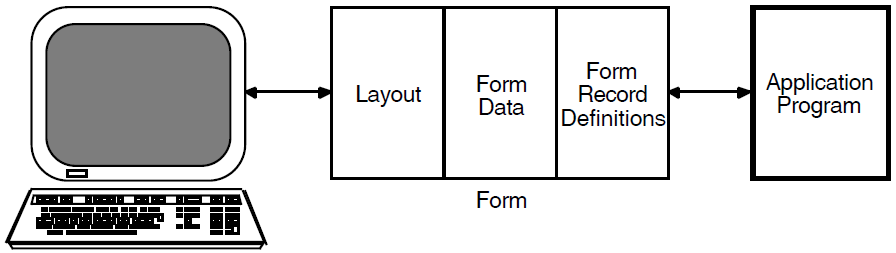
Figure 8.2, ''General Structure of a Form'' illustrates the general structure of a form. The sections that follow describe each of the form elements shown in the figure.
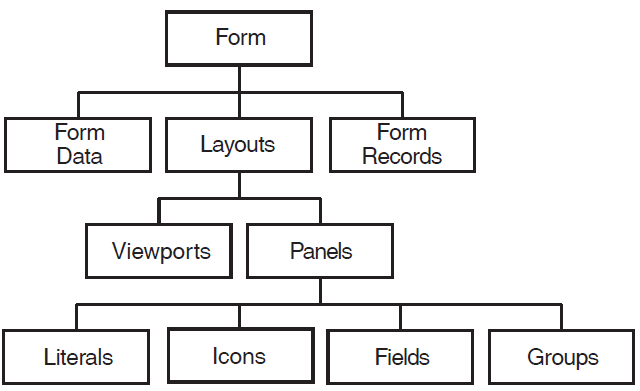
8.1.1. Form Data
Form data items are the only means of storing values that an operator enters. You can display the value stored in a form data item on the screen or pass it to the program.
Data passed to or from the program (by means of records) is stored in form data items. You also can use a form data item internally in the form without displaying it or passing it to the program. Section 3.7.3, ''Specifying Picture Fields for the Group'' describes examples of internal form data items—the N and BLANK_DATE fields in the mileage reimbursement application.
In DECforms software, each enabled form maintains a copy of form data items that persistthroughout application execution. For example, if you store the value "10" in a form data item and never change that value, the form data item stores that value until your program disables the form.
You can organize form data items that are related to one another into form data groups. You can nest data groups. Nested data groups can have multiple occurrences so that elements of the groups (data items or other groups) can be arrays. An array is a multiply occurring data item in a group. Chapter 9, "Declaring, Displaying, and Tracking Data" describes how to use groups and arrays.
8.1.2. Form Records
A form record is a map of form data that allows the Form Manager to exchange data between the program and the form. For the map to operate correctly, the form record must be logically equivalent to an application program record. The name you declare for the record in IFDL is passed as an argument to a request call. A request is a Form Manager routine that performs form processing, such as enabling a form or sending a record message between the form and the program.
When the Form Manager transfers data to a form during the processing of a request, it copies the data into the form data items with the same names as fields in the form record. These values are kept in the form until they are changed by operator input, by the form itself, or by the processing of another request called from the application program.
Form record fields correspond to form data items and usually have the same names as the corresponding form data items. If the form record fields do not have the same names as form data items,you can specify the correspondence explicitly with a USING clause or a TRANSFER clause (see Chapter 9, "Declaring, Displaying, and Tracking Data").
You must specify data types for form record fields. The data types do not have to match those of the form data items because you might want your application program to send or receive the data in a different format. The Form Manager performs the data conversion. However, the most efficient data transfer occurs when no conversion is needed.
Note
Your application will perform better if you define records that match your processing. Because the value of form data remains the same between calls to a form, you should transfer only the data you need or the data that has changed.
The VSI DECforms Programmer's Reference Manual describes data transfer between the application program and the form in more detail.
8.1.3. Layouts
Layouts contain all the information needed for mapping a form to a display device. You can define several layouts for a form so that you can use the same form to display information on several different display devices.
Character cell—for devices using a character-cell display on OpenVMS systems, such as VT terminals
PRINTER—for high quality print output of panels and form data
The application program requires no knowledge of the screen layout or display device. All the application does is communicate with the form by means of form records. The form knows how to display and return data to the program. How you display the data can vary depending on the display device.
Use a different layout to define a view of the form for each type of device. For example, you might choose to display information in one large screen on a VAXstation terminal emulation window that is 54 lines long. On a VT330 terminal you might divide the information into several small panels and display them one at a time.
At run time, the Form Manager chooses a layout based on the device specified in the application program's ENABLE request. On OpenVMS systems, if the request does not specify a device, DECforms uses the definition of the logical name FORMS$DEFAULT_DEVICE.
In a layout, you designate the size of the display. The display is the rectangular area that is available to your application; it might or might not be as large as the display screen. You can adjust the size of the display depending on considerations such as the number of lines and columns on the screen or how much of the display the application can access. You also specify the units in which position coordinates and measurements are to be expressed—inches, millimeters,points, BMUs (Basic Measurement Units or 1/1200 of an inch).
You can define functions and function responses to control what actions occur when the operator presses one or more keys on the keyboard. For information about defining functions and responses, see Chapter 4, "Adding Functions, Responses, Display Actions,and Validations to the IFDL File" and Chapter 11, "Designing the Operator Interface".
Layouts are also convenient for defining several different natural languages for one form. For example, you could have two different views of a form, one for English-speaking operators and one for French-speaking operators. The form would contain two layouts, one that specifies English as the natural language and one that specifies French. At run time, the Form Manager chooses one of these layouts based on the definition of the logical name FORMS$LANGUAGE.
For more information about how the Form Manager chooses a layout, see the VSI DECforms Programmer's Reference Manual.
8.1.4. Viewports
Within a layout, the display is divided into viewports. A viewport's location is relative to the screen. You can have more than one viewport on the display at a time, and they can overlap.
Viewports are useful because they name a rectangular part of the display. You can use this name to specify explicitly where each panel appears on the display. You can display a panel in a viewport, remove it, display another panel in the same viewport, remove it, and so on, for as long as you have panels to display.
If you do not define a viewport explicitly, DECforms uses a default viewport that corresponds to the size of the layout.
8.1.5. Panels
A layout generally contains several panels. When you create a panel, you identify it as either a data entry panel (the default) or a help panel. A data entry panel is used for data input and operator actions. A help panel is used to provide help information. You can also use a help panel for data entry and operator actions.
A third type of panel, a message panel, is used to display error or informational messages to the operator. DECforms supports one message panel for each layout.
Relationship to Viewports and to Other Panels
Default to the default viewport
If you do not specify a viewport explicitly, DECforms uses the default viewport, the size of which is determined by the SIZE clause in the LAYOUT declaration.
Specify a viewport by using a VIEWPORT clause in the PANEL declaration
Specify a viewport in a DISPLAY response step
You can associate several panels with the same viewport, although the Form Manager displays only one panel in the viewport at a time. One panel can occupy different viewports at different times, but cannot occupy different viewports at the same time.
In a character-cell display, the viewports and panels remain in a fixed relationship to each other. The coordinates of character-cell panel objects are relative to the viewport's origin. All objects on a character-cell panel must fit inside the viewport in which the panel is displayed
Processing and Functions
Within a data entry or help panel declaration,you can specify processing that is done when input is first entered in the panel and when input is completed. You also can define function keys that are specific to a panel, and you can specify messages that give help to the operator. Literals, panel fields, icons and panel groups are the elements that compose the actual display. The following sections discuss these elements.
For complete information about how to create panels using the FDE or a panel editor, see the VSI DECforms Guide to Commands and Utilities. For information about declaring help panels in the IFDL source file, or about using message panels, see Chapter 11, "Designing the Operator Interface".
Literals
Literals are text and graphics that form the background ofa panel and that do not change while the application is running. You can use literals to convey messages to the operator (about how touse the panel, for example), or to create borders and other graphics.
Literals can have display attributes; you can specify that a literal be bolded or underlined, for example. You can specify a set of literal default attributes to be applied to all literals on a panel. You can turn off or override default attributes for a particular literal or set of literals.
Panel Fields
Picture fields—one-line fields that have specified formats
Picture fields have associated picture strings that describe how data is to appear in them and what data the operator can enter into them under the direction of the Form Manager.
Text fields—fields of one or more lines that contain text
Panel field values change over time as form data changes—when information is sent from the program to form data items and when statements in the form change the form data items.
You can assign display attributes to individual panel fields. You also can declare and apply field default attributes at the layout, panel, group, or field level. Field defaults are similar to literal defaults: you can override field defaults by assigning other display attributes or by setting the defaults off at a lower level.
A panel field must have the same name as the form data item it displays. At run time, the initial value of a panel field is the value stored in the form data item it represents. You can allow the operator to change that value. When the value of a form data item changes, DECforms dynamically updates any associated onscreen field.
In a panel field declaration, you can specify that operator entry be validated before the corresponding data value is returned to the program in a record.
Icons
Panels use icons to give operators a way to perform an action by moving the cursor to and selecting an icon. An icon is composed of one or more text or graphic literals.
Unlike fields, icons have no associated form data items. Although icons cannot accept data input, function key input is allowed. For example, you can use icons to represent a menu option that the operator can select. You can declare processing attributes for an icon, such as active highlight, or conditional display by means of the CONCEALED WHEN clause.
Panel Groups
A panel group is a collection of panel fields, literals, and icons within the panel that can be treated as an entity for certain operations. Such operations include scrolling, deciding which fields can have input, deciding where to move the cursor, determining what to do when a function is entered while one of the fields of the group is active, and so on.
A panel group is the mapping of a data group to the panel. Just as data groups can have multiple occurrences, panel groups also can have multiple occurrences and appear on the screen as lists or tables (possibly scrolled).
8.2. Responses
By default, the Form Manager moves data from form records to form data and displays the panels necessary for the operator to enter the data that is to be transferred back to the program. You can take over control of part or all of the communication between the operator, the application program,and the form, by declaring responses. A response consists of a list of instructions, called response steps,to the Form Manager.
Reposition the cursor to a particular panel field when the operator presses a function key
Display a set of follow-up questions, based on the value of the panel field just completed
Call an application subroutine to verify that the entry in a panel field is valid in a database
Validate that two fields in the form are in the proper relation to each other
A response is procedural in that the response steps are executed at particular times, in a particular order, and there can be a choice between alternate sets of steps. A form is restricted to performing only display-oriented procedures.
A DECforms response has no looping mechanism, so it cannot execute general procedural algorithms. A response step that is a call to a user-supplied subroutine is called a procedural escape. The user-supplied subroutine called in a procedural escape is an escape routine.
Accept Responses—control what the Form Manager does when accepting input from the operator or when the operator presses a function key.
External Responses—control what the Form Manager does in response to one of the six DECforms external requests or in response to control text received on a request.
Internal Responses—contain response steps used in more than one response; another response can call an internal response.
The responses are discussed in later chapters of this guide. For information about how the Form Manager processes requests, responses,and response steps, see the VSI DECforms Programmer's Reference Manual. For IFDL syntax information, see the VSI DECforms IFDL Reference Manual.
8.3. Methods for Creating a Form
Using the Form Development Environment (FDE)
Using a text editor to write the IFDL source file
The FDE is useful to form designers who are new to DECforms and who are creating forms for character-cell displays. The FDE helps you keep the structure of the form in mind as you create it so that you can develop the form in an organized fashion.
Within the FDE, you can specify many elements of the form without having to write IFDL statements for them. When you must write IFDL statements, you can directly access the IFDL source code without leaving the FDE. You can also use other DECforms utilities, such as CCPED and the Test Utility, from within FDE. The FDE can produce form files, IFDL source files, or both.
For more information about using the FDE, see the VSI DECforms Guide to Commands and Utilities.
There are instances when you must write IFDL statements directly,for example, to define function responses, to specify certain declarations, and to create PRINTER layouts. You must specify these statements by editing IFDL source code using your text editor. If you are unfamiliar with the IFDL structure, you can use the optional DEC LSE (Language Sensitive Editor)and its EXPAND command to produce a template of the structure. (For more information on using DEC LSE, see the VSI DECforms Guide to Commands and Utilities.)
Whichever method you choose, you can always use the appropriate panel editor (CCPED on form files to create and organize panel appearance.
8.4. How a Form Is Described in the IFDL
The Independent Form Description Language ?(IFDL) is the language you use to create source files that define forms and form characteristics. You can create or modify an IFDL source file with any text editor supported by your operating system. You specify the language statements according to IFDL syntax rules, and then you translate the source file into a form file using the IFDL Translator.
Data and records associated with the form
Layouts associated with the form
Viewports associated with panel displays
Functions and responses
Panel descriptions
Object descriptions (field, icon, literal, group) and their locations on panels
Display attributes and properties
Help associated with panels and objects
Figure 8.3, ''Hierarchical Structure of a Form'' illustrates a simplified view of the hierarchical structure of a form in terms of its IFDL elements. These elements are specified as IFDL statements in the IFDL source file.
Figure 8.4, ''Structure of a Form in IFDL Declarations'' shows a syntactical view of the form's structure. This figure shows the structure of a form as it is written in the IFDL. Uppercase letters denote IFDL keywords, words that have special meaning in the IFDL.
The VSI DECforms IFDL Reference Manual describes the complete form structure,including syntax rules for the IFDL and rules for naming DECforms elements.
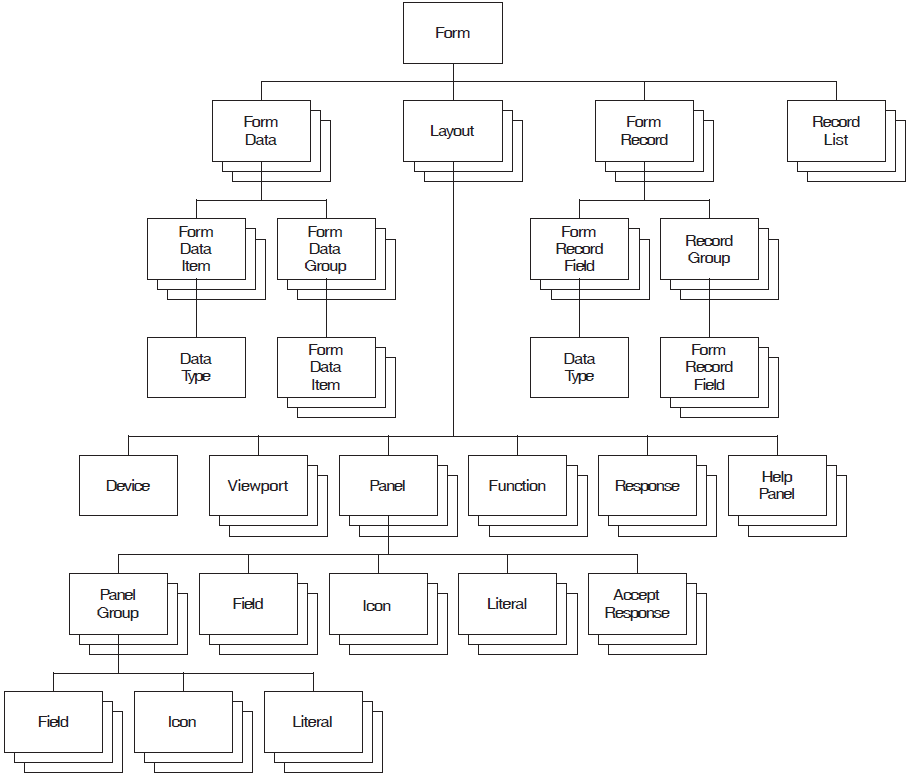
FORM
FORM DATA declarations
FORM RECORD declarations
RECORD LIST declarations
LAYOUT declarations
DEVICE declarations
VIEWPORT declarations
FUNCTION declarations
RESPONSE declarations
USE HELP PANEL clause
MESSAGE PANEL declaration
PANEL declarations
VIEWPORT viewport-name
ACCEPT RESPONSE declarations
FIELD declarations
TEXTFIELD declarations
LITERAL declarations
GROUP declarations
Fields, icons, literals
ICON declarations
END FORM8.5. IFDL Syntax Example
Form EMPLOYEE/* This is the employee_record form */
Form Data
Copy
EMPLOYEE_RECORD Of "DEPT_FILE.TLB" End Copy HIRE_DATE Character(6) PREV_EMPLOYER Character(30) End Data Form Record EMPLOYEE_RECORD
Copy EMPLOYEE_RECORD Of "DEPT_FILE.TLB" End Copy End Record Form Record EMPLOYEE_HISTORY HIRE_DATE Character(6) PREV_EMPLOYER Character(30) End Record Layout EASY
Device
Terminal DECVT Type %VT200 End Device Units Characters
Size 24 Lines By 80 Columns
Viewport MAIN
Lines 1 Through 22 Columns 1 Through 80 End Viewport Panel BASIC
Viewport MAIN
Literal Text
Line 5 Column 5 Value "Name: " End Literal Field NAME
Same Line Next Column Use Help Message "Enter employee's name" End Field End Panel End Layout End Form
/* End of employee_record form */
| The FORM declaration specifies the form name EMPLOYEE. |
| This is a comment stating that the employee record form follows. The IFDL Translator does not interpret comments. For information about the best way to place comments in a form, see the VSI DECforms Guide to Commands and Utilities. |
| The FORM DATA declaration specifies the form data for the EMPLOYEE form. This FORM DATA declaration contains the same COPY statement as the first FORMRECORD declaration because both include the same information. |
| The COPY statement tells the IFDL Translator to copy into the form record
the description of the data record EMPLOYEE_RECORD from the EMPLOYEE_RECORD
module in the text library DEPT_FILE.TLB. The EMPLOYEE_RECORD looks like
this: NAME Character(30)
ADDRESS Character(30)
CITY Character(15)
STATE Character(2)
ZIP Integer(2) |
| The FORM RECORD declaration specifies that the data record EMPLOYEE_RECORD is to be exchanged between the form and the application program. |
| This LAYOUT declaration begins the layout section for a character-cell device. The name of the layout is EASY. |
| The DEVICE declaration specifies the device for the layout. The TERMINAL declaration specifies the class of terminal (DECVT, in this case). The TYPE declaration labels the specific type of terminal. END DEVICE specifies the end of the device declaration. |
| The UNITS declaration specifies the units (in this case, characters) in which coordinates and measurements are expressed in the layout. |
| The SIZE clause specifies an area of 24 lines by 80 columns as the layout size. |
| The VIEWPORT declaration names the viewport MAIN and specifies the portion of the screen to use for displaying panels. |
| The PANEL declaration names the panel BASIC as the panel to be displayed. |
| The viewport MAIN is named as the viewport to use for the panel BASIC. |
| The LITERAL TEXT declaration specifies a text literal to be displayed beginning at line 5, column 5. The VALUE clause outputs "Name: " as background text on the panel when it is displayed. END LITERAL specifies the end of the literal declaration. |
| The FIELD declaration specifies the characteristics of the field NAME. SAME LINE and NEXT COLUMN tell the program to output the contents of the field on the same line and the column after the value "Name: ". The USE HELP MESSAGE declaration specifies a help message to be associated with the field. END FIELD specifies the end of the field NAME. END PANEL declares the end of the panel BASIC. END LAYOUT specifies the end of the layout. |
| END FORM declares the end of the EMPLOYEE form. |
Chapter 9. Declaring, Displaying, and Tracking Data
Choose appropriate data types
Assign default values to panel fields
Apply conditional highlighting to panel fields
Declare and display arrays
Transfer data explicitly
Track form data items that have changed
Note
You should not allow the operator to enter nonprintable characters, such as escape sequences, in character panel fields. Although the DECforms run-time system does not prevent the use of such characters, the results are device dependent, and VSI Equipment Corporation cannot ensure that later versions of DECforms will perform the same way.
The result of passing nonprintable characters to a DECforms character panel field is unpredictable and undefined. VSI strongly recommends against this practice.
9.1. Specifying Form Data Types
The FORM DATA declaration specifies all data stored in the form for all layouts. Each form data item must have a unique name and must also have a clause describing the data format.
9.1.1. Text Data
- CHARACTER
- CHARACTER NULL TERMINATED
- CHARACTER VARYING
- INTEGER
- INTEGER PACKED
- DECIMAL
- DECIMAL PACKED
- FLOAT
You can use null terminated data with C programs. For example,if you specify a data item named ADDRESS as a CHARACTER NULL TERMINATED text string that is 61 characters long, the 61st character will be null. The maximum number of characters the operator can enter into a field having this format is 60. If the initial value of the data is blank spaces, and the operator enters 40 characters, the next 20 characters will remain blank, followed by the null character. You can use an escape routine in an EXIT response to trim the trailing spaces.
You can use varying strings with Pascal or PL/I programs.
A packed integer is not a longword; rather, it is a byte string in which each byte contains two digits, each packed into four bits. The four low-order bits of the last byte in the string specify the sign.
See the TEXT DATA Clause section of the VSI DECforms IFDL Reference Manual for details on the text formats.
9.1.2. Atomic Data
- BYTE INTEGER
- DFLOATING
- FFLOATING
- GFLOATING
- HFLOATING
- LONG FLOAT
- LONGWORD INTEGER
- QUADWORD INTEGER
- SFLOATING
- SHORT FLOAT
- TFLOATING
- UNSIGNED BYTE
- UNSIGNED LONGWORD
- UNSIGNED WORD
- WORD INTEGER
- XFLOATING
DFLOATING, FFLOATING, GFLOATING, HFLOATING, and TFLOATING differ in precision and length. Use Short Float and Long Float for future portability.
See the ATOMIC DATA Clause section of the VSI DECforms IFDL Reference Manual for details on the atomic formats.
9.1.3. Date/Time Data
- ADT
- ADT CURRENT
- DATE
- DATE CURRENT
- TIME
- TIME CURRENT
- DATETIME
For portable applications, use DATETIME. See the DATETIME DATA Clause section of the VSI DECforms IFDL Reference Manual for details on date/time formats.
9.2. Assigning Default Values to Form Data
Form Data
ORDER_DATE Date VALUE 1994 01 01
SHOE_SIZE Integer VALUE 7
SHOE_COLOR Character(10) VALUE BLACK
SHOE_NUMBER Integer VALUE 1
SHOE_PRICE Longword Integer VALUE 2500
End DataIf you do not explicitly assign default values, DECforms uses default values such as zeros for integer data, blanks for character data, and November 17, 1858 for dates.
When DECforms displays a panel containing fields, the default values for the associated form data appear on the screen display. The operator might change these values by entering new values.
To cause DECforms to delete any changed values for form data and return to the default values, use the RESET response step. The RESET response step causes DECforms to display the default form data value when displaying the associated panel field.
The RESET response step lets you reset the value for a particular form data item, all values in a form data group, or all form data items in your form.
Form Data
ACCOUNT_NUMBER Unsigned Longword VALUE 1000
.
.
.
End Data
.
.
.
Field ACCOUNT_NUMBER
Line 10
Column 5
Input Picture 999'-'99999'-'999
Validation Response
Call "CHECK_DIGIT_VALIDATION" Using
By Reference ACCOUNT_NUMBER
Giving STATUS
If STATUS <> 1 Then
Invalid
Reset ACCOUNT_NUMBER
Else
Position To Next Item
End If
End Response
End Field
| This is the FORM DATA declaration for the ACCOUNT_NUMBER panel field, which includes a default value of 1000. |
| The CALL response step calls an escape routine named CHECK_DIGIT_VALIDATION. The escape routine verifies that the account number just entered by the operator is valid. |
| The value returned from the escape routine, which is stored in the form data item STATUS, is then tested. If the value contains a 1, the operator continues input with the next panel field. If the return status indicates failure, the INVALID response step is performed. This response step causes operator entry to this panel field to begin again. The RESET response step sets the form data item ACCOUNT_NUMBER back to its default value. |
9.3. Altering the Display Attributes of Panel Fields
Using the HIGHLIGHT WHEN clause, you can change the display attributes of panel fields or icons, with a conditional expression. The display attributes change immediately after the condition becomes true and remain in effect until the condition is no longer true.
DECforms adds display attributes specified with the HIGHLIGHTWHEN clause to the attributes that are in effect for the panel field, including active highlighting (that is, highlighting applied to the panel field when it becomes the current activation item). If the attributes specified with the ACTIVE HIGHLIGHT and HIGHLIGHT WHEN clauses conflict with each other or with the attributes specified in the panel field's DISPLAY clause, the last attribute applied takes precedence.
Attributes specified in the DISPLAY clause
Attributes specified in the ACTIVE HIGHLIGHT clause
Attributes specified in the HIGHLIGHT WHEN clause
Field EMPLOYEE_NAME
Next Line
Same Column
Active Highlight
Bold
Highlight Reverse
When (ERROR = "TRUE")
Exit Response
Call "CHECK_DATA_BASE" Using
By Reference EMPLOYEE_NAME
Giving STATUS
If STATUS <> 1 Then
Let ERROR = "TRUE"
Invalid
Else
Position To Next Item
End If
End Response
End Field
| The ACTIVE HIGHLIGHT clause specifies the display attributes applied when the operator is entering data in the panel field.(Bold is an attribute for a character-cell layout.) |
| The HIGHLIGHT WHEN clause specifies the display attributes applied when the form data item ERROR is equal to "TRUE". HIGHLIGHT WHEN clauses are evaluated after ACTIVE HIGHLIGHT clauses. Therefore, if this panel field is active and the ERROR form data item equals "TRUE" (which sets the reverse highlight on), DECforms applies the bold and reverse attributes. |
| The EXIT RESPONSE declaration calls the escape routine CHECK_DATA_BASE to verify that the employee name exists in the employee database. If the employee name is not in the database, the response sets the ERROR form data item to "TRUE" and uses the INVALID response step to continue input into the EMPLOYEE_NAME panel field. Otherwise, the operator begins input to the next panel field, as specified by the POSITION response step. |
9.4. Declaring and Displaying Groups and Arrays
DECforms allows you to specify groups or arrays in your form records. In DECforms you can use groups with scrolled regions (see Chapter 11, "Designing the Operator Interface"). You might want to use groups to organize your data.
You can create arrays by using groups. A form data group is a set of form data items that are related to each other. You can declare form record field groups, and you can also declare panel groups that contain fields,icons, and literals.
The following sections explain storing data in form data groups in a form,activating panel groups, displaying panel groups, and passing group data between the form and the program.
9.4.1. Grouping Data in a Form
A form data group can be a simple group, which is a collection of form data items without an OCCURS clause. Such a form data group contains form data items that occur only once and do not need subscripts.
You can even create a group containing only one form data item.
Note
You can nest only one multiply occurring group from within the outermost multiply occurring group; DECforms does not support arrays larger than two dimensions.
Form Data
EMPLOYEE_NAME Character(30)
EMPLOYEE_ID_NUMBER Integer(10)
Group EMPLOYEE_ADDRESS
STREET_ADDRESS Character(32)
CITY Character(32)
STATE Character(2)
ZIP_CODE Integer(9)
End Group
Group SPOUSE
Occurs 2
NAME Character(15)
End Group
Group DEPENDENT
Occurs 4
Group CHILDREN
Occurs 2
CHILD_NAME Character(15)
End Group
End Group
End Data
| The EMPLOYEE_ADDRESS group is a collection of four form data items. You refer to the first item in this group by the name EMPLOYEE_ADDRESS.STREET_ADDRESS. |
| The SPOUSE group is a one-dimensional array. It contains one form data item that occurs twice. The group stores the spouse's first name in the SPOUSE(1).NAME form data item and the spouse's last name in the SPOUSE(2).NAME form data item. Array indexes are in the range of 1 to the number of occurrences. |
| The CHILDREN group contains one form data item that occurs twice(representing the first and last name of each child). The DEPENDENT group contains four occurrences of the CHILDREN group, each of which represents a single child, so this group stores the full name of four children. |
Using Subscripts and Qualified Names
You can use the group name to perform operations on a group, or you can name a single member of a group to perform the operation only on that member. To refer to group form data items, you must always use the full name from the outermost group name to the innermost data item.
|
Type of Group |
Example of Group Item Names |
|---|---|
|
Simple group |
FAMILY.FATHER FAMILY.MOTHER FAMILY.CHILD1 FAMILY.CHILD2 |
|
Multiply occurring group |
FAMILY(1).FATHER FAMILY(1).MOTHER FAMILY(1).CHILD1 FAMILY(1).CHILD2 FAMILY(2).FATHER FAMILY(2).MOTHER FAMILY(2).CHILD1 FAMILY(2).CHILD2 |
|
Nested group |
FAMILY(1).FATHER FAMILY(1).MOTHER FAMILY(1).CHILD(1).CHILD_NAME FAMILY(1).CHILD(2).CHILD_NAME FAMILY(2).FATHER FAMILY(2).MOTHER FAMILY(2).CHILD(1).CHILD_NAME FAMILY(2).CHILD(2).CHILD_NAME FAMILY(2).CHILD(3).CHILD_NAME |
|
Multiply occurring group nested in simple group |
FAMILY.FATHER FAMILY.MOTHER FAMILY.CHILD(1).CHILD_NAME FAMILY.CHILD(2).CHILD_NAME |
In Example 9.3, ''Declaration of Form Data Groups'', the CHILDREN group is a one-dimensional array. The DEPENDENT group is a two-dimensional array. You refer to a form data item of the DEPENDENT group using subscripts.
For example, DEPENDENT(1).CHILDREN(1).CHILD_NAME refers to the first occurrence of the CHILD_NAME form data item in the CHILDREN group and the first occurrence of the CHILD_NAME form data item in the DEPENDENT group.
Because the CHILDREN group is nested in the DEPENDENT group, you cannot refer to items in the CHILDREN group without naming the DEPENDENT group.
For example, CHILDREN(1).CHILD_NAME is an unqualified reference. The reference must be a qualified name, such as DEPENDENT(2).CHILDREN(1).CHILD_NAME.
9.4.2. Displaying Data Stored in Form Data Groups
To display form data items that are declared in a form data group, you must declare a panel group that corresponds by name to that form data group. You can include literals or icons in a panel group. The panel fields in the panel group must have the same names as the form data items in the form data group.
Group TRIP
Vertical
Displays 12
Field TRIP_DATE
Line 6
Column 8
.
.
.
End Field
Field TRIP_FROM
Line 6
Column 22
.
.
.
End FieldThe VERTICAL and HORIZONTAL clauses control the appearance of subsequent occurrences. If you specify vertical, subsequent occurrences of items in the panel group appear below the first occurrence. If you specify horizontal,subsequent occurrences of the panel group appear to the right of the first occurrence. You cannot specify both vertical and horizontal.
If the number of display occurrences is less than the number of form data occurrences, DECforms allows the operator to scroll the panel group display area to show more occurrences of the panel group.
An inner multiply occurring panel group cannot scroll. Therefore, you must make sure that a multiply occurring panel group nested inside another multiply occurring panel group occurs the same number of times as its related form data group.
Use the DISPLAYS clause to specify how many occurrences in a vertical or horizontal panel group will appear on the screen at one time. Chapter 11, "Designing the Operator Interface" describes the DISPLAYS clause.
Panel GROUP_PANEL
Literal Text
Line 3
Column 5
Value "Employee Information"
Display
Font Size Double High
End Literal
Group EMPLOYEE_ADDRESS
Literal Text
Line 6
Column 5
Value "Street:"
End Literal
Field STREET_ADDRESS
Same Line
Next Column +1
Display
Underlined
End Field
Literal Text
Next Line
Column 5
Value "City:"
End Literal
Field CITY
Same Line
Next Column +3
Display
Underlined
End Field
Literal Text
Next Line
Column 5
Value "State:"
End Literal
Field STATE
Same Line
Next Column +2
Display
Underlined
End Field
Literal Text
Same Line
Next Column +3
Value "Zip code:"
End Literal
Field ZIP_CODE
Same Line
Next Column +1
Display
Underlined End Field
End Group
Literal Text
Line 10
Column 5
Value "Spouse:"
End Literal
Group SPOUSE
Horizontal
Field NAME
Line 10
Column 13
Display
Underlined
Input Picture XXXXXXXXXXXXXXX' '
End Field
End Group
Literal Text
Line 12
Column 5
Value "Dependent children:"
End Literal
Group DEPENDENT
Vertical
Group CHILDREN
Horizontal
Field CHILD_NAME
Line 13
Same Column
Display
Underlined
Input Picture XXXXXXXXXXXXXXX' '
End Field
End Group
End Group
End Panel
| Declaration of a literal with a double-high font that labels the panel. |
| Declaration of a panel group that contains literals and panel fields. This group corresponds to the form data group EMPLOYEE_ADDRESS, which is a simple group. |
| Declaration of a text literal to label the next group on the panel. The text literal is not declared inside the SPOUSE panel group because the NAME form data item occurs twice. If the text literal declaration is placed inside the panel group declaration, the text literal appears twice on the panel. In this case, the form designer wants the text literal to appear only once on the panel,so the text literal is declared outside the panel group. |
| Declaration of a panel group that corresponds to the SPOUSE form data group. The NAME panel field is displayed twice and is underlined. |
| Declaration of a text literal to label the DEPENDENT group. Once again, the text literal is needed only once on the panel and so is declared outside the panel group. |
| Declaration of the panel group that displays the DEPENDENT form data group. The DEPENDENT form data group is displayed vertically; the second, third, and fourth occurrences appear below the first occurrence. The CHILDREN form data group is displayed horizontally. The first occurrence of that group appears on line 13in column 5. The second occurrence is repeated to the right of the first occurrence. |
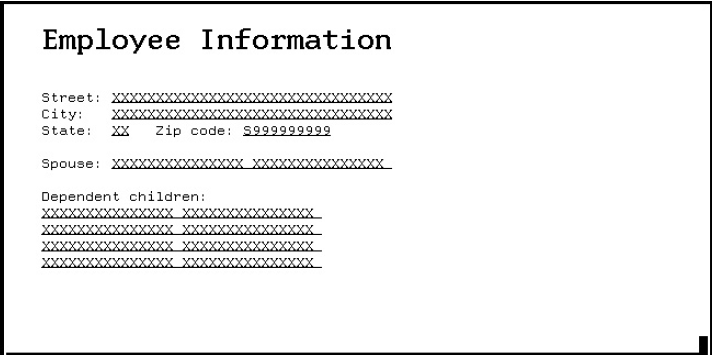
Figure 9.2, ''Appearance of Panel Groups on a Character-Cell Display Device'' illustrates how the panel in Example 9.4, ''Declaration of Panel Fields to Display a Form Data Group'' is displayed to the operator.
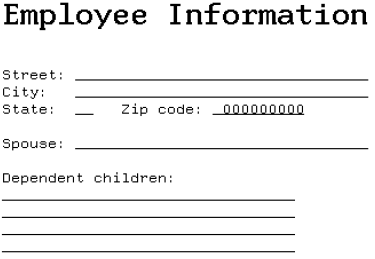
A panel group need not have a panel field declaration for every form data item in the data group. On the other hand, it is possible for a panel group to have an item in it that is not in the associated form data group—an icon. You can declare icons in simple or multiply occurring panel groups. They must not have the same name as any form data items. When you declare an icon within a panel group, you must qualify it in the same way as you would qualify a panel field. For example, if you declare icon MENU_ITEM in panel group MENU, you would refer to the icon as MENU.MENU_ITEM.
9.4.3. Using Corresponding Subscripts in Panel Field Description Entries
- CONCEALED WHEN
- HIGHLIGHT WHEN
- PROTECTED WHEN
- OUTPUT WHEN
- RANGE
- REQUIRE
Group GROUP_1 Occurs 10 /* data group */
AMOUNT Longword Integer
LIMIT Longword Integer
End Group
.
.
.
Group GROUP_1 /* panel group */
Vertical Displays 5
Field AMOUNT
Input Picture 999,999.99
Protected When GROUP_1(**).LIMIT > 9999
End Field
Field LIMIT
Protected
Output Picture 999,999.99
End Field
End GroupIn
this example, each occurrence of GROUP_1.AMOUNT is protected if the corresponding
occurrence of GROUP_1.LIMIT is greater than 9999. If GROUP_1(1).LIMIT is greater
than 9999, GROUP_1(1).AMOUNT is protected;if GROUP_1(2).LIMIT is greater than 9999,
GROUP_1(2).AMOUNT is protected;and so on, for all 10 occurrences of the panel fields
in GROUP_1.9.4.4. Activating Panel Groups for Input
To activate all items within either a simple or multiply occurring panel group, you specify the ACTIVATE GROUP response step and name the panel group to be activated.
To activate individual panel fields or icons in a panel group, you use the ACTIVATE FIELD, ACTIVATE or ACTIVATE ICON response step.
In the ACTIVATE response step, you must include the name of the panel on which the panel group, panel field, or icon is displayed.
Activating Simple Panel Groups and Panel Fields
Activate Group EMPLOYEE_ADDRESS On GROUP_PANEL
- STREET_ADDRESS
- CITY
- STATE
- ZIP CODE
Activate Field EMPLOYEE_ADDRESS.STREET_ADDRESS On GROUP_PANEL
Activating Multiply Occurring Panel Groups and Panel Fields
- Refer to the entire panel group without specifying any subscripts. For example:
Activate Group DEPENDENT on GROUP_PANEL
This response step activates each panel field in the DEPENDENT panel group shown in Example 9.4, ''Declaration of Panel Fields to Display a Form Data Group'' and creates the following activation list:- DEPENDENT(1).CHILDREN(1).CHILD_NAME
- DEPENDENT(1).CHILDREN(2).CHILD_NAME
- DEPENDENT(2).CHILDREN(1).CHILD_NAME
- DEPENDENT(2).CHILDREN(2).CHILD_NAME
- DEPENDENT(3).CHILDREN(1).CHILD_NAME
- DEPENDENT(3).CHILDREN(2).CHILD_NAME
- DEPENDENT(4).CHILDREN(1).CHILD_NAME
- DEPENDENT(4).CHILDREN(2).CHILD_NAME
- Refer to a specific occurrence of the panel group by specifying a subscript that is either a number or a numeric form data item. For example,the following response step shows the use of a subscript to refer to the second occurrence of the DEPENDENT panel group in the previous example
Activate Group DEPENDENT(2) On GROUP_PANEL
This response step creates the following activation list:- DEPENDENT(2).CHILDREN(1).CHILD_NAME
- DEPENDENT(2).CHILDREN(2).CHILD_NAME
The following response steps show the use of subscripts to refer to specific panel fields in the DEPENDENT panel group:Activate Field DEPENDENT(2).CHILDREN(1).CHILD_NAME On GROUP_PANEL Activate Field DEPENDENT(1).CHILDREN(2).CHILD_NAME On GROUP_PANEL
These response steps create the following activation list:- DEPENDENT(2).CHILDREN(1).CHILD_NAME
- DEPENDENT(1).CHILDREN(2).CHILD_NAME
- Specify a range of subscripts, anywhere from one occurrence to all occurrences of the panel group. The following response step shows the use of a subscript range to refer to specific occurrences of a multiply occurring panel group:
Activate Group EXAMPLE(5:9) On SAMPLE_PANEL
This response step activates five occurrences (the fifth through the ninth)of a panel group EXAMPLE on a panel SAMPLE_PANEL.You can specify any legal subscripts as the minimum and maximum occurrences;the subscript after the colon must be at least as large as the subscript before the colon. An asterisk (*) in either position selects the minimum or maximum for that position. For example:Activate Field EXAMPLE(5.*).FIELD_1 On SAMPLE_PANEL
This response step activates all panel fields FIELD_1 in occurrences of panel group EXAMPLE starting at occurrence 5 up through the end of the array. The following response step example activates occurrence 5 of panel field FIELD_1 in all occurrences of panel group EXAMPLE:Activate Field EXAMPLE(*).FIELD_1(5) on SAMPLE_PANEL.
You can abbreviate the notation (*:*) to (*), which means all occurrences of the array. This notation is the same as specifying no subscript.
The following example from the advanced sample checking form shows the use of a variable in a subscript range:Activate Field REGISTER(1:ENTRY_COUNT).REG_TAX_DED on REGISTER_PANEL
The variable ENTRY_COUNT determines how many elements of the array are meaningful at this time, and the Form Manager activates only those panel fields.
9.4.5. Specifying Navigation in a Panel Group
The POSITION response step
Built-in functions
User-defined function responses to built-in functions
Icons in panel groups
The CURRENT clause in the declaration for the form data group in conjunction with a temporary form data item, and entry and exit responses for the panel group
The BASE clause in the declaration for the form data group
The FIRST clause in the GROUP declaration
This section describes using the POSITION response step,the major built-in navigation functions and function responses, and icons, and the CURRENT clause. For information about using the BASE and FIRST clauses, see the VSI DECforms IFDL Reference Manual.
Using the POSITION Response Step
Position To Field EMPLOYEE_ADDRESS.STREET_ADDRESS on GROUP_PANELBy naming the panel group, you can make the current activation item be whatever item happens to be the first item of the panel group on the activation list. You might want to do this when, for example, some items in a panel group are conditionally protected, in which case you might not know whether they are accessible at a certain time. In such a situation, the POSITION TO GROUP response step causes the cursor to move to the first accessible item of the panel group. For example:
Position to Group DEPENDENT on GROUP_PANEL
Position To Group EXAMPLE(5) on SAMPLE_PANEL
Using Built-In Functions to Control Navigation
To control the operator's navigation in a panel group that has several items on the activation list, you can use the built-in functions described in this section. Each built-in function has a default function response (listed in the appendix on built-in functions in the VSI DECforms IFDL Reference Manual).
Declare a user-defined function that uses the same key or keys as the built-in function (as shown in Section 4.2, ''Creating User-Defined Functions and Function Responses'').
Define your own function response to the built-in function.
Some functions, called situational functions (described in Section 11.4, ''Using Situational Function Responses'') do not have associated function keys. You override these function responses by explicitly defining your own function responses.
NEXT ITEM and PREVIOUS ITEM
These built-in functions move to the next and previous items on the activation list. When the Form Manager reaches the end of the elements that belong to the panel group, it automatically goes to the first nonprotected item not in the panel group (in the appropriate direction).
UP OCCURRENCE, DOWN OCCURRENCE, LEFT OCCURRENCE, and RIGHT OCCURRENCE
These built-in functions move to the next occurrence of the panel group in the displayed direction. If there is another occurrence of the panel group, but that occurrence is not visible because the panel group is scrolled, the Form Manager automatically scrolls the panel group.
If the Form Manager reaches the end of the occurrences, it issues an error message. The operator has to use another function to leave the panel group, unless you override the default function response for the OCCURRENCE function in your IFDL source file.
EXIT GROUP NEXT and EXIT GROUP PREVIOUS
These built-in functions leave the group immediately in the specified direction. You might use these functions when,for example, you have a scrolled panel group with many occurrences, and you want to spare the operator from having to press the keys bound to the NEXT ITEM or DOWN OCCURRENCE built-in functions many times to get out of the group. You position to the previous or next unprotected item on the activation list that is not part of the current group.
FOCUS CHANGE
An area on the screen that is ready to accept input has input focus.The DECforms FOCUS CHANGE built-in function response for the current activation item is invoked when the operator changes focus. The default FOCUS CHANGE function response is POSITION IMMEDIATE TOFOCUS CHANGE.
Using Icons for Navigation in Groups
You also can use icons for navigation in panel groups. When an icon is declared as part of a panel group that has multiple occurrences, the icon also has multiple occurrences—it becomes an icon array, just as panel fields become panel field arrays.
You could use an icon array for navigation,for example, in cases where all the fields in a panel group are protected. Because icons accept function key input, the operator can scroll from one occurrence of the panel group to another.
Using the CURRENT Clause to Return to the Occurrence Last Visited
Specify a CURRENT clause in the form data group declaration. The CURRENT clause identifies a form data item that the Form Manager sets to the value of the subscript of the current form data item in the form data group whenever the operator navigates to a different occurrence of the panel group.
Create a temporary form data item for saving the subscript.
Specify an entry response for the panel group that contains a POSITIONIMMEDIATE response step to move to the saved occurrence of the panel group.
Specify an exit response for the panel group to save the subscript when the panel group is exited.
Form Data
Group REVISIT
Occurs 10
Current REV_CUR
EMPLOYEE_NAME Character(18)
End Group
REV_CUR Longword Integer
SAVE_REV_CUR Word Integer VALUE 1
End Data
.
.
.
Panel CURRENT_EMPLOYEES
Group REVISIT
Vertical
Displays 10
Entry Response
Position Immediate To Group REVISIT(SAVE_REV_CUR)
On CURRENT_EMPLOYEES
End Response
Exit Response
LET SAVE_REV_CUR = REV_CUR
End Response
Field EMPLOYEE_NAME
.
.
.
| When the operator visits an element of the panel group—for example, REVISIT(1).EMPLOYEE_NAME—the Form Manager executes the entry response for the panel group REVISIT before soliciting input for the panel field EMPLOYEE_NAME in the first occurrence. |
| The POSITION response step instructs the Form Manager to ignore the current activation item (REVISIT(1).EMPLOYEE_NAME, in this example) and go to occurrence SAVE_REV_CUR of the panel group (presumably the panel field EMPLOYEE_NAME of that occurrence).Because the POSITION response step is executed before the operator is asked for input for this occurrence, the Form Manager does not get input for the occurrence. Instead, the Form Manager moves to the saved occurrence. |
| When the operator exits the panel group, the Form Manager saves the subscript for the revisit. |
The method illustrated in Example 9.5, ''IFDL Source Code for Returning to the Occurrence Last Visited'' works for any way the operator entered the panel group, because the entry response for the panel group is always executed by the Form Manager before any input is entered into items in the panel group.
9.4.6. Passing Group Data Between the Program and the Form
Form data items that hold the transferred data either implicitly or explicitly
A form record that contains a form record group corresponding to the form data group
If you are passing data by means of escape routines (see Section 2.5, ''Planning the Program Style''), the use of form records is optional.
An application program record that is logically equivalent to the form record and that contains a structure that is logically equivalent to the form record group
If Oracle CDD/Repository software is installed on your OpenVMS system, you can avoid declaring the same record twice by storing record declarations in Oracle CDD/Repository. Using the COPY FROM DICTIONARY statement, you can copy the form record declarations into your form and program.
Form EMPLOYEE_FORM
.
.
.
Form Data
Group EMPLOYEE_ADDRESS
STREET_ADDRESS Character (30)
CITY Character (15)
STATE Character(2)
ZIP_CODE Integer(9)
End Group
.
.
.
Group DEPENDENT
Occurs 4
Group CHILDREN
Occurs 2
CHILD_NAME Character(15)
End Group
End Group
Form Record EMPLOYEE_DATA
Group EMPLOYEE_ADDRESS
STREET_ADDRESS Character (30)
CITY Character (15)
STATE Character(2)
ZIP_CODE Integer(9)
End Group
Group SPOUSE
Occurs 2
NAME Character(15)
End Group
Group DEPENDENT
Occurs 4
Group CHILDREN
Occurs 2
CHILD_NAME Character(15)
End Group
End Group
End RecordIDENTIFICATION DIVISION.
PROGRAM ID. Employee_program
DATA DIVISION.
WORKING STORAGE SECTION.
01 GROUP_RECORD GLOBAL.
03 STREET_ADDRESS PIC X(30).
03 CITY PIC X(15).
O3 STATE PIC X(2).
03 ZIP_CODE PIC 9(9).
03 SPOUSE OCCURS 2.
05 NAME PIC X(15).
03 DEPENDENT OCCURS 4.
05 CHILDREN OCCURS 2.
07 CHILD_NAME PIC X(15).
PROCEDURE DIVISION.
.
.
.
END PROGRAM Employee_program.
| The form record fields in the EMPLOYEE_ADDRESS form record group have a default data transfer association with the form data items in the EMPLOYEE_ADDRESS form data group (refer to Example 9.3, ''Declaration of Form Data Groups'').The names of the form record fields match the names of the form data items. In this example, the size of each form data item does not always match the size of each associated form record field. The result of this size mismatch is that the data will be truncated in the program. In this case,the Form Manager issues a warning, but continues to process the form. |
| The SPOUSE.NAME form record field is associated with the SPOUSE.NAME form data item for data transfer. |
| The DEPENDENT form record field group is associated with the DEPENDENT form data group. |
| The program record is logically equivalent to the form record. |
Data Transfer When Occurrences Do Not Match
The form data groups and form record groups have the same names and dimension. For example, in both the form data and the form record, the DEPENDENT group has a nested group called CHILDREN, which contains one element called CHILD_NAME.
The form data and form record groups have the same number of occurrences in each dimension.
If the number of occurrences in an array does not match in the form data and the form record, the number of occurrences that gets transferred is the smaller of the two. For example, if the form record group SPOUSE shown in Example 9.7, ''Declaration of Logically Equivalent Data: Program Data and Records'' had an OCCURS 5 clause, only the first two occurrences would be transferred to the form data, because there is no place to put the other three occurrences. On a RECEIVE request, only the first two occurrences would be received by the program from the form data; the remaining three would be set to default values (spaces for character data and zeros for numeric data).
A likely application of this data transfer feature is to change or retrieve only one or two occurrences of form data groups. For example, if the form record contains form data group SPOUSE with an OCCURS 1 clause, the first occurrence would be transferred.
Form Data
.
.
.
Group REPEAT_1 Occurs 4
ITEM_1 Character(8)
End Group
.
.
.
End Data
Form Record GROUP_RECORD
.
.
.
Group REPEAT_1
Occurs 1
ITEM_1 Character(8) Using REPEAT_1(2).ITEM_1
End Group
.
.
.
End RecordTo transfer more than a single occurrence, you can use a subscript range. For example, suppose there are five occurrences of the form data group in form data, and two occurrences in the form record. In this case, you could specify USING REPEAT_1(3:4).ITEM_1 to transfer the two occurrences in the form record to the third and fourth occurrences in form data.
Form Data
.
.
.
Group REPEAT_1 Occurs 4
ITEM_1 Character(8)
End Group
WHICH_ONE Unsigned Word
.
.
.
End Data
Form Record JUST_ONE
WHICH_ONE Unsigned Word
Group REPEAT_1
ITEM_1 Character(8) Using REPEAT_1(WHICH_ONE).ITEM_1
End Group
End RecordOn
a SEND request for the form record JUST_ONE,the program sets the occurrence number
into the form record field WHICH_ONE. The Form Manager transfers the occurrences in
the form record to the proper occurrences in form data. In the same way, the program
can get back a specific occurrence on a RECEIVE request. This method is particularly
useful in conjunction with the CURRENT clause of a form data group declaration. See
Example 9.8, ''Group Data Transfer on a RECEIVE Request''.Form Data
CR1 Longword Integer
Group REPEAT_1
Occurs 12
Current CR1
ITEM_A Longword Integer
ITEM_B Character(4)
End Group
End Data
Form Record ONE
CR1 Longword Integer
Group REPEAT_1
ITEM_A Longword Integer Using REPEAT_1(CR1).ITEM_A
ITEM_B Character(4) Using REPEAT_1(CR1).ITEM_B
End Group
End RecordCR1 is the occurrence of the panel group the operator was in or visited last. The form record fields REPEAT_1.ITEM_A and REPEAT_1.ITEM_B would receive the occurrences of form data items REPEAT_1(CR1).ITEM_A and REPEAT_1(CR1).ITEM_B, the two data items in occurrence CR1 of form data group REPEAT_1.
9.5. Transferring Data Explicitly
Default data transfer between form data items and form record fields occurs only when their full names match. To transfer a form data item named G1.G2.ITEM_1 by default to a form record field, you must declare a form record field named G1.G2.ITEM_1.
Specify the USING clause to transfer data from a form data item to a form record field or the opposite.
Use the SOURCE clause to transfer data from a form data item to a form record field.
Use the DESTINATION clause to transfer data from a form record field to a form data item.
If you are using Oracle CDD/Repository data definitions, use the TRANSFER clause, because Oracle CDD/Repository does not support the USING, SOURCE, and DESTINATION clauses in a form record field.
Form Data
Group G1
Group G2
ITEM_1 Character(1)
End Group
End Group
End Data
Form Record REC_1
Group G2
ITEM_1 Character(1)
End Group
End RecordForm Record REC_1
Group G2
ITEM_1 Character(1) Using G1.G2.ITEM_1
End Group
End RecordThe
USING clause causes data to be transferred to the record from the G1.G2.ITEM_1 form data
item. You do not have to declare a form record with the same name. If the form record
REC_1 was defined in Oracle CDD/Repository, you would use a TRANSFER clause to achieve the same effect.
For
example:Form Record REC_1
Copy CDD$TOP.REC_1 From Dictionary End Copy
Transfer G2.ITEM_1 Using G1.G2.ITEM_1End RecordAny form record fields in a receive record that do not correspond to form data items and that are not specified in a TRANSFER clause are initialized to default values (zero or blanks) before the form record is returned to the program.
9.6. Determining What Changed During Operator Input
Tracked form data items
Send and receive shadow records
9.6.1. Using Tracked Form Data Items
- One copy containing the last known value, which is one of the following:
The last value passed from the program into the form data item
The last value passed from the form data item to the program
A second copy that stores the current value of the form data item
Immediately before the Form Manager returns the current value of the form data item to the program, it compares the current value to the last known value. If these values differ, the Form Manager returns information to your program in a receive shadow record, which indicates that the form data item has changed.
To specify that a form data item is tracked, you use the TRACKED clause in the FORM DATA declaration.
Form EMPLOYEE_FORM
Form Data
EMPLOYEE_NAME Character(30) Tracked
EMPLOYEE_ID_NUMBER Integer(10)
HIRE_DATE Date
CURRENT_JOB_TITLE Character(30) Tracked
End Data
Form Record EXPERIENCE_RECORD
EMPLOYEE_NAME Character(30)
EMPLOYEE_ID_NUMBER Integer(10
HIRE_DATE Date
CURRENT_JOB_TITLE Character(30)
End Record
.
.
.Note
You should use the TRACKED clause only where you need it, because the TRACKED clause doubles the amount of storage needed for a data item. Doubling data item storage could degrade performance.
9.6.2. Using Receive Shadow Records
If you create a receive shadow record and pass it in your request call,the Form Manager writes information about the tracked data items in the receive shadow record. To create a receive shadow record, declare a form record in your program that has a one-character field at the beginning, followed by a one-character field for each of the fields in your record. Each field in the receive shadow record should be one character in length.
WORKING STORAGE SECTION.
*-----
* COBOL record declaration for a shadow record
*-----
01 EXPERIENCE_RECORD_SHADOW GLOBAL.
03 RECORD_SHADOW PIC X.
03 EMPLOYEE_NAME_SHADOW PIC X.
03 EMPLOYEE_ID_NUMBER_SHADOW PIC X.
03 HIRE_DATE_SHADOW PIC X.
03 CURRENT_JOB_TITLE_SHADOW PIC X.The first character in the shadow record indicates whether any field in the record being returned to the program has been modified.
The second shadow record character gives information about the first record field.
The third shadow record character gives information about the second record field.
And so on.
|
Shadow Character |
(First Character in Shadow Record) Meaning for Entire Record |
(All Other Characters) Meaning for a Specific Field |
|---|---|---|
|
1 |
One or more fields in the record have been modified. |
The record field has changed. |
|
X |
Modified status was not requested for at least one field,and all fields in the record were either not tracked or not modified. |
The form data item to which this shadow record field corresponds is not tracked. |
|
0 |
All fields in the record are unchanged. |
The record field is unchanged. |
|
First Character |
Second Character |
Third Character |
Fourth Character |
Fifth Character |
|---|---|---|---|---|
|
1 |
1 |
X |
X |
0 |
The first character (RECORD_SHADOW) indicates that one or more fields in the original EXPERIENCE_RECORD have changed.
The second character indicates the first field in the original EXPERIENCE_RECORD (EMPLOYEE_NAME) has changed.
The third and fourth characters indicate that the second and third fields (EMPLOYEE_ID_NUMBER and HIRE_DATE) were not tracked.
The fifth character indicates that CURRENT_JOB_TITLE was not changed.
You can tell the Form Manager not to update its internal last known values for the tracked form data items when you receive a shadow record; you do this by passing a receive shadow record whose first character is "N". This capability is useful when, for example,your program has to validate fields received. You might want your program to validate only those fields that the operator has changed—not counting the value that the application passes in this record.
The Form Manager will update a receive shadow record whose first character is "Y" or any character other than "N".
You pass the receive shadow record in an argument to the RECEIVE and TRANSCEIVE requests. For information on these arguments, see the VSI DECforms Programmer's Reference Manual.
9.6.3. Using Send Shadow Records
You can tell the Form Manager not to update its internal last known values for the tracked form data items when you are sending records to the form. Unlike receive shadow records, send shadow records must be one character long. A value of "N"tells the Form Manager not to update the last known value. A "Y" or any character other than "N" tells the Form Manager to update the last known value of the corresponding form data items in the record.
You pass the send shadow record in an argument to the SEND and TRANSCEIVE requests. For information on these arguments, see the VSI DECforms Programmer's Reference Manual.
Chapter 10. Controlling Form Processing
Use the IF response step to perform conditional processing
Use control text responses to cause an action to occur prior to the processing of a request's responses
Control the order of the activation list
Call escape routines
Perform integer arithmetic
Move between panels without returning to your program
Create a wait activation item for operator input
Write the currently displayed panel to a printable file
Return control to the application program
For information about how to get the best performance from DECformsforms, see Chapter 12, "Getting the Best Performance from Your Form".
10.1. Using IF Response Steps
To perform conditional processing in a request, you can use the IF response step. The IF response step, with its THEN and ELSE clauses, causes the Form Manager to execute optional response steps based on the result of the evaluation of a conditional expression.
Send Response UPDATE
If (NEXT_UPDATE_MESSAGE <> "") Then
Message
NEXT_UPDATE_MESSAGE
": "
NEXT_UPDATE_AMOUNT
Reset
NEXT_UPDATE_MESSAGE
End If
If ROOM_IN_REG = 0 Then
Message
"The register is full, you can only do reviews now."
Signal
End If
.
.
.
End Response
| This IF response step checks whether there is a message in the NEXT_UPDATE_MESSAGE variable. If there is a message, the Form Manager displays it in the message panel and then resets the variable so the same message is not displayed again. For more information about the IF response step, seethe comments to Example 11.5, ''New Definition for a Built-In Function Response''. The VSI DECforms Programmer's Reference Manual also contains descriptions of how the Form Manager processes each response step. |
| This IF response step checks whether there is room in the check register for more transactions. If the register is full, the Form Manager displays the message and rings the terminal bell. |
You can also display the value of a variable by including its name in the message.
10.2. Using Control Text Responses
You can use control text responses in your form to cause the Form Manager to perform certain actions immediately before it responds to a request(but after it distributes data). For example, you could define a send control text response that applies highlighting to a set of panel fields that are about to be activated for input from the operator.
The Form Manager does not contain any built-in control text responses. You must define control text responses in your IFDL source file and pass a send control message in your request call in order for the Form Manager to process any control text responses.
You can specify up to a maximum of five control text responses to be executed prior to the request response. Each control text response to be executed corresponds to a control text item, which is a five-character string holding the name of the response.
The application passes control text items with the request as a five-element array. Each element in the array is five characters in length. The application also supplies a control text count with the request specifying the number of valid elements in the array of control text items. Do not embed blank items when specifying control text items.
Set the control text string to contain one or more control text items.
Set the count of valid control text items.
Create a corresponding control text response for each control text item within the form.
Pass the control text as an argument for the OpenVMS API or as an option list item for the portable API.
Enter values for a new employee.
Correct the current values.
Confirm that the record for this employee is to be deleted.
The only difference you want the operator to see on the panel for these three operations is a label at the top of the panel. To avoid defining the same panel three times(for character-cell layouts) you define a protected field on the panel that will contain a title. You set the value of the title form data item in three LET response steps, one for each use of the panel.
To specify which LET response step to execute, send a control message to specify the control text response that includes the correct LET response step.
Control Text Response "NEW$$"
Let TITLE = "Fill in data for the new employee"
End Response
Control Text Response "MODIF"
Let TITLE = "Modify this employee's data"
End Response
Control Text Response "DELET"
Let TITLE = "Press F13 to delete this employee"
End ResponseForms_Request_Options request_option [2];
Forms_Record_Data account_record;
Forms_Session_Id session_id;
account_record.data_length = sizeof (employee_data);
account_record.data_record = &employee_data;
account_record.shadow_record = NULL;
account_record.shadow_length = 0;
request_option[0].option = forms_c_opt_send_control;
request_option[0].send_control.text_count = 1;
request_option[0].send_control.text = "MODIF";
request_option[1].option = forms_c_opt_end;
status = forms_send(
session_id /*session id */
"employee_data", /*record name in form */
&account_record, /*send record structure */
request_option); /*send control request option */10.3. Controlling the Activation List
The Form Manager maintains the activation list, an internal list containing items (fields, icons, and waits) that are eligible for input. For information about activation list processing, see the VSI DECforms Programmer's Reference Manual.
In simple forms, you might not have to do anything explicitly with the activation list. If you do not specify a RECEIVE response for a record, the Form Manager executes a default RECEIVE response, putting panel fields corresponding to the form record fields on the activation list.
The order in which the Form Manager puts panel fields on the activation list is the visitation order (the order in which the cursor moves to panel fields when the operator presses the key bound to the NEXT ITEM built-in function). If you are satisfied the order, and you do not want to do any special navigation between fields,you need not be concerned with the activation list.
The default RECEIVE response is ACTIVATE CORRESPONDING RECEIVE ALL;this response step directs the Form Manager to select panel fields to activate. If a panel field appears on more than one panel, the Form Manager could activate a field other than the one you want. In such a situation, write your own RECEIVE response with an ACTIVATE response step to select exactly what you want activated.
You might use icons, or other interface control mechanisms that do not relate directly to form records. In this case, you must specify the ACTIVATE response step to get the effect you want.
10.3.1. Using the ACTIVATE Response Step
Panel fields
Icons
Waits
When you specify an ACTIVATE FIELD, ACTIVATE ICON, or ACTIVATE BUTTON response step, you usually add a single panel field, icon, to the activation list. If the object of the ACTIVATE response step specifies a range of fields, or icons in a multiply occurring group, you add all the fields, and icons in the range to the activation list. The items in the range are added to the activation list with the lowest subscripts first. For nested arrays, elements are added in row major order.
When you specify an ACTIVATE GROUP or ACTIVATE PANEL response step, you might be adding all those items in the group or panel that are unprotected or conditionally protected to the activation list. Using an ACTIVATEGROUP or ACTIVATE PANEL response adds the contents of the group or panel to activation list, not the group or panel itself.
Although you do not add groups or panels to the activation list, the panel fields, and icons that you do add have groups and panels associated with them. The concept of group and panel therefore has meaning when you specify navigation and refer to panels or groups.
The Form Manager always performs navigation with respect to items on the activation list. When a response contains a POSITION response step, the POSITION response step refers to a particular item on the activation list or to an item relative to the current activation item. If you try to use the POSITION response step to move to an item that is not on the activation list, the response step is ignored.
10.3.2. Controlling the Activation List During the Accept Phase
A new activation list is created each time the application program makes a form request. The activation list exists only for the life of the request. You can manipulate the activation list after it has been created at the external response phase of request processing (during the accept phase) by using the ACTIVATE response step to add more items to it and by using the DEACTIVATE response step to delete items from it. You might want to control the activation list during the accept phase to achieve special navigational effects, often involving pop-up panels.
- FIELD_A
- FIELD_B
- FIELD_C
- FIELD_A
- FIELD_B
- FIELD_D
- FIELD_C
If you then specify POSITION TO NEXT ITEM, the cursor goes to FIELD_D instead of FIELD_C.
- FIELD_A
- FIELD_B
- FIELD_D
- FIELD_E
- FIELD_C
ACTIVATE FIELD X ON Panel_A ACTIVATE PANEL Panel_AIn this example, the activation list contains field X first and then all the other fields of panel PANEL_A in the order in which they are declared. This is a convenient way of changing the visitation order that you would get by specifying just ACTIVATE PANEL PANEL_A.
10.3.3. Using Conditional Protection in Navigation
If you exercise control over the activation list by means of the ACTIVATE response step, you must pay attention to panel fields and icons that are conditionally protected (items with a PROTECTEDWHEN clause). Such items go on the activation list, but whenever a POSITION response step is executed, their protection determines whether the operator can move to them.
Whenever a POSITION response step specifies a target, the Form Manager evaluates the fields and icons on the activation list. If a field or icon is a potential target, the conditional expression in the PROTECTED WHEN clause is evaluated. If the expression is evaluated as false, the item is not protected,and it can be considered a target of the POSITION response step. If the expression is evaluated as true, the item is protected, and it is not considered a target of the POSITION response step.
For example, if the operator presses the NEXT ITEM function key, the Form Manager tries to move to the next item on the activation list after the current item. If the next item on the list is protected, the Form Manager ignores that item as if it were not on the list, and then goes to the following item, checking to see whether that item is unprotected.
Items protected by a PROTECTED WHEN clause are particularly useful in menu processing. The WHEN clause can specify a condition that determines when the item is not a legal choice. If the item is not a legal choice, the operator will not be able to move the cursor to it.
The CONCEALED WHEN,OUTPUT WHEN, or HIGHLIGHT WHEN clauses are useful in conjunction with such protected items;they can specify that the item not be displayed on the screen, so that the operator cannot move to or see the item.
The character-cell layout of the advanced sample application shows an example of using a PROTECTED WHEN clause in conjunction with a CONCEALED WHEN clause in the CASH_PANEL panel: the operator can only see and move the cursor to those icons representing amounts that can be withdrawn. The condition is a comparison of the amount in the checking account against the amount represented by the icon.
Icon CHOICE_CASH_50
Function Response SELECT
Let AMOUNT = 5000
Let NEXT_UPDATE_AMOUNT = "$50"
Return
End Response
Active Highlight
Reverse
Concealed
When (CHECKING_BALANCE < 5000)
Protected
When (CHECKING_BALANCE < 5000)
Literal Text
Next Line
Same Column
Value " $50"
End Literal
End IconChapter 13, "Demonstration and Sample Forms and Applications" contains more information on the CASH_PANEL panel used in the advanced sample checking form.
10.3.4. Using the DEACTIVATE Response Step
When you use the DEACTIVATE response step, the Form Manager removes items from the activation list. You should use the DEACTIVATE response step with care, to avoid deactivating an item that was previously specified as the next activation item.
For example, if you use POSITION TO PANEL PAYROLL_PANEL as part of a function response, the Form Manager specifies the first item on PAYROLL_PANEL that is on the activation list to be the next activation item—the one to be processed after the current activation item has been processed. If you then use DEACTIVATE PANEL PAYROLL_PANEL, the current activation item is now on a deactivated panel.
In this case, the Form Manager goes to the next activation item on another panel. If there are no more activation items, the Form Manager sets the current activation item as the next activation item. The cursor does not move and input starts again with the same item, which might confuse the operator.
Refer to Figure 13.2, ''Operator Choice Panel on a Character-Cell Device'', and Example 13.1, ''IFDL Source for the Introductory Sample Operator Choice Panel—Character-Cell Layout'' to see the appearance and the complete IFDL source code for this panel.
How the ACTIVATE and DEACTIVATE Response Steps Work Together
The advanced sample checking form shows how the ACTIVATE and DEACTIVATE response steps can work together. The following description refers to the character-cell layout.
- CHOICE_CHECK
- CHOICE_DEPOSIT
- CHOICE_CASH
- CHOICE_TRANSFER
- CHOICE_REVIEW
- CHOICE_EXIT
ACTIVATE PANEL deposit_panel POSITION IMMEDIATE TO PANEL deposit_panel
|
CHOICE_CHECK |
(icon in the CHOICE_PANEL panel) |
|
CHOICE_DEPOSIT |
(icon in the CHOICE_PANEL panel) |
|
AMOUNT |
(field in the DEPOSIT_PANEL panel) |
|
MEMO |
(field in the DEPOSIT_PANEL panel) |
|
CHOICE_CASH |
(icon in the CHOICE_PANEL panel) |
|
CHOICE_TRANSFER |
(icon in the CHOICE_PANEL panel) |
|
CHOICE_REVIEW |
(icon in the CHOICE_PANEL panel) |
|
CHOICE_EXIT |
(icon in the CHOICE_PANEL panel) |
FUNCTION RESPONSE NEXT ITEM
MESSAGE "Press F10 or PF1-E to make the deposit."
END RESPONSESimilarly, the AMOUNT field contains a PREVIOUS ITEM function response that overrides the default. The PREVIOUS PANEL function response is also overridden. These function responses display a useful message instead of allowing the operator to go to another panel.
The operator can leave the DEPOSIT_PANEL panel by pressing the key bound to the QUIT function (F8 or PF1-Q in the character-cell layout). In this context, the QUIT function response should return to the menu on the CHOICE_PANEL menu and disregard the deposit slip.
Function Response QUIT
Message "Quitting – no deposit has been made."
Position Immediate to Previous Panel
End ResponseThe
response step establishes the next activation item to be the first field,
CHOICE_CHECK,on the previous panel, CHOICE_PANEL. Returning directly to this field
returns the operator to the beginning of the list of selection icons instead of to
the icon selected last. Therefore, the panel's EXIT response overrides the QUIT
function response by executing the DEACTIVATE PANEL DEPOSIT_PANEL response step,
removing the AMOUNT and MEMO fields from the activation list, and executing the
POSITION IMMEDIATE TO PREVIOUS ITEM response step, as
follows:Exit Response
Remove MID_VP
If IMMEDIATE Then
Deactivate Panel DEPOSIT_PANEL
Position Immediate To Previous Item
.
.
.
End ResponseBecause
the AMOUNT and MEMO fields are no longer on the activation list, the previous item
is CHOICE_DEPOSIT, and that icon becomes the next new activation item.It removed all activation items on the DEPOSIT_PANEL panel so that the POSITION IMMEDIATE TO PREVIOUS ITEM response step returned the cursor to the activation item on the previous panel that had activated the pop-up panel.
The POSITION response step now works, no matter how many items were on the DEPOSIT_PANEL panel or where the cursor was located on the DEPOSIT_PANEL panel (no matter what the current activation item was).
It removed the items from the activation list.
If the items stayed on the activation list, a POSITION TO NEXT ITEM response step while the operator had moved to the CHOICE_DEPOSIT icon would send the cursor to the DEPOSIT_PANEL panel again. The operator would not expect to move to that panel.
10.4. Writing Responses That Call Escape Routines
An escape routine is a program subroutine that is called from a form (instead of from another part of the program) during request processing. Escape routines are used to do operations that cannot be done within the form. For example, an escape routine can be written to perform a file operation or make a system call. For information about writing escape routines and linking applications that use escape routines, seethe VSI DECforms Programmer's Reference Manual. This section describes how to call escape routines.
To transfer control to an escape routine, you write a response that contains the CALL response step. This response step calls the escape routine. You can pass form data names to the escape routine as read or write parameters with this response step.
You can use the GIVING clause of the response step to get the status from the escape routine when it completes. You must declare the variable into which the status is written as either a longword integer or an unsigned longword, according to the data type returned from the escape routine.
A panel, panel group, icon, or panel field is entered or exited.
A panel field is being validated.
A request begins (request response) or ends (request exit response).
The operator presses a function key.
Entry Response
.
.
.
Call "FIELDEDIT" Using
By Descriptor BOUND_RECORD
By Descriptor TEXT_AREA_RECORD
By Descriptor EXIT_DIRECTION
.
.
.
End ResponseThe ENTRY RESPONSE declaration in Example 10.5, ''CALL Response Step'' calls an escape routine named FIELDEDIT and passes the form data items BOUND_RECORD, TEXT_AREA_RECORD, and EXIT_DIRECTION to the escape routine.
For more information about using the CALL response step, see the VSI DECforms IFDL Reference Manual.
10.5. Performing Arithmetic Operations
- +
- -
- *
- /
Form Data
N Unsigned Longword
Group TRIP
Occurs 36
Current N
AMOUNT Longword Integer
TOLL Longword Integer
SUBTOTAL Longword Integer
End Group
.
.
.
End Data
.
.
.
Exit Response
Let TRIP(N).SUBTOTAL = TRIP(N).AMOUNT + TRIP(N).TOLL
End Response10.6. Moving Between Panels
Get data from any number of panels during the processing of a single request
Process decision-making data (the operator's choices for performing tasks)in the form, rather than in the program
Suppose your application displays a menu that contains three choices. Depending on the operator's choice, one of two panels is displayed, or control is returned to the program.
Form Data
CHOICE_ITEM Integer(1)
End Data
.
.
.
Panel MENU
Field CHOICE_ITEM
Line 10
Column 20
Minimum Length 1
Range 1 Through 3
Exit Response
If Functionname = "NEXT ITEM" Then
If CHOICE_ITEM = 1 Then
Activate
Group NEW_EMPLOYEE_DATA On NEW_EMPLOYEE
Position To Panel NEW_EMPLOYEE
End If
If CHOICE_ITEM = 2 Then
Activate
Field GET_EMPLOYEE_NAME
On EXISTING_EMPLOYEE
Position To Field GET_EMPLOYEE_NAME
On EXISTING_EMPLOYEE
End If
If CHOICE_ITEM = 3 Then
Return
End If
End If
End Response
End Field
.
.
.
| The FORM DATA declaration specifies an integer of length 1 to hold the operator's choice. |
| The EXIT RESPONSE declaration determines what action the Form Manager takes when the operator leaves the CHOICE_ITEM field. |
| FUNCTIONNAME is a built-in form data item that contains the name of the last function the operator entered. If the operator leaves the field by entering the NEXT ITEM built-in function, the Form Manager executes the response steps included in the EXIT response. For more information on built-in form data items, see the VSI DECforms Programmer's Reference Manual. |
| If the CHOICE_ITEM form data item contains a 1, the NEW_EMPLOYEE panel is displayed. A group of data items that is displayed on that panel is added to the activation list. The POSITION response step moves the activation list processing to the first item on the NEW_EMPLOYEE panel. There is no DISPLAY response step because the Form Manager automatically displays a panel when input is required for a field on the panel. |
| If the CHOICE_ITEM form data item contains a 2, the GET_EMPLOYEE_NAME field is activated. The POSITION response step designates getting input to that field as the next step in processing. |
| If the CHOICE_ITEM form data item contains a 3, control is returned to the program. The operator wants to exit the application when choosing the number 3. |
When the Form Manager needs input to satisfy an item, it displays the panel on which the item is displayed, unless that panel is already displayed. If a panel is already displayed, the Form Manager uses the display on the panel rather than repainting the screen. Therefore,each item that becomes the current activation item is by default moved to and displayed by the Form Manager.
10.7. Waiting for Operator Input
In character-cell layouts, you can regulate program processing with the pace of the operator by using the ACTIVATE WAIT response step to create a wait activation item. When the wait activation item becomes the current activation item, the cursor moves to the bottom right corner of the screen and waits for the operator to enter a function. Once the operator enters a function, the wait is terminated, the Form Manager executes the function response defined for the function at the layout level (or the default, if no response is explicitly defined), and processing proceeds.
To cause the cursor to move to the wait activation item, use the POSITION TO WAIT response step. Otherwise, the wait activation item becomes the current activation item when the Form Manager encounters it during activation list processing.
.
.
.
Function GOTO_PANEL_2
Is %PF3
End Function
Function GOTO_PANEL_3
Is %PF4 End Function
.
.
.
Function Response GOTO_PANEL_2
Activate Panel PANEL_2
Position to Panel PANEL_2
End Response
Function Response GOTO_PANEL_3
Activate Panel PANEL_3
Position to Panel PANEL_3
End Response
.
.
.
Enable Response
Activate Wait on PANEL_1
Message "Press PF3 to display Panel 2 and PF4 to display Panel 3"
End ResponseWait activation is available only for character-cell layouts. Because of this, the use of the WAIT ACTIVATE response step is discouraged. A preferred method that works for character-cell layouts is to use icons to wait for operator input. Label the icon with an operator instruction such as "OK", "Cancel", "Continue", or "Exit".
10.8. Printing Panels
To allow the operator to create a printable file of a panel that is currently displayed, use the PRINT response step in your form. In character-cell layouts, this response step causes the Form Manager to write a panel to a file for subsequent printing. By default, the PRINT response step writes the current display to a file. To specify that a specific panel is printed, name the panel in the PRINT response step.
Each PRINT response step starts a new page in the printed output. You can close the current version of the input file and open a new version by specifying PRINT IMMEDIATE. Otherwise, output from all the PRINT response steps in your form is written to the same file (OpenVMS).
On OpenVMS systems,the Form Manager writes the output from the PRINT response step to your current default node, device, and directory. The Form Manager gives the file the same name as the form file, with a .txt file type for character-cell layouts. You can specify a different file specification by defining the OpenVMS FORMS$PRINT_FILE logical name to point to the node,device, directory, file name, and file type of your choice. The file created by the PRINT response step is an ASCII text file for character-cell layouts.
For more information about the PRINT response step, see the VSI DECforms IFDL Reference Manual.
To test the appearance of the print panels in character-cell or PRINTER layouts, use the Extract Appearances Utility. When you extract a panel using the Extract Appearances Utility, the panel's fields show either their initial values or picture strings. For complete information on the Extract Appearances Utility, see the VSI DECforms Guide to Commands and Utilities.
To create an OpenVMS file that supports high-quality,printable output that represents form panels and panel contents,including application data, use a PRINTER layout in your form.
On OpenVMS, the operator can convert the resulting DDIF output to PostScript format for viewing or printing.
You cannot use the PRINT response step in PRINTER layouts: the purpose of the entire PRINTER layout is to create a printable file for a form. The VSI DECforms Programmer's Reference Manual contains additional information about creating applications that use a PRINTER layout.
10.9. Returning Control to the Application
During the accept phase, you can use the RETURN response step in any response to terminate data input and return control to the application program, thereby ending the accept phase. If you specify the IMMEDIATE clause, control is returned to the application program as soon as the current activation item has been processed. If you do not specify the IMMEDIATE clause, the Form Manager performs validation on all currently activated items on the activation list.
If validation is successful, the accept phase ends, and control returns to the application program. If validation fails, the Form Manager positions the operator to the item that caused the failure.
Chapter 11. Designing the Operator Interface
Viewports
Scrolled regions
Function keys
Functions associated with collections of keys
Keypad mode
Operator signaling
Input validation
Messages
Online help
Simulation of menus on character-cell terminals
11.1. Using Viewports
You can declare a unique viewport for each panel, but there are other useful ways to use viewports.
If you have several panels that use the same section of the screen, those panels can share the same viewport: you create one viewport, and then associate each panel with that viewport. Using one viewport has the advantage of automatically removing the old panel when the new panel is displayed.
Sometimes, however, you might want different panels to appear in different areas of the display. In a PRINTER layout, if you want to print more than one panel on a page, you must use a different, non-overlapping viewport for each panel.
Viewport TOP_HALF_OF_SCREEN
| The TOP_HALF_OF_SCREEN viewport uses the top 10 lines of the screen. |
| The BOTTOM_HALF_OF_SCREEN viewport uses the bottom 10 lines of the screen (assume that the message panel is lines 21 through 24). |
| The internal response causes the panel POPUP_USER_PANEL to be displayed on the top or the bottom of the screen, depending on what else is on the screen at the moment. The variable USE_TOP_OF_SCREEN determines which half of the screen should contain the panel. You would include the DISPLAY_POPUP_PANEL internal response in another response in the form where you would normally use the ACTIVATE and POSITION response steps to display the POPUP_USER_PANEL panel. The ACTIVATE and POSITION response steps are included in the internal response, instead of in a panel declaration, to save steps. |
| The panel POPUP_USER_PANEL is displayed in the top or the bottom of the screen, as determined by the internal response. In the absence of a DISPLAY response specifying the viewport, the Form Manager uses the default viewport declared for the panel, TOP_HALF_OF_SCREEN. |
11.2. Creating Scrolled Regions
A scrolled region is a section of a form with one or more identical, vertically or horizontally contiguous areas that can contain panel fields, icons, and literals in a group. A scrolled region enables the operator to enter and read multiple occurrences of a group on a panel with limited space.
You indicate a scrolled region for a group with a DISPLAYS clause.
If you have a nested group, only the outer group can scroll.
Scrolled regions can contain any number of occurrences, from one to whatever fits on the panel.
In character-cell layouts, scrolled regions can include double-wide and double-high lines.
A region can scroll either vertically or horizontally.
The following sections explain how to display arrays in a scrolled region and give the operator control of the scrolled region.
11.2.1. Displaying Scrolled Data
Declare a form data group and a corresponding panel group, using the same name for each.
Include a VERTICAL DISPLAYS or a HORIZONTAL DISPLAYS clause in the GROUP declaration to specify the number of group occurrences to place on the display. For a description of the DISPLAYS clause, seethe CREATE GROUP and MODIFY GROUP command descriptions for CCPED in the VSI DECforms Guide to Commands and Utilities,or the description of the GROUP declaration in the VSI DECforms IFDL Reference Manual.
The Form Manager displays the amount of data in the panel group that fits in the number of occurrences on the display. If the operator requests to see more of the data, the Form Manager scrolls the data, either by occurrence or by page, depending on what you specify.
Figure 11.1, ''Operation of a Vertical Scrolled Region'' and Example 11.2, ''Scrolling in a Character-Cell Layout'' show how a vertical scrolled region works on a character-cell device.
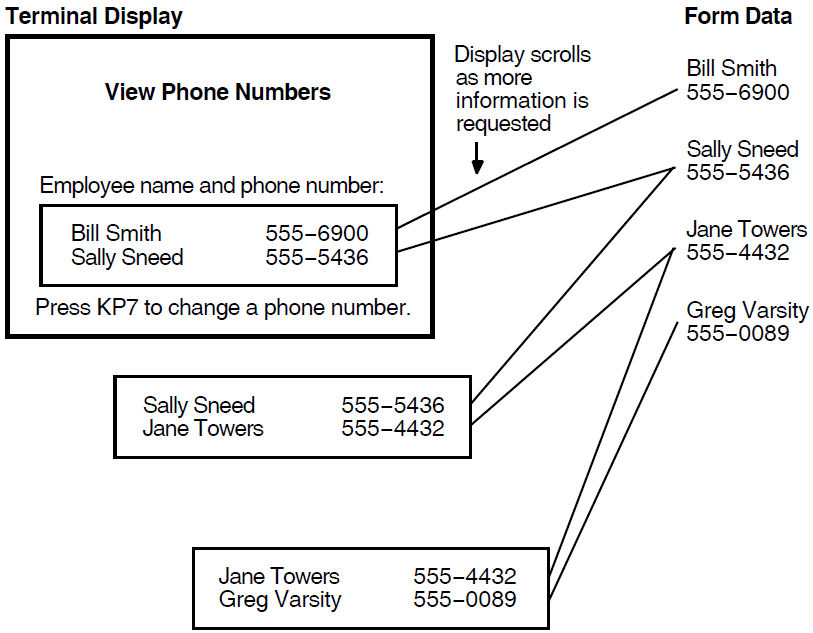
In Figure 11.1, ''Operation of a Vertical Scrolled Region'', the form data group occurs four times. The panel group displays two occurrences of the form data group at once. When the panel is first displayed, the form data occurrence that contains Bill Smith and the form data occurrence that contains Sally Sneed are displayed.
When the operator requests more information by pressing a function key or key sequence,the form data occurrence that contains Jane Towers is displayed on the bottom line of the scrolled region. The form data occurrence that contains Sally Sneed moves to the top line of the scrolled region, and the form data occurrence that contains Bill Smith is removed from the display. This process continues until the operator stops requesting new data or all occurrences have been displayed.
Form EMPLOYEE_FORM
Form Data
Group NAME_AND_NUMBER Occurs 4
EMPLOYEE_NAME Character (30)
EMPLOYEE_PHONE Character (10)
End Group
CHANGE_NUMBER Character (1)
End Data
Form Record EMPLOYEE_PHONE_NUMBERS
Group NAME_AND_NUMBER Occurs 4
EMPLOYEE_NAME Character (30)
EMPLOYEE_PHONE Character (10)
End Group
CHANGE_NUMBER Character (1)
End Record
Layout VT_LAYOUT
Device
Terminal
Type %VT100
End Device
Size 24 Lines by 80 Columns
.
.
.
Panel SCROLL_PANEL
Literal Text
Line 2
Column 31
Value "VIEW PHONE NUMBERS"
Display
Font Size Double High
End Literal
Literal Text
Line 7
Column 10
Value "Employee Name and Phone Number:"
End Literal
Literal Rectangle
Line 10
Column 10
Line 16
Column 65
End Literal
Group NAME_AND_NUMBER
Vertical Displays 2
Field EMPLOYEE_NAME
Line 12
Column 15
End Field
Field EMPLOYEE_PHONE
Line 12
Column 47
End Field
End Group
Literal Text
Line 20
Column 10
Value "Press KP7 to change a phone number."
End Literal
End Panel
End Layout
.
.
.
End Form
| The NAME_AND_NUMBER form data group stores the group data for the scrolled region. This group contains only four occurrences. This is an arbitrary limit. The form data item group could contain hundreds of data items and scrolling would work the same. |
| The EMPLOYEE_PHONE_NUMBERS form record allows the form to exchange phone number data with the program. |
| The NAME_AND_NUMBER panel group corresponds to the NAME_AND_NUMBER
form data group. Two occurrences of the group are displayed
vertically,which means that the field declaration specifies the position
of the first item in the activation list. Another item is displayed
directly below that item. NoteOn VT1xx, VT2xx, and VT3xx terminals, hardware considerations might require DECforms to rewrite all contents of the scrolling region on every scroll operation rather than using the more time-saving hardware scroll operation. If your panel design allows it, you can have DECforms use hardware scrolling: define elements in the group so that each occurrence takes up the entire width of the terminal screen. In this case, declare literals in columns 1 and 80, each containing a single blank. Data in the NAME_AND_NUMBER.EMPLOYEE_NAME and NAME_AND_NUMBER.EMPLOYEE_PHONE panel fields scrolls because the panel fields are displayed fewer times than the data occurs. |
| In a character-cell layout, declare the locations of fields within the group relative to the panel. |
11.2.2. Setting Up the Operator's Control
|
Function Name |
Default Key Binding |
|---|---|
|
DOWN OCCURRENCE |
(PF4 Down arrow) |
|
LEFT OCCURRENCE |
(PF4 Left arrow) |
|
RIGHT OCCURRENCE |
(PF4 Right arrow) |
|
UP OCCURRENCE |
(PF4 Up arrow) |
Using the function keys causes the cursor to move to the occurrence in the direction indicated. If scrolling is necessary to make the new cursor position visible, the Form Manager will scroll the scrolled region.
You can change the keys bound to these functions by declaring the function in your IFDL source file. If you need actions other than those given by default, you can write a function response for these functions. For information on declaring functions and writing function responses, see Section 11.3, ''Defining Form Function Keys'' and the table on built-in functions in the VSI DECforms IFDL Reference Manual.
If you specify the SCROLL BY PAGE clause in the GROUP declaration, a new page of data is output to the display. If you omit the SCROLL BY PAGE clause, the region scrolls smoothly, one occurrence at a time.
11.3. Defining Form Function Keys
Chapter 2, "Planning the Application" and Chapter 4, "Adding Functions, Responses, Display Actions,and Validations to the IFDL File" introduced you to the concepts and implementation of functions and function responses. This section and its subsections cover the same topic, adding more detail and providing additional examples.
DECforms allows you to define non- alphanumeric keyboard keys in the form so that the operator can press a key or key sequence to perform a certain task. The key or key sequence is called a function.
The following sections explain the types of functions,how to bind functions to keys, and how to write responses for function keys. Function responses allow you to tailor or control what happens when a function key or key sequence is pressed.
11.3.1. Binding Functions to Keys
A predefined, DECforms built-in function name
A user-defined name
Built-in function names are bound to keys by default. When you bind one of the DECforms built-in function names to a key in a function declaration, you replace the previous default key binding with the binding you specify.
You can bind more than one key to a function name by naming more than one key in the FUNCTION declaration. For example, if you want the operator to be able to invoke a function using a default key and another key, name both the default key and the other key in a function declaration.
You can declare function definitions only at the layout level. However, you can declare or change the form's response to a key definition at the layout, panel, group, field, or icon level by redefining function responses (see Section 11.3.2, ''Writing Function Responses'').
Note
If you bind a built-in function name to a different key, and that key is already bound to another built-in function name, your redefinition of the key takes precedence.
All key sequences must be unique and start with a key that is not bound to any single-key function.
.
.
Layout VT_LAYOUT
Device
Terminal
Type %VT100
End Device
Size 24 Lines By 80 Columns
Function TRANSMIT
Is %KP_1
%F10
%CONTROL_Z
End Function
.
.
.
.
.
.It is possible to disable the default key definition for a built-in function;see Section 11.3.3, ''Disabling Built-In Function Key Bindings''.
Layout ANOTHER_LAYOUT
.
.
.
Function CHANGE_EMPLOYEE
Is %F11
End Function
.
.
.11.3.2. Writing Function Responses
To control what occurs when the operator presses a function key, you define a function response. You can write a function response for any function, including many of the DECforms built-in functions.
You can define function responses at the layout, panel, field,icon, or group level. Function responses defined at the layout level apply throughout the layout. Function response declarations at lower levels in the layout hierarchy override function response declarations at higher levels, so you can change the behavior of keys at any level in the form.
For example, you can define a function response at panel level and define the same function response to perform a different set of actions for a field in that panel. If a form element does not contain a function response declaration, the Form Manager uses the function response defined at the next level above.
When the key is pressed, the Form Manager performs the function response defined in the field or icon declaration.
If there is no function response defined at field, icon, and the field, icon is declared in a panel group, a function response defined at group level is performed.
If there is no function response defined for the group (or if the field or icon is not part of a group), a function response defined at panel level is performed.
For character-cell layouts, if the current activation item is a wait activation item that is associated with a panel, the function response at panel level is performed.
If there is no function response defined for the panel, or if the current activation item is a wait activation item that is not associated with a panel,a function response defined at layout level is performed.
If there is no function response defined at layout level, a DECforms built-in function is performed.
If no built-in function response exists, the function has no effect.
To control what occurs when the operator presses an undefined key for character-cell layouts only, you can write a special function response called UNDEFINED FUNCTION. For information on the UNDEFINED FUNCTION function response, see Section 11.4, ''Using Situational Function Responses''.
When you write a function response for a built-in function, you change what occurs when the operator accesses the function. For example, the default function response for the NEXT ITEM built-in function makes the next item on the activation list the current item. If no next item exists (because the current item is the last on the list), the Form Manager displays a message.
Layout SAMPLE
.
.
.
Function Response NEXT ITEM
If LAST ITEM Then
Position To FIRST ITEM
Else
Position To NEXT ITEM
End If
End Response
Panel EMPLOYEE_PANEL
Builtin Function Response NEXT ITEM
.
.
.
| This function response tests the elementary condition LAST ITEM. Elementary conditions are predefined conditions that indicate the state of activation item processing. If the condition is true, activation list processing proceeds with the first item on the activation list. Otherwise, activation list processing proceeds with the next item on the activation list. You do not have to redeclare the NEXT ITEM function for this function response to work. The built-in functions are declared by default, and you only declare them when you want to bind them to keys other than the default keys. |
| This built-in function response restores the default response for the NEXT ITEM built-in function. The default response applies only to this panel. |
When you write a function response for a function other than a built-in function, you determine what happens when the function key bound to that function is pressed.
Layout L1
.
.
.
Function CHANGE_EMPLOYEE
Is %F11
End Function
.
.
.
Panel EMPLOYEE_PANEL
Function Response CHANGE_EMPLOYEE
Position To Next Panel
End Response
.
.
.11.3.3. Disabling Built-In Function Key Bindings
You may want to use a built-in function key for your own task and not allow that key to be used for the default DECforms function. Or you may simply want to disable one or more key bindings for a built-in function. This section describes two ways to disable built-in function key bindings.
The first method for disabling built-in function key bindings is to explicitly declare the built-in function at the layout level in your form.
Layout VT_LAYOUT
Function NEXT HELP
Is %None
End FunctionLayout VT_LAYOUT
Function NEXT HELP
Is %Help
End FunctionFor a table of the DECforms built-in functions, their default key bindings, and default responses and for syntax information on the built-in functions, see the appendix on built-in functions in the VSI DECforms IFDL Reference Manual.
11.4. Using Situational Function Responses
DECforms provides special functions for character-cell layouts that are associated with situations or context rather than with particular keys.
UNDEFINED FUNCTION
A function key that does not have a built-in function response or a function response declared in the form is called an undefined function. The Form Manager's default function response for an undefined function is to display a message stating that the key is undefined. By using a function response for the function name UNDEFINED FUNCTION, you can direct the Form Manager to perform some other action. Normally, such an action would provide more direction to the operator about what to do in a particular context.
USER FUNCTION
If the operator presses a function key that is defined in a user-defined function, but there is no function response for that user-defined function at the level where the operator pressed the key, the Form Manager executes the USER FUNCTION function response if it is defined at this level. You usually use the USER FUNCTION function response as a catch-all. For example, you might specify several functions at a particular level,and you might want all other functions to receive the same error message.
BUILTIN FUNCTION
BUILTIN FUNCTION has the same purpose as USER FUNCTION, but it refers only to the DECforms built-in functions.
BOUNDARY CURSOR UP/DOWN/LEFT/RIGHT
The Form Manager invokes these function responses when the cursor is in an icon, a wait, or at the up, down, left, or right boundary of a field when the operator enters a key bound to the CURSOR UP, CURSOR DOWN,CURSOR LEFT, or CURSOR RIGHT built in function. (These are special situations when the Form Manager does not just move the cursor.)
BOUNDARY DELETE LEFT
The Form Manager invokes this function response when the cursor is in an icon, a wait, or at the left boundary of a field when the operator enters a key bound to the DELETE CHARACTER built-in function.
11.4.1. Situational Function Responses in Character-Cell Layouts
Panel WELCOME_PANEL
Viewport WELCOME_VP
Display
%Keypad_Application
Remove
Function Response NEXT HELP
Enter Help
End Response
Function Response BUILTIN FUNCTION
Return
End Response
Function Response USER FUNCTION
Return
End Response
Function Response UNDEFINED FUNCTION
Return
End Response
.
.
.
Literal Text
Next Line
Same Column
Value "To continue, press RETURN."
End Literal
End PanelThis panel demonstrates the use of the UNDEFINED FUNCTION, the USER FUNCTION, and the BUILTIN FUNCTION function responses in a panel to allow any key to return to the application.
Example 11.10, ''Use of the USER FUNCTION Function Response'' from the Windows Form demo shows another use of the USER FUNCTION function response. In this ICON declaration, if the operator presses any user-defined function key or key sequence, the Form Manager calls the POSITION_TO_BLANK internal response.
Icon FILE_ICON
Function Response SELECT
Activate
Panel FILE_PANEL
Position To Panel FILE_PANEL
End Response
Function Response RIGHT_ITEM
Position To Next Item
End Response
Function Response UP_ITEM
Position To Icon ICONIZE_PUZZLE On PUZZLE_PANEL
End Response
Function Response FLIP_FLOP
Include POSITION_TO_BLANK
End Response
Function Response USER FUNCTION
Include POSITION_TO_BLANK
End Response
Active Highlight
Reverse
Underlined
Literal Text
Line 2
Column 2
Value " File "
Display
Underlined
End Literal
End IconExample 11.11, ''Use of the BOUNDARY CURSOR LEFT Function Response'' shows a function response for a boundary function.
Layout VT_LAYOUT
.
.
.
Icon CHOICE_REV_REG
.
.
.
Function Response BOUNDARY CURSOR LEFT
Position to Previous Item
End Response
.
.
.
End Icon
.
.
.The BOUNDARY CURSOR xxx functions are activated when one of the CURSOR xxx functions is entered and the cursor is at the boundary mentioned. In an icon, because there is no data input allowed, the cursor is always considered to be on the boundary. In this example, when the operator enters the CURSOR LEFT function (bound by default to the left arrow key), the function response causes the Form Manager to move the cursor to the previous item rather than to perform the default function response, which is to display an error message.
11.5. Modifying the Keypad Mode
In character-cell layouts, DECforms allows you to modify the mode (numeric or application)of the terminal keypad. In numeric mode, the keypad keys send the characters inscribed on the keys. In application mode, the keypad keys are additional function keys for operator input into a field or icon.
Panel EMPLOYEE_PERSONAL_INFO
Display
%Keypad_Application
Field EMPLOYEE_NAME
Line 3
Column 10
End Field
Field EMPLOYEE_PHONE_NUMBER
Line 5
Same Column
Display
%Keypad_Numeric
End Field
| The DISPLAY clause causes keypad keys to be treated as function keys. The keypad mode is application for all fields on the panel, unless the field overrides the mode in its own DISPLAY clause. |
| The keypad mode for the EMPLOYEE_NAME field is application. |
| The DISPLAY clause for the EMPLOYEE_PHONE_NUMBER field specifies the %KEYPAD_NUMERIC attribute, which specifies that keypad keys send the characters inscribed on the keys. |
11.6. Signaling the Operator
The SIGNAL %BELL attribute specifies that an audible signal(ringing the terminal bell) be given. SIGNAL %BELL is the default.
The SIGNAL %REVERSE attribute specifies that a visible signal(reversing the screen) be given to users on character-cell devices. The screen video attributes remain reversed (complemented) until the operator enters the next character, and then the video attributes return to their original appearance.
A VT241 terminal takes a significant amount of time to reverse the screen. Other VT-class terminals perform reversal almost instantly.
Usually, you signal the operator when new information is displayed or when the operator has entered invalid data. Therefore, you might want to use the SIGNAL response step in entry responses, exit responses, validation responses,and function responses.
Layout SAMPLE
.
.
.
Function SELECT
Is %KP_3
End Function
.
.
.
Panel WRITE_CHECK
Field CHOICE_CHECK
.
.
.
Function Response SELECT
If CHECKING_BALANCE = 0 Then
Signal %Bell
Message
"You can't write a check; you have a zero balance."
Invalid
Else
Activate Panel CHECK_PANEL
.
.
.
End If
End Response
End Field
.
.
.
| This function declaration binds the user-defined SELECT function to theKP3 key. |
| The function response specifies that a message be displayed and the terminal bell rung if the operator's checking account balance is zero. Otherwise, the panel that allows the operator to write a check is activated. In other fields, the SELECT function could have a different function response. |
11.7. Validating Fields
Field AMOUNT
.
.
.
Validation Response
If OPERATOR_CHOICE = VALUE_XFER_TO_SAV
Then
If AMOUNT > CHECKING_BALANCE
Then
Message "Transfer amount must be less"-
" than the checking account balance."
Invalid
Signal
End If
Else
If OPERATOR_CHOICE = VALUE_XFER_TO_CHK
Then
If AMOUNT > SAVINGS_BALANCE
Then
Message "Transfer amount must be less "-
"than the savings account balance."
Invalid
Signal
End If
End If
End If
End ResponseThe Forms Manager executes the validation response if the operator moves from the transfer panel after choosing to transfer money and then entering an amount in this field. If the operator cancels the selection or moves from the panel without making a selection, the field is not entered and the validation is not performed. In this case, the Forms Manager deactivates the panel so that the validation is not performed at the end of the accept phase.
When the operator moves from the panel, the validation compares the transfer amount against the appropriate balance amount depending upon whether the operator has chosen to transfer from checking to savings or from savings to checking.
If the comparison fails, the field is marked INVALID(which means the cursor stays on the field)and the operator is signaled with a beep(see Section 11.6, ''Signaling the Operator'').The Form Manager then returns to the operator input phase and waits for the operator to correct the data or cancel the operation.
11.8. Sending Messages to the Operator
You display messages to the operator by using the message panel. The message panel is a special panel in which error messages, help messages,and output from the MESSAGE response step are displayed. DECforms supports one message panel for each layout in a form. A message panel cannot contain fields or literals, but you can specify display attributes for the messages that appear on it.
If you do not specify a message panel for a layout, the Form Manager creates a default message panel and a default message viewport when it loads the form into memory. The Form Manager places the default message panel at the bottom of the area defined in the SIZE clause for the layout. For character-cell layouts, this is the last line of the area.
11.8.1. Sending Messages from the Form
The name of a form data item
A string literal
A Form Manager message code
The VSI DECforms Programmer's Reference Manual describes each of these methods, including a list of the message codes that you can use.
You can also use help messages to send information to the operator. For information about help messages, see Section 11.9.1, ''Using Help Messages''.
11.8.2. Sending Messages from a Program or Escape Routine
To send a message from your application program or from an escape routine, use a record field named MESSAGEPANEL in a SEND record message. The value of the MESSAGEPANEL record field is transferred to the message panel,and the message panel is automatically displayed when that record message is sent to the form.
Form Record MESSAGE_RECORD
MESSAGEPANEL Character(512) Varying
End Record11.9. Providing Online Help
Help messages
Help messages are associated with a field, group, icon, panel, or field default.
Help panels
Help panels are special panels that you declare with the HELP PANEL statement. Each help panel is associated with a field, group, icon, data-entry panel, or field default.
If a help message is specified for the current field, that message is displayed.
If no help message is specified for the current field, but one is specified for the group that contains that field, the message associated with the group is displayed.
If no help message is associated with the group, the message associated with the current panel is displayed.
If no help message is found, the help panel at the lowest level of the hierarchy is displayed.
The following sections explain how to use help messages and help panels to provide online help for operators.
11.9.1. Using Help Messages
The purpose of a help message is to provide specific information about what is needed as input to a particular field. You create a help message with the USEHELP MESSAGE clause.
Form EMPLOYEE_FORM
.
.
.
Layout VT_LAYOUT
.
.
.
Panel EMPLOYEE_INFORMATION
Viewport DEFAULT_VIEWPORT
Use Help Message
"Enter the employee's name and previous work experience"
Literal Text
Line 2
Column 2
Value "Employee Name:"
End Literal
Field EMPLOYEE_NAME
Line 2
Column 20
End Field
Group PREVIOUS_EMPLOYER_INFORMATION
Vertical
Displays 4
Use Help Message
"Enter information about the employee's previous jobs"
Literal Text
Line 5
Column 1
Value "Employer Name: "
End Literal
Field EMPLOYER_NAME
Line 5
Column 16
Use Help Message
"Enter the previous employer's name"
End Field
Literal Text
Same Line
Column 47
Value "Street: "
End Literal
Field EMPLOYER_STREET
Same Line
Column 55
End Field
Literal Text
Same Line
Column 66
Value "Years Emp: "
End Literal
Field YEARS_EMPLOYED
Same Line
Column 77
No Help Message
End Field
End Group
End Panel
End Layout
| When the operator presses Help while the cursor is on the EMPLOYEE_NAME field, the message "Enter the employee's name and previous work experience" is displayed as shown in Figure 11.2, ''Help Message at Panel Level on a Character-Cell Device''. This message appears because that field does not have a specific help message. Therefore, the help message at the panel level is used. 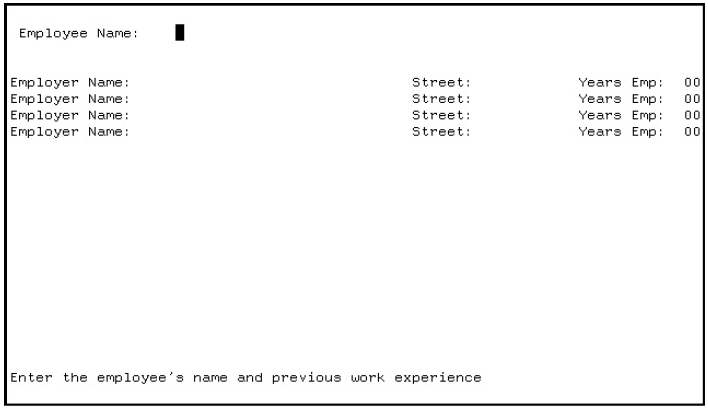 |
| When the operator presses Help while the cursor is on the PREVIOUS_EMPLOYER_INFORMATION.EMPLOYER_NAME field, the message "Enter the previous employer's name" appears. This message is specified in the USE HELP MESSAGE clause of that field declaration. Figure 11.3, ''Help Message at Field Level on a Character-Cell Device'' shows an example. 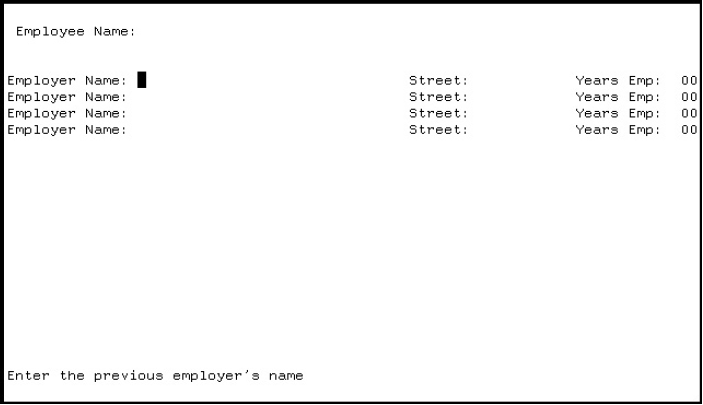 |
| When the operator presses Help while the cursor is on the PREVIOUS_EMPLOYER_INFORMATION.EMPLOYER_STREET field,the message "Enter information about the employee's previous jobs" is displayed as shown in Figure 11.4, ''Help Message at Group Level on a Character-Cell Device''. The field does not have a specific help message. The field is a member of a group, however, and the group does have a specific help message, which is displayed. 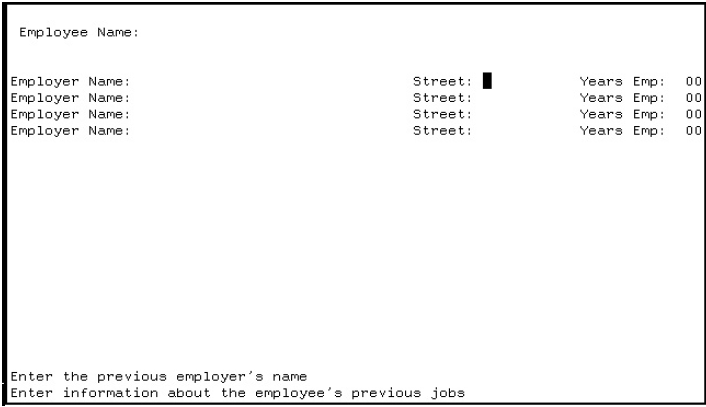 |
| When the operator presses Help while the cursor is on the PREVIOUS_EMPLOYER_INFORMATION.YEARS_EMPLOYED field, no message appears, as specified in the USE HELPMESSAGE clause of that field declaration. |
You can specify only one help message for each field. Each help message can be any length—the Form Manager wraps and scrolls messages that are too long to fit in the message panel. This might cause long messages to scroll off the message panel before the operator has a chance to read the entire message,so try to avoid using multiple-line messages unless you have declared your message panel to occupy a viewport having more than a single line.
11.9.2. Providing Hints
Sometimes you want to supply messages that provide help when the operator moves the cursor to a field. Such messages—or hints—differ from those that are displayed after data is entered, such as error messages, or those that are displayed when the operator presses Help.
One way of providing hints is to include an entry response containing the MESSAGE HELP response step in each field for which you want to display a hint. The entry response causes the Form Manager to take the specified action when the operator moves the cursor to the field. The MESSAGE HELP response step causes the Form Manager to display the help message(specified by the USE HELP MESSAGE clause) associated with the field.
Field EMPLOYEE_NAME
Line 3
Column 18
Entry Response
Message Help
End Response
Display
Reverse
Use Help Message
"Enter the employee's name"
End Field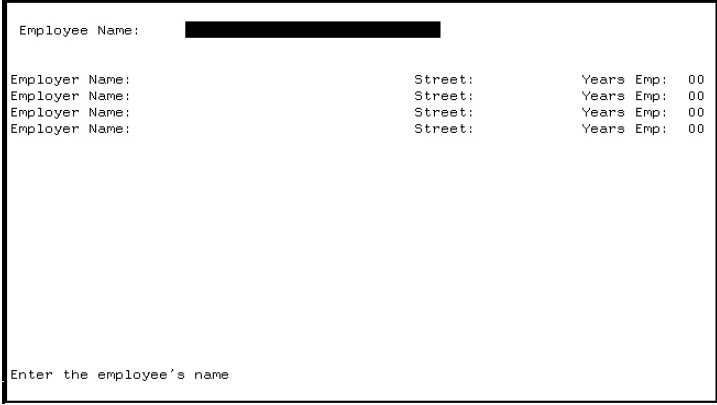
Panel SHIPPING_PANEL
Apply Field Default Of
Entry Response
Message Help
End Response
End Default
Field SHIP_TO_CITY
Use Help Message
"Enter the city to ship to"
.
.
.
End Field
Field SHIP_DATE
Use Help Message
"Enter the date the item was shipped"
.
.
.
End Field
.
.
.
End PanelGive the operator the choice of enabling or disabling hints;for example, define a function key to turn hinting on or off.
The form needs to determine whether hinting is on or off.
Include conditional processing in each entry response step.
Declare an internal response that contains the conditional processing so as to avoid repeating the conditional processing in each field declaration.
You can include the internal response in entry responses in the field declarations, as shown in Example 11.18, ''Using an Internal Response to Display Hints Conditionally''.
Layout SAMPLE
.
.
.
Internal Response CHECK_HINTING
If (HINTING_STATUS = 1) Then
Message Help
End If
End Response
.
.
.
Field EMPLOYEE_NAME
Line 3
Column 18
Entry Response
Include CHECK_HINTING
End Response
Display
Underlined
Use Help Message
"Enter the employee's name"
End Field
.
.
.
| The CHECK_HINTING internal response determines whether hinting is enabled or disabled by checking the value of the HINTING_STATUS variable. If the value of HINTING_STATUS is zero, help messages are not displayed when the operator moves the cursor to fields. If HINTING_STATUS is 1, help messages are displayed. |
| The entry response for the field includes the internal response. If the form does not contain such an internal response, every entry response that displays hints would have to include conditional processing like that in the CHECK_HINTING internal response. |
11.9.3. Using Help Panels
When the operator presses Help, a help message is displayed.
If the operator presses Help again, a help panel is displayed, and control is passed to that panel if any fields or icons are present. This is the recommended way to pass control to the panel. It avoids the use of wait activation, which is no longer in the FIMS standard.
The help panel can be a simple text panel, or it can prompt the operator to navigate through more help panels.
By default, the operator exits help by pressing PF1-PF2 on character-cell devices.
Create a help panel with the HELP PANEL declaration.
Include at least one field or icon (it could be blank) on the panel so that the Form Manager can activate the panel. Ideally,you should include icons for navigating to the next or previous help and for exiting help.
Associate the help panel with a field, icon, group, data-entry panel, or field default with the USE HELP PANEL clause.
Help Panel EMPLOYEE_INFORMATION_HELP
| The EMPLOYEE_INFORMATION_HELP and the EMPLOYEE_NAME_HELP help panels contain text, fields, and icons that explain how to use the EMPLOYEE_INFORMATION panel and the EMPLOYEE_NAME field. |
| When the operator presses Help while the cursor is on the EMPLOYEE_NAME field, the EMPLOYEE_NAME_HELP help panel is displayed as specified by the USE HELP PANEL clause. |
| When the operator presses Help while the cursor is on the PREVIOUS_EMPLOYER_INFORMATION.EMPLOYER_NAME field, the "Enter the previous employer's name" message is displayed. If the operator presses Help again, the EMPLOYEE_INFORMATION_HELP help panel is displayed. |
| When the operator presses Help while the cursor is on the PREVIOUS_EMPLOYER_INFORMATION.EMPLOYER_STREET field, the EMPLOYEE_INFORMATION_HELP help panel is displayed. |
| When the operator presses Help while the cursor is on the PREVIOUS_EMPLOYER_INFORMATION.YEARS_EMPLOYED field, the same help panel is displayed as for the PREVIOUS_EMPLOYER_INFORMATION.EMPLOYER_STREET field. |
You can put help panels anywhere inside a LAYOUT statement, as long as they are outside all PANEL declarations.
You can create special viewports for help panels. Doing so allows you to position the help panels anywhere on the display. Also, the RETAIN clause allows you to specify that a help panel not be removed from the display when the operator terminates help. Therefore, the help information can remain on the screen while the operator is entering data in the field on which help was needed. For more information on the RETAIN clause, see the description of the POSTDISPLAY declaration in the VSI DECforms IFDL Reference Manual.
11.9.4. Creating Levels of Help Panels
To display different help panels when the operator presses Help several times in succession, you can redefine the function responses for the NEXT HELP and TERMINATE HELP built-in functions within each help panel. For example, if the first help panel to be displayed is the EMPLOYEE_INFORMATION_HELP help panel, you use function responses inside that panel to display other help panels.
Help Panel EMPLOYEE_INFORMATION_HELP
Function Response Next Help
Activate
Panel SECOND_HELP_PANEL
Position To Panel SECOND_HELP_PANEL
End Response
.
.
.
End Panel
Help Panel SECOND_HELP_PANEL
Function Response Next Help
Activate
Panel THIRD_HELP_PANEL
Position To Panel THIRD_HELP_PANEL
End Response
Function Response Previous Panel
Deactivate
Panel SECOND_HELP_PANEL
Position To Previous Panel
End Response
.
.
.
End Panel
Help panel THIRD_HELP_PANEL
.
.
.
End Panel
Panel USER_PANEL
Use Help Panel
EMPLOYEE_INFORMATION_HELP
.
.
.
End Panel
| If the operator presses Help while the EMPLOYEE_INFORMATION_HELP help panel is active, the SECOND_HELP_PANEL help panel is activated. The POSITION response step causes this help panel to be displayed. |
| If the operator presses Help while the SECOND_HELP_PANEL help panel is displayed, the THIRD_HELP_PANEL help panel is activated and displayed. |
| If the operator presses a key or key sequence bound to the PREVIOUS PANEL function while the SECOND_HELP_PANEL help panel is active, the SECOND_HELP_PANEL help panel is deactivated, and the previous help panel (EMPLOYEE_INFORMATION_HELP) is displayed again. To leave help entirely, the operator presses the key bound to the TERMINATE HELP function. In that case,processing of the data entry panel (USER_PANEL)resumes at the point where help was invoked. |
11.9.5. Using a Help Text File
On OpenVMS systems, you can create a text library containing help text and use a
procedural escape to scroll an array of text lines on the help panel display. For
sample files that support this approach for character-cell terminals, see the files
forms$demo_show_textlib.ifdl and
forms$demo_textlib.cob in the FORMS$EXAMPLES directory. These files
contain comments explaining the procedure.
You might want to present a Motif style windowing environment on a character-cell terminal. For information about designing and implementing screens, controls, menus, and dialog boxes, see the VSI DECforms Style Guide for Character-Cell Devices. For another example of a form that demonstrates a windowing environment for a character-cell layout, see the Window Simulation demo in the OpenVMS examples directory.
11.10. Simulating Menus and Dialog Boxes in Character-Cell Layouts
You might want to present a Motif style windowing environment on a character-cell terminal. For information about designing and implementing screens, controls, menus, and dialog boxes, see the VSI DECforms Style Guide for Character-Cell Devices. For another example of a form that demonstrates a windowing environment for a character-cell layout, see the Window Simulation demo in the OpenVMS examples directory.
Chapter 12. Getting the Best Performance from Your Form
General optimizations
Ways to improve the performance of character-cell forms
12.1. General Optimizations
How you design your form can affect performance. This section helps you determine the tradeoffs between functionality and performance.
12.1.1. Transferring Data
Send data to the form once, rather than sending it in each request that needs it.
Data sent to the form is stored in form data and remains there until the session finishes. Data used to process one request is already available for subsequent requests.
Use records that match your processing needs.
Consider the volume of information that must be exchanged in each request and transfer only the data needed or the data that has changed.
Use TRANSFER clauses to pass subsets of large arrays.
Transfer individual fields of a form record by using SOURCE and DESTINATION clauses on the TRANSFER clause when declaring the form record, or by using a subscript range specification to limit the number of elements passed. A subscript range is shown in the following example:Form Record MY_RECORD MAX_ITEMS Longword Integer Group LARGE_ARRAY Occurs 1000 MY_NAME Character(10) Using MY_NAME (1 : MAX_ITEMS) MY_AGE Integer(3) Using MY_AGE (1 : MAX_ITEMS) End Group End RecordIn this example, MAX_ITEMS occurrences are transferred to form data.
Use SEND and RECEIVE requests to send or receive data as needed. Use a TRANSCEIVE request to send and receive data in a single request, as when your program must send data and receive immediate input on it. When you use TRANSCEIVE, consider whether you should use different records for the send and receive parts of the request, to avoid transferring data unnecessarily.
Avoid unnecessary data type conversions. See Section 12.1.7, ''Performing Data Conversion'' for more information.
12.1.2. Using Escape Routines
The Form Manager collects data prior to a procedure call and distributes it after the call. The amount of data that is passed as parameters affects performance. Because parameters passed by reference and by descriptor are read and write enabled, you should transfer only the data you need,to use the minimum processing time.
To optimize performance, you should limit array transfers, as described previously in Section 12.1.1, ''Transferring Data''. Use SOURCE and DESTINATION clauses when passing form records as parameters to simulate read-only (source) and write-only (destination) parameters, or use the parameter passing mechanism BY VALUE in the CALL response step to gain the effect of a read-only parameter.
If you send records in an escape routine, you might want to create records especially for the escape routine. Sometimes the data you pass to an escape routine might not be the same data you send to the application program. Using a separate record for the escape routine ensures that only relevant data is transferred.
12.1.3. WHEN Clause Performance
HIGHLIGHT WHEN controls display attributes dynamically.
CONCEALED WHEN makes fields and icons visible or invisible dynamically.
PROTECTED WHEN makes active fields and icons inaccessible dynamically.
OUTPUT WHEN displays fixed text in picture fields dynamically.
Field ACCOUNT_BALANCE Highlight Reverse When ACCOUNT_BALANCE < 0 End Field
Whenever a form data item referenced in a WHEN expression could change,as ACCOUNT_BALANCE in the previous example, the Form Manager reevaluates the expression if the field is on a displayed panel. You can control evaluation by carefully selecting the form data items used in the expression. Consider using additional form data items,and then setting them in explicit LET response steps. Data transfer and escape routines can modify large amounts of form data, which can trigger expression evaluation. Avoid complex expressions; character conditional expressions are the most efficient.
Field ACCOUNT_BALANCE Output " " When (STUDENT(3).GRADE > "A") AND (FACULTY(8).NAME = SAVED_NAME)End Field
Limit use of CONCEALED WHEN to icons and to fields that need non-echoed input such as passwords.
12.1.4. Controlling the Activation List
The activation list contains all the fields and icons, eligible for data input or function key input. The primary performance consideration for the activation list is the number of items on it.
You should avoid large activation lists. Certain navigation operations are sensitive to the length of the list. For example, the POSITION TO NEXT PANEL response step searches forward through the activation list for the first field not on the current panel.
Activating entire panels, rather than individual items, is more efficient when you need to add all the items to the activation list.
During accept phase, you should add items to and delete items from the list as needed, rather than create one large activation list. For example, you can avoid activating a panel group until the operator moves off the field immediately before it. If the operator does not visit the group, the Form Manager does not have to activate all the fields in the group.
If you do use the method just described, the performance cost of activating the panel group occurs at the point the operator moves into the group. You might prefer that this cost occur when the panel is first displayed. This trade-off depends on the size of the panel group, how likely it is that the operator will visit the group, and where the cost is least noticeable. You can try various activation possibilities and see which ones best suit your needs.
After accept phase, deactivate fields and panels you no longer need. Deactivating entire panels is more efficient that deactivating individual items.
12.1.5. Preventing Unnecessary Validation
You can specify validation when the operator leaves a field (field validation), and again at the end of accept phase (request validation) to validate all items on the activation list. Request validation is useful for cross-field validation; data entered or changed later in the form might invalidate an earlier check. The only way the Form Manager can guarantee that all validation is satisfied at the same time is to perform all validation at request validation time.
Deactivate fields for which validation is specified before declaring RETURN response steps. The Form Manager only validates fields that are on the activation list at the time a RETURN response step is executed.
- Validate only those fields that the operator has changed. For example, suppose you have the following validation response for a field named DATABASE_FIELD (assume that the value of DATABASE_FIELD_LAST_VALID is originally set to the value of DATABASE_FIELD).
Field DATABASE_FIELD Validation Response If DATABASE_FIELD_LAST_VALID <> DATABASE_FIELD Then Call DB_LOOKUP Using DATABASE_FIELD Giving DB_STATUS If DB_STATUS <> 1 Then Message "Field not in database" Else Let DATABASE_FIELD_LAST_VALID = DATABASE_FIELD End If End If End Response . . . End FieldThe response performs validation by calling an escape routine. DATABASE_FIELD_LAST_VALID contains the last valid value for DATABASE_FIELD. If the operator changes the value, the new value needs validation. Otherwise,no validation is performed. Use the RETURN IMMEDIATE response step to avoid all validation.
12.1.6. Using Multiple Sessions
When you have multiple sessions enabled on a single input device, keep in mind how the sessions interact on the display.
Each session controls its own viewports. Viewports are a session-wide entity: if you have a form with three viewports enabled twice on a single display device, the Form Manager considers these three viewports as six individual viewports for purposes of display.
Panel display
Panels displayed in viewports of one session can occlude panels displayed in viewports of a second session.
Viewport removal
When viewports are removed, they can expose previously occluded sections of viewports on the same session or on other sessions. Occluded sections ofall viewports are refreshed immediately.
Viewport refresh
Refreshing an individual viewport does not alter that viewport's position in the current stack of viewports. If a completely occluded viewport is refreshed, no display changes are visible.
12.1.7. Performing Data Conversion
The Form Manager must convert all data that appears on the screen to character format to display the data. If the data can be stored in form data in character format, and transferred to and from the program in character format, no data conversion has to occur for your form to perform optimally.
Often, however, data needs to be used in other formats, and data conversion is necessary. Consider where the data is used in what format, and then decide the best place for conversion.
For example, suppose you need data in your program in a binary format, such as longword integer, and that data is displayed only in one field on one panel. You might store the data in a longword integer in form data and let it be converted twice: once on data entry (input)and once on display (output).
However, if the data item is displayed on many panels, the Form Manager would need to convert the data item into a character format every time it is displayed. If the record is sent instead as a longword integer with a corresponding form data item of character format, the Form Manager would need to perform data conversion only twice: once at the beginning of the send and once at the exit. There would be no need to perform data conversion for input and output.
12.2. Optimizations for Character-Cell Devices
The following sections describe performance optimizations that can affect forms that run on character-cell devices.
12.2.1. Using Terminal Hardware Scrolling
Although DECforms can scroll partial screen areas,it can take advantage of VT100-, VT200-, or VT300-series terminal hardware scrolling, if the scrolling region spans the full width of the screen.
The viewport must be full width (80 or 132 columns).
The group must touch both column 1 and column 80 (or 132).
If the group does not touch both columns, you can add blank literals to make it touch. For example, if group elements are displayed from columns 5 to 72, you could add the following literals:Literal Text Same Line Column 1 Value " " End Literal Literal Text Same Line Column 80 Value " " End LiteralYou cannot have any objects (literals, for example) declared outside the group crossing the scrolling region.
The most common example of objects declared outside a group is a border rectangle that surrounds the viewport. To make hardware scrolling work, you need to break the border up into pieces. The parts above and below the scroll region are defined with normal polyline literals. The part that crosses the scroll region is done by vertical bars added to the group in the appropriate spots. For example, if you want a border to cross the scroll area in columns 2 and 79, you could add this to the group:Literal Text Same Line Column 2 Value "x" Display Character Set Private_Rule End Literal Literal Text Same Line Column 79 Value "x" Display Character Set Private_Rule End Literal(The "x" character is the vertical bar from the line drawing character set. For more information about this Private Rule character set, see the VSI DECforms IFDL Reference Manual.)
Because the message panel frequently scrolls, you should make message panels the full width of the screen (layout).
If you use VT400-series terminals, DECforms takes advantage of the device's rectangular area copy feature. For this type of terminal, scrolling is efficient, regardless of the scrolling region's size.
12.2.2. Using Double-High and Double-Wide Attributes
If you are going to use double-high and double-wide attributes, you should specify panels that use the entire width of the display device. Also, do not mix double-high and double-wide attributes with single-high and single-wide attributes on the same line.
12.2.3. Optimizing Screen Clearing
For optimum screen clearing performance, specify that the viewport touch an edge of the display device. If the viewport touches both edges of the screen, performance is improved, but it is not significantly better than having just one viewport edge touch the display edge. Having the viewport touch both edges as well as the top and bottom of the screen is most efficient, because the Form Manager can clear an entire area rather than erase each line individually.
If the display device is a VT200-, VT300, VT400-, or VT500-series terminal and the viewport edges do not touch the edge of the screen, there is no significant performance penalty during screen clearing. However, if the device is a VT100 terminal, there is a performance penalty because of the way in which the VT100 clears the screen.
12.2.4. Improving Panel Display
When the Form Manager displays panels, it attempts to buffer its output to minimize the number of $QIO operations. The MAXBUF system parameter sets the maximum size of buffered I/O transfer. To ensure the timely display of panels, you should set the value of MAXBUF to a minimum of 2048.
If you set MAXBUF to a value higher than 2048, panels might not be displayed until a buffer is filled (although transaction processing performance will improve). For example, if you display two panels in the same DISPLAY clause,and both panels are fairly small, the panels might not be displayed until the Form Manager has processed both of them.
For more information about the MAXBUF system parameter, see the OpenVMS documentation on the System Generation Utility (SYSGEN).
12.2.5. Formatting Input Pictures
If possible, use fixed sign and currency symbols. Using floating signs and currency symbols reduces efficiency.
If the Delete key is bound to a function other than DELETE CHARACTER,delete character performance is not as efficient as possible,due to underlying operating system constraints.
Overstrike editing produces the most efficient operation when the Form Manager enters a Format 1 (character format) picture string. Overstrike is the default for left-justified fields.
- The EDITING clauses REPLACE LEADING and REPLACE TRAILING cause the Form Manager to consume additional CPU cycles to keep the field up to date during data entry. You should avoid replacement editing whenever possible. For example, replacement editing is usually unnecessary in Format 1pictures.
Note
Floating sign and currency symbols imply REPLACE LEADING and REPLACE TRAILING field editing clauses. Use fixed sign and currency symbols when possible.
If you specify replacement editing to the left of the decimal point, try to place the R next to the decimal point. For example, use 99R.99rather than 9R9.99.
Avoid placing the rightmost character of a field on the right margin of the display. Doing so requires additional cursor positioning sequences to be generated to avoid losing track of the cursor during delete operations on some terminals.
Right-justified input can be expensive if you also specify floating objects or replacement editing. Right justification increases the number of characters transmitted between the program and the terminal because a portion of the field needs to be repainted after each keystroke. In most cases, you can avoid right justification in Format 1 pictures. However, in Format 2pictures (numeric pictures), right justification is often the best choice for input processing.
You use floating objects (sign, currency, and so on).
Replacement editing is occurring and does not cover the entire area that is being shifted right (for example, using 99R.99 with JUSTIFICATION DECIMAL instead of 9R9.99 is more efficient).
Low terminal speeds are being used. Low speed is generally defined as less than 2400 baud.
You have double-high fields. In double-high fields, right-justified input can be slow, especially over low-speed lines.
You are accessing data over a slow network link.
The expensive performance of complex field pictures is the result of necessary device handling. It is not due to any deficiency in DECforms. For more information about picture strings, see the Picture String section of the VSI DECforms IFDL Reference Manual.
Chapter 13. Demonstration and Sample Forms and Applications
This chapter provides information about the demonstration forms and sample applications that come with DECforms.
13.1. Displaying the Demonstration Forms
DECforms provides some demonstration forms. Some of these forms do not have individual applications, so all you can do is display these and see how they respond to various operations you perform on the forms. However, they might give you ideas for creating your own forms, or perhaps you can adapt some of the demonstration forms for your own applications.
For information about the demonstration forms and a program to enable them on OpenVMS
systems, type or print the file forms$demo_guide.txt from the directory
FORMS$EXAMPLES.
On OpenVMS systems,if you have access to a PostScript ® printer such as the LPS40, you can
print the PostScript version of the file, forms$demo_guide.ps.
13.2. The Sample Application Files
Note
You can also examine the mileage reimbursement application, described in chapters 1-7 and Appendix A, "The Mileage Reimbursement Application", in the same location as the sample applications.
The introductory application uses the DECforms OpenVMS API (application programming interface), which supports the OpenVMS Calling Standard. The introductory application is available in FORTRAN and C on OpenVMS systems only.
For more information about the APIs, see the VSI DECforms Programmer's Reference Manual.
The source files for the advanced application are available in several programming languages. The C and FORTRAN source files for the advanced application support the DECforms portable API. The rest of the languages (Ada, Basic, COBOL, DIBOL, Pascal, and PL/I) support the OpenVMS Calling Standard and the DECforms OpenVMS API on OpenVMS systems.
How the data declarations in the introductory sample form correspond to the data declarations in the introductory sample application program
A summary of what the Form Manager does in response to the OpenVMS API request calls made in the introductory sample application program
What statements in the IFDL source file create the panels that are displayed during the execution of the introductory sample application program
A description of the PRINTER layout in the introductory sample application
A summary of the portable API request calls in the advanced sample application
An example of what occurs in the advanced sample application during one complete operator transaction
For detailed information about the syntax of the request calls and about the Form Manager's processing of these calls, see the VSI DECforms Programmer's Reference Manual.
On OpenVMS systems, the files are installed in a directory pointed to by the logical name FORMS$EXAMPLES. If you find that the directory for the sample files is empty or does not exist, ask your system manager to install DECforms with the sample applications and demonstration forms.
To create a working version of the OpenVMS applications in your own directory, see the instructions in the source files.
Important
For reference as you read this chapter,you should print any relevant form and program files.
- Introductory samples
forms$sample_form.ifdlforms$sample_common.fforms$sample_program_fortran.forforms$sample_program_c.c
- Advanced samples
forms$checking_ada.adaforms$checking_basic.basforms$checking_cobol.cobforms$checking_dibol.dblforms$checking_pascal.pasforms$checking_pli.pli
forms$checking_form.ifdlforms$checking_fortran.forforms$checking_c.c
13.3. Data Declarations in the Introductory Sample Form and Application
For data to be exchanged between the form and the application program, the declarations of records in the form and of records in the application program must be logically equivalent.
Figure 13.1, ''Logically Equivalent Declarations of the ACCOUNT Record'' shows a record declaration in the introductory sample form and in the application program. The names of the records match, and the record fields have identical (or equivalent) data types and identical lengths. The data declarations in the advanced sample application are similar to those in the introductory sample.
IFDL Syntax FORTRAN Syntax
FORM RECORD account STRUCTURE /account/
account_number UNSIGNED LONGWORD INTEGER account_number
mail_name CHARACTER(39) CHARACTER*39 mail_name
street CHARACTER(30) CHARACTER*30 street
mail_csz CHARACTER(30) CHARACTER*30 mail_csz
END RECORD END STRUCTURE
RECORD /account/ accountForm records define a mapping between program data and form data. Form data items must be declared in the IFDL source file for each record field that the user wants to transfer to and from the form.
|
Form Data Declaration |
Form Record Field Declarations | ||
|---|---|---|---|
|
FORM DATA | |||
|
account_number |
UNSIGNED LONGWORD |
account_number |
UNSIGNED LONGWORD |
|
balance |
UNSIGNED LONGWORD |
balance |
UNSIGNED LONGWORD |
|
check_amount |
UNSIGNED LONGWORD |
check_amount |
UNSIGNED LONGWORD |
|
check_memo |
CHARACTER(35) |
check_memo |
CHARACTER(35) |
|
check_number |
UNSIGNED WORD |
check_number |
UNSIGNED WORD |
|
check_payto |
CHARACTER(35) |
check_payto |
CHARACTER(35) |
|
deposit_amount |
UNSIGNED LONGWORD |
deposit_amount |
UNSIGNED LONGWORD |
|
deposit_memo |
CHARACTER(35) |
deposit_memo |
CHARACTER(35) |
|
mail_csz |
CHARACTER(30) |
mail_csz |
CHARACTER(30) |
|
mail_name |
CHARACTER(39) |
mail_name |
CHARACTER(39) |
|
menu_option |
UNSIGNED BYTE VALUE 2 |
menu_option |
WORD INTEGER |
|
street |
CHARACTER(30) |
street |
CHARACTER(30) |
|
END DATA | |||
13.4. OpenVMS API Request Calls in the Introductory Sample Application
The purpose of the introductory sample application is to maintain a personal checking account. The account data would usually be maintained in a database file, from which the application program would read values when it begins executing. To make the introductory sample application program less complex, values are explicitly assigned to the account record fields in the STRUCTURE statement that defines the account record.
The operator who uses this application can write checks on the account and make deposits into the account. When the operator chooses to write a check, a panel resembling the checks that most banks issue is displayed. When the operator chooses to make a deposit, a panel that prompts for the deposit amount and a memorandum is displayed. The panel also shows the current date and the account number.
- forms$enable
- forms$send
- forms$transceive
- forms$receive
- forms$receive
- forms$disable
- forms$enable
- forms$send
- forms$send
- forms$send
- forms$disable
Explain the purpose of these request calls.
Summarize the processing the Form Manager performs in response to the requests.
Show how the processing affects the screen display.
Show the IFDL syntax that creates each screen display.
13.4.1. ENABLE Request
forms_status = forms$enable( forms$ar_form_table,
1 'forms$default_device',
2 session_id,
3 forms$sample_form',
4
5 ,
6 ,
7 ,
8 ,
9 ,
1 ,
2 )
CALL check_forms_status( forms_status )forms$ar_form_table—a symbol that points to the address of the form object module, which contains the addresses of escape routines linked with the application.
forms$default_device—the logical name of the device.
session_id—a required argument in which the Form Manager returns a session identification string. You must pass this string in subsequent calls to indicate which device and form the Form Manager should use.
forms$sample_form—the internal name of the form in the IFDL source file.
As part of the ENABLE request, the Form Manager clears the display and resets all data items. Because there is no ENABLE response, control is returned to the application upon completion of these ENABLE actions.
By using the logical name FORMS$DEFAULT_DEVICE for the device specification, this application can run on character-cell devices. The operator on OpenVMS define the logical name FORMS$DEFAULT_DEVICE name to SYS$INPUT (for character cell) before running the application.
The null parameters shown at the end of the list in this example can be omitted. They are included here to show how many parameters can be passed.
There is a check_forms_status call after each request. VSI recommends that you check request status for any failure.
A second ENABLE request controls the print session, and is described in Section 13.5, ''Support for Printing in the Introductory Sample Application''.
13.4.2. ACCOUNT Record SEND Request
forms_status = forms$send( session_id,
1 'account',
2 count,
3 ,,
4 ,,
5 ,
6 ,
7 descriptor1,
8 )
CALL check_forms_status( forms_status )This request call sends the initial values that were assigned to the ACCOUNT application program record to the ACCOUNT form record. In the request call,the string ’account ’ (the second argument) names the form record to which data is sent. This data is stored in the form data items that correspond to the ACCOUNT form record. The count argument contains a value of 1, which indicates that only one record is being sent.
13.4.3. UPDATE Record TRANSCEIVE Request
forms_status = forms$transceive(session_id,
1 'update',
2 %ref(count),
3 'operator_choice',
4 %ref(count),
5 ,,
6 ,,
7 ,
8 ,
9 descriptor1,
1 ,
2 descriptor2,
3 )
CALL check_forms_status( forms_status )This request first performs all SEND request actions and then all RECEIVE request actions. As part of the SEND request actions, the check number and current balance are distributed from the application program to the form. This allows the form to display a new check number with each new check that is displayed and the current balance of the account when the account balance is displayed. The new check number and current balance are sent, or distributed,from fields in the UPDATE application program record to form data items that correspond to fields in the UPDATE form record.
When data distribution has been completed, the Form Manager performs a RECEIVE request, specifying the OPERATOR_CHOICE form record (the fourth argument). As the default RECEIVE response, the Form Manager solicits input from the operator and returns that input to the application program. The input returned whether the operator wants to write a check on the account, deposit money into the account, or exit the application.
This input is sent from the OPERATOR_CHOICE record in the form to the MENU_CHOICE record in the application program. The mapping from the form record to the program record is achieved in the TRANSCEIVE request arguments, which specify the form record and also the name of the structure that points to the program record information.
Because the form contains no explicit response for this request call, the Form Manager executes the default RECEIVE response, ACTIVATECORRESPONDING RECEIVE ALL. The default response causes the Form Manager to add an activation item to the activation list for each field in the OPERATOR_CHOICE record.
The OPERATOR_CHOICE record contains only one field, MENU_OPTION. Therefore, the Form Manager adds one activation item to the activation list. The Form Manager also displays the panel on which the MENU_OPTION field is contained.
Figure 13.2, ''Operator Choice Panel on a Character-Cell Device'' shows the operator choice panel for the character-cell layout.
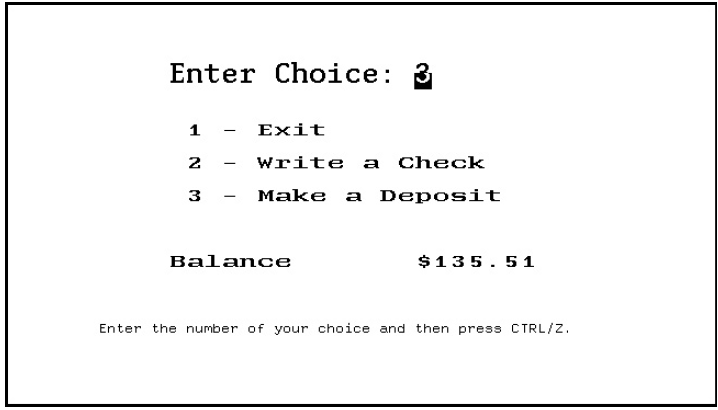
Example 13.1, ''IFDL Source for the Introductory Sample Operator Choice Panel—Character-Cell Layout'' shows the IFDL source statements that DECwindows operator compose the character cell operator choice panel shown in Figure 13.2, ''Operator Choice Panel on a Character-Cell Device''.
PANEL choice_panel
LITERAL TEXT
LINE 5 COLUMN 19
VALUE "Enter Choice:"
DISPLAY FONT SIZE DOUBLE HIGH
END LITERAL
FIELD menu_option
SAME LINE NEXT COLUMN + 2
DISPLAY FONT SIZE DOUBLE HIGH
OUTPUT PICTURE 9
USE HELP MESSAGE "Enter 1, 2, or 3; then press Ctrl/Z."
RANGE 1 THROUGH 3
MESSAGE "Please choose a value between 1 and 3."
FUNCTION RESPONSE NEXT ITEM
RETURN
END RESPONSE
END FIELD
LITERAL TEXT
NEXT LINE + 2 COLUMN 21
VALUE "1 - Exit"
DISPLAY FONT SIZE DOUBLE WIDE
END LITERAL
LITERAL TEXT
NEXT LINE + 1 SAME COLUMN
VALUE "2 - Write a Check"
DISPLAY FONT SIZE DOUBLE WIDE
END LITERAL
LITERAL TEXT
NEXT LINE + 1 SAME COLUMN
VALUE "3 - Make a Deposit"
DISPLAY FONT SIZE DOUBLE WIDE
END LITERAL
LITERAL TEXT
NEXT LINE + 3 COLUMN 19
VALUE "Balance "
DISPLAY FONT SIZE DOUBLE WIDE
END LITERAL
FIELD balance
SAME LINE NEXT COLUMN
OUTPUT PICTURE 9,999,99W9.99
CURRENCY SIGN IS "$"
SCALE -2
PROTECTED
DISPLAY FONT SIZE DOUBLE WIDE
END FIELD
LITERAL TEXT
NEXT LINE + 3 COLUMN 11
VALUE "Enter the number of your choice and then press CTRL/Z."
END LITERALEND PANEL
| The DISPLAY FONT SIZE statements declare the font sizes that are used for the panel's fields and literals. |
| The RANGE statement in the field declaration specifies the valid range of values the operator can enter into the MENU_OPTION field. If the operator enters a value other than 1, 2, or 3 in this field, the Form Manager displays the text specified in the MESSAGE clause of the RANGE statement. If the operator presses Help, the text specified in the USE HELP MESSAGE clause for the MENU_OPTION field is displayed. Because there is no explicit declaration of a message panel in the form, the Form Manager displays the messages in the default message panel. |
| The BALANCE field displays the current account balance. The CURRENCY SIGN literal is displayed with the value of the BALANCE form data item to indicate to the operator what the number in the BALANCE field shows (the BALANCE field shows the current account balance in dollars). The OUTPUTPICTURE and SCALE clauses combine to format the data in the BALANCE form data item. The OUTPUT PICTURE clause displays a decimal number that has a floating currency symbol, which can appear anywhere to the left of the "W" shown in the picture string (9,999,99W9.99). The picture string also indicates that a comma is to be inserted if the number displayed in the BALANCE field is greater than five characters. The SCALE clause causes the value of the BALANCE form data item (which is an integer number representing cents) to be multiplied by 1/100 before being passed through the output picture. The output picture specifies that a decimal point be displayed as a period. |
13.4.4. GET_CHECK Record RECEIVE Request
forms_status = forms$receive( session_id,
1 'get_check',
2 %ref(count),
3 ,,
4 ,,
5 ,
6 ,
7 ,
8 descriptor1,
9 )
CALL check_forms_status( forms_status )RECEIVE RESPONSE GET_CHECK
RESET check_payto check_amount check_memo
ACTIVATE FIELD check_payto ON check_panel
FIELD check_amount ON check_panel
FIELD check_memo
ON check_panelEND RESPONSEThe RESET response step in this response causes the Form Manager to set the values of the form data items CHECK_PAYTO, CHECK_AMOUNT, and CHECK_MEMO to their initial values. Because no values were specified in the declarations of these form data items, the RESET response step causes these data items to beset to spaces (for the alphanumeric data items CHECK_PAYTO and CHECK_MEMO) or zeros (for the numeric data item CHECK_AMOUNT).
The ACTIVATE response step in the GET_CHECK request response causes the Form Manager to add activation items to the activation list for the CHECK_PAYTO, CHECK_AMOUNT, and CHECK_MEMO form record fields. The Form Manager adds the activation items to the activation list in the order in which the form record field names are specified in the response step. The Form Manager also displays the panel on which the CHECK_PAYTO, CHECK_AMOUNT, and CHECK_MEMO fields appear.
Figure 13.3, ''Check Panel on a Character-Cell Device'' shows the appearance of the check panel on a character-cell device.
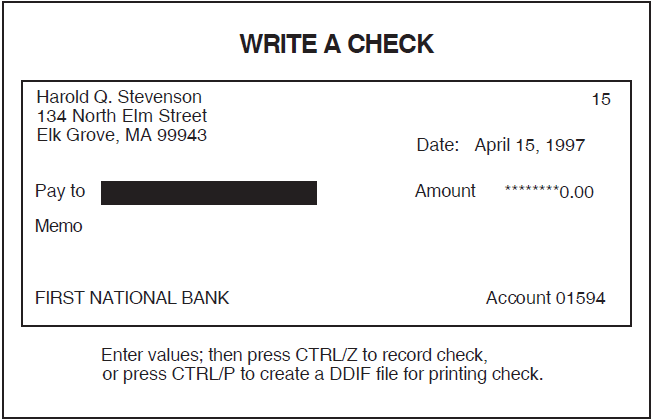
Example 13.2, ''IFDL Source for the Introductory Sample Check Panel—Character-Cell Layout'' shows the IFDL source code for the character cell check panel.
PANEL check_panel
LITERAL TEXT
LINE 4 COLUMN 27
VALUE "WRITE A CHECK"
DISPLAY FONT SIZE DOUBLE HIGH
END LITERAL
LITERAL RECTANGLE
LINE 5 COLUMN 2
LINE 18 COLUMN 79
END LITERAL
FIELD check_number
LINE 6 COLUMN 70
OUTPUT PICTURE 9999R9
PROTECTED
END FIELD
FIELD mail_name
LINE 6 COLUMN 4
PROTECTED
END FIELD
FIELD street
PROTECTED
END FIELD
FIELD mail_csz
PROTECTED
END FIELD
LITERAL TEXT
NEXT LINE +1 COLUMN 54
VALUE "Date:"
END LITERAL
FIELD current_date
SAME LINE NEXT COLUMN + 1
OUTPUT PICTURE FOR DATE MMMMMMMMMQ' 'DD', 'YYYY
PROTECTED
END FIELD
LITERAL TEXT
NEXT LINE +1 COLUMN 4
VALUE "Pay to"
END LITERAL
FIELD check_payto
SAME LINE NEXT COLUMN +1
OUTPUT PICTURE X(35)
ACTIVE HIGHLIGHT REVERSE
USE HELP MESSAGE "Enter the person or organization to whom you"
" wish to pay the check."
MINIMUM LENGTH 1
MESSAGE "You must fill in the payee."
END FIELD
LITERAL TEXT
SAME LINE COLUMN 59
VALUE "Amount"
END LITERAL
FIELD check_amount
SAME LINE NEXT COLUMN + 1
OUTPUT PICTURE 9,999,99R9.99
SCALE -2
JUSTIFICATION DECIMAL
REPLACE LEADING "*"
ACTIVE HIGHLIGHT REVERSE
USE HELP MESSAGE "Enter the amount to be paid."
RANGE 0 THROUGH balance
MESSAGE "Check amount must be less than the balance in "
"the account."
REQUIRE check_amount > 0
MESSAGE "Check amount must be greater than zero."
END FIELD
LITERAL TEXT
NEXT LINE + 1 COLUMN 4
VALUE "Memo"
END LITERAL
FIELD check_memo
SAME LINE NEXT COLUMN + 1
OUTPUT PICTURE X(35)
ACTIVE HIGHLIGHT REVERSE
USE HELP MESSAGE "Fill in a reminder to yourself about what the"
" check is for. You need not fill this in."
END FIELD
LITERAL TEXT
NEXT LINE + 2 COLUMN 4
VALUE "FIRST NATIONAL BANK"
END LITERAL
LITERAL TEXT
SAME LINE COLUMN 65
VALUE "Account"
END LITERAL
FIELD account_number
SAME LINE NEXT COLUMN + 1
OUTPUT PICTURE 9(5)
PROTECTED
END FIELD
LITERAL TEXT
LINE 19 COLUMN 11
VALUE "Enter values and then press Ctrl/Z to record check."
END LITERAL
LITERAL TEXT
LINE 20 COLUMN 11
VALUE "or press CTRL/P to create a DDIF file for printing check."
END LITERALEND PANEL
| The following fields are declared with the PROTECTED clause:
These fields contain variable data received from the application program. Because the operator does not need to change these fields,they are protected from operator entry. Because they are fields instead of literals, they can be changed by new data from the application program. |
| The three fields that can receive operator input--- CHECK_PAYTO, CHECK_AMOUNT, and CHECK_MEMO—all have help text specified for them. The text specified in the USE HELP MESSAGE clause is displayed in the message panel when the operator presses Help. In the character-cell layout,The ACTIVE HIGHLIGHT REVERSE clause is specified for all three of these fields. This clause causes the Form Manager to display the field in reverse video when the field corresponds to the current activation item on the activation list (when the operator is allowed to enter input into the field). |
| Validation MESSAGE clauses are included in the declarations of the CHECK_PAYTO and CHECK_AMOUNT fields. If the data that the operator enters fails validation, the text in the MESSAGE clause is displayed in the message panel. For example, if the operator does not enter a value in the CHECK_PAYTO field, the MINIMUMLENGTH 1 clause causes validation of the CHECK_PAYTO field to fail. When this failure occurs, the Form Manager displays the "You must fill in the payee"message in the message panel. |
| The CHECK_AMOUNT field contains an OUTPUT PICTURE clause with a picture string that specifies replacement editing. When the Form Manager displays the value of the form data item, the picture string causes the Form Manager to replace certain characters with the character specified in the REPLACE LEADING clause. In this case, the REPLACELEADING clause specifies that the Form Manager use an asterisk (*) to replace leading characters. The position of the "R" in the picture string (9,999,99R9.99) and the value to be displayed determine what characters are replaced with an asterisk. The picture string in this OUTPUT PICTURE clause causes the Form Manager to replace zeros and insertion literals to the left of the position specified by the "R" with asterisks. |
| In the character-cell layout,the JUSTIFICATION DECIMAL clause in the CHECK_AMOUNT field declaration causes the operator input to be justified around the fixed decimal point specified in the OUTPUT PICTURE clause. When the operator enters the field, the cursor is on the decimal point, and entry of the dollar amount is made using right justification. When the operator enters a period, the cursor moves to the cents (or fractional part of the number) and enters that part of the amount as a left-justified number. In a right-justified field, each new character that the operator enters forces any existing characters to move one character position to the left. The last character in the data appears in the far right character position, and the rest of the data characters appear to the left of that character position. |
| When the operator presses Ctrl/Z on the character-cell panel, the Form Manager by default performs the TRANSMIT built-in function,which contains the RETURN response step. The RETURN response step causes the Form Manager to return control to the program. In fact, Ctrl/Z also performs the TRANSMIT built-in function on character-cell devices, and F10 performs the same function on character-cell devices. Only one method is documented to the operator for the sake of simplicity. |
13.4.5. GET_DEPOSIT Record RECEIVE Request
After calling the RECEIVE request for the GET_CHECK record, the application program reissues the TRANSCEIVE request call, which sends a new check number and balance to the form and activates the field in the operator choice panel. The operator can choose to write another check, make a deposit, or exit the application. For this example, assume that the operator chooses to make a deposit into the account.
forms_status = forms$receive(session_id,
1 'get_deposit',
2 %ref(count),
3 ,,
4 ,,
5 ,
6 ,
7 ,
8 descriptor1,
9 )
CALL check_forms_status( forms_status )
RECEIVE RESPONSE get_deposit RESET deposit_amount deposit_memo ACTIVATE PANEL deposit_panel END RESPONSE
The RESET response step causes the Form Manager to set the values of the DEPOSIT_AMOUNT form data item to zeros and of the DEPOSIT_MEMO form data item to spaces.
The ACTIVATE response step causes the Form Manager to add an activation item for all the unprotected fields on the deposit panel—the DEPOSIT_AMOUNT and DEPOSIT_MEMO fields, in the order in which the fields are declared in the panel. The Form Manager also displays the deposit panel, as shown in Figure 13.4, ''Deposit Panel on a Character-Cell Device''.
After the operator enters valid input to the DEPOSIT_AMOUNT field and,optionally, the DEPOSIT_MEMO field, pressing Ctrl/Z or Ctrl/D returns control to the application program.
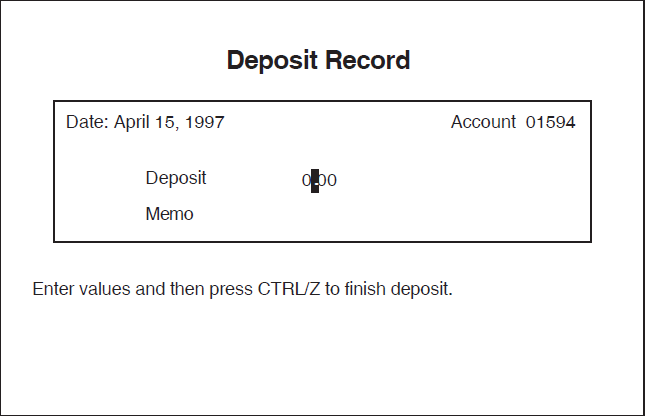
PANEL deposit_panel
LITERAL RECTANGLE
LINE 5 COLUMN 14
LINE 13 COLUMN 67
END LITERAL
LITERAL TEXT
LINE 4 COLUMN 27
VALUE "Deposit Record"
DISPLAY FONT SIZE DOUBLE HIGH
END LITERAL
LITERAL TEXT
NEXT LINE + 1 COLUMN 16
VALUE "Date:"
END LITERAL
FIELD current_date
SAME LINE NEXT COLUMN + 1
OUTPUT PICTURE FOR DATE MMMMMMMMMQ' 'DD', 'YYYY
PROTECTED
END FIELD
LITERAL TEXT
SAME LINE COLUMN 53
VALUE "Account"
END LITERAL
FIELD account_number
SAME LINE NEXT COLUMN + 1
OUTPUT PICTURE 9(5)
PROTECTED
END FIELD
LITERAL TEXT
NEXT LINE + 2 COLUMN 21
VALUE "Deposit"
END LITERAL
FIELD deposit_amount
SAME LINE SAME COLUMN + 10
OUTPUT PICTURE 9,999,99R9.99
SCALE -2
JUSTIFICATION DECIMAL
USE HELP MESSAGE "Enter the amount of the deposit."
REQUIRE deposit_amount > 0
MESSAGE "You must specify a non-zero deposit amount."
END FIELD
LITERAL TEXT
NEXT LINE + 2 COLUMN 21
VALUE "Memo"
END LITERAL
FIELD deposit_memo
SAME LINE SAME COLUMN + 10
OUTPUT PICTURE X(35)
USE HELP MESSAGE "Fill in a reminder of where you got the money."
END FIELD
LITERAL TEXT
LINE 14 COLUMN 13
VALUE "Enter values and then press Ctrl/Z to finish deposit."
END LITERAL
END PANEL13.4.6. DISABLE Requests
After calling the RECEIVE request for the GET_DEPOSIT record, the application program calls the TRANSCEIVE request to update form data items and activate the choice panel again. The operator can choose to write another check, deposit more into the account, or exit from the application program.
forms_status = forms$disable( ddif_session_id ) CALL check_forms_status( forms_status ) forms_status = forms$disable( session_id ) CALL check_forms_status( forms_status )
These requests end the sessions that were created by the two ENABLE requests. In response to these requests, the Form Manager detaches the display device and restores all device settings. Once the display device has been detached, the Form Manager returns control to the application program. If the operator pressed Ctrl/P, a DDIF file is created.
At this time, the application program would normally write new information received from the operator into a database file. However, because this sample application program does not maintain a database file, execution of the program ends directly after the processing of the DISABLE request.
13.5. Support for Printing in the Introductory Sample Application
forms_status = forms$enable( forms$ar_form_table,
1 'ddif_form.doc',
2 ddif_session_id,
3 forms$sample_form,
4
5 ,
6 ,
7 ,
8 ,
9 ,
1 ,
2 )
CALL check_forms_status( forms_status )The operator can create a DDIF file called ddif_form.doc by pressing Ctrl/P after entering the data for the check on the check display.
The following sections describe the FORTRAN subroutine and the IFDL source code that support the creation of the DDIF file.
$CONVERT/DOCUMENT DDIF_FORM.DOC DDIF_FORM.PS/FORMAT=PS$PRINT/QUEUE=MY_POSTSCRIPT_QUEUE DDIF_FORM.PS
13.5.1. PRINT_PANEL Function and Function Response
Function PRINT_PANEL
Is %CONTROL_P
End Function Function Response PRINT_PANEL
Return
Call "PRINT_CHECK"
Using
By Descriptor CHECK_PAYTO
By Reference CHECK_AMOUNT
By Descriptor CHECK_MEMO
End ResponseThe RETURN response step returns the data entered by the operator to the application. The Call response step invokes the PRINT_CHECK subroutine,sending it the check and application-provided data.
13.5.2. PRINT_CHECK Subroutine
The PRINT_CHECK subroutine sends the check data to the forms print session in response to the GET_CHECK send response described in Section 13.5.3, ''PRINTER Layout in the Introductory Sample Application''.
SUBROUTINE print_check( payto, amount, memo )
C Send the check data to a DDIF file.
INCLUDE 'forms_sample_common.f'
CHARACTER*35 payto
INTEGER amount
CHARACTER*35 memo
INTEGER forms_status,
1 count/1/
STRUCTURE /descriptor/
INTEGER*2 reclen
BYTE type /DSC$K_DTYPE_T/
BYTE class /DSC$K_CLASS_S/
INTEGER*4 address
END STRUCTURE
RECORD /descriptor/ descriptor1
C Initialize the descriptor with ACCOUNT structure info
descriptor1.reclen =4 +
1 len(account.mail_name) +
1 len(account.street) +
1 len(account.mail_csz)
descriptor1.address = %loc(account)
C Send the static account information to be printed
C (i.e., the account record).
forms_status = forms$send( ddif_session_id,
1 'account',
2 count,
3 ,,
4 ,,
5 ,
6 ,
7 ,
8 descriptor1,
9 )
CALL check_forms_status( forms_status )
C Initialize the descriptor with the current check number
descriptor1.reclen = 6
descriptor1.address = %loc(update)
C Send the dynamic account information to be printed
C (i.e., check number)
forms_status = forms$send( ddif_session_id,
1 'update',
2 count,
3 ,,
4 ,,
5 ,
6 ,
7 ,
8 descriptor1,
9 )
CALL check_forms_status( forms_status )
C Fill in current values for GET_CHECK structure
get_check.check_payto = payto
get_check.check_amount = amount
get_check.check_memo = memo
C Initialize the descriptor with GET_CHECK structure info
descriptor1.reclen = 4 +
1 len(get_check.check_payto) +
1 len(get_check.check_memo)
descriptor1.address = %loc(get_check)
C Send the check-specific information to be printed
C (i.e., check amount, to whom, and possibly memo).
forms_status = forms$send( ddif_session_id,
1 'get_check',
2 count,
3 ,,
4 ,,
5 ,
6 ,
7 ,
8 descriptor1,
9 )
CALL check_forms_status( forms_status )
END13.5.3. PRINTER Layout in the Introductory Sample Application
Layout SIMPLE_DDIF
Device
Pixel DDIF
Type %PRINTER
End Device
Units Inches
Size 6.000 Lines by 8.880 Columns
Send Response GET_CHECK
Display Check_Panel
End Response
Panel CHECK_PANEL
Display Viewport
Nodecorations
Literal Rectangle
Line 1.125 Column .166
Line 4.375 Column 8.713
End Literal
Field CHECK_NUMBER
Line 1.250
Column 7.659
DISPLAY
NOSHADOW
Output Picture 9999R9
Protected
End Field
.
.
.
Field CURRENT_DATE
Line 2.250
Column 6.549
DISPLAY
UNDERLINED
Output Picture For Date MMMMMMMMMQ' 'DD', 'YYYY
Protected
End Field
.
.
.
End Panel
End Layout
| The PRINTER layout must have a device declaration of type %PRINTER. |
| The layout has an appropriate size for printing. |
| The DISPLAY response step in the SEND RESPONSE declaration causes the Form Manager to send the data associated with the CHECK_PANEL panel's fields from the PRINT_CHECK subroutine (described in Section 13.5.2, ''PRINT_CHECK Subroutine '')to the form. |
| NODECORATIONS as a DISPLAY VIEWPORT clause option removes the default border line around the edge of the panel. |
| Underlining is added to some fields for the printed version of the form for improved appearance. |
13.6. Portable API Request Calls in the Advanced Sample Application
The purpose of the advanced sample application is to maintain a personal checking account. In addition to writing checks on the checking account and to making deposits into that account, the operator can withdraw cash from the checking account, transfer cash between this account and a savings account, and review account information.
- forms_enabl?
- forms_send
- forms_send
- forms_send
- forms_receive
- forms_transceive
- forms_receive
- forms_send
- forms_disable
The following sections show and briefly explain the purpose of these calls. In addition to explaining two of the request calls, the last section discusses the IFDL source code for two panels used in an operator transaction and provides two examples of operator transactions.
13.6.1. ENABLE Request
forms_status = forms_enable ( session_id, 1 device_name_string, 2 form_file_name_string, 3 form_name_string, 4 enable_request_options)
The device name is specified in the sample application, but you can omit it in the portable API. For the portable API, the session ID is specified first. For more information about the difference in the ENABLE request between the OpenVMS and portable APIs, see the VSI DECforms Programmer's Reference Manual.
13.6.2. SEND Requests
forms_status = forms_send ( session_id, 1 'account', 2 record_data, 3 0)
forms_status = forms_send( session_id, 1 'mail_format', 2 record_data, 3 0)
forms_status = forms_send_ ( session_id, 1 'update', 2 record_data, 3 0 )
For information about the remaining SEND request (the eighth request),see Section 13.6.6, ''RECEIVE and SEND Requests in an Operator Transaction''.
13.6.3. RECEIVE Requests
The fifth request is a RECEIVE request,which gets the CHOOSE record for the form when the operator requests a choice. For information about this request,see Section 13.6.6, ''RECEIVE and SEND Requests in an Operator Transaction''.
forms_status = forms_receive ( session_id, 1 'account', 2 record_data, 3 request_options)
13.6.4. TRANSCEIVE Request
forms_status = forms_transceive ( session_id, 1 'register_record', 2 record_data, 3 'register_record', 4 record_data, 5 request_options)
TRANSCEIVE RESPONSE register_record register_record
ACTIVATE FIELD register(1:entry_count).reg_tax_ded ON register_panel
POSITION TO LAST ITEM
END RESPONSEWhen the check register is displayed, the operator can change only tax deduction information and is given access only to the tax deduction field on the check register. The cursor appears on the last item in the tax deduction column.
13.6.5. DISABLE Request
forms_status = forms_disable(session_id , 0 )
13.6.6. RECEIVE and SEND Requests in an Operator Transaction
forms_status = forms_receive( session_id, 1 'choose', 2 record_data, 3 0)
RECEIVE RESPONSE choose
ACTIVATE PANEL choice_panel
/* Don't have to worry about check, since that's where the cursor
will go by default, so we can start checking for deposit */
IF operator_choice = value_deposit THEN
POSITION TO ICON choice_deposit ON choice_panel
END IF
IF operator_choice = value_cash THEN
POSITION TO ICON choice_cash ON choice_panel
END IF
IF operator_choice = value_xfer_to_sav OR
operator_choice = value_xfer_to_chk THEN
POSITION TO ICON choice_transfer ON choice_panel
END IF
IF operator_choice = value_rev_reg OR
operator_choice = value_rev_account THEN
POSITION TO ICON choice_review ON choice_panel
END IF
END RESPONSEThis response causes the Form Manager to determine which option on CHOICE_PANEL the operator last selected and to place the cursor on that option. If this series of IF statements was not executed, the Form Manager would put the cursor in the first icon on the panel (Write a Check...). Having the cursor on the item last selected is probably more natural to most operators.
Figure 13.5, ''Operator Choice Panel for the Character-Cell Layout'' shows the choice panel for the character-cell layout.

PANEL choice_panel VIEWPORT top_vp DISPLAY %keypad_application FUNCTION RESPONSE quit
| Function responses declare actions that the Form Manager is to perform when the user-defined QUIT function (declared earlier in the form) or one of the built-in functions NEXT ITEM, PREVIOUS ITEM, UP ITEM, or DOWN ITEM is called; for example, when the operator presses a function key. These FUNCTION RESPONSE declarations apply only to this panel. Other function responses for these functions can be declared elsewhere in the form. Function responses for the built-in NEXT ITEM, PREVIOUS ITEM, UPITEM, or DOWN ITEM function might not be declared for one of the other panels in the form. If this is the case, the Form Manager performs the default function responses for these functions if the functions are called when that panel is activated. |
| In the character-cell layout,the special function BOUNDARY CURSOR allows you to control where the cursor goes next when it is at the beginning or end of an icon or panel field. Because data entry is not allowed for an icon, the cursor is positioned at the icon's boundary. As a result, the left and right arrow keys in this example become (by default) the BOUNDARY CURSOR functions. The function responses allow you to use the arrow keys for right and left navigation through the menu. |
| The icon for the character-cell layout for CHOICE_CASH is protected and displayed as a blank when the operator can no longer perform transactions of the account (if the operator chooses to withdraw cash). This occurs when the check register that the application program maintains is full. When the register is full, the application program sends the value zero in the ROOM_IN_REG variable to the form. This occurs when the application program calls the SEND request explained after Example 13.6, ''IFDL Source for the Advanced Sample Cash Panel—Character-Cell Layout''. In the character-cell layout,the ACTIVE HIGHLIGHT REVERSE clause causes the icon to be displayed in reverse video when the icon is the current activation item. The icon becomes the current activation item because the operator called the NEXT ITEM, PREVIOUSITEM, UP ITEM, DOWN ITEM, CURSOR LEFT, or CURSOR RIGHT function to move the cursor to the field. The function responses for these functions cause the Form Manager to begin processing the activation item associated with the icon on which the operator positions the cursor. If the operator positions the cursor on the CHOICE_CASH icon, the function response is performed after pressing the key bound to the SELECT function. |
| The key bound to the SELECT function on the character-cell layout The function response causes the Form Manager to add activation items
to the activation list for the unprotected icons in the cash panel:
The POSITION response step in the SELECT function response causes the activation item associated with the CHOICE_CASH_10 icon to become the current activation item. The Form Manager also displays the cash panel,as shown in Figure 13.6, ''Cash Panel for the Character-Cell Layout''. |
PANEL cash_panel
VIEWPORT cash_vp
DISPLAY %keypad_application
EXIT RESPONSE
/* Put these 3 assignments here to avoid doing them */
/* for each choice. */
LET operator_choice = value_cash
LET memo = "*Cash withdrawal*"
LET next_update_message =
"Cash withdrawal made against your checking account"
DEACTIVATE PANEL cash_panel
REMOVE cash_vp
POSITION TO PREVIOUS ITEM
END RESPONSE
FUNCTION RESPONSE quit
MESSAGE "Quitting – no cash withdrawn."
DEACTIVATE PANEL cash_panel
POSITION IMMEDIATE to PREVIOUS ITEM /*Causes exit & deactivate*/
END RESPONSE
FUNCTION RESPONSE NEXT ITEM
IF NOT PANEL LAST ITEM THEN
POSITION TO NEXT ITEM
END IF
END RESPONSE
FUNCTION RESPONSE BOUNDARY CURSOR RIGHT
POSITION TO DOWN ITEM
END RESPONSE
FUNCTION RESPONSE BOUNDARY CURSOR LEFT
POSITION TO UP ITEM
END RESPONSE
FUNCTION RESPONSE UP ITEM
IF UPPERMOST ITEM THEN
POSITION TO PREVIOUS ITEM /* which is on previous panel */
ELSE
POSITION TO UP ITEM
END IF
END RESPONSE
USE HELP PANEL CASH_PANEL_HELP
LITERAL RECTANGLE
LINE 1 COLUMN 1
LINE 7 COLUMN 8
END LITERAL
LITERAL TEXT
LINE 1 COLUMN 2
VALUE " Cash "
DISPLAY REVERSE
END LITERAL
ICON choice_cash_10
ACTIVE HIGHLIGHT REVERSE
CONCEALED WHEN checking_balance < 1000
PROTECTED WHEN checking_balance < 1000
FUNCTION RESPONSE select
LET amount = 1000
LET next_update_amount = "$10"
RETURN
END RESPONSE
LITERAL TEXT
LINE 3 COLUMN 2
VALUE " $10"
END LITERAL
END ICON
ICON choice_cash_20
ACTIVE HIGHLIGHT REVERSE
CONCEALED WHEN checking_balance < 2000
PROTECTED WHEN checking_balance < 2000
FUNCTION RESPONSE select
LET amount = 2000
LET next_update_amount = "$20"
RETURN
END RESPONSE
LITERAL TEXT
NEXT LINE SAME COLUMN
VALUE " $20"
END LITERAL
END ICON
ICON choice_cash_50
ACTIVE HIGHLIGHT REVERSE
CONCEALED WHEN checking_balance < 5000
PROTECTED WHEN checking_balance < 5000
FUNCTION RESPONSE select
LET amount = 5000
LET next_update_amount = "$50"
RETURN
END RESPONSE
LITERAL TEXT
NEXT LINE SAME COLUMN
VALUE " $50"
END LITERAL
END ICON
ICON choice_cash_100
ACTIVE HIGHLIGHT REVERSE
CONCEALED WHEN checking_balance < 10000
PROTECTED WHEN checking_balance < 10000
FUNCTION RESPONSE select
LET amount = 10000
LET next_update_amount = "$100"
RETURN
END RESPONSE
LITERAL TEXT
NEXT LINE SAME COLUMN
VALUE " $100"
END LITERAL
END ICON
END PANEL
| The VIEWPORT statement causes the cash panel to be displayed within the CASH_VP viewport. In
the character-cell layout,this viewport is declared as
follows: Viewport CASH_VP
Lines 3 Through 9
Columns 33 Through 40
End ViewportThis viewport declaration specifies that the top left-hand corner of the viewport appear 3 lines from the top edge of the character-cell layout for this form and 33 columns from the left edge of that layout. |
| The exit response for this panel specifies that the Form Manager assign values to the OPERATOR_CHOICE, MEMO, and NEXT_UPDATE_MESSAGE form data items. The OPERATOR_CHOICE form data item is assigned the value stored in the VALUE_CASH form data item. This form data item is initialized to 4 in the FORM DATA statement, indicating that a cash withdrawal has been made. The MEMO form data item is assigned a string value that also indicates a cash withdrawal. The value assigned to the NEXT_UPDATE_MESSAGE form data item is displayed in the message panel the next time the account balance is updated. In this case, the message indicates to the operator that cash has been withdrawn from the checking account. The exit response also causes the cash panel to be deactivated and the CASH_VP viewport to be removed; the panel disappears from the display. The POSITION TO PREVIOUS ITEM response step returns the operator to the CHOICE_CASH icon in the choice panel. |
| The icon for CHOICE_CASH_10is protected and output as a blank when the account form data item contains a value that is less than 1000 (if there is less than$10—or 1000 pennies—in the checking account). This ensures that the operator cannot withdraw more money than the account contains. The operator chooses to withdraw $10 from the account by pressing the key bound to the SELECT or TRIGGER OBJECT function. For the character-cell layout, the SELECT function is bound to the following keys:
|
| The function response defined for the SELECT or TRIGGER OBJECT function assigns a value to the AMOUNT form data item, indicating that the operator chose to withdraw $10 from the checking account. This function response also contains a RETURN response step, which causes the Form Manager to perform the exit responses for the icon and the panel. |
To finish processing the RETURN response step specified in the SELECT function response, the Form Manager passes values to the application program. The Form Manager returns the values in the OPERATOR_CHOICE, AMOUNT, MEMO, and CURRENT_DATE form data items, which are specified as fields in the CHOOSE form record.
In the RECEIVE request shown at the beginning of this section, the application program specified the CHOOSE form record. The Form Manager moves the values for this record into the CHOICE application program record.
forms_status = forms_send ( session_id, 1 'account', 2 record_data, 3 0)
- the checking account balance
- the savings account balance
- the current check number
- the value of a logical variable, ROOM_IN_REG
The SEND request updates the values of these form data items.
In this case, the checking account balance sent to the form is $10 less than the previous checking account balance because the operator withdrew$10 from the checking account. The savings account balance and the check number are unchanged. The operator did not make any transactions on the savings account balance before this request was called.
Note
The check register that the application program maintains is limited to storing memorandums of 30 transactions made on the account. This means that the operator can make only 30 transactions on the account. Normally, an application would not restrict the number of transactions made on the account in this way.
After the processing of the SEND request for the UPDATE record, the application program calls the RECEIVE request for the OPERATOR_CHOICE record again. This RECEIVE request is shown at the beginning of this section. During the processing of the RECEIVE request, the operator can choose to make another account transaction.
Appendix A. The Mileage Reimbursement Application
This appendix contains the sources for the Mileage Reimbursement Form application used as an example throughout this guide. Although a fairly simple application, it demonstrates many DECforms features (though by no means the majority).
The Independent Forms Description Language (IFDL) source for the form, as well as the application sources in C and FORTRAN formats are included. For a summary of the DECforms architecture and process for creating an application, see Chapter 1, "Introduction".
mrf_form.ifdl is called forms$demo_mrf_form.ifdl
on OpenVMS systems. Note
If you created your own mileage reimbursement application by following the directions in this book, your source files should have the same content as those in this appendix. However, there will be minor differences such as the order in which literal text items appear in the panel declarations. You may have created items in a different order.
In addition, OpenVMS file names listed in the instructions at the beginning of the
OpenVMS program files include the prefix forms$demo_ so that they can be
used in the DECforms examples directory.
A.1. IFDL Source: mrf_form.ifdl
This section shows the IFDL source code for the mileage reimbursement form.
Form MRF_FORM
Form Data
EMPLOYEE_NAME Character(32)
BADGE_NUMBER Integer(6)
COST_CENTER Character(3)
ADDRESS Character(120)
REASON Character(64)
N Unsigned Longword
BLANK_DATE Datetime(8)
Group TRIP
Occurs 36
    Current N
    TRIP_DATE Datetime(8)
    TRIP_FROM Character(3)
    TRIP_TO Character(3)
    MILES Longword Integer
    AMOUNT Longword Integer
    TOLL Longword Integer
    SUBTOTAL Longword Integer
End Group
TOTAL_MILES Longword Integer
TOTAL_AMOUNT Longword Integer
TOTAL_TOLLS Longword Integer
FORM_TOTAL Longword Integer
End Data
Form Record HEADER_INFO_RECORD
EMPLOYEE_NAME Character(32)
BADGE_NUMBER Character(6)
COST_CENTER Character(3)
ADDRESS Character(120)
REASON Character(64)
End Record
Form Record TRIP_ROW_RECORD
Group TRIP
TRIP_DATE Datetime(8)
Using TRIP(N).TRIP_DATE
TRIP_FROM Character(3)
Using TRIP(N).TRIP_FROM
TRIP_TO Character(3)
Using TRIP(N).TRIP_TO
MILES Longword Integer
Using TRIP(N).MILES
AMOUNT Longword Integer
Using TRIP(N).AMOUNT
TOLL Longword Integer
Using TRIP(N).TOLL
SUBTOTAL Longword Integer
Using TRIP(N).SUBTOTAL
End Group
End Record
Form Record TRIPS_RECORD
Group TRIP
Occurs 36
TRIP_DATE Datetime(8)
TRIP_FROM Character(3)
TRIP_TO Character(3)
MILES Longword Integer
AMOUNT Longword Integer
TOLL Longword Integer
SUBTOTAL Longword Integer
End Group
End Record
Form Record TOTALS_RECORD
TOTAL_MILES Longword Integer
TOTAL_AMOUNT Longword Integer
TOTAL_TOLLS Longword Integer
FORM_TOTAL Longword Integer
End Record
Layout VT_LAYOUT
Device
Terminal
Type %VT100
End Device
Size 24 Lines by 80 Columns
List LOCATION_CODES
"ACT"
"BXB"
"LTN"
"MKO"
"ZKO"
End List
Viewport MAIN_VIEWPORT
Lines 1 Through 22
Columns 1 Through 80
End Viewport
Viewport DEFAULT_MESSAGE_VIEWPORT
Lines 23 Through 24
Columns 1 Through 80
End Viewport
Viewport HELP_VIEWPORT
Lines 1 Through 22
Columns 1 Through 80
End Viewport
Function DO_TOTALS
Is %DO
(%PF1 %KP_PERIOD)
End Function
Function DISCARD
Is %F8
(%PF1 %KP_8)
End Function
Function INSERT LINE
Is %CARRIAGE_RETURN
End Function
Function EXIT GROUP NEXT
Is (%PF4 %HORIZONTAL_TAB)
(%PF4 %CARRIAGE_RETURN)
(%PF4 %ENTER)
(%PF1 %DOWN)
End Function
Function MOVE_UP
Is %UP
End Function
Function MOVE_DOWN
Is %DOWN
End Function
Function SELECT
Is %SELECT
%KP_PERIOD
End Function
Function PRINT_FILE
Is %CONTROL_P
End Function
Internal Response BORDER_PATROL
Message
"No items in that direction."
Signal
End Response
Internal Response RESET_DATA
Reset All
Message
"Data discarded."
Signal
Position To Panel TRIPS_INFO_PANEL
End Response
Internal Response RECORD_DATA
Message
"Data received. Program exiting."
Signal
Return Immediate
End Response
Internal Response UPDATE_TOTALS
Message
"Computing totals..."
Call "DO_TOTALS" Using
By Reference TRIPS_RECORD
By Reference TOTAL_MILES
By Reference TOTAL_AMOUNT
By Reference TOTAL_TOLLS
By Reference FORM_TOTAL
Message
"Done computing totals."
Signal
End Response
Disable Response
Remove All
End Response
Receive Response HEADER_INFO_RECORD
Activate
Panel HEADER_INFO_PANEL
Position To Panel HEADER_INFO_PANEL
End Response
Receive Response TRIPS_RECORD
Activate
Panel TRIPS_INFO_PANEL
Position To Panel TRIPS_INFO_PANEL
End Response
Function Response DISCARD
Include RESET_DATA
End Response
Function Response MOVE_UP
If ( NOT UPPERMOST ITEM) Then
Position To Up Item
Else
Include BORDER_PATROL
End If
End Response
Function Response MOVE_DOWN
If ( NOT LOWERMOST ITEM) Then
Position To Down Item
Else
Include BORDER_PATROL
End If
End Response
Function Response PRINT_FILE
Message
"Preparing the print file..."
Print
TRIPS_INFO_PANEL
Message
"Print file completed."
End Response
Use Help Panel
HELP_PANEL
Field Default BOLD_ICON
Active Highlight
Bold
End Default
Apply Field Default Of
Active Highlight
Underlined
End Default
Message Panel DEFAULT_MESSAGE_PANEL
Viewport DEFAULT_MESSAGE_VIEWPORT
End Panel
Help Panel HELP_PANEL
Viewport HELP_VIEWPORT
Function Response NEXT HELP
Activate
Panel SECOND_HELP_PANEL
Position To Panel SECOND_HELP_PANEL
End Response
Literal Text
Line 1
Column 18
Value "HELP FOR THE MILEAGE REIMBURSEMENT APPLICATION"
Display
Bold
End Literal
Literal Polyline
Line 2 Column 1
Line 2 Column 80
Display
Bold
End Literal
Literal Rectangle
Line 4 Column 1
Line 18 Column 80
End Literal
Literal Polyline
Line 4 Column 40
Line 18 Column 40
End Literal
Literal Text
Line 3
Column 14
Value "To:"
Display
Bold
End Literal
Literal Text
Line 3
Column 59
Value "VT"
Display
Bold
End Literal
Literal Text
Line 5
Column 3
Value "Move to next item"
End Literal
Literal Text
Line 5
Column 42
Value "Tab or KP Enter"
End Literal
Literal Text
Line 6
Column 3
Value "Move to previous item"
End Literal
Literal Text
Line 6
Column 42
Value "F12 or Backspace"
End Literal
Literal Text
Line 7
Column 3
Value "Display help message"
End Literal
Literal Text
Line 7
Column 42
Value "PF2 or Help"
End Literal
Literal Text
Line 8
Column 3
Value "Leave help"
End Literal
Literal Text
Line 8
Column 42
Value "PF1-PF2 or PF1-Help"
End Literal
Literal Text
Line 9
Column 6
Value "Header Screen:"
Display
Bold
End Literal
Literal Text
Line 10
Column 3
Value "Next line of address"
End Literal
Literal Text
Line 10
Column 42
Value "Return"
End Literal
Literal Text
Line 11
Column 3
Value "Move to next screen"
End Literal
Literal Text
Line 11
Column 42
Value "F10 or Ctrl/Z"
End Literal
Literal Text
Line 12
Column 6
Value "Trips Screen:"
Display
Bold
End Literal
Literal Text
Line 13
Column 3
Value "Move to option buttons"
End Literal
Literal Text
Line 13
Column 42
Value "PF1-down arrow"
End Literal
Literal Text
Line 14
Column 3
Value "Choose an option"
End Literal
Literal Text
Line 14
Column 42
Value "Select or KP."
End Literal
Literal Text
Line 15
Column 3
Value "Compute totals"
End Literal
Literal Text
Line 15
Column 42
Value "Do or PF1-KP."
End Literal
Literal Text
Line 16
Column 3
Value "Discard data"
End Literal
Literal Text
Line 16
Column 42
Value "F8 or PF1-KP8"
End Literal
Literal Text
Line 17
Column 3
Value "Record and exit"
End Literal
Literal Text
Line 17
Column 42
Value "F10 or Ctrl/Z"
End Literal
Icon MORE_HELP
Apply Field Default BOLD_ICON
Function Response SELECT
Activate
Panel SECOND_HELP_PANEL
Position To Panel SECOND_HELP_PANEL
End Response
Literal Rectangle
Line 19 Column 16
Line 21 Column 33
End Literal
Literal Text
Line 20
Column 17
Value "Help on Printing"
End Literal
End Icon
Icon LEAVE_HELP
Apply Field Default BOLD_ICON
Function Response SELECT
Exit Help
Remove Help
End Response
Literal Text
Line 20
Column 44
Value "Dismiss Help"
End Literal
Literal Rectangle
Line 19 Column 43
Line 21 Column 56
End Literal
End Icon
End Panel
Panel HEADER_INFO_PANEL
Viewport MAIN_VIEWPORT
Display
%Keypad_Application
Entry Response
Message
"Press Help for information on how to use this
application."
End Response
Exit Response
Message
"Displaying next screen..."
End Response
Literal Text
Line 1
Column 15
Value "Mileage Reimbursement Form"
Display
Font Size Double Wide
End Literal
Literal Text
Line 2
Column 23
Value "Header Information"
Display
Font Size Double Wide
End Literal
Literal Polyline
Line 3 Column 1
Line 3 Column 80
End Literal
Literal Text
Line 5
Column 2
Value "Employee Name: "
End Literal
Field EMPLOYEE_NAME
Line 5
Column 17
End Field
Literal Text
Line 7
Column 3
Value "Badge Number:"
End Literal
Field BADGE_NUMBER
Line 7
Column 17
Output Picture 999999R
Justification Right
End Field
Literal Text
Line 7
Column 30
Value "Cost Center:"
End Literal
Field COST_CENTER
Line 7
Column 43
Autoskip
Uppercase
End Field
Literal Text
Line 9
Column 8
Value "Address:"
End Literal
Textfield ADDRESS
Line 9
Column 17
Builtin Function Response CURSOR UP
Builtin Function Response CURSOR DOWN
Rows 3
Columns 40
End Field
Literal Text
Line 13
Column 2
Value "Reason for"
End Literal
Literal Text
Line 14
Column 2
Value "Reimbursement:"
End Literal
Field REASON
Line 14
Column 17
End Field
Literal Text
Line 17
Column 17
Value "To move to the previous item:"
End Literal
Literal Text
Line 16
Column 17
Value "To move to the next item:"
End Literal
Literal Text
Line 19
Column 17
Value "When you are finished:"
End Literal
Literal Text
Line 20
Column 17
Value "For more information:"
End Literal
Literal Text
Line 16
Column 50
Value "Tab or Enter"
Display
Bold
End Literal
Literal Text
Line 17
Column 50
Value "F12 or Backspace"
Display
Bold
End Literal
Literal Text
Line 19
Column 50
Value "F10 or Ctrl/Z"
Display
Bold
End Literal
Literal Text
Line 20
Column 50
Value "PF2 or Help"
Display
Bold
End Literal
Literal Rectangle
Line 15 Column 16
Line 21 Column 68
End Literal
Literal Text
Line 18
Column 17
Value "To move to next line of address:"
End Literal
Literal Text
Line 18
Column 50
Value "Return"
Display
Bold
End Literal
End Panel
Panel TRIPS_INFO_PANEL
Viewport MAIN_VIEWPORT
Display
%Keypad_Application
Entry Response
Message
"Press Help for information on how to use this
application."
End Response
    Function Response TRANSMIT
        Include UPDATE_TOTALS
        Include RECORD_DATA
    End Response

    Function Response DO_TOTALS
        Include UPDATE_TOTALS
    End Response
Literal Text
Line 1
Column 15
Value "Mileage Reimbursement Form"
Display
Font Size Double Wide
End Literal
Literal Polyline
Line 2 Column 1
Line 2 Column 80
End Literal
Literal Text
Line 3
Column 11
Value "Date"
End Literal
Literal Text
Line 4
Column 8
Value "DD-MMM-YYYY"
End Literal
Literal Rectangle
Line 5 Column 6
Line 18 Column 69
End Literal
Literal Text
Line 3
Column 21
Value "Travel Points"
End Literal
Literal Text
Line 3
Column 39
Value "Personal Car"
End Literal
Literal Text
Line 4
Column 22
Value "From"
End Literal
Literal Text
Line 4
Column 33
Value "To"
End Literal
Literal Text
Line 4
Column 39
Value "Miles"
End Literal
Literal Text
Line 4
Column 46
Value "Amount"
End Literal
Literal Text
Line 4
Column 53
Value "Tolls"
End Literal
Literal Text
Line 4
Column 61
Value "Subtotal"
End Literal
Group TRIP
Vertical
Displays 12
Function Response MOVE_UP
If ( NOT FIRST OCCURRENCE VERTICAL) Then
Position To Up Occurrence
Else
Include BORDER_PATROL
End If
End Response
Function Response MOVE_DOWN
If ( NOT LAST OCCURRENCE VERTICAL) Then
Position To Down Occurrence
Else
Include BORDER_PATROL
End If
End Response
Field TRIP_DATE
Line 6
Column 8
Autoskip
Input Picture For Date DD-AAA-YYYY
Output " "
When (TRIP(**).TRIP_DATE = BLANK_DATE)
End Field
Field TRIP_FROM
Line 6
Column 22
Autoskip
Uppercase
Protected
When (TRIP(**).TRIP_DATE = BLANK_DATE)
Search LOCATION_CODES
Message
"Must be a valid code: ACT, BXB, LTN, MKO, or ZKO"
End Field
Field TRIP_TO
Line 6
Column 29
Autoskip
Uppercase
Protected
When (TRIP(**).TRIP_DATE = BLANK_DATE)
Search LOCATION_CODES
Message
"Must be a valid code: ACT, BXB, LTN, MKO, or ZKO"
End Field
Field MILES
Line 6
Column 40
Exit Response
Call "UPDATE_ROW" Using
By Reference TRIP_ROW_RECORD
End Response
Output Picture 999R
Justification Right
Output ""
When (TRIP(**).TRIP_DATE = BLANK_DATE)
Protected
When (TRIP(**).TRIP_DATE = BLANK_DATE)
Range
1 Through 100
Message
"You cannot get reimbursed for more than 100 "
"miles per trip!"
End Field
Field AMOUNT
Line 6
Column 46
Output Picture 99R9.99
Scale -2
Output ""
When (TRIP(**).TRIP_DATE = BLANK_DATE)
Protected
End Field
Field TOLL
Line 6
Column 54
Exit Response
Let TRIP(N).SUBTOTAL = (TRIP(N).AMOUNT + TRIP(N).TOLL)
End Response
Output Picture 99R9.99
Scale -2
Justification Decimal
Output ""
When (TRIP(**).TRIP_DATE = BLANK_DATE)
Protected
When (TRIP(**).TRIP_DATE = BLANK_DATE)
End Field
Field SUBTOTAL
Line 6
Column 62
Output Picture 99R9.99
Scale -2
Output ""
When (TRIP(**).TRIP_DATE = BLANK_DATE)
Protected
End Field
End Group
Field TOTAL_MILES
Line 19
Column 39
Output Picture 999R9
Protected
End Field
Field TOTAL_AMOUNT
Line 19
Column 45
Output Picture 999R9.99
Scale -2
Protected
End Field
Field TOTAL_TOLLS
Line 19
Column 54
Output Picture 999R.99
Scale -2
Protected
End Field
Literal Text
Line 19
Column 31
Value "Totals:"
End Literal
Field FORM_TOTAL
Line 19
Column 61
Output Picture 999R9.99
Scale -2
Protected
End Field
Icon COMPUTE_TOTALS
Apply Field Default BOLD_ICON
     Function Response SELECT
         Include UPDATE_TOTALS
     End Response
Literal Rectangle
Line 20 Column 2
Line 22 Column 19
End Literal
Literal Text
Line 21
Column 4
Value "Compute Totals"
End Literal
End Icon
Icon DISCARD_DATA
Apply Field Default BOLD_ICON
     Function Response SELECT
         Include RESET_DATA
     End Response
Literal Rectangle
Line 20 Column 22
Line 22 Column 37
End Literal
Literal Text
Line 21
Column 24
Value "Discard Data"
End Literal
End Icon
Icon RECORD_AND_EXIT
Apply Field Default BOLD_ICON
     Function Response SELECT
         Include UPDATE_TOTALS
         Include RECORD_DATA
     End Response
Literal Rectangle
Line 20 Column 40
Line 22 Column 58
End Literal
Literal Text
Line 21
Column 42
Value "Record and Exit"
End Literal
End Icon
Icon HELP_ICON
Apply Field Default BOLD_ICON
Function Response SELECT
Enter Help
End Response
Literal Rectangle
Line 20 Column 61
Line 22 Column 75
End Literal
Literal Text
Line 21
Column 66
Value "Help"
End Literal
End Icon
End Panel
Help Panel SECOND_HELP_PANEL
Viewport HELP_VIEWPORT
Literal Text
Line 1
Column 24
Value "HELP ON PRINTING FORM DATA"
Display
Bold
End Literal
Literal Polyline
Line 2 Column 1
Line 2 Column 80
End Literal
Literal Text
Line 3
Column 1
Value "When you finish entering the data for your form, you "-
"can press Ctrl/P to"
End Literal
Literal Text
Line 4
Column 1
Value "create a file that contains a picture of the second "-
"screen:"
End Literal
Literal Text
Line 5
Column 7
Value "Platform"
Display
Underlined
End Literal
Literal Text
Line 5
Column 30
Value "Files Created"
Display
Underlined
End Literal
Literal Text
Line 5
Column 56
Value "Description"
Display
Underlined
End Literal
Literal Text
Line 6
Column 10
Value "VT"
End Literal
Literal Text
Line 6
Column 30
Value "mrf_form.txt"
End Literal
Literal Text
Line 6
Column 56
Value "Text file "
End Literal
Literal Polyline
Line 9 Column 1
Line 9 Column 80
End Literal
Literal Text
Line 10
Column 1
Value "On all platforms, all your form data is formatted for "-
"quality printing."
End Literal
Literal Text
Line 11
Column 1
Value "On OpenVMS, the application creates a file named "-
"prin_mrf.doc."
End Literal
Literal Polyline
Line 12 Column 1
Line 12 Column 80
End Literal
Literal Text
Line 14
Column 1
Value "On OpenVMS, to convert a .doc file to PostScript "-
"format and print the file,"
End Literal
Literal Text
Line 15
Column 1
Value "use the following commands:"
End Literal
Literal Text
Line 16
Column 1
Value "$ CONVERT/DOCUMENT filename.DOC filename.PS/FORMAT=PS"
End Literal
Literal Text
Line 17
Column 1
Value "$ PRINT /QUEUE=postscript_queue_name file_name.PS"
End Literal
Icon PREV_HELP
Apply Field Default BOLD_ICON
Function Response SELECT
Activate
Panel HELP_PANEL
Position To Panel HELP_PANEL
End Response
Literal Rectangle
Line 19 Column 15
Line 21 Column 29
End Literal
Literal Text
Line 20
Column 16
Value "Previous Help"
End Literal
End Icon
Icon LEAVE_SECOND_HELP
Apply Field Default BOLD_ICON
   Function Response SELECT
     Exit Help
     Remove Help
   End Response
Literal Rectangle
Line 19 Column 42
Line 21 Column 55
End Literal
Literal Text
Line 20
Column 43
Value "Dismiss Help"
End Literal
End Icon
End Panel
End Layout
End FormA.2. C Application Source: mrf_c.c
This section shows the C language source code for the mileage reimbursement application program.
/*
 *         © Copyright 2005 Hewlett-Packard Development Company,
 *
 *     Consistent with FAR 12.211 and 12.212, Commercial Computer Software,
 *     Computer Software Documentation, and Technical Data for Commercial
 *     Items are licensed to the U.S. Government under vendor’s standard
 *     commercial license.
 *
 *
 *========== OpenVMS - Character-Cell Instructions ========
 *
 * If your system manager copied the Mileage Reimbursement Demonstration
 * Application from the DECforms kit onto your system, you can run the
 * application by doing the following:
 *
 * To run the character-cell version:
 *
 *  $ run forms$examples:forms$demo_mrf
 *
 * Any printing you do while running the Mileage Reimbursement Demonstration
 * Application will end up in your SYS$SCRATCH directory (usually your login
 * directory).
 *
 * The Mileage Reimbursement Demonstration Application in the C language
 * consists of three files:
 *
 *     forms$demo_mrf_form.ifdl The IFDL source form
 *     forms$demo_mrf_c.c The application itself
 *     formsdef.h                     An include file with DECforms definitions
 *
 * The first two files are copied from the DECforms kit to the FORMS$EXAMPLES
 * directory and the last is put into SYS$LIBRARY. Putting the files in
 * FORMS$EXAMPLES is an installation option; talk to your system manager if
 * they aren’t there. The FORMSDEF.H file is put into SYS$LIBRARY
 * unconditionally, so that you should be able to use it from all your C
 * programs using DECforms.
 *
 * To create a working version of the Mileage Reimbursement Application in
 * your own directory from these sources, follow these steps:
 *
 *     1. Set the default to your own directory:
 *
 *         $ set default your-directory
 *
 *     2. Copy the source files to your own directory:
 *
 *         $ copy forms$examples:forms$demo_mrf_form.ifdl, -
 *                               forms$demo_mrf_c.c []
 *
 *     3. Translate the IFDL form file with the following command:
 *
 *         $ forms translate forms$demo_mrf_form.ifdl
 *
 *      This creates a binary form file named forms$demo_mrf_form.form.
 *
 *     4. Create the form object file with the following command:
 *
 *     $ forms extract object /portable_api /form_load forms$demo_mrf_form.form
 *
 *       This creates a forms object file named forms$demo_mrf_form.obj.
 *
 *     5. Compile the program with the following command:
 *
 *         $ cc forms$demo_mrf_c
 *
 *       This creates an object file named forms$demo_mrf_c.obj.
 *
 *     6. Create a file named mrf_opt.opt that contains the following line:
 *
 *             SYS$LIBRARY:FORMS$PORTABLE_API.EXE/SHARE
 *
 *         This file tells the linker to link in the shareable image that
 *         contains the portable API entry points to the Form Manager.
 *
 *     7. Define the logical LNK$LIBRARY with the following command:
 *
 *          $ define lnk$library sys$library:vaxcrtl
 *
 *       This links in the C run-time library that defines the C forms calls.
*     8. Link the C program with the following command:
*
*          $ link forms$demo_mrf_c, forms$demo_mrf_form, mrf_opt/opt
*
*     9. To prepare to run this application on character-cell devices, define
*        the logical FORMS$DEFAULT_DEVICE with the following command:
*
*          $ define forms$default_device sys$input:
*
*     10. To create a trace file that will describe each action taken
*         during the course of the application session, define the logical
*         FORMS$TRACE with the following command:
*
*          $ define forms$trace t
*
*     11. To the application, enter the following command:
*
*          $ run forms$demo_mrf_c
*
*        If you turned on the trace file, running the application will
*        produce a log file named forms$demo_mrf_form.trace.
*
*=======================================================================
*/
#include <stdio.h>
#include <formsdef.h>

#define EMPNAME 32
#define EMPBADGE 6
#define EMPCC 3
#define EMPADDRESS 120
#define EMPREASON 64
#define TRIPDATE 8
#define TRIPFROM 3
#define TRIPTO 3
#define TRIPRECORD 36

/*
 * Structure format declarations for records that will be sent to the form
 */
typedef struct {
    char employee_name[EMPNAME], badge_number[EMPBADGE], cost_center[EMPCC],
        address[EMPADDRESS], reason[EMPREASON];
} Hdr_Info_Record;

typedef struct {
    char        trip_date[TRIPDATE], trip_from[TRIPFROM], trip_to[TRIPTO];
    unsigned long miles, amount, toll, subtotal;
} Trip_Record;

typedef struct {
    unsigned long total_miles, total_amount, total_tolls, form_total;
} Totals_Record;

/*
 * Static storage
 */
Hdr_Info_Record header_info_record; /* The header info record */
Trip_Record trips_record[TRIPRECORD]; /* Array of trip records */
Totals_Record totals_record; /* totals for all trips */

/*
 * Create instances from datatypes in forms_def header file
 */
Forms_Session_Id session_id;
Forms_Form_Object MRF_FORM; /* linked form name */
Forms_Status status;
Forms_Record_Data header_info_record_descr; /* record */
Forms_Record_Data trips_record_descr; /* record */
Forms_Record_Data totals_record_descr; /* record */
Forms_Request_Options request_options[2]; /* form object for linked form*/
Forms_Session_Id print_session; /* session for creating print form */

/*
 * Routine: main
 *
 * Functional Description:
 *
 *     Enables the form session and performs the receive requests necessary to
 *     obtain the employee and the trips data. Note that although these
 *     operations are performed in two separate requests for simplicity, a
 *     single request receiving both records would be more efficient and is
 *     suitable for this situation since the application performs no operations
 *     between the separate requests.
 */
int main (void)
{
/*
 * Set up the request options for linking the form object file and
 * enable the form.
 */
request_options[0].option      = forms_c_opt_form;
request_options[0].form.object = MRF_FORM;
request_options[1].option      = forms_c_opt_end;

status = forms_enable (session_id,         /* session id returned */
                       NULL,               /* current device */
                       NULL,               /* name of form file */
                       "MRF_FORM",         /* name of the form */
                       request_options);   /* request options */
/*
 * Obtain the employee header information -- structure must contain the length
 * and address of the record being received from DECforms.
 */

header_info_record_descr.data_record = &header_info_record;
header_info_record_descr.data_length = sizeof(header_info_record);
header_info_record_descr.shadow_record = NULL;
header_info_record_descr.shadow_length = 0;

status = forms_receive (session_id,                 /* session id */
                        "header_info_record",       /* form record in IFDL */
                        &header_info_record_descr,  /* record in program */
                        NULL);                      /* no request options */

/*
 * Obtain the information on all the trips made.
 */

trips_record_descr.data_record = &trips_record;
trips_record_descr.data_length = sizeof(trips_record);
trips_record_descr.shadow_record = NULL;
trips_record_descr.shadow_length = 0;

status = forms_receive (session_id,
                        "trips_record",
                        &trips_record_descr,
                        NULL);

/*
* Obtain totals for the form.
*/

totals_record_descr.data_record = &totals_record;
totals_record_descr.data_length = sizeof(totals_record);
totals_record_descr.shadow_record = NULL;
totals_record_descr.shadow_length = 0;

status = forms_receive (session_id,
                        "totals_record",
                        &totals_record_descr,
                        NULL);

status = forms_enable (print_session,
                       "prin_mrf.doc",
                       NULL,
                       "MRF_FORM",
                       request_options);

status = forms_send (print_session,
                       "header_info_record",
                       &header_info_record_descr,
                       NULL);

status = forms_send (print_session,
                       "trips_record",
                       &trips_record_descr,
                       NULL);

status = forms_send (print_session,
                       "totals_record",
                       &totals_record_descr,
                       NULL);

/*
 * Disable each session and exit.
 */
status = forms_disable (print_session, NULL);
return 1;

status = forms_disable (session_id, NULL);
return 1;
}

/*
 * Routine: update_row
 *
 * Functional Description:
 *
 *     Updates the information in the row of a trip record. The mileage
 *     reimbursement amount is calculated from the number of miles travelled
 *     (using 22½¢ per mile).
 *
 * Formal Parameters:
 *
 *     trip-record - a pointer to the trip record
 *
 * Routine Value:
 *
 *     none
 *
 */
void Forms_Callback update_row (Trip_Record *trip)
{

/*
 * Type cast trip miles to unsigned float, multiply by 22.5, and add .5
 * to round off, and then recast to unsigned integer.
 */
    trip->amount = (unsigned long)(((float)trip->miles * 22.5) + 0.5);
    return;
}

/*
 * Routine: do_totals
 *
 * Functional Description:
 *
 *     Computes and updates the totals given the entire collection of trip
 *     records.
 *
 * Formal Parameters:
 *
 *     trips-record
 *     total-miles
 *     total-amount
 *     total-tolls
 *     form-total
 *
 * Routine Value:
 *
 *     none
 *
 */
void Forms_Callback do_totals (Trip_Record (*trips)[TRIPRECORD],
                               unsigned long *miles, unsigned long *amount,
                               unsigned long *tolls, unsigned long *total)
{
unsigned n;
/*
* Initialize counters to zero
*/
     *miles = *amount = *tolls = *total = 0;
/*
 * For each entry with a nonzero mileage, accumulate the trips values into
 * the counters.
 */
    for (n = 0; n < TRIPRECORD; n++) {
        if ((*trips)[n].miles != 0) {
            *miles = *miles + (*trips)[n].miles;
            *amount = *amount + (*trips)[n].amount;
            *tolls = *tolls + (*trips)[n].toll;
            *total = *total + (*trips)[n].subtotal;
        }
    }
    return;
}
A.3. FORTRAN Application Source for OpenVMS Systems:mrf_for.for
This section shows the FORTRAN language source code for the mileage reimbursement application program for OpenVMS systems.
!+
!     © Copyright 2005 Hewlett-Packard Development Company,.
!
!     Consistent with FAR 12.211 and 12.212, Commercial Computer Software,
!     Computer Software Documentation, and Technical Data for Commercial
!     Items are licensed to the U.S. Government under vendor’s standard
!     commercial license.
!
!
!============== OpenVMS(TM) - Character-Cell Instructions ==============
!
! If your system manager copied the Mileage Reimbursement Application from
! the DECforms kit onto your system, you can run the application by doing
! the following:
!
! To run the character-cell version of the application:
!
!     $ run forms$examples:forms$demo_mrf
!
! Any printing you do while running the application will end up in your
! SYS$SCRATCH directory (usually your login directory).
!
! The Mileage Reimbursement Demonstration Application in the FORTRAN language
! consists of the following files:
!
!     forms$demo_mrf_form.ifdl   The IFDL source form
!     forms$demo_mrf_for.for     The application itself
!     forms$demo_mrf_def.for     An include file
!     formsdef.f                 An include file with DECforms definitions
!
! The first three files are copied from the DECforms kit to the FORMS$EXAMPLES
! directory and the last is put into SYS$LIBRARY. Putting the files in
! FORMS$EXAMPLES is an installation option; talk to your system manager if they
! aren’t there. The FORMSDEF.F file is put into SYS$LIBRARY unconditionally, so
! that you should be able to use it from all your FORTRAN programs using
! DECforms.
!
! To create a working version of the Mileage Reimbursement Application in
! the FORTRAN language in your own directory, follow these steps:
!
!     1. Set the default to your own directory:
!
!         $ set default your-directory
!
!     2. Copy all the source files from FORMS$EXAMPLES to your own directory:
!
!     $ copy forms$examples:forms$demo_mrf_form.ifdl, -
!                           forms$demo_mrf_for.for, -
!                           forms$demo_mrf_def.for []
!
!   3. Translate the IFDL form file with the following command:
!
!        $ forms translate forms$demo_mrf_form.ifdl
!
!      This creates a binary form file named forms$demo_mrf_form.form.
!
!   4. Create the form object file with the following command:
!
!      $ forms extract object /portable_api /form_load forms$demo_mrf_form.form
!
!      This creates a forms object file named forms$demo_mrf_form.obj.
!
!   5. Compile the program with the following command:
!
!        $ fortran forms$demo_mrf_for.for
!
!      This creates an object file named forms$demo_mrf_c.obj.
!
!   6. Create a file named mrf_opt.opt that contains the following line:
!
!         SYS$LIBRARY:FORMS$PORTABLE_API.EXE/SHARE
!
!      This file tells the linker to link in the shareable image that
!      contains the portable API entry points to the Form Manager.
!
!
!   7. Link the FORTRAN program with the following command:
!
!        $ link forms$demo_mrf_for, forms$demo_mrf_form, mrf_opt/opt
!
!   8. To prepare to run this application on character-cell devices, define
!      the logical FORMS$DEFAULT_DEVICE with the following command:
!
!        $ define forms$default_device sys$input:
!
!   9. To create a trace file that will describe each action taken
!      during the course of the application session, define the logical
!      FORMS$TRACE with the following command:
!
!        $ define forms$trace t
!
!  10. To the application, enter the following command:
!
!       $ run forms$demo_mrf_for
!
!      If you turned on the trace file, running the application will
!      produce a log file named forms$demo_mrf_form.trace.
!
!============================================================================
!-
        Implicit None
        Include ’Sys$Library:formsdef.f’
        Include ’forms$demo_Mrf_Def’
!
! Variables
!
        Record /trip_struct/ trips_record(TRIPRECORD)
        Record /header_info_struct/ header_info_record
        Record /totals_struct/ totals_record
        Record/Forms_Record_Data/header_info_record_descr
        Record/Forms_Record_Data/trips_record_descr
        Record/Forms_Record_Data/totals_record_descr
        Record/Forms_Request_Options/request_options(2)

        Integer MRF_FORM
CDEC$   ATTRIBUTES EXTERN :: MRF_FORM
        Character*16 session_id
        Character*16 print_session
        Integer status

!
! Request options for linked-in form
!

        request_options(1).option = forms_c_opt_form
        request_options(1).form_object = %loc (MRF_FORM)
        request_options(2).option = forms_c_opt_end

!
! Structure must contain the length and address of the record being sent
! or received from DECforms; shadow records are optionally used to track
! changes to fields in a data record - here they are set to 0
!
        header_info_record_descr.data_length=sizeof(header_info_record)
        header_info_record_descr.data_record = %loc(header_info_record)
        header_info_record_descr.shadow_record = 0
        header_info_record_descr.shadow_length = 0
        trips_record_descr.data_length = sizeof(trips_record)
        trips_record_descr.data_record = %loc (trips_record)
        trips_record_descr.shadow_record = 0
        trips_record_descr.shadow_length = 0
        totals_record_descr.data_length = sizeof(totals_record)
        totals_record_descr.data_record = %loc (totals_record)
        totals_record_descr.shadow_record = 0
        totals_record_descr.shadow_length = 0

!
! Enable the form -- the ENABLE request expects 5 parameters; in FORTRAN
! requests, all expected parameters must be specified by passing a
! variable, a value, or a placeholder; session id returned by DECforms
! is used in all subsequent calls to the form and device
!

        status = forms_enable_for(
        1                        session_id,
        2                        , ! current device
        3                        , ! name of form file
        4                        ’MRF_FORM’, ! form name
        5                        request_options)

!
! Obtain the header information
!

        status = forms_receive_for(
                                   1 session_id,
                                   2 ’header_info_record’, !form record
                                   3 header_info_record_descr, !program record
                                   4  ) ! no request
options
!
! Obtain information on all trips
!
        status = forms_receive_for(
        1                          session_id,
        2                          ’trips_record’,
        3                          trips_record_descr,
        4                          )
!
! Obtain totals for all trips (to send to print session)
!
        status = forms_receive_for(
        1                         session_id,
        2                         ’totals_record’,
        3                         totals_record_descr,
        4                         )

!
! Enable second session for print file
!
        status = forms_enable_for (
        1                     print_session,
        2                     ’prin_mrf.doc’,
        3                     ,
        4                     ’MRF_FORM’,
        5                     request_options)
!
! Send data from program to form for print file
!
        status = forms_send_for (
        1                     print_session,
        2                     ’header_info_record’,
        3                     header_info_record_descr,
        4                     )

        status = forms_send_for (
        1                     print_session,
        2                     ’trips_record’,
        3                     trips_record_descr,
        4                     )

        status = forms_send_for (
        1                     print_session,
        2                     ’totals_record’,
        3                     totals_record_descr,
        4                     )
!
! Disable the form
!
        status = forms_disable_for (
        1                     print_session, )

        status = forms_disable_for(
        1                     session_id,)
        End

!+
! Routine: Update_Row
!
! Functional Description:
!
!     Updates the information in the row of a trip record. The mileage
!     reimbursement amount is calculated from the number of miles travelled
!     (using 22½¢ per mile)
!
! Formal Parameters:
!
!     trip-record - the trip record
!
!-
         Subroutine Update_Row (trip)
         Include ’sys$library:formsdef.f’
         Include ’forms$demo_Mrf_Def’
         Record /trip_struct/ trip
         trip.amount = Int((trip.miles * 22.5)+0.5)
         Return
         End

!+
! Routine: Do_Totals
!
! Functional Description:
!
!     Computes and updates the totals given the entire collection of trip
!     records.
!
! Formal Parameters:
!
!     trips-record
!     total-miles
!     total-amount
!     total-tolls
!     form-total
!-

        Subroutine Do_Totals (trips, miles, amount, tolls, total)
        Include ’sys$library:formsdef.f’
        Include ’forms$demo_Mrf_Def’
        Record /trip_struct/ trips(TRIPRECORD)
        Integer miles, amount, tolls, total, n

!
! Initialize counters to zero
!
        miles = 0
        amount = 0
        tolls = 0
        total = 0
!
! For each entry with a nonzero mileage, accumulate the trips values into
! the counters.
!
        Do n = 1,TRIPRECORD
            If (trips(n).miles .ne. 0) Then
                miles = miles + trips(n).miles
                amount = amount + trips(n).amount
                tolls = tolls + trips(n).toll
                total = total + trips(n).subtotal
            End If
        End Do
        Return
        End
A.4. FORTRAN Application Definition File: mrf_def.for
This section shows the FORTRAN definition file for the mileage reimbursement application program.
!+
! Symbolic constants
!-
        Integer EMPNAME, EMPBADGE, EMPCC, EMPADDRESS, EMPREASON
        Integer TRIPDATE, TRIPFROM, TRIPTO, TRIPRECORD
        Parameter(EMPNAME=32)
        Parameter(EMPBADGE=6)
        Parameter(EMPCC=3)
        Parameter(EMPADDRESS=120)
        Parameter(EMPREASON=64)
        Parameter(TRIPDATE=8)
        Parameter(TRIPFROM=3)
        Parameter(TRIPTO=3)
        Parameter(TRIPRECORD=36)
!+
! Structure delcarations for the form records
!-

        Structure /header_info_struct/
            Character employee_name*(EMPNAME)
            Character badge_number*(EMPBADGE)
            Character cost_center*(EMPCC)
            Character address*(EMPADDRESS)
            Character reason*(EMPREASON)
        End Structure

        Structure /trip_struct/
            Character trip_date*(TRIPDATE) ! date of the trip
            Character trip_from*(TRIPFROM) ! start facility
            Character trip_to*(TRIPTO) ! end facility
            Integer*4 miles ! miles travelled
            Integer*4 amount ! mileage amount
            Integer*4 toll ! toll amount
            Integer*4 subtotal ! total for trip
        End Structure

        Structure /totals_struct/
            Integer*4 total_miles ! total miles travelled
            Integer*4 total_amount ! total mileage amount
            Integer*4 total_tolls ! total toll amount
            Integer*4 form_total ! total for all trips
End StructureA Longword Integer has a specified format and occupies 4bytes in a form record. You will store money amounts in pennies, and convert to dollars and cents in the form.
Up arrow key
Down arrow key
The DECforms Independent Form Description Language is a subset of the Independent Form Description Language proposed as a standard by the CODASYL Form Interface Management System Committee and ISO/IEC JTC1/SC22 Working Group 18 (FIMS).
The request names in the C binding of the portable API use the format forms_request-name. In the FORTRAN binding,all request names use the format forms_request-name_for.