VSI DECforms IFDL Reference Manual
- Software Version:
- DECforms Version 4.0
- Operating System and Version:
- VSI OpenVMS IA-64 Version 8.4-1H1 or higher
VSI OpenVMS Alpha Version 8.4-2L1 or higher
Preface
VSI DECforms is a software product for applications, services, and tools that require a structured, forms-based, or menu-based user interface. DECforms is the first commercial implementation of an ANSI/ISO standard for forms-based interfaces, the CODASYL Form Interface Management System (FIMS).
1. About VSI
VMS Software, Inc. (VSI) is an independent software company licensed by Hewlett Packard Enterprise to develop and support the OpenVMS operating system.
2. Intended Audience
This manual is intended for application programmers and form designers. The information in this manual is not introductory. For an introduction to DECforms software, see the VSI DECforms Guide to Commands and Utilities.
3. Document Structure
This manual is divided into one chapter and seven appendixes.
| Chapter 1, "Independent Form Description Language" |
Describes each syntax element of the Independent Form Description Language (IFDL) in detail. |
| Appendix A, "Using Arrays with DECforms Software" |
Describes how to use arrays and numeric expressions with DECforms. |
| Appendix B, " DECforms Data Types" |
Describes the data type equivalencies between DECforms data types and OpenVMS data types. |
| Appendix C, "IFDL Reserved Words" | Lists the DECforms IFDL reserved words. |
| Appendix D, " DECforms Function Key Names" | Lists the DECforms function key names. |
| Appendix E, "DECforms Hebrew User's Guide" |
Describes how to use DECforms software to display Hebrew forms. |
| Appendix F, "Built-In Functions" | Describes how to use DECforms built-in functions. |
| Appendix G, "Intrafield Editing Functions" |
Describes how to use DECforms intrafield editing functions, which are built-in functions that you use to enter and edit data in an elementary display object such as a field or push-button label. |
4. Related Documents
VSI DECforms Installation Guide for OpenVMS Systems—Describes how to install DECforms software on processors that are running the OpenVMS operating system.
VSI DECforms Guide to Commands and Utilities—Introduces DECforms software and describes how to create forms.
VSI DECforms Style Guide for Character-Cell Devices—Describes how to develop user interfaces for DECforms applications for character-cell terminals.
VSI DECforms Programmer's Reference Manual—Describes how DECforms software operates at run time and how to call the DECforms requests from an application program.
VSI DECforms Guide to Developing an Application—Explains how to create a DECforms application, including both the form and the program, and contains additional guidelines and examples for more experienced DECforms programmers.
VSI DECforms Guide to Demonstration Forms and Applications—Describes how to use various demonstration forms and applications. This guide is contained in online files named
forms$demo_guide.txtandforms$demo_guide.psin the FORMS$EXAMPLES directory on OpenVMS systems. If you cannot find this document, ask your system manager to install it in the appropriate directory.For information about displaying these forms, see the VSI DECforms Guide to Developing an Application.
VSI DECforms Guide to Converting FMS Applications—Describes how to convert a VAX FMS or DEC FMS application to a DECforms application.
DEC LSE documentation for information on how to use DEC LSE
Oracle CDD/Repository documentation set for information on Oracle CDD/Repository definitions
ISO IS 11730:1994 for information on the standard of which DECforms is an implementation.
5. OpenVMS Documentation
The full VSI OpenVMS documentation set can be found on the VMS Software Documentation webpage at https://docs.vmssoftware.com.
6. VSI Encourages Your Comments
You may send comments or suggestions regarding this manual or any VSI document by sending electronic mail to the following Internet address: <docinfo@vmssoftware.com>. Users who have VSI OpenVMS support contracts through VSI can contact <support@vmssoftware.com> for help with this product.
7. Conventions
| Symbol or Term | Meaning |
|---|---|
| Ctrl/X |
In procedures, a sequence such as Ctrl/X indicates that you must hold down the key labeled Ctrl while you press another key. |
| KPn |
Key names that begin with KP indicate keys on the numeric keypad on the right side of the terminal keyboard. For example, KP4 and KPperiod are keys on the numeric keypad. |
| PF1-X |
A sequence such as PF1-X indicates that you must first press and release the key labeled PF1, and then press and release another key. |
... |
In examples, a horizontal ellipsis indicates one of the
following possibilities:
|
. . . |
A vertical ellipsis indicates the omission of items from a code example or command format; the items are omitted because they are not important to the topic being discussed. |
| Alt |
The Alt key is labeled as the Compose Character key on some keyboards. |
| bold type |
DECforms terms are shown in bold where introduced or explained. |
| italic type | Italic type indicates important information, complete titles of manuals, or variables. Variables include information that varies in system output (Internal error number), in command lines (/PRODUCER=name), and in command parameters in text (where dd represents the predefined code for the device type). |
| $ |
The default user prompt is your system name followed by a right angle bracket (>).The dollar sign is used to indicate the DCL prompt on OpenVMS systems. |
| The following terms are used in the DECforms documentation to refer to layouts: | |
| character-cell |
Refers to layouts that display forms on character-cell devices or on terminal emulators such as DECterm. |
| PRINTER | Refers to layouts that output forms for quality printing. |
| pixel | Refers to PRINTER layouts. |
| DECforms |
References to DECforms throughout this manual refer to DECforms software. |
Chapter 1. Independent Form Description Language
DECforms software uses the Independent Form Description Language (IFDL) to create forms. Forms consist of IFDL statements, clauses, and phrases.
You use the IFDL to define different aspects of forms. For example, you use IFDL statements to define the appearance of a form and how the form is processed by the Form Manager. The IFDL also describes the application data and record messages exchanged between the application program and the form.
The IFDL is primarily a declarational language, and is not intended to be used as a sequential programming language. Section 1.1, ''IFDL Concepts'' gives an overview of the IFDL and its structure. Section 1.2, ''IFDL Syntax Descriptions'' contains detailed descriptions of each individual language element.
1.1. IFDL Concepts
The IFDL consists of keywords, reserved words, user-defined names, implementor names, literals, separators, punctuation, picture strings, and comments. These elements are arranged into statements, clauses, and phrases following the format rules of the IFDL.
Statements, Clauses, and Phrases
IFDL syntax diagrams show permissible arrangements of IFDL elements. These diagrams show high-level arrangements (usually called declarations or statements) or lower-level arrangements (usually called phrases) that are contained in declarations or other clauses.
Additional requirements on arrangements are specified as Syntax Rules.
IFDL Words
An IFDL word is a character string of 31 characters or fewer that forms one of the following: a keyword, a reserved word, a user-defined name, or an implementor name.
Keywords and Reserved Words
Keywords are words that have a special meaning within the IFDL. Keywords always appear in uppercase in syntax diagrams. The subset, reserved words, are keywords that cannot be used as names; they can be used only as shown in the syntax diagrams. For example, you must not use COPY as a name within a source file, because COPY is an IFDL reserved word. Appendix C, "IFDL Reserved Words" lists IFDL reserved words.
IFDL keywords can appear in uppercase or lowercase in your IFDL source file. The Back Translator capitalizes the first letters of keywords.
User-Defined Names
A user-defined name is a name that you must supply for a form entity, such as a layout or panel, to complete an IFDL clause or statement. User-defined names must consist of letters, digits (0 to 9), dollar signs ($), or underscores (_). The first character of the user-defined name must be alphabetic, and a user-defined name cannot be more than 31 characters long. The underscore must not be used as the first or last character.
- attribute-name
- button-name
- data-group-name
- data-name
- field-default-name
- field-name
- form-name
- function-name
- function-response-name
- group-name
- icon-name
- internal-response-name
- layout-name
- list-name
- literal-default-name
- panel-name
- pushbutton-name
- record-field-name
- record-group-name
- record-list-name
- record-name
- terminal-name
- viewport-name
Implementor Names
An implementor name is an IFDL word that is used to specify an implementor-defined feature. It is called an implementor name because the rules for defining it are specific to each implementation of the Form Interface Management System (FIMS). DECforms implementor names must consist of letters, digits (0 to 9), dollar signs ($), or underscores (_). The first character of the implementor name must be a percent sign (%). Implementor names cannot be more than 31 characters long. Uppercase and lowercase letters have no special significance in implementor names.
- attribute-declaration
- device-declaration
- display-viewport-clause
- function-declaration
- implementor-attribute
- let-response-step
- signal-response-step
Literals
A literal is a character string whose value is implicit in the characters themselves. Literals are either numeric or string.
A numeric literal is a character string whose characters can consist of the digits 0 to 9, plus (+) or minus (–) signs, periods, and the character E (for exponential notation). You must use a period (.) to denote a decimal point in a numeric literal within IFDL source files, even though decimal points can be displayed as commas in a panel field on a display device. If a numeric literal is enclosed in quotation marks (" ") or apostrophes (’ ’), the IFDL Translator treats it as a string. 1.2E+89 and –2.34 are examples of numeric literals.
A string is a character string of any length that is delimited by quotation marks (" ") or apostrophes (’ ’). For example, "check_book" is a string. A string must begin and end with the same delimiter. For example, you cannot begin a string with an apostrophe and close it with a quotation mark.
"""check_book"
""


’"check_book"’
Close the quotation marks or apostrophes.
Type a hyphen directly following the closing quotation mark or apostrophe at the end of the source line. (Leave no spaces between the hyphen and the quotation mark or apostrophe.)
Begin the next line with an opening quotation mark or an apostrophe.
"You may cash checks only if you have an account at MegaMoney "-
"Bank. If you do not have an account, you cannot cash checks here."
Note
Strings can extend beyond one source line except in picture strings. For more information on picture strings, see the picture string syntax description in Section 1.1.1, ''IFDL Syntax Conventions''.
Separators
A separator is a character or group of characters that divides or organizes pieces of information. Tab characters, carriage returns, and spaces are valid IFDL separators. Punctuation characters that are not part of literals or picture strings are also separators.
Punctuation
A punctuation character is a separator that is part of a literal or a picture string. Periods (.), commas (,), hyphens (-), colons (:), and slashes (/) are valid IFDL punctuation characters.
Picture Strings
A picture string is a string used to express a form data item visually. The picture string, along with input and output picture clauses, formats a form data item for display on a display device. (See Section 1.1.1, ''IFDL Syntax Conventions'' for more information.)
Comments
Comments are allowed within the IFDL source file and the form file. To store comments within the form file, you specify the /COMMENTS qualifier to the FORMS TRANSLATE command on the DCL command line. (By default, /COMMENTS is the qualifier when you specify FORMS TRANSLATE.) For a complete description of these commands, see the VSI DECforms Guide to Commands and Utilities.
/* comment text */
{ comment text }
The IFDL Translator does not translate text between comment delimiters (/* */, { }). A single comment can continue for more than one line. A comment is considered to be a separator: it is syntactically equivalent to a space.
Comment position is not always maintained upon back translation. Back translation converts a form file back into an IFDL source file, reversing the translation process of the IFDL Translator. To prevent comments in your form from drifting, place them inside and at the start of syntactic blocks. A syntactic block is an IFDL statement, declaration, or phrase that is bounded by a beginning and ending statement.
Field SALARY_FIELD
/* Don't reveal salaries to nonmanagers */
     CONCEALED
End Field
The Field and End Field statements are the beginning and end of a syntactic block.
Form Hierarchy
FORM
     FORM DATA declarations
     FORM RECORD declarations
     RECORD LIST declarations
     LAYOUT declarations
          DEVICE declarations
          LANGUAGE clause
          UNITS declaration
          SIZE clause
          LIST declarations
          ATTRIBUTE declarations
          DISPLAY VIEWPORT clause
          VIEWPORT declarations
          FUNCTION declarations
          FUNCTION RESPONSE declarations
          EXTERNAL RESPONSE declarations
          INTERNAL RESPONSE declarations
          CONTROL TEXT RESPONSE declarations
          FIELD DEFAULT declarations
          LITERAL DEFAULT declarations
          Field default application
          Literal default application
          HELP PANEL declaration
          MESSAGE PANEL declaration
          PANEL declarations
               panel properties
               ACCEPT RESPONSE declarations
               HELP PANEL declaration
               Field default applications
               Literal default applications
               PICTURE FIELD declarations
               TEXT FIELD declarations
               SLIDER FIELD declarations
               PUSH BUTTON declarations
               ICON declarations
                    field positioning clauses
                    item description entries
               Literal declarations
               GROUP declarations
                   Fields, icons, buttons, scroll bars, and literals
END FORM
1.1.1. IFDL Syntax Conventions
Clauses must appear in the order in which they appear in the syntax diagrams, unless specifically stated otherwise.
Uppercase words are required unless they appear in an optional choice;words beginning with a percent sign (%) indicate a word that is always required.
Lowercase words are generic terms indicating entries that you must provide.
Brackets ([ ]) enclose an optional part of a general format. When brackets enclose vertically stacked entries, they indicate that you can select only one of the enclosed entries. For example, if the syntax diagram is as follows:
You can choose one of the following:- Apple
- Banana
- Nothing — neither Apple nor Banana
Braces ({ }) indicate that you must select only one of the enclosed entries. For example, given the example that follows:
You must choose one of the following:- Apple
- Banana
Vertical bars enclosed by braces ({| |}) indicate a mandatory choice. You must select one or more of the entries in any order, but you can use each entry only once. For example, given the example that follows:
You must choose one of the following:- Apple
- Banana
- Apple Banana
- Banana Apple
Vertical bars enclosed by brackets ([| |]) indicate an optional choice. You can select zero or more of the entries, but you may choose each entry only once. For example, given the example that follows:
You can choose one of the following:- Apple
- Banana
- Apple Banana
- Banana Apple
- None of the above
For all vertically stacked entries,the choices are those printed on the same indentation level. A given choice can extend over more than one line by indenting additional lines.
An ellipsis (...) indicates that you can repeat the format between the matched pair of delimiters immediately preceding the ellipsis. For example, given the example that follows:
You can choose an infinite number, including:- Apple
- Banana
- Apple Banana
- Banana Apple
- Banana Banana Apple
- Apple Banana Apple Banana Apple Banana
Lowercase hyphenated phrases indicate clauses that are expanded in an individual syntax section, implementor names,or user-defined information as specified in the list of user-defined names. If the phrase is a syntax clause that is expanded, you are directed to the appropriate syntax section.
1.1.2. Name Sharing
A form and its layouts can share names with any other kind of form entity; any form entity can have the same name as its layout and form. A layout is the map of a form to a display. The layout controls the user's view of the form.
Record fields can share names with all other form entities;all other form entities can have the same names as record fields.(If a record field without a data transfer clause has the same qualified name as a form data item, data transfer occurs by default between those two items.)
Any entity that is declared inside a layout can share names with any entity declared in another layout.
- In addition to the preceding rules, the entities listed in Table 1.1, ''Rules for Name Sharing Among Dissimilar Entities'' can share names.
Table 1.1. Rules for Name Sharing Among Dissimilar Entities Named Entity
Possible Name Shares
Data group
Panel group, record group
Data item
Panel field
Function name
Function response
Function response
Functions in the same layout, function responses at different levels in the layout
Panel field
Data item
Panel group
Data group, record group
Receive response
Record, record list, send and transceive responses
Record
Send response, receive response, transceive response
Record group
Panel group, data group
Record list
Send response, receive response, transceive response
Send response
Record, record list, receive and transceive responses
Transceive response
Record, record list, send and receive responses
If two entities are of the same type, they can share names if the entities are declared in different structures. For example, you can have more than one panel named CHOICE_PANEL, as long as each CHOICE_PANEL is declared in a different layout. Table 1.2, ''Name Sharing Among Similar Entities'' shows the entity and the structure in which its possible name share must be declared.
|
Named Entity |
Shared Name Structure |
|---|---|
|
Attribute name |
Layout |
|
Button |
Panel |
|
Control text response |
Layout |
|
Field? |
Panel |
|
Function name |
Layout |
|
Function response |
Button, field, group, icon, layout, panel |
|
Group? |
Panel |
|
Icon? |
Panel |
|
Internal response |
Layout |
|
List |
Layout |
|
Named field default |
Layout |
|
Named literal default |
Layout |
|
Panel |
Layout |
|
Receive response |
Layout |
|
Record field? |
Record |
|
Send response |
Layout |
|
Terminal type |
Layout |
|
Transceive response |
Layout |
|
Viewport |
Layout |
1.2. IFDL Syntax Descriptions
Overview of the syntax element
Syntax diagram of the language element
Set of syntax rules
Examples
ACCEPT RESPONSE Declaration
ACCEPT RESPONSE Declaration — The ACCEPT RESPONSE declaration specifies the action the Form Manager takes when certain events occur during the accept phase of form processing. During accept phase, activation items can accept input from an operator. The ACCEPT RESPONSE declaration allows you to customize processing during run time, primarily during accept phase. The specific events include field input validation; function entry; and the beginning and end of panel, icon, panel field, button, and field group processing during entry and exit response processing.
accept-response-declaration
Format
Where you specify this clause:
Syntax Rules
entry-response-declaration
Performs a response when a panel, group, field, button, or icon becomes the current activation item. There is no default response for entry response processing. For more information, see the ENTRY RESPONSE declaration syntax section.
NO ENTRY RESPONSE
Specifies that no entry response is performed when a panel, group, field, button, or icon becomes the current activation item. Use NO ENTRY RESPONSE to override field defaults to customize form processing.
exit-response-declaration
Performs a response when the Form Manager exits a panel, group, field,button, or icon. Exit responses for the group and panel level are called when the Form Manager exits the last active field, button, or icon of the group or panel, and after the last active item's exit response is executed.
There is no default response for exit response processing. For more information, see the EXIT RESPONSE declaration syntax section.
NO EXIT RESPONSE
Specifies that no exit response is performed when the Form Manager exits a panel, group, field, button, or icon. Use NO EXIT RESPONSE to override field defaults to customize form processing.
function-response-declaration
Performs a response when the operator enters a function. For more information, see the FUNCTION RESPONSE declaration syntax section.
NO FUNCTION RESPONSE
Specifies that no function response is performed when the operator enters a function. Use NO FUNCTION RESPONSE to override field defaults to customize form processing.
validation-response-declaration
Performs a response when the operator has completed input into a field, icon, button, or group. There is no default response for validation response processing. For more information, see the VALIDATION RESPONSE declaration syntax section.
NO VALIDATION RESPONSE
Specifies that no validation response is performed when the operator has completed input into a field, icon button, or group. Use NO VALIDATION RESPONSE to override field defaults to customize form processing.
Example
The following IFDL syntax shows examples of each type of accept response.
.
.
.
Panel P1
Group G1
Entry Response  Message "Abandon hope all ye who enter here"
End Response
Field F1
Exit Response
Message "Abandon hope all ye who enter here"
End Response
Field F1
Exit Response  If G1.F1 = 5 Then Position to Field F3 On P2 End If
End Response
Validation Response
If G1.F1 = 5 Then Position to Field F3 On P2 End If
End Response
Validation Response  If G1.F1 >= 6 or G1.F1 <= 0 Then
Message "Please enter a number from 1 to 5"
Invalid
End If
End Response
End Field
Field F2
Function Response Next Panel
If G1.F1 >= 6 or G1.F1 <= 0 Then
Message "Please enter a number from 1 to 5"
Invalid
End If
End Response
End Field
Field F2
Function Response Next Panel  Message "There is no next panel"
End Response
End Field
End Group
End Panel
Message "There is no next panel"
End Response
End Field
End Group
End Panel
| When Group G1 is entered, an entry response displays the message "Abandon hope all ye who enter here ". |
| If form data item G1.F1 equals 5, an exit response executes a POSITION response step. Field F3 is on a previous panel. |
| This validation response is interpreted after input to Field G1.F1 is completed. If the validation is within the specified range, the operator moves on to the next field. If the validation is not within the specified range, the message "Please enter a number from 1 to 5" is displayed. |
| A function response occurs when the operator enters the NEXT PANEL function. The function response in this case displays a message stating "There is no next panel". |
ACTIVATE Response Step
ACTIVATE Response Step — The ACTIVATE response step adds items to the activation list.
activate-response-step
Format
Where you specify this clause:
Syntax Rules
ACTIVATE
Puts the items listed on the activation list. The activation items are one or more panel fields, icons, buttons, or requests to wait until the operator enters a function. The items are added after the current activation item and after any other items added during this response. Once the items are on the activation list they can receive operator input.
BUTTON button ON panel-name-1 (window layouts)
Causes button to be placed on the activation list. Panel-name-1 specifies the panel on which button occurs. The operator is allowed to enter only function key input, not data input, into button.
BUTTON button-array ON panel-name-2 (window layouts)
Causes all the buttons in the array reference to be added to the activation list. Panel-name-2 specifies the panel on which button-array occurs. The operator is allowed to enter only function key input, not data input, into the buttons specified in button-array.
CORRESPONDING RECEIVE ALL
Activates all panel fields that correspond to a record field in the current receive record. Not all such panel fields on all panels are activated—only as many as necessary so that each form data item corresponding to a record field has one of its panel fields on the activation list.
CORRESPONDING SEND PANELS
Activates wait activation items for panels that contain at least one panel field corresponding to a record field in the current send record. Not all such panels are activated—only a sufficient number so that all corresponding panel fields are displayed at least once.
If more than one panel contains the same field, the Form Manager activates the first field that it finds that is not protected or concealed.
FIELD field ON panel-name-3
Causes field to be placed on the activation list. Panel-name-3 specifies the panel on which field occurs. Field cannot have a PROTECTED attribute unless it is the PROTECTED WHEN attribute.
FIELD field-array ON panel-name-4
Causes all the panel fields in the array reference to be added to the activation list. Panel-name-4 specifies the panel on which field-array occurs.
GROUP panel-group ON panel-name-5
Causes all fields, icons, and buttons in that declaration of the panel group to be added to the activation list. The order of addition is the order of declaration within the group. Panel-name-5 specifies the panel on which panel-group occurs.
GROUP panel-group-array ON panel-name-6
Causes all fields, icons, and buttons in the array reference to be added to the activation list. Panel-name-6 specifies the panel on which panel-group-array occurs.
ICON icon ON panel-name-7 (character-cell layouts)
Causes icon to be placed on the activation list. Icon is the name of the icon;the operator cannot input data into icon, but function keys can be pressed in icon. Panel-name-7 specifies the panel on which icon occurs.
ICON icon-array ON panel-name-8 (character-cell layouts)
Causes all the icons in icon-array to be added to the activation list. Icon-array is the name of the array; the operator cannot input data into the icons specified in icon-array, but function keys can be pressed in icon-array. Panel-name-8 specifies the panel on which icon-array occurs.
PANEL panel-name-9
Activates all fields, icons, and buttons on panel-name-9 in the order in which they are declared in the panel.
WAIT [ ON panel-name-10 ] (character-cell layouts)
Enters a wait activation item on the activation list. During accept phase, when the Form Manager requests input for this activation item and panel-name-10 is specified, the Form Manager ensures that panel-name-10 is displayed and associates the wait with the panel (as far as position panel references are concerned).
Note
Use of WAIT is discouraged because it is no longer in the FIMS standard. DECforms will continue to support wait activation, but you are encouraged to change any forms that use waits. To achieve the same effect as waits, you should use an icon, for character-cell layouts, or a button, for window layouts.
ALL
Activates all fields, icons, and buttons on all panels in the layout.
TIMEOUT integer
Specifies the number of seconds allowed for operator input. For more information, see the TIMEOUT clause syntax section.
A TIMEOUT clause in an ACTIVATE response step overrides a TIMEOUT clause in a field, icon, or button declaration. A TIMEOUT clause in an external request overrides a TIMEOUT clause in an ACTIVATE response step.
General Rules
If an item is already on the activation list, an ACTIVATE response step for that activation item has no effect. If an item of the same name is declared on more than one panel, it can appear as an activation item once for each panel.
The ACTIVATE response step is ignored in PRINTER layouts.
Examples
Activate Wait On PANEL_P1
This activates a wait on PANEL_P1 in a character-cell layout.
Receive Response GET_CHECK
    Reset    CHECK_PAYTO CHECK_AMOUNT CHECK_MEMO
    Activate Field CHECK_PAYTO  On CHECK_PANEL
             Field CHECK_AMOUNT On CHECK_PANEL
             Field CHECK_MEMO   On CHECK_PANEL
End Response
This example specifies that a RESET response step is performed when the GET_CHECK record is received. The RESET response step specifies that the form data items CHECK_PAYTO, CHECK_AMOUNT, and CHECK_MEMO are restored to their initial values. After the reset is performed, the ACTIVATE response step activates the CHECK_PAYTO, CHECK_AMOUNT, and CHECK_MEMO fields on CHECK_PANEL.
ACTIVE HIGHLIGHT Clause
ACTIVE HIGHLIGHT Clause — The ACTIVE HIGHLIGHT clause allows you to specify additional display attributes to apply to a panel entity when the panel entity becomes the current activation item during accept phase.
active-highlight-clause
Format
Where you specify this clause:
Syntax Rules
ACTIVE HIGHLIGHT display-attribute-entry
Specifies that display-attribute-entry is to be applied to a field, button, or icon, in addition to its current display attributes when the field, button, or icon becomes the current activation item during accept phase. For more information, see the DISPLAY ATTRIBUTE entry syntax section.
NO ACTIVE HIGHLIGHT
Specifies that no active highlight is to be applied to the field, button, or icon.
General Rules
Attributes that change the size of a field or icon in a character-cell layout are not allowed for the ACTIVE HIGHLIGHT item description entry. These attributes are SINGLE, NORMAL, DOUBLE HIGH, and DOUBLE WIDE for font size or line width.
In Motif layouts, changing font sizes does change the size of an autosized field or button.
If your field, button, or icon already has specified attributes, and the application of the ACTIVE HIGHLIGHT clause to the existing attributes would cause a conflict between attributes, the attribute specified by the display attribute entry takes precedence.
Example
Field CHECK_PAYTO
    Same Line Next Column +1
    Output Picture x(35)
    Active Highlight Reverse
    Use Help Message "Enter the person or organization to whom you"
                     " wish to pay the check."
    Minimum Length 1
         Message "You must fill in the payee."
End Field
In this example, when the field CHECK_PAYTO is entered, its current background and foreground colors are reversed.
ATOMIC Clause
ATOMIC Clause — The ATOMIC clause describes data items in records or form data. Atomic data items are declared, interpreted, and stored as VAX atomic data types or the lowest level of system-specific data types. The ATOMIC clause is used in form record and form data declarations.
atomic-clause
Format
Where you specify this clause:
Syntax Rules
BYTE INTEGER
Interprets the form data item as a signed two's complement integer. The valid range is –128 to 127. This integer occupies one byte in a form record.
DFLOATING
Specifies a 64-bit floating point number with precision to approximately 16 decimal digits. Valid values for this number are zero and those numbers whose absolute value is within the range of 0.29E-38 to 1.7E38, approximately. This number occupies eight bytes in a form record.
The DFLOATING data type on OpenVMS Alpha systems has 53 bits of precision; on OpenVMS VAX systems, DFLOATING has 56 bits of precision.
FFLOATING
Specifies a 32-bit floating point number with precision to approximately seven decimal digits. Valid values for this number are zero and those numbers whose absolute value is within the range of 0.29E-38 to 1.70E38, approximately. This number occupies four bytes in a form record. See SHORT FLOAT.
GFLOATING
Specifies that the value in the form data item is an extended range 64-bit floating point number with precision to approximately 15 decimal digits. Valid values for this number are zero and those numbers whose absolute value is approximately within the range of 0.56E-308 to 0.9E308. This number occupies eight bytes in a form record. See LONG FLOAT.
HFLOATING
Specifies that the value in the form data item is an extended range 128-bit floating point number with precision to approximately 33 decimal digits. Valid values for this number are zero and those numbers whose absolute value is within the range of 0.84E-4932 to 0.59E4932, approximately. This number occupies 16 bytes in a form record.
LONG FLOAT
Specifies that the value in the form data item is the same as the GFLOATING data item.
VSI recommends that you use LONG FLOAT instead of GFLOATING for future portability.
LONGWORD INTEGER
Interprets the form data item as a signed two's complement integer. The valid range is –2,147,483,648 to 2,147,483,647. This integer occupies four bytes in a form record.
QUADWORD INTEGER
Specifies a form data item as a signed two's complement integer. The valid range is –9,223,372,036,854,775,808 to 9,223,372,036,854,775,807. This integer occupies eight bytes in a form record.
SFLOATING
Specifies that the value in the form data item is a floating point number that conforms to the ANSI/IEEE754-1985 format for Basic Single.
Data specified as SFLOATING on OpenVMS VAX systems is converted to FFLOATING.
This number occupies four bytes in a form record. See SHORT FLOAT.
SHORT FLOAT
Specifies that the value in the form data item is the same as an FFLOATING data item. VSI recommends that you use SHORT FLOAT instead of FFLOATING for future portability.
TFLOATING
Specifies that the value in the form data item is a floating point number that conforms to the ANSI/IEEE754-1985 format for Basic Double.
This number occupies eight bytes in a form record. See LONG FLOAT.
Data specified as TFLOATING on OpenVMS VAX systems is converted to GFLOATING.
UNSIGNED BYTE
Declares an integer in the range of 0 to 255. This integer occupies one byte in a form record.
UNSIGNED LONGWORD
Declares an integer within the range of 0 to 4,294,967,295. This integer occupies four bytes in a form record.
UNSIGNED WORD
Declares an integer within the range of 0 to 65,535. This integer occupies two bytes in a form record.
WORD INTEGER
Interprets the form data item as a signed two's complement integer. The valid range is –32,768 to 32,767. This integer occupies two bytes in a form record.
XFLOATING
Specifies that the value in the form data item is an extended range 128-bit floating point number with precision to approximately 33 decimal digits. Valid values for this number are zero and those numbers whose absolute value is within the range of 0.84E-4932 to 0.59E4932, approximately.
This number occupies 16 bytes in a form record.
Data specified as XFLOATING on OpenVMS VAX systems is converted to HFLOATING.
General Rules
If you declare a form data item with a VALUE clause for these data types and the value is outside the item's range, the IFDL Translator displays an error, and no form is created.
- Bit
- Bit Unaligned
- Bound Label Value
- Bound Procedure Value
- Descriptor
- D_Floating Complex
- F_Floating Complex
- G_Floating Complex
- H_Floating Complex
- Instruction Sequence
- Octaword Integer
- Octaword Unsigned
- Procedure Entry Mask
- Quadword Unsigned
Example
Form Data
    ACCOUNT_NUMBER      unsigned longword
    AMOUNT              unsigned longword
    CHECKING_BALANCE    unsigned longword
    CHECK_MEMO          character (35)
    CHECK_NUMBER        unsigned word
    .
    .
    .
End Data
| The ACCOUNT_NUMBER, AMOUNT, and CHECKING_BALANCE form data items are declared to be unsigned longwords. |
| The CHECK_NUMBER form data item has an unsigned word data type. |
ATTRIBUTE Declaration
ATTRIBUTE Declaration — Use the ATTRIBUTE declaration to group together a set of display attributes by name and to refer to them as a single entity. You can use the ATTRIBUTE declaration to differentiate between display attributes for Motif and character-cell devices. If the list of attributes designated by an attribute name contains in compatible attributes, the incompatible attribute that appears latest in the list applies.
attribute-declaration
Format
for-clause
is-clause
Where you specify this clause:
Syntax Rules
attribute-name
The name you choose for the set of elementary attributes specified. Whenever you specify attribute-name, all the attributes in the list are applied. Attribute-name must be unique in a layout.
for-clause
Specifies a terminal or list of terminals for which the attributes are valid within a layout. This clause must specify only terminal names declared in the DEVICE declaration within the current layout. If for-clausedoes not appear, the corresponding attributes apply to all terminals declared for the layout.
There can be only one IS clause without a FOR clause in the ATTRIBUTE declaration, and it must be the last IS clause in the declaration.
terminal-name
If the terminal is specified in a FOR clause for attribute-name, the attributes associated with the first such FOR clause are applied.
If the terminal is not specified in a FOR clause for attribute-name and there is no attribute declaration for attribute-name without a FOR clause, no attributes are applied.
If the terminal is not specified in a FOR clause for attribute-name and there is an ATTRIBUTE declaration for attribute-name without a FOR clause, the attributes for that declaration are applied.
is-clause
Specifies elementary attributes or implementor names as the set of display attributes.
elementary-attribute
An attribute that can appear in a DISPLAY ATTRIBUTE declaration. Elementary attributes are display characteristics like color and reverse. For more information on elementary attribute clauses,see the Elementary Attribute declaration syntax.
implementor-attribute
A DECforms implementor-defined attribute that can appear in a DISPLAY ATTRIBUTE declaration. For more information on implementor attributes, see the IMPLEMENTOR ATTRIBUTE declaration syntax.
Examples
Attribute AS_NORMAL
    For VT100 Is Nobold
        Font Size Single
        Noreverse Nounderlined
End Attribute
The name AS_NORMAL is specified for a set of attributes for the terminal called VT100. The attributes specified as AS_NORMAL are no bold, single font size, no reverse, and no underlined.
Attribute BIG
    For Noavo Is Font Size Double Wide
              Is Font Size Double High
End Attribute
The name BIG is specified for a set of attributes. For the terminal called Noavo, BIG specifies a double-wide font size. For all other terminals, BIG specifies a double-high font size.
Attribute BLACK_PANEL
    Is Background Color Black
End Attribute
The name BLACK_PANEL is given to a set of attributes that specify black background color.
BUILTIN FUNCTION Clause
BUILTIN FUNCTION Clause — Built-in functions are associated with terminal-related mechanisms such as pressing keys, or pressing key sequences. You can use FUNCTION declarations to override these associations. Built-in functions are associated with predefined function responses. You can use FUNCTION RESPONSE declarations to override these predefined function responses. For information on default key bindings for built-in functions, see Appendix F, "Built-In Functions".
builtin-function
Format
Where you specify this clause:
Syntax Rules
BOUNDARY CURSOR DOWN (character-cell layouts)
Specifies a special function response that identifies a contextual situation rather than the entry of a specific key.
If the cursor is in an icon, a wait,or is at the lowermost boundary of a field when the operator presses a key bound to the CURSOR DOWN built-in function, the Form Manager invokes the BOUNDARY CURSOR DOWN function response rather than move the cursor.
You can specify the BOUNDARY CURSOR DOWN function response to do something special; for example, move the cursor to the next field. This function response allows you to specify special processing for keys that are usually intrafield editing keys.
The default BOUNDARY CURSOR DOWN function repose is to display an error message.
BOUNDARY CURSOR LEFT (character-cell layouts)
Specifies a special function response that identifies a contextual situation rather than the entry of a specific key.
If the cursor is in an icon, a wait, or is at the left boundary of a field when the operator enters a key bound to the CURSOR LEFT built-in function, the Form Manager invokes the BOUNDARY CURSOR LEFT function response rather than move the cursor.
You can specify the BOUNDARY CURSOR LEFT function response to do something special; for example, move the cursor to a previous field. This function response allows you to specify special processing for keys that are usually intrafield editing keys.
The default BOUNDARY CURSOR LEFT function response is to give an error message.
BOUNDARY CURSOR RIGHT (character-cell layouts)
Specifies a special function response that identifies a contextual situation rather than the entry of a specific key.
If the cursor is in an icon, a wait,or is at the right boundary of a field when the operator enters a key bound to the CURSOR RIGHT built-in function, the Form Manager invokes the BOUNDARY CURSOR RIGHT function response rather than move the cursor.
You can specify the BOUNDARY CURSOR RIGHT function response to do something special; for example, move the cursor to the next field. This function response allows you to specify special processing for keys that are usually intrafield editing keys.
The default BOUNDARY CURSOR RIGHT function response is to display an error message.
BOUNDARY CURSOR UP (character-cell layouts)
Specifies a special function response that identifies a contextual situation rather than the entry of a specific key.
If the cursor is in an icon, a wait, or is at the topmost boundary of a field when the operator enters a key bound to the CURSOR UP built-in function, the Form Manager invokes the BOUNDARY CURSOR UP function response rather than move the cursor.
You can specify the BOUNDARY CURSOR UP function response to do something special; for example, move the cursor to a previous field. This function response allows you to specify special processing for keys that are usually intrafield editing keys.
The default BOUNDARY CURSOR UP function response is to give an error message.
BOUNDARY DELETE LEFT (character-cell layouts)
Specifies a special function response that identifies a contextual situation rather that the entry of a specific key.
If the cursor is in an icon, a wait, or is at the left boundary of a field when the operator enters a key bound to the DELETE CHARACTER built-in function, the Form Manager invokes the BOUNDARY DELETE LEFT function response rather than move the cursor.
You can specify the BOUNDARY DELETE LEFT function response to do something special; for example, move the cursor to the previous field. This function response allows you to specify special processing for keys that are usually intrafield editing keys.
The default BOUNDARY DELETE LEFT function response is to do nothing.
BUILTIN FUNCTION (character-cell layouts)
Specifies that the Form Manager executes the BUILTIN FUNCTION function response when the key or key sequence pressed is bound to a built-in function, but no function response is declared at this level.
CURSOR DOWN
Predefined function response that moves the cursor one character down.
CURSOR LEFT
Predefined function response that moves the cursor one character to the left.
CURSOR RIGHT
Predefined function response that moves the cursor one character to the right.
CURSOR UP
Predefined function response that moves the cursor one character up.
DELETE CHARACTER (character-cell layouts)
Predefined function response that deletes the character immediately to the left of the cursor.
This function response is ignored by the Form Manager unless it is specified in a character-cell layout.
DOWN ITEM
Predefined function response that moves the cursor down to the item below the current item. You can use DOWN ITEM to move through the currently active panel.
DOWN OCCURRENCE
Predefined function response that moves the cursor to the next occurrence of the current activation item. DOWN OCCURRENCE has meaning only when the active field is part of a vertically occurring group.
DOWN OCCURRENCE specifies an occurrence of an item with a subscript at least one more than the current subscript. If the item so specified is not currently displayed (in the case of a scrolled group), the Form Manager scrolls the group to display the item.
ERASE FIELD (character-cell layouts)
Predefined function response that erases the entire field in which the cursor currently appears.
EXIT GROUP NEXT
Predefined function response that moves the cursor to the next itemon the activation list that either does not belong to a group, or belongs to a group that does not contain the currently active item. To determine the item specified in EXIT GROUP NEXT, the Form Manager looks forward through the activation list.
EXIT GROUP PREVIOUS
Predefined function response that moves the cursor to the first item on the activation list that either does not belong to a group or belongs to a group that does not contain the currently active field. To determine the item specified in EXIT GROUP PREVIOUS,the Form Manager looks back through the activation list.
FOCUS CHANGE (window layouts)
Specifies a function response when the input focus changes to another field or button due to an external event, like a mouse movement. FOCUS CHANGE is supported only for window layouts; it is ignored at run time for all other layouts.
INSERT LINE (character-cell layouts)
Predefined function response that inserts a new-line character into a text field and moves the cursor down to the new line created. There must be space left in the data item to insert a new line. If there is not enough space,the predefined function response displays a "Field full" message.
For fields other than text fields, the predefined function response for INSERT LINE displays a message to the operator stating that a new line cannot be inserted.
INSERT OVERSTRIKE (character-cell layouts)
Predefined function response that toggles between insert and overstrike mode.
Insert mode in a left-justified field causes typed characters to be inserted into the field; the remaining characters in the field are shifted to the right.
Insert mode in a right-justified field causes typed characters to be inserted; characters to the left are shifted further to the left.
Overstrike mode causes typed characters to overprint the character at the cursor position.
For character-cell text fields,the initial mode of INSERT OVERSTRIKE is overstrike. For picture fields, the initial mode of INSERT OVERSTRIKE depends on the input picture. For more information on input pictures, see the INPUT PICTURE Clause syntax section.
LEFT ITEM
Predefined function response that moves the cursor to the item closest to the current item on the left.
LEFT OCCURRENCE
Designates another occurrence of the current activation item on the activation list. The predefined function response moves the cursor to the previously active occurrence in the group of the current activation item. LEFT OCCURRENCE has meaning only when the active item is part of a horizontally occurring group.
LEFT OCCURRENCE specifies an occurrence of the item with a subscript at least one less than the current subscript. If the item so specified is not currently displayed (in the case of a scrolled group), the Form Manager scrolls the group to display the item.
NEXT HELP
Predefined function response displays the help message associated with the current activation item,if present. If this message has already been displayed, NEXT HELP uses the ENTER HELP response step to activate a help panel.
NEXT ITEM
Predefined function response moves the cursor to the next itemon the activation list.
NEXT PANEL
Predefined function response instructs the Form Manager to search forward through the activation list and move the cursor to the next item on the activation list on a panel different from the panel of the currently active item.
PREVIOUS ITEM
Predefined function response moves the cursor to the previous item on the activation list.
PREVIOUS PANEL
Predefined function response instructs the Form Manager to search backward through the activation list and move the cursor to the first item on the activation list on a panel different from the panel of the currently active item.
REFRESH DISPLAY (character-cell layouts)
Predefined function response erases the screen and repaints it.
RIGHT ITEM
Predefined function response moves the cursor to the item closest to the cursor in a right direction.
RIGHT OCCURRENCE
Designates another occurrence of the current activation item on the activation list. The predefined function response moves the cursor to the next active occurrence in the group of the current activation item. RIGHT OCCURRENCE has meaning only when the active item is part of a horizontally occurring group.
RIGHT OCCURRENCE specifies an occurrence of the item with a subscript at least one more than the current subscript. If the item so specified is not currently displayed (in the case of a scrolled group), the Form Manager scrolls the group to display the item.
TERMINATE HELP
Predefined function response executes the EXIT HELP response step, if help is active.
TRANSMIT
Predefined function response performs the RETURN response step if help processing is inactive, or the EXIT HELP response step if help is active.
TRIGGER OBJECT (window layouts)
Specifies that the Form Manager execute the TRIGGER OBJECT function response when a button is pushed (triggered).
UNDEFINED FUNCTION (character-cell layouts)
Specifies that the Form Manager execute the UNDEFINED FUNCTION function response when no other function response is declared explicitly at this level for the key or key sequence pressed. The key or key sequence may either be bound to a function in the FUNCTION declaration and have no function response,or not be bound to any function.
UP ITEM
Predefined function response moves the cursor vertically upward to the item closest to the cursor.
UP OCCURRENCE
Predefined function response moves the cursor vertically upward to the item closest to the cursor. UP OCCURRENCE has meaning only when the active field is part of a vertically occurring group.
UP OCCURRENCE specifies an occurrence of an item with a subscript at least one less than the current subscript. If the item so specified is not currently displayed (in the case of a scrolled group), the Form Manager scrolls the group to display the field.
USER FUNCTION (character-cell layouts)
Specifies that the Form Manager executes the USER FUNCTION function response when the key or key sequence pressed is bound to a user-defined function, but no function response is declared at this level.
VALUE CHANGED (window layouts)
Specifies that the Form Manager execute the VALUE CHANGED function response when the slider bar in a slider field in a window layout is moved. This function response is executed when the slider field value changes even if the slider field value is reset to its current value.
General Rules
There is no default function response for a user-defined function.
Two built-in functions cannot be bound to the same key or key sequence.
A built-in function cannot be bound to a key that begins another built-in function key sequence.
These rules apply to all function key bindings, including explicitly defined built-in function bindings and default built-in key bindings. For information on default built-in key bindings, see Appendix F, "Built-In Functions".
Example
Function INSERT LINE
Is %CARRIAGE_RETURN
End Function
This example specifies that the INSERT LINE built-in function occurs when the carriage return key is pressed. This definition for the carriage return key takes precedence over a predefined default for carriage return (NEXT ITEM).
CALL Response Step
CALL Response Step — The CALL response step issues an escape routine—a user-supplied subroutine call—from the form.
call-response-step
Format
Where you specify this clause:
Syntax Rules
CALL string-1
Issues a subroutine call with the parameters specified. String-1 is forced to uppercase in the object file.
Once a passing mechanism is specified, all subsequent arguments are passed using the specified mechanism until a different mechanism is specified. The Form Manager calls the escape routine using string-1 as the identification (the subroutine name) of the escape routine.
USING
Specifies parameters passed to the escape routine.
BY REFERENCE
Directs the Form Manager to pass the argument's address to the escape routine. The escape routine can change the argument's value.
BY DESCRIPTOR
Directs the Form Manager to pass the address of an OpenVMS descriptor containing the length, data type, and address of the data to the escape routine for each subsequent argument.
The escape routine should not modify the data type, class, length,or pointer fields in the descriptor itself—only the data pointed to by the descriptor's pointer field can be modified. Modifying the descriptor may produce unpredictable results.
BY VALUE
Directs the Form Manager to pass the argument's 32-bit value to the escape routine in a temporary location. If the escape routine changes the value of the argument, the form data item is not changed, and no data collection is performed.
You can pass only byte, word, longword, ffloating, and short float data items by value.
BY DEFAULT
Directs the Form Manager to pass subsequent arguments by the default passing mechanism, depending on the data item type. See Table 1.3, ''Passing Mechanisms by Data Type'' for default passing mechanisms.
string-2
Specifies a character string to pass to the escape routine as a parameter. The default passing mechanism for string-2 is by descriptor.
data-1
- unsigned byte
- byte integer
- unsigned word
- word integer
- unsigned longword
- longword integer
- quadword integer
- ffloating
- dfloating
- gfloating
- hfloating
- sfloating
- tfloating
By default, the Form Manager passes character, integer, decimal, and float data types by descriptor.
record-name
Specifies a record to pass to the escape routine as a parameter.
Before making the call, the contents of the record are collected as described in the data collection phase of the Form Manager in its actions to satisfy a RECEIVE request.
After making the call, the contents of the record are distributed as described in the data distribution phase of the Form Manager in its actions to satisfy a RECEIVE request. By default, the Form Manager passes record-name by reference.
GIVING data-2
Allows the procedural escape to return a status value to the form. The parameter data-2 is restricted to the longword integer data type.
General Rules
The escape routine can make requests of the Form Manager before returning to the Form Manager to complete the procedural escape. The contents of the SESSION built-in form data item and the PARENTREQUESTID built-in form data item should be passed as two of the arguments when such requests are on the same session.
If the escape routine makes a request of the Form Manager that uses a different session, PARENTREQUESTID should be passed as one of the arguments.
If the escape routine makes a request of the Form Manager, the Form Manager satisfies the request and returns control to the escape routine as for any other request. However, if the escape routine makes a request of the Form Manager that uses a different session, the Form Manager rejects any attempt by an escape routine to disable the session or the form that generated the call on the escape routine.
After the Form Manager receives control back from the escape routine, it resumes interpreting the response.
When the CALL response step is used with the GIVING clause, the value returned to the GIVING clause is moved to form data before the arguments are copied back to form data. Moving the value to form data may cause unexpected results when you specify the same form data item in the USING and GIVING clauses. For more information, see the Examples section.
| Data Type | By Value | By Reference | By Descriptor |
|---|---|---|---|
|
ADT |
Default |
* | |
|
Byte Integer |
* |
Default |
* |
|
Character(x) |
Default | ||
|
Character(x) Null Terminated |
Default |
* | |
|
Date |
Default |
* | |
|
DateTime(x) |
Default | ||
|
Decimal(x,y) |
Default | ||
|
Dfloating |
Default |
* | |
|
Ffloating |
* |
Default |
* |
|
Float(x,y) |
Default | ||
|
Gfloating |
Default |
* | |
|
Hfloating |
Default |
* | |
|
Integer(x) |
Default | ||
|
Long Float |
Default |
* | |
|
Longword Integer |
* |
Default |
* |
|
Quadword Integer |
Default |
* | |
|
Record |
Default |
* | |
|
Sfloating |
Default |
* | |
|
Short Float |
* |
Default |
* |
|
"string value" |
Default | ||
|
Tfloating |
Default |
* | |
|
Time |
Default |
* | |
|
Tm |
Default |
* | |
|
Unsigned Byte |
* |
Default |
* |
|
Unsigned Longword |
* |
Default |
* |
|
Unsigned Word |
* |
Default |
* |
|
Word Integer |
* |
Default |
* |
Examples
Call "MY_PROG" Using By Default DATA45
This example calls an escape routine named MY_PROG by using the default calling mechanism for form data item DATA45.
Call "INCREMENT_DATA_ITEM"
     Using MY_DATA_ITEM   /*not recommended*/
     Giving MY_DATA_ITEM
This example calls an escape routine, INCREMENT_DATA_ITEM,that increments a form data item by one. However, because the USING clause is processed after the GIVING clause, the original value of MY_DATA_ITEM passed to the escape routine is written over the value returned by the GIVING clause.
COLOR Clause
COLOR Clause — The COLOR clause specifies the color for an element in a layout.
color-clause
Format
Where you specify this clause:
Syntax Rules
COLOR
Specifies the color that you are choosing. COLOR and COLOUR are equivalent.
number-1, number-2, number-3
Specifies a color in the RGB color system. Each number is a floating point number that represents an intensity of the three primary colors: red, green, and blue. Number-1 represents the red intensity; number-2 the green intensity; number-3 the blue intensity. Each value must be in the range of 0 to 1, inclusive.
UNCHANGED
Specifies that the color is not modified from any previous color that is set for the entity being specified: viewport, panel field,button, icon, or literal. Within window layouts, COLOR UNCHANGED specifies that no color is assigned to the entity being specified,allowing the resource file for the window environment to provide a default.
BLACK
Symbolic name for 0, 0, 0 in RGB notation.
BLUE
Symbolic name for 0, 0, 1 in RGB notation.
GREEN
Symbolic name for 0, 1, 0 in RGB notation.
CYAN
Symbolic name for 0, 1, 1 in RGB notation.
RED
Symbolic name for 1, 0, 0 in RGB notation.
MAGENTA
Symbolic name for 1, 0, 1 in RGB notation.
YELLOW
Symbolic name for 1, 1, 0 in RGB notation.
WHITE
Symbolic name for 1, 1, 1 in RGB notation.
string
Allows you to specify a windows-named color within a window layout. The list of named colors is specified by a DECwindows server startup file and may vary from system to system.
If a named color cannot be used at run time, the Form Manager defaults to COLOR UNCHANGED.
General Rules
The IFDL Translator does not validate color; the Form Manager determines whether the display devices declared in the layout can display the specified color at run time.
DECforms supports two types of color on character-cell devices: ReGIS color and ANSI color.
$ SET TERMINAL/REGIS
ANSI color is supported on terminal emulators for color workstations only and on the VT525 terminal. You can specify ANSI color at the panel object level (fields, buttons, literals, icons, and groups) by using the DISPLAY BACKGROUNDCOLOR and DISPLAY FOREGROUND COLOR clauses.
$ SET TERMINAL/REGIS/BLOCK
Do this before calling your application.
You can specify color in any layout. If a device supports color and the color attribute is present, color is displayed. In all other cases, the presence of the color attribute is ignored.
Defaults
Character-Cell Layouts
If not specified, color defaults to COLOR UNCHANGED.
Window Layouts
If not specified, color defaults to COLOR UNCHANGED.
Examples
COLOR 1, 0, 0
This COLOR clause specifies red.
COLOR RED
This COLOR clause specifies red.
COLOUR UNCHANGED
This COLOR clause specifies that the color remain unchanged.
COLOUR 1, 0, 1
This COLOR clause specifies magenta.
COLOR .7921568, .6666666, .5686274
This COLOR clause specifies a shade of beige.
CONCEALED Clause
CONCEALED Clause — The CONCEALED clause specifies the conditions under which a picture field, text field, or icon is displayed or hidden on a panel.
concealed-clause
Format
Where you specify this clause:
Syntax Rules
CONCEALED [ WHEN conditional-expression ]
Specifies the condition under which afield or icon is concealed. If conditional-expression is true, the panel field or icon is concealed; if it is false, the panel field or icon is displayed.
NOT CONCEALED
Specifies that the field or icon is displayed to the operator.
General Rules
When the CONCEALED clause is applied to a field in a window layout, the contents of that field are no longer visible. If this concealed field gets input focus and the operator enters characters into that field, these characters are added to the end of the concealed value.
In a similar fashion, if the operator presses the Delete key to delete characters from a concealed field, characters are deleted one at a time from the end of the concealed value.
Moving the arrow keys does not change the insert cursor or the delete cursor position when a field is concealed. The only editing key allowed is the Delete key. All other editing keys have no effect.
If any form data item in conditional-expression changes, the effect of the WHEN clause is immediately recalculated.
The CONCEALED clause does not remove any borders or shadows on window layout fields. Those must be removed with the HIGHLIGHT clause.
CONCEALED without WHEN specifies that the panel field or icon is not displayed to the operator. The CONCEALED clause is ignored for buttons and slider fields in window layouts. The shadow of concealed fields in window layouts is visible unless the NOSHADOW attribute is used.
For more information on conditional expressions, see the CONDITIONAL EXPRESSION syntax section.
Examples
Icon CHOICE_CASH_100
    Active Highlight Reverse
    Concealed When CHECKING_BALANCE < 10000
          Protected When CHECKING_BALANCE < 10000
    .
    .
    .
End Icon
This example specifies that the icon CHOICE_CASH_100 is not displayed when the checking account balance is less than 10 000(which is $100.00 when the 10 000 units are pennies).
Field PASSWORD
    Line 5 Column 5
    Concealed
End Field
This example specifies a field that can receive input but whose value is invisible.
CONDITIONAL EXPRESSION
CONDITIONAL EXPRESSION — A conditional expression produces a logical value by combining relations, numeric and string expressions, relational operators, and conditions.
conditional-expression
Format
conditional-term
relation
relational-op
Where you specify this clause:
Syntax Rules
conditional-term-1
Specifies the first operand in the expression.
AND
Specifies the logical AND operator. The result of an AND is true when conditional-term-1 and conditional-term-2 are both true; otherwise, the result is false.
OR
Specifies the logical OR operator—logical inclusive OR. The result of an OR is true when either conditional-term-1 or conditional-term-2 is true, or both are true; otherwise, the result is false.
XOR
Specifies the logical XOR operator—logical exclusive OR. The result of an XOR is true when conditional-term-1 is true and conditional-term-2 is false, or when conditional-term-1 is false and conditional-term-2 is true;otherwise the result is false.
conditional-term-2
Specifies the second operand in the expression.
NOT
Specifies the NOT logical operator. The result of a NOT is true when the operand (elementary condition, relation,or conditional expression) it is applied to is false. The result of a NOT is false when the operand (elementary condition, relation, or conditional expression) it is applied to is true.
elementary-condition
- ACCEPT PHASE
- CONVERTED
- EMPTY FIELD
- FIRST DISPLAYED HORIZONTAL
- FIRST DISPLAYED VERTICAL
- FIRST ITEM
- FIRST OCCURRENCE HORIZONTAL
- FIRST OCCURRENCE VERTICAL
- FULL FIELD
- GROUP FIRST ITEM
- GROUP LAST ITEM
- GROUP OTHER ITEM
- HELP ACTIVE
- HELP MESSAGE AVAILABLE
- HELP MESSAGE EXISTS
- HELP PANEL EXISTS
- IMMEDIATE
- LAST DISPLAYED HORIZONTAL
- LAST DISPLAYED VERTICAL
- LAST ITEM
- LAST OCCURRENCE HORIZONTAL
- LAST OCCURRENCE VERTICAL
- LEFTMOST ITEM
- LOWERMOST ITEM
- OTHER DISPLAYED HORIZONTAL
- OTHER DISPLAYED VERTICAL
- OTHER ITEM
- OTHER OCCURRENCE HORIZONTAL
- OTHER OCCURRENCE VERTICAL
- PANEL FIRST ITEM
- PANEL LAST ITEM
- PANEL OTHER ITEM
- RIGHTMOST ITEM
- UPPERMOST ITEM
- VALIDATED
- VALIDATION STARTED
The VSI DECforms Programmer's Reference Manual lists the meanings of the DECforms elementary conditions. Elementary conditions can be used only in IF response steps.
relation
Specifies a comparison of two operands.
conditional-expression
Specifies an expression made up of relations and elementary conditions, yielding a logical value of true or false.
numeric-expression-1
Specifies a numeric expression as the first operand in a relation. For more information, see the NUMERIC EXPRESSION syntax section.
string-expression-1
Specifies a string expression as the first operand in a relation. For more information, see the STRING EXPRESSION syntax section.
relational-op
-
<less than -
<=less than or equal to -
>greater than -
>=greater than or equal to -
=equal to -
<>not equal to
Only the results of relational operators can be used as operands with the AND, OR, and XOR logical operators.
numeric-expression-2
Specifies a numeric expression as the second operand in a relation. For more information, see the NUMERIC EXPRESSION syntax section.
string-expression-2
Specifies a string expression as the second operand in a relation. For more information, see the STRING EXPRESSION syntax section.
General Rules
Elementary conditions and relational operators produce logical values. Only logical values can be operands of AND, OR, XOR, and NOT.
Only numeric and string values can be operands of the relational operators.
Example
IF ((FUNCTIONNAME = 'FIRST ITEM') AND (data_item_1 <> 5 ))
In this example, a response step is executed if FUNCTIONNAME is set to FIRST ITEM and the value of data_item_1 is not equal to 5.
PROTECTED WHEN ((data_item_1 <> 5) OR (data_item_2 = "1"))
In this example, when data_item_1 is not equal to 5 or data_item_2 equals "1 ", a WHEN condition is true, and the field, button, or icon is protected.
If SALARY > 8 * MINIMUM_SALARY And COMPANY_NAME = "Ben & Jerrys" Then
     Message "Salary too big"
     Invalid
End If
In this example, when the value in SALARY is greater than eight times that of the lowest paid employee in the company, MINIMUM_SALARY, and the company is "Ben & Jerrys", a message stating "Salary too big" is displayed and the current activation item is marked as invalid.
Protected When EMPLOYEES(**).TAX_EXEMPT = 1 Or EMPLOYEES(**).AGE > 65
In this example, a field in a multiply occurring group is protected if an employee has taken 1 as her exemption, or she is over 65.
CONTROL TEXT RESPONSE Declaration
CONTROL TEXT RESPONSE Declaration — When an application executes a request and sends control text with the request, the Form Manager interprets the control text response associated with that control text.
control-text-response-declaration
Format
Where you specify this clause:
Syntax Rules
CONTROL TEXT RESPONSE
Performed when the application sends control text to the form. Only one control text response for a given control text literal can appear in each layout. You can use control text to send information to the form and perform an action without transmitting a form record.
The default control text response is to do nothing.
string
It must consist of printable characters.
It must be at least one character long, and can be up to five characters long.
It must contain at least one nonspace character.
The DECforms Form Manager does case-insensitive matching of control text strings at run time.
response-step
Specifies the response steps performed during the control text response. For more information,see the RESPONSE STEP clause syntax section.
Example
Control Text Response 'WIN'
    Display WINNER_PANEL
    If CURRENT_SCORE > PREV_SCORE
        Signal %bell
    End If
End Response
In the preceding example, when the Form Manager receives the control text ’WIN’, WINNER_PANEL is displayed. If the value of CURRENT_SCORE is greater than the value of PREV_SCORE, a bell is rung to indicate that this score is the big winner.
COPY Statement
COPY Statement — The COPY statement incorporates source text from one IFDL source file, Oracle CDD/Repository™, or a text library, into another IFDL source file.
copy-statement
Format 1
Where you specify this clause:
Format 2
Where you specify this clause:
Syntax Rules: Format 1
Use Format 1 to copy any IFDL source text into an IFDL source file. You can specify this format in an IFDL source file anywhere IFDL source text can occur. However, the text that you want to copy cannot contain a COPY statement.
file_name
A file specification for a sequential text file with a default file extension of .IFDL. You need not contain file_name within quotation marks; however, if you are specifying a file name that matches an IFDL reserved word, or if you use brackets ([ ]) in your file specification, placing it within single or double quotation marks assures correct translation.
If a directory location is not specified in your file name, the IFDL Translator searches for your file using the search path specified in the /INCLUDE qualifier of the forms translate command, or in your working directory. For more information on these options, see the DCL forms translate command line syntax.
text_name
The name of a module in library_name. Text_name can be enclosed in single (’)or double (") quotes.
library_name
An OpenVMS Librarian text library. The default extension for library_name is .TLB. This file specification must be contained within a pair of single (’ ’) or double (" ")quotation marks.
Syntax Rules: Format 2
Oracle CDD/Repository record descriptions, or an elementary field or group within Oracle CDD/Repository record descriptions, into a form record definition.
An elementary field or group in a Oracle CDD/Repository record description into a form data definition.
All the elementary fields and groups in a Oracle CDD/Repository record description into form data.
An elementary field in a Oracle CDD/Repository record description into a panel field definition.
A record referenced through an RDB$RELATION.
record_name
A node in Oracle CDD/Repository whose protocol is CDD$RECORD. Record_name must conform to the rules for user-defined Oracle CDD/Repository names and can represent a partial or complete Oracle CDD/Repository name. If you specify a partial Oracle CDD/Repository name, this name must be unique with respect to other Oracle CDD/Repository names.
If record_name is a logical name, the resultant path name must conform to all rules for Oracle CDD/Repository path names.
If there is a structure declaration immediately inside the record declaration, you must give the structure and the record the same name. The IFDL Translator ignores the CDDL structure immediately within the RECORD declaration.
Period (.) must be used to represent a decimal point.
Comma (,) must be used to represent a comma.
Dollar sign ($) must be used as the currency sign.
To designate any other characters to be used in displaying records, you must use the DECIMAL POINT IS COMMA or the CURRENCY SIGN editing clauses in either the source form or in the Oracle CDD/Repository record definition.
If you are specifying a Oracle CDD/Repository record name that matches an IFDL reserved word, or if you are specifying an anchor and need to use brackets ([ ]) in your record name, you must place the record name within quotation marks (" ").
FIELD IS field_name
This clause is optional; if you use field_name, it must be the qualified name of an elementary field structure in the Oracle CDD/Repository record description. If you specify a qualified Oracle CDD/Repository field name in the FIELDIS clause of the COPY statement, you can copy appearance-related information from a Oracle CDD/Repository field that has a different name than the panel field in the IFDL file.
FROM DICTIONARY
This clause specifies that the record description is from the Oracle CDD/Repository.
In form data and form records, you can use the FIELD IS clause with COPY FROM DICTIONARY to select a particular field from the Oracle CDD/Repository record definition by specifying the qualified name of the field. If you specify a Oracle CDD/Repository structure, you get that structure and its contents.
In panel fields, you can use the COPY FROM DICTIONARY clause to extract appearance-related information from Oracle CDD/Repository. If you specify the FIELD IS clause, you can get the appearance-related information from the field you name.
If you do not specify the FIELD IS clause, the qualified name of the field in the Oracle CDD/Repository that you specify in the COPY statement must match the qualified name of the panel field in the IFDL file that contains the COPY statement.
The DECforms IFDL and Oracle CDD/Repository use different data types. When the IFDL Translator copies an Oracle CDD/Repository record description, some data types are converted directly to IFDL data types, some data types are ignored, and some data types cause the IFDL Translator to display a compilation error. Table B.1, ''DECforms Data Types and Corresponding Oracle CDD/Repository and VAX Data Types'' in Appendix B, " DECforms Data Types" lists Oracle CDD/Repository data types and the conversion result for each.
You can use the TRANSFER clause to avoid naming conflicts between Oracle CDD/Repository record descriptions and IFDL reserved words. For more information, see the description of record-field in the TRANSFER clause.
Data type, as described in Appendix B, " DECforms Data Types".
Scale. However, DECforms does not support scaled binary integers. If Oracle CDD/Repository specifies a scale value for a binary integer, DECforms considers the value as an appearance attribute rather than a data attribute.
Initial value. This applies only to form data; the IFDL Translator ignores initial values for form record fields and panel fields.
- Array bounds that are mapped into a base and into an occurs value. There are other restrictions on arrays:
Only one-dimensional arrays are supported.
Arrays must have names.
Data items may have structures, not array bounds.
Alignment on form record groups and form record fields. The IFDL Translator ignores form data and panel field alignment.
Variants, in Common Dictionary Operator (CDO) libraries only. The IFDL Translator processes only the first variant; it ignores the others.
- The IFDL Translator also supports the following Oracle CDD/Repository attributes:
BASED ON
CURRENCY IS
DECIMAL POINT
HELP_TEXT
INPUT_VALUE REQUIRED
JUSTIFIED DECIMAL
JUSTIFIED LEFT
JUSTIFIED RIGHT
OCCURS DEPENDING ON
The IFDL Translator ignores these attributes except in panel fields. If the panel field specifies PROTECTED, NO HELPMESSAGE, or USE HELP MESSAGE before the COPY FROM DICTIONARY clause, the HELP_TEXT attribute is ignored. OCCURS DEPENDING ON takes the highest value specified and allocates that much space.
The CURRENCY IS, DECIMAL_POINT, INPUT_VALUE REQUIRED,and JUSTIFIED RIGHT attributes are used only in panel fields. If a conflicting field description entry is specified in the IFDL file before the COPYFROM DICTIONARY clause, these attributes are ignored.
DECforms supports the pieces tracking capability of the Oracle CDD/Repository dictionary. Pieces tracking gives you the ability to check whether anything your application depends on has changed since the application was last built, or what will need to be rebuilt if any one item within the Oracle CDD/Repository is changed.
Oracle CDD/Repository pieces tracking involves attaching a node to the dictionary that identifies the DECforms form. The form itself is not stored in the dictionary. During the compilation of the form, the IFDL Translator sets a pointer from the form's dictionary node to each record or field node in the dictionary that it references (a "uses"pointer). The IFDL Translator also sets a pointer to the form's node in the referenced item's dictionary node (a "used by" pointer) and flags the pointer to indicate that the form has changed.
Pieces tracking allows you to obtain a list of all other dictionary elements used by a particular dictionary element, and all dictionary elements that use the current element. Once you have obtained this list, you can obtain a list of all elements that have changed since the current element was built, or which elements have to be rebuilt if the current element is changed.
If you specify /SHOW=COPY when translating from an IFDL source file into a form file, the IFDL Translator describes the information it is getting from Oracle CDD/Repository in the listing file.
Note
DECforms requires CDD/Plus, Version 4.1, or Oracle CDD/Repository, Version 5.0 or later, to use COPY FROM DICTIONARY.
%null_terminated
Specifies that fixed strings defined by this COPY statement are interpreted as null-terminated strings. %Null_terminated has no effect on other data types, including varying text.
BYTES
Specifies that the length of the string as recorded in Oracle CDD/Repository is specified in bytes. If the length of the string is 25, the field can hold up to 24 characters and occupies 25 bytes in a form record. If an initial value is specified, that value is shortened if necessary to avoid overflowing the string.
CHARACTERS
Specifies that the length of the string as recorded in Oracle CDD/Repository is specified in characters. If the length of the string is 25, the field can hold up to 25 characters and occupies 26 bytes in a form record.
General Rules
The translation of an IFDL source file containing a COPY statement is equivalent to processing all COPY statements first, and then processing the resultant source form.
The COPY statement neither changes the text file, nor checks the syntax of the copied text. When all COPY statements have been processed, the IFDL Translator checks the correctness of the source file. In the resulting source file, the copied source text replaces the entire COPY statement, beginning with the word COPY and ending with the words END COPY, inclusive.
You can specify the name immediately following the COPY keyword with or without quotation marks for all forms of COPY. Using quotation marks allows you to specify an alternate Oracle CDD/Repository root in the COPY statement.
Examples
Copy
MYDEFS In "MYLIB.TLB"
End Copy
In this example of the Format 1 COPY statement, the module MYDEFS is copied from the library MYLIB.TLB.
Copy
'SPAZMOID.IFDL'
End Copy
In this example of the Format 1 COPY statement, SPAZMOID.IFDL is copied.
define field name datatype is varying string size is 80 characters.
define field street datatype is varying string size is 80 characters.
define field city datatype is varying string size is 15 characters.
define field state datatype is text size is 2 characters.
define field zip_1 datatype is unsigned numeric size is 5 digits.
define field zip_2 datatype is unsigned numeric size is 4 digits.
define field country datatype is varying string size is 15 characters.
define record address_record.
    name.
    street.
    city.
    state.
    zip_code structure.
      zip_1.
      zip_2.
    end zip_code structure.
    country.end address_record record.
    .
    .
    .
Copy
CDD$TOP.CORPORATE.ADDRESS_RECORD Field Is CITY From Dictionary
End Copy
In this example of the Format 2 COPY statement, the city field is copied from the CDD$TOP.CORPORATE.ADDRESS_RECORD record in the Oracle CDD/Repository.
Copy
CDD$TOP.SMITH.PERSONNEL.RDB$RELATIONS.EMPLOYEES From Dictionary
End Copy
In this example of the Format 2 COPY statement, the DEC Rdb relation EMPLOYEES is copied from CDD$TOP.SMITH.PERSONNEL.RDB$RELATIONS.EMPLOYEES in the Oracle CDD/Repository.
define field help_field_1
datatype is text
size is 1
help_text is "In help field 1.  Enter a character.".
define field help_field_2
datatype is text
size is 1
help_text is "In help field 2. Enter a character.".
define record help_record.
help_field_1.
a_group structure.
help_field_2.
end a_group structure.
end help_record record.
    .
    .
    .
Form TEST_HELP_TEXT
    Form Data
        Copy HELP_RECORD From Dictionary
        End Copy
    End Data

    Layout VT_LAYOUT
        Device
            Terminal
                Type %VT100
        End Device
        Size 24 Lines by 80 Columns

        Enable Response
            Activate Panel THE_PANEL
        End Response

        Panel THE_PANEL
            Literal Text
                Line 5
                Column 10
                Value "Help Field 1:"
            End Literal

            Literal Text
                Line 7
                Column 10
                Value "Help Field 2:"
            End Literal

            Field help_field_1
                Line 5
                Column 24
                Copy help_field_1 field is help_field_1 From Dictionary
                End Copy
            End Field

            Group A_GROUP
                Field help_field_2
                    Line 7
                    Column 24
                    Copy help_field_2 field is a_group.help_field_2 From Dictionary
                    End Copy
                End Field
            End Group
        End Panel
    End Layout
End Form
In this example of the Format 2 COPY statement, the help records are copied from the Oracle CDD/Repository, along with the associated help text.
DATETIME DATA Clause
DATETIME DATA Clause — The DATETIME DATA clause specifies that a form data item is a field formatted as a standard OpenVMS 64-bit date/time field or a string containing a numeric date and time. You can use Format 4 picture strings to express these fields. For a description of Format 4 picture strings,see the discussion of the PICTURE STRING syntax.
datetime-data-clause
Format
Where you specify this clause:
Syntax Rules
ADT
Specifies a standard 64-bit OpenVMS formatted date/time field. This form data item is expressed as an absolute time: a specific date and time of day. The value is a binary number in 100-nanosecond units offset from the system base date and time, which is 00:00 hours, November 17, 1858 (the Smithsonian base date and time for the astronomical calendar). This value is always positive.
DATE
Specifies a standard 64-bit OpenVMS formatted date/time field. Only the date (high-order) bits are used. The time (low-order) bits are ignored.
TIME
Specifies a standard 64-bit OpenVMS formatted date/time field. Only the low-order (time) bits are used. The high-order (date) bits are ignored.
CURRENT
Explicitly, using the RESET response step
Implicitly, during the enabling of the form
The CURRENT clause replaces a default value. If a SEND record field is mapped to this form data item, the Form Manager does not transfer the data into this data item.
All panel fields mapped to a form data item with data type ADT CURRENT,DATE CURRENT, or TIME CURRENT must be assigned either the NO DATA INPUT or the PROTECTED attribute. If these attributes are not explicitly applied, the field defaults to NO DATA INPUT.
DATETIME
The first four digits are the year.
The next two digits are the month.
The two following are the day of the month.
The next two are the digits in the 24 hour clock.
The next two digits are the minutes.
The next two digits are the seconds.
The remaining digits are the fractions of seconds.
The time is assumed to be local time. Precision is relative to the length of the string: if the string is 14 digits long it has a precision of 1 second; if the string is eight digits long it has a precision of 1 day.
If the picture field specifies only a date, only the date portion of the form data item is updated. The time portion of the data item remains unchanged.
If the picture field specifies only a time, only the time portion of the form data item is updated. The date portion of the data item remains unchanged.
If the picture field specifies both a date and a time, both the date and time portion of the form data item are updated.
integer
Specifies an integer that specifies the length of the DATETIME form data item.
Example
This example from the DECforms sample application shows a number of form data items with different data types.
Form Data
    ACCOUNT_NUMBER      unsigned longword
    AMOUNT              unsigned longword
    CHECKING_BALANCE    unsigned longword
    CHECK_MEMO          character (35)
    CHECK_NUMBER        unsigned word
    CITY                character (20)
    CURRENT_DATE        adt current
    DATE_ESTABLISHED    adt
    .
    .
    .
End Data
| The CURRENT_DATE form data item has ADT CURRENT specified as the data type. The current date and time of the transaction is placed into the CURRENT_DATE form data item each time the Form Manager resets the data item at runtime. |
| The DATE_ESTABLISHED form data item has ADT specified as the data type. The date and time that the account is established could be stored in the DATE_EST field. |
Form DATE_ADT_TIME
    Form Data
        TEST_DATE     date
        Value "1954 10 02"
        TEST_ADT1     adt
        TEST_ADT2     adt         Current
        TEST_TIME     integer(4)  Value 930
    End Data

    Form Record R1
        TEST_DATE     date
        TEST_ADT1     character(27)
        TEST_ADT2     character(27)
        TEST_TIME     integer(4)
    End Record

    Layout L1
        Device
            Terminal
            Type %VT100
        End Device
        Size 24 Lines By 80 Columns

        Enable Response
            Activate Panel P1
        End Response

        Panel P1
            Field TEST_DATE
                Line 1
                Column 1
                Output Picture For Date UMLMMMMMMMMQ' 'DDQ', 'YYYY
            End Field
            Field TEST_ADT1
                /* Uses the default input/output picture */
            End Field
            Field TEST_ADT2
                /* Uses the default input/output picture */
            End Field

            Field TEST_TIME
                Input Picture For Date GG:II
            End Field
       End Panel
End Layout- October 2, 1954
- 17-Nov-1858 00:00:00.00
- 30-Jun-1994 13:32:08.78
- 09:30
TEST_ADT2 contains the current date and time (time at enable). On input, the user must type the comma and spaces in the TEST_DATE picture because of the remove blanks(specified by the picture character Q). The user does not type the insertion literals in the TEST_ADT1, TEST_ADT2, and TEST_TIME fields.
During a send request for record R1, the Form Manager converts the character strings for TEST_ADT1 and TEST_ADT2 from international date/time format to the 64-bit OpenVMS ADT value inform data.
During a receive request for record R1, the Form Manager converts the values for TEST_ADT1 and TEST_ADT2 to international date and time format. It takes 10 characters to represent dates, 16 characters to represent times, and 27 characters to represent an absolute date and time in international date/time format.
For more information on international date and time format, see the FORM DATA declaration syntax section.
DATETIME FIELD Clause
DATETIME FIELD Clause — The DATETIME FIELD clause specifies date and time fields in a form record.
datetime-field-clause
Format
Where you specify this clause:
Syntax Rules
ADT
Specifies that the field is a standard 64-bit OpenVMS binary date/time field. This value is expressed as an absolute time (a specific date and time of day). The value is a binary number in 100-nanosecond units offset from the system base date and time, which is 00:00 hours, November 17, 1858 (the Smithsonian base date and time for the astronomical calendar). This value is always positive.
TIME
Specifies a standard 64-bit OpenVMS binary date/time field. Only the low-order (time) bits are used. The high-order (date) bits are ignored.
DATE
Specifies a standard 64-bit OpenVMS binary date/time field. Only the high-order (date) bits are used. The low-order (time) bits are ignored.
DATETIME
The first four digits are the year.
The next two digits are the month.
The two following are the day of the month.
The next two are the digits in the 24 hour clock.
The next two digits are the minutes.
The next two digits are the seconds.
The remaining digits are the fractions of seconds.
The time is assumed to be local time. Precision is relative to the length of the string: if the string is 14 digits long it has a precision of 1 second; if the string is 8 digits long it has a precision of 1 day.
integer
Specifies the length of the DATETIME form data item.
TM
seconds
minutes
hours
day of the month
month of the year
year since 1900
day of the week
day of the year
Daylight Savings Time
The standards define the tm structure in terms of ANSI C syntax. To write portable programs you must use this structure only in ways that are defined by the standards. The standards do not specify the length of the tm structure in bytes. You must not assume that the tm structure as implemented by your C compiler has the same length or offsets as the DECforms implementation of the tm structure.
A C compiler from a different vendor, or a new version of your present C compiler, may change the length or offsets while remaining compliant to the ANSI standard. If you depend on the C compiler's tm structure matching the DECforms tm data type, your program may fail when run with the new compiler.
   struct time_record {
    Forms_Tm    current_forms_tm;
    };
#define TIME_SIZE sizeof (struct time_record)

    struct time_record time_rec;
    struct tm *current_tm;

    Forms_Record_Data    record_data;

    time_rec.current_forms_tm.tm_sec = current_tm->tm_sec;
    time_rec.current_forms_tm.tm_min = current_tm->tm_min;
    time_rec.current_forms_tm.tm_hour = current_tm->tm_hour;
    time_rec.current_forms_tm.tm_mday = current_tm->tm_mday;
    time_rec.current_forms_tm.tm_mon = current_tm->tm_mon;
    time_rec.current_forms_tm.tm_year = current_tm->tm_year;
    time_rec.current_forms_tm.tm_wday = current_tm->tm_wday;
    time_rec.current_forms_tm.tm_yday = current_tm->tm_yday;
    time_rec.current_forms_tm.tm_isdst = current_tm->tm_isdst;
The Forms_Tm structure is defined in the DECforms include files, and contains the fields listed previously. By writing your application as shown, you can move it between standard-conforming implementations of ANSI C because the application is not sensitive to the length or offsets of fields in the tm structure.
For a complete example of how to use the TM data type in a portable program, see the source code for the TM demonstration program in FORMS$EXAMPLES.
Example
Form Record R1
    TEST_DATE   date
    TEST_ADT1   character(27)
    TEST_ADT2   character(27)
    TEST_TIME   integer(4)
End Record
In form record R1, TEST_DATE is specified as a standard OpenVMS date field.
DEACTIVATE Response Step
DEACTIVATE Response Step — The DEACTIVATE response step takes items off the activation list.
deactivate-response-step
Format
Where you specify this clause:
Syntax Rules
DEACTIVATE
Removes the specified item or items from the activation list. If an activation item is not already on the activation list,a DEACTIVATE response step for that activation item has no effect.
The DEACTIVATE response step is ignored in PRINTER layouts.
BUTTON button ON panel-name-1 (window layouts)
Removes button from the activation list. Panel-name-1 specifies the panel on which button occurs. The operator is allowed to enter only function key input, not data input, into button.
BUTTON button-array ON panel-name-2 (window layouts)
Removes all the buttons in the array reference from the activation list. Panel-name-2 specifies the panel on which button-array occurs. The operator is allowed to enter only function key input, not data input, into the buttons specified in button-array.
FIELD field ON panel-name-3
Removes field from the activation list. Panel-name-3 specifies the panel on which field occurs.
FIELD field-array ON panel-name-4
Removes all the panel fields in the array reference from the activation list. Panel-name-4 specifies the panel on which field-array occurs.
GROUP panel-group ON panel-name-5
Removes all fields, icons, and buttons in that declaration of the panel group from the activation list. Panel-name-5 specifies the panel on which panel-group occurs.
GROUP panel-group-array ON panel-name-6
Removes all fields, icons, and buttons in the array reference from the activation list. Panel-name-6 specifies the panel on which panel-group-array occurs.
ICON icon ON panel-name-7 (character-cell layouts)
Removes icon from the activation list. Icon is the name of the icon; the operator cannot enter data into icon, but the operator can press function keys in icon. Panel-name-7 specifies the panel on which icon occurs.
ICON icon-array ON panel-name-8 (character-cell layouts)
Removes all the icons in the icon array reference from the activation list. Icon-array is the name of the array;the operator cannot enter data into the icons specified in icon-array, but the operator can press function keys in icon-array. Panel-name-8 specifies the panel on which icon-array occurs.
PANEL panel-name-9
Removes all fields, icons, and buttons on panel-name-9 from the activation list.
WAIT [ ON panel-name-10 ] (character-cell layouts)
Deactivates the wait on panel-name-10. If panel-name-10 is not specified, any waits that were activated without specifying a panel are deactivated.
ALL
Removes all activation items from the activation list.
General Rules
When an item is deactivated, you cannot position the cursor to it, you cannot perform field input, and the item is not validated before control returns to the application program.
Examples
Deactivate All
This example deactivates all fields, icons, buttons, and waits.
Function Response DISCARD
    Deactivate
        Panel FILE_PULLDOWN_PANEL
    Remove
        FILE_PULLDOWN_PANEL
    Position To Previous Item
    Let FILE_ENTRY_CONTROL = 0
End Response
   .
   .
   .
End Response
.
.
. A function response named DISCARD is declared.
The response specifies that FILE_PULLDOWN_PANEL is deactivated.
The response specifies that FILE_PULLDOWN_PANEL is removed once it is deactivated.
A POSITION response step specifies that the cursor is moved to the previous item on the activation list.
A LET response step assigns a value of zero to the FILE_ENTRY_CONTROL data item.
DEVICE Declaration
DEVICE Declaration — The DEVICE declaration associates a device with a layout. DECforms supports three layout device classes:the VT class (character-cell terminals), the pixel class (workstations that run the Motif windowing system), and the PRINTER class (output-only file devices). The PRINTER class is used to produce platform-specific output of panels. You cannot specify more than one device class in a single layout.
device-declaration
Format
device-color-clause
Where you specify this clause:
Syntax Rules
TERMINAL [terminal-name-1]
Specifies a terminal type to be used in a layout.
Terminal-name-1is the terminal name used in the FOR clause of the FUNCTION and ATTRIBUTE declarations. Each terminal-name-1must be unique within a layout.
If you specify more than one terminal, the Form Manager chooses the device that is closest incapability to the device on which the form is being enabled. Terminal types from different classes (VT, window, and PRINTER) cannot be specified in the same layout.
TYPE %VT100
Specifies a VT100 terminal with AVO (advanced video option). Terminals with AVO can display blinking and bold characters, as well as some extended character sets.
TYPE %VT100_HEBREW
Specifies a VT100-series terminal with AVO capable of displaying Hebrew characters.
TYPE %VT100_NO_AVO
Specifies a VT100-series terminal without AVO.
TYPE %VT200 [ device-color-clause ]
Specifies either a monochrome VT200-series or a color VT200-series terminal.
TYPE %VT200_HEBREW [ device-color-clause ]
Specifies a monochrome or a color VT200-series terminal capable of displaying Hebrew characters.
TYPE %VT300 [ device-color-clause ]
Specifies either a monochrome VT300-series or a color VT300-series terminal.
TYPE %VT300_HEBREW [ device-color-clause ]
Specifies either a monochrome VT300-series or a color VT300-series terminal capable of displaying Hebrew characters.
TYPE %VT400
Specifies a monochrome VT400-series terminal. If you specify a color VT400-series terminal with device-color-clause, the IFDL Translator does not signal an error, even though the VT400-series terminal does not support color.
The VT420 terminal supports screen sizes of 80 or 132 characters in width, by 24, 25, 36, 48, or 72 lines. Both widths are supported at the 24, 25, 36, and 48 line displays. Although DECforms supports the 72-line page provided by the VT420 hardware, it does not support software-controlled panning of this page length.
Because DECforms uses the rectangular area operations of the VT420 terminal, scrolling restrictions for other VT-series terminals do not apply to the VT420 terminal. Constructing a scrolled region less than the full width of the screen does not degrade performance significantly.
TYPE %VT400_HEBREW
Specifies a VT400-series terminal capable of displaying Hebrew characters.
TYPE %VT500
Specifies a VT500-series terminal. VT500-series terminals are all monochrome, with the exception of the VT525, which supports ANSI color. VT500-series terminals support the same screen sizes as the VT420 terminal.
TYPE %VT500_HEBREW
Specifies a VT500-series terminal capable of displaying Hebrew characters.
TYPE %BLOCKMODE
Specifies a standard block-mode terminal. All 3270 terminals are block-mode terminals and are included in this terminal type.
To use DECforms with 3270 terminals,you must purchase the DEC SNA 3270 Application Services software. For more information on using DECforms with 3270 terminals, see the DECforms Use with 3270 Terminals manual.
TYPE %3270_BASIC
Specifies an implementor name that specifies an IBM ® 3270-class terminal type. Because the 3270 terminals are block-mode terminals, their ability to support all forms features is limited and they require their own layouts.
For more information, see the description of TYPE %BLOCKMODE.
PIXEL [terminal-name-2]
Specifies a terminal type to be used in a window or PRINTER layout.
Terminal-name-2 is the terminal name used in the FOR clause of the FUNCTION and ATTRIBUTE declarations. Each terminal-name-2must be unique within a layout.
If you specify more than one terminal, the Form Manager chooses the device that is closest incapability to the device on which the form is being enabled. You cannot specify different class terminal types in the same layout.
TYPE %MOTIF
Specifies a Motif device: a window device capable of displaying pixels.
[PLANES integer-1]
Specifies the number of color planes of the Motif device. The Form Manager selects a layout at enable time by comparing the value in integer-1 with the number of planes of the display device.
device-color-clause
Specifies the color capability of the terminal. COLOR and COLOUR are synonyms. If this clause is not specified, NOCOLOR is the default.
TYPE %PRINTER
Specifies a PRINTER class output device.
General Rules
If you specify more than one terminal type, the layout can use only those capabilities that are present on all specified terminals,with the exception of color and those capabilities modified by FOR clauses in ATTRIBUTE and FUNCTION declarations. If you specify TERMINAL TYPE %VT100 only, the layout can use all the features applicable to character-cell terminals in DECforms. Normally you specify %VT100 for all character-cell terminals; at run time the Form Manager provides the appropriate layout characteristics.
A VT100 terminal without AVO is capable of a single emphasis rendition only, chosen by SET-UP. On such a terminal, BOLD, BLINK, UNDERLINE, and REVERSE are mapped into the single selected emphasis rendition.
You can specify colors other than BLACK and WHITE for monochrome terminals; however, they are ignored at run time.
In general,the IFDL Translator accepts all other attributes that are incompatible with the terminal, but the Form Manager ignores them.
Hebrew terminal types cannot be specified in the same layout as non-Hebrew terminal types.
Example
The following example shows a typical DEVICE declaration.
Layout CHECKING_LAYOUT
    Device
        Terminal DECVT
            Type %VT100
    End Device
    .
    .
    .
End Layout
| Begins the DEVICE declaration. |
| Specifies DECVT as the terminal name. |
| Specifies a VT100 as the terminal. |
| Ends the DEVICE declaration. |
DISABLE RESPONSE Declaration
DISABLE RESPONSE Declaration — The DISABLE RESPONSE declaration specifies the response performed when the Form Manager disables a form.
disable-response-declaration
Format
Where you specify this clause:
Syntax Rules
response-step
Specifies the response steps performed during the disable response. For more information, see the RESPONSE STEP clause syntax section.
REQUEST validation-response-declaration
Establishes the validation response as the response to be interpreted after the operator has signaled completion of input during accept phase. For more information, see the VALIDATION RESPONSE declaration syntax section.
REQUEST exit-response-declaration
Establishes a response to be executed after the completion of accept phase. For more information, see the EXIT RESPONSE declaration syntax section.
General Rules
If the session being disabled is the only session active on the display device, the Form Manager leaves the display device in the state it is in after completion of the disable response. You can choose to display some panels, clear the display, or leave the display as it is by specifying the DISABLERESPONSE declaration.
If other sessions are active on the display device at the time the form is disabled, the Form Manager removes all panels from the current session so that the remaining sessions' panels can be seen, after the form has been disabled.
Only one disable response can appear in a layout. The default is to do nothing.
Example
Disable Response
    Include FAREWELL
    Request Exit Response
        Remove All
    End Request
End Response

Internal Response FAREWELL
    Message 'Thanks for banking with MegaMoney Bank'
    Activate Wait
End Response
This disable response displays "Thanks for banking with MegaMoney Bank" in the message panel, waits for the operator to acknowledge the message by pressing a function key, and then clears the display.
DISPLAY ATTRIBUTE Entry
DISPLAY ATTRIBUTE Entry — The DISPLAY ATTRIBUTE entry specifies one or more display attributes that apply to a field, literal, icon, or button.
display-attribute-entry
Format
Where you specify this clause:
Syntax Rules
attribute-name
Specifies named group of display characteristics. For further information, see the ATTRIBUTE declaration syntax.
elementary-attribute
Specifies an attribute that can apply to literals, fields, buttons, and icons. For more information, see the ELEMENTARY ATTRIBUTE syntax section.
implementor-attribute
An attribute that sets the keypad mode. For more information, see the IMPLEMENTOR ATTRIBUTE syntax section.
General Rules
When declared in a field, literal, button, or icon, the display attribute entry specifies one or more display attributes that apply to the item. If keypad mode is set for a particular item, the Form Manager sets that mode while the item is the current activation item.
When declared in a panel, the display attribute entry specifies the display attributes that are inherited by the fields, literals, icons, and buttons of the panel. You can redefine these inherited attributes by subsequent field default declarations and literal default declarations within the panel.
If keypad mode is specified for a particular panel, the Form Manager sets that mode while the current active item is on that panel.
If the device does not support an attribute, the Form Manager either ignores the attribute or substitutes a supported attribute.
Example
Attribute ATTR_1
| An attribute named ATTR_1 is declared. |
| ATTR_1 is specified as having the elementary attributes of bold and blinking. |
DISPLAY Clause
DISPLAY Clause — The DISPLAY clause specifies elementary attributes and user-defined display attributes previously declared in the ATTRIBUTE declaration. Display attributes control the appearance of objects on the display device. The DISPLAY clause can appear in panel, literal, literal default, icon, field, button, and field default definitions.
display-clause
Format
Where you specify this clause:
Syntax Rules
display-attribute-entry
Specifies the visual characteristics that apply to fields, icons, buttons, and literals within the scope of the clause.
General Rules
A DISPLAY clause does not replace the attributes of a higher level display clause, but is merged with them. Conflicts are resolved in favor of the lowest level display clause; for example, displays specified at the field level override those defined at the panel level.
If no DISPLAY clause is specified at any level,the attributes are the DECforms defaults, as specified in the ELEMENTARY ATTRIBUTE syntax section.
Examples
Display TWINKIE_ATTRIBUTES
This example causes the attributes previously defined as TWINKIE_ATTRIBUTES to be displayed.
Literal Text
    Line 2 Column 27
    Value "ACCOUNT DATA"
    Display Font Size Double High
End Literal
This example displays the phrase "ACCOUNT DATA" in a double-high, double-wide font. (Choosing the double-high font gives you characters that are double high and double wide;double-wide specifies double-wide characters only.)
Field LAST_NAME
    Same Line Column 16
    Output Picture X(20)
    Display Underlined
End Field
This example underlines the LAST_NAME field on the display device.
DISPLAY Response Step
DISPLAY Response Step — The DISPLAY response step displays panels in a viewport.
display-response-step
Format
Where you specify this clause:
Syntax Rules
DISPLAY [ IMMEDIATE ]
IMMEDIATE applies to PRINTER layouts only. IMMEDIATE specifies that output is directed to a file and that the file is closed after the display operation is performed. If IMMEDIATE is not specified, the Form Manager does not close the file, and output of subsequent DISPLAY response steps is appended to the current device.
panel-name
The panel to be displayed.
ON viewport-name
The viewport where panel-name is displayed.
For character-cell layouts, when ON viewport-name is present in the DISPLAY response step, the viewport specified must be at least as large as the viewport for which the panel was originally created. Window and PRINTER layouts do not have this restriction.
If ON viewport-name is not specified, the panel is displayed in its default viewport.
General Rules
If a panel has already been displayed but becomes obscured or covered up, the DISPLAY response step pops the occluded panel to the top so that it is no longer hidden.
Example
Send Response HAPPY_BDAY
             Display BDAY_PANEL
             Message "Happy Birthday!"
End Response
This example specifies that the BDAY_PANEL is displayed and a MESSAGE response step is performed when the application sends the HAPPY_BDAY record to the form. The MESSAGE response step issues the message "Happy Birthday!" to the message panel.
DISPLAY VIEWPORT Clause
DISPLAY VIEWPORT Clause — The DISPLAY VIEWPORT clause allows you to specify attributes that apply to the viewport, background, and foreground of panel objects. In the case of character-cell terminals, these attributes apply to the entire device. You can declare display viewport attributes at the layout, viewport, and panel levels. At run time,the Form Manager merges display viewport attributes from each level, with panel level attributes taking precedence over viewport level attributes, which in turn take precedence over layout level attributes.
display-viewport-clause
Format
Where you specify this clause:
Syntax Rules
BACKGROUND color-clause-1
Specifies color-clause-1 as the viewport background color. The viewport background is the area of the viewport that does not contain any objects such as fields, icons, buttons, and literals. If FOREGROUND is also specified, the foreground color should be a different color from the background. For more information on color specification, see the COLOR clause syntax section.
BACKGROUND COLOR UNCHANGED is the default.
FOREGROUND color-clause-2
Specifies color-clause-2 as the color of the viewport foreground color. The viewport foreground is the text on lines present in fields, icons, and literals. If BACKGROUND is also specified, the background color should be a different color from the foreground. For more information on color specification, see the COLOR clause syntax section.
FOREGROUND COLOR UNCHANGED is the default.
BOLD FOREGROUND color-clause-3 (character-cell layouts)
Specifies that an object is displayed in color-clause-3. To display an object in the color specified as BOLD FOREGROUND, you must specify the BOLD attribute for that object.
If you specify BOLD FOREGROUND, whenever the BOLD attribute is applied to a literal or panel field,that literal or panel field is displayed in the color-clause-3, instead of bolding.
REVERSE FOREGROUND color-clause-4 (character-cell layouts)
Specifies that an object is displayed in color-clause-4.To display an object in the color specified as REVERSE FOREGROUND, you must specify the REVERSE attribute for that object.
Note
$ SET TERMINAL/REGIS
%TERMINAL_WIDTH_80 (character-cell layouts)
Specifies that the terminal width of this viewport is 80 columns.
%TERMINAL_WIDTH_132 (character-cell layouts)
Specifies that the terminal width of this viewport is 132 columns. If the number of columns specified in the SIZE clause of the LAYOUT declaration has been declared as greater than 80 columns, %TERMINAL_WIDTH_132 is assumed, even if it has not been explicitly specified.
%TERMINAL_WIDTH_UNCHANGED (character-cell layouts)
Specifies that this viewport does not affect terminal width, unless the panel is greater than 80 columns.
- FILL pattern-clause (PRINTER layouts)
- NOFILL
Specifies whether the viewport is filled. Pattern-clause is the pattern that fills the viewport's background. For more information, see the PATTERN clause syntax section.
NOFILL is the default.
- TITLE string-1 (window layouts)
- TITLE data-1
Specifies the title in the viewport window's title box as either a static string, string-1, or a dynamic data item, data-1. If the value of data-1 changes, the title is dynamically changed to reflect the new data.
The default viewport title is the name of the panel displayed in the viewport.
[NO]DECORATIONS (window layouts)
Specifies whether the viewport window has decorations. Decorations include a full window border, border resize handles,maximize and minimize buttons, a window menu button, and a title bar. Decorations apply only to window layouts.
DECORATIONS is the default. NODECORATIONS must be specified as one word.
- ICONLABEL string-2 (window layouts)
- ICONLABEL data-2
Specifies the label for the viewport icon, either a static string, string-2, or a form data item, data-2. If the data-2 value changes while the window is shrunk to an icon, the label is dynamically changed to reflect the new data.
The default viewport ICONLABEL for a minimized (iconized) viewport is the name of the panel displayed in the viewport.
General Rules
Attributes specified by the DISPLAY VIEWPORT clause do not affect the inheritance of attributes for fields, icons, buttons, or literals on panels displayed in the viewport except for background and foreground colors.
On character-cell devices,when a panel is removed from the display, the Form Manager determines the width of the largest panel remaining on the display and resizes the viewport if necessary. If there are no panels displayed that need 132 columns, and if %TERMINAL_WIDTH_80 is specified on at least one of the remaining panels,the Form Manager resizes the display to 80 columns. When multiple viewports are displayed, the terminal width is that of the viewport of the most recently displayed or active panel.
When designing a layout for monochrome character-cell terminals, it is recommended that form designers do not specify black or white backgrounds, but allow operators to keep their own preference.
Because the OpenVMS operating system does not keep track of the current background color of the terminal and the Form Manager cannot determine the current background color of character-cell terminals, DECforms cannot return the background color to its original state after it is changed to a color specified in the form.
For the VT200- and VT300-series terminals, the operator can lock the background color of the terminal. This feature means that the operator can disable all background color changes, so that program control of background color is ignored, no matter what the form specifies. In this case, the original color of the terminal is available after the operator finishes data input, but intermediate color changes specified in the form are denied.
VT400 terminals are monochrome terminals; specifying a background color other than black or white does not affect display.
If the layout in which the DISPLAY VIEWPORT clause is declared contains no color-capable devices, you can specify only BLACK or WHITE in the COLOR clause of the BACKGROUND and FOREGROUND colors.
All color defaults are UNCHANGED. If you specify a color clause in the PRINT response step, the BACKGROUND COLOR default is white and cannot be changed.
Example
Form COLOR_TEST
Layout ATT_REQUEST_LAYOUT
Device
Terminal
Type %VT200
Color
End Device
Units Characters
Size 24 Lines By 80 Columns
Viewport V1
Lines 2 Through 2
Columns 1 Through 80
Display Viewport
Background Color Black
End Viewport
Viewport V_BLACK
Lines 4 Through 4
Columns 1 Through 20
Display Viewport
Foreground Color Black
End Viewport
Viewport V_WHITE
Lines 7 Through 7
Columns 1 Through 20
Display Viewport
Bold Foreground Color White
End Viewport
Viewport V_BLUE
Lines 10 Through 10
Columns 1 Through 20
Display Viewport
Reverse Foreground Color Blue
End Viewport
Enable Response
Activate All
End Response
Panel P1
Viewport V1
Display Viewport
Background Color White
Foreground Color Black
Icon Icon1
Literal Text
Value "Panel P1 in V1"  End Literal
End Icon
End Panel
Panel P2
Viewport V_BLACK
Icon Icon2
Literal Text
Value "Panel P2 in V_BLACK"
End Literal
End Icon
End Panel
Panel P2
Viewport V_BLACK
Icon Icon2
Literal Text
Value "Panel P2 in V_BLACK"  End Literal
End Icon
End Panel
Panel P3
Viewport V_WHITE
Icon Icon3
Literal Text
Value "Panel P3 in V_WHITE"
End Literal
End Icon
End Panel
Panel P3
Viewport V_WHITE
Icon Icon3
Literal Text
Value "Panel P3 in V_WHITE"  DISPLAY BOLD
End Literal
End Icon
End Panel
Panel P4
Viewport V_BLUE
Icon Icon4
Literal Text
Value "Panel P4 in V_BLUE"
DISPLAY BOLD
End Literal
End Icon
End Panel
Panel P4
Viewport V_BLUE
Icon Icon4
Literal Text
Value "Panel P4 in V_BLUE"  DISPLAY REVERSE
End Literal
End Icon
End Panel
End Layout
End Form
DISPLAY REVERSE
End Literal
End Icon
End Panel
End Layout
End Form
| In the layout ATT_REQUEST_LAYOUT, a VT200 or better terminal with color capabilities is declared as the display device. The actual colors displayed depend on the activation order of the panels, as noted in the callouts. If Panel P1 is displayed first, the screen has a white background. If Panel P2 is displayed first, the screen background is whatever it was when the form was activated. If you use the FORMS TEST APPEARANCES command to test this form, and use the NEXT ITEM function to go through the panels, you will get the results specified in callouts 2 to 9. |
| Viewport V1 is specified with a black background. |
| Viewport V_BLACK is specified with a black foreground. |
| On a color terminal, objects with the BOLD attribute displayed within viewport V_WHITE are displayed with a white foreground. |
| Objects within the panel displayed in viewport V_BLUE are specified as having a reversed blue foreground. Specifying REVERSE FOREGROUND means that objects displayed in the V_BLUE viewport with the REVERSE attribute are blue. |
| Icon Icon1 on Panel P1 is displayed as having black text against a white background,overriding the declaration of Viewport V1. |
| Icon Icon2 on Panel P2 is displayed as having black text against a white background. |
| Icon Icon3 on Panel P3 is displayed as having white text against a white background. |
| Icon Icon4 on Panel P4 is displayed as having blue text against a white background. |
EDITING Clause
EDITING Clause — The EDITING clause allows you to specify phrases that provide capabilities to edit a picture field value in conjunction with the OUTPUT PICTURE clause before display. Editing clauses are also used with the INPUT PICTURE clause to provide information for removing editing characters from the data item after input.
editing-clause
Format
Where you specify this clause:
Syntax Rules
SCALE integer
Specifies that the value of the form data item to be edited is multiplied by 10 raised to the integerpower before any other editing takes place. Integer must be in the range of –128 to 127 inclusive.
SIGN
Specifies the sign for the numeric field value. See Table 1.4, ''Sign Control Symbol Values''.
SIGN PLUS
Specifies plus and minus as sign symbols. Plus signs explicitly appear. See Table 1.4, ''Sign Control Symbol Values''.
SIGN MINUS
Specifies plus and minus as sign symbols. Plus signs are displayed as blanks. See Table 1.4, ''Sign Control Symbol Values''.
SIGN PARENTHESES
Specifies that matched parentheses are displayed for negative values and blanks are displayed for positive values.
SIGN POSITIVE string-1
Specifies a string, string-1,as a positive sign symbol. String-1 is a character string of any length. String-1 cannot contain digits, spaces, or the decimal point character applicable to the field. String-1 must not equal string-2 or string-6.
SIGN NEGATIVE string-2
Specifies a string, string-2,as a negative sign symbol. String-2 cannot contain digits, spaces, or the decimal point character applicable to the field. String-2 must not equal string-1 or string-6.
SIGN ZERO string-3
Specifies a string, string-3,as a zero sign symbol. String-3 cannot contain digits, spaces, or the decimal point character applicable to the field. String-3 must not equal string-6. Zeros are still output in addition to being specified as a sign symbol.
Specifies the character to be used as a replacement character and placed to the left of the decimal character for leading zeros in numeric displays and for leading spaces in alphanumeric displays. String-4 must be exactly one character long and in single or double quotation marks. String-4 cannot contain the decimal point character applicable to the field.
If REPLACE LEADING is specified with a field that defines a Format 4 (date) picture string, string-4must be either a space or 0. If an inappropriate default is inherited, it is ignored and 0 is used instead.
REPLACE TRAILING string-5
Specifies the character to be used as a replacement character and placed to the right of the decimal character for trailing zeros in numeric displays and for trailing spaces in alphanumeric displays. String-5 must be exactly one character long and in single or double quotation marks. String-5 cannot contain the decimal point character applicable to the field.
DECIMAL POINT IS PERIOD
Specifies that a period is used to designate the decimal point. A period can appear only once in an input or output picture for the picture field. A period can appear only once in any input to the picture field. If you choose a period to specify the decimal point, you can use a comma as an ordinary nonnumeric insertion literal within a picture string for the field.
DECIMAL POINT IS COMMA
Specifies that a comma is used to designate the decimal point. A comma can appear only once in an input picture or output picture string for the picture field. A comma can appear only once in any input to the field. If you choose a comma to specify the decimal point, you can use a period as an ordinary nonnumeric insertion literal within a picture string for the field.
CURRENCY SIGN IS string-6
Specifies a string, string-6, as the currency sign. String-6 cannot contain the decimal point character applicable to the field.
General Rules
If the INPUT PICTURE clause for the field contains an S picture character, string-4, string-5, and string-6 cannot contain a sign.
Signs are not applicable to DATE picture strings (Format 4 picture strings) or to Format 1 picture strings.
The characters of the SIGN clause must be unique; they cannot appear in another SIGN clause for the same field or in any other REPLACE or CURRENCY clause. The characters of a SIGN clause apply to an edited item only when the S picture character appears in the corresponding picture string.
- The sign control symbols specified in the SIGN clause produce the results shown in Table 1.4, ''Sign Control Symbol Values'', depending on the value of the form data item.
The characters of a SIGN clause appear as fixed or floating characters, or leading or trailing characters in an edited item (according to the picture string), except when you specify PARENTHESES, the "accountant's positive and negative".
When PARENTHESES is specified, the appropriate left parenthesis or space is inserted at the left of the edited item, and the appropriate right parenthesis or space is inserted at the right of the edited item. The picture string specifies the exact positions of the form data item.
The characters in any CURRENCY clause must be unique: they cannot appear in any other SIGN or REPLACE clause. The characters of a CURRENCY clause apply to an edited item only when the W picture character appears in the corresponding picture string.
The position of string-6 in the edited item is given by the location of the W within the picture string.
If no CURRENCY clause applies to the field, the dollar sign character($) is used.
For more information on picture string symbols, see the PICTURE STRING syntax section.
Defaults
SCALE 0
SIGN MINUS
REPLACE LEADING Space character
REPLACE TRAILING Space character
DECIMAL POINT PERIOD
CURRENCY SIGN $
Examples
Field CHECKING_BALANCE
    Same Line Next Column +1
    Output Picture 99,999,99W9.99
    Scale -2
    Protected
End Field
In this field, the Scale –2 clause divides the value of the edited form data item by 100. Because the value of CHECKING_BALANCE is maintained in pennies, Scale –2 allows the field to be displayed as dollars.
Field AMOUNT
    Same Line Next Column
    Output Picture 999,99R9.99
    Justification Right
    Replace Leading "*"
    Scale -2
    .
    .
    .
End Field
In this field, the Scale –2 clause divides the value of the form data item AMOUNT by 100. Field AMOUNT is stored in pennies, so Scale –2 allows AMOUNT to be displayed as dollars. The R in the picture string and the Replace Leading "*"clause specify that any leading zeros are replaced with asterisks (*) when the picture is displayed.
ELEMENTARY ATTRIBUTE
ELEMENTARY ATTRIBUTE — An elementary attribute is an attribute that applies to the way an object is rendered. You can group elementary attributes together in an ATTRIBUTE declaration, and then refer to that name in a DISPLAY ATTRIBUTE entry. There are three types of elementary attributes: area, line, and text attributes. Area attributes affect the area an object covers, or the background of an object. Line attributes affect the outlines drawn around objects. Text attributes affect how the textual parts of objects are represented on a screen.
elementary-attribute
Format
elementary-attribute
area-attribute
line-attribute
text-attribute
character-set-name
Where you specify this clause:
Syntax Rules
area-attribute
Specifies a set of attributes that affect the area covered by an object.
BACKGROUND color-clause-1
Specifies color-clause-1 as the color against which objects are seen on the display device. For ReGIS terminals, the Form Manager ignores this clause. ReGIS terminals are the VT125, the VT240, and the VT340. ReGIS color is supported on only VT241 and VT340 terminals.
BACKGROUND COLOR UNCHANGED is the default. For more information, see the COLOR clause syntax section.
BORDER WIDTH IS number (window layouts)
Specifies the width of the border drawn around an object. Number specifies a positive or zero value. If a value of zero is specified for number, no border is drawn for the object. BORDER WIDTH IS number is supported only for window layouts; all other layout types ignore this clause.
In Motif layouts, number is expressed in layout units and represents the width of the border. For example, if you express number as .225 and your units are inches, the border generated will be .225 inches wide. The default value for number is zero in Motif layouts.
NOFILL
Specifies that an object is not filled with any pattern.
FILL pattern-clause (PRINTER and window layouts)
Specifies pattern-clause as the pattern that fills a graphic literal object. Only closed polyline literals and rectangles within a PRINTER layout or window layout can have a FILL pattern. For more information, see the PATTERN clause syntax section.
NOFILL is the default.
FOREGROUND color-clause-2
Specifies color-clause-2 as the foreground color for an object. The foreground of an object is that perceived as the closest to the user. All objects do not have foregrounds (panels, for example). The Form Manager ignores this clause for ReGIS terminals.
FOREGROUND COLOR UNCHANGED is the default. For more information, see the COLOR clause syntax section.
- REVERSE
- NEGATIVE
Specifies that the current background and foreground colors are reversed. REVERSE and NEGATIVE are synonyms.
NOREVERSE is the default.
- NOREVERSE
- NONEGATIVE
Specifies that the background and foreground colors are not reversed. NOREVERSE and NONEGATIVE are synonyms.
NOREVERSE is the default.
- SHADOW (window layouts)
- NOSHADOW
Specifies whether or not an object has a shadow.
SHADOW is the default.
line-attribute
Specifies the line attributes for a graphic literal object. For PRINTER layouts, all line attributes are applicable, but LINEWIDTH must be specified as a numeric value. LINE WIDTH SINGLE, NORMAL, DOUBLE HIGH, and DOUBLE WIDE,do not apply to PRINTER layouts.
Window layouts support the same line attributes as PRINTER layouts with two exceptions: LINE MARKER does not apply, and CAP END does not apply. (CAP START is applicable and determines how the end of the line is drawn.)
For character-cell layouts, the only line attributes that apply are LINE WIDTH SINGLE, NORMAL, DOUBLE HIGH, and DOUBLE WIDE.
LINE STYLE (PRINTER and window layouts)
Specifies how the outline of a graphic literal object is drawn. LINE STYLE SOLID is the default.
LINE STYLE SOLID (PRINTER and window layouts)
Specifies that the outline of an object is drawn as a solid line.
LINE STYLE DASHED (PRINTER and window layouts)
Specifies that the outline of an object is drawn as a dashed line.
LINE STYLE DOTTED (PRINTER and window layouts)
Specifies that the outline of an object is drawn as a dotted line.
LINE STYLE DASHEDDOTTED (PRINTER and window layouts)
Specifies that the outline of an object is drawn as a dashed and dotted line.
LINE WIDTH
Specifies the width of the outline of a graphic literal object in layout units.
LINE WIDTH IS number (PRINTER and window layouts)
Specifies the width of the outline of a graphic literal object. Number specifies a positive or zero value and is expressed in layout units.
The default for number is zero. If a value of zero is chosen,the thinnest line possible is drawn as the object's outline.
- LINE WIDTH SINGLE
- LINE WIDTH NORMAL (character-cell layouts)
Specifies the width of the outline of an object as one layout unit. SINGLE and NORMAL are synonyms.
LINE WIDTH NORMAL is the default.
LINE WIDTH DOUBLE HIGH (character-cell layouts)
Specifies the width of the outline of an object as twice the standard line width and height.
LINE WIDTH DOUBLE WIDE (character-cell layouts)
Specifies the width of the outline of an object as twice the width of a normal line.
LINE MARKER (PRINTER layouts)
Specifies the shapes of markers used at the joints of lines.
The default is no line marker.
LINE MARKER DOT (PRINTER layouts)
Specifies that a dot is used to join lines.
LINE MARKER PLUS (PRINTER layouts)
Specifies that a plus sign is used to join lines.
LINE MARKER ASTERISK (PRINTER layouts)
Specifies that an asterisk is used to join lines.
LINE MARKER CIRCLE (PRINTER layouts)
Specifies that a circle is used to join lines.
LINE MARKER CROSS (PRINTER layouts)
Specifies that a cross is used to join lines.
- CAP START (PRINTER and Motif layouts)
- CAP END (PRINTER layouts)
Specifies how the beginning and end of line segments are drawn. CAP END is ignored at run time for window layouts and for rectangles.
If either CAP START or CAP END is omitted,the omitted attribute defaults to the specified attribute. CAP START must be the same as CAP END unless either is specified as ARROW.
If both attributes are omitted, ROUND is the default.
- CAP START BUTT (PRINTER and Motif layouts)
- CAP END BUTT (PRINTER layouts)
Specifies the start and end of a line segment are flat.
- CAP START ROUND (PRINTER and Motif layouts)
- CAP END ROUND (PRINTER layouts)
Specifies the start and end of a line segment are rounded.
- CAP START SQUARE (PRINTER and Motif layouts)
- CAP END SQUARE (PRINTER layouts)
Specifies the start and end of a line segment are squared.
- CAP START ARROW (PRINTER and Motif layouts)
- CAP END ARROW (PRINTER layouts)
Specifies the start and end of a line segment are arrows.
JOIN (PRINTER and Motif layouts)
Specifies how the joints of multisegmented objects are drawn.
ROUND is the default for JOIN.
JOIN MITER (PRINTER and Motif layouts)
Specifies that the joints of a multisegmented object are mitered: drawn at 90 degree angles.
JOIN ROUND (PRINTER and Motif layouts)
Specifies the joints of a multisegmented object are rounded.
ROUND is the default for JOIN.
JOIN BEVEL (PRINTER and Motif layouts)
Specifies the joints of a multisegmented object are beveled: drawn at angles other than 90 degrees.
text-attribute
Specifies how text is displayed within an object. Text attributes include font style, underlining and overlining, bolding, blinking, and character set.
- BLINKING (character-cell layouts)
- NOBLINKING
Specifies whether text in an object blinks.
NOBLINKING is the default.
- BOLD (character-cell layouts)
- NOBOLD
- NORMAL INTENSITY
Specifies whether text in an object is displayed at an increased intensity. NOBOLD and NORMAL INTENSITY are synonyms. This attribute is not applicable in Motif layouts, but specifying FONT WEIGHT BOLD for Motif layouts may have a similar effect on increasing the intensity at which text is displayed.
NOBOLD is the default.
- CROSSOUT (PRINTER layouts)
- NOCROSSOUT
Specifies whether text in an object is crossed out.
NOCROSSOUT is the default.
- ENCLOSED BOX (PRINTER layouts)
- ENCLOSED ENCIRCLE (PRINTER layouts)
- NOENCLOSED
Specifies whether text in an object is enclosed within an outline. The outline may be either a box or a circle.
NOENCLOSED is the default.
- OVERLINED (PRINTER layouts)
- NOOVERLINED
Specifies whether text in an object is overlined with a single line.
NOOVERLINED is the default.
- UNDERLINED (character-cell and PRINTER layouts)
- UNDERLINED DOUBLE (PRINTER layouts)
- NOUNDERLINED
Specifies whether text in an object is underlined with a single or a double line, or not underlined.
NOUNDERLINED is the default.
font-declaration
Specifies the character font used to display a field or literal. A font is a set of print characters of one type size and face. For more information on font characteristics, see the FONT declaration syntax section.
- TEXT PATH RIGHT
- TEXT PATH HEBREW
Specifies the geographical path of text within an object. TEXT PATH RIGHT specifies that the geographical path of an object's text is from left to right. TEXT PATH HEBREW specifies that the geographical path of an object's text is from right to left in a Hebrew layout.
TEXT PATH RIGHT is the default for all layouts.
CHARACTER SET character-set-name
Specifies one of the registered international character set names or one of the valid private character set names as the character set. he device you are using must support the character set that you specify. Check your device documentation to see which character sets you can specify.
ISO_XXXX_X
PRIVATE_yyy
XXXX_X is the ISO character set registration number and yyy is a character string up to 22 characters in length defined by DECforms. The International Organization for Standardization (ISO) mandates that character sets be specified with four digit registration numbers.
CHARACTER SET PRIVATE_USER_PREFERENCE is the default for character-cell layouts. CHARACTER SET ISO_8859_1 is the default for PRINTER layouts. The default for Motif layouts is supplied by the Motif toolkit.
character-set-name
Specifies one of the following as the character set that text is displayed in.
ISO_8859_1
Specifies ISO 8859/1 as the character set that displays text. ISO 8859/1 is an 8-bit single byte code graphic character set. ISO 8859/1 is the same as PRIVATE_LATIN_1.
ISO_8859_9
Specifies ISO 8859/9 as the character set that displays text. ISO 8859/9 is an 8-bit single byte code graphic character set. ISO 8859/9 is the same as PRIVATE_LATIN_5.
PRIVATE_ASCII
Specifies ASCII as the character set that displays text.
PRIVATE_DEC_ARABIC
Specifies the Arabic character set as the character set that displays text.
PRIVATE_DEC_HANGUL
Specifies the Hangul character set (used in Korea) as the character set that displays text.
PRIVATE_DEC_HANYU
Specifies the Hanyu character set (used in Taiwan) as the character set that displays text.
PRIVATE_DEC_HANZI
Specifies the Hanzi character set (used in the People's Republic of China) as the character set that displays text.
PRIVATE_DEC_HEBREW
Specifies the Hebrew character set as the character set that displays text.
PRIVATE_DEC_KANJI
Specifies the Kanji character set (used in Japan) as the character set that displays text.
PRIVATE_DEC_KATAKANA
Specifies the Katakana character set (used in Japan) as the character set that displays text.
PRIVATE_DEC_TURKISH
Specifies the Turkish character set as the character set that displays text.
PRIVATE_LATIN_1
Specifies Latin 1 as the character set that displays text. Latin 1 is an 8-bit character set that contains 190 graphic characters. The set includes letters with accents and diacritical marks used in languages in many countries in western Europe and North and South America, as well as other special characters not included in the DEC Supplemental Graphic set.
PRIVATE_LATIN_1 is a synonym for ISO_8859_1.
PRIVATE_LATIN_5
Specifies Latin 5 as the character set that displays text. Latin 5 is an 8-bit character set that contains 190 graphic characters. The set includes letters with accents and diacritical marks used in eastern European languages that use Latin rather than Cyrillic characters, as well as other special characters not included in the DEC Supplemental Graphic set.
PRIVATE_LATIN_5 is a synonym for ISO_8859_9.
PRIVATE_MIA_KANJI
Specifies the MIA Kanji character set as the character set that displays text.
MIA Kanji is a character set for displaying Kanji in a fixed 2-byte per character format.
PRIVATE_RULE
Specifies the DEC Special Graphic Character Set as the character set that displays text. The DEC Special Graphic Character Set has 94 graphic characters,most of which are also in the ASCII character set. The special characters include symbols and line-drawing characters.
PRIVATE_THAI
Specifies that the Thai character set (used in Thailand)is the character set that displays text.
PRIVATE_UK
Specifies the British version of ASCII as the character set that displays text.
PRIVATE_USER_PREFERENCE
Specifies the user preference character set as the character set that displays text. On VT100 terminals,this is ASCII. On VT200 terminals, it is the DEC Multinational Character Set (MCS). On VT300 and VT400 terminals, it is either Latin 1 or DEC MCS, depending on set-up.
PRIVATE_VT100_SET1
Specifies the first VT100 customer-supplied character set as the character set that displays text.
PRIVATE_VT100_SET2
Specifies the second VT100 customer-supplied character set as the character set that displays text. This character set is available only on a VT100 terminal with special ROM.
General Rules
Attribute defaults are determined according to layout types, as is the handling of attribute omission. In character-cell and PRINTER layouts, omitted attributes are inherited from higher level display clauses. If no higher level display clause contains an explicit setting for an attribute, a DECforms default is applied.
In window layouts, omitted attributes are also inherited from higher level display clauses, but if no explicit settings are inherited, a DECforms default is not applied. The DECforms default is not applied to allow a default value for that attribute to be applied at run time using the DECwindows resource file mechanism.
If there is no default value for that attribute in the resource file, the IFDL Translator ignores the attribute or issues an error message. See the description of each attribute for specific information. If the layout's device class does not support an attribute, the IFDL Translator ignores the attribute.
Defaults
area-attribute
- BACKGROUND COLOR UNCHANGED
- NOFILL
- FOREGROUND COLOR UNCHANGED
- NOREVERSE
- SHADOW (window objects only)
line-attribute
- LINE STYLE SOLID (PRINTER and window layouts only)
- LINE WIDTH SINGLE (character-cell layouts only)
- LINE WIDTH IS 0 (PRINTER and window layouts only)
- NO LINE MARKER (PRINTER layouts only)
- JOIN ROUND (PRINTER and window layouts only)
- CAP START ROUND (PRINTER and window layouts only)
In PRINTER layouts, if either CAP START or CAP END is omitted, the omitted attribute defaults to the specified attribute.
text-attribute
- NOBLINKING
- NOBOLD
- NOUNDERLINED
- NOOVERLINED
- NOCROSSOUT
- NOENCLOSED
- TEXT PATH RIGHT
Example
Attribute DOUBLE_ATTRIBS
        IS
    Background Color Unchanged
    Font Size Double High
    Nobold
    Noblinking
    Character Set Private_VT100_Set1
End Attribute
| The background color is not modified by the operator. |
| The font size is specified as double high. |
| Text displayed is not bolded. |
| Text displayed does not blink. |
| Text is displayed in the PRIVATE_VT100_SET1 character set. |
ENABLE RESPONSE Declaration
(ENABLE RESPONSE Declaration — The ENABLE RESPONSE declaration specifies the action or actions that occur when a form is enabled. You can use an enable response to display a panel or a series of panels until the next request following the enable is received.
enable-response-declaration
Format
Where you specify this clause:
Syntax Rules
response-step
Specifies the response steps to be performed when the application enables the form. For more information, see the RESPONSE STEP clause syntax section.
REQUEST validation-response-declaration
Establishes the validation response as the response to be interpreted after the operator has signaled completion of input processing during accept phase (if any). For more information, see the VALIDATION RESPONSE declaration syntax section.
REQUEST exit-response-declaration
Establishes a response to be executed after the completion of accept phase. For more information, see the EXIT RESPONSE declaration syntax section.
General Rules
You can declare only one ENABLE RESPONSE declaration for each layout. When the session being enabled is the only session on the display device, the default enable response clears the display. When there are other sessions already running on the display device, the default enable response does nothing.
Example
Enable Response
    Display HOWDY FIRST_FORM
End Response
This ENABLE RESPONSE declaration displays the panels HOWDY and FIRST_FORM in their respective viewports.
ENTER HELP Response Step
ENTER HELP Response Step — The ENTER HELP response step allows you to create DECforms help.
enter-help-response-step
Format
Where you specify this clause:
Syntax Rules
ENTER HELP
Switch from the main activation list to the help activation list.
Set the HELP ACTIVE condition to true.
Activate the help panel specified in the USE HELP PANEL clause that applies to the current activation item, if one has been declared in the LAYOUT declaration.
Control does not return to the response step after the ENTER HELP response step until a successful EXIT HELP response step is executed, a successful RETURN response step is executed, or the help activation list is empty.
The EXIT HELP and RETURN response steps are successful if they are specified as IMMEDIATE, or if IMMEDIATE was not specified and the help activation item passed validation. If there is no USE HELP PANEL clause, or if help is already active, the ENTER HELP response step is ignored.
For character-cell layouts, if there are no unprotected fields or icons on the panel when the help panel is activated, the Form Manager performs an ACTIVATE WAIT on the panel.
For window layouts, if there are no unprotected fields or buttons on the panel when the help panel is activated, the Form Manager displays the panel and an implicit EXIT HELP response step is executed.
The ENTER HELP response step is ignored in PRINTER layouts.
Example
ENTER HELP
This example specifies that a help panel is activated.
ENTRY RESPONSE Declaration
ENTRY RESPONSE Declaration — The ENTRY RESPONSE declaration specifies what action the Form Manager takes when an item becomes the current activation item. Entry responses for the group and panel level are called just before the Form Manager enters the first active field, button, or icon of the group or panel. Entry responses are executed during accept phase only.
entry-response-declaration
Format
Where you specify this clause:
Syntax Rules
response-step
Specifies the response steps to be performed during accept phase. For more information, see the RESPONSE STEP clause syntax section.
General Rules
The Form Manager interprets entry responses for fields,buttons, and icons during accept phase just before operator input into an item. The Form Manager performs an entry response for a group during accept phase just before the Form Manager allows the operator to enter input into the first active field, icon, or button of a group.
The Form Manager interprets the group entry response before the field, button, or icon entry response. If you specify an entry response for a panel, the response is interpreted during accept phase just before the Form Manager displays a panel to solicit input for an activation item on that panel.
There is no default entry response.
Examples
Panel P1
    Group G1
       Entry Response
             Message "Abandon hope all ye who enter here"
       End Response
    .
    .
    .
End Panel
This example specifies that a MESSAGE response step is performed when a field, button, or icon from Group G1 becomes the current activation item. The response step displays the message "Abandon hope all ye who enter here".
Panel CHECK_PANEL
    Viewport MID_VP

    Entry Response
        Reset MEMO AMOUNT CHECK_MEMO
    End Response
    .
    .
    .
End Panel
This example specifies that the RESET response step is performed when panel CHECK_PANEL is about to receive input to one of its fields,buttons, or icons. The response step specifies that the form data items MEMO, AMOUNT, and CHECK_MEMO are restored to their initial values.
EXIT HELP Response Step
EXIT HELP Response Step — The EXIT HELP response step specifies that help activation processing should end conditionally or unconditionally after validation.
exit-help-response-step
Format
Where you specify this clause:
Syntax Rules
EXIT HELP [ IMMEDIATE ]
The EXIT HELP response step sets the HELP ACTIVE condition to false,and switches from the help activation list to the current item on the main activation list. An EXIT HELP response step does not change the current activation item on the main activation list.
IMMEDIATE specifies that validation is not performed on any item on the help activation list when help is exited.
The EXIT HELP response step is ignored in PRINTER layouts.
Example
EXIT HELP IMMEDIATE
This example specifies that the Form Manager exits help without validating any items on the help activation list, after completing any exit responses for the current activation item.
EXIT RESPONSE Declaration
EXIT RESPONSE Declaration — The EXIT RESPONSE declaration specifies what action the Form Manager takes when an item is no longer the current activation item. Exit responses for the group and panel level are called when the Form Manager exits the last active field, button, or icon of the group or panel,and after the Form Manager has called the last field's, button's, or icon's exit response. Exit responses are executed during accept phase only.
exit-response-declaration
Format
Where you specify this clause:
Syntax Rules
response-step
Specifies the response steps to be performed during accept phase. For more information, see the RESPONSE STEP clause syntax section.
General Rules
The Form Manager interprets an exit response for a field, button, or icon during accept phase after the operator has indicated that item input is completed and the item has been validated, or the item is bypassing validation.
For a group, the Form Manager interprets an exit response just after the operator has indicated that item input into the last field, button, or icon of an active group is completed and the field has been validated, or the item is bypassing validation.
An exit response for a panel is interpreted during accept phase just after the Form Manager completes processing for an activation item on that panel, and either accept phase is ending or the next activation item is on another panel.
There is no default exit response.
Example
Panel REGISTER_PANEL
    Viewport MID_VP
       Exit Response
           Let NEXT_UPDATE_MESSAGE = "Heigh Ho! You're broke!"
       End Response
    .
    .
    .
End Panel
This example specifies that a LET response step be performed when panel REGISTER_PANEL is about to cease being the panel with the current activation item. A LET response step assigns a value to a form data item. This response step puts the character string "Heigh Ho! You're broke!" into the NEXT_UPDATE_MESSAGE form data item.
EXTENT Clause
EXTENT Clause — The EXTENT clause specifies the horizontal and vertical spans of an object in a window or PRINTER layout.
extent-clause
Format
full-extent-clause
partial-extent-clause
Where you specify this clause:
Syntax Rules
WIDTH number-1 HEIGHT number-2
Specifies the width and height of an object's extents; number-1 and number-2 are expressed in layout units.
HEIGHT number-2 WIDTH number-1
Specifies the width and height of an object's extents; number-2 and number-1 are expressed in layout units.
WIDTH number-1
Specifies the horizontal extent of an object; number-1 is expressed in layout units.
HEIGHT number-2
Specifies the vertical extent of an object; number-2 is expressed in layout units.
General Rules
An EXTENT clause can be used to specify explicitly the size of various DECforms objects. The size of objects is particularly significant for objects within groups. The size of a group's occurrence, in the absence of an EXTENT clause, is determined by the sum of the sizes of all the objects within that occurrence. By default, a group's occurrence is the smallest extent rectangle that completely contains all the objects within that occurrence.
For window layouts, the Form Manager retrieves the default size of these objects at run time by querying the display device. Therefore, the default sizes of objects can vary slightly from one device to another.
For PRINTER layouts, the IFDL Translator sizes text objects by querying system font metric resource files to determine the height and width of text literals and fields. If a specific font metric file is not available, the metrics for FONT FAMILYCOURIER STYLE ROMAN SIZE 12 are used.
There are two types of EXTENT clauses: full and partial. You must specify both vertical and horizontal dimensions in full extent clauses. You can omit either dimension in a partial extent clause.
Example
Push Button EXIT_APPLICATION
    Line 2500
    Column 200
    Height 75
    Width 100
    Label "Exit"
End Button
This example creates an Exit push button.
EXTERNAL RESPONSE Declaration
EXTERNAL RESPONSE Declaration — The EXTERNAL RESPONSE declaration customizes the run-time processing of the form. Each external response defines an action or set of actions to be performed by the Form Manager when an external request is called. The requests that the application program can make of the Form Manager that have reference to forms are enable form, disable form, send a record message, receive a record message, and transceive (send and receive) record messages. In addition, each of the five requests can have associated control text. (If this is the case, you can declare a control text response.) For each external request you can declare a validation response, an exit response, or both. If you specify an external response, and the response is defined for the current request, the Form Manager performs that response. If you do not specify an external response for the current request, the Form Manager performs a default response. For the defaults, see the Defaults section.
external-response-declaration
Format
Where you specify this clause:
Syntax Rules
enable-response-declaration
Performed when the Form Manager enables a form. Only one enable response may appear in each layout. For more information, see the ENABLE RESPONSE declaration syntax section.
disable-response-declaration
Performed when the Form Manager disables a form. Only one disable response can appear in each layout. For more information, see the DISABLE RESPONSE declaration syntax section.
send-response-declaration
Performed when an application sends a record message to the form. For more information, see the SEND RESPONSE declaration syntax section.
receive-response-declaration
Performed when the application receives a record message from the form. For more information, see the RECEIVE RESPONSE declaration syntax section.
transceive-response-declaration
Performed when the application transceives (sends and receives) a record message or messages. For more information, see the TRANSCEIVE RESPONSE declaration syntax section.
control-text-response-declaration
Performed when the application sends control text to the form. For more information, see the CONTROL TEXT RESPONSE declaration syntax section.
Defaults
enable-response-declaration
The default enable response is to execute a REMOVE ALL response step and clear the display, unless there are other sessions on the display device.
disable-response-declaration
The default disable response is to do nothing.
send-response-declaration
The default send response is to do nothing.
receive-response-declaration
The default receive response executes an ACTIVATE CORRESPONDING RECEIVE ALL response step.
transceive-response-declaration
The default transceive response performs a receive response for the receive records.
control-text-response-declaration
The default control text response is to do nothing.
Example
The following are examples of external responses.
Enable Response
| The ENABLE RESPONSE declaration is executed when the Form Manager enables the form and displays the WELCOME_PANEL panel on the display device. |
| The ACTIVATE response step causes the WELCOME_PANEL panel to be displayed and waits for operator input. |
| REQUEST EXIT RESPONSE specifies that a DISPLAY response step is performed after the completion of accept phase. This DISPLAY response step displays the CHOICE_PANEL and BALANCE_PANEL panels. |
| REQUEST EXIT RESPONSE also specifies that a MESSAGE response step is performed after the completion of accept phase. In this case a message telling the operator to use arrows to position to the choice panel and press Return is displayed in the message panel. |
| The REQUEST EXIT RESPONSE declaration is ended. |
| The ENABLE RESPONSE declaration is ended. |
FIELD DEFAULT Application
FIELD DEFAULT Application — The FIELD DEFAULT application specifies the default characteristics applied to subsequent fields, icons, or buttons within a layout, group, or panel in an IFDL source file.
field-default-application
Format
Where you specify this clause:
Syntax Rules
NO FIELD DEFAULT
Specifies that no user-defined defaults apply at the current level.
FIELD DEFAULT default-name
Specifies that the named default, default-name, applies at the current level.
FIELD DEFAULT OF [field-default-entry] ... END DEFAULT
Specifies that a set of field default entries applies at the current level. For further information, see the FIELD DEFAULT entry syntax section.
General Rules
Description entries for fields, icons, and buttons can be declared in the same field default. Only the description entries allowed for each item are applied as field defaults: for example, field validation entries cannot be applied to icons.
Field characteristics set by the FIELD DEFAULT application remain in effect for a layout, group, panel,field, icon, or button until the end of that syntactic entity. At that time, all field characteristics revert to defaults declared at a higher level, if any. If no defaults are declared at a higher level, field characteristics revert to DECforms defaults.
When a field description entry from a field default is to be applied to a field, icon, or button,that field description is applied only if it does not conflict with any field description entry in the field, icon, or button. For a list of conflicting field description entries, see the FIELD VALIDATION entry syntax section.
You cannot specify the negation of a field description entry—for example, NOT PROTECTED—in a field default application. The negative field description entry is the default.
An explicit default declaration (FIELD DEFAULT OF), listing all the entries that compose the default.
A reference to a named default. The reference acts as if the entries in the named default had been explicitly declared as an explicit default declaration.
A NO FIELD DEFAULT declaration. This declares that no default is to be applied while the layout, group, or panel is being processed.
The absence of any defaulting declaration. Any default currently active remains in effect for the layout, group, panel, field, button, or icon.
Defaults are not additive; when a default becomes active for an item, it completely obscures any default that is active at a higher level.
When a field default is active within a layout, group, panel,field, button, or icon, the default is applied to that object only when the clause in question is entirely absent from the object, and the clause in question is explicitly declared in the default.
For example, the ACTIVE HIGHLIGHT clause in a default application is applied to a field within the default application's influence only when an explicit ACTIVE HIGHLIGHT is absent from the field. If there is no ACTIVE HIGHLIGHT in the default application, no ACTIVE HIGHLIGHT is applied to the field.
Any inheritance of attributes within the DISPLAY clause for the object from higher levels takes place after the defaulting mechanism is applied. Therefore, an object obtains display attributes from a default application only when the object possesses no DISPLAY clause of its own, and there is an explicit DISPLAY clause within the currently active default application.
In this case,the DISPLAY clause within the default acts (for inheritance purposes) exactly as if it were the DISPLAY clause for the object; the fact that the object obtained the DISPLAY clause from the default application is entirely transparent to the inheritance mechanism.
Array expressions in field default applications either must be fully subscripted or must refer to data items that are associated with panel fields that are contained in the panel group where the default application is declared. Array expressions in named field default declarations must always be fully subscripted.
Defaults
If you specify NO FIELD DEFAULT, or if there are no applicable field entries, the field defaults are as follows:
LOCATION Clause
For character-cell layouts, the LOCATION clause specifies that the field or icon display starts at the next line,and the same column. You cannot default a location in a window or PRINTER layout.
FONT Declaration
For character-cell layouts, the character set defaults to PRIVATE_USER_PREFERENCE and the font size defaults to SINGLE.
For Motif layouts, the character set and font defaults are supplied by the Motif toolkit.
For PRINTER layouts, the character set and font default is FAMILY COURIER STYLE ROMAN WEIGHT MEDIUM SIZE 12.
BACKGROUND COLOR UNCHANGED
The background color remains as set by the user.
FOREGROUND COLOR UNCHANGED
The foreground color remains as set by the user.
Examples
Panel FOO
Apply Field Default
    Of
        Active Highlight Reverse
        Minimum Length 1
            Message "You must enter something "
End Default
    .
    .
    .
End Panel
This example specifies a field default of ACTIVE HIGHLIGHT REVERSE and MINIMUM LENGTH 1; these apply to all the fields in panel FOO that do not have field default applications declared in them.
Apply Field Default
    Of
        Same Line Next Column + 1
        Protected
End Default
This example specifies a field default of field placement at same line and next column + 1, relative to the previously declared field. It also specifies protected as the field default.
FIELD DEFAULT Declaration
FIELD DEFAULT Declaration — The FIELD DEFAULT declaration specifies a named set of defaults at the layout level that can be applied as the default characteristics of subsequent fields, icons, or buttons within a panel in an IFDL source file.
field-default-declaration
Format
Where you specify this clause:
Syntax Rules
field-default-name
Specifies a name for a default to be subsequently referred to in one or more field default applications.
field-default-entry
Specifies the attributes to be used as field defaults. For further information, see the FIELD DEFAULT entry syntax section.
General Rules
You cannot specify negative field description entries—for example, NOT PROTECTED—in a FIELD DEFAULT declaration. The negative field description entry is the default.
Array references in named field default declarations must be fully subscripted. For more information on arrays and subscripts, see Appendix A, "Using Arrays with DECforms Software".
Examples
Field Default UC_DEF
     Uppercase
End Default
In this example, UC_DEF is the name of a field default that specifies uppercase.
Field Default PROT_DEF
    Protected
End Default
In this example, PROT_DEF is the name of a field default that specifies protected fields, buttons, and icons.
Field Default ENTRY_FIELD
    Display Underlined
    Active Highlight Reverse
    Minimum Length 1
       Message "You must enter something in this field."
End Default
In this example, ENTRY_FIELD defines attributes of fields that must be filled in by the operator. Fields that receive this default are displayed with underlines, have the reverse attributes added to the field when it is the active field, and require at least one nonzero or nonblank character.
FIELD DEFAULT Entry
FIELD DEFAULT Entry — The FIELD DEFAULT entry specifies characteristics for fields, icons, or buttons that can be used in field default applications and field default declarations.
field-default-entry
Format
Where you specify this clause:
Syntax Rules
field-validation-entry
Specifies the validation attributes for a field. For more information, see the FIELD VALIDATION entry syntax section.
item-description-entry
Specifies the display and processing attributes for an item. Item description entries are applied from the previously stated item default in the same panel or group. For more information, see the ITEM DESCRIPTION entry syntax section.
picture-field-description-entry
Specifies the display,validation, and processing attributes for a picture field. For more information, see the PICTURE FIELD declaration syntax section.
slider-field-description-entry (window layouts)
Specifies characteristics of an object that presents and allows input of a numeric value within fixed limits. For more information, see the SLIDER FIELD declaration syntax section.
text-field-description-entry
Specifies characteristics of an object that presents and allows input of a multiline text value. For more information, see the TEXT FIELD declaration syntax section.
Example
Field Default BORING_DEF
    Same Line
    Next Column
End Default
In this FIELD DEFAULT declaration, BORING_DEF is specified as the name for the field default entry of same line, next column.
FIELD VALIDATION Entry
FIELD VALIDATION Entry — The FIELD VALIDATION entry specifies the validation attributes for a field.
field-validation-entry
Format
Where you specify this clause:
Syntax Rules
INPUT REQUIRED
Specifies that the operator must enter data into the field for the field to be considered valid. (If the operator enters the existing value of the panel field, the INPUT REQUIRED clause is not satisfied. The INPUT REQUIRED clause is satisfied only if the value of the data item has been modified by the operator. The Read Verify function of the OpenVMS terminal driver determines the behavior of the INPUT REQUIRED clause.) Once data has been entered into to the field, the field is considered valid for the duration of the accept phase, or until the field is deactivated. Once the field is deactivated, its valid status is reset. If the field is activated again later, and revisited, more data must be entered into the field to validate it.
INPUT REQUIRED is not the same as MINIMUM LENGTH.
message-clause-1
Specifies the message that is displayed to the operator when INPUT REQUIRED validation fails. The message text may be supplied as a form data item, as a text string, or as a code for a message text string from the Form Manager.
NO INPUT REQUIRED
Specifies that the operator does not have to enter data into a field before the field is considered valid.
- RANGE literal-1 THROUGH literal-2
- RANGE data-1 THROUGH data-2
- RANGE corresponding-data-1 THROUGH corresponding-data-2
Declared inside a data group.
Declared in at least one multiply occurring group.
At least one of the multiply occurring groups has a corresponding subscript specified.
The specified range is inclusive. THROUGH and THRU are synonyms.
message-clause-2
Specifies what is displayed to the operator if range validation fails. You can specify a form data item, a text string, or a code for a message text string from the Form Manager as the message text.
NO RANGE
Specifies that there is no range check on the value of the form data item validation.
REQUIRE conditional-expression-1
Specifies that conditional-expression-1need be satisfied for the field to be considered valid. For more information on conditional expressions, see the CONDITIONAL EXPRESSION syntax section.
message-clause-3
Specifies a message that is displayed to the operator if conditional-expression-1 is false. You can specify a form data item, a text string, or a code for a message text string from the Form Manager as message text.
NO REQUIRE
Specifies that no REQUIRE condition needs to be satisfied for the field to be considered valid.
SEARCH [ NOT ] list-name
Specifies that the field value must be one of a list of items, list-name. List-name must contain all numeric items if the field's data type is numeric; list-name must contain all alphanumeric items if the field's data type is alphanumeric. For more information, see the LIST declaration.
If you specify SEARCH NOT, the field value must not be one of the items in list-name. You must not use date fields as items in list-name in SEARCH.
message-clause-4
Specifies what is displayed to the operator if the item does not pass SEARCH validation. You can specify a form data item, a text string, or a code for a message text string from the Form Manager as the message text.
NO SEARCH
Specifies that no list is checked for field validation.
General Rules
Field validation entries must be either on or off. If you specify a particular field characteristic, you cannot specify the negative of that same characteristic in the same field declaration.
If a message clause is omitted, a default message is printed in its place.
| Field Description Entry | Conflicting Entries |
|---|---|
|
ACTIVE HIGHLIGHT |
NO ACTIVE HIGHLIGHT, CONCEALED, PROTECTED |
|
AUTOSKIP |
NO AUTOSKIP, NO DATA INPUT, PROTECTED |
|
CONCEALED |
NOT CONCEALED, ACTIVE HIGHLIGHT, CONCEALED WHEN, DISPLAY CLAUSE, HIGHLIGHT WHEN, OUTPUT PICTURE |
|
CONCEALED WHEN |
CONCEALED, NOT CONCEALED |
|
DATA INPUT |
NO DATA INPUT, PROTECTED |
|
DISPLAY |
NO DISPLAY, CONCEALED |
|
ENTRY RESPONSE |
NO ENTRY RESPONSE, PROTECTED |
|
EXIT RESPONSE |
NO EXIT RESPONSE, PROTECTED |
|
FUNCTION RESPONSE |
NO FUNCTION RESPONSE, PROTECTED |
|
HIGHLIGHT WHEN |
NO HIGHLIGHT, CONCEALED |
|
INPUT PICTURE |
NO DATA INPUT, PROTECTED |
|
INPUT REQUIRED |
NO INPUT REQUIRED, NO DATA INPUT, PROTECTED |
|
JUSTIFICATION DECIMAL |
JUSTIFICATION LEFT, JUSTIFICATION RIGHT, NO DATA INPUT, PROTECTED |
|
JUSTIFICATION LEFT |
JUSTIFICATION DECIMAL, JUSTIFICATION RIGHT, NO DATA INPUT, PROTECTED |
|
JUSTIFICATION RIGHT |
JUSTIFICATION LEFT, JUSTIFICATION DECIMAL, NO DATA INPUT, PROTECTED |
|
MAXIMUM DOWN |
MAXIMUM UP, MAXIMUM LEFT, MAXIMUM RIGHT |
|
MAXIMUM LEFT |
MAXIMUM RIGHT, MAXIMUM DOWN, MAXIMUM UP |
|
MAXIMUM RIGHT |
MAXIMUM LEFT, MAXIMUM DOWN, MAXIMUM UP |
|
MAXIMUM UP |
MAXIMUM DOWN, MAXIMUM LEFT, MAXIMUM RIGHT |
|
MINIMUM LENGTH |
NO MINIMUM LENGTH, NO DATA INPUT, PROTECTED |
|
MIXED CASE |
UPPERCASE, NO DATA INPUT, PROTECTED |
|
NO DATA INPUT |
INPUT PICTURE, AUTOSKIP, INPUT REQUIRED, MINIMUMLENGTH, MIXED CASE, PROTECTED, RANGE, REQUIRE, SEARCH, UPPERCASE |
|
OUTPUT PICTURE |
CONCEALED |
|
OUTPUT WHEN |
NO OUTPUT WHEN |
|
PROTECTED |
NOT PROTECTED, PROTECTED WHEN, accept-response-declaration, ACTIVE HIGHLIGHT, AUTOSKIP, DATA INPUT, INPUT PICTURE, INPUT REQUIRED, MINIMUM LENGTH, MIXED CASE,RANGE, REQUIRE, SEARCH, TIMEOUT, USE HELP MESSAGE, USE HELP PANEL, UPPERCASE |
|
PROTECTED WHEN |
PROTECTED, NOT PROTECTED |
|
RANGE |
NO RANGE, NO DATA INPUT, PROTECTED |
|
REQUIRE |
NO REQUIRE, NO DATA INPUT, PROTECTED |
|
SEARCH |
NO SEARCH, NO DATA INPUT, PROTECTED |
|
TIMEOUT |
NO TIMEOUT, PROTECTED |
|
UPPERCASE |
MIXED CASE, NO DATA INPUT, PROTECTED |
|
USE HELP MESSAGE |
NO HELP MESSAGE, PROTECTED |
|
USE HELP PANEL |
NO HELP PANEL, PROTECTED |
|
VALIDATION RESPONSE |
NO VALIDATION RESPONSE, PROTECTED |
Example
Field RANGE_FIELD
    Line 18
    Column 1
    Range data_x_1 Thru data_x_2
        MESSAGE "Data must be between data_x_1 and data_x_2."-
                "No other value will suffice."
END FIELD
The field RANGE_FIELD specifies that the data must be between data_x_1 and data_x_2 and displays a message when the data is not in the correct range.
FONT Declaration
FONT Declaration — The FONT declaration specifies the set of type for text rendition.
font-declaration
Format
Where you specify this clause:
Syntax Rules
FAMILY
- A Latin set:
- Courier
- Helvetica
- Menu
- Symbols Set
- Terminal
- Times
- An Asian set:
- Gothic
- Gotic
- Hei
- Heiti
- Kmenu
- Mincho
- Myungcho
- Screen
- Songti
- Sung
- A Hebrew set:
- David
- Frankruhl
- Gam
- Miriam
- Miriamfixed
- Narkisstam
The font specified by FAMILY specifies the font used for text rendition. Each font specified in FAMILY has a set of characteristics that you can specify: STYLE, WEIGHT, and SIZE. See Table 1.6, ''Valid IFDL Font Combinations for Motif'' for valid font combinations for Motif layouts.
FAMILY cannot be specified for character-cell terminals.
"user-name"
In Motif layouts, "user-name" specifies an X Logical Font Definition (XLFD) family as the font used for text rendition. "User-name" must be a supported XLFD font.
If "user-name" is specified, it will be used as the XLFD family name when building the XLFD font name. This gives you the ability to select XLFD font families that are not explicitly supported in the IFDL, for example, Asian fonts.
STYLE
Specifies a particular style of font. STYLE ROMAN is the default font style.
STYLE ROMAN
Specifies that a Roman style is applied to the chosen font. A Roman style is characterized by upright letters. This is the default style.
STYLE ITALIC
Specifies that an Italic style is applied to the selected font. An italic style is characterized by letters slanting to the right. STYLE ITALIC and STYLE OBLIQUE are equivalent for all fonts with the exception of user-name. If you specify user-name, you must specify the appropriate style for the font on your system.
STYLE OBLIQUE
Specifies that an oblique style is applied to the selected font. An oblique style is characterized by letters that are neither parallel nor perpendicular to the line they rest upon.
WEIGHT
Specifies the heaviness, or thickness, of the font. WEIGHT MEDIUM is the default font weight. These font weights are listed in ascending order of lightest to heaviest.
WEIGHT MEDIUM
Specifies that the font is of average weight. This is the default.
WEIGHT BOLD
Specifies the heaviest weight of the font.
SIZE
Specifies the physical dimension of the font.
SIZE integer
Specifies that the height of the font is integer. The default for integer is 12, specifying 12 point type.
- SIZE SINGLE
- SIZE NORMAL
Specifies the standard font size for the display device. SIZE SINGLE and SIZE NORMAL are synonyms. This is the default font for character-cell terminals.
SIZE SINGLE and SIZE NORMAL apply only to character-cell layouts.
SIZE DOUBLE HIGH
Specifies a font that is twice as high and twice as wide as the standard font size.
SIZE DOUBLE HIGH applies only to character-cell layouts.
SIZE DOUBLE WIDE
Specifies a font that has twice the normal width of the standard font size, but has the standard height.
SIZE DOUBLE WIDE applies only to character-cell layouts.
General Rules
The FAMILY, STYLE, WEIGHT, and SIZE integerclauses are permitted only in window and PRINTER layouts. If the integer clause is not specified, the SIZE clause is supported only in character-cell layouts.
You cannot use SINGLE (NORMAL), DOUBLE HIGH, and DOUBLE WIDE in combination for fields and literals on the same line in a panel in character-cell layouts.
In character-cell layouts, you are restricted as to where fields and literals that have a DOUBLE HIGH or DOUBLE WIDE font size may appear. These constraints result from hardware restrictions on VT-class terminals.
Objects having either DOUBLE HIGH or DOUBLE WIDE font size must be in odd columns. Because the physical column is made up of two components, the viewport base and the object COLUMN clause, the restrictions on the objects' COLUMN clauses are stated in one of two ways.
If an object is in a panel that has a viewport starting in an odd column, the object must have an odd column specification. If the object is in a panel that has a viewport starting in an even column, the object must have an even column specification. For example, panels in a viewport starting in column 1 must have all DOUBLE font objects starting in odd columns.
%FORMS-E-NODBLHIGH, double high objects cannot exist on this line
You can work around this problem by declaring the second literal with a NEXT LINE+1 clause. For more information, see the Examples section.
If an object has a DOUBLE HIGH font size, the line specified is the line of the bottom half of the object. Such objects must have line clauses that specify at least line two (to allow the upper half of the characters room in the viewport).
Defaults
Character-Cell Layouts
The default font is FONT SIZE NORMAL or FONT SIZE SINGLE.
PRINTER Layouts
The default font is FONT FAMILY COURIER FONTSTYLE ROMAN FONT WEIGHT MEDIUM FONTSIZE 12.
Window Layouts
The default font is device-specific. See Table 1.6, ''Valid IFDL Font Combinations for Motif'' for valid Motif font combinations.
| Family | Description | Weight | Style | Size |
|---|---|---|---|---|
|
Latin Languages | ||||
|
COURIER |
Fixed width, serif |
Medium Bold |
Roman Italic Oblique |
8 10 12 14 18 24 |
|
HELVETICA |
Variable width, sans serif |
Medium Bold |
Roman Italic Oblique |
8 10 12 14 18 24 |
|
MENU |
Screen menu font |
Medium |
Roman |
10 12 |
|
SYMBOLS SET |
Math and Greek symbols |
Medium |
Roman |
8 10 12 14 18 24 |
|
TERMINAL |
VT100 Character Set |
Medium Bold |
Roman |
14 18 28 36 |
|
TIMES |
Variable width, serif |
Medium Bold |
Roman Italic Oblique |
8 10 12 14 18 24 |
|
Asian Languages | ||||
|
GOTHIC |
Katakana, Kanji fonts |
Medium |
Roman |
8 10 12 14 18 24 |
|
GOTIC |
Hangul font |
Medium |
Roman |
16 24 |
|
HEI |
Hanyu font |
Medium |
Roman |
16 24 |
|
HEITI |
Hanzi font |
Medium |
Roman |
16 24 34 |
|
KMENU |
Katakana font |
Medium |
Roman |
12 |
|
MINCHO |
Katakana, Kanji fonts |
Medium |
Roman |
8 10 12 14 18 24 |
|
MYUNGCHO |
Hangul font |
Medium |
Roman |
16 24 32 |
|
SCREEN |
Hanzi, Hanyu, Hangul fonts |
Medium |
Roman |
18 24 |
|
SONGTI |
Hanzi font |
Medium |
Roman |
16 24 34 |
|
SUNG |
Hanyu font |
Medium |
Roman |
24 32 |
|
Hebrew Languages | ||||
|
DAVID |
Hebrew font |
Medium Bold |
Roman Italic Oblique |
8 10 12 14 18 24 |
|
FRANKRUHL |
Hebrew font |
Medium Bold |
Roman Italic Oblique |
8 10 12 14 18 24 |
|
GAM |
Hebrew font |
Medium Bold |
Roman Italic Oblique |
8 10 12 14 18 24 |
|
MIRIAM |
Hebrew font |
Medium Bold |
Roman Italic Oblique |
8 10 12 14 18 24 |
|
MIRIAMFIXED |
Hebrew font |
Medium Bold |
Roman Italic Oblique |
8 10 12 14 18 24 |
|
NARKISSTAM |
Hebrew font |
Medium Bold |
Roman Italic Oblique |
8 10 12 14 18 24 |
Examples
FONT SIZE DOUBLE HIGH
In this example for character-cell layouts, the font size declared is DOUBLE HIGH, which specifies a font that is twice as high and twice as wide as the standard font size.
FONT SIZE NORMAL
In this example, the font is specified as the standard character cell font.
FONT FAMILY Helvetica FONT STYLE Roman FONT WEIGHT Medium FONT SIZE 14
In this example, a Helvetica Roman medium weight 14 point font is specified.
Literal Text
    Line 2
    Column 1
    Value "lit1"
    Display
         Font Size Double High
End Literal

Literal Text
    Next Line +1
    Same Column
    Value "lit2"
    Display
         Font Size Double High
End Literal
In this example, you avoid positioning errors by declaring two successive text literals as DOUBLE HIGH and by declaring the second one using NEXT LINE+1.
Literal Text
    Line 2
    Column 1
    Value "Choose one:"
    Display
         Font Family Menu
        Font Size 10
End Literal
In this example, text is displayed in the font most often used by Motif applications.
FORM DATA Declaration
FORM DATA Declaration — The FORM DATA declaration specifies all data stored in the form. Panel fields provide for the visual display of information contained in form data. Form data have attributes that belong to the form, independent of layouts; panel fields have attributes that belong to a panel, specific to a display device. Panel fields, which are declared in a panel, declare the attributes for displaying the information contained in form data items.
form-data-declaration
Format
track-clause
form-data-item-declaration, Format 1
form-data-item-declaration, Format 2
builtin-name
form-data-group-declaration-1
for-current-clause
for-locator-current-clause
Where you specify this clause:
Syntax Rules: form-data-declaration
track-clause-1
Specifies the tracking attribute for all the data items declared within the FORM DATA declaration. You can change the tracking attribute for any form data item by declaring a track clause within a form data group declaration.
Where the track clause adheres depends on where it is declared. You must declare track-clause-1 at the beginning of a FORM DATA declaration, before any form data items are defined.
form-data-item-declaration-1
Specifies the name and data type of the form data stored within the form. Form data items must have unique names.
The FORM DATA ITEM declaration has two formats. For more information, see the FORM DATA ITEM declaration syntax rules.
form-data-group-declaration-1
Declares a group of form data items to be stored in the form.
More than one form data item can have the same name, provided that each item is in a different group. To differentiate between form data items with the same names, you must use a qualified name.
GROUP firstgroup
    GROUP lastgroup
    ITEM_A CHARACTER(10)
END GROUPEND GROUP
The form data item item_a must be referred to as FIRSTGROUP.LASTGROUP.ITEM_A. When referring to this data item, the order in which the qualifying group names are specified must match the order in which the nested groups are declared.
Intervening group names cannot be omitted. You can also embed spaces in qualified names, and specify the components of qualified names on different lines.
GROUP firstgroup OCCURS 10
    GROUP lastgroup OCCURS 5
    ITEM_A CHARACTER(10)
END GROUPEND GROUP
FIRSTGROUP(2).LASTGROUP(3).ITEM_A is the correct reference for a particular ITEM_A, not FIRSTGROUP(2).LASTGROUP.ITEM_A(3).
The subscripts for each group and for the item must occur immediately after each multiply occurring group.
for-current-clause-1
Allows a CURRENT item to be specified for any multiply occurring group, including those copied from Oracle CDD/Repository.
for-locator-current-clause-1
Allows a LOCATOR CURRENT item to be specified for any multiply occurring group, including those copied from Oracle CDD/Repository.
copy-statement-format-2
If you specify copy-statement-format-2, the IFDL Translator interprets each elementary field in CDD$RECORD as a form data item and each structure as a form data group unless the FIELD IS clause is present.
If the FIELD IS clause is present, the IFDL Translator interprets only the Oracle CDD/Repository field or structure specified as a form data item or group. If a structure is specified, that structure and all its contents are copied.
For compatibility with other languages, the IFDL Translator does not interpret the outermost CDDL structure. The IFDL Translator extracts the data type and length from the Oracle CDD/Repository record definition to obtain the IFDL description of the form data items.
For more information, see the COPY statement syntax section.
Syntax Rules: track-clause
TRACKED
Specifies that the Form Manager keep information specifying whether the form data item has been modified, so that the information can be returned in shadow records for RECEIVE and TRANSCEIVE requests.
Tracking whether data is modified increases data storage and time. For further information on tracking, see the VSI DECforms Programmer's Reference Manual.
UNTRACKED
Specifies that the Form Manager not keep in formation about whether the form data item has been modified. UNTRACKED is the default.
Syntax Rules: form-data-item-declaration, Format 1
data-name
Specifies the name of a form data item.
text-data-clause
Specifies a text string interpreted by the Form Manager according to the text data type. For more information, see the TEXT DATA clause syntax section.
atomic-clause
Specifies that the form data item has an atomic data type. For more information, see the ATOMIC clause syntax section.
datetime-data-clause
Specifies that the form data item represents a date or time. For more information, see the DATETIME DATA clause syntax section.
VALUE literal
Specifies an initial value for a form data item. Literal is the specified value.
When the value item specifies a value to a form data item using this clause, if there are decimal positions in the value for an integer text data type, or more decimal positions in the value than declared for the decimal data type, the value item is rounded up if the first extra decimal position is equal to or greater than 5, and is truncated if less than 5.
VALUE is not allowed with the CURRENT clause in an ADT, DATE, or TIME form data item.
YYYY NN DD GG II SS CCCCCCC
YYYY NN DD
GG II SS CCCCCCC
YYYYNNDDGGIISSCCCCCCC
|
Format Character |
Description |
|---|---|
|
YYYY |
Digits of year |
|
NN |
Digits of month |
|
DD |
Digits of day of month |
|
GG |
Digits of 24-hour clock |
|
II |
Digits of minute |
|
SS |
Digits of whole seconds |
|
CCCCCCC |
Digits of fractions of seconds |
track-clause-2
Specifies the tracking attribute for only the data item it follows. It overrides any explicit or default tracking set either at the top level of the form data declaration or at any group level.
Syntax Rules: form-data-item-declaration, Format 2
builtin-name
In addition to form data items that you can create,a set of predefined form data items are provided. You use Format 2 of the form data item declaration to use these predefined form data items, which are called built-in form data items.
To access these data items, which are read only, you must declare them as built-in data items. These built-in data items cannot appear in a form data group; you cannot extract built-in data items from Oracle CDD/Repository.
All built-in data items must be declared as CHARACTER (integer-1), CHARACTER (integer-1) VARYING, or CHARACTER (integer-1) NULL TERMINATED in the declaration, with the exception of FIELDVALUE.
Integer-1 is the length of the built-in form data item that you specify. The length of integer-1 depends on which built-in form data item you specify. The built-in data item FIELDVALUE must not have a data type associated with it. All these items contain read-only data.
Form data items with the same name as built-in data item names that are declared without the BUILTIN clause are not read-only, and are not updated by the Form Manager. Names of built-in form data items must not conflict with form data item names. This permits VSI to add new built-in data items in the future without making forms you write today obsolete.
FIELDVALUE BUILTIN
Specifies that the form data item is set to the value and data type of the current field.
The FIELDVALUE data item is available only during accept phase. If you use the FIELDVALUE data item outside of accept phase, the Form Manager sets the value of the item to spaces.
You cannot specify a data type for FIELDVALUE, as it changes dynamically according to the data type of the current activation item. You cannot pass the FIELDVALUE built-in data item to an escape routine.
Syntax Rules: builtin-name
CURRENTITEM
If the current activation item is a field, the form data item is set to the field name.
If the current activation item is a wait with a panel, the form data item is set to the name of the panel.
If the current activation item is a wait with no panel, the form data item is set to spaces.
The CURRENTITEM data item is available only during accept phase. If you use the CURRENTITEM data item outside of accept phase, the Form Manager sets the value of the item to spaces.
CURRENTITEMHELPED
Specifies that the form data item is set to the name of the current activation item for which help is being given. When you are not in help, the Form Manager sets the value of the item to spaces.
The CURRENTITEMHELPED data item is available only during help processing.
CURRENTPANEL
If the current activation item is a wait with a panel, the form data item is set to the name of the panel.
If the current activation item is a wait with no panel, the form data item is set to spaces.
The CURRENTPANEL data item is available only during accept phase. If you use the CURRENTPANEL data item outside of accept phase, the Form Manager sets the value of the item to spaces.
CURRENTPANELHELPED
Specifies that the form data item is set to the name of the panel on which CURRENTITEMHELPED occurs. When you are not in help, the Form Manager sets the value of the item to spaces.
The CURRENTPANELHELPED data item is available only during help processing.
FIELDIMAGE
If the current activation item is an icon, a push button, a slider field, or a wait, FIELDIMAGE is set to blanks.
The FIELDIMAGE built-in data item is available only during accept phase. If you use the FIELDIMAGE data item outside of accept phase, the Form Manager sets the value of the item to spaces.
FORMNAME
Specifies that the form data item is set to the name of the form, as specified in the form declaration. The FORMNAME data item is valid only after the completion of an enable request.
FUNCTIONNAME
Specifies that the form data item is set to the name of the last function entered by the operator.
The FUNCTIONNAME data item is available only during accept phase. If you specify the FUNCTIONNAME data item outside of accept phase, the Form Manager sets the value of the item to spaces.
SESSION
Specifies that this form data item is set to the session string for the current session. The SESSION data item is valid only after the completion of an enable request.
TERMINAL
Specifies that the form data item is set to the character string name of the display device as specified in an enable request. The TERMINAL form data item is valid only after the completion of an enable request.
PARENTREQUESTID
Specifies that the form data item is set to the request identification string of the current request.
You can pass PARENTREQUESTID only to an escape routine where it can be used as a parent request ID on recursive calls into the Form Manager. You must declare PARENTREQUESTID as CHARACTER(24).
LOCATORITEM
If the current locator item is a field, button, or icon,the form data item is set to the name of the field, button, or icon.
If the current locator item is a wait with a panel, the form data item is set to the name of the panel.
If the current locator item is a wait with no panel, the form data item is set to spaces.
LOCATORITEM is the same as CURRENTITEM in character-cell layouts. In window layouts, LOCATORITEM behaves in the same fashion as a CURRENTITEM, except when the operator uses the locator to change the focus to a different item on the activation list. When the focus is changed, LOCATORITEM is set to the name of the new activation item.
The LOCATORITEM data item is available only during accept phase. If you specify the LOCATORITEM data item outside of accept phase, the Form Manager sets the value of the item to spaces.
LOCATORPANEL
Specifies that the form data item is set to the name of the panel on which the locator is positioned.
The LOCATORPANEL built-in data item is available only during accept phase. If the LOCATORPANEL data item is specified outside of accept phase,the Form Manager sets the value of the item to spaces.
Syntax Rules: form-data-group-declaration-1
group-name-1
Specifies the name for the group of form data items.
track-clause-3
Specifies the tracking attribute for a data item declared in form-data-item-declaration-1 except those form data items having their own track clause.
OCCURS integer-2
Integer-2 must be greater than zero, and specifies that the form data items and form data groups declared within group-name-1 have integer-2 occurrences.
The maximum nesting level of groups is eight; the maximum number of repeating groups for these nested groups is two (you can only declare one- or two-dimensional arrays).
When reference is made to group-name-1 or the name of any form data item or form group name declared in group-name-1,the highest subscript value allowed is integer-2 (unless BASE is declared, in which case the highest subscript is integer-2 plus integer-3 minus 1).
BASE integer-3
Specifies that the value of integer-3 is to be considered the lowest subscript for the form data group. If the BASE clause does not appear, integer-3 is assumed to be 1. This is the default.
A subscript on group-name-1, or on the name of any form data item or form group name declared in group-name-1, selects the ordinal position in the group array or data array by subtracting the value of integer-3 from the subscript expression and adding 1 to the result. The highest subscript value is integer-2 plus integer-3, minus 1.
CURRENT data-1
Specifies a form data item that will be set to the value of the subscript of the current form group item whenever the form group is referenced at run time.
The Form Manager always updates the value of data-1 when it moves the active field among group-name-1 elements. When the active field is not one of the group-name-1elements, the value of data-1 is the index of the field that was most recently active in group-name-1.
The Form Manager may transfer the value of data-1 to the application program. If data-1 overflows during forms processing, a run-time error is reported. The initial value of data-1 is integer-3. Data-1 is read only; the form or a data transfer clause cannot change its value.
Must be a numeric integer with no decimal point.
Cannot be declared with a VALUE clause.
Can be signed or unsigned.
Can be declared after it is referenced in an OCCURS clause.
Cannot be declared in form-data-group-declaration-1.
Can be referenced only in a single CURRENT clause inform data.
Cannot be a built-in data item.
Cannot be a member of a multiply occurring group.
LOCATOR CURRENT data-2
Specifies a form data item that will be set to the value of the subscript of the current form group item whenever a locator function is entered in that group at run time.
The Form Manager always updates the value of data-2 when a locator function is entered within group-name-1.
The Form Manager can transfer the value of data-2 to the application program. If data-2 overflows during forms processing, a run-time error is reported. Data-2 is read only.
Must be a numeric integer with no decimal point.
Cannot be declared with a VALUE clause.
Can be signed or unsigned.
Can be declared after it is referenced in an OCCURS clause
Cannot be declared in form-data-group-declaration-1.
Can be referenced only in a single LOCATOR CURRENT clause inform data.
Cannot be a built-in data item.
Cannot be a member of a multiply occurring group.
form-data-item-declaration-2
Specifies the form data items that are part of group-name-1. For more information, see the FORM DATA ITEM declaration syntax rules.
form-data-group-declaration-2
Declares a group of form data items as part of group-name-1. For more information, see the FORM DATA group declaration syntax rules.
for-current-clause-2
Specifies that data-2 is a CURRENT item to be associated with group-name-2, which can be a data group copied from Oracle CDD/Repository. For-current-clause is the only way to specify a group copied from Oracle CDD/Repository.
for-locator-current-clause-2
Allows a LOCATOR CURRENT item to be a specified data item for any multiply occurring group, including those groups copied from the Oracle CDD/Repository.
copy-statement-format-2
Specifies that form data information is copied from Oracle CDD/Repository. For more information, see the COPY statement.
Syntax Rules: for-current-clause
for-current-clause
Allows a CURRENT item to be specified for any multiply occurring group, including those copied from Oracle CDD/Repository.
FOR group-name-2 CURRENT data-3
Specifies that the value of data-3 is set to the subscript of group-name-2 at run time.
Syntax Rules: for-locator-current-clause
for-locator-current-clause
Allows a LOCATOR CURRENT item to be specified for any multiply occurring group, including those copied from Oracle CDD/Repository.
FOR group-name-3 LOCATOR CURRENT data-4
Specifies that the value of data-4 is set to the subscript of group-name-3 at run time.
Examples
Form Data
    CALENDAR date current
End Data
In this example, a form data item called CALENDAR is declared, with a DATE CURRENT data type.
Form Data
    ACCOUNT_NUMBER    unsigned longword
    AMOUNT            unsigned longword
        CHECKING_BALANCE  unsigned longword
        CHECK_MEMO        character(35)
        CHECK_NUMBER      unsigned word
        CITY              character(20)
        CURRENT_DATE      adt current
    .
    .
    .
End Data
In this example from the DECforms sample application, which is a checking account, a number of items are declared as form data—the account number, the amount of the check, and so on. The form data items and their data types are declared as follows: ACCOUNT_NUMBER, AMOUNT, and CHECKING_BALANCE have an UNSIGNED LONGWORD data type.
CHECK_MEMO has a CHARACTER data type.
CHECK_NUMBER has an UNSIGNED WORD data type.
CITY has a CHARACTER data type.
CURRENT_DATE has an ADT CURRENT data type.
FORM Declaration
FORM Declaration — The FORM declaration provides for definition of all records that are transferred to and from the application program, and for all attributes of panels and fields transferred to and from the display device. The FORM declaration specifies the syntactic beginning of the form definition in the IFDL. A form consists of a name, data declarations,record declarations, record list declarations, and layout declarations. You must supply a form name. This name does not need to match the form file name when you load the form from a form file. (In your application program, you specify the file name containing the form; the Form Manager uses the form in that file. When the form is linked with your program or in a shareable image, the Form Manager uses the form name to find the form.)
form-declaration
Format
Syntax Rules
form-name
Specifies the name you supply for the form.
form-data-declaration
Specifies all data stored in the form. For more information, see the FORM DATA declaration syntax section.
form-record-declaration
Describes a data structure to be exchanged between the application program and the form. For more information, see the FORM RECORD declaration syntax section.
record-list-declaration
Declares a list of records to be combined for the transfer of multiple records between the application program and the form. For more information, see the RECORD LIST declaration syntax section.
layout-declaration
Maps a form to a display device. For more information, see the LAYOUT declaration syntax section.
General Rules
The IFDL Translator translates only the first form in a source file. Upon reaching the END FORM statement, the IFDL Translator closes all files and stops translating. The IFDL Translator ignores statements in the IFDL source file that appear after the END FORM statement, and displays a message stating that these statements were ignored.
Example
Form MY_FORM
| The FORM declaration of a form called MY_FORM. |
| The beginning of the declaration of the STANDARD_LAYOUT layout. |
| The end of the LAYOUT declaration. |
FORM RECORD Declaration
FORM RECORD Declaration — The FORM RECORD declaration describes a data structure to be exchanged between the application program and the form. This declaration also specifies how the values in the record are transferred to and from form data. Form records are composed of record groups and record fields.
form-record-declaration
Format
record-field-description
record-group-description
Where you specify this clause:
Syntax Rules: form-record-declaration
record-name
Identifies the name of a record.
record-field-description-1
Specifies a record field that must be defined as a text, atomic, or date/time field. Each record field that has the same name as a form data item transfers data to and from that form data item when records are sent and received.
To transfer data between record fields and form data items with different names, you must use transfer-clause or data-transfer-clause. For information about data-transfer-clause, see the TRANSFER clause syntax section.
record-group-description-1
Treats a group of record fields as a unit within a record.
transfer-clause-1
Allows you to specify source and destination mappings between record fields and form data items. You can specify the TRANSFER clause anywhere within a record declaration. However, the record field specified within a TRANSFER clause must have been previously declared within the same form record declaration. For more information, see the TRANSFER clause syntax section.
copy-statement-format-2
Allows you to incorporate source text from Oracle CDD/Repository into form record definitions. You can substitute a COPY statement for the record field descriptions.
If the COPY statement includes a record definition from Oracle CDD/Repository, the IFDL Translator extracts the data type, field lengths, decimal point, and sign clauses from the Oracle CDD/Repository record definition to obtain the IFDL description of a form record. Always put the Oracle CDD/Repository record name in quotation marks.
You can have more than one COPY statement in a record; the IFDL Translator concatenates the groups and fields defined as the record, along with any record fields and record groups. If you specify FIELD IS, only the item or structure specified is copied. For more information, see the Format 2 COPY statement in the COPY statement syntax section.
Syntax Rules: record-field-description
record-field-name
Identifies the record field. By default, data is transferred between record fields and form data with the same names. More than one record field can have the same name, as long as the record fields are in different groups. To refer to these fields by unique names, you must specify record-field-name as a qualified name. For more information on qualified names, see Appendix A, "Using Arrays with DECforms Software".
text-record-field-clause
Specifies a text record field. Text record fields are composed of text strings that are interpreted by the Form Manager according to the text field type. For more information, see the TEXT RECORD FIELD clause syntax section.
atomic-clause
Describes data items in records or form data, declared, interpreted, and stored as OpenVMS atomic data types. For more information, see the ATOMIC clause syntax section.
datetime-field-clause
Specifies date and time fields. For more information, see the DATETIME FIELD clause syntax section.
data-transfer-clause
Specifies a way to transfer data between record fields and form data with different names. For more information on data transfer, see the TRANSFER clause syntax section.
Syntax Rules: record-group-description
GROUP group-name
Specifies the name for the form record group.
OCCURS integer
Specifies the number of occurrences of the form record group and all its contained items. Integer must be greater than zero.
record-field-description-2
Specifies a record field that must be defined as a text, atomic, or date/time field.
record-group-description-2
Specifies a group of record fields.
transfer-clause-2
Specifies data transfer. For more information, see the TRANSFER clause syntax section.
copy-statement-format-2
Allows you to incorporate source text from Oracle CDD/Repository into form record definitions. You can substitute a COPY statement for the record field descriptions.
If the COPY statement includes a record definition from Oracle CDD/Repository, the IFDL Translator extracts the data type, field lengths, decimal point, and sign clauses from the Oracle CDD/Repository record definition to obtain the IFDL description of a form record. Place the Oracle CDD/Repository record name in quotation marks.
Example
Form Record NEW_CUSTOMER
    Copy "CDD$TOP.JONES.CUSTOMER_RECORD" From Dictionary End Copy
End Record
In this example, the IFDL Translator copies all fields from the CUSTOMER_RECORD record in Oracle CDD/Repository into a form record called NEW_CUSTOMER.
FUNCTION Declaration
FUNCTION Declaration — The FUNCTION declaration allows you to associate a physical terminal key or key sequence with a particular logical function. When the key or key sequence is pressed, the Form Manager decides what logical function it corresponds to and interprets an associated function response. (You specify this response in the FUNCTION RESPONSE declaration.)
function-declaration
Format
for-clause
is-clause
key-name
Where you specify this clause:
Syntax Rules: function-declaration
function-name
A logical name you choose to associate with a physical key name. You can name the function whatever you want, provided the name follows DECforms naming conventions and it does not conflict with other names in the form. Once you have declared a function name,you can refer to this name in function responses.
builtin-name
Specifies a built-in DECforms function that is associated with a predefined key and a predefined function response. When you declare one of these built-in functions, you change the keys that invoke the built-in function. Such a declaration does not change what happens as a result of pressing the key; you must define a function response to do that.
- BOUNDARY CURSOR UP
- BOUNDARY CURSOR DOWN
- BOUNDARY CURSOR LEFT
- BOUNDARY CURSOR RIGHT
- BOUNDARY DELETE LEFT
- BUILTIN FUNCTION
- FOCUS CHANGE
- TRIGGER OBJECT
- UNDEFINED FUNCTION
- USER FUNCTION
- VALUE CHANGE
For more information on built-in functions, see the BUILTIN FUNCTION clause syntax section.
Syntax Rules: for-clause
for-clause
Specifies a terminal or list of terminals for which the function is valid. Each terminal name must be declared in the DEVICE declaration for the layout. If the FOR clause does not appear, the corresponding attributes apply to all terminals declared for the layout.
There can be only one IS clause without a FOR clause in the FUNCTION declaration and it must be the last IS clause in the declaration.
terminal-name
Specifies a terminal name from a device declaration. This can be either a character-cell terminal name, or a window terminal name, as appropriate.
Syntax Rules: is-clause
is-clause
Specifies the list of keys or key sequences that invoke the function for the specified terminal.
NONE
Specifies that the function is disabled for the layout in which it is declared.
If you specify NONE, the predefined keys for that function are available for other functions. Use NONE to disable a built-in function; specifying a nondefault key binding for a built-in function has the effect of making default keys available for redefinition without disabling the built-in function.
Syntax Rules: key-name
key-name
Specifies a key name recognized by DECforms. See Appendix G, "Intrafield Editing Functions" for supported key names for each character-cell and window device, respectively.
%ALT
Specifies an Alt key prefix in a chorded key specification. %ALT is supported in window layouts only.
%CONTROL
Specifies a Control key prefix in a chorded key specification.%CONTROL is supported in window layouts only.
%SHIFT
Specifies a Shift key prefix in a chorded key specification.%SHIFT is supported in window layouts only.
%implementor-key-name
Specifies the name of a key defined by the implementor. See the Appendix D, " DECforms Function Key Names" for a complete list of key names.
General Rules
A function can be associated with more than one key or key sequence. If any of the keys or key sequences associated with a function are pressed, the function response associated with that key or key sequence is executed.
A key or key sequence can be associated with more than one function name only if each function response exists on a different level in the form hierarchy for a given terminal. Context determines the meaning of the key:the key executes the lowest level function response. This constraint follows the levels of the form hierarchy, from lowest to highest: field, button or icon, group, panel, and layout.
Key-name-1, key-name-2, and key-name-3 must not name any printable character in the character set; in other words,any character that is valid input to a picture string on character-cell devices. However, this restriction does not hold true for alphanumeric keys used in conjunction with %ALT or %CONTROL on window devices.
Key-name-3 and key-name-4cannot name the same key. Therefore, repeatedly typing key-name-3 when it is the first key in a two-key sequence does not cause an error.
Key-name-3 and key-name-4 must be typed in the exact order in which the key names are specified in the key sequence to be recognized as a valid function key sequence.
Two-key sequences are not supported for window layouts.
The execution state of a key sequence, specified by key-name-3 and key-name-4, is not maintained across errors. If an error occurs, the whole key sequence must be entered again.
If you declare a single-key function, you cannot declare a two-key function with the same first key as the single-key function.
- DELETE
- ERASE
- INSERT
- CURSOR
- BOUNDARY
- TERMINATE
- NEXT
- PREVIOUS
- REFRESH
- EXIT
- UP
- DOWN
- LEFT
- RIGHT
- USER
- BUILTIN
- UNDEFINED
- BOUNDARY
The VT420 terminal provides a way to designate F1 to F5 as function keys, overriding their standard behavior. You can set the keys by using the SET-UP option on the terminal. The Form Manager supports these keys if they are declared in a form, and have been set to the Fkey state using the SET-UP menu.
The %ALT, %CONTROL, and %SHIFT prefixes are used to produce chorded key specifications in window layouts. Chording with %SHIFT is not allowed for alphanumeric keys.
Chorded keys are not allowed in character-cell layouts. Key sequences are not allowed in window layouts. Function keys may be declared in PRINTER layouts, but are ignored at run time.
Specifying %CONTROL + %SMALL_X or %CONTROL + %CAPITAL_X in a window layout is equivalent to specifying %CTRL_X in a character-cell layout. See Appendix F, "Built-In Functions" for the complete list of built-in (default) key combinations.
Examples
The following are FUNCTION declaration examples. The first eight examples are for character-cell devices; the last is a window example.
Function
    Next Item Is %carriage_return %horizontal_tab
End Function
In this FUNCTION declaration,the carriage return and the horizontal tab keys are each associated with the NEXT ITEM function.
Function Previous Item
    For VT1 Is (%PF1 %BACKSPACE)
    For VT2 Is (%CONTROL_B)
        Is (%PF1 %KP_0)
End Function
In this FUNCTION declaration, the PREVIOUS ITEM function is associated with different key sequences for different devices: PF1 BACKSPACE for VT1, CONTROL B for VT2, and PF1 0 on the keypad for other devices.
Function
    Transmit Is %KP_ENTER
End Function
In this FUNCTION declaration, the Enter key on the keypad is accepted as the TRANSMIT function. This FUNCTION declaration works only if the keypad is in application mode.
Function
    Cancel Is %F6
End Function
In this FUNCTION declaration, the F6 function key is associated with the CANCEL function on the OpenVMS operating system. Because of OpenVMS restrictions, the F6 key may be used only if you disable the advanced line-editing features for command lines, or if you set the terminal to PASTHRU mode. To disable line-editing, use the following command:$ SET TERMINAL/NOLINE
To set the terminal to PASTHRU mode, use the following command:$ SET TERMINAL/PASTHRU
Function
    Transmit Is (%PF1 %KP_ENTER)
End Function
In this FUNCTION declaration, the key sequence PF1, Enter is used as the TRANSMIT logical function.
Function
    USER_I Is (%PF1 %KP_3)
End Function
In this FUNCTION declaration, the key sequence PF1, Keypad 3 is used to define a user-defined function, USER_I.
Function
    NEXT ITEM Is NONE
End Function
In this FUNCTION declaration, NONE is used to disable the built-in key association for the NEXT ITEM function.
Function CURSOR_L
    Is %LEFT
End Function

Function CURSOR_R
    Is %RIGHT
End Function

Function Response CURSOR_L
    Position to LEFT ITEM
End Response

Function Response CURSOR_R
    Position to RIGHT ITEM
End Response
In this example, functions and function responses are defined to use right and left arrow keys to move between icons without using boundary cursor functions.
Function PRINT_FILE
    Is %CONTROL + %SMALL_P
End Function
In this FUNCTION declaration, Ctrl/P is used to execute a user-defined function, PRINT_FILE, in a window layout.
FUNCTION RESPONSE Declaration
FUNCTION RESPONSE Declaration — The FUNCTION RESPONSE declaration specifies what action the Form Manager takes when the operator enters a function during input.
function-response-declaration
Format
Format 1
Format 2
Where you specify this clause:
Syntax Rules: Format 1
builtin-function
Specifies that the Form Manager executes the BUILTIN FUNCTION function response when the key or key sequence pressed is bound to a built-in function, but no function response is declared at this level.
- CURSOR UP
- CURSOR DOWN
- CURSOR LEFT
- CURSOR RIGHT
- DELETE CHARACTER
- ERASE FIELD
- INSERT LINE
- INSERT OVERSTRIKE
- NEW TAB
- PAGE DOWN
- PAGE UP
function-name
Must be the name of a built-in function or must be defined in the FUNCTION declaration. The FUNCTION declaration allows you to associate a physical terminal key or key sequence with a particular logical function.
response-step
Specifies the response steps to be performed during accept phase. For more information, see the RESPONSE STEP clause syntax section.
Syntax Rules: Format 2
BUILTIN FUNCTION RESPONSE (character-cell layouts)
Restores the meaning of the function to the DECforms default at the level at which the BUILTIN function response is declared.
builtin-function
Specifies the DECforms default for the function response to be invoked at this level. You may want to use builtin-function to restore the DECforms default at a lower level after overriding it at a higher level. This is the only way to restore the default meaning for an intrafield editing function.
General Rules
You may declare function responses at several levels: layout, panel, group, icon, field,and button. The lower-level declarations override the higher level declarations. There is no default function response for a user-defined function. For the default function response for built-in functions, see the BUILTIN FUNCTION syntax section.
Function responses are ignored in PRINTER layouts.
Only one function response for a given function name can appear at a given level.
A key name or key sequence associated with the function in a FUNCTION declaration.
A key name or key sequence associated with a built-in function by default.
Examples
Function Response NEXT PANEL
    Message "Press F8 or PF1-C to cancel the update or "
    Message "      F10 or CTRL/Z to update your personal record."
End Response
This defines the function response for NEXT PANEL to be a message.
Form FUNCTION_EXAMPLE
   .
   .
   .
    Layout SAMPLE
        .
        .
        .
        Function Response NEXT ITEM
            Message "The NEXT ITEM key does not work at this level"
            Signal %Bell
        End Response
        Panel TEST_PANEL_1
           Function Response NEXT ITEM
           Message "In TEST_PANEL_1 NEXT ITEM key reverses the display"
           Signal %Reverse
           End Response

           Field FIELD_1
           .
           .
           .
           End field

           Field FIELD_2
           .
           .
           .
           End Field
        End Panel

        Panel TEST_PANEL_2
        Field FIELD_1
         .
         .
         .
        End Field

        Field FIELD_2
            Builtin Function Response NEXT ITEM
        .
        .
        .
        End Field

        Field FIELD_3
            Function Response NEXT ITEM
                Message "You encountered a field level response"
                Signal
             End Response
        End Field
        End Panel
End Layout
   .
   .
   .
End Form
A function response NEXT ITEM is declared to be associated with the built-in function NEXT ITEM at the layout level.
If there is no definition of NEXT ITEM at a lower level(in the field, group or panel), the user-specified function response outputs the message "The NEXT ITEM key does not work at this level " and rings the bell. This function response overrides the DECforms default of moving the cursor to the next item on the activation list.
TEST_PANEL_1 defines its own function response for NEXT ITEM and overrides the DECforms default and the function response declared at the layout level. As a result, if the operator presses the Tab key (assuming that the Tab key is associated with NEXT ITEM) in FIELD_1 or FIELD_2 on TEST_PANEL_1, the display is reversed.
There is no function response defined for NEXT ITEM at the panel level for TEST_PANEL_2.
If the operator presses the Tab key in FIELD_1 on TEST_PANEL_2, the function response outputs the message "The NEXT ITEM key does not work at this level" and rings the bell. The function response declared at the layout level is invoked because there is no definition of the function at the field, group, or panel level.
If the operator presses the Tab key in FIELD_2 on TEST_PANEL_2, the DECforms default function response is invoked. The BUILTIN FUNCTION RESPONSE clause in FIELD_2 overrides the definitions at the higher level in the same way a function response at the field level would override a function response at the group, panel, or layout level.
If the operator presses the Tab key in FIELD_3 on TEST_PANEL_2, the function response outputs the message, "You encountered a field level response".
If the operator presses the F12 or Backspace key, the PREVIOUS ITEM function is invoked. Because you have not declared a function response of this name at any level, the DECforms default would be invoked at all levels in the layout.
GROUP Declaration
GROUP Declaration — The GROUP declaration groups a logically related set of fields, icons, buttons, and literals within a panel. All fields declared as members of the group on the panel must have their form data declarations in the form data declaration of group-name.
group-declaration
Format
Where you specify this clause:
Syntax Rules
group-name
The name specified for the group. Group-name must appear as a group declaration in the FORM DATA declaration. For more information, see the FORM DATA declaration syntax section.
HORIZONTAL
Specifies that group-name is replicated on the panel horizontally.
VERTICAL
Specifies that group-name is replicated on the panel vertically.
DISPLAYS integer-1
Specifies that integer-1 occurrences of data group group-name appear on the panel in the chosen direction.
Integer-1 must be greater than zero and must not be larger than the number of occurrences declared for group-name in the FORM DATA declaration.
If integer-1 is less than the number of occurrences of group-name, occurrences of group-name scroll in the direction specified.
If VERTICAL or HORIZONTAL appears without DISPLAYS, the size of the OCCURS clause in the FORM DATA declaration is used as integer-1. In this case, all occurrences of the form data are displayed on the panel.
FIRST
Specifies which indexed element of group-name is to be displayed at the top of the scrolled region for the VERTICAL clause, or at the left of the scrolled region for the HORIZONTA L clause.
If you do not specify FIRST and you specified BASE as a numeric literal, FIRST defaults to the base of the form data group. If you did not specify BASE as a numeric literal, FIRST defaults to 1.BASE is specified in the FORM DATA declaration associated with the group. For more information, see the FORM DATA declaration syntax section.
In some cases it is not possible to specify an arbitrary occurrence of a group as FIRST. For example, suppose you have a data group with BASE 1 and OCCURS 20. The corresponding panel group has a DISPLAYS 5 clause, but its first clause is FIRST 19.
In this case, it is not possible to display the 19th occurrence as FIRST,because five occurrences must be displayed and there is only one occurrence beyond the 19th (20). When there are not enough occurrences to fill the DISPLAYS clause, the Form Manager fills the display area with the end of the array. In this example, the 16th to 20th occurrences are displayed, with occurrence 16 as FIRST.
integer-2
Specifies the index of the first element displayed at the top of the scrolled area (if the array is scrolling vertically) or to the left of the scrolled area (if the array is scrolling horizontally), as the first element displayed the first time the group is displayed. Operations on the scrolled area can change the first element displayed during execution of the form.
Integer-2 must be greater than or equal to the minimum subscript of the group (the base of the associated data group), and must be less than or equal to the maximum subscript for the group minus integer-1 plus 1.
data
Controls the first element displayed at the top of or the left of the scrolled area by specifying the index of that element.
If data is changed at any time, the group display is adjusted accordingly. If the Form Manager changes the index of the first element displayed because of a POSITION response step that causes scrolling of the group, the contents of data are modified accordingly.
It must be an integer.
It cannot be declared with a VALUE clause.
It can be signed or unsigned.
If data is out of the bounds of the array, or causes any of the displayed occurrences in the group to be out of bounds of the array, the Form Manager forces the value of data to be such that the displayed area is filled with either the beginning or end of the array. If data is greater than the array upper bound, the end of the array is used; if datais less than the array lower bound, the beginning of the array is used.
SCROLL BY PAGE
Specifies that scrolling is to be done by multiples of integer-1 occurrences of group-name, rather than by one occurrence at a time. The entire contents of the scrolled area are replaced, that is, moved, by page. If there are fewer elements remaining in group-name than on a page, scrolling can be performed by smaller units to reach the end of the range limit of group-name.
full-location-clause
Specifies the vertical and horizontal position of an occurrence of the group. This clause is required for panel groups declared in window and PRINTER layouts, but is not allowed for panel groups declared in character-cell layouts. The LOCATION clause must be expressed using absolute (Format 1) positions. For more information, see the LOCATION clause syntax section.
partial-extent-clause
Specifies the size of one occurrence of a group in window and PRINTER layouts. For more information, see the EXTENT clause syntax section.
scroll-bar-clause (window layouts)
Species the scroll bars for the group.
The scroll bar default for groups is SCROLLBAR BOTTOM DYNAMIC SCROLLBARRIGHT DYNAMIC. This default specifies that scroll bars appear if, in a multiply occurring group,the integer specified in the DISPLAYS clause is less than the integer specified in the OCCURS clause of the associated data group.
For more information, see the SCROLL BAR clause syntax section.
entry-response-declaration
Specifies a response when the group becomes the current activation item.
Entry responses for groups are interpreted during accept phase just before the Form Manager allows the operator to enter input into the first active field, icon, or button of a group.
There is no default response for entry response processing. For more information, see the ENTRY RESPONSE declaration.
exit-response-declaration
Specifies a response when the Form Manager exits the group. Exit responses for the group level are called when the Form Manager exits the last active field, button, or icon of the group,and after the last active field, button, or icon's exit response is called. There is no default response for exit response processing. For more information, see the EXIT RESPONSE declaration.
function-response-declaration
Specifies a response when the operator enters a function. Function responses can be declared at the layout, panel, group,field, icon, and button level. For more information, see the FUNCTION RESPONSE declaration.
validation-response-declaration
Performs a response when the operator has completed input into a panel,group, field, icon, or button. For more information, see the VALIDATION RESPONSE declaration.
USE HELP PANEL panel-name
Specifies that the Form Manager activate a help panel when an ENTER HELP response step is executed and there are no USE HELP PANEL clauses at lower levels. If you specify USE HELP PANEL in an item that has been activated as a help panel, the Form Manager ignores the USE HELP PANEL declaration at run time.
NO HELP PANEL
Specifies that no help panels are activated.
USE HELP message-clause
Specifies a message to be displayed in the message panel when the Form Manager executes the MESSAGE response step and there are no USE HELP message clauses at lower levels.
NO HELP MESSAGE
Specifies that no help message is displayed.
field-default-application
Specifies the application of one or more field defaults to the group. These defaults remain in effect until the end of the group. For more information, see the FIELD DEFAULT application syntax section.
literal-default-application
Specifies the application of one or more literal defaults to the group. These defaults remain in effect until the end of the group. For more information, see the LITERAL DEFAULT application syntax section.
group-declaration
Specifies a group within the group. You can nest a group only within a group; you cannot nest groups more than two levels deep.
picture-field-declaration
Specifies an object that displays the image attributes of a form data item on a panel. For more information, see the PICTURE FIELD declaration.
text-field-declaration
Specifies an object that presents and allows input of a multiline text value. For more information, see the TEXT FIELD declaration.
slider-field-declaration (window layouts)
Specifies an object that presents and allows input of a numeric value within fixed limits. For more information, see the SLIDER FIELD declaration syntax section.
icon-declaration (character-cell layouts)
Specifies the characteristics of an icon within the group. For more information, see the ICON declaration syntax section.
pushbutton-declaration (window layouts)
Specifies an active object that contains either a label or an arrow. For more information, see the PUSH BUTTON declaration syntax section.
literal-declaration
Describes an object (a text string, a point, line segments, or a rectangle) to be drawn on the panel. For more information on literals, see the LITERAL declaration syntax section.
General Rules
A group is a set of panel fields, icons,buttons, or literal declarations that can be referred to collectively and that can have accept responses associated with them. (You may want to refer to a group, for example, in an ACTIVATE response step.) The group declaration in a panel specifies that some or all form data items and data groups within group-name are to appear on the panel. If data group group-name has multiple occurrences, you can view all occurrences of the included form data items and data groups on the panel.
Each panel group is the mapping of a form data group to the panel and so must have a form data group of the same name associated with it. Each field within a panel group must also have a form data item defined that is a member of the associated form data group; each panel group within a group must have a form data group defined that is within the same owning group.
A maximum of two panel groups that have associated data groups with OCCURS clauses may appear in a nested set of panel group declarations. When two nested groups occur multiple times, the innermost multiply occurring group cannot have a DISPLAYS clause. This permits the display of one- and two-dimensional arrays, in which the first dimension can scroll vertically or horizontally, but the second dimension does not scroll at all.
For multiple-occurrence panel groups, the LOCATION clauses of the first occurrence of each field, literal, icon, or button in the group are evaluated once. The first occurrence of each field,literal, icon, and button is located on the panel (for character-cell layouts) and on the group (for window and PRINTER layouts) according to that position.
In character-cell layouts, objects in a group are placed relative to a panel. In window and PRINTER layouts, objects in a group are placed relative to the origin of the group.
If a partial extent clause is not specified, the aggregate of all field and literal description entries defines a rectangle around the minimum and maximum LINE and COLUMN for the group. The group is repeated the number of times specified in the DISPLAYS clause with only the LINE and COLUMN clauses changed by the size of the rectangle in the direction stated (vertical, horizontal), with no additional space between vertical or horizontal occurrences. The repetitions must not cause display positions of fields to extend beyond the boundaries of the viewport specified by the containing panel on character-cell layouts.
If a partial extent clause is specified, the size of the group is determined by the clause.
On character-cell layouts, if you want extra vertical or horizontal space to appear between occurrences, you can specify a text literal of zero or more blanks to extend the size of the repeated rectangle. (Specifying a text literal of zero blanks sets the size of the group.)
An occurrence can occupy more than a single line on the display. When the group scrolls, it scrolls by multiples of the number of lines for a single occurrence. On window and PRINTER layouts, the partial extent clause can be used to add extra space to an occurrence.
If the OCCURS clause does not appear in the FORMDATA declaration for the group, neither VERTICAL nor HORIZONTAL can occur in the panel declaration of the group. If the OCCURS clause does appear in the FORM DATA declaration for the group, either VERTICAL or HORIZONTAL must occur in the panel declaration of the group.
See Appendix A, "Using Arrays with DECforms Software" for information on how to reference elements in groups.
Example
Group MESSAGE_GROUP Vertical
    Use Help Message "Get Help!"
    .
    .
    .
End Group
This example specifies a panel group called MESSAGE_GROUP that replicates vertically, and displays a help message that says, "Get Help!" whenever help is requested for objects within the group.
The group in this example has no DISPLAYS clause. The group is displayed vertically with all occurrences of the group displayed.
HELP PANEL Declaration
HELP PANEL Declaration — The HELP PANEL declaration describes a panel that is referenced by any other panels and in response steps as a help panel and contains help for the panels that reference it.
help-panel-declaration
Format
Where you specify this clause:
Syntax Rules
panel-name
The name of the help panel.
panel-property
Specifies properties of the help panel, such as the viewport in which the help panel is displayed, its title, and the responses associated with the help panel. For more information on panel-property, see the PANEL declaration syntax section.
field-default-application
Specifies default attributes of fields declared within the help panel. The field defaults remain in effect until the end of the panel. For a detailed description of field default applications, see the FIELD DEFAULT application syntax section.
literal-default-application
Specifies default characteristics of literals within the help panel. The literal defaults remain in effect until the end of the panel. For a detailed description of literal default applications, see the LITERAL DEFAULT application syntax section.
group-declaration
Groups together a logically related set of fields, literals, buttons, and icons within a help panel. For more information, see the GROUP declaration syntax section.
picture-field-declaration
Specifies an object that displays the image attributes of a form data item on a panel. For more information, see the PICTURE FIELD declaration syntax section.
text-field-declaration
Specifies an object that presents and allows input of a multiline text value. For more information, see the TEXT FIELD declaration syntax section.
slider-field-declaration (window layouts)
Specifies an object that presents and allows input of a numeric value within fixed limits. For more information, see the SLIDER FIELD declaration syntax section.
pushbutton-declaration (window layouts)
Specifies an active item that contains either a label or an arrow. For more information, see the PUSH BUTTON declaration syntax section.
icon-declaration (character-cell layouts)
Specifies the characteristics of an icon within the help panel. For more information, see the ICON declaration syntax section.
literal-declaration
Describes an object (a text string, a point, line segments, or a rectangle) to be drawn on the help panel. For more information, see the LITERAL declaration syntax section.
General Rules
A help panel gives information about the display when the Form Manager executes an ENTER HELP response step. It is illegal to specify the USE HELP PANEL clause at the help panel level; the Form Manager ignores the USE HELP PANEL clause at run time. To provide additional help, you must explicitly write function responses to do so.
Example
Help Panel VSI_1
    Field HELP_FIELD
    Line 10
    Column 10
    End Field
End Panel
This example specifies a help panel named VSI_1 that contains a picture field that is displayed at line 10, column 10.
HIGHLIGHT WHEN Clause
HIGHLIGHT WHEN Clause — The HIGHLIGHT WHEN clause specifies display attributes to be applied to fields, icons, and buttons in addition to attributes already specified in the DISPLAY clause and ACTIVE HIGHLIGHT clause of the item description entry. The WHEN clause specifies the condition under which the item is highlighted. When the expression becomes true, the attributes in the HIGHLIGHT WHEN clause are added to the current highlights of the item.
highlight-when-clause
Format
Where you specify this clause:
Syntax Rules
HIGHLIGHT display-attribute-entry WHEN conditional-expression
Specifies the condition under which afield, icon, or button has attributes applied to it. Display-attribute-entry specifies one or more display attributes that apply to a field, icon, or button WHEN conditional-expression specifies that the highlight is applied if the Form Manager determines that conditional-expressionis true. For more information on conditional expressions, see the CONDITIONAL EXPRESSION syntax section.
NO HIGHLIGHT
Specifies that no HIGHLIGHT WHEN clause applies to this field, icon, or button.
General Rules
Attributes that change the size of a field, icon, or button in a character-cell layout are not allowed for the HIGHLIGHT WHEN item description entry. These attributes are SINGLE, NORMAL, DOUBLE HIGH, and DOUBLE WIDE for font size or line width.
For Motif layouts, using a FONT SIZE clause doescause an autosized field or button to resize itself.
On initial display of a field, icon, or button in its panel, when more than one HIGHLIGHT is specified, each WHEN is evaluated in order and display-attribute-entry is applied if the WHEN condition is true. If applying one attribute would necessarily exclude the application of another attribute, the last applied attribute is used.
When an ACTIVE HIGHLIGHT clause also applies to the field, icon, or button, the order of evaluation is DISPLAY clause, ACTIVE HIGHLIGHT clause, HIGHLIGHT WHEN clause. For more information, see the ACTIVE HIGHLIGHT clause syntax section.
If a form data item in conditional-expression changes while the item is displayed, the effect of the WHEN clause is immediately recalculated.
If conditional-expression becomes false, the highlight attributes are turned off.
If conditional-expressionbecomes true, the highlight is applied and the result of conflicting attributes being applied is recalculated depending on the true conditions.
Examples
Icon CHOICE_CASH_100
    Highlight Blinking When CHECKING_BALANCE < 10000
    Protected When CHECKING_BALANCE < 10000
    .
    .
    .
End Icon
This example specifies that the icon CHOICE_CASH_100 blink when the checking account balance is less than 10 000 (which is $100.00 when the 10 000 units are pennies).
Icon CHOICE_CHECK
    Highlight Bold When ROOM_IN_REG = 0
    .
    .
    .
End Icon
This HIGHLIGHT WHEN clause specifies that the CHOICE_CHECK icon is highlighted in bold when there is no room left in the checkbook register.
ICON Declaration
ICON Declaration — The ICON declaration describes an icon, which is an item that can be activated; its appearance is specified by literals. You cannot enter data into icons, but function keys can be pressed in icons. Icons are allowed only in character-cell layouts. Push buttons, a similar construct, are used in window layouts.
icon-declaration
Format
Where you specify this clause:
Syntax Rules
icon-name
Specifies the name for the icon. An icon cannot have the same name as a form data item.
field-default-application
Specifies the application of one or more field defaults to the icon. For more information, see the FIELD DEFAULT application syntax section.
literal-default-application
Specifies the application of one or more named literal defaults to the literals on the icon. If no literal default appears, literal defaults previously stated in the same panel, group, or layout are applied to the literal declarations within the icon. The icon cannot contain any literal default declarations. For more information, see the LITERAL DEFAULT application syntax section.
item-description-entry
Specifies the display, validation, and processing attributes for this icon. Item description entries are applied from previously stated field defaults in the same panel, group, or layout.
Item description entries declared in this icon override previously applied defaults. For more information, see the ITEM DESCRIPTION entry syntax section.
literal-declaration
Describes an object (a text string, a point, line segments, or a rectangle) as it appears on the icon. For more information on literals, see the LITERAL declaration syntax section.
General Rules
An icon may be activated, deactivated, positioned to, and validated.
Literals declared within an icon inherit attributes from the icon's display clause.
Because icons possess no associated data, icons can be included in a panel group without an associated data item existing in the data group. If the icon is declared inside a help panel, USE HELP PANEL or USE HELPMESSAGE clauses within the ICON declaration are illegal. For more information on the USE HELP PANEL and USE HELP MESSAGE clauses, see the ITEMDESCRIPTION Entry syntax section.
Example
Icon CHOICE_CASH_100
| An icon named CHOICE_CASH_100 is specified. |
| ACTIVE HIGHLIGHT REVERSE specifies that the foreground and background colors of the icon are reversed:the icon is displayed using the REVERSE color when operator input is allowed on this icon. |
| CONCEALED WHEN specifies that the icon is concealed when the checking balance is less than $100.00 (because 10 000 is treated as pennies). |
| PROTECTED WHEN specifies that the icon does not go on the activation list and cannot be positioned to. Therefore, the icon does not accept function key input when the checking balance is less than $100.00. |
| A function response is declared that is associated with a user-defined function called SELECT. |
| The LET response step assigns two separate values, an integer 10 000 to the AMOUNT form data item, and a string, $100.00 to the NEXT_UPDATE_AMOUNT form data item. |
| The RETURN response step specifies that accept phase (that is, input from the operator) should end. Since you did not declare IMMEDIATE, validation occurs before accept phase ends. |
| LITERAL specifies a text literal of "$100" as the appearance of the icon. |
| End Icon completes the ICON declaration. |
IF Response Step
IF Response Step — The IF response step lets you specify optional response step execution based on the evaluation of a conditional expression.
if-response-step
Format
Where you specify this clause:
Syntax Rules
conditional-expression
Defines an expression that is tested to enable the Form Manager to select a set of response steps. Conditional expressions containing corresponding data references are illegal in IF response steps. For more information on conditional expressions, see the CONDITIONAL EXPRESSION syntax section.
THEN response-step-1
Specifies the Form Manager perform these response steps as the result of conditional-expression being evaluated as true.
ELSE response-step-2
Specifies that the Form Manager perform these response steps as a result of the evaluation of conditional-expression as false.
END IF
Specifies that if the condition is false, and no ELSE clause exists, the Form Manager performs no response steps.
General Rules
The IF response step is a control response step. Control response steps allow you to control the order of interpretation of response steps. The IF response step lets you perform alternate sets of response steps, such as activating or deactivating panel fields and icons, depending on whether a conditional expression is true or false. You can use the IF response step to provide different views of a single form.
Example
IF A > B
THEN
     LET A = B
ELSE
     LET B = A
END IF
In this example, if the conditional expression A > B is true, then B is assigned to A. Otherwise, A is assigned to B.
IMPLEMENTOR ATTRIBUTE
IMPLEMENTOR ATTRIBUTE — An implementor attribute specifies keypad attributes. Keypad attributes are only valid in character-cell layouts. Keypad attributes do not apply to wait activation items.
implementor-attribute
Format
mplementor-attribute
Where you specify this clause:
Syntax Rules
%KEYPAD_NUMERIC
Specifies numeric keypad mode for operator input into a field or or icon. %KEYPAD_NUMERIC specifies that the keypad's values be numeric. This is the default.
%KEYPAD_APPLICATION
Specifies that each keypad key is treated as a function key for operator input into a field or icon.
%KEYPAD_UNCHANGED
Specifies that the current keypad setting remain unchanged, whether set by the terminal operator or by the form designer.
Example
%KEYPAD_NUMERIC
This example specifies keypad numeric mode for operator input.
INCLUDE Response Step
INCLUDE Response Step — The INCLUDE response step specifies an internal response to be performed as part of the processing for the current response. The INCLUDE response step is similar to a subroutine call without parameters.
include-response-step
Format
Where you specify this clause:
Syntax Rules
INCLUDE
Specifies an internal response to be performed as part of the processing for the current response. The included response must have been previously declared as an internal response.
internal-response-name
Identifies an internal response that can be referred to by other responses. This name must be unique at the layout level. For more information on internal-response-name, see the INTERNAL RESPONSE declaration syntax section.
Example
Include MY_RESPONSE
This example specifies that MY_RESPONSE is performed.
INPUT PICTURE Clause
INPUT PICTURE Clause — The INPUT PICTURE clause defines the legal values for input to a picture field.
input-picture-clause
Format
Where you specify this clause:
Syntax Rules
picture-string-1
Specifies a Format 1, Format 2, or Format 3 picture string. For more information on the format of this string, see the PICTURE STRING syntax section.
FOR DATE picture-string-2
Specifies a Format 4 picture string. For more information on the format of this string, see the PICTURE STRING syntax section.
General Rules
The operator is allowed to enter characters into a picture field's image value. The Form Manager then removes the editing characters from the data item according to the picture string to produce the picture field's data value.
If the picture field's data value is incorrect after the editing characters have been removed from the data item, the operator is informed of a validation error and is required to correct the value.
If you do not specify an input picture, the output picture is used for validation.
If you specify both an input picture and an output picture clause fora panel field, the picture strings must be of the same length. The insertion literals specified in the input picture and the output picture must occupy the same character positions in each picture.
For more information, see the PICTURE STRING syntax section.
Example
Input Picture For Date GG:II
This example specifies a Format 4 picture string with digits of hours and digits of minutes of a 24-hour clock.
INTERNAL RESPONSE Declaration
INTERNAL RESPONSE Declaration — The INTERNAL RESPONSE declaration provides a method of referencing response steps used in more than one response.
internal-response-declaration
Format
Where you specify this clause:
Syntax Rules
internal-response-name
Identifies an internal response that can be referred to by other responses. This name must be unique in each layout.
response-step
Specifies the response steps to be performed. For more information, see the RESPONSE STEP clause syntax section.
General Rules
An internal response can be referred to by other responses by using the INCLUDE response step. An internal response is treated as if it were included inline by the referring response.
An internal response may not include itself, either directly or indirectly.
Example
Send Response RECORD_1
    Display PANEL_A
    Include RESPONSE_MSG
    Display PANEL_A
End ResponseInternal Response RESPONSE_MSG
Display PANEL_C
Message "Your dentist called. Your appt. is tomorrow at 8:00"
Display PANEL_D
End ResponseRESPONSE_MSG sends the image for PANEL_C to the display, and displays the message, "Your dentist called. Your appt. is tomorrow at 8:00" in the message panel. PANEL_D is then displayed, and then PANEL_A is redisplayed.
INVALID Response Step
INVALID Response Step — The INVALID response step specifies the current activation item (field, icon, button, or wait) as invalid during input.
invalid-response-step
Format
Where you specify this clause:
Syntax Rules
INVALID
Specifies that the current activation item is considered invalid during input validation. It also executes an implicit POSITION IMMEDIATE TO CURRENT ITEM response step.
The implicit response step overrides any previous POSITION response step so that the Form Manager requests input from the operator for the current activation item again. (A POSITION IMMEDIATE response step tells the Form Manager to get input from the position target first, even when this activation item is invalid.)
If a POSITION IMMEDIATE response step occurs after an INVALID response step, it overrides the implicit POSITION IMMEDIATE TO CURRENT ITEM response step.
The INVALID response step is ignored in PRINTER layouts.
Example
Field FOO
    Line 12
    Column 16
    Validation Response
        IF A > B
           THEN
           INVALID
        END IF
    End Response
End Field
In this example, if the conditional expression in the IF response step is true, the field is specified as invalid.
ITEM DESCRIPTION Entry
ITEM DESCRIPTION Entry — The ITEM DESCRIPTION entry specifies the display and processing attributes for a field, icon, or button.
item-description-entry
Format
Where you specify this clause:
Syntax Rules
accept-response-declaration
States what entry, exit, validation, and function responses are invoked during input to the field, icon, or button. For more information, see the ACCEPT RESPONSE declaration syntax section.
active-highlight-clause
Specifies one or more display attributes to add to the field, icon, or button while the operator is allowed to enter input to it. Attributes that change the size of the item (SINGLE, NORMAL, DOUBLE HIGH and DOUBLE WIDE) are not allowed for character-cell devices. For more information, see the ACTIVE HIGHLIGHT clause syntax section.
concealed-clause
Specifies that the contents of the picture field, text field, or icon are not displayed. The CONCEALED clause is ignored for push buttons and slider fields in window layouts. For more information, see the CONCEALED clause syntax section.
display-clause
Specifies display attributes for the field, icon, or button. For more information,see the DISPLAY clause syntax section.
NO DISPLAY
Negates the display attributes that would be inherited or would default to the field,icon, or button. It has no effect on whether the contents of the item are displayed.
DATA INPUT
Specifies that the operator can enter data into the field. (DATA INPUT is not allowed for buttons or icons.) DATA INPUT is the default: you only need to specify DATA INPUT to override a NO DATA INPUT clause in a field default.
NO DATA INPUT [ message-clause-1 ]
Specifies that the operator cannot enter data into the field, icon, or button, but the operator can position to the item and function key input can be accepted for the item. All icons and buttons are NO DATA INPUT.
Message-clause-1 specifies a message that is displayed if the operator attempts to enter data into the field or icon. In character-cell layouts,specifying NO DATA INPUT with a message clause allows the form designer to specify the message to be displayed when the operator attempts to enter data. In window layouts, a message clause specified for a NO DATA INPUT item is ignored.
For more information, see the MESSAGE clause syntax section.
USE HELP message-clause-2
Specifies that the Form Manager displays message-clause-2 in the message panel when it executes the MESSAGE HELP response step. If this clause is omitted, a default message is displayed.
For more information, see the MESSAGE response step syntax section.
NO HELP MESSAGE
Specifies that no help message is displayed in the message panel.
USE HELP PANEL panel-name
Specifies that the Form Manager activate a help panel when it executes an ENTER HELP response step. If you specify USE HELP PANEL in an item that has been activated as a help panel, the Form Manager ignores the USE HELP PANEL declaration at run time.
NO HELP PANEL
Specifies that no help panel is activated when the Form Manager performs an ENTERHELP response step.
highlight-when-clause
Specifies whether the field, icon, or button is augmented by an additional set of attributes under certain circumstances. For more information, see the HIGHLIGHT WHEN clause syntax section.
For character-cell terminals, attributes that change the size of an item are not allowed for the HIGHLIGHT WHEN clause. These attributes are SINGLE, DOUBLE HIGH, and DOUBLE WIDE.
protected-clause
Specifies whether afield, icon, or button may or may not accept operator input. When a field, icon, or button is protected, it cannot be the current activation item. For more information, see the PROTECTED clause syntax section.
timeout-clause
Specifies the number of seconds allowed for operator input. A TIMEOUT clause in an external request or in an ACTIVATE response step overrides a TIMEOUT clause in an item description entry. For more information, see the TIMEOUT clause syntax section.
General Rules
Item description entries must be either on or off. If you specify a particular item characteristic, you cannot specify the negation of that same characteristic in the same item declaration.
Negative item description entries (specified by NO or NOT in front of the entry) allow you to override currently active defaults set by the FIELD DEFAULT declaration. Override item description entries that do not have a negative item description entry by specifying an alternate or null attribute.
You can write the clauses of an item description entry in any order.
Examples
Field TIMER_FIELD
    Line 22
    Column 1
    Timeout 10
End Field
Field TIMER_FIELD has the TIMEOUT item description entry specified. This TIMEOUT clause specifies that the operator has 10 seconds between characters to enter input.
Field JUST_LOOKING
    Line 8
    Column 1
    No Data Input
        Message "You can't type here!"
End Field
The JUST_LOOKING field specifies NO DATA INPUT and displays the message "You can't type here!" if the operator attempts to enter input into the field. The message clause on the NO DATA INPUT clause is ignored in window layouts.
LAYOUT Declaration
LAYOUT Declaration — The LAYOUT declaration maps a form to a display device. You can specify more than one layout for each form. The Form Manager selects a layout when the form is enabled, using information specified in the layout, such as the device class, the natural language, and the display size. The layout is a group of panels specified for a particular device:what the operator sees as the form. Form designers must take into account the different capabilities of different display devices. For more information on device capability, see the DISPLAYVIEWPORT clause.
layout-declaration
Format
Where you specify this clause:
Syntax Rules
layout-name
Name you supply for the layout. You use layout-name to list the layouts in a form within an FDE editing session.
device-declaration
States the device that the layout is enabled on. For more information, see the DEVICE declaration syntax section.
LANGUAGE string-1
A character string that the Form Manager uses to select a layout. String-1 is the language of the layout.
In Motif and PRINTER layouts, if a language is specified at form enable time, and the value of string-1 matches the translated value of the OpenVMS logical name FORMS$LANGUAGE, the Form Manager chooses the layout whose language string matches the logical definition. If you do not define FORMS$LANGUAGE, the language specified for the logical name SYS$LANGUAGE is matched to the LANGUAGE clause. If no LANGUAGE declaration is made, the Form Manager does not attempt to match the layout to the logical name or to FORMS$LANGUAGE.
Note
The LANGUAGE clause controls layout selection based on the FORMS$LANGUAGE logical name, but does not affect run-time messages generated by the Form Manager.
LAYOUT SELECTION string-2 (PRINTER layouts)
Specifies a string used for PRINTER layout selection. LAYOUT SELECTION is ignored in all layouts except PRINTER layouts. For more information on layout selection, see the VSI DECforms Programmer's Reference Manual.
UNITS
Specifies the units in which position coordinates and measurements are expressed. If VT-class terminals are specified in the layout, the layout UNITS clause must specify CHARACTERS. The UNITS clause is required for window and PRINTER layouts.
CHARACTERS (character-cell layouts)
Specifies that position coordinates and measurements are expressed in characters, typically 1/6 inch vertically and 1/10 inch horizontally. The lowest specifiable coordinate is LINE 1, COLUMN 1:representing the top-left corner of the device. Fractional character positions are truncated to integer. Whether the font is normal size or double high or double wide, a unit is still the size of a single character cell.
INCHES (PRINTER and window layouts)
Specifies that position coordinates and measurements are expressed in inches. The lowest specifiable coordinate is LINE 0, COLUMN 0: representing the top-left corner of the device. Fractions can be specified to thousandths of an inch; for example, 2.341 inches.
MILLIMETERS (PRINTER and window layouts)
Specifies that position coordinates and measurements are expressed in millimeters. The lowest specifiable coordinate is LINE 0, COLUMN 0:representing the top-left corner of the device. Fractions of a millimeter can be specified to hundredths of a millimeter; for example, 2.34 millimeters.
PIXELS (window layouts)
Specifies that position coordinates and measurements are expressed in pixels. The lowest specifiable coordinate is LINE 0, COLUMN 0:representing the top-left corner of the device. Fractions of a pixel cannot be specified; fractional pixel positions are truncated to integer.
PIXELS is not recommended if you anticipate that your form will be used on more than one resolution of screen.
POINTS (Motif and PRINTER layouts)
Specifies that position coordinates and measurements are expressed in points. One point is equivalent to 1/72 of an inch. The lowest specifiable coordinate is LINE 0, COLUMN 0: representing the top-left corner of the device. Fractions of a point can be specified to hundredths of a point; for example, 2.34 points.
BMUS (PRINTER layouts)
Specifies that position coordinates and measurements are expressed in Basic Measurement Units. One BMU is equivalent to 1/1200 of an inch. The lowest specifiable coordinate is LINE 0, COLUMN 0:representing the top-left corner of the device. Fractions of a BMU cannot be specified.
BMUS can be specified in PRINTER layouts only.
SIZE
Defines the size of the default viewport. In character-cell layouts, all the viewports must fit within the default viewport, except for viewports declared with the FOR PRINTING clause (see the VIEWPORT declaration syntax section). You must specify the size of the layout. PRINTER layouts can use the standard paper sizes in Table 1.7, ''Standard Paper Size''; all other layouts must specify the LINES BY COLUMNS clause.
number-1 LINES BY number-2 COLUMNS
Number-1 specifies the number of units in the vertical direction in the SIZE clause. Number-2specifies the number of units in the horizontal direction in the SIZE clause. For the VT100-, VT200-, and VT300-series terminals supported by DECforms, the maximum number of lines is 24 and the maximum number of columns is 132. For VT400-series terminals, the maximum number of lines is 48 and the maximum number of columns is 132.
The IFDL Translator allows the SIZE clause to declare more lines and columns than a character-cell terminal or printer so that it can take advantage of emulated terminals on VAXstation computers.
On the OpenVMS operating system, the Form Manager uses the size of the terminal as specified in the OpenVMS terminal services to determine whether the layout fits. On windowing systems, the Form Manager queries the window device to determine whether the layout fits.
A (PRINTER layouts)
Specifies the A standard paper size as the maximum rectangular area for a PRINTER layout. See Table 1.7, ''Standard Paper Size'' for the dimensions corresponding to A.
A3 (PRINTER layouts)
Specifies the A3 standard paper size as the maximum rectangular area for a PRINTER layout. See Table 1.7, ''Standard Paper Size'' for the dimensions corresponding to A3.
A4 (PRINTER layouts)
Specifies the A4 standard paper size as the maximum rectangular area for a PRINTER layout. See Table 1.7, ''Standard Paper Size'' for the dimensions corresponding to A4.
A5 (PRINTER layouts)
Specifies the A5 standard paper size as the maximum rectangular area for a PRINTER layout. See Table 1.7, ''Standard Paper Size'' for the dimensions corresponding to A5.
B (PRINTER layouts)
Specifies the B standard paper size as the maximum rectangular area for a PRINTER layout. See Table 1.7, ''Standard Paper Size'' for the dimensions corresponding to B.
B3 (PRINTER layouts)
Specifies the B3 standard paper size as the maximum rectangular area for a PRINTER layout. See Table 1.7, ''Standard Paper Size'' for the dimensions corresponding to B3.
B4 (PRINTER layouts)
Specifies the B4 standard paper size as the maximum rectangular area for a PRINTER layout. See Table 1.7, ''Standard Paper Size'' for the dimensions corresponding to B4.
B5 (PRINTER layouts)
Specifies the B5 standard paper size as the maximum rectangular area for a PRINTER layout. See Table 1.7, ''Standard Paper Size'' for the dimensions corresponding to B5.
C (PRINTER layouts)
Specifies the C standard paper size as the maximum rectangular area for a PRINTER layout. See Table 1.7, ''Standard Paper Size'' for the dimensions corresponding to C.
D (PRINTER layouts)
Specifies the D standard paper size as the maximum rectangular area for a PRINTER layout. See Table 1.7, ''Standard Paper Size'' for the dimensions corresponding to D.
E (PRINTER layouts)
Specifies the E standard paper size as the maximum rectangular area for a PRINTER layout. See Table 1.7, ''Standard Paper Size'' for the dimensions corresponding to E.
F (PRINTER layouts)
|
Size |
Inches |
Millimeters |
Points |
BMUs |
|---|---|---|---|---|
|
A |
8.5 x 11 |
216 x 279 |
612 x 792 |
1208.5 x 13200 |
|
A3 |
11.69 x 16.54 |
297 x 420 |
841.68 x 1190.88 |
14028 x 19848 |
|
A4 |
8.27 x 11.69 |
210 x 297 |
595.44 x 841.68 |
9924 x 14028 |
|
A5 |
5.83 x 8.27 |
148 x 210 |
419.76 x 595.44 |
6996 x 9924 |
|
B |
11 x 17 |
279 x 432 |
792 x 1224 |
13200 x 20400 |
|
B3 |
13.9 x 19.68 |
353 x 500 |
1000.8 x 1416.96 |
16680 x 23616 |
|
B4 |
9.84 x 13.9 |
250 x 353 |
708.48 x 1416.96 |
11808 x 16680 |
|
B5 |
6.93 x 9.84 |
176 x 250 |
498.98 x 708.48 |
8316 x 11808 |
|
C |
17 x 22 |
432 x 559 |
1224 x 1584 |
20400 x 26400 |
|
D |
22 x 34 |
559 x 864 |
1584 x 2448 |
26400 x 40800 |
|
E |
34 x 44 |
864 x 1118 |
2448 x 3168 |
40800 x 52800 |
|
F |
28 x 40 |
711 x 1016 |
2016 x 2880 |
33600 x 48000 |
PORTRAIT (PRINTER layouts)
Specifies that the page has a portrait orientation: the shorter dimension is the width of the page. You can specify PORTRAIT only if you have specified a standard page size.
LANDSCAPE (PRINTER layouts)
Specifies that the page has a landscape orientation: the longer dimension is the width of the page. You can specify LANDSCAPE only if you have specified a standard page size.
list-declaration
Specifies a list of values to be used in field validation in the SEARCH clause. For more information on the LIST and SEARCH clauses, see the LIST declaration syntax section.
attribute-declaration
Specifies a name for a set of display attributes that are applied to fields, icons, buttons, or literals. For more information, see the ATTRIBUTE declaration syntax section.
display-viewport-clause
Allows you to specify default attributes that apply to viewports in the layout. Display viewport attributes are not included in the inheritance of attributes for fields, literals, icons, or buttons of panels displayed in the viewport. For more information, see the DISPLAY VIEWPORT clause syntax section.
viewport-declaration
Specifies a rectangular area of the display device that is used to display panels within the layout. The default viewport is the entire layout size declared. For more information, see the VIEWPORT declaration syntax section.
function-declaration
States what terminal keys are recognized in this layout. For more information, see the FUNCTION declaration syntax section.
external-response-declaration
Declares what action or actions the Form Manager performs when the application makes an external request of the form while this layout is displayed. For more information, see the EXTERNAL RESPONSE declaration syntax section.
internal-response-declaration
Used by other responses to simplify common response sequences. For more information, see the INTERNAL RESPONSE declaration syntax section.
function-response-declaration
States what actions the Form Manager should take if the terminal operator invokes a function while the Form Manager is soliciting input from the operator. For more information, see the FUNCTION RESPONSE declaration syntax section.
USE HELP PANEL panel-name
Specifies a help panel that is displayed when the Form Manager executes an ENTER HELP response step and there are no USE HELP PANEL clauses at lower levels. If you specify USE HELP PANEL in an item that has been activated as a help panel, the Form Manager ignores the USE HELP PANEL declaration at run time.
NO HELP PANEL
Specifies that no help panel is displayed.
field-default-declaration
Specifies named field defaults that can be referred to in subsequent field default applications. For more information, see the FIELD DEFAULT declaration syntax section.
literal-default-declaration
Specifies named literal defaults that can be referred to in subsequent literal default applications. For more information, see the LITERAL DEFAULT declaration syntax section.
field-default-application
Specifies the application of a field default. For more information, see the FIELD DEFAULT application syntax section.
literal-default-application
Specifies the application of a literal default. For more information, see the LITERAL DEFAULT application syntax section.
message-panel-declaration
Used to display error and informational messages. For more information, see the MESSAGE PANEL declaration syntax section.
panel-declaration
Specifies items (fields, literals, icons, buttons, and groups) displayed in viewports. For more information, see the PANEL declaration syntax section.
help-panel-declaration
Specifies a panel that gives information about the display when the Form Manager executes an ENTER HELP response step. For more information, see the HELP PANEL declaration syntax section.
Examples
Layout COLOR_LAYOUT
    Device         Terminal C1
            Type %VT200 Color
    End Device
    Units Characters
    Size 24 Lines By 80 Columns
    Viewport FIRST_VIEWPORT
           Lines 1 Through 22
           Columns 1 Through 80
    End Viewport
    Panel P1
        Viewport FIRST_VIEWPORT
        Field F1
        End Field
    End Panel
End Layout
| The device is a terminal class that supports color, for example, a VT241. |
| Units are characters. |
| The display size is 24 lines by 80 columns. |
| A viewport named FIRST_VIEWPORT is declared, with Panel P1 displayed on it. |
Layout WINDOW_LAYOUT
    Device
         Pixel WL1
            Type %Motif
    End Device
     Display Viewport
        Title "TRAVEL VOUCHER FORM"
        Nodecorations
    Units Inches
    Size 6.250 Lines By 8.991 Columns
    .
    .
    .
| The device is a Motif device. |
| The title that appears at the top of the viewport is "TRAVEL VOUCHER FORM". |
| The viewport has no decorations, such as borders, maximize and minimize buttons, or a title bar. |
| Units are inches. |
| The display size is 6.25 inches by 8.991 inches. |
LET Response Step
LET Response Step — The LET response step assigns a value to a form data item.
let-response-step
Format
Where you specify this clause:
Syntax Rules
LET data-1
Assigns a value to a form data item. The LET response step cannot assign a value to any of the built-in read-only data items.
data-2
Specifies that the assigned value is another data item.
%REV(string)
Specifies that the assigned value is a nonnumeric literal stored in reverse order in the form data item. This is useful for displaying text in Hebrew layouts.
literal
Specifies that the assigned value is a literal. Only a string or character data item in international date/time format can be assigned to a DATE, TIME, or ADT data item in a LET response step. (For example, LET X = "1993 04 15" is a legal response step, where X has been declared as a date data type.) For information on the international date/time format, see the discussion of the VALUE clause in the FORM DATA declaration syntax section.
scalar-numeric-expression
Specifies a scalar numeric expression: an expression whose computed value is specified by a single number (an expression that does not contain a "corresponding" subscript (that is, (*)). For more information, see the NUMERIC EXPRESSION syntax section and Appendix A, "Using Arrays with DECforms Software".
scalar-string-expression
Specifies a string expression: an expression whose computed value is a single character string. For more information, see the STRING EXPRESSION syntax section.
General Rules
If the data type of the right side of the LET response step does not match the data type of the left side, the Form Manager attempts to convert the left side's data type. Serious conversion errors (errors other than string truncation) result in request termination.
For further information on data conversion, see the VSI DECforms Programmer's Reference Manual.
Example
LET Choice = "2"
In this example, the LET step assigns the string 2 to the CHOICE form data item.
LET ADT1 = ADT2
In this example, the LET step assigns the value ADT2 to ADT1.
LIST Declaration
LIST Declaration — The LIST declaration specifies a set of items that are used for validation checking in afield with the SEARCH field validation entry.
list-declaration
Format
Where you specify this clause:
Syntax Rules
list-name
The name you select for the list of items. This name is used in the SEARCH clause.
EXACTCASE
Specifies that alphanumeric comparisons require a match in case as well as contents; you cannot use this clause when all elements in a list are numeric.
If you do not use EXACTCASE, alphanumeric comparisons provide a match if the only difference is in the case of the alphabetic characters of the string. This is the default.
literal
Specify the search items. Literal specifies that the search items are either numeric or nonnumeric literals; data specifies that the search items must be either numeric or nonnumeric data items.
You cannot mix character string and numeric elements in the same list.
Examples
List DAY_LIST
    'MONDAY'
    'TUESDAY'
    'WEDNESDAY'
    'THURSDAY'
    'FRIDAY'
End List
If a field has Search DAY_LIST as a field validation entry, the value of the field has to match one of the days on DAY_LIST to pass validation.
List STATE_LIST Exactcase
    "AL" "AK" "AZ" "AR" "CA" "CO" "CN" "DE" "DC" "FL"
    "GA" "HI" "ID" "IL" "IN" "IA" "KS" "KY" "LA" "ME"
    "MD" "MA" "MI" "MN" "MS" "MO" "MT" "NE" "NV" "NH"
    "NJ" "NM" "NY" "NC" "ND" "OH" "OK" "OR" "PA" "RI"
    "SC" "SD" "TE" "TX" "UT" "VA" "VT" "WA" "WV" "WI"
    "WY"
End List
If a field has Search STATE_LIST as a field validation entry, the value of the field has to be an uppercase, 2-character abbreviation for a state on the STATE_LIST list to pass validation.
LITERAL Declaration
LITERAL Declaration — The LITERAL declaration describes an object (a text string, a point, line segments, or a rectangle) to be drawn on the display at or between the specified coordinates. Literals represent the parts of panels that never change, such as background text and drawings.
literal-declaration
Format
Where you specify this clause:
Syntax Rules
TEXT location-clause
Specifies a character string to be displayed. Location-clause specifies the position of the string. For character-cell layouts, if you do not specify location-clause, the location of the current literal default is used. If no literal default is in effect, the default NEXT LINE, SAME COLUMN is used. There is no default location for window and PRINTER layouts. If you do not specify a location in a window or PRINTER layout, the IFDL Translator signals an error and your form is not translated. For more information, see the LOCATION clause syntax section.
VALUE string
Specifies a string value for the text literal.
For character-cell layouts, the area allotted for a literal by location-clause and the size of the viewport must be compatible with the value to be displayed in the area. The length of the literal must be less than or equal to the maximum number of characters that can be inscribed into this rectangular area.
For window layouts, the area allotted for a literal by location-clause does not have to be contained within the viewport. If the literal expands beyond the area of the viewport, the Form Manager uses scroll bars on the viewport.
POINT full-location-clause-1
For character-cell layouts, POINT specifies a single dot to be drawn on the panel. Full-location-clause-1 specifies the coordinates of the point.
For window and PRINTER layouts, POINT specifies a polyline with height equal to width. The location of the point is specified by full-location-clause-1. The height and width of the point are specified by the line width elementary attribute.
POLYLINE
A series of one or more connecting line segments. At least two points are required to define a polyline. If the beginning and end points of a polyline specify the same location, the polyline is considered closed. Otherwise, the polyline is open.
An open polyline cannot be filled in Motif layouts.
- full-location-clause-2
- full-location-clause-4
- full-location-clause-4
Specifies the point coordinates at which the lines of the polyline are drawn.
For character-cell layouts, the sequence of points in polylines must be orthogonal.
RECTANGLE
A rectangle is a special type of closed polyline. Two points representing opposite diagonal corners are required to specify a rectangle.
- full-location-clause-5
- full-location-clause-6
Specifies the point coordinates of the opposite corners of the rectangle.
literal-default-application
Specifies the application of defaults to a literal declaration. For more information, see the LITERAL DEFAULT application syntax section.
display-clause
Specifies display attributes for the literal. For more information, see the DISPLAY clause syntax section.
NO DISPLAY
NO DISPLAY cancels out the effect of the display attributes that would be inherited or would default to the literal. It has no effect on whether the contents of the literal are displayed. For example, if you specify NO DISPLAY on a literal that has the BOLD attribute applied, the literal is not automatically specified as NO BOLD. The literal would not have the BOLD applied if it is not already in effect.
General Rules
Where graphic literals meet in a character-cell display, the proper,line-drawing characters are inserted at the intersections of the literals. Where lines cross, a graphic cross is inserted, and where a line and an end point meet, the appropriate T is inserted.
Because window and PRINTER layouts are displayed on bit-mapped devices,lines are drawn directly on the device. In PRINTER layouts, the line attributes determine the behavior of joined lines.
Examples
Literal Text
     Same Line Next Column +4
     Value "Zip"
End Literal
This example displays the word "Zip "at the designated location on the panel.
Literal Rectangle
    Line 5 Column 2
    Line 17 Column 77
End Literal
This example displays a rectangle whose upper-left corner is at line 5, column 2, and whose lower-right corner is at line 17, column 77, on the panel.
Literal Polyline
    Line 4 Column 1
    Line 4 Column 80
End Literal
This literal draws a single line from column 1 to column 80 on the fourth line of the panel.
LITERAL DEFAULT Application
LITERAL DEFAULT Application — The LITERAL DEFAULT application specifies the default characteristics of literals within a layout, panel, group, icon, or literal. These defaults remain in effect until the Form Manager reaches the end of the entity in which they are declared.
literal-default-application
Format
Where you specify this clause:
Syntax Rules
NO LITERAL DEFAULT
Specifies no literal default is to be applied at the current level.
LITERAL DEFAULT default-name
Specifies a previously declared literal default as the default. Default-name is the name of the literal default. For more information, see the LITERAL DEFAULT declaration syntax section.
LITERAL DEFAULT OF [ literal-default-entry ] ...
Specifies that a set of literal default entries applies at the current level. For more information, see the LITERAL DEFAULT declaration syntax section.
General Rules
You can specify only Format 2 (relative) LOCATION clauses in a LITERAL DEFAULT application. If you specify a literal default with a location in a window layout, the IFDL Translator signals an error.
Example
Literal Default B_DEF
    Next Line
    Next Column
    Display Blinking
End Default

Literal Text
    Value "Entry:"
    Apply Literal Default B_DEF
    Display Bold
End Literal
In this example, a LITERAL DEFAULT declaration, B_DEF, specifies a literal default of next line, next column, and that the literal blinks on the display. However, when B_DEF is applied to the literal that follows, "Entry:" is displayed in bold, because the DISPLAY BOLD clause overrides the previous DISPLAY clause.
LITERAL DEFAULT Declaration
LITERAL DEFAULT Declaration — The LITERAL DEFAULT declaration specifies a named set of defaults that can be applied as the default characteristics for the subsequent literals declared in the layout.
literal-default-declaration
Format
Where you specify this clause:
Syntax Rules
LITERAL DEFAULT literal-default-name
Specifies the name of the literal default. You use this name to refer to subsequent literal default applications.
literal-default-entry
Specifies a default for the literals. For more information, see the LITERAL DEFAULT entry syntax section.
General Rules
If a LOCATION clause appears in a LITERAL DEFAULT declaration, it is applied only to text literals in a character-cell layout that possess no explicit corresponding location clause themselves. Location defaults cannot be applied to nontext or window and PRINTER literals.
Example
Literal Default BORING_DEF
    Next Line
    Same Column
End Default
    .
    .
    .
Literal Text
    Value "Entry:"
    Apply Literal Default BORING_DEF
    .
    .
    .
End Literal
In this example, a LITERAL DEFAULT declaration, BORING_DEF, specifies that each text literal begin on the next line, directly under the object preceding it.
LITERAL DEFAULT Entry
LITERAL DEFAULT Entry — The LITERAL DEFAULT entry establishes defaults for literals.
literal-default-entry
Format
Where you specify this clause:
Syntax Rules
partial-location-clause
Specifies the coordinates at which text literals appear. You can specify Format 2 LOCATION clauses only. For more information, see the LOCATION clause syntax section.
display-clause
Specifies display attributes. For more information on display attributes, see the DISPLAY clause syntax section.
Example
Literal Default BORING_DEF
    Next Line
    Same Column
End Default
In this example, a named literal default, BORING_DEF, specifies that each text literal begins on the line directly under the object preceding it. NEXT LINE and SAME COLUMN are literal default entries.
LOCATION Clause
LOCATION Clause — The LOCATION clause specifies the vertical and horizontal positions of an object. There are two types of location clauses: full and partial. You must specify both vertical and horizontal positions in full location clauses. You can omit either position in a partial location clause.
location-clause
Format
location-clause
full-location-clause
partial-location-clause
horizontal-location-clause-format-1
horizontal-location-clause-format-2
vertical-location-clause-format-1
vertical-location-clause-format-2
Where you specify this clause:
Syntax Rules
location-clause
Specifies the position of an object as a full or partial location clause.
full-location-clause
Specifies the vertical and horizontal positions of an object. You must specify a location clause as full-location-clause in window and PRINTER layouts.
partial-location-clause
Specifies either the horizontal or vertical position of an object.
General Rules
For character-cell layouts, line and column specifications for fields and literals can be declared as either Format 1 or Format 2 location clauses. All fields and literals in character-cell layouts must be contained within their associated viewport. If a field or a literal extends beyond the viewport boundary, the IFDL Translator signals an error and a form is not created.
For window and PRINTER layouts, the location of objects must be declared using Format 1 location clauses for both horizontal and vertical positions. In addition, within such layouts object locations must be specified as full location clauses, even if the syntax specifies partial.
All numbers in the horizontal-location-clause and vertical-location-clause are specified in the units declared in the layout. If the layout units are inches, millimeters, or points, the lines and columns are specified as decimal values. If the layout units are characters, pixels, or BMUs, decimal values are rounded to the nearest integer value.
If you specify any nontext literal (a point, polyline, or a rectangle), you must specify vertical-location-clause before horizontal-location-clause.
The maximum line or column specification for any form object allowed in all viewports is 65 535.
Syntax Rules: horizontal-location-clause-format-1
horizontal-location-clause-format-1
Defines the horizontal location of an object as an absolute position within a panel.
COLUMN number-1
Specifies an absolute horizontal position of the object being declared. Number-1 must be positive.
In character-cell layouts, number-1 is an absolute horizontal position from the origin of the viewport of the panel in which the field or literal is declared. Number-1 must lie within the viewport that contains the object.
In window layouts, number-1 is an absolute horizontal position from the origin of the parent of the object. The parent of a viewport is the screen itself. All other object coordinates are relative to the viewport. The origin of all window objects is the upper-left corner of the object.
General Rules: horizontal-location-clause-format-1
Window and PRINTER layouts must use Format 1 of horizontal-location-clause.
The Format 1 (absolute) LOCATION clause is not allowed in field and literal defaults.
Syntax Rules: horizontal-location-clause-format-2
horizontal-location-clause-format-2
Defines the column of a field or literal relative to another field or literal within the panel.
SAME COLUMN
Specifies that the field or literal starts in the same column number as the first character in the previous field or literal.
NEXT COLUMN
Specifies that the field or literal starts in the next available column number after the previous field or literal. The picture string of the previous field or the size of the previous literal determines the next column offset.
If the previously declared item requiring column coordinates is a point, polyline, or rectangle, NEXT COLUMN is the first column after the highest column coordinate of the literal.
number-2
Specifies the number of units the column should move relative to the current or next column. The sum of the current or next column plus number-2 must lie within the viewport that contains the column.
SAME/NEXT COLUMN + n moves the column coordinate n characters to the right.
SAME/NEXT COLUMN – n moves the column coordinate n characters to the left.
General Rules: horizontal-location-clause-format-2
Format 2 is permitted only in character-cell layouts.
If no previous column has been declared,SAME COLUMN or NEXT COLUMN is interpreted as COLUMN 1 for single/normal and double high fonts; as COLUMN 2 for double wide fonts.
The Back Translator converts relative (Format 2) LOCATION clauses used in polyline literals to absolute (Format 1) LOCATION clauses.
Syntax Rules: vertical-location-clause-format-1
vertical-location-clause-format-1
Defines the line of an object as an absolute position within a panel.
LINE number-3
Specifies an absolute vertical position of the object being declared. Number-3 must be positive.
In character-cell layouts, number-3 is an absolute vertical position from the origin of the viewport of the panel in which the field or literal is declared. Number-3 must lie within the viewport that contains the object.
In window layouts, number-3 is an absolute vertical position from the origin of the parent of the object. The parent of a viewport is the screen itself. All other object coordinates are relative to the viewport. The origin of all window objects is the upper-left corner of the object.
General Rules: vertical-location-clause-format 1
Window and PRINTER layouts must use Format 1 of vertical-location-clause. The Format 1 (absolute) LOCATION clause is not allowed in field and literal defaults.
Syntax Rules: vertical-location-clause-format-2
vertical-location-clause-format-2
Defines the line of a field or literal relative to another field or literal within the panel.
SAME LINE
Specifies that the field or literal starts on the same line as the first character in the previous field or literal.
NEXT LINE
Specifies that the field or literal starts in the next available line number after the previous field or literal.
The height of the font determines the NEXT LINE offset.
number-4
Specifies the number of units the line should move relative to the current or next line. The sum of the current or next line plus number-4 must lie within the viewport that contains the line.
SAME/NEXT LINE + n moves the line coordinate n characters towards the bottom.
SAME/NEXT LINE – n moves the line coordinate n characters towards the top.
General Rules: vertical-location-clause-format-2
Format 2 is permitted only in character-cell layouts. For items having double-size fonts, the line specified is the lower line of the character. The smallest line number possible for such items is line 2.
If no previous line is declared,the Form Manager interprets SAME LINE or NEXT LINE as LINE 1 for single/normal and double wide fonts; LINE 2 for double high fonts.
The Back Translator converts relative (Format 2) LOCATION clauses in polyline literals to absolute (Format 1) LOCATION clauses.
Examples
Same Column + 3
This clause places the starting column three characters to the right of the current column in a character-cell layout.
Next Column
This clause places the starting column in the next available column to the right of the previous field or literal in a character-cell layout.
Same Line +3
This clause places the starting line three characters down from the current line in a character-cell layout.
Same Column -2
This clause places the starting column two characters to the lef of the current column in a character-cell layout.
Column 4
This clause positions the starting column at the fourth column within the viewport within a character-cell layout, and four units to the right of the parent object's origin in a Motif or PRINTER layout.
Next Line
This clause places the starting line as the next available line down in a character-cell layout.
Same Line -2
This clause places the starting line two characters up from the current line in a character-cell layout.
Line 4
This clause positions the starting line as the fourth line on the viewport in a character-cell layout and four units down from the parent object's origin in a Motif or PRINTER layout.
Group REGISTER
     Vertical
         Displays 10
         First REGISTER_FIRST
         Scroll By Page

      Field REG_CHK_NUM
         Line 5
         Column 1
         Output Picture 9999R
      End Field

      Field REG_DATE
         Next Line
         Same Column + 5
         Output Picture For Date NN/DD/YY
      End Field
End Group
   .
   .
   .
Group REGISTER
     Vertical
         Displays 10
         First REGISTER_FIRST
         Scroll By Page
         Line 1.000

     Field REG CHK_NUM
         Line .200
         Column .000
         Output Picture 9999R
     End Field

     Field REG_DATE
         Line .400
         Column .555
         Output Picture For Date NN/DD/YY
     End Field
End Group
In this example, the first group named REGISTER has been converted from a character-cell layout to a Motif layout. The first group contains one set of relative (Format 2) clauses, but the second contains only absolute (Format 1) clauses, because relative clauses are not allowed in Motif layouts.
The line 5 offset in the first group becomes line .200 in the second group, which is equivalent to .2 inches.
MESSAGE Clause
MESSAGE Clause — The MESSAGE clause specifies the components of a message to be displayed in the message panel.
message-clause
Format
Where you specify this clause:
Syntax Rules
MESSAGE
Outputs a string of values to the message panel,formatted in a word-wrapped manner.
form-manager-message-code
Specifies the value of a Form Manager message in the MESSAGE clause. For a list of Form Manager messages, see the VSI DECforms Programmer's Reference Manual.
data
Specifies the contents of a form data item in the MESSAGE clause.
corresponding-data
Specifies the contents of a data item that is declared in at least one multiply occurring group and that one of the multiply occurring groups has a corresponding subscript specified.
integer(n)
unsigned byte
byte integer
unsigned word
word integer
unsigned longword
longword integer
For more information on corresponding data, see Appendix A, "Using Arrays with DECforms Software".
string
Specifies a character string in the MESSAGE clause.
General Rules
You can specify text strings, contents of form data items, or values associated with Form Manager messages as messages to the operator wherever a message clause is allowed. The Form Manager concatenates all items and displays them on the message panel, performing word wrapping as necessary. The MESSAGE clause is ignored in PRINTER layouts.
Examples
Function Response NEXT PANEL
    Message "Press F8 or PF1-C to cancel the update or "
    Message "      F10 or CTRL/Z to update your personal record."
End Response
This defines the function response for NEXT PANELto be a message.
Field RANGE
    Line   1
    Column 10
    Range 0 Thru 10
        Message %RANGE_FAILS
This MESSAGE clause specifies that Form Manager error message "data invalid; enter a value within the correct range" is displayed in the message panel if the value specified is not between 0 and 1.
Range low_value Thru high_value
    Message "More than " low_value " but not exceeding " high_value "."
This MESSAGE clause specifies a sentence with the values of two data items.
Require (G(**).A*2) < G(**).B
    Message "You must enter at least "G(**).A*2" units."
This MESSAGE clause shows a validation using a corresponding subscript to compare a number on one side with another.
MESSAGE PANEL Declaration
MESSAGE PANEL Declaration — The MESSAGE PANEL declaration describes the mapping and display characteristics of error and informational messages onto a viewport of the display device. You can associate the message panel with a specific viewport or with the default message viewport. You can also specify the display attributes of the message panel and its contents.
message-panel-declaration
Format
Where you specify this clause:
Syntax Rules
panel-name
Specifies a name for the message panel.
VIEWPORT viewport-name
Specifies the viewport in which the message panel is displayed. For more information, see the VIEWPORT declaration syntax section.
display-viewport-clause
Allows you to specify attributes that apply only to the viewport in which the panel is displayed. Display viewport attributes declared at the panel level are merged with and take precedence over display viewport attributes declared at the viewport and layout levels. For more information,see the DISPLAY VIEWPORT clause syntax section.
display-clause
Specifies the inheritance of display attributes of the panel's contents. For more information on display attributes, see the DISPLAY clause syntax section.
DISPLAYS integer-1
Specifies the number of message lines that are visible in a window layout if no viewport is declared for the message panel. Integer-1 must be a positive, nonzero integer.
If a named viewport is specified for the message panel, the number of message lines displayed is based upon the number specified for the viewport.
If DISPLAYS is omitted, the default is two message lines.
RETAINS integer-2
Specifies the maximum number of messages kept on the list for scrolling in a window layout. Integer-2 must be a positive integer.
If RETAINS is omitted, the default for window layouts is 100 messages.
General Rules
If you do not declare a message panel in your IFDL source file, a default message panel is created. For character-cell layouts,the Form Manager uses a default message viewport one line high that is the width of the layout display size and is on its lowest line.
For window layouts, the default message panel is DISPLAYS 2 RETAINS 100. The panel is displayed at the line specified in the layout SIZE clause, starting at column 0 with a width equal to the columns specified in the layout SIZE clause. For PRINTER layouts, a message panel can be declared, but the Form Manager ignores it at run time.
To send messages from your application program or from an escape routine, use a record field named MESSAGEPANEL in a SEND record message. The field name MESSAGE PANEL acts almost like a keyword —the value of the MESSAGEPANEL record field is transferred to the message panel and the message panel is displayed automatically when that record message is sent to the form. You declare MESSAGEPANEL in form records, but not in form data.
The DISPLAYS and RETAINS clauses are valid only in window layouts. You can define only one message panel for a layout.
Example
Message Panel WARNING_PANEL
     Viewport MESSAGE_VP
End Panel
The message panel WARNING_PANEL is displayed in viewport MESSAGE_VP.
MESSAGE Response Step
MESSAGE Response Step — The MESSAGE response step lets you send messages to the message panel.
message-response-step
Format
Where you specify this clause:
Syntax Rules
message-clause
Stored in a form data item
As a string literal
As the code for a message text string from the Form Manager
The MESSAGE response step is ignored in PRINTER layouts.
MESSAGE HELP
Causes the text string associated with the USE HELP clause for the current item to be displayed in the message panel. This display happens by default when the operator presses the function key defined as the HELP key. If no text string is associated with the USE HELP clause for the current item, or if there is no current item, this response step is ignored.
Example
Message "There is no money in that account."
This example specifies that a MESSAGE response step put out the message "There is no money in that account." to the message panel.
NUMERIC EXPRESSION
NUMERIC EXPRESSION — Numeric expressions let you perform arithmetic operations with integers in the form.
numeric-expression
Format
numeric-term
arithmetic-op
Where you specify this clause:
Syntax Rules
+
Specifies the addition operator. Can be a leading-sign unary operator.
–
Specifies the subtraction operator.
numeric-term-1
Specifies a form data item, number, or expression as the first operand in an arithmetic operation.
arithmetic-op
- +
- -
- *
- /
numeric-term-2
Specifies a form data item, number, or expression as the second operand in an arithmetic operation.
integer
Specifies an integer constant used as an operand. Integer must be an integer; decimal point and E-notation are not allowed.
data
INTEGER(n)
UNSIGNED BYTE
BYTE INTEGER
UNSIGNED WORD
WORD INTEGER
UNSIGNED LONGWORD
LONGWORD INTEGER
The value of data is the content of the form data item referenced by data. Data must be a scalar data reference: a data item that is not in a multiply occurring group or a single occurrence of a data item in a multiply occurring group.
corresponding-data
Declared in at least one multiply occurring group.
At least one of the multiply occurring groups has a corresponding subscript specified.
integer(n)
unsigned byte
byte integer
unsigned word
word integer
unsigned longword
longword integer
For more information on corresponding data, see Appendix A, "Using Arrays with DECforms Software".
numeric-expression
Specifies an arithmetic expression whose value is determined by evaluating the expression.
*
Specifies the multiplication operator.
/
Specifies the division operator. Only integer division is allowed; any remainder resulting from a division operation is lost.
General Rules
The value of a numeric expression is a numeric value determined by applying the operators to the operands as specified.
Higher precedence operators are evaluated before lower precedence operators; equal precedence operators are evaluated from left to right. Addition has equal precedence to subtraction, and lower precedence than either multiplication or division. Multiplication and division have equal precedence.
An initial negative sign (-) negates the value of numeric-term-1. An initial positive sign (+) does make the value of numeric-term-1 positive.
The data class of the intermediate value is the same as that of the numeric terms used in the generating expression.
The intermediate data type is unsigned if both operands are unsigned and the data type is signed otherwise.
If one operand is character-coded and the other is not (it is binary or computational), the operand that is not character coded is converted to a character-coded operand.
- The precision of the intermediate value is the number of decimal digits kept (for character-coded values) or the number of binary places kept. The precision of the intermediate value depends on the data class:
For class float, the precision is the maximum precision of the two operands, and the range (of exponent values) is the maximum range of the two operands, as determined by the implementation.
For binary integer data type operands (long integer and short integer), first determine the maximum precision of the two operands. If that precision is the maximum available for the class, it is used as the result. If there is a higher precision available, the next higher precision is used. For example, for combining two short integer values, the precision resulting is long integer, but the result of combining two long integer values is long integer.
For all other integer class data types and for class decimal, the total number of digits of precision of the intermediate value is 18. The number of integer part digits (digits to the left of the decimal point) and decimal part digits (digits to the right of the decimal point) is determined in an implementor defined manner, subject to the rule: the number of digits for the integer part is the maximum necessary (up to 18) to store the result, with any remaining digits allocated to the decimal part.
Overflow during the evaluation of a numeric expression results in a fatal error and leaves the state of the session undefined.
The result of division by zero is undefined.
Corresponding data references are legal only in WHEN clauses. For more information on the legal usage of corresponding data references, see Appendix A, "Using Arrays with DECforms Software".
Example
Form Data
    A Unsigned Word
    B Integer(10)
    C Byte Integer
    Group G1 Occurs 10
        F1 Integer(5)
        D Longword Integer
        E Word Integer
    End Group
End Data
   .
   .
   .
LET A = (B + G1(3).D)/C
In this example, the value of the expression on the right is assigned to A.
OUTPUT PICTURE Clause
OUTPUT PICTURE Clause — The OUTPUT PICTURE clause specifies the output editing necessary to display a field.
output-picture-clause
Format
Where you specify this clause:
Syntax Rules
picture-string-1
Specifies a Format 1, Format 2, or Format 3 picture string.
FOR DATE picture-string-2
Specifies a Format 4 picture string. For more information on picture string formats, see the PICTURE STRING syntax section.
General Rules
The OUTPUT PICTURE clause uses picture-string-1 or picture-string-2 to define the editing of a form data item value to create a picture field image value.
If you do not specify an OUTPUT PICTURE clause, the input picture is used.
If you specify both an input picture and an output picture clause fora panel field, the picture strings must be of the same length. The insertion literals specified in the input picture and the output picture must occupy the same character positions in each picture.
Editing Rules, picture-string-1
An image string is created that contains the same number of 9, X, C, A, and E characters as in picture-string-1.
Literals from picture-string-1 are inserted into the image string.
Sign and currency replacement characters are inserted into the image string at a position specified by S and W in picture-string-1.
Leading or trailing zeros or blanks in the image string are replaced by a replacement character. The extent of the replacement is specified by the R in picture-string-1.
- The starting value for the image string is created from the form data item value for numeric items (Formats 2 and 3 picture strings) as follows:
The absolute value of the form data value is represented as a series of decimal digit characters with an implicit decimal point.
Truncation occurs on the left and right of the decimal point and leading and trailing characters are added as necessary.
The sign of the image string is the sign of the form data item, unless all the decimal digit characters in the image string corresponding to nine positions in picture-string-1 are zero. If all these positions are zero, the sign of the image string is considered zero, so the sign of the image can be zero even if the form data item does not have a value of zero.
- Sign invocation:
The appearance of one or two S picture characters in a picture string means that a sign is to be inserted in the image string.
Either sign replacement editing can occur at the left or right end of the image string, or it can specify the replacement of leading or trailing zeros with a specified sign and (possibly) spaces.
If the S character appears to the left of the V (a picture with no V is equivalent to the same picture with a V following the last picture character), the sign appears to the left of the value.
If the S character appears to the right of the V, the sign appears to the right of the value. If the sign clause is PARENTHESES, a left parenthesis character ( ( ) appears to the left of the value and a right parenthesis character ( ) ) appears to the right of the value; the S character can appear on either side or both sides (left and right) of the V.
If the S character is missing from the left side, it is assumed to be to the immediate left of the leftmost 9.
If the S character is missing from the right side, and if the picture contains a V, the S character is assumed to be to the immediate right of the rightmost 9.
If the picture does not contain a V, the S character is to the right of the implied V that is placed at the right of the picture.
If picture-string-1 specifies an S and there is no applicable SIGN clause, SIGN MINUS is assumed.
If an S is to the left of all 9s and insertion literals, the sign is said to be fixed on the left.
If an S is to the right of all 9s and insertion literals and at the right of the decimal point (explicit or implied), the sign is said to be fixed on the right.
If an S appears in any other position, the sign is said to float, meaning that the sign replaces any leading zeros and insertion literals to the outside of the S (the side away from the V character).
- Currency invocation:
The appearance of a W picture character in a picture string means that a currency sign is to be inserted into the image string.
Currency replacement editing can occur at the left or right end of the image string, or it can specify the replacement of leading or trailing zeros with a specified currency and (possibly) spaces.
If the W character appears to the left of the V (a picture with no V equals the same picture with a V following the last picture character), the currency sign appears to the left of the value. If the W character appears to the right of the V, the currency sign appears to the right of the value.
- Sign and currency replacement editing:
Spaces are added first to the left and right ends of the image string to achieve the same number of currency sign and sign characters that are inserted by the W and S characters in picture-string-1. The Form Manager calculates the number of characters from the length of the applicable CURRENCY and SIGN clauses.
For fixed replacement on the left, the currency symbol or sign appears in the item aligned immediately to the left of the leading symbol 9 or insertion literal.
For floating replacement on the left, the floating currency symbol or sign appears in the item aligned immediately to the left of the leftmost leading nonzero digit in the image string corresponding to the symbol 9 or the position corresponding to symbol S or W, whichever applies.
For fixed replacement on the right, the currency symbol or sign appears in the item aligned immediately to the right of the trailing symbol 9 or insertion literal.
For floating replacement on the right, the floating currency symbol or sign appears in the item aligned immediately to the right of the rightmost trailing nonzero digit in the image string corresponding to the symbol 9 or the position corresponding to the symbol S or W, whichever applies.
If both S and W appear adjacent or with only an R separating them, their relative order in picture-string-1 determines the relative order of their appearance in the image string. For example,in the picture string 99SW9, the sign appears to the left of the currency symbol in the image string.
- The symbol R appearing to the left of the actual or assumed decimal point invokes leading replacement. Replacement proceeds as follows:
The starting point of the replacement is the leftmost character in the image string of the following characters: the leading nonzero digit, the character that corresponds to the first 9 or insertion literal to the right of the R in picture-string-1, or any inserted floating sign or currency sign.
All zeros and insertion literals to the left of the actual or assumed decimal point are replaced by the replacement literal character.
- The symbol R appearing to the right of the decimal point invokes trailing replacement. Replacement proceeds as follows:
The starting point of the replacement is the rightmost character of the following characters: the trailing nonzero digit, the character that corresponds to the first 9 or insertion literal to the left of th eR in picture-string-1, or any inserted floating sign or currency sign.
All zeros and insertion literals to the right of the decimal point are replaced by the replacement literal character.
Floating point editing:
The 9 symbols to the left of the symbol E represent the fraction. The 9 symbols to the right of the symbol E represent the exponent.
Editing Rules, picture-string-2
A C D G H I L M N P Q R S U Y – / : , .
If the number of M characters cannot contain the month name on edit (at run time), the Form Manager generates a nonfatal run-time error. Similarly, if the number of A characters cannot contain the full abbreviated month string on edit, the Form Manager generates a nonfatal run-time error. The same rule applies to the P character (the meridian indicator).
The C picture character can be repeated as many as seven times. The most significant digits of the fraction of seconds are displayed within the number of characters given.
The formats DD, NN, HH, and GG are equivalent to DRD,NRN, HRH, and GRG with a replace leading nonnumeric literal of "0" (zero). The II and SS substrings are also filled with zeros on the left if necessary.
If the M substring or the A substring does not end with the Q picture character, the month or abbreviated month name are padded on the right with blanks if necessary.
Examples
RX(32)
Replace Trailing "_"
This produces a 32-character field with replace trailing. By default,input into this field is left-justified overstrike.
A'.'A'.'
This is an example of a two-character alphabetic field with insertion literals. This picture can be used to enter a two-digit state code. By default, input into this field is left-justified overstrike.
999'-'99'-'9999
Justification Left
This example specifies an overstrike numeric field that is left justified. This field allows input of a standard social security number.
9999R9
Replace Leading "*"
Justification Right
This example specifies a right-justified numeric field with replace leading check protection. By default, input into this field would be right-justified insert mode.
S99,999.99
Justification Decimal
This example specifies a numeric field with a fixed leading sign. Numeric entry occurs in fixed decimal format.
W99,99S9.99
Justification Decimal
This example specifies a numeric field with a fixed leading currency and a floating leading sign.
Justification Decimal
This example specifies a field that is right justified by default. To improve performance, it is suggested that input into floating fields use JUSTIFICATION DECIMAL. This example specifies the same picture as Example 6.
W99,999.99S
Positive Sign "DB"
Negative Sign "CR"
Justification Decimal
This example specifies a picture with a fixed leading currency sign and floating trailing currency sign. In this case, the sign is two characters long and is in the trailing position.
W99,99S9.99S
Sign Parentheses
Justification Decimal
This example specifies a picture with a fixed leading currency sign, a floating leading sign (parenthesis) with a fixed trailing sign (parenthesis). The leading sign can float during operator input.
PANEL Declaration
PANEL Declaration — The PANEL declaration describes the mapping of certain visual elements of the form onto a viewport of the display device.
panel-declaration
Format
panel-property
Where you specify this clause:
Syntax Rules
panel-name
The name of the panel.
panel-property
Specifies the properties of the panel.
field-default-application
Specifies default attributes of fields,icons, and buttons on the panel. The field defaults remain in effect until the end of the panel. For a detailed description of field default applications, see the FIELD DEFAULT declaration syntax section.
literal-default-application
Specifies default characteristics of literals within the panel. The literal defaults remain in effect until the end of the panel. For more information, see the LITERAL DEFAULT application syntax section.
group-declaration
Specifies a group of logically related fields, literals, icons,buttons, or groups within a panel. For more information, see the GROUP declaration syntax section.
picture-field-declaration
Specifies the characteristics of a picture field within the panel. For more information, see the PICTURE FIELD declaration syntax section.
text-field-declaration
Specifies the characteristics of a text field within the panel. For more information, see the TEXT FIELD declaration syntax section.
slider-field-declaration (window layouts)
Specifies the characteristics of a slider field within the panel. For more information, see the SLIDER FIELD declaration syntax section.
pushbutton-declaration (window layouts)
Specifies the characteristics of a button within the panel. For more information, see the PUSH BUTTON declaration syntax section.
icon-declaration (character-cell layouts)
Specifies the characteristics of an icon within the panel. For more information, see the ICON declaration syntax section.
literal-declaration
Specifies a background object (a text string, a point, line segments, or a rectangle) as applied to the icon. For more information, see the LITERAL declaration syntax section.
Syntax Rules, panel-property
VIEWPORT viewport-name
Specifies the viewport in which the panel is displayed. For character-cell layouts, all items in the panel are specified with positions (lines and columns) that are relative to this viewport (not relative to the absolute coordinates of the display). For window and PRINTER layouts, the position of an object is relative to the position of the object's parent.
If an object is declared inside a group, its parent is the group. Otherwise, its parent is the panel that contains it.
If no VIEWPORT clause is specified, the default viewport for the panel is the default viewport for the layout. The size of the layout's default viewport is specified in the layout's SIZE clause. If the panel does not have a VIEWPORT clause, it will use the default viewport, unless it is referenced in a DISPLAY response step with another viewport.
For more information, see the VIEWPORT declaration syntax section.
display-viewport-clause
Allows you to specify attributes that apply only to the viewport in which the panel is displayed. Display viewport attributes declared at the panel level are merged with and take precedence over display viewport attributes declared at the viewport and layout levels. For more information, see the DISPLAY VIEWPORT clause syntax section.
display-clause
Specifies the attributes that will be inherited by display attributes of the panel's contents. For more information on display attributes, see the DISPLAY clause syntax section.
postdisplay-clause
Specifies what happens to the viewport and its contents when the Form Manager exits the panel. For more information, see the POSTDISPLAY clause syntax section.
scroll-bar-clause (window layouts)
Specifies the scroll bars for the panel.
The scroll bar default for panels is SCROLLBAR BOTTOM DYNAMIC SCROLLBARRIGHT DYNAMIC. This default specifies that scroll bars appear if the area covered by the objects in the panel is larger than the size of the viewport in which the panel is displayed.
For more information, see the SCROLL BAR clause syntax.
entry-response-declaration
Specifies that the Form Manager performs a response when the current activation item is on a different panel from the previous activation items.
The entry response for the panel is interpreted during accept phase just before the Form Manager has displayed the panel to allow input to an activation item on the panel.
There is no default entry response at the panel level. For more information, see the ENTRY RESPONSE declaration.
exit-response-declaration
Specifies that the Form Manager performs a response when the Form Manager exits the panel. An exit response for the panel is called when the Form Manager exits the last active item of the panel,and after the last active item's exit response is called. There is no default response for exit response processing. For more information, see the EXIT RESPONSE declaration.
function-response-declaration
Specifies that the Form Manager performs a response when the operator enters a function at the panel level. A function response declared at this level is overridden by functions at the group, field, icon, and button level. For more information, see the FUNCTION RESPONSE declaration.
validation-response-declaration
Specifies that the Form Manager performs a response when the operator has completed input into the panel. For more information, see the VALIDATION RESPONSE declaration.
USE HELP message-clause
Specifies a message to be displayed in the message panel when the MESSAGE HELP response step is executed and there are no USE HELP MESSAGE clauses at lower levels. For more information, see the MESSAGE clause syntax section.
NO HELP MESSAGE
Specifies that no help message is displayed.
USE HELP PANEL panel-name
Specifies a help panel that is displayed and possibly activated when the Form Manager executes the ENTER HELP response step and there are no USE HELP PANEL clauses associated with items on the panel. If USE HELP PANEL is specified in a help panel, the Form Manager ignores the USE HELP PANEL declaration at run time.
NO HELP PANEL
Specifies that no help panels are activated.
Example
Panel NAME_PANEL
    Literal Text Line 5 Column 5
        Value "Name: "
    End Literal
    Field NAME
        Line 5 Column 12
    End Field
End Panel
In this example, a panel named NAME_PANEL containing a literal at line 5, column 5, is displayed. The operator sees "Name:" on the display device. The next field specifies the contents of a form data item to be displayed.
PATTERN Clause
PATTERN Clause — The PATTERN clause specifies the pattern to be used for the FILL attribute. Only closed objects—viewports, closed polyline literals, and rectangles—within PRINTER and window layouts can have a FILL pattern.
pattern-clause
Format
Where you specify this clause:
Syntax Rules
PATTERN BUILTIN pattern-name
Specifies the pattern to be used on a closed object with the FILL attribute in a PRINTER or window layout. Pattern-namecan be one of the following:
BACKGROUND
Specifies a solid pattern consisting of the background color.
FOREGROUND
Specifies a solid pattern consisting of the foreground color.
SHADE LIGHT
SHADE MEDIUM
SHADE DARK
Example
Literal Polyline
    Line 4 Column 1
    Line 4 Column 20
    Line 12 Column 1
    Line 4 Column 1
    Display
        Fill Pattern Builtin Foreground
End Literal
This example specifies that a solid pattern of the foreground color is used to fill a triangular PRINTER polyline literal.
PICTURE FIELD Declaration
PICTURE FIELD Declaration — The PICTURE FIELD declaration specifies the characteristics of a form data item as it is displayed on a panel.
picture-field-declaration
Format
picture-field-description-entry
Where you specify this clause:
Syntax Rules
field
The name of the field. This name must match a form data item.
location-clause
Specifies the vertical and horizontal position of the picture field. In character-cell layouts, if you do not specify the LOCATION clause for a picture field, the LOCATION clause of the current field default is used. If no field default is currently in effect, NEXT LINE, SAME COLUMN is used.
You must specify a LOCATION clause for window and PRINTER layouts. For more information, see the LOCATION clause syntax section.
partial-extent-clause (PRINTER and window layouts)
Specifies the size of the picture field. The default size of a picture field is a height tall enough for one row of text and wide enough for the picture string. For more information, see the EXTENT clause syntax section.
field-default-application
Specifies the application of a previously defined field default. For more information,see the FIELD DEFAULT application syntax section.
picture-field-description-entry
Specifies the display,validation, and processing attributes for a picture field.
copy-statement-format-2
You use the COPY statement to copy information from a Oracle CDD/Repository field into a field in your IFDL source file.
item-description-entry
Specifies the display and processing attributes for the picture field.
field-validation-entry
Specifies the validation attributes for the picture field.
AUTOSKIP (character-cell layouts)
Specifies that a keystroke resulting in a full field also causes an automatic NEXT ITEM.
NO AUTOSKIP (character-cell layouts)
Specifies that no automatic NEXT ITEM is to be performed.
output-picture-clause
Specifies the picture for output editing. For more information, see the OUTPUT PICTURE syntax section.
editing-clause
Specifies how output-picture-clause is edited. For more information, see the EDITING clause syntax section.
input-picture-clause
States what is acceptable input for the picture field. For more information, see the INPUT PICTURE clause syntax section.
JUSTIFICATION LEFT (character-cell and window layouts)
Declares that operator input begins at the leftmost data position of a picture field. The default insertion mode for JUSTIFICATION LEFT in character-cell layouts is overstrike. When the picture field is in overstrike mode, the characters in the field are typed over when new characters are entered into the picture field.
When the insertion mode is set to insert, the character at the cursor position and the characters to the right of the cursor are shifted right when a data character is inserted and shifted left when a data character is deleted. The initial position for the cursor in a left-justified field in insert or overstrike mode is the leftmost data position.
JUSTIFICATION LEFT is the default justification for Format 1 picture strings and Format 2 picture strings that do not contain a decimal point.
JUSTIFICATION LEFT is the default justification for window layouts.
JUSTIFICATION RIGHT (character-cell layouts)
Declares that operator input begins at the rightmost data position of a picture field. The default insertion mode for JUSTIFICATION RIGHT is insert. When the picture field is in insert mode, the characters to the left of the cursor are shifted left when a data character is inserted and shifted right when a data character is deleted. The initial position for the cursor in a right-justified field is to the right of the rightmost data position.
Window layouts do not support JUSTIFICATION RIGHT.
JUSTIFICATION DECIMAL (character-cell layouts)
Causes the whole part of the number to be entered in right-justified insert mode to the left of the decimal point and the fractional part of the number to be entered in left-justified overstrike mode to the right of the decimal point. The initial position for the text cursor is on the decimal point.
JUSTIFICATION DECIMAL is the default for Format 2 picture strings that have a decimal point.
UPPERCASE
Changes operator input to uppercase. In character-cell layouts, the conversion is done as the input is typed. In window layouts, the conversion is done when the operator exits the field.
MIXED CASE
Accepts operator input as entered.
MINIMUM LENGTH integer
Specifies integer as the number of nondefault characters that must be in the field value for the picture field to be considered valid. Default characters for nonnumeric fields are leading or trailing blanks; for numeric fields default characters are leading zeros before the decimal point and trailing zeros after the decimal point. Leading or trailing replacement characters count as zeros or blanks.
message-clause
Specifies the message to be displayed if the operator tries to enter fewer characters than the number specified in the MINIMUM LENGTH clause. You may specify a form data item, a text string, or a code for a message text string from the Form Manager as the message text. For more information, see the MESSAGE clause syntax section.
NO MINIMUM LENGTH
Specifies that fields that contain all nondefault characters (blanks or zeros) are valid. For example, you may specify zeros in a nonnumeric field.
OUTPUT string WHEN conditional-expression
If string is the same length as the form field image value, no further output editing is performed. String is used with no insertion literal editing and no replacement editing.
If string is shorter than the field image value would be if full editing took place, string is extended on the right with spaces to the length of the field image value.
If string is longer than the field image value would be if full editing took place, string is truncated on the right to the length of the field image value.
If more than one OUTPUT WHEN clause appears, conditional-expression is evaluated for each, in order of declaration, until one evaluated as true is found, in which case the corresponding string is used as specified previously.
If an OUTPUT WHEN clause appears in a field declaration, all OUTPUTWHEN clauses specified in an applicable field default application are ignored. For more information on conditional expressions, see the CONDITIONAL EXPRESSION syntax section.
NO OUTPUT WHEN
Specifies that output editing continues according to the editing clause applicable to the field.
General Rules
For character-cell layouts,the area allotted for the field's image value by the LOCATION clause must be compatible with the value to be displayed in that area. The length of the field's image value implied by the picture clauses must be less than or equal to the maximum number of characters that can be written into this area. For window and PRINTER layouts, the length of a field is determined by the field picture and its EXTENT clause.
If you do not specify a picture field description entry, the current field default characteristics determine field characteristics. Any field characteristic that is different from the current field defaults holds for the current field specification only.
Negative picture field default entries (specified by NO or NOT in front of the entry) allow you to override currently active defaults set by the FIELD DEFAULT application. Override picture field description entries that do not have a negative item description entry by specifying an alternate attribute.
Panel fields whose data items have DATE CURRENT, TIME, CURRENT, and ADT CURRENT data types default to the NO DATA INPUT description entry.
If you specify both an input picture and an output picture clause fora panel field, the picture strings must be of the same length. The insertion literals specified in the input picture and the output picture must occupy the same character positions in each picture.
Defaults
If a field default application is not in effect, the following are the field defaults.
LOCATION Clause
For character-cell layouts, the LOCATION clause specifies that the field display starts at the next line, and the same column. You cannot default a location in a window or PRINTER layout.
FONT Declaration
For character-cell layouts,the character set defaults to PRIVATE_USER_PREFERENCE and the font size defaults to SINGLE.
For Motif layouts, the character set and font defaults are supplied by the Motif toolkit. For PRINTER layouts, the character set and font default is FONT FAMILY COURIER STYLE ROMAN WEIGHT MEDIUM SIZE 12.
BACKGROUND COLOR UNCHANGED
The background color remains as set by the user.
FOREGROUND COLOR UNCHANGED
The foreground color remains as set by the user.
OUTPUT PICTURE
If the output picture is present, the input picture is inferred from the output picture.
If the input picture is present, the output picture is inferred from the input picture.
If neither picture appears, the default picture is inferred from the data type of the associated form data item.
Table 1.8, ''Default Pictures According to Data Type'' shows default pictures according to data type. The characters in the right column are picture characters that make up input and output pictures.
|
Data Type |
Default Picture? |
|---|---|
|
DATE |
DD-AAA-YYYY |
|
TIME |
GG:II |
|
ADT |
DD-AAA-YYYY ’ ’GG:II:SS.CC |
|
CHARACTER (integer-n) |
X(integer-n) |
|
CHARACTER (integer-n) VARYING |
X(integer-n) |
|
CHARACTER (integer-n) NULL TERMINATED |
X(integer-n*–*1) |
|
DATETIME (integer-n) |
DD-AAA-YYYY ’ ’GG:II? |
|
INTEGER (integer-n) |
S9(integer-n) |
|
DECIMAL (integer-n, integer-y) |
S9(integer-n).9(integer-y) |
|
FLOAT (integer-n) |
S.9(integer-n)ES99 |
|
FLOAT (integer-n, integer-y) |
S.9(integer-n)ES9(integer-y) |
|
UNSIGNED BYTE |
9(3) |
|
BYTE INTEGER |
S9(3) |
|
UNSIGNED WORD |
9(5) |
|
WORD INTEGER |
S9(5) |
|
UNSIGNED LONGWORD |
9(10) |
|
LONGWORD INTEGER |
S9(10) |
|
QUADWORD INTEGER |
S9(19) |
|
FFLOATING |
S9.9(7)ES99 |
|
GFLOATING |
S9.9(15)ES999 |
|
DFLOATING |
S9.9(16)ES99 |
|
HFLOATING |
S9.9(33)ES9999 |
|
SFLOATING |
S9.9(6)ES99 |
|
TFLOATING |
S9.9(17)ES999 |
|
XFLOATING |
S9.9(33)ES9999 |
|
SHORT FLOAT |
S9.9(6)ES99 |
|
LONG FLOAT |
S9.9(17)ES999 |
Examples
Field CITY
    Same Line Column 16
    Output Picture X(20)
    Display Underlined
End Field
This example specifies a picture field named CITY. The picture field is displayed on the same line as the previously declared field, literal, or icon at column 16, and the picture field is underlined.
Field STATE
    Line 10 Column 16
    Output Picture X(2)
    Display Underlined
    Uppercase
    Minimum Length 2
        Message "State field must be two letters"
    Search STATE_LIST
        Message "Must be one of the fifty states or DC"
End Field
This example specifies a picture field named STATE. The picture field is displayed on line 10, at column 16, and the picture field is underlined. Input to the picture field must match an item on a list called STATE_LIST, with a minimum length of two characters. Input to the field is converted to uppercase.
Field SHOWY_FIELD
    Line 2
    Column 1
    Active Highlight Bold
    Output "Oops, you definitely messed up!"
        When a > b
End Field
SHOWY_FIELD is bolded when the operator is allowed to enter input to this field. The string "Oops, you definitely messed up!"is displayed when a > b (a is greater than b).
Field PICTURE_FIELD
     Line 6
    Column 1
    Output Picture aa'-'aa'/'cccccc
End Field
Field PICTURE_FIELD specifies a Format 1 picture string.
PICTURE STRING
PICTURE STRING — The Picture String provides the format by which a form data item value is edited to create a picture field's image value. It also provides the format by which the picture field's image value is edited (the editing characters are removed from the data item) to create the form data item.
picture-string
Format
Format 1
Format 2
integer-part
decimal-part
Format 3
Format 4
date-punc
Where you specify this clause:
Syntax Rules: Formats 1, 2, and 3
A
Represents a character position that contains only alphabetic characters (a to z, A to Z, accented letters for those character sets that support them, and space/blank) characters from the device's character set. Each A is counted in the size of the picture. An A can be followed by a positive integer within parentheses, specifying that the A occurs that many times in the string.
The Form Manager assumes that the character in form data that corresponds to A is a printable character.
C
Represents a character position that contains only alphanumeric characters (a to z, A to Z, accented letters for those character sets that support them, the numbers 0 to 9, and space/blank) from the device's character set. Each C is counted in the size of the picture. A C can be followed by a positive integer within parentheses, specifying that the C occurs that many times in the string.
The Form Manager assumes that the character in form data that corresponds to C is a printable character.
R
Indicates the location of leading or trailing zeros and where insertion literals are replaced. If the R appears before the V, replacement occurs before the R; if the R appears after the V, replacement occurs after the R. If no V is present, replacement occurs before the R. The R does not represent a character position and, therefore, is not counted in the size of the picture. Although only one R is allowed in Format 1 picture strings, it can appear anywhere in the string.
If the picture string specifies an R and there is no applicable REPLACE LEADING or REPLACE TRAILING clause, a space character is used.
All zeros and insertion literals to the left or right of R are replaced by the replacement literal character.
string
A string that is enclosed in quotation marks.
X
Represents a character position that contains any allowable character from the device's character set. Each X is counted in the size of the picture. An X can be followed by a positive integer within parentheses, specifying that the X occurs that many times in the string.
The Form Manager assumes that the character in form data that corresponds to X is a printable character.
9
Represents a digit position that contains a numeric character and is counted in the size of the picture. A 9 can be followed by a positive integer within parentheses, specifying that the 9 occurs that many times in the string.
integer-part
Specifies how the integer portion of the data item will be represented.
S
Indicates that a sign indicator should be present in the edited string. The actual position of the sign is specified by the location of the S with respect to the other characters in the picture string, and can be either leading or trailing, fixed or floating, as specified under the OUTPUT PICTURE clause.
The S represents a number of character positions in the size of the item depending on the size of the applicable SIGN clause. You can have only one S in the picture string, unless you are using parentheses in the sign.
W
Indicates that a currency symbol should be present in the edited string. The actual position of the currency symbol is specified by the location of the W with respect to the other characters in the picture string, and can be leading or trailing, fixed or floating, as specified under the OUTPUT PICTURE clause. The W represents a number of character positions in the size of the picture depending on the size of the applicable CURRENCY clause.
If the picture string specifies a W and there is no applicable CURRENCY clause, CURRENCY IS $ is assumed.
If a W is to the left of all 9s and insertion literals, the currency sign is said to be fixed on the left.
If a W is to the right of all 9s and insertion literals and at the right of the decimal point (explicit or implied), the currency sign is said to be fixed on the right.
If a W appears in any other position, the currency sign is said to float:the currency sign replaces any leading zeros and insertion literals to the outside of the W (the side away from the V character).
After insertion of a floating sign or currency symbol, lead or repeating replacement editing is performed at the location of the inserted sign/currency characters. If no R character appears, the replacement character used is space, regardless of what the applicable REPLACE clause specifies.
decimal-part
Specifies the part of the picture string containing the decimal point.
V
Indicates the location of the assumed decimal point. The V does not represent a character position and, therefore, is not counted in the size of the item. When the assumed decimal point is to the right of the rightmost symbol in the string representing a digit position, the V is redundant.
dec
Indicates the character used as decimal point. If the applicable decimal sign phrase is a period, this character is a period and is equivalent to V ’. ’.If the applicable decimal sign clause is a comma, this character is a comma and is equivalent to V ’, ’.
’
The single quotation mark delimits literals that are contained within the character string. Each character in the literal is counted in the size of the picture, but the quotation marks are not counted.
( )
The parentheses symbols enclose a positive integer representing the number of consecutive occurrences of the preceding symbol (either 9, X, C, or A) contained in the character string. The parentheses are not counted in the size of the picture.
E
The E indicates that the symbols that follow to the right in the character string represent the exponent of a floating-point numeric data item. When used in the character string of a floating-point numeric data item, the E represents the character position into which the character E is inserted and is counted in the size of the picture.
Syntax Rules: Format 4
D
Marks the position of the day of month of the date. The digits of the day are displayed in this portion of the date field. If the day value contains only one digit (for example, the fifth day of the month), the day portion of the date field is filled with zeros by default. You can use the R picture character to specify blank fill or the Q picture character to specify no fill characters.
R
Specifies the replace-leading designator,as in Format 1 and 2 picture strings. For date/time picture strings, the replace-leading character can be either zero (0) or blank ( ).
Q
Used in a substring to indicate that all blanks that are not explicit date punctuators should be removed from the substring. The remaining characters are then left-justified. Because the Q does not represent a character position, it is not counted in the size of the picture.
When the Q character is used in any substring of the picture string, the operator is responsible for reentering any insertion literals that have been deleted from the original string.
If you specify a Q on input, the user must enter all insertion literals to the right of the first Q character. The Form Manager does not validate the date when you exit the field.
U
Causes all characters in the substring that are to the right of the U character to be displayed in uppercase, if the specified language allows. Because U does not represent a character position, it is not counted in the size of the picture.
Input validation is not case sensitive, regardless of the U characters in the picture string.
When no L or U is used, the defaults are capitalized month: UML{M} … or abbreviated month: UAL{A} … and uppercase meridian indicator U{P} … .
L
Causes all characters in the substring that are to the right of the L character to be displayed in lowercase, if the language specified allows. Because L does not represent a character position, it is not counted in the size of the picture.
Input validation is not case sensitive, regardless of the L characters in the picture string.
When no L or U is used, the defaults are capitalized month: UML{M} … or abbreviated month UAL{A} ... and uppercase meridian indicator U{P} … .
M
Marks the position of the name of the month. The characters of the name of the month are displayed in this portion of the date field. If the number of positions in the name of the month portion is insufficient, the leftmost characters are displayed and an informational message is output to the trace file.
Any unique designation of the month is accepted in the M substring on input. You must enter enough letters to identify the month uniquely for the given language, but you need not enter as many characters as the picture designates.
An M can be followed by a positive integer within parentheses specifying that the M occurs that many times in the string.
On OpenVMS systems, you can specify foreign language month names. At run time the Form Manager uses OpenVMS date/time logical names to get language-specific month names for input and output.
A
Designates the location and number of character positions reserved for the abbreviated month name string. If the number of picture characters of the abbreviated month is not sufficient to contain the abbreviated month at run time, the leftmost characters are displayed and an informational message is output to the trace file.
Any unique designation of the abbreviated month is accepted in the A substring on input. You must enter enough letters to identify the abbreviated month uniquely for the given language, but you need not enter as many characters as the picture designates.
An A can be followed by a positive integer within parentheses specifying that the A occurs that many times in the string.
On OpenVMS systems, you can specify abbreviated foreign language month names. At run time the Form Manager uses OpenVMS date/time logical names to get language-specific abbreviated month names for input and output.
N
Marks the position of the number of the month. The digits of the number of the month are displayed in this portion of the date field. If the value contains only one digit (for example, the sixth month), the number of the month portion of the date field is filled with zeros by default. You can use the R picture character to specify blank fill or the Q picture character to specify no fill characters.
Y
This picture character marks the position of the year. The digits of the year are displayed in this portion of the date field. If the number of positions in the year portion is insufficient, the least significant digits are displayed. Y(4) is recommended.
H
Marks the position of the hour of a 12-hour clock. The digits of the hour are displayed in this portion of the time field. If the hour value contains only one digit (for example, the fourth hour of the day), the hour portion of the time field is filled with zeros by default. You can use the R picture character to specify blank fill or the Q picture character to specify no fill characters.
G
Marks the position of the hour of a 24-hour clock. The digits of the hour are displayed in this portion of the time field. If the hour value contains only one digit (for example, the fourth hour of the day), the hour portion of the time field is filled with zeros by default. You can use the R picture character to specify blank fill or the Q picture character to specify no fill characters.
I
Marks the position of the minute of the time. The digits of the minute are displayed in this portion of the time field. This field is filled with zeros when necessary.
S
This picture character marks the position of the seconds of the time. The digits of the seconds are displayed in this portion of the time field. This field is filled with zeros when necessary.
C
Marks the position of the fractions of the seconds of the time. The digits of the fractions of seconds are displayed in this portion of the time field. If the number of positions in the fractions of seconds portion is insufficient, the most significant fractions of seconds digits are displayed. This field is filled with zeros when necessary.
P
Marks the position of the meridian (for example, AM/PM) portion of the time. If the number of positions in the meridian portion is insufficient, only the leftmost characters are displayed. If this picture character is used, the 12-hour clock character, H, must be used.
A P can be followed by a positive integer within parentheses specifying that the P occurs that many times in the string.
On OpenVMS systems, you can specify foreign language meridian names. At run time the Form Manager uses OpenVMS date/time logical names to get language-specific meridian names for input and output.
’
The single quotation mark delimits literals that are contained within the character string. Each character in the literal is counted in the size of the picture, but the quotation marks are not counted.
( )
The parentheses symbols enclose a positive integer representing the number of consecutive occurrences of the preceding symbol (either M, A, or P) contained in the character string. The parentheses are not counted in the size of the picture.
General Rules: All Formats
A picture string must be complete on a single source line; it cannot be continued on a subsequent source line.
The total length of the field defined by each picture string must be the same.
Insertion characters in the INPUT PICTURE picture string must be aligned with insertion characters in the OUTPUT PICTURE picture string.
Data characters in the INPUT PICTURE picture string must have the same position as data characters in the OUTPUT PICTURE picture string.
W and S must be the same in both picture strings and must appear on the same side of a decimal point, if one exists. Currency symbols and signs are permitted to float in one picture string and be fixed in the other picture string.
The intent of these restrictions is that picture characters corresponding to data entry characters are the only characters that can differ in corresponding input and output pictures.
You cannot use double quotation marks to delimit strings in pictures.
The number of 9, X, A, C, and E characters for Formats 1, 2, and 3 picture strings.
The number of D, M, A, N, Y, H, G, I, S, C, and P characters for Format 4 picture strings.
The size of the insertion literals in the picture string.
The size of the applicable currency and sign phrases that are invoked by W and S characters for Format 2 picture strings.
Picture strings cannot include form feeds or comments. Picture strings can contain spaces and tabs if they are included as nonnumeric literals.
General Rules: Format 1
A picture string is Format 1 if it contains any of the picture characters X, A, or C. You must have at least one X, 9, A, or C picture character. You can have only one R.
General Rules: Format 2
At least one symbol 9 must be specified.
Only one W character can appear in a picture string.
The symbols R and S may appear twice only if a decimal point or V character appears between them.
Two S characters can appear in a picture string only if SIGN PARENTHESES is used.
If the character S appears in the picture string, string cannot contain the characters plus (+), minus (–), left parenthesis ( ( ), or right parenthesis ( ) ). A string cannot contain a SIGN POSITIVE, NEGATIVE, or ZERO strings, but space characters are allowed.
String cannot contain digits.
String cannot contain the current CURRENCY literal if the picture string contains a W character. A string may not contain the replacement character if the picture string contains an R character.
General Rules: Format 3
You must specify at least one symbol 9 in the fraction.
String cannot contain the characters plus (+), minus (-), left parenthesis ( ( ), or right parenthesis ( ) ), if the character S appears in the picture string. A string cannot contain the applicable SIGN POSITIVE, NEGATIVE, or ZERO strings, with the exception that the space character is allowed.
String cannot contain digits.
String cannot contain the exponentiation character e or E.
General Rules: Format 4
Date/time pictures allow you to leave date/time validation to the Form Manager. You can use date/time pictures to input or output dates and times in a variety of formats and languages.
- ADT
- CHARACTER(n)
- DATE
- DATETIME(n)
- INTEGER(n)
- INTEGER PACKED(n)
- TIME
Fields with data type DATE, TIME, ADT, and DATETIME can use picture string Format 4 only.
You can use all possible Format 4 picture combinations for input or output pictures with ADT and DATETIME data types. You can use all possible Format 4 picture combinations for input pictures with CHARACTER data types.
You can use only the numeric picture characters (D, N, Y, H, G, I, S, C) plus any desired insertion literals (for either the output or input picture) when they are associated with the form data in INTEGER or INTEGER PACKED format. If the INTEGER or INTEGER PACKED data type is not large enough to contain the converted date, a nonfatal run-time error is generated.
Note
If languages other than English are desired on OpenVMS systems, the system manager must create the appropriate logical name definitions. For further information on defining system logical names, see the OpenVMS documentation on date and time manipulation in the Run-Time Library documentation. DECforms uses the language defined by the logical name SYS$LANGUAGE or English if SYS$LANGUAGE is undefined.
|
Date Picture Character | Description |
|---|---|
| A | Characters in abbreviated month name |
| C | Digits of fractions of seconds |
| D | Digits of day of month |
| G | Digits of 24-hour clock |
| H | Digits of 12-hour clock |
| I | Digits of minutes |
| L | Lowercase designator |
| M | Characters of month name |
| N | Digits of month number |
| P | Characters of meridian (a.m./p.m.) |
| Q | Remove blanks |
| R | Replace leading zeros |
| S | Digits of seconds (not hundredths) |
| U | Uppercase designator |
| Y | Digits of year |
| - |
Special insertion literal hyphen no quotation marks necessary |
| / |
Special insertion literal slash no quotation marks necessary |
| : |
Special insertion literal colon no quotation marks necessary |
| , |
Special insertion literal comma no quotation marks necessary |
| . |
Special insertion literal period no quotation marks necessary |
Examples
HH:II:SS:CC' 'PP
Specifies a picture string for ADT, DATETIME, TIME, or CHARACTER input pictures. This picture string is not permissible for DATE, INTEGER, or INTEGER PACKED input pictures.
DD-AAA-YYYY
Specifies a picture string for ADT, DATETIME, DATE, or CHARACTER input pictures. This picture string is not permissible for TIME, INTEGER, or INTEGER PACKED input pictures.
GG:II
Specifies a picture string for ADT, DATETIME, TIME, CHARACTER, INTEGER, or INTEGER PACKED input pictures. This picture string is not permissible for DATE input pictures.
M(9)Q' 'DDQ,' 'YYYY
Specifies a picture string for ADT, DATE, DATETIME, or CHARACTER input pictures. This picture string is not permissible for TIME, INTEGER, or INTEGER PACKED input pictures.
POSITION Response Step
POSITION Response Step — The POSITION response step specifies the next activation item to be processed when processing for the current activation item is complete.
position-response-step
Format
Where you specify this clause:
Syntax Rules
POSITION [ IMMEDIATE ] TO
Specifies the activation item to be accessed after the current activation item has successfully completed all processing. If the IMMEDIATE clause is specified, no further validation is done on the original current activation item, and the item specified by the POSITION clause unconditionally becomes the current activation item.
If the IMMEDIATE clause is not specified, the item specified becomes the current activation item only if the current activation item passes validation.
When no item on the activation list corresponds to the target specified by the POSITION response step, no processing takes place (that is, the previously specified next activation item remains the same). Any items that are PROTECTED or PROTECTED WHEN are treated as if they are not on the activation list.
POSITION response steps are ignored in PRINTER layouts.
Otherwise, the targets of the POSITION response step are as follows:
BUTTON button ON panel-name-1 (window layouts)
Specifies that button on panel-name-1 becomes the next activation item.
You cannot specify buttons for character-cell layouts.
CURRENT ITEM
Specifies the currently active field, icon, or button. Positioning to CURRENT ITEM restarts input processing for the item, after processing for the current item is complete.
DOWN ITEM
Specifies the active item geographically below and closest to the current item on the current panel.
DOWN OCCURRENCE
Specifies an occurrence of the item with a subscript at least one greater than the current subscript. If the item so specified is not currently displayed (in the case of a scrolled group), the Form Manager scrolls the group so that the item is displayed.
DOWN OCCURRENCE is meaningful only when the active item is part of a vertically occurring group. If the current activation item is not in a multiply occurring group, the POSITION response step is ignored.
If UNSEEN appears, it is equivalent to specifying the next active occurrence of the item not yet displayed on the display device.
If there are no remaining occurrences of the item on the activation list in the direction specified, no new active item is specified.
If there is at least one occurrence of the item,but none are unseen, the Form Manager selects the furthest such occurrence on the activation list—the occurrence closest to the end.
EXIT GROUP NEXT
Specifies the first item on the activation list that does not belong to the group that contains the currently active item. The Form Manager scans the list forward for EXIT GROUP NEXT, starting at the current activation item.
EXIT GROUP PREVIOUS
Specifies the first item on the activation list that does not belong to the group that does not contain the currently active item. The Form Manager scans the list backward for EXIT GROUP PREVIOUS starting at the current activation item.
FIELD field ON panel-name-2
Specifies that field on panel-name-2 becomes the next activation item.
FIRST ITEM
Specifies the first field, icon, button,or wait on the activation list.
FIRST PANEL
Specifies the first active item of the first panel on the activation list. If that item is a wait, the wait is the new activation item. If that item is a field, icon, or button,the new activation item is that field, icon, or button.
FOCUS CHANGE (window layouts)
Specifies the field or button where the locator is,if the locator caused the focus change, or if the item that receives focus is the result of a window navigational operation. POSITION [IMMEDIATE] TO FOCUS CHANGE is allowed only in the FOCUS CHANGE function response.
GROUP group ON panel-name-3
Specifies the first active item in the named group on the activation list.
ICON icon ON panel-name-4 (character-cell layouts)
Specifies that icon on panel-name-4 becomes the next activation item.
LAST ITEM
Specifies the last field, icon, button, or wait on the activation list.
LAST PANEL
Specifies the last active item of the last panel on the activation list. If that item is a wait, the wait is the new activation item. If that item is a field, icon, or button, the new activation item is the field, icon, or button on that panel.
LEFT ITEM
Specifies the active item geographically to the left and closest to the current item on the current panel.
LEFT OCCURRENCE
Specifies an occurrence of an item with a subscript at least one less than the current subscript. LEFT OCCURRENCE is meaningful only when the active item is part of a horizontally occurring group. If the current activation item is not in a multiply occurring group, the POSITION response step is ignored.
If UNSEEN appears, it is equivalent to specifying the next active occurrence of the item not yet displayed on the display device.
If there are no remaining occurrences of the item on the activation list in the direction specified, no new active item is specified.
If there is at least one occurrence of the item,but none is unseen, the Form Manager positions itself to the furthest such occurrence on the activation list—the occurrence closest to the left.
NEXT ITEM
Specifies the next field,icon, button,or wait on the activation list,relative to the current activation item.
NEXT PANEL
Specifies the first active item of the first panel on the activation list that belongs to a panel different from the panel of the currently active item. The Form Manager scans the list forward to determine the next panel, starting at the current activation item.
PANEL panel-name-5
Specifies the first item of panel-name-5 that is on the activation list.
PREVIOUS ITEM
Specifies the previous field, icon, button, or wait on the activation list, relative to the current activation item.
PREVIOUS PANEL
Specifies the first active item of the first panel on the activation list that belongs to a panel different from the panel of the currently active item. The Form Manager scans the list backward to determine the previous panel, starting at the current activation item.
RIGHT ITEM
Specifies the active item to the right and closest to the current item on the current panel.
RIGHT OCCURRENCE
Specifies an occurrence of an item with a subscript at least one more than the current subscript. RIGHT OCCURRENCE is meaningful only when the active item is part of a horizontally occurring group. If the current activation item is not in a multiply occurring group, the POSITION response step is ignored.
If UNSEEN appears, it is equivalent to specifying the next active occurrence of the item not yet displayed on the display device.
If there are no remaining occurrences of the item on the activation list in the direction specified, no new active item is specified.
If there is at least one occurrence of the item,but none is unseen, the Form Manager selects the furthest such occurrence on the activation list—the occurrence closest to the right.
UP ITEM
Specifies the active item geographically above and closest to the current item on the current panel.
UP OCCURRENCE
Specifies an occurrence of the item with a subscript at least one less than the current subscript. If the item so specified is not currently displayed (in the case of a scrolled group), the Form Manager scrolls the group so that the item is displayed.
UP OCCURRENCE is meaningful only when the active item is part of a vertically occurring group. If the current activation item is not in a multiply occurring group, the POSITION response step is ignored.
If UNSEEN appears, it is equivalent to specifying the next active occurrence of the item not yet displayed on the display device.
If there are no remaining occurrences of the item on the activation list in the direction specified, no new activeitem is specified.
If there is at least one occurrence of the item,but none is unseen, the Form Manager selects the furthest such occurrence on the activation list—the occurrence closest to the front.
WAIT (character-cell layouts)
Specifies a wait item not associated with any panel.
WAIT ON panel-name-6 (character-cell layouts)
Specifies the wait item on panel-name-6.
General Rules
A POSITION response step changes the next activation item so that the designated item becomes available for input. The most a POSITION response step can do is change what will be next on the activation list: successive POSITION response steps are not additive. Each POSITION response step replaces the result of any previous POSITION response step.
Once a POSITION IMMEDIATE response step is executed, however, succeeding POSITION response steps without IMMEDIATE are ignored. Succeeding POSITION IMMEDIATE response steps replace any previous POSITION IMMEDIATE response steps. An INVALID response step performs an implicit POSITION IMMEDIATE response step to the current item.
The POSITION response step is not equivalent to a GOTO in other languages. It merely sets up the next activation item to receive focus when processing for the current activation item is complete, including validation, entry, and exit responses.
Example
Position To FIRST PANEL
This example specifies the first item on the first panel as the current activation item.
POSTDISPLAY Clause
POSTDISPLAY Clause — The POSTDISPLAY clause declares the action that occurs regarding the viewport when the Form Manager exits the panel.
postdisplay-clause
Format
Where you specify this clause:
Syntax Rules
REMOVE
Specifies that the viewport and its contents are cleared from the display device and that the contents of any viewports beneath it are restored to their original state.
RETAIN
Specifies that the viewport and its contents are left as is .RETAIN is the default.
Examples
Panel P1
    Remove
    Field F1
    End Field
End Panel
The viewport is cleared of its contents and removed from the display device, restoring the display of any other viewport beneath it.
Panel P1
    Retain
    Field A
    End Field
End Panel
The viewport and its contents are left as is even after the panel is exited.
PRINT Response Step
PRINT Response Step — The PRINT response step specifies that zero or more panels in the layout of the current session are output to a file or a printer.
print-response-step
Format
Where you specify this clause:
Syntax Rules
If panel-name is not specified, the current display is output to a file for subsequent printing. Each PRINT response step produces a new page. If you specify panel-name, the Form Manager outputs the specified panels to a file.
If you have multiple sessions running simultaneously on the same display, only the panels from the current session are output, on character-cell layouts.
IMMEDIATE
Specifies that the Form Manager closes the print file at the completion of the current PRINT response step. If the IMMEDIATE keyword is not present in the current PRINT response step, the Form Manager does not close the print file, and the output of subsequent PRINT response steps is appended to the current file.
In Motif layouts, PRINT IMMEDIATE generates a copy of the screen's current appearance and sends it to the print file. The entire display, even panels not in the current session, are printed.
panel-name
Specifies that the Form Manager outputs panel-name to a file. If more than one panel is specified, the panels are printed in the order specified.
ON viewport-name
If you specify ON viewport-name for the panel,the panel is printed in the specified viewport; otherwise it is printed in the viewport specified in the panel declaration. If there is no viewport specified for the panel, the default viewport is used. When you specify a viewport name, the size of the panel implicitly defined by the position and length of the panel fields and literals must not exceed the limits for the viewport.
The ON viewport-name clause is ignored in window layouts.
General Rules
When executed in a character-cell layout,the background color default for the PRINT response step is white, and line literals are converted to plus signs (+), vertical bars (|), and minus signs (-) for output to character-cell terminals. Output is limited to line-oriented characters:no display attributes are used in the PRINT response step—no BOLD, BLINKING, or UNDERLINE attributes.
When the PRINT response step is executed in a window layout,a screen image of that panel is created and placed in a PRINTER output file. To print a panel in a window layout, that panel must be displayed on the device when the PRINT response step is invoked. When the PRINT response step is invoked in a Motif layout, the entire display, even panels not in the current session, are printed.
If the panel is not displayed when the PRINT response step is invoked, the PRINT step is ignored and an error message is written to the trace file.
The PRINT response step with the IMMEDIATE clause specifies that the currently open output file be closed after the panels are downloaded to the print file. By default, the file is written to your current default node, device, and directory. You can specify that the file be written to a different directory by using the FORMS$PRINT_FILE logical name to point to a node, device, directory, file name, and file type of your choice. You can also do this with the FORMS$K_PRINTFILE request option in the OpenVMS API and forms_c_opt_printin the portable API. See the VSI DECforms Programmer's Reference Manual for more information on FORMS$PRINT_FILE and FORMS$K_PRINTFILE.
The PRINT response step is ignored in PRINTER layouts. Use the DISPLAY response step to generate PRINTER output.
Example
Send Response HAPPY_BDAY
             Display BDAY_PANEL
             Print BDAY_PANEL
End Response
This example specifies that the DISPLAY response steps puts BDAY_PANEL on the display device, and a PRINT response step is performed when the application sends the HAPPY_BDAY record to the form. The PRINT response step prints out BDAY_PANEL.
PROTECTED Clause
PROTECTED Clause — The PROTECTED clause specifies whether a field, icon, or button cannot be solicited for input.
protected-clause
Format
Where you specify this clause:
Syntax Rules
PROTECTED [ WHEN conditional-expression ]
Specifies the conditions under which the Form Manager cannot solicit an item for input. When conditional-expression is true, the Form Manager may not solicit input from the current field, icon, or button. For more information on conditional expressions, see the CONDITIONAL EXPRESSION syntax section.
NOT PROTECTED
Specifies that the field, icon, or button is available for input from the operator if the item is placed on the activation list.
General Rules
PROTECTED without WHEN specifies that the field, icon, or button is not available for input from the operator.
If conditional-expression is true, PROTECTED with WHEN and PROTECTED without WHEN are equivalent.
If conditional-expression is false, PROTECTED with WHEN and NOT PROTECTED are equivalent.
If any form data item in conditional-expression changes, the effect of the WHEN clause is immediately recalculated.
Examples
Icon CHOICE_CASH_100
    Active Highlight Reverse
    Concealed When CHECKING_BALANCE < 10000
    Protected When CHECKING_BALANCE < 10000
    .
    .
    .
End Icon
This example specifies that the icon CHOICE_CASH_100 is unavailable for input when the checking account balance is less than 10 000 (this is $100.00 when the layout units are pennies).
Icon CHOICE_CHECK
    Protected When ROOM_IN_REG = 0
    Concealed When ROOM_IN_REG = 0
    .
    .
    .
End Icon
This PROTECTED WHEN clause specifies that the CHOICE_CHECK icon is unavailable for input when there is no room left in the checkbook register.
PUSH BUTTON Declaration
PUSH BUTTON Declaration — The PUSH BUTTON declaration specifies a push button:an item that contains either a label or an arrow. Push buttons do not accept data input but they do accept function key input. Push buttons are allowed only in window layouts. Icons can be used in character-cell layouts to perform the same function. Icons are not allowed in PRINTER or window layouts.
pushbutton-declaration
Format
Where you specify this clause:
Syntax Rules
button-name
Specifies the name of the button. This name must not match a form data item.
full-location-clause
Specifies the vertical and horizontal position of the push button. For more information, see the LOCATION clause syntax section.
partial-extent-clause
Specifies the size of the push button. For more information, see the EXTENT clause syntax section.
field-default-application
Specifies the application of a previously defined field default. For more information, see the FIELD DEFAULT application syntax section.
item-description-entry
Specifies the display and processing attributes for the push button. For more information, see the ITEM DESCRIPTION entry syntax section.
ARROW UP
Specifies the push button as a button containing an arrow pointing up.
ARROW DOWN
Specifies the push button as a button containing an arrow pointing down.
ARROW LEFT
Specifies the push button as a button containing an arrow pointing left.
ARROW RIGHT
Specifies the push button as a button containing an arrow pointing right.
LABEL
Specifies the push button as a button containing a text label.
string
Specifies a string as the label for the push button. String is a static label—it cannot be changed.
data
Specifies a form data item as the label for the push button. Data is a dynamic label. If the value of data changes, the label changes.
General Rules
When a push button is pushed, the TRIGGER OBJECT function response is invoked. If there is no TRIGGER OBJECT function response defined for the push button, nothing happens when the push button is pushed. The default TRIGGER OBJECT function response is to do nothing.
If a push button is declared inside a help panel, you cannot use USE HELP PANEL or USE HELP MESSAGE clauses.
Push buttons can be included in a panel group without associated data items in the corresponding data group. Push buttons within a panel group can be referenced with a subscript defined by the DISPLAYS clause for the group.
The current field default characteristics determine push button characteristics.
Example
Push Button OK_BUTTON
    Line 100 Column 100
    Function Response TRIGGER OBJECT
       Return
    End Response
    Label "OK"
End Button
This example specifies a push button named OK_BUTTON. The push button is displayed at line 100, column 100, with the label"OK". When the push button is pushed using the mouse or the keyboard, the TRIGGER OBJECT function response, containing a RETURN response step, is executed.
RECEIVE RESPONSE Declaration
RECEIVE RESPONSE Declaration — A RECEIVE RESPONSE declaration specifies what actions occur when the form receives a particular record message, or several record messages defined by a record list from the program.
receive-response-declaration
Format
Where you specify this clause:
Syntax Rules
record-identifier
Specifies the name of the record or record list that the application receives.
response-step
Specifies the actions to be performed during the receive response. For more information, see the RESPONSE STEP clause syntax section.
REQUEST validation-response-declaration
Establishes the validation response as the response to be interpreted after the operator has signaled completion of input during accept phase. For more information, see the VALIDATION RESPONSE syntax section.
REQUEST exit-response-declaration
Establishes a response to be executed after the completion of accept phase. For more information, see the EXIT RESPONSE syntax section.
General Rules
There can be only one receive response declared in a layout for each form record or record list.
The default receive response is to execute an ACTIVATE CORRESPONDING RECEIVE ALL response step.
Example
Receive Response GET_CHECK
| Specifies that a RESET response step is performed when the GET_CHECK record is received by the form. |
| The form data items CHECK_PAYTO, CHECK_AMOUNT, and CHECK_MEMO are restored to their initial values (the values they had at form enable time). |
| After the reset is performed, an ACTIVATE response step activates the fields that have had their form data items reset (CHECK_PAYTO, CHECK_AMOUNT, CHECK_MEMO). |
RECORD IDENTIFIER Declaration
RECORD IDENTIFIER Declaration — The RECORD IDENTIFIER declaration allows you to specify the name of a record, or a list of records, to transfer single or multiple records between an application program and a form.
record-identifier
Format
Where you specify this clause:
Syntax Rules
record-name
Specifies the name of a record to be transferred.
record-list-name
Specifies a name for the record list. Record-list-name cannot duplicate a record-name. For more information, see the RECORD LIST declaration syntax section.
Example
Form Record R1
    ITEMA character(10)
    ITEMB character(10)
End Record
   .
   .
   .
    Record List RL1
    R1
End List
   .
   .
   .
Layout L1
   .
   .
   .
Receive Response RL1
   .
   .
   .
End Response
In this example, RL1 is the record identifier of a record list. RL1 consists of a single record, R1.
RECORD LIST Declaration
RECORD LIST Declaration — The RECORD LIST declaration allows you to specify a list of records to be combined for the transfer of multiple records between an application program and a form.
record-list-declaration
Format
Where you specify this clause:
Syntax Rules
record-list-name
Specifies a name for the record list. Record-list-name and record-name cannot have the same names.
record-name
Specifies the name of a record to be transferred.
General Rules
The order in which records are named in the RECORD LIST declaration is the order in which they are associated with the parameters in calls made to the Form Manager at run time.
The order in which records are named is also the order in which they are processed in data distribution and collection.
If no record names appear within the record list, the record list can be named only in a send response with no associated record messages.
Example
Form Record R1
    ITEMA character(10)
    ITEMB character(10)
End Record
    .
    .
    .
Record List RL1
    R1
End List
In this example, record list RL1 is specified. RL1 consists of a single record, R1.
REFRESH Response Step
REFRESH Response Step — The REFRESH response step redisplays viewports on your display.
refresh-response-step
Format
Where you specify this clause:
Syntax Rules
REFRESH
Requests that viewports and their contents are redisplayed to clear a corrupted screen. If you do not specify a viewport,the default viewport is refreshed. If you specify a viewport or a list of viewports, any of those viewports that are currently displayed are refreshed.
viewport-name
Specifies the viewport to be refreshed.
ALL
Specifies that all displayed viewports are refreshed in all sessions on the device of the session.
General Rules
The REFRESH response step does not alter occlusion order of viewports.
The REFRESH response step is ignored in PRINTER layouts.
Example
REFRESH BDAY_VP
This example specifies that BDAY_VP is redisplayed.
REMOVE Response Step
REMOVE Response Step — The REMOVE response step removes one or more viewports from a display device.
remove-response-step
Format
Where you specify this clause:
Syntax Rules
REMOVE
Specifies that viewports and their contents are removed from the display. The contents of any viewports obstructed by those removed are redisplayed. REMOVE without a qualifier removes the default viewport.
The REMOVE response step is ignored in PRINTER layouts.
viewport-name
Specifies the viewports to be removed.
HELP
Specifies the removal of the viewports that currently display help panels.
ALL
Specifies the removal of all viewports for this session.
Example
REMOVE ALL
This example specifies that all viewports be removed.
RESET Response Step
RESET Response Step — The RESET response step restores form data items to their values at form enable time.
reset-response-step
Format
Where you specify this clause:
Syntax Rules
RESET
Specifies that some or all of the form data is restored to its initial value. Resetting a current date/time item sets the value of the data item to the current date and time.
data
Resets the value of data to its value at the time the form was enabled.
data-array
Resets the value of each element of data-array to its value at the time the form was enabled.
data-group
Resets the values of all data items within data-group to their values at the time the form was enabled.
data-group-array
Resets the values of all data items within data-group-array to their values at the time the form was enabled.
ALL
Resets the values of all form data items to their values at the time the form was enabled.
General Rules
Initial values for form data items are specified in the VALUE clause of the FORM DATA declaration. For information on default values for initial values of form data items, see the FORM DATA declaration syntax section.
Example
RESET A.B
This example specifies that the value in A.B is restored to its value at form enable time.
RESPONSE STEP Clause
RESPONSE STEP Clause — The RESPONSE STEP clause describes actions to be performed that can change the value of form data items, the screen appearance, or the activation list, as well as call escape routines, process help, signal the operator, conditionally determine a course of action, and validate and terminate form processing. Using the RESPONSE STEP clause allows you to create special display effects and change the order of field processing.
response-step-clause
Format
Where you specify this clause:
Syntax Rules
activate-response-step
Puts the specified items on the activation list. The activation item can be a panel field, an icon, a button, or a request to wait until the operator enters a function. Once the items are on the activation list they can receive operator input. For more information, see the ACTIVATE response step syntax section.
call-response-step
Issues a subroutine call to the application program. For more information, see the CALL response step syntax section.
deactivate-response-step
Removes items from the activation list. For more information, see the DEACTIVATE response step syntax section.
display-response-step
Shows panels in a viewport. For more information, see the DISPLAY response step syntax section.
enter-help-response-step
Sets the HELP ACTIVE condition to true,and switches to the HELP activation list.For more information, see the ENTER HELP response step syntax section.
exit-help-response-step
Sets the HELP ACTIVE condition to false,and switches to the main activation list. EXIT HELP does not change the current position on the main activation list. For more information, see the EXIT HELP response step syntax section.
if-response-step
Allows optional response steps to be executed based on the result of the evaluation of a conditional expression. For more information, see the IF response step syntax section.
include-response-step
Specifies another response to be performed as part of the processing for the current response. The other response must have been previously declared as an internal response. For more information, see the INCLUDE response step syntax section.
invalid-response-step
Specifies that the current activation item is considered invalid during input validation. Also executes an implicit POSITION IMMEDIATE CURRENT response step. For more information, see the INVALID response step syntax section.
let-response-step
Assigns a value to a form data item. For more information, see the LET response step syntax section.
message-response-step
Outputs a string of values to the message panel, formatted in a word-wrapped manner. For more information, see the MESSAGE response step syntax section.
position-response-step
Specifies which activation item will be processed after processing of the current activation item is complete. For more information, see the POSITION response step syntax section.
print-response-step
Specifies that one or more panels are output to a file. For more information, see the PRINT response step syntax section.
refresh-response-step
Requests that currently displayed viewports and their contents are redisplayed to clear a corrupted screen. For more information, see the REFRESH response step syntax section.
remove-response-step
Specifies that viewports and their contents are removed from the display. For more information, see the REMOVE response step syntax section.
reset-response-step
Specifies that some or all of the form data is restored to its initial value. For more information, see the RESET response step syntax section.
return-response-step
Specifies that accept phase (input from the operator) should end. For more information, see the RETURN response step syntax section.
signal-response-step
Specifies that an audible or a visible signal is given to the operator. For more information, see the SIGNAL response step syntax section.
validate-response-step
Specifies that the Form Manager should validate items on the activation list. For more information, see the VALIDATE response step syntax section.
General Rules
Response steps permit you to control form processing at the field, group, and panel level. The Form Manager interprets a response at predetermined points while processing a request. The interpretation is sequential (from the beginning of the response to the end), and does not interact directly with the process of asking the operator for input. Any special actions concerning input are performed only after the interpretation of the response that specifies the actions. A CALL response step may affect input before a given response is completed if that CALL response step has a recursive request within it.
A response is procedural insofar as its steps are executed sequentially and the branching of the IF step may depend on the action of previous steps. However, there is no way to loop. You must use the procedural escape mechanism of the CALL response step to perform any iteration in another programming language. You also can manipulate form data that is not displayed.
The Form Manager interprets a response sequentially from the beginning, departing from linear order only to select the choice specified in the IF control step or to include other response steps in the INCLUDE step. The Form Manager sends output images to the display in the order in which they occur in the response. The Form Manager adjusts the activation list by interpreting the ACTIVATE and DEACTIVATE steps in the order in which they occur in the response. The activation list is empty at the start of a request. Each response invoked thereafter may add or delete activation items from the activation list.
Examples
Include MY_RESPONSE
This example specifies that MY_RESPONSE is performed.
Signal %BELL
This example specifies the bell as the signal.
RETURN Response Step
RETURN Response Step — The RETURN response step specifies that accept phase should end unconditionally or conditionally after validation.
return-response-step
Format
Where you specify this clause:
Syntax Rules
RETURN [ IMMEDIATE ]
Specifies that accept phase(input from the operator)should end.
If you do not specify IMMEDIATE, the Form Manager performs field validation, validation responses, and request validation responses for all items on the activation list.
If validation is successful, accept phase is completed.
If validation is not successful, the Form Manager performs a POSITION IMMEDIATE TO CURRENT ITEM response step.
If you specify IMMEDIATE,the Form Manager performs no further validation and control is returned to the application program as soon as processing of the current activation item is finished.
Exit responses are executed regardless of whether IMMEDIATE appears or not. For RECEIVE or TRANSCEIVE requests, the record is returned to the application program whether IMMEDIATE is specified or not.
string
Specifies that the string is returned to the application program in the receive control text message; string must be in control text format.
It must be a 3- to 5-character string.
If you specify RETURN IMMEDIATE, the first character must be an E. If you do not specify RETURN IMMEDIATE, the first character must be a blank.
The second character must be an F.
The third through fifth characters may contain any printable characters, at least one of which must be a nonspace character. Nonprintable characters are not allowed.
Example
Return Immediate "EFQUT"
This example returns control immediately to the application program, bypassing validation, and returns the receive control text string EFQUT to the program.
SCROLL BAR Clause
SCROLL BAR Clause — The SCROLL BAR clause allows you to specify scroll bars in window layouts.
scroll-bar-clause
Format
dynamic-clause
Where you specify this clause:
Syntax Rules
NO SCROLLBARS
Specifies no scroll bars on the object.
SCROLLBAR TOP [ dynamic-clause-1 ]
Specifies that a scroll bar be put on the top side of the object.
SCROLLBAR BOTTOM [ dynamic-clause-2 ]
Specifies that a scroll bar be put on the bottom side of the object.
SCROLLBAR RIGHT [ dynamic-clause-3 ]
Specifies that a scroll bar be put on the right side of the object.
SCROLLBAR LEFT [ dynamic-clause-4 ]
Specifies that a scroll bar be put on the left side of the object.
dynamic-clause
Specifies that the scroll bar is either dynamic or static.
DYNAMIC
A dynamic scroll bar is one that appears only if necessary to view the entire object. If either scroll bar on an object is dynamic, both scroll bars on the object are dynamic.
STATIC
A static scroll bar is always present and scroll bars are static in text fields.
For information on scroll bar defaults, see the scroll bar information in the appropriate object (panel, panel group, and text field).
Example
TextField EMPLOYEE_ADDRESS
    Line 10 Column 10
    Rows 5 Columns 40
    SCROLLBAR RIGHT
End TextField
This example specifies that the field EMPLOYEE_ADDRESS, which is located at line 10 and column 10, and which contains 5 rows and 40 columns, has a vertical scroll bar on the right side of the field. The scroll bar is static, as scroll bars are static in text fields.
SEND RESPONSE Declaration
SEND RESPONSE Declaration — The SEND RESPONSE declaration specifies what actions occur when the Form Manager sends a record message or a list of record messages from the application to the form.
send-response-declaration
Format
Where you specify this clause:
Syntax Rules
record-identifier
The name of the record or record list sent from the application to the form.
response-step
Specifies the response steps to be performed during the send response. For more information, see the RESPONSE STEP clause syntax section.
REQUEST validation-response-declaration
Establishes the validation response as the response to be interpreted after the operator has signaled completion of input during accept phase.
REQUEST exit-response-declaration
Establishes a response to be executed after the completion of accept phase.
General Rules
You can use a send response to show specific panels to the operator,and allow the operator to indicate that the output has been seen.
There can be only one send response declared in a layout for each record or record list.
The default is to do nothing.
Example
Send Response GO_HOME
| The GO_HOME send response specifies that actions that will occur when the application sends the GO_HOME record to the form. |
| The LATE_NIGHT_PANEL is displayed. |
| The MESSAGE response step puts out the message "Go home, it's late". |
SIGNAL Response Step
SIGNAL Response Step — The SIGNAL response step gives a signal to the operator.
signal-response-step
Format
Where you specify this clause:
Syntax Rules
SIGNAL
Specifies that an audible or a visible signal is given to the operator.
The SIGNAL response step is ignored in PRINTER layouts.
%BELL
Specifies that an audio signal (a terminal bell or beep) is sounded. This is the default.
%REVERSE
Reverses the background and foreground colors on the screen until the next character is input by the operator. This applies only to character-cell devices.
Example
SIGNAL %BELL
This example specifies that a bell is sounded.
SLIDER FIELD Declaration
SLIDER FIELD Declaration — The SLIDER FIELD declaration specifies an object that presents and allows input of a numeric value within fixed limits. When the slider bar of the slider field is moved, the slider's value is updated. The update takes place immediately and the VALUE CHANGED function response is executed. Slider fields are allowed only in window layouts.
slider-field-declaration
Format
slider-field-description-entry
Where you specify this clause:
Syntax Rules
field-name
The name of the slider field. This name must match a form data item.
full-location-clause
Specifies the vertical and horizontal position of the slider field. For more information, see the LOCATION clause syntax section.
partial-extent-clause
Specifies the size of the slider field. For more information, see the EXTENT clause syntax section.
copy-statement-format-2
You use the COPY statement to copy information from a Oracle CDD/Repository field into a panel field in your IFDL source file. For more information, see the COPY statement syntax section.
field-default-application
Specifies the application of a previously defined field default. For more information, see the FIELD DEFAULT application syntax section.
slider-field-description-entry
Specifies the display, processing, and validation attributes for the slider field.
item-description-entry
Specifies the display and processing attributes for the slider field.
field-validation-entry
Specifies the validation attributes for the slider field. Range validation is independent of the LIMITS clause.
MAXIMUM UP
Specifies that the slider field extends in a vertical direction with its maximum value at the top of the slider. MAXIMUM UP is the default orientation.
MAXIMUM DOWN
Specifies that the slider field extends in a vertical direction with its maximum value at the bottom of the slider.
MAXIMUM LEFT
Specifies that the slider field extends in a horizontal direction with its maximum value at the left of the slider.
MAXIMUM RIGHT
Specifies that the slider field extends in a horizontal direction with its maximum value at the right of the slider.
- SHOW VALUE
- NO SHOW VALUE
Specifies that the current value of the slider is displayed in text with the slider bar. NO SHOW VALUE specifies that the current value is not displayed.
SHOW VALUE is the default.
SCALE integer
Specifies the number of decimal points to shift the slider value when it is displayed. Integer must be zero or negative. For example, if integer is –2 and the internal value of the slider is 2 350, the slider value is displayed as 23.50.
SCALE 0 is the default.
- LABEL string
- LABEL data
Specifies a label for the slider field. If you specify LABEL string, the slider field label is a static string.
If you specify LABEL data, the slider field label is a form data item that is dynamic and changes when the value of data-1 changes.
If you specify LABEL as a null string (" "), no label is displayed, for either LABEL data or LABEL string.
LIMITS number-1 THROUGH number-2
Specifies the minimum and maximum values of the slider. If the data item is modified by a LET response step, or by means other than the slider field to a value outside LIMTS number-2, the slider is moved to the furthest possible point along the slider field in the direction of the value. Any value displayed is limited to the field's specified limits and may not accurately reflect the data item value. Number-1 must be less than number-2.
General Rules
A slider field is associated by name with a form data item. The form data item must be either a signed or unsigned byte, word, or longword, or a text integer or text decimal data type.
The Form Manager executes the VALUE CHANGED function response when the slider bar in a slider field is moved. This function response is executed when the slider field value changes even if the slider field value is reset to its current value.
If a slider field is declared inside a help panel, you cannot specify USE HELP PANEL or USE HELP MESSAGE.
If you do not specify a field description entry, the current field default characteristics determine field characteristics.
Example
Form Data
    DISCOUNTVALUE longword integer
End Data
   .
   .
   .
Slider Field DISCOUNTVALUE
   Line 1 Column 1
   MAXIMUM RIGHT
   Label "Percent Discount"
   Limits 0 Through 50
End Field
| A form data item, DISCOUNTVALUE, is declared as a longword integer. |
| A slider field named DISCOUNTVALUE is associated with the DISCOUNTVALUE form data item. |
| The slider field extends horizontally, with the maximum value at the right of the slider. |
| A string, "Percent Discount" is the slider field's label. |
| The minimum of value of the slider is specified as 0; the maximum is 50. |
STRING EXPRESSION
STRING EXPRESSION — String expressions allow you to specify string values in conditional expressions and LET response steps.
string-expression
Format
Where you specify this clause:
Syntax Rules
string
Specifies a character string in quotes.
data
CHARACTER(n)
CHARACTER(n) VARYING
CHARACTER(n) NULL TERMINATED
The value of data is the content of the form data item referenced by data. Data must be a scalar data reference: a data item that is not in a multiply occurring group or a single occurrence of a data item in a multiply occurring group.
corresponding-data
Declared in at least one multiply occurring group.
At least one of the multiply occurring groups has a corresponding subscript specified.
CHARACTER(n)
CHARACTER(n) VARYING
CHARACTER(n) NULL TERMINATED
Corresponding data references are allowed in a variety of item description and field validation clauses. For more information on corresponding data references and their use in string expressions, see Appendix A, "Using Arrays with DECforms Software".
string-expression
Specifies a string expression whose value is determined by evaluating the expression.
Example
Form Data
    A Character(20)
    B Character (20) Varying
End Data
   .
   .
   .
LET B = A
In this example, the value of A is copied to B. The length of B is set to 20.
Group G1
    Field B
        Entry Response
           Let G1(**).B = " "
        End Response
     End Field
End Group
In this example, when you move the cursor to B, it is reset to blanks.
TEXT DATA Clause
TEXT DATA Clause — TEXT DATA clauses specify text data items. Text data items consist of text strings, interpreted by the Form Manager according to the text data type. There are four text data types: CHARACTER, INTEGER, DECIMAL, FLOAT. The data types of text data items are similar to those of text record items. The values are stored in the formats indicated.
text-data-clause
Format
Where you specify this clause:
Syntax Rules
CHARACTER
Specifies that the form data item is a string of integer-1 characters.
integer-1
Specifies a value in the range 1 to 65 535, inclusive. If NULL TERMINATED is specified, integer-1 is a value in the range 2 to 65 535.
VARYING
Specifies that the data item is a varying string,suitably formatted for use by Pascal or PL/I programs. Integer-1 indicates the maximum number of characters in the string.
NULL TERMINATED
Specifies that the data item is a null-terminated string, suitably formatted for use by C programs. Integer-1 indicates the maximum number of characters in the string, plus one additional character.
INTEGER
Specifies that there are integer-2 numeric characters in the form data item, plus an additional character position that is always present for an explicit, leading-sign character.
integer-2
A numeric value in the range of 1 to 31, inclusive.
PACKED
Designates a packed decimal numeric string, with no decimal point (integers only). Integer-2 represents the number of digits,not bytes, in the string. The sign occupies the four low-order bits of the last byte in the string.
- DECIMAL integer-3
- DECIMAL integer-4
Specifies a form data item containing integer-3 digits that represent the whole part of a number and integer-4 digits that represent the decimal part of the number. Integer-3 must be greater than or equal to zero; integer-4 must be greater than zero. The sum of integer-3 and integer-4 must be in the range 1 to 31, inclusive.
There are integer-3 plus integer-4 numeric characters in the form data item, plus one additional character position that is always present for an explicit, leading-sign character, and one additional character position that is always present for an explicit decimal point.
PACKED
Designates a PACKED DECIMAL numeric string. Integer-3 and integer-4 represent the number of digits, not bytes, in the string. The sign occupies the four low-order bits of the last byte in the string.
FLOAT
Specifies a form data item containing integer-5 digits of fraction followed by the character E, and integer-6 digits of exponent. For form data type FLOAT there are integer-5 plus integer-6 numeric characters in the form data item, plus a number of additional characters. There are two additional character positions that are always present for the explicit leading-sign characters (one each for the fraction and the exponent), plus one other character position that holds a place for an explicit decimal point in the fraction and one additional character position for the E character.
integer-5
Specifies the digits of the fraction. The allowed range for integer-5 is 1 to 33, inclusive.
integer-6
Specifies the digits of the exponent. The exponent is assumed to have an explicit sign, either plus (+) or minus (-). If integer-6 is missing, it is assumed to be 2. The allowed range for integer-6 is 1 to 4, inclusive.
Examples
ITEM_1 CHARACTER(10) VARYING
This example specifies a form data item, ITEM_1. ITEM_1 is a CHARACTER VARYING text string with a maximum length of 10 characters.
ITEM_2 INTEGER(30) PACKED
This example specifies a form data item, ITEM_2.ITEM_2 is an INTEGER text string that is no longer than 30 characters, with no decimal point.
TEXT FIELD Declaration
TEXT FIELD Declaration — The TEXT FIELD declaration specifies an object that presents and allows input of a single- or multiline text value that scrolls.
text-field-declaration
Format
text-field-description-entry
Where you specify this clause:
Syntax Rules
field-name
Specifies the name of the text field. This name must match a form data item that has one of the CHARACTER data types.
location-clause
Specifies the vertical and horizontal position of the text field. In character-cell layouts, if you do not specify the LOCATION clause for a text field, the LOCATION clause of the current field default is used. If no field default is currently in effect, NEXT LINE,SAME COLUMN is used.
You must specify a LOCATION clause for window layouts. For more information, see the LOCATION clause syntax section.
partial-extent-clause (PRINTER and window layouts)
Specifies the height and width of the text field.
The height and width specified in partial-extent-clause override the rows and columns specified in the text field description entry. If height is not specified, the height of the field is determined by the ROWS clause. If width is not specified, the width of the field is determined by the COLUMNS clause. For more information, see the EXTENT clause syntax section.
copy-statement-format-2
Copies information from a Oracle CDD/Repository field into a text field in your IFDL source file. For more information, see the COPY statement syntax section.
field-default-application
Specifies the application of a previously defined field default. For more information, see the FIELD DEFAULT application syntax section.
text-field-description-entry
Specifies the display, processing, and validation attributes for the field.
item-description-entry
Specifies the display and processing attributes for the text field.
field-validation-entry
Specifies the validation attributes for the text field.
AUTOSKIP (character-cell layouts)
Specifies that a keystroke resulting in a full field also causes an automatic NEXT ITEM function response.
NO AUTOSKIP (character-cell layouts)
Specifies that no automatic NEXT ITEM function response is to be performed.
NO AUTOSKIP is the default.
UPPERCASE
Changes operator input to uppercase. In character-cell layouts, the conversion is done as the input is typed. In window layouts, the conversion is done when the operator leaves the field.
MIXED CASE
Displays operator input as entered.
MIXED CASE is the default.
scroll-bar-clause (window layouts)
Specifies the scroll bars for the text field. If scroll bars are specified for the text field, they will be static, regardless of whether a dynamic clause is specified. For more information, see the SCROLL BAR clause syntax section.
NO SCROLLBARS is the default.
ROWS integer-1
Specifies the number of visible lines in the text field. Integer-1 must be positive.
ROWS 1 specifies a single-line text field that pans left to right if the width of the field is too short to display the entire data item value.
COLUMNS integer-2
Specifies the number of visible columns in the text field. Integer-2 must be positive.
COLUMNS 20 is the default.
[ NO ] WORD WRAP (window layouts)
Specifies whether word wrapping is used in the text field. Word wrap is the automatic dropping to the next line of any word a user types if it extends past the right margin of the text. Word wrap disables horizontal panning.
NO WORD WRAP is the default.
General Rules
The TEXT FIELD declaration specifies an object that presents and allows input of a single or multiline text value that scrolls horizontally or vertically. A text field, unlike a picture field, considers the line feed character (ASCII 10) to be a special new-line character, which indicates that the remaining text should be put on the next line.
The new-line character (and word wrap, if the WORD WRAP clause is used) causes multiple lines of text in the text field. Each new-line character takes up space in the data item and is counted towards the length of the field's value. The operator can use the INSERT LINE built-in function to insert new-line characters into the text field as long as the field is not already full.
A text field does not use picture strings, editing clauses, or justification clauses. The operator is simply allowed to enter data until the data item is full. Because the width of the field can be less than the length of the data displayed, data may extend beyond the right edge of the field. In this case, you can use horizontal scrolling to allow the operator to access characters off the right edge of the field if WORD WRAP is not used.
If WORDWRAP is used, words are wrapped (at word breaks if possible) before the right edge of the field, so horizontal scrolling is not needed. A new-line character (ASCII 10) in the data (or a word wrap if the WORD WRAP clause is used) causes remaining data to be put on the next line.
Because the height of the field can be less than the number of rows of data, vertical scrolling is used to allow the operator to access characters off the bottom edge of the field. The Form Manager uses horizontal and vertical scrolling to keep the cursor visible.
The Form Manager keeps track of how many characters are in each text field. When the operator enters data into a text field associated with a CHARACTERVARYING or CHARACTER NULL TERMINATED data item, the Form Manager sets the current length of the data item to the actual length of the data entered into the text field.
Because the Form Manager keeps track of each character entered into the text field, it is able to set the length of the data item rather than pad the data item with spaces as it does for picture fields. Because CHARACTER data items do not store the current length of data items, the Form Manager cannot store the actual length of the data entered into CHARACTER data items associated with text fields, and padding occurs.
To match the padding that occurs when data is input into a text field with a CHARACTER data item, the Form Manager trims spaces off the end of the field when the operator enters a text field associated with a CHARACTER data item. In character-cell layouts, the Form Manager also allows spaces at the end of a text field to be pushed off the end of the field if a character is inserted before the end of the field.
The Form Manager keeps track of the cursor row and column for text fields so that if the operator leaves and then reenters the field, the cursor position is the same as when the field was left. In Motif layouts, this information is stored for the entire form session.
In character-cell layouts, this information and also the insert/overstrike mode is stored as long as the field is displayed; if the panel is removed or if the field is scrolled off the display (in a scrolled group), the cursor row, cursor column, and insert/overstrike mode are reset to the defaults for that field.
The default cursor row is the first row. The default cursor column is the first column. The default insert/overstrike mode is overstrike for character-cell layouts (Motif only supports insert mode).
The Form Manager uses a bound cursor for text fields. Each line of the text field can have a different number of characters than on the next line. The Form Manager keeps the cursor within the characters entered(not allowing the cursor to move outside of the data).
If the value of the field changes (such as by using a LET response step), the Form Manager attempts to keep the cursor row and cursor column the same. If the cursor row and cursor column stored for that field is no longer within the bounds of the field, the Form Manager puts the cursor on the nearest row and column.
When the insert/overstrike mode is overstrike, characters that the operator enters overstrike characters at the cursor position. However, if the cursor is at the end of a line, characters entered do not overstrike anew-line character but are inserted at the end of the line. Similarly, the INSERT LINE function always inserts a new line even if the insert/overstrike mode is overstrike.
The DELETE CHARACTER function in overstrike mode replaces the previous character with a space. If the previous character is a new line, however, it deletes the new line but does not replace it with a space. Overstrike mode is allowed only in character-cell layouts.
If a text field is declared inside a help panel, you cannot specify USE HELP PANEL or USE HELP MESSAGE.
If you do not specify a text field description entry, the current field default characteristics determine field characteristics.
Examples
TEXTFIELD employee_address
    Line 5 Column 5
    Rows 3 Columns 40E
ND FIELD
This example declares a text field named employee_address that is on line 5, column 5. This text field is high enough for 3 rows of text and wide enough for 40 columns of text. The syntax is valid for character-cell, window, and PRINTER layouts. If the employee_address data item had the value"John Smith*25 Elm St.*Boston, MA 02130*USA" where "*" is actually a new-line character (ASCII 10), the field would be displayed as:John Smith 25Elm St. Boston, MA 02130
The line containing "USA" is in the text field but because only three rows were specified, the line containing "USA" is not visible until the cursor is moved down in the field causing the text field to scroll upwards.
If the length of the employee_address data item is 100 characters, then the operator will be allowed to enter up to 100 characters in the field, including new-line characters.
TEXTFIELD comment1
    Line 5 Column 5
    Columns 30
END FIELD

LITERAL RECTANGLE
    Line 4 Column 4
    Line 6 Column 35
END LITERAL
This example declares a text field named comment1 on line 5, column 5. This text field is high enough for 1 row of text and wide enough for 30 columns of text. The syntax is valid for character-cell, window, and PRINTER layouts.
The rectangle is useful in character-cell and PRINTER layouts but should not be used in pixel layouts. Fields in Motif layouts should have a shadow around them. If the comment1 data item had the value "This is a comment*that takes*up 3 lines." where "*" is actually a new-line character (ASCII 10), the field would be displayed as:

The remaining two lines are displayed only if the cursor is moved down in the field causing the text field to scroll upwards. If the comment1 data item had the value "This is a comment that takes up 1 line.", the field would be displayed as:
 The remaining nine characters will be displayed if the cursor is moved right in the field causing the text field to scroll left. If you want to keep the user from inserting a new line into any text field, you can define the INSERT LINE function to be associated with no keys:
Function INSERT LINE
  Is None
End Function
If you want to allow the user to insert new lines in some text fields but not in others, define a function response for the text fields where you want inserting new lines to be disallowed:Function try_inserting_line Is (%PF1 %CARRIAGE_RETURN) End Function . . . TEXTFIELD comment1 Line 5 Column 5 Columns 30 Function Response try_inserting_line Message "single-line textfield" End Response END FIELD%PF1 %CARRIAGE_RETURN is the key sequence currently associated with INSERT LINE for character-cell terminals.
TEXTFIELD comment1
    Line 5 Column 5
    Rows 3
    Word Wrap
END FIELD
This example declares a text field named comment1 that is on line 5, column 5. This text field is high enough for 3 rows of text and wide enough for 20 columns of text. The syntax is valid for window and PRINTER layouts. If the comment1 data item had the value "This is the first paragraph.*Here is the second." where "*" is actually a new-line character (ASCII 10), the field would be displayed as:This is the first paragraph. Here is the second.
"paragraph " is on the line following "first" because "paragraph" did not fit on the previous line. "Here" is on the line after "paragraph" because of the new-line character after the period.
TEXT RECORD FIELD Clause
TEXT RECORD FIELD Clause — TEXT RECORD FIELD clauses specify text record fields. Text record fields are composed of text strings that the Form Manager interprets according to the text field type. The four text record field types are CHARACTER, INTEGER, DECIMAL, and FLOAT.
text-record-field-clause
Format
record-sign-clause
record-decimal-clause
Where you specify this clause:
Syntax Rules, text-record-field-clause
CHARACTER
Declares that the field is integer-1 characters long. Neither SIGN nor DECIMAL clauses are permitted for character record fields.
REVERSED
Specifies that characters are stored in memory in the reverse of the order in which they are intended to be read. This data type is used for Hebrew strings stored in physical order: the last (leftmost) character on the screen is the first character in the program buffer.
integer-1
Specifies an integer that must be in the range 1 to 65 535, inclusive. If CHARACTER is specified as NULL TERMINATED, integer-1 must be in the range 2 to 65 535, inclusive.
VARYING
Specifies that the field is a varying string, suitable for use with Pascal or PL/I programs. If VARYING is chosen, integer-1 indicates the maximum number of characters in the field, rather than the actual number of characters present. There are always integer-1 plus two character positions allocated in the record for this field. The additional two character positions contain the current length of the field.
NULL TERMINATED
Specifies that the field is a null-terminated string,suitable for use with C programs. If NULL TERMINATED is chosen, integer-1 specifies the maximum number of characters in the field plus 1 character, rather than the actual number of characters present. There are always integer-1 character positions allocated in the record for this field.
INTEGER
Specifies a field containing integer-2characters, all of which are digits. Unless PACKED is specified, each digit in this field uses 1 byte of space in the record field, and 1 byte of space for the sign, for a total of integer-2 plus 1 byte. The default is EXPLICIT SIGN.
integer-2
Specifies the number of digits in an INTEGER field. Integer-2 must be in the range of 1 to 31, inclusive.
If you specify EXPLICIT SIGN with the SEPARATE clause (or if you do not specify a sign positioning clause on the EXPLICIT SIGN clause), the field occupies integer-2 plus 1 byte in the form record.
INTEGER PACKED
Specifies that the integer string is formatted like a PACKED DECIMAL string except that it does not contain a decimal point. If the PACKED clause is present, integer-2 represents the number of digits (not bytes) in the string.
To compute the number of character positions allocated in the record,take the number of digits, add one for the sign, add one if necessary to make the number even, and divide by two.
An EXPLICIT SIGN clause is allowed, but is not necessary with INTEGER PACKED; a sign occupies the four low-order bits of the last byte in the character string. The IMPLICIT SIGN clause is not allowed. The sign positioning clause (LEFT, RIGHT, or ZONED) is not allowed with PACKED.
record-sign-clause-1
Specifies the sign character and its position in the record field. The default is EXPLICIT SIGN.
DECIMAL
Specifies a field of integer-3 digits that represent the whole part of a number, and integer-4 digits that represent the fractional part of the number.
If PACKED is not specified, the number of character positions allocated in the record for this field is integer-3 plus integer-4, plus possible positions for the sign and decimal point.
If no other clauses are specified, two additional positions are allocated for the left separate sign and the decimal point, for a total of integer-3 plus integer-4 plus two character positions.
You can specify record sign clauses and record decimal clauses in either order when you declare a DECIMAL text record field.
- integer-3
- integer-4
Specifies values that must be present in a decimal string. Integer-3 must be greater than or equal to zero. Integer 4 must be greater than zero. The sum of integer-3 and integer-4 must be in the range 1 to 31, inclusive.
You can choose the SIGN and DECIMAL clauses. If the IMPLICIT DECIMAL point and IMPLICIT SIGN clause are present, a decimal number occupies an integer-3 plus integer-4 byte field in the record.
If no SIGN clause or DECIMAL POINT clause is present, or an EXPLICIT DECIMAL point or EXPLICIT SIGN clause is present, an additional byte for each (decimal point, sign) is present in the record field.
DECIMAL PACKED
Designates a PACKED DECIMAL numeric string. To compute the number of character positions allocated in the record, take the number of digits, add one for the sign, add one if necessary to make the number even, and divide by two.
Integer-3 and integer-4 represent the number of digits (not bytes) in the string.
record-sign-clause-2
Specifies the sign character and its position in the clause. If the PACKED clause is present,an EXPLICIT SIGN clause is allowed, but is not necessary;a sign occupies the four low-order bits of the last byte in the character string. The IMPLICIT SIGN clause is not allowed. The sign positioning clause (LEFT, RIGHT, or ZONED) is not allowed with the EXPLICIT SIGN clause.
record-decimal-clause-1
Specifies the decimal symbol and its position in the record field.
If you specify the EXPLICIT DECIMAL clause, an additional decimal point character appears between the integer and decimal parts of the number in the numeric string. The decimal point character can be either a period or a comma. The default decimal point character is PERIOD.
If you specify the IMPLICIT DECIMAL clause, no decimal point appears in the number string. The decimal point is assumed to be to the right of the integer-3 digit. The EXPLICIT DECIMAL clause is not allowed with the PACKED clause; the IMPLICIT DECIMAL clause is allowed, but it is not necessary.
FLOAT
Specifies a record field containing integer-5 digits of fraction followed by the character E, and integer-6 digits of exponent.
The number of character positions allocated in the record for this field is integer-5 plus integer-6, plus two for the E and its sign, plus a possible position for the sign of the fraction, plus a possible position for the decimal point, depending on other clauses. If no other clauses are specified, two additional positions are allocated for the sign and the decimal point, for a total of integer-5 plus integer-6 plus four character positions.
You cannot specify LEFT, RIGHT, SEPARATE, OVERPUNCHED,and ZONED with FLOAT.
- integer-5
- integer-6
Specifies values in a FLOAT record field. The exponent is assumed to have an explicit sign, either plus (+) or minus (-). If integer-6 is missing, it is assumed to be 2. The allowed range for integer-5 is 1 to 33, inclusive; the allowed range for integer-6 is 1 to 4, inclusive. Integer-6 is assumed to have an explicit sign, either plus (+) or minus (–).
record-sign-clause-3
Specifies the sign character. The SIGN clauses can appear, but the sign positioning clauses (LEFT, RIGHT, or ZONED) are not allowed.
record-decimal-clause-2
Specifies the decimal symbol and its position in the record field. The SIGN and DECIMAL POINT clauses can appear, but the sign positioning clauses, (LEFT, RIGHT, or ZONED) are not allowed.
Syntax Rules, record-sign-clause
EXPLICIT SIGN
Indicates that a character position in the field contains a sign character, either plus (+), minus (–), or blank (meaning plus). The sign positioning clause (LEFT, RIGHT, or ZONED) indicates where and how the sign is stored.
If no sign positioning clauses are included with the EXPLICIT SIGN clause, the sign occupies the first character position in the field by itself; effectively, this makes the default sign LEFT SEPARATE.
LEFT SEPARATE
Indicates that the sign occupies an additional character position at the high-order end of the numeric string. An additional character position is allocated in the record for this sign.
RIGHT SEPARATE
Indicates that the sign occupies an additional character position at the low-order end of the numeric string. An additional character position is allocated in the record for this sign.
LEFT OVERPUNCHED
Indicates that the sign is associated with the leading digit position in the numeric string. The character in the leading digit position represents both a numeric digit and its sign. The overpunched sign codes are in Table 1.10, ''Overpunched and Zoned Sign Codes''.
|
Sign |
Digit |
Overpunched Sign Code |
Zoned Sign Code |
|---|---|---|---|
|
Positive |
0 |
{ |
0 |
|
Positive |
1 |
A |
1 |
|
Positive |
2 |
B |
2 |
|
Positive |
3 |
C |
3 |
|
Positive |
4 |
D |
4 |
|
Positive |
5 |
E |
5 |
|
Positive |
6 |
F |
6 |
|
Positive |
7 |
G |
7 |
|
Positive |
8 |
H |
8 |
|
Positive |
9 |
I |
9 |
|
Negative |
0 |
} |
p |
|
Negative |
1 |
J |
q |
|
Negative |
2 |
K |
r |
|
Negative |
3 |
L |
s |
|
Negative |
4 |
M |
t |
|
Negative |
5 |
N |
u |
|
Negative |
6 |
O |
v |
|
Negative |
7 |
P |
w |
|
Negative |
8 |
Q |
x |
|
Negative |
9 |
R |
y |
Syntax Rules, record-decimal-clause
EXPLICIT DECIMAL
Specifies the character and position of the decimal symbol. In a FLOAT record field, this clause specifies that the character immediately to the left of the most significant digit is a decimal point (either comma or period). The decimal point appears to the right of the sign, if any. In a DECIMAL record field, the decimal point is between the whole number and the fraction.
PERIOD
Specifies that the decimal point character is a period.
COMMA
Specifies that the decimal point character is a comma.
IMPLICIT DECIMAL
Specifies that the number has no explicit decimal point. In a FLOAT record field, this clause specifies that the decimal point is assumed to be to the left of the most significant digit.
Examples
The following examples show how text record fields are formatted in records,and how the SIGN and DECIMAL clauses affect that storage. Although the field length specification in IFDL indicates the number of characters or digits stored in the field, the actual length of the field within the record can be longer or shorter,depending upon the presence or absence of the PACKED, VARYING, DECIMAL, and SIGN clauses.
CHARACTER(3)
The string abc is three characters long and is stored in a CHARACTER field that is three bytes long, as is shown by the following figure:
CHARACTER (5) VARYING
The string abc is three characters long and is stored in a CHARACTER VARYING field. This field is made up of two bytes that contain the actual length (3) of the string, and five bytes that can contain a string of up to the maximum length (5) characters, stored one character per byte. The string is stored in the following manner:
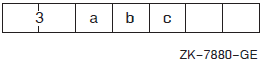
INTEGER (4) EXPLICIT SIGN RIGHT SEPARATE
The numeric string integer –4321 contains four digits and a sign character located in a separate position. Therefore, the entire string (digits plus sign) is stored infive contiguous bytes. If the number were 4321 (positive), a plus sign would be in the byte in which there is a minus sign. The string is stored in the following manner:
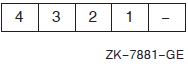
INTEGER (4) PACKED EXPLICIT SIGN
The numeric string integer 1234 contains four digits and a sign character. (Because the number is positive, the sign character is coded as decimal 12.) The digits are packed two digits per byte; the sign character is stored in the left half of the last byte. (The sign positioning clause is not allowed with the PACKED keyword.)
If the numeric string were three characters in length, the third byte would not be necessary; the sign character would be stored in the left half of the second byte. The values in the figure are binary. Becausethe number of characters plus the sign equals an odd number (5), a zero (0) is put at the beginning of the string to fill the extra 1/2 byte.
The following figure illustrates this:
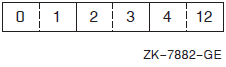
DECIMAL (2,3) IMPLICIT DECIMAL EXPLICIT SIGN LEFT OVERPUNCHED
The numeric string–12.045 has two digits to the left of the decimal point and three to the right of it, as expressed by the length description of (2,3). Because the IMPLICIT DECIMAL clause is present, no character position is reserved for the decimal point.
The EXPLICIT SIGN LEFT OVERPUNCHED clause indicates that the sign is stored in the same character position as the digit at the left end of the numeric string. J is the code for minus 1 (–1), as the following figure illustrates:
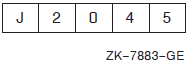
DECIMAL (2,3) PACKED
The numeric string 12.045 has two digits to the left of the decimal point and three to the right of the decimal point, as expressed in the length description (2,3). The characters in the string are stored two per byte. The implied sign is positive, coded as 12, as the following figure illustrates:
TIMEOUT Clause
TIMEOUT Clause — The TIMEOUT clause specifies the amount of time allowed for operator input.
timeout-clause
Format
Where you specify this clause:
Syntax Rules
TIMEOUT integer
Specifies the number of seconds allowed for operator input. (The timer is reset after any input is entered.) Integer specifies the time, in seconds, that the operator has to enter input to the field, icon, button, or wait activation item to which the input applies before timeout.
If the operator does not enter input during this time, the request terminates (times out). The Form Manager terminates accept phase and returns an error message to the application program.
Integer must be greater than or equal to zero. If integer is zero, it is equivalent to no timeout being used.
NO TIMEOUT
Specifies that the operator has an indefinite period of time in which to enter input. NO TIMEOUT cannot be specified as part of an ACTIVATE response step.
General Rules
If you do not specify a TIMEOUT clause for a field, icon, or button,the operator has an indefinite amount of time to enter input,unless an ACTIVATE response step with a TIMEOUT clause places the item on the activation list, or the external request has specified a timeout value for completion of the request.
Higher level TIMEOUT clauses override TIMEOUT clauses specified at lower levels in the form. A TIMEOUT clause in an ACTIVATE response step overrides a TIMEOUT or NO TIMEOUT clause in an item description entry. A TIMEOUT clause in an external request overrides a TIMEOUT clause in an ACTIVATE response step and a TIMEOUT or NO TIMEOUT clause in an item description entry.
Examples
TIMEOUT 3
This example specifies that the operator must enter input within 3 seconds.
TIMEOUT 300
This example specifies that the operator must enter input within 5 minutes.
TRANSCEIVE RESPONSE Declaration
TRANSCEIVE RESPONSE Declaration — The TRANSCEIVE RESPONSE declaration specifies what actions occur when the application transceives (sends and receives) a record message or messages.
transceive-response-declaration
Format
Where you specify this clause:
Syntax Rules
record-identifier-1
The name of the record or record list sent.
record-identifier-2
The name of the record or record list received.
response-step
Specifies the response steps to be performed during the transceive response. For more information, see the RESPONSE STEP clause syntax section.
REQUEST validation-response-declaration
Establishes the validation response as the response to be interpreted after the operator has signaled completion of input during accept phase. For more information, see the VALIDATION RESPONSE declaration syntax section.
REQUEST exit-response-declaration
Establishes a response to be executed after the completion of accept phase. For more information, see the EXIT RESPONSE declaration syntax section.
General Rules
No more than one transceive response can appear for a given record identifier pair in each layout.
The default transceive response is to execute a receive response with a matching receive record name. If no matching receive record name is found, the default receive response that contains an ACTIVATE CORRESPONDING RECEIVE ALL response step is executed.
Example
Transceive Response BADGE_NO NAME
     Activate Panel EMPLOY_HIST_PANEL
End Response
In this example, record BADGE_NO is sent to the form and record NAME is received. Panel EMPLOY_HISTORY_PANEL is activated.
TRANSFER Clause
TRANSFER Clause — The TRANSFER clause allows you to specify source and destination mappings between record fields and form data items.
transfer-clause
Format
Where you specify this clause:
Syntax Rules
record-field
Specifies the name of the record field. Record-field must not be subscripted. A TRANSFER clause applies to all occurrences of a multiply occurring record field.
When multiple record fields map to the same form data item, each record field is mapped to the data item in the order in which it occurs. The result after data distribution is that the contents of the last record field mapped to the data item are left in the data item.
If no explicit data transfer clause is associated with record-field, the data transfer characteristics of the record field function as if USING record-field appears. However, this implicit data transfer takes place only if the qualified record-field name in a record matches a qualified data name in form data.
You can also specify a quoted string as record-field. This allows you to specify data transfer for data items that are DECforms reserved words specified in the Oracle CDD/Repository.
data-transfer-clause
Specifies the mapping between record fields and form data items.
SOURCE
Specifies that the value or values of a record field are to be set from data-1 or data-array-1 when the application program receives the record from the Form Manager.
- data-1
- data-array-1
Specifies a form data item, data-1, or a data array expression, data-array-1, to be transferred to the record field.
DESTINATION
Specifies a data item or a data array to receive the value of the record field when the record is sent to the Form Manager from the application program. You cannot specify a record field as a destination.
If more than one DESTINATION clause is specified, each specified data item or data array receives the designated value.
- data-2
- data-array-2
Specifies a data item, data-2, or data array expression, data-array-2, to receive the value of the record field specified in the DESTINATION clause.
USING
Specifies that the record field is to be processed as if it had both SOURCE and DESTINATION clauses, with ach clause referencing the same data item.
- data-3
- data-array-3
Specifies a data item, data-3, or data array expression, data-array-3, to serve as both source and destination in a USING clause.
General Rules
When the destination of a data transfer is a CHARACTER VARYING record field or data item, and the source data item or record field is shorter than the length of the destination, the destination record field or data item is not padded with spaces.
Example
Form FORM_NODE
| Form FORM_NODE is declared. |
| A series of form data items is declared. |
| The form record REC_1 is declared, and a series of record fields is declared. |
| DATA_ITEM_A receives the value of REC_FIELD_A when the application program sends form record REC_1 to the Form Manager. |
| The form data items, DATA_ITEM_B1, DATA_ITEM_B2, and DATA_ITEM_B3, each receive the value in REC_FIELD_B when the application program sends form record REC_1 to the Form Manager. |
| The value of REC_FIELD_C is set to the value in DATA_ITEM_A when the application program receives the form record REC_1 from the Form Manager. |
| The value of REC_FIELD_D is set to the value of DATA_ITEM_D when the application program receives the form record from the Form Manager. DATA_ITEM_D receives the value of REC_FIELD_D when the application program sends the form record to the Form Manager. |
| DATA_ITEM_E receives the value of REC_FIELD_E when the application program sends REC_1 to the Form Manager. |
VALIDATE Response Step
VALIDATE Response Step — The VALIDATE response step validates the specified items on the activation list. If the item named is not on the activation list, or is protected, the Form Manager ignores it. If an item is protected, VALIDATE has no effect for that item. The VALIDATE response step is ignored in PRINTER layouts.
validate-response-step
Format
Where you specify this clause:
Syntax Rules
ALL
Validates each item on the activation list in order, beginning with the first item. VALIDATE ALL is equivalent to the termination check that occurs when the Form Manager executes a RETURN response step.
BUTTON button ON panel-name-1 (window layouts)
Validates button on the activation list. Panel-name-1 specifies the panel on which button occurs.
BUTTON button-array ON panel-name-2 (window layouts)
Validates all the buttons in the array reference on the activation list.
FIELD field ON panel-name-3
Validates field on the activation list. Panel-name-3 specifies the panel on which field occurs.
FIELD field-array ON panel-name-4
Validates all the panel fields in the array reference on the activation list. Panel-name-4 specifies the panel on which field-array occurs.
GROUP panel-group ON panel-name-5
Validates each item from the group in panel-group on the activation list. Panel-name-5 specifies the panel on which panel-group occurs.
GROUP panel-group-array ON panel-name-6
Validates all the fields, buttons, and icons in the array reference on the activation list. Panel-name-6 specifies the panel on which panel-group-array occurs.
ICON icon ON panel-name-7 (character-cell layouts)
Validates icon on the activation list. Panel-name-7 specifies the panel on which icon occurs.
ICON icon-array ON panel-name-8 (character-cell layouts)
Validates all the icons in the array reference on the activation list. Panel-name-5 specifies the panel on which icon-array occurs.
PANEL panel-name-9
Validates all fields, buttons, and icons on panel panel-name-9.
WAIT ON panel-name-10 (character-cell layouts)
Validates a wait activation item on the activation list. Panel-name-10 specifies the panel on which the wait occurs.
General Rules
- Sets certain data items to temporary values. These values are the ones that the data items would hold if the Form Manager were conducting validation while visiting the item. The data items that the Form Manager sets are the CURRENT data items associated with the occurrence of this activation item (if any such CURRENT data items exist) and the following built-in data items:
- CURRENTITEM
- CURRENTPANEL
- LOCATORITEM
- LOCATORPANEL
- FIELDVALUE
- FIELDIMAGE
Executes the field property validations for the activation item that is being validated. For fields, these property validations are INPUT REQUIRED,MINIMUM LENGTH (picture fields only), RANGE, REQUIRE, and SEARCH. Other activation items (icons, buttons, and waits) have no field property validations.
Executes the validation response for the activation item that is being validated. For fields, icons, and buttons, this is the field validation response. For waits, this is the panel validation response. VALIDATE response steps encountered while executing a VALIDATE response step (recursive VALIDATE response steps)are ignored.
Executes validation responses for groups or panels if necessary. Before the search continues with the next activation item, the Form Manager first determines the next unprotected activation item. If a group or a panel is exited in moving from the activation item being validated to the next unprotected activation item, group or panel validation responses are executed. These validation responses are executed first for inner groups, then for outer groups, and finally for the panel.
However, if the VALIDATE response step does not specify an entire group or panel to validate, then the validation response for the group or panel is not executed (because the entire group or panel has not been validated first). Because an entire group or panel must be specified for group or panel validation to occur, this group and panel validation does not apply to VALIDATE response steps specifying afield, field array, button, button array, icon, icon array, or wait.
At any time during validation, if the Form Manager detects a validation failure or a POSITION IMMEDIATE at the end of a field validation,or at the end of any validation response, it stops further validation. A response can determine that validation failed if the elementary condition IMMEDIATE is true.
Inactive items are not validated, just as they are not visited. Because a later validation can execute a validation response that changes a data item, a previously inactive, skipped item can become active. Such an item is then not subject to validation; no rescanning of the activation list is performed.
If an item is added to the activation list after the item currently being validated, that new item is validated when the pseudo-visitation reaches it.
- POSITION IMMEDIATE
- RETURN IMMEDIATE
- EXIT IMMEDIATE
- INVALID
These response steps turn off validation.
Examples
Validate All
This example validates all fields, icons, groups, buttons, and panels on the activation list. Assume an activation list with a multiply occurring group G1 and a singly occurring group G2 inside of group G1, as follows:- Field G1(1).G2.F1 on Panel P
- Field G1(1).G2.F2 on Panel P
- Field G1(2).G2.F1 on Panel P
- Field G1(2).G2.F2 on Panel P
- Icon I1 on Panel P
The response step performs the following:Validates G1(1).G2.F1 (field properties and validation response).
Validates G1(1).G2.F2 (field properties and validation response).
Executes validation response for G1(1).G2.
Validates G1(2).G2.F1 (field properties and validation response).
Validates G1(2).G2.F2 (field properties and validation response).
Executes validation response for G1(2).G2.
Executes validation response for G1.
Validates I1 (validation response).
Executes validation response for P.
When the Form Manager moves from Field G1(1).G2.F2 to Field G1(2).G2.F1, the validation response for Group G1(1).G2 is executed because the Group G1(1).G2 is considered to be a different group from G1(2).G2. Moving from Field G1(1).G2.F2 to Field G1(2).G2.F1 means exiting Group G1(1).G2, so the validation response for G1(1).G2 is executed.
Validate Group G3.G4 On P
This example validates all fields, icons, buttons, and groups on the activation list that are within the panel group G3.G4 on Panel P. Because the VALIDATE response step specifies the whole of group G3.G4, validation responses for group G3.G4 can also be executed. Validation responses for Group G3 or Panel P are not executed because the VALIDATE response step specifies only a part of G3 and Panel P.
Assume an activation list with a singly occurring group G3 and a multiply occurring Group G4 inside of Group G3, as follows- Field G3.X on Panel P
- Field G3.G4(1).F1 on Panel P
- Field G3.G4(1).F2 on Panel P
- Field G3.G4(2).F1 on Panel P
- Field G3.G4(2).F2 on Panel P
- Icon I1 on Panel P
The response step performs the following:Skips G3.X because it is not in Group G3.G4.
Validates G3.G4(1).F1 (field properties and validation response).
Validates G3.G4(1).F2 (field properties and validation response).
Validates G3.G4(2).F1 (field properties and validation response).
Validates G3.G4(2).F2 (field properties and validation response).
Executes validation response for G3.G4.
Skips I1 because it is not in Group G3.G4.
However, if G3.G4(1).F1 and G3.G4(1).F2 were separated on the activation list by Y, a field not in G3.G4, the activation list would be as follows:- Field G3.X on Panel P
- Field G3.G4(1).F1 on Panel P
- Field Y on Panel P
- Field G3.G4(1).F2 on Panel P
- Field G3.G4(2).F1 on Panel P
- Field G3.G4(2).F2 on Panel P
- Icon I1 on Panel P
The response step performs the following:Skips G3.X because it is not in Group G3.G4.
Validates G3.G4(1).F1 (field properties and validation response).
Executes the validation response for G3.G4.
Skips Y because it is not in the group G3.G4.
Validates G3.G4(1).F2 (field properties and validation response).
Validates G3.G4(2).F1 (field properties and validation response).
Validates G3.G4(2).F2 (field properties and validation response).
Executes the validation response for G3.G4.
Skips I1 because it is not in the Group G3.G4.
Validate Group G3.G4(2:4) On P
This example validates all fields, icons, buttons, and groups on the activation list that are within the panel group occurrences G3.G4(2), G3.G4(3), and G3.G4(4) on Panel P. Validation responses for group G3 or Panel P are not executed because the VALIDATE response step specifies only a part of G3 and P.
If the index range 2:4 comprises the entire range of subscripts for group G3.G4 (if G3.G4 occurs 3 times with a base of 2), then the validation response for G3.G4 can be executed. Otherwise, the VALIDATE response step did not specify the whole of group G3.G4, so no validation for Group G3.G4 occurs.
VALIDATION RESPONSE Declaration
VALIDATION RESPONSE Declaration — The VALIDATION RESPONSE declaration defines what action the Form Manager takes during accept phase.
validation-response-declaration
Format
Where you specify this clause:
Syntax Rules
response-step
Specifies the response steps to be performed during accept phase. For more information, see the RESPONSE STEP clause syntax section.
General Rules
A validation response for a field, icon, or button is interpreted after the operator has terminated input; the function response, if any, has been interpreted; and validation for the field, icon, or button is satisfied.
A validation response for a group is interpreted after the operator has terminated input; the function response, if any, has been interpreted; validation of the field, icon, or button has been satisfied; and the next activation item to be processed is not in the same group as the current activation item.
A validation response for a panel is interpreted after the operator has terminated input; the function response, if any, has been interpreted; validation of the field, icon, or button has been satisfied and validation of the group has been satisfied; and the next activation item to be processed is not on the same panel as the current item.
A validation response for a request is interpreted after a RETURN response step (without IMMEDIATE) has been executed and after all items on the activation list have been validated.
The VALIDATION RESPONSE declaration is particularly useful for cross-field validation.
There is no default response for the validation response.
Example
Panel P1
    Group G1
       Entry Response
             Message "Abandon hope all ye who enter here"
       End Response
       Field F1
       Exit Response
             If G1.F1 = 5 Then Position To Field F3 On P2
       End Response
       Validation Response
             If G1.F1 > 6 or G1.F1 <= 0 Then
             Message "Please enter a number from 1 to 5"
             Invalid
             End If
       End Response
       End Field
    End Group
    .
    .
    .
End Panel
The validation response is interpreted after input to Field G1.F1 is completed. If G1.F1 is within the specified range, the operator moves on to the next field or to field F3 on panel P2. If G1.F1 is not within the range, the message "Please enter a number from 1 to 5" is displayed.
RANGE 1 THROUGH 5
     MESSAGE "Please enter a number from 1 to 5"
VIEWPORT Declaration
VIEWPORT Declaration — The VIEWPORT declaration specifies a rectangular portion of the display device as the panel display area.
viewport-declaration
Format
Where you specify this clause:
Syntax Rules
viewport-name
Specifies the name of the viewport.
FOR PRINTING
Specifies that the Form Manager not validate the viewport size against the SIZE clause in the LAYOUT declaration. This allows you to define a viewport that is too large to be displayed on a display device, but that can be printed using a PRINT response step. Any response step other than the PRINT response step will be ignored.
LINES number-1 THROUGH number-2
Specifies a location and origin for the viewport. Number-1 and number-2 are expressed in layout units. THROUGH and THRU are equivalent.
COLUMNS number-3 THROUGH number-4
Specifies a location and origin for the viewport. Number-3 and number-4 are expressed in layout units. THROUGH and THRU are equivalent.
display-viewport-clause
Specifies viewport attributes at the layout, viewport, and panel levels. At run time, the Form Manager merges display viewport attributes from each level, with panel-level attributes taking precedence over viewport-level attributes, which, in turn,take precedence over layout-level attributes. For more information, see the DISPLAY VIEWPORT clause syntax section.
General Rules
In character-cell layouts, the viewport must fit within the display size specified in the layout unless the FOR PRINTING clause is specified. This means the line values must be less than or equal to the corresponding line size in the SIZE clause for the layout, and both the column values must be less than or equal to the corresponding column size in the SIZE clause.
All panels are displayed in viewports and the coordinates in panels are relative to the default viewport in character-cell terminals. In window layouts, panel coordinates are relative to their parent object. The upper-left corner of a viewport has position (1,1) for objects displayed in it for character-cell terminals; and position (0,0) for window devices.
Once you have resized a viewport, that size should remain throughout your session. On window devices, if the viewport is moved or resized, it retains its size and position when it is used again in the same session. Viewports cannot be resized or moved on a character-cell device.
When designing a layout for monochrome character-cell terminals, it is recommended that form designers do not specify black or white backgrounds, but allow operators to keep their own preference. Because the operating system does not keep track of the current background color of the terminal and the Form Manager cannot determine the current background color of character-cell terminals, DECforms cannot return the background color to its original state after it is changed to a color specified in the form.
For the VT200- and VT300-series terminals, the operator can also lock the background color of the terminal. This feature means that the operator can disable all background color changes, so that program control of background color is ignored, no matter what the form specifies. In this case, the original color of the terminal is available after the operator finishes input, but intermediate color changes specified in the form are denied. VT400 terminals are monochrome terminals; specifying a background color other than black or white does not affect display.
Examples
Viewport tiny_rectangle
    Lines 1 Thru 2
    Columns 1 Thru 3
End Viewport
In this example, the viewport TINY_RECTANGLE is specified as being displayed on lines 1 through 2, and columns 1 through 3, a total of six character positions.
Viewport FIRST_VP
   Lines 1 Through 21
   Columns 1 Through 70
End Viewport
The FIRST_VP viewport is specified as being displayed on lines 1 through 21, and columns 1 through 70. (This is a wide viewport.)
Appendix A. Using Arrays with DECforms Software
This appendix contains information about qualified names, how to use arrays and subscripts with DECforms, and how to use scalar and corresponding numeric expressions.
A.1. Qualified Names
Form data items can have the same name, as long as each form data item is in a different group. To refer to these data items with unique names, a qualified name must be used.
         GROUP firstgroup
               GROUP lastgroup
                     item_a CHARACTER(10)
               END GROUP
         END GROUP
You must refer to the form data item item_a as "FIRSTGROUP.LASTGROUP.ITEM_A".When referring to this data item, the order in which the qualifying group names are specified must match the order in which the nested groups were declared. Intervening group names can never be omitted.
 "FIRSTGROUP .
LASTGROUP
. ITEM_A"
"FIRSTGROUP . LASTGROUP . ITEM_A"
This capability is useful for long qualified names.
Each way of specifying a qualified name is considered equivalent by the IFDL Translator.
Name qualification of form data must be complete in every instance. All references to data items must be fully qualified, even references where lack of qualification would not result in ambiguity.
A.2. Specifying Subscripts
Numeric subscripts (numeric literals or numeric data references)
Slice subscripts
Range subscripts
Corresponding subscripts (data items only)
A.2.1. Numeric Subscripts
Legal subscripts are numeric literals or numeric data references. Subscripts are truncated to an integer before use. For the problem case of a negative number, truncation means using the integer algebraically smaller than the decimal number; for example "A(–1.5)" means "A(–2)".
A.2.2. Slice Subscripts
     Form Data
        Group Classyear Occurs 12
            Group Student Occurs 2
                Student_Name Character(40) Varying
                Grades       Character(5)
            End Group
        End Group
    End Data

    Layout L1
    ...
        Panel P1
            Group Classyear Vertical Displays 5
                Group Student Vertical
                    Student_Name Character(40) Varying
                    Grades       Character(5)
                End Group
            End Group
        End Panel
If all occurrences of the GRADES panel field in the multiply occurring STUDENT group in the eighth year only of the multiply occurring CLASSYEAR group are to be activated, the following slice designation would be appropriate in the ACTIVATE response step:
ACTIVATE FIELD CLASSYEAR(8).STUDENT(*).GRADES ON PANEL P1
If a subscript is not present in the declaration, all occurrences of the item will be referenced as though a slice designation was used.
For example, 'ACTIVATE FIELD CLASSYEAR.STUDENT(2).GRADES ON PANEL P1' activates the GRADES field as though the subscript were ACTIVATE CLASSYEAR(*).STUDENT(2).GRADES. All occurrences of CLASSYEAR activate the GRADES field of the second student on the list.
CLASSYEAR.STUDENT.GRADES is considered to represent all occurrences of GRADES in every group within which it is nested.
A.2.3. Range Subscripts
A subscript range can be used anywhere a slice designator can be used.
- A(3).B(–4:5).C
- A(3).B(X:6).C
- A(3).B(X:Y).C
- A(3).B(4:*).C
- A(3).B(*:6).C
- A(*).B(*:*).C
- A(*:*).B(*:*).C
Each value of the pair must itself represent a legal value for the array. If the second of the pair has a lower value than the first, a run-time error is reported.
The last two examples are equivalent and are the same as A.B.C, without explicit subscripts. A(3).B(5:4).C is an illegal subscript range.
A.2.4. Corresponding Subscripts
CONCEALED WHEN
HIGHLIGHT WHEN
PROTECTED WHEN
OUTPUT WHEN
RANGE
REQUIRE
- Message clauses on the following item description and field validation:
NO DATA INPUT
INPUT REQUIRED
USE HELP MESSAGE
MINIMUM LENGTH
RANGE
REQUIRE
SEARCH
When a corresponding subscript is used in a form data array expression within one of the previous field description entries, each occurrence of the data item in the expression is evaluated. The resulting value is used on the same occurrence of the panel field in which the field description entry occurs. Consider the following data group and panel group:
     Group G1    Occurs 10                   { data group }
        Amount    longword integer
        Limit     longword integer
    End Group
    ...
    Group G1    Vertical                    { panel group }
                Displays 5
        Field Amount
            Input picture 999,999.99
            Protected when G1(**).Limit > 9999
        End field
        Field Limit
            Protected
            Output picture 999,999.99
        End Field
    End Group
If G1(1).Limit > 9999, then G1(1).Amount is protected.
If G1(2).Limit > 9999, then G1(2).Amount is protected.
Restrictions
- data-array-references
- data-group-array-references
- field-array-references
- panel-group-array-references
- icon-array-references
- button-array-references
Subscripted references are supported for up to two dimensions. A subscript must directly follow the multiply occurring group to which it refers. A subscript must be a single numeric value; strings and array slices are not allowed.
- data_group_1(*).data_item_1
- data_group_1(5).data_item_1
- data_group_1(data_item_2).data_item_1
- data_group_1(data_group_2(5).data_item_2).data_item_1
- data_group_1(data_item_2+5).data_item_1
where data_group_2.data_item_2 has a numeric data type.
- data_group_1.data_item_1(3)
- data_group_1("one").data_item_1
- data_group_1(data_item_2).data_item_1
- data_group_1(data_item_3(*)).data_item_1
where data_item_2 has a string data type.
A run-time error is reported if the subscript goes out of range.
A.3. Singular, Array, and Corresponding References
The following sections discuss references to form data items, panel fields, icons, buttons, and data and panel groups in the IFDL language. The following form data and layout definitions are used in these sections:
    Form Data

        Item_1 Character(10)
        Group G1
             Item_1 Character(10)
            Group G2 Occurs 10
                Group G3 Occurs 2
                    Item_1 Character(10)
                    Item_2 Character(10)
                    Item_3 Character(10)
                End Group
            End Group
            Group G4
                Item_1 Character(10)
            End Group
        End Group

    End Data

    Layout L1
        ...
        Panel P1
            Field Item_1
            End Field
            Group G1
                 Field Item_1
                 End Field
                Group G2 Vertical Displays 5
                    Group G3 Horizontal
                        Field Item_1
                         End Field
                         Icon I1
                            Literal Text
                                 Value "Icon"
                            End Literal
                         End Icon
                         Button B1
                         End Button
                    End Group
                End Group
                Group G4
                    Field Item_1
                    End Field
                End Group
            End Group

        End Panel
    End Layout
A.3.1. Singular References: Data, Field, Icon, and Button References
Not declared inside a data group.
Not declared inside in a multiply occurring data group, and not declared inside a group that is nested within a multiply occurring group.
Fully subscripted: any multiply occurring groups that are part of the reference contain subscripts that evaluate to a single occurrence.
Reset Item_1
Let G1.Item_1 = " "
Let G1.G2(3).G3(1).Item_1 = "xxx"
Activate Field Item_1 on P1
Position To Field G1.Item_1 on P1
Deactivate Icon G1.G2(3).G3(1).I1 on P1
Activate Button G1.G2(7).G3(1).B1 on P1
These conditions apply to any IFDL syntactic entity defined as data-n, field-n, icon-n, or button-n.
A.3.2. Data, Field, Icon, and Button Array References
It is declared inside a data group.
At least one of groups where the item is nested is multiply occurring.
The subscript for at least one of the multiply occurring groups specifies either multiple occurrences of that group or all occurrences of that group (the reference is not fully subscripted).
Reset G1.G2(*).G3(1).Item_1
Reset G1.G2(3:5).G3(1).Item_1
Reset G1.G2(2).G3.Item_1
Reset G1.G2.G3.Item_1
Activate Icon G1.G2(3:5).G3(1).I1 on P1
Deactivate Button G1.G2(1:4).G3(1).B1 on P1
Deactivate Field G1.G2(2).G3.Item_1 on P1
Activate Field G1.G2(*).G3(*).I1 on P1
Even if data group G3 was defined as "Occurs 1", it would still be considered a multiply occurring group, because an OCCURS clause is specified. The reference to "G1.G2(2).G3.Item_1" would be classified as a data array reference rather than as a singular data reference. However, a reference to "G1.G2(2).G3(1).Item_1" would be classified as a singular data reference because the reference is fully subscripted.
These conditions apply to any IFDL syntactic entity defined as data-array-n, field-array-n, icon-array-n, or button-array-n.
A.3.3. Singular Group References: Data Group and Panel Group References
The group is not nested inside a data group.
The group is not nested inside in a multiply occurring data group.
The group is fully subscripted: any multiply occurring groups that are part of the group reference contain subscripts that evaluate to a single occurrence.
Reset G1
Reset G1.G4
Reset G1.G2(3).G3(1)
Activate Group G1 Item_1 on P1
Position To Group G1.G4 on P1
Deactivate Group G1.G2(3).G3(1) on P1
These conditions apply to any IFDL syntactic entity that is defined as data-group-n, or panel-group-n.
A.3.4. Data Group and Panel Group Array References
The array group is declared with an OCCURS clause, or is nested inside a group that is declared with an OCCURS clause.
The subscript for at least one of the multiply occurring groups in the array group reference specifies either multiple occurrences of that group, or all occurrences of that group (the reference is not fully subscripted).
Reset G1.G2(*).G3(1)
Reset G1.G2(3:5).G3(1)
Reset G1.G2(2).G3
Reset G1.G2.G3
Activate Group G1.G2(3:5).G3(1) on P1
Deactivate Group G1.G2(2).G3 on P1
Activate Group G1.G2(*).G3(*) on P1
Even if data group G3 were defined as "Occurs 1", it would still be considered a multiply occurring group, because an OCCURS clause was specified. This means that the reference to "G1.G2(2).G3" would be classified as a data group array reference rather than a data group singular reference. However, a reference to "G1.G2(2).G3(1)" would be classified as a data group singular reference, because the reference is fully subscripted.
These conditions apply to any IFDL syntactic entity defined as data-group-array-n or panel-group-array-n.
A.3.5. Corresponding Data References
The data item is declared inside a data group.
At least one of groups where the data item is nested is multiply occurring.
At least one of the multiply occurring groups in the corresponding data reference, there is a corresponding subscript ("**") specified.
Range G1.G2(**).G3(1).Item_2 Thru G1.G2(**).G3(1).Item_3
Require G1.G2(**).G3(**).Item_2 > G1.G2(**).G3(**).Item_3
Input Required
    Message G1.G2(3).G3(**).Item_3
    Protected When
        G1.G2(**).G3(**).Item_2 = G1.G2(**).G3(**).Item_3
These conditions apply to any IFDL syntactic entity that is defined as corresponding-data-n. The semantics of corresponding data references is described in Section A.2, ''Specifying Subscripts''.
A.4. Scalar Numeric Expressions
A scalar numeric expression does not specify corresponding data.
The right operand of a LET response step. In addition to being a data item or a constant, the right operand of a LET response step can be a scalar numeric expression.
Subscripts: in addition to being a data item or a number, a subscript can also be a scalar numeric expression. The value of the expression is truncated to an integer, in the same way as the value of the data item.
Subscript bound: same as subscript.
    Form Data
        A   Unsigned Word
        B   Integer(10)
        C   Byte Integer
        Group G1 Occurs 10
            F1  Integer(5)
            D  Longword Integer
            E  Word Integer
        End Group
End DataLet A = (B + G1(3).D) / C
Protected When G1(G1(B).D-A).F1 > A * C
Activate field G1(1:B-C).F1 on P1
A.5. Corresponding Numeric Expressions
A corresponding numeric expression is a numeric expression in which at least one corresponding data array is specified. Corresponding-data-1 is a corresponding data reference, designated by a double-asterisk ("**"). For more information on corresponding data references, refer to Section A.3, ''Singular, Array, and Corresponding References''.
CONCEALED WHEN
HIGHLIGHT WHEN
PROTECTED WHEN
OUTPUT WHEN
REQUIRE
Protected When G1(**).D > A * C / G1(**).E
Require G1(**).D + 100 > G1(**).E * C
A corresponding data reference in a numeric expression in a relation must obey all of the current rules for a corresponding data reference in a relation. For example, "A(**).D + B(**).C" is valid only if "A(**).D"and "B(**).C" are both valid in that context under current rules.
Appendix B. DECforms Data Types
This appendix contains information about DECforms data types and their equivalents.
Table B.1, ''DECforms Data Types and Corresponding Oracle CDD/Repository and VAX Data Types'' lists the DECforms data types and the equivalent Oracle CDD/Repository and VAX data types. Table B.2, ''IFDL Data Types and Supported OpenVMS Data Types''lists the OpenVMS data types supported by DECforms and the equivalent IFDL data types. Table B.3, '' DECforms Data Types and Corresponding COBOL Data Types'' lists the DECforms data types and equivalent COBOL data types.
| DECforms Data Type | Oracle CDD/Repository Data Type |
VAX Data Type |
|---|---|---|
|
ADT |
ADT |
ADT |
|
Byte Integer |
B |
B |
|
Character(x) |
T |
T |
|
Character Varying(x) |
VT |
VT |
|
Date |
ADT? | |
|
Decimal(x,y) explicit sign
|
NLO? | |
|
Decimal(x,y) explicit sign
|
NLO? | |
|
Decimal(x,y) explicit sign
|
NL? | |
|
Decimal(x,y) explicit sign
|
NL? | |
|
Decimal(x,y) explicit sign
|
NRO? | |
|
Decimal(x,y) explicit sign
|
NRO? | |
|
Decimal(x,y) explicit sign
|
NR? | |
|
Decimal(x,y) explicit sign
|
NR? | |
|
Decimal(x,y) explicit sign
|
NZ? | |
|
Decimal(x,y) explicit sign
|
NZ? | |
|
Decimal(x,y) implicit sign
|
NU? | |
|
Decimal(x,y) implicit sign
|
NU? | |
|
Decimal(x,y) packed
|
P? | |
|
Dfloating |
D |
D |
|
Ffloating |
F |
F |
|
Float(x,y) explicit sign
|
T? | |
|
Float(x,y) explicit sign
|
T? | |
|
Float(x,y) implicit sign
|
T? | |
|
Float(x,y) implicit sign
|
T? | |
|
Gfloating |
G |
G |
|
Hfloating |
H |
H |
|
Integer(x) explicit sign
|
NLO? | |
|
Integer(x) explicit sign
|
NL? |
NL? |
|
Integer(x) explicit sign
|
NRO? | |
|
Integer(x) explicit sign
|
NR? | |
|
Integer(x) explicit sign
|
NZ? | |
|
Integer(x) implicit sign |
NU? |
NU? |
|
Integer(x) packed
|
P? |
P? |
|
Longword Integer |
L |
L |
|
Quadword Integer |
Q |
Q |
|
Time |
ADT ? | |
|
Unsigned Byte |
BU |
BU |
|
Unsigned Longword |
LU |
LU |
|
Unsigned Word |
WU |
WU |
|
Unsupported |
BPV |
BPV |
|
Unsupported |
DC |
DC |
|
Unsupported |
DSC |
DSC |
|
Unsupported |
FC |
FC |
|
Unsupported |
GC |
GC |
|
Unsupported |
HC |
HC |
|
Unsupported |
O |
O |
|
Unsupported |
OU |
OU |
|
Unsupported |
QU |
QU |
|
Unsupported |
V |
V |
|
Unsupported |
VU |
VU |
|
Unsupported |
ZI |
ZI |
|
Unsupported |
ZEM |
ZEM |
|
Word Integer |
W |
W |
Table B.2, ''IFDL Data Types and Supported OpenVMS Data Types'' lists the OpenVMS data types supported by DECforms and the equivalent IFDL data types.
|
IFDL Data Type |
OpenVMS Data Type |
|---|---|
|
ADT |
Yes |
|
ADT Current |
Data |
|
Byte Integer |
Yes |
|
Character Reversed(x) |
Record |
|
Character Reversed(x) Null Terminated |
Record |
|
Character Reversed(x) Varying |
Record |
|
Character(x) |
Yes |
|
Character(x) Null Terminated |
Yes |
|
Character(x) Varying |
Yes |
|
Date |
Yes |
|
Date Current |
Data |
|
Datetime(x) |
Yes |
|
Decimal(x,y) explicit sign
|
Record |
|
Decimal(x,y) explicit sign
|
Record |
|
Decimal(x,y) explicit sign
|
Record |
|
Decimal(x,y) explicit sign
|
Record |
|
Decimal(x,y) explicit sign
|
Yes |
|
Decimal(x,y) explicit sign
|
Record |
|
Decimal(x,y) explicit sign
|
Record |
|
Decimal(x,y) explicit sign
|
Record |
|
Decimal(x,y) explicit sign
|
Record |
|
Decimal(x,y) explicit sign
|
Record |
|
Decimal(x,y) explicit sign
|
Record |
|
Decimal(x,y) explicit sign
|
Record |
|
Decimal(x,y) explicit sign
|
Record |
|
Decimal(x,y) explicit sign
|
Record |
|
Decimal(x,y) explicit sign
|
Record |
|
Decimal(x,y) implicit sign
|
Record |
|
Decimal(x,y) implicit sign
|
Record |
|
Decimal(x,y) implicit sign
|
Record |
|
Decimal(x,y) packed |
Yes |
|
Dfloating |
Yes |
|
Ffloating |
Yes |
|
Float(x,y) explicit sign
|
Record |
|
Float(x,y) explicit sign
|
Yes |
|
Float(x,y) explicit sign
|
Record |
|
Float(x,y) implicit sign
|
Record |
|
Float(x,y) implicit sign
|
Record |
|
Float(x,y) implicit sign
|
Record |
|
Gfloating |
Yes |
|
Hfloating |
Yes |
|
Integer(x) explicit sign
|
Record |
|
Integer(x) explicit sign
|
Yes |
|
Integer(x) explicit sign
|
Record |
|
Integer(x) explicit sign
|
Record |
|
Integer(x) explicit sign
|
Record |
|
Integer(x) implicit sign |
Record |
|
Integer(x) packed |
Yes |
|
Long Float |
Yes |
|
Longword Integer |
Yes |
|
Quadword Integer |
Yes |
|
Short Float |
Yes |
|
Time |
Yes |
|
Time Current |
Data |
|
Datetime(x) |
Yes |
|
Unsigned Byte |
Yes |
|
Unsigned Longword |
Yes |
|
Unsigned Word |
Yes |
|
Word Integer |
Yes |
| DECforms Data Type | COBOL Data Type |
|---|---|
|
Integer(18) Explicit Sign Right Overpunched |
PIC S9(18) USAGE IS DISPLAY |
|
Integer(18) Explicit Sign Right Overpunched |
PIC S9(18) USAGE IS DISPLAY SIGN IS TRAILING |
|
Integer(18) Explicit Sign Left Overpunched |
PIC S9(18) USAGE IS DISPLAY SIGN IS LEADING |
|
Integer(18) Explicit Sign Right Separate |
PIC S9(18) USAGE IS DISPLAY IS TRAILING SEPARATE |
|
Integer(18) Explicit Sign Left Separate |
PIC S9(18) USAGE IS DISPLAY IS LEADING SEPARATE |
|
Integer(18) Implicit Sign |
PIC 9(18) USAGE IS DISPLAY |
|
Character(10) |
PIC X(10) USAGE IS DISPLAY |
|
Character(10) |
PIC A(10) USAGE IS DISPLAY |
|
Decimal (9,9) Explicit Sign Right Overpunched Implicit Decimal |
PIC S9(9)V9(9) USAGE IS DISPLAY |
|
Decimal (9,9) Explicit Sign Right Overpunched Implicit Decimal |
PIC S9(9)V9(9) USAGE IS DISPLAY SIGN IS TRAILING |
|
Decimal (9,9) Explicit Sign Left Overpunched Implicit Decimal |
PIC S9(9)V9(9) USAGE IS DISPLAY SIGN IS LEADING |
|
Decimal (9,9) Explicit Sign Right Separate Implicit Decimal |
PIC S9(9)V9(9) USAGE IS DISPLAY SIGN IS TRAILING SEPARATE |
|
Decimal (9,9) Explicit Sign Left Separate Implicit Decimal |
PIC S9(9)V9(9) USAGE IS DISPLAY SIGN IS LEADING SEPARATE |
|
Decimal (9,9) Implicit Sign Implicit Decimal |
PIC S9(9)V9(9) USAGE IS DISPLAY |
Appendix C. IFDL Reserved Words
| ACTIVATE | ACTIVE | ALL | ATTRIBUTE |
| AUTOSKIP | BACKGROUND | BY | CALL |
| CHARACTER | CHARACTERS | COLUMN | COLUMNS |
| CONCEALED | CONSTANT | COPY | CURRENCY |
| DATA | DEACTIVATE | DECIMAL | DEFAULT |
| DELETE | DEVICE | DISABLE | DISPLAY |
| DISPLAYS | ELSE | ENABLE | END |
| ENTER | ENTRY | EXIT | FIELD |
| FIELDS | FOREGROUND | FORM | FUNCTION |
| GROUP | HELP | HIGHLIGHT | ICON |
| IF | INCLUDE | INITIAL | INPUT |
| INSERT | INTEGER | INTERNAL | INVALID |
| IS | JUSTIFICATION | LABEL | LAYOUT |
| LENGTH | LET | LINE | LINES |
| LIST | LITERAL | LOCATOR | LOWERCASE |
| MESSAGE | MINIMUM | MIXED | NEXT |
| NO | NOT | OCCURS | OF |
| ON | OUTPUT | PANEL | PIC |
| PICTURE | POSITION | PREVIOUS | |
| PROTECTED | RANGE | RECEIVE | RECORD |
| RECORDS | REFRESH | REMOVE | REPLACE |
| REPLACING | REQUEST | REQUIRE | REQUIRED |
| RESET | RESPONSE | RETAIN | RETURN |
| SCALE | SEARCH | SEND | SIGN |
| SIGNAL | TABLE | TEXT | THEN |
| THROUGH | THRU | TIMEOUT | TRANSCEIVE |
| TRANSLATE | TRANSMIT | UNTIL | UPPERCASE |
| USE | USING | VALIDATE | VALIDATION |
| VALUE | VIEWPORT | WAIT |
Appendix D. DECforms Function Key Names
Keys that generate the characters in the DEC Multinational Character Set
Top row function keys and keypad keys on the LK201 keyboard
The following sections list the key names.
D.1. Function Key Names for the DEC Multinational Character Set
Table D.1, ''DEC Multinational Character Set Key Names'' lists DECforms function names for the keys that generate the characters in the DEC Multinational Character Set. For information on the keys associated with the DEC Multinational Character set, see the documentation for your terminal keyboard.
Keys that produce printable characters are not allowed as function keys in DECforms, except as the second key of a two-key sequence. The letter P in the third column of Table D.1, ''DEC Multinational Character Set Key Names'' indicates a printable key.
|
IFDL Function Key Name |
Key Value (DEC Multinational) |
Print Status |
|---|---|---|
|
%NULL |
0 | |
|
%START_HEADING or %CONTROL_A |
1 | |
|
%START_TEXT or %CONTROL_B |
2 | |
|
%END_TEXT or %CONTROL_C |
3 | |
|
%END_TRANSMISSION or %CONTROL_D |
4 | |
|
%ENQUIRE or %CONTROL_E |
5 | |
|
%ACKNOWLEDGE or %CONTROL_F |
6 | |
|
%BELL or %CONTROL_G |
7 | |
|
%BACKSPACE? or %CONTROL_H |
8 | |
|
%HORIZONTAL_TAB? or %CONTROL_I |
9 | |
|
%LINE_FEED or %CONTROL_J |
10 | |
|
%VERTICAL_TAB or %CONTROL_K |
11 | |
|
%FORM_FEED or %CONTROL_L |
12 | |
|
%CARRIAGE_RETURN? or %CONTROL_M |
13 | |
|
%SHIFT_OUT or %CONTROL_N |
14 | |
|
%SHIFT_IN or %CONTROL_O |
15 | |
|
%DATA_LINK_ESCAPE or %CONTROL_P |
16 | |
|
%XON or %CONTROL_Q |
17 | |
|
%DEVICE_CTRL_2 or %CONTROL_R |
18 | |
|
%XOFF or %CONTROL_S |
19 | |
|
%DEVICE_CTRL_4 or %CONTROL_T |
20 | |
|
%NEGATIVE_ACKNOWLEDGE or %CONTROL_U |
21 | |
|
%SYNCHRONOUS_IDLE or %CONTROL_V |
22 | |
|
%END_TRANSMISSION_BLOCK or %CONTROL_W |
23 | |
|
%CANCEL or %CONTROL_X |
24 | |
|
%END_MEDIUM or %CONTROL_Y |
25 | |
|
%SUBSTITUTE or %CONTROL_Z |
26 | |
|
%ESCAPE? |
27 | |
|
%FILE_SEPARATOR |
28 | |
|
%GROUP_SEPARATOR |
29 | |
|
%RECORD_SEPARATOR |
30 | |
|
%UNIT_SEPARATOR |
31 | |
|
%SPACE |
32 |
P |
|
%EXCLAMATION_POINT |
33 |
P |
|
%QUOTATION_MARK |
34 |
P |
|
%NUMBER_SIGN |
35 |
P |
|
%DOLLAR_SIGN |
36 |
P |
|
%PERCENT_SIGN |
37 |
P |
|
%AMPERSAND |
38 |
P |
|
%APOSTROPHE |
39 |
P |
|
%OPENING_PARENTHESIS |
40 |
P |
|
%CLOSING_PARENTHESIS |
41 |
P |
|
%ASTERISK |
42 |
P |
|
%PLUS_SIGN |
43 |
P |
|
%COMMA |
44 |
P |
|
%MINUS_SIGN |
45 |
P |
|
%PERIOD |
46 |
P |
|
%SLASH |
47 |
P |
|
%DIGIT_ZERO |
48 |
P |
|
%DIGIT_ONE |
49 |
P |
|
%DIGIT_TWO |
50 |
P |
|
%DIGIT_THREE |
51 |
P |
|
%DIGIT_FOUR |
52 |
P |
|
%DIGIT_FIVE |
53 |
P |
|
%DIGIT_SIX |
54 |
P |
|
%DIGIT_SEVEN |
55 |
P |
|
%DIGIT_EIGHT |
56 |
P |
|
%DIGIT_NINE |
57 |
P |
|
%COLON |
58 |
P |
|
%SEMICOLON |
59 |
P |
|
%LESS_THAN_SIGN |
60 |
P |
|
%EQUALS_SIGN |
61 |
P |
|
%GREATER_THAN_SIGN |
62 |
P |
|
%QUESTION_MARK |
63 |
P |
|
%COMMERCIAL_AT |
64 |
P |
|
%CAPITAL_A |
65 |
P |
|
%CAPITAL_B |
66 |
P |
|
%CAPITAL_C |
67 |
P |
|
%CAPITAL_D |
68 |
P |
|
%CAPITAL_E |
69 |
P |
|
%CAPITAL_F |
70 |
P |
|
%CAPITAL_G |
71 |
P |
|
%CAPITAL_H |
72 |
P |
|
%CAPITAL_I |
73 |
P |
|
%CAPITAL_J |
74 |
P |
|
%CAPITAL_K |
75 |
P |
|
%CAPITAL_L |
76 |
P |
|
%CAPITAL_M |
77 |
P |
|
%CAPITAL_N |
78 |
P |
|
%CAPITAL_O |
79 |
P |
|
%CAPITAL_P |
80 |
P |
|
%CAPITAL_Q |
81 |
P |
|
%CAPITAL_R |
82 |
P |
|
%CAPITAL_S |
83 |
P |
|
%CAPITAL_T |
84 |
P |
|
%CAPITAL_U |
85 |
P |
|
%CAPITAL_V |
86 |
P |
|
%CAPITAL_W |
87 |
P |
|
%CAPITAL_X |
88 |
P |
|
%CAPITAL_Y |
89 |
P |
|
%CAPITAL_Z |
90 |
P |
|
%OPENING_SQUARE_BRACKET |
91 |
P |
|
%BACK_SLASH |
92 |
P |
|
%CLOSING_SQUARE_BRACKET |
93 |
P |
|
%CIRCUMFLEX_ACCENT |
94 |
P |
|
%LOW_LINE |
95 |
P |
|
%LEFT_SINGLE_QUOTATION_MARK |
96 |
P |
|
%SMALL_A |
97 |
P |
|
%SMALL_B |
98 |
P |
|
%SMALL_C |
99 |
P |
|
%SMALL_D |
100 |
P |
|
%SMALL_E |
101 |
P |
|
%SMALL_F |
102 |
P |
|
%SMALL_G |
103 |
P |
|
%SMALL_H |
104 |
P |
|
%SMALL_I |
105 |
P |
|
%SMALL_J |
106 |
P |
|
%SMALL_K |
107 |
P |
|
%SMALL_L |
108 |
P |
|
%SMALL_M |
109 |
P |
|
%SMALL_N |
110 |
P |
|
%SMALL_O |
111 |
P |
|
%SMALL_P |
112 |
P |
|
%SMALL_Q |
113 |
P |
|
%SMALL_R |
114 |
P |
|
%SMALL_S |
115 |
P |
|
%SMALL_T |
116 |
P |
|
%SMALL_U |
117 |
P |
|
%SMALL_V |
118 |
P |
|
%SMALL_W |
119 |
P |
|
%SMALL_X |
120 |
P |
|
%SMALL_Y |
121 |
P |
|
%SMALL_Z |
122 |
P |
|
%OPENING_CURLY_BRACKET |
123 |
P |
|
%VERTICAL_LINE |
124 |
P |
|
%CLOSING_CURLY_BRACKET |
125 |
P |
|
%TILDE |
126 |
P |
|
%DELETE? |
127 | |
|
RESERVED |
128 | |
|
RESERVED |
129 | |
|
RESERVED |
130 | |
|
RESERVED |
131 | |
|
RESERVED |
132 | |
|
RESERVED |
133 | |
|
RESERVED |
134 | |
|
RESERVED |
135 | |
|
RESERVED |
136 | |
|
RESERVED |
137 | |
|
RESERVED |
138 | |
|
RESERVED |
139 | |
|
RESERVED |
140 | |
|
RESERVED |
141 | |
|
RESERVED |
142 | |
|
RESERVED |
143 | |
|
RESERVED |
144 | |
|
RESERVED |
145 | |
|
RESERVED |
146 | |
|
RESERVED |
147 | |
|
RESERVED |
148 | |
|
RESERVED |
149 | |
|
RESERVED |
150 | |
|
RESERVED |
151 | |
|
RESERVED |
152 | |
|
RESERVED |
153 | |
|
RESERVED |
154 | |
|
RESERVED |
155 | |
|
RESERVED |
156 | |
|
RESERVED |
157 | |
|
RESERVED |
158 | |
|
RESERVED |
159 | |
|
%NO_BREAK_SPACE |
160 |
P |
|
%INVERTED_EXCLAMATION_MARK |
161 |
P |
|
%CENT_SIGN |
162 |
P |
|
%POUND_SIGN |
163 |
P |
|
%CURRENCY_SIGN |
164 |
P |
|
%YEN_SIGN |
165 |
P |
|
%BROKEN_BAR |
166 |
P |
|
%SECTION_SIGN |
167 |
P |
|
%DIAERESIS |
168 |
P |
|
%COPYRIGHT_SIGN |
169 |
P |
|
%FEMININE_ORDINAL_INDICATOR |
170 |
P |
|
%LEFT_ANGLE_QUOTATION_MARK |
171 |
P |
|
%NOT_SIGN |
172 |
P |
|
%SOFT_HYPHEN |
173 |
P |
|
%REGISTERED_TRADE_MARK_SIGN |
174 |
P |
|
%MACRON |
175 |
P |
|
%DEGREE_SIGN |
176 |
P |
|
%PLUS_MINUS_SIGN |
177 |
P |
|
%SUPERSCRIPT_TWO |
178 |
P |
|
%SUPERSCRIPT_THREE |
179 |
P |
|
%ACUTE_ACCENT |
180 |
P |
|
%MICRO_SIGN |
181 |
P |
|
%PARAGRAPH |
182 |
P |
|
%MIDDLE_DOT |
183 |
P |
|
%CEDILLA |
184 |
P |
|
%SUPERSCRIPT_ONE |
185 |
P |
|
%MASCULINE_ORDINAL_INDICATOR |
186 |
P |
|
%RIGHT_ANGLE_QUOTATION_MARK |
187 |
P |
|
%VULGAR_FRACTION_ONE_QUARTER |
188 |
P |
|
%VULGAR_FRACTION_ONE_HALF |
189 |
P |
|
%VULGAR_FRACTION_THREE_QUARTERS |
190 |
P |
|
%INVERTED_QUESTION_MARK |
191 |
P |
|
%CAPITAL_A_WITH_GRAVE_ACCENT |
192 |
P |
|
%CAPITAL_A_WITH_ACUTE_ACCENT |
193 |
P |
|
%CAPITAL_A_WITH_CIRCUMFLEX_ACCENT |
194 |
P |
|
%CAPITAL_A_WITH_TILDE |
195 |
P |
|
%CAPITAL_A_WITH_DIAERESIS |
196 |
P |
|
%CAPITAL_A_WITH_RING_ABOVE |
197 |
P |
|
%CAPITAL_DIPTHONG_AE |
198 |
P |
|
%CAPITAL_C_WITH_CEDILLA |
199 |
P |
|
%CAPITAL_E_WITH_GRAVE_ACCENT |
200 |
P |
|
%CAPITAL_E_WITH_ACUTE_ACCENT |
201 |
P |
|
%CAPITAL_E_WITH_CIRCUMFLEX_ACCENT |
202 |
P |
|
%CAPITAL_E_WITH_DIAERESIS |
203 |
P |
|
%CAPITAL_I_WITH_GRAVE_ACCENT |
204 |
P |
|
%CAPITAL_I_WITH_ACUTE_ACCENT |
205 |
P |
|
%CAPITAL_I_WITH_CIRCUMFLEX_ACCENT |
206 |
P |
|
%CAPITAL_I_WITH_DIAERESIS |
207 |
P |
|
%CAPITAL_ICELANDIC_LETTER_ETH |
208 |
P |
|
%CAPITAL_N_WITH_TILDE |
209 |
P |
|
%CAPITAL_O_WITH_GRAVE_ACCENT |
210 |
P |
|
%CAPITAL_O_WITH_ACUTE_ACCENT |
211 |
P |
|
%CAPITAL_O_WITH_CIRCUMFLEX_ACCENT |
212 |
P |
|
%CAPITAL_O_WITH_TILDE |
213 |
P |
|
%CAPITAL_O_WITH_DIAERESIS |
214 |
P |
|
%MULTIPLICATION_SIGN |
215 |
P |
|
%CAPITAL_O_WITH_OBLIQUE_STROKE |
216 |
P |
|
%CAPITAL_U_WITH_GRAVE_ACCENT |
217 |
P |
|
%CAPITAL_U_WITH_ACUTE_ACCENT |
218 |
P |
|
%CAPITAL_U_WITH_CIRCUMFLEX |
219 |
P |
|
%CAPITAL_U_WITH_DIAERESIS |
220 |
P |
|
%CAPITAL_Y_WITH_ACUTE_ACCENT |
221 |
P |
|
%CAPITAL_ICELANDIC_LETTER_THORN |
222 |
P |
|
%SMALL_GERMAN_LETTER_SHARP_S |
223 |
P |
|
%SMALL_A_WITH_GRAVE_ACCENT |
224 |
P |
|
%SMALL_A_WITH_ACUTE_ACCENT |
225 |
P |
|
%SMALL_A_WITH_CIRCUMFLEX_ACCENT |
226 |
P |
|
%SMALL_A_WITH_TILDE |
227 |
P |
|
%SMALL_A_WITH_DIAERESIS |
228 |
P |
|
%SMALL_A_WITH_RING_ABOVE |
229 |
P |
|
%SMALL_DIPHTHONG_AE |
230 |
P |
|
%SMALL_C_WITH_CEDILLA |
231 |
P |
|
%SMALL_E_WITH_GRAVE_ACCENT |
232 |
P |
|
%SMALL_E_WITH_ACUTE_ACCENT |
233 |
P |
|
%SMALL_E_WITH_CIRCUMFLEX_ACCENT |
234 |
P |
|
%SMALL_E_WITH_DIAERESIS |
235 |
P |
|
%SMALL_I_WITH_GRAVE_ACCENT |
236 |
P |
|
%SMALL_I_WITH_ACUTE_ACCENT |
237 |
P |
|
%SMALL_I_WITH_CIRCUMFLEX_ACCENT |
238 |
P |
|
%SMALL_I_WITH_DIAERESIS |
239 |
P |
|
%SMALL_ICELANDIC_LETTER_ETH |
240 |
P |
|
%SMALL_N_WITH_TILDE |
241 |
P |
|
%SMALL_O_WITH_GRAVE_ACCENT |
242 |
P |
|
%SMALL_O_WITH_ACUTE_ACCENT |
243 |
P |
|
%SMALL_O_WITH_CIRCUMFLEX_ACCENT |
244 |
P |
|
%SMALL_O_WITH_TILDE |
245 |
P |
|
%SMALL_O_WITH_DIAERESIS |
246 |
P |
|
%DIVISION_SIGN |
247 |
P |
|
%SMALL_O_WITH_OBLIQUE_STROKE |
248 |
P |
|
%SMALL_U_WITH_GRAVE_ACCENT |
249 |
P |
|
%SMALL_U_WITH_ACUTE_ACCENT |
250 |
P |
|
%SMALL_U_WITH_CIRCUMFLEX_ACCENT |
251 |
P |
|
%SMALL_U_WITH_DIAERESIS |
252 |
P |
|
%SMALL_Y_WITH_ACUTE_ACCENT |
253 |
P |
|
%SMALL_ICELANDIC_LETTER_THORN |
254 |
P |
|
%SMALL_Y_WITH_DIAERESIS |
255 |
P |
D.2. Key Names for the Keypads and Top Row Function Keys
Table D.2, ''Keypad and Function Key Names'' lists the names of the keys on the editing keypad and the auxiliary keypad, which are located to the right of the main keypad on the LK201 keyboard. It also lists the names of the top row function keys.
It is recommended that you use both SMALL_ and CAPITAL_ when you define sequences that use letters. If you use both small and capital letters, the user will not need to be concerned as to whether the caps lock key is on.
|
IFDL Key Name |
Character-Cell Key Name |
Window Key Name |
|---|---|---|
|
%ALT? |
Alt |
Compose Character |
|
%SHIFT |
Shift |
Shift |
|
%CONTROL |
Ctrl |
Ctrl |
|
%PF1 |
PF1 |
PF1 |
|
%PF2 |
PF2 |
PF2 |
|
%PF3 |
PF3 |
PF3 |
|
%PF4 |
PF4 |
PF4 |
|
%KP_0 |
Keypad 0 |
Keypad 0 |
|
%KP_1 |
Keypad 1 |
Keypad 1 |
|
%KP_2 |
Keypad 2 |
Keypad 2 |
|
%KP_3 |
Keypad 3 |
Keypad 3 |
|
%KP_4 |
Keypad 4 |
Keypad 4 |
|
%KP_5 |
Keypad 5 |
Keypad 5 |
|
%KP_6 |
Keypad 6 |
Keypad 6 |
|
%KP_7 |
Keypad 7 |
Keypad 7 |
|
%KP_8 |
Keypad 8 |
Keypad 8 |
|
%KP_9 |
Keypad 9 |
Keypad 9 |
|
%KP_MINUS |
Keypad minus |
Keypad minus |
|
%KP_COMMA |
Keypad comma |
Keypad comma |
|
%KP_PERIOD |
Keypad decimal |
Keypad decimal |
|
%ENTER, %KP_ENTER |
Keypad Enter |
Keypad Enter |
|
%RETURN, %CARRIAGE_RETURN |
Return |
Return |
|
%TAB %HORIZONTAL_TAB |
Tab |
Tab |
|
%BACKSPACE |
Ctrl/H |
Ctrl/H |
|
%DELETE? |
Delete key |
Delete key |
|
%UP |
Up arrow |
Up arrow |
|
%DOWN |
Down arrow |
Down arrow |
|
%LEFT |
Left arrow |
Left arrow |
|
%RIGHT |
Right arrow |
Right arrow |
|
%F1 |
F1? |
F1? |
|
%F2 |
F2? |
F2? |
|
%F3 |
F3? |
F3? |
|
%F4 |
F4? |
F4? |
|
%F5 |
F5? |
F5? |
|
%F6 |
F6? |
F6? |
|
%F7 |
F7 |
F7 |
|
%F8 |
F8 |
F8 |
|
%F9 |
F9 |
F9 |
|
%F10 |
F10 |
F10 |
|
%F11 |
F11 |
F11 |
|
%F12 |
F12 |
F12 |
|
%F13 |
F13 |
F13 |
|
%F14 |
F14 |
F14 |
|
%F15, %HELP |
F15, Help |
F15, Help |
|
%F16, %DO |
F16, Do |
F16, Do |
|
%F17 |
F17 |
F17 |
|
%F18 |
F18 |
F18 |
|
%F19 |
F19 |
F19 |
|
%F20 |
F20 |
F20 |
|
%FIND, %E1 |
Find |
Find |
|
%INSERT, %INSERT_HERE, %E2 |
Insert, Insert Here |
Insert, Insert Here |
|
%REMOVE, %E3 |
Remove |
Remove |
|
%SELECT, %E4 |
Select |
Select |
|
%PREV_SCREEN, %PREV_PAGE, %PAGE_UP, %E5 |
Prev Screen, Prev Page, Prev |
Prev Screen, Prev Page, Prev |
|
%NEXT_SCREEN, %NEXT_PAGE, %PAGE_DOWN, %E6 |
Next Screen, Next Page, Next |
Next Screen, Next Page, Next |
The editing keypad names are the same as the names printed on the keys; the key with the word Find printed on it is named %FIND.
The Find key is also named %E1, the Insert Here key is also named %E2, and so on. %PF and %KP precede the auxiliary keypad names.
The top row function keys are named by %F and a number. Starting from the left side of the keyboard, the %F6 key is the first key in the second group of function keys of an LK201 keyboard.
(%PF1 %SMALL_A)    PF1, "a"
(%PF1 %CAPITAL_A)  PF1, "A"
%CARRIAGE_RETURN   Return or Ctrl + "M"
%HELP              Help key
The first key in a two-key sequence of a character-cell device must be from Table D.2, ''Keypad and Function Key Names'' or a key from Table D.1, ''DEC Multinational Character Set Key Names'' that is not printable.
%ALT + %SMALL_A        Alt "a"
%ALT + %CAPITAL_A      Alt "A"
%CONTROL + %SMALL_A    Ctrl "a"
%CONTROL + %CAPITAL_A  Ctrl "A"
%SHIFT + %F1           Shift F1
%F1                    F1 key
If %SHIFT is used in the chord, the second key must be from Table D.2, ''Keypad and Function Key Names''. For example, %SHIFT+ %SMALL_A is not allowed, but %SHIFT + %TAB is allowed. If %ALT or %CONTROL is used without%SHIFT, then the other key can be any key from Table D.1, ''DEC Multinational Character Set Key Names''that is a printable key.
Appendix E. DECforms Hebrew User's Guide
DECforms software provides you with the option of specifying Hebrew forms. This appendix tells you how to specify Hebrew forms using Hebrew terminals and DECforms software.
E.1. Hebrew Terminals
DECforms uses Hebrew terminal capabilities to process Hebrew text.
- %VT100_HEBREW
- %VT200_HEBREW
- %VT300_HEBREW
- %VT400_HEBREW
As with other terminal types, specifying %VT100_HEBREW as your device type enables a form for a Hebrew VT100, or higher VT terminal type.
Do not specify both Hebrew and non-Hebrew terminals within the same layout. A layout intended to run on a Hebrew terminal can specify only Hebrew terminal types. However, DECforms does not check whether the terminal is an actual Hebrew terminal. You must ensure that a Hebrew form is used on a Hebrew terminal. Running a form that contains Hebrew fields on a non-Hebrew terminal may cause unexpected results.
The default terminal type used by the Form Development Environment (FDE) for a newly created layout is %VT100. Hebrew users need to set the Layout Type in the Modify Layout FDE screen to Hebrew Terminals. Then DECforms software considers the selected terminals for the current layout to be Hebrew terminals.
The Hebrew VT terminal types replace the non-Hebrew VT terminal types wherever a device type is specified in a Hebrew form;for example, in the optional /DEVICE qualifier of the FORMS EXTRACT OBJECT utility command.
E.1.1. Information for DECforms/Hebrew Version 1.0 Users
There is a slight incompatibility with Hebrew forms created in DECforms/Hebrew Version 1.0 (local version). The Hebrew terminal types were not available in DECforms Version 1.0, and the LANGUAGE clause was used to specify a Hebrew form. DECforms/Hebrew Version 1.0 forms should be modified to include the new Hebrew terminal definitions. The features previously based on the Hebrew language definition are currently based on the Hebrew terminal definition. The LANGUAGE clause is used now only for layout selection.
E.2. Hebrew Fields and Literals
Hebrew fields are character fields that accept and display Hebrew data in a right-to-left direction. Hebrew literals are background text objects that contain Hebrew text.
Direction—Text Path
Language—Character Set
Data representation—Logical/Physical order
E.2.1. Text Path
The text path attribute controls the input/output direction. Hebrew objects, fields and literals, must specify their text path attributes as Hebrew. English and numeric objects should have text path right.
Display Text Path { Hebrew | Right }Field HEBREW_FIELD
Line 7
Column 1
Display
Text Path Hebrew
Font Size Double High
Output Picture X(35)
End FieldApply { Field | Literal } Default of
Display
Text Path Hebrew
End defaultIn the Panel Editor, use the Display Attributes menu to set or modify the Text Path attribute. A Text Path pull-down menu has been added for this purpose.
Set Text Path { Hebrew | Right }Modify Selected [Objects] Text Path { Hebrew | Right }A new Text Path field indicator is defined in the status line, showing the current text path as either Hebrew or Right. If the cursor is positioned on a text object, the indicator shows the object's text Path. Otherwise, it shows the default text path for newly created text objects.
When the cursor is located on the adjacent position of a text object(that is, one position to the left of a Hebrew literal or to the right of a non-Hebrew literal), the indicator shows the default text path. However, if a character is typed in, it becomes a part of that object and inherits the object's text path.
When the Text Path indicator indicates Hebrew,characters are entered from right to left. Therefore, Hebrew background text should always be created with the Text Path Hebrew attribute. Entry Mode is automatically set to Hebrew Insert, because Hebrew Overstrike is not implemented.
The initial Text Path default is Right. You can change the default by setting an initialization command script that performs ’Set Text Path Hebrew’ whenever the Panel Editor is invoked. The logical name FORMS$EDIT_INIT points to this script file, as described in the VSI DECforms Guide to Commands and Utilities.
E.2.2. Character Set
Hebrew 7-bit NRC for VT100/Hebrew terminals
DEC Hebrew 8-bit for VT200/Hebrew and VT320/Hebrew terminals
DEC Hebrew 8-bit or ISO_Hebrew for VT330-340/Hebrew and terminal emulators that support ISO_Hebrew
DEC Hebrew 8-bit or ISO_Hebrew for VT400/Hebrew and terminal emulators that support ISO_Hebrew
Hebrew 7-bit is supported on VT100-class or on other terminals, under VT100 mode only. That is, to work in a 7-bit Hebrew environment,VT200-, VT300-, and VT400-type terminals must be defined as VT100 in the OpenVMS operating system by the DCL command SET TERM, as well as in the terminal setup.
The same layout can run on VT100-, VT200-, VT300- VT400-type Hebrew terminals. In this case, to ensure that the layout is properly displayed on both 7-bit and 8-bit terminals,all Hebrew text items such as background text and messages must be 8-bit Hebrew character strings.
When 8-bit Hebrew text items are used for purposes other than display, they are not converted into 7-bit Hebrew when running on VT100-type terminals. For example, you cannot compare range values for field validation specified in 8-bit Hebrew with 7-bit Hebrew input. In this case you must define separate layouts for 7-bit and 8-bit devices.
You can also explicitly specify the Hebrew character set for fields and literals, as you can specify any other character set supported by DECforms software. The character set name PRIVATE_DEC_HEBREW has been added to the IFDL syntax and to the Panel Editor (PED) Character Set menu. This character set is interpreted as Hebrew 7-bit or Hebrew 8-bit according to the actual terminal, as described above for User Preference.
E.2.3. Logical/Physical Order
Data can be stored in a Hebrew field in logical or physical order.
Hebrew field on screen: LATIGID /* where "LATIGID" is "HP" in Hebrew */
Field picture is X(8):  XXXXXXXX
| Memory Offsets |
Logical Order |
Physical Order |
|---|---|---|
|
0000: |
D | |
|
0001: |
I |
L |
|
0002: |
G |
A |
|
0003: |
I |
T |
|
0004: |
T |
I |
|
0005: |
A |
G |
|
0006: |
L |
I |
|
0007: |
D |
The default order for a Hebrew field is logical order. Logical order is required for search, sort, and compare data manipulations.
To store data in physical order, the Hebrew record field should have a CHARACTER REVERSED data type. This data type may be specified for record fields only, within the record definition in the IFDL file. It may not be specified for form data items.
When the application calls the form with a record, the physical order data that corresponds to a character reversed record field is inverted into logical order. The form sees the data in logical order only, and manipulates it in the same manner as logical order fields.
Within the form, the developer always refers to record field data as logical order data, and can implement data operations supported by the IFDL regardless of the order needed for the application.
When the form calls back the application with the record, an inversion takes place again, from logical into physical order.
The reverse operation takes place in the Data Distribution phase. The form data field associated with the character reversed record field must be a character field, and the reverse operation may occur between CHARACTER REVERSED and CHARACTER data types only.
Character Reversed(n) [VARYING | NULL TERMINATED]
Oracle CDD/Repository software does not support this data type. Therefore, you cannot store or fetch a record definition that contains Character Reversed fields from Oracle CDD/Repository software.
E.3. Hebrew Icons
A Hebrew icon is an icon that uses the Text Path Hebrew attribute. The cursor is positioned on the right lower corner of a Hebrew icon at run time. In an icon on a non-Hebrew terminal, the cursor is positioned on the left lower corner of the icon.
Icon OK
    Display
      Text Path Hebrew
    Literal Text
      Line 11 Column 10
      Value "Hebrew-text"
      Display
        Text Path Hebrew
        Bold
    End Literal
    Literal Rectangle
      Line 9  Column 3
      Line 13 Column 19
    End Literal
End Icon
In the Panel Editor, an icon is created with the default Text Path as a field or a text literal. To modify an icon's text path, you must first select the icon. You cannot select an icon by moving the cursor and pressing the Select key: you can select an icon using only a Select All, Select [Marked] Area, or Select Named command.
Select All and Select [Marked] Area select only the icons, not the literal objects within the icons. In this case,the Modify Text Path command affects only the icon, not the literals that belong to the icon. Text Path differs from other elementary attributes in this regard. For example, when you select an icon and modify the video attributes,the literals, not the icon, are modified.
When creating a Hebrew icon in the Panel Editor, the text literals selected for the icon must be of Text Path Hebrew. If non-Hebrew literals are required within a Hebrew icon, you must define those in the IFDL, with a Text Path Right attribute explicitly assigned to them. Otherwise the literals inherit the Text Path Hebrew attribute from the icon.
Neither Hebrew text in a non-Hebrew icon nor a non-Hebrew literal in a Hebrew icon can be edited interactively. When the cursor is positioned on a literal that belongs to an icon, the status line shows the Text Path of the icon, together with the icon name, and not the Text Path of the literal. The Entry Mode is determined according to the icon Text Path.
The Text Path attribute can also be inherited from a higher level object,as can any other elementary attribute. The DISPLAY TEXT PATH HEBREW clause specified at the panel level sets the default text path to Hebrew for all lower level objects within the panel. This may be helpful, especially for using icons.
E.4. Hebrew Values in Fields
A value specified in an IFDL file may be assigned to a form data item as a default value, or dynamically, during execution, as in any other high-level programming language.
A value assigned to a Hebrew data item should be specified in logical order value. This is also true for values that are compared to Hebrew data items, or have any other relation to the content of a Hebrew data item.
Logical order Hebrew values specified in the IFDL file are Hebrew strings written from left to right. The first Hebrew character of the value is the leftmost one, and the last Hebrew character is the rightmost one. Hebrew background text and Hebrew messages, however, are written in a readable Hebrew format in the IFDL.
To avoid this inconvenience of logical order, the syntax of the LET response step has been expanded to include a reverse option. The reverse option allows you to specify a Hebrew string in physical order, as a source for a LET response step, and to store the value in logical order within a destination variable. The variable can then be used in data manipulations.
LET
     Variable = %REV ( 'Readable_Hebrew_string' )
The LET response step can be used to assign default values to data items,to create search lists, and in most instances, to specify a character string.
Data items can also store physical order Hebrew data for other purposes. To store data items used in a Hebrew message in physical order, do not use the reverse option of the LET statement.
The reverse option can also be useful for converting from logical into physical order, for example, when the content of a Hebrew data item is to be displayed in a message. (Section E.7, ''Hebrew Messages'' contains an example.)
In general, the %REV function is required only when dealing with data item values. All other Hebrew items, such as text literals, messages, field pictures,should be specified in physical order, that is, as they are displayed at run time.
E.5. Hebrew Fields and Literals Column Clause
The column specified for fields and literals is always the leftmost column,regardless of the object's text path. The column indicates the starting position of the field in the panel definition environment, which is left-to-right oriented.
The {Next}, {+n}, and {-n} expressions in the COLUMN clause are always implemented in the left-to-right direction.
Field ENGLISH_FIELD
    Line 7    Column 1
    Output Picture X(40)
End Field

Field HEBREW_FIELD
    Same Line
     Next Column
     Display
      Text Path Hebrew
    Output Picture X(40)
End Field
E.6. Hebrew Pictures and Justification
Output Picture XXXX99
PIC 99XXXX
Hebrew text fields are right justified by default. The option of specifying a nondefault justification to a Text Path Hebrew field is disabled. Such an attempt results in an error message. Symmetrically, a Text Path Hebrew default is not applied to a field that has specified justification explicitly.
E.7. Hebrew Messages
Hebrew messages should be displayed in a Hebrew message panel, which is a panel that uses the Text Path Hebrew attribute. In a Hebrew panel, the line wrapping is done from left to right and the message is right justified. For example, in a Hebrew message panel the leftmost word of a line is wrapped to the rightmost position of the next line.
Message Panel MESSAGE_PN
    Viewport MESSAGE_VP
    Display
      Text Path Hebrew
End Panel
If you do not define your own message panel, DECforms creates a default message panel, one per layout. For a layout intended to run on a Hebrew terminal, the default message panel is created with a Text Path Hebrew attribute. Changing from a non-Hebrew terminal to a Hebrew terminal (or conversely) with the FDE updates the Text Path attribute of the default message panel (if one exists).
Messages are composed of text literals and data items. The Hebrew literals are written in physical order, that is, in a normal readable Hebrew format.
Let
  Customer_Name_Msg = %REV( Customer_Name_Field )

Message
  Customer_Name_Msg ":Hebrew-text"
Hebrew messages can also contain non-Hebrew items; however,wrapping is not language sensitive and all text items in a Hebrew message panel are wrapped in the left-to-right direction.
E.8. Bidirectional Editing in a Panel Field
Bidirectional input in a field is implemented by a Push mode. This mode enables you to enter English or numeric text in a Hebrew field, and Hebrew text in an English field.
A new built-in function has been defined for this purpose, INSERT PUSH. The function works in exactly the same way as the INSERT OVERSTRIKE function, and toggles Insert mode and Push mode.
Function INSERT PUSH
    IS %F17
End Function
Pressing F17 in a textual field, Hebrew or non-Hebrew, sets the entry mode to Push mode. Characters entered in Push mode are pushed against the field direction (Text Path). Pressing this key a second time terminates Push mode. The entry mode is switched to Insert and the cursor is moved to the end of field.
The mix of languages does not affect the logical/physical order of data or any other field attribute. The form treats the data as it appears on the screen, regardless of the typing order of characters.
Hebrew field picture:                           XXXXX
Two characters entered into a Hebrew field:        eH
Cursor location:                                  -
Push mode key is pressed, cursor does not move:   -
Three digits entered in push mode:              902eH
Cursor location:                                  -
Table E.2, ''Typing Characters in Hebrew Fields'' shows the memory offsets, logical order buffer,and physical order buffer of the characters typed in the previous example.
|
Memory Offsets |
Logical Order |
Physical Order |
|---|---|---|
|
0000: |
H |
9 |
|
0001: |
e |
0 |
|
0002: |
2 |
2 |
|
0003: |
0 |
e |
|
0004: |
9 |
H |
This function is available also in the FDE and should help you enter Hebrew values, such as comments and messages, interactively.
E.9. Activation Order in a Hebrew Form
The activation order of fields in a panel is the order in which the fields are created, unless you change it.
To modify the activation order of fields using the Panel Editor, first select the objects in the required order, then enter an Order Selected Objects command.
For a non-Hebrew panel, the default order should be left to right, top to bottom. For a Hebrew panel, the default order should be right to left, top to bottom. To set the appropriate default, a new Panel Editor command has been implemented.
Set Origin [Mode] { Left | Right }Left is intended for non-Hebrew and Right is for Hebrew.
Because the Origin Mode affects selection order, determine the Origin Mode before you select the objects. Then enter the Order command.
Setting the Origin Mode does not affect the internal order of horizontal group occurrences. The Select command treats these occurrences as one group. To process the horizontal occurrences from right to left,use an activation list. For information on activating panel groups for input, see the VSI DECforms Guide to Commands and Utilities.
Position Next { Object | Word }Position Previous { Object | Word }When the Origin Mode is Right, the objects and words are scanned in the right-to-left, top-to-bottom direction for Next, and in the left-to-right, bottom-to-top direction for Previous.
In addition, the Return key function determines the next line starting position according to the Origin Mode. For Origin Mode Right, the cursor is in the rightmost position.
Columns in the Panel Editor are always numbered from left to right, regardless of the Origin Mode. You should make all references to column numbers, such as the starting position of an object, the Position Horizontal command, the plus (+) and minus (–) operators, in the same manner for Origin Mode Left and Right.
E.10. LSE Support
Text Path attribute
CHARACTER REVERSED data type
INSERT PUSH built-in function
LET response step %Reverse declaration
PRIVATE_DEC_HEBREW character set
E.11. DEC FMS to DECforms Forms Conversion
You can convert DEC FMS (Forms Management System) Hebrew screen layouts to DECforms forms, but FMS Hebrew field attributes are not converted. You must assign the Text Path Hebrew attribute to Hebrew fields and text literals manually. In FMS, Hebrew background text does not use any Hebrew attributes; in DECforms it does.
FMS Hebrew fields are physical order fields by default. DECforms default order for Hebrew record fields is logical order. Also, in FMS, order is a field attribute. In DECforms, order is a record field data type.
You should also specify the Hebrew terminal in the DEVICE declaration.
When converting from FMS Version 2.2 or previous versions, FMS Hebrew fields are converted to Concealed (Noecho) fields. It is recommended that you upgrade from FMS Version 2.2/Hebrew to FMS Version 2.3/Hebrew before converting to DECforms/Hebrew.
For more information on how to upgrade Hebrew forms, see the FMS Version 2.3 Hebrew User's Guide.
E.12. Hebrew Installation Notes
The DECforms installation process on OpenVMS systems places the Hebrew run-time message file in SYS$MESSAGE:FORMS$MSGMGRSHR_HEBREW.EXE.
The English run-time message file is found in SYS$MESSAGE:FORMS$MSGMGRSHR.EXE.
DECforms uses the English message file by default. To use the Hebrew messages, the system manager should physically replace the English file with the Hebrew file, and then reinstall the image by performing @FORMS$STARTUP.
The user can also use the logical name FORMS$MSGMGRSHR to point to the desired language-specific message file.
Appendix F. Built-In Functions
Built-in functions and their default key bindings
Default response syntax for the built-in functions
Contextual, or special-case, built-in functions
Character-cell considerations for function key bindings
System reserved keys
For more information about built-in functions, including a description and syntactical use, see the description of the BUILTIN FUNCTION clause.
F.1. Default Key Bindings for Built-in Functions
Table F.1, ''Default Key Bindings for Built-In Functions'' lists, in alphabetical order, each built-in function name for which DECforms provides at least one default key binding, followed by the key binding.
Key bindings enclosed in parentheses (()) indicate character-cell key sequences.
Key bindings containing a plus sign (+) indicate chorded key bindings for window devices.
Key bindings separated by commas (,) indicate that there is more than one default binding for the function on that particular system.
|
Function Name |
Key Binding | |
|---|---|---|
|
Character-Cell Function |
Window Function | |
|
CURSOR DOWN ? |
%DOWN |
%DOWN |
|
CURSOR LEFT? |
%LEFT |
%LEFT |
|
CURSOR RIGHT? |
%RIGHT |
%RIGHT |
|
CURSOR UP? |
%UP |
%UP |
|
DELETE CHARACTER? |
%DELETE |
%DELETE |
|
DOWN ITEM |
(%PF1 %DOWN) |
%CONTROL + %SHIFT + %PF4 |
|
DOWN OCCURRENCE |
(%PF4 %DOWN) |
%CONTROL + %PF4 |
|
ERASE FIELD |
%LINE_FEED,%F13? |
Not Available |
|
EXIT GROUP NEXT |
(%PF4 %HORIZONTAL_TAB), (%PF4 %CARRIAGE_RETURN), (%PF4 %KP_ENTER) |
%SHIFT + %PF2 |
|
EXIT GROUP PREVIOUS |
(%PF4 %BACKSPACE) |
%SHIFT + %PF1 |
|
INSERT LINE? |
(%PF1 %CARRIAGE_RETURN) |
%RETURN %CONTROL + %RETURN |
|
INSERT OVERSTRIKE? |
%CONTROL_A, %F14? |
Not Available |
|
INSERT PUSH |
(%RECORD_SEPARATOR) |
%F17 |
|
LEFT ITEM |
(%PF1 %LEFT) |
%CONTROL + %SHIFT + %PF1 |
|
LEFT OCCURRENCE |
(%PF4 %LEFT) |
%CONTROL + %PF1 |
|
NEXT HELP |
%PF2, %HELP? |
%HELP |
|
NEXT ITEM |
%HORIZONTAL_TAB, %CARRIAGE_RETURN, %KP_ENTER |
%PF4 |
|
NEXT PANEL |
(%PF1 %PF4), %NEXT_SCREEN? |
%SHIFT + %PF4 |
|
PREVIOUS ITEM |
%BACKSPACE, %F12? |
%PF3 |
|
PREVIOUS PANEL |
(%PF1 %PF3), %PREV_SCREEN ? |
%SHIFT + %PF3 |
|
REFRESH DISPLAY |
%CONTROL_R, %CONTROL_W |
Not Available |
|
RIGHT ITEM |
(%PF1 %RIGHT) |
%CONTROL + %SHIFT +%PF2 |
|
RIGHT OCCURRENCE |
(%PF4 %RIGHT) |
%CONTROL + %PF2 |
|
TERMINATE HELP |
(%PF1 %PF2), (%PF1 %HELP)? |
%CONTROL + %HELP |
|
TRANSMIT |
%CONTROL_Z, %CONTROL_D, %F10? |
%CONTROL + %SMALL_D, %CONTROL + %CAPITAL_D, %CONTROL + %SMALL_Z, %CONTROL + %CAPITAL_Z |
|
UP ITEM |
(%PF1 %UP) |
%CONTROL + %SHIFT + %PF3 |
|
UP OCCURRENCE |
(%PF4 %UP) |
%CONTROL + %PF3 |
F.2. Response Syntax for Built-In Functions
The following sections show the default response syntax for the built-in functions used for navigation and intrafield editing.
F.2.1. Navigation Functions
- DOWN ITEM
Function Response DOWN ITEM If LOWERMOST ITEM Then Message %NO_DOWN_ITEM Else Position To DOWN ITEM End If End Response - DOWN OCCURRENCE
Function Response DOWN OCCURRENCE If LAST OCCURRENCE VERTICAL Then Message %NODOWNOCC Else Position To DOWN OCCURRENCE End If End Response - EXIT GROUP NEXT
Function Response EXIT GROUP NEXT Position To EXIT GROUP NEXT End Response - EXIT GROUP PREVIOUS
Function Response EXIT GROUP PREVIOUS Position To EXIT GROUP PREVIOUS End Response - LEFT ITEM
Function Response LEFT ITEM If LEFTMOST ITEM Then Message %NO_LEFT_ITEM Else Position To LEFT ITEM End If End Response - LEFT OCCURRENCE
Function Response LEFT OCCURRENCE If FIRST OCCURRENCE HORIZONTAL Then Message %NOLEFTOCC Else Position To LEFT OCCURRENCE End If End Response - NEXT HELP
Function Response NEXT HELP If HELP MESSAGE AVAILABLE Then Message Help Else If HELP PANEL EXISTS Then Enter Help Else If HELP ACTIVE Then Message %NO_MORE_HELP Position To CURRENT ITEM Else If HELP MESSAGE EXISTS Then Message %NO_MORE_HELP Position To CURRENT ITEM Else Message %NO_HELP_AVAIL End If End If End If End If End Response - NEXT ITEM
Function Response NEXT ITEM If LAST ITEM Then Message %NO_NEXT_ITEM Else Position To NEXT ITEM End If End Response - NEXT PANEL
Function Response NEXT PANEL Position To NEXT PANEL End Response - PREVIOUS ITEM
Function Response PREVIOUS ITEM If FIRST ITEM Then Message %NO_PREV_ITEM Else Position To PREVIOUS ITEM End If End Response - PREVIOUS PANEL
Function Response PREVIOUS PANEL Position To PREVIOUS PANEL End Response - REFRESH DISPLAY
Function Response REFRESH DISPLAY REFRESH ALL End Response - RIGHT ITEM
Function Response RIGHT ITEM If RIGHTMOST ITEM Then Message %NO_RIGHT_ITEM Else Position To RIGHT ITEM End If End Response - RIGHT OCCURRENCE
Function Response RIGHT OCCURRENCE If LAST OCCURRENCE HORIZONTAL Then Message %NORIGHOCC Else Position To RIGHT OCCURRENCE End If End Response - TERMINATE HELP
Function Response TERMINATE HELP If HELP ACTIVE Then Exit Help Else Message %HELP_INACTIVE End If End Response - TRANSMIT
Function Response TRANSMIT If HELP ACTIVE Then Exit Help Else Return End If End Response - UP ITEM
Function Response UP ITEM If UPPERMOST ITEM Then Message %NO_UP_ITEM Else Position To UP ITEM End If End Response - UP OCCURRENCE
Function Response UP OCCURRENCE
    If FIRST OCCURRENCE VERTICAL Then
        Message
            %NOUPOCC
    Else
        Position To UP OCCURRENCE
    End If
End Response
F.2.2. Intrafield Editing Functions
CURSOR DOWN
CURSOR LEFT
CURSOR RIGHT
CURSOR UP
DELETE CHARACTER
ERASE FIELD (not available in window layouts)
INSERT LINE
INSERT OVERSTRIKE (not available in window layouts)
INSERT PUSH
F.3. Contextual Built-in Functions
The following sections describe special built-in functions. These functions are not listed in Table F.1, ''Default Key Bindings for Built-In Functions'' because there are no default key bindings for them.
In each case, the response is not bound to a specific key, but reflects a particular context; it may depend on the cursor context, it may do nothing by default (and output a message to that effect), or it may depend on the windowing environment.
You cannot bind contextual functions to a key, but you can declare a different response.
F.3.1. Character-Cell Functions
The following functions are used in character-cell layouts only.
BOUNDARY Functions
- BOUNDARY CURSOR DOWN
Function Response BOUNDARY CURSOR DOWN
  Message %CANTMOVEDOWN
End Response
- BOUNDARY CURSOR LEFT
Function Response BOUNDARY CURSOR LEFT
  Message %CANTMOVELEFT
End Response
- BOUNDARY CURSOR RIGHT
Function Response BOUNDARY CURSOR RIGHT
  Message %CANTMOVERIGHT
End Response
- BOUNDARY CURSOR UP
Function Response BOUNDARY CURSOR UP
  Message %CANTMOVEUP
End Response
- BOUNDARY DELETE LEFT
Function Response BOUNDARY DELETE LEFT
End Response
BUILTIN Function
Function Response BUILTIN FUNCTION
End Response
UNDEFINED Function
Function Response UNDEFINED FUNCTION
    Message %NO_FUNC_RESPONSE
End Response
USER Function
F.3.2. Window Functions
DECwindows Motif systems define certain mouse actions and keystrokes to provide the following special functions, used only in window layouts. See Section F.5, ''Window Considerations for Function Key Bindings'' for information about focus change processing (FOCUS CHANGE) and processing associated with the locator (TRIGGER OBJECT and VALUE CHANGE).
FOCUS CHANGE
Function Response FOCUS CHANGE
    Position Immediate to FOCUS CHANGE
End Response
TRIGGER OBJECT
Function Response TRIGGER OBJECT
End Response
VALUE CHANGED
F.4. Character-Cell Considerations for Function Key Bindings
Rebinding NEXT ITEM and INSERT LINE
- If you use the defaults for all DECforms built-in functions, note that:
The NEXT ITEM function is bound by default to the Return,Tab, and Enter keys (%CARRIAGE_RETURN, %HORIZONTAL_TAB, %KP_ENTER) on the keypad.
The Enter key is distinguished from the Return key on character-cell keyboards only when the keypad is in application mode.
The INSERT LINE function is bound by default to the key sequence PF1/Return (%PF1 %CARRIAGE_RETURN).
Because of the default bindings, the operator must press a two-key sequence (PF1/Return) to invoke the function INSERT LINE.
To allow the operator to press only the Return key to invoke INSERT LINE, enter the following at the layout level:Function Insert Line Is %RETURN End Function Builtin Function Response NEXT ITEMThe line "Builtin Function Response NEXT ITEM " is necessary to reestablish the Return, Enter, and Tab keys as the NEXT ITEM function for the rest of the form.
In the text field, enter the following:Builtin Function Response INSERT LINE
This function response has the effect of accepting the Return key as the INSERT LINE function because the Form Manager sees the INSERT LINE function first (at the text field level) as it searches up the hierarchy to find a function response that applies to the key.
Now the operator must press the Tab key from the keypad to invoke the NEXT ITEM function. Depending on the keypad mode setting, the Enter key is interpreted as follows:If keypad mode is %KEYPAD_APPLICATION, the Enter key is interpreted as Enter, which invokes the NEXT ITEM function.
If keypad mode is %KEYPAD_NUMERIC, the Enter key is interpreted as Return, which invokes the INSERT LINE function.
You can determine which keypad mode is in effect by using the DISPLAY clause in the text field.
Function Key Processing for Text Processing
For the object that is the current activation item (field or push button), looks at all the function responses declared in that object. If the name of the function is bound to the key, the Form Manager executes that function response and stops searching.
If the object is in a group, searches the group function responses. Because groups may be nested, the Form Manager searches each level of the nesting from the deepest up to the panel level. If any function response is found bound to the key, the Form Manager executes that function response and stops searching.
Searches the panel level. If any function response is found bound to the key, the Form Manager executes that function response and stops searching.
Searches the layout level. If any function response is found bound to the key, the Form Manager executes that function response and stops searching.
- If no function has been found by this time, searches the DECforms defaults, in two stages:
Searches the rebound built-in functions (these are built-in functions that the form has changed to keys other than the DECforms defaults). If any function response is found bound to the key, the Form Manager executes that function response and stops searching.
Searches the built-in functions that still have the original DECforms bindings. If any function response is found bound to the key, the Form Manager executes that function response and stops searching.
F.5. Window Considerations for Function Key Bindings
Focus Change Processing
Focus is another name for the current activation item. An item has focus if it will receive input from the keyboard. Focus change is an event outside normal keyboard processing intended to change focus.
The operator brings a window to the top by clicking on the banner or other non-DECforms active part of the window,or by entering the system-reserved keystrokes for changing the window that has focus. The windowing system selects an item in the window to receive the focus—either the last active item in that window that had focus or, in the case of the first display of the window, the first active item in the window.
A window belonging to another process goes away (because it is deleted or minimized) and the windowing system assigns focus to a DECforms window. Again, the windowing system selects an item to receive focus.
The operator positions the locator in a field or push button and presses MB1. The MB1 down click is the focus change event. See the section called “Locator Processing” for the action of releasing MB1.
You cannot rebind the FOCUS CHANGE function to any keys. The function is generated by DECforms interpreting messages from the windowing system. On DECwindows Motif systems, the function also may be generated by a function key not recognized by DECforms, but used by Motif for its own navigation.
Focus Change Processing from the Locator
Locator is a generic term that refers to a pointing mechanism, such as a mouse or track ball.
If a focus change is directed to the current activation item, the Form Manager does nothing (it ignores the event), because focus is where it belongs.
If a focus change is not directed to the current activation item, the Form Manager executes the FOCUS CHANGE function response. The default response is POSITION IMMEDIATE TO Focus Change. The normal accept phase processing for this response step is to exit the current activation item without further validation and to make the item receiving focus the new current activation item.
You can override the default behavior by declaring a function response at any level. Because the Form Manager delivers a FOCUS CHANGE function to the current activation item, that item (or its ancestors) may choose an action different than the default by specifying its own FOCUS CHANGE function response. That item might, for example, specify a null function response so that the locator button has no effect (does not change focus – effectively nullifying the effect of the focus change event, trapping focus in this activation item). Alternately, the item might specify POSITION TO Focus Change, allowing the refocusing to take place only if no validation failure occurs on the current activation item.
The response POSITION...TO Focus Change has effect only while the FOCUS CHANGE function response is being executed; it is ignored at other times.
Focus Change Processing from the Keyboard
On DECwindows Motif systems, the Tab and the Shift/Tab keys are not defined by default for navigation. Motif interprets these keys as Motif keyboard transversal, meaning that Motif selects another active item on the same panel to be the next recipient of focus (a FOCUS CHANGE function in DECforms terms).
DECforms uses the functions NEXT ITEM and PREVIOUS ITEM to provide item-to-item navigation. The DECforms functions are not necessarily bound to the same panel. The default for NEXT ITEM, when the current activation item is the last item on the panel, is to go to the next panel, if any. Similarly, the default for PREVIOUS ITEM, when the current activation item is the first item on the panel, is to go to the previous panel, if any. This navigation is useful in heavy data entry situations where the operator is continuously typing fields that are located across several panels.
You can override this behaviour, and program behavior similar to the Motif behavior,by using the conditions PANEL FIRST ITEM and PANEL LAST ITEM.
Also, you can rebind the NEXT ITEM function to the Tab key but you should be aware that, by so doing, the Tab key no longer gives the default Motif traversal behavior. (The Ctrl/Tab keys still yield Motif traversal.)Similar considerations apply to the PREVIOUS ITEM function. You should consider whether the consistent Motif behavior of the Tab key is more important than the additional functions provided by DECforms.
Locator Processing
On DECwindows systems, DECforms does not let you associate user-defined functions with the locator. It does, however, provide several types of processing with the locator: window manipulation, text selection, slider value change, the FOCUS CHANGE function,and the TRIGGER OBJECT function for push buttons.
DECforms provides window manipulations using locators consistent with the platform. Manipulations include the ability to move, raise, lower, minimize, or maximize windows, and to pan windows, arrays, and text fields using scroll bars. These features are available automatically whenever the IFDL specifies the enabling display objects: decorations for viewports and scroll bars for panels, text fields, and panel groups.
DECforms supports use of the locator to select items from picture fields or text fields for cutting or copying to the clipboard and from the clipboard. These functions are available automatically, without any syntax needed in the IFDL. Cutting and pasting are considered intrafield editing operations and can be executed only on active items; Appendix G, "Intrafield Editing Functions" describes the specific functions recognized.
The operator can use the locator to move the slider indicator, changing a slider field's value. This operation is available automatically, as an implied intrafield editing operation for slider fields. If the operator changes the value of the slider, either by moving the slider indicator or by changing the slider value from the keyboard, the Form Manager executes the VALUE CHANGED function.
When the operator positions the locator in a DECforms window and clicks a locator button, that action can generate zero, one, or two DECforms functions. The actual mechanism is easier to understand if you realize that a button click consists of two separate actions: a down click and an up click. These two actions generate two events, which the Form Manager turns into DECforms functions.
If the locator is not within the current activation item when the down click occurs, the Form Manager generates the FOCUS CHANGE function for the current activation item, which is processed as described previously, possibly changing the current activation item. If the locator is within the current activation item, the Form Manager does nothing on the down click.
After all the processing for the down click, including the complete processing for any FOCUS CHANGE function, the Form Manager takes care of the up click event. (The current activation item for the up click and the down click may be different.) If the up click occurs in the current activation item and that is the same item in which the down click occurred and if the current activation item is a push button, the Form Manager generates a TRIGGER OBJECT function; otherwise, the Form Manager ignores the up click.
- The locator is outside the current activation item and is not on an active item:
If the locator is in the same panel as the current activation item, nothing happens (no functions are executed, either on down click or on up click).
If the locator is in a different panel than the current activation item, the FOCUS CHANGE function is executed. No matter where the up click occurs, nothing happens.
The locator is outside the current activation item and is on an active item that is a push button:
The FOCUS CHANGE function is executed. If the up click happens in the same item as the down click and if that item has become the current activation item, the TRIGGER OBJECT function is executed. For either of the following situations, no function is executed on the up click: the item pointed to by the locator does not become the current activation item or the operator moves the locator out of the item before the up click.
The locator is outside the current activation item and is on an active item that is not a push button:
The FOCUS CHANGE function is executed. No matter where the up click occurs, nothing happens.
The locator is inside the current activation item:
No FOCUS CHANGE function is executed for the down click. If the up click occurs when the locator is in the same item and it is a push button, the TRIGGER OBJECT function is executed. If the operator moves the locator out of the current activation item and then performs the up click, or if the current activation item is not a push button, the TRIGGER OBJECT function is not executed.
Keypad Function Key Bindings
Use of the numeric keypad is different for window devices than it is for character-cell devices.
DECwindows Motif Systems—The keypad on LKxxx keyboards contains 18 keys. The top row of keys, labelled PF1, PF2, PF3, and PF4, and the Enter key are treated as function keys on DECwindows Motif systems. The remaining 13 keys—0 to 9, minus (–), comma ( , ), and period ( . )—can be used either as numeric keys or function keys. The choice of numeric or function keys must be made, for the most part, once per application; it cannot be changed depending on context.
To use the keypad for data entry of numbers, you should not define any functions using those 13 keys (%KP_0 to%KP_PERIOD).
To use the keypad as function keys, you can define functions using the keys. However, once a keypad key has a function response defined for it, no object in the scope of the response can use the key for data entry; the key always generates a function. If you define even one of the numeric keys on the keypad as a function, the keypad essentially cannot be used for numeric data entry, because that key can no longer be used as a number. The operator could, of course, enter the digit from the main keyboard, but that would be awkward, a misuse of the keypad, and bad input design.
It is possible to define the three keys %KP_MINUS, %KP_COMMA, and %KP_PERIOD as functions and still be able to use the numbers on the keypad to enter data. However, the main keyboard then must be used to enter a minus, comma, or period. If your numbers are not signed and do not have decimal points, the preceding may be a useful alternative for you, but if you want to use the keypad for entry of numeric, signed, decimal data, VSI recommends you not use any keypad keys as functions.
Keyboard Function Key Bindings
LK201 keyboards cannot recognize three chording keys simultaneously. For example, the LK201 keyboard cannot generate the code for key sequences involving the Ctrl key, the Shift key, the Alt key, and some other key at the same time.
Though other keyboards do not have this restriction, VSI recommends that you not use such function bindings.
F.5.1. System-Reserved Keys
|
Meaning |
DECwindows Motif Default |
|---|---|
|
Expand an icon into its window |
Alt/F5 |
|
Start move window mode |
Alt/F7 |
|
Start resize window mode |
Alt/F8 |
|
Shrink current window to an icon |
Alt/F9 |
|
Expand window size to whole screen |
Alt/F10 |
|
Push window behind all others |
Alt/F3 |
|
Close application |
Alt/F4 |
|
Switch to last application used, and then to next application |
Alt/Tab |
|
Switch to previous application |
Alt/Shift/Tab |
|
Open control menu for application |
Shift/F11 |
|
Move to next window in window family |
Alt/F6 |
|
Move to previous window in window family |
Alt/Shift/F6 |
|
Console mode |
Ctrl/*?/F2 |
|
Next window |
Alt/F11 |
|
Open control menu |
Alt/Select |
|
Previous window |
Alt/Shift/F11 |
|
Pseudo mouse mode |
Ctrl/Shift/F3 |
|
Toggle |
Ctrl/Alt/1 |
|
Reserved |
Ctrl/Alt/F1 |
|
Reserved |
Ctrl/Alt/F4 |
|
Reserved |
Ctrl/Alt/F14 |
|
Reserved |
Ctrl/Alt/Help |
|
Reserved |
Ctrl/Alt/Do |
|
Reserved |
Ctrl/Alt/F17 |
|
Reserved |
Ctrl/Alt/F18 |
|
Reserved |
Ctrl/Alt/Find |
|
Reserved |
Ctrl/Alt/Insert |
|
Reserved |
Ctrl/Alt/Remove |
|
Scroll bar up? |
Prev Screen Ctrl/Alt/Left Arrow |
|
Scroll bar down? |
Next Screen Ctrl/Alt/Right Arrow |
|
Scroll bar left? |
Alt/Left Arrow Ctrl/Prev Screen |
|
Scroll bar right? |
Alt/Right Arrow Ctrl/Next Screen |
F.5.2. OpenVMS System Function Keys
Certain Control key functions on OpenVMS systems are bound to a particular action. To define DECforms functions that use those Control key combinations, you must perform additional setup beyond what is specified in the form itself.
For information about changing terminal driver characteristics and key bindings so you can enable these system function keys for DECforms use, see your operating system documentation.
Appendix G. Intrafield Editing Functions
Intrafield editing functions are built-in functions that you use to enter and edit data in an elementary display object such as a field or push button label. The meaning of each function is defined based on the type of device you are using; DECforms does not let you declare a function response for these functions.
Intrafield editing functions are context-sensitive; the function might perform different editing for different display objects. In some cases (for example, push buttons), an intrafield editing function might not be meaningful and is ignored if it is the applicable function.
Character-cell intrafield editing functions
Window intrafield editing functions
Keys reserved in window layouts
G.1. Intrafield Editing Functions for Character-Cell Devices
The Form Manager provides intrafield editing keys that allow the operator to move the cursor within a field, to erase the field, and to delete characters. You can override the default keys by rebinding new keys to the functions.
|
Function |
Meaning |
Default Key |
|---|---|---|
|
PICTURE FIELD | ||
|
Cursor Left Cursor Right |
Move the cursor in the direction specified; arrow keys automatically skip over insertion literals |
Left Arrow Right Arrow |
|
Delete Character |
Delete the previous character |
Delete |
|
Erase Field |
Erase the contents of the field; fill each picture character with the default character for the element |
Ctrl/J F13 |
|
Insert Overstrike |
Toggle insertion mode between insert and overstrike |
Ctrl/A F14 |
|
TEXT FIELD | ||
|
All those in PICTURE FIELD | ||
|
Cursor Up Cursor Down |
Move the cursor in the direction specified; arrow keys automatically skip over insertion literals |
Up Arrow Down Arrow |
|
Insert Line |
Insert a new-line character into the form data item and reformat the text field |
Return |
G.1.1. Data Entry and Editing Details
The following sections provide additional details about the operations associated with intrafield editing and data entry.
Using Insert and Overstrike Mode
In overstrike mode, data characters that the operator enters into a field overstrike the character in the current cursor position. After each character is entered, the cursor moves right to the next data position. If the cursor is not over a data position, an error is generated.
If AUTOSKIP processing was specified and the cursor is forced to move into the hanging cursor position after entering data into the rightmost data position (the position one character cell to the right of the last data position) in the field, an AUTOSKIP condition occurs.
In left justified insert mode, data characters that you enter into the field cause all data characters to the right of the cursor to be shifted one position to the right. The character entered then is inserted in the data position under the cursor and the cursor moves right one data position.
If the field is full before the character is entered into the field, afield full condition occurs. If entering the data character into the field causes the field to become full, and if AUTOSKIP processing was specified, an AUTOSKIP condition occurs.
In right justified insert mode, data characters that the operator enters into the field cause all data characters from the cursor position to be shifted one position to the left. The character entered then is inserted in the data position under the cursor. If the field is full before the character is entered into the field, afield full condition occurs. If entering the data character into the field causes the field to become full, and if AUTOSKIP processing was specified, an AUTOSKIP condition occurs.
Entering Periods or Commas
If the field in which data is being entered is a Format 2 field and the operator enters a decimal point or comma while the cursor is sitting on the decimal point or comma, the cursor shifts right into the decimal portion of the field and enters left justified overstrike mode. This behavior is only allowed if the input mode is justification decimal. Otherwise the decimal point and comma keys are treated as field input.
Justification decimal causes all data characters to the left of the decimal point to be entered in right justified insert mode and all data characters to the right of the decimal point to be entered in left justified overstrike mode.
Entering Sign
To change the sign of the field, the operator can enter either the plus (+) or minus (–) key. This causes the sign (if any) to be changed to reflect the new value. If no sign appears in the field, an error is generated. Sign characters can be entered anytime during field input.
Inserting Lines
INSERT LINE inserts, at the character position, a new-line character into the form data item and reformats the text field by remapping the form data item to the text field area.
G.2. IntraField Editing Functions for Window Devices
DECwindows Motif provides basic intrafield editing keys that allow the operator to move the cursor within the field, to erase the field, and to delete characters. The functions are provided by the windowing system; you cannot declare responses for the mor rebind them to different keys. In addition, VSI recommends that you not use these key combinations when defining other functions.
|
Function |
Meaning |
Default Keys |
|---|---|---|
|
PICTURE FIELD | ||
|
Cursor Left Cursor Right |
Move the cursor one character in the direction specified |
Left Arrow Right Arrow |
|
Large Left |
Move left one word |
Ctrl/Left Arrow |
|
Large Right |
Move right one word |
Ctrl/Right Arrow |
|
Field Start |
Move to start of field (same as start of line for one line fields) |
Ctrl/Alt/Left Arrow |
|
Field End |
Move to end of field (same as start of line for one line fields) |
Ctrl/Alt/Right Arrow |
|
Line Start |
Move to start of line |
Alt/Left Arrow F12 Ctrl/H |
|
Line End |
Move to end of line |
Alt/Right Arrow Ctrl/E |
|
Text Scroll Left |
Scrolls left in field |
Ctrl/Prev Screen |
|
Text Scroll Right |
Scrolls right in field |
Ctrl/Next Screen |
|
Select Character Left |
Select or cancel selection left one character |
Shift/Left Arrow |
|
Select Character Right |
Select or cancel selection right one character |
Shift/Right Arrow |
|
Select Word Left |
Select or cancel selection left one word |
Ctrl/Shift/Left Arrow |
|
Select Word Right |
Select or cancel selection right one word |
Ctrl/Shift/Right Arrow |
|
Select Line Start |
Select or cancel selection to start of line |
Shift/Alt/Left Arrow Ctrl/Shift/H |
|
Select Line End |
Select or cancel selection to end of line |
Shift/Alt/Right Arrow Ctrl/Shift/E |
|
Start Select |
Start a selection region |
Select |
|
Select Range |
Select string from text cursor point to mouse pointer |
Ctrl/Shift/Space Shift/Select |
|
Reselect Range |
Restore previous selection |
Ctrl/Shift/Space Ctrl/Shift/Select |
|
Select All |
Select entire text field |
Ctrl/Slash (/) |
|
Deselect All |
Deselect entire text field (any data key also deselects) |
Ctrl/Backslash ( \) |
|
Delete Next Character |
If any characters are selected, delete them; else delete character to right (left for Hebrew) of insertion point |
Shift/Delete |
|
Delete Previous Character |
Delete character to left (right for Hebrew) of insertion point |
Delete |
|
Delete Previous Word |
Delete word to left (right for Hebrew) of insertion point |
F13 Ctrl/J Ctrl/Shift/J |
|
Delete Start Line |
Delete from insertion point to start of line |
Ctrl/U Ctrl/Shift/U |
|
Delete End Line |
Delete from insertion point to end of line |
Ctrl/Remove |
|
Erase Field |
Delete entire field |
Not available |
|
Insert Overstrike |
Toggle between insert overstrike mode |
Not available |
|
Copy To Clipboard |
Copy selected text to clipboard |
Shift/Remove |
|
Cut to Clipboard |
Delete and copy selected text to clipboard |
Remove |
|
Paste From Clipboard |
Paste clipboard to field |
Insert Here |
|
Primary Copy |
Copy selected text to cursor |
Alt/Shift/Remove |
|
Primary Cut |
Cut and move selected text to cursor |
Alt/Remove |
|
Disjoint Selection |
Toggle between Normal and Disjoint Selection Modes (also called Add Mode in Motif) |
Shift/F8 |
|
Undo Edit |
Undo last editing action |
Alt/Delete |
|
Restore Text |
Restores text to value prior to editing |
Ctrl/Shift/Insert Here |
|
Set Text Cursor |
Within field, set text cursor to locator |
MB1 |
|
Locator Extend |
Extend text selection from text cursor to locator |
Shift/MB1 |
|
Locator Select |
Select text |
MB1 drag |
|
Locator Word Select |
Select word that locator is on |
MB1 double click |
|
Primary Locator Paste |
Cut or copy current text selection to locator position (operator depends on object being cut or copied and on destination) |
MB2 |
|
Primary Locator Copy |
Copy text selection to locator position |
Ctrl/MB2 |
|
Primary Locator Cut |
Cut (move) text selection to locator position |
Alt/MB2 |
|
Quick Locator Paste |
Cut or copy secondary selection to text cursor |
MB2 |
|
Quick Locator Copy |
Copy secondary selection to text cursor |
Ctrl/Shift/MB2 |
|
Quick Locator Cut |
Cut secondary selection to text cursor |
Alt/Shift/MB2 |
|
TEXT FIELD | ||
|
All those in PICTURE FIELD |
| |
|
Cursor Down |
Move down one line |
Down Arrow |
|
Cursor Up |
Move up one line |
Up Arrow |
|
Insert Line |
Insert Carriage Return into data |
Return Ctrl/Return |
|
Paragraph Up |
Move to previous paragraph |
Ctrl/Up Arrow |
|
Paragraph Down |
Move to next paragraph |
Ctrl/Down Arrow |
|
Page Up |
Move up one page |
Prev Screen |
|
Page Down |
Move down one page |
Next Screen |
|
Select Line Up |
Select line of text up |
Shift/Up Arrow |
|
Select Line Down |
Select line of text down |
Shift/Down Arrow |
|
SLIDER FIELD | ||
|
Cursor Down |
Move slider down by smallest amount |
Down Arrow |
|
Cursor Left |
Move slider left by smallest amount |
Left Arrow |
|
Cursor Right |
Move slider right by smallest amount |
Right Arrow |
|
Cursor Up |
Move slider up by smallest amount |
Up Arrow |
|
Large Down |
Move slider down by 10 percent |
Ctrl/Down Arrow |
|
Large Left |
Move slider left by 10 percent |
Ctrl/Left Arrow |
|
Large Right |
Move slider right by 10 percent |
Ctrl/Right Arrow |
|
Large Up |
Move slider up by 10 percent |
Ctrl/Up Arrow |
|
Line End |
Move slider to maximum value |
Alt/Right Arrow |
|
Line Start |
Move slider to minimum value |
Alt/Left Arrow |
|
PUSH BUTTON | ||
|
Trigger Object |
Execute button response |
Return Ctrl/Return Enter Space Alt/Space Select MB1 |
G.2.1. Data Entry and Editing Details
Field input for picture fields and text fields is in left-justified insert mode. Additionally, you must explicitly provide insertion literals including sign, decimal point, currency, and exponential characters for picture fields.
Validation of input to picture fields does not occur until the data conversion stage, when the input picture is used to de-edit the field input. For more information, see the PICTURE STRING section of this manual.
When a data input field is full, at run time the system automatically executes a NEXT ITEM function response.
G.2.2. Reserved Intrafield Editing Keys
|
Enter |
|
All combinations of Ctrl, Shift, Alt with Up Arrow |
|
All combinations of Ctrl, Shift, Alt with Down Arrow |
|
All combinations of Ctrl, Shift, Alt with Left Arrow |
|
All combinations of Ctrl, Shift, Alt with Right Arrow |
|
MB3 |
|
F4, F10, F11 |
Must have a qualified name. For information on qualified names, see the FORM DATA declaration.
If the sign of the value matches the clause given, the string in the corresponding clause is used as the sign character.
The number of spaces (or the number of spaces and the minus sign) is the maximum of the length of string-1, string-2, or string-3. Each string-1, string-2, and string-3 is extended with spaces to reach the same length.
In these picture strings, a comma replaces the period character whenever DECIMAL POINT IS COMMA is specified except in the case of the ADT data type.
In these picture strings, precision is relative to integer-n. For more information, see the DATETIME DATA clause.
The DECforms DATE and TIME data types represent an ADT field of 64 bits (a quadword); however, for the DATE data type, only the date portion of the field is significant: the time portion is ignored. Similarly, for the TIME data type, only the time portion of the field is significant: the date portion is ignored.
Indicates DECforms data types that do not directly correspond to VAX data types. The data conversion process removes the explicit decimal point when the record is received from the application program (in a send or transceive request).The explicit decimal is reinserted when the record is returned to the application program (in a receive or transceive request). These data types are available for form record fields but not for form data items.
Indicates DECforms data types that are available for form record fields but not for form data items.
Specifies that the data type is converted to NL when it is used to define form data items.
Specifies that the SCALE clause has been used to define the data item.
These DECforms data types are valid for record fields and form data items; however, when these data types are used to define form data items, sign and decimal clauses are neither necessary nor valid.
The DECforms float data type is implemented as a text string that represents a floating-point number formatted according to the clauses in the declaration.
See %BACKSPACE in Table D.2, ''Keypad and Function Key Names''.
See %TAB in Table D.2, ''Keypad and Function Key Names''.
See %RETURN in Table D.2, ''Keypad and Function Key Names''.
See %ESCAPE in Table D.2, ''Keypad and Function Key Names''.
See %DELETE in Table D.2, ''Keypad and Function Key Names''.
This key can be used in window layouts only.
The Delete key deletes the character to the left of the cursor.
The F1 to F5 keys are not always available on character-cell and Motif devices. They are often used to perform local terminal functions.
F6 is often equivalent to ^Y (interrupt) on OpenVMS. To use F6 in your application, you must disable advanced line editing. To do this, use the SET TERM/NOLINE command.
You cannot assign new keys to this function. However,you can assign these key names to other functions. For example, you cannot redefine CURSOR DOWN, but you may use%DOWN in another function.
Additional key binding for VT200/VT300/VT400 devices.
Any combination of Shift and Alt
Reserved whenever the current window has scroll bars.