VSI DECset for OpenVMS Guide to VSI Digital Test Manager
- Software Version:
- DECset Version 12.7
- Operating System and Version:
- VSI OpenVMS x86-64 Version 9.2-2 or higher
VSI OpenVMS IA-64 Version 8.4-1H1 or higher
VSI OpenVMS Alpha Version 8.4-2L1 or higher
Preface
This guide explains how to use VSI Digital Test Manager for OpenVMS as an automated regression test system. The guide describes how to use the product during the development and maintenance phase of a software development project.
VSI Digital Test Manager allows you flexibility in organizing tests, selecting tests for execution, and reviewing and verifying test results. This guide provides examples for both basic and advanced techniques.
1. About VSI
VMS Software, Inc. (VSI) is an independent software company licensed by Hewlett Packard Enterprise to develop and support the OpenVMS operating system.
2. Intended Audience
This guide is intended primarily for programmers, software engineers, and project managers who are responsible for producing fully tested code. Users should be familiar with the OpenVMS operating system, Digital Command Language (DCL), OpenVMS program development facilities, and OpenVMS utilities.
3. Document Structure
This guide contains the following chapters:
Chapter 1, "Introduction to VSI Digital Test Manager" explains regression testing, gives an overview of how VSI Digital Test Manager automates the regression testing process, and briefly explains its major concepts. It includes a sample, interactive terminal session.
Chapter 2, "Using VSI Digital Test Manager for OpenVMS in a DECwindows Environment" describes the VSI Digital Test Manager DECwindows interface. It gives an overview and a sample DECwindows session.
Chapter 3, "Creating Tests" describes the concepts of VSI Digital Test Manager libraries and tests. It explains how to create noninteractive and interactive terminal and DECwindows tests.
Chapter 4, "Organizing and Executing Test Collections" explains how to organize, execute, display,delete, recreate, compare, and stop test collections.
Chapter 5, "Reviewing Test Results" explains how to examine test results. Topics include evaluating the results of a test run, examining and updating test results, and displaying and printing reports of the test results.
Chapter 6, "Tailoring Your Test System" explains how to add features to your test system to create a custom testing environment. Topics include prologue and epilogue files, groups, variables, filters, defining keys for the VSI Digital Test Manager keypads, initialization and command files, and spawning subprocesses.
Chapter 7, "Maintaining a VSI Digital Test Manager Library" explains the VSI Digital Test Manager library functions, including how to store files outside the library, verify data in the library, access the library from a remote node, and set user identification code (UIC) and access control list (ACL) file protections.
Chapter 8, "Working with Terminal Session Files" describes session files and input files for terminal-based tests and discusses how they are used.
Chapter 9, "Working with DECwindows Session Files" describes the format of DECwindows session files and input files and explains how to edit DECwindows session files.
Chapter 10, "VSI Digital Test Manager Callable Interface" explains how to call VSI Digital Test Manager from other programs.
4. Related Documents
See the VSI DECset for OpenVMS Installation Guide for installation instructions for VSI Digital Test Manager.
VSI DECset for OpenVMS Test Manager Reference Manual for complete information on all available commands.
See Using VSI DECset for OpenVMS Systems for information on using VSI Digital Test Manager with other DECset tools.
5. References to Other Products
Note
These references serve only to provide examples to those who continue to use these products with DECset.
Refer to the Software Product Description for a current list of the products that the DECset components are warranted to interact with and support.
6. OpenVMS Documentation
The full VSI OpenVMS documentation set can be found on the VMS Software Documentation webpage at https://docs.vmssoftware.com.
7. VSI Encourages Your Comments
You may send comments or suggestions regarding this manual or any VSI document by sending electronic mail to the following Internet address: <docinfo@vmssoftware.com>. Users who have VSI OpenVMS support contracts through VSI can contact <support@vmssoftware.com> for help with this product.
8. Conventions
| Convention | Meaning |
|---|---|
|
Ctrl/ x |
A sequence such as Ctrl/ x indicates that you must hold down the key labeled Ctrl while you press another key or a pointing device button. |
|
PF1 x |
A sequence such as PF1 x indicates that you must first press and release the key labeled PF1 and then press and release another key or a pointing device button. |
|
Return |
In examples, a key name enclosed in a box indicates that you press a key on the keyboard. (In text, a key name is not enclosed in a box.) |
... |
A horizontal ellipsis in examples indicates one of the
following possibilities:
|
. . . |
A vertical ellipsis indicates the omission of items from a code example or command format; the items are omitted because they are not important to the topic being discussed. |
|
( ) |
In command format descriptions, parentheses indicate that you must enclose the options in parentheses if you choose more than one. |
|
[ ] |
In command format descriptions, brackets indicate optional choices. You can choose one or more items or no items. Do not type the brackets on the command line. However, you must include the brackets in the syntax for OpenVMS directory specifications and for a substring specification in an assignment statement. |
|
[ |] |
In command format descriptions, vertical bars separate choices within brackets or braces. Within brackets, the choices are options; within braces, at least one choice is required. Do not type the vertical bars on the command line. |
|
{ } |
In command format descriptions, braces indicate required choices; you must choose at least one of the items listed. Do not type the braces on the command line. |
|
bold text |
This typeface represents the introduction of a new term. It also represents the name of an argument, an attribute, or a reason. |
|
italic text |
Italic text indicates important information, complete titles of manuals, or variables. Variables include information that varies in system output (Internal error number), in command lines (/PRODUCER= name), and in command parameters in text (where dd represents the predefined code for the device type). |
|
UPPERCASE TEXT |
Uppercase text indicates a command, the name of a routine, the name of a file, or the abbreviation for a system privilege. |
|
|
Monospace type indicates code examples and interactive screen displays. In the C programming language, monospace type in text identifies the following elements: keywords, the names of independently compiled external functions and files, syntax summaries, and references to variables or identifiers introduced in an example. |
|
- |
A hyphen at the end of a command format description, command line, or code line indicates that the command or statement continues on the following line. |
|
numbers |
All numbers in text are assumed to be decimal unless otherwise noted. Nondecimal radixes—binary, octal, or hexadecimal—are explicitly indicated. |
Chapter 1. Introduction to VSI Digital Test Manager
This chapter describes the VSI Digital Test Manager environment and components, and introduces its command-line interface. Usage is demonstrated in a sample session.
1.1. Overview
VSI Digital Test Manager is a software development and maintenance tool that organizes and automates the software regression testing process. You use the product to run, review, and store software regression tests and test results.
To ensure that the introduction of a new software component does not produce a negative impact on existing software components.
To ensure that changes to the environment outside of the application do not affect the application itself. For example, an upgraded operating system or a change in an error message file should not affect the application (other than to issue new error messages).
Regression testing is a method of ensuring that an application being developed runs correctly when new features are added to the application; that is, previously tested features are not affected by new features. If errors occur when new features are added to an application, the application is said to have regressed.
- Create tests for the application.
Organize the tests.
Create a mechanism to allow ready access to tests.
Run the tests.
- Examine the test results.
Compare the test results to those you expected and note any differences.
Revise the application code to correct problems that caused incorrect test output. Repeat Steps 2 and 3 until the test output is correct.
Save the correct output as the validated test results.
Repeat Steps 2 through 4 whenever you modify the application or add new code.
If the current and the previously validated test results match, the application being tested is working as expected.
If you find unexpected changes in test results, the application being tested might contain errors.
VSI Digital Test Manager automates the regression testing steps except for the creation of tests, which only you can do for your software applications. Figure 1.1, ''Regression Testing with VSI Digital Test Manager'' shows the regression testing steps. The shaded area indicates those steps that VSI Digital Test Manager automates.
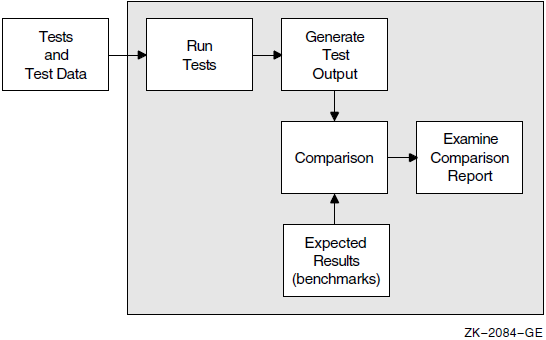
Organizes test files.
Runs tests.
Compares the current results with the expected results in the benchmark file and logs any differences found between benchmark and current results. (A benchmark file contains the expected output for the test's execution.)
Saves the test results if different from the benchmark.
|
Chosen Environment |
Result |
|---|---|
|
Noninteractive |
You can use VSI Digital Test Manager with noninteractive tests that do not have a terminal-oriented or workstation interface. Software that accepts an input text file and gives you an output text file can be tested as a noninteractive test. |
|
Interactive Terminal |
You can use VSI Digital Test Manager with interactive terminal tests for testing software with an interactive, terminal-oriented interface. |
|
Interactive DECwindows |
You can use VSI Digital Test Manager with DECwindows tests for testing software that presents a windowed interface within the DECwindows environment. |
|
Term |
Description |
|---|---|
|
Library |
VSI Digital Test Manager stores the information it needs to manage a test system in an OpenVMS directory called a VSI Digital Test Manager library. Chapter 3, "Creating Tests" describes these libraries in detail. |
|
Test Description |
A collection of fields that contains the information that VSI Digital Test Manager needs to run a particular test. A test description requires a template file and can have other optionally specified test-related entities. A template file is an OpenVMS command procedure that executes a noninteractive test, or a session file containing a recorded interactive terminal or DECwindows session. Chapter 3, "Creating Tests" describes tests and test descriptions in more detail. |
|
Collection |
A set of tests selected for execution. You can execute a test only in the context of a collection. You can select tests for inclusion in a collection by test name or groups. Chapter 4, "Organizing and Executing Test Collections" describes collections in detail. |
1.2. Entering Commands
From the Digital Command Language (DCL) command line
From the VSI Digital Test Manager command line
From the DECwindows interface (see Chapter 2, "Using VSI Digital Test Manager for OpenVMS in a DECwindows Environment")
From a program that calls VSI Digital Test Manager directly (see Chapter 10, "VSI Digital Test Manager Callable Interface")
When you enter a command from the VSI Digital Test Manager command line, do not type the
DTM> prompt shown in the examples. After the command executes,
control returns to the VSI Digital Test Manager subsystem level.
$ DTM
DTM> SHOW VERSION
Digital Test Manager Version 3.9
DTM> EXIT
$
If you press RETURN before completing a command, you are prompted for all required information for a command.
Note
The dollar sign prompt ($) indicates DCL level.
The VSI Digital Test Manager prompt (
DTM>) means a command is being issued from the VSI Digital Test Manager subsystem; examples in this manual typically show commands entered from this prompt.The
DTM_REVIEW>prompt means a command is being issued from the Review subsystem of VSI Digital Test Manager.
1.2.1. Getting Help
$ HELP DTM
$ HELP DTM COPY TEST_DESCRIPTION
1.2.2. Canceling Commands
If you want to cancel a command before it has completed, press Ctrl/C. If you press Ctrl/C during a wildcard transaction that updates the library, VSI Digital Test Manager completes the current transaction, but does not continue.
When you enter a VSI Digital Test Manager command from DCL and then press Ctrl/C during execution of
the command, VSI Digital Test Manager returns control to DCL level. If you enter the command from a
subsystem prompt level, VSI Digital Test Manager retains control as indicated by the
DTM> prompt.
1.3. Getting Started
This section shows fundamental VSI Digital Test Manager features. To get you started using the product, this section shows a sample session with an interactive terminal test. Noninteractive and DECwindows tests are described later in this manual.
Invoking VSI Digital Test Manager
Creating a new VSI Digital Test Manager library
Creating a test
Showing a test within VSI Digital Test Manager
Recording a test
Creating a collection
Showing a collection within VSI Digital Test Manager
Executing the test in a collection
Comparing the test results to the expected output
Examining the test results
Example 1.1, ''Sample Interactive Terminal Session'' uses the OpenVMS Mail Utility (MAIL) and shows you how to use VSI Digital Test Manager to test some of the MAIL commands.
The reverse numbers refer you to the command-line explanation in the list that follows the example.
$ CREATE/DIRECTORY [.DTMLIB]$ DTM
DTM> CREATE LIBRARY [.DTMLIB] "New Digital Test Manager Library"
%DTM-S-CREATED, Digital Test Manager library DUA1:[USER01.DTMLIB] created DTM> CREATE TEST_DESCRIPTION MAIL_TEST/INTERACTIVE
_Remark: Going to record a MAIL test
%DTM-I-DEFAULTED, benchmark file name defaulted to MAIL_TEST.BMK %DTM-I-DEFAULTED, template file name defaulted to MAIL_TEST.SESSION %DTM-S-CREATED, test description MAIL_TEST created DTM> SHOW TEST_DESCRIPTION
Test Descriptions in Digital Test Manager Library DUA1:[USER01.DTMLIB] MAIL_TEST "Going to record a MAIL test" Template = MAIL_TEST.SESSION Benchmark = MAIL_TEST.BMK Prologue = None Specified Epilogue = None Specified DTM> RECORD MAIL_TEST "Recording Mail on the terminal"
%DTM-I-BEGIN, your interactive test session is now beginning... Type Ctrl/P twice to terminate the session. $ SET BROADCAST=NONE
MAIL> SHOW PERSONAL_NAME
Your personal name is "Digital Test Manager - Project Q41327". MAIL> SET PERSONAL_NAME "Digital Test Manager - Engineer USER01"
MAIL> SHOW PERSONAL_NAME
Your personal name is "Digital Test Manager - Engineer USER01". MAIL> EXIT
$ set broadcast=all
$ ^P ^P
^P %DTM-I-BMK_SAVED, benchmark has been saved in file DUA1:[USER01.DTMLIB]MAIL_TEST.BMK;1 %DTM-S-RECORDED, test MAIL_TEST has been successfully recorded in file DUA1:[USER01]MAIL_TEST.SESSION DTM> CREATE COLLECTION MAIL_COLL MAIL_TEST "Creating the MAIL test collection"
%DTM-S-CREATED, collection MAIL_COLL created DTM> SHOW COLLECTION
Collections in Digital Test Manager Library DUA1:[USER01.DTMLIB] MAIL_COLL 1 test 27-OCT-1998 09:49:38 Command: CREATE COLLECTION MAIL_COLL MAIL_TEST "Creating the MAIL test collection" Status: not run DTM> RUN MAIL_COLL
Starting MAIL_TEST test run... %DTM-I-BEGIN, your interactive test session is now beginning... $ SET BROADCAST=NONE $ MAIL MAIL> SHOW PERSONAL_NAME
Your personal name is "Digital Test Manager - Engineer USER01". MAIL> SET PERSONAL_NAME "Digital Test Manager - Engineer USER01" MAIL> SHOW PERSONAL_NAME Your personal name is "Digital Test Manager - Engineer USER01". MAIL> EXIT $ SET BROADCAST=ALL $ %DTM-S-CONCLUDED, your interactive test session has concluded Performing post-run cleanup with comparison... %DTM-I-UNSUCCESS, the comparison for the test MAIL_TEST was unsuccessful %DTM-S-COMPARED, collection MAIL_COLL compared DTM> REVIEW MAIL_COLL
Collection MAIL_COLL with 1 test was created on 27-OCT-1998 09:49:38 by the command: CREATE COLLECTION MAIL_COLL MAIL_TEST "Creating the MAIL test collection" Last Review Status = not previously reviewed Success count = 0 Unsuccessful count = 1
New test count = 0 Updated test count = 0 Comparisons aborted = 0 Test not run count = 0 Result Description MAIL_TEST Comparison Status : Unsuccessful DTM_REVIEW> SHOW/DIFFERENCES
. . . DTM_REVIEW> EXIT
%DTM-S-EXIT, leaving Review subsystem DTM> EXIT
$

| Create an empty subdirectory for use as a VSI Digital Test Manager library. |
| Invoke VSI Digital Test Manager. |
| Create a new VSI Digital Test Manager library and assign it to the empty subdirectory. When you create a library, VSI Digital Test Manager automatically sets this as the current library; you do not need to set the library. |
| Create the test description called MAIL_TEST and designate it as an interactive terminal test. |
| If you do no supply a comment to the CREATE TEST_DESCRIPTION command, VSI Digital Test Manager prompts you for one. |
| Show the test descriptions in the current library. |
| Record the MAIL_TEST test. Note that VSI Digital Test Manager spawned to DCL. |
| Set your terminal to NOBROADCAST so incoming messages do not interfere with the test recording. |
| Invoke the Mail Utility. |
| Show the current personal name. In this case, no personal name was set. |
| Set the personal name. |
| Show the personal name again. |
| Exit from the Mail Utility. |
| Reset your terminal to receive broadcast messages. |
| End the recording session by pressing Ctrl/P twice. The ^P characters are not echoed on the terminal, but a ^P character appears below the end of the recording session. |
| Create the collection MAIL_COLL and include the MAIL_TEST test in it. |
| Show the collection information. |
| Run the MAIL_COLL collection interactively. |
| Note here that when VSI Digital Test Manager issues the SHOW PERSONAL_NAME command from the session file, the Mail Utility displays the previously stored personal name and not the message that was displayed when the test was recorded. The result of this command causes the test to be reported as unsuccessful. |
| After the collection run ends and the test has been compared, invoke the Review subsystem to review the MAIL_COLL collection. VSI Digital Test Manager automatically displays collection statistics for MAIL_COLL. |
| VSI Digital Test Manager marked the test as unsuccessful because the result file differed from the benchmark file. |
| Enter the SHOW/DIFFERENCES command. The screens are omitted from this example but you can display them by pressing the RETURN key or specifying the NEXT command to view subsequent difference file records. |
| Enter the EXIT command to exit from the Review subsystem. |
| Enter the EXIT command to exit from VSI Digital Test Manager. |
Chapter 2. Using VSI Digital Test Manager for OpenVMS in a DECwindows Environment
This chapter describes how to use VSI Digital Test Manager for OpenVMS in a DECwindows environment. This chapter also provides a sample DECwindows session.
2.1. Overview
$ DTM/INTERFACE=DECWINDOWS
Note
The VSI Digital Test Manager DECwindows interface spawns a subprocess that invokes the product whenever you record or play a test, review an interactive Terminal or DECwindows test, or run or compare a collection. If you have defined the command DTM as a symbol such as DTM/INTERFACE=DECWINDOWS, the subprocess spawned by VSI Digital Test Manager will fail.
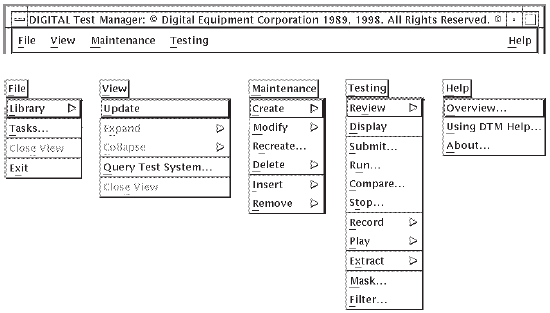
Figure 2.1, ''VSI Digital Test Manager Title Bar and Main Menus'' shows the initial VSI Digital Test Manager title bar and the main menus you can select from the menu bar. The menus are detached from the menu bar to show you all the main menus at once. You can pull down only one main menu at a time.
2.1.1. Getting Help
You can obtain VSI Digital Test Manager Help in a DECwindows environment by pulling down the Help menu.
Pull-down Menu—Go to a menu selection using the keyboard up-arrow and down-arrow keys, and press the HELP key (F15).
Dialog box—Go to a button or text field using the Tab and Shift/Tab keys, and press the HELP key (F15).
If a help frame is not defined for an artifact, DTM displays a "could not find frame" error.
2.1.2. Displaying VSI Digital Test Manager Information in DECwindows
You can display files and view information on collections, tests, groups, and variables through views. The views are the DECwindows equivalent of the character-cell interface SHOW commands.
VSI Digital Test Manager displays the collection view when you invoke the product.
Choose Query Test System... from the View menu. The Query Test System dialog box appears listing the available views, as shown in Figure 2.2, ''Query Test System Dialog Box''.
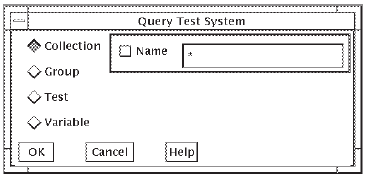
Select the applicable type of view.
Optionally, specify the names of the items to be displayed. The names specified can include wildcards and commas for lists.
Click on OK. The view is displayed in a new window.
Figure 2.3, ''Sample Test View'' shows a sample test view.
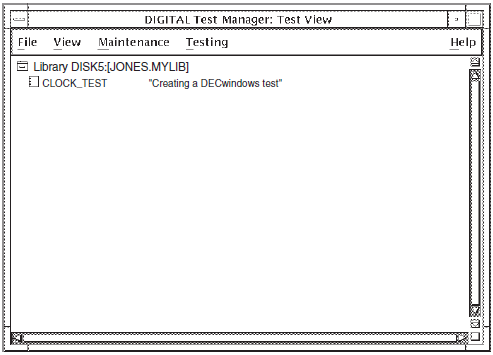
You can obtain more detail by double clicking on an item (test, group,collection, variable, or library) inside a view. If an item is expanded fully, double clicking collapses the item to the previous level of information.
2.1.3. VSI Digital Test Manager Command Correlation
Most VSI Digital Test Manager commands have a corresponding menu path in the DECwindows interface; however, there is not a complete one-to-one correspondence.
There is no corresponding DECwindows action for the VSI Digital Test Manager SPAWN and ATTACH commands, because DECwindows enables you to create another process without having to spawn out of a process.
There is no corresponding DECwindows action for the VSI Digital Test Manager SHOW HISTORY command. History records can only be accessed from the command-line interface.
2.2. Sample DECwindows Session
Creating and opening a library
Creating a test
Recording a test
Creating a collection
Running a collection
Displaying test results
Updating a benchmark file
Creating a benchmark mask
Removing the Screen Editor
Note
Many of the figures in this section show dialog boxes from which you initiate tasks. These figures also show the menu and menu item from which the dialog box is invoked.
2.2.1. Creating a Library
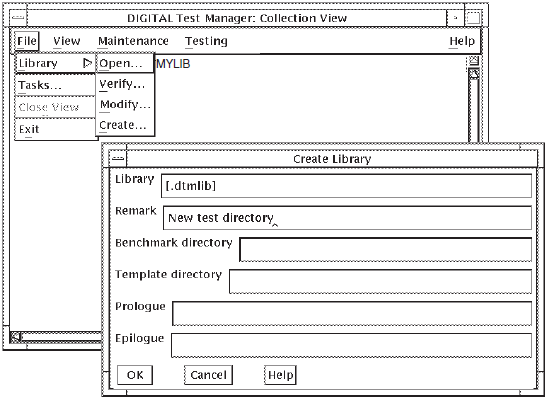
Choose Library and then Create from the File menu.
Specify the library in the Create Library dialog box. You can also specify default Benchmark and Template directories, as well as default collection Prologue and Epilogue files in the dialog box.
Click on OK.
Note
The VSI Digital Test Manager library you specify is an OpenVMS directory in which library files are created. Therefore, you must create an empty OpenVMS directory before you can create a VSI Digital Test Manager library.
2.2.2. Creating a Test
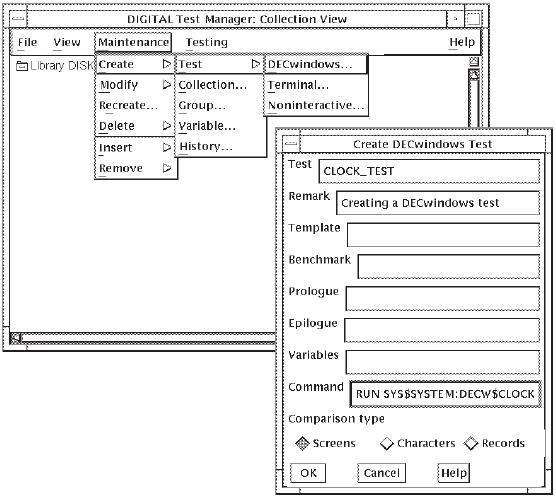
Figure 2.5, ''Creating a DECwindows Test'' shows how to create a DECwindows test. The test is for the DECwindows clock application. The command to run the clock application is specified in the Command field of the Create DECwindows Test dialog box.
2.2.3. Recording a Test
Figure 2.6, ''Recording a DECwindows Test'' shows a sample DECwindows Record dialog box and how to invoke it. You can use the Record dialog box to specify parameters or test files associated with the application being recorded. If you click on the test name before invoking the Record dialog box, the test name automatically appears in the Test field.
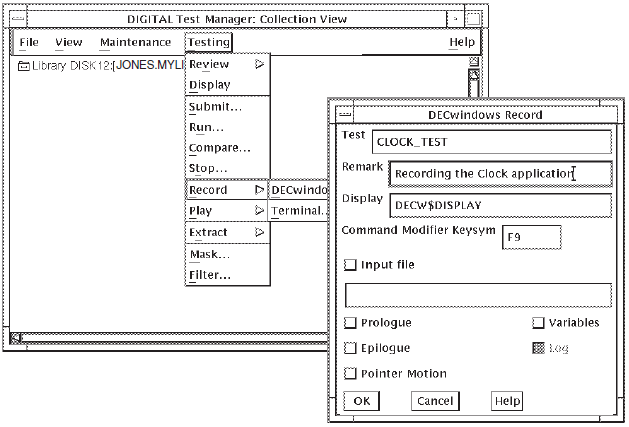
When you record the DECwindows test, ensure that the conditions of the test at its start are the same as at its end. For example, creating a solid background, making icons of all applications, and placing the icons in a consistent order all help to ensure that start and end conditions are equal. See Section 3.5.2, ''Recording Interactive DECwindows Tests'' for more information about recording DECwindows tests. See the VSI DECset for OpenVMS Test Manager Reference Manual for more information about the RECORD command and its qualifiers.
When you click OK in the Record window, a DECterm window appears and a message lets you know that the recording has started.
F9-M — Marks a screen for comparison.
F9-P — Ends the recording session and saves the session and benchmark files.
At the end of the recording process, press Return to remove the displayed DECterm.
DECterm Window Configuration
For the DECwindows interface to VSI Digital Test Manager, DECterm windows are created during RECORD, PLAY and RUN operations. You can control the position and size of these DECterm windows.
| Command | Description |
|---|---|
|
DTM_DECTERM_FREE |
Position of windows will vary (that is, ignore other logical names ). The equivalence value is not used. |
|
DTM_DECTERM_ROWS |
The equivalence value is interpreted as a string containing the required number of rows. |
|
DTM_DECTERM_X |
The equivalence value is interpreted as a string containing the required X coordinate of the DECterm windows. |
|
DTM_DECTERM_Y |
The equivalence value is interpreted as a string containing the required Y coordinate of the DECterm windows. |
2.2.4. Creating a Collection
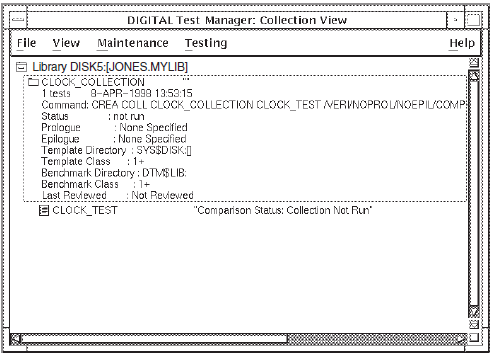
Figure 2.7, ''Creating a Collection'' shows how to create a collection. In the example, the CLOCK_TEST test is the only test in the collection. Tests can only be run in the context of a collection.
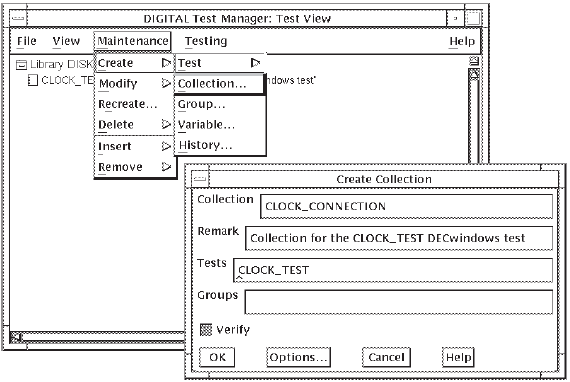
Figure 2.8, ''Sample DECwindows Collection'' shows an expanded view of the newly created collection and the test it contains.
2.2.5. Executing a Collection
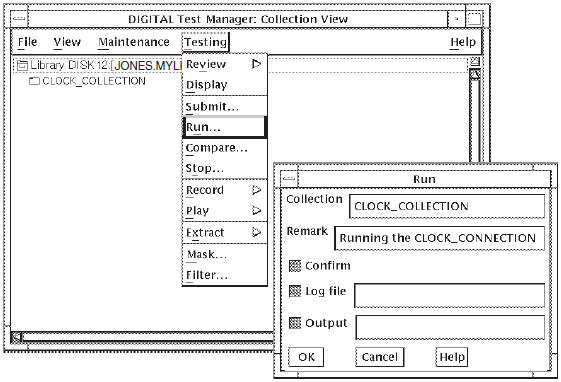
Choose Run... from the Testing menu. VSI Digital Test Manager displays the Run dialog box.
Specify the collection name and any remarks you have about the collection in the Collection and Remark fields.
Click on OK.
Note
Expect warning messages, such as "Timeout looking for string ’time’".
When the collection process has finished, press Return to remove the displayed DECterm.
2.2.6. Displaying Test Results
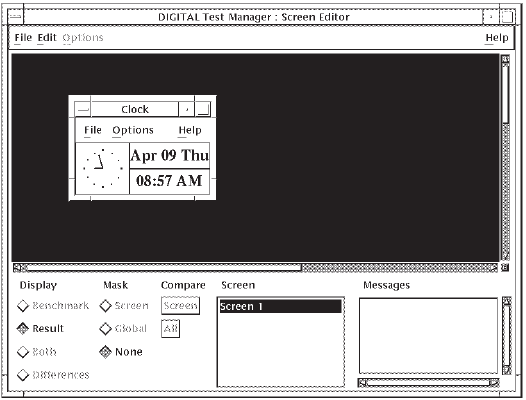
In the Collection view, expand the appropriate collection, expand the test to show the benchmark, result, and difference files, then double click on the file you want to display. VSI Digital Test Manager displays the Screen Editor with the selected file (as shown in Figure 2.10, ''Viewing a Test File'').
Note
When using the DECwindows interface to review interactive terminal tests, do not set input focus and type into the result, benchmark, or differences display window. This will terminate the subprocess controlling the window. You must interact with the window only via the VSI Digital Test Manager Display control panel.
2.2.7. Updating a Benchmark File
Create a Collection View.
Click on (highlight) the collection whose benchmarks you want to create or update.
Pull down the testing menu.
Choose the Review menu item and the Open submenu item.
Click on the OK button in the resulting Review Collection dialog box.
In the collection view, expand the collection by double clicking on the collection name.
Click on the result description (preceded by an icon) whose benchmark you want to create or update.
Pull down the testing menu.
Choose the Review menu item and the Update... submenu item.
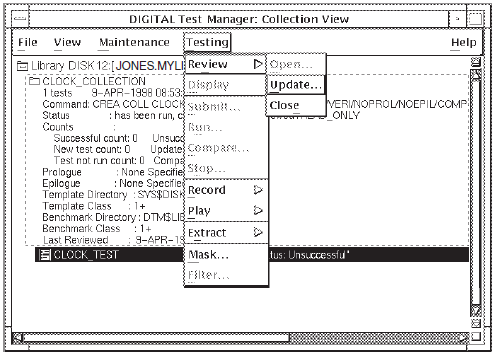
VSI Digital Test Manager automatically creates the first benchmark files from the recorded session's output for both DECwindows and terminal interactive tests. For noninteractive tests, however, create the first benchmark file from a result file.
Use the result file to update the benchmark file when results do not match the previous benchmark file, but are the expected results for a test.
2.2.8. Creating a Benchmark Mask
Several factors can cause a test to fail with undesirable results. For example, if mail is received during the sample session described in this chapter, the icons in the DECwindows Mail facility can become altered. To ensure that areas of a DECwindows application that you have no interest in do not affect a test-result comparison, you can create areas called masks on benchmark images using the VSI Digital Test Manager Screen Editor. Areas that are masked are not compared when VSI Digital Test Manager compares the results of a test execution against the benchmark image.
Generally, areas are masked on a benchmark image after recording the test and before executing the test to mask out run-dependent image data and maximize the chances for successful comparison status for the test. However, you can create masked areas on a benchmark image at any time.
To access the Screen Editor, click on the DECwindows test, then pull down the Testing menu and choose the Mask... menu item. The benchmark image is automatically loaded into the Screen Editor.
Click the Screen option in the Mask column.
Move the pointer to the beginning of the area to mask, and press and hold MB1.
Move the pointer to the opposite corner of the area to mask and release MB1.
Figure 2.12, ''Applying Masks to a Benchmark Image'' shows a mask (vertical stripes in the rectangle below the date) being defined for the CLOCK_TEST benchmark image.
Masked areas do not become part of the benchmark image. VSI Digital Test Manager stores the coordinates of the masked areas in a mask file, but you determine whether to compare the image with or without the mask. If you create masked areas on a benchmark file, the masks are used by default. If you do not want previously created mask areas to be applied to a result comparison, you must explicitly specify ignoring masks on the Create Collection or Compare dialog box. You can delete a mask by double clicking on a defined mask.
The VSI Digital Test Manager DECwindows Screen Editor does not purge benchmark files when new versions are created by modifying the masks defined for a benchmark file. You must manually purge the older versions. This applies even if the benchmark files are located in a VSI Digital Test Manager library.
You can also move a mask by placing the pointer on the mask you want to move, pressing and holding MB3, and releasing MB3 when you move the mask to the new area.
To save a mask file, choose Save Mask from the File menu. The Screen Editor saves the mask file in the same location as the test benchmark file. All mask files have the extension .MXK.
The global mask filter is useful when tests fail because of a difference that affects several screens (e.g., if an unexpected window is present in the test results ). By eliminating this area from the screen comparisons, other reasons for unsuccessful comparisons are more easily detected.
The global mask filter is not included when masks are saved, so it does not affect collection comparisons involving the test.
Chapter 3. Creating Tests
A VSI Digital Test Manager library
Tests
Collections
VSI Digital Test Manager history
Test descriptions
Noninteractive tests
Interactive terminal tests
Input files created from session files
3.1. VSI Digital Test Manager Libraries
VSI Digital Test Manager stores the information it needs to manage a test system in an OpenVMS directory called a VSI Digital Test Manager library. Figure 3.1, ''Overview of a Custom VSI Digital Test Manager Library'' shows a customized library and its structure, with template files and benchmark files stored in their own directories instead of in the default directory and VSI Digital Test Manager library directory.
3.1.1. Creating a VSI Digital Test Manager Library
$ CREATE/DIRECTORY [.DTMLIB]
$ DTM
DTM> CREATE LIBRARY [.DTMLIB] "New Digital Test Manager library"
%DTM-S-CREATED, Digital Test Manager library DUA0:[USER01.DTMLIB] created
DTM>
The phrase enclosed in quotation marks (" ") following the library specification is a remark that you associate with the library you are creating. VSI Digital Test Manager prompts you for a remark if you do not include one on the command line, but a null remark string is permitted.
VSI Digital Test Manager creates a subdirectory in the library for each collection you create. Do not create subdirectories or files in a directory containing the VSI Digital Test Manager library or any of its subdirectories. Do not set the default directory as a VSI Digital Test Manager library or any of its subdirectories.
If you put files in these subdirectories, they are deleted along with the collection files when you instruct VSI Digital Test Manager to delete the collections.
3.1.2. Setting a Library
When you invoke VSI Digital Test Manager, you must explicitly specify the library you want to use to store files. You do this by selecting an existing library using the SET LIBRARY command.
$ DTM SET LIBRARY [.DTMLIB]
%DTM-S-LIBIS, Digital Test Manager library is DUA0:[USER01.DTMLIB]
After you select a library, all VSI Digital Test Manager commands you enter refer to that library until you select another library, create another library, or logout.
Setting a Benchmark Directory
DTM> SET BENCHMARK_DIRECTORY DUA0:[USER01.BMK]
_Remark: "New default benchmark directory"
%DTM-S-NEWDEF, DUA0:[USER01.BMK] is the new default collection benchmark
directory
DTM>
See Chapter 7, "Maintaining a VSI Digital Test Manager Library" for information about storing files outside the VSI Digital Test Manager library, such as in a Code Management System (CMS) library.
Setting a Template Directory
DTM> SET TEMPLATE_DIRECTORY DUA0:[USER01.TMPL]
_Remark: "New default template directory"
%DTM-S-NEWDEF, DUA0:[USER01.TMPL] is the new default
collection template directory
DTM>Note
In a DECwindows environment, you can set default benchmark and template directories, and collection prologue and epilogue files using the Create Library or Modify Library dialog box.
3.1.3. Displaying VSI Digital Test Manager Library Information
DTM> SHOW LIBRARY
Your VSI Digital Test Manager library is DUA0:[USER01.DTMLIB]
DTM> SHOW ALL

Description of VSI Digital Test Manager Library DUA0:[USER01.DTMLIB]


Default template  directory: DUA0:[USER01.TEMPLATES] ""
Default benchmark directory: DUA0:[USER01.BENCHMARKS] ""
Default collection prologue: None Specified
Default collection epilogue: None Specified
Number of collections:       20
Number of test descriptions: 152
Number of groups:            18
Number of variables:         9
If one of these entities does not exist for the library, the message NONESPECIFIED is displayed. You can also place the library summary information into a file by specifying the /OUTPUT qualifier.
3.1.4. VSI Digital Test Manager History
When you create a new library, VSI Digital Test Manager automatically creates a history for that library. Whenever you issue a command that alters the library, VSI Digital Test Manager enters that command and its associated remark into the history.
You cannot access these history records from the DECwindows interface. However, you can access them via the SHOW HISTORY command from the VSI Digital Test Manager command line, the DCL command line, or the VSI Digital Test Manager callable interface.
DTM> SHOW HISTORY

History in Digital Test Manager Library DUA0:[USER01.DTMLIB]

25-JAN-1998 12:03:54 USER01 CREATE LIBRARY DUA0:[USER01.DTMLIB]
                            "Test library"
25-JAN-1998 12:04:12 USER01 CREATE TEST_DESCRIPTION MAIL_TEST/INTERACTIVE

"Going to record a MAIL test"
25-JAN-1998 12:05:32 USER01 RECORD MAIL_TEST
                     "Recording MAIL on the terminal"
   .
   .
   .
DTM>DTM> SHOW HISTORY MAIL_TEST/TRANSACTION=RECORD/USER=USER01 History in Digital Test Manager Library DUA0:[USER01.DTMLIB] 25-JAN-1998 12:05:32 USER01 RECORD MAIL_TEST "Record MAIL on the terminal" . . . DTM>
3.1.4.1. Adding a Remark to the History
3.1.4.2. Deleting History Information
1-JUN-1998 15:03:55 USER01 REMARK "Deleting the old information"
DTM> DELETE HISTORY "Deleting all the old information"
Confirm DELETE HISTORY/BEFORE=14-Nov-1998 [Y/N] (N): Y
%DTM-S-HISTDEL, 323 history records deleted
DTM>
DTM> DELETE HISTORY/BEFORE=1-JUN-1998 "Deleting the old information"
Confirm DELETE HISTORY/BEFORE=1-Jun-1998 [Y/N] (N): Y
%DTM-S-HISTDEL, 150 history records deleted
DTM>
3.2. Test Descriptions
A test description identifies a test and its related files to VSI Digital Test Manager. A test description consists of a set of fields that identify the files and other entities (filters and variables) associated with the test;it contains the information VSI Digital Test Manager needs to run that particular test. This section describes how to create, display, copy, modify, and delete test descriptions.
3.2.1. Creating Test Descriptions
You create a test description by using the CREATE TEST_DESCRIPTION command with qualifiers to specify the test description fields.
| Field | Field Type | Function |
|---|---|---|
|
Test name |
Name string |
Identifies the test description. |
|
Test prologue |
File specification |
Identifies a DCL command file that runs immediately before the template file. You use a prologue file to set up any special environment that the test requires. Output from a prologue file does not appear in the test results. |
|
Test epilogue |
File specification |
Identifies a DCL command file that runs immediately after the template file. You use an epilogue file to clean up operations, or to apply user-created filters to the result file. Unlike the prologue file, the epilogue file can directly alter the test results. |
|
Template |
File specification |
Identifies a DCL command file for an on interactive test, or the session file for an interactive terminal or DECwindows test. This field defaults to test-name.SESSION for an interactive terminal or DECwindows test and test-name.COM for noninteractive tests. |
|
Benchmark |
File specification |
Identifies a file that contains the expected test output. It is the standard against which VSI Digital Test Manager compares the results of a test run. This field defaults to test-name.BMK. |
|
Variables |
Name string and value |
Identifies the variables and associated values used with the template, prologue, or epilogue files for this test. |
|
Groups |
Name string |
Identifies the groups to which the test description belongs. |
|
Test type |
Boolean flags |
Identifies the test as either an interactive terminal, DECwindows, or noninteractive test. |
|
Command |
DCL command |
Identifies a DCL command to be spawned when a DECwindows test is recorded or executed. This command can be used to invoke applications for inclusion in the test. |
|
Comparison type |
Value |
Identifies the comparison type: screen,record, or character. |
|
Filters |
Boolean flags (One flag per filter type) |
Identifies one or more filters to remove run-time-dependent information from the result file. |
|
Remark |
Quoted string |
Identifies a comment that you add to the history. |
DTM> CREATE TEST_DESCRIPTION MAIL_TEST /INTERACTIVE
_Remark: Going to record a MAIL test
%DTM-I-DEFAULTED, benchmark file name defaulted to MAIL_TEST.BMK
%DTM-I-DEFAULTED, template file name defaulted to MAIL_TEST.SESSION
%DTM-S-CREATED, test description MAIL_TEST created
DTM> RECORD MAIL_TEST "Recording MAIL on the terminal"
%DTM-I-BEGIN, your interactive test session is now beginning...
Type Ctrl/P twice to terminate the session.


$
The VSI Digital Test Manager Create Test dialog box in the DECwindows interface does not allow you to specify variables where the variable value contains commas. For example, you cannot define a variable X with a value of "A,B,C." If you require this ability, use the CREATE TEST_DESCRIPTION command in the VSI Digital Test Manager DCL interface.
3.2.2. Displaying Test Descriptions
DTM> SHOW TEST_DESCRIPTION MAIL_TEST

Test descriptions in VSI Digital Test Manager Library DUA0:[USER01.DTMLIB]

MAIL_TEST          "MAIL command test"

  Template        = MAIL_TEST.COM
  Benchmark       = MAIL_TEST.BMK
  Prologue        = None Specified
  Epilogue        = None Specified
You can display more than one test by specifying test names or group names, or you can use wildcards.
Groups to which the test belongs
Type of test (noninteractive, interactive, or DECwindows)
Benchmark file specification
Epilogue file specification
Prologue file specification
Template file specification
Command string
Filters
Variables
You can also use qualifiers to display all the test description information or a portion of it; the default qualifier is /INTERMEDIATE.
3.2.3. Copying Test Descriptions
Use the COPY TEST_DESCRIPTION command to create an exact or modified copy of a test description in the VSI Digital Test Manager library. This command enables you to create a series of similar test descriptions without repeatedly entering the CREATE TEST_DESCRIPTION command. You can modify some of the field values for each new test description.
You cannot use wildcards.
You cannot specify the value of the benchmark field.
When you specify the /NOTEMPLATE qualifier, VSI Digital Test Manager uses the default template file name.
You cannot change the test type.
Although you can specify new values for some of the fields of a new test description, you must either copy a test description with its filter, variable,and group field values intact, or eliminate the field values altogether; you cannot modify these values when you copy the test description. You can eliminate these field values with the COPY TEST_DESCRIPTION negating qualifiers. (For example, /NOFILTER is a negating qualifier that disassociates filters from the new test description.)
DTM> CREATE TEST_DESCRIPTION MAIL_TEST_NONINT -
_DTM> /TEMPLATE=MAIL_NONINT.COM/NONINTERACTIVE -
_DTM> /PROLOGUE=NOBROADCAST.COM/EPILOGUE=BROADCAST.COM
_Remark: Creating a MAIL test
%DTM-I-DEFAULTED, benchmark file name defaulted to MAIL_TEST_NONINT.BMK
%DTM-I-DEFAULTED, template file name defaulted to MAIL_TEST_NONINT.COM
%DTM-S-CREATED, test description MAIL_TEST_NONINT created
DTM>
DTM> COPY TEST_DESCRIPTION MAIL_TEST_NONINT SHOW_ALL_TEST -
_DTM> /TEMPLATE=SHOW_ALL_NONINT.COM
_Remark: Copied margin test into SHOW_ALL_TEST with new template file
%DTM-I-DEFAULTED, benchmark file name defaulted to SHOW_ALL_TEST.BMK
%DTM-I-COPIED, test description MAIL_TEST_NONINT copied
-DTM-S-CREATED, test description SHOW_ALL_TEST created
DTM>
DTM> COPY TEST_DESCRIPTION MAIL_TEST_NONINT SEND_MAIL_TEST -
_DTM> /TEMPLATE=MAIL_TEMPLATE.COM
_Remark: Copied margin test into SEND_MAIL_TEST with new template file
%DTM-I-DEFAULTED, benchmark file name defaulted to SEND_MAIL_TEST.BMK
%DTM-I-COPIED, test description MAIL_TEST_NONINT copied
-DTM-S-CREATED, test description SEND_MAIL_TEST created
DTM>
The test description generated by the CREATE TEST_DESCRIPTION command sets up the prologue and epilogue files. Subsequent COPY TEST_DESCRIPTION commands create new tests using the first test description, MAIL_TEST_NONINT. By default, the prologue and epilogue files that are associated with MAIL_TEST_NONINT are copied into the SHOW_ALL_TEST and SEND_MAIL_TEST test descriptions. However, the MAIL_TEST_NONINT, SHOW_ALL_TEST, and SEND_MAIL_TEST test descriptions have different template files.
If you do not specify any qualifiers, the value for the test description fields are copied from the existing test description to the new test description.
3.2.4. Modifying Test Descriptions
Use the MODIFY TEST_DESCRIPTION command to modify a test description to include or exclude a prologue file, an epilogue file, filters, variables, or other test description attributes.
DTM> MODIFY TEST_DESCRIPTION MAIL_TEST/EPILOGUE=NODCL_BROADCAST.COM
_Remark: Using a different epilogue file
%DTM-S-MODIFIED, test_description MAIL_TEST modified
DTM>
If you use a negating qualifier, VSI Digital Test Manager either removes the value of the qualifier, or reverts the value to its default value.
DTM> MODIFY TEST_DESCRIPTION MAIL_TEST /NOPROLOGUE
_Remark: Deleting the prologue
%DTM-S-MODIFIED, test_description MAIL_TEST modified
DTM>
Only the test description fields you specify with the MODIFY TEST_DESCRIPTION command are affected when you modify a test description.
VSI Digital Test Manager ignores negating qualifiers specified for fields for which no value was assigned. For example, the /NOPROLOGUE qualifier is ignored if no prologue file had been previously assigned.
The VSI Digital Test Manager Modify Test dialog box in the DECwindows interface does not allow you to specify variables where the variable value contains commas. For example, you cannot define a variable X with a value of "A,B,C." If you require this ability, use the MODIFY TEST_DESCRIPTION command in the VSI Digital Test Manager DCL interface.
3.2.5. Deleting Test Descriptions
Use the DELETE TEST_DESCRIPTION command to delete a test description from the library. If the test description has a benchmark file that resides in the library, the benchmark file is also deleted. If the benchmark file is outside the library, it is unaffected.
The DELETE TEST_DESCRIPTION command does not delete any template, prologue, or epilogue file associated with the test.
The DELETE TEST_DESCRIPTION command has no effect on any result files or difference files that were produced for this test during a collection run. VSI Digital Test Manager deletes result and difference files with the collection rather than with the test description, because these files are associated with the collection.
DTM> DELETE TEST_DESCRIPTION SHOW_ALL_TEST
_Remark: Deleting the revised Test for sending mail
Confirm deletion of test_description SHOW_ALL_TEST [Y/N] (N): Y
%DTM-S-DELETED, test_description SHOW_ALL_TEST deleted
DTM>
You cannot delete a test description while it is a member of any group. Use the REMOVE TEST_DESCRIPTION command to remove a test description from all groups to which it belongs. Then use the DELETE TEST_DESCRIPTION command to delete the test description.
3.3. Creating Noninteractive Tests
Write the test.
Write the template file.
Create the test description.
3.3.1. Writing a Noninteractive Test
$!    *** SEND MAIL TEST ***
$!       SEND_MAIL_TEST.COM
$!
$mail
set personal "Digital Test Manager - Project Q"
send/subject="Mail test procedure"
USER01
This test message is sent by Electronic mail using a DCL
procedure to test the MAIL utility.
$mail
show personal_name
exit
3.3.2. Writing a Template File for a Noninteractive Test
The template file for a noninteractive test can be the test itself. For example, the test in Example 3.2, ''Sample Noninteractive Test File'' can be executed by itself. If the template file is the test itself, you do not need to create a new template file to execute your test.
Note
You can also use test prologue and epilogue files to perform these actions. Chapter 6, "Tailoring Your Test System" describes using prologue and epilogue files.
$!    *** MAIL TEMPLATE ***
$!       MAIL_TEMPLATE.COM
$!
$ SET BROADCAST=NONE
$ @SEND_MAIL_TEST
$ SET BROADCAST=ALL
3.3.3. Creating a Noninteractive Test Description
DTM> CREATE TEST_DESCRIPTION SEND_MAIL_TEST/TEMPLATE=MAIL_TEMPLATE.COM
_Remark: Test for sending mail
%DTM-I-DEFAULTED, benchmark file name defaulted to SEND_MAIL_TEST.BMK
%DTM-S-CREATED, test description SEND_MAIL_TEST created
DTM>
3.4. Creating Interactive Tests
During record, VSI Digital Test Manager captures all input and output generated on the display device to create an interactive terminal or DECwindows test. The basic concept is the same for both terminal and DECwindows sessions; that is, VSI Digital Test Manager records and places the input into a template file and the output into a benchmark file.
DTM> CREATE TEST_DESCRIPTION/INTERACTIVE MAIL_TEST
_Remark: Test for sending mail
%DTM-I-DEFAULTED, benchmark file name defaulted to MAIL_TEST.BMK
%DTM-I-DEFAULTED, template file name defaulted to MAIL_TEST.SESSION
%DTM-I-OPENIN, error opening MAIL_TEST.SESSION as input
-DTM-I-CURRTERM, characteristics of current terminal will be used
%DTM-S-CREATED, test description MAIL_TEST created
-DTM-W-FILENOTEXIST, template file DISK:[USER]MAIL_TEST.SESSION does not exist
DTM> CREATE TEST_DESCRIPTION/DECWINDOWS CLOCK_TEST
_Remark: Test of clock
%DTM-I-DEFAULTED, benchmark file name defaulted to CLOCK_TEST.BMK
%DTM-I-DEFAULTED, template file name defaulted to CLOCK_TEST.SESSION
%DTM-S-CREATED, test description CLOCK_TEST created
Session Files
A description of the type of display device on which you recorded the test
A record of all input during the recording session
Additional control and timing information
See Chapter 8, "Working with Terminal Session Files" and Chapter 9, "Working with DECwindows Session Files" for more information about session files.
Benchmark Files
A benchmark file contains the expected output for the test's execution; it is a standard by which other test results can be judged. VSI Digital Test Manager compares a benchmark file to the result file, which is generated using the input from a recorded session file when you run a test within a collection. A benchmark file has a default file type of .BMK.
3.5. Recording Interactive Tests
VSI Digital Test Manager uses the RECORD command to record input from the display device, keyboard, and pointer device.
3.5.1. Recording Interactive Terminal Tests
DTM> RECORD MAIL_TEST " "
%DTM-I-BEGIN, your interactive test session is now beginning...
Type CTRL/P twice to terminate the session.
See Chapter 8, "Working with Terminal Session Files" for complete information about session files for interactive terminal tests.
The template file for an interactive terminal test is the recorded terminal session file that VSI Digital Test Manager produces when you use the RECORD command. An interactive terminal test requires user input from a terminal keyboard. For example, an interactive terminal test can be a forms program that requests information from you.
VSI Digital Test Manager subsequently uses the recorded session file to supply data to applications in future test runs to ensure that the applications you are testing have not regressed. You can have VSI Digital Test Manager execute the interactive session file on the screen or in batch mode. Either way, VSI Digital Test Manager supplies the input data that was recorded.
If your interactive terminal session needs a screen size larger than 24 lines by 132 columns, set the display device to the largest size it requires during recording before you begin the recording session.
When recording interactive terminal tests from the DCL interface, VSI Digital Test Manager sets the terminal characteristics to "Application Keypad." If the test you are recording requires "Numeric Keypad," specify the DCL command SET TERM /NOAPP at the start of test recording.
Note
VSI Digital Test Manager can hang when recording or executing interactive terminal tests that contain mouse input. It is recommended that you do not use interactive terminal testing features to test mouse input to applications with terminal interfaces.
3.5.1.1. Terminal Record Command Keys
VSI Digital Test Manager provides several recording key sequences, depending on the type of test you are recording. During a recording session, these key sequences can be used to mark screens, terminate the recording session, and so on.
To enter record key sequences for terminal tests, first type the termination character (the default termination character is ^P (Ctrl/P)), then type a valid command character. If you type an invalid command character, the terminal bell sounds once (unless it is disabled). To override the default termination character, use the /TERMINATION_CHARACTER qualifier on the RECORD command. See Section 3.5.1.3, ''Redefining the Termination Character'' for an example.
|
Terminal Test |
Function |
|---|---|
|
Ctrl/P-B |
Starts automatic screen comparison and ends manual screen comparison for terminal-based tests. |
|
Ctrl/P-! |
Invokes an editor so you can enter a comment into the session file. You end the comment by pressing Ctrl/Z in a terminal session file. |
|
Ctrl/P-E |
Ends automatic screen comparison and begins manual screen comparison for terminal-based tests. |
|
Ctrl/P-Ctrl/P |
Ends the recording session and returns control to the previous command level. When you end a recording session this way, VSI Digital Test Manager saves the session and benchmark files. |
|
Ctrl/P-? |
Displays the current screen comparison mode and lists the available recording functions. |
|
Ctrl/P-I |
Inserts an input file into the session file you are recording. VSI Digital Test Manager prompts you for the input file specification. |
|
Ctrl/P-C |
Marks a screen for comparison. VSI Digital Test Manager automatically compares all screens for terminal-based tests. Use this control key sequence in terminal-based tests when automatic comparison is disabled. |
|
Ctrl/P-Ctrl/Z |
Ends an interactive recording session and saves the session file, but does not save the benchmark file. |
|
Ctrl/P-W |
Invokes a prompt for you to specify a wait time. You issue this control key sequence at the place in a session file where you want the wait to occur. When the session file is subsequently played or executed,the wait time is included in the session file. Wait times are specified in the dddd hh:mm:ss.cc format. |
|
Ctrl/P-Ctrl/C |
Aborts an interactive recording session without saving any of the generated files. |
When recording interactive terminal tests from the VSI Digital Test Manager DECwindows interface, you cannot use the Ctrl/P-W and Ctrl/P-C commands to enter wait records and comments. If you require these capabilities, you must record your interactive terminal tests from the DCL interface.
3.5.1.2. Exiting from a Terminal Recording Session
To exit
from a terminal recording session, press Ctrl/P twice. Control returns to the
DCL level if you recorded a test from the DCL prompt, or to the VSI Digital Test Manager level if
you recorded a test from the DTM> prompt.
3.5.1.3. Redefining the Termination Character
The default termination character for interactive terminal tests is Ctrl/P. To redefine the termination character, use the RECORD command with the /TERMINATION_CHARACTER qualifier.
DTM> RECORD MAIL_TEST/TERMINATION_CHARACTER=^D ""
Type Ctrl/D twice to terminate the session.
   .
   .
.3.5.2. Recording Interactive DECwindows Tests
DTM> RECORD CLOCK_TEST " "
%DTM-I-XTRAPVERSION, Display SDCW01::0 is running XTrap V0.3-0
%DTM-I-RECORDING, Recording to file DISK:[USER]CLOCK_TEST.SESSION at line 0
Before recording a DECwindows test, ensure that the testing environment has been initialized so conditions remain the same at the start of the test and at the end. This enables you to play several DECwindows session files without interruption.
For example, iconizing all windows and ordering the icons at the start of a test enables you to reproduce the start condition of a test. It also enables you to mask out small portions of the workstation screen using the Screen Editor. See Section 2.2.8, ''Creating a Benchmark Mask'' for information about masking portions of the workstation screen.
Note
There is no automatic comparison in a DECwindows recording session. Screens must be explicitly marked for comparison.
See Chapter 2, "Using VSI Digital Test Manager for OpenVMS in a DECwindows Environment" for a sample, interactive recording session using DECwindows.
3.5.2.1. DECwindows Record Command Keys
VSI Digital Test Manager provides several recording key sequences, depending on the type of test you are recording. During a recording session, these key sequences can be used to mark screens for comparison, terminate the recording session, and so on.
To enter record key sequences for DECwindows tests, press and release the command key, then press and release a valid command character. The default command key is the F9 key.
|
DECwindows Test |
Function |
|---|---|
|
F9-P |
Ends the recording session and returns control to the previous command level. When you end a recording session this way, VSI Digital Test Manager saves the session and benchmark files. |
|
F9-M |
Marks a screen for comparison. This is the only way to mark screens for DECwindows tests. |
|
F9-Z |
Ends an interactive recording session and saves the session file, but does not save the benchmark file. |
|
F9-C |
Aborts an interactive recording session without saving any of the generated files. |
|
F9-A |
Pauses the DECwindows recording session. |
|
F9-B |
Resumes the DECwindows recording session. |
|
F9-H |
Shows the status. |
|
F9-W |
Displays a Record Tool window.? |
3.5.2.2. Redefining the Command Key
You can redefine the command key for a DECwindows test by using the RECORD command with the /KEYSYM qualifier.
The command key must be in the DECwindows Latin-1 KEYSYM encodings. Display the file DECW$INCLUDE:KEYSYMDEF.H with the DCL TYPE command to view the list of Latin-1 KEYSYM keys.
DTM> RECORD test-name/KEYSYM=F7
DTM> RECORD test-name/KEYSYM=a
DTM> RECORD test-name/KEYSYM="comma"
3.6. Playing Back an Interactive Test
Use the PLAY command to playback a session file interactively.
Use the CREATE COLLECTION and RUN commands to execute a test.
The PLAY command executes a specific session file. The file is not played back as part of a collection and the results of the playback are not compared. The RUN command executes a collection of tests interactively; results can be compared.
Chapter 4, "Organizing and Executing Test Collections" describes how to create collections and run tests.
3.6.1. Playing an Interactive Terminal Test
DTM> PLAY MAIL_TEST.SESSION/INTERACTIVE
%DTM-I-BEGIN, your interactive test session is now beginning
   .
   .
   .
%DTM-S-CONCLUDED, your interactive test session has concludedDTM>
A session file is executed as if it were being run on the same type of display device on which it was recorded. If the display device characteristics differ from those for the recording display device, the output might not appear as you expect.
3.6.2. Playing an Interactive DECwindows Test
DTM> PLAY CLOCK_TEST.SESSION/DECWINDOWS
   .
   .
   .
DTM>
If the test corresponding to the session file has a DCL command associated with it, specify the DCL command with the /COMMAND qualifier.
Note
To play a DECwindows session file, VSI Digital Test Manager requires a physical workstation and its DECwindows server. Do not use the mouse or keyboard while a DECwindows session file is being played. This might cause the session file to be played incorrectly.
3.7. Processing Considerations for Interactive Terminal Tests
The following sections describe processing considerations and restrictions on the types of interactive terminal applications you can test when using VSI Digital Test Manager.
3.7.1. Time-Dependent Applications
By default, VSI Digital Test Manager does not execute the test at the same speed at which it was recorded; therefore, time-dependent screens marked for comparison usually do not match, and the comparison of the test results are usually unsuccessful. For example, you cannot test the OpenVMS Phone Utility because your input as the person initiating the call depends on the person you are calling to answer your call. These two, time-dependent events cannot be consistently duplicated.
Other examples of timing-dependent applications are those submitted as batch jobs or executed as subprocesses. You cannot test timing-dependent applications unless the application is a submitted batch job with the DCL SYNCHRONIZE command. Using the SYNCHRONIZE command, you have the choice of either waiting for the batch job or subprocess to finish, or performing other operations with the application. The Language-Sensitive Editor (LSE) COMPILE command is an example of this type of timing-dependent application.
3.7.2. Playing Back Applications in Real Time
Read input from a terminal device.
Determine what to do with the input.
Execute code that results in the input being sent to a display device.
Issue another read and wait for the next round of input.
By default, VSI Digital Test Manager plays back tests at a rate faster than the speed at which they were recorded. Regulation of playback speed is governed solely by the rate at which the application reads input from a terminal device.
Conversely, some applications are more than simple input-processing loops,and might not play back correctly if input is sent to them faster than they can read it. In this sense, these types of applications are time dependent, for which VSI Digital Test Manager does not guarantee accurate playback.
However, to accommodate testing of time-dependent applications, VSI Digital Test Manager provides a /REALTIME qualifier that you can specify with the RECORD, PLAY, or CREATE COLLECTION commands. When you specify the /REALTIME qualifier, all input time delays that occur during an interactive recording session are preserved during playback.
When specified with the RECORD command, the /REALTIME qualifier forces time delays to be recorded as WAIT records in the session file. When used with the PLAY and CREATE COLLECTION command, the /REALTIME qualifier forces recorded timing information to be interpreted as input time delays and test synchronization (based on application read detection) is disabled. This enables VSI Digital Test Manager to send input to the application at a rate determined only by the speed at which the test was recorded.
Use the /REALTIME qualifier sparingly because it slows down the execution of your tests. Although time delays are preserved during playback, VSI Digital Test Manager cannot absolutely guarantee accurate playback of time-dependent applications. For such applications, the readiness of the application to accept input can be highly dependent on the current system performance and load. When executing such tests, it is recommended that you run these tests on a system where processing demands are strictly regulated.
3.7.3. Ctrl/C or Ctrl/Y
While recording a test, do not press Ctrl/C or Ctrl/Y except at a point where the application being tested is expecting input. Pressing Ctrl/C or Ctrl/Y at a point other than where the application is expecting input terminates the application at a random point that generally cannot be duplicated when you run the test. For example, if you press Ctrl/C or Ctrl/Y while output is being displayed during testing of the DCL DIRECTORY command,you create a screen that cannot be consistently duplicated; the comparison of the test results is usually unsuccessful.
3.7.4. Applications That Accept Unsolicited Input
You can use VSI Digital Test Manager to test only those applications that accept input after prompting for it. You cannot test programs such as the OpenVMS Monitor Utility (MONITOR) with VSI Digital Test Manager. MONITOR displays screen after screen of continuously changing statistical information about the system. After you invoke MONITOR, it does not prompt you for input; it displays information until you terminate it by pressing Ctrl/Z. The termination occurs in a way that cannot be consistently duplicated; thus, the comparison of the test results usually is unsuccessful.
3.7.5. Device Type and Terminal Characteristics
If VSI Digital Test Manager does not recognize the device type of the terminal you are using to record the interactive terminal session, it defaults to a VT100-compatible terminal. Chapter 8, "Working with Terminal Session Files" describes the significance of device type and terminal characteristics when recording an interactive terminal session.
3.7.6. Graphics Mode Commands
You can compare tests that contain graphics mode (sixel and ReGIS) commands. For tests where screen comparison is specified, VSI Digital Test Manager ignores graphics-mode commands. Only differences in the text mode sections of the test are found.
3.7.7. Comparison of Scrolled Screens
Screen comparison is performed at the completion of the previous operation. If the previous operation causes information to scroll off the screen, only the information visible at the completion of the operation is captured and compared. To ensure that scrolling occurs page by page, use the TYPE/PAGE command.
Chapter 4. Organizing and Executing Test Collections
Selecting tests to execute and organizing them into collections
Executing collections in batch mode
Executing collections interactively at a terminal or DECwindows workstation
Stopping collections
Displaying the collection summary
Deleting collections
Re-creating collections
Comparing test results
4.1. Creating Collections
A collection is a snapshot of specified test descriptions and the VSI Digital Test Manager library as they exist at the time you create the collection. You must organize tests into collections before you can execute them to produce result files for comparison.
Collections are stored in a VSI Digital Test Manager library. They can have prologue files, epilogue files, and variables associated with them, but the prologue and epilogue files must be stored in locations other than the VSI Digital Test Manager library. For example, you could use Code Management System (CMS) libraries. See Chapter 7, "Maintaining a VSI Digital Test Manager Library" for more information on libraries.
You create a collection by using the CREATE COLLECTION command. It generates a command file that contains information about the specified set of tests and their related files. When the collection is executed, VSI Digital Test Manager executes this command file, which runs each test alphabetically by name.
The test-group expression selects the tests to be placed in the collection. Valid test-group expressions are test names, group names (to indicate that all the test descriptions in the group are part of the collection), or a list containing any combination of these. You must use the /GROUP qualifier to label group names and group expressions in a test-group expression. You can use wildcards. You can include a test in more than one collection.
DTM> CREATE COLLECTION MAIL_COLL MAIL* "Tests of MAIL commands"
%DTM-S-CREATED, collection MAIL_COLL created
If you modify test descriptions or the contents of groups after including them in a collection, those changes are not reflected in the collection unless you re-create it using the RECREATE command. For example, if you delete the MAIL_SHOW_ALL_TEST test description after you create the MAIL_COLL collection, the MAIL_COLL collection still contains pointers to the files associated with MAIL_SHOW_ALL_TEST. If you then try to run this collection, it will not run properly because VSI Digital Test Manager will try to find the deleted test.
You do not have to re-create a collection for benchmark files because you can update them. This is the only exception. Section 4.5, ''Re-Creating Collections'' describes the RECREATE command.
When you create a collection, VSI Digital Test Manager attempts to resolve all the file specifications in each test description and any file specifications included with the CREATE COLLECTION command. If VSI Digital Test Manager fails to find one or more of the required files, it lists the files and does not create the collection. However, if the only file that VSI Digital Test Manager cannot find is the benchmark file for a test, it creates the collection and treats the test with the missing benchmark file as a new test.
If you specify the CREATE COLLECTION command with the /NOVERIFY qualifier, VSI Digital Test Manager creates the collection, but resolves only those file specifications included on the command line.
Collection prologue and epilogue files are command files run before and after (respectively) a collection is executed. They can be used to set up an environment for the entire collection; they are similar to test prologue and epilogue files. VSI Digital Test Manager also provides collection-wide variables to tailor the test environment (see Chapter 6, "Tailoring Your Test System").
DTM> CREATE COLLECTION RUN_MAIL RMTEST/NOVERIFY/SUBMIT=(NOTIFY) -
_DTM> /PROLOGUE=SETUP.COM "First run of test RMTEST"The first parameter identifies the collection name as RUN_MAIL.
The second parameter, RMTEST, identifies the test you want to include in the collection and to run.
The /NOVERIFY qualifier specifies that VSI Digital Test Manager is to create the collection without verifying the existence of any files associated with the test description.
The /SUBMIT qualifier specifies that VSI Digital Test Manager is to submit the collection to the batch queue as soon as the collection is created. The NOTIFY keyword specifies that you will be notified when the batch job has completed.
The /PROLOGUE=SETUP.COM qualifier specifies that SETUP.COM is the collection prologue. Because the collection prologue file SETUP.COM is issued with the CREATE COLLECTION command (it is associated with the collection), VSI Digital Test Manager verifies the existence of this file even if you specify the /NOVERIFY qualifier.
Note that collection names cannot begin with the characters DTM$.
4.2. Executing Collections
When you execute a collection, VSI Digital Test Manager sets up the test environment and executes all the tests in the collection. Each test in a collection generates a separate result file. The result file contains the output generated by the template file. The result file is used for comparison against a test's benchmark file. Section 4.6, ''Comparing Test Results'' describes comparing test results. See Chapter 2, "Using VSI Digital Test Manager for OpenVMS in a DECwindows Environment" for information on executing collections in a DECwindows environment.
VSI Digital Test Manager associates the result file with a test by adding its name to the result description for the test. Result descriptions are described in Chapter 5, "Reviewing Test Results".
Note
When you interactively execute the tests in a large collection, you can occupy the display device for a long time. Consider executing large collections in batch mode; the results are the same, provided the batch and interactive environments are the same.
If your login command file sets up your interactive environment differently than it sets up your batch environment, the results might vary for the same test executed both interactively and in batch mode. For more information, see the Guide to Using DCL and Command Procedures on OpenVMS.
All tests in a collection are executed during the collection run. After the collection has executed and has been compared, you can examine the test results by using the Review subsystem (see Chapter 5, "Reviewing Test Results").
Defines the DTM$COLLECTION_NAME variable (defined by VSI Digital Test Manager as the collection name)
Defines any global variables
Executes the collection prologue file, if one exists
- Calls a generic command file in the library that performs the following tasks on each test:
Defines any local variables
Defines the DTM$TEST_NAME logical name (defined by VSI Digital Test Manager as the test name of the current test)
Executes the test prologue, if one exists
Executes the test template
Defines the DTM$RESULT logical name (defined by VSI Digital Test Manager as the test result file name of the current test)
Executes the test epilogue, if one exists
Executes VSI Digital Test Manager-provided filters, if any are associated with the test
Undefines local variables
Undefines the DTM$RESULT logical name
Compares the result file with the benchmark file
4.2.1. Executing Collections in Batch Mode
Use the CREATE COLLECTION command with the /SUBMIT qualifier to automatically submit the collection to the batch queue after creating it. You can also specify any of the SUBMIT command qualifiers.
Use the SUBMIT command to submit the collection.
DTM> SUBMIT MAIL_COLL/NOTIFY/LOG_FILE=[]/QUEUE=SYS$LARGE
%DTM-S-SUBMITTED, collection MAIL_COLL submitted
-DTM-I-TEXT, Job MAIL_COLL (queue SYS$LARGE entry 1000) started on
     SYS$LARGE
You can submit a collection to a batch queue more than once. However, if you attempt to resubmit a collection that you have executed and not reviewed, VSI Digital Test Manager prompts you to confirm that you want to resubmit the collection without reviewing it. To eliminate the confirmation prompt when resubmitting a collection without reviewing it, specify the SUBMIT command with the /NOCONFIRM qualifier.
4.2.2. Executing Collections Interactively
You can execute a collection interactively using the RUN command. The collection you execute can contain any combination of noninteractive, interactive terminal, and DECwindows tests.
If you specify a test name rather than an existing collection name as the parameter for the RUN command, VSI Digital Test Manager prompts you for automatic collection creation. Collections created this way contain only the specified test and have the same collection name as the test name.
The RUN command displays the output of each test on the screen. If you want to see messages from the prologue or epilogue file, specify the /LOG_FILE qualifier.
DTM> RUN SEND_MAIL_COLL "running the send mail test"
Starting SEND_MAIL_TEST test run...

Your personal name is "Digital Test Manager - Project Q"

Performing post-run cleanup with comparison...

%DTM-I-NEWTEST, test SEND_MAIL_TEST is a New test
%DTM-S-COMPARED, collection SEND_MAIL_COLL compared
DTM>
Section 4.6, ''Comparing Test Results'' describes how to compare the results of the execution of tests in a collection with the benchmark files of each test in a collection.
4.2.3. Stopping the Execution of Collections
Use the STOP command to terminate a collection executing in batch; this command stops execution of the collection and cleans up the VSI Digital Test Manager library.
Press Ctrl/C (rather than Ctrl/Y) to terminate a collection running interactively.
If you stop an executing collection with a command other than the STOP command or Ctrl/C, or if the system crashes while a collection is executing, errors will occur and you will not be able to review the collection. Pressing Ctrl/C or typing the STOP command to terminate a collection run enables VSI Digital Test Manager to restore its library to a consistent state and to perform necessary post-run cleanup after the collection run stops. See Chapter 7, "Maintaining a VSI Digital Test Manager Library" for instructions on how to recover the library, review the executed tests,and rerun the tests that did not execute.
DTM> STOP MSGTEST /CONFIRM "Stopping collection run"
Confirm stop of collection MSGTEST [Y/N] (N): Y
%DTM-S-STOPPED, collection MSGTEST stopped
DTM>
4.3. Displaying a Collection Summary
Use the SHOW COLLECTION command to display a brief listing of the attributes of a collection.
The collection name
The number of tests in the collection
The time the collection was created
The command that created the collection and the remark associated with it
The collection's status—whether it has been run, compared, reviewed,rerun, or stopped
The status of the tests in the collection—how many are successful,unsuccessful, new, updated, not run, or which comparison aborted
DTM> SHOW COLLECTION MSGTEST
Collections in VSI Digital Test Manager Library DUA0:[USER01.DTMLIB]

MSGTEST    4 test    21-MAY-1998    11:09:17 "Group of message tests"
       Command: CREATE COLLECTION MSGTEST INFOMSGTEST/GROUP
                                                 "Messages"
       Status: has been run, compared, not reviewed
       Successful count: 0      Unsuccessful count: 0
       New test count: 4        Updated test count: 0
       Test not run count: 0    Comparisons Aborted: 0
DTM>
4.4. Deleting Collections
Use the DELETE COLLECTION command to delete a collection. You should delete a collection after you review it and no longer need the results. When you delete a collection, all collection-related files are deleted. Benchmark files, test descriptions, and groups, including any groups created during a Review session, are not deleted.
You can delete several collections at a time by using wildcards, or use commas to separate collection names in a list.
You cannot delete a collection while it is running or in use.
DTM> DELETE COLLECTION MSGTEST "no longer needed"
Confirm deletion of collection MSGTEST [Y/N] (N): Y
%DTM-S-DELETED, collection MSGTEST deleted
DTM>
Note
Your ability to delete a collection depends on the protection of the files in the collection and your OpenVMS privileges. See Section 7.3, ''Security Features'' for more information about file protection.
4.5. Re-Creating Collections
Caution
Ensure that the prologue and epilogue files associated with the collection and template, prologue, and epilogue files associated with the tests in the collection exist in their proper directories. If VSI Digital Test Manager cannot find one or more of these files, the original collection is deleted, but a new collection is not created.
When you create a collection, VSI Digital Test Manager stores the command in the VSI Digital Test Manager database. When you re-create a collection using the RECREATE command, VSI Digital Test Manager uses the command stored in the database so none of the file specifications or qualifiers are changed.
4.6. Comparing Test Results
For every test in a collection that runs to completion, VSI Digital Test Manager compares the result file against the benchmark file (if it exists), saves the comparison status for the test, and saves any differences in a difference file. If the benchmark file and result file match, VSI Digital Test Manager deletes the result file.
If you specify the CREATE COLLECTION command with the /NOCOMPARE qualifier,or if a collection is only partially run, you must use the COMPARE command to manually compare the existing result files with the appropriate benchmark files.
You press Ctrl/C to abort an interactive execution.
You use the STOP command to stop a collection you submitted to batch mode.
VSI Digital Test Manager terminates abnormally.
Screen comparison (using the COMPARE command with the /SCREENS qualifier; available for interactive terminal and DECwindows tests only)
Record comparison (using the COMPARE command with the /RECORDS qualifier; available for noninteractive and interactive terminal tests only)
Character comparison (using the COMPARE command with the /CHARACTERS qualifier; available for noninteractive and interactive terminal tests only)
Note
For character and record comparison, the record size limit is 65,536 characters.
| Comparison Status | Meaning |
|---|---|
|
Comparison aborted |
A test whose comparison cannot be completed. The benchmark file exists, but the result file and difference file might not. |
|
New test |
A test that does not have a benchmark file. A result file was produced, but no difference file exists. |
|
Not run |
A test that did not run in a partially run collection. A benchmark file might exist. No result file or difference file exists. |
|
Successful |
A test whose benchmark and result files match. The result file was deleted and no difference file exists. |
|
Unsuccessful |
A test whose benchmark and result files do not match. A difference file exists. |
|
Updated |
A test whose benchmark file was updated after the comparison was performed for a collection. No result file or difference file exists. |
For comparison types of RECORDS and CHARACTERS, use the /IGNORE qualifier to specify types of special characters that VSI Digital Test Manager should ignore during a comparison. You can use the /FULL qualifier to specify that both identical and different data be included in the comparison report of the difference file.
The VSI Digital Test Manager character comparison facility might incorrectly detect result and benchmarks that contain identical characters but grouped on different character boundaries as being different. This primarily is a problem when specifying character comparison for interactive terminal tests. It is recommended that you specify a comparison type of SCREENS for interactive terminal tests.
After running and comparing a collection, you can review the test results and comparison status with VSI Digital Test Manager. Reviewing a collection gives you access to the results of a collection run and to other collection information. The Review subsystem is described in Chapter 5, "Reviewing Test Results".
4.7. Recomparing Partially Compared Collections
If the comparison of a collection is terminated abnormally before comparing the whole collection, you can recompare the collection using the COMPARE command.
Note
If you need to recompare a collection, do not review the partially compared collection. You cannot compare a collection that has been reviewed.
Chapter 5. Reviewing Test Results
- Review concepts
Output files
Comparison status
Specifying result descriptions
- Examining test results
Using the Review subsystem
Displaying test results
Printing test results
- Working with test results
Updating and creating benchmark files
Reviewing partially run collections
5.1. Review Concepts
When you execute a collection, VSI Digital Test Manager compares the test results with the benchmark file for each test that has been run. If the comparison is unsuccessful (differences are detected), VSI Digital Test Manager creates a difference file. If the comparison is successful (no differences are detected), the result file is deleted and no difference file is created.
You can then review the differences using the Review subsystem, which gives you access to the results obtained by executing the collection, as well as other information about the collection. It also enables you to invoke the Performance and Coverage Analyzer (PCA) to gather performance and coverage data for the test. Section 5.2, ''Examining Test Results'' describes the Review subsystem. Using VSI DECset for OpenVMS Systems describes using VSI Digital Test Manager with PCA.
You must execute and compare a collection before it can be reviewed. See Section 5.3.3, ''Reviewing Partially Run Collections'' for instructions for reviewing a partially run collection.
In a DECwindows environment, you can review test results by direct manipulation in the collection view. However, if you need to update benchmark files, you must pull down the Testing menu, choose the Review menu item, and choose the Open menu item to lock the collection so only you can perform an update operation.
The following sections describe result descriptions, test output files, and comparison status. These concepts apply to both the terminal and the DECwindows environments.
5.1.1. Using Result Descriptions
Result descriptions contain information about test output and comparison status. In the same way that a test description contains information about test files, VSI Digital Test Manager creates a result description that summarizes information about the test results (see Section 5.1.1.1, ''Output Files'').
The result description name
The comparison status of the test
The names of the result, benchmark, and difference files, if they exist
DTM_REVIEW> SHOW MAIL_TEST
Result Description MAIL_TEST         Comparison Status :  Successful

   Benchmark File  MAIL_TEST.BMK
   Result file does not exist
   Difference file does not exist

DTM_REVIEW>
5.1.1.1. Output Files
|
Output File |
Description |
|---|---|
|
Benchmark |
Contains the expected output for the test. |
|
For an interactive terminal test that has a benchmark file, VSI Digital Test Manager also creates the file test-name.BMK_SCREENS. This file contains printable copies of the interactive screen images corresponding to the information in the benchmark file. | |
|
Result |
Contains the results of a test's execution within a collection. |
|
For an interactive terminal test that has a result file, VSI Digital Test Manager also creates the file test-name.RES_SCREENS. This file contains printable copies of the interactive screen images corresponding to the information in the result file. | |
|
Difference |
Contains the differences between the benchmark and result files. |
|
This file is created during comparison of the benchmark and result files. A difference file is created only if differences exist between the benchmark and result files. |
Duplicate screen images are defined as any two consecutive screen images that are completely identical. This occurs, for example, when input causes the same screen image to be displayed more than once. During the generation of a screen file, if the screen image is identical to the previous screen image, another copy of that screen image is not placed in the printable screen file.
Each individual screen in both the benchmark or result file is consecutively numbered and each screen image placed in the screen file is associated with this screen number. The screen numbers in the printable screen file might not be in consecutive order; that is, the missing screen numbers correspond to the duplicate screen images that have been eliminated from the screen file. This technique is used for generating both the benchmark and results screen files.
Note
For interactive tests, VSI Digital Test Manager by default generates the files test-name.BMK_SCREENS and test-name.RES_SCREENS during comparison. These files contain printable copies of the screen images in the benchmark and result files respectively. These files are to be used strictly for printing purposes. They are not used as input to any VSI Digital Test Manager functions. The creation of these files can be prevented by using the DTM$OMIT_PRINTABLE_SCREENS logical variable, as defined in Section 6.3.4.2, ''DTM$OMIT_PRINTABLE_SCREENS Logical Variable''. Use this logical variable if disk space usage is critical.
5.1.1.2. Comparison Status
5.1.2. Specifying Result Descriptions
- You can specify each result description both by its result description name and its comparison status. You can organize sets of result descriptions that have similar characteristics in the following ways:
For the SHOW and PRINT commands, you can also specify output file qualifiers to print or display output files. For example, you can enter the SHOW * /SUCCESS/BENCHMARK command to display the benchmark files for all successful tests.
When you enter a Review subsystem command that accepts the result description expression and the comparison status qualifiers, the information in Table 5.2, ''Result Descriptions and Comparison-Status Qualifier Variations for the SHOW Command'' applies.
|
Result Descriptions |
Comparison-Status Qualifiers |
Result of the Command |
|---|---|---|
|
None |
None |
Shows the current result description. |
|
None |
One or more |
Shows all result descriptions with the specified comparison status. VSI Digital Test Manager interprets the result description parameter of the SHOW command as the wildcard parameter. For example, you can enter SHOW/FILES/SUCCESS/NEW to display the comparison status and whether output files exist for all successful and new result descriptions. The current result description position remains unchanged when you specify the SHOW command without specifying a result description. |
|
One |
None |
Shows the specified result description and makes it the current result description. For example, you can enter SHOW RMTEST to display the result file for result description RMTEST, then make RMTEST the current result description. |
|
One |
One or more |
Shows the specified result description, makes it the current result description, and ignores the comparison-status qualifiers. For example, you can enter SHOW/SUCCESS RMTEST to display the result file for result description RMTEST, then make RMTEST the current result description. VSI Digital Test Manager ignores the /SUCCESS qualifier with this command and displays the result file. |
|
One or more (using wildcards) |
None |
Shows all result descriptions matching the result description expression, but does not change the review position of the current result description. For example, you can make the current position the RMTEST result description, then enter SHOW/RESULT *RM*to display the result files for all result descriptions matching *RM*; the review position remains on RMTEST. |
|
One or more |
One or more |
Shows all result descriptions that match both the result description expression and any of the comparison status qualifiers. For example, if you enter INSERT/UNSUCCESS/NOT_RUN *RM*, all test descriptions that match *RM* and have the unsuccessful or not run comparison status are marked for insertion into a group when you exit from the Review subsystem. |
5.2. Examining Test Results
Invoke the Review subsystem.
Examine the collection summary information.
Examine the results for each test.
Examine one or more of the output files referenced in the result description: the result, difference, and benchmark files.
You can examine test results by issuing the SHOW and PRINT commands. The SHOW command displays information about result descriptions and displays their output files on the display device. The PRINT command prints copies of specified output files.
5.2.1. Using the Review Subsystem
This section provides an overview of the Review subsystem and shows how to use it to locate test results in a terminal environment. The Review subsystem exists only in a terminal environment; DECwindows tests cannot be reviewed in a terminal environment. You review DECwindows test results using views in the DECwindows environment (see Chapter 2, "Using VSI Digital Test Manager for OpenVMS in a DECwindows Environment").
5.2.1.1. Review Subsystem Overview
The REVIEW command
invokes the Review subsystem, which you use to examine the test results of a
collection execution. In a terminal environment, the Review subsystem is
indicated by the DTM_REVIEW> prompt.
DTM> REVIEW MSGTEST
Collection MSGTEST with 4 tests was created on 20-MAY-1998 10:46:34 by the command:
        CREATE COLLECTION MSGTEST MSGTEST/GROUP "Creating collection
                                                             MSGTEST"
        Last Review Date = 23-MAY-1998 10:04:45
        Success count = 0
        Unsuccessful count = 0
        New test count = 4
        Updated test count = 0
        Comparisons aborted = 0
        Test not run count = 0

Result Description MESSAGE_1    Comparison Status : New Test

DTM_REVIEW>
To exit from the Review subsystem, type EXIT at the
DTM_REVIEW> prompt, or press Ctrl/Z. Control returns to
the DCL level if you invoked the Review subsystem from the DCL prompt
($); control returns to the VSI Digital Test Manager level if you invoked the Review
subsystem from the DTM> prompt.
5.2.1.2. Primary and Read-only Reviewers
The primary reviewer can insert tests into groups and update benchmarks in a DECwindows environment. Only one person at a time can be the primary reviewer of a collection. If you try to access a collection as a primary reviewer while it is already being reviewed by another primary reviewer, you receive an error message. You are designated a primary reviewer of a collection if you enter the REVIEW command without the /READ_ONLY qualifier.
You are designated a read-only reviewer of a collection by entering the REVIEW command with the /READ_ONLY qualifier. You can view the result descriptions (see Section 5.1.1, ''Using Result Descriptions'') and print files, but you cannot make any changes to the result descriptions. Read-only reviewers cannot update benchmarks or insert tests into groups. VSI Digital Test Manager allows multiple, read-only reviewers.
As a read-only reviewer, you might obtain inaccurate information if you enter a SHOW command when the primary reviewer is updating benchmark files. Under the same circumstances, the Collection Summary Information also might be incorrect and files queued for printing may disappear.
As a read-only reviewer, you can use the PRINT/NOW command to avoid having files you select for printing disappear.
5.2.1.3. Canceling Review Subsystem Commands
Press Ctrl/C to cancel a transaction
while it is being processed and to return control to the
DTM_REVIEW> prompt.
If you press Ctrl/C during a wildcard transaction that updates the library,
VSI Digital Test Manager finishes updating the file it is processing before it returns to the
DTM_REVIEW> prompt.
If you press Ctrl/C at the DTM_REVIEW> prompt, VSI Digital Test Manager
terminates the Review session as if you had entered the EXIT command with the
/NOPRINT and /NOINSERT qualifiers.
5.2.1.4. Locating Test Results in the Review Subsystem
When you enter the Review subsystem, the first result description of a collection is set as the current location. Test results are arranged sequentially by result description name.
|
Command |
Description |
|---|---|
|
FIRST |
Moves you to the first result description in the collection. |
|
LAST |
Moves you to the last result description in the collection. |
|
NEXT |
Moves you to the next result description in the collection. You can use the comparison status to move to the next test with the specified comparison status. For example, to move to the next unsuccessful test in a collection, specify NEXT/UNSUCCESSFUL. You can also move forward a specified number of tests in a collection; for example, NEXT 3 moves you forward three tests in the collection. Further, you can combine the comparison status and count parameters to move forward to specific tests. |
|
BACK |
Moves you to the previous result description in the collection. You can use the comparison status to move to the previous test with the specified comparison status. For example, to move to the previous unsuccessful test in a collection, specify BACK/UNSUCCESSFUL. You can also move backward a specified number of tests in a collection; for example, BACK 3 moves you backward three tests in the collection. Further, you can combine the comparison status and count parameters to move backward to specific tests. |
|
SELECT |
Moves you to a specific result description that you
specify by its result description name. For
example:
DTM_REVIEW> SELECT INFOMSGTEST |
DTM_REVIEW> SHOW/UNSUCCESSFUL
Result Description MSGTEST   Comparison Status :  Unsuccessful

    Benchmark File is DUA0:[USER01.DTMLIB]MSGTEST.BMK
    Result file is present
    Difference file is present

Result Description INFOMSGTEST   Comparison Status :  Unsuccessful

    Benchmark File is DUA0:[USER01.DTMLIB]INFOMSGTEST.BMK
    Result file is present
    Difference file is present

DTM_REVIEW>
Locating Test Results with DECwindows
5.2.1.5. Using the Review Subsystem Keypads
In the following illustrations, the white area of a key indicates that you can issue the command by pressing only the key. The shaded area of a key indicates that you can issue the command by pressing PF1, then the shaded key.
Note
The number keys on the keyboard give you the same movement as the numbers on the keypad.
Within the Review subsystem, Ctrl/H displays HELP, Ctrl/W refreshes the screen, and Ctrl/Z terminates display of the result,benchmark, or difference file and returns control to the Review subsystem.
Figure 5.1, ''Review Subsystem Default Keypad'' shows the default Review subsystem keypad, which has most of the keypad keys defined.
| Key Sequence | Key Definition |
|---|---|
|
KP0 |
Displays the next test in a collection. |
|
PF1-KP0 |
Displays the previous test in a collection. |
|
KP1 |
Displays the next unsuccessful test in a collection. |
|
PF1-KP1 |
Displays the previous unsuccessful test in a collection. |
|
KP2 |
Displays the next new test in a collection. |
|
PF1-KP2 |
Displays the previous new test in a collection. |
|
KP3 |
Displays the next updated test in a collection. |
|
PF1-KP3 |
Displays the previous updated test in a collection. |
|
KP4 |
Places the currently selected files for printing on the print queue immediately. |
|
KP5 |
Marks the test description and inserts into a group. |
|
KP6 |
Updates the current test in a collection. |
|
KP7 |
Issues the SHOW command with the /DIFFERENCES qualifier and displays the differences. |
|
PF1-KP7 |
Prints the difference file. |
|
KP8 |
Issues the SHOW/RESULTS command and displays the result file. |
|
PF1-KP8 |
Prints the result file. |
|
KP9 |
Issues the SHOW/BENCHMARK command and displays the benchmark file. |
|
PF1-KP9 |
Prints the benchmark file. |
|
period (KP.) |
Displays the first test. |
|
PF1-period (KP.) |
Displays the last test. |
|
comma (KP,) |
Issues the SPAWN command, causing you to temporarily exit from VSI Digital Test Manager. |
|
PF1-comma (KP,) |
Issues the ATTACH command to attach you to the parent process (return to the VSI Digital Test Manager Review subsystem). |
|
Dash (KP-) |
Displays the collection summary. |
|
PF1-PF2 |
Displays help for review subsystem. |
|
PF2 |
Displays review subsystem Keypad. |
When you press either KP8 or KP9 on the default Review subsystem keypad (see Figure 5.1, ''Review Subsystem Default Keypad'')
When you issue the SHOW command with the /BENCHMARK or /RESULT qualifier from the Review subsystem command line
When you specify the DISPLAY/BENCHMARK command from the
DTM>command line

| Key Sequence | Key Definition |
|---|---|
|
KP0 |
Displays the next screen. |
|
KP1 |
Displays the previous screen. |
|
KP5 |
Displays the first screen in the file. |
|
KP7 |
Toggles the screen number display. If the screen number display is on the screen, pressing KP7 removes it. If the screen number display is not on the screen, pressing KP7 displays it. |
|
PF2 |
Displays review subsystem Keypad. |
Figure 5.3, ''Review Subsystem SHOW/DIFFERENCES Default Keypad'' shows the SHOW/DIFFERENCES keypad. When you press KP7 on the Review keypad, or issue the SHOW command with the /DIFFERENCES qualifier from the Review subsystem command line, the default Review subsystem SHOW/DIFFERENCES keypad becomes available.
| Key Sequence | Key Definition |
|---|---|
|
KP0 |
Displays the next screen. |
|
KP1 |
Displays the previous screen. |
|
KP3 |
Shifts split-screen mode. If the top (or bottom) half of the result and benchmark files is displayed, pressing KP3 displays the other half of the two screens. If the right (or left) half of the result and benchmark screens is displayed, pressing KP3 displays the other half of the two screens. |
|
KP4 |
Changes highlighting of differences for screens that have not been displayed. Differences are highlighted in bold reverse video. You can change this so differences are underlined. Pressing KP4 changes highlighting for the screens that have not been displayed. After a screen is displayed, you cannot change the way its differences are highlighted. |
|
KP5 |
Displays the first screen in the file. |
|
KP7 |
Toggles the screen number. If the screen number is on the screen, pressing KP7 removes it. If the screen number is not displayed,pressing KP7 displays it. |
|
KP8 |
Toggles split-screen mode. If you are in full-screen mode,pressing KP8 puts you in split-screen mode. If you are in split-screen mode,pressing KP8 switches you between horizontal split-screen mode and vertical,split-screen mode. |
|
KP9 |
Toggles full-screen mode. If you are in split-screen mode,pressing KP9 puts you in full-screen mode. If you are in full-screen mode,pressing KP9 switches you between displaying full screens from the result and benchmark files. |
|
PF2 |
Displays review subsystem Keypad. |
5.2.2. Displaying Test Results
This section describes how to display test results in the terminal environment. See Chapter 2, "Using VSI Digital Test Manager for OpenVMS in a DECwindows Environment" for information about displaying tests in a DECwindows environment.
The Review subsystem SHOW command displays information about result descriptions and displays the output files associated with result descriptions to the display device (SYS$OUTPUT).
You can specify a result description expression with the SHOW command, which identifies the result descriptions about which information is displayed. If you do not specify a result description, VSI Digital Test Manager displays information about the current result description.
- /BENCHMARK
- /DIFFERENCE
- /RESULT
If you do not include an output-file qualifier, VSI Digital Test Manager displays information about the specified result descriptions rather than an output file.
- /COMPARISON_ABORTED
- /NEW
- /NOT_RUN
- /SUCCESSFUL
- /UNSUCCESSFUL
- /UPDATED
/FILES–Displays the comparison status for result descriptions and states whether each output file exists. You cannot use the /FILES qualifier with the /SUMMARY qualifier.
/OUTPUT–Directs the output to the specified file.
/SUMMARY–Displays the collection summary information; the information displayed when you invoke the Review subsystem. You cannot use the /SUMMARY qualifier with the comparison status or the /FILES qualifier.
DTM_REVIEW> SHOW/BENCHMARK
Benchmark File DUA0:[USER01.DTMLIB]MSGTEST.BMK For Result Description
MSGTEST
   .
   .
   .
DTM_REVIEW>
When you enter a SHOW command with an output file qualifier for an interactive terminal test, VSI Digital Test Manager displays the result or benchmark files screen by screen, record by record, or character by character (depending on the comparison type).
For a comparison using the /SCREENS qualifier, the differences are displayed in split-screen mode; the top half of a result file screen is displayed on the top half of the screen, and the top half of the corresponding benchmark screen is displayed on the bottom half of the screen. You can also view the differences in full-screen mode.
When you enter the SHOW command with the /RESULT or /BENCHMARK qualifiers, an initial banner screen (Screen 0) is displayed. Subsequent screens are numbered for easy referencing. Press RETURN to access the next screen.
When you display a result or benchmark file, the specified file is displayed screen by screen. The screen number, initially on the top right corner of the screen, shows the number of the screen and type of file currently displayed.
To view other screens in the result and benchmark files, you must use the default keypad for the SHOW/RESULT and SHOW/BENCHMARK screens. Section 5.2.1.5, ''Using the Review Subsystem Keypads'' describes the SHOW/RESULT or SHOW/BENCHMARK keypad keys and their associated functions.
When you enter the SHOW command with the /DIFFERENCE qualifier, an initial banner screen (Screen 0) is displayed, as shown in Figure 5.4, ''VSI Digital Test Manager Difference File Screen 0''.
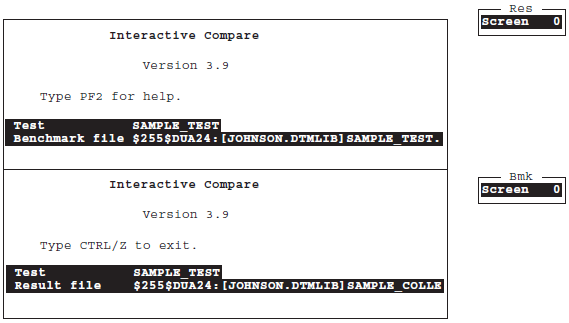
When you display a difference file, you are in horizontal split-screen mode by default; the terminal screen is divided horizontally into two windows. The top window displays the top half of a screen from the result file, and the bottom window displays the top half of the corresponding screen from the benchmark file.
When you display a difference file for a failed, interactive terminal test from its DECwindows interface, VSI Digital Test Manager attempts to create a 49-line DECterm screen. This is too large for some monitors. If you cannot examine the full contents of an interactive terminal test's difference file from the DECwindows interface, you will need to use the DCL interface.
To view other screens in the result or benchmark file, you must use the default keypad for the SHOW/DIFFERENCES screen. Section 5.2.1.5, ''Using the Review Subsystem Keypads''describes the SHOW/DIFFERENCES keypad keys and their associated functions.
5.2.3. Printing Test Results
Note
The PRINT command does not apply to DECwindows files. DECwindows result,benchmark, and difference files are stored in DDIF format. They require conversion to another format for printing.
The PRINT command does not queue the selected files for printing until after you exit from the Review subsystem with the EXIT command, or by pressing Ctrl/Z. If you leave the Review subsystem by pressing Ctrl/C, or entering the EXIT/NOPRINT/NOINSERT command, the selected files are not printed.
If you do not include an output file qualifier, VSI Digital Test Manager prints the result file associated with the current result description.
/[NO]LOG–Controls whether VSI Digital Test Manager displays informational and success messages on the display device. The /LOG qualifier is the default.
/NOW–Places all specified files immediately in the print queue.
/SELECTED–Concatenates all files already selected for printing with the currently specified files and immediately places them in the print queue.
5.3. Working with Test Results
This section summarizes the procedures for working with test results in the Review subsystem. You must be the primary reviewer of a collection before you can update any benchmark files.
While in the Review subsystem, you can use the UPDATE command to create or replace a benchmark file for a test. The UPDATE command makes the new benchmark file from the current result file for the specified result descriptions. VSI Digital Test Manager also provides DECwindows menu access for updating functions.
If a benchmark file already exists in the library, it is deleted when you enter the UPDATE command. If a benchmark file already exists but is outside the library, VSI Digital Test Manager informs you of this and replaces it as the benchmark file; it does not delete the old file.
Section 5.3.1, ''Updating an Existing Benchmark File'' shows how to use Review subsystem commands to replace a test's benchmark file. Section 5.3.2, ''Creating a Benchmark File for a New Test'' shows how to use Review subsystem commands to create a benchmark file for a new test.
See Chapter 2, "Using VSI Digital Test Manager for OpenVMS in a DECwindows Environment" for information on updating a benchmark file in a DECwindows environment.
5.3.1. Updating an Existing Benchmark File
You might want to update an existing benchmark file if you have changed an application in a way that changes the expected results for a test.
DTM_REVIEW> SELECT MSGTEST
Result Description MSGTEST    Comparison Status :  Unsuccessful

DTM_REVIEW> UPDATE
%DTM_I_UPDATED, the benchmark for test MSGTEST has been updated

DTM_REVIEW>
The result file is renamed as the benchmark file and the reference to the former benchmark file is removed. If the former benchmark file is in the library, it is deleted.
When you update a benchmark file that is stored in a Code Management System (CMS) library, VSI Digital Test Manager reserves the existing benchmark element in the CMS library and replaces it with the result file from the current test run. If you specified a CMS generation for the existing benchmark file with the CREATECOLLECTION/CLASS command, VSI Digital Test Manager inserts the updated benchmark file as the new generation in the specified CMS class.
If you update the benchmark file for an interactive terminal test, the file containing benchmark screens is also updated. If you update the benchmark file for a DECwindows test, any masks in the existing benchmark are transferred to the new benchmark.
5.3.2. Creating a Benchmark File for a New Test
This section shows you how to create a benchmark file for a new test in the Review Subsystem.
Invoke the Review subsystem to review a collection.
Locate the result description for a test.
Display the result file.
Create the benchmark file for the test by renaming the result file as the benchmark file (using UPDATE).
Show the collection summary.
Print the newly created benchmark file.
DTM> REVIEW MAIL_COLL
| Invoke the Review subsystem to review the MAIL_COLL collection. Note that the collection was not reviewed previously and it contains one new test,MAIL_TEST. |
| Display a result file to determine whether the results are correct. It is unnecessary to specify the result description name, because MAIL_TEST is the current result description. If the results are correct, you can then make this file the benchmark file for the test. Because MAIL_TEST is a noninteractive test, VSI Digital Test Manager displays the result file on the screen. |
| Use the UPDATE command to create a benchmark file for the test by renaming the result file as the benchmark file. This command creates a benchmark file for MAIL_TEST from its result file, deletes the result file, and changes the comparison status of the test from new to updated. VSI Digital Test Manager stores the benchmark file in the library and uses it as the benchmark file for MAIL_TEST when the test is run in future collections. If you are creating the benchmark file for an interactive test, the file containing benchmark screens (test-name.BMK_SCREENS) is also created. These files are printable for interactive terminal tests. |
| Show the collection summary. Note that the New test count field value is 0 and the Updated test count field value is 1. |
| Print the newly created benchmark file with the PRINT command. |
| Exit from the Review subsystem. |
Note
When you create a new benchmark file in a CMS library, VSI Digital Test Manager creates a new benchmark element in the specified CMS library. If you specify a CMS class with the CREATE COLLECTION/CLASS command, VSI Digital Test Manager inserts the new benchmark file as a generation in the class. See Chapter 7, "Maintaining a VSI Digital Test Manager Library" for more information about using CMS with VSI Digital Test Manager.
5.3.3. Reviewing Partially Run Collections
You stopped a collection by typing the STOP command if the collection was executing in batch mode, or by pressing Ctrl/C or Ctrl/Y if the collection was running interactively.
Your collection terminated abnormally during execution.
You used the DCL DELETE command with the /ENTRY qualifier to stop a collection of tests running in batch mode.
Another user stopped the process executing the collection.
Issuing the STOP command is the recommended way to terminate a collection executing in batch mode. Pressing Ctrl/C is the recommended way to stop a collection that is running interactively. Taking either of these actions causes VSI Digital Test Manager to clean up the VSI Digital Test Manager library, after which you must enter the COMPARE command to compare the partially run collection before reviewing it.
If you do not use the STOP command or press Ctrl/C to stop a collection,errors might occur and you will not be able to compare or review the collection. Before using the collection, you must enter the VERIFY/RECOVER command to cleanup the library, correct the errors, and mark the tests that did not run.
Note
For partially run or partially compared collections, all tests that did not run are marked with the not run comparison status. In both cases, you must perform a comparison before reviewing the collection.
If you review the collection before comparing it, VSI Digital Test Manager will not allow you to compare the collection later. If the collection is stopped after several tests have been compared, those tests will retain the correct comparison status.
Reviewing a partially run collection is especially important if the collection is large. Following the instructions described, prepare the partially run collection for review. Then, from the Review subsystem, examine the tests that ran and use the INSERT/NOT_RUN command to create a group containing all the tests that did not run. This group can then be included in a collection, executed, and reviewed. Creating a group while reviewing a collection is described in Chapter 6, "Tailoring Your Test System".
Chapter 6. Tailoring Your Test System
Using prologue and epilogue files
Creating and using groups
Using variables
Using filters
Using masks
Defining keypad keys
Using command files
Creating initialization files
Spawning and attaching processes
6.1. Using Prologue and Epilogue Files
Prologue and epilogue files are command files that enable you to control the environment in which VSI Digital Test Manager runs your tests. You store prologues and epilogues outside the VSI Digital Test Manager library, in OpenVMS directories or Code Management System (CMS) libraries.
You use prologues to set up test conditions before executing a test in a collection, or before executing the collection as a whole. You use epilogues to clean up or filter files after executing a test in a collection, or after executing the collection as a whole.
| File | Description |
|---|---|
|
Test prologue |
Associated with a specific test description, it is executed before the test template file is executed. |
|
Test epilogue |
Associated with a specific test description, it is executed after the test template executes and DTM$RESULT is defined, but before the VSI Digital Test Manager-provided filters are run. |
|
Collection prologue |
Associated with a collection, it is executed whenever the collection is executed after the global variables and DTM$COLLECTION_NAME are defined, but before any tests are executed. |
|
Collection epilogue |
Associated with a collection, it is executed after the collection is executed and is the last file executed. |
6.1.1. Test Prologue and Epilogue Files
CREATE TEST_DESCRIPTION
MODIFY TEST_DESCRIPTION
In a DECwindows environment, you specify test prologue and test epilogue files in text entry fields on the Create Test... or Modify Test... dialog box.
Test prologue and epilogue files are associated with a specific test description and are executed whenever the test is executed.
A prologue file can set up an environment for the test template file. For example, a test prologue file can define local variables, retrieve elements from a CMS library (using the FETCH command), or set default values.
An epilogue file can clean up the environment after the template file is run. Test epilogue files can also remove run-dependent data from a test's result file. By running a test once and checking for run-dependent data in the result file, you can determine the need to filter run-dependent data with an epilogue file. See Section 6.3.3.3, ''DTM$RESULT Logical Name'' and Section 6.4, ''Using Filters'' for more information.
You can disassociate a prologue or epilogue file from a test description by specifying the MODIFY TEST_DESCRIPTION command with the /NOPROLOGUE or /NOEPILOGUE qualifier. This does not delete the prologue or epilogue file.
Example 1.1, ''Sample Interactive Terminal Session'' shows the disabling and enabling of broadcast messages as part of a recorded test. However, it is possible that broadcast messages can appear in the recording before the SET BROADCAST=NONE command is entered, or after the SETBROADCAST=ALL command is entered and before the test recording is terminated. By placing these commands into test prologue and epilogue files, you eliminate that possibility. The following sections show how to place these commands into test prologue and epilogue files.
$!  DTMNOBROADCAST.COM
$!
$!  Disable broadcast messages before recording.
$!
$ SET BROADCAST=NONE$!
DTM> MODIFY TEST_DESCRIPTION MAIL_TEST -
_DTM> /PROLOGUE=DUA0:[USER01.PROLIB]DTMNOBROADCAST.COM
_Remark: Adding the prologue to disable broadcast messages
%DTM-S-MODIFIED, test description MAIL_TEST modified
DTM>
$!  RESETBROADCAST.COM
$!
$!  Re-enable broadcast messages after recording.
$!
$ SET BROADCAST=ALL$!
DTM> MODIFY TEST_DESCRIPTION MAIL_TEST -
_DTM> /EPILOGUE=DUA0:[USER01.EPILIB]RESETBROADCAST.COM
_Remark: Adding the epilogue to re-enable broadcast messages
%DTM-S-MODIFIED, test description MAIL_TEST modified
DTM>
6.1.2. Collection Prologues and Epilogues
SET PROLOGUE
SET EPILOGUE
Pull down the Library menu.
Choose the Create... or Modify... menu item.
Fill in the Prologue and Epilogue text entry fields.
When you associate prologue and epilogue files with a library using the SETPROLOGUE and SET EPILOGUE commands, those files become the default prologue and epilogue files for any collections you create. The default prologue and epilogue files are invoked whenever you execute one of those collections.
To cancel the default files, specify the SET NOPROLOGUE and SET NOEPILOGUE commands.
To associate different prologue and epilogue files when creating subsequent collections, specify new files with the CREATE COLLECTION command and the /PROLOGUE and /EPILOGUE qualifiers.
In a DECwindows environment, you specify collection prologue and collection epilogue files in text entry fields on the Create Collection... dialog box.
To create a collection that does not use the default collection prologue and epilogue files, specify the CREATE COLLECTION command with the /NOPROLOGUE and /NOEPILOGUE qualifiers.
Tests the variable USE_PCA to determine whether to process the Performance and Coverage Analyzer (PCA) Collector initialization file.
Defines the Collector initialization file according to the variable USE_PCA_INIT_FILE. Running the PCA Collector during a test is especially useful for determining which code paths are being exercised by the tests themselves. See the Guide to Performance and Coverage Analyzer for OpenVMS Systems for information about PCA. See Using VSI DECset for OpenVMS Systems for information about using VSI Digital Test Manager with PCA.
$!              –-- COLLECTION_PROLOGUE.COM –--
$! Collection prologue file for running the Collector in batch mode
$!
$  SET VERIFY$
!$  TRANSLIT:==$'F$LOGICAL("TRANSLIT")'
$!
$! Test DTM variable to determine whether or not to run PCA prologue
$!
$  IF USE_PCA .EQS. "FALSE" THEN EXIT
$!
$! Define the Collector initialization file
$!
$  DEFINE PCAC$INIT USE_PCA_INIT_FILE
$!
$! End of collection prologue fileDTM> SET PROLOGUE DUA0:[USER01.DTM_CMSLIB]COLLECTION_PROLOGUE.COM
In this example, the prologue file exists in the CMS library.
$!              –--  COLLECTION_EPILOGUE.COM  –--
$! Collection epilogue file for mailing test results to USER87,
$! upon completion of the test run.
$!
$ DTM SHOW COLLECTION 'DTM$COLLECTION_NAME'/FULL-
$ /OUTPUT='DTM$COLLECTION_NAME'.REPORT
$!
$ MAIL 'DTM$COLLECTION_NAME'.REPORT/SUBJECT="Collection summary" USER87
$!
$! End of collection epilogue file
DTM> SET EPILOGUE DUA0:[USER01.DTM_CMSLIB]COLLECTION_EPILOGUE.COM
In this example, the epilogue file exists in the CMS library.
6.2. Grouping Tests
You can classify test descriptions by placing them into categories called groups. You identify each group in the library with a group name, which is unique in the current library. As a result,you need only specify a group name, rather than a long list of individual test descriptions when referencing the tests in a group.
Create a group.
Change the contents of a group.
Delete a group.
Build a hierarchy of groups.
| Command | Description |
|---|---|
|
CREATE GROUP |
Creates an empty group into which you can insert tests or groups. |
|
DELETE GROUP |
Deletes an existing group. A group must be empty before it can be deleted. |
|
INSERT GROUP |
Places a group inside another group. |
|
INSERT TEST_DESCRIPTION |
Places a test inside an existing group. |
|
MODIFY GROUP |
Replaces the remark associated with an existing group. |
|
REMOVE GROUP |
Removes a group from another group. |
|
REMOVE TEST_DESCRIPTION |
Removes a test from an existing group. |
|
SHOW GROUP |
Lists the group's name, its contents, and its creation remark. |
6.2.1. Organizing Tests into Groups
After you create a group name with the CREATE GROUP command, you can insert one or more tests by listing the test names with the INSERT TEST_DESCRIPTION command. You can use wildcards when you specify test names to be inserted into a group. Tests are associated together by group name only; they are not relocated or copied.
DTM> CREATE GROUP BOUNDARIES "Creating Group BOUNDARIES"
When you insert a group into another group, you create a group hierarchy. Figure 6.1, ''Sample Group Hierarchy'' shows the BOUNDARIES groups hierarchy.
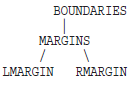
6.2.2. Displaying a Group Structure
DTM> SHOW GROUP/FULL

Groups in Digital Test Manager Library DUA0:[USER01.PROJECT]

BOUNDARIES   "Creating Group BOUNDARIES"
    MARGINS/Group
        LMARGIN/Group
            LMTEST1
            LMTEST2
            LMTEST3
         RMARGIN/Group
            RMTEST1
            RMTEST2
            RMTEST3
            RMTEST4

LMARGIN      "Creating Group LMARGIN"
    LMTEST1
    LMTEST2
    LMTEST3

MARGINS        "Creating Group MARGINS"
    LMARGIN/Group
        LMTEST1
        LMTEST2
        LMTEST3
     RMARGIN/Group
        RMTEST1
        RMTEST2
        RMTEST3
        RMTEST4

RMARGIN          "Creating Group RMARGIN"
     RMTEST1
     RMTEST2
     RMTEST3
     RMTEST4
DTM>
6.2.3. Removing Tests and Sub-groups from Groups
Use the REMOVE TEST_DESCRIPTION command to disassociate tests from a group. Use the REMOVE GROUP command to disassociate groups from a group. These commands reverse the actions of the INSERT TEST_DESCRIPTION and INSERT GROUP commands. The remove commands do not delete any tests or groups.
DTM> REMOVE TEST_DESCRIPTION LMTEST2 LMARGIN
_Remark: Removing test 2 from LMARGIN
Confirm removal of test description LMTEST2 from group LMARGIN [Y/N] (N): Y
%DTM-I-REMOVED, test description LMTEST2 removed from group LMARGIN
DTM>
6.2.4. Deleting Groups
When you create a group, VSI Digital Test Manager continues to associate that name with a group, even if the group no longer contains tests. You can delete the associated group name by specifying the DELETE GROUP command.
DTM> REMOVE TEST_DESCRIPTION * RMARGIN
_Remark: Preparing to delete group RMARGIN
Confirm removal of test description RMTEST1 from group RMARGIN [Y/N] (N): Y
%DTM-I-REMOVED, test description RMTEST1 removed from group RMARGIN
   .
   .
   .
Confirm removal of test description RMTEST4 from group RMARGIN [Y/N] (N): Y
%DTM-I-REMOVED, test description RMTEST4 removed from group RMARGIN
%DTM-S-REMOVALS, 4 removals completed
DTM> DELETE GROUP RMARGIN "Deleting the RMARGIN group"
Confirm deletion of group RMARGIN [Y/N] (N): Y
%DTM-S-DELETED, group RMARGIN deleted
DTM>
6.3. Using Variables
A VSI Digital Test Manager variable is a user-defined OpenVMS symbol or logical name that you use in tests, prologue files, and epilogue files.
Note
P1 through P8 and any variable name with the prefix DTM$ are reserved for exclusive use by VSI Digital Test Manager, except for those variables described in Section 6.3.4, ''Using User-Defined Variables to Control VSI Digital Test Manager''. You receive a warning if you attempt to create a variable with these names.
A VSI Digital Test Manager variable can be global or local in scope. A global variable is associated with all tests in a collection; a local variable is defined only during a specific test execution. Local variables must be associated with specific test descriptions by using the CREATE TEST_DESCRIPTION or MODIFY TEST_DESCRIPTION command with the /VARIABLE qualifier. When you create a collection, VSI Digital Test Manager associates all existing global variables with the collection and defines them at the start of every collection.
If you redefine a global variable or create a new global variable in the VSI Digital Test Manager library, use the RECREATE command to re-create the collection and associate it with the new global variables.
DTM> CREATE VARIABLE SUBMIT "SUBMIT/NOPRINTER"/GLOBAL/SYMBOL
_Remark: "Redefine the SUBMIT command"
$ SUBMIT :== SUBMIT/NOPRINTER
Note
Avoid assigning values to global variables from within template, prologue, or epilogue files. Instead, let VSI Digital Test Manager assign the indicated value before the template, prologue, or epilogue file is executed.
Global variable values can be overridden for an individual test that requires special handling. See Section 6.3.2, ''Overriding Variable Default Values'' for more information.
Specify the CREATE VARIABLE or MODIFY VARIABLE command with the /LOCAL qualifier to define the variable as a local variable.
- Specify the variable using the CREATE TEST_DESCRIPTION or MODIFYTEST_DESCRIPTION command with the /VARIABLE qualifier, as shown in the following example:
DTM> CREATE TEST_DESCRIPTION MECHANIX -
_DTM> /VARIABLE=(SUBMIT="SUBMIT/NOPRINTER")
Use the variable in the template file, prologue file, or epilogue file of specific test descriptions.
Wherever the SUBMIT variable is used in the MECHANIX test, VSI Digital Test Manager translates the variable to SUBMIT/NOPRINTER. Other tests are unaffected by this local definition of the SUBMIT variable.
You can disassociate variables from an existing test description by using the MODIFY TEST_DESCRIPTION command with the /NOVARIABLE qualifier.
6.3.1. Modifying and Deleting Variables
You can modify one or more variable characteristics and delete variables.
DTM> MODIFY VARIABLE INPUT_FILE/VALUE=INPUT.RNO
_Remark: "Replacing value of INPUT_FILE with INPUT.RNO"
%DTM-S-MODIFIED, variable INPUT_FILE modified.
The variable expression parameter can be a variable name, a wildcard character, a wildcard in combination with a variable name, or a list of these separated by commas.
DTM> DELETE VARIABLE INPUT_FILE "Deleting the INPUT_FILE variable"
Confirm deletion of variable INPUT_FILE [Y/N] (N): Y
%DTM-S-DELETED, variable INPUT_FILE deleted.
Note
VSI Digital Test Manager will not delete a variable that is associated with a test description. If you attempt to delete several variables with a variable expression and one or more of them is associated with a test description, VSI Digital Test Manager deletes only those variables not associated with a test description. Use the MODIFY TEST_DESCRIPTION/NOVARIABLE command to disassociate variables from test descriptions.
6.3.2. Overriding Variable Default Values
Most tests use a variable's default value. However, certain tests might require special handling and variable values. For example, you might want to use one template file to run several tests. You can do this by using a variable in the template file to override the variable's value for each test description.
Creates the variable TEMPLDIR, with DUA0:[USER01.TMP] as its value
Modifies the variable's value so when it is used with the test description MECHANIX, its value is DUA0:[USER01.PROJECT.TMP]
DTM> CREATE VARIABLE TEMPLDIR DUA0:[USER01.TMP]/GLOBAL
_Remark: Template Directory
%DTM-S-CREATED, logical variable TEMPLDIR created
DTM> MODIFY TEST_DESCRIPTION MECHANIX -
_DTM> /VARIABLE=(TEMPLDIR=DUA0:[USER01.PROJECT.TMP])
_Remark: "Change variable value when used in MECHANIX"
%DTM-S-MODIFIED, test description MECHANIX modified
DTM>
DTM> CREATE COLLECTION KEYTESTS * -
_DTM> /VARIABLE=(TEMPLDIR="DUA0:[USER01.TEST.TMP]")-
_Remark: New template directory for this collection
Note
You should override variables sparingly because you are changing the variable's value from earlier test runs. This might cause the actual test output to differ from the expected test output. In addition, any changes invariable values might affect the prologue and epilogue files. As a result, you must examine the differences and result files to discover whether the actual test output is what you expected.
6.3.3. Using Variables Defined by VSI Digital Test Manager
VSI Digital Test Manager supplies built-in variables that you can use in template, prologue, and epilogue files. The following sections describe these built-in variables and provide examples of how to use each one.
6.3.3.1. DTM$COLLECTION_NAME Global Symbol
VSI Digital Test Manager defines the OpenVMS global symbol DTM$COLLECTION_NAME as the current collection name before the collection prologue file executes. It is available for use in any prologue, epilogue, or template file in the collection.
Invoke VSI Digital Test Manager.
Enter the SHOW COLLECTION command with the /FULL qualifier using DTM$COLLECTION_NAME to specify the collection name.
Invoke the OpenVMS Mail Utility (MAIL) to send you the output of this command.
See Example 6.4, ''Sample Collection Epilogue File'' for the sample collection epilogue file.
6.3.3.2. DTM$TEST_NAME Local Symbol
VSI Digital Test Manager establishes the OpenVMS local symbol DTM$TEST_NAME as the test name field of the test description. You can use DTM$TEST_NAME in template files, test epilogue files, and test prologue files.
$!          –--  MAIL_TEMPLATE.COM  –--
$! TEMPLATE file for MAIL message sending commands
$!
$ @'dtm$test_name'.COM
$!
$! This new template file can be used with any test whose test
$! name is the same as that of the input file.
6.3.3.3. DTM$RESULT Logical Name
VSI Digital Test Manager establishes the OpenVMS logical name DTM$RESULT as the logical equivalent to the file specification for the test result file. VSI Digital Test Manager defines DTM$RESULT immediately after the test template file executes and just before the test epilogue file executes. It is deassigned after the test epilogue file executes and therefore exists only during test epilogue file execution.
DTM$RESULT enables you to create the epilogue file to filter run-dependent information from the result file. To do this, the epilogue file runs the result file through a text editor, such as EDT.
Note
VSI Digital Test Manager DECwindows result files are in DDIF format. Attempts to alter these files can corrupt them.
$! MEM.FIL -- Eliminate any "Memory Used:"
$!            messages from .RES files.
$ EDIT/EDT DTM$RESULT
c;32767('Memory Used:' dl) ex
EXIT
$ PURGE DTM$RESULT
6.3.4. Using User-Defined Variables to Control VSI Digital Test Manager
Note
VSI Digital Test Manager does not propagate logicals to batch jobs created with the SUBMIT command.
Alternatively, you can define VSI Digital Test Manager variables and have the logicals automatically defined when recording tests or running collections. The following sections describe these variables and provide examples.
6.3.4.1. DTM$DELAY_TIMEOUT Logical Variable
During interactive terminal test playback, VSI Digital Test Manager sends terminal input to an application as fast as the application will accept it. Under some circumstances, an application might never directly request input (with a QIO), but can check input queues periodically for the presence of input.
For interactive terminal test playback, VSI Digital Test Manager waits 7 seconds for the application to reach an input point, then sends more input allowing the test to continue.
For DECwindows tests, test synchronization can be accomplished by editing an input file.. VSI Digital Test Manager waits for a specified DECwindows display event to occur before continuing to send input. VSI Digital Test Manager waits 3 minutes by default, but you can specify another timeout value.
DTM> CREATE VARIABLE /LOGICAL DTM$DELAY_TIMEOUT "0 00:00:15.0" -
_DTM> "MY TIMEOUT"
DTM> MODIFY TEST MAIL /VARIABLE=DTM$DELAY_TIMEOUT "NEW TIMEOUT"
6.3.4.2. DTM$OMIT_PRINTABLE_SCREENS Logical Variable
When VSI Digital Test Manager compares interactive tests while running a collection,it can optionally create printable versions of the result (.RES_SCREENS) and the benchmark (.BMK_SCREENS) files. These files are only used for printing by the PRINT command with the /RESULT or /BENCHMARK qualifiers during the subsequent REVIEW of the collection test results. The files can become quite large depending on the quantity of screens compared during the collection run.
DTM> CREATE VARIABLE /LOGICAL /GLOBAL DTM$OMIT_PRINTABLE_SCREENS "1"
Note
$ DEFINE DTM$OMIT_PRINTABLE_SCREENS "1"
$ DTM COMPARE collection_name
6.3.4.3. DTM$DATE_FILTER_MIN_YEAR Logical Variable
You can use the DTM$DATE_FILTER_MIN_YEAR variable to define the first year in the range when filtering dates in test results. The default year is 1858
DTM> CREATE VARIABLE /LOGICAL DTM$DATE_FILTER_MIN_YEAR "1998" -
_DTM> "FIRST YEAR IN FILTER RANGE"
DTM> MODIFY TEST MAIL /VARIABLE=DTM$DATE_FILTER_MIN_YEAR "1998" -
_DTM> "NEW FILTER RANGE START DATE"
6.3.4.4. DTM$DATE_FILTER_MAX_YEAR Logical Variable
You can use the DTM$DATE_FILTER_MAX_YEAR variable to define the last year in a filter range when filtering dates in test results. The default year is 2500.
DTM> CREATE VARIABLE /LOGICAL DTM$DATE_FILTER_MAX_YEAR "1998" -
_DTM> "LAST DATE IN FILTER RANGE"
DTM> MODIFY TEST MAIL /VARIABLE=DTM$DATE_FILTER_MAX_YEAR "1998" -
_DTM> "NEW FILTER RANGE END DATE"
6.3.4.5. DTM$DATE_FILTER_STRING Logical Variable
You can use the DTM$DATE_FILTER_STRING variable to specify a string that VSI Digital Test Manager uses to replace all valid dates when filtering test results. For a list of date filters, see Table 6.3, ''Keywords Used with the /FILTER Qualifier''. The string specified by DTM$DATE_FILTER_STRING overrides the default replacements that the VSI Digital Test Manager DATE filter uses.
DTM> CREATE VARIABLE /LOGICAL DTM$DATE_FILTER_STRING "DATE" -
_DTM> "STRING USED TO REPLACE DATES"
DTM> MODIFY TEST MAIL /VARIABLE=DTM$DATE_FILTER_STRING -
_DTM> "NEW DATE FILTER STRING"
6.3.4.6. DTM$DATE_FILTER_FIRST Logical Variable
You can use the DTM$DATE_FILTER_FIRST variable to provide control over how ambiguity in date filtering should be resolved. Because the two-digit numbers 32–99 and 00 can only be a year, not a day, this ambiguity occurs only when the affected number is the range 01 to 31.
In date formats where the year is represented as a two-digit number, dates in the range 1-JAN-2001 to 31-DEC-2031 are ambiguous. For example,03-JUN-04 could be 3-JUN-2004 or 4-JUN-2003. Therefore, tests that use the date filter on dates in the affected formats might fail to match their benchmarks when these dates occur in the result.
Using the default date filtering where the year is not assumed first, the affected date formats are those in which the year comes first. For example, the date 98-JUN-02 is filtered into yy-mmm-dd, but 01-JUN-02 is filtered into dd-mmm-yy. However, formats where the year comes last are not affected. For example, both 02-JUN-98 and 02-JUN-01 are filtered into dd-mmm-yy.
- yy-mm-dd — yy.mm.dd — yy/mm/dd
- yy-mmm-dd — yy.mmm.dd — yy mmm dd
- year-month-day — year.month.day — year month day
The alternative punctuation characters can be used in either or both positions, such as yy-mm/dd.
DTM> CREATE VARIABLE /LOGICAL DTM$DATE_FILTER_FIRST "YEAR"
DTM> MODIFY TEST MAIL /VARIABLE=DTM$DATE_FILTER_FIRST
The only value allowed with this variable is "YEAR." If the variable is not defined or the value "YEAR" was not specified, then ambiguities are resolved so that the day or month occurs first.
6.3.4.7. DTM$DATE_MASK_MIN_YEAR Logical Variable
You can use the DTM$DATE_MASK_MIN_YEAR variable to define the first year in the range when masking dates in test results. The default year is 1858.
DTM> CREATE VARIABLE /LOGICAL DTM$DATE_MASK_MIN_YEAR "1998" -
_DTM> "FIRST YEAR IN MASK RANGE"
DTM> MODIFY TEST MAIL /VARIABLE=DTM$DATE_MASK_MIN_YEAR "1998" -
_DTM> "NEW MASK RANGE START DATE"
6.3.4.8. DTM$DATE_MASK_MAX_YEAR Logical Variable
You can use the DTM$DATE_MASK_MAX_YEAR variable to define the last year in a mask range when masking dates in test results. The default year is 2500.
DTM> CREATE VARIABLE /LOGICAL DTM$DATE_MASK_MAX_YEAR "1998" -
_DTM> "LAST DATE IN MASK RANGE"
DTM>
MODIFY TEST MAIL /VARIABLE=DTM$DATE_MASK_MAX_YEAR "1998" -
_DTM> "NEW MASK RANGE END DATE"
6.3.4.9. DTM$IGNORE_PROLOGUE_ERRORS Logical Variable
If the status returned by the test prologue is Error or Severe Error, the test template is not executed. The test status is set to Not Run.
If DTM$IGNORE_PROLOGUE_ERRORS logical is not defined or has the value zero, an error status returned by the test prologue causes the test template to be skipped. If this logical has the value "1", errors in the test prologue are ignored.
Note that Warning and Informational states do not prevent the test running. Also, collection prologue errors and test and collection epilogue errors continue to be ignored.
6.3.4.10. DTM$RETAIN_RESULTS Logical Variable
When this logical is not defined or is set to a value of zero, the result file is purged. If the logical is defined and set to a value of "1", the result file is not purged.
The option to retain the original result may be useful in cases where the reason for a failure is obscured by filtering of the result file.
Note that all result files are still deleted if the test is successful.
6.3.4.11. DTM$TIME_FILTER_NO_SPACE Logical Variable
DTM$TIME_FILTER_NO_SPACE is used to provide control over the TIME filter.
If this logical is not defined or the value is zero, a space preceding a single digit hour is absorbed by the filter. If the logical is defined with the value "1", a space preceding a single digit hour is not absorbed.
    Transaction complete at 4.34
    Transaction complete at 11.47
6.4. Using Filters
VSI Digital Test Manager enables you to filter data that varies in test results from one test run to the next. VSI Digital Test Manager also enables you to filter data during the recording of a test to produce a filtered benchmark file.
VSI Digital Test Manager filters operate by changing specified data types (like timestamps) to ASCII characters of a standard format. For example, an OpenVMS time stamp of 13:20:23.0002 can be changed to hh:mm:ss.xxxx. To be recognized by VSI Digital Test Manager, filter patterns must appear contiguously in the file you want to filter.
CREATE TEST_DESCRIPTION/FILTER=keyword MODIFY TEST_DESCRIPTION/FILTER=keyword
Using the CREATE TEST_DESCRIPTION or MODIFY TEST_DESCRIPTION command with the /FILTER qualifier, the specified filters apply only to the test being created (see Section 6.4.1, ''Associating and Disabling Test Filters''). When a test is run in a collection, the filters associated with it apply to the result file.
RECORD testname/FILTERS
Using the RECORD command with the /FILTERS qualifier when the test is recorded causes VSI Digital Test Manager to apply the filters associated with the test description to the benchmark file (if a benchmark file is produced).
FILTER file-specification/qualifier
Using the FILTER command, the specified filters apply to the specified file, which can be any OpenVMS file and does not necessarily need to be applied to VSI Digital Test Manager files (see Section 6.4.2, ''Applying File Filters'').
|
Keyword |
Description |
|---|---|
|
ALL |
Specifies that all filters be used. |
|
DATE |
Where the date form is abbreviated, the date filter replaces date stamps by substituting a d for each displayed number of the day of the month, an m for each displayed letter of the month, and a y for each displayed number of the year. Where the date form is spelled out, the month name is replaced by month, the numeric day is replaced by day, and the year is replaced by year. The following list shows examples of the date filtering functions. Note that this list
is not all-inclusive.
|
|
TIME |
Replaces time stamps with the following forms:
|
|
FILE_NAMES |
Replaces the file names with FILENAME.EXT. |
|
DIRECTORIES |
Replaces the directory specification field in the file specification with DISK:[DIRECTORY]. |
|
TRACE_BACK |
Replaces 32-bit memory addresses with xxxxxxxx and 64-bit memory addresses with xxxxxxxx xxxxxxxx. |
|
VERSION |
Replaces file versions with VERSION. |
|
USER_FILTER |
Specifies a user defined TPU filter file. |
|
NOUSER_FILTER |
Removes any user filter that had been specified earlier with /USER_FILTER qualifier. |
If you specify more than one keyword, separate the keywords with commas and enclose the list in parentheses. If you specify only one keyword, omit the parentheses.
|
Logical Variable |
Description |
|---|---|
|
DTM$DATE_FILTER_MIN_YEAR |
Used to specify the first year in a filter range. The default year is 1858. |
|
DTM$DATE_FILTER_MAX_YEAR |
Used to specify the last year in a filter range. The default year is 2500. |
|
DTM$DATE_FILTER_STRING |
Used to specify a string of your choice that replaces all filtered dates. |
Note
Use caution with filters because the original, unfiltered result file is deleted after the filtering occurs, leaving only the filtered file. Using filters on interactive tests that contain escape sequences can delete information that is essential to the test.
6.4.1. Associating and Disabling Test Filters
Use the CREATE TEST_DESCRIPTION or MODIFY TEST_DESCRIPTION command with the /FILTER qualifier to associate filters with a specific test description.
When the test is executed, VSI Digital Test Manager filters the result file (after the epilogue file is run).
DTM> MODIFY TEST_DESCRIPTION MAIL_TEST/NOFILTER=DATE
_Remark: Disabling the DATE filter
Note
If you modify filters for a test description, you must subsequently use the RECREATE command to re-create any collections containing the test.
The SHOW TEST_DESCRIPTION with the /FULL or /FILTER qualifier lists the filters associated with a specific test description.
6.4.2. Applying File Filters
6.4.3. Using Masks
For interactive terminal test results and benchmark screens comparison, VSI Digital Test Manager enables you to mask, or ignore, particular data that varies from one test run to the next. Masking is performed in the comparison phase of a collection run when interactive test screens are being compared.
CREATE COLLECTION /MASK=keyword
COMPARE /MASK=keyword
|
ALL |
Specifies that all the masks in this table be used. |
|
DATE |
The date mask ignores comparison of date stamps. The following list shows examples of
the date patterns that you can mask. Note that this list is not all-inclusive.
|
|
TIME |
Ignores time stamps with the following forms:
|
|
FILE_NAMES |
Ignores file names of the form FILENAME.EXT. |
|
VERSION |
Ignores file versions on file names. |
|
DIRECTORIES |
Ignores directory specification fields of the form DISK:[DIRECTORY]. |
If you specify more than one keyword, separate the keywords with commas and enclose the list in parentheses. If you specify only one keyword, omit the parentheses. Masking is performed in the order of the keywords shown above.
|
Logical variable |
Description |
|---|---|
|
DTM$DATE_MASK_MIN_YEAR |
Used to specify the first year in the masking range. The default is 1858. |
|
DTM$DATE_MASK_MAX_YEAR |
Used to specify the last year in the masking range. The default is 2500. |
6.4.4. User Defined Filters
The user defined filter facility provides a mechanism whereby filters written as DEC Text Processing Utility (DECTPU) programs are automatically executed when tests are run. These filters are referred to as user filters.
This enables users to solve easily many filtering problems, often with a single-line program, while allowing full access to the facilities of DECTPU to solve more complex cases.
global_replace( identifier + ':[' , 'DEVICE:[' )
Usage:
DTM> FILTER/USER_FILTER=DEVICE.TPU TEST.DAT
Alternatively, filters can be developed using the TPU pattern style feature of Language-Sensitive Editor for OpenVMS.
DTM> CREATE VARIABLE /LOGICAL DTM$UF_DEVICE
"DISK1:[TEST.FILTERS]DEVICE.TPU"
DTM> MODIFY TEST /VARIABLE=DTM$UF_DEVICE
When the test is run, as part of a collection, the filter is applied.
6.4.4.1. Command Qualifier
FILTER
     /USER_FILTER
          /USER_FILTER=filename
          /USER_FILTER=(filename[,...])
          /NOUSER_FILTER (D)
The specified files are executed by DEC Text Processing Utility (DECTPU). If more than one file is specified they are executed in the order given. The user filters are applied before any built-in filters that are also specified on the command line.
User filter files can be located either in OpenVMS directories or in Code Management System for OpenVMS libraries. Files may be specified using logical names that include search lists. Wildcards cannot be used. For files in CMS libraries, the most recent generation on the main line of descent is used.
Before the first file is executed, the file to be filtered is read into the DECTPU buffer "filter_buffer". Next, the file specified by the logical name DTM$UFDEFINES is executed. The system logical name DTM$UFDEFINES references the file SYS$LIBRARY:DTM$UFDEFINES.TPU, which contains definitions of a global replace procedure and patterns which can be used in building filters. This logical can be redefined to point to a custom file.
Any errors in accessing the user filter files or in executing the DECTPU commands are reported. However, they do not cause the FILTER command to fail, and any remaining user and built-in filters are applied.
6.4.4.2. Variables for User Filters
Variables with names beginning with the string "DTM$UF_" may now be defined. These variables must be logical variables but can be global or local.
When tests are run that have associated variables whose names begin with the string "DTM$UF_", DTM applies the user filters contained in the files referenced by the value of those variables. Only a single file may be referenced by each variable.
The specified files are executed by DEC Text Processing Utility (DECTPU). If more than one user filter variable is associated with a test, the files are executed in the lexicographic order of the variable names. The user filters are applied before any built-in filters that are also specified for the test.
User filter files can be located either in OpenVMS directories or in CMS libraries. Files may be specified using logical names including logical names that specify search lists. Wildcards cannot be used. For files in CMS libraries, the most recent generation on the main line of descent is used.
Before the first file is executed the file to be filtered is read into the DECTPU buffer "filter_buffer". Next, the file specified by the logical name DTM$UFDEFINES is executed. The system logical name DTM$UFDEFINES references the file SYS$LIBRARY:DTM$UFDEFINES.TPU, which contains definitions of a global replace procedure and patterns which can be used in building filters. This logical can be redefined to point to a custom file.
Any errors in accessing the user filter files or in executing the DECTPU commands are reported. However, they do not cause the filter operation to fail, and any remaining user and built-in filters are applied.
After all the user filters have been applied, the file being filtered is written out. If any built-in filters are also specified, they are applied to the newly created file, resulting in a second new version.
DTM> MODIFY TEST CHECK_DEVICES /VARIABLE=DTM$UF_DEVICE=" "
6.4.4.3. Filtering Benchmarks on Recording Interactive Terminal Tests
DTM> RECORD /FILTER /VARIABLES TERMINAL_TEST1
6.4.4.4. Using the Global Replace Procedure
PROCEDURE global_replace ( pattern_to_replace,
                              replacement_string;
                              search_mode,
                              evaluate_replacement,
                              convert_linefeeds)DESCRIPTION:
             Replace all occurrences of a given pattern with a
given string in the buffer "filter_buffer".|
pattern_to_replace |
The pattern to be replaced. |
|
replacement_string |
The string to be substituted. |
|
search_mode (optional) |
The mode of pattern matching to be used when searching for the pattern. The
following lists the mode of pattern:
|
|
evaluate_replacement (optional) |
Specifies whether the replacement string is to be evaluated.
If specified as ON or 1, the replacement string is evaluated before use. This is needed if the replacement string contains any partial pattern variables. In this case, any string literals in the replacement string must be specified as nested strings and partial pattern variables converted to strings using STR. |
|
convert_linefeeds (optional) |
Specifies whether any linefeed characters in the replacement string are to be
converted into line breaks.
|
6.4.4.5. Examples of User Filters
Example 1: Simple Use of procedure global_replace
global_replace ( 'UDISK' + number, 'DISK_NAME')
The pattern to replace is built from a string literal ('UDISK'), the concatenation operator (+) and the pattern "number" included in the supplied definitions file. The pattern "number" matches a sequence of digits.
The replacement string is the string literal 'DISK_NAME'.
Example 2: Using the Null Pattern
This example uses the supplied "null" pattern with the DECTPU alternation operator to include an optional element in a pattern.
global_replace ( ("U"|null) + "DISK" + number, "DISK_NAME")Example 3: Using Pattern Variables
    37-NOV-0999 as a valid date.
    day := any(" 123") + digit;
    month := "JAN" | "FEB" | "MAR" | "APR" |
             "MAY" | "JUN" | "JUL" | "AUG" |
             "SEP" | "OCT" | "NOV" | "DEC";
             year := any(digits,4);
             date := day + "-" + month + "-" + year;
    global_replace( date, "dd-mmm-yyyy");
This filter defines the pattern variables "day", "month" and "year" which are then used to define the pattern variable "date" used in the call to global_replace.
The "day" pattern uses the DECTPU function "any" to match either a space or one of the characters "1", "2" or "3", followed by a digit.
The "month" pattern uses the DECTPU pattern alternation operator "|" to specify a list of alternative string literals.
The "year" pattern uses the DECTPU function "any" with the supplied pattern "digits". The "4" parameter indicates that exactly 4 digits are to be matched.
The "date" pattern concatenates these patterns and linking punctuation.
Example 4: Removing Blank Lines
global_replace( LINE_BEGIN + LINE_END, '');
The LINE_END keyword absorbs the new line.
global_replace( LINE_BEGIN + (white_space|null) + LINE_END, '');
Example 5: Using Partial Pattern Variables to Retain Context
day := any(" 123") + digit;
          month := "JAN" | "FEB" | "MAR" | "APR" |
                   "MAY" | "JUN" | "JUL" | "AUG" |
                   "SEP" | "OCT" | "NOV" | "DEC";
                   year := any(digits,4);
                   date := (day + "-"@day_part) + month +
                            ("-" + year@year_part);
global_replace( date, 'str(day_part) + "mmm" + str(year_part)',,ON);
The day part of the date and the "-" character are assigned to the partial pattern variable day_part and the year part of the date and preceding "-" assigned to year_part. These partial pattern variables are then included in the replacement string.
When partial pattern variable are used in the replacement string they must be evaluated for each replacement. To do this, set the parameter evaluate_replacement to ON, as shown above.
When the replacement string is to be evaluated, string literals must be nested inside further quotes. This is most easily done by using single quotes for the outer string and double quotes for any nested string literals,or vice-versa. Also, any partial pattern variables must be converted to strings using the DECTPU procedure STR.
Note that including LINE_END in the definition of a partial pattern variable does not have the effect of retaining the line break. See the following example for a resolution of this problem.
Example 6: Using LINE_END for Context
If the search pattern contains LINE_END, the matched line break is removed, causing the next line to be appended to the current line. To use LINE_END to only provide context for the search, the line break must be reinserted. This is done using the parameter convert_linefeeds.
If the convert_linefeeds parameter is specified as ON, any linefeed characters appearing in the replacement string are removed and the built-in DECTPU procedure SPLIT_LINE is called at the point of the linefeed character.
global_replace (number+LINE_END, "x"+lf,,,ON)
The "lf" pattern is defined as a linefeed character in the supplied definitions file.
global_replace (number+(LINE_END@sep),'"x"+STR(sep,lf)',,ON,ON)
The second parameter to STR specifies the string that line breaks occurring in the first parameter should be converted to. Line breaks are retained by specifying the linefeed character and setting the parameter convert_linefeeds to ON.
Example 7: Using UNANCHOR to Replace Sections
global_replace ( "/*" + UNANCHOR + "*/", "/* Deleted */")
Note that while a similar effect is possible using the COMPARE/SENTINEL command, the filter can be applied to individual tests, whereas the /SENTINEL qualifier applies only to collections.
Example 8: Using Other DECTPU Commands
The global_replace procedure can be used for many filtering tasks. However any DECTPU commands can be used to build filters. The file being filtered is read into the buffer "filter_buffer" before the user filters are applied and written out afterwards.
EDIT( filter_buffer, UPPER, OFF)
Note that while a similar effect is possible using the COMPARE/IGNORE=CASE command, the filter can be applied to individual tests, whereas the IGNORE qualifier applies only to collections.
POSITION (BEGINNING_OF (filter_buffer));
                  LOOP
                    found_range := SEARCH_QUIETLY (number, FORWARD);
                    EXITIF found_range = 0;
                    POSITION (END_OF(found_range));
                    MOVE_HORIZONTAL(1);
                    value := INT(STR(found_range));
                    IF (value>350) AND (value<570)
                      THEN
                        COPY_TEXT ("XXX");
                        ERASE (found_range);
                    ENDIF;
                  ENDLOOP;
The initial POSITION is required to ensure that the whole of the filter_buffer is processed, because the editing point is undefined at the start of each filter. Then, as each number is processed, the editing point is moved to the end of the number. The MOVE_HORIZONTAL procedure call is necessary because the previous POSITION leaves the editing point at the last character of the number, which would result in an immediate match on the next call to SEARCH_QUIETLY.
6.5. Defining Keypad Keys
VSI Digital Test Manager supplies you with four, default operations keypads for the terminal environment, depending on the subsystem that you are using. Keypad definitions are not recognized by the DECwindows interface. This section describes the VSI Digital Test Manager system default keypad. The other keypads are described in Chapter 5, "Reviewing Test Results".
The keypad is available when you invoke VSI Digital Test Manager. The GOLD key (PF1), HELP key (PF2), and ENTER (RETURN) keys are already defined; the rest of the keys on the keypad are undefined. You can define a key to execute up to two VSI Digital Test Manager commands by specifying one command to execute when you press the defined key, and specifying another command to execute when you press the GOLD key and then the defined key. You can create a custom keypad by defining keys to execute frequently used commands, or command strings that are very long.
When you create key definitions with the DEFINE/KEY command, these definitions are in effect only for the current session. The next time you invoke VSI Digital Test Manager, only the default key definitions will be in effect. To save key definitions to use in every VSI Digital Test Manager session you initiate, include the key definitions in a VSI Digital Test Manager initialization file. This file is executed whenever you invoke VSI Digital Test Manager. For more information on initialization files, see Section 6.6.2, ''Creating a VSI Digital Test Manager Initialization Command File''.
If you have key definitions that you want to save, but do not necessarily want to use every time you invoke VSI Digital Test Manager, store them in a command file.
Use the DEFINE/KEY command to define the keypad keys to execute VSI Digital Test Manager commands in a single
keystroke. The command you associate with a keypad key must be appropriate for the prompt,
DTM> or DTM_REVIEW>, at which it will be entered. You
cannot define keypad keys for the recording key sequences.
DTM> DEFINE/KEY KP5 "SET LIBRARY DUA0:[USER01.LIB_A]"/TERMINATE
DTM>
DTM> SET LIBRARY DUA0:[USER01.LIB_A]
%DTM-S-LIBIS, VSI Digital Test Manager library is DUA0:[USER01.LIB_A]
DTM>
DTM> DEFINE/KEY KP5 /IF_STATE=GOLD_DTM/TERM -
_DTM> "SET LIBRARY DUA0:[USER01.LIB_B]"/TERMINATE
DTM>
6.6. Using Command Files
DTM> @file-specification
Note
VSI Digital Test Manager does not check for recursive command files. If you have a command file that invokes itself, or invokes another command file that invokes the original command file, you will create an infinite loop.
An EXIT command in a command file causes VSI Digital Test Manager to terminate the subsystem that is running. It does not necessarily terminate execution of the command file. For example, if the command file issues the EXIT command from the Review subsystem, control returns to the VSI Digital Test Manager level. If an EXIT command terminates the session, execution of the command file terminates.
If the command file causes an error or warning to occur, execution of the command file stops and no subsequent commands are executed.
6.6.1. Creating and Invoking a Command File
You create command files with a text editor and invoke them from the VSI Digital Test Manager subsystem level, from the Review subsystem level, or from within another command file. If you include only a file name with the @file-specification command, VSI Digital Test Manager assumes a file type of .COM.
If you specify a command but omit a required parameter, VSI Digital Test Manager prompts you for the missing parameter.
When you invoke VSI Digital Test Manager from a DCL command procedure, be sure to supply all required command parameters. If you omit a required parameter for which you would be prompted if you entered the command interactively, DCL reads the next line in the command file as the missing parameter rather than as a separate command. The second command is lost.
6.6.2. Creating a VSI Digital Test Manager Initialization Command File
Use the DCLDEFINE command to define an initialization command file. VSI Digital Test Manager provides the OpenVMS logical name DTM$INIT that you define to identify a command file that you want VSI Digital Test Manager to execute each time you invoke it. The command file specified by DTM$INIT is not executed when you invoke VSI Digital Test Manager using the DTM/DECWINDOWS command.
$ DEFINE DTM$INIT SAMPLE_STARTUP.COM
!Initialization file to set library and define keys
!
!Establish the library! SET LIBRARY DUA0:[USER01.DTMLIB]
!
!Define keypad keys!
 DEFINE/KEY KP3/IF_STATE=DTM         "SHOW COLLECTION */FULL"/TERMINATE
 DEFINE/KEY PF4/IF_STATE=GOLD_DTM    "SET LIBRARY DUA0:[USER01.LIB_A]"/TERMINATE
 DEFINE/KEY KP1/IF_STATE=REVIEW      "NEXT/SUCCESSFUL"/TERMINATE
 DEFINE/KEY KP1/IF_STATE=GOLD_REVIEW "BACK/SUCCESSFUL"/TERMINATE
$ DTM/NOINIT
6.7. Spawning or Attaching to Another Process
DTM>) and the Review prompt
(DTM_REVIEW>). These commands enable you to create one or more subprocesses
of your parent process, and to move between these processes.Note
The SPAWN and ATTACH commands have no corresponding actions in a DECwindows environment.
The SPAWN command enables you to create (spawn) a subprocess and to attach your terminal or workstation to the subprocess. You can create a subprocess to issue DCL commands, read an electronic mail message, or create another VSI Digital Test Manager session. The ATTACH command enables you to switch to other subprocesses.
If you specify a DCL command as a parameter to the SPAWN command, the DCL command is executed and control is returned immediately to the VSI Digital Test Manager session. If you do not include a DCL command, the DCL prompt displays, and you can then issue DCL commands. As each command terminates, the DCL prompt is displayed. You can return to the parent process by logging out of the subprocess or by issuing the ATTACH command.
6.8. Gathering Test Coverage Data
VSI Digital Test Manager can be used in conjunction with the Performance and Coverage Analyzer to gather data on how thoroughly your test system exercises your application. This data can aid in identifying those pieces that are not being tested.
For more information on using VSI Digital Test Manager with the Performance and Coverage Analyzer, see Using VSI DECset for OpenVMS Systems.
Chapter 7. Maintaining a VSI Digital Test Manager Library
Correcting an invalid library
Storing files outside a library
How to set up security features for a library and its files
7.1. Correcting an Invalid VSI Digital Test Manager Library
If an abrupt process termination or system failure occurs while a library-altering command is executing, the library is considered invalid. During the processing of a command, if VSI Digital Test Manager detects that a library is invalid, it stops the processing of the command and issues an error message stating that the library needs to be recovered.
To recover a library, use the VERIFY/RECOVER command. If you want to check if a library is valid, use the VERIFY command without the /RECOVER qualifier.
When you enter the VERIFY command, VSI Digital Test Manager performs an evaluation on the current library to determine whether the library and its files have a valid structure.
When you enter the VERIFY/RECOVER command, VSI Digital Test Manager attempts to repair any damage to the library and the files it detects. If you specify the VERIFY/RECOVER command and VSI Digital Test Manager fails to return the library to a valid state, you must restore it from backup.
Note
Do not attempt to recover a library while the library is in use. It could have adverse effects on other users of the library.
If a collection run is terminated other than with the STOP command or by pressing Ctrl/C, that collection is locked and you are not able to review it. In this case, the VERIFY/RECOVER command unlocks the library and marks the tests that did not run.
You can now compare and review the collection. While reviewing the collection, you can create a group containing the tests that did not run. After leaving the Review subsystem, you can execute that group of tests.
The VERIFY/REPAIR command attempts to reclaim loose blocks in the current library and deletes illegal files found in the library.
7.2. Storing Files Outside a VSI Digital Test Manager Library
You must store template files, test prologue and epilogue files, and collection prologue and epilogue files outside the VSI Digital Test Manager library, in OpenVMS directories, Code Management System (CMS) libraries, or both. You can store benchmark files inside or outside a VSI Digital Test Manager library.
7.2.1. Setting Benchmark and Template Directories
Use the SET BENCHMARK_DIRECTORY and SET TEMPLATE_DIRECTORY commands to establish default benchmark and template directories for the current VSI Digital Test Manager library. VSI Digital Test Manager processes files faster when you use default benchmark and template directories rather than specifying a directory with each file name.
If you do not specify default benchmark and template directories, VSI Digital Test Manager uses your current default directory (SYS$DISK:[]) for template files and the VSI Digital Test Manager library (DTM$LIB) for benchmark files.
In a DECwindows environment, default benchmark and template directories are specified on the Create Library or Modify Library dialog box. The Create Library dialog box is shown in Chapter 2, "Using VSI Digital Test Manager for OpenVMS in a DECwindows Environment".
After you create or modify a test description, you can override the default directories for the current VSI Digital Test Manager library (if defaults exist) by using the CREATE COLLECTION command with the /BENCHMARK_DIRECTORY and /TEMPLATE_DIRECTORY qualifiers. The specified directories are used for the benchmark and template files for the collection being created.
To remove a default benchmark or template directory without replacing it, enter the SET NOBENCHMARK_DIRECTORY or the SET NOTEMPLATE_DIRECTORY command. These commands return the benchmark directory to DTM$LIB and the template directory to SYS$DISK:[].
7.2.2. Storing Files in CMS Libraries
Create a directory and make it a CMS library. This directory cannot be a subdirectory of the VSI Digital Test Manager library. See the VSI DECset for OpenVMS Code Management System Reference Manual for information about setting up a CMS library.
Include the directory specification for the CMS library in the appropriate VSI Digital Test Manager command (any command where you can specify a directory specification for a file).
|
User Action |
VSI Digital Test Manager Action in CMS |
|---|---|
|
Specify benchmark and template files. |
VSI Digital Test Manager always evaluates directory specifications to determine whether the directory specifications refer to CMS libraries. If a directory name is a CMS library, VSI Digital Test Manager issues the appropriate CMS commands to access the files. |
|
VSI Digital Test Manager translates the file name into a CMS element name and accesses the appropriate element. If a CMS class is also specified with the /CLASS qualifier with the CREATE COLLECTION command, VSI Digital Test Manager accesses the indicated generation of the element. If you specify a class for TEMPLATE files, then for every specified test, the test's template file (if stored in a CMS library) must be in the specified class. | |
|
Execute a collection. |
VSI Digital Test Manager fetches a copy of the template element from the CMS library and deletes the copy after using it. |
|
Compare a collection. |
VSI Digital Test Manager compares the result file with the specified benchmark element in the CMS library. If a CMS class is specified for the benchmark element, VSI Digital Test Manager compares the result file with the appropriate generation of the benchmark element. |
|
Update an existing benchmark file from the Review subsystem. |
VSI Digital Test Manager retrieves and reserves the specified benchmark element from the CMS library. VSI Digital Test Manager then replaces the reserved benchmark element with the result file from the current test run. |
|
If you specify a CMS class for the benchmark file, VSI Digital Test Manager places the result file in the appropriate benchmark generation. If you update a benchmark generation other than the latest, a variant line D is created. If the variant line D already exists, the update fails and VSI Digital Test Manager unreserves the benchmark element. | |
|
Create a new benchmark file. |
VSI Digital Test Manager creates anew benchmark element in the CMS library. |
|
Print or display a benchmark file. |
VSI Digital Test Manager fetches a copy of the benchmark element from the CMS library and deletes the benchmark file copy after printing or displaying it. |
|
Record an interactive test whose template and benchmark files are stored in CMS libraries. |
VSI Digital Test Manager creates new elements for new benchmark and template files if the files do not already exist. If they do exist, VSI Digital Test Manager replaces them with new benchmark and template files. |
Note
VSI Digital Test Manager retrieves files from CMS libraries by fetching them to SYS$SCRATCH. When using CMS libraries with VSI Digital Test Manager, SYS$SCRATCH must be defined to a valid directory where the user has both read and write access.
7.3. Security Features
You can protect VSI Digital Test Manager files and libraries with two mechanisms: user identification code (UIC)-based protection and access control list (ACL) protection. You protect the files and libraries; VSI Digital Test Manager does not define protection for library directories or library files.
UIC protection grants or denies access based on a user's UIC code. ACL protection grants or denies access based on a list of users. With ACLs you can specify access for a set of users who are not in the same UIC group.
Evaluate the ACL (if present).
If no ACL is present, or the ACL does not prohibit access, evaluate the UIC.
Evaluate the privileges. If a user has GRPPRV, READALL, and SYSPRV privileges, or if a user has BYPASS privileges, OpenVMS grants access, even if the ACL and UIC protections deny access.
7.3.1. Assigning UIC Protection
Every file has a user identification code protection associated with it. UIC protection is determined by an owner UIC and a protection code. UIC protection controls access to directories and files. When you attempt to gain access to a directory or file, the system checks for existing ACLs; it then checks the UIC protection code.
See VSI OpenVMS DCL Dictionary for more information about UIC protection.
$ SET PROTECTION=(S:RWE,O:RWE,G:RWE,W) [PROJ]TESTING.DIR
$ SET PROTECTION=(S:RWED,O:RWED,G:RW,W) [PROJ.TESTING]00DTM.CON
|
Object |
Privilege |
|---|---|
|
Library directory |
RW |
|
Control file (00DTM.CON) |
RW |
|
History file (00DTM.HIS) |
RW |
|
All collection subdirectories (collection-name.DIR) |
RWD |
|
All collection control files (collection-name.CON) in the collection subdirectories |
RWD |
|
Generic command file (DTM$$TEST_RECORD.COM) used to record collections |
RD |
|
Generic command file (DTM$$TEST_RUN.COM) used to run collections |
RD |
|
All other files in the library directory |
RD |
|
All other files in the collection subdirectories |
RD |
|
VSI Digital Test Manager images (SYS$SYSTEM:DTM.EXE, DTMSHR.EXE, and DTM$XTRAP.EXE) |
E |
If you enable read-only access to a library directory or to the library control file, users cannot make changes to the contents of the library, execute tests, review tests, or perform comparisons. If you do not enable write access to the collection control files, users cannot review collections. Therefore, you should enable group read and write access to these files.
Note
If you have SYSPRV privileges, file protection problems can occur when you issue a VSI Digital Test Manager command that creates files in a directory or library owned by another user, because having SYSPRV privileges changes the ownership of files created in a directory owned by another user.
You can restrict a person's access to library files by using a UIC protection or ACL. If you do not use ACLs, all users of a particular VSI Digital Test Manager library must be in the same user group. If you want to define more selective protection (where various individuals in the user group have differing access), you can use ACLs for the library directory and its files and subdirectories.
The following sections summarize the procedures you can use to define the access to a VSI Digital Test Manager library. For more information, see the VSI OpenVMS DCL Dictionary and the VSI OpenVMS Guide to System Security.
7.3.2. Assigning ACL Protection
An ACL consists of access control entries (ACEs) that grant or deny access by specific users to a library directory file or library file. ACLs, used with library directory files, enable you to define access to an entire library. ACL sused with library files enable you to establish specific control over access to library contents. Generally, OpenVMS ACLs are used in conjunction with the standard UIC-based protection as a way to fine-tune protection.
See the VSI OpenVMS DCL Dictionary for more information on these commands. See the VSI OpenVMS Guide to System Security for more information on using ACLs and ACEs.
7.3.2.1. Using ACLs on Library Directories
- By controlling access to the directory file itself, as shown in the following example:
$ SET FILE/ACL=(IDENTIFIER=DBASEGRP,ACCESS=READ+WRITE) DTMLIB.DIR
This ACE grants READ and WRITE access to the directory file DTMLIB.DIR to users who have the DBASEGRP identifier.
- By specifying a default UIC protection to be assigned to each new file created in the directory. To set a specific UIC protection, use the DEFAULT_PROTECTION keyword as the first field of an ACE, as shown in the following example:
$ SET FILE/ACL=(DEFAULT_PROTECTION,S:RWED,O:RWED,G:RWED) DTMLIB.DIR
This ACE specifies that the UIC protection (S:RWED,O:RWED,G:RWED) be applied to each new file created in the directory. (It does not affect any files that might already exist in the directory.) If no other ACEs impose stricter limitations, the system, owner, and group users are granted full use of the library.
- By specifying a default identifier-based protection to be assigned to each file created in the directory. To specify a default identifier ACE, use the OPTIONS=DEFAULT keyword in the second field of an ACE that is applied to a directory file, as shown in the following example:
$ SET FILE/ACL=(IDENTIFIER=DBASEGRP,OPTIONS=DEFAULT,ACCESS=READ+WRITE+DELETE)
The OPTIONS=DEFAULT keyword directs the operating system to duplicate this ACE in the ACL of every new file created in the directory. This ACE grants read, write, and delete access to users who have the DBASEGRP identifier.
7.3.2.2. Using ACLs on Library Files
To control library access further, you can set the file protection for each file in the library.
| Command | Library Directory | Library Control File | Collection Subdirectories | Library Files | Collection Files |
|---|---|---|---|---|---|
|
COMPARE |
RW |
RW |
RW |
RW |
RWD |
|
COPY TEST_DESCRIPTION |
RW |
RW |
RW | ||
|
CREATE COLLECTION |
RW |
RW |
RW |
RW |
RWD |
|
CREATE GROUP |
RW |
RW |
W | ||
|
CREATE LIBRARY |
RW? |
RW |
W | ||
|
CREATE TEST_DESCRIPTION |
RW |
RW |
RW | ||
|
CREATE VARIABLE |
RW |
RW |
W | ||
|
DELETE COLLECTION |
RW |
RW |
RD |
RW |
RD |
|
DELETE GROUP |
RW |
RW |
W | ||
|
DELETE HISTORY |
RW |
R |
RWD | ||
|
DELETE TEST_DESCRIPTION |
RW |
RW |
RWD | ||
|
DELETE VARIABLE |
RW |
RW |
W | ||
|
DISPLAY |
RW |
RW |
R | ||
|
EXIT (REVIEW) |
RW |
RW |
RW |
R | |
|
INSERT GROUP |
RW |
RW |
W | ||
|
INSERT TEST_DESCRIPTION |
RW |
RW |
W | ||
|
MODIFY GROUP |
RW |
RW |
W | ||
|
MODIFY TEST_DESCRIPTION |
RW |
RW |
RWD | ||
|
MODIFY VARIABLE |
RW |
RW |
W | ||
|
RECORD |
RW |
RW |
W | ||
|
RECREATE |
RW |
RW |
RWD |
RWD |
RWD |
|
REMARK |
RW |
W | |||
|
REMOVE GROUP |
RW |
RW |
W | ||
|
REMOVE TEST_DESCRIPTION |
RW |
RW |
W | ||
|
REVIEW |
RW |
RW |
R |
RWD |
RWD |
|
RUN |
RW |
RW |
RW |
RW |
RWD |
|
SET BENCHMARK_DIRECTORY |
RW |
RW |
RW | ||
|
SET EPILOGUE |
RW |
RW |
RW | ||
|
SET LIBRARY |
R |
R |
RW | ||
|
SET PROLOGUE |
RW |
RW |
RW | ||
|
SET TEMPLATE_DIRECTORY |
RW |
RW |
RW | ||
|
SHOW ALL |
R |
R | |||
|
SHOW BENCHMARK_DIRECTORY |
R |
R | |||
|
SHOW COLLECTION/FULL |
R |
R |
R |
R |
R |
|
SHOW EPILOGUE |
R |
R | |||
|
SHOW GROUP |
R |
R | |||
|
SHOW HISTORY |
R |
R | |||
|
SHOW LIBRARY |
R |
R | |||
|
SHOW PROLOGUE |
R |
R | |||
|
SHOW TEMPLATE_DIRECTORY |
R |
R | |||
|
SHOW TEST_DESCRIPTION |
R |
R | |||
|
SHOW VARIABLE |
R |
R | |||
|
SHOW VERSION |
R |
R | |||
|
STOP |
RW |
RW |
RW |
W |
RW |
|
SUBMIT |
RW |
RW |
RW |
RW |
RWD |
|
VERIFY |
RW |
R |
R |
W |
R |
|
VERIFY/RECOVER |
RW |
RW |
RD |
RW |
RWD |
IDENTIFIER=TESTGRP,OPTIONS=DEFAULT,S:RWED,O:RWED,G:RWED
This ACE specifies that the UIC protection (S:RWED,O:RWED,G:RWED) is applied to each new file created in the directory. (It does not affect any files that might already exist in the directory.) If no ACEs impose stricter limitations,the system, owner, and group users (as defined by the UIC) are granted full use of the library.
IDENTIFIER=TESTGRP,OPTIONS=DEFAULT,ACCESS=READ+WRITE+DELETE
The OPTIONS=DEFAULT keyword directs the operating system to duplicate this ACE in the ACL of every new file created in the library. This ACE then grants read, write, and delete access to users who have the TESTGRP identifier.
Chapter 8. Working with Terminal Session Files
The format of session files
The format of input files
- Creating an input file
From an existing session file
Using an editor
Recording a session file from an input file
A terminal session file contains a record of an interactive terminal session recorded for the purpose of interactively testing a program with VSI Digital Test Manager. A session file has the default file type .SESSION and contains a description of the type of terminal on which you recorded a terminal session, a record of all keystrokes you input during the terminal session, a record of all system output during the terminal session, and additional control and timing information.
An input file contains a textual representation of all or part of an interactive terminal session. You can read input files and edit them with any editor. An input file has the default file type .INP and contains a record of all characters you input during an interactive terminal session, and all special strings, which are textual representations of nonprinting actions (such as a backspace) and recording functions contained in session files. An input file does not contain a record of characters output for the system during the terminal session.
Input files can be used in place of manually recording a test. By editing an input file, you can change the input sent to an application during the test. You can also add wait records to control synchronization, or mark additional screens for comparison.
DTM> RECORD testname/INPUT=SETUP.INP/APPEND
The previous command directs VSI Digital Test Manager to record the test by taking input from the file SETUP.INP and, when the file is empty, by taking input from the user.
Note
VSI Digital Test Manager works only with session files produced from properly generated input files and with unmodified session files it creates. If you write programs to create session files, or if you edit or otherwise modify session files, do so using input files as described in this chapter.
Session files created or modified outside of VSI Digital Test Manager might not be upwardly compatible with future versions of VSI Digital Test Manager. Session files from properly generated input files are upwardly compatible.
8.1. Terminal Session Files
A terminal session file consists of a record containing a 12-byte terminal characteristics block followed by a sequence of records,each beginning with a 1-character record type. Section 8.1.2.1, ''Record Structure of Session Files''describes the record structure of a session file.
8.1.1. Sample Session File
$ DTM
DTM> CREATE TEST_DESCRIPTION
_test name: test1
_Remark: Creating a simple session file
DTM> RECORD test1
%DTM-I-DEFAULTED, benchmark file name defaulted to TEST1.BMK
%DTM-I-DEFAULTED, template file name defaulted to TEST1.SESSION
%DTM-I-BEGIN, your interactive test session is now beginning...
Type Ctrl/P twice to terminate the session.


$ SHOW DEFAULT
  DUA0:[USER01.DTMLIB]
$ ^P^P


^P

%DTM-I-BMK_SAVED, benchmark has been saved in file
 DUA0:[USER01.DTMLIB]TEST1.BMK;1
%DTM-S-RECORDED, test TEST1 has been successfully recorded in
 DUA0:[USER01.DTMLIB]TEST1.SESSION
DTM>
| Terminal characteristics block |
| Comment record |
| Ctrl/A, indicating that VSI Digital Test Manager will compare this screen |
8.1.2. Terminal Session File Structure
Because both timing and system load can affect the performance of the system and the application being tested, two or more session files recorded independently might result in completely different, yet valid, session files. This occurs even though you typed exactly the same keystrokes when recording both terminal sessions. Thus, performing a source comparison on two session files yields no useful information.
Because most OpenVMS terminal drivers are full duplex, when dealing with session files you should consider input and output to be asynchronous events. You can be typing input while the system is simultaneously writing output. As a result,input and output can appear mixed in a session file.
  .
  .
  .
Ia
Oa
Ib
Ob
Ic
Oc
Id
Od
Ie
Oe
If
Of
  .
  .
  .
  .
  .
  .
Iab
Oa
Ic
Obc
Ide
Ode
If
Of
  .
  .
  .
Although you typed the same input, ABCDEF, both times and the system echoed back the same letters, the two session files are different. Session files recorded under different circumstances will vary, but all session files are equally valid.
The session file will be further varied if the program outputs something to the screen other than what you type. For example, the program might output X whenever you type A, or it might output nothing at all. Asynchronous events, for example, entering Ctrl/T or a broadcast write that occurs while the system is echoing input, will change the session file.
The terminal driver might also arbitrarily place text in a buffer, or split it into groups before generating output. Even though a program might have issued a six-character QIO to output ABCDEF, the terminal driver might output the text as two groups, ABCD followed by EF; or as six separate characters; or as a single six-character string. The terminal driver might even output the text appended to some previously entered text that has not yet been output. Each elementary operation of the terminal driver results in a separate record being written to the session file. Thus, each record in the session file describes a single terminal-driver operation.
VSI Digital Test Manager also writes additional timing and control information to the session file.
8.1.2.1. Record Structure of Session Files
The record structure of a session file is extremely important. You must not change it except as described in this section.
Terminal Characteristics Block
The first record in a session file is a 12-byte (12-character) information block called a terminal characteristics block. This block of information describes the type of terminal on which the terminal session was recorded and the characteristics of that terminal. The terminal characteristics block is described in the OpenVMS I/O User's Reference Manual: Part 1 and is shown in Figure 8.1, ''Format of the Terminal Characteristics Block''.
Note
You must not change the terminal characteristics block in any way. Any change to this record can invalidate the entire file. Do not add bytes to this record or delete bytes from it. This record must contain exactly 12 bytes.
Subsequent Records
|
Record Type |
Meaning |
Description |
|---|---|---|
|
B |
BEGIN_COMPARE |
Restarts automatic screen compare terminated by a previous E record. When an input point is reached, VSI Digital Test Manager automatically marks the current screen for comparison with the corresponding screen in the benchmark file. |
|
C |
COMPARE_SCREEN |
Marks the current screen for comparison, even though automatic screen comparison is turned off. |
|
E |
END_COMPARE |
Terminates automatic screen compare. When an input point is reached, VSI Digital Test Manager automatically marks the current screen for comparison with the corresponding screen in the benchmark file. |
|
I |
INPUT |
Contains characters you input, that is, characters you type at the terminal. This record usually contains only one character. These characters do not automatically echo to the screen unless the terminal is set in half-duplex mode. This input is usually echoed in a subsequent O record. |
|
O |
OUTPUT |
Labels the record as containing characters output by the system and displayed on the terminal. |
|
T |
TIMING |
Contains a standard OpenVMS delta time specification. This time interval represents the clock time elapsed between the previous I (INPUT) record and the next I record. |
|
W |
WAIT |
Contains a standard OpenVMS delta time specification
in the following format:
dddd
                                                hh::mm:ss.cc
. It produces a pause of the
specified length in the input stream when the terminal
session is played back. A sample time interval of 10
seconds appears as follows:
{WAIT} 0000 00:00:10.00 |
|
! |
BEGIN_COMMENT |
Contains a comment. This record is ignored. |
|
0 |
Null or OUTPUT |
This record type is supported for compatibility,though its use is not recommended. VSI Digital Test Manager interprets this as an O record. |
|
1 |
Ctrl/A or INPUT |
This record type is supported for compatibility, though its use is not recommended. VSI Digital Test Manager interprets this as an I record. |
T0 :00:02.3
W0 :00:02.3
In T records, the time interval represents the elapsed clock time between the previous and next I records. VSI Digital Test Manager does not normally record timing intervals of less than one second.
When VSI Digital Test Manager replays a terminal session, T records cause a time delay on the input stream when VSI Digital Test Manager replays the session at the speed at which it was recorded.
In W records, this time interval causes a pause in the input stream of the specified duration.
8.1.2.2. Modifying Session Files Directly
Seemingly harmless changes, such as changing the case of letters in a session file to all uppercase or all lowercase, can invalidate the entire file; this action changes the case and, therefore, the meaning of characters inside control and escape sequences.
Passing a session file through some editors might change the record structure, or add or remove new line characters such as line feed or return characters. These changes invalidate the session file.
In general, splitting a record or combining two consecutive records can invalidate the entire session file. If you modify the records in a session file directly, observe the guidelines in the following sections. It is recommended that you modify session files indirectly using input files. Section 8.2, ''Input Files'' describes input files.
Modifying O Records
You can combine two consecutive O records into a single O record. When you do this, drop the O character from the second record.
You can split an O record into multiple O records. When you do this, begin each new record with an O record type.
You must preserve the number of Ctrl/A characters in the output stream. A single Ctrl/A character represents a point where the program is requesting input and where VSI Digital Test Manager compares screens. Two consecutive Ctrl/A characters represent an input point where automatic screen comparison is suppressed.
The terminal driver inserts a Ctrl/A character into the output stream whenever the program issues an input QIO. If the program prompts for the input,the Ctrl/A character appears after the prompt. Additionally, VSI Digital Test Manager sometimes inserts Ctrl/A characters into the session file to mark input points for comparison.
Modifying I Records
You can combine two consecutive I records into a single I record. When you do this, drop the I character from the second record.
You can split an I record into multiple I records. When you do this, begin each new record with an I record type.
Modifying B, C, and E Records
The B, C, and E (BEGIN_COMPARE, COMPARE_SCREEN, and END_COMPARE) records can occur in the session file only as the next record immediately following an O record that ends with a Ctrl/A character. The one exception to this is a B,C, or E record that is the first noncomment record in the file immediately following the terminal characteristics block. If a B, C, or E record occurs in a session file, that file must also contain at least one O record. The number of Ctrl/A characters in the file must agree with the number of Ctrl/A characters output by the interactive terminal session when it is run with the PLAY command.
Modifying T and W Records
You can modify T and W records, or you can delete them to change or remove timing information. When modifying this record, you must enter the delta time in a valid format as specified in the VSI OpenVMS System Services Reference Manual. This is not necessarily in the format that VSI Digital Test Manager uses. Do not omit any required punctuation.
The behavior of some programs varies depending on the speed of user input. Removing or modifying timing information for such programs can adversely affect the way these programs run.
8.2. Input Files
Input for the terminal session—the characters that were typed when you recorded the terminal session
All nonprinting characters and recording functions represented as special strings
You can create input files in several ways. You can record an input file from an existing session file using the EXTRACT command, or you can create an input file using any text editor. You can also use a combination of these techniques. For example, you can edit an existing test script to reformat it as an input file.
8.2.1. Sample Input File
DTM> EXTRACT
_session file: TEST1.SESSION
_input file: TEST1.INP

%DTM-S-EXTRACTED, input file DUA0:[USER01.DTMLIB]TEST1.INP created
DTM>
SHOW DEFAULT{<CR>}The input file TEST1.INP contains the text entered during the terminal session
(the DCL command SHOW DEFAULT) and the special string {<CR>},
which terminates the entered text. Note that output supplied by the system is not
included in the input file. You can edit this input file and then use it to generate
a new session file.
8.2.2. Special Strings
All nonprinting characters and recording functions found in session files are
replaced in input files by special strings, which have the following format:
{special-string}
Special strings are textual representations for nonprinting characters and recording functions. They are enclosed within braces ({}).
8.2.2.1. Types of Special Strings Recognized by VSI Digital Test Manager
Control and nonprinting characters—Mnemonic control-character names and decimal integer values for control characters available in both 7-bit and 8-bitenvironments
Common names for nonprinting characters
8-bit control characters—Mnemonic control-character names and decimal integer values for control characters available only in 8-bit environments
- Key names
Names written on keyboard keys (with underscores substituted for spaces)
Names for the arrow keys
Names for the editing keys
Names for the keypad keys
Names for the function keys
Names for the recording functions
When you extract an input file from a session file, VSI Digital Test Manager translates each nonprinting character and recording function in the session file into the appropriate special string. When you generate a session file from an input file, VSI Digital Test Manager retranslates the special strings. Table 8.2, ''Translation of Nonprinting Characters and Control Codes When Extracting an Input File from a Session File'' lists the translations performed when extracting an input file from a session file. Tables 8.3 through 8.9 list the translations performed when recording a session file from an input file.
Control Characters and Common Names of Nonprinting Characters
Special strings for control characters of the forms {Ctrl/X} and {^x}
For example, VSI Digital Test Manager interprets both {Ctrl/A} and {^A} as the same control character.
Special strings for all mnemonic control-character names listed in the ASCII 7-bit and 8-bit character tables surrounded by angle brackets (< >)
For example, VSI Digital Test Manager interprets
{<SOH>}and{<IND>}.Special strings for all integer decimal values for control characters listed in the ASCII 7-bit and 8-bit character tables
For example, VSI Digital Test Manager interprets {27} as ESC.
VSI Digital Test Manager ignores leading zeros on integer decimal values.
- Special strings for common names for nonprinting characters, as follows:
-
{<BACK_SPACE>} -
{<DELETE>} -
{<ENTER>} -
{<ESC>} -
{<ESCAPE>} -
{<FORM_FEED>} -
{<LINE_FEED>} -
{<PAGE>} -
{<RETURN>} - {SPACE},
{<SP>}, {32}, and regular spaces{}are all recognized as the space character -
{<KEY>(TAB\TEXT)}
-
Tables 8.3 and 8.4 list the special string translations that VSI Digital Test Manager performs for control characters. Table 8.3, ''Translation of Special Strings Representing Control and Nonprinting Characters When Recording a Session File from an Input File'' also lists the special string translations for common names for nonprinting characters. Consult a terminal manual for tables on ASCII 7-bit and 8-bit codes.
Key Names
Names written on the keyboard keys with underscores (_)substituted for spaces. For example, {RETURN},{LINE_FEED}, and {PF1}.
Function keys by name. For example, both {F12}and {BS} (see Table 8.5, ''Translation of Special Strings Representing the Function Key Codes When Recording a Session File from an Input File'').
Editing keys by name. For example, {REMOVE},{NEXT_SCREEN}, and {NEXT} (see Table 8.6, ''Translation of Special Strings Representing the Editing Key Codes When Recording a Session File from an Input File'').
Keypad keys by name. For example, {KP3},{MINUS}, and {ENTER} (see Table 8.7, ''Translation of Special Strings Representing the Keypad Key Codes When Recording a Session File from an Input File'').
Arrow keys by name. For example, both{UP_ARROW} and {UP} (see Table 8.8, ''Translation of Special Strings Representing the Arrow Key Codes When Recording a Session File from an Input File'').
Recording Functions
- {BEGIN_COMMENT} and {END_COMMENT}
- {BEGIN_COMPARE} and {END_COMPARE}
- {COMPARE_SCREEN}
- {WAIT}
Use these special strings in input files to avoid making the input file dependent on a particular termination character. For example, if you enter{Ctrl/P}C in an input file to mark a screen for comparison, the input file and all session files generated from it must be used in conjunction with the termination character Ctrl/P. But if you enter {COMPARE_SCREEN} to mark a screen for comparison, the input file and all session files generated from it can be used in conjunction with any termination character.
Table 8.9, ''Translation of Special Strings Representing the Recording Functions When Recording a Session File from an Input File'' lists the special string translations that VSI Digital Test Manager performs for the recording functions.
8.2.2.2. Using Special Strings in Input Files
The VSI Digital Test Manager interpretation of special strings in input files is not case sensitive. You can use uppercase or lowercase characters, or a combination of the two when you enter a special string in an input file.
When processing input files, VSI Digital Test Manager does not interpret the end of a record as
the end of input. Therefore, you must be careful to enter a special string
corresponding to a carriage return; (for example, {<CR>})
at the end of any input normally terminated with a carriage return.
To include text enclosed within braces ({}) in the input file, enter double braces around the text, (for example, ). When processing the input file, VSI Digital Test Manager translates the double braces to single braces;it does not interpret the text contained within the braces as a special string.
Use the special string equivalents for the recording functions when writing an input file. This avoids building a dependency on a particular termination character into an input file.
When you enter a comment in an input file, enclose the comment between the{BEGIN_COMMENT} and {END_COMMENT} special strings. Enter the {BEGIN_COMMENT}and {END_COMMENT} special strings on separate lines because VSI Digital Test Manager ignores the remainder of the line following these special strings. You must begin each line of comment text with the comment character (!).
Do not nest input files. VSI Digital Test Manager ignores INSERT recording functions (Ctrl/P I) when they occur in input files.
8.3. Creating Input Files
Note
When you create a terminal input file, use the same type of display device on which the session file was created. If you do not, you might cause the input file and session to have different characteristics.
When you extract an input file from a session file, you might not be able tore-create the session file except by using a display device of the same type as the display device used to record the original recording session, especially if the recording display device handles 8-bit characters and the extracting display device handles 7-bit characters.
8.3.1. Extracting an Input File from a Session File
DTM> EXTRACT session-file-specification [input-file-specification]/INTERACTIVE
The session file specification is the file specification of the session file from which VSI Digital Test Manager extracts an input file. If you specify a filename for the session file without specifying a file type, the file type defaults to .SESSION.
The input file specification is the file specification for the input file being created. If you do not specify an input file specification, the file specification defaults to session-file-name.INP. If you specify an input filename without specifying a file type, the file type defaults to .INP.
You can store both files in CMS libraries. The EXTRACT command can fetch the session file from a CMS library and place the input file in the CMS library.
If you subsequently record a session file from an input file stored in a CMS library, you must first fetch the input file from the CMS library by issuing the appropriate CMS commands.
The EXTRACT command takes the /[NO]LOG and /TERMINATION_CHARACTER qualifiers. The /TERMINATION_CHARACTER qualifier specifies the termination character that VSI Digital Test Manager is to use when translating the recording functions in the session file to special strings in the input file. If the interactive terminal session you are recording does not use the default termination character (Ctrl/P), you need not specify a different termination character. If the interactive terminal session you are recording uses Ctrl/P for its own purposes, you must specify a different termination character.
All input in the session file is written to the input file.
All nonprinting characters and recording functions are translated to special strings—text delimited by braces ({}).
Any braces appearing in the text of the session file are doubled in the input file.
DTM> EXTRACT TEST1.SESSION TEST1_A.INP

%DTM-S-EXTRACTED, input file DUA0:[USER01.DTMLIB]TEST1_A.INP created
DTM>
8.3.2. Creating an Input File with a Text Editor
You can create an input file using any text editor. See Section 8.2.2.2, ''Using Special Strings in Input Files'' for information on using special strings in input files.
{BEGIN_COMMENT}
! This is a sample input file. When used, it calls up EDT
! to create a file, enters some text into the buffer, and
! moves around that text, finally quitting without saving
! the file.
{END_COMMENT}
edit/edt sample.tmp{<CR>}
change{<CR>}
{BEGIN_COMMENT}
! Enter the text into the buffer.
{END_COMMENT}
This is the first line of the file.{<CR>}
This is the
second line of the file.{<CR>}
{UP_ARROW}{UP}{KP2}
{SPACE}This is more of the first line.
{Ctrl/Z}
quit{<CR>}
8.4. Recording a Session File from an Input File
By using the /INPUT qualifier on a RECORD command
By entering the INSERT recording function (Ctrl/P I) while recording an interactive terminal session
8.4.1. Using the /INPUT Qualifier
The RECORD command with the /INPUT qualifier specifies that VSI Digital Test Manager record a new session file by initiating an interactive terminal session and taking input from the specified input file. If you do not also specify the /APPEND qualifier, VSI Digital Test Manager terminates the interactive terminal session when the input file is exhausted. If you include both the/INPUT and /APPEND qualifiers, VSI Digital Test Manager leaves the terminal in record mode when the input file is exhausted. You can then continue the terminal session interactively and terminate it by entering the termination character(Ctrl/P) twice.
DTM> RECORD/INPUT=TEST2.INP
_Remark: Recording TEST2.SESSION from TEST2.INP
%DTM-I-DEFAULTED, benchmark file name defaulted to TEST2.BMK
%DTM-I-DEFAULTED, template file name defaulted to TEST2.SESSION
%DTM-I-BEGIN, your interactive test session is now beginning...


$ show default
  DUA0:[USER01.DTMLIB]

^P

%DTM-I-BMK_SAVED, benchmark has been saved in file
 DUA0:[USER01.DTMLIB]TEST2.BMK;1
%DTM-S-RECORDED, test TEST2 has been successfully recorded in
 DUA0:[USER01.DTMLIB]TEST2.SESSION
DTM>
DTM> RECORD/INPUT=SAMPLE_TEST.INP
_Remark: Recording a sample session file
%DTM-I-DEFAULTED, benchmark file name defaulted to SAMPLE_TEST.BMK
%DTM-I-DEFAULTED, template file name defaulted to SAMPLE_TEST.SESSION
%DTM-I-BEGIN, your interactive test session is now beginning...
Type Ctrl/P twice to terminate the session.


$ show default
  DUA0:[USER01.DTMLIB]
$ show time

$ ^P^P

^P

%DTM-I-BMK_SAVED, benchmark has been saved in file
 DUA0:[USER01.DTMLIB]SAMPLE_TEST.BMK;1
%DTM-S-RECORDED, test SAMPLE_TEST has been successfully recorded in
 DUA0:[USER01.DTMLIB]SAMPLE_TEST.SESSION
DTM>
8.4.2. Using the INSERT Recording Function
When you enter the INSERT recording function Ctrl/P-I during an active recording session, it specifies that VSI Digital Test Manager is to take input from the specified input file. When you enter the INSERT recording function, VSI Digital Test Manager prompts you for the file specification for a single input file. VSI Digital Test Manager then takes input from the specified input file and returns control to the terminal when the input file is exhausted.
DTM> RECORD/INPUT=SAMPTEST.INP
_test name: SAMPTEST
_Remark: Recording SAMPTEST.SESSION from SAMPTEST.INP
%DTM-I-DEFAULTED, benchmark file name defaulted to SAMPTEST.BMK
%DTM-I-DEFAULTED, template file name defaulted to SAMPTEST.SESSION
%DTM-I-BEGIN, your interactive test session is now beginning...
Type Ctrl/P twice to terminate the session.


   .
   .
   .


^PI

_Input file: SAMPTEST2.INP

   .
   .
   .


^P^P

^P

%DTM-I-BMK_SAVED, benchmark has been saved in file
 DUA0:[USER01.DTMLIB]SAMPTEST.BMK;1
%DTM-S-RECORDED, test SAMPTEST has been successfully recorded in
 DUA0:[USER01.DTMLIB]SAMPTEST.SESSION
DTM>
During a terminal session, you can read input from multiple input files sequentially. The input files cannot be nested. VSI Digital Test Manager ignores any INSERT recording functions in an input file.
8.4.3. Terminal Characteristics
The process of creating an input file is not terminal specific. When you extract an input file from a session file, all control codes and other nonprinting characters are translated to special strings, regardless of whether they have meaning to the terminal you are using to perform the translation.
The process of creating a session file from an input file is terminal specific. When you record a session file, VSI Digital Test Manager translates all special strings back to control codes and other nonprinting characters based on the terminal characteristics for the recording terminal. If VSI Digital Test Manager encounters a special string that it cannot translate for the recording terminal, the braces are stripped off the special string and the characters representing the untranslated special string are printed in the session file. They are also displayed on the terminal screen along with an error message.
Note
You might encounter problems re-recording a session file on a VT100-seriesterminal if the session file was originally recorded on a VT200-seriesterminal. Problems will occur if the original session file contains control codes that are restricted to use in an 8-bit compatible environment. Table 8.4, ''Translation of Special Strings Representing 8-Bit Control Characters When Recording a Session File from an Input File'' lists these codes. VSI Digital Test Manager cannot translate these 8-bit control codes for use in a 7-bit environment.
If you record an interactive terminal session on a VT100-series terminal and extract an input file from this session file, you will be able to successfully record the edited terminal session again on either a VT100- orVT200-series terminal.
The VSI Digital Test Manager interactive terminal testing does not provide support for VT400 or greater series terminals. Tests recorded or executed on VT400 or greater series terminals might cause VSI Digital Test Manager screen comparisons to fail. Set VT400- or greater series terminal characteristics to a VT100-, VT200-, or VT300-series terminal when using VSI Digital Test Manager interactive terminal testing features.
8.4.4. Type-Ahead
Anything you type on a terminal while input is being taken from an input file will have no immediate effect on the terminal session. All or part of what you type might be stored as type-ahead and might appear when the input file is exhausted and control is returned to the terminal.
8.5. Translation Tables
|
Code in Session File |
Translated Special String in Input File | |||
|---|---|---|---|---|
|
Mnemonic |
Recording Function |
8-bit Control String |
Escape Sequence |
Special String |
|
— |
— |
<CSI> A and <SS3>A |
<ESC> A and <ESC>[ A and <ESC>O A |
{UP_ARROW} |
|
— |
— |
<CSI> B and <SS3> B |
<ESC> B and <ESC>[ B and <ESC>O B |
{DOWN_ARROW} |
|
— |
— |
<CSI> C and <SS3> C |
<ESC> C and <ESC>[ C and <ESC>O C |
{RIGHT_ARROW} |
|
— |
— |
<CSI> D and <SS3> D |
<ESC> D and <ESC>[ D and <ESC>O D |
{LEFT_ARROW} |
|
— |
— |
<SS3> P |
<ESC> P and <ESC>O P |
{PF1} |
|
— |
— |
<SS3> Q |
<ESC> Q and <ESC>O Q |
{PF2} |
|
— |
— |
<SS3> R |
<ESC> R and <ESC>O R |
{PF3} |
|
— |
— |
<SS3> S |
<ESC> S and <ESC>O S |
{PF4} |
|
— |
— |
<SS3> l |
<ESC>? l and <ESC>O l |
{COMMA} |
|
— |
— |
<SS3> m |
<ESC>? m and <ESC>O m |
{MINUS} |
|
— |
— |
<SS3> n |
<ESC>? n and <ESC>O n |
{PERIOD} |
|
— |
— |
<SS3> M |
<ESC>? M and <ESC>O M |
{ENTER} |
|
— |
— |
<SS3> p |
<ESC>? p and <ESC>O p |
{KP0} |
|
— |
— |
<SS3> q |
<ESC>? q and <ESC>O q |
{KP1} |
|
— |
— |
<SS3> r |
<ESC>? r and <ESC>O r |
{KP2} |
|
— |
— |
<SS3> s |
<ESC>? s and <ESC>O s |
{KP3} |
|
— |
— |
<SS3> t |
<ESC>? t and <ESC>O t |
{KP4} |
|
— |
— |
<SS3> u |
<ESC>? u and <ESC>O u |
{KP5} |
|
— |
— |
<SS3> v |
<ESC>? v and <ESC>O v |
{KP6} |
|
— |
— |
<SS3> w |
<ESC>? w and <ESC>O w |
{KP7} |
|
— |
— |
<SS3> x |
<ESC>? x and <ESC>O x |
{KP8} |
|
— |
— |
<SS3> y |
<ESC>? y and <ESC>O y |
{KP9} |
|
— |
— |
<CSI> 17~ |
<ESC>[ 17~ |
{F6} |
|
— |
— |
<CSI> 18~ |
<ESC>[ 18~ |
{F7} |
|
— |
— |
<CSI> 19~ |
<ESC>[ 19~ |
{F8} |
|
— |
— |
<CSI> 21~ |
<ESC>[ 21~ |
{F10} |
|
— |
— |
<CSI> 23~ |
<ESC>[ 23~ |
{F11} |
|
— |
— |
<CSI> 24~ |
<ESC>[ 24~ |
{F12} |
|
— |
— |
<CSI> 25~ |
<ESC>[ 25~ |
{F13} |
|
— |
— |
<CSI> 26~ |
<ESC>[ 26~ |
{F14} |
|
— |
— |
<CSI> 28~ |
<ESC>[ 28~ |
{F15} |
|
— |
— |
<CSI> 29~ |
<ESC>[ 29~ |
{F16} |
|
— |
— |
<CSI> 31~ |
<ESC>[ 31~ |
{F17} |
|
— |
— |
<CSI> 32~ |
<ESC>[ 32~ |
{F18} |
|
— |
— |
<CSI> 33~ |
<ESC>[ 33~ |
{F19} |
|
— |
— |
<CSI> 34~ |
<ESC>[ 34~ |
{F20} |
|
— |
— |
<CSI> 1~ |
<ESC>[ 1~ |
{FIND} |
|
— |
— |
<CSI> 2~ |
<ESC>[ 2~ |
{INSERT_HERE} |
|
— |
— |
<CSI> 3~ |
<ESC>[ 3~ |
{REMOVE} |
|
— |
— |
<CSI> 4~ |
<ESC>[ 4~ |
{SELECT} |
|
— |
— |
<CSI> 5~ |
<ESC>[ 5~ |
{PREV_SCREEN} |
|
— |
— |
<CSI> 6~ |
<ESC>[ 6~ |
{NEXT_SCREEN} |
|
<NUL> |
— |
— |
— |
{Ctrl/@} |
|
<SOH> |
— |
— |
— |
{Ctrl/A} |
|
<STX> |
— |
— |
— |
{Ctrl/B} |
|
<ETX> |
— |
— |
— |
{Ctrl/C} |
|
<EOT> |
— |
— |
— |
{Ctrl/D} |
|
<ENQ> |
— |
— |
— |
{Ctrl/E} |
|
<ACK> |
— |
— |
— |
{Ctrl/F} |
|
<BEL> |
— |
— |
— |
{Ctrl/G} |
|
<BS> |
— |
— |
— |
{<BS>} |
|
<HT> |
— |
— |
— |
{<TAB>} |
|
<LF> |
— |
— |
— |
{<LF>} |
|
<VT> |
— |
— |
— |
{Ctrl/K} |
|
<FF> |
— |
— |
— |
{<FF>} |
|
<CR> |
— |
— |
— |
{<CR>} |
|
<SO> |
— |
— |
— |
{Ctrl/N} |
|
<SI> |
— |
— |
— |
{Ctrl/O} |
|
<DLE> |
— |
— |
— |
{Ctrl/P} |
|
<DC1> |
— |
— |
— |
{Ctrl/Q} |
|
<DC2> |
— |
— |
— |
{Ctrl/R} |
|
<DC3> |
— |
— |
— |
{Ctrl/S} |
|
<DC4> |
— |
— |
— |
{Ctrl/T} |
|
<NAK> |
— |
— |
— |
{Ctrl/U} |
|
<SYN> |
— |
— |
— |
{Ctrl/V} |
|
<ETB> |
— |
— |
— |
{Ctrl/W} |
|
<CAN> |
— |
— |
— |
{Ctrl/X} |
|
<EM> |
— |
— |
— |
{Ctrl/Y} |
|
<SUB> |
— |
— |
— |
{Ctrl/Z} |
|
<ESC> |
— |
— |
— |
{<ESC>} |
|
<FS> |
— |
— |
— |
{Ctrl/ \} |
|
<GS> |
— |
— |
— |
{Ctrl/]} |
|
<RS> |
— |
— |
— |
{Ctrl/^} |
|
<US> |
— |
— |
— |
{Ctrl/_} |
|
<DEL> |
— |
— |
— |
{<DEL>} |
|
<IND> |
— |
— |
— |
{<IND>} |
|
<NEL> |
— |
— |
— |
{<NEL>} |
|
<SSA> |
— |
— |
— |
{<SSA>} |
|
<ESA> |
— |
— |
— |
{<ESA>} |
|
<HTS> |
— |
— |
— |
{<HTS>} |
|
<HTJ> |
— |
— |
— |
{<HTJ>} |
|
<VTS> |
— |
— |
— |
{<VTS>} |
|
<PLD> |
— |
— |
— |
{<PLD>} |
|
<PLU> |
— |
— |
— |
{<PLU>} |
|
<RI> |
— |
— |
— |
{<RI>} |
|
<SS2> |
— |
— |
— |
{<SS2>} |
|
<SS3> |
— |
— |
— |
{<SS3>} |
|
<DCS> |
— |
— |
— |
{<DCS>} |
|
<PU1> |
— |
— |
— |
{<PU1>} |
|
<PU2> |
— |
— |
— |
{<PU2>} |
|
<STS> |
— |
— |
— |
{<STS>} |
|
<CCH> |
— |
— |
— |
{<CCH>} |
|
<MW> |
— |
— |
— |
{<MW>} |
|
<SPA> |
— |
— |
— |
{<SPA>} |
|
<EPA> |
— |
— |
— |
{<EPA>} |
|
<CSI> |
— |
— |
— |
{<CSI>} |
|
<ST> |
— |
— |
— |
{<ST>} |
|
<OSC> |
— |
— |
— |
{<OSC>} |
|
<PM> |
— |
— |
— |
{<PM>} |
|
<APC> |
— |
— |
— |
{<APC>} |
|
— |
!++ |
— |
— |
{BEGIN_COMMENT} |
|
— |
!– – |
— |
— |
{END_COMMENT} |
|
— |
Ctrl/P? B |
— |
— |
{BEGIN_COMPARE} |
|
— |
Ctrl/P? C |
— |
— |
{COMPARE_SCREEN} |
|
— |
Ctrl/P? E |
— |
— |
{END_COMPARE} |
|
— |
Ctrl/P? W |
— |
— |
{WAIT} |
|
Special Strings in Input File |
Translation in Session File | |||
|---|---|---|---|---|
|
Control Character Mnemonics |
Decimal Value | |||
|
{Ctrl/@} |
{^@} |
{<NUL>} |
{0} |
NUL |
|
{Ctrl/A} |
{^A} |
{<SOH>} |
{1} |
SOH |
|
{Ctrl/B} |
{^B} |
{<STX>} |
{2} |
STX |
|
{Ctrl/C} |
{^C} |
{<ETX>} |
{3} |
ETX |
|
{Ctrl/D} |
{^D} |
{<EOT>} |
{4} |
EOT |
|
{Ctrl/E} |
{^E} |
{<ENQ>} |
{5} |
ENQ |
|
{Ctrl/F} |
{^F} |
{<ACK>} |
{6} |
ACK |
|
{Ctrl/G} |
{^G} |
{<BEL>} |
{7} |
BEL |
|
{Ctrl/H}and{BACK_SPACE} |
{^H} |
{<BS>} |
{8} |
BS |
|
{Ctrl/I} and {TAB} |
{^I} |
{<HT>} |
{9} |
HT |
|
{Ctrl/J} and {LINE_FEED} |
{^J} |
{<LF>} |
{10} |
LF |
|
{Ctrl/K} |
{^K} |
{<VT>} |
{11} |
VT |
|
{Ctrl/L} and {PAGE} and {FORM_FEED} |
{^L} |
{<FF>} |
{12} |
FF |
|
{Ctrl/M} and {RETURN} |
{^M} |
{<CR>} |
{13} |
CR |
|
{Ctrl/N} |
{^N} |
{<SO>} |
{14} |
SO |
|
{Ctrl/O} |
{^O} |
{<SI>} |
{15} |
SI |
|
{Ctrl/P} |
{^P} |
{<DLE>} |
{16} |
DLE |
|
{Ctrl/Q} |
{^Q} |
{<DC1>} |
{17} |
DC1 |
|
{Ctrl/R} |
{^R} |
{<DC2>} |
{18} |
DC2 |
|
{Ctrl/S} |
{^S} |
{<DC3>} |
{19} |
DC3 |
|
{Ctrl/T} |
{^T} |
{<DC4>} |
{20} |
DC4 |
|
{Ctrl/U} |
{^U} |
{<NAK>} |
{21} |
NAK |
|
{Ctrl/V} |
{^V} |
{<SYN>} |
{22} |
SYN |
|
{Ctrl/W} |
{^W} |
{<ETB>} |
{23} |
ETB |
|
{Ctrl/X} |
{^X} |
{<CAN>} |
{24} |
CAN |
|
{Ctrl/Y} |
{^Y} |
{<EM>} |
{25} |
EM |
|
{Ctrl/Z} |
{^Z} |
{<SUB>} |
{26} |
SUB |
|
{Ctrl/[} {ESCAPE} and {ESC} |
{^[} |
{<ESC>} |
{27} |
ESC |
|
{Ctrl/ \} |
{^ \} |
{<FS>} |
{28} |
FS |
|
{Ctrl/]} |
{^]} |
{<GS>} |
{29} |
GS |
|
{Ctrl/~} |
{^~} |
{<RS>} |
{30} |
RS |
|
{Ctrl/?} and {Ctrl/_} |
{^?} and {^_} |
{<US>} |
{31} |
US |
|
{DELETE} |
— |
{<DEL>} |
{128} |
DEL |
|
{SPACE} |
— |
— |
— |
(a space character) |
|
Special String in Input File |
Translation in Session File | |
|---|---|---|
|
Mnemonic |
Decimal Value | |
|
{<IND>} |
{132} |
IND |
|
{<NEL>} |
{133} |
NEL |
|
{<SSA>} |
{134} |
SSA |
|
{<ESA>} |
{135} |
ESA |
|
{<HTS>} |
{136} |
HTS |
|
{<HTJ>} |
{137} |
HTJ |
|
{<VTS>} |
{138} |
VTS |
|
{<PLD>} |
{139} |
PLD |
|
{<PLU>} |
{140} |
PLU |
|
{<RI>} |
{141} |
RI |
|
{<SS2>} |
{142} |
SS2 |
|
{<SS3>} |
{143} |
SS3 |
|
{<DCS>} |
{144} |
DCS |
|
{<PU1>} |
{145} |
PU1 |
|
{<PU2>} |
{146} |
PU2 |
|
{<STS>} |
{147} |
STS |
|
{<CCH>} |
{148} |
CCH |
|
{<MW>} |
{149} |
MW |
|
{<SPA>} |
{150} |
SPA |
|
{<EPA>} |
{151} |
EPA |
|
{<CSI>} |
{155} |
CSI |
|
{<ST>} |
{156} |
ST |
|
{<OSC>} |
{157} |
OSC |
|
{<PM>} |
{158} |
PM |
|
{<APC>} |
{159} |
APC |
|
Special String in Input File |
Translation inSession File | |
|---|---|---|
|
VT200 Mode |
VT100 and VT52 Mode | |
|
{F6} |
CSI 17~ and ESC [? 17~ |
— |
|
{F7} |
CSI 18~ and ESC [? 18~ |
— |
|
{F8} |
CSI 19~ and ESC [? 19~ |
— |
|
{F9} |
CSI 20~ and ESC [? 20~ |
— |
|
{F10} |
CSI 21~ and ESC [? 21~ |
— |
|
{F11} and {ESC} |
CSI 23~ and ESC [? 23~ |
ESC |
|
{F12} and {BS} |
CSI 24~ and ESC [? 24~ |
BS |
|
{F13} and {LF} |
CSI 25~ and ESC [? 25~ |
LF |
|
{F14} |
CSI 26~ and ESC [? 26~ |
— |
|
{F15} and {HELP} |
CSI 28~ and ESC [? 28~ |
— |
|
{F16} and {DO} |
CSI 29~ and ESC [? 29~ |
— |
|
{F17} |
CSI 31~ and ESC [? 31~ |
— |
|
{F18} |
CSI 32~ and ESC [? 32~ |
— |
|
{F19} |
CSI 33~ and ESC [? 33~ |
— |
|
{F20} |
CSI 34~ and ESC [? 34~ |
— |
|
Special String in Input File |
Translation in Session File | |
|---|---|---|
|
VT200 Mode |
VT100 and VT52 Modes | |
|
{FIND} |
CSI 1~ and ESC [? 1~ |
— |
|
{INSERT_HERE} and {INSERT} |
CSI 2~ and ESC [? 2~ |
— |
|
{REMOVE} |
CSI 3~ and ESC [? 3~ |
— |
|
{SELECT} |
CSI 4~ and ESC [? 4~ |
— |
|
{PREV_SCREEN} and {PREV} |
CSI 5~ and ESC [?5~ |
— |
|
{NEXT_SCREEN} and {NEXT} |
CSI 6~ and ESC [?6~ |
— |
|
Special String in Input File |
Translation in Session File | |||
|---|---|---|---|---|
|
ANSI Mode? |
VT52 Mode? | |||
|
Numeric Keypad Mode |
Application Keypad Mode |
Numeric Keypad Mode |
Application Keypad Mode | |
|
{KP0} |
0 |
SS3 p and ESC O ? p |
0 |
ESC ? p |
|
{KP1} |
1 |
SS3 q and ESC O ? q |
1 |
ESC ? q |
|
{KP2} |
2 |
SS3 r and ESC O ? r |
2 |
ESC ? r |
|
{KP3} |
3 |
SS3 s and ESC O ? s |
3 |
ESC ? s |
|
{KP4} |
4 |
SS3 t and ESC O ? t |
4 |
ESC ? t |
|
{KP5} |
5 |
SS3 u and ESC O ? u |
5 |
ESC ? u |
|
{KP6} |
6 |
SS3 v and ESC O ? v |
6 |
ESC ? v |
|
{KP7} |
7 |
SS3 w and ESC O ? w |
7 |
ESC ? w |
|
{KP8} |
8 |
SS3 x and ESC O ? x |
8 |
ESC ? x |
|
{KP9} |
9 |
SS3 y and ESC O ? y |
9 |
ESC ? y |
|
{COMMA} |
, (comma) |
SS3 l and ESC O ? l |
,(comma) |
ESC ? l |
|
{MINUS} |
- (minus) |
SS3 m and ESC O ? m |
- (minus) |
ESC? m |
|
{PERIOD} |
. (period) |
SS3 n and ESC O ? n |
.(period) |
ESC ? n |
|
{ENTER} |
CR |
SS3 M and ESC O ? M |
CR |
ESC ? M |
|
{PF1} |
SS3 P and ESC O ? P |
SS3 P and ESCO ? P |
ESC P |
ESC P |
|
{PF2} |
SS3 Q and ESC O ? Q |
SS3 Q and ESCO ? Q |
ESC Q |
ESC Q |
|
{PF3} |
SS3 R and ESC O ? R |
SS3 R and ESCO ? R |
ESC R |
ESC R |
|
{PF4} |
SS3 S and ESC O ? S |
SS3 S and ESC OS ? |
ESC S |
ESC S |
|
Special String in Input File |
Translation in Session File | |||
|---|---|---|---|---|
|
ANSI Mode ? |
VT52 Mode ? | |||
|
|
Cursor Key Mode Reset Normal |
Cursor KeyMode Set Application |
Cursor Key Mode Reset Normal |
Cursor KeyMode Set Application |
|
{UP_ARROW} and {UP} |
CSI A and ESC [ ? A |
SS3 A and ESC O ? A |
ESC A |
ESC A |
|
{DOWN_ARROW} and {DOWN} |
CSI B and ESC [ ?B |
SS3 B and ESC O ? B |
ESC B |
ESC B |
|
{RIGHT_ARROW} and {RIGHT} |
CSI C and ESC[ ? C |
SS3 C and ESC O ? C |
ESC C |
ESC C |
|
{LEFT_ARROW} and {LEFT} |
CSI D and ESC [ ?D |
SS3 D and ESC O ? D |
ESC D |
ESC D |
Chapter 9. Working with DECwindows Session Files
When you record a DECwindows test, VSI Digital Test Manager creates an editable and ASCII format session file containing all the mouse inputs, keyboards inputs, and text output activity that occurred during recording. VSI Digital Test Manager reads this file during test playback to transmit recorded input activity to the workstation under test. Playback reads the output text records from the script and uses that text information to properly pace the playback of the mouse and keyboard input.
9.1. DECwindows Session File Format
Example 9.1, ''DECwindows Session File'' shows a simple DECwindows session file. It has been edited to show some of the optional records that could be added to a script. This script moves to the session manager icon box, brings up its help menu, saves a screen, and brings down the help menu. A loop record is used to make this occur three times.
Orient= 1020408;
HeadSize=92; XdtVers=2; Xvers=12; Xrel=0; NScrs=1;
ScrNum=0; ScrWid=1024; ScrHt=864; ScrPlanes=1;
HeadExt=255; StartData=100;
PF= "DEC" ; XTRel=3; XtVers=3; XTRev-0; Flags=41bf;
Requests = " 0 0 1400 0 0 0 0 0 ";
Events = " 7C 0 0 0 0 0 0 0 ";
#
# Configuration records
#
SetScreen(0); SetBase(0,0); SetTimeout(Actual,180); SetSpeed(100);
Set Delay(100);
#
# Begin of recorded input and output events.
#
Msg("Defining a logical name on OpenVMS");
#
# Note that system() commands are nonportable.
#
Shell ("define/job sample_apps $255$dua101:[users.sample_apps]");
#
# Now loop
#
Loop(3);
#
# Teleport mouse to Session Box and click on the Help icon
#
XY(457,739,16); XY(458,739,16) XY(459,739,32); XY(460,739,64);
XY(461,739,48); XY(462,739,80);
BP(1,462,739,128,0);
# WaitForText(76, 1, 540, 0, 0, 25, "Session Manager on WUTSUP");
  WaitForText(74, 2, 1310, 0, 0, 9, "On Window");
  WaitForText(74, 2, 1600, 0, 0, 9, "On Basics");
  WaitForText(74, 2, 1610, 0, 0, 8, "Tutorial");
  WaitForText(74, 2, 1620, 0, 0, 10, "On Version");
  WaitForText(74, 2, 1640, 0, 0, 7, "On Help");
BR(1,462,739,4176,0);
#
# Save the screen
#
SaveScreen(FullScreen,0,0,0,0,0,5170,0);
#
# Move away from the Help menu and click anywhere to remove it
#
XY(420,785,16); XY(420,786,16) XY(420,787,16); XY(420,788,16);
XY(420,789,32); XY(420,790,16) XY(419,791,32);
BP(1,419,791,352,0); BR(1,419,791,464,0);
#
# Do next loop
EndLoop();
#
# The end of this script
#
Note("This is an alternate way to comment.");
Note("This form of commenting will allow you to use the");
Note("pound sign for C pre-processor directives that could");
Note("generate scripts using system commands specific to");
Note("a platform.");
9.1.1. DECwindows Session File Header Information
The first seven lines of a DECwindows session file show the workstation configuration on which the session file was recorded. Note that the header information is at the beginning of the file. You should make edits to the file after the header information only.
The header information is generated by querying the workstation under test. The returned information is as follows:
The version of the VSI Digital Test Manager DECwindows testing tool.
The version and release of X.
The number of screens on the workstation.
The screen on which the recording was done.
The height, width and depth of the screen.
The size of any extended header data.
The offset (in bytes) to the start of script records.
The platform running the X server.
The XTrap X server extension version, release and revision.
A set of undocumented flags reserved for VSI Digital Test Manager use.
A hexadecimal bit mask of the X Requests found in the session file. Each hexadecimal number represents 16 bits or a word.
A hexadecimal bit mask of the X Events that were recorded. Each hexadecimal number represents 8 bits or a byte.
9.1.2. DECwindows Session File Records
The session file contains the following records:
#—This is the comment character. It can occur any place after the initial data header for the script file. The initial data header ends with the first line after the ’Events= ’ record.
Note("%s");—This is another form of commenting. It is more difficult to use, but it allows the use of the pound sign (#) for C preprocessing.
SetScreen(%d);—The set screen record indicates the number of the X Server screen that playback uses to transmit X events. This is usually screen 0.
SetBase(%d,%d);—This record is reserved for future use to set the absolute X and Y coordinates for relative mouse motion during playback. This record can be used as part of the default header setup for newly recorded session files. The default is ’SetBase(0,0);’.
SetTimeout(%d,%d);—This record tells playback how long to wait for a particular WaitForText( ) record when playback has already waited the time specified in this record. The decimal given is in seconds, and the text string should read ’Actual’. The record default is ’SetTimeout(Actual,60);’.
SetSpeed(%d);—This record indicates the speed of playback relative to the recording times, expressed as a percentage. For example, a value of 50 indicates that the test should be played back at half speed. The default is ’SetSpeed(100)’.
SetDelay(%d);—This record indicates a scaling factor to be applied during playback to delays that occurred when the test was recorded. The value is expressed as a percentage. For example, a value of 50 indicates that delays should be reduced to half their duration when recorded. The default is ’SetDelay(100)’.
KP(XK_%s,%d);—This is the key press record that tells playback to simulate a key press to the current workstation. The key string is a key symbol, followed by a millisecond delta time. XK_ is the prefix to keyboard key symbols defined in the X windows keysym.h file. Record and playback use the X toolkit’s translation routines to map key symbols to X Server-specific key codes. This file is found in DECW$INCLUDE.
KR(XK_%s,%d);—This record simulates a key release on the workstation currently being driven. See the discussion for KP( ); for more details. The %s is the keyboard key string found in keysym.h (XK_ is part of the key string).
BP(%d,%d,%d,%d,%d);—This record simulates a button press to the X workstation under test. The data for this record is BP(button#,x-coord,y-coord,delta-milli-timestamp, window_id). The window identifiers are not yet recorded.
BR(%d,%d,%d,%d,%d);—This record is a button release record very similar to the button press record above. It simulates a button release event on the current X server being driven.
XY(%d,%d,%d);—This record simulates a mouse event to the X Workstation under test. The parameters are ’XY(x-coord,y-coord,timestamp);’. This is a motion notify event in X terms.
Loop(%d);—This record allows looping around a section of a script. It is a simple mechanism in that the corresponding EndLoop record matches the last seen Loop record. These can be nested, but a nested loop cannot cross its parent’s boundary. The decimal indicates how many times the loop should execute.
EndLoop( );—The EndLoop record terminates the Loop record. These records match only the most recently used Loop record.
SaveScreen(%d,%d,%d,%d,%d,%d,%d,%d);—This record saves a screen on the X workstation under test. Its parameters are as follows:
A string to indicate the type of save screen to be done. Currently only a full screen can be saved. The string used is ’FullScreen’.
A decimal indicating the widget level of the screen to be saved. This is not implemented, but is specified as 0 and must be present in the record.
A decimal indicating the X coordinate of the screen section to save. This is not implemented, but is specified as 0 and must be present in the record.
A decimal indicating the Y coordinate of the screen section to save. This is not implemented, but is specified as 0 and must be present in the record.
A decimal indicating the width of the screen section to save. This is not implemented, but is specified as 0 and must be present in the record.
A decimal indicating the height of the screen section to save. This is not implemented, but is specified as 0 and must be present in the record.
A decimal indicating the millisecond delta-timestamp that playback will use to wait before saving the screen.
A decimal indicating the identifier of the window to save. This is not implemented, but is specified as 0 and must be present in the record.
Shell("%s");—This record allows a script to call out to the operating system to do anything the user wants. The command string is quoted for this record and is executed by the system during playback. Use this directive with caution.
Msg("%s");—This record outputs a user-specified text string to the current output device. This could be standard output or the record and playback user interface.
WaitForText((%d,%d,%d,%d,%d,%d,"%s");— This record defines attributes of a text string that playback uses to wait. When the text string shows up to the playback client, playback continues. If the text string does not show up to playback, playback times out the text string based on the time stamp in the text string and the value of the SetTimeout( ) record. Its parameters are as follows:
A decimal indicating the X Request identification of the text string. This is 74 for X_PolyText8 strings and 76 for X_ImageText8 strings. The difference between these strings is that ImageText X Requests contain one single string of text to output, whereas PolyText X Requests can contain many text strings to output. Regardless, all text strings get their own WaitForText( ) records. ImageText strings are seen in typing dialog boxes and terminal simulation boxes like DECterms. PolyText strings are usually associated with pull down menus, labels, toggles and other nontyping textual information.
A decimal holding the identifier of the client to which this string was associated. In some cases, this field can change from playback to playback, and is in the record for future use.
A decimal, millisecond delta-time used for timeout purposes during playback. It reflects the delta-time from the last user input in most cases. It is arrival time as seen by the record.
A decimal showing the absolute X coordinate of where the text was placed on the screen. This is not currently used, but must be present in the record.
A decimal showing the absolute Y coordinate of where the text was placed on the screen. This is not currently used, but must be present in the record.
A decimal indicating the size of the text string that follows in quotes.
The text string that was seen by record and playback. Record and playback take the last 32 characters of any incoming text string for processing purposes.
9.2. Synchronizing Playback
Input events can be lost if they are sent to a workstation before the workstation can process the input. For example, if the mouse clicks on a menu item that has not yet appeared on the screen, the application would never see the mouse click as a selection of an item in the pull down menu. The application might well see the mouse click as a change-focus action. Regardless, the intent of the mouse click will have been corrupted from the point of view of a playback.
Recorded scripts contain WaitForText( ) records that cause the playback system, when it reads the script record, to stop sending data to the workstation until the workstation returns specified text to the playback client. When playback receives the output text from the workstation, playback resumes sending input data to the workstation.
When you record a DECwindows session file, VSI Digital Test Manager records text information generated by the application as it is manipulated. This information is written to the session file as WaitForText( ) records. These records provide what is called text-based synchronization, and they are used during playback to pace input with application output. They are used to determine when the application is ready for more keyboard or mouse input. Playback uses every WaitForText( ) record as a synchronization point.
There is a timeout feature to keep playback from waiting for a text pattern that will never show up (for example, a time or date string from DECW$CLOCK or DECW$CALENDAR). This timeout feature takes the time stamp on the WaitForText( ) record (which indicates how long it took the record client to see the text string) and adds a default timeout value in seconds. The default is currently 60 seconds as can be seen in any recorded session file.
When you record the test, there might be text output that will not normally appear when the test is played back. This extraneous text appears as WaitForText( ) records in your session file. When the text is played back, these records cause an unneeded delay in the test execution as VSI Digital Test Manager waits for each text to appear, then times out when the text does not appear. These records can be commented out of the script manually or automatically.
9.2.1. Auto Synchronize Option
VSI Digital Test Manager provides a method by which you can automatically remove undesirable WaitForText( ) records from your session file. To do this, use the Auto Synchronize option with the Play command. This is specified as /AUTOSYNCH from the Play command, or from the toggle switch in the Play dialog box when using the DECwindows interface.
When the Play command is executed with the /AUTOSYNCH Auto Synchronize option, VSI Digital Test Manager automatically comments out all WaitForText( ) records in the session file that do not occur during the playback. Effectively, a new session file is generated from this type of playback.
The only caution with this form of playback is that it should be used only on a playback that is being monitored by the user. If something goes wrong with the test application such that it does not come up on the workstation, all WaitForText( ) records in the script could end up being commented out. In a case like this, playback can be aborted using the F9-C keyboard command on the workstation under test. Note that if a collection is being run, only that test will abort. Because the following tests in the collection will be run, you can abort a collection only by pressing F9-C for all the subsequent tests.
9.2.2. Record and Playback Resource File
The record and playback tool reads and uses the values found in its default resource file (SYS$LIBRARY:DXDTMPLAYREC.DAT). This file can be copied to DECW$USER_DEFAULTS:DXDTMPLAYREC.DAT and edited to provide the default record and playback behavior desired.
The following list describes the resources that you can modify to customize record and playback behavior:
Set the generalVerboseFlag resource to 1 to obtain informational messages during record and playback.
Set the generalShowLines resource to 1 to obtain playback informational messages that show each record from the session file as it is processed.
Use the generalTimeoutValue resource to set the timeout duration for WaitForText records used to synchronize playback. The value is in seconds.
Use the cmdkeyValue resource used to set the keysym key. Use the mnemonic for the key definition, without the preceeding XK_, found in the DECW$INCLUDE:KEYSYMDEF.H file.
Chapter 10. VSI Digital Test Manager Callable Interface
This chapter describes the callable interface for VSI Digital Test Manager. DTM$DTM is a high-level entry point that enables calling programs to pass a DCL command line to VSI Digital Test Manager for processing. DTM$DTM parses and executes the command line, then returns to the calling program. It can return all return codes and CLI$ errors. The DTM$DTM routine provides a full command-line level interface into VSI Digital Test Manager.
10.1. Calling Sequence for DTM$DTM
|
DTM$DTM ( |
[command_line], |
|
[msg_routine], | |
|
[prompt_routine], | |
|
[confirm_routine], | |
|
[output_routine], | |
|
[width], | |
|
[init_flag] ) |
To perform confirmation, prompting, or display output, you must supply callback routines. The following sections describe these callback routines and other parameters to the DTM$DTM routine.
10.1.1. Command Line (command_line)
|
Type: |
char_string |
|
Access: |
read |
|
Mechanism: |
by descriptor |
The command-line parameter specifies the address of a string descriptor that contains a command line. If you specify a value of 0, VSI Digital Test Manager calls DTM$$GET_INPUT to obtain the command line. The prompt_routine parameter is then passed as a parameter to CLI$DCL_PARSE.
10.1.2. Message Routine (msg_routine)
|
Type: |
procedure |
|
Access: |
read |
|
Mechanism: |
by reference |
The message routine specifies a message handler routine. See Section 10.4, ''Writing an Error Message Handler'' for information about writing a message handler routine.
10.1.3. Prompt Routine (prompt_routine)
|
Type: |
procedure |
|
Access: |
read |
|
Mechanism: |
by reference |
The prompt routine parameter specifies the address of a callback routine that is called when the caller specifies a missing or incomplete line.
If you do not specify a prompt callback, VSI Digital Test Manager does not prompt you, but operates as if a callback were specified and has returned the status RMS$_EOF (except in the case of prompting for a VSI Digital Test Manager remark,where the status is RMS$_NORMAL). The RMS$_EOF return status causes termination of command parsing (as if you pressed Ctrl/Z at the DCL prompt).
The prompt callback routine is called with three parameters:
response_string
Specifies the address of a descriptor that points to the character string into which the prompt routine writes the text in response to the prompt
prompt_string
Specifies a string descriptor containing the prompt string, passed by reference
response_string_length
Specifies the number of bytes written into response-string by the prompt routine
Note
The parameters you specify for the prompt routine parallel the parameters for the Run Time Library (RTL) routine, LIB$GET_INPUT, allowing LIB$GET_INPUT to be specified as your callback routine.
10.1.4. Confirmation Routine (confirm_routine)
|
Type: |
procedure |
|
Access: |
read |
|
Mechanism: |
by reference |
When the /CONFIRM qualifier is specified as part of the command line, the confirmation routine parameter specifies the address of a callback routine that is used, rather than specifying direct terminal input.
|
String |
Meaning |
|---|---|
|
YES, 1, true |
Indicates positive confirmation |
|
ALL |
Indicates positive confirmation and that future actions of the current call to VSI Digital Test Manager should be carried out without confirmation |
|
NO, 0, false |
Indicates negative confirmation |
|
QUIT |
Indicates negative confirmation and that VSI Digital Test Manager performs no further actions |
|
Return Code |
Meaning |
|---|---|
|
DTM$_CONFIRM |
Yes |
|
DTM$_NOCONFIRM |
No |
|
DTM$_ALL |
All |
|
DTM$_STOPPED |
Quit |
If the callback routine returns one of these codes, any string returned is ignored. The callback routine returns a status of DTM$_NORMAL when returning a response string.
For confirmation where ALL and QUIT are not meaningful, ALL is equivalent to YES and QUIT is equivalent to NO.
If you do not specify a confirm callback routine, VSI Digital Test Manager does not request confirmation. It operates as if a callback had been specified and had returned the string YES. VSI Digital Test Manager then proceeds with the operation.
If an invalid response is given, VSI Digital Test Manager prompts you again. Note that any response can be abbreviated to a single character. If a null string is returned, VSI Digital Test Manager defaults to NO.
The confirm callback routine is called with two parameters:
response_string
Specifies the address of a descriptor that points to the character string into which the confirm routine writes the text in response to the confirmation prompt.
prompt_string
Specifies a string descriptor passed by reference for the prompt string, which can then be displayed to the user.
10.1.5. Output Routine (output_routine)
|
Type: |
procedure |
|
Access: |
read |
|
Mechanism: |
by reference |
The output routine parameter specifies the address of a callback routine to handle output usually sent to SYS$OUTPUT. For example, all output from a SHOW command is directed to SYS$OUTPUT (in the absence of an overriding /OUTPUT qualifier). Note also that if you specify the /OUTPUT qualifier to redirect terminal output to a file, VSI Digital Test Manager opens, writes to, and closes the file normally and does not use the output callback routine. This callback also receives the output for the commands specifying the /OUTPUT=SYS$OUTPUT qualifier.
If you do not specify output_routine, VSI Digital Test Manager writes all output to SYS$OUTPUT.
The output callback routine is called with one parameter:
output_string
Specifies a string descriptor for the output string, passed by reference.
10.1.6. Output Width (width)
|
Type: |
longword_signed |
|
Access: |
read |
|
Mechanism: |
by reference |
When using the DTM$DTM callable interface, if the OUTPUT_ROUTINE parameter is specified but the OUTPUT_WIDTH parameter is not specified, all SHOW commands return its output one character at a time.
10.1.7. Initialization Flag (init_flag)
|
Type: |
longword_signed |
|
Access: |
read |
|
Mechanism: |
by reference |
The initialization flag parameter specifies whether VSI Digital Test Manager processes an existing initialization command file before processing the passed command line. If this argument is not specified, the default is to execute the initialization file. Specifying a 0 value suppresses the execution of the initialization command file.
10.2. Rules for Writing VSI Digital Test Manager Callback Routines
Every callback routine must return control to VSI Digital Test Manager. If your routine does not return control to VSI Digital Test Manager, VSI Digital Test Manager cannot finish the transaction and the library remains locked. (If your library becomes locked, you must use the VERIFY command with the /RECOVER qualifier to unlock it.) In addition, any resources used to process the command are not released.
Callback routines must return a defined condition value to VSI Digital Test Manager. You can use DTM$_NORMAL to indicate successful completion of the callback routine, or you can return a condition code from an OpenVMS system service or other system software. VSI Digital Test Manager checks for the DTM$_EOF and RMS$_EOF values, and checks the low-order bit to determine whether the status code indicates success.
A success code directs VSI Digital Test Manager to continue processing. If more data awaits processing, VSI Digital Test Manager calls the callback routine again.
If the callback routine encounters an error during processing, it aborts the VSI Digital Test Manager call by returning an error status, thus causing the call to exit.
10.3. Handling Error Conditions
If the condition is not fatal, VSI Digital Test Manager calls a message handler. You can provide a message routine to handle messages (see Section 10.4, ''Writing an Error Message Handler''), or, if you do not provide a message routine, VSI Digital Test Manager calls its own message handler.
If the condition is fatal, VSI Digital Test Manager signals the error. Fatal conditions are those situations where execution cannot continue. VSI Digital Test Manager does not call the message routine under these circumstances.
If you have established a condition handler in the calling program and the condition handler encounters a fatal return value, do not return a value of SS$_CONTINUE from the condition handler or signal SS$_CONTINUE again, and do not issue additional calls to VSI Digital Test Manager until you have exited and entered the image again. The fatal error indicates that VSI Digital Test Manager cannot continue with the current invocation of the image.
If you supply a routine for input or output and you establish a condition handler within this routine, do not exit from the image (either through the condition handler or the routine itself).
To exit the image, return an error (any status with the low bit clear) from your routine, causing VSI Digital Test Manager to terminate with DTM$_USERERR status. DTM$_USERERR status indicates that a callback routine returned an error.
10.4. Writing an Error Message Handler
VSI Digital Test Manager directs all diagnostic messages to the default destinations SYS$OUTPUT and SYS$ERROR. However, you can write your own routine to handle messages. When you specify the msg_routine parameter to the DTM$DTM routine, VSI Digital Test Manager passes control to your message handler instead of using the default handler. VSI Digital Test Manager does not call your message handler routine if a fatal condition occurs, but instead notifies you by signaling the condition. If you receive a fatal error message, exit and enter VSI Digital Test Manager again; do not attempt to recall it within the same image invocation if VSI Digital Test Manager detected a fatal error.
VSI Digital Test Manager passes the following parameters in the order shown with each call to msg_routine:
(signal_array, mechanism_array)
|
Type: |
vector_longword_unsigned |
| Access: | read |
| Mechanism: | by reference |
Specifies a standard OpenVMS signal array.
|
Type: |
vector_longword_unsigned |
| Access: | read |
| Mechanism: | by reference |
Specifies a standard OpenVMS mechanism array.
Do not invoke any VSI Digital Test Manager routines from a message routine.
Do not use the LIB$ESTABLISH RTL routine to enable the message routine as the exception handler for a VSI Digital Test Manager call. VSI Digital Test Manager uses its own exception handlers and calls the user-supplied message routine under the correct circumstances. (The message routine is only for handling messages, not for general exception handling during the execution of a VSI Digital Test Manager routine.)
10.5. Linking with the VSI Digital Test Manager Image
$LINK filename[,...],SYS$INPUT/OPTIONS Return SYS$SHARE:DTMSHR.EXE/SHARE Ctrl/Z
Warning: If you click on any buttons in the Record Tool window, those mouse movements are also recorded. Obviously, this will affect the integrity of the recording process.
The directory must be empty.
Ctrl/P is used here only as an example. The actual value will be the termination character specified when the session file was recorded.
ESC [ is the 7-bit code extension equivalent for the 8-bit control string CSI.
ESC [ is the 7-bit code extension equivalent for the 8-bit control string CSI.
ANSI mode applies to VT200 and VT100 modes. VT52 mode is an ANSI-incompatible mode.
ESC O is the 7-bit code extension equivalent for the 8-bitcontrol string SS3.
ANSI mode applies to VT200 and VT100 modes. VT52 mode is an ANSI-incompatible mode.
ESC [ is the 7-bit code extension equivalent for the 8-bitcontrol string CSI.
ESC O is the 7-bit code extension equivalent for the 8-bitcontrol string SS3.
DLE (Ctrl/P) is used here only as an example. The actual value will be the termination character specified when the session file is recorded.