VSI DECset for OpenVMS Guide to VSI Source Code Analyzer
- Software Version:
- DECset Version 12.7
- Operating System and Version:
- VSI OpenVMS x86-64 Version 9.2-2 or higher
VSI OpenVMS IA-64 Version 8.4-1H1 or higher
VSI OpenVMS Alpha Version 8.4-2L1 or higher
Preface
This guide explains how to use the VSI Source Code Analyzer (SCA) in the OpenVMS environment.
1. About VSI
VMS Software, Inc. (VSI) is an independent software company licensed by Hewlett Packard Enterprise to develop and support the OpenVMS operating system.
2. Intended Audience
This guide is intended for experienced programmers and technical managers.
3. Document Structure
Chapter 1, "Introduction" provides an overview of SCA. It describes SCA components and features, how to get help, and how to use SCA interactively and with the SCA batch commands.
Chapter 2, "Getting Started" provides information on invoking SCA, opening the sample library, and performing SCA queries.
Chapter 3, "Using SCA Libraries" provides information on creating analysis data files, creating an SCA library, loading files to an SCA library, and performing library maintenance.
Chapter 4, "Performing Queries" provides more information on specifying cross-reference, call graph, and data structure queries. It also describes how to use multiple queries and customize graphical results.
Chapter 5, "Using LSE and SCA to Design Programs" provides a scenario of how to create and process a detailed program design. It also shows how to evolve an implementation from this design, and how to reverse-engineer the implementation to retrieve a design corresponding to the original.
4. Related Documents
See the VSI DECforms Installation Guide for OpenVMS Systems for installation instructions for SCA.
VSI DECset for OpenVMS Source Code Analyzer Command-Line Interface and Callable Routines Reference Manual contains callable interface information, OpenVMS-specific information, and SCA query language information.
The VSI DECset for OpenVMS Language-Sensitive Editor/Source Code Analyzer Reference Manual provides a description of the SCA commands.
5. References to Other Products
Note
These references serve only to provide examples to those who continue to use these products with DECset.
Refer to the Software Product Description for a current list of the products that the DECset components are warranted to interact with and support.
6. OpenVMS Documentation
The full VSI OpenVMS documentation set can be found on the VMS Software Documentation webpage at https://docs.vmssoftware.com.
7. VSI Encourages Your Comments
You may send comments or suggestions regarding this manual or any VSI document by sending electronic mail to the following Internet address: <docinfo@vmssoftware.com>. Users who have VSI OpenVMS support contracts through VSI can contact <support@vmssoftware.com> for help with this product.
8. Conventions
| Convention | Meaning |
|---|---|
|
Ctrl/ x |
A sequence such as Ctrl/ x indicates that you must hold down the key labeled Ctrl while you press another key or a pointing device button. |
|
PF1 x |
A sequence such as PF1 x indicates that you must first press and release the key labeled PF1 and then press and release another key or a pointing device button. |
|
Return |
In examples, a key name enclosed in a box indicates that you press a key on the keyboard. (In text, a key name is not enclosed in a box.) |
... |
A horizontal ellipsis in examples indicates one of the
following possibilities:
|
. . . |
A vertical ellipsis indicates the omission of items from a code example or command format; the items are omitted because they are not important to the topic being discussed. |
|
( ) |
In command format descriptions, parentheses indicate that you must enclose the options in parentheses if you choose more than one. |
|
[ ] |
In command format descriptions, brackets indicate optional choices. You can choose one or more items or no items. Do not type the brackets on the command line. However, you must include the brackets in the syntax for OpenVMS directory specifications and for a substring specification in an assignment statement. |
|
[ |] |
In command format descriptions, vertical bars separate choices within brackets or braces. Within brackets, the choices are options; within braces, at least one choice is required. Do not type the vertical bars on the command line. |
|
{ } |
In command format descriptions, braces indicate required choices; you must choose at least one of the items listed. Do not type the braces on the command line. |
|
bold text |
This typeface represents the introduction of a new term. It also represents the name of an argument, an attribute, or a reason. |
|
italic text |
Italic text indicates important information, complete titles of manuals, or variables. Variables include information that varies in system output (Internal error number), in command lines (/PRODUCER= name), and in command parameters in text (where dd represents the predefined code for the device type). |
|
UPPERCASE TEXT |
Uppercase text indicates a command, the name of a routine, the name of a file, or the abbreviation for a system privilege. |
|
|
Monospace type indicates code examples and interactive screen displays. In the C programming language, monospace type in text identifies the following elements: keywords, the names of independently compiled external functions and files, syntax summaries, and references to variables or identifiers introduced in an example. |
|
- |
A hyphen at the end of a command format description, command line, or code line indicates that the command or statement continues on the following line. |
|
numbers |
All numbers in text are assumed to be decimal unless otherwise noted. Nondecimal radixes—binary, octal, or hexadecimal—are explicitly indicated. |
Chapter 1. Introduction
The VSI Source Code Analyzer (SCA) is an interactive cross-reference and static analysis tool that works with many languages. It can help you understand the complexities of a large software project. Because it allows you to analyze and understand an entire system, SCA is extremely useful during the implementation and maintenance phases of a project.
SCA is especially useful with the VSI Language-Sensitive Editor (LSE). When SCA is used with LSE, you can interactively edit, compile, debug, navigate, and analyze source code during a single editing session.
1.1. SCA Concepts and Features
In a large, multi-module system, you might not be familiar with all of the source code. It might have been written by different developers in a number of different programming languages. SCA can help you browse through the source code and learn about the program structure. If you are already familiar with the source code, SCA lets you navigate directly to the source code you want and gives you valuable cross-reference information.
Navigation
SCA provides navigation capabilities that let you locate and view the components of your source code. SCA accomplishes this by storing compiler-generated information about a set of source files in an SCA library. SCA then allows you to perform queries about your source code in several ways:By using a name browser to quickly locate all items that match a search string
By using a class browser to quickly locate all program symbols that match a search string
By specifying a cross-reference query to find how and where program symbols are used
By specifying a call graph query to graphically display call relationships between routines
By specifying a data structure query to graphically display the structure of data types in your code or find symbols of a given type
After you have a query result, you can use the go-to-source feature to navigate to locations of interest in your source code.
Graphical user interface
SCA capabilities are accessible through a DECwindows graphical user interface. This user interface makes it easy to specify complex queries without learning a specialized query language. It is easy to navigate between call graph queries, data structure queries, and cross-reference queries. The context-sensitive help facility allows you to display help information on all parts of the user interface.
Library creation and maintenance
SCA merges analysis data (.ANA) files generated by supporting compilers into SCA libraries to create a picture of your entire source code. These files contain a collection of information relating to all of the program symbols, modules, and files contained in your source files. Once you open an SCA library for a particular software project, you can use the SCA navigational and static analysis features. You can also open a personal library, containing information on only those modules you are working on, and use this library with the main library that describes the rest of the system.
Sample SCA library
To get you started, SCA provides a sample library that you can open from the SCA Main window. The library is in
SCA$ROOT:[EXAMPLE]on OpenVMS systems. All tutorials presented in this guide are based on this library. For information on opening this library, see Section 2.2, ''Opening the Sample SCA Library''.Static analysis
SCA provides static analysis capabilities that let you check for consistent use of program symbols. This capability is provided by the INSPECT command. See the VSI DECset for OpenVMS Source Code Analyzer Command-Line Interface and Callable Routines Reference Manual for information on using this command to perform static analysis.
1.1.1. SCA Terminology
Symbol – A single object in a program, such as a procedure, variable, file, or module.
Symbol name – The exact name of the symbol as it is used in the source code.
Occurrence – A single declaration of a symbol or reference to a symbol.
Analysis data – Information generated by supporting compilers about all symbols contained in the source files.
.ANA files – A file of analysis data generated by the compiler. These files are loaded into an SCA library, which is the database for SCA navigation and static analysis features. Some compilers generate .XREF files that can be converted to .ANA files by means of the SCA IMPORT command.
SCA library – A collection of source information generated by supporting compilers in the form of .ANA files.
Cross-reference query – A request that SCA find occurrences of symbols and indicate their locations in the source code.
Call graph query – A request that SCA show the structure of subroutine call relationships in the source.
Data structure query – A request that SCA show the structure of data types in the source.
Relationship – The relationship between one occurrence of a symbol to another.
1.1.2. SCA Language Support
- Ada
- BASIC
- VAX BLISS-32
- VSI C
- VSI C++
- VSI COBOL
- VAX COBOL
- VSI Fortran
- VAX MACRO
- VSI Pascal
- VAXELN Pascal
- VAX PL/I
1.2. Using SCA
Performing queries
Getting help
Using SCA windows
Using SCA batch commands
See Chapter 2, "Getting Started" and Chapter 4, "Performing Queries" for complete, task-oriented information on using SCA.
1.2.1. Performing Queries with SCA
The SCA query facilities let you obtain information about symbols in your source code. You can specify a cross-reference query to display specific symbol, file, or module information. You can determine declarations of program symbols, references to the symbols, and references to source files. You can also determine the call relationships between routines by displaying call tree information. Within the editing environment, you can navigate through the complexities of an entire system and, as necessary, inspect and edit related source files.
Interactive query of symbol, module, and file information
Display of routine call relationships and type trees
Inspection of routines, variables, and other symbols
Maintenance of source code information libraries
Navigation through one or more SCA queries
Access and display of source code during an interactive query
With LSE editing features, you can move through an unfamiliar system without regard for module or file boundaries. For example, given the task of modifying the characteristics of a variable, you can locate all of the uses of the variable across the system and make your changes without leaving LSE.
1.2.2. Getting Help
Help is available for SCA within LSE, as well as for SCA at the DCL or subsystem level.
LSE>HELP SCA_TOPICS SCA_EXAMPLE
The DECwindows SCA user interface provides context-sensitive online help for all window items, menu items, commands, and graph displays.
Set the location cursor by selecting the menu or submenu item. For example, press and hold MB1 and choose a pull-down menu item.
Press the Help key.
SCA displays context-sensitive help on that item. However, if the input focus is in a dialog box and you press the Help key, you receive an overview of the entire dialog box and not just the selected item.
Pull down the Help menu.
Choose the on Context menu item. The pointer changes to a question mark.
Position the question mark on a window object and press MB1.
on Version – Shows copyright and version information
on Terms – Provides a glossary of SCA terms
on Help – Provides general information about context-sensitive and task-oriented help
on Window – Provides help information specific to the current window
1.2.3. Using SCA Windows
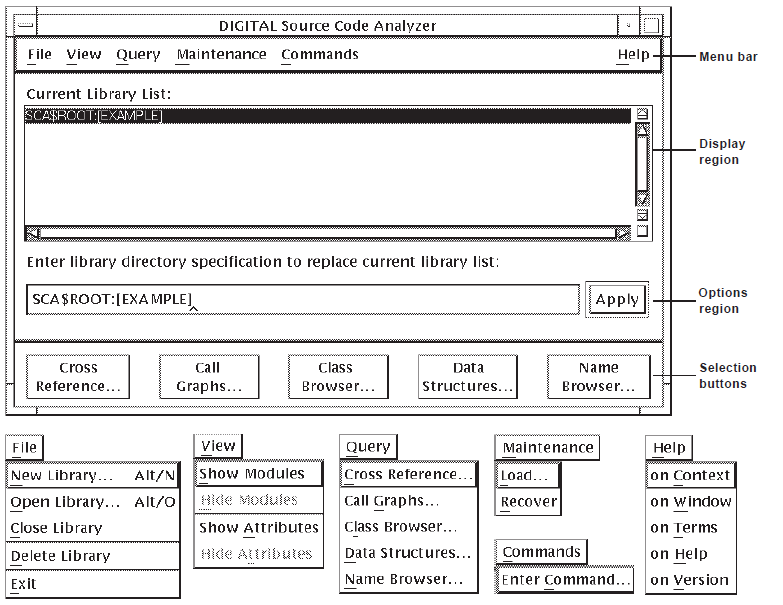
The SCA Main window is the starting point for using all the SCA interactive features. It lets you perform library management functions and provides access to the name browser and query windows, from which you interactively analyze your source code.
The SCA Main window, shown in Figure 1.1, ''SCA Main Window'', is composed of screen objects used in all the SCA graphical windows. These objects include the menu bar, options region, display region,and selection buttons.
Create and manage SCA libraries.
View library and module information.
Access a query window.
Load and recover SCA libraries.
Enter SCA commands.
Access topical help information.
The options region allows you to enter information and select one or several options. In the SCA Main window, for example,you can enter the name of an SCA library in the box labeled "Enter library directory specification to replace current library list:". Other windows, like the query windows, allow you to click on any of several options from a list.
The display region complements the options region. In the SCA Main window, a list of active SCA libraries appears in the Current Library List: box.
The Apply button accepts the current settings and performs the operation. This action does not close the window or dialog box.
The Close button closes the window.
The Cancel button closes the dialog box.
The OK button accepts the current settings and performs the operation. This action closes the window or dialog box.
The Reset button clears the current settings from the window or dialog box, allowing you to start over.
1.2.4. Using SCA Batch Commands
From the DCL command line
From the SCA Show Command dialog box, accessed from the SCA Main window by choosing Enter Command... from the Commands menu
ANALYZE – Creates analysis data (.ANA) files that describe the indicated source files.
INSPECT – Checks the consistency between declarations or references for the same symbol.
LOAD – Loads analysis data into an SCA library. Note that you would normally load files from within SCA (using the Load dialog box). However, if you are loading a large number of files, you might want to load them outside SCA using this command.
REORGANIZE – Organizes the specified SCA libraries for optimal query and update performance.
REPORT – Produces a user-written report or one of the following standard reports: HELP, PACKAGE, INTERNALS, and 2167A_DESIGN. (See the Guide to Detailed Program Design for OpenVMS Systems for more information.)
For more information on these commands, as well as other SCA commands, see the VSI DECset for OpenVMS Language-Sensitive Editor/Source Code Analyzer Reference Manual.
Chapter 2. Getting Started
This chapter provides a tutorial to get you started with SCA by using information from the sample SCA library.
Invoking SCA
Opening the sample SCA library
Performing SCA queries (see Chapter 4, "Performing Queries" for detailed information about performing SCA queries)
2.1. Invoking SCA
With VSI Language-Sensitive Editor (LSE)—As an integrated tool.
At the DCL level—As a standalone tool in either character-cell or DECwindows mode.
With the SCA callable interface—See the VSI Source Code Analyzer Command-Line Interface and Callable Routines Reference Manual for details and examples.
As an integrated tool, LSE supports an expanded command language, which includes all SCA standalone commands and related navigational commands. SCA-related commands are defined in the Command Dictionary section of the VSI DECset for OpenVMS Language-Sensitive Editor/Source Code Analyzer Reference Manual. SCA commands are issued in the same manner as LSE commands. For information on the VMS and Portable command languages, see the section on using command languages in the VSI Source Code Analyzer Command-Line Interface and Callable Routines Reference Manual.
LSE> command [parameter] [/qualifier...]$ SCA command [parameter] [/qualifier...]$ SCASCA>
You can enter SCA commands at this prompt in the same way you do at the LSE prompt within LSE: type each command and execute it by pressing the Return or Enter key. An EXIT command ends an SCA session and returns you to the DCL level. You can also press Ctrl/Z to end an SCA session.
$SCA/INTERFACE=DECWINDOWS
2.2. Opening the Sample SCA Library
To get started with SCA, you need to open an SCA library. The tutorials presented in this guide use the sample SCA library.
To begin, invoke the VSI Language-Sensitive Editor (LSE), as described in Section 2.1, ''Invoking SCA''.
LSE>SET LIBRARY SCA$EXAMPLE
Your SCA Library is SCA$ROOT:[EXAMPLE]From the SCA Main window, position the pointer on the Enter library directory specification to replace current library list box and click on MB1 to activate it.
Enter the OpenVMS library specification,
SCA$ROOT:[EXAMPLE].Press Return or click on Apply.
The Current Library List: box now shows this library. See Chapter 3, "Using SCA Libraries" for information on creating your own SCA libraries.
2.3. Performing SCA Queries
SCA query capabilities let you systematically browse your software system for important information. When you perform a query, you ask SCA to retrieve any information that meets the query criteria.
The name browser lets you browse for program symbols by wildcard string. It functions as a convenient memory jogger to help locate the names of items with which you are somewhat familiar.
The class browser lets you browse for program symbols by displaying the inheritance hierarchy of C++ classes.
Cross-reference queries let you find occurrences of symbols and see where they are located in the source code.
Call graph queries let you construct a picture of calls to or within routines in your source code.
Data structure queries let you see the structure and the use of data types in your code.
You might first want to see which modules comprise the system loaded into the SCA library. To do this, view the modules of analysis data contained in the sample SCA library by following the steps in Section 3.5.3.2, ''Displaying Modules and Module Attributes''. After you are familiar with the modules of this library, proceed with the following tutorial.
2.3.1. Using SCA Query Windows
SCA query windows let you specify query attributes and view query results. When you use SCA to browse names in your source code (see Section 2.3.2, ''Browsing for Names''), you specify your query and view the result in the same Name Browser window. When you use SCA to get cross-reference information, or to create call graphs or type trees, you specify your query in one window (the query window) and view the results in another window (the result window).
For example, if you want to see all calls to the routine build_table,
specify the query in the Call Graph Query window. SCA then displays the call graph
in the Call Graph Query Result window.
When you specify subsequent queries, SCA reuses the same two windows. SCA keeps a list of previous query specifications and results that you can use (see Section 4.5, ''Using Multiple Queries'').
It is easy to navigate from one query to another. From any query window or query result window, you use the Query pull-down menu and choose the type of query you want to perform next.
The following sections get you started using the SCA query windows.
2.3.2. Browsing for Names
The SCA name browser lets you specify wildcard expressions from which SCA displays a list of symbols matching that string. The name browser helps you find symbols when you are not quite sure of their names.
Suppose that you know of a procedure in the system that might be useful in new
code that you are writing, but you cannot remember its name. You only remember that
it begins with build.
From the SCA Main window, position the pointer on the Name Browser ...button and press MB1, or pull down the Query menu and choose the Name Browser... menu item. The Name Browser dialog box is displayed.
Point and click on the Filter box to activate it, then type
build*.Click on Filter.
SCA displays all the symbol names that match the wildcard expression.
As you can see in Figure 2.1, ''Name Browser Dialog Box'', SCA found four names that match the wildcard string.(Note that the first item in the list is selected.)
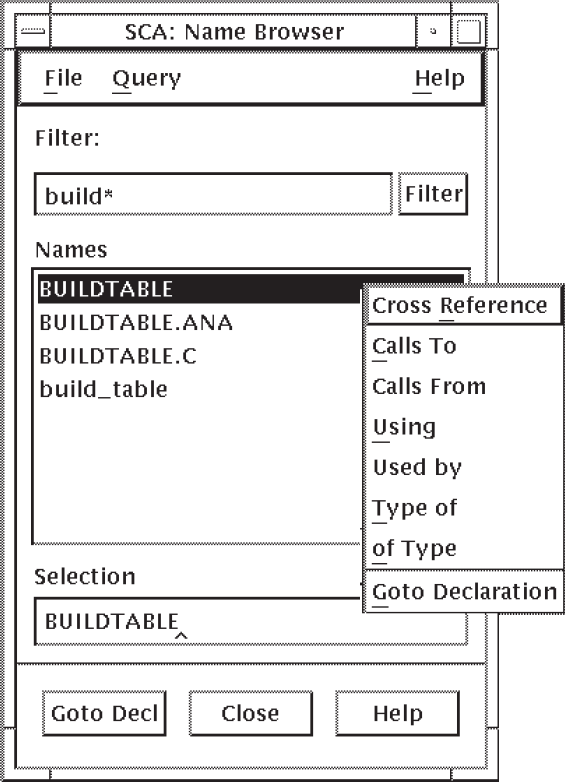
Click on MB3. SCA displays a pop-up menu, as shown in Figure 2.1, ''Name Browser Dialog Box''.
Position the pointer on the Cross Reference menu item and click on MB3.
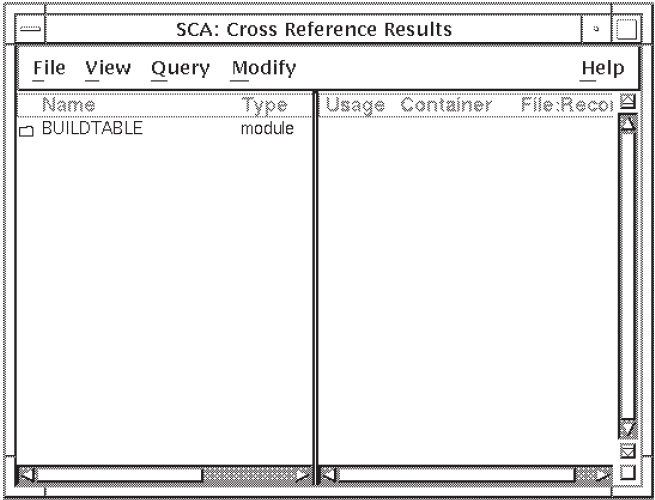
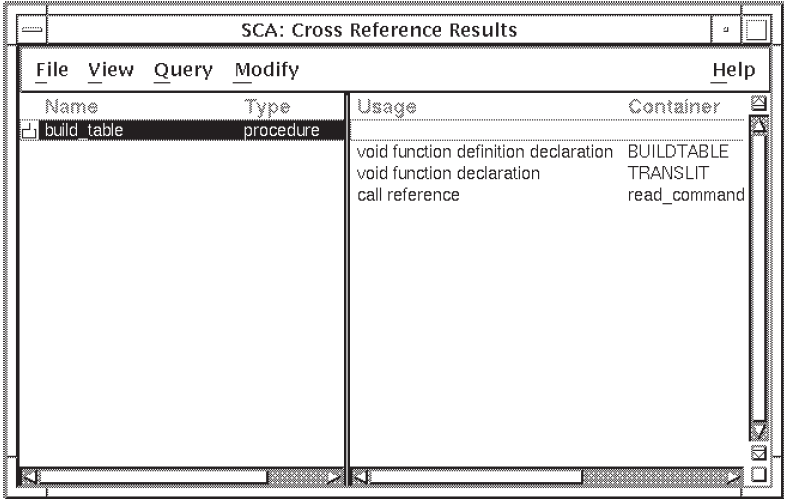
SCA displays the Cross-Reference Results window, as shown in Figure 2.2, ''Cross-Reference Results Window''. As you can see, buildtable is a
module. Section 2.3.4, ''Cross Referencing Information'' describes how to perform a
cross-reference query on the last item from the name browser list,
build_table.
2.3.3. Browsing for Classes
Display a type tree, which gives structured information about a specified type.
Display a list of symbols that are of the specified type.
The following sections describe how to perform a class structure query and manipulate the results.
2.3.3.1. Specifying a Class Browser Query
From any SCA query window (for example, the Call Graph Query window ), pull down the Query menu. (You can also click the Class Browser... selection button from the SCA main window. )
Choose the Class Browser... menu item. SCA displays the Class Browser Query window, shown in Figure 2.3, ''The Class Browser Query Window''.
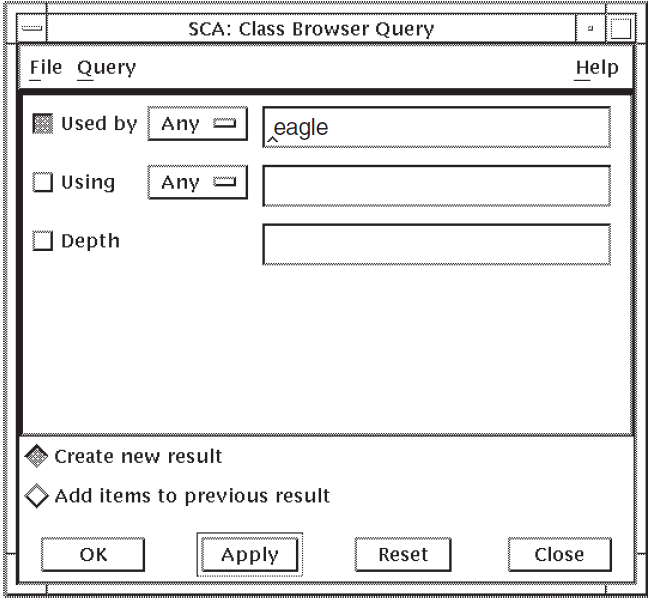
Position the pointer in the specification box (upper right) for the Used by query attribute and press MB1 to activate it.
Enter
eaglein the specification box. By leaving the To and Depth query attributes blank, SCA interprets this query as, "Find the first level of all classes used by "eagle"". The Depth query attribute specifies how many levels SCA should display.Click on OK. SCA graphically displays the class structure.
2.3.3.2. Viewing Class Browser Query Results
Figure 2.4, ''The Class Browser Results Window'' shows the query result from Section 2.3.3.1, ''Specifying a Class Browser Query''.
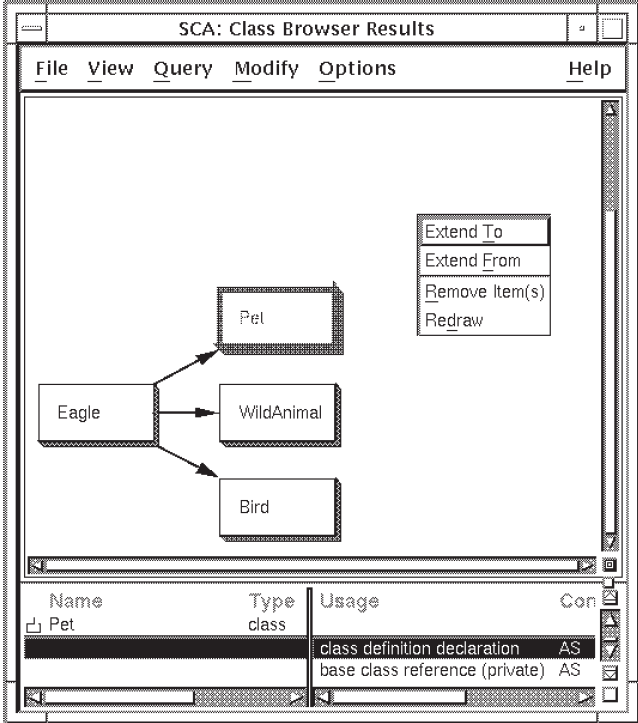
The class structure shows that eagle is used by several classes.
Each class, depicted within a box, is called a node. The
arrows showing the class relationships are called
arcs.
By default, SCA displays the type tree as a lexical tree. A lexical tree shows all calls for the indicated depth, in the order in which they appear in the source code.
SCA also displays more detail about each node in the type tree. As shown in Figure 2.4, ''The Class Browser Results Window'', the lower pane of the Class Browser Results window shows an alphabetic list of the usage. Use the horizontal scroll bar to view all the details about this usage. You can select a class from either the display graph or the list in the lower pane.
eagle. You could have specified Depth = All to show
all levels of detail from eagle.A more efficient way is to use the
Extend options. Using these options,you can incrementally expand your class
display to show additional levels of detail. For example, to see what calls
pet, do the following:Position the pointer on the class
petand click on MB1 to select it.Click on MB3. A pop-up menu is displayed, as shown in Figure 2.4, ''The Class Browser Results Window''.
Position the pointer on the Extend To menu item and click on MB3. SCA extends the class browse display to
petby one level, as shown in Figure 2.5, ''Extending to a Class Node''. (Note that you can choose the Extend To menu item from the Modify menu to get the same result.)
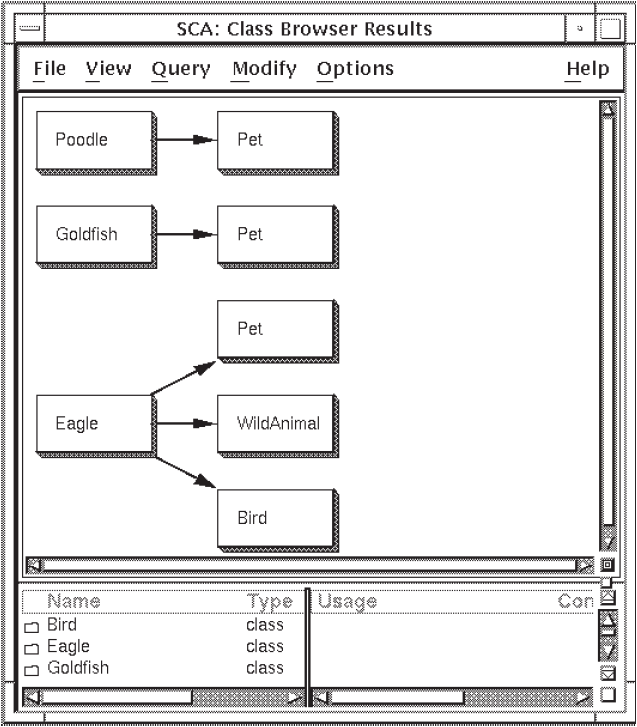
The class browser display now shows all classes that extend to the class
pet, including the original class browser result,
eagle.
2.3.4. Cross Referencing Information
A cross-reference query enables you to find specific occurrences of a symbol and their locations in the source code.
2.3.4.1. Specifying a Cross-Reference Query
build_table, continue these
steps from the tutorial in Section 2.3.2, ''Browsing for Names'':From the Cross-Reference Results window, pull down the Query menu.
Choose the Show Query Window menu item.
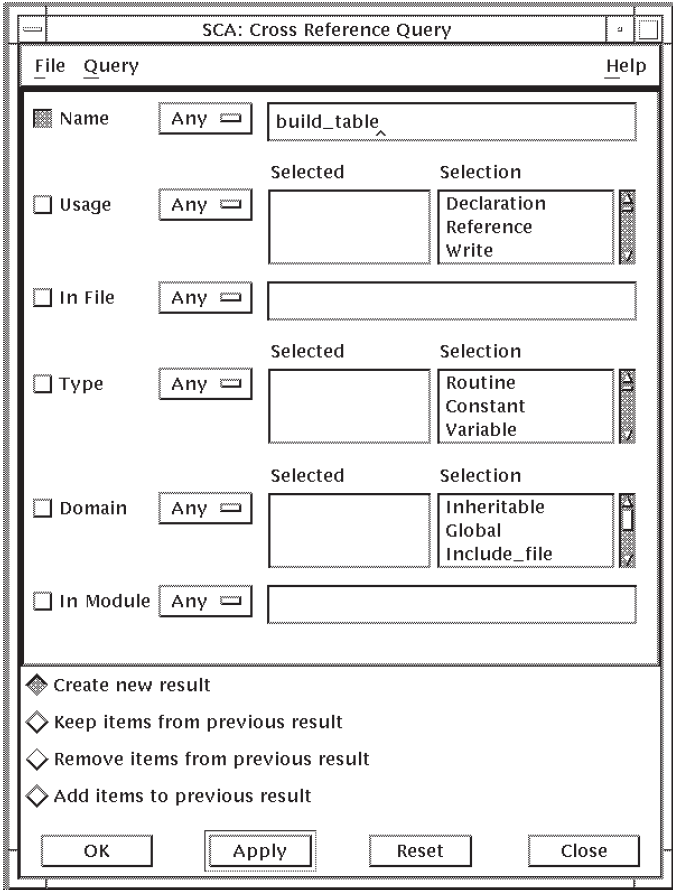
SCA displays the Cross-Reference Query window, as shown in Figure 2.6, ''The Cross-Reference Query Window''.
Click MB1 on the Reset button to clear the window. Click on the specification box for the Name query attribute.
Type
build_tablein the specification box.Click on OK. (You can also click on Apply or press Return for the same action. Clicking on Apply retains the query window.)
2.3.4.2. Viewing Cross-Reference Query Results
Figure 2.7, ''The Cross-Reference Query Result Window'' shows the cross-reference query result.
This information includes the symbol name, type, and domain. (Use the scroll bar
or move the sash to the right to view this information.) In this example,
build_table is a procedure.
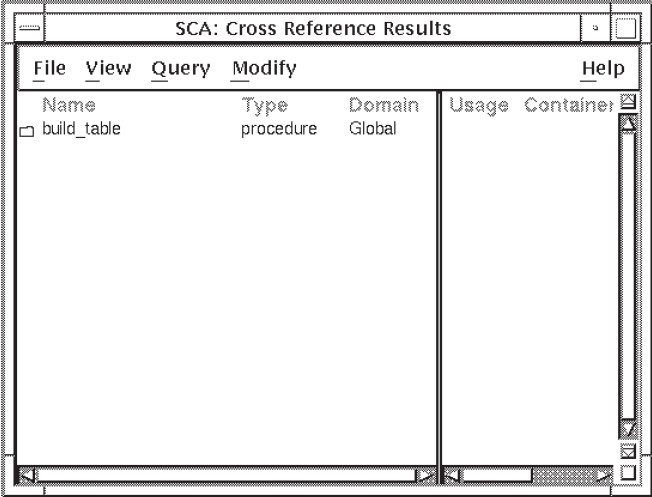
You can expand the result to display information about occurrences of a symbol. This information includes the usage, module or routine that contains the occurrence, and file where the occurrence resides.
Position the pointer on the icon next to the symbol name.
Double click on MB1. (Alternatively, you can click MB1 anywhere on the line to select the symbol, then choose the Expand menu item from the View menu.) SCA provides information about the occurrences of the selected symbol, as shown in Figure 2.8, ''Expanding Information''.
The right-hand pane of the result window now shows the occurrences of
build_table. For example, the first occurrence is in the module
buildtable in the file buildtable.c on line 117.
You can collapse this information by double clicking again on the symbol
icon.
SCA also enables you to display full information for a selected symbol or occurrence. See Section 4.1, ''Performing Cross-Reference Queries'' for more information on cross-reference queries.
With LSE running, you can double click MB1 on a symbol name in the left-hand pane, or an occurrence in the right-hand pane of a query result, and go directly to its location in the source code.
2.3.5. Creating Call Graphs
A call graph query enables you to graphically display call relationships between routines in your source code. SCA builds a call graphthat hierarchically shows these relationships. SCA provides you with several options for formatting the call graph display.
2.3.5.1. Specifying a Call Graph Query
From any SCA query window (for example, the Cross-Reference Results window from the last example), pull down the Query menu.
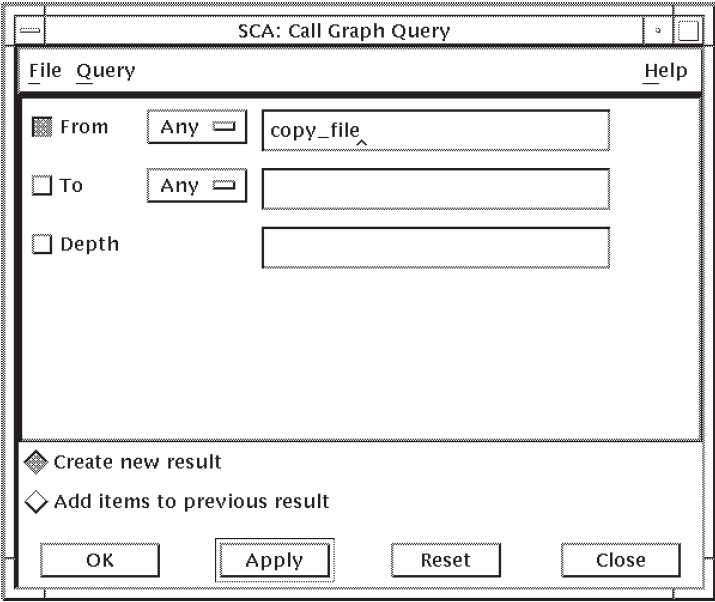
Choose the Call Graphs... menu item. The Call Graph Query window is displayed, as shown in Figure 2.9, ''The Call Graph Query Window''.
Position the pointer in the specification box for the From query attribute and press MB1 to activate it.
Enter
copy_filein the specification box. By leaving the To and Depth query attributes blank, SCA interprets this query as, "Find the first level of all calls from copy_file". The Depth query attribute specifies how many levels of calls SCA should display.Click on Apply. SCA displays a Cancel Operation box in case you change your mind. SCA creates a new call graph with a depth of 1.
2.3.5.2. Viewing Call Graph Query Results
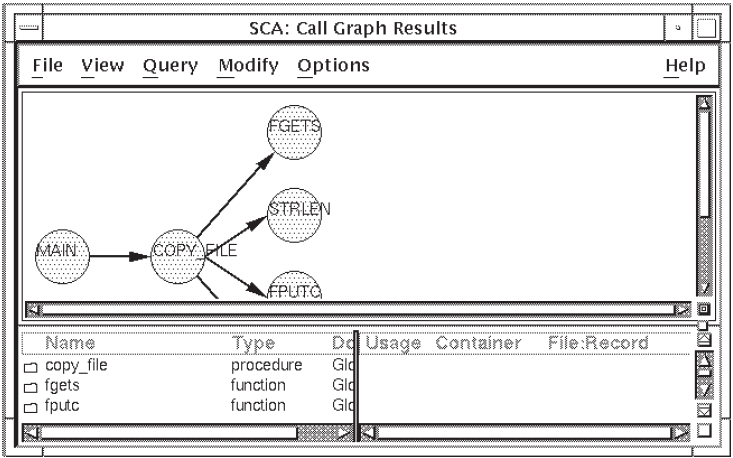
Figure 2.10, ''The Call Graph Results Window'' shows the query result from Section 2.3.5.1, ''Specifying a Call Graph Query''.
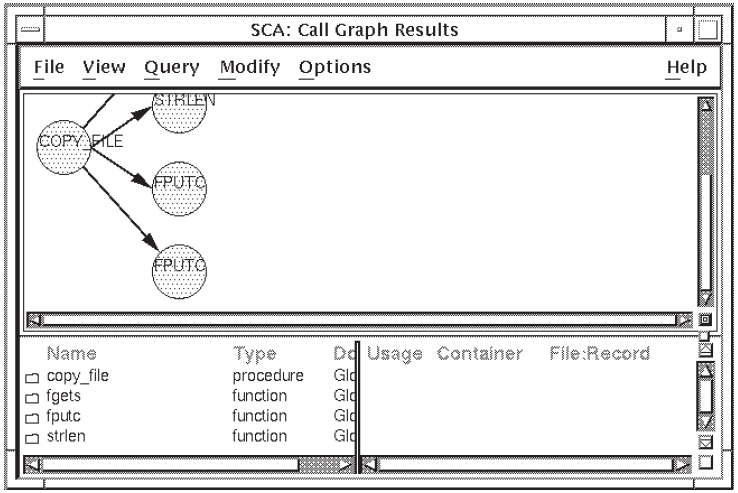
The call graph shows that the routine copy_file calls several
routines. Each routine, depicted in the call graph by a circle, is called a
node. The arrows showing the call relationships are
called arcs.
By default, SCA displays a call graph as a lexical tree. A lexical tree shows all calls for the indicated depth, in the order in which they appear in the source code. See Section 4.4, ''Modifying the Current Query'' for information about other call graph display formats.
SCA also displays more detail about each node in the call graph. As shown in Figure 2.10, ''The Call Graph Results Window'', the lower pane of the Call Graph Results window shows an alphabetic list of the routines. For each routine it shows its type, the domain it is part of, its usage, what module or routine it is contained by, the file it resides in, and the line number in that file. You can select a node in the call graph by pointing to a node in the graph, or by pointing to a node name in the list and pressing MB1.
copy_file. You could have specified Depth =
All to show all levels of detail from copy_file.A more efficient
way is to use the Extend options. Using these options,you can incrementally
expand your call graph to show additional levels of detail. For example, to see
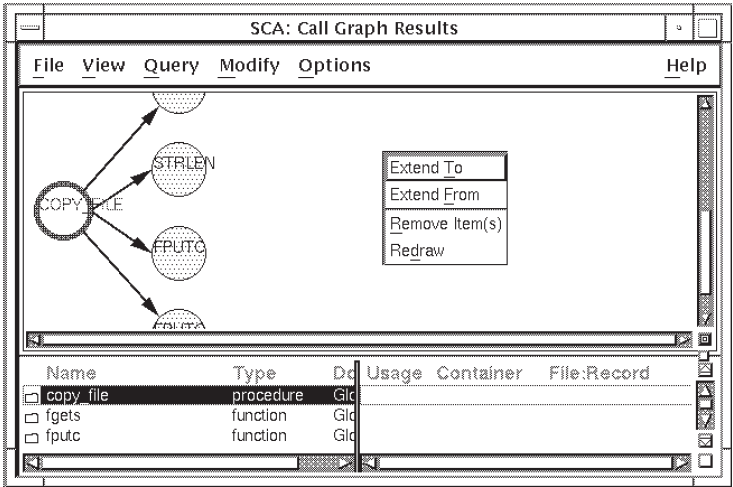
what calls copy_file, do the following: Position the pointer on the node
copy_fileand click on MB1 to select it.Click on MB3. A pop-up menu is displayed, as shown in Figure 2.11, ''Extending to a Node''.
Position the pointer on the Extend To menu item and click on MB3. SCA extends the call graph to
copy_fileby one level. (Note that you can choose the Extend To menu item from the Modify menu to get the same result.)
Position the pointer on the node
mainand click on MB1 to select it.Click on MB3. A pop-up menu is displayed.
Choose the Extend From menu item. SCA extends the call graph from
mainby one level. Figure 2.12, ''Extending from a Node'' shows the result.
2.3.5.3. Moving to a Routine's Source
When you use SCA with LSE, you can read and modify associated source code. To
go to the source of a particular routine, point to a node in the call graph, or
to its name in the lower pane, and double click on MB1. For example, when you
double click on copy_file, LSE displays the declaration of
copy_file in the source code.
2.3.6. Reviewing Data Structures
Display a type tree, which gives structured information about a specified type.
Display a list of symbols that are of the specified type.
The following sections describe how to perform a data structure query and manipulate the results. For more information on specifying data structure queries, see Section 4.3, ''Performing Data Structure Queries''.
2.3.6.1. Specifying a Data Structure Query
From any SCA query window (for example, the Call Graph Query window), pull down the Query menu.
Choose the Data Structures... menu item. SCA displays the Data Structures Query window, shown in Figure 2.13, ''The Data Structures Query Window''.
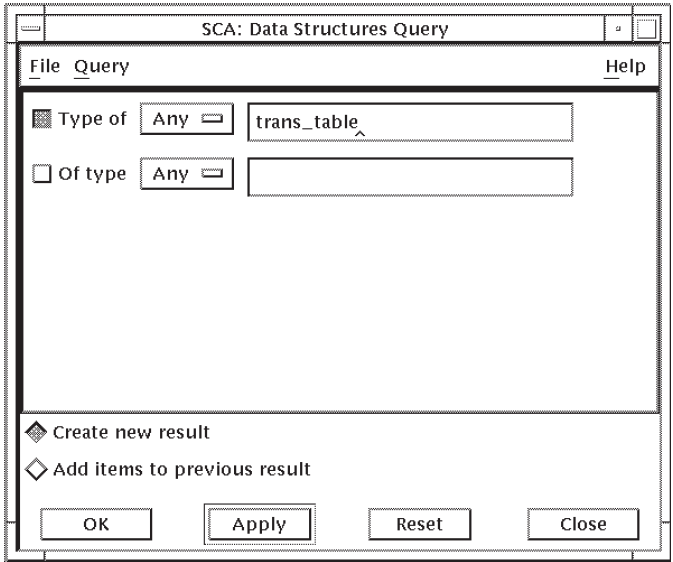
Position the pointer in the specification box (upper right) for the Type of query attribute and press MB1 to activate it.
Enter
trans_tablein the specification box.Click on OK. SCA graphically displays the data structure.
2.3.6.2. Viewing Data Structure Query Results
Figure 2.14, ''The Data Structures Results Window'' shows the query result from Section 2.3.6.1, ''Specifying a Data Structure Query''.
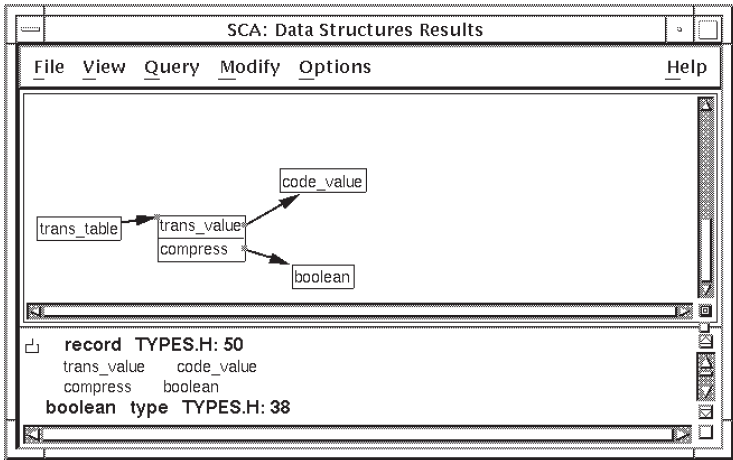
The data structure result shows that trans_table is an array of
records with the components trans_value and compress.
trans_value is of type code_value, and
compress is of type boolean.
When you position the pointer on a node and press MB1, SCA highlights the
corresponding information in the lower pane of the window. For example, when you
click on trans_value, SCA highlights the line
"trans_value [is of type]
code_value."
As with a call graph, SCA displays a type tree in lexical format by default and lets you manipulate the display of information in several ways from the View menu. SCA allows you to customize the result window so your default display is, for example, a graph instead of a lexical tree. See Section 4.6, ''Modifying the Display Options'' for information on modifying the display data structure queries, see Section 4.3, ''Performing Data Structure Queries''.
2.3.7. Maintaining Multiple Queries
SCA lets you maintain more than one query at a time. This feature maximizes the use of SCA by allowing you to perform simultaneous source investigations.
For example, when you specify a cross-reference query, SCA creates a new query by default. If, during the session, you go to the source of a symbol occurrence and find another symbol you want to investigate before returning to your last query, you can specify a new query about the symbol. After inquiries in your new session are completed, you can go back to your previous session.
You can navigate between individual queries using convenient pull-down menu items.
- When you specify a query, you can update existing queries in the following ways:
Keep the items from the previous query result that match the new selection attributes.
Remove the items from the previous query result that match the new selection attributes.
Add the new items matching the current selection attributes to the previous query result.
2.4. Exiting from SCA
To end your SCA session and return to the DCL level, enter the EXIT command or press Ctrl/Z.
To exit from any SCA window, choose Exit from the File menu. When you exit from the SCA Main window, you terminate the SCA session.
When you reinvoke SCA, the SCA libraries that you created and opened will be active in the library list.
Chapter 3. Using SCA Libraries
An SCA library is a collection of information about your source code. The information in an SCA library includes the names and locations of variables in your code, information about where routines are called and what their arguments are, and other useful information about your source code.
Setting up your SCA environment in preparation for creating and loading SCA libraries
Creating new SCA libraries
Loading SCA libraries
Opening existing SCA libraries
Maintaining your SCA libraries
3.1. Setting Up Your SCA Environment
The information in your SCA libraries is generated by supporting compilers in the form of analysis data (.ANA) files. You might have to convert some compilers' files, as described in Section 3.1.1, ''Creating Analysis Data Files''. This section describes how to set up your environment in preparation for creating SCA libraries and loading the analysis data files.
3.1.1. Creating Analysis Data Files
SCA depends on supporting compilers for the generation of files containing detailed analysis data. These analysis data files contain information about all of the symbols, files, and modules in the source code. You load this information into an SCA library (see Section 3.3, ''Loading an SCA Library''). It is then used as a database for the SCA query and analysis features.
Some compilers generate .XREF files that can be converted to .ANA files by means of the SCA IMPORT command. For more information on the IMPORT command, see the VSI Language-Sensitive Editor/Source Code Analyzer for OpenVMS Reference Manual.
For OpenVMS systems, you produce an analysis data file by specifying the /ANALYSIS_DATA qualifier during compilation. This qualifier requests that the compiler generate a file of analysis data information with a default file type of .ANA.
$CC/ANALYSIS_DATA PG1,PG2,PG3
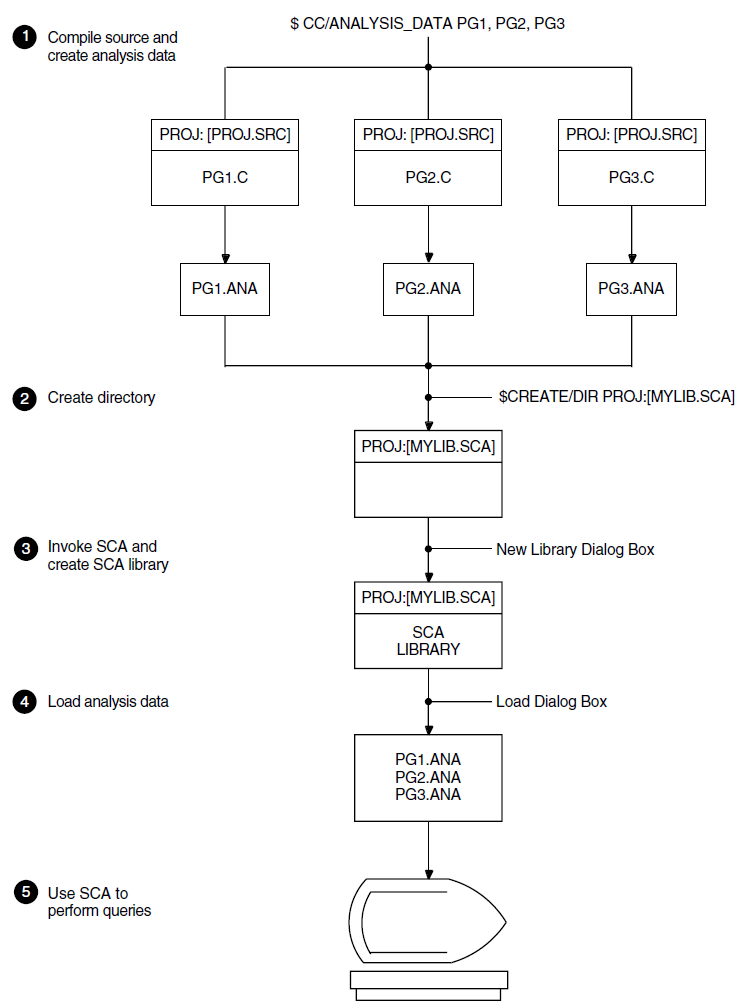
3.1.2. Steps for Environment Setup
Create the analysis data files (for example, PG1.ANA, PG2.ANA, PG3.ANA with the VSI C compiler).
Create a directory to contain the SCA library (for example, PROJ:[MYLIB.SCA]).
Use SCA to create a new SCA library; use the directory created in Step 2 as the library specification (see Section 3.2, ''Creating a New SCA Library'').
Load the analysis data files into the new SCA library (see Section 3.3, ''Loading an SCA Library'').
Use SCA to perform queries about the information stored in the library.
Figure 3.1, ''Setting Up an SCA Environment'' shows these steps.
3.2. Creating a New SCA Library
This section describes how to create an SCA library. For information on opening existing SCA libraries, see Section 3.4, ''Opening an Existing SCA Library''.
Compile your source code and specify that the compiler generate analysis data files (for information on creating these files, see Section 3.1, ''Setting Up Your SCA Environment'').
Create a directory to contain the new SCA library.
$CREATE/DIRECTORY PROJ:[USER.LIB1]
CREATE LIBRARY [/qualifier...] directory-spec[,...]
$SCA CREATE LIBRARY [.LIB1],[.LIB3]%SCA-S-NEWLIB, SCA Library created in PROJ:[USER.LIB1]%SCA-S-LIB, your SCA Library is PROJ:[USER.LIB1]%SCA-S-NEWLIB, SCA Library created in PROJ:[USER.LIB3]%SCA-S-LIB, your SCA Libraries are-SCA-S-LIB, PROJ:[USER.LIB1]-SCA-S-LIB, PROJ:[USER.LIB3]
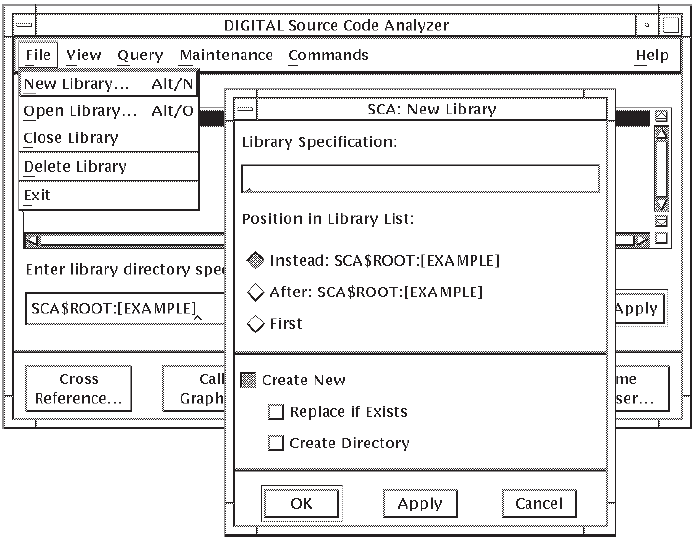
From the SCA Main window, pull down the File menu.
Choose the New Library... menu item. The New Library dialog box is displayed, into which you enter the specification for the new library. Figure 3.2, ''The New Library Dialog Box'' shows the New Library dialog box.
Position the pointer in the Library Specification box and click on MB1 to activate it.
Enter the library specification (the directory specification of the directory you created for the SCA library). This becomes the name of the new SCA library.
Click on OK. (If you are creating more than one library, click on Apply and enter the next library specification. Click on OK when you are finished.)
SCA creates the library and positions it first in the list of current SCA libraries in the main window. The first library in the library list is the primary library, which is used by any operation that acts on a single library (for example, LOAD, RECOVER, VERIFY). See Section 3.4.3, ''Repositioning Libraries in the Current Library List for DECwindows'' for information on how to position SCA libraries in the library list.
SCA displays a message if the name you specified for the new library already exists. You can recreate an existing library by choosing the Replace if Exists option in the New Library dialog box.
3.3. Loading an SCA Library
A newly created SCA library is empty until you load analysis data files.
LOAD [/qualifier...] file-spec[,...]
$SCA LOAD PG1,PG2,PG3$SCA LOAD/LIBRARY=[.LIB2] PG4,PG5$SCA LOAD/LIBRARY=[.LIB3] PG6,PG7
By default, the first command loads the first library listed (LIB1) with the modules contained in the specified data analysis files (PG1 to PG3); the next commands then load the libraries (LIB2 and LIB3) specified by the /LIBRARY qualifier. You must use the /LIBRARY qualifier to specify libraries on your library list.
3.3.1. Replacing and Adding Analysis Data
The /REPLACE qualifier replaces modules in the specified library, if they exist, and adds any newly specified modules. The /NOREPLACE qualifier adds new modules to the library. The default is /REPLACE.
$SCA LOAD/NOREPLACE PG1,PG4%SCA-W-LOADED, module PG1 has already been loaded%SCA-S-LOADED, module PG4 loaded%SCA-S-COUNT, 1 module loaded, (1 new, 0 replaced)
3.3.2. Specifying the Update Library
The /LIBRARY=library-spec qualifier specifies the SCA library to be updated. The update library must be one of the libraries on the current list. The default is /LIBRARY=primary-library.
$SCA LOAD/LIBRARY=LIB2 PG1%SCA-S-LOADED, module PG1 loaded
3.3.3. Deleting Analysis Data Files
The /DELETE qualifier deletes an .ANA file from its present location when it is successfully loaded into an SCA library. You can recover deleted .ANA files from SCA libraries using the EXTRACT MODULE command.
From the SCA Main window, pull down the Maintenance menu.
Choose the Load... menu item. The Load dialog box is displayed. Figure 3.3, ''The Load Dialog Box'' shows the Load dialog box. Note that the Filter box shows the current directory and *.ANA for the analysis data files. If your analysis data files are in a different directory, enter that directory name in the Filter box, or double click on a directory from the Directories box. The analysis data files are listed in the Files box.
Position the pointer on an analysis data file and double click on MB1. SCA loads the file into the selected SCA library.
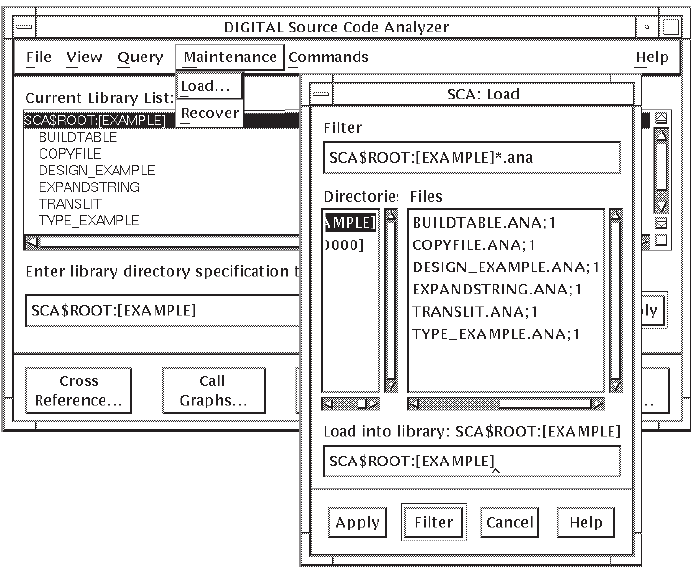
Another way to load an analysis data file is to type the file name directly in the Load into Library: box on the bottom of the dialog box and click on Apply. Using this method, you can load several files by entering the file names in a space-separated list, or by specifying a wildcard expression.
3.4. Opening an Existing SCA Library
SET LIBRARY [/qualifier...] directory-spec[,...]
$SCA SET LIBRARY [.LIB1],[.LIB2]%SCA-S-LIB, your SCA libraries are-SCA-S-LIB, PROJ:[USER.LIB1]-SCA-S-LIB, PROJ:[USER.LIB2]
Note
Certain SCA functions use only the selected library (for example, the LOAD command). The SCA query functions use all libraries in the current library list.
From the SCA Main window, which replaces libraries in the list
From the Open Library dialog box, which adds or replaces libraries to the list
Depending on the method you choose, you either replace the list of current libraries with the libraries you are opening or add them to the current library list, as described in the following sections.
3.4.1. Replacing the Library List
$SCA CREATE LIBRARY/REPLACE [.LIB3]%SCA-S-NEWLIB, SCA Library created in PROJ:[USER.LIB3]%SCA-W-NEWLIB, your SCA Library is PROJ:[USER.LIB3]
For DECwindows, the easiest way to open an SCA library is to enter a library specification directly from the SCA Main window. SCA replaces all libraries in the Current Library List: box with the ones you specified. Subsequent SCA functions now use these libraries.
Position the pointer on the "Enter library directory specification to replace current library list" box and click on MB1 to activate it.
Enter the specification for the library. You can indicate multiple libraries by separating each library name with a comma. The libraries will be opened in the order in which you typed them.
Press Return or click on Apply.
The Current Library List box shows the libraries you opened.
3.4.2. Adding Libraries to the Library List
SCA searches for libraries in the order they are listed on library lists. The /BEFORE qualifier adds the libraries specified on the command line to the beginning of the current library list. The /BEFORE=library-spec qualifier inserts the libraries specified on the command line before the library specified by the qualifier.
$SCA CREATE LIBRARY/BEFORE=[.LIB3] [.LIB2]%SCA-S-NEWLIB, SCA Library created in PROJ:[USER.LIB2]%SCA-S-LIB, your SCA Libraries are-SCA-S-LIB, PROJ:[USER.LIB1]-SCA-S-LIB, PROJ:[USER.LIB2]-SCA-S-LIB, PROJ:[USER.LIB3]
The /AFTER qualifier adds the libraries specified on the command line to the end of the current library list. The /AFTER=library-spec qualifier inserts libraries specified on the command line after the library specified by the qualifier.
$SCA CREATE LIBRARY/AFTER=[.LIB3] [.LIB4]%SCA-S-NEWLIB, SCA Library created in PROJ:[USER.LIB4]%SCA-S-LIB, your SCA Libraries are-SCA-S-LIB, PROJ:[USER.LIB1]-SCA-S-LIB, PROJ:[USER.LIB2]-SCA-S-LIB, PROJ:[USER.LIB3]-SCA-S-LIB, PROJ:[USER.LIB4]
For DECwindows, another way to open an SCA library is from the Open Library dialog box. Using this method, you can add libraries to the current library list. This method also allows you to position the libraries among other libraries in the list (see Section 3.4.3, ''Repositioning Libraries in the Current Library List for DECwindows''). By default, the new library you add becomes the selected library.
From the SCA Main window, pull down the File menu.
Choose the Open Library... menu item. The Open Library dialog box appears, from which you enter a library specification. Figure 3.4, ''The Open Library Dialog Box'' shows the Open Library dialog box.
Position the pointer in the Library Specification: box and click on MB1 to activate it.
Enter the specification of the library you want to open.
Click on OK. (If you are adding more than one library, click on Apply and enter the next library specification. Click on OK when you are finished.)
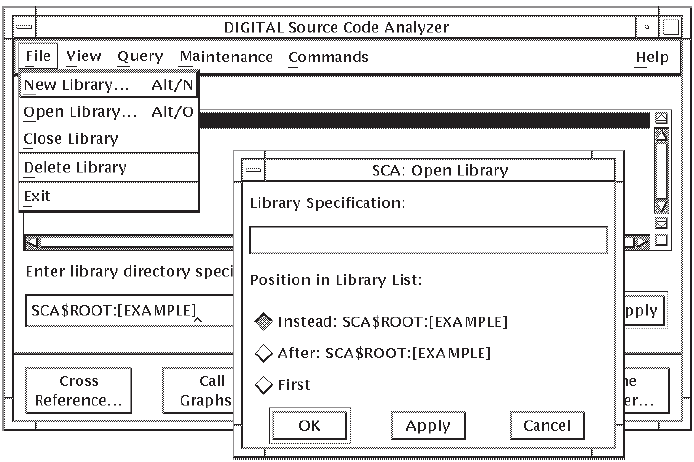
Note
If you do not want the libraries you added to replace the current library,choose the After or First button from the Open Library dialog box before clicking on OK. SCA places the new libraries after the current library or first in the library list, depending on which button you chose.
3.4.3. Repositioning Libraries in the Current Library List for DECwindows
Where you position a library in the current library list affects how SCA uses modules of analysis data. Table 3.1, ''How SCA Uses Multiple Libraries'' shows this concept.
- LIB1, Module A
- LIB2, Module B, D
- LIB3, Module C
|
Libraries |
Modules | |||
|---|---|---|---|---|
|
LIB1 |
A | |||
|
LIB2 |
A |
B |
D | |
|
LIB3 |
C |
D | ||
If Module A in LIB1 and Module A in LIB2 were different in content and you want SCA to use Module A in LIB2, position LIB2 before LIB1 in the library list when you open it.
From the SCA Main window, click on MB1 on LIB1 in the Library List box.
Pull down the File menu.
Choose the Close Library menu item.
SCA closes, or deactivates, LIB1. LIB1 still exists with all its analysis data, it is just removed from the library list. If you chose the Delete Library menu item, the library would no longer exist.
Click MB1 on LIB2 in the Library List box.
Pull down the File menu.
Choose the Open Library... menu item.
SCA displays the Open Library dialog box (see Figure 3.4, ''The Open Library Dialog Box''). Because you selected LIB2 in Step 4, the Instead of button and After button are now active.
Enter LIB1 in the Library Specification box and click on the After button.
Click on OK.
SCA updates the current library list. Modules in LIB2 now occlude modules with the same name in LIB1.
In the previous example, you had to close a library on the current library list to reposition it. The recommended way to use SCA is to first determine the order in which you want to position SCA libraries before you open them. As such, you would have opened LIB2 before LIB1.
3.5. Maintaining Your SCA Libraries
By reorganizing the contents of individual SCA libraries for better performance
By deleting unneeded SCA libraries
By displaying information on library and module attributes
By recovering damaged libraries
The following sections describe these library maintenance features.
3.5.1. Reorganizing SCA Libraries
When you reorganize SCA libraries, you optimize their size and organization. As a result, query and update operations are faster.
The REORGANIZE command sorts, compresses, and reorders the data structures in an SCA library, freeing up memory space and improving library performance. The result is a smaller, more efficient SCA library.
REORGANIZE [/qualifier...] [library-spec[,...]]
$SCASCA>CREATE LIBRARY/SIZE=8000/MOD=200 library-directorySCA>LOAD data-file-directory:*.ANASCA>REORGANIZE
The library-directory parameter specifies the location of the library to be reorganized. The default is the current library directory.
The REORGANIZE commands creates scratch files in SYS$SCRATCH approximately equal in size to the files in the library being reorganized.
From the SCA Main window, select a library from the Current Library List box.
Pull down the Maintenance menu.
Choose the Reorganize menu item.
3.5.2. Deleting an SCA Library
DELETE LIBRARY [/qualifier...] directory-spec[,...]
From the SCA Main window, position the pointer on a library in the Current Library List: box and press MB1 to select it.
Pull down the File menu.
Choose the Delete Library menu item.
Click on OK when SCA prompts you to confirm the deletion before deleting the library.
SCA deletes the selected library and removes it from the library list.
3.5.3. Displaying Library and Module Information
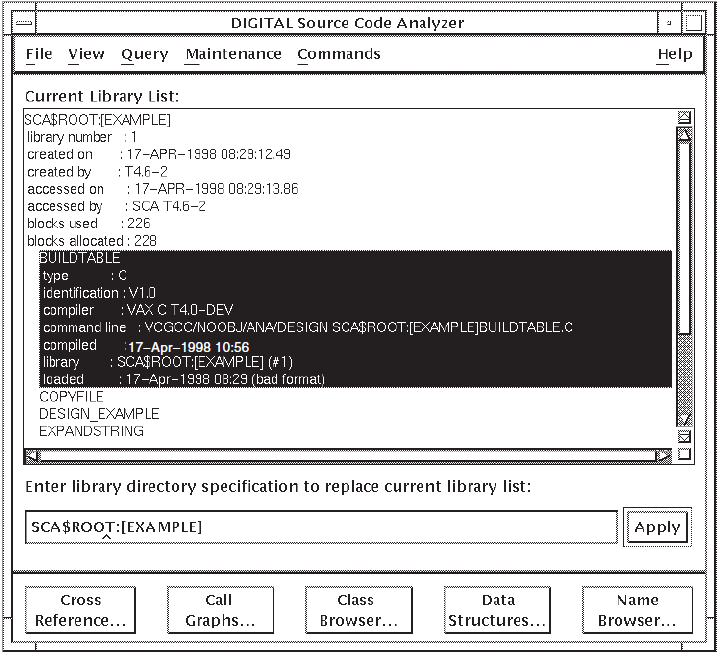
The library attributes include the library number, date it was created,date last accessed and by whom, and number of blocks allocated and used. The module attributes include the module type (for example, C), module identifier, compiler name and compile command line used, date compiled, SCA library where the module resides, and date it was loaded into the library.
3.5.3.1. Displaying Library Attributes
$SCA SHOW LIBRARY%SCA-S-LIB, your current SCA library is PROJ:[USER.SCA]$
Position the pointer on a library in the Current Library List: box and press MB1 to select it.
Pull down the View menu.
Choose the Show Attributes menu item. SCA displays attribute information for the selected library.
3.5.3.2. Displaying Modules and Module Attributes
SHOW MODULE [/qualifier...] [module-name-expr[,...]]
Complete or partial information about all modules, or selected modules, can be displayed. The terms "visible" and "hidden" refer to the results of the module selection process that occur when multiple libraries are accessed.
$SCA SHOW MODULEModule Ident Language CompiledBUILD_TABLE 1 01 Pascal 24-Oct-1998 15:43COPY_FILE 1 01 Pascal 24-Oct-1998 15:44EXPAND_STRING 1 01 Pascal 24-Oct-1998 15:44OPEN_FILES 1 01 Pascal 24-Oct-1998 15:43TRANSLIT 1 01 Pascal 24-Oct-1998 15:44TYPES 1 01 Pascal 24-Oct-1998 15:43%SCA-S-MODULES, total of 6 modules
If you use a general module query with the /FULL qualifier, details of all the module information in the library are displayed.
If you type a specific module name, detailed information on the specified module is displayed.
The /VISIBLE qualifier displays only visible modules. The default is /VISIBLE.
The /ALL qualifier displays all modules (both visible and hidden).
For DECwindows, to display a list of modules for any SCA library, position the pointer on a library name in the Current Library List box and double click on MB1.You can also select an SCA library, then choose the Show Modules menu item from the View menu.
SCA displays a list of modules for the selected library. Double click again on the library name to hide the modules, or select a library and choose the Hide Modules menu item from the View menu.
Position the pointer on a module name and press MB1 to select it.
Pull down the View menu.
Choose the Show Attributes menu item. SCA displays the attributes for the selected module.
Figure 3.5, ''Displaying Attributes'' shows the attributes of the sample
SCA library and the attributes for the build_table module.
3.5.3.3. Hiding Library and Module Attributes
The /HIDDEN qualifier displays hidden modules.
From the SCA Main window Current Library List box, click on a library or module name.
Pull down the View menu.
Choose the Hide Attributes menu item. SCA hides the attributes of the selected library or module.
3.5.4. Recovering SCA Libraries
SCA provides a way for you to recover an SCA library. For example, a library may have inconsistencies resulting from the abnormal termination of a LOAD or DELETE MODULE command.
When you recover a library, SCA deletes from the library any module that started to load but had not completed loading, or any module that started to be deleted but had not completed deleting. SCA cannot recover modules waiting to be processed; you will need to load them again.
From the SCA Main window, click MB1 on a library in the Current Library List box.
Pull down the Maintenance menu.
Choose the Recover menu item. SCA recovers the library.
Chapter 4. Performing Queries
This chapter describes how to use SCA as an interactive tool for analyzing source code. Chapter 2, "Getting Started" introduced the SCA query capabilities. This chapter builds on that information.
Using SCA to get cross-reference information about your source code
Graphically displaying call graph queries
Graphically displaying data structure queries
Modifying the current query
Navigating through the list of queries and using previous queries to build new ones
Modifying the graphical display defaults
The tutorials in this chapter use the sample SCA library (see Section 2.2, ''Opening the Sample SCA Library''). In addition, certain examples refer to the editing capabilities of the VSI Language-Sensitive Editor (LSE) to demonstrate SCA as an integrated tool.
4.1. Performing Cross-Reference Queries
When you perform cross-reference queries, you ask SCA to show how and where symbols are used in your code. Once you open an SCA library, you can interactively perform queries directly from your editor.
code. You want to ask SCA for the following types of information:All places where
codeis usedAll write-references to
codeHow
codeis used in a specific module
The following sections demonstrate a typical cross-reference query session that lets you obtain this and other information. Note that the example begins with a broad query specification that is continually revised to narrow the results until only the information of interest remains.
4.1.1. Cross-Referencing a Symbol by Name
A name-selection expression selects occurrences that have names that match a specified name expression.
name-selection-exp ::= name-expression |
                       name=name-expression |
name=( name-expression,... )name=( namexp1, namexp2 ) name=namexp1 OR name=namexp2namexp1 OR namexp2
"one quotation mark ("")"Use the name expression &* to find the name consisting of a single asterisk.
Use the name expression && to find the name consisting of a single ampersand.
Enclosing a complex string in quotation marks does not affect the case-sensitivity of matching. String matching is not sensitive to the case of the string specified in the name expression.
Although a hyphen (-) is allowed in a simple name, a command line that ends in a hyphen is a continued command, just as in DCL.
build_table and code, do the following:- From the SCA Main window or from any query window, pull down the Query menu and choose the Cross Reference... menu item. SCA displays the Cross Reference Query window (see Figure 2.6, ''The Cross-Reference Query Window'').
Note
In LSE, when you enter the FIND OCCURRENCES command or GOTO DECLARATION command and specify a symbol name, an SCA cross-reference query is automatically performed. SCA displays the query result in the Cross Reference Query Result window.
- Click on the specification box for the Name query attribute and enter
build_table,code.Note
SCA lets you specify multiple items in the specification boxes for the Name,In File, and In Module query attributes. Use a comma to separate items in the list.
Click on Apply. SCA displays the query result.
Position the pointer on the window sash (the vertical bar in the center of the display area) and press and hold MB1.
Drag the sash to the right to see more information about the symbols.
Note that the right-hand pane is blank. SCA lets you display occurrence information in that pane, as in the next step.
Double click on the icon to the left of
code(the second symbol in the list).
SCA shows all occurrences of the variable codein the right-hand pane
(see Figure 4.1, ''Cross-Referencing by Symbol Name'').
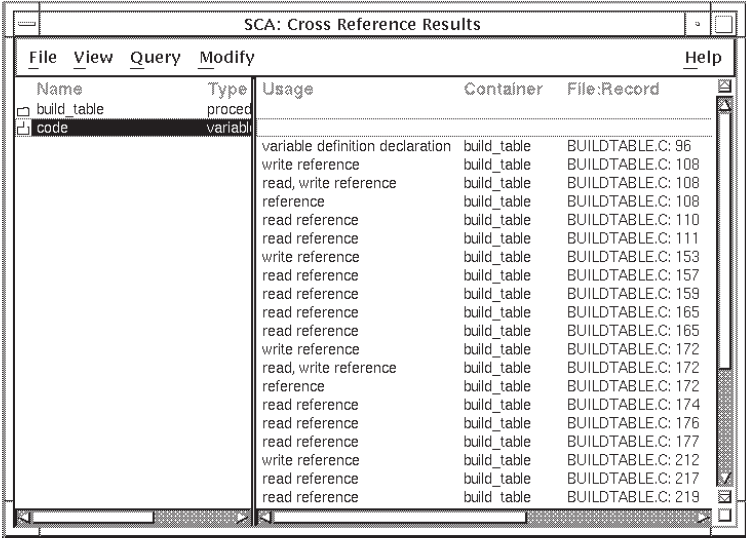
code is:A write reference
Contained in the module
codeLocated in file
buildtable.cLocated on line 108 in
buildtable.c
4.1.2. Cross-Referencing by Symbol Usage
occurrence-selection-exp ::= occurrence=occurrence-class |
                             occurrence=( occurrence-class,...
Occurrence is a formal parameter name and occurrence-class is one of the following keywords:
PRIMARY—Most significant declaration (such as FUNCTION)
ASSOCIATED—Associated declaration (such as EXTERNAL)
DECLARATION—Both PRIMARY and ASSOCIATED declarations
READ, FETCH—Retrieval of a symbol value
WRITE, STORE—Assignment of a symbol value
ADDRESS, POINTER—Reference to the location of a symbol
CALL—Call to a routine or macro
COMMAND_LINE—Command-line file reference
INCLUDE—Source file include reference
PRECOMPILED—Precompiled file include reference
BASE—Any base class of a C++ class
FRIEND—Any friend of a C++ class
MEMBER—Any member of a C++ class
SEPARATE—Any Ada package or subprogram unit defined as SEPARATE
USE—Any USE of an Ada package or subprogram unit, or USE of a VSI Fortran 90 module
WITH—Any WITH of an Ada package or subprogram unit
REFERENCE—All of the previous references
OTHER—Any other kind of reference (such as a macro expansion or use of a constant)
EXPLICIT—Explicitly declared
IMPLICIT—Implicitly declared
VISIBLE—Occurrence appears in the source
HIDDEN—Occurrence does not appear in the source
COMPILATION_UNIT—Occurrence is compilation-unit
LIMITED—Any Ada limited private type
PRIVATE—Any private C++ object, or Ada private type
PROTECTED—Any protected C++ object
PUBLIC—Any public C++ object
VIRTUAL—Any virtual C++ object
code. To revise your query to show this particular usage for
DECwindows, do the following:From the Cross Reference Results window, pull down the Query menu.
Choose the Show Query Window menu item. SCA displays the query window.
Scroll to Write in the Selection box for the Usage query attribute and click on Write. Write appears in the Selected box.
Click on the Keep items from previous result option. This option keeps the results from the previous query that match the new selection attributes (it updates the previous query).
Click on Apply and wait for the new query result to display.
Pull down the View menu.
Choose the Expand All menu item. SCA displays the query result and shows only write and read-write references to the variable
code.
4.1.3. Limiting Queries to Specific Modules
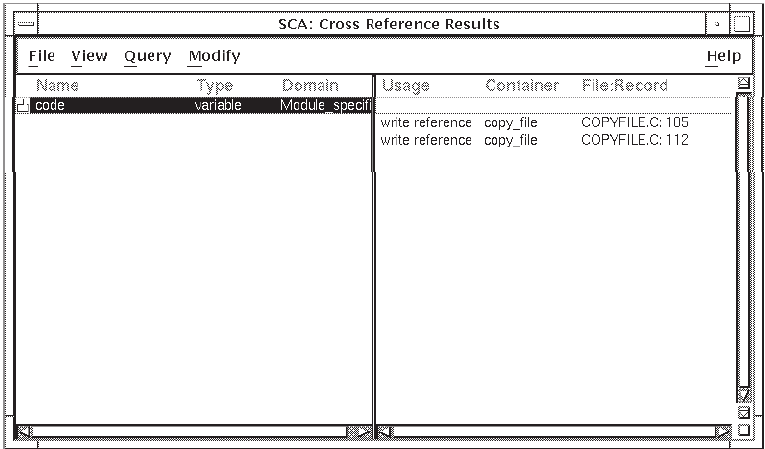
code in the module copyfile. To do this for
DECwindows, perform these steps:From the Cross Reference Query window, click on the specification box for the In Module attribute to activate it.
Enter
copyfilein the specification box.Click on Apply.
SCA displays the new result. It again keeps items from the previous result, because this option remains active from the last query. Choose the Expand All menu item from the View menu to see more detail. Figure 4.2, ''Limiting Queries to Specific Modules'' shows the query specification and result.
code in module copyfile:Return to the Cross Reference Query window.
Scroll to find Primary in the Selection Box for the Usage query attribute, then click on MB1 to select it. Primary is added to the Selected box.
Click on the Create new result button.
Click on Apply. SCA shows the result in the result window.
Double click on the icon next to the variable name
codeto expand the information. SCA shows the primary declaration ofcodein modulecopyfilein the result.
4.1.4. Cross-Referencing by Symbol Type
symbol-class-selection-exp ::= symbol=symbol-class |
                               symbol=( symbol-class,... )
ARGUMENT—Formal argument (such as a routine argument or macro argument)
CLASS—Any C++ class object construct defined by union, structure, or class statements
COMPONENT, FIELD—Component of a record
CONSTANT, LITERAL—Named compile-time constant value
EXCEPTION—Exception
FILE—File
FUNCTION, PROCEDURE, PROGRAM, ROUTINE, SUBROUTINE—Callable program function
GENERIC—Generic unit
KEYWORD—Keyword
LABEL—User-specified label
MACRO—Macro
MODULE, PACKAGE—Collection of logically related elements
PLACEHOLDER—Marker where program text is needed
PSECT—Program section
TAG—Comment heading
TASK—Task
TYPE—User-defined type
UNBOUND—Unbound name
VARIABLE—Program variable
OTHER—Any other class of symbol
You use one or more of the generic (multilanguage) keywords to request specific classes of symbols. Because different languages use different terminology, several alternatives are provided for some classes of symbols.
A list of symbol classes is equivalent to a union of symbol-class-selection expressions, each having a single symbol class.
In the following example for DECwindows, you specify a cross-reference query by symbol type. There are several symbol types listed in the Selection box, for example: variables, constants, and functions. When you specify a symbol type, SCA lists the names of all symbols of that type.
SCA lists generic symbol types in the Selection box for this attribute. To see what types correspond to these symbol types, look at the language table in SCA help for the language that you are using. For example, the symbol type routine means procedure in Pascal.
In the Cross Reference Query window, click on Reset to clear the previous query specification. The Reset button clears the window and resets the Create new result option.
Click on the specification box for the Name query attribute.
Enter
type_example.Press and hold MB1 on the Any box for the Type query attribute.
Drag the mouse to choose the None option and release MB1.
Select Module in the Selection box for the Type query attribute. Module appears in the Selected box.
Click on Apply. SCA creates a new query result showing
type_examplethat is not of type Module.
4.1.5. Cross-Referencing by Symbol Domain
A symbol-domain-selection expression selects occurrences whose symbol domain is one of those specified in the symbol-domain-selection expression.
Symbol domain is the range of source code in which a symbol has the potential of being used. For example, a C static declaration creates a symbol that has a module-specific symbol domain; it cannot be used outside of that module. On the other hand, a regular C module-level declaration creates a symbol that has a multimodule symbol domain; it has the potential of being used in more than one module. The symbol domain of a GLOBAL is multimodule, regardless of how many modules there are in which the symbol is used.
symbol-domain-selection-exp ::= domain=symbol-domain |
                                domain=( symbol-domain,... )
INHERITABLE—Able to be inherited into other modules (for example, by means of Pascal environment or Ada compilation system mechanisms)
GLOBAL—Known to multiple modules via linker global symbol definitions
PREDEFINED—Defined by the language (examples: FORTRAN sin, Pascal writeln)
MULTI_MODULE—Domain spans more than one module (domain=multi_module is equivalent to domain=(inheritable,global, predefined))
MODULE_SPECIFIC—Domain is limited to one module
A list of symbol domains is equivalent to a union of symbol-domain-selection expressions, each having a single symbol domain.
build_table?":In the Cross Reference Query window, click on Reset to clear the previous query specification.
Click on the selection box for the Name query attribute.
Enter
build_table.Select Global in the Selection box for the Domain query attribute. Global appears in the Selected box.
Click on Apply. SCA creates a new query result showing only the global procedures.
Double click MB1 on the icon next to the procedure
build_tableto see more detail.
Figure 4.3, ''Cross-Referencing by Symbol Domain'' shows the query specification and result.

4.1.6. Limiting Queries to Specific Files
As with modules, you can limit your cross-reference query results to occurrences located in a particular file. In the Cross Reference Query window, enter the file specification in the specification box for the In File query attribute.
x.c, x.h
4.1.7. Go-To-Source Feature
Note
The go-to-source feature is available from the Name Browser and from the Cross Reference, Call Graph, and Data Structure query results. See Section 4.2, ''Performing Call Graph Queries'' and Section 4.3, ''Performing Data Structure Queries'' for information on going to source from a call graph or data structure query result. To go-to-source from the Name Browser, you select a name and click on the Go to Declaration button in the Name Browser dialog box.
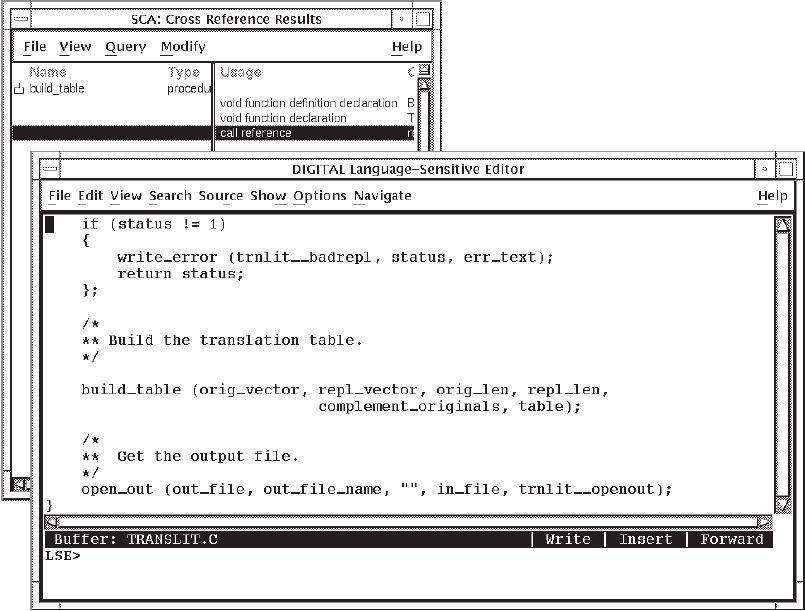
From the Cross Reference Results window, position the pointer on the name of a
symbol in the left-hand pane, or the name of an occurrence in the right-hand pane of
the query result, and double click on MB1. Figure 4.4, ''Go-To-Source Feature'' shows
an occurrence of build_table that has been selected and the cursor
positioned to its corresponding location in the source code.
4.1.8. Navigating to Other Query Windows
As you examine the cross-reference results, you might also want to see the structure of your code. SCA can graphically display routine calls and data structures. From the Query pull-down menu, you can select menu items to specify call graph and data structure queries.
Pull down the Query menu.
Choose the Call Graphs... menu item. The Call Graph Query window is displayed.
4.2. Performing Call Graph Queries
This section describes how to graphically display call relationships in your source.
Beginning with a simple query, you construct a graph that gives you an overview of particular calls in your software system. You build your call graph by extending to and from nodes that depict routines in your graph, as well as removing unwanted nodes. The end result is a detailed graph of the call relationships you want to see.
The following sections describe how to perform call graph queries.
4.2.1. Displaying Calls From a Routine
read_command_line and you want
to know which routines might be invoked if you called it. To specify a call graph
query, do the following:From the SCA Main window, click MB1 on the Call Graphs … button. The Call Graph Query window is displayed.
Click MB1 on the specification box for the From query attribute.
Enter
read_command_linein the specification box.Click on OK.
SCA interprets this query as, "Find all calls from
read_command_line".
Figure 4.5, ''Call Graph Results''shows the resulting display. Note that the
default depth is 1.
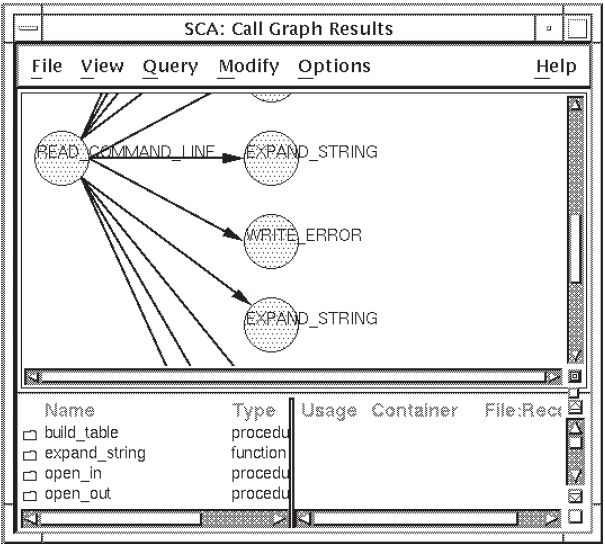
4.2.1.1. Navigating a Large Display
SCA displays all routines called by read_command_line.Because
this is a large display, the entire result (shown as a lexical tree by default)
cannot fit in the window's display area. You can use the scroll bars to view
various parts of the call graph, or click MB1 on a name in the lower pane to
show the graph area that pertains to that node.
You can determine the part of the graph you want to see and navigate to that location.
Upon viewing an image of the entire graph, you can decide whether to use this graph, or to respecify your query to limit the results.
To display the Navigation window, click on the navigation button. The navigation button is the small square (icon) in the lower-right corner of the top pane, between the horizontal and vertical scroll bars.
SCA displays the Navigation window, shown in Figure 4.6, ''The Navigation Window''. The Navigation window shows an image of the entire graphical display.
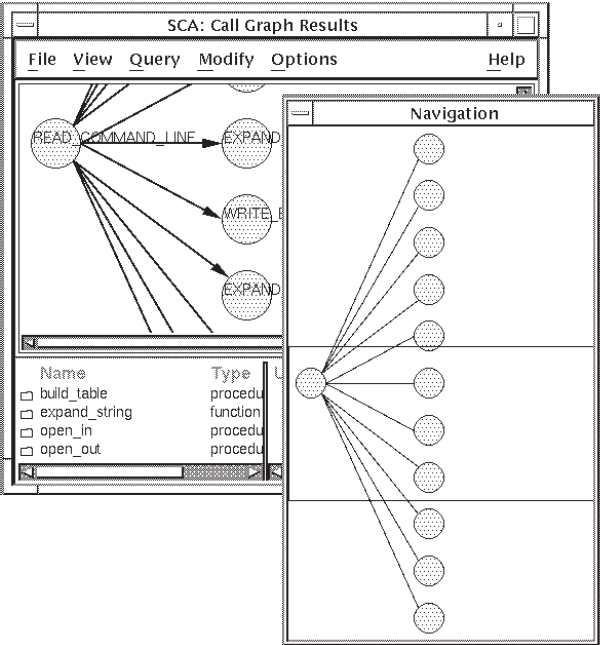
Position the pointer in the Navigation box. A cross-hair cursor appears.
Press and hold MB1.
Move the box to the part of the call graph you want to see. In this case, move the box up to the top of the graph.
Release MB1. The display area of the Call Graph Results window now shows this part of the graph (you should see the routine
open_in). The Navigation window stays active until you click MB1 again on the navigation button.
4.2.1.2. Going to Source Code
Position the pointer on a node or arc of the call graph and double click on MB1.
Double click MB1 on a line in the list of information below the call graph.
Select a node or arc in the call graph, then pull down the View menu and choose the Goto Source menu item.
In the first case, double clicking on a node goes to the declaration of the routine. Double clicking on an arc goes to the source of the call.
If you are displaying the call graph in compacted or graph format, double clicking MB1 on an arc highlights that arc and all corresponding calls in the list below. SCA goes to the source of the first call in the list.
4.2.2. Refining Your Query
After you specify an SCA query, you can refine it until you arrive at the most meaningful information. This section demonstrates several ways to refine your query.
4.2.2.1. Using the Negation Operator
str and
you do not need to see calls to these routines. You can use the negation
operator to exclude that information from the result. To refine your query to
remove calls to these routines, do the following:Pull down the Query menu and choose the Show Query Window menu item. SCA displays the Call Graph Query window.
Press and hold MB1 on the Any box for the To query attribute.
Drag the mouse to choose the None option and release MB1.
Click MB1 on the corresponding selection box and enter
str*.Click on Apply.
Use the scroll bar or Navigation window to move to the top of the display.
Note that SCA has removed calls to strlen and
strncpy.
4.2.2.2. Eliminating Extraneous Information
From the Call Graph Results window, pull down the Modify menu.
Choose the Remove items not defined in the SCA library menu item. This step keeps everything that has primary declarations in the SCA library.
Figure 4.7, ''Simplified Call Graph'' shows the simplified query result.
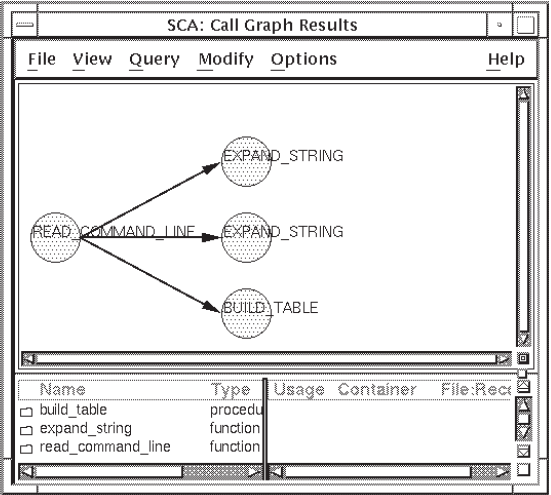
4.2.2.3. Removing Redundancy
expand_string appears twice. To compact
the call graph to eliminate redundancy, do the following:Pull down the View menu from the Call Graph Results window.
Choose the Compact Tree menu item.
SCA further simplifies the call graph.
4.2.2.4. Extending Information About a Routine
By specifying new query attributes for the current query
By extending your current query display
In the first case, you return to the query window and revise the current query specification (see Section 4.4.3, ''Adding Items to the Previous Query Result'').This method is useful when you know several things about your code and want to indicate several conditions in your query. If you want to see what, if anything, calls a given routine or what that routine calls, you can use the Extend options.
build_table directly from
the display of the query result, do the following:In the display of the current query result, position the pointer on the node
build_tableand click MB1 to select it.Click on MB3. A pop-up menu is displayed.
Choose the Extend From menu item. SCA adds calls from
build_table. Figure 4.8, ''Extending From a Node'' shows the result.
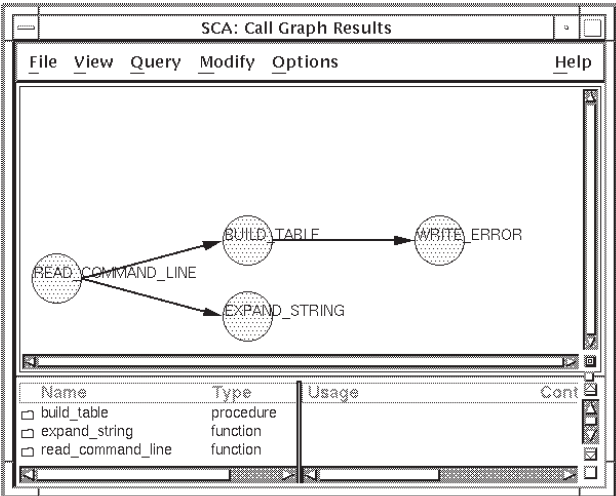
In the same way that you extend from a node, you can select the Extend To menu
item to extend to a node. Extending to a node finds routines that call the
routine corresponding to that node. For example, if you had a call tree from
build_table and you selected Extend To
build_table, SCA would show the node read_command_line
with an arc extending to build_table.
4.2.3. Selecting and Removing Items
read_command_line to build_table. You can select the
nodes from your call graph and remove them in the following ways:By choosing Remove Item(s) from the pop-up menu
By choosing Remove Selected Items from the Modify pull-down menu
4.2.3.1. Selecting Nodes
Position the pointer near the nodes you want to select.
Press and hold MB1.
Drag the mouse. SCA forms a box that grows as you drag the mouse.
Outline the nodes that you want to select, then release MB1. SCA highlights the selected nodes.
4.2.3.2. Removing Nodes
In the call graph display, position the pointer on
expand_stringand click on MB1.Click on MB3. A pop-up menu is displayed.
Choose the Remove Item(s) menu item. SCA removes the node and its subgraph from the display.
4.2.4. Formatting Your Display
Note
You can format and print data structure query results in the same way as call graph query results. See Section 4.3, ''Performing Data Structure Queries'' for information on performing data structure queries.
4.2.4.1. Specifying Vertical Call Graphs
build_table. Perform these steps:From the call graph query display, pull down the View menu.
Choose the Vertical menu item. SCA changes the call graph to a vertical representation. Note how the display is somewhat crowded. Assume that you want more space between
build_tableandwrite_errorto better show the arcs between the nodes. To move these nodes, continue with Steps 3 and 4.Position the pointer on
write_errorand press and hold MB2.Drag the mouse down slightly and release MB2. SCA moves
write_errorto the new position and extends the arc.
4.2.4.2. Redrawing the Graph
SCA enables you to redraw the graph after deleting nodes. Redrawing the graph compresses the display in the results window.
Pull down the View menu from the Call Graph or Data Structure Results window and choose the Redraw menu item.
Press and hold MB3 from the Call Graph or Data Structure Results window and choose the Redraw pop-up menu item. Release MB3.
4.2.4.3. Specifying Lexical, Compact, and Graph Displays
SCA displays call graphs (and type trees) as lexical trees by default. When you pull down the View menu from the Call Graph Results window or Data Structure Results window, note that Lexical Tree, Compact Tree, and Graph are all display options. Lexical Tree is the default display option. (See Section 4.6, ''Modifying the Display Options'' for information on changing the default display option.)
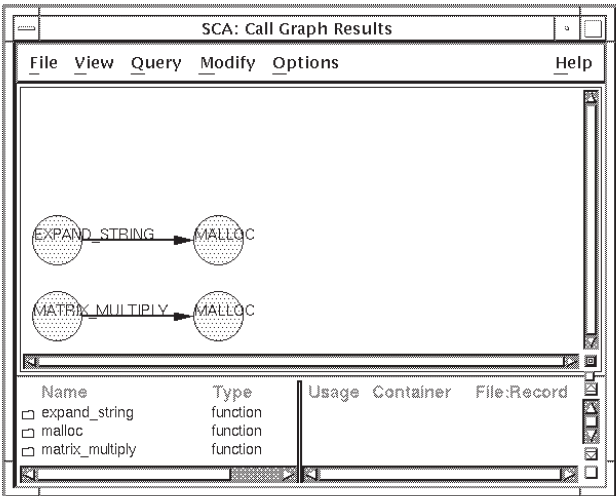
As mentioned in Section 2.3.5, ''Creating Call Graphs'', a lexical tree shows
query results in lexical order and shows all calls for the indicated depth.
Figure 4.9, ''Lexical Tree Display Example'' shows a sample lexical tree. Note that all
calls to malloc are represented.
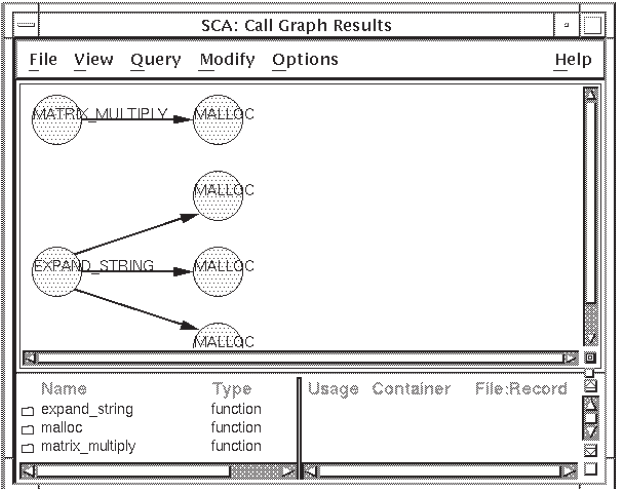
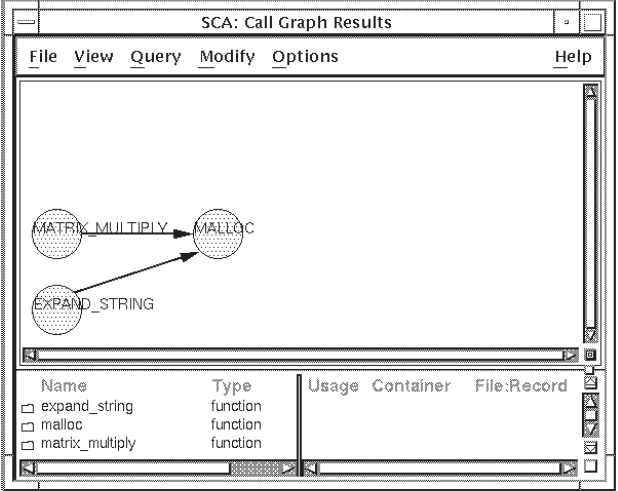
The Compact Tree format removes redundant calls from a given node,as shown in Figure 4.10, ''Compact Tree Display Example''.
The Graph format further compresses the call graph result by removing all
duplicate nodes. In Figure 4.11, ''Graph Display Example'', the multiple nodes for
malloc shown in Figure 4.10, ''Compact Tree Display Example'' have been
removed.
The Graph format is the most concise format. The format you choose depends on the amount of information you need to see. If, for example, you need to see how many times a given routine is called, the Lexical Tree format is most useful. If you are interested in finding all calls to a routine, the Graph format is most useful.
4.2.5. Displaying Recursive Calls
A calls A
A calls B calls A
Proc routine1 ( )
        routine2 ( )
Proc routine2 ( )
        routine1 ( )
routine2 ( )Click MB1 on the specification box for the From query attribute.
Enter
routine2in the specification box.Click MB1 on the specification box for the Depth query attribute.
Enter
allin the specification box.Select the Create new result option.
Click on OK.
Figure 4.12, ''Recursive Calls'' shows the resulting call graph in Lexical format.
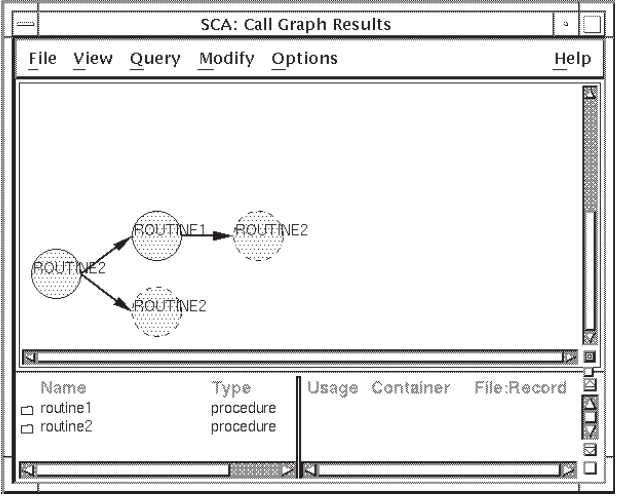
As you can see, routine2 calls routine1,which calls
routine2 again. In addition, routine2 calls
itself.
Recursive calls are shown as dashed circles. If you change your query result to
Graph format, SCA displays the arc from routine2 to
routine1, then back again to routine2, as well as an
arc pointing from routine2 to itself.
4.2.6. Printing Call Graph Results
From the Call Graph Results window, pull down the File menu.
Choose the Extract menu item. The Extract graph dialog box is displayed, as shown in Figure 4.13, ''Extract Graph Dialog Box''.
Enter the file specification for the output file.
Click on OK.
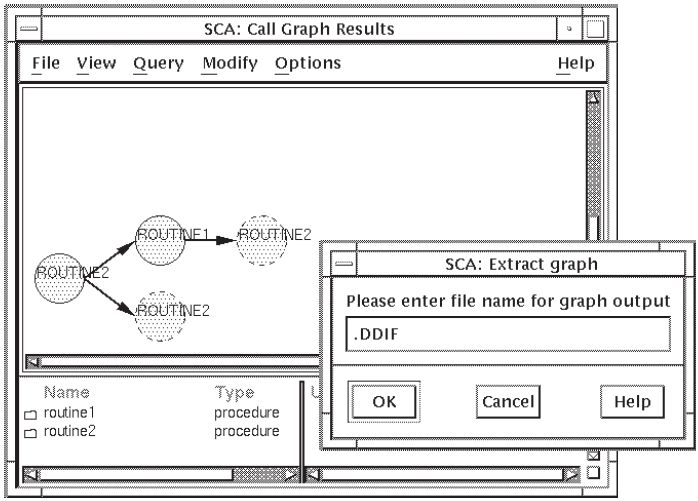
SCA creates a .DDIF file of the currently displayed call graph. You can continue displaying the results of other call graph queries and extract them in the same manner.
4.3. Performing Data Structure Queries
Data structure queries enable you to see the relationship between data types in your code. This information is useful if your code has many user-defined data types, particularly if they are complex record structures.
The following sections describe how to perform data structure queries in more detail. For an example of the Data Structures Query window, see Figure 2.13, ''The Data Structures Query Window''.
4.3.1. Using the Data Structure Query Attributes
Display a graphical representation of a data type (enter query attribute in the "Type of" data field ).
Find symbols of a specified type (enter query attribute in the "Of type" data field ).
In the first case, you provide a symbol name for the "Type" of query attribute in the Data Structure Query window. The symbol can be a variable or a type. SCA finds the type of each symbol.
For example, suppose you have the variable X in your code. If you enter X in the specification box, SCA finds the data type of the variable X. In another example, if you have a type named T in your code and you enter T in the "Type of" specification box, SCA graphically displays the structure of T.
When you provide a data type name for the "Of type" query attribute in the Data Structure Query window, SCA finds symbols that are of that type. For example, if you enter "Type of" X and "Of type" INTEGER, SCA finds symbols named X that are of type INTEGER.
The type can be predefined by the programming language, such as INTEGER, or it can
be user-defined. For example, if you leave the "Type of" attribute
blank and enter user_defined_type for the "Of type" query
attribute, SCA finds all symbols that are of type
user_defined_type.
4.3.2. Creating Type Trees
The result of a data structure query is a type tree. Type trees give you a graphical overview of the structure of your data types. Like call graphs, type trees contain nodes and arcs. You can click on anode to get "type" information about the structure. Double clicking on a node takes you to that occurrence in your source code.
Another similarity to call graphs is that type trees can be extended,compressed, and in other ways modified to best display the result. You can also extract your final result into a file for printing (see Section 4.2.6, ''Printing Call Graph Results'' for information).
From the Data Structure Query window, click MB1 on the specification box for the "Type of" query attribute.
Enter
ui_user_data.Click on OK.
SCA creates a type tree that shows the data structure for the type
ui_user_data. See Figure 4.14, ''Initial Type Display''.
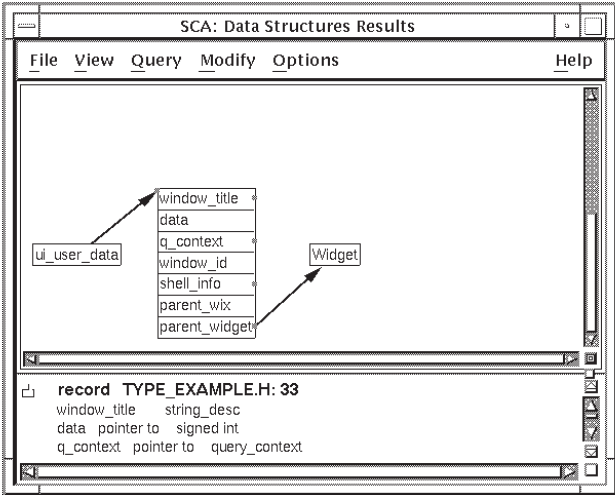
4.3.2.1. Extending a Type Tree
You can extend your type tree to see more information. The node beginning with
window_title is a record containing several fields. Note that
window_title and several other fields are marked with squares
in the right margin. These indicate that you can further extend the type tree
from that item because these fields are also of some user-defined type.
Before you can extend an item, you must select it. SCA lets you select a
single item or select the entire node (in this case, all the fields in the
record). To select a single item, click MB1 on the name of the item (for
example, window_title). To select the entire record, clickMB1 on
the border of the node, or on the line between the item names. Selecting
globally is useful for extending or removing all items in a node.
window_title, do the following:Click MB1 on
window_titleto select it. Note that the line highlighted in the lower pane of Figure 4.14, ''Initial Type Display'' shows thatwindow_titleis of typestring_desc. To see the structure ofstring_desc, continue with Steps 2 and 3.Click on MB3. A pop-up menu is displayed.
Choose the Extend From menu item.
Figure 4.15, ''Extended Type Tree'' shows the result.
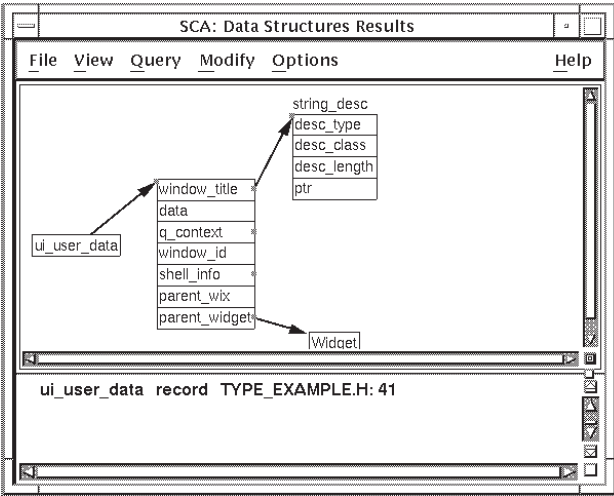
SCA shows that the structure string_desc has four fields (SCA
shows the name of a structure outside the node box). When you click on the name
of any field, the corresponding information is displayed in the bottom
window.
q_context. (Again,
the square in the right margin next to the name denotes an extendible field, as
well as the information in the lower pane.) To extend from
q_context, do the following:Click on MB3. A pop-up menu is displayed.
Choose the Extend From menu item. Note that the resulting type tree is large and cannot display in its entirety.
Click MB1 on the navigation button. SCA displays the Navigation window, which shows an image of the entire graphical display. The outlined area within the Navigation window represents the current display. To navigate to another part of the type tree, go to Step 4.
Click and hold MB1 and move the outline box up so you see the top nodes of the tree, then release MB1. The display area of the Data Structure Results window now shows this part of the tree.
The node represented by a broken-line box indicates a recursive structure. The
recursive data structure display is similar to a recursive call graph display
(see Section 4.2.5, ''Displaying Recursive Calls''). In this example, the structure
query_context contains a field that is also of type
query_context.
You can also reposition nodes in the query result. Position the pointer on a node then click and hold MB2. Drag the node to the desired location and release MB2. Figure 4.16, ''Repositioned Type Tree'' shows the previous type tree repositioned.

4.3.2.2. Selecting and Removing Nodes from a Type Tree
Suppose you decide that the node string_desc is not important and
you want to remove all occurrences of it from the type tree. By selecting the
node, SCA selects all nodes with the same name.
To select string_desc, click MB1 on the border of the node box.
SCA highlights the selected nodes, as shown in Figure 4.17, ''Selecting a Node''.
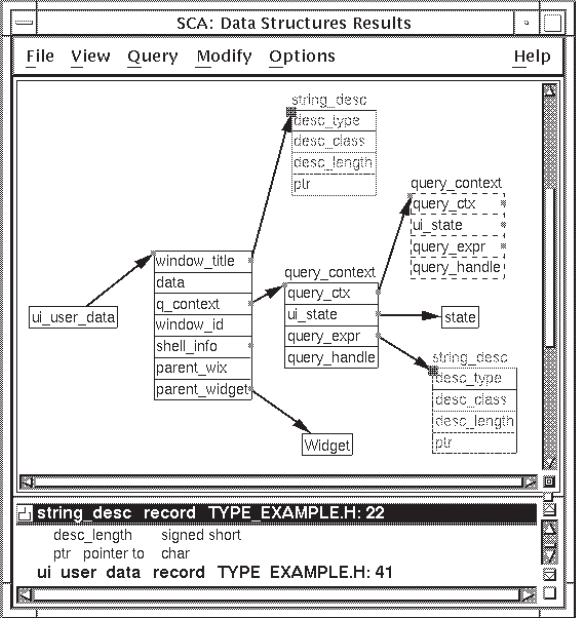
Click on MB3. A pop-up menu is displayed.
Choose the Remove Item(s) menu item. SCA removes both nodes for
string_desc.
Figure 4.18, ''Final Display'' shows the modified type tree.
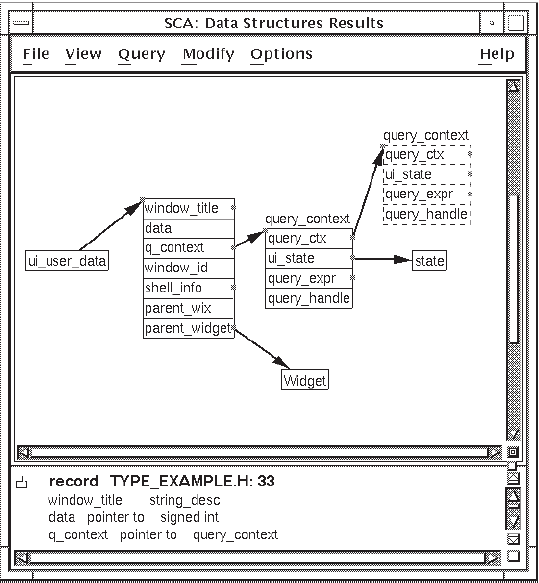
As with cross-reference or call graph queries, you can go to the source code by double clicking MB1 on a node in the display or item in the bottom window. You can also specify additional queries by choosing items from the Query pull-down menu. Choose Show Query Window to specify data structure queries. Choose Call Graphs or Cross Reference to specify call graph and cross-reference queries, respectively.
4.4. Modifying the Current Query
When you display the query window for cross references, call graphs, or data structures, SCA provides several options that affect the query result. By default, SCA creates a new query each time you enter a query specification and the new query is added to the query list (see Section 4.5, ''Using Multiple Queries''). You also have the option to modify the current query instead of creating a new query.
By modifying the current query, you use previous query results to build a new result. The following sections explain how to do this.
4.4.1. Keeping Items from the Previous Query Result
From the Cross Reference Query window, when you click MB1 on the Keep items from
previous result option, SCA keeps the results from the previous query that match the
new selection attributes. For example, if you ask SCA to cross reference the symbol
build* then modify your query to show only declarations of
build*, SCA will update the result to keep only the matching
items.
Figure 4.19, ''Keeping Items from the Results'' shows the query specification and result.
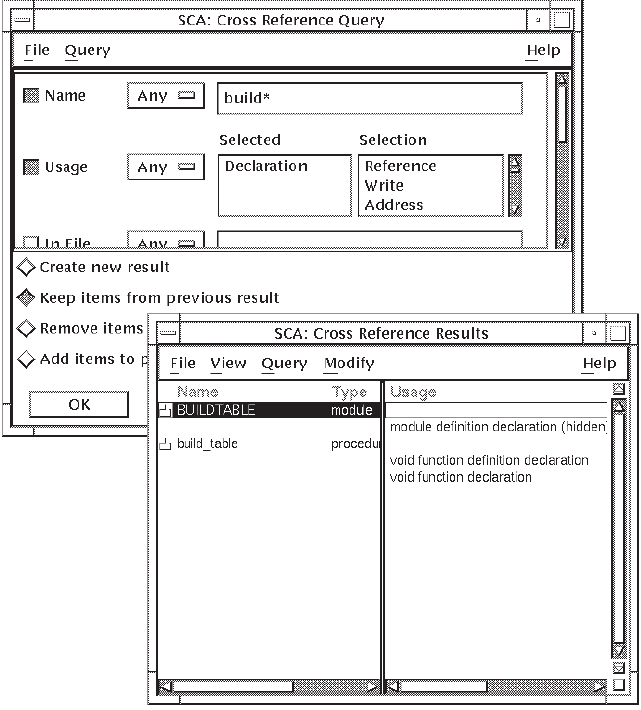
4.4.2. Removing Items from the Previous Query Result
build* and you do not want to see module declarations.
To remove that information from the previous result, do the following:From the Cross Reference Query window, revise your query by selecting Module for the Type query attribute. (Note that in the previous example you specified Name =
build*and Usage = Declaration.)Choose the Remove items from previous result option.
Click on Apply.
SCA removes the module declaration from the result, as shown in Figure 4.20, ''Removing Items from the Results''.
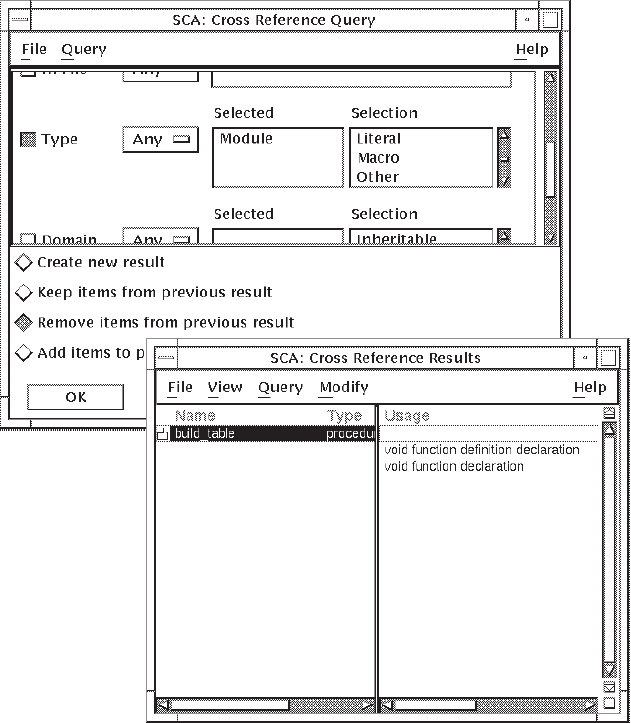
4.4.3. Adding Items to the Previous Query Result
copy_file. To continue the current query and ask SCA to add that
information to the current query results, do the following: Press the Reset button to clear the query window.
Enter
copy_fileas the Name query attribute.Choose the Add items to previous result option.
Click on Apply.
SCA adds information about copy_file to the previous results(see
Figure 4.21, ''Adding Items to the Results'').
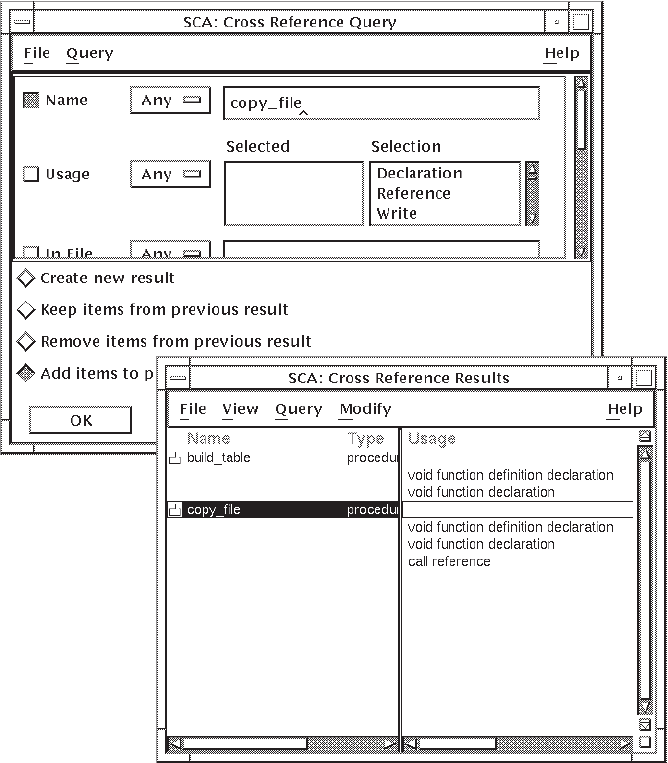
In the previous examples, you performed several steps but modified the same query. SCA shows this as one query in the query result list.
4.5. Using Multiple Queries
SCA provides a multiple query feature that enables you to maintain more than one query session at a time. This feature maximizes the use of SCA by enabling you to perform simultaneous source investigations.
For example, when you issue a query command, a new query session is created. If, during a session, you go to the source of an occurrence and find a symbol that you want to investigate before returning to your last query, you can issue a new query about the symbol. After the inquiries in your new session are completed, you can then go back to your previous session by issuing a PREVIOUS QUERY command.
Current query defines the last query command issued as the target of a GOTO QUERY, NEXT QUERY, or PREVIOUS QUERY command. If no query command has been issued during the current editing session, there is no current query. Using one of the query commands (FIND, INSPECT, GOTO QUERY, NEXT QUERY,PREVIOUS QUERY) reestablishes a query as the current query.
You can also display all the queries you have made during an SCA session by issuing the SHOW QUERY command. The one marked with asterisks (*) indicates the current query.
From any query or query result window, you can access this list and select a previously defined query. From there, you can modify this query and get additional information.
The following sections describe how to navigate to previous queries and select them for use. In addition, you are shown how to delete unwanted queries from the query list.
4.5.1. Moving to the Next or Previous Query
SCA provides a way to navigate to the previous or next query in the query list.
LSE>NEXT QUERY
The NEXT QUERY command moves forward through the query sessions in their order of creation. The window is remapped to the buffer associated with the next query session. If there is no next query session, the previous query session is used.
LSE>PREVIOUS QUERY
The PREVIOUS QUERY command moves backward through the query sessions in the reverse order of their creation. The window is remapped to the buffer associated with the previous query session. If there is no previous query session, the next query session is used.
For DECwindows, from the Query window or Results window, pull down the Query menu and choose the Previous or Next menu item. SCA displays the query specification or result for that query.
4.5.2. Navigating Through the List of Queries
After you create several queries, you might want to see a list of those queries and select a query for modification or deletion, or look at the query results again. The following sections describe how to access and select from the query list.
4.5.2.1. Accessing the Query List
The GOTO QUERY command moves the cursor to the specified query session. The
command has the following form: GOTO QUERY name
LSE>GOTO QUERY 1
The GOTO QUERY command causes the query number specified by the name parameter to become the current query session and maps the buffer associated with that query session.
From a Query window or a Results window, pull down the Query menu.
Choose the List … menu item.
The Query List dialog box is displayed. Figure 4.22, ''Query List Dialog Box''shows the Query List dialog box with a list of queries.
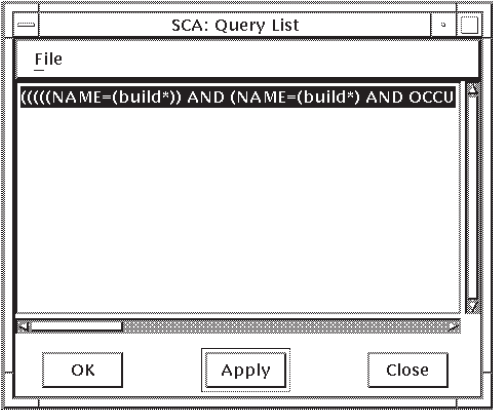
4.5.2.2. Selecting from the Query List
To select a query from the query list, position the pointer on a query and click on MB1. When you click on OK or Apply in the Query List dialog box, or double click on a query, the selected query becomes the current query, which you can modify or delete.
4.5.3. Saving Queries
Use the SAVE QUERY command to save queries made during an SCA session into a command file. The saved query can then be read into any SCA session by using the @file-specification command.
The SAVE QUERY command saves a query session. The command has the following form:
SAVE QUERY [query-name,...] /OUTPUT=output-file-specification
/PREFIX=name-prefix /QUALIFIERS=find-command-qualifiers
LSE>SAVE QUERY
/OUTPUT=output-file-specification – Specifies an output file name and overrides the default QUERY.COM.
/PREFIX=name-prefix – Adds the specified prefix to all query names. Use this qualifier to make sure query names are unique.
/QUALIFIERS=find-command-qualifiers – Used to specify FIND command qualifiers that will be added to each saved query.
For more details, including a full example, see the SAVE QUERY description in the Command Dictionary section of the VSI DECset for OpenVMS Language-Sensitive Editor/Source Code Analyzer Reference Manual.
4.5.4. Deleting Queries
As your list of queries grows, you might want to delete unneeded queries. The SCA delete operation always deletes the current query (the query currently displayed on the screen). You can set the current query by using Previous or Next, or the query list (see Section 4.5.1, ''Moving to the Next or Previous Query'' and Section 4.5.2, ''Navigating Through the List of Queries'').
The DELETE QUERY command deletes a query session. The command has the following
form: DELETE QUERY [name]
LSE>DELETE QUERY 1
The DELETE QUERY command deletes the specified query session. If no name is specified, the current query session is deleted. If the current query session is deleted, no current query exists.
Pull down the Query menu.
Choose the Delete menu item.
SCA deletes the query. If there are more queries, the next query in the list becomes the current query.
4.6. Modifying the Display Options
SCA lets you modify the View menu defaults for displaying the results of Call Graph and Data Structure queries. These changes stay in effect for the current SCA session.
Pull down the View menu from the Call Graph Query Result window.
Choose the Compact Tree menu item.
You can also use the View menu to change the compacted call graph to vertical instead of horizontal.
However, you might prefer your result graphs to always display in a compacted, vertical form. SCA lets you change the View menu defaults so the Compact Tree and Vertical menu items become the defaults.
Pull down the Options menu from the Call Graph Results window.
Choose the View menu item. The Customize Views dialog box is displayed, as shown in Figure 4.23, ''Customize Views Dialog Box''.
Click MB1 on Compact Tree, then click MB1 on Vertical.
Click on OK.
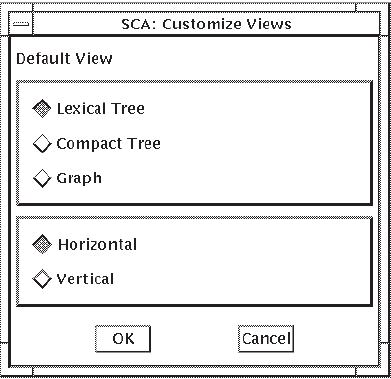
When SCA displays the results of a subsequent call graph or data structure,it will automatically compact the tree and show it vertically. When you pull down the View menu from the Call Graph Results window, these menu items will appear as the defaults (grayed out in the list). Changing the default does not affect the appearance of call graphs that already exist.
Chapter 5. Using LSE and SCA to Design Programs
This chapter provides a scenario of how you can generate a detailed program design. This is only a guideline that takes you through the stages of generating a detailed design.
In addition, this chapter describes how to create and process the design. It also shows how to evolve an implementation from this design, and shows how to reverse-engineer the implementation to retrieve a design corresponding to the original.
Introducing detailed program design
Using LSE to create the design
Using the OpenVMS compilers and SCA to process the design
Analyzing designs
Storing design information in tagged comments and defining new tags and keyword lists
Generating design reports
Reverse-engineering designs
5.1. Introduction
Use traditional programming languages.
Embed design information in comments.
Write algorithms with pseudocode placeholders.
The language you use for your implementation can be your Program Design Language.
Once written, you can process and analyze designs to produce a variety of design reports. You can reverse-engineer existing code to create a design report that describes the design of the code as actually implemented.
Specification of module organization
Global interfaces
Global data and data types
Outlines of crucial algorithms
Because design is an ongoing, iterative process, there are no rules for determining when a design is complete, or for which pieces of a design must be specified. In the OpenVMS environment, designs consist of one or more modules, in one or more of the available languages. Within each module, there is great flexibility concerning how much must be fully specified and how much can be left as pseudocode. Customer-written compilers, and even some obsolescent VSI compilers, might not support the /DESIGN qualifier. Refer to the specific compiler's documentation to determine whether it supports the entering of design information.
5.2. Creating Designs
When you create a design for a single module that contains two routines, such a design is likely to identify some general information about the module, such as name, purpose, global data, design issues, and so on. Similarly, it will identify the routines, their purposes, basic algorithms, and possibly parameters, return values, and other design information.
Invoke LSE to create a new Ada file.
LSE creates a file containing the single placeholder {compilation_unit}.
Expand the placeholder and choose the package body.
Expand the header comment and start filling it in.
– ++– FACILITY:–  –
         Sample facility 1–  – ABSTRACT:–  –
      This package is a sample package used to illustrate the way you–
      use LSE and SCA to create a detailed design.–  – AUTHORS:–  –
      Dave Ang---- CREATION DATE: 2 July 1998---- DESIGN ISSUES:----
      This is a sample design. There is one module, which contains two–
      routines and one global data declaration.----
      To illustrate the various levels of design that are possible, you –
      can expand one of the routines in some detail, while leaving the other–
      routine at a very abstract level.---- KEYWORDS:----
      Examples, sample design---- MODIFICATION HISTORY:---- –[context_clause]...{package_body}
This example shows how you can use comment tags for design information. Most tags contain ordinary text that describes specific pieces of the design. Here, keyword tags are used to express relationships and associations. The keyword tag FACILITY indicates that this module is part of Sample facility 1. In addition, the keyword tag KEYWORDS is used to associate the terms examples and sample design with this module.
If you establish appropriate conventions for such tags, you can use SCA for queries such as "find all packages that belong to a particular facility" or "find all packages that have to do with examples." For any given project, there will probably be tags that are specific to that project. Section 5.5.2, ''Adding New Tags and Keyword Lists'' describes how to add new tags.
Type declaration
Function body declaration
Procedure body declaration
package body first_module is
    type {identifier} ([discriminant_part]) is {type_definition};
    function function_1 ([formal_part]) return {type_mark} is
    – [function_header_comment]
        [declarative_part]
    begin
        [statement]...
        return {expression};
    [exception_part]
    end function_1;
    procedure procedure_2 ([formal_part]) is
    – [procedure_header_comment]
        [declarative_part]
    begin
        {statement}...
    [exception_part]
    end procedure_2;
begin
    {statement}...
end first_module;
The next section shows how to expand these placeholders to obtain useful routine designs.
5.2.1. Designing Routine Declarations
To create designs for individual routines, you expand LSE placeholders as necessary. Use tags and pseudocode placeholders to contain design information that is still at an abstract level, and use actual language constructs for those portions of the algorithm that are known.
    function function_1 (
        P1 : in P1_type;
        P2 : in P2_type := null_P2)
            return integer is
    – ++
    – FUNCTIONAL DESCRIPTION:
    –
    –      This function computes the integer function of the P1, with
    –  or without P2s.
    –
    – FORMAL PARAMETERS:
    –
    –      P1:
    –
    –          The P1 whose function we want.
    –
    –      P2:
    –
    –          The P2 to involve with the P1.
    –
    – RETURN VALUE:
    –
    –      The computed function.
    –
    – ALGORITHM:
    –
    –      Use the regular function algorithm if the P2 is
    –      present, and use Murphy's function algorithm if
    –      it isn't.
    –
    – [logical properties]
    –
    – [optional subprogram tags]
    – –
        [declarative_part]
    begin
        [statement]...
        return {expression};
    [exception_part]
    end function_1;
Much of the calling sequence has been specified. This information is useful to people who use this function. Thus far, this example shows how you can use the ALGORITHM tag to describe the top layer of the algorithm in ordinary English. Later, you can use pseudocode to describe the algorithm. Other placeholders are left in place, because they will also be expanded as work progresses.
To complete the algorithm design, use the ENTER PSEUDOCODE command to write the algorithm design.
partial_function, –Used to store the partial
– results from Murphy's algorithm
final_function : integer; – Used to store the final result
begin
if the P2 is present then  Use the standard algorithm
  else
Use Murphy's algorithm
final_function :=
fix_partial_function(partial_function);
else
Use Murphy's algorithm
final_function :=
fix_partial_function(partial_function);  end if;
[statement]...
end if;
[statement]...  return final_function;
end function_1;
return final_function;
end function_1;
| Use pseudocode as the conditional expression in the if statement. |
| Use pseudocode to represent the entire body of the then clause of the statement. |
| Show a procedure call. The procedure specification (not shown) must also be present for Ada to recognize this procedure call. Subsequently, you will be able to use SCA to get information about calls to this routine, including this call. |
| Contain an ordinary LSE placeholder. You can use placeholders as part of a design in any context in which they normally appear. In this example, the [statement]... placeholder remains as a convenience because the algorithm is not yet complete. |
5.2.2. Refining the Design
As the design is refined, more details can be filled in. To preserve the original design information, use the ENTER COMMENT command. This applies both during the low-level design phase and during the implementation phase.
        if P2 /= null_P2 then
       – the P2 is present
            – Use the standard algorithm
            [loop_identifier]: loop
                Calculate function iteratively from P2
            end loop;
            {tbs}
        else
            Use Murphy's algorithm
            final_function := fix_partial_function(partial_function);
        end if;
| The ENTER COMMENT/LINE command is used to move the pseudocode for the if statement over to the right, before writing the actual condition. |
| The ENTER COMMENT/BLOCK comment is used to turn the pseudocode placeholder into a block comment before writing the first statement,which is a loop statement. The ENTER COMMENT/BLOCK command produces the {tbs} placeholder. |
5.2.3. Designing Data Declarations
    type record_type is
         record
            count : integer := 0;
            record_name : string({discrete_range}...);
            subfield_1 : A type suitable for subfield 1;
            subfield 2, which has property x
            [component_declaration]...
            [variant_part]
        end record;
    shared_array : array ({discrete_range}...) of record_type;
| LSE generates the placeholder discrete_range. |
| Show a pseudocode placeholder. This is created using the ENTER PSEUDOCODE command, and then typing the contents. |
| Show a pseudocode placeholder, which describes the next field of the record in general terms. |
The contents of a pseudocode placeholder typically has whatever information is available to describe the object. The level of detail and the nature of the information varies from design to design.
Whenever possible, it is preferable to fill in as much detail of the design as possible in the native language.
    type record_type is
        a complicated record definition;
Although this format might seem to have the same information, it actually suppresses information that could be parsed by the compiler and entered in your SCA database. For instance, in this case, the compiler does not recognize the type definition as a record definition and will not be able to do as much design checking later. This would make subsequent review of your design more difficult. Of course, if the nature of the high-level design makes it improper to make decisions, such as the names of the fields, it might be appropriate to use the natural language description in pseudocode. The choice depends upon the particular goals of the low-level design.
5.3. Processing Designs
Once there is a partial or complete design, you can process the design by using an OpenVMS compiler and the VSI Source Code Analyzer.
[NO]COMMENT
This tells the compiler to search inside comments for program design information.
[NO]PLACEHOLDERS
This tells the compiler to recognize placeholders as valid program syntax.
$ADA first_module/DESIGN=(COMMENT,PLACEHOLDERS)/ANALYSIS_DATA
$ADA first_module/DESIGN/ANALYSIS_DATA
5.3.1. Loading Design Information into an SCA Library
To load analysis data files created with the /DESIGN qualifier into an SCA library, use the SCA LOAD command. From the point of view of SCA, there is no difference between an analysis data file containing design information and one containing pure code. If a design evolves directly into an implementation, you can use the same arrangement of libraries during design as during implementation.
$SCA SET LIBRARY [user.code.sca_library],[project.code.sca_library], - [user.design.sca_library],[project.design.sca_library]
You can choose a naming convention at the module level to distinguish between the design of a module and its code. This is necessary because SCA allows only one module of a given name in any virtual library; any other modules are occluded.
You can switch back and forth, using the VSI Source Code Analyzer SETLIBRARY command.
5.4. Analyzing Designs
Once the analysis data files from a design are loaded into an SCA library, you can use SCA queries to retrieve information, as with any other SCA library. There are a number of symbol classes defined by SCA specifically for design information, such as keyword, placeholder, and tag. To get the indicated design information, you use these classes with the SYMBOL= construct.
$SCA FIND CONTAINED_BY(SYMBOL=routine, 'interface' AND -SYMBOL=KEYWORD, DEPTH=1)
5.5. Expressing Design Information in Comments
You can capture much of a detailed design by using pseudocode placeholders;however, a significant amount of information is expressed using tagged comments. With LSE, you can easily enter tagged comments into your programs. The templates for LSE include a standard set of comment tags. In addition, you can change these tags or add new tags.
Scans the contents of comments
Parses tags and their values
Inserts relevant data about those comments into the SCA analysis file
This information can then be retrieved by SCA and matched with corresponding identifiers, such as routine names that appear in the code, and used to generate design reports.
5.5.1. Using Tagged Comments
Tagged comments are based on a simple structure. Each comment is treated as a sequence of (tag, tag value) pairs. You define tags in LSE and save the definitions in an LSE environment file, which is read by the compiler. Default tags are in the LSE$SYSTEM_ENVIRONMENT file,where they are also available to compilers. There are several types of tags, and the value of the tag is parsed differently depending on the tag type. There are also a number of special case tags, each of which begins with a dollar sign ($).
As the compiler scans comments, it groups the comments into comment blocks. Comment blocks are separated either by code(any visible text that is not contained in a comment) or by a totally blank line (any blank line that is not contained in a comment). Within each comment block, the compiler scans the text of the comment line by line, looking for tags. To be recognized, the tag must be the first text on the line of the comment, not counting the comment delimiters. Furthermore, the tag must either be the only text on the line, or the tag must be terminated by a colon or hyphen. Anything after the tag, either on the same line or on subsequent lines, forms the value of the tag, up to but not including the next tag found.
There are three types of tags: text, keyword, and structured.
Text tags contain ordinary text and are the most common type of tag. No further processing or special scanning is done on the value of a text tag.
Keyword tags contain a list of zero or more keywords used to flag sections of code. Any given keyword tag can be defined to accept keywords from a predefined list, which in turn is defined with the DEFINE KEYWORD command, or can take arbitrary keywords. In either case, keywords are separated by commas, and can contain space characters. The keywords are scanned by the compiler, and each keyword is stored in the SCA analysis file, making subsequent retrieval easy.
Each subtag must be preceded by a blank comment line.
The subtag must be indented at least as much as the structured tag to which it belongs.
The subtag must be terminated by a colon or hyphen.
It must be preceded by a blank comment line.
- One of the following must hold:
Indented less than the previous subtag and less than or equal to the indentation of the previous tag
Terminated with a punctuation character different from the one used to terminate the last subtag
Two implicit tags are defined for all languages. These are the $UNTAGGED tag and the $REMARK tag. The $UNTAGGED tag refers to any comment text that occurs at the beginning of a comment block, before the first tag of the comment block is found.
     function function_1 (...)
     –
     – This function computes the integer function of the P1,
     – with or without P2s.
     –
     – FORMAL PARAMETERS:
     ...
The text This function computes the integer ... would be the value of the $UNTAGGED tag, because no tag name precedes it in the comment block.
     v1,
             – remark for v1
     v2,
             – remark for v2
     ...
     vN :INTEGER;
    – remark for vN
5.5.2. Adding New Tags and Keyword Lists
You can use user-defined tags to represent various kinds of design information. To define new tags, use the DEFINE TAG and DEFINE KEYWORDS commands. To save tag definitions in an environment file, use the SAVE ENVIRONMENT command. To tell the compiler about the tag definitions, define the logical name LSE$ENVIRONMENT to include the environment file (LSE$ENVIRONMENT can be a search list). Then these tags are available when compiling programs with the /DESIGN qualifier.
DEFINE TAG requirements/TYPE=KEYWORD/KEYWORDS=requirement_list/LANGUAGE=ADA
DEFINE KEYWORDS requirement_list
    "Requirement 1"
    "Requirement 2"
    "Requirement 3"
END DEFINELSE>SAVE ENVIRONMENT/NEW MYDISK:[MYDIRECTORY]MYTAGS
$DEFINE LSE$ENVIRONMENT MYDISK:[MYDIRECTORY]MYTAGS.ENV
You can now use the /DESIGN qualifier to compile your program.
5.5.3. Associating Tags with Objects
You can use tagged comments to associate design information with objects in your program. They are meaningful only when used in conjunction with declarations. Tagged comments that occur in executable portions of your code, where there are no adjacent declarations, are not used for design reports.
        FIND CONTAINED_BY ( -
                R1 AND SYMBOL=ROUTINE, -
                "FUNCTIONAL DESCRIPTION" AND SYMBOL=TAG, -
1)The $REMARK tag is always contained inside another tag, typically inside the $UNTAGGED tag. Hence it will be at DEPTH=2.
Subtags of structured tags are contained inside the structured tag. Therefore, subtags will be at DEPTH=2 with respect to the associated object,and DEPTH=1 with respect to the structured tag that contains the subtags.
Because the SCA containment functions can be slow for depths greater than 1, use only DEPTH=2 when necessary, that is, when you know that you are in one of these situations.
Sometimes tagged comments are not strictly nested inside a declaration. For example, a common formatting style for the C programming language is to put the comment block for a function in front of the function declaration. A strict interpretation of containment would imply that the function declaration does not contain the comment block. To solve this problem, SCA implicitly extends the lexical range of definitions so they include comment blocks that are adjacent to those definitions.
SCA generally looks for the closest declaration immediately adjacent to the comment block. If the code fragments on both sides of the comment block are not part of declarations, no comment association is done by SCA. In that case, the comment is contained in whatever outer-level declaration contains the comment, if any.
        int x;
        /* This comment describes a variable */
int y; int x;
/* This comment describes a variable */
int y; int x;
/* This comment describes a variable */
int y;This results in the comment being associated with y.
If you leave an ambiguous situation in your code, SCA uses the setting of the/COMMENT=(ASSOCIATED_IDENTIFIER=keyword) qualifier on the LSE command DEFINELANGUAGE. (See the entry for DEFINE LANGUAGE in the VSI DECset for OpenVMS Language-Sensitive Editor/Source Code Analyzer Reference Manual for more details on the syntax of this qualifier.)
The ASSOCIATED_IDENTIFIER=keyword qualifier is subtle. SCA does not use the current value of the qualifier when you run SCA from within LSE. Rather, when you use the /DESIGN=COMMENTS qualifier to compile your source program, the compiler uses your LSE$ENVIRONMENT file and the LSE$SYSTEM_ENVIRONMENT file to determine the setting of the /COMMENT=(ASSOCIATED_IDENTIFIER=keyword) qualifier. That setting is stored in your .ANA file. SCA performs the comment association, using that setting, at the time you load the file into the SCA library. If you want to change the setting of that qualifier, you must change the setting in LSE, save a new LSE environment file, recompile your program, and load the new .ANA file into SCA.
5.6. Generating Design Reports
In addition to getting information directly from SCA queries, you can produce a variety of reports based upon your design in your SCA database. Typically,reports cover all or a designated part of your SCA database and present information in a structured, organized way. You must have both LSE and SCA on your system to generate reports.
You generate reports with the SCA command REPORT. The REPORT command requires both SCA and LSE because the reports are actually implemented in underlying code common to LSE and SCA. This code is installed as part of LSE, not with SCA.
5.6.1. Using Design Report Formats
LSE>REPORT report_name
HELP – An OpenVMS Help file generated from your design or code
PACKAGE – An LSE package definition
INTERNALS – A general report that describes your entire design in an organized manner
2167A_DESIGN – A report that produces a document that meets the requirements of the U.S. Defense Department's DOD-STD-2167A Software Design Document
The output of the REPORT command is typically not in its final state. For example, HELP reports must be loaded by the OpenVMS librarian into a help library, and PACKAGE reports must be executed by LSE to produce package definitions. With INTERNALS and 2167A reports, you can produce reports that can be read in three different ways: directly, with DECdocument, or with VSI Standard Runoff. You get more power by using either DECdocument or VSI Standard Runoff.
Because reports typically perform many SCA queries over your SCA library, they can be time-consuming. For this reason, VSI recommends that you use the REPORT command from batch jobs. However, when customizing reports, use a small SCA library for testing purposes. You must debug these reports by executing them from within LSE, and by using TPU features to help with your debugging.
You make reports work by building an SCA query that represents the files in your system. To extract the data for the report, it steps through the files one at a time and steps through the routines within each file one at a time. Most of the data in reports is taken directly from the appropriate comment tags in your program. Certain significant data is based on properties of your code,such as the parameters to a routine. Reports are designed to accept a variety of synonymous tags for specific sections of reports. For example, the FORMALPARAMETERS and FORMAL ARGUMENTS tags are treated as synonyms.
The reports provided by VSI use tags that are included in the system environment file supplied with LSE. You can use the SHOW TAGS command to show the tags for a particular language.
An important convention followed by these tags is that the tags that are applicable for an entire file or module are distinct from the tags that are applicable for a single subroutine. For example, the ABSTRACT tag describes a module, whereas the FUNCTIONAL DESCRIPTION tag describes a subroutine or function. This convention makes it easier for the report tool to distinguish between the two levels of tag information.
Because there are so many tags, not all of them are actually used by reports, so the reports do not become unwieldy. You can customize reports to include tags of interest to you, and you can add new tags in addition to the tags supplied by VSI.
FIND SYMBOL=FILE AND OCCURRENCE=COMMAND_LINE
Determine an SCA query that represents the specific files.
Perform the query and give it a name by using the FIND/NAME command.
Use the query name as the domain for the report.
    FIND/NAME=myquery -
        *matrix* AND SYMBOL=FILE AND OCCURRENCE=COMMAND_LINE
    REPORT/DOMAIN=myquery report_name
Reports are driven by the source files, and this limits the ability of the reports to present information that is not explicit in your source files. For example, if a routine declaration or comment block crosses a file boundary by including another file, the report can behave unpredictably. In addition, declarations that are generated by macros or preprocessors are not processed by the reports provided by VSI. Declarations that occur in precompiled files, such as Pascal environment files, will show up in the report for the precompiled file—not for the source files that use the precompiled file.
An additional restriction is that your SCA library must reflect the current state of your source files. Otherwise, the report tool will be unable to locate the tags in your source files. In many cases, you can customize reports to solve particular problems of this nature.
5.6.2. Creating Online HELP
The HELP report produces an .HLP file, suitable for loading by the OpenVMS Librarian into a standard OpenVMS help library. See the OpenVMS Command Definition, Librarian, and Message Utilities Manual for information on help libraries. The default output file name for the HELP report is HELP.HLP. You can change this by using the /OUTPUT qualifier on the REPORT command to specify a different file name.
The HELP report recognizes the HELP and HLP target types, both of which result in .HLP files. Because this is the default, there is no need to specify the /TARGET qualifier when using the HELP report supplied by VSI, unless you have added customizations for different targets.
For each file in the domain, the HELP report creates a top-level entry for the file. The help information for that entry is taken verbatim from the module description tag for the file. (The tags MODULE DESCRIPTION, PROGRAM DESCRIPTION, PACKAGE DESCRIPTION, and ABSTRACT are considered synonyms for this purpose.) Then, for each routine in the file, a level 2 entry is created. Again, the help text is taken from a tag (in this case, the FUNCTIONAL DESCRIPTION tag) for the routine. Finally, level 3 entries are created for the parameters of the routine, with the text from the comment associated with the parameter or the text from the appropriate subtag of the FORMAL PARAMETERS tag used as the help text. (The tags FORMAL PARAMETERS, FORMAL ARGUMENTS,PARAMETERS, and ARGUMENTS are considered synonyms.)
The /FILL qualifier is not meaningful for the HELP report. All output text in the help report is copied verbatim from tags in your program, with no filling or justification.
5.6.3. Creating LSE Package Definitions
The PACKAGE report produces an .LSE file, suitable for execution by LSE to define LSE packages for your program. The default output file name for the PACKAGE report is PACKAGE.LSE. You can change this by using the /OUTPUT qualifier on the REPORT command to specify a different file name.
The PACKAGE report recognizes only the LSE target type. Because this is the default, there is no need to specify the /TARGET qualifier when using the PACKAGE report.
For each file in the domain, the PACKAGE report creates an LSE DEFINEPACKAGE command. It then generates a DEFINE ROUTINE command for each routine in the file and DEFINE PARAMETER commands, as appropriate. The description string on the DEFINE ROUTINE command is the $REMARK string associated with the routine. The /TOPIC string for the DEFINE PACKAGE command is the name of the package, whereas the /TOPIC string for each DEFINE ROUTINE is the name of the routine.
The PACKAGE report uses two additional qualifiers. The /HELP_LIBRARY qualifier specifies the name of the help library to use for the DEFINE PACKAGE commands created by the report. The /LANGUAGES qualifier specifies the languages to use for the DEFINE PACKAGE command.
The /FILL qualifier is not meaningful for the package report.
5.6.4. Creating INTERNALS Reports
The INTERNALS report is a comprehensive report on the design of your system, on a module-by-module, routine-by-routine basis. The INTERNALS report extracts information from tags contained in comments to describe the various aspects of your program. For example, information under the FUNCTIONAL DESCRIPTION tag is used to describe each routine, whereas information under the RETURN VALUE tag is used to describe the return value of each routine. The INTERNALS report also uses the LSE overview mechanism to present the code of each routine in a structured, top-down way.
DOCUMENT – This is the default target. This outputs an .SDML file suitable for processing by DECdocument.
RUNOFF – This outputs an .RNO file suitable for processing by VSI Standard Runoff (DSR).
TEXT – This outputs a .TXT file that you can read directly.
SCA>REPORT INTERNALS/TARGET=DOCUMENT
$DOCUMENT INTERNALS.SDML SOFTWARE.REFERENCE destination
The /FILL qualifier is important for INTERNALS reports. In cases where text tags are copied into the report, the /FILL qualifier determines whether the text will be filled. Use /NOFILL if your comments typically contain tables or other formatted output that should not be filled.
Description of the file or module, taken from the ABSTRACT or MODULE DESCRIPTION tags
Sections that describe the global objects of the module, such as imported variables and exported variables
A section on each routine
The format of each routine section is similar to the format of routines in the VMS Run-Time Library Routines Volume. That is, each routine section has a title, a brief description of the routine (taken from the $REMARK tag for the routine), a sample invocation, a more complete description (taken from the FUNCTIONAL DESCRIPTION tag), sections for the other tags in the comment block for the routine, and the body of the routine.
The body of the routine is presented in a top-down, hierarchical fashion, using overviews to hide details at the upper layers, and proceeding until the entire body has been produced. For each overview placeholder that appears in the body, there is a cross-reference number (white-on-black callout for DECdocument output; boldface for RUNOFF output) to the expansion corresponding to that placeholder. An example of the output for a routine in the INTERNALS report is presented in Section 5.7.1, ''Sample Report''.
5.6.5. Creating 2167A Software Design Reports
Use the DECdocument <INCLUDE> or <ELEMENT> tags for DECdocument reports.
Use the .REQUIRE directive for VSI Standard Runoff (DSR) reports.
Manually merge the output of the report tool with other text for text reports.
    2167A_PROFILE.SDML
    2167A_PROFILE.RNO
The PROFILE files use the appropriate commands to include the lower-level files in the report. This examples directory also contains stub files for each of those lower-level files. Typically, you create the chapters, other than the requirements chapter, manually or you use some other design tool.
$SCA REPORT 2167A_DESIGN
The PROFILE files use 2167A_DESIGN as the name of the file to include as Section 4 of the report. If you change the output file name by specifying the /OUTPUT qualifier on the REPORT command, you must also change the PROFILE file to correspond to the new file name.
5.6.5.1. Describing 2167A Structure in your Code
The specifications for the DOD-STD-2167A Software Design Report call for a hierarchy of program elements. A design is separated into COMPONENTS,which can be further separated into sublevel COMPONENTS, or into UNITS. UNITS are the lowest level of entity described in the design. The design facility allows you to use tagged comments to represent this structure in your code.
The mapping implemented by the 2167A_DESIGN report treats the individual files in your system as the UNITS of the 2167A design. You specify design information relevant to each unit by including the information in a comment block in the source file corresponding to that unit. Because 2167A COMPONENTS are collections of units and other components, the 2167A_DESIGN report maps sets of files into components. However, it would be redundant to duplicate all the design information at the component level in each file of the component. Instead, select one file as the main design file of the component and put the design information there. The other files in the component contain a single tag that names the component to which they belong.
UNIT OF
COMPONENT
COMPONENT OF
The UNIT OF tag is used in each unit (each file of your system) and names the component to which the file belongs.
The COMPONENT tag is used only in those files that you have designated as the design file for specific components; the tag names the component that the file specifies.
File: TOP_LEVEL_COMPONENT_.ADA
    –  COMPONENT: Top level component
    –  ABSTRACT: This is the top level component in a system.
    –  [additional tags that describe the design of the component]
    package top_level_component is
    – This can be an empty package, or it might contain data that is used
    – throughout the component, or perhaps data exported by the component,
    – or even an entire unit.
    end top_level_component
    File: SUB_LEVEL_COMPONENT_.ADA
    –  COMPONENT: Sub-level component
    –  COMPONENT OF: Top level component
    –  ABSTRACT: This is a lower-level component in a system. Note that the
    –  value of the COMPONENT OF tag in this file must be spelled exactly
    –  the same as the value of the COMPONENT tag in the parent component.
    –  [additional tags that describe the design of the component]
    –
    –  UNIT OF: Sub-level component
    –  UNIT DESCRIPTION: For the purposes of this example, we assume that
    –  this file contains a complete unit. Therefore, it must also have the
    –  UNIT OF tag, even though the component has already been named in the
    –  COMPONENT tag.
    –  [additional tags that describe the design of the unit]
    –  package sub_level_component
    package sub_level_component is
    procedure ...
    function ...
    [other declarations]
    end sub_level_component
File: UNIT_1_.ADA
    –  UNIT OF: top_level_component
    –  UNIT DESCRIPTION:  This is a simple unit that belongs to the
    –  top_level_component.
    –  [additional tags that describe the design of the unit]
    package unit_1 is
    function ...
    end unit_1
    –  UNIT OF: sub_level_component
    –  UNIT DESCRIPTION:  This is another simple unit that belongs to the
    –  sub_level_component.
    –  [additional tags that describe the design of the unit]
    package unit_2 is
    function ...
end unit_2- To set your SCA library to be SCA$2167A, enter the following command:
$SCA SET LIBRARY SCA$2167A - To create a report, enter the following command:
$SCA REPORT 2167A_DESIGN/OUTPUT=mydir:2167a_design
- Copy the SDML files from SCA$2167A into your directory, as follows:
$COPY SCA$2167A:*.SDML mydir: - Define 2167A_DESIGN to point at the version you just generated, as follows:
$DEFINE 2167A_DESIGN mydir:2167a_design.sdml - Invoke DECdocument with a destination_type recognized by DECdocument, such as POSTSCRIPT, or LINE, as follows:
$DOCUMENT 2167A_PROFILE MILSPEC destination_type
5.6.5.2. Retrieving 2167A Structure Information
SCA>FIND COMPONENT AND SYMBOL=TAG
     CONTAINED_BY ( -
         END = "UNIT OF" AND SYMBOL=TAG, -
         BEGIN = "Component 1" AND SYMBOL=KEYWORD, -
         DEPTH = 1)
Similarly, you can use queries on the COMPONENT OF tag to find sublevel components of a given component.
    CONTAINED_BY( -
        END = "COMPONENT", -
        BEGIN = SYMBOL=KEYWORD, -
        DEPTH = 1, -
RESULT = BEGIN) CONTAINED_BY( -
END = "UNIT OF", -
BEGIN = component_name AND SYMBOL=KEYWORD, -
DEPTH = 1, -
RESULT = BEGIN),This returns the UNITS that belong to this component. For each such unit,the corresponding unit subsection is written.
  TAGS FOR COMPONENT INFORMATION:
     Tag:                         Description of corresponding section:
         INPUT/OUTPUT DATA
             Input and output data for the component
  ALGORITHMS                      Algorithms used by the component
  ERROR HANDLING                  Error detection/recovery features
  DATA CONVERSION                 Data conversions done by the component
  LOGIC FLOW                      Logic flow of the component
  REQUIREMENTS ALLOCATION         Requirements satisfied by this component
      TAGS FOR UNIT INFORMATION:
      Tag:                        Description of corresponding section:
  INPUT/OUTPUT DATA ELEMENTS      Input and output data for the unit
  LOCAL DATA ELEMENTS             Data used only in this unit
  INTERRUPTS AND SIGNALS          Interrupts/signals handled by this unit
  UNIT ALGORITHMS                 Algorithms used by this unit
  UNIT ERROR HANDLING             Error detection/recovery for the unit
  UNIT DATA CONVERSION            Data conversions done by unit
  USE OF OTHER ELEMENTS           Other elements used by this unit
  UNIT LOGIC FLOW                 Logic flow of the unit
  DATA STRUCTURES                 Data structures implemented by unit
  LOCAL DATA FILES                Data files or databases used by unit
  LOCAL DATABASES                 Same as LOCAL DATA FILES
  LIMITATIONS                     Limitations of the unit
  REQUIREMENTS ALLOCATED TO
  THIS UNIT
                                  Requirements satisfied by this unit
For Ada programs, these tags can be put into your comment headers automatically by expanding the 2167A placeholder in the header comment for the file.
Because the exact mapping between elements of your program and 2167A items is highly dependent on your particular application and policies, the 2167A report as supplied by VSI makes no attempt to use program elements (packages, routines, and so on). All information in the report is obtained from tags. It is, however, possible to customize reports to use information from your program elements. It is also possible to change the mapping of UNITS to files and COMPONENTS to sets of files. It is expected that you will want to use a text editor to do at least some customization of the 2167A report.
5.7. Reverse-Engineering a Design
function matrix_multiply (left, right : in integer_matrix)
    return integer_matrix is
– ++
– FUNCTIONAL DESCRIPTION:
–     This function computes the matrix product of two integer matrices.
–     It uses a simple, triple-nested loop, and does not do any checking to
–     see if the matrices conform.
– FORMAL PARAMETERS:
–       left:
–          The left operand.
–       right:
–          The right operand.
– FUNCTION VALUE:
–
–          The result of multiplying the two matrices.
– –
    result_matrix :
        integer_matrix(left'range,right'range(2));
            := (others => (others => 0));
begin
    – Loop over the rows of the left matrix
    outer_loop: for i in left'range loop
        – loop over the columns of the right matrix
        middle_loop: for j in right'range(2) loop
            – compute the inner product of the current row and column
            inner_loop: for k in left'range(2) loop
                result_matrix(i,j)
                    := result_matrix (i,j) + left(i,k) * right(k,j);
            end loop inner_loop;
        end loop middle_loop;
    end loop outer_loop;
    return result_matrix;
end matrix_multiply;
5.7.1. Sample Report
LSE>REPORT INTERNALS
The report might include a routine section similar to that on the following pages.
matrix_multiply
matrix_multiply — This function computes the matrix product of two integer matrices.
Format
result := matrix_multiply left, right
Returns
The result of multiplying the two matrices
Arguments
left
The left operand
right
The right operand
Description
This function computes the matrix product of two integer matrices.
It uses a simple, triple-nested loop, and does not do any checking to see if the matrices conform.
Body
The report is generated with numbered callout tags representing levels of hierarchy in the output. In this example, tag 1 is the top level, the first tag 2 is a pseudocode comment reflecting the fact that a section of code has been collapsed into this code, and the second tag 2 is the expanded code from the first tag 2.