DECwindows Motif for OpenVMS Management Guide
- Software Version:
- DECwindows Motif for OpenVMS Version 1.7F
- Operating System and Version:
- VSI OpenVMS IA-64 Version 8.4-1H1 or higher
VSI OpenVMS Alpha Version 8.4-2L1 or higher
Preface
1. About VSI
VMS Software, Inc. (VSI) is an independent software company licensed by Hewlett Packard Enterprise to develop and support the OpenVMS operating system.
2. Intended Audience
This manual is intended for experienced OpenVMS system administrators who need to manage and customize the VSI DECwindows Motif for OpenVMS (VSI DECwindows Motif for OpenVMS) software on clustered or standalone systems on the OpenVMS I64 or OpenVMS Alpha platform.
3. Document Structure
Chapter 1, "System Overview" provides an overview of the VSI DECwindows Motif for OpenVMS architecture and describes the various components.
Chapter 2, "Starting DECwindows Motif" describes the VSI DECwindows Motif for OpenVMS startup process and explains how to customize and tune the startup command procedure.
Chapter 3, "Configuring the Display Server" explains how to configure the X display server using symbols to customize such things as server process behavior, device setup, font setup, backing store, extensions, and error reporting. This chapter also includes examples for setting server access control, specifying alternate methods of transport, enabling font and proxy servers, and configuring multihead displays.
Chapter 4, "Using DECwindows" describes the client login procedure and explains how to customize the Session Manager environment. This includes descriptions of how to specify and manage the access control method used by client applications, specify an alternate logo, create dedicated accounts, and customize print formats.
Appendix A, "Tuning the DECwindows System" lists the recommended minimum settings for UAF limits and system parameters on OpenVMS systems. It also contains tuning recommendations for non-VGA configurations.
Appendix B, "DECwindows Motif Keymap Names" contains a list of all the keymaps supported by VSI DECwindows Motif for OpenVMS. This appendix is arranged alphabetically by name and grouped by the language for which each keyboard is designed.
4. VSI Encourages Your Comments
You may send comments or suggestions regarding this manual or any VSI document by sending electronic mail to the following Internet address: <docinfo@vmssoftware.com>. Users who have VSI OpenVMS support contracts through VSI can contact <support@vmssoftware.com> for help with this product.
5. OpenVMS Documentation
The full VSI OpenVMS documentation set can be found on the VMS Software Documentation webpage at https://docs.vmssoftware.com.
6. Conventions
VMScluster systems are now referred to as OpenVMS Cluster systems. Unless otherwise specified, references to OpenVMS Cluster systems or clusters in this document are synonymous with VMScluster systems.
The contents of the display examples for some utility commands described in this manual may differ slightly from the actual output provided by these commands on your system. However, when the behavior of a command differs significantly between OpenVMS Alpha and Integrity servers, that behavior is described in text and rendered, as appropriate, in separate examples.
In this manual, every use of DECwindows and DECwindows Motif refers to DECwindows Motif for OpenVMS software.
| Convention | Meaning |
|---|---|
|
Ctrl/ x |
A sequence such as Ctrl/ x indicates that you must hold down the key labeled Ctrl while you press another key or a pointing device button. |
|
PF1 x |
A sequence such as PF1 x indicates that you must first press and release the key labeled PF1 and then press and release another key or a pointing device button. |
|
Return |
In examples, a key name enclosed in a box indicates that you press a key on the keyboard. (In text, a key name is not enclosed in a box.) |
|
… |
A horizontal ellipsis in examples indicates one of the
following possibilities:
|
|
. . . |
A vertical ellipsis indicates the omission of items from a code example or command format; the items are omitted because they are not important to the topic being discussed. |
|
( ) |
In command format descriptions, parentheses indicate that you must enclose the options in parentheses if you choose more than one. |
|
[ ] |
In command format descriptions, brackets indicate optional choices. You can choose one or more items or no items. Do not type the brackets on the command line. However, you must include the brackets in the syntax for OpenVMS directory specifications and for a substring specification in an assignment statement. |
|
[ |] |
In command format descriptions, vertical bars separate choices within brackets or braces. Within brackets, the choices are options; within braces, at least one choice is required. Do not type the vertical bars on the command line. |
|
{ } |
In command format descriptions, braces indicate required choices; you must choose at least one of the items listed. Do not type the braces on the command line. |
|
bold text |
This typeface represents the introduction of a new term. It also represents the name of an argument, an attribute, or a reason. |
|
italic text |
Italic text indicates important information, complete titles of manuals, or variables. Variables include information that varies in system output (Internal error number), in command lines (/PRODUCER= name), and in command parameters in text (where dd represents the predefined code for the device type). |
|
UPPERCASE TEXT |
Uppercase text indicates a command, the name of a routine, the name of a file, or the abbreviation for a system privilege. |
|
|
Monospace type indicates code examples and interactive screen displays. In the C programming language, monospace type in text identifies the following elements: keywords, the names of independently compiled external functions and files, syntax summaries, and references to variables or identifiers introduced in an example. |
|
- |
A hyphen at the end of a command format description, command line, or code line indicates that the command or statement continues on the following line. |
|
numbers |
All numbers in text are assumed to be decimal unless otherwise noted. Nondecimal radixes—binary, octal, or hexadecimal—are explicitly indicated. |
Chapter 1. System Overview
The VSI DECwindows Motif for OpenVMS processing model and basic system architecture
Optional font and proxy server configurations
Components of the client and X display server software
1.1. The DECwindows Client/Server Processing Model
The VSI DECwindows Motif for OpenVMS software follows a client/server processing model, where the server is a single-shared process that performs operations at the request of many client processes.
Figure 1.1, ''DECwindows System Architecture: Basic'' illustrates the basic VSI DECwindows Motif for OpenVMS client/display server architecture.
In most client/server relationships, the client system is located on the desktop, while the server system resides across the network. With VSI DECwindows Motif for OpenVMS, as in all X Window System environments, the server system resides on the desktop and displays graphics onscreen.
1.1.1. The Client
The client is a process, such as a desktop application or X Window System utility, that issues X protocol requests. For example, in the VSI DECwindows Motif for OpenVMS environment, desktop applications (such as DECterm) and X Window System utilities (such as xlsfonts) are the clients that interact with the X display server.
The client controls what appears on the display server system and generates the graphic interface with which the user interacts.
1.1.2. The Transport
In the DECwindows architecture, as with most client/server processing models, the client and display server may reside on separate systems. These systems are connected to each other by a network transport that is essentially transparent to the user.
The transport is responsible only for transferring data between the client and server systems—it does not alter the data in any way.
Local (shared memory)
Local Area Transport (LAT)
DECnet
TCP/IP using either the Internet Protocol Version 4 (IPv4) or Internet Protocol Version 6 (IPv6) host name and address format
The client and server each maintain and manage their own interface to the network transport.
1.1.3. The Display Server
The display server enables client applications to interact with supported devices in a consistent manner. The display server manages the physical graphics display and perhipheral devices on behalf of the client applications. It receives X protocol requests from client applications through the transport layer and performs the functions required to fulfill the request for a specific device.
Essentially, the server converts data that represents the request into commands that can be executed by the appropriate graphics device. When a user enters application data with an input device (such as a mouse, keyboard, or touchpad), the display server receives input from the device drivers and passes protocol packets back through the transport layer(s) to X Library (Xlib) and X Toolkit Intrinsics (Xt) routines.
In order to communicate successfully, settings such as the access control method, communication protocol, and host name format must be compatible between the client and display server.
1.2. Optional Server Configurations
The basic system architecture can be extended to include other types of servers, as described in the following sections.
1.2.1. The Font Server
The X display server includes a font renderer that supports the use of one or more font servers to access font files distributed on systems other than the one on which the display server is running. Communication between the display and font servers uses the X Font Server (FS) protocol.
Figure 1.2, ''DECwindows System Architecture: Font Server'' illustrates the VSI DECwindows Motif for OpenVMS architecture with a font server added.
1.2.2. The Proxy Server
The proxy server appears to clients as any other X server. The proxy server accepts connection requests from a client and acts as an intermediary between the client and the X server. Communication between the proxy server and client uses the standard X protocol. Communication between the proxy and the X server uses the Low-Bandwidth X (LBX) protocol.
LBX is designed for those configurations where the display server is separated from the client by a slow speed line, such as a 56K dial-in modem or a wide-area network (WAN). When the X protocol was developed, it was used primarily over local area networks (LANs) and was not optimized for low-speed connections. LBX addresses this shortcoming by using a compression and caching scheme designed to minimize the data flow between the client and display server.
Figure 1.3, ''DECwindows System Architecture: Proxy Server'' illustrates the VSI DECwindows Motif for OpenVMS server architecture with a proxy server added.
Optionally, the proxy server can be managed by a proxy manager application. Clients applications provide the requested X display server to the proxy manager. The manager, in turn, either finds the appropriate existing proxy server or starts a new instance of the proxy server automatically.
1.3. VSI DECwindows Motif for OpenVMS Components
This section lists the client components that comprise the VSI DECwindows Motif for OpenVMS layered product software and the display server and common components that are bundled with the OpenVMS operating system.
1.3.1. Layered Product Components
Desktop applications
X Window System utilities
Session management utilities
- Programming libraries
- X Library (Xlib)
- X Toolkit Intrinsics (Xt)
- OSF/Motif toolkit (Xm)
- VSI Extensions to Motif (DXm)
- Inter-Client Exchange (ICE) and X Session Management (XSMP)
- Extensions
Examples and sample widgets
1.3.2. Operating System Components
- X display server – Consists of the following shareable images:
- Main entry-point stub
- Device-independent server (DIX) image
- Device-dependent server (DDX) images
- Dynamically-loadable extensions
The main image and DIX image are linked together. During initialization, depending on which graphics devices are available and have been selected, the DDX images are activated dynamically. The loadable extensions are activated dynamically either during initialization of the operating system or at first use.
Transport interface – Consists of a single common image and a collection of transport-specific images.
The common transport image is built into the display server. Based on the transport initialization parameters, the required transport-specific images are activated dynamically.
Device drivers – The DECwindows display server uses two types of drivers: input and graphics/video.
- Data files – The display server references the following types of data files:
- X authority and access lists (control access to a server system)
- Font (contain detailed font descriptions)
- Keymap (define how keyboard keys are interpreted)
- Color database (define how color names and RGB values are associated)
Chapter 2. Starting DECwindows Motif
This chapter describes the DECwindows system startup process, which begins when the first DECwindows startup command file executes and continues until the DECwindows Start Session dialog box is displayed.
Understanding the startup procedure
Using the DECW$STARTUP.COM procedure
System startup considerations
2.1. Understanding the Startup Procedure
This section describes the VSI DECwindows Motif for OpenVMS startup process. Figure 2.1, ''DECwindows Startup Command Procedure Flow'' illustrates the startup sequence from when the VSI DECwindows Motif for OpenVMS startup command procedure, DECW$STARTUP, is invoked.
Note that some procedures are optional. For example, DECW$STARTI18N is only invoked if OpenVMS Internationalization (I18N) kit has been installed. These optional procedures appear shaded in the following diagram.
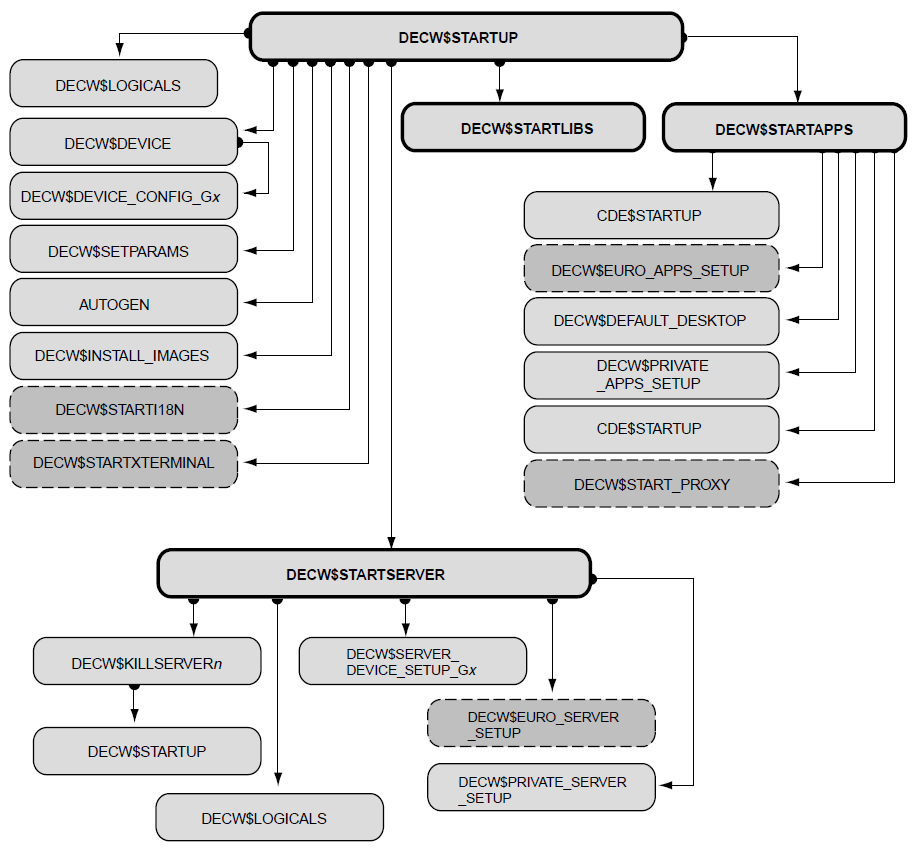
DECW$LOGICALS.COM: Creates the DECW$LOGICAL_NAMES table. DECwindows application startup and configuration parameters are defined during this step. The DECW$SYSCOMMON logical is also defined, which enables individual systems to override cluster-wide settings for data files (such as keymap and font files).
DECW$DEVICE.COM: Loads and configures the DECwindows device drivers. This procedure also defines the symbols used in subsequent phases of the DECwindows startup sequence. Before loading the specific device drivers, it executes the INIT portion of the DECW$PRIVATE_SERVER_SETUP file (if it exists), which allows systems to override automatic device selection.
It then sets the symbol DECW$DEVICE, which contains a list of the graphics devices available to the display server. DECW$DEVICE.COM uses this list to invoke the device-specific configuration procedures, DECW$DEVICE_CONFIG_G
x, (wherexrepresents the device type identifier, such as Z for GZA0).DECW$SETPARAMS.COM: Sets the required system parameter values. This procedure sets the appropriate values for system parameters required during DECwindows startup.
If one or more parameters are not set correctly, a list of parameters that need to be modified is displayed. The DECW$STARTUP.COM procedure asks if the user wants to run AUTOGEN. If you invoked DECW$STARTUP.COM with the RESTART parameter, the question displays on the system console.
If you answer NO to this question, DECW$STARTUP.COM displays a message stating that DECwindows cannot start until the system parameters are modified and exits. If you answer YES, DECW$STARTUP.COM runs AUTOGEN from the GETDATA phase to REBOOT. This modifies system parameters and then reboots system.
To bypass the system parameter check, define the logical name DECW$IGNORE_AUTOGEN before running DECW$STARTUP.COM (see Table 2.2, ''System Logicals'').
- DECW$INSTALL_IMAGES.COM: Loads the system and transport shareable images. By default, the following shareable images are installed in SYS$SHARE on startup:
- DECW$XPORT_SERVICES.EXE (memory resident)
- DECW$LCNLIBSHR.EXE (memory resident)
- DECW$XPORT_PTHREAD.EXE
- DECW$TRANSPORT_COMMON.EXE (memory resident)
- DECW$TRANSPORT_DECNET.EXE
- DECW$TRANSPORT_LOCAL.EXE
- DECW$TRANSPORT_TCPIP.EXE
- DECW$SECURITY.EXE
- DECW$SETSHODIS.EXE
- DECW$SETSHODISSHR.EXE (memory resident)
- DECW$XAUSHR.EXE (memory resident)
- DECW$TRANSPORT_LAT.EXE
- DECW$STARTI18N.COM: Sets the language locale (optional). If the I18N option was chosen during DECwindows installation, the following functions are performed at system startup:
Creates the language-specific directories.
Specifies default system language.
Modifies system logicals and default to reflect the appropriate language-specific directory specification.
Runs the country-specific startup procedure, DECW$STARTI18N_
xx_xx.COM, wherexx_xxrepresents the language locale (such as, FR_FR).
- DECW$STARTXTERMINAL.COM: Installs support for X terminal emulators (optional). If the logical DECW$INSTALL_XTERMINAL has been defined in the system startup procedure, the following functions are performed:
Provides client support using the LAT transport.
Adds XTDRIVER as class driver for Xlib to communicate to the LT driver.
Installs DECW$TRANSPORT_LAT.EXE.
Provides font file sharing through the DECW$FD process.
Runs the font daemon process as a detached process.
Installs the DECnet access gateway server image with SYSNAM privileges.
- DECW$STARTSERVER.COM: Starts the DECwindows display server. This procedure performs the following:
Handles the RESTART option to the DECW$STARTUP procedure. If RESTART is selected, a command file named DECW$KILLSERVERn.COM is created and executed as a detached process with the process name "Server n Restart". This procedure stops the current server process and executes DECW$STARTUP.COM with P1 set to null.
Writes progress to a startup log file, SYS$MANAGER:DECW$STARTUP_
n.LOG, and purges previous logs according to the value specified by the DECW$KEEPLIMIT logical. The default value is 2.Creates the server-specific logical name table DECW$SERVER
n_TABLE.Executes the file SYS$MANAGER:DECW$EURO_SERVER_SETUP.COM, if the euro option was chosen at installation time. This changes the default paths for font and keymap files to euro-enabled files.
Invokes the server customization file DECW$PRIVATE_SERVER_SETUP.COM. See Section 3.1, ''Customizing the DECwindows Display Server'' for information about how to customize the display server.
Populates the server-specific logical name table based on symbols defined in DECW$DEVICE.COM, DECW$PRIVATE_SERVER_SETUP.COM, and DECW$EURO_SERVER_SETUP.COM (if it exists).
Checks for and starts the font server, if it has been defined.
Purges previous versions of the server error log file DECW$SERVER_n_ERROR.LOG.
Checks for the symbol DECW$SERVER_DUMP that indicates whether the server saves a process dump file when a server crash occurs. Setting this logical also disables the server's condition handler.
Checks for user-specified server process parameters. See Section 3.1.2.1, ''Server Process'' for a list of server process parameters that you can modify.
- Determines the server executable name. Normally this is SYS$SYSTEM:DECW$SERVER_MAIN.EXE. An alternative server image executes if:
The logical DECW$SERVER_MAIN is defined to point to an alternative server executable file.
A file exists with the name SYS$SYSTEM:DECW$SERVER_MAIN_xx.EXE, where xx are the first two letters of the primary graphics device defined by the symbol DECW$DEVICE.
Note that an alternate server image is executed only for bug fixes and special hardware releases.
Runs the display server image as a detached process using the device name and process parameter information collected.
- DECW$STARTLIBS.COM: Loads and configures the client and shared libraries. This procedure performs the following:
Defines DECwindows logicals.
Installs Xlib, Xt, and other shared libraries.
Connects the WSDRIVER for the DCL command SET DISPLAY.
DECW$STARTAPPS.COM: Establishes the user application development environment. This procedure also creates a WSAn: device in executive mode and creates a Start Session dialog box. If you have created the customization command files DECW$PRIVATE_APPS_SETUP.COM and DECW$EURO_APPS_SETUP.COM (if the euro option has been installed), they are invoked here. Use this file to customize the login sequence. See Section 4.4, ''Customizing the Startup Environment'' for information about how to customize application startup.
2.2. Using the DECW$STARTUP.COM Procedure
During system startup to invoke DECwindows Motif.
By a privileged user to restart the display server, if required.
By a privileged user to start the DECwindows server, libraries, or applications. "Starting" the libraries, for example, consists of defining logicals and installing images.
|
P1 Value |
Invokes... |
|---|---|
|
" " (null) |
The full startup process |
|
RESTART |
SYS$MANAGER:DECW$STARTSERVER.COM |
|
I18N |
SYS$MANAGER:DECW$STARTI18N.COM (if it exists) |
|
XTERMINAL |
SYS$STARTUP:DECW$STARTXTERMINAL.COM (if it exists) |
|
SERVER |
SYS$MANAGER:DECW$STARTSERVER.COM |
|
LIBS |
SYS$MANAGER:DECW$STARTLIBS.COM |
|
APPS |
SYS$MANAGER:DECW$STARTAPPS.COM |
2.3. System Startup Considerations
The following sections describe actions you may want to take prior to invoking the VSI DECwindows Motif for OpenVMS system startup procedure.
2.3.1. Defining DECwindows System Logicals
Before starting DECwindows, you may want to make changes or add logicals to the system startup file, SYSTARTUP_VMS.COM, which is located in the SYS$MANAGER directory.
|
Logical Name |
Meaning |
|---|---|
|
DECW$DEFAULT_TRANSPORT |
Set the default transport used by the initial workstation display device at the start of a DECwindows session. |
|
DECW$IGNORE_AUTOGEN |
Do not verify SYSGEN parameters. |
|
DECW$IGNORE_DECWINDOWS |
Do not start up DECwindows. |
|
DECW$IGNORE_SHARE_ADDRESS |
Do not install images resident or with shared address data. |
|
DECW$IGNORE_SUBPROCESS |
Do not spawn as a subprocess. |
|
DECW$IGNORE_WORKSTATION |
Do not perform workstation-specific startup. |
|
DECW$INSTALL_TCPIP |
Include server support for the TCP/IP transport. |
|
DECW$PARAMS_BEFORE_DEVICE |
Check SYSGEN parameters before determining the display devices. |
|
DECW$SETDISPLAY_DEFAULT_TRANSPORT |
Set the default transport used by the DCL command SET DISPLAY/CREATE. |
|
DECW$USEXLIBPG4 |
Use the Xlib C Run-Time Library (C RTL) locale functions. |
|
OPC$OPA0_ENABLE |
Send broadcast messages to the operator console (OPA0:). |
2.3.2. Adjusting System Parameters
Caution
Parameter values set in SYS$SYSTEM:MODPARAMS.DAT override all other settings. Setting values in this file may prevent DECwindows Motif from starting.
To optimize system performance and use of physical memory, many DECwindows images are installed as resident (with shared address data) during system startup.
$ @SYS$MANAGER:DECW$STARTUP
%INSTALL-I-NONRES, image installed ignoring '/RESIDENT' DISK$ALPHA:
<SYS0.SYSCOMMON.SYSLIB>DECW$XPORT_SERVICES.EXE
-INSTALL-E-NOGHREG, insufficient memory in the code or data granularity hint region
%INSTALL-I-NONRES, image installed ignoring '/RESIDENT' DISK$ALPHA:
<SYS0.SYSCOMMON.SYSLIB>DECW$LCNLIBSHR.EXE
-INSTALL-E-NOGHREG, insufficient memory in the code or data granularity hint region
%INSTALL-I-NONRES, image installed ignoring '/RESIDENT' DISK$ALPHA:
<SYS0.SYSCOMMON.SYSLIB>DECW$TRANSPORT_COMMON.EXE
-INSTALL-E-NOGHREG, insufficient memory in the code or data granularity hint region
.
.
.
These messages indicate that there is not enough memory in the granularity hints region to install the images as resident. As a result, the images are installed nonresident, without shared address data. These messages are not critical; however, the performance of these images may be affected, particularly during activation.
If these messages are displayed at startup, increase the value of one or more of the GH_* system parameters, such as GHRSRVPGCNT, and restart VSI DECwindows Motif for OpenVMS to ensure that resident images are installed successfully.
Chapter 3. Configuring the Display Server
Customizing the display server, which describes how to use the DECW$PRIVATE_SERVER_SETUP file and lists the available customization parameters
Specifying network transports
Establishing access control
Setting up a multihead system
Changing the default keyboard layout
Specifying new fonts
Setting up an LBX proxy server
3.1. Customizing the DECwindows Display Server
This section describes how to change the default behavior of the DECwindows display server using server customization parameters. It describes the available parameters and how to set them on cluster-common and standalone systems.
3.1.1. Using the DECW$PRIVATE_SERVER_SETUP File
The DECW$PRIVATE_SERVER_SETUP.TEMPLATE file is located in the SYS$MANAGER directory. This template file contains the information that you need to customize your VSI DECwindows Motif for OpenVMS display server environment.
When the display server is started, it looks in the logical name table (DECW$SERVER n_TABLE) for logical names that can override the default characteristics. The logical name table is created and populated during the DECwindows startup process, as described in Chapter 2, "Starting DECwindows Motif". For each parameter defined in the DECW$PRIVATE_SERVER_SETUP.COM file, the startup procedure creates a logical name in the display-server logical name table.
Some parameters are used only during the startup procedure and do not have a matching logical name in the display server logical name table. These parameters either identify system parameters to be used in starting the display server process or are used in combination with other parameters to obtain the value of a logical name to be added to the display server logical name table.
If the display server does not find a logical name in its private logical name table, it looks in the system logical name table. Use the DCL command DEFINE/SYSTEM in the DECW$PRIVATE_SERVER_SETUP.COM file to define logicals for those functions that are supported but do not have an associated parameter in the version of OpenVMS that you are using.
3.1.2. The Display Server Customization Parameters
|
Parameter |
Type |
Default Value |
Range |
|---|---|---|---|
|
DECW$CLIENT_ERROR_THRESHOLD |
Integer |
1 | |
|
DECW$CURSOR_SIZE |
Integer |
32 | 16,32 |
|
DECW$DEFAULT_KEYBOARD_MAP |
String |
NORTH_AMERICAN_LK401AA | |
|
DECW$DEVICE |
String list | ||
|
DECW$FONT_SERVERS |
String list | ||
|
DECW$IPV6_FONT_SUPPORT |
String | ||
|
DECW$KEYMAP |
String | ||
|
DECW$MONITOR_DENSITY |
Integer list |
100 | |
|
DECW$PRIMARY_DEVICE |
String | ||
|
DECW$RGBPATH |
String |
SYS$MANAGER:DECW$RGB.DAT | |
|
DECW$SECURITY_POLICY |
String | ||
|
DECW$SERVER_ACCESS_TRUSTED |
String |
SYS$MANAGER:DECW$SERVER_ACCESS_TRUSTED.DAT | |
|
DECW$SERVER_ACCESS_ALLOWED |
String |
SYS$MANAGER:DECW$SERVER_ACCESS_ALLOWED.DAT | |
|
DECW$SERVER_AUDIT_LEVEL |
Integer |
0 | 0,1,2,4 |
|
DECW$SERVER_BELL_BASE_VOLUME |
Integer |
50 | 0...100 |
|
DECW$SERVER_BUG_COMPATIBILITY |
Boolean |
True | |
|
DECW$SERVER_DEFAULT_BACKING_STORE |
Integer |
0 | 0...2 |
|
DECW$SERVER_DEFAULT_VISUAL_CLASS |
Integer |
Device dependent | 0...5 |
|
DECW$SERVER_DENSITY |
Integer |
100 | 75,100 |
|
DECW$SERVER_DISABLE_BACKING_STORE |
Boolean |
False | |
|
DECW$SERVER_DISABLE_SAVE_UNDER |
Boolean |
False | |
|
DECW$SERVER_DISABLESCREEN |
Integer | 0...15 | |
|
DECW$SERVER_DISABLE_TEST |
Boolean |
False | |
|
DECW$SERVER_DUMP |
Boolean |
False | |
|
DECW$SERVER_EDGE_BOTTOM |
Integer list | ||
|
DECW$SERVER_EDGE_LEFT |
Integer list | ||
|
DECW$SERVER_EDGE_RIGHT |
Integer list | ||
|
DECW$SERVER_EDGE_TOP |
Integer list | ||
|
DECW$SERVER_ENABLE_ACCESSX |
Integer |
0 | 0,1 |
|
DECW$SERVER_ENABLE_KB_AUTOREPEAT |
Boolean |
True | |
|
DECW$SERVER_ENABLESCREEN |
Integer | 0...15 | |
|
DECW$SERVER_ENQUEUE_LIMIT |
Integer | ||
|
DECW$SERVER_ERROR_LOG_TO_KEEP |
Integer |
2 | |
|
DECW$SERVER_ERROR_THRESHOLD |
Integer |
10 | |
|
DECW$SERVER_EXTENSIONS |
String list |
XIE,DEC-XTRAP,MULTI-BUFFERING,SEC_XAG | |
|
DECW$SERVER_FILE_LIMIT |
Integer |
200 | |
|
DECW$SERVER_FONT_CACHE_SIZE |
Integer |
0 | |
|
DECW$SERVER_FONT_CACHE_UNIT |
Integer |
128 | |
|
DECW$SERVER_KEYCLICK_VOLUME |
Integer |
0 | 0...100 |
|
DECW$SERVER_KEY_REPEAT_DELAY |
Integer |
660 | 0...1000 |
|
DECW$SERVER_KEY_REPEAT_INTERVAL |
Integer |
40 | 0...1000 |
|
DECW$SERVER_MOUSE_ACCELERATION |
Integer |
2 |
0..2 |
|
DECW$SERVER_MOUSE_THRESHOLD |
Integer |
4 | |
|
DECW$SERVER_ONLYSCREEN |
Integer | 0...15 | |
|
DECW$SERVER_PAGE_FILE |
Integer | ||
|
DECW$SERVER_PRIORITY |
Integer |
6 | 1...15 |
|
DECW$SERVER_SCALE_BITMAP_FONTS |
Boolean |
False | |
|
DECW$SERVER_SCREENS |
String list | ||
|
DECW$SERVER_SCREEN_SAVER_INTERVAL |
Integer |
600 | |
|
DECW$SERVER_SCREEN_SAVER_PREFER_BLANKING |
Boolean |
True | |
|
DECW$SERVER_SCREEN_SAVER_TIMEOUT |
Integer |
600 | |
|
DECW$SERVER_TRANSPORTS |
String list | ||
|
DECW$SERVER_WSDEF |
Integer | ||
|
DECW$SERVER_WSEXTENT |
Integer | ||
|
DECW$SERVER_WSQUOTA |
Integer | ||
|
DECW$SERVER_XAUTHORITY |
String | ||
|
DECW$SERVER_XKEYBOARD_COMPILED_DIR |
String |
SYS$COMMON: [SYS$KEYMAP.XKB .COMPILED] | |
|
DECW$SERVER_XKEYBOARD_DIRECTORY |
String |
DECW$SYSCOMMON: [SYS$KEYMAP.XKB] | |
|
DECW$SERVER_XKEYBOARD_LOAD_MAP |
Integer |
0 | 0,1 |
|
DECW$SERVER_XKEYBOARD_MAP |
String |
DIGITAL_US_LK201 | |
|
DECW$START_FONT_SERVER |
Boolean | False | |
|
DECW$XPORT_SYNC_TIMEOUT |
Integer |
30000 |
The following sections contain definitions and examples for all the parameters listed in Table 3.1, ''DECwindows Display Server Customization Parameters''.
3.1.2.1. Server Process
As part of the DECwindows startup process, the display server is invoked as a detached process. Normally, the default quotas assigned to the server process are sufficient. However, in some instances, certain parameters may need to be increased. By defining symbols in DECW$PRIVATE_SERVER_SETUP.COM, server process quotas can be adjusted.
High memory usage – This results from running applications that use many large pixmaps.
To adjust for a high memory-usage environment, increase the value assigned to DECW$SERVER_PAGE_FILE. This controls the PGFLQUOTA of the server process. Note that this parameter is limited by the VIRTUALPAGECNT system parameter and by the size of the system page file. In addition, you may consider increasing the values for DECW$SERVER_WSDEF and DECW$SERVER_WSQUOTA.
Concurrent use of many fonts – All font files that are referenced and for which font caching is enabled remain open until all of the client applications that reference those fonts are terminated.
To adjust for this situation, increase the value of DECW$SERVER_FILE_LIMIT. This value must be greater than the total number of fonts used by any set of concurrently active client applications.
Request-intensive applications – Some client applications send continuous requests that do not require a reply from the X display server. These requests can impact the processing time allocated to other applications. This can sometimes slow other applications, such as the Window Manager.
To improve response-time, adjust the priority of the display server process by changing the value of DECW$SERVER_PRIORITY.
Concurrent use of many applications – If a large number of client applications are connected to the same display server simultaneously, the network transport may require server additional resources.
For more information on tuning the DECwindows display server, see Appendix A, "Tuning the DECwindows System".
DECW$SERVER_PRIORITY
The DECW$SERVER_PRIORITY parameter controls the priority of the display server process. This parameter enables you to reduce the priority of the server process and improve system performance in request-intensive situations where response time is sluggish.
Estimate the optimal priority for the server process; valid values range from 1 (low) to 15 (high). For the best results, VSI recommends that you use a mid-range value of 4, 5, or 6 (default). Setting the priority too low can reduce the responsiveness of input devices (such as keyboard or mouse actions).
The following symbol definition assigns a priority of 4 to the DECwindows display server:
Example
$ DECW$SERVER_PRIORITY == "4"DECW$SERVER_WSDEF
This parameter defines the process limits (in pagelets) to be applied to the DECwindows display server process. DECW$SERVER_WSDEF values that are larger than the value of DECW$SERVER_WSQUOTA revert to the value of DECW$SERVER_WSQUOTA. For information about establishing working set sizes, see the Guide to OpenVMS Performance Management.
The following logical definition assigns a working set size of 5000 pagelets for the DECwindows display server:
Example
$ DEFINE DECW$SERVER_WSDEF 5000DECW$SERVER_WSQUOTA
This parameter defines the maximum amount of physical memory (working set) that can be allocated to the DECwindows server. For information about establishing working set sizes, see the Guide to OpenVMS Performance Management.
The following logical definition establishes the maximum number of pagelets allocated to the DECwindows server as 10000:
Example
$ DEFINE DECW$SERVER_WSQUOTA 10000DECW$SERVER_WSEXTENT
This parameter defines the absolute limit on physical memory that the DECwindows display server is to be allocated if the server requires more space than the DECW$SERVER_WSDEF value allots. The total number of pagelets allocated to the DECwindows server may exceed the value in DECW$SERVER_WSQUOTA (up to the value of DECW$SERVER_WSEXTENT if the additional pagelets are available). For information about establishing working set sizes, see the Guide to OpenVMS Performance Management.
The following logical definition allocates 20000 pagelets for the DECwindows server on an as-needed basis, not to exceed the value in DECW$SERVER_WSQUOTA:
Example
$ DEFINE DECW$SERVER_WSEXTENT 20000DECW$SERVER_PAGE_FILE
This parameter defines the maximum amount of virtual memory (in pagelets) that the DECwindows display server can use.
The following logical definition increases the size of the page file to 1000000 blocks:
Example
$ DEFINE DECW$SERVER_PAGE_FILE 1000000DECW$SERVER_FILE_LIMIT
This parameter defines the maximum number of files the server can open at onetime. It also represents the maximum number of concurrent client connections. The default is 200 files.
The following logical definition increases the maximum number of files the server can open to 275:
Example
$ DEFINE DECW$SERVER_FILE_LIMIT 275DECW$SERVER_ENQUEUE_LIMIT
This parameter defines the maximum number of outstanding locks that can be used in sharing resources, particularly files, between processes. The default is 512 locks.
The following logical definition doubles the default enqueue limit to 1024locks:
Example
$ DEFINE DECW$SERVER_ENQUEUE_LIMIT 10243.1.2.2. Extensions
A feature of all the X display servers is the ability to support server extensions. These extensions are additions to the X display server that interpret additional protocol requests and perform new or improved functions.
While some extensions are built-in and always enabled, some require activation through a parameter definition. OpenVMS display servers support dynamically-loaded extensions. These extensions are contained in separate shareable images and are activated on demand. The advantage of dynamically loaded extensions is that the resources required by an extension are not used unless the extension is used.
The display server requires that certain dynamic extensions be loaded at server initialization time. Use the symbol DECW$SERVER_EXTENSIONS to identify which extensions to load.
DECW$SERVER_EXTENSIONS
This parameter is used to define a list of extensions to load at server initialization. The parameter translates to a list of dynamically-loadable extension images (in addition to the built-in extensions).
|
Extension Name |
Parameter Value |
Description |
|---|---|---|
|
Digital 2D Extension |
D2DX |
Enhances server performance in 2D graphics environment. |
|
Digital Trapping Extension |
DEC-XTRAP? |
Performs event trapping and simulation. |
|
Low-Bandwidth X Extension |
LBX |
Enables Low-Bandwidth X proxy capabilities. |
|
X Double-Buffering Extension |
DBE |
Provides flicker-free windows and smooth animation. |
|
X Imaging Extension |
XIE ? |
Performs imaging operations locally. |
|
X Keyboard Extension |
XKB |
Enables use of X keymaps, keyboard compilers, and the Access X keyboard features for the movement impaired. |
|
X Multi-Buffering Extension |
MULTI-BUFFERING ? |
Enables multi-buffered windows for smooth animation. |
|
X Security and Application Group Extensions |
SEC_XAG ? |
Enables X security and application grouping capabilities. |
|
Xinerama Extension |
XINERAMA |
Enables configuration of multihead systems based on the XINERAMA protocol. |
|
Extension Name |
Parameter Value |
Description |
|---|---|---|
|
Big Requests |
BIG-REQUESTS |
Extends the length field of a protocol request to a 32-bit value. |
|
Colormap Utilization Policy |
TOG-CUP |
Provides colormap management policies to the display server. |
|
DEC-Server-Mgmt-Extension |
– |
Provides server management functions used exclusively by the Session Manager. |
|
Extended Visual Information |
EVI |
Enables a client to query the server for information about the core X visuals, such as colormap information or frame buffer levels. |
|
MIT Miscellaneious |
MIT-SUNDRY-NONSTANDARD |
Provides miscellaneous bug compatibility mode control. |
|
MIT Screen Saver |
MIT-SCREEN-SAVER |
Enables a client to be notified when the screen saver is activated or cycles. |
|
MIT Shared Memory |
MIT-SHM |
Enables shared memory, fast Put Image support. |
|
Non-Rectangular Window Shape |
SHAPE |
Enables non-rectangular windows. |
|
X Miscellaneous |
XC-MISC |
Allows previously-used resource ID ranges to be retrieved from the display server. |
|
X Synchronization |
SYNC |
Provides primitive calls that synchronize requests from multiple clients on different operating systems. |
|
X Test |
XTEST |
Provides simple event trapping and simulation capabilities. |
Note
To prevent server resource contention, some combinations of extensions should not be loaded on the same display server system. See the VSI DECwindows Motif for OpenVMS Release Notes for information on extension restrictions.
The following symbol definition specifies the range of server extensions to enable at startup:
Example
$ DECW$SERVER_EXTENSIONS == "XIE,DEC-XTRAP,XINERAMA,SEC_XAG,DBE"DECW$SERVER_DISABLE_TEST
This parameter controls whether test extensions, XTEST and DEC-XTRAP, are enabled. Valid values for this parameter are T (True-disable) or F (False-enable) The default value is F.
The following symbol definition disables all test extensions:
Example
$ DECW$SERVER_DISABLE_TEST == "T"3.1.2.3. Security
User-based access control using an authorized users list
Token-based access control using an X authority file and the Magic Cookie (MIT-MAGIC-COOKIE-1) or Kerberos (MIT-KERBEROS-5) protocol
Use of the Security extension (SECURITY)
Each of these methods provides additional means for defining which clients are authorized to connect to an X display server and what operations they can perform once connected. Use the parameters in this section to specify the location of the files used with these mechanisms (security policy, X authority, access allowed, and access trusted files).
See Section 3.3, ''Establishing Server Access Control'' for details on implementing an access control scheme for the display server.
DECW$SECURITY_POLICY
When using the Security extension, this parameter specifies the name of the security policy file. By default, no file is specified.
The following symbol definition specifies the security policy file SYS$MANAGER:DECW$SECURITY_POLICY.DAT:
Example
$ DECW$SECURITY_POLICY == "SYS$MANAGER:DECW$SECURITY_POLICY.DAT"DECW$SERVER_XAUTHORITY
This parameter specifies the name of the X authority file referenced by the display server. This file provides records used to authorize client connections to the server. By default, no file is specified. This allows access to the server from the local SYSTEM account (via DECnet or the Local transport)without requiring additional authentication from the client.
If a file is specified, the values from this file are loaded into the server and can be used by all client connections. To allow a normal login process to occur, trusted access must be explicitly granted using the DECW$SERVER_ACCESS_TRUSTED.DAT file.
Note that the settings in the X authority file specified by DECW$SERVER_XAUTHORITY apply to server connections made before a user logs into the DECwindows desktop. Once a user logs into the desktop, the user's X authority settings are applied.
The following symbol definition specifies the X authority file SYS$MANAGER:DECW$XAUTH.DAT:
Example
$ DECW$SERVER_XAUTHORITY == "SYS$MANAGER:DECW$XAUTH.DAT"DECW$SERVER_ACCESS_TRUSTED
This parameter specifies the name of the trusted access file. This file lists those clients who maintain trusted access to the server. The default file is SYS$MANAGER:DECW$SERVER_ACCESS_TRUSTED.DAT.
Note that the settings in the trusted access file specified by DECW$SERVER_ACCESS_TRUSTED apply to server connections made before a user logs into the DECwindows desktop. Once a user logs into the desktop, the user's access settings are applied.
The following symbol definition changes the trusted access file specification to DECW$SERVER1_ACCESS_TRUSTED.DAT:
Example
$ DECW$SERVER_ACCESS_TRUSTED == "SYS$MANAGER:DECW$SERVER1_ACCESS_TRUSTED.DAT"DECW$SERVER_ACCESS_ALLOWED
This parameter specifies the name of the access allowed file. This file lists those clients who are granted automatic access to the server without requiring additional authentication. The default file is SYS$MANAGER:DECW$SERVER_ACCESS_ALLOWED.DAT.
Note that the settings in the allowed access file specified by DECW$SERVER_ACCESS_ALLOWED apply to server connections made before a user logs into the DECwindows desktop. Once a user logs into the desktop, the user's access settings are applied.
The following symbol definition changes the allowed access file specification to DECW$SERVER1_ACCESS_ALLOWED.DAT:
Example
$ DECW$SERVER_ACCESS_ALLOWED == "SYS$MANAGER:DECW$SERVER1_ACCESS_ALLOWED.DAT"3.1.2.4. Devices
During startup, the DECwindows startup procedures attempt to identify and activate device-specific server components to manage all graphics devices of which the system is aware. You can use the symbols and logicals in this section to influence how many and which specific devices are used by the display server.
Additionally, there is some information that the server cannot obtain from a device or that you may want to override about the display device. For example, you may need to provide information about a special type of monitor with limited color capabilities or construct a multihead system, which is a system that consists of multiple monitors that function as a single, virtual display.
Simple configurations using the DECW$MULTI_HEAD parameter
Advanced configurations based on the Xinerama extension (XINERAMA) and parameters
The XINERAMA (formerly known as Panoramix) enables you to construct a multihead system and has multiple parameters to define and enable the screens in the display, control their order, and set the boundary and shape of the display.
By default, all screens in a multihead display are enabled. You can use DECW$SERVER_ONLYSCREEN, DECW$SERVER_DISABLESCREEN to remove one or more screens from the from the display. Disabled screens are not initialized and are not assigned a screen number.
For instructions on how to configure a multihead display, see Section 3.4, ''Setting Up a Multihead System''.
DECW$MULTI_HEAD
This parameter configures the system for multihead support. The DECW$MULTI_HEAD symbol is already set in the SYS$MANAGER:DECW$PRIVATE_SERVER_SETUP.TEMPLATE file.
To activate this parameter, copy the SYS$MANAGER:DECW$PRIVATE_SERVER_SETUP.TEMPLATE to DECW$PRIVATE_SERVER_SETUP.COM.
DECW$PRIMARY_DEVICE
The server uses this parameter to check for a device name by activating a
specific DECW$DEVICE_ xx.COM procedure, where
xx is the string supplied for the symbol. The following
symbol definition assigns GXA0 as the primary device:
Example
$ DECW$PRIMARY_DEVICE == "GXA0"DECW$DEVICE
This parameter allows you to identify those graphics devices that are used in a simple multihead configuration and specify their order. By default, the DECW$DEVICE values for will be determined based on the graphics devices installed on the system.
The following example shows a list of graphics devices to be controlled by one server, one mouse, and one keyboard:
Example
$ DECW$DEVICE == "GAA0,GAB0"DECW$DEFAULT_VISUAL_CLASS
- 0 = StaticGray
- 1 = GrayScale
- 2 = StaticColor
- 3 = PseudoColor
- 4 = TrueColor
- 5 = DirectColor
The default for a specific device type is dependent on the hardware and is typically PseudoColor for an 8-plane color board, and TrueColor for a 24-plane option. If you have a monochrome display, you can change the default visual class to GrayScale, which causes the system to convert colors to levels of gray. Output for GrayScale is on the green lead. You can assign multiple values to this parameter for each head in a multihead system.
The following symbol definition specifies PseudoColor on head 0, TrueColor on head 1, StaticGray on head 2:
Example
$ DECW$SEVER_DEFAULT_VISUAL_CLASS == "3,4,0"DECW$MONITOR_DENSITY
The monitor density defines the dots per inch (dpi) value of the monitor so that VSI DECwindows Motif for OpenVMS applications can determine the actual width of the screen.
The default value for the monitor density is the server density. Because few monitors are actually 75 or 100 dpi (the values used for DECW$SERVER_DENSITY with regard to font size), these values cannot be used to calculate accurately the actual width and length of items on the screen. By setting DECW$MONITOR_DENSITY to the actual value, you can obtain correct values for the width and height of the screen using Xlib routines.
Determine the pixel width of the screen.
Generally, the number of pixels is either 1024 or1280, depending on the graphics adapter on your system. You can use the X Display Information utility (xdpyinfo) to obtain the pixel width and height of the current display (see Section 3.1.5.2, ''Using the X Display Information Utility (xdpyinfo)'').
Measure across the visible portion of the screen (in inches).
Divide the pixel value by the screen value.
If you have a VRT19 monitor and SPX graphics, make this calculation:1280 pixels / 13.5 inches = 94.81 dpi
By rounding the dpi value to the nearest integer, assign 95 to DECW$MONITOR_DENSITY, as shown in the following example:
Example
$ DECW$MONITOR_DENSITY == "95"Note
Setting different values for the monitor density and the server density can cause display problems because you cannot scale the 75- and 100-dpi fonts to match the actual monitor density.
DECW$MONITOR_DENSITY can be set on a per-monitor basis. The following example shows how to set the monitor densities for a dual-head workstation,where screen 0 is set to 95 dpi and screen 1 is set to 75 dpi:
Example
$ DECW$MONITOR_DENSITY == "95,75"DECW$SERVER_SCREENS
With a multihead system based on XINERAMA, screens are initialized in alphabetical order according to their device name versus their physical position. Use this parameter to change the order in which the screens are initialized.
The following symbol definition changes the initialization order in a four-screen multihead display:
Example
$ DECW$SERVER_SCREENS == "GYB0,GYA0,GYD0,GYC0"DECW$SERVER_ENABLESCREEN
With a multihead system based on XINERAMA, you can choose tore-enable disabled screens in the display individually. This parameter enables the specified screen(s). The valid value ranges from0 to 15, which represents the maximum number of screens supported by the extension.
The following example enables the second screen (1) in a four-screen (0,1,2,3) multihead display:
Example
$ DECW$SERVER_ENABLESCREEN == "1"DECW$SERVER_DISABLESCREEN
With a multihead system based on XINERAMA, you can choose to disable each screen in the display individually. This parameter disables the specified screen. The valid value ranges from 0 to 15, which represents the maximum number of screens supported by the extension.
Once a screen is disabled, it is no longer initialized as part of the display and is not assigned a screen number. Note that this changes the existing screen order and alters the display of any predefined edge attachments.
The following symbol definition disables the third screen (2) in a four-screen (0,1,2,3) multihead display:
Example
$ DECW$SERVER_DISABLESCREEN == "2"DECW$SERVER_ONLYSCREEN
With a multihead system based on XINERAMA, you can choose to enable individual screens in the display at the exclusion of all others. This parameter explicitly enables the specified screen and disables all others. The valid value ranges from 0 to 15, which represents the maximum number of screens supported by the extension.
The following symbol definition enables the second screen (1) and disables all other screens (0,2,3) in a four-screen (0,1,2,3) multihead display:
Example
$ DECW$SERVER_ONLYSCREEN == "1"DECW$SERVER_EDGE_LEFT
With a multihead system based on XINERAMA, edge controls are used to define the boundaries of the virtual display. This parameter determines to what screen(s) the left boundary of the display is attached. The values are determined by screen number, for example:
left-screen , index-screen , right-screen
where index-screen represents the number of the screen to
which you want the boundary attached, left-screen indicates
the number of the screen directly to the left of the index, and
right-screen indicates the number of the screen directly
to the right of the index. Repeat this pattern for each screen to which you want
the border attached. A value of -1 equates to none.
- 0 1
- 2 3
where the left edge of the second and fourth screens (indices 1 and 3) are attached to the first and third screens (0,2):
Example
$ DECW$SERVER_EDGE_LEFT == "-1,0,-1,2"DECW$SERVER_EDGE_RIGHT
With a multihead system based on XINERAMA, edge controls are used to define the boundaries of the virtual display. This parameter determines to what screen the right boundary of the display is attached. The values are determined by screen number, for example:
right-screen , index-screen , left-screen
where index-screen represents the number of the screen to
which you want the boundary attached, right-screen indicates
the number of the screen directly to the right of the index, and
left-screen indicates the number of the screen directly
to the left of the index. Repeat this pattern for each screen to which you want
the border attached. A value of -1 equates to none.
- 0 1
- 2 3
where the right edges of the first and third screens (indices 0 and 2) are attached to the second and fourth screens (1,3):
Example
$ DECW$SERVER_EDGE_RIGHT == "1,-1,3,-1"DECW$SERVER_EDGE_TOP
With a multihead system based on XINERAMA, edge controls are used to define the boundaries of the virtual display. This parameter determines to what screen the top boundary of the display is attached. The values are determined by screen number, for example:
top-screen , index-screen , bottom-screen
where index-screen represents the number of the screen to
which you want the boundary attached, top-screen indicates
the number of the screen directly above the index, and bottom-screen
indicates the number of the screen directly below the index. Repeat
this pattern for each screen to which you want the border attached. A value of
-1 equates to none.
- 0 1
- 2 3
where the top edges of the third and fourth screens (indices 2 and 3) are attached to the first and second screens (0,1):
Example
$ DECW$SERVER_EDGE_TOP == "-1,-1,0,1"DECW$SERVER_EDGE_BOTTOM
With a multihead system based on XINERAMA, edge controls are used to define the boundaries of the virtual display. This parameter determines to what screen the bottom boundary of the display is attached. The values are determined by screen number, for example:
bottom-screen , index-screen , top-screen
where index-screen represents the number of the screen to
which you want the boundary attached, bottom-screen
indicates the number of the screen directly below the index, and
top-screen indicates the number of the screen directly
above the index. Repeat this pattern for each screen to which you want the
border attached. A value of -1 equates to none.
- 0 1
- 2 3
where the bottom edges of the first and second screens (indices 0 and 1) are attached to the third and fourth screens (2,3):
Example
$ DECW$SERVER_EDGE_BOTTOM == "2,3,-1,-1"3.1.2.5. Transport and Network Connections
The transport is the link between DECwindows client applications and the display server. Use the symbols in this section to control the types of available network transport links and the timing characteristics of the link.
DECW$SERVER_TRANSPORTS
You can specify which network transports your server monitors for incoming connections. Valid values for DECW$SERVER_TRANSPORTS are "DECNET", "LOCAL", "TCPIP", and "LAT". The default value for this parameter depends on the value of the DECW$INSTALL_TCPIP system logical. If the logical is set to True, the default value is "DECNET,LOCAL,TCPIP"; if the logical is not set, the default value is "DECNET,LOCAL."
The following example shows how to specify DECnet, local, and TCP/IP as the transports you will use:
Example
$ DECW$SERVER_TRANSPORTS == "DECNET,LOCAL,TCPIP"DECW$XPORT_SYNC_TIMEOUT
This parameter defines the transport timeout value (in milliseconds). The default is 30000 milliseconds (30 seconds). If the client does not take action to empty its buffers before the timeout, the server disconnects the client.
The following logical definition extends the timeout value to 60000milliseconds (1 minute):
Example
$ DEFINE/SYSTEM DECW$XPORT_SYNC_TIMEOUT 600003.1.2.6. Fonts
Displaying text is one of the major tasks of the display server. To display text, the display server is given a font name and a set of characters to be drawn. Usually, the font name corresponds to a particular font file resident on a server system (either display server or font server). When trying to match a font name with a font file, the display server searches the font path, which is an ordered list of directories. Each valid font directory contains a font directory file (DECW$FONT_DIRECTORY*.DAT) that lists font file names and corresponding font names. The display server searches each directory file, in order, until it finds a matching font name.
In addition, DECwindows Motif supports font alias files (DECW$FONT_ALIAS*.DAT),which can reside in any valid font directory. These files map one font name to a different font name. After the display server checks the font directory file in a given font directory without finding a match, it will then search the font alias file, if it exists. If it finds a match in the alias file, the translated font name is substituted and the search is restarted from the beginning of the font path.
3.1.2.6.1. Font Path
As stated in Section 3.1.2.6, ''Fonts'', the font path is an ordered list of directories in which font files that are available to the display server reside. The font path is constructed from a number of setup parameters.
- SYS$COMMON:[SYSFONT.DECW.CURSOR32]
- SYS$COMMON:[SYSFONT.DECW.CURSOR16]
- SYS$COMMON:[SYSFONT.DECW.100DPI]
- SYS$COMMON:[SYSFONT.DECW.75DPI]
- SYS$COMMON:[SYSFONT.DECW.COMMON]
- SYS$COMMON:[SYSFONT.DECW.SPEEDO]
- SYS$COMMON:[SYSFONT.DECW.TRUETYPE]
- SYS$COMMON:[SYSFONT.DECW.TYPE1]
Pointers to font servers can also be added to the end of the font path. For more information, see the section called “DECW$FONT_SERVERS”.
A variant of each directory exists for user-supplied and euro-enabled fonts, for example: SYS$COMMON:[SYSFONT.DECW.USER_100DPI]. For more information, see Section 3.6, ''Specifying New Fonts''.
DECW$SERVER_DENSITY
The server density value is used to determine the font size to use, either 75or 100 dots per inch (dpi). If you have a 100-dpi monitor, you can have a screen density of 75 or 100 dpi. Fonts intended for 75-dpi monitors that are displayed on 100-dpi monitors may appear small and difficult to read.
The following symbol definition sets the screen density to use 100-dpi fonts:
Example
$ DECW$SERVER_DENSITY == "100"DECW$CURSOR_SIZE
This parameter defines which cursor font directories are included in the font path. It can be set to 16 to include only the 16x16 cursors or to 32 to include both the 32x32 and 16x16 cursor. The larger cursor size resulting from a value of 32 is usually appropriate for a100-dpi display.
The following symbol definition sets the cursor size to 16x16:
Example
$ DECW$CURSOR_SIZE == "16"DECW$FONT_SERVERS
You can add font servers to the font path by defining the symbol DECW$FONT_SERVERS in the site-specific server section of the file SYS$MANAGER:DECW$PRIVATE_SERVER_SETUP.COM.
Multiple font servers can be added by defining the symbol as a comma-separated list. The symbol is not case sensitive.
The following symbol adds the font server ASHFLD::FONTSRV to the font path:
Example
$ DECW$FONT_SERVERS == "DECNET/ASHFLD::FONTSRV"DECW$IPV6_FONT_SUPPORT
TCP_IS_INET6
The TCP and TCPIP transport names are interpreted as synonyms for theINET6 transport. Using this value enables IPv6 as the default transport between the display server and its font servers when the TCP or TCPIP transport name is specified. Note that this setting requests the IPv6 transport be used as a default. If the IPv6 transport is not available for the specified node, the IPv4 transport is used.
DISABLED
The TCP and TCPIP transport names are interpreted as synonyms for the INET transport. This is the default value if the parameter is undefined. Using this value sets IPv4 as the transport between the display server and its font server when a TCP or TCPIP transport name is specified. A client can still request the IPv6 transport by explicitly specifying the INET6 transport in its font server path.
The following example specifies the transport names TCP and TCPIP be interpreted as synonyms for the INET6 transport:
Example
$ DECW$IPV6_FONT_SUPPORT == TCP_IS_INET63.1.2.6.2. Font Caching
DECW$SYSCOMMON:[SYSFONT.DECW.100DPI]HELVETICA12_100DPI.DECW$FONT
The DECwindows display server supports the portable compiled format (PCF) that was introduced with the X11R5 display server. PCF is a modified font format that includes bit/byte ordering and alignment information as part of the font data and allows for vendor-independent font support.
DECW$SERVER_FONT_CACHE_SIZE
This parameter defines the number of units to allocate for each font. It only applies to 16-bit .PCF fonts. The default is 1024.
The following logical definition reduces the font cache size to 512:
Example
$ DEFINE/SYSTEM DECW$SERVER_FONT_CACHE_SIZE 512DECW$SERVER_FONT_CACHE_UNIT
This parameter defines the bytes per unit. The default is 128.
The following logical definition increases the number of bytes per unit to 512:
Example
$ DEFINE/SYSTEM DECW$SERVER_FONT_CACHE_UNIT 5123.1.2.6.3. Font Scaling
In addition to supporting several formats of scalable outline fonts, the DECwindows display server also can scale any of its bitmap fonts to any size.
Note, however, that the quality of these scaled bitmap fonts is significantly less than the original bitmap fonts or even comparable scaled outline fonts. By default, this capability is disabled. In some cases, this reduction in quality may be an acceptable tradeoff, given the greater flexibility in font sizes.
DECW$SERVER_SCALE_BITMAP_FONTS
This parameter enables the scaling of bitmap fonts to render arbitrary point-size characters. The default value is False (disabled).
The following logical definition enables scalable fonts:
Example
$ DEFINE/SYSTEM DECW$SERVER_SCALE_BITMAP_FONTS TRUE3.1.2.7. Keyboard
Some default characteristics of the keyboard attached to the server system can be modified. These include keyboard operations, such as keyclick and bell volume and autorepeat, as well as how the keyboard keys are mapped to keyboard independent symbols used by client applications.
Additionally, the X Keyboard extension (XKB) provides enhanced capabilities for defining the keyboard layout and audio feedback. Use the parameters in this section when using XKB to specify the settings for the X Keyboard layout files. See Section 3.5, ''Changing the Default Keyboard Layout'' for instructions on how to load custom key map and keyboard layout files.
Some of the keyboard settings in this section can be overridden by the Session Manager. Setting these symbols takes effect before the user logs in or if you are not using DECwindows Session Manager.
DECW$KEYMAP
The DECW$KEYMAP parameter translates to the directory specification where keyboard mapping files reside. It is provided for your reference only. Do not modify its value.
DECW$DEFAULT_KEYBOARD_MAP
You can specify the language for which your keyboard is designed. Valid values for DECW$DEFAULT_KEYBOARD_MAP are the file names (without file type) in the SYS$COMMON:[SYS$KEYMAP.DECW.SYSTEM] and SYS$COMMON:[SYS$KEYMAP.DECW.USER] directories.
For a list of valid key map names, see Appendix B, "DECwindows Motif Keymap Names".
The following symbol definition changes the keyboard layout to a Dutch typewriter layout:
Example
$ DECW$DEFAULT_KEYBOARD_MAP == "DUTCH_LK201LH_TW"DECW$SERVER_BELL_BASE_VOLUME
This parameter determines the volume of the bell sound in a keyboard. Values are from 0 to 100, with 100 being the loudest. The default volume level is 50.
The following logical definition sets the volume to one quarter of full volume:
Example
$ DEFINE/SYSTEM DECW$SERVER_BELL_BASE_VOLUME 25DECW$SERVER_ENABLE_ACCESSX
This parameter enables the AccessX keyboard features for disabled users,such as sticky keys or slow keys. The valid values are 0 (disabled) or 1 (enabled). The default is 0.
The following example enables the AccessX features:
Example
$ DECW$SERVER_ENABLE_ACCESSX == "1"DECW$SERVER_ENABLE_KB_AUTOREPEAT
Keyboard autorepeat is an option that causes a character to repeat itself automatically while that character key is pressed. You can enable this option by specifying True for this parameter.
The following logical definition enables keyboard autorepeating of typed characters:
Example
$ DEFINE/SYSTEM DECW$SERVER_ENABLE_KB_AUTOREPEAT TDECW$SERVER_KEYCLICK_VOLUME
This parameter determines the volume of the click sound in a keyboard.Values are from 0 to 100, with 100 being the loudest. The default is 0.
The following symbol definition sets the volume to one quarter of fullvolume.
Example
$ DEFINE/SYSTEM DECW$SERVER_KEYCLICK_VOLUME 25DECW$SERVER_KEY_REPEAT_DELAY
When using XKB, this parameter specifies the number of milliseconds before a keystroke is first repeated. The valid values for this parameter are 0 to 1000.The default is 660.
The following symbol definition specifies the delay for keystroke repetition:
Example
$ DECW$SERVER_KEY_REPEAT_DELAY == "800"DECW$SERVER_KEY_REPEAT_INTERVAL
When using XKB, this parameter specifies the number of milliseconds between repeated keystrokes. The valid values for this parameter are 0 to 1000. The default is 40.
The following symbol definition specifies the interval for keystroke repetition:
Example
$ DECW$SERVER_KEY_REPEAT_INTERVAL == "20"DECW$SERVER_XKEYBOARD_COMPILED_DIR
When using XKB, this parameter specifies the default directory for all compiled X keyboard files. This directory is also where the server places any keymap files that it compiles on demand. The default is SYS$COMMON:[SYS$KEYMAP.XKB.COMPILED].
The following symbol definition changes the root directory to SYS$COMMON:[SYS$KEYMAP.XKB.SERVER1]:
Example
$ DECW$SERVER_XKEYBOARD_COMPILED_DIR == "SYS$COMMON:[SYS$KEYMAP.XKB.SERVER1]"DECW$SERVER_XKEYBOARD_DIRECTORY
When using XKB, this parameter specifies the default root directory for all X keyboard files. All component source X keyboard files are stored in subdirectories under this root directory. The default is DECW$SYSCOMMON:[SYS$KEYMAP.XKB].
The following symbol definition changes the root directory to SYS$COMMON:[SYS$KEYMAP.XKB]:
Example
$ DECW$SERVER_XKEYBOARD_DIRECTORY == "SYS$COMMON:[SYS$KEYMAP.XKB]"DECW$SERVER_XKEYBOARD_LOAD_MAP
When using XKB, this parameter loads the X keyboard layout specified by DECW$SERVER_XKEYBOARD_MAP. The valid values for this parameter are 0 (disabled)or 1 (enabled). The default is 0. When this parameter is disabled, the DECwindows keyboard maps are used.
The following symbol definition loads the default DECwindows keyboard map file:
Example
$ DECW$SERVER_XKEYBOARD_LOAD_MAP == "1"DECW$SERVER_XKEYBOARD_MAP
When using XKB, this parameter specifies the default X keyboard layout file for your keyboard. The default is DIGITAL_US_LK201. If the compiled layout file is not available in the area specified by DECW$SERVER_XKEYBOARD_COMPILED_DIR, the display server will attempt to compile the file on-demand based on data in the X keyboard components database.
The following symbol definition changes the X Keyboard layout to an alternate keyboard layout:
Example
$ DECW$SERVER_XKEYBOARD_MAP == "DIGITAL_US_LK401"3.1.2.8. Mouse
Use the symbols in this section to modify mouse pointer characteristics. All the mouse pointer settings in this section are overridden by the Session Manager. Setting these symbols takes effect before the user logs in or if you are not using DECwindows Session Manager.
DECW$SERVER_MOUSE_ACCELERATION
- 2 (fast)
- 1 (medium)
- 0 (slow)
The following logical definition causes the pointer to move at the fast speed in relation to your mouse movements:
Example
$ DEFINE/SYSTEM DECW$SERVER_MOUSE_ACCELERATION 2DECW$SERVER_MOUSE_THRESHOLD
This parameter defines the minimum motion of the mouse (in pixels) at which the DECwindows server is notified of the motion. The default is 4 pixels.
The following logical definition causes the mouse to be very sensitive to movement, resulting in the report of movement to the DECwindows server:
Example
$ DEFINE/SYSTEM DECW$SERVER_MOUSE_THRESHOLD 13.1.2.9. Color Database
The display server uses a color database file to translate color names passed to the server from client applications into RGB values. Use the symbols in this section to modify color database characteristics.
DECW$RGBPATH
This parameter defines the RGB database filename to be used with the display server. The default name is SYS$MANAGER:DECW$RGB.DAT.
The following symbol definition changes the filename value to DECW$RGBPATH.DAT:
Example
$ DECW$RGBPATH == "SYS$MANAGER:DECW$RGBPATH.DAT"3.1.2.10. Screen Saver
The screen saver causes the monitor to go blank after a specified length of time (10 minutes by default) during which no user input occurs. Note that the actual value is specified in seconds.
Note
VSI does not recommend this screen saver for normal use because the screen background remains visible.
DECW$SERVER_SCREEN_SAVER_PREFER_BLANKING
This parameter determines the method by which screen saver is performed. When the value is True (the default), the DECwindows server causes the video device driver to turn off the video signal when the Screen Saver timeout expires. When the value is False, the DECwindows server blanks the screen when the timeout expires.
The following logical definition causes the screen to be cleared when the screen saver timeout expires:
Example
$ DEFINE/SYSTEM DECW$SERVER_SCREEN_SAVER_PREFER_BLANKING FDECW$SERVER_SCREEN_SAVER_TIMEOUT
This parameter defines the initial time (in minutes) before the screen saver is activated, after which the screen saver interval takes effect. The default is 600 seconds (10 minutes).
The following logical definition causes the initial screen saver time to be 5 minutes:
Example
$ DEFINE/SYSTEM DECW$SERVER_SCREEN_SAVER_TIMEOUT 5DECW$SERVER_SCREEN_SAVER_INTERVAL
This parameter defines the number of minutes the server waits before repainting the screen background. The screen saver rearranges the screen pixels to avoid burning the screen phosphor. Some servers use nonblanking screen savers, such as swimming fish or logos. The default is 600seconds (10 minutes).
The following logical definition causes the background screen to be repainted in 7-minute intervals:
Example
$ DEFINE/SYSTEM DECW$SERVER_SCREEN_SAVER_INTERVAL 73.1.2.11. Backing Store and Save Under
In general, it is the responsibility of the client application to restore occluded regions of the screen once they are exposed. However, the display server has several techniques available to perform this operation on behalf of the client. These are the backing store and save under options.
Backing store saves portions of windows in server memory just before they are obscured. Later, when the portions are exposed, the server can repaint them without involving the client. This can drastically reduce the time required to repaint, particularly for windows containing complex graphics or for environments where the client/server link is slow.
Save under is a similar mechanism where just prior to painting a window, the server saves the portion of the screen that is about to be obscured.
Note
Both backing store and save under put a significant burden on the DECwindows server and can reduce performance.
DECW$SERVER_DEFAULT_BACKING_STORE
|
Value |
Meaning |
|---|---|
|
2 |
Enable backing store at all times |
|
1 |
Enable backing store only when window is mapped |
|
0 |
Indeterminate; depends on the server and the device being used |
A True value for DECW$SERVER_DISABLE_BACKING_STORE causes the backing store option not to be used. The value for DECW$SERVER_DEFAULT_BACKING_STORE can be overridden in applications on a per-window basis.
The following logical definition causes the server to save and restore windows when the windows are mapped to the screen:
Example
$ DEFINE/SYSTEM DECW$SERVER_DEFAULT_BACKING_STORE 1DECW$SERVER_DISABLE_BACKING_STORE
Use this parameter to disable backing store support. The default value is False so that backing store is enabled by default.
When DECW$SERVER_DISABLE_BACKING_STORE is set to True (disable backing store),restart the server, at which time the backing store option is disabled. Thereafter, to reenable backing store, deassign or redefine DECW$SERVER_DISABLE_BACKING_STORE and restart the server.
If your application window comes up blank, then the application is requesting backing store incorrectly and waiting for an expose event to begin processing. Either modify your application so that it does not request backing store, or set DECW$SERVER_DISABLE_BACKING_STORE to True, and restart the DECwindows display server.
The following symbol definition disables backing store:
Example
$ DECW$SERVER_DISABLE_BACKING_STORE == "T"DECW$SERVER_DISABLE_SAVE_UNDER
The save under option records window information that may be hidden when another window is placed on top. You can disable this option by specifying True for this parameter.
The save under option is similar to the backing store option, but only the occluded portions of windows are saved by the server so that when that portion of the window becomes visible, the server redraws that portion of the window.
The following symbol definition disables the server's save under option:
Example
$ DEFINE/SYSTEM DECW$SERVER_DISABLE_SAVE_UNDER T3.1.2.12. Error Reporting
The display server creates a log file into which it writes informational and
error messages to aid in troubleshooting problems. The log file is called
SYS$MANAGER:DECW$SERVER_ n_ERROR.LOG, where
n is the server number (usually 0).
The display server uses a condition handler to trap error conditions (such as an access violation) that might otherwise cause the display server to stop. If the condition handler detects a nonfatal error, it tries to allow the display server to continue. The condition handler always records the error in the error log file. If the condition handler detects errors for a single client (2 by default), it disconnects the client.
When the condition handler recovers from an error, the display server may lose track of some resources, such as memory. Therefore, after a number of these exceptions (10 by default), the condition handler broadcasts a message to all users on the system indicating that the display server may be running in a degraded mode and suggests that the display server should be restarted. If you see a message like this, restart the display server at the next convenient opportunity. See Section 2.2, ''Using the DECW$STARTUP.COM Procedure'' for instructions for restarting the server.
DECW$SERVER_AUDIT_LEVEL
- 0 (disabled)
- 1 (enabled)
- 2 (enabled with success messages)
- 4 (enabled with security logging)
The default value is 0.
The following symbol definition enables minimal audit logging:
Example
$ DECW$SERVER_AUDIT_LEVEL == "1"DECW$SERVER_BUG_COMPATIBILITY
Inconsistencies between pre–X11R4 servers and the X11 protocol allowed some undefined bits to be set in some X requests. By strictly enforcing this part of the protocol, however, some applications that set undefined bits no longer worked. By setting bug compatibility to True (default), the server will continue to allow these applications to work; however, the applications should be recoded to comply with the X11 protocol.
The following symbol definition allows pre–X11R4 servers and X11 protocol applications to function correctly:
Example
$ DECW$SERVER_BUG_COMPATIBILITY == "T"DECW$SERVER_DUMP
Setting this parameter to True adds the /DUMP qualifier to the DCL RUN command, which causes a process dump if the server crashes. Specifying True also automatically disables the server condition handler (sets DECW$SERVER_DISABLE_CH to True).
The following logical definition adds the /DUMP qualifier to the DCL RUN command and disables the server condition handler:
Example
$ DEFINE DECW$SERVER_DUMP TDECW$SERVER_ERROR_LOG_TO_KEEP
This parameter defines the number of versions of the error log file to save. The default is two versions.
The following symbol definition causes the DECwindows server to save the three most recent versions of the error log file:
Example
$ DECW$SERVER_ERROR_LOG_TO_KEEP == "3"DECW$CLIENT_ERROR_THRESHOLD
This parameter defines the number of protocol errors generated by a single client above which the client will be terminated. The default is one protocol error.
The following logical definition causes the DECwindows display server to terminate a client after 10 or more protocol errors have been generated:
Example
$ DEFINE/SYSTEM DECW$CLIENT_ERROR_THRESHOLD 10DECW$SERVER_ERROR_THRESHOLD
Server internal runtime error threshold exceeded (code =
%x),server performance may be degraded.
The symbol %x is replaced by the condition code (in
hexadecimal) that forced the error. The most typical value is "c",
specifying an access violation.
DECW$SERVER_ERROR: internal runtime error threshold exceeded.
Performance may be degraded, restart DECwindows software when
convenient by @SYS$MANAGER:DECW$STARTUP RESTART.
Server performance still degrading...
%d is decimal
value and %x is hexadecimal value.- Errors that count toward the client error threshold
- If the error count is less than the client error threshold, the following error is reported:
opcode
%dis ignored due to internal runtime error%xfor client%d( error =%d) - If the error count equals or exceeds the client error threshold, the following error is reported:
Client
%dhas made too many runtime errors%d, its connection is marked for termination
- Errors that disconnect a client
Client
%dhas been disconnected due to unrecoverable runtime error%xdetected while processing opcode%dOr, if the server is processing an opcode for a server extension,the following message is displayed:Exception trapped while processing extension opcode
%d(extension id=%d) - Errors that terminate the server
Unrecoverable server internal error (error code = %d) found,
terminating all connections.
   .
   .
   .
  List of active images and
  call chain at time of the error
   .
   .
   .
** SERVER INTERNAL RUNTIME ERROR ENCOUNTERED,
SERVER HAS JUST CRASHED!! **
********************************************
The following logical definition causes the DECwindows server to report a system degradation message after 20 server errors have accumulated:
Example
$ DEFINE/SYSTEM DECW$SERVER_ERROR_THRESHOLD 203.1.3. Setting Cluster-Common Parameters
If DECW$PRIVATE_SERVER_SETUP.COM is placed in SYS$COMMON:[SYSMGR], symbols defined within the file apply to every system that shares that system disk, which is usually every member of a cluster.
Copy the template file into SYS$COMMON:[SYSMGR]DECW$PRIVATE_SERVER_SETUP.COM.
Edit the command file and search for the section titled Cluster-Common or Standalone Workstation Setup. If no such section exists, search for node_list = "".
Add any customizations in this section.
- Restart the DECwindows display server with the following command:
$
@SYS$STARTUP:DECW$STARTUP RESTARTYou need to restart DECwindows on each system on which you want the customizations to take effect.Caution
Restarting the DECwindows server disconnects all current client processes.
3.1.4. Setting Standalone System Parameters
Create a private copy of the DECW$PRIVATE_SERVER_SETUP.COM file and place it in SYS$SPECIFIC:[SYSMGR] on each system that you want customized.
- Use the node list facility in the DECW$PRIVATE_SERVER_SETUP.COM file, as follows:
Edit the DECW$PRIVATE_SERVER_SETUP.COM and search for node_list = "".
- Add the nodes in your cluster between the quotation marks. For example:
$
node_list = "NODE1/NODE2/NODE3" At the end of the command procedure, add a label and your system-specific definitions.
$!
$! server symbol definitions for NODE1
$!
$DO_NODE1:
$ DECW$SERVER_TRANSPORTS == "DECNET,LOCAL,TCPIP,LAT"
$ EXIT
$!
$! server symbol definitions for NODE2
$!
$DO_NODE2:
$ DECW$SERVER_DENSITY == "75"
$ EXIT
$!
$! server symbol definitions for NODE3
$!
$DO_NODE3:
$ DECW$DEFAULT_KEYBOARD_MAP == "US_LK201AA"
$ EXIT
3.1.5. Determining the Current Server Parameters
This section lists the commands that you can use to determine the current server settings.
3.1.5.1. Displaying the Server Logical Name Table
You can use the DCL SHOW LOGICAL command to display all of the logical names in the server logical name table that are defined from symbols specified in the DECwindows startup process.
$ SHOW LOGICAL/TABLE=DECW$SERVER0_TABLE
(DECW$SERVER0_TABLE)

  "DECW$COLOR" = "TRUE"
  "DECW$DEFAULT_FONT" = "FIXED"
  "DECW$DEFAULT_KEYBOARD_MAP" = "NORTH_AMERICAN_LK401AA"
  "DECW$FONT" = "DECW$SYSCOMMON:[SYSFONT.DECW.USER_CURSOR32]"
        = "DECW$SYSCOMMON:[SYSFONT.DECW.CURSOR32]"
        = "DECW$SYSCOMMON:[SYSFONT.DECW.USER_CURSOR16]"
        = "DECW$SYSCOMMON:[SYSFONT.DECW.CURSOR16]"
        = "DECW$SYSCOMMON:[SYSFONT.DECW.USER_100DPI]"
        = "DECW$SYSCOMMON:[SYSFONT.DECW.100DPI]"
        = "DECW$SYSCOMMON:[SYSFONT.DECW.USER_75DPI]"
        = "DECW$SYSCOMMON:[SYSFONT.DECW.75DPI]"
        = "DECW$SYSCOMMON:[SYSFONT.DECW.USER_COMMON]"
        = "DECW$SYSCOMMON:[SYSFONT.DECW.COMMON]"
        = "DECW$SYSCOMMON:[SYSFONT.DECW.SPEEDO]"
        = "DECW$SYSCOMMON:[SYSFONT.DECW.TYPE1]"
        = "DECW$SYSCOMMON:[SYSFONT.DECW.USER_TYPE1]"
        = "DECW$SYSCOMMON:[SYSFONT.DECW.TRUETYPE]"
        = "DECW$SYSCOMMON:[SYSFONT.DECW.USER_TRUETYPE]"
  "DECW$KEYBOARD" = "OPA2:"
  "DECW$KEYMAP" = "DECW$SYSCOMMON:[SYS$KEYMAP.DECW.USER]"
        = "DECW$SYSCOMMON:[SYS$KEYMAP.DECW.SYSTEM]"
  "DECW$MONITOR_DENSITY" = "100"
  "DECW$POINTER" = "TTA0:"
  "DECW$RGBPATH" = "SYS$MANAGER:DECW$RGB.DAT"
  "DECW$SERVER_AUDIT_LEVEL" = "4"
  "DECW$SERVER_BUG_COMPATIBILITY" = "Y"
  "DECW$SERVER_DISABLE_BACKING_STORE" = "FALSE"
  "DECW$SERVER_DISABLE_CH" = "N"
  "DECW$SERVER_DISABLE_TEST" = "F"
  "DECW$SERVER_ENABLE_ACCESSX" = "0"
  "DECW$SERVER_EXTENSIONS" = "Xie"
        = "Multi-Buffering"
        = "Sec_Xag"
  "DECW$SERVER_KEY_REPEAT_DELAY" = "660"
  "DECW$SERVER_KEY_REPEAT_INTERVAL" = "40"
  "DECW$SERVER_SCREENS" = "GYA0"
  "DECW$SERVER_TRANSPORTS" = "DECNET"
        = "LOCAL"
        = "TCPIP"
        = "LAT"
  "DECW$SERVER_XKEYBOARD_COMPILED_DIR" = "SYS$COMMON:[SYS$KEYMAP.XKB.COMPILED]"
  "DECW$SERVER_XKEYBOARD_DIRECTORY" = "DECW$SYSCOMMON:[SYS$KEYMAP.XKB]"
  "DECW$SERVER_XKEYBOARD_LOAD_MAP" = "0"
  "DECW$SERVER_XKEYBOARD_MAP" = "DIGITAL_US_LK201"
  "DECW$SYSCOMMON" = "SYS$SYSROOT"
  "DECW$XPORT_LRP_SIZE" = "32768"
  "DECW$XSIZE_IN_PIXELS" = "1280"
  "DECW$YSIZE_IN_PIXELS" = "1024"
3.1.5.2. Using the X Display Information Utility (xdpyinfo)
You can use the X Display Information utility (xdpyinfo) to query the server directly and report various server parameters.
Before running this utility, make sure you have the correct display selected by using the SET DISPLAY command.
$SET DISPLAY/CREATE/NODE=$node_nameRUN DECW$UTILS:XDPYINFO
name of display:    _WSA1:
version number:    11.0
vendor string:    DECWINDOWS Hewlett-Packard Development Company OpenVMS
vendor release number:    8002
maximum request size:  65535 longwords (262140 bytes)
motion buffer size:  0
bitmap unit, bit order, padding:    32, LSBFirst, 32
image byte order:    LSBFirst
number of supported pixmap formats:    6
supported pixmap formats:
    depth 1, bits_per_pixel 1, scanline_pad 32
    depth 4, bits_per_pixel 8, scanline_pad 32
    depth 8, bits_per_pixel 8, scanline_pad 32
    depth 12, bits_per_pixel 32, scanline_pad 32
    depth 24, bits_per_pixel 32, scanline_pad 32
    depth 32, bits_per_pixel 32, scanline_pad 32
keycode range:    minimum 8, maximum 255
number of extensions:    17
    DEC-Server-Mgmt-Extension
    ServerManagementExtension
    SHAPE
    MIT-SHM
    Extended-Visual-Information
    XTEST
    BIG-REQUESTS
    MIT-SUNDRY-NONSTANDARD
    MIT-SCREEN-SAVER
    SYNC
    XC-MISC
    TOG-CUP
    Xie
    DEC-XTRAP
    Multi-Buffering
    SECURITY
    XC-APPGROUP
default screen number:    0
number of screens:    1
screen  0:
  dimensions:    1280x1024 pixels (325x260 millimeters)
  resolution:    100x100 dots per inch
  depths (1):    8  root window id:    0x2e
  depth of root window:    8 planes
  number of colormaps:    minimum 1, maximum 1
  default colormap:    0x21
  default number of colormap cells:    256
  preallocated pixels:    black 0, white 1
  options:    backing-store YES, save-unders YES
  current input event mask:    0x0
  number of visuals:    10
  default visual id:  0x22
  visual:
    visual id:    0x22
    class:    PseudoColor
    depth:    8 planes
    size of colormap:    256 entries
    red, green, blue masks:    0x0, 0x0, 0x0
    significant bits in color specification:    8 bits
  visual:
    visual id:    0x23
    class:    PseudoColor
    depth:    8 planes
    size of colormap:    256 entries
    red, green, blue masks:    0x0, 0x0, 0x0
    significant bits in color specification:    8 bits
  visual:
    visual id:    0x24
    class:    DirectColor
    depth:    8 planes
    size of colormap:    8 entries
    red, green, blue masks:    0xe0, 0x1c, 0x3
    significant bits in color specification:    3 bits
  visual:
    visual id:    0x25
    class:    GrayScale
    depth:    8 planes
    size of colormap:    256 entries
    red, green, blue masks:    0x0, 0x0, 0x0
    significant bits in color specification:    8 bits
  visual:
    visual id:    0x26
    class:    StaticGray
    depth:    8 planes
    size of colormap:    256 entries
    red, green, blue masks:    0x0, 0x0, 0x0
    significant bits in color specification:    8 bits
  visual:
    visual id:    0x27
    class:    StaticColor
    depth:    8 planes
    size of colormap:    256 entries
    red, green, blue masks:    0xe0, 0x1c, 0x3
    significant bits in color specification:    8 bits
  visual:
    visual id:    0x28
    class:    TrueColor
    depth:    8 planes
    size of colormap:    8 entries
    red, green, blue masks:    0xe0, 0x1c, 0x3
    significant bits in color specification:    3 bits
  visual:
    visual id:    0x29
    class:    TrueColor
    depth:    8 planes
    size of colormap:    8 entries
    red, green, blue masks:    0xe0, 0x1c, 0x3
    significant bits in color specification:    3 bits
  visual:
    visual id:    0x2a
    class:    TrueColor
    depth:    8 planes
    size of colormap:    8 entries
    red, green, blue masks:    0xe0, 0x1c, 0x3
    significant bits in color specification:    3 bits
  visual:
    visual id:    0x2b
    class:    TrueColor
    depth:    8 planes
    size of colormap:    8 entries
    red, green, blue masks:    0xe0, 0x1c, 0x3
    significant bits in color specification:    3 bits
3.1.5.3. Using X Set Utility (xset)
Use the X Set utility (xset) to query the server directly for parameter settings. Running xset is a good method to determine the current font path.
Before running this utility, make sure you have the correct display selected by using the SET DISPLAY command.
$SET DISPLAY/CREATE/NODE=$node_nameMCR DECW$UTILS:XSET Q
Keyboard Control:
  auto repeat:  on    key click percent:  25    LED mask:  00000000
  auto repeating keys:  0000000000000000
                        0000c0ffffffffff
                        ffffffffff27f8ff
                        ffffffffffffffff
  bell percent:  0    bell pitch:  400    bell duration:  100
Pointer Control:
  acceleration:  7/1    threshold:  3
Screen Saver:
  prefer blanking:  yes    allow exposures:  yes
  timeout:  600    cycle:  600
Colors:
  default colormap:  0x21    BlackPixel:  0    WhitePixel:  1
Font Path:
DECW$SYSCOMMON:[SYSFONT.DECW.CURSOR32],DECW$SYSCOMMON:[SYSFONT.DECW.CURSOR16],
DECW$SYSCOMMON:[SYSFONT.DECW.100DPI],DECW$SYSCOMMON:[SYSFONT.DECW.75DPI],
DECW$SYSCOMMON:[SYSFONT.DECW.USER_COMMON],DECW$SYSCOMMON:[SYSFONT.DECW.COMMON],
DECW$SYSCOMMON:[SYSFONT.DECW.SPEEDO],DECW$SYSCOMMON:[SYSFONT.DECW.TYPE1],
DECW$SYSCOMMON:[SYSFONT.DECW.TRUETYPE],CDE$SYSTEM_DEFAULTS:[CONFIG.XFONTS.C.100DPI],
CDE$SYSTEM_DEFAULTS:[CONFIG.XFONTS.C.75DPI],CDE$SYSTEM_DEFAULTS:[CONFIG.XFONTS.C]
Bug Mode: compatibility mode is enabled
3.2. Specifying the Network Transports
As illustrated in Chapter 1, "System Overview", the DECwindows transport interface is a general data-transfer mechanism for moving X protocol requests between a client and server.
The following sections briefly describe the supported transports and how to enable them for use by the X display server. See Section 4.1, ''Setting the Display'' for information about how to set the transport for the client.
3.2.1. Using the Local Transport
The local transport is the default network transport, which is always available. Use local transport when a DECwindows client and the display server are running on the same OpenVMS system. The local transport generally improves performance because data is transferred between client and server more directly through shared memory. This mechanism reduces the number of data copies in the system and eliminates the extra overhead incurred by network access.
3.2.2. Using the DECnet Transport
DECwindows also provides support for the DECnet transport. Before you can enable and use this transport, either the VSI DECnet Phase IV for OpenVMS or VSI DECnet-Plus (Phase V) for OpenVMS software must be installed and running on the system.
Note
If DECnet or TCP/IP is shut down while the server is attached to it, the transport will continuously poll the network to reattach when the network is restarted.
3.2.3. Using the TCP/IP Transport
DECwindows Motif supports both the Internet Protocol Version 4 (IPv4) and Internet Protocol Version 6 (IPv6) implementations of the TCP/IP transport, as described in Chapter 4, "Using DECwindows". Before you can enable and use this transport, the VSI TCP/IP Services for OpenVMS software or a supported third-party TCP/IP product must be installed and running as part of system startup.
The TCP/IP Services software is configured to run at system startup by default. If you are using a third-party product, see the product documentation for instructions on how to install and configure the software.
You can conserve memory and process slots by configuring VSI TCP/IP Services for OpenVMS software for the minimum DECwindows requirement to support the X protocol. DECwindows only requires that INET_ACP be running. For more information about TCP/IP concepts and configuring the network software, see the TCP/IP Services for OpenVMS documentation.
3.2.4. Using the LAT Transport
DECwindows supports LAT as a network transport mechanism for displaying to other OpenVMS Alpha and OpenVMS IA-64 workstations. Before you can enable and use LAT transport, you must start the LAT software on both the DECwindows client and server systems. Refer to the LATCP Utility Reference Manual for details on starting and configuring the LAT software.
$ DEFINE /SYSTEM DECW$INSTALL_XTERMINAL SERVERYou must define this logical before DECwindows is started. VSI suggests that you define this logical in SYS$MANAGER:SYLOGICALS.COM.
3.2.5. Changing the Default Transports
The DECnet and local transports are enabled by default. To enable or disable transports for your display server, modify the DECW$PRIVATE_SERVER_SETUP.COM file and redefine the DECW$SERVER_TRANSPORTS parameter.
$do_TCPIP:
$ decw$server_transports == "TCPIP,LOCAL"
$ exit
$ !
3.3. Establishing Server Access Control
The following sections describe the access control schemes supported by VSI DECwindows Motif for OpenVMS and how to use them to manage access to the X display server.
3.3.1. User-Based Access Control
User-based access control authorizes access to the X display server based on the triplet of host, transport, and user name (such as, DECNET ZEPHYRJONES). The user name, node name, and transport information you provide acts as a filter to screen out all except a selected class of users.
User-based access control is always available, as long as there are entries in either the authorized users list or access allowed list. Due to lack of encryption and the inability to specify user names in the TCP/IP environment,this form of access control is the least secure and is recommended for authorizing access in local, DECnet, or LAT environments only.
3.3.2. Token-Based Access Control
Token-based access control authorizes access to the X display server based on the presentation of a valid password or token by a client application during a connection request. The level to which the client is authenticated and the method of authentication varies depending on the protocol in use: Magic Cookie (MIT-MAGIC-COOKIE-1) or Kerberos(MIT-KERBEROS-5).
In general, each time a client application attempts to connect to a server protected with token-based access control, it references an X authority file to determine the appropriate protocol to apply and authentication method to follow in order to grant the connection.
Note
Additional X Window System security protocols, such as XDM-AUTHORIZATION-1 andSUN-DES-1, are not currently supported. Any third-party client applications using these protocols to access a DECwindows X display server will default to user-based access control.
3.3.2.1. Magic Cookie
Magic Cookie was designed to provide a more secure alternative to the host-based security mechanism available in previous releases of the X Window System. The first protocol to use a token-based approach, it provided the initial, standard means for restricting access to the X display server on a user level.
Magic cookie authorizes connections to a server based on a client presenting a binary numeric value, known as a cookie, to the server. Normally, the client obtains this cookie value from an X authority file; however, some programs may use alternate mechanisms.
- the address of the X display device
- the protocol name (MIT-MAGIC-COOKIE-1)
- a random, numeric cookie value
When Magic Cookie is used to authorize connections during a VSI DECwindows Motif for OpenVMS session, a cookie is generated each time a user successfully logs into their local VSI DECwindows Motif for OpenVMS desktop. The magic cookie authorizing the local connection, along with the device,transport, and protocol name is passed to the X display server and stored in the current X authority file (SYS$LOGIN:DECW$XAUTHORITY.DECW$XAUTH).
Each time a client application attempts to connect to the display server during the session, the application must present a valid cookie to the server along with the connection request. If the cookie matches any one of the cookies maintained by the X display server, the connection is authorized, access is granted, and the display is opened. When the user logs out of the VSI DECwindows Motif for OpenVMS session, the server is reset, and the cookie is discarded.
Due to the use of a randomly-generated value, Magic Cookie provides a more secure form of access control than the user-based scheme. However, the cookies are sent across the network unencrypted, leaving them prone to interception. As a result, this form of access control is recommended for authorizing connections across local area networks (LANs), limited DECnet environments, across TCP/IP networks that have been secured using another form of protection.
3.3.2.2. Kerberos
- the protocol name (MIT-KERBEROS-5) in the X authority file
- a list of valid Kerberos principals and their associated passwords
- presentation of valid credentials
Kerberos credentials, or tickets, are a set of electronic information that can be used to verify the identity of a principal.These principals are stored in an Authorized Principals list kept on the server system. With Kerberos, client applications run by a valid principal send requests for a ticket from the Kerberos Key Distribution Center (KDC) each time they attempt to connect to the Kerberos-protected X display server.
Once Kerberos access control is enabled on the server, a new ticket is requested from the KDC automatically each time a user logs into their local desktop. The KDC creates a ticket-granting ticket (TGT) associated with the user's principal name, encrypts it using the password as the key, and returns the encrypted TGT.
If the TGT is decrypted successfully, the user is authenticated and the TGT is cached. The TGT permits the authenticated principal to obtain additional tickets. These additional tickets grant access to specific services, in this case, access to the X display server from other client applications. The requesting and granting of these additional tickets happens transparently.
With VSI DECwindows Motif for OpenVMS, user-to-user authentication is employed. In this model, both the client and server use a Kerberos client at each end of the connection to verify the identify of the user (principal). Once the principal is authenticated at both ends of the connection, access is granted to the server.
By default, each TGT expires at a specified time. If a TGT has expired or been compromised, you can choose to revoke the current TGT and generate a new TGT by forcing a Kerberos login.
Note
Kerberos is designed to generate a session key that can be used to encrypt all data transmitted over a network connection. The X Window System uses this key only to encrypt the initial authentication messages. Once the identity of the client has been reliably verified, all subsequent data is sent across the network channel unencrypted. As a result, the server itself can remain susceptible to some forms of network-level attacks.
3.3.3. The X Authority File
The X authority file is a binary data file that contains information used to authorize connections to the X display server. Each time a client application attempts to connect to an X server, it references the current X authority file to determine the appropriate authorization key to apply in order to authenticate the connection.
MIT-MAGIC-COOKIE-1 + cookie value
MIT-KERBEROS-5 + encrypted TGT (cached separately)
By default, an X authority file is created automatically the first time a user logs into a desktop on a system configured for Magic Cookie or Kerberos access control. The file is stored in that user's OpenVMS login directory (SYS$LOGIN:DECW$XAUTHORITY.DECW$XAUTH). Each time the user subsequently logs into a desktop on that system, a new authorization key is generated, passed to the X display server, and written to the user's X authority file. This key controls access to the X display server during the VSI DECwindows Motif for OpenVMS session.
A separate X authority file can be defined manually (using the DECW$SERVER_XAUTHORITY symbol) for those client applications that require access to a server outside of the normal VSI DECwindows Motif for OpenVMS login process.
If the Security extension is enabled, authorization keys can also be manually generated. Manually-generated keys can be used to further restrict server access. The generated key is stored in the X authority file on the client system overwriting any value already present for the specified display server. The key can be distributed to different client systems to allow connections to a specific server and can be revoked to stop subsequent connections.
Generated keys are assigned an authorization ID that associates the key with the user who generated the key. As a result, only the user who generated the key can revoke the key.
3.3.4. The Access Allowed File
The access allowed file is an ASCII text file that grants additional OpenVMS users access to the X display server automatically at server startup.
The access allowed settings remain in effect until a user logs into a VSI DECwindows Motif for OpenVMS desktop. Once a user logs into a desktop and begins a VSI DECwindows Motif for OpenVMS session, any security options defined by the Session Manager for that user are applied.
Caution
The access allowed file is intended for use on workstations that do not normally use the VSI DECwindows Motif for OpenVMS login process. Do not use this file on workstations that rely on the VSI DECwindows Motif for OpenVMS login process to restrict access to the X server, as it can compromise the security of the VSI DECwindows Motif for OpenVMS system.
For example, a user granted access through an access allowed file could spoof a login window that captures the passwords of other users attempting to log into a VSI DECwindows Motif for OpenVMS desktop.
3.3.5. The Access Trusted File
Trusted users are those who are authorized to change security settings. The access trusted file is an ASCII text file that identifies which OpenVMS users can change the access control settings fora particular display server.
By default, the local SYSTEM account is granted trust privileges (over the local or DECnet transport). Entries in this file are automatically added to the access allowed list, unless a token-based authentication scheme is in place. In that case, trusted users must be granted access to the X display server either through a manual entry to the access allowed list or through an entry in the appropriate X authority file.
Similar to the settings in an access allowed file, access trusted settings remain in effect until a user logs into a VSI DECwindows Motif for OpenVMS desktop.
3.3.6. Choosing an Access Control Method
When configuring access control for the X display server, you can choose to apply one or a combination of schemes depending upon your network environment. For example, you may choose to use Kerberos to authorize all remote server connections over TCP/IP and Magic Cookie to authorize LAN network connections.
When used in combination, the most restrictive access control scheme presented by the client always takes precedence. For example, if the server has all three schemes enabled, and the requesting client is using Magic Cookie, the server will attempt to authorize the connection via Magic Cookie. Note that with Magic Cookie access control, user-based access is available by default. If the client attempts and fails to connect to the server using a token-based scheme but is also a member of the authorized users list, then access will still be granted.
However, before enabling an access control scheme, you must first determine the server connection environment, as described in the following sections. For example, some VSI DECwindows Motif for OpenVMS systems only run applications outside of a desktop session. For these systems,you should apply access control only to connections made outside of a VSI DECwindows Motif for OpenVMS session. Applying access control to connections both inside and outside a desktop session can result in a situation where the initial VSI DECwindows Motif for OpenVMS login process cannot login.
3.3.6.1. Applying Access Control to Connections Outside a Desktop Session
Enabling access control outside of a VSI DECwindows Motif for OpenVMS desktop session allows authorized OpenVMS users to run client applications on systems without a login process. This type of access control is used typically for systems that function as a standalone X display server, rather than an interactive VSI DECwindows Motif for OpenVMS workstation.
Use the server customization parameters and either the access allowed file or X authority file to set access control.
3.3.6.2. Applying Access Control to Connections Inside a Desktop Session
Use the Security Options dialog box to set the access control scheme in effect inside a VSI DECwindows Motif for OpenVMS session. The options in the dialog box enable you to set the access control scheme used by the local X display server,to authorize other users access to the display server, and to specify the scheme local client applications use when connecting to a display server.
Settings in the Traditional Desktop are stored in the DECW$SMB_SECURITY.DAT file as soon as the changes are applied.
Settings in the New Desktop are saved whenever a session is saved (such as when saving a new home session or when saving the current session). Note that on the New Desktop, if you chose to restore the home session on next login, any changes will be lost unless you save them by updating the home session.
3.3.7. Enabling User-Based Access Control
The following sections describe how to apply user-based access control to server connections outside and inside a desktop session.
Note that user-based access control over the TCP/IP Services transport uses the getnameinfo function to obtain the name of the peer system and matches this value against the values supplied by the user. If the address is an IPv4-mapped IPv6 address, the getnameinfo is called using the AF_INET family and the IPv4 address extracted from the IPv4-mapped IPv6 address. Otherwise, the getnameinfo function is called with AF_INET6 and the IPv6 address. IPv4 connections that fail reverse name translation are represented in IPv4 format. All other connections that fail reverse name translation are represented in IPv6 format.
If the address used is link local, a scope identifier is included in the string
returned by the TCP/IP Services getnameinfo function. The server matches this
against a host name in the authorized users list regardless of whether the enter
contains a scope identifier or not. For example,a returned value of
test12i6%WE1 matches either test12i6%WE1 or
test12i6.
For Server Connections Outside a Desktop Session
Caution
Authorizing TCPIP host connections to an X server using an access allowed file entry provides unauthenticated access to a VSI DECwindows Motif for OpenVMS system. This could leave the system vulnerable to unwanted intrusion, Denial of Service (DoS) attacks, and possible data loss.
To ensure the proper level of system security, VSI strongly recommends that a token-based scheme (such as Magic Cookie or Kerberos) be used to authorize remote access to an X server over TCP/IP. Not only do these schemes provide greater system protection, they also allow you to grant (or deny) access on aper-user basis.
- Modify the SYS$MANAGER:DECW$PRIVATE_SERVER_SETUP.COM file and define the value of the DECW$SERVER_ACCESS_ALLOWED and DECW$ACCESS_TRUSTED parameters so that they refer to the location where the files are stored, such as:
$
DECW$SERVER_ACCESS_ALLOWED == "SYS$MANAGER:DECW$SERVER1_ACCESS_ALLOWED.DAT"$DECW$SERVER_ACCESS_TRUSTED == "SYS$MANAGER:DECW$SERVER1_ACCESS_TRUSTED.DAT" Create and edit the access allowed and access trusted files adding the appropriate user entries. Each entry follows the
transport-host-usernameformat. Note that the only valid transport values are DECNET, TCPIP, and LOCAL. The transport synonyms TCP, INET, INET6, and DNET described in Table 4.1, ''Supported VSI DECwindows Motif for OpenVMS Transport Names'' are not supported.For example, the following entries grant user JONES local access to the server as well as network access from node ZEPHYR through the DECnet transport:DECNET ZEPHYR JONESLOCAL 0 JONES ⋮
Note that when using TCP/IP as the network transport, access and trust privileges can only be assigned to a host rather than to specific users. TCP/IP does not provide the user specification as part of the data provided on are mote connection.
As a result, file entries for hosts using TCP/IP must contain an asterisk (*) for the user specification. This grants all users on a particular host system access privileges when they connect to the X display server using TCP/IP. For example, the following entry grants access to all users on node ZEPHYR through the TCP/IP transport:TCPIP ZEPHYR * ⋮
Save the files and restart the server. The new access and trust privileges are applied automatically at system startup.
For Connections Inside a Desktop Session
- Do one of the following, depending on the desktop:
From the Traditional Desktop, choose Security... from the Session Manager Options menu.
From the New Desktop, click the Style Manager Security control.
The Security Options dialog box is displayed.
Under Server Access Control, click Users... to display the Configure Users dialog box.
Type the node, the user name, and the method of transport for the users you want to authorize.
Click on the Add button. The users are added to the Authorized Users list.
Click on OK to save and apply the changes and close the Configure Users dialog box.
To disable user-based access control, you must remove all users from the Authorized Users list.
To remove a user name, first click on the names you want to remove. Then click on the Remove button. Finally, click on OK or Apply. The users will no longer have authorized access to the system.
3.3.8. Enabling Magic Cookie Access Control
The following sections describe how to apply Magic Cookie access control to server connections outside and inside a desktop session.
For Connections Outside a Desktop Session
Log into the SYSTEM account or another privileged account.
- Modify the DECW$PRIVATE_SERVER_SETUP.COM file and define the value of the DECW$SERVER_XAUTHORITY parameter so that it refers to the location where the X authority file will be stored, for example:
$
DECW$SERVER_XAUTHORITY == "SYS$MANAGER:SERVER_ZEPHYR.DECW$XAUTH" - Using the X Authority File utility (xauth), manually create the X authority file for the server and add the appropriate entries. For example, the following command creates the new X authority file SERVER_ZEPHYR.DECW$XAUTH, adds the entry for the local transport, specifies the Magic Cookie protocol, and assigns a cookie value of 12345abcdef56789:
$
XAUTH -f SYS$SYSROOT:[SYSMGR]SERVER_ZEPHYR.DECW$XAUTH ADD -_$:0 MIT-MAGIC-COOKIE-1 12345abcdef56789The cookie in this file is loaded into the X server at startup and can be used to authorize all client connections.
Save the file and restart the server.
Propagate the key to all client systems using the xauth utility. For additional information on using the xauth utility, see the VSI DECwindows Motif for OpenVMS New Features manual or refer to the online help.
For Connections Inside a Desktop Session
- Do one of the following, depending on the desktop:
From the Traditional Desktop, choose Security... from the Session Manager Options menu.
From the New Desktop, click the Style Manager Security control.
The Security Options dialog box is displayed.
Under Server Access Control, choose the Magic Cookie option.
Click on OK to save and apply the changes and close the Security Options dialog box.
Once enabled, a cookie is generated each time you log into the desktop. To grant other users access to the X display server, you must propagate the cookie to their X authority file using the xauth utility.
For additional information on using the xauth utility, see the VSI DECwindows Motif for OpenVMS New Features manual or refer to the online help.
To disable Magic Cookie, deselect the Magic Cookie option and click OK or Apply.
Note
Any client applications that are connected to the X display server when a new cookie is generated will remain connected. Authentication occurs only during the initial connection to the server.
3.3.9. Enabling Kerberos Access Control
Installed and configured the TCP/IP for OpenVMS software with a domain name server.
Installed and configured the Kerberos Client for OpenVMS software, as described in the Kerberos Client for OpenVMS Installation Guide and Release Notes.
- Obtained the following information:
Location of the KDC
The appropriate node, domain, and realm information for adding principals
Your principal name and password
Enabled the TCP/IP transport by defining the DECW$SERVER_TRANSPORTS parameter in SYS$MANAGER:DECW$PRIVATE_SERVER_SETUP and then restart the server.
Note that Kerberos access control is not supported in TCP/IP environments that use IPv6. If Kerberos and IPv6 are enabled, the server connection attempt will fail with a KERBEROS error indicating that the network address is invalid. To use Kerberos access control, specify the INET transport name (as described in Table 4.1, ''Supported VSI DECwindows Motif for OpenVMS Transport Names''). This forces the use of IPv4 addresses.
The following sections describe how to apply Kerberos access control to server connections outside and inside a desktop session.
For Connections Outside a Desktop Session
- Invoke the Kerberos Administration utility, as follows:
$
KERBEROS/INTERFACE=DECWINDOWS/ADMIN - Create the following principal, keytab file, and keytab file entry. Refer to your Kerberos Client for OpenVMS documentation for information on how to use the Kerberos Administration Utility.
- Create the principal x0/
host@REALM, for example:x0/system@ORG.COMPANY.COM
Create the keytab file SYS$SYSROOT:[SYSMGR]DECW$X0.KEYTAB.
Create an entry in that keytab file for principal x0.
- Modify the DECW$PRIVATE_SERVER_SETUP.COM file and define the values of the following parameters so that they refer to the location where the X authority file, access allowed, and access trusted files will be stored, for example:
$
DECW$SERVER_XAUTHORITY == "SYS$MANAGER:SERVER_ZEPHYR.DECW$XAUTH"$DECW$SERVER_ACCESS_ALLOWED == "SYS$MANAGER:DECW$SERVER_ZEPHYR_ACCESS_ALLOWED.DAT"$DECW$SERVER_ACCESS_TRUSTED == "SYS$MANAGER:DECW$SERVER_ZEPHYR_ACCESS_TRUSTED.DAT" - Using the xauth utility, manually create the X authority file for the server, and add the appropriate entries. For example, the following command creates the new X authority file SERVER_ZEPHYR.DECW$XAUTH, adds the entry for the local transport, specifies the Kerberos protocol, and assigns a value that identifies the keytab file:
$
XAUTH -f SYS$SYSROOT:[SYSMGR]SERVER_ZEPHER.DECW$XAUTH -_$ADD :0 MIT-KERBEROS-5 -_$"""CS:X0,SYS$SYSROOT:[SYSMGR]DECW$X0.KEYTAB""" - Manually create an access trusted file in the location specified by the DECW$SERVER_ACCESS_TRUSTED parameter and add an entry for the SYSTEM account, as follows:
* SYSTEM 0
Manually create an access allowed file in the location specified by the DECW$SERVER_ACCESS_ALLOWED parameter and place an entry in the file for each Kerberos principal you want to grant access to the server. Each entry for a Kerberos principal in an access allowed file follows the
protocol-principal@realm-accessrightsformat, whereaccessrightscan be NONE, ALL, or *.For example, the following entry in an access allowed file grants principal JONES access to the server through the TCP/IP transport:KERBEROS jones@ORG.COMPANY.COM ALL ⋮
Save the file and restart the server.
For Connections Inside a Desktop Session
- Do one of the following, depending on the desktop:
From the Traditional Desktop, choose Security... from the Session Manager Options menu.
From the New Desktop, click the Style Manager Security control.
The Security Options dialog box is displayed.
Click on the Configure Principals button.
Enter the specification(s) for the Kerberos principal(s) you want to add to the Authorized Principals list.
The format of a typical Kerberos principal is
primary/instance@REALM.Click on the Add button. The principal is added to the Authorized Principals box.
Click on OK to save and apply the changes and close the Configure Principals dialog box.
Under Server Access Control, choose Kerberos and click OK.
The Kerberos Login dialog box is displayed, and you are prompted to log in and verify your Kerberos credentials.
Enter your Kerberos principal name and password and click OK. Note that principal names and passwords are case-sensitive.
To disable Kerberos, deselect the Kerberos option, remove all principals from the list, and click OK or Apply.
To prevent one or more principals from accessing your session, first click on the name(s) you want to remove. Then click on the Remove button. Finally, click on OK or Apply. The principal will no longer have authorized access to your workstation.
If you believe the current ticket has been compromised, you can deny access to your session and force principals to repeat the login and authentication process by clicking on the Revoke Ticket button.
3.3.10. Using the Security Extension
UNTRUSTED – Indicates that this is an untrusted connection. An untrusted connection severely restricts the operations that can be performed over the connection. Client applications running over an untrusted connection are allowed limited access to X server extensions and are prevented from accessing windows other than those created by the application. This is the default attribute for all authorization keys.
TRUSTED – Indicates that this is a trusted connection.A trusted connection allows all client operations (except those that change access control parameters) to occur over the connection.
TIMEOUT – Sets an expiration period for the token.
GROUP – Indicates the application group to which the token applies.
Note
Client applications that have not been coded to allow for use over an untrusted connection may behave unexpectedly. See the specification for the Security extension from the X. Org Foundation for a description of the limitations of an untrusted connection.
3.3.10.1. Enabling the Security Extension
$ decw$server_extensions == "SEC_XAG"Save the file and restart the server.
3.3.10.2. Using the Security Policy File
The security policy file enables you to configure the server to allow certain actions (at the X atom level) to be performed over untrusted network connections. This file establishes one or more site policies that specify the set of allowable actions through a series of field definitions.
A sample file has been provided with VSI DECwindows Motif for OpenVMS and is located in DECW$EXAMPLES:DECW$SECURITY_POLICY.TXT. Use this file as a template when creating a policy file. Security policies are described in the Security Extension Specification published by the X. Org Foundation. Refer to this specification for details regarding the use and definition of security policies.
Copy DECW$EXAMPLES:DECW$SECURITY_POLICY.TXT to another file, make the necessary changes, and save the file to an alternate location on the system.
Modify the DECW$PRIVATE_SERVER_SETUP.COM file, and define the value of the DECW$SECURITY_POLICY parameter to point to the location where security policy file resides.
Save the file and restart the server.
3.4. Setting Up a Multihead System
Multihead systems enable you to connect multiple monitors to a system to form a single display. The following sections describe the system setup prerequisites and the supported methods for configuring multihead systems.
3.4.1. System Setup
- Disable VGA services. – Some video cards can dynamically disable or enable VGA services as necessary,but others require that you manually disable VGA using a jumper setting on the video card. Refer to the documentation for your video cards to determine if this change is required. If so, make this change prior to installing the cards in your system.
Warning
If you install multiple video cards on a system without disabling VGA services on all but one of the cards, all of the cards will compete for control of the video subsystem at boot time, resulting in possible system damage.
Install the video cards. – Shut down the OpenVMS system and install the video cards, as instructed by the hardware documentation.
Turn the power back on and reboot the operating system. During startup, the OpenVMS operating system will verify that the video cards were installed correctly.
3.4.2. Configuring a Simple Multihead System
$ IF DECW$DEVICE_COUNT .GT. 1 THEN DECW$MULTI_HEAD == 1The template file is located in the SYS$MANAGER directory. To invoke multihead support, copy the template file to SYS$MANAGER:DECW$PRIVATE_SERVER_SETUP.COM. Editing of this file is not needed.
3.4.3. Configuring a Multihead System Using XINERAMA
The Xinerama extension (XINERAMA) enables you to connect multiple monitors to a single system running to create a unified virtual display. In contrast to simple multihead systems, XINERAMA provides control over the arrangement of the screens and desktop. You can customize the number, order, and configuration of each screen in the display, and you can drag windows and text from screen to screen on the desktop.
The following sections describe how to configure a multihead system using XINERAMA.
3.4.3.1. Hardware and Configuration Requirements
XINERAMA is supported only in a homogeneous graphics environment. Each multihead configuration must consist of common video cards, bit depths, visual classes, screen resolutions, and monitors of a similar size. The monitors must also be arranged into a rectangle–without gaps in between.
See the VSI DECwindows Motif for OpenVMS Software Product Description for a list of the currently supported video graphics cards; see Section 3.1.2.4, ''Devices'' for a description of the logicals you can use to change the default values for these graphics settings.
The display server supports up to 16 monitors in a multihead configuration. Note that the actual number of monitors you can use may be further limited by the number of available option card slots.
3.4.3.2. Enabling the XINERAMA Extension
Although this extension is part of the X display server, it is not enabled by default.
$ DECW$SERVER_EXTENSIONS == "DEC-XTRAP,XINERAMA"Save the file and restart the server.
3.4.3.3. Arranging the Monitors
By default, the system uses the physical location of the video cards on the system bus to assign the device names (such as, GYA0, GYB0, etc.). The devices are subsequently assigned screen numbers and initialized in alphabetical order according to device name.
For example in a four-monitor multihead configuration, if you have connected the cables to the video cards in the proper order and placed the monitors side-by-side, the screens should be numbered in either ascending (0, 1, 2, 3) or descending (3, 2, 1, 0) order.
Physically move the monitors to the correct placement.
Reconnect the cables in the correct order.
Edit the DECW$PRIVATE_SERVER_SETUP.COM file and define the DECW$SERVER_SCREENS parameter so that it overrides the default screen initialization order.
- DECW$SERVER_EDGE_LEFT
- DECW$SERVER_EDGE_RIGHT
- DECW$SERVER_EDGE_TOP
- DECW$SERVER_EDGE_BOTTOM
These parameters control where each edge of the virtual display is attached.
When the setup process is complete, all the monitors should be active and organized in the proper arrangement. Once you restart VSI DECwindows Motif for OpenVMS,the login dialog box for the session is displayed at the center of the virtual display, and you should be able to open application windows and drag them from screen to screen.
3.5. Changing the Default Keyboard Layout
There are two types of keyboard layouts available to VSI DECwindows Motif for OpenVMS: the DECwindows keymaps and the X Keyboard keymaps. The following sections describe how to change the default keyboard settings outside of a desktop session. Note that these settings can be overridden by the Session Manager during a desktop session, as described in the Using VSI DECwindows Motif for OpenVMS and Getting Started With the New Desktop manuals.
See Appendix B, "DECwindows Motif Keymap Names" for a listing of all languages, keyboard models, and keymap names.
3.5.1. Using the DECwindows Keymap Files
Turn the keyboard upside down and look for a label that specifies the model number. The model number should be in a format similar to LK401-- xx.
The model number may also be listed as simply LK401. In this case, the information you need is in another part of the label, where there will be a number that has the format nn-nnnnn-xx.
Use the xx part of this number to choose a keymap name from Appendix B, "DECwindows Motif Keymap Names". The table is arranged based on the language for which each keyboard is designed.
Choose the keymap ending in:- _DP for the data processing keyboard layout
- _TW for the typewriter layout
- _LK for an LK-series layout
- _PC for a PC-based layout
- After you choose a keymap name, modify the DECW$PRIVATE_SERVER_SETUP.COM file. For example, to change the keyboard layout to a Dutch typewriter layout, add the following line to DECW$PRIVATE_SERVER_SETUP.COM:
$
DECW$DEFAULT_KEYBOARD_MAP == "DUTCH_LK201LH_TW" Add a line similar to this for each workstation that does not have a North American keyboard layout, or add this line to the common section for all workstations (if all the workstations use the same keyboard layout).
$do_DUTCH:
$do_DUTCH2:
$ decw$server_density == 100
$ decw$default_keyboard_map == "DUTCH_LK201LH_DP"
$ exit
3.5.2. Using X Keyboard Keymap Files
The X Keyboard keymap files are the standard X Window System alternative to the keymaps provided with VSI DECwindows Motif for OpenVMS. They are intended to supplement, rather than replace, the VSI DECwindows Motif for OpenVMS keymap files.
You can compile X Keyboard layout files to create loadable keymaps using the X Keyboard Compiler utility (xkbcomp), as described in the following section,or the server will compile the files as needed.
Also, since the X Keyboard keymap format (.XKM) is the accepted,vendor-independent standard for loadable keyboards, you can choose to load. XKM files from other X11R6-based systems and X Window System software providers.
3.5.2.1. The X Keyboard Components Database
The X display server maintains a database of X keyboard components and common keyboard mappings. When combined, these components provide a complete description of a keyboard and its behavior.
The server loads the database from the compiled keymap file specified by the DECW$SERVER_XKEYBOARD_MAP parameter. This file is located in the directory defined by the DECW$SERVER_XKEYBOARD_COMPILED_DIR parameter. If the compiled keymap file does not exist, the server runs the xkbcomp utility to compile the file from its component sources.
Keymap source files – These are the upper-level source files that are specified as input files on the xkbcomp utility command line. The keymap source files reference the other component source files during compilation to produce a complete, loadable keymap (.XKM) file.
These files are stored in the KEYMAP.DIGITAL subdirectory of the root directory specified by the DECW$SERVER_XKEYBOARD_DIRECTORY parameter. There is one keymap file for each supported language variant, for example:- DECW$SYSCOMMON:[SYS$KEYMAP.XKB.KEYMAP.DIGITAL]US
- DECW$SYSCOMMON:[SYS$KEYMAP.XKB.KEYMAP.DIGITAL]JAPANESE
Keycode component source files – These files specify the range and interpretation of the raw keycodes reported by the input device. They set the keycode symbolic names, the minimum and maximum legal keycodes for the keyboard, and the symbolic name for each key.
The keycode files can also contain aliases for keys,symbolic names for indicators, and a description of which indicators are physically present.
The keycode component source files are stored in the KEYCODES.DIGITAL subdirectory of the root directory specified by the DECW$SERVER_XKEYBOARD_DIRECTORY parameter, for example:- DECW$SYSCOMMON:[SYS$KEYMAP.XKB.KEYCODES.DIGITAL]LK
- DECW$SYSCOMMON:[SYS$KEYMAP.XKB.KEYCODES.DIGITAL]PC
Types source files – These files specify the layout types that can be associated with the various keyboard keys. They affect the types symbolic name and the list of layout types associated with the keyboard.
The types component can also contain real modifier bindings and symbolic names for one or more virtual modifiers.
These files are stored in the TYPES subdirectory under the root directory specified by the DECW$SERVER_XKEYBOARD_DIRECTORY parameter, for example:- DECW$SYSCOMMON:[SYS$KEYMAP.XKB.TYPES]BASIC
- DECW$SYSCOMMON:[SYS$KEYMAP.XKB.TYPES]DEFAULT
- Compatibility map source files – These files specify the rules used to assign actions to keyboard symbols (keysyms) based on the XKB capability (aware or unaware) between the client and server. The XKB capability is determined through the following compatibility transformations:
- XKB extension state to core state
- Core keyboard mapping to XKB keyboard mapping
- XKB keyboard mapping to Core keyboard mapping
The compatibility map component affects the compatibility symbolic name,the symbol compatibility map, and the group compatibility map. This component can also specify maps for indicators, as well as the real modifier bindings and symbolic names for some virtual modifiers.
The compatibility map source files are stored in the COMPAT subdirectory under the root directory specified by the DECW$SERVER_XKEYBOARD_DIRECTORY parameter, for example:- DECW$SYSCOMMON:[SYS$KEYMAP.XKB.COMPAT]BASIC
- DECW$SYSCOMMON:[SYS$KEYMAP.XKB.COMPAT]DEFAULT
Symbols source files – These files specify the symbols bound to each keyboard key. They affect the key symbol mappings for each key, the keyboard modifier mapping, and the symbolic names for the keyboard symbol groups. The symbols component can also contain explicit actions and behaviors for some keys or the real modifier bindings and symbolic names for some virtual modifiers.
The symbols source files are stored in the SYMBOLS and SYMBOLS.DIGITAL subdirectories under the root directory specified by the DECW$SERVER_XKEYBOARD_DIRECTORY parameter, for example:- DECW$SYSCOMMON:[SYS$KEYMAP.XKB.SYMBOLS]US
- DECW$SYSCOMMON:[SYS$KEYMAP.XKB.SYMBOLS.DIGITAL]SWISS_FRENCH
Geometry source files – These files define the geometry of the keyboard. They define the geometry symbolic name and the keyboard geometry description. The geometry component can also contain aliases for keys or symbolic names for indicators and might affect the set of indicators that are physically present. Key aliases defined in the geometry component of a keyboard mapping override those defined in the keycodes component.
These files are stored in the GEOMETRY subdirectory under the root directory specified by the DECW$SERVER_XKEYBOARD_DIRECTORY parameter, for example:- DECW$SYSCOMMON: [SYS$KEYMAP.XKB.GEOMETRY.DIGITAL]LK
- DECW$SYSCOMMON: [SYS$KEYMAP.XKB.GEOMETRY.DIGITAL]PC
Other directories – The SEMANTICS subdirectory of the base directory DECW$SERVER_XKEYBOARD_DIRECTORY contains a set of files that define the default semantics for keyboard types and compatibility components.
Files in the base directory DECW$SERVER_XKEYBOARD_DIRECTORY and in subdirectories TMP and RULES are used by the server and should not be modified.
3.5.2.2. Creating an X Keyboard Keymap File
- Edit one or more of the component source files described in Section 3.5.2.1, ''The X Keyboard Components Database'' and make the necessary changes. For example, to swap the left and right parenthesis for all US keymaps, edit SYS$COMMON:[SYS$KEYMAP.XKB.SYMBOLS.DIGITAL]US, as follows:
⋮ 19 key <AE09> { [ 9, parenleft ] }; 20 key <AE10> { [ 0, parenright ] }; ⋮ - Using the xkbcomp utility, compile the component source files to create the modified keymap file. For example, to create a modified keymap file for DIGITAL_US_LK401, compile the sources as follows:
$
xkbcomp -RDECW$SYSCOMMON:[SYS$KEYMAP.XKB] -xkm -m lk401 -_$DECW$SYSCOMMON:[SYS$KEYMAP.XKB.KEYMAP.DIGITAL]us -_$-o SYS$COMMON:[SYS$KEYMAP.XKB.COMPILED]digital_us_lk401.xkm
You can then load the modified, compiled keymap file as described in Section 3.5.2.3, ''Loading a Compiled Keymap File''.
3.5.2.3. Loading a Compiled Keymap File
- Modify the DECW$PRIVATE_SERVER_SETUP.COM file, and define the value of the DECW$SERVER_EXTENSIONS parameter so that it enables the use of the X Keyboard (XKB) extension, similar to the following:
$
DECW$SERVER_EXTENSIONS == "XKB,XINERAMA" - Define the value of the parameter DECW$SERVER_XKEYBOARD_LOAD_MAP to enable the use of X Keyboard keymaps:
$
DECW$SERVER_XKEYBOARD_LOAD_MAP=="1" Define the value of the DECW$SERVER_XKEYBOARD_COMPILED_DIR parameter to point to where the keymap files are located. This directory is also where the server places any keymap files that it compiles on demand.
Define the value of the DECW$SERVER_XKEYBOARD_MAP parameter to point to the default X Keyboard keymap to load at server startup.
Save the file and restart the server.
3.5.2.4. Enabling AccessX Key Features
Edit the DECW$PRIVATE_SERVER_SETUP.COM file.
- Define the value of the DECW$SERVER_EXTENSIONS parameter so that it enables the use of the X Keyboard (XKB) extension, similar to the following:
$
DECW$SERVER_EXTENSIONS == "XKB,XINERAMA" Set the value of the DECW$SERVER_ENABLE_ACCESSX parameter to 1 (enabled).
Save the file and restart the server.
|
To... |
Perform This Action... |
|---|---|
|
Toggle slow keys |
Hold Shift key by itself for eight seconds |
|
Toggle sticky keys |
Press and release the left or right Shift key five times in a row, without any intervening key events and with less than 30 seconds delay between consecutive presses |
|
Turn off sticky keys |
Simultaneously press two or more modifier keys. |
3.6. Specifying New Fonts
Place the DECW$FONT file in the DECW$SYSCOMMON: [SYSFONT.DECW.USER_ xx] directory.
- Update the font database for the server by entering the following command from a privileged account:
$
@SYS$UPDATE:DECW$MKFONTDIRThis command creates new font directories for all layered-product fonts and runs automatically when DECwindows is installed.
3.6.1. Using Third-Party Fonts
If you want to use a third-party font, choose one of the following options:
Font File is in BDF Format
Obtain the font source in bitmap distribution format (BDF).
- Compile the font with the FONT command, as follows:
$
FONT file-nameSee the VMS DECwindows Guide to Xlib(Release 4) Programming: MIT C Binding manual for a full description of the FONT command.
- Copy the resulting *.PCF file to one of the following directories:
SYS$COMMON:[SYSFONT.DECW.USER_75DPI]
SYS$COMMON:[SYSFONT.DECW.USER_100DPI]
SYS$COMMON:[SYSFONT.DECW.COMMON_USER]
- Create new font directories from a privileged account using the following command:
$
@SYS$UPDATE:DECW$MKFONTDIR
End the current session and start a new session for the new font to become available.
Other Third-Party Fonts
To use other third-party fonts, create a DECW$FONT_ALIAS.DAT file in the appropriate font directory.
The format of the font alias file is:
alias-font-name actual-font-name
If the font names contain embedded spaces, enclose the names in double quotes (" ").
The alias-font-name value is the third-party font name, and the
actual-font-name value is a DECwindows font name.
See the VMS DECwindows Guide to Xlib(Release 4) Programming: MIT C Binding and VSI DECwindows Motif for OpenVMS New Features manuals for supported DECwindows font names.
3.6.2. Enabling Support for Euro Currency Symbol
VSI DECwindows Motif for OpenVMS includes support for the euro currency symbol. The euro font sets are installed during the base OpenVMS operating system installation. Choosing the euro option during installation allows you to then enable and display the euro symbol on systems running VSI DECwindows Motif for OpenVMS Version 1.3 or higher.
$COPY SYS$COMMON:[SYSMGR]DECW$EURO_APPS_SETUP.TEMPLATE -_$SYS$COMMON:[SYSMGR]DECW$EURO_APPS_SETUP.COM$COPY SYS$COMMON:[SYSMGR]DECW$EURO_SERVER_SETUP.TEMPLATE -_$SYS$COMMON:[SYSMGR]DECW$EURO_SERVER_SETUP.COM
Restart your VSI DECwindows Motif for OpenVMS system. The command files are run automatically as part of the VSI DECwindows Motif for OpenVMS startup procedure.
Support for the euro locale by the OpenVMS C Run-Time Library is not required for base VSI DECwindows Motif for OpenVMS euro support. However, if you want to run Motif applications in a euro locale, you must install euro locale support, which is included in the OpenVMS Alpha and OpenVMS IA-64 media kits.
3.6.2.1. Displaying the Euro Symbol in VSI DECwindows Motif for OpenVMS Applications
Once euro support is enabled on your system, you can display the euro sign with any ISO8859-1 bitmap font on your workstation, with no additional setup. VSI DECwindows Motif for OpenVMS applications that use standard ISO Latin-1 fonts to display text will display the euro sign for character 0xA4. The character set portion of the X Logical Font Description (XLFD) name for these fonts is ISO8859-1.
- UPSS ISO Latin-1
- 8-Bit Multinational Characters
3.6.2.2. Using the Keyboard to Manually Enter the Euro Symbol (Alpha Only)
|
Keyboard Type |
Keymap |
Key Sequence |
|---|---|---|
|
LK-style |
*LK201* keymap |
Use the same key sequence you use for the universal
currency symbol. For
example:
Compose+Space o x or Compose+Space O X Compose+Space x o or Compose+Space X O Compose+Space 0 x or Compose+Space 0 X Compose+Space x 0 or Compose+Space X 0 |
|
LK-style |
*LK401* keymap ? |
Left Compose + E |
|
PC-style ? |
*LK44* keymap |
Right Alt + E |
3.6.3. Enabling Font Server Support
- To add support for the TCP/IP transport, specify TCP as the network connection type that will communicate with the font server. Replace
nodewith the Internet node name. Specify the TCP/IP port number forport_number, as shown in the following example:$
DECW$FONT_SERVERS == "TCP/node::port_number" - To add support for the DECnet transport, specify DECNET as the network connection type that will communicate with the font server. Replace
nodewith the DECnet node name. Specify the DECnet object name fornetwork_object.$
DECW$FONT_SERVERS == "DECNET/node::network_object"
Multiple font servers can be added by defining the symbol as a comma-separated list. The symbol is not case sensitive.
3.7. Setting up an LBX Proxy Server
Managed – The proxy server is managed by a proxy manager. The server can be used by multiple clients to access multiple X display servers. Clients do not need to know the proxy server's server number, they simply provide the requested X display server to the proxy manager. The manager, in turn, either finds the appropriate existing proxy server or starts a new instance of the proxy server automatically.
Unmanaged – The proxy server is started manually. The proxy manager is aware of the server. The proxy server can be used by multiple clients to access multiple X display servers.
Standalone – The proxy server is started manually. The proxy manager is not aware of the proxy server. The server can be used by multiple clients to access a single X display server. Clients need to know the proxy server's number.
VSI DECwindows Motif for OpenVMS currently supports the managed and standalone configurations.
In order to use the proxy server and proxy manager components, the LBX option must have been chosen during DECwindows installation. See the VSI DECwindows Motif for OpenVMS Installation Guide for information about installing LBX support.
Note
Because the communication between the client and the proxy server uses the unoptimized X protocol, the client and the proxy server should always be on the same node or on the same LAN.
Although LBX reduces data flow between systems, it is not recommended fora LAN-only environment. While it does reduce overall traffic flow, this comes at a cost of increased processing requirements. This generally results in as light decrease in performance in a LAN-only environment.
3.7.1. Enabling the LBX Extension
The use of LBX requires that the X display server be capable of interpreting the LBX protocol. On VSI DECwindows Motif for OpenVMS systems, you must enable the use of the LBX protocol through the DECW$SERVER_EXTENSIONS parameter.
$ DECW$SERVER_EXTENSIONS == "LBX"Save the file and restart the server.
3.7.2. Starting the Proxy Server
How you start an LBX proxy server determines the proxy server's type and how a client accesses the proxy server. Both methods use the LBXPROXY command; see the online help for the command to learn more about the available qualifiers and their values.
Before you start an LBX proxy server, ensure that the proxy server is properly authorized to connect to the X display server, as described in Section 3.7.2.1, ''Authentication in a Proxy Server Environment''.
3.7.2.1. Authentication in a Proxy Server Environment
When the proxy server connects to an X server, the proxy server undergoes authentication in the same manner as a client. How the proxy server obtains its authentication information depends on the type of proxy server.
A managed proxy server obtains its authentication information from the proxy manager. The proxy manager in turn receives the authentication information from the client. The client's default authentication information is contained in the client's X authority file. The client can control which X authority file is used by using the /XAUTHORITY qualifier to the SET DISPLAY command. The client can supply explicit authentication information on the SET DISPLAY command using the /LBXAUTHENTICATE and /LBXDATA qualifiers. The client also has the option of using the /NOLBXAUTHENTICATE qualifier to specify that the authentication information come from the proxy server's current X authority file. For more information about the SET DISPLAY command qualifiers for LBX, see VSI OpenVMS DCL Dictionary: N–Z.
A standalone proxy server obtains its authentication information from the information present in the current X authority file.
3.7.2.2. Starting a Managed Proxy Server
LBX MANAGED COMMAND SYS$MANAGER:DECW$LBXPROXY_SUB ["qualifiers"]After the proxy manager is configured, no specific action is required to start the proxy server; the proxy manager starts the server when the manager receives the first client request.
3.7.2.3. Starting a Standalone Proxy Server
LBXPROXY [qualifiers]$ LBXPROXY /DISPLAY="REMOTE1.CMP.COM:0"/SERVER=50/FIXED_SERVER@SYS$MANAGER:DECW$LBXPROXY ["lbxproxy-qualifiers"] ["run-qualifiers"]
$@SYS$MANAGER:DECW$LBXPROXY "/DISPLAY=""REMOTE1.CMP.COM:0""" + -_$"/SERVER=50/FIXED_SERVER"
Use the run-qualifiers parameter to pass any qualifiers to the RUN command used to invoke the LBXPROXY image. One use of this parameter might be to override the default LBXPROXY process characteristics or any values set by the logicals provided to modify these defaults.
Note
To start an LBX proxy server as a detached process requires the DETACH privilege or maximum available detached process quota. To modify the process quotas for a detached process requires the DETACH privilege.
3.7.3. Using the Proxy Server in an IPv6 Environment
The proxy server listens on all configured transports specified with the /TRANSPORT qualifier when the proxy server is started. If the TCPIP transport has been selected, then the proxy server listens on all configured TCP/IP interfaces, regardless of whether they are IPv4- or IPv6-compatible.
The /DISPLAY qualifier allows the additional transport names discussed in Chapter 4, "Using DECwindows". The interpretation of the TCP and TCPIP transport names as seen by the proxy server process is governed by the DECW$IPV6_SUPPORT logical name defined in the DECW$PRIVATE_APPS_SETUP.COM file.
3.7.4. Modifying the Default Proxy Server Process Characteristics
|
Logical |
RUN Command Qualifier |
|---|---|
|
DECW$LBX_AST_LIMIT |
/AST_LIMIT |
|
DECW$LBX_BUFFER_LIMIT |
/BUFFER_LIMIT |
|
DECW$LBX_DUMP |
/DUMP |
|
DECW$LBX_ENQUEUE_LIMIT |
/ENQUEUE_LIMIT |
|
DECW$LBX_EXTENT |
/EXTENT |
|
DECW$LBX_FILE_LIMIT |
/FILE_LIMIT |
|
DECW$LBX_IO_BUFFERED |
/IO_BUFFERED |
|
DECW$LBX_IO_DIRECT |
/IO_DIRECT |
|
DECW$LBX_LOG |
/ERROR |
|
DECW$LBX_MAXIMUM_WORKING_SET |
/MAXIMUM_WORKING_SET |
|
DECW$LBX_PAGE_FILE |
/PAGE_FILE |
|
DECW$LBX_PRIORITY |
/PRIORITY |
|
DECW$LBX_PROCESS_NAME |
/PROCESS_NAME |
|
DECW$LBX_QUEUE_LIMIT |
/QUEUE_LIMIT |
|
DECW$LBX_WORKING_SET |
/WORKING_SET |
3.7.5. Stopping a Proxy Server
You can stop an LBX proxy server either automatically or manually.
3.7.5.1. Stopping Automatically
To stop an LBX proxy server automatically, use the /ONEXIT=TERMINATE qualifier when you start the server. For standalone proxy servers, specify this qualifier either on the LBXPROXY command line or in the lbxproxy-qualifiers parameter of the SYS$MANAGER:DECW$LBXPROXY command procedure.
Note
If not already terminated, all managed proxy servers automatically terminate when their proxy manager is terminated.
3.7.5.2. Stopping Manually
To stop an LBX proxy server manually, use the DCL STOP command.
3.7.6. The Proxy Manager Configuration File
Comment – Comment lines must begin with an exclamation character (!) in the first character position. All other characters in the line are ignored.
- Managed service entry – Managed service entries have the following format:
service-name MANAGED COMMAND command-file [parameters]
where:service-name
Specifies the name of the managed service. The service name is case-insensitive. If the file contains multiple entries with the same service name, only the first occurrence has any effect. For the LBX service, the service name must be LBX. Service names must use characters in the X Portable Character Set with the exception of the Space, Tab, and Newline characters.
command-file
Specifies the name of the command procedure that the proxy manager should invoke to create a new instance of a proxy server for this service. For the LBX service, this argument is usually SYS$MANAGER:DECW$LBXPROXY_SUB.COM.
parameters
Specifies any parameters to pass to the command procedure specified in the command-file argument. All characters following the space after the command-file argument are passed as parameters to the command procedure. For the LBX service, the command procedure expects one quoted parameter, that is, one or more command qualifiers.
Currently, the only managed service supplied with VSI DECwindows Motif for OpenVMS is LBX.
- Unmanaged service entry – Unmanaged service entries have the following format:
service-name UNMANAGED address
where:service-name
Specifies the name of the unmanaged service. The service name is case-insensitive. If the file contains multiple entries with the same service name, the manager tries each entry in order until an active and available proxy server is found. Service names must use characters in the X Portable Character Set with the exception of the Space, Tab, and Newline characters.
address
Specifies the address of the proxy server in Inter-Client Exchange (ICE) format.
Currently, no unmanaged service is supplied with VSI DECwindows Motif for OpenVMS.
3.7.7. Starting the Proxy Manager
You can configure the proxy manager either to start automatically when VSI DECwindows Motif for OpenVMS starts or to start manually at a later time.
3.7.7.1. Starting Automatically at VSI DECwindows Motif for OpenVMS Startup
To start the proxy manager at VSI DECwindows Motif for OpenVMS startup, edit the SYS$MANAGER:DECW$PRIVATE_APPS_SETUP.COM file. For more information on customizing the Session Manager environment, see Chapter 4, "Using DECwindows".
|
Symbol |
Description |
|---|---|
|
DECW$PROXY_MANAGER_CONFIG |
Specifies the name of the proxy manager's configuration file. The definition of this symbol causes the DECwindows startup process to start the proxy manager. The file name specified by this symbol overrides any configuration file specified in the DECW$PROXY_MANAGER_OPTIONS symbol. A default configuration file, SYS$MANAGER:DECW$LBXPROXY.DECW$PMCFG, is provided at installation time. This file has a single service entry for the LBX service. |
|
DECW$PROXY_MANAGER_LOG |
Specifies the name of the file that the proxy manager should use to log events. If the proxy manager starts and this symbol is undefined, the default log file is SYS$MANAGER:DECW$PROXYMANAGER.LOG. |
|
DECW$PROXY_MANAGER_OPTIONS |
Specifies any qualifiers that should be included on the XPROXYMANAGER command line when the proxy manager is started. Note that the configuration file specified by the DECW$PROXY_MANAGER_CONFIG symbol always has precedence over any value specified by this symbol. |
|
DECW$PROXY_MANAGER_QUOTAS |
Specifies any qualifiers to include on the RUN command line used to start the proxy manager. |
Note
If you restart VSI DECwindows Motif for OpenVMS while a proxy manager process is running, the proxy manager does not restart automatically. To ensure that the proxy manager restarts (with any associated options) during DECwindows startup, stop the proxy manager process prior to restarting DECwindows.
Also note that when restarting the proxy manager as part of DECwindows startup,the owner of the proxy manager process is the user who issues the VSI DECwindows Motif for OpenVMS startup command. If DECwindows is started as part of system startup, the owner is the SYSTEM account. If DECwindows is started from another account, verify that the owner of that account has been granted access to the X display server.
3.7.7.2. Starting Manually
XPROXYMANAGER [qualifiers]$XPROXYMANAGER/CONFIGURATION=SYS$MANAGER:DECW$LBXPROXY.DECW$PMCFG -_$/LOG=SYS$MANAGER:DECW$PM.LOG
See the online help for the XPROXYMANAGER command to learn more about the available qualifiers and their values.
Chapter 4. Using DECwindows
Setting the display
Understanding the VSI DECwindows Motif for OpenVMS login process on both the New Desktop and Traditional DECwindows Desktop
Customizing the login environment
Customizing the startup environment
Modifying the default behavior of the Session Manager
Modifying system resource files
Specifying client access control
Customizing print formats
Note
VSI OpenVMS DCL Dictionary: N–Z (SET DISPLAY and SHOW DISPLAY commands)
Getting Started With the New Desktop
Using VSI DECwindows Motif for OpenVMS
4.1. Setting the Display
When a client application starts up, it opens one or more connections to adisplay server. The display server can be on the local system or on a remote system. The application needs to tell the underlying Xm, Xt, or Xlib routines the display server's node name and other connection information. This information is contained in a string called a display name.
In X Window System terms, the display name "specifies the hardware display name,which determines the display and communications domain to be used. [...] if the display name is NULL, it defaults to the value of the DISPLAY environment variable."
On OpenVMS systems, the display name takes the form of either a WSA device that contains the necessary server information or a display name string that specifies the necessary server information explicitly. If neither form of display name is provided, Xlib translates the logical name DECW$DISPLAY to obtain the display name. If the DECW$DISPLAY logical name is undefined, then Xlib translates the logical name DISPLAY. If the DISPLAY logical name is undefined, then Xlib translates the logical name SYS$OUTPUT.
You must have previously created the WSA device and specified the display server information using one or more SET DISPLAY commands. If no SET DISPLAY commands are issued, the DECW$DISPLAY and DISPLAY logical names are inherited from the parent process. Note that the SET DISPLAY command also sets the DECW$DISPLAY and DISPLAY logical names when the /CREATE qualifier is used and no logical name is specified.
4.1.1. The Display Name Format
The display name string format is as follows:
|
Transport Name |
Meaning |
|---|---|
|
DECNET |
Uses the DECnet network protocols. |
|
DNET |
The X Window System name for the DECnet network protocols. DNET is equivalent to DECNET, in most instances. |
|
INET |
Uses the TCP over the IPv4 protocol. This option adds support for the X synonym for TCPIP. With the addition of IPv6 support, this is one of two transports to which TCPIP equates. |
|
INET6 |
Uses the TCP over the IPv6 protocol, if available. If the IPv6 protocol is not available, the IPv4 protocol is used. This is one of two transports to which TCPIP equates. |
|
LAT |
Uses the LAT protocol. There is no X equivalent for this transport. |
|
LOCAL |
Uses shared memory between the server and client processes within the same host. |
|
TCP |
The X Window System name for the TCPIP protocol option. TCP is equivalent to TCPIP. |
|
TCPIP |
Uses the TCP protocol over a version of IP. Previously, this option was an X synonym for INET. With the addition of IPv6 support, this option now equates to either INET or INET6 depending on the setting of the DECW$IPV6_SUPPORT logical name. (See Section 4.4.3, ''Enabling Support for IPv6'' for information about setting this logical name.) |
This parameter is optional. By default, node names ending in a single colon use the TCPIP transport. If you specify a second colon instead of a transport name,the DECNET transport is used. If a DECnet node name ends in a colon, enclose the node name in double quotation marks (""). Addresses ending in a triple colon (:::) are interpreted either as INET6 or DECnet.
The node parameter must specify a node value compatible with the specified transport. When parsing the display name string, VSI DECwindows Motif for OpenVMS does not verify that the node and transport parameters are compatible. Incompatible parameters will cause a failure when the connection is actually attempted. If both the transport and node display name parameters are omitted, the LOCAL transport is assumed.
|
DECnet node |
For the DECNET or DNET transport, specify a DECnet Phase-IV node name, a DECnet Phase-IV address, a DECnet Phase-V node name or alias, or a DECnet Phase-V address. Use 0 to specify the local node. DECnet node names can be enclosed in quotes (" "). |
|
TCP/IP host |
For the TCPIP, TCP, INET, or INET6transport, specify a TCP/IP host name or address. See Table 4.2, ''Supported IPv6 Host Name and Address Formats'' and Table 4.3, ''Supported IPv4 Host Name and Address Formats'' for more information. Use 0 to specify the local node. |
|
LAT service name |
For the LAT transport, specify the name of the local system. The transport uses this value as a service name only. |
|
Local system name |
For the LOCAL transport, specify the name of the local system or 0. |
All node names or addresses must be followed by a colon in addition to any trailing colons within the actual node parameter. You can optionally include a second colon to specify the DECNET transport; seethe transport parameter description for more information. If both the transport and node display name parameters are omitted, the LOCAL transport is assumed.
|
Format |
Example |
|---|---|
|
IPv6 host name or fully-qualified domain name |
ashfld.franklin.mass.us |
|
IPv6 normal address |
FEDC:BA98:7694:3210:FEDC:BA98:7654:3210 |
|
IPv6 compressed address |
::7654:3210 |
|
IPv4-compatible IPv6 address |
::978.765.432.1 |
|
IPv4-mapped IPv6 address |
::FFFF:978.765.432.1 |
|
RFC 2732 style IPv6 literal address |
[FEDC:BA98:7694:3210:FEDC:BA98:7654:3210] |
|
Format |
Example |
|---|---|
|
IPv4 host name or fully-qualified domain name |
ashfld.franklin.mass.us |
|
IPv4 normal address |
978.765.432.10 |
Specifies the decimal number of the display server on the X server display system. Display numbers usually start at 0. A single display server system usually uses the number 0.
Specifies the decimal number of the screen to be used on the specified X display server. Screen numbers start at 0. This parameter is optional. The default is screen number 0.
4.1.2. TCP/IP Host Name Translation
The method used to translate a host name depends on whether IPv6 or IPv4 is selected. If the INET6 or TCPIP transport is specified, and the logical name DECW$IPV6_SUPPORT is defined as "TCP_IS_INET6", the TCP/IP Services getaddrinfo function is used to retrieve the address information from either the local database or the domain name server. If multiple addresses are available, all IPv6 addresses are tried before any IPv4 addresses. The order in which addresses are tried within each IP version is indeterminate.
If the INET transport is specified, and the logical name DECW$IPV6_SUPPORT is not defined as "DISABLED", the TCP/IP Services getaddrinfo function is used to retrieve the IPv4 address information from either the local database or the domain name server. If multiple IPv4 addresses are available, the order in which the addresses are tried is indeterminate.
If the INET or TCPIP transport is specified, and the logical name DECW$IPV6_SUPPORT is defined as "DISABLED", the TCP/IP Services get hostbyaddr function is used to retrieve the address information from either the local database or the domain name server. This method is only provided for compatibility with earlier versions of VSI DECwindows Motif for OpenVMS.
4.2. Understanding the Login Process
This section describes the DECwindows login process, which begins when the Start Session dialog box appears to after the Session Manager starts.
4.2.1. The New Desktop Login Sequence
- LOGINOUT.EXE: Calls routines within DECW$LOGINOUT.EXE. It performs the following functions:
Checks the DW-MOTIF license to verify that the system is licensed to open connections to the display server. If not, DECW$LOGINOUT.EXE displays a warning message, restarts itself, and exits. A new Start Session dialog box displays.
Changes the input pointer to a watch cursor.
Modifies the authorized and trusted user lists to allow you to run applications that connect to the display server and change security settings. Also removes previously set server security settings.
Instructs the server to impersonate a user logging in so that the owner of the server process changes to the user.
Sets a random magic cookie value in the server and stores it in the X authority file DECW$ENDSESSION.DECW$XAUTH. This cookie guarantees that the process will be able to connect to the server to terminate the session.
Instructs the DTGREET process to terminate.
Starts a process that executes DTHELLO.EXE that displays the welcome screen and holds a connection to the server during the startup process.
Sets the process name to DTSESSION.
Initializes the accumulated CPU time for the Start Session process to zero so that the user process is not charged for time spent displaying the Start Session dialog box.
Passes CDE$SYSTEM_DEFAULTS:[BIN]XSESSION.COM as the command procedure that DCL executes.
Exits and passes control of the process to DCL.
- XSESSION.COM: Runs as the Session Manager's default DCL command procedure. It performs the following functions:
If the logical name DECW$SM_WSQUOTA is defined, sets the Session Manager process's working set quota to the value of the logical name.
Runs the system login command procedure as determined by the SYS$SYLOGIN logical name. By default, this is SYLOGIN.COM.
If you did not specify /NOCOMMAND after the user name in the Start Session dialog box, executes your LOGIN.COM (or other login command procedure as specified in the UAF record). You can redefine the DECW$USER_DEFAULTS logical name in your LOGIN.COM to change the directory that is used for your resource files.
If Kerberos authentication is required, the process displays the Kerberos login dialog box. It requests a principal and password and generates a ticket.
Inserts and removes entries from the user's default X authority file, as required.
Executes SYS$MANAGER:DECW$SYLOGIN.COM, if it exists.
Executes SYS$LOGIN:DECW$LOGIN.COM, if it exists.
Runs CDE$SYSTEM_DEFAULTS:[BIN]DTSESSION.EXE to start Session Manager.
4.2.2. The Traditional DECwindows Desktop Login Sequence
- LOGINOUT.EXE: Calls routines within DECW$LOGINOUT.EXE. It performs the following functions:
Checks the DW-MOTIF license to verify that the system is licensed to open connections to the display server. If not, DECW$LOGINOUT.EXE displays a warning message, restarts itself, and exits. A new Start Session dialog box displays.
Changes the input pointer to a watch cursor.
Modifies the authorized and trusted user lists to allow you to run applications that connect to the display server and change security settings. Also removes previously set server security settings.
Instructs the server to impersonate a user logging in so that the owner of the server process changes to the user.
Sets a random magic cookie value in the server and stores it in the X authority file DECW$ENDSESSION.DECW$XAUTH. This cookie guarantees that the process will be able to connect to the server to terminate the session.
Starts a process that executes DECW$WAITFORSM.EXE, which holds a connection to the server during the startup process.
Sets the process name to DECW$SESSION.
Initializes the accumulated CPU time for the Start Session process to zero so that the user process is not charged for time spent displaying the Start Session dialog box.
Passes SYS$MANAGER:DECW$STARTSM.COM as the command procedure that DCL executes.
Exits and passes control of the process to DCL.
- SYS$MANAGER:DECW$STARTSM.COM: Runs as the Session Manager's default DCL command procedure. It performs the following functions:
If the logical name DECW$SM_WSQUOTA is defined, sets the Session Manager process's working set quota to the value of the logical name.
Executes the system login command procedure as determined by the SYS$SYLOGIN logical name. By default, this is SYLOGIN.COM.
If you did not specify /NOCOMMAND after the user name in the Start Session dialog box, executes your LOGIN.COM (or other login command procedure as specified in the UAF record). You can redefine the DECW$USER_DEFAULTS logical name in your LOGIN.COM to change the directory that is used for your resource files.
- Executes SYS$SYSTEM:DECW$WSINIT.EXE to read your workstation customization files. This program opens a connection to the display server and makes Xlib calls to apply your customizations, setting the screen background, pointer shape and color, and other workstation settings. It also creates a property on the root window to communicate your customizations to DECwindows applications that are started later.
Note
If you are logging in to a DECwindows Motif system for the first time after having used the XUI version of DECwindows, DECW$WSINIT.EXE will read your XUI resource files and convert them to DECwindows Motif format.
If Kerberos authentication is required, the process displays the Kerberos login dialog box. It requests a principal and password and generates a ticket.
Inserts and removes entries from the user's default X authority file, as required.
Executes SYS$MANAGER:DECW$SYLOGIN.COM, if it exists.
Executes SYS$LOGIN:DECW$LOGIN.COM, if it exists.
Runs SYS$SYSTEM:DECW$SESSION.EXE to start Session Manager.
4.3. Customizing the Login Environment
The following sections describe techniques to improve or customize the default DECwindows login environment.
4.3.1. Improving Application Startup Performance
Extensive SYLOGIN.COM or LOGIN.COM command procedures can slow down application startup. Many of the operations performed in a SYLOGIN.COM or LOGIN.COM are meaningless for DECwindows application startup. Therefore, the SYLOGIN.COM and LOGIN.COM files should be conditionalized for DECwindows application startup performance.
When starting a DECwindows application, only a minimum of SYLOGIN.COM and LOGIN.COM commands should be executed. Typically,the commands that should be executed are the redefinition of DECW$USER_DEFAULTS(if present), and other logical name definitions if the user will be referencing them from within the context of a DECwindows application.
$ mode = f$mode()
$ tt_devname = f$trnlnm("TT")
$ session_mgr_login = (mode .eqs. "INTERACTIVE") .and.  -
      (f$locate("WSA",tt_devname) .ne. f$len(tt_devname))
$ session_detached_process = (mode .eqs. "INTERACTIVE") .and. -
      (f$locate("MBA",tt_devname) .ne. f$len(tt_devname))
$ if session_mgr_login .or. session_detached_process then exit
4.3.2. Customizing the Login Screen (Traditional DECwindows Desktop Only)
You can customize the VSI DECwindows Motif for OpenVMS login screen to display alternate logos or screen colors. To customize the login screen, create a file named DECW$LOGIN.DAT in the SYS$MANAGER directory that contains your resource definitions. The custom resource definitions from SYS$MANAGER:DECW$LOGIN.DAT are merged with the resource definitions supplied by VSI in SYS$COMMON:[DECW$DEFAULTS.SYSTEM]DECW$LOGIN.DAT to form the new login screen.
Keep customized versions of the DECW$LOGIN.DAT resource file in the SYS$MANAGER directory, and not in DECW$SYSTEM_DEFAULTS, to prevent your customized file from being overwritten when upgraded to a newer version of VSI DECwindows Motif for OpenVMS software. In addition,storing the file in the SYS$MANAGER directory prevents the custom file from superseding the file that is supplied by VSI.
4.3.2.1. Customizing the Logo and Login Screen Colors
|
Resource |
Description |
|---|---|
|
rootColor |
Color of the screen background. |
|
logoColor |
Color of the logo (default is burgundy). |
|
logoX |
x position of the logo (default is 0). |
|
logoY |
y position of the logo (default is 75). |
|
centerLogoX |
Boolean; if true (default), the logo is centered horizontally on the screen. |
decw$login.logoX: 100
decw$login.logoY: 600
decw$login.centerLogoX: false
4.3.2.2. Changing Positions of the Start Session and Set Password DialogBoxes
|
Resource |
Description |
|---|---|
|
centerStartSessionX |
Boolean; if true (default), the Start Session dialog box is centered horizontally. |
|
centerStartSessionY |
Boolean; if true (default), the Start Session dialog box is centered vertically. |
|
centerSetPasswordX |
Boolean; if true (default), the Set Password dialog box for expired passwords is centered horizontally. |
|
centerSetPasswordY |
Boolean; if true (default), the Set Password dialog box is centered vertically. |
decw$login.centerStartSessionX: false
decw$login.centerStartSessionY: false
decw$login.HiddenShell.x: 100
decw$login.HiddenShell.y: 600
decw$login.centerSetPasswordX: false
decw$login.centerSetPasswordY: false
decw$login.SetPasswordShell.x: 30
decw$login.SetPasswordShell.y: 100
4.3.2.3. Disabling a Node Name Display in the Start Session DialogBox
decw$login.displayNodeName: false
4.3.3. Displaying Custom Messages Prior to Login (New Desktop Only)
System managers or other privileged users can display custom messages (such as greetings, security updates, and system broadcasts) prior to session log in on the New Desktop.
At session startup, VSI DECwindows Motif for OpenVMS searches for the message file SYS$MANAGER:DECW$GREET.TXT. If the file is found, a window that contains the text from the message file is displayed in front of the login dialog box. Users must then press the Return key or click OK to continue and log into their New Desktop session. If the file is not found, the window is not displayed, and users can log into their New Desktop session directly.
Log into SYSTEM (or another privileged account).
- Create the file DECW$GREET.TXT in one of the following locations:
For standalone systems, create the file in the directory SYS$SPECIFIC:[SYSMGR].
If you want to display a message across a cluster, create the file in the directory SYS$COMMON:[SYSMGR].
Enter the message text that you want displayed. The text is displayed according to the font family and language variant currently defined in CDE$SYSTEM_DEFAULTS:[CONFIG]XCONFIG.DAT and CDE$SYSTEM_DEFAULTS:[CONFIG.%L]XRESOURCES.DAT. All printable characters supported by the current font family and variant are valid for display.
Also note that there are no explicit size requirements; the message window will size itself dynamically. Extremely long lines (those that are too long to fit on the screen itself) may be truncated.Note
Lines that do not contain any text or formatting characters are ignored. To insert a blank line in the message file, enter at least one space character
<sp>at the beginning of the line.Save the file and restart the desktop session.
4.3.4. Disabling the Suggested Password List (New Desktop Only)
You can disable the display of the suggested password list when logging into New Desktop with an expired password.
$ DEFINE/SYSTEM CDE$NOGENPWD 14.3.5. Enabling Support for UNIX-Style Filenames (New Desktop Only)
You can display file and device names in UNIX-style format in the File Selection widget and the File Manager.
When this feature is enabled, file and directory specifications are displayed according to UNIX pathname conventions, such as using slashes instead of square brackets to delimit directory trees. In addition, the case of device names is preserved when displaying UNIX-style pathnames versus being converted to uppercase.
The following sections briefly describe how to enable this feature.
4.3.5.1. Enabling in the File Selection Dialog Box
- DECC$FILENAME_UNIX_ONLY (CRTL mode)
- DECW$XM_FORCE_UNIX_NAMES_TO_VMS
These logicals can be defined system-wide by adding them to the SYS$MANAGER:SYLOGICALS.COM file, or defined on a per-user basis by adding them to each user's DECW$LOGIN.COM or LOGIN.COM file.
To force the File Selection dialog box to return selected filenames in OpenVMS format while displaying them in UNIX format, define the logical DECW$XM_UNIX_NAMES_TO_VMS. This enables other applications that rely on filenames in OpenVMS format to interact successfully with the File Selection dialog box while still displaying filenames in UNIX format.
4.3.5.2. Enabling in the File Manager
To enable the display of UNIX-style filenames in the File Manager,set the logical CDE$DTFILE_UNIX_NAMES to a non-zero value.
This logical can be defined system-wide by adding it to the SYS$MANAGER:SYLOGICALS.COM file, or defined on a per-user basis by adding it to each user's DECW$LOGIN.COM or LOGIN.COM file.
4.4. Customizing the Startup Environment
This section provides an overview of how to change the default VSI DECwindows Motif for OpenVMS startup environment using application customization parameters.
4.4.1. Using the DECW$PRIVATE_APPS_SETUP File
The DECW$PRIVATE_APPS_SETUP.TEMPLATE file is located in the SYS$MANAGER directory. This template file contains information you can use to customize your VSI DECwindows Motif for OpenVMS startup environment.
|
Client Area |
Global Symbol |
Default |
|---|---|---|
|
Applications | ||
|
Bookreader online book directory |
DECW$BOOK |
SYS$SYSROOT:[DECW$BOOK] |
|
FileView command file directory |
VUE$LIBRARY? |
DECW$SYSCOMMON: [VUE$LIBRARY.USER], DECW$SYSCOMMON: [VUE$LIBRARY.SYSTEM] |
|
FileView public profile file directory |
VUE$LIBRARY_WRITE ? |
SYS$COMMON: [VUE$LIBRARY.USER] |
|
Console Window | ||
|
Enable or disable the display of system messages in the console window |
DECW$CONSOLE_SELECTION |
Disable |
|
Specify the position of the console window |
DECW$CONSOLE_GEOMETRY |
-0,-0 |
|
Desktop | ||
|
Desktop to run at session startup |
DECW$START_NEW_DESKTOP |
True (Run New Desktop) |
|
Display Devices | ||
|
SET DISPLAY command parameters |
DECW$APPSNODE DECW$APPSSERVER DECW$APPSSCREEN |
Node 0 Server 0 Screen 0 |
|
Enable or disable support for IPv6 over the TCP/IP transport |
DECW$IPV6_SUPPORT |
None |
|
Examples and Tutorials | ||
|
Example program directory |
DECW$EXAMPLES? |
SYS$SYSROOT: [SYSHLP.EXAMPLES.DECW] |
|
Computer-based instruction file directory |
DECW$CBI |
SYS$SYSROOT: [SYSCBI.DECW$CBI] |
|
Keymaps | ||
|
Keymap file directory |
DECW$KEYMAP |
DECW$SYSCOMMON: [SYS$KEYMAP.DECW.USER],DECW$SYSCOMMON: [SYS$KEYMAP.DECW.SYSTEM] |
|
Login | ||
|
LOGINOUT log file |
DECW$LOGINLOG |
None |
|
Use multiple connections during loginout |
DECW$LOGINMANY |
False |
|
Login logo |
DECW$LOGINLOGO? |
None |
|
Run login logo in a subprocess |
DECW$LOGINLOGOSUB? |
False (detached process) |
|
Provide data from the specified X authority file during loginout |
DECW$LOGIN_XAUTHORITY |
SYS$LOGIN: DECW$XAUTHORITY.DECW$XAUTH |
|
Proxy Manager | ||
|
Proxy Manager configuration file |
DECW$PROXY_MANAGER_CONFIG |
None |
|
Proxy Manager log file |
DECW$PROXY_MANAGER_LOG |
None |
|
Default command line options for the Proxy Manager application at startup |
DECW$PROXY_MANAGER_OPTIONS |
/PORT=6500/TRANSPORT= "LOCAL,TCPIP,DECNET" |
|
Default command line options to run when the Proxy Manager is started as a detached process |
DECW$PROXY_MANAGER_QUOTAS |
/PROCESS_NAME=DECW$PROXY |
|
Session Management | ||
|
Command that runs a session |
DECW$SESSIONMAIN? |
Run SYS$SYSTEM: DECW$SESSION |
|
Command that resets a session |
DECW$SESSIONEND? |
None |
|
Enable or disable session logging |
DECW$SESSIONLOG? |
True (Log file on) |
|
System Startup | ||
|
DCL command executed when DECwindows startup is complete |
DECW$MAINAPP? |
Run SYS$SYSTEM: DECW$STARTLOGIN |
|
Command procedure that runs after user authorization is complete |
DECW$SESSIONCOM |
SYS$MANAGER: DECW$STARTSM.COM |
|
VSI DECwindows Motif for OpenVMS SYLOGIN command procedure |
DECW$SYLOGINCOM |
None |
|
UNIX Compatibility | ||
|
Define logical names for UNIX compatibility |
DECW$UNIXLOGICALS |
True |
|
User Resources | ||
|
Command that initializes the system with the correct user resource values |
DECW$SESSIONINIT |
Run SYS$SYSTEM: DECW$WSINIT |
|
Utilities | ||
|
X Window System Utilities directory |
DECW$UTILS |
SYS$SYSROOT:[SYSHLP. EXAMPLES.DECW.UTILS] |
$COPY SYS$COMMON:[SYSMGR]DECW$PRIVATE_APPS_SETUP.TEMPLATE -_$SYS$COMMON:[SYSMGR]DECW$PRIVATE_APPS_SETUP.COM/LOG
Then edit the file to change the appropriate symbol.
The following sections contain examples for customizing the DECwindows client environment using the template file.
This file contains two sections, a Cluster Common section, and a Cluster Member Workstation-Specific section. Add the new symbol to the appropriate section.
4.4.2. Switching Between Desktops
To load a different desktop than the one chosen during installation, set the value of the DECW$START_NEW_DESKTOP symbol in DECW$PRIVATE_APPS_SETUP.COM to either TRUE (for the New Desktop) or FALSE (for the Traditional DECwindows Desktop).
$COPY SYS$MANAGER:DECW$PRIVATE_APPS_SETUP.TEMPLATE -_$SYS$COMMON:[SYSMGR]DECW$PRIVATE_APPS_SETUP.COM
4.4.3. Enabling Support for IPv6
TCP_IS_INET6
Use this value if your network has been configured to support IPv6. The TCPIP and TCP transport names are interpreted as synonyms for theINET6 transport. Note that the INET6 transport attempts to use IPv6 where available; it does not guarantee that the IPv6 will be used. Individual programs can explicitly specify either the INET6 or INET transport option.
If you set this value, and your domain name servers are not configured to handle IPv6, then you may experience delays when opening display connections.
DISABLED
Use this value only if an application opens display connections from user-mode AST routines. The TCPIP and TCP transport names are interpreted as synonyms for the INET transport. The INET6 transport option is not available.
"any other value"
Use this value if your network does not support IPv6, or if IPv6 is only used for select IPv6-over-IPv4 tunnels. The TCPIP and TCP transport names are synonyms for the INET transport. Unlike the DISABLED option, individual programs can explicitly specify either the INET6 or INET transport option. This is the default value if the logical name is undefined.
Note
The TCP_IS_INET6 option uses the TCP/IP Services getaddrinfo function instead of the gethostbyaddr function. TCP/IP Services does not support use of its getaddrinfo function from within AST routines. VSI recommends that you use the DISABLED option if your application opens the DECwindows transport from within an AST routine. All VSI DECwindows Motif for OpenVMS applications support the TCP_IS_INET6 option.
4.4.4. Changing the Default Logo (Traditional DECwindows Desktop Only)
You can substitute the default VSI logo with an alternate logo by running a separate application that displays your logo.
Create a command file (SYS$MANAGER:LOGO.COM, for example).
Define the global symbol DECW$LOGINLOGO in SYS$MANAGER:DECW$PRIVATE_APPS_SETUP.COM, with its value set to the name of your command file. Note that this command file is run by the system account.
- If the SYS$MANAGER directory does not contain a command file, copy the template file to a command file:
$
COPY SYS$COMMON:[SYSMGR]DECW$PRIVATE_APPS_SETUP.TEMPLATE -_$SYS$SPECIFIC:[SYSMGR]DECW$PRIVATE_APPS_SETUP.COM/LOG Edit the file and define the symbol DECW$LOGINLOGO to point to the command file that displays your custom logo.
Add the following line:$
DECW$LOGINLOGO == "SYS$MANAGER:MYLOGO.COM"Create the command file that displays your logo. This needs to be the filename and directory specified in step 2. Note that the command file runs as a detached process under the SYSTEM account. Be careful not to give users access to the system through your custom logo. Do not run applications like FileView or DECterm as a custom logo.
For example, the file SYS$MANAGER:MYLOGO.COM could contain this command to display the icosahedron that is shipped as an example program:$
RUN DECW$EXAMPLES:ICO- Restart DECwindows by rebooting your workstation running DECW$STARTUP, as follows.
$
@SYS$STARTUP:DECW$STARTUP RESTARTTo restore the VSI logo, you need to remove the definition of DECW$LOGINLOGO from your DECW$PRIVATE_APPS_SETUP.COM file and restart DECwindows.
4.4.5. Displaying Logos on Systems with Personal-Use Licenses (Traditional DECwindows Desktop Only)
If a license for VSI DECwindows Motif for OpenVMS has not been registered for the SYSTEM account, DECwindows does not display customized login logos. This can occur on systems with VSI DECwindows Motif for OpenVMS personal-use licenses that do not include SYSTEM on the list of authorized DECwindows users.
$ DECW$LOGINLOGOSUB == "TRUE"$ @SYS$MANAGER:DECW$STARTUP RESTARTVSI DECwindows Motif for OpenVMS login starts the logo process as a subprocess instead of as a detached process.
4.4.6. Displaying Console Messages
Note
If you select an alternate port (other than OPA0:) for console communications,the DECwindows Console Window is disabled and console broadcasts are enabled. Refer to the owner's guide for your workstation for information about selecting the Alternate Console port.
WINDOW
Displays console messages in the Console Window application. If you specify the WINDOW value, the Console Window is displayed in the lower right corner of the login screen by default and continues to be displayed after the user logs in to the system.
The Console Window application shares the same executable file and looks similar to the Message Window. However, a menu bar is not displayed in the Console Window; it reads its resources from the DECW$CONSOLE.DAT file instead of from the DECW$MESSAGEPANEL.DAT file. Internally, the Console Window is invoked by running the DECW$MESSAGEPANEL.EXE executable with the command line option -console.
To control the initial position of the Console Window and the classes of OPCOM output that are enabled, you can the define the DECW$CONSOLE_GEOMETRY global symbol in the file SYS$MANAGER:DECW$PRIVATE_APPS_SETUP.COM.
The DECW$CONSOLE_GEOMETRY symbol specifies the value of the -geometry option in the DECW$MESSAGEPANEL.EXE command line; this command is used to start the ConsoleWindow application. The default value is "-0-0", which specifies the location of the window in the lower right corner of the screen.
To position the window at the lower left corner of the screen, for example,add the following line to the command file SYS$MANAGER:DECW$PRIVATE_APPS_SETUP.COM:$
DECW$CONSOLE_GEOMETRY == "+0-0"DISABLE (default)
Disables broadcasts to the OPA0: device. Console messages are not displayed.
ENABLE
Displays console messages in the console window.Note
Although ENABLE was the default value in previous releases of DECwindows Motif, it is recommended that you do not use this option. Displaying console messages by default in the console window can corrupt the contents of the workstation display.
4.4.7. Creating Dedicated Accounts (Traditional DECwindows Desktop Only)
If you are a system manager, you can set up user accounts to run only certain applications. For example, you might want users to use only the Bookreader application.
Modifying the Session Manager command procedure
Modifying the Session Manager executable file
Modifying the Session Manager profile file
4.4.7.1. Modifying the Session Manager Command Procedure
You can define the global symbol DECW$SESSIONCOM in the SYS$MANAGER:DECW$PRIVATE_APPS_SETUP.COM file so that when a user logs in, LOGINOUT runs a command file other than DECW$STARTSM.COM. This action bypasses Session Manager altogether.
In Example 4.1, ''Using a Private Session Manager Command File'', DECW$SESSIONCOM is defined in DECW$PRIVATE_APPS_SETUP.COM to point to the private command procedure SYS$MANAGER: PRIVATE_SESSIONCOM.COM. The default command file is SYS$MANAGER:DECW$STARTSM.COM.
Note
With this method, the following startup command procedures (normally executed from DECW$STARTSM.COM) do not run:SYLOGIN.COM, LOGIN.COM, DECW$SYLOGIN.COM, and DECW$LOGIN.COM.
- Create the command procedure shown in Example 4.1, ''Using a Private Session Manager Command File''.
Example 4.1. Using a Private Session Manager Command File $ CREATE SYS$MANAGER:PRIVATE_SESSIONCOM.COM $! $! Check to see whether this is the dedicated DECwindows account. $! If it isn't, run the normal procedure to start Session Manager. $! $ username = F$USER() $ IF F$LOCATE("BOOK_READER", username) .NE. F$LENGTH(username) - THEN GOTO dedicated$!$! Normal, nondedicated DECwindows login $! $ @SYS$MANAGER:DECW$STARTSM$ EXIT $! $! Dedicated DECwindows login. Run Bookreader and then exit. $! $ dedicated: $! $ RUN SYS$SYSTEM:DECW$WSINIT $ display = F$TRNLNM("DECW$DISPLAY") $ RUN/DETACHED/OUTPUT='display' SYS$SYSTEM:DECW$MWM $ RUN SYS$SYSTEM:DECW$BOOKREADER
$ endsession := $DECW$ENDSESSION
$ RUN SYS$SYSTEM:DECW$BOOKREADER
$ endsession := $DECW$ENDSESSION  $ endsession -noprompt
  $ STOP/ID=0
DECW$MWM is the Motif WindowManager. Its SYS$OUTPUT definition needs to be set to the translation of DECW$DISPLAY so that DECW$DISPLAY is defined correctly in the detached process.
DECW$ENDSESSION resets the server and displays a Start Session dialog login box.
The -noprompt qualifier prevents DECW$ENDSESSION from asking the user to confirm whether to end the session. (If the user cancels the End Session operation, the workstation will be unusable because Bookreader will exit and the login box will not be displayed.)
STOP/ID=0 logs out the process without writing an error message to SYS$OUTPUT.
- Define the DECW$SESSIONCOM symbol in DECW$PRIVATE_APPS_SETUP.COM as follows:
$
DECW$SESSIONCOM :== SYS$MANAGER:PRIVATE_SESSIONCOM.COMIf SYS$MANAGER:DECW$PRIVATE_APPS_SETUP.COM does not already exist, create it as follows from the template file:$
COPY SYS$MANAGER:DECW$PRIVATE_APPS_SETUP.TEMPLATE -_$SYS$COMMON:[SYSMGR]DECW$PRIVATE_APPS_SETUP.COM - Restart DECwindows by entering the following command:
$
@SYS$MANAGER:DECW$STARTUP RESTARTThis step is necessary for the changes to DECW$PRIVATE_APPS_SETUP.COM to take effect.
Log in to the dedicated account on a DECwindows system.
After entering the user name and password of the dedicated account,Bookreader starts and Session Manager is not displayed. When the user exits from Bookreader, the PRIVATE_SESSIONCOM.COM procedure ends the session operation and then logs out. The End Session command displays the Start Session screen.
4.4.7.2. Modifying the Session Manager Executable File
You can define DECW$SESSIONMAIN in the SYS$MANAGER: DECW$PRIVATE_APPS_SETUP.COM file so that DECW$STARTSM.COM runs the specified command file instead of DECW$SESSION.EXE. Session Manager reads resource files and runs login command files but does not display the Session Manager menu bar. With this method, ensure that the End Session command does not prompt for confirmation.
When DECW$STARTSM.COM starts (that is, if DECW$SESSIONCOM has its default value), it starts Session Manager by running the DCL command that is stored in the logical name DECW$SESSIONMAIN. To define this logical name, edit SYS$MANAGER: PRIVATE_APPS_SETUP.COM so that it defines the global symbol DECW$SESSIONMAIN as the DCL command to execute.
This method is similar to the one described in the Section 4.4.7.1, ''Modifying the Session Manager Command Procedure''except that, with this method, DECW$STARTSM.COM executes the SYLOGIN.COM,LOGIN.COM, DECW$SYLOGIN.COM, and DECW$LOGIN.COM command procedures. Also, DECW$STARTSM.COM executes DECW$WSINIT.EXE, so the private command procedure does not need to do so.
- Create the command procedure shown in Example 4.2, ''Modifying the Session Manager Executable File''.
Example 4.2. Modifying the Session Manager Executable File $ CREATE SYS$MANAGER:PRIVATE_SESSIONMAIN.COM $! $! Check to see whether this is the dedicated DECwindows account. $! If it isn't, run the normal procedure to start Session Manager. $! $ username = F$USER() $ IF F$LOCATE("BOOK_READER", USERNAME) .NE. F$LENGTH(USERNAME) - THEN GOTO dedicated$!$! Normal, nondedicated DECwindows login $! $ RUN SYS$SYSTEM:DECW$SESSION$ EXIT $! $! Dedicated DECwindows login. Run Bookreader and then exit. $! $ dedicated: $! $ display = F$TRNLNM("DECW$DISPLAY") $ RUN/DETACHED/OUTPUT='display' SYS$SYSTEM:DECW$MWM
$ RUN SYS$SYSTEM:DECW$BOOKREADER
$ endsession := $DECW$ENDSESSION
$ endsession -noprompt
$ STOP/ID=0 DECW$MWM is the Motif Window Manager. Its SYS$OUTPUT definition needs to be set to the translation of DECW$DISPLAY so that DECW$DISPLAY is defined correctly in the detached process.
DECW$ENDSESSION resets the server and displays a new Start Session screen.
The -noprompt qualifier prevents DECW$ENDSESSION from displaying the End Session prompt. (If the user cancels the End Session prompt,the workstation will be unusable because Bookreader will exit and the Start Session screen will not be displayed.)
STOP/ID=0 logs out the process without writing a message to SYS$OUTPUT.
Define the DECW$SESSIONMAIN symbol in DECW$PRIVATE_APPS_SETUP.COM.
Edit this command procedure to define DECW$SESSIONMAIN. Note that the symbol must be defined as a DCL command (unlike DECW$SESSIONCOM, which is defined as the name of a command procedure).$
DECW$SESSIONMAIN :== @SYS$MANAGER:PRIVATE_SESSIONMAIN.COMIf SYS$MANAGER:DECW$PRIVATE_APPS_SETUP.COM does not already exist, create it as follows from the template file:$
COPY SYS$MANAGER:DECW$PRIVATE_APPS_SETUP.TEMPLATE -_$SYS$COMMON:[SYSMGR]DECW$PRIVATE_APPS_SETUP.COM- Restart DECwindows by entering the following command:
$
@SYS$MANAGER:DECW$STARTUP RESTARTThis step is necessary for the changes to DECW$PRIVATE_APPS_SETUP.COM to take effect.
Log in to the dedicated account on a DECwindows system.
After entering the user name and password of the dedicated account,Bookreader starts and the Session Manager menu bar is not displayed. When the user exits Bookreader, the PRIVATE_SESSIONMAIN.COM procedure performs an End Session operation and then logs out. The End Session command displays a DECwindows Start Session screen.
4.4.7.3. Modifying the Session Manager Profile File
This method starts Session Manager normally, but the system manager customizes its menus to remove any applications that are not started automatically. By removing certain applications, you can limit user access to applications.
With this method, the Session Manager menu bar is displayed, and the user can interact with whatever dialog boxes the system manager does not disable.
Log in to the dedicated account on a DECwindows system.
When you enter the user name and password of the dedicated account, Session Manager starts.
Add the applications to the automatic startup list that you want to be displayed when a user logs in.
Choose Automatic Startup... from the Session Manager Options menu. Session Manager displays the Automatic Startup dialog box.
Use this dialog box to remove any undesired applications, such as FileView,from the automatic startup list. (For more information about using the Automatic Startup dialog box, see Using VSI DECwindows Motif for OpenVMS.)Note
Do not remove Window Manager from the automatic startup list.
For this example add Bookreader to the list and click on OK.
Remove Applications from the Session Manager menu bar.
Choose Menu Bar... from the Session Manager Options menu. Session Manager displays the Menu Bar dialog box.
Use this dialog box to remove the applications you do not want to be displayed. (For more information about using the Menus dialog box, see Using VSI DECwindows Motif for OpenVMS.)
Click on OK to save your changes and to dismiss the dialog box.
Choose Save Session Manager from the Session Manager Options menu to save your menu bar settings.
Remove any menu items that you do not want to be displayed on the Options menu.
Choose Menus... from the Session Manager Options menu and remove the following menu items from the Session Manager Options menu:- Automatic Startup...
- Menus...
- Menu Bar...
- Save Session Manager
You should also remove any other menu items that you do not want users to have access to in the dedicated account, such as Security.
After removing the items, click on OK to dismiss the dialog box and to save your menu settings.
Choose End Session from the Session Manager Session menu.
Session Manager logs you out of the dedicated account and displays the DECwindows login box.
Log back in to the dedicated account.
To test your changes, log in to the dedicated account from the DECwindows login box. Bookreader and Session Manager should start up by default, and you should not be able to start any other application. To log out, choose End Session from the Session Manager menu.
If you decide to make the account non dedicated again, or if you want to make changes in a dialog box that you have removed from the system menu bar,delete or rename the file VUE$PROFILE.VUE$DAT in the dedicated account's SYS$LOGIN directory.
4.4.8. Creating a Custom Bookreader Directory
When you start Bookreader, the system uses the logical name DECW$BOOK to locate the file LIBRARY.DECW$BOOKSHELF. By default, the logical name DECW$BOOK equates to SYS$SYSROOT:[DECW$BOOK]. You can create a private directory containing the file LIBRARY.DECW$BOOKSHELF.
To do this, you need to create the directory and then define a global symbol in the DECW$PRIVATE_APPS_SETUP.COM file.
- Create the directory, giving the world read access as in the following example:
$
CREATE/DIRECTORY/PROTECTION=WORLD:R -_$SYS$COMMON:[DECW$BOOK_LOCAL] - Copy the Bookreader LIBRARY.DECW$BOOKSHELF file to the new directory.
$
COPY SYS$SYSROOT:[DECW$BOOK]LIBRARY.DECW$BOOKSHELF -_$SYS$COMMON:[DECW$BOOK_LOCAL]/LOG - If the SYS$MANAGER directory does not contain the DECW$PRIVATE_APPS_SETUP.COM command file, copy the template file to a command file.
$
COPY SYS$MANAGER:DECW$PRIVATE_APPS_SETUP.TEMPLATE -_$SYS$MANAGER:DECW$PRIVATE_APPS_SETUP.COM/LOG Edit the file and define the global symbol DECW$BOOK to point to your personal Bookreader directory.
Add the following line:$
DECW$BOOK == "SYS$COMMON:[DECW$BOOK_LOCAL]"- Restart DECwindows Motif, as follows:
$
@SYS$MANAGER:DECW$STARTUP RESTART
4.5. Modifying Session Manager Behavior (Traditional DECwindows Desktop Only)
|
Logical Name |
Meaning |
|---|---|
|
DECW$VUENOAUTOSTART |
Prevents applications in the Session Manager autostart list from being started. |
|
DECW$VUENORESET |
Prevents Session Manager from resetting the display server when Session Manager exits. |
|
DECW$VUELOGINOUTPUT |
Saves any output from the login command files (SYSLOGIN, LOGIN, DECW$LOGIN) as applications start up from Session Manager. You can access this information by clicking on the SHOW OUTPUT button in the Work in Progress dialog box, which is located in the Session menu in the Session Manager window. |
$ DEFINE DECW$VUENOAUTOSTART 14.6. Modifying System Resource Files
Most DECwindows applications provide dialog boxes that contain options for customizing your DECwindows environment and saving your settings. For example, using Session Manager Options menu, you can look at many predefined settings and then choose and save new settings.
Caution
Options dialog boxes cannot be used to change settings that are specified in the DECW$XDEFAULTS.DAT file.
In future DECwindows releases, application dialog boxes might contain the options you have added to your X defaults file. You will have to modify your DECW$XDEFAULTS.DAT file to reflect these changes.
Error handling for resources is not available in this version of DECwindows. Syntax errors in resource files might cause DECwindows to fail without providing error messages.
Using a large DECW$XDEFAULTS.DAT file significantly degrades application startup performance.
To use resources to change application settings,create a file (DECW$XDEFAULTS.DAT) in the directory specified by the logical name DECW$USER_DEFAULTS. In this file, specify the resources for the application settings you want to change. Alternatively, if your changes are specific to one application, you can modify that application's resource file (for example, DECW$MAIL.DAT).
Note that each resource specification in the DECW$XDEFAULTS.DAT file follows explicit syntax rules. For more information about the resource syntax, see the VMS DECwindows Guide to Xlib(Release 4) Programming: MIT C Binding or X Window System.
See the Getting Started With the New Desktop and Using VSI DECwindows Motif for OpenVMS manuals for resource information on application-specific resources.
4.7. Specifying Client Access Control
When a client application connects to an X display server, the server determines which access control scheme to use by referencing the current X authority file. The X authority file identifies the protocol to use based on the workstation to which the client is connecting. You can make changes to the X authority file using the Security Options dialog box.
4.7.1. Setting Security Options
- Do one of the following, depending on the desktop:
From the Traditional Desktop, choose Security... from Session Manager's Options menu.
From the New Desktop, click the Style Manager Security control.
The Security Options dialog box is displayed.
- Under Client Access Control, choose one of the following:
- Authorized Users List
- Kerberos
- Magic Cookie
Click on OK to save and apply the changes and close the Security Options dialog box.
All subsequent client applications run from this system by the current user will apply this access control scheme when connecting to local X servers.Note
Changes to client access control settings impact the contents of the default X authority file entries (local and DECnet) for the current user only, and do not impact any other access control settings in place on the system.
4.7.2. Refreshing Security Options During a Session
Changing or resetting the client access control method to token-based access control.
Specifying an alternate X authority file for the current display device used by the session.
Once you specify an alternate X authority file, the original settings used to grant access during the session no longer apply, and the new settings are not available to clients.
Choose Security... from the Session Manager's (Traditional DECwindows Desktop) or the Style Manager's (New Desktop) Options menu.
- From the Security Options dialog box, do one of the following:
For Magic Cookie access control, click on Create Cookie.
For Kerberos access control, deselect the Kerberos option under Client Access Control, and click on Apply. Then reselect the option, and click on Apply.
Both actions create a new X authority entry in both the server and the alternate X authority file.
If you cannot access the Session Manager or Style Manager, exit and restart your VSI DECwindows Motif for OpenVMS session. Exiting the current session restores the server to its default state.
4.7.3. Enabling and Disabling Access Control at Login
VSI DECwindows Motif for OpenVMS does not enable access control by default. Instead,the product uses access control set by the server at startup time.
$DEFINE/SYSTEM/EXECUTIVE DECW$LOGIN_ACCESS_CONTROL ENABLE$DEFINE/SYSTEM/EXECUTIVE DECW$LOGIN_ACCESS_CONTROL DISABLE
If the logical name is not defined, or if it is defined to some other value, such as "SERVER", DECwindows login neither enables nor disables access control.
In most cases, it should not be necessary to define the logical name.
4.7.4. Enabling Trusted Users to Unlock Paused Desktop Sessions
You can grant a VSI DECwindows Motif for OpenVMS user the ability to unlock a VSI DECwindows Motif for OpenVMS session paused using the Screen Lock function.
username represents the name of an OpenVMS
user:$ DEFINE/SYSTEM DECW$TRUSTED_UNPAUSE "username"Note that for screen unlock to function properly, the session user and any specified trusted users must share the same level of password access.
4.8. Customizing Print Formats
This section describes how to define print formats and lists the logical names and associated print formats for VSI DECwindows Motif for OpenVMS software. Depending on your configuration, VSI DECwindows Motif for OpenVMS customization tasks can include defining logical names to specify print formats.
Before you start up the system, edit the OpenVMS startup procedure to define the logical names that associate print queues with print formats. This startup procedure will subsequently call the VSI DECwindows Motif for OpenVMS startup procedure. You can also add these logicals to your login command file.
4.8.1. Defining Print Formats
Many VSI DECwindows Motif for OpenVMS applications use the Print dialog box to queue files or screens to a printer. By default, all printing devices on the system are displayed in the Printer list box. However, print queues can be associated with print formats through the definition of logical names. You define the logical name in the OpenVMS startup command procedure before the call to the VSI DECwindows Motif for OpenVMS startup procedure. Separate the list of print queues with commas or spaces,with the first queue being the default choice.
    $ Define DECW$PRINTER_FORMAT_TEXT   "CLUSTER_LN03,CLUSTER_PRINT, -
    _$ ANSI_ARTWRK,ANSI_PROTON"
    $ Define DECW$PRINTER_FORMAT_LINE   "CLUSTER_PRINT"
    $ Define DECW$PRINTER_FORMAT_ANSI2  "CLUSTER_LN03,ANSI_ARTWRK,ANSI2_PROTON"
    $ Define DECW$PRINTER_FORMAT_ANSI   "CLUSTER_LN03,ANSI_ARTWRK,ANSI_PROTON"
    $ Define DECW$PRINTER_FORMAT_PS     "PS_ARTWRK,PS_PROTON"
    $ Define DECW$PRINTER_FORMAT_REGIS  "SYS$NULL"
For example, if DECW$PRINTER_FORMAT_ANSI2 is defined as CLUSTER_LN03, ANSI_ARTWRK, ANSI2_PROTON, then when you selectANSI2 from the Print Format list box, only CLUSTER_LN03, ANSI_ARTWRK, and ANSI2_PROTON are shown in the Printer list box, with CLUSTER_LN03being the default choice.
4.8.2. Logical Names and Print Formats
|
Logical Name |
Print Format |
|---|---|
|
DECW$PRINTER_FORMAT_DEFAULT |
Default |
|
DECW$PRINTER_FORMAT_TEXT |
Text |
|
DECW$PRINTER_FORMAT_LINE |
Line printer |
|
DECW$PRINTER_FORMAT_TERM |
Terminal |
|
DECW$PRINTER_FORMAT_ANSI2 |
ANSI2 |
|
DECW$PRINTER_FORMAT_ANSI |
ANSI |
|
DECW$PRINTER_FORMAT_PS |
PostScript |
|
DECW$PRINTER_FORMAT_REGIS |
ReGIS |
|
DECW$PRINTER_FORMAT_TEK |
TEKTRONIX |
|
DECW$PRINTER_FORMAT_DDIF |
DDIF |
You can define the logical names in systemwide logical name tables and users can override the logicals when necessary.
Appendix A. Tuning the DECwindows System
This appendix lists the recommended values for quotas and system parameters for DECwindows Motif systems.
A.1. Establishing UAF Parameters for DECwindows Applications
DECwindows applications can be sensitive to user authorization file (UAF) limits. If problems occur while starting a session or while starting applications, or if an application disappears without an error message, check the UAF limits of the account under which the session was started.
|
Limit |
Setting |
Usage |
|---|---|---|
|
ASTLM |
100 |
Asynchronous system trap (AST) queue limit |
|
BIOLM |
100 |
Buffered I/O count limit |
|
BYTLM |
100000 |
I/O byte limit |
|
DIOLM |
100 |
Direct I/O count limit |
|
ENQLM |
300 |
Enqueue lock limit |
|
FILLM |
100 |
Open file limit |
|
MAXDETACH |
0 |
Maximum detached processes for a single user name (0 = no limit) |
|
MAXJOBS |
0 |
Maximum active processes for a single user name (0 = no limit) |
|
MAXACCTJOB |
0 |
Maximum active processes for a single account (0 = no limit) |
|
PGFLQUOTA |
70000 |
Paging file limit |
|
PRCLM |
10 |
Subprocess creation limit |
|
TQELM |
10 |
Timer queue entry limit |
|
WSDEFAULT |
1024 |
Default working set size |
|
WSEXTENT |
8192 |
Working set extent |
|
WSQUOTA |
2048 |
Working set quota |
A.2. Establishing System Parameters for DECwindows Applications and the Display Server
Because most DECwindows processes, especially DECterm windows, run in detached mode, you may need to increase the values of certain system parameters. Table A.2, ''Recommended Settings for System Parameters on Alpha Systems'' and Table A.3, ''Recommended Settings for System Parameters on IA-64 Systems'' list these parameters, their minimum settings, add values, and usage for Alpha and I64systems. An add value is the increment by which AUTOGEN increases the parameter to allow for resource usage by VSI DECwindows Motif for OpenVMS.
See the VSI OpenVMS System Management Utilities Reference Manual for information about modifying system parameters.
|
Parameter |
Minimum |
Add Value |
Description |
|---|---|---|---|
|
GBLSECTIONS |
600 |
280 |
System global sections |
|
GBLPAGES |
150000 |
92000 |
System global page table entries |
|
GBLPAGFIL |
4096 |
768 |
System global page-file sections limit |
|
NPAGEDYN |
1348576 |
300000 |
System nonpaged dynamic pool |
|
PAGEDYN |
704288 |
180000 |
System paged dynamic pool |
|
SWPOUTPGCNT |
512 |
– |
Minimum process page size before swapping |
|
MAXBUF |
8192 |
– |
Maximum buffer size |
|
CHANNELCNT |
255 |
– |
System permanent I/O channel limit |
|
PROCSECTCNT |
128 |
– |
Process image section descriptor limit |
|
WSMAX |
12000 |
– |
Process working set maximum |
|
CLISYMTBL |
512 |
– |
Minimum size of the command interpreter symbol table |
|
PQL_MPGFLQUOTA |
32768 |
– |
Minimum page file quota |
|
PQL_MASTLM |
100 |
– |
Minimum AST limit |
|
PQL_MBIOLM |
100 |
– |
Minimum buffered I/O limit |
|
PQL_MDIOLM |
100 |
– |
Minimum direct I/O limit |
|
PQL_MFILLM |
100 |
– |
Minimum open file limit |
|
PQL_MBYTLM |
100000 |
– |
Minimum buffered I/O byte limit |
|
PQL_MPRCLM |
10 |
– |
Minimum subprocess limit |
|
PQL_MENQLM |
300 |
– |
Minimum enqueued lock limit |
|
PQL_MWSDEFAULT |
1024 |
– |
Minimum working set default |
|
PQL_MWSQUOTA |
2048 |
– |
Minimum working set quota |
|
PQL_MWSEXTENT |
8192 |
– |
Minimum working set extent |
|
GH_RES_CODE |
1584 |
560 |
Resident image code granularity hint region limit |
|
IMGREG_PAGES |
10000 |
3160 |
Minimum number of reserved pages for installing images with shareable address data |
|
Parameter |
Minimum | Add Value | Description |
|---|---|---|---|
|
GBLSECTIONS |
1000 | 400 | System global sections |
|
GBLPAGES |
150000 | 92000 | System global page table entries |
|
GBLPAGFIL |
4096 | 768 | System global page-file sections limit |
|
NPAGEDYN |
4194304 | 300000 | System nonpaged dynamic pool |
|
PAGEDYN |
4194304 | 180000 | System paged dynamic pool |
|
SWPOUTPGCNT |
512 | – | Minimum process page size before swapping |
|
MAXBUF | 8192 | – | Maximum buffer size |
|
CHANNELCNT | 255 | – | System permanent I/O channel limit |
|
PROCSECTCNT | 64 | – | Process image section descriptor limit |
|
WSMAX | 131072 | – | Process working set maximum |
|
CLISYMTBL | 512 | – | Minimum size of the command interpreter symbol table |
|
PQL_MPGFLQUOTA |
32768 | – | Minimum page file quota |
|
PQL_MASTLM |
100 | – | Minimum AST limit |
|
PQL_MBIOLM |
100 | – | Minimum buffered I/O limit |
|
PQL_MDIOLM |
100 | – | Minimum direct I/O limit |
|
PQL_MFILLM |
100 | – | Minimum open file limit |
|
PQL_MBYTLM |
100000 | – | Minimum buffered I/O byte limit |
|
PQL_MPRCLM |
10 | – | Minimum subprocess limit |
|
PQL_MENQLM |
300 | – | Minimum enqueued lock limit |
|
PQL_MWSDEFAULT |
4096 | – | Minimum working set default |
|
PQL_MWSQUOTA |
8192 | – | Minimum working set quota |
|
PQL_MWSEXTENT |
16384 | – | Minimum working set extent |
|
GH_RES_CODE | 3072 | 1450 | Resident image code granularity hint region limit |
|
IMGREG_PAGES | 10000 | – | Minimum number of reserved pages for installing images with shareable address data |
A.3. Establishing Server Parameters for Non-VGA Devices
The DECwindows X display server requires specific tuning for graphics-intensive and 3D applications because of greater demand for system resources. You may need to make adjustments for server quotas on 3D-accelerated systems. These are minimum values suggested for a system with as little as 64 MB of physical memory and for running complex clients.
|
Quota |
Value |
|---|---|
| DECW$SERVER_FILE_LIMIT | 400 |
| DECW$SERVER_ENQUEUE_LIMIT | 2000 |
| DECW$SERVER_WSDEF | 10240 |
| DECW$SERVER_WSQUOTA | 16384 |
Tuning for Animation Applications
|
Quota |
Value |
|---|---|
| DECW$SERVER_WSDEF | 10240 |
| DECW$SERVER_WSQUOTA | 20480 |
Note
These parameters should not be tuned upward unless you have at least 128 MB of physical memory.
Tuning for Memory-Intensive Applications
|
Quota |
Value |
|---|---|
| DECW$SERVER_FILE_LIMIT | 6000 |
| DECW$SERVER_WSDEF | 32768 |
| DECW$SERVER_WSQUOTA | 65536 |
| DECW$SERVER_PAGE_FILE_QUOTA | 2000000 |
Determining Tuning Needs
To determine whether you need to set larger parameters, monitor the server process during the heaviest display usage. If the working set use approaches the maximum values, then you need to adjust the value of the DECW$SERVER_WS* server parameters.
However, do not set large values unless it is necessary. If you set these values too high, performance may be degraded. Optimal DECwindows server performance depends on application demands and available physical memory.
The next time you restart the server, the new values will take effect. If, after initial tuning and considerable use, the server is failing or is unnecessarily unresponsive, the server may have run out of memory or memory may have become fragmented. A particularly demanding application may require that you give the server even larger DECW$SERVER_PAGE_FILE_QUOTA value. Note that pagefile quota for the server is derived from system page files.
If the server error log SYS$MANAGER:DECW$SERVER_0_ERROR.LOG contains the statement
xxx: Out of memory, increase the pagefile quota for the server. Set
this quota by modifying the DECW$SERVER_PAGE_FILE_QUOTA parameter in the file
DECW$PRIVATE_SERVER_SETUP.COM. Note that in multihead configurations, the
DECW$SERVER_PAGE_FILE_QUOTA parameter should be increased to meet your system
requirements.
Appendix B. DECwindows Motif Keymap Names
Table B.1, ''DECwindows Motif Keymap'' lists the DECwindows Motif keymap names. The table is arranged based on the language for which each keyboard is designed.
|
Language |
Model |
DECwindows Keymap Name |
|---|---|---|
|
Austrian/German |
LK201–(AG,LG,BG,MG) |
AUSTRIAN_GERMAN_LK201LG_DP |
|
AUSTRIAN_GERMAN_LK201LG_TW | ||
|
LK201–(NG,PG) |
AUSTRIAN_GERMAN_LK201NG_DP | |
|
AUSTRIAN_GERMAN_LK201NG_TW | ||
|
LK401–(AG) |
AUSTRIAN_GERMAN_LK401AG_TW | |
|
LK444–(AG) |
AUSTRIAN_GERMAN_LK444AG_LK | |
|
AUSTRIAN_GERMAN_LK444AG_PC | ||
|
Belgian/French |
LK201–(AP,LP,BP,MP) |
BELGIAN_FRENCH_LK201LP_DP |
|
BELGIAN_FRENCH_LK201LP_TW | ||
|
LK401–(AP) |
BELGIAN_FRENCH_LK401AP_DP | |
|
BELGIAN_FRENCH_LK401AP_TW | ||
|
LK444–(AP) |
BELGIAN_FRENCH_LK444AP_LK | |
|
BELGIAN_FRENCH_LK444AP_PC | ||
|
British |
LK201–(AE,LE,BE,ME) |
BRITISH_LK201LE_DP |
|
BRITISH_LK201LE_TW | ||
|
LK401–(AA,PA) |
BRITISH_LK401AA_DP | |
|
BRITISH_LK401AA_TW | ||
|
LK444–(AE) |
BRITISH_LK444AE_LK | |
|
BRITISH_LK444AE_PC | ||
|
Canadian/French |
LK201–(AC,LC,BC,MC) |
CANADIAN_FRENCH_LK201LC_DP |
|
CANADIAN_FRENCH_LK201LC_TW | ||
|
LK401–(AC,LC,BC,MC) |
CANADIAN_FRENCH_LK401AC_DP | |
|
Canadian/French |
LK444–(AC,LC,BC,MC) |
CANADIAN_FRENCH_LK401AC_TW |
|
CANADIAN_FRENCH_LK444AC_LK | ||
|
CANADIAN_FRENCH_LK444AC_PC | ||
|
Czech |
LK401–(BV) |
CZECH_LK401_BV |
|
Danish |
LK201–(AD,LD,BD,MD) |
DANISH_LK201LD_DP |
|
DANISH_LK201LD_TW | ||
|
LK201–(ED,RD,FD) |
DANISH_LK201RD_DP | |
|
DANISH_LK201RD_TW | ||
|
LK401–(AD,LD,BD,MD) |
DANISH_LK401AD_DP | |
|
DANISH_LK401AD_TW | ||
|
LK444–(AD,LD,BD,MD) |
DANISH_LK401AD_LK | |
|
DANISH_LK401AD_PC | ||
|
Dutch |
LK201–(AH,LH,BH,MH) |
DUTCH_LK201LH_DP |
|
DUTCH_LK201LH_TW | ||
|
LK201–(NH,PH) |
DUTCH_LK201NH | |
|
LK401–(NH,PH) |
DUTCH_LK401AH | |
|
LK444–(NH,PH) |
DUTCH_LK444AH_LK | |
|
DUTCH_LK444AH_PC | ||
|
Finnish |
LK201–(AF,LF,BF,MF) |
FINNISH_LK201LF_DP |
|
FINNISH_LK201LF_TW | ||
|
LK201–(NX,PX) |
FINNISH_LK201NX_DP | |
|
FINNISH_LK201NX_TW | ||
|
LK401–(AF,LF,BF,MF) |
FINNISH_LK401AF_DP | |
|
FINNISH_LK401AF_TW | ||
|
LK444–(CA) |
FINNISH_LK401CA_LK | |
|
FINNISH_LK401CA_PC | ||
|
Flemish |
LK201–(AB,LB,BB,MB) |
FLEMISH_LK201LB_DP |
|
FLEMISH_LK201LB_TW | ||
|
LK401–(AB,LB,BB,MB) |
FLEMISH_LK401AB_DP | |
|
FLEMISH_LK401AB_TW | ||
|
LK444–(AB,LB,BB,MB) |
FLEMISH_LK401AB_LK | |
|
FLEMISH_LK401AB_PC | ||
|
Hungarian |
LK401–(BQ) |
HUNGARIAN_LK401_BQ |
|
Icelandic |
LK201–(AU,LU,BU,MU) |
ICELANDIC_LK201LU_DP |
|
ICELANDIC_LK201LU_TW | ||
|
Italian |
LK201–(AI,LI,BI,MI) |
ITALIAN_LK201LI_DP |
|
ITALIAN_LK201LI_TW | ||
|
LK401–(AI,LI,BI,MI) |
ITALIAN_LK401AI_DP | |
|
Italian |
LK444–(AI,LI,BI,MI) |
ITALIAN_LK401AI_TW |
|
ITALIAN_LK444AI_LK | ||
|
ITALIAN_LK444AI_PC | ||
|
North American |
LK201–(AA,LA,BA,MA) |
NORTH_AMERICAN_LK201LA |
|
LK401–(AA,LA,BA,MA) |
NORTH_AMERICAN_LK401AA | |
|
LK443–(AA,LA,BA,MA) |
NORTH_AMERICAN_LK443AA_LK | |
|
NORTH_AMERICAN_LK443AA_PC | ||
|
Norwegian |
LK201–(AN,LN,BN,MN) |
NORWEGIAN_LK201LN_DP |
|
NORWEGIAN_LK201LN_TW | ||
|
LK201–(EN,RN,FN) |
NORWEGIAN_LK201RN_DP | |
|
NORWEGIAN_LK201RN_TW | ||
|
LK401–(AN,LN,BN,MN) |
NORWEGIAN_LK401AN_DP | |
|
NORWEGIAN_LK401AN_TW | ||
|
LK444–(AN,LN,BN,MN) |
NORWEGIAN_LK444AN_LK | |
|
NORWEGIAN_LK444AN_PC | ||
|
Polish |
LK401–(BP) |
POLISH_LK401_BP |
|
Portuguese |
LK201–(AV,LV,BV,MV) |
PORTUGUESE_LK201LV |
|
LK401–(AV,LV,BV,MV) |
PORTUGUESE_LK401AV | |
|
LK444–(AV,LV,BV,MV) |
PORTUGUESE_LK444AV_LK | |
|
PORTUGUESE_LK444AV_PC | ||
|
Russian |
LK401–(BT) |
RUSSIAN_LK401_BT |
|
Slovak |
LK401–(CZ) |
SLOVAC_LK401_CZ |
|
Spanish |
LK201–(AS,LS,BS,MS) |
SPANISH_LK201LS_DP |
|
SPANISH_LK201LS_TW | ||
|
LK401–(AS,LS,BS,MS) |
SPANISH_LK401AS_DP | |
|
SPANISH_LK401AS_TW | ||
|
LK444–(AS,LS,BS,MS) |
SPANISH_LK444AS_LK | |
|
SPANISH_LK444AS_PC | ||
|
Swedish |
LK201–(AM,LM,BM,MM) |
SWEDISH_LK201LM_DP |
|
SWEDISH_LK201LM_TW | ||
|
LK201–(NM,PM) |
SWEDISH_LK201NM_DP | |
|
SWEDISH_LK201NM_TW | ||
|
LK401–(AM,LM,BM,MM) |
SWEDISH_LK401AM_DP | |
|
SWEDISH_LK401AM_TW | ||
|
LK444–(CA) |
SWEDISH_LK444CA_LK | |
|
SWEDISH_LK444CA_PC | ||
|
Swiss/French |
LK201–(AK,LK,BK,MK) |
SWISS_FRENCH_LK201LK_DP |
|
SWISS_FRENCH_LK201LK_TW | ||
|
Swiss/French |
LK401–(AK,LK,BK,MK) |
SWISS_FRENCH_LK401AK_DP |
|
SWISS_FRENCH_LK401AK_TW | ||
|
LK444–(AK,LK,BK,MK) |
SWISS_FRENCH_LK444AK_LK | |
|
SWISS_FRENCH_LK444AK_PC | ||
|
LK201–(AL,LL,BL,ML) |
SWISS_GERMAN_LK201LL_DP | |
|
SWISS_GERMAN_LK201LL_TW | ||
|
LK401–(AL,LL,BL,ML) |
SWISS_GERMAN_LK401AL_DP | |
|
SWISS_GERMAN_LK401AL_TW | ||
|
LK444–(CH) |
SWISS_GERMAN_LK401CH_LK | |
|
SWISS_GERMAN_LK401CH_PC | ||
|
Combined US/UK |
LK201–(EE,RE,PE) |
UK_LK201RE |
|
US_LK201RE | ||
|
LK401–(EE,RE,PE) |
UK_LK401AA | |
|
US_LK401AA | ||
|
LK443–(EE,RE,PE) |
UK_LK443AA_LK | |
|
US_LK443AA_PC |
Pre-loaded by default.
Note that the RUSSIAN_LK401_BT keymap does not support the LeftCompose + E key sequence. The POLISH_LK401_BT keymap supports euro input using the LeftCompose + U key sequence.
Such as, LK44*-**, PCXA*-**, or LK97W-**
Traditional DECwindows Desktop only.
If you redefine this symbol to point to another directory, you must also change the definition of the DECW$UTILS symbol accordingly.