VSI FMS Utilities Reference Manual
- Software Version:
- VSI FMS Version 2.6 or higher
- Operating System and Version:
- VSI OpenVMS IA-64 Version 8.4-1H1 or higher
VSI OpenVMS Alpha Version 8.4-2L1 or higher
VSI OpenVMS x86-64 Version 9.2-2 or higher
Preface
1. About VSI
VMS Software, Inc. (VSI) is an independent software company licensed by Hewlett Packard Enterprise to develop and support the OpenVMS operating system.
2. About This Manual
This manual describes the FMS utilities, invoked with DCL commands, that you use to create video forms and form libraries and to manage these forms and libraries.
3. Intended Audience
This manual is intended for programmers who write application programs that use FMS and for anyone who creates forms with either the Form Editor or with the Form Language.
4. Document Structure
This manual consists of ten chapters and an appendix.
Chapter 1, "Introduction" provides an overview of the FMS utilities as they relate to the development cycle of an application that uses FMS. А table of commands is included.
Chapter 2, "Form Characteristics" describes FMS video forms. Major topics discussed are form attributes, background text, and fields.
Chapter 3, "Form Editor - FMS/EDIT" describes the interactive Form Editor, which you use to lay out forms on а video terminal.
Chapter 4, "Form Language Translator - FMS/ТRANSLATE" describes а way to create forms by using Form Language statements in form descriptions. You use the Form Language Translator to translate these form descriptions to binary forms. The Form Language Translator is optional software that is purchased separately.
Chapter 5, "Form Librarian - FMS/LIBRARY" describes the utility that you use to manage forms and form libraries.
Chapter 6, "Form Application Aids" describes а set of application aids that you use during application development.
Chapter 7, "Form Tester - FMS/ТEST" describes the utility that you use to test а form by displaying it and entering data in its fields.
Chapter 8, "TDMS to FMS Form Converter - FMS/CONVERT" describes the process of converting TDMS forms from the Common Data Dictionary (CDD) into valid FMS form files.
Chapter 9, "Upgrading V1 Application Programs" describes the process of upgrading V1 form files and form libraries into the V2 format.
Chapter 10, "FMS V1 Compatibility" describes the new enhanced Form Editor, two new components-the Form Librarian and the Form Application Aids-and how to use FMS V1 after FMS V2 has been installed on your system.
Appendix A, "VSI FMS Software Messages" lists software messages that you may encounter while using FMS.
5. Related Documents
VSI FMS for OpenVMS Systems Mini-Reference
6. OpenVMS Documentation
The full VSI OpenVMS documentation set can be found on the VMS Software Documentation webpage at https://docs.vmssoftware.com.
7. VSI Encourages Your Comments
You may send comments or suggestions regarding this manual or any VSI document by sending electronic mail to the following Internet address: <docinfo@vmssoftware.com>. Users who have VSI OpenVMS support contracts through VSI can contact <support@vmssoftware.com> for help with this product.
8. Conventions
| Convention | Meaning |
|---|---|
|
Ctrl/ x |
A sequence such as Ctrl/ x indicates that you must hold down the key labeled Ctrl while you press another key or a pointing device button. |
|
PF1 x |
A sequence such as PF1 x indicates that you must first press and release the key labeled PF1 and then press and release another key or a pointing device button. |
|
Return |
In examples, a key name enclosed in a box indicates that you press a key on the keyboard. (In text, a key name is not enclosed in a box.) |
... |
A horizontal ellipsis in examples indicates one of the
following possibilities:
|
. . . |
A vertical ellipsis indicates the omission of items from a code example or command format; the items are omitted because they are not important to the topic being discussed. |
|
( ) |
In command format descriptions, parentheses indicate that you must enclose the options in parentheses if you choose more than one. |
|
[ ] |
In command format descriptions, brackets indicate optional choices. You can choose one or more items or no items. Do not type the brackets on the command line. However, you must include the brackets in the syntax for OpenVMS directory specifications and for a substring specification in an assignment statement. |
|
[ |] |
In command format descriptions, vertical bars separate choices within brackets or braces. Within brackets, the choices are options; within braces, at least one choice is required. Do not type the vertical bars on the command line. |
|
{ } |
In command format descriptions, braces indicate required choices; you must choose at least one of the items listed. Do not type the braces on the command line. |
|
bold text |
This typeface represents the introduction of a new term. It also represents the name of an argument, an attribute, or a reason. |
|
italic text |
Italic text indicates important information, complete titles of manuals, or variables. Variables include information that varies in system output (Internal error number), in command lines (/PRODUCER= name), and in command parameters in text (where dd represents the predefined code for the device type). |
|
UPPERCASE TEXT |
Uppercase text indicates a command, the name of a routine, the name of a file, or the abbreviation for a system privilege. |
|
|
Monospace type indicates code examples and interactive screen displays. In the C programming language, monospace type in text identifies the following elements: keywords, the names of independently compiled external functions and files, syntax summaries, and references to variables or identifiers introduced in an example. |
|
- |
A hyphen at the end of a command format description, command line, or code line indicates that the command or statement continues on the following line. |
|
numbers |
All numbers in text are assumed to be decimal unless otherwise noted. Nondecimal radixes—binary, octal, or hexadecimal—are explicitly indicated. |
Chapter 1. Introduction
FMS utilities are tools for developing video forms applications - applications that display information on а video terminal screen and process input. An example of а forms application might be the computerized system that some hospital admissions desks use to record the patient's name, to check previous admissions, to identify insurance coverage, to initiate billing, and so on. The admissions desk employee sees а collection of structured information (that is, а form) on а video terminal screen.
To FMS internally, а form is а binary data structure that specifies how information is to be displayed on а terminal and how the operator (for example, that admissions desk employee) can interact with that display. The application program that you write displays forms that ask for data or show data. The program can process data input and perhaps display it in the same form, in other forms, or in reports printed out on а line printer. Indeed, applications that use video forms offer endless possibilities for processing the information gathered from video forms. The admissions desk employee might fill in the type of room. The application subsequently could use that information to establish the room cost per day. This cost, plus other expenses incurred during the patient's stay, could be processed and billed by the application.
The Form Driver is the FMS component that assists your application program's interaction with forms. The Form Driver is the run-time component, а subroutine package that is linked with your program. The Form Driver accepts calls from the program, maintains FMS data structures, and issues terminal 1/0 calls to communicate with the operator. All Form Driver calls refer to forms and data within forms by names that you assign when you create the forms. The VSI FMS Form Driver Reference Manual describes Form Driver concepts and documents each call in detail.
Two of the FMS utilities are tools for creating forms. Another utility helps you build applications, and the others help you manage forms (for example, by putting them in libraries or testing them). Another utility converts FMS V1 forms to FMS V2 forms, and another converts ТDMS forms to FMS forms. The utilities described in this manual are:
Form Editor
Form Language Translator
Form Librarian
Form Application Aids
Form Tester
Form Upgrade
Form Converter
Important background information about video forms is presented in Chapter 2, "Form Characteristics" on Form Characteristics. You should read Chapter 2, "Form Characteristics" before you start to develop an application program that uses FMS.
Different stages of the program development cycle require you to use specific utilities, which you invoke with DCL commands. The following sections:
Describe the relationship between the development cycle and the FMS utilities
Introduce the DCL command syntax
1.1. FMS Development Cycle
When you write а video form application, the development cycle may include the following steps described in Section 1.1.1, ''Create Forms'' through Section 1.1.7, ''Link the Application''.
Create forms
Create form libraries
Write the application program
Write user action routines
Create object modules
Test forms
Link the application
1.1.1. Create Forms
You can create FMS forms by using either the Form Editor or the Form Language Translator. Use the Form Editor if you want an interactive utility that allows you to see the form as you type it in and work on it. Use the Form Language Translator if you prefer а programming-language style of working, if you do not have а video terminal, or if you have many similar but slightly different forms to create. The Form Language Translator is optional software that is purchased separately.
The product of either the Form Editor or the Form Language Translator is а binary form (stored in а form file), which you subsequently put in а form library or make memory resident.
1.1.1.1. Form Editor
The Form Editor is an interactive utility that lets you create and edit forms on а VТ100- or VT200-compatible terminal. Creating or editing а form may include the following operations:
Typing in background text
Setting up fields
Selecting form, field, video, and line attributes
Establishing field access order
Creating scrolled areas
Associating user action routines with the form
Associating Named Data with the form
The Form Editor allows you to perform these various operations in different phases, which you enter through the Form Editor menu.
The Form Editor menu is the first image that appears on your screen after you invoke the Form Editor. The menu gives you а choice of seven phases. To select the phase that you want to enter, you type in the phase name. You subsequently return to the menu to choose other phases when you are ready to perform other operations.
The phase in which you do most of the work is the Layout phase. It allows you to type in the text that appears when the video form is displayed and to set up fields that the operator or application program will fill in when the application program is running. Fields are the variable parts of the form. The Layout phase offers you а number of capabilities that are similar to а video text editor's capabilities. Layout is an interactive phase; that is, you see the form on the screen as you type it, and you see any changes that you make as you edit the form.
Other Form Editor phases let you perform other operations. For example, you assign certain characteristics to fields in а form during the Assign phase. These characteristics are called field attributes.
In Form phase, you assign form wide attributes, identify user action routines (UAR) for the form, and assign initial field attributes. User action routines are subroutines that you associate with а particular form and FMS invokes at run time when the operator presses certain keys. All attributes, as well as user action routines, are described in Chapter 2, "Form Characteristics".
You can associate Named Data items with а form in the Data phase. Named Data is an ordered collection of constant information useful to the application program and associated with а specific form, but which is not displayed on the screen. For instance, in the admissions desk example, the cost of different rooms might be Named Data items associated with а form. (Remember that the admissions desk employee types in the type of room when the patient is admitted.) If inflation drives up the costs of rooms, the costs can be changed in the form (since they are Named Data items) rather than in the application program. At any time, the application program can get the latest room price information to bill the patient for the correct amount.
The order in which the operator will be given access to the fields at run time is established during the Order phase.
The Test phase lets you test а form by displaying it as an application program would. It even allows you to type data into fields and get field-level help.
When you use the Exit phase to leave the Form Editor, you can save the form on which you were working. The Form Editor saves the form as а binary form.
1.1.1.2. Form Language
Using the Form Language is another way to create forms. You write Form Language statements in а form description file and use the Form Language Translator to convert the description into а binary form. You can use any text editor on any terminal to create the form description file. You would use the Form Language instead of the Form Editor if you like а programming-language style of working or if you do not have а video terminal. The Form Language Translator is optional software that is purchased separately.
With the Form Language, you can also work on а form that was originally created with the Form Editor. You may find it convenient to do so, for instance, if you have many similar but slightly different forms to create. To use the Form Language on а form created with the Form Editor, you must create а form description file from the binary form saved by the Form Editor. А form description file can be produced by the Form Application Aids utility and can be edited and subsequently translated.
1.1.2. Create Form Libraries or Memory-Resident Forms
Once you have created binary forms, you must put them in form libraries or in an object module (which becomes memory resident). Either operation makes the binary forms available to the Form Driver and your application program at run time.
The Form Librarian is the utility that manages form libraries. If you choose to use а form library, you must start by making а new library file with the Form Librarian's create operation. This operation makes а new library file and puts one or more binary forms in it. If you want to add а form to an existing library, you use the insert operation. If you want to exchange one version of а form in а library with а newer version of the same form, you use the replace operation. Replace removes the old version of the binary form and replaces it with the new version. The extract operation copies а binary form from the library and puts it in а form file. The delete operation removes а form altogether. The Form Editor can copy а binary form from а library and make it available for modification.
When the application requires а form at run time, the Form Driver reads the form directly from а form library file that is stored on а disk. You do not link the form library with the application, but you do name the form library in а Form Driver call. Storing forms in form libraries makes it easy to change and manage forms. You do not need to relink the application every time you change а form. Relinking would be necessary if you used memory-resident forms. You can store all your forms in one place. Also, by using form libraries instead of memory-resident forms you can keep the size of the program image smaller.
On the other hand, you may prefer some of the advantages of memory-resident forms. Because you link memory-resident forms with the application program, they are brought into memory when the program is brought in. Since а form library directory does not have to be searched, access to forms by the Form Driver or the application is faster than if the forms were stored in libraries. Memory-resident forms also save you from having to manage additional pieces of the application-that is,form libraries. You create а linkable file of memory-resident forms by using the Form Application Aids utility.
1.1.3. Write the Application Program
Writing and compiling the application program is, of course, an indispensible step. You will find several other manuals particularly helpful when you write the application program. The VSI FMS Form Driver Reference Manual provides complete reference information on all the Form Driver calls. It also describes the Form Driver's interactions with your program and with terminals. The VSI FMS Language Interface Manual provides information on programming FMS applications in each of seven languages. The Introduction to VSI FMS introduces some concepts and supplies exercises to help you get started with FMS.
During the program development process, you may also find some FMS features helpful. For example, the Form Driver offers а Debug mode that reports status conditions of Form Driver calls.
The Form Application Aids utility also offers some helpful services. You can get listings of form descriptions and of form library directories. You can also get COBOL-like and DATATRIEVE-like field data structure descriptions that you can include (with minor editing) in your source program. See Chapter 6, "Form Application Aids".
1.1.4. Write User Action Routines
If you choose to use user action routines (form-associated subroutines), refer to Chapter 2, "Form Characteristics" and to the VSI FMS Form Driver Reference Manual for help in writing them. Remember that you must associate each user action routine with the appropriate form when you create the form.
1.1.5. Create Object Modules
As with any other application program, you must compile the application program and user action routines to produce object modules suitable for linking. Also, if you have user action routines, you must link with your program an object module containing the names and vectors of all the routines to be called. You can generate such an object module by using the Form Application Aids. The Form Driver uses these vectors to locate user action routine addresses in memory at run time.
1.1.6. Test Forms
You can test forms at several stages in the development cycle, with either of two utilities.
While you are using the Form Editor to create and modify forms, you can use the Test phase to display а form as an application program would and to type data into fields and display field help.
You can also test forms by using the Form Tester utility, which allows testing on either VT52-, VT100-, or VT200-compatible terminals. The Form Tester lets you test forms in the same way as the Test phase of the Form Editor.
You will probably find it convenient to use the Form Editor's test capability when you are already working with the Form Editor. If you are not in the Form Editor, you will probably prefer to use the Form Tester. You can test forms created with the Form Language Translator by using the Form Tester.
1.1.7. Link the Application
Once you have done the following, you must link the application and all its pieces with the Form Driver:
Created forms and form libraries
Created а linkable file of memory-resident forms
Written and compiled the application program
Written and compiled user action routines and produced а vector object module for them
The VSI FMS Form Driver Reference Manual provides information on linking the application.
1.2. DCL Commands
All the FMS utilities are invoked through the use of DCL commands, which are summarized in а table at the end of this chapter. The following paragraphs describe the general command syntax and Chapter 3, "Form Editor - FMS/EDIT" through Chapter 9, "Upgrading V1 Application Programs" contain complete command syntax for each of the utilities. Chapter 10, "FMS V1 Compatibility" discusses the changes that have been made since FMS V1.
FMS commands conform to the OpenVMS command language, DCL. Commands consist of English-language words that describe what you want FMS to do. Commands can optionally contain qualifiers and parameters. Command qualifiers modify а command. They provide the system with additional information on how to execute the command. Command parameters describe the object of the command.
FMS command qualifiers such as /DIRECTORY, /DESCRIPTION, /ТRANSLAТE, and the /LIBRARY subqualifiers such as /CREATE, and /DELETE, are position dependent. Refer to Chapter 4, "Form Language Translator - FMS/ТRANSLATE", Chapter 5, "Form Librarian - FMS/LIBRARY", and Chapter 6, "Form Application Aids" for the specific command syntax.
The default FMS operation is Form Editor editing; that is, typing the command FMS is the same as typing FMS/EDIТ. The command FМS/LIВRARY has five subcommands:
FMS/LIBRARY/CREATE
FMS/LIBRARY/INSERT
FMS/LIBRARY/REPLACE
FMS/LIBRARY/EXTRACT
FMS/LIBRARY/DELEТE
FMS/LIВRARY is the same as FMS/LIВRARY/REPLACE, since replace is the default Form Librarian operation.
Throughout this manual, DCL commands are printed in uppercase characters. However, you can enter these commands in uppercase, lowercase, or а mixture.
When you enter а command at the terminal, you need not enter the entire command all at once. If you enter а command that requires parameters, and you do not specify any parameters, the command interpreter prompts you for the remaining parameters.
The following shows the general FMS command line format:
FMS [/command] [/subcommand] [/qualifier]... [file-spec] [form-spec-list] The notation shown in Table 1.1, ''Command Syntax Notation'' is used in command syntax descriptions throughout this manual. In addition, the phrase "partial form library" is used to mean one or more forms from а form library, as specified in the /FORM_NAME qualifier.
| Item | Meaning |
|---|---|
| brackets [ ] | Indicate that the enclosed item is optional. |
| braces{ } | Enclose lists from which one element is to be chosen. Choices are indicated in one of two ways: (1) stacked vertically or (2) listed horizontally and separated with vertical bars (1). |
| file-spec | Represents а file specification. |
| form-spec | Represents any one of the following file specifications: form-file-spec, form-library-spec, form-library spec/FORM_NAME=form-name, or formlibrary-spec/FORM_NAME =(form-name-list). |
| form-library-spec | Represents а file specification for а form library. |
| form-file-spec | Represents а file specification for а form file. |
| form-name | Represents а form name. |
| form-spec-list | Represents а list of one or more form-specs separated by commas. |
| form-name-list | Represents а list of one or more form-names separated by commas. |
| level | Represents а value for the /WARNINGS qualifier of the FMS/ТRANSLATE command. |
| п | Represents а value for the /ERROR_LIMIТ qualifier of the FMS/ТRANSLATE command. |
Table 1.2, ''Default File Types'' shows the default file types that FMS assumes for input and output files whenever you do not explicitly specify а file type in а command. An exception to this table occurs whenever the /FORМ_NAМE qualifier is used for an input file, in which case FMS always assumes а default file type of .FLB. Also, whenever the /OUТPUT qualifier is specified for а command that would normally display output on the terminal (SYS$0UТPUT), the default output file type is .LIS. Table 1.3, ''FMS Commands and Qualifiers'' shows the complete FMS command syntax.
| Command | Input File | Output File |
|---|---|---|
| FMS/CONVERT | .FRM | |
| FMS/DESCRIPTION/ВRIEF | .FRM | SYS$0UТPUT |
| FMS/DESCRIPTION/FULL | .FRM | .FLG |
| FMS/DESCRIPTION/DECLARATIONS | .FRM | .txt |
| FMS/DESCRIPГION/DISPLAYIMAGE | .FRM | .us |
| FМS/DIRECTORY | .FLВ | SYS$0UТPUТ |
| FMS/EDIT | .FRM | .FRM |
| FMS/LIВRARY/CREATE | .FRM | .FLB |
| FMS/LIBRARY/DELETE | .FLВ | .FLB |
| FMS/LIВRARY/ЕХТRАСТ | .FLВ | .FRМ |
| FMS/LIBRARY/INSERT | .FRM | .FLB |
| FMS/LIBRARY/REPLACE | .FRM | .FLВ |
| FMS/OBJECT | .FRМ | .ОВJ |
| FMS/TEST | .FRM | no output |
| FMS/TRANSLATE | .FLG | .FRМ |
| FMS/UPGRADE | .FLB | .FLB |
| FMS/VECTOR | .FLB | .ОВJ |
| Command | Qualifier | Description |
|---|---|---|
FMS/CONVERT CDD path-name |
/LOG /NOLOG | Logs completed actions on the terminal. INOLOG is the default |
|
/OUTPUТ[=file-spec] /NOOUТPUТ | Output form file specification. /ОUТРUТ is the default | |
| Generates а form file from а TDMS form stored in the Common Data Dictionary. | ||
FMS/DESCRIPTION
form-spec[,form-spec]... | /ВRIEF | brief text description of а form declarations for FMS data fields full text description of а form printable image of а form |
| /DECLARATIONS | ||
| /FULL (default) | ||
| /DISPLAY_IМAGE[={ESCAPE_SEQUENCE NOESCAPE..SEQUENCE}] | ||
|
/ОUТРUТ[=file-spec] /NOOUTPUT | output file specification | |
|
/LOG /NOLOG | logs completed actions on the terminal | |
| Produces а readable text description of а form. | ||
FMS/DIRECTORY
form-spec[,form-spec]... | /ВRIEF (default) | brief directory that lists only form names full directory that lists the full file specifications for form or library files output file specification |
| /FULL | ||
| /ОUТРUТ[ =file-spec] | ||
| /NOOUТPUT | ||
| Displays а directory of the forms in form files or in form libraries that lists the form names, their size, and the date they were last updated. | ||
FМS[/EDIТ] {form-file-spec I form-library-spec
/FORМ_NAМE=form-name} |
/ОUТРUТ[ =file-spec] /NOOUТPUТ | output file specification |
| Invokes the Form Editor which allows you to create and edit forms. This is the default FМS command. | ||
FMS/LIBRARY/CREAТE form-library-spec
form-spec[,form-spec]... |
/LOG /NOLOG | logs completed actions on the terminal |
| Creates а form library from forms and other form libraries. | ||
FMS/LIВRARY/DELETE
                                form-library-spec/FORМ_NAМE=(form-name
[,form-name]...) |
/LOG /NOLOG | logs completed actions on the terminal |
| Deletes forms from а form library. | ||
FМS/LIВRARY/EXТRACT
form-library-spec/FORМ_NAМE=form-name |
/LOG /NOLOG | logs completed actions on the terminal |
|
/ОUТРUТ[ =file-spec] /NOOUТPUТ | output file specification | |
| Extracts а copy of а form from а form library. | ||
FMS/LIВRARY/INSERT form-library-spec
form-spec[,form-spec]... |
/LOG /NOLOG | logs completed actions on the terminal |
| Inserts forms into а form library. | ||
FМS/LIВRARY[/REPLACE]form-library-spec
form-spec[,form-spec]... |
/LOG /NOLOG | logs completed actions on the terminal |
| Replaces old forms with new forms in а form library. This is the default FMS/LIBRARY command. | ||
FМS/OВJECT
form-spec[,form-spec]... |
/LOG /NOLOG | logs completed actions on the terminal |
|
/ОUТРUТ[=file-spec] /NOOUТPUТ | output file specification | |
| Generates an object module of concatenated forms. The object file can be linked with your application to use memory-resident forms. | ||
FМS/TEST {form-file-spec I form-library-spec
/FORМ_NAМE =form-name} |
/QUIET /NOQUIET | quiet signaling mode |
| Invokes the Form Tester that displays the form as it will appear at run time. | ||
FMS/ТRANSLATE file-spec |
/ОUТРUТ[=file-spec] /NOOUТPUТ | output file specification |
|
/LIST[ =file-spec] /NOLIST | translation listing | |
| /WARNINGS={ALL I INFORMATIONAL I ERROR I WARNING} | severity level of messages that appear in the translation listing | |
| /ERROR_LIМIТ=n | number of errors allowed before the translation is aborted | |
| Invokes the Form Language Translator that converts Form Language text files to forms. | ||
FМS/UPGRADE file-spec |
/LOG /NOLOG | logs completed actions on the terminal |
|
/OUТPUТ[=file-spec] /NOOUТPUТ | output file specification | |
| Converts an FМS Version 1 form or form library to FMS Version 2.6 format. | ||
FМS/VECТOR
form-spec[,form-spec]... |
/LOG /NOLOG | logs completed actions on the terminal |
|
/ОUТРUТ[ =file-spec] /NOOUТPUТ | output file specification | |
| Creates an object module that contains user action routine (UAR) vectors. You must link this module with your application to use UARs. | ||
НELP FMS | Displays а description of FМS and the qualifiers to use with the НЕLР command to obtain additional information. | |
Note
Three qualifiers have been changed in the DCL syntax for FMS. These new qualifiers perform the same functions as the old qualifiers. The old qualifiers will remain valid until the next major release of FMS. The new qualifiers are the recommended way of performing each action. The old and new qualifiers are listed below.
| OLD | NEW |
|---|---|
| /МEMORY_RESIDENT | /OBJECT |
| /IMAGE | /DISPLAY_IMAGE |
| /МESSAGE | /WARNINGS |
Chapter 2. Form Characteristics
To а terminal operator running а video form application (for example, а hospital admissions clerk), а form is а collection of structured information displayed on а video screen. To FMS internally, а form is а binary data structure that specifies how information is to be displayed on а terminal and how the operator can interact with that display.
You can create FMS forms by using either the Form Editor (described in Chapter 3, "Form Editor - FMS/EDIT") or the Form Language Translator (described in Chapter 4, "Form Language Translator - FMS/ТRANSLATE"). Use the Form Editor if you want an interactive utility that allows you to see the form as you type it in and work on it. Use the Form Language Translator if you prefer а programming-language style of working, if you do not have а video terminal, or if you want to create many similar forms.
FMS forms include:
Background text
Fields
Names of user-provided subroutines for extended processing
Named Data
Attributes
The following paragraphs introduce these concepts. Section 2.1, ''Background Text'' describes background text in detail, Section 2.2, ''Fields'' describes fields, Section 2.3, ''Named Data'' describes Named Data, and Section 2.4, ''Attributes'' describes each attribute.
Background Text
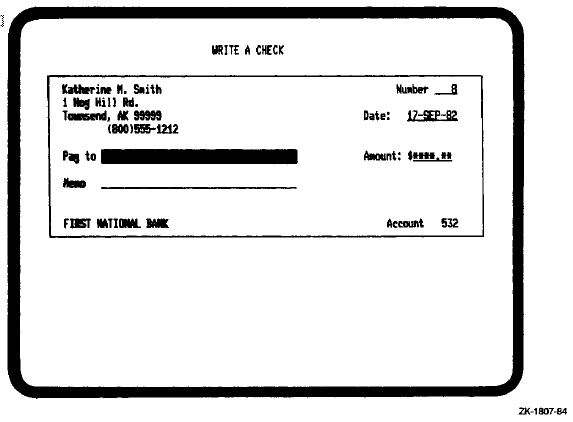
In а video form, background text is the displayed part of а form - the part that cannot be modified by the operator at run time. Compare а video form and an ordinary paper form, such as а bank check. Figure 2.1, ''Background Text and Fields in а Bank Check Fields'' shows the part of а bank check that would be background text in а video check form.
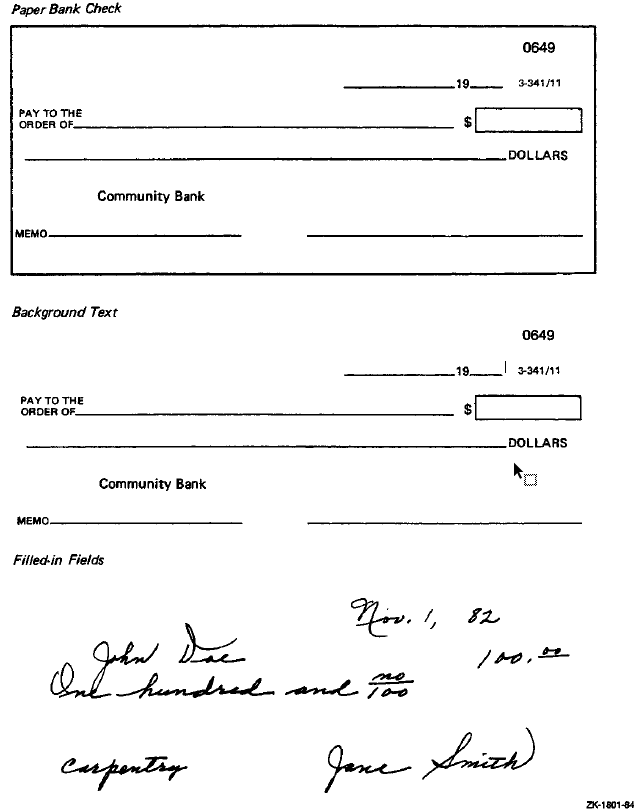
Fields
Fields, on the other hand, are variable parts of the form; they are the parts of а form that the operator (or the program) fills in when the program is running. In other words, fields are analogous to the places on the check where you would write in the name of the person to whom the check should be paid, the amount of the check, your signature, and so on. Figure 2.1, ''Background Text and Fields in а Bank Check Fields'' also shows the check's "variables" or "fields."
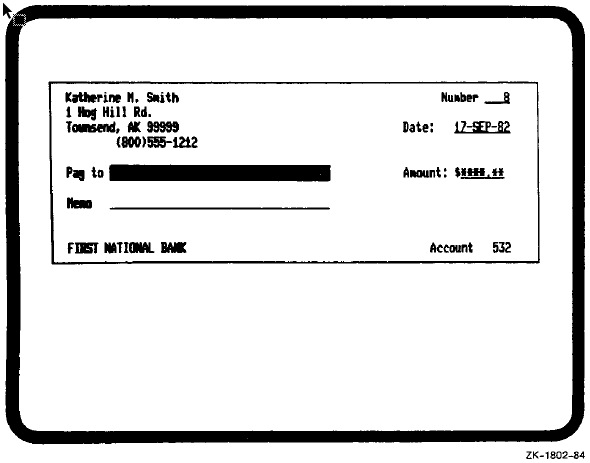
Fields in video forms differ from "fields" in paper forms in that they can be modified by the application program itself. Figure 2.2, ''Check Form from the Sample Application'' shows а video check that is part of the Sample Application program. The program fills in the number field when the next check is displayed for use. The program can also process data that the operator enters in the check form. For example, when the operator writes а check - that is, fills in the fields - the program deducts the amount of the check from the account.
Names of User-Provided Subroutines
User-provided subroutines that the Form Driver calls at run time are called user action routines (UARs). UARs support extended forms processing (for example, range checking for field values). When you create а form, you connect or associate with it any user action routines that the application requires. You do this by naming UARs in the Form and Assign phases of the Form Editor or in the FORM and FIELD statements in the Form Language.
Named Data
Named Data is an ordered collection of constant information useful to the application program and associated with а specific form, but not displayed on the screen. Named Data consists of constants, each of which can be accessed by name or by index. You associate Named Data with а form when you create the form - either by using the Data phase of the Form Editor or by using the NAMED_DATA statement in the Form Language.
Attributes
Attributes are characteristics of FMS video forms. These characteristics can be categorized into four types:
Field attributes
Form attributes
Line attributes
Video attributes
Field Attributes
Field attributes are characteristics of а field. You assign field attributes when you create а form, and they become active at run time. Both the Form Editor and the Form Language provide default field attributes if you do not specify any. The three categories of field attributes deal with data display, data alignment and padding, and operator interaction.
Some field attributes control data display in fields. For example, No Echo inhibits display of characters that the operator enters at the terminal. Other field data display attributes are Clear Character, Uppercase, and Zero Suppress.
Other field attributes control data alignment and padding. They are Left Justified, Right Justified, Fixed Decimal, Вlank Fill, and Zero Fill. Left Justified, for example, causes data to be entered in а field starting from the left.
Field attributes that control the way an operator inputs data in fields at run time can be thought of as operator interaction attributes. An example of such an attribute is Autotab, which automatically moves the cursor to the next field when the operator fills in the current field. Display Only, another example, allows only the application program to fill in the field and prohibits the operator from altering the field's contents. The other field attributes in this category are Default Value, Must Fill, Response Required, and Supervisor Only.
The complete list of field attributes is:
Autotab
Blank Fill
Clear Character
Default Value
Display Only
Field Completion UARs
Field Name
Fixed Decimal
Help Text
Indexed
Left Justify
Must Fill
No Echo
Response Required
Right Justify
Supervisor Only
Uppercase
Zero Fill
Zero Suppress
Form Attributes
Form attributes are characteristics that apply to the entire form. For example, the form attribute Area to Clear specifies the area of the screen that is to be erased whenever the form is displayed. This attribute allows you to overlay forms on each other, since you can specify that only а part of the screen should be cleared.
The complete list of form attributes is:
Form Name
Help Form Name
Screen Background
Screen Width
Screen Character Set
Screen Area to Clear
Field Highlighting
Function Key UARs
Pre-help UARs
Post-help UARs
Line Attributes
Line attributes apply to lines in а form. The three line attributes are illustrated in Figure 2.3, ''Line Attributes''.
Double Wide
Double Size
Scrolled
Figure 2.3. Line Attributes 
Video Attributes
Video attributes are visual characteristics that can apply to any part of the form. The reverse video attribute is illustrated in Figure 2.4, ''Reverse Video Attribute''. The complete list of video attributes is:
Blink
Bold
Reverse
Underline
Character Set
Figure 2.4. Reverse Video Attribute 
2.1. Background Text
Background text is composed of text characters displayed in а form that are not alterable by your program or by the terminal operator at run time. Background text is typically used to provide captions for fields and to give information to the operator.
Background text can be specified with any or all of the video attributes supported by the VT100/200-compatible terminal. These attributes include Blink, Bold, Reverse, and Underline. Additionally, the character set for background text characters on any part of the screen can be specified explicitly (see Section 3.7.4, ''Characters: Changing Character Sets'' and Section 3.7.19, ''Select: Defining а Select Area'' on the form Editor operations CНARSET and SELECT, and Section 4.2, ''Form Language Statements'' on the form Language ТЕХТ statement).
2.2. Fields
Fields are areas of а form where the terminal operator can enter or view variable data. FMS provides many features for controlling the way the terminal operator interacts with fields. Section 2.4.1, ''Field Attributes'' describes field attributes.
The following sections describe field pictures (а way of specifying fields), special predefined date and time fields, and field ordering.
2.2.1. Field Picture
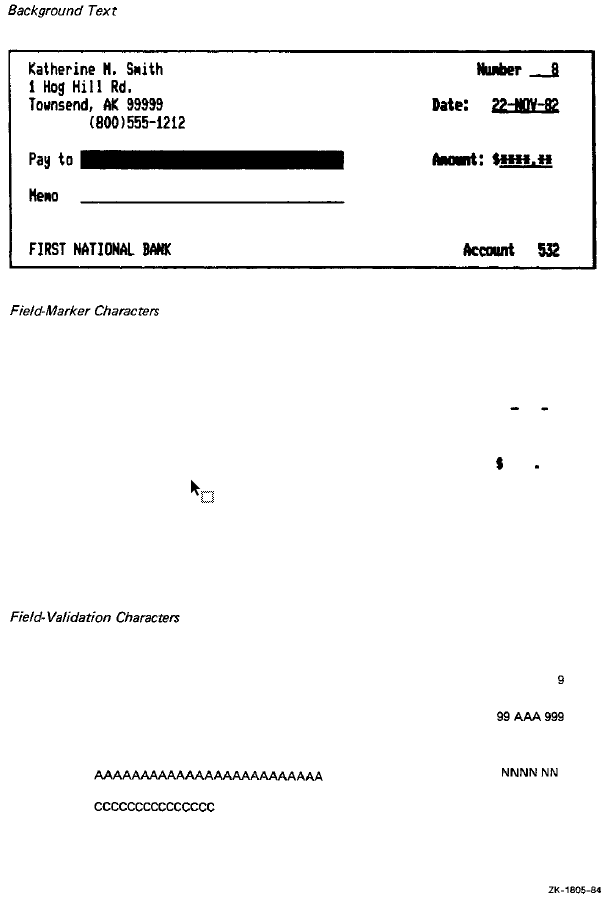
Fields in FMS are specified by field pictures. А field picture is а contiguous sequence of field-validation characters and optional field-marker characters. Field-validation characters are characters that define data positions within а field and describe valid input for each position in that field. FMS validates data entered into fields at run time by comparing the characters entered with these undisplayed field-validation characters (see Figure 2.5, ''Background Text, Field-Marker Characters, and Field-Validation Characters'' and Table 2.1, ''Field-Validation Characters''). Field-marker characters can be included in а field when the form is created. Field-marker characters, however, do appear on the screen at run time and are used to make the form more readable (see Table 2.2, ''Field-Marker Characters''). Field-marker characters are the constant part of the field.
А field picture, therefore, specifies both the size of а field, and the set of data characters allowed to be input. Field-marker characters are never returned to the program as part of а field's value.
Field pictures must include at least one field-validation character.
| Character Entered By Operator | Valid for Field Validation Character | ||||
|---|---|---|---|---|---|
| A | C | N | 9 | X | |
| Space | * | * | * | ||
| ! thru * | * | ||||
| + | * | * | |||
| - | * | * | |||
| , | * | * | |||
| . | * | * | |||
| 0 thru 9 | * | * | * | * | |
| : thru @ | * | ||||
| А thru Z | * | * | * | ||
| [ thru 1 | * | ||||
| а thru z | * | * | * | ||
| { thru ~ | * | ||||
| ¡ thru £ | * | ||||
| ¥ | * | ||||
| § thru " | * | ||||
| ° thru ³ | * | ||||
| µ thru · | * | ||||
| ¹ thru ½ | * | ||||
| ¿ | * | ||||
| À thru Ï | * | * | * | ||
| Ñ thru Ÿ | * | * | * | ||
| ß | * | * | * | ||
| à thru ï | * | * | * | ||
| ñ thru ÿ | * | * | * | ||
All others are invalid for any picture.
| Symbol | Name |
|---|---|
| B | space |
| ! | exclamation mark |
| " | quote |
| # | pound sign |
| $ | dollar sign |
| % | percent sign |
| & | ampersand |
| ' | apostrophe |
| ( | left parenthesis |
| ) | right parenthesis |
| * | asterisk |
| + | plus sign |
| , | comma |
| - | hyphen or minus sign |
| . | period |
| / | slash |
| : | colon |
| ; | semicolon |
| < | left angle bracket |
| = | equal sign |
| > | right angle bracket |
| ? | question mark |
| @ | at sign |
| [ | left square bracket |
| \ | backslash |
| ] | right square bracket |
| ¡ | inverted ! |
| ¢ | cent sign |
| £ | pound sign |
| ¥ | yen sign |
| § | section sign |
| ¤ | currency sign |
| © | copyright sign |
| ª | feminine ordinal indicator |
| « | angle quotation mark left |
| ° | degree sign |
| ± | plus/minus sign |
| ² | superior 2 |
| ³ | superior 3 |
| µ | micro sign |
| ❡ | paragraph sign |
| · | middle dot |
| ¹ | superior 1 |
| º | masculine ordinal indicator |
| » | angle quotation mark right |
| ¼ | fraction one-quarter |
| ½ | fraction one-half |
| ¿ | inverted ? |
| ^ | caret or circumflex |
| _ | underscore |
| ` | grave accent |
| { | left brace |
| | | vertical bar |
| } | right brace |
| ~ | tilde |
2.2.2. Date and Time Fields
Date and time fields are special predefined fields provided by FMS. Whenever а form is displayed or refreshed, the system date and time is placed in any date or time fields respectively. Date and time fields are normally display only fields, but that attribute can be changed to allow the terminal operator to enter the date or time. Date and time fields are specified with one of а set of predefined field pictures.
The following date fields are available:
month day, year
Month is spelled out, day is а 2-digit decimal number, and year is а 4-digit number.
dd-mmm-yy
Day is а 2-digit decimal number, month is the first 3 letters of each month, and year is а 2-digit decimal number.
mm/dd/yy
All entries are 2-digit decimal numbers.
dd-mm-yy
All entries are 2-digit decimal numbers.
The following time fields are available:
hh:mm:ss
The time is standard 24- hour time.
hh:mm АМ/РМ
Time is expressed in hours from 0 to 12 with АМ/РМ indication.
Table 2.3, ''Date Field Formats'' and Table 2.4, ''Time Field Formats'' summarize the date and time field formats and their corresponding field pictures.
| Format | Field Picture |
|---|---|
| month day, year | АААААААААВ99,В9999 |
| day-month-year | 99-ААА-99 |
| month/day/year | 99/99/99 |
| day-month-year | 99-99-99 |
| Format | Field Picture |
|---|---|
| hour:minute:second | 99:99:99 |
| hour:minute АМ/РМ | 99:99ВАА |
2.2.3. Field Ordering
FMS allows you to specify the order in which fields are to be accessed at run time, when your program requests the Form Driver to get all fields in а form. The order specified is also the order in which field data is positioned in the record returned to your program. You do not need to use this ordering; it is only а convenience. You can always have the Form Driver return the values of the fields one at а time in any order you choose. If your program does request the Form Driver to get all field values at once, the cursor is moved to the first field in the form, and the program waits for the operator to enter data for that field. When the operator presses the NEXT FIELD function key (usually ТАВ), the cursor moves to the next field in the form, according to the order that you specified. This process is repeated until the operator indicates that the form is complete.
2.3. Named Data
Named Data is an ordered collection of constant information useful to the application program and associated with а specific form, but not displayed on the screen. Named Data consists of constants, each of which can be accessed by name or by index. You associate Named Data with а form when you create the form - either by using the Data phase of the Form Editor or by using the NAМED_DATA statement in the Form Language.
Named Data is useful for storing form-dependent information independent of your program.
FMS forms can include approximately 60,000 Named Data items, where each item consists of an index, а Named Data name, and а Named Data string. Named Data items can be referenced from your program either by index or by name. The indexes for Named Data items in а form must be consecutive and must begin with one. The name for а Named Data item can be up to 31 characters long and can include any displayable character. Names for Named Data items need not be unique. If no name is specified for а Named Data item, а blank name is assumed. The data string of а Named Data element can be up to 80 characters long and can include any displayable character.
Refer to the VSI FMS Form Driver Reference Manual for more information about Named Data.
2.4. Attributes
The following sections describe field attributes, form attributes, line attributes, and video attributes.
2.4.1. Field Attributes
Field attributes are characteristics of а field. You assign field attributes when you create а form, and they become active at run time. Some field attributes control data display, some control data alignment and padding, and others control the way an operator puts data in fields at run time. The complete list of field attributes is:
Autotab
Blank Fill
Clear Character
Default Value
Display Only
Field Completion User Action Routines
Field Name
Fixed Decimal
Help Text
Indexed
Left Justify
Must Fill
No Echo
Response Required
Right Justify
Supervisor Only
Uppercase
Zero Fill
Zero Suppress
2.4.1.1. Autotab
The Autotab attribute automatically moves the cursor to the next field when the operator has filled the current field. The default is no Autotab.
2.4.1.2. Blank Fill
The Blank Fill attribute causes any data positions not entered by the terminal operator or specified in а field default value to be returned to the application program as blanks. Blank Fill is the default for FMS fields.
2.4.1.3. Clear Character
The clear character is а character that is displayed in each field position where no data has been entered, and no default value has been specified. The default clear character is а blank.
2.4.1.4. Default Value
The default value for а field is а string that is placed in а field when the form is first displayed before the operator has entered any data. If the operator does not enter data for а particular field, the default value is returned to the application program as the value for that field. Note that the default value is never checked against the field picture. If the default value is too long for the field, it is truncated.
2.4.1.5. Display Only
The Display Only attribute is used to prohibit the operator from altering the contents of а field. А field that is marked display only can only be accessed by the application program, never by the terminal operator. The default is No Display Only.
2.4.1.6. Field Completion User Action Routine
Field completion user action routines (Field UARs) are program subroutines that are called at run time whenever the operator completes data input to а field. Field completion UARs are specified by giving the name of the subroutine that is to be called and an associated data string of up to 80 characters. Up to 15 field completion UARs can be associated with each field, and they are processed in the order specified. Field completion UARs are especially useful for performing extended field processing beyond that which is normally provided by FMS.
When you create а form, you connect or associate with it any user action routines that the application requires. You do this by naming UARs in the Form and Assign phases of the Form Editor or in the FORM and FIELD statements in the Form Language.
To use user action routines, you need to create an object module of UAR vectors which you must link with the Form Driver and your program. See Chapter 6, "Form Application Aids" for а description of creating object modules of UAR vectors. Field completion UARs are assignable in the ASSIGN phase of the Form Editor or with the FIELD statement of the Form Language.
2.4.1.7. Field Name
The field name is а unique name of up to 31 characters associated with each field. An application program can read or write to а field in а form by providing to the Form Driver the name of the field to be accessed. If no field name is given when the form is created, FMS assigns а default name according to the pattern F$nnnn where пппп is а four-digit sequential index starting with one.
The rules for specifying field names are:
Must begin with а letter (A-Z)
Must end with а letter (A-Z) or digit (0-9)
Cannot exceed 31 characters in length
Can contain only letters (A-Z), digits (0-9), dollar signs ($), or underscores (_)
2.4.1.8. Fixed Decimal
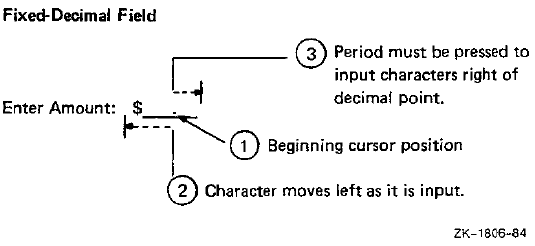
The Fixed Decimal attribute specifies а field with а fixed decimal point separator and special field justification rules. In fixed-decimal fields the part of the field to the left of the decimal separator is treated as right justified, while the part of the field to the right of the decimal separator is treated as left justified. In а fixed-decimal field, the cursor is first positioned over the decimal point separator, and characters are entered into the left side of the field. As each character is entered, the other characters to the left of the decimal separator are shifted one position left to make room for the new entry. When the left side of the field is complete, the operator types in the decimal separator, either а decimal point or а comma, and then proceeds to enter data into the right side of the field. The decimal separator in а fixed decimal field is not returned to the application program as part of the field's value (see Figure 2.6, ''Fixed Decimal Attribute''). The field-picture rules for fixed-decimal fields are listed below.
The field-validation characters must be all 9s or all Ns.
At least one period or comma must be included.
The rightmost period or comma becomes the active decimal separator.
At least one field-validation character must be on each side of the active decimal separator.
Any number of other field-marker characters are permitted.
The attributes Left Justify, Right Justify, and Fixed Decimal are mutually exclusive. The default for FMS fields is Left Justify.
2.4.1.9. Help Text
Help text for а field is an 80-character or 132-character text string. It is displayed at the bottom of the screen when the operator requests help by pressing HELP (PF2 for а VТ100 terminal) while the cursor is in а field at run time.
2.4.1.10. Indexed
Indexed fields are fields with the same name but with а different numerical index for identification. To reference indexed fields from your program, you must specify both the field name and the field index. The field index is just а sequential number from one to the number of fields in an indexed set. Indexed fields can be located anywhere on the screen but must have identical field pictures and field attributes. А typical use for indexed fields is to simplify using program loops to process а set of similar fields. See the VSI FMS Form Driver Reference Manual for information on using indexed fields.
2.4.1.11. Left Justify
The Left Justify attribute causes data to be entered in а field starting from the left. As each character is entered, the cursor moves one position to the right to accept the next character.
The attributes Left Justify, Right Justify, and Fixed Decimal are mutually exclusive. Left Justify is the default for FMS fields.
2.4.1.12. Must Fill
The Must Fill Attribute is used to require the operator to enter data in every position of а field if any data is entered. The Must Fill attribute is useful for fields where partial completion does not make sense, such as for Social Security numbers. The default for FMS fields is no Must Fill.
2.4.1.13. No Echo
The No Echo attribute is used to inhibit display of characters entered in а field by the terminal operator. No Echo is typically used for fields that request privileged information such as passwords. The default for FMS fields is Echo.
2.4.1.14. Response Required
The Response Required attribute is used to force the operator to enter data in а given field before proceeding to the next form. The default is no Response Required.
2.4.1.15. Right Justify
The Right Justify attribute causes data to be entered in а field starting from the right. The cursor is positioned at the right edge of the field, and as each character is entered, the other characters in the field are all shifted one position to the left to make room for the new character. The field picture for right-justify fields must have only one type of field-validation character to allow the data to be shifted without conflict.
The attributes Left Justify, Right Justify, and Fixed Decimal are mutually exclusive. The default for FMS fields is Left Justify.
2.4.1.16. Supervisor Only
The Supervisor Only attribute is used to provide one level of selective field protection. Fields marked supervisor only can only be accessed by the terminal operator when the application program has turned supervisor-only mode off. The default is No Supervisor Only.
2.4.1.17. Uppercase
The Uppercase attribute is used to convert all lowercase alphabetic characters entered to uppercase automatically. Data entered in fields with the uppercase attribute is displayed and returned to the application program in uppercase. The default is No Uppercase.
2.4.1.18. Zero Fill
The Zero Fill attribute causes any data positions not entered by the terminal operator or not specified in а field default value to be returned to the application program as zeros. Zero Fill requires а clear character of zero. The default for FMS fields is Вlank Fill.
2.4.1.19. Zero Suppress
The Zero Suppress attribute is used to suppress leading zeros in right-justified or fixed-decimal fields. Zero Suppress requires the Zero Fill attribute. The default is no Zero Suppress.
2.4.2. Form Attributes
Form attributes are characteristics that apply to an entire form. The list of form attributes is:
Form Name
Help Form Name
Screen Background
Screen Width
Screen Character Set
Screen Area to Clear
Field Highlighting
Function Key User Action Routine
Pre-help User Action Routine
Post-help User Action Routine
2.4.2.1. Form Name
The form name is а unique name of up to 31 characters associated with each form and used for identification. To display а form on the terminal, your program provides to the Form Driver the name of the form to be displayed.
The rules for specifying form names are as follows:
Must begin with а letter (A-Z)
Must end with а letter (A-Z) or digit (0-9)
Cannot exceed 31 characters in length
Can contain only letters (A-Z), digits (0-9), dollar signs ($), or underscores (_)
2.4.2.2. Help Form Name
The help form name is the name of а form that is to be displayed when the operator requests form level help by pressing HELP (PF2 on а VT100 terminal) more than once. (See form naming rules in Section 2.4.2.1, ''Form Name''.)
2.4.2.3. Screen Background
The Screen Background attribute specifies the screen background when the form is displayed. As Is (for the Form Editor) or CURRENT (for the Form Language) means do not change the screen background from its present setting. Black sets the terminal to display white characters on а black background. White sets the terminal to display black characters on а white background (sometimes known as reverse video). The default for Screen Background is As Is in the Form Editor and BLACK in the Form Language.
2.4.2.4. Screen Width
The Screen Width attribute specifies the width of the terminal screen in characters when the form is displayed. As Is (for the Form Editor) or CURRENT (for the Form Language) means do not change the screen width from its present setting. 80 sets the screen width to 80 characters per line and 132 sets the screen width to 132 characters per line. In 132- column mode, terminals without the advanced video option (AVO) are restricted to а maximum form size of 13 lines. The default for screen width is As Is for the Form Editor and CURRENT for the Form Language.
2.4.2.5. Screen Character Set
The Screen Character Set attribute specifies the default character set to be used when the form is displayed. The default character set is used to display all text and fields that do not explicitly specify а different character set. The choices for character set are As Is, US, UK, RULE, SET1, and SET2. Specifying the character set As Is means do not change the character set from its present setting. US is the standard United States character set supplied with every VT100. UK is the same as US except that the British pound sign (TBS) replaces the US pound sign (#). RULE is the name used for the graphics or line drawing character set. SET1 and SET2 specify optional character sets that may be added to the standard VT100. For more information on character sets, refer to the VT100 User Guide or your VT200 Programmers Reference Guide if you wish to use the multinational character set on а VT200 series terminal. The FMS default for Character Set is As Is.
2.4.2.6. Screen Area to Clear
The Screen Area to Clear attribute specifies the area of the screen that is to be erased whenever the form is displayed. By clearing only part of the screen when а form is displayed, more than one form can be shown at а time. One form can be "overlaid" on another form. The area to clear is given by specifying the first and last line numbers of the range of lines to be erased when the form is displayed. The line numbers specified must be in the range of 0 to 23, and the first line specified must be less than or equal to the last line. If both numbers are given as zero, no lines of the screen will be cleared. If either number is given in correctly, the area to clear will be set from line 1 to line 23 by default.
2.4.2.7. Field Highlighting
Field Highlighting allows you to highlight the field that is being accessed at run time by altering its video characteristics. Whenever the cursor enters а field, and if field highlighting is enabled, the video attributes for that field change to the highlight attribute(s). When the cursor leaves the field, the attributes are restored to their previous settings. The attributes for field highlighting include any combination of Blink, Bold, Reverse, Underline, and Clear. The default for Field Highlighting is No Highlighting.
2.4.2.8. Function Key User Action Routine
User action routines (UARs) are user-provided subroutines that the Form Driver calls at run time to support extended forms processing. The conditions under which user action routines for а form are invoked are described below.
When you create а form, you connect or associate with it any user action routines that the application requires. You do this by naming UARs in the Form and Assign phases of the Form Editor or in the FORM and FIELD statements in the Form Language.
To use user action routines, you need to create an object module of UAR vectors which you must link with the Form Driver and your program. See Chapter 6, "Form Application Aids" for а description of creating object modules of UAR vectors.
The rules for specifying UAR names are as follows:
Must begin with а letter (A-Z)
Must end with а letter (A-Z) or digit (0-9)
Cannot exceed 31 characters in length
Can contain only letters (A-Z), digits (0-9), dollar signs ($), or underscores (_)
The function key user action routine is а subroutine that is called at run time whenever the operator presses an undefined (to FMS) function key. А function key user action routine is used to provide additional special key processing beyond that which is already supported by FMS.
2.4.2.9. Pre-help User Action Routine
А pre-help user action routine is а subroutine that is called at run time whenever the operator presses HELP before any other FMS help is provided.
Refer to Section 2.4.2.8, ''Function Key User Action Routine'' for UAR naming rules.
2.4.2.10. Post-Help User Action Routine
А post-help user action routine is а subroutine that is called at run time when the operator presses HELP and after all other FMS help has been displayed.
Refer to Section 2.4.2.8, ''Function Key User Action Routine'' for UAR naming rules.
2.4.3. Line Attributes
Line attributes are characteristics that apply to entire lines in а form. FMS line attributes are double size, double wide, and scrolled.
Any number of lines in а form can be given line attributes. Although the lines in а single scrolled area must be adjacent, you can define more than one scrolled area in а single form. By default, lines in а form are defined to be normal size and nonscrolled.
2.4.3.1. Double Size
Characters on double-size lines are twice as large as normal. Each character occupies two columns on two lines. Double-size and double-wide lines reduce the maximum number of characters that can fit on а single line by half.
2.4.3.2. Double Wide
Characters on double-wide lines are twice as wide as normal. Each character occupies two columns. Double-size and double-wide lines reduce the maximum number of characters that can fit on а single line by half.
2.4.3.3. Scrolled
Scrolled lines are lines that become part of an FMS scrolled area at run time. An FMS scrolled area is а part of the screen that can be scrolled forward and backward by the operator, allowing the operator to enter or display more data than will fit on the screen at one time. А scrolled line must contain at least one field, and the fields and background text in each line of а scrolled area must be identical. Refer to the VSI FMS Form Driver Reference Manual for more information about scrolling.
2.4.4. Video Attributes
Video attributes are visual characteristics that can apply to any part of the form. FMS allows you to specify the full range of video attributes supported by VT100/200 terminals. VT100/200 video attributes include Blink, Bold, Reverse, Underline, and Character Set. Combinations of video attributes can be assigned on а per character basis except for fields, which must be assigned video attributes as а unit. On VT100 terminals without the advanced video option, only the Reverse or Underline attribute is displayed, depending on whether the cursor is а block or underscore, respectively. Figure 2.7, ''Underline Video Attribute'' shows the Underline video attribute.
Chapter 3. Form Editor - FMS/EDIT
The form Editor is an interactive utility that lets you create and edit forms on а video (VT100- or VT200-compatible) terminal. An alternative to the Form Editor is the Form Language, described in Chapter 4, "Form Language Translator - FMS/ТRANSLATE".
Creating or editing а form may include many operations:
Typing in background text
Setting up fields
Selecting form, field, video, and line attributes
Establishing field access order
Creating scrolled areas
Associating user action routines with the form
Associating Named Data with the form
When you are creating а new form, you type in the background text and set up the fields. The background text is the constantly displayed part of а form, the part that cannot be modified by the operator at run time. А field, on the other hand, is а variable part of the form; it is the part of the form that the operator or program fills in when the FMS application program is running. Fields can also be modified by the application program. To set up а field, you type in field-validation characters, which indicate the type of input that will be allowed at run time. You can also use field-marker characters to make the field more readable for the operator. You can give а field one or more field attributes, which are described in Chapter 2, "Form Characteristics" (examples are Autotab and No Echo).
You can give а form certain characteristics, such as color of background or the number of columns in the screen width, that affect the whole form. These characteristics, called form attributes, are also described in Chapter 2, "Form Characteristics".
Although you write user action routines separately, you must associate their names with the appropriate form when you create or edit that form. User action routines are subroutines, associated with а particular form, that FMS invokes at run time when the operator completes а field or presses HELP. А user action routine can also be used to process various keys, such as function keys, when they are pressed by the operator at run time.
Another form creation or editing activity is associating Named Data with а form. Named Data is an ordered collection of constant information that is useful to the application program and associated with the form, but not displayed on the screen. Named Data for а form consists of constants, each of which can be accessed by its name or by its index.
You can also establish field access order. Field access order is the order in which the operator accesses fields in а form at run time. As the operator moves through the form, the cursor is positioned at fields in the order specified.
The Form Editor allows you to perform these various operations in different phases, which you enter through the Form Editor menu. Following are the seven Form Editor phases:
Form
Layout
Assign
Data
Order
Test
Exit
You will probably find it efficient to perform editing operations in the order of the preceding list of phases, particularly when you are creating new forms. However, the Form Editor allows you to use the phases in whatever order you prefer, and to go back and forth between phases. The recommended steps, then, for creating а new form are:
Assign form attributes, function key and help user action routine names and data, if needed, and initial field attributes.
Lay out the form's background text and fields.
Assign field attributes.
Assign Named Data.
Assign field access order.
Test the form.
Save the form.
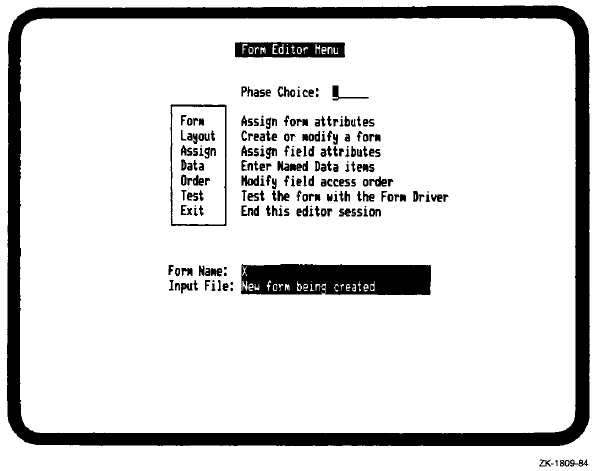
The Form Editor menu is the first image that appears on your screen when you invoke the Form Editor. The menu shows you the list of Form Editor phases. You type in the name of the phase that lets you do the work that you want to do. You return to the menu and choose other phases when you are ready to perform other operations. Section 3.5, ''Choosing а Phase'' through Section 3.12, ''Exit Phase'' explain in detail how to use the Form Editor phases.
Form Phase
Assign form wide attributes, user action routine names and data, and initial field attributes using the Form phase. The initial field attribute assignment capability in the Form phase lets you preselect the field attributes that the Form Editor will assign to the fields you create in the current editing session. In the Layout and Assign phases, you can assign field attributes to individual fields.
Layout Phase
Use the Layout phase to type in the text that appears when the video form is displayed and to set up the fields that the operator (or application program) fills in when the application program is running. Layout is an interactive phase; that is, you see the form on the screen as you type it, and you see changes as you edit а form. А status line at the bottom of the screen displays information about your editing activities. The Layout phase offers you а number of capabilities that are similar to а video text editor's capabilities. Using Form Editor keys, you can easily move the cursor, delete characters and lines, and perform other editing operations.
Assign Phase
Assign field attributes to fields in а form using the Assign phase. You can also assign them in other phases. The Form phase lets you preselect the field attribute assignments for any new fields created during an editing session. The Layout phase lets you assign field attributes to individual fields while you are laying out the text and fields of the form. The Assign phase is а different way to assign attributes to fields. It allows you to assign attributes to fields that have been changed since the last assignment, to assign attributes to one field, or to assign attributes to all fields (but not all at once).
Data Phase
Use the Data phase to associate Named Data with the form.
Order Phase
Specify the order in which the Form Driver allows the operator to access fields at run time.
Test Phase
Display the current form as an application program would display it. The Test phase allows you to type data into fields to test field validation.
Exit Phase
Use the Exit phase to leave the Form Editor and optionally save the form on which you were working.
3.1. Terminal Characteristics
The Form Editor works properly on а VT100- or VT200-compatible terminal only If the following terminal SET-UP features are in effect.
On VT100:
ANSINT52 bit is set to one (1) in SET-UP В
For more information on SET-UP В, see the VT100 User Guide
On VT200:
Select VТ100 mode or VT200 mode or 8 bit controls
For more information on VT200 series terminals set up, see the VT200 User Guide.
3.1.1. Terminal Setup
FMS has alternate character sets, double size and double wide lines, ruling characters, and AST reentrancy. In addition, FMS display several forms on the screen simultaneously. FMS requires more complete control of the terminal to handle the additional screen characteristics than FMS V1 did.
FMS V1 queried the terminal directly for terminal type, options (such as Advanced Video Option), and current screen characteristics. This operation did not allow type-ahead; you could not enter commands or data while FMS was preparing for form display.
To allow type-ahead, FMS queries the operating system for terminal attributes and screen characteristics. Type the following VМS command to make sure that VMS knows your terminal attributes and screen characteristics before running your application:
$ SET TERMINAL/INQUIRE@
The operating system queries your terminal, and records its characteristics. Do not type ahead until the operation is complete. You might consider putting the SET TERMINAL/INQUIRE command in your login command file.
At any time you can type the following VMS command to display the characteristics of the current terminal:
$ SHOW TERMINAL@
If your terminal characteristics differ from those the operating system has recorded, your FMS application may not perform correctly. FMS also expects that the ANSLCRT and DEC_CRT attributes are set appropriately. See the VSI OpenVMS Command Language User's Guide for details on terminal characteristics.
3.2. FMS/EDIT Command
FMS/EDIT
FMS/EDIT — Invokes the Form Editor.
Syntax
FMS [/EDIТ] { form-file-spec | form-library-spec/FORM_NAМE=form-name } [/[NO]OUТPUT [=filespec]]| form-library-spec |
represents а file specification for а form library |
| form-file-spec |
represents а file specification for а form file (А form file is а file containing а single binary form.) |
| form-name |
represents а form name |
| file-spec |
represents а file specification |
Description
In the command syntax illustration shown above, you can use either а form file-spec or а form-library-spec as input. The parameter form-file-spec represents the file specifications for the form file you wish to create or edit. If you do not supply а file type, FMS assumes .FRM by default. The parameter form-library-spec represents the file specifications of the Form Library of the form you wish to edit. FMS assumes а .FLB file type. The parameter form-name represents the name of the form you wish to edit. The parameter file-spec represents the file specifications of the output file.
Note that /EDIT is the default FMS command. That is, if you do not specify а command with FMS, FMS assumes /EDIT by default.
Qualifiers
- /OUТPUT[ =file-spec]
/NOOUТPUТ The /OUTPUT qualifier specifies that you want an output file created.
If you do not explicitly specify the directory in which the output file should be placed, the default directory is one of two possibilities. (1) if you specify the /OUTPUT qualifier, the default directory is your current directory. (2) If you do not specify the /OUTPUТ qualifier, the default directory is the same as the input directory.
If you do not include the file specification of the output file, the default file specification of the output file is one of three possibilities. (1) if you are creating а new form, the default output file specification is the file specification given plus the default type .FRM. (2) if you are editing an existing form from а form file, the default output file specification is the input file specification with an incremented version number. (3) If you are editing an existing form from а form library, the default output file specification is the form name (truncated) plus the file type .FRM. (If а form name contains а dollar sign or underscore, FMS removes the dollar sign and underscore and truncates the name to the first 9 characters.) Use the /NOOUTPUT qualifier if you do not want an output file created.
This qualifier is useful for viewing forms in directories to which you do not have write access.
Examples
$ FMS MENU
This example creates or edits the form in the form file MENU.FRM.
$ FMS/EDIT SAMP/FORM_NAME=DEPOSIT /DUTPUT=DEPOS!Tl
This example edits the form DEPOSIT from form library SAMP.FLB. The output file is assigned the name DEPOSIT1.FRM.
3.3. Form Editor Keys
The Form Editor uses the VT100/200 keyboard and alternate keypad to perform editing functions and to move the cursor on the terminal screen. Figure 3.1, ''Form Editor Keys'' shows the keypad keys.
Pressing GOLD MENU always returns you to the Form Editor menu. Pressing HELP always displays any available Form Editor help.
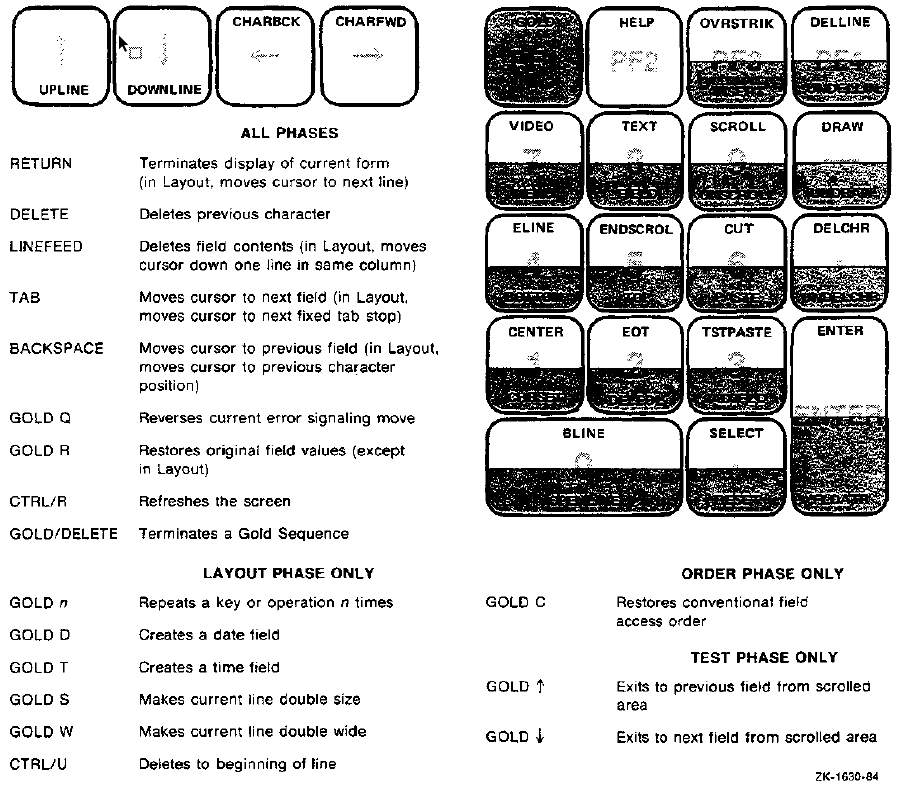
The VT200 series of terminals have six additional function key definitions for the Form Editor. These functions, their associated keys and the phases in which these functions are active are listed below.
VT200
| Function | (LK201 Keyboard) | Phase |
|---|---|---|
| BACKSPACE |
F12 |
Layout |
| DOWNLINE |
F13 |
Layout |
| HELP |
HELP(F15) |
All phases |
| PASTE |
Е2 |
Layout |
| CUT |
Е3 |
Layout |
| SELECT |
Е4 |
Layout |
3.4. Error Signaling in the Form Editor
When an illegal function is attempted or when screen boundaries are reached, the Form Editor signals an error based on the current signal mode. An error message is also displayed on the bottom line of the screen. The error message is erased after another key is pressed.
Pressing GOLD Q changes the current signaling mode from Terminal Bell to Quiet and vice versa. If the screen background is specified "As Is", it is changed to "Black" for Quiet signaling.
Terminal Bell signal mode is а 'beер." Quiet signal mode reverses the current screen background instead of beeping. The signal mode is visual rather than audio. The default signal mode is Terminal Bell.
Four functions display error messages on the bottom line of the screen only if you press HELP. The error is signaled, however, based on the current signal mode. The four functions are:
Creating Date Fields - GOLD D
Creating Тime Fields - GOLD Т
Assigning Video Attributes - VIDEO
Assigning character sets - CНARSET
3.5. Choosing а Phase
To choose а phase from the Form Editor menu (see Figure 3.2, ''Form Editor Menu''), type in the whole phase name or just the first letter. Each phase is described in the following sections.
3.6. Form Phase
The Form phase lets you assign form attributes, identify user action routines for the form, and assign initial field attributes. Form attributes are the characteristics, such as color of background and number of columns in the screen width, that affect the whole form. User action routines are routines that you associate with а particular form and that FMS invokes at run time when the operator presses а function key or HELP. The initial field attribute assignment capability in the Form phase lets you preselect the field attributes that the Form Editor will assign to the fields you create in the current editing session. Refer to Chapter 2, "Form Characteristics" for more detail on form characteristics, such as user action routines.
You use Form phase by filling in а series of three questionnaires that appear on the screen:
Assign Form Attributes
Assign Initial Field Attributes
Form User Action Routines
The second and third questionnaires appear on the screen only if you answer yes to the last two questions on the Assign Form Attributes Questionnaire. Figure 3.3, ''Assign Form Attributes Questionnaire'' through Figure 3.5, ''Form User Action Routines Questionnaire'' show the three questionnaires.
The following is а complete list of the assignments you can make in the Form phase. Section 3.6.1, ''Form Name'' through Section 3.6.9, ''Initial Field Attributes'' describe how to make those assignments.
Form Name
Help Form Name
Screen Background
Screen Width
Screen Character Set
Screen Area to Clear
Field Highlighting
User action routine Names and data
Initial Field Attributes
Entering the Form Phase
Type FORM to enter the Form phase at any time from the Form Editor menu. When you enter the Form phase, the Assign Form Attributes questionnaire is displayed (see Figure 3.3, ''Assign Form Attributes Questionnaire'').
Use the following keys to control processing in the Form phase:
ТАВ to move the cursor to the next field
BACKSPACE to move the cursor to the previous field
GOLD MENU to return to the Form Editor menu
HELP to get help in any field or for the Form phase
RETURN or ENTER to move to the next form
DELETE to delete the character to the left of the cursor
LINEFEED to delete the contents of а field
QUIET to change the signal mode to reverse screen
Pressing HELP displays а single line of help text on the bottom line of the screen. Pressing HELP а second time displays an entire screen of help information about the Form phase.
Leaving the Form Phase
Press RETURN, ENTER or GOLD MENU to return to the Form Editor menu once you have finished assigning form wide attributes.
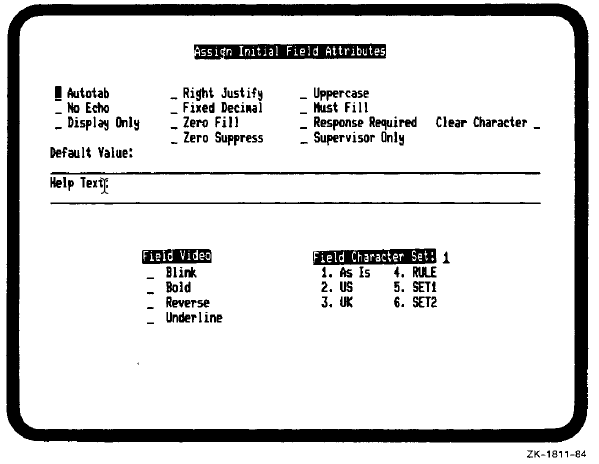
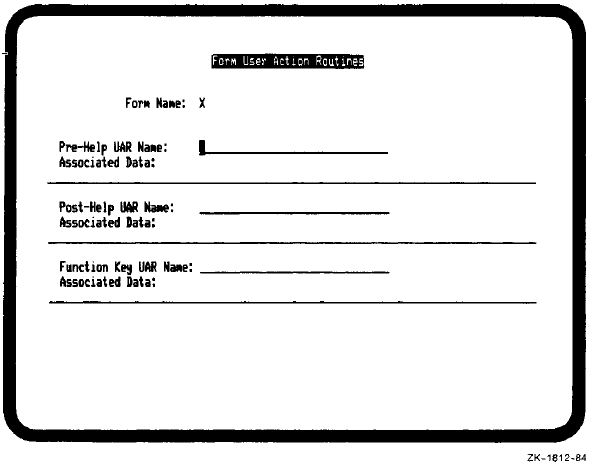
3.6.1. Form Name
You can select а name for the form on which you are working. If you do not give а name to the form in the Form phase, FMS uses the name of the input file as the form name. If the file name begins with а numeric digit, FMS appends the letter F to the beginning of the name to make it suitable as а form name. See Section 2.4.2.1, ''Form Name'' for naming rules. When the Assign Form Attributes questionnaire is displayed, the cursor is positioned next to Form Name. You type in the name that you want for the form and then press ТАВ to move the cursor to Help Form Name.
3.6.2. Help Form Name
You can specify the name of а help form that you want to associate with the form on which you are working. А help form is not required. See Section 2.4.2.1, ''Form Name'' for naming rules.
To give the name that you want to the help form, move to the appropriate field (using ТАВ) in the Assign Form Attributes questionnaire and type in the name of the help form.
3.6.3. Screen Background
You can specify the background (black or white) that the form will have when the application program is running.
To select screen background, move to the appropriate field (using ТАВ) in the Assign Form Attributes questionnaire and type the number of your choice.
3.6.4. Screen Width
You can specify how wide the form will be in the running application. The form can be either 80 columns or 132 columns wide.
To select the screen width you want, move to the appropriate field (using ТАВ) in the Assign Form Attributes questionnaire and type the number of your choice.
3.6.5. Screen Character Set
You can choose one of five character sets to appear in the form at run time. The US, UK, and RULE character sets are standard on every VТ100-family terminal. SET1 and SET2 character sets on the VT100 require optional hardware. Refer to your VT200 User Guide for information about the use of the multinational character set and the compose character function. See Chapter 2, "Form Characteristics" for more detail about character sets.
To select the character set you want, move to the appropriate field (using ТАВ) in the Assign Form Attributes questionnaire and type the number of your choice.
3.6.6. Screen Area to Clear
You can specify the area to be cleared at run time when the form is displayed. You indicate the area by specifying the first and last lines. Initial default values are 1 through 23. These fields are right justified with the zero fill attribute. If either initial value is deleted, the Form Driver supplies а value of zero. An error message will be displayed if only one value is left at zero.
Refer to Chapter 2, "Form Characteristics" for more detail.
To specify the screen area to clear, move to the First Line field (using ТАВ) under Screen Area to Clear in the Assign Form Attributes questionnaire and type the number of the first line. Then move to the Last Line field and type the number of the last line.
3.6.7. Field Highlighting
If you choose field highlighting, the field on which the cursor is positioned at run time blinks, appears in bold type, appears in reverse video, is underlined, or has any combination of these attributes. See Section 2.4.4, ''Video Attributes'' for more details.
To select the type of highlighting that you want (or No Highlighting), move to the appropriate field (using ТАВ) in the Assign Form Attributes questionnaire, and type Х. You must erase the Х in the No Highlighting field before selecting any specific highlight attributes. To use Clear as the highlight, erase the No Highlight and all other highlight attributes.
The highlight option fields are supervisor only fields. If the NO HIGHLIGHTING field is Х, then the highlight option fields cannot be accessed. If the NO HIGHLIGHTING field is BLANK, then the highlight option fields are accessible. The default is NO HIGHLIGHTING.
3.6.8. User Action Routine Names and Data
If а form will have user action routines associated with it, you must provide the names to those user action routines. Remember that user action routines are routines that you associate with а particular form and FMS invokes at run time when the operator presses а function key or HELP. Refer to Chapter 2, "Form Characteristics" for more information on user action routines.
To name user action routines for а form, move to the appropriate field (using ТАВ) in the Assign Form Attributes questionnaire, type Y, and press RETURN. The Form UAR questionnaire appears on the screen. Move to the appropriate fields in the questionnaire and type in the names of the user action routines. Move to the appropriate fields to type in associated data that is made available to the user action routines at run time.
3.6.9. Initial Field Attributes
If you choose to assign initial field attributes, any new fields you create during the current editing session will have those attributes. In other words, you can preselect characteristics for the Form Editor to assign to fields. Those characteristics become active at run time and in the Test phase.
To assign initial field attributes, move to the appropriate field (using ТАВ) in the Assign Form Attributes questionnaire, type Y, and press RETURN. The Assign Initial Field Attributes questionnaire appears on the screen. Again move to the appropriate field and type Х for each initial field attribute that you want to assign. For Clear Character, type in the character that you want to be displayed in fields at run time. For Default Value, type in а data or numeric string that you want to appear in the fields when the form is displayed. For Help Text, type in а help string up to 80 characters long. For Field Character Set, choose one of the character sets offered.
3.7. Layout Phase
Layout is the phase that lets you (1) type in the background text that appears when the video form is displayed and (2) set up the fields that the operator (or application program) will fill in when the application program is running. Layout is an interactive phase; that is, you see the form on the screen as you type it and you see changes as you edit а form. А status line at the bottom of the screen displays information about your editing activities. Figure 3.6, ''Layout Phase Status Line'' shows а status line, and Table 3.1, ''Layout Phase Status Line Information'' summarizes the information supplied in it.
The Layout phase offers you а number of capabilities that are similar to а video text editor's capabilities. The Form Editor displays а cursor, the small, rectangular, blinking symbol or underscore that marks the place of the current operation. Using the Form Editor Keys shown in Figure 3.1, ''Form Editor Keys'', you can easily move the cursor, delete characters and lines, and perform other Layout operations. In addition, you can choose the editing mode that you want: (1) а mode that replaces the character at the cursor position with the character that you type (Overstrike) or (2) а mode that inserts а character you type and moves any other characters to the right to make room (Insert). You can also choose Text and Field modes to let you create or edit background text or fields, respectively.
Many form editing operations are possible in Layout phase. For example, you can insert or delete characters or spaces. Cut and paste operations let you take out а part of а form and put that part in а different place in the form. You can set up an area of а form (called а scrolled area) that allows your program to gather or display more information than could otherwise be done with one form on а terminal screen. А scrolled area consists of identically formatted lines that create а window where the terminal operator can move up or down without affecting the rest of the form. See Section 2.4.3.3, ''Scrolled'' for more information on scrolled areas.
Layout phase provides the capability to select а part of а form and perform certain operations on it. You can remove the area, copy the area to another location in the form, center the area, draw а line around the area, change the character set in the area, or give video attributes to the area. The first step in holding an area and performing an operation on it is to define the select area. Pressing SELECT marks the current cursor position as а starting point for а select area. The end of the select area is the final position to which you move the cursor. The Form Editor indicates the select area in reverse video. The Center, Character Set, Cut, Draw, Paste, and Video attributes operations use select areas and are described in the following sections. The select operation is described in Section 3.7.19, ''Select: Defining а Select Area''.
The following is а complete list of the operations that you can perform in Layout phase. To perform them, use the Form Editor keys as described in Section 3.7.1, ''Adjacent: Breaking а Field into Two Adjacent Fields'' through Section 3.7.22, ''Video Attributes: Assigning Video Attributes''.
Adjacent: Break а Field into Two Adjacent Fields
Cancel: Cancel а Select, Gold, or Scroll Operation
Center: Center the Select Area
Characters: Change Character Sets
Cursor: Move the Cursor
Cut: Cut the Characters in а Select Area
Date: Define а Date Field
Delete: Delete Characters and Lines
Double Size: Make Lines Double Size
Double Wide: Make Lines Double Wide
Draw: Draw Lines and Boxes
Field Attributes: Assign Field Attributes
Insert: Insert Blank Lines
Modes: Overstrike/Insert, Text/Field, and Terminal Bell/Quiet and vice versa
Paste: Paste Previously Cut Characters
Refresh: Redisplay the Current Form
Repeat: Repeat Characters or Operations
Scroll: Make а Scrolled Area
Select: Define а Select Area
Test Paste: Test а Paste Operation
Time: Define а Time Field
Video Attributes: Assign Video Attributes
Entering the Layout Phase
Type LAYOUT to enter the Layout phase from the Form Editor menu. А screen filled with spaces is displayed along with а status line at the bottom of the screen.
The status line (see Figure 3.6, ''Layout Phase Status Line'') gives information about the current cursor location (whether it is in background text or in а field, whether it is on а scrolled line or on а normal line, and its line and column numbers), the modes that are in effect (Text or Field, Overstrike or Insert), and the current field name, if the cursor is positioned in а field.
| Item | Meaning | |
|---|---|---|
| Cursor | ||
|
TXT or FLD |
Indicates that the character at the cursor position is either text (ТХТ) or field (FLD). | |
|
NOR or SCR |
Indicates whether the line on which the cursor is positioned is normal (NOR) or scrolled (SCR). | |
|
LINE (1-23) | Indicates the line number. | |
|
COLUMN (1-132) | Indicates the column. | |
| Modes | ||
|
TXT or FLD |
Indicates the mode that controls whether background text (ТХТ) or fields (FLD) are entered. | |
|
OVS or INS |
Indicates how characters are entered on the screen. Character entry mode can be either Overstrike (OVS) or Insert (INS). | |
| Field Name | Displays the name of the current field, if the cursor is positioned in а field. | |
Help in the Layout Phase
Help is available at all times when you are in the Layout phase. Pressing HELP displays multiple help frames that describe Layout functions.
Form Display in the Layout Phase
Figure 3.7, ''Form in the Layout Phase'' shows а form as it appears in the Layout phase. The status line and field pictures do not appear in а displayed form in the Test phase or at run time.
In the Layout phase, а form is а rectangular area of the screen filled with characters (spaces are the default). Line terminator characters, like carriage return (CR) and linefeed (LF), do not apply to the Layout phase as they do in other text editors, but they are available as cursor positioning keys.
Leaving the Layout Phase
You can leave the Layout phase at any time by pressing GOLD MENU to return to the Form Editor menu.
3.7.1. Adjacent: Breaking а Field into Two Adjacent Fields
Pressing GOLD ADJFLD breaks the current field into two adjacent fields. The cursor is positioned in the newly created, second field.
An error is signaled and the adjacent field operation fails If the cursor is not in а field or If the field is not at least two characters long.
You can use ADJFLD (adjacent field) in the Layout phase to create fields next to one another. The field to the left of the cursor is marked modified by the Form Editor and retains the original attributes assigned to it. The field to the right of the cursor is marked as а new field, and default attributes are assigned to it. You can then edit the attributes of the new field using the Assign phase.
3.7.2. Cancel: Canceling а Select, Gold, or Scroll Operation
Pressing GOLD RESET cancels an active select, gold, or scroll function. The cursor does not move.
3.7.3. Center: Centering Characters on а Line
Pressing CENTER centers the contents of а line or the contents of а select area. Leading and trailing spaces surrounding text on а line are not counted as characters. An error is signaled and centering fails if the action would write over existing characters that are not spaces. To center one or more lines, use the select operation. If select is not active, the entire current line is centered.
3.7.4. Characters: Changing Character Sets
You can assign different character sets to parts of а form. All VT100s come with character sets that FMS calls US, UK, and RULE.
To define an area of the screen to have а specified character set, press GOLD CНARSET after defining а select area. You receive а prompt, which you can reply to with US, UK, RULE, SETI, or SET2. Typing SAVE saves the last character set that you choose. If select is not active and the cursor is in а field, the entire field is used as the select area. If select is not active and the cursor is not in а field, the current character is used as the select area.
If an error occurs during processing, the error is signaled using the current signal mode (Terminal Bell or Quiet). The error message is not displayed unless you press HELP. Pressing any other key restores the character set prompt.
3.7.5. Cursor: Moving the Cursor
You use keypad keys as well as keyboard keys to position the cursor in the Layout phase.
The cursor symbol, а rectangle or an underscore, blinks at the current screen position.
Up a Line
Pressing UPLINE moves the cursor up one line. The cursor remains in the same column on the new line. If you try to move the cursor above the top line of the screen, an error is signaled.
When you move from а normal line to а double-size or double-wide line, or vice versa, the screen column position does not change, but the column number does.
Down a Line
Pressing DOWNLINE moves the cursor down one line on the screen. The cursor remains in the same column on the new line.
When you move from а normal line to а double-size or double-wide line, or vice versa, the screen column position does not change, but the column number does.
If you try to move the cursor below the bottom line of the screen, an error is signaled. Pressing LINEFEED performs the same action as DOWNLINE. The cursor moves down one line on the screen in the same column.
Forward а Character
Pressing CHARFWD moves the cursor one character position to the right on а line or to the beginning of the next line if moving right would go over the last column.
Back а Character
Pressing СНАRВСK moves the cursor one character position to the left on а line or to the end of the previous line if moving left would go beyond the first column.
Pressing BACKSPACE moves the cursor one character position to the left on а line. An error is signaled if the cursor is at the left margin.
Next Таb Stop on а Line
Pressing ТАВ moves the cursor to the next fixed tab stop. The tab stops are 1, 9, 17, 25, 33, 41, 49, 57, 65, and 73. For 132-column forms, the additional tab stops are 81, 89, 97, 105, 113, 121, and 129. Tab stops that you set on your VT100 in SET-UP А are ignored.
From the last tab stop on а line, the cursor moves to the first tab stop on the next line. If the cursor is on the last line of the screen, an error is signaled and the cursor does not move. Tabbing moves the cursor only; the content of your form is unaffected.
Beginning of the Current Line
Pressing BLINE moves the cursor to the beginning of the current line. If the cursor is already at the beginning of а line, the cursor moves to the beginning of the preceding line, and so on. The action is rejected and an error is signaled if BLINE is pressed at the beginning of the first line of the screen.
Beginning of the Next Line
Pressing RETURN (or ENTER) moves the cursor to the beginning of the next line on the screen. If the cursor is on the last line of the screen when you press RETURN, an error is signaled and the cursor does not move.
End of a Line
Pressing ELINE moves the cursor to the end of the current line. If ELINE is pressed at the end of а line, the cursor moves to the end of the subsequent line, and so on. If the cursor is on the last line of the screen when you press ELINE, an error is signaled and the action is rejected.
End of Text
Pressing ЕОТ moves the cursor to the end of text on the current line. The cursor moves to the right of the last non-blank character on that line. If the cursor is in the last character position of the line, and that character position is occupied, the character position is actually one character position to the right. If you press ЕОТ when the cursor is at the end of а text line, the cursor moves to the end of text on the next line.
Bottom of the Screen
Pressing GOLD ВОТТОМ moves the cursor to the left bottom corner of the screen. If the cursor is already at the lower left, an error is signaled and the cursor does not move.
Top of the Screen
Pressing GOLD ТОР moves the cursor to the upper left corner of the screen. If the cursor is already at the upper left, an error is signaled and the cursor does not move.
3.7.6. Cut: Cutting Characters in а Select Area
Pressing CUT saves all the characters in the select area in the paste buffer. The select area on the screen is replaced with spaces. The characters in the paste buffer retain their video characteristics.
If no select area is currently active and the cursor is positioned in а field and CUT is pressed, the field becomes the select area; otherwise, the current character becomes the select area.
А select area can be defined for а scrolled area, but the entire scrolled area must be included.
An error is signaled and CUT fails if only part of а scrolled area is selected. After а cut the cursor is positioned at the top left corner of the previous select area.
3.7.7. Date: Defining а Date Field
Pressing GOLD D displays the date menu from which you choose а date field picture. Enter the number of the type of date field that you want. Press RETURN to insert the field picture of your choice.
The field picture that you choose is inserted to the right of the current cursor position on the screen. The cursor is positioned to the right of the newly inserted field.
You cannot edit the field picture after it has been entered. You must first delete the entire field, using CUT or DELLINE.
If an error occurs during processing, the error is signaled using the current signal mode (Terminal Bell or Quiet). The error message is not displayed unless you press НЕLР. Pressing any other key restores the Date menu.
Figure 3.8, ''Date Field Menu'' shows the date format menu that Layout displays on the last line of the screen.

3.7.8. Delete: Deleting Characters and Lines
АН characters and lines that you delete are retrievable from character and line buffers in the Form Editor. In other words, for every delete function, there is an undelete function. Undeleting what you deleted always restores whatever was most recently deleted.
Character to the Left of the Cursor
Pressing DELETE deletes the character to the left of the cursor. The character is stored in the character buffer and can be replaced by pressing GOLD UNDELCHR.
An error is signaled if DELETE is pressed when the cursor is at the leftmost character position on а line.
If you are in Overstrike mode, pressing DELETE replaces the character to the left of the cursor with а blank and moves the cursor one position to the left.
In Insert mode, the cursor and the characters to the right of the cursor are shifted left one position.
Pressing GOLD UNDELCHR places the deleted character at the current cursor position. The character remains in the buffer as well. If the buffer is empty, then an error is signaled, and the cursor does not move. The action of the cursor and other characters on the line is the same as If the character had been typed.
Character that the Cursor Is On
Pressing DELCHR deletes the character the cursor is on. The deleted character is stored in the character buffer and can be recovered by pressing GOLD UNDELCНR.
When you press DELCHR again, the character in the buffer is replaced with the most recently deleted character.
In Overstrike mode, the character position is replaced with а space, and the cursor moves one character position to the right on the line.
lf you are in Insert mode, the characters to the right of the cursor are moved one character position to the left. The cursor remains at its current position, and а space is added to the end of the line.
Pressing GOLD UNDELCHR places the deleted character at the current cursor position. The character remains in the buffer as well. If the buffer is empty, then an error is signaled, and the cursor does not move. The action of the cursor and other characters on the line is the same as If the character had been typed.
Beginning of а line
Pressing CТRL/U deletes all characters from the current cursor position to the beginning of the same line and replaces them with spaces. The cursor does not move. If the cursor is already at the beginning of the current line, the previous line is deleted. The operation fails if the cursor is in the middle of а field. Only entire fields can be deleted. The characters are stored in the line buffer, so you can do а GOLD UNDELLINE to get them back. UNDELLINE places characters to the left of the cursor if you deleted to the beginning of а line.
End of a Line
Pressing GOLD DELEOL deletes all characters from the current cursor position to the end of the same line and replaces them with spaces. The cursor does not move. If the cursor is already at the end of the current line, the next line is deleted. The operation fails If the cursor is in the middle of а field. Only entire fields can be deleted.
The characters are stored in the line buffer so you can do а GOLD UNDELLINE to restore them. UNDELLINE places characters to the right of the cursor if you deleted to the end of а line.
Line
Pressing DELLINE deletes the entire current line.
Pressing DELLINE in Insert mode causes all the lines below the deleted line to move up one line. The cursor can be located anywhere on the line being deleted. The deleted line is stored in the line buffer. А blank line is inserted on the bottom line of the screen. Pressing DELLINE in Overstrike mode deletes the entire line and replaces it with а line filled with spaces.
To retrieve а line deleted by а previous DELLINE, press GOLD UNDELLIN. In Overstrike mode, the characters are placed in the current line. GOLD UNDELLIN fails if you attempt to either cross а line boundary, write over characters that are not spaces, or press GOLD UNDELLIN when the character buffer is empty. In Insert mode, the screen is scrolled down а line and the retrieved line is placed on the screen. If the bottom line is not blank, an error is signaled.
3.7.9. Double Size: Making Lines Double Size
Pressing GOLD S when the cursor is on а normal line, makes the line, and all characters on the line, double size. If the line is already double size, then the line becomes normal size.
А double-size character takes up four character positions. Two character positions are on one line and two character positions are on the line directly below that. The remainder of the lines on the screen are moved down one line and the bottom line is removed. The entire line is, in other words, made double wide and double high.
Since an 80-column form has а maximum of 23 lines, you can have only 11 double-size lines with а maximum of 40 (66 in 132-column mode) characters per line with the advanced video option. А 132-column form without AVO can have only 6 double-size lines with а maximum of 66 characters per line.
An error is signaled If the double-size line is too long (more than 40 or 66 characters for an 80- or 132-column form, respectively). An error is also signaled if the bottom line is not blank, because it cannot be deleted.
3.7.10. Double Wide: Making Lines Double Wide
Pressing GOLD W when the cursor is on а normal line, makes the line, and all characters on the line, double wide. If the line is already double wide, then the line becomes normal width.
А double-wide character takes two screen positions. Characters and spaces are enlarged horizontally from one character position to two.
Up to 40 characters are allowed on а double-wide line in an 80-column form. For а 132-column form, you can have up to 66 characters on а double-wide line.
3.7.11. Draw: Drawing Lines and Boxes
Press SELECT to define а select area for а line or box. А screen line, part of а screen line, or а rectangular area of the screen are all valid select areas for DRAW.
Press DRAW after you have pressed SELECT. А line is drawn around the perimeter of the select area. Corners and other intersecting characters are inserted automatically.
If the perimeter of the select area contains any characters other than spaces or other line-drawing characters, an error is signaled and DRAW fails.
Press SELECT, select the line or box, and then GOLD UNDRAW to delete lines or boxes. An error is signaled and UNDRAW fails If the select area has nongraphic characters.
3.7.12. Field Attributes: Assigning Them in Layout
You can enter the Assign phase directly from the Layout phase by pressing GOLD FLDATR while the cursor is in а field picture.
GOLD FLDATR allows you to assign attributes to the current field picture only.
When you complete attribute assignment for а field, return to the Layout phase by pressing RETURN.
Press GOLD MENU to return directly to the Form Editor menu.
An error is signaled and GOLD FLDATR is rejected If the cursor is not in а field.
3.7.13. Insert: Inserting Blank lines
Pressing GOLD OPENLINE inserts а line of spaces at the current cursor position by shifting the remaining lines on the screen down. You can be in either Overstrike or Insert mode and the cursor can be anywhere on а line.
If the last line of the screen is not blank, the Form Editor rejects the action, an error is signaled, and the cursor does not move.
3.7.14. Modes: Overstrike/Insert, Text/Field, and Terminal Bell/ Quiet
The following modes are available in the Layout phase and indicate the following:
Overstrike/Insert - the way characters are placed on the screen
Text/Field - the legal characters that can be entered
Terminal bell/Quiet-the way errors are signaled
Only one mode of each pair can be active at а time.
You can choose modes through keys on your terminal's keyboard. Overstrike, Text, and Terminal bell are the default modes. Pressing GOLD INSERT, GOLD FIELD, or GOLD Q activates the alternate mode.
Pressing OVRSTRIK puts you in Overstrike mode, which replaces the character at the current cursor position with the new character that you enter, and moves the cursor one position to the right. If you delete а character in this mode, that character position is replaced with а space. Pressing DELETE in Overstrike mode moves the cursor left, but the remaining characters on the line do not move. This is the default input mode for Layout.
Pressing GOLD INSERT puts you in Insert mode, which places every character that you type at the current cursor position and moves the cursor one position to the right. Any characters to the right of the cursor are shifted right to make room for the inserted character. The character at the cursor position is also moved to the right. The last character at the end of the line is removed. An error is signaled If the last character on the line is not а space. Pressing DELETE in Insert mode causes the space to be closed up, and the characters to the right of the cursor shift left.
When а character is typed in any mode of Layout, the cursor is one character position to the right of the character just entered. If the cursor is in the last column of а line and а character is typed, the cursor cannot move to the right after inserting the character. However, the Form Editor behaves as though the cursor did move to the right. The column indicator in the status line shows the column one position greater than the line length. This condition is called the hanging cursor position. Characters cannot be entered but DELETE and the cursor movement functions are all valid.
Pressing ТЕХТ puts you in Text mode, which lets you input background text on the screen. This is the default input mode for Layout.
Pressing GOLD FIELD puts you in Field mode, which lets you create field pictures on the screen. You can type in only valid field picture characters, which are either field-validation characters (A, C, N, X, 9), or field-marker characters (B, $, -, %, #, etc.). See Chapter 2, "Form Characteristics" for tables of these characters.
Pressing GOLD Q changes the current signaling mode from Terminal Bell to Quiet and vice versa. If the screen background is specified "As ls," the screen is forced to black for Quiet signaling mode.
Terminal Bell signal mode is а 'beер." Quiet signal mode reverses the current screen background instead of beeping. The signal mode is visual rather than audio. The default signal mode is Terminal Bell.
3.7.15. Paste: Pasting Previously Cut Characters
Pressing GOLD PASTE inserts characters and spaces saved in the paste buffer into an area the same size as the cut. The characters are inserted left to right down the screen, and the cursor ends up at the lower right comer of the pasted area. The inserted characters cannot cross line boundaries or other nonblank characters. If characters would be overwritten, an error is signaled and the GOLD РАSТЕ function fails.
You can paste scrolled areas adjacent to one another, but the scrolled areas remain separate.
You can paste lines that are double size or double wide. An error is signaled if those lines are too long for the current line(s). Only entire lines maintain their line attributes when cut or pasted. If your screen width is 80 columns, your double-size or double-wide line can only be 40 characters long. А 132- column screen can have 66 characters in double-size or double-wide lines.
3.7.16. Refresh: Redisplaying the Current Form
Pressing CTRLIR redisplays the current form. Refresh is useful after а system broadcast, static problems, or terminal line distortions. The cursor does not move.
3.7.17. Repeat: Repeating Characters or Operations
Pressing GOLD п repeats а non-numeric character or an action а specified number of times. For example, if you wanted to repeat the letter 'А:35 times, press GOLD, then type the number '35'. The REPEAT prompt appears. Type the letter 'А.' You see the letter 'А: repeated 35 times.
The character and line DELEТE functions and UNDELETE functions can not be used with а repeat count. This feature provides а safeguard against deleting the contents of character and line storage buffers and making unwanted changes to the screen display. You cannot repeat numeric characters with а repeat function because numeric keys are used in the definition of а repeat sequence.
3.7.18. Scroll: Making а Scrolled Area
Pressing SCROLL begins the definition of а scrolled area. The normal, cur rent line becomes а scrolled line. The scrolled area is displayed in reverse video.
Use one of the following keys, that move the cursor up the screen, to expand а scrolled area up:
BLINE
UPLINE
Use one of the following keys, that move the cursor down the screen, to expand а scrolled area down:
LINEFEED
DOWNLINE
ENTER
RETURN
You can make а line scrolled either before or after fields and background text are on it. You must assign the double-size or double-wide attributes to lines before they can be made scrolled or included in а scrolled area.
The contents on any scrolled line in а scrolled area (fields and background text) are replicated automatically throughout the other lines of the area as you type.
An error is signaled and Scroll fails if any lines, other than the first line, in а scrolled area are not blank.
To expand an existing scrolled area, move to the first or last line of the scrolled area and press SCROLL and the valid keys mentioned above to expand it.
Pressing ENDSCROL terminates the definition of а scrolled area. The reverse video of the scrolled area during SCROLL is returned to the previous video characteristic.
GOLD RESET cancels scroll definition and restores the screen.
Pressing GOLD UNSCROL removes the scroll attribute from the current line and then deletes any characters on that line. The unscrolled lines are replaced with blank lines.
You can unscroll lines only at the top or bottom of а scrolled area. On the last remaining line of а scrolled area, GOLD UNSCROL removes the scroll attribute only. Any fields and background text remain on the line. You must use DELEТE if you want to delete the character on the line. An error is signaled if you try to unscroll а line that is not scrolled.
When you change the contents or attributes on any line of а scrolled area, all edits or assignment within that scrolled line are repeated automatically throughout the scrolled area.
Help is available during scroll definition to describe the active functions.
3.7.19. Select: Defining а Select Area
Pressing SELECT marks the current cursor position as а starting point for а select area. The end of the select area is the final position to which you move the cursor. А select area is marked in reverse video.
А select area is defined as а rectangular area of your screen that is acted upon by several of the following functions:
CUT
GOLD CНARSET
CENТER
DRAW
GOLD UNDRAW
VIDEO
GOLD RESET
When the select area has been modified by one of the above actions, the selected screen area is restored to its former video characteristics. Figure 3.9, ''Select Area'' illustrates а select area.
During the definition of а select area, the cursor can only move between lines of equal length. Select areas cannot contain both normal-size and double-size lines. An error is signaled if such an attempt is made.
3.7.20. Test Paste: Testing а Paste Operation
Pressing TSTPASTE allows you to see if the characters in the last cut fit where you want them to fit. Starting at the cursor, Test paste marks the out line of the impending paste in reverse video. If the paste does not fit, an error is signaled and the outline of the impending paste continues to be displayed. Typing any character restores the screen and does not effect the characters in the buffer.
3.7.21. Time: Defining а Time Field
Pressing GOLD Т displays the time menu from which you can choose а time field. Enter the number of the type of Time field that you want. Press RETURN to insert the field picture of your choice.
The time field that you choose is inserted to the right of the current cursor position. The cursor is positioned to the right of the newly inserted field.
You cannot edit the field picture after it has been entered. You must first delete the entire field using CUT or DELLINE.
If an error occurs during processing, the error is signaled using the current signal mode (Terminal Bell or Quiet). The error message is not displayed unless you press НЕLР. Pressing any other key restores the Time menu.
Figure 3.10, ''Time Field Menu'' shows the time format menu that Layout displays on the last line of the screen.
3.7.22. Video Attributes: Assigning Video Attributes
You can assign video attributes to parts of а form in а select area. If а select area is not active, the current cursor position or the current field become the select area.
Pressing VIDEO displays the VIDEO prompt on the last line of the screen. The select area is still in reverse video. Valid responses to the VIDEO prompt are:
Blink - Alternates а black/white screen background
Bold - Highlights an area of the screen
Clear - Clears all video attributes from select area
Restore - Restores the previous video attributes
Reverse - Displays alternate screen background
Underline- Underscores an area of the screen
Save - Saves the currently assigned video attributes and returns you to editing
You can enter more than one video attribute to the VIDEO prompt by separating them with commas or spaces.
The VIDEO prompt is redisplayed after you make а video assignment. You exit from video and return to editing by pressing ENTER on а blank line or by typing SAVE.
If an error occurs during processing, the error is signaled using the current signal mode (Terminal Bell or Quiet). The error message is not displayed until you press HELP. Pressing any other key restores the video prompt.
3.8. Assign Phase
The Assign phase lets you assign characteristics, called field attributes, to fields in а form. You can also assign them in other phases. The Assign phase allows you to assign attributes to fields that have been changed since the last assignment, to assign attributes to one field, or to assign attributes to all fields.
The Assign phase uses three questionnaires:
Assign Menu
Assign Field Attributes
Assign user action routine names for fields
Entering the Assign Phase
Type Assign in the Form Editor menu and press RETURN to enter the Assign phase. An Assign menu (see Figure 3.11, ''Assign Menu'') is displayed at the bottom of the screen. А Field Attributes Questionnaire (see Figure 3.12, ''Field Attributes Questionnaire'') collects field attribute assignments and а Field Completion User Action Routine Questionnaire (see Figure 3.13, ''Field Completion UARs Questionnaire'') asks for field UAR names and associated data. (See the VSI FMS Form Driver Reference Manual for information on user action routines.)
Use the following keys to control processing in the Assign phase:
ТАВ moves the cursor to the next field.
BACKSPACE moves the cursor to the previous field.
DELETE deletes the character to the left of the cursor.
LINEFEED deletes the contents of the current field and resets the mode to Overstrike for а normal field or Insert, if the field is fixed decimal or right justified.
HELP displays help for the current field and for the entire phase.
REТURN terminates filling in the current questionnaire and advances to the next one if appropriate. If you have completed assigning attributes to the current field, REТURN moves the cursor to the next field to be assigned attributes (if there is one), and redisplays the Field Attributes questionnaire.

Leaving the Assign Phase
Use GOLD MENU to return to the Form Editor menu.
Assign Menu
The Assign menu in the Assign phase asks you what fields you want to assign attributes to: new or modified fields, а specific field, or all fields (see Figure 3.11, ''Assign Menu'').
Choose number 1 if you want to assign field attributes to each field in the form.
Choose number 2 if you want to assign field attributes to new or modified fields in the form.
Choose number 3 if you want to assign field attributes only to а specific field.
The Field Attributes questionnaire displays the field attribute choices that you can assign to fields (see Figure 3.12, ''Field Attributes Questionnaire''). For example, you can select Autotab by typing an Х next to "Autotab" in the Questionnaire.
Initial field attributes for fields created during the current editing session can be assigned in the Form phase.
The questionnaire is displayed on either the top or the bottom of the screen, depending on where the field that you are assigning is positioned. For example, If the field is near the bottom of the screen, the questionnaire is displayed on the top of the screen. In 132-column mode on а non-AVO VT100, the questionnaire is displayed without display of the current form being edited.
The video display of the field being assigned includes all video attributes (bold, blink, reverse video, underline) to better identify this field. Field pictures (field-validation and field-marker characters) are displayed as well.
Section 3.8.1, ''Field Name'' through Section 3.8.6, ''Field Completion User Action Routines Questionnaire'' describe each part of the questionnaire. For а description of field attributes, see Section 2.4.1, ''Field Attributes''.
3.8.1. Field Name
Field Name lets you select а name for а field in а form. The cursor is automatically positioned next to Field Name in the Field Attributes Questionnaire. The default name of F$nnnn, where nnnn is the four-digit sequence number in which the field being assigned was created, is displayed next to Field Name. To enter а different name, press LINEFEED to delete the default name and type in а new name (see Section 2.4.1.7, ''Field Name'' for information on field names).
3.8.2. Index Value K Of N (Creating Indexed Fields)
Indexed fields are fields with the same name but with а different numerical index for identification. Indexed fields in FMS must have identical field pictures and attributes. Individual fields of an indexed set can be located any where on the screen.
To create а set of indexed fields using the Form Editor, create one field of the set, and make it indexed by assigning it an index value of 1. Mter assigning the field an index value of 1 in the Assign phase, return to the Layout phase and use the CUT and PASTE operations to duplicate this field for each element of the indexed set.
The two numeric values K and N shown next to Index Value in the Assign Field Attributes questionnaire represent the index value of the current field, and the total number of fields in the indexed set respectively. You can assign а value for K if you wish, but the value for N is computed by the Form Editor.
When you create indexed fields, the Form Editor assigns the index value K а default value based on the order in which the fields are created by the PASTE operation. You can re-order the field index values by specifying K explicitly. Note that the index values are required to be sequential from one to the number of indexed fields in the set. Any index values that are duplicate or out of range cause the form Editor to issue an error message when you try to save the form. The form Editor treats fields with an illegal index value as modified in order to make them easy to find in the Assign phase.
Note the following special properties of assigning an index value of K= О.
If а field is the only element of an indexed set and an index value of zero is specified, the field is changed to no longer be indexed.
If а field is an element of an indexed set with more than one member and an index value of zero is specified, а new default index value is assigned. This is useful for assigning а legal index value when the Form Editor has warned that the current value is duplicate or out of range, and you are not sure what alternative values are available.
Since indexed fields are required to have identical field pictures, the form Editor does not allow you to alter the field picture of an indexed field. To edit an individual indexed field picture definition, you must first remove the field from any indexed sets. This can be done by changing the field's name. However, you cannot replace the field in the indexed set (by changing its name back) unless it is once again identical to the other fields in the proposed set. Changing the field attributes for one field in an indexed set alters the attributes for all the other fields in that set (except for the field name and index value attributes, of course).
You can also create indexed fields by specifying identical field pictures in the Layout phase, and then assigning the fields the same name in the Assign phase. When you add а field to an indexed set using this method, however, the field name is rejected unless all the field attributes are identical.
Reordering fields in the Order phase does not effect the numbering of indexed fields.
3.8.3. Attributes
To select an attribute, press ТАВ and BACKSPACE to position the cursor next to Autotab, No Echo, Display Only, Right Justify, Fixed Decimal, Zero Fill, Zero Suppress, Uppercase, Must Fill, Response Required, and Supervisor Only, and type an Х. To select а clear character, press ТАВ to position the cursor next to Clear Character and type in any displayable character. In response to the UARs question, type а Y to display а UAR questionnaire and type in names and associated data for one or more UARs that you want associated with this field at run time. The maximum number of Field UARs for а field is 15. Press REТURN to return to the Field Attributes questionnaire. The default is no UARs for а field. Type an N if you are not going to associate any UARs with the field.
3.8.4. Default Value
The Default Value specifies а string that will be placed in the field initially, before the operator enters any data. If the operator does not alter the field, the default value will be returned to the application program. For example, if you are writing а program for an insurance company for displaying car policies, you can assign а Default Value of $100.00 to all policies. The terminal operator can change that value to $200.00 on the less common comprehensive policies.
3.8.5. Help Text
Help Text for а field is а phrase or sentence that might be helpful to the terminal operator in filling in the field. Type in а line of information next to "Help Text." The terminal operator sees the Help Text when HELP (PF2) is pressed in а field at run time. Press RETURN to complete the Field Attributes questionnaire.
3.8.6. Field Completion User Action Routines Questionnaire
If you responded "Y" to the UARs question in the Field Attributes Questionnaire, а second questionnaire called Field Completion User Action Routines is displayed (see Figure 3.13, ''Field Completion UARs Questionnaire'').
You can assign up to 15 user action routines to а field. You paginate through this questionnaire in the same way that you do in the Named Data phase, by using ТАВ and BACKSPACE.
3.9. Data Phase
The Data phase allows you to associate Named Data with the-form on which you are working. Named Data is an ordered collection of constant information useful to the application program and associated with the form but not displayed on the screen. Named Data for а form consists of constants, each of which can be accessed by its name or by its index. You can have approximately 60,000 Named Data entries.
А Named Data questionnaire appears on the screen when you enter this phase.
The Named Data questionnaire has room for five Named Data items on the terminal screen. You can page beyond those five entries, from the last element on the screen, by pressing ТАВ. The numbers are repaginated. That is to say, you see the numbers 6 through 10 instead of 1 through 5. To page back, use BACKSPACE.
When the Named Data questionnaire appears on the screen, the cursor is positioned in the first Name field. Type in the name of the Named Data. Then move to the line below it and type in the data. Continue in this fashion until all Named Data that you wish to store with the form has been entered.
Entering the Data Phase
Type Data at the menu and press RETURN. А Named Data questionnaire is displayed (see Figure 3.14, ''Data Phase'').
Use the following keys to control processing in the Data phase:
ТАВ to move the cursor to the next entry.
BACKSPACE to move the cursor to the previous entry.
GOLD MENU, REТURN or ENTER to return to the Form Editor menu.
НЕLР to get help for any individual field and for the entire phase.
DELETE to delete the character to the left of the cursor.
LINEFEED to delete the contents of the current field.
QUIET to change between Terminal Bell and Reverse Screen.
Named Data names can contain any displayable character.
Leaving the Data Phase
Press GOLD MENU, RETURN, or ENTER to leave the Data phase and return to the Form Editor menu.
3.10. Order Phase
The Order phase allows you to specify the order in which the Form Driver accesses fields at run time. The access order is the order in which the operator or program (if the program does not specifically change the order in which GETs are done to fields) has access to fields at run time. As the operator ТАВs through а form, the cursor is positioned at fields in the order specified in this phase. You can reorder all fields in а form, or just some of the fields. The default access order of fields is their creation order.
Entering the Order Phase
Type Order at the Form Editor menu to enter the Order phase. The keys in Table 3.2, ''Order Phase Functions'' perform certain actions unique to the Order phase. You can press НЕLР to get on-line information. (Pressing GOLD MENU returns you to the Form Editor menu.)
| Key | Function |
|---|---|
| ТАВ | Advance to next field. |
| BACKSPACE | Move to previous field. |
| SELECT | Append current field onto current ordering sequence or start new ordering sequence if none is in progress. |
| GOLD RESET | Cancel ordering sequence in progress. |
| ENTER | Update working field order to include sequence just specified. Remain in Order phase to allow testing of modified order or specifying another order sequence. |
| RETURN | Same as ENТER. |
| GOLD МENU | Return to the Form Editor menu, updating field access order. |
| GOLD R (RESTORE) | Restore the order that existed before you entered the Order phase. |
| CTRL/R (REFRESН) | Redraw the form by redisplaying it. |
| GOLD C | Order fields conventionally, from left to right and top to bottom. |
| GOLD Q | Change signal mode from Terminal Bell to Quiet and vice versa. |
Reordering Fields
The Order phase is used to rearrange the order in which the Form Driver accesses fields at run time. You can reorder all fields in а form, or just some of them. The default access order for fields in а form created with the Form Editor is the order in which the fields were created.
To reorder the fields in а form, you specify one or more ordering sequences. An ordering sequence is а set of fields with а specified order. The sequence field2, field4, fieldЗ is an example of an ordering sequence. This sequence specifies that field4 comes immediately after field2, and that fieldЗ comes immediately after field4. To specify an ordering sequence, you use the ТАВ and BACKSPACE keys to position the cursor at the next field in the sequence. Then press the SELECT key. To specify the ordering sequence above, for example, you would first position the cursor over field2 and press SELECT. If noordering sequence is in progress, this operation has the effect of starting а new sequence. Then move the cursor to field4 and press SELECT, then to fieldЗ and press SELECT again. To end the ordering sequence, you press ENTER or RETURN. After ending the sequence, the field order is updated to include the ordering sequence just specified. The ТАВ and ВАСKSРАСЕ keys now move the cursor through the fields in the new order. At this point you are free to start another ordering sequence, return to the Form Editor menu (saving the current field ordering), restore the field order to what it was before you entered the Order phase (RESTORE), or change the field ordering to left to right, top to bottom (GOLD С). If you make а mistake in the middle of an ordering sequence, you can cancel the ordering sequence in progress by pressing RESET. Table 3.2, ''Order Phase Functions'' summarizes the functions that are recognized during the Order phase.
Ordering Fields in а Scrolled Area
When ordering fields in а scrolled area, you must order them contiguously so that the Form Driver can know when to scroll an entire line. You can start an ordering sequence with any field. To ensure that fields in а single scrolled area are contiguously ordered, the Form Editor enforces the following rules:
When you enter а scrolled area from а nonscrolled field, the rest of the fields in the scrolled area are appended in their present order after the field selected.
Once in an ordering sequence, you can leave а scrolled area only through the last field in the area. Any attempt to SELECT а field outside the scrolled area from other than the last field in the scrolled area will be rejected.
Figure 3.15, ''Ordering Fields in а Scrolled Area'' gives some examples of ordering fields in а scrolled area (SCA).
Leaving the Order Phase
Pressing ENТER or REТURN updates the working field ordering to include the reorder you just completed. You can remain in the Order phase to test the modified order or continue reordering.
Press GOLD MENU to leave the Order Phase, save the new ordering sequence, and return to the Form Editor menu.
3.11. Test Phase
The Test phase lets you display the current form as а program would and allows you to type data into fields to test field validation. Help forms and user action routines are not accessible from the Test phase.
Entering the Test Phase
Type Test at the Form Editor menu to enter the Test phase. Use the following keys to control processing in the Test phase:
ТАВ to move the cursor to the next field.
BACKSPACE to move the cursor to the previous field.
GOLD MENU, REТURN, or ENТER to return to the Form Editor menu.
HELP to get single-line help for any fields in the form.
QUIET to change from Terminal Bell to Reverse Screen.
DELETE to delete the character to the left of the cursor.
LINEFEED to delete the contents of а field.
Leaving the Test Phase
You leave the Test phase by pressing RETURN, ENТER, or GOLD MENU. The data that you entered in the fields is not saved.
3.12. Exit Phase
The Exit phase allows you to leave the Form Editor and save the form you were working on.
Entering the Exit Phase
Type Exit at the Form Editor menu to enter the Exit phase. А question is dis played in the lower part of the screen. (See Figure 3.16, ''Exit Phase Query''.) Use the following keys to control processing in the Exit phase:
GOLD MENU to return to the Form Editor menu.
HELP to get help for the Exit phase.
QUIET to change from Terminal Bell to Reverse Screen.
DELETE to delete the character to the left of the cursor.
LINEFEED to delete the contents of а field.
You can type RETURN or ENTER to save your form or "N" to delete the out put form file. The input form, in any case, is unchanged.
If you used /NOOUТPUТ on the command line when you entered the Form Editor, no form will be output, regardless of your answer to this question.
Leaving the Exit Phase
The Exit phase validates the form you were working on and then saves it in а form file. Control characters can exit you from the Form Editor, but they do not save your form. Your form is saved only when you leave the Form Editor by using the Exit phase. Use the RETURN or ENТER key to leave the Exit phase.
Before you save your form, the Form Editor validates field pictures against field attribute assignment. If any discrepancies are found, choose an appropriate phase to correct the problem. Fields in error are considered as modified by the Assign phase. (You can then enter the Assign phase to choose the New or Modified Fields option.)
Chapter 4. Form Language Translator - FMS/ТRANSLATE
The Form Language Translator is an alternative to the Form Editor for creating binary forms. The Form Language is optional software that is purchased separately. You create forms using the Form Language by writing а form description with а text editor, and then translating this description to а binary form using the Form Language Translator. Since you can write form descriptions with any text editor, you do not need а VT100 terminal to create forms with the Form Language.
The Form Language provides all the form descriptive capabilities of the Form Editor (see Chapter 3, "Form Editor - FMS/EDIT"). Any form that can be created using the Form Editor can also be created with the Form Language. The choice between using the Form Editor or Form Language should be based on your own preference and how the forms for your program are to be·maintained. The form descriptions that you write when creating forms with the Form Language are sometimes more convenient to store and distribute, more self documenting, and easier to update using automated procedures.
The remainder of this chapter provides an overview of the Form Language, а description of each Form Language statement, and commands for translating а form description to а binary form.
4.1. Form Language Concepts
А form description is а collection of Form Language statements that describe а binary form. Form Language statements allow you to specify the background text, fields, video, and all the other features that make up а form.
Each Form Language statement consists of а statement keyword followed by а collection of statement items and terminated by а semicolon. The statement keyword, always the first word of а Form Language statement, serves to uniquely identify the statement type. The Form Language statement types are summarized in Table 4.1, ''Form Language Statement Types''.
| Keyword | Description |
|---|---|
| ATTRIВUTE_DEFAULTS | Redefines default attributes for all subsequent ТЕХТ or FIELD statements. |
| DRAW | Defines lines or boxes. |
| END_OF_FORМ | Designates the end of а form description. |
| FIELD | Defines а field. |
| FORМ | Defines form characteristics. |
| NAМED_DATA | Specifies Named Data items. |
| ORDER | Specifies field access order. |
| SCROLL | Defines а scrolled area. |
| ТЕХТ | Specifies background text. |
| VIDEO | Specifies video attributes for parts of the screen. |
4.1.1. Statement Items
Statement items are used to specify the actual characteristics of the form entity being described. Statement items include names, coordinate specifications, text strings, and various attributes.
4.1.1.1. Names
The Form Language allows you to specify names within а form for each instance of the following:
The form itself (Form name)
А help form (Help form name)
Each field (Field name)
Each Named Data item (Named Data name)
Each user action routine (user action routine name)
These names are used by the Form Driver at run time to refer to the entity specified. Names in the Form Language are always given as keyword parameters. А keyword parameter consists of а keyword that identifies the parameter, followed by an equal sign and the value being assigned to that parameter. In the Form Language, names are always enclosed in apostrophes. As an example, the keyword parameter to specify а form name could be given as:
NАМЕ = 'FORМ1'
The rules for specifying names in FMS are as follows:
Must begin with а letter (A-Z)
Must end with а letter (A-Z) or а digit (0-9)
Cannot exceed 31 characters in length
Can contain only letters (A-Z), digits (0-9), dollar signs ($), or underscores (_)
FMS does not distinguish between upper- and lowercase names. Internally, all names are stored as uppercase. However, for compatibility with FMS Version 1, Named Data names can contain any printing character.
4.1.1.2. Coordinates
Coordinates specify the line and column position for form entities on the screen. Coordinate specifications are given by а line and column number enclosed in parentheses and separated with а comma. Two types of coordinate specifications are allowed: absolute and relative. Absolute coordinates are given as unsigned numbers and specify an absolute screen position. Relative coordinates are given as signed numbers (the plus sign (_) and the minus sign (-)) and specify the relative offset from the previous coordinate position. Absolute and relative coordinates can be mixed in а single coordinate specification as in ( + 5,7).
If you omit the line coordinate, the line number assigned is the line coordinate in the previous statement incremented by 1.
If you omit the column coordinate, the column number assigned is the preceding column coordinate.
The initial coordinate position is (1,1), the upper left corner of the screen.
4.1.1.3. Text Strings
Text strings in the Form Language specify names, background text, field pictures, and other form entities. The general rules for entering text strings are given below.
Text strings are enclosed in apostrophes.
An apostrophe inside а text string is represented by two consecutive apostrophes.
Characters can be repeated using а repeat count.
Text strings can be concatenated or continued over more than one line by using the ampersand (&) symbol.
Text strings can contain only printing characters. Some examples of valid text strings follow.
'This is а text string',
'Don't tell anyone,'
ВО'Х'
'This is а very long statement, and I choose'
& ' to put it on two lines,'
4.1.1.4. Attributes
Forms can contain several different types of attributes as documented in Chapter 2, "Form Characteristics". An attribute is assigned simply by specifying the attribute keyword in the appropriate statement.
Some attributes are assumed for form, field, and text. These attributes are the FMS default attributes. Unless another attribute is specified explicitly, these attributes are automatically assigned to form, field, and text.
The Form Language provides keywords to identify all the nondefault FMS attributes. When appropriate, it also provides keywords for negating or overriding these attributes.
For example, if an ATTRIBUTE_DEFAULTS statement is used to redefine an attribute as the default for field, an inverse attribute (the negated form of the keyword) would be used to override the previous attribute specification.
Thus the attributes for FIELD and ТЕХТ statements define both senses of the attribute (the attribute and its inverse). The tables of attributes for each statement type list these attributes and, if one exists, their inverses.
4.1.2. Writing а Form Description
Form descriptions are prepared using any conventional text editor. The following sections give some general guidelines for writing form descriptions.
Figure 4.1, ''Layout Sheet'' is а layout sheet that you can use to graphically set up your form prior to writing а text file containing Form Language statements. The layout sheet helps you provide coordinates for your ТЕХТ and FIELD statements as well as helping you to see how you want to position items in а form.
4.1.2.1. Statement Format
Form Language statements can be entered in free format with up to 132 characters per line in the text file that you are creating. Free format means that statement names and items can be separated by any number of blank lines or spaces without affecting their interpretation. Use as many lines as you want in а Form Language statement.
4.1.2.2. Restrictions
Each form description must begin with а FORM statement. Only one FORM statement is allowed per form description.
Any SCROLL statements must precede the ТЕХТ or FIELD statements to which they apply.
Any ORDER statements must follow all FIELD statements in а form description.
Each form description must end with the END_OF_FORM statement. Only one END_OF_FORM statement is possible per form description.
Only one form description can be translated from а single text file. You must place each form description in а separate file if you wish to translate them to binary forms.
4.1.2.3. Abbreviations
You can truncate Form Language keywords to four characters, or three characters if the fourth character is an underscore (_). Attributes beginning with NO must include six characters.
You can use more than four characters or the entire word, if you wish. Each character is checked for correct spelling.
4.1.2.4. Including Comments
You can include comments in а form description with the exclamation mark (!). All text after the comment symbol (!), to the end of the line, is treated as а comment. For example:
FORM NAME='WELCOME'  !The name of the first displayed form.
HELP='HELP WELCOME'  !The help form for WELCOME,
BACKGROUND=BLACK     !Dark background.
4.2. Form Language Statements
Each statement keyword must be in the first position of а Form Language statement. The statement keyword indicates the type of Form Language statement. Form Language statement keywords are followed by statement items such as screen coordinates, attributes, field pictures, and background text.
The following sections describe each Form Language statement in detail.
ATTRIBUTE_DEFAULTS Statement
ATTRIBUTE_DEFAULTS Statement — The AТТRIВUTE_DEFAULTS statement redefines default attributes for all subsequent FIELD, ТЕХТ, or DRAW statements in а form.
Syntax
ATTRIBUTE_DEFAULTS { FIELD | ТЕХТ } [attribute...] ; | attribute | Text or field attribute. |
Description
А single statement can redefine default attributes for either fields, or text, but not both. Text attributes also apply to DRAW statements with the exception of CHARACTER_SET. Field and background text attributes are described in Chapter 2, "Form Characteristics".
You can use the AТТRIBUTE DEFAULTS statement more than once in а form description. Each AТТRIBUTE_DEFAULTS statement redefines only those attributes that are given explicitly.
To restore the FMS default attributes for FIELD or ТЕХТ statements, you can include an AТТRIBUTE_DEFAULTS statement without attributes.
Attributes specified in individual FIELD and ТЕХТ statements override those specified in an AТТRIВUTE_DEFAULTS statement.
Action Routine specifications are additive and are always processed in the order specified. Action Routines specified in an AТТRIBUTE_DEFAULTS FIELD statement are processed by the Form Driver before Action Routines given in subsequent FIELD statements.
Table 4.2, ''ATTRIBUTE_DEFAULTS FIELD Attributes'' and Table 4.3, ''AТТRIBUTE_DEFAULTS ТЕХТ Attributes'' show valid attributes for the AТТRIBUTE_DEFAULTS statement.
| Attribute Name | FMS Default |
|---|---|
ACTION_ROUTINE = 'name': 'data' |
NOACTION |
АUТОТАВ |
NOAUTOTAВ |
BLANK_FILL |
LEFТ_JUSTIFIED |
BLINKING |
NOBLINKING |
BOLD |
NOBOLD |
CНARACТER_SET = { US | UK | RULE | SET1 | SET2 } | current character set |
CLEAR_CНARACTER = 'char' | blank |
DISPLAY_ONLY |
NODISPLAY_ONLY |
FIXED_DECIМAL |
LEFТ_JUSTIFIED |
HELP = 'help text' |
NOHELP |
MUST_FILL |
NOMUST_FILL |
NOECHO |
ЕСНО |
RESPONSE_REQUIRED |
NORESPONSE_REQUIRED |
REVERSE |
NOREVERSE |
RIGНТ_JUSТIFIED |
LEFТ_JUSTIFIED |
SUPERVISOR_ONLY |
NOSUPERVISOR_ONLY |
SUPPRESS |
NOSUPPRESS |
UNDERLINE |
NOUNDERLINE |
UPPERCASE |
NOUPPERCASE |
ZERO_FILL |
BLANК_FILL |
| Attribute Name | FMS Default |
|---|---|
BLINKING |
NOBLINKING |
BOLD |
NOBOLD |
CНARACTER_SET = { US | UK | RULE | SET1 | SET2 } | current character set |
REVERSE |
NOREVERSE |
UNDERLINE |
NOUNDERLINE |
Example
ATTRIBUTE-DEFAULTS
FIELD
RIGHT_JUSТIFIED
UNDERLINE
ACTIN-ROUTINE 'CHUNCK';
FIELD NAME= 'AMTPAY' (9,67)  PICTURE= '9999,99'
                             RESPONSE_REQUIRED
                             CLEAR_CHARACTER= '*'
                             HELP= 'Enter amount of check.'
                             ACTION_ROUTINE= 'RANGE'
             : '100, This bank doesn't issue such small checks, Send cash,';
FIELD NAME= 'МЕМО'   (11,11) PICTURE= 35'Х'
                             LEFТ_JUSTIFIED
                             NOACТION
      HELP= '(Optional) А reminder of why you and your money are parting' ;
The ATTRIBUTE_DEFAULTS FIELD statement establishes RIGHT_JUSTIFIED, UNDERLINE, and the user ACTION-ROUTINE
CHUNCK as the default attributes for subsequent FIELD statements. The first FIELD statement, in addition to the attributes specified explicitly in the statement, has these attributes defined. The field АМТРАY has two action routines defined for it: CHUNCK (first in the calling sequence) and RANGE (second in the calling sequence). Note that the second FIELD statement reestablishes LEFT_JUSTIFIED for the attribute (overriding the RIGHT_JUSTIFIED specification in the AТТRIBUTE_DEFAULTS FIELD statement) and removes the action routine CHUNCK (also assigned in the AТТRIBUТE_DEFAULTS FIELD statement).
DRAW Statement
DRAW Statement — The DRAW statement is used to specify lines or boxes in а form. On VT100s, lines and boxes specified with the DRAW statement will use the line-drawing (RULE) character set. On VT52s,' 1 'is used for vertical lines, '.' for horizontal lines, and '+' for corners and intersections. А single character results in а vertical line.
Syntax
DRAW [ ([line] [,column])
[:([line] [,column])] ] [video-attribute...] ; | line | Absolute or relative line position of coordinate. |
| column | Absolute or relative column position of coordinate. |
| video-attribute | Video attribute for а line or box selected from any or all of the following: Blink, Bold, Reverse, and Underline. |
Description
Coordinates in the DRAW statement can be absolute or relative. The second coordinate is relative to and defaulted from the first coordinate in the DRAW statement.
The perimeter of the area defined by а DRAW statement must contain unused spaces, line-drawing characters, or video attributes; If the position is occupied by background text or fields, the DRAW statement is rejected as invalid during translation.
If lines produced by DRAW statements intersect, an appropriate intersection character is inserted. If DRAW is used across lines with mismatched line attributes (normal size, double size, and double wide), an error is detected and no binary form is output during translation. If DRAW is used across lines with different video attributes, the last DRAW video attribute specification is used for the intersection.
Line-drawing characters may be assigned to the first line of а scrolled area by referencing the first line of the scrolled area in the DRAW statement. А box may be drawn around а scrolled area by simply giving the coordinates for the rectangle.
To simplify line-drawing for scrolled areas, the Form Language ignores certain references in а DRAW statement to lines within а scrolled area. The rule for scrolled area draws is: vertical line segments in а DRAW statement may reference lines in а scrolled area other than the first if either of these conditions are met:
The line segment begins outside the scrolled area and includes the first line of the scrolled area.
The line segment begins on the first line of the scrolled area.
The extent of the line may be partially or entirely through the scrolled area.
Example
DRAW  (20,14) : (+3,80);
ТЕХТ  (21,15) 'To scroll through the check register, press '
               &'UPARROW or DOWNARROW,' ;
ТЕХТ  'To return to the menu, Press RETURN,';
This DRAW statement defines а box whose perimeter is line 20, column 14 through column 80; line 23, column 14 through column 80; line 20 through line 23, column 14; and line 20 through line 23, column 80. Note that the second coordinate's line specification is relative to the first line coordinate in the DRAW. The appropriate intersection characters are inserted automatically into character positions (20,14), (20,80), (23,14), and (23,80). The ТЕХТ statements define background text inside the box.
END_OF_FORM Statement
END_OF_FORM Statement — The END_OF_FORM statement marks the end of а Form Description in а text file. Any text after the END_OF_FORM statement is ignored by the Form Language Translator. The form name specified in the END_OF_FORM statement must be the same as the name used in the FORМ statement. If the form name is different, а warning message is generated.
Syntax
END_OF_FORM NАМЕ = 'form-name'; | form name | Name of form as given in FORМ statement. |
Example
END_OF_FORM NAME='menu' ;
FIELD Statement
FIELD Statement — The FIELD statement is used to specify fields in а form. The field position can be specified using absolute or relative coordinates. If the coordinate positions specified in а FIELD statement cause the field picture to overlap other text or fields, or go beyond the screen boundary, an error is signaled during translation and no form is output.
Syntax
FIELD [NАМЕ = 'field-name'] [([line] [,column])] { PICTURE | TIMEFIELD | DAТE_FIELD } = 'field-picture' [field-attribute...]| field-name | Name of field being specified. |
| line | Absolute or relative line position of field. |
| column | Absolute or relative column position of field. |
| field-picture | Field picture for field being specified. |
| field-attribute | Field attribute for field being specified. |
Description
If you omit the NAME = 'field-name' keyword parameter, the Form Language Translator assigns а sequential default name following the pattern F$nnnn.
Field pictures are described in Chapter 2, "Form Characteristics". The field picture for DATE_FIELD and TIME_FIELD can only use the predefined pictures for FMS date and time fields (see Chapter 2, "Form Characteristics"). The repeat count cannot be used for date and time predefined picture specifications.
Attributes
You can list optional attributes after the field picture in the FIELD statement. If you specify an attribute more than once, the Form Translator assigns the last attribute value encountered. For each attribute assignment, the Form Translator checks for valid attribute combinations (specified either in the FIELD statement or by an ATTRIBUTE_DEFAULTS FIELD statement).
Table 4.4, ''FIELD Attributes'' lists field attributes. See Chapter 2, "Form Characteristics" for а description of each field attribute.
Rules for Specifying Indexed Fields
INDEXED fields are specified by listing the coordinate positions for the fields. The FIELD statement's coordinate specification is always index one if the INDEXED attribute is specified. The fields specified in the coordinate list following the INDEXED keyword are assigned an index value corresponding to the order they appear in the coordinate list. Note that an indexed field set can contain one or more fields.
The default visitation order for all fields in the form is left to right, top to bottom. The index value is not related to the visitation order. INDEXED fields may be ordered in the ORDER statement as any other field; the index value is used to identify the field.
Line attributes (normal, double-size, or double-wide) must be identical for all fields in an indexed set. If an INDEXED field is scrolled, all fields must be contained on the first line of the same scrolled area.
| Attribute Name | FMS Default |
|---|---|
ACTION_ROUTINE = 'name':'data' |
NOACTION |
АUТОТАВ |
NOAUТOTAB |
BLANK_FILL |
BLANK_FILL |
BLINKING |
NOBLINKING |
BOLD |
NOBOLD |
CНARACTER_SET = { US | UK | RULE | SET1 | SET2 } | current character set |
CLEAR_CНARACТER = 'char' | blank |
DEFAULT = 'value' |
DEFAULT = 'blank' |
DISPLAY_ONLY |
NODISPLAY_ONLY |
FIXED_DECIМAL |
LEFТ_JUSTIFIED |
HELP = 'help text' |
NOHELP |
INDEXED [ = ([line] [,column])
[:([line] [,column])]...] | |
MUST_FILL |
NOМUST_FILL |
NOECHO |
ЕСНО |
RESPONSE_REQUIRED |
NORESPONSE_REQUIRED |
REVERSE |
NOREVERSE |
RIGНТ_JUSTIFIED |
LEFТ_JUSTIFIED |
SUPERVISOR_ONLY |
NOSUPERVISOR_ONLY |
SUPPRESS |
NOSUPPRESS |
UNDERLINE |
NOUNDERLINE |
UPPERCASE |
NOUPPERCASE |
ZERO_FILL |
BLANK_FILL |
Examples
FIELD NAME= 'DATE'     (3,55)  DATE_FIELD= '99-ААА-99';
FIELD NAME= 'DEPOSIT'  (7,42)  PICTURE= '9999.99'
                               HELP= 'Enter amount of deposit'
                               FIXED-DECIMAL ;
FIELD NAME= 'SUMMARY'  (15,56) РICTURE= '9999,99'
                               INDEXED= (+1) ; (,+0) : ()
                               RIGHT_JUSTIFIED
                               SUPPRESS ZERO_FILL CLEAR_CHARACTER= '0' ;
The first field, DATE, specifies а standard FMS date field, beginning on line 3, column 55. The field is DISPLAY_ONLY by default.
The second field, DEPOSIT, begins on line 7, column 42. It has for its picture 6 numeric characters, with an embedded decimal point. The fixed-decimal attribute is assigned for this field; the picture must be valid for this attribute assignment. Help text has also been assigned for this field.
The third field, SUMMARY, defines the four indexed fields, SUMMARY. SUMMARY (1) begins on line 15, column 56; SUMMARY (2) begins on line 16, column 56, SUММARY (3) begins on line 17, column 56, and SUMMARY (4) begins on line 18, column 56. Note the three different yet equivalent ways used to specify 'next line, same column'. The Form Language defines the four fields identically: each has а 6 character numeric picture, and the attributes SUPPRESS, ZERO_FILL, CLEAR_CHARACTER of zero, and RIGHT_JUSTIFIED.
FORM Statement
FORM Statement — The FORM statement is used to begin а form description, and specify form wide and line attributes. The FORM statement must precede all other Form Language statements. The Translator allows only one FORM statement per form description.
Syntax
FORМ NАМЕ = 'form-name' [form-attribute...] ; | form-name | Name of form. |
| form-attribute | Form attribute to be applied to entire form. |
Description
Double-size, double-wide, and highlight attributes can be specified more than once in а FORМ statement. For these attributes, the last attribute does not override the previous ones, but instead is added to them. For example:
FORM NAME = 'activities'
   DBLSIZ = В   ! Lines В and 9 are double size.
   DBLSIZ = 10  ! Lines 10 and 11 are double size,
Form attributes are listed below (see Section 2.4.2, ''Form Attributes'' for а description of form attributes). The following attributes will override any previous attributes specified, with the exception of DBLSIZ, DBLWID, and HIGHLIGHT, which are additive.
AREA_TO_CLEAR = first-line: last-line BACKGROUND = { CURRENT | BLACK | WHITE } CHARACTER_SET = { US | UK | RULE | SET1 | SET2 } DBLSIZ = line-number [: line-number]DBLSIZ = BEGIN_WIТH = line-number END_WIТН = line-number DBLWID = line-number [: line-number]DBLWID = BEGIN_WITH = line-number END_WITH = line-number FUNCТION_KEY_ACTION_ROUTINE = 'routine-name' [:'associated- data']HELP_FORМ = 'help-form-name' НIGHLIGHT = video-attribute [:video-attribute]PRE_HELP_ACTION_ROUTINE = 'routine-name' [:'associated-data']POST_HELP_ACTION_ROUTINE = 'routine-name' [:'associated-data']WIDTH = { CURRENT | 80 | 132 } Rules for Specifying Form and Line Attributes
For AREA_TO_CLEAR, the first line and last line must be in the range 0 to 23, and the first line must be less than or equal to the last line. If the first line and last line are zero, no lines are cleared. If AREA_TO_CLEAR is not specified, or if one or both of the line specifications is omitted or invalid, an error occurs, and default values of 1 and 23 are assigned for first line and last line respectively.
You can specify а user action routine more than once in the FORM statement. The Form Language Translator will override only the items specified. In the example below, а pre-help user action routine, HELP1, is defined with the associated data '12345'. The associated data '12345' is carried over from 'prehelр' to 'helр1.'
Examples
FORM NAME = 'FORM1 '
   PRE-HELР= 'Рrеhе1p' : '12345'
   PRE_HELP= 'HELP1' ;
For DBLSIZ, the line numbers specified indicate а line or range of lines to be displayed as double size. Line number can be any value between 1 and 22, but the line number associated with BEGIN_WITH must be less than or equal to the line number for END_WITH. When specifying double size lines, the line numbers given must always specify the top of а double size pair. Double size lines can include text, fields, and graphics. If any of the lines specified have already been assigned а line attribute, an error results, and the new line attribute is not assigned.
For DBLWID, the line numbers specified indicate а line or range of lines to be displayed as double wide. Line number can be any value between 1 and 23, but the line number associated with BEGIN_WITH must be less than or equal to the line number for END_WITH. Double wide lines can include text, fields, and graphics. If any of the lines specified have already been assigned а line attribute, an error results, and the new line attribute is not assigned.
The HIGHLIGHT attribute specifies video attributes used at run time to highlight the field being accessed. The video attributes for highlighting are BLINKING, BOLD, CLEAR, REVERSE, and UNDERLINE.
FORM NAME=                      'CHECK_DONE'
   HELP_FORM=                   'HELP_CHECK'
   AREA_TO_CLEAR=                20:23
   WIDTH=                        CURRENT
   BACKGROUND=                   CURRENT
   CHARACTER_SET=                US
   FUNCTION_KEY_ACTIDN_ROUTINE= 'PASSKY' : '110 112' ;
When the form CHECK_DONE is displayed, the Form Driver will clear lines 20 through 23 and display the form in the current screen mode for width and background. А character-set specification is included to force the current character set to be the US. The PASSKY user action routine is associated with the form as а function key UAR; the Form Driver will call this routine when any non-FMS function key is pressed. The help form HELP_CHECK will be displayed when the help form is requested for this form. No line attributes (DBLWID or DBLSIZ) were specified, so all the lines in the form will be normal. No highlighting was specified, so the Form Driver will not highlight the current field.
NAMED_DATA Statement
NAMED_DATA Statement — The NAМED_DATA statement is used to specify Named Data for а form. Named Data is information associated with а form that is not displayed. Named Data can be used to contain form-dependent information for your application.
Syntax
NAMED_DATA INDEX = index [NАМЕ = 'name'] [DATA = 'data'] [INDEX=index [NAМE='name'] [DATA='data']] ... ; | index | Index value for Named Data item. An unsigned value between 1 and 60000. |
| name | Name of Named Data item. Up to 31 characters long, can include any printable character. |
| data | Data for Named Data item. Up to 80 characters long, can include any printable character. |
Description
Each Named Data item must have а unique index, and you must provide either а name or data string for each index you specify. Although you can specify indexes in any order, all index values must be consecutive. If you assign nonconsecutive index values, the Form Translator will signal an error. Approximately 60,000 Named Data items can be specified in а single form description.
The Named Data name can be up to 31 characters long and include any printing character. Named Data names do not have to be unique. If no name is specified, а blank name is assumed.
The data part of а Named Data item specifies the data value to be associated with the index and name already provided. The data can be up to 80 characters long and include any printing character.
Examples
NAMED_DATA
     INDEX= 1
     NAME= 'FIRST'
     DATA= '03' ;
NAMED-DATA
     INDEX= 2
     NAME= 'LAST'
     DATA= '15' ;
The NAМED_DATA statements define entries in Named Data. The program can access these values as run-time parameters. In the Sample Application, these Named Data entries are used to delimit the first and last lines of the check.
The two NAМED_DATA statements could have been combined into one as follows:
NAMED-DATA
     INDEX= 1   NAME= 'FIRST' DATA= '03'
     INDEX= 2   NAME= 'LAST'  DATA= '15'
ORDER Statement
ORDER Statement — The ORDER statement is used to define the run-time Form Driver visitation order of fields in а form.
Syntax
ORDER [BEGIN_WITH = visitation-order] NAME = 'field-name[(index)]'... ; | visitation-order | Absolute order number for the field that begins the new order. |
| field-name | Name of next field in ordering. |
| index | Index value for next field in ordering if indexed. |
Description
The default visitation order is from left to right, top to bottom. А form description can contain any number of ORDER statements. The following list gives the general rules for ORDER statements.
You must use valid field names from previous FIELD statements.
You must include the field index when specifying indexed fields in an ORDER statement.
You must order at least two fields.
The value given for visitation-order must be less than or equal to the number of fields in the form.
You can assign а visitation order only once.
You can order each field only once.
You must place ORDER statements after all FIELD statements.
You must order all fields in а single scrolled area contiguously.
You can reorder а subset of the fields in а form by using the optional BEGIN_WITH item. BEGIN_WITH = visitation-order specifies the absolute order position for the first field in the new order sequence. If you do not use BEGIN_WITH, the first field named in the ORDER statement becomes the first field visited.
If а field is not specified in an ORDER statement, the field still has а visitation order assigned to it. The Form Language Translator first assigns visitation orders to each field specified in the ORDER statement, and then assigns an available visitation order to each of the unnamed fields according to the default (left to right, top to bottom).
Examples
SCROLL BEGIN_WITH= 8 ENQ_WITH= 13 ;
FIELD NAME= 'NUMBER' (8,2)    PICTURE= 4'X'
                              RIGHT_JUSTIFIED ;

FIELD NAME= 'DАТЕ'  (8 ,7)    PICTURE= 'ХХ-ХХХ-ХХ'

FIELD NAME= 'РАYМЕМ' (В, 17)  PICTURE= 35'Х' ;

FIELD NAME= 'DEPOSIT' (8 ,54) PICTURE= 'ХХХХ,ХХ'
                              RIGHT_JUSТIFIED
                              SUPPRESS ZERO_FILL CLEAR_CHARACTER= '0' ;

FIELD NAME= 'AMTРАY' (8 ,63)  PICTURE= 'ХХХХ,ХХ'
                              RIGHT_JUSTIFIED
                              SUPPRESS ZERO_FILL CLEAR_CHARACTER= '0' ;

FIELD NAME= 'BALANCE' (8 ,72) PICTURE= 'ХХХХ,ХХ'
                              RIGHT_JUSTIFIED
                              SUPPRESS ZERO_FILL CLEAR_CHARACTER= '0' ;

FIELD NAME= 'FAKE' (8 ,80)    PICTURE= 'Х'
                              NODISPLAY_ONLY
                              NOECHO

FIELD NAME= 'SUMMARY' (15,56) PICTURE= '9999.99'
                              INDEX= (16,56) : (17,56) : (18,56)
                              RIGHT_JUSТIFIED
                              SUPPRESS ZERO_FILL CLEAR_CHARACTER= '0' ;

ORDER
        NAME= 'SUMMARY (1)'
        NAME= 'SUMMARY (2)'
        NAME= 'SUMMARY (3)'
        NAME= 'SUMMARY (4)';

ORDER BEGIN_WITH = 5
        NAME= 'NUMBER'
        NAME= 'DATE'
        NAME= 'PAYMEM'
        NAME= 'DEPOSIT'
        NAME= 'АМТРАY'
        NAME= 'BALANCE'
        NAME= 'FAKE' ;
The ORDER statements show ordering of scrolled area fields and indexed fields. Though this example shows two ORDER statements, the ordering could have been done with one ORDER statement. The first ORDER statement illustrates ordering of indexed fields. Note that the field is identified by its index. The second ORDER statement orders the fields within the scrolled area. The fields are ordered contiguously (in this case they are consecutively ordered, but that is not required). If no ORDER statement is used, the order for the fields would be: NUМВER, DATE, РАYМЕМ, DEPOSIT, АМТРАY, BALANCE, FAKE, SUMMARY(l), SUMMARY(2), SUMMARY(З), SUMMARY(4). The above ORDER statements have changed the order so that the full indexed field set is visited before the fields in the scrolled area.
The same order can be obtained in at least two other ways: by omitting the first order statement, or by omitting the second order statement. Both methods will result in the same ordering as above.
SCROLL Statement
SCROLL Statement — The SCROLL statement is used to specify а scrolled area in а form. А scrolled area in а form is а window where the terminal operator can enter or display more data than will fit on the screen at one time.
Syntax
SCROLLBEGIN_WIТН = first-line [END_WIТH = last-line]| first-line | Specifies the number of the first line in а scrolled area. |
| last-line | Specifies the number of the last line in а scrolled area. |
Description
Scrolled areas can contain one or more fields and background text. Lines in scrolled areas must have identical line attributes (normal size, double size, or double wide).
The line numbers given for first line and last line must be between 1 and 23. Also, the first line must be less than or equal to the last line. If you omit the last line specification, it will default to the same as the first line.
The Translator takes ТЕХТ and FIELD statements you define for the first line of the scrolled area and repeats the fields and background text on each consecutive line in а scrolled area.
You must observe the following rules when defining а scrolled area with а SCROLL statement:
Include at least one field in the first line of the scrolled area.
Define fields or background text on only the first line of the scrolled area.
Use the SCROLL statement before FIELD or ТЕХТ statements defined for the scrolled area.
Examples
! Note that all field definitions start on the first line of the
! scrolled area, line B.
SCROLL BEGIN_WITH= 8 ENO_WITH= 13 ;
DRAW   (7,1) : (14,79);
! These definitions Provide the vertical lines in the scrolled area to
! intersect the lines Just above and below the scrolled areas,
DRAW   (7,6):(14,6);
DRAW   (7,16):(14,16);
DRAW   (7,53):(14,53);
DRAW   (7,62):(14,62);
DRAW   (7,71):(14,71);
FIELD NAME= 'NUMBER'  (8,2)  PICTURE= 4'Х'
                      RIGHT_JUSТIFIED
FIELD NAME= 'FAKE'    (8,80) PICTURE= 'Х'
                      NODISPLAY_ONLY
                      NOECHO ;
The SCROLL statement defines а scrolled area beginning on line 8 and ending on line 13. Two fields are assigned to it. The first DRAW statement defines а box around the scrolled area. The rest of the DRAW statements define а series of vertical lines through the scrolled area. Appropriate intersection characters are inserted at the vertical line intersections.
ТЕХТ Statement
ТЕХТ Statement — The ТЕХТ statement is used to specify background text in а form.
Syntax
ТЕХТ [([line] [,column])] 'background-text' [attribute...] ; | line | Line number of text position. |
| column | Column number of text position. |
| background-text | Background text string to be placed at coordinate position specified. |
| attribute | Attribute for background text. |
Description
You can specify the position of background text using either absolute or relative coordinates. If any portion of the specified position is occupied, or goes beyond the boundaries of the screen, the translator issues an error and no form is output.
Table 4.5, ''Attributes for Background Text'' lists attributes for background text. Video attributes are described in Chapter 2, "Form Characteristics".
| Attribute Name | FMS Default |
|---|---|
BLINKING |
NOBLINKING |
BOLD |
NOBOLD |
CHARACTER { US | UK | RULE | SET1 | SET2 } | current character set |
REVERSE |
NOREVERSE |
UNDERLINE |
NOUNDERLINE |
Examples
ТЕХТ (2,3) 'СНЕСК REGISTER - ТНЕ ACCOUNT HISTORY'
                         BOLD ;
! Heading for the scrolled area (register proper)
ТЕХТ (5,2)
'Chk.,                                   Deposit  Check   New' ;
ТЕХТ
'No, Date   Check Payee or Deposit Memo  Amount   Amount  Balance'
The first ТЕХТ statement defines the header for the form. The text begins on line 2, column 3 and is displayed in bold video. If the FORМ statement had contained а DBLWID = 2 attribute specification, the background text would be displayed as double wide.
The next two ТЕХТ statements define а header for а table. They are defined for two consecutive lines. The text is spaced so that it is placed over the proper column (corresponding to the fields in the table). Since no attributes are defined, all the text will be displayed with normal video.
VIDEO Statement
VIDEO Statement — The VIDEO statement is used to define the video display attributes of an area of a form.
Syntax
VIDEO [[([line] [,column])] [:([line] [,column])]] video-attribute...; | line | Line number of coordinate position. |
| column | Column number of coordinate position. |
| video-attribute | Video attribute to be applied to area of form specified. |
Description
The line and column coordinates, which specify the boundaries of an area of the screen, can be absolute or relative. The second coordinate uses values from the first coordinate for relative and default assignments. You can default the first coordinate to the last line plus one and the last column. If the values you specify for line or column are invalid, the Translator signals an error and no form is output.
At-least one video attribute is required for each VIDEO statement. Attributes listed in DRAW, FIELD, ТЕХТ, and other VIDEO statements will override attributes specified in а VIDEO statement.
The attributes for VIDЕО statements are BLINKING, BOLD, REVERSE, and UNDERLINE.
Examples
VIDED (10,20):(+0,+50) BOLD, REVERSE ;
The VIDEO statement defines line 10, column 20 through column 70 inclusive, to contain the video attributes bold and reverse. If subsequent definitions of field, text, or line-drawing characters overwrite any characters of the video definition, the characters overwritten take on only the video attributes defined in that statement.
FMS/ТRANSLATE Command
FMS/ТRANSLATE Command — To convert а form description into а binary form, use the FMS/ТRANSLATE command.
Syntax
FMS/TRANSLAТE [ /[NO]LISTING [=file-spec] | /WARNINGS=level | /ERROR/LIMIТ=n ] file-spec [/[NO]OUТPUТ [
=file-spec]] | file-spec | represents а file specification |
| level | represents one of the error message levels: ALL, INFORМAТIONAL, ERROR, WARNING |
| n | represents the number of errors allowed before translation is aborted |
Description
This command allows you to convert а form description to а binary form. In the command syntax illustration shown above, file-spec represents the following file specifications:
А form description, when used as the input file
А listing file, when used with the /LISTING qualifier
А binary form, when used with the /OUTPUT qualifier
Qualifiers
- /LISTING [=file-spec]
/NOLISTING Creates а translation listing. Use file-spec to specify а name for the listing file; if you do not specify this file, FMS uses the name of the input file and assigns an .LIS file type. The default when you use the FMS/ТRANSLATE command interactively is /NOLISTING. The default when you use it in а batch job is /LIST. /NOLISTING does not create а translation listing.
- /WARNINGS={ALL | INFORMATIONAL | ERROR | WARNING}
Specifies which level of error messages are to be reported. The qualifier value represents the minimum severity level of messages reported. The levels are: ALL, INFORMATIONAL, ERROR, or WARNING. The default is ALL. For example, if you specify /WARNINGS=WARNING, the informational messages are not reported.
- /ERROR-LIMIT =n
Specifies the number of errors allowed, represented by n, before the translation is aborted. The default limit is 20. The valid values for n are О through 255 (inclusive).
- /OUТPUT [=file-spec]
/NOOUTPUT Specifies the name of the output file, which is the form file represented by file-spec. If you do not specify file-spec, FMS uses the name of the input file and assigns а .FRM file type. /NOOUTPUT does not create an output file.
Examples
$ FMS/ТRANSLATE MENU
In this example, а binary form is created from the form description MENU.FLG and is stored in the form file MENU.FRM.
$ FMS /TRANSLATE/WARNINGS= ERROR MENU/QUTPUT=TEST
In this example, а binary form is created from MENU.FLG and is stored in TEST.FRM; this command also specifies that only messages of severity ERROR and SEVERE are to be reported.
$ FMS/TRANSLATE/LIST=MENULIST MENU/NOOUTPUT
In this example, а listing file named MENULIST.LIS is created from the translation of MENU.FLG. The command also specifies that no output form file should be created.
Sample Translation Listing
Example 4.1, ''Sample Translation Listing'' shows а sample listing produced by the Form Language Translator. The listing prints out coordinates in the left margin to show the absolute coordinate values for relative coordinates in statements. At the bottom of the listing is а summary of errors, the time it took to translate the form description, and the command line processed.
5-Oct-1982 10:03:11 FMS Form Language Translator 2.2
30-SEP-1982 11:50:28 USER:[FMS]MENU.FLG;
0001 ! MENU
0002 ! FMS VZ SAMPLE APPLICATION PROGRAM FORM
0003 ! MENU
0004
0005 FORM NAME= 'MENU'
0006 HELP_FORM= 'HELP_MENU'
0007 AREA_T0_CLEAR= 1: 23
0008 WIDTH= 80
0009 BACKGROUND= WHIТЕ
0010 DBLWID= 7
0011 DBLSIZ= 3
0012 FUNCTION_KEY_ACTION_ROUTINE='TAKE15';
( 0, 1)
0013
0014
0015 ТЕХТ (3,9) ' Checking Account Menu '
0016    REVERSE
( 3, 9)
0017
0018 ТЕХТ (7,10) 'Choose option (1-5):';
( 7, 10)
0019
0020 FIELD NAME= 'OPТION' (7,31) PICTURE= '9'
0021    HELP=
0022  'Enter one of the numbers 1, 2, 3, 4, or 5'
0023   DEFAULТ= '2'
0024  ACТION_ROUТINE= 'VALID1' : '12345'
0025   RESPONSE_REQUIRED
0026   UNDERLINE ;
( 7, 31)
0027
0028 ТЕХТ (9,27) '1 'Exit' ;
(9,27)
0029 ТЕХТ (11,27) '2 Write а check' ;
(11,27)
0030 ТЕХТ (13,27) 'З Make а deposit' ;
(13,27)
0031 ТЕХТ (15,27) '4 View the check register' ;
(15,27)
0032 ТЕХТ (17,27) '5 Show account data' ;
(17,27)
0033
0034 DRAW (20,49) : (23,80) ;
(23,49)
0035
0036 ТЕХТ (21,50) 'For help, Press HELP,' ;
(21,50)
0037 ТЕХТ (22,50) 'To continue, Press keypad 15.' ;
(22,50)
0038
0039 END_OF_FORM NAME= 'MENU' ;

End of translation 5-0ct-1982 10:03:13
39 lines were parsed,
No errors were detected.
Elapsed time is 0,61 seconds,
FMS/TRANSLATE USER:[FMS]MENU,FLG;
/L!ST = USER:[FMS]MENU,LIS;
/0UTPUT=USER:[FMS]MENU,FRM;
Chapter 5. Form Librarian - FMS/LIBRARY
The Form Librarian is the utility that manages form libraries. Putting forms in form libraries makes the forms available to the Form Driver and your application program at run time. You can also make them available by making them memory resident. Memory-resident forms are described in Chapter 6, "Form Application Aids".
When the application requires the use of а form at run time, the Form Driver reads the form directly from а form library file that has been stored on а disk. You do not link the form library with the application, but you do name the form library in а Form Driver call. Storing forms in form libraries makes it easy to change and manage forms. You do not need to relink the application every time you change one or more forms; relinking would be necessary if you used memory-resident forms. You can store all your forms in one place. Also, when you use form libraries instead of memory-resident forms, the size of the application program image is smaller.
The Form Librarian offers а variety of operations that can be performed on form libraries:
Create а library FMS/LIВRARY/CREATE
Insert а form in а library FMS/LIВRARY/INSERT
Replace а form in а library FMS/LIВRARY/REPLACE
Extract а form from а library FMS/LIBRARY/EXTRACT
Delete а form from а library FMS/LIBRARY/DELETE
The following paragraphs introduce the Form Librarian capabilities and describe the various commands in detail. Chapter 1, "Introduction" describes DCL command syntax in general.
The create operation makes а new library file and puts one or more binary forms in it. If you want to put an additional form in an existing library, use the insert operation. If you want to exchange one version of а form in а library with а newer version of the same form, use the replace operation. Replace removes the old version of the binary form and replaces it with the new version. The extract operation copies а binary form from the library and puts it in а form file. The delete operation removes а form altogether. Note that the Form Editor can copy а binary form from а library and make it available for modification.
Warning
When the Form Librarian updates а form library file, it does not create а new output form library file. Instead, it updates in place, without changing the form library file's version number. For this reason, you may find it helpful to keep copies of old forms, which would otherwise be destroyed by а replace or а delete operation.
The Form Application Aids FMS/DIRECTORY command produces directories of form files and form libraries. Refer to Chapter 6, "Form Application Aids" for information on the Form Application Aids.
You can run the Form Librarian on any type of terminal, video or hard copy.
FMS/LIBRARY/CREATE Command
FMS/LIBRARY/CREATE Command — To create а form library, use the FMS/LIBRARY/CREATE command.
Syntax
FМS/LIВRARY/CREATE [/[NO]LOG] form-library-spec form-spec-list | form-library-spec |
represents а file specification for а form library |
| form-spec-list |
represents а list of one or more form-specs separated by commas |
| form-spec |
represents any one of the following file specifications: form-file-spec, form-library-spec, form-library-spec/FORМ NAМE= form-name, or form-library-spec/FORМ NAME (form-name-list) |
Description
In the command syntax illustration shown above, form-library-spec represents the file specification of the form library file you wish to create. FMS assigns а .FLB file type to the form library file specification by default. The parameter form-spec-list represents а list of input files (form files, partial form libraries, or whole form libraries) containing forms that you wish to insert in the form library you are creating. FMS assumes an .FRМ file type for input file specifications by default, unless you specify /FORМ-NAМE (in which case FMS assumes а default file type of .FLB). The input cannot contain forms with duplicate names. The Form Librarian skips to the next form in the input if it reads а duplicate form name. Figure 5.1, ''Creating а Form Library'' illustrates the create operation.
Qualifiers
- /LOG
/NOLOG The /LOG qualifier logs completed actions on the terminal. The /NOLOG qualifier is the default.
Examples
$ FMS/LIBRARY/CREATE/LDG SUBSET MENU,ACCOUNTS,FLB,CHECKING/FORM=(REGISTER,DEPOSIT)
In this example, the form library SUBSET.FLB is created. The form in the form file МENU.FRM, all the forms in the form library ACCOUNTS.FLB, and the forms REGISTER and DEPOSIT in the form library CHECKING.FLB, are inserted in SUBSET.FLB. Also, the /LOG qualifier is used to provide logging of the action on the terminal.
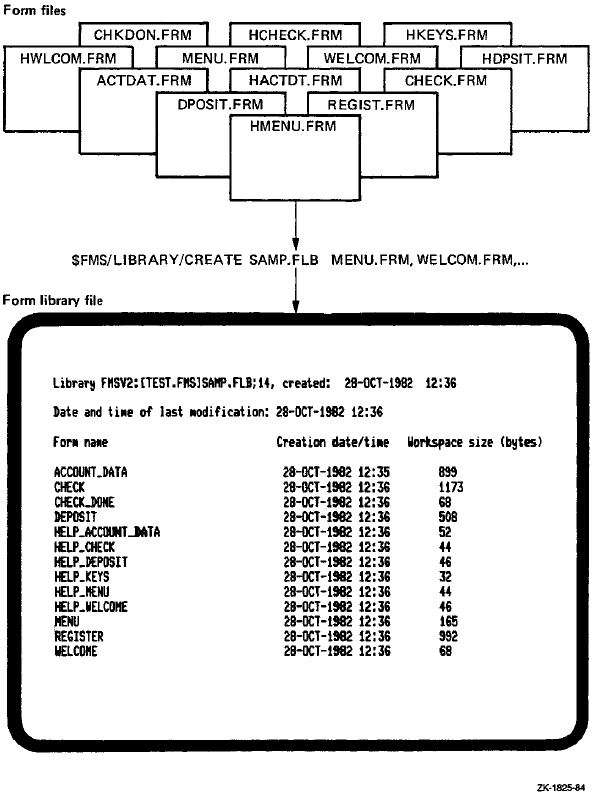
FMS/LIBRARY/INSERT Command
FMS/LIBRARY/INSERT Command — To insert а form in а form library, use the FMS/LIBRARY/INSERT command.
Syntax
FMS/LIВRARY/INSERT [/[NO]LOG] form-library-spec form-spec-list | form-library-spec | represents а file specification for а form library |
| form-spec-list | represents а list of one or more form-specs separated by commas |
| form-spec |
represents any one of the following file specifications: form-file-spec, form-library-spec, form-library-spec/FORM_NAМE =form-name, or form-library-spec/FORM_NAМE = (form-name-list) |
Description
In the command syntax illustration shown above, the parameter form-library-spec represents the file specification of the existing form library in which you wish to insert а form. If you do not supply а file type, FMS assumes .FLB by default. The parameter form-spec-list represents а list of input files (form files, partial form libraries, or whole form libraries) containing forms you wish to insert. If you do not supply а file type, FMS assumes .FRM by default, unless you specify /FORМ_NAМE (in which case, FМS assumes .FLB by default).
If you try to insert а form that is already in а library, an error is signaled and the form is not inserted. The operation continues If there are other forms to be processed. If forms in the input files have duplicate names, an error is signaled and only the first of the forms with the same name will be inserted.
Qualifiers
- /LOG
/NOLOG The /LOG qualifier logs completed actions on the terminal. /NOLOG does not log completed actions. The /NOLOG qualifier is the default.
Examples
$ FMS/LIBRARY/INSERT SUBSET WELCOME,HELPFORMS/FORM=HWELCOME,SUBFORMS.FLB
In this example, the form in the form file WELCOME.FRM, the form НWЕLСОМЕ in the form library НELPFORМS.FLB, and all the forms in the form library SUBFORMS.FLB are inserted in the form library SUBSET.FLB.
FMS/LIBRARY/REPLACE Command
FMS/LIBRARY/REPLACE Command — To replace а form in а form library, use the FMS/LIBRARY/REPLACE command.
Syntax
FMS/LIВRARY/REPLACE [/[NO]LOG] form-library-spec form-spec-list | form-library-spec | represents а file specification for а form library |
| form-spec-list | represents а list of one or more form-specs separated by commas |
| form-spec |
represents any one of the following file specifications: form-file-spec, form-library-spec, form-library-spec/FORM_NAМE =form-name, or form-library-spec/FORM_NAМE = (form-name-list) |
Description
This command allows you to replace а form in а form library. In the command syntax illustration shown above, form-library-spec represents the file specifications of the form library file in which you are replacing а form. FMS assumes а .FLB file type for the form library file specification by default. The parameter form-spec-list represents а list of input files (form files, partial form libraries, or whole form libraries) containing forms that you wish to replace in the form library. FMS assumes а .FRМ file type for input file specifications by default, unless you specify /FORМ_NAМE (in which case, FMS assumes а default file type of .FLB). When you use this command, FMS replaces the form in the form library with form of the same name, which is contained in the input files. If an input form name does not match а form name already in the library, the input form is simply inserted. If more than one input file contains а form with the same name, the last such form is put in the library. If you do many delete and replace operations, the size of the library continues to grow. You can compress the library by creating а new version.
Note that /REPLACE is the default Form Librarian operation. That is, if you specify the FMS/LIBRARY command, FMS assumes FMS/LIBRARY/ REPLACE by default.
Warning
The Form Librarian updates form libraries in place. Therefore, the forms that are in the library, and that you are replacing, are destroyed. If you want to keep copies of forms that you replace, use the extract operation before replacing.
Qualifiers
- /LOG
/NOLOG The /LOG qualifier logs completed actions on the terminal. /NOLOG does not log completed actions. The /NOLOG qualifier is the default.
Examples
$ FMS/LIBRARY MULTITERM TEST5,SUBSET/FORM=TERMINAL
In this example, forms TEST5 and TERMINAL in the form library MULTITERM.FLB are replaced by newer versions of the forms from the form file TEST5.FRМ and the form library SUBSET.FLB.
FMS/LIBRARY/EXTRACT Command
FMS/LIBRARY/EXTRACT Command — To extract а form from а form library, use the FMS/LIВRARY/EXTRACT command.
Syntax
FМS/LIВRARY/EXTRACT [[NO]LOG] form-library-spec/FORM_NAМE=form-name [[NO]OUТPUТ [ =file-speck]]| form-library-spec | represents а file specification for а form library |
| form_name | represents а form name |
| file-spec | represents а file specification |
Description
In the command syntax illustration shown above, the parameter form-library-spec represents the file specification of the form library from which you wish to extract а form. If you do not supply а file type, FMS assumes .FLB by default. The parameter form-name represents the name of the form you wish to extract. The parameter file-spec represents the file specification of the file in which you wish the extracted form to be stored. If you do not supply а file type, FMS provides .FRM by default. If you do not specify the /OUTPUT qualifier, FMS uses the form name as the default output file name, with а file type of .FRM. If the form name is longer than nine characters or contains the characters $ or -, these characters are removed and the name is truncated to nine characters.
Note that the extract operation only extracts а copy of the form from the library. It does not delete the form from the library.
Qualifiers
- /LOG
/NOLOG The /LOG qualifier logs completed actions on the terminal. The /NOLOG qualifier is the default.
- /ОUТРUТ = [file-spec]
/NOOUТPUТ The /OUTPUT qualifier specifies the output file in which you wish the extracted form to be stored. If you do not supply а file specification, FMS provides the name of the extracted form and assigns а .FRM file type. The / NOOUTPUT qualifier specifies that no output file is to be created.
Examples
$ FMS/LIBRARY/EXTRACT SUBSET/FORM_NAME=REGISTER/OUTPUT=REGISTER1
In this example, form REGISTER is extracted from the form library SUBSET.FLB and stored in the output form file REGISTER1.FRM.
FMS/LIBRARY/DELETE Command
FMS/LIBRARY/DELETE Command — To delete а form from а form library, use the FMS/LIBRARY/DELETE command.
Syntax
FMS/LIBRARY/DELETE [[NO]LOG] form-library-spec/FORМ_NAМE=(form-name-list) | form-library-spec | represents а file specification for а form library |
| form-name-list | represents а list of one or more form-names separated by commas |
Description
In the command syntax illustration shown above, the parameter form-library-spec represents the file specifications of the form library from which you wish to delete а form. If you do not supply а file type, FMS assumes .FLB by default. The parameter form-name-list represents а list of the names of the forms that you wish to delete.
Only one form library can be specified on а command line. If forms specified for deletion are not in the library, the Form Librarian signals an error but continues processing if other forms are specified. The delete operation does not reclaim file space in the library. if you do many delete and replace operations, the size of the library continues to grow. You can compress the library by creating а new version.
Warning
The Form Librarian updates form libraries in place. Therefore, the forms that you delete are destroyed. If you want to keep copies of forms that you delete, use the extract operation before deleting.
Qualifiers
- /LOG
/NOLOG The /LOG qualifier logs completed actions on the terminal. The /NOLOG qualifier is the default.
Examples
$ FMS/LIBRARY/DELETE SAMP/FORM_NAME=(REGISTER,HELP.MENU)
In this example, the forms REGISTER and HELP_МENU are deleted from the form library SAMP.FLВ.
Chapter 6. Form Application Aids
The Form Application Aids utility offers some services that are useful during the application program development cycle. These services include:
Obtaining form descriptions FMS/DESCRIPТION
Obtaining а directory of form files and libraries FMS/DIRECTORY
Creating memory-resident forms FMS/OВJECT
Creating object modules of user action routine vectors FMS/VECTOR
The following paragraphs introduce Form Application Aids capabilities and describe each command in detail. Chapter 1, "Introduction" describes the DCL command syntax in general.
The Form Application Aids utility can provide four basic types of descriptions of forms:
А brief description contains summary information about а form, its fields, its Named Data, and its user action routines. It is а valuable reference tool during program development.
А declarations file for FMS data fields is similar to COBOL data divisions or DATATRIEVE record definitions.
А full text description of а form consists of Form Language statements and is suitable for input to the Form Language Translator (see Chapter 4, "Form Language Translator - FMS/ТRANSLATE").
А printable image shows background text and any field default values.
The FMS/DIRECTORY command produces either а brief or full directory of form files or form libraries.
You can create а linkable file of memory-resident forms by using the FMS/OBJECT command. Once you have created binary forms, you must put them in form libraries or make them memory resident. Either operation makes the binary forms available to the Form Driver and your application program at run time. You may prefer some of the advantages of memory-resident forms. Because you link memory-resident forms with the application program, they are brought into memory when the program is brought in.
Since а form library directory does not have to be searched, access to forms by the Form Driver or the application is faster than if the forms were stored in libraries. Memory-resident forms also save you from having to manage additional pieces of the application; that is, form libraries.
In order to make use of user action routines, you must link with your program an object module containing the names and vectors of all the routines to be called. The Form Driver can use these vectors to locate user action routine addresses in memory at run time. You generate such an object module by using the FMS/VECTOR command.
FMS/DESCRIPTION Command
FMS/DESCRIPTION Command — To obtain а description of а form or of all forms in а library file, use the FMS/DESCRIPTION command.
Syntax
FМS/DESCRIPТION [ { /BRIEF | /DECLARATION | /FULL | /DISPLAY_IMAGE[=[NO]ESCAPE_SEQUENCE] } | /[NO]LOG | /[NO]OUTPUT [=file-spec] ] form-spec-list | form-spec-list | represents а list of one or more form-specs separated by commas |
| form-spec |
represents any one of the following file specifications: form-file-spec, form.-library-spec, form-library-spec/FORМ..NAME=form-name, or form-library-spec/FORM_NAМE = (form-name-list) |
Description
In the command syntax illustration shown above, the parameter form-spec-list represents one or more input file specifications (form files, partial form libraries, and whole form libraries). If you do not supply а file type, FMS assumes .FRM by default, unless you specify /FORM_NAME (in which case, FMS assumes .FLB by default). The qualifier value file-spec represents the file specification of the output file for the description. The default file type FMS provides is discussed in the following sections. The qualifiers /FULL, /ВRIEF, /DISPLAY_IMAGE, and /DECLARATIONS are mutually exclusive and cannot be used in the same command line. If you do not specify а qualifier, FMS assumes /FULL by default. The default output file name is the same as the first input file name.
Qualifiers
- /ВRIEF
Produces а brief text description of а form. If the /OUТPUT qualifier is used, FMS provides а .LIS default file type. If /OUTPUТ is not specified, output is sent to the terminal.
The brief description contains а concatenated list of descriptions in table format, including the following information:
- Form name
- Help form name
- Area to clear
- Memory-resident form size
- Field names
- Scrolled fields
- Number of indexed fields
- Length and type of field picture
- Type of access (Display-Only Supervisor-Only)
- Total length required for fields (except in scrolled areas)
- Longest field
- Named data indexes and names
- User action routine names
The total length and longest length are the size of the buffer required for concatenated field calls.
The Memory Resident Form Size indicates the number of bytes that would be required in а user program If the form were to be converted into а Memory Resident form and LINKed into the application program. This does not indicate the size of а workspace, but the size of the form which is currently being examined.
If you process two or more forms, the brief description includes а summary with the following information:
- Required length for any one form being processed (not including fields in scrolled areas)
- Largest field size
- Largest scrolled line length
- Largest scrolled area in lines
- Number of forms processed
- /DECLARATIONS
Produces а declarations file for FMS data fields similar to COBOL data divisions or DATATRIEVE record definitions. (See Example 6.2, ''Data Description File''.) The default output file type is .ТХТ.
Declaration files must be edited to suit your application's requirements. They list а form's name, field names, and indexed field names. FMS does not check for invalid names when you use this command. Fields are listed in the order that the Form Driver processes them. The /DECLARATIONS qualifier defines all fields in а form as "х" data type regardless of the type defined originally.
Scrolled areas are not defined in the declaration file; if а form contains only scrolled fields, the output contains only the form name.
FMS tries to treat sets of indexed fields that look like tables as tables. FMS assumes that two consecutive sets of indexed fields with an equal number of indices comprise а table and FMS generates declarations accordingly.
А form without fields generates а blank output file. If you generate а declaration file of all the forms in а library, only those forms with fields are included in the output file.
- /FULL
Produces а full text description of the forms in the input files. This text description, consisting of Form Language statements, is suitable for input to the Form Language Translator. However, the Form Translator can process only one form description at а time. Therefore, if you input more than one form, split the output text file into separate files for each form. This is the default FMS/DESCRIPTION qualifier. The default output file type is .FLG. Figure shows а sample full description.
- /DISPLAY-IMAGE[=[NO]ESCAPE_SEQUENCE]]
Produces а printable image of а form. The ESCAPE_SEQUENCE value for the /DISPLAY_IMAGE qualifier produces an image that includes VT100 video escape sequences. The NOESCAPE_SEQUENCE value, the default value for this qualifier, produces an image with no video information. The default output file type is .LIS. Figure 6.1, ''Printed Image of а Description'' shows а printed image of а form and Figure 6.2, ''Video Image of а Description'' shows а video image.
- /LOG
/NOLOG The /LOG qualifier logs completed actions on your terminal. The /NOLOG qualifier is the default.
- /ОUТРUТ[ =file-spec]
/NOOUTPUТ Specifies the output file in which the description is to be stored. If you do not use file-spec, FMS uses the name of the first input file. The /NOOUTPUT qualifier specifies that no output file is to be created.
Examples
FMS Form Description Application Aid  - V2,2 -  Brief Description
Form Name = REGISTER
No Help Form
Area to Clear = 1:23
Memory Resident Form Size = 1634

     Field Name (Max Index)      Pic(Length)     Access   UARs
––––––––––––––––––––––––––      –––––––––––––   –––––––   –––––
––––––– Scrolled Area ––––––
NUMBER                           x(4)            DISP
DATE                             x(7)            DISP
PAYMEM                           x(35)           DISP
DEPOSIT                          x(6)            DISP
AMTPAY                           x(6)            DISP
BALANCE                          x(6)            DISP
FAKE                             x(1)            DISP
––– 6 Lines with Line Length = 65 –––
SUMМARY              (4)         9(6)            DISP
Total Length Required = 24
Longest Field = 35

                   Named  Data
1    NSCROL  User Action  Routines
PASSKYА form:
EMPLOYEE: ___________________
ТYРЕ OF SALE NUMBER OF SALES DOLLARS
REТAIL: __________ $----,--
WHOLESALE: __________ ----,--
OTHER: __________ ----,--
TOTAL: __________ $----,--
The data description file:
01 EMPLOYEE_SALES.
05 EMPLOYEE PIC Х(20).
05 FMS_TABLE_1 OCCURS 3 TIMES.
10 NUMBER_OF_SALES PIC Х(5).
10 TOTAL PIC X(6).
05 TOTAL_NUMBER_OF_SALES PIC Х(6).
05 TOTAL_DOLLAR_AMOUNT PIC Х(7).! FMS Form Description Application Aid
! Version V2.6
FORM NAME='DEPOSIT'
HELP_FORM='HELP_DEPOSIT'
AREA_TO_CLEAR=l:23
WIDTH=80
BACKGROUND=CURRENT
FUNCTION_KEY_ACTION_ROUTINE='PASSKY'
: '110'
;
ТЕХТ (1,32) 'MАKЕ А DEPOSIT'
BOLD
;
ТЕХТ (3,49) 'Date:'
;
ТЕХТ (S,22) 'Current Balance $'
;
ТЕХТ (7,22) 'Deposit $'
;
ТЕХТ (9,22) 'New Balance $'
;
ТЕХТ (12,22) 'Memo:'
;
ATTRIBUTE_DEFAULTS FIELD
CLEAR_CHARACTER=' '
NOAUTOTAB BLANK_FILL NOBLINKING NOBOLD NOREVERSE
NOUNDERLINE NODISPLAY_ONLY ЕСНO NOFIXED_DECIMAL
LEFT_JUSTIFIED NOSUPERVISOR_ONLY NOSUPPRESS NOUPPERCASE
;
FIELD NAME='DATE' (3,55)
DATE_FIELD='99-AAA-99'
DISPLAY_ONLY
;
FIELD NAME='CURBAL' (5,42)
PICTURE='9999,99'
RIGHT_JUSTIFIED ZERO_FILL SUPPRESS DISPLAY_ONLY CLEAR_CHARACTER='0'
;
FIELD NAME='DEPOSIТ' (7,42)
PICTURE='9999,99'
HELP='Enter amount of deposit'
FIXED_DECIMAL ZERO_FILL RESPONSE-REQUIRED CLEAR_CHARACTER='0' UNDERLINE
;
FIELD NAME= 'NEWBAL' (8,42)
PICTURE='9999,99'
RIGHT_JUSTIFIED ZERO_FILL SUPPRESS DISPLAY_ONLY CLEAR_CHARACTER='0'
;
FIELD NAME='MEMO' (12,28)
PICTURE=35'X'
HELP='Enter the origin of the deposit'
RESPONSE_REQUIRED UNDERLINE
;
ORDER BEGIN_WITH =1
NAME= 'DATE'
NAME='CURBAL'
NAME= 'DEPOSIТ'
NAME='NEWBAL'
NAME='MEMO'
;
NAMED_DATA INDEX=l NAME='DONE'
DATA='Deposit made. Press RETURN or ENTER to continue.'
END_OF-FORM NAME='DEPOSIT' ;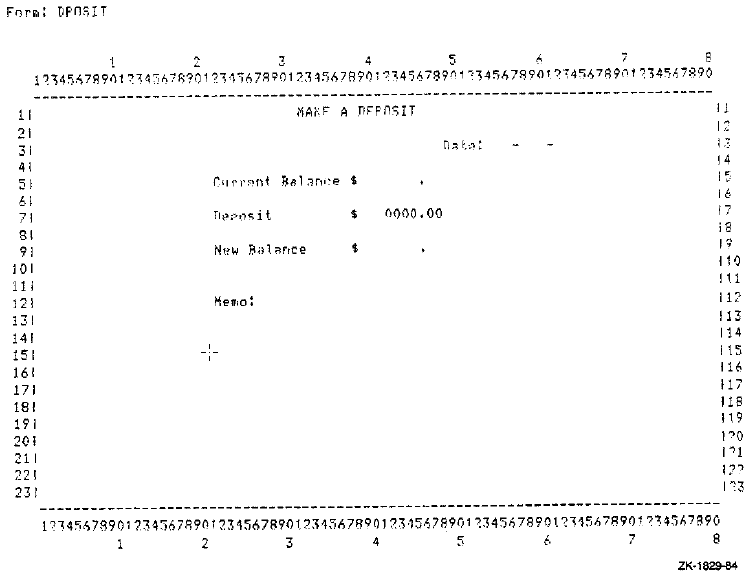
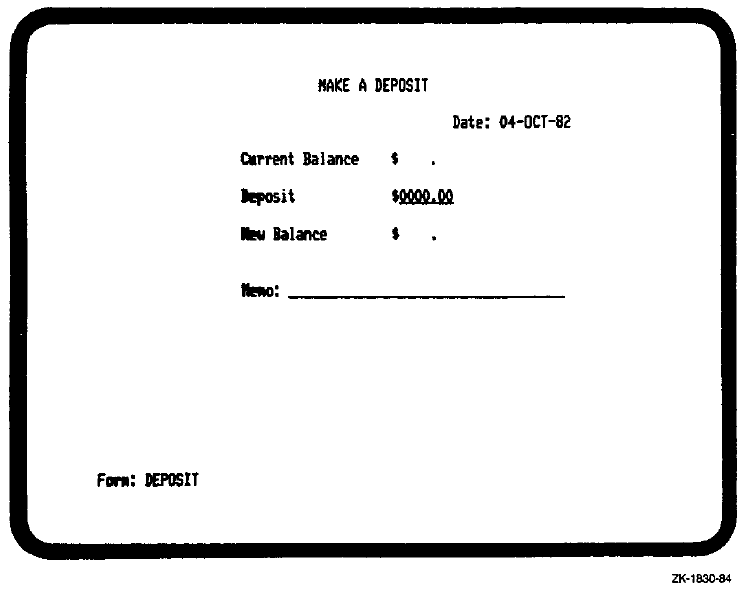
FMS/DIRECTORY Command
FMS/DIRECTORY Command — To obtain а directory of а form file or form library, use the FMS/DIRECTORY command.
Syntax
FMS/DIRECTORY [ { /BRIEF | /FULL } ] form-spec-list [/[NO]OUTPUT [ =file-spec]]| form-spec-list | represents а list of one or more form-specs separated by commas |
| form-spec |
represents any one of the following file specifications: form-file-spec, form-library-spec, form-library-spec/FORM_NAME =form-name, or form-library-spec/FORМ_NAМE =(form-name-list) |
| file-spec | represents а file specification |
Description
In the command syntax illustration shown above, the argument form-spec-list represents а list of input files (form files, partial form libraries, or whole form libraries). If you do not supply а file type, FMS assumes .FLB by default. If /OUTPUT is not specified, output goes to the terminal. The qualifiers /FULL and /ВRIEF are mutually exclusive and cannot be used in the same command line. The default is /ВRIEF. The default output file type is .LIS. The default output file name is the same as the first input file name.
Qualifiers
- /ВRIEF
Displays а summary directory listing showing only form names that exist within the specified file(s).
- /FULL
Displays а full directory listing showing the form name, creation date and time, and workspace size for each form in the file.
The workspace size is considerably smaller than the form size since, currently, background text is not stored in the workspace. The value passed in the "Size" argument to the FDV$AWKSP call need not be precise, as the form driver allocates the space it requires dynamically. The size reported by the FMS/DIRECTORY/FULL command can be used as the workspace size when calling FDV$AWKSP to allocate memory for the workspace.
Figure 6.3, ''Full Form File Directory'' shows а sample full form file directory listing and Figure 6.4, ''Full Form Library Directory'' shows а sample full form library directory.
- /ОUТРUТ[=file-spec]
/NOOUTPUТ The /OUTPUT qualifier specifies that an output file is to be created. The /NOOUТPUT qualifier specifies that no output file is to be created.
Examples
$ FMS /DIRECTORY/FULL THISLIB/OUTPUT=LIBRDIR
In this example, а full directory listing of the form library file THISLIВ.FLB is produced. The directory listing is to be stored in the output file LIВRDIR.LIS.
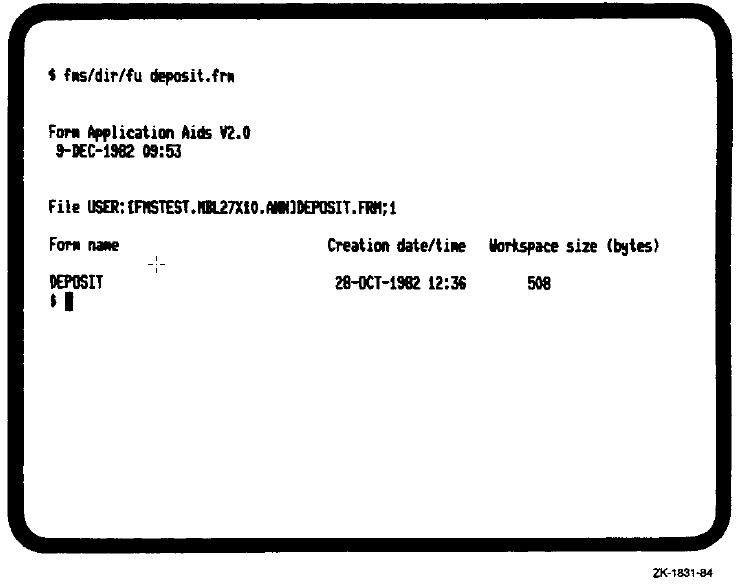
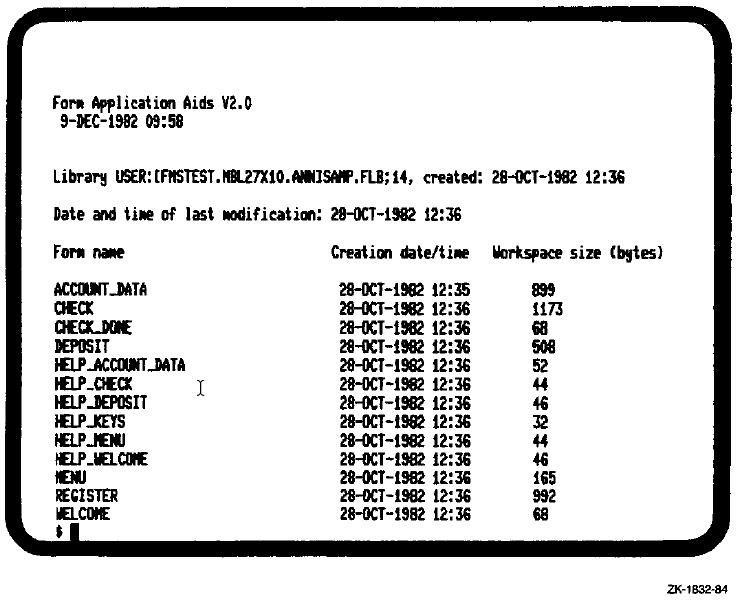
FMS/OBJECT Command
FMS/OBJECT Command — To create а memory-resident form or forms, use the FMS/OBJECT command (see Figure 6.5, ''Creating Memory-Resident Forms'').
Syntax
FMS/OBJECT /[NO]LOG form-spec-list [/[NO]OUTPUТ [=file-spec]]| form-spec-list | represents а list of one or more form-specs separated by commas |
| form-spec |
represents any one of the following file specifications: form-file-spec, form-library-spec, form-library-spec/FORM_NAME =form-name, or form-library-spec/FORМ_NAМE =(form-name-list) |
| file-spec | represents а file specification |
Description
In the command syntax illustration shown above, the parameter form-spec-list represents one or more input file specifications (form files, partial form libraries, and whole form libraries). If you do not supply а file type, FMS assumes .FRM by default, unless you specify /FORМ_NAМE (in which case, FMS assumes .FLB by default). The parameter file-spec, when used with the /OUTPUT qualifier, represents the file specification of the memory-resident output file. If you do not supply а file type, FMS assumes .OBJ by default. The default output file name is the same as the first input file name.
To determine how much space to allocate when you create arrays to load memory-resident forms, refer to the brief form description produced by the FMS/DESCRIPТION/BRIEF command.
Qualifiers
- /LOG
/NOLOG The /LOG qualifier logs completed actions on the terminal. The /NOLOG qualifier suppresses logging of completed actions (the default qualifier).
- /ОUТРUТ[=file-spec]
/NOOUТPUТ The /OUТPUT qualifier specifies the file specification of the output file. If you do not supply the file specification, FMS uses the name of the first input file and assigns а .ОВJ file type. The /NOOUTPUT qualifier specifies that no output file is to be created.
Examples
$ FMS/OBJECT TERMCHECK
In this example, the memory-resident form named ТЕRМСНЕСК.ОВJ is created from the input form file TERMCHECK.FRM.
$ FMS/OBJECT SAMP/FORM_NAME=(WELCOME,REGISTER,CHECK)/OUTPUT=CHECKFORM
In this example, а memory-resident form file СНЕСКFОRМ.ОВJ is created from the input forms WELCOME, REGISTER, and СНЕСК, which are in the form library SAМP.FLB.
Figure 6.5. Creating Memory-Resident Forms 
FMS/VECTOR Command
FMS/VECTOR Command — To create а user action routine (UAR) vector module, use the FMS/VECTOR command (see Figure 6.6, ''Creating Object Modules of UAR Vectors'').
Syntax
FMS/VECTOR /[NO]LOG form-spec-list [/[NO]OUTPUТ [=file-spec]]| form-spec-list | represents а list of one or more form-specs separated by commas |
| form-spec |
represents any one of the following file specifications: form-file-spec, form-library-spec, form-library-spec/FORM_NAME =form-name, or form-library-spec/FORМ_NAМE =(form-name-list) |
| file-spec | represents а file specification |
Description
In the command syntax illustration shown above, the parameter form-spec-list represents one or more input file specifications (form files, partial form libraries, and whole form libraries). If you do not supply а file type, FMS assumes .FLB by default. The qualifier value file-spec represents the file specification of the output file for the vector module. If you do not supply the file specification for the /OUTPUT qualifier, FMS uses the name of the first input file and assigns а .ОВJ file type.
Qualifiers
- /LOG
/NOLOG The /LOG qualifier logs completed actions on the terminal. The /NOLOG qualifier suppresses logging of completed actions (the default qualifier).
- /ОUТРUТ[=file-spec]
/NOOUТPUТ The /OUTPUТ qualifier specifies the file specifications of the output file. If you do not supply the file specification, FMS uses the name of the first input file and assigns а .ОВJ file type. The /NOOUTPUT qualifier specifies that no output file is to be created.
Examples
$ FMS/VECTOR EXEMPTION,FRM/OUTPUT=EXEMVEC
In this example, the UAR vector module named ЕХЕМVЕС.ОВJ is created from the UARs in the input form file EXEМPТION.FRМ.
$ FMS/VECTOR THISLIB
In this example, the UAR vector module named THISLIB.OВJ is created from the UARs in all forms from the input form library THISLIB.FLB.
Chapter 7. Form Tester - FMS/ТEST
The form Tester is the utility that allows you to display а form as an application program would, to type data into fields, and to display field help. The form Tester does not require а VT100- or VT200-compatible terminal - you can use а VT52 terminal. You can test forms created by either the Form Editor or the form Language Translator. The Form Editor (described in Chapter 3, "Form Editor - FMS/EDIT") also lets you test forms during its Test phase.
You can test forms stored in either form files or form libraries. You can display field help by pressing НЕLР. You can see help forms If they are in the same form library as the form you are testing. The form Tester displays any fatal form Driver error messages. However, certain nonfatal form Driver error conditions are ignored. You can see these messages when they occur if you assign form Driver Debug mode before you test the form. See the VSI FMS Form Driver Reference Manual for more information on the form Driver. The form Driver errors listed in Table 7.1, ''Form Driver Errors Ignored by the Form Tester'' are ignored by the form Tester in certain cases.
When testing а form with the АUТОТАВ attribute in the last field visited in the form, the cursor remains on the last character and the message "no next field on form" is displayed.
When using FMS/ТEST (and the ТЕSТ phase of the form Editor), the field's help text is not displayed if the user has specified pre-help user action routines. Post-help user action routines prevent the no help available message from being displayed.
| Error | Code Meaning |
|---|---|
| FDV$_UDE | UAR Depth exceeded(-33) |
| FDV$_UAR | UAR returned illegal code (-34) |
| FDV$_UNF | UAR specified but not found (-35) |
| FDV$_UТR | Undefined field terminator (-17) |
| FDV$_FCH | Form library is not open on channel (-7) |
| FDV$_FNМ | Specified form does not exist (-9) |
| FDV$_FLD | Field does not exist, or index value is invalid for field (-11) |
| FDV$_NOF | Form contains no fields (-12) |
| FDV$_DSP | Form contains only display-only fields (-13) |
Figure 7.1, ''Form Tester Displaying а Form'' shows а form displayed by the Form Tester.
Note that the Form Tester always runs with supervisor mode on. Therefore, all fields having the Supervisor-Only attribute are treated as display-only fields.
The FMS/ТEST command invokes the Form Tester.
7.1. Terminal Setup
FMS now has alternate character sets, double size and double wide lines, ruling characters, and AST reentrancy. In addition, FMS now can display several forms on the screen simultaneously. FMS now requires more complete control of the terminal to handle the additional screen characteristics than FMSV1 did.
FMS V1 queried the terminal directly for terminal type, options (such as the Advanced Video Option), and current screen characteristics. This operation did not allow type-ahead; you could not enter commands or data while FMS was preparing for form display.
To allow type-ahead, FMS now queries the operating system for terminal attributes and screen characteristics. Type the following VМS command to make sure that VMS knows your terminal attributes and screen characteristics before running your application:
$ SET TERMINAL/INQUIRE @
The operating system queries your terminal, and records its characteristics. Do not type ahead until the operation is complete. You might consider putting the SET ТERМINAL/INQUIRE command in your login command file.
At any time you can type the following VMS command to display the characteristics of the current terminal:
$ SHOW TERMINAL @
If your terminal characteristics differ from those the operating system has recorded, your FMS application may not perform correctly. FMS also expects that the ANSLCRT and DEC_CRT attributes are set appropriately. See the VSI OpenVMS Command Language User's Guide for details on terminal characteristics.
FMS/ТEST Command
FMS/ТEST Command — To test а form you have created, use the FMS/ТEST command.
Syntax
FMS/TEST { form-file-spec | form-library-spec/FORМ_NAМE =form-name } [/[NO]QUIET]| form-file-spec | represents а file specification for а form file |
| form-library-spec | represents а file specification for а form library |
| form-name | represents а form name |
Description
In the command syntax illustration shown above, the parameters form-file-spec and form-library-spec are mutually exclusive and cannot be used in the same command line. The parameter form-file-spec represents the file specification of the binary form file you wish to test. If you do not supply а file type, FMS assumes .FRM by default. The parameter form-library-spec represents the file specification of the form library in which the form that you wish to test exists. If you do not supply а file type for form-library-spec, FMS assumes .FLB by default. The parameter form-name represents the name of the form you wish to test.
Qualifiers
- /QUIET
/NOQUIET The /QUIET qualifier invokes the Form Driver quiet signaling mode. The /NOQUIET qualifier, the default qualifier, invokes normal signaling mode.
Examples
$ FMS/TEST SUBSET/FORM_NAME=MENU/QUIET
The example tests the form MENU, which exists in the form library SUBSET.FLB. The /QUIET qualifier is used to invoke the quiet signaling mode.
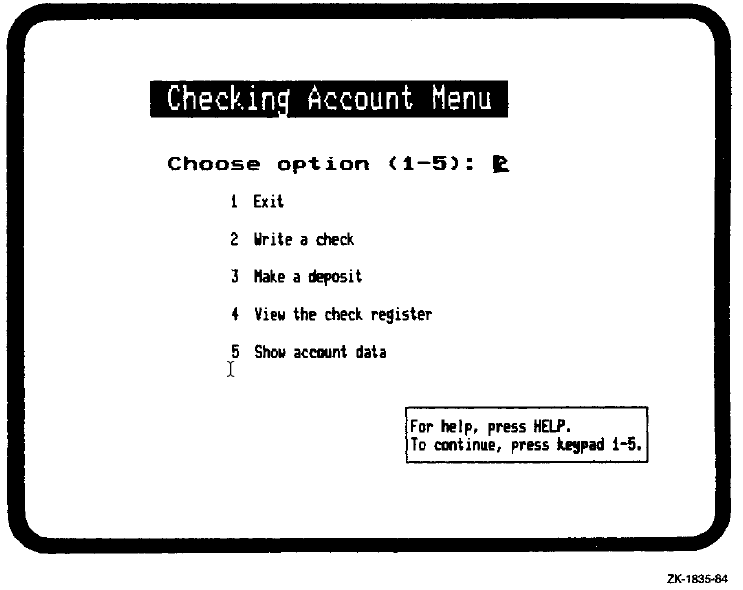
Chapter 8. TDMS to FMS Form Converter - FMS/CONVERT
The Terminal Data Management System (TDMS) to FMS Form Converter is а new component of FMS which will take an existing TDMS form from the Common Data Dictionary (CDD) and output an FMS form. The Form Converter will be used by TDMS users who wish to transfer their existing TDMS forms to FMS.
The Form Converter will only run on the VAX series of computers. It is not dependent on any particular type of peripheral device. It does, however, require the following software components:
VAX TDMS
VAX CDD
This chapter describes the TDMS to FMS Form Converter in detail. Section 8.1, ''TDMS to FMS Form Converter Functions'' describes the functions performed as well as features the converter does not support.
The FMS/CONVERT command invokes the Form Converter. This command requires one parameter: The CDD path name for the name of the TDMS form. FMS/CONVERT command has two optional qualifiers - /LOG and /OUTPUT. Section 8.2, ''FMS/CONVERT Command'' describes the FMS/CONVERT command and its parameters and qualifiers; a listing of а TDMS form, the FMS/CONVERT command syntax used to convert that form, and а full description of the resulting FMS form.
8.1. TDMS to FMS Form Converter Functions
8.1.1. Functions Performed
The Form Converter accepts а valid TDMS form that is stored in the CDD as а CDD$FORM (i.e., with а CDD protocol of CDD$FORМ) with а CDD core level of 2.
The Form Converter will output а valid FMS form file (assuming the /NOOUTPUT qualifier is not used). It will also output informational messages to the SYS$ERROR device.
Assuming the /NOOUТPUТ qualifier is not used and the TDMS form is valid, this product will always attempt to output an FMS form file, regardless of the presence of any TDMS features that are not supported by FМS.
8.1.2. TDMS Features Not Supported by FMS
The TDMS to FMS Form Converter will ignore the following TDMS features that are contained in the ТDMS form being converted (appropriate informational messages will be issued to the user if the /LOG qualifier is specified - see Appendix A, "VSI FMS Software Messages" for the messages that will be issued):
Help form path name
Form field data types
Field validators:
Range
Choice
Size
Check digit
Scale factors
In addition, the Form Converter will modify the following field attribute combinations to make them compatible with FMS:
Zero Suppress, Zero Fill and Right Justify set. The fill character will be set to zero.
Zero Suppress set but Zero Fill and Right Justify not set. The Zero Suppress attribute will be removed.
Zero Suppress and Right Justify set but Zero Fill not set. The Zero Fill attribute is set.
Zero Suppress and Zero Fill set but Right Justify not set. Both Zero Suppress and Zero Fill attributes are removed.
Zero Fill set and Clear Character is not О. The Clear Character is set to zero.
8.2. FMS/CONVERT Command
FMS/CONVERT
FMS/CONVERT — Converts а TDMS form from the CDD to an FMS form.
Syntax
FMS/CONVERT CDD-path-name [/[NO]LOG] [/[NO]OUТPUT [ =file-spec]]| CDD-path-name | represents the CDD path name for the name of the TDMS form to be converted to an FMS form file. |
Description
In the command syntax illustration shown above, CDD-path-name is the only parameter accepted. It is the CDD path name for the name of the TDMS form. If the path name contains any characters other than those allowed in VМS file s specifications and/or logical names, then the path name must be enclosed in quotes. This includes CDD passwords and the CDD hyphen character. Normal CDD defaulting rules apply to the path name. The CDD path name is required.
Command Qualifiers
- /LOG
The /LOG qualifier will cause the Form Converter to display logging information on the default SYS$ERROR device. This logging information will consist of success messages telling the name of the ТDMS form being converted and the name of the output form file (if any). If the default, /NOLOG, qualifier is given, this logging information will not be output.
Informational messages for any TDMS features being ignored by the Form Converter will always be output whether the /LOG qualifier is specified or not.
- /ОUТРUТ = file-spec
The /ОUТРUТ qualifier causes а form file to be created. If а file-spec is specified with the qualifier, that file specification will be the name of the output form file. The default file type will be .FRМ. If а file-spec is not specified, the filename of the form file will be the object name of the TDMS form and the file type will be .FRМ.
The NOOUТPUТ qualifier does not create а form file.
Conversion Example
This example illustrates how the FMS/CONVERT command converts а TDMS form into an FMS form. In this example you will see а listing of а TDMS form which was created using the Form Definition Utility (FDU), the FMS/CONVERT command syntax and output, and а full description of the converted FMS form file. The following figure illustrates the output from the FDU LIST FORM command:
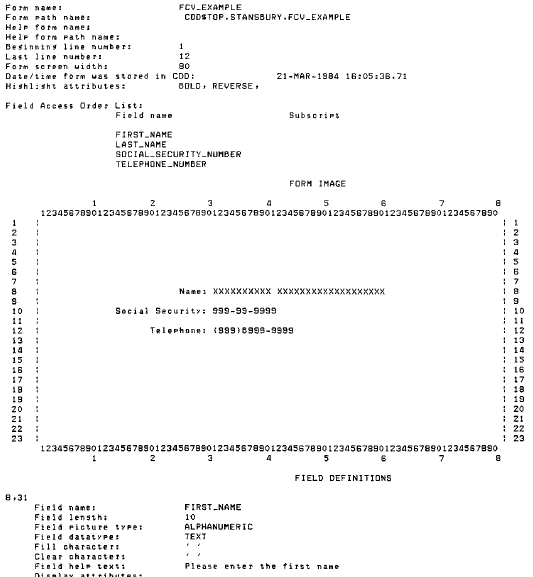
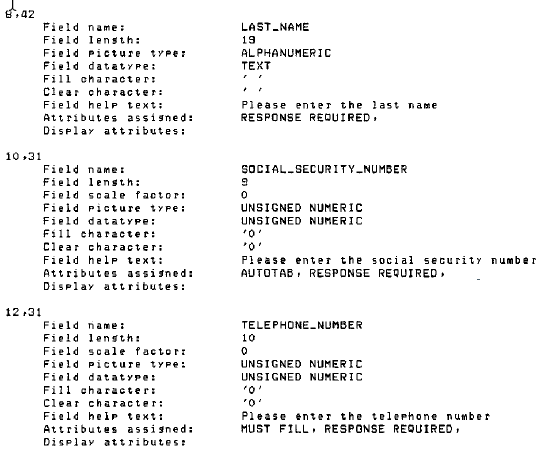
Example 8.1, ''Converting the Form'' shows the command syntax used to convert the form into an FMS form, and the output from that command:
$ FMS/CONVERT/LOG/OUTPUT CDD$TOP.STANSBURY.FCV_EXAMPLE
%FMS-S-CDD_EXTRACTING, Extracting TDMS form FCV_EXAMPLE form the CDD.
%FMS-I-DATATYPE_IGNRD, Datatype ignored on field FIRST_NAME.
%FMS-I-DATATYPE_IGNRD, Datatype ignored on field LAST_NAME.
%FMS-I-DATATYPE_JGNRD, Datatype ignored on field SOCIAL_SECURITY_NUMBER.
%FMS-I-SCALEFCTR_JGNRD, Scale factor ignored on field SOCIAL_SECURITY_NUMBER.
%FMS-I-DATATYPE_IGNRD, Datatype ignored on field TELEPHONE_NUMBER.
%FMS-I-SCALEFCTR_IGNRD, Scale factor ignored on field TELEPHONE_NUMBER.
%FMS-S-FRM_OUTPUT, TDMS form successfully extracted into WORKS:[STANSBURY]FCV_EXAMPLE.FRM1.
If logging is turned on using the LOG qualifier, at least one logging message for the data type of each field will be issued.
The following command will give you а complete description of the converted FMS form.
$ FMS/DESCRIPTION/FULL FCV_EXAMPLE.FRM
Example 8.2, ''Full Description of the FMS Form File'' shows the full description of the FMS form file.
!     FMS Form Description Application Aid
!               Version V2.2
FORM NAME='FCV_EXAMPLE'
   AREA_TO_CLEAR=l:12
   WIDTH=80
   BACKGROUND=CURRENT
   HIGHLIGHT=BOLD:REVERSE
   ;

ТЕХТ (8,25) 'Name:'
   ;
ТЕХТ (10,14) 'Social Security:'
   ;
ТЕХТ (12,20) 'Telephone:'
   ;

ATTRIBUTE_DEFAULTS FIELD
   CLEAR_CHARACTER=' '
   NOAUTOTAB BLANK_FILL NOBLINKING NOBOLD NOREVERSE
   NOUNDERLINE NODISPLAY_ONLY ЕСНO NOFIXED_DECIMAL
   LEFT_JUSTIFIED NOSUPERVISOR_ONLY NOSUPPRESS NOUPPERCASE
   ;

FIELD NAME='FIRST_NAME' (8,31)
   PICTURE=10'X'
   HELP='Please enter the first name'
   ;

FIELD NAME='LAST_NAME' (8,42)
   PICTURE=19'X'
   HELP='Please enter the last name'
   RESPONSE-REQUIRED
   ;

FIELD NAME= 'SOCIAL_SECURIТY_NUMBER' (10,31)
   PICTURE='999-99-9999'
   HELP='Please enter the social security number'
   AUTOTAB ZERO_FILL RESPONSE_REQUIRED CLEAR_CHARACTER='0'
   ;

FIELD NAME= 'TELEPHONE_NUMBER' (12,31)
   РIСТURЕ='(999)9999-9999'
   HELP='Please enter the telephone number'
   ZERO_FILL MUST_FILL RESPONSE-REQUIRED CLEAR_CHARACTER='0'
   ;

ORDER BEGIN_WITH = 1
   NAME='FIRST_NAME'
   NAME='LAST-NAME'
   NAME='SOCIAL_SECURITY_NUMBER'
   NAME='TELEPHONE_NUMBER'
   ;

END_OF_FORM NAME='FCV_EXAMPLE' ;
Chapter 9. Upgrading V1 Application Programs
The Form Upgrade Utility is used to convert V1 form files and form libraries to V2 format. The following paragraphs discuss the necessary process for upgrading to FMS V2. Section 9.2, ''Using the Form Upgrade Utility'' describes the Form Upgrade Utility. Section 9.3, ''Linking Existing Application Programs to the V2 Form Driver'' describes the process for linking your applications, and the FMS/UPGRADE command section describes the command and its qualifiers in detail.
If you have already installed VSI FMS V2, and have upgraded your V1 form files and form libraries to V2, you will not have to upgrade again. If you have not upgraded to FMS V2, use the following two-step procedure to upgrade your application programs.
Upgrade V1 form files and form libraries to run properly with upgraded application programs. Use the Form Upgrade Utility to convert V1 form files and form libraries to V2 form files and form libraries (as described in Section 9.1, ''Upgrading V1 Form Files and Form Libraries'' and Section 9.2, ''Using the Form Upgrade Utility'').
Relink your application programs (as described in Section 9.3, ''Linking Existing Application Programs to the V2 Form Driver'').
9.1. Upgrading V1 Form Files and Form Libraries
The Form Upgrade Utility converts V1 form files and form libraries to V2 format. Some exceptions are discussed in the following paragraphs.
The Form Upgrade Utility replaces duplicate and blank field names in а V1 form with default field names in the equivalent V2 form, and issues messages indicating what default names have been assigned. The default field names have the following format:
F$nnnn
'nnnn' is а number string from 0001 to 9999.
V2 field and form names conform to the VSI naming conventions. Names that contain illegal characters are not modified by the Form Upgrade Utility. For more details, refer to Chapter 2, "Form Characteristics".
Upgraded V1 forms that have text in scrolled areas will not scroll the text off the screen, as the equivalent V1 forms did. Instead, the text will remain in the scrolled area. The Form Upgrade Utility issues а message when such forms are upgraded.
V2 utilities that generate forms also validate forms according to V2 definitions. Therefore, you cannot use the V2 Form Editor to edit а form without conforming to V2 definitions. Similarly, Form Language files are validated by the Form Language Translator according to V2 definitions.
9.2. Using the Form Upgrade Utility
The Form Upgrade Utility converts V1 form descriptions to V2 format and stores them in V2 form files or form libraries. The converted file has the same file specification as the V1 equivalent, but it has а higher version number. The default input file extension is .FLB. To avoid confusion, VSI recommends that you use the /OUTPUT qualifier to specify а different output file name.
Note
VSI recommends that you make backup copies of V1 form files and form libraries before using the Form Upgrade Utility.
9.3. Linking Existing Application Programs to the V2 Form Driver
After you upgrade V1 form files and form libraries, you must link your application programs with the V2 Form Driver. Application programs linked with the V1 Form Driver shareable image must be relinked with the V2 Form Driver. You may have to edit the command procedures that build your application program, since the V2 Form Driver is а shareable image. Any references to the V1 Form Driver object library will cause an error. The FMS installation places the shareable image in the system's default shareable image library. The VAX linker resolves references to the Form Driver so you do not need to reference the Form Driver shareable image in link commands as you may have had to in V1.
Use the following command format to link the appropriate Form Driver modules with your application program.
$ LINK file-spec RET
Example
$ LINK SAMP,SMPVECTOR, SMPMEMRES RET
FMS/UPGRADE Command
FMS/UPGRADE Command — To convert V1 form descriptions to V2 format use the /UPGRADE command.
Syntax
FMS/UPGRADE [V1 file-spec] [OUТPUТ[= V2 file-spec]] /[NO]LOG | V1 file-spec | represents form library or form file to be converted |
Description
In the command syntax illustration shown above, V1 file-spec represents the form library or form file to be converted to V2 format. If the V1 input file spec is а form library, it is converted to the specified V2 form library. If the V1 input file-spec is а form file, it is converted to the specified V2 form file. If you specify an output file that already exists, the Form Upgrade Utility creates the next highest version number of the file. You can convert only one form file or one form library at а time while using FMS/UPGRADE.
Qualifiers
- /LOG
/NOLOG The /LOG qualifier displays а confirmation message for every form that is successfully upgraded. The /NOLOG qualifier suppresses the display of а confirmation message for files that are successfully upgraded. The /NOLOG qualifier is the default FMS/UPGRADE qualifier.
Note
V1 form files or form libraries that have been altered by any means other than the V1 Form Editor cannot be quaranteed successful conversion to V2.
Chapter 10. FMS V1 Compatibility
The V1 Form Editor has been replaced by а new enhanced Form Editor. Section 10.1, ''Form Editor'' describes the new Form Editor.
There are two new components that replace the FMS V1 Form Utility: the Form Librarian and the Form Application Aids. The Form Librarian creates and modifies the form libraries that your application uses. The Form Application Aids are а group of programming tools to aid you in developing your application. Section 10.2, ''Form Utility'' describes these components in detail. Section 10.2.1, ''Comparison of V1 Form Utility Options and V2 Commands'' describes the comparison of V1 Form Utility options and V2 commands.
Section 10.3, ''Installing VSI FMS V2 with VSI FMS V1 Present on the System'' describes how to use FMS V1 after FMS V2 has been installed on your system.
10.1. Form Editor
The V2 Form Editor is а forms driven interactive editor. The Form Editor Menu provides а choice of seven major functions that the Form Editor supports. The Form Editor functions have been completely redefined for V2. А list of these functions, with а brief description of each, follows:
| Form | Assign form attributes |
| Layout | Create or modify а form |
| Assign | Assign field attributes |
| Data | Enter Named Data items |
| Order | Modify field access order |
| Test | Test the form with the Form Driver |
| Exit | End this editor session |
10.1.1. Keyboard Layout-Form Editor Keys
The function keys that are active in the Form Editor phase are shown in the Figure 10.1, ''Form Editor Keys''. To use the function on the upper part of а key, press that function key. To use the function on the lower part of а key, use а GOLD key sequence.
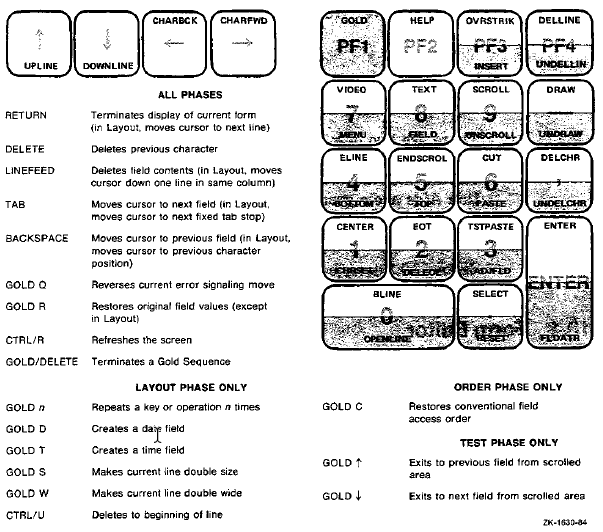
10.2. Form Utility
The operations performed by the V1 Form Utility are performed by two components in V2. These components are the Form Librarian and the Form Application Aids.
The Form Librarian creates and modifies the form libraries that your application accesses at run time. The Form Librarian performs the following operations:
Creates libraries from form files and other form libraries or partial form libraries
Deletes forms from libraries
Extracts copies of forms from libraries
Inserts forms into libraries
Replaces forms in libraries
The Form Application Aids are а group of programming tools to aid you in developing your application. These tools are listed below.
FMS/DESCRIPТION produces
а summary of а form
а form description
а data definition
а printable image
а video image of а form
FMS/DIRECTORY displays а directory of one or more form files or form libraries.
FMS/VECTOR generates an object module containing а User Action Routine vector.
FMS/OВJECT generates an object module of concatenated forms that you can link with an application program to create memory-resident forms.
10.2.1. Comparison of V1 Form Utility Options and V2 Commands
Table 10.1, ''Comparison of V1 Form Utility Options and V2 Commands'' shows the Form Utility options and the corresponding V2 commands and qualifiers.
| Option | Description | Commands and Qualifiers |
|---|---|---|
| /BA | Controls form description block alignment in а form library | Not supported in V2 |
| /СС | Creates а COBOL form description | FMS/DESCRIPТION/DECLARATIONS |
| /CR | Creates а form library | FMS/LIBRARY/CREAТE |
| /DE | Deletes forms from libraries | FMS/LIВRARY/DELETE |
| /ЕХ | Extracts forms from libraries to create а form library | FMS/LIBRARY/CREATE |
| /FD | Creates а listing of а form description |
FMS/DESCRIPТION/ВRIEF FMS/DESCRIPТION/FULL FMS/DESCRIPТION/DISPLAY_IМAGE =NOESCAPE_/SEQUENCE |
| /FF | Extracts а form file from а form library | FMS/LIBRARY/ЕХТRАСТ |
| /НЕ | Displays FUT НЕLР | НELP FMS |
| /ID | Displays FUT identification | Not applicable |
| /LI | Creates а form directory |
FMS/DESCRIPТION/ВRIEF FMS/DESCRIPТION/FULL |
| /ОВ | Creates object modules of forms for PDP-11 systems | FМS/OBJECT |
| /RP | Replaces forms in libraries | FMS/LIВRARY/REPLACE |
| /SP | Controls spooling to line printer | Not applicable |
10.2.2. FMS/DESCRIPTIONS/DECLARATIONS COBOL/DATATRIEVE Data Description
The FMS/DESCRIPTION/DECLARATIONS command produces а data description of а form that can be used in а COBOL data division or in а DATATRIEVE record definition.
The format of the data description used in а COBOL data division or in а DATATRIEVE record definition has completely changed for FMS V2. V1 has two variables defined for each field; one variable for the field name, and one variable for the data. V2 defines only the data variable.
V1 variable names are built from а prefix, а form name, and а field name. V2 variable names are built from the field name only. COBOL programmers can use literals in the procedure division when referencing fields. Below is а section of a V1 data description that appeared in the V1 VSI OpenVMS FMS Software Reference Manual that shows the format of the FUT/CC output. The data description has а field named "PARTNO" in а form named "PARTS."
    .
    .
    .
 01 FORM-PARTS-DEF
    03 FORM-PARTS PIC Х(6) VALUE "PARTS",
    03 N-PARTS-PARTNO PIC Х(6) VALUE "PARTNO",
    03 D-PARTS-PARTND PIC Х(9),
    .
    .
    .
In V2, the FMS/DESCRIPTION/DECLARATIONS command produces the same data description in the following format:
    .
    .
    .
 01 PARTS
    05 PARTND PIC Х(9),
    .
    .
    .
In most cases, the output can be used without modification; however, in the case of scrolled or indexed fields, you may have to edit the output.
If you modify an upgraded V1 form, and you want to create а new data definition to reflect the changes, you must also modify the variable names in the new data definition to match the variable names in the rest of the application.
Scrolled Fields
In V1, scrolled fields are included in the data definition and are noted in the comments. The V2 data definition works for the general form wide field calls. In the V2 data definition, all scrolled fields are ignored. They are not defined or listed in the FMS/DESCRIPТION/DECLARATIONS output, and there are no corresponding messages to indicate that scrolled areas have been ignored.
Indexed Fields
The FMS/DESCRIPTION/DECLARATIONS command determines if an index field group is part of а table. А table is defined as follows: the first element of an indexed field is followed, in access order, by another first element of an indexed field that contains the same number of indexes. Only the first element of the indexed set is checked for access order; all other elements of the indexed set are ignored.
In the following example of а form description, the first elements of the indexed fields NUMBER_OF_SALES, and DOLLARS are sequential in access order. Both groups have three elements. Therefore, the indexed fields are defined as а table in the data definition.
Example Form
EMPLOYEE: ___________________

ТYРЕ OF SALE   NUMBER OF SALES   DOLLARS
   REТAIL:      __________       $----,--
WHOLESALE:      __________        ----,--
    OTHER:      __________        ----,--
    TOTAL:      __________       $----,--

Example Description

01 EMPLOYEE_SALES.
   05 EMPLOYEE                     PIC Х(20).
   05 FMS_TABLE_1 OCCURS 3 TIMES.
      10 NUMBER_OF_SALES           PIC Х(5).
      10 DOLLARS                   PIC X(6).
   05 TOTAL_NUMBER_OF_SALES        PIC Х(6).
   05 TOTAL_DOLLAR_AMOUNT          PIC Х(7).
10.3. Installing VSI FMS V2 with VSI FMS V1 Present on the System
The VSI FMS V2 installation procedure makes provisions for systems that have VSI FMS V1 installed. This affects two categories of users:
Users who have а version of ALL-IN-1 that requires VSI FMS V1
Users who wish to ease migration to VSI FMS V2
VSI FMS V1 is left intact on the system. The VАХ FMS V2 installation procedure makes the following changes to avoid any conflict between the two versions:
All references to FMS V1 are deleted from STARLET.OLB.
To use FMS V1, you can link programs with FDVLIВ.OLB in the directory SYS$LIBRARY. Programs that are already linked with FDVLIB.OLB will run correctly.
The Form Driver shareable image, FDVSHR.EXE, in the directory SYS$LIBRARY, is renamed to FDVSHR.OLD. The option file used to link with the shareable image is renamed to FDVSНARE.OLD.
If you wish to continue using the FMS V1 shareable image, move FDVSHR.OLD from the directory SYS$LIBRARY to another account and rename it to FDVSНR.EXE.
Examples
$ СОРY SYS$LIBRARY:FDVSHR,DLD SYS$SYSTEM:FDVSHR.EXE
To access the shared image, assign FDVSHR.EXE, with the associated device and directory specification, to the logical FDVSHR.
$ ASSIGN SYS$SYSTEM:FDVSHR FDVSHR
Appendix A. VSI FMS Software Messages
This appendix lists VSI FMS software messages that are displayed when you use FMS utilities or run а program that uses FMS.
FMS messages are grouped and listed alphabetically in the following three sections:
FMS Utilities Messages describe each message that might occur when using FMS commands at DCL level or within each utility.
Form Driver Messages for Programmers describe each message that might occur during program debugging.
Form Driver Messages for Terminal Operators describe messages that might occur at run time in programs that use FMS.
A.1. Message Format
FMS messages displayed at DCL level generally have the following format:
 %FMS-ident, text
 [-FMS-L-ident, text]
FMS
Is the FMS facility code.
L
Is а severity level indicator of the following values:
| Code | Meaning |
|---|---|
| S | Success |
| I | Information |
| W | Warning |
| E | error |
| F | Fatal, or severe error |
Success and information messages display information on the performed operation(s). An operation can be а Form Editor function, а Form Language statement, Form Library operation. Form Application Aid operation, or а Form Driver call.
Warning messages indicate that the operation performed may have been partially completed but that you may have to check to see that it was completely performed.
Error messages indicate that the output or program result is incorrect, but FMS may attempt to continue execution.
Fatal or severe messages indicate that FMS cannot continue execution of an operation.
Ident
Is an abbreviation of the message text. The messages under each of the following sections are alphabetized according to this abbreviation.
Text
А description of what happened.
FMS messages displayed within the Form Editor are displayed without а facility identification. Only а textual message is displayed on the bottom line of the terminal.
A.2. Messages for Programmers
Programmers see the following types of FMS messages:
FMS utilities messages
Form Driver messages
FMS utilities messages are displayed on the SYS$ERROR and SYS$OUTPUT devices if errors occur while you are using any of the utilities or if you specify commands with the /LOG qualifier. The messages are in simple textual format and are described in detail in this appendix in the FMS Utilities Messages section.
Form Driver messages are displayed on the terminal when а program that uses FMS is being executed. These messages enable you to minimize or completely eliminate program-related error messages. These messages are described in detail in the section on Form Driver Messages for Programmers.
A.3. Messages for Terminal Operators
When terminal operators run programs that use FMS, the Form Driver displays messages on the bottom line of the current terminal or the default terminal associated with the program. You can also provide messages for terminal operators by using the FDV$PUTL call (see the VSI FMS Form Driver Reference Manual.
Form Driver messages are issued if the terminal operator makes an input error, such as typing in an invalid character, or trying to move the cursor illegally. А message is displayed on the bottom line of the screen and the terminal bell is rung. The terminal operator can specify Quiet mode by pressing GOLD Q, which specifies that the screen's video is reversed when an error occurs. If GOLD Q is pressed again, the signal mode reverts to the terminal bell. The text messages displayed at the bottom of the screen are in simple textual format and are described in detail in the following section on Form Driver Messages for Terminal Operators.
A.4. Suggestions to Follow if FMS Software Malfunctions
If you think that FMS software has malfunctioned, take the following steps:
As accurately as possible, write down the functions, commands, terminal input, and user program processes that you used before the messages appeared that indicated а malfunction.
Save any programs and files that you were using.
Check with the person who installed FMS to make sure that nothing went wrong with the installation and that the installation was properly verified.
If you still think that FMS software has malfunctioned, check your hardware or find someone to check it for you.
If the problem persists, consult someone in your area who is very familiar with FMS software.
If you qualify to receive а written reply under VSI's Software Performance Report (SPR) service, follow the directions on the SPR form.
A.5. FMS Utilities Messages
ADJFLD The cursor is not over а field.
Explanation: The adjacent field function is valid only when the cursor is over а field with more than one character.
User Action: Position the cursor over а field that is longer than one character or make the current field picture more than one character.
ADJPROT You cannot split а date, time, or indexed field.
Explanation: Тime, date, and indexed fields cannot be split with the Adjacent Field Function.
User Action: Delete the entire date or time field and create the fields that you want. If you want to split an indexed field, press GOLD FLDATR, then ТАВ to "Index_." Тyре а zero to make the field not indexed and press RETURN to continue editing.
ADVPARSN Parsing has advanced to 'numeric value'.
Explanation: This message is а result of the previously reported syntax error. The message gives an indication of what internal error recovery was done. No binary form will be output as а result of this translation.
User Action: Correct the syntax error.
ADVPARSS Parsing has advanced to 'keyword or statement item'.
Explanation: This message is а result of the previously reported syntax error. The message gives an indication of what internal error recovery was done. No binary form will be output as а result of this translation.
User Action: Correct the syntax error.
ALLBAD None of the input files could be opened.
Explanation: None of the specified input files could be opened.
User Action: Check to make sure that the input files were specified correctly and that they exist in the specified directory.
ATERM Unable to attach terminal.
Explanation: The FMS Form Driver was unable to attach the terminal.
User Action: Check succeeding messages for reason.
AТТRPREV The value 'value' has replaced the previous attribute assignment.
Explanation: This attribute is already defined in the Form Language statement. The last attribute specification in the statement has been assigned. А binary form will be output.
User Action: Only one attribute assignment is valid for this particular attribute. You should remove all other attribute assignments for the Form Language statement.
AWKSP Unable to attach workspace.
Explanation: The FMS Form Driver was unable to attach the workspace.
User Action: Check succeeding messages for reason.
BAD_CORE_LEVEL Unsupported core level for this TDMS form.
Explanation: The user specified а TDMS form that has а core level that the Form Converter does not support.
User Action: Upgrade the core level of the TDMS form to that which is supported by the Form Converter.
BADDRAW Illegal SELECT perimeter for DRAW or UNDRAW function.
Explanation: The DRAW and UNDRAW functions can only overwrite blanks and other line drawing characters. The perimeter of the current select area violates this restriction and the function is rejected.
User Action: Adjust the SELECT area as required.
BAD_PATHNAME Error in accessing the pathname.
Explanation: The user specified а bad pathname. This message is followed by the CDD error message that explains the error.
User Action: Specify а correct pathname.
BAD_PROTOCOL Incorrect protocol for this CDD object - should be "CDD$FORM".
Explanation: The user specified а CDD object that is not а TDMS form.
User Action: Specify а TDMS form pathname instead.
BLANKNAME А blank field name was specified in form 'form-name'; default name 'field-name' has been assigned.
Explanation: Blank field names are not allowed in FMS Version 2.6, so а default name was supplied for the field. This should not have any effect on the upgraded application program.
User Action: If the default field name is not appropriate, rename the field.
BRIEF Form 'form-name' brief description output to 'file-spec'.
Explanation: А brief form description of the specified form has been successfully output to the specified file or device. The description contains only summary information such as names of forms, fields, UARs, and Named Data, and various other attributes.
User Action: Use the information as а reminder while you code your application program.
BRIEFERR Error generating brief description for input file 'file-spec'.
Explanation: An error occurred while attempting to generate а brief description for the specified input file.
User Action: Check to be sure the input files are valid and were entered correctly. Also look at any previous messages for more information.
BTSLINE Form too wide on line 'line-number'.
Explanation: The FMS Form Tester was unable to display the form on the user's Bisynch terminal since the line specified did not fit after it had been expanded with BTS terminal attributes.
User Action: Edit the form with the form editor to cause the line to be displayable on the screen. This may involve removing video attributes or extra spaces between text or fields.
CDD-EXTRACTING Extracting TDMS form 'form-name' from the CDD.
Explanation: This message tells the user the name of the form being extracted from the CDD. This message is output before the extraction starts.
User Action: The message indicates that the conversion has started successfully. No user action is required.
CDD_FAILURE А CDD call failed. Aborting the form conversion.
Explanation: А call to the CDD run-time routines failed. The Form Converter cannot continue converting the TDMS form.
User Action: Make sure that the CDD is installed on the system. Make sure that the TDMS form is accessible by the TDMS Form Definition Utility.
CDISP Unable to display form named 'form-name'.
Explanation: The FMS Form Driver was unable to display the specified form.
User Action: Check succeeding messages for reason.
CHECKDGT_IGNRD Check digit field validator ignored on field 'field-name'.
Explanation: This field contains а check digit field validator. It will be ignored.
User Action: The message is informational.
CHOICE_IGNRD Choice field validator ignored on field 'field-name'.
Explanation: This field contains а choice field validator. It will be ignored.
User Action: The message is informational.
CLEARAREA An invalid line number was specified for AREA_TO_CLEAR. Lines 1 and 23 have been assigned.
Explanation: The line number specified for the AREA_TO_CLEAR is invalid, or the order of specification is wrong. Valid line values are 0 through 23 inclusive. The range for the area requires the number specified first to be greater than or equal in value to the number specified last. The default values (1 and 23) were assigned for this form. А binary form will be output.
User Action: Correct the values for the lines in AREA_TO_CLEAR.
CLEAR_TO_ZERO Clear character set to zero on field 'field-name'.
Explanation: This field contained а conflict of attributes involving the clear character. To resolve the conflict, the clear-character was set to zero.
User Action: The message is informational.
CMDLNERR An error was encountered in processing the command line.
Explanation: The command line has an error and cannot be processed.
User Action: Check the command line syntax, parameters, and qualifiers, and then retype the command.
CONF_SCREEN_POS Conflicting screen positions at line 'line-number' column 'column-number'.
Explanation: The TDMS form specifies two entities that occupy the same screen position. These entities can be background text, fields, rule characters, or video attributes.
User Action: Edit the TDMS form with the Form Definition Utility. Remove the conflicting entities from the indicated line and column position.
CONTINUE Continuing to process.
Explanation: Recovery is possible from any of the reported errors; therefore, processing continues.
User Action: Look at the previous messages to determine their causes and also make sure that the output is as you intended.
CONТXTLST An internal recovery error was detected.
Explanation: This is an internal logic error message. This message should not occur during translation.
User Action: Send in SPR.
COORDOCC Coordinate position is already occupied by field or text.
Explanation: The screen position specified already contains а field or background text. Field and text cannot overlap one another. No binary form will be output as а result of this translation.
User Action: Correct the coordinate position for the current statement or that of the conflicting field or text definition.
CURSORMOV Cannot move cursor past display boundary.
Explanation: The cursor cannot be moved past the display boundaries. Any attempt to move the cursor beyond the top, bottom, left, or right of the display will be rejected.
User Action: Do not attempt the illegal move.
CUTLINES Cannot cut or paste а SELECT area with different line types.
Explanation: You cannot cut or paste а SELECT area that has more than one line type. Line types can be double wide, double size, scrolled, and normal.
User Action: If you want to cut or paste the specified select area, you must alter the line types first.
CUTSCROLL Cannot cut part of а scrolled area.
Explanation: You can only cut all of а scrolled area.
User Action: To cut а scrolled area, create а select area for the entire scrolled area. If you wish to cut the present select area, change the appropriate lines so they are not scrolled.
DATAТYPE_IGNRD Datatype ignored on field 'field-name'.
Explanation: This field contains а datatype. The datatype will be ignored.
User Action: The message is informational.
DBLLENGTH Line is too long to display as double wide or double size.
Explanation: Displaying the current line as double wide or double size would cause some characters to be truncated at the right margin.
User Action: Shorten the line by deleting characters past the midpoint of the line.
DBLPREV А line attribute has already been assigned to this line.
Explanation: The line specified for the DBLWID or DBLSIZ attribute already has а line attribute assigned to it. Only one line attribute assignment can be made to any line. No binary form will be output as а result of this translation.
User Action: Correct the line number specified in the current or previous DBLSIZ or DBLWID attribute specification.
DBLSCR Cannot change line size of line in scrolled area.
Explanation: Lines cannot be changed between normal and double size or double wide within а scrolled area.
User Action: Remove the line(s) from the scrolled area by pressing UNSCROLL and then assign а line attribute.
DBLSIZE Line is already double sized.
Explanation: The specified line is already double size and therefore cannot be converted to double wide.
User Action: Press GOLD S again to make the line normal; then press GOLD W to make the line double wide.
DBLSLINE Invalid double size line assignment.
Explanation: The line number specified for the DBLSIZ attribute is invalid. Valid line numbers are 1 through 22 inclusive. No binary form will be output as а result of this translation.
User Action: Specify а valid line number for the DBLSIZ assignment.
DBLWIDE Line is already double wide.
Explanation: The specified line is already double wide and therefore cannot be converted to double size.
User Action: Press GOLD W again to make the line normal; then press GOLD S to make the line double size.
DBLWLINE Invalid double wide line assignment.
Explanation: The line number specified for the DBLWID attribute is invalid. Valid line numbers are 1 through 23 inclusive. No binary form will be output as а result of this translation.
User Action: Specify а valid line number for the DBLWID assignment.
DECLARS Form 'form-name' declarations output to 'file-spec'.
Explanation: А set of declarations for various form elements for the specified form has been put in the specified file. These declarations are similar to what would be needed in а COBOL or DATATRIEVE program, but they may need to be modified to be used in an actual program.
User Action: Modify the file as necessary and include it in your COBOL or DATATRIEVE program.
DECLERR Error generating form declarations for input file 'file-spec'.
Explanation: An error occurred while attempting to generate form declarations for the specified input file.
User Action: Check to be sure the input files are valid and were entered correctly; also look at any previous messages for more information.
DELВOUND Cannot delete past display boundaries.
Explanation: You cannot delete characters past the display boundaries. Any attempt to delete а character beyond the top, bottom, left, or right of the display will be rejected.
User Action: Do not attempt the illegal deletion.
DELCHRDTM Cannot delete characters in date, time, or indexed fields.
Explanation: You cannot delete individual characters in date, time, or indexed fields. The attempted delete has been rejected.
User Action: Press CUT or DELLINE to delete the entire field, and then respecify the field as desired.
DELCHRLEF Cannot delete before beginning of line.
Explanation: You cannot delete characters before the beginning of а line.
User Action: Do not attempt to delete characters beyond the physical screen boundary (beginning of а line).
DELCURCHR Cannot delete character in hanging cursor position.
Explanation: The current character cannot be deleted from the hanging cursor position because the cursor is not logically over а character.
User Action: Move cursor left, or delete previous character.
DELETED Form 'form-name' deletedfrom 'library-name'.
Explanation: The specified form was successfully deleted form the form library.
User Action: The message is informational.
DELFIELD Cannot split а field when deleting to beginning or end of line.
Explanation: You cannot delete part of а field; you must delete the whole field.
User Action: Reposition the cursor to delete either all or none of the field.
DELFILE Unable to delete output file 'file-spec'.
Explanation: Due to an error in processing, the output file is not valid, but for some reason it could not be deleted.
User Action: Check to make sure the output device is on line and delete the output file yourself.
DELLINE Cannot delete scrolled line.
Explanation: Lines in scrolled area cannot be deleted.
User Action: Remove the line from the scrolled area and then delete the line.
DELLINSEL Cannot delete or undelete а line during SELECT definition.
Explanation: You cannot press DELLINE or UNDELLIN after you have pressed SELECT. You can only press CUT, CHARSET, DRAW, UNDRAW, CENTER, VIDEO, and RESET during definition of а select area.
User Action: Cancel the SELECT function by pressing GOLD RESET and then perform the desired function.
DELOUTPUT Output file deleted.
Explanation: The output file has been deleted due to а severe error.
User Action: Check previously issued messages to determine the cause of the problem.
DESCERR Error generating form description for input file 'file-spec'.
Explanation: An error occurred while attempting to generate а form description for the specified input file.
User Action: Check to be sure the input files are valid and were entered correctly. Also look at any previous messages for more information.
DESCRIВED Form 'form-name' described in 'file-spec'.
Explanation: А form description of the specified form has been put in the specified text file. The form description consists of Form Language statements which completely describe the form. If а text file contains only one form description, it may be used as input to the Form Language Translator, which will output the corresponding binary form.
User Action: You can print the file for а hard-copy record of everything in the form.
DISPAUТO DISPLAY_ONLY is invalid with АUТОТАВ.
Explanation: DISPLAY_ONLY and AUTOTAB cannot be assigned to the same field. No binary form will be output when using the Form Language Translator.
User Action: If using the Form Editor, assign only one of the field attributes. If using the Form Language, correct the statement to include only one of these attribute specifications.
DISPHELP DISPLAY _ONLY is invalid for а field with help text.
Explanation: Help text cannot be assigned to а display-only field. No binary form will be output when using the Form Language Translator.
User Action: If using the Form Editor, assign only one of the field attributes. If using the Form Language, сопесt the statement to use only one of these attribute specifications.
DISPMUST DISPLAY_ONLY is invalid with MUST_FILL.
Explanation: DISPLAY_ONLY and MUST_FILL cannot be assigned to the same field. No binary form will be output when using the Form Language Translator.
User Action: If using the Form Editor, assign only one of the field attributes. If using the Form Language, correct the statement to include only one of these attributes.
DISPRESP DISPLAY_ONLY is invalid with RESPONSE REQUIRED.
Explanation: DISPLAY_ONLY and RESPONSE REQUIRED cannot be assigned to the same field. No binary form will be output when using the Form Language Translator.
User Action: If using the Form Editor, assign only one of the field attributes. If using the Form Language, correct the statement to include only one of these attributes.
DISPSUPE DISPLAY_ONLY is invalid with SUPERVISOR_ONLY.
Explanation: DISPLAY_ONLY and SUPERVISOR_ONLY cannot be assigned to the same field. No binary form will be output when using the Form Language Translator.
User Action: If using the Form Editor, assign only one of the field attributes. If using the Form Language, correct the statement to include only one of these attributes.
DISPUAR DISPLAY_ONLY is invalid for а field with action routines.
Explanation: The Display Only attribute and UARs cannot be assigned to the same field. No binary form will be output when using the Form Language Translator.
User Action: If using the Form Editor, assign only one of the field attributes. If using the Form Language, correct the statement to include only one of these attributes.
DISPUPPR DISPLAY_ONLY is invalid with UPPERCASE.
Explanation: DISPLAY_ONLY and UPPERCASE cannot be assigned to the same field. No binary form will be output when using the Form Language Translator.
User Action: If using the Form Editor, assign only one of the field attributes. If using the Form Language, correct the statement to include only one of these attributes.
DTMBADRES Invalid response to date or time query.
Explanation: Only the characters shown can be entered in response to а date or time query.
User Action: Reenter а valid response.
DTMDELLEF Cannot delete blank response.
Explanation: А blank response to а date or time query cannot be deleted.
User Action: Do not attempt the deletion.
DTМNВLANK Area for date or time field is not blank.
Explanation: Date and time fields can overwrite blank spaces only.
User Action: Reposition the cursor or clear an area large enough to contain the date or time field.
DTМNOROOM Date or time field will not fit here.
Explanation: There is not enough room beyond the current cursor position to hold the selected date or time field.
User Action: Reposition the cursor or delete unwanted characters to make sufficient room for the selected date or time field.
DUPFLDNAМ Field name 'field-name' was already specified; default name has been assigned.
Explanation: The field name was assigned to а previously defined field. Each field must have а unique name. А default name was substituted for the field name specified. If using the Form Language, no binary form will be output as а result of this translation.
User Action: Assign the field а unique field name or use the default name substitution. For the Form Language, correct the field name or use а default name by removing the NАМЕ keyword from the FIELD statement.
DUPFRM Form 'form-name' from file 'file-spec' is already in the library.
Explanation: А form in the library has the same name as one contained in the specified input file. The form in the input file is not inserted into the library. This does not prevent the insertion of other forms from the input file(s) into the library.
User Action: If you want to have both forms in the library, rename one of them. If you want to replace the form in the library with the input form, use the FMS/LIВRARY/REPLACE command.
DUPNМDIDX А duplicate INDEX value has been assigned to this named data entry.
Explanation: The NAMED_DATA INDEX value duplicates the index value of an existing Named Data entry. Each INDEX must be unique. No binary form will be output as а result of this translation.
User Action: Correct the INDEX values for the NAMED_DATA entries so that they are unique and consecutive.
DUPORDASN The field 'field-name' has already been assigned an order.
Explanation: А field with this name was previously specified in an ORDER statement. А field can be ordered only once in а source form description. No binary form will be output as а result of this translation.
User Action: Correct the ORDER statement(s) in the source form description to contain only one reference to any field name.
DUPPICT PICTURE is multiply defined for this field.
Explanation: More than one picture specification was assigned to this field. Only one picture specification is allowed in а FIELD statement. No binary form will be output as а result of this translation.
User Action: Correct the FIELD statement to contain only one PICTURE, DATE_FIELD, or TIME_FIELD attribute specification.
ENDMISSNG An END_OF_FORM statement is missing.
Explanation: No valid END_OF_FORM statement was included in the source file, or the translation terminated before the END_OF_FORМ statement was reached. А binary form will be output if other errors have not caused the END_OF_FORM to be missed.
User Action: If the END_OF_FORМ statement is missing, add one. Otherwise, correct the other errors found during the translation or increase the error limit so the entire translation completes.
ENDNOFRM Translation was completed with errors. No binary form was output.
Explanation: The translation had ERROR level errors. No binary form was output. Check the translation listing file or the error Jog for the errors.
User Action: Correct the errors.
EOF End Of File occurred while expecting input from 'file-spec'.
Explanation: An End Of File (EOF) was reached while there was still more input expected from the specified file.
User Action: Check to see if the input file has been truncated or altered in some undesired manner.
EXTRACТED Form 'form-name' extracted into 'file-spec'.
Explanation: The specified form was successfully extracted from the form library and stored in the specified file.
User Action: The message is informational.
FIELDORD Field already part of new order sequence.
Explanation: This field has already been marked as part of the new order sequence in the Order phase.
User Action: Move to another field to add it to the current order sequence.
FILВADFRM File name is not valid as form name; name was changed to 'file-spec'.
Explanation: The file name started with а numeric digit, so it could not be used as а form name. The letter "F" was added to the beginning of the name to make it valid.
User Action: If the form name used is inappropriate, change it.
FLDINDEX Warning, field index is duplicate or out of range.
Explanation: The specified field index is а duplicate or out of range. This is а warning message only. The index will still be recorded as specified, but you cannot save the form until the conflict is resolved.
User Action: Change the indexed field set to make the current index value acceptable, or modify the current assignment. If you specify zero for the index value, the Form Editor will assign the next available index by default.
FLDSIZ Warning, field has no validation characters.
Explanation: А field must have at least one field-validation character. This is а warning message so you can continue editing, but you cannot save the form until the above condition is satisfied.
User Action: Modify field picture, or change field-marker characters to background text.
FORMPROC А FORM statement has already been processed.
Explanation: More than one FORM statement was detected in the source form description. Only one FORМ statement is allowed in а source form description. No binary form will be output as а result of this translation.
User Action: Correct the source form file to contain only the FORМ statement you want.
FORMQUAL /FORМ_NAМE must be specified in this context.
Explanation: /FORM_NAME =form-name must be specified (following the form library specification). Only one or more forms in the form library can be specified, not the whole library.
User Action: Reenter the command, using the /FORM_NAME qualifier.
FORMSIZE Insufficient memory to read in form, execution terminated.
Explanation: The Form Editor was unable to allocate sufficient memory to read in the requested form. This should only occur from an error in the form size or from an internal logic error.
User Action: Check to be sure the form specified is valid. If the error persists, submit an SPR.
FRMBADFIL Form name 'form-name' is not valid as file name; name was changed to 'file-spec'.
Explanation: The specified form name was too long or had characters not allowed in file names, so а compacted version of the name was used as the file name.
User Action: If the file name used is inappropriate, rename the file.
FRMNOTFND Form 'form-name' not found in library.
Explanation: The specified form name was not found in the specified library.
User Action: Check to be sure the library and form names were entered correctly. You can use the FMS/DIRECTORY command to list the names of forms in а library.
FRM_OUTPUT TDMS form successfully extracted into 'file-name'.
Explanation: The Form Converter has successfully extracted the TDMS form from the CDD and put the resulting FMS form into the indicated file.
User Action: No user action is required.
GET Error getting data from field named 'field-name'.
Explanation: The FMS Form Driver was unable to get data from the specified field.
User Action: Examine the succeeding messages to determine the cause of the error.
GETFIRST Error getting data from first field in form.
Explanation: The FMS Form Driver was unable to get data from the first field in the form.
User Action: Examine the succeeding messages to determine the cause of the error.
HELPFORM_IGNRD 'Help-form-name' help form ignored.
Explanation: The TDMS form contained а help form name. This name is ignored. The help form name is not stored in the FMS form file.
User Action: If you intend to use а help form name for this form, you must edit the form and enter the name of the help form.
IDXSCALIN Indexed fields must be contained in а single scrolled area.
Explanation: The field coordinates listed in the INDEXED assignment are not all contained in the same scrolled area. А set of indexed fields within а scrolled area must be assigned to the first line of the same scrolled area. No binary form will be output for this translation.
User Action: Correct the field coordinate specifications so that all the fields are in or all the fields are out of the scrolled area; or correct the SCROLL statement.
ILLDBL Cannot use DBLSIZ or DBLWID during SELECT definition.
Explanation: SELECT lines must have identical attributes (doublesize, doublewide, or normal size).
User Action: Make lines double size or double wide before Select definition.
ILLINPCHR Illegal character was input.
Explanation: The statement contains а nonprinting character. Only printing characters are valid in Form Language statements. No binary form will be output as а result of this translation.
User Action: Remove the nonprinting character from the source file.
ILLSCR Cannot define scroll area during SELECT definition.
Explanation: The Scroll function uses SELECT internally to define а scrolled area; therefore, Scroll is an illegal function during SELECT.
User Action: Terminate the SELECT operation before using the SCROLL function.
ILLSELECT Illegal SELECT area; fields cannot be split.
Explanation: You must select whole fields.
User Action: Adjust the select area boundaries to include entire fields only.
ILLSIZE Terminal size (lines or columns) too small for FMS form.
Explanation: The display size available (lines or columns) is not large enough for the specified form.
User Action: Use а terminal that can display more lines or columns as needed for the specified form, or adjust the form description to fit terminal needs. А 24 line by 132 column form, for example, requires а VT100 with the advanced video option.
ILLTERM Illegal terminal type - must be VТ100 compatible.
Explanation: The FMS Form Editor requires а VT100-compatible terminal.
User Action: Use а VT100-compatible terminal, or use the FMS Form Language to create forms with а standard text editor.
IMAGE Form 'form-name' screen image output to 'file-spec'.
Explanation: А copy of the screen image of the form, suitable for printing, has been put in the specified text file.
User Action: You can print the file for а hard-copy record of the appearance of the form.
IMAGERR Error generating image description for input file 'file-spec'.
Explanation: An error occurred while attempting to generate an image description for the specified input file.
User Action: Check to be sure the input files are valid and were entered correctly. Also look at any previous messages for more information. Submit an SPR if you cannot generate an image file.
INACTIVE Function key not currently active.
Explanation: The function key pressed is not active in the current Form Editor phase.
User Action: Refer to the Form Editor keypad.
INDXPREV The INDEXED attribute assignment has been replaced for this field.
Explanation: The INDEXED attribute was previously assigned in this FIELD statement. The last specification will be used for the indexed field assignments. The previous INDEXED field assignments will not be used. А binary form w ill be output.
User Action: Correct the FIELD statement so that it contains only the INDEXED field definitions that you want for this FIELD statement.
INDXUNASN Invalid line or column specification: no INDEX assignment was made for this field.
Explanation: The line or column specification for the first field is invalid. No indexed field assignments will be made. No binary form will be output as а result of this translation.
User Action: Correct the invalid line or column specification in the FIELD coordinate specification.
INSCHR No room for character insertion.
Explanation: There is no room for character insertion on this line.
User Action: Remove one or more characters from the end of the line.
INSCHRDТМ Cannot insert characters in date, time, or indexed field.
Explanation: Characters cannot be inserted in date, time, and indexed fields.
User Action: Delete the entire field and respecify the field as desired.
INSCHRFLD Invalid character for field insertion.
Explanation: Only field-validation and field-marker characters can be entered in Field mode.
User Action: Enter а valid field character or change to Text mode.
INSERТED Form 'form-name' inserted in 'library-name'.
Explanation: The specified form was successfully inserted into the form library.
User Action: The message is informational.
INSVIRMEM Insufficient memory available, attempted operation rejected.
Explanation: The Form Editor was unable to acquire sufficient virtual memory for the attempted operation, therefore the operation was rejected.
User Action: Insufficient memory may be caused by an internal logic error. If the problem persists, submit an SPR.
INVALID_FIELD Field 'field-name' contains no FMS picture characters.
Explanation: The field does not contain any FMS picture characters. TDMS allows fields to contain only marker characters. FMS does not allow this. The field is not converted.
User Action: Edit the TDMS form and add an FMS picture character to the field. Then convert the form again.
INVALID_INDEX Field 'field-name' is not indexed correctly.
Explanation: The field is not indexed correctly. The Form Converter cannot store the field in the FMS form. The field is ignored.
User Action: Edit the form using the Form Definition Utility. Assign new attributes to the indexed field, and use the Form Converter again.
INVCLRCHR The specified clear character is invalid.
Explanation: The specified clear character is either more than one character in length, or it is not а valid clear character. No binary form will be output as а result of this translation.
User Action: Supply а single valid clear character.
INVCMD Unrecognized command, re-enter.
Explanation: The phase name entered is not а valid phase name in the Form Editor menu.
User Action: Enter а valid phase name.
INVDATA Invalid character(s) in data string.
Explanation: Non printing characters are not valid in а data string. No binary output will be generated as а result of this translation.
User Action: Correct the data string.
INVDATALN Data is too long.
Explanation: The number of characters in the data string exceeds the maximum allowed (80 characters). No binary form will be output as а result of this translation.
User Action: Delete some characters in the data string.
INVDATE Invalid DATE_FIELD picture was specified.
Explanation: The DATE_FIELD picture is not valid. Standard field pictures of the DAТE_FIELD are required. No binary form will be output as а result of this translation.
User Action: Use one of the standard FMS DAТE_FIELD pictures.
INVDBLASN Text or field assignments must be made to the top line of а double size line pair.
Explanation: Text and field line specifications must reference the first line of the DBLSIZ line pair. No references to the bottom half of the DBLSIZ line pair are allowed. No binary form will be output as а result of this translation.
User Action: Correct the line coordinate specification so it references the first line of the DBLSIZ line pair.
INVDBLRNG First DBLSIZ or DBLWID line exceeds last DBLSIZ or DBLWID line.
Explanation: The double-size or double-wide range specification requires the first line number to be less than the last line number. No binary form will be output as а result of this translation.
User Action: Correct the range specified in the DBLSIZ or DBLWID attribute specification.
INVDEFCH DEFAULT specification for field exceeds the field length. The string has been truncated.
Explanation: The number of characters in the DEFAULT specification cannot exceed the number of field-validation characters. The DEFAULT string is truncated to the number of field-validation characters. А binary form will be output.
User Action: Correct the length of the DEFAULT string specification to be less than or equal to the number of field-validation characters in the picture, or increase the field length.
INVDEFLEN Default value for field is longer than the field definition.
Explanation: The number of characters in the default value string for the field is greater than the number of field definition characters in the field definition.
User Action: Delete some characters in the default field value string.
INVDRWLAT Line attributes for lines contained in the DRAW are not identical.
Explanation: The line attributes for all lines in the DRAW area must be identical. The DRAW perimeter specified contains а line with different line attributes. No binary form will be output as а result of this translation.
User Action: Correct the line attribute assignments or the DRAW coordinate specifications.
INVDVSPEC Invalid coordinates were specified for DRAW or VIDEO.
Explanation: The line or column specified in the statement is invalid. Valid line values are 1 through 23 inclusive. Valid column values are 1 through 80 inclusive, for 80-column screens; 1 through 132 inclusive, for 132-column screens. No binary form will be output as а result of this translation.
User Action: Correct the line or column specifications.
INVENDNAM The name 'form-name' specified in the END_OF_FORM statement is invalid.
Explanation: The name specified for the END_OF_FORM statement must match the name given in the FORМ statement. А binary form will be output.
User Action: Correct the spelling of the name in either the FORM or END_OF_FORM statement so that they are identical.
INVERRVAL The value for /ERROR_LIMIT is invalid. /ERROR_LIMIT=20 is used.
Explanation: An incorrect value was given for /ERROR_LIМIT. The valid values are О through 255 inclusive. The translation will continue with а value of 20 assigned for /ERROR_LIMIT.
User Action: Supply а valid value for the /ERROR_LIMIT qualifier.
INVFIXPIC Field picture for FIXED_DECIMAL field is invalid.
Explanation: The specified field picture is invalid for а fixed-decimal field. The field-validation characters must be all numeric (9's) or signed numeric (N's) with at least one embedded decimal point or comma. No binary form will be output when using the Form Language Translator.
User Action: Refer to the VSI FMS Utilities Reference Manual for а description of the fixed-decimal field picture requirements. Correct the field picture or remove the FIXED_DECIMAL attribute specification.
INVFLDCH Field PICТURE contains invalid character(s).
Explanation: Only field-marker characters or field-validation characters are allowed in the field definition. No binary form will be output as а result of this translation.
User Action: Correct the field picture so that it contains only valid field-definition characters.
INVFLDLEN Field PICTURE length is invalid.
Explanation: The picture length is invalid for one of the following reasons: the length is zero, the length exceeds the width of the screen, or the field contains no field-validation characters. No binary form will be output as а result of this translation.
User Action: Correct the field picture length or use а wider form (132-column mode is the maximum).
INVFLDNAM Field name 'field-name' in form 'form-name' violates FMS V2 naming standards.
Explanation: The field name specified does not follow the rules for defining valid names for FMS V2.0.
User Action: If the message was issued by the Form Upgrade Utility, then the form can be used by the upgraded application program with no change. The name must be changed, however, to be valid for any of the other V2.0 utilities.
INVFORM Binary form 'form-name' in file 'file-spec' is invalid.
Explanation: The internal structure of the given form in the specified file is invalid.
User Action: Check to make sure that you specified the correct file. If you cannot determine the cause of the corruption, submit an SPR including information about the utility that produced the form and exactly what steps were taken.
INVFRM Input file does not contain а valid form, execution terminated.
Explanation: The internal structure of the form in the specified input file is invalid.
User Action: Check to make sure that you specified the correct file. If you cannot determine the cause of the message, submit an SPR that includes information about the utilities that you used to produce the form and exactly what steps you took to create it.
INVFRМNAМ Form name 'form-name' violates FMS V2 naming standards.
Explanation: The form name specified does not follow the rules for defining valid names for FMS V2.0.
User Action: If this message was issued by the Form Upgrade Utility, the form can be used by the upgraded application program without any changes. The name must be changed, however, to be valid for any of the other FMS V2.0 utilities.
INVHLPLEN The help text exceeds the line width.
Explanation: The help text is too long to fit on the screen. Help text can be а maximum of one line of information (80 characters for 80-column forms, 132 characters for 132-column forms). No binary form will be output as а result of this translation.
User Action: Correct the length of the help text or change the width of the form to 132 columns.
INVIMGVAL 'value' is not а valid value for the /IMAGE qualifier.
Explanation: The value given for the /IMAGE qualifier was not valid, so the operation has been rejected.
User Action: Enter а valid qualifier value. The legal values are ESCAPE_SEQUENCE and NOESCAPE_SEQUENCE. Only the first four characters are necessary.
INVINDFLD Invalid indexed field specification, field attributes do not match.
Explanation: The fields in an indexed set must have identical field attributes.
User Action: Redefine the fields so that they have identical field attributes before including them in an indexed set.
INVINDLAT Line attributes for lines containing the INDEXED fields are not identical.
Explanation: The lines in the INDEXED field specification do not all have identical line attributes. All fields specified in the INDEXED set must have identical line attributes. No binary form will be output as а result of this translation.
User Action: Correct either the line attribute assignments or the INDEXED coordinate specifications.
INVLDCOL Column specification is invalid.
Explanation: The column value specified is invalid. The valid values for column are 1 through 80 inclusive for 80-column forms; 1 through 132 inclusive for 132-column forms. No binary form will be output as а result of this translation.
User Action: Correct the column specification.
INVLDLINE Line specification is invalid.
Explanation: The line value specified is invalid. The valid values for line are 1 through 23 inclusive. No binary form will be output as а result of this translation.
User Action: Correct the line specification.
INVLINCOL А check for conflicting screen position was not done.
Explanation: The coordinate specification is invalid; therefore, no check can be made if the screen position is occupied. No binary form will be output as а result of this translation.
User Action: Correct the coordinate specification.
INVLSTCOL The last character in the field or text extends beyond the form boundary.
Explanation: The character position for the last character in the field or text definition extends beyond the form boundary. The coordinate specification, or the number of characters in the string or picture field is invalid. No binary form will be output as а result of this translation.
User Action: Correct either the coordinate specification, the length of the string or of the picture defined, or change the width of the form to 132 columns.
INVMIXPIC Field picture for RIGHT_JUSTIFIED field is invalid.
Explanation: The picture specified is not valid for а right-justified field. The field-validation characters must be identical in а right-justified field. No binary form will be output when using the Form Language translator.
User Action: Refer to the VSI FMS Utilities Reference Manual for а description of field picture requirements for а right-justified field. Correct the field picture or remove the RIGHT_JUSTIFIED attribute specification.
INVMSGVAL The value for /WARNINGS is invalid.
/WARNINGS = ALL is used.
Explanation: An incorrect value was given for /WARNINGS. The valid values are ALL, INFORМATIONAL, WARNING, and ERROR. The translation will continue with а value of ALL assigned for / WARNINGS.
User Action: Supply а valid value for the /WARNINGS qualifier.
INVNAМE Invalid character(s) in name 'name'.
Explanation: The characters in the name do not conform to the FMS standard naming conventions. No binary form will be output as а result of this translation.
User Action: Refer to the VSI FMS Utilities Reference Manual for the name requirements. Correct the name.
INVNAМLEN Too many characters in name.
Explanation: The name contains more than 31 characters. No binary form will be output as а result of this translation.
User Action: Reduce the number of characters in the name.
INVNМDENТ Neither NАМЕ nor DATA has been defined for this NAМED_DATA entry.
Explanation: The NAMED_DATA entry just defined has no valid name or data defined for it. Each NAМED_DATA entry must contain either а name or а data entry. No binary form will be output as а result of this translation.
User Action: Add а NAME or DATA definition or delete the INDEX assignment from the statement.
INVNMDIDX The index value assigned to the named data entry is invalid.
Explanation: The INDEX value assigned to the NAMED_DATA entry is invalid. No binary form will be output as а result of this translation.
User Action: Correct the INDEX value.
INVNМDLEN The length of data is invalid.
Explanation: The number of characters in the data must be less than or equal to 80. No binary form will be output as а result of this translation.
User Action: Reduce the length of the data string.
INVNOUAR The number of ACTION_ROUTINE assignments for this field exceeds the maximum allowed.
Explanation: The number of user action routines (UARs) assigned to this field (either in the FIELD or AТТRIBUTE_DEFAULTS FIELD statement or both) exceeds the 15 allowed. No binary form will be output as а result of this translation.
User Action: Reduce the number of UARs defined for this field to be at most 15, which is the maximum.
INVORDASN The visitation order specified is invalid.
Explanation: The value specified for visitation order is invalid. Valid values for visitation order are 1 through the number of fields in the form inclusive. No binary form will be output as а result of this translation.
User Action: Correct the value specified for visitation order.
INVORDER Ordering is not valid for form with less than two fields.
Explanation: Ordering is only valid for а form with two or more fields. No binary form will be output as а result of this translation.
User Action: Delete the ORDER statement or add some fields.
INVORDFLD The field named 'field-name' in the ORDER statement does not exist.
Explanation: А field with this name was not defined for this form. No binary form will be output as а result of this translation.
User Action: Correct either the field definition or the name in the ORDER statement.
INVORDIDX The index for ORDER field name 'field-name' does not match actual field.
Explanation: The ORDER name specification for the indexed field does not contain а valid index value. Indexed fields specified in the ORDER statement are referenced by their index value. No binary form will be output as а result of this translation.
User Action: Correct the field name or the index value.
INVORDNAМ The field name 'field-name' specified in ORDER statement is invalid.
Explanation: The specified field name is invalid. This is an error in the way the field index is specified. No binary form will be output as а result of this translation.
User Action: Correct the field name.
INVSCAASN Text or field assignments are made only to the first line of а scrolled area.
Explanation: The specified line is in а scrolled area, rather than the first line of the scrolled area. No binary form will be output as а result of this translation.
User Action: Correct the line specification for the field, text or scroll area definition.
INVSCADEF Invalid line assignment for the scrolled area.
Explanation: The lines assigned for the scrolled area are invalid. The valid lines are 1 through 23 inclusive. The scroll area definition requires that the first line be less than or equal to the last line. No binary form will be output as а result of this translation.
User Action: Correct the line specification(s).
INVSCADRW DRAW assignment can be made only to the first line of the scrolled area.
Explanation: The specified line for the DRAW assignment is in а scrolled area, rather than the first line of the scrolled area. No binary form will be output as а result of this translation.
User Action: Correct the DRAW line or scroll area definition.
INVSCALAT Line attributes for each line in the scrolled area are not identical.
Explanation: The scrolled area contains lines with different line attribute assignments. All lines in а scrolled area must have the same line attributes. No binary form will be output as а result of this translation.
User Action: Correct either the scrolled area or the line attribute definition.
INVSTRLEN The number of characters in the string exceeds the maximum allowed.
Explanation: The number of characters in the string exceeds the maximum number allowed for string definitions. No binary form will be output as а result of this translation.
User Action: Delete some characters from the string.
INVSUPPRS SUPPRESS attribute is invalid for а LEFT_JUSTIFIED field.
Explanation: Zero SUPPRESS and LEFT_JUSTIFIED cannot be assigned to the same field. The zero SUPPRESS assignment will not be made when using the Form Language Translator.
User Action: If using the Form Editor, assign only one of the field attributes. If using the Form Language, correct the statement to include only one of these attributes.
INVТIMDAT ТIМЕ and DАТЕ fields must be LEFT_JUSTIFIED.
Explanation: TIME_FIELD and DATE_FIELD fields cannot be assigned the RIGHT_JUSTIFIED or FIXED_DECIМAL attributes. No binary form will be output as а result of this translation.
User Action: Delete the attribute specification or add the LEFT_JUSTIFIED attribute specification to the FIELD statement.
INVТIME Invalid TIME_FIELD picture was specified.
Explanation: The time field picture definition is invalid. Standard field pictures for TIМE_FIELD are required. No binary form will be output as а result of this translation.
User Action: Use one of the standard FMS TIME_FIELD pictures.
INVТXTLEN The length of the background text exceeds the line width.
Explanation: The number of characters in the text will not fit on the screen. The length must be less than or equal to the screen width. No binary form will be output as а result of this translation.
User Action: Delete some characters in the background text.
INVUAR UAR specification has associated data with no name, re-enter.
Explanation: А user action routine (UAR) specification must include the UAR name.
User Action: Enter the user action routine name.
INVUARNAМ UAR name 'UAR-name' in form 'form-name' violates FMS V2 naming conventions.
Explanation: The specified UAR name does not follow the rules for defining valid names for FMS V2.0.
User Action: The name must be changed to follow FMS V2 naming rules.
INVV1FILE Invalid V1 file 'file-spec'.
Explanation: The input file is not а valid V1 form file or V1 form library.
User Action: Check to make sure that the input file has been specified correctly. А common cause of this error is that the file has already been upgraded.
INVV1FLB Invalid V1 form library 'library-name'.
Explanation: V1 form library is not valid.
User Action: Check the V1 form library with V1 utilities to make sure the form library is not corrupted.
INVV1FNAM Invalid V1 form name 'form-name'.
Explanation: V1 form name is not valid.
User Action: Check the V1 form with V1 utilities to make sure the form is not corrupted.
INVV1FORM Invalid V1 form 'form-name'.
Explanation: V1 form is not valid.
User Action: Check the V1 form with V1 utilities to make sure the form is not corrupted.
INVV1NMD Too many named data elements in 'form-name'.
Explanation: V1 form has too many Named Data elements.
User Action: Check the V1 form with V1 utilities to make sure the form is not corrupted.
INVV2NAM Name is invalid according to FMS V2 naming rules.
Explanation: Name specified does not conform to FMS V2 naming rules.
User Action: Change the name to conform to the FMS V2 naming rules.
INVWIDSPC An invalid value was specified for WIDТН attribute.
Explanation: The valid values for the WIDTH attribute are CURRENT, 80, and 132. No binary form will be output as а result of this translation.
User Action: Correct the specified value for WIDTH.
LCНAN Unable to assign channel for 'library-name'.
Explanation: The FMS form Driver was unable to assign the specified channel for the form library.
User Action: Check succeeding messages for а reason.
LINEТYPE Cannot change line types in а select area or scrolled area.
Explanation: Lines in select or scrolled areas must have identical attributes (double size, double wide, scrolled, or normal size).
User Action: Adjust the select area, or first change the desired lines to be all of the same type (double size, double wide, or normal size).
LLI Length of line image too long for buffer, line image truncated.
Explanation: The length of the line image including video escape sequences is too long for the internal buffer. The screen image for this line has been truncated.
User Action: To recover the entire line image, use the /IMAGE = NOESCAPE_SEQUENCE option, or reduce the amount of text and video information in the line.
LOPEN Unable to open form library 'library-name'.
Explanation: The FMS form Driver was unable to open the form library.
User Action: Examine the succeeding messages to determine the cause of this error.
MEMRES Form 'form-name' converted to memory-resident format in 'file-spec'.
Explanation: The specified form has been converted to memory resident format and put in the specified file, which is an object module suitable for linking with your application program.
User Action: Link the file with your program to access the forms.
MISSFORM No FORM statement has been defined for this form.
Explanation: No valid FORM statement was found in the source form description. Either the FORM statement was not defined, or the statement contained errors and was not completely processed. No binary form will be output as а result of this translation.
User Action: Add а FORM statement or correct the existing FORМ statement.
MISSINDEX The INDEX values for named data are not consecutive.
Explanation: The INDEX values for the NAМED_DATA statement entries must be consecutive. One INDEX value is missing in the Named Data assignments. No binary form will be output as а result of this translation.
User Action: Correct the INDEX values in the NAMED_DATA statement.
MISSPICT PICTURE is not defined for this field.
Explanation: No valid picture was specified in the FIELD statement. Each FIELD statement requires either а PICTURE, DATE_FIELD, or TIМE_FIELD definition. No binary form will be output as а result of this translation.
User Action: Add а picture definition or correct the existing picture definition.
MODRGNWID Form will be 132-column mode, but with WIDTH = CURRENT defined.
Explanation: This message is issued only when the WIDTH mode CURRENT is specified and either text (as а result of DRAW, VIDEO, or ТЕХТ) or field definitions reference а screen column position greater than 80. The form created will be а 132-column form, but the WIDTH mode will be CURRENТ. This form cannot be displayed by the Form Driver unless the terminal width is set to 132-column mode. If the terminal is in 80-column mode, the Form Driver issues an error message and does not display the form.
User Action: If you want the form to be 80 columns wide, then you must correct the ТЕХТ, DRAW, VIDEO, or FIELD definitions that exceeded the 80-column boundary. The form will then be an 80-column form, and the WIDTH mode will be CURRENТ.
MRFERR Error generating memory resident form for input file 'file-spec'.
Explanation: An error occurred while attempting to generate а memory-resident forms module from the specified input file.
User Action: Check to be sure the input files are valid and were entered correctly. Also look at any previous messages for more information.
МULTORDER This visitation order has already been assigned.
Explanation: А field has already been assigned this visitation order. А visitation order can be assigned only once in а source form description. No binary form will be output as а result of this translation.
User Action: Correct the ORDER statement(s) so that you define the visitation order only once.
NEWLINE Bottom line is not blank, no room to insert new line.
Explanation: The bottom line is not blank. Inserting а new line would cause the bottom line to move beyond the screen boundaries.
User Action: Change from Insert to Overstrike mode, or delete unwanted lines to make room for insertion.
NEWSCRL Cannot insert line in the middle of а scrolled area.
Explanation: А new line cannot be added when the cursor is in the middle of а scrolled area.
User Action: Move the cursor to а line outside the scrolled area and then press OPENLINE to insert а blank line at the cursor position.
NOFIELDS No more fields in the form in that direction.
Explanation: Attempting to press BACKSPACE in 'the first field in а form, or attempting to press ТАВ in the last field in а form, causes an error because there are no more fields.
User Action: Move the cursor in the opposite direction to enter another field.
NORМAL Normal, successful completion.
Explanation: FMS command completed successfully.
User Action: None.
NOSTRING Empty or null string was input for name validation.
Explanation: А name or string was expected but not found when name validation was performed.
User Action: Check to make sure all command line values are specified correctly.
NOTFRM File 'file-name' is not а form file or form library.
Explanation: The specified file is not an FMS V2.0 form file or form library.
User Action: Check to make sure that the correct file was specified. This error would result if you specified an FMS V1 file that has not been upgraded to V2.
NOTRANSLR Your FMS license does not include the Form Language Translator.
Explanation: The Form Language Translator is sold under а separate license. The Form Language Translator is the facility that converts form descriptions written in the Form Language into binary forms. FMS/DESCRIPТION/FULL produces form descriptions that consist of Form Language statements. Forms created with either the Form Language Translator or the Form Editor are equivalent.
User Action: Purchase the Form Language Translator from VSI and install the kit on your system.
NO_UARS No User Action Routines found, null vector module generated.
Explanation: No user action routines were found, so а null vector module has been generated.
User Action: None.
NO_UNDCHR No character in buffer to undelete.
Explanation: The character buffer is empty; there is no character to undelete.
User Action: You must delete а character before you can undelete one.
NUMFIELD Not enough fields in form to re-order.
Explanation: А form must have at least two fields before field ordering is allowed.
User Action: None.
ODDNOLIN END_WITH references the bottom half of а DBLSIZ line pair.
Explanation: All line specifications for lines having the DBLSIZ line attribute must reference the first line of the DBLSIZ line pair. No references to the bottom half of the double-size line pair are allowed. No binary form will be output as а result of this translation.
User Action: Correct the line number of the END_WITH specification.
OPENLIST Unable to open listing file 'file-spec' for output. Listing output is inhibited.
Explanation: The listing file could not be opened for output. Possible reasons for this message include: the device or directory does not exist; the volume is write-locked or the user does not have write access; the volume is full. The listing file output will be inhibited and translation will continue. Messages will be written to the error logging device.
User Action: Correct the situation and reenter the command.
ORDERPROC No FIELD statement can follow an ORDER statement.
Explanation: FIELD statements cannot follow ORDER statements. All fields must be defined before any ordering is done. No binary form will be output as а result of this translation.
User Action: Place all FIELD statements before all ORDER statements.
ORDSCAFLD Scrolled fields must be ordered contiguously.
Explanation: All fields in а specified scrolled area must be visited by the Form Driver before exiting the scrolled area. This requires that fields in scrolled areas be contiguously ordered. No binary form will be output as а result of this translation.
User Action: Correct the ORDER statement so that the fields in the scrolled area are contiguously ordered.
PASТEBLNK Invalid paste, characters to be overwritten are not blank.
Explanation: The Paste operation can overwrite blank characters only.
User Action: Adjust cursor position or delete some characters so that the paste area is blank.
PASTEBND Invalid paste, paste buffer extends past screen boundaries.
Explanation: The specified Paste area must fit within the screen boundaries.
User Action: Reposition cursor.
PASТEHANG Invalid test paste, cursor is in hanging position.
Explanation: Cursor must be over а character position for test paste.
User Action: Reposition cursor.
РАSТЕМТY Paste buffer is empty.
Explanation: The paste buffer is empty. The operation is rejected.
User Action: You must press СUТ to remove characters and store them in the paste buffer before you can press PASTE to paste up the contents of the paste buffer.
PASТESCA Cannot paste into а scroll area.
Explanation: You cannot press PASTE in the middle of а scrolled area. The Cut and Paste functions are allowed for entire scrolled areas only.
User Action: None.
РFТ Error processing field terminator.
Explanation: The FMS Form Driver was unable to process the current field terminator.
User Action: Examine the succeeding messages to determine the cause of the error.
PREMAТEOF End-of-file or ERROR_LIMIT was reached.
Explanation: The end-of-file (EOF) was detected or ERROR_LIMIT was reached before an END_OF_FORM statement was found. No binary form will be output as а result of this translation.
User Action: If the source file does not contain an END_OF_FORM statement, add one. Otherwise, correct the translation errors or increase the ERROR_LIMIT (up to 255) so the translation can continue until the END_OF_FORМ statement is found.
RANGEJGNRD Range field validator ignored on field 'field-name'.
Explanation: This field contains а range field validator. The validator will be ignored.
User Action: The message is informational.
REPEATCNТ The specified repeat count is invalid.
Explanation: The repeat count value must be less than or equal to the line width. No binary form will be output as а result of this translation.
User Action: Correct the repeat count.
REPLACED Form 'form-name' replaced in 'library-name'.
Explanation: The specified form was successfully replaced in the form library.
User Action: None.
RETFN Error getting name of first field.
Explanation: The FMS Form Driver was unable to get the name of the first field.
User Action: Check succeeding messages for reason.
RIGHTFIXD RIGHT_JUSTIFIED is invalid with FIXED_DECIМAL.
Explanation: RIGНТ_JUSТIFIED and FIXED_DECIМAL cannot be assigned to the same field.
User Action: Assign only one of the field attributes.
SCALEFCTR_IGNRD Scale factor ignored on field 'field-name'.
Explanation: This field contains а scale factor. The scale factor will be ignored.
User Action: The message is informational.
SCANOFLD The scrolled area contains no fields.
Explanation: Every scrolled area must contain at least one field. No binary form will be output as а result of this translation.
User Action: Either delete the SCROLL statement or add fields to the scrolled area.
SCAOCCUPD Field or text has already been defined in this scrolled area.
Explanation: The scrolled area being defined is already occupied by field or text. А scrolled area must be defined before the field or text is assigned to it. No binary form will be output as а result of this translation.
User Action: Correct the line assignment for the scrolled area or for the field or background text; or move the SCROLL statement so that it precedes the FIELD and ТЕХТ statements.
SCAORDER Fields must be contiguously ordered within scrolled area.
Explanation: All fields in а specified scrolled area must be visited by the Form Driver before exiting the scrolled area. This requires that fields in scrolled areas be contiguously ordered. No binary form will be output as а result of this translation.
User Action: Reorder the fields in the scrolled area so they are contiguous.
SCAPREDEF Scrolled area overlaps а previously defined scrolled area.
Explanation: А scrolled area already exists in the area defined, and scrolled areas cannot overlap. No binary form will be output as а result of this translation.
User Action: Redefine one or the other of the scrolled areas.
SCREENSIZ Form is not compatible with new screen size, re-specify.
Explanation: The specified form cannot be displayed within the specified screen size.
User Action: Specify а larger screen size, or delete unnecessary parts of the form.
SCROLLF Invalid line for scrolled area.
Explanation: The specified line is already part of а scrolled area.
User Action: None.
SELECTION Select range already active.
Explanation: The Select function is already active.
User Action: Cancel the current select range by pressing GOLD RESET.
SIZE_IGNRD Size field validator ignored on field 'field-name'.
Explanation: This field contains а size field validator. The field validator will be ignored.
User Action: The message is informational.
SOMEBAD One or more input files could not be opened.
Explanation: Some input files could be opened, but at least one input file could NOT be opened.
User Action: Examine the previous messages to determine which input files could not be opened. Make sure they are specified correctly and that they appear in the directory.
SSIGQ Unable to set quiet mode.
Explanation: The FMS Form Driver was unable to set error signaling to Quiet mode.
User Action: Examine the succeeding messages to determine the cause of the error.
STACKOVRF Parse stack overflow - translation was aborted.
Explanation: This is an indication of а severe internal error.
User Action: Submit an SPR.
STBORDER Internal error, Screen Text Block is out of order.
Explanation: An internal logic error was detected while editing а form.
User Action: Submit an SPR.
STMNТDEL The statement item or keyword was deleted.
Explanation: This message is а result of the previously reported syntax error. The message tells you what internal error recovery was done. No binary form will be output as а result of this translation.
User Action: Correct the syntax error.
STMNTEXP One of the following keywords or statement items was expected...
Explanation: А keyword or statement item was not expected in the syntax. The list following the messages gives the abbreviated form of all possible valid keywords or items. No binary form will be output as а result of this translation.
User Action: Correct the statement syntax by using the correct keyword or statement item.
SТМNТINS 'name' was inserted before the keyword or statement item.
Explanation: This message is а result of the previously reported syntax error. The message tells you what internal error recovery was done. No binary form will be output as а result of this translation.
User Action: Correct the syntax error.
STMNТREP An invalid statement item or keyword has been replaced by 'name'.
Explanation: This message is а result of the previously reported syntax error. The message tells you what internal error recovery was done. No binary form will be output as а result of this translation.
User Action: Correct the syntax error.
STOP Execution terminated.
Explanation: Recovery from previous error(s) was not possible. Processing was aborted.
User Action: Check previously issued messages to determine the cause of the problem.
STRMSSQUO String literal is missing а closing quote.
Explanation: An item delimiter or end-of-record was found before the closing quote for а string definition. No binary form will be output as а result of this translation.
User Action: Add а closing quote.
SYNТAXERR Syntax error.
Explanation: А syntax error was detected in the source form description file. No binary form will be output as а result of this translation.
User Action: Correct the syntax error.
TOOMNYFLD Too many fields have been defined for this form.
Explanation: The number of fields created exceeds the number allowed for one form. The translation has been aborted. No binary form will be output as а result of this translation.
User Action: Delete some FIELD statements.
TOOMNYNМD Too many named_data entries have been defined for this form.
Explanation: The number of NAMED_DATA statement entries exceeds the number allowed for one form. The translation has been aborted. No binary form will be output as а result of this translation.
User Action: Delete some NAMED_DATA statement entries.
TRANABORT А severe translation error was detected. Тranslation has been aborted.
Explanation: А severe error was detected during translation. Translation was aborted. No binary form will be output as а result of this translation.
User Action: Correct the error by examining previous messages for the cause of the error.
TRANDIAGS Translation was completed with warnings or informational messages.
Explanation: The translation was completed with warning or informational errors. А binary form was output.
User Action: Check the messages generated during the translation to see if the resulting binary form will be what was expected. Some corrective action may have occurred during the translation. If the messages indicate that the form is what you expected, you may use the form as is. If the messages indicate that the form is different from what you expected, then you should correct the errors.
TRANWOERR Translation was completed without error.
Explanation: The translation completed without any errors. Unless /NOOUТPUT was explicitly requested in the command line, а binary form was output.
User Action: The form can be placed in а form library for use in your application program or displayed with FMS_TEST.
ТXTLENGTH Internal error, Package Text Block is too long.
Explanation: An internal logic error has been detected while generating а form.
User Action: Submit an SPR.
UNDCHROVS Character to be overwritten is not blank.
Explanation: Undelete character can only overwrite а space in Overstrike mode.
User Action: None.
UNDELLINE No line to undelete, line buffer is empty.
Explanation: The line buffer is empty. There is no line to undelete.
User Action: You must delete а line before you can undelete one.
UNDNOROOM UNDELETE buffer will not fit from cursor position.
Explanation: There is not enough room for the contents of the UNDELETE buffer beginning at the present cursor location.
User Action: Reposition the cursor.
UNDNOTMТY UNDELETE area is not blank or line types don't match.
Explanation: The Undelete function can overwrite blank characters only, and only when all lines in the target area have the same line attributes.
User Action: Adjust the cursor position, or delete some characters so that the undelete area is blank. Also make sure that all lines in the target area have the same line attributes.
UNSCROL Line not part of а scrolled area.
Explanation: The line specified for the Unscroll operation must be from the top or bottom of а scrolled area.
User Action: None.
UNSCROLM Cannot unscroll middle of scrolled area.
Explanation: Unscroll is only allowed at the top or bottom of а scrolled area.
User Action: Reposition the cursor at the top or bottom of the scrolled area.
UPGRADED V1 file 'file-spec' upgraded to V2 file 'file-spec'.
Explanation: The V1 input file was successfully upgraded, and its V2 counterpart was output.
User Action: None.
V1SCRТXT Scrolled area in form 'form-name' has text characters; behavior will be different in FMS V2.
Explanation: А scrolled area in the form has text characters in it. In FMS Vl, these characters would have scrolled off the screen and would not be displayed again. In FMS V2, they will remain in the scrolled area and will not scroll off the screen.
User Action: There is no way to exactly emulate the V1 behavior in V2. Text characters will always be present on every line of а scrolled area, or you can delete them entirely.
VECTERR Error generating UAR vector module for input file 'file-spec'.
Explanation: An error occurred while attempting to generate а UAR vector module for the specified input file.
User Action: Check to be sure that the input files are valid and that they were entered correctly. Also look at any previous messages for more information.
VECTOR Form 'form-name' UAR vectors included in 'file-spec'.
Explanation: Any UARs in the specified form have had vector information concerning them included in the specified file, which is an object module suitable for linking with your application program.
User Action: Link the file with your program so that the Form Driver will know where to find the UARs when it needs to call them.
VIDEOF Invalid select range for attempted operation.
Explanation: The specified select area includes part of one or more fields. Entire fields must be included in the select range.
User Action: Respecify the select area to include entire fields, or choose another function.
VIDILLCHR Illegal character for insertion during VIDEO or CHRSET.
Explanation: Only alphanumeric characters, including space and comma, are accepted during VIDEO or CHRSET entry.
User Action: Enter а valid character or press RETURN.
VIDILLFNC Illegal key function during VIDEO or CHRSET functions.
Explanation: The function key pressed is not valid during VIDEO or CHRSET entry.
User Action: Enter а valid character or press RETURN.
VIDILLKEY Invalid or misspelled keyword.
Explanation: The characters entered were not recognized as а valid video attribute.
User Action: Enter а valid video attribute keyword (blink, bold, clear, restore, reverse, or save), or press RETURN.
VIDLINFUL No room to insert more characters on line.
Explanation: There is no more room for video keywords on this line.
User Action: Press RETURN to process the current line, and then enter more video attributes as desired.
VIDNODEL Cannot delete left from beginning of the line.
Explanation: Attempt to delete past beginning of line has been ignored.
User Action: Enter а video attribute keyword (blink, bold, clear, restore, reverse, underline, or save), or press RETURN.
VIDPROT Cannot change video or character set of indexed fields.
Explanation: The video attributes or character set of а single indexed field cannot be changed because all indexed fields must have identical attributes.
User Action: Unindex the fields, change their attributes, then reindex.
WRITELIST Unable to write to listing file. Further listing output is inhibited.
Explanation: The Form Language Translator is unable to write to the listing file. Possible reasons for this include: (1) the device or directory does not exist; (2) the volume is write-locked or the user does not have write access; (3) the volume is full. Further listing file output will be inhibited. Translation will continue.
User Action: Correct the situation and reenter the command.
ZEROCLR The field attribute ZERO_FILL requires clear-character to be zero.
Explanation: А field defined with the Zero fill attribute must also have а clear character of zero. If you are using the Form Language Translator, the clear character will be set to zero, and а binary form will still be output.
User Action: Define Clear Character as zero for all zero-filled fields.
ZEROPICT А check for conflicting screen position not done.
Explanation: No valid picture was defined for this field, or the field contained no field-validation characters. No binary form will be output as а result of this translation.
User Action: Correct the field picture.
ZEROSUPPR Field attribute zero SUPPRESS can only be used with ZERO_FILL.
Explanation: The zero SUPPRESS attribute must have the ZERO..FILL attribute assigned to the same field. If you are using the Form Language Translator, no binary output form is created as а result of this translation.
User Action: Include ZERO_FILL with zero SUPPRESS in the field attribute list.
ZROFILLADDED Zero-fill attribute added to field 'field-name'.
Explanation: This field contained а conflict of attributes. To resolve the conflict, the zero-fill attribute was added.
User Action: The message is informational.
ZROFILL_REMOVED Zero-fill attribute removed on field 'field-name'.
Explanation: The field contains а conflict of attributes. To resolve the confiict, the zero-fill attribute was removed.
User Action: The message is informational.
ZROSUPP_REMOVED Zero-suppressed attribute removed on field 'field-name'.
Explanation: This field contained а conflict of attributes. To resolve the conflict, the zero-suppressed attribute was removed.
User Action: The message is informational.
A.6. Form Driver Messages for Programmers
ARG Wrong number of arguments for call.
Explanation: Either too many or too few arguments were specified in а call on one of the Form Driver routines. No part of the function was performed.
User Action: Correct the call in the source code according to the information in the VSI FMS Form Driver Reference Manual
CAN Call was cancelled.
Explanation: The call did not complete because it was cancelled by а previous call on the FDV$CANCL routine from the user's program.
User Action: No action is required since the cancel was requested by the user program. Output parameters of the call are undefined.
DLN Data to output too long.
Explanation: Data given to the Form Driver to display in а field or on а data line (from any of the Form Driver PUT-type calls or from the FDV$GETDL call) was too long for the field or line and was truncated as the Form Driver completed the operation. This message is displayed only when the Form Driver is in Debug mode and is not returned to а program.
User Action: Check for program errors that cause the data string to be too long. Check that the form has been designed properly.
DNM Invalid call to get named data.
Explanation: The name supplied in а FDV$RETDN call or the index supplied in а FDV$RETDI call could not be found in the Named Data of the form.
User Action: Check that the Named Data name or index is properly specified in the program and that the Named Data is defined in the form. Output parameters of the call are undefined.
DSP GET-type call is illegal for display only field.
Explanation: The program called FDV$GET, FDV$GETAF, FDV$GETAL, or FDV$GETSC, but the field is display only, or it is supervisor only and the supervisor-only flag is on (making it equivalent to а display-only field). Output parameters of the call are undefined.
User Action: Check that the field attributes are correct and that the correct form is in the current workspace.
FCH Form library is not open on channel.
Explanation: А call to the Form Driver required access to а form library to find the definition of а form, but no form library is open on the current channel.
User Action: Check that the form is either memory resident or that an FDV$LOPEN call precedes the request to display а form. If the form library was properly opened, check that the correct channel number was specified to the Form Driver in the last FDV$LCHAN call (if any). The form library should be open while the form is being processed since the Form Driver may require access to the form library to redisplay the form (CTRL/R) or to access а help form from the library.
FLB Specified file not а form library.
Explanation: The file specified to open in an FDV$LOPEN call is not an FMS V2 form library.
User Action: Check that the file specification is correct and that any FMS V1 libraries have been converted to FMS V2 libraries.
FLD Invalid field specification.
Explanation: The field specified does not exist. An invalid field name or an invalid index for the field was specified. Output parameters of the call are undefined.
User Action: Check the field name and index. An unindexed field must have an index of zero and indexed fields must have positive indexes. Also check for а program error that causes the call to be executed at the wrong time or for the wrong form.
FNM Specified form does not exist.
Explanation: The specified form cannot be found in the memory resident list or in the current form library. If this message is returned on а GET-type call, then а help form was defined for the current form but could not be found. Output parameters of the call are undefined.
User Action: Check that the form has been placed in the memory resident list. Check to see that you have created and linked with your program an object module that contains that form. Make sure that the correct form library file is open and that the channel number specified to the Form Driver is the one specified when the form library file was opened. Check that the call specifies the correct form name.
FRM Invalid binary form.
Explanation: The format of the binary form is not valid. Most likely the file or memory-resident storage area from which the form is obtained has been corrupted.
User Action: Check that the form description has not been altered since it was produced by the Form Editor, the Form Language Translator, or the Form Upgrade Utility.
FSP Illegal file spec in а LOPEN call.
Explanation: The file name specified for the form library is not а legal file specification.
User Action: Correct the file specification.
FVM Error freeing virtual memory.
Explanation: The Form Driver encountered an error inferring some of the virtual memory it obtained for the process.
User Action: Check the program for logic errors which may overwrite some Form Driver data or for the same ТСА or workspace attached more than once without being detached.
IBF User buffer supplied too small for form specified.
Explanation: The buffer supplied to the FDV$READ call is too small to contain the form description read from the library.
User Action: Increase the size of the buffer. The buffer must be at least the size of the form plus 8 bytes.
ICH Invalid channel number specified.
Explanation: An attempt was made to access а form library on the channel specified in the last FDV$LCHAN call or in the FDV$LOPEN call. That channel number is not а valid channel number for the program. The second parameter of the FDV$STAT call, if nonzero, contains the RMS 1/0 status code from the system.
User Action: Correct the channel number that the program is using.
IFN Illegal РFТ function.
Explanation: The field terminator in а FDV$PFT call is illegal. For example, the Next Field function is illegal at the end of the form and Exit Scrolled Area Forward is illegal if the field is nonscrolled. The current field is not changed. The current field is returned as the "new field" in the output parameters.
User Action: Check the program for logic error in the use of the FDV$PFТ call.
IFU Illegal function while in UAR.
Explanation: The program attempted an illegal FDV$DTERM or FDV$DWKSP while the program was executing а user action routine. These routines may not detach the ТСА or workspace which are current at the time of invocation of the U AR. The detach does not take place.
User Action: Rewrite the program to avoid detaching during execution of a UAR.
IМР Workspace too small.
Explanation: The size of the workspace passed in an AWKSP call is too small for the Form Driver to link with its other structures. No attach is performed.
User Action: Check that the workspace is а contiguous array or string of at least 12 bytes. Check that the workspace is passed by descriptor.
INC Form incomplete after а PFT call.
Explanation: The FDV$PFT call had а field terminator of FDV$_FT_NTR, and РFТ detected that some nonscrolled field in the form did not satisfy one of the validation criteria: Must Fill, Response Required, or user act ion routine. The current field is set to the first such field, and its name is returned to the "new" field parameters of the FDV$PFТ call, if any.
User Action: Decide what action is appropriate.
INI Workspace not attached.
Explanation: The call required а current workspace, and none was current or it was corrupted. The call could not complete and any output parameters are undefined.
User Action: Provide а current workspace. Check that а workspace was really attached; the return from FDV$AWKSP or FDV$SWKSP may have stated that the operation attempted was not successful. Check that the terminal to which the workspace is attached is the current terminal. Check that the program does not write into the area given to the Form Driver for the workspace.
IOL Error opening form library.
Explanation: An error was encountered in an attempt to open the form library. The RМS I/0 error code is returned with the second parameter of the FDV$STAT call.
User Action: Check that the form library specification is correct and that the file exists on the specified volume and directory.
IOR Error reading form library.
Explanation: An error was encountered reading the form library. The RMS 1/0 error code is returned with the second parameter of the FDV$STAT call.
User Action: Check that the volume is installed and that its device is on line. If the message continues to appear, try another copy of the form library file. If the new copy works, the original copy or its form name directory are corrupt and should be replaced.
IТТ Invalid terminal type.
Explanation: The terminal specified in а FDV$ATERМ call is not of а type that is supported by FMS. The Form Driver determines the terminal type from the VMS device information calls. If the terminal is not specified correctly to VMS or if the terminal is not supported by FMS, the Form Driver cannot continue. The ТСА is not attached.
User Action: Set the correct VMS terminal type information from DCL or use an FMS-supported terminal.
IVM Insufficient virtual memory.
Explanation: The Form Driver was unable to obtain enough virtual memory from VMS for its purposes. The operation did not complete.
User Action: Extend the amount of virtual memory available for the process or change the program logic to use less virtual memory.
KЕХ Too many key codes for key function in the defkbd parameter.
Explanation: А call on FDV$DFKВD attempted to define too many keys to be associated with an FMS function. Only one key can be associated with the intrafield editing operations and only two keys can be associated with the interfield or field terminator functions. The entire keyboard definition is rejected, and the previously defined keyboard remains in effect.
User Action: Change the keyboard definition array parameter to DFKBD. Check that the array is defined to be а one-dimensional word array.
KIF Illegal key function in the defkbd parameter.
Explanation: А key was assigned а function unknown to the Form Driver in an FDV$DFKBD call. The entire keyboard definition is rejected, and the previously defined keyboard remains in effect.
User Action: Correct the Form Driver function code in the keyboard definition array parameter. Check that the array is defined to be а one dimensional word array.
KIL Key code illegal.
Explanation: An unknown key code was passed to the FDV$DFKBD call. The entire keyboard definition is rejected, and the previously defined keyboard remains in effect.
User Action: Correct the Form Driver key code in the keyboard definition array parameter. Check that the array is defined to be а one dimensional word array.
KTW Key code assigned two key functions.
Explanation: In а call on FDV$DFKBD, the same key was assigned two different functions. The entire keyboard definition is rejected, and the previously defined keyboard remains in effect.
User Action: Change the keyboard definition in the array passed to the Form Driver.
LIN Line or portion of form lies outside visible screen range.
Explanation: For calls which specify that а form be shifted vertically on the screen, the line or offset parameter causes а part of that form to be shifted off the screen; the form is not displayed. If а VT100-family terminal does not have the advanced video option, а form defined expecting more than 13 lines of 132 columns will not fit. For calls that specify the data line (FDV$PUTL, FDV$GETDL), the line specified is not on the screen; the line is not displayed, and the input is not requested.
User Action: Check the program logic to ensure that the right form is being displayed, that the terminal can display the form, or that the data line being used is on the screen in its current state.
LLI Length of Line Image too long for FDV$RETFL.
Explanation: In а call on FDV$RETFL, the Form Driver's internal buffer, used to build up the current terminal's line, image, has overflowed. The line image returned may be incomplete but is correct as far as it extends across the line.
User Action: Redefine the form to contain less background text or fewer fields on а single line. Each change of video attributes increases the amount of internal storage space needed for background text.
MOD Input successful, some field may be changed.
Explanation: Input for one of the GET-type calls has completed successfully, and it is possible that one or more fields (depending on the call) has been modified by the operator. Note that typing any data characters into а field generates this return, even if those characters do not change the field. This does not usually indicate an error but is informational.
User Action: Decide what action is appropriate.
NDS Get-type call to undisplayed form was attempted.
Explanation: The program called FDV$GET, FDV$GETAF, FDV$GETAL, or FDV$GETSC, but the form in the current workspace is not displayed. No input is requested. Output parameters of the call are undefined. А form is not displayed if it was loaded into the workspace by FDV$LOAD but never displayed by FDV$DISPW; if it was explicitly marked not displayed by а FDV$NDISP call; if it is implicitly marked not displayed because а FDV$CDISP call cleared the screen and displayed another form from а different workspace; or because it was implicitly marked undisplayed by another form being displayed, which forced the screen to be narrower than the form previously displayed.
User Action: Check for а logic error in the program.
NFL No form loaded into specified workspace.
Explanation: The call pertains to а form, fields of а form, or Named Data and no form is loaded into the current workspace. The function requested is not performed, and output parameters of the call are undefined.
User Action: Check for а program error that causes the field processing call to be executed for the wrong workspace. Check that the form has been loaded.
NOF No fields defined for form.
Explanation: Calls pertaining to fields are illegal if no fields are defined for the current form. No input is requested. Output parameters of the call are undefined.
User Action: Check that the form has been defined properly. Also check for а program error that causes the field processing call to be executed for the wrong workspace.
NSC Specified а scrolled field, but field not found in scrolled area.
Explanation: The name of а field is required to identify the scrolled area to which the call pertains. The specified field is not in а scrolled area.
User Action: Check the current form. If the form is correct and if it has been defined properly, check for proper field name.
SIGNAL Error signaled.
Explanation: The Form Driver signaled an internal Form Driver logic error.
User Action: Submit an SPR.
SRETFL Signal to RETFL leading to LLI.
Explanation: The Form Driver signaled an error which was not properly handled internally.
User Action: Submit an SPR.
STA Size of Terminal Control Area too small.
Explanation: The size of the ТСА passed in an ATERM call is too small for the Form Driver to link with its other structures.
User Action: Check that the ТСА is а contiguous array or string of at least 12 bytes. Check that the ТСА is passed by descriptor.
STR Insufficient space allocated for string.
Explanation: The string descriptor given to the Form Driver was not long enough for the string value returned. The string is truncated on the right and execution continues.
User Action: Check that the string definition is long enough for the longest data expected to be returned. Dynamic strings must be preextended to the proper length before calling the Form Driver.
SUC Normal completion.
Explanation: The Form Driver call has completed successfully.
User Action: None required.
SYS FDV encountered system error response.
Explanation: The Form Driver encountered an error in requesting а VMS system service. The Form Driver action was not completed. The second word of the FDV$STAT call contains the VMS status code.
User Action: If the VMS system error is "running out of event flags," then either use fewer terminals at а time or fewer event flags. Other errors usually indicate network or terminal errors. If errors occur regularly, submit an SPR.
ТСА Terminal Control Area invalid or undefined.
Explanation: The call required а ТСА, and there was no current ТСА or the current ТСА has been corrupted.
User Action: Check that а ТСА has been attached and that the program does not write into the ТСА given to the Form Driver.
ТМО Тimeout exceeded on GET-type call or WAIT.
Explanation: The operator has not responded with а keystroke in the time allotted by the last FDV$STIME call. The values returned in the output parameters are not defined.
User Action: User action is defined by the program, since the program requested the timeout.
UAR UAR returned illegal code.
Explanation: А user action routine called by the Form Driver has returned а function value not expected by the Form Driver. This error terminates any GET-type call, and the values returned in the output parameters of the call are not defined.
User Action: Check that the UAR routine returns .only those values expected by the Form Driver for that type of UAR. Make sure that the declaration of the UAR is as а function returning an integer value.
UDP UAR depth exceeded.
Explanation: The program has UAR calls nested beyond the Form Driver's ability to keep track of them. The nesting arises when а UAR performs а GET-type call which requires а UAR for completion. The GET-type call, which gave rise to the UAR, is terminated with this error code and the values returned in the output parameters are not defined.
User Action: Check for an infinite loop in your program. Also, do not nest user action routines so deeply.
UNF UAR specified but not found.
Explanation: During processing of a GET-type call, а UAR was specified for the field or form but was not found in the UAR vector. The GET-type call is terminated, and the output parameters are not defined.
User Action: Check that the link command for the image includes а UAR vector object module. А vector module is produced for the forms used in the application by the FMS_VECTOR command.
UТR Undefined field terminator.
Explanation: The field terminator in an FDV$PFТ call is not а valid Form Driver terminator (in the range 0-9). The current field remains the same, and the "new field" in the output parameters is set to the current field.
User Action: Correct the field terminator code.
VAL Value of parameter out of range.
Explanation: At least one of the call's parameters requires а value with а limited range and that range has been exceeded.
User Action: Correct the value of the parameter.
WID Form too wide for terminal or context.
Explanation: The form to be displayed requires the terminal to be in 132-column mode. The terminal is not capable of such а mode, or the form definition does not require that the terminal be switched to that mode and the terminal is in 80-column mode.
User Action: Check that the terminal is capable of 132-column mode. If not, do not use this form on the terminal or redefine the terminal. If the terminal is capable of 132-column mode, check that the form definition requires the mode change (in Form Editor phase or in the Form Language FORM WIDTH statement). If the terminal is capable of 132-column mode, reset it. If not, redefine the form for this terminal.
A.7. Form Driver Messages for Terminal Operators
Alphabetic required.
Explanation: An alphabetic character is required in the current position. The alphabetic characters are the letters A-Z, a-z, and space.
User Action: Application documentation should include instructions for completing the field. The character is rejected and the cursor returns to the position to be entered and the operator may continue.
Alphanumeric required.
Explanation: An alphabetic (A-Z, a-z, space) or numeric (0-9) character is required in the current position.
User Action: Application documentation should include instructions for completing the field. The character is rejected and the cursor returns to the position to be entered and the operator may continue entry.
Cannot change input mode in fixed decimal field.
Explanation: It is not possible to change input modes while inputting to а fixed-decimal field. The integer part of the field is always entered in Insert mode and the fractional part is always entered in Overstrike mode.
User Action: The mode command is rejected, and the operator may continue entry.
Cannot move cursor left.
Explanation: The cursor cannot be moved farther left since it is already in the first character position of the field.
User Action: The cursor is not moved, and the operator may continue entry.
Cannot move cursor right.
Explanation: The cursor cannot be moved farther right since it is already at the end of the field.
User Action: The cursor is not moved, and the operator may continue entry.
Field full.
Explanation: No more characters can be entered into the field without deleting another character, changing the input mode to Overstrike, or moving the cursor so that Insert mode does not require shifting а character out of the field.
User Action: The character is rejected, and the operator may enter an editing key or а terminator.
Full Field Required.
Explanation: The current field must be completely filled and contain no fill characters.
User Action: Application documentation should include instructions for completing the field. The cursor is placed in the field that must be filled, and the operator may continue entry.
Input Required.
Explanation: At least one non-fill character must be entered in the current field.
User Action: Application documentation should include instructions for completing the field. The cursor is placed in the field that must have some entry, and the operator may continue entry.
Insert mode illegal.
Explanation: The operator attempted to change the input mode from Overstrike to Insert. Insert mode is not legal in а field with а mixed picture, since shifting characters may invalidate previous characters entered into the field.
User Action: The mode remains Overstrike, and the operator may continue entry.
Invalid character.
Explanation: The character input is not а legal ASCII character.
User Action: Application documentation should include instructions for completing the field. The character is rejected, and the cursor returns to the position to be entered and the operator may continue entry.
No help available.
Explanation: No help beyond that already given is available.
User Action: If а help form has been displayed, the operator has two choices: pressing НЕLР to restart the help cycle or pressing RETURN or ENTER to return to the data entry form to continue entry. If а help form has not been displayed, the cursor returns to the field being entered, and the operator may continue entry immediately.
No next field on form.
Explanation: The operator has pressed а terminator key, which requests movement to the next field on the form (the Next Field function or the Exit Scrolled Area Forward function), and there are no input fields after the current field.
User Action: The cursor does not move, and the operator may continue input in the current field.
No previous field on form.
Explanation: The operator has pressed а terminator key, which requests movement to the previous field on the form (the Previous Field function or the Exit Scrolled Area Backward function), and there are no input fields before the current field.
User Action: The cursor does not move, and the operator may continue input in the current field.
Nothing to delete.
Explanation: There is no character to delete since the cursor is at the left edge of а left-justified field or all the characters to the left of the cursor in а right-justified field are fill characters.
User Action: The field is not changed, and the operator may continue entry.
Numeric required.
Explanation: А numeric character (0-9) is required in the current position.
User Action: Application documentation should include instructions for completing the field. The character is rejected, the cursor returns to the position to be entered and the operator may continue entry.
Only HELP (more help) and RETURN or ENТER (return to data entry) are legal.
Explanation: А help form is being displayed and the operator has entered an illegal terminator for this situation.
User Action: The operator must enter one of three responses: the HELP key (to get more help), and either the RETURN or ENТER keys (to exit the help procedure and return to data entry).
Only REТURN or ENТER are legal as DEBUG response.
Explanation: The Form Driver has just displayed а Debug mode message, and the operator has entered an illegal terminator for this situation.
User Action: The operator must enter one of two keys, RETURN or ENTER, to signal the Form Driver that the Debug message has been seen. The program continues from the point of the error.
Signed numeric required.
Explanation: А valid signed numeric character (0-9, period, comma, plus, minus) is required in the current position. Whether period or comma is accepted as the decimal point depends on the last FDV$DPCOM call. The default is period. No more than one decimal point or sign is allowed in any field with а signed numeric validation character.
User Action: Application documentation should include instructions for completing the field. The character is rejected, and the cursor returns to the position to be entered and the operator may continue entry.
Terminator required.
Explanation: The operator pressed а data key, but the Form Driver requires а terminator in this context, since the input operation results from an FDV$WAIT call.
User Action: Application documentation should include instructions for completing the form. The character is rejected, and the operator may continue entry.
That terminator is legal only in scrolled areas.
Explanation: The current field is nonscrolled, and the operator pressed а terminator key which applies only to scrolled areas (Scroll Forward, Scroll Backward, Exit Scrolled Area Forward, Exit Scrolled Area Backward).
User Action: Application documentation should include instructions for completing the form. The cursor is not moved, and the operator may continue entry.