Guide to Using OmniView
- Software Version:
- VSI OMNI Version 4.1
- Operating System and Version:
- VSI OpenVMS IA-64 Version 8.4-1H1 or higher
VSI OpenVMS Alpha Version 8.4-2L1 or higher
Preface
This guide describes how OmniView can be used to display:
Lists of objects that reside on a Virtual Manufacturing Device (VMD)
The attributes of objects that reside on a VMD
The guide also describes how OmniView can be used to read and write the values of variables that reside on a VMD.
1. About VSI
VMS Software, Inc. (VSI) is an independent software company licensed by Hewlett Packard Enterprise to develop and support the OpenVMS operating system.
2. Intended Audience
This guide is intended primarily for an application developer who uses VSI OMNI to write applications for manufacturing devices; but the guide can also be helpful to a user who wants to quickly obtain information about objects that reside on a selected VMD. The OmniView user should be familiar with terminology used in the Manufacturing Message Specification (MMS) ISO Standard 9506.
3. Document Structure
This guide is structured as follows:
Chapter 1, "Introduction to OmniView" provides an introduction to OmniView.
Chapter 2, "Using OmniView" explains how to use OmniView menus and text fields in conjunction with push buttons to display data associated with VMDs, Program Invocations, Domains, and Variables.
Appendix A, "Appendix A: OmniView Error Messages" lists OmniView error messages.
4. Associated Documents
This document is part of the following online documentation set:
VSI OMNI Application Programmer's Guide
VSI OMNI API Guide to Using OmniView
VSI OMNI Network Manager's Guide
5. OpenVMS Documentation
The full VSI OpenVMS documentation set can be found on the VMS Software Documentation webpage at https://docs.vmssoftware.com.
6. VSI Encourages Your Comments
You may send comments or suggestions regarding this manual or any VSI document by sending electronic mail to the following Internet address: <docinfo@vmssoftware.com>. Users who have VSI OpenVMS support contracts through VSI can contact <support@vmssoftware.com> for help with this product.
7. Conventions
| Convention | Meaning |
|---|---|
|
Return |
Press the Return key. |
| UPPERCASE TYPE |
All uppercase letters in a command line indicate keywords that must be entered. You can enter them in either uppercase or lowercase. You can use the first three characters to abbreviate command keywords, or you can use the minimum unique abbreviation. |
|
lowercase ital- ics |
Lowercase italics in command syntax or examples indicate variables for which either you or the system supplies a value. |
|
[ ] |
In examples showing VMS directory specifications, square brackets are a necessary part of the specification, [directory-name]. In a procedure, square brackets in an inquiry enclose the default response for the inquiry. |
| key |
Press the specified key. |
CTRL/x |
While holding down the Ctrl key, press the key specified
by |
⁝ |
Vertical ellipses (dots) in examples represent data that has been omitted. |
Chapter 1. Introduction to OmniView
This chapter provides an overview of OmniView, explains how to invoke OmniView, and gets you started using OmniView.
Note
To use OmniView, you should have a basic understanding of DECwindows.
1.1. Overview of OmniView
OmniView is a diagnostic tool that uses DECwindows and the VSI OMNI Application Programmer's Interface (API) to display data associated with a Virtual Manufacturing Device (VMD) and to write the values of Variables that reside on a VMD.
For OmniView to access data from a VMD, that VMD must be defined using the Omni Definition Facility (ODF). See the ODF chapter of the VSI OMNI Network Manager's Guide for information about how to define a VMD.
OmniView uses the API routine OMNI$CONNECT to establish connections. As a default, OmniView does not provide a value for the "CallingVMD" parameter; however, you can provide a value by assigning a value to the logical OMNI$VIEW_CALLING_VMD before OmniView is started. All attempts by OmniView to establish connections will use the value of this logical as the Calling VMD. For more information about the OMNI$CONNECT routine, see the VSI OMNI Application Programmer's Guide.
If the value of the logical is not defined in ODF, then OmniView will not start up as usual but will display an appropriate message. The VMD name assigned to OmniView will not appear in OmniView's startup window nor will it appear in the dialog box that is used to establish connections.
The availability of OmniView options (displayed in the OmniView menus) is dependent on the MMS services supported by the selected VMD.
OmniView supports the following MMS services to the degree that VSI OMNI supports them:
Initiate
Conclude
Abort
Identify
Status
GetNameList
GetCapabilityList
GetDomainAttributes
GetProgramInvocationAttributes
GetVariableAccessAttributes
Read
Write
Start
Stop
Reset
For information about these MMS services, see the VSI OMNI Application Programmer's Guide.
1.2. Running OmniView
Once a VMD has been defined by the ODF, you can run OmniView by doing the following:
Determine that VSI OMNI has been started on the node that will run OmniView.
Enter a workstation/DECwindows environment.
- Create a DECterm window and at the DCL prompt ($), enter the following command:
$ run sys$system:omni$view
Note
In a DECwindows environment, you can run applications on remote processors for display in windows on your workstation. Thus you can run an application that demands a large amount of computing power on a processor best suited for that task and display that application in a window on your workstation.
1.3. Getting Started with OmniView
The following sections describe the makeup of the OmniView startup window, how to get a main OmniView window, the components of a main OmniView window, and how to conclude an OmniView session.
1.3.1. The OmniView Startup Window
When you invoke OmniView, the OmniView startup window is displayed.
This startup window displays the set of VMDs that were defined using the Omni Definition Facility (ODF). A scroll bar appears in the window if all defined VMDs are not shown. Use the scroll bar or the resize button to view all the VMDs.
You must select and establish a connection with at least one of the listed VMDs before you can proceed beyond OmniView's startup window.
To connect to a VMD, do the following:
Move the mouse pointer to the VMD name you want and press MB1. (Your VMD choice becomes shaded.).
Click on either the OK button or the Apply button.
If you activate the OK button and make a successful connection to a VMD, your VMD choice is recorded and the OmniView startup window is dismissed. The main OmniView window with a message box then replaces the startup window. The box displays a message that the connection was successfully completed (see Figure 1.1, ''Successful Connection to a VMD''). Click on the Acknowledged button to confirm the success of the VMD connection you made. You are now ready to activate and display data from the connected VMD.
Figure 1.1. Successful Connection to a VMD 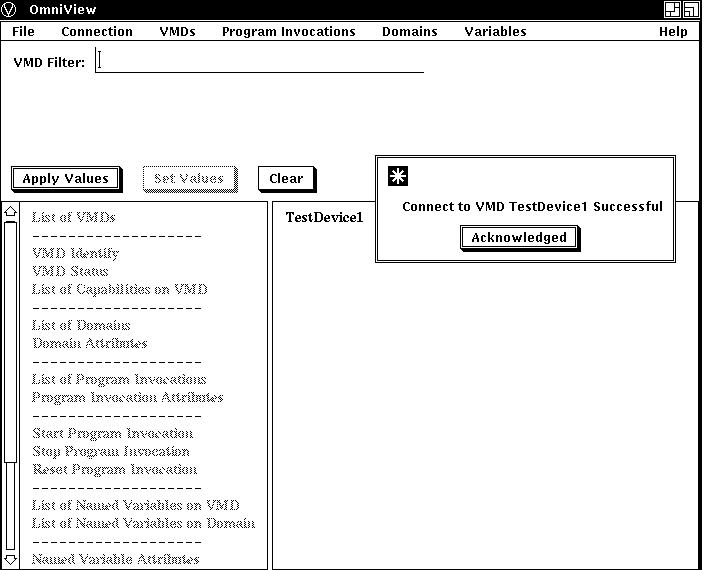
If you activate the OK button and fail to make a successful connection to a VMD, a message box displays a message that the connection was not successfully completed (see Figure 1.2, ''Failure to Connect to a VMD''). Click on the Acknowledged button to confirm the failure of the VMD connection you attempted; then try again to connect to a VMD from the VMD choices in the startup/connect box.
Figure 1.2. Failure to Connect to a VMD 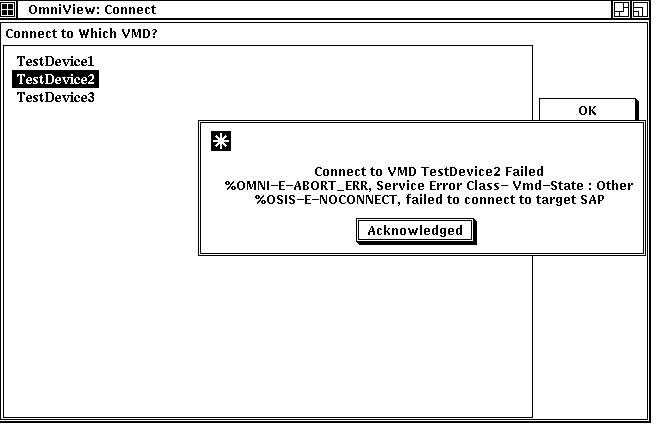
If you click on the Apply button, a message box appears in the OmniView startup window that indicates whether the connection was successful or not. Click on the Acknowledged button to confirm the success or failure of the VMD connection you attempted. After you acknowledge your VMD connection or failure you can select another VMD. The Apply button allows you to establish connections (one at a time) with as many VMDs as required without leaving the OmniView startup window environment.
When you click on the Cancel button, the startup window disappears and is replaced by the main OmniView window, as seen in Figure 1.3, ''Parts of an OmniView Window'', if at least one connection has been established. The OmniView window is shown and described in Section 1.3.2, ''Viewing the OmniView Window''.
Figure 1.3. Parts of an OmniView Window 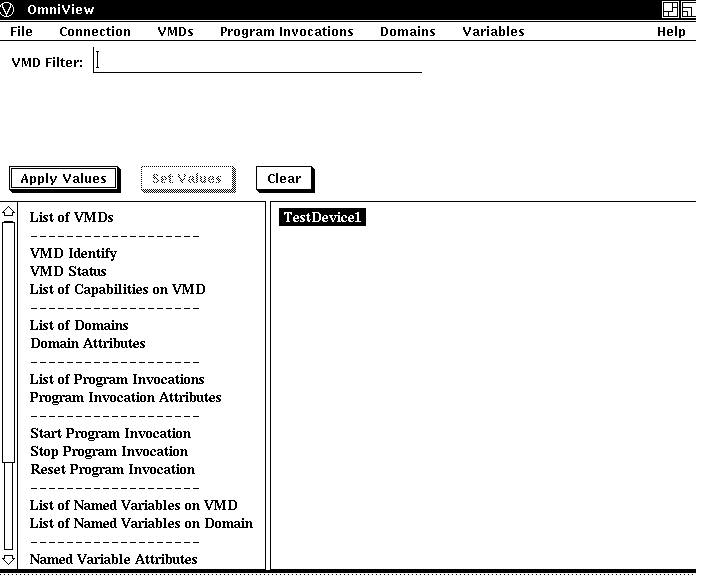
1.3.2. Viewing the OmniView Window
After you have made at least one connection to a VMD and you have exited from the startup window, a main OmniView window, as shown in Figure 1.3, ''Parts of an OmniView Window'' is displayed.
The OmniView window in Figure 1.3, ''Parts of an OmniView Window'' includes the following elements:
The menu bar contains the names of menus you can choose to examine data related to the VMDs listed in the window. The menu bar choices are File, Connection, VMDs, Program Invocations, Domains, Variables, and Help.
The pull-down menus related to each of the menu bar choices allow you to do the following:
File - Quits an OmniView session.
Connection - Creates, concludes, or aborts a VMD connection.
VMDs - Lists Domains, PIs, and Variables resident on the selected VMD, displays the list of capabilities resident on the selected VMD, displays the Status and Identification of the selected VMD, and lists all VMDs with which there is a connection.
Note
A selected (or chosen) object means that the name of the object is one of the following: .Highlighted by a mouse click
Shown in the text field at the top of the OmniView window
Entered in a dialog box by the user
Program Invocations (PIs) - Lists PIs resident on the selected VMD, displays attributes of the chosen PI, and starts, stops, or resets the chosen PI.
Domains - Lists Domains resident on the selected VMD, lists Variables resident on the selected Domain, and lists attributes of the selected Domain.
Variables - Reads the value of the chosen Variable, writes the value of the chosen Variable, displays attributes of the chosen Variable, and lists Variables resident on the selected VMD.
Help - Gives OmniView help.
The VMD Filter text bar can list a subset of the VMDs selected. You can enter a VMD name in this text bar and activate the Apply Values or Set Values push buttons accordingly.
Note
The number and type of text fields displayed will change depending on the VMD component you monitor. See Chapter 2, "Using OmniView" for more details.
The Apply Values button performs the following functions:
It reexecutes the last completed function for the values displayed in the text fields.
For example, you can view Domain Attributes on VMD_1. After you view those attributes, you can change the name of the VMD in the VMD text field and the value of the Domain in the Domain text field and then activate the Apply Values button. As a result, the Domain Attributes function is re-executed for the newly specified Domain and VMD.
It saves the values in the text fields.
The values in the text fields are in effect only after the Apply Values button (or the Set Values button) is activated. When a new VMD and associated values are saved, the side-bar menu choices may be altered - that is, those menu choices highlighted after the save could be different than those highlighted before the save, since choices are highlighted based on what a specific VMD supports.
The Set Values button performs the same save function as the Apply Values button, but it does not re-execute the last completed function as the Apply Values button does. Use this button, instead of the Apply Values button, if you want to determine whether a specific VMD supports a function that you want to execute.
The Set Values button is sensitive, except when viewing a list of VMDs.
The Clear button clears all visible text fields.
The side-bar menu (left side of the window) contains a list of VMD and VMD component selections.
You can choose any of the darkened options to examine data related to the VMDs listed in the window. The contents of the side-bar menu indicate what is supported by OmniView. The darkened choices indicate what is supported by the selected VMD. No choices are darkened unless a VMD is selected. OmniView bases what is darkened on the set of services supported by the selected VMD. The set of services supported by a VMD is determined when when a connection to that VMD is made.
Note
No menu bar choices are selectable if a VMD is not selected. Selection of pulldown menu choices follow the same rules as side-bar options.
The work section of the window (right side of the window) is where data is displayed. Data in this section is selectable only if viewing a list of names. The OmniView window in Figure 1.3, ''Parts of an OmniView Window'' displays TestDevice1 for which a connection currently exists.
Note
OmniView does not display popup menus.
Figure 1.4, ''OmniView Pull-Down Menus'' displays all the pull-down menus that are available from the OmniView menu bar choices.

1.3.3. Concluding an OmniView Connection
After at least one VMD connection is made, you can conclude or abort that connection by selecting the Connection choice from the menu bar and by clicking on either the Conclude or Abort choice in the pull-down menu.
1.3.4. Exiting an OmniView Session
The following sections explain how to quit or exit an OmniView session.
1.3.4.1. Exiting an OmniView Session Before Making a VMD Connection
Before you connect to a VMD, you can conclude an OmniView session by clicking on the Cancel button in the startup window.
When you click on the Cancel button, a dialog box is displayed, as shown in Figure 1.5, ''Exiting an OmniView Session Before Connecting to a VMD''. The dialog box asks if you wish to continue the session. If you click on the No button in the dialog box, the system returns you to the DCL prompt ($).
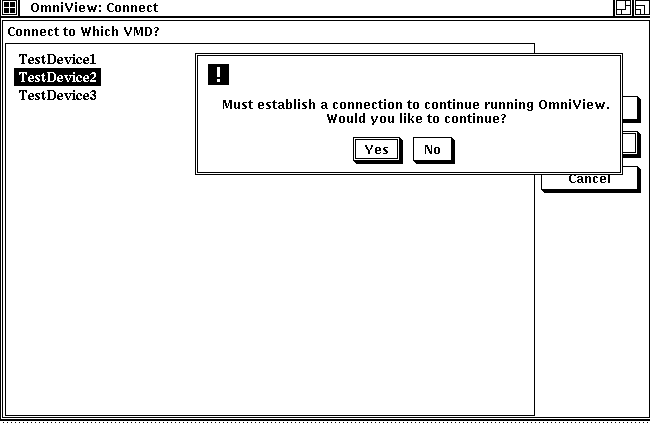
1.3.4.2. Exiting an OmniView Session After Connecting to a VMD
After you make one or more VMD connections, you can quit the OmniView session by selecting the File menu choice and clicking on the Quit option. This option aborts all VMD connections and the system returns you to the DCL prompt ($).
Chapter 2. Using OmniView
This chapter explains how to use OmniView to display lists of objects on a VMD or Domain and attributes of an object that resides on a VMD. The chapter also explains how to use OmniView to read and write Variables.
2.1. Viewing a List of Objects on a VMD or Domain
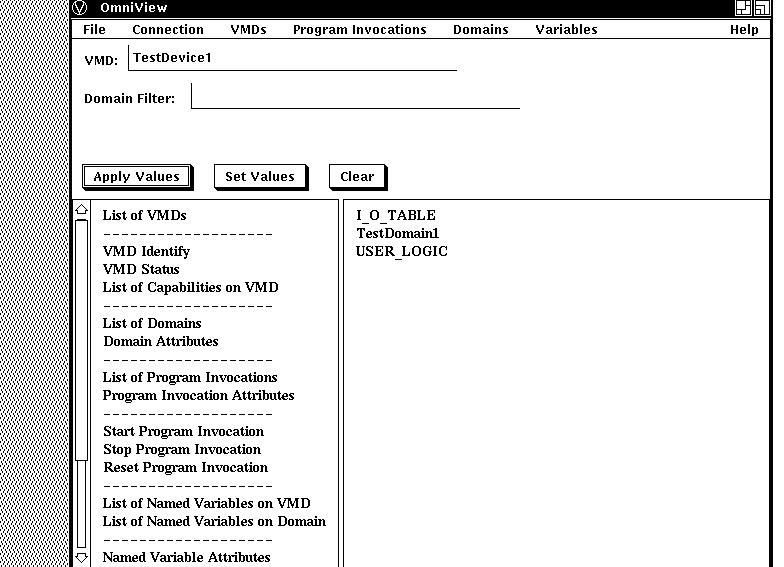
After you connect to a VMD, you can view objects related to that VMD. For example, to view the set of Domains on TestDevice1 click on the List of Domains in the side-bar menu or press and hold MB1 on the VMD or Domains menu bar choice. Each choice provides pull-down menu options to view Domains.
Figure 2.1, ''Viewing a List of Domains'' shows an OmniView window that displays the List of Domains of TestDevice1. The VMD name, TestDevice1, is automatically listed in the VMD text field. The Domains are: I_O_TABLE, TestDomain1, TestDomain2, and USER_LOGIC.
 |
2.1.1. Viewing Variables on a Domain
To view a set of Variables that reside on a specific Domain, click on the appropriate menu bar or side-bar menu choice for viewing Variables.
For example, you can view the List of Named Variables on a Domain by selecting a Domain (such as P3_DOMAIN) and then choosing the List of Named Variables on a Domain option from the side-bar menu.
Figure 2.2, ''Viewing a List of Variables'' shows an OmniView window that displays the List of Named Variables on Domain P3_DOMAIN.
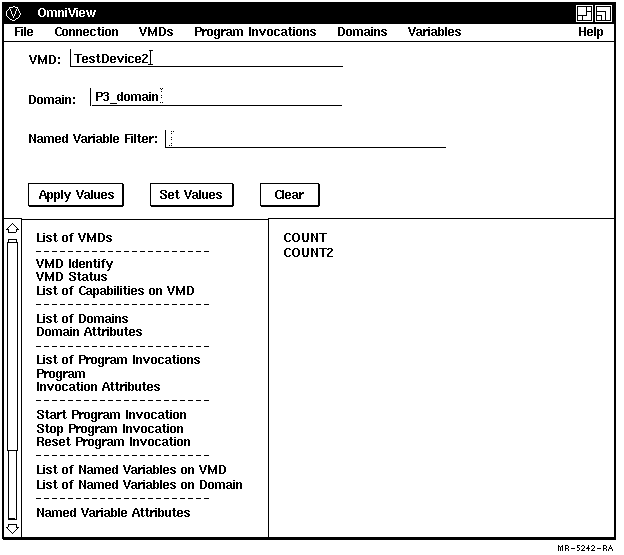
The name of the Domain (P3_DOMAIN) you selected to examine is automatically inserted into the Domain text field. This Domain text field is automatically displayed when you examine a Domain. Since Variables are being displayed, a Variable filter is also automatically displayed.
2.2. Viewing Object Attributes
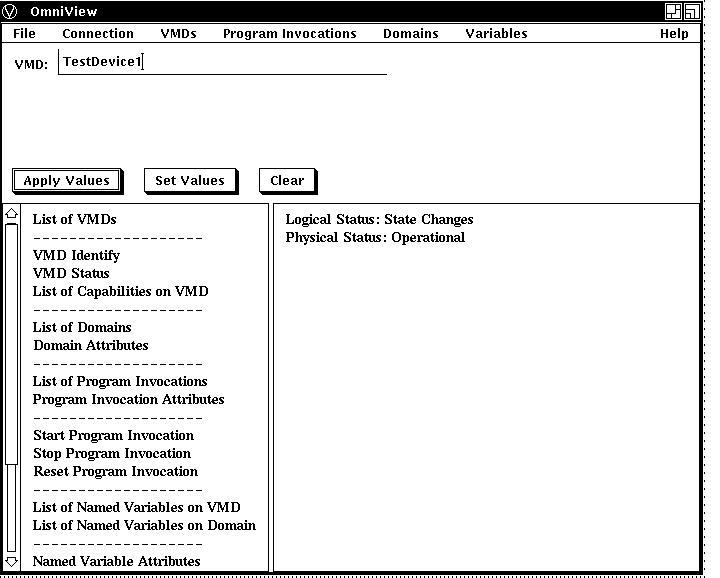
To display the values of the attributes returned by VMD- specific MMS services such as Identify, Status, and GetCapabilityList, choose the appropriate VMD option from the side-bar menu or from the VMD pull-down menu.
Figure 2.3, ''VMD Status Option'' shows the result of choosing the Status option for TestDevice1.
To view the values of the attributes of a Domain, Program Invocation, or Variable, do one of the following:
Press and hold down the appropriate pull-down menu choice.
Click on the appropriate side-bar choice.
Double-click MB1 on the name of an object displayed in the work window (if a list of names is being viewed).
For example, when viewing the set of Program Invocations on a VMD, double-click on a specific Program Invocation to see its attributes.
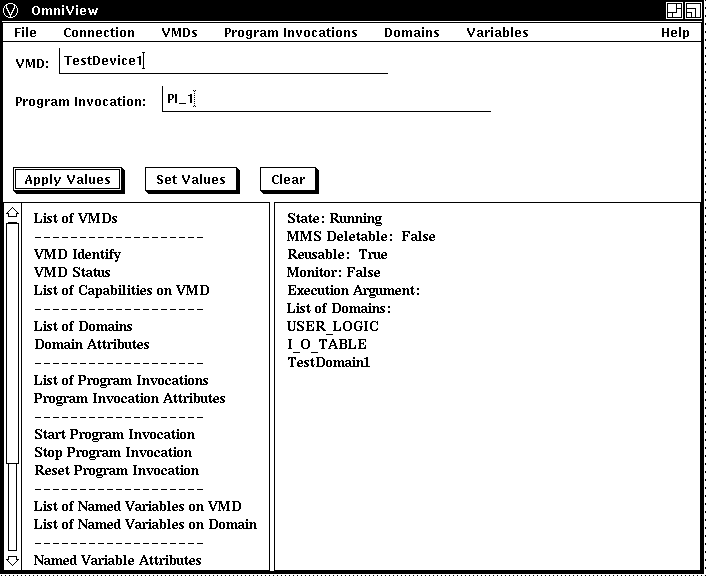
Figure 2.4, ''List of Program Invocations on TestDevice1'' shows the Program Invocation on TestDevice1. If you double-click on PI_1, OmniView updates the work area as shown in Figure 2.5, ''List of Program Invocation Attributes''.
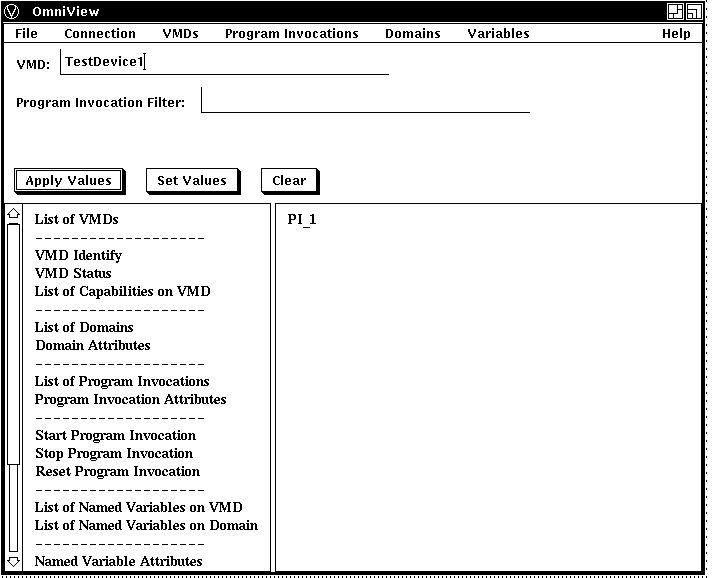
Figure 2.5, ''List of Program Invocation Attributes'' displays the attributes of Program Invocation PI_1. A Program Invocation text field is automatically created with the name of the Program Invocation being viewed listed in it.
OmniView also supports the MMS services Start, Stop, and Reset.
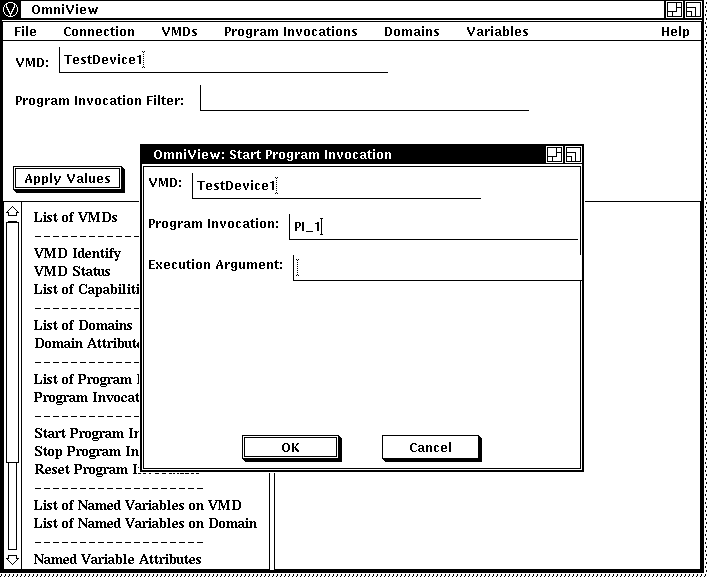
Figure 2.6, ''Start Program Invocation'' displays the popup dialog box that appears when the "Start Program Invocation" option is selected. Enter an execution argument to manipulate the PI.
2.2.1. Viewing Unnamed Variable Attributes
To view Unnamed Variable Attributes as shown in Figure 2.7, ''Viewing Unnamed Variable Attributes'' you must specify the address type and address value in the OmniView pop-up dialog box that appears when you select the Unnamed Variable Attributes choice from the side-bar menu or from the Variables pull down menu.
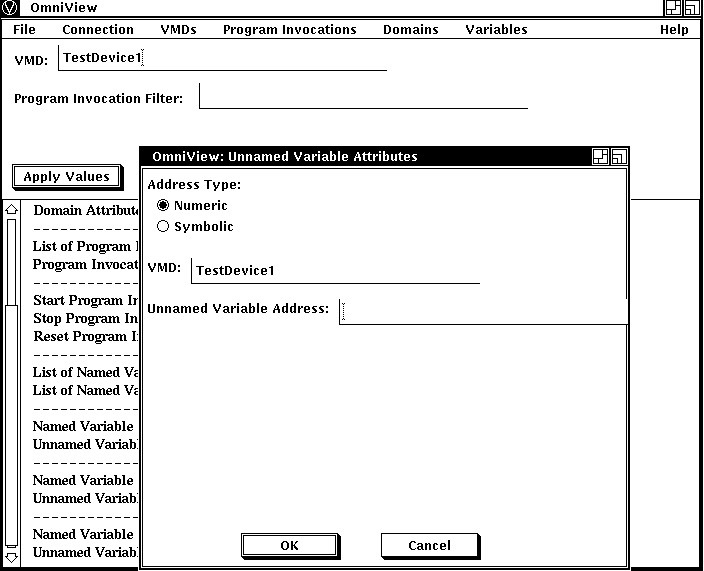
In the Unnamed Variable Attributes screen, the following guidelines apply.
Radio buttons are used to specify the address type.
The address type is Numeric or Symbolic. OmniView provides the Numeric address type by default.
When an Unnamed Variable Attributes window is displayed, the name of the selected VMD appears in the VMD text field.
Enter the address of the Unnamed Variable in the text field labeled Unnamed Variable Address.
After the value is entered, click on the OK button or press Return. If the operation succeeds, you are returned to an OmniView main window where information about the Unnamed Variable is displayed. If the operation fails, a message box appears with text that indicates the operation has failed.
The Apply button can be used to view the attributes of other Unnamed Variables only while you are viewing Unnamed Variable Attributes.
When you use the Apply button with Unnamed Variable Attributes, the address type is not changed. OmniView uses the address type that it has stored after a successful Unnamed Variable Attributes operation.
The initial address type selected is stored by OmniView and is used as the address type until you:
select another address type in the Unnamed Variable Attribute dialog box;
update another address value in the Unnamed Variable Attributes dialog box, if necessary;
click OK;
have an operation that succeeds.
2.3. Reading and Writing Variables with OmniView
You can use OmniView to read and write Named and Unnamed Variables on a selected VMD.
2.3.1. Reading Variables with OmniView
If you know which Named Variable you want to read, you can select the Read pull-down menu under the Variables menu bar choice or the Named Variable Read side-bar option. When OmniView displays the window as shown in Figure 2.8, ''Named Variable Read'' enter the name of the Variable you want to read.
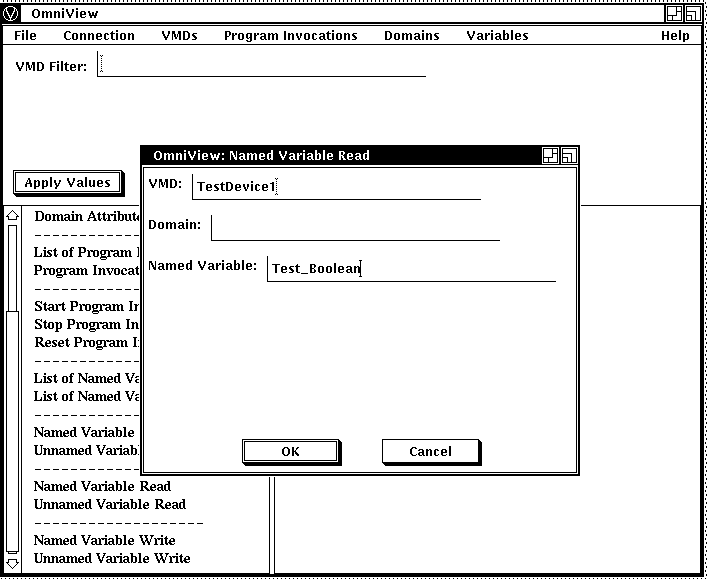
After you enter the name of the Named Variable and activate the OK button, OmniView displays a window with the Named Variable's type and value displayed as shown in Figure 2.9, ''Results of Named Variable Read''.
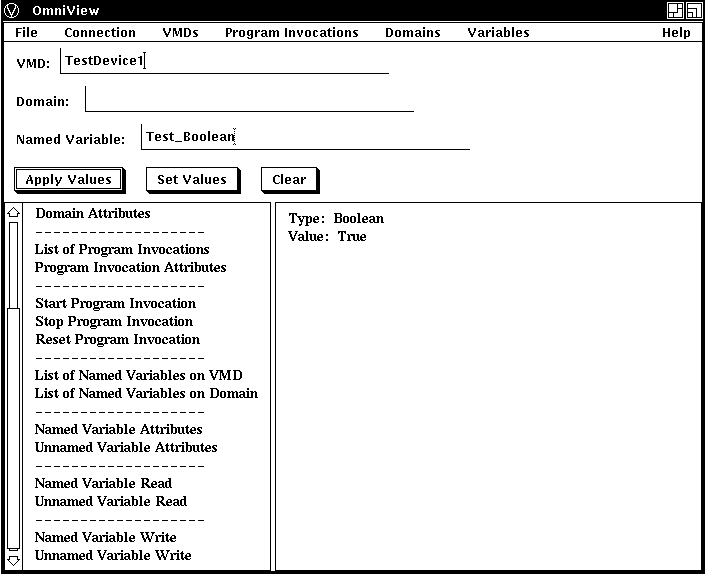
If you are not sure which Named Variables reside on a selected VMD, press and hold MB1 on the Variables menu choice and select the 'Variables on VMD' choice, or click on the 'List of Named Variable on VMD' side-bar option.
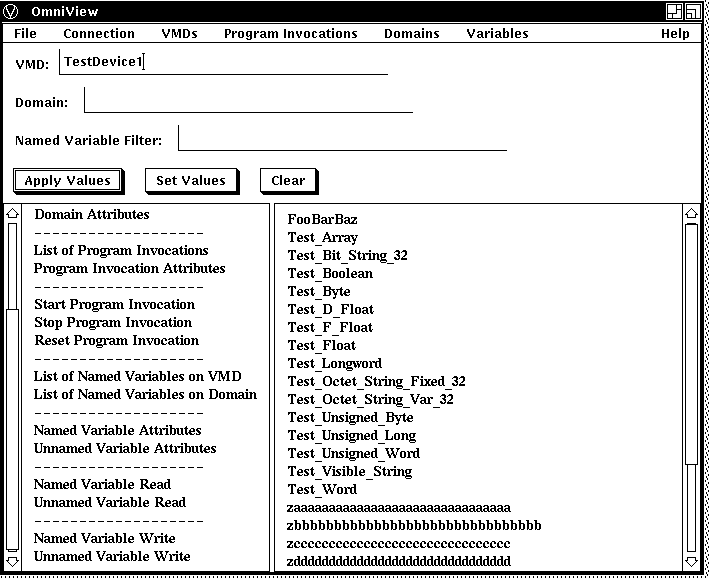
An OmniView window is displayed. It has a list of the Named Variables associated with a selected VMD. You can select one of these Variables and then select the Read pull-down menu under Variables, or select the Named Variable Read option in the side-bar menu to get the type and value of that Variable.
Figure 2.10, ''List of Named Variables'' shows an OmniView window with a list of Named Variables displayed.
To read an Unnamed Variable, select either the Unnamed Variable Read side-bar choice or the Unnamed Variable Read pull-down menu option under the Variables menu bar choice. OmniView displays a window as shown in Figure 2.11, ''Unnamed Variable Read''.
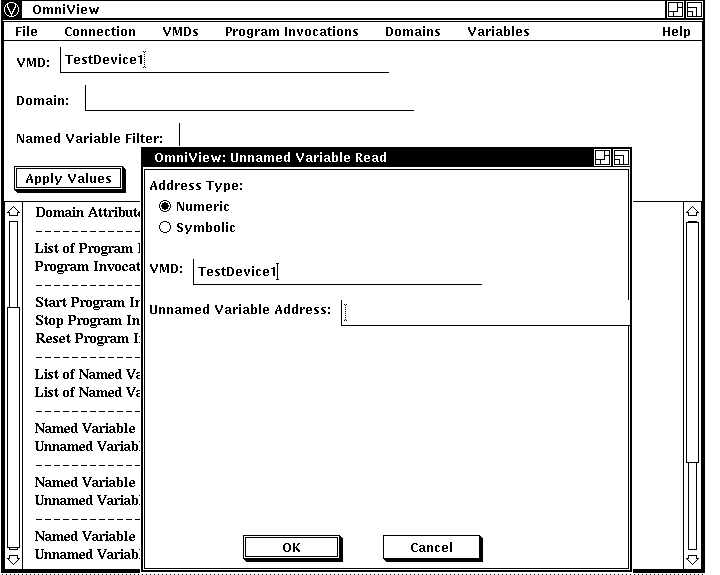
In the Unnamed Variable Read screen, the following guidelines apply:
Radio buttons are used to specify the address type.
The address type is Numeric or Symbolic. OmniView provides the Numeric address type by default.
When an Unnamed Variable Read window is displayed, the name of the selected VMD appears in the VMD text field.
Enter the address of the Unnamed Variable in the text field labeled Unnamed Variable Address.
After the value is entered, click on the OK button or press Return. If the operation succeeds, you are returned to an OmniView main window where information about the Unnamed Variable is displayed. If the operation fails, a message box appears with text that indicates the operation has failed.
The Apply button can be used to read Unnamed Variables only while you are reading Unnamed Variables.
When you use the Apply button with Unnamed Variable Attributes, the address type is not changed. OmniView uses the address type that it has stored after a successful Unnamed Variable Attributes operation.
The initial address type selected is stored by OmniView and is used as the address type until you: 1) select another address type in the Unnamed Variable Attribute dialog box; 2) update another address value in the Unnamed Variable Attributes dialog box, if necessary; 3) click on OK; and 4) have an operation that succeeds.
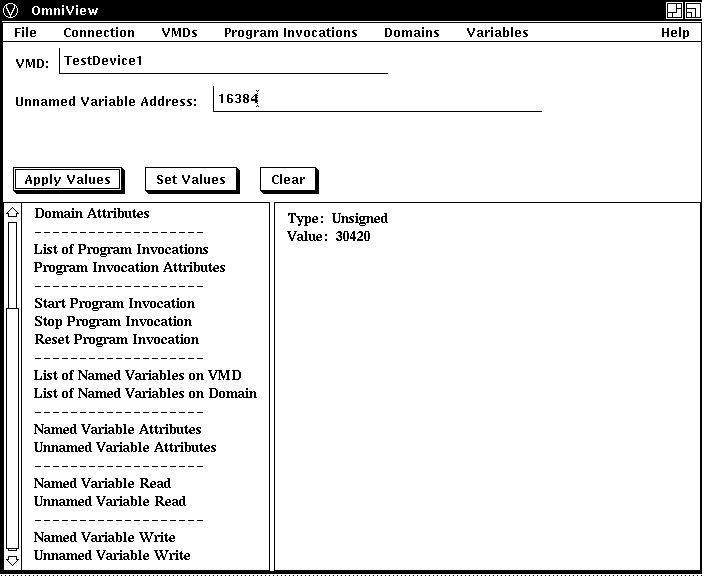
When you enter the address of the Unnamed Variable and activate the OK button, OmniView displays the type and value of the Unnamed Variable as shown in Figure 2.12, ''Unnamed Variable Read Result''.
2.3.1.1. Guidelines for Reading Variables
The following guidelines apply to reading variables:
Arrays are displayed recursively.
Variables of type Boolean have a value of True or False, and non-zero values are interpreted as True.
Octet strings are displayed with a hexadecimal equivalent for each byte. Bytes are separated by a space.
An Unnamed Variable read follows the same Apply button rules as those for Unnamed Variable Attributes.
2.3.2. Writing Variables with OmniView
To write a new value to a Named Variable on a selected VMD, you can press and hold MB1 on the Variables menu bar choice to get the Write Named Variable option, or click on the Named Variable Write side-bar option.
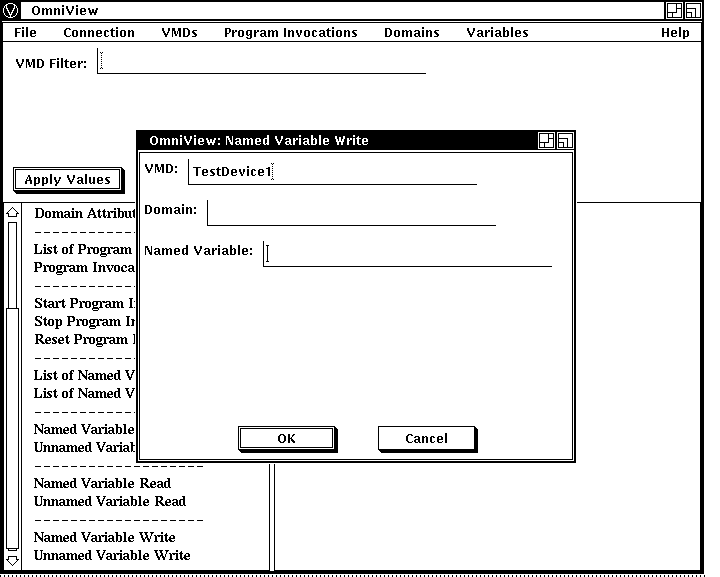
When you select the Named Variable option under the Variables menu bar choice or the Named Variable Write side-bar option, OmniView displays a window as shown in Figure 2.13, ''Named Variable Write Window'' that prompts you for the name of the Variable.
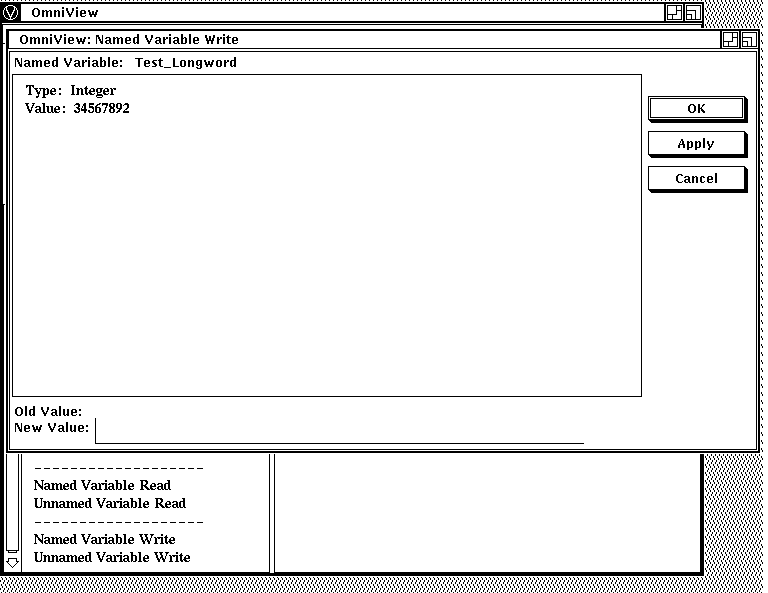
After you enter the name of the Variable and activate the OK button, OmniView displays a new window as shown in Figure 2.14, ''Enter Named Variable Write Value''. Select the value you wish to change, enter a new value for the Named Variable, and activate the Apply or OK button. The new value becomes the current value. If the Write operation succeeds, the value of the Variable as shown in the dialog box is updated.
 |
To change the value of an Unnamed Variable, select the Unnamed Variable Write side-bar option or choose Write Unnamed Variables from the Variables pulldown menu choice. OmniView then displays the window as shown in Figure 2.15, ''Unnamed Variable Write''.
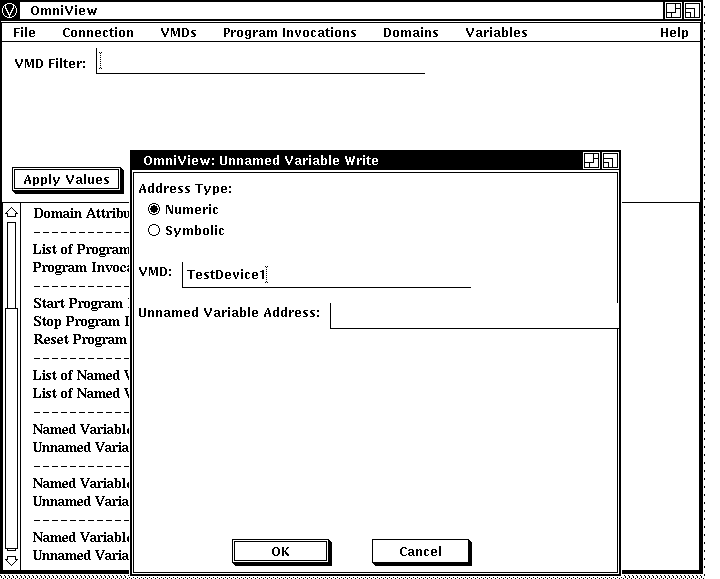
Radio buttons are used to specify the address type.
The address type is Numeric or Symbolic. OmniView provides the Numeric address type by default.
When an Unnamed Variable Write window is displayed, the name of the selected VMD appears in the VMD text field.
Enter the address of the Unnamed Variable in the text field labeled Unnamed Variable Address.
After the value is entered, click on the OK button or press Return.
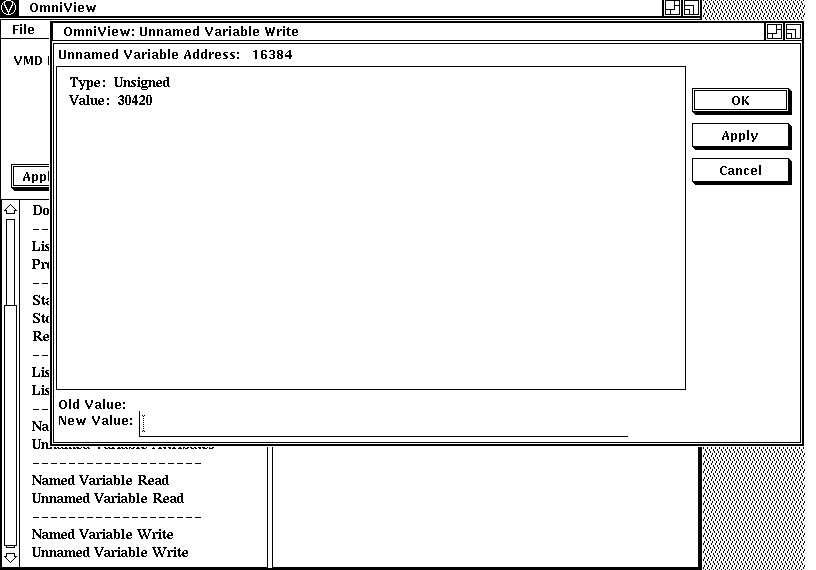
When you enter an appropriate address, OmniView displays a window as shown in Figure 2.16, ''Unnamed Variable Write Result''.
The address, type, and current value of the Variable are shown. Select the value listed in the window, then enter the new value and activate the OK or Apply button. The new value becomes the current value.
 |
2.3.2.1. Guidelines for Writing Variables
The following guidelines apply to writing variables:
Bitstrings and octet strings must be entered in their entirety.
Octet strings should be entered with hexadecimal equivalent for each byte, with a space between each byte. Each byte should be represented by two digits. If the hexadecimal equivalent is less than ten (10), a zero should precede the hexadecimal value. For example, a byte that has a hexidecimal equivalent of "A" should be entered as "0A".
Make a Boolean value False by entering a single zero with any number of spaces preceding it. Any other value is interpreted as True.
In MMS, octet strings and visible strings can be of varying length. A Variable read cannot indicate whether the length is fixed or varying. OmniView will permit the user to enter a value of any length, provided it is less than or equal to OMNI$K_OCTET_STR_WC_MAX or OMNI$K_VISIBLE_STRING_MAX (in OMNI$DEFS). It is up to the device to reject the value.
Unless the type of Variable is a Visible String, OmniView removes all whitespaces from the front of the input value.
An integer may be 8, 16, or 32 bits. When an integer is read, OmniView recognizes it only as an integer. OmniView cannot check the input value to determine if the Variable on the device is large enough to accommodate the user's value. The value is checked to ensure that it is between zero (0) and 231 - 1 if it is unsigned and between - 231 and 231 - 1 if it is signed.
Appendix A. Appendix A: OmniView Error Messages
OmniView returns the subset of VSI OMNI error messages that are listed in Table A-1.
| OmniView Error | OmniView Message |
|---|---|
| INITIATE_REJECT | Initiate rejected |
| INITFAIL | Initiate Request Failed |
| INITIATE_ERR | Initiate Error |
| INITIATE_CNF_ERR | Initiate Confirm Error |
| VERSION_INCOMPATIBLE | Service Error Class- Initiate: Version Incompatible |
| MAX_SEGMENT_INSUFF | Service Error Class- Initiate: Max Seg Insufficient |
| MAX_SVCS_OUT_SRC_INSUFF | Service Error Class- Initiate: Max Svcs Out Calling In |
| MAX_SVCS_OUT_DEST_INSUFF | Service Error Class- Initiate: Max Svcs Out Called In |
| SVC_CBB_INSUFF | Service Error Class- Initiate: Svc Cbb Insufficient |
| PARAMETER_CBB_INSUFF | Service Error Class- Initiate: Param Cbb Insufficient |
| NESTING_LEVEL_INSUFF | Service Error Class- Initiate: Nesting Level Insufficient |
| OTHER_INITIATE | Service Error Class- Initiate: Other |
| INITIATE_ERR_IND_ERR | Initiate Error Indication Error |
| CONCLUDE_REJECTED | Conclude rejected |
| CONCLUDE_RSP_ERR | Conclude Error |
| CONCLUDE_RSP_FINISH_ERR | Conclude Response Error |
| CONCLUDE_ERR_IND_ERR | Conclude Error Indication Error |
| CONCLUDE_CNF_FINISH_ERR | Conclude Confirm Finish Error |
| ABORT_ERR | Service Error Class- Vmd-State : Other |
| ABORT_IND_ERR | Abort Indication Error |
| NOT_FOUND | Can not locate specified object |
| GETDOMATTR_REQ_ERR | Get Domain Attributes Request Service Error |
| GETDOMATTR_CNF_ERR | Get Domain Attributes Confirmation Service Error |
| GETPIATTR_REQ_ERR | Get Program Invocation Attributes Request Service Error |
| GETPIATTR_CNF_ERR | Get Program Invocation Attributes Confirmation Service |
| GET_NAME_LIST_REQ_ERR | Get Name List Request Error |
| GET_NAME_LIST_CNF_ERR | Get Name List Confirm Error |
| GET_ATTR_REQ_ERR | Get Attribute Request Error |
| GET_ATTR_CNF_ERR | Get Attribute Confirm Error |
| STATUS_REQ_ERR | Status Request Error |
| STATUS_CNF_ERR | Status Confirm Error |
| IDENTIFY_CNF_ERR | Identify Confirm Error |
| IDENTIFY_REQ_ERR | Identify Request Error |
| GET_CAPABILITY_REQ_ERR | Get Capability List Request Error |
| GET_CAPABILITY_CNF_ERR | Get Capability List Confirm Error |
| CONNECTION_LOST | Service Error Class- Applic Ref: Connection Lost |
| NOCONN | There is no connection with the remote device |