VSI OpenVMS DEC Text Processing Utility User Guide
- Operating System and Version:
- VSI OpenVMS Alpha Version 8.4-2L1 or higher
Preface
1. About VSI
VMS Software, Inc. (VSI) is an independent software company licensed by Hewlett Packard Enterprise to develop and support the OpenVMS operating system.
2. About the Guide
This manual discusses the DEC Text Processing Utility (DECTPU).
3. Intended Audience
This manual is for experienced programmers who know at least one computer language, as well as for new users of DECTPU. Some features of DECTPU, for example, the callable interface and the built-in procedure FILE_PARSE, are for system programmers who understand VSI OpenVMS operating system concepts. Relevant documents about the VSI OpenVMS operating system are listed under Related Documents.
4. Document Structure
Chapter 1 contains an overview of DECTPU.
Chapter 2 describes how to invoke DECTPU.
Chapter 3 provides detailed information on DECTPU data types.
Chapter 4 discusses the lexical elements of DECTPU. These include the character set, identifiers, variables, constants, and reserved words, such as DECTPU language statements.
Chapter 5 describes DECTPU program development.
Appendix A contains sample procedures written in DECTPU.
Appendix B describes terminals supported by DECTPU.
Appendix C lists commands for debugging DECTPU.
5. Related Documents
For additional information about VSI OpenVMS products and services, please visit
the VMS
Software website at
https://vmssoftware.com or contact
us at <info@vmssoftware.com>.
6. OpenVMS Documentation
The full VSI OpenVMS documentation set can be found on the VMS Software Documentation webpage at https://docs.vmssoftware.com.
7. VSI Encourages Your Comments
You may send comments or suggestions regarding this manual or any VSI document by sending electronic mail to the following Internet address: <docinfo@vmssoftware.com>. Users who have VSI OpenVMS support contracts through VSI can contact <support@vmssoftware.com> for help with this product.
8. Conventions
| Convention | Meaning |
|---|---|
|
Ctrl/x |
A sequence such as Ctrl/x indicates that you must hold down the key labeled Ctrl while you press another key or a pointing device button. |
|
PF1 x |
A sequence such as PF1 x indicates that you must first press and release the key labeled PF1 and then press and release another key or a pointing device button. |
... |
A horizontal ellipsis in examples indicates one of the
following possibilities:
|
|
A vertical ellipsis indicates the omission of items from a code example or command format; the items are omitted because they are not important to the topic being discussed. |
|
( ) |
In command format descriptions, parentheses indicate that you must enclose the options in parentheses if you choose more than one. |
|
[ ] |
In command format descriptions, brackets indicate optional choices. You can choose one or more items or no items. Do not type the brackets on the command line. However, you must include the brackets in the syntax for VSI OpenVMS directory specifications and for a substring specification in an assignment statement. |
|
[ | ] |
In command format descriptions, vertical bars separate choices within brackets or braces. Within brackets, the choices are options; within braces, at least one choice is required. Do not type the vertical bars on the command line. |
|
{ } |
In command format descriptions, braces indicate required choices; you must choose at least one of the items listed. Do not type the braces on the command line. |
|
bold text |
This typeface represents the introduction of a new term. It also represents the name of an argument, an attribute, or a reason. |
|
italic text |
Italic text indicates important information, complete titles of manuals, or variables. Variables include information that varies in system output (Internal error number), in command lines (/PRODUCER= name), and in command parameters in text (where dd represents the predefined code for the device type). |
|
UPPERCASE TEXT |
Uppercase text indicates a command, the name of a routine, the name of a file, or the abbreviation for a system privilege. |
|
|
Monospace type indicates code examples and interactive screen displays. In the C programming language, monospace type in text identifies the following elements: keywords, the names of independently compiled external functions and files, syntax summaries, and references to variables or identifiers introduced in an example. |
- |
A hyphen at the end of a command format description, command line, or code line indicates that the command or statement continues on the following line. |
|
numbers |
All numbers in text are assumed to be decimal unless otherwise noted. Nondecimal radixes—binary, octal, or hexadecimal—are explicitly indicated. |
Chapter 1. Overview of the DEC Text Processing Utility
This chapter presents information about the DEC Text Processing Utility (DECTPU). The chapter includes the following:
A description of DECTPU
A description of DECwindows DECTPU
A description of the Extensible Versatile Editor (EVE)
Information about the DECTPU language
Information about the hardware that DECTPU supports
How to learn more about DECTPU
1.1. Description of DECTPU
DECTPU is a high-performance programmable text processing utility that includes the following:
A high-level procedural language
A compiler
An interpreter
Text manipulation routines
Integrated display managers for the character-cell terminal and DECwindows environments
The Extensible Versatile Editor (EVE) interface, which is written in DECTPU
DECTPU is a procedural programming language that enables text processing tasks; it is not an application.
1.1.1. DECTPU Features
DECTPU aids application and system programmers in developing tools that manipulate text. For example, programmers can use DECTPU to design an editor for a specific environment.
DECTPU provides the following special features:
Multiple buffers
Multiple windows
Multiple subprocesses
Keystroke and buffer-change journaling
Text processing in batch mode
Insert or overstrike text entry
Free or bound cursor motion
Learn sequences
Pattern matching
Key definition
Procedural language
Callable interface
1.1.2. DECTPU and User Applications
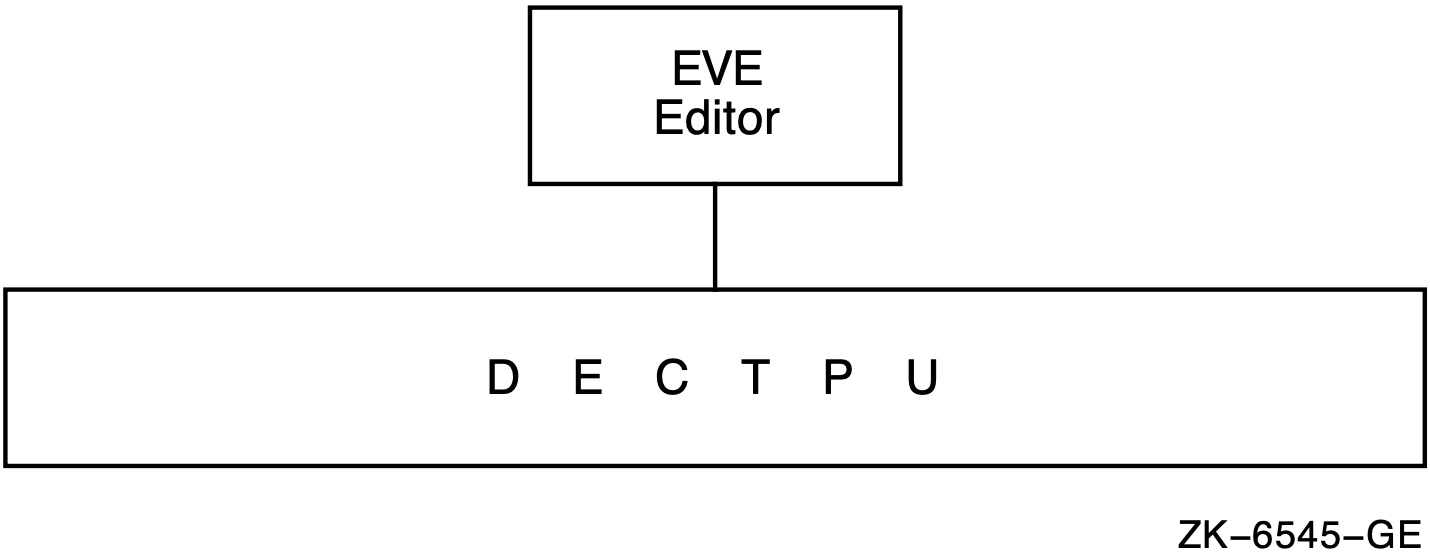
DECTPU is a language that you can use as a base on which to layer text processing applications. When you choose an editor or other application to layer on DECTPU, that becomes the interface between you and DECTPU. You can also create your own interface to access DECTPU.
Figure 1.1 shows the relationship of DECTPU with EVE as its user interface.
1.1.3. DECTPU Environments
You can use DECTPU on the OpenVMS VAX and OpenVMS Alpha operating systems.
You can display text in two environments:
Character-cell terminals
Bit-mapped workstations running the DECwindows software
1.2. Description of DECwindows DECTPU
DECTPU supports the VSI DECwindows Motif for OpenVMS user interface. The variant of DECTPU that supports window-oriented user interfaces is known as DECwindows DECTPU. The windows referred to as DECwindows are not the same as DECTPU windows. For more information about the difference between DECwindows and DECTPU windows, see Chapter 5.
Because DECTPU is a language, not an application, DECTPU does not have a window-oriented interface. However, DECTPU does provide built-in procedures to interact with the DECwindows Motif environment. (For information on invoking DECTPU on systems running DECwindows Motif, see Chapter 2.)
1.2.1. DECwindows DECTPU and DECwindows Features
The DECwindows environment has a number of toolkits and libraries that contain routines for creating and manipulating DECwindows interfaces. DECwindows DECTPU contains a number of built-in procedures that provide access to the routines in the DECwindows libraries and toolkits.
With these procedures, you can create and manipulate various features of a DECwindows interface from within a DECTPU program. In most cases, you can use DECTPU DECwindows built-in procedures without knowing what DECwindows routine a given built-in procedure calls. For a list of the kinds of widgets you can create and manipulate with DECTPU built-in procedures, see Chapter 5.
You cannot directly call DECwindows routines (such as X Toolkit routines) from within a program written in the DECTPU language. To use a DECwindows routine in a DECTPU program, use one or more of the following techniques:
Use a DECTPU built-in procedure that calls a DECwindows routine. Examples of such DECTPU built-in procedures include the following:
CREATE_WIDGET
DELETE (WIDGET)
MANAGE_WIDGET
REALIZE_WIDGET
SEND_CLIENT_MESSAGE
SET (CLIENT_MESSAGE)
SET (DRM_HIERARCHY)
SET (ICON_NAME)
SET (ICON_PIXMAP)
SET (MAPPED_WHEN_MANAGED)
SET (WIDGET)
SET (WIDGET_CALL_DATA)
SET (WIDGET_CALLBACK)
UNMANAGE_WIDGET
For more information about how to use the DECwindows built-ins in DECTPU, see the individual built-in descriptions in the DEC Text Processing Utility Reference Manual.
Use a compiled language that follows the OpenVMS calling standard to write a function or a program that calls the desired routine. You can then invoke DECTPU in one of the following ways:
Use the built-in procedure CALL_USER in your DECTPU program when the program is written in a non-DECTPU language. For more information about using the built-in procedure CALL_USER, see the DEC Text Processing Utility Reference Manual.
Use the DECTPU callable interface to invoke DECTPU from the program. For more information about using the DECTPU callable interface, see the VSI OpenVMS Utility Routines Manual.
The DECwindows version of DECTPU does not provide access to all of the features of DECwindows. For example, there are no DECTPU built-in procedures to handle floating-point numbers or to manipulate entities such as lines, curves, and fonts.
With DECwindows DECTPU, you can create a wide variety of widgets, designate callback routines for those widgets, fetch and set geometry and text-related resources of the widgets, and perform other functions related to creating a DECwindows application. For example, the DECwindows EVE editor is a text processing interface created with DECwindows DECTPU.
1.2.2. DECwindows DECTPU and the DECwindows User Interface Language
You can use DECTPU programs with DECwindows User Interface Language (UIL) files just as you would use programs in any other language with UIL files. For an example of a DECTPU program and a UIL file designed to work together, see the description of the CREATE_WIDGET built-in in the DEC Text Processing Utility Reference Manual. For more information about using UIL files in conjunction with programs written in other languages, see the VMS DECwindows Guide to Application Programming.
1.3. Description of EVE
The Extensible Versatile Editor (EVE) is the editor provided with DECTPU. EVE is easy to learn and to use. You can access many of EVE’s editing functions by pressing a single key on the keypad. EVE is also a powerful and efficient editor, which makes it attractive to experienced users of text editors. You can access more advanced editing functions by entering commands on the EVE command line. Many of the special features of DECTPU (such as multiple windows) are available with EVE commands. You can access other DECTPU features by entering DECTPU statements from within EVE.
EVE has both a character-cell and a DECwindows interface. To use EVE’s DECwindows interface, you must be using a bit-mapped terminal or workstation.
Although EVE is a fully functional editor, it is designed to make customization easy. You can use either DECTPU statements or EVE commands to tailor EVE to your editing style.
You can write extensions for EVE or you can write a completely separate interface for DECTPU. Figure 1.2 shows the interface choices for DECTPU.
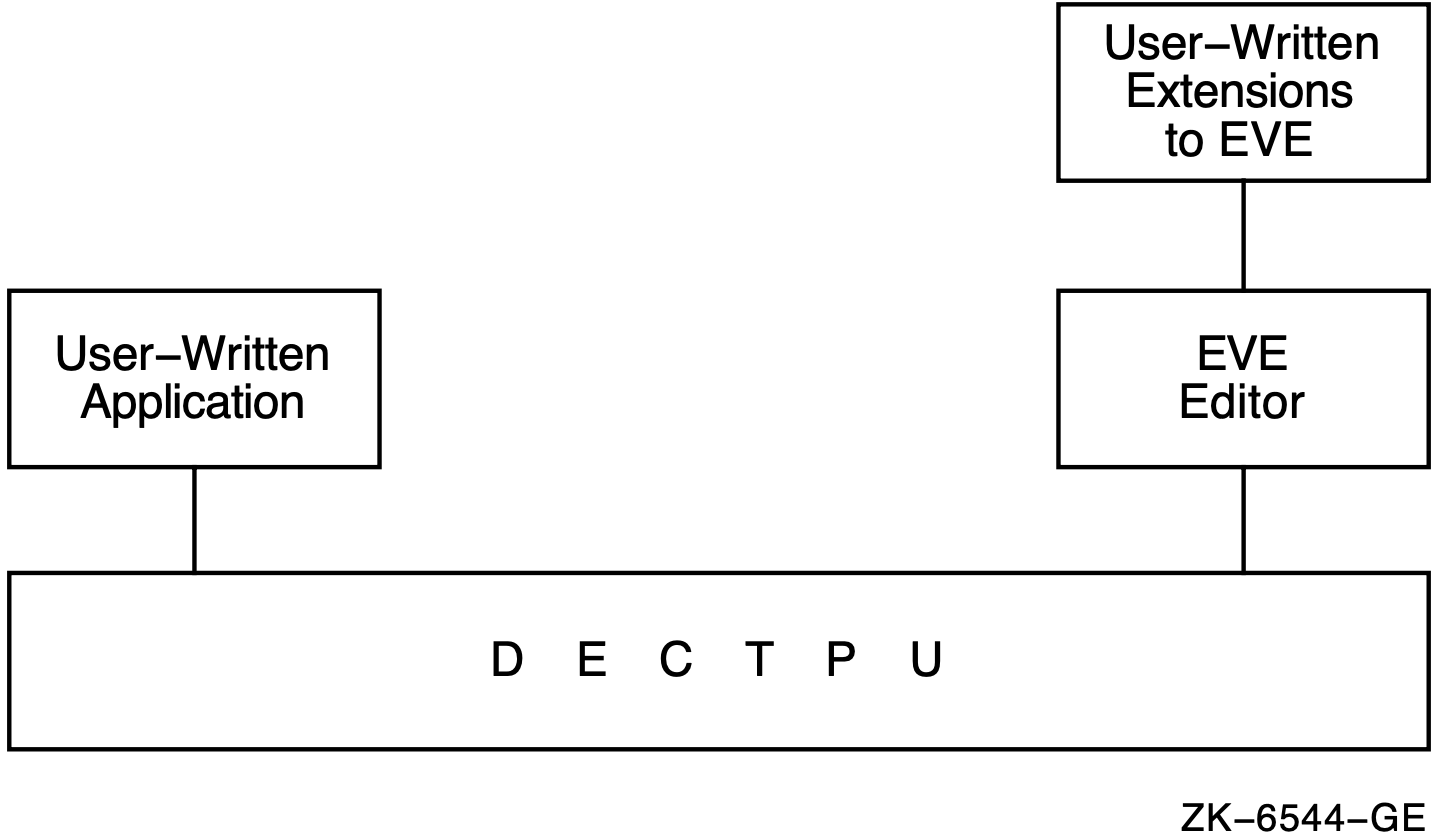
You can implement extensions to EVE with any of the following:
A DECTPU command file (DECTPU source code)
A DECTPU section file (com piled DECTPU code in binary form)
An initialization file (commands in a format that EVE can process)
Because a DECTPU section file is already compiled, startup time for your editor or application is shorter when you use a section file than when you use a command file or an initialization file. Section 2.1.2 contains more information on startup files.
To implement an editor or application that is entirely user written, use a section file. Chapter 5 contain s more information on DECTPU command files, section files, and initialization files. The DEC Text Processing Utility Reference Manual contains information on layering applications on DECTPU.
1.4. DECTPU Language
You can view the DECTPU language as the most basic component of DECTPU. To access the features of DECTPU, write a program in the DECTPU language and then use the utility to compile and execute the program. A program written in DECTPU can be as simple as a single statement or as complex as the section file that implements EVE.
The block-structured DECTPU language is easy to learn and use. DECTPU language features include a large number of data types, relational operators, error interception, looping and case statements, and built-in procedures that simplify development or extension of an editor or application. Comments are indicated with a single comment character (! ) so that you can document your procedures easily. There are also capabilities for debugging procedures with user-written debugging programs.
1.4.1. Data Types
The DECTPU language has an extensive set of data types. You use data types to interpret the meaning of the contents of a variable. Unlike many languages, the DECTPU language has no declarative statement to enforce which data type must be assigned to a variable. A variable in DECTPU assumes a data type when it is used in an assignment statement. For example, the following statement assigns a string data type to the variable this_var:
this_var := ’This can be a string of your choice.’;
The following statement assigns a window data type to the variable x. The window occupies 15 lines on the screen, starting at line 1, and the status line is off (not displayed).
x := CREATE_WINDOW (1, 15, OFF);
Many of the DECTPU data types (for example, learn and pattern) are different from the data types usually foun d in programming languages. See the DEC Text Processing Utility Reference Manual for the keywords used to specify data types. See Chapter 3 of this manual for a discussion of DECTPU data types.
1.4.2. Language Declarations
DECTPU language declarations include the following:
Module declaration (MODULE/IDENT/ENDMODULE)
Procedure declaration (PROCEDURE/ENDPROCEDURE)
Constant declaration (CONSTANT)
Global variable declaration (VARIABLE)
Local variable declaration (LOCAL)
See Chapter 4 of this manual for a discussion of DECTPU language declarations.
1.4.3. Language Statements
DECTPU language statements include the following:
Assignment statement ( := )
Repetitive statement (LOOP/EXITIF/ENDLOOP)
Conditional statement (IF/THEN/ELSE/ENDIF)
Case statement (CASE/ENDCASE)
Error statement (ON_ERROR/ENDON_ERROR)
See Chapter 4 of this manual for a discussion of DECTPU language statements.
1.4.4. Built-In Procedures
The DECTPU language has many built-in procedures that perform functions such as screen management, key definition, text manipulation, and program execution.
You can use built-in procedures to create your own procedures. You can also invoke built-in procedures from within EVE. The DEC Text Processing Utility Reference Manual contains a description of each of the DECTPU built-in procedures.
1.4.5. User-Written Procedures
You can write your own procedures that combine DECTPU language statements and calls to DECTPU built-in procedures. DECTPU procedures can return values and can be recursive. After you write a procedure and compile it, you use the procedure name to invoke it.
When writing a procedure, use the following guidelines:
Start each procedure with the word PROCEDURE, followed by the procedure name of your choice.
End each procedure with the word ENDPROCEDURE.
Place a semicolon after each statement or built-in call if the statement or call is followed by another statement or call.
If the statement or call is not followed by another statement or call, the semicolon is not necessary.
Example 1.1 is a sample procedure that uses the DECTPU language statements PROCEDURE/ENDPROCEDURE and the built-in procedures POSITION, BEGINNING_OF, and CURRENT_BUFFER to move the current character position to the beginning of the current buffer. The procedure uses the MESSAGE built-in to display a message; it uses the GET_INFO built-in to get the name of the current buffer.
! This procedure moves the editing
! position to the top of the buffer

PROCEDURE user_top

   POSITION (BEGINNING_OF (CURRENT_BUFFER));
   MESSAGE ("Now in buffer" + GET_INFO (CURRENT_BUFFER, "name"));

ENDPROCEDURE;
Once you have compiled this procedure, you can invoke it with the name user_top. For information about writing procedures, see Chapter 4 and Chapter 5.
1.5. Terminals Supported by DECTPU
DECTPU runs on all VAX and Alpha computers, and supports screen-oriented editing on the Compaq VT400-, VT300-, VT200-, and VT100-series terminals, as well as on other video display terminals that respond to ANSI control functions.
Optimum screen-oriented editing performance occurs when you run DECTPU from VT400-series, VT300-series, VT220-series, and VT100-series terminals. Some video terminal hardware does not have optimum DECTPU performance. See Appendix B for a list of hardware characteristics that may adversely affect DECTPU’s performance.
Although you cannot use the screen-oriented features of DECTPU on a VT52 terminal, hardcopy terminal, or foreign terminal that does not respond to ANSI control functions, you can run DECTPU on these terminals with line-mode editing. For information on how to implement this style of editing, see the description of the /NODISPLAY qualifier in Chapter 2 and the sample line-mode editor in Appendix A.
1.6. Learning Path for DECTPU
The suggested path for learning to use DECTPU is to first read the documentation describing EVE if you are not familiar with that editor. The DECTPU/EVE documentation contains both reference and tutorial material for new EVE users. It also contains material for more experienced users of text editors and explains how to use DECTPU to extend the EVE interface.
When you are familiar with EVE, you may want to extend or customize it. Study the source code to see which procedures, variables, and key definitions the editor uses. Then write DECTPU procedures to implement your extensions. Make sure that the DECTPU procedures you write do not conflict with procedures or variables that EVE uses.
To help you learn about the DECTPU language, this manual contain s examples of DECTPU procedures and programs. Many of the descriptions of the built-in procedures in the DEC Text Processing Utility Reference Manual also have a short sample procedure that uses the built-in procedure in an appropriate context.
Appendix A contains longer sample procedures that perform useful editing tasks. These procedures are merely samples; you can adapt them for your own use. You must substitute an appropriate value for any item in lowercase in sample procedures and syntax examples.
For more information on designing your own DECTPU-based editor or application rather than using EVE, see Chapter 5.
Chapter 2. Getting Started with DECTPU
This chapter describes the following:
Invoking DECTPU on OpenVMS systems
Invoking DECTPU from a DCL command procedure
Invoking DECTPU from a batch job
Using journal files
Avoiding errors related to virtual address space
Using OpenVMS command line qualifiers
2.1. Invoking DECTPU on OpenVMS Systems
On OpenVMS systems you can invoke DECTPU through the Digital Command Language (DCL).The basic DCL command for invoking DECTPU with EVE (the default editor) is as follows:
$ EDIT/TPU
To invoke DECTPU from DCL, type the command EDIT/TPU, optionally followed by the name of your file:
$ EDIT/TPU text_file.lis
This command opens TEXT_FILE.LIS for editing.If you are using the EVE editor, VSI suggests that you create a symbol like the following one to simplify invoking EVE:
$ EVE == "EDIT/TPU"
When you invoke DECTPU with the preceding command, you are usually placed in EVE, the default editor. However, you should check that your system manager has not overridden this default.
You can specify multiple input files on the DECTPU command line. The files must be separated by commas. The maximum number of files you can specify is 10. For the ambiguous file names, EVE displays a warning message.
2.1.1. Default File Specifications
Table 2.1 lists the default TPU and EVE file specifications on OpenVMS systems.
| File | OpenVMS File Specification |
|---|---|
| Section | SYS$SHARE:TPU$SECTION.TPU$SECTION |
| Command | TPU$COMMAND.TPU |
| Init | SYS$DISK:EVE$INIT.EVE |
| Init | SYS$LOGIN:EVE$INIT.EVE |
| Debugger | SYS$SHARE:TPU$DEBUG.TPU |
| Keystroke journal | SYS$DISK:.TJL |
| Buffer-change journal | SYS$SCRATCH:.TPU$JOURNAL |
| Buffer-change journal | TPU$ JOURNAL:.TPU$JOURNAL |
| Work | SYS$SCRATCH:.TPU$WORK |
| Motif Resource | SYS$LIBRARY:.UID? |
| Application defaults | DECW$SYSTEM_DEFAULTS:.DAT |
| Application defaults | DECW$USER_DEFAULTS:.DAT? |
| EVE Motif resource | SYS$SHARE:EVE$WIDGETS.UID? |
| EVE sources | SYS$EXAMPLE S:EVE$*.* |
OpenVMS system managers should note that the OpenVMS systemwide logical name is defined as TPU$SECTION to point to EVE$SECTION.TPU$SECTION. You can modify this logical to use a different default editing interface.
2.1.2. Startup Files
Command files and section files can create or customize a DECTPU editor or application. Initialization files can customize EVE or other layered applications by using EVE or other application-specific commands, settings, and key bindings.
A command file is a file that contains DECTPU source code. A command file has the file type .TPU and is used with the DECTPU /COMMAND= filespec qualifier. DECTPU tries to read a command file unless you specify /NOCOMMAND. The default command file is the file called TPU$COMMAND.TPU in your current directory, if such a file exists. You can specify a different file by defining the logical name TPU$COMMAND.
A section file is the compiled form of DECTPU source code. It is a binary file that has the default file type .TPU$SECTION. It is used with the qualifier /SECTION= filespec . The default section file is TPU$SECTION.TPU$SECTION in the area SYS$SHARE. The systemwide logical name TPU$SECTION is defined as EVE$SECTION. This definition causes the EVE editor to be invoked by default when you use the DCL command EDIT/TPU. You must specify a different section file (for example, /SECTION= my_section_file) or /NOSECTION if you do not want to use the EVE interface.
Note
When you invoke DECTPU with the /NOSECTION qualifier, DECTPU does not use any binary file to provide an interface. Even the Return and Delete keys are not defined. Use /NOSECTION when you are running a standalone command file or when you are creating a new section file and do not want the procedures, variables, and definitions from an existing section file to be included. See Section 2.6 and Chapter 5 for more information on /NOSECTION.
An initialization file contains commands for a DECTPU-based application. For example, an initialization file for EVE can contain commands that define keys or set margins. Initialization files are easy to create, but they cause DECTPU to start up somewhat more slowly than section and command files do. To invoke an initialization file, use the /INITIALIZATION qualifier. For more information on using initialization files, see Chapter 5.
You can use either a command file or a section file, or both, to customize or extend an existing interface. Generally, you use a command file for minor customization of an interface. Because startup time is faster with a section file, you should use a section file when the customization is lengthy or complex, or when you are creating an interface that is not layered on an existing editor or application. You can use an initialization file only if your application supports the use of such a file.
The source files for EVE are in SYS$ EXAMPLE S. To see a list of the EVE source files, type the following at the DCL prompt:
$ DIRECTORY SYS$EXAMPLES:EVE$*.TPU
If you cannot find these files on your system, see your system manager.
Chapter 5 describes how to write and process command files and section files.
2.2. Invoking DECTPU from a DCL Command Procedure
There are two reasons that you might want to invoke DECTPU from a command procedure:
To set up a special environment for interactive editing
To create a noninteractive, DECTPU-based application
The following sections explain how to do this.
2.2.1. Setting Up a Special Editing Environment
You can run DECTPU with a special editing environment by writing a DCL command procedure that first establishes the environment that you want and then invokes DECTPU. In such a command procedure, you must define SYS$INPUT to have the same value as SYS$COMMAND because DECTPU signals an error if SYS$INPUT is not defined as the terminal. To prevent such an error, place the following statement in the command procedure setting up the environment:
$ DEFINE/USER SYS$INPUT SYS$COMMAND
Example 2.1 shows a DCL command procedure that ‘‘remembers’’ the last file that you were editing and uses it as the input file for DECTPU. When you edit a file, the file name you specify is saved in the DCL symbol last_file_edited . If you do not specify a file name when you invoke the editor the next time, the file name from the previous session is used.
$ IF P1 .NES. "" THEN last_file_edited == P1
$ WRITE SYS$OUTPUT "*** ’’last_file_edited’ ***"
$ DEFINE/USER SYS$INPUT SYS$COMMAND $
EDIT/TPU/COMMAND=DISK$:[USER]TPU$COMMAND.TPU ’last_file_edited’
Example 2.2 establishes an environment that specifies tab stop settings for FORTRAN programs.
$ IF P1 .EQS. "" THEN GOTO REGULAR_INVOKE
$ last_file_edited == P1
$ FTN_TEST = F$FILE_ATTRIBUTES (last_file_edited,"RAT")
$ IF FTN_TEST .NES. "FTN" THEN GOTO REGULAR_INVOKE
$ FTN_INVOKE:
$     DEFINE/USER SYS$INPUT SYS$COMMAND
$     EDIT/TPU/COMMAND=FTNTABS ’last_file_edited’
$ GOTO TPU_DONE
$ REGULAR_INVOKE:
$     DEFINE/USER SYS$INPUT SYS$COMMAND
$     EDIT/TPU/ ’last_file_edited’
$ TPU_DONE:
2.2.2. Creating a Noninteractive Application
In some situations, you may want to put all of your editing commands in a file and have them read from the file rather than entering the commands interactively. You may also want DECTPU to perform the edits without displaying them on the screen. You can do this type of editing from a batch job; or, if you want to see the results of the editing session displayed on your screen, you can do this type of editing from a DCL command procedure. Even though the edits are not displayed on your screen as they are being made, your terminal is not free while the command procedure is executing.
Example 2.3 shows a DCL command procedure named INVISIBLE_TPU.COM, which contains a single command line that uses the following qualifiers to invoke DECTPU:
/NOSECTION—This qualifier prevents DECTPU from using a section file. All procedures and key definitions must be specified in a command file.
/COMMAND=gsr.tpu—This qualifier specifies a command file that contains the code to be executed (GSR.TPU).
/NODISPLAY—This qualifier suppresses screen display.
! This command procedure invokes DECTPU without an editor.
! The file GSR.TPU contains the edits to be made.
! Specify the file to which you want the edits made as p1.
!
$ EDIT/TPU/NOSECTION/COMMAND=gsr.tpu/NODISPLAY ’p1’
!
The DECTPU command file GSR.TPU, which is used as the file specification for the /COMMAND qualifier, performs a search through the current buffer and replaces a string or a pattern with a string. Example 2.4 shows the file GSR.TPU. GSR.TPU does not create or manipulate any windows.
PROCEDURE global_search_replace (str_or_pat, str2)

! This procedure performs a search through the current
! buffer and replaces a string or a pattern with a new string

LOCAL src_range, replacement_count;

! Return to caller if string not found
ON_ERROR
   msg_text := FAO (’Completed !UL  replacement!%S’, replacement_count);
   MESSAGE (msg_text);
   RETURN;
ENDON_ERROR;

replacement_count := 0;

LOOP
   src_range := SEARCH (str_or_pat, FORWARD);  ! Search returns a range if found
   ERASE (src_range);                          ! Remove first string
   POSITION (END_OF (src_range));              ! Move to right place
   COPY_TEXT (str2);                           ! Replace with second string
   replacement_count := replacement_count + 1;
ENDLOOP;
ENDPROCEDURE;        ! global_search_replace

! Executable statements
input_file := GET_INFO (COMMAND_LINE, "file_name");
main_buffer:= CREATE_BUFFER ("main", input_file);
POSITION (BEGINNING_OF (main_buffer));
global_search_replace ("xyz$_", "user$_");
pat1:= "" & LINE_BEGIN & "t";
POSITION (BEGINNING_OF (main_buffer));
global_search_replace (pat1, "T");
WRITE_FILE (main_buffer, "newfile.dat");
QUIT;
To use the DCL command procedure INVISIBLE_TPU.COM interactively, invoke it with the DCL command @ (at sign). For example, to use INVISIBLE_ TPU.COM interactively on a file called MY_F ILE.TXT, type the following at the DCL prompt:
$ @invisible_tpu my_file.txt
You must explicitly write out any modified buffer s before leaving the editor with QUIT or EXIT. If you use QUIT before writing out such buffer s, DECTPU quits without saving the modifications. If you use EXIT, DECTPU asks if it should write the file before exiting.
2.3. Invoking DECTPU from a Batch Job
If you want your edits to be made in batch rather than at the terminal, you can use the DCL command SUBMIT to send your job to a batch queue. For example, if you want to use the file GSR.TPU (shown in Example 2.4) to make edits in batch mode to a file called MY_F ILE.TXT, enter the following command:
$ SUBMIT
      invisible_tpu.COM/LOG=invisible_tpu.LOG/parameter=my_file.txt
This job is then entered in the default batch queue for your system. The results are sent to the log file that the batch job creates.
In batch DECTPU, EXIT is the same as QUIT.
2.4. Using Journal Files
Journal files help you to recover your work when the system fails. This section discusses the journaling methods you can use with DECTPU. DECTPU offers two journaling methods:
Keystroke journaling
Buffer-change journaling
You can use both keystroke and buffer-change journaling at the same time (except on DECwindows, where you can use only buffer-change journaling). To turn on keystroke journaling, the application uses the JOURNAL_OPEN built-in.
The application layered on DECTPU, not the DECTPU engine, determines what kind of journaling is turned on and under what conditions. Table 2.2 shows the journaling behavior established by EVE.
| OpenVMS Qualifier | Effect on Keystroke Journaling | Effect on Buffer-Change Journaling |
|---|---|---|
| None specified | Disabled | Enabled |
| /JOURNAL | Disabled | Enabled |
| /JOURNAL = filename | Enabled | Enabled |
| /NOJOURNAL | Disabled | Disabled. However, you can use SET (JOURNALING) to enable buffer-change journaling. |
Caution
Journal files contain a record of all information being edited. Therefore, when editing files that contain secure or confidential data, be sure to keep the journal files secure as well.
You must use the same major version of DECTPU to recover the journal that you used to create it.
2.4.1. Keystroke Journaling
In keystroke journaling, DECTPU keeps track of each keystroke made during a session, regardless of which buffer is in use. If a system interruption occurs during a session, you can reconstruct the work done during the session. To determine the name of the keystroke journal file, use a statement similar to the following:
filename := GET_INFO (SYSTEM, "journal_file");
For more information on using a keystroke journal file for recovery, see ??? and the Extensible Versatile Editor Reference Manual.
Note
VSI strongly recommends the use of buffer-change journaling rather than keystroke journaling.
To reconstruct your work, use the /JOURNAL and /RECOVER qualifiers. The following example shows system recovery on a file called JACKI.SDML:
$ EDIT/TPU JACKI.SDML /JOURNAL /RECOVER
2.4.2. Buffer-Change Journaling
Buffer-change journaling creates a separate journal file for each text buffer. The application can use the enhanced SET (JOURNALING) built-in to direct DECTPU to establish and maintain a separate journal file for any buffer or buffer s created during the session. The application programmer or user can also use the SET (JOURNALING) built-in to turn journaling off or on for a given buffer during a session.
In the buffer’s journal file, DECTPU keeps track of the following record attributes (and any changes made to them):
Left margin setting
Modifiability or unmodifiability
Display value
The journal file also tracks the following:
Characters inserted in and deleted from a record (including the location where the change took place)
Records inserted in and deleted from a buffer (including the location where the change took place)
To determine whether buffer-change journaling is turned on, use the following statement:
status := GET_INFO (buffer_name, "journaling");
For more information on record attributes and display values, see the descriptions of the SET (RECORD_ATTRIBUTE) and SET (DISPLAY_VALUE) built-in procedures in the DEC Text Processing Utility Manual.
Buffer-change journaling does not keep a record of all keystrokes performed while editing a given buffer.
2.4.3. Buffer-Change Journal File-Naming Algorithm
By default, DECTPU creates the buffer-change journal file name by using the following algorithm:
Converts all characters in the buffer name that are not alphanumeric, a dollar sign, underscore, or hyphen to underscores
Truncates the resulting file name to 39 characters
Adds the file type .TPU$ JOURNAL
For example, a buffer named TEST.BAR has a default journal file name of TEST_ BAR.TPU$ JOURNAL.
DECTPU puts all journal files in the directory defined by the logical name TPU$ JOURNAL. By default, this logical is defined as SYS$SCRATCH. You can reassign this logical name. For example, if you want journal files written to the current default directory, define TPU$ JOURNAL as [ ].
2.5. Avoiding Errors Related to Virtual Address Space
DECTPU manipulates data in a process’s virtual memory space. If the space required by the DECTPU images, data structures, and files in memory exceeds the virtual address space, DECTPU tries to write part of the data to the work file, thus freeing up space for other parts of the data that it needs immediately.
If the work file is full, DECTPU attempts to return either a TPU$_GETMEM or TPU$_NOCACHE error message. Although you may be able to free up some space by deleting unused buffers, VSI recommends that you terminate the DECTPU session if you encounter either of these errors. You can then start a new session with fewer or smaller buffer s. Alternatively, you may want to put the work file on a disk that contains more free space. Use one of the following methods to do this:
Redefine TPU$WORK to point to the disk with more free space.
Invoke DECTPU with the /WORK= filename qualifier.
DECTPU may be unable to signal an error when it frees up memory by writing to the work file. In this case, DECTPU aborts with a fatal internal error.
You may be able to avoid writing to the work file by increasing the virtual address space available to a process. The virtual address space is controlled by the following two factors:
The SYSGEN parameter VIRTUALPAGECNT
The page file quota of the account you are using
The VIRTUALPAGECNT parameter controls the number of virtual pages that can be mapped for a process. For more information on VIRTUALPAGECNT, see the description of this parameter in the OpenVMS documentation on the System Generation Utility (SYSGEN).
The page file quota controls the number of pages in the system paging file that can be allocated to your process. For more information on the page file quota, see the description of the /PGFLQUOTA qualifier in the OpenVMS documentation on the Authorize Utility (AUTHORIZE).
You may need to modify both the VIRTUALPAGECNT parameter and the page file quota to enlarge the virtual address space.
DECTPU keeps strings in a different virtual pool than it does other memory. Once DECTPU starts writing to the work file, the size of the string memory pool is fixed. DECTPU cannot write strings to the work file, so if it needs to allocate more space in the string memory pool, it will fail with a fatal internal error. If you encounter this problem, you can expand the string memory pool during startup by preallocating several large strings. The following example shows how to do this:
PROCEDURE preallocate_strings
LOCAL
    str_len,
    string1,
    string2;

str_len := 65535;
string1 := ’a’ * str_len;
string2 := string1;
ENDPROCEDURE;
2.6. Using OpenVMS EDIT/TPU Command Qualifiers
The DCL command EDIT/TPU has qualifiers for setting attributes of DECTPU or an application layered on DECTPU. The qualifiers fall into the following two categories:
Qualifiers handled by DECTPU
Qualifiers in this category have their defaults set by DECTPU.
Qualifiers handled by the application layered on DECTPU
Some qualifiers in this category have their defaults set entirely by DECTPU; some have their defaults set entirely by the layered application, and some have their defaults set partly by each.
The following sections present the qualifiers in alphabetical order, giving a detailed description of each. The examples in the following sections show the qualifiers directly after the EDIT/TPU command and before the input file specification. You can place the qualifiers anywhere on the command line after EDIT/TPU. These sections show the defaults that are set if you use EVE. They also explain how EVE handles each qualifier that can be processed by a layered application. Applications not based on EVE may handle qualifiers differently.
2.6.1. /CHARACTER_SET
- /CHARACTER_SET=DEC_MCS (default)
The /CHARACTER_SET qualifier determines the character set you want DECTPU to use to display 8-bit characters. The choice of character set affects how DECTPU performs the following operations on characters:
Converting to lowercase
Converting to uppercase
Inverting case
Removing diacritical marks
Converting to uppercase and removing diacritical marks
The choice of character set also affects how your text appears when printed. For the text displayed in DECTPU to look the same when printed, you must choose the same character set for both DECTPU and the printer. There are two ways to specify the character set you want to use:
Define the TPU$CHARACTER_SET logical name to specify the character set.
This lets you use that character set for all editing sessions—including when you invoke DECTPU within MAIL or other utilities. You can put the definition in your LOGIN.COM file. For example, the following commands define TPU$CHARACTER_SET as ISO_LATIN1 and then use that character set to invoke DECTPU:
$ DEFINE TPU$CHARACTER_SET ISO_LATIN1
$ EDIT/TPU
Use /CHARACTER_SET= and specify the character set on the command line.
This overrides any definition of the TPU$CHARACTER_SET logical name. By default, DECTPU uses the DEC_MCS character set. For example, the following command specifies the GENERAL character set to invoke DECTPU. DECTPU uses the current character set to display 8-bit characters and does not use the default DEC Supplemental Graphics character set.
$ EDIT/TPU/CHARACTER_SET=general
If the character set you specify either with /CHARACTER_SET or by defining TPU$CHARACTER_SET is invalid, the editing session is aborted, returning you to the DCL level.
Table 2.3 shows the values you can specify with the /CHARACTER_SET qualifier or the TPU$CHARACTER_SET logical name.
| Value | Description |
|---|---|
| DEC_MCS | This is the default setting that uses the DEC Supplemental Graphics character set containing supplemental and multinational characters, such as letters with accents and umlauts. |
| ISO_LATIN1 | This character set contains supplemental and multinational characters that contain LATIN1 characters, such as the non- breaking space, multiplication and division signs, and the trademark sign. |
| GENERAL | DECTPU does not specify a character set for 8-bit characters. 8-bit characters are displayed the same as they were before you started DECTPU. |
2.6.2. /COMMAND
- /COMMAND[[=filespec]]
- /NOCOMMAND
- /COMMAND=TPU$COMMAND.TPU (default)
The /COMMAND qualifier determines whether DECTPU com piles and executes a command file (a file of DECTPU procedures and statements) at startup time. Command files extend or modify a DECTPU-based application or create a new application. The default file type for DECTPU comman d files is .TPU. You cannot use wildcards in the file specification.
By default, DECTPU tries to read a command file called TPU$COMMAND.TPU in your default directory. You can use a full file specification after the /COMMAND qualifier or define the logical name TPU$COMMAND to point to a command file other than the default.
To determine whether you specified /COMMAND on the DCL command line, use the following call in the application:
x := GET_INFO (COMMAND_LINE, "command");
The preceding call returns 1 if /COMMAND was specified, 0 otherwise. To fetch the name of the command file specified on the command line, use the following call:
x := GET_INFO (COMMAND_LINE, "command_file");
For more information on GET_INFO, see the DEC Text Processing Utility Manual.
The following command causes DECTPU to read a command file named SYS$LOGIN:MY_TPU$COMMAND.TPU and uses LETTER.RNO as the input file for an editing session:
EDIT/TPU/COMMAND=sys$login:my_tpu$command.tpu letter.rno
To prevent DECTPU from processing a command file, use the /NOCOMMAND qualifier. If you usually invoke DECTPU without a command file, define a symbol similar to the following:
$ EDIT/TPU/COMMAND=sys$login:my_tpu$command.tpu letter.rno
Using /NOCOMMAND when you do not want to use a command file decreases startup time by eliminating the search for a command file. If you specify a command file that does not exist, DECTPU terminates the editing session and returns you to the DCL command level. For more information on writing and using command files, see Chapter 5.
2.6.3. /CREATE
- /CREATE (default)
- /NOCREATE
The /CREATE qualifier controls whether a DECTPU-based application creates a new file when the specified input file is not foun d. If you do not specify /CREATE or /NOCREATE on the comman d line, DECTPU sets the default to /CREATE but does not specify a default name for the file to be created.
The application layered on DECTPU is responsible for handling this qualifier. To determine if you specified /CREATE on the DCL command line, include the following call in the application:
x := GET_INFO (COMMAND_LINE, "create");
The preceding call returns 1 if /CREATE was specified, 0 otherwise. For more information on GET_INFO, see the DEC Text Processing Utility Manual.
By default, EVE creates a new file if the specified input file does not exist. If you use /NOCREATE and specify an input file that does not exist, EVE aborts the editing session and returns you to the DCL command level. For example, if your default device and directory are DISK$:[USER] and you specify a nonexistent file, NEWFILE.DAT, your command and EVE’s response would be as follows:
$ EDIT/TPU/NOCREATE
        newfile.dat
Input file does not exist: DISK$:[USER]NEWFILE.DAT;
2.6.4. /DEBUG
- /DEBUG[[=deb ug_source_filename]]
- /NODEBUG (default)
The /DEBUG qualifier determines whether DECTPU loads, compiles, and executes a file implementing a DECTPU debugger. If /DEBUG is specified, DECTPU reads, compiles, and executes the contents of a debugger file before executing the procedure TPU$INIT_PROCEDURE and before executing the command file. For more information on the DECTPU initialization sequence, see Chapter 5.
By default, DECTPU does not load a debugger. If you specify that a debugger is to be loaded but do not supply a file specification, DECTPU loads the file SYS$SHARE:TPU$DEBUG.TPU. For more information on how to use the default DECTPU debugger, see Chapter 5.
To use a debugger file other than the default, use the /DEBUG qualifier and specify the device, directory, and file name of the debugger to be used. If you specify only the file name, DECTPU searches SYS$SHARE for the file. You can define the logical name TPU$DEBUG to specify a file that contains a debugger program. Once you define this logical name, using /DEBUG without specifying a file calls the file specified by TPU$DEBUG.
2.6.5. /DISPLAY
- /NODISPLAY
To choose the DECwindows or the non-DECwindows version of DECTPU, use the /DISPLAY qualifier on the DCL command line when you invoke DECTPU.
The /DISPLAY qualifier is optional. By default, DECTPU uses /DISPLAY=CHARACTER_CELL, regardless of whether you are running DECTPU on a workstation or a terminal.
If you specify /DISPLAY=CHARACTER_CELL, DECTPU uses its character-cell screen manager, which implements the non-DECwindows version of DECTPU by running in a DECterm terminal emulator or on a physical terminal.
If you specify /DISPLAY=DECWINDOWS, and if the DECwindows environment is available, DECTPU uses the DECwindows screen manager, which creates a DECwindows window in which to run DECTPU.
If you specify /DISPLAY=DECWINDOWS and the DECwindows environment is not available, DECTPU uses its character-cell screen manager to implement the non-DECwindows version of DECTPU.
For more information about the difference between a DECwindows window and a DECTPU window, see Chapter 5.
The /NODISPLAY qualifier causes DECTPU to run without using the screen display and the keyboard functions of a terminal. Use /NODISPLAY in the following cases:
When running DECTPU procedures in a batch job
When using DECTPU on an unsupported terminal
When you use /NODISPLAY, all operations continue as usual, except that no output occurs. The only exception is that information usually put into the message buffer will appear on SYS$OUTPUT if no message buffer is available.
The following command causes DECTPU to edit the file MY_BATCH_F ILE.RNO without using terminal functions such as screen display:
$ EDIT/TPU/NODISPLAY my_batch_file.rno
2.6.6. /INITIALIZATION
- /INITIALIZATION[[=filespec]] (default)
- /NOINITIALIZATION
The /INITIALIZATION qualifier determines whether the DECTPU-based application being run executes a file of initialization commands. The application layered on DECTPU is responsible for processing this qualifier.
To determine whether you specified /INITIALIZATION on the DCL command line, use the following call in the application:
x := GET_INFO (COMMAND_LINE, "initialization");
The preceding call returns 1 if /INITIALIZATION was specified, 0 otherwise. To fetch the name of the initialization file specified on the command line, use the following call:
x := GET_INFO (COMMAND_LINE, "initialization_file");
For more information on GET_INFO, see the DEC Text Processing Utility Manual.
If you do not specify any form of /INITIALIZATION on the DCL command line, DECTPU specifies /INITIALIZATION but does not supply a default file specification. The default file specification for /INITIALIZATION is set by the application. VSI recommends that a user-written application define the default file specification of an initialization file by using the following format:
facility$init.facility
For example, the default initialization file for the EVE editor is EVE$INIT.EVE.
In EVE, if you do not specify a device or directory, EVE first checks the current directory. If the specified (or default) initialization file is not there, EVE checks SYS$LOGIN. If EVE finds the specified (or default) initialization file, EVE executes the commands in the file.
For more information on using initialization files with EVE, see Chapter 5 and the Extensible Versatile Editor Reference Manual.
2.6.7. /INTERFACE
The /INTERFACE qualifier determines the interface or screen display you want (same as /DISPLAY). The default is CHARACTER_CELL. For example, to invoke EVE with the DECwindows interface, use the following command:
$ EDIT/TPU /INTERFACE=DECWINDOWS
Then, if DECwindows is available, DECTPU displays the editing session in a separate window on your workstation screen and enables DECwindows features; for example, the EVE screen layout includes a menu bar and scroll bars. If DECwindows is not available, DECTPU works as if on a character-cell terminal.
2.6.8. /JOURNAL
- /JOURNAL[[=in put_file.TJL]] (default for EVE)
- /NOJOURNAL (default for DECTPU)
The /JOURNAL qualifier determines whether DECTPU keeps a journal file of an editing session so you can recover the session if it is unexpectedly interrupted. DECTPU offers two forms of journaling:
Keystroke—In a single journal file, keeps track of each keystroke you make, regardless of which buffer is in use when you press the key.
Buffer-change—In a separate journal file, keeps track of changes made to buffer s for each buffer created during the session.
The application layered on DECTPU is responsible for processing this qualifier. To determine whether you specified /JOURNAL on the DCL command line, use the following call in the application:
x := GET_INFO (COMMAND_LINE, "journal");
The preceding call returns 1 if /JOURNAL was specified, 0 otherwise.
To determine whether buffer-change journaling is turned on for a buffer, use a statement similar to the following:
status := GET_INFO (buffer_name, "journaling");
To determine the name of the keystroke journal file specified on the command line, use the following call:
x := GET_INFO (COMMAND_LINE, "journal_file");
For more information on GET_INFO, see the DEC Text Processing Utility Manual.
In EVE, if you do not specify any form of /JOURNAL or specify /JOURNAL but not a journal file, buffer-change journaling is turned on. The buffer-change journal file’s default file type is .TPU$ JOURNAL.
If you specify /JOURNAL= filename, then EVE also turns on keystroke journaling. The keystroke journal file’s default file type is .TJL.
To prevent EVE from creating either a keystroke or buffer-change journal file for an editing session, use the /NOJOURNAL qualifier. For example, the following command causes EVE to turn off buffer-change journaling when you edit the input file MEMO.TXT:
$ EDIT/TPU/NOJOURNAL memo.txt
If you are developing an application layered on DECTPU, you can use the built-in JOURNAL_OPEN to direct DECTPU to create a keystroke journal file for an editing session. Using JOURNAL_OPEN causes DECTPU to provide a 500-byte buffer in which to journal keystrokes. By default, DECTPU writes the contents of the buffer to the journal file when the buffer is full.
You can use the built-in procedure SET (JOURNALING) to turn on buffer-change journaling, even if you have used /NOJOURNAL to turn it off initially. You can also use SET (JOURNALING) to adjust the journaling frequency. For more information on JOURNAL_OPEN and SET (JOURNALING), see the DEC Text Processing Utility Manual. For more information on buffer-change journaling, see Section 2.4.
Once a keystroke journal file is created, use the /RECOVER qualifier to direct DECTPU to process the commands in the keystroke journal file. For example, the following command causes DECTPU to recover a previous editing session on an input file named MEMO.TXT. Because the journal file has a name different from the input file name, both /JOURNAL and /RECOVER are used. The name of the keystroke journal file is MEMO.TJL:
$ EDIT/TPU/RECOVER/JOURNAL=memo.tjl memo.txt
In buffer-change journaling, to recover the changes made to a specified buffer, use the built-in RECOVER_BUFFER procedure. For more information on RECOVER_BUFFER, see the DEC Text Processing Utility Manual. For more information on how to recover from an interrupted EVE editing session, see the Extensible Versatile Editor Reference Manual.
Note
VSI strongly recommends the use of buffer-change journaling rather than keystroke journaling.
2.6.9. /MODIFY
- /MODIFY (default)
- /NOMODIFY
The /MODIFY qualifier determines whether the first user buffer in an editing session is modifiable. The application layered on DECTPU is responsible for processing /MODIFY.
To determine what form of the /MODIFY qualifier was used on the DCL command line, use the following calls:
x := GET_INFO (COMMAND_LINE, "modify");x := GET_INFO (COMMAND_LINE, "nomodify");
The first statement returns 1 if /MODIFY was explicitly specified on the command line, 0 otherwise. The second statement returns 1 if /NOMODIFY was explicitly specified on the command line, 0 otherwise. If both statements return 0, then the application is expected to determine the default behavior.
For more information on GET_INFO, see the DEC Text Processing Utility Manual.
If you invoke EVE and do not specify /MODIFY, /NOMODIFY, /READ_ONLY, or /NOWRITE, EVE makes the first user buffer of the editing session modifiable. If you specify /NOMODIFY, EVE makes the first user buffer unmodifiable. Regardless of what qualifiers you use on the DCL command line, EVE makes all user buffer s after the first buffer modifiable.
If you do not specify either form of the /MODIFY qualifier, EVE checks whether you have used any form of the /READ_ONLY or /WRITE qualifier. By default, a read-only buffer is unmodifiable and a write buffer is modifiable. However, if you specify /READ_ONLY and /MODIFY or /NOWRITE and /MODIFY, the buffer is modifiable. Similarly, if you specify /WRITE and /NOMODIFY or /NOREAD_ ONLY and /NOMODIFY, the buffer is unmodifiable.
2.6.10. /OUTPUT
- /OUTPUT[[=in put_file.type]] (default)
- /NOOUTPUT
The /OUTPUT qualifier determines whether the output of your DECTPU session is written to a file. The application layered on DECTPU is responsible for processing this qualifier.
To determine whether you specified /OUTPUT on the DCL command line, use the following call in the application:
x := GET_INFO (COMMAND_LINE, "output");
The preceding call returns 1 if /OUTPUT was specified, 0 otherwise. To fetch the name of the output file specified on the command line, use the following call:
x := GET_INFO (COMMAND_LINE, "output_file");
For more information on GET_INFO, see the DEC Text Processing Utility Manual.
If you do not specify any form of /OUTPUT on the DCL command line, DECTPU specifies /OUTPUT but does not supply a default file specification.
In EVE, when you use /OUTPUT, you can name the file created from the main buffer when you exit from DECTPU. For example, the following command causes DECTPU to read in a file called LETTER.RNO and to write the contents of the main buffer to the file NEWLET.RNO upon exiting from DECTPU:
$ EDIT/TPU/OUTPUT=newlet.rno letter.rno
If you use /OUTPUT= to specify an output file, EVE modifies the buffer even if you do not modify the actual text. In this case, when you exit from EVE, EVE writes the buffer to the output file you specify.
By default, the output file has the same name as the input file, and the version number is one higher than the highest existing version of the input file. You can specify a different name for the output file by using the file specification argument for the /OUTPUT qualifier.
In EVE, specifying /NOOUTPUT causes EVE to suppress creation of an output file for the first buffer of the editing session. Using /NOOUTPUT does not suppress creation of a journal file.
Using /NOOUTPUT, you can develop an application that lets you control the output of a file. For example, an application could be coded so that if you specify /NOOUTPUT on the DCL command line, DECTPU would set the NO_WRITE attribute for the main buffer and suppress creation of an output file for that buffer.
2.6.11. /READ_ONLY
- /READ_ONLY
- /NOREAD_ONLY (default)
The /READ_ONLY qualifier determines whether the application layered on DECTPU creates an output file from the contents of the main buffer if the contents are modified.
The processing of the /READ_ONLY qualifier is interrelated with the processing of the /WRITE qualifier. /READ_ONLY is equivalent to /NOWRITE; /NOREAD_ ONLY is equivalent to /WRITE.
DECTPU signals an error and returns control to DCL if DECTPU encounters either of the following combinations of qualifiers on the DCL command line:
/READ_ONLY and /WRITE
/NOREAD_ONLY and /NO_WRITE
The application layered on DECTPU is responsible for processing this qualifier. To determine whether either the /READ_ONLY or /NOWRITE qualifier was used on the DCL command line, use the following call in an application:
x := GET_INFO (COMMAND_LINE, "read_only");
This statement returns 1 if /READ_ONLY or /NOWRITE was explicitly specified on the command line.
To determine whether either /NOREAD_ONLY or /WRITE was used on the DCL command line, use the following call in an application:
x := GET_INFO (COMMAND_LINE, "write");
This statement returns 1 if /NOREAD_ONLY or /WRITE was explicitly specified on the command line.
If both GET_INFO calls return false, the application is expected to determine the default behavior. For more information on GET_INFO, see the DEC Text Processing Utility Manual.
In EVE, using the /READ_ONLY qualifier is equivalent to using the /NOJOURNAL, /NOMODIFY, and /NOOUTPUT qualifiers. If you specify /READ_ ONLY, DECTPU does not maintain a journal file for your editing session, and the NO_WRITE and NO_MODIFY attributes are set for the main buffer. When a buffer is set to NO_WRITE, the contents of the buffer are not written out upon exit, regardless of whether the session is terminated with the EXIT built-in or the QUIT built-in. For example, if you want to edit a file called MEETING.MEM but not write out the contents when exiting or quitting, use the following command:
$ EDIT/TPU/READ_ONLY meeting.mem
In response to the /NOREAD_ONLY qualifier, EVE writes out the buffer specified on the command line (if the buffer has been modified) when an EXIT command is issued. This is the default behavior.
2.6.12. /RECOVER
- /RECOVER
- /NORECOVER (default)
The /RECOVER qualifier determines whether DECTPU reads a keystroke journal file at the start of an editing session to recover edits made during a prior interrupted editing session. For example, the following command causes DECTPU to recover the edits made in a previous EVE editing session on the file NOTES.TXT:
$ EDIT/TPU/RECOVER notes.txt
To determine whether you specified /RECOVER on the DCL command line, use the following call:
x := GET_INFO (COMMAND_LINE, "recover");
The preceding call returns 1 if /RECOVER was specified, 0 otherwise. For more information on GET_INFO, see the DEC Text Processing Utility Manual.
DECTPU uses /RECOVER to recover a keystroke journal file only. In buffer-change journaling, to recover the changes made to a specified buffer, use the RECOVER_BUFFER built-in procedure. For more information on RECOVER_BUFFER, see the DEC Text Processing Utility Manual.
If DECTPU encounters and executes the built-in JOURNAL_OPEN procedure while running a layered application, by default DECTPU opens the journal file for output only. If you specify /RECOVER when invoking DECTPU with a layered application, then when the built-in procedure JOURNAL_OPEN is executed, the keystroke journal file is opened for input and output. DECTPU opens the input file to restore whatever commands it contains. Then DECTPU continues to journal keystrokes for the rest of the editing session or until a statement that contains the built-in JOURNAL_CLOSE is executed.
When you recover an editing session, every file used during the session must be in the same state as it was at the start of the session being recovered. Each terminal characteristic must also be in the same state as it was at the start of the editing session being recovered. If you have changed the width or page length of the terminal, you must change the attribute back to the value it had at the start of the editing session you want to recover. Check especially the following values:
Device type
Edit mode
8-bit
Page length
Width
If the journal file has a different name from the input file, you must include both /JOURNAL and /RECOVER with the EDIT/TPU command. For example, if you want to use the keystroke journal file SAVE.T JL to recover the edits you made to a file called LETTER.DAT, enter the following command on the DCL command line:
$ EDIT/TPU/RECOVER/JOURNAL=save.TJL letter.dat
In EVE, you can use /RECOVER to recover either an editing session from a keystroke journal file or a single buffer from a buffer-change journal file. If you specify /JOURNAL= filename, EVE recovers from the specified keystroke journal file. Otherwise, EVE recovers from a buffer-change journal file that corresponds to the input parameter (or the buffer specified on the command line if no input parameter is specified).
For more information on journaling and recovery in EVE, see the Extensible Versatile Editor Reference Manual.
2.6.13. /SECTION
- /SECTION[[=filespec]]
- /NOSECTION
- /SECTION=TPU$SECTION (default)
The /SECTION qualifier determines whether DECTPU loads a section file. A section file is a startup file that contains key definitions and compiled procedures in binary form.
The default section file is TPU$SECTION. When DECTPU tries to locate the section file, DECTPU supplies a default directory of SYS$SHARE and a default file type of .TPU$SECTION. OpenVMS systems define the systemwide logical name TPU$SECTION as EVE$SECTION, so the default section file is the file that implements the EVE editor. To override the OpenVMS default, redefine TPU$SECTION.
You can specify a different section file. The preferred method is to define the logical name TPU$SECTION to point to a section file other than the default file. You can also supply a full file specification for the /SECTION qualifier. For example, if your device is called DISK$USER and your directory is called [SMITH], the following command causes DECTPU to read a section file called VT100INI.TPU$SECTION:
$ EDIT/TPU/SECTION=disk$user:[smith]vt100ini
If you omit the device and directory in the file specification, DECTPU assumes the file is in SYS$SHARE. The section file must be located on the same node on which you are running DECTPU.
To determine whether /SECTION was specified on the DCL command line, use the following call in the application:
x := GET_INFO (COMMAND_LINE, "section");
The preceding call returns 1 if /SECTION was specified, 0 otherwise. To fetch the name of the section file specified on the command line, use the following call:
x := GET_INFO (COMMAND_LINE, "section_file");
For more information on GET_INFO, see the DEC Text Processing Utility Manual.
You must compile the file used as the value for the /SECTION qualifier. To do so, run the source code version of the file through DECTPU and then use the built-in procedure SAVE. This process converts the file to the proper binary form.
For more information on creating and using section files, see Chapter 5. If you specify the /NOSECTION qualifier, DECTPU does not load a section file. Unless you use the /COMMAND qualifier with /NOSECTION, DECTPU has no user interface and no keys are defined. In this state, the only way to exit from DECTPU is to press Ctrl/Y. Typically, you use /NOSECTION when you create your own layered DECTPU application without EVE as a base.
2.6.14. /START_POSITION
- /START_POSITION=(line,column)
- /START_POSITION=(1,1) (default)
The /START_POSITION qualifier determines where the application layered on DECTPU positions the cursor.
Chapter 3. DEC Text Processing Utility Data Types
A data type is a group of elements that ‘‘belong together’’; the elements are all formed in the same way and are treated consistently. The data type of a variable determines the operations that can be performed on it. The DECTPU data types are represented by the following keywords:
ARRAY
BUFFER
INTEGER
KEYWORD
LEARN
MARKER
PATTERN
PROCESS
PROGRAM
RANGE
STRING
UNSPECIFIED
WIDGET
WINDOW
You use data types to interpret the contents of a variable. Unlike many programming languages, DECTPU permits any variable to have any type of data as a value. DECTPU has no declaration statement to restrict the type of data that you can assign to a variable. DECTPU variables take on a data type when they are placed on the left-hand side of an assignment statement. The right-hand side of the assignment statement determines the data type of the variable.
Although you can construct variables freely, DECTPU built-in procedures require that their parameters be of specific data types. Each built-in procedure can operate only on certain data types. Some built-in procedures return a value of a certain data type when they are executed. The following sections describe the DECTPU data types.
3.1. Array Data Types
An array is a structure for storing and manipulating a group of elements. These elements can be of any data type. You create arrays with the CREATE_ARRAY built-in procedure. For example, the following statement creates the array new_array:
new_array := CREATE_ARRAY;
You can delete arrays with the DELETE built-in procedure.
When you create an array, you can optionally direct DECTPU to allocate a specified number of integer-indexed array elements. DECTPU processes this block of preallocated elements quickly. You can direct DECTPU to create such a block of elements only at the time you create the array.
The following statement creates the array int_array, directs DECTPU to allocate 10 sequential, integer-indexed elements to the array, and specifies that the lowest index value should be 1:
int_array := CREATE_ARRAY (10, 1);
Regardless of whether you specify a preallocated block of elements, you can always add array elements dynamically. Dynamically added elements can be of any data type except learn, pattern, program, or unspecified. You can mix the data types of indexes in an array.
In the following code fragment, the array mix_array is created and the integer 1 is stored in the array element indexed by the marker mark1.
mix_array := CREATE_ARRAY;
mark1 := MARK (NONE);
mix_array {mark1} := 1;
mix_array {"Kansas"} := "Toto";
You can index dynamic elements with integers, even if this means that the array ends up with more integer-indexed elements than you specified when you created the array. DECTPU does not process dynamically added integer-indexed elements as quickly as it processes preallocated elements.
To refer to an array element, use the name of an existing array variable followed by the array index enclosed in braces ( { } ) or parentheses ( ( ) ). For example, if you create an array and store it in the variable my_array , the following are valid element names:
my_array{2}
my_array("fred")
To create an element dynamically for an existing array, use the new element as the target of an assignment statement. The following statement creates the element "string1" in the array my_array and assigns the element to the string "Topeka":
my_array{"string1"} := "Topeka";In the following example, the first statement creates an integer-indexed array, int_array. The array has 10 elements; the first element starts at index 1. The second statement stores a string in the first integer-indexed element of the array. The third statement stores a buffer in the eighth element of the array. The fourth statement adds an integer-indexed element dynamically. This new element contains a string.
int_array := CREATE_ARRAY (10, 1);
int_array {1} := "Store a string in the first element";
int_array {8} := CURRENT_BUFFER;
int_array {42} := "This is a dynamically created element.";
If you assign a value to an element that has not yet been created, then that element is dynamically created and both the index and the value are stored. Subsequent references to that element index return the stored value.
In most cases, if you reference an element that has not yet been created and you do not assign a value to the nonexistent element, DECTPU does not create the element. DECTPU simply returns the data type unspecified. However, if you reference a nonexistent element by passing the nonexistent element to a procedure, DECTPU adds a new element to the array, giving the element the index you pass to the procedure. DECTPU assigns to this new element the data type unspecified.
You can delete an element in the array by assigning the data type unspecified to the element. For example, the following statement deletes the element my_array {"fred"}:
my_array {"fred"} := TPU$K_UNSPECIFIED;
The following code fragment shows how you can find all the indexes in an array:
the_index := GET_INFO (the_array, "FIRST");

LOOP
   EXITIF the_index = TPU$K_UNSPECIFIED;
   .
   .
   .
   the_index := GET_INFO (the_array, "NEXT");
ENDLOOP;
Note
DECTPU does not guarantee the order in which it will return the array indexes.
3.2. Buffer Data Type
A buffer is a work space for manipulating text. A buffer can be empty or it can contain text records. You can have multiple buffer s. A value of the buffer data type is returned by the CREATE_BUFFER, CURRENT_BUFFER, and GET_INFO built-in procedures. CREATE_BUFFER is the only built-in procedure that creates a new buffer. CURRENT_BUFFER and GET_INFO return pointers to existing buffers.
The following statement makes the variable my_buf a variable of type buffer:
my_buf := CREATE_BUFFER ("my_buffer");
When you use a buffer as a parameter for DECTPU built-in procedures, you must use as the parameter the variable to which you assigned the buffer. For example, if you want to erase the contents of the buffer created in the preceding statement, enter the following:
ERASE (my_buf);
In this statement, my_buf is the identifier for the variable my_buf. The string "my_buffer" is the name associated with the buffer. The distinction between the name of the buffer variable and the name of the buffer is useful when you are developing an application layered on DECTPU. For example, the application can use an internal buffer name such as main_buffer to manipulate a given buffer (such as the main buffer in EVE). However, the application can associate the name of your input file with the buffer, making it easier for you to remember which buffer contains the contents of a given file.
If you want to delete the buffer itself, use the built-in DELETE procedure with the buffer variable as the parameter.
More than one buffer variable can represent the same buffer. The following statement causes both my_buf and old_buf to point to the same buffer:
old_buf := my_buf;
A buffer remains in DECTPU’s internal list of buffers even when there are no variables pointing to it. You can use the GET_INFO built-in procedure to retrieve buffers from DECTPU’s internal list.
Creating a buffer does not cause the information contained in the buffer to become visible on the screen. The buffer must be associated with a window that is mapped to the screen for the buffer contents to be visible. Editing can take place in a buffer even if the buffer is not mapped to a window on the screen.
The current buffer contains the active editing point. The editing point can be different from the cursor position, and often each is in a different location. When the current buffer is associated with a visible window (one that is mapped to the screen), the editing point and the cursor position are usually the same.
At present, a line in a buffer can contain up to 32767 characters. If you try to create a line that is longer than 32767 characters, DECTPU truncates the inserted text and inserts only the amount that fills the line to 32767 characters. If you try to read a file that contain s lines longer than 32767 characters, DECTPU truncates all characters after the 32767 characters.
You can associate a single buffer with 0 to 255 windows for editing purposes. You can have a buffer visible in two windows so that you can look at two separate parts of the same file. For example, you could display a set of declarations in one window and code that uses the declarations in another window. Edits made to a buffer show up in all windows to which that buffer is mapped and in which the editing point is visible.
3.3. Integer Data Type
DECTPU uses the integer data type to represent numeric data. DECTPU perform s only integer arithmetic. The type integer consists of the whole number values ranging from –2,147,483,648 to 2,147,483,647. In DECTPU, an integer constant is a sequence of decimal digits; no commas or decimal points are allowed.
The following example assigns a value of the integer data type to the variable x:
x := 12345;
DECTPU also supports binary, octal, and hexadecimal integers. Binary integers are preceded by %b or %B, octal by %o or %O, and hexadecimal by %x or %X. Thus, all the following statements are acceptable:
x := %B10000;
x := %o20;
x := %X130;
x := 12345;
3.4. Keyword Data Type
Keywords are reserved words in DECTPU that have special meaning to the compiler. To see a list of all DECTPU keywords, use the SHOW (KEYWORDS) built-in. You use keywords in the following ways:
As parameters for DECTPU built-in procedures. For example, the first parameter of the SET built-in procedure is always a keyword (for instance, PAD, SCROLLING, STATUS_LINE).
As values returned by DECTPU built-in procedures, such as CURRENT_ DIRECTION, KEY_NAME, LAST_KEY, READ_KEY, and GET_INFO. For example, the call GET_INFO (window, "status_video ") has the following keywords as possible return values:
BLINK
BOLD
NONE
REVERSE
SPECIAL_GRAPHICS
UNDERLINE
As pattern directives. The following keywords fall into this category:
ANCHOR
BUFFER_BEGIN
BUFFER_END
LINE_BEGIN
LINE_END
PAGE_BREAK
REMAIN
UNANCHOR
These keywords, which behave like built-in procedures, are described in the DEC Text Processing Utility Reference Manual.
To specify the DECTPU data types (BUFFER, MARKER, LEARN, and so on).
To report warning or error status conditions (TPU$_BADMARGINS, TPU$_ CREATEFAIL, TPU$_NOEOBSTR, and so on).
To pass the names of keys to DECTPU procedures.
Table 3.1 shows the correspondence between keywords used as DECTPU key names and the keys on the VT400, VT300, VT200, and VT100 series of keyboards. You do not have to define a key or control sequence just because there is a DECTPU keyword for the key or sequence.
| DECTPU Key Name | VT400, VT300, VT200 Series Key | VT100 Key |
|---|---|---|
| PF1 | PF1 | PF1 |
| PF2 | PF2 | PF2 |
| PF3 | PF3 | PF3 |
| PF4 | PF4 | PF4 |
| KP0, KP1, . . . , KP9 | 0, 1, . . . , 9 | 0, 1, . . . , 9 |
| Period | . | . |
| Comma | , | , |
| Minus | – | – |
| Enter | Enter | Enter |
| Up | Up arrow | Up arrow |
| DOwn | Down arrow | Down arrow |
| Left | Left arrow | Left arrow |
| Right | Right arrow | Right arrow |
| E1 | Find / E1 | |
| E2 | Insert Here / E2 | |
| E3 | Remove / E3 | |
| E4 | Select / E4 | |
| E5 | Prev Screen / E5 | |
| E6 | Next Screen E6 | |
| Help | Help / F15 | |
| Do | Do / F16 | |
| F6, F7, … , F20 | F6, F7, … , F20 | |
| NULL_KEY | Ctrl/space | Ctrl/space |
| TAB_KEY | Tab | Tab |
| RET_KEY | Return | Return |
| DEL_KEY | ⌫ | Delete |
| LF_KEY | Ctrl/J | Line feed |
| BS_KEY | Ctrl/H | Backspace |
| Ctrl_A_KEY | Ctrl/A? | Ctrl/A? |
| Ctrl_B_KEY | Ctrl/B | Ctrl/B |
| . | . | . |
| . | . | . |
| . | . | . |
| Ctrl_Z_KEY | Ctrl/Z | Ctrl/Z |
The OpenVMS terminal driver handles the following keys as special cases. VSI recommends that you avoid defining the following control characters and function key:
Ctrl/C
Ctrl/O
Ctrl/Q
Ctrl/S
Ctrl/T
Ctrl/X
Ctrl/Y
F6
3.5. Learn Data Type
A learn sequence is a collection of DECTPU keystrokes for use later. The LEARN_BEGIN built-in procedure starts collecting keystrokes; the LEARN_END built-in procedure stops the collection of keystrokes and returns a value of the learn data type as a result. The following example assigns a learn data type to the variable x:
LEARN_BEGIN (EXACT);
.
.
.
x := LEARN_END;
All keystrokes that you enter between the LEARN_BEGIN and LEARN_END built-in procedures are stored in the variable x. The EXACT keyword specifies that, when the learn sequence is replayed, the input (if any) for the built-in procedures READ_CHAR, READ_KEY, and READ_LINE (if used in the learn sequence) will be the same as the input entered when the learn sequence was created. If you specify NO_EXACT, a replay of a learn sequence containing keys that invoke the built-in procedures READ_LINE, READ_KEY, or READ_CHAR looks for new input.
For more information on replaying a learn sequence, see LEARN_BEGIN and LEARN_END in the DEC Text Processing Utility Reference Manual.
You can use the LEARN_ABORT built-in procedure to interrupt the execution of a learn sequence. For information on using LEARN_ABORT, see LEARN_ABORT in the DEC Text Processing Utility Reference Manual.
To enable your user-written DECTPU procedures to work successfully with learn sequences, you must observe the following coding rules when you write procedures that you or someone else can bind to a key:
The procedure should return true or false, as needed, to indicate whether execution of the procedure completed successfully.
The procedure should invoke the LEARN_ABORT built-in in case of error.
These practices help prevent a learn sequence from finishing if the learn sequence calls the user-written procedure and the procedure is not executed successfully.
A procedure that does not explicitly return a value returns 0 by default, thus aborting a learn sequence.
Note
Learn sequences do not include mouse input or characters inserted in a widget.
If, while recording a learn sequence, a margin action routine is executed (such as EVE’s word wrap), the routine may not be executed during the replay of the sequence.
3.6. Marker Data Type
A marker is a reference point in a buffer. You can think of a marker as a “place holder”. To create a marker, use the MARK built-in procedure.
The following example assigns a value of the marker data type to the variable x:
x := MARK (NONE);
After this statement is executed, the variable x contains the character position where the editing point was located when the statement was executed. The editing point is the point in a buffer at which most editing operations are carried out.
You can cause a marker to be displayed with varying video attributes (BLINK, BOLD, REVERSE, UNDERLINE). The NONE keyword in the preceding example specifies that the marker does not have any video attributes.
When you use the MARK built-in, DECTPU puts the marker on the buffer’s editing point. The editing point is not necessarily the same as the window’s cursor position.
A marker can be either free or bound. Free markers are useful for establishing place marks in locations that do not contain characters, such as locations before the beginning of a line, after the end of a line, in the white space created by a tab, or below the end of a buffer. By placing a free marker in such a location, you make it possible to establish the editing point at that location without inserting padding space characters that could complicate later operations such as FILL.
A marker is bound if there is a character in the position marked by the editing point at the time you create the marker. A bound marker is tied to the character on which it is created. If you move the character to which a marker is bound, the marker moves with the character. If you delete the character to which a marker is bound, DECTPU binds the marker to the nearest character or to the end of the line if that is closer than any character.
To force the creation of a bound marker, use the MARK built-in with any of its parameters except FREE_CURSOR. This operation creates a bound marker even if the editing point is beyond the end of a line, before the beginning of a line, in the middle of a tab, or beyond the end of a buffer. To create a bound marker in a location where there is no character, DECTPU fills the space between the marker and the nearest character with padding space characters.
A marker is usually free if all of the following conditions are true:
You used MARK (FREE_CURSOR) to create the marker.
There was no character in the position marked by the editing point at the time you created the marker.
Nothing has happened to cause the marker to become bound.
The following paragraphs explain each of these conditions in more detail.
If you use the MARK (FREE_CURSOR) built-in procedure and there is a character in the position marked by the editing point, the marker is bound even though you specify otherwise. Once a marker becomes bound, it remains bound throughout its existence. To determine whether a marker is bound, use the following GET_INFO call:
GET_INFO (marker_variable, "bound");
DECTPU keeps track of the location of a free marker by measuring the distance between the marker and the character nearest to the marker. If you move the character from which DECTPU measures distance to a free marker, the marker moves too. DECTPU preserves a uniform distance between the character and the marker. If you collapse white space that contains one or more free markers (for example, if you delete a tab or use the APPEND_LINE built-in procedure), DECTPU preserves the markers and binds them to the nearest character.
If you use the POSITION built-in procedure to establish the editing point at a free marker, the marker remains free and the editing point is also said to be free; that is, the editing point is not bound to a character. Some operations cause DECTPU to fill the space between a free marker and the nearest character with padding space characters, thereby converting the free marker to a bound marker. For example, if you type text into the buffer when the editing point is detached, DECTPU inserts padding space characters between the nearest character and the editing point. Using any of the following built-in procedures when the editing point is detached also causes DECTPU to perform padding:
APPEND_LINE
COPY_TEXT
CURRENT_CHARACTER
CURRENT_LINE
CURRENT_OFFSET
ERASE_CHARACTER
Marker Data Type
ERASE_LINE
MOVE_HORIZONTAL
MOVE_TEXT
MOVE_VERTICAL
SELECT
SELECT_RANGE
SPLIT_LINE
Example 3.1 shows how to suppress padding while using these built-ins. The example assumes that the editing point is free. The code in this example assigns the string representation of the current line to the variable bat without adding padding blanks to the buffer.
x := MARK (FREE_CURSOR);                ! Places a marker at the
                                        ! detached editing point

POSITION (SEARCH_QUIETLY ("",FORWARD)); ! Moves the active editing
                                        ! point to the nearest
                                        ! text character

bat := CURRENT_LINE;                    ! Assigns the string
                                        ! representation of the
                                        ! current line to bat without
                                        ! adding padding blanks

POSITION (x);                           ! Returns the active editing
                                        ! point to the free marker
To remove a marker, use the DELETE built-in procedure with the marker as a parameter. For example, the following statement deletes the marker mark1:
DELETE (mark1);
You can also set all variables referring to the marker to refer to something else, for example, tpu$k_unspecified or 0. The following statement sets the variable mark1 to 0:
mark1 := 0;
If mark1 were the only variable referring to a marker, that marker would be deleted upon execution of the previous statement.
The marker data type is returned by the MARK, SELECT, BEGINNING_OF, END_OF, and GET_INFO built-in procedures.
3.7. Pattern Data Type
A pattern is a structure that DECTPU uses when it searches for text in a buffer. You can think of a pattern as a template that DECTPU com pares to the searched text, looking for a match between the pattern and the searched text. You can use a variable whose data type is the pattern data type when you specify the first parameter to the SEARCH and SEARCH_QUIETLY built-in procedures.
To create a pattern, use DECTPU pattern operators (+, &, | , @) to connect any of the following:
String constants
String variables
Pattern variables
Calls to pattern built-in procedures
The following keywords:
ANCHOR
BUFFER_BEGIN
BUFFER_END
LINE_BEGIN
LINE_END
PAGE_BREAK
REMAIN
UNANCHOR
Parentheses (to enclose expressions)
Patterns can be simple or complex. A simple pattern can be composed of sets of strings connected by one of the pattern operators. The following example indicates that pat1 matches either the string "abc" or the string "def":
pat1 := "abc" | "def";
If you connect two strings with the + operator, the result is a string rather than a pattern. For example, the following statement gives pat1 the string data type:
pat1 := "abc" + "def";
The SEARCH and SEARCH_QUIETLY built-in procedures accept such a string as a parameter.
A more complex pattern uses pattern built-in procedures and existing patterns to form a new pattern. The following example indicates that pat2 matches the string "abc" followed by the longest string that contains any characters from the string "12345 ":
pat2 := "abc" + SPAN ("12345");
Pat2 matches the string "abc123" in the text string "xyzabc123def".
Following are additional examples of statements that create complex patterns:
pat1 := any( "abc" );
pat2 := line_begin + remain;
pat3 := "abc" | "xes";
pat4 := pat1 + "12";
pat5 := "xes" @ var1;
pat6 := "abc" & "123";
You can assign a pattern to a variable and then use the variable as a parameter for the SEARCH or SEARCH_QUIETLY built-in procedure. SEARCH or SEARCH_QUIETLY looks for the character sequences specified by the pattern that you use as a parameter. If SEARCH or SEARCH_QUIETLY finds a match for the pattern, the built-in returns a range that contains the text that matches the pattern. You can assign the range to a variable.
The following example uses strings and pattern operators to create a pattern that is stored in the variable my_pat . The variable is then used with the SEARCH or SEARCH_QUIETLY built-in procedure in a forwar d direction. If SEARCH or SEARCH_QUIETLY finds a match for my_pat , the range of matching text is stored in the variable match_range . The POSITION built-in procedure causes the editing point to move to the beginning of match_range.
my_pat := ("abc" | "def") + "::";
match_range := SEARCH (my_pat, FORWARD);
POSITION (match_range);
3.7.1. Using Pattern Built-In Procedures and Keywords
The following built-in procedures return values of the pattern data type:
ANY
ARB
MATCH
NOTANY
SCAN
SCANL
SPAN
SPANL
See the DEC Text Processing Utility Reference Manual for a complete description of these pattern built-in procedures.
3.7.2. Using Keywords to Build Patterns
You can use the following keywords as the first argument to the SEARCH or SEARCH_QUIETLY built-in procedures. You can also use them to form patterns in expressions that use the pattern operators. See the DEC Text Processing Utility Reference Manual for a complete description of these keywords.
ANCHOR
BUFFER_BEGIN
BUFFER_END
LINE_BEGIN
LINE_END
PAGE_BREAK
REMAIN
UNANCHOR
3.7.3. Using Pattern Operators
The following are the DECTPU pattern operators:
Concatenation operator ( + )
Link operator ( & )
Alternation operator ( | )
Partial pattern assignment operator (@ )
The pattern operators are equal in DECTPU’s precedence of operators. For more information on the precedence of DECTPU operators, see Chapter 4. Pattern operators associate from left to right. Thus, the following two DECTPU statements are identical:
pat1 := a + b & c | d @ e;
pat1 := (((a + b) & c) | d) @ e;
In addition to the pattern operators, you can use two relational operators, equal ( = ) and not equal (<>), to compare patterns. The following sections discuss the pattern operators.
3.7.3.1. + (Pattern Concatenation Operator)
The concatenation operator ( + ) tells SEARCH or SEARCH_QUIETLY that text matching the right pattern element must immediately follow the text matching the left pattern element in order for the complete pattern to match. In other words, the concatenation operator specifies a search in which the right pattern element is anchored to the left. For example, the following pattern matches only if there is a line in the searched text that ends with the string abc.
pat1 := "abc" + line_end;
If SEARCH or SEARCH_QUIETLY finds such a line, the built-in returns a range that contains the text abc and the end of the line.
VSI recommends that you use the concatenation operator rather than the link operator unless you specifically require the link operator.
3.7.3.2. & (Pattern Linking Operator)
The link operator ( & ) is similar to the concatenation operator ( + ). Unlike the concatenation operator, the link operator does not necessarily cause an anchored search. If you define a pattern by specifying any pattern element, an ampersand ( & ), and a pattern or keyword variable, a search for each subpattern is not an anchored search.
If you link elements other than pattern variables, the search is an anchored search unless you specify otherwise. Strings, constants, and the results of built-in procedures are not pattern variables.
For example, suppose you defined two subpattern variables as follows:
 p1 := "a" & ANY("012345678");
p2 := "c" & ARB (1);
You then define the following pattern variable:
pat_var := p1 & p2
Given this sequence of definitions, a search for pat_var succeeds if DECTPU encounters the following string:
a5xcd
Because two pattern variables are linked, DECTPU searches first for the text that matches p1, then unanchors the search, and then searches for the text that matches p2.
To specify an anchored search when the right-hand subpattern is a pattern or keyword variable, use a plus sign ( + ). You must use a plus sign ( + ) to anchor the search if the right-hand subpattern is a keyword variable. If the right-hand subpattern is a pattern variable, you can use the ANCHOR keyword as the first element of that subpattern to anchor the right-hand subpattern.
For example, suppose you defined the following patterns:
p1 := LINE_BEGIN + "a";
p2 := "b" + LINE_END;
You anchor the search for p2 by using ( + ) as follows:
pat_var := p1 + p2;
If you use an ampersand ( & ), you unanchor the search for p2.
You can also anchor the search for p2 by defining p2 as follows:
p2 := ANCHOR + "b" + LINE_END;
3.7.3.3. | (Pattern Alternation Operator)
The alternation operator ( | ) tells SEARCH or SEARCH_QUIETLY to match a sequence of characters if those characters match either of the pattern elements separated by the alternation operator. The following pattern matches either the string abc or the string xes:
pat1 := "abc" | "xes";
If the text being searched contain s text that matches both alternatives, SEARCH or SEARCH_QUIETLY matches the earliest occurring match. If two matches start at the same character, SEARCH or SEARCH_QUIETLY matches the left element. For example, suppose you had the search text abcd and the following pattern definitions:
pat1 := "abc" | "bcd";
pat2 := "bcd" | "abc";
pat3 := "bc" | "bcd";
pat4 := "bcd" | "bc";
Given these definitions and search text, a search for the patterns pat1 and pat2 would return a range that contains the text abc. A search for the pattern pat3 would return a range that contains the text bc. Finally, a search for the pattern pat4 would return a range that contains the text bcd.
3.7.3.4. @ (Partial Pattern Assignment Operator)
The partial pattern assignment operator (@ ) tells SEARCH or SEARCH_ QUIETLY to create a range that contains the text matching the pattern element to the left of the partial pattern assignment operator. When the search is completed, the variable to the right of the partial pattern assignment operator references the created range. If SEARCH or SEARCH_QUIETLY is given the search text abcdefg and the following pattern, it returns a range that contains the text abcdefg:
pat1 := "abc" + (arb(2) @ var1) + remain;
SEARCH or SEARCH_QUIETLY also assigns to var1 a range that contains the text de.
If you assign to a variable a partial pattern that matches a position, rather than a character, the partial pattern variable is a range that contains the character or line-end at the point in the file where the partial pattern was matched. For example, in any of the following patterns that contain partial pattern assignments, the variable partial_pattern_variable contains the character or line-end at the point in the file where the partial pattern was matched:
"" @ partial_pattern_variable
ANCHOR @ partial_pattern_variable
UNANCHOR @ partial_pattern_variable
LINE_BEGIN @ partial_pattern_variable
BUFFER_BEGIN @ partial_pattern_variable
If you use one of the preceding patterns when the cursor is free (that is, in an area that does not contain text, such as the area after the end of a line), the variable partial_pattern_variable contains the line-end or character nearest to the cursor.
SEARCH or SEARCH_QUIETLY does partial pattern assignment only if the complete pattern matches. If the complete pattern matches, it makes assignments only to those variables paired with pattern elements that are used in the complete match. If a partial pattern assignment variable appears more than once in a pattern in places where it is legal for a partial pattern assignment to occur, the last occurrence in the pattern determines what range SEARCH assigns to the variable. For example, with the search text abcdefg and the following pattern, SEARCH or SEARCH_QUIETLY returns a range that contain s the text abcde and assigns a range that contains the text d to the variable var1:
pat1 := "a" + ("b" @ var1) + "c" + ("d" @ var1)
        + ("e" | ("x" @ var1));
3.7.3.5. Relational Operators
You can use the two relational operators, equal ( = ) and not equal (<>), to compare patterns. Two patterns are equal if they are the same pattern, as pat1 and pat2 are in the following example:
pat1 := notany("abc", 2) + span("123");
pat2 := pat1;
Two patterns are also equal if they have the same internal representation. Patterns have the same internal representation only if they are built in exactly the same way. The order of the characters in the arguments to ANY, NOTANY, SCAN, SCANL, SPAN, and SPANL does not matter when you are comparing patterns returned by any of these built-ins. Other than this, almost any difference in the building of two patterns makes those patterns unequal. For example, suppose you defined the variable this_pat as follows:
this_pat := ANY ("abc");
Given this definition, the following patterns match the same text but are not equal:
pat1 := LINE_BEGIN + ANY ("abc");
pat2 := LINE_BEGIN + this_pat;
3.7.4. Compiling and Executing Patterns
When you execute a DECTPU statement that contains a pattern expression, DECTPU builds an internal representation of the pattern. DECTPU uses the current contents of any buffer s or ranges used as arguments to pattern built-ins in the pattern expression to build the internal representation. Later changes to those buffer s and ranges do not affect the internal representation for the pattern. DECTPU also uses the current values of any variables used in the pattern expression. Later changes to these variables do not affect the internal representation of the pattern. For example, suppose you wrote the following code fragment:
p1 := "abc";
p2 := "123";
pat := p1 & p2;
p1 := "xyz";
SEARCH (pat, FORWARD);
Given this code fragment, the search matches the string "abc123 " because the variable pat is evaluated as it is built from p1 and p2 during the assignment statement.
3.7.5. Searching for a Pattern
The SEARCH and SEARCH_QUIETLY built-ins use the following algorithm to find a match for a pattern:
Put the internal marker that marks the search position at the starting position for the search. The starting position is determined as follows:
If you do not specify where to search, search the current buffer, starting at the editing point.
If you specify a buffer or range where the search is to take place, start at the beginning or end of the buffer or range, depending on the direction of the search.
Check whether the pattern matches text, starting at the current search position and extending toward the end of the searched buffer or range. If a range is being searched, the matched text cannot extend beyond the end of that range. If the pattern matches, return a range that contains the matching text and stop searching.
If the previous step fails, move the search position one character forward or backward, depending upon the direction of the search. If this is impossible because the search position is at the end or beginning of the searched buffer or range, stop searching. If this step succeeds, repeat the previous step.
Note
This algorithm changes if you specify a reverse search for a pattern starting with SCAN, SPAN, SCANL, or SPANL. For more information, see the descriptions of these built-in procedures in the DEC Text Processing Utility Reference Manual.
3.7.6. Anchoring a Pattern
Anchoring a pattern forces SEARCH or SEARCH_QUIETLY to match the anchored part of the pattern to text starting at the current search position. If the anchored part of a pattern fails to match that text, SEARCH or SEARCH_ QUIETLY stops searching.
Usually, all pattern elements other than the first pattern element of a pattern are anchored. This means that a pattern can match text starting at any point in the searched text but that once it starts matching, each pattern element must match the text immediately following the text that matched the previous pattern element.
To direct DECTPU to stop searching if the characters starting at the editing point do not match the pattern, use the ANCHOR keyword as the first pattern element. For example, the following pattern matches only if the string abc occurs at the editing point:
pat1 := ANCHOR + "abc";
There are two ways to unanchor pattern elements in the midst of a pattern. The easiest is to concatenate or link the UNANCHOR keyword before the pattern element you want to unanchor. The following pattern unanchors the pattern element xyz:
pat1 := "abc" + UNANCHOR + "xyz";
This means that the pattern pat1 matches any text beginning with the characters abc and ending with the characters xyz. It does not matter what or how many characters or line breaks appear between the two sets of characters. Since SEARCH or SEARCH_QUIETLY matches the first xyz it finds, the text between the two sets of characters by definition does not contain the string xyz.
The second way to unanchor a pattern element is to use the special properties of the link operator ( & ). While the concatenation operator always anchors the right pattern element to the left, the link operator does so only if the right pattern element is not a pattern variable. If the link operator’s right pattern element is a pattern variable, the link operator unanchors that pattern element. The pattern pat2 defined by the following assignments matches any sequence of text that begins with the letter a and ends with a digit.
pat1 := ANY ("0123456789");
pat2 := "a" & pat1;
Any amount of text can occur between the a and the digit. Pat2 matches the same text as the following pattern:
pat3 := "a" + UNANCHOR + ANY( "0123456789" );
The link operator unanchors a pattern variable regardless of what the left pattern element is. In particular, the following two patterns match the same text:
pat2 := "a" & pat1;
pat3 := "a" & ANCHOR & pat1;
If you are using pattern variables to form patterns and you wish those variables to be anchored, you have two choices: you can use the concatenation operator, or you can use the ANCHOR keyword as the first element of any pattern the pattern variables reference.
3.8. Process Data Type
The CREATE_PROCESS built-in procedure returns a value of the process data type. A DECTPU process runs as a subprocess. DECTPU processes have the same restrictions that OpenVMS subprocesses have. Following are some of the restrictions:
You cannot create more DECTPU processes than your account subprocess quota allows.
You cannot spawn a subprocess in an account that has the CAPTIVE flag set.
Only OpenVMS utilities that can perform I/O to a mailbox and that do simple reads and writes (for example, MAIL) can run in a DECTPU process. Programs like FMS, PHONE, or any other program that takes full control of the screen, do not work properly in a DECTPU process. See the built-in procedure SPAWN for information on running these types of programs from DECTPU.
You do not see any prompts from the utility you are using. For example, in MAIL, you have to be aware of the sequence of prompts for sending a mail message because you do not see the prompts.
The following example assigns a value of the process data type to the variable x:
x := CREATE_PROCESS (main_buffer, "MAIL");
The first parameter specifies that the output from the process is to be stored in MAIN_BUFFER. The string "MAIL" is the first command sent to the subprocess.
To pass commands to a subprocess, use the SEND built-in procedure, as follows:
SEND ("MAIL", x);
To pass the READ command to the Mail utility, enter the following DECTPU statement:
SEND ("READ", x);
The output from the READ command is stored in the buffer associated with the process x. If the buffer associated with a process is deleted, the process is deleted as well.
3.9. Program Data Type
A program is the compiled form of a sequence of DECTPU procedures and executable statements. The COMPILE and LOOKUP_KEY built-in procedures can optionally return a value of the program data type as a result. The following example assigns a value of the program data type to the variable x:
x := COMPILE (main_buffer);
MAIN_BUFFER must contain only DECTPU declarations, executable statements, and comments. All declarations must come before any executable statements that are not included in the declarations. The declarations and statements are compiled and the resulting program is stored in the variable x.
3.10. Range Data Type
A range contains all the text between (and including) two markers. You can form a range with the CREATE_RANGE built-in procedure. A range is associated with characters within a buffer. If the characters within a range move, the range moves with them. If characters are added or deleted between two markers that delimit a range, the size of the range changes. If all the characters in a range are deleted, the range moves to the nearest character.
DECTPU does not support ranges of zero length unless the range begins and ends at the end of a buffer. All other ranges contain at least one character (which could be a space character) or a line-end (if the range is created at the end of a line).
If you create a range by specifying a free marker as a parameter to the CREATE_ RANGE built-in, DECTPU creates a new marker and binds the marker to the text nearest to the free marker position. DECTPU uses the new bound marker as the range delimiter. This operation does not cause insertion of padding spaces.
Deleting the markers used to create a range does not affect the range.
To convert the contents of a range to a string, use either the STR or the SUBSTR built-in procedure.
To remove a range, use the DELETE built-in procedure with the range as a parameter. For example, the following statement deletes the range range1:
DELETE (range1);
You can also delete a range by removing all variable references to the range. To do this, set all variables referring to the range to some other value, such as 0. For example, the following statement sets the variable range1 to 0:
range1 := 0;
Deleting a range does not remove the characters of the range from the buffer; it merely removes the range data structure. To remove the characters of a range, use the ERASE built-in procedure with the range as a parameter. For example, ERASE (my_range) removes all the characters in my_range, but it does not remove the range structure. Using the statement DELETE (range_variable) removes the range data structure, but does not affect the characters in the range.
The following built-in procedures, as well as the partial pattern assignment operator, all return values of the range data type:
CHANGE_CASE
CREATE_RANGE
EDIT
GET_INFO
READ_CLIPBOARD
READ_GLOBAL_SELECT
SEARCH
SEARCH_QUIETLY
SELECT_RANGE
TRANSLATE
The following example assigns a value of the range data type to the variable x:
x := CREATE_RANGE (mark1, mark2, UNDERLINE);
You can specify the video attribute with which DECTPU should display a range. The possible attributes are BLINK, BOLD, REVERSE, and UNDERLINE. The UNDERLINE keyword in the preceding example specifies that the characters in the range will be underlined when they appear on the screen. You cannot give more than one video attribute to a range. However, to apply multiple video attributes to a given set of characters, you can define more than one range that contains those characters and give one video attribute to each range.
3.11. String Data Type
DECTPU uses the string data type to represent character data. A value of the string data type can contain any of the elements of a character set. You can select one of the following character sets to use with your string data:
DEC_MCS—DEC Multinational Character Set
ISO_LATIN1—ISO Latin1 Character Set
GENERAL—Other general character sets
DECTPU uses the string data type to represent character data. A value of the string data type can contain any of the elements of the character sets mentioned previously. To specify a string constant, enclose the value in quotation marks. In DECTPU, you can use either the quotation mark ( " ) or the apostrophe ( ’ ) as the delimiter for a string. The following statements assign a value of the string data type to the variable x:
x := ’abcd’;
x := "abcd";
To specify the quote character itself within a string, type the character twice if you are using the same quote character as the delimiter for the string. The following statements show how to quote an apostrophe and a quotation mark, respectively:
x := ’’’’; ! The value assigned to x is ’.
x := """"; ! The value assigned to x is ".
If you use the alternate quote character as the delimiter for the string within which you want to specify a quote character, you do not have to type the character twice. The following statements show how to quote an apostrophe and a quotation mark, respectively, when you use the alternate quote character to delimit the string:
x := "’"; ! The value assigned to x is ’.
x := ’"’; ! The value assigned to x is ".
A null string is a string of length zero. You can assign a null string to the variable x in the following way:
x := ’’;
To create a string from the contents of a range, use the STR or the SUBSTR built-in procedure. To create a string from the contents of a buffer, use the STR built-in.
The maximum length for a string is 65,535 characters. A restriction of the DECTPU compiler is that a string constant (an open quotation mark, some characters, and a close quotation mark) must have both its opening and closing quotation marks on the same line. While a string can be up to 65,535 characters long, a line in a DECTPU buffer can only be 32767 characters long. If you try to create a line that is longer than 32767 characters, DECTPU truncates the inserted text to the amount that fills the line to 32767 characters.
Many DECTPU built-in procedures return a value of the string data type. The ASCII built-in procedure, for example, returns a string for the ordinal value that you use as a parameter. The following statement returns the string "K" in the variable my_char:
my_char := ASCII (75);
To replicate a string, specify the string to be reproduced, then the multiplication operator ( * ), and then the number of times you want the string to be replicated. For example, the following DECTPU statement inserts 10 underscores into the current buffer at the editing point:
COPY_TEXT ("_" * 10)The string to be replicated must be on the left-hand side of the operator. For example, the following DECTPU statement produces an error:
COPY_TEXT (10 * "_")
To reduce a string, specify the string to be modified, then the subtraction operator (–), and then the substring to be removed. Table 3.2 shows the effect s of two string-reduction operations.
| DECTPU Statement | Result |
|---|---|
| COPY_TEXT ("FILENAME.MEM"–"FILE") | Inserts the string "NAME.MEM" into the current buffer at the editing point. |
| COPY_TEXT ("woolly"–"wool") | Inserts the string "ly" into the current buffer at the editing point. |
3.12. Unspecified Data Type
An unspecified value is the initial value of a variable after it has been compiled (added to the DECTPU symbol table). In the following example, the COMPILE built-in procedure creates the variable x and initially gives it the data type unspecified unless x has previously been declared as a global variable:
COMPILE ("x := 1");An assignment statement that creates a variable must be executed before a data type is assigned to the variable. In the following example, when you use the EXECUTE built-in procedure to run the program that is stored in the variable prog, the variable x is assigned an integer value:
prog := COMPILE ("x := 1");
EXECUTE (prog);
To give a variable the data type unspecified, assign the predefined constant TPU$K_UNSPECIFIED to the variable:
prog := TPU$K_UNSPECIFIED;
3.13. Widget Data Type
The DECwindows version of DECTPU provides the widget data type to support DECwindows widgets. The non-DECwindows version of DECTPU does not support this data type.
A widget is an interaction mechanism by which users give input to an application or receive messages from an application.
You can use the equal operator ( =) or the not-equal operator ( <>) on widgets to determine whether they are equal (that is, whether they are the same widget instance), but you cannot use any other relational or arithmetic operators on them.
Once you have created a widget instance, DECTPU does not delete the widget instance, even if there are no variables referencing it. To delete a widget, use the DELETE built-in procedure.
DECwindows DECTPU provides the same support for DECwindows gadgets that it provides for widgets. A gadget is a structure similar to a widget, but it is not associated with its own unique DECwindows window. Gadgets do not require as much memory to implement as widgets do. In most cases, you can use the same DECwindows DECTPU built-ins on gadgets that you use on widgets.
For more information on widgets or gadgets, see the OpenVMS overview documentation.
3.14. Window Data Type
A window is a portion of the screen that displays as much of the text in a buffer as will fit in the screen area. In EVE, the screen contains three windows by default: a large window for viewing the text in your editing buffer and two one-line windows for displaying commands and messages. In EVE or in a user-written interface, you can subdivide the screen to create more windows.
A variable of the window data type ‘‘contains’’ a window. The CREATE_WINDOW, CURRENT_WINDOW, and GET_INFO built-in procedures return a value of the window data type. CREATE_WINDOW is the only built-in procedure that creates a new window. The following example assigns a value of the window data type to the variable x:
x := CREATE_WINDOW (1, 12, OFF);
The first parameter specifies that the window starts at screen line number 1. The second parameter specifies that the window is 12 lines in length. The OFF keyword specifies that a status line is not to be displayed when the window is mapped to the screen.
3.14.1. Defining Window Dimensions
Windows are defined in lines and columns. In EVE, all windows extend the full width of the screen or terminal emulator. In DECTPU, you can set the window width to be narrower than the width of the screen or terminal emulator.
The allowable dimensions of a window often depend on whether the window has a status line, a horizontal scroll bar, or both. A status line occupies the last line of a window. By default, a status line contains information about the buffer and the file associated with the window. You can turn a status line on or off with the SET (STATUS_LINE) built-in procedure.
A horizontal scroll bar is a one-line widget at the bottom of a window that you can use to shift the window to the right or left, controlling what text in the buffer can be seen through the window. You can turn a horizontal scroll bar on or off with the SET (SCROLL_BAR) built-in procedure.
Lines on the screen are counted from 1 to the number of lines on the screen; lines in a window are counted from 1 to the number of lines in the window. Columns on the screen are counted from 1 to the physical width of the screen; columns in a window are counted from 1 to the number of columns in the window.
The minimum length for a window is one line if you do not include a status line or horizontal scroll bar, two lines if you include either a status line or a horizontal scroll bar, and three lines if you include both a status line and scroll bar.
The maximum length of a window is the number of lines on your screen. For example, if your screen is 24 lines long, the maximum size for a single window is 24 lines. On the same size screen, you can have a maximum of 24 visible windows if you do not use status lines or horizontal scroll bars. If you use a status line and a horizontal scroll bar for each window, the maximum number of visible windows is 8.
3.14.2. Creating Windows
When you use a device that supports windows (see Chapter 1 for information on terminals that DECTPU supports), you or the section file that initializes your application must create and map windows. In most instances, it is also advisable to map a buffer to the window. To map a buffer to a window, use the MAP built-in procedure. If you do not associate a buffer with a window and map the window to the screen, the only items displayed on the screen are messages that are written to the screen at the cursor position.
The CREATE_WINDOW built-in procedure defines the size and location of a window and specifies whether a status line is to be displayed. CREATE_ WINDOW also adds the window to DECTPU’s internal list of windows available for mapping. At creation, a window is marked as being not visible and not mapped and the following values for the window are calculated and stored:
Original_top—Screen line number of the top of the window when it was created.
Original_bottom—Screen line number of the bottom of the window when it was created (not including the status line).
Original_length—Number of lines in the window (including the status line).
Later calls to ADJUST_WINDOW may change these values.
3.14.3. Displaying Window Values
When you use the CREATE_WINDOW built-in procedure to create a window, DECTPU saves the numbers of the screen lines that delimit the window in original_top and original_bottom. When you map a window to the screen with the MAP built-in procedure, the window becomes visible on the screen. If it is the only window on the screen, its visible_top and visible_bottom values are the same as its original_top and original_bottom values. You can use SHOW (WINDOWS) to display the original and the visible values or the GET_INFO built-in procedure to retrieve them.
However, if there is already a window on the screen and you map another window over part of it, the values for the previous window’s visible_top, visible_bottom , and visible_length are modified. The value for visible_length of the previous window is different from its original_length until the new window is removed from the screen. As long as the new window is on the screen and does not have another window mapped over it, its original top and bottom are the same as its visible top and bottom.
3.14.4. Mapping Windows
When you want a window and its associated buffer to be visible on the screen, use the MAP built-in procedure. Mapping a window to the screen has the following effects:
The mapped window becomes the current window and the cursor is moved to the editing point in the buffer associated with the window.
The buffer associated with the window becomes the current buffer.
The window is marked as visible and mapped.
The visible_top , visible_bottom, and visible_length of the window are calculated and stored. Initially, these values are the same as the original values that were calculated when the window was created (See the last item in the next list).
Mapping a window to the screen may have the following side effect s:
The newly mapped window may occlude other windows. This happens when the original_top or original_bottom line of the newly mapped window overlaps the boundaries of existing visible windows. Overlapping can cause some windows to be totally occluded or not visible. Occluded windows are still marked mapped ; when the window that is covering them is unmapped, they may reappear on the screen without being explicitly remapped.
If the newly mapped window divides a window into two parts, only the top part of the segmented window continues to be updated. The lower part of the segmented window is erased at the next window update.
The visible_top, visible_bottom, and visible_length values of a window that is occluded change from their original values.
When a newly mapped window becomes the current window (the MAP, POSITION, and ADJ UST_WINDOW built-in procedures cause this to happen), the cursor is placed in the current window. In addition to the active cursor position in the current window, there is a marker that designates a cursor position in all other windows. The cursor position in a window other than the current window is the last location of the cursor when it was in the window. By maintaining a cursor position in all windows, DECTPU lets you edit in multiple locations of a single buffer if that buffer is associated with more than one window.
For more information on the cursor position in a window and the POSITION built-in procedure, see the DEC Text Processing Utility Reference Manual.
3.14.5. Removing Windows
To remove a window from the screen, you can use either the UNMAP built-in procedure or the DELETE built-in procedure. UNMAP removes a window from the screen. However, the window is still in DECTPU’s internal list of windows. It is available to be remapped to the screen without being re-created. DELETE removes a window from the screen and also removes it from DECTPU’s list of windows. It is then no longer available for future mapping to the screen.
Unmapping or deleting a window has the following effects:
The unmapped window is marked as not visible and not mapped.
Another window becomes the current window and the cursor is moved to the last cursor position in that window.
If other windows were occluded by the window you removed from the screen, text from the occluded windows reappears on the screen. The visible_top, visible_bottom, and visible_length values of the previously occluded windows are modified according to the lines that are returned to them when the occluding window is unmapped. When an occluding window is removed, the window or windows it occluded become visible again.
3.14.6. Using the Screen Manager
The screen manager is the part of DECTPU that controls the display of data on the screen. You can manipulate data without having it appear on a terminal screen (see Chapter 5). However, if you use the DECTPU window capability to make your edits visible, the screen manager controls the screen.
In the main control loop of DECTPU, the screen manager is not called to perform its duties until all commands bound to the last key pressed have finished executing and all input in the type-ahead buffer has been processed. Upon completion of all the commands, the screen manager updates every window to reflect the current state of the part of the buffer that is visible in the window. If you want to make the screen reflect changes to the buffer prior to the end of a procedure, use the UPDATE built-in procedure to force the updating of the window. Using UPDATE is recommended with built-in procedures such as CURRENT_COLUMN that query DECTPU for the current cursor position. To ensure that the cursor position returned is the correct location (up to the point of the most recently issued command), use UPDATE before using CURRENT_ COLUMN or CURRENT_ROW.
3.14.7. Getting Information on Windows
There are two DECTPU built-in procedures that return information about windows:
GET_INFO and SHOW (WINDOW). GET_INFO returns information that you can store in a variable. You can get information about the visible and original values of windows, as well as about other attributes that you have set up for your window environment. See GET_ INFO in the DEC Text Processing Utility Reference Manual.
SHOW (WINDOW) or SHOW (WINDOWS) puts information about windows in the SHOW_BUFFER. If you use an editor that has an INFO_WINDOW, you can display the SHOW_BUFFER information in the INFO_WINDOW.
3.14.8. Terminals That Do Not Support Windows
DECTPU supports windows only for ANSI character-cell terminals. Noncharacter-cell terminals do not support windows and are considered “unsupported devices”.
If you are using an unsupported device, you must use the /NODISPLAY qualifier when you invoke DECTPU. /NODISPLAY informs DECTPU that you do not expect the device from which you are issuing DECTPU commands to support screen-oriented editing. If one of the previous conditions exists and you do not specify the /NODISPLAY qualifier, DECTPU exits with an error condition.
You are using an unsupported device if logical name SYS$INPUT points to an unsupported device, such as a character-cell terminal. Appendix B contains more information about DECTPU terminal support. Chapter 2 contains more information on the /NODISPLAY qualifier.
Chapter 4. Lexical Elements of the DEC Text Processing Utility Language
4.1. Overview
A DECTPU program is composed of lexical elements. A lexical element may be an individual character, such as an arithmetic operator, or it may be a group of characters, such as an identifier. The basic unit of a lexical element is a character from either the DEC Multinational Character Set or the ISO_LATIN1 Character Set.
This chapter describes the following DECTPU lexical elements:
Character set
Identifiers
Variables
Constants
Operators
Expressions
Reserved words
Lexical keywords
4.2. Case Sensitivity of Characters
The DECTPU compiler does not distinguish between uppercase and lowercase characters except when they appear as part of a quoted string. For example, the word EDITOR has the same meaning when written in any of the following ways:
- EDITOR
- EDitOR
- editor
The following, however, are quoted strings, and therefore represent different values:
- "XYZ"
- "xyz"
4.3. Character Sets
When you invoke DECTPU, you can use one of the following keywords with the /CHARACTER_SET qualifier to specify the character set that you want DECTPU to use:
DEC_MCS (for the DEC Multinational Character Set)
ISO_LATIN1 (for the ISO Latin1 Character Set)
GENERAL (for other general character sets)
TPU$CHARACTER_SET (see the DCL help topic for this logical name)
Each character set is an 8-bit character set with 256 characters. Each character in a set is assigned a decimal equivalent number ranging from 0 to 255. Each character set uses an extension of the American Standard Code for Information Interchange (ASCII) character set for the first 128 characters. Table 4.1 shows the categories into which you can group the ASCII characters.
| Category | Meaning |
|---|---|
| 0–31 | Nonprinting characters such as tab, line feed, carriage return, and bell |
| 32 | Space |
| 33–64 | Special characters such as the ampersand ( & ), question mark ( ? ), equal sign ( = ), and the numbers 0 through 9 |
| 65–122 | The uppercase and lowercase letters A through Z and a through z |
| 123–126 | Special characters such as the left brace ({ ) and the tilde ( ~ ) |
| 127 | Delete |
The following sections discuss the types of character sets supported by DECTPU.
4.3.1. DEC Multinational Character Set (DEC_MCS)
The DEC Multinational Character Set characters from 128 to 255 are extended control characters and supplemental multinational characters. Table 4.2 shows the categories into which you can group the characters.
| Category | Meaning |
|---|---|
| 128–159 | Extended control characters |
| 160 | Reserved |
| 161–191 | Supplemental special graphics characters such as the copyright sign ( © ) and the degree sign ( ° ) |
| 192–254 | The supplemental multinational uppercase and lowercase letters such as the Spanish Ñ and ñ |
| 255 | Reserved |
For a complete list of characters in the DEC Multinational Character Set, see the OpenVMS documentation.
4.3.2. ISO Latin1 Character Set (ISO_LATIN1)
The ISO Latin1 Character Set characters from 128 to 255 are extended control characters and Latin1 supplemental multinational characters. Table 4.3 shows the groups into which you can categorize characters.
| 128-159 | Extended control characters |
| 160-191 | Latin1 supplemental graphics characters such as the nonbreaking space and the currency sign |
| 192-255 | The Latin1 supplemental uppercase and lowercase letters such as the uppercase and lowercase thorn |
For a complete list of the ISO Latin1 Character Set, see the OpenVMS documentation.
4.3.3. General Character Sets
If you specify the GENERAL keyword with the /CHARACTER_SET qualifier or the -C option, DECTPU is unable to set a character set for 8-bit characters. The character set used and how DECTPU displays 8-bit characters are the same as before you started DECTPU. For this reason, the characters from 128 to 255 in the General Character Sets are not specific to any character set.
4.3.4. Entering Control Characters
There are two ways to enter control characters in DECTPU:
Use the ASCII built-in procedure with the decimal value of the control character that you want to enter. The following statement causes the escape character to be entered in the current buffer:
COPY_TEXT (ASCII (27));
Use the special functions provided by EVE to enter control characters:
EVE provides a QUOTE command that is bound to Ctrl/V to insert control characters in a buffer. For example, to use the quote command to insert an escape character in a buffer, do the following:
Press Ctrl/V.
Press the ESCAPE key (on VT100-series terminals) or Ctrl/[.For example:
Ctrl/V ESC
EVE’s EDT-like keypad setting provides a SPECINS key sequence to insert control characters in a buffer. Use the SPECINS key to enter a control character as follows:
Press the GOLD key.
Enter the ASCII value of the special character that you want to insert in the buffer; in this case 27 (the escape character). (Use the keys on the keyboard, not the ones on the keypad.)
Press the GOLD key again.
Press the SPECINS key on the EDT keypad. For example:
GOLD 27 GOLD Specins
4.3.5. DECTPU Symbols
Certain symbols have special meanings in DECTPU. You can use them as statement delimiters, operators, or other syntactic elements. Table 4.4 lists the DECTPU symbols and their functions.
| Name | Symbol | DECTPU Function |
|---|---|---|
| Apostrophe | ’ | Delimits a string |
| Assignment operator | := | Assigns a value to a variable |
| At sign | @ | Partial pattern assignment operator |
| Left brace | { | Opens an array element index expression |
| Close parenthesis | ) | Ends parameter list, expression, procedure call,argument list, or array element index |
| Comma | , | Separates parameters |
| Exclamation point | ! | Begins comment |
| Dollar sign | $ | Indicates a variable, constant, keyword, or procedure name that is reserved to Compaq |
| Right brace | } | Closes array element index expression |
| Equal sign | = | Relational operator |
| Greater than sign | > | Relational operator |
| Greater than or equal to sign | >= | Relational operator |
| Slash | / | Integer division operator |
| Asterisk | * | Integer multiplication operator |
| Left bracket | [ | Begins case label |
| Less than sign | < | Relational operator |
| Less than or equal to sign | <= | Relational operator |
| Minus sign | – | Subtraction operator |
| Not equal sign | <> | Relational operator |
| Vertical bar | | | Pattern alternation operator |
| Open parenthesis | ( | Begins parameter list, expression, argument list, or array element index |
| Ampersand | & | Pattern linkage operator |
| Plus sign | + | String concatenation operator, pattern concatenation operator, integer addition operator |
| Quotation mark | " | Delimits string |
| Right bracket | ] | Ends case label |
| Semicolon | ; | Separates language statements |
| Underscore | _ | Separates words in identifiers |
4.4. Identifiers
In DECTPU, identifiers are used to name programs, procedures, keywords, and variables. An identifier is a combination of alphabetic characters, digits, dollar signs, and underscores, and it must conform to the following restrictions:
An identifier cannot contain any spaces or symbols except the dollar sign and the underscore.
Identifiers cannot be more than 132 characters long.
DECTPU identifiers for built-in procedures, constants, keywords, and global variables are reserved words.
You can create your own identifiers to name programs, procedures, constants, and variables. Any symbol that is neither declared nor used as the target of an assignment statement is assumed to be an undefined procedure.
4.5. Variables
Variables are names given to DECTPU storage locations that hold values. A variable name can be any valid DECTPU identifier that is not a DECTPU reserved word or the name of a DECTPU procedure. You assign a value to a variable by using a valid identifier as the left-hand side of an assignment statement. Following is an example of a variable assignment:
new_buffer := CREATE_BUFFER ("new_buffer_name");VSI suggests that you establish some convention for naming variables so that you can distinguish your variables from the variables in the section file that you are using.
DECTPU allows two kinds of variables: global and local. Global variables are in effect throughout a DECTPU environment. Local variables are evaluated only within the procedure or unbound code in which they are declared. A variable is implicitly global unless you use the LOCAL declaration. You can also declare global variables with the VARIABLE declaration.
Example 4.1 shows a global variable declaration and a procedure that contains a local variable declaration.
VARIABLE user_tab_char;

! Tab key procedure. Always inserts a tab, even if current mode
! is overstrike.

PROCEDURE user_tab

LOCAL this_mode;         ! Local variable for current mode

this_mode := GET_INFO (CURRENT_BUFFER, "mode"); ! Save current mode
SET (INSERT, CURRENT_BUFFER);                  ! Set mode to insert
user_tab_char := ASCII (9);                    ! Define the tab char
COPY_TEXT (user_tab_char);                     ! Insert tab
SET (this_mode, CURRENT_BUFFER);               ! Reset original mode

ENDPROCEDURE;
The global variable user_tab_char is assigned a value when the procedure user_tab is executing. Since the variable is a global variable, it could have been assigned a value outside the procedure user_tab.
The local variable this_mode has the value established in the procedure user_tab only when this procedure is executing. You can have a variable also named this_mode in another procedure. The two variables are not the same and may have different values. You can also have a global variable named this_mode. However, using this_mode as a global variable when you are also using it as a local variable is likely to confuse people who read your code. DECTPU will return an informational message during compilation if a local variable has the same name as a global variable.
4.6. Constants
DECTPU has three types of constants:
Integers
Strings
Keywords
Integer constants can be any integer value that is valid in DECTPU. See the DEC Text Processing Utility Reference Manual for more information on the integer data type.
String constants can be one character or a combination of characters delimited by apostrophes or quotation marks. See the DEC Text Processing Utility Reference Manual for a complete description of how to quote strings in DECTPU.
Keywords are reserved words that have special meaning to the DECTPU compiler. See Chapter 3 for a complete description of keywords.
With the CONSTANT declaration, you can associate a name with a constant expression. User-defined constants can be locally or globally defined.
A local constant is a constant declared within a procedure declaration. The scope of the constant is limited to the procedure in which it is defined.
A global constant is a constant declared outside a procedure. Once a global constant has been defined, it is set for the life of the DECTPU session. You can reassign to a constant the same value it was assigned previously, but you cannot redefine a constant during a DECTPU session.
See Section 4.9.5.3 for a complete description of the CONSTANT declaration.
Example 4.2 shows a global constant declaration and a procedure that contains a local constant declaration.
! Define some global constants.
CONSTANT
   user_bell := BELL,
   user_hello := "Hello",
   user_ten := 10;

! Hello world procedure.
PROCEDURE user_hello_world
CONSTANT
   world := "world";
MESSAGE (user_hello + " " + world);   ! Display "Hello world"
                                      ! in message area
ENDPROCEDURE;
4.7. Operators
DECTPU uses symbols and characters as language operators. There are five types of operators:
Arithmetic
String
Relational
Pattern
Logical
Table 4.5 lists the symbols and language elements that DECTPU uses as operators.
| Type | Symbol | Description |
|---|---|---|
| Arithmetic |
|
|
| String |
|
|
| Relational |
|
|
| Pattern |
|
|
| Logical |
|
|
You can use the + operator to concatenate strings. You can also use the relational operators to compare a string with a string, a marker with a marker, or a range with a range.
The precedence of the operators in an expression determines the order in which the operands are evaluated. Table 4.6 lists the order of precedence for DECTPU operators. Operators of equal precedence are listed on the same line.
| Operator | Precedence |
|---|---|
| unary +,unary – | Highest |
| NOT | |
| *, /, AND | |
| @, &, +, –, | , OR, XOR | |
| =, <>, <, <=, >, >= | |
| := | Lowest |
Expressions enclosed in parentheses are evaluated first. You must use parentheses for correct evaluation of an expression that combines relational operators.
You can use parentheses in an expression to force a particular order for combining operands. For example:
Expression           Result

8 * 5 / 2 - 4          16
8 * 5 / (2 - 4)       -20
4.8. Expressions
An expression can be a constant, a variable, a procedure, or a combination of these separated by operators. You can use expressions in a DECTPU procedure where an identifier or constant is required. Expressions are frequently used within DECTPU conditional language statements.
The data types of all elements of a DECTPU expression must be the same. The following are exceptions to this rule:
You can mix keywords, strings, and pattern variables in expressions used to create patterns.
You can mix data types when using the not equal (<>) and equal ( = ) relational operators.
You can mix strings and integers when doing string replication.
Except for these cases, DECTPU does not perform implicit type conversions to allow for the mixing of data types within an expression. If you mix data types, DECTPU issues an error message.
In the following example, the elements (J > 4) and (my_string = "this is my string") each evaluate to an integer type (odd integers are true; even integers are false) so that they can be used following the DECTPU IF statement:
IF (J > 4) AND (my_string = "this is my string")
THEN
   .
   .
   .
With the exception of patterns and the relational operators, the result of an expression is the same data type as the elements that make up the expression.
The following example shows a pattern expression that uses a string data type on the right-hand side of the expression. The LINE_BEGIN and REMAIN pattern keywords are used with the string constant "the" to create a pattern data type that is stored in the variable pat1 :
pat1 := LINE_BEGIN + "the" + REMAIN;
Whenever possible, the DECTPU compiler evaluates constant expressions at compile time. DECTPU built-in procedures that can return a constant value given constant input are evaluated at compile time.
In the following example, the variable fubar has a single string assigned to it:
fubar := ASCII (27) + "[0m";
Note
Do not assume that the DECTPU compiler automatically evaluates an expression in left-to-right order.
To avoid the need to rewrite code, you should write as if this compiler optimization were already implemented. If you need the compiler to evaluate an expression in a particular order, you should force the compiler to evaluate each operand in order before using the expression. To do so, use each operand in an assignment statement before using it in an expression. For example, suppose you want to use ROUTINE_1 and ROUTINE_2 in an expression.
Suppose, too, that ROUTINE_1 must be evaluated first because it prompts for user input. To get this result, you could use the following code:
PARTIAL_1 := ROUTINE_1;
PARTIAL_2 := ROUTINE_2;
You could then use a statement in which the order of evaluation was important, such as the following:
IF PARTIAL_1 OR PARTIAL_2
   .
   .
   .
There are four types of DECTPU expressions:
Arithmetic
Relational
Pattern
Boolean
The following sections discuss each of these expression types.
4.8.1. Arithmetic Expressions
You can use any of the arithmetic operators (+, –, *, / ) with integer data types to form arithmetic expressions. DECTPU performs only integer arithmetic. The following are examples of valid DECTPU expressions:
12 + 4 ! adds two integers
"abc" + "def" ! concatenates two strings
The following is not a valid DECTPU expression because it mixes data types:
"abc" + 12 ! you cannot mix data types
When performing integer division, DECTPU truncates the remainder; it does not round. The following examples show the results of division operations:
Expression         Result

 39 / 10              3
 -39 / 10            -3
4.8.2. Relational Expressions
A relational expression tests the relationship between items of the same data type and returns an integer result. If the relationship is true, the result is integer 1; if the relationship is false, the result is integer 0.
Use the following relational operators with any of the DECTPU data types:
Not equal operator (<>)
Equal operator ( = )
For example, the following code fragment tests whether string1 starts with a letter that occurs later in the alphabet than the starting letter of string2:
string1 := "gastropod";
string2 := "arachnid";
IF string1 > string2
THEN
    MESSAGE ("Out of alphabetical order ");
ENDIF;
Use the following relational operators for comparisons of integers, strings, or markers:
Greater than operator (>)
Less than operator (<)
Greater than or equal to operator (>=)
Less than or equal to operator (<=)
When used with markers, these operators test whether one marker is closer to (or farther from) the top of the buffer than another marker. (If markers are in different buffer s, they will return as false.) For example, the procedure in Example 4.3 uses relational operators to determine which half of the buffer the cursor is located in.
PROCEDURE which_half

LOCAL  number_lines,
       saved_mark;

saved_mark := MARK (FREE_CURSOR);
POSITION (BEGINNING_OF (CURRENT_BUFFER));
number_lines := GET_INFO (current_buffer, "record_count");
IF number_lines = 0

THEN
    MESSAGE ("The current buffer is empty");
ELSE
    MOVE_VERTICAL (number_lines/2);
      IF MARK (FREE_CURSOR) = saved_mark
      THEN
          MESSAGE ("You are at the middle of the buffer");
      ELSE
          IF MARK (FREE_CURSOR) < saved_mark
          THEN
            MESSAGE ("You are in the second half of the buffer");
          ELSE
            MESSAGE ("You are in the first half of the buffer");
          ENDIF;
      ENDIF;

ENDIF;

ENDPROCEDURE;
4.8.3. Pattern Expressions
A pattern expression consists of the pattern operators (+, &, | , @) combined with string constants, string variables, pattern variables, pattern procedures, pattern keywords, or parentheses. The following are valid pattern expressions:
pat1 := LINE_BEGIN + SPAN ("0123456789") + ANY ("abc"); pat2 := LINE_END + ("end"|"begin"); pat3 := SCAN (’;"!’) + (NOTANY ("’") & LINE_END); See Chapter 3 for more information on pattern expressions.
4.8.4. Boolean Expressions
DECTPU performs bitwise logical operations on Boolean expressions. This means that the logical operation is performed on the individual bits of the operands to produce the individual bits of the result. In the following example, the value of user_variable is set to 3.
user_variable := 3 AND 7;
As another example, if user_var were %X7777 (30583), then you would use the following statement to set user_var to %x0077 (119):
user_var := user_var AND %XFF
A true value in DECTPU is any odd integer; a false value is any even integer. Use the logical operators (AND, NOT, OR, XOR) to combine one or more expressions. DECTPU evaluates Boolean expressions enclosed in parentheses before other
elements. The following example shows the use of parentheses to ensure that the Boolean expression is evaluated correctly:
IF (X = 12) AND (y <> 40)
THEN
  .
  .
  .
ENDIF;
4.9. Reserved Words
Reserved words are words that are defined by DECTPU and that have a special meaning for the compiler.
DECTPU reserved words can be divided into the following categories:
Keywords
Built-in procedure names
Predefined constants
Declarations and statements
The following sections describe the categories of reserved words.
4.9.1. Keywords
Keywords are a DECTPU data type. They are reserved words that have special meaning to the compiler. You can redefine DECTPU keywords only in local declarations (local constants, local variables, and parameters in a parameter list). If you give a local constant, local variable, or parameter the same name as that of a keyword, the compiler issues a message notifying you that the local declaration or parameter temporarily supersedes the keyword. In such a circumstance, the keyword is said to be occluded. See Chapter 3 and the DEC Text Processing Utility Reference Manual for more information on keywords.
4.9.2. Built-In Procedure Names
The DECTPU language has many built-in procedures that perform functions such as screen management, key definition, text manipulation, and program execution. You can redefine DECTPU built-in procedures only in local declarations (local constants, local variables, and parameters in a parameter list). If you give a local constant, local variable, or parameter the same name as that of a built-in procedure, the compiler issues a message notifying you that the local declaration or parameter temporarily supersedes the built-in. In such a circumstance, the built-in is said to be occluded. See the DEC Text Processing Utility Reference Manual for a complete description of the DECTPU built-in procedures.
4.9.3. Predefined Constants
The following is a list of predefined global constants that DECTPU sets up. You cannot redefine these constants.
FALSE
TPU$K_ALT_MODIFIED
TPU$K_CTRL_MODIFIED
TPU$K_HELP_MODIFIED
TPU$K_MESSAGE_FACILITY
TPU$K_MESSAGE_ID
TPU$K_MESSAGE_SEVERITY
TPU$K_MESSAGE_TEXT
TPU$K_SEARCH_CASE
TPU$K_SEARCH_DIACRITICAL
TPU$K_SHIFT_MODIFIED
TPU$K_UNSPECIFIED
TRUE
4.9.4. Declarations and Statements
A DECTPU program can consist of a sequence of declarations and statements. These declarations and statements control the action performed in a procedure or a program. The following reserved words are the language elements that when combined properly make up the declarations and statements of DECTPU:
Module declaration
MODULE
IDENT
ENDMODULE
Procedure declaration
PROCEDURE
ENDPROCEDURE
Repetitive statement
LOOP
EXITIF
ENDLOOP
Conditional statement
IF
THEN
ELSE
ENDIF
Case statement
CASE
FROM
TO
INRANGE
OUTRANGE
ENDCASE
Error statement
ON_ERROR
ENDON_ERROR
RETURN statement
ABORT statement
Miscellaneous declarations
EQUIVALENCE
LOCAL
CONSTANT
VARIABLE
GLOBAL, UNIVERSAL, BEGIN, and END are words reserved for future expansion of the DECTPU language.
The DECTPU declarations and statements are reserved words that you cannot define. Any attempt to redefine these words results in a compilation error.
4.9.4.1. Module Declaration
With the MODULE/ENDMODULE declaration, you can group a series of global CONSTANT declarations, VARIABLE declarations, PROCEDURE declarations, and executable statements as one entity. After you compile a module, the compiler will generate two procedures for you. One procedure returns the identification for the module and the other contains all the executable statements for the module. The procedure names generated by the compiler are module- name_MODULE_ID ENT and module-name_MODULE_INIT, respectively.
Syntax
MODULE module-name IDENT string-literal ⟦declarations⟧ ⟦ON_ERROR ...
ENDON_ERROR⟧ statement_1; . . . statement_ n; ENDMODULE
The declarations part of a module can include any number of global VARIABLE, CONSTANT, and PROCEDURE declarations.
The ON_ERROR/ENDON_ERROR block, if used, must appear after the declarations and before the DECTPU statements that make up the body of the module. Statements that make up the body of a module must be separated with semicolons. For more information on error handlers, see Section 4.9.4.14.
In the following example, the compiler creates two procedures: user_mod_module_ident and user_mod_module_init. User_mod_module_ident returns the string "v1.0". User_mod_module_init calls the routine user_hello.
MODULE user_mod IDENT "v1.0"

PROCEDURE user_hello
    MESSAGE ("Hello");
ENDPROCEDURE;

ON_ERROR
    MESSAGE ("Good-bye");
END_ON_ERROR;

user_hello;
ENDMODULE
4.9.4.2. Procedure Declaration
The PROCEDURE/ENDPROCEDURE declaration delimits a series of DECTPU statements so they can be called as a unit. With the PROCEDURE/ENDPROCEDURE combination, you can declare a procedure with a name so that you can call it from another procedure or from the command line of a DECTPU editing interface. Once you have compiled a procedure, you can enter the procedure name as a statement in another procedure, or enter the procedure name after the TPU Statement: prompt on the command line of EVE.
Syntax
PROCEDURE procedure-name ⟦ (parameter-list) ⟧ ⟦local-declarations⟧
⟦ON_ERROR ... ENDON_ERROR⟧ statement_1; statement_2; . . . statement_ n;
ENDPROCEDURE;
The local declarations part of a procedure can include any number of LOCAL and CONSTANT declarations.
The ON_ERROR/ENDON_ERROR block, if used, must appear after the declarations and before the DECTPU statements that make up the body of the procedure. For more information on error handlers, see Section 4.9.4.14.
After the ON_ERROR/ENDON_ERROR block, you can use any kind of DECTPU language statements in the body of a procedure except another ON_ERROR/ENDON_ERROR block. Statements that make up the body of a procedure must be separated with semicolons. For example:
PROCEDURE version

   MESSAGE ("This is Version 1-020");

ENDPROCEDURE;
This procedure writes the text "This is Version 1–020 " in the message area.
4.9.4.3. Procedure Names
A procedure name can be any valid identifier that is not a DECTPU reserved word. VSI suggests that you use a convention when naming your procedures. For instance, you might prefix procedure names with your initials. In this way, you can easily distinguish procedures that you write from other procedures such as the DECTPU built-in procedures. For example, if John Smith writes a procedure that creates two windows, he might name his procedure js_two_ windows. This helps ensure that his procedure name is a unique name. Most of the sample procedures in this manual have the prefix user_ with procedure names.
4.9.4.4. Procedure Parameters
Using parameters with procedures is optional. If you use parameters, they can be input parameters, output parameters, or both. For example:
PROCEDURE user_input_output (a, b)

   a :=a+ 5;
   b := a;
ENDPROCEDURE;
In the preceding procedure, a is an input parameter. It is also an output parameter because it is modified by the procedure input_output . In the same procedure, b is an output parameter.
The scope of procedure parameters is limited to the procedure in which they are defined. The maximum number of parameters in a parameter list is 127. A procedure can declare its parameters as required or optional. Required parameters and optional parameters are separated by a semicolon. Parameters before the semicolon are required parameters; those after the semicolon are optional. If no semicolon is specified, then the parameters are required.
Syntax
PROCEDURE proc-name ⟦ ( ⟦req-p aram ⟦...⟧ ⟧ ⟦;op t-param ⟦...⟧ ⟧ ) ⟧ . . .
ENDPROCEDURE;
A procedure parameter is a place holder or dummy identifier that is replaced by an actual value in the program that calls the procedure. The value that replaces a parameter is called an argument . Arguments can be expressions. There does not have to be any correlation between the names used for parameters and the values used for arguments. All arguments are passed by reference. Example 4.4 shows a simple procedure with parameters.
!This procedure adds two integers. The parameters, int1 and int2,
!are replaced by the actual values that you supply.
!The result of the addition is written to the message area.

PROCEDURE ADD (int1, int2)

   MESSAGE (STR (int1 + int2));

ENDPROCEDURE;
For example, call the procedure ADD and specify the values 5 and 6 as arguments, as follows:
ADD (5, 6);
The string "11" is written to the message buffer.
Any caller of a procedure must use all required parameters to call it. The caller can also use optional parameters. If the required parameters are not present or the procedure is called with too many parameters (more than the sum of the required and optional parameters), then DECTPU issues an error.
If a procedure is called with the required number of parameters, but with less than the maximum number of parameters, then the remaining parameters up to the maximum automatically become “null parameters”. A null parameter is a modifiable parameter of data type unspecified. A null parameter can be assigned a value and will become the value it is assigned, but the parameter’s value is discarded when the procedure exits.
Null parameters can also be explicitly passed to a procedure. You can do this by omitting a parameter when calling the procedure.
Example 4.5 shows a more complex procedure that uses optional parameters.
CONSTANT
    user_warning       := 0,        ! Warning severity code
    user_success       := 1,        ! Success severity code
    user_error         := 2,        ! Error severity code
    user_informational := 3,        ! Informational severity code
    user_fatal         := 4;        ! Fatal severity code
!
! Output a message with fatal/error/warning flash.
!
PROCEDURE user_message (the_text; the_severity)

LOCAL flash_it;
!
! Only flash warning, error, or fatal messages.
!
CASE the_severity FROM user_warning TO user_fatal
    [user_warning, user_error, user_fatal] : flash_it := TRUE;

    [user_success, user_informational] : flash_it := FALSE;

    [OUTRANGE] : flash_it := FALSE;

ENDCASE;
!
! Output the message - flash it, if appropriate.
!
MESSAGE (the_text);
IF flash_it
THEN
    SLEEP ("0 00:00:00.3");
    MESSAGE ("");
    SLEEP ("0 00:00:00.3");
    MESSAGE (the_text);
ENDIF;

ENDPROCEDURE;
Caution
Do not assume that the DECTPU compiler automatically evaluates parameters in the order in which you place them.
To avoid the need to rewrite code, you should write as if this compiler optimization were already implemented. If you need the compiler to evaluate parameters in a particular order, you should force the compiler to evaluate each parameter in order before calling the procedure. To do so, use each parameter in an assignment statement before calling the procedure. For example, suppose you want to call a procedure whose parameter list includes PARAM_1 and PARAM_2. Suppose, too, that PARAM_1 must be evaluated first. To get this result, you could use the following code:
partial_1 := param_1;
partial_2 := param_2;
my_procedure (partial_1, partial_2);
4.9.4.5. Procedures That Return a Result
Procedures that return a result are called function procedures. Example 4.6 shows a procedure that returns a true ( 1 ) or false ( 0 ) value.
Note
All DECTPU procedures return a result. If they do not do so explicitly, DECTPU returns 0.
PROCEDURE user_on_end_of_line !test if at eol, return true or false

IF CURRENT_OFFSET = LENGTH (CURRENT_LINE)    ! we are on eol
THEN
    user_on_end_of_line := 1                   ! return true
ELSE
    user_on_end_of_line := 0                   ! return false
ENDIF;

ENDPROCEDURE;
Another way of assigning a value of 1 or 0 to a procedure is to use the DECTPU RETURN language statement followed by a value. See Example 4.13.
You can use a procedure that returns a result as a part of a conditional statement to test for certain conditions. Example 4.7 shows the procedure in Example 4.6 within another procedure.
PROCEDURE user_nested_procedure
   .
   .
   .
IF user_on_end_of_line = 1 ! at the eol mark
THEN
    MESSAGE ("Cursor is at the end of the line")
ELSE
    MESSAGE ("Cursor is not at the end of the line")
ENDIF;
   .
   .
   .
ENDPROCEDURE;
4.9.4.6. Recursive Procedures
Procedures that call themselves are called recursive procedures. Example 4.8 shows a procedure named user_reverse that displays a list of responses to the READ_LINE built-in procedure in reverse order. Note the call to the procedure user_reverse within the procedure body.
PROCEDURE user_reverse
LOCAL temp_string;

temp_string := READ_LINE("input>");

                          ! Read a response

IF temp_string <> " "     ! Quit if nothing entered
                          ! but the RETURN key.
THEN
    user_reverse          ! Call user_reverse recursively
ELSE
    RETURN                ! All done, go to display lines
ENDIF;
MESSAGE (temp_string);    ! Display lines typed in reverse order
                          ! in the message window
ENDPROCEDURE;
4.9.4.7. Local Variables
The use of local variables in procedures is optional. If you use local variables, they hold the values that you assign them only in the procedure in which you declare them. The maximum number of local variables that you can use is 255. Local variables are initialized to 0.
Syntax
LOCAL variable-name ⟦,...⟧;
If you declare a local variable in a procedure and, in the same procedure, use the EXECUTE built-in to assign a value to a variable with the same name as the local variable, the result of the EXECUTE built-in has no effect on the local variable. Consider the following code fragment:
PROCEDURE test
   LOCAL X;
   EXECUTE ("X := 3");
   MOVE_VERTICAL (X);
ENDPROCEDURE;
In this fragment, when the compiler evaluates the string "X := 3", the compiler assumes X is a global variable. The compiler creates a global variable X (if none exists) and assigns the value 3 to the variable. When the MOVE_VERTICAL built-in procedure uses the local variable X, the local variable has the value 0 and the MOVE_VERTICAL built-in has no effect.
Local variables may also be declared in unbound code. See Section 4.9.5.2.
4.9.4.8. Constants
The use of constants in procedures is optional. The scope of a constant declared within a procedure is limited to the procedure in which it is defined. See Section 4.9.5.3 for more information on the CONSTANT declaration.
Syntax
CONSTANT constant-name := compile-time-constant-expression ⟦,...⟧;
4.9.4.9. ON_ERROR Statements
The use of ON_ERROR statements in procedures is optional. If you use an ON_ ERROR statement, you must place it at the top of the procedure just after any LOCAL and CONSTANT declarations. The ON_ERROR statement specifies the action or actions to be taken if an ERROR or WARNING status is returned. See Section Section 4.9.4.14 for more information on ON_ERROR statements.
4.9.4.10. Assignment Statement
The assignment statement assigns a value to a variable. In so doing, it associates the variable with the appropriate data type.
Syntax
identifier := expression;
The assignment operator is a combination of two characters: a colon and an equal sign (:=). Do not confuse this operator with the equal sign (=), which is a relational operator that checks for equality.
DECTPU does not do any type checking on the data type being stored. Any data type may be stored in any variable. For example:
X := "abc";
This assignment statement stores the string "abc" in variable X.
4.9.4.11. Repetitive Statement
The LOOP/ENDLOOP statements specify the repetitive execution of a statement or statements until the condition specified by EXITIF is met.
Syntax
LOOP statement_1; statement_2; . . . EXITIF expression; statement_ n;
ENDLOOP;
The EXITIF statement is the mechanism for exiting from a loop. You can place the EXITIF statement anywhere inside a LOOP/ENDLOOP combination. You can also use the EXITIF statement as many times as you like. When the EXITIF statement is true, it causes a branch to the statement following the ENDLOOP statement.
Syntax
EXITIF expression;
The expression is optional; without it, EXITIF always exits from the loop.
Any DECTPU language statement except an ON_ERROR statement can appear inside a LOOP/ENDLOOP combination. For example:
LOOP
   EXITIF CURRENT_OFFSET = 0;
   temp_string := CURRENT_CHARACTER;
   EXITIF (temp_string <> " ") AND
          (temp_string <> ASCII(9));
   MOVE_HORIZONTAL (-1);
   temp_length := temp_length + 1;
ENDLOOP;
This procedure uses the EXITIF statement twice. Each expression following an EXITIF statement defines a condition that causes an exit from the loop. The statements in the loop are repeated until one of the EXITIF conditions is met.
4.9.4.12. Conditional Statement
The IF/THEN statement causes the execution of a statement or group of statements, depending on the value of a Boolean expression. If the expression is true, the statement is executed; otherwise, program control passes to the statement following the IF/THEN statement.
The optional ELSE clause provides an alternative group of statements for execution. The ELSE clause is executed if the test condition specified by IF/THEN is false.
The ENDIF statement specifies the end of a conditional statement.
Syntax
IF expression THEN statement_1; . . . statement_ n ⟦ELSE alternate-statement_ 1;
. . . alternate-statement_ n;⟧ ENDIF;
You can use any DECTPU language statements except ON_ERROR statements in a THEN or ELSE clause. For example:
PROCEDURE set_direct

MESSAGE ("Press PF3 or PF4 to indicate direction");
temp_char := READ_KEY;
IF temp_char = KP5
THEN
    SET (REVERSE, CURRENT_BUFFER);
ELSE
    IF temp_char = KP4
    THEN
        SET (FORWARD, CURRENT_BUFFER);
    ENDIF;
ENDIF;

ENDPROCEDURE;
In this example, nested IF/THEN/ELSE statements test whether a buffer direction should be forward or reverse.
Caution
Do not assume that the DECTPU compiler automatically evaluates all parts of an IF statement.
To avoid the need to rewrite code, you should write as if this compiler optimization were already implemented. If you need the compiler to evaluate all clauses of a conditional statement, you should force the compiler to evaluate each clause before using the conditional statement. To do so, use each clause in an assignment statement before using it in a conditional statement. For example, suppose you want the compiler to evaluate both CLAUSE_1 and CLAUSE_2 in a conditional statement. To get this result, you could use the following code:
relation_1 := clause_1;
relation_2 := clause_2;
IF relation_1 AND relation_2
THEN
  .
  .
  .
ENDIF;
4.9.4.13. Case Statement
The CASE statement is a selection control structure that lets you list several alternate actions and choose one of them to be executed at run time. In a CASE statement, case labels are associated with the possible executable statements or actions to be performed. The CASE statement then executes the statement or statements labeled with a value that matches the value of the case selector.
Syntax
CASE case-selector ⟦FROM
lower-constant-expr, TO upper-constant-expr⟧
     [constant-expr_1 ⟦,...⟧] : statement ⟦,...⟧;
     [constant-expr_2 ⟦,...⟧] : statement ⟦,...⟧;
          .
          .
          .

     [constant-expr_n ⟦,...⟧] : statement ⟦,...⟧;

    ⟦[INRANGE] : statement ⟦,...⟧ ;⟧

    ⟦[OUTRANGE] : statement ⟦,...⟧ ;⟧
ENDCASE;
The single brackets are not optional for case constants. Example 4.9 shows how to use the CASE statement in a procedure.
CASE constant expressions must evaluate at compile time to either a keyword, a string constant, or an integer constant. All constant expressions in the CASE statement must be of the same data type. There are two special case constants in DECTPU: INRANGE and OUTRANGE. INRANGE matches anything that falls within the case range that does not have a case label associated with it. OUTRANGE matches anything that falls outside the case range. These special case constants are optional.
FROM and TO clauses of a CASE statement are not required. If FROM and TO clauses are not specified, INRANGE and OUTRANGE labels refer to data between the minimum and maximum specified labels.
Example 4.9 shows a sample procedure that uses the CASE statement.
PROCEDURE grades

answers := READ_LINE ("Enter number of correct answers:",5);
answers := INT (answers);

CASE answers FROM 0 TO 10
                   [10] : score := "A+";
                    [9] : score := "A";
                    [8] : score := "B";
                    [7] : score := "C";
                    [6] : score := "D";
          [0,1,2,3,4,5] : score := "F";
             [OUTRANGE] : score := "Invalid entry.";
ENDCASE;

MESSAGE (score);

ENDPROCEDURE;
This CASE statement compares the value of the constant selector answers to the case labels (the numbers 0 through 10). If the value of answers is any of the numbers from 0 through 10, the statement to the right of that number is executed. If the value of answers is outside the range of 0 through 10, the statement to the right of [OUTRANGE] is executed. The value of score is written in the message area after the execution of the CASE statement.
4.9.4.14. Error Handling
A block of code starting with ON_ERROR and ending with ENDON_ERROR defines the actions that are to be taken when a procedure fails to execute successfully. Such a block of code is called an error handler . An error handler is an optional part of a DECTPU procedure or program. An error handler traps WARNING and ERROR status values. See SET (INFORMATIONAL) and SET (SUCCESS) in the DEC Text Processing Utility Reference Manual for information on handling informational and success status values.
It is good programming practice to put an error handler in all but the simplest procedures. However, if you omit the error handler, DECTPU’s default error handling behavior is as follows:
If you press Ctrl/C, DECTPU places an error message in the message buffer, exits from all currently active procedures (in their reverse calling order), and returns to the “wait for next key” loop.
If an error or warning is generated during a CALL_USER routine, ERROR is set to the keyword that represents the failure status of the routine, ERROR_ LINE is set to the line number of the error, and ERROR_TEXT is set to the message associated with the error or warning. DECTPU places the message in the message buffer, then resumes execution at the statement after the statement that generated the error or warning.
For other errors and warnings, ERROR is set to the keyword that represents the error or warning, ERROR_LINE is set to the line number of the error, and ERROR_TEXT is set to the message associated with the error or warning. DECTPU places the message in the message buffer, then resumes execution at the statement after the statement that generated the error or warning.
In a procedure, the error handler must be placed at the beginning of a procedure—after the procedure parameter list, the LOCAL or CONSTANT declarations, if present, and before the body of the procedure. In a program, the ON_ERROR language statements must be placed after all the global declarations (PROCEDURE, CONSTANT, and VARIABLE) and before any executable statements. Error statements can contain any DECTPU language statements except other ON_ERROR statements.
There are three DECTPU lexical elements that are useful in an error handler: ERROR, ERROR_LINE, and ERROR_TEXT.
ERROR returns a keyword for the error or warning. The DEC Text Processing Utility Reference Manual includes information on the possible error and warning keywords that each built-in procedure can return.
ERROR_LINE returns the line number at which the error or warning occur s. If a procedure was com piled from a buffer or range, ERROR_LINE returns the line number within the buffer. (This may be different from the line number within the procedure.) If the procedure was compiled from a string, ERROR_LINE returns 1.
ERROR_TEXT returns the text of the error or warning, exactly as DECTPU would display it in the message buffer, with all parameters filled in.
After the execution of an error statement, you can choose where to resume execution of a program. The options are the following:
ABORT—This language statement causes an exit back to the DECTPU “wait for next key” loop.
RETURN—This language statement stops the execution of the procedure in which the error occurred but continues execution of the rest of the program.
If you do not specify ABORT or RETURN, the default is to continue executing the program from the point at which the error occurred.
DECTPU provides two forms of error handler: procedural and case style.
4.9.4.15. Procedural Error Handlers
If a WARNING status is trapped by an ON_ERROR statement, the warning message is suppressed. However, if an ERROR status is trapped, the message is displayed. With the ON_ERROR trap, you can do additional error handling after the DECTPU message is displayed.
Syntax
ON_ERROR statement_1; statement_2; . . . statement_n; ENDON_ERROR;Example 4.10 shows error statements at the beginning of a procedure. These statements return control to the caller if the input on the command line of an interface is not correct. Any warning or error status returned by a statement in the body of the procedure causes the error statements to be executed.
!
! Gold 7 emulation (command line processing)
!
PROCEDURE command_line

LOCAL
   line_read, X;

ON_ERROR
    MESSAGE ("Unrecognized command: " + line_read);
    RETURN;
ENDON_ERROR;
!
! Get the command(s) to execute
!
line_read := READ_LINE ("DECTPU Statement: "); ! get line from user
!
! compile them

!
IF line_read <> ""
THEN
    X := COMPILE (line_read);
ELSE
    RETURN
ENDIF;
!
! execute
!
IF X <>0
THEN
    EXECUTE (X);
ENDIF;

ENDPROCEDURE;
The effects of a procedural error handler are as follows:
If you press Ctrl/C, DECTPU places an error message in the message buffer, exits from all currently active procedures (in their reverse calling order), and returns to the “wait for next key” loop.
If an error or warning is generated during a CALL_USER routine, ERROR is set to a keyword that represents the failure status of the routine, ERROR_LINE is set to the line number of the error, and ERROR_TEXT is set to a warning or error message that is placed in the message buffer. Finally, DECTPU runs the error handler code.
For other warnings and errors, ERROR is set to a keyword that represents the error or warning, ERROR_LINE is set to the line number of the error, and ERROR_TEXT is set to the error or warning message associated with the keyword. DECTPU places error messages in the message buffer but suppresses the display of warning messages. Finally, DECTPU runs the error handler code.
If an error or warning is generated during execution of a procedural error handler, DECTPU behaves as follows:
If you press Ctrl/C during the error handler, DECTPU puts an error message in the message buffer, exits from all currently active procedures (in their reverse calling order), and returns to the “wait for next key” loop.
For other errors and warnings, the appropriate error or warning message is written to the message buffer. DECTPU resumes execution at the next statement after the statement that generated the error.
4.9.4.16. Case-Style Error Handlers
Case-style error handlers provide a number of advantages over procedural error handlers. With case-style error handlers, you can do the following:
Suppress the automatic display of both warning and error status messages
Trap the TPU$_CONTROLC status
Write clearer code
 ON_ERROR [con dition_1]: statement_1;... [con dition_2]: statement_2;... . . .
[condition_n]: statement_ n; ENDON_ERROR;
You can use the [OTHERWISE] selector alone in an error handler as a shortcut. For example, the following two error handlers have the same effect:
! This error handler uses [OTHERWISE] alone as a shortcut.
ON_ERROR [OTHERWISE] : ;
ENDON_ERROR

! This error handler has the same effect as using
! [OTHERWISE] alone.

ON_ERROR
[OTHERWISE] :
   LEARN_ABORT;
   RETURN (FALSE);
ENDON_ERROR;
Example 4.11 from the EVE editor shows a procedure with a case-style error handler.
PROCEDURE eve$learn_abort

ON_ERROR
    [TPU$_CONTROLC]:
       MESSAGE (ERROR_TEXT);
       RETURN (LEARN_ABORT);
ENDON_ERROR;

IF LEARN_ABORT
THEN
    eve$message (EVE$_LEARNABORT);
    RETURN (TRUE);
ELSE
    RETURN (FALSE);
ENDIF;

ENDPROCEDURE;
If a program or procedure has a case-style error handler, DECTPU handles errors and warnings as follows:
If you press Ctrl/C, DECTPU determines whether the error handler contain s a selector labeled TPU$_CONTROLC. If so, DECTPU sets ERROR to TPU$_ CONTROLC, ERROR_LINE to the line that DECTPU was executing when Ctrl/C was pressed, and ERROR_TEXT to the message associated with TPU$_ CONTROLC. DECTPU then executes the statements associated with the selector. If there is no TPU$_CONTROLC selector, DECTPU exits from the error handler and looks for a TPU$_CONTROLC selector in the procedures or program (if any) in which the current procedure is nested. If no TPU$_ CONTROLC selector is found in the containing procedures or program, DECTPU places the message associated with TPU$_CONTROLC in the message buffer.
If an error or warning is generated during a CALL_USER routine, ERROR is set to a keyword that represents the failure status of the routine, ERROR_LINE is set to the line number of the error, and ERROR_TEXT is set to the warning or error message associated with the keyword. DECTPU then processes the error handler that trapped the CALL_USER error in the same way that DECTPU processes normal case-style error handlers.
For other warnings and errors, ERROR is set to a keyword that represents the error or warning, ERROR_LINE is set to the line number of the error, and ERROR_TEXT is set to the error or warning message associated with the keyword.
The way a case-style error handler processes an error or warning depends on how the error handler traps the error. There are three possible ways, as follows:
The error handler can trap the error by using a selector that matches the error exactly (that is, using a selector other than OTHERWISE).
The error handler can trap the error by using the OTHERWISE selector.
The error handler can completely fail to trap the error.
The following discussion explains how a case-style error handler processes an error or warning in each of these circumstances.
If the error or warning is trapped by a selector other than OTHERWISE, DECTPU does not place the error or warning message in the message buffer unless the error handler code instructs it to do so. In this case, after setting ERROR, ERROR_LINE, and ERROR_TEXT, DECTPU executes the code associated with the selector. If the code does not return to the calling procedure or program, DECTPU checks whether one of the selectors associated with the code just executed is TPU$_CONTROLC or OTHERWISE. If so, DECTPU performs the equivalent of the following sequence:
special_error_symbol := 0;
LEARN_ABORT;
RETURN (FALSE);
If not, the error handler terminates and DECTPU resumes execution at the next statement after the statement that generated the error or warning.
For more information on the special error symbol in DECTPU, see the description of the SET (SPECIAL_ERROR_SYMBOL) built-in procedure in the DEC Text Processing Utility Reference Manual.
If the error or warning is trapped by the OTHERWISE selector, DECTPU writes the associated error or warning message in the message buffer. Next, DECTPU executes the code associated with the OTHERWISE selector. If the code does not return to the calling procedure or program, DECTPU performs the equivalent of the following sequence:
special_error_symbol := 0;
LEARN_ABORT;
RETURN (FALSE);
If the error or warning is not trapped by any selector, DECTPU writes the associated error or warning message in the message buffer. Next, DECTPU performs the equivalent of the following sequence:
special_error_symbol := 0;
LEARN_ABORT;
RETURN (FALSE);
If an error or warning is generated during execution of a case-style error handler, DECTPU behaves as follows:
If you press Ctrl/C during the error handler, DECTPU sets ERROR to TPU$_CONTROLC, ERROR_LINE to the line being executed when Ctrl/C was pressed, and ERROR_TEXT to the message associated with TPU$_ CONTROLC.
If one of the case selectors in the error handler is TPU$_CONTROLC, DECTPU executes the code associated with the selector. If the code does not return to the calling procedure or program, DECTPU performs the equivalent of the following sequence:
special_error_symbol := 0;
LEARN_ABORT;
RETURN (FALSE);
If none of the selectors is TPU$_CONTROLC, then DECTPU exits from the error handler and looks for a TPU$_CONTROLC selector in the procedures or program (if any) in which the current procedure is nested. If DECTPU does not find a TPU$_CONTROLC selector in the containing procedures or program, DECTPU places the message associated with TPU$_CONTROLC in the message buffer.
If the error is not due to you pressing Ctrl/C, the error message is written to the message buffer and DECTPU performs the equivalent of the following sequence:
special_error_symbol := 0;
LEARN_ABORT;
RETURN (FALSE);
In a procedure with a case-style error handler, an ABORT statement produces the same effect as the sequence Ctrl/C, with one exception: an ABORT statement in the TPU$_CONTROLC clause of a case-style error handler does not reinvoke the TPU$_CONTROLC clause, as is the case when Ctrl/C is pressed while TPU$_CONTROLC is executing. Instead, an ABORT statement causes DECTPU to exit from the error handler and look for a TPU$_CONTROLC selector in the procedures or program (if any) in which the current procedure is nested. If DECTPU does not find a TPU$_CONTROLC selector in the containing procedures or program, DECTPU places the message associated with TPU$_CONTROLC in the message buffer.
4.9.4.17. Ctrl/C Handling
The ability to trap a Ctrl/C in your DECTPU program is both powerful and dangerous. When you press Ctrl/C, you usually want the application that is running to prompt for a new command. The ability to trap the Ctrl/C is intended to allow a procedure to clean up and exit gracefully.
4.9.4.18. RETURN Statement
The RETURN statement causes a return to the procedure that called the current procedure or program. The return is to the statement that follows the statement that called the current procedure or program. You can specify an expression after the RETURN statement and the value of this expression is passed to the calling procedure.
Syntax
RETURN expression;
The expression is optional; if it is missing, DECTPU supplies a 0. Also, the RETURN statement itself is optional. That is, if DECTPU reaches the endprocedure of a procedure before encountering a RETURN statement, it will return 0. Example 4.12 shows a sample procedure in which a value is returned to the calling procedure.
PROCEDURE user_get_shift_key

LOCAL key_to_shift; ! Keyword for key pressed after shift key

SET (SHIFT_KEY, LAST_KEY);
key_to_shift := KEY_NAME (READ_KEY, SHIFT_KEY);
RETURN key_to_shift;

ENDPROCEDURE;
In addition to using RETURN to pass a value, you can use a 1 (true) or a 0 (false) with the RETURN statement to indicate the status of a procedure. Example 4.13 shows this usage of the RETURN statement.
PROCEDURE user_at_end_of_line

! This procedure returns a 1 (true) if user is at the end of a
! line, or a 0 (false) if the current character is not at the
! end of a line

ON_ERROR
! Suppress warning message
   RETURN (1);
ENDON_ERROR;

IF CURRENT_OFFSET = LENGTH (CURRENT_LINE)
THEN
    RETURN (1);
ELSE
    RETURN (0);
ENDIF;

ENDPROCEDURE;
You can use the RETURN statement in the ON_ERROR section of a procedure to specify a return to the calling procedure if an error occurs in the current procedure. Example 4.14 uses the RETURN statement in an ON_ERROR section.
! Attach to the parent process. Used when EVE is spawned
! from DCL and run in a subprocess ("kept DECTPU"). The
! ATTACH command can be used for more flexible process control.

PROCEDURE eve_attach
ON_ERROR
    IF ERROR = TPU$_NOPARENT
    THEN
        MESSAGE ("Not running DECTPU in a subprocess");
        RETURN;
    ENDIF;
ENDON_ERROR;

ATTACH;

ENDPROCEDURE;
4.9.4.19. ABORT Statement
The ABORT statement stops any executing procedures and causes DECTPU to wait for the next keystroke. ABORT is commonly used in error handlers. For additional information on using ABORT in error handlers, see Section 4.9.4.14.
Syntax
ABORT
Example 4.15 shows a simple error handler that contains an ABORT statement.
ON_ERROR
   MESSAGE ("Aborting procedure because of error.");
   ABORT;
ENDON_ERROR;
4.9.5. Miscellaneous Declarations
This section describes the following DECTPU language declarations:
EQUIVALENCE
LOCAL
CONSTANT
VARIABLE
4.9.5.1. EQUIVALENCE
With the EQUIVALENCE declaration, you can create synonyms. Equivalences work only when both real_name and synonym_name are defined at the same time. You cannot save a section file that contains real_name and then later use that section file to extend code that uses an EQUIVALENCE of the saved name. To avoid problems, include all EQUIVALENCE declarations in the same compilation unit where real_name is defined.
The equivalences can reside in different compilation units, but you must use all of the compilation units when building the section file from scratch. If you use a base section file that you extend interactively, you cannot make equivalences to procedures or variables defined in the base section file.
Syntax
EQUIVALENCE synonym_name1 = real_name1, synonym_name2 = real_name2, ...;
Elements of the EQUIVALENCE Statement
- real_name
A user-defined global variable or procedure name. If real_name is undefined, DECTPU defines it as an ambiguous name. This ambiguous name can become a variable or procedure later.
- synonym_name
A name to be defined as a synonym for the real_name.
4.9.5.2. LOCAL
With the LOCAL declaration, you can identify certain variables as local variables rather than global variables. All variables are considered to be global variables unless you explicitly use the LOCAL declaration to identify them as local variables. The LOCAL declaration in a procedure is optional. It must be specified after the PROCEDURE statement and before any ON_ERROR statement. LOCAL declarations and CONSTANT declarations can be intermixed.
The maximum number of local variables you can declare in a procedure is 255. Local variables are initialized to 0.
Syntax
LOCAL variable-name ⟦,...⟧;
Local variables may also be declared in unbound code. Such variables are accessible only within that unbound code.
Unbound code can occur in the following places:
Module initialization code
This occurs after all procedure declarations within a module but before the ENDMODULE statement.
Executable code
This occurs after all module and procedure declarations in a file but before the end of file.
The following example shows a complete compilation unit. This unit contains a module named mmm that, in turn, contains a procedure bat and some initialization code mmm_module_init , a procedure bar defined outside the module, and some unbound code at the end of the file. In each of these sections of code, a local variable X is defined. The variable is displayed using the MESSAGE built-in procedure.
MODULE mmm IDENT "mmm"

PROCEDURE bat;                  ! Declare procedure "bat" in module "mmm"
LOCAL
    X; ! "X" is local to procedure "bat"

    X := "Within procedure bat, within module mmm";
MESSAGE (X);

ENDPROCEDURE; ! End procedure "bat"

LOCAL
        X;                      ! "X" is local to
                                ! procedure "mmm_module_init"

X := "Starting or ending the module init code";
MESSAGE (X);
bat;
MESSAGE (X);

ENDMODULE;              ! End module "mmm"

PROCEDURE bar           ! Declare procedure "bar"

LOCAL
        X;                      ! "X" is local to procedure "bar"

X := "In procedure bar, which is outside all modules";
MESSAGE (X);

ENDPROCEDURE;           ! End procedure "bar"

LOCAL
        X;                      ! "X" is local to the unbound code...

X := "Starting or ending the unbound, non-init code";
MESSAGE (X);
mmm_module_init;
bat;
bar;
MESSAGE (X);
EXIT;
If this code is included in TEMP.TPU, the following command demonstrates the scope of the various local variables:
$
EDIT/TPU/NOSECTION/NOINITIALIZE/NODISPLAY/COMMAND=temp.tpu
Starting or ending the unbound, non-init code
Starting or ending the module init code
Within procedure bat, within module mmm
Starting or ending the module init code
Within procedure bat, within module mmm
In procedure bar, which is outside all modules
Starting or ending the unbound, non-init code
4.9.5.3. CONSTANT
With the CONSTANT declaration, you can associate a name with certain constant expressions. The constant expression must evaluate at compile time to a keyword, a string, an integer, or an unspecified constant value. The maximum length of a string constant allowed in a constant declaration is about 4000 characters in length. DECTPU sets up some predefined global constants. See Section 4.9.3 for a list of predefined constants.
Constants can be either globally or locally defined. Global constants are constants declared outside procedure declarations. Once a global constant has been defined, it is set for the life of the DECTPU session. An attempt to redefine a constant will succeed only if the constant value is the same.
Local constants are constants declared within a procedure. You must specify a local CONSTANT declaration after the PROCEDURE statement and before any ON_ERROR statement. You can intermix LOCAL statements and CONSTANT statements.
Syntax
CONSTANT constant-name := compile-time-constant-expression ⟦,...⟧
4.9.5.4. VARIABLE
With the VARIABLE declaration, you can identify certain variables as global variables. Any symbols that are neither declared nor used as the target of an assignment statement before being referenced by DECTPU are assumed to be undefined procedures. You must use the VARIABLE declaration outside a procedure declaration. Initialize global variables to the data type unspecified.
Syntax
VARIABLE variable-name ⟦,...⟧;
4.10. Lexical Keywords
The next two sections explain the DECTPU lexical keywords and how to use them for the following:
Conditional compiling
Specifying the radix of numeric constants
4.10.1. Conditional Compilation
The following lexical keywords control what code is compiled under different conditions:
%IF
%IFDEF
%THEN
%ELSE
%ENDIF
You use conditional compilation lexical keywords in a manner similar to ordinary IF/THEN/ELSE/ENDIF statements. The syntax is as follows:
%IFDEF variable_or_proc_name %THEN ... [%ELSE ...] %ENDIF
or
%IF boolean_expression %THEN ... [%ELSE ...] %ENDIF
If you use the %IFDEF structure, specify variable_or_proc_name as the name of a DECTPU procedure or variable. IFDEF is a statement that says ‘‘if a variable or procedure with this name is defined.’’ If the name is defined, the compiler compiles the code marked by %THEN. If the name is not defined, the compiler compiles the code marked by %ELSE.
If you use the %IF structure, specify boolean_expression as either a numeric constant or a defined global variable whose value is an integer. Any odd value is true and any even value is false. If the variable or constant contains a value that is odd, the compiler compiles the code marked by %THEN. If the variable or constant contains a value that is even, the compiler compiles the code marked by %ELSE.
You do not have to put conditional compilation lexical keywords at the beginning of a line. You can nest conditional statements to a depth of 2**32-1. For example:
ON_ERROR
    [TPU$_CREATEFAIL]:
%IF eve$x_option_decwindows
%THEN
      IF eve$x_decwindows_active
      THEN
          eve$popup_message (MESSAGE_TEXT (EVE$_CANTCREADCL, 1));
      ELSE
          eve$message (EVE$_CANTCREADCL);
      ENDIF;
%ELSE
      eve$message (EVE$_CANTCREADCL);
%ENDIF
      eve$learn_abort;
      RETURN (FALSE);
   [OTHERWISE]:
ENDON_ERROR;
This ON_ERROR procedure determines whether a pop-up message widget or a simple message is used, depending on whether the code is being compiled by a DECwindows version of DECTPU.
4.10.2. Specifying the Radix of Numeric Constants
You can specify constants with binary, octal, hexadecimal, and decimal radices.
To specify a numeric constant in binary, precede the number with %B. The number can consist only of the digits 0 and 1.
To specify a numeric constant in octal, precede the number with %O. The number can consist only of the digits 0 through 7.
To specify a numeric constant in hexadecimal, precede the number with %X. The number can consist of digits 0–9 and A–F.
There is no radix specifier for decimal. Any numeric constant without an explicit radix specifier is assumed to be decimal. The radix specifier may be in uppercase or lowercase.
The following are examples of correct numeric constants:
!
! Many different ways of saying the same thing.
!
CONSTANT binary_constant := %b11111;
CONSTANT octal_constant := %o37;
CONSTANT decimal_constant := 31;
CONSTANT hex_constant := %x1f;
!
! Compile time expressions work, too.
!
CONSTANT negative_value := -%x1f;
CONSTANT strange_zero := hex_constant - %x1f;
Invalid constructs for numeric constants return the error level message TPU$_ UNKLEXICAL, "Unknown lexical element" during compilation. The following examples are not valid:
constant bad_binary := %b123;      ! only 0’s and 1’s are legal.
constant bad_hex := %x10abg;       ! ’g’ is illegal digit.
constant not_a_radix := %z0123;    ! No such radix.
Chapter 5. DEC Text Processing Utility Program Development
Previous chapters have described the lexical elements of the DECTPU language, such as data types, language statements, expressions, built-in procedures, and so on. This chapter describes how to combine these elements in DECTPU programs. You can use DECTPU programs to perform editing tasks, to customize or extend an existing application, or to implement your own application layered on DECTPU.
Before you start writing programs to customize or extend an existing application, you should be familiar with the DECTPU source code that creates the editor or application that you want to change. For example, if you use the Extensible Versatile Editor (EVE) and you want to change the size of the main window, you must know and use the procedure name that EVE uses for that window. (If you want to change the main window, you use the procedure name eve$ main_window . Many of the EVE variables and procedure names begin with eve$.)
The sample procedures and syntax examples in this book use uppercase letters for items that you can enter exactly as shown. DECTPU reserved words, such as built-in procedures, keywords, and language statements are shown in uppercase. Lowercase items in a syntax example or sample procedure indicate that you must provide an appropriate substitute for that item.
This chapter discusses the following topics:
Creating DECTPU programs
Programming in DECwindows DECTPU
Writing code compatible with DECwindows EVE
Compiling DECTPU programs
Executing DECTPU programs
Using DECTPU startup files
Debugging DECTPU programs
Handling Errors
5.1. Creating DECTPU Programs
When you write a DECTPU program, keep the following pointers in mind:
You can use EVE or some other editor to enter or change the source code of a program in the DECTPU language.
A program can be a single executable statement or a collection of executable statements.
You can use executable statements either within procedures or outside procedures. You must place all procedure declarations before any executable statements that are not in procedures.
You can enter DECTPU statements from within EVE by using the EVE command TPU. For more information on using this command, see the Extensible Versatile Editor Reference Manual.
5.1.1. Simple Programs
The following statement is an example of a simple program:
SHOW (SUMMARY);
The preceding statement, entered after the appropriate prompt from your editor, causes DECTPU to execute the program associated with the SHOW (SUMMARY) statement. If you use EVE with a user-written command file, your screen may display text similar to Example 5.1.
DECTPU V3.1  1993-08-17 08:37

Journal file:

Section file name: EVE$SECTION  Ident: V3.1  Date: 17-AUG-1993 08:49
   Activated from: TPU$SECTION
       Created by: DECTPU V3.1  1993-08-17 08:37

Extension: SCREEN_UPDATER  Ident: DECTPU V3.1  1993-08-17 08:37

Timer Message:         working

 24 System buffers and 1 User buffer
5.1.2. Complex Programs
When writing complex DECTPU programs, avoid the following practices:
Creating large procedures
Creating large number of procedures
Including a large number of executable statements that are not within procedures
These practices, if carried to extremes, can cause the parser stack to overflow.
The DECTPU parser currently allows a maximum stack depth of 1000 syntax tree nodes. When the parser first encounters a DECTPU statement, the parser assigns each token in the statement to a syntax tree node. For example, the statement “a := 1” contains three tokens, each of which occupies a syntax tree node. After the parser parses this statement, only the assignment statement remains on the stack of nodes. The a and the 1 are subtrees to the assignment syntax tree node.
The most common cause of stack overflow, which is signaled by the status TPU$_ STACKOVER, is creating one or more large procedures whose statements occu py too many syntax tree nodes. To make your program manageable by the parser, break the large procedures into smaller ones.
Other possible reasons for a TPU$_STACKOVER con dition are that you have too many statements that are not in procedures, or that you have too many small procedures. If you have too many small procedures, you must either consolidate them or break them into separate files.
To see an example of a complex DECTPU program, examine the source files that implement EVE. The EVE source code files are located at SYS$ EXAMPLE S:EVE$*.*. These files contain many procedure declarations and executable statements that specify EVE’s screen layout and display. These files also contain key definitions that specify which editing operations are performed when you press certain keys on the keyboard. You can examine these files to learn the programming techniques that were used to create EVE.
See Section 5.6 for information on using a command file or section file to create or customize an application layered on DECTPU. See theDEC Text Processing Utility Reference Manual for information on using the EVE$BUILD module to layer applications on top of EVE.
5.1.3. Program Syntax
The rules for writing DECTPU programs are simple. You must use a semicolon to separate each executable statement from other statements. In a program, you must place all procedure declarations before any executable statements that are not part of a procedure declaration. For information on DECTPU data types, see Chapter 3. For information on DECTPU language elements, see Chapter 4. Example 5.2 shows the correct syntax for a DECTPU program.
PROCEDURE
    .
    .
   .
ENDPROCEDURE

PROCEDURE;
    .
    .
    .
ENDPROCEDURE;
    .
    .
    .
PROCEDURE
    .
    .
    .
ENDPROCEDURE;

statement 1;
statement 2;
    .
    .
    .
statement n;
A variety of syntactically correct DECTPU programs is shown in Example 5.3.
! Program 1
! This program consists of a single DECTPU built-in procedure.
   SHOW (KEYWORDS);

! Program 2
! This program consists of an assignment statement that
! gives a value to the variable video_attribute

   video_attribute := UNDERLINE;

! Program 3
! This program consists of the DECTPU LOOP statement (with
! a condition for exiting) and the DECTPU built-in procedure ERASE_LINE.
  x := 0; LOOP x :=x+1; EXITIF x > 100; ERASE_LINE; ENDLOOP;

! Program 4
! This program consists of a single procedure that makes
! DECTPU quit the editing session.

   PROCEDURE user_quit
      QUIT;         ! do DECTPU quit operation
   ENDPROCEDURE;

! Program 5
! This program is a collection of procedures that
! makes DECTPU accept "e", "ex", or "exi" as
! the command for a DECTPU exit operation.

   PROCEDURE e
      EXIT;         ! do DECTPU exit operation
   ENDPROCEDURE;

   PROCEDURE ex
      EXIT; ENDPROCEDURE;

   PROCEDURE exi
      EXIT;
   ENDPROCEDURE;
5.2. Programming in DECwindows DECTPU
This section provides information about programming with DECTPU in the DECwindows environment.
5.2.1. Widget Support
With DECwindows DECTPU, you can create widgets from within DECTPU programs by using the CREATE_WIDGET built-in procedure. For more information on widgets, see the OpenVMS overview documentation.
With the CREATE_WIDGET built-in, you can create the following widgets in DECTPU:
Caution_box
Dialog_box
File_selection
Label
List_box
Main_window
Menu_bar
Popup_attached_db
Popup_dialog_box
Popup_menu
Pulldown_entry
Pulldown_menu
Push_button
Scroll_bar (vertical and horizontal)
Separator
Simple_text
Toggle_button
5.2.2. Input Focus Support
In DECwindows, at most one of the applications on the screen can have the input focus; that is, only one application can accept user input from the keyboard. For more information about the input focus, see the Motif documentation.
DECwindows DECTPU automatically grabs the input focus whenever you cause an unmodified M1DOWN event (that is, an event not modified by Shift, Ctrl, or other modifying key) while the pointer cursor is in either of the following locations:
DECTPU’s main window widget
DECTPU’s title bar
DECwindows assigns input focus to DECTPU only if and when it is possible to do so. To make sure that DECwindows can assign input focus, your application should use the GET_INFO (SCREEN, “input_focus”) built-in procedure. If assignment of input focus to DECTPU is enabled, DECTPU can receive input focus in the following circumstances:
DECwindows DECTPU grabs input focus.
The DECwindows session manager assigns input focus to DECTPU.
An application layered on DECTPU requests input focus.
In the Motif environment, DECTPU supports both implicit and explicit focus policies.
VSI recommends that you use only a DECwindows section file with DECwindows DECTPU. (All versions of EVE shipped with VSI OpenVMS Version 5.1 or higher are compatible with DECwindows and are suitable for building DECwindows section files, as well as DECTPU Version 3.0 or higher.) However, if you do not follow this recommendation, DECTPU’s automatic grabbing of the input focus enables your layered application to interact with other DECwindows applications.
5.2.3. Global Selection Support
Global selection in DECwindows is a means of preserving information selected by you so your selection, or data about your selection, can pass between DECwindows applications. Each DECwindows application can own one or more global selections.
5.2.3.1. Difference Between Global Selection and Clipboard
A global selection differs from the clipboard in that the global selection changes dynamically as you change the select range, while the contents of the clipboard remain unchanged until you use a command (such as EVE’s STORE TEXT command) that sends new information to the clipboard. By default EVE does not use the clipboard.
5.2.3.2. Handling of Multiple Global Selections
At any particular time, a global selection is owned by at most one DECwindows application; a global selection can also be unowned. A DECwindows application can own more than one global selection at the same time. For example, an application layered on DECTPU can own both the primary and secondary global selections. The DECwindows server determines which application currently owns which global selection.
Information about a global selection property may be stored in different format s, but the format of a particular property must be the same for all DECwindows applications. DECTPU directly accepts information that is stored in integer or string format. DECTPU handles information in other format s by describing the information in an array. For more information about this array, see the descriptions of the GET_GLOBAL_SELECT and WRITE_GLOBAL_SELECT built-in procedures in the DEC Text Processing Utility Reference Manual.
Global selections are identified in DECTPU either as strings or keywords. While DECwindows provides for many global selections, applications conforming to the Motif Style Guide are concerned with only two selections—the primary and secondary selections. DECTPU provides a pair of keywords (PRIMARY and SECONDARY) to refer to these selections. DECTPU also provides built- in procedures that enable layered applications to manipulate global selection information.
You can refer to other global selections by specifying a string instead of the keywords PRIMARY and SECONDARY. For example, if your application has a global selection whose name is auxiliary, use the string "auxiliary" to specify the selection. Selection names are case sensitive; the string "auxiliary" does not refer to the same global selection as the string "AUXILIARY".
5.2.3.3. Relation of Global Selection to Input Focus
An application that conforms to the Motif Style Guide requests ownership of the primary global selection in its input focus grab procedure. Regardless of whether the application conforms, when DECTPU gets the input focus, it automatically grabs the primary global selection if it is not already the owner.
An application cannot prevent DECTPU from attempting to assert ownership of the primary global selection when DECTPU receives the input focus. If DECTPU gets the primary selection by grabbing ownership itself, DECTPU automatically executes the application’s global selection grab routine if one is present. If you are writing an application that conform s to the Motif Style Guide and you find that DECTPU has had to grab ownership of the primary selection itself and execute the global select grab routine, your application may have a design problem.
5.2.3.4. Response to Requests for Information About the Global Selection
DECTPU provides a three-level hierarchy for responding to requests from another application for information about the current selection. Applications layered on DECTPU may specify a routine that responds to requests for information about global selections either for the entire application or for one or more buffer s in the application.
When DECTPU receives a request for information, it checks whether there is a routine for the current buffer that responds to information about global selections. If no buffer-specific routine is available, DECTPU checks for an application-wide routine. If no application-wide routine is available, DECTPU can provide information only about the primary selection, the file name, font, line number, and text.
DECTPU responds to all other requests with a message that no information is available. DECTPU does not send requests for information about the global selection to other DECwindows applications. DECTPU applications may use the various built-in procedures to do so.
DECTPU’s responses to requests for information about the primary selection are as follows:
| "FILE_NAME" | DECTPU responds with the string returned by the GET_INFO (CURRENT_BUFFER, "file_name ") built-in procedure. |
| "FONT" | DECTPU responds with the string returned by the GET_INFO (SYSTEM, "default_font ") built-in procedure. |
| "LINE_NUMBER" | DECTPU responds with the value of type span containing the record number where the select range starts and the record number where the select range ends. |
| "TEXT" or "STRING" | DECTPU responds with the text of the select range as a string, with each line break represented by a line feed. |
VSI recommends that you use only a DECwindows section file with DECwindows DECTPU. However, if you do not follow this recommendation, DECTPU’s automatic grabbing of the primary global selection enables your layered application to interact with other DECwindows applications.
If an application requests information about the primary global selection while DECTPU owns the selection, DECTPU attempts to respond to the request if the application cannot do so. If DECTPU responds to the request by sending the text of a buffer or range, DECTPU converts the buffer or range to a string, converts line breaks to line feeds, and inserts padding blanks before text to fill any unoccupied space between the margins. If neither the application nor DECTPU can respond to the request, DECTPU inform s DECwindows that the requested information is not available.
DECTPU does not automatically grab the secondary selection. Layered applications are responsible for handling this selection.
5.2.4. Using Callbacks
This section presents background information on the DECwindows concept of callbacks and explains how DECwindows DECTPU implements this concept.
5.2.4.1. Background on DECwindows Callbacks
A callback is a mechanism used by a DECwindows widget to notify an application that the widget has been modified in some way. DECwindows applications have one or more callback routines that define what the application does in response to the callback.
For more information about the use of callbacks and callback routines in DECwindows programs, see the OpenVMS documentation overview.
5.2.4.2. Internally Defined DECTPU Callback Routines and Application-Level Callback Action Routines
DECTPU implements the DECwindows concept of callback routines by providing internally defined routines that deliver the information obtained from a widget’s callback to a layered application. These routines are referred to as “internally defined DECTPU callback routines.”
When a widget calls back to DECTPU, DECTPU packages the callback information, adds the information to its input queue, and returns to the widget. DECTPU may not process the callback packet on its input queue until later. As a result, the information about the widget that DECTPU gets from the callback may not match the information returned by the GET_INFO (widget_variable, "widget_info") built-in procedure.
When DECTPU processes the callback packet, it uses the CREATE_WIDGET built-in or the SET (WIDGET_CALLBACK) built-in to execute the program or learn sequence that was associated with the widget. This program or learn sequence controls what the application does in response to the callback information passed by the DECTPU callback routines. An application’s callback routines are referred to as “application-level callback action routines.”
The following sections present information on internally defined DECTPU callback routines and on application-level callback action routines.
5.2.4.3. Internally Defined DECTPU Callback Routines with UIL
DECTPU declares two internally defined callback routines to the X Resource Manager to handle incoming callbacks and dispatch them to the layered application:
TPU$WIDGET_INTEGER_CALLBACK—Use this routine as the callback routine for all callbacks that have an integer closure.
TPU$WIDGET_STRING_CALLBACK—Use this routine as the callback routine for all callbacks that have a string closure.
Although DECwindows lets you specify a different callback routine for each reason that a widget can call back, DECwindows DECTPU does not support this capability. Instead, it provides only the two callback routines mentioned.
Use these callback routines only if you are specifying a widget’s callback resources in a User Interface Language (UIL) file. When a widget is part of an X Resource Manager hierarchy, do not include callback resource names or values in the array you pass to SET (WIDGET). Instead, specify one of the two internally defined callback routines in the UIL file.
5.2.4.4. Internally Defined DECTPU Callback Routines with Widgets Not Defined by UIL
Although the SET (WIDGET) built-in procedure lets you specify values for various resources of a widget, there are restrictions on specifying values for callback resources of widgets. When a widget is not part of an X Resource Manager hierarchy, specify the names of the callback resources in the array you pass to SET (WIDGET), and specify 0 as the value of each such callback resource. DECTPU automatically substitutes its common callback entry point for the 0 value. A widget calls back only for those reasons specified in the widget’s argument list. If a reason is omitted from the list, the corresponding event does not cause a callback.
5.2.4.5. Application-Level Callback Action Routines
When DECTPU receives a widget callback, it identifies and executes the layered application procedure or learn sequence that has been designated as the callback action routine. You can designate a procedure or learn sequence as a callback action routine either when the widget is created, by using the CREATE_WIDGET built-in procedure, or at some later time, by using the SET (WIDGET_CALLBACK) built-in procedure. When you specify an application-level callback program or learn sequence with CREATE_WIDGET or SET (WIDGET_ CALLBACK), all widgets in the same X Resource Manager hierarchy have the same callback program or learn sequence. Therefore, the callback program or learn sequence must have a mechanism for handling all possible callback reasons.
5.2.4.6. Callable Interface-Level Callback Routines
If you are layering an application on DECTPU or on EVE, you can specify callable interface-level callback routines only if you are specifying a widget’s callback resources in a User Interface Language (UIL) file.
Callbacks can pass values known as closures. Closures are strings or integers whose function depends on the application you are writing. (DECwindows documentation refers to closures as tags.) For more information about what closures are and how to use them, see Section 5.2.5.
You use the DECTPU callable interface routine TPU$WIDGET_INTEGER_ CALLBACK as the callback routine for all callbacks that have an integer closure. You use the DECTPU routine TPU$WIDGET_STRING_CALLBACK for all callbacks that have a string closure.
When a widget is part of an X Resource Manager hierarchy, do not include callback resource names or values in the array you pass to SET (WIDGET). Instead, specify the callback routine in the UIL file. When a widget is not part of an X Resource Manager hierarchy, specify the names of the callback resources in the array you pass to SET (WIDGET), and specify 0 as the value of each such callback resource. DECTPU automatically substitutes its common callback entry point for the 0 value. A widget calls back only for those reasons specified in the widget’s argument list. If a reason is omitted from the list, the corresponding event does not cause a callback.
5.2.5. Using Closures
With DECwindows, you can specify a closure value for a widget. (DECwindows documentation refers to closures as tags.) DECwindows does not define what a closure value is; a closure is simply a value that DECwindows understands how to recognize and manipulate so that a DECwindows application programmer can use the value if needed in the application. For general information about using closures in DECwindows, see the OpenVMS documentation overview.
When a widget calls back to the DECwindows application, the callback parameters include the closure value assigned to the widget. DECwindows allows the application to define the significance and possible values of the closure.
DECTPU supports closure values of type string and integer. Closure values are optional for widgets used by applications layered on DECTPU. If you do not specify a closure value, the GET_INFO (WIDGET, "callback_parameters", array) built-in procedure returns unspecified in the "closure" array element. If you create a widget without using a UIL file, the GET_INFO (WIDGET, "callback_ parameters ", array) built-in procedure returns the closure you specified as a parameter to CREATE_WIDGET. If you create a widget by using a UIL file, the GET_INFO (WIDGET, "callback_parameters ", array) built-in procedure returns the closure value (if any) defined in the X Resource Manager. If none is defined, the built-in returns unspecified.
DECTPU leaves it to the layered application to use the closure in any way the application programmer wishes. DECTPU passes through to the application any closure value received as part of a callback.
DECwindows EVE provides an example of how an application can use closure values. DECwindows EVE assigns a unique closure value to every widget instance that can be created during an EVE editing session. Each closure value corresponds to something that EVE must do in response to the activation of that particular widget. When an event causes DECTPU to execute EVE’s main callback program, the GET_INFO (WIDGET, "callback_parameters", array) built-in procedure returns the widget activated, the reason code (the reason the widget is calling back), and the closure associated with the particular widget instance.
EVE’s main callback program contains an array that is indexed with values identical to the widget closure values. Each array element contains a pointer to the EVE code to be executed in response to the corresponding widget’s callback. EVE’s callback program uses the closure value to locate the appropriate array index so the correct EVE routine can be executed in response to the callback.
If your layered application does not use EVE’s callback program, then its callback program or learn sequence must have a mechanism for determining which widget is calling back and which application code should be executed as a result.
5.2.6. Specifying Values for Widget Resources in DECwindows DECTPU
This section discusses techniques for specifying values for widget resources.
5.2.6.1. DECTPU Data Types for Specifying Resource Values
DECTPU supports the following data types with which to specify values for widget resources:
String
Array of strings
Integer
DECTPU converts the value you specify into the data type appropriate for the widget resource you are setting. Table 5.1 shows the relationship between DECTPU data types for widget resources and DECwindows data types for widget resources.
| DECwindows Argument Data Type | DECTPU Data Type |
|---|---|
| Array of strings | Array of strings |
| Boolean | Integer |
| Callback | Integer (0) |
| Compound string | String |
| Compound string table | Array of strings |
| Dimension | Integer |
| Integer | Integer |
| Position | Integer |
| Short | Integer |
| String | String |
| Unsigned character | Integer |
DECTPU does not support setting values for resources (such as pixmap, color map, font, icon, widget, and so on) whose data types are not listed in this table.
When you pass an array that specifies values for a widget’s resources by using CREATE_WIDGET or SET (WIDGET), DECTPU verifies that each array index is a string that corresponds to a valid resource name for the specified widget. DECTPU also verifies that the data type of the value you specify is valid for the specified resource.
5.2.6.2. Specifying a List as a Resource Value
List box and file selection widgets manipulate lists. For example, the file selection widget manipulates a list of files. The widget resource that stores such a list is specified to DECTPU by using an array.
To handle an array that passes a list to a widget, DECwindows must know how many elements the array contains. For example, if you set the value of the "items" resource of a list box widget to point to a given array, DECwindows does not handle the array successfully unless the list box widget’s "itemsCount" resource contains the number of elements in the array.
However, you do not necessarily know how many elements the array has at a given moment. To help you pass arrays, DECTPU has a convention for referring to widget resources. If you follow the convention, DECTPU will handle the resource that stores the number of array elements.
The following paragraphs discuss the naming convention in more detail.
Setting Resources
When you use the SET (WIDGET) built-in procedure to pass a list to a widget, you must specify both the list name and the list count resource in the same array index, separated by a line feed (ASCII (10)). The array element should be the array that is to be passed. For example, to specify the "items" resource to the list box widget, use code similar to the following:
line_feed := ASCII (10);
resource_array {"items" + line_feed + "itemsCount"}:=list_array;
The line-feed character, ASCII (10), is a delimiter that separates two resource names.
DECTPU automatically generates two resource entries. The first is the array of strings that specifies the data to the list box for the "items" resource. The second is the count of elements in the array for the "itemsCount" resource.
Getting Resources
To get resource values from a widget, use the following statement:
GET_INFO (widget, "WIDGET_INFO", array)
The indices of the array parameter are strings or string constants that name the resources whose values you want. (The initial values in the array are unimportant.) The GET_INFO statement directs DECTPU to fetch the specified resource values of the specified widget and put the values in the array.
For list box widgets or file selection widgets, one element of the array receives another array that contains the list manipulated by the widget. The indices of this array are of type integer. The lowest index has the value 0, and each subsequent index is incremented by 1. The contents of the array elements are of type string.
When you create the index of the element that receives the widget’s list, you must observe the same naming convention as for setting resources so that DECTPU can handle both the list itself and the resource value that specifies the length of the list. Give the index the following format:
items<line-feed>items_count
For example, if you used GET_INFO (widget, "WIDGET_INFO", array) to get resource values from a list box widget, you could specify the index for the element storing the widget’s list as follows:
"items" + ASCII(10) + "itemsCount"
The element for the widget’s list does not actually contain an array until after execution of the GET_INFO statement. When DECTPU encounters the GET_ INFO statement, it parses the indices of the specified array. When DECTPU parses the index of the element for the widget’s list, it fetches both the list itself and the length of the list. Using the resource specifying the length, DECTPU creates an array of the correct size to hold the widget’s list.
See the DEC Text Processing Utility Reference Manual for sample uses of DECwindows DECTPU built-ins.
5.3. Writing Code Compatible with DECwindows EVE
This section provides information useful for programmers who extend DECwindows EVE or layer applications on DECwindows EVE.
5.3.1. Select Ranges in DECwindows EVE
This section is intended for programmers who are extending EVE or layering an application on EVE.
There are four possible types of selection:
Dynamic selection
Static selection
Found range selection
DECwindows primary or secondary global selection
EVE can use only one type of selection at a time. The ways in which these selections differ are explained in the following sections.
EVE has a routine called EVE$SELECTION that returns the current selection, regardless of whether the selection is dynamic, static, formed from a found range, or the primary global selection. You can use the SELECT_RANGE built-in procedure to get the current selection if the selection is a dynamic selection. However, VSI recommends that you use EVE$SELECTION to get the current selection because this routine returns the current selection regardless of how it was created. To see how the EVE$SELECTION routine works and what parameters it takes, see the code for this routine in SYS$ EXAMPLE S:EVE$CORE.TPU.
5.3.1.1. Dynamic Selection
When you press the Select key or invoke the SELECT command, EVE creates a dynamic selection. A dynamic selection expands and contracts as you move the text cursor. Moving the text cursor away from the text already selected does not cancel the selection. If you use the mouse to start a selection while a dynamic selection is active, the dynamic selection is canceled.
If EVE’s current selection is a dynamic selection, the routine EVE$SELECTION returns the selected range and terminates the selection. If, for some reason, you want to use a statement that returns the current dynamic selection but does not terminate it, you can use a statement whose format is similar to the following:
r1 := EVE$SELECTION (TRUE, TRUE, TRUE, TRUE, FALSE)
The last parameter directs EVE$SELECTION not to terminate the selection. For more information on how to use these parameters, see the EVE$SELECTION routine in SYS$ EXAMPLE S:EVE$CORE.TPU.
5.3.1.2. Static Selection
EVE creates a static selection if you do any of the following:
Click the MB1 mouse button two or more times to select a word, line, paragraph, or buffer
Use the EVE command SELECT ALL
Press the MB1 mouse button, drag the mouse across text, and then release the mouse button
Use the MB1 mouse button with the Shift key to extend a selection
EVE implements a static selection by creating a range upon which you can perform EVE commands such as STORE TEXT or REMOVE. However, EVE does not use the DECTPU SELECT built-in procedure to start this range. Thus, if you use the SELECT_RANGE built-in while a static selection is active, DECTPU returns the message “No select active”.
If you move the text cursor off the text in the static selection, the selection is canceled.
5.3.1.3. Found Range Selection
When EVE positions to the beginning of a range as the result of the FIND command, the WILDCARD FIND command, or pressing the Find key, EVE creates a found range that contains the text EVE found as a match for your search string. If no other selection is active, EVE treats the found range as the current selection.
EVE implements a found range selection by creating a range upon which you can perform EVE commands such as STORE TEXT or REMOVE. However, EVE does not use the DECTPU SELECT built-in procedure to start this range. Thus, if you use the SELECT_RANGE built-in while a found range selection is active, DECTPU returns the message “No select active.”
If you move the text cursor off the text in the found range selection, the selection is canceled.
5.3.1.4. Relation of EVE Selection to DECwindows Global Selection
If EVE has a dynamic selection or a static selection active, that selection is automatically designated as the primary global selection. A found range selection is not designated as the primary global selection.
You can use the EVE$SELECTION to get the text of the primary global selection when an application other than DECTPU owns the selection. To do so, the call to EVE$SELECTION must be in code bound to a mouse button other than MB1. The value returned is a string that contains the text of the primary global selection.
5.4. Compiling DECTPU Programs
Before compiling programs in DECTPU, you should enable the display of informational messages to help you locate errors. EVE automatically enables the display of informational messages for you when you use the EXTEND EVE command. For more information on displaying messages, see the description of the SET (INFORMATIONAL) built-in procedure in the DEC Text Processing Utility Reference Manual.
The DECTPU compiler numbers the lines of code it compiles. The line numbers begin with 1. For a string, all DECTPU statements are considered to be on line 1. For a range, line 1 is the first line of the range, regardless of where in the buffer the range begins. Buffer s are numbered starting at the first line. When a compilation error occurs, DECTPU tells you the approximate line number where the error occurred. To move to the line at which the error occurred, use the POSITION (integer) built-in procedure.
In EVE, you can use the LINE command. For example, the command LINE 42 moves the editing point and the cursor to line 42.
To see DECTPU messages while in EVE, use the BUFFER MESSAGES command. To return to the original buffer or another buffer of your choice, use the BUFFER name_of_buffer command.
There are two ways to compile a program in DECTPU: on the command line of EVE or in a DECTPU buffer.
5.4.1. Compiling on the EVE Command Line
You can compile a simple DECTPU program by entering it on the EVE command line. For example, if you use the TPU command and then enter the SHOW (SUMMARY) statement, DECTPU compiles and executes the program associated with the SHOW (SUMMARY) statement.
5.4.2. Compiling in a DECTPU Buffer
DECTPU programs are usually compiled by entering DECTPU procedures and statements in a buffer and then compiling the buffer. If you are using EVE, you can enter the SHOW (VARIABLE S) command in a buffer and compile the buffer by using the TPU command and entering the following statement after the prompt:
TPU Statement:
COMPILE (CURRENT_BUFFER);
The program associated with SHOW (VARIABLE S) is not executed until you enter the following statement:
TPU Statement: EXECUTE (CURRENT_BUFFER);
If you use a buffer, a range, or a string as the parameter for the EXECUTE built-in procedure, DECTPU first compiles and then executes the buffer, range, or string. See the description of EXECUTE in the DEC Text Processing Utility Reference Manual.
The COMPILE built-in procedure optionally returns a program data type. If you want to use the program that you are compiling later in your session, you can assign the program that is returned to a variable. The following example shows how to make this assignment:
new_program := COMPILE (CURRENT_BUFFER);
If no error messages are issued while you compile the current buffer, you can then execute the program new_program with the following statement:
EXECUTE (new_program);
You can use the COMPILE built-in procedure to compile certain parts of a buffer rather than a whole buffer. To do so, create a range that includes the statements within the buffer that you want compiled, and then specify the range as the parameter for COMPILE.
5.5. Executing DECTPU Programs
You can use programs that are already compiled as parameters for the EXECUTE built-in procedure. In addition, you can use buffer s, ranges, or strings that contain executable DECTPU statements as parameters for the EXECUTE built-in procedure. DECTPU compiles the contents of the buffer, range, or string if necessary; then DECTPU executes the compiled buffer, range, or string.
After using the TPU command, suppose you used the following statement to create a program called new_program:
TPU Statement: new_program := COMPILE (CURRENT_BUFFER);You could then execute new_program by using the following statement after using the TPU command:
TPU Statement: EXECUTE (new_program);You could also compile and execute the statements in the current buffer by using the following TPU statement after using the TPU command:
TPU Statement: EXECUTE (CURRENT_BUFFER);You can enter, com pile, and execute small DECTPU programs on the EVE command line. The following example shows a small program that you can enter after the TPU Statement: prompt.
TPU Statement: SET (TIMER, ON, "Executing");The preceding command executes the program associated with the SET (TIMER) built-in procedure and causes the string "Executing" to be displayed at 1-second intervals when a long procedure is executing. The string is displayed in the last 15 spaces of the prompt area at 1-second intervals.
5.5.1. Procedure Execution
If you include procedure declarations as part of a program, the procedure is compiled and the procedure name is added to the DECTPU list of procedures when you execute the program. You invoke the procedure in one of the following ways:
Enter the name of the compiled procedure after the TPU Statement: prompt from EVE.
Call the procedure from within a program or another procedure.
5.5.2. Process Suspension
To suspend a process, you can use Ctrl/C. Pressing Ctrl/C causes DECTPU to stop the execution of a user-written program. You can also stop the execution of the following DECTPU built-in procedures with Ctrl/C:
LEARN_BEGIN . . . LEARN_END (execution of a learn sequence)
READ_FILE
SEARCH
WRITE_FILE
Caution
Because DECTPU does not journal Ctrl/C, using Ctrl/C may affect the accuracy of your keystroke journal file. In addition, Ctrl/C prevents com pletion of some built-in procedures, such as ERASE_RANGE, MOVE_ TEXT, and FILL. DECTPU behavior after such an interruption is unpredictable. VSI recommends that you exit from the editor after pressing Ctrl/C to ensure that you do not lose any work because of an inaccurate keystroke journal file.
Buffer-change journaling works properly with Ctrl/C. Therefore, if you are not using keystroke journaling, exiting from the editor is not necessary.
For more information on the effects of pressing Ctrl/C, see Section 4.9.4.14 and Section 4.9.4.16.
5.6. Using DECTPU Startup Files
DECTPU startup files are files that DECTPU reads, compiles, and executes during its initialization sequence.
There are three types of DECTPU startup files:
Section files
Command files
Initialization files
5.6.1. Section Files
A section file is the compiled binary form of a file that contains DECTPU source code. To direct DECTPU to execute a section file, use the appropriate command syntax for your section.
To execute a section file, use the /SECTION qualifier with the EDIT/TPU command or let DECTPU execute the default section file.
The default section file is TPU$SECTION. When DECTPU tries to locate the section file, DECTPU supplies a default directory of SYS$SHARE and a default file type of .TPU$SECTION. OpenVMS systems define the system-wide logical name TPU$SECTION as EVE$SECTION, so the default section file is the file that implements the EVE editor. To override the OpenVMS default, redefine TPU$SECTION.
For more information on the /SECTION qualifier, see Section 2.6.13.
5.6.2. Command Files
A command file contains a series of DECTPU procedures followed by a sequence of TPU statements. To direct DECTPU to compile and execute a command file, use the appropriate command syntax, as explained in this section.
To specify a DECTPU command file, use either the /COMMAND qualifier with the EDIT/TPU command or let DECTPU compile and execute the default command file.
The default command file is TPU$COMMAND. When DECTPU tries to locate the command file, it supplies a default file type of .TPU. To direct DECTPU to compile and execute a particular command file, define the logical name TPU$COMMAND to be the file you want DECTPU to use. For more information on the /COMMAND qualifier, see Section 2.6.2.
5.6.3. Initialization Files
An initialization file contains commands to be executed by an application layered on DECTPU. To specify an initialization file to be executed, use the appropriate command syntax, as explained in this section.
DECTPU does not determine the default handling of an initialization file; nor does DECTPU directly load or execute the commands in an initialization file. The application layered on DECTPU must determine the defaults and must handle the loading and execution of an initialization file. For example, EVE reads an initialization file (if one is present) and interprets the initialization commands when it processes the appropriate initialization file. Any key definitions in an initialization file override corresponding key definitions saved in a section file and key definitions in a command file.
Typically, you use EVE initialization files to set values that are not usually saved in a section file, such as margins, tab stops, and bound or free cursor. For a list of the EVE default values that you might want to modify by using an EVE initialization file, see the see the Extensible Versatile Editor Reference Manual.
To use an initialization file, use the /INITIALIZATION qualifier with the EDIT/TPU command. For more information on the /INITIALIZATION qualifier, see Section 2.6.6.
5.6.4. Sequence in Which DECTPU Processes Startup Files
When you invoke DECTPU, by default DECTPU reads, compiles, and executes several files. The sequence in which DECTPU perform s these tasks is as follows:
DECTPU loads into memory the specified or default section file unless you specify the /NOSECTION qualifier on the command line.
DECTPU reads the specified or default command file, if found, into a buffer named $LOCAL$INI$ unless you specify the /NOCOMMAND qualifier on the command line.
If you specify the /DEBUG qualifier on the command line, DECTPU reads the specified or default debugger file into a buffer named $DEBUG$INI$. A debugger file contains DECTPU procedures and statements to help debug DECTPU code. For more information on the default DECTPU debugger, see Section 5.7.
If the buffer named $DEBUG$INI$ (which contain s debugger code) is present, DECTPU compiles the buffer and executes the resulting program.
DECTPU calls and executes the procedure named TPU$INIT_PROCEDURE if the procedure is present in the section file or is defined in the debug file.
If the command file is read into the buffer named $LOCAL$INI$, DECTPU compiles that buffer and executes the resulting program.
DECTPU calls and executes the procedure named TPU$INIT_POSTPROCEDURE if the layered application has defined this procedure in the section file, debug file, or command file.
If a layered application makes use of an initialization file, it is the responsibility of the application to define when the initialization file is processed. EVE processes initialization files during the TPU$INIT_POSTPROCEDURE phase.
5.6.5. Using Section Files
A section file is the binary form of a program that implements a DECTPU-based editor or application. It is a collection of compiled DECTPU procedure definitions, variable definitions, and key bindings. The advantage of using a binary file is that the source code does not have to be compiled each time you invoke the editor or application, so startup performance is improved.
5.6.5.1. Creating and Processing a New Section File
To create a section file, begin by writing a program in the DECTPU language. The program must adhere to all the programming conventions discussed throughout this manual. For examples of programs used to create a section file, see the files in the directory SYS$ EXAMPLE S. This directory contains the sources used to create the EVE section file. To see a list of the EVE source files, type the following:
$ DIR SYS$EXAMPLES:EVE$*.TPUIf you cannot find these files on your system, see your system manager.
When writing the DECTPU program that implements your application, place your initializing statements in a procedure named TPU$INIT_PROCEDURE. Such statements might create buffer s, create windows, associate windows with buffer s, set up screen attributes, initialize variables, define how the journal facility works, and so on. You can put the procedure TPU$INIT_PROCEDURE anywhere in the procedure declaration portion of your program. DECTPU executes TPU$INIT_PROCEDURE before executing the command file (if there is one). For more information on DECTPU’s initialization sequence, see Section 5.6.4.
Place any statements that implement or handle initialization files in a procedure named TPU$INIT_POSTPROCEDURE. DECTPU executes this procedure after both the TPU$INIT_PROCEDURE and the command file have been executed. This enables commands or definitions in the initialization file to modify commands or definitions in the command file. EVE defines both TPU$INIT_PROCEDURE and TPU$INIT_POSTPROCEDURE procedures. For more information on how EVE implements initialization files, see Section 5.6.7.
After you put the desired DECTPU procedures and statements into the program that implements your application, end your program with the following statements:
A statement that contains the SAVE built-in procedure. SAVE is the mechanism by which you store all currently defined procedures, variables, and bound keys in binary form.
The QUIT built-in procedure. QUIT ends the DECTPU session.
For more information on SAVE and QUIT, see the descriptions of these built-ins in the DEC Text Processing Utility Reference Manual. For examples of files that use these statements, see Example 5.4 and Example 5.5.
To compile your program into a section file, invoke DECTPU but do not supply as a parameter the name of a file to be edited. Use the /NOSECTION qualifier to indicate that no existing section file should be loaded. Use the /COMMAND qualifier to specify the file that contains your program. For example, to create a section file from a program in a file called my_application.tpu, enter the following at the DCL prompt:
$ EDIT/TPU/NOSECTION/COMMAND=my_application.tpuThis command causes DECTPU to write the binary form of the file MY_ APPLICATION.TPU to the file you specified as the parameter to the SAVE statement in your program. To use the section file, invoke DECTPU, specifying your section file. For more information on invoking DECTPU, see Chapter 2.
5.6.5.2. Extending an Existing Section File
To extend an existing section file, begin by writing a program in the DECTPU language.
If you are extending the EVE section file, put your initializing statements in an initialization procedure called TPU$LOCAL_INIT. TPU$LOCAL_INIT is an empty procedure in the EVE section file. When you add your DECTPU statements and procedures to the EVE section file, your procedure named TPU$LOCAL_INIT supersedes EVE’s original empty value of TPU$LOCAL_INIT. TPU$LOCAL_INIT is called at the end of the procedure TPU$INIT_ PROCEDURE during the initialization sequence. For more information on the initialization sequence, see Section 5.6.4.
If you are extending a non-EVE section file, you must determine whether that section file has implemented the convention of including a TPU$LOCAL_INIT procedure.
After adding DECTPU procedures and statements that implement your application, end your program with the following statements:
A statement that contains the SAVE built-in procedure. SAVE is the mechanism by which you store all currently defined procedures, variables, and bound keys in binary form.
The QUIT built-in procedure. QUIT ends the DECTPU session.
For more information on SAVE and QUIT, see the descriptions of these built-ins in the DEC Text Processing Utility Reference Manual.
Example 5.4 shows the syntax of a program that could be used to create a section file.
PROCEDURE tpu$local_init
     .
     .
     . ENDPROCEDURE;

PROCEDURE vt100_keys
    .
    .
    .
ENDPROCEDURE;

vt100_keys;  !Call the procedure that defines the keys

SAVE ("vt100ini.tpusection");

QUIT;
To add your program to an existing section file, invoke DECTPU but do not supply as a parameter the name of a file to be edited. Use the /SECTION qualifier to specify the section file to which you want to add your program. Use the /COMMAND qualifier to specify the file that contains your program.
For example, to add a program called MY_CUSTOMIZATIONS.TPU to the EVE section file, you would enter the following:
$
EDIT/TPU/SECTION=EVE$SECTION/COMMAND=my_customizations.tpu
This command causes DECTPU to load the EVE section file and then read, compile, and execute the command file you specify. A new section file is created. The new file includes both the EVE section file and the binary form of your program. The section file is written to the file you specified as the parameter to the SAVE statement in your program. To use the section file, invoke DECTPU, specifying your section file.
For more information on invoking DECTPU, see Chapter 2.
For more information on extending the EVE section file, see the Extensible Versatile Editor Reference Manual.
5.6.5.3. Sample Section File
If you choose to design an application layered on DECTPU and not layered on EVE, you must provide certain basic structures and key definitions to be able to use the DECTPU compiler and interpreter. Example 5.5 is a sample of the source code that creates a minimal interface. It provides the following basic structures:
A buffer and a window for DECTPU messages
A buffer and a window for information from the SHOW built-in procedure
A buffer and a window in which to enter DECTPU programs or text
A prompt area in which to enter DECTPU commands
Because DECTPU does not have any keys defined when invoked without a section file, the sample program also contains the following key definitions:
Return key
Delete key
Key for exiting from DECTPU
Key for entering DECTPU statements (Example 5.5 uses the Tab key)
By default, DECTPU looks for TPU$INIT_PROCEDURE, so the statements that create the structures for a minimal interface are contained in TPU$INIT_ PROCEDURE. Individual statements that define keys come after any procedures in the file.
If you entered the text from Example 5.5 into a file named MINI.TPU and you want to compile that file into a section file, enter the following command:
$ EDIT/TPU/NOSECTION/COMMAND=MINI.TPUIn the previous example, the /NOSECTION qualifier specifies that DECTPU does not read a section file. This ensures that none of the procedures or variables from an existing section file are loaded into the internal DECTPU tables. The /COMMAND qualifier specifies that DECTPU com piles the command file MINI.TPU. The SAVE built-in procedure at the end of the command file specifies that all of the procedures, variables, and key definitions in the file are to be saved in binary form in SYS$LOGIN:MINI.TPU$SECTION. The QUIT built-in procedure then causes you to leave DECTPU.
Example 5.5 contains the source code for a command file that you can use for a minimal interface to DECTPU.
! MINI.TPU - minimal DECTPU interface

PROCEDURE tpu$init_procedure

! Create a buffer and window for messages

    message_buffer := CREATE_BUFFER ("Message Buffer");
    SET (NO_WRITE, message_buffer);
    SET (SYSTEM, message_buffer);
    SET (EOB_TEXT, message_buffer, "");
    message_window := CREATE_WINDOW (21, 4, OFF);
    MAP (message_window, message_buffer);

! Create a buffer and window for SHOW

    show_buffer := CREATE_BUFFER("Show Buffer");
    SET (NO_WRITE, show_buffer);
    SET (SYSTEM, show_buffer);
    info_window := CREATE_WINDOW (1, 20, ON);

! Create a buffer and window for editing

    main_buffer := CREATE_BUFFER ("Main Buffer");
    main_window := CREATE_WINDOW (1, 20, ON);
    MAP (main_window, main_buffer);

! Create an area on the screen for prompts

    SET (PROMPT_AREA, 21, 1, NONE);

!Put the editing point in the main buffer

    POSITION (main_buffer);
    tpu$local_init;

ENDPROCEDURE;

PROCEDURE tpu$local_init   !Procedure to allow end users
                           !to add private extensions
ENDPROCEDURE;

! Define the minimal editing keys:
  DEFINE_KEY ("SPLIT_LINE", RET_KEY);
  DEFINE_KEY ("ERASE_CHARACTER(-1)", DEL_KEY);
  DEFINE_KEY ("EXECUTE(READ_LINE(’DECTPU Statement: ’))", TAB_KEY);
  DEFINE_KEY ("EXIT", Ctrl_Z_KEY);

! Create a section file and then quit

IF (get_info/system,("operating_system")=ULTRIX)
THEN
   save(’/usr/user/jacki/mini.tpu_section’);
ELSE
   save(’sys$login.mini);
ENDIF

QUIT;

! End of MINI.TPU
If you created the section file SYS$LOGIN:MINI.TPU$SECTION, you could use the procedures and definitions in that file as an interface to DECTPU. To invoke DECTPU with SYS$LOGIN:MINI.TPU$SECTION as the MINI section file, use the following command:
$ EDIT/TPU/SECTION=SYS$LOGIN:MINI your_text.filYou can define the logical name TPU$SECTION to point to your section file. By default, DECTPU looks for a file that TPU$SECTION points to and reads that file as the default section file.
Whenever you want to add new procedures, variables, learn sequences, or key definitions to a section file, edit the command file to include the new items, and then recompile the command file to produce a section file with the new items. For example, if you want to add key definitions for the arrow keys, you could edit the file MINI.TPU and add the following statements after any procedures in the file:
DEFINE_KEY  ("MOVE_VERTICAL (-1)",  UP);
DEFINE_KEY  ("MOVE_VERTICAL (1)",  DOWN);
DEFINE_KEY  ("MOVE_HORIZONTAL (1)",  RIGHT);
DEFINE_KEY  ("MOVE_HORIZONTAL (-1)",  LEFT);
Recompile the command file with the following command:
$ EDIT/TPU/NOSECTION/COMMAND=MINI.TPUAfter you have completed the previous steps, you can use the section file you created to invoke DECTPU with the new key definitions included.
An alternate way of adding these key definitions to your section file is to enter the definitions as text in the current buffer. You could then press the Tab key (the command prompt key for the minimal interface) and enter the following command after the prompt:
TPU Statement: EXECUTE (CURRENT_BUFFER);This causes the new key definitions to be added to your current editing context. To add the definitions to the section file so you can use them in future sessions, enter the following statement at the Command prompt:
Command: SAVE ("sys$login:mini");If you want to save the DECTPU source code for the key definitions, write out the current buffer or use the EXIT built-in procedure to leave the DECTPU session so that the contents of the buffer are written to a file.
5.6.5.4. Recommended Conventions for Section Files
A section file that implements a layered application should include the following procedures:
TPU$INIT_PROCEDURE
TPU$LOCAL_INIT
If your application is to support initialization files, the section file that implements the application should also include a procedure called TPU$INIT_ POSTPROCEDURE. This procedure should contain the DECTPU statements that implement or handle the initialization files.
For information on EVE’s implementation of initialization files, see Section 5.6.7.
The TPU$INIT_PROCEDURE procedure should perform the following operations:
Initialize all global variables to their startup values
Create all required work spaces for the editor (see the list of special purpose buffers and windows in Table 5.2)
You can add other functions to TPU$INIT_PROCEDURE, but it should perform at least these two operations.
If your application allows the end user to customize the application by using a command file, you may want to make available to the user a procedure called TPU$LOCAL_INIT. (Although this name is not required, it is commonly used by DECTPU programmers.)
In EVE, the code that implements the initialization sequence calls TPU$LOCAL_INIT before executing your command or initialization files. EVE defines this procedure but leaves it empty. The user can use this procedure in a command file to contain DECTPU statements that implement private initializations.
You can see the code that implements TPU$LOCAL_INIT in EVE in SYS$ EXAMPLE S:EVE$CORE.TPU.
A section file that implements a layered application should assign values to the following special variables in the procedure TPU$INIT_PROCEDURE:
TPU$X_ME SSAGE_BUFFER or MESSAGE_BUFFER
TPU$X_S HOW_BUFFER or SHOW_BUFFER
TPU$X_S HOW_WINDOW or INFO_WINDOW
If you write a section file that extends the EVE section file, EVE provides six variables (three pairs of synonyms) to be used by layered applications. Although DECTPU automatically declares the variables, the application must assign a value to one of the synonyms in each pair. If you choose to write your own application, your application must contain these structures and procedures.
Table 5.2 shows the names and uses of these variables.
| Recommended Name | Synonym Provided for Backward Compatibility | Data Type Structure | How DECTPU Uses the Variable |
|---|---|---|---|
| TPU$X_MESSAGE_ BUFFER | MESSAGE_BUFFER | Buffer | DECTPU writes messages in this buffer. If the MESSAGE_BUFFER is associated with a window that is mapped to the screen, DECTPU updates the window. If the application does not assign a buffer to this variable, DECTPU writes messages to the screen. |
| TPU$X_SHOW_ BUFFER | SHOW_BUFFER | Buffer | DECTPU writes information stored by the SHOW built-in in this buffer. |
| TPU$X_SHOW_ WINDOW | INFO_WINDOW | Window | DECTPU displays information stored by the SHOW built-in in this window. |
If you want to use the SHOW built-in procedure in your application, you must create these special variables that DECTPU uses for SHOW.
5.6.6. Using Command Files
A command file is a DECTPU source file that can contain procedures, key definitions, and other DECTPU executable statements. You can have any number of command files in your directory. You might want to write one command file that customizes your editor for programming in Pascal, another command file that customizes your editor for text editing, and so on. If you have several command files, give them names that remind you of their contents. If you have one command file that you use most of the time, name it TPU$COMMAND.TPU.
The command to invoke DECTPU with a command file is:
$ EDIT/TPU/COMMAND ⟦= filespec⟧
If you name your command file TPU$COMMAND.TPU and it is in your default directory, DECTPU reads the file by default, without your having to use the /COMMAND qualifier. If you name your file something other than TPU$COMMAND.TPU, or if you put it in a directory other than your default directory, you must use the /COMMAND qualifier explicitly and provide a full file specification after the qualifier.
DECTPU reads a command file, compiles it, and executes any commands that do not contain syntax errors. If there are errors, DECTPU writes an error message to the message area. The command file can customize or extend the application implemented by the section file with which you invoked DECTPU.
Example 5.6 is a sample DECTPU command file that defines a procedure that moves the editing point to the beginning of a segment of text delimited by the characters %( / * at the beginning and * / )% at the end.
PROCEDURE goto_text_marker

   LOCAL text_marker_pattern,
         text_marker_range;

   text_marker_pattern := ’%(/*’ + MATCH (’*/)%’);
   text_marker_range :=  SEARCH_QUIETLY (text_marker_pattern,
                             GET_INFO (CURRENT_BUFFER, "direction"));
   IF text_marker_range <> 0
   THEN
       POSITION (text_marker_range);
   ELSE
       MESSAGE ("Text_marker not found");
   ENDIF;

   RETURN text_marker_range;

ENDPROCEDURE;
If you name the file that contain s this procedure TEXT_MARKERS.TPU, you can invoke DECTPU with EVE and your command file with the following command:
$ EDIT/TPU/COMMAND=device:[directory]text_markers.tpu
If you add procedures or statements to the command file TEXT_MARKERS.TPU, place all procedures before any individual statements that are not listed within a procedure (for example, key definitions to move to the next text marker).
Remember to name your variables and procedures so they do not conflict with DECTPU reserved words and predefined identifiers. VSI recommends that you prefix your variable and procedure names with three letters (your initials, for example) followed by an underscore ( _ ).
5.6.7. Using EVE Initialization Files
An initialization file is a file that contains commands to be executed by an application. Any application layered on DECTPU can support initialization files.
With EVE initialization files, you can do the following:
Use EVE commands in a startup file to customize editing sessions
Set formats for individual buffers
EVE initialization files contain EVE commands that are executed either when you invoke the editor or when you issue the EVE @ (at sign) command.
To create an EVE initialization file, put in the file the EVE commands you want to use to customize the editor. Use one command on each line and one line for each command. Do not separate the commands with semicolons. If a command in an EVE initialization file is incomplete, EVE prompts you for more information, the same as if you were typing the command during an editing session. Comments in EVE initialization files must be on lines separate from commands and must begin with an exclamation point (!). You cannot nest EVE initialization files. Do not use the DO command in an EVE initialization file.
The following sample initialization file sets left and right margins, establishes overstrike mode, binds the QUIT command to the GOLD/Q key sequence, and enables an EDT-like keypad:
SET LEFT MARGIN 5
SET RIGHT MARGIN 60
OVERSTRIKE MODE
DEFINE KEY=gold/q QUIT
SET KEYPAD EDT
5.6.7.1. Using an EVE Initialization File at Startup
You can cause an initialization file to be executed in any of the following ways when you invoke EVE:
Name the file EVE$INIT.EVE. This is the default file name for EVE initialization files.
Specify the name of the initialization file as a qualifier to the EDIT/TPU command.
Define a logical name, EVE$INIT, to point to your initialization file.
The first and third methods are appropriate if you intend to use one initialization file most of the time to customize your editing sessions. If you name the file EVE$INIT.EVE and do not specify another EVE initialization file on the command line, EVE automatically executes that file when you invoke DECTPU.
Use the second method to control which initialization file EVE executes to customize the editing session. For example, if you have an EVE$INIT file but want to use another initialization file, specify the other file by using the /INITIALIZATION qualifier to EDIT/TPU. To specify an initialization file called MY_INIT.EVE, enter the following command string on the command line:
$ EDIT/TPU/INITIALIZATION=MY_INIT.EVEEVE always executes the initialization file specified on the command line, if such a file is present. If no file is specified on the command line, EVE searches for EVE$INIT.EVE first in the current directory and then in your login area. If EVE finds EVE$INIT.EVE, it executes that file. If the file is not found, the editor checks whether the logical name EVE$INIT has been defined.
If you plan to create several initialization files and to use them equally, you may not want to name one of the files EVE$INIT. For example, if you want one initialization file to set narrow margins and another to set wide margins, create both files and specify the file you want when you invoke EVE.
5.6.7.2. Using an EVE Initialization File During an Editing Session
To execute an EVE initialization file during an editing session, use the @ (at sign) command and specify the file. For example, the following command executes an initialization file called MYEVE.EVE in your current (default) directory.
Command: @MYEVECommands for buffer settings apply to the current buffer. This is effectively the same as typing the commands that the file contains. You may want to create initialization files to execute two or more related commands, such as resetting both margins.
5.6.7.3. How an EVE Initialization File Affects Buffer Settings
Commands in an EVE initialization file that set buffer characteristics (such as margins and tab stops) affect a system buffer named $DEFAULTS$. Buffer s created during the editing session have the same settings as $DEFAULTS$. For example, if your initialization file contains the command SET RIGHT MARGIN 65, the value 65 is used as the right margin setting for the main buffer and for any buffer s you create during the session with GET FILE or BUFFER commands.
To see the settings for the $DEFAULTS$ buffer, use the EVE command SHOW DEFAULTS BUFFER. For example, if you want to know what the tab settings are for the $DEFAULTS$ buffer, type the following command:
Command: SHOW DEFAULTS BUFFERThis command causes EVE to show buffer information in a format similar to the format in Example 5.7 (using values that apply to your editing session).
EVE V3.1 1993-08-17 08:47
Information about buffer $DEFAULTS$

    Not modified               Left margin set to: 1
    Mode: Insert               Right margin set to: 79
    Paragraph indent: none     WPS word wrap indent: none
    Read-only                  Unmodifiable
    Direction: Forward
    Max lines: no limit
Tab stops set every 8 columns.
Word wrap: on
To change the characteristics of the $DEFAULTS$ buffer during an editing session, use the command BUFFER $DEFAULTS$ to put the defaults buffer in a window. This buffer is empty and you cannot add text to it. However, when you change the settings of the $DEFAULTS$ buffer, the changes are saved and used to set the characteristics of any user buffers you create.
Use commands such as SET RIGHT MARGIN, SET LEFT MARGIN, SET TABS, FORWARD, REVERSE, INSERT, or OVERSTRIKE to change the characteristics of the $DEFAULTS$ buffer. The new characteristics are applied to new buffer s but not to existing ones. To leave the $DEFAULTS$ buffer and put a different buffer in the window, use the BUFFER command.
5.7. Debugging DECTPU Programs
This section discusses the options you have for debugging DECTPU programs.
To debug DECTPU programs, you can do one of the following:
Write your own debugger in the DECTPU language. This is discussed in Section 5.7.1.
Use the DECTPU debugger provided in TPU$DEBUG.TPU. This is discussed in Section 5.7.2.
Regardless of which debugger you use, you may find it helpful to enable the display of error line numbers by using SET (LINE_NUMBER, ON) and to enable the display of procedures called when an error occurs by using SET (TRACEBACK, ON).
5.7.1. Using Your Own Debugger
If you write your own debugger, you can invoke it (and bypass the default bugger) by using the /DEBUG qualifier with the EDIT/TPU command. For example, to use a debugger called MY_DEBUGGER.TPU on a file called MIGHT_BE_ BUGGY.TPU, type the following:
$ EDIT/TPU/DEBUG=MY_DEBUGGER.TPU MIGHT_BE_BUGGY.TPU5.7.2. Using the DECTPU Debugger
You can invoke the DECTPU debugger to debug one of the following kinds of files:
Section files
Command files
Files that contain DECTPU programs that are not startup programs
The following sections contain more information on debugging each kind of file.
5.7.2.1. Debugging Section Files
To invoke the debugger for a section file, specify the following command on your command line:
$ EDIT/TPU/DEBUGUse of your system’s debug command causes the DECTPU initialization routine to execute the debugger file before the system runs its initialization procedure.
The debugger initially creates a window that fills most of the screen. The window consists of the following three areas:
Source area—Displays your code when it has been placed in the debugger source buffer.
Output area—Displays one-line messages or one-line results of an EXAMINE command.
Debug command line—Displays the Debug: prompt.
When DECTPU displays the debug window, you can set breakpoints in the section file by using the SET BREAKPOINT command. For example, if you want to debug a procedure called user_fum, type the following on the debugger command line:
Debug: SET BREAKPOINT user_fumAfter setting breakpoints, use the GO command to switch control of execution from the debugger to DECTPU. After you have used this command, the screen displays the code you specified.
5.7.2.2. Debugging Command Files
To invoke the debugger on a command file, use the /DEBUG, /COMMAND, and /NOSECTION qualifiers. To debug a command file called MY_COMMANDS.TPU, type the following at the DCL prompt:
$ EDIT/TPU/NOSECTION/COMMAND=MY_COMMANDS.TPU/DEBUGDECTPU compiles and executes the debugger and places the debug window on the screen before compiling the command file. As a result, you must set breakpoints in the command file before it has been compiled. When you set breakpoints, DECTPU notifies you that you have specified breakpoints at nonexistent procedures.
To continue with the debugging session, use the GO command. GO causes DECTPU to compile the contents of the command file. Recompiling a procedure does not remove any breakpoints set in that procedure.
You cannot use the DECTPU debugger on a file that does not contain DECTPU procedures. If your command file does not contain any procedures, you must find a different method of debugging it.
5.7.2.3. Debugging Other DECTPU Source Code
To debug a DECTPU program that is not a section file or a command file, use the /DEBUG qualifier when you invoke DECTPU. For example, to debug procedures in a file called USER_APPLICATION.TPU, invoke the debugger on the command line as follows:
$ EDIT/TPU/DEBUG USER_APPLICATION.TPUThe debugger creates a window that fills the screen as described in Section 5.7.2.1.
5.7.3. Getting Started with the DECTPU Debugger
This section describes using the default DECTPU debugger with EVE.
If you know which parts of the code you want to debug, use the SET BREAKPOINT command to set breakpoints. If you need to look at the code before setting breakpoints, use the GO command as soon as the debugger window appears. This places on the screen the code in the file you specified on the command line. At this point, EVE commands are available so you can manipulate the text. To return to the debugger so you can set breakpoints, enter the command DEBUG at the EVE command line. You can also gain access to the debugger with the DECTPU procedure called DEBUGON. To invoke this procedure from within EVE, type the following at the EVE Command prompt:
Command: TPU DEBUGONWhen you use either DEBUG or DEBUGON, the screen displays the debugger window and command line. After setting breakpoints, use the GO command to return control of execution to DECTPU.
To compile all code in the buffer, use the EXTEND ALL command or use the COMPILE (CURRENT_BUFFER) statement. To execute a procedure after compilation, use the TPU command. For example, if you want to execute the compiled procedure user_fum, type the following at the EVE Command prompt:
Command: TPU user_fumWhen DECTPU encounters a breakpoint (or when you use the STEP command described later), DECTPU invokes the debugger program. As the debugger assumes control, it receives from DECTPU the name of the procedure whose execution has been suspended. The debugger searches its source buffer for that procedure.
When DECTPU encounters the first breakpoint in the session, the code you are debugging has not yet been placed in the debugger’s source buffer. The debugger prompts for the name of the file that contains your code. Using your response, the debugger places your code in its source buffer. The debugger uses your previous response to supply missing fields, if any, in subsequent file names that you specify. All files read into the source buffer remain there, so that the time DECTPU takes to find a procedure may increase as more files are read into the source buffer.
You cannot use the TPU command followed by the MESSAGE built-in procedure to examine the contents of a local variable while debugging. To use the MESSAGE built-in to examine a local variable, you must write the MESSAGE built-in into the procedure you are debugging. After the statement that contains MESSAGE is executed, you can examine the message buffer to see the results. Alternatively, you can use the debugger EXAMINE command to examine local variables and the formal parameters of the suspended procedure.
5.8. Handling Errors
Each DECTPU built-in procedure returns one or more status codes telling you what happened when the built-in was executed. A DECTPU status code can have one of the following severity levels:
SUCCESS
INFORMATIONAL
WARNING
ERROR
FATAL
You can enable or disable the display of informational or success messages with the SET (INFORMATIONAL) and SET (SUCCESS) built-in procedures.
See Chapter 4 for a description of how to use the ON_ERROR language statement to trap error and warning messages.
In addition to messages that are generated by DECTPU, a built-in procedure may return system messages.
Appendix A. Sample DECTPU Procedures
The following DECTPU procedures are samples of how to use DECTPU to perform certain tasks. These procedures show one way of using DECTPU; there may be other, more efficient ways to perform the same task. Make changes to these procedures to accommodate your style of editing.
For these procedures to compile and execute correctly, you must make sure that there are no conflicts between these sample procedures and your interface. This appendix contains the following types of procedures:
Line-mode editor.
Translation of control characters.
Restoring terminal width before exiting from DECTPU.
DCL command procedure to run DECTPU from a subprocess.
A.1. Line-Mode Editor
Example A.1 shows a portion of an editing interface that uses line mode rather than screen displays for editing tasks. You can use this mode of editing for batch jobs or for running DECTPU on terminals that do not support screen-oriented editing.
! Portion of a line mode editor for DECTPU
!
input_file := GET_INFO (COMMAND_LINE, "file_name");  ! Set up main
main_buffer := CREATE_BUFFER ("MAIN", input_file);   ! buffer from input
POSITION (BEGINNING_OF (main_buffer));               ! file
!
LOOP                    ! Continuously loop until QUIT
    cmd := READ_LINE ("*");
    IF cmd = ""
    THEN
        cmd_char := "N";
    ELSE
        cmd_char := SUBSTR (cmd, 1, 1);  CHANGE_CASE (cmd_char, UPPER);
    ENDIF;

    CASE cmd_char FROM "I" TO "T"       ! Only accepting I,L,N,Q,T
!Top of buffer command
        ["T"]:
                POSITION (BEGINNING_OF (CURRENT_BUFFER));
                MESSAGE (CURRENT_LINE);
!Next line command
         ["N"]:
                MOVE_HORIZONTAL (-CURRENT_OFFSET);
                MOVE_VERTICAL (1);
                MESSAGE (CURRENT_LINE);
!Insert text command
         ["I"]:
                SPLIT_LINE;
                COPY_TEXT (SUBSTR (cmd, 2, 999));
                MESSAGE (CURRENT_LINE);
!List from here to end of file command
         ["L"]:
                m1 := MARK (NONE);
                LOOP
                MESSAGE (CURRENT_LINE);
                MOVE_VERTICAL (1);
                EXITIF MARK (NONE) = END_OF (CURRENT_BUFFER);
                ENDLOOP;
                POSITION (m1);
!QUIT
         ["Q"]:
                QUIT;
                [INRANGE,OUTRANGE]:
                MESSAGE ("Unrecognized command - enter I,L,N,Q or T");
    ENDCASE;
ENDLOOP;
A.2. Translation of Control Characters
Example A.2 shows how to display control characters in a meaningful way. This is accomplished by translating the buffer to a different visual format and mapping this new form to a window. On the VT400, VT300, and VT200 series of terminals, control characters are shown as reverse question marks; on the VT100 series of terminals, they are shown as rectangles.
! This procedure performs the substitution of meaningful characters
! for the escape or control characters.
!
PROCEDURE translate_controls (char_range)

    LOCAL
        replace_text;
!
! If the translation array is not yet set up, then do it now. The elements
! that we do not initialize will contain the value TPUK_UNSPECIFIED. They are
! characters that TPU will display meaningfully.
!
    IF translate_array = TPU$K_UNSPECIFIED
    THEN
        translate_array := CREATE_ARRAY (32, 0);
        translate_array {1} := ’<SOH>’;
        translate_array {2} := ’<STX>’;
        translate_array {3} := ’<ETX>’;
        translate_array {4} := ’<EOT>’;
        translate_array {5} := ’<ENQ>’;
        translate_array {6} := ’<ACK>’;
        translate_array {7} := ’<BEL>’;
        translate_array {8} := ’<BS>’;
        translate_array {14} := ’<SO>’;
        translate_array {15} := ’<SI>’;
        translate_array {16} := ’<DLE>’;
        translate_array {17} := ’<DC1>’;
        translate_array {18} := ’<DC2>’;
        translate_array {19} := ’<DC3>’;
        translate_array {20} := ’<DC4>’;
        translate_array {21} := ’<NAK>’;
        translate_array {22} := ’<SYN>’;
        translate_array {23} := ’<ETB>’;
        translate_array {24} := ’<CAN>’;
        translate_array {25} := ’<EM>’;
        translate_array {26} := ’<SUB>’;
        translate_array {27} := ’<ESC>’;
        translate_array {28} := ’<FS>’;
        translate_array {29} := ’<GS>’;
        translate_array {30} := ’<RS>’;
        translate_array {31} := ’<US>’;

    ENDIF;

!
! The range *must* be a single character long
!
    IF LENGTH (char_range) <> 1
    THEN
        RETURN 0;
    ENDIF;
!
! Find the character
!
    replace_text := translate_array {ASCII (STR (char_range))};
!
! If we got back a value of TPU$K_UNSPECIFIED, TPU will display the character
! meaningfully
!
    IF replace_text = TPU$K_UNSPECIFIED
    THEN
        RETURN 0;
    ENDIF;
!
! Erase the range and insert the new text
!
    ERASE (char_range);
    COPY_TEXT (replace_text);

    RETURN 1;

ENDPROCEDURE;

!
! This procedure controls the outer loop search for the special
! control characters that we want to view.
!
PROCEDURE view_controls (source_buffer)

    CONSTANT
        Ctrl_char_str :=
                    ASCII  (0) + ASCII  (1) + ASCII  (2) + ASCII  (3) +
                    ASCII  (4) + ASCII  (5) + ASCII  (6) + ASCII  (7) +
                    ASCII  (8) + ASCII  (9) + ASCII (10) + ASCII (11) +
                    ASCII (12) + ASCII (13) + ASCII (14) + ASCII (15) +
                    ASCII (16) + ASCII (17) + ASCII (18) + ASCII (19) +
                    ASCII (20) + ASCII (21) + ASCII (22) + ASCII (23) +
                    ASCII (24) + ASCII (25) + ASCII (26) + ASCII (27) +
                    ASCII (28) + ASCII (29) + ASCII (30) + ASCII (31);
    LOCAL
        Ctrl_char_pattern,
        Ctrl_char_range;

! Create the translation buffer and window, if necessary
!
    IF translate_buffer = TPU$K_UNSPECIFIED
    THEN
        translate_buffer := CREATE_BUFFER ("translation");
        SET (NO_WRITE, translate_buffer);
    ENDIF;

    IF translate_window = TPU$K_UNSPECIFIED
    THEN
        translate_window := CREATE_WINDOW (1, 10, ON);
    ENDIF;
!
! Make a copy of the buffer we are translating
!
    ERASE (translate_buffer);
    POSITION (translate_buffer);
    COPY_TEXT (source_buffer);

!
! Search for any control characters and translate them. If a control character
! is not found, SEARCH_QUIETLY will return a 0.
!
    Ctrl_char_pattern := ANY (Ctrl_char_str);
    POSITION (BEGINNING_OF (translate_buffer));

    LOOP
        Ctrl_char_range := SEARCH_QUIETLY (Ctrl_char_pattern, FORWARD);
        EXITIF Ctrl_char_range = 0;
        POSITION (Ctrl_char_range);
        !
        ! If we did not translate the character, move past it
        ! IF NOT translate_controls (Ctrl_char_range)
        THEN
            MOVE_HORIZONTAL (1);
        ENDIF;
    ENDLOOP;
!
! Now display what we have done
!
    POSITION (BEGINNING_OF (translate_buffer));
    MAP (translate_window, translate_buffer);

ENDPROCEDURE;
A.3. Restoring Terminal Width Before Exiting from DECTPU
Example A.3 compares the current width of the screen with the original width. If the current width differ s from the original width, the procedure restores each window to its original width. The screen is refreshed so that information is visible on the screen after you exit from DECTPU. When all of the window widths are the same, the physical screen width is changed.
PROCEDURE user_restore_screen

LOCAL
    original_screen_width,
    temp_w;

original_screen_width := GET_INFO (SCREEN, "original_width");

IF original_screen_width <> GET_INFO (SCREEN, "width")
THEN
    temp_w := get_info(windows,"first");

    LOOP
        EXITIF temp_w = 0;

        SET (WIDTH, temp_w, original_screen_width);

        temp_w := GET_INFO (WINDOWS, "next");
    ENDLOOP;

    REFRESH;
ENDIF;

ENDPROCEDURE;

! Define the key combination Ctrl/E to do an exit which
! restores the screen to its original width, repaints
! the screen, and then exits.

DEFINE_KEY ("user_restore_screen;EXIT", Ctrl_E_KEY);
A.4. Running DECTPU from an OpenVMS Subprocess
Example A.4 shows one way of running DECTPU from a subprocess. It also shows how to move to or from the subprocess.
!
!DCL command procedure to run DECTPU from subprocess
!
!Put $ e = "@keptedit"
!in your login.com. This spawns the editor the first time
!and attaches to it after that. I have defined a key to be
!"attach" so it always goes back to the parent.

$ tt = f$getdvi("sys$command","devnam") - "_" - "_" - ":"
$ edit_name = "Edit_" + tt
$ priv_list = f$setprv("NOWORLD, NOGROUP")
$ pid=0
$10$:
$ proc = f$getjpi(f$pid(pid), "PRCNAM")
$ if proc .eqs. edit_name then goto attach
$ if pid .ne. 0 then goto 10$
$spawn:
$ priv_list = f$setprv(priv_list)
$ write sys$error "[Spawning a new Kept Editor]"
$ define/nolog sys$input sys$command:
$ t1 = f$edit(p1 + " " + p2 + " " + p3 + " " + p4 + " "
  + p5 + " " + p6 + " " + p7 + " " + p8,"COLLAPSE")
$ spawn/process="’’edit_name’" /nolog edit/tpu ’t1’

$ write sys$error "[Attached to DCL in directory ’’f$env("DEFAULT")’]"
$ exit
$attach:
$ priv_list = f$setprv(priv_list)
$ write sys$error "[Attaching to Kept Editor]"
$ define/nolog sys$input sys$command:
$ attach "’’edit_name’"
$ write sys$error "[Attached to DCL in directory ’’f$env("DEFAULT")’]"
$ exit
Appendix B. DECTPU Terminal Support
This appendix lists the terminals that support screen-oriented editing and describes how differences among these terminals affect the way DECTPU performs. This appendix also describes how you can run DECTPU on terminals that do not support screen-oriented editing. Finally, this appendix tells you how DECTPU manages wrapping and how you can modify that.
B.1. Using Screen-Oriented Editing on Supported Terminals
DECTPU supports screen-oriented editing only on terminals that respond to ANSI control functions and that operate in ANSI mode.
DECTPU screen-oriented editing is designed to optimize the features available with the Compaq VT400, VT300, and VT200 families of terminals and the Compaq VT100 family of terminals. DECTPU does not support screen-oriented editing on Compaq VT52-compatible terminals. Optimum DECTPU performance is achieved on the VT300-series, VT200-series, and VT100-series terminals. Some of the high-performance characteristics of DECTPU may not be apparent on the terminals listed in Table B.1 for the reasons stated.
| Terminal | Characteristic |
|---|---|
| VT102 | Slow autorepeat rate |
| VT240 |
Slow autorepeat rate Slower scrolling region setup time than the VT220 |
| GIGI |
One form of scrolling region (DECTPU repaints screen, rather than use this scrolling mechanism) Variable autorepeat rate (cursor keys pick up speed when used repeatedly) |
By default, your DECTPU session runs with the screen management file TPU$CCTSHR.EXE. To check your terminal setting, enter the following command at the command prompt:
$ SHOW TERMINAL
B.1.1. Terminal Settings on OpenVMS Systems That Affect DECTPU
The following settings may affect the behavior of DECTPU, depending on the terminal that you use.
132-Column Mode
Only terminals that set the DEC_CRT mode bit and the advanced video mode bit can alter their physical width from 80 columns to 132 and back. All other terminals keep the physical width that is set when you enter the editor.
For the DECTPU screen manager to behave predictably on GIGI terminals, you should report the terminal width as 84 to OpenVMS systems. Use the DCL command SET TERMINAL/DEVICE=VT100 to set the proper terminal width.
Autorepeat ON/OFF and Auxiliary Keypad Enabling
To take advantage of the SET (AUTO_REPEAT) built-in procedure or to enable the auxiliary keypad for applications mode, the terminal must be set to DEC_CRT3, DEC_CRT2, DEC_CRT, or VT100. Use the DCL command SET TERMINAL/DEVICE=characteristic to set the terminal.
Control Sequence Introducer
DECTPU can use one 8-bit control sequence introducer (CSI) to introduce a terminal control sequence. (Usually you use the 2-character combination of the ESCAPE key and the left bracket ( [ ).) To take advantage of this feature, set your terminal to DEC_CRT2 mode. The Compaq VT300-series and VT220 and VT240 terminals currently support this feature.
Cursor Positioning
If your terminal sets the DEC_CRT mode bit, DECTPU assumes that when control sequences that position the cursor to row 1 or column 1 are sent to the terminal, the 1 can be omitted. If your terminal does not behave correctly when it receives these control sequences, you must turn off the DEC_CRT mode bit. Some foreign terminals may not be fully compatible with DECTPU and may exhibit this behavior.
Edit Mode
Terminals that are operating in edit mode allow the editor to take advantage of special edit-mode control sequences during deletion and insertion of text for optimization purposes. Some current Compaq terminals that support edit mode include the VT102, the VT220, the VT240, the VT241, and VT300-series terminals.
8-Bit Characters
ANSI terminals operating in 8-bit mode have the ability to use the supplemental characters and control sequences in the DEC Multinational Character Set. The Compaq VT300-series and the VT220 and VT240 terminals currently support 8-bit character mode. If you have the 8-bit mode bit set, DECTPU designates the DEC Multinational Character Set into G2 and invokes it into GR. For more information on how your terminal interacts with the DEC Multinational Character Set, refer to the programming manual for your specific terminal.
Scrolling
DECTPU uses scrolling regions only for terminals that have the DEC_CRT mode bit set. On other terminals, DECTPU repaints the window when a scroll would have been used (for example, when a line is deleted or inserted).
Video Attributes
When you set the video attributes of windows, markers, or ranges, only those attributes supported by your terminal type give predictable results. Most ANSI CRTs support reverse video. However, only terminals that support DEC_CRT mode with the advanced video option (AVO) have the full range of video attributes (reverse, bold, blink, underline) that DECTPU supports.
B.1.2. SET TERMINAL Command
When you use the SET TERMINAL command to specify characteristics for your terminal, make sure to set only those characteristics that are supported by your terminal. If you set characteristics that the terminal does not support, the screen-oriented functions of DECTPU may behave unpredictably. For example, if you run DECTPU on a VT100 terminal and you set the DEC_CRT2 characteristic that VT100s do not support, DECTPU tries to use 8-bit CSI controls. This could cause ‘‘;7m’’ to appear on the screen where the reverse video attribute should be set.
Most users do not knowingly set characteristics that are not supported by their terminals. However, if you temporarily move to a different type of terminal, your LOGIN.COM file may have characteristics set for your usual terminal that do not apply to the current terminal. This problem may also occur if, before running DECTPU, you run a program that modifies your terminal characteristics without your knowledge.
If you see unexpected video attributes or extraneous characters on the screen, exit from DECTPU and check your terminal characteristics with the DCL command SHOW TERMINAL.
To recover your files, use the same terminal characteristics you used to create your file; otherwise, a journal file inconsistency may occur, depending on how your interface is written.
B.2. Using Line-Mode Editing on Unsupported Terminals
If you want to run DECTPU from an unsupported terminal, you must inform DECTPU that you do not want to use screen capabilities. To invoke DECTPU on an unsupported terminal, use the /NODISPLAY qualifier after the EDIT/TPU command. See Chapter 2 for more information on this qualifier. While in no- display mode, DECTPU uses the RTL generic LIB$PUT_OUTPUT routine to display prompts and messages at the current location in SYS$OUTPUT. By using a combination of the READ_LINE and MESSAGE built-in procedures, you can devise your own line-mode editing functions or perform editing tasks from a batch job. See the sample line-mode editor in Appendix A.
B.3. Using Terminal Wrap
Terminal wrap characteristics perform differently on each operating system.
If you have enabled an automatic wrap setting on your terminal, DECTPU disables this setting in order to manage the screen more efficiently. When you exit from DECTPU, DECTPU restores all terminal characteristics. If the SET TERM/NOWRAP command is active, DECTPU leaves the hardware wrap off. However, if the SET TERM/WRAP command is active, DECTPU assumes that you want hardware wrap on, so it turns it on when you exit from DECTPU.
You can prevent DECTPU from turning on hardware wrap by specifying SET TERM/NOWRAP before invoking DECTPU. You can enter the command interactively, or you can write a DCL command procedure that makes this setting part of your DECTPU environment. Example B.1 shows a DCL command procedure that is used to control this terminal setting before and after a DECTPU session.
$ SET TERM/NOWRAP
$ ASSIGN/USER SYS$COMMAND SYS$INPUT
$ EDIT/TPU/SECTION = EDTSECINI
$ SET TERM/WRAP
Appendix C. DECTPU Debugger Commands
You can use the following commands for debugging once you have set breakpoints, compiled code, and started execution.
- ATTACH process
Suspends the current editing session and transfers control to another active process or subprocess.
DCL process names are case sensitive.
- CANCEL BREAKPOINT procedure-name
Cancels a breakpoint set with the SET BREAKPOINT command.
- DEPOSIT variable := expression
Lets you set the values of global variables, local variables, and formal parameters.
- DISPLAY SOURCE
Clears text from the screen after use of the HELP or SHOW BREAKPOINTS command. Causes the source display area to display your code.
- EXAMINE variable
Displays the current contents of global and local variables, global constants, formal parameters of the procedure that has been interrupted, and variables local to that procedure. Local constants cannot be examined.
- GO
Causes the debugger to relinquish control of execution until it is invoked again by a breakpoint, by the DEBUG command, or by the DEBUGON procedure.
- HELP
Lists available debugger commands and keypad bindings.
- QUIT
Stops execution of the current procedure. Uses the ABORT statement to return to the main loop of DECTPU. This command is useful when you have located a problem in a procedure and are ready to get out of the procedure.
- SCROLL [-] number-of-lines
Scrolls text in the source display area by the specified number of lines. To scroll backward through the code in the display area, specify a negative number of lines.
To scroll forward by one line less than the number of lines in the display window, press the Next Screen key or the sequence GOLD/Down Arrow. To scroll backward in the same way, press the Prev Screen key or the sequence GOLD/Up Arrow.
- SET BREAKPOINT procedure-name
Invokes the debugger when the specified procedure is entered.
- SET WINDOW top, length
Places the top of the debugger window at the line number specified by the top parameter. Extends the window down by the number of lines specified by the length parameter. The default length is 7 lines. The minimum valid length is 3 lines. The SET WINDOW command changes only the size of the source display area. The output area and command line always occupy exactly one line.
- SHIFT [-] number-of-columns
Moves the source display window left or right across the source code to display text wider than the screen.
To move left, you press the key sequence GOLD/Left Arrow, then enter the number of columns to move. To move right, you press the key sequence GOLD/Right Arrow, then enter the number of columns to move.
- SHOW BREAKPOINTS
List the current breakpoints in the debugger source window. To redisplay code in the source window, use the DISPLAY SOURCE command.
- SPAWN subprocess
Suspends the current editing session and creates a new process.
- STEP
Executes one line of DECTPU code, then returns control to the debugger. If you have several DECTPU statements on one line, all statements are executed before control returns to the debugger.
- TPU statement
Executes the DECTPU statement you specify. You can enter more than one statement by using the TPU command just once.
These directory and file type defaults are added by the Motif Resource Manager if missing from the file specification.
xxxxxx = suffix from mktemp(3). Note that this file is invisible.
These X resource files are used only by dmtpu and dxtpu.
Ctrl/A means pressing the Ctrl key simultaneously with the A key. A and a produce the same results.