VSI DECnet-Plus DECdns Management Guide
- Operating System and Version:
- VSI OpenVMS IA-64 Version 8.4-1H1 or higher
VSI OpenVMS Alpha Version 8.4-2L1 or higher
Preface
The VSI Distributed Name Service (DECdns) is a networkwide service that enables users to assign names to resources and then use those resources without needing to know their physical location in the network. This manual introduces DECdns concepts and describes how to manage a namespace and solve problems after you install and configure the software. For information on planning, installing, and configuring DECdns, see the documentation for your platform.
1. About VSI
VMS Software, Inc. (VSI) is an independent software company licensed by Hewlett Packard Enterprise to develop and support the OpenVMS operating system.
2. Intended Audience
This manual is intended for two audiences: namespace administrators, who oversee the design of the namespace and the creation of names in it, and server managers, who oversee day-to-day operations at DECdns server nodes. Both audiences should have a sound understanding of basic DECdns concepts before starting to use the software. Information about management and problem-solving tasks may apply to either of the two audiences, depending on the size of the namespace and the scope of the task (in small networks, one person may take the role of both namespace administrator and server manager). This manual points out the tasks that would normally be the responsibility of each audience.
3. Document Structure
Chapter 1, "Introduction to DECdns", Chapter 2, "How DECdns Looks Up Names", and Chapter 3, "How DECdns Updates Data" introduce basic DECdns concepts and describes how to manage DECdns.
Chapter 4, "Using the DECdns Control Program", Chapter 5, "Managing DECdns Access Control", Chapter 6, "Managing Clerks, Servers, and Clearinghouses", Chapter 7, "Managing Directories", Chapter 8, "Viewing the Structure and Contents of a Namespace", Chapter 9, "Restructuring a Namespace", and Chapter 10, "Using the DECdns Configuration Program" are the DECdns Control Program (DNSCP) command dictionary.
Chapter 11, "DECdns Control Program Command Dictionary" and Chapter 12, "DECdns Problem Solving" explain how to isolate and solve DECdns problems.
Appendix A, "DECdns Naming Guidelines" lists valid characters and syntax for DECdns names and provides naming guidelines.
Appendix B, "Special Clearinghouse Rules" explains two rules that affect the creation of clearinghouses and directories.
Appendix C, "DECdns Error Messages" lists and explains error messages that occur while running DECdns.
Appendix D, "DECdns Events" lists and explains DECdns events.
Appendix E, "Location of DECdns Files" contains information on the location of the DECdns files on OpenVMS.
Appendix F, "DECdns Version Interoperability" describes interoperability considerations for DECdns and the Distributed Name Service (DNS) Version 1.
Appendix G, "Sample Command Files" includes samples of useful command files.
Appendix H, "The DECdns Browser Utility" explains how to use the unsupported DECdns Browser utility to view the namespace.
4. Related Documents
VSI DECnet-Plus for OpenVMS DECdts Management
VSI DECnet-Plus DECdts Programming
Additional information about DECdns, including namespace planning guidelines, is in other parts of the documentation set for your platform.
VSI DECnet-Plus Planning Guide
VSI DECnet-Plus for OpenVMS Introduction and User's Guide
VSI DECnet-Plus for OpenVMS Installation and Configuration
DECnet-Plus for OpenVMS Applications Installation and Advanced Configuration Guide
VSI DECnet-Plus for OpenVMS Network Management Guide
DECnet-Plus for OpenVMS Installation and Quick Reference
DECnet-Plus for OpenVMS Network Management and Quick Reference Card
5. VSI Encourages Your Comments
You may send comments or suggestions regarding this manual or any VSI document by sending electronic mail to the following Internet address: <docinfo@vmssoftware.com>. Users who have VSI OpenVMS support contracts through VSI can contact <support@vmssoftware.com> for help with this product.
6. OpenVMS Documentation
The full VSI OpenVMS documentation set can be found on the VMS Software Documentation webpage at https://docs.vmssoftware.com.
7. Typographical Conventions
special type | Indicates a literal example of system output or user input. In text, indicates DECdns names, command names, keywords, node names, file names, path names, directories, utilities, and tools. |
| Bold | Represents the introduction of a new term. |
| Italics | Indicate a variable for which either the user or the system supplies a value. |
| UPPERCASE | Indicates the name of a rights identifier code, or an abbreviation of a system privilege. |
| [@] | In format descriptions, brackets enclose optional items. Default values apply for unspecified options. (Do not type the brackets.) |
| (@) | In format descriptions, if you choose more than one option, parentheses indicate that you must enclose the choices in parentheses. |
| Ctrl/x | Indicates that you hold down the Ctrl key while you press another key (specified here by x). |
| $ | Represents the OpenVMS DCL system prompt. |
Chapter 1. Introduction to DECdns
The VSI Distributed Name Service (DECdns) is a networkwide service that makes it possible to use network resources without knowing their physical location. Users and applications can assign DECdns names to resources such as nodes, disks, and files. The creator of a name also supplies other relevant information, such as the resource's network address, for DECdns to store. Users then need to remember only the name, and DECdns acts as a lookup service, providing the rest of the data when necessary.
The ability to store data with a name is especially useful in a changing and growing distributed computing environment. Traditional references to resources such as disks, files, and print queues include the name of the node where they reside. Now, because DECdns stores that information along with—but not as part of—a name, a resource can be moved from one node to another without making users change the way they refer to it.
DECnet-Plus software can use DECdns to store node names. The major benefit of using DECdns to store node names is ease of maintenance. With DECdns, it is not necessary to maintain a node database on every system in the network. A few DECdns servers store node names, and all other nodes in the network can depend on those servers for node name-to-address mapping. When data associated with the node name changes, DECdns propagates the change automatically to all servers that store that node name.
Another benefit of using DECdns node names with DECnet-Plus software is that they can be longer than DECnet Phase IV names and hence more descriptive. Whereas Phase IV node names were limited to 6 characters, any DECdns name, including a node name, can be as long as 255 characters. See Appendix A, "DECdns Naming Guidelines" for complete guidelines for all DECdns names. In addition, with DECdns, you can give printers, disks, and files names that are independent of their physical location. If the resource's address (or some other characteristic) changes, network users and applications are unaffected: the same name is used. The change is recorded with the name's associated characteristics that are stored in the DECdns database.
Availability — Because you can store the same name in more than one place, data is likely to be available even in the event of a system or network failure.
Efficiency — DECdns finds names efficiently because you can store them close to where they are used most often.
Load sharing — Because names are in more than one place, several nodes can share the load of looking them up.
Expandability — New names are easily accommodated as the network grows and more applications use DECdns.
DECdns is flexible enough to support small or large networks.
1.1. How DECdns Works
Client applications
Servers
Clerks
Clearinghouses
DECdns uses a client/server model. An application that depends on DECdns to store and retrieve information for it is a client of DECdns. Client applications create names for resources on behalf of their users. Through a client application, a user can supply other information for DECdns to store with a name. This information is stored in data structures called attributes. Then, when a client application user refers to the resource by its DECdns name, DECdns retrieves from the attributes the data to be used by the client application.
A system running DECdns server software is a DECdns server. A DECdns server stores and maintains DECdns names and handles requests to create, modify, or look up data. You designate a system as a DECdns server when configuring the DECnet-Plus software.
A component called the clerk is the interface between client applications and DECdns servers. A clerk must exist on every DECnet-Plus node using DECdns and is created during configuration of the network software. The clerk receives a request from a client application, sends the request to a server, and returns the resulting information to the client. This process is called a lookup. The clerk is also the interface through which client applications create and modify names. One clerk can serve many client applications.
The clerk caches, or saves, the results of lookups so it does not have to repeatedly go to a server for the same information. The cache is written to disk periodically so the information can survive a system reboot or the restart of an application. Caching improves performance and reduces network traffic.
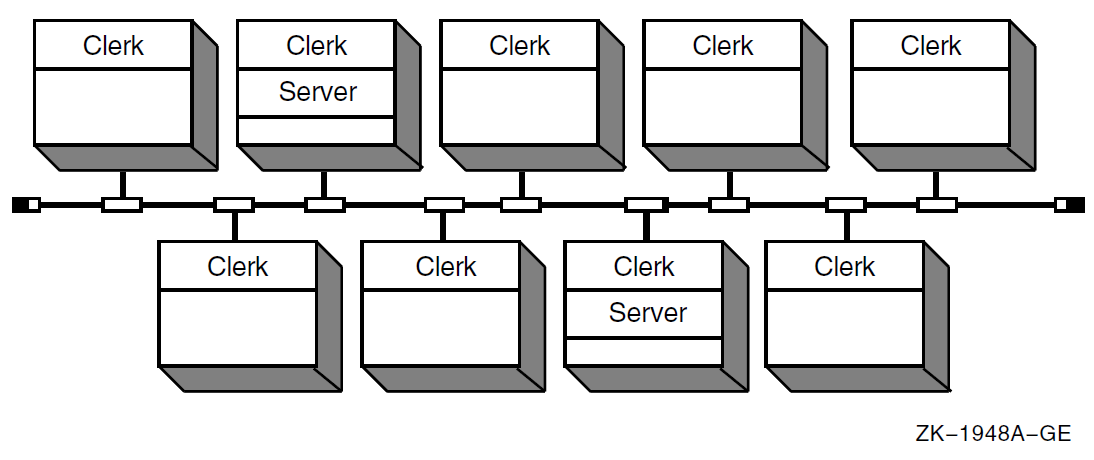
Figure 1.1, ''Sample DECdns LAN Configuration'' shows a sample configuration of DECdns clerks and servers on a nine-node local area network (LAN). Every node is a clerk, and DECdns servers run on two selected nodes.
 |
Every DECdns server has a database called a clearinghouse in which it stores names and other DECdns data. The clearinghouse is where a DECdns server adds, modifies, deletes, and retrieves data on behalf of client applications. Although more than one clearinghouse can exist at a server node, VSI does not recommend it as a normal configuration because it degrades the performance of the server.
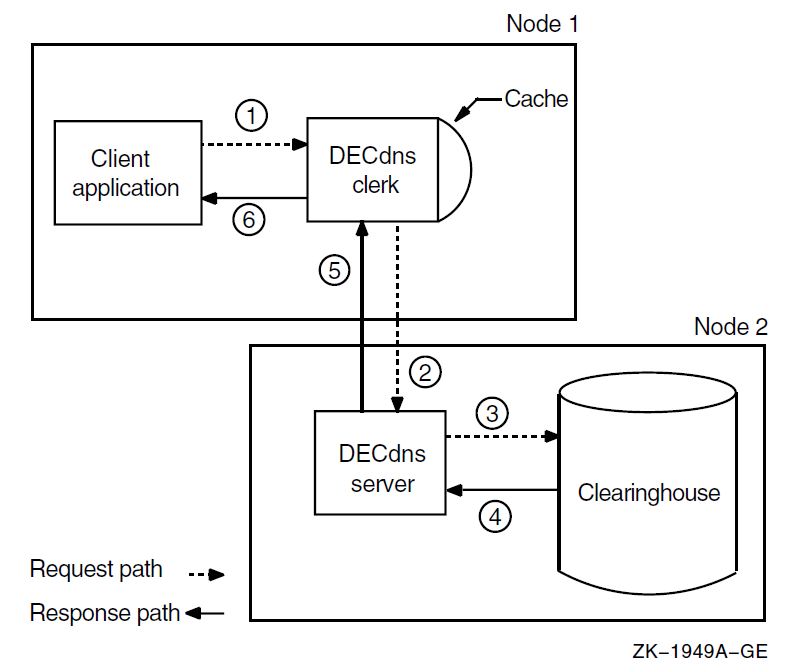
Figure 1.2, ''Simple Lookup'' shows the interaction between a DECdns client, clerk, server, and clearinghouse during a simple lookup. First, the clerk receives the lookup request from the client application (step 1) and checks its cache. Not finding the name there, the clerk contacts the server on Node 2 (step 2). The server finds the name in its clearinghouse (steps 3 and 4) and returns the requested information over the network to the clerk (step 5), which passes it to the client application (step 6). The clerk also caches the information so it does not have to contact a server the next time a client requests a lookup of that same name.
 |
1.2. Examples of Client Applications that Use DECdns
One of the most important users of DECdns is DECnet Phase V software such as DECnet-Plus. When you make the transition from DECnet Phase IV to DECnet Phase V, all node names in your network become full names. If DECdns is used as the naming service, then all node names become DECdns full names. (For a discussion of full names, see Section 2.1, ''Structure of a Name''.) Along with the node names, DECdns stores the address and protocol information that DECnet needs to make connections between nodes. The DECnet-Plus software includes a registration tool to help you create DECdns names for nodes.
Another important user of DECdns in DECnet-Plus software is the VSI Distributed Time Service (DECdts). DECdts and DECdns actually depend on each other. DECdts uses DECdns as a networkwide registry for global time servers that synchronize system clocks in the network. DECdns uses timestamps to determine the order in which changes to its data occur, and it depends on DECdts to synchronize time on DECdns servers so their timestamps are consistent. Synchronized clocks are important to any distributed application that needs to keep track of the order in which events occur across multiple systems.
Two of the other OpenVMS applications that use DECdns (in conjunction with DECnet) are:
VSI DECdfs for OpenVMS
Notes for OpenVMS
VSI DECdfs for OpenVMS allows users on one OpenVMS system to access files on another system as if the files were on the local system. DECdfs uses DECdns to register file resources, called DECdfs access points.
VSI Notes is a computer conferencing system that lets you conduct online conferences or meetings. It uses DECdns to store the location (node name or address) of a conference. If a conference moves from one node to another, its moderator can update the address information stored in DECdns. Users can continue to refer to the conference by the same DECdns name and never need to know that it has moved to another node.
If you have VSI software that uses DECdns, read the documentation for that software for a further understanding of how it interacts with DECdns.
1.3. How People Use DECdns
A user who copies a file from one node to another and includes DECdns node names in the command is using DECdns, indirectly through DECnet-Plus.
A user who includes a DECdns node name in a mail address is using DECdns through the system's mail utility.
A user who opens a VSI Notes conference entry with a DECdns name is using DECdns through the Notes application.
A DECdfs manager who defines an access point (such as a disk) and gives it a DECdns name is using DECdns through the DECdfs control program. Any user who subsequently mounts the access point by referring to that name is a DECdns user.
1.4. What's in a Namespace?
The previous sections introduced a variety of ways in which applications and people can use DECdns names. This section describes basic concepts related to organizing and managing those names.
The total collection of names that one or more DECdns servers know about, look up, manage, and share is called a namespace. A DECdns namespace can be stored as a partitioned, partially replicated database. As a partitioned database, it is stored in several locations. As a partially replicated database, part of it is stored simultaneously in multiple locations.
When you create a namespace, you organize DECdns names into a hierarchical structure of directories. DECdns directories are conceptually similar to the directories you create in your operating system's file system. They are a logical way to group names for DECdns-specific management or usage purposes. Directory replicas are physical instances of a directory, stored in clearinghouses. In this way, a clearinghouse can be defined as a collection of directory replicas stored on a particular server. (A clearinghouse does not necessarily contain the entire namespace.)
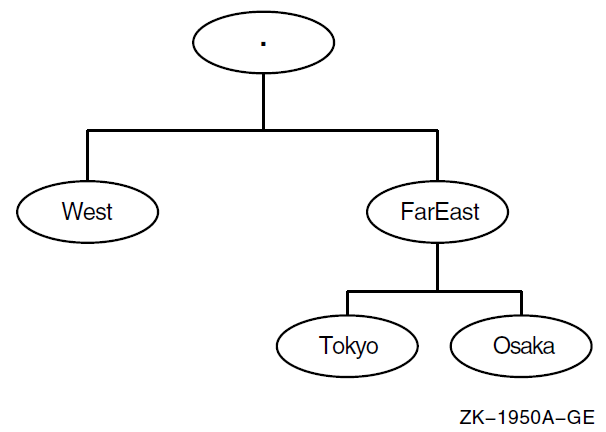
The highest-level directory in the namespace is denoted by a dot (.) and is called the root directory. The root is created automatically when you initialize a namespace. You can then create and name other directories below the root. Any directory that has a directory beneath it is considered the parent of that directory. Any directory that has a directory above it is considered a child of the directory above it.
Figure 1.3, ''Sample Namespace Directory Hierarchy'' shows a simple hierarchy of directories. The root directory (.) is the parent of the directories named West and FarEast. The FarEast directory is a child of the root directory and the parent of the Tokyo and Osaka directories.
 |
If you have a small network and do not expect much growth, you need a minimum number of directory levels in the namespace. For administrators of large networks, multiple directory levels provide greater flexibility in distributing, controlling access to, and managing many names. Distribution of names helps to balance the work load on DECdns servers.
1.4.1. Replicas and Their Contents
Directory replicas are the units by which you distribute names in clearinghouses throughout the namespace. You can think of a clearinghouse as a collection of directory replicas at a particular server. After you create a directory in one clearinghouse, you can create replicas of it in other clearinghouses.
All of the replicas of a specific directory in the namespace constitute that directory's replica set. DECdns ensures that all replicas of a directory remain consistent. See Chapter 3, "How DECdns Updates Data" for details on how this is done.
Master
Read-only
A replica's type affects the processing that can be done on it and the way DECdns updates it. The type of replica DECdns uses when it looks up or changes data is invisible to users. However, it helps to understand how the two types differ.
The master replica is the first instance of a specific directory in the namespace. After you make copies of the directory, you can designate a different replica as the master, if necessary, but only one master replica of each directory can exist at a time.
The master replica is the only directly modifiable replica of a directory. DECdns can create, change, and delete information in a master replica. Because it is directly modifiable, the master replica incurs more overhead than read-only replicas, which DECdns modifies using periodic updates.
A read-only replica is a copy of a directory that is available only for looking up information. DECdns does not create, modify, or delete names in read-only replicas; it simply updates them with changes made to the master replica. Read-only replicas save resources because DECdns does not make changes in them, except for periodic updates, nor does it have to gather changes from them to disseminate to other replicas.
Object entries
Soft links
Child pointers
1.4.1.1. Object Entries
An object is any real-world network resource—such as a disk, application, or node—that is given a DECdns name. When an object name is created, client applications and the DECdns software supply attributes to be stored with the name. The name and its attributes make up the object entry. When a client application requests a lookup of the name, DECdns returns the value of the relevant attribute or attributes.
Every object has a defined class, which is stored as an attribute of the object entry. Programmers who write applications to use DECdns can define their own object classes and supply class-specific attributes for the name service to store on behalf of the application. Class-specific attributes have meaning only to the particular class of objects with which they are associated.
Group
Clearinghouse object entry
Groups let you associate, or manage as a group, names that have something in common. They do this by mapping a specific name (the group name) to a set of names, denoting the group members. DECdns managers can create groups that assign several users a single set of access rights to names.
Applications that use DECdns can create groups for purposes other than access control. This manual discusses groups only in the context of DECdns access control.
The clearinghouse object entry serves as a pointer to the location of an actual clearinghouse in the network. DECdns needs this pointer so it can look up and update data in a clearinghouse.
When you create a clearinghouse, DECdns creates its clearinghouse object entry automatically. The object entry acquires the same name as the clearinghouse. The clearinghouse object entry is like any other object entry in that it describes a network resource, but it is different because it is solely for internal use by DECdns. DECdns itself updates and manages clearinghouse object entries when necessary.
1.4.1.2. Soft Links
A soft link is a pointer that provides an alternate name for an object entry, directory, or other soft link in the namespace. You can restructure a namespace on a minor scale by creating soft links that point from an existing name to a new name. Soft links also can be a way to give something multiple names, so different kinds of users can refer to a name in a way that makes the most sense to them.
Soft links can be permanent, or they can expire after a period of time that you specify. If the name to which a soft link points is deleted, DECdns deletes the soft link automatically.
DECdns managers should use soft links carefully. They should not use soft links to completely redesign the namespace or to provide shortcuts for users who do not want to refer to the full name of an entry. Overuse of soft links makes DECdns names more difficult to track and manage. Section 9.1, ''Managing Soft Links'' provides more detail on soft links and how you can use and manage them.
1.4.1.3. Child Pointers
A child pointer connects a directory to another directory immediately beneath it in a namespace. Users and applications do not create or manage child pointers; DECdns creates a child pointer automatically when someone creates a new directory. DECdns uses child pointers to locate directory replicas when it is trying to find a name in the namespace. Child pointers do not require management except in rare problem-solving situations.
1.4.2. Putting It All Together
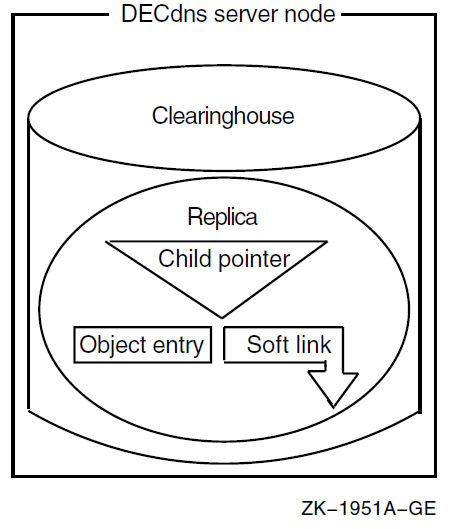
To summarize, a namespace consists of a complete set of names shared and managed by one or more DECdns servers. A name can designate a directory, object entry, or soft link. The logical picture of a namespace is a hierarchical structure of directories and the names they contain. Every physical instance of a directory is called a replica. Names are physically stored in replicas, and replicas are stored in clearinghouses. Any node that contains a clearinghouse and runs DECdns server software is a server.
Figure 1.4, ''Components of a DECdns Server Node'' shows the components of a DECdns server. Every server manages at least one clearinghouse containing directory replicas. A replica can contain object entries, soft links, and child pointers. Figure 1.4, ''Components of a DECdns Server Node'' shows only one replica and one of each type of entry possible in a replica. Normally, a clearinghouse contains many replicas, and a replica contains many entries.
1.5. How DECdns Protects Names
DECdns lets you control access to clearinghouses, directories, and their contents. Access to clerks and servers is determined by operating system rights identifiers.
Read access lets users view data.
Write access lets users change data.
Delete access lets users remove data.
Test access lets users test whether an attribute of a name has a specific value without being able to see any values (that is, without having read access to the name). This access right's main advantage is that it gives application programmers a more efficient way to read a value. Rather than reading a whole set of values, the application can test for a particular value. DECdns itself uses test access internally to test for group membership during access checking.
Control access lets users change the access control on a name and grants other powers normally given only to an owner, such as the right to replicate a directory or relocate a clearinghouse.
You assign access in the form of an access control entry (ACE), which consists of two parts: the principal portion and the list of access rights that the principal has to the associated name in the namespace. The principal part of the ACE can be the name of an individual user, a name with one or more wildcard characters to denote several users, or a group name.
Note
The access control provided by DECdns applies only to DECdns names, not the physical resources they describe. Traditional methods of access control are still necessary to protect the resources described by the object entries in a namespace.
It is often useful to set up an access control policy when you plan your namespace, choosing a select group of users who will have control over the root of the namespace and deciding how to delegate access in lower levels of the directory structure. Section 5.3, ''Setting Up Access Control in a New Namespace'' provides guidelines for planning an access control policy for your namespace.
1.6. Available Management Tools
• The DECdns configuration program (see Chapter 10, "Using the DECdns Configuration Program") – Allows you to modify the namespace, change a clerk’s default namespace, configure a DECdns server in an existing namespace and so forth.
• The
decnet_registertool (see the VSI DECnet-Plus for OpenVMS Network Management Guide) — Allows you to manage node information on your node.
1.6.1. DECdns Control Program
The DECdns Control Program (DNSCP) is an interface that accepts commands targeted for specific entities. It is available on all DECdns clerks and servers. The control program is patterned after the DECnet Phase V management interface Network Control Language (NCL), which defines an entity as any individually manageable part of the network or of an application in the network. Some DECdns entities can be managed from NCL as well as from DNSCP. The commands are the same from both interfaces; when DNSCP receives a command targeted for an NCL entity, it passes the command on to NCL.
The general distinction between NCL and DNSCP is physical management versus logical management. NCL commands allow you to manage the physical components of DECdns, such as the server and clerk. Thus, you can include startup and shutdown commands for these components in NCL scripts. The DNSCP commands manage primarily the logical parts of a namespace, such as directories and the names they contain.
dns clerkdns clerk known namespacedns clerk manual name serverDNS clerk remote clearinghousedns serverdns server clearinghouse
Child
Clearinghouse
Directory
Group
Link
Object
Replica
Subtree
See Chapter 4, "Using the DECdns Control Program" for details on how to use DNSCP and an explanation of each of the entities.
1.7. Management Tasks
DECdns requires advance planning and, once the namespace has been established, ongoing maintenance. For detailed planning guidelines, see the VSI DECnet-Plus Planning Guide. This section describes the routine DECdns ongoing management tasks.
DECdns management tasks fall into two main categories: namespace administration and day-to-day server management. In small networks, it is possible for one person to handle both types of tasks. In larger networks, the responsibility will most likely be divided among several people.
Oversee the creation of new directories and assign names according to a standard, or enforce established guidelines in assigning and controlling access to names. (Beyond a certain directory level, the namespace administrator might delegate the responsibility of creating and maintaining directories to a server manager. The administrator should still keep track of the new directories being created to make sure they are appropriately replicated.)
Along with server managers, monitor the size and usage of clearinghouses and determine the need for new DECdns servers and clearinghouses. Plan and oversee the configuration of these new servers and clearinghouses.
Determine where and when new replicas of a directory are necessary.
Use the DECdns Control Program to monitor namespace directories and their contents. Determine the need for new directories under the root.
Create soft links for object entries whose names change or for entries that people can refer to by more than one name. Publicize and encourage use of the new names so that eventually the soft links can expire and be deleted.
Solve or direct the resolution of problems involving multiple DECdns servers.
Enable event logging, monitor DECdns events, and solve system-specific problems if they arise. If necessary, notify the namespace administrator of problems that could affect other DECdns servers or clerks.
Monitor the success of skulks that originate at the server. This task is the most important maintenance procedure.
Monitor the size and usage of the server's clearinghouse and, if necessary, discuss with the namespace administrator the need to relocate some replicas or create a new clearinghouse.
Monitor and tune system parameters that affect or are affected by DECdns server operation.
Chapter 2. How DECdns Looks Up Names
This chapter describes the structure of DECdns names, illustrates the relationship between a name and the physical resource it describes, and explains how DECdns handles requests to look up names. It also explains how to create short forms of long DECdns names. Understanding these concepts can help you plan the location of clearinghouses and directories in your namespace. It can also help you isolate the source of problems if you encounter lookup errors or failures.
2.1. Structure of a Name
The complete specification of a name in the namespace is called its full name and includes the names of all of its parent directories, starting from the root. Each element within a full name is separated by a dot (.) and is known as a simple name.
A full name also can include a namespace nickname, but that is not necessary when only one namespace exists in a network. A namespace administrator or system manager defines the default namespace during configuration of a DECdns clerk, or later by a management command. Then, unless a user specifies otherwise, DECdns always assumes a name is in the default namespace. If it is necessary to specify a namespace, use the following format:
namespace_nickname:.simplename.simplename...For example, ABC:.Dir1 specifies a directory called .Dir1 in
the ABC namespace. Similarly, JKL:.Dir1.Object denotes an
object entry with the simple name Object in the Dir1 directory
and the JKL namespace.
2.2. Translating from Names to Resources
Just as directory names in a logical namespace hierarchy translate to physical replicas in clearinghouses, DECdns names translate to physical resources that are used either internally by DECdns or by client applications. The attributes of a name are what make the translation possible. This section illustrates the relationship between DECdns names and the physical resources they describe.
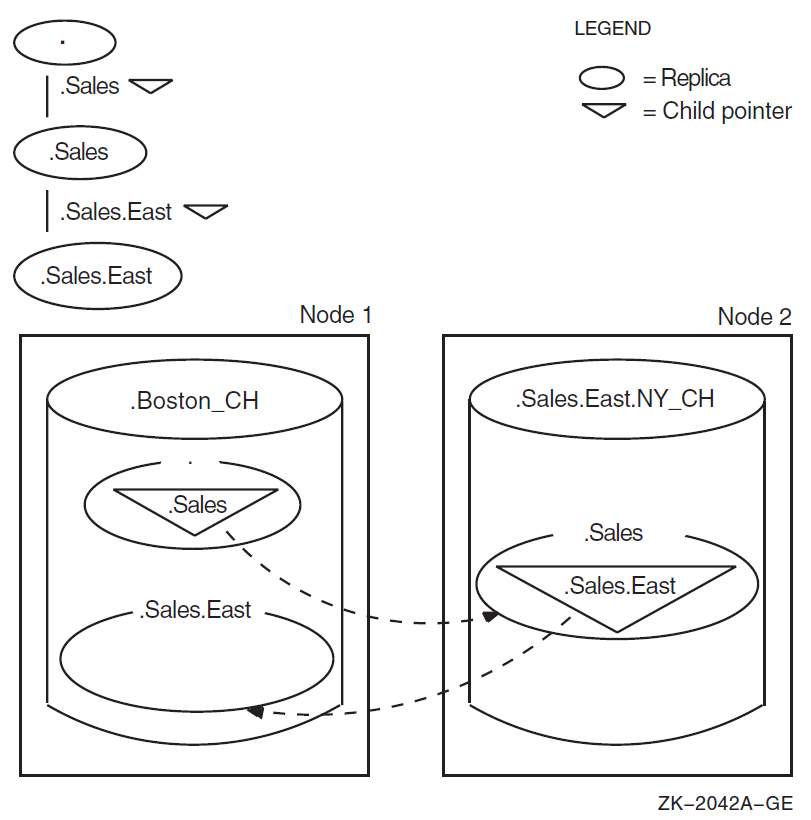
Figure 2.1, ''Logical and Physical Views of a Namespace'' shows three directories and their contents in a logical
namespace, and how replicas of those directories are physically implemented in two
clearinghouses. The clearinghouses themselves have DECdns names: .Boston_CH
on Node 1 and .Sales.East.NY_CH on Node 2. The _CH suffix is a
recommended convention for naming clearinghouses. The .Boston_CH
clearinghouse contains replicas of the root directory and the .Sales.East
directory. The .Sales.East.NY_CH clearinghouse contains a
replica of the .Sales directory. VSI recommends that you create at least
two replicas of every directory. Therefore, each directory shown should be replicated in
at least one other clearinghouse somewhere in the network.
To discover the physical location of a DECnet resource, for example, DECdns looks up an address associated with its node name. The next four figures illustrate the connection between various kinds of DECdns names and the resources they describe. The figures are based on the namespace in Figure 2.1, ''Logical and Physical Views of a Namespace''.
Figure 2.2, ''A Node Object Entry and a Node'' shows the relationship between an object entry named
.Sales.NY01 and the resource it describes: a node at the organization's
New York sales headquarters. The node object entry resides in a replica of the
.Sales directory in the .Sales.East.NY_CH clearinghouse.
The entry has a DNA$Towers attribute, which contains protocol and address
information necessary to contact the node. The name of this attribute reflects the fact
that a DECnet Phase V address consists of separate layers, sometimes called tower
floors, in the Network Architecture (DNA) and Open Systems Interconnection (OSI)
models.
Figure 2.3, ''Clearinghouse Object Entries and Clearinghouses'' shows the relationship between two clearinghouse object entries and the clearinghouses they describe. A clearinghouse object entry differs from other kinds of object entries in that it is created and maintained by the DECdns software instead of by a client application, and special rules exist regarding where it can be stored (see Appendix B, "Special Clearinghouse Rules" for details). However, it is just like any other object entry in that it describes a physical resource in the network: the clearinghouse. The clearinghouse and its object entry both have the same name; DECdns creates the object entry automatically when you create and name the clearinghouse.
The figure shows two clearinghouse object entries: .Boston_CH, which
points to the clearinghouse named .Boston_CH on Node 1, and
.Sales.East.NY_CH, which points to the clearinghouse named
.Sales.East.NY_CH on Node 2. Each clearinghouse object entry has a
DNA$Towers attribute that contains, among other things, the DECnet
address of the node where the clearinghouse resides. As the figure shows, it is not
necessary for the clearinghouse object entry to be stored within the clearinghouse to
which it points.
Figure 2.4, ''A Soft Link and Its Resolution'' shows the relationship between a soft link, the object
entry it points to, and the resource that the object entry describes. The link,
.Sales.LN03, has an attribute called DNS$LinkTarget, which
contains the name that the link points to: an object entry named
.Sales.East.Floor1LN03. The object entry describes an LN03 printer on
the first floor of the company's New York sales office. A replica containing the
.Sales.East.Floor1LN03 object entry exists in the
.Boston_CH clearinghouse. The entry has an attribute that contains
information on how to locate the printer in the network.
Figure 2.5, ''Child Pointers and Directories'' shows the relationship between directories and their associated child pointers. It illustrates that, although a child pointer has the same name as its associated directory, the pointer is a separate entry in the namespace and resides in the parent of the directory to which it points.
In the .Boston_CH clearinghouse, the root replica contains a child
pointer for the .Sales directory. The child pointer has an attribute called
DNS$Replicas that contains the name and address of the
Sales.East.NY_CH clearinghouse, where a replica of the
.Sales directory exists.
In the .Sales.East.NY_CH clearinghouse, the .Sales replica
contains a child pointer for the .Sales.East directory. The child pointer's
DNS$Replicas attribute contains the name and address of the
.Boston_CH clearinghouse, where a replica of the
.Sales.East directory exists.
When a directory has multiple replicas, as would normally be the case, the
DNS$Replicas attribute lists all of the clearinghouses containing a
replica of that directory.
2.3. Resolving Names and Addresses with the Naming Cache
DECnet-Plus software includes the common directory interface (CDI) which acts as an interface between DECnet Phase V Session Control and all the supported name services (Local namespace, DECdns, DNS/BIND). CDI performs the necessary switching between the various name services during lookups, enabling the use of multiple name services. CDI uses an in-memory naming cache to improve performance of name and address resolution for the supported name services.
Previous to the addition of the CDI, the DECdns clerk was the primary interface between DECnet Phase V Session Control and DECdns servers or the Local namespace. Now most all DECnet-related calls to DECdns (or to any other name service) are first handled by CDI.
The DECdns clerk receives requests for name/address information from client applications and looks up the requested information on the appropriate DECdns server or in the Local namespace. The DECdns clerk caches (saves) pointers to DECdns servers discovered during these lookups. For lookups involving applications such as DECmcc and DFS, the DECdns clerk caches results of lookups. This saves the clerk from repeatedly connecting to a server for the same information. Caching improves performance and reduces network traffic.
The DECdns clerk cache still exists. When CDI calls DECdns for node name information,
DECdns searches the clerk cache to determine where to look up the requested information.
DECdns continues to use the clerk cache to determine the location of servers in the
DECdns namespace. DECnet-Plus for OpenVMS uses the DECdns clerk to parse the special
namespace nicknames LOCAL: and DOMAIN:. These nicknames in a
node full name indicate to DECnet-Plus the name service where the name and addressing
information is stored. Note that DECdns clerks do not cache DECnet names for any
namespace. The clerk caches pointers to the servers where node names are stored.
The DECdns clerk cache continues to be used by applications other than DECnet-Plus that use DECdns directly, such as the DECdfs application.
Using NCL commands, you can manage two CDI naming cache parameters: the checkpoint interval and the timeout period, and you can flush entries from the in-memory naming cache. These parameters control CDI; they do not control DECdns. For more information on managing CDI, see the VSI DECnet-Plus for OpenVMS Network Management Guide.
2.4. How DECdns Finds Names
As the previous figures illustrate, DECdns finds information about the physical location of a resource by looking up one or more attributes associated with its name. First, though, the clerk must know how to find the name. If a name does not yet exist in the clerk's cache, the clerk must know of at least one DECdns server to contact in search of the name.
During configuration
A system manager either supplies or selects the address of at least one server during clerk configuration.
Through the solicitation and advertisement protocol
Clerks and servers on the same local area network (LAN) communicate using the solicitation and advertisement protocol. A server transmits messages at regular intervals to advertise its existence to clerks on its LAN. The advertisement message contains data about the namespace that the server belongs to, the server's network address, and the clearinghouse it manages. Clerks learn about servers by listening for these advertisements on the LAN. A clerk also sends out solicitation messages (which request advertisements) at startup and when it encounters a namespace nickname that it does not have in its cache.
During a lookup
During a lookup, if a clearinghouse does not contain a name that the clerk is searching for, the server managing that clearinghouse gives the clerk as much data as it can about where else to search for the name. This information can come from two sources:The contents of a clearinghouse attribute called DNS$CHUpPointers
If a clearinghouse does not contain any replicas that are part of the full name being looked up, the server returns a list of clearinghouses that helps the clerk search closer to the root for replicas relevant to the name. The server keeps the list in a clearinghouse attribute called
DNS$CHUpPointers. The attribute contains the names of clearinghouses that store either a root replica or replicas closer to the root than the replicas in that server's own clearinghouse.The contents of a child pointer attribute called DNS$Replicas
If a clearinghouse contains replicas that are part of the full name being looked up, but not the replica containing the target simple name, it returns data from a relevant child pointer in the replica it has. The data helps the clerk find the next child directory in the path toward the target simple name. The child pointer's
DNS$Replicasattribute contains this data.
Figure 2.6, ''How the Clerk Finds a Name'' is an example of how the clerk finds the root and works
downward from it to locate an object entry. The entry, .Sales.RSMcl,
describes a client system at a company's London sales headquarters.
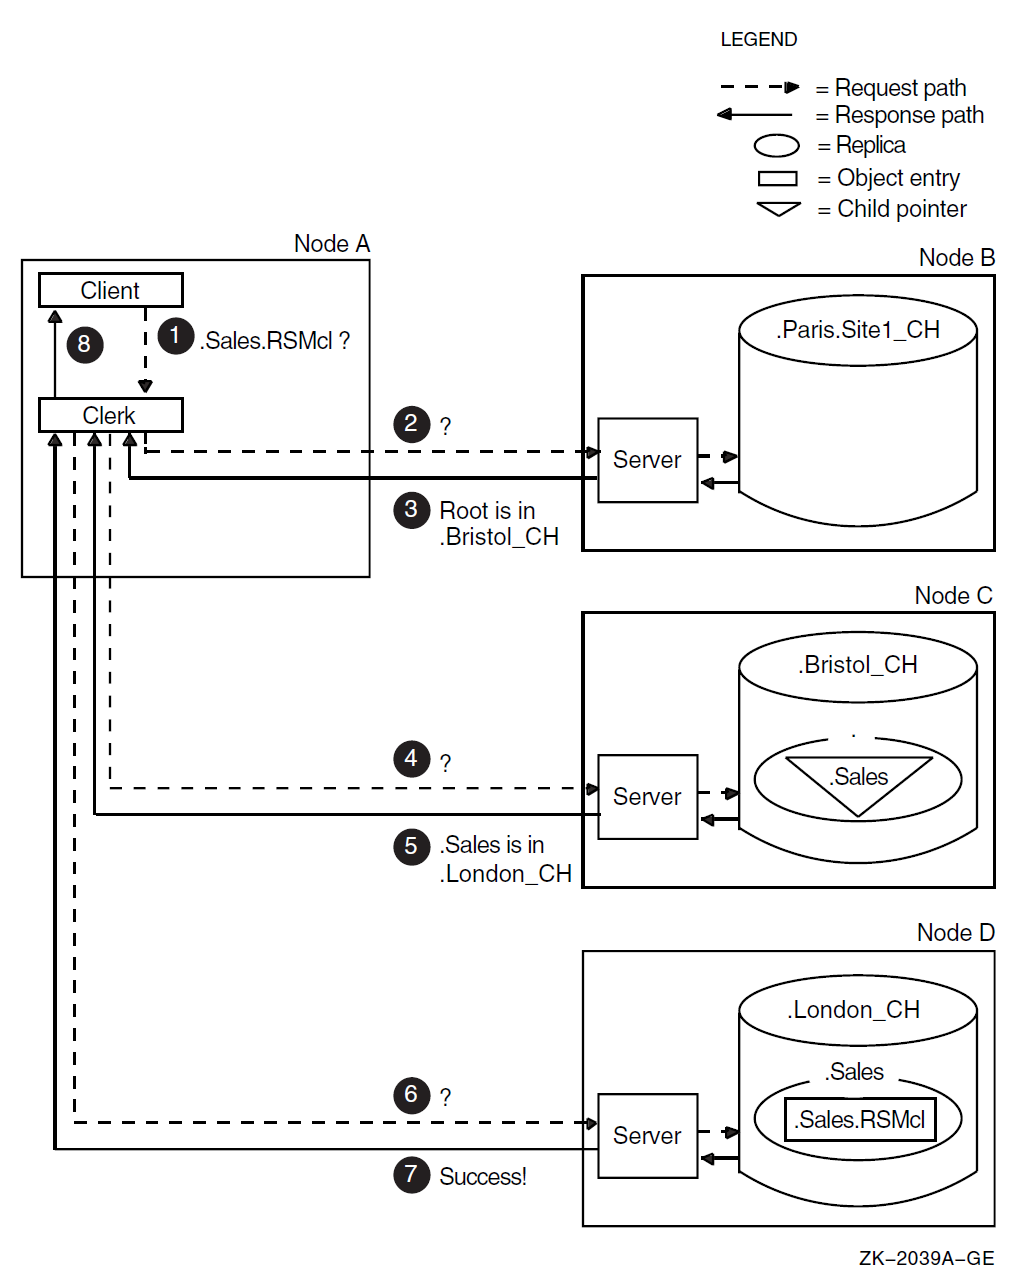
On Node A, a client application requests the address of the
.Sales.RSMclobject entry. The clerk does not have that name in its cache, and the only clearinghouse it knows about so far is.Paris.Site1_CHon Node B.The clerk contacts the server on Node B with the lookup request.
The
.Paris.Site1_CHclearinghouse contains no replicas relevant to the target name. However, itsDNS$CHUpPointersattribute contains the name and address of the.Bristol_CHclearinghouse, which stores a replica of the root. Starting from the root, the clerk will be able to find directories that are part of the name even if the.Bristol_CHclearinghouse does not contain the target name itself. The server on Node B sends the requesting clerk the name and address of the.Bristol_CHclearinghouse on Node C.The clerk contacts the server on Node C with the lookup request.
The
.Bristol_CHclearinghouse does not contain the target object entry, but from the.Saleschild pointer in the root, the clerk can learn the names and addresses of clearinghouses that have a replica of the.Salesdirectory. The server on Node C returns this data to the clerk, informing it that a replica of the.Salesdirectory is in clearinghouse.London_CHon Node D.The clerk contacts the server on Node D with the lookup request.
The
.Salesreplica in the clearinghouse on Node D contains the.Sales.RSMclobject entry, so the server passes the contents of the entry's address attribute to the clerk.The clerk returns the address to the client application. The application can now locate the client system in the network.
Long lookups like the one illustrated in Figure 2.6, ''How the Clerk Finds a Name'' should not happen often after a clerk establishes its cache and becomes more knowledgeable about servers and their contents. The figure illustrates the resources and connections that could be involved in an initial lookup—the clerk contacted three servers before it found the information it needed. The figure also illustrates the important job DECdns has of making sure the parent and child directories in the namespace remain connected. If the directory path is broken or a clearinghouse is unreachable, a clerk might not be able to complete a lookup. Keep this example in mind when planning the replication of directories.
2.5. Short Forms of DECdns Names
Because a full name consists of the complete directory path from the root directory to the target object entry, directory, or soft link, full names can be long if a namespace has several levels of directories.
DECnet Phase V software supports a form of abbreviated name called the node synonym. A node synonym is a soft link that points to the full name of a node object entry. Node synonym soft links, in the form of a DECnet Phase IV-style node name, enable applications that do not support the length of DECdns full names to continue to use six-character node names.
Node synonyms should not be viewed as a way for users to avoid typing the DECdns full name of a node. Local names, and a feature called the local root, are a faster and more convenient method of shortening names. Both local names and local roots are for use only on the system where they are defined; unlike node synonyms, they do not have global meaning throughout the namespace. Local names and local roots are usable for any DECdns name, not just node names. However, they are not usable for DECnet node name lookups; they are used for DECdns Control Program lookups and lookups for applications other than DECnet.
2.5.1. How Node Synonyms Work
A node synonym is optional; the system manager can supply it during configuration of the DECnet-Plus software. DECnet-Plus systems store node synonyms in a DECdns directory called .DNA_NodeSynonym.
When DECnet Phase V Session Control receives a node name of six alphanumeric
characters or fewer (one alphabetic character minimum) that does not contain a
leading dot, it first uses local name mapping with CDI to resolve the name. If that
method fails, Session Control tries to look up the name in the Session Control node
synonym directory, which is typically .DNA_NodeSynonym. Suppose, for
example, DECnet is given the node name MIS01. Session Control sends a request to
DECdns to look up .DNA_NodeSynonym.MIS01. The node synonym exists and
points to the full name of the node, ABC:.Geneva.Admin.MIS01.
If a node synonym does not exist, DECnet asks the DECdns clerk to determine the full name. The clerk uses the name abbreviation methods described in Section 2.5.2, ''Name Abbreviation Methods''.
2.5.2. Name Abbreviation Methods
The DECdns clerk uses local name resolution methods when it encounters any abbreviated name; that is, a name that does not start with a namespace nickname or a dot. The method by which DECdns clerks interpret abbreviated names varies by operating system.
$ define/table=dns$system name1 "name2"
where name1 is the abbreviated name that a user can enter, and name2 is the name to be substituted for it in the process of translation to a full name. Name2 can be either a DECdns full name or another shortened name.
2.5.3. Local Root
The local root is a prefix that DECnet Phase V software obtains automatically by
stripping off the rightmost simple name of the local node's full name. For example,
a node named IAF:.Dist.QA01 would have IAF:.Dist as its
local root. Users will likely want to refer frequently to other names in the
hierarchy in which their local node is named. The local root capability makes such
name references more convenient by allowing users to omit the part of the full name
that is also part of their node's full name.
DECnet Phase V Session Control creates the local root under the fixed name dnsroot in the DNS$SYSTEM logical name table.
2.5.4. How Local Name Substitution Works
The clerk first attempts to translate the leading (leftmost) simple name by using the local name-mapping file. If it finds a translation in the file, the clerk replaces the leading simple name with the result of the translation. This process is repeated until there is no local mapping for the leading simple name, or until the translation results in either a namespace nickname or a leading dot.
If the clerk does not find a local name-mapping, and the name is still abbreviated, the clerk next attaches the local root to the front of the name to create a full name.
If no local root exists, the clerk attaches a leading dot to the front of the name to create a full name.
Once the clerk obtains a full name, it attempts the requested operation on that name. If the name does not exist, DECdns returns an error.
Sales.Forecasts.DECdns searches the local name-mapping file for a match for Sales.
The name Sales exists in the file and maps to the name
IAF:.Sales.East.Region3, so the name the user entered expands toIAF:.Sales.East.Region3.Forecasts.
Support_disk, entered by a user on node .Eng.Vega in
the IAF namespace: DECdns searches the local name-mapping file for the name Support_disk.
Not finding a match in the local name file, DECdns attaches the local root,
IAF:.Eng, to the front of the name, resulting in the full nameIAF:.Eng.Support_disk.
.Sales.Monet in the IAF namespace: DECdns searches the local name-mapping file for the name RSM_client.
The name RSM_client exists in the file and maps to
Personnel.RSM_client, so the name the user entered expands toPersonnel.RSM_client.Because the expanded name still does not include a leading dot or namespace nickname, DECdns searches the file for Personnel.
DECdns does not find Personnel in the local name mapping file, so it attaches the local root,
IAF:.Sales, to the front of the name, resulting in the full nameIAF:.Sales.Personnel.RSM_client.
Chapter 3. How DECdns Updates Data
Once names exist in the namespace, users who have the appropriate access can make changes to the data associated with them. Any addition, modification, or deletion of DECdns data initially happens in only one replica: the master replica. This chapter introduces the main methods by which DECdns keeps other replicas consistent: update propagation and the skulk operation. It also describes two timestamps that help ensure consistency in DECdns data. By understanding the concepts in this chapter, you can more effectively plan the content and replication of directories in your namespace.
3.1. Update Propagation
An update propagation is an immediate attempt to apply one change to all replicas of the directory in which the change was just made. Its main benefit is that it delivers each change in an efficient and timely way. Unlike a skulk operation, however, update propagation does not guarantee that the change gets made in all replicas. If a particular replica is not available, the update propagation does not fail; the change simply does not get made in that replica. The skulk operation ensures that when the replica is available again, it becomes consistent with the other replicas in its set.
You can tune the degree of persistence that DECdns uses in attempting an update propagation—or prevent propagation altogether—by adjusting a directory attribute called DNS$Convergence. Convergence also affects the frequency of skulks on a directory. See Section 7.5, ''Adjusting a Directory's Convergence'' for details on viewing and changing a directory's convergence.
3.2. Skulk Operation
Removing soft links that have expired (you can specify an expiration time when you create a soft link).
Maintaining child pointers, which includes removing pointers to directories that were deleted.
Removing information about deleted replicas.
DECdns skulks each directory individually. During a skulk, DECdns collects all changes made to the master replica since the last skulk completed and applies them to the replica on the server where the skulk started. DECdns then disseminates the changes from the up-to-date replica to all other replicas of the directory. All replicas must be available for a skulk to be considered successful. If DECdns cannot contact a replica, it continues making changes in the replicas that it can contact, and generates an event to notify you of the replica or replicas it could not update. DECdns then periodically reattempts the skulk until it completes successfully.
A DECdns manager can enter a command to start an immediate skulk on a directory.
- DECdns starts a skulk as an indirect result of other namespace management activities, which include:
Adding or removing a replica
Creating or deleting a directory
Creating a clearinghouse
Redesignating replica types
All of these activities produce changes in the structure of the namespace, so an immediate skulk ensures that the new structure is reflected throughout the namespace as quickly as possible.
The DECdns server initiates skulks automatically at a routine interval called the background skulk time.
The background skulk time guarantees a maximum lapse of time between skulks of a directory, regardless of other factors, such as namespace management activities and user-initiated skulks. Every 24 hours, a DECdns server checks each master replica in its clearinghouse and initiates a skulk if changes were made in a directory since the last time a skulk of that directory completed successfully.
3.3. How Timestamps Help Keep Data Consistent
Creation timestamp (CTS)
Update timestamp (UTS)
DECdns assigns a creation timestamp (CTS) to everything within a namespace (clearinghouses, directories, object entries, soft links, and child pointers) as well as to the namespace itself. On the namespace, the timestamp is called a namespace creation timestamp (NSCTS).
The CTS is a unique value reflecting the date, time, and location where a namespace, clearinghouse, directory, or entry in a directory was created. It consists of two parts: a time portion and the system identifier of the node on which the name was created. The two parts guarantee uniqueness among timestamps generated on different nodes.
During propagation of a new name to each replica of the directory where it was created, every DECdns server checks the validity of the CTS before accepting the new name. A name's CTS is valid if it falls between the current time and the time of the last skulk on the directory where it was created. When determining the current time, the server allows a maximum acceptable time difference of 300 seconds into the future.
The update timestamp (UTS) reflects the most recent change made to any of the attributes of a clearinghouse, directory, object entry, soft link, or child pointer. When a DECdns server receives an update to an existing entry in a directory, it checks the validity of the UTS before accepting the update. Occasionally, between skulks or update propagations, separate changes may be made to the same attribute of the same entry in different replicas. In that case, the change with the most recent UTS remains.
Directories and replicas have several other timestamps that DECdns uses when determining whether to skulk a directory or make a change in a directory. Chapter 11, "DECdns Control Program Command Dictionary" describes those timestamps and how DECdns uses them.
Chapter 4. Using the DECdns Control Program
This chapter introduces the DECdns Control Program (DNSCP). The control program is an interface with which you can manage the components of DECdns and the contents of the namespace.
$ run sys$system:dns$control
dns> help
dns> exit
4.1. Elements of a DECdns Command
verb [entity-name] [argument] [attribute] [, prepositional-phrase]
Verb — A verb, or directive, denotes the action to be taken on the DECdns entity that you specify.
Entity name — An entity name describes the DECdns entity on which the action specified by a command's directive is taken. See Section 4.6, ''Supplementary Commands'' for details on how to set a default entity.
Argument — An argument affects the result of the action specified by a command's directive. Some arguments are required; others are optional.
Attribute — An attribute is an element whose value (or values) describes a particular operational property of an entity and specifies other information that reflects the entity's behavior.
Prepositional phrase — A prepositional phrase affects the destination or content of command output.
Refer to the command descriptions in Chapter 11, "DECdns Control Program Command Dictionary" for complete listings of the arguments, attributes, and prepositional phrases you can use with a particular DECdns command.
You can enter commands that manage Network Control Language (NCL) entities from either NCL or DNSCP. You can abbreviate an NCL directive or entity name to a minimum of four unique characters. You can abbreviate a DNSCP directive or entity name to its fewest number of unique characters.
4.2. DECdns Entities
This section lists the DECdns entities and describes what each entity represents.
Child
A child pointer connects a parent and child directory in a hierarchical namespace. The child pointer is stored in the parent directory.
Clearinghouse
A clearinghouse is a database containing a collection of directory replicas at a particular server. Commands directed to this entity manage DECdns attributes of the clearinghouse (for example, its access control set). You can enter these commands only from DNSCP.
Directory
A directory contains object entries and other namespace entries that are logically stored under one name (the directory name).
DNS Clerk
The clerk is the interface between client applications and servers. You can enter commands directed to this entity from either NCL or DNSCP.
DNS Clerk Known Namespace
A known namespace is a namespace that a clerk has discovered and cached as a result of configuration information, datagrams received on a local area network (LAN), or an explicit management command. You can enter commands directed to this entity from either NCL or DNSCP.
DNS Clerk Manual Name Server
A manual name server creates knowledge in the local clerk's cache about a server that exists across a wide area network (WAN). You can enter commands directed to this entity from either NCL or DNSCP.
DNS Clerk Remote Clearinghouse
A remote clearinghouse is a clearinghouse that a clerk has discovered and cached. A clerk can learn about clearinghouses as a result of configuration information, datagrams received on a local area network (LAN), an explicit management command, or during the process of finding a name. To a clerk, all clearinghouses are remote, even if they exist on the same node as the clerk. You can enter commands directed to this entity from either NCL or DNSCP.
DNS Server
A server handles lookup requests from clerks and maintains the contents of the clearinghouse or clearinghouses at its node. You can enter commands directed to this entity from either NCL or DNSCP.
DNS Server Clearinghouse
A clearinghouse is a database containing a collection of directory replicas at a particular server. Commands directed to this entity manage NCL attributes of the clearinghouse and perform NCL management functions such as enabling or disabling the clearinghouse. You can enter these commands from either NCL or DNSCP.
Group
A group lets you assign a uniform set of access rights to several users at once. DECdns does this by mapping a set of names representing the group members to a single name (the group name).
Link
A soft link is a pointer providing an alternate name for an object entry, directory, or other soft link.
Object
An object entry is the name of a resource (such as a node, print queue, or application) that is stored in the namespace.
Replica
A replica is a copy of a directory. Each copy, including the original or master, is referred to as a replica.
Subtree
A subtree is a specific directory and its contents or a hierarchy of directories and their contents.
4.3. Attribute Groups
Every DECdns entity has attributes that contain data associated with that entity. Attributes describe the operational properties of an entity and specify other information that regulates or monitors the entity's behavior. Some attributes have a single value; others contain a set of values. Attributes fall into one of four categories:
Characteristics
Reflect or affect the operational behavior of an entity. Some characteristics are static and cannot be modified; others can be modified with DNSCP or NCL commands.
Counters
Record the number of times a particular event or problem occurred since the entity was last enabled.
Identifiers
Uniquely distinguish an entity from any other entity.
Status Attributes
Reflect the current operational state of an entity.
4.4. Prepositional Phrases
You can use prepositional phrases to affect the destination or content of command
output. Generally these phrases are most useful with the show and
directory commands. Chapter 11, "DECdns Control Program Command Dictionary" documents the
appropriate use of prepositional phrases in individual commands.
, with attribute
                                        [relop]
value |
Limits a directive only to those entities whose attributes
have certain values. If you do not specify a
relop (relational operator), the
default is an equal sign. Other valid relational operators are
greater than |
, to file=filename |
Redirects the output to filename. If the file does not exist, this command creates it. If the file does exist, its contents are overwritten. |
, to extend
file=filename |
Appends the output to an existing filename. If the file does not exist, it is created. |
, to terminal |
Directs the output to the terminal. This is the default option. |
4.5. NCL Access Control Information
Commands that you can enter from either DNSCP or NCL allow you to manage entities on
remote systems in the network. You can specify an access control string, which consists
of a user name and a password, for an account on the remote system you wish to access.
Enter the access control string as part of the node name specification in the format
nodename"user-name password". In the following example, syspasswd is the password of the
system account on node .nrl. (In this example, the default namespace specified for the
clerk is IAF.)
ncl> set node .nrl"system syspasswd" dns clerk default namespace IAF
show commands require the NET$EXAMINE
rights identifier. See Chapter 11, "DECdns Control Program Command Dictionary" for complete information on the
access rights and rights identifiers required for commands you can enter from both DNSCP
and NCL. Note
Because of the way that NCL and OpenVMS interact, remote creation of DECdns
clerks and servers is not possible. To use the create dns clerk and
create dns server commands, you must be logged into the clerk
or server to which you are directing the command.
4.6. Supplementary Commands
Read commands from files
Control the confidence level, timeout value, and display format of timestamps and nicknames
Specify a preferred clearinghouse to examine an attribute's value
Specify a default entity name
Use the do command or run @filename from inside
DNSCP to read a file of commands.
show status commands from the file
.status.dns> do .status
You can create a .dnscpinit file if you want DECdns to execute a set of
commands automatically when you start the control program. The dnscpinit.
file should reside in the SYS$LOGIN directory. Note that the dot (.) follows the dnscpinit file name.
Confidence Level Commands
These commands set and display the confidence level of clerk calls. Setting the
confidence controls the accuracy level and cost of clerk calls. The set dnscp
confidence[=]value command sets the value as one of
the following: low, medium, or high. A low confidence level means the clerk obtains
information from caches or the most convenient server. A medium level means the clerk
obtains information directly from a server, and a high level obtains information only at
master replicas. The initial value is medium.
high:
dns> set dnscp confidence high
show dnscp confidence command shows the current confidence level of
clerk calls:dns> show dnscp confidence
Timeout Commands
These commands set and display the length of time, in seconds, that the control
program will wait for a clerk call to complete. You can use the set dnscp
timeout[=]value command to increase the timeout
value if you are having trouble with calls not completing. This command sets the value
as either a number of seconds or the word default, which is 30 seconds for
most operations. You can also use the value 0 to indicate the
default value.
dns> set dnscp timeout 60
show dnscp timeout command displays the current timeout
value:dns> show dnscp timeout
Commands That Display Timestamps and Namespace Nicknames
The timestamp display commands set and display the format of timestamps, which is
useful for troubleshooting or if you need to discover the timestamp for a namespace. The
set dnscp timestamp display[=]value command
controls the format in which timestamps are displayed. Specify one of the following
units for value: time, hexadecimal, or default. The initial setting
is the default value time, a human-readable date and time.
dns> set dnscp timestamp display hex
show dnscp timestamp display command displays the current format of
timestamps:dns> show dnscp timestamp display
The nickname display commands control the format in which namespace nicknames are
displayed in DNSCP. The set dnscp nickname
display[=]value command sets the value as one of the
following units: time, hexadecimal, timestamp, name, or default. The initial setting is
the default value name.
dns> set dnscp nickname display timestamp
show dnscp nickname display command displays the current format of
nicknames in the control
program:dns> show dnscp nickname display
Preferred Clearinghouse Commands
These commands enable you to specify a clearinghouse from which to read attribute values for entries stored in that clearinghouse. You cannot specify a preferred clearinghouse for modifications.
The set dnscp preferred clearinghouse
clearinghouse-name command enables you to specify the clearinghouse
from which to read the values of specific individual attributes using show
clearinghouse commands of the form:
show clearinghouse clearinghouse-name attribute-speciferall characteristics or
DNS$ACS (the access control set for the clearinghouse). The following
example sets the preferred clearinghouse to
.paris_ch.dns> set dnscp preferred clearinghouse .paris_ch
The set dnscp preferred clearinghouse command (or the set dnscp
preferred clearinghouse any command) causes DNSCP to revert to the default,
which is to use any clearinghouse.
show dnscp preferred clearinghouse command displays the current
clearinghouse mode: dns> show dnscp preferred clearinghouse
Default Entity Commands
These commands set and display a default entity. To set the default entity, enter
set dnscp default entity
entity-type entity-name. When the control program starts, the
default entity is the root directory. This command only works for directory
and show commands.
.pjl.dns> set dnscp default entity directory .pjl
show dnscp default entity command displays the current default
entity.dns> show dnscp default entity
Local Root Commands
These commands set and display your local root setting. The local root is a prefix
that DECnet-Plus software obtains automatically by stripping off the rightmost simple
name of the local node's full name. DECnet Phase V Session Control creates the local
root as a reserved name in the DNS$SYSTEM logical name table. The set
dnscp local root command enables you to override the systemwide local name
setting for your current DNSCP session. To set the local root, enter set dnscp
local root
directory-name.
.pjl directory in the
IAF namespace:
dns> set dnscp local root IAF:.pjl
show dnscp local root command displays the current local
root.dns> show dnscp local root
4.7. Wildcards
show and directory commands and in some
subtree entity commands. You can also use wildcards for specifying
principals in commands that affect access rights and group membership. Table 4.1, ''Wildcard Characters'' describes the valid wildcard characters you can
use. | Symbol | Meaning |
|---|---|
* | Matches zero (0) or more characters in the name you specify in a simple name |
? | Matches exactly one character in the name you specify |
... | Searches any part of the directory hierarchy at or below this level for a match |
See Chapter 11, "DECdns Control Program Command Dictionary" for more information on using wildcard characters in specific commands.
4.8. Editing the Commands
You can cancel commands, edit command lines, continue a command beyond one line, or recall commands within DNSCP.
Canceling a Command
Press Ctrl/Y to cancel command processing during command entry or while the command is being processed.
Continuing a Command Line
dns> set group .sales.testgroup DNS$GroupRevoke -
_> 2019-12-31-12:00:00 090-00:00:00
Recalling a Command
You can recall previously typed commands and avoid the inconvenience of retyping long commands. The recall buffer holds up to 20 previously entered commands. Once a command is displayed, you can reexecute or edit it.
To display the commands stored in the recall buffer, press Ctrl/B or the up arrow and down arrow keys.
Press Ctrl/B once to display your previous command. Press Ctrl/B again to display your next previous command, and so on, to the last saved command.
Press the up arrow and down arrow keys to display the previous and successive commands, respectively. Press the arrow keys repeatedly to move backward or forward through the buffer of saved commands until you display the command you want to reuse or edit.
Chapter 5. Managing DECdns Access Control
DECdns allows you to control access to the clearinghouses, directories, object entries, and soft links in your namespace. The access rights to a name that you grant users determine how they can use the name and what management operations they are allowed to perform on it. For object entries that represent physical network resources, such as DECdfs access points, VSI Notes files, disks, and print queues, remember that DECdns access control protects only the names that represent these resources in the namespace, not the resources themselves.
You control access to dns server, dns clerk, dns clerk
known namespace, dns clerk manual nameserver, and
dns clerk remote clearinghouse entities with operating system
rights identifiers. These are Network Control Language (NCL) entities, and because
they are not actually contained in a namespace, DECdns access control cannot protect
them. See the VSI DECnet-Plus for OpenVMS Network Management Guide to control access to these entities.
How DECdns access control works (Section 5.1, ''How DECdns Access Control Works'')
Adding, modifying, and denying access (Section 5.2, ''Adding, Modifying, and Denying Access'')
Setting up access control in a new namespace (Section 5.3, ''Setting Up Access Control in a New Namespace'')
Displaying access rights (Section 5.4, ''Displaying Access Rights'')
Removing access (Section 5.5, ''Removing Access'')
Managing groups (Section 5.6, ''Managing Groups'')
Modifying principals and removing access for a subtree (Section 5.7, ''Modifying Principals and Removing Access for a Subtree'')
5.1. How DECdns Access Control Works
The access rights that you grant users to a name are stored as separate sets
of values within the access control set (ACS) associated with the name's
DNS$ACS attribute. Within a name's ACS is a list of
access control entries (ACEs). Each ACE consists of two parts: a principal,
describing the user (or users) to whom the access is granted, and a rights
list containing the specific access rights granted to the principal. The
ACEs stored in a name's ACS collectively determine who (which user or
application accounts) can access the name.
5.1.1. Specifying a DECdns Version 2 Principal
The principal of an ACE can be the name of an individual user, a name
with one or more wildcard characters to denote several users (see
Section 4.7, ''Wildcards''), or a group name. You
specify a DECdns Version 2 (DECnet Phase V style) principal with a
nodename.username combination, where
nodename is the DECdns full name of the
node. Separate the node name and user name with a dot (.). For
example, to specify a user named jones, whose login
account is on node .titan, enter
.titan.jones.
You represent an application program as a principal with the node name
and account name under which the application is running. For
example, you specify an application running on node
.eng.orion under an account named
program1 as
.eng.orion.program1.
Specify the DNS$Server principal for the server running
on node .polaris as
.polaris.dns$server.
5.1.2. Specifying a DNS Version 1 Principal
If your namespace uses servers running both DECdns Version 2 and
Version 1 of the VAX Distributed Name Service (DNS), you will
sometimes need to create ACEs that specify principals in the Version
1 format. You specify a Version 1 principal with a
nodename::username combination, where
nodename is the six-character-maximum
DECnet Phase IV-style node name. Separate the node name and user
name with two colons (::) rather than with a dot as in
a Version 2 principal.
For example, to specify a Version 1 principal for a user named
jones, whose login account is on node
titan, enter titan::jones. (See
Section 5.4, ''Displaying Access Rights'' for an example display
of access rights that include Version 1 principals.)
If any of your Version 2 DECdns directories store replicas on DNS Version 1 servers, make sure you always create two sets of ACEs when granting access to those directories and their contents. One set must specify Version 2 principals, and the other set must specify Version 1 principals.
.eng in both Version 2 and Version 1 servers.
To grant user jones on node titan access
to the .eng directory, and to ensure that
Jones receives the same access to the directory
in every clearinghouse where a replica is stored, you must create
two ACEs. One ACE must specify the Version 2-style principal
.titan.jones. The other ACE must specify the
Version 1-style principal titan::jones. Note
The DNS Version 1 and DECdns Version 2 principal
expressions for granting world access,
*::* and .*...
respectively, permit access to any user on any node,
but only within the particular
namespace in which the access control entries (ACEs)
containing these expressions were created. Because
you do not have to enter a namespace nickname as
part of a principal expression, and DNS Version 1
does not display the namespace nickname associated
with the principal expression of ACEs, it is easy to
assume incorrectly that the
expressions can be used for granting world access to
any user, on any node, in any namespace.
5.1.3. Specifying Group Principals
You can also specify a DECdns group as the principal of an ACE. A group is an object containing a list of members that you can treat as a single unit for various purposes, including access control. A group member can be an individual principal, a wildcard principal, or another group. See Section 5.6, ''Managing Groups'' for more information on groups.
5.1.4. DECdns Access Rights and Their Meanings
Read access allows a principal to look up a name and view the attribute values associated with it.
Write access allows a principal to create new names and change any modifiable attribute of a name (except its ACS).
Delete access allows a principal to delete a name from the namespace.
Test access allows a principal to test whether an attribute of a name has a particular value without actually seeing any of the values (that is, without having read access to the name).
The main benefit of test access is that it gives application programmers a more efficient way to verify an attribute value. Rather than reading the entire set of values, an application can test for the presence of a particular value. DECdns itself uses this function to test for group membership during access checking. You should grant at least test access to all users of client applications that use the test function on their own objects.
Control access allows a principal to perform any operation on a name, including modifying its ACS. Control access also grants other rights normally reserved only for the creator account or your namespace administrator group, such as the ability to replicate a directory or relocate a clearinghouse. In a secure namespace, you should grant control access judiciously.
| Access Right | Permitted Operation |
|---|---|
| Clearinghouse | |
| Read |
Look up the clearinghouse by name. Read any attribute of the clearinghouse. |
| Write |
Change the replica type of any replica stored in the clearinghouse. Create or delete replicas in the clearinghouse. Modify any modifiable attribute of the clearinghouse (except its ACS). |
| Delete |
Delete the clearinghouse. |
| Test |
Check for the presence of a specific value in any attribute of the clearinghouse. |
| Control |
Modify the ACS of the clearinghouse. Relocate the clearinghouse on another server. |
|
Directory | |
| Read |
Look up the directory by name. List the names of any child directories of the directory. Read any directory attribute. |
| Write |
Create object entries or soft links in the directory. Skulk the directory. Create, modify, or delete child directories (delete access to the child directories is also required). Dump the directory. Re-create object entries and soft links in the directory. Re-create an existing directory as a child of the directory. |
| Delete |
Delete the directory. Delete any name in the directory. |
| Test |
Check for the presence of a specific value in any attribute of the directory. |
| Control |
Perform any operation on any object entry, soft link, or child pointer in the directory. Read or modify any attribute of the directory (including its ACS). Modify the replica type of a replica or the epoch value of the directory. Merge the directory. |
| Object Entry and Soft Link | |
| Read |
Look up the object entry or soft link by name. Read any attribute. Perform a wildcard lookup. |
| Write |
Modify any attribute except the ACS. Remove a value from an attribute of an application-defined object entry. |
| Delete |
Delete the name or any attribute associated with it. |
| Test |
Check for the presence of a specific value in any attribute. |
| Control |
Modify the ACS. |
You can abbreviate each of the rights you specify in an ACE to its first character (read=r, write=w, delete=d, test=t, control=c). These abbreviations are used in all the example commands that appear throughout this manual.
5.1.5. How DECdns Checks Access
DECdns first looks for an ACE whose principal matches exactly with the name of the requesting principal, ignoring all ACEs that contain wildcard principals. DECdns stops searching at the first ACE that it finds containing a matching principal. If that ACE contains the required access rights, the principal's requested operation is carried out; if not, DECdns returns an error message.
If DECdns cannot find an exact matching principal, it next examines any ACEs containing wildcard principals for a match. If DECdns finds an ACE containing a matching wildcard principal that does not include the required access rights, it ignores it. (This differs from the behavior described in step 1, where DECdns stops searching at the first ACE it finds that contains a matching principal.)
If DECdns cannot find an ACE containing a wildcard principal that grants the required access rights, it searches the ACS for any ACEs referring to groups of which the requesting principal is a member.
If no match can be found among the wildcard principals or groups, DECdns denies the requested access and returns an error message.
Because DECdns stops searching as soon as it finds the first exact match of an individual principal name, you can create special null ACEs for individual users that grant no access rights to the users, and deny access that might otherwise be granted to them through wildcard principals or group membership. See Section 5.2.4, ''Using Null ACEs to Deny Access'' for information on how to create null ACEs to deny access to individual users.
5.2. Adding, Modifying, and Denying Access
Note
When adding, modifying, or denying access to a name that exists in a namespace other than your clerk's default namespace, you must specify the nickname of the nondefault namespace as part of the name.
5.2.1. Adding Access
Use the add access command to create an ACE and add it to
the ACS of the name you specify.
Examples
smith on node .orion for an object
entry named
.admin.disk3.dns> add object .admin.disk3 access .orion.smith for r,w,t
.vega to an object entry named
.sales.quota_disk.dns> add object .sales.quota_disk access .vega.* for r
.mfg.public_disk.dns> add object .mfg.public_disk access ... for r,t
.Paris2_CH clearinghouse on behalf of an
access control group named
.testgroup.dns> add clearinghouse .paris2_ch access .testgroup for r,w,t,c
5.2.2. Modifying Existing Access
You can also use the add access command to overwrite the
list of rights granted to a principal by an existing ACE.
Example
show object access command displays an ACE
that grants read, write, and test access to user smith
on node .orion to a node object entry named
.admin.mynode.
dns> show object .admin.mynode access
SHOW
OBJECT IAF:.admin.mynode
AT 31-MAY-2019:09:26:00
DNS$ACS (set) = :
Flags = propagate
Rights = read, write, test
(V) Principal = .orion.smithadd object access command overwrites this
ACE and replaces it with a new ACE that grants
.orion.smith only read and test access to
.admin.mynode.
dns> add object .admin.mynode access .orion.smith for r,t
show object access command displays the
result of the preceding command:
dns> show object .admin.mynode access
SHOW
OBJECT IAF:.admin.mynode
AT 31-MAY-2019:09:28:00
DNS$ACS (set) = :
Flags = propagate
Rights = read, test
(V) Principal = .orion.smith5.2.3. Making Access Assignment Easier
Two features of DECdns access control make it easier for you to assign access to directories and their future contents: automatic rights propagation and default ACEs.
5.2.3.1. Using Automatic Rights Propagation
When you create an ACE for a directory, DECdns automatically copies (propagates) the ACE into the ACSs of all the child directories you may later create under that directory.
Example
jones on node
.rigel for the directory
.sales.
dns> add directory .sales access .rigel.jones for r,t
show directory access command
displays the ACE created with the preceding command:
dns> show directory .sales access
SHOW
DIRECTORY IAF:.sales
AT 11-JAN-2019:05:13:00
DNS$ACS (set) = :
Flags = propagate
Rights = read, test
(V) Principal = .rigel.jonesThe Flags = propagate line indicates that, by
default, DECdns will copy this ACE into the ACS of any child
directory later created under the .sales
directory. This means that, by creating a single ACE
granting user Jones read and test access to
.sales, you also automatically grant
user Jones the same rights to any child
directory that may subsequently be created under the
.sales directory. Remember that an ACE
you create for a directory is inherited only by the child
directories that you create after you create the ACE;
directory ACEs are not propagated to child directories that
already exist.
5.2.3.2. Suppressing Automatic ACE Propagation
Automatic propagation of every ACE that you create for a
directory always occurs unless you include the
nopropagate option in the add
access command that you enter to create the
ACE.
You should use the nopropagate option when you
want to create an ACE for a directory, but would prefer that
the rights you grant be applied only to that particular
directory and not be inherited by any future child
directories.
Example
.rigel for
the .mfg directory. By including the
nopropagate option, you prevent this
access from propagating to any child directories that may
later be created under the .mfg
directory.dns> add directory .mfg nopropagate access .rigel.* for r,w,t
show access command displays the
ACE created with the preceding command:
dns> show directory .mfg access
SHOW
DIRECTORY IAF:.mfg
AT 25-AUG-2019:06:31:00
DNS$ACS (set) = :
Flags = nopropagate
Rights = read, write, test
(V) Principal = .rigel.*5.2.3.3. Creating Default ACEs
add access command's
default option to create a default ACE
for a directory that applies specifically to the directory's
future contents (soft links, application-defined object
entries, groups, and clearinghouse object entries). Although
a default ACE is associated with a directory name, it
applies only to the future contents of the directory, not to
the directory itself.Note
Because a clearinghouse itself is not
contained in a directory, it cannot inherit ACEs.
Only the clearinghouse object entry (which
represents a clearinghouse) is actually contained
in a directory and is, therefore, able to inherit
ACEs automatically. To grant access to a
clearinghouse itself, use the add
clearinghouse access command to explicitly
create appropriate ACEs in the ACS of the
clearinghouse for the users and applications that
require it.
Remember that default ACEs apply only to names that are created in the directory after you create the ACEs; they do not affect access to names that already exist in the directory.
As with other directory ACEs, the access you grant with a
default ACE also propagates to the future contents of any
child directories of the associated directory unless you
suppress the propagation by including the
nopropagate option in the command that
you use to create the default ACE. See Section 5.2.3.2, ''Suppressing Automatic ACE Propagation'' for information on
how to use the nopropagate option.
Examples
jones on node
.rigel for the future contents of the
.dist directory and the future contents
of its child
directories:dns> add directory .dist default access .rigel.jones for r,t
show directory access command
displays the ACE created with the preceding
command:dns> show directory .dist access
SHOW
DIRECTORY IAF:.dist
AT 31-APR-2019:10:47:06
DNS$ACS (set) = :
Flags = propagate, default
Rights = read, test
(V) Principal = .rigel.jones.orion for the future contents of the
.admin directory. Because the
nopropagate option is also used in the
command, these rights will not apply to the future contents
of any child directories later created under the
.admin
directory.dns> add directory .admin default,nopropagate access .orion.* - _> for r,w,t
dns> show directory .admin access
SHOW
DIRECTORY IAF:.admin
AT 21-DEC-2019:16:24:21
DNS$ACS (set) = :
Flags = nopropagate, default
Rights = read, write, test
(V) Principal = .orion.*5.2.4. Using Null ACEs to Deny Access
Because of the sequence in which DECdns searches a name's ACS for a
security match, you can deny a user access to a name by creating a
null ACE for the name that specifies a user's individual login name
as principal, but contains no rights in the rights list. You can
also create null ACEs that specify as principal the account under
which a client application is running. You express the absence of
access rights in an ACE by entering the word none in
the rights list portion of the ACE.
Example
jones on node .vega access to an
object entry named .eng.rnd_notes. dns> add object .eng.rnd_notes access .vega.jones for none
Note
.vega users whose principal names
begin with the character string abc
(that is, access to an object entry named
.eng.rnd_notes).dns> add object .eng.rnd_notes access .vega.abc* for none
Null ACEs that you create for a directory will propagate to all future child directories and, by combining these ACEs with default null ACEs to deny access to future directory contents, you can lock a user out of the namespace from that directory level downward through the hierarchy. By creating such ACEs for the root directory in a new namespace, you can deny a user account access to an entire namespace.
.orion.smith all
access to the .eng directory. These examples assume
that the .eng directory has just been created, contains
no object entries or soft links, and has no child directories.- The following command creates an ACE that denies
.orion.smithaccess to the.engdirectory. Because thenopropagateoption is not used in the command, this ACE will be inherited by all child directories that may later be created under the.engdirectory.dns> add directory .eng access .orion.smith for none
- The following command creates a default ACE that denies access to all names that may be created later in the
.engdirectory. Again, because thenopropagateoption is omitted from the command, this ACE will also be inherited by the contents of any child directories later created under.eng.dns> add directory .eng default access .orion.smith for none
For more information on how DECdns checks access, see Section 5.1.5, ''How DECdns Checks Access''.
5.3. Setting Up Access Control in a New Namespace
Add members to the
.DNS_Adminadministrator group that was created for you automatically during the configuration of the first server in your new namespace. Then, grant full access (read, write, delete, test, and control) on behalf of the group to the entire namespace beginning at the root directory.Implement a namespacewide access control policy, beginning at the root directory, to grant the general user population a minimum set of rights that will propagate to lower-level directories and their contents as they are created.
5.3.1. Adding Members to Your Namespace Administrator Group
To make the task of managing and troubleshooting your namespace
easier, the DECnet-Plus configuration process on the first DECdns
server in your namespace automatically creates an access control
group in the root directory named .DNS_Admin. Before
the group can be of any use, you must add, as members, the persons
in your organization who are responsible for managing,
administering, and troubleshooting your namespace. Because this
group can possess unlimited access to the entire namespace, its
members can intervene, whenever necessary, to restore lost access or
solve other problems that might arise. See Section 5.6.2, ''Adding Group Members'' for complete information
on how to add members to your namespace administrator group and
other access control groups that you create.
5.3.2. Adding Access for Your Namespace Administrator Group
Root directory (.) — You can assign full access to the root directory on behalf of the administrator group that will be inherited by all future names created in the root directory. This access will also propagate to all future child directories and their future contents.
Initial clearinghouse — Unlike clearinghouse object entries, clearinghouses themselves (including your namespace's initial clearinghouse) are not actually contained within a directory, and therefore cannot inherit access. To grant the administrator group full access to the initial clearinghouse itself, you must use the
add clearinghouse accesscommand to explicitly create appropriate ACEs in the ACS of the clearinghouse.Because clearinghouses cannot inherit access, you should institute a policy requiring that your administrator group always be granted full access to all new clearinghouses as they are created. Most new clearinghouses in your namespace will be created as a result of server configuration.
To Add Full Access
add directory access commands to
grant your .DNS_Admin administrator group full access
to the namespace's root directory, the root directory's initial
clearinghouse, and to every directory, object entry, and soft link
that may later be created in the namespace:- The following
add directory accesscommand grants the group.DNS_Adminfull access to the root directory. This access will be inherited by all directories later created under the root.dns> add directory . access .DNS_Admin as group for r,w,d,t,c
- The following
add directory accesscommand, using thedefaultoption, grants.DNS_Adminfull access to all names that may later be created in the root directory. This access will also be inherited by the future contents of all directories that are later created under the root.dns> add directory . default access .DNS_Admin as group for r,w,d,t,c
- The final command grants
.DNS_Adminfull access to the initial clearinghouse.init_CH.dns> add clearinghouse .init_ch access .DNS_Admin as group - _> for r,w,d,t,c
Creating Directory-Level Administrator Groups
To delegate local authority, you can create additional directory-level
access control groups for each of the functional directories in your
namespace (.Sales_Admin, .Eng_Admin, and so on). Each
local administrator group could have full access to the contents of
the directory for which it is responsible and include as members all
the names of the current managers of that directory. With groups as
the main method of granting access control, the namespacewide
administrator group (.DNS_Admin) could simply add and
remove members of a local group instead of creating and deleting
individual ACEs every time there is a change in management
responsibility for a directory.
5.3.3. Implementing a General Access Control Policy
Full Access
Read, Write, and Test
Read and Test
Explicit Access
The first three policies (Full Access; Read, Write, and Test; and Read and Test) establish a basic set of access rights for all potential users of your namespace and allow you to take advantage of automatic rights propagation. When implemented at the root level in a new namespace, these policies automate the creation of most of the ACEs that you would otherwise need to create individually. Although none of these policies eliminates the need for some future access modifications, implementing the policy that most closely provides the minimum level of security you require can help minimize the task of assigning access to future directories and the names later created within them.
The fourth policy (Explicit Access) does not grant general users a specific set of access rights to the namespace, and therefore does not take advantage of automatic rights propagation.
5.3.3.1. Full Access Policy
The Full Access policy grants all potential users read, write, delete, test, and control access to all names (except clearinghouses). This policy permits all users (people and client applications) to perform any operation on any directory, object entry, group, or soft link in your namespace.
Although the Full Access policy is the easiest to manage and minimizes the number of ACEs that you must explicitly create, it is also the least secure because it allows all users to create new names, modify attributes of names, delete names, relocate clearinghouses, and merge directories. You might implement this policy in small or experimental, single-site namespaces where maintaining strict security is not an issue, or where other measures already minimize the risk of unauthorized access to the namespace.
add directory access
commands:dns> add directory . access ... for r,w,d,t,c
dns> add directory . default access ... for r,w,d,t,c
The first command creates an ACE that grants full access to all principals for the root directory. These rights will be inherited by all child directories later created under the root.
The second command, specifying the default
option, creates an ACE that grants all principals full
access to the future contents of the root directory. These
rights automatically propagate to the contents of all child
directories that are later created under the root.
5.3.3.2. Read, Write, and Test Policy
The Read, Write, and Test policy grants all potential users read, write, and test access to the contents of the namespace. Because this policy does not include delete and control access, users are prevented from deleting names, relocating clearinghouses, modifying replica sets, and modifying a name's ACS. Because the policy grants write access to all users, it is most appropriate for a namespace in which the majority of users frequently need to create and populate their own directories.
To implement the Read, Write, and Test policy, enter the same
two commands used to implement the Full Access policy (Section 5.3.3.1, ''Full Access Policy''), but include only read,
write, and test access in the rights list of each ACE for
(r,w,t).
5.3.3.3. Read and Test Policy
The Read and Test policy grants all potential users read and test access to the contents of the namespace, but requires you to explicitly assign write access every time a user or application needs to create a name, modify an attribute of a name, create or delete a replica, modify replica types, or skulk a directory. The Read and Test policy is most appropriate for a namespace in which the majority of users only need to look up names or enumerate attributes, and where the tasks of creating names and modifying their attributes are reserved for namespace administrators, server managers, or other management personnel. In such a namespace, read and test rights provide users with all the access they normally require during the day-to-day use of their DECdns client applications.
If you implement this policy, you should consider granting write access for client application accounts to the particular directories in which they need to create their own object entries. This will save you the trouble of modifying the access to those directories every time an application needs to create, modify, or delete its own object entries.
r,t).Note
Although the preceding three access control policies are described beginning at the root directory of the namespace, you can also implement them for any directory, at any level, and on behalf of any principal or access control group. For example, to maintain greater security on your namespace's root directory and its contents, you could implement the Read and Test policy at root level. Then, starting at directories one level below the root, implement the Read, Write, and Test policy. As with a root-level implementation, the best time to implement a policy for a lower-level directory is immediately after the directory is created.
5.3.3.4. Explicit Access Policy
The Explicit Access policy differs from the preceding three policies because it does not grant a basic set of rights to users, and therefore does not initially provide the convenience of automatic rights propagation. You do not propagate ACEs from the root directory to implement this policy.
The Explicit Access policy provides the greatest namespace security, but can also require extensive access control management. By using wildcards and groups to express multiple principals, and by taking advantage of automatic propagation of lower-level directory ACEs, you can minimize the number of ACEs you will need to explicitly create for each name.
5.4. Displaying Access Rights
You use the show access commands to display the ACEs associated
with the clearinghouse, directory, object entry, or soft link that you
specify.
Example 1
.eng directory in the IAF namespace:dns> show directory .eng access
SHOW
DIRECTORY IAF:.eng
AT 26-NOV-2019:18:36:03
DNS$ACS (set) = :
Flags = propagate, group
Rights = read, write, delete, test, control
Group = .DNS_Admin
DNS$ACS (set) = :
Flags = propagate, default
Rights = read, test
(V) Principal = .orion.smith
DNS$ACS (set) = :
Flags = propagate, default
Rights = read, test
(V) Principal = .rigel.jonesNote
You can also display access by using the show
command and specifying the DNS$ACS attribute of
the name whose ACS you want to examine. See Chapter 8, "Viewing the Structure and Contents of a Namespace" for more information and
examples of how to display namespace information.
Example 2
.budget, which contains both DECdns Version 2 (DECnet
Phase V) and DNS Version 1 (DECnet Phase IV) principals.
dns> show directory .budget access
SHOW
DIRECTORY IAF:.budget
AT 17-APR-2019:14:54:54
DNS$ACS (set) = :
Flags = none
Rights = read, write, delete, test, control
(IV) Principal = ABC::SYSTEM
(V) Principal = IAF:.ABC.SYSTEM
DNS$ACS (set) = :
Flags = none
Rights = read, write, delete, test, control
(IV) Principal = ORION::DNS$SERVER
(V) Principal = IAF:.ORION.DNS$SERVER
DNS$ACS (set) = :
Flags = authenticated
Rights = read, write, delete, test, control
(V) Principal = IAF:.budget.orion_ch
DNS$ACS (set) = :
Flags = default, propagate, group
Rights = read, write, delete, test, control
Group = IAF:.ad_users5.5. Removing Access
Use the remove access commands to remove an ACE from the ACS of
the name that you specify. This command removes ACEs from a name's ACS one
at a time. You cannot remove individual access rights (read, write, delete,
test, or control) separately.
default option
(default ACE), you must include the default option in the
remove access command. Note
The DECdns software does not prevent you from deleting all the ACEs associated with a name. When you remove ACEs, make sure that, by doing so, you do not remove all the access that exists to the name you specify. If you accidentally delete all the access to a name, see Chapter 12, "DECdns Problem Solving" for instructions on how to restore access.
Examples
show object access command displays an existing ACE
that grants user smith (on node .orion) read and
test access to an object entry named
.sales.work_disk2.dns> show object .sales.work_disk2 access
SHOW
OBJECT IAF:.sales.work_disk2
AT 26-JAN-2019:09:16:51
DNS$ACS (set) = :
Flags = none
Rights = read, test
(V) Principal = .orion.smithSmith to
.sales.work_disk2, enter the following remove
object access command:
dns> remove object .sales.work_disk2 access .orion.smith
show directory access command displays an existing
ACE that grants user jones (on node .polaris) full
access to the .sales directory. Another ACE, created with the
default option, grants Jones full access
to the future contents of the .sales
directory.dns> show directory .sales access
SHOW
DIRECTORY IAF:.sales
AT 02-FEB-2019:21:09:31
DNS$ACS (set) = :
Flags = propagate
Rights = read, write, delete, test, control
(V) Principal = .polaris.jones
DNS$ACS (set) = :
Flags = default
Rights = read, write, delete, test, control
(V) Principal = .polaris.jonesremove directory access command removes access
rights of user Jones to the .sales directory
itself:dns> remove directory .sales access .polaris.jones
remove directory access command removes access
rights of user Jones to the future contents of the
.sales directory:
dns> remove directory .sales access as default .polaris.jones
The access rights of user Jones to the .sales
directory and its future contents have now been removed. Remember, however,
that the preceding two commands do not remove any access rights that
Jones might have been granted to names that already
exist in the .sales directory. To remove access rights of user
Jones to these names, you must issue separate
remove access commands for each name, or use the
remove subtree access command to remove access for the
entire directory and its contents.
show directory access command displays an existing
ACE, created with the nopropagate option, that grants read and
test access to the .mfg directory for user smith
on node
.vega.dns> show directory .mfg access
SHOW
DIRECTORY IAF:.mfg
AT 21-MAR-2019:08:16:50
DNS$ACS (set) = :
Flags = nopropagate
Rights = read, test
(V) Principal = .vega.smithremove directory access command removes this ACE.
Note that you do not have to include the nopropagate option in
the
command.dns> remove directory .mfg access .vega.smith
Remember that removing an ACE associated with an individual user does not revoke the rights granted to the user by any ACEs containing wildcard principals that include the user or access control groups of which the user is a member. To revoke the access rights of individual members of an access control group, remove the user from the group. See Section 5.6.4, ''Removing Group Members'' for information on how to remove group members.
5.6. Managing Groups
A group is an object entry that contains a collection of principals (members)
stored in the group's DNS$Members attribute. Whenever you
identify users to whom you want to grant a common set of access rights, you
can treat the users as a unit by creating an access control group of which
they all are members. When you add a member to an access control group, the
principal described by that member acquires all the access rights assigned
to the group. When you remove a member from an access control group, the
principal described by that member loses all the access granted to the
group. By assembling principals into access control groups, you can simplify
the task of assigning access to multiple users.
Using access control groups can also improve performance by helping you avoid the creation of ACSs that contain large numbers of ACEs specifying individual principals. Maintaining large ACSs degrades response time during access checking and can consume significant amounts of memory and disk space. Access control groups make it possible for you to keep the number of ACEs you require to a minimum.
The DECnet-Plus configuration program on the first DECdns server in your
namespace automatically creates an access control group named
.DNS_Admin to which you can add, as members, namespace
administrators, server managers, and other personnel to whom you want to
grant unlimited access to the entire namespace. See Section 5.6.2, ''Adding Group Members'' for information on how to add
group members. See Section 5.3.2, ''Adding Access for Your Namespace Administrator Group'' for information on
assigning access for a namespace administrator group in a new
namespace.
5.6.1. Creating a Group
Use the create group command to create a group with the
name you specify. To create a group, you need write access to the
directory in which you intend to create the group.
You can use the set group command to cause requesting
clerks to cache the results of the test operations that they direct
to the group. Although this may optimize the test operations of
requesting clerks, only a slight increase in overall performance is
realized. See Chapter 11, "DECdns Control Program Command Dictionary" for more information on
the set group command.
Example
create group command creates a group named
.group1 in the .sales
directory:dns> create group .sales.group1
5.6.2. Adding Group Members
Immediately after creation, a group does not contain any members. The principal that creates a group is not included as a member. Before a group can be of any use, you must add members.
To add members to a group, you must have write access to the group. The account under which a group is created will already have this access. Do not store more than 100 members in a group. VSI recommends that no group contain more than 75 members.
.dir_admin. Two possible solutions are:Create three groups called
.dir_admin_a_to_f,.dir_admin_g_to_l, and.dir_admin_m_to_z. These three groups are entered as the only three members of the group.dir_admin. Each contains a part of the alphabetically sorted list of members.Create subgroups that use some other partitioning algorithm, such as by site code or group function instead of the alphabet as used in the preceding solution.
To Add Group Members
add member command and specify the member
(principal) you want to add to the group. You can specify an
individual principal, a wildcard principal, or another group as a
group member. Note
When adding another group as a member, be careful not to accidentally create a group loop by adding a group of which another group is itself a member. In such a case, DECdns is unable to verify access and generates an error message. See Chapter 12, "DECdns Problem Solving" for information on how to detect and eliminate loops.
Examples
add group member command adds user
smith on node .orion to the
namespace administrator group
.DNS_Admin.dns> add group .DNS_Admin member .orion.smith
add group member command adds all users on
all nodes named in the .mfg directory to a group named
.mfg.camgroup.dns> add group .mfg.camgroup member .mfg.*...
add group member command adds a group named
.dist.transport_group as a member to the
existing group .mfg.camgroup.
dns> add group .mfg.camgroup member .dist.transport_group
Modifying a Group's ACS
Although the account under which a group is created automatically receives full access to the group, membership in a group conveys no access rights to the group itself. To protect the identity of group members, you may want to grant only test access to the group for most of the group's members. This prevents individual members from determining who the other members of the group are. Be certain, however, to grant at least one member full access to the group; this allows that member to add and remove other members, or to delete the group if necessary.
5.6.3. Modifying Group Membership
You can use the change subtree group member command to
replace an existing group member with a new group member in all
access control groups named in the directory or subtree that you
specify. (A subtree can be a single directory and its contents, or a
directory and all its child directories and their contents.) By
appending the recursion notation (...) to the directory
that you specify, you can extend the command's effect to the groups
contained in all child directories of that directory. If you use the
command recursively, you can use the exclude argument
to exclude all groups contained within particular child directories
from group member modification.
This command provides a convenient way for you to modify a group
member specification in multiple groups with a single command. For
example, user smith, whose login account is on node
.orion, is represented as a member in several
access control groups as .orion.smith. If Smith's login
account is moved to node .trifid (or if node
.orion is renamed .trifid), the
old member specification .orion.smith is no longer
valid and will not grant Smith the access that membership in these
groups was intended to convey. To maintain Smith's access, you can
use the change subtree group member command to
substitute the old member .orion.smith for the new
member .trifid.smith in all appropriate groups.
To use the change subtree group member command, you must
have write access to the group whose member you intend to modify. If
you use the command recursively, you must have write access to all
groups affected by the command.
Examples
change subtree group member command
replaces the old member .orion.smith with the new
member .trifid.smith in all groups named in the
.sales directory. Note that, for the new
member, you only need to specify the portion you want to change (the
node name .trifid) in the
command.dns> change subtree .sales group member .orion.smith .trifid
change subtree group member command
replaces the old member .vega.group1 with the new
member .vega.group2 in all groups named in the
.admin directory and all its child directories.
Note that, because you are changing the entire group member, you
must specify both the node name and user name
(.vega.group2) as the new
member.dns> change subtree .admin... group member .vega.group1 .vega.group2
change subtree group member command
replaces the old member iaf:.orion.smith with the new
member abc:.orion.smith in all groups named in the
abc: namespace. Note that you only need to
specify the namespace nickname portion of the new member
(abc:) in the command.
dns> change subtree ... group member iaf:.orion.smith abc:.
5.6.4. Removing Group Members
Use the remove member command to remove a group member
from the group or groups that you specify. You must have write
access to the group from which you intend to remove members.
Remember that removing a principal from membership in a group only denies that principal the access rights granted to that group. Loss of membership in a group does not revoke the access rights that may otherwise be granted to the group member as an individual principal, a wildcard principal, or by membership in other groups.
Examples
remove member command removes user
jones on node .orion from the
namespace administrator group
.DNS_Admin.dns> remove group .DNS_Admin member .orion.jones
remove member command removes all users on
all nodes named in the .mfg directory from the group
named
.mfg.camgroup.dns> remove group .mfg.camgroup member .mfg.*...
.dist.transgroup from membership in the group
named
.mfg.camgroup.dns> remove group .mfg.camgroup member .dist.transgroup
5.6.5. Removing Group Members from Multiple Groups
You can use the remove subtree group member command to
remove a group member from all the groups named in the directory or
subtree that you specify. When you remove a group member from a
group, the user specified by that member automatically loses all
access rights granted to that group.
By appending the recursion notation (...) to the
directory that you specify, you can extend the command's effect to
all groups named in that directory and to all the child directories
of that directory. If you use the command recursively, you can use
the exclude argument to exclude the groups in specific
child directories from group member removal.
To use the remove subtree group member command, you must
have write access to the group (or groups) named in the directory or
subtree that you specify. If you use the command recursively, you
must have write access to all groups affected by the command.
Remember that removing a principal from membership in a group only denies that principal the access granted to the group. Loss of membership in a group does not revoke the access rights that may otherwise be granted to a group member as an individual principal, a wildcard principal, or by membership in other groups.
Examples
remove subtree group member command removes
user .orion.jones from membership in all groups named
in the .sales
directory:dns> remove subtree .sales group member .orion.jones
remove subtree group member command removes
user .vega.smith from membership in all groups named in
the .eng directory and all its child
directories:dns> remove subtree .eng... group member .vega.smith
remove subtree group member command removes
the group named .transport_group from membership in all
the groups in the
namespace:dns> remove subtree ... group member .transport_group
5.6.6. Deleting a Group
You may want to delete a group when the circumstances that warranted the group's creation no longer exist. For example, you should delete a group if the user group for whom the group was created disbands, or if the directories to which the group was collectively granted access are deleted.
To delete a group, you must have delete access to the group. Make sure that, by deleting a group, you are not removing the only access that exists to a particular name.
To Delete a Group
Use the delete group command to delete a group from the
namespace. You do not need to remove a group's members before you
delete the group.
Example
delete group command deletes an access
control group named .testgroup from the
.eng
directory:dns> delete group .eng.testgroup
After You Delete a Group
After you delete a group, the ACSs of the names to which the group was
assigned access will still contain ACEs that contain the deleted
group as a principal. To avoid confusion, you should remove the ACEs
that refer to the deleted group from the ACSs of those names. You
can use the remove subtree access command to remove
multiple ACEs with a single command. See Section 5.7.2, ''Removing Access from Multiple Names'' for more information on the
remove subtree access command.
5.7. Modifying Principals and Removing Access for a Subtree
DECdns provides several commands that allow you to modify existing principals in ACEs or to remove ACEs associated with a particular directory and all of its contents or with an entire subtree of directories. Section 5.7.1, ''Modifying Principals'' and Section 5.7.2, ''Removing Access from Multiple Names'' describe how to use these commands to make the task of modifying or removing multiple ACEs more convenient.
5.7.1. Modifying Principals
You can use the change subtree access command to replace
an existing principal with a new principal in all the ACEs
associated with the directory (and contents) that you specify. Use
the command's optional exclude argument to exclude from
principal modification the ACEs associated with the object entries
or soft links in the specified directory.
You can also use the change subtree access command
recursively. By appending the recursion notation (...)
to the directory that you specify, you can also modify the ACEs
associated with all the child directories (and contents) of the
specified directory. If you use the command recursively, you can use
the exclude argument to exclude from principal
modification the ACEs associated with specific child
directories.
For example, a user named smith, whose login account is
on node .orion, is expressed as principal
.orion.smith in the ACEs associated with names
throughout the namespace. If Smith's login account is moved to node
.trifid (or if node .orion is
renamed .trifid), the old principal specification
.orion.smith no longer grants Smith the proper
access.
Rather than individually removing each of these old ACEs and replacing
them with new ACEs that specify .trifid.smith, you can
use one change subtree access command to update the old
principal expression in all affected ACEs.
change subtree access command, you must have
the following access rights: Control and write access to the directory that you specify.
Control and write access to the contents of the directory.
If you use the command recursively, you also need control and write access to all child directories (and contents) of the directory that you specify.
Examples
change subtree access command replaces the
old principal .orion.smith with the new principal
.trifid.smith in all ACEs associated with the
.sales directory and all its contents. Note
that, for the new principal, you only need to specify the portion
you want to change (the node name .trifid) in the
command.dns> change subtree .sales access .orion.smith .trifid
change subtree access command replaces the
old principal .oberon.jones with the new principal
.oberon.smith in all ACEs associated with the
.mfg directory, its contents, and all child
directories and their contents with the exception of ACEs associated
with soft links. Note that, since you are changing the entire
principal, you must specify both the node name and user name
(.oberon.smith) as the new
principal.dns> change subtree .mfg... access .oberon.jones .oberon.smith - _> exclude links
change subtree access command to
maintain the usability of ACEs associated with names that were
merged from one namespace into another. For example, user
smith, in the iaf: namespace, is
expressed as principal iaf:.orion.smith in ACEs
throughout the iaf: namespace. Suppose that, because of
corporate restructuring, the iaf: namespace is merged
into the abc: namespace. To maintain the access that
Smith needs in the new namespace, you can enter the following
change subtree access command to substitute the
new namespace nickname abc: for the old namespace
nickname iaf: in the principal expression of every ACE
that specifies iaf:.orion.smith throughout the
abc:
namespace:dns> change subtree ... access iaf:.orion.smith abc:
change subtree access command substitutes
the new namespace nickname abc: for the old namespace
nickname iaf: in the principal expression of every ACE
in the abc:
namespace:dns> change subtree ... access iaf:. abc:.
5.7.2. Removing Access from Multiple Names
You can use the remove subtree access command to remove
all ACEs containing the principal that you specify from the ACSs
associated with a particular directory (and its contents). Use the
command's optional exclude argument to exclude from
removal the ACEs associated with all object entries and soft links
in the specified directory.
By appending the recursion notation (...) to the
directory that you specify, you can also remove the ACEs associated
with all the child directories (and contents) of the specified
directory. If you use the command recursively, you can use the
exclude argument to exclude from removal the
ACEs associated with specific child directories.
For example, if a user leaves your namespace, you can use the
remove subtree access command to remove all
ACEs that specify the user as a principal. Similarly, if a
particular access control group is deleted, you can remove all ACEs
that specify the group's name as a principal.
remove subtree access command, you need the
following access rights: Control and write access to the directory that you specify.
Control and write access to the contents of the directory.
Control and write access to all child directories (and contents) of the directory that you specify, if you use the command recursively.
Examples
remove subtree access command removes all
ACEs that contain .vega.jones as a principal from the
ACS of the .eng directory and from the ACSs of its
contents:
dns> remove subtree .eng access .vega.jones
remove subtree access command removes all
ACEs that specify an access control group named
.test_group as a principal from the ACS of the
.sales directory, its contents, and from the
ACSs of all its child directories and their
contents:dns> remove subtree .sales... access .test_group
remove subtree access command removes all
ACEs that specify .vega.jones as a principal from the
ACS of the .eng directory and all its child
directories. ACEs associated with the object entries and soft links
in these directories are not
removed.dns> remove subtree .eng... access .vega.jones exclude - _> objects, exclude links
Chapter 6. Managing Clerks, Servers, and Clearinghouses
All DECdns clerks are initially created and enabled as part of the DECnet configuration
process. The first server and clearinghouse in a namespace are created and enabled as part
of the configuration process (NET$CONFIGURE ADVANCED).
All additional servers and their resident clearinghouses are created and enabled with the DECdns configuration program. See Chapter 10, "Using the DECdns Configuration Program" for complete information on how to use the DECdns configuration program.
The clerk, server, and clearinghouse entities are largely self-regulating and, apart from your routine monitoring of their status and counter attributes, should require only minor management intervention. You can manage these entities remotely by specifying the node name of their host systems in your commands.
Status (Section 6.1, ''Monitoring Status'')
Counters (Section 6.2, ''Monitoring Counters'')
Clerk communication with specific clearinghouses (Section 6.3, ''Monitoring Clerk Communication with Specific Clearinghouses'')
Contents of a clearinghouse (Section 6.4, ''Monitoring the Contents of a Clearinghouse'')
Modifying a clerk's timeout interval (Section 6.5, ''Modifying a Clerk's Timeout Interval'')
Modifying a clerk to use the cluster alias (Section 6.6, ''Modifying a Clerk To Use the Cluster Alias on Server Requests'')
Deleting and restarting clerks and servers (Section 6.7, ''Deleting and Restarting Clerks and Servers'')
Preserving a clearinghouse across a server system upgrade (Section 6.9, ''Preserving a Clearinghouse Across a Server System Upgrade'')
Backing up namespace information (Section 6.10, ''Backing Up Namespace Information'')
For information on how to delete a clearinghouse, see Section 9.6, ''Deleting a Clearinghouse''.
6.1. Monitoring Status
At any time, a clerk, server, or clearinghouse can be in only one of the following states:
off, initial, on, shut, or
broken. The clerk, server, and clearinghouse entities are available
only when they are enabled (in the on state). See the reference pages for the show
dns clerk, show dns server, and show dns server
clearinghouse commands in Chapter 11, "DECdns Control Program Command Dictionary" for full
descriptions of the states for these entities.
To Display Clerk Status
Use the show dns clerk command and specify the state attribute to
check the current status of a clerk.
To use the show dns clerk command, you must have the
NET$EXAMINE rights identifier.
Example
dns> show dns clerk state
To Display Server Status
Use the show dns server command and specify the state attribute to
check the current status of a server.
To use the show dns server command, you must have the
NET$EXAMINE rights identifier.
Example
dns> show dns server state
To Display Clearinghouse Status
Use the show dns server clearinghouse command and specify the state
attribute to check the current status of a clearinghouse.
To use the show dns server clearinghouse command, you must have the
NET$EXAMINE rights identifier.
Example
dns> show dns server clearinghouse state
6.2. Monitoring Counters
Every clerk, server, and clearinghouse maintains a set of counters to keep track of the read, write, and other operations that it has performed (or that were performed on it) since it was last enabled. You can monitor these counters to determine the type and volume of the DECdns traffic being generated on your network. Clerk, server, and clearinghouse counters are fully described in Chapter 11, "DECdns Control Program Command Dictionary".
Some clerk, server, and clearinghouse counters are incremented by DECdns events. See Appendix D, "DECdns Events" for more information on these events.
To Display Clerk Counters
Use the show dns clerk command with the all counters attribute
specifier to display the current counter values of a clerk.
To use the show dns clerk command, you must have the NET$EXAMINE rights
identifier.
Example
.umbriel.dns> show node .umbriel dns clerk all counters
To Display Server Counters
Use the show dns server command with the all counters attribute
specifier to display the current counter values of a server.
To use the show dns server command, you must have the NET$EXAMINE rights
identifier.
Example
dns> show dns server all counters
To Display Clearinghouse Counters
Use the show dns server clearinghouse command with the all counters
attribute specifier to display the current counter values of a clearinghouse.
To use the show dns server clearinghouse command, you must have the NET$EXAMINE
rights identifier.
Example
.paris1_ch running on node .vega.
dns> show node .vega dns server clearinghouse .paris1_ch all - _> counters
6.3. Monitoring Clerk Communication with Specific Clearinghouses
dns clerk remote
clearinghouse entity for a particular clerk.Note
The term remote in dns clerk remote
clearinghouse applies to all clearinghouses. From a clerk's
perspective, all clearinghouses are remote, including any clearinghouse that
resides on its own system. See Chapter 4, "Using the DECdns Control Program" for
information on the dns clerk remote clearinghouse entity.
You can monitor a clerk's remote clearinghouse counters to look at the distribution of the clerk's transactions to each of the clearinghouses that it uses and to find out where a clerk's requests are most often directed.
To Monitor a Clerk's Communication with Specific Clearinghouses
Use the show dns clerk remote clearinghouse command with the all
counters attribute specifier to display the current counter values for any or
all of the clearinghouses with which a clerk has communicated.
To use the show dns clerk remote clearinghouse command, you must have the
NET$EXAMINE rights identifier.
Examples
dns clerk remote clearinghouse counters
maintained by the local clerk for the .ny1_ch
clearinghouse:dns> show dns clerk remote clearinghouse .ny1_ch all counters
dns clerk remote clearinghouse counter values
for all the clearinghouses used by the local clerk:
dns> show dns clerk remote clearinghouse * all counters
6.4. Monitoring the Contents of a Clearinghouse
Monitor the number of replicas in a directory's replica set.
Modify the replica set of any directory stored in the clearinghouse.
Gather the name and replica-type information that you need to create a duplicate clearinghouse on another server.
To Monitor the Contents of a Clearinghouse
Use the show clearinghouse command and specify the DNS$CHDirectories
attribute to display the creation timestamps (CTSs) and names of all the directories
stored in a clearinghouse.
To use the show clearinghouse command, you must have read permission to the
clearinghouse.
Examples
DNS$CHDirectories attribute for
the local clearinghouse
.Paris1_CH:dns> show clearinghouse .paris1_ch dns$chdirectories
6.5. Modifying a Clerk's Timeout Interval
The value assigned to a clerk's clerk timeout attribute specifies how long the
clerk waits for a response to a request. After a clerk issues a request, it waits for
the specified length of time and, if no response is received from DECdns within that
time period, returns a timeout error message to the requesting application.
A clerk's clerk timeout attribute is set to a value of 150 seconds when the clerk
is created. If you experience a large number of timeout errors on a clerk, you should
either increase the clerk's timeout interval or replicate the information the clerk most
often requests in a clearinghouse that is located closer on the network to the clerk
system.
For example, a clerk that frequently initiates skulks of a directory whose replicas are spread
over extreme distances throughout the network may often time out before receiving a
response from the clearinghouses in which these remote replicas are stored. To make it
possible for the clerk's skulks of this directory to succeed, you should increase the
clerk's clerk timeout attribute value to a duration long enough to ensure
that the clerk will not time out before receiving a response from the remote locations.
To Modify a Clerk's Clerk Timeout Attribute
Use the set dns clerk command to specify a new value for the clerk
timeout attribute. If you do not specify a value in the command, the
attribute is set to its default value of 150 seconds.
To use the set dns clerk command, you must have the NET$MANAGE rights
identifier.
Example
clerk timeout attribute to a value of 180 seconds
for the local clerk: dns> set dns clerk clerk timeout 180
6.6. Modifying a Clerk To Use the Cluster Alias on Server Requests
DECdns clerk requests from nodes in an OpenVMS Cluster can send the cluster alias address as the source address. The default behavior is to send the individual node address.
To use this functionality, edit the SYS$MANAGER:DNS$CLERK_CLUSTER.NCL
file and set outgoing alias = true.
To affect the running system, use the following NCL command on all nodes in your cluster:
NCL>set session control application dnsclerk outgoing alias = true
Note
Implementing this functionality might require nontrivial changes to the current access control in your namespace because you are changing the source address of the DECdns clerk requests.
6.7. Deleting and Restarting Clerks and Servers
You may want to delete the clerk or server running on a particular system when the active clerk or server processes need to be stopped, such as to perform diagnostic or troubleshooting work on the system.
When you delete a clerk, only the active clerk processes are deleted. Deleting a clerk does not remove the clerk software from the system or delete the clerk's cache. If you delete the clerk from a system that also functions as a DECdns server, that server and the clearinghouse it serves become unavailable.
Note
Each system on which DECdns runs uses Network Control Language (NCL) startup and shutdown scripts that you can edit and run as part of the DECnet startup or shutdown procedure. These scripts are the recommended method of deleting and restarting clerks and servers. For more information, see the VSI DECnet-Plus for OpenVMS Network Management Guide.
If you intend to delete only the server, leaving the clerk running, use the procedure described in Section 6.7.2, ''Deleting a Server''.
6.7.1. Deleting a Clerk
To delete a clerk, use the instructions provided in the subsections that follow.
Before You Delete a Clerk
Before you can delete a clerk, you first must disable it (turn it off) by entering
the disable dns clerk command.
To use the disable dns clerk command, you must have the NET$MANAGE
rights identifier.
On systems running a DECdns server, be sure you disable the server before disabling the clerk. If you do not disable the server and clerk in the right sequence, the server will not operate properly when you restart it. When you disable the clerk, it writes the contents of its cache to disk. Unless you explicitly delete the cached information, or change its file location, the information remains available and is automatically read back into the clerk's cache when the clerk processes are next started up.
Example
dns> disable dns clerk
To Delete a Clerk
Use the delete dns clerk command to delete the clerk.
To use this command, you must have the NET$MANAGE rights identifier.
Examples
dns> disable dns server dns> disable dns clerk dns> delete dns clerk
.miranda, which is a clerk-only
system.dns> disable node .miranda dns clerk dns> delete node .miranda dns clerk
To Delete a Clerk Cache
To write the DECdns clerk in-memory cache to disk, you must stop DECnet. Simply deleting the DECdns clerk software does not remove the in-memory copy of the cache. After stopping DECnet, you can then delete the cache files, rename them, or change their file location. Then, reboot the system.
The cache files (DNS$CACHE.*) are in
SYS$SYSROOT:[SYSEXE].
Example
$ @sys$manager:net$shutdown $ delete sys$sysroot:[sysexe]dns$cache.0000011411;1 $ delete sys$sysroot:[sysexe]dns$cache.version;11413 ! Reboot the system!!!!
6.7.2. Deleting a Server
Before You Delete a Server
Before you can delete a server, you first must disable it (turn it off) by entering the
disable dns server command.
disable dns server command, you must have the NET$MANAGE rights identifier.Note
When you issue the disable dns server command, DECdns writes
to disk a new clearinghouse checkpoint file that contains all the updates
received since the last time the checkpoint file was written to disk. This
can take up to 30 minutes to complete, depending on disk speed, memory, and
the size of the checkpoint file. By waiting for this write operation to
complete, you decrease the time required for the next server startup.
Example
.vega.dns> disable node .vega dns server
To Delete a Server
Use the delete dns server command to delete the server from the system that you
specify.
To use the delete dns server command, you must have the NET$MANAGE
rights identifier.
Example
.vega.dns> delete node .vega dns server
Deleting Server Files Left Behind
Stop and delete the DECdns server (see previous subheadings).
Delete the clearinghouse files and other files that point to the default namespace.
Stop the DECdns clerk and delete the DECdns clerk cache file and any other clerk-related files that might have pointers to the default namespace (see Section 6.7.1, ''Deleting a Clerk'').
Create a new
NET$DNS_CLERK_STARTUP.NCLfile without anyKnown Namespaceparameter.Reboot the system. This is necessary because although the DECdns clerk is stopped, its cache remains mapped in memory. The reboot clears this cache.
- To create the new namespace for the reconfigured server, take the following steps:
Use the
SYS$MANAGER:NET$CONFIGURE.COMprocedure and, if DECnet-Plus has already been configured on the new server system, select option 2 ("Change Naming Information"). If DECnet-Plus has not been configured, do the full configuration rather than option 2.The configuration procedure asks if you want to disable the DECdns server by renaming the DECdns server startup procedure
NET$DNS_SERVER_STARTUP.COMtoNET$DNS_SERVER_STARTUP.COM-DISABLED. Answer Yes.The configuration procedure asks for a list of directory services to use on the system. You must specify LOCAL only (Local namespace) this time—do not specify any other name services.
When prompted for the system's node name, specify a Local namespace name.
After the configuration procedure completes, rerun the configuration procedure and select option 2.
This time, when you are prompted for the name services to use, you must specify DECdns as the first name service. VSI recommends listing DECdns only for now. Then, once the new namespace is created successfully for the server, you can rerun the configuration procedure to add other name services.
When the procedure asks for a node full name, you must enter a full name that includes the new namespace name (not one that already exists in the network). The
NET$CONFIGUREprogram must determine and report that it did not find the specified namespace being served on the LAN (or else you would create an Ambiguous Nickname problem on the DECdns clerks on your LAN). The configuration procedure provides a list of currently available namespaces from which to choose. You must reject this list by selecting option 0.The procedure then asks if you wish to create a new namespace. Answer
yesto this question to proceed with creating a new DECdns Version 2 namespace. See Section 10.6, ''Creating and Initializing a New Namespace '' for more information on how to create a new namespace.
Appendix G, "Sample Command Files" includes two sample command files that perform the steps outlined above.
6.7.3. Restarting a Deleted Clerk
$ @sys$startup:dns$clerk_startup
$ @sys$startup:dns$server_startup
Note that you must have the NET$MANAGE rights identifier to run these commands
and that the commands must be entered on the system where the clerk or server
resides.
Depending on the disk speed, memory, and the size and state of the clearinghouse database (in
particular, the checkpoint file), the enable dns server command, which
is called in the SYS$STARTUP:DNS$SERVER_STARTUP command procedure, can
take several minutes. If the server did not complete the checkpoint operation the
last time it was shut down (for example, the system crashed during the shutdown
process), server startup can take up to 30 minutes.
6.8. Controlling the LAN Devices Used By DECdns
The static device tables formerly used to determine the devices used by DECdns have
been removed. Now, DECdns uses the $DEVSCAN and $GETDVI system
services to build a list of devices that have the following characteristics:
a device class of
DC$SCOM(synchronous communication device)a device characteristic of
DEV$V_NETa device status of
UCB$V_ONLINEandUCB$V_TEMPLATEa device name in the form
_ddcn:
You can use the logical name DNS$ETHERNET_DEVICE to provide a list of
devices that DECdns should NOT use. All devices must be in the form _ddcn:,
where dd is the OpenVMS physical device name, c is the controller letter, and n is the
port number. The string is limited to 255 characters and can contain spaces and other
text which is ignored by DNS. For example, the following two commands tell DECdns not to
use the _EIA0: and _FWA0: devices.
$ DEFINE/SYSTEM DNS$ETHERNET_DEVICE "Don’t use _EIA0: and _FWA0: " $ DEFINE/SYSTEM DNS$ETHERNET_DEVICE "_EIA0:_FWA0:"
Note
Unterminated network adapters can cause the dynamic device recognition process to
hang. Either terminate all network adapters or include any unterminated devices in
the DNS$ETHERNET_DEVICE logical definition.
6.9. Preserving a Clearinghouse Across a Server System Upgrade
- Before you perform a server system upgrade, invoke the DECdns Control Program and enter the following command to disable the server:
dns> disable dns server
Exit the DECdns Control Program and return to the system prompt. Then, back up the following DECdns files:
SYS$SYSDEVICE:[DNS$SERVER]clearinghouse- name.CHECKPOINTnnnnnnnnnnSYS$SYSDEVICE:[DNS$SERVER]clearinghouse- name.TLOGnnnnnnnnnnSYS$SYSDEVICE:[DNS$SERVER]clearinghouse-name.versionSYS$MANAGER:DNS_FILES.TXTSYS$MANAGER:NET$DNS_SERVER_STARTUP.NCL
Perform the system upgrade.
Restore all DECdns files you backed up in step 2.
Run the
SYS$MANAGER:NET$STARTUPprocedure. It starts the clerk and then automatically discovers the restored files and starts the server which, in turn, enables the clearinghouse. See the VSI DECnet-Plus for OpenVMS Network Management Guide for complete information on how to run@SYS$MANAGER:NET$STARTUP.
6.10. Backing Up Namespace Information
Directory replication — For most namespaces, replication is the only completely reliable method of protecting namespace data. By maintaining multiple replicas of each directory, you can easily restore lost or damaged clearinghouse database files. (See Section 6.10.1, ''Using Replication to Back Up Namespace Information''.)
DECdns dump/merge facilities — You can merge recently dumped directory information back into your namespace hierarchy to restore deleted directories and their contents. (See Section 6.10.2, ''Using the Dump/Merge Facilities to Back Up Directories and Their Contents''.)
Operating system backups — VSI does not recommend that you use traditional operating system backups unless your entire namespace resides on a single clearinghouse. (See Section 6.10.3, ''Using Operating System Backups''.)
6.10.1. Using Replication to Back Up Namespace Information
Directory replication is always the most reliable way to back up the information in your namespace. When you create a new replica of a directory at a clearinghouse, you are not only distributing the information but also creating an up-to-date, real-time backup of the information. If a replica in one clearinghouse becomes unavailable, users can look up the information they need in another replica of the directory in some other clearinghouse. The more replicas of a directory you create, the more likely users will always be able to find the information contained in the directory somewhere in the namespace.
If an entire clearinghouse is corrupted, you can restore it by creating a new clearinghouse and then creating new replicas of the directories that were stored there. See Chapter 12, "DECdns Problem Solving" for complete information on how to restore a lost clearinghouse.
6.10.2. Using the Dump/Merge Facilities to Back Up Directories and Their Contents
You can use the dump subtree command to produce an interim file that contains a
copy of the structure and contents of any portion of your directory hierarchy. You
can then use this file as a backup to restore deleted directories and their contents
by loading the file back into your namespace with the merge file
command.
merge file command to append that copy of the directory
back under its former parent directory. Then, using the create replica
command, you can create a new replica of the directory in each of the clearinghouses
from which the directory was deleted. Although the information in an interim file
may be slightly out of date, using an interim file to restore the directory and its
contents is usually more efficient than creating a new directory and repopulating it
one name at a time. See Section 9.4, ''Merging Directories'' for information on
how to create an interim file.Note
If you try to restore only a subset of your directory hierarchy by using an interim file that contains the entire namespace, be aware that, although the operation will restore the lost information, many conflicting names will be displayed on your screen and sent to the failures file (if you specify a file). You can ignore these conflict reports on the screen. If you specified a failures file, you can delete it after the restoration.
Remember that the dump subtree command deals exclusively with directories and
their contents. It does not copy clearinghouses or their associated clearinghouse
object entries to the interim file and therefore cannot be used to restore
clearinghouses or to account for discrepancies in information among individual
replicas resident on different clearinghouses. Furthermore, as with traditional
operating system backups, the directory information in an interim file only reflects
what the directory (or directory subtree) contained at the time you created the
file.
See Chapter 9, "Restructuring a Namespace" for information on using the dump subtree and
merge file commands.
6.10.3. Using Operating System Backups
Because a namespace is a distributed database to which modifications are synchronized at variable intervals, any traditional backup of a particular server system will always contain old and incomplete information. If you frequently create, modify, or delete names, restoring an out-of-date backup may cause recently created names to disappear, recent modifications to be reversed, or recently deleted names to reappear in the namespace. The degree to which a traditional backup reflects the current condition of a clearinghouse depends entirely on how recently the backup was created and what modifications were made since that time.
If you decide to use operating system backups, you should only back up the server systems whose clearinghouses store master replicas of directories. Make sure you disable the clearinghouses on these systems before you perform the backups.
If your namespace is small enough to be maintained on one clearinghouse, you can reliably use traditional operating system backups to save and restore the clearinghouse data. If only one clearinghouse exists, only one replica (the master replica) of each directory exists. This eliminates the need to account for the discrepancies that may exist among multiple directory replicas. Remember that the more frequently you back up clearinghouse data, the more up to date that information will be if you need to restore it.
Chapter 7. Managing Directories
If you manage a namespace with 50 or fewer DECdns servers, you can name all your clearinghouses and create all your object entries in the root directory and may not need to create additional directories. However, if you manage a namespace with more than 50 DECdns servers, you should consider creating at least one additional level of directories under the root.
Creating a directory (Section 7.1, ''Creating a Directory'')
Creating a replica (Section 7.2, ''Creating a Replica'')
Deleting a replica (Section 7.3, ''Deleting a Replica'')
Skulking a directory (Section 7.4, ''Skulking a Directory'')
Adjusting a directory's convergence (Section 7.5, ''Adjusting a Directory's Convergence'')
For information on how to delete a directory, see Section 9.3, ''Deleting Directories''.
7.1. Creating a Directory
By creating directories, you make it possible to replicate and manage groups of object entries according to where, how often, or by whom they are used. Grouping application-defined object entries into separate directories also makes it possible to collectively control access to the entries and allows you to take advantage of automatic rights propagation. See Chapter 5, "Managing DECdns Access Control" for complete information on how to grant access to directories and their contents.
To establish an initial directory hierarchy for your namespace.
To add directories to the upper levels of the hierarchy.
To create additional lower-level directories to store object entries that are created locally and used by namespace user groups and applications. Below a certain level in your hierarchy, you may prefer to allow users to create and manage their own directories.
Creating a directory hierarchy requires planning. Make sure you read the naming and hierarchy design information in the VSI DECnet-Plus Planning Guide before you create directories.
To Create a Directory
Write access to the parent of the new directory
Write access to the clearinghouse in which you are naming the new directory
create directory command to create a new directory (master replica) with
the name that you specify. When you use this command, DECdns, by default,
stores the master replica of the new directory in the same clearinghouse
that stores the master replica of the new directory's parent directory. Note
For the create directory command to execute
successfully, the clearinghouse that stores the master
replica of the new directory's parent directory must be
available when you enter the command.
Creating a Directory in a Nondefault Clearinghouse
Sometimes DECdns may not be able to create the new directory in the default clearinghouse. If
this happens, or if you want to create the directory in a clearinghouse
other than the default clearinghouse, use the create
directory command's optional clearinghouse
argument to specify another clearinghouse. The clearinghouse you choose
must be named in either the root directory or in a directory that is
closer to the root than the directory you are creating. (The DECdns
software enforces this requirement to guarantee compliance with
clearinghouse rule 2. See Appendix B, "Special Clearinghouse Rules" for more
information on the clearinghouse rules.)
Examples
.sales. DECdns, by default,
stores the master replica of this new directory in the clearinghouse
containing the master replica of the root
directory.dns> create directory .sales
.region1 under its parent
directory .sales. The clearinghouse argument
directs DECdns to store the master replica of the new directory in a
clearinghouse named .eng.London1_CH rather than in the
clearinghouse that stores the master replica of the .sales
directory.dns> create directory .sales.region1 clearinghouse .eng.london1_ch
After You Create a Directory
After you create a directory, enter the show directory access command to display
the DNS$ACS attribute of the new directory. Make sure that
the users and applications for whom the directory was created have the
proper access. If the required access was not inherited from the access
control set (ACS) of the new directory's parent directory, use the
add directory access command to create the
necessary access control entries (ACEs). See Chapter 5, "Managing DECdns Access Control"
for complete information on how to add access to a directory.
7.2. Creating a Replica
To distribute the information contained in the directory throughout your network, and to make it more accessible to users and applications at other locations.
To improve response time, especially in a namespace dispersed over a large geographic area. You should create replicas in clearinghouses that are located near the user groups and applications that most frequently use the information contained in the directory.
To preserve a backup of the information contained in the master replica of the directory. Maintaining multiple replicas ensures that the temporary loss of an individual replica will not cause an interruption in service and that permanent loss of a replica can be easily recovered. Even directories that store information used at only one particular site should be replicated in at least one other clearinghouse (preferably on a server at another location) so a local failure at one site will not cause both replicas to be unreachable at the same time.
All replicas that you create with the create replica command are read-only
replicas. In a read-only replica, users and client applications can look
up information, but are not permitted to create new information or modify
existing information. You should create replicas in clearinghouses whose
users need to access the directory but do not need (or are not permitted)
to update its contents. You can modify a directory's replica set to
redesignate the master replica or to exclude certain replicas, as
explained in Section 9.2, ''Modifying a Directory's Replica Set''.
You can display the replica set for a directory by using the DECdns Control Program command
show directory directory-name
dns$replicas (see Chapter 11, "DECdns Control Program Command Dictionary").
Before You Create a Replica
Use the
add directory accesscommand to grant read, write, delete, and control access to the directory for theDNS$Serverprincipal on the server node (clearinghouse) where you intend to create the replica. TheDNS$Serverprincipal requires this access to successfully carry out updates and skulks of the directory. Specify this principal asnodename.dns$serverin the principal argument of the command.For example, before creating a replica of the.engdirectory in the.NY1_CHclearinghouse (running on remote server.taurus), you would enter the following command:dns> add directory .eng access .taurus.dns$server for r,w,d,c
Note
If a replica of the directory is stored on a VAX Distributed Name Service (DNS) Version 1 server (on a DECnet Phase IV node), make sure that both Version 1 and Version 2 (DECnet Phase V ) style ACEs exist on the directory and all of the directory's contents before you try to create the replica. Otherwise, the replication fails. See Section 5.1.1, ''Specifying a DECdns Version 2 Principal'' and Section 5.1.2, ''Specifying a DNS Version 1 Principal'' for information on how to specify Version 2 and Version 1 principals in ACEs.
Initiate a skulk of the directory to make sure the new access you added in step 1 is applied to all existing replicas in the directory's replica set. (See Section 7.4, ''Skulking a Directory'' for information on how to skulk a directory.)
Make sure all clearinghouses that already store a replica of the directory you intend to replicate are running and available. If any replica in the directory's existing replica set cannot be reached, the replication fails.
For example, if you intend to create a replica of the root directory, then all clearinghouses that currently store a replica of the root directory must be running (in the on state) and available when you try to create the new replica.
To verify that these conditions are satisfied, take the following steps:For the directory you intend to replicate, use the
show directorycommand and specify theDNS$Replicasattribute to display the name of every clearinghouse that currently stores a replica of the directory.With this information, use the
show dns server clearinghousecommand and specify thestateattribute to make sure each of the clearinghouses is running and available.
If a directory contains node object entries, locate at least one replica (preferably the master) on the same LAN as the nodes described by the node object entries. Locate the master replica of each
.DNA_BackTranslationarea directory in the area it is named after, if that area contains DECnet Phase V nodes. In addition, replicate an area directory in other areas most likely to communicate frequently with the nodes whose addresses are contained by the directory.In a solely WAN environment, try to replicate every directory so each can be reached reliably by any DECnet system that needs it.
To Create a Replica
Control access to the directory you want to replicate
Write access to that directory's parent directory
Write access to the clearinghouse where you want to store the replica
create replica command to create a
read-only replica of a directory and store it in the clearinghouse that
you specify.Example
.mfg directory and stores the
replica in a root-level clearinghouse named .paris1_ch.
dns> create replica .mfg at clearinghouse .paris1_ch
7.3. Deleting a Replica
Sometimes, you may need to delete a replica when the information it contains is no longer needed by the local users of the clearinghouse in which the replica is stored. You may also need to delete a replica to prepare for deleting the directory of which the replica is a member or before deleting the clearinghouse in which the replica is stored.
To Delete a Replica
Control access to the directory whose replica you want to delete
Write access to the clearinghouse from which you are deleting the replica
Write and delete access to the directory's parent directory
Use the delete replica command to delete a replica from the clearinghouse that
you specify.
Example
.eng directory from the
.chicago2_ch clearinghouse: dns> delete replica .eng at clearinghouse .chicago2_ch
Note
You can only delete a directory's master replica by using
the delete directory or delete
subtree commands. See Chapter 9, "Restructuring a Namespace" for complete information
on how to use these commands to delete a master
replica.
7.4. Skulking a Directory
DNS$Convergence attribute. To ensure that
updates are distributed to all replicas as soon as possible, you can
initiate a skulk of a directory yourself by using the set directory
to skulk command, rather than waiting for the next
scheduled skulk to distribute the new information. You should use this
command for the following tasks:Distribute crucial updates made to a directory's contents (such as modifications to a name's ACS or a directory's replica set, or the removal or addition of a member in a DECdns group) when you do not want to wait for the next skulk.
Skulk directories that store replicas on servers that were disabled for an extended period and were just brought back on line.
To Skulk a Directory
To skulk a directory, you must have write access to the directory.
Use the set directory to skulk command to initiate an immediate skulk
on the directory that you specify. After you enter the command, the DECdns Control
Program temporarily suspends the dns> prompt while the skulk is in
progress. (It may take some time for DECdns to complete skulks of directories with
large replica sets.) If the prompt returns with no error messages, the skulk was
successful (see Note). If errors are returned before the prompt reappears, the skulk
failed. Skulk failure also generates the DECdns Skulk Failed event at the server that
stores the master replica of the directory being skulked. See Appendix D, "DECdns Events" for more information on this event.
Note
Under certain circumstances, it is possible to receive the dns>
prompt before a skulk completes. To be absolutely positive that a skulk
operation succeeded, you should check the DNS$SkulkStatus attribute
at the master replica for the directory (using the show replica
command).
For a skulk to succeed, every replica in the directory's replica set must be reachable. Skulks
may sometimes fail, especially on directories with large replica sets, or when the
servers that store replicas of the directory are located over great distances where
network connectivity is not always reliable. Skulk failure does not make DECdns
unusable. Although the skulking process is unable to update information in a replica
that it cannot contact, it always updates information in the replicas it can reach.
Temporarily, some replicas contain the latest information and some do not. When a
skulk fails, DECdns automatically repeats the skulking process (at an interval based
on the directory's convergence value) until all replicas in the set are updated with
the latest changes. When all replicas contain identical information, DECdns considers
the skulk to have succeeded, and updates the DNS$AllUpTo attribute of
the directory.
If skulks of a particular directory continue to fail, you can determine the cause by reviewing the DECnet event log of the server that stores the master replica of the directory.
Example
.admin
directory:dns> set directory .admin to skulk
7.5. Adjusting a Directory's Convergence
The value assigned to a directory's DNS$Convergence attribute determines how
frequently the server that stores the master replica of the directory
initiates a skulk of the directory's replica set. A directory's
convergence can be set to a value of low, medium, or high.
A directory set to low convergence is skulked at least once every 24 hours. The server on which a low convergence directory resides makes no attempt to propagate updates and waits for the next skulk to synchronize the replica set.
A directory set to medium convergence is skulked at least once every 12 hours. If an update is made to the directory, the server that stores the master replica attempts to propagate the new information to the entire replica set. If the propagation fails, the server waits for the next skulk to synchronize the replica set.
Note
The high-convergence setting is intended only for temporary use such as for troubleshooting. Directories that are permanently set to high convergence can, in certain cases, cause extensive network and memory usage.
Every newly created directory inherits the convergence value of its parent directory. The root directory of a namespace defaults to a convergence value of medium at its creation. Unless you change this value (or the convergence value of any lower-level directories after you create them), all directories that you create under the root will also default to medium. For most directories, you should never need to modify this value. However, you may occasionally find it useful to set a directory's convergence to high or low.
Before You Modify a Directory's Convergence
Use the show directory command and specify the DNS$Convergence
attribute to verify the current value of the directory's convergence.
To Modify a Directory's Convergence
You must have write access to the directory whose convergence you intend to modify.
Use the set directory command to assign a value of high, medium, or low to a
directory's DNS$Convergence attribute.
Examples
.sales directory to high.
dns> set directory .sales dns$convergence = high
.mfg directory to
low.
dns> set directory .mfg dns$convergence = low
Chapter 8. Viewing the Structure and Contents of a Namespace
This chapter explains how to use the DECdns Control Program to display namespace information. (You can also use the Browser utility to display namespace information, as explained in Appendix H, "The DECdns Browser Utility"; however, the Browser utility is not supported by VSI.)
The DECdns Control Program provides two basic display commands, show and
directory, you can use to view namespace structure and contents.
show command, you can display: Current status of a clerk, server, or clearinghouse
Current values of any or all attributes associated with any directory, object, link, group, or child pointer
With the directory command, you can display a list of names that match the name
you specify in the command.
show and directory commands, you must have read access to
the name you want to display. Note
You also need the NET$EXAMINE rights identifier to use show commands
you direct to clerks and servers and their subentities. See Chapter 11, "DECdns Control Program Command Dictionary" for complete information.
Using prepositional phrases in
showanddirectorycommands (Section 8.1, ''Using Prepositional Phrases in show and directory Commands'')Using the
showcommand (Section 8.2, ''Using the show Command'')Using the
directorycommand (Section 8.3, ''Using the directory Command'')
8.1. Using Prepositional Phrases in show and directory Commands
You can use prepositional phrases to redirect a command's output and to qualify commands that
contain wildcard characters. For example, with the to file [=]
filename phrase, you can redirect the output of a
command to a file on disk. You can use the with
attribute phrase to limit the action of a command to
affect only those entities that have the attribute value you specify. See Chapter 11, "DECdns Control Program Command Dictionary" for descriptions of the prepositional phrases you can use
with the show and directory commands.
8.2. Using the show Command
With the show command, you can display the directories stored in a clearinghouse
and the current values of any or all of the attributes associated with a directory,
group, link, object, or child pointer.
The basic syntax of all show commands is as follows:
show entity entity-nameChild
Clearinghouse
Directory
Group
Link
Object
You cannot use wildcard characters within the directory specification, but you can use wildcard characters in the terminating (rightmost) simple name.
show command using attribute specifiers and attribute groups
are described in the following list:show entity entity-nameDisplays the current values of all identifier attributes associated with the entity you specify. (If the entity you specify does not maintain any identifier attributes, all attributes are displayed.)
show entity entity-name allDisplays the current values of all the attributes (identifiers, characteristics, counters, and status) associated with the entity you specify. Not all entities maintain attributes from all four categories. See Chapter 11, "DECdns Control Program Command Dictionary" for complete listings of the attributes associated with each DECdns entity.
show entity entity-name all characteristicsDisplays the current values of all characteristic attributes associated with the entity you specify.
show entity entity-name all countersDisplays the current values of all counter attributes associated with the entity you specify.
show entity entity-name all statusDisplays the current values of all the status attributes associated with the entity you specify.
show entity entity-name attribute-name
Displays the current value of a particular attribute associated with the entity you specify. To display values of multiple attributes in one command, separate the attribute names with commas on the command line.
You can combine multiple all, all characteristics, all
counters, all status, and attribute
qualifiers in a single command. Separate them with commas.
Examples
dns> show dns clerk all
Node 0 DNS Clerk
AT 2019-04-29-10:38:48.306-04:00I0.102
Status
State = On
Characteristics
Version = V2.0.0
Clerk Timeout = 0-00:01:00.000I0.000 Seconds
Solicit Holddown = 0-00:00:15.000I0.000 Seconds
UID = 32A56750-059F-11CA-B98E-08002B0DC09D
Default Namespace = IAF
Counters
Creation Time = 2019-04-28-22:54:24.163+00:00I0.000
Incompatible Protocol Errors = 0
Authentication Failures = 0
Read Operations = 1194
Cache Hits = 364
Cache Bypasses = 830
Write Operations = 293
Miscellaneous Operations = 0 dns> show dns server all
Node 0 DNS Server
AT 2019-04-29-10:42:07.717-04:00I0.108
Status
State = On
Characteristics
UID = 3E6475F4-059F-11CA-B98E-08002B0DC09D
Minimum Protocol Version = V1.0.0
Maximum Protocol Version = V2.0.0
Future Skew = 0-00:05:00.000I0.000 Seconds
Counters
Creation Time = 2019-04-28-22:54:43.725+00:00I0.000
Incompatible Protocol Errors = 0
Authentication Failures = 0
Read Accesses = 491
Write Accesses = 211
Skulks Initiated = 12
Skulks Completed = 12
Times Lookup Paths Broken = 0
Possible Cycles = 0
Crucial Replica Removals Backed Out = 0
Child Pointer Update Failures = 0
Security Failures = 0 8.3. Using the directory Command
You can use the directory command to display a list of names that match the name
you specify in the command or to display a list of the object entries, soft links, and
child pointers in a directory.
The basic syntax of all directory commands is as follows:
directory entity entity-nameChild
Clearinghouse
Directory
Group
Link
Object
You cannot use wildcard characters within the directory specification, but you can use wildcard characters in the terminating (rightmost) simple name.
Examples
.eng
directory:
dns> directory object .eng.*
DIRECTORY
OBJECT IAF:.eng
AT 13-JUL-2019:18:45:00
sales_group
test_group
triton
work_disk1
work_disk2.eng
directory whose names begin with the letter t.
dns> directory object .eng.t*
DIRECTORY
OBJECT IAF:.eng
AT 13-JUL-2019:18:46:00
test_group
triton Chapter 9. Restructuring a Namespace
Over time, you may need to restructure or create alternative names for certain elements of your namespace. For example, you can create soft links to provide users with one or more alternative names for an existing namespace entry. You can reconfigure a directory's replica set to modify the locations and types of particular replicas, or exclude a replica from the set. Occasionally, you may want to delete certain directories when the information they contain is no longer needed by users. You may want to merge or append directories to reflect organizational changes. You may also need to relocate or delete a clearinghouse from a server system to perform diagnostic or troubleshooting work on the system, or to prepare for removing the system from your network.
Managing soft links (Section 9.1, ''Managing Soft Links'')
Modifying a directory's replica set (Section 9.2, ''Modifying a Directory's Replica Set'')
Deleting directories (Section 9.3, ''Deleting Directories'')
Merging directories (Section 9.4, ''Merging Directories'')
Relocating a clearinghouse (Section 9.5, ''Relocating a Clearinghouse'')
Deleting a clearinghouse (Section 9.6, ''Deleting a Clearinghouse'')
9.1. Managing Soft Links
A soft link is an alternative name, or synonym, with which you can refer to another existing name in a namespace. Soft links allow users and client applications to refer to a particular directory, object entry, or soft link by more than one name.
Do not use soft links to completely redesign your directory hierarchy or to change the names of multiple directories at different levels.
Do not create soft links only to provide abbreviations for long names that are difficult to remember or type. System environment variables and logical names are available for that purpose.
Avoid creating long chains of soft links in which one soft link points to another soft link which, in turn, points to another soft link, and so on.
9.1.1. Creating a Soft Link
To create a soft link, you must have write access to the directory in which you intend to create the soft link.
Use the create link command to create a soft link with the link name you specify.
Use the required destination argument to specify the soft link's
destination name (the existing name to which the new soft link will point). You can
specify any name in the namespace as the destination name, including another soft
link.
If you create a soft link that points to another soft link, be careful not to create a soft link loop where the destination name you specify eventually points back to the new soft link's own link name.
Using Optional Arguments
[expiration]
All soft links you create are permanent and never expire unless you use the
optional expiration argument. You can use this argument to specify a
future date and time when the name service will examine the soft link to make sure
that the destination name to which it points still exists. If the destination name
cannot be found (has already been deleted) when the expiration date is reached,
DECdns automatically deletes the soft link. Enter the expiration time value using
the yyyy-mm-dd-hh:mm:ss format. For example,
expiration 2019-01-25-16:00:00 indicates that DECdns will check to
see if the target of the soft link still exists on January 25, 2019, at 4:00 p.m.
If, at that time, the destination name cannot be found, DECdns deletes the soft
link.
[extension]
If you specify an expiration value, you can also use the optional
extension argument to specify a period of time to be added to the
expiration date and time that you assigned. Enter the extension time value using the
ddd-hh:mm:ss format. For example,
extension 030-00:00:00 indicates that, if the destination name of
the soft link still exists when the assigned expiration date and time are reached,
DECdns allows another 30 days to pass before it again checks for the existence of
the destination name. If, at that time, the destination name cannot be found, DECdns
deletes the soft link.
Examples
.sales.asia that points
to a directory named
.sales.eur.dns> create link .sales.asia destination .sales.eur
.mfg.robo1 that points to an
object entry named .mfg.robotics_controller03:
dns> create link .mfg.robo1 destination .mfg.robotics_controller03 - _> expiration 2019-12-12-09:00:00
In the preceding command, the expiration value indicates that DECdns will check to make sure
that the destination name .mfg.robotics_controller03 still exists on
December 12, 2019, at 9:00 a.m. If the destination name cannot be found, DECdns
deletes the soft link. If the destination name exists, but no extension value has
been assigned, DECdns deletes the soft link.
.admin.linka that points to an
object entry named .sales.discount_stats.
dns> create link .admin.linka destination .sales.discount_stats - _> expiration 2019-01-11-12:00:00 extension 090-00:00:00
In the preceding command, the expiration value indicates that DECdns will check to make sure
that the destination name .sales.discount_stats still exists on January
11, 2019, at 12:00 p.m. If the destination name does not exist, DECdns deletes the
soft link. If the destination name still exists, DECdns will check for the existence
of the destination name after a period of 90 days, as specified in the command's
extension argument. If, at that time, the destination name cannot
be found, DECdns deletes the soft link.
9.1.2. Changing a Soft Link's Destination Name
To change a soft link's destination name, you must have write access to the soft link.
Use the set link command to specify a new value for a soft link's
DNS$LinkTarget attribute and redirect the soft link from its
current destination name to some other name in the namespace.
Example
set link command redirects a soft link named
.admin.work_disk from its current destination name to a new
destination name .admin.work_disk03.
dns> set link .admin.work_disk dns$linktarget .admin.work_disk03
9.1.3. Changing a Soft Link's Expiration or Extension Time
To change a soft link's expiration or extension time, you must have write access to the soft link.
Use the set link command to specify a new value for either or both the expiration
and extension times currently stored in a soft link's DNS$LinkTimeout
attribute. Even if you want to modify only one of the values, you must specify
values for both expiration and extension in your command. You specify a new value in
the same format used to establish the original value. Specify an
expiration value in the yyyy-mm-dd-hh:mm:ss format, and an extension value in
the ddd-hh:mm:ss format.
Examples
set link command sets the expiration time of a soft link named
.eng.link01 to December 31, 2019, at 12:00 p.m. In this example,
zero extension value (no extension) is currently assigned to the soft link.
dns> set link .eng.link01 dns$linktimeout - _> (2019-12-31-12:00:00 000-00:00:00)
.eng.link01
to December 31, 2019, at 12:00 p.m. and sets the soft link's extension value to 90
days:
dns> set link .eng.link01 dns$linktimeout - _> (2019-12-31-12:00:00 090-00:00:00)
9.2. Modifying a Directory's Replica Set
DNS$Replicas attribute
associated with a directory contain information that describes the directory's replica
set, including how many replicas exist, their replica types, and the name of the
clearinghouse where each of the replicas is stored. You can use the set directory
to new epoch command to overwrite the current values stored in the
directory's DNS$Replicas attribute and perform either or both of the
following operations in a single command: Redesignate the master replica in a directory's replica set (Section 9.2.1, ''Changing the Replica Type of a Replica'').
Exclude a replica from a directory's replica set (Section 9.2.2, ''Excluding a Replica from a Replica Set'').
You do not need to modify a directory's replica set when you create or delete read-only replicas; the normal skulking process for the directory will distribute these modifications to all members of the replica set automatically.
Before You Modify a Directory's Replica Set
Before you can modify a directory's replica set, you need to know how many replicas exist, the replica type of each replica, and the name of the clearinghouse where each of the replicas is stored. The command you use to modify a directory's replica set prevents you from accidentally leaving a replica out of the new set. You must explicitly list all existing replicas in the set. You can include or exclude any replica from the new set, but you must account for all replicas. Only one of the replicas that you include in the new set can be designated as the master replica.
Use the show directory command and specify the directory's
DNS$Replicas attribute to gather this information. See Chapter 8, "Viewing the Structure and Contents of a Namespace" for complete information on how to use the show
directory command.
Read and control access to the directory
Write access to each clearinghouse that stores a replica of the directory
Note
If the directory is replicated in both Version 1 (DNS Version 1) and Version 2 (DECdns Version 2) clearinghouses, make sure that both Version 1 and Version 2 ACEs exist on the directory and all of the directory's contents before you try to set the new epoch. See Section 5.1.1, ''Specifying a DECdns Version 2 Principal'' and Section 5.1.2, ''Specifying a DNS Version 1 Principal'' for information on how to specify Version 2 and Version 1 principals in ACEs.
After You Modify a Directory's Replica Set
After you use the set directory to new epoch command, DECdns automatically
initiates a special skulk of the directory. This skulk may require more time to complete
than other regularly scheduled skulks and will require more network resources.
9.2.1. Changing the Replica Type of a Replica
A server system whose clearinghouse contains a master replica will be down for an extended period of time or removed permanently from the network.
A clearinghouse that stores a master replica is going to be deleted from the namespace.
You want to locate the master replica closer to where the majority of updates to the directory originate.
Use the set directory to new epoch command to designate a new master replica.
Example
In this example, the replica set of the .eng directory consists of three
replicas: the master replica (stored in clearinghouse .ny1_ch), a
read-only replica (stored in clearinghouse .ny2_ch), and a read-only
replica (stored in clearinghouse .chicago1_ch), as shown in Figure 9.1, ''Example Replica Set''.
.chicago1_ch) as the directory's new master replica, designates the
former master replica (stored in clearinghouse .ny1_ch) as a read-only
replica, and leaves the read-only replica (stored in clearinghouse
.ny2_ch) as it is. Figure 9.2, ''Example Replica Set After Master Redesignation'' shows the result
of this command.
dns> set directory .eng to new epoch master .chicago1_ch, read-only - _> .ny1_ch, read-only .ny2_ch
9.2.2. Excluding a Replica from a Replica Set
Note
When you know in advance that a replica will become permanently
unavailable because its clearinghouse is being removed from the network, you
should delete the replica rather than temporarily exclude it from the
replica set. You must delete the replica before the clearinghouse becomes unavailable. See Section 7.3, ''Deleting a Replica'' for complete information on using the
delete replica at clearinghouse command.
Excluding a replica does not delete the replica; it only prevents the replica from being updated by a skulk. DECdns clerks and servers still use the excluded replica for lookups. You should reintroduce the excluded replica to its replica set as soon as possible after the clearinghouse on which it resides becomes available. Otherwise, lookup requests directed to the excluded replica may return outdated information.
Use the set directory to new epoch command with the optional exclude
argument to rebuild a directory's replica set, excluding the replica that you
specify. Remember that you must account for all existing replicas in the command.
Example
In this example, the replica set of the .eng directory consists of three
replicas: the master replica (stored in clearinghouse .chicago1_ch) and
read-only replicas (stored in clearinghouses .ny1_ch and
.ny2_ch).
In this case, the .ny1_ch clearinghouse has been cut off from the network because
of accidental damage to the network transmission lines. Connectivity to the
clearinghouse will not be restored for several days. During this period, skulks of
the .eng directory will fail unless you temporarily exclude the
read-only replica stored in clearinghouse .ny1_ch.
.eng directory to succeed during the repair
period, you can enter the following set directory to new epoch command
to overwrite the current values of the .eng directory's
DNS$Replicas attribute with new values that include only the
replicas stored in the .ny2_ch and .chicago1_ch
clearinghouses:
dns> set directory .eng to new epoch master .chicago1_ch, read-only - _> .ny2_ch, exclude .ny1_ch
Figure 9.3, ''Example Replica Set After Replica Exclusion'' shows the result of the preceding command.
.ny1_ch clearinghouse is reestablished, enter the
following set directory to new epoch command to reintroduce the
read-only replica stored in clearinghouse .ny1_ch to the replica set.dns> set directory .eng to new epoch master .chicago1_ch, read-only - _> .ny1_ch, read-only .ny2_ch
Note
You should always reintroduce excluded replicas to their replica sets as soon as possible after the clearinghouse in which they reside again becomes available. Otherwise, lookup requests directed to the excluded replicas in the clearinghouse may return outdated information.
9.3. Deleting Directories
You may sometimes want to delete directories from your namespace when the information they
contain is no longer needed by users. DECdns provides two commands you can use to delete
directories: delete directory and delete subtree. (A subtree
can be a single directory and its contents, or a directory and all its child directories
and their contents.)
When deleting directories, remember that DECdns does not permit you to delete a directory that stores clearinghouse object entries.
Read and delete access to the directory
Write, delete, or control access to the directory's parent directory
Write access to the clearinghouse that stores the master replica of the directory (or directories) you intend to delete
9.3.1. Deleting a Bottom-Level Directory
Identify the clearinghouse locations of all replicas in the replica set of the directory you intend to delete. Use the
show directorycommand and specify theDNS$Replicasattribute to display this information.Use the
delete replica at clearinghousecommand to delete all the read-only replicas you found in step 1.Use the
delete objectanddelete linkcommands to delete the directory's contents.Use the
delete directoryor thedelete subtreecommand (nonrecursive mode) to delete the master replica of the directory from the namespace.
Example
.sales. In this
example, the contents of the .sales directory were already deleted,
making step 3 of the above procedure unnecessary. - The following
show directorycommand, specifying theDNS$Replicasattribute, displays the replica type and clearinghouse location of all replicas in the replica set of the.salesdirectory:dns> show directory .sales dns$replicas SHOW DIRECTORY IAF:.sales AT 09-APR-2019:16:08:25 DNS$Replicas (set) = : Clearinghouse’s DNS$CTS = 2018-03-22-14:39:34.58/aa-00-04-00-de-11 Tower 1 CTS = 2018-04-09-20:08:25.835/08-00-2b-0d-c0-9d Floor 1 = 01 2c (null) Floor 2 = 02 00 2c ncacn_dnet_nsp Floor 3 = 04 (null) Floor 4 = 06 49 00 37 aa 00 04 00 22 dc 20 Replica type = master Clearinghouse’s Name = IAF:.NY1_CH DNS$Replicas (set) = : Clearinghouse’s DNS$CTS = 2018-07-30-20:32:42.82/aa-00-04-00-de-11 Tower 1 CTS = 2019-04-09-20:08:25.835/08-00-2b-0d-c0-9d Floor 1 = 01 2c (null) Floor 2 = 02 00 2c ncacn_dnet_nsp Floor 3 = 04 (null) Floor 4 = 06 49 00 14 aa 00 04 00 7e 52 20 Replica type = readonly Clearinghouse’s Name = IAF:.NY2_CH DNS$Replicas (set) = : Clearinghouse’s DNS$CTS = 2018-01-12-18:15:01.77/aa-00-04-00-de-11 Tower 1 CTS = 2019-04-09-20:08:25.835/08-00-2b-0d-c0-9d Floor 1 = 01 2c (null) Floor 2 = 02 00 2c ncacn_dnet_nsp Floor 3 = 04 (null) Floor 4 = 06 49 00 33 aa 00 04 00 0a ce 20 Replica type = readonly Clearinghouse’s Name = IAF:.Chicago1_CHThe output of this command shows that the master replica of the
.salesdirectory is stored in clearinghouse.ny1_ch, a read-only replica is stored in clearinghouse.ny2_ch, and another read-only replica is stored in clearinghouse.chicago1_ch. - The following command deletes the read-only replica stored in clearinghouse
.ny2_ch.dns> delete replica .sales at clearinghouse .ny2_ch
The following command deletes the read-only replica stored in clearinghouse.chicago2_ch.dns> delete replica .sales at clearinghouse .chicago2_ch
With all read-only replicas deleted, the following command deletes the master replica of the
.salesdirectory stored in clearinghouse.ny1_ch.dns> delete directory .sales
9.3.2. Deleting a Subtree of Directories
You can use the recursive mode of the delete subtree command to delete the
directory (and its contents) you specify, as well as all child directories (and
their contents) that exist beneath it. Using this command provides a convenient way
to delete an entire subtree of directories and saves you the effort of deleting the
contents of each directory yourself.
delete subtree command provided that the
following conditions are satisfied: You have already deleted all read-only replicas of all the directories in the subtree that you intend to delete.
No clearinghouse object entries exist in any of the affected directories.
delete
subtree command deletes the directory's contents, deletes its master
replica, then moves up to the next directory in the subtree and repeats this process
until all directories under and including the directory you specified are deleted. Note
If a clearinghouse object entry is found in a directory, the recursive
delete subtree command does not delete the clearinghouse
object entry, the directory that contains it, or any directories further up
that branch of the subtree. However, DECdns continues to delete other
directories in other branches of the specified subtree that do not contain
clearinghouse object entries.
Example
delete subtree command, using the recursion flag
(...), deletes the .sales directory and its child
directory .sales.region1:
dns> delete subtree .sales...
When you enter the command, DECdns deletes the contents of the .sales.region1
directory, then deletes the master replica of the directory itself. DECdns then
moves up to the .sales directory, deletes its contents, then deletes
its master replica.
9.4. Merging Directories
Sometimes, because of corporate restructuring or other reasons, you may want to combine or rearrange various directories, or subtrees of directories, in your namespace.
For example, suppose the engineering group in your organization (.eng) is
combined with the research and development group (.rnd) and that the two
groups will begin to share a common set of network resources. You can reflect this
organizational change in your namespace hierarchy by combining these directories.
Similarly, if the engineering group becomes subordinate to the research and development
group, you can reflect this change by creating an empty directory named
.rnd.eng and then merging the contents of the .eng
directory into .rnd.eng, thus appending .eng below
.rnd.
9.4.1. Overview of the Merge Procedure
Use the
dump subtreecommand to create an interim file containing the information you intend to merge or append.Merge the interim file you created in step 1 with another existing directory. Use the
merge filecommand to combine the directory information in an interim file with another directory or to append the information below an existing bottom-level directory.The master replica of a directory that you dump and then merge with another directory is stored in the clearinghouse that stores the master replica of the directory with which (or below which) you merge the dumped directory.
For example, if you dump the
.engdirectory to the interim file and then merge the interim file with the.rnddirectory, the master replica of the.engdirectory is stored in the clearinghouse that stores the master replica of the.rnddirectory.Delete the directory or subtree (and contents) that you merged in step 2 from its old location in the hierarchy and replace the deleted directory information with a single soft link of the same name to redirect lookups of the information at its new location. See Section 9.3, ''Deleting Directories'' for information on how to delete a directory. See Section 9.1.1, ''Creating a Soft Link'' for information on how to create a soft link.
If a directory or subtree that you merge stores a clearinghouse object entry, you may prefer to use the
replace subtreecommand to perform this step. See Section 9.4.4, ''Handling Clearinghouse Object Entries'' and Chapter 11, "DECdns Control Program Command Dictionary" for more information on thereplace subtreecommand.
Note
The presence of duplicate names, unreachable names, clearinghouse object entries, groups, and node object entries in a merged directory requires special handling. See Section 9.4.4, ''Handling Clearinghouse Object Entries'' to Section 9.4.7, ''Handling Changed Node Object Entries'' for details on merging directories that contain these elements. The basic merge and append operations described in the following sections assume that no clearinghouse object entries, groups, or node object entries exist in the source directory and that no duplicate or unreachable names exist in either the source or target directory.
9.4.2. Basic Merge and Append Operations
The following merge and append operations are based on a sample namespace (Figure 9.4, ''Example Namespace Hierarchy'') that consists of two directories
under the root: .eng and .rnd. The source directory
(.eng) contains two object entries: .eng.obj1 and
.eng.link1. The target directory (.rnd) also contains
two object entries: .rnd.obj2 and .rnd.link2.
9.4.2.1. Performing a Basic Merge Operation
.eng into the target
directory .rnd. Step 3 of the procedure deletes the merged
.eng directory from its original location and replaces it with
a soft link to redirect lookups of .eng to the .rnd
directory. - The following
dump subtreecommand creates an interim file namedeng.datthat contains the.engdirectory and its contents,.eng.obj1and.eng.link1.dns> dump subtree .eng into file eng.dat
Note
The
.datextension of the interim fileeng.datis added to the file name only to avoid confusion in the following example commands. File extensions are not required in the names of interim files. An interim file is a printable ASCII file.The
dump subtreecommand can take some time to execute, especially if you are dumping large subtrees that contain many names. The clearinghouses that store the master replicas of the directories in the subtree you specify must all be enabled and reachable when you enter the command. Otherwise, the command fails and an error message is displayed explaining the reasons for the failure. The interim file contains only the directory information that was successfully dumped before the error occurred. - The following
merge filecommand merges the interim file you created in step 1 (eng.dat) with the.rnddirectory. Thefailures to fileargument copies, to a failures file namedfailures.dat, any names that cannot be reached (and therefore cannot be created) when you enter the command. In this example, it is assumed that all affected files were successfully merged. See Section 9.4.5, ''Using the Failures File'' for more information on using the failures file.dns> merge file eng.dat into subtree .rnd failures to file - _> failures.dat
Figure 9.5, ''Example Namespace Before and After the Merge Operation'' shows the structure of the example namespace before and after this merge operation.
Figure 9.5. Example Namespace Before and After the Merge Operation 
- After the merge operation, the
.engdirectory (and its contents) still exists at the source location. The following commands delete the.engdirectory from its original location and then create a soft link named.engin place of the deleted directory. This soft link redirects lookups of.obj1and.link1to their new locations in the.rnddirectory.dns> delete subtree .eng...
dns> create link .eng destination .rnd
9.4.2.2. Performing a Basic Append Operation
.eng into the empty target
directory .rnd.eng (that is, appends the .rnd
directory under the .eng directory). Step 4 of the procedure
deletes the merged .eng directory from its original location and
replaces it with a soft link to redirect lookups of .eng to the
.rnd directory.- The following
dump subtreecommand creates an interim file namedeng.datthat contains the.engdirectory and its contents,.eng.obj1and.eng.link1.dns> dump subtree .eng into file eng.dat
- The following
create directorycommand creates a new empty directory named.rnd.eng.dns> create directory .rnd.eng
- The following
merge filecommand merges the interim file you created in step 1 (eng.dat) with the new.rnd.engdirectory. Thefailures to fileargument copies, to a failures file namedfailures.dat, any names that cannot be reached (and therefore cannot be created) when you enter the command. In this example, it is assumed that all affected files were successfully merged. See Section 9.4.5, ''Using the Failures File'' for more information on using the failures file.dns> merge file eng.dat into subtree .rnd.eng failures to file - _> failures.dat
Figure 9.6, ''Example Namespace Before and After the Append Operation'' shows the structure of the example namespace before and after this append operation.
Figure 9.6. Example Namespace Before and After the Append Operation 
- After the append operation, the
.engdirectory (and its contents) still exists at the source location. The following commands delete the.engdirectory from its original location and then create a soft link named.engin place of the deleted directory. This soft link redirects lookups of.obj1and.link1to their new locations in the.rnd.engdirectory.dns> delete subtree .eng...
dns> create link .eng destination .rnd.eng
9.4.3. Merging Directories with a Single Command
Although not always appropriate, you may sometimes be able to use the merge
subtree command to merge or append directories. The merge
subtree command combines step 1 (dump subtree) and step 2
(merge file) of a merge operation into a single command. See Section 9.4.2, ''Basic Merge and Append Operations'' for information on how to use these commands
individually.
merge subtree command when you are sure that the following two
conditions are satisfied: No duplicate names exist in the source and target directories.
All clearinghouses that store master replicas of affected directories (at both the source and target locations) are running and reachable when you enter the command.
If a duplicate name is detected, or if any affected clearinghouse cannot be reached while the
merge subtree command is in progress, the affected entries are not
merged. In this case, the merge subtree command creates a named interim
file or failures file with a randomly generated name in the current directory.
Errors are reported only to your screen.
If the merge operation is incomplete, you can delete the partially merged information at the target location. Then reenter the command after you delete any duplicate names and are certain that connectivity to the affected clearinghouses can be maintained.
Example
merge subtree command (which produces the same result as steps 1
and 2 in Section 9.4.2.1, ''Performing a Basic Merge Operation'') merges the
.eng directory with the .rnd directory. This example
assumes that no duplicate names exist and the master replicas of all affected
directories are reachable.
dns> merge subtree .eng into subtree .rnd
9.4.4. Handling Clearinghouse Object Entries
Merge and append operations affect only directories, application-defined object entries, node
object entries, and groups. They do not affect clearinghouse object entries or the
actual clearinghouses those object entries represent. Any clearinghouse object
entries that exist in the directory or subtree you specify in a dump
subtree command are not copied to the interim file. Clearinghouse object
entries cannot be merged because to do so would interrupt the connectivity of the
namespace.
After a merge operation, do not delete a clearinghouse object entry, and the source directory in which it resides, unless you also intend to abandon use of the clearinghouse that the clearinghouse object entry represents.
If a directory that you merge contains a clearinghouse object entry (and you want to preserve
the associated clearinghouse), you cannot delete the directory and replace it with a
single soft link. Instead, you must delete only the contents of the directory
(except the clearinghouse object entry) and replace each name with a soft link of
the same name to redirect lookups to the target location. To save time and effort,
you can use the replace subtree command to complete these tasks with a
single command. The replace subtree command deletes only a directory's
contents (except for clearinghouse object entries and the directories that contain
them) and creates individual soft links for every name in the source directory that
was merged. These soft links redirect lookups of the names from their old (source)
locations to their new (target) locations. Using this command preserves both the
clearinghouse object entry and the directory that contains it while deleting the
directory's contents and replacing each name with an individual soft link.
9.4.5. Using the Failures File
merge file command's failures to file argument to save a
copy of directory and name information that could not be merged. A failures file can
contain the following information: Duplicate names detected during the merge operation
Names in the source subtree stored in clearinghouses that were not reachable when the command was executing
You can use this information as an index of the names that could not be merged or, when appropriate, you can merge the failures file itself on a subsequent merge operation.
Section 9.4.5.1, ''Handling Duplicate Names'' and Section 9.4.5.2, ''Handling Unreachable Name Failures'' explain how to deal with duplicate names and failures caused when names to be merged are unreachable.
9.4.5.1. Handling Duplicate Names
If the full name of a source directory, object entry, or soft link is identical to a full name
of a target directory, object entry, or soft link, the merge file
command does not merge the duplicate source name. Duplicate names are not
merged, to avoid overwriting and destroying the identical names in the target
directory.
The failures to file argument is especially useful in merge file
commands that specify directories in which you know or suspect that duplicate
names exist. During execution, the merge file command displays any
duplicate names on your screen and copies them to the failures file.
Delete the duplicate name in the target directory, then reenter the
merge filecommand and specify the failures file (rather than the interim file) in the command's ifile argument.Delete the duplicate name from the source directory (the directory you dumped to the interim file) and keep only the name in the target directory. If you choose this solution, you do not need to use the failures file.
- Use the
recreatecommands to re-create a duplicate object entry, soft link, or directory in the source subtree as a new object entry, soft link, or directory in the target subtree. Then delete the duplicate name from the source subtree. New names that you create with these commands retain the same writable attribute values as the existing duplicate names on which they are based. The commands do not delete or modify the existing names. An additional ACE is created for the new name (in the target subtree) that grants the creator full access to the name. The new name also inherits any existing default ACEs that may be propagated from the parent directory (the directory in which you recreate the name) in the target subtree. The name that you assign to the new directory, object entry, or soft link in the target subtree must be different from the name of the existing directory, object entry, or soft link in the source subtree.Note
The
recreatecommands are also useful for creating new object entries whose user-defined, writable attributes (with the exception of theDNS$ACSattribute) are identical to those of an existing application-defined object entry. This is especially useful when the existing object entry maintains many writable attributes whose values you would otherwise have to assign individually with theset objectcommand.See Chapter 11, "DECdns Control Program Command Dictionary" for more information on using the
recreatecommands.
9.4.5.2. Handling Unreachable Name Failures
Sometimes, a clearinghouse that stores the master replica of a directory you are trying to
merge is disabled or unreachable when you enter the merge file
command. When this happens, DECdns is unable to create the name at the target
location.
When unable to merge a name for this reason, the merge file command copies the
name to the failures file and displays an error message specifying the name that
could not be created. By maintaining a log of these messages, you can identify
failures that were caused by name conflicts as opposed to failures that were
caused because a name was unreachable or could not be created.
9.4.6. Adjusting Access After a Merge
When the name of a node changes, the principal specifications
(nodename.username) for all users with accounts on that
node also change. All existing ACEs whose principals refer to users on the old node
name are invalid. For example, suppose that directory .eng is merged
with directory .rnd. Before the merge, user smith, whose
login account was on node .eng.orion, was specified as a principal in
ACEs throughout the namespace as .eng.orion.smith. After the merge,
Smith's new principal specification becomes .rnd.orion.smith,
invalidating all existing ACEs that specify .eng.orion.smith as a
principal. Until you replace the old principal with the new principal in these ACEs,
Smith will be denied the required access. You can use the change subtree
access command to substitute a new principal for an invalidated principal
in all affected ACEs with a single command. See Section 5.7.1, ''Modifying Principals''
for information on how to use this command.
Updating Merged Group Names
When you merge an access control group, you change the full DECdns name of the group. Because such a group name is specified as a principal in ACEs throughout a namespace, changing its name renders all ACEs that refer to the group by its original name unable to convey access.
For example, suppose a group named .eng.group1 is specified as a principal in
ACEs throughout the namespace. If you append the .eng directory below
the .rnd directory, the full name of the group becomes
.rnd.eng.group1. Until you update the principal specification in
all ACEs that refer to .eng.group1 with the new name
.rnd.eng.group1, members of the group are denied the access they
need.
change subtree access command to update a group name in the
principal specification of all affected ACEs. The following change subtree
access command replaces the old group name .eng.group1 with
the new group name .rnd.eng.group1 in all ACEs that refer to the old
group name throughout the entire namespace:
dns> change subtree ... access .eng.group1 .rnd.eng.group1
See Section 5.7.1, ''Modifying Principals'' for additional examples of the change subtree
access command.
If a merged group itself is specified as a member of another existing group, you also need to
update the group member specification in that group to reflect the new name of the
group member. For example, suppose the group .eng.group1 is a member of
a group named .rnd.group2. If you merge the .eng directory
with the .rnd directory, the name .eng.group1 becomes
.rnd.group1. However, because group .rnd.group2 still
refers to .eng.group1 as a member, you need to update the old group
member specification with the new group member specification in group
.rnd.group2. Since the old group name (.eng.group1)
may also be a member of other groups in the namespace, you need to update the old
group member specification in all affected groups.
change subtree group member command to replace an existing group
member with a new group member in all access control groups named in the directory
or subtree you specify. The following command replaces the old group member
.eng.group1 with the new group member .rnd.group1 in
all groups in the namespace, including .rnd.group2.
dns> change subtree ... group member .eng.group1 .rnd.group1
See Section 5.6.3, ''Modifying Group Membership'' for additional examples of the change subtree
group member command.
9.4.7. Handling Changed Node Object Entries
When you merge a node object entry, you change the name of the node that the node object entry represents. For most types of object entries, deleting the merged name from the source location and replacing it with a soft link of the same name that points to the new name is sufficient to maintain usability of the object entry. However, because a merged node object entry no longer matches the node name of the actual system, you need to edit the DECnet startup script on the system, resetting the node name in the script to match the new name of the node object entry.
9.4.8. Merging Two Namespaces
You must include the nickname and root directory (.) of the source namespace in step 1 (
dump subtree). See Section 9.4.2.1, ''Performing a Basic Merge Operation''.You must include the nickname of the target namespace in step 2 (
merge file). See Section 9.4.2.1, ''Performing a Basic Merge Operation''.- Both namespaces are likely to contain the following four DECnet node directories created with the node registration tool:
.DNA_Node.DNA_NodeSynonym.DNA_BackTranslation.DTSS_GlobalTimeServers
Because these directories reside directly beneath the root directory in both namespaces, they are duplicate names and are not merged in the initial merge operation. To merge these directories, you must create a separate interim file for each source directory, then merge each file individually with its counterpart in the target namespace.
You may also need to resolve duplicate node synonym conflicts. Backtranslation conflicts should not occur as long as all nodes in the network have unique addresses. (See the DECnet-Plus configuration and network management documentation for your operating system for more information on these directories.)
In step 3 of a namespace merge operation, you must delete all directories that exist directly below the root of the source namespace and replace them with individual soft links that point to their new locations in the target namespace. Be sure to include the target namespace nickname in the soft link's destination name (
DNS$LinkTargetattribute).- After the merge operation, complete the following tasks in the target namespace:
Update the principal specifications in all ACEs associated with merged names. Replace the source namespace nickname with the target namespace nickname. You can use the
change subtree accesscommand to perform this operation with a single command. See Section 5.7.1, ''Modifying Principals'' for information on how to use this command.In the DECnet node directories
.DNA_NodeSynonymand.DNA_BackTranslation, update the destination name of each merged soft link. Replace the source namespace nickname with the target namespace nickname in each soft link'sDNS$LinkTargetattribute. Use theset linkcommand to make these modifications.
9.5. Relocating a Clearinghouse
You need to temporarily disconnect the host server system from the network for repair or for other reasons.
You no longer want the current host system to function as a DECdns server.
You want to move the clearinghouse to a server system that is physically closer on the network to the user groups and applications that use the information contained in the clearinghouse.
- For the server to which you intend to move the clearinghouse (the destination server system), grant the following DECdns access to the clearinghouse:
For the
DNS$Serverprincipal on the server, grant read, write, delete, test, and control access to the clearinghouse and the object. Specify the principal as nodename.dns$server, where nodename is the full DECdns name of the node on which the server is running.For the
systemaccount, grant read, write, delete, test, and control access to the clearinghouse. Specify the principal as nodename.system.
Dissociate the clearinghouse from the server where it is currently running.
Copy the clearinghouse database files from their current location (source server system) to their new location (target server system).
Create a new clearinghouse on the target server system using the same name used on the source server system from which you copied the database files.
Enable the relocated clearinghouse at the target server.
9.5.1. Dissociating a Clearinghouse from Its Host Server System
Disable the clearinghouse with the
disable dns server clearinghousecommand. This command places the clearinghouse in a safe state and prohibits further transactions against it.To use the
disable dns server clearinghousecommand, you must have the NET$MANAGE rights identifier.Use the
clear dns server clearinghousecommand to remove, from the server’s internal memory, the clearinghouse you specify. This ensures that the clearinghouse is not automatically enabled on server restarts (even if the clearinghouse files are not deleted).To use the
clear dns server clearinghousecommand, you must have the NET$MANAGE rights identifier.
Example
disable dns server clearinghouse command disables the clearinghouse
.chicago2_ch.
dns> disable dns server clearinghouse .chicago2_ch
clear dns server clearinghouse command removes knowledge of
clearinghouse .chicago2_ch from the memory of its host server:
dns> clear dns server clearinghouse .chicago2_ch
9.5.2. Copying the Clearinghouse Database Files to the Target Server System
After you disable the clearinghouse and remove knowledge of the clearinghouse from the host server, you must copy the clearinghouse database files to a specific location on the new host server system.
clearinghouse-name
.checkpointnnnnnnnnnnclearinghouse-name
.tlognnnnnnnnnnclearinghouse-name
.version
These files reside, by default, in the SYS$SYSDEVICE:[DNS$SERVER]
account. (If the clearinghouse was created with DNS Version 1 software and later
converted to DECdns Version 2 format, the clearinghouse files reside, by default, in
the SYS$SYSROOT:[DNS$SERVER] account.)
Actual clearinghouse file locations may vary from one system to another if they were created explicitly or moved to a different location. You should verify the existence of these three files before you attempt to copy them to the new host system.
Note
You may sometimes find two
.checkpointnnnnnnnnnn files in the
directory. This can happen as a result of a system crash, or other interruption,
during the clearinghouse's most recent checkpoint operation. If you do find two
files, copy both of them to the target server system. The server software on
that system will automatically reconcile any problem that may exist as soon as
the clearinghouse is enabled at the target server.
9.5.3. Re-creating and Enabling the Clearinghouse on the Target Server
After copying the clearinghouse database files to the appropriate location on the target
server system, use the create dns server clearinghouse command to
recreate the clearinghouse there. Make sure you specify the same clearinghouse name
that was used at the source location.
To use the create dns server clearinghouse command, you must have the
NET$MANAGE rights identifier.
Example
.chicago2_ch were successfully copied (relocated) to the default
file location on server .orion. The following create dns server
clearinghouse command (issued on server .orion) creates a
new clearinghouse named .chicago2_ch on that
server:dns> create dns server clearinghouse .chicago2_ch
.chicago2_ch clearinghouse is successfully created on server
.orion, enter the following enable dns server
clearinghouse command (also at server .orion) to enable the
new clearinghouse:
dns> enable dns server clearinghouse .chicago2_ch
9.6. Deleting a Clearinghouse
The system is scheduled for reallocation or removal from your network.
You no longer want or need the system to function as a DECdns server.
You have relocated the clearinghouse on another server system and need to delete the clearinghouse from its original location.
Before You Delete a Clearinghouse
Make sure you have write and delete access to the clearinghouse you intend to delete and to its clearinghouse object entry. If any read-only replicas exist in the clearinghouse, you also need control access to the directories of which those replicas are members so that DECdns can automatically delete them and rebuild the replica sets of the directories.
Make sure the clearinghouse you intend to delete does not store a master replica of any directory. DECdns does not allow you to delete a clearinghouse that contains a directory's master replica. Before you can delete such a clearinghouse, you must designate another replica in that directory's replica set as the master replica by using the DECdns Control Program
set directory to new epochcommand. If no other replicas of the directory exist, you must create a read-only replica at another clearinghouse and then designate it as the directory's new master replica before you can delete the original master replica from the clearinghouse. See Section 9.2, ''Modifying a Directory's Replica Set'' for information on how to modify a replica's replica type.- Although the
delete dns server clearinghousecommand automatically deletes any read-only replicas, VSI recommends that you delete each replica on the clearinghouse to be deleted. In this way, should the clearinghouse deletion fail, none of these unwanted replicas are left available for data requests. Be sure to leave one replica closest to the root, as required by the clearinghouse rules explained in Appendix B, "Special Clearinghouse Rules".Note
Use the DECdns Control Program
delete replica at clearinghousecommand to delete replicas. Do not exclude replicas (using theexcludequalifier with theset directory to new epochcommand).
To Delete a Clearinghouse
To delete a clearinghouse, first disable it, using the disable dns clearinghouse
command. Then use the delete dns server clearinghouse command. Use both of
these commands locally.
To use these commands, you must have the NET$MANAGE rights identifier.
As part of the delete dns server clearinghouse command, DECdns automatically
deletes all read-only replicas from the clearinghouse and rebuilds the replica sets of
those directories, excluding the deleted replicas from their replica sets. In addition
to deleting the clearinghouse, the command deletes the clearinghouse's associated
clearinghouse object entry. The command may not delete the clearinghouse database files
from the system. You should ensure that they are deleted, as indicated below.
Clearinghouse deletion can take some time to complete. DECdns deletes a clearinghouse only after successfully completing a skulk of the directory that stores its associated clearinghouse object entry. Because a clearinghouse's deletion may not be made known immediately to all replicas of the directory in which its clearinghouse object entry is stored, a deleted clearinghouse may appear to exist in the namespace for some time after you issue the command. You can initiate a skulk on the directory yourself to ensure that all replicas are updated as quickly as possible.
Example
.paris2_ch on your
local server system.
dns>disable dns server clearinghouse .paris2_ch dns> delete dns server clearinghouse .paris2_ch
After You Delete a Clearinghouse
clearinghouse-name
.checkpointnnnnnnnnnnclearinghouse-name
.tlognnnnnnnnnnclearinghouse-name
.version
where nnnnnnnnnn represents an 10-digit number.
They reside, by default, in the SYS$SYSDEVICE:[DNS$SERVER] account. (If
the clearinghouse was created with DNS Version 1 software and later converted to DECdns
Version 2 format, the clearinghouse files reside, by default, in the
SYS$SYSROOT:[DNS$SERVER] account.)
When you delete a clearinghouse, DECdns removes the contents of the
dns_files.txt file (created when the clearinghouse is created and
containing the path to the clearinghouse). This file is located in
SYS$SPECIFIC:[SYSMGR]. Unless you have another clearinghouse on this
server, delete the dns_files.txt file to complete cleanup of all
clearinghouse-related files. If you have another clearinghouse on the server, keep this
file and ensure that it includes a pointer to the remaining clearinghouse only. (The
pointer to the deleted clearinghouse should be removed from the file.)
Chapter 10. Using the DECdns Configuration Program
Changing a clerk's default namespace (Section 10.2, ''Changing a Clerk's Default Namespace'')
Establishing communications with an off-LAN server (Section 10.3, ''Establishing Communications with an Off-LAN Server'')
Configuring a DECdns server in an existing namespace (Section 10.4, ''Configuring a DECdns Server in an Existing Namespace'')
Converting an existing DNS Version 1 clearinghouse to DECdns Version 2 format (Section 10.4.4, ''Converting an Existing DNS Version 1 Clearinghouse to DECdns Version 2 Format'')
Displaying address information for your local node (Section 10.5, ''Displaying Address Information for Your Local Node'')
Section 10.6, ''Creating and Initializing a New Namespace '' explains how to create a new namespace using the
net$configure procedure.
10.1. Running the DECdns Configuration Program
To invoke the DECdns configuration program, enter the following command:
$ @sys$manager:dns$configure.com
DECdns Configuration [1] Set the default namespace [2] Establish communications with an off-LAN server [3] Configure server in an existing namespace [4] Show address information of this node [5] Exit At anytime, you can enter ? for help or ^Z to quit the current operation Pick a number from the list:
| Option | Task |
|---|---|
| 1 | Set the default namespace. |
| 2 | Establish an initial connection from this clerk to a server that exists outside the clerk's LAN. (DECdns server advertisement messages do not span WAN links.) |
| 3 |
Configure a DECdns server (and its clearinghouse) in an existing namespace. Create an additional clearinghouse on an existing server. Convert an existing DNS Version 1 clearinghouse to DECdns Version 2 format. |
| 4 | Display the network service access point (NSAP) address information for the local node. Use this option on server nodes to provide address information needed by the configuration program on clerks to make an initial connection to the server across a WAN link. |
| 5 | Exit the DECdns configuration program and return to the system prompt. |
10.2. Changing a Clerk's Default Namespace
- Choose option 1 ("Set the default namespace") from the configuration menu. The configuration program displays the nickname and namespace creation timestamp (NSCTS) of your current default namespace:
Your default namespace nickname is IAF Your default namespace NSCTS is 00-12-34-56-77-A0-A1-A2-A3-A4-A5-A6-A7-B0 Do you want to change the default namespace?
If you do not want to change your default namespace, enter
noto quit the procedure and return to the configuration menu.If you want to change your default namespace, enteryes. If you respondyes, the configuration program displays a list of the nicknames for all the clerk's known namespaces:Getting server data, please wait ... [ 1] IAF [ 2] NAF [ 3] DOMAIN [ 4] LOCAL [ 5] X500 [ 0] - Reject this list - Pick a number from the list: 2
This list contains all known namespaces for this clerk, including all the namespaces being advertised by servers on the clerk's own local area network (LAN) as well as off-LAN namespaces made known to the clerk through the use of configuration menu option 2 ("Establish communications with an off-LAN server"). This list also includes three special namespace nicknames that are already known to DECdns:
DOMAIN,LOCAL, andX500. Do not select any of these here. You can select theDOMAINandLOCALnamespace nicknames during the DECnet-Plus configuration procedure (NET$CONFIGURE).- Enter the number corresponding to the nickname of the namespace that you want to be your default. After you make a selection, the configuration program displays the nickname and NSCTS of your new default namespace and informs you that the clerk's startup script has been amended so that the clerk uses the new default namespace whenever it is enabled:
sys$manager:net$dns_clerk_startup.ncl changed to use the new default namespace. Your default namespace nickname is NAF. Your default namespace NSCTS is AA-00-04-00-DE-11-A0-AA-F9-6E-56-DE-8E-00.
If the namespace you want to designate as the clerk’s default namespace exists outside the clerk’s LAN, its nickname may not appear on the list. In this case, enter
0to reject the list and return to the main menu. Then choose option 2 ("Establish communications with an off-LAN server"). See Section 10.3, ''Establishing Communications with an Off-LAN Server'' for complete instructions on how to make an initial connection to an off-LAN namespace; then, choose option 1 ("Set the default namespace").
10.3. Establishing Communications with an Off-LAN Server
A clerk learns about all namespaces on its own LAN by listening to advertisements from servers on the same LAN. Because server advertisements do not span wide area network (WAN) links, a clerk cannot automatically learn about namespaces that exist outside the clerk's own LAN. For a clerk to make an initial connection to an off-LAN server, you must provide the clerk with the server's network service access point (NSAP) address, DECnet Phase IVcompatible address, or IP address. This information is saved in the clerk's cache and is used to make subsequent connections to the off-LAN server.
- Contact the namespace administrator of the off-LAN namespace and obtain the DECnet Phase IV-compatible address (if one exists), the NSAP address, or the IP address of some server in that namespace. The system administrator of the off-LAN server can provide the NSAP or DECnet Phase IV-compatible address by using the DECdns configuration program on that system and choosing menu option 4 ("Show address information of this node").
Note
If the off-LAN server is a VAX Distributed Name Service (DNS) Version 1 server on an OpenVMS VAX system, you must have read access to the
SYS$LIBRARY:DNS$NS_DEF_FILE.DATfile on that server. Otherwise, the configuration will fail. Invoke the DECdns configuration program. See Section 10.1, ''Running the DECdns Configuration Program''.
- Choose option 2 ("Establish communications with an off-LAN server") from the configuration menu. The configuration program prompts you for the address information of a server in the off-LAN namespace. You can enter an NSAP address (as shown), a Phase IV-compatible address, or an IP address:
Enter NSAP or Phase IV compatible address or IP address of the server you want to connect to: %x490004aa0004066a1121
After you enter an address, the configuration program displays a list of the namespaces (known to the remote server) that were added to your clerk's list of known namespaces. This information is retained in the clerk's cache and will survive a reboot of the clerk system. For example:Getting server data, please wait ... These namespaces have been added to your clerk's list of known namespaces [ 1] EMV
10.4. Configuring a DECdns Server in an Existing Namespace
Configure a DECdns Version 2 server in an existing namespace (Sections 10.4.1 and 10.4.2).
Create an additional clearinghouse on an existing server (Section 10.4.3, ''Creating an Additional Clearinghouse on an Existing Server'').
Convert an existing DNS Version 1 clearinghouse to DECdns Version 2 format (Section 10.4.4, ''Converting an Existing DNS Version 1 Clearinghouse to DECdns Version 2 Format'').
The first DECdns Version 2 server in a new namespace is usually configured as a result of (or following the process of) configuring DECnet-Plus software. Even if you maintain a small namespace that services only a few nodes, you should consider configuring at least one additional server on another stable system whose connectivity to your network is reliable. By maintaining your namespace on two servers (two clearinghouses), you create a real-time backup of namespace data and ensure that a failure on one of the servers will not interrupt DECdns service. As your namespace and network expand, you may want to configure additional servers to distribute namespace information around the network.
10.4.1. Before You Configure a Server
The most important step is planning how the namespace will be distributed across this and the existing DECdns servers. Will all directories exist in each clearinghouse, or will you distribute them across two or more clearinghouses? To keep this procedure simple, we assume you are configuring the second server and clearinghouse in the namespace, and it will contain a read-only copy of all directories found in the first (already existing) clearinghouse.
- Determine the following information. In the examples given here, the information is obtained from the SYSTEM account on the node with the first clearinghouse.
- What is the first DECdns server node's full name? For example:
$ show log sys$node_fullname "SYS$NODE_FULLNAME" = "WATTS_NS:.DNA_NODE.SHANTI::" (LNM$SYSTEM_TABLE)
- On which node do you want to place the second clearinghouse? For example:
$ show log sys$node_fullname "SYS$NODE_FULLNAME" = "WATTS_NS:.DNA_NODE.META::" (LNM$SYSTEM_TABLE)
- What is the name of the existing clearinghouse? For example:
$ mcr dns$control DNS> dir clear .* DIRECTORY CLEARINGHOUSE WATTS_NS:.* AT 08-APR-2019:10:38:24 shanti_ch - What directories are located in the namespace? Check the root directory first for child pointers, then check all directories under the root for child pointers, as in the following example:
$ mcr dns$control DNS> dir dir .* DIRECTORY DIRECTORY WATTS_NS:.* AT 08-APR-2019:10:41:41 DNA_BackTranslation DNA_NODE DNA_NodeSynonym DTSS_GlobalTimeServers DNS> dir dir .*... DIRECTORY DIRECTORY WATTS_NS:.DNA_BackTranslation.* AT 08-APR-2019:10:46:32 %X49 DIRECTORY DIRECTORY WATTS_NS:.DNA_BackTranslation.%X49.* AT 08-APR-2019:10:46:33 %X0028 %X0037 DIRECTORY DIRECTORY WATTS_NS:.DNA_BackTranslation.%X49.%X0028.* AT 08-APR-2019:10:46:53 DIRECTORY
 WATTS_NS:.DNA_BackTranslation.%X49.%X0037.*
AT 08-APR-2019:10:46:53
DIRECTORY
DIRECTORY WATTS_NS:.DNA_NODE.*
AT 08-APR-2019:10:47:03
DIRECTORY
DIRECTORY WATTS_NS:.DNA_NodeSynonym.*
AT 08-APR-2019:10:47:03
DIRECTORY
DIRECTORY WATTS_NS:.DTSS_GlobalTimeServers.*
AT 08-APR-2019:10:47:04
DIRECTORY
DIRECTORY WATTS_NS:.DNA_BackTranslation.%X49.%X0037.*
AT 08-APR-2019:10:46:53
DIRECTORY
DIRECTORY WATTS_NS:.DNA_NODE.*
AT 08-APR-2019:10:47:03
DIRECTORY
DIRECTORY WATTS_NS:.DNA_NodeSynonym.*
AT 08-APR-2019:10:47:03
DIRECTORY
DIRECTORY WATTS_NS:.DTSS_GlobalTimeServers.*
AT 08-APR-2019:10:47:04 No output means no subdirectories were found here.
Note
The WATTS_NS: example namespace is actually populated with
.DNA_BackTranslation.%X49.*directories for DECnet Phase IV areas 1 through 63, (hexadecimal %X0001 through %X003F). To keep the output reasonably brief, only areas 40 and 55 (hexadecimal %X0028 and %X0037) are shown.
Verify that the DECdns server software and a valid server software license are installed on the system. See Section 10.4.1.1, ''Verifying DECdns Server Software and License Requirements''.
Choose a name for the new clearinghouse. See Appendix A, "DECdns Naming Guidelines".
If you plan to name the clearinghouse in a directory other than the root directory, first verify that the directory allows the storage of clearinghouse object entries. See Section 12.8.2, ''Allowing a Directory to Store Clearinghouse Object Entries''.
- Ensure that the new server has a node object registered in the namespace to be joined. For example, use the following DECdns Control Program command:
dnscp show obj ns:.newsrv
- Ensure that the node object has the correct addressing information. For example, use the following DECdns Control Program command:
dnscp show obj .newsrv dna$towers
The output should match output of the
ncl show addresscommand. Ensure that the DECdns server storing the master replica of the directory to be joined is registered in the namespace and has correct addressing information. Each system should be able to connect to the other (for example, check using the
set hostcommand).Grant required access to the directory in which you intend to name the new clearinghouse (usually the namespace's root directory) on behalf of the
DNS$Serverprincipal and thesystemaccount principal of the new server. See Section 10.4.1.2, ''Granting the Access Required for Clearinghouse Creation''.
Configuring a DECdns Version 2 Server into a DNS Version 1 Namespace
Before you can configure a DECdns Version 2 server into an existing namespace that was created
with DNS Version 1 software, you must prepare the namespace for use by DECnet-Plus. To
accomplish this, you need to configure a DECdns Version 2 clerk into the DNS Version 1
namespace and create and populate a backtranslation directory
(.DNA_BackTranslation) and node synonym directory
(.DNA_Node_Synonym) in the root directory. You must create these directories
to ensure that the DECdns Version 2 clerks and servers you later create are able to
interpret and process the DNS Version 1-style access control entries that are already in use
in the DNS Version 1 namespace. See the appropriate DECnet-Plus installation and
configuration documentation for complete information on how to prepare a DNS Version 1
namespace for use by DECnet-Plus systems. Appendix F, "DECdns Version Interoperability" summarizes
interoperability considerations in an environment with both DNS Version 1 and DECdns Version
2.
10.4.1.1. Verifying DECdns Server Software and License Requirements
DECdns server software must be installed on the system.
The DECdns server software is included as optional software on the DECnet-Plus installation media. Most system managers install the server software as part of the DECnet-Plus installation. Others may choose to postpone the server software installation until they need to configure the system as a DECdns server.
If DECdns server software has not been installed on the system, the following message is displayed when you choose option 3 on the DECdns configuration menu ("Configure server in an existing namespace") to configure the server.The DECdns server software is not installed on this system. If you want to configure a server on the system, type N or ^Z to exit this procedure and install the server software before continuing.
After this message is displayed, you are returned to the main configuration menu.
If the DECdns server software was not installed during the initial DECnet-Plus installation, rerun the DECnet-Plus installation procedure to install the the optional DECdns server software before you try to configure the system as a DECdns server. See the appropriate DECnet-Plus installation documentation for information on how to install the DECdns server software.
A valid server software license must exist on the system.
Before the DECdns configuration program permits you to configure a system as a DECdns server, it verifies that a valid DNS Version 1 or DECdns Version 2 server license exists in the license management database on the system. If a valid license cannot be found, the following message is displayed when you choose option 3 on the DECdns configuration menu ("Configure server in an existing namespace") to configure the server.No DECdns server license is present. If you want to install a server on this system, type N or ^Z to exit this procedure and install a license before continuing.
If you purchased but never installed a DECdns Version 2 server software license, invoke the License Management Facility (LMF) and install the license before you try to configure the system as a DECdns server. See the LMF documentation for complete information on how to install a DECdns server license. (If the system is currently configured as a DNS Version 1 server or, if you are creating an additional clearinghouse on an existing DECdns Version 2 server, a valid server license should already exist on the system.)
Note
The DECdns server software is not installed on this system. If you want to configure a server on the system, type N or ^Z to exit this procedure and install the server software and a valid license before continuing.
10.4.1.2. Granting the Access Required for Clearinghouse Creation
To successfully create a clearinghouse and perform subsequent clearinghouse operations, the
DNS$Server principal and the system account principal on the server system
that you intend to configure must have sufficient access to the directory (usually the
root) in which you intend to name the new clearinghouse. You must grant this access before
you configure the server.
For the
DNS$Serverprincipal on the server, grant read, write, delete, and control access to the directory in which you intend to name the new clearinghouse. Specify the principal as nodename.dns$server, where nodename is the DECdns full name of the node on which the server is running.For the
systemaccount of the node, grant control access to the directory in which you intend to name the new clearinghouse. Specify the principal as nodename.system
You must enter the add directory access commands to grant this access from an
account that has control access to the directory in which you intend to name the
clearinghouse.
Example
DNS$Server
and system principals to the root directory of the namespace in which a new
clearinghouse on node .dna_node.meta will be created: Note that if any
replica of the directory in which you intend to name the new clearinghouse is stored on a
VAX Distributed Name Service (DNS) Version 1 server (on a DECnet Phase IV node),
additional access is required. See the section called “Additional Access Required for Interoperation with DNS Version
1 Servers” for more information. - The following command (entered from an account that has control access to the root directory) grants read, write, delete, and control access to the root directory (
.) for theDNS$Serverprincipal on node.dna_node.meta.dns> add directory . access .dna_node.meta.dns$server for r,w,d,c
- The following command (entered from an account that has control access to the root directory) grants read, write, delete, and control access to the root directory for the
systemaccount on node.dna_node.meta.dns> add directory . access .dna_node.meta.system for r,w,d,c
Additional Access Required for Interoperation with DNS Version 1 Servers
add access commands (from an account with control access to the
root directory) to create the required Version 1-style ACEs:
dns> add directory . access dna_node.meta::dns$server for r,w,d,c dns> add directory . access dna_node.meta::system for c
Appendix F, "DECdns Version Interoperability" summarizes interoperability considerations in an environment with both DNS Version 1 and DECdns Version 2.
10.4.2. Configuring the Server
To configure the server and create a clearinghouse, follow the steps listed below.
You can examine SYS$SYSTEM:DNS$SERVER.LOG for clearinghouse creation
failures.
- Choose option 3 ("Configure server in an existing namespace") from the configuration menu. The configuration program displays the nickname and NSCTS of this node’s default namespace, and prompts you to enter the DECdns full name of the new clearinghouse that you are about to create on this server. Note that short-form names (local names) are not allowed.
Your default namespace nickname is WATTS_NS Your default namespace NSCTS is 00-12-34-56-77-A0-A1-A2-A3-A4-A5-A6-A7-B0 Enter a name for the clearinghouse that will be created on this node. If you want to join a namespace other than your default namespace, include the namespace nickname as part of the full name. If the namespace nickname is ambiguous, use the NSCTS instead of the nickname. You must have appropriate access to the DECdns directory in which this clearinghouse will reside. See DECdns Management for more information. Enter full name of new clearinghouse (include leading dot): .Meta_CH
- After you enter a clearinghouse name, the configuration program prompts you to enter the name of the directory that you want be the clearinghouse's initial replica. Unless you specify otherwise at the prompt, DECdns creates by default a replica of the directory in which you named the new clearinghouse (see step 1) and stores the replica in the clearinghouse as its initial replica. This directory is displayed as the default response to the prompt. For example, because the clearinghouse name
.Meta_CHwas entered in step 1 of this sample procedure, the root directory [.] is shown as the default response in this step.Enter the name of the directory that is to be stored in the clearinghouse as the initial replica. The directory name must be closer to the root (have fewer simple names) than the clearinghouse name. The default is the parent directory of the clearinghouse. Enter replica full name (include leading dot) [.]:
If you named the clearinghouse in the root directory (such as
.Meta_CHas shown in step 1), you must press Return to accept the default response of root directory[.].If you named the new clearinghouse in a directory other than the root directory, you can press Return to accept the parent directory of the directory that you specified in step 1 as the initial replica, or enter the name of another directory.
If you specify an initial replica directory other than the parent directory of the clearinghouse name (the default), you must set the
DNS$InCHNameattribute for that directory totrue(even if you do not intend to store clearinghouse object entries in it). This attribute defines whether the directory or its descendants can store clearinghouse names. Use the DECdns Control Programset directorycommand to set this attribute. - After you specify the name of the new clearinghouse's initial replica, the configuration program prompts you to select the directory version for all directories that you will later create in this clearinghouse. If you intend to create only DNS Version 1 directories, set the directory version value to
V1.0.0. Set the value toV2.0.0to create only DECdns Version 2 directories. Whether you set the value to V1.0.0 or V2.0.0, you can still store both Version 1 and Version 2 directories in the clearinghouse. However, if you set the value to V2.0.0, you cannot replicate the directories you create in this clearinghouse in any Version 1 clearinghouse. Because a setting of V1.0.0 allows you to create directories and replicate them in both Version 1 and Version 2 clearinghouses, the default response to the prompt is V1.0.0 (option 1).Enter the directory version for the clearinghouse. This affects all replicas stored in this clearinghouse. If you plan to replicate any of the directories created at this clearinghouse into a V1 clearinghouse, you must choose V1.0.0. Otherwise, choose V2.0.0. [1] V1.0.0 [2] V2.0.0 Pick a number from the list [1]:
To create only Version 1 directories, press Return to accept the default response, option 1. To create only Version 2 directories, choose option 2.
After you make your selection, the configuration program creates the server and clearinghouse, displays an informational message, then returns you to the main configuration menu. The following message is displayed:Server created. Clearinghouse files are in sys$sysdevice:[dns$server].
If the clearinghouse creation fails, double check that the required access (as described in Section 10.4.1.2, ''Granting the Access Required for Clearinghouse Creation'') exists on the directory in which you are trying to name the new clearinghouse. If the access is correct, see Section 12.8, ''Handling Clearinghouse Creation Failures'' for more information on handling clearinghouse creation failures.
If any problem occurs at this step, verify that the new clearinghouse exists by using the DECdns Control Program command shown in the following example:$ mcr dns$control DNS> dir clear meta_ch DIRECTORY CLEARINGHOUSE WATTS_NS:.meta_ch AT 08-APR-2019:10:38:24 meta_ch Finally, replicate any directories from existing servers into the new clearinghouse, as explained in Section 7.2, ''Creating a Replica''. You can designate any of these replicas to be master replicas by modifying the replica set, as explained in Section 9.2, ''Modifying a Directory's Replica Set''.
This step may require a large number of commands. VSI recommends that you create a command file similar to the one in Section G.2 of Appendix G, "Sample Command Files" to complete the process.
10.4.3. Creating an Additional Clearinghouse on an Existing Server
Although the DECdns configuration program supports the creation of multiple clearinghouses on one server, VSI does not recommend permanently locating two or more clearinghouses on the same server. A server cannot load-balance incoming clerk requests to multiple clearinghouses. Also, multiple clearinghouses demand more than a proportionate increase of system resources when compared to an individual clearinghouse and will compromise the performance of the one server on that system. As a rule, you should create a second clearinghouse on a server only when another dedicated server system is not available, or to temporarily relocate a functional clearinghouse when the server system on which the clearinghouse usually resides is being removed from your network.
If you must create an additional clearinghouse on an existing server, follow the procedure described in Sections 10.4.1 through 10.4.2. Be sure to choose a different name for the new clearinghouse than the name of the clearinghouse that is already operating on the server system.
10.4.4. Converting an Existing DNS Version 1 Clearinghouse to DECdns Version 2 Format
If you are already using a namespace (created with Version 1 of the VAX Distributed Name Service (DNS) software running on DECnet Phase IV), you may want to convert one or more of your existing DNS Version 1 clearinghouses to DECdns Version 2 format. By doing so, you can take advantage of the improved performance offered by DECdns Version 2. You can also continue to use your existing namespace rather than abandoning it and create a new namespace when you upgrade your networking software to DECnet-Plus for OpenVMS.
Note
Before you try to convert a DNS Version 1 clearinghouse to DECdns Version 2 format,
make sure the namespace served by the Version 1 clearinghouse has been prepared for use
by DECnet-Plus. A backtranslation directory (.DNA_BackTranslation) and node
synonym directory (.DNA_Node_Synonym), containing the node names of all
nodes participating in the Version 1 namespace, must exist in the root directory. This
is necessary to ensure that the DECdns Version 2 servers you later create can interpret
and process the DNS Version 1-style access control entries that are already in use in
the DNS Version 1 namespace. If these directories do not exist, be sure to create and
populate them before you attempt to convert any DNS
Version 1 clearinghouses to DECdns Version 2 format. See the appropriate DECnet-Plus
installation and configuration documentation for complete information on how to
configure the first DECdns Version 2 clerk into an existing DNS Version 1 namespace. See
the appropriate DECnet-Plus network management documentation for information on how to
create and populate the node synonym and backtranslation directories.
- Log in to the server node that stores the DNS Version 1 clearinghouse you want to convert to DECdns Version 2 format. Use the DNS Version 1 control program (DNS$CONTROL)
add accesscommand to grant the following access on behalf of thesystemaccount:Grant read, write, delete, test, and control access to the DNS Version 1 clearinghouse you intend to convert. Specify the principal of this ACE in DNS Version 1-style format (nodename::
system).Grant read, write, delete, test, and control access to the directory in which the clearinghouse is named. Specify the principal of this ACE in DNS Version 1-style format (nodename::
system).Grant read, write, delete, test, and control access to the DNS Version 1 clearinghouse you intend to convert. Specify the principal of this ACE with the DECnet Phase V full name (
.dna_node.nodename.system).Grant read, write, delete, test, and control access to the directory in which the clearinghouse is named. Specify the principal of this ACE with the full DECnet Phase V name (
.dna_node.nodename.system).
For example, if you intend to convert a clearinghouse named.eng.London_chthat resides on a Phase-IV node namedtrue, enter the following four commands:dns> add access true::system clearinghouse .eng.London_ch /rights=(r,w,d,t,c)
dns> add access true::system directory .eng /rights=(r,w,d,t,c)
dns> add access .dna_node.true.system clearinghouse .eng.London_ch - _> /rights=(r,w,d,t,c)
dns> add access .dna_node.true.system directory .eng /rights=(r,w,d,t,c)
You need to grant these access rights to ensure that thesystemaccount on the server has sufficient access to the clearinghouse you want to convert, and to the directory in which the clearinghouse is named (.engin this example).Note
As a precaution, before you proceed to the next step, VSI recommends that you create a replica of each directory stored in the Version 1 clearinghouse you intend to convert. In the event the clearinghouse conversion fails, these directories will remain available.
- While logged in to the server node that stores the DNS Version 1 clearinghouse you want to convert, perform the following steps:
Install DECnet-Plus for OpenVMS software on the node and configure it as a DECdns Version 2 clerk in the namespace served by the DNS Version 1 server that you want to convert. See VSI DECnet-Plus for OpenVMS Installation and Configuration or DECnet-Plus for OpenVMS Applications Installation and Advanced Configuration Guide for complete information on how to configure a DECdns clerk.
- On the clerk system, at the OpenVMS system prompt, enter the following command to invoke the DECdns configuration program:
$ @ sys$manager:dns$configure.com
- Choose menu option 3 ("Configure server in an existing namespace"). When the configuration program detects the presence of the Version 1 clearinghouse, the following message is displayed:
You must convert your version 1 DECdns data so that you can use it with version 2 DECdns. If you have already converted your data, press Return. DNS Version 1 clearinghouse(s) database exists on this system. Do you want to convert the Version 1 data to DECdns Version 2 format [n]:
Enter
Yto convert the DNS Version 1 clearinghouse.Before the DECdns configuration program initiates the conversion process, it verifies that the following server system parameters are satisfied:Available free page count is 2.5 times that of the Version 1 clearinghouse database you intend to convert.
User quota
pgflquois set to permit the use of 2.5 times that of the Version 1 clearinghouse database.SYSGEN parameter
virtualpagcntis set high enough to allow the database conversion process to allocate 2.5 times that of the Version 1 clearinghouse database.
If any of these system criteria are not satisfied, the DECdns configuration program displays a warning message to inform you about which parameters need to be reset and to what degree. (See Section 10.4.5, ''Clearinghouse Conversion Warnings and Informational Messages'' for examples of these warning messages.) The clearinghouse conversion may complete successfully with less than the recommended memory. In the event that the conversion cannot complete, processing stops. If this occurs, you should reset any parameters for which you received a warning message before you retry the conversion.
In addition to these parameter recommendations, the DECdns configuration program requires that the available disk space on the server system is equal to the size of the DNS Version 1 clearinghouse database you intend to convert. If this requirement is not satisfied, the conversion process fails and the DECdns configuration program displays an informational message specifying the number of free blocks required to successfully perform the clearinghouse conversion. See Section 10.4.5, ''Clearinghouse Conversion Warnings and Informational Messages'' for an example of this informational message.
If the available disk space requirement is satisfied, no informational message is displayed, and the conversion process continues as shown in the following example output:Conversion proceeding - please wait. Beginning to convert clearinghouse TRW0306_NS:.trw0306_ch Elapsed=0 00:00:23.33 CPU=0:00:10.81 DIRs done=44% MEM Kbytes=501 Elapsed=0 00:00:44.12 CPU=0:00:27.01 DIRs done=86% MEM Kbytes=1004 Successfully converted clearinghouse TRW0306_NS:.trw0306_ch Clearinghouse database conversion completed successfully. After backing up the following version 1 server data files, please delete: SYS$SYSTEM:DNS$GLOBAL.GBL SYS$SYSROOT:[DNS$SERVER]trw0306_ch.DNS,.GBL Elapsed=0 00:00:59.27 CPU=0:00:32.59 DIRs done=100% MEM Kbytes=1004 Type Return to continue:- Press Return at the prompt to initiate the server creation process.
Server creation proceeding - please wait. %RUN-S-PROC_ID, identification of created process is 0000005A %PURGE-I-NOFILPURG, no files purged %PURGE-I-NOFILPURG, no files purged Create Node 0 DNS Server at 2019-03-24-15:16:48.424-05:00I0.629 Enable Node 0 DNS Server at 2019-03-24-15:17:00.301-05:00I0.513
When the server creation completes, the configuration program displays the following message and then returns you to the main configuration menu.Server created and enabled successfully.
Exit the DECdns configuration program; then, from the system prompt, invoke the
decnet_registerutility. Choose menu option 2 to re-register the newly converted server node as a DECnet-Plus node. For complete information on how to use thedecnet_registernode registration tool, see VSI DECnet-Plus for OpenVMS Network Management Guide.
10.4.5. Clearinghouse Conversion Warnings and Informational Messages
OpenVMS Paging Recommendations
Warning>> You may need your page file quota to be 10327 during conversion.
Warning>> You may require up to 10327 contiguous free pages during conversion.
>> This may mean that you need to add an additional pagefile.Warning>> You may need to increase your VIRTUALPAGECNT to 10327 to complete conversion. Warning>> You may need your page file quota to be 10327 during conversion.
If any of these warnings is displayed, the clearinghouse conversion may still succeed. However, VSI recommends that you stop the conversion process and reset the appropriate system/process parameters before you continue. See your OpenVMS system management documentation for complete information on how to reset these parameters.
Free Disk Space Requirement
ERROR>> Insufficient disk space on DKA100: disk;
>> you need 4131 free blocks there for the conversion.
>> Please make disk space available before continuing.
Elapsed=0 00:00:10.75 CPU=0:00:02.47 DIRs done= 0% MEM Kbytes=13
%DNS-F-CONVERT Cannot convert V1 dataBefore you again attempt to convert the clearinghouse, you must increase the available disk space on the system to the number of free blocks specified in the message.
10.4.6. Reconfiguring a DECdns Server
If you want to reconfigure an existing server to have a new namespace, the reconfiguration process does not replace or delete the DECdns files used by the existing server. You must delete these files before the proper namespace pointers can take effect. For more information, see Section 6.7.2, ''Deleting a Server''.
10.5. Displaying Address Information for Your Local Node
If your node is a server, system managers of clerks that want to participate in your server's namespace, but exist across WAN links, may contact you to obtain your server node's NSAP address. Clerks need this information to make an initial connection to your server.
This node's NSAP is %x490004aa0004066a1120 This node's NSAP is %x490004aa0004066a1121
The display will contain one or more NSAP addresses, each address corresponding to one of the protocols that the server runs (TP4, NSP, and so on). If more than one NSAP is listed, make sure you inform the manager of the clerk system of all addresses. At least one address is likely to correspond to a protocol that the clerk can use to make its initial connection to your server. See VSI DECnet-Plus for OpenVMS Network Management Guide for more information on NSAP addressing.
10.6. Creating and Initializing a New Namespace
You only need to create a new DECdns namespace if you are configuring the first DECdns server for the network (where no DECdns namespace exists) or if you are creating an additional namespace. When you create a namespace, you need a namespace nickname and clearinghouse name. The namespace nickname is part of the full name of every system configured subsequently in the network and should be unique to your network. The namespace nickname that you specify becomes the actual name of the namespace.
Note
DECnet-Plus does not support the creation of more than one namespace on a single DECdns server system. If you need more than one namespace in your network, you must initially create each namespace on its own DECdns server system.
You create and initialize a namespace during the DECnet-Plus advanced configuration procedure. See DECnet-Plus for OpenVMS Applications Installation and Advanced Configuration Guide for details.
Before creating and initializing a new namespace, first configure the server to use the Local namespace, then check that the DECnet software works properly.
To create a new namespace while configuring a DECnet-Plus system:
The DECdns server software must be installed on the system.
DECdns must be specified as one of the naming services configured on the system.
In addition, VSI highly recommends you to refer to the VSI DECnet-Plus Planning Guide. Once you understand what is involved in creating a namespace, you can configure the server node to use the new DECdns namespace and create and initialize that namespace.
Use the DECnet-Plus configuration procedure (SYS$MANAGER:NET$CONFIGURE.COM)
and select option 2 ("Change Naming Information") to create a new namespace. Choose the DECdns
directory service as the primary directory service to be used on the system. The configuration
procedure then prompts you for other information required for creating a namespace and the
initial namespace directories.
The procedure instructs you to use the decnet_register tool to:
Create a command file to automatically register previously defined Phase IV nodes. Execute this command file before using the
decnet_registertool to manually register any other nodes.Create any directories needed for node names that should be registered immediately, according to your namespace design. (This includes the node on which you are currently running if the node is not in the root directory of the new namespace or if the configuration procedure indicates it was not able to register the node automatically.)
Add backtranslation directories for any non-Phase-IV areas/IDPs. Failure to do so will lead to backtranslation failures. Once you have added the necessary backtranslation directories, you may need to use the ncl flush session control naming cache entry "*" command.
Change the local node’s registered name from its default name to its final full name. (The local node is registered as a Phase IV node with a default name when you execute the Phase IV node registration command file mentioned above.)
Change the currently registered names of other nodes from their default names to their final full names when appropriate (for example, when they are upgraded to run DECnet-Plus software).
- Continue to use the
decnet_registertool to:Create any additional directories you need for node names, as new nodes are brought up on the network.
Register new nodes as they are brought up on the network.
Add members to the
new_ns:.DNA_Registraraccess control group (where new_ns is the new namespace name).
- Use the DECdns Control Program to:
Add specific access control to individual directories, objects, and soft links.
Create replicas of directories (see Section 7.2, ''Creating a Replica'').
For more information about the decnet_register tool, see the
VSI DECnet-Plus for OpenVMS Network Management Guide.
Chapter 11. DECdns Control Program Command Dictionary
This chapter describes the DECdns Control Program (DNSCP) commands. The DECdns Control Program is an interface you can use to manage the components of DECdns and the contents of the namespace.
Table 11.1, ''DECdns Control Program Commands'' lists the DNSCP commands grouped by entity.
| Entity | Command | Function |
|---|---|---|
| Child | Create | Creates a child pointer |
| Delete | Deletes a child pointer | |
| Directory | Displays a list of child pointers | |
| Show | Displays a child pointer's attribute information | |
| Clearinghouse | Add Access | Adds an access control entry to a clearinghouse's access control set |
| Directory Remove Access |
Displays a list of clearinghouses Deletes an access control entry from a clearinghouse's access control set | |
| Show | Displays a clearinghouse's DNSCP attribute
information | |
| Show Access | Displays a clearinghouse's access control set | |
| Directory | Add Access | Adds an access control entry to a directory's access control set |
| Create | Creates a directory | |
| Delete | Deletes a directory | |
| Directory | Displays a list of directories | |
| Recreate | Creates a copy of a directory with a new full name | |
| Remove Access | Deletes an access control entry from a directory's access control set | |
| Set | Modifies directory characteristics | |
| Set to New Epoch | Modifies a directory's replica set | |
| Set to Skulk | Initiates a skulk | |
| Show | Displays a directory's attribute information | |
| Show Access | Displays a directory's access control set | |
| DNS Clerk | Create | Creates a clerk |
| Delete | Deletes a clerk | |
| Disable | Stops operation of the clerk | |
| Dump | Dumps the clerk cache | |
| Enable | Starts the clerk | |
| Set | Modifies clerk characteristics | |
| Show | Displays a clerk's attribute information | |
| DNS Clerk Known Namespace | Create | Adds a namespace to the list of namespaces in a clerk's cache |
| Delete | Removes a namespace from the list of namespaces in the clerk's cache | |
| Set | Modifies a known namespace name attribute | |
| Show | Displays a namespace's attribute information | |
| DNS Clerk Manual Name Server | Create | Creates knowledge in the clerk's cache about a server that exists across the wide area network (WAN) |
| Delete | Deletes knowledge from the clerk's cache about a server that exists across the WAN | |
| Show | Displays knowledge in the clerk's cache about a server that exists across the WAN | |
| DNS Clerk Remote Clearinghouse | Show | Displays a remote clearinghouse's attribute information |
| DNS Server | Create | Creates a server |
| Delete | Deletes a server | |
| Disable | Stops operation of the server | |
| Enable | Starts the server | |
| Initialize | Creates a new namespace and the first server in the namespace | |
| Show | Displays a server's attribute information | |
| DNS Server Clearinghouse | Clear | Removes knowledge of a clearinghouse from a server |
| Create | Creates a clearinghouse | |
| Delete | Deletes a clearinghouse | |
| Disable | Stops operation of a clearinghouse | |
| Enable | Starts a clearinghouse | |
| Show | Displays a clearinghouse's Network Control Language (NCL) attribute information | |
| Group | Add Access | Adds an access control entry to a group's access control set |
| Add Member | Adds a member to an existing group | |
| Create |
Creates a group | |
| Delete | Deletes a group | |
| Directory | Displays a list of groups | |
| Remove Access | Deletes an access control entry from a group's access control set | |
| Remove Member | Deletes a member from an existing group | |
| Set | Modifies group characteristics | |
| Show | Displays a group's attribute information | |
| Show Access | Displays a group's access control set | |
| Link | Add Access | Adds an access control entry to a soft link's access control set |
| Create | Creates a soft link | |
| Delete | Deletes a soft link | |
| Directory | Displays a list of soft links | |
| Recreate | Creates a copy of a soft link with a new full name | |
| Remove Access | Deletes an access control entry from a soft link's access control set | |
| Replace | Replaces a soft link to redirect lookups | |
| Set | Modifies a soft link's characteristics | |
| Show | Displays a soft link's attribute information | |
| Show Access | Displays a soft link's access control set | |
|
Object | Add | Adds a value to an object's modifiable, set-valued attribute\ |
| Add Access | Adds an access control entry to an object entry's access control set | |
| Create | Creates a new object entry | |
| Delete | Deletes an object entry | |
| Directory | Displays a list of object entries | |
| Recreate | Creates a copy of an object entry with a new full name | |
| Remove | Deletes a value from an object's application-defined, set-valued attribute | |
| Remove Access | Deletes an access control entry from an object entry's access control set | |
| Replace | Replaces an object entry with a soft link | |
| Set | Changes the value of an object's modifiable, single-valued attribute | |
| Show | Displays an object entry's attribute information | |
| Show Access | Displays an object entry's access control set | |
|
Replica |
Create |
Adds a replica of an existing directory to a clearinghouse |
| Delete | Removes a replica of a directory from a clearinghouse | |
| Show | Displays a replica's attribute information | |
|
Subtree | Change Access | Changes a principal in a subtree's access control entries |
| Change Group Member | Changes a group member in all access control groups containing that member in a subtree | |
| Delete | Deletes a subtree and its contents | |
| Dump | Dumps a subtree and its contents into an interim file | |
| Merge | Dumps a directory and then merges its contents into an existing subtree | |
| Merge File | Merges the contents of a file into an existing subtree | |
| Remove Access | Removes a principal from the access control set of a particular directory and its contents | |
| Remove Group Member | Removes a member from all groups in a subtree | |
| Replace | Replaces a subtree with soft links pointing to the new subtree location |
add clearinghouse access
add clearinghouse access — Adds an access control entry (ACE) to a clearinghouse's access control set (ACS).
Format
add clearinghouse access clearinghouse-name access
principal [as group] [for] access Arguments
- clearinghouse-name
The name of the clearinghouse to which access is being added.
- principal
The principal for whom access is being added. You can specify a principal as a group name, a collection of principals denoted with wildcards (for example,
.org.name*), or an individual name in the format nodename.username. To specify a DNS Version 1-style principal, use the format nodename::username. The phraseas groupindicates the specified principal is a group. You cannot use this phrase with wildcard principal names.- access
The access rights for the specified principal. Rights are read, write, delete, test, control, and none, and you can specify them as
r,w,d,t,c, andnon. Separate multiple access rights with commas.
Description
| Read | The principal can look up the clearinghouse by name and read any attribute of the clearinghouse. |
| Write | The principal can change the replica type of any replica stored in the clearinghouse, create or delete replicas in the clearinghouse, alter any modifiable attribute of the clearinghouse (except the ACS). |
| Delete | The principal can delete the clearinghouse. |
| Test | The principal can check the value of any attribute of the clearinghouse. |
| Control | The principal can alter the clearinghouse's ACS and move the clearinghouse to another server. |
| None | The principal has no access rights. |
For more information on defining and modifying access control, refer to Chapter 5, "Managing DECdns Access Control".
Access Rights
You must have control access to the clearinghouse whose access control set (ACS) is being modified.
Example
The following command grants an access control group named
.testgroup read, write, test, and control access to the
.paris2_ch clearinghouse.
dns> add clearinghouse .paris2_ch access .testgroup - _> as group for r, w, t, c
add directory access
add directory access — Adds an access control entry (ACE) to a directory's access control set (ACS).
Format
add directory access directory-name [access-option]
access
principal [as group] [
for]
access Arguments
- directory-name
The full name of the directory.
- access-option
- The extent to which the access rights apply. Possible access options are
defaultandnopropagate. Enter one or both of them. If you enter both options, separate them with a comma. If you omit this argument, the ACE applies to the directory and automatically propagates to subsequent child directories.defaultIndicates that the ACE applies to all new object entries created in this directory. Access to already existing entries is not affected. A default ACE applies only to the contents of the directory, not to the directory itself. If you do not use the default option, the ACE applies to the directory. nopropagatePrevents the access rights in this ACE from being inherited by subsequently created child directories of the specified directory. When used in conjunction with default, prevents the ACS from being inherited by the contents of future children of the specified directory.Nopropagateis optional; if you do not use it, access rights propagate automatically. - principal
The principal for whom access is being added. You can specify a principal as a group name, a collection of principals denoted with wildcards (for example,
.org.name*), or an individual name in the format nodename.username. To specify a DNS Version 1-style principal, use the format nodename::username. The phraseas groupindicates the specified principal is a group. You cannot use this phrase with wildcard principal names.- access
The access rights for the specified principal. Rights are read, write, delete, test, control, and none, and you can specify them as
r,w,d,t,c, andnon. Separate multiple access rights with commas.
Description
| Read | The specified principal can look up the directory by name, list the contents of the directory, and read any directory attribute. |
| Write | The specified principal can create object entries or soft links in the directory, skulk the directory, and create, modify, or delete child directories. |
| Delete | The specified principal can delete the directory or any name in the directory. |
| Test | The specified principal can check the value of any attribute of the directory. |
| Control | The specified principal can perform any operation on any object entry, soft link, or child in the directory, as well as read or modify any attribute of the directory (including its ACS), and modify the replica type of a replica or the epoch value of the directory. |
| None | Does not grant the specified principal any access rights. |
For more information on defining and modifying access control, refer to Chapter 5, "Managing DECdns Access Control".
Access Rights
You must have control access to the directory whose ACS is being modified. You also need write access to the clearinghouse.
Example
The following command grants read and write access for the .DNS_Admin
administration group to the .sales directory.
dns> add directory .sales access .DNS_Admin as group for r,w
add group access
add group access — Adds an access control entry (ACE) to a group's access control set (ACS).
Format
add group group-name access
principal [as group
] [for]
access Arguments
- group-name
The full name of the group.
- principal
The principal for whom access is being added as a member of the group. You can specify a principal as a group name, a collection of principals denoted with wildcards (for example,
.org.name*), or an individual name in the format nodename.username. To specify a DNS Version 1-style principal, use the format nodename::username. The phraseas groupindicates the specified principal is a group. You cannot use this phrase with wildcard principal names.- access
The access rights for the specified principal. Rights are read, write, delete, test, control, and none, and you can specify them as
r,w,d,t,c, andnon. Separate multiple access rights with commas.
Description
| Read | The principal can look up the group by name and read any attribute of the group. |
| Write | The principal can change any modifiable group attribute except the ACS. |
| Delete | The principal can remove the member from the set of group members |
| Test | The principal can check the value of any attribute of the group. |
| Control | The principal can alter the group's ACS. |
| None | The principal does not have access rights. |
For more information on defining and modifying access control, refer to Chapter 5, "Managing DECdns Access Control".
Access Rights
You must have control access to the group whose ACS is being modified.
Example
The following command grants user .sales.deneb.smith read access to
the .DNS_admin group.
dns> add group .DNS_admin access .sales.deneb.smith for r
add group member
add group member — Adds a member to an existing group.
Format
add group group-name member [=] principal [as group]Arguments
- group-name
The full name of the group.
- principal
The principal that is being added as a member of the group. You can specify a principal as a group name, a collection of principals denoted with wildcards (for example,
.org.name*), or an individual name in the format, nodename.username. To specify a DNS Version 1-style principal, use the format nodename::username. The phraseas groupindicates the specified principal is itself a group. You cannot use this phrase with wildcard principal names.
Description
This command adds a member to an existing group.
Access Rights
You must have write access to the group to which you are adding a member.
Example
The following command adds the member smith on node
.sales.orion to the admin group.
dns> add group .admin member .sales.orion.smith
add link access
add link access — Adds an access control entry (ACE) to a soft link's access control set (ACS).
Format
add link link-name access
principal [as group] [for]
access Arguments
- link-name
The full name of the soft link.
- principal
The principal for whom access is being added. You can specify a principal as a group name, a collection of principals denoted with wildcards (for example,
.org.name*), or an individual name in the format, nodename.username. To specify a DNS Version 1-style principal, use the format nodename::username. The phraseas groupindicates the specified principal is a group. You cannot use this phrase with wildcard principal names.- access
The access rights for the specified principal. Rights are read, write, delete, test, control, and none, and you can specify them as
r,w,d,t,c, andnon. Separate multiple access rights with commas.
Description
| Read | The principal can look up the soft link by name, read any soft link attribute, and perform wildcard lookups. |
| Write | The principal can change any modifiable attribute except the ACS. |
| Delete | The principal can delete the soft link. |
| Test | The principal can check the value of any attribute of the soft link. |
| Control | The principal can alter the soft link's ACS. |
| None | The principal does not have access rights. |
For more information on defining and modifying access control, refer to Chapter 5, "Managing DECdns Access Control".
Access Rights
You must have control access to the soft link whose ACS is being modified.
Example
The following command grants an access control group named .testgroup
read, write, and test access to the soft link .sales.asia.
dns> add link .sales.asia access .testgroup as group for r, w, t
add object
add object — Adds a value to a modifiable, set-valued attribute (including application-defined attributes) of an object entry.
Format
add object object-name
attribute-name [=]
attribute-value Arguments
- object-name
The full name of an object entry.
- attribute-name
The name of a particular attribute. Specify your own attribute name or one of the DECdns-defined attributes. Separate multiple attributes with commas.
- attribute-value
The value of a particular attribute. You can express the values of application-defined attributes as quoted strings, "ps"; hexadecimal strings, %x FF00EE; or concatenations of them in parentheses, (%x0103 "ps").
Description
This command adds a value to a modifiable, set-valued attribute, including application-defined attributes. If the value is already defined for the attribute, no error message is generated. Usually this task is performed through the client application, because the client application defines the name of the attribute and the syntax of its value.
Access Rights
You must have write access to the object entry or control access to the parent directory in which you intend to store the attribute.
Example
The following command adds the value "ps" to the user-defined
set-valued attribute printcap of an object entry named
.sales.east.deskprinter.
dns> add object .sales.east.deskprinter printcap "ps"
add object access
add object access — Adds an access control entry (ACE) to an object entry's access control set (ACS).
Format
add object object-name
access
principal
[as group] [for]
access Arguments
- object-name
The full name of the object entry.
- principal
The principal for whom access is being added. You can specify a principal as a group name, a collection of principals denoted with wildcards (for example,
.org.name*), or an individual name in the format, nodename.username. To specify a DNS Version 1-style principal, use the format nodename::username. The phraseas groupindicates the specified principal is a group. You cannot use this phrase with wildcard principal names.- access
The access rights for the specified principal. Rights are read, write, delete, test, control, and none, and you can specify them as
r,w,d,t,c, andnon. Separate multiple access rights with commas.
Description
| Read | The principal can look up the object entry by name, read any object attribute, and perform wildcard lookups. |
| Write | The principal can change any modifiable attribute except the ACS. |
| Delete | The principal can delete the object entry. |
| Test | The principal can check the value of the object entry. |
| Control | The principal can alter the object entry's ACS. |
| None | The principal does not have access rights. |
For more information on defining and modifying access control, refer to Chapter 5, "Managing DECdns Access Control".
Access Rights
You must have control access to the object entry whose ACS is being modified.
Example
The following command grants read, write, and test access to user
smith on node .sales.orion for an object entry named
.admin.work_disk3.
dns> add object .admin.work_disk3 access .sales.orion.smith for r, w, t
change subtree access
change subtree access — Replaces an existing principal with a new principal in all ACEs associated with the subtree you specify.
Format
change subtree tree-name
[...]
access
old-principal
new-principal
[exclude
entry-type]Arguments
- tree-name
The name of the topmost directory in the subtree. When used without the optional recursion notation (
...), the change applies only to the specified directory and the soft links and objects in that directory. The recursion notation causes the change to additionally apply to all child directories and their contents.- old-principal
The principal that you want to change. You can specify a principal as a group name or an individual name in the format nodename.username. To specify a DNS Version 1-style principal, use the format nodename::username.
- new-principal
The new principal. You can specify a principal as a group name or an individual name in the format nodename.username. To specify a DNS Version 1-style principal, use the format nodename::username.
- entry-type
- One or more of the following arguments to exclude from principal modification: objects, links, or directories. Multiple directories can be excluded in a single command. Use any combination of the following entry-type specifiers, separating multiple arguments with commas:
objectslinksdirectorydirectory-name
Description
This command changes all relevant access control entries (ACEs) associated with
the directory specified in tree-name and all
relevant ACEs associated with that directory's contents. You can use the optional
recursion notation (...) to modify the ACEs associated with all the
child directories and their contents. You can also use the optional
exclude argument to restrict the type of entries affected by this
command.
Access Rights
You must have control and write access to the directory you specify as well as to the contents of the directory. If you use the command recursively, you also need control and write access to all child directories (and their contents) of the directory you specify.
Example
The following command changes the old principal .pjl.smith to the new
principal .ins.smith in all ACEs associated with the
.admin directory and its contents. By using the recursion notation
(...), the command additionally changes the ACEs of all child
directories and their contents.
dns> change subtree .admin... access .pjl.smith .ins.smith
change subtree group member
change subtree group member — Replaces an existing group member's principal specification with a new group member's principal specification in all access control groups named in the directory or subtree you specify.
Format
change subtree tree-name
[...]
group member
old-member
new-member
[exclude directory
directory-name]Arguments
- tree-name
The name of the topmost directory in the subtree. When used without the optional recursion notation, the change applies only to groups in the specified directory. The recursion notation causes the change to additionally apply to groups in all child directories.
- old-member
The name of the existing group member that you want to replace.
- new-member
The new name of the group member.
- directory-name
One or more directories that contain groups you want to exclude from this change. You can exclude multiple directories with a single command. Separate multiple arguments with commas.
Description
This command replaces an existing group member's principal specification with a
new group member's principal specification in all access control groups named in the
directory or subtree you specify. You can use the optional recursion notation
(...) to extend the command's effect to the groups contained in all
child directories of that directory. If you use the command recursively, you can use
the optional exclude directory
directory-name argument to exclude groups named in a particular
directory (and all its child directories) from group member modification. You can
exclude multiple directories in a single command. Specify multiple directories in
the following format:
exclude directory
directory-name, directory
directory-name, directory
directory-name
Access Rights
You must have control access to the group whose member you intend to change. If you use the command recursively, you must have control access to all groups affected by the command.
Example
The following command replaces the old member .pjl.smith with new
member .jmh.smith in all groups in the .admin directory
and its child directories.
dns> change subtree .admin... group member .pjl.smith .jmh.smith
clear dns server clearinghouse
clear dns server clearinghouse — Removes knowledge of the specified clearinghouse from the server's memory.
Format
clear [node
node-id]
dns server clearinghouse
clearinghouse-name Arguments
- node-id
The name of the node. If you do not specify a node name, the local node is assumed.
- clearinghouse-name
The full name of the clearinghouse.
Description
This command removes the specified clearinghouse from the server's memory. This ensures that the clearinghouse is not auto-enabled on server restarts, even if the clearinghouse database files themselves are not deleted. This command is part of the process of relocating a clearinghouse. See Section 9.5, ''Relocating a Clearinghouse'' for more information. You can also enter this command through the NCL interface.
Privileges Required
You must have the NET$MANAGE rights identifier.
Example
The following command removes knowledge of the .paris2_ch
clearinghouse from the server's memory.
dns> clear dns server clearinghouse .paris2_ch
create child
create child — Creates a child pointer at the master replica of the parent directory.
Format
create child child-name
clearinghouse
clearinghouse-name Arguments
- child-name
The full name of the child pointer.
- clearinghouse-name
The name of a clearinghouse that contains a replica of the child directory.
Description
Note
You should use the create child command only to re-create a
child pointer that was accidentally deleted.
Access Rights
You must have read access to the orphaned child directory and write access to the parent directory of the orphaned child directory.
Example
The following command creates the child pointer for the .sales.east
directory in the .ny_ch clearinghouse.
dns> create child .sales.east clearinghouse .ny_ch
create directory
create directory — Creates a directory.
Format
create directory directory-name
[clearinghouse
clearinghouse-name]Arguments
- directory-name
The full name of the directory.
- clearinghouse-name
The name of the clearinghouse where the directory is created.
Description
This command creates a new directory with the name you specify. If no clearinghouse is specified, DECdns creates the master replica of the directory in the same clearinghouse as the parent directory's master replica. For more information on creating and managing directories, see Chapter 7, "Managing Directories".
Access Rights
You must have write access to the clearinghouse in which you are creating the new directory and write access to the parent of the new directory.
Example
The following command creates a new directory named .region1 and
stores it in a clearinghouse named .eng_ch1 rather than in the same
clearinghouse as the master replica of the parent directory.
dns> create directory .region1 clearinghouse .eng_ch1
create dns clerk
create dns clerk — Creates a clerk on the specified node.
Format
create [node
node-id]
dns clerk Arguments
- node-id
The name of the node. If you do not specify a node name, the local node is assumed.
Description
This command creates a clerk on the specified node. You can also enter this command through the NCL interface. This command should not normally be executed outside of the DECnet startup procedure. For more information on managing clerks, see Chapter 6, "Managing Clerks, Servers, and Clearinghouses".
Note
To create a clerk, enter the command
@SYS$STARTUP:DNS$CLERK_STARTUP from the DCL prompt. You must
have the NET$MANAGE rights identifier to execute this command. You can only use
the command locally; you must be logged in to the system where the clerk
resides. See Section 6.7.3, ''Restarting a Deleted Clerk'' for more
information on how to create or restart a clerk.
Privileges Required
You must have the NET$MANAGE rights identifier.
Example
The following command creates a clerk on node .mfg.umbriel.
dns> create node .mfg.umbriel dns clerk
create dns clerk known namespace
create dns clerk known namespace — Adds a namespace to the list of namespaces cached by a specified DECdns clerk.
Format
create [node
node-id]
dns clerk
                        known namespace
name
NSCTS
nscts Arguments
- node-id
The name of the node. If you do not specify a node name, the local node is assumed.
- name
A simple name for the namespace.
- nscts
The value of the namespace creation timestamp (NSCTS) that is automatically assigned when the namespace is created. The format of the NSCTS is 14 pairs of hexadecimal digits (xx-xx).
Description
This command adds a namespace to the list of namespaces cached by the DECdns clerk. This is useful for defining namespaces the clerk does not learn about automatically from advertisements on a local area network (LAN). The simple name you supply in the name argument becomes both name and nickname. If the name you supply conflicts with an existing name or nickname, this command is rejected. You can also enter this command through the NCL interface.
Privileges Required
You must have the NET$MANAGE rights identifier.
Example
The following command adds the namespace with the name jns and NSCTS
value of 08-00-2B-0D-C0-9D-CD-3B-C6-16-EC-3B-94-00 to the list of
namespaces cached by the local clerk.
dns> create dns clerk known namespace jns NSCTS - _> 08-00-2B-0D-C0-9D-CD-3B-C6-16-EC-3B-94-00
create dns clerk manual nameserver
create dns clerk manual nameserver — Creates knowledge in the local clerk's cache about a server that exists across a wide area network (WAN).
Format
create [node
node-id]
dns clerk
manual nameserver
name
tower
TowerSet Arguments
- node-id
The name of the node on which the clerk exists. If you do not specify a node name, the local node is assumed.
- name
A simple name for the manual name server. The name is used only as a handle for managing this entity.
- TowerSet
- The Network Architecture (NA) TowerSet address of the server node. (You must use a continuation character (-) for commands that extend beyond one line of text, but this only works if it is the very last character on the line of text.) The format of a TowerSet is:
{([DNA_OSInetwork , nsap-value ])}
Description
Note
You should not normally enter this command from the DECdns Control Program (DNSCP). You can use the configuration program to accomplish what this command does.
Privileges Required
You must have the NET$MANAGE rights identifier.
Example
The following command informs the clerk on node .mfg.umbriel about
the existence of the server nrl.
dns> create node .mfg.umbriel dns clerk manual nameserver nrl tower -
_> {([ DNA_OSInetwork , 49::00-04:AA-00-04-00-6A-11:20 ])}create dns server
create dns server — Creates a server on the specified node.
Format
create [node
node-id] dns server Arguments
- node-id
The name of the node. If you do not specify a node name, the local node is assumed.
Description
Note
To create a clerk, enter the command
@SYS$STARTUP:DNS$SERVER_STARTUP from the DCL prompt. You
must have the NET$MANAGE rights identifier to execute this command. You can
only use the command locally; you must be logged in to the system where the
clerk resides. See Section 6.7.3, ''Restarting a Deleted Clerk'' for
more information on how to create or restart a clerk.
Privileges Required
You must have the NET$MANAGE rights identifier.
Example
The following command creates a DECdns server on the local node.
dns> create dns server
create dns server clearinghouse
create dns server clearinghouse — Creates a clearinghouse on the specified node.
Format
create [node
node-id] dns server clearinghouse
clearinghouse-name
[new directory version
version-number,] [initial replica
replica-name,] [file
filespec]Arguments
- node-id
The name of the node. If you do not specify a node name, the local node is assumed.
- clearinghouse-name
The full name of the clearinghouse.
- version-number
The DECdns version number the new directories will have at this clearinghouse. Specify the value as
Vx.y.z, where x defines the major release number, y specifies the minor version number, and z specifies an ECO level. This argument is optional. Set the value to V1.0.0 if you intend to create DNS Version 1 directories. Set it to V2.0.0 to create only DECdns Version 2 directories. If you omit this argument, the default is V2.0.0.- replica-name
The full name of the first directory replica to store in the clearinghouse. This argument is optional. If you omit this argument, the parent directory of this clearinghouse becomes the initial replica.
- filespec
A file specification that will contain the clearinghouse. This argument, which is optional, is useful if you have moved an existing clearinghouse and do not want new default names to be generated automatically. The default directory for the
dns$serveraccount.
Description
Note
The create dns server clearinghouse command is normally
executed only by the DECdns configuration program during the configuration
of a DECdns server in an existing namespace (see Chapter 10, "Using the DECdns Configuration Program"). You should use this command only to re-create a clearinghouse whose
database files are relocated on another server system.
Access Rights
The account executing the command needs write access to the directory in which you
want to name the clearinghouse. This access must be propagated to all members of the
directory's replica set before you enter the create dns server
clearinghouse command. Otherwise, the command fails. If you do need to
add write access for the directory, be sure to skulk the directory successfully
before you try to create the clearinghouse. For more information
about the access rights required for this command, see Section 12.8.1, ''Granting Required Access''.
Privileges Required
You must have the NET$MANAGE rights identifier.
Example
The following command creates a clearinghouse named .sales.ny_ch on
node .sales.orion.
dns> create node .sales.orion dns server clearinghouse .sales.ny_ch
create group
create group — Creates a group.
Format
create group group-name Arguments
- group-name
The full name of the group.
Description
This command creates a group. For more information on managing groups, see Chapter 5, "Managing DECdns Access Control".
Access Rights
You must have write access to the directory in which you intend to create the group.
Example
The following command creates a group named .sales_group1 in the
directory .sales.
dns> create group .sales.sales_group1
create link
create link — Creates a soft link and optionally specifies an expiration time and an extension time.
Format
create link link-name
destination
destination-name
[expiration
expiration-time] [extension
extension-time]Arguments
- link-name
The full name of the soft link.
- destination-name
The full name of the entry to which the soft link points.
- expiration-time
A date and time after which DECdns checks for existence of the soft link's target and either extends or deletes the soft link. The value is specified as yyyy-mm-dd-hh:mm:ss. This argument is optional. If you omit the argument, the soft link is permanent and must be explicitly deleted.
- extension-time
A period of time in which to renew the soft link's life if it expires but still points to an existing name. The value is specified as ddd-hh:mm:ss. This argument is optional. The default is 000-00:00:00.
Description
This command creates a soft link and optionally specifies an expiration time and an extension time. For more information on managing soft links, see Chapter 9, "Restructuring a Namespace".
Access Rights
You must have write access to the directory in which you intend to create the soft link.
Example
The following command creates a permanent soft link named
.sales.asia.price-server that points to an object entry named
.sales.eur.price-server.
dns> create link .sales.asia.price-server destination - _> .sales.eur.price-server
create object
create object — Creates a new object entry.
Format
create object object-name
DNS$Class
class-name
DNS$ClassVersion
value Arguments
- object-name
The full name of the object entry.
- class-name
The class of object entry being created. You can specify an application-defined class name. A class is specified as a simple name limited to 31 characters.
- value
The version of the class assigned to the object. Specify the value as v.n, where v defines the major release number and n specifies the minor version number. Specifying a class version is useful for allowing the definition of a class to evolve as an application is revised.
Description
This command creates a new object entry. This task is usually done through a client application.
Access Rights
You must have write access to the directory where you intend to store the object entry.
Example
The following command creates an object entry named
.sales.east.floor1cprn with the DNS$Class
printer and DNS$ClassVersion value 1.0. The
object entry describes a color printer on the first floor of the company's eastern
sales office.
dns> create object .sales.east.floor1cprn DNS$Class printer - _> DNS$ClassVersion 1.0
create replica
create replica — Adds a replica of an existing directory to the specified clearinghouse.
Format
create replica directory-name
[at]
clearinghouse
clearinghouse-name Arguments
- directory-name
The full name of the directory.
- clearinghouse-name
The full name of the clearinghouse in which you want to create the replica.
Description
This command adds a replica of an existing directory to the specified clearinghouse. You are creating a read-only replica, which is a copy of the directory to which users cannot directly make changes. You can only modify a directory at the master replica. The skulking process automatically distributes any modifications made to the master replica to all read-only replicas in the directory's replica set. For more information on creating replicas, see Chapter 7, "Managing Directories". For information on modifying a replica set, see Chapter 9, "Restructuring a Namespace".
Access Rights
You must have read, write, delete, and control access to the directory you are replicating. You must also have write access to that directory's parent directory, and write access to the clearinghouse in which you are storing the replica.
The access required on the directory and parent directory must be propagated to
all members of the directories' replica sets before you enter the create
replica command. Otherwise, the command fails. If you need to add this
access, be sure to skulk the directories successfully before you try to create the
replica.
The DNS$Server principal (nodename.dns$server) and the system principal
(nodename.system) on the server
node where you intend to create the replica needs read, write, delete, and control
access to the directory you intend to replicate and write access to its parent
directory.
Example
The following command creates a replica of the .mfg directory in the
clearinghouse .paris1_ch:
dns> create replica .mfg at clearinghouse .paris1_ch
delete child
delete child — Deletes a child pointer from the namespace.
Format
delete child child-name Arguments
- child-name
The full name of the child pointer.
Description
Note
Use the delete child command only when the directory to which
the child pointer refers was deleted and the child pointer accidentally
remains.
Access Rights
You must have delete access to the directory in which the child pointer is stored.
Privileges Required
You must have system administrator's privileges.
Example
The following command deletes the child pointer that accidentally remained after
the .sales.east directory was deleted:
dns> delete child .sales.east Directory .sales is still reachable at clearinghouse iaf:.Paris1_ch.
delete directory
delete directory — Deletes a directory from the namespace.
Format
delete directory directory-name Arguments
- directory-name
The full name of the directory.
Description
This command deletes a directory from a namespace. The directory may not contain
any object entries, soft links, or child pointers. The master replica must be the
only remaining replica in the namespace. Use the delete replica at
clearinghouse command if you need to remove read-only replicas. For more
information on deleting directories, see Chapter 9, "Restructuring a Namespace".
Access Rights
You need write access to the clearinghouse that stores the master replica of the directory and delete access to the directory itself.
Example
The following command deletes the .eng directory.
dns> delete directory .eng
delete dns clerk
delete dns clerk — Deletes the DECdns clerk on the specified node.
Format
delete [node
node-id]
dns clerk Arguments
- node-id
The name of the node. If you do not specify a node name, the local node is assumed.
Description
This command deletes the DECdns clerk on the specified node and reclaims all clerk
system resources. You must disable a clerk before you delete it (see the
disable dns clerk command). You can also enter this command through
the NCL interface. For more information on managing clerks, see Chapter 6, "Managing Clerks, Servers, and Clearinghouses".
Privileges Required
You must have the NET$MANAGE rights identifier.
Example
The following command deletes a clerk running on node .mfg.umbriel.
dns> delete node .mfg.umbriel dns clerk
delete dns clerk known namespace
delete dns clerk known namespace — Removes a namespace from a specified clerk's list of known namespaces.
Format
delete [node
node-id]
dns clerk
known namespace
identifier Arguments
- node-id
The name of the node. If you do not specify a node name, the local node is assumed.
- identifier
- The identifier of the namespace. This is a required argument. You can use one of the following:
name The name of the namespace. The name argument may be different from the nickname if the nickname is ambiguous. nscts The value of the namespace creation timestamp (NSCTS) assigned to the specified namespace when it was created. The format is 14 pairs of hexadecimal digits (xx-xx).
Description
Note
You are not permitted to delete the known namespace that is currently the
default namespace (that is, the one shown by show dns clerk default
namespace).
Privileges Required
You must have the NET$MANAGE rights identifier.
Example
The following command removes the namespace with the name jns from
the clerk's list of known namespaces.
dns> delete dns clerk known namespace jns
delete dns clerk manual nameserver
delete dns clerk manual nameserver — Removes the knowledge of a server that exists across a WAN from the local clerk's cache.
Format
delete [node
node-id]
dns clerk manual nameserver
name Arguments
- node-id
The name of the node on which the clerk exists. If you do not specify a node name, the local node is assumed.
- name
The simple name of the manual name server entity you want to delete.
Description
This command removes the knowledge of a server that exists across a WAN from the local clerk's cache. You can also enter this command through the NCL interface.
Privileges Required
You must have the NET$MANAGE rights identifier.
Example
The following command removes knowledge of server nrl from the clerk
cache on node .mfg.umbriel.
dns> delete node .mfg.umbriel dns clerk manual nameserver nrl
delete dns server
delete dns server — Deletes the DECdns server on the specified node.
Format
delete [node
node-id]
dns server Arguments
- node-id
The name of the node. If you do not specify a node name, the local node is assumed.
Description
This command deletes the DECdns server on the specified node and reclaims all server resources except clearinghouses, which remain. You must disable a server before you can delete it. You can also enter this command through the NCL interface. For more information on managing servers, see Chapter 6, "Managing Clerks, Servers, and Clearinghouses".
Privileges Required
You must have the NET$MANAGE rights identifier.
Example
The following command deletes the DECdns server from node
.mfg.polaris.
dns> delete node .mfg.polaris dns server
delete dns server clearinghouse
delete dns server clearinghouse — Deletes a clearinghouse on the specified node. You must disable a clearinghouse before you can delete it. You must disable and delete the clearinghouse from the local node only.
Format
delete dns server clearinghouse
clearinghouse-name Arguments
- clearinghouse-name
The full name of the clearinghouse.
Description
Note
Although deleting a clearinghouse automatically deletes the clearinghouse's replicas, VSI recommends that, before deleting the clearinghouse, you manually delete each read-only replica. In this way, should the clearinghouse deletion fail, none of these unwanted replicas are left available for data requests. Be sure not to delete the replica closest to the root, as required by the clearinghouse rules explained in Appendix B, "Special Clearinghouse Rules".
Access Rights
You must have delete access to the directories in the clearinghouse as well as to the clearinghouse.
Privileges Required
You must have the NET$MANAGE rights identifier.
Example
The following command deletes a clearinghouse named .sales.ny_ch:
dns> delete dns server clearinghouse .sales.ny_ch
delete group
delete group — Deletes a group from the namespace.
Format
delete group group-name Arguments
- group-name
The full name of the group.
Description
This command deletes a group from the namespace. The group does not have to be empty to be deleted. For more information on managing groups, see Chapter 5, "Managing DECdns Access Control".
Access Rights
You must have delete access to the group you are deleting.
Example
The following command deletes the group named .sales_group1 from the
.sales directory.
dns> delete group .sales.sales_group1
delete link
delete link — Deletes a soft link.
Format
delete link link-name Arguments
- link-name
The full name of the soft link.
Description
This command deletes a soft link. For more information on managing soft links, see Chapter 9, "Restructuring a Namespace".
Access Rights
You must have delete access to the soft link you want to delete.
Example
The following command deletes the soft link named .sales.asia.
dns> delete link .sales.asia
delete object
delete object — Deletes an object entry from the namespace.
Format
delete object object-name Arguments
- object-name
The full name of the object entry.
Description
This command deletes an object entry from the namespace. This task is usually done through the client application that created the object entry, except under specific circumstances (for example, if the application is obsolete or no longer has access to the namespace).
Access Rights
You must have delete access to the object entry that you want to delete.
Example
The following command deletes the object entry .floor1pr2 from the
directory .sales.east.
dns> delete object .sales.east.floor1pr2
delete replica
delete replica — Removes a replica of a directory from a clearinghouse.
Format
delete replica directory-name
[at]
clearinghouse
clearinghouse-name Arguments
- directory-name
The full name of the directory.
- clearinghouse-name
The full name of the clearinghouse.
Description
This command removes a replica of a directory from a clearinghouse. Use this
command to delete read-only replicas. Use the delete directory command
to delete the master replica and the entire directory. For more information on
deleting replicas, see Chapter 7, "Managing Directories".
Access Rights
You must have control access to the directory whose replica you intend to delete, write access to the clearinghouse from which you are deleting the replica, and write and delete access to the directory's parent.
Example
The following command deletes a replica of the .mfg directory from
the .paris1_ch clearinghouse.
dns> delete replica .mfg at clearinghouse .paris1_ch
delete subtree
delete subtree — Deletes a specified directory and its contents, or a hierarchy of directories and their contents.
Format
delete subtree tree-name
[...] [exclude directory
directory-name]Arguments
- tree-name
The name of the topmost directory in the subtree. The recursion notation causes the change to additionally apply to all child directories and their contents. When used without the optional recursion notation, the change applies only to the specified directory. This then behaves just like the
delete directorycommand in that the directory must be empty to be deleted.- directory-name
The full name of a directory that you want to exclude from deletion. When you exclude a directory, its parent directory is preserved.
Description
This command deletes the specified directory and its contents, or a hierarchy of
directories and their contents. Before using this command, you must delete all
read-only replicas and all clearinghouse object entries in any of the affected
directories. You can use the optional recursion notation (...) to
additionally delete all child directories and their contents. The optional
exclude directory argument lets you specify one or more directories
to exclude from deletion. Specify multiple directories in the following format:
exclude directory
directory-name, directory
directory-name, directory
directory-name
Access Rights
You must have read, write, and delete access to the directory you specify as well as the contents of the directory. If you use the command recursively, you also need read, write, and delete access to all child directories (and their contents) of the directory you specify.
Example
The following command deletes the .pjl directory and its contents as
well as all of its child directories and their contents.
dns> delete subtree .pjl...
directory child
directory child — Displays a list of all the child pointers whose names match the specified child name.
Format
directory child child-name
[prepositional-phrase] Arguments
- child-name
A specific child name or a complete directory specification followed by a wildcard template for matching simple names of child pointers.
- prepositional-phrase
- A phrase that affects the destination or content of command output. You can use one or more prepositional phrases. Be sure to precede each of the following prepositional phrases with a comma and a space:
withattribute [relop] valueWhen used with a wildcard child-name, limits the output only to directories whose specified attributes have certain values. to file[=]filenameRedirects the output to filename. If the file does not exist, this command creates it. If the file does exist, its contents are overwritten. to extend file[=]filenameAppends the output to an existing filename. If the file does not exist, it is created. to terminalDirects the output to the terminal. This is the default option.
Description
This command displays a list of all the child pointers whose names match the specified entity name.
Example
The following command displays all child pointers named in the
.paris directory.
dns> directory child .paris.*
.z in the .sales directory:
dns> directory child .sales.z*
DIRECTORY
CHILD NRL:.sales.z*
AT 17-APR-2019:16:32:02
zba
zeh
zpl
zsjdirectory clearinghouse
directory clearinghouse — Displays a list of all the clearinghouses whose names match the specified clearinghouse name.
Format
directory clearinghouse clearinghouse-name
[prepositional-phrase] Arguments
- clearinghouse-name
A specific clearinghouse full name or a complete directory specification followed by a wildcard template for matching simple names of clearinghouses.
- prepositional-phrase
- A phrase that affects the destination or content of command output. You can use one or more prepositional phrases. Be sure to precede each of the following prepositional phrases with a comma and a space:
withattribute [relop] valueWhen used with a wildcard clearinghouse-name, limits the output only to directories whose specified attributes have certain values. to file[=]filenameRedirects the output to filename. If the file does not exist, this command creates it. If the file does exist, its contents are overwritten. to extend file[=]filenameAppends the output to an existing filename. If the file does not exist, it is created. to terminalDirects the output to the terminal. This is the default option.
Description
This command displays a list of the clearinghouses whose names match the specified name.
Example
The following command displays all clearinghouses named in the root directory (.).
dns> directory clearinghouse .*
.pjl
directory.
dns> directory clearinghouse .pjl.*
DIRECTORY
CLEARINGHOUSE NRL:.pjl.*
AT 17-APR-2019:16:35:01
ares_ch
athena_ch
mars_chdirectory directory
directory directory — Displays the names of all the directories whose names match the specified directory name.
Format
directory directory directory-name
[prepositional-phrase] Arguments
- directory-name
A specific directory name or a complete directory specification followed by a wildcard template for matching simple names of directories.
- prepositional-phrase
- A phrase that affects the destination or content of command output. You can use one or more prepositional phrases. Be sure to precede each of the following prepositional phrases with a comma and a space:
withattribute [relop] valueWhen used with a wildcard directory-name, limits the output only to directories whose specified attributes have certain values. to file[=]filenameRedirects the output to filename. If the file does not exist, this command creates it. If the file does exist, its contents are overwritten. to extend file[=]filenameAppends the output to an existing filename. If the file does not exist, it is created. to terminalDirects the output to the terminal. This is the default option.
Description
This command displays the names of all the directories whose names match the specified directory name.
Example
The following command displays the names of all the directories whose names are
stored in the directory .sales.
dns> directory directory .sales.*
.ad*.
dns> directory directory .ad*
DIRECTORY
DIRECTORY NRL:.ad*
AT 17-APR-2019:16:40:02
adb
admin
adxdirectory group
directory group — Displays a list of groups whose names match the specified group name.
Format
directory group group-name
[prepositional-phrase] Arguments
- group-name
A specific group name or a complete directory specification followed by a wildcard template for matching simple names of groups.
- prepositional-phrase
- A phrase that affects the destination or content of command output. You can use one or more prepositional phrases. Be sure to precede each of the following prepositional phrases with a comma and a space:
withattribute [relop] valueWhen used with a wildcard group-name, limits the output only to directories whose specified attributes have certain values. to file[=]filenameRedirects the output to filename. If the file does not exist, this command creates it. If the file does exist, its contents are overwritten. to extend file[=]filenameAppends the output to an existing filename. If the file does not exist, it is created. to terminalDirects the output to the terminal. This is the default option.
Description
This command displays a list of the groups whose names match the specified group name.
Example
The following command displays all the groups whose names are stored in the
directory .dist.
dns> directory group .dist.*
.d.
dns> directory group .d*
DIRECTORY
GROUP NRL:.d*
AT 17-APR-2019:16:44:02
des_registrar
dis_dev
drx_serversdirectory link
directory link — Displays a list of soft links whose names match the link name that you specify.
Format
directory link link-name
[prepositional-phrase] Arguments
- link-name
A specific name of a soft link or a complete directory specification followed by a wildcard template for matching simple names of soft links.
- prepositional-phrase
- A phrase that affects the destination or content of command output. You can use one or more prepositional phrases. Be sure to precede each of the following prepositional phrases with a comma and a space:
withattribute [relop] valueWhen used with a wildcard link-name, limits the output only to directories whose specified attributes have certain values. to file[=]filenameRedirects the output to filename. If the file does not exist, this command creates it. If the file does exist, its contents are overwritten. to extend file[=]filenameAppends the output to an existing filename. If the file does not exist, it is created. to terminal
Directs the output to the terminal. This is the default option.
Description
This command displays the names of soft links whose names match the name that you specify.
Example
The following command displays all the soft links whose names begin with the
.admin.new.link1 string.
dns> directory link .admin.new.link1*
.c*.
dns> directory link .c*
DIRECTORY
SOFTLINK NRL:.c*
AT 17-APR-2019:16:44:30
crx_conf
crx_notesdirectory object
directory object — Displays a list of all the object entries (including groups and clearinghouse object entries) whose names match the object entry name that you specify.
Format
directory object object-name
[prepositional-phrase] Arguments
- object-name
A specific object entry name or a complete directory specification followed by a wildcard template for matching simple names of object entries.
- prepositional-phrase
- A phrase that affects the destination or content of command output. You can use one or more prepositional phrases. Be sure to precede each of the following prepositional phrases with a comma and a space:
withattribute [relop] valueWhen used with a wildcard object-name, limits the output only to directories whose specified attributes have certain values. to file[=]filenameRedirects the output to filename. If the file does not exist, this command creates it. If the file does exist, its contents are overwritten. to extend file[=]filenameAppends the output to an existing filename. If the file does not exist, it is created. to terminalDirects the output to the terminal. This is the default option.
Description
This command displays a list of all the object entries (including groups and clearinghouse object entries) whose names match the object name that you specify.
Example
The following command displays all the object entries in the directory
.eng.
dns> directory object .eng.*
DIRECTORY
OBJECT NRL:.eng.*
AT 17-APR-2019:16:51:33
ny1_ch
ny1_admin
paris1_ch
perth1_ch
tokyo1_ch
tokyo1_salesdisable dns clerk
disable dns clerk — Stops the DECdns clerk on the specified node.
Format
disable [node
node-id]
dns clerk Arguments
- node-id
The name of the node. If you do not specify a node name, the local node is assumed.
Description
state attribute is set to off. For more information on managing
clerks, see Chapter 6, "Managing Clerks, Servers, and Clearinghouses". Note
If you are disabling a clerk on a node where a server is running, make sure you disable the server first.
Privileges Required
You must have the NET$MANAGE rights identifier.
Example
The following command stops the DECdns clerk running on node
.mfg.miranda.
dns> disable node .mfg.miranda dns clerk
disable dns server
disable dns server — Stops the DECdns server on the specified node.
Format
disable [node
node-id]
dns server Arguments
- node-id
The name of the node. If you do not specify a node name, the local node is assumed.
Description
This command stops the DECdns server on the specified node. The server is
disabled after all transactions in process have completed and an updated
clearinghouse checkpoint file has been written to disk. You can also enter this
command through the NCL interface. When this procedure is completed, the server's
state attribute is set to off.
Depending on the disk speed, memory, and the size of the database (in particular,
the checkpoint file), the disable dns server command can take up to 30
minutes. For more information on managing servers, see Chapter 6, "Managing Clerks, Servers, and Clearinghouses".
Privileges Required
You must have the NET$MANAGE rights identifier.
Example
The following command stops the DECdns server running on the
.eng.abc node.
dns> disable node .eng.abc dns server
disable dns server clearinghouse
disable dns server clearinghouse — Disables the specified clearinghouse. VSI recommends that you issue this command locally only.
Format
disable dns server clearinghouse
clearinghouse-name Arguments
- clearinghouse-name
The name of the clearinghouse being disabled.
Description
This command disables the specified clearinghouse on the local node. When this
procedure is completed, the clearinghouse's state attribute is set to
off. You can also enter this command through the NCL interface. For more information
on managing clearinghouses, see Chapter 6, "Managing Clerks, Servers, and Clearinghouses".
Privileges Required
You must have the NET$MANAGE rights identifier.
Example
The following command disables the .ny_ch clearinghouse on the local
node:
dns> disable dns server clearinghouse .ny_ch
dump dns clerk cache
dump dns clerk cache — Dumps the clerk cache to the terminal for use in solving DECdns problems.
Format
dump dns clerk cache Description
This command dumps the clerk cache to the terminal for use in solving DECdns problems. You can only dump a local clerk's cache.
Privileges Required
You must have CMKRNL privileges.
Example
The following command dumps the clerk cache running on the local node.
dns> dump dns clerk cache
dump subtree
dump subtree — Dumps a subtree into an interim file.
Format
dump subtree tree-name
[...]
into file
filename
[exclude
entry-type]Arguments
- tree-name
The name of the topmost directory in the subtree. When used without the optional recursion notation, the dump applies only to the specified directory and its contents. The recursion notation causes the command to additionally dump all child directories and their contents.
- filename
The name of the interim file to which the subtree is dumped.
- entry-type
- One or more of the following types of entries to exclude from the dump: objects, links, or specific directories. Multiple directories can be excluded in a single command. Use any combination of the following entry-type specifiers, separating multiple arguments with commas:
objectslinksdirectorydirectory-name
Description
This command dumps a directory and its contents into an interim file. Use the
optional recursion flag (...) to additionally dump all child
directories and their contents. Use the optional exclude argument to
omit links, objects, or specific directories from the dump file. Use the file name
extension .dat as a convention for interim file names. This command is
useful for backing up a directory or as the first step of the merging directories
procedure. See Section 9.4, ''Merging Directories'' for more information about
merging directories.
Access Rights
You must have read access to the specified directory and its contents. If you use the command recursively, you also need read access to all child directories (and their contents) of the directory you specify.
Example
The following command creates an interim file named pjl.dat that
contains the .pjl directory and its contents.
dns> dump subtree .pjl into file pjl.dat
enable dns clerk
enable dns clerk — Starts the DECdns clerk on the specified node.
Format
enable [node
node-id]
dns clerk Arguments
- node-id
The name of the node. If you do not specify a node name, the local node is assumed.
Description
This command starts the DECdns clerk on the specified node. You can also enter
this command through the NCL interface. When this procedure is complete, the clerk's
state attribute is set to on. For more information on managing
clerks, see Chapter 6, "Managing Clerks, Servers, and Clearinghouses".
Privileges Required
You must have the NET$MANAGE rights identifier.
Example
The following command starts the DECdns clerk on the local node.
dns> enable dns clerk
enable dns server
enable dns server — Starts the DECdns server on the specified node.
Format
enable [node
node-id]
dns server Arguments
- node-id
The name of the node. If you do not specify a node name, the local node is assumed.
Description
This command starts the DECdns server on the specified node. You can also enter
this command through the NCL interface. All clearinghouses on the server are
automatically enabled when this command is issued. When this procedure is completed,
the server's state attribute is set to on.
Depending on the disk speed, memory, and the size and state of the database (in
particular, the checkpoint file), the enable dns server command can
take several minutes. If the previous server shutdown was not completed correctly
(for example, the system crashed during the process), this command can take up to 30
minutes. For more information on managing servers, see Chapter 6, "Managing Clerks, Servers, and Clearinghouses".
Privileges Required
You must have the NET$MANAGE rights identifier.
Example
The following command starts the local DECdns server.
dns> enable dns server
enable dns server clearinghouse
enable dns server clearinghouse — Enables the specified clearinghouse on the specified node.
Format
enable [node
node-id] dns server clearinghouse
clearinghouse-name Arguments
- node-id
The name of the node. If you do not specify a node name, the local node is assumed.
- clearinghouse-name
The name of the clearinghouse being enabled. There is no default.
Description
This command enables the specified clearinghouse on the specified node. When this
procedure is complete, the clearinghouse's state attribute is set to
on. Because the enable dns server command auto-enables clearinghouses
known to a server, this command is only necessary when a clearinghouse has
specifically been disabled (see the disable dns server clearinghouse
command). You can also enter this command through the NCL interface. For more
information on managing clearinghouses, see Chapter 6, "Managing Clerks, Servers, and Clearinghouses".
Privileges Required
You must have the NET$MANAGE rights identifier.
Example
The following command enables the .ny_ch clearinghouse on the local
node.
dns> enable dns server clearinghouse .ny_ch
initialize dns server
initialize dns server — Creates a new namespace, assigns it the specified nickname, creates a clearinghouse, and places the master replica of the root directory in that clearinghouse.
Format
initialize [node
node-id]
dns server nickname
namespace-nickname,
owner
name, root clearinghouse
clearinghouse-name Arguments
- node-id
The name of the node. If you do not specify a node name, the local node is assumed.
- namespace-nickname
The nickname of the namespace. You must specify the name; there is no default name.
- name
The simple name of a user or account to be given initial access to the entities created with this command. Based on the name that you must supply, the software generates ACEs that grant the user or account read, write, delete, test, and control access to the first clearinghouse in the namespace and to the root directory. The principal name in the ACEs is derived by attaching the full name of the node where the command is executed to the front of the simple name that you supply.
- clearinghouse-name
The simple name of the first clearinghouse in the namespace. You must specify the name; there is no default name.
Description
Note
This command should ordinarily be executed only by the DECnet configuration procedure. This operation can only be performed once in the lifetime of a namespace. For details on creating and initializing a namespace, see Section 10.6, ''Creating and Initializing a New Namespace ''.
Privileges Required
You must have the NET$MANAGE rights identifier.
Example
The following command creates a namespace, assigns it the nickname
jns, gives all access rights to the root account, and
creates the clearinghouse paris_ch, placing the master replica of the
root directory in that clearinghouse.
dns> initialize dns server nickname jns, owner root, - _> root clearinghouse paris_ch
merge file
merge file — Merges the contents of an interim file that was created with the dump
subtree command into an existing subtree.
Format
merge file file
ifile
into subtree
tree-name
[failures to file [=]
filename]Arguments
- ifile
The name of an interim file that contains a directory and its contents, or a hierarchy of directories and their contents.
- tree-name
The name of the topmost directory in the subtree.
- filename
The name of a file that contains names that could not be merged.
Description
This command merges the contents of an interim file that was created using the
dump subtree command into an existing subtree whose top directory
is specified in tree-name. If the target
tree-name does not exist, the command returns an error and
the user must use the create directory command to create it. The
failures to file =
filename argument specifies a file name to contain the names
that could not be merged. For more information on merging directories, see Chapter 9, "Restructuring a Namespace".
Access Rights
You must have control and write access to the directory you specify as well as the contents of the directory.
Example
The following command merges the interim file branch1.dat with the
.pjl directory.
dns> merge file branch1.dat into subtree .pjl
merge subtree
merge subtree — Dumps a directory or subtree and its contents into an interim file and then merges the contents of that file into an existing subtree.
Format
merge subtree old-tree-name
[...] [into]
subtree
new-tree-name
[exclude
entry-type]Arguments
- old-tree-name
The name of the topmost directory in the subtree that is being changed. When used without the optional recursion notation (...), only the specified directory and its contents are merged. The recursion notation additionally causes all child directories (and their contents) to merge into the target subtree.
- new-tree-name
The name of the topmost directory in the target subtree.
- entry-type
- One or more of the following types of entries to exclude from the change: objects, links, or directories. Multiple directories can be excluded in a single command. Use any combination of the following entry-type specifiers, separating multiple arguments with commas:
objectslinksdirectorydirectory-name
Description
This command dumps a subtree into an interim file and then merges the contents of
that file into an existing subtree. Use the recursion flag (...) to
merge an entire subtree and its contents. If you do not use the recursion flag, only
the specified directory and its contents are dumped and merged into the target
subtree.
This command is useful when all clearinghouses are available for every directory
in both subtrees and when no duplicate names exist in source and target directories.
If a duplicate name is detected, or if any affected clearinghouse cannot be reached
while the merge subtree command is in progress, the command completes
what it can. In this situation, a named interim file or failures file with a
randomly generated name is created in the current directory. The directory
new-tree-name must already exist. If it does not, the
command returns an error and you must use the create directory or
recreate directory command to create it.
Access Rights
You must have control and write access to the directory you specify as well as the contents of the directory. If you use the command recursively, you also need control and write access to all child directories (and their contents) of the directory you specify.
Example
The following command merges the contents of the .sth directory with
the .pjl directory.
dns> merge subtree .sth into subtree .pjl
recreate directory
recreate directory — Creates a duplicate directory in the source subtree as a new directory in the target subtree.
Format
recreate directory directory-name
[as]
directory
newdirectory-name Arguments
- directory-name
The full name of the directory.
- newdirectory-name
The new name of the copy of the directory.
Description
DNS$ACS, DNS$Convergence,
and DNS$UpgradeTo) are retained. Note
Although all original access control entries (ACEs) are retained, the new directory also inherits all ACEs that may be propagated from the new parent directory in the target subtree. The principal executing this command is granted full access to the new directory.
The following attribute values are updated and do not match the values of the
original directory: DNS$AllUpTo, DNS$CTS, DNS$DirectoryVersion, DNS$InCHName,
DNS$ParentPointers, DNS$Replicas, and DNS$UTS. This command
does not delete or modify the source directory.
Access Rights
You must have read, write, and delete access to the directory in which you intend to re-create the source directory.
Example
The following command re-creates the existing directory .sales.quar1
as a new directory named .mkt.quar1.
dns> recreate directory .sales.quar1 as directory .mkt.quar1
recreate link
recreate link — Creates a duplicate soft link in the source subtree as a new soft link in the target subtree.
Format
recreate link link-name
[as]
link
newlink-name Arguments
- link-name
The full name of the soft link.
- newlink-name
The new name of the copy of the soft link. If you specify the name of an existing directory in the target subtree, the soft link is re-created in that directory with its original link name.
Description
DNS$CTS and
DNS$UTS attribute values are not preserved. Note
Although all original access control entries (ACEs) are retained, the new soft link also inherits all ACEs that may be propagated from the new parent directory in the target subtree. The principal executing this command is granted full access to the new soft link.
Asterisk wildcards are acceptable in both arguments. This command does not modify or delete the source soft link. For more information on managing soft links, see Chapter 9, "Restructuring a Namespace".
Access Rights
You must have read, write, and delete access to the directory in which you intend to re-create the soft link.
Example
The following command re-creates all soft links that exist in the
.sales directory as new soft links in the .mkt
directory.
dns> recreate link .sales.* as link .mkt.*
recreate object
recreate object — Creates a duplicate object entry in the source subtree as a new object entry in the target subtree.
Format
recreate object object-name
[as]
object
newobject-name Arguments
- object-name
The full name of the object entry.
- newobject-name
The new name of the copy of the object entry. If you specify the name of an existing directory in the target subtree, the object is re-created in that directory with its original object name.
Description
DNS$CTS and DNS$UTS attribute values are not
preserved. Note
Although all original access control entries (ACEs) are retained, the new object entry also inherits all ACEs that may be propagated from the new parent directory in the target subtree. The principal executing this command is granted full access to the new object entry.
Asterisk wildcards are acceptable in both arguments. This command does not modify or delete the source object entry.
Access Rights
You must have read, write, and delete access to the directory in which you intend to re-create the object entry.
Example
The following command re-creates the existing object entry .sth.obj2
as a new object entry named .pjl.obj4.
dns> recreate object .sth.obj2 as object .pjl.obj4
remove clearinghouse access
remove clearinghouse access — Deletes an access control entry (ACE) from a clearinghouse's access control set (ACS).
Format
remove clearinghouse clearinghouse-name
access
principal Arguments
- clearinghouse-name
The name of the clearinghouse from which access is being deleted.
- principal
The principal for whom access is being removed. You can specify a principal as a group name, a collection of principals denoted with wildcards (for example,
.org.name*), or an individual name in the format nodename.username. To specify a DNS Version 1-style principal, use the format nodename::username.
Description
This command deletes an access control entry from a clearinghouse's access control set (ACS).
Access Rights
You must have control access to the clearinghouse whose ACS is being modified.
Example
The following command removes access for the user group .testgroup
from the .paris2_ch clearinghouse.
dns> remove clearinghouse .paris2_ch access .testgroup
remove directory access
remove directory access — Deletes an access control entry (ACE) from a directory's access control set (ACS).
Format
remove directory directory-name access
principal
[as default]Arguments
- directory-name
The full name of the directory.
- principal
The principal for whom access is being removed. You can specify a principal as a group name, a collection of principals denoted with wildcards (for example,
.org.name*), or an individual name in the format nodename.username. To specify a DNS Version 1-style principal, use the format nodename::username.
Description
This command removes an access control entry from a directory's access control
set. The optional argument as default indicates the ACE to be deleted
is a default ACE. If this argument is not used, DECdns assumes the ACE is associated
with the directory.
Access Rights
You must have control access to the directory whose ACS is being modified.
Example
The following command removes the default ACE for user smith on node
.admin from the .sales directory.
dns> remove directory .sales access .admin.smith as default
remove group access
remove group access — Deletes an access control entry (ACE) from a group's access control set (ACS).
Format
remove group group-name
access
principal Arguments
- group-name
The full name of the group from which an ACE is being removed.
- principal
The principal whose access is being removed. You can specify a principal as a group name, a collection of principals denoted with wildcards (for example,
.org.name*), or an individual name in the format nodename.username. To specify a DNS Version 1-style principal, use the format nodename::username.
Description
This command deletes an access control entry from a group's access control set.
Access Rights
You must have write access to the group from which you are removing access.
Example
The following command removes the access rights of user smith on
node .sales.deneb from the administrator group .dns_admin.
dns> remove group .dns_admin access .sales.deneb.smith
remove group member
remove group member — Deletes one member from an existing group.
Format
remove group group-name
member
[=]
principal
[as group]Arguments
- group-name
The full name of a group.
- principal
The principal who is being deleted from the group. You can specify a principal as as a collection of principals denoted with wildcards (for example,
.org.name*), or an individual name in the format nodename.username. To specify a DNS Version 1-style principal, use the format nodename::username. Use the phraseas groupto specify that the member you are removing is itself a group.
Description
This command deletes one member from an existing group.
Access Rights
You must have write access to the group from which you are removing a member.
Example
The following command removes the user smith on node
.sales.orion from the group .admin.
dns> remove group .admin member .sales.orion.smith
remove link access
remove link access — Deletes an access control entry (ACE) from a soft link's access control set (ACS).
Format
remove link link-name
access
principal Arguments
- link-name
The full name of the soft link.
- principal
The principal for whom access is being removed. You can specify a principal as a group name, a collection of principals denoted with wildcards (for example,
.org.name*), or an individual name in the format nodename.username. To specify a DNS Version 1-style principal, use the format nodename::username.
Description
This command deletes an access control entry from a soft link's access control set.
Access Rights
You must have control access to the soft link whose ACS is being modified.
Example
The following command removes access for the user group .testgroup
from the .sales.asia soft link.
dns> remove link .sales.asia access .testgroup
remove object
remove object — Deletes a value from an application-defined, set-valued attribute of an object entry.
Format
remove object object-name
attribute-name
[=]
attribute-value Arguments
- object-name
The full name of the object entry.
- attribute-name
The simple name of the attribute. Specify your own attribute name or one of the DECdns-defined attributes. Separate multiple attributes with commas.
- attribute-value
The value of a particular attribute. You can express the values of application-defined attributes as quoted strings, "ps"; hexadecimal strings, %x FF00EE; or concatenations of them in parentheses, (%x0103 "ps").
Description
This command deletes a value from an application-defined, set-valued attribute of an object entry. If the value is not presently defined for the attribute, no error message is generated. Usually this task is accomplished through the client application.
Access Rights
You must have write access to the object entry whose attribute value you intend to remove or have control access to the parent directory.
Example
The following command removes the value of "ps" from the set-valued
attribute printcap of the object entry named
.sales.east.deskprinter.
dns> remove object .sales.east.deskprinter printcap "ps"
remove object access
remove object access — Deletes an access control entry (ACE) from an object entry's access control set (ACS).
Format
remove object object-name
access
principal Arguments
- object-name
The full name of the object entry.
- principal
The principal for whom access is being removed. You can specify a principal as a group name, a collection of principals denoted with wildcards (for example,
.org.name*), or an individual name in the format, nodename.username. To specify a DNS Version 1-style principal, use the format nodename::username.
Description
This command deletes an access control entry from an object entry's access control set.
Access Rights
You must have control access to the object entry whose ACS is being modified.
Example
The following command removes access for user smith on node
.sales.orion from the object entry .sales.work_disk2.
dns> remove object .sales.work_disk2 access .sales.orion.smith
remove subtree access
remove subtree access — Removes an access control entry (ACE) from the access control set (ACS) of a directory and its contents, or from an entire subtree.
Format
remove subtree tree-name
[...]
access
principal
[exclude
entry-type]Arguments
- tree-name
The name of the topmost directory in the subtree. When used without the optional recursion notation, the change applies only to the specified directory and the links and objects in that directory. The recursion notation causes the change to additionally apply to all child directories and their contents.
- principal
The principal whose ACE is being removed. Principals can be specified as a group name or an individual name in the format nodename.user. To specify a DNS Version 1-style principal, use the format nodename::username.
- entry-type
- One or more of the following types of entries to exclude from the change: objects, links, or directories. You can exclude multiple directories with a single command. Use any combination of the following entry-type specifiers, separating multiple arguments with commas:
objectslinksdirectorydirectory-name
Description
This command removes an ACE from the access control set of a particular directory
(and its contents) or from an entire subtree of directories. You can use the
optional recursion notation (...) to modify the ACEs associated with
all the child directories (and their contents). You can use the optional
exclude argument to restrict the type of entries affected by this
command. You can also use exclude with the recursion notation to
prevent certain directories from being processed.
Access Rights
You must have control and write access to the directory you specify as well as to the contents of the directory. If you use the command recursively, you also need control and write access to all child directories (and their contents) of the directory you specify.
Example
The following command removes all ACEs that specify the principal
.pjl.smith from the .admin directory and all its child
directories.
dns> remove subtree .admin... access .pjl.smith
remove subtree group member
remove subtree group member — Removes a specified group member from all groups in the specified subtree.
Format
remove subtree tree-name
[...]
group member
member-name
[exclude directory
directory-name]Arguments
- tree-name
The name of the topmost directory in the subtree. When used without the optional recursion notation, the change applies only to the specified directory and to the links and objects in that directory. The recursion notation causes the change also to apply to all child directories (and their contents).
- member-name
The name of the group member that you want to remove.
- directory-name
One or more directories and their associated ACEs to exclude from the change. You can exclude multiple directories with a single command. Separate multiple arguments with commas.
Description
This command removes a specified group member specification from all groups in
the directory specified in tree-name. If you use the recursive
notation (...), you can use the optional exclude directory
directory-name argument to exclude groups named in a particular
directory (and all its child directories) from group member modification. You can
exclude multiple directories in a single command. Specify multiple directories in
the following format:
exclude directory
directory-name, directory
directory-name, directory
directory-name
Access Rights
You must have control access to the group whose member you intend to modify. If you use the command recursively, you must have control access to all groups affected by the command.
Example
The following command removes user .pjl.smith from membership in all
groups named in the .admin directory.
dns> remove subtree .admin group member .pjl.smith
replace link
replace link — Deletes an individual soft link and replaces it with a new soft link to redirect lookups from the original location to the new location.
Format
replace link link-name
[with]
link
newtree-name Arguments
- link-name
The full name of the soft link in its old location.
- newtree-name
The full name of the directory into which the soft link has moved.
Description
This command deletes a specified soft link and replaces it with a soft link whose link target is the corresponding entry in the specified newtree-name directory. This command is useful when you need to redirect lookups only for a subset of a directory's contents. For more information on managing soft links, see Chapter 9, "Restructuring a Namespace".
Access Rights
You must have read, write, and delete access to the directory in which you intend to create the soft link.
Example
The following command replaces the soft link .ceb.link1 with a soft
link whose link target is the corresponding entry in the directory
.pjl.
dns> replace link .ceb.link1 with link .pjl
replace object
replace object — Deletes a specified object entry and replaces it with a new soft link whose link target is the corresponding entry in a new location.
Format
replace object object-name
[with]
link
newtree-name Arguments
- object-name
The full name of the object entry in its old location.
- newtree-name
The full name of the directory to which the object entry was moved.
Description
This command deletes a specified object entry and replaces it with a soft link whose link target is the corresponding entry in the specified newtree-name directory. This command is useful when you need to redirect lookups only for a subset of a directory's contents.
Access Rights
You must have read, write, and delete access to the directory in which you intend to create the soft link.
Example
The following command replaces the object entry .ceb.obj2 with a
soft link whose link target is the corresponding entry in the directory
.pjl.
dns> replace object .ceb.obj2 with link .pjl
replace subtree
replace subtree — Deletes the contents of a subtree that has just been merged or appended to a new location and replaces the information with soft links whose targets are the corresponding entries in the new location.
Format
replace subtree tree-name
[...] [with]
link
newtree-name [exclude
entry-type]Arguments
- tree-name
The full name of the topmost directory in the subtree.
- newtree-name
The full name of the topmost directory in the target subtree.
- entry-type
- One or more of the following types of entries to exclude from the change: objects, links, or directories. Use any combination of the following entry-type specifiers, separating multiple arguments with commas:
objectslinksdirectorydirectory-name
Description
This command is useful after you have merged or appended a subtree that contains
clearinghouse object entries. For all entries except clearinghouse object entries,
this command deletes the entries in a directory specified in
tree-name and replaces them with soft links. These soft
links redirect lookups of the names from their old (source) locations to their new
(target) locations. Using this command preserves both the clearinghouse object entry
and its enclosing directory while deleting the directory's contents and replacing
each name with an individual soft link. The optional recursion notation
(...) also applies the delete and replace operation to the contents
of all child directories of tree-name.
Access Rights
You must have read, write, and delete access to the directory you specify as well as to the contents of the directory. If you use the command recursively, you also need read, write, and delete access to all child directories (and their contents) of the directory you specify.
Example
The following command deletes the entries in the directory
.sales.quar1 and replaces them with soft links whose targets are
their corresponding entries in .total.quar1 .
dns> replace subtree .sales.quar1 with link .total.quar1
set directory
set directory — Modifies characteristics for the specified directory.
Format
set directory directory-name
characteristic Arguments
- directory-name
The full name of the directory to be modified.
- characteristic
- The name and value of the characteristic to be modified. Specify one or more of the following:
DNS$Convergence [=] valueDNS$InCHName [=] booleanDNS$UpgradeTo [=] v.n
Description
This command modifies characteristics for the specified directory. You can specify one or more of the listed characteristics to be modified. Use a comma to separate characteristics. For more information on managing directories, see Chapter 7, "Managing Directories".
Characteristics
DNS$Convergence [=] value
Low | The next skulk distributes all DECdns updates that occurred since the previous skulk. Skulks occur at least once every 24 hours. |
Medium | DECdns attempts to propagate an update to all replicas. If the attempt fails, the next scheduled skulk makes the replicas consistent. Skulks occur at least once every 12 hours. |
High | DECdns attempts to propagate an update to all replicas. If that attempt fails (for example, if one of the replicas is unavailable), a skulk occurs within one hour. Background skulks occur at least once every 12 hours. VSI recommends that you use this setting temporarily (and briefly) because it uses extensive system resources. |
By default, every directory inherits the convergence setting of its parent at
creation time. The default setting of the root directory is medium.
DNS$InCHName [=] boolean
boolean argument can be specified as one of the
following: | True | The directory or its descendants can store clearinghouse names. |
| False | The directory or its descendants cannot store clearinghouse names. This is the default value. |
DNS$UpgradeTo [=] v.n
Controls the upgrading of a directory from one version of DECdns to another. By
modifying this attribute, you can initiate the upgrading of a directory to a higher
version of DECdns. Specify the value as v.n where
v indicates the major version number and n
specifies the minor version number. There is no default.
Access Rights
You must have write access to the directory whose attribute you intend to modify.
Example
The following command sets a low convergence value on the .mfg
directory.
dns> set directory .mfg DNS$Convergence = low
set directory to new epoch
set directory to new epoch — Reconstructs a directory's replica set, allowing you to exclude a replica or re-specify replica types.
Format
set directory directory-name
to new epoch master
clearinghouse-name
[,read-only
clearinghouse-name] [...] [,exclude
clearinghouse-name]Arguments
- directory-name
The full name of the directory.
- clearinghouse-name
The name of the clearinghouse in which an individual replica is located. The first clearinghouse-name specifies where the master replica is stored.
Description
read-only
clearinghouse-name, read-only
clearinghouse-name. Note
When you include a replica, you are not creating it; you are simply
specifying it as a member of the replica set. Use the create
replica command to create a replica.
Likewise, when you exclude a replica, you are not deleting it; you are merely excluding it from the skulk process. DECdns clerks and servers continue to use the replica for lookups.
In general, exclude a replica when it is temporarily unavailable (its clearinghouse is temporarily unreachable), and you want a skulk to complete successfully. Include the replica again to its replica set as soon as possible after the clearinghouse on which it resides becomes available. Otherwise, lookup requests directed to the excluded replica may return outdated information.
Exclude a replica permanently when you are certain it will never be
reachable again, such as when its clearinghouse has been corrupted and is
being deleted. To remove a replica of a directory from a clearinghouse, use
the delete replica at clearinghouse command. For more
information on using the set directory to new epoch command, see Section 9.2, ''Modifying a Directory's Replica Set''.
Do not assume that the set directory to new epoch command
completed successfully if you do not get any errors reported. You must check
the skulk status on the master replica to determine if the command completed
successfully. To check the skulk status, use the following show replica
command:
show replica .directory clearinghouse .master_ch DNS$SkulkStatus
Be sure to specify the name of the clearinghouse that contains the master replica, as the skulk status is only available on the master replica.
After you use the set directory to new epoch command, a special
skulk of the directory is automatically initiated. This skulk may require more time
to complete than other, regularly scheduled skulks and will require more network
resources.
Access Rights
You must have read and control access to all the replicas in the replica set. To change the type of replica, you must have write access to the clearinghouse that stores the replica whose type is being changed.
Example
The following command sets a new epoch for the directory .mfg. The
master replica is in .paris_ch, and read-only replicas are in
.chicago1_ch and .seattle_ch. The new replica set
excludes the replica in .ny1_ch.
dns> set directory .mfg to new epoch master .paris1_ch, - _> read-only .chicago1_ch, read-only.seattle_ch, exclude .ny1_ch
set directory to skulk
set directory to skulk — Skulks a directory immediately.
Format
set directory directory-name to skulk Arguments
- directory-name
The full name of the directory.
Description
This command skulks a directory immediately. The DECdns Control Program prompt
(dns>) does not return until the skulk is complete. The amount of
time for skulking to complete depends on the number of replicas of the directory,
the number of updates to be propagated through the network, and the speed of the
network connections between the nodes in the replica set. For more information on
managing directories and skulking them, see Chapter 7, "Managing Directories".
Note
Under certain circumstances, it is possible to receive the dns>
prompt before a skulk completes. To be absolutely positive that a skulk
operation has succeeded, you should check the DNS$SkulkStatus attribute at the
master replica for the directory. To check the skulk status, use the following
show replica command:
show replica .directory clearinghouse .master_ch DNS$SkulkStatus
Be sure to specify the name of the clearinghouse that contains the master replica, as the skulk status is only available on the master replica.
Access Rights
You must have write access to the directory you intend to skulk.
Example
The following command initiates a skulk on the .admin directory.
dns> set directory .admin to skulk
set dns clerk
set dns clerk — Modifies characteristics of the clerk entity on the specified node.
Format
set [node
node-id]
dns clerk
characteristic Arguments
- node-id
The name of the node. If you do not specify a node name, the local node is assumed.
- characteristic
- The name and the value of the characteristic to be modified. Specify one or any combination of the following for the characteristic argument:
Clerk Timeout[[=]secs]Specifies the default timeout of client interface calls. If no response is received in the specified timeout, the clerk generates an error message. If you use this argument without specifying a value, it is set to the default (150 seconds). Default Namespace[=]nameDesignates the known namespace whose name is given as the default namespace for this clerk. A name must be supplied; there is no default. Solicit Holddown[[=]secs]Specifies the time (in seconds) to wait after initialization before soliciting advertisements from servers. If you use this argument without specifying a value, it is set to the default (15 seconds).
Description
This command modifies characteristics of the clerk entity on the specified node. You can specify one or more of the listed characteristics to be modified. Use a comma to separate characteristics. If you do not specify a value, the attribute is set to its default if that attribute has a default. You can also enter this command through the NCL interface. For more information on managing clerks, see Chapter 6, "Managing Clerks, Servers, and Clearinghouses".
Privileges Required
You must have the NET$MANAGE rights identifier.
Example
The following command sets the clerk timeout to a value of 90
seconds for the clerk running on node .eng.rigel.
dns> set node .eng.rigel dns clerk clerk timeout 90
set dns clerk known namespace
set dns clerk known namespace — Modifies characteristics for the specified known namespace.
Format
set [node
node-id]
dns clerk known namespace
identifier
name [=]new-name Arguments
- node-id
The name of the node. If you do not specify a node name, the local node is assumed.
- identifier
- The identifier of the namespace. This is a required argument. You can use one of the following:
name
A simple name for the namespace. nscts The value of the namespace creation timestamp (NSCTS) that is automatically assigned when the namespace is created. The format of the NSCTS is 14 pairs of hexadecimal digits (xx-xx). - new-name
Specifies a new name for this known namespace, in effect, renaming the known namespace.
Description
This command modifies the Name attribute of a known namespace. The
nickname attribute is not changed. You will find this command
useful in the case of ambiguous nicknames, where a name was generated that you want
to change. You can also enter this command through the NCL interface.
Privileges Required
You must have the NET$MANAGE rights identifier.
Example
The following command renames the IAF_1 namespace in the local
clerk's cache with the new name NDL.
dns> set dns clerk known namespace IAF_1 name NDL
set group
set group — Modifies characteristics of the specified group.
Format
set group group-name
DNS$GroupRevoke
(expiration-time extension-time) Arguments
- group-name
The full name of the group.
- expiration-time
A date and time after which a clerk must verify that a principal is still a member of a group. The value is specified as yyyy-mm-dd-hh:mm:ss.
- extension-time
A period of time for which to renew the clerk's reliance on cached data when checking for group membership. After the specified expiration time, a clerk must verify group membership from the server. If the test is positive, the clerk adds the extension time to obtain a new expiration date. The extension time is specified as ddd-hh:mm:ss.
Description
This command modifies the attribute DNS$GroupRevoke for the
specified group. This attribute specifies a timeout that determines how long a
positive result from a group membership test operation may be cached by the clerk
that issued the request. For more information on managing groups, see Chapter 5, "Managing DECdns Access Control".
Access Rights
You must have write access to the group whose attribute you intend to modify.
Example
The following command specifies a group membership test of the group
.sales.admingroup with an expiration time of December 31, 2019,
that is extended 90 days if the clerk verifies membership.
dns> set group .sales.admingroup DNS$GroupRevoke - _> (2019-12-31-12:00:00 090-00:00:00)
set link
set link — Modifies characteristics of the specified soft link.
Format
set link link-name
characteristic Arguments
- link-name
The full name of the soft link.
- characteristic
- The name and the value of the characteristic to be modified. Specify one or both of the following for the characteristic argument:
DNS$LinkTarget[=]fullnameDNS$LinkTimeout[=][(expiration-time extension-time)]
Description
This command modifies characteristics of the specified soft link. Enter one or both of the following characteristics. If you enter both characteristics, separate them with a comma. For more information on managing soft links, see Chapter 9, "Restructuring a Namespace".
DNS$LinkTarget
Specifies the full name of the directory, object entry, or other soft link to which the soft link points.
DNS$LinkTimeout
Specifies a timeout value after which the soft link is either extended or deleted. The timeout value contains both an expiration time and an extension time. If a soft link expires and its target entry was deleted, the soft link is deleted. If the link still points to an existing entry, its life is extended by the extension time. Specify expiration-time in the format yyyy-mm-dd-hh:mm:ss. The default value of 0 means "never expire." Specify extension-time in the format ddd-hh:mm:ss. The default value is 000-00:00:00.
Access Rights
You must have write access to the soft link you intend to modify.
Example
The following command sets the expiration value of a soft link named
.eng.link01 to December 31, 2019, at 12:00 p.m. and sets the soft
link's extension value to 90 days.
dns> set link .eng.link01 dns$linktimeout - _> (2019-12-31-12:00:00 090-00:00:00)
set object
set object — Changes the value of a modifiable, single-valued attribute (including application-defined attributes) of an object entry.
Format
set object object-name
attribute-name
[=]
attribute-value Arguments
- object-name
The full name of the object entry. Specify your own attribute name or one of the DECdns-defined attributes.
- attribute-name
The name of the attribute to be modified.
- attribute-value
The value of the attribute to be modified. You can express the values of application-defined attributes as quoted strings, "ps"; hexadecimal strings, %x FF00EE; or concatenations of them in parentheses (%x0103 "ps").
Description
This command changes the value of a modifiable, single-valued attribute (including application-defined attributes) of an object entry. This task is usually accomplished through the client application. Use a comma to separate attributes.
Access Rights
You must have write access to the object entry whose attribute you intend to modify or have control access to the parent directory.
Example
The following command changes the Q1 attribute of the object entry
.sales_records to a value of 2.
dns> set object .sales_records Q1 %x2
show child
show child — Displays current information about the specified child pointer.
Format
show child child-name
[attribute-specifier]
[prepositional-phrase] Arguments
- child-name
A specific child name or a complete directory specification followed by a wildcard template for matching simple names of child pointers.
- attribute-specifier
- The name of an attribute or an attribute group. Enter one or more of the following attribute specifiers:
all [attributes]all characteristicsDNS$ChildCTSDNS$CTSDNS$ReplicasDNS$UTS
- prepositional-phrase
- A phrase that affects the destination or content of command output. Specify one or more of the following prepositional phrases:
with attribute [relop] valueto file[=]filenameto extend file[=]filenameto terminal
Description
This command displays the names and values of the attributes or attribute groups
named in attribute-specifier. If you do not supply any attribute
specifier, the command displays all attributes and their values. You can use any
combination of attribute specifiers in any sequence in a single command. Use a comma
to separate specifiers.
Characteristics
The following are descriptions of valid characteristics:
DNS$ChildCTS
Specifies the creation timestamp (CTS) of the child directory referenced by the child pointer.
DNS$CTS
Specifies the CTS of the specified child pointer.
DNS$Replicas
Specifies the address, CTS, and name of a set of clearinghouses where a copy of the child directory referenced by the child pointer is located. This attribute also specifies whether the directory in a particular clearinghouse is a master or read-only replica.
DNS$UTS
Specifies the timestamp of the most recent update to an attribute of the child pointer.
Prepositional Phrases
You can affect the destination or content of command output by using prepositional phrases. Be sure to precede each of the following prepositional phrases with a comma and a space:
with attribute [relop] value
When used with a wildcard child-name, limits the output only to directories whose specified attributes have certain values.
to file[=]filename
Redirects the output to filename. If the file does not exist, this command creates it. If the file does exist, its contents are overwritten.
to extend file[=]filename
Appends the output to an existing filename. If the file does not exist, it is created.
to terminal
Directs the output to the terminal. This is the default option.
Access Rights
You must have read access to the directory in which the child pointer is located.
Example
The following command displays the creation timestamp (CTS) of the child directory
.sales to which the child pointer refers.
dns> show child .sales dns$cts
.admin child pointer.
dns> show child .admin
SHOW
CHILD IAF:.admin
AT 17-APR-2019:13:59:01
DNS$ChildUID = 2019-02-27-21:27:30.98/aa-00-04-00-2a-10
DNS$Replicas (set) = :
Clearinghouse's DNS$CTS = 2019-01-23-20:38:05.18/aa-00-04-00-de-11
Tower 1 Floor 1 = 01 2c (null)
Tower 1 Floor 2 = 02 00 2c ncacn_dnet_nsp
Tower 1 Floor 3 = 04 (null)
Tower 1 Floor 4 = 06 49 00 04 aa 00 04 00 2a 10 20
Replica type = master
Clearinghouse's Name = IAF:.admin1_ch
DNS$Replicas (set) = :
Clearinghouse's DNS$CTS = 2019-01-25-17:36:02.65/aa-00-04-00-de-11
Tower 1 Floor 1 = 01 2c (null)
Tower 1 Floor 2 = 02 00 2c ncacn_dnet_nsp
Tower 1 Floor 3 = 04 (null)
Tower 1 Floor 4 = 06 49 00 37 aa 00 04 00 49 dc 20
Replica type = readonly
Clearinghouse's Name = IAF:.admin2_ch
DNS$CTS = 2019-02-27-21:27:31.79/aa-00-04-00-2a-10
DNS$UTS = 2019-03-26-15:07:16.55/aa-00-04-00-2a-10show clearinghouse
show clearinghouse — Displays DECdns attribute information about the specified clearinghouse.
Format
show clearinghouse clearinghouse-name
[attribute-specifier]
[prepositional-phrase] Arguments
- clearinghouse-name
A specific clearinghouse name or a complete directory specification followed by a wildcard template for matching simple names of clearinghouses.
- attribute-specifier
- The name of an attribute or an attribute group. Enter one or more of the following attribute specifiers:
all [attributes]all characteristicsall identifiersall statusDNS$ACSDNS$CHCTSDNS$CHDirectoriesDNS$CHLastAddressDNS$CHNameDNS$CHStateDNS$CHUpPointersDNS$NSCTSDNS$NSNicknameDNS$UTS
- prepositional-phrase
- A phrase that affects the destination or content of command output. Specify one or more of the following prepositional phrases:
with attribute [relop] valueto file[=]filenameto extend file[=]filenameto terminal
Description
This command displays the names and values of the attributes or attribute groups
named in attribute-specifier. You can use any combination of
attribute specifiers in any sequence in a single command. Use a comma to separate
specifiers. If you do not supply any attribute specifier, the command displays all
attributes and their values. The following is a description of clearinghouse
attributes:
Characteristics
DNS$ACS
Specifies the access control set for the clearinghouse.
DNS$CHCTS
Specifies the time at which the clearinghouse was created.
DNS$CHLastAddress
Specifies the current reported network address of the clearinghouse.
DNS$CHUpPointers
Specifies pointers to clearinghouses that contain replicas closer to the root than those in this clearinghouse. If the attribute has no values, either this clearinghouse stores a replica of the root directory, or it has not yet obtained the necessary up-pointer information from other clearinghouses.
DNS$NSCTS
Specifies the creation timestamp of the namespace of which the clearinghouse is a part.
DNS$NSNickname
Specifies the nickname of the namespace of which the clearinghouse is a part.
DNS$UTS
Specifies the timestamp of the most recent update to an attribute of the clearinghouse.
Identifier
DNS$CHName
Specifies the full name of the clearinghouse.
Status Attributes
DNS$CHDirectories
Specifies the full name and creation timestamp (CTS) of every directory that has a replica in this clearinghouse.
DNS$CHState
| Dying | The clearinghouse is being deleted. |
| On | The clearinghouse is running and available. |
| New | The clearinghouse is being created. |
Prepositional Phrases
You can affect the destination or content of command output by using prepositional phrases. Be sure to precede each of the following prepositional phrases with a comma and a space:
with attribute [relop] value
When used with a wildcard clearinghouse-name, limits the output only to directories whose specified attributes have certain values.
to file[=]filename
Redirects the output to filename. If the file does not exist, this command creates it. If the file does exist, its contents are overwritten.
to extend file[=]filename
Appends the output to an existing filename. If the file does not exist, it is created.
to terminal
Directs the output to the terminal. This is the default option.
Access Rights
You need read access to the clearinghouse to display a list of known attributes or the value of an attribute.
Example
The following command displays the current values of the DNS$ACS
attribute associated with the .chicago1_ch clearinghouse.
dns> show clearinghouse .chicago1_ch DNS$ACS
.chicago1_ch clearinghouse.
dns> show clearinghouse .chicago1_ch all
SHOW
CLEARINGHOUSE IAF:.chicago1_ch
AT 17-APR-2019:10:48:51
DNS$ACS (set) = :
Flags = none
Rights = read, write, delete, test, control
(V) Principal = IAF:.CHICAGO1.DNS$SERVER
DNS$ACS (set) = :
Flags = propagate
Rights = read, write, delete, test, control
(V) Principal = IAF:.chicago1.system
DNS$ACS (set) = :
Flags = propagate, group
Rights = read, write, delete, test, control
Group = IAF:.chicago1.chi_admin
DNS$CHDirectories (set) = :
CTS of Directory = 2018-09-04-18:52:56.19/aa-00-04-00-eb-27
Name of Directory = .
DNS$CHLastAddress = :
Tower 1 Floor 1 = 01 2c (null)
Tower 1 Floor 2 = 02 00 2c ncacn_dnet_nsp
Tower 1 Floor 3 = 04 (null)
Tower 1 Floor 4 = 06 49 00 04 aa 00 04 00 2a 10 20
DNS$CHName = IAF:.chicago1_ch
DNS$CHState = on
DNS$CHCTS = 2018-01-23-20:38:05.18/aa-00-04-00-de-11
DNS$CHUpPointers (set) = :
Clearinghouse's DNS$CTS = 2018-04-23-21:02:32.01/aa-00-04-00-de-11
Tower 1 Floor 1 = 01 2c (null)
Tower 1 Floor 2 = 02 00 2c ncacn_dnet_nsp
Tower 1 Floor 3 = 04 (null)
Tower 1 Floor 4 = 06 49 00 18 aa 00 04 00 eb 61 20
Replica type = readonly
Clearinghouse's Name = IAF:.chicago1_ch
DNS$NSNickname = IAF
DNS$NSCTS = 2018-04-23-21:02:32.01/aa-00-04-00-de-11
DNS$CTS = 2019-01-23-20:38:05.18/aa-00-04-00-de-11
DNS$UTS = 2019-04-17-14:04:41.88/aa-00-04-00-2a-10show clearinghouse access
show clearinghouse access — Displays the access control set of a clearinghouse.
Format
show clearinghouse clearinghouse-name
access
[prepositional-phrase] Arguments
- clearinghouse-name
The name of the clearinghouse for which you want to see the access control set. It can be a specific clearinghouse name or a complete directory specification followed by a wildcard template for matching simple names of clearinghouses.
- prepositional-phrase
- A phrase that affects the destination or content of command output. Specify one or more of the following prepositional phrases:
to file[=]filenameto extend file[=]filenameto terminal
Description
This command displays the access control set of a clearinghouse.
Prepositional Phrases
You can affect the destination or content of command output by using prepositional phrases. Be sure to precede each of the following prepositional phrases with a comma and a space:
to file[=]filename
Redirects the output to filename. If the file does not exist, this command creates it. If the file does exist, its contents are overwritten.
to extend file[=]filename
Appends the output to an existing filename. If the file does not exist, it is created.
to terminal
Directs the output to the terminal. This is the default option.
Access Rights
You need read access to the clearinghouse.
Example
The following example displays the access control set of the .ny_ch
clearinghouse.
dns> show clearinghouse .ny_ch access
.paris2_ch clearinghouse.
dns> show clearinghouse .paris2_ch access
SHOW
CLEARINGHOUSE IAF:.paris2_ch
AT 17-APR-2019:13:49:08
DNS$ACS (set) = :
Flags = none
Rights = read, write, delete, test, control
(V) Principal = IAF:.PARIS2.DNS$SERVER
DNS$ACS (set) = :
Flags = propagate
Rights = read, write, delete, test, control
(V) Principal = IAF:.paris2.system
DNS$ACS (set) = :
Flags = propagate, group
Rights = read, write, delete, test, control
Group = IAF:.paris_adminshow directory
show directory — Displays current information about the specified directory.
Format
show directory directory-name
[attribute-specifier]
[prepositional-phrase] Arguments
- directory-name
A specific directory name or a complete directory specification followed by a wildcard template for matching simple names of directories.
- attribute-specifier
- The name of an attribute group or a particular attribute. Enter one or more of the following attribute specifiers:
all [attributes]all characteristicsDNS$ACSDNS$AllUpToDNS$ConvergenceDNS$CTSDNS$DirectoryVersionDNS$InCHNameDNS$ParentPointerDNS$ReplicasDNS$RingPointerDNS$UpGradeToDNS$UTS
- prepositional-phrase
- A phrase that affects the destination or content of command output. Specify one or more of the following prepositional phrases:
with attribute [relop] valueto file[=]filenameto extend file[=]filenameto terminal
Description
This command displays the names and values of the attributes or attribute groups
named in attribute-specifier. If you do not supply any attribute
specifier, the command displays all attributes and their values. You can use any
combination of attribute specifiers in any sequence in a single command. Use a comma
to separate specifiers.
Characteristics
The following are descriptions of valid characteristics:
DNS$ACS
Specifies the access control set for the directory.
DNS$AllUpTo
Indicates the date and time of the last successful skulk on the directory. All replicas of the directory are guaranteed to have received all updates whose timestamps are less than the value of this characteristic.
DNS$Convergence
Low | The next skulk distributes all updates that occurred since the previous skulk. Skulks occur at least once every 24 hours. |
Medium | DECdns attempts to propagate an update to all replicas. If the attempt fails, the next scheduled skulk makes the replicas consistent. Skulks occur at least once every 12 hours. |
High | DECdns attempts to propagate an update to all replicas. If the attempt fails (for example, if one of the replicas is unavailable), a skulk occurs within one hour. Background skulks will occur at least once every 12 hours. Use this setting temporarily and briefly, because it uses extensive system resources. |
By default, every directory inherits the convergence setting of its parent at
creation time. The default setting of the root directory is medium.
DNS$CTS
Specifies the creation timestamp (CTS) of the directory DECdns.
DNS$DirectoryVersion
Specifies the current version of the directory. (The version is derived from the
DNS$DirectoryVersion attribute of the clearinghouse in which the
directory was created.) Multiple directory versions are supported in a namespace.
DNS$InCHName
Specifies whether a directory or any of its descendants can store clearinghouse names. If this value is true, the directory can store clearinghouse names. If it is false, the directory cannot store clearinghouse names.
DNS$ParentPointer
A pointer that links a child directory to its parent directory, allowing clerks and servers to navigate up and down the namespace hierarchy.
DNS$Replicas
Specifies the address, creation timestamp (CTS), and name of every clearinghouse where a replica of this directory is located. This attribute also specifies whether the replica in a particular clearinghouse is a master or read-only replica.
DNS$RingPointer
Contains the CTS of the next clearinghouse in the ring. This attribute is for internal use only.
DNS$UpgradeTo
Controls the upgrading of a directory from one version of DECdns to another. By modifying this attribute, you can initiate the upgrading of a directory to a newer version of DECdns.
DNS$UTS
Specifies the timestamp of the most recent update to an attribute of the directory.
Prepositional Phrases
You can affect the destination or content of command output by using prepositional phrases. Be sure to precede each of the following prepositional phrases with a comma and a space:
with attribute [relop] value
When used with a wildcard directory-name, limits the output only to directories whose specified attributes have certain values.
to file[=]filename
Redirects the output to filename. If the file does not exist, this command creates it. If the file does exist, its contents are overwritten.
to extend file[=]filename
Appends the output to an existing filename. If the file does not exist, it is created.
to terminal
Directs the output to the terminal. This is the default option.
Access Rights
You need read access to the directory to use the show command.
Example
The following command displays the creation timestamp (CTS), the time at which
the .admin directory was created.
dns> show directory .admin dns$cts
.admin directory.
dns> show directory .admin
SHOW
DIRECTORY IAF:.admin
AT 03-MAR-2019:16:39:03
DNS$ACS (set) = :
Flags = none
Rights = read, write, delete, test, control
(V) Principal = IAF:.ABC.SYSTEM
DNS$ACS (set) = :
Flags = none
Rights = read, write, delete, test, control
(V) Principal = IAF:.ORION.DNS$SERVER
DNS$ACS (set) = :
Flags = authenticated
Rights = read, write, delete, test, control
(V) Principal = IAF:.admin.orion_ch
DNS$AllUpTo = 2019-03-03-11:52:16.851/08-00-2b-10-27-f4
DNS$Convergence = medium
DNS$CTS = 2018-07-22-15:09:49.102/08-00-2b-03-87-72
DNS$DirectoryVersion = 1.0
DNS$Epoch = 2018-07-22-15:09:50.102/08-00-2b-03-87-72
DNS$LastSkulk = 2019-03-03-11:52:16.851/08-00-2b-10-27-f4
DNS$LastUpdate = 2019-03-03-11:52:16.671/08-00-2b-10-27-f4
DNS$ParentPointer = :
Parent's DNS$CTS = 2018-03-25-22:49:33.409/08-00-2b-03-87-72
Timeout = :
Expiration = 2019-03-04-11:52:16.581
Extension = +1-00:00:00.000
DNS$Replicas (set) = :
Clearinghouse's DNS$CTS = 2018-03-25-22:49:33.409/08-00-2b-03-87-72
Tower 1 Floor 1 = 01 2c (null)
Tower 1 Floor 2 = 03 00 2c
Tower 1 Floor 3 = 05 de c0
Tower 1 Floor 4 = 06 49 00 04 aa 00 04 00 a1 13 21
Tower 2 Floor 1 = 01 2c (null)
Tower 2 Floor 2 = 03 00 2c
Tower 2 Floor 3 = 04 (null)
Tower 2 Floor 4 = 06 49 00 04 aa 00 04 00 a1 13 20
Tower 3 Floor 1 = 01 2c (null)
Tower 3 Floor 2 = 03 00 2c
Tower 3 Floor 3 = 05 de c0
Tower 3 Floor 4 = 06 41 45 41 87 15 00 41 08 00 2b 10
27 f4 21
Tower 4 Floor 1 = 01 2c (null)
Tower 4 Floor 2 = 03 00 2c
Tower 4 Floor 3 = 04 (null)
Tower 4 Floor 4 = 06 41 45 41 87 15 00 41 08 00 2b 10
27 f4 20
Replica type = master
Clearinghouse's Name = IAF:.admin.orion_ch
DNS$ReplicaState = on
DNS$ReplicaType = master
DNS$ReplicaVersion = 1.0
DNS$RingPointer = 2018-03-25-22:49:33.409/08-00-2b-03-87-72
DNS$UTS = 2019-03-03-11:52:16.671/08-00-2b-10-27-f4show directory access
show directory access — Displays the access control set of a directory.
Format
show directory directory-name
access
[prepositional-phrase] Arguments
- directory-name
A specific directory name or a complete directory specification followed by a wildcard template for matching simple names of directories.
- prepositional-phrase
- A phrase that affects the destination or content of command output. Specify one or more of the following prepositional phrases:
to file[=]filenameto extend file[=]filenameto terminal
Description
This command displays the access control set of a directory.
Prepositional Phrases
You can affect the destination or content of command output by using prepositional phrases. Be sure to precede each of the following prepositional phrases with a comma and a space:
to file[=]filename
Redirects the output to filename. If the file does not exist, this command creates it. If the file does exist, its contents are overwritten.
to extend file[=]filename
Appends the output to an existing filename. If the file does not exist, it is created.
to terminal
Directs the output to the terminal. This is the default option.
Access Rights
You must have read access to the directory.
Example
The following command displays the access control set of the directory
.sales and stores the output in a file called sdshow.
dns> show directory .sales access, to file sdshow
.admin.
dns> show directory .admin access
SHOW
DIRECTORY IAF:.admin
AT 17-APR-2019:14:54:54
DNS$ACS (set) = :
Flags = none
Rights = read, write, delete, test, control
(V) Principal = IAF:.ABC.SYSTEM
DNS$ACS (set) = :
Flags = none
Rights = read, write, delete, test, control
(V) Principal = IAF:.ORION.DNS$SERVER
DNS$ACS (set) = :
Flags = authenticated
Rights = read, write, delete, test, control
(V) Principal = IAF:.admin.orion_ch
DNS$ACS (set) = :
Flags = default, propagate, group
Rights = read, write, delete, test, control
Group = IAF:.ad_users.admin is replicated on mixed-version servers (DECdns
Version 2 and DNS Version 1), the display of its access control set would include
two styles of access control entries (DECnet Phase IV and Phase V), as in the
following example:
dns> show directory .admin access
SHOW
DIRECTORY IAF:.admin
AT 17-APR-2019:14:54:54
DNS$ACS (set) = :
Flags = none
Rights = read, write, delete, test, control
(IV) Principal = ABC::SYSTEM
(V) Principal = IAF:.ABC.SYSTEM
DNS$ACS (set) = :
Flags = none
Rights = read, write, delete, test, control
(IV) Principal = ORION::DNS$SERVER
(V) Principal = IAF:.ORION.DNS$SERVER
DNS$ACS (set) = :
Flags = authenticated
Rights = read, write, delete, test, control
(V) Principal = IAF:.admin.orion_ch
DNS$ACS (set) = :
Flags = default, propagate, group
Rights = read, write, delete, test, control
Group = IAF:.ad_usersshow dns clerk
show dns clerk — Displays current information about the specified DECdns clerk.
Format
show [node
node-id]
dns clerk
[attribute-specifier] Arguments
- node-id
The name of the node. If you do not specify a node name, the local node is assumed.
- attribute-specifier
- The name of an attribute or an attribute group. Enter one or more of the following attribute specifiers:
all [attributes]all characteristicsall countersall statusAuthentication FailuresCache BypassesCache HitsClerk TimeoutCreation TimeDefault NamespaceIncompatible Protocol ErrorsMiscellaneous OperationsRead OperationsRead OperationsSolicit HolddownStateUIDVersionWrite Operations
Description
This command displays the names and values of the attributes or attribute groups
named in attribute-specifier. You can also enter this command
through the NCL interface. You can use any combination of attribute specifiers in
any sequence in a single command. Use a comma to separate specifiers. If you do not
supply any attribute specifier, the command displays all identifiers and their
values. The following is a description of the clerk attributes:
Characteristics
Clerk Timeout
Specifies the default timeout of client interface calls. If no response is received in the specified time, an error message is generated. The default is 150 seconds.
Default Namespace
Contains the name of the clerk's default namespace.
Solicit Holddown
Specifies the time (in seconds) to wait after initialization before soliciting advertisements from servers. The default is 15 seconds.
UID
Uniquely identifies the entity.
Version
Specifies the version of the DECdns architecture implemented by this clerk.
Counters
Authentication Failures
Specifies the number of times a requesting principal failed authentication procedures.
Cache Bypasses
Specifies the number of requests to read attributes for which the clerk was specifically directed by the requesting application to bypass its own cache. Instead, a server is contacted to get the requested information. This counter does not account for requests that the clerk is unable to satisfy from the cache or for requests to look up names or enumerate the contents of directories.
Cache Hits
Specifies the total number of read requests directed to this clerk that were satisfied entirely by the information contained in its own cache. This figure accounts only for requests to read attribute values and does not include requests to look up names or enumerate the contents of directories.
Creation Time
Specifies the time when this entity was created.
Incompatible Protocol Errors
Specifies the number of times this clerk received a response to one of its own requests from a server running a protocol version of DECdns software that was incompatible with the protocol version of DECdns software the clerk was running. Clerk requests directed to servers running incompatible protocol versions do not complete.
Miscellaneous Operations
Specifies the number of operations other than read and write (that is, skulks, enumerating contents of directories, and so on) performed by this clerk.
Read Operations
Specifies the number of lookup operations performed by this clerk. This counter accounts only for requests to read attributes and does not include name lookups or enumerations of multiple names.
Write Operations
Specifies how many requests to modify data were processed by this clerk.
Status Attributes
State
| Broken | The DECdns clerk has a fatal error condition. |
| Initial | The DECdns clerk is in the process of initializing. |
| Off | The DECdns clerk is not available. |
| On | The DECdns clerk is running and available. |
| Shut | The DECdns clerk is in the process of an orderly shutdown. |
Privilege Required
You must have the NET$EXAMINE rights identifier.
Example
The following command displays the state of the clerk running on node
.mfg.ariel.
dns> show node .mfg.ariel dns clerk state
dns> show dns clerk all
Node 0:. DNS Clerk
AT 2019-04-16-15:18:12.014-04:00I0.173
Status
State = On
Characteristics
Version = V2.0.0
Clerk Timeout = 0-00:01:00.000I0.000 Seconds
Solicit Holddown = 0-00:00:15.000I0.000 Seconds
UID = D370CD10-DC0B-11B8-AB12-07001C0DC09D
Default Namespace = IAF
Counters
Creation Time = 2019-04-16-18:26:49.543+00:00I0.000
Incompatible Protocol Errors = 0
Authentication Failures = 0
Read Operations = 7304
Cache Hits = 2994
Cache Bypasses = 1734
Write Operations = 1090
Miscellaneous Operations = 3100show dns clerk known namespace
show dns clerk known namespace — Displays current information about the specified namespace.
Format
show [node
node-id]
dns clerk known namespace
identifier
[attribute-specifier]
[prepositional-phrase] Arguments
- node-id
The name of the node. If you do not specify a node name, the local node is assumed.
- identifier
The identifier of the namespace. You can use one of the following identifiers: the simple name for the namespace, which can contain wildcard characters, or the NSCTS, which is the value of the namespace creation timestamp that is automatically assigned when the namespace is created. The format of the NSCTS is 14 pairs of hexadecimal digits (xx-xx).
- attribute-specifier
- The name of an attribute or an attribute group. Enter one or more of the following attribute specifiers:
all [attributes]all characteristicsall countersall identifiersall statusAmbiguousCreation TimeExplicit CreationNameNicknameNSCTSUID
- prepositional-phrase
- A phrase that affects the content of command output. Specify the following prepositional phrase:
with attribute [relop] value
Description
This command displays the names and values of the attributes or attribute groups
named in attribute-specifier. You can also enter this command
through the NCL interface. You can use any combination of attribute specifiers in a
single command. Use a comma to separate the specifiers. If you do not supply any
attribute specifier, the command displays all identifiers and their values. The
following are descriptions of valid characteristics, counters, identifiers, and
status attributes:
Characteristics
UID
Uniquely identifies the entity.
Counters
Creation Time
Specifies the time when the clerk added this known namespace to its cache.
Identifiers
Name
Specifies an external, human-readable name by which the namespace can be identified. If the namespace nickname is unique, the Name is the same as the Nickname. Otherwise, the name is generated by appending _n to the nickname for some value of n that makes it unique. The Ambiguous attribute is then set to true for the known namespace.
NSCTS
Specifies the creation timestamp of the namespace.
Status Attributes
Ambiguous
Indicates whether the nickname for this namespace is ambiguous; that is, more than one namespace known to this clerk has the same nickname. If true, the namespace nickname is ambiguous. If false, the namespace nickname is unique.
Explicit Creation
Specifies whether the namespace was created by a create command. If
false, the namespace was created by the clerk itself.
Nickname
The name given to the namespace when it was created.
Prepositional Phrases
You can affect the content of command output by using prepositional phrases. Be sure to precede the following prepositional phrase with a comma and a space:
with attribute [relop] value
When used with a known namespace nickname wildcard, limits the output only to a namespace whose specified attribute has a certain value.
Privilege Required
You must have the NET$EXAMINE rights identifier.
Example
The following command displays the identifiers of all namespaces with ambiguous nicknames.
dns> show dns clerk known namespace *, with ambiguous=true
.oberon.
dns> show node .oberon dns clerk known namespace * all
Node oberon:. DNS Clerk Known Namespace AA-00-01-00-01-FC-A0-4C-FF-8C-06-64-94-00
AT 2019-04-16-17:39:42.765-04:00I0.112
Identifiers
NSCTS = AA-00-01-00-01-FC-A0-4C-FF-8C-06-64-94-00
Name = orion_ns
Status
Nickname = orion_ns
Ambiguous = False
Explicit Creation = False
Counters
Creation Time = 2019-04-16-18:55:14.407+00:00I0.000show dns clerk manual nameserver
show dns clerk manual nameserver — Displays the knowledge in the clerk's cache about a server that exists across a wide area network (WAN).
Format
show [node
node-id]
dns clerk manual namespace
name
[attribute-specifier]
[prepositional-phrase] Arguments
- node-id
The name of the node. If you do not specify a node name, the local node is assumed.
- name
The name of the manual name server entity that you want to show. It can contain wildcard characters.
- attribute-specifier
- The name of an attribute or an attribute group. Enter one or more of the following attribute specifiers:
all [attributes]all characteristicsall countersall identifiersall statusCreation TimeFailed SolicitsLast SolicitNameSuccessful SolicitsTowersUID
- prepositional-phrase
- A phrase that affects the content of command output. Specify the following prepositional phrase:
with attribute [relop] value
Description
This command displays the names and values from the attributes or attribute
groups named in attribute-specifier. You can also enter this
command through the NCL interface. You can use any combination of attribute
specifiers in a single command. Use a comma to separate the specifiers. If you do
not supply any attribute specifier, the command displays all identifiers and their
values. The following are descriptions of valid characteristics, counters,
identifiers, and status attributes:
Characteristics
Towers
Specifes the DECnet Phase V address of the server that this entity represents.
UID
Uniquely identifies the entity.
Counters
Creation Time
Specifies the time when the clerk created knowledge of this server in its cache.
Successful Solicits
The number of times the clerk made a successful solicit connection to the server and received clearinghouse advertisement data.
Failed Solicits
The number of times solicitation of clearinghouse advertisement data from the server failed.
Identifier
Name
Specifies an external, human-readable name by which the server can be identified.
Status Attributes
Last Solicit
Indicates the time when the clerk last tried to solicit this server.
Prepositional Phrases
You can affect the content of command output by using prepositional phrases. Be sure to precede the following prepositional phrase with a comma and a space:
with attribute [relop] value
When used with a wildcard name, limits the output only to directories whose specified attributes have certain values.
Privilege Required
You must have the NET$EXAMINE rights identifier.
Example
The following command displays the Name attribute of the manual name server
rns.
dns> show dns clerk manual nameserver rns Name
emv.
dns> show dns clerk manual nameserver emv all
Node DNS Clerk Manual Nameserver emv
AT 2019-04-02-15:21:21.326-04:00I0.127
Identifiers
Name = emv
Status
Last Solicit = 2019-04-02-19:19:59.596+00:00I0.000
Characteristics
UID = D86D22D5-07A5-11BC-9814-07001B1027C4
Towers =
{
(
[ DNA_SessionControlV2 , number=76 ] ,
[ DNA_NSP ] ,
[ DNA_OSInetwork , 41::00-04:BB-00-04-00-A7-11:20 ]
)
}
Counters
Creation Time = 2019-04-02-19:19:59.596+00:00I0.000
Successful Solicits= 0
Failed Solicits = 0show dns clerk remote clearinghouse
show dns clerk remote clearinghouse — Displays current information about the specified remote clearinghouse.
Format
show [node
node-id]
dns clerk remote clearinghouse
clearinghouse-name
[attribute-specifier]
[prepositional-phrase] Arguments
- node-id
The name of the node. If you do not specify a node name, the local node is assumed.
- clearinghouse-name
A specific clearinghouse name or a complete directory specification followed by a wildcard template for matching simple names of clearinghouses.
- attribute-specifier
- The name of an attribute or an attribute group. Enter one or more of the following attribute specifiers:
all [attributes]all characteristicsall countersall identifiersCreation TimeCTSMiscellaneous OperationsNameRead OperationsUIDWrite Operations
- prepositional-phrase
- A phrase that affects the content of command output. Specify the following prepositional phrase:
with attribute [relop] value
Description
This command displays the names and values of the attributes or attribute groups
named in attribute-specifier. You can also enter this command
through the NCL interface. You can use any combination of attribute specifiers in a
single command. Use a comma to separate the specifiers. If you do not supply any
attribute specifier, the command displays all identifiers and their values. The
following are descriptions of valid characteristics, counters, and identifiers:
Characteristics
UID
Identifies the remote clearinghouse entity.
Counters
Creation Time
Specifies the time when this entity was created.
Miscellaneous Operations
Specifies the number of operations other than read and write (that is, skulks, new epochs, and so on) performed by this clerk on the remote clearinghouse.
Read Operations
Specifies the number of lookup operations of any sort performed by the clerk on the remote clearinghouse.
Write Operations
Specifies the number of write operations performed by this clerk on the remote clearinghouse.
Identifiers
CTS
Indicates the creation timestamp (CTS) of this entity.
Name
Specifies the full name of the clearinghouse.
Prepositional Phrases
You can affect the content of command output by using prepositional phrases. Be sure to precede the following prepositional phrase with a comma and a space:
with attribute [relop] value
When used with a wildcard clearinghouse-name, limits the output only to directories whose specified attributes have certain values.
Privilege Required
You must have the NET$EXAMINE rights identifier.
Example
The following command displays the CTS of the remote clearinghouse
.paris2_ch cached by the clerk on node .jmh.
dns> show node .jmh dns clerk remote clearinghouse .paris2_ch cts
.paris2_ch.
dns> show dns clerk remote clearinghouse .paris2_ch all
Node 0:. DNS Clerk Remote Clearinghouse IAF:.paris2.paris2_ch
AT 2019-04-17-11:25:00.786-04:00I0.495
Identifiers
CTS = AB-01-03-00-CE-11-B0-1A-82-10-23-18-85-00
Name = IAF:.paris2.paris_ch
Characteristics
UID = 2C0435B0-CBF0-11B9-AC12-07001C0BC08D
Counters
Creation Time = 2019-04-17-10:03:18.988-04:00I0.142
Read Operations = 1735
Write Operations = 3100
Miscellaneous Operations= 1509show dns server
show dns server — Displays current information about the specified server.
Format
show [node
node-id]
dns server
[attribute-specifier]
Arguments
- node-id
The name of the node. If you do not specify a node name, the local node is assumed.
- attribute-specifier
- The name of an attribute or an attribute group. Enter one or more of the following attribute specifiers:
all [attributes]all characteristicsall countersall statusAuthentication FailuresChild Pointer Update FailuresCreation TimeCrucial Replica Removals Backed OutFuture SkewIncompatible Protocol ErrorsMaximum Protocol VersionMinimum Protocol VersionPossible CyclesRead AccessesSecurity FailuresSkulks CompletedSkulks InitiatedStateTimes Lookup Paths BrokenUIDVersionWrite Accesses
Description
This command displays the names and values of the attributes or attribute groups
named in the attribute-specifier argument. You can also enter
this command through the NCL interface. You can use any combination of attribute
specifiers in a single command. Use a comma to separate the specifiers. If you do
not supply any attribute specifier, the command displays all identifiers and their
values. The following are descriptions of valid characteristics, counters, and
status attributes:
Characteristics
Future Skew
Specifies the maximum amount of time that a timestamp can vary from local system time at the server node. This characteristic ensures data consistency.
Maximum Protocol Version
Specifies the maximum version of the DECdns clerk/server protocol that this particular DECdns server supports.
Minimum Protocol Version
Specifies the minimum version of the DECdns clerk/server protocol that this particular DECdns server supports.
UID
Uniquely identifies the entity.
Version
Specifies the version of the architecture implemented by this server.
Counters
Authentication Failures
Specifies the number of times a requesting principal failed authentication procedures.
Child Pointer Update Failures
Specifies the number of times the server background process was unable to contact all the clearinghouses where a replica of a particular child directory's parent directory is stored, and was, therefore, unable to apply the child updates that have occurred since the last skulk. This counter increases by 1 at each occurrence of the Cannot Update Child Pointer event.
Creation Time
Specifies the time when the DECdns server entity was created.
Crucial Replica Removals Backed Out
Specifies the number of times a user attempted (from this server) to remove a replica that is crucial to the connectivity of a directory hierarchy. The server background process prevents users from accidentally disconnecting lower-level directories from higher-level directories. When it detects an attempt to remove a crucial replica, it will not execute the command to do so. This counter increases by 1 at each occurrence of the Crucial Replica event.
Incompatible Protocol Errors
Accounts for the total number of requests received by this server from a clerk running an incompatible protocol version. A server can communicate with any clerk running the same protocol version, or the version previous to the one it is running. This counter increases by 1 at each occurrence of the Incompatible Request event.
Possible Cycles
Specifies the number of times this server followed a chain and encountered an entry already in the chain. For example, a soft link is created that points to a series of links that eventually point back to the first link, or a group that is a member of itself. This counter increases by 1 at occurrence of the Possible Cycles event.
Read Accesses
Specifies the number of read operations directed to this DECdns server.
Security Failures
Specifies the number of times the Security Failures event was generated. This counter is increased whenever a DECdns server has insufficient access rights to a directory or object to perform either a client-requested action or a background operation.
Skulks Completed
Specifies the number of skulks that were successfully completed by this DECdns server.
Skulks Initiated
Specifies the number of skulks that were initiated by this DECdns server.
Times Lookup Paths Broken
Specifies the number of broken connections between clearinghouses on this server and clearinghouses closer to the root. Incoming requests to this server that require a downward lookup in the directory hierarchy may still succeed, but requests requiring lookup in directories closer to the root will fail. This counter increases by 1 at each occurrence of the Broken Lookup Paths event.
Write Accesses
Specifies the number of write operations to this DECdns server.
Status Attributes
State
| Broken | The server has a fatal error condition. |
| Initial | The server is initializing. |
| Off | The server is not available. |
| On | The server is running and available. |
| Shut | The server is undergoing an orderly shutdown. |
Privileges Required
You must have the NET$EXAMINE rights identifier.
Example
The following command displays information about the number of completed skulks
on the server running on node .sales.orion.
dns> show node .sales.orion dns server skulks completed
dns> show dns server all
show dns server all
Node 0:. DNS Server
AT 2019-04-18-17:07:37.093-04:00I2.147
Status
State = On
Characteristics
UID = 8BD2B21C-FCB43-11B8-A702-07001B2602FB
Minimum Protocol Version = V1.0.0
Maximum Protocol Version = V2.0.0
Future Skew = 0-00:05:00.000I0.000 Seconds
Counters
Creation Time = 2019-04-18-20:59:29.042+00:00I0.000
Incompatible Protocol Errors = 0
Authentication Failures = 0
Read Accesses = 1
Write Accesses = 0
Skulks Initiated = 0
Skulks Completed = 0
Times Lookup Paths Broken = 0
Possible Cycles = 0
Crucial Replica Removals Backed Out = 0
Child Pointer Update Failures = 0
Security Failures = 0 show dns server clearinghouse
show dns server clearinghouse — Displays current NCL attribute information about the specified clearinghouse.
Format
show [node
node-id]
dns server clearinghouse
clearinghouse-name
[attribute-specifier]
[prepositional-phrase]
Arguments
- node-id
The name of the node. If you do not specify a node name, the local node is assumed.
- clearinghouse-name
A specific clearinghouse name or a complete directory specification followed by a wildcard template for matching clearinghouse simple names.
- attribute-specifier
- The name of an attribute or an attribute group. Enter one or more of the following attribute specifiers:
all [attributes]all characteristicsall countersall identifiersall statusCreation TimeData CorruptionsDisable CountsCTSEnable CountsNameRead AccessesReferences ReturnedSkulk FailuresStateTimes Clearinghouse Entry MissingTimes Root Not ReachableUIDUpgrades Not PossibleWrite Accesses
- prepositional phrase
- A phrase that affects the content of command output. Specify the following prepositional phrase:
with attribute [relop] value
Description
This command displays the names and values of the attributes or attribute groups
named in attribute-specifier. You can also enter this command
through the NCL interface. You can use any combination of attribute specifiers in a
single command. Use a comma to separate the specifiers. If you do not supply any
attribute specifier, the command displays all identifiers and their values. The
following are descriptions of valid characteristics, counters, identifiers, and
status attributes:
Characteristics
CTS
Specifies the creation timestamp (CTS) of this clearinghouse.
UID
Uniquely identifies the entity.
Counters
Creation Time
Specifies the time when the clearinghouse entity was created.
Data Corruptions
Specifies the number of times the Data Corruption event was generated.
Disable Counts
Specifies the number of times the clearinghouse was disabled since it was last started.
Enable Counts
Specifies the number of times the clearinghouse was enabled since it was last started.
Read Accesses
Specifies the number of read operations directed to this clearinghouse.
References Returned
Specifies the number of requests directed to this clearinghouse that resulted in the return of a partial answer instead of satisfying the client's request.
Skulk Failures
Specifies the number of times a skulk of a directory, initiated from this clearinghouse, failed to complete—usually because one of the replicas in the replica set was unreachable.
Times Clearinghouse Entry Missing
Specifies the number of times the Clearinghouse Entry Missing event was generated.
Times Root Not Reachable
Specifies the number of times the Root Lost event was generated.
Upgrades Not Possible
Specifies the number of times the clearinghouse tried to upgrade a directory and failed.
Write Accesses
Specifies the number of write operations directed to this clearinghouse.
Identifier
Name
Specifies the full name of the clearinghouse.
Status Attributes
State
| Broken | The clearinghouse has a fatal error condition. |
| Initial | The clearinghouse is in the process of initializing. |
| Off | The clearinghouse is not available. |
| On | The clearinghouse is running and available. |
| Shut | The clearinghouse is in the process of an orderly shutdown. |
Prepositional Phrases
You can affect the content of command output by using prepositional phrases. Be sure to precede the following prepositional phrase with a comma and a space:
with attribute [relop] value
When used with a wildcard clearinghouse-name, limits the output only to directories whose specified attributes have certain values.
Access Rights
You need read access to the clearinghouse to display a list of known attributes or the value of an attribute.
Privilege Required
You must have the NET$EXAMINE rights identifier.
Example
The following command displays the current value of the Write
Accesses counter associated with the .chicago1_ch
clearinghouse on server node .midwest1.
dns> show node .midwest1 dns server clearinghouse .chicago1_ch 0 - _> Write Accesses
.dublin1_ch clearinghouse on the local server.
dns> show dns server clearinghouse .dublin1_ch all
Node 0:. DNS Server Clearinghouse IAF:.dublin1_ch
AT 2019-04-17-11:16:21.598-04:00I0.447
Identifiers
Name = IAF:.dublin1_ch
Status
State = On
Characteristics
CTS = 07-00-1C-0D-C0-8C-05-61-3C-4D-78-70-92-00
UID = AB1234A5-CD67-87D1-EF23-07001BODC08C
Counters
Creation Time = 2018-04-17-13:58:51.369+00:00I0.000
Read Accesses = 0
Write Accesses = 0
References Returned = 0
Times Root Not Reachable = 0
Data Corruptions = 0
Skulk Failures = 0
Times Clearinghouse Entry Missing = 0
Directory Upgrade Failures = 0
Enable Counts = 1
Disable Counts = 0show group
show group — Displays current information about the specified group.
Format
show group-name [attribute-specifier]
[prepositional-phrase]
Arguments
- group-name
A specific group name or a complete directory specification followed by a wildcard template for matching simple names of groups.
- attribute-specifier
- The name of an attribute or an attribute group. Enter one or more of the following attribute specifiers:
all [attributes]all characteristicsDNS$ACSDNS$CTSDNS$GroupRevokeDNS$MembersDNS$UTS
- prepositional-phrase
- A phrase that affects the destination or content of command output. Specify one or more of the following prepositional phrases:
with attribute [relop] valueto file[=]filenameto extend file[=]filenameto terminal
Description
This command displays the names and values of the attributes or attribute groups
named in attribute-specifier. You can use any combination of
attribute specifiers in a single command. Use a comma to separate the specifiers. If
you do not supply any attribute specifier, the command displays all attributes and
their values. The following are descriptions of valid characteristics:
Characteristics
DNS$ACS
Specifies the access control set of the group.
DNS$CTS
Specifies the creation timestamp of this group.
DNS$GroupRevoke
Specifies a timeout that determines how long a positive result from a group membership test operation may be cached by the clerk that issued the request.
DNS$Members
Specifies the DECdns full name of each member of the group. Members are specified
as a group name, a collection of principals denoted with wildcards (for example,
.org.name*), or an individual name in the format
nodename.username. To specify a DNS Version 1-style
principal, use the format nodename::username.
DNS$UTS
Specifies the timestamp of the most recent update to an attribute of the group.
Prepositional Phrases
You can affect the destination or content of command output by using prepositional phrases. Be sure to precede each of the following prepositional phrases with a comma and a space:
with attribute [relop] value
When used with a wildcard group-name, limits the output only to directories whose specified attributes have certain values.
to file[=]filename
Redirects the output to filename. If the file does not exist, this command creates it. If the file does exist, its contents are overwritten.
to extend file[=]filename
Appends the output to an existing filename. If the file does not exist, it is created.
to terminal
Directs the output to the terminal. This is the default option.
Access Rights
You need read access to the group for which you want to display attribute information.
Example
The following command displays the full name of each member of the group
.sales_group1.
dns> show group .sales_group1 DNS$members
.sales_group1.
dns> show group .sales_group1 all
SHOW
GROUP MEH:.sales_group1
AT 17-APR-2019:13:53:21
DNS$ACS (set) = :
Flags = none
Rights = read, write, delete, test, control
(V) Principal = MEH:.MIDAS.SYSTEM
DNS$ACS (set) = :
Flags = propagate
Rights = read, write, delete, test, control
(V) Principal = MEH:.camelot.system
DNS$Class = DNS$Group
DNS$ClassVersion = 1.0
DNS$Members (set) = :
(V) Principal = MEH:.midas.system
DNS$Members (set) = :
(V) Principal = MEH:.midas.dns$server
DNS$Members (set) = :
(V) Principal = MEH:.midas.snow
DNS$CTS = 1991-06-12-18:57:31.18/aa-00-04-00-de-11
DNS$UTS = 2019-04-04-15:38:09.31/aa-00-04-00-eb-61show group access
show group access — Displays the access control set of a group.
Format
show group-name access
[prepositional-phrase] Arguments
- group-name
A specific group name or a complete directory specification followed by a wildcard template for matching simple names of groups.
- prepositional-phrase
- A phrase that affects the destination or content of command output. Specify one or more of the following prepositional phrases:
to file[=]filenameto extend file[=]filenameto terminal
Description
This command displays the access control set of a group.
Prepositional Phrases
You can affect the destination or content of command output by using prepositional phrases. Be sure to precede each of the following prepositional phrases with a comma and a space:
to file[=]filename
Redirects the output to filename. If the file does not exist, this command creates it. If the file does exist, its contents are overwritten.
to extend file[=]filename
Appends the output to an existing filename. If the file does not exist, it is created.
to terminal
Directs the output to the terminal. This is the default option.
Access Rights
You must have read access to the group.
Example
The following command displays the access control set of the group
.eng.testgroup.
dns> show group .eng.testgroup access
.lex.edgroup.
dns> show group .lex.edgroup access
SHOW
GROUP IAF:.lex.edgroup
AT 17-APR-2019:14:02:42
DNS$ACS (set) = :
Flags = none
Rights = read, write, delete, test, control
(V) Principal = IAF:.MIDAS.SYSTEM
DNS$ACS (set) = :
Flags = propagate
Rights = read, write, delete, test, control
(V) Principal = IAF:.camelot.system
DNS$ACS (set) = :
Flags = propagate
Rights = read, test
(V) Principal = IAF:.*...show link
show link — Displays current information about the specified soft link.
Format
show link-name [attribute-specifier]
[prepositional-phrase] Arguments
- link-name
A specific name of a soft link or a complete directory specification followed by a wildcard template for matching simple names of soft links.
- attribute-specifier
- The name of an attribute or an attribute group. Enter one or more of the following attribute specifiers:
all [attributes]all characteristicsDNS$ACSDNS$CTSDNS$LinkTargetDNS$LinkTimeout
- prepositional-phrase
- A phrase that affects the destination or content of command output. Specify one or more of the following prepositional phrases:
with attribute [relop] valueto file[=]filenameto extend file[=]filenameto terminal
Description
This command displays the names and values of the attributes or attribute groups
named in attribute-specifier. You can use any combination of
attribute specifiers in a single command. Use a comma to separate the specifiers. If
you do not supply any attribute specifier, the command displays all attributes and
their values. The following are descriptions of valid characteristics:
Characteristics
DNS$ACS
Specifies the access control set for the soft link.
DNS$CTS
Specifies the creation timestamp of the soft link.
DNS$LinkTarget
Specifies the full name of the directory, object entry, or other soft link to which the soft link points.
DNS$LinkTimeout
Specifies a timeout value after which the soft link is either extended or deleted. The timeout value contains both an expiration time and an extension time. If the soft link does not point to anything when it is checked, it is deleted.
DNS$UTS
Specifies the timestamp of the most recent update to an attribute of the soft link.
Prepositional Phrases
You can affect the destination or content of command output by using prepositional phrases. Be sure to precede each of the following prepositional phrases with a comma and a space:
with attribute [relop] value
When used with a wildcard link-name, limits the output only to directories whose specified attributes have certain values.
to file[=]filename
Redirects the output to filename. If the file does not exist, this command creates it. If the file does exist, its contents are overwritten.
to extend file[=]filename
Appends the output to an existing filename. If the file does not exist, it is created.
to terminal
Directs the output to the terminal. This is the default option.
Access Rights
You must have read access to the soft link.
Example
The following command displays the full name of the directory, object entry, or
other soft link to which the soft link named .sales.australia points.
dns> show link .sales.australia DNS$LinkTarget
.sales.australia:
dns> show link .sales.australia all
SHOW
SOFTLINK IAF:.sales.australia
AT 18-APR-2019:14:38:10
DNS$ACS (set) = :
Flags = none
Rights = read, write, delete, test, control
(V) Principal = IAF:.JWH.AUS_OSG
DNS$ACS (set) = :
Flags = propagate, group
Rights = read, write, delete, test, control
Group = IAF:.name_sydney
DNS$ACS (set) = :
Flags = group
Rights = read, write, delete, test, control
Group = IAF:.name_perth
DNS$LinkTarget = IAF:.notes.aus_os
DNS$LinkTimeout = :
Expiration = 1583-10-25-00:00:00.0
Extension = 0-00:00:00.000
DNS$CTS = 2018-02-20-09:24:09.52/aa-00-04-00-de-11
DNS$UTS = 2018-02-20-09:24:09.53/aa-00-04-00-de-11show link access
show link access — Displays the access control set of a soft link.
Format
show link-name access
[prepositional-phrase] Arguments
- link-name
A specific name of a soft link or a complete directory specification followed by a wildcard template for matching simple names of soft links.
- prepositional-phrase
- A phrase that affects the destination or content of command output. Specify one or more of the following prepositional phrases:
to file[=]filenameto extend file[=]filenameto terminal
Description
This command displays the access control set of a soft link.
Prepositional Phrases
You can affect the destination or content of command output by using prepositional phrases. Be sure to precede each of the following prepositional phrases with a comma and a space:
to file[=]filename
Redirects the output to filename. If the file does not exist, this command creates it. If the file does exist, its contents are overwritten.
to extend file[=]filename
Appends the output to an existing filename. If the file does not exist, it is created.
to terminal
Directs the output to the terminal. This is the default option.
Access Rights
You must have read access to the soft link.
Example
The following command displays the access control set of the soft link
.sales.australia and stores the output in a file called
slshow.
dns> show link .sales.australia access, to file=slshow
.admin.australia.dns> show link .admin.australia access
SHOW
SOFTLINK IAF:..admin.australia
AT 17-APR-2019:14:44:14
DNS$ACS (set) = :
Flags = none
Rights = read, write, delete, test, control
(V) Principal = IAF:.ARACHNE.WEB
DNS$ACS (set) = :
Flags = propagate, group
Rights = read, write, delete, test, control
Group = IAF:.name_admin
DNS$ACS (set) = :
Flags = propagate
Rights = read, test
(V) Principal = IAF:.*.*
DNS$ACS (set) = :
Flags = propagate
Rights = read, test
Group = IAF:.root_serversshow object
show object — Displays current information about the specified object entry.
Format
show object-name [attribute-specifier]
[prepositional-phrase] Arguments
- object-name
A specific object entry name or a complete directory specification followed by a wildcard template for matching simple names of object entries.
- attribute-specifier
- The name of an attribute or an attribute group. Enter one or more of the following attribute specifiers:
all [attributes]all characteristicsDNA$TowersDNS$ACSDNS$AddressDNS$ClassDNS$ClassVersionDNS$CTSDNS$ObjectUIDDNS$UTS
- prepositional-phrase
- A phrase that affects the destination or content of command output. Specify one or more of the following prepositional phrases:
with attribute [relop] valueto file[=]filenameto extend file[=]filenameto terminal
Description
This command displays current information about the specified object entry.
Application-defined attributes for an object are included in the output of this
command (if they exist). Names and values of the attributes or attribute groups
named in attribute-specifier are shown. You can use any
combination of attribute specifiers in a single command. Use a comma to separate the
specifiers. If you do not supply any attribute specifier, the command displays all
attributes and their values. The following are descriptions of valid
characteristics:
Characteristics
DNA$Towers
Specifies the DECnet Phase V address of every node at which the object entry may be found. This attribute is used only by DECnet Phase V nodes and servers.
DNS$ACS
Specifies the access control set for the object entry. Refer to Chapter 5, "Managing DECdns Access Control" for information about access control sets and access control entries.
DNS$Address
Specifies the DECnet Phase IV address of every node at which the object entry may be found. This attribute is used only by Phase IV nodes and servers.
DNS$Class
Classifies objects according to the type of object being named. Client application programs can define their own classes for object entries that their application creates.
DNS$ClassVersion
Allows the definition of an object class to be evolved over time (for example, by changing the definition of the class-specific attributes) without confusing the clients of the DECdns directory service.
DNS$CTS
Specifies the creation timestamp of this object.
DNS$ObjectUID
Specifies the unique identifier (UID) associated with the object entry. This attribute is optional and, if present, its value can be null. Clients are responsible for maintaining the UIDs of object entries that they are using; DECdns does not ensure that object entry UIDs are valid or unique.
DNS$UTS
Specifies the timestamp of the most recent update to an attribute of the object entry.
In addition, application-specific attributes may exist for an object entry. See your application programmer for a list of application-defined attributes.
Prepositional Phrases
You can affect the destination or content of command output by using prepositional phrases. Be sure to precede each of the following prepositional phrases with a comma and a space:
with attribute [relop] value
When used with a wildcard object-name, limits the output only to directories whose specified attributes have certain values.
to file[=]filename
Redirects the output to filename. If the file does not exist, this command creates it. If the file does exist, its contents are overwritten.
to extend file[=]filename
Appends the output to an existing filename. If the file does not exist, it is created.
to terminal
Directs the output to the terminal. This is the default option.
Access Rights
You must have read access to the object entry.
Example
The following command lists the DNS$CTS value of the object entry
new_dev.
dns> show object new_dev DNS$CTS
rsm_dev.
dns> show object rsm_dev all
SHOW
OBJECT IAF:.rsm_dev
AT 17-APR-2019:14:48:56
DNS$ACS (set) = :
Flags = none
Rights = read, write, delete, test, control
(V) Principal = IAF:.MIDAS.SYSTEM
DNS$ACS (set) = :
Flags = propagate, group
Rights = test
Group = IAF:.name_minos
DNS$Class = DNS$Group
DNS$ClassVersion = 1.0
DNS$CTS = 2018-07-22-15:09:49.102/08-00-2b-03-87-72
DNS$UTS = 2019-03-03-11:52:16.671/08-00-2b-10-27-f4show object access
show object access — Displays the access control set of an object entry.
Format
show object-name access
[prepositional-phrase] Arguments
- object-name
A specific object entry name or a complete directory specification followed by a wildcard template for matching simple names of object entries.
- prepositional-phrase
A phrase that affects the destination or content of command output. Specify one or more of the following prepositional phrases:
to file[=]filenameto extend file[=]filenameto terminal
Description
This command displays the access control set of an object entry.
Prepositional Phrases
You can affect the destination or content of command output by using prepositional phrases. Be sure to precede each of the following prepositional phrases with a comma and a space:
to file[=]filename
Redirects the output to filename. If the file does not exist, this command creates it. If the file does exist, its contents are overwritten.
to extend file[=]filename
Appends the output to an existing filename. If the file does not exist, it is created.
to terminal
Directs the output to the terminal. This is the default option.
Access Rights
You must have read access to the object entry.
Example
The following command displays the access control set of the object entry
.sales.east.floor1Ln03 and stores the output in a file called
coshow.
dns> show object .sales.east.floor1ln03 access, to file=coshow
.psl_dev.dns> show object .psl_dev access
SHOW
OBJECT IAF:.psl_dev
AT 17-APR-2019:15:01:14
DNS$ACS (set) = :
Flags = none
Rights = read, write, delete, test, control
(V) Principal = IAF:.MIDAS.SYSTEM
DNS$ACS (set) = :
Flags = none
Rights = test
(V) Principal = IAF:.*.DNS$SERVER
DNS$ACS (set) = :
Flags = propagate, group
Rights = read, write, delete, test, control
Group = IAF:.name_devshow replica
show replica — Displays current information about the specified replica.
Format
show directory-name
[at]
clearinghouse
clearinghouse-name
[attribute-specifier]
[prepositional-phrase] Arguments
- directory-name
The full name of the directory.
- clearinghouse-name
The full name of the clearinghouse.
- attribute-specifier
The name of an attribute or an attribute group. Enter one or more of the following attribute specifiers:
all [attributes]all characteristicsall identifiersall statusDNS$CTSDNS$EpochDNS$LastSkulkDNS$LastUpdateDNS$ReplicaStateDNS$ReplicaTypeDNS$ReplicaVersionDNS$RingPointerDNS$SkulkStatus
- prepositional phrase
A phrase that affects the destination or content of command output. Specify one or more of the following prepositional phrases:
to file[=]filenameto extend file[=]filenameto terminal
Description
This command displays the names and values from the attributes or attribute groups
named in attribute-specifier. This command displays
directory-specific attributes as well as per-replica attributes. If you do not
supply any attribute specifier, the command displays all attributes and their
values. You can use any combination of attribute specifiers in any sequence in a
single command. The following are descriptions of valid characteristics,
identifiers, and status attributes that pertain just to the replica:
Characteristics
DNS$CTS
Specifies the creation timestamp (CTS) of the directory of which this replica is a copy.
DNS$LastSkulk
Records the timestamp of the last skulk that began processing this particular replica of a directory. This will be zero for read-only replicas because they do not start processing for a skulk.
DNS$LastUpdate
Records the timestamp of the last update to any attribute of the replica, or any change to the contents of the replica, including object entries, child pointers, and soft links. This will be zero for read-only replicas.
DNS$ReplicaType
Specifies the type of this replica.
DNS$ReplicaVersion
Specifies the version of this replica.
DNS$RingPointer
Contains the CTS of the next clearinghouse in the ring. This attribute is for internal use only.
Identifier
DNS$Epoch
Identifies a replica as part of a directory's complete set.
Status Attribute
DNS$ReplicaState
Specifies the internal state of a replica. When you create or delete a replica, it goes through various states.
DNS$SkulkStatus
If the replica is a master replica on the server for which this command is issued, this attribute contains information about the status of the skulk, such as whether it completed successfully or how it failed. The attribute does not display information for replicas mastered on DNS Version 1 servers.
Prepositional Phrases
You can affect the destination or content of command output by using prepositional phrases. Be sure to precede each of the following prepositional phrases with a comma and a space:
to file[=]filename
Redirects the output to filename. If the file does not exist, this command creates it. If the file does exist, its contents are overwritten.
to extend file[=]filename
Appends the output to an existing filename. If the file does not exist, it is created.
to terminal
Directs the output to the terminal. This is the default option.
Access Rights
You must have read access to the directory from which this replica was created.
Example
The following command displays the replica type of the .eng directory
in the .chicago2_ch clearinghouse.
dns> show replica .eng at clearinghouse .chicago2_ch DNS$ReplicaType
.eng directory in the .galbally_ch
clearinghouse.dns> show replica .eng at clearinghouse .galbally_ch all
SHOW
REPLICA IAF:.eng
AT 17-APR-2019:15:14:39
DNS$ACS (set) = :
Flags = none
Rights = read, write, delete, test, control
(V) Principal = IAF:.MIDAS.SYSTEM
DNS$ACS (set) = :
Flags = none
Rights = read, write, delete, test, control
(V) Principal = IAF:.MINOS.DNS$SERVER
DNS$ACS (set) = :
Flags = authenticated
Rights = read, write, delete, test, control
(V) Principal = IAF:.galbally_ch
DNS$ACS (set) = :
Flags = propagate, group
Rights = read, write, delete, test, control
Group = IAF:.name_dev
DNS$AllUpTo = 2019-04-17-15:13:09.45/aa-00-04-00-2a-10
DNS$Convergence = medium
DNS$DirectoryVersion = 1.0
DNS$Epoch = 2018-04-27-21:27:30.98/aa-00-04-00-2a-10
DNS$LastSkulk = 2019-04-17-15:13:09.45/aa-00-04-00-2a-10
DNS$LastUpdate = 2019-04-17-18:04:47.55/aa-00-04-00-2a-10
DNS$ParentPointer = :
Parent's DNS$CTS = 2018-07-21-18:56:49.42/aa-00-04-00-2a-10
Timeout = :
Expiration = 2019-04-18-18:04:47.35
Extension = 1-00:00:00.000
MyName = IAF:.eng
DNS$Replicas (set) = :
Clearinghouse's DNS$CTS = 2019-01-20-20:38:05.18/aa-00-04-00-de-11
Tower 1 Floor 1 = 01 2c (null)
Tower 1 Floor 2 = 02 00 2c ncacn_dnet_nsp
Tower 1 Floor 3 = 04 (null)
Tower 1 Floor 4 = 06 49 00 04 aa 00 04 00 2a 10 20
Replica type = master
Clearinghouse's Name = IAF:.galbally_ch
DNS$ReplicaState = on
DNS$ReplicaType = master
DNS$ReplicaVersion = 1.0
DNS$RingPointer = 2018-01-20-17:07:28.11/aa-00-04-00-de-11
DNS$CTS = 2018-05-28-21:27:30.98/aa-00-04-00-2a-10
DNS$UTS = 2019-04-17-18:04:47.55/aa-00-04-00-2a-10
DNS$SkulkStatus (set) = :
Last status = SuccessChapter 12. DECdns Problem Solving
Isolating the source of a problem - see Section 12.1, ''Isolating the Source of a Problem: General Suggestions''
Using tracing facilities - see Section 12.2, ''Handling Communication Errors''
Locating DECdns files - see Section 12.3, ''Handling Skulk Failures''
Solving clerk startup problems - see Section 12.4, ''Clerk Tuning''
Solving server startup problems - see Section 12.5, ''Solving Server Startup Problems''
Solving common access control problems - see Section 12.6, ''Server Tuning''
Handling clearinghouse creation failures - see Section 12.7, ''Solving Common Access Control Problems''
Restoring a corrupted clearinghouse - see Section 12.8, ''Handling Clearinghouse Creation Failures''
Restoring a deleted child pointer - see Section 12.9, ''Restoring a Corrupted Clearinghouse''
Restoring a missing clearinghouse object entry - see Section 12.10, ''Restoring a Deleted Child Pointer''
Handling node verification failures - see Section 12.11, ''Restoring a Missing Clearinghouse Object Entry''
Breaking soft link loops and group loops - see Section 12.12, ''Handling Node Verification Failures''
Eliminating ambiguous namespace nicknames - see Section 12.13, ''Breaking Soft Link Loops and Group Loops''
Handling communication errors - see Section 12.14, ''Eliminating Ambiguous Namespace Nicknames''
Fixing clock synchronization errors - see Section 12.15, ''Fixing Clock Synchronization Errors''
Handling clerk and server software errors - see Section 12.16, ''Handling Clerk and Server Software Errors''
Handling skulk failures - see Section 12.17, ''Using Tracing Facilities''
12.1. Isolating the Source of a Problem: General Suggestions
Prove you have a DECdns problem before making DECdns changes. If in doubt, do nothing to DECdns components and get help from support services.
Remember that not all DECdns problems originate from faults with the DECdns software. The majority of perceived DECdns clerk or server problems are caused by underlying network or operating system problems. For example, the network path to a particular DECdns server could be down or the system itself could have a resource problem.
Whatever you do, keep a log of your activities so that someone coming on to help later knows the entire story.
Most problems originating from DECdns actually involve access control problems.
To control access to DECdns information and to prevent accidental or malicious damage to the namespace, access control is applied on a node/user name basis. DECdns bars a person or process from accessing its information if the node/user name cannot be determined. Turn on event logging (the event dispatcher on DECnet Phase V systems) and enable any DECdns events. The DECdns server reports access control problems effectively. For more information on event logging, see the DECnet-Plus network management documentation. For more information on solving access control problems, see Section 12.7, ''Solving Common Access Control Problems''.
The first step to isolating the source of a problem is to collect and verify information about the software on the affected system. This is essential not only for fault isolation but also for providing important background information for any report that you must make to escalate problems not resolved at an early stage.
Basic information about the DECnet system (Section 12.1.1, ''Obtain Basic DECnet Information'').
Basic information about the clerk and (if applicable) server on your system (Section 12.1.2, ''Obtain Basic Clerk and Server Information'').
More specific information about the DECdns clerk (Section 12.1.3, ''Investigating the DECdns Clerk'').
More specific information about the DECdns server (Section 12.1.4, ''Investigating the DECdns Server'').
12.1.1. Obtain Basic DECnet Information
Collect key information about the DECnet system and its functionality. Verify the following information:
That you have the required privileges for using the Network Control Language (NCL)—You use NCL to examine and manage DECnet Phase V entities.
You require the
NET$EXAMINEandNET$MANAGErights identifiers to use NCL for read and write operations.The DECnet-Plus software version of your system – Use the ncl show implementation command to determine the DECnet-Plus version.
The DECnet Phase V node name and address—Use the ncl show address command to obtain the node name and address for your system. Ensure that backtranslation is indicated. The name of your node should be displayed to the right of the address as in the following example for node
ACME:.ZOO.MONKEY:49::00-30:AA-00-04-00-96-c0:20 (ACME:.ZOO.MONKEY)
If backtranslation is not evident, this could indicate a network or DECdns problem.
Basic system information—Use the show system command to display system information. The display includes information about DECnet.
Look for information on the following:
NET$ACPon Alpha systems,NETACPon VAX systems.DNS$ADVER—the DECdns clerk advertiserLES$ACP—core DECnet-Plus ACPREMACP—process required for inbound SET HOST to workDNS$SERVER—DECdns server process (present only if the server software has been installed)NET$EVD—DECnet-Plus event dispatcherNET$MOP—DECnet-Plus MOP (Maintenance Operation Protocol) downline load processDTSS$CLERK—Distributed time service clerk processDTSS$SERVER—Distributed time service server process (present only if the server software has been installed)
Addresses of adjacent routers—Each transport protocol enabled on the node has an associated routing port connecting the Transport layer to Routing. By displaying this port, you can show which network address is being used to get data to each transport. Use the following command:
ncl show routing port * all status
The most important remote nodes displayed are the adjacent routers on the LAN. These nodes are usually key to successful network connections. Use this command to check that your node can see an adjacent router.
12.1.2. Obtain Basic Clerk and Server Information
Is the DECdns clerk running?
Is the node also a DECdns server?
What are the DECdns clerk and server versions?
The following subsections explain how to check for this information.
12.1.2.1. Checking the DECdns Clerk
Check that the DECdns clerk is loaded and running normally. If it is not, attend to this problem before undergoing any further investigation. The DECdns clerk interoperates with the Session layer. A problem with the DECdns clerk could indicate a DECnet startup problem.
ncl> show dns clerk all status Node 0 DNS Clerk at 2019-07-05-17:18:30.372+02:00I35.989 Status State = On
[options] command failed due to: no such object instance
In this example, the clerk has been loaded but subsequently disabled and removed. This could suggest someone has shut down the DECdns clerk.
12.1.2.2. Checking the DECdns Server
If your system is a DECdns server, use NCL to check that the server is running and to check the clearinghouse. Though the OpenVMS show system command might indicate that the DECdns server is running on the system, certain server components might not be correctly loaded.
Use the NCL show dns server all status command to check the
server, and the NCL show dns server clearinghouse * command to
check the clearinghouse.
12.1.2.3. Checking the Clerk and Server Software Versions
The DECdns clerk and server software is bundled and shipped with the DECnet-Plus software. The DECdns version is identical to the DECnet-Plus version. If DECnet-Plus ECO kits have been installed, you may want to determine the ECO level of the DECdns software components.
DECdns Clerk Software Version
No single image contains all the clerk functions. However, a significant part
of the software code exists in
SYS$LOADABLE_IMAGES:SYS$NAME_SERVICES. Analyze this image to
obtain a DECnet-Plus ECO number, using the following command:
$ ana/image/inter sys$loadable_images:sys$name_services
The DECdns clerk software version is indicated as the image file
identification in the output.
DECdns Server Software Version
Analyze the SYS$SYSTEM:DNS$SERVER image to obtain a DECnet-Plus
ECO number, using the following command:
$ ana/image/inter sys$system:dns$server
The DECdns server software version is indicated as the image file
identification in the output.
12.1.3. Investigating the DECdns Clerk
DECdns clerk cache
DECdns clerk known namespaces
12.1.3.1. DECdns Clerk Cache Information
The DECdns clerk caches useful information about the results of lookup operations by DECdns servers. The information is periodically saved in a file and preserved across reboots. You can use the DECdns Control Program to dump the cache information (see Chapter 11, "DECdns Control Program Command Dictionary"). In addition, you can examine the cache files. (A cache file may not have been created at server startup because of insufficient resources.)
Using the DECdns Control Program to Obtain Cache Information
dump dns clerk cache command dumps the cache
information. This information can provide clues to the source of the problem,
such as the following: Which DECdns servers the clerk knows
Which namespaces the clerk can see (or has seen)
The results of successful lookups in the namespace
Clearinghouse information that has been cached in lookups
The dump dns clerk cache command dumps the cache information to your terminal.
To facilitate examination of this information, redefine output from the DECdns
Control Program to a file before you dump the cache. Then you can use an editor
to search for useful information.
Removing Obsolete DNS$CACHE Files
Occasionally, obsolete copies of the DECdns clerk cache file
(SYS$SYSTEM:DNS$CACHE.nnnnnnnnnn can
accumulate and cause disk space problems on the system. DECdns uses only the
files referenced in the SYS$SYSTEM:DNS$CACHE.VERSION file. DECdns
normally deletes prior unreferenced versions of the file.
If you check the contents of the SYS$SYSTEM: directory and see
more than one DECdns clerk cache file, check the DNS$CACHE.VERSION
file to see which cache files DECdns is currently using and delete all prior
cache files from the directory.
Using CDI Trace to Obtain Cache Information
You can run the CDI Trace utility to obtain trace inforamtion. Use the following command to
run CDI$TRACE, located in SYS$SYSTEM: $ run
sys$system:cdi$trace
CDI$TRACE output to a file: - Define a DCL foreign command symbol:
$ cdi$trace == "$cdi$trace"
- Specify the name of the file to contain the
CDI$TRACEoutput:$ cdi$trace trace.log
The output file may occasionally be missing the last few records of the trace. This is a known problem.
CDI$TRACE has known problems when run during a LAT terminal session (on an LT
device). A workaround is to issue the DCL spawn command first.
Note
On OpenVMS systems, you can also use the Common Trace Facility to
obtain naming trace information. Use the following command to invoke the
Common Trace Facility: $ Trace Start "SESSION CDI *"
Including the CDI parameter restricts trace facility
output to node name and address resolution messages.
12.1.3.2. DECdns Clerk Known Namespaces
ncl> show dns clerk known namespace *
12.1.4. Investigating the DECdns Server
If your system is a DECdns server, and you have the basic information about the server on your system described in Section 12.1.2, ''Obtain Basic Clerk and Server Information'', investigate further to find information about the server. You can perform remote and local checks on the server.
12.1.4.1. Remote Checks on the Server
The checks described here can be performed remotely as well as locally. The network must be running and sufficient DECnet resources must be available on the DECdns server to allow incoming network management commands. If these commands fail, the DECdns server could still be running properly. The problem could be due to a DECnet or operating system fault.
Find out the name or address of the remote DECdns server by using the NCL show dns clerk
remote clearinghouse *. However, the NCL command does not clearly
indicate whether the server is a DECdns Version 2 or DNS Version 1 server. As an
alternative, you can get the address of a remote node with which a connection
failed by examining the DNS$CHFAIL.LOG file.
You can determine the node name from the clearinghouse NSAP, as explained in Section 12.1.4.3, ''Determining a Node Name from a Clearinghouse NSAP Address''.
show node address dns serverThis command returns output such as the following:Node 0 DNS Server at 2019-07-05-17:18:30.372+02:00I35.989
When this command fails to return information similar to this, the DECdns server is not running. It was either never started or has stopped running.
If this command hangs but other commands to the remote node work, it indicates a DECdns server problem that must be investigated locally.
- Check that the DECdns server knows about its local clearinghouse files, as in the following example:
ncl> show node address dns server clearinghouse * Node 0:. DNS Server Clearinghouse IAF:.dublin1_ch AT 2019-04-17-11:16:21.598-04:00I0.447 Identifiers Name = IAF:.dublin1_ch
If you get this output, the server has started and has found at least one DECdns clearinghouse file on disk. However, this does not mean the DECdns server is running now.
- Next examine the clearinghouse counters, as in the following example:
ncl> show node address dns server clearinghouse * all counters Node 0:. DNS Server Clearinghouse IAF:.dublin1_ch AT 2019-04-17-11:16:30.598-04:00I0.447 Counters Creation Time = 2019-04-17-13:58:51.369+00:00I0.000 Read Accesses = 149679 Write Accesses = 913 References Returned = 31721 Times Root Not Reachable = 0 Data Corruptions = 0 Skulk Failures = 0 Times Clearinghouse Entry Missing = 0 Directory Upgrade Failures = 0 Enable Counts = 1 Disable Counts = 0
The counters in this example only indicate that the server has (at some time) performed a number of read and write operations successfully. They also indicate when the server was started (
Creation Time). This could differ from the boot time, which can be determined from theCreation Timecounter on routing. If the startup time for the server clearinghouse is later than the boot time for the system, it may indicate that someone has already attempted to perform some troubleshooting on the server. Note this in your log. - The
ncl dns server clear * replicascommand is crucial for checking if the server and clearinghouse are actually running properly. Unlike the earlier commands which only query DECnet and the DECdns server component, this command requires data to be read from the DECdns clearinghouse database. The following example shows the command and resulting output:ncl> show node address dns server clearinghouse * replicas Node 0:. DNS Server Clearinghouse IAF:.dublin1_ch AT 2019-04-17-11:17:31.598-04:00I0.447 Status Replicas = { IAF:. , IAF:.uvo , IAF:.ilo , IAF:.Applications , IAF:.Accounting , IAF:.Europe , IAF:.Asia , IAF:.Downunder , }If the output includes replica information, the server is working properly. If the command hangs, or produces an error, the DECdns server is probably not working properly. Perform the local checks in Section 12.1.4.2, ''Local Checks on the Server''.
If there is a significant difference in the elapsed time to execute the last two commands (displaying all counters and displaying replicas), it usually indicates that the performance of the operating system and network differs from the performance of the remote DECdns server itself. Very slow access times to the replica data can indicate problems with process virtual memory or paging.
12.1.4.2. Local Checks on the Server
$ show system/output=dns.tmp $ search dns.tmp dns$server 0000027E DNS$Server LEF 9 52699 0 00:50:32.03 140958 49382 $ delete dns.tmp.*
12.1.4.3. Determining a Node Name from a Clearinghouse NSAP Address
- Use the
show directorycommand and specify theDNS$Replicasattribute to display the network service access point (NSAP) address of the clearinghouse. For example, suppose you need to determine the name of the node where the clearinghouse that stores the master replica of the root directory resides. The following command displays theDNS$Replicasattribute for the root directory of theIAFnamespace.dns> show directory . dns$replicas SHOW DIRECTORY IAF:. AT 09-APR-2018:16:08:25 DNS$Replicas (set) = : Clearinghouse’s DNS$CTS = 2018-03-22-14:39:34.58/aa-00-04-00-de-11 Tower 1 CTS = 2018-04-09-20:08:25.835/08-00-2b-0d-c0-9d Floor 1 = 01 2c (null) Floor 2 = 02 00 2c ncacn_dnet_nsp Floor 3 = 04 (null) Floor 4 = 06 49 00 37 aa 00 04 00 22 dc 20 Replica type = readonly Clearinghouse’s Name = IAF:.Chicago2_CH DNS$Replicas (set) = : Clearinghouse’s DNS$CTS = 2018-07-30-20:32:42.82/aa-00-04-00-de-11 Tower 1 CTS = 2018-04-09-20:08:25.835/08-00-2b-0d-c0-9d Floor 1 = 01 2c (null) Floor 2 = 02 00 2c ncacn_dnet_nsp Floor 3 = 04 (null) Floor 4 = 06 49 00 14 aa 00 04 00 7e 52 20 Replica type = readonly Clearinghouse’s Name = IAF:.Paris1_CH DNS$Replicas (set) = : Clearinghouse’s DNS$CTS = 2018-01-12-18:15:01.77/aa-00-04-00-de-11 Tower 1 CTS = 2018-04-09-20:08:25.835/08-00-2b-0d-c0-9d Floor 1 = 01 2c (null) Floor 2 = 02 00 2c ncacn_dnet_nsp Floor 3 = 04 (null) Floor 4 = 06 49 00 33 aa 00 04 00 0a ce 20 Replica type = readonly Clearinghouse’s Name = IAF:.NY1_ch DNS$Replicas (set) = :The display shows that the master replica of the root directory is stored in the
.Chicago1_CHclearinghouse and that the clearinghouse's NSAP address is 49 00 18 aa 00 04 00 eb 61 20 (see the information for the last clearinghouse listed in this display). - To determine the node name associated with this NSAP address, you must use the
show linkcommand to follow the soft link in the backtranslation tree (.DNA_BackTranslation) that points from the NSAP address (Floor 4 of the Tower address) to the corresponding node name (DNS$LinkTarget). The following command displays the node name stored in the backtranslation tree that corresponds to the NSAP address 49 00 18 aa 00 04 00 eb 61 20, which you gathered in step 1. (Note that you must specify the NSAP address on the command line exactly as shown.)Preface the address with
.DNA_BackTranslation, then type.%Xand the first pair of characters in the NSAP address (.%X49). This is the initial domain part (IDP) of the address.Type
.%Xfollowed by the second and third pairs of characters (.%X0018). This is the local area portion of the address.Type
.%Xagain, this time followed by the next six pairs of characters (.%Xaa000400eb61). This is the node-ID portion of the address.Ignore the last pair of characters (the selector portion of the address), in this case
20.Specify the
DNS$LinkTargetattribute at the end of the command.dns> show link .DNA_BackTranslation.%X49.%x0018.%Xaa000400eb61 DNS$LinkTarget SHOW SOFTLINK IAF:.DNA_BackTranslation.%X49.%X0018.%XAA000400EB6 AT 09-APR-2018:16:14:51 DNS$LinkTarget = IAF:.orion
The output of the command shows that the name of the node corresponding to the NSAP address
49 00 18 aa 00 04 00 eb 61 20 is IAF:.orion.
12.2. Handling Communication Errors
When a clerk is unable to communicate with any DECdns server capable of processing its request, the following error message is displayed:
Unable to communicate with any DECdns server
12.2.1. Identifying Clearinghouses to Which Communication Failed
SYS$MANAGER:DNS$CHFAIL.LOG
file, especially the last few entries. Output from the following example shows that
the local clerk tried and failed to connect to three clearinghouses:
.Chicago1_CH, .NY2_CH, and .Paris1_CH.
$ type sys$manager:dns$chfail.log
Wed Mar 18 18:49:24 2019
PID: 39, DNS status: NOCOMMUNICATION, IPC status: NOAPPLICATION
Clearinghouse: IAF:.Chicago1_CH
Tower: 04-00-02-00-01-2c-00-00-01-00-02-02-00-00-2c-01-00-04-00-00-01-
00-06-0a-00-49-00-04-aa-00-04-00-c8-11-20
Wed Mar 18 21:32:03 2019
PID: 39, DNS status: NOCOMMUNICATION, IPC status: NODEUNREACHABLE
Clearinghouse: IAF:.NY2_CH
Tower: 04-00-02-00-01-2c-00-00-01-00-02-02-00-00-2c-01-00-04-00-00-01-
00-06-0a-00-49-00-04-aa-00-04-00-c7-11-20
Wed Mar 18 21:43:35 2019
PID: 39, DNS status: NOCOMMUNICATION, IPC status: TIMEDOUT
Clearinghouse: IAF:.Paris1_CH
Tower: 04-00-02-00-01-2c-00-00-01-00-02-02-00-00-2c-01-00-04-00-00-01-
00-06-0a-00-49-00-04-aa-00-04-00-a5-10-20DNS$CHFAIL.log file: | Field | Description | |
|---|---|---|
| DATE/TIME | This is the date and time of the lookup failure. | |
| PID |
This identifies the process that failed to look up
information from DECdns. Frequently this process ID can be
that of NET$ACP, which might be looking up this information
on behalf of you as a user (for example, you issue the
Running | |
| DNS status |
In this case, DNS status will always be NOCOMM, but it will also log other DECnds status failures, such as the following: | |
| NONSRESOURCES | Sufficient resources are not available to the server to process your request. The server node may require tuning, more memory, or faster hardware. | |
| RESOURCEERROR | No resources are available elsewhere, probably at the clerk. If the PID identifies NET$ACP, the resource shortage probably involves a DECnet/tuning need or a memory leak. If the PID identifies another process, the process probably needs to have more memory resources. | |
|
IPC status |
These status errors are returned to DECdns from DECnet. (IPC is the interface DECdns uses to communicate with DECnet.) Common values are: | |
| MAXCONNECTEXCEE | The local node has too many connections open; that is, the
number of open connections exceeds the value of the MAXIMUM
TRANSPORT CONNECTION parameter defined for the transport
protocol attempted for use, NSP or OSI. (Look at the last byte
in the tower: 20 denotes NSP, while 21
denotes OSI transport.) If this error happens regularly,
increase the maximum number of transport connections by using
NET$CONFIGURE ADVANCED. | |
| NOAPPLICATION | This means that a server is not running on the node whose address you have for the listed tower set. DECnet on the node itself is up and reachable. | |
| NODEUNREACHABLE | This means that the clerk could not contact the indicated clearinghouse using the tower that is listed. This error could mean the server node is down (or DECnet is not running there), the network is disconnected, the routers have marked the server as unreachable, or the clerk has an incorrect tower (DECnet address) cached for the clearinghouse (this is usually caused by moving the clearinghouse location). | |
| NOSCRESOURCES | This means session control has no resources. This can happen on either end of the connection. It probably means that NET$ACP has run out of memory, either due to misconfiguration, poor tuning, or memory leaks in DECnet or DECdns. | |
| NOTRANSPORTRESO | No transport resource. This indicates that the remote system (that is, the server to which you attempt to connect) has exceeded its maximum transport connections (because of too many open connections). See the description above for the MAXCONNECTEXCEE value. | |
| REMOTEDISCONN | Remote node disconnected. This happens when the remote server has accepted your connection and then decides to drop it. For example, if it could not authenticate your communications request properly or if the server is being shut down. | |
| TIMEDOUT |
This means that DECnet or the clerk on your system gave up after waiting a length of time for a response. This can happen if the server or network failed in mid-request, or more often, if the server at the other end is overloaded, or hung, and is not responding after the initial lookup request was received. The default timeout for the DECdns Control Program can be modified as described in Section 4.6, ''Supplementary Commands''. | |
| USERREJECT |
This usually means that the server is just coming up. (DECdns OpenVMS servers reject connections until they have fully read in the clearinghouse database.) On large namespaces where the clearinghouse may be over 50,000 blocks, this read action can take ten minutes or longer. Server configuration may also be restricting the number of simultaneous connections. See Section 10.4, ''Configuring a DECdns Server in an Existing Namespace'' for more information on server configuration and Section 12.6, ''Server Tuning'' for information on tuning your server to accommodate a higher number of simultaneous connections. | |
|
Tower |
This can indicate such problems as your DECdns cache file
having outdated information for finding a clearinghouse,
perhaps trying the wrong address or tower. Compare this
address with the address for the node that hosts the
clearinghouse you are failing to reach. If you can, log into
that node and issue the | |
For DNS Version 1 servers, you can enable a very helpful DECnet event to
see the reason for the "Unable to communicate with any server" error
you are getting in DNS$CONTROL.
You need to enable the DNS event 353.5.
The 353.5 event gives you the reason
for the communication failure.
You can see if the event is enabled by using NCP
SHOW KNOWN LOGGING command (on the DECnet Phase IV node).
Turn on the event with the NCP SET LOG MONITOR EVENT 353.5
command. You may want to specify 353.* to turn on all
the DNS events. After you enable the event(s), issue
the command that generates the communication error and wait a minute to
receive the event via OPCOM. If you enable the event in NCP and
still do not receive an OPCOM message, you may have an old version of the
clerk image that did not implement this.
12.2.2. Determining Whether Communication Errors Are Caused by DECdns or DECnet
- Set host to the local system:
$ set host 0
- Set host again to the local system, this time specifying the numeric Phase IV-compatible network address (in decimal format) of the node (such as 5.4 in the following example):
$ set host 5.4
- Set host to the DECnet Phase V-compatible address of the local node. To determine this address, use the NCL
show addresscommand, as shown:$ mcr ncl NCL> NCL>show address Node 0 at 2019-10-03-17:23:00.699-04:00I79.428 Identifiers Address = { ( [ DNA_CMIP-MICE ] , [ DNA_SessionControlV3 , number = 19 ] , [ DNA_OSItransportV1 , ’DEC0’H ] , [ DNA_OSInetwork , 49::00-04:AA-00-04-00-97-11:21 (LOCAL:.IAF.DHARMA) ] ) , ( [ DNA_CMIP-MICE ] , [ DNA_SessionControlV3 , number = 19 ] , [ DNA_OSItransportV1 , ’DEC0’H ] , [ DNA_OSInetwork , 47:24:02-01-0A-04:08-00-2B-95-53-25:21 (LOCAL:.IAF.DHARMA) ] ) , ( [ DNA_CMIP-MICE ] , [ DNA_SessionControlV2 , number = 19 ] , [ DNA_OSItransportV1 , ’DEC0’H ] , [ DNA_IP , 0.0.0.0 ] ) , ( [ DNA_CMIP-MICE ] , [ DNA_SessionControlV3 , number = 19 ] , [ DNA_NSP ] , [ DNA_OSInetwork , 49::00-04:AA-00-04-00-97-11:20 (LOCAL:.IAF.DHARMA) ] ) , ( [ DNA_CMIP-MICE ] , [ DNA_SessionControlV3 , number = 19 ] , [ DNA_NSP ] , [ DNA_OSInetwork , 47:24:02-01-0A-04:08-00-2B-95-53-25:20Use the first DECnet Phase V address shown, which in this example is
49::00-04:AA-00-04-00-97-11:21, and remove all punctuation and dashes:490004AA000400971121. Now append this address to the prefixnet$for theset hostcommand as follows:$ set host net$490004AA000400971121
DECdns full names are not allowed for these commands.
If these login commands succeed, the communication failure to DECdns servers is probably caused by DECdns. If any of these login commands fails, the problem is more likely related to DECnet.
12.3. Handling Skulk Failures
This section discusses possible solutions to skulk problems.
12.3.1. General Considerations
DNS$SkulkStatus attribute with the DECdns
Control Program show replica command, as in the following example. This
attribute can provide details on why the directory skulk failed. For troubleshooting
purposes, specify the DNS$SkulkStatus attribute explicitly as in this
example. Note that failure-related information provided by this attribute is also
recorded in the DNS$SERVER.LOG file. The attribute does not display
information for replicas mastered on DNS Version 1 servers.
DNS> show repli .dave at clear .fact_ch DNS$SkulkStatus
SHOW
REPLICA AUTUMN:.dave
AT 13-SEP-2019:10:45:00
DNS$SkulkStatus (set) = :
Last status = Failure
Phase = Spread
Reason = Attempted reading DNS$REPLICASTATE at clearinghouse AUTUMN:.dave.able_ch
Reason = %DNS-E-NAMESERVERBUG, Software error detected in serverIn this example, an error occurred because the .dave.able_ch
clearinghouse object or the clearinghouse itself was
deleted or nonexistent. Rebuild the replica set to remove the missing
clearinghouse (use the set directory to new epoch command).
DNS$SkulkStatus attribute does not help you identify the source of the
problem, do the following: Verify that replicas of the directories being skulked do not exist in a corrupted clearinghouse. See Section 12.9, ''Restoring a Corrupted Clearinghouse'' for more information about corrupted clearinghouses.
Ensure that the number of members (principals) for any access group does not exceed 100. If this limitation is exceeded, the server process can crash during the skulk procedure. Because this skulk does not necessarily happen immediately (it can occur up to 24 hours after the group size limit was exceeded), diagnosis of this problem can be difficult.
If the skulk failure occurs in an environment with both DECdns Version 2 and DNS Version 1 servers, see Section 12.3.2, ''Skulk Problems in Mixed Server Environments''.
12.3.2. Skulk Problems in Mixed Server Environments
DNS$CHDirectories attribute for a clearinghouse
object lists the set of directories replicated at that particular clearinghouse. If
the following two conditions exist, the DNS$CHDirectories attribute may
grow too large to be handled by the DNS Version 1 server. You have more than 200 directories stored in the DECdns Version 2 clearinghouse (for example,
.eng.host_ch).You have a DNS Version 1 server that replicates the directory containing the DECdns server's clearinghouse object (for example, a DNS Version 1 server replicating the .eng directory).
The DNS server will have insufficient resources
to support the skulk for the directory. The directory fails
to skulk with the following status:
Insufficient local resources at the server node
To prevent this problem, you can use a switch to delete,
and disable updating of, the
DNS$CHDirectories attribute.
These actions do not affect the operation of the server because this
attribute is read-only.
To set the switch, create a file called
dns.conf in the
SYS$SYSDEVICE:[DNS$SERVER] directory
and add the following line:
dnsd.chdirectories_setting: switch_value
0 – Disables updating the
DNS$CHDirectoriesattribute.1 – Deletes the
DNS$CHDirectoriesattribute and never updates it.2 – Enables automatic updating of
DNS$CHDirectoriesuntil a size threshold is reached, at which point the attribute is deleted.
To bring the switch into effect,
stop and then restart the
server (the dns.conf
file is read once during server startup).
12.4. Clerk Tuning
DNS clerk tuning includes the following tasks:
Ensuring that the
DNS$ADVERprocess has adequate process quotas.Ensuring that the clerk cache size is optimal for the system memory configuration.
The next two sections discuss these tuning tasks.
12.4.1. Defining Quotas for the DNS$ADVER Process
One of the functions of the DNS$ADVER process is to serve as the
process-based component of the DNS clerk software. If the DNS$ADVER
process experiences quota problems you will notice clerk errors.
Five user-defined system logicals are available to define process quotas for the
DNS$ADVER process:
DNS$ADVER_AST_LIMIT
DNS$ADVER_BUFFER_LIMIT
DNS$ADVER_EXTENT
DNS$ADVER_MAX_WORKING_SET
DNS$ADVER_PAGE_FILE
These system logical names correspond to qualifiers on the RUN statement which are
described in the OpenVMS documentation. If any of these system logical names are
defined at the time that the DNS$ADVER process is started (by
SYS$SYSTARTUP:DNS_CLERK_STARTUP.COM), then the values defined for
these system logical names are used instead of the default quotas. Typically, these
system logical names are defined in the file
SYS$MANAGER:SYLOGICALS.COM.
The default clerk configuration adequately supports two network adapters. Use
these system logical names if you have a system configured with three or more
ethernet controllers. You can also use these logicals to define increased quotas for
the DNS$ADVER process when you receive a message on the console during
startup that the clerk’s cache is not initialized (DNS$_NOCACHE,"Clerk
cache not initialized").
In particular, you may need to modify the DNS$ADVER_BUFFER_LIMIT
logical.
Generally, determine the value of the DNS$ADVER_BUFFER_LIMIT logical
by using the greater of 300,000 or the value of the following formula:
DNS$ADVER_BUFFER_LIMIT = n * 75,000where n is the number of network adapters.
Selected default quotas for the DNS$ADVER process have also been
increased for this release. The selected quotas that have been increased include
direct I/0, enqueue limit, queue limit, buffer limit, and maximum working
set.
12.4.2. Clerk Cache Size and the GBLPAGFIL System Parameter
On systems where the amount of physical memory has changed or the GBLPAGFIL system parameter has changed, it is important to make the clerk aware of this change. The DECdns clerk resizes the clerk cache file only when a sizing calculation determines that the file is less than whichever is smaller: 1,000 blocks or .5% of memory.
If the amount of physical memory available to a system has changed or if the
GBLPAGFIL system parameter has been modified, check the
SYS$MANAGER:DNS$ADVER_ERROR.LOG file. The DECdns clerk indicates in
this file if it has calculated a new recommended cache size.
When you see the following message, fewer than 10 GBLPAGFILs are available and the cache file was not created:
Insufficient Global Page File Limit - no cache
When this situation happens, increase the size of GBLPAGFIL, run AUTOGEN, and reboot your system to get a functioning DECdns clerk.
If the cache file size exceeds 75 percent of the available GBLPAGFIL, it is set to that figure (75 percent of the available GBLPAGFIL) so it does not use up all of the available GBLPAGFIL. The message Cache Size ceiling exceeded in the log file indicates that this has occurred. The maximum size of the clerk cache is 512 MB.
If the recommended change in the size of the cache file is substantial and you want DECdns to use the new cache size, take the following steps:
Shut down the DNS clerk.
Delete the existing cache files (
SYS$SYSTEM:DNS$CACHE.*).Reboot the system (do not start DECdns before rebooting – the cache sizing algorithm must run on a fresh boot of OpenVMS).
12.5. Solving Server Startup Problems
Usually a server startup problem involves a file configuration problem. Section 12.5.1, ''Server Startup Delay in a TCP/IP Environment'' lists steps you can take to solve the problem on an OpenVMS system.
Check that the
SYS$MANAGER:DNS_FILES.TXTfile exists and contains the correct file name and location for the clearinghouse files.Make sure that the
SYS$SYSDEVICE:[DNS$SERVER]directory exists, even if the clearinghouse is located elsewhere.If the clearinghouse files are on a disk other than the system disk, make sure the disk is mounted before DECnet starts up.
Make sure the disk on which the clearinghouse files are located has enough space to write out a second checkpoint file plus 5,000 blocks for the
TLOGfile.Make sure that
SYS$MANAGER:NET$DNS_SERVER_STARTUP.NCLandSYS$STARTUP:DNS$SERVER_STARTUP.COMexist.
SYS$MANAGER:DNS$SERVER.LOG
files on the server system that failed to start up. Note
Depending on the size of the disk and the speed of memory, the startup can take up to 30 minutes.
12.5.1. Server Startup Delay in a TCP/IP Environment
There can be a delay in the startup of the DECdns server when the server is using DECnet over TCP/IP connections. This delay is due to the time required for the server to obtain a non-zero IP address from DECnet and the PATHWORKS Internet Protocol (PWIP) software. The IP address is initially zero until it is updated by DECnet and PWIP with the actual IP address for the node.
12.6. Server Tuning
Server tuning is driven by two major factors:
Clerk usage
Database size
The next two sections discuss the tuning tasks related to these factors.
12.6.1. Tuning for Increased Clerk Use
A DECdns server is configured by default to accept up to 200 simultaneous network connections. If you anticipate a higher load than that for your server, take the following steps to allow the server to accommodate that load.
Edit the server configuration file, (
SYS$SYSDEVICE:[DNS$SERVER]DNS.CONF), to increase the resources available to the server. In particular, modify the parameters in the following table as needed:dns.dnsd.ta_conn_quotaLimits the number of clerk-to-server connections. The default is 200. Raise this value as needed for increased server load. dns.dnsd.back_conn_quotaLimits the number of server-to-server connections. The default is 20. This is usually sufficient. dns.dnsd.maximum_handlers_quotaLimits the number of request handlers available for clerk request processing. The default value is 200. This value should be equal to or slightly higher than the value specified for dns.dnsd.ta_conn_quota.dns.dnsd.maximum_buffers_quotaLimits the number of buffers available for request handlers. The default is 200. This value should equal the value specified for dns.dnsd.maximum_handlers_quota.See Section 12.6.3, ''The Server Configuration File - DNS.CONF'' for more information about the server configuration file.
You should also make several other changes:
Check
DNS$SERVER_STARTUP.COMfor any process limits that will stop the server from accepting more links. FILLM, ASTLM can be increased if needed.The default value of 100 for FILLM on a DECdns server limits the number of DECdns clerks that can connect to the server. This limitation causes the DECdns clerk to log a USERREJECT error into the
DNS$CHFAIL.LOGfile when the limit of 100 connections is exceeded. You can raise this limit by modifying the line inSYS$STARTUP:DNS$SERVER_STARTUP.COMthat specifies/FILLM=100.Note that the ASTLM value for the
NET$ACPprocess also defaults to 100. This limits the number of connections thatNET$ACPcan process at any one time thereby limiting the number of clerk connections. Raise this value when increasing the server’sFILLMvalue.Check the actual size of the clearinghouse database files. On OpenVMS
VAX systems, set
VIRTUALPAGECNTto be at least three times the sum of the database file sizes (also known as the checkpoint file size). For example, if the checkpoint file is 80,000 blocks, setVIRTUALPAGECNTto the value 240,000 inMODPARAMS.DATand do an AUTOGEN to activate any other new values.You must also size the page files on the node accordingly. If the system has more than one page file, the individual page files must be at least as large as the checkpoint file. Because each OpenVMS process is assigned to a single page file, the total combined size of the page files is not useful to DECdns, because it can only use the capacity of one of them when it reads the entire clearinghouse checkpoint file into memory. Note also that DECdns is not guaranteed to use the larger page file if one page file is sufficiently large and others are not.
Now that the server will support more links than it did before, verify that the DECnet values for
NSP Maximum Transport Connectionsand/orOSI Transport Maximum Transport Connectionsare increased also. To find out the current number of links on a system, use the following NCL commands:NCL> SHOW NSP CURRENTLY ACTIVE CONNECTIONS NCL> SHOW OSI TRANSPORT CURRENTLY ACTIVE CONNECTIONS
12.6.2. Tuning for Increased Database Size
It is important to provide the DECdns server with adequate resources because the DECdns server uses an "in memory" database. VSI strongly recommends that users be generous with system quotas, especially the working set quota.
AUTOGEN does not correctly calculate the working set size required by the DECdns Server. The working set size depends on the size of your checkpoint file. The size of the working set typically varies from 50,000 to 250,000. Using working set sizes below 50,000 is generally not recommended.
If you need help on setting the quotas, contact your VSI representative to obtain the tools to monitor the quota.
12.6.3. The Server Configuration File - DNS.CONF
The DECdns server configuration file,
SYS$SYSDEVICE:[DNS$SERVER]DNS.CONF, contains several parameters
that allow you to control the following operational characteristics of the DECdns
server:
Access control
Node verification
Timer values
Resource limits
Replica pruning
Table 12.2, ''DNS.CONF Configuration Parameters'' describes the available parameters.
dns.dnsd.acs_override |
Disables access control if set to 1. The default setting is zero (access control checking on). CautionWhile access control checking is overridden, any privileged or nonprivileged user on your network has complete read, write, delete, and control privileges to any object, directory, or clearinghouse managed on this server. |
dns.dnsd.node_verification |
Disables node verification if set to zero. The default setting is 1 (node verification enabled). If you set this option to 0, the server does not backtranslate the incoming address to verify that the incoming connection is actually coming from where the incoming connection claims it is coming from. With this disabled, servers are vulnerable to intentional or unintentional "node spoofing" where systems make updates to the namespace for which their node names are authorized but their addresses are not. |
dns.dnsd.idle_conn_timeout | Time in seconds to wait while link is idle before disconnecting the link. The default value is 300 seconds (5 minutes). If this value is set too low, it results in excessive processing time to recreate links every time a request is processed. If set too high, it ties up resources for links that are not being used. |
dns.dnsd.null_port_timeout |
Time in seconds to wait before unconditionally disconnecting the link. The default value is 1800 seconds (30 minutes). The value should be set high enough to allow the longest command to complete execution. Typically, the longest command is set dir to new epoch which includes a skulk as the final part of its processing. Values for this parameter can range anywhere from a couple of minutes to 90 minutes depending on the size of the directory involved and delays present in the network. NoteIf you receive the message
|
dns.dnsd.maximum_handlers_quota | Maximum number of request handlers to allocate for request processing. The default value is 200. In most cases, the number of request handlers needed is approximately equal to the number of clerks connecting to the server. |
dns.dnsd.standby_handlers_quota |
Maximum number of request handlers to keep ready to process incoming requests. The default is 10. |
dns.dnsd.maximum_buffers_quota
| Maximum number of buffers available for request handlers from the
request pool (rpool). The default is 200. Normally, the value for
this parameter should be the same as the
maximum_handlers_quota parameter. |
dns.dnsd.ta_conn_quota |
Maximum number of connections for front end operations (lookups, modify operations). The default is 200. Typically, the value for this parameter can be same or
somewhat less than the Both the See additional requirements in the description of the
|
dns.dnsd.back_conn_quota |
Maximum number of connections for back end operations (skulks, other back ground activities). The default is 20. Note that the sum of these two connection quotas (specified by
the |
dns.dnsd.dormancy_evaluation_interval |
The time (in seconds) to keep resources used by a request available in pool so that they may be reused. The default is 60. Decreasing the value from the default may allow resources to be released earlier. However, decreasing it too much results in a delay in starting the processing of a new request. Consequently, if it is changed, it should be done very carefully. |
dns.dnsd.db_version_to_prune |
Sequence number of a checkpoint file. All dying replicas will be removed from this file. The default is 0 (turned off). The sequence number can be determined by typing out the
clearinghouse version file (the file which has a file extension
of Finally, remove the above line from the Only one prune operation is allowed per server session. NoteIf you choose to leave the line in the file, change the value to 0 (zero) to avoid accidental pruning. To display the results of a prune operation in the
|
An example DNS.CONF file is shown below:
! all parameters in lowercase dns.dnsd.acs_override: 1 dns.dnsd.node_verification: 0 !dns.dnsd.idle_conn_timeout: 500 !dns.dnsd.null_port_timeout: 5400 dns.dnsd.maximum_handlers_quota: 1000 dns.dnsd.standby_handlers_quota: 10 dns.dnsd.maximum_buffers_quota: 1000 dns.dnsd.ta_conn_quota: 600 !dns.dnsd.back_conn_quota: 100 dns.dnsd.dormancy_evaluation_interval: 30 !dns.dnsd.db_version_to_prune: 1236
Parameter lines can be commented out by placing a exclamation character (!) at the beginning of the line.
12.7. Solving Common Access Control Problems
Viewing namespace information
Creating a clearinghouse
Creating a directory
Deleting a directory
Creating a replica
Deleting a replica
Modifying a directory's replica set
Restoring access
12.7.1. Access Problems Viewing Namespace Information
The DECdns Control Program provides two basic display commands, show and
directory, with which you can view namespace structure and
contents. To use these commands, you must have read access to the name you want to
display. If you try to display a name to which you do not have read access, an error
message appears, indicating the requested name does not exist:
Requested name does not exist
The name you tried to access does not exist in the namespace.
The name exists but is newly created and is not yet known to the clearinghouse with which you are communicating.
The name you tried to access is being deleted.
You mistyped the name.
If read access has been granted to the name through the use of an access control group, make sure the group flag is specified in the ACS.
For directory names, check to see if the only access control entry (ACE) specifying the requesting principal is a default ACE. (Default ACEs grant access only to the future contents of a directory and not to the directory itself.) If this is the case, create another ACE on behalf of the principal that does not specify the default flag.
12.7.2. Access Problems Creating a Clearinghouse
When you configure a DECdns server in an existing namespace.
When you relocate an existing functional clearinghouse on another node and use the
create dns server clearinghousecommand to re-create the clearinghouse at its new location.
The account under which you are executing the clearinghouse creation needs write access to the directory in which you intend to name the clearinghouse.
You must have the NET$MANAGE rights identifier.
The
DNS$Serverprincipal on the server where you are creating the clearinghouse needs read, write, delete, and control access to the directory in which you intend to name the new clearinghouse. Specify the principal as nodename.DNS$Server, where nodename is the DECdns full name of the node on which you are creating the clearinghouse.The
systemaccount of the node needs control access to the directory in which you intend to name the new clearinghouse. Specify the principal as nodename.systemIf any replica of the directory in which you intend to name the new clearinghouse is stored on a VAX Distributed Name Service (DNS) Version 1 server (on a DECnet Phase IV node), you must create two additional ACEs that grant the same access described in the preceding bullet item but that specify DNS Version 1 principals (in the format nodename::username).
Insufficient rights to perform requested operation
Server process has insufficient access to clearinghouse
If either of these occur, use the show directory access commands to verify the
rights currently granted on behalf of your principal name, the
DNS$Server principal, and the root or
system accounts. If the required access is not in place, ask your
namespace administrator (or someone else who has the necessary rights and
privileges) to grant the required access. After the appropriate ACEs are created,
retry the clearinghouse creation.
12.7.3. Access Problems Creating a Directory
Write access to the parent directory of the directory you intend to create
Write access to the clearinghouse in which you are naming the new directory
Insufficient rights to perform requested operation
show directory access and show clearinghouse
access commands to verify the rights currently granted on behalf of your
principal name. If you do not have write access to both the parent directory and
clearinghouse, ask your namespace administrator (or someone else who has control
access to the parent directory and clearinghouse) to grant you the required access.
After the appropriate ACEs are created, reenter your original create
directory command. Note
For the create directory command to execute successfully,
the clearinghouse that stores the master replica of the new directory's
parent directory must be available when you enter the command.
After you create a directory, enter the
show directory access
command to display the
DNS$ACS
attribute of the new directory. Make sure that the users and applications for
whom the directory was created have the proper access. If the required access
was not inherited from the access control set (ACS) of the new directory's
parent directory, use the
add directory access
command to create the necessary access control entries (ACEs). See
Chapter 5, "Managing DECdns Access Control"
for complete information on how to add access to a directory.
12.7.4. Access Problems Deleting a Directory
Read and delete access to the directory
Write, delete, or control access to the directory's parent directory
Write access to the clearinghouse that stores the master replica of the directory (or directories) you intend to delete
Insufficient rights to perform requested operation
If this occurs, use the
show directory access
and
show clearinghouse access
commands to verify the rights currently granted on behalf of your principal
name. If you do not have all the required access, ask your namespace
administrator
(or someone else who has control access to the directory, parent directory and
clearinghouse that stores the directory's master replica) to
grant you the required access.
After the appropriate ACEs are created, reenter your original
delete directory command.
12.7.5. Access Problems Creating a Replica
Control access to the directory you want to replicate
Write access to the directory's parent directory
Write access to the clearinghouse where you want to store the replica
The
DNS$Serverprincipal on the server node (clearinghouse) where you intend to create the replica needs read, write, delete, and control access to the directory you want to replicate. TheDNS$Serverprincipal requires this access to successfully carry out updates and skulks of the directory.
Insufficient rights to perform requested operation
Server process has insufficient access to clearinghouse
If this occurs, use the
show directory access
and
show clearinghouse access
commands to verify the rights currently granted on behalf of your principal
name and the
DNS$Server principal. If the required access is not in place,
ask your namespace administrator
(or someone else who has control access to the directory, parent directory and
clearinghouse where you intend to store the new replica) to
grant the required access.
After the appropriate ACEs are created,
initiate a skulk of the directory you want to replicate to make sure
that the new access is applied to all existing replicas in
the directory's replica set.
Then, reenter your original
create replica command.
12.7.6. Access Problems Deleting a Replica
Control access to the directory whose replica you want to delete
Write access to the clearinghouse from which you are deleting the replica
Write and delete access to the directory's parent directory
Insufficient rights to perform requested operation
If this occurs, use the
show directory access
and
show clearinghouse access
commands to verify the rights currently granted on behalf of your principal
name. If you do not have all the required access, ask your namespace
administrator
(or someone else who has control access to the directory, parent directory and
the clearinghouse from which you want to delete the replica) to
grant you the required access.
After the appropriate ACEs are created, reenter your original
delete replica command.
12.7.7. Access Problems Modifying a Directory's Replica Set
set directory to new epoch
command to modify a directory's replica set. To use this command, you must
have the following access:
Read and control access to the directory
Write access to each clearinghouse that stores a replica of the directory
Insufficient rights to perform requested operation
show directory access and show clearinghouse
access commands to verify the rights currently granted on behalf of your
principal name. If you do not have all the required access, ask your namespace
administrator (or someone else who has control access to the directory, parent
directory and the clearinghouse from which you want to delete the replica) to grant
you the required access. After the appropriate ACEs are created, reenter your
original set directory to new epoch command. Note
If the directory is replicated in both DNS Version 1 and DECdns Version 2 clearinghouses, make sure that both Version 1 and Version 2 ACEs exist on the directory and all of its contents before you try to set the new epoch. See Section 5.1.1, ''Specifying a DECdns Version 2 Principal'' and Section 5.1.2, ''Specifying a DNS Version 1 Principal'' for information on how to specify Version 2 and Version 1 principals in ACEs. Appendix F, "DECdns Version Interoperability" summarizes interoperability considerations in an environment with both DNS Version 1 and DECdns Version 2.
12.7.8. Restoring Access to a Name
Note
You must perform the following procedure at the server that stores the master replica of the directory (or contents) to which you intend to restore access. You cannot restore access remotely.
Use the diagnostic interface only as directed.
Make sure you are logged in under the
systemaccount. Invoke the DECdns diagnostic interface by entering the following command:$ run sys$system:dns$diag
The
diag>prompt appears.- At the
diag>prompt, enter the following command:diag> enable acs_override
Type
qto exit the diagnostic interface and return to the system prompt.Invoke the DECdns Control Program and use the
add accesscommands to restore minimum required access. See Chapter 5, "Managing DECdns Access Control" for information on granting access.After you restore sufficient access, exit the DECdns Control Program and return to the system prompt.
- Repeat step 1 to invoke the diagnostic interface again. At the
diag>prompt, enter the following command to disable the access override:diag> disable acs_override
Type
qto exit the diagnostic interface and return to the system prompt.
With minimum required access restored, invoke the DECdns Control Program again to grant additional access if necessary.
12.8. Handling Clearinghouse Creation Failures
Check that the
DNS$Serverprincipal and the root principals on the server have the required access to the directory in which you intend to name the clearinghouse (usually the namespace's root directory). See Section 12.8.1, ''Granting Required Access'' for information on how to grant the necessary access.If you are trying to name the clearinghouse in a directory other than the root directory, verify that the directory allows the storage of clearinghouse object entries (
DNS$InCHName=true). See Section 12.8.2, ''Allowing a Directory to Store Clearinghouse Object Entries''.Verify that the system on which you are trying to create the clearinghouse has been registered in the namespace through the use of the DECnet-Plus node registration tool
decnet_register.If a replica of the directory in which you are trying to name the new clearinghouse is stored on a DNS Version 1 server (on a Phase IV node), you must also verify that the name of the DECnet Phase V server on which you are creating the clearinghouse is defined in the Phase IV server's node database and that its address in the node database matches the DECnet Phase V server's node address in the namespace. See Section 12.8.3, ''Verifying Server Node Registration and Address Information''.
Make sure all clearinghouses that store a replica of the directory in which you are trying to name the new clearinghouse are running and are available. See Section 12.8.4, ''Verifying Availability and Connectivity to Clearinghouses''.
12.8.1. Granting Required Access
For the
DNS$Serverprincipal on the server, grant read, write, delete, and control access to the directory in which you intend to name the clearinghouse. Specify the principal as nodename.DNS$Server, where nodename is the full DECdns name of the node on which the server is running.For the
systemaccount on the server, grant control access to the directory in which you intend to name the clearinghouse. Specify the principal as nodename.rootor nodename.system.If a replica of the directory in which you intend to name the new clearinghouse is stored on a DNS Version 1 server, you must create two additional ACEs that grant the same access as described above (for the
DNS$Serverprincipal, and for thesystemprincipals (in the format nodename::username)). Thus, four ACEs (two in Version 2 format and two in Version 1 format) are required. Appendix F, "DECdns Version Interoperability" summarizes interoperability considerations in an environment with both DNS Version 1 and DECdns Version 2.
The
add directory
                                                  access
commands that you use to grant this access must be entered from an account
that has control access to the directory in which you intend to name the
new clearinghouse.
For more information on specifying principals and granting DECdns
access, see Chapter 5, "Managing DECdns Access Control".
Example
DNS$Server
and system principals to the root directory of the namespace in which a
new clearinghouse on node .mynode will be created. You must enter both
commands from an account that has control access to the root directory of the
namespace. - The following command grants read, write, delete, and control access to the root directory (
.) for theDNS$Serverprincipal on node.mynode.dns> add directory . access .mynode.dns$server for r,w,d,c
- The following command grants control access to the root directory for the
systemaccount on node.mynode.dns> add directory . access .mynode.system for c
dns> add directory . access mynode::dns$server for r,w,d,c dns> add directory . access mynode::system for c
12.8.2. Allowing a Directory to Store Clearinghouse Object Entries
Before you try to name a clearinghouse in any directory below the root, make sure that the directory allows the storage of clearinghouse object entries (even if you do not intend to store clearinghouse object entries in the directory). If you are trying to name a clearinghouse in the root directory, this task is not required.
You control whether a directory can store clearinghouse object entries by modifying the value
of its DNS$InCHName attribute. Except for the root directory (whose
DNS$InCHName attribute is always set to true), this directory
attribute can have a value of true or false. By default, the
DNS$InCHName attribute of all directories that you create under the
root is set to false. To name a clearinghouse (that is, to create a clearinghouse
object entry) in a lower-level directory, you must reset the value of the
directory's DNS$InCHName attribute to true.
Before You Modify a Directory's DNS$InCHName Attribute
Before you try to set a directory's DNS$InCHName attribute to true, make sure the
directory's parent directory already has its own DNS$InCHName attribute
set to true.
To Set a Directory's DNS$InCHName Attribute to True
To modify the value of a directory's DNS$InCHName attribute, you must have
control access to the directory.
Use the set directory command to set the value of a directory's
DNS$InCHName attribute from false to true.
Example
DNS$InCHName attribute of the .admin
directory to true:
dns> set directory .admin dns$inchname=true
12.8.3. Verifying Server Node Registration and Address Information
The system on which you intend to create a clearinghouse must be registered in the namespace
for clearinghouse creation to succeed. You can use the DECnet-Plus node registration
tool (decnet_register) to display node information and verify that a
node is properly registered in the namespace.
For complete information on how to use the node registration tool for this purpose, see the VSI DECnet-Plus for OpenVMS Network Management Guide.
DECnet Phase IV Interoperability Considerations
show node
nodename command to verify the following
conditions: Verify that the name of the DECnet Phase V node on which you are trying to create the clearinghouse is defined in the Phase IV node's local node database.
Verify that the address of the DECnet Phase V node (as stored in the Phase IV node's local node database) matches the DECnet Phase V address of the DECnet Phase V node.
The DECnet Phase V server on which you create the clearinghouse must be represented in the Phase IV node database with a Phase IV compatible address (for example, 4.20).
12.8.4. Verifying Availability and Connectivity to Clearinghouses
When you create a clearinghouse, a replica of the directory in which the clearinghouse is named is also created and stored in the new clearinghouse as its initial replica. The replica creation succeeds only if all the clearinghouses that store a replica of the directory containing the new clearinghouse name are running and reachable when you try to configure the new server, because DECdns skulks a directory when it creates a new replica.
For example, if you intend to name a new clearinghouse in the root directory, then all clearinghouses that store a replica of the root directory must be running (in the on state) and reachable when you try to create the clearinghouse.
- For the directory in which you intend to name the new clearinghouse (usually the root), use the
show directorycommand and specify theDNS$Replicasattribute to display the name of every clearinghouse that stores a replica of the directory. For example, the following command displays a list of all clearinghouses that store a replica of the root directory:dns> show directory . DNS$Replicas
- With this information, use the
show replicacommand to verify that you can receive a response to a look up request of any attribute associated with the replica at each of the clearinghouses you found in step 1. If you receive a response to theshow replicacommand, you can be sure that the clearinghouse in which it is stored is running and available. (Remember that you must have read access to the clearinghouse for theshow replicacommand to succeed.) For example, the following command displays the value of theDNS$CTSattribute associated with the replica of the root directory stored at clearinghouse.Paris_CH:dns> show replica . at clearinghouse .paris_ch dns$cts
- Alternatively, if you know the node names of each of the clearinghouses you found in step 1, you could use the
show dns server clearinghousecommand and specify thestateattribute to make sure each of the clearinghouses is running and available. For example, the following command displays the current state of the clearinghouse on node.vega.dns> show node .vega dns server clearinghouse state
Note
create replicadelete replicacreate dns server clearinghousedelete dns server clearinghouseset directory to new epoch
12.9. Restoring a Corrupted Clearinghouse
One or more of the clearinghouse's database files is missing, usually because of accidental deletion or removal from its default location on disk.
Individual entries within the database files are missing, incomplete, or out of sequence.
The
TLOGfiles on the system keep growing and fail to checkpoint. ATLOGfile is a transaction log file maintained on disk. All changes made to the running DECdns server database (held in memory) are recorded in theTLOGfile. ATLOGfile is typically 201 blocks in size when empty. Whenever the file is larger than 201 blocks, the memory copy of the database contains changes that are not in the disk copy of the checkpoint file. Once a new copy of the checkpoint file has been written to disk, the version file will be updated to a new sequence and theTLOGfile emptied.
To determine the cause, check the DNS$SERVER.LOG file for clues.
Verify the corruption.
First, disable the clearinghouse by entering the
disable dns server clearinghousecommand. With the clearinghouse in the off state, verify that the clearinghouse database files exist. DECdns Version 2 clearinghouse database files reside in theSYS$SYSDEVICE:[DNS$SERVER]directory (or in the alternative directory contained inSYS$MANAGER:DNS_FILES.TXT). (If the clearinghouse was created with DNS Version 1 software and later converted to DECdns Version 2 format, the clearinghouse files reside in theSYS$SYSROOT:[DNS$SERVER]account.)Clearinghouse files are named in the following format:clearinghouse-name.
checkpointnnnnnnnnnnclearinghouse-name.
tlognnnnnnnnnnclearinghouse-name.
version
If any or all of these files are missing, the clearinghouse cannot be restored. Delete any remaining files and go to step 2.
If all the database files exist, turn on the clearinghouse by using the
enable dns server clearinghousecommand. If service is not restored, delete all database files and go to step 2.- Gather directory and replica-type information.
- Use the
show objectcommand to examine theDNS$CHDirectoriesattribute of the corrupted clearinghouse's associated clearinghouse object entry. This command displays the names of all the directories that stored replicas in the corrupted clearinghouse. For example, the following command displays theDNS$CHDirectoriesattribute values for a clearinghouse object entry named.NY1_CH.dns> show object .ny1_ch dns$chdirectories SHOW CLEARINGHOUSE IAF:.NY1_CH AT 17-JUL-2018:09:11:00 DNS$ChDirectories = : CTS of Directory = 2018-03-11-05:35:16.16000000/aa-00-05-00-de-09 Name of directory = . DNS$ChDirectories = : CTS of Directory = 2018-06-15-15:50:44.18000000/aa-00-04-00-de-11 Name of directory = .sales DNS$ChDirectories = : CTS of Directory = 2018-07-21-14:01:21.18000000/aa-00-05-00-de-11 Name of directory = .eng - For each directory you find in step 2a, use the
show directorycommand and specify theDNS$Replicasattribute to determine the replica type (master or read-only) of the replica that each directory stored in the corrupted clearinghouse. For example, the following command displays theDNS$Replicasattribute values for the.salesdirectory found by the example command in step 2a.dns> show directory .sales dns$replicas SHOW DIRECTORY IAF:.sales AT 09-APR-2018:16:08:25 DNS$Replicas (set) = : Clearinghouse's DNS$CTS = 2018-03-22-14:39:34.58/aa-00-04-00-de-11 Tower 1 CTS = 2018-04-09-20:08:25.835/08-00-2b-0d-c0-9d Floor 1 = 01 2c (null) Floor 2 = 02 00 2c ncacn_dnet_nsp Floor 3 = 04 (null) Floor 4 = 06 49 00 17 aa 00 04 00 22 dc 20 Replica type = master Clearinghouse's Name = IAF:.Chicago1_CH DNS$Replicas (set) = : Clearinghouse's DNS$CTS = 2018-07-30-20:32:42.82/aa-00-04-00-de-11 Tower 1 CTS = 2018-04-09-20:08:25.835/08-00-2b-0d-c0-9d Floor 1 = 01 2c (null) Floor 2 = 02 00 2c ncacn_dnet_nsp Floor 3 = 04 (null) Floor 4 = 06 49 00 13 aa 00 04 00 7e 52 20 Replica type = readonly Clearinghouse's Name = IAF:.NY1_CH
Make a note of this directory and replica-type information. You will need it later (in step 4) to rebuild the replica sets of the directories that were stored in the clearinghouse and to repopulate the new clearinghouse that you create to replace the corrupted clearinghouse.
Delete the associated clearinghouse object entry.
After you gather the replica-type information, use the
delete objectcommand to delete the corrupted clearinghouse's associated clearinghouse object entry. This prevents further lookup requests to the corrupted clearinghouse.Rebuild the replica sets of the directories.
With the information you gathered in step 2, use the
set directory to new epochcommand to rebuild the replica set of each directory that stored a replica in the corrupted clearinghouse. Use theexcludeargument of the command to exclude the replica that was stored in the corrupted clearinghouse from each directory's replica set. Until you perform this step, skulks of these directories will fail.Handling Master Replicas
If a replica stored on the corrupted clearinghouse was a master replica, and if other read-only replicas of the directory exist, you must designate one of those read-only replicas as the directory's new master replica.
You can simultaneously omit a replica and redesignate a new master replica of a directory with the
set directory to new epochcommand. See Chapter 9, "Restructuring a Namespace" for information on how to use theset directory to new epochcommand to perform these tasks.Handling Orphaned Child Directories
If a master replica stored on the corrupted clearinghouse was the only replica in that directory's replica set, the directory is lost and cannot be retrieved. Furthermore, any child directory that exists below a lost directory are orphaned (cut off from the directories that exist above it in the namespace hierarchy). Although the directory and the information it contained are lost, you can reconnect an orphaned child directory by creating a new directory in place of the lost directory and then creating a new child pointer to the orphaned child directory.Note
If none of the replicas stored on the corrupted clearinghouse were master replicas, you can skip this step and go to step 5.
To reconnect an orphaned directory, perform the following steps:For each orphaned directory, use the
delete childcommand to delete (from the lost directory's parent directory) the child pointer to the lost directory.Use the
create directorycommand to create a new directory of the same name as the lost directory.For each orphaned directory, follow the procedure described in Section 12.10, ''Restoring a Deleted Child Pointer'' to create new child pointers to those directories. After you create the necessary child pointers, go to step 5 of this procedure.
Create a new clearinghouse.
Use the
create dns server clearinghousecommand to create a new clearinghouse of the same name as the corrupted clearinghouse you are replacing. See Chapter 6, "Managing Clerks, Servers, and Clearinghouses" for information on how to create a clearinghouse with thecreate dns server clearinghousecommand.Repopulate the new clearinghouse with the contents of the corrupted clearinghouse.
With the replica-type information that you gathered in step 2, use the
create replicacommand to populate the new clearinghouse with replicas (of the same replica types) of the same directories that the corrupted clearinghouse originally contained. See Chapter 7, "Managing Directories" for information on how to use thecreate replicacommand.
12.10. Restoring a Deleted Child Pointer
Occasionally, you may need to restore a child pointer that has been accidentally deleted. Child pointers contain the information that DECdns uses to keep track of the clearinghouses where each replica of a child directory's replica set is stored. If a child pointer is deleted, the parent directory and child directory are cut off from each other. Name lookups downward from this point through the namespace hierarchy fail because, without the child pointer, DECdns cannot determine where to find the information for which it is searching.
- Before you try to restore a deleted child pointer, make sure you have the following access rights:
Write access to the parent directory of the orphaned child directory
Read access to the orphaned child directory
Because the child pointer is missing, DECdns cannot determine where any replicas of the orphaned directory are stored. Before you use the
create childcommand to restore the child pointer, you must make sure the create child operation will be directed to a clearinghouse that stores a replica of the orphaned child directory. If this information is not readily available, use theshow replicacommand and specify the names of clearinghouses that you suspect might contain a replica of the orphaned directory. Continue issuing this command until you find a clearinghouse that stores a replica of the orphaned directory.After you identify a clearinghouse that stores a replica of the orphaned directory, use the
set dnscp preferred clearinghousecommand to ensure that thecreate childcommand you enter in the next step is directed to the clearinghouse that stores a replica of the orphaned directory.Enter the
create childcommand and specify the clearinghouse you identified in step 3 to restore the child pointer.
12.11. Restoring a Missing Clearinghouse Object Entry
Every time a clearinghouse is enabled, it tries to contact its corresponding clearinghouse object entry to verify that the clearinghouse is still properly registered in the namespace. If a clearinghouse object entry is mistakenly deleted, requesting clerks may not be able to access the associated clearinghouse.
Verify that the clearinghouse object entry was deleted.
- Use the
create objectcommand to create a new clearinghouse object entry. Make sure you specify the following values:Specify the same name that was assigned to the deleted clearinghouse object entry.
Set the
classattribute toDNS$Clearinghouse.Set the
class versionattribute to1.0.
For example, the following command creates a clearinghouse object entry named.Paris1_CH.dns> create object .paris1_ch class=dns$clearinghouse, class - _> version=1.0
Make sure that the
DNS$Serverprincipal on the server where the associated clearinghouse resides has full access (read, write, delete, test, and control) to the restored clearinghouse object entry.
Normal service will be restored when the clerk (on the server system where the associated
clearinghouse resides) detects that the DNS$CTS attribute of the
clearinghouse object entry has changed. This usually occurs within one hour. Remember,
however, that a record of the original clearinghouse object entry may be temporarily
retained in the caches of other clerks that regularly use the associated
clearinghouse.
12.12. Handling Node Verification Failures
DECdns, together with DECnet, performs a special security check called node verification on all operations that could modify information in the namespace. Whenever a clerk connects to a DECdns Version 2 server, DECnet passes the clerk's request to the server and includes the principal (nodename.username) associated with the request.
For read operations (show and directory commands), the
server trusts that the node name provided by DECnet is a valid node name
and then performs the usual access control checks using that name.
However, for write and control operations (such as with the
set, create, and
delete commands)
the server must first authenticate the node name. That is,
the server must authenticate the requesting node by requesting DECnet to
verify the node name.
Requesting principal could not be authenticated to the clearinghouse
A node object entry representing the requesting clerk must exist and be properly registered in the namespace.
You can use the DECnet-Plus node registration tool (
decnet_register) to display node information and verify that the clerk node has been properly registered in the namespace. See the VSI DECnet-Plus for OpenVMS Network Management Guide for complete information on how to use the node registration tool for this purpose.The
DNS$Serverprincipal (nodename.dns$server) on the server storing the master replica of the directory (or contents) you are trying to modify must have read access to the node object entry that represents the requesting clerk in the namespace. Node object entries are typically created with world read access. Unless this access has been changed, theDNS$Serverprincipal of every server in the namespace should have sufficient access to the node object entry.See Section 12.1.4.3, ''Determining a Node Name from a Clearinghouse NSAP Address'' for instructions on how to determine the node name of the server (clearinghouse) that stores the master replica of a directory.
At least one clearinghouse that stores a replica of the directory containing the node object entry must be running and available when the clerk makes its request. If the server cannot communicate with such a clearinghouse, node verification fails due to insufficient information.
Assuming that the preceding conditions are satisfied, the
DNA$Towersattribute associated (registered) with the node object entry (which holds address information for the node) must match the address information associated with the DECnet Phase IV or Phase V connection. If the towers (addresses) match, the requesting node is verified. If the towers do not match, the verification fails. For complete information on how to use the node registration tool to edit a node address, see the VSI DECnet-Plus for OpenVMS Network Management Guide.
Note
Node verification can occasionally fail in response to a request to read a name. Permission to perform a read operation is granted if the requesting principal has read access to the name itself, or control access to the directory in which the named is stored. If the requesting principal has read access to the name, permission to perform the read operation is granted based on that access. However, if the requesting principal does not have read access, DECdns, before denying access, examines the ACS of the parent directory of the name, to see if the principal has control access to that directory. This second check for control access on the parent directory triggers the node verification process, which may succeed or fail for the reasons described previously in this section.
Version 1 servers (running Version 1.1 of the VAX Distributed Name Service
software) do not perform node verification and grant or deny permission to
modify a name based only on whether the requesting principal has sufficient
access to the master replica of the directory (or the name therein) to be
modified. If your namespace contains both Version 1 and Version 2 servers
(running DECdns Version 2.0), you may experience access or node registration
problems if you move a master replica of a directory (through the use of the
set directory to new epoch command) from a Version 1 server to
a Version 2 server on which node verification is enforced. Appendix F, "DECdns Version Interoperability" summarizes interoperability considerations in an
environment with both DNS Version 1 and DECdns Version 2.
Overriding Node Verification for Operations on Individual Names
.*... as the user name portion of the ACE. For example, the
following add access command creates an ACE that grants, to all users of
the IAF namespace, write access to the .eng directory:
dns> add directory .eng access IAF:.*... for r,w
Once this ACE is created, all users of the IAF namespace can perform write
operations on the
.eng
directory, even if the node name with which their individual user accounts are
associated cannot be verified by DECnet.
Enabling and Disabling Node Verification on Individual Servers
Note
To disable node verification, you must be logged into the server whose node verification function you want to disable. You cannot disable node verification remotely.
- While logged in under the
systemaccount, invoke the DECdns diagnostic interface by entering the following command at the system prompt:$ run sys$system:dns$diag
- At the
diag>prompt, enter the following command to turn off node verification on the local server:diag> disable node_verification
Node verification will remain disabled until the server is restarted or until you enter the following command to reenable it manually:diag> enable node_verification
To exit the diagnostic interface, type
q.
Note
Use the diagnostic interface only as directed.
You can also use the dns.dnsd.node_verification parameter in the
DNS.CONF file. See Section 12.6, ''Server Tuning'' for more
information.
12.13. Breaking Soft Link Loops and Group Loops
A soft link loop occurs when a soft link (in a series of two or more soft links) points back
to itself. In its simplest form, a soft link loop involves only two soft links whose
destination names (DNS$LinkTarget attributes) specify each other. For
example, suppose two soft links (.link1 and .link2) exist in
the root directory of a namespace. A soft link loop between these two soft links exists
if the destination name of .link1 points to .link2 and the
destination name of .link2 points to .link1. Soft link loops
can involve more than two soft links.
A group loop occurs when two or more groups include each other as group members.
Possible cycle detected
Enter the
show linkcommand and specify theDNS$LinkTargetattribute of the soft link specified in the error message.Enter the
show linkcommand and specify theDNS$LinkTargetattribute of the soft link you found in step 1.Continue this process until you find the soft link whose
DNS$LinkTargetattribute specifies a soft link earlier in the series of soft links.
To break a soft link loop, use the
delete link command to delete the soft link that is causing the
loop, or
use the
set link command to
redirect one (or more) of the soft links to different destination names.
Enter the
show groupcommand and specify theDNS$Membersattribute to display the members of the group specified in the error message.For each group member that is itself a group, repeat step 1 until you find the group (or groups) that specify each other as members.
To break a group loop, use the
remove member command to remove from membership the particular
group (or groups) causing the
loop.
12.14. Eliminating Ambiguous Namespace Nicknames
DNS$ADVER) broadcasts messages, called server
advertisement messages, to the network so that clerks can determine the location and
availability of DECdns servers. A clerk detects an ambiguous nickname when it receives a
server advertisement message containing a nickname that matches the nickname of a known
namespace in its cache but has a different namespace creation timestamp (NSCTS) value
than the NSCTS value of the cached namespace. After receiving the message, the clerk
detects that two entries exist in its list of known namespaces that use the same
nickname but have different NSCTS values. The clerk considers the nicknames in both
entries to be ambiguous. The next time you enter a command from the clerk that specifies
either nickname, the clerk returns the following error message:
Specified nickname is ambiguous
A namespace administrator creates a namespace on a server that is not currently connected to the local area network (LAN) but assigns it a nickname that matches the nickname of a namespace already in use on the LAN. The server is subsequently connected to the LAN and advertises the duplicate nickname.
A namespace administrator creates a namespace that advertises its existence to all clerks on the LAN. Then, for some reason, the administrator deletes the namespace and creates another namespace using the same nickname assigned to the deleted namespace. In this case, clerks on the LAN have known namespace entries for two namespaces using the same nickname.
A namespace administrator on a system running VAX Distributed Name Service (DNS) software on your LAN creates a namespace and assigns a nickname matching that of a namespace already in use on your LAN. (DNS Version 1 clerk software does not prevent users from assigning the same nickname to different namespaces.)
A user configures a clerk on a LAN to communicate with a server in a namespace that exists across a wide area network (WAN) link. The nickname of the namespace across the WAN link matches the nickname of a namespace already in use on the LAN.
NSCTS — The value of the
NSCTSattribute is assigned automatically when the namespace is created. A namespace's NSCTS cannot be modified and is guaranteed to be unique.Nickname — A namespace's
nicknameattribute is a human-readable name assigned by the creator and coupled with theNSCTSattribute during namespace creation. After it is assigned, a namespace nickname cannot be modified.Name — A namespace's
nameattribute is generated by the clerk when it receives an advertisement message for the namespace. The value of a namespace'snameattribute is usually the same as its nickname attribute, whose value you assign during namespace creation. If a nickname in an advertisement message is ambiguous, the clerk modifies the namespace's correspondingnameattribute by appending an underscore and a number (_n) to the Name. Remember that, because each clerk maintains its own list of known namespaces, and because all clerks on the LAN may not receive advertisements in the same sequence, the value of a namespace'snameattribute can vary from one clerk to another. (You can use theset dns clerk known namespacecommand to modify the value of a namespace'snameattribute. See Chapter 11, "DECdns Control Program Command Dictionary" for more information on this command.)
12.14.1. Locating the Source of an Ambiguous Nickname
abc, you must locate the source of the ambiguous nicknames. The
following command displays the NSCTS and name attributes
for all namespaces with the nickname abc.
dns> show dns clerk known namespace *, with nickname=abc
Node 0 DNS Clerk Known Namespace 08-00-2B-0D-C0-9D-CD-3B-C6-16-EC-3B-94-00
AT 2018-02-07-10:38:23.387-05:00I0.189
Identifiers
NSCTS = 08-00-2B-0D-C0-9D-CD-3B-C6-16-EC-3B-94-00
Name = abc
_______
Node 0 DNS Clerk Known Namespace 08-00-2B-0D-C0-9D-19-6B-56-B9-8C-3D-94-00
AT 2018-02-07-10:38:23.567-05:00I0.189
Identifiers
NSCTS = 08-00-2B-0D-C0-9D-19-6B-56-B9-8C-3D-94-00
Name = abc_1The output of this command shows that the nickname abc was given to two different
namespaces whose NSCTS values are 08-00-2B-0D-C0-9D-CD-3B-B6-16-EC-3B-94-00 and
08-00-2B-0D-C0-9D-19-6B-56-B9-8C-3D-94-00. Because of this ambiguity, the clerk on
this system appended the suffix _1 to the name attribute
of the namespace uniquely identified by the latter NSCTS value.
If the clerk receives advertisements from servers associated with other name-spaces in use on
the LAN that are also using the abc nickname, the clerk will detect
these additional ambiguities and append suffixes incrementally (_2,
_3, and so on) to the name attributes of these
namespaces.
12.14.2. Eliminating an Ambiguous Nickname
- Eliminate all sources of ambiguous advertisements on your LAN that are associated with the namespace or namespaces you intend to eliminate.
Locate all the servers on the LAN that are advertising the namespaces with the ambiguous nickname you want to eliminate.
On the server where each clearinghouse resides, use the
clear dns server clearinghousecommand to delete the clearinghouse associated with the ambiguous nickname from the server's list of clearinghouses it needs to automatically enable during its startup process. See Chapter 11, "DECdns Control Program Command Dictionary" for information on how to use theclear dns server clearinghousecommand.Delete or relocate the clearinghouse database files from each affected server system. If you decide to relocate the clearinghouse, you must copy the database files to an off-LAN server. See Chapter 9, "Restructuring a Namespace" for information on how to relocate a clearinghouse.
When a DECdns clerk starts the
NET$DNS_CLERK_STARTUP.NCLfile executes. This file may contain an NSCTS of a name server that no longer exists on the LAN, in which case the clerk will not be able to communicate with a name server. The clerk could be getting the incorrect NSCTS from this file. Use option 1 of the DECdns configuration program to create a new file with the correct NSCTS (see Section 10.2, ''Changing a Clerk's Default Namespace'').
On each clerk on the LAN, use the
delete dns clerk known namespacecommand to eliminate the clerks' knowledge of the ambiguous nickname. You can use the namespace'snameorNSCTSattribute in the command to specify the correct namespace.For example, either of the following commands deletes (from the local clerk's list of known namespaces) the ambiguous nickname associated with the namespace whosenameattribute isabc_1and whose NSCTS value is08-00-2B-0D-C0-9D-19-6B-56-B9-8C-3D-94-00.dns> delete dns clerk known namespace abc_1
dns> delete dns clerk known namespace - _> 08-00-2B-0D-C0-9D-19-6B-56-B9-8C-3D-94-00
12.15. Fixing Clock Synchronization Errors
The error message Distributed update contained an invalid timestamp may indicate
a clock synchronization problem. Verify that DECdts is running and is correctly
synchronizing all servers listed in the message text. This error does not necessarily
indicate that clocks are not synchronized. Check the
SYS$MANAGER:DNS$SERVER.LOG file for additional information about this
error.
A clock synchronization problem usually does not require immediate attention, but you should have it fixed, because it can prevent replicas from receiving updates. Consult your VSI support representative.
If the server is run on a system that has the system time improperly set in the future, the server will store information in the database with a timestamp set in the future. The server rejects updates with timestamps more than 4 minutes into the future. You will see server messages when that happens. If you believe a server has this problem, first correct the time. If the error persists for more than 48 hours after the clocks have been corrected, contact your VSI support representative for help on correcting the problem. See the VSI DECnet-Plus for OpenVMS DECdts Management for information on clock synchronization.
12.16. Handling Clerk and Server Software Errors
When a DECdns clerk or server encounters an internal problem, the following error messages may be displayed:
Software error detected in clerk
Software error detected in server
These errors may indicate a serious problem in the clerk or server running on the system that receives the message. However, if DECdns service is not interrupted, and even if the error recurs, you should wait at least 24 hours before taking any action. For a server, the 24-hour waiting period allows sufficient time for DECdns to complete skulks of all the directories stored in the server's clearinghouse. Often, the skulking process solves the problem causing the error.
If, after 24 hours, the error messages continue to occur, or if DECdns service is interrupted, contact your VSI support representative.
12.17. Using Tracing Facilities
This section explains how to use trace facilities to help ascertain the cause of DECdns-related problems. You can trace the advertiser, clerk, server, and DECnet to record errors and help isolate the source of a problem.
12.17.1. Tracing the Advertiser
- Edit
SYS$STARTUP:DNS$CLERK_STARTUP.COM, removing the exclamation point (!) from the following line:$! Define/system DNS$_ADVER_TRACE 65535
Shut down the clerk.
Stop the
DNS$ADVERprocess.Restart the clerk (using
SYS$STARTUP:DNS$CLERK_STARTUP.COM.
When you restart the clerk, information will be logged to the file
SYS$MANAGER:DNS$ADVER_ERROR.LOG.
12.17.2. Tracing the Clerk
You can trace all events or only protocol-related activity.
Tracing All Clerk-Related Events
$ @sys$startup:dns$clerk_startup "DEBUG" "8191"
DNS$CLERK.LOG in
SYS$MANAGER:. When you specify 8191, all events will be
logged. Inevitably, however, some internal buffer will be overrun, causing some
events to be dropped. If you display the
SYS$STARTUP:DNS$CLERK_STARTUP.COM file, you will see individual
event types described for each of the bits in this mask. If you already know what
you want to observe, trace only a subset of all the events. For example, to look at
arguments, service, and tree walk information, enter the following command:
$ @sys$startup.dns$clerk_startup "DEBUG" "ARGS" "SERVICE" "TREEWALK"
$ @sys$startup:dns$clerk_startup "DEBUG" "0"
For tracing on the clerk, you can look in
SYS$STARTUP:DNS$CLERK_STARTUP.COM for the list of different trace
points available (in comments).
If the clerk is consuming a large amount of CPU or writing excessive data to the
DNS$CHFAIL.LOG, you can raise the priority of the
DNS$ADVER process to 8. This increases the throughput of the
advertiser. (The advertiser writes to the debug logs; in contrast, the clerk runs in
kernel mode and does not write information directly to the disk.)
Tracing Protocol Activity
@sys$startup:dns$clerk_startup debug protocol
Run your DECdns application. You should see a file named
SYS$MANAGER:DNS$CLERK.TRACE.
@sys$startup:dns$clerk_startup "DEBUG" "0"
$ mcr dns$analyze
This creates file DNS$CLIENT.ANA in your current directory.
12.17.3. Tracing the Server
DNS$DIAG tool
only as directed: $ MCR DNS$DIAG
diag> set events allon
diag> mark begin test
| This writes the string "begin test" into the log. |
$ mcr dns$diag diag> flush log
DNS$SERVER.LOG
file. Note
VSI recommends using this diagnostic tool only as directed, unless you have in-depth understanding of this tool and of the consequences of the commands you want to use. Consult your VSI software support personnel for more assistance.
$ mcr dns$diag diag> set events normal diag>mark end test
To have the server log information during startup, create the file
SYS$SYSDEVICE:[DNS$SERVER]DNSD.EVENTS and enter a single asterisk
(*) in the file. Then restart the server.
12.17.4. Tracing DECnet
As mentioned earlier, problems that seem related to DECdns often actually originate elsewhere. Most often, general lookup problems are related to DECnet. Check that the basic DECnet operations work. First, execute commands that cause DECnet to take actions not using DECdns.
Next, execute commands using node addresses instead of node names. If a command that works with a node name does not work with an address, then the problem lies in DECnet, not DECdns. If a command works with a DECnet address but not with a node name, then the problem involves DECdns.
- Enter the following
SET HOSTcommand to connect to the local system. If this command fails, DECnet is at fault. DECdns cannot operate.$ SET HOST 0
- Now use the
SET HOST nn.nnncommand to connect to the server that stores the information you are looking up. Here nn.nnn is a host node address, as in the following example:$ SET HOST 24.723
After these steps, troubleshooting becomes more complex. The next best tracing
tool is CDI$TRACE. Start CDI$TRACE in one window
(MCR CDI$TRACE), and then execute the command that fails in
another. Review the output closely. Often the failed lookup reveals that the
information is first being looked up in the CDI LOCAL: namespace, or under another
name you had not expected as the target of a lookup. If you do not see a lookup to
DECdns listed in the CDI$TRACE, then DECnet is not looking for the
information from DECdns.
$ MCR NCL FLUSH SESSION CONTROL NAMING CACHE ENTRY "*"
Or, you can purge single entries by specifying them individually in place of the asterisk (*) in the command example. (Use the quotes in any case.)
$ DELETE CTF*.DAT;*$ TRACE CTF> STOP CTF> ANAL/TRACE/FULL/OUT=filename.ext
CTF> EXIT $ TYPE filename.ext
| Deletes old trace files. |
| Do whatever you want while tracing. |
| Use any file name except |
CTF> START/LIVE SESSION
Appendix A. DECdns Naming Guidelines
This appendix defines the valid character set and syntax rules for DECdns names. It also contains general guidelines for naming namespaces, clearinghouses, directories, and their contents.
A.1. Valid Characters and Syntax Rules
A name can be any combination of letters, digits, and certain punctuation characters from the ISO Latin-1 character set. Valid characters include any in Figure A.2, ''Character Codes in DECdns Names'' that appear in a white or lightly shaded box. Characters in lightly shaded boxes must be enclosed in quotation marks (") to be valid. Characters in dark boxes are not valid. Binary names consist of pairs of hexadecimal characters and must be preceded by %X or %x.
DECdns preserves the case of names as they are entered. Lookups, however, are case insensitive, so it is not possible to create two names that differ only in their case. For example, requests to look up .MYNODE, .mynode, and .MyNode would all produce the same result. Similarly, if someone attempted to create all three of those names, only the first attempt would succeed.
A full name, including the namespace nickname, can have as many as 511 characters, as illustrated in Figure A.1, ''Full Name''.
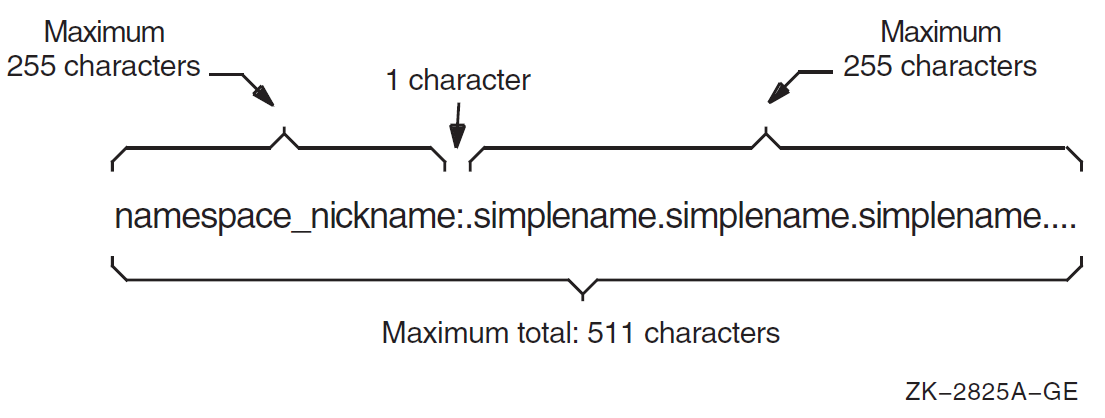
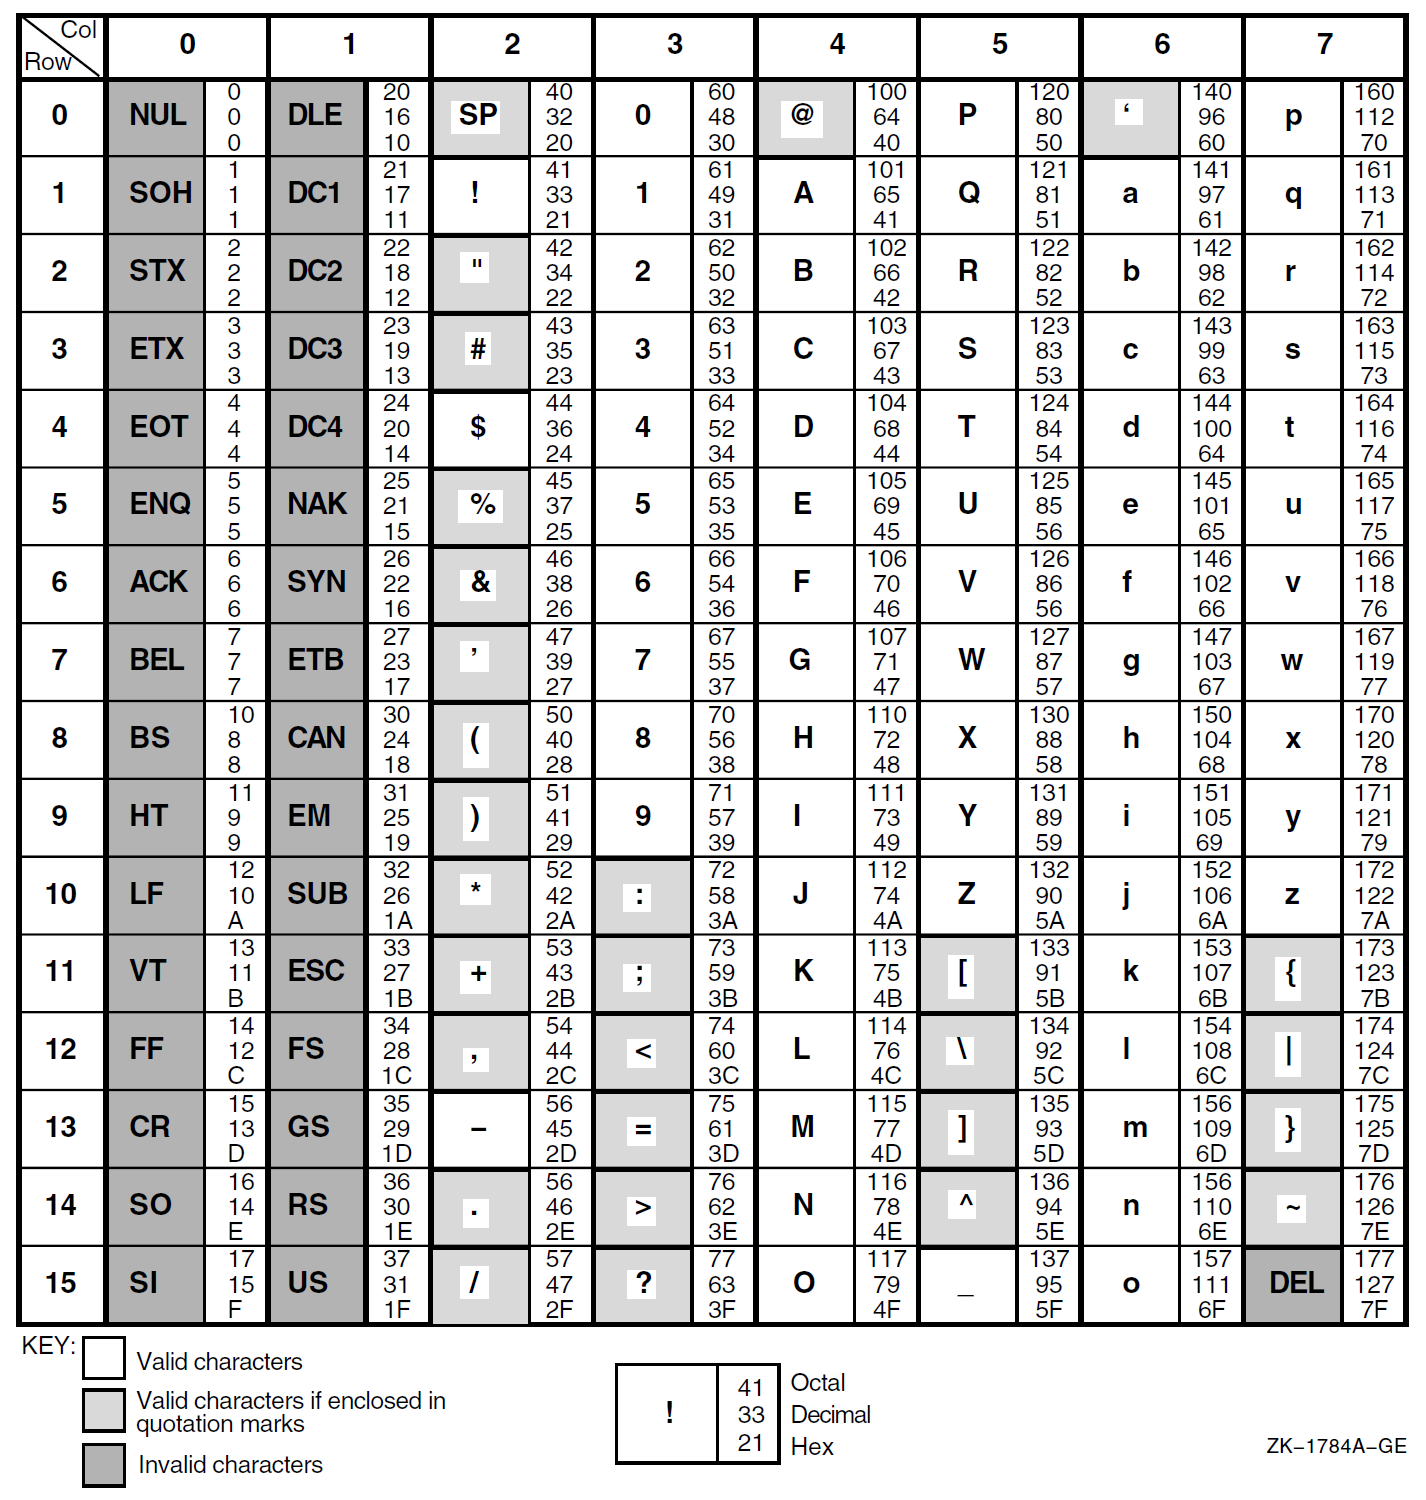 |
|
Name Component/Type |
Valid Syntax | |
|---|---|---|
|
EasyNameChar | ← |
{ Set of characters that are valid without quotation marks } |
|
HardNameChar | ← |
{ Set of characters that are valid when enclosed in quotation marks } |
|
Separator | ← |
. |
|
Quote | ← |
" |
|
WildChar | ← |
<EasyNameChar>|?|* |
|
Ellipsis | ← |
<Separator> <Separator> <Separator> |
|
AnyNameChar | ← |
<EasyNameChar>|<HardNameChar>|<Quote> <Quote> |
|
HexChar | ← |
0|1|2|3|4|5|6|7|8|9|A|B|C|D|E|F|a|b|c|d|e|f |
|
HexRadix | ← |
%X|%x |
|
HexPair | ← |
<HexChar> <HexChar> |
|
HexString | ← |
<HexPair>|<HexString> < HexPair> |
|
EasySimpleName | ← |
<EasyNameChar>|<EasySimpleName> <EasyNameChar> |
|
HardSimpleName | ← |
<AnyNameChar>|<HardSimpleName> <AnyNameChar> |
|
QuotedSimpleName | ← |
<Quote> <HardSimpleName> <Quote> |
|
HexSimpleName | ← |
<HexRadix> <HexString> |
|
WildSimpleName | ← |
<WildChar>|<WildSimpleName> <WildChar> |
|
SimpleName | ← |
<EasySimpleName>|<QuotedSimpleName>|<HexSimpleName> |
|
MaybeNullSimpleName | ← |
<SimpleName>|<Quote> <Quote> |
|
NSNickName | ← |
<EasySimpleName>: |
|
SimpleNameStr | ← |
<SimpleName>|<SimpleNameStr> <Separator> <SimpleName> |
|
WildNameStrNoE | ← |
<WildSimpleName>| <SimpleNameStr> <Separator> <WildSimpleName> |
|
WildNameStr | ← |
<Wild-NameStrNoE>|<SimpleNameStr> <Ellipsis>| <WildNameStrNoE> <Ellipsis> |
|
FullName | ← |
<SimpleNameStr>|<Separator> <SimpleNameStr>|<Separator> |
|
WildFullName | ← |
<WildNameStr>|<Separator> <WildNameStr> |
|
NSNFullName | ← |
<FullName>|<NSNickName> <Fullname> |
|
NSNWildFullName | ← |
<WildFullName>|<NSNickName> <WildFullName> |
A.2. General Naming Guidelines
A name should be meaningful and easy for its users to remember and type. Give meaning to a name by making it descriptive of the resource it names. For example,
.Aero.Dev.Project_diskcould be the name of the DECdfs access point used by a company's aerospace development division, and.Sales.Topdollarcould be the name of a node in the company's sales division.A name should be as short as is practical without causing it to lose meaning or uniqueness.
If you create a directory hierarchy, choose directory names that are stable and are not likely to be affected by reorganizations or changes in product strategy. It is difficult to change existing directory names, especially at high levels in the namespace. Also, a change in a directory name affects all applications that use names in that directory, as well as any users who memorized the full name of a resource or created a local name for it. See Chapter 2, "How DECdns Looks Up Names" for details on how local name substititution works.
A.3. Guidelines for Naming Clearinghouses
In networks of fewer than 50 DECdns servers, name all clearinghouses in the root directory (for example,
.Bonn_CH). This enables you to automatically comply with two special clearinghouse rules that protect the name service's ability to find names. In networks of 50 or more DECdns servers, you should name some clearinghouses at levels below the root. See Appendix B, "Special Clearinghouse Rules" for details.Including a suffix like
_CHat the end of clearinghouse names (for example,.Paris_CHor.Sales_CH) can help you to easily identify clearinghouse names and avoid accidentally deleting them. Tightly controlling access to clearinghouse names also can help prevent accidental deletion.Avoid naming a clearinghouse based on the name of the server node where it exists. Although using the node name conveniently indicates the exact location of a clearinghouse, it can make things confusing if you later move the clearinghouse to another node, because you cannot rename a clearinghouse once it is created. VSI does not recommend naming a clearinghouse based on the node where it currently exists. Instead, consider naming clearinghouses based on the site, city, or region where they are located. Even if you move a clearinghouse, you are not likely to move it far from the site or city where it resides.
If you intend to create an additional clearinghouse on an existing server system, be sure to choose a name for the new clearinghouse that is different than the name of the clearinghouse that currently resides on the system.
A.4. Guidelines for Naming Namespaces
Choose a short and simple namespace nickname. When you refer to a name in your clerk's default namespace, it is not necessary to specify a namespace nickname. However, the namespace nickname still appears in command output, and even though the nickname can be as long as 255 characters, it makes sense to keep it short.
Because a namespace has no relationship to any individual node, you should give the namespace a nickname that is meaningful to users networkwide. You might base the namespace nickname on your company's name. For example, a company called International Air Freight could have a namespace nickname of IAF. Choose the namespace nickname carefully; it is inconvenient to change it.
You might decide to create a test namespace so you can become familiar with the DECdns software. If you do, give the namespace a nickname like Test to clearly indicate its purpose. Do not give a test namespace a nickname that you eventually want to use for a networkwide namespace. Namespace nicknames are difficult to reuse once they have been established in clerk caches throughout the network.
Appendix B. Special Clearinghouse Rules
Two rules governing the creation of clearinghouses and the directories they can contain help to ensure that DECdns can look up a name. The DECdns software enforces the rules through defaults and error messages; so, in general, you are protected from breaking them. The only time you must explicitly follow the rules is when you recover a lost or permanently unavailable clearinghouse. Understanding the rules can help you interpret error messages you might receive, and can help prevent namespace design problems that result in errors during configuration. This appendix introduces the clearinghouse rules and explains their significance.
Clearinghouse Rule 1—Every clearinghouse must contain either the root directory or a directory whose name is closer to the root than the clearinghouse's name.
This rule ensures that no matter what clearinghouse a clerk starts from, it eventually finds the root directory. The clerk must always be able to locate a replica of the root because, as in the case illustrated in Chapter 2, "How DECdns Looks Up Names", the clerk must sometimes find the root and work down from it to find a name.
DECdns enforces clearinghouse rule 1 by requiring that the first replica you place in a new clearinghouse (the initial replica) complies with the rule. The software also prevents you from deleting a replica if that replica is the last one in the clearinghouse that complies with the rule.
During configuration, rule 1 is easy to comply with if you name all clearinghouses in the root directory. If you will have fewer than about 50 servers in the namespace, just name all clearinghouses in the format .clearinghouse-name, and replicate the root directory in every new clearinghouse that you create.
If you do choose to name clearinghouses in a directory other than the root, count simple names to ensure compliance with the rule. "Closer to the root" is another way of saying "having fewer simple names." So when you create a new clearinghouse, the number of simple names in the full name of its initial replica must be fewer than the number of simple names in the clearinghouse's name.
The namespace structure shown in Figure B.1, ''Sample Namespace Structure'' helps illustrate rule 1:
 |
.tokyo.site1.local_ch, thereby storing its object entry in the
.tokyo.site1 directory. To satisfy rule 1, the
.tokyo.site1.local_ch
clearinghouse can contain a replica of any of the following directories:
. (the root)
.Tokyo.Paris.Tokyo.Site1.Tokyo.Site2.Paris.Site4.Paris.Site6
.tokyo.site1.local_ch clearinghouse cannot contain replicas of the following
three directories,
unless at least one other
replica with a shorter name also exists in the clearinghouse:
.tokyo.site1.dist.paris.site6.sales.paris.site6.svcs
These directories, and any others with three or more simple names, would not be able to exist
alone in the .tokyo.site1.local_ch clearinghouse because they have the same number of
simple names as the clearinghouse (three).
Clearinghouse Rule 2—Every directory other than the root must have a replica in at least one clearinghouse whose name is closer to the root than the directory itself is.
As with rule 1, counting simple names is an easy way to check compliance with this rule. When you create a new directory, the number of simple names in its full name must be equal to or greater than the number of simple names in the full name of the clearinghouse where you create it. Later, as you add and remove replicas in different clearinghouses, at least one replica must remain in a clearinghouse that complies with rule 2.
Again, the simplest way to comply with rule 2 is to configure all clearinghouses in the root. By limiting all clearinghouse names to one simple name, you can create any directory and be assured that its number of simple names is equal to or greater than the number of simple names in the name of the clearinghouse where it is created.
Suppose, in the namespace shown in the previous figure, you create the
clearinghouse .tokyo.site1.local_ch and try to create a directory in it
called .admin. That directory consists of one simple name,
whereas the clearinghouse has three simple names, so DECdns prevents
you from creating the directory there.
To comply with rule 2, you would first have to create the .admin directory
in a clearinghouse with a shorter name, and then replicate it into the
.tokyo.site1.local_ch clearinghouse. For example, creating the
directory in
a clearinghouse called .hq_ch would satisfy rule 2, because that
clearinghouse name consists of one simple name—the same number of simple
names in the
name of the .admin directory.
Rule 2 ensures that the clerk can find any directory without having to look up a clearinghouse object entry that, in itself, would require looking up the target directory. More specifically, the rule ensures that a replica containing a clearinghouse object entry exists in at least one clearinghouse other than the clearinghouse that the entry describes.
The protection that rule 2 provides is important because DECdns looks up a clearinghouse
object entry when no other method of finding the clearinghouse produces the correct address. For
example, suppose you move a clearinghouse from one node to another. DECdns updates the address
in the clearinghouse object entry immediately. However, directories with replicas in that
clearinghouse, and their associated child pointers, temporarily retain the inaccurate address in
their DNS$Replicas attributes. DECdns places the correct address in those
attributes during a skulk or an update propagation. The clearinghouse object entry is therefore
the only place where a clearinghouse address is always guaranteed to be accurate, and the clerk
must be able to look up that object entry in a clearinghouse other than the one it is trying to
find.
Clearinghouses named in directories other than the root are more complex to administer than those named in the root, because of the restrictions rule 2 places on creating and removing replicas in them. For that reason, VSI recommends that the full names of clearinghouses do not contain more than three simple names.
Appendix C. DECdns Error Messages
This appendix lists error messages reported by the DECdns Control Program. The messages are listed in alphabetical order by message text string. Following each message is an explanation of the conditions that generated the message, and some general advice on how to proceed.
A known namespace with this name or namespace creation
timestamp (NSCTS) already exists
Explanation: The name or NSCTS of the namespace you specified in
your
create dns clerk known namespace
command is already known to the clerk.
User Action: None, or reenter your command and specify a namespace currently unknown to the clerk.
A manual nameserver with this name already exists
Explanation: The name of the server you specified in
your
create dns clerk manual nameserver
command is already known to the clerk.
User Action: None or reenter your command and specify a remote server currently unknown to the clerk.
A remote clearinghouse with this name or CTS already exists
Explanation: The name or creation timestamp
(CTS) of the namespace you specified in your
create dns clerk remote clearinghouse
command is already known to the clerk.
User Action: None, or reenter your command and specify a clearinghouse currently unknown to the clerk.
Bad local name abbreviation translation
Explanation: A local name abbreviation translation is invalid because it contains invalid characters or it causes a translation loop.
User Action: Review the logical names in the DNS$SYSTEM
logical name table (this is where local name abbreviation translation
occurs).
Cannot delete crucial replica
Explanation: You attempted to delete a replica crucial to the preservation of clearinghouse rule 2. Deleting the replica would cause a loss of connectivity in the namespace.
User Action: See Appendix B, "Special Clearinghouse Rules" for complete information on the clearinghouse rules. See Appendix D, "DECdns Events" for a description of the Crucial Replica server event.
Cannot delete the clerk while it is enabled
Explanation: You attempted to delete a DECdns clerk while it was
enabled (in the
on state).
User Action: Use the
disable dns clerk
command to disable the clerk. Then, use the
delete dns clerk
command to delete the clerk.
Cannot delete the current default namespace
Explanation: The namespace nickname you specified in your
delete dns clerk known namespace
command is the default namespace for this clerk. You cannot delete a clerk's
default namespace.
User Action: None or use the DECdns configuration program to select
a new default namespace for the clerk. Then, use the
delete dns clerk known namespace
command to delete the old default namespace.
Cannot delete the entity when it is enabled
Explanation: You attempted to delete a server while it was
enabled (in the
on state).
User Action: Use the
disable dns server
command to disable the server. Then, use the
delete dns server
command to delete the server.
Cannot upgrade replica in old clearinghouse
Explanation: DECdns was unable to upgrade a replica because the clearinghouse in which it is stored was created with an earlier version of DECdns. DECdns cannot upgrade a directory to a later version until all replicas in its replica set are stored in clearinghouses created with the later version of the server software.
User Action: Delete the replicas created in earlier clearinghouses, upgrade the server software on the servers where those clearinghouse reside, then re-create the replicas in their original locations.
Clearinghouse clearinghouse-name
duplicated
Explanation: You specified the same clearinghouse name
more than once in the preceding
set directory to new epoch
command.
User Action: Reenter the command, omitting the duplicate clearinghouse specification.
Clearinghouse clearinghouse-name
exclusion argument missing
Explanation: You did not account for
clearinghouse clearinghouse-name
(which stores a replica of the
directory that you specified)
in your preceding
set directory to new epoch command.
User Action: If the replica at this clearinghouse is still a
part of the directory's replica set, you must include the clearinghouse name
and the replica type in the command. If you intend to exclude the replica
from the replica set, use the exclude argument in the command.
See Chapter 9, "Restructuring a Namespace" for information on how to exclude a
replica from a replica set.
Clerk is not enabled
The clerk may have been deliberately disabled and deleted.
The clerk process may have failed because of some other internal problems.
User Action: Run the Network Control Language (NCL) startup
script or use the create dns clerk (or the
@SYS$STARTUP:DNS$CLERK_STARTUP command) followed by the
enable dns clerk commands) to re-create and enable the
clerk process. See Section 6.7, ''Deleting and Restarting Clerks and Servers''. Use the
show dns clerk command and specify the state
attribute to verify that the clerk is in the on
state.
Clerk timeout occurred before any modifications completed
Explanation: DECdns did not complete the operation you requested within the allotted clerk timeout period, or the clerk crashed while trying to process your request. No modifications were made in the namespace.
User Action: Use the
show dns clerk
command and specify the state attribute
to verify that the clerk is running
and is in the on
state. Reenter your command. If the error recurs, use the
set dns clerk
command to increase the value of the clerk's
clerk
                timeout
attribute.
Clerk timeout occurred, modifications may have completed
Explanation: DECdns did not complete the operation you requested within the allotted clerk timeout period, or the clerk crashed while trying to process your request. Requested modifications may or may not have been made to the target name.
User Action: Verify that the clerk is running and is in the
on
state. Check to see if DECdns completed the operation. If not, reenter your
command. If the error recurs, use the
set dns clerk
command to increase the value of the clerk's
clerk timeout attribute.
Conflicting arguments specified
Explanation: Your command contains two or more conflicting arguments. The specified arguments cannot be included within a single command.
User Action: Reenter your command, omitting the conflicting argument (or arguments).
Corrupted response returned by clearinghouse,
Explanation: The clerk received a corrupted response from the first clearinghouse to which it connected and was unable to retry its request at another clearinghouse because no other clearinghouses containing the requested information were available. The data corruption may be caused by a hardware or software problem on either the clerk or server system.
User Action: None immediately. You should examine the
syslog file to identify the server and clearinghouse to
which the clerk was connected when the error was returned. If the error
recurs, always specifying the same server and clearinghouse, the data
corruption is most likely caused by the hardware or DECdns server or
clearinghouse software on the server system. If the error recurs specifying
a variety of different clearinghouses, the data corruption may be due to a
hardware or software problem on the clerk system. If the error persists,
contact your network service providers to verify that the network hardware
is functioning properly, or contact your namespace administrators or your
VSI support representative.
Data corruption detected at clearinghouse
Explanation: An error occurred while DECdns was accessing the data in a clearinghouse. The clearinghouse may be corrupted.
User Action: Refer to the DECnet event log to determine the cause of the error. See Chapter 12, "DECdns Problem Solving" for instructions on how to recover a corrupted clearinghouse database.
DECdns license is not present or is invalid
Explanation: While trying to create the DECdns server on this
server node (during system startup or after entering the
@SYS$STARTUP:DNS$SERVER_STARTUP command), the DECdns server
license could not be found or had been rendered unusable.
User Action: To determine the specific cause of the error,
examine the DNS$SERVER_ERROR.LOG file systems. Invoke the
License Management Facility (LMF) to reload or activate the server license.
See the LMF documentation for complete information on how to use the License
Management Facility.
Directory creation in this clearinghouse violates clearinghouse rules
Explanation: Creating a directory in the clearinghouse that you specified violates the clearinghouse rules.
User Action: Create the directory in another clearinghouse that is named closer to the root. If necessary, you can then create a replica of the new directory in the clearinghouse where you originally intended to create the directory. See Appendix B, "Special Clearinghouse Rules" for a complete description of the clearinghouse rules.
Directory must be empty to be deleted
Explanation: You attempted to delete a directory that still contains entries.
User Action: Delete the contents of the directory before you
reenter the
delete directory
command. Make sure you do not accidentally delete any clearinghouse object
entries.
Directory replicas are not synchronized
Explanation: During a skulk of a directory, the update procedure
found that the values stored in the DNS$Epoch
attribute of each replica in the directory's replica set were not identical.
User Action: Use the
set directory
                to new epoch
command to synchronize all members of the directory's replica set.
Distributed update contained an invalid
timestamp
Explanation: While propagating updates, DECdns detected that an update contained an invalid timestamp. The discrepancy between the server that issued the invalid timestamp and the other DECdns servers on the network is greater than 4 minutes.
User Action: Verify that DECdts is
running and is correctly synchronizing all servers listed in the message
text. This error does not necessarily indicate that clocks are not
synchronized. Check the SYS$MANAGER:DNS$SERVER.LOG file for
additional information about this error. See Section 12.15, ''Fixing Clock Synchronization Errors'' for more information on fixing clock synchronization errors. If the error
persists for more than 48 hours after the clocks have been corrected,
contact your VSI support representative for help on correcting the problem.
See the VSI DECnet-Plus for OpenVMS DECdts Management for information on clock synchronization.
Inappropriate name use
Explanation: You specified a name in an inappropriate context. For
example, you entered a
set directory
command specifying a name that is not a directory name.
User Action: Reenter your command correctly.
Insufficient local resources
Explanation: The system was unable to provide adequate memory or communications resources to process your request.
User Action: Monitor the available memory and check system log files to determine the current availability of system resources. If necessary, allocate additional resources.
Insufficient resources at server
Explanation: Available resources at the responding DECdns server were insufficient to process your request. The server system was unable to provide adequate memory, communications, or other resources.
User Action: Reenter your command.
Insufficient rights to perform requested operation
Explanation: The user account from which you entered the command does not have the required DECdns access rights to perform the operation you requested.
User Action: Assuming you have adequate access rights, grant yourself the appropriate access to perform the operation. Otherwise, contact your namespace administrator to get the appropriate access, or reenter the command while you are logged in to an account that has the required access.
Invalid argument
Explanation: One or more of the specified argument values is
invalid. Argument values may be syntactically incorrect or may be outside the
range of allowed values.
For example, you may have specified a
DNS$CTS value that refers to a future time.
User Action: Refer to Chapter 11, "DECdns Control Program Command Dictionary" for descriptions of allowed argument values and proper usage. Reenter the command, specifying valid argument values.
Invalid name
Explanation: The command you entered contains misspelled words, illegal characters, or other typographical errors. You may have included extraneous words or omitted required node, option, or argument specifications. Command arguments and options may not appear in proper sequence.
Note
Syntax error
message. Appearance of the
Invalid name message
can sometimes indicate that:
A merge operation you requested (and which involved valid full names at the command line) was concatenated internally to produce a new full name that was improperly formed or of illegal length.
An internal conversion routine or other operation failed.
A software error has developed within the control program itself.
If the Invalid name error message is displayed repeatedly in response to a
command you are sure you entered correctly, contact your VSI support
representative.
More than one master replica specified
Explanation: You specified more than one master replica in your
preceding
set directory to new epoch
command. A directory's replica set can contain only one master replica.
User Action: Reenter your command specifying only one clearinghouse location for the directory's master replica.
No replica of specified directory exists at
clearinghouse
clearinghouse-name
Explanation: The clearinghouse clearinghouse-name (which you specified in the
exclude argument of your preceding set directory to
new epoch command) does not store a replica of the specified
directory.
User Action: Enter the show
directory command and specify the DNS$Replicas
attribute to display a list of the clearinghouses that contain replicas of
the specified directory. Then, reenter your original command, specifying the
correct clearinghouse names.
Operation must be performed at master replica of root directory
Explanation: You entered a command requesting an operation that must be directed to the clearinghouse that stores the master replica of the root directory.
User Action: Enter the
show
                directory
command for the root directory (.) and specify the
DNS$Replicas
attribute to determine the name and location of the clearinghouse that stores
the master replica. Reenter your original command, specifying that
clearinghouse.
Operation not supported by Local namespace
Explanation: The clerk on this node is using the Local namespace rather than the fully distributed DECdns implementation. The command you entered specifies an operation that is not supported by the Local namespace.
User Action: None.
Possible cycle detected
Explanation: While processing your command, DECdns detected a possible soft link loop or group loop. A soft link loop occurs when a soft link (in a series of two or more soft links) points back to itself. A group loop occurs when two or more groups include each other as group members.
User Action: See Chapter 12, "DECdns Problem Solving" for instructions on how to break soft link loops and group loops.
Replica of specified directory cannot be created in old clearinghouse
Explanation: You attempted to create a replica of a directory in a clearinghouse running an earlier version of the DECdns software than the version with which the directory itself was created. For example, you cannot create a replica of a Version 2 directory in a clearinghouse maintained with DNS Version 1 software.
User Action: Upgrade the DECdns software of the server on which the clearinghouse resides, or create the replica in a clearinghouse that was created with the later version of the software.
Replica set of specified directory contains more than one
replica
Explanation: You tried to delete a directory whose replica set still contains one or more read-only replicas.
User Action: Enter the
show
                                directory
command and specify the
DNS$Replicas
attribute to display a list of the clearinghouses that contain
replicas of the directory. You must delete all read-only replicas
before you can delete the directory's master replica.
Requested clearinghouse exists but is not available
Explanation: The clearinghouse that you tried to access
resides on the specified server but is not currently available. The
clearinghouse may not be in the on state.
User Action: Enter the show dns server
clearinghouse command and specify the state
attribute to verify that the clearinghouse is in the on
state. Reenter your original command when the clearinghouse is in the
on state.
Requested function not supported by this version of
architecture
Explanation: The function you requested is not supported by the current version of the DECdns architecture.
User Action: None.
Requested name does not exist
The name you tried to access does not exist in the namespace.
The name exists but is newly created and is not yet known to the clearinghouse with which you are communicating.
The name you tried to access is being deleted.
The requesting principal (the user account from which you entered the command) does not have read access to the requested name.
Read access is granted to the requesting principal through the use of an access control group, but the
groupflag is not specified in the ACE associated with the name.For a directory name, the only ACE specifying the requesting principal is a default ACE. Default ACEs grant access only to the future contents of a directory and not to the directory itself.
You mistyped the name.
User Action: Assuming you have adequate access rights, try to create the name yourself. If the name exists, the creation fails and the following error message is displayed:
Specified full name already exists
If this occurs, ask your namespace administrator (or the owner of the name) to grant read access to the name for your user account. If you mistyped the name, reenter your command specifying the correct name.
Requested operation would result in lost connectivity to root directory
Explanation: You entered a command requesting an operation that would have resulted in a loss of connectivity with the root of the namespace. DECdns cannot process your request.
User Action: None.
Requested optional function is not implemented in this release
Explanation: You entered a command requesting an operation that is supported by the current version of the DECdns architecture, but is defined as optional and has not been implemented in this release of the DECdns software.
User Action: None.
Requesting principal could not be authenticated to the clearinghouse
Explanation: DECnet node verification failed. The server that stores the master replica of the directory (or contents) you are trying to read or modify was unable to verify the DECnet node name portion of the principal associated with the clerk from which you made the request.
Verify that a node object entry representing the requesting clerk exists in the namespace and can be reached, at the time you enter your command, by the server storing the master replica.
Make sure the
dns$serveraccount (nodename.dns$server) on the server storing the master replica has read access to the node object entry.Make sure the address (
DNA$Towersattribute) associated with the node object matches the actual address of the requesting clerk.
See Section 12.12, ''Handling Node Verification Failures'' for more information on how to perform these tasks.
Responding entity in wrong state to process requested operation
Explanation: A responding entity (a DECdns clerk, DECdns
server, clearinghouse, or replica) is not in the
on
state and cannot process your request.
User Action: Verify that the entity you are trying to access is in
the
on
state before you reenter your command.
Server is in the wrong state to initialize namespace
Explanation: During the DECnet configuration process,
the namespace creation process failed because the DECdns server
was not enabled (not in the
on
state).
User Action: Enter the
enable dns server
command to enable the server.
Server is in the wrong state to be disabled
Explanation: The DECdns server running on the node you specified in
your
disable dns server
command was not enabled (in the
on state) when you issued the command.
User Action: Use the
show dns server command to verify the status of the server.
Server process has insufficient access to clearinghouse
Explanation: The
DNS$Server
principal on the requesting server has insufficient access to a clearinghouse
that stores the name the server was trying to access.
User Action: Have your namespace administrator
(or the manager of the server on which the clearinghouse resides)
grant the
DNS$Server
principal on the requesting server the access it
requires to perform the requested operation.
Skulk in progress terminated, superseded by more recent skulk
Explanation: A skulk in progress contacted a replica and found that the replica was modified by a more recent skulk. The skulk in progress terminates.
User Action: None.
Software error detected in clerk
Explanation: DECdns detected a software problem in the clerk interface.
User Action: See Chapter 12, "DECdns Problem Solving" for information on recovering from this error.
Software error detected in server
Explanation: DECdns detected a software problem in a DECdns server.
User Action: See Chapter 12, "DECdns Problem Solving" for information on recovering from this error.
Specified attribute cannot be modified
Explanation: You attempted to modify the value of an attribute that cannot be modified.
User Action: None.
Specified attribute type is incorrect
Explanation: One or more of the attributes that you specified are not included in the correct attribute group (identifiers, characteristics, counters, or status).
User Action: Before you reenter the command, see Chapter 11, "DECdns Control Program Command Dictionary" to determine the attribute group to which each of the specified attributes belongs.
Specified clearinghouse already contains a replica of that directory
Explanation: You tried to create a replica of a directory in a clearinghouse that already contains a replica of that directory. A clearinghouse can store only one replica of a directory.
User Action: None, or choose another clearinghouse in which to create the replica.
Specified clearinghouse does not contain a replica of that directory
Explanation: The clearinghouse you specified in the command does not contain a replica of the directory you are trying to access.
User Action: Enter the
show directory
command and specify the
DNS$Replicas
attribute to display the names of the clearinghouses that contain a replica of
the directory you are trying to access. Reenter your original command and
specify a clearinghouse that stores a replica of the target directory.
Specified clearinghouse does not exist
Explanation: The clearinghouse you specified in the command does not exist in the namespace.
User Action: Make sure you typed the full name of the clearinghouse correctly. Reenter the command and specify the correct name of an existing clearinghouse.
Specified directory does not allow clearinghouse name storage
Explanation: You attempted to name a new clearinghouse in a
directory that does not permit storage of clearinghouse object entries. The
directory's DNS$InCHName attribute is not set to
true.
User Action: Use the set directory command to
reset the value of the directory's DNS$InCHName attribute to
true, then reenter your original command. See Chapter 12, "DECdns Problem Solving" for information on allowing a directory to store
clearinghouse object entries.
Alternatively, you can name the new clearinghouse in a directory that already allows clearinghouse creation.
Specified full name already exists
Explanation: You cannot create the name that you specified because an identical name already exists in the namespace. (For directory creation, a directory of the same name may be in the process of being deleted.)
User Action: Make sure that the full name you specified is actually the name you intended to create. If it is, you must choose another name that does not already exist in the namespace.
Specified name exists but is not a soft link
Explanation: The name you specified exists in the namespace but is not a soft link.
User Action: Use the
directory link
command to display the names of all the soft links in the appropriate
directory. Reenter your command and specify the correct name of
the soft link that you are trying to access.
Specified nickname already assigned to another namespace
Explanation: In this clerk's cache, the namespace nickname
you
specified is already coupled with the NSCTS attribute of another namespace.
User Action: Specify a namespace nickname that is not already in use on your network.
Specified nickname is ambiguous
Explanation: According to this clerk's cached list of known
namespaces, the nickname you specified in your command is coupled with the
NSCTS attributes of two (or
more) namespaces.
User Action: See Chapter 12, "DECdns Problem Solving" for information on how to eliminate the ambiguous namespace (or namespaces) or specify the NSCTS (rather than the nickname) of the appropriate namespace in your command. A namespace's NSCTS is guaranteed to be unique.
Specified nickname unknown to this clerk
Explanation: The namespace nickname you specified does not exist in this clerk's cached list of known namespaces.
User Action: Make sure that you entered the namespace nickname
correctly. Use the
create dns clerk known namespace
command to add the namespace nickname to the list of known namespaces in the
clerk's cache.
Specified object is not a group
Explanation: The object you specified in your command is
not a group; its object class is not
DNS$Group.
User Action: Use the
directory group
command to display the names of all the groups in the appropriate
directory. Reenter your original command and specify the correct name of
the group you are trying to access.
Specified soft link points to nonexistent name
Explanation: The
destination-name
(DNS$LinkTarget)
to which the specified soft link points no longer exists (or may never have
existed) in the namespace.
User Action: Enter the
delete link
command to delete the soft link, or use the
set link
command to modify the current
destination-name.
Syntax error
Explanation: The DECdns Control Program detected a syntax error in your command before attempting to execute it. The command may contain misspelled words, illegal characters, or other typographical errors. You may have included extraneous words or omitted required node, option, or argument specifications. Command arguments and options may not appear in proper sequence.
User Action: Invoke DECdns online help or see Chapter 11, "DECdns Control Program Command Dictionary" for a description of proper syntax for the command you are trying to use.
The DNS clerk entity already exists
Explanation: You tried to create a DECdns clerk on a node where a clerk already exists.
User Action: None.
The DNS clerk is not enabled
Explanation: You tried to disable a clerk that was not enabled (in
the on state).
User Action: None, if you intend to disable the clerk.
The nameserver entity already exists
Explanation: You tried to create a DECdns server on a node where a server already exists.
User Action: None.
Unable to communicate with any DECdns server
The requesting clerk was unable to establish a DECnet link to an appropriate DECdns server.
The clerk was able to connect to an appropriate server, but the server was not in the
onstate.A clearinghouse containing a replica of the directory that stores the information you were trying to access was not in the
onstate.
User Action: Verify DECnet connectivity to an appropriate server
node.
Make sure that the server is in the
on
state. Make sure that at least one clearinghouse that stores a replica of the
directory you want to access is reachable and is in the
on
state. See Section 12.2, ''Handling Communication Errors''
for more information on how to handle communication
errors.
Appendix D. DECdns Events
DECdns uses the DECnet-Plus event logger to record significant events for DECdns clerks, servers, and clearinghouses. By default, all DECdns events are turned on by the DECnet-Plus configuration program.
This appendix alphabetically lists DECdns events, explains their meanings and, where appropriate, suggests what action you should take.
Clerk Event
Parameters
Incompatible Protocol Error
The clerk received a response from a server running an incompatible or unsupported version (major version number) of the DECdns clerk/server protocol. A clerk can only communicate with other clerks or servers that are running the same version as (or one version earlier than) the protocol version that the clerk itself is running. This event increments the Incompatible Protocol Errors clerk counter.
|
Version Received |
Specifies the protocol version running on the responding entity. |
Server Events
Parameters
Broken Lookup Paths
During a directory lookup operation, the account (principal) under which the server is running (nodename.
dns$server) was found to have insufficient access to the child pointer of the target directory. (A directory's child pointer exists in its parent directory.) Access to a directory's child pointer is inherited from the access assigned to the directory's parent directory. To correct the problem, make sure the nodename.dns$serverprincipal has write access to the parent directory.The child pointer to the disconnected directory was accidentally deleted from its parent directory. See Chapter 12, "DECdns Problem Solving" for complete information on how to restore a lost child pointer.
This event increments the Times Lookup Paths Broken server counter.
Orphan | Specifies the full name of the directory being accessed by the server at the time the disconnection was detected. |
Cannot Update Child Pointer
The server was unable to update a parent directory's child pointer attribute
(with update information stored in the child directory's parent pointer
attribute). This happens when the server is unable to contact all the clearinghouses
that store a replica of the directory's parent directory and therefore cannot apply
updates that occurred since the last skulk. One or more replicas of the parent directory
may be temporarily unreachable. This event increments the Child Pointer Update Failures
server counter.
This event may also be generated if the server was found to have insufficient access to perform the update. In this case, the Security Failure server event is also logged.
Directory | Specifies the full name of the directory for which the server's parent pointer tracking failed. |
Reason | Specifies the reason for the update failure. Reasons are expressed as DECdns or operating system error messages. |
If the Security Failure or Broken Lookup Paths events are also logged, take action on those events first. If DECdns only logs the Cannot Update Child Pointer event, then one or more of the clearinghouses that stores a replica of the directory being updated could not be contacted. This condition will be corrected when the server's ability to communicate with the clearinghouses is restored.
Crucial Replica
An attempt was made, from this server, to delete a replica that is crucial to the preservation
of the clearinghouse rules. The clearinghouse rules require every directory to store at
least one of its replicas in a clearinghouse that is named closer to the root than is
the directory itself. (See Appendix B, "Special Clearinghouse Rules" for complete information on
the clearinghouse rules.) When the background process on the server detects that a
crucial replica was deleted, it reverses the delete replica operation and
returns the replica to the on state.
This event is raised as a result of two separate delete replica operations.
Although each operation may be valid, the combination of the two operations is not. The
server background process examines the combined deletions and reverses the deletion of
the replica that will preserve the clearinghouse rules and restore the server's ability
to communicate with the root directory. This event increments the Crucial Replica
Removals Backed Out server counter.
Directory | Specifies the full name of the directory whose replica was being deleted when the server background process detected the failure. |
Clearinghouse | Specifies the full name of the clearinghouse that stores the crucial replica whose removal caused the failure. |
If you must remove a crucial replica from a clearinghouse, first create another replica of the directory in some other clearinghouse whose name is closer to the root directory than is the directory itself.
Incompatible Protocol Error
The server received a request from a clerk running an incompatible or unsupported version (major version number) of the DECdns clerk/server protocol. A server can only communicate with clerks that are running the same version (or one version previous to) the protocol version that the server itself is running. This event increments the Incompatible Protocol Errors server counter.
Version Received | Specifies the protocol version running on the requesting entity. |
Source | Specifies the full name of the node entity containing the clerk that generated the incompatible request. |
Possible Cycle
The server detected a possible soft link loop or group loop while trying to resolve a name or group. This event increments the Possible Cycles server counter.
Name | Specifies the full name being resolved when the loop was detected. |
See Chapter 12, "DECdns Problem Solving" for information on how to break a soft link loop or group loop.
Security Failure
The server encountered an unexpected security failure while trying to perform an operation on behalf of a user or application, or while trying to perform an internal background operation. For example, the server, on behalf of a requesting application, was unable to create an object entry in a directory because the account under which the application was running (principal) did not have write access to the directory. This event increments the Security Failures server counter.
Accessing | Specifies the full name being accessed when the security failure was detected. |
Source | Specifies the full name of the accessing principal. |
Time Went Backward
The time on this server system appears to have gone backward.
Time | Specifies the time after which you must reset the system clock to correct the problem. |
This problem can occur when a user mistakenly sets the system time ahead to adjust for normal clock drift or for daylight saving time; then, after realizing an error was made, the user sets the system clock back again. All DECdns transactions that occur while a server's system clock is set ahead appear, to DECdns, to have occurred in the future. DECdns is unable carry out updates and other background operations on names that bear timestamps specifying future times.
If the future timestamps are only a few minutes or hours in the future, you can simply wait until the date and time expressed in the timestamps has passed. At that time, DECdns will continue to synchronize update information in the normal manner.
If the timestamps are so far in the future that you would need to wait for days or weeks before resuming normal operations, you must repair the damage manually.
Clearinghouse Events
Parameters
Clearinghouse Created
The clearinghouse was created by use of the create dns server clearinghouse
command.
Clearinghouse Deleted
The clearinghouse was deleted by use of the delete dns server clearinghouse
command.
Clearinghouse Disabled
The clearinghouse was disabled by use of the disable dns server clearinghouse
command. This event increments the Disable Counts clearinghouse counter.
How | Specifies how the clearinghouse was disabled: |
Clearinghouse Enabled
The clearinghouse was enabled by use of the enable clearinghouse command. This
event increments the Enable Counts clearinghouse counter.
The clearinghouse object entry that represents this clearinghouse in the name-space has disappeared, possibly because of accidental deletion. This event increments the Times Clearinghouse Entry Missing clearinghouse counter.
See Chapter 12, "DECdns Problem Solving" for instructions on how to restore a deleted clearinghouse object entry.
Data Corruption
The clearinghouse data files may have become corrupted. This event increments the Data Corruptions clearinghouse counter.
Reason | Specifies why the integrity of the clearinghouse data is suspect. Reasons are expressed as DECdns or operating system error messages. |
Check the appropriate DECdns error messages in Appendix C, "DECdns Error Messages" and take the indicated user actions. See Chapter 12, "DECdns Problem Solving" for instructions on how to recover a corrupted clearinghouse.
Root Lost
The directory's name must be closer to the root (contain fewer simple names) than the name of the clearinghouse itself.
The directory must have its
DNS$InCHNameattribute set totrue.
This event increments the Times Root Not Reachable clearinghouse counter.
To recover from this problem, use the create replica command to create (in this
clearinghouse) a replica of some directory that satisfies the preceding requirements.
The root directory is guaranteed to satisfy these requirements.
Skulk Failed
A skulk (initiated by this server) of some directory that stores a replica on this clearinghouse has failed. This event increments the Skulk Failures clearinghouse counter.
Directory | Specifies the full name of the directory being skulked. |
Reason | Specifies why the skulk failed. Reasons are expressed as DECdns or operating system error messages. |
Check the appropriate DECdns error messages in Appendix C, "DECdns Error Messages" and take the indicated user actions.
Upgrade Not Possible
The server where this clearinghouse resides was unable to upgrade a directory during a skulk of that directory. This event increments the Upgrades Not Possible clearinghouse counter.
Directory | Specifies the full name of the directory that could not be upgraded. |
Why | Specifies why the attempted upgrade failed. Reasons are expressed as DECdns or operating system error messages. |
Check the appropriate DECdns error messages in Appendix C, "DECdns Error Messages" and take the indicated user actions.
Appendix E. Location of DECdns Files
This appendix contains information on the location of the DECdns clerk and server files. E.1 list the locations of DECdns Version 2 files for OpenVMS systems.
Note that what files are on a system depends on whether the system has DECdns installed on it or it is a clerk-only system.
|
File |
Description |
|---|---|
|
SYS$SPECIFIC:[SYSEXE] | |
|
DNS$CACHE.000000nnnn |
The backing store file for the DECdns clerk cache. The extension
part of the file name ( |
|
DNS$CACHE.VERSION |
Contains the version of the dns$cache backing store file. |
|
SYS$COMMON:[SYSEXE] | |
|
DNS$ADVER.EXE |
Executable image file for DECdns advertisement process. |
|
DNS$ANALYZE.EXE |
Executable image file for analyzing clerk protocol traces. |
|
DNS$CONFIGURE.EXE |
Executable image file for DECdns configuration program. |
|
DNS$CONTROL.EXE |
Executable image file for DNS management control program. |
|
DNS$CONVERT.EXE |
Executable image file for converting DNS Version 1 files to DECdns Version 2 format. |
|
DNS$DIAG.EXE |
Executable image file for DECdns diagnostics tool. |
|
DNS$DUMP.EXE |
Executable image file for DECdns dump utility. |
|
DNS$SERVER.EXE |
Executable image file for the server. |
|
DNSBROWSER.EXE |
Executable image file for the DECdns Browser utility. |
|
DNSCP.BPT |
Parse table for the DECdns Control Program. |
|
DNSCP.MBF |
Message text file for the DECdns Control Program. |
|
SYS$SPECIFIC:[SYSLIB] | |
|
DNS$NS_DEF_FILE.DAT |
The server default file. |
|
SYS$COMMON:[SYSLIB] | |
|
DNS$CLIENT.EXE |
DNS client (clerk) shareable library, the old version kept for backward compatibility with systems having VMS software earlier than Version 5.3. (OpenVMS VAX only) |
|
DNS$PI.EXE |
DECdns shared library of DECdns run-time routines. (OpenVMS VAX only) |
|
DNS$RTL.EXE |
DECdns run-time library routines. |
|
DNS$SHARE.EXE |
DECdns clerk shareable library. (OpenVMS VAX only) |
|
DNSDEF.BAS |
Definitions for DECdns application programming interface (API). |
|
DNSDEF.FOR |
Definitions for DECdns API. |
|
DNSDEF.H |
Definitions for DECdns API. |
|
DNSDEF.MAR |
Definitions for DECdns API. |
|
DNSDEF.PAS |
Definitions for DECdns API. |
|
DNSDEF.PLI |
Definitions for DECdns API. |
|
DNSDEF.R32 |
Definitions for DECdns API. |
|
DNSMSG.BAS |
Definitions for DECdns API. |
|
DNSMSG.FOR |
Definitions for DECdns API. |
|
DNSMSG.H |
Definitions for DECdns API. |
|
DNSMSG.MAR |
Definitions for DECdns API. |
|
DNSMSG.PAS |
Definitions for DECdns API. |
|
DNSMSG.PLI |
Definitions for DECdns API. |
|
DNSMSG.R32 |
Definitions for DECdns API. |
|
SYS$HELP | |
|
DECDNS_BROWSER.HLB |
Help files for the DECdns Browser utility. |
|
DNS$CPHELP.HLB |
Help files for the DECdns Control Program. |
|
SYS$SPECIFIC:[SYS$STARTUP] | |
|
DNS$SERVER_STARTUP.COM |
Server startup command file. |
|
SYS$COMMON:[SYS$STARTUP] | |
|
DNS$CLERK_STARTUP.COM |
Clerk startup command file. |
|
DNS$CLERK_STOP.COM |
Clerk shutdown command file. |
|
DNS$SERVER_SHUTDOWN.COM |
Server shutdown command file. |
|
SYS$SPECIFIC:[SYSMGR] | |
|
DNS$CONVERT.COM |
Used for converting DNS Version 1 files to DECdns Version 2 format. |
|
DNS$STARTUP.COM |
DECdns startup command file. |
|
DNS$STOP.COM |
DECdns shutdown command file. |
|
NET$DNS_CLERK_STARTUP.NCL |
Clerk startup file with information specific for the node. |
|
NET$DNS_CLERK_STOP.NCL |
Clerk shutdown file. |
|
NET$DNS_SERVER_STARTUP.NCL |
Server startup file with information specific for the node. |
|
NET$DNS_SERVER_STOP.NCL |
Server shutdown file. |
|
DNS$ADVER_ERROR.LOG |
Log file that records errors related to the DNS$ADVER advertiser process. |
|
DNS$CHFAIL.LOG |
Log file that records errors related to clearinghouse failures. |
|
DNS$SERVER.LOG |
Log file that records server activity. |
|
DNS$SERVER_ERROR.LOG |
Log file that records server errors. |
|
DNS_FILES.TXT |
File created when the clearinghouse is created, containing the path to the clearinghouse. It is necessary for starting up the DECdns server. |
|
SYS$COMMON:[SYSMGR]? | |
|
DECNET_DNS_REGISTER.COM |
DECnet-Plus registration tool used by
|
|
DECNET_DNS_TOWERS.COM |
Command file used by |
|
DECNET_REGISTER_DECDNS.COM |
Part of the |
|
DNS$CHANGE_DEF_FILE.COM |
DECdns command file that changes default server. |
|
DNS$CLIENT_STARTUP.COM |
DNS Version 1 clerk startup file left over if you have upgraded to DECdns Version 2. |
|
DNS$CLIENT_STOP.COM |
DNS Version 1 clerk shutdown file left over if you upgraded to DECdns Version 2. |
|
DNS$CONFIGURE.COM |
DECdns configuration program. |
|
DNS$CLERK_CLUSTER.NCL |
Script file for clerks on clusters. |
|
NET$DNS_CLERK_STARTUP.NCL |
Script file for clerk startup. |
|
SYS$SYSDEVICE:[DNS$SERVER]? | |
|
chfile_CH.CHECKPOINTn |
Clearinghouse checkpoint file, where chfile is the name of the clearinghouse file and n denotes an eight-digit number. |
|
chfile_CH.TLOGn |
Clearinghouse file, where chfile is the name of the clearinghouse file and n is the version number. |
|
chfile_CH.VERSION |
Clearinghouse file (where chfile is the name of the clearinghouse file) containing the value for the version number on chfile_CH.TLOGn. |
|
SYS$MESSAGE: | |
|
DNS$MSG.EXE |
Error message file. |
|
SYS$COMMON:[SYSHLP.EXAMPLES.DNVOSI] | |
|
DNS_ADD_VALUE_TO_ATTRIBUTE.C |
Programming example. |
|
DNS_CREATE_OBJECT.C |
Programming example. |
|
DNS_READ_ATTRIBUTE.C |
Programming example. |
|
SYS$COMMON:[SYS$LDR] | |
|
SYS$NAME_SERVICES.EXE |
File that loads clerk system services. |
|
SYS$NAME_SERVICES.STB |
File that loads clerk symbol table. |
Appendix F. DECdns Version Interoperability
DECdns is Version 2 of a product called VAX Distributed Name Service (DNS) Version 1. Version 1 and Version 2 clerks and servers can interoperate in the same namespace, with a few restrictions and considerations. This appendix summarizes interoperability considerations in a mixed Version 1 and Version 2 environment.
F.1. Version 2 Directories Cannot Be Replicated in Version 1 Clearinghouses
This restriction is a problem only if you modify the default behavior of Version 2 software.
Every clearinghouse has a DNS$DirectoryVersion attribute, whose value
determines the version number of all directories created in that clearinghouse. Version
2 software creates clearinghouses with a default directory version of 1, so that
directories created in the clearinghouse can be replicated in either Version 1 or
Version 2 clearinghouses. Therefore, even if a server is running Version 2 software, its
normal behavior is to create Version 1 directories.
If you would like the ability to replicate directories at servers running either Version 1 or Version 2 of the software, accept the default directory version of 1 when you configure a clearinghouse.
Note
If you have a DECdns Version 2 server clearinghouse (for example, .eng.host_ch)
that stores more than 200 directories and a DNS Version 1 server that replicates
a directory containing the DECdns Version 2 server's clearinghouse object (for
example, a DNS Version 1 server replicating directory .eng), then
the DNS Version 1 server might have insufficient resources to handle the
directory's skulk. To prevent this problem, see Section 12.3.2, ''Skulk Problems in Mixed Server Environments''.
F.2. Double ACEs on Directories Replicated at Mixed-Version Servers
Version 1 and Version 2 use different formats for specifying principals in access control entries (ACEs). If you plan to replicate a directory at both Version 1 and Version 2 servers, you must create both Version 1- and Version 2-style ACEs for the directory and its contents. If you do not, you can get unexpected access violations on attempts to replicate, skulk, or otherwise manage the directory and its contents.
In a Version 1 ACE, you specify a principal as nodename::username, where nodename is the 6-character-maximum DECnet Phase IV-style node name. In a Version 2 ACE, you specify a principal as nodename.username, where nodename is the DECdns full name of the node. See Chapter 5, "Managing DECdns Access Control" for details on creating ACEs.
F.3. Command Interfaces Differ
The Version 1 and Version 2 command interfaces are different. The Version 1 interface,
DNS$CONTROL, has commands that are similar to the DECnet Phase IV
Network Control Program (NCP). The Version 2 DECdns Control Program (DNSCP) has commands
that are styled after the DECnet Phase V interface, Network Control Language
(NCL).
The Version 2 interface offers more capabilities than the Version 1 interface, including commands that allow you to merge and append portions of a namespace.
When you use the Version 2 command
set directory to new epoch, you cannot specify a clearinghouse at a Version 1 server node as the location of the master replica. You must use the Version 1rebuild directorycommand to establish the master replica in a clearinghouse at a Version 1 server.- You cannot use the Version 2 interface to manage the following entities on remote systems running Version 1:
dns clerkdns clerk known namespacedns clerk manual nameserverdns clerk remote clearinghousedns serverdns server clearinghouse
F.4. Clerks on Nodes with Extended Addresses
DECdns clerks on nodes with extended addresses (without DECnet Phase IV-compatible addresses) can communicate only with DECdns Version 2 servers. They cannot communicate with DNS Version 1 servers, because these servers are DECnet Phase IV nodes. The DECdns clerk node needs a DECnet Phase IV-compatible address to communicate with DNS Version 1 servers or any DECnet Phase IV node.
F.5. Version 2 Clerks Connecting to Version 1 Servers Across a WAN
The Version 2 dnsconfigure utility lets a clerk contact a server across a wide
area network (WAN) link to obtain the information it needs to communicate with that
server. For a Version 2 clerk to obtain the required information from a Version 1
server, the account running dnsconfigure on the clerk system must have read
access to the SYS$LIBRARY:DNS$NS_DEF_FILE.DAT file on the server
system.
F.6. Version 1 Clerks Contacting a Version 2 Server's Namespace
DNS$DEFAULT_FILE.DAT, which contains data
necessary for the clerk to contact at least one server in every namespace with which it
needs to communicate. To inform a Version 1 clerk of a namespace in which a DECdns
Version 2 server exists, you must sometimes manually create the information for this
file and copy it to the clerk system. The manual procedure is necessary in either of the
following cases: The clerk is on a system running OpenVMS Version 5.4-1 or higher and the server you want it to learn about exists across a WAN.
The clerk is on a system running a version of OpenVMS lower than 5.4-1; in this case, you must explicitly inform the clerk about the server even when the server exists on the clerk's own local area network (LAN).
- On the DNS Version 1 clerk system, run the following command from the system prompt to stop the clerk process:
$ @sys$manager:dns$clerk_stop.com
- After you stop the clerk, enter the following command:
$ @sys$manager:dns$change_def_file.com
The following prompt appears:Name of DNS server node?
At the prompt, enter either the Phase-IV node name or the decimal network address of the Version 2 server node you want to contact and press Return. After you enter this information, the command procedure copies the contents of the
DNS$NS_DEF_FILE.DATon the Version 2 server in to theSYS$SYSTEM:DNS$DEFAULT_FILE.DATfile on the Version 1 clerk node.- Restart the Version 1 clerk by entering the following command:
$ @sys$manager:dns$clerk_startup.com
Appendix G. Sample Command Files
This appendix includes samples of useful command files. A command file helps ensure that all necessary information has been obtained and entered. If you make a mistake, you need only edit the file and run it again to continue the process. You can save the command file for future use.
G.1. Deleting Server Files
Note
You can use this command file on a server that is a member of an existing namespace
used by multiple servers (either a Version 2.0 or a mixed version namespace). If this is
the case, you need to take additional steps on the remaining DECdns server nodes in the
namespace to remove pointers to the DECdns Version 2.0 server replica that is being
deleted. Also, if the Version 2.0 DECdns server being deleted is in a multi-server
namespace, and it contains the only copy of a particular directory, that directory must be
copied and set up as a master replica for another server prior to using this procedure.
Otherwise, this directory will be lost. Use the DECdns Control Program create
replica command to create a copy of the directory (that is, create a replica), as
explained in Section 7.2, ''Creating a Replica''. Use the set directory to new
epoch command to set up the new replica as a master replica on another server, as
explained in Section 9.2, ''Modifying a Directory's Replica Set''.
G.1.1. Command File
$! $! WARNING: This command file deletes DECdns files and automatically $! reboots your system. If you are not sure about doing this, do not $! use the file. $! $! This sample command procedure has been tested using DECnet/OSI for $! OpenVMS VAX V6.2. However, VSI cannot guarantee its effectiveness $! because of the possibility of error in transmitting or implementing it. $! It is meant for use as a template for writing your own command $! procedure and may require modification for use on your system. $! $! This command file is designed to eliminate an existing DECdns $! Version 2.0 server installation on a DECnet Phase V installation. $! Ignore any errors in command execution. $! $ set noverify $ set noon $ NCL :==$NCL $! $! stop dns server $! $ ncl disable dns server $ ncl delete dns server $! $! Delete clearinghouse files $! $ del sys$specific:[dns$server]*.tlog*;*/nolog $ del sys$specific:[dns$server]*.check*;*/nolog $ del sys$specific:[dns$server]*.version;*/nolog $ del sys$sysdevice:[dns$server]*.tlog*;*/nolog $ del sys$sysdevice:[dns$server]*.check*;*/nolog $ del sys$sysdevice:[dns$server]*.version;*/nolog $! $! Delete other server files $! $ del sys$manager:dns_files.txt;*/nolog $ del sys$library:dns$ns_def_file.dat;*/nolog $! $! Stop dns clerk $! $ @sys$startup:dns$clerk_stop $! $! Delete other clerk cache files $! $ del sys$system:dns$cache.*;*/nolog $! $! Delete default namespace file for clerk $! $ del sys$system:dns$default_file.dat;* /nolog $ del sys$startup:net$dns_clerk_startup.ncl;*/nolog $! $! Create a new net$dns_clerk_startup.ncl with no default namespace $! $ open/write test sys$sysroot:[sysmgr]net$dns_clerk_startup.ncl $ write test "create dns clerk" $ write test "enable dns clerk" $ close test $! $! System must now be rebooted because clerk cache is mapped in memory $! $ @sys$system:shutdown 0 reboot no yes later yes none $ exit
G.2. Replicating A Server's Directories Into a New Clearinghouse
Example G.2, ''Sample OpenVMS Command File for Replicating Directories onto the New
Clearinghouse'' is a command file for use with OpenVMS systems that replicates for
read-only all the directories of an existing server (.dna_node.shanti) into the
newly created clearinghouse .dna_node.meta. The file was designed to execute on
the system containing the newly created clearinghouse. This command file does not use DECdns
groups. If a significant number of principals share equal access rights, you could use DECdns
groups to facilitate adding or removing principals. For more information on the use of groups,
see Chapter 5, "Managing DECdns Access Control".
- Section 1 – Increase the DECdns Clerk Timeout Value for Replication of Large Directories
This timeout value specifies how long the clerk waits for a response to a request. If you are replicating a large number of directories, or the replicas are distributed over a wide area, increase the timeout value. For more information, see Section 6.5, ''Modifying a Clerk's Timeout Interval''.
- Section 2 – Expand ACEs on Directories
This step adds the proper access control entries on all the directories in the namespace.
- Section 3 – Expand ACEs on Existing Clearinghouse
This step adds access control entries on the existing clearinghouse and the clearinghouse object. Remember that this command file assumes the existing server and clearinghouse were the first in the namespace and the server being configured is only the second one.
- Section 4 – Expand ACEs on the New Clearinghouse
This step adds access control entries for the new (second) clearinghouse.
- Section 5 – Create Additional Directory Replicas
This step includes commands that create replicas for the new clearinghouse. They are replicas of all the directories in the original clearinghouse.
- Section 6 – Rebuild all Directories with Master and Read-Only Clearinghouses
The commands in this section rebuild the directories listed in the preceding section so that the existing (first) clearinghouse contains master replicas and the new (second) clearinghouse contains read-only replicas. In effect, this command file builds a backup clearinghouse for the first clearinghouse. You can customize this file to distribute read-only and master replicas in any way suitable to you.
- Section 7 – Set All Directories to Skulk
This step causes all directories to skulk immediately.
$!
$! Introduction
$!
$! This template command file can be used to perform the majority of
$! dns$control commands necessary to replicate directories into a
$! second read-only DECdns Version 2.0 clearinghouse.You can name
$! the file create_replicas.com and modify it to conform to a
$! specific namespace design. This particular file must be executed from
$! the SYSTEM account on the first clearinghouse node. The example namespace
$! for this example file consists of the following:
$!
$! Namespace Nickname: watts_ns:
$! First Clearinghouse Node: watts_ns:.dna_node.shanti
$! First Clearinghouse Name: .shanti_ch
$! Second Clearinghouse Node: watts_ns:.dna_node.meta
$! Second Clearinghouse Name: .meta_ch
$! Directories in the Namespace: . (root)
$! .dna_node
$! .dna_nodesynonym
$! .DTSS_GlobalTimeServers
$! .dna_backtranslation
$! .dna_backtranslation.%X49
$! .dna_backtranslation.%X49.%X0028
$! .dna_backtranslation.%X49.%X0037
$!
$ set noon
$ set verify
$ ncl :== $ncl
$ dnscp :== $dns$control
$! Section 1: Increase DECdns Clerk Timeout Value for Replication of Large Directories
$!
$ ncl
set dns clerk clerk timeout +0-00:10:00.000I0.000
exit
$!
$! Section 2: Expand ACEs on Directories
$!
$! This step adds proper ACEs on all the existing directories in
$! the namespace.
$!
$ dnscp
!
! Add ACEs to all directories for system account from node where
! the second clearinghouse clearinghouse exists
!
add dir . access .dna_node.meta.system for r,w,d,t,c
add dir . default access .dna_node.meta.system for r,w,d,t,c
add dir .* access .dna_node.meta.system for r,w,d,t,c
add dir .* default access .dna_node.meta.system for r,w,d,t,c
add dir .*... access .dna_node.meta.system for r,w,d,t,c
add dir .*... default access .dna_node.meta.system for r,w,d,t,c
!
! Add ACE's to all directories for dns$server account from node where
! the second clearinghouse exists
!
add dir . access .dna_node.meta.dns$server for r,w,d,t,c
add dir . default access .dna_node.meta.dns$server for r,w,d,t,c
add dir .* access .dna_node.meta.dns$server for r,w,d,t,c
add dir .* default access .dna_node.meta.dns$server for r,w,d,t,c
add dir .*... access .dna_node.meta.dns$server for r,w,d,t,c
add dir .*... default access .dna_node.meta.dns$server for r,w,d,t,c
!
! Add ACE's to all directories for the second clearinghouse named .meta_ch
!
add dir . access .meta_ch for r,w,d,t,c
add dir . default access .meta_ch for r,w,d,t,c
add dir .* access .meta_ch for r,w,d,t,c
add dir .* default access .meta_ch for r,w,d,t,c
add dir .*... access .meta_ch for r,w,d,t,c
add dir .*... default access .meta_ch for r,w,d,t,c
exit
$!
$! Section 3: Expand ACEs on Existing Clearinghouse
$!
$! A clearinghouse is a database containing a collection of directory
$! replicas at a particular server. Certain accounts must have access
$! to each clearinghouse for management and skulking operations to complete.
$! The following commands add ACEs on both the clearinghouse and the
$! clearinghouse object.
$!
$ dnscp
!
! Add ACEs for Existing Server Node Name and Accounts
!
add clear .shanti_ch access .dna_node.shanti.system for r,w,d,t,c
add clear .shanti_ch access .dna_node.shanti.dns$server for r,w,d,t,c
add clear .shanti_ch access .dna_node.shanti.DNA$SessCtrl for r,w,d,t,c
add obj .shanti_ch access .dna_node.shanti.system for r,w,d,t,c
add obj .shanti_ch access .dna_node.shanti.dns$server for r,w,d,t,c
add obj .shanti_ch access .dna_node.shanti.DNA$SessCtrl for r,w,d,t,c
!
! Add ACEs for New Server Node Name and Accounts
!
add clear .shanti_ch access .dna_node.meta.system for r,w,d,t,c
add clear .shanti_ch access .dna_node.meta.dns$server for r,w,d,t,c
add clear .shanti_ch access .dna_node.meta.DNA$SessCtrl for r,w,d,t,c
add obj .shanti_ch access .dna_node.meta.system for r,w,d,t,c
add obj .shanti_ch access .dna_node.meta.dns$server for r,w,d,t,c
add obj .shanti_ch access .dna_node.meta.DNA$SessCtrl for r,w,d,t,c
!
! Add ACEs for World Read and Test
!
add clear .shanti_ch access .*... for r,t
add obj .shanti_ch access .*... for r,t
exit
$!
$! Section 4: Expand ACEs on the New Clearinghouse
$!
$ dnscp
!
! Add ACEs for Existing (first) Server Node Name and Accounts
!
add clear .meta_ch access .dna_node.shanti.system for r,w,d,t,c
add clear .meta_ch access .dna_node.shanti.dns$server for r,w,d,t,c
add clear .meta_ch access .dna_node.shanti.DNA$SessCtrl for r,w,d,t,c
add obj .meta_ch access .dna_node.shanti.system for r,w,d,t,c
add obj .meta_ch access .dna_node.shanti.dns$server for r,w,d,t,c
add obj .meta_ch access .dna_node.shanti.DNA$SessCtrl for r,w,d,t,c
!
! Add ACEs for New (Second) Server Node Name and Accounts
!
add clear .meta_ch access .dna_node.meta.system for r,w,d,t,c
add clear .meta_ch access .dna_node.meta.dns$server for r,w,d,t,c
add clear .meta_ch access .dna_node.meta.DNA$SessCtrl for r,w,d,t,c
add obj .meta_ch access .dna_node.meta.system for r,w,d,t,c
add obj .meta_ch access .dna_node.meta.dns$server for r,w,d,t,c
add obj .meta_ch access .dna_node.meta.DNA$SessCtrl for r,w,d,t,c
!
! Add ACEs for World Read and Test
!
add clear .meta_ch access .*... for r,t
add obj .meta_ch access .*... for r,t
exit
$!
$! Section 5: Create Additional Directory Replicas
$!
$! The following commands create replicas of all the desired
$! directories for the second clearinghouse called .meta_ch. Use the
$! results of the tree-walk performed in Step 1 to determine which
$! directories need replication. The root [.] directory need not be
$! replicated because that operation was completed in a previous step
$! by the dns$configure.com utility.
$!
$! Note: DECnet PhaseIV areas 40 and 55 (hexadecimal %x0028 and %x0037)
$! are the only .dna_backtranslation.%x49.* directories shown.
$! If the namespace includes additional directories and you
$! want them replicated, include them.
$!
$ dnscp
create replica .dna_node clearinghouse .meta_ch
create replica .dna_nodesynonym clearinghouse .meta_ch
create replica .DTSS_GlobalTimeServers clearinghouse .meta_ch
create replica .dna_backtranslation clearinghouse .meta_ch
create replica .dna_backtranslation.%x49 clearinghouse .meta_ch
create replica .dna_backtranslation.%x49.%x0028 clearinghouse .meta_ch
create replica .dna_backtranslation.%x49.%x0037 clearinghouse .meta_ch
exit
$!
$! Section 6: Rebuild all Directories with Master and Read-Only
$! Clearinghouses.
$!
$! The following commands rebuild the same directories listed above
$! to include both clearinghouses. The root [.] directory is included.
$!
$dnscp set dir . to new epoch -
master .shanti_ch, read-only .meta_ch
$!
$dnscp set dir .dna_node to new epoch -
master .shanti_ch, read-only .meta_ch
$!
$dnscp set dir .dna_nodesynonym to new epoch -
master .shanti_ch, read-only .meta_ch
$!
$dnscp set dir .DTSS_GlobalTimeServers to new epoch -
master .shanti_ch, read-only .meta_ch
$!
$dnscp set dir .dna_backtranslation to new epoch -
master .shanti_ch, read-only .meta_ch
$!
$dnscp set dir .dna_backtranslation.%X49 to new epoch -
master .shanti_ch, read-only .meta_ch
$!
$dnscp set dir .dna_backtranslation.%X49.%X0028 to new epoch -
master .shanti_ch, read-only .meta_ch
$!
$dnscp set dir .dna_backtranslation.%X49.%X0037 to new epoch -
master .shanti_ch, read-only .meta_ch
$!
$! Section 7: Set All Directories to Skulk
$!
$! The following commands set all directories to skulk immediately.
$! Skulking is the process where read-only directories are updated from
$! the master copy. DECdns performs skulking at regular intervals
$! after this procedure is complete.
$!
$ dnscp
set dir . to skulk
set dir .dna_node to skulk
set dir .dna_nodesynonym to skulk
set dir .DTSS_GlobalTimeServers to skulk
set dir .dna_backtranslation to skulk
set dir .dna_backtranslation.%X49 to skulk
set dir .dna_backtranslation.%X49.%X0028 to skulk
set dir .dna_backtranslation.%X49.%X0037 to skulk
exit
$! Replication of All Directories into the Second Clearinghouse
$! is now Complete.
$ set noverify
$ exitAppendix H. The DECdns Browser Utility
DECdns provides the DECdns Browser utility (for DECwindows and Motif users only) to display namespace information. This utility is not supported by VSI.
The DECdns Browser is a tool for viewing the namespace. To use it, you need DECwindows or Motif software. The DECdns Browser can display an overall directory structure as well as the contents of directories, enabling you to monitor growth and change in the namespace. You can customize the DECdns Browser utility to display only certain kinds of object entries, such as those representing nodes, Remote System Manager (RSM) servers, or DECdfs access points. You also can quickly change the browser display from one directory to another, and even to a directory in another namespace.
This appendix gives an overview of the DECdns Browser utility. It assumes you are familiar with basic DECwindows terms and concepts. For a detailed tutorial, see the DECwindows User's Guide. Detailed online help is available from the browser window's Help pull-down menu.
H.1. Starting the Browser
$ run sys$system:dnsbrowser
To end a browser session, choose Quit from the File menu.
H.2. Expanding and Collapsing Directories
When you start the DECdns Browser, the only item in the display is the root directory of the system's default namespace. Double click on the root directory to expand (open) it. To collapse (close) an expanded directory, double click on it.
When you expand a directory, you see the soft links and object entries to which you have read access. You also see all child directories, but you can expand only those child directories to which you have read access.
Directories, object entries, and soft links all have icons associated with them in the browser. Most object entries have unique icons based on their class; the class indicates the type of resource that the entry represents (nodes, DFS access points, and so on). When the browser does not recognize the class of an entry, it displays a generic icon. Figure H.1, ''DECdns Browser Icons and Their Meaning'' shows the browser icons and what they represent.
 |
By double clicking on single directories, you can continue expanding a particular directory path one level at a time. Other methods are available to expand all directories at once or to expand selected groups of directories.
Expanding or collapsing a group of directories involves selecting them and double clicking. Note that because double clicking has a toggle effect, you can expand or collapse groups of directories only one level at a time. If you double click multiple directory levels at a time, the result may be the opposite of what you expect.
To expand or collapse selected directories, click on the first directory you want to select, then continue selecting directories by shift clicking on them. When selecting the last directory, give it a double click instead of a single click, while still pressing the Shift key (this selects the last directory and expands or collapses all of the directories you have selected).
Note
Use the Expand All option carefully if you have a large namespace. The larger a namespace, the longer it takes to display its entire contents.
H.3. Namespace Display Formats
The browser has two formats for displaying the namespace: outline format and tree format. The default is outline format, as shown in Figure H.2, ''Namespace in Outline Format''.
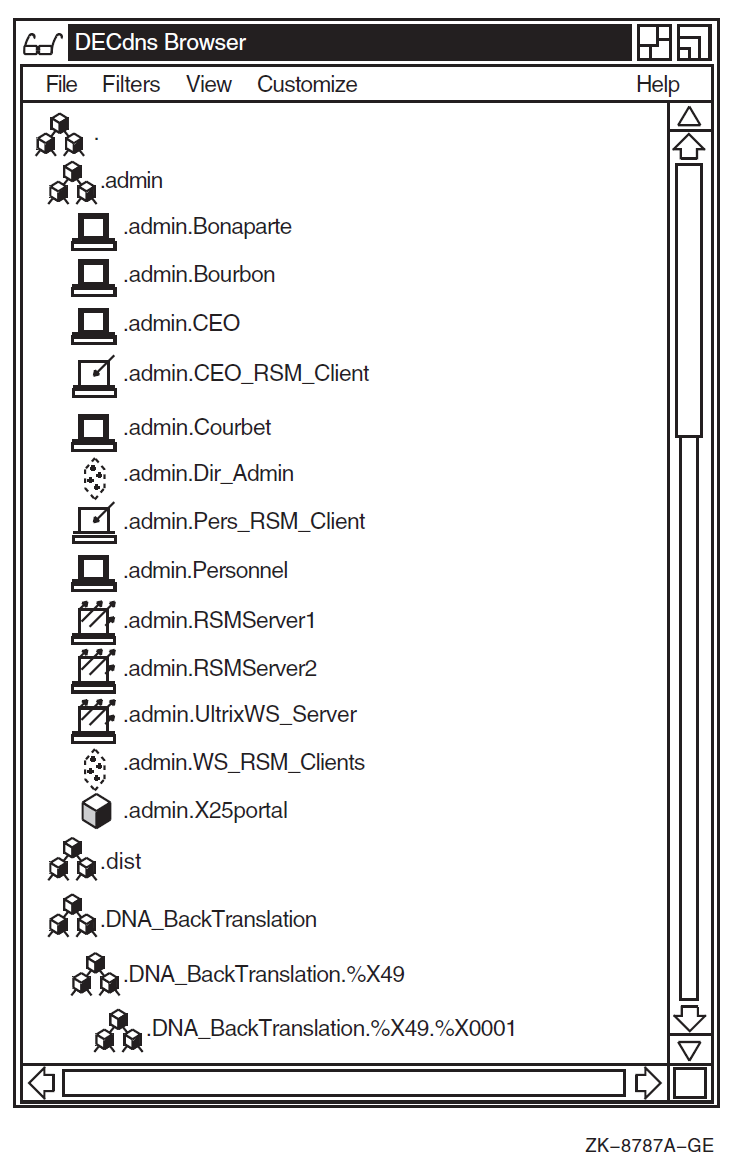
Figure H.3, ''Namespace in Tree Format'' shows the same namespace in tree format. To toggle between the two formats, choose Display Tree or Display Outline from the View menu.
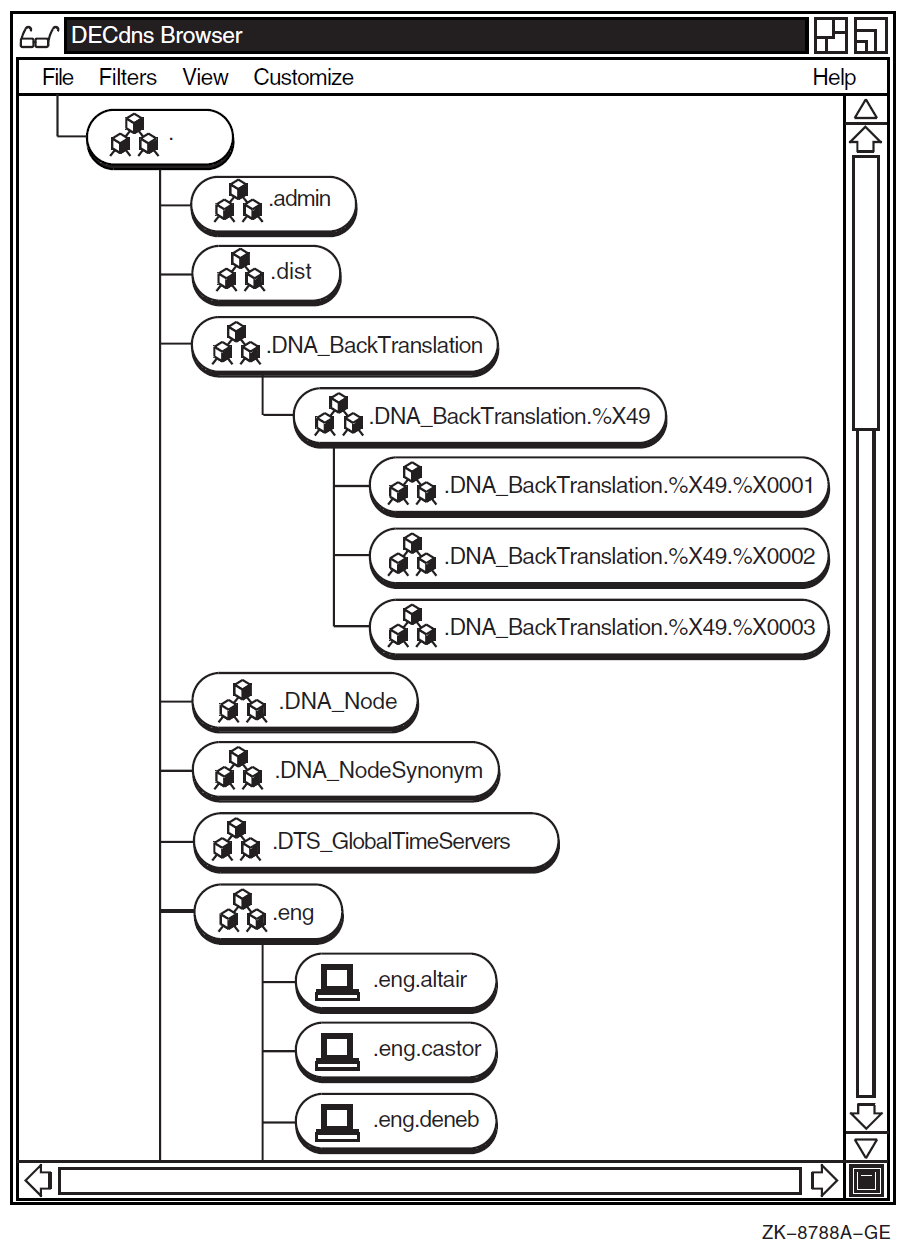
H.4. Using a Virtual Root
To customize your view of the namespace, you can specify a virtual root—a directory other than the root at which you want the browser to start displaying the namespace.
The virtual root is a convenient way to focus immediately on a particular directory of interest instead of expanding directories level by level. It also enables you to quickly change the browser display from one directory to another, and even to a directory in another namespace.
Another use of the virtual root is in a secure namespace that does not allow read access to all directories for all users. For example, the browser normally displays the root directory (.) when it starts. However, if you do not have read access to the root directory, you cannot expand it. To display and expand a directory to which you do have access, you can specify its name as the virtual root.
To set a virtual root, choose Virtual Root from the Customize menu. A Virtual Root selection box appears. At the Selection prompt, enter the full name of the directory (including the namespace nickname, if necessary) that you want to specify as the virtual root.
Once you have entered one or more virtual root names, subsequent displays of the Virtual Root selection box show an alphabetized list of the most recently specified names. The list always includes the root directory (.) of the default namespace. Double click on a directory name in the list to cause it to become the new virtual root.
You can save the list of virtual roots from one browser session to another by choosing Save Virtual Root Settings from the Customize menu.
H.5. Filtering the Namespace Display
You can use the Filters menu to selectively display only objects of a specific class. For
example, if you are interested in seeing only node object entries, choose the class
DNA$Node from the Filters menu.
Setting a filter does not affect the current display, but when you next expand a directory, you see only object entries whose class matches the filter. Note that soft links and child directories still appear; they are not object entries and the browser filters only object entries.
You can filter only one object class at a time. To change the filter, choose a new class from the Filter menu. To reset the filter so you can view all entries, choose the asterisk (*) from the Filters menu.
H.6. Navigating the Namespace
Once you begin expanding the namespace, it may exceed the boundaries of the browser window, even if you enlarge the window. You can use the horizontal and vertical scroll bars and stepping arrows to scroll through the namespace.
H.6.1. Outline Navigation Aids
If the namespace display is in outline format, dragging the slider up and down the vertical scroll bar produces an index window, as shown in Figure H.4, ''Namespace with Index Window''. The index window shows the name where the slider is currently positioned in the namespace. When the index window contains the name you want to view, release MB1 (mouse button 1) to position that name at the top of the browser window.

In namespaces that are larger than the length of the browser window, scrolling
through directory levels may produce a reference line toward the top of the window.
The line orients you by showing the full directory path from the current name to the
root or virtual root. It also indicates that you have scrolled past other parts of
the namespace that are no longer displayed. Figure H.5, ''Display with Reference Line''
illustrates how a reference line is produced. On the left is a display before it has
been scrolled. On the right is the same display after the user has scrolled to the
middle of the .eng directory. The root and .eng
directories above the reference line indicate the hierarchy of which the
.eng.RSM_Server entry is a part.
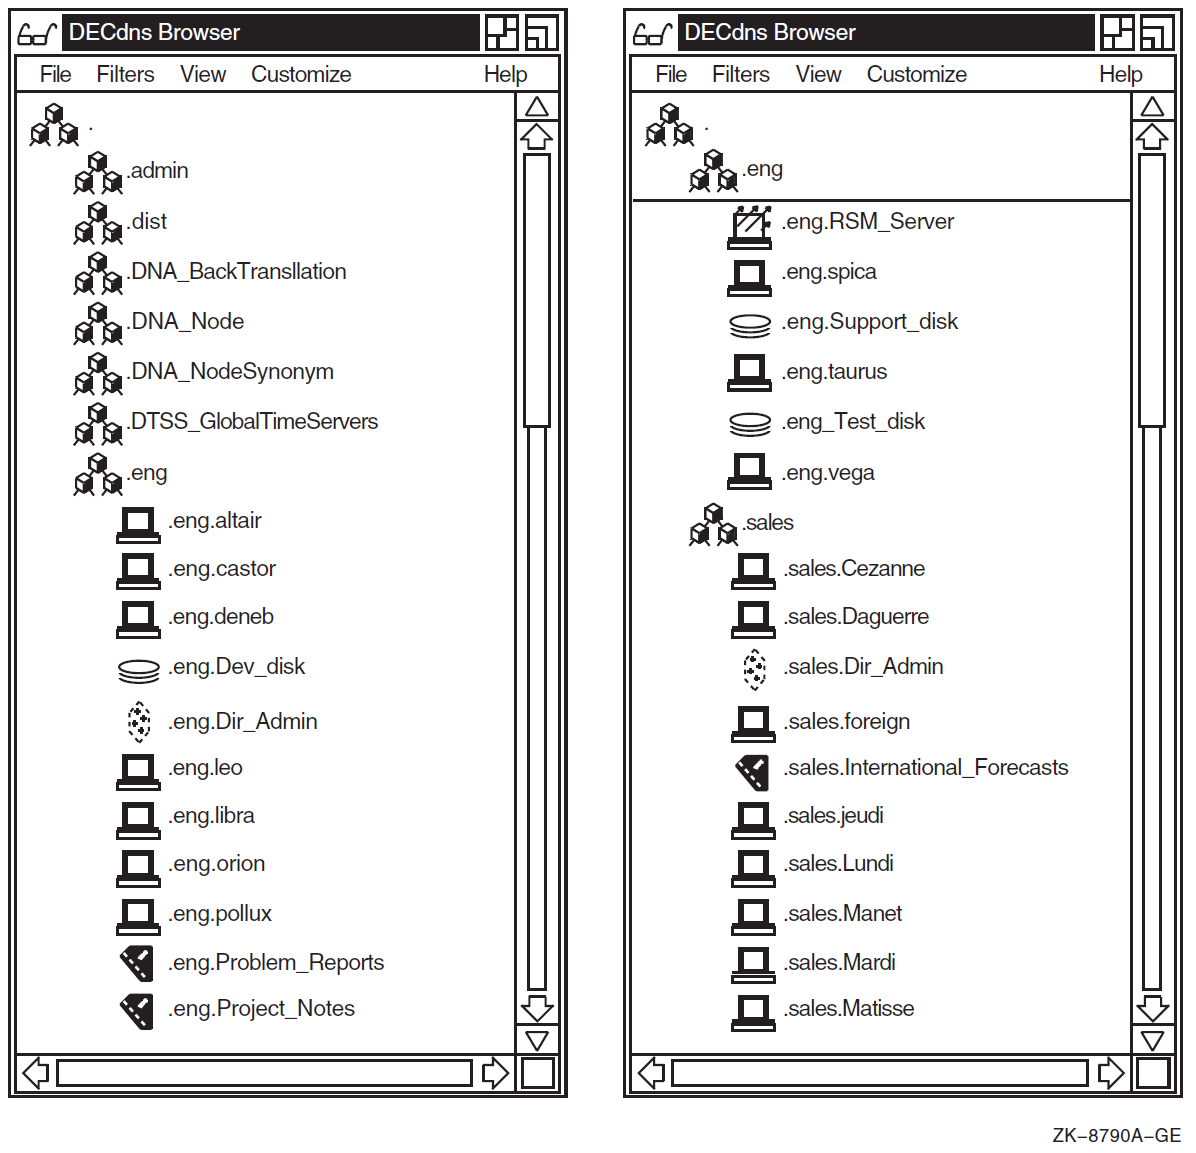
H.6.2. Tree Navigation Aids
If the namespace display is in tree format, dragging the slider on a scroll bar produces a navigation window. Figure H.6, ''Display with Navigation Window'' shows the navigation window within the browser window.
The navigation window contains a reduced image of the currently expanded part of the namespace. The box within the navigation window indicates the portion of the namespace where the slider is positioned; releasing MB1 displays that portion of the namespace in the browser window and closes the navigation window.
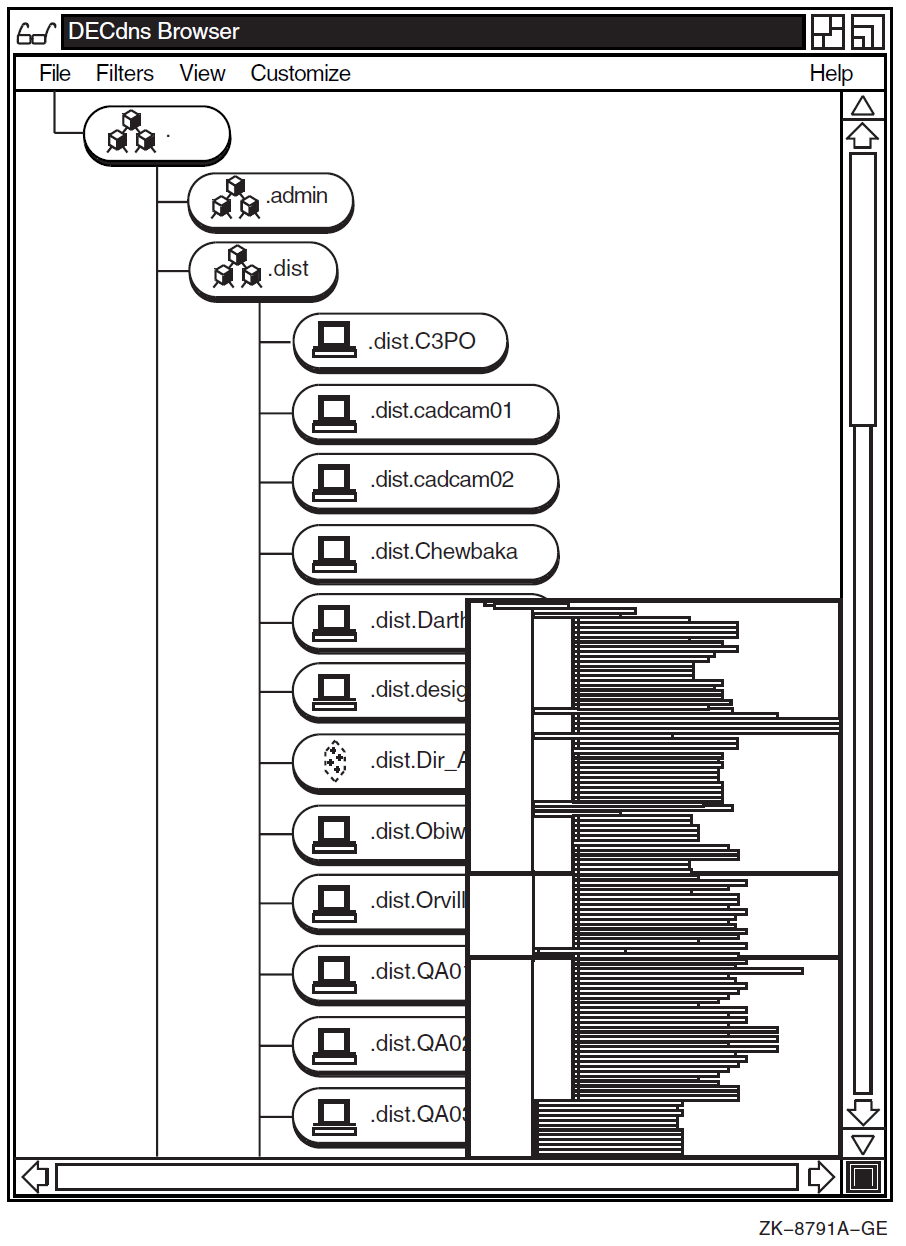
To make the navigation window a separate, permanent window, click on the button at the bottom right corner of the browser window. Click on the same button to close the navigation window.
To move around in the namespace display, point anywhere in the navigation window and drag the mouse up, down, left, or right to move the box that is inside the navigation window. When you release MB1, the portion of the namespace that is inside the box appears in the browser window.
The SYS$COMMON:[SYS$MGR] directory contains files used for starting up DECdns tools and facilities.
The SYS$SYSDEVICE:[DNS$SERVER] directory and the clearinghouse files it contains are created during configuration.