DECnet-Plus FTAM and Virtual Terminal Use and Management
- Operating System and Version:
- VSI OpenVMS IA-64 Version 8.4-1H1 or higher
VSI OpenVMS Alpha Version 8.4-2L1 or higher
Preface
This manual provides information about the FTAM and Virtual Terminal applications that are part of the DECnet-Plus product set.
1. About VSI
VMS Software, Inc. (VSI) is an independent software company licensed by Hewlett Packard Enterprise to develop and support the OpenVMS operating system.
2. Intended Audience
|
Chapter 1, "OSI Applications Overview" through Chapter 5, "Using Virtual Terminal" |
Users who need the FTAM (File Transfer, Access, and Management) functions to work with files on remote OSI systems, or Virtual Terminal functions to access remote OSI systems. |
|
Chapter 6, "General OSI Concepts" through Chapter 14, "Lower-Layer Addressing Information (UNIX)", appendices |
System or network managers who need to manage the FTAM and Virtual Terminal software, or VSI Services representatives who require a basic understanding of the upper-layer standards that the FTAM and Virtual Terminal software implement. |
3. Related Documents
The VSI DECnet-Plus FTAM Programming document provides additional information on the FTAM software.
Read the Release Notes before you read any other document in this set.
4. VSI Encourages Your Comments
You may send comments or suggestions regarding this manual or any VSI document by sending electronic mail to the following Internet address: <docinfo@vmssoftware.com>. Users who have VSI OpenVMS support contracts through VSI can contact <support@vmssoftware.com> for help with this product.
5. OpenVMS Documentation
The full VSI OpenVMS documentation set can be found on the VMS Software Documentation webpage at https://docs.vmssoftware.com.
6. Typographical Conventions
VMScluster systems are now referred to as OpenVMS Cluster systems. Unless otherwise specified, references to OpenVMS Cluster systems or clusters in this document are synonymous with VMScluster systems.
The contents of the display examples for some utility commands described in this manual may differ slightly from the actual output provided by these commands on your system. However, when the behavior of a command differs significantly between OpenVMS Alpha and Integrity servers, that behavior is described in text and rendered, as appropriate, in separate examples.
In this manual, every use of DECwindows and DECwindows Motif refers to DECwindows Motif for OpenVMS software.
| Convention | Meaning |
|---|---|
|
Ctrl/x |
A sequence such as Ctrl/x indicates that you must hold down the key labeled Ctrl while you press another key or a pointing device button. |
|
PF1 x |
A sequence such as PF1 x indicates that you must first press and release the key labeled PF1 and then press and release another key or a pointing device button. |
|
… |
A horizontal ellipsis in examples indicates one of the
following possibilities:
|
|
. |
A vertical ellipsis indicates the omission of items from a code example or command format; the items are omitted because they are not important to the topic being discussed. |
|
( ) |
In command format descriptions, parentheses indicate that you must enclose the options in parentheses if you choose more than one. |
|
[ ] |
In command format descriptions, brackets indicate optional choices. You can choose one or more items or no items. Do not type the brackets on the command line. However, you must include the brackets in the syntax for OpenVMS directory specifications and for a substring specification in an assignment statement. |
|
[ |] |
In command format descriptions, vertical bars separate choices within brackets or braces. Within brackets, the choices are options; within braces, at least one choice is required. Do not type the vertical bars on the command line. |
|
{ } |
In command format descriptions, braces indicate required choices; you must choose at least one of the items listed. Do not type the braces on the command line. |
|
bold text |
This typeface represents the introduction of a new term. It also represents the name of an argument, an attribute, or a reason. |
|
italic text |
Italic text indicates important information, complete titles of manuals, or variables. Variables include information that varies in system output (Internal error number), in command lines (/PRODUCER= name), and in command parameters in text (where dd represents the predefined code for the device type). |
|
UPPERCASE TEXT |
Uppercase text indicates a command, the name of a routine, the name of a file, or the abbreviation for a system privilege. |
|
|
Monospace type indicates code examples and interactive screen displays. In the C programming language, monospace type in text identifies the following elements: keywords, the names of independently compiled external functions and files, syntax summaries, and references to variables or identifiers introduced in an example. |
|
- |
A hyphen at the end of a command format description, command line, or code line indicates that the command or statement continues on the following line. |
|
numbers |
All numbers in text are assumed to be decimal unless otherwise noted. Nondecimal radixes—binary, octal, or hexadecimal—are explicitly indicated. |
All numbers are decimal unless otherwise noted.
All Ethernet addresses are hexadecimal.
Chapter 1. OSI Applications Overview
OSI Applications are tools you use to perform communication tasks, such as exchanging files, and logging on to remote systems. You can transfer files with FTAM, and access remote systems with Virtual Terminal.
1.1. FTAM Overview
FTAM software is an Open Systems Interconnection (OSI) product that implements the OSI File Transfer, Access and Management standard ISO 8571 developed by the International Organization for Standardization (ISO). This standard enables you to transfer, access, and manage files residing on other vendors' computer systems that have also implemented this standard. An FTAM system is any system containing an FTAM implementation that conforms to the FTAM standard and the necessary underlying OSI software.
FTAM software operates on both unstructured files (containing either binary or text data) and sequential text files.
The FTAM facilities (appending, copying, deleting, listing, and renaming) operate on files stored on both local FTAM systems (local files) and remote FTAM systems (remote files). Using FTAM, you can copy, append, delete, rename, and inspect the file attributes of local files, remote files, or both.
To create and manage local files on an OpenVMS system, FTAM uses the OpenVMS Record Management Services (RMS), while on a UNIX system, FTAM uses the UNIX File System. Other types of FTAM systems use different methods of creating and managing files. Refer to the documentation for each remote FTAM system for further information.
- OpenVMS
On OpenVMS, the FTAM facilities operate through a DCL interface. To activate the FTAM facilities, the FTAM DCL interface requires a single command qualifier (
/application_protocol=ftam), which operates with the FTAM facility commands. For convenience, this qualifier is abbreviated to/app=ftamin this document. The commands you can use areappend, copy, delete, directoryandrename.- UNIX
On UNIX, the commands you can use are
ols(lists files),ocp(copies files),orm(deletes files),omv(renames files), andocat(appends files). See Section 2.2, ''FTAM Commands'' for more information on all the FTAM commands.
Each FTAM system contains an FTAM application that implements the FTAM standard on the system. A distinct FTAM application name identifies a specific FTAM application. To access a remote file, you must identify both the remote file and the FTAM application on the remote FTAM system. An FTAM command causes FTAM to communicate with the FTAM applications you specify.
FTAM uses your process to perform the operation that you specify in your command.
From your process, FTAM initiates an association for each FTAM application that you specify in the command. An association is a cooperative link between two OSI application processes. The software that initiates an association for a user process is called the initiator.
The software that receives an initiator's request for an association is called a responder. If a responder accepts a request for an association, the responder's system may start up an application process to support the responder's side of the association.
The responder's process handles the requested file operation.
When the file operation completes, the FTAM initiator ends the association and returns the control of your process to your local system.
1.2. FTAM Gateways
DAP–FTAM Gateway on OpenVMS systems
FTAM–FTP Gateway on UNIX systems
For more information on these gateways see Chapter 3, "Using the DAP–FTAM Gateway (OpenVMS)" and Chapter 4, "Using the FTAM–FTP Gateway (UNIX)".
1.3. FTAM User Facilities
FTAM appending facility
This facility allows you to append one or more input files to the end of a single output file, within local or between local and remote FTAM applications.
FTAM copying facility
This facility allows you to copy one or more input files to a single output file, within local or between local and remote FTAM applications.
FTAM deletion facility
This facility allows you to delete remote files.
FTAM directory facility
This facility allows you to display file attributes for one or more remote files or directories.
FTAM renaming facility
This facility allows you to rename remote files.
1.4. Virtual Terminal Overview
To take advantage of today's networking technology, terminals need access to applications on a variety of local and remote systems. In the single-vendor environment, this is rarely a problem. The difficulty arises in the multivendor environment when diverse systems need to communicate.
The OSI solution to this problem is the Virtual Terminal (VT), an abstract representation of a real terminal, complete with terminal operations (reads text from the keyboard, writes text to the screen, moves the cursor, and so on). Using this model, any terminal connected to a system running VT can access any other system running VT, regardless of type. This type of access can also occur by using gateways, as discussed in Chapter 5, "Using Virtual Terminal".
The Virtual Terminal standard is made up of the service definition (ISO 9040) and the protocol (ISO 9041). The VT software adheres to these standards, and enables applications and systems supporting different types of terminals to interact with each other.
1.4.1. Virtual Terminal Interactions
VT interactions involve two systems: the system that initiates the interaction and the system that responds. These two systems are often referred to as the terminal implementation and the host implementation.
With some VT software, terminal and host implementations can both initiate an interaction, or respond to one. With the DECnet-Plus VT software, the terminal implementation can only initiate an interaction, and the host implementation can only respond. Therefore, the documentation refers to these systems as the initiator and the responder.
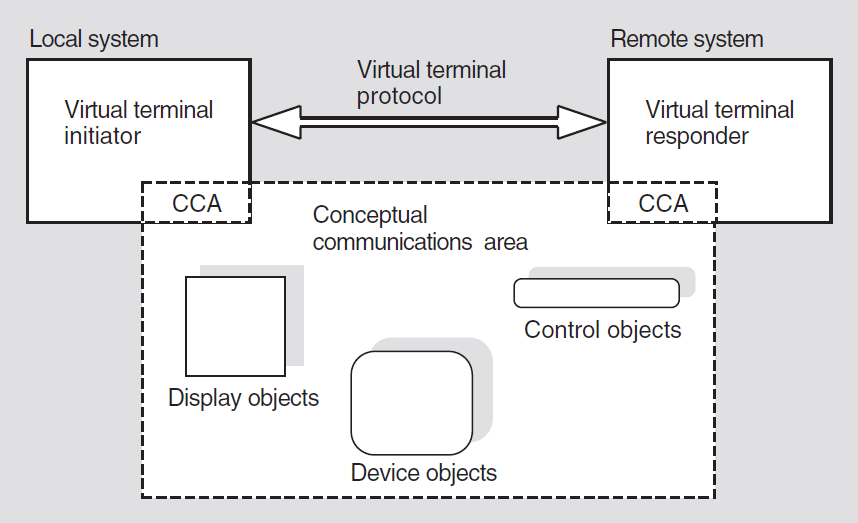
When an initiator requests a connection to a responder and the responder accepts the request, this is referred to as negotiating an association. Both systems must then agree on the context in which the virtual terminal will exist. This context, the virtual terminal environment (VTE), is a set of predefined values both sides use to translate information (by means of local mapping) that the virtual terminal transfers to both systems. These predefined values describe the capabilities of the Virtual Terminal, such as cursor addressing, forms processing, and color capabilities.
Display objects — to model a terminal's display and keyboard operations.
Control objects — to model a terminal's control sequences (such as one that rings the bell on a terminal).
Device objects — to model characteristics of real devices and help map display objects.
The systems only communicate changes to the conceptual communications area; both sides of the virtual terminal association assume that the rest of the data store's contents remain unchanged. A virtual terminal protocol machine on each side of the virtual terminal association maintains a separate copy of the conceptual communications area.
Figure 1.1, ''Components of a VT Interaction'' shows the components of a VT interaction.
1.4.2. Virtual Terminal Operation in a Network
The initiator requests an association with a remote responder. Both systems must agree on the VTE for the virtual terminal.
After the association takes place, the initiator maps the keyboard operations that a user can enter to specific virtual terminal representations as defined by the VTE.
For example, pressing Return on a UNIX system results in a line feed character. VT maps the line feed character to a protocol message that says "go to a new line."
The initiator then transfers this information across the network to the responder.
The responder then maps the virtual terminal information to local commands that its software understands.
For example, an OpenVMS system receiving the "go to a new line" message translates it to a carriage return sequence, the sequence generated by pressing Return on an OpenVMS system.
The responder performs the operation requested by the initiator. If the request generates a response, this information is mapped to the appropriate VT operation. The responder then sends this information across the network to the initiator.
The OpenVMS system echoes the carriage return-linefeed sequence. VT maps this new character sequence to a second "go to a new line" message.
The initiator receives the virtual terminal information from the responder and maps this information to commands that the terminal understands. The UNIX system maps the "go to a new line" message to a carriage return-linefeed sequence.
The user sees no difference between the behavior of VT and that of a terminal directly connected to a responder.
1.4.3. Virtual Terminal Profiles
A terminal's needs vary with the application. Virtual terminals meet these needs in virtual terminal environments (VTEs) called profiles.
Each profile has a unique character map, or translation of characters and keys. See Appendix F, "Virtual Terminal Profile Mapping" for a description of the individual character maps.
Each profile also has a unique name that the initiator sends to the responder to establish a context for data transfer. If the responder supports the specified profile, an association is established; otherwise the responder returns an error message.
A-mode Default
The Virtual Terminal standard supports two modes of communication:A-mode (asynchronous mode)
S-mode (synchronous mode)
All OSI-based Virtual Terminal products that support A-mode communication must support the A-mode Default profile. It provides a scrolled display of lines up to 80 characters in length, with no paging.
Telnet, or Telnet-1988
This profile supports limited TELNET? operations, a Telnet interface, and characteristics such as:Ability to send TELNET commands across the network.
Ability to control local terminal characteristics such as echoing (displaying typed characters).
Ability to transmit raw binary data, which is a necessary characteristic for sending control characters embedded in a block of text.
Generalized Telnet
This profile supports features contained within the Telnet-1988 profile, plus:Ability to negotiate up to 256 separate options.
Ability to perform TELNET suboption negotiations.
The features of the Generalized Telnet protocol resemble those of Internet TELNET, more so than do the features of Telnet-1988.
Transparent
This profile allows the exchange of uninterpreted sequences of characters. It does not provide a model of what is displayed on the initiator's virtual terminal. Data is simply transmitted in the form of octet (8-bit) strings and is not interpreted by Virtual Terminal software. Users who want to control terminals directly through the use of embedded control characters and escape sequences specify this profile. For example, if you are using a full-screen editor on a responder, you would specify this profile.
Note
You need to know which profile to select when using your VT software to access applications on remote OSI systems. See your system administrator for this information.
1.4.4. Virtual Terminal Repertoires
A repertoire contains a set of representations of symbols such as numeric, graphic, and control characters. When you specify a profile during a virtual terminal association, it uses a specific repertoire. An example of a repertoire is the American Standard Code for Information Interchange (ASCII) character set. A repertoire could also be a subset of the ASCII character set.
The ASCII graphics (G0) character set, used with the A-mode default profile.?
The full U.S. ASCII (G0 and C0) character set, used with the Telnet-1988 and Generalized Telnet profiles. ?
The Transparent repertoire, used with the profile of the same name. When the Transparent repertoire is active, the software does not interpret the data transmitted by the initiator or responder node.
Chapter 2. Using FTAM
Listing file attributes
Copying files
Deleting files
Renaming files
Concatenating and displaying files
2.1. FTAM File Specifications
The FTAM user facilities require you to supply one or more file specifications for each operation. An FTAM file specification is a unique string of characters that an FTAM application uses to create or select a file stored on an FTAM system in the same network.
With FTAM software, as with the UNIX File System or Record Management Service (RMS), you need to include only essential information in your FTAM file specification. For example, directory information is necessary for a local file only when the file is outside your working directory. For a remote file, the sort of device or directory information required depends on the remote system's implementation of FTAM and its internal file management software.
|
OpenVMS |
UNIX |
|---|---|
|
application address |
application address |
|
security information |
pathname |
|
account name | |
|
file designation |
2.1.1. File Specification Format for OpenVMS
rms-file-designation
appl-address::rms-file-designation
appl-address::"non-rms-file-designation"
appl-address"initiator-id password account"::rms-file-designation
appl-address"initiator-id password account"::"non-rms-file-designation"
|
Variable |
Explanation |
|---|---|
|
|
An FTAM application address that corresponds to the FTAM responder of an FTAM system. An FTAM responder handles incoming requests for files from FTAM users. |
|
|
A character string that identifies an initiator ID on the specified FTAM node. If you specify this string in a local file specification, FTAM uses the initiator ID as an OpenVMS user name. |
|
|
A string that identifies an FTAM filestore password. If you specify this string in a local file specification, FTAM uses the filestore password as the login password for the OpenVMS user name identified by the initiator ID. |
|
|
A string that identifies an FTAM account name. If you specify this string in a local file specification, FTAM uses it as an OpenVMS account name. To specify an account, you must also specify both a user name and a password. |
|
|
A standard Record Management Services (RMS ) file specification, which contains one or more components in the following format:
Except for the file name or file name delimiter (.), all the components are optional. Note that the DIRECTORY command supports the use of standard DCL wildcards. See Section 2.1.1.5, ''Using Wildcards with the Directory Facility (OpenVMS)'' for more information about DCL wildcards. |
|
|
A file designation whose format RMS cannot interpret. A
non-RMS file designation contains whatever information the
remote FTAM system requires for locating a remote file.
Enclosing non-RMS file designations between double quotation
marks
Note that FTAM cannot handle a remote file designation that contains one or more double quotation marks among its characters. |
The following sections describe the file specification components.
2.1.1.1. FTAM Application Address (OpenVMS)
The FTAM application address defines the unique location of an FTAM responder on a specific FTAM system. For a remote file, you must include an application address in the file specification. For a local file, you need the local FTAM application address only if you want to include security information.
Alternatively, when specifying files on your local system, you can substitute your system's DECnet node name for a local application address using the standard DECnet-Plus format. For more information, refer to your DECnet-Plus management documentation.
An FTAM system manager creates an FTAM alias to define an application address for each FTAM
responder that you can access using FTAM commands. All FTAM aliases must be
defined in the sys$system:isoapplications.dat file. For more
information on the alias database and how to check an alias, see Chapter 9, "The OSI Application-Entity Database".
For a list of available FTAM systems and aliases that define their application addresses, see your system manager.
2.1.1.2. Security Information (OpenVMS)
Security information includes an initiator identity (initiator ID) and, optionally, a filestore password. The initiator identityparameter is an FTAM parameter whose usual purpose is to identify the calling user. The filestore password is an FTAM parameter whose usual purpose is to convey a password for authenticating the initiator to the responder. However, the interpretation of FTAM parameters varies among the responders of different vendors. Therefore, the significance of security information passed in FTAM file specifications depends on how a given responder interprets the initiator ID and filestore password. For information on how a remote responder interprets this parameter, refer to the appropriate documentation for that responder.
On an FTAM system, security information permits you to access directories in OpenVMS accounts other than the one in which you are working. The FTAM responder uses an incoming initiator ID as an OpenVMS user name and an incoming filestore password as a login password. The FTAM responder gives the user name and password to OpenVMS, which attempts to create a user process with them. If the combined user name and login password are valid for an OpenVMS account, FTAM logs into that account and gains owner's privileges for the duration of that FTAM association.
The FTAM initiator passes values for the initiator ID and filestore password only if you specify them on your command line. If a remote responder requires a specific initiator ID and filestore password, you must specify them. If you specify a value that is unacceptable to the responder, your connection attempt fails.
2.1.1.3. Account Name (OpenVMS)
An account name is an FTAM parameter whose usual purpose is to identify an FTAM account. However, the local interpretation of FTAM accounts varies among the responders of different vendors. For information on how a remote responder interprets this parameter, refer to the appropriate documentation for that responder. The OpenVMS FTAM responder equates the FTAM account name to an OpenVMS account name (which is a meaningless value to OpenVMS).
To specify an account, you must also specify an initiator ID and a filestore password.
2.1.1.4. File Designation (OpenVMS)
A file designation is unique system-specific information that identifies a file within its storage system. A file designation typically includes the device, directory, and file information a given FTAM system requires to identify the targeted file. Successful operation of FTAM facilities requires that you use file designations that are native to the remote FTAM system. For information on the types of information and the format you need to identify a remote file, refer to the user documentation for the remote FTAM machine's storage system.
For a local file, a file designation can include a device name, a directory name, a file name, and either a file extension, version number, or both in a specific format. For example:
device-name:[directory-name]file-name.file-extension;version-number
Note that a local file designation minimally requires a file name or a file-name delimiter (.).
Note
It is important to understand that the responding FTAM system can
alter a remote file designation specified in an FTAM DCL command. To
see whether a remote FTAM system has altered a given file designation,
use the directory/app=ftam command. As a precaution against
losing a file because of a mismatch between input and real file
designations, include the /confirm qualifier in the
copy/app=ftam and delete/app=ftam
commands. The confirmation message contains the file specification that
the remote system is actually using.
File designations equate to FTAM file names. An FTAM file name is a text string that identifies a file to an FTAM system. The FTAM system requesting a file (the initiator) supplies an FTAM file name to the FTAM system accepting the file request (the responder).
When you request a remote file, the FTAM initiator separates the FTAM application address from the file designation. The application address translates into the address of an FTAM application on a particular remote FTAM system. The file designation includes everything to the right of the double colons (::).
When processing an incoming file request, the FTAM responder treats whatever string it receives for the FTAM file name as an RMS file designation.
2.1.1.5. Using Wildcards with the Directory Facility (OpenVMS)
Wildcards provide a method for generalizing a file designation to encompass a set of files. Standard DCL wildcard techniques work for both local (RMS) files and remote files for those remote FTAM systems that support the NBS-9 document type. If using wildcard techniques with remote FTAM systems does not work, you should use the complete file designation.
The supported wildcard characters include an asterisk (*) to represent a text string, a percent sign (%) to represent a single character, or empty brackets ([]) to represent all files in the local default RMS directory.
2.1.2. File Specification Format for UNIX
On UNIX, the FTAM file-specification format has two components: an application address and a path name. Its syntax is:
application-address::pathnameThe FTAM software provides a series of file-specification formats. Select one that meets the needs of a particular situation. The valid formats are:
unix-file-designationapplication-address::unix-file-designationapplication-address::'non-unix-file-designation'|
Variable |
Explanation |
|---|---|
|
|
A standard UNIX file specification, containing one or more components in the following format:
Except for the file name, all the components are optional. |
|
|
An FTAM application address corresponding to the location of the FTAM responder on an FTAM system. An FTAM responder handles incoming requests for files from FTAM users. Section 2.1.2.1, ''Application Address (UNIX)'' describes the format of the application address. |
|
|
A file designation whose format UNIX cannot or should not
interpret. A non-UNIX file designation contains whatever
information the remote FTAM system requires for locating a
remote file. Enclosing non-UNIX file designations between
single quotation marks
( Note that the FTAM software cannot handle a remote file designation containing one or more single quotation marks among its characters. |
The following sections describe the file specification components.
2.1.2.1. Application Address (UNIX)
On UNIX, the application address identifies an alias in
/etc/isoapplications that defines the location of the responder
on a remote FTAM system. Chapter 9, "The OSI Application-Entity Database" describes the various
types of aliases that can be used. For a remote file, you must include an
application address in the file specification. Otherwise, the application
assumes you are referring to a local file.
An FTAM system manager creates an FTAM alias for each application address, defining a unique
FTAM responder that you can access. For a list of available FTAM systems and
their aliases, see your system manager. The /etc/isoapplications
file lists all available aliases. Section 9.1, ''About The OSI Applications Database'' describes how to
add aliases to the /etc/isoapplications file.
Included as part of the application address are user account and security information. The format of an application address is:
alias/user/password/account|
Component |
Explanation |
|---|---|
|
|
Defined in the |
|
|
The remote login ID. This value is optional for some responders, but is required for the FTAM responder. |
|
|
The password for the remote login ID. If you specify
|
|
|
The FTAM account name. This value is optional. |
The interpretation of FTAM parameters varies among the responders of different vendors. Therefore, the significance of security information passed in FTAM file specifications depends on how a given responder interprets the remote login ID and its password. For information on how a remote responder interprets these parameters, refer to the appropriate documentation for that responder.
On an FTAM system, security information permits you to access files on remote systems. The FTAM responder uses an incoming remote login ID as a UNIX user ID and an incoming remote login password as a login password. The FTAM responder gives the user ID and password to the UNIX operating system, which attempts to create a user process with them. If the combined user ID and login password are valid for a UNIX account, FTAM logs in to that account and gains owner's privileges for the duration of that FTAM association.
The FTAM initiator passes values for the remote login ID and its password only if you specify them on your command line. If a remote responder requires a specific login ID and password, you must specify them. If you specify a value that is unacceptable to the responder, your connection attempt fails.
2.1.2.2. Path Name (UNIX)
On UNIX, a path name can be either a file name by itself or a file name preceded by a directory name. It is unique system-specific information that identifies a file to its storage system. A path name should include whatever directory or file information a given FTAM system requires to identify the targeted file. Successful operation of FTAM facilities requires you to use an appropriate path name for each remote FTAM system. For information on the types of information and the format you need to identify a remote file, refer to the user documentation of the file's storage system.
Note
It is important to understand that the responding remote FTAM system can alter a remote file designation specified in an FTAM command. To see whether a remote FTAM system has altered a given file designation, use the directory facility to list the file.
File designations equate to FTAM file names. An FTAM file name is a text string that identifies a file to an FTAM system. The FTAM system requesting a file (the initiator) supplies an FTAM file name to the FTAM system accepting the file request (the responder).
When you request a remote file, the FTAM initiator separates the FTAM application address from the file designation. The application address translates into the presentation address (p-address), and optionally the remote login information of an FTAM application on a particular FTAM system. See Table 2.3, ''File Specification Variables'' for additional details.
See also Section 6.4.2, ''Service Access Points'' for additional information on the p-address.
The file designation includes everything to the right of the double colons (::) except for single quotation marks that enclose an FTAM file designation. It serves unchanged as an FTAM file name.
When processing an incoming file request, the FTAM responder treats whatever string it receives for the FTAM file name as an UNIX file designation.
See Section 12.4, ''Managing FTAM Virtual Filestore Information '' for managing virtual filestore information.
2.2. FTAM Commands
|
Task |
OpenVMS |
UNIX |
|---|---|---|
|
Listing |
directory |
ols |
|
Copying |
copy |
ocp |
|
Deleting |
delete |
orm |
|
Renaming |
rename |
omv |
|
Concatenating |
append |
ocat |
Note
If a remote file is specified as part of the input/output file specifications, the actions taken by the command and its qualifiers depend on the remote FTAM responder functionalities and support.
The following sections describe these commands.
2.2.1. FTAM Responder Log File (OpenVMS)
On OpenVMS, when the FTAM responder is activated, a log file is created in the home directory of the user specified by the FTAM operation. The name of the log file is OSIF$RESPONDER.LOG.
The OSIF$RESPONDER.LOG log file contains any errors that may be generated by the FTAM responder. It also contains a list of all files that are accessed by an F-OPEN-REQUEST, including the processing mode of the access.
amiguita:
$ copy/app=ftam test.dat amiguita"fencer thrust"::test.dat
On system amiguita, in the home directory of user fencer, there is
an OSIF$RESPONDER.LOG file corresponding to the operation that you can use to check
on the status of the copy command.
2.2.2. Copying Files
The copying facility allows you to copy a single input file to a single output file, within or between FTAM systems.
The FTAM copying facility operates on any combination of local-to-remote files,
remote-to-local files, and remote-to-remote files. However, local-to-local file
copies are only supported by the OpenVMS copy command.
On OpenVMS, the copy command has the following format:
copy/app=ftam [/qualifier(s)] input-file-spec [,...] output-file-spec
test.dat to
\dir\file on
amiguita:$ copy/app=ftam test.dat amiguita::"\dir\file"
\dir\file, RMS would
generate the following
error:%COPY-F-OPENIN, error opening AMIGUITA::\DIR\FILE as input -RMS-F-SYN, file specification syntax error
For a complete description of the copy command and its qualifiers, see Appendix A, "FTAM Command Summary (OpenVMS)".
On UNIX, the ocp command has the following format:
ocp [options...] [application-address::] file1 [application-address::] file2
test.dat to an OpenVMS file
called test.dat;25 on
lesamies.% ocp test.dat lesamies::'test.dat;25'
Note that because the output-file designation is enclosed in single quotation marks ('), the characters entered in the command are retained in the output-file designation sent to the remote FTAM system.
For a complete description of the ocp command and its options, see Appendix B, "FTAM Command Summary (UNIX)".
2.2.2.1. Copying FTAM-2 Document Types
FTAM maps an RMS file to a single FTAM document type, based on the record format and record
attributes of the RMS file. In previous versions of FTAM, if the responding
FTAM implementation did not support the abstract syntax required for our FTAM
document type, the file could not be transferred. This situation was seen most
commonly when the copy command attempted to transfer an RMS file
with a variable record format (which FTAM maps to the FTAM-2 (sequential text
file) document type) to an implementation that cannot support the FTAM-2
document type.
If this situation occurs with FTAM, the FTAM initiator automatically attempts to transfer the local FTAM-2 file to the responder as an FTAM-1 (unstructured text file) document type and FTAM sends you an informational message that the file was transferred as an FTAM-1 file.
For more information on FTAM document types, see Section 7.2.2.6, ''Document Types''. For specific information on the relationship of RMS files to FTAM document types, see Appendix E, "Mapping of FTAM to RMS File Attributes (OpenVMS)".
2.2.2.2. Copying Files With Records Larger Than 7168 Bytes
Due to the size restrictions specified in NIST Phase 2 and Phase 3 agreements and ISO/IEC ISP 10607-3, you cannot send files using FTAM with fixed-length records longer than 7168 bytes, because fixed-length records cannot be segmented.
Before you can send such a file using FTAM – for example, an OpenVMS save set that has a block size greater than 7168 bytes – you must first unwind the file and rewind it with a block size of less than 7168 bytes.
2.2.2.3. Copying FTAM Files
ocp command let you specify certain properties
specific to FTAM files. For example, to copy an FTAM file with the properties of
a particular document type, you can use a command that resembles the
following:% ocp -D FTAM-1 -C General -M 512 petrie::ftam.tst ftam.txt
GeneralString and a maximum string length of 512.
The characteristics you specify must match those of the source file. This
command also specifies that the destination file is created with the same
attributes as the source file. Note
The FTAM responder on UNIX does not properly handle any attempt to transfer a non-fixed record length file as a fixed length.
2.2.2.4. Copying Files with Confirmation
- OpenVMS:
- If you want the system to query you about copying files when using the
copycommand, use the/confirmoption with your command, as in the following example:$ copy/confirm/app=ftam test.dat amiguita::"\dir\file" COPY TEST.DAT to AMIQUITA::"\DIR\FILE"?
If you type
yand press Return, the output file is copied. Otherwise, the file is not copied. - UNIX:
- On UNIX, if you want the system to query you about overwriting existing files when using the
ocpcommand, use the-ioption with your command, as in the following example:% ocp -i petrie::'user2:[ami]ftam.tst' ftam.txt ocp: overwrite ftam.txt?
If you type
yand press Return, the output file is overwritten. Otherwise, the file is not copied.
2.2.2.5. Copying Files With No Output File-Designation
copy
command has one of the following formats:
copy/app=ftam [/qualifier(s)] input-file-spec[,...] appl-address:: copy/app=ftam [/qualifier(s)] input-file-spec[,...] appl-address"initiator-id password account"::
$ copy/app=ftam ftam.txt amiguita::
The name of the file that is created on the remote FTAM system is the same as the name of the local file to be copied (FTAM.TXT in this example). Note that if the remote FTAM system is case-sensitive (for example, a UNIX system), the remote file name is in uppercase even if you typed it in lowercase because OpenVMS file names are always uppercase.
2.2.3. Appending Files
The FTAM append facility can append multiple input files together to form a new output file through concatenation. Concatenation takes each input file in its input order and appends its contents to the end of the output file. The output file is a new file.
The append facility also allows you to append an input file to a single output file, and concatenate two or more input files to a single output file. (When using FTAM on a UNIX system, the output file must be local.)
On an OpenVMS system, if the output-file designation identifies an existing local file, the new output file receives the next highest version by default.
On a UNIX system, the new output file overwrites the existing file. When concatenating to a remote output file, the effect of specifying an existing remote file name depends on the file management procedures of the remote operating system.
Concatenation primarily affects three RMS file attributes: file organization, record format,
and record attributes. Use the directory command to display these
attributes for any local or remote file (see Section 2.2.5, ''Listing Files''). Taken
together, these RMS file attributes equate to an FTAM file attribute called
contents type.
During concatenation, the appending facility monitors the contents type of the first input file to determine the contents type of the output file. If the input-file list begins with a wildcard file designation, the output contents type is determined by the file whose file specification is first alphabetically. Note that using wildcards for the local input file succeeds only if the local file designation is compatible with the file-designation format of the remote system. (For an explanation of wildcards, see Section 2.1.1.5, ''Using Wildcards with the Directory Facility (OpenVMS)''.)
On OpenVMS, the append command has the following format:
append/app=ftam [/qualifier(s)] input-file-spec [,...] output-file-spec
^vol>main>file.ext, from
freunde, and the local input file, test.dat (assuming
the files have a single contents type), into the local output file,
largetest.dat:$ append/app=ftam/new_ver freunde::"^vol>main>file.ext",- _$ test.dat largetest.dat
^vol>main>file.ext, DCL interprets the symbol ^ as a parameter
delimiter and generates the following error:
%DCL-W-PARMDEL, invalid parameter delimiter - check ... \^VOL\
For a complete description of the append command and its qualifiers, see Appendix A, "FTAM Command Summary (OpenVMS)".
On UNIX, the ocat command has the following format:
ocat [options...] application-address::file [application-address::file...]
/usr/user1/file1, on freunden, to the local file
file2 on the local standard
output:% ocat freunden/fencer/thrust::/usr/user1/file1 > file2
Note the use of user name fencer, and password thrust in the
application address of the remote UNIX responder.
The contents of remote files can only be appended by redirecting the output to a local file. You must specify whatever type of information the remote FTAM system requires for specifying files. Refer to the user documentation for the remote FTAM system.
For a complete description of the ocat command and its options, see Appendix B, "FTAM Command Summary (UNIX)".
2.2.3.1. Concatenating with the copy Command
The copying facility can also concatenate input files that have an identical contents type to an output file with the same contents type. This is similar to the append facility described in Section 2.2.3, ''Appending Files''. For input files with non-identical contents types, the concatenated output file has the contents type of the first input file. With non-identical contents types, a warning message occurs that informs you of the incompatible attributes.
copy command, you must use the
/concatenate qualifier, as in the following
example:$ copy/concatenate/app=ftam *.dat freunde::newfile.dat
2.2.3.2. Appending Files with the ocp Command
ocp command has a -A option that allows you to append
files within or between FTAM systems. For example, you might use the following
command to append the remote file ftam.tst to the local file
ftam.txt:%ocp -A petrie::'user2:[ami]ftam.tst' ftam.txt
2.2.4. Deleting Files
The delete facility allows you to delete any combination of local or remote files. For local OpenVMS files, you must specify a version number. For remote files, you must specify whatever type of information the remote FTAM system requires for deleting files. Refer to the user documentation for the remote FTAM system.
delete command has the following
format:delete/app=ftam [/qualifier(s)] file-spec[,...]
/main/sub/file/ext:$ delete/app=ftam amiguita::"/main/sub/file/ext"
For a complete description of the delete command and its qualifiers, see Appendix A, "FTAM Command Summary (OpenVMS)".
orm command has the following format:
orm [options...] application-address::file [application-address::file...]
-i
option with your command, as in the following
example:% orm -i petrie::ftam.txt orm: remove ftam.txt?
If you type y followed by any other character, the file is deleted. Otherwise,
the file is not removed.
For a complete description of the orm command and its associated options, see
Appendix B, "FTAM Command Summary (UNIX)".
2.2.5. Listing Files
Each file has a set of file attributes. File attributes are characteristics whose values identify and describe a file and record its history. The FTAM directory facility allows you to display FTAM file attributes for remote files. You can produce a minimal display containing only the FTAM application address and the file designation, or a full display, containing information on all the supported FTAM file attributes.
directory command has the following
format:directory/app=ftam [/qualifier(s)] file-spec [,...]
ext, and for the local file
test.dat.$ directory/app=ftam amiguita::"\dir\file\ext", test.dat
test.dat;7. The output resembles the following:Directory AMIGUITA:: \DIR\FILE\EXT Total of 1 file Directory USER$75:[USERNAME] TEST.DAT;7 Total of 1 file Grand total of 2 directories, 2 files.
Note
The directory facility in previous versions of FTAM allowed you to display
the file attributes for one file only. Now that FTAM supports the NBS-9
document type, you can use the directory command to display the
file attributes of multiple files in a specified directory, assuming the
peer FTAM system also supports the NBS-9 document type.
To use this capability, use the directory/app=ftam command
and specify a directory as the file-spec
parameter. The output that appears is a listing of the file attributes for
the files in that directory. You can use the DCL wildcard characters in this
command.
For a complete description of the directory command and its qualifiers, see Appendix A, "FTAM Command Summary (OpenVMS)".
ols command has the following format:
ols [options...] application-address::file [application-address::file...]
% ols freunden::/
NBS-9 dr-------- 512 Jan 25 14:01 /. NBS-9 dr-------- 512 Jan 25 14:01 /.. NBS-9 dr-------- 2048 Jul 30 1996 /bin NBS-9 dr-------- 4608 Jan 28 13:21 /etc NBS-9 drw------- 512 Jan 30 09:57 /tmp NBS-9 dr-------- 512 Jan 25 15:31 /usr NBS-9 dr-------- 2560 Jan 24 13:01 /dev FTAM-3 -r-------- 3418740 Jan 4 16:11 /vmunix FTAM-3 -r-------- 512 May 23 1996 /var FTAM-1 -r-------- 172 Apr 5 1996 /.profile FTAM-3 -r-------- 512 May 23 1996 /sys NBS-9 dr-------- 512 May 23 1996 /opr FTAM-3 -r-------- 2560 Jan 28 13:27 /lib FTAM-1 -r-------- 89 Apr 1 1996 /.login FTAM-1 -r-------- 241 Apr 1 1996 /.cshrc
For a complete description of the ols command and its associated options, see
Appendix B, "FTAM Command Summary (UNIX)".
2.2.6. Renaming Files
The FTAM renaming facility allows you to rename any combination of files. You can change the directory specification, file name, file type, or file version of an existing file. For remote files, you must specify whatever type of information the remote FTAM system requires for specifying files. Refer to the user documentation for the remote FTAM system.
rename command has the following
format:rename/app=ftam [/qualifier] input-file-spec[,...] output-file-spec
/main/file located on the system called
ami is renamed to the remote file /new/file on the
same
system:$ rename/app=ftam ami::"/main/file" "/new/file"
Note that it is not necessary to include the name of the remote system (ami) in
the output file specification because it must be the same system as that of the
input file specification.
For a complete description of the rename command and its qualifiers, see Appendix A, "FTAM Command Summary (OpenVMS)".
omv command has the following format:
omv [options...] application-address::file1 file2
/user1/file2, on freunden (username
fencer, password thrust) to file1 in the
user's default directory on that same remote
system:% omv freunden/fencer/thrust::/user1/file2 file1
For a complete description of the omv command and its associated options, see
Appendix B, "FTAM Command Summary (UNIX)".
2.3. Recovering from Data Transfer Errors While Copying or Appending
FTAM supports the Restart and Recovery functionality for Class-1, Class-2, and Class-3 errors as detailed in ISO 8571-4. This functionality is supported in both the DEC FTAM initiator and in the DEC FTAM responder.
To use the Restart and Recovery related functionality, both the initiating and the responding entities must support Restart and Recovery.
On OpenVMS, the /journal qualifier is added to either the copy or
append command to request that the Restart and Recovery function be
proposed.
On UNIX, the -R option is added to the ocp command to request the
Restart and Recovery function be proposed.
For both OpenVMS and UNIX, the FTAM responder will negotiate (support) the Restart and Recovery functionality when it is requested by an initiator.
FTAM creates and maintains a docket to contain the Restart and Recovery related information needed by the FTAM association.
For OpenVMS, the docket information is maintained in the file:
sys$scratch:osif$recovery.dat. This file should be truncated or deleted periodically by the FTAM user. This file maintenance should be done when no active FTAM responders are being used as part of FTAM associations.For UNIX, the docket information is maintained in the file:
/etc/ftam_recovery.dat.The sender of FTAM data inserts checkpoints in the data transfer.
FTAM returns an informational message stating that either a Restart or a Recovery is in progress.
FTAM uses the Recovery information in the docket to recover the association (Class-3 error).
FTAM uses the checkpoints, which were inserted into the data flow, to restart the data transfer at a point agreed upon by both the initiating and responding entities (Class-1 and Class-2 errors).
|
Logicals |
Defaults |
|---|---|
|
OSIF_REINIT_MAX_RETRY |
Default is 5. The number of times that the initiating entity will "retry" to re-establish the association with the responding entity after a Class-3 failure. On UNIX, this value may also be set via the |
|
OSIF_REINIT_SLEEP |
Default is 180 seconds. The number of seconds that the initiating entity will "sleep" or wait after a Class-3 error is received and before attempting to recover the association. On UNIX, this value may also be set via the |
|
OSIF_REINIT_TIMEOUT |
Default is 120 seconds. The number of seconds that the
initiating entity will wait for a response from the responding
entity after attempting to recover the association by sending an
On UNIX, this value may also be set via the |
|
OSIF_REDIRECT_TIMEOUT |
Default is 1500 seconds. The number of seconds that the responding entity will wait for the initiating entity to recover the association before timing out and exiting. On UNIX, this value may also be set via the |
If an error is detected by the internal FTAM file service and either the initiating or responding entity is unable to complete the Restart and Recovery, FTAM prints a message and terminates the association.
/journal on OpenVMS, or command
line option -R on UNIX, all other Restart and Recovery related operations
and procedures are completely transparent to the user. Note
If the responder image (on OpenVMS) or executable (on UNIX) exits, a Restart or Recovery is no longer possible for that FTAM association.
2.4. File Protection Assignment Upon File Creation
permitted_actions attribute of the F-CREATE-REQUEST against OWNER
access as follows:|
FTAM Permitted Action |
OWNER Protection |
|---|---|
|
read |
read |
|
read-attribute |
read |
|
traversal |
read |
|
reverse-traversal |
read |
|
random-order |
read |
|
insert |
write |
|
replace |
write |
|
extend |
write |
|
erase |
write |
|
change-attribute |
write |
|
delete-file |
delete |
Chapter 3. Using the DAP–FTAM Gateway (OpenVMS)
Note
While the DAP–FTAM Gateway only resides on an OpenVMS system, it can still be accessed from other OSI systems, providing you can access the remote OpenVMS system where the gateway resides.
The DAP–FTAM Gateway software allows any DECnet node to participate in an OSI network, provided that the node has DECnet access to the DAP–FTAM Gateway node.
3.1. Function of the DAP–FTAM Gateway
The DAP–FTAM Gateway resembles a server, in that it receives Data Access Protocol (DAP) messages through DECnet software and uses that information to establish and maintain a connection with a remote FTAM system.
The main advantage of the DAP–FTAM Gateway is that it simplifies communications capabilities for DECnet nodes because users can use system commands to communicate with remote OSI systems through the gateway. For the DCL user or UNIX shell user, this means that communication with a remote FTAM application is handled the same as any DECnet dialogue.
3.2. Invoking the DAP–FTAM Gateway from OpenVMS FTAM Nodes
gtwysystem"OSIGTWY password"::remote-alias["initiator-id [password [account]]"]::filename
Table 3.1, ''Gateway Format Variables'' describes the gateway format variables in this format statement.
initiator-id,
password and account variables. These variables apply to
the remote-alias node (the OSI system), while the OSIGTWY
account applies to the gateway system. The installation procedure creates the
OSIGTWY account and provides a list of computer-generated passwords
from which to choose.|
Variable |
Explanation |
|---|---|
|
|
The name of the node where the DAP–FTAM Gateway software is installed. |
|
|
Your DAP–FTAM Gateway user name and password. |
|
|
The alias of the remote OSI system running FTAM that you want to access. |
|
|
The full file designation for the remote OSI system, supplied in its native file name conventions. |
% dls gtwysystem/osigtwy/password::'remote-alias["initiator-id [password [account]]"]::filename'
directory command initiated on
node1 (an OpenVMS system) brings up the DAP–FTAM Gateway on
node2 (an OpenVMS system) which converts the message from DAP protocol
to FTAM protocol and then establishes a connection with remote FTAM system
osisys. On osisys, FTAM requests the file attributes of
the file data.out.
$ directory node2"OSIGTWY password"::osisys::"/files/data.out"
In this example, the user on node1 typed the directory
command, followed by the node name of the system that has the DAP–FTAM Gateway
installed (node2). To use the DAP–FTAM Gateway, the user must supply
the correct password for the OSIGTWY account to invoke the DAP–FTAM
Gateway on system node2.
Then, the user typed two colons (::), followed by the alias of the remote FTAM system. This was followed by two colons (::), and then the full file designation for the pertinent file contained in the remote filestore.
Note that the alias of the remote FTAM system must be known by the gateway system (for
example, it must be defined in isoapplications.dat on the gateway
system).
Refer to your installation and configuration documentation for additional information on gateway user names and passwords for the DAP–FTAM Gateway.
3.3. Supported Qualifiers for OpenVMS Systems
|
Command |
Qualifiers Supported |
|---|---|
|
|
|
|
|
|
|
|
|
|
|
|
3.4. Supported Document Types
|
Document Type |
String Significance |
|---|---|
|
FTAM-1 |
Not significant |
|
FTAM-2 |
Not significant |
|
FTAM-3 |
Not significant |
For more information on document types, see Section 7.2.2.6, ''Document Types''.
3.5. Quoting File Names
When using the DAP–FTAM Gateway, you should use double quotation marks around file names in order to avoid the possibility of system software adding any additional information to the file name. For example, an unquoted file name might be appended with a semicolon (;). In addition, using quotation marks preserves the case of the file name.
3.6. DAP–FTAM Gateway Messages
DAP MICCODE: 250 [NETFAIL]
To an OpenVMS system, this is equivalent to the error RMS$_NETFAIL. If you receive this message when using the gateway, ask your system manager to obtain a trace of the protocol exchange between the gateway and the remote FTAM node as a way to find the problem. Refer to VSI DECnet-Plus for OpenVMS Problem Solving Guide for information on how to use the tracing utility to trace gateway connections automatically.
Chapter 4. Using the FTAM–FTP Gateway (UNIX)
Note
Although the FTAM–FTP Gateway only resides on a UNIX system, it can still be accessed from other OSI systems. For more information see Section 4.3, ''Using the FTAM–FTP Gateway from an OSI Node''.
The FTAM–FTP Gateway software provides bidirectional access between OSI systems and Internet systems (such as those based on Berkeley 4.2/4.3 BSDTCP/IP implementations). The FTAM–FTP Gateway software lets you exchange files between these systems.
OSI end systems and Internet systems that communicate through the FTAM–FTP Gateway do not need special software, and remote users do not have to establish accounts on the gateway system. The FTAM installation procedure installs the FTAM–FTP Gateway software. For a complete description of the installation procedure, see your FTAM installation documentation.
4.1. Gateway Functions and Sample Commands
|
Gateway Function |
FTAM Command |
FTP Command |
|---|---|---|
|
Change directory |
— |
|
|
Display directory |
|
|
|
|
| |
|
Delete files |
|
|
|
Display files |
|
|
|
| ||
|
Transfer files |
|
|
|
| ||
|
| ||
|
| ||
|
|
| |
|
Rename files |
|
|
If you log in to an Internet system (such as a UNIX system) and use the FTAM–FTP Gateway to access OSI systems, see Section 4.2, ''Using the FTAM–FTP Gateway from an Internet Host '' for instructions.
If you log in to an OSI system (such as a DECnet-Plus for UNIX system) and use the FTAM–FTP Gateway to access Internet systems, see Section 4.3, ''Using the FTAM–FTP Gateway from an OSI Node'' for instructions.
4.2. Using the FTAM–FTP Gateway from an Internet Host
This section tells you how to work with files on a remote OSI node from an Internet host.
Note that the examples in this section assume that your Internet host is a UNIX system. If your Internet host is based on Berkeley 4.2/4.3 BSD TCP/IP implementations, you might need different commands to perform the tasks described in this section.
4.2.1. Invoking the FTAM–FTP Gateway from Internet Nodes
ftp command
sequence:% ftp gateway-node Name (gateway-node:): alias::user Password (alias::user): password
|
Variable |
Explanation |
|---|---|
|
|
The name of the Internet node where the FTAM–FTP Gateway is installed. |
|
|
The login name of the user on the FTAM system. |
|
|
The alias of the FTAM system to which you want to connect. |
|
|
The password for the user on the FTAM system. |
The name of the user who initiated the FTP session appears next to the gateway node name when the system prompts you for the login name on the FTAM system. The password is not displayed on the screen.
The DECnet–Internet Gateway invokes the FTAM–FTP Gateway if you supply an alias at
the username prompt that is in the /etc/isoapplications file,
regardless of the application (FTAM or VT) for which the alias is defined.
4.2.2. Specifying a Concatenation Character
Different operating systems use different syntax for path names. A path name is the order in which a directory is concatenated to a subdirectory and then concatenated to a file. The syntax is the concatenation character (or characters)used to represent the concatenation.
/usr/users/smith/bin
\usr\users\smith\bin
The FTAM–FTP Gateway always requires an argument to the append,
delete, get, put, recv,
rename, send, and cd commands. An
argument is also required for the ls and dir commands
until you specify a path name using the cd command.
To perform FTAM operations on a remote system, you must use a syntax the remote operating
system understands. Since the FTAM–FTP Gateway software has no knowledge of
what operating system or path name syntax the remote system uses, you must specify
which concatenation character (syntax) you will use. This must be done with the
quote CCAT command before using any FTAM–FTP command that
requires or makes use of an argument.
cd command.Note
Operating systems using a more complex syntax for concatenating file names
to directories (such as OpenVMS) are not supported by the CCAT
command.
quote CCAT command
is:quote CCAT charactercharacter argument is the concatenation character. For
example, the command:ftp> quote CCAT /
specifies that the slash (/) is used as the concatenation character.
cd command, and then without
specifying the concatenation character. Smith then specifies the concatenation
character and the FTAM operations are successful. $ ftp snozar Connected to snozar.nac.dec.com. 220 snozar.nac.dec.com FTP server (Version 4.1 Thu Dec 5 19:16:40 EST 1996) ready. Name (snozar:smith): snozar_regtster::smith 331 Password required for FTAM Gateway access to snozar_regtster. Password: 230 User smith logged in.
ftp> pwd 257 "(null)" is current directory. ftp> ls 200 PORT command successful. 501 Directory path must be specified via the CWD command.
ftp> cd /tmp 250 CWD command successful.
ftp> cd / 501 Concatenation character must be specified via the quote CCAT command.
ftp> quote CCAT / 200 Concatenation character is set to ’/’.
ftp> cd /usr/users/smith 250 CWD command successful. ftp> pwd 257 "/usr/users/smith" is current directory.
ftp> ls utils 200 PORT command successful. 150 Opening data connection for /usr/users/smith/utils (16.20.0.89,1180) (0 bytes). /usr/users/smith/utils /usr/users/smith/utils/. /usr/users/smith/utils/.. /usr/users/smith/utils/orm_dir /usr/users/smith/utils/omv_dir /usr/users/smith/utils/ocat_dir /usr/users/smith/utils/ocp_dir /usr/users/smith/utils/ols_dir /usr/users/smith/utils/lis /usr/users/smith/utils/ftamd 226 Transfer complete. remote: utils 316 bytes received in 0.63 seconds (0.49 Kbytes/s)
ftp> bye 221 Goodbye.
| Smith invokes the FTAM–FTP Gateway. |
| Smith attempts to list the contents of a directory without using the
|
| Smith uses the |
| Smith attempts to change the directory again without specifying the concatenation character. This attempt fails because the software cannot determine if the directory specification is absolute or relative, so no action is taken. |
| Smith specifies the concatenation character as |
| Smith is now able to change directories. |
| Smith is now able to list the contents of a directory. |
| Smith closes the FTP session. |
4.2.3. Sample Internet Commands
| Command | Function |
|---|---|
|
|
Starts an FTP session. |
|
|
Copies a local file to the end of a remote file. |
|
|
Sets the file transfer type to ASCII mode (FTAM-1 file). |
|
|
Sets the file transfer type to binary image mode (FTAM-3 file). |
|
|
Closes an FTP session. |
|
|
Changes the current remote directory. |
|
|
Terminates a connection to a remote node. |
|
|
Deletes a single remote file. |
|
|
Lists the contents (in long form) of a remote directory. |
|
|
Terminates a connection to a remote node. |
|
|
Copies a remote file to the local directory (same as
|
|
|
Displays the names of files in the remote directory. |
|
|
Copies a local file to the remote directory (same as
|
|
|
Closes an FTP session. |
|
|
Copies a remote file to the local directory (same as
|
|
|
Renames a remote file to another file. |
|
|
Copies a local file to the remote directory (same as
|
|
|
Identifies the user to the remote FTP server. |
To use FTP, start an FTP session by issuing the ftp command. The session lasts
until you end it with either the quit, close,
bye, or disconnect command. During an FTP session, you
see the ftp> prompt. You also establish a connection with the remote
OSI node that you want to access. Once connected, you can use FTP commands to
manipulate files and directories on that node.
The following sections describe specific tasks you can perform using FTP commands.
4.2.4. Starting an FTP Session
ftp at the system prompt. For
example:% ftp ftp>
4.2.5. Ending an FTP Session
bye or quit at the ftp>
prompt. For example:ftp> bye %
4.2.6. Connecting to a Remote OSI Node
To access files on a remote OSI node using FTP, you first need to establish a connection to that node. Once you are connected to a node, you can use FTP commands to work with files and directories on that node.
boston:% ftp boston
When the gateway prompts you for a user name, specify the alias of the FTAM system to which you want to connect and your login name on that system. Enter the information in this format:
alias::user
boston is the Internet system where the gateway is installed and
doe is the name of the user who initiated the FTP session;
freunde is the FTAM alias representing the destination FTAM system;
and smith is the login name of the user on the FTAM
system.Name (boston::doe): freunde::smith
Password (freunde::smith): secret
boston, the target FTAM system is freunde, the user is
smith, and the password is
secret.% ftp boston Connected to boston. 220 boston FTP server (Version 4.1 Fri Feb 15 19:42:25 EDT 1996) ready. Name (boston::doe): freunde::smith Password (freunde::smith): secret 331 Password required for FTAM gateway access freunde::smith. 230 User smith logged in. ftp>
4.2.7. Disconnecting from a Remote OSI Node
close or
disconnect command at the ftp> prompt. For example:
ftp> close 221 Goodbye. ftp>
Note that the
close command does not end the FTP session. The Internet connection is still in effect, but the FTAM association is terminated.
4.2.8. Viewing Remote Directories
While connected to a remote OSI node, you can view different directories on that node, as follows:
cd command followed by the name
of the directory. Enter the complete path name of the remote directory in the syntax
expected by the remote system. If you do not specify the directory name with the
cd command, the system prompts you for one. For
example:ftp> cd /usr/users/smith/memos 250 CWD command successful. ftp>
ftp> cd (remote-directory) /usr/user/smith/memos 250 CWD command successful. ftp>
To return to the home directory after accessing a subdirectory in FTP, specify the full path
name and the correct directory syntax with the cd command. You should
use the cd command to set your default directory when opening your
connection. Doing so allows you to use the ls and dir
commands without an argument.
ls command.
For
example:ftp> ls /smith/memos/tasks 200 PORT command successful. 150 Opening data connection for /smith/memos/tasks (123.45.6). bc.txt status.sdml tips.txt 226 TRANSFER COMPLETE. 54 bytes received in 0.83 seconds (0.064 Kbytes/s) ftp>
dir command. For example:
ftp> dir tasks 200 PORT command successful. 150 Opening data connection for /smith/memos/tasks (123.45.6). FTAM-1 -rwx------ 29266 Mar 13 1996 bc.txt FTAM-1 -rw------- 6534 Apr 19 1996 status.sdml FTAM-1 -rwx------ 7718 May 15 12:55 tips.txt 226 TRANSFER COMPLETE. 300 bytes received in 0.71 seconds (0.41 Kbytes/s) ftp>
4.2.9. Displaying Remote Files
get command followed by the name of the remote
file and a hyphen. For example:
ftp> get team.txt -
200 PORT command successful.
150 Opening data connection for
/smith/memos/team.txt (123.45.6)
This file lists all the reviewers for the book:
Donna
Geeta
John
Larry
Michael
Ravi
Scott
Tracy
226 Transfer complete.
remote: team.txt
111 bytes received in 0.15 seconds (0.72 Kbytes/s)
ftp>The hyphen indicates that you want the file displayed at the terminal. If you omit the hyphen, the system copies the remote file to your current working directory, without displaying anything.
The
recv command works exactly like
get.
4.2.10. Setting the File Transfer Type
You can transfer, or copy, ASCII and binary files using ftp commands. Set the
FTAM–FTP Gateway file transfer type to ASCII when you transfer ASCII files
(FTAM-1 files) and to binary (image mode) when you transfer binary files (FTAM-3
files). ASCII is the default.
You can set the file transfer type using the FTP commands shown in the following examples.
ascii command. For
example:ftp> ascii 200 Type set to A. ftp>
binary command. For
example:ftp> binary 200 Type set to I. ftp>
To display the current settings of the FTP variables, use the
status command.
4.2.11. Copying Files Between Systems
When connected to a remote OSI node, you can copy files to and from that node. To copy a remote file, type either the
get or
recv command, followed by the remote file name. If you want the local file to have a different name, also specify a local file name. The
get and
recv commands are interchangeable.
The following examples illustrate the different ways you can copy files with FTP commands.
- In the following example of the
recvcommand, a local file name is not specified, softpcreates a local file with the same name as the remote file:ftp> recv games.lis 200 PORT command successful. 150 Opening data connection for /smith/memos/games.lis (123.45.6) 226 Transfer complete. local: games.lis remote:games.lis 6010 bytes received in 0.8 seconds (7.3 Kbytes/s) ftp> - In the following example of the
getcommand, a local filename is specified:ftp> get games.lis games 200 PORT command successful. 150 Opening data connection for /smith/memos/games.lis (123.45.6) 226 Transfer complete. local: games remote:games.lis 6010 bytes received in 0.41 seconds (14 Kbytes/s) ftp>Note
If you use the
getorrecvcommand and type a hyphen instead of specifying a local file name for the file, the file is displayed on your terminal without being copied to the local system. - To copy a local file to a remote file, type the
putcommand, followed by the local file name and the remote file name (optional). For example:ftp> put team.txt newteam.txt 200 PORT command successful. 150 Opening data connection for /smith/memos/team.txt (123.45.6) 226 Transfer complete. local: team.txt remote: newteam.txt 6010 bytes sent in 0.4 seconds (42 Kbytes/s) ftp> - To copy a local file to the end of a remote file, type the
appendcommand followed by the local file name and the remote file name. The following example appends the local fileteam.txtto the remote filescores:ftp> append team.txt scores 200 PORT command successful. 150 Opening data connection for /smith/memos/scores (123.45.6) 226 Transfer complete. local: team.txt remote: scores 9398 bytes sent in 0.59 seconds (16 Kbytes/s) ftp>You cannot use the
appendcommand to copy a remote file to the end of a local file. - To delete a single remote file, type the
deletecommand followed by the file name. For example:ftp> delete team.txt 250 DELE command successful. ftp>
If you do not specify the file name after thedeletecommand, the system prompts you for the file name. For example:ftp> delete (remote-file) team.txt 250 DELE command successful. ftp>
4.3. Using the FTAM–FTP Gateway from an OSI Node
This section tells you how to work with files on an Internet host while logged on to an OSI node.
Note that the examples in this chapter assume that your OSI node is an OpenVMS FTAM system. If your OSI node is from another vendor, you might need different commands to perform the tasks described in this section.
4.3.1. Invoking the FTAM–FTP Gateway from OpenVMS FTAM Nodes
gateway-alias"user@node password"::"filename"
|
Component |
Explanation |
|---|---|
|
|
The alias of the node where the FTAM–FTP Gateway is installed. |
|
|
The name of the user on the remote Internet node. |
|
|
The name of the Internet node where you want to connect. |
|
|
The password for the user on the target node. |
|
|
The name of the file to be accessed. |
Note that the file name is enclosed within quotation marks to ensure that the Internet host receives the file name in lowercase letters as required.
user and
the node values must be separated by the "at sign"
(@). For example, an FTAM directory command on a UNIX system would resemble the
following:% ols gateway-alias/user@node/password::filename
where the format is the same as for OpenVMS, except that the conventions of the UNIX operating system are followed.
4.3.2. Sample OpenVMS FTAM Commands
/application_protocol=ftam to
/appl=ftam, as used throughout the rest of this section.|
Command |
Function |
|---|---|
|
|
Copies a remote file to the end of a local file. |
|
|
Transfers a file to or from an Internet host. |
|
|
Deletes a file. |
|
|
Displays the file names in an Internet directory. |
|
|
Renames a file to or from an Internet system. |
From your OpenVMS system prompt, you can use five OpenVMS FTAM commands to work with files and directories on an Internet host:
append, copy, delete, directory, and
rename. The following sections on gateway-supported OpenVMS FTAM commands explain how to type command lines and which tasks you can perform with these commands.
4.3.3. Viewing Remote Directories
directory command
and specify the directory and files (optional) you want displayed. For example: $ directory/appl=ftam boston"a_lima@bean topsecret":: Directory BOSTON"a_lima@bean password":: Message1 dnetcheck.rnd doctype.txt inventory tasks.s team.txt Total of 6 files. $
Note
Due to the nature of the File Transfer Protocol (FTP), this command lists only the file names within specific directories; information about file protections, dates, or sizes does not pass through the FTAM–FTP Gateway.
4.3.4. Copying Files Between Systems
copy command followed by the
remote file name and the local file name. For
example:$ copy/appl=ftam boston"a_lima@bean secret"::"tasks.s" tasks.lis
copy command followed by the
local file name and the remote file name. For example:
$ copy/appl=ftam notes.lis boston"a_lima@bean secret"::"notes.lis"
append
command followed by the remote file name and the local file name. In the following
example, the phone numbers in the remote file phones.txt are copied to
the end of the local file
team.txt:$ append/appl=ftam boston"a_lima@bean secret"::"phones.txt" team.txt
4.3.5. Deleting Remote Files
delete command followed by the name of the
remote file to be deleted. For example, the following command removes the file
report.1 from the kiko account on the Internet host
tokyo. The password is secret; the Gateway node name
is boston.
$ delete/appl=ftam boston"kiko@tokyo secret"::"report.1"
Notice that the file name must be in lowercase type enclosed within quotation marks to ensure that the Internet host receives the file name in lowercase letters as required.
4.3.6. Renaming Files Between Systems
rename command followed by
the remote file name and the local file name. For
example:$ rename/appl=ftam boston"a_lima@bean secret"::"team.txt" team.lis
rename command followed by
the local file name and the remote file name. For
example:$ rename/appl=ftam notes.lis boston"a_lima@bean secret"::"notes.lis"
Note that the file name is enclosed within quotation marks to ensure that the Internet host receives the file name in lowercase letters as required.
4.4. Special Considerations for Internet Systems
The
/etc/isoapplicationsfile must be present on the gateway system. See Chapter 12, "Managing FTAM and Virtual Terminal (UNIX)" for more information on managing the FTAM–FTP Gateway and the/etc/isoapplicationsfile.An FTAM responder must be running on the FTAM system. It must be listening on the FTAM alias named in the gateway connection. See Chapter 12, "Managing FTAM and Virtual Terminal (UNIX)" for more information on managing the FTAM–FTP Gateway and the FTAM listener.
Upon establishing the FTAM association, the default directory name is still unknown to the FTP process. Until the FTP user specifies a directory with the
cdcommand, use of thelscommand without an argument results in failure.
4.5. Special Considerations for Internet Systems Not Based on UNIX
A file you transfer appears on your system with no end-of-line terminators.
The file transfer fails, and an error message indicates that the record was too large for your buffer.
These problems may indicate that the FTAM–FTP Gateway's default data transfer mode is inappropriate for transferring files from other types of Internet systems. Contact your system administrator.
Chapter 5. Using Virtual Terminal
5.1. Accessing Remote Nodes
Virtual Terminal (VT) provides services to log in to remote systems.
|
OpenVMS |
UNIX |
|---|---|
|
|
|
|
OpenVMS |
UNIX |
|---|---|
|
LAT/VT Gateway |
LAT/VT Gateway |
|
VT/LAT Gateway | |
|
Telnet/VT Gateway |
Telnet/VT Gateway |
|
VT/Telnet Gateway |
VT/Telnet Gateway |
|
CTERM/VT Gateway | |
|
VT/CTERM Gateway |
5.1.1. Starting a VT Association
To access any remote OSI node in your network that supports OSI Virtual Terminal operations, you must first establish a VT association with that node. An OSI Virtual Terminal responder must already be running on the remote system in order to establish the VT association.
Use the appropriate command to establish a VT association with a remote VT application.
OpenVMS:
set host/vtp application [qualifiers]application specifies an alias listed in the
sys$system:isoapplications.dat file, or an X.500
Distinguished Name. If you supply an X.500 Distinguished Name, you must enclose it
in quotes.
If you do not enter a value for application, the
software prompts you to do so. See Appendix C, "VT Command Summary (OpenVMS)" for a complete list of
the command qualifiers.
UNIX:
ologin application [options]application specifies an alias listed in the
/etc/isoapplications file, or an X.500 Distinguished Name.
If you do not supply a value for application,
then the software displays an error and exits. See Appendix D, "VT Command Summary (UNIX)" for a
complete list of the command options.
Contact your system administrator for the aliases available to you.
If the input is an alias, then it is looked up in the isoapplications
file. See Chapter 9, "The OSI Application-Entity Database" for additional information on aliases and
the isoapplications file.
Note
Agreements in International OSI Implementors groups regarding the storage of Form2 AE-titles in the X.500 Directory are still in draft form. Therefore, the FTAM and VT software will only request the value of the presentation address attribute of the object identified by the X.500 Distinguished Name, and only the presentation address will be used to establish the Virtual Terminal connection.
OpenVMS
On OpenVMS, the following examples show the set host/vtp command
being used to establish a VT association with the VT applications specified by the
alias rnode in sys$system:isoapplications.dat,
and the Distinguished Name /c=us/o=abacus/cn=rnode/cn=vtp.
my_template
is
used.$ set host/vtp rnode /log=myfile.out $ set host/vtp "/c=us/o=abacus/cn=rnode/cn=vtp:" /log=myfile.out $ set host/vtp "template=my_template:/c=us/o=abacus/cn=rnode/cn=vtp:" /log=myfile.out
UNIX:
On UNIX, the following examples show the ologin command being used to
establish a VT association with the VT applications specified by the alias
rnode in /etc/isoapplications, and the Distinguished
Name /c=us/o=abacus/cn=rnode/cn=vtp.
my_template
is
used.% ologin rnode -o myfile.out % ologin /c=us/o=abacus/cn=rnode/cn=vtp: -o myfile.out % ologin template=my_template:/c=us/o=abacus/cn=rnode/cn=vtp: -o myfile.out
5.1.2. Using VT in Command Mode
Once you have accessed the remote node, you can enter command mode and issue commands to control and monitor the association. Press the appropriate key sequence to enter command mode.
On OpenVMS, enter Ctrl/@, and VT_PAD> appears as the prompt.
On UNIX, enter Ctrl/], and ologin appears as the prompt.
To exit command mode, press Return, or enter resume.
|
Command |
Description |
|---|---|
|
|
Sends a |
|
|
Sends a |
|
|
Same as |
|
|
(Available only with Telnet-1988and Generalized Telnet
profiles.) Toggles between
trueand
false the flags that control how the VT
initiator responds to events. After you issue the
toggle command, VT automatically exits
command mode. You can display the current value of these
flags with the display command. Valid arguments
are:
|
|
|
Accesses online help. Entering |
|
|
Exits command mode and resumes your VT association. |
|
|
Sends one or more special character sequences to the
remote host. After you issue the
send command,
VT automatically exits command mode. Valid arguments are:
|
|
|
Entering |
|
|
Same as |
|
|
Sets a VT initiator variable to a specific value. The
You can display the current values of variables with the
display or show commands.
Valid arguments are:
With the |
|
|
Sets a VT initiator variable to |
|
|
(Available only with Telnet-1988 and Generalized Telnet
profiles.) Enters either |
|
|
Displays the current profile and any negotiated profile
information. Note that the |
Note
Not all commands or command options are available for all profiles. For
example, commands that send a telnet equivalent command, such
as send ayt, will only work for the Telnet and
Generalized Telnet profiles. See Section 1.4.3, ''Virtual Terminal Profiles'' for more information on profiles.
Note
To set the Ctrl/@ key to be the break, command, or disconnect character, you must enter it using the circumflex-character notation (for example, by entering the "^" character, followed by the "@" character.
5.2. Using Gateways for Remote OSI Node Access
The VT Gateways support communication to and from non-OSI systems by means of LAT, CTERM, and Telnet.
|
OpenVMS |
UNIX |
|---|---|
|
LAT/VT Gateway |
LAT/VT Gateway |
|
VT/LAT Gateway | |
|
Telnet/VT Gateway |
Telnet/VT Gateway |
|
VT/Telnet Gateway |
VT/Telnet Gateway |
|
CTERM/VT Gateway | |
|
VT/CTERM Gateway |
For the LAT/VT, Telnet/VT, and CTERM/VT Gateways, the profile you use in an association is always Generalized Telnet. The VT/LAT, VT/Telnet, and VT/CTERM Gateways accept associations for any supported profile, such as A-mode Default, Telnet-1988, Generalized Telnet, and Transparent.
5.2.1. Using the LAT/VT Gateway
Any computer terminal
Any personal computer running MS-DOS, OS/2, or Macintosh
Any OpenVMS or VMS Version 5.5 (or later) system
Any VMS Version 5.4 (or later) system, running the optional LAT software
Local> connect service-name [node node-name [destination port-name]]
|
|
The name of the LAT service for the gateway. System administrators assign this name when they enable a LAT/VT Gateway. The local system uses this name to determine which gateway node to use for the connection. |
|
|
The name of the gateway node. |
|
|
The alias of the remote OSI system you want to access. (For UNIX gateway nodes only.) |
If you do not specify the gateway node name, the system connects to the first available node that is announcing the LAT/VT Gateway service.
For UNIX, if you specify a remote node name port-name without
specifying a gateway node-name, you receive an error message.
See Appendix C, "VT Command Summary (OpenVMS)" and Appendix D, "VT Command Summary (UNIX)" for more information
on the connect command.
In the following examples, two gateway systems (systems where the LAT/VT Gateways
reside) are used. The name of the OpenVMS gateway system is intrpd, and
the name of the UNIX gateway system is discvr. The name of the LAT
service for the LAT/VT Gateways is LAT_VT_GTWY.
Local> connect lat_vt_gtwy node intrpd
serchr:
Local> connect lat_vt_gtwy node discvr destination serchr
$ set host/lat lat_vt_gtwy/node=intrpd
/destination_port qualifier to specify the remote OSI node
alias):$ set host/lat lat_vt_gtwy/node=discvr
See Appendix D, "VT Command Summary (UNIX)" or enter help set host /lat for more
information on the set host/lat command.
See also Appendix C, "VT Command Summary (OpenVMS)" and Appendix D, "VT Command Summary (UNIX)" for information
on the sethost command to access the LAT/VT Gateway from
a PC.
Welcome to the LAT/VT gateway on INTRPD Enter remote alias name:
At the gateway prompt, enter the alias or the X.500 Distinguished Name of the
remote OSI system you want to access. The alias must be known by the gateway system
(for example, it must be defined in the isoapplications.dat file on the
gateway system). If you enter an X.500 Distinguished Name, be sure to terminate it
with a colon (:). After the VT connection is established to the remote system, it
prompts you to log in as usual.
UNIX:
A successful LAT connection command to a UNIX gateway system with a remote OSI node alias supplied on the connection command results in the LAT/VT gateway automatically attempting to establish a VT connection with the alias specified. Note that unlike at the gateway prompt, you cannot specify an X.500 Distinguished Name on the LAT connection command; only aliases are accepted.
Welcome to the LAT/VT gateway on discvr.org.com Connecting to serchr
After the VT connection is established to the remote system, it prompts you to log in as usual.
5.2.2. Using the OpenVMS VT/LAT Gateway
Note
The VT/LAT Gateway is not available on UNIX; that is, a UNIX node cannot act
as a VT-to-LAT gateway node, only as a LAT-to-VT gateway node. A UNIX user can
use the VT/LAT Gateway on an OpenVMS system by using the ologin
command.
If your network has one or more VT/LAT Gateways enabled, you can access a remote system that supports the LAT protocol from an OSI system.
The gateway system administrator assigns a unique OSI address to the VT/LAT Gateway and creates an alias pointing to the gateway. To access the gateway, specify the gateway alias on the VT connect command.
In the following examples, intrpd is the name of the OpenVMS gateway
system (system where the VT/LAT Gateway resides). The alias defined for the VT/LAT
Gateway on the intrpd system is intrpd$lat.
$ set host/vtp intrpd$lat
See Appendix C, "VT Command Summary (OpenVMS)" for more information on the set host
command.
% ologin intrpd$lat
See Appendix D, "VT Command Summary (UNIX)" for more information on the ologin
command.
Welcome to the VT/LAT gateway on INTRPD Enter LAT service name:
At the gateway prompt, enter the LAT service name of the remote LAT system you want to access. After the LAT connection is established to the remote system, it prompts you to log in as usual.
5.2.3. Using the Telnet/VT Gateway
If your network has one or more Telnet/VT Gateways enabled, you can use the
telnet command from an Internet system to access a remote OSI
system that has a Virtual Terminal responder installed.
If the gateway system is an OpenVMS system, you may need to specify the port number. The default port number on OpenVMS is 30324. If the gateway system is a UNIX system, you do not need to specify the port number.
Note
To use the Telnet/VT Gateway, your local OpenVMS system must have the TCP/IP Services for OpenVMS product installed.
In the following examples, two gateway systems (systems where the Telnet/VT
Gateways reside) are used. The name of the OpenVMS gateway system is
intrpd, and the name of the UNIX gateway system is
discvr.
$ telnet intrpd/port=30324 $ telnet intrpd 30324
$ telnet discvr
See Appendix C, "VT Command Summary (OpenVMS)" or enter help telnet for more
information on the telnet command.
% telnet intrpd 30324
serchr:% telnet discvr -l serchr::
The -l option on the telnet command specifies the input
to the login prompt (see below). The -l option is required on the
telnet command if you are logged in to a UNIX system and you want
to use the Telnet/VT Gateway that is installed on another UNIX system. Otherwise,
telnet automatically specifies your user name at the login
prompt.
See Appendix D, "VT Command Summary (UNIX)" or the telnet(1c) reference page for
more information on the telnet command.
telnet command to an OpenVMS gateway system results in a
prompt for the remote alias name as shown in the following
example:Trying...16.63.96.230 Connected to INTRPD Escape character is ’^]’. Welcome to the Telnet/VT gateway on INTRPD Enter remote alias name:
At the gateway prompt, enter the alias or X.500 Distinguished Name of the remote
OSI system you want to access. The alias must be known by the gateway system (for
example, it must be defined in the isoapplications.dat file on the
gateway system). If you enter an X.500 Distinguished Name, be sure to terminate it
with a colon (:). After the VT connection is established to the remote system, you
are prompted to log in as usual.
telnet
command to a UNIX gateway system results in a login prompt as shown in the following
example:Trying...16.62.96.231 Connected to DISCVR. Escape character is ’^]’. Digital UNIX (discvr.org.com) (ttyp4) login:
If you are connecting from a UNIX system, you must supply your response to the
login prompt via the -l option on the telnet command. All
of the information presented here about the alias entered at the login prompt also
applies to the alias entered at the -l option.
At the login prompt (or at the -l), enter the alias of the remote OSI
system you want to access, followed by a double colon (::). The alias must be
defined on the gateway system. The double colon indicates that you want to connect
using the DECnet–Internet Gateway.
The DECnet–Internet Gateway invokes the Telnet/VT Gateway if you supply an
alias that is in the /etc/isoapplications file on the gateway system,
regardless of the application (FTAM or VT) for which the alias is defined.
If you supply an alias that does not exist in the
/etc/isoapplications file, then the gateway software attempts to
establish a CTERM connection with the system specified.
nobel on an
OpenVMS system accessing a remote UNIX system with alias serchr from
the UNIX gateway system
discvr:$ telnet discvr Trying...16.62.96.231 Connected to DISCVR. Escape character is ’^]’. Digital UNIX (discvr.org.com) (ttyp4) Login: serchr:: Digital UNIX (serchr.org.com) (ttyp1) Login: nobel Password: password
5.2.4. Using the VT/Telnet Gateway
If your network has one or more VT/Telnet Gateways enabled, you can access a
remote Internet system that supports the telnet protocol from an OSI
system.
For OpenVMS, the gateway system administrator assigns a unique OSI address to the VT/Telnet Gateway and creates an alias pointing to the gateway. To access the gateway, specify the gateway alias on the VT connect command.
In the following examples, two gateway systems (systems where the VT/Telnet
Gateways reside) are used. The name of the OpenVMS gateway system is
intrpd, and the name of the UNIX gateway system is
discvr. The alias defined for the VT/Telnet Gateway on the
intrpd system is intrpd$telnet.
$ set host/vtp intrpd$telnet
$ set host/vtp discvr
See Appendix C, "VT Command Summary (OpenVMS)" for more information on the set
host/vtp command.
% ologin intrpd$telnet
% ologin discvr
See Appendix D, "VT Command Summary (UNIX)" for more information on the ologin
command.
Welcome to the VT/Telnet gateway on INTRPD Enter remote host name:
At the gateway prompt, enter the host name of the remote Internet system you want
to access. After the telnet connection is established to the remote
system, it prompts you to log in as usual.
UNIX (discvr.org.com) (ttyp4)login:
telnet connection is
established to the remote system, it prompts you to log in as usual.Note
The Telnet implementation on UNIX attempts to supply your login ID to the remote Telnet system. This is done on the assumption that a Telnet user would have the same account name on multiple systems.
When the VT/Telnet Gateway makes a Telnet connection to a system that can
respond to this feature (for example, another UNIX system), the login ID of
the gateway process (usually root or daemon) is
sent to the remote system and the first prompt the user sees is for the
password. The desired action is that the destination system should prompt
for the user ID.
To work around this problem, simply press Return at the password prompt. This causes the destination system to prompt for the login ID again.
nobel on a UNIX system
accessing a remote UNIX system called serchr from a UNIX gateway system
called
discvr:% ologin discvr Digital UNIX (discvr.org.com) (ttyp4) Login: @serchr Trying...16.63.96.230 Connected to serchr.org.com Escape character is ’^]’. Digital UNIX (serchr.org.com) (ttyp1) Login: root Password: root login refused on this terminal. Login incorrect Login: nobel Password: password
5.2.5. Using the UNIX CTERM/VT Gateway
Note
The CTERM/VT Gateway is not available on OpenVMS; that is, an OpenVMS node
cannot act as a CTERM/VT Gateway node. An OpenVMS user can use the CTERM/VT
Gateway on a UNIX system by using the set host command.
If your network has one or more CTERM/VT Gateways enabled, you can access a remote OSI system that has a Virtual Terminal responder installed from a DECnet system.
In the following examples, discvr is the name of the UNIX gateway
system (system where the CTERM/VT Gateway resides).
$ set host discvr
% dlogin discvr
Refer to online help for more information on the set host command and
see the dlogin(1dn) reference page for more information on the
dlogin command.
UNIX (discvr.org.com) (ttyp4) login:
At the login prompt, enter the alias of the remote OSI system you want to access, followed by a double colon (::). The alias must be defined on the gateway system.
The CTERM/VT Gateway is invoked if you supply an alias at the login prompt that is
in the /etc/isoapplications file, regardless of the application (FTAM
or VT) for which the alias is defined.
If you supply an alias that does not exist in the
/etc/isoapplications file, then the gateway software attempts to
establish a CTERM connection with the system specified.
nobel on an
OpenVMS system accessing a remote UNIX system with alias serchr from
the UNIX gateway system
discvr:$ set host discvr UNIX (discvr.org.com) (ttyp4) Login: serchr:: UNIX (serchr.org.com) (ttyp1) Login: nobel Password: password
5.2.6. Using the UNIX VT/CTERM Gateway
Note
The VT/CTERM Gateway is not available on OpenVMS; that is, an OpenVMS node
cannot act as a VT/CTERM Gateway node. An OpenVMS user can use the VT/CTERM
Gateway on a UNIX system by using the set host/vtp command.
If your network has one or more VT/CTERM Gateways enabled, you can access a remote DECnet system from an OSI system.
In the following examples, discvr is the name of the UNIX gateway
system (the system where the CTERM/VT Gateway resides).
$ set host/vtp discvr
See Appendix C, "VT Command Summary (OpenVMS)" for more information on the set
host/vtp command.
% ologin discvr
See Appendix D, "VT Command Summary (UNIX)" for more information on the
ologin command.
UNIX (discvr.org.com) (ttyp4) login:
At the login prompt, enter the node name of the remote DECnet system that you want to access, followed by a double colon (::). After the CTERM connection is established to the remote system, it prompts you to log in as usual.
nobel on an OpenVMS system
accessing a remote UNIX system with node name serchr from the UNIX
gateway system
discvr:$ set host/vtp discvr Digital UNIX (discvr.org.com) (ttyp4) Login: serchr:: Digital UNIX (serchr.org.com) (ttyp1) Login: nobel Password: password
5.3. Interoperability Issues With Previous Versions
The following sections discuss interoperability issues with previous versions of Virtual Terminal.
5.3.1. SEND SYNCH
DECnet-Plus Virtual Terminal Version 1.0 for VAX ULTRIX and for OpenVMS VAX do not properly handle updates to the SY control object, such as with the SEND SYNCH command. The Version 1.0 responder either aborts the Virtual Terminal connection or gives an error if it receives an SY control object update.
5.3.2. VT-BREAK
DECnet-Plus Virtual Terminal Version 1.0 for OpenVMS VAX and for RISC ULTRIX does not support the VT-BREAK service as a responder. The Version 1.0 responder aborts the Virtual Terminal association if it receives a VT-BREAK indication.
DECnet-Plus Virtual Terminal Version 1.0 for VAX ULTRIX does not properly support the VT-BREAK service as a responder. Once the VT-BREAK request has been issued, the VT connection hangs if you attempt to log out. You can terminate the Virtual Terminal association by issuing the quit command from local command mode.
5.3.3. Set Terminal
When interoperating with DECnet-Plus Virtual Terminal Version 1.0 for OpenVMS, you
must use the DCL set terminal command to successfully switch between
line mode and character mode, as well to switch into binary mode.
Line mode, enter the DCL command
set terminal/noechoBinary mode, enter the DCL command
set terminal/eightbit
When using the OpenVMS Version 1.0 initiator to communicate with the UNIX
responder, enter the DCL command set terminal/eightbit before entering
the set host/vtp command.
5.3.4. Telnet/VT Gateway
The Telnet/VT Gateway uses the Generalized Telnet profile. This profile is not supported by DECnet-Plus Virtual Terminal for ULTRIX.
Chapter 6. General OSI Concepts
Open Systems Interconnection (OSI) is an architecture containing a set of protocols for computer communications. This set of protocols provides rules for behavior that allows computer systems from different manufacturers to communicate. A document called the OSI Reference Model defines the OSI architecture.
An open system is a computer system that contains implementations of the seven layers of the OSI Reference Model.
The Application layer
The Application layer contains the application programs and supporting protocols that use the lower layers in performing different functions. The functions, or service elements, that are important for the FTAM and VT software are:The File Transfer, Access and Management (FTAM) service element
The FTAM service element views files in standard terms that allow open systems to transfer, access, and manage remote files.
The Virtual Terminal service element
The VT service element allows communication between terminals of different types through the use of local mapping.
The Association Control Service Element (ACSE)
ACSE starts and stops communications links (called associations) between corresponding processes on open systems. ACSE operates on behalf of specific application service elements, including the FTAM and VT service elements.
The Presentation layer
The Presentation layer organizes the encoding of information being sent and the decoding of information being received.
The Session layer
The Session layer structures and controls communications and data transfer.
|
OSI Component |
ISO Identifier |
Topic of Standard |
|---|---|---|
|
FTAM |
ISO 8571 |
FTAM concepts, virtual-filestore model, services, and protocol |
|
Virtual Terminal |
ISO 9040 |
VT services |
|
ISO 9041 |
VT protocol | |
|
ACSE |
ISO 8649 |
ACSE services |
|
ISO 8650 |
ACSE protocol | |
|
Presentation |
ISO 8822 |
Presentation services |
|
ISO 8823 |
Presentation protocol | |
|
Session |
ISO 8326 |
Session services |
|
ISO 8327 |
Session protocol |
The remainder of this chapter introduces a number of general OSI concepts.
6.1. Protocols
A protocol is a set of operational rules and procedures for communication. Protocols govern the behavior of open systems at each layer. Some layers, including the Application layer, have several protocols.
The software that implements a protocol is called a protocol machine. The application software contains either the FTAM or VT protocol machines. Both are dependent upon OSAK (OSI Application Kernel) for the following underlying protocol machine components: ACSE, Presentation, and Session.
6.2. Dialogue
Much as diplomatic protocols aid human communications, OSI protocol machines ensure that open systems can establish message exchanges called dialogues. Though many dialogues can occur simultaneously, each dialogue is independent of other dialogues. Protocol machines cooperate to conduct a dialogue through a predictable sequence of states. The portion of a dialogue conducted at the Application layer is called an association; the portions of dialogues conducted at other layers are called connections.
6.3. Entities
Protocol machines operate within system-specific processes. For every dialogue, one or more processes activate the protocol machines of each layer independently. An instance of such protocol-machine activity is called an entity. The relationship between processes and entities is implementation specific.
Each entity communicates with equivalent entities on different systems. Such equivalent entities are called peer entities.
6.4. Services
A service is an interface provided by a service element or a layer for accessing one or more OSI functions. The service element or layer that provides a specific set of services is called the service provider. An application program, service element, or layer that uses those services is called the service user. A service provider is always on the same system as its service users. In some cases, a service user and its service provider reside in separate layers; for example, the Presentation layer is a service provider for the FTAM service element. In other cases, a service user and its service provider reside within the same layer; for example, ACSE is also a service provider for the FTAM service element.
Each service supports a set of parameters whose values control the functions accessed by the service. Two types of services exist: confirmed and unconfirmed. A confirmed service is a service where the service user receives a confirmation service primitive to acknowledge that the service has been performed. The confirmation service primitive might contain information regarding the results of that action. An unconfirmed service is a service where the service user does not receive a confirmation service primitive and has no knowledge that the service has been performed.
Each service provider offers a set of services that allows its users to perform communications roles and related responsibilities. For example, FTAM file services perform file transfer, access, and management functions for application processes. Communications services often provide access to the supporting functions of underlying layers. For example, ACSE provides a service for establishing associations (A-ASSOCIATE) to its service users, including FTAM; the A-ASSOCIATE service then accesses the underlying connection services for the ACSE service user. The descriptions of the components in later chapters list the specific services of each component.
6.4.1. Service Primitives
To request or receive indications of a service, peer entities exchange messages called service primitives. A service primitive carries parameter values for a specific service. There are two pairs of service primitives: request and indication primitives and response and confirm primitives. The request and indication primitives exist for all services. The response and confirm primitives, however, exist only for confirmed services. Each pair of service primitives generates only one unit of user data (a protocol data unit or PDU).
Request and response primitives originate with service users, which use those primitives to request services and negotiate parameter values. Indication and confirm primitives originate with service providers, which use those primitives to pass on information that comes in for their users.
The service primitives of each service are interdependent and together form that service. Each type of service has a standard set of primitives, which always occur in a standard order. The following descriptions of service primitives appear in the order of their occurrence. The number beside each primitive reflects the order of its origin. The type of the entity (service user or service provider) that generates a primitive appears alongside the primitive.
Request primitive — The service user requesting a service (requestor) issues a request primitive to a peer service user (the acceptor) on another open system. This results in the exchange of information between the peer entities.
Indication primitive — On encountering an incoming request, the acceptor's service provider generates an indication primitive to pass the request on to the acceptor.
Response primitive — For a confirmed service, an acceptor issues a response primitive to the requestor confirming the information that the acceptor will accept or decline to perform a service.
Confirm primitive — On encountering an incoming response primitive, the responder's service provider generates a confirm primitive to pass the response on to the requestor.
Figure 6.1, ''Movement of Service Primitives Between Service Users and Providers'' illustrates the movement of the service primitives between service users and providers.
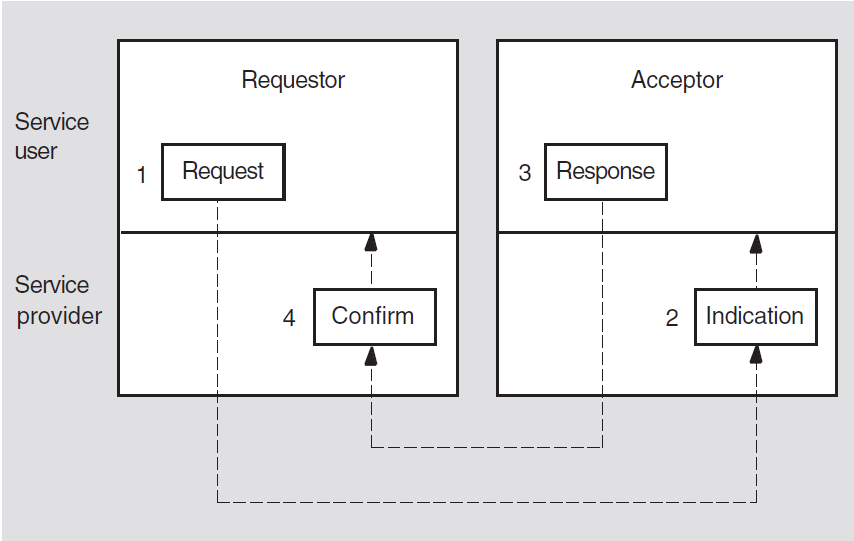
Before passing parameter values to a protocol machine, a service implementation verifies whether the parameter values proposed by its service user conform to constraints created by the service definition and the current dialogue.
6.4.2. Service Access Points
A service provider delivers services to a service user at an interface called a service access point (SAP). Figure 6.2, ''Relationship of a Service User, Service Provider, and SAP '' illustrates the relationship of a service user, a service provider, and a SAP.
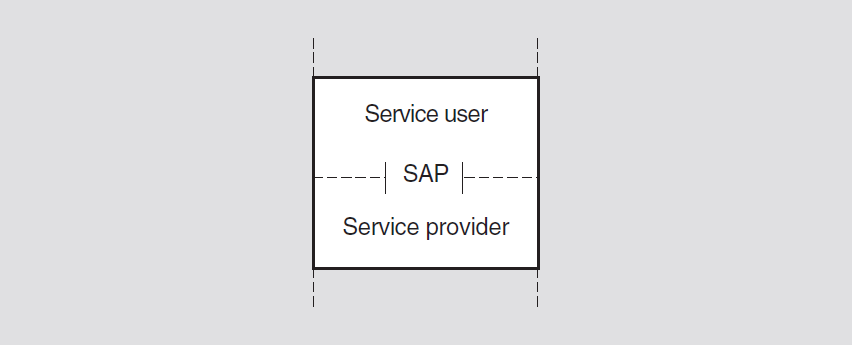
Except for the Application and Physical layers, SAPs exist at the boundaries of all OSI layers. SAPs are designated by using the name of their layer; for example, any SAP that the Presentation layer provides is called a Presentation SAP (PSAP). Figure 6.3, ''SAP Nomenclature'' illustrates SAP nomenclature.
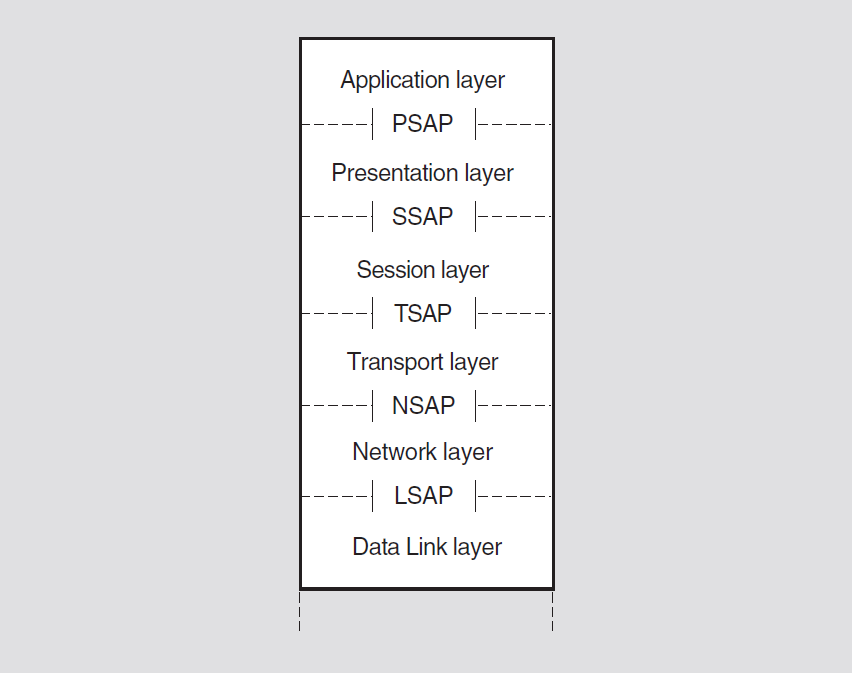
SAPs are logical constructs defined by an identifier called a SAP selector. To create a SAP, a system manager or application user defines a unique SAP selector for a specific layer. SAP selectors are the building blocks of the addresses. A given address takes the name of the uppermost SAP that contributes a selector to the address. For example, a presentation address accesses the Application layer. A presentation address (p-address) contains one or more SAP selectors at the upper layers. The composition of a given address depends on the purpose of the address. For example, an address that allows the Transport layer to access the Application layer contains SAPs at three layers: Transport, Session, and Presentation. A p-address is used for upper-layer addressing and contains SAPs at four layers: Network, Transport, Session, and Presentation.
6.4.3. Functional Units
To help negotiate services between peer entities, service elements or layers classify their services into functional units. A functional unit is a predefined set of interdependent services, which together perform a high-level function such as transferring data. Session, Presentation, ACSE, VT, and FTAM all have functional units. When establishing connections or associations, an entity requests one or more specific functional units of a peer entity. The peer can accept requests only for functional units that it supports.
6.5. Protocol Control Information (PCI)
For each layer or service element, service definitions describe the parameters of each primitive and the valid values for each parameter. The protocol describes the rules and procedures for using service primitives. A protocol machine ensures that a dialogue progresses along the predictable, controlled course that is defined in the state tables of the protocol specification. The parameters in a service primitive are conveyed as protocol control information (PCI), which determines how a service operates. Exchanging PCI allows peer entities to specify services and establish their parameter values.
6.6. Syntaxes
Local descriptions of data vary among different systems. For example, some systems use ASCII to represent text, while others use EBCDIC. Overcoming differences between local data descriptions requires an intermediate descriptive method that can transform local data into a commonly understood format. Syntaxes fulfill this requirement for open systems using applications such as FTAM.
An abstract syntax is a high-level description written in a descriptive language called abstract syntax notation, which provides a standard means of describing concepts and data types. The FTAM standard, for example, formally describes FTAM file structure and protocol as abstract syntaxes.
A transfer syntax is a set of rules and, possibly, conditions for formatting data for transmission between systems. For example, it specifies how text is represented when sent as protocol control information.
Transferring data requires applying the rules of abstract and transfer syntaxes to encode and decode data between a local and a transformed format. Local data includes any data stored locally by a system; for example, file data or the system information that maps to ISO service parameters. Transformed data is a stream of octets (bytes) that can pass over the communications line as a pattern of bits that a peer entity can interpret correctly.
Whenever two application entities use an abstract syntax, they must agree on a specific transfer syntax. The resulting pair of abstract and transfer syntaxes is called a presentation context. A presentation context controls how peer entities transform data. A given association can use several presentation contexts to transfer different types of PCI and file data.
In an operation called syntax transformation, Presentation uses the rules of the negotiated presentation context (abstract and transfer syntaxes) to interpret incoming data and encode outgoing data.
Figure 6.4, ''Syntax Transformation '' illustrates the encoding and decoding phases of syntax transformation.

For writing abstract syntaxes, ISO has a standard notation called Abstract Syntax Notation One (ASN.1). ASN.1 provides a set of data types (for example, boolean and integers) and the means to arrange them into finite constructions such as bounded sequences and sets. ASN.1 has a corresponding transfer syntax named the Basic Encoding Rules for ASN.1.
Other abstract-syntax notations or transfer syntaxes are potentially possible, but the FTAM and VT software uses only ASN.1 and its encoding rules.
6.7. Protocol Data Units (PDUs)
A protocol machine places the PCI for a service into a protocol data unit (PDU). A protocol data unit (PDU) is information made up of PCI from the current layer and, possibly, user data from above. PDUs are exchanged between peer protocol machines using service primitives. A given service primitive can correspond to zero, one, or more PDUs. The integrity and identity of a PDU remains intact while it is being exchanged.
The underlying layer places each PDU received from the above layer into a service data unit (SDU). The SDU becomes user data in the PDU of its underlying layer. PDUs remain intact until they arrive at the protocol machine of the peer entity. The peer's protocol machine separates the PCI from user data and processes the PCI. Figure 6.5, ''The Relationship Between PCI, PDUs, User Data, and SDUs '' shows the relationships among the PCI, user data, SDUs, and PDUs.
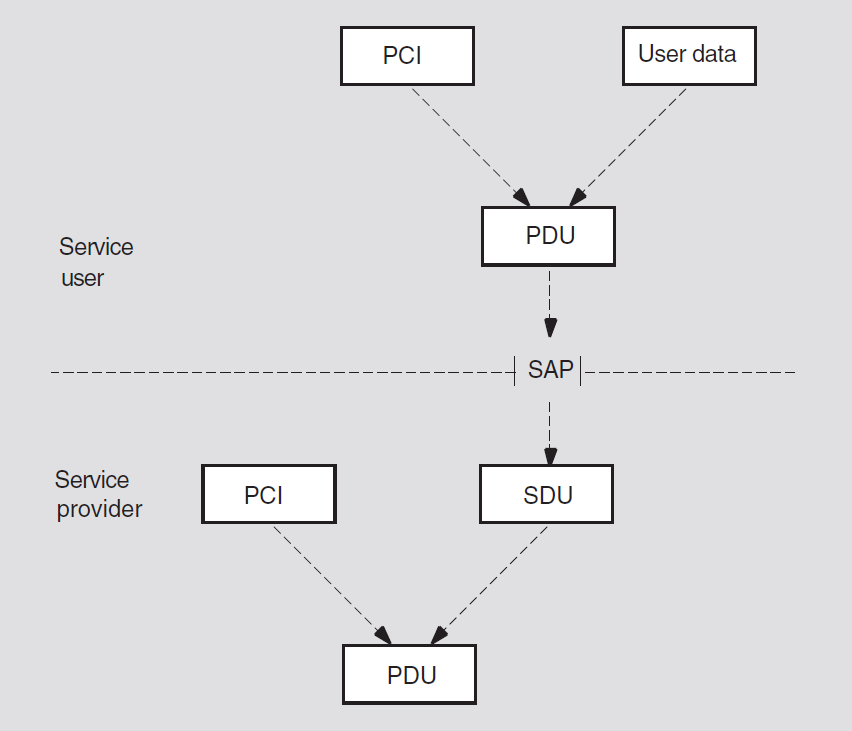
Chapter 7. The Application Layer: FTAM and ACSE
The OSI Application layer consists of application service elements. An application service element is an open-system component that provides an application-level function. FTAM is one such service element, and ACSE is another.
7.1. FTAM Application Processes and Entities
Open-system functions occur within the context of system-specific processes. At the Application layer, such processes are called application processes. An application process is an interface between an operating system and one or more protocol machines of the Application layer and, possibly, of other layers. An entity involving one or more protocol machines of the Application layer is called an application entity.
An initiator is an application process that receives requests from users for FTAM functions and activates its system's FTAM and ACSE protocol machines to start FTAM communications.
A responder is an application process that receives incoming communications from an initiator and activates its system's FTAM and ACSE protocol machines to answer.
The FTAM implementation uses one responder and five initiators. The responder handles all incoming FTAM requests. Each of the initiators supports a single type of file operation (append, copy, delete, directory, or rename).
The communications link that occurs at the Application layer between an initiator and a responder is called an association. For each association, the initiator and the responder invoke a separate FTAM application entity (FTAM entity). An FTAM entity is an instance of activating and using the FTAM and ACSE protocol machines. Within an FTAM entity, the rules and procedures of the FTAM protocol machine control the operation of the ACSE protocol machine.
Each time a user requires an FTAM association, an initiator on the user's system invokes an FTAM entity to request the association. The targeted responder invokes another FTAM entity to answer the initiator's request. Once an association exists, the initiator can request the responder to perform one or more file actions, such as reading or writing file data. The responder handles each request according to its capabilities. An initiator and responder maintain communicating FTAM entities until their association terminates.
For each association, an application process (whether an initiator or responder) invokes a distinct FTAM entity.
FTAM entities are identified by an application-entity title (AE-title). As defined for ACSE, an AE-title is an identifier constructed of two other identifiers: an application-process title (AP-title) and a unique application-entity qualifier (AE-qualifier). The AP-title identifies an application such as FTAM on the network. The AE-qualifier identifies a specific invocation of that application.
The FTAM software follows the recommendations of the U.S. National Institute of Standards and Technology (NIST) that specify that the AP-title should be an object identifier and the AE-qualifier should be an integer containing up to 255 decimal digits.
7.2. Overview of FTAM Operation
The FTAM service element allows file transfer between, access to, and management of open systems. The File Transfer, Access and Management (FTAM) International Standard (ISO 8571) — the FTAM standard — is one of the OSI standards for specific application needs. The FTAM standard specifies structures, functions, services, and communications rules for the FTAM service element.
Basic features of FTAM communications
The virtual-filestore model
The file-service model
The basic file protocol
Manipulating files depends on the interrelated virtual-filestore and file-service models. The basic file protocol controls FTAM services.
7.2.1. Basic Components of FTAM Communications
Two basic asymmetries characterize the roles of FTAM entities during an association: initiator/responder pairs and sender/receiver pairs. The FTAM standard allows FTAM implementations to support either or both of the roles in each pair. The FTAM implementation supports all four roles.
Initiator/responder pairs
Each association involves one initiator and one responder, each of which invokes and maintains an FTAM entity specifically for that association.
Sender/receiver pairs
At a given moment during data transfer, file data flows in a single direction. Data transfer requires that when one FTAM entity sends file data, another receives that data. An FTAM entity that is currently writing (sending) part or all of the contents of a file is called the sender. An FTAM entity that is currently reading (receiving) all or part of a file's contents is called the receiver.
Assuming that an implementation supports both sender and receiver roles, any FTAM entity performs either role. Therefore, both initiators and responders can write and read files. For example, when a user copies a file to another system, the initiator acts as sender; when the user copies a file from another system, the initiator acts as receiver.
7.2.2. Virtual-Filestore Model
A fundamental goal of FTAM is to accommodate a wide variety of file structures and possible actions on files. However, different vendors' file systems often differ substantially in how they organize, store, and access files. The virtual-filestore model masks local differences by applying a common generalized description of the structure and attributes of files and the actions on them. By describing a file in terms of the virtual-filestore model, an initiator and a responder can establish a common view of any file. This involves each entity establishing a virtual filestore, which is an idealized filestore defined by the virtual-filestore model.
Virtual file stores are mapped to the real filestore of each FTAM system. A real filestore is the actual method of data storage and access on a particular system. For example, the real filestore on a UNIX system is provided by the UNIX File System, and for OpenVMS, by the Record Management Service (RMS).
The sender, using a system-specific portion of its application process, translates the information requested from its system's real filestore into the equivalent structures and file attributes of the virtual filestore.
The receiver, reversing the procedure, translates the information from the virtual filestore into whatever equivalent structures and file attributes are meaningful in its system's real filestore.
Figure 7.1, ''Relationship Among Filestores During Data Transfer '' illustrates the relationship among the file stores during data transfer. The sender's real filestore is mapped to a virtual filestore before being sent to the receiver. Once sent, the receiver then maps the virtual filestore to its own entity-specific real filestore format.
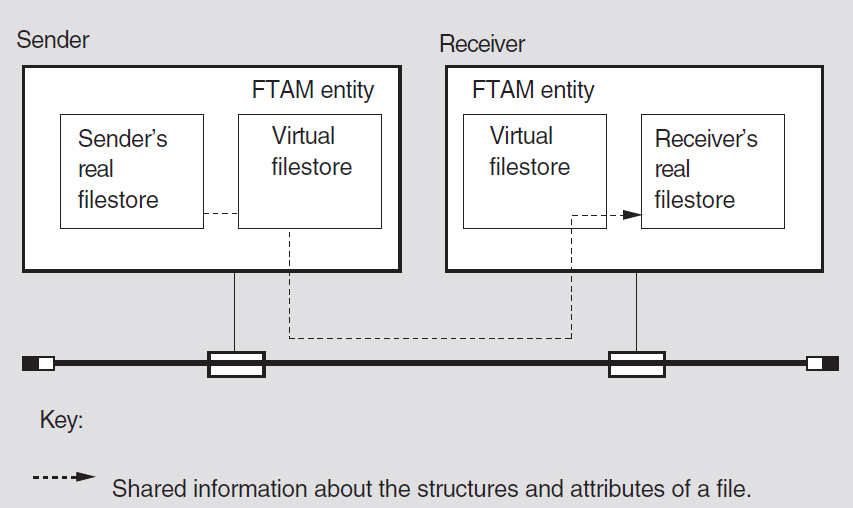
The virtual-filestore model describes an idealized hierarchical file structure together with its formal properties (file attributes) and possible types of file data (file contents). The model also describes the possible actions on a file (filestore actions). For selecting among these possibilities, the model provides several descriptive mechanisms (access contexts, constraint sets, and document types). For conveying current information about a file and an association, the model provides a set of descriptive properties (activity attributes). The following sections briefly describe each of these elements of the virtual-filestore model.
7.2.2.1. File Attributes
In the virtual filestore, a file possesses formal properties called file attributes, which at a given moment are identical for all users. FTAM file attributes include a range of properties, such as unique file name, access-control specifications, size, history, and structure. The FTAM software partially supports those FTAM file attributes that correspond to UNIX file attributes.
7.2.2.2. File Contents
File contents consist of file data of one or more types. The types of file data most likely to be supported by FTAM implementations are text and binary data — as defined in the FTAM standard and referenced in the U.S. National Institute of Standards and Technology (NIST) OSI implementation agreements. Forming an association or opening a file requires negotiating an abstract syntax and a corresponding transfer syntax for each type of file data. Currently, ASN.1 and Basic Encoding Rules (BER) are the only abstract-syntax notation and transfer syntax required for FTAM implementations.
Actions performed on files within a virtual filestore are called filestore actions. Filestore actions are divided between actions on complete files and their attributes (whole-file actions) and actions for accessing file contents (access actions). Whole-file actions operate on files as a unit and allow file selection, file management, and file opening. File-access actions operate on the contents of files, as, for example, reading or writing data during data exchange.
7.2.2.3. File Structure
The virtual-filestore model defines an idealized file structure called the hierarchical file model. The hierarchical file model recognizes structural elements called nodes, which are ordered into a generalized tree structure. Schematically, this structure is represented as an upside-down tree, with a root node at the top and levels of subordinate nodes beneath. Figure 7.2, ''Schematic Representation of a File Tree'' shows the schematic structure of a small 3-level tree structure.
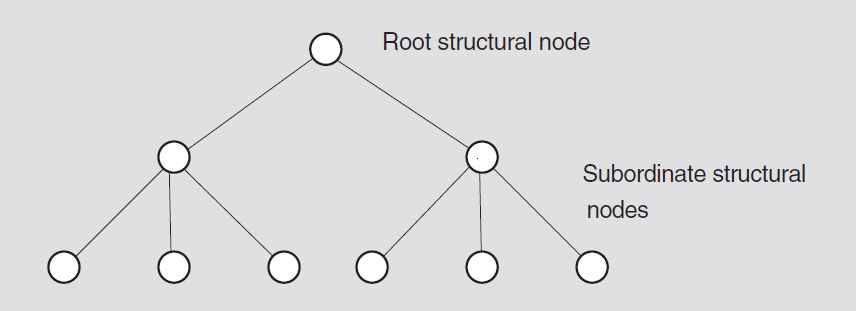
The hierarchical file model describes file data as being organized into file-contents data units. A file-contents data unit is a collection of file data that is associated with a specific node in a file. (Not all nodes, however, have associated file-contents data units.) A given file contains zero or more file-contents data units. Figure 7.3, ''Relationship of File Data and Structural Nodes'' illustrates the relation of file-contents data units to structural nodes.
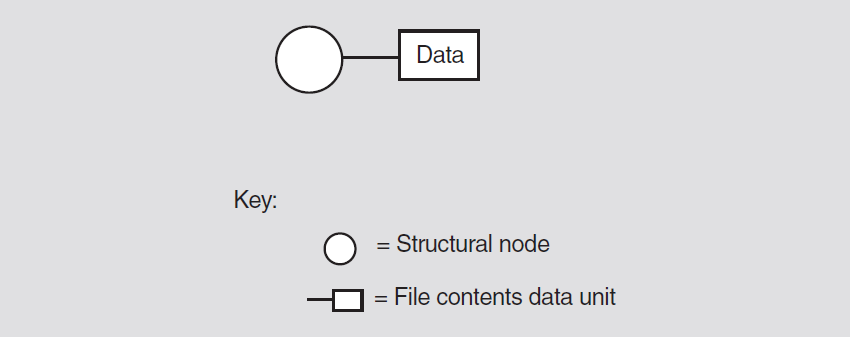
Files are divided into units called file-access data units. A file-access data unit ( FADU) is a data structure that is made up of one or more nodes and their associated file-contents data units. A FADU includes either a whole file tree or a specific segment of a file tree (subtree). Potentially, any node can be the entry point of a FADU that encompasses the entry node and all of its subordinate nodes. Figure 7.4, ''Division of a File into File-Access Data Units (FADUs )'' illustrates a possible segmentation of nodes (and their associated file-contents data units) into series of FADUs of decreasing size.
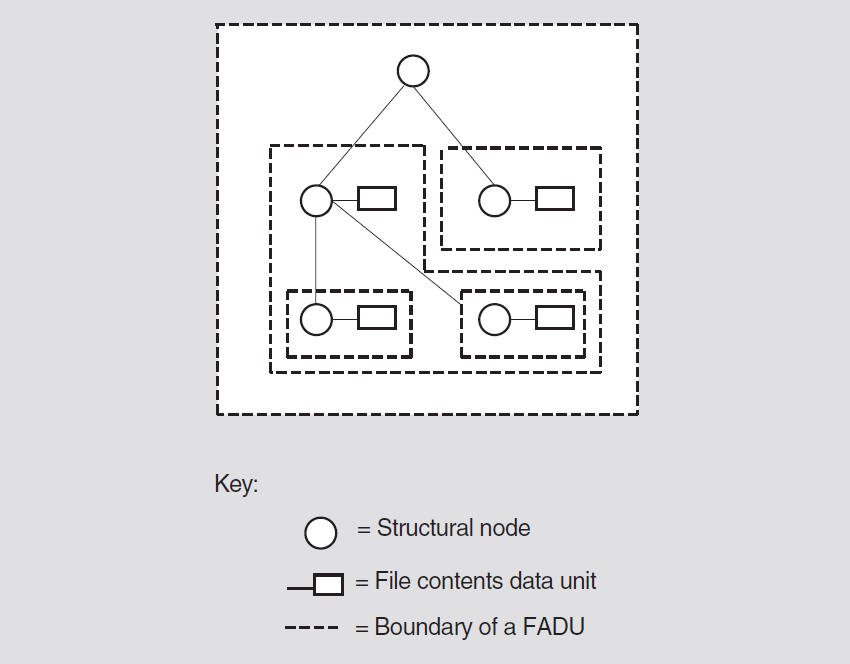
As the examples of file structures in Figure 7.5, ''Examples of File Structures'' show, the hierarchical file model accommodates a wide range of actual file structures: for example, unstructured, sequential, and hierarchical file structures. An unstructured file has a single node; binary files are often unstructured. A sequential file has an entry node and, directly below it, one or more subordinate nodes; for example, text files are often sequential and each node could represent a separate text record. A hierarchical file has two or more levels of subordinate nodes below its root node.
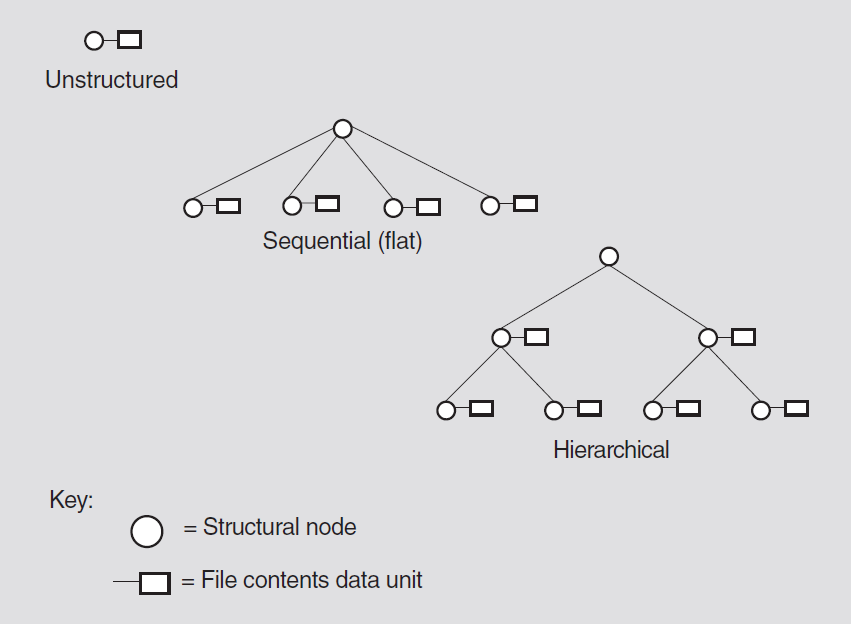
7.2.2.4. Access Contexts
To provide alternative views of a particular file structure during file reading, the virtual filestore model defines a series of access contexts. An access context is a statement of what structural elements (nodes) and associated file data (file-contents data units) are currently needed for reading or writing. Specifying an access context lets an initiator limit the types of information that a sender must handle. Access contexts thereby avoid wasted effort for the sender. For example, you can send the data units from a flat file without the node information by specifying the appropriate access context.
7.2.2.5. Constraint Sets
A constraint set is a set of related statements delimiting how filestore actions can proceed and how FTAM entities view file structure and contents during those actions. Among other things, constraint sets, as defined by both ISO 8571 and the NIST OSI Implementors Workshop (OIW) FTAM agreements, specify available access contexts and possible file-access actions (see the next section). Opening a file requires the initiator to specify a constraint set by selecting either a contents type (an abstract syntax and constraint set pair) or a document type (see Section 7.2.2.6, ''Document Types''). The FTAM software uses document types exclusively.
7.2.2.6. Document Types
A document type is an officially registered definition of a file type. The FTAM software uses the convention of FTAM document types to describe a file. Document types have been defined by both ISO 8571 and the NIST OSI implementation agreements. The division of an actual file into FADUs depends on the file's document type and on the current access context.
Document type definitions reflect the virtual-filestore model. Each document type consists of a set of related statements about the structure and contents of a file and about the available access procedures. Some of the statements relate to the intended use of the file; others describe factors such as its structure, scope, abstract syntax for file data, a constraint set to be used with the file, qualifications placed on filestore actions, and so forth.
|
Name |
Description |
|---|---|
|
FTAM–1 |
Unstructured text files |
|
FTAM–2 |
Sequential text files |
|
FTAM–3 |
Unstructured binary files |
|
NBS–9 |
NBS file directories |
|
INTAP–1 |
INTAP record files ? |
7.2.2.7. Activity Attributes
Activity attributes are descriptive properties whose values portray the conditions of an association. As conditions change, the values of activity attributes change.
Activity attributes assign values to FTAM properties that express FTAM concepts. The value of any activity attribute is meaningful on a given open system only if that attribute corresponds to an actual property of the system's real filestore. Some activity attributes convey information about the initiator: for example, its identity and address. Some activity attributes define a specific instance of the virtual-filestore model: for example, the current value of file attributes. Still other activity attributes convey current information about the regime (and any nested regime): for example, the current location.
7.2.3. File-Service Model
The file-service model is a description of the communications features that support filestore actions. The file-service model defines services. (For an overview of service concepts, see Section 7.2.3.2, ''FTAM Services''.) The model also defines intervals of FTAM communications called regimes, each of which accommodates a distinct set of file services.
7.2.3.1. Regimes
The FTAM regime controls the binding of two FTAM entities to an association.
The file-selection regime describes the procedure by which an initiator selects and deselects a file. The selection process allows an initiator to create a file and then select it. The deselection process allows an initiator to deselect or delete a file.
An initiator can select only one file at a time. However, after deselecting a file, the initiator may be able to select another file during an ongoing FTAM regime. Where available, this capability enables manipulation of a series of files during a single FTAM regime. Note that for the FTAM software, each FTAM command initiates a unique association and file-selection regime.
The file-open regime controls access to the contents of a currently selected file.
The data-transfer regime controls data transfer. A sequence of read, write, or both read and write data-transfer regimes is possible during a given open regime.
Regimes are nested within one another in the same order in which they have just been listed. Figure 7.6, ''Nesting of FTAM Regimes'' illustrates this nesting order.
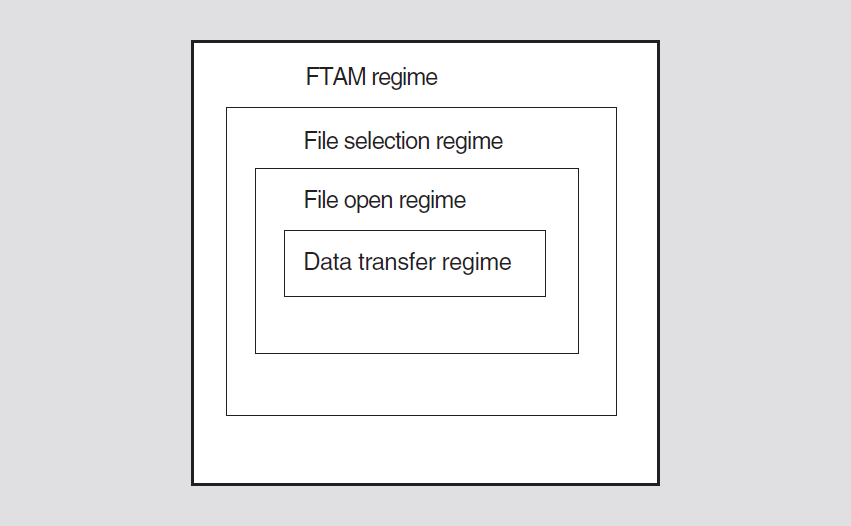
An FTAM regime is always the first to be formed and the last to be terminated. Normally, each regime persists until any nested regime ceases, thereby ensuring that files receive predictable and orderly treatment.
7.2.3.2. FTAM Services
FTAM services are interfaces that access functions of FTAM's service providers and of peer FTAM entities. The FTAM standard defines services both for basic communications functions (such as starting or stopping data-transfer activities) and for filestore services (such as opening and closing files, reading file attributes, and reading or writing data).
|
FTAM File Service? | Source | Type (confirmed or unconfirmed) | Explanation |
|---|---|---|---|
|
F-BEGIN-GROUP |
Initiator |
Conf. |
Signals the beginning of a set of grouped service primitives within a regime that the responder must process together. |
|
F-CANCEL |
Either?, as sender or receiver |
Conf. |
Cancels a data-transfer activity. |
|
F-CHANGE- ATTRIBUTE |
Initiator |
Conf. |
Modifies the file attributes of a selected file. |
|
F-CLOSE |
Initiator |
Conf. |
Releases the regime established by the F-OPEN service. |
|
F-CREATE |
Initiator |
Conf. |
Either creates a specified file and then selects that file or selects an existing file; also binds the selected file to the FTAM regime. |
|
F-DATA |
Either?, as sender |
Uncf. |
Transmits bulk file data from an opened file. |
|
F-DATA-END |
Either?, as sender |
Uncf. |
Indicates completion of a data transfer (by sender). |
|
F-DELETE |
Initiator |
Conf. |
Releases the binding between an FTAM regime and a specified file in such a way that the selected file ceases to exist. |
|
F-DESELECT |
Initiator |
Conf. |
Releases the binding between an FTAM regime and a specified file. |
|
F-END-GROUP |
Initiator |
Conf. |
Signals the end of a set of grouped services. The responder begins processing the grouped services after receiving an F-END-GROUP indication. |
|
F-ERASE |
Initiator |
Conf. |
Removes a specified FADU from an opened file. |
|
F-INITIALIZE |
Initiator |
Conf. |
Creates and binds an FTAM regime to an association between two FTAM entities. |
|
F-LOCATE |
Initiator |
Conf. |
Locates a specified FADU of an opened file. |
|
F-OPEN |
Initiator |
Conf. |
Establishes the processing mode, presentation contexts, and concurrency controls for data transfer or access for a selected file. |
|
F-P-ABORT |
Any service provider |
Uncf. |
Dissolves unconditionally an FTAM regime and its binding to an association. |
|
F-READ |
Initiator |
Uncf. |
Initiates a bulk data transfer from the responder (in the role of sender) to the initiator (in the role of receiver). |
|
F-READ-ATTRIBUTE |
Initiator |
Conf. |
Reads the file attributes of the currently selected file. |
|
F-SELECT |
Initiator |
Conf. |
Selects an existing file and binds it to the FTAM regime. |
|
F-TERMINATE |
Initiator |
Conf. |
Gracefully dissolves an FTAM regime and unbinds it from its association. |
|
F-TRANSFER-END |
Initiator |
Conf. |
Confirms completion of a data transfer. |
|
F-U-ABORT |
Initiator or responder |
Uncf. |
Dissolves unconditionally an FTAM regime and its binding to an association. |
|
F-WRITE |
Initiator |
Uncf. |
Initiates a bulk data transfer from the initiator (in the role of sender) to the responder (in the role of receiver). |
When negotiating a service, FTAM entities exchange FTAM service primitives that carry FTAM PCI data as parameters. Some parameters carry association-specific information, such as the identities of the FTAM entities or action results. Other parameters carry protocol-specific information, such as the active values for file attributes and permitted filestore actions (both for the initiator and for concurrent users).
7.2.3.3. Relationship of Services to Regimes
Except for the grouping services, each service always occurs within a single type of regime. Furthermore, each constituent service of a regime occurs during a specific phase of the regime. The only other exceptions are the F-P-ABORT and F-U-ABORT services, which can occur at any time once the FTAM regime is established. Figure 7.7, ''Relationship of File Services to Regimes'' shows the general relationship of services to their regimes.
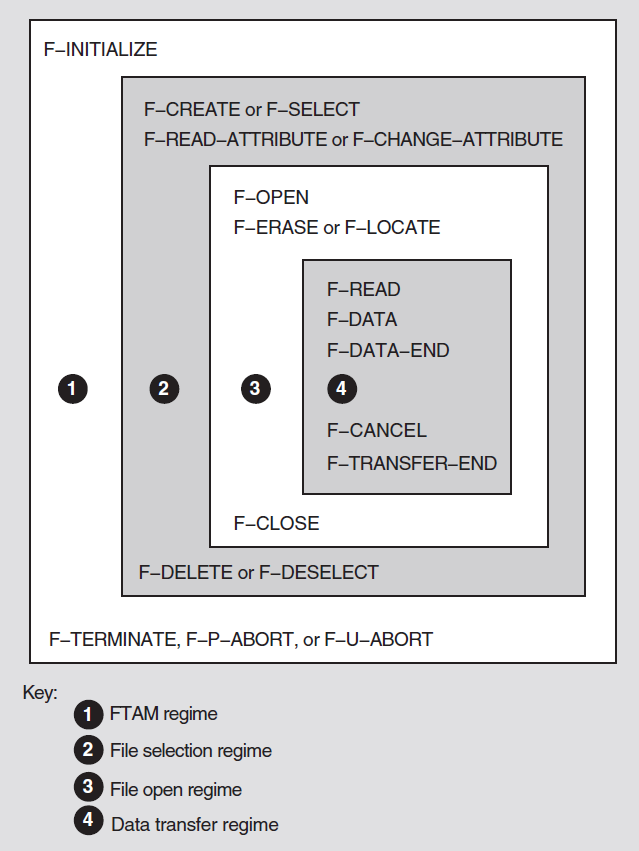
7.2.4. The FTAM File Protocol
The FTAM file protocol implements a series of operational rules that govern the FTAM communications and the operations of file services during an association. These rules are implemented by the FTAM protocol machine (FPM). Acting for an initiator, the FPM issues request service primitives, and acting for a responder, the FPM issues indication service primitives.
The FPM ensures that a requested progression of valid file services occurs.
7.2.5. Summary of the FTAM Operation Overview
Virtual-filestore model
The virtual-filestore model defines a hierarchical file model with its essential file structures and a set of possible filestore actions. Document types help FTAM entities communicate about file structures and filestore actions.
File-service model
The file-service model defines the available FTAM services, the service parameters carried by each service primitive, the sequencing of file services into standard regimes, and the activity attributes that dynamically describe the current conditions of a regime, a file, the virtual filestore, and the initiator.
The file protocol
The file protocol defines the communications rules that permit the exchange of file information between open systems. These rules are implemented by software called the FTAM protocol machine (FPM).
The interplay among the elements of the virtual-filestore and file-service models and the protocol machines allows open systems to build common views of each other's files and to act on each other's files in controlled, mutually understood ways.
7.3. Overview of ACSE
The Association Control Service Element (ACSE) contributes to every FTAM entity. ACSE is a service provider to the FTAM service element. The ACSE protocol and services provide facilities for establishing and releasing associations between any application entities.
7.3.1. Establishing an Association
For each association, ACSE establishes an application context. An application context is an explicitly identified set of one or more application service elements (in this case, FTAM), related options, and any other necessary information or rules for an association.
When requesting an association, the FTAM protocol machine supplies the information that the FTAM regime requires. Using an association-establishment service (A-ASSOCIATE), ACSE passes this information down to the Presentation layer as user information in a connection request. Presentation then specifies it as user information to Session.
The resulting presentation and session connections have a one-to-one correspondence to the association. A-ASSOCIATE also carries parameters that affect the behavior of Presentation and Session for the current connection. For example, A-ASSOCIATE negotiates which Session functional units are available during a connection.
7.3.2. Terminating an Association
When the FTAM initiator issues an F-TERMINATE request, ACSE submits an A-RELEASE request to the Presentation release (P-RELEASE) service. This is a confirmed service. If the negotiated-release functional unit is negotiated, the acceptor can refuse the release. Data in transit is preserved.
7.3.3. ACSE Services
|
ACSE Service |
Type? |
Explanation |
|---|---|---|
|
A-ASSOCIATE |
Conf. |
Initiates an association by those application-service-element (ASE) procedures identified by the application-context-name parameter; submits requests to the underlying presentation connection service (P-CONNECT). |
|
A-RELEASE |
Conf. |
If successful, causes the completion of the use of an association using those ASE procedures identified by the application context. Preserves the data during transit. |
|
A-ABORT |
Uncf. |
Causes the abnormal release of the association with the possible loss of information in transit; submits requests to the underlying presentation-user abort service (P-U-ABORT). |
|
A-P-ABORT |
Uncf. |
Indicates the abnormal release of the association as a result of action by the underlying presentation service with the possible loss of information in transit; receives indications from the underlying presentation-provider abort service (P-P-ABORT). |
Chapter 8. Introduction to Presentation and Session Layers
Presentation and session entities provide the presentation and session connections. To form an association, FTAM and Virtual Terminal entities require a corresponding presentation entity and session entity. For the FTAM and VT software, these presentation and session entities occur within the same process as the FTAM and VT entities.
The combined effect of the presentation and session entities is to manage data transfer for application entities. For OSI applications, such as FTAM or VT, Presentation handles syntax transformation. Presentation also establishes presentation contexts and manages them if necessary. Presentation and Session both perform connection management functions for their own connections. Session also transfers information and manages each dialogue between peer application entities. Presentation supports this use of Session services by providing the Application layer with a set of services that correspond to the data-transfer and dialogue-management services of the Session layer.
This chapter considers each of these tasks and the services that perform them.
8.1. Context Management (Presentation)
Before data exchange can occur, a connection must have at least one presentation context. A presentation context is a pair of abstract and transfer syntax names. An initiator specifies the names of one or more abstract syntaxes. Presentation then negotiates the name of the transfer syntax to be used with each instance of an abstract syntax in a specific presentation context. The FTAM and VT software requires the Basic Encoding Rules for ASN.1 as its transfer syntax.
If a connection has multiple presentation contexts, they can be nested. To ensure the integrity of each presentation context, Presentation offers context-management functions to coordinate negotiations for new presentation contexts during a connection. Note that the FTAM and VT software always establish all of their presentation contexts when establishing an association and do not use context-management functions.
8.2. Connection Management (Presentation and Session)
Both Presentation and Session possess their own connection-establishment and connection-termination services. For each association, the Presentation and Session layers require connections. When forming a connection, ACSE activates the presentation connection-establishment service. In turn, Presentation activates the session connection-establishment service. When negotiating its connection, Presentation also negotiates specialized sets of services (functional units) for both its own connection and for the underlying Session connection. Note that the session-requirements parameter of A-ASSOCIATE determines the functional units that Presentation negotiates.
8.3. Dialogue Control (Presentation and Session)
Session services perform the actual dialogue control. Session segments a dialogue into a series of activities. An activity is a specific period during which data exchange can occur. However, the corresponding Presentation services determine the parameter values for a given association. Requests to Presentation for service primitives to manage an association's dialogue invoke a corresponding primitive at the Session layer.
8.4. Information Transfer (Presentation and Session)
Presentation transforms data and sends the transformed data to Session. Session services then manage the actual information transfer.
8.5. Presentation and Session Services
|
Service? |
Type? |
Explanation |
|---|---|---|
|
Connection Management | ||
|
P/S-U-ABORT |
Uncf. |
Generates a user-initiated abort. |
|
P/S-CONNECT |
Conf. |
Establishes a connection. |
|
P/S-RELEASE |
Conf. |
Releases a connection with an orderly (negotiated) end. |
|
P/S-P-ABORT |
Uncf. |
Generates a provider-initiated abort. |
|
Context Management | ||
|
P-ALTER-CONTEXT? |
Conf. |
Manages presentation contexts by deleting old contexts, negotiating additional contexts, or both. |
|
Dialogue Control | ||
|
P/S-ACTIVITY-DISCARD |
Conf. |
Allows an activity to be abnormally terminated with the implication that the work so far achieved will be discarded and cannot be resumed; controlled by the major activity token; can cause the loss of session service data units (SDUs). |
|
P/S-ACTIVITY-END |
Conf. |
Ends an activity and can set a major synchronization point; controlled by the major activity token. |
|
P/S-ACTIVITY-INTERRUPT |
Conf. |
Allows an activity to be terminated abnormally with the implication that the work so far achieved will be retained and can be resumed; use is controlled by the major activity token; can cause the loss of session SDUs. |
|
P/S-ACTIVITY-RESUME |
Uncf. |
Indicates that a previously interrupted activity is reentered; use is controlled by the major activity token. |
|
P/S-ACTIVITY-START |
Uncf. |
Indicates entering a new activity; use is controlled by the major activity token. |
|
P/S-CONTROL-GIVE |
Uncf. |
Allows a session-service user to surrender all available tokens to a peer session-service user. |
|
P/S-P/S-EXCEPTION-REPORT |
Uncf. |
Reports unexpected events and possible errors that originate at that layer. |
|
P/S-RESYNCHRONIZE |
Conf. |
Resynchronizes connections. |
|
P/S-SYNC-MAJOR |
Conf. |
Uses major synchronization points to restore the appropriate active contexts when the connection is resynchronized or interrupted. |
|
P/S-SYNC-MINOR |
Conf. |
Uses minor synchronization points to restore the appropriate active contexts when the connection is resynchronized or interrupted. |
|
P/S-TOKEN-GIVE |
Uncf. |
Relinquishes one or more specific tokens for accessing and employing the corresponding services. |
|
P/S-TOKEN-PLEASE |
Conf. |
Requests one or more specific tokens for accessing and employing the corresponding services. |
|
P/S-U-EXCEPTION-REPORT |
Uncf. |
Reports unexpected events and possible errors for a service user. |
|
Information Transfer | ||
|
P/S-CAPABILITY-DATA |
Conf. |
Sends data outside of an activity. |
|
P/S-DATA |
Uncf. |
Sends user data as normal data that can be subject to token control. |
|
P/S-EXPEDITED-DATA |
Uncf. |
Sends data that has a higher priority than normal. |
|
P/S-TYPED-DATA |
Uncf. |
Sends data even when the requester lacks a normally required token. |
Chapter 9. The OSI Application-Entity Database
The FTAM and Virtual Terminal applications require you to manage the OSI application-entity database. This database stores addressing information for aliases that represent FTAM and VT applications and listeners.
9.1. About The OSI Applications Database
sys$system:isoapplications.dat
/etc/isoapplications
isoapplications file:Addressing information about remote applications, local listeners, and source aliases.
Information that allows retrieval of the necessary addressing information from the X.500 Directory.
The isoapplications file can contain information exclusively from the first
category, information exclusively from the second category, or information from both
categories.
9.1.1. Support For X.500 Directory Service
The addresses of the local FTAM and VT applications can be registered in the X.500 Directory
by means of dxim, the DEC X.500 Administration Facility. On UNIX, you
can do this by means of the /usr/sbin/osiapplsetup procedure. On
OpenVMS, you must register these applications manually.
If you want to configure the FTAM and Virtual Terminal software to work in conjunction with the X.500 Directory, then you must have the base component of the DEC X.500 Directory Service product installed on your system.
On OpenVMS, you must choose the "base kit" component from the DEC X.500 Installation menu.
On UNIX, you must install the DXDABASE nnn (DEC X.500 base) subset, where nnn is the product version number.
Configuring FTAM and VT to retrieve addressing information from the X.500 Directory is optional. The FTAM and VT software does not require that the DEC X.500 Directory Service software be installed for FTAM and VT to work properly.
The rest of the documentation assumes that you are familiar with basic X.500 concepts and terminology. For additional information on the X.500 Directory, or X.500 Directory Service, refer to DEC X.500 Directory Service Management.
9.1.2. Updating isoapplications
The isoapplications file is readable by all, but it can be written to only by a
privileged user. The database entries can be modified using any text editor, or on
UNIX you can use the /usr/sbin/osiapplsetup procedure. For information
on the /usr/sbin/osiapplsetup procedure, see Chapter 12, "Managing FTAM and Virtual Terminal (UNIX)".
The entries in the isoapplications database must conform to the Address,
Distinguished Name, or Pattern formats. See Section 9.2, ''Entry Formats in isoapplications'' for
information on these formats.
9.2. Entry Formats in isoapplications
isoapplications has one of three formats:Address format
Distinguished Name format
Pattern format
Each format of entry contains an alias field and an application-name field. An alias is a short name that refers to an instance of FTAM or
VT on a particular system. In the isoapplications file, the alias expands
either to a full OSI address, or to an X.500 Distinguished Name. Aliases do not have to
be unique in isoapplications.
The aliases used in isoapplications do not have to correspond to node names since
they are already references to applications that reside on a node. Also, users specify
these aliases within commands; therefore, a brief alias name is easier to use.
The order of the entries in isoapplications is significant. Section 9.4, ''How Entries in isoapplications Are Used'' describes in detail how the entries are used to generate an address for a local
listener or remote FTAM or VT application.
# - pound sign \ - backslash / - slash : - colon
The value of the application-name field indicates the OSI Application with which the entry is associated. The value of this field is either FTAM or VT.
9.2.1. The Address Format
Entries of the Address format support the first category of information mentioned in Section 9.1, ''About The OSI Applications Database''.
alias :application-name:ap-title:ae-qualifier:psel.ssel.tsel.nsap, transport_options;
nsap, transport_options;
:
nsap, transport_options:
ap-title is not required, the following entry for
FTAM can be
specified:remote_system :FTAM:::psap.ssap.tsap.%x4145418715004108002B0DC29621:
remote_system :VT:::psap.ssap.tsap.%x4145418715004108002B0DC29621:
The pound sign (#) is used for comments and can be located anywhere in the file.
The backslash (\) is used at the end of a line as a continuation character.
Table 9.1, ''ISO Application-Entity Database Address Format Components'' describes each component in the Address format entry.
|
Component |
Explanation | ||
|---|---|---|---|
|
|
Name of the alias that you intend to use when referring to a system. The alias must be delimited from the other fields with a colon. This field is mandatory. | ||
|
|
Name of the OSI application that will use the address.
This component of the entry allows the same alias to be used
for multiple applications. Thus, the alias
The | ||
|
|
Application-process title by which the remote application is known (FTAM or VT). This field is optional. Object identifier values are the valid values for this field. | ||
|
|
Application-entity qualifier that helps to further distinguish the AP-title. This optional field is an integer field. | ||
|
|
Presentation service access point selector. This optional value can be any string or hexadecimal value. | ||
|
|
Session service access point selector. This optional value can be any string or hexadecimal value. | ||
|
|
Transport service access point selector. For aliases representing remote systems, this value can be any string or hexadecimal value. The TSEL must be unique for each responder on the local system. | ||
|
|
Network service access point. The NSAP can be either an OSI address or an Internet address. If you use an Internet address, use a 4-byte address followed by a port number. For example, the address could be 120.0.0.1.102, where 120.0.0.1 is the 4-byte address and 102 is the port number. You can find additional information on Internet addresses and port designations in the UNIX System and Network Management Guide. For a remote system, you must ask the manager of the
remote system or the network manager for this information.
For the local system, use the | ||
|
|
Selectable transport options for each NSAP specified in the database entry. Including transport options information is optional. Enter all transport option names in lowercase letters. The transport options are: | ||
|
Option |
Value |
Default | |
|
|
Either |
| |
|
|
The name of the transport characteristics, such as
|
| |
Note
The value for the SAP selectors can include character strings or hexadecimal strings. Hexadecimal strings must be preceded by %x or %X (for example, %X1010).
PSAP..TSAP.NSAP
9.2.1.1. Using Transport Options
If you specify more than one NSAP with transport options, FTAM and VT attempt to make remote connections to the NSAP and its transport options in the order in which they appear in the ISO application-entity database.
- If you specify a transport template, remember that it points to a network template. It is important that your templates are properly configured. Refer to your Network Management documentation for information about creating templates.
Note
Use the Network Control Language (NCL)
osi transport templateentity to create and manage transport templates.
remote_system :FTAM:::psap.ssap.%x0001.%x4945418715004108002B0DC29621, \provider=osi,template=default;%x47004AA000400351121,provider=osi,template=cons; \120.0.0.1.102,provider=rfc1006:
remote_system :VT:::psap.ssap.%x0002.%x4945418715004108002B0DC29621, \provider=osi,template=default;%x47004AA000400351121,provider=osi,template=cons; \120.0.0.1.102,provider=rfc1006:
The OSI application (FTAM or VT) uses the selectors
psap.ssap.tsap.%x4945418715004108002B0DC29621over theosiprovider using thedefaulttemplate to attempt a remote connection.If the connection request fails, the application makes a second remote connection request using
psap.ssap.tsap.%x47004AA000400351121over theosiprovider using theCONStemplate.If this second request fails, the application attempts a third remote connection request using address
psap.ssap.tsap.120.0.0.1.102over therfc1006provider.If this request fails, the application stops making connection requests since there are no other NSAPs specified for the alias.
9.2.2. The Distinguished Name Format
Entries of the Distinguished Name format support the second category of information mentioned in Section 9.1, ''About The OSI Applications Database''.
alias :application-name:transport_template_list:x500_distinguished_name:The application-name field contains the name of the
application associated with the entry. The value of this field can be either FTAM or
VT.
transport_template_list field lists the
names of the transport templates to use when communicating with the application
identified by the X.500 Distinguished Name. The
transport_template_list takes the
following
form:template=template1, template2,...:
The x500_distinguished_name field contains an X.500
Distinguished Name of a particular FTAM or Virtual Terminal application. In the
X.500 Directory, the object entry identified by this Distinguished Name is
associated with a presentation address. The X.500 Distinguished Name is used to
query the X.500 Directory for the presentation address of the FTAM or VT application
in question.
The colon (:) at the end of the Distinguished Name denotes the end of the Distinguished Name. It is not considered to be a part of the Distinguished Name.
The templates are used in conjunction with the presentation address of the application, as returned by the X.500 Directory. For example, the presentation address of the application may contain more than one NSAP. In establishing a connection with the application, the first template is used with the first NSAP in the presentation address. If the connection attempt fails, then the first template is used with the next NSAP in the presentation address. If there are no more NSAPs to try, the next template in the list of templates is used with the first NSAP in the presentation address, and so on, until either a connection is established with the application or you run out of templates.
isoapplications may look like
this:foo :VT:template=template1,template2:/c=us/o=widgetco/cn=alias/cn=vt:
foo
were:psel.ssel.tsel.nsap1,nsap2,nsap3
foo:template1, psel.ssel.tsel.nsap1 template1, psel.ssel.tsel.nsap2 template1, psel.ssel.tsel.nsap3 template2, psel.ssel.tsel.nsap1 template2, psel.ssel.tsel.nsap2 template2, psel.ssel.tsel.nsap3
9.2.3. The Pattern Format
Entries of the Pattern format support the second category of information mentioned in Section 9.1, ''About The OSI Applications Database''.
* :application-name:transport_template_list:incomplete_distinguished_name:The asterisk (*) is a special form of the alias. It is considered to match all input provided to the FTAM and VT commands.
The application-name field contains the name of the
application associated with the entry. The value of this field can be either FTAM or
VT.
The incomplete_distinguished_name also contains one or more
asterisks (*). At run time, each asterisk is replaced by the input provided to the
FTAM and VT commands, thereby creating a complete X.500 Distinguished Name. For
FTAM, user names and passwords are not included in any of the substitutions.
The x500_distinguished_name field contains the X.500
Distinguished Name of a particular FTAM or Virtual Terminal application. In the
X.500 Directory, the object entry identified by this Distinguished Name is
associated with a presentation address. The X.500 Distinguished Name is used to
query the X.500 Directory for the presentation address of the FTAM or VT application
in question.
The colon (:) at the end of the Distinguished Name denotes the end of the Distinguished Name. It is not considered to be a part of the Distinguished Name.
transport_template_list field lists the
transport templates to use when communicating with the application identified by the
X.500 Distinguished Name. The
transport_template_list takes the following
form:template=template1, template2,...:
See the description in Section 9.2.2, ''The Distinguished Name Format'' to understand how templates used in conjunction with the presentation address of the application.
isoapplications may look like the following:* :VT:template=default:/c=us/o=widgetco/cn=*/cn=vt:
Note
At the time of this writing, ISO documents regarding the storage of Form2 (Object Identifier) AE-titles in the X.500 Directory are in draft form. Therefore, the FTAM and Virtual Terminal software will only query the X.500 Directory for the value of the presentation address attribute of the object identified by the X.500 Distinguished Name.
If a particular end system implementation requires that a Form2 AE-title
be sent, you cannot use the X.500 Directory, but must instead use an Address
Format entry in the isoapplications file.
The FTAM and Virtual Terminal software do not currently support specification or transmission of Form1 (Directory Name) AE-titles.
9.3. Managing the OSI Applications Entity Database
You can edit the isoapplications file directly, using a text editor. See Section 9.2, ''Entry Formats in isoapplications'' for information on the entry formats in the file.
On UNIX, you can run the /usr/sbin/osiapplsetup procedure to configure addressing
information that allows the local FTAM and VT initiators to communicate with local
listeners or remote applications. This procedure adds addressing information to the
isoapplications file.
By default, the FTAM and Virtual Terminal configuration procedure adds entries to the
isoapplications file in the following order: Distinguished Name format,
Address format, and Pattern format.
See Section 12.1, ''Managing the OSI Application Entity Database'' for information on running the
/usr/sbin/osiapplsetup procedure.
9.4. How Entries in isoapplications Are Used
Each entry in isoapplications can be considered to be a rule. The first rule that
matches the user's input alias and application (FTAM or VT) is applied to retrieve the
required addressing information. If applying the rule does not produce complete and
syntactically correct information, then the search in isoapplications
continues until there are no more rules, or until complete and syntactically correct
addressing information is retrieved. Thus, the order of entries in
isoapplications is significant.
isoapplications
file:* :VT:template=default:/c=us/o=org1/cn=*/cn=vt: remote_alias :VT:template=default:/c=us/o=org1/ou=docs/cn=remote_alias/cn=vt: remote_alias :VT:::psap.ssap.tsap.%x4145418715004108002b0dc29621:
$ set host/vtp remote_alias
or
% ologin remote_alias
the following will happen:
remote_alias, will be compared to the text in the alias part of
the first entry. Since the text in the alias part of the first entry is an asterisk, it
is considered to be a match. The value of the application-name field in the entry, VT,
is also a match. Therefore, all asterisks in the Pattern in the first entry are replaced
with remote_alias, producing the following Distinguished
Name:/c=us/o=org1/cn=remote_alias/cn=vt
The X.500 Directory is queried for the presentation address associated with the X.500 Directory entry specified by the Distinguished Name. If the query is successful and a complete and syntactically correct address is returned, then the address is used by VT to establish a Virtual Terminal association with the remote application.
If the query fails, then the search continues in the isoapplications file. The
second entry in the file matches the user's alias and application. The X.500 Directory
is queried for the presentation address associated with the X.500 Directory entry
specified by the Distinguished Name. If the query is successful and a complete and
syntactically correct address is returned, then the address is used by VT to establish a
Virtual Terminal association with the remote application.
If the second query fails, then the search continues in the isoapplications file.
The final entry in the file matches the user's alias and application. The provided
address in the entry establishes a Virtual Terminal association with the remote
application.
Note
The FTAM and VT software uses information in the file to bind to an X.500 Directory System
Agent. On OpenVMS, this file is:
dxd$directory:dxd$dua_defaults.dat
The FTAM and VT software uses information in the file to bind to an X.500
Directory System Agent. On UNIX, this file is:
/etc/dua.defaults
9.5. Usage Considerations
isoapplications:Using Pattern format entries to retrieve addressing information solely from the X.500 Directory may allow you to store less information in
isoapplications, depending on the Distinguished Names of the remote applications on your network.For example, if the naming scheme for your network spans a single organization and country, you may be able to store one or two entries inisoapplications:* :FTAM:template=default:/c=country_name/o=organization_name/cn=*/cn=ftam: * :VT:template=default:/c=country_name/o=organization_name/cn=*/cn=vt:
If the naming scheme is stable for your network, then you could use the Pattern or Distinguished Name entry formats. This can eliminate having to add or change entries to
isoapplicationswhen new nodes are added to your network, or if addressing information on your network changes.If you can assume that the addresses of the remote applications on your network have been stored in the X.500 Directory, and you choose to include only Pattern or Distinguished Name format entries in
isoapplications, then you will not need to obtain the presentation addresses of the remote applications in order to add Address format entries for the remote applications toisoapplications.To retrieve addressing information from the X.500 Directory, a connection must first be made with an X.500 Directory System Agent. Based on the order of entries in
isoapplications, some time may be lost in communicating with the X.500 Directory System Agent, especially if any queries to the X.500 Directory fail.For frequently accessed applications, consider using the Address format for your entries and placing these entries at the top or close to the top of the
isoapplicationsfile. This should decrease the time required for FTAM/VT to retrieve a valid application address.If some applications are rarely used, then the time factor mentioned previously may not be an issue and the Distinguished Name format may be preferable for these applications.
You may want to consider placing Pattern format entries at the end of the
isoapplicationsfile, to provide X.500 lookup for those applications that do not have an explicit entry in the file.
9.6. Determining Service Access Points Selectors for Application Addresses
Before you configure FTAM and VT, you should have the presentation address (also called the upper_layer address) of each remote FTAM and VT application that you expect to access.
sys$system:isoapplications.dat file on your system. This file contains
aliases for:The local VT responder
The local VT/Telnet gateway
The local VT/LAT gateway
The local FTAM responder
Note
If you choose the autoconfigure option during installation, the installation procedure assigns values to each address component for the local FTAM and VT applications.
The FTAM and VT software uses these presentation addresses to differentiate between responders. You also use this information when you manage the ISO application-entity database, which stores addressing information about local and remote FTAM and VT applications or listeners.
Note
The U.S. GOSIP (Government OSI Profile) standard (Version 1.0) specifies that SAP values should be two octets in length.
PSEL..local.%X490004AA000400351121
In this example, the PSEL is PSEL followed by its delimiter and the SSEL's
delimiter, the TSEL is local and the NSAP is
%X490004AA000400351121.
The following sections explain how to specify each component of the application address. If you are unfamiliar with SAPs, see Chapter 6, "General OSI Concepts" and Chapter 10, "Managing FTAM (OpenVMS)" before proceeding with the installation.
9.6.1. Specifying PSEL, SSEL, and TSEL Values
The PSEL and SSEL values in the application address are optional and can be any string, including a hexadecimal string. A hexadecimal string is preceded by %x (or %X). You specify the TSEL value in the same way as the PSEL and SSEL values; however, the TSEL value must be unique for each responder or alias that resides on the same system as another responder or alias. Using the same TSEL value for another alias on the same system can cause addressing problems.
9.6.2. Specifying NSAP Values
To get the NSAP value for remote systems, ask the system manager or the network
manager of the remote system for this information. To get the NSAP value for a local
system, use the ncl show osi transport local nsap command.
ncl> show osi transport local nsap * name
Node 0 OSI Transport Local NSAP %X490004AA000400351121
AT 1991-06-26-16:11:03.775-04:00I0.138
Identifiers
Name = %X490004AA000400351121
-------
Node 0 OSI Transport Local NSAP %X4145418715004108002B0DA48721
AT 1991-06-26-16:11:03.815-04:00I0.138
Identifiers
Name = %X4145418715004108002B0DA4872
-------9.6.3. Specifying NSAP Values for X.25
The X.25 Access module can be set up such that either X.25 NSAPs or X.25 DTE addresses are
passed to it. If X.25 NSAPs are passed to the X.25 Access module, specify the NSAP
in the alias definition in isoapplications.dat in the normal NSAP
location.
local_ftam_nsap :FTAM:::RMS.FTAM.OSIF.%x103631346175551111,provider=osi,template=osit$loop_cons:
If DTE addresses are passed to the X.25 Access module, you must define a logical name in the
OSIT$NAMES logical name table for the DTE of the remote system. You then specify
this logical name in the NSAP field of the alias definition in
isoapplications.dat.
$ define/table=OSIT$NAMES REMOTE_DTE 031346175551111
local_ftam_dte :FTAM:::RMS.FTAM.OSIF.REMOTE_DTE,provider=osi,template=osit$loop_cons:
Chapter 10. Managing FTAM (OpenVMS)
You will need to perform certain management tasks in order to set up and manage an FTAM system environment. This chapter considers the relationship of the FTAM software and an OpenVMS system, and explains the required tasks.
10.1. Required System Resources
10.1.1. Quotas for Initializing FTAM Software
The DECnet-Plus for OpenVMS distribution kit requires that the OpenVMS OSI default account
(whose default name is osit$default) has approximately 20,000 units of
BYTLM. The FTAM installation procedure locates or creates this default account and
ensures that it has sufficient BYTLM.
Refer to your OSAK installation documentation for the required BYTLM quotas.
10.1.2. User Quotas
The BYTLM quota requires at least 12,288 bytes. (The typical value for the BYTLM quota of each OpenVMS user process is 8,192.)
The ASTLM (AST queue limit) quota requires a value of at least 8. (The typical value for the ASTLM quota of each OpenVMS user process is 24.)
The FILLM (open file limit) quota requires a value of at least 10. (The typical value for the FILLM quota of each OpenVMS user process is 20.)
10.2. Required Privileges
Starting FTAM by executing
osif$startup.comrequires a number of privileges, which exist in the system account. Therefore, start FTAM from the system account.Using FTAM DCL commands and enabling the FTAM tracing facility requires only TMPMBX and NETMBX privileges.
Displaying event messages requires OPER privileges for defining network operator consoles.
10.3. The OSAKserver
The OSAKserver is a background process responsible for handing over association indications to addressed OSI applications.
The OSAKserver contains a database of addresses it compares to the address in an incoming A-ASSOCIATE indication PDU. If these addresses match, the OSAKserver starts an appropriate application process. Refer to your OSAK documentation for more information on the OSAKserver.
10.4. Initializing the OSAKserver and FTAM
You must start the OSAKserver before FTAM can run. Start the OSAKserver by executing the startup procedure called
osak$start.com in
sys$startup.
Start FTAM by executing
sys$startup:osif$startup.com.
osif$startup.com. To enable automatic restart, edit the network startup
file (sys$manager:systartup_vms.com) and add a command to execute
osak$start.com and osif$startup.com as
follows:$ @sys$startup:osak$start.com ! osak start-up command file $ @sys$startup:osif$startup.com ! FTAM start-up command file
$ @sys$startup:osak$stop.com
10.5. Event Logging to OPCOM Consoles
FTAM logs significant events by sending event messages to the OpenVMS OPCOM utility. OPCOM
forwards each event message to all network operator consoles on the local system. A
network operator console is a terminal that is enabled for network replies using the DCL
reply/enable=network command. For full information on the
reply command, see the VSI OpenVMS DCL Dictionary.
%%%%%%%%%% OPCOM 31-MAR-1996 09:00:00.00 %%%%%%%%%% message from user SYSTEM on OSIVAX OSI upper layer event detected, PID = 00000046 %OSIS-E-NOADDRCONN, no address found for inbound connect
The preceding message indicates that the OSAKserver did not find the inbound local application address in the OSAK application database.
10.6. Downstream Processing Support
The FTAM responder includes the following support for downstream file processing. The FTAM responder creates a logical name, OSIF$FILEINFO, in the process logical name table of the FTAM responder process.
$ SHOW LOGICAL OSIF$FILEINFO
"OSIF$FILEINFO" [super] = "DKA500:[TMP]FILE1.TXT;1/48" (LNM$PROCESS_TABLE)
= "DKA500:[TMP]TMP.TMP;9/48"This logical name may have multiple translations, one translation for each file that was opened during the FTAM association by an FTAM F-OPEN-REQUEST. The information currently available includes the local RMS file name and the FTAM processing mode for the file. Additional information may be provided with future releases. Each piece of information is delimited by a slash ("/").
The processing mode is represented as a decimal number. This is a bit mask, representing the processing mode bits that were set when the file was opened. The meanings for these bits are documented in SYS$LIBRARY:OSIF.H and ISO 8571.
SYS$SYSTEM:OSIF$RESPONDER.COM, the FTAM responder command procedure, contains DCL code demonstrating how this information can be parsed and used. OSIF$RESPONDER.COM uses the information in OSIF$FILEINFO to print out the file information into the OSIF$RESPONDER.LOG log file.
10.7. Controlling RMS Record I/O
|
Logical Name |
Controls |
Unit |
|---|---|---|
|
OSIF_FILE_ALQ |
initial file allocation size |
blocks |
|
OSIF_FILE_DEQ |
extension size |
blocks |
Proper setting of these logical names can enhance the performance of RMS during record-oriented I/O. These logical names are most useful when you know in advance that files received typically exceed a given size.
The values specified in these logical names are used as defaults for the case when the
future_filesize parameter is not supplied in the F-CREATE-REQUEST. If
the future_filesize parameter is not supplied and these logical names are
not defined, the FTAM responder uses the RMS defaults for the device (cluster size and
extend quantity).
$ DEFINE OSIF_FILE_ALQ 500 ! initial size 500 blocks $ DEFINE OSIF_FILE_DEQ 500 ! extend by 500 blocks
The initial file allocation size and extension size can be controlled on the initiator side by
using the /ALLOCATION=n and /EXTENSION=n qualifiers on the copy or
append command.
10.8. Overview of FTAM Addressing
You need to understand addressing information in order to manage an FTAM system. There are two types of communications, outbound and inbound, and each requires a different type of address.
An address for outbound communications (a remote application address) requires a presentation address (p-address), which consists of an upper-layer address and an OSI Transport address. An address for inbound communications (a local application address) consists only of an upper-layer address, which is a p-address without the NSAP or DTE.
10.8.1. Application-Entity Titles (AE-titles)
An application-process title (AP-title) is a value that identifies an OSI application process.
An application-entity qualifier (AE-qualifier) is a value that identifies an application entity, such as FTAM, within an application process.
For a general description of application processes and entities, see Section 7.1, ''FTAM Application Processes and Entities ''.
AE-titles for inbound connections are not supported by the OSAK upper-layer software. AE-titles for inbound connections are therefore meaningless to this implementation and consequently cannot be defined in NCL. AE-titles for outbound connections may, however, be meaningful to a remote OSI implementation.
AE-titles for outbound connections may be specified by including the AE-title specification in
the sys$system:isoapplications.dat file as part of the alias
definition.
For outbound connections, see Chapter 9, "The OSI Application-Entity Database" for a description on how to define an AE-title.
10.9. Managing Inbound Addresses
The FTAM application requires a system manager or a designated support person to be
responsible for maintaining the osak application database.
The osak application database holds addressing information for inbound
connections to FTAM. The OSAKserver uses this information in managing inbound OSI
communications for processes in the upper layers.
Section 10.9.10, ''The DAP–FTAM Gateway Default Account '' explains DAP–FTAM Gateway management.
10.9.1. The Local Application Address Format
The local application address is an upper-layer address that contains transport, session, and presentation selectors. Upper-layer addresses take the following format:
p-selector . s-selector . t-selector .
Any of these selectors could be null.
Together, the service access point (SAP) selectors form an upper-layer address for the local
FTAM responder. You can create a new address for each remote application by adding
it to the osak application database. You can also locate an existing
address within this database that you want a remote system to use. Give the selected
upper-layer address to the system manager of the remote system. Note that you must
also give your system's NSAP to that system manager. For additional information on
upper-layer addresses, see Chapter 9, "The OSI Application-Entity Database".
10.9.2. File Designation
This is the name of the FTAM responder command file that is to be executed by the OSAKserver
upon receiving an inbound FTAM connection request. A responder command file is
mandatory. The installation verification procedure (IVP) creates a responder command
file for FTAM called sys$system:osif$responder.com, which you can use
in its original form or copy to another file name and adapt to your needs. For
example, to research interoperability issues, you might want to modify your
osif$responder.com file to enable tracing only under testing
conditions.
10.9.3. OpenVMS User Name
This is the user name of the OpenVMS account in which inbound connections reside. The
responder has owner privileges whenever it runs in a user's account. By default,
owner privileges allow complete access to files, which allows the responder to read,
write, and delete files. You can restrict these privileges for a given file or
directory by using the DCL set protection command.
10.9.4. OpenVMS Login Password
This is the login password associated with the specified user name. If the user's account is password protected, accessing the FTAM responder requires that both the password and the user name reside in the address database. If the user's account lacks password protection, omit this parameter from the address database.
10.9.5. OpenVMS Account
This is the OpenVMS account name corresponding to the user name. You can specify an account name for billing purposes. Note that OpenVMS ignores the account name. For information about accounts on OpenVMS systems, refer to the DECnet-Plus management documentation.
10.9.6. Transport Class
The OSI standards define five different protocol classes for the Transport layer. These protocol classes are labeled 0, 1, 2, 3, and 4. OSI Transport implements three transport classes (0, 2, and 4). All three classes are available for negotiation at connection time. The class selected is negotiated based on the classes supported by the peer user. In negotiation, the highest class supported by both entities is selected.
10.9.7. Transport Options
The transport options that are available to FTAM include checksums, expedited, extended format, and flow control. You can specify any combination of these options. For more information, refer to your DECnet/OSI for UNIX management documentation.
10.9.8. The FTAM Default Address
Remote file access for FTAM is equivalent to remote file access on a DECnet node. The OpenVMS
OSI default account serves the same functions as the DECnet default account. The
default name of the OpenVMS OSI default account is osit$default.
On OpenVMS operating systems for Version 5.7 and later, you need a password to access the
osit$default account.
rms.ftam.osif., which uses the account
osit$default. If this account name is nonexistent on your system,
then the default address will not work. The default address has the following
information in the address database.|
Item |
Default Value |
|---|---|
|
Address |
|
|
Service |
|
|
File |
|
|
User |
|
|
Password |
There is no default password |
10.9.9. Example of Inbound Address Entry
$ ncl create osak application """RMS""/""FTAM""/""OSIF""/NS+, CLNS" $ ncl create osak application """RMS""/""FTAM""/""OSIF""/NS+, CLNS" - invocation [ap = -1, ae = -1] $ ncl set osak application """RMS""/""FTAM""/""OSIF""/NS+, CLNS" - invocation [ap = -1, ae = -1] startup information - "user=OSIT$DEFAULT, file=SYS$SYSTEM:OSIF$RESPONDER.COM" $ ncl set osak applic """RMS""/""FTAM""/""OSIF""/NS+, CLNS" startup policy
$ ncl create osak application """""/""FTAM""/""OSIF""/NS+, CLNS"
10.9.10. The DAP–FTAM Gateway Default Account
When the DAP–FTAM Gateway (also referred to as the gateway) is installed, the
installation procedure creates the gateway account. The name of the default gateway
account is osigtwy and the name of the default directory is
[OSIF$GTWY].
Account Parameters
When the gateway account is created, several critical flags and UAF (User Authorization File) fields are set by the installation procedure. For the DAP–FTAM Gateway to function effectively, these should not be modified.
nocaptiverestricteddefclinodisuserlockpwddismaildisctly
|
Critical UAF Values for the Gateway Account | |
|---|---|
|
Field |
Value |
|
|
###25 |
|
|
###20 |
|
|
20000 |
|
|
#3072 |
The FAL Session Control Application
The Network Control Language (NCL) database contains a number of session control applications.
One of the objects in the NCL database is the file access listener (FAL), which is
the target for requests made by remote nodes. A command file
(sys$system:fal.exe) is associated with the FAL. This file contains
the program or procedure used to start the FAL object.
When FTAM is installed, a file (sys$system:osif$gtwy.com) is created which
replaces sys$system:fal.exe in the NCL database. The old file name
(sys$system:fal.exe) is then assigned to a symbol that is stored in
sys$system:osif$gtwy.com. In the Gateway account's
login.com, another symbol is assigned to point to
sys$system:osif$gtwy.com.
When a request is directed to the Gateway account, the symbol is redefined to execute the
DAP–FTAM Gateway image. However, if the incoming request was directed to any
other account, the symbol does not get changed and the old file
(sys$system:fal.exe) is executed.
10.10. Managing Outbound Addresses
The FTAM application requires that a system manager or designated support person be
responsible for maintaining the OSI application entity database
(sys$system:isoapplications.dat) and the DAP–FTAM Gateway. You
must also manage other components of the software, depending on the application in
use.
See Chapter 9, "The OSI Application-Entity Database" for additional information on managing the sys$system:isoapplications.dat file.
10.11. Overview of FTAM Operations
The purpose of this section is to help you understand FTAM operations sufficiently to manage FTAM communications effectively. FTAM uses different sorts of processes for initiating connections and for responding to connection requests. This section considers the operation of FTAM processes in both situations.
This discussion assumes that you are familiar with the concepts discussed in Chapter 7, "The Application Layer: FTAM and ACSE " and Chapter 8, "Introduction to Presentation and Session Layers".
The FTAM protocol allows for a limited form of security through FTAM access information. Remote FTAM applications can request any combination of FTAM's initiator ID, filestore password, and filestore account attributes.
For a remote file specification, an FTAM user refers to the remote FTAM application by its application name (alias), plus any required FTAM access information. This application information precedes a file designation, as follows:
alias" initiator-id filestore-password account":: file-designation|
Variable |
Explanation |
|---|---|
|
|
The initiator ID required by a remote FTAM application or null. |
|
|
The filestore password required by a remote FTAM application or null. |
|
|
The filestore account required by a remote FTAM application or null. |
|
|
The unique system-specific information that identifies a remote file using whatever information (device, directory, file name, and so forth) that the remote FTAM application requires to locate that file in its system's real filestore. |
|
FTAM Attribute |
OpenVMS Parameter |
|---|---|
|
Initiator ID |
OpenVMS user name |
|
Filestore password |
OpenVMS login password |
|
FTAM account |
OpenVMS account? |
Examples
a$ftam and b$ftam represent remote FTAM
applications residing on system A and system B, respectively. The file names are
src.file and dst.file.
$ directory/app=ftam/full a$ftam"anon secret"::src.file
a$ftam to
access a remote FTAM application. The command supplies anon as the
initiator identity and secret as the filestore password; it supplies no
account name. The command requests the remote FTAM application to return the
characteristics of the remote file
src.file.$ copy/app=ftam a$ftam"anon secret account"::src.file _$ b$ftam::dst.file
This command accesses the remote FTAM applications identified by the addressing information
associated with aliases a$ftam and b$ftam. The command
supplies FTAM application a$ftam with the initiator identity
anon, the filestore password secret, and the account name
account. The command supplies no access information to
b$ftam. The command requests that the file src.file from
system A be copied to dst.file on system B.
For further information about the FTAM file-specification format and commands, see Chapter 2, "Using FTAM".
10.11.1. Dynamics of Outbound Connections
- FTAM initiates connections in response to an FTAM DCL command issued by a user; for example:
$ delete/app=ftam freunde::"^vol>dir>file.ext"
DCL's Command Language Interpreter (CLI) parses an FTAM DCL command and maps it to an initiator image file:
osif$append.exe, osif$copy.exe, osif$delete.exe, osif$dir.exe, orosif$rename.exe(in thesys$system:[sysexe]directory).The CLI activates the initiator by running the appropriate initiator image file in the OpenVMS user process, which activates the FTAM shareable images for its own use.
The initiator parses the command's file specifications for application names. Then the initiator compares the application names to the entries in the alias file. For example, the preceding
delete/app=ftamcommand specifies an FTAM application namedfreunde, so the initiator looks for the aliasfreunde.The outcome of this parsing determines how the initiator continues, as follows:If none of the specified names exist in the alias file, the initiator attempts to access the files using RMS.
If an alias matches any specified application name, then the initiator uses the FTAM protocol to access all of the files.
- On finding the necessary alias, the initiator reads the alias database entry. For example, for the sample alias,
freunde, the database information might include the information shown in the following table:FTAM Alias Database Entry for FREUNDE
Item
Value
Alias (application name)
FREUNDE
Remote application address
a.b.c.X25%3130608555000013
AP-title
{1 3 9999 1 7}
AE-qualifier
1
Session versions
1,2
- The initiator issues a service request for the F-INITIALIZE service. That service then uses information from the alias database to make service requests for A-ASSOCIATE, P-CONNECT, S-CONNECT, and T-CONNECT. The addressing information from the alias database entry is used as follows:
The ACSE element of the FTAM entity uses the AP-title and AE-qualifier values (if any).
The presentation entity uses the presentation selector.
The session entity uses the session version (if any) and the session selector.
The session entity passes the transport selector and OSI Transport address downward to OSI Transport for processing. For information on OSI Transport operations, refer to the your DECnet/OSI for UNIX management documentation.
On completing the user's file operation, the initiator image exits. By entering another FTAM DCL command, the user can reactivate the initiator, which establishes anew set of connections from within the same OpenVMS user process.
10.11.2. Dynamics of Inbound Connections
The OSAKserver declares itself to OSI Transport as the target for all TSAPs defined in the NCL Session Control module. When a transport connection arrives for one of those TSAPs, the OSAKserver accepts the transport connection.
Each inbound connection request asks for a specific local application address. If that address resides in the OSAK application database in NCL, the OSAKserver retrieves that entry.
For example, the entry for the IVP's default local application address,rms.ftam.osif., provides the OSAKserver with the values in the following table:FTAM Address Database Entry for RMS.FTAM.OSIF.
Item
Value
Service name
ACSE
File name
sys$common:osif$responder.comUser name
osit$defaultLogin password
There is no password for this entity
If the called AP-title or called AE-qualifier is absent from the inbound request, the OSAKserver ignores those parameters.
If the OpenVMS user name, password, and account are valid, the OSAKserver creates an OpenVMS process using the specified user name and password. If the values are invalid, the connection is rejected.
The OSAKserver executes the specified responder command file in that OpenVMS process; the distribution version of this command file is named
sys$system:osif$responder.com. The command file activates the FTAM responder image, which then takes over the transport connection from the OSAKserver.The responder image then establishes an FTAM association and the session and presentation connections. When the connections and association terminate, the responder process waits for the next connect request directed to the same process. The OSAKserver process continues.
Chapter 11. Managing a VT Application (OpenVMS)
The Virtual Terminal responder
The LAT/VT and Telnet/VT Gateways
The OSI application entity database stores addressing information for aliases that represent VT applications.
11.1. Managing the OSI Application Entity Database
The sys$system:isoapplications.dat file is the local database for storing
all the addressing information about remote and local VT applications or listeners. The
aliases used in this file do not have to correspond to node names because they may also
be references to applications. Since users specify these aliases within commands, a
brief alias name is easier to use.
The sys$system:isoapplications.dat file is readable by all, but it can be
written to only by a privileged user. The database entries can be modified using any
text editor, and the entries must conform to the formats described in Chapter 9, "The OSI Application-Entity Database".
11.2. Managing the VT Responder
The VT responder executes as a detached process and waits for inbound association requests. When the responder receives and verifies the application-context-name for an association request, OpenVMS creates a detached process that provides the interactive process context for the remote VT user.
Communication between the VT responder and the detached process is by a pseudoterminal device driver (FTDRIVER). The responder is responsible for all encoding and decoding of data, and interfacing with the OSAK software.
sys$startup:vt_systart.com.Note
The sys$startup:vt_start.com procedure should be invoked
after you start the OSAK software.
The VT startup procedure sys$startup:vt_start.com creates the
vt$names logical name table, and defines a set of logical names within
this table for use by the VT software. The vt$names logical name table is
not deleted when VT is shut down.
LOCAL_VTP, which is then looked up in
sys$system:isoapplications.dat By default, the LOCAL_VTP
alias in sys$system:isoapplications.dat is specified
as:LOCAL_VTP :VT:::%x0001.%x0001.%x0002.%x21, \
provider=osi,template=osit$loop_clns:osit$loop_clns is the name of a template that is created automatically by
DECnet-Plus when OSI Transport is started.
To change the alias that the responder listens on, modify the definition of
VT$VT_LOCAL_ALIAS in the file
sys$startup:vt_systart.com. To change the address that the alias
translates to, modify the definition of the alias in the file
sys$system:isoapplications.dat.
The VT responder can only listen on one address. The transport service access point (TSAP) used by the responder cannot be shared by any other OSI application (such as FTAM).
The number of concurrent associations the VT responder will support is controlled by
the logical name VT$VT_RJOBLIM. The default value of
VT$VT_RJOBLIM is 8. If you want to change this
value, you can modify the definition in the file
sys$startup:vt_systart.com. The value is not dynamic; the responder only
examines the value of VT$VT_RJOBLIM when it initially starts
up.
@ sys$manager:vt_stop.com responder @ sys$manager:vt_start.com responder
sys$startup:vt_start.com procedure is executed, it will compute
the needed resources for the VT responder process. However, the responder also requires
some system resources, the most important of which is nonpaged dynamic memory
(NPAGEDYN). For the default value of VT$VT_RJOBLIM (8), the VT
responder requires a minimum of 14,512 bytes of NPAGEDYN. The formula for computing
minimum NPAGEDYN requirements
is:VT$VT_RJOBLIM * 1696 + 944 = minimum npagedyn
sys$startup:vt_start.com and sys$manager:vt_stop.com
files. Specify RESPONDER as parameter P1. For
example:Lnode $ @sys$startup:vt_start responder %RUN-S-PROC_ID, identification of created process is 0000022E Lnode $ @sys$manager:vt_stop responder %%% VT_RESPONDER is running in process 0000022E %%% Process will be stopped
Stopping the VT responder terminates any current interactive associations.
11.3. Managing the VT Gateways
The VT software supports communication by LAT/VT and Telnet/VT Gateways. Both gateways are bidirectional. The LAT/VT Gateway provides communication from a LAT environment to a VT environment, or a VT environment to a LAT environment. The Telnet/VT Gateway provides communication from an Internet system to a remote OSI system, or from an OSI system to a remote Internet system.
sys$startup:vt_start.com procedure automatically starts both gateways.
To utilize the Telnet/VT Gateway, you must also install the TCP/IP Services for OpenVMS product.Note
If you intend to use the Telnet/VT Gateway, you should execute the
sys$startup:vt_start.com
after you start the TCP/IP Services for OpenVMS
product.
If you intend to utilize the LAT/VT Gateway, you should execute the
sys$startup:vt_start.com
after you start the LAT service.
LOCAL_VTP_LAT, which defaults to the following
address:LOCAL_VTP_LAT :VT:::%x0001.%x0001.%x0003.%x21, \
provider=osi,template=osit$loop_clns:LOCAL_VTP_TELNET :VT:::%x0001.%x0001.%x0004.%x21, \
provider=osi,template=osit$loop_clns:sys$system:isoapplications.dat, then the gateway is not started. Table 11.1, ''Logical Names, Alias Names and Default Addresses'' shows each logical name, default alias name, who uses it, and
the default address associated with that alias name.|
Logical Name |
Alias Name |
Used by |
Default Address |
|---|---|---|---|
|
VT$VT_LOCAL_ALIAS |
LOCAL_VTP |
VT Responder |
|
|
VT$LAT_LOCAL_ALIAS |
LOCAL_VTP_LAT |
LAT/VT Gateway |
|
|
VT$TELNET_LOCAL_ALIAS |
LOCAL_VTP_TELNET |
Telnet/VT Gateway |
|
Note
All responder and gateway aliases must have unique TSAP names in the address. See Chapter 6, "General OSI Concepts" and Chapter 13, "Lower-Layer Addressing Information (OpenVMS)" for more information on the Transport layer.
You can change the alias used by the responder or by one of the gateways, by editing
sys$startup:vt_systart.com and changing the value of the corresponding
logical name. You can change the address associated with each alias by editing
sys$system:isoapplications.dat.
|
Logical Name |
Used by |
Default Limit |
|---|---|---|
|
VT$VT_RJOBLIM |
Virtual Terminal responder |
8 |
|
VT$LAT_RJOBLIM |
LAT/VT Gateway |
4 |
|
VT$TELNET_RJOBLIM |
Telnet/VT Gateway |
4 |
To disable a gateway, simply change the value of the appropriate logical name to 0
(zero). You can also use the sys$manager:vt_stop.comprocedure to stop a
specific gateway (see below).
As with the VT responder, the gateways also consume NPAGEDYN, based on the maximum number of concurrent associations allowed. Using the default values and the same formula as the responder, each gateway needs a minimum of 7,728 bytes of NPAGEDYN.
Both gateways specify the Generalized Telnet profile when initiating an association to another OSI VT system. When accepting an association from a remote OSI VT system, the gateways accept any supported profile (Amode_Default, Telnet or Transparent) specified by the remote OSI system.
sys$startup:vt_start.com and sys$manager:vt_stop.com
files. Specify either LAT or Telnet as parameter P1. For example:
Lnode $ @sys$startup:vt_start telnet %RUN-S-PROC_ID, identification of created process is 000000B5 %RUN-S-PROC_ID, identification of created process is 000000B6 Lnode $ @sys$manager:vt_stop lat %%% VT_LAT_GTWY is running in process 0000012B %%% Process will be stopped %%% LAT_VT_GTWY is running in process 0000012C %%% Process will be stopped
11.3.1. Telnet/VT Gateway
30324. Internet users who want to use the
Telnet/VT Gateway must know both the IP address of the gateway and the port number.
If the logical name is not defined, the gateway does not listen for inbound Telnet connections.Note
The Telnet/VT Gateway does not support all possible Telnet options, but only supports those necessary to support the VT Telnet and Generalized Telnet profiles.
Lnode $ ucx UCX> stop service telnet UCX> exit Lnode $ define/table=vt$names/supervisor/log vt$telnet_port 23 Lnode $ @sys$manager:vt_stop telnet %%% VT_TELNET_GATE is running in process 00000129 %%% Process will be stopped %%% TELNET_VT_GTWY is running in process 0000012A %%% Process will be stopped Lnode $ @sys$startup:vt_start telnet %DCL-I-TABSUPER, previous table VT$NAMES has been superseded %DCL-I-SUPERSEDE, previous value of VT$INPUT has been superseded %DCL-I-SUPERSEDE, previous value of VT$OUTPUT has been superseded %RUN-S-PROC_ID, identification of created process is 000000B5 %RUN-S-PROC_ID, identification of created process is 000000B6
sys$startup:vt_systart.com
file, changing the value assigned to VT$TELNET_PORT.Note
If you choose to have the Telnet/VT Gateway listen on the "well-known" Telnet port, you cannot also allow incoming interactive Telnet connections.
11.3.2. LAT/VT Gateway
The LAT/VT Gateway has two additional logical names: VT$LAT_SERVICE and VT$LAT_SERVICE_IDENT. VT$LAT_SERVICE specifies the name of the LAT service offered for incoming LAT connections. By default, the service name is LAT_VT_GTWY. VT$LAT_SERVICE_IDENT specifies the identification string for the LAT service. By default, the identification string is "LAT/VT Gateway".
If you want to change these values, you may edit the
sys$startup:vt_systart.com file. If the logical name
VT$LAT_SERVICE is not defined, the gateway will not
allow incoming LAT connections.
The LAT/VT Gateway does not support any LAT options for initiating a LAT
connection from the VT environment. If you need special options, you must log in
interactively and issue the appropriate set host/lat command.
11.4. Identifying Connection Problems
You can use the OSAK software's trace utility to identify problems with the VT software. This trace utility helps you examine the VT connections to other OSI systems and is fully explained in VSI DECnet-Plus for OpenVMS Problem Solving Guide. The VT software also generates error messages that can help identify problems. For the initiator, these messages appear on the user's terminal. For the responder and gateways, the error messages are logged to OPCOM.
Appendix I, "Virtual Terminal Error Messages" describes how to interpret these error messages.
Chapter 12. Managing FTAM and Virtual Terminal (UNIX)
The FTAM and Virtual Terminal applications require you to manage the OSI application entity database. You must also manage other components of the software, depending on the application in use.
The FTAM listeners
Virtual filestore information
The FTAM–FTP Gateway
The VT listeners
The LAT/VT Gateways
The Telnet/VT Gateways
The CTERM/VT Gateways
Each of these managed pieces serves an important function. The OSI application entity database stores addressing information for aliases that represent FTAM and VT applications and listeners. The listeners wait for incoming connection requests. The virtual filestore information addresses problems with file attributes that do not match the default values. The FTAM–FTP, LAT/VT, Telnet/VT, and CTERM/VT Gateways allow remote access and file exchange among systems implementing OSI, Internet, LAT, and CTERM protocols.
12.1. Managing the OSI Application Entity Database
Once you install the FTAM and Virtual Terminal software, you need to configure addressing information that allows the local FTAM and VT initiators to communicate with local listeners or remote applications.
The /etc/isoapplications file is the local database for storing all the
addressing information about remote and local VT applications or listeners. The aliases
used in this file do not have to correspond to node names because they may also be
references to applications. Since users specify these aliases within commands, a brief
alias name is easier to use.
The /etc/isoapplications file is readable by all, but it can be written to only
by a privileged user. You can modify the database entries with any text editor, and you
can use the /usr/sbin/osiapplsetup procedure to add new entries to the
file. All entries must conform to the formats described in Chapter 9, "The OSI Application-Entity Database".
See
Chapter 9, "The OSI Application-Entity Database" for information about the
/etc/isoapplications file.
12.2. Using the /usr/sbin/osiapplsetup Procedure
/usr/sbin/osiapplsetup procedure. The
osiapplsetup procedure allows you to perform the following functions:Add aliases to
/etc/isoapplicationsfor local listeners (OSI Transport and RFC 1006 Transport).Add source aliases to
/etc/isoapplications("local_ftam" and "local_vtp").Register the local listeners in X.500 Directory and add corresponding Distinguished Name format aliases to
/etc/isoapplications.Add commands to start local listeners at system startup to
/sbin/osi_applstartup.Start local listeners.
Run the FTAM and VT IVPs.
Add aliases for remote FTAM and VT applications to
/etc/isoapplicationsin Distinguished Name, Address, and Pattern formats.
The /usr/sbin/osiapplsetup procedure adds information to the
/etc/isoapplications file, the /sbin/osi_applstartup file,
or to X.500 Directory by prompting the user for the appropriate information.
12.3. Managing Listeners
The following sections describe how to manage listeners.
12.3.1. Using osi_applstartup to Start Listeners at System Startup
When you configure local addresses via either the autoconfiguration or manual configuration
procedure (refer to DECnet/OSI for UNIX Installation and Configuration
Guide), you have the option of adding the FTAM and VT listeners to
the /sbin/osi_applstartup file and of starting up those
listeners.
The /sbin/osi_applstartup file is executed automatically at system startup time.
When executed, the /sbin/osi_applstartup file enables local listeners
that wait for incoming connection requests at that particular alias' transport
address.
/sbin/osi_applstartup
file:# %ftamvtSTART%echo 'OSI Application Listeners:\c' >/dev/console
[ -f /usr/sbin/ftam_listener ] &&
{
echo ' FTAM...\c'
/usr/sbin/ftam_listener -q 10 serchr >/dev/console 2>&1
}
[ -f /usr/sbin/vt_listener ] &&
{
echo ' VT...\c'
/usr/sbin/vt_listener -q 10 serchr >/dev/console 2>&1
}
echo ' done.'
# %ftamvtEND%If you want to start more listeners on your system after completing the installation, you can
edit the /sbin/osi_applstartup file by using a text editor, or you can
use the /usr/sbin/osiapplsetup procedure to update the file.
If you use osiapplsetup, run the procedure and select option 4, "Add Commands to
Start Listeners to /sbin/osi_applstartup". In response to the prompts, enter the
FTAM and VT aliases for the local listeners that you want to add with a queue length
for each one. The procedure also asks you if you want to start the listeners. Refer
to DECnet/OSI for UNIX Installation and Configuration Guide for
more information about running osiapplsetup.
If you edit /sbin/osi_applstartup directly, duplicate the lines that invoke the
listeners, replace the aliases with the new aliases you want to enable, and rerun
the file.
/sbin/osi_applstartup and delete or comment
out the lines in the /sbin/osi_applstartup file that invoke the
listeners you want to remove.Note
You must be a superuser to modify the /sbin/osi_applstartup
file.
Do not remove the %ftamvtSTART% or %ftamvtEND%
lines. Doing so will cause the installation procedure to fail and probably
corrupt your /sbin/osi_applstartup file.
12.3.2. Listening on OSI and RFC 1006 Networks
For FTAM, VT, and their listeners to accept inbound connections over both OSI and RFC 1006 networks, you must start separate FTAM and VT listeners for OSI Transport and RFC 1006 Transport.
Use the /usr/sbin/osiapplsetup procedure to configure the OSI and RFC 1006
Transport aliases for the local listeners. With both the autoconfiguration and
manual configuration procedures, you have the option of defining aliases in
/etc/isoapplications for both OSI Transport listeners and RFC 1006
Transport listeners. Refer to DECnet/OSI for UNIX Installation and
Configuration Guide for more information.
The alias name provided to the OSI Transport listeners must contain an OSINSAP. The OSI Transport listeners will accept connections from both CLNS and CONS/X.25. The alias name provided to the RFC 1006 Transport listeners must contain an NSAP address in the form of an Internet address. See Section 9.1, ''About The OSI Applications Database'' for more information about NSAP and Internet addresses.
Error during call to XTI service t_close Connection refused
For more information on managing the RFC 1006 daemon, refer to your DECnet-Plus programming documentation.
12.3.3. Starting Listeners
You may start local FTAM and VT listeners by either running the
/usr/sbin/osiapplsetup procedure or by executing listener commands
directly.
If you use osiapplsetup, run the procedure, choose option 2, "Manually Configure
Local Addresses" from the main menu, and then choose option 5, "Start Listeners"
from the manual configuration menu. In response to the prompts, enter the FTAM and
VT aliases for the listeners that you want to start with a queue length for each
one.
/usr/sbin/ftam_listener [-q queue-length] [-r responder [-T trace-file]] alias
/usr/sbin/vt_listener [-q queue-length] [-r responder] alias
|
Variable |
Explanation |
|---|---|
|
|
Maximum queue length for outstanding transport connect indications. This value determines the number of connect indications that can be received and not responded to by the listener before further connect indications are rejected. The default value is 10. |
|
|
Name of the responder to start when a transport connect
request arrives. By default, |
|
|
Name of the trace file to be created. You must use the
|
|
|
Alias from the |
If you are a superuser, you can start and stop the listener by issuing commands on the command line. To start a listener, issue the listener command with the appropriate options as follows.
# /usr/sbin/ftam_listener [-q queue-length] [-r responder] alias
# /usr/sbin/vt_listener [-q queue-length] [-r responder] alias
The FTAM or VT listener may pause before you are returned to the shell prompt. The listener is ready to accept incoming connections only after you are returned to the shell prompt.
To stop a listener, you need to determine its process identifier (PID) and then terminate that process by using the following commands.
% ps axuw | grep ftam_listener
.
.
.
# kill pid% ps axuw | grep vt_listener
.
.
.
# kill pidWhere the
pid is the PID of the listener that you want to stop.
12.3.4. Registering Listeners in X.500 Directory
If you have the DEC X.500 Directory Service product installed on your system, you may register
the addresses of the local FTAM and VT listeners in the X.500 Directory. Do this by
either running the /usr/sbin/osiapplsetup procedure or by executing DEC
X.500 Administration Facility (dxim) commands manually.
If you use osiapplsetup, run the procedure, choose option 2, "Manually Configure
Local Addresses" from the main menu, and then choose option 4, "Register Listeners
in X.500 Directory" from the manual configuration menu. In response to the prompts,
enter the information needed to complete the X.500 Distinguished Names for the
listeners. The osiapplsetup procedure also asks if you want to add
aliases to /etc/isoapplications for the X.500 entries of the local
listeners.
dxim, refer
to the DEC X.500 Administration Facility documentation. For example, the commands
may look like the following:
dxim create entry /c=country/o=org/ou=org_unit/cn=node attributes \
objectclass=applicationProcess
dxim create entry /c=country/o=org/ou=org_unit/cn=node/cn=ftam attributes \
objectclass=applicationEntity, \
presentationaddress="'0001'H/'0001'H/'0001'H/NS+4700240408002BBC4EC321"
dxim create entry /c=country/o=org/ou=org_unit/cn=node/cn=vt attributes \
objectclass=applicationEntity, \
presentationaddress="'0001'H/'0001'H/'0002'H/NS+4700240408002BBC4EC321"12.4. Managing FTAM Virtual Filestore Information
The FTAM responder must maintain certain FTAM file attributes with a file when it is stored
on the local system. Some of the FTAM file attributes can be mapped directly to UNIX
File System attributes, such as filename and filesize. Other
attributes, such as contents type, cannot be mapped directly and must be
stored with the file.
The FTAM responder maintains virtual filestore information about FTAM files in a file header. This header is created and appended to the beginning of a file that is created by the responder only if the contents type of the file does not match the default contents type specified by the FTAM responder. If you create a file with a header, it is called an FTAM file. See Section 7.2.2, ''Virtual-Filestore Model'' for more information about virtual filestores and other FTAM concepts.
For FTAM-1 files, the default is a maximum string length of
unlimited, string significance ofnot significant, and universal class number ofGeneralString.For FTAM-2 files, the default is a maximum string length of
unlimited, string significance ofnot significant, and universal class number ofGraphicString.For FTAM-3 files, the default is a maximum string length of
512and string significance ofnot significant.
If an initiator creates a file that does not match these parameters, an FTAM file header is appended to the beginning of the file. Then, if users copy a file to the FTAM responder and they want to use it locally, the header must be stripped off. The initiator using the FTAM responder receives the file without the header when it reads the file.
ftamconvert fileThe file is the name of the file from which you strip the
header.
file command.
See file(1) in the UNIX reference pages for more information. For example,
if the file command is used on a file that was transferred with FTAM, the
following can appear:
FTAM-1 (header V1) string-significance=not significant msl=134 UCN=IA5String
The responder also uses the
file command to determine the document type for a transferred file. For example, C program text is transferred as an FTAM-1 file with the default maximum string length of
unlimited, string significance of
not significant, and universal class number of
GeneralString. Files determined to be data are transferred as FTAM-3 files.
12.5. Managing the FTAM–FTP Gateway
The FTAM–FTP Gateway allows nodes on OSI or Internet networks to exchange files with each other by interpreting FTAM or FTP protocol messages and translating them into FTP or FTAM protocol messages. Because the gateway is bidirectional, there are two parts to manage. See Chapter 4, "Using the FTAM–FTP Gateway (UNIX)" for information on how to use the FTAM–FTP Gateway from Internet or OSI nodes.
12.5.1. Invoking the FTAM Daemon
/usr/sbin/ftam2ftpd). Start the FTAM daemon
as
follows:/usr/sbin/ftam_listener -r /usr/sbin/ftam2ftpd aliasThe
alias is the name you use to represent the gateway
host system. This entry must be in the /etc/isoapplications
file.
12.5.2. Invoking the FTP–FTAM Daemon
The part of the FTAM–FTP Gateway that translates FTP protocol messages into FTAM
protocol messages is the FTP–FTAM daemon (/usr/sbin/ftp2ftamd).
The FTAM–FTP Gateway is an integral part of the DECnet–Internet Gateway
and provides transparent access to OSI networks from the Internet. The
DECnet–Internet Gateway examines login information specified by the FTP client
and determines which gateway is invoked. The DECnet–Internet Gateway supports
Internet File Transfer Protocol (FTP), DECnet Data Access Protocol (DAP), and OSI
File Transfer, Access, and Management (FTAM) protocols.
Because the format of the FTAM–FTP Gateway file specification is the same as that of the
DECnet–Internet Gateway, this information determines the protocol that should
be supported. If the specified login information does not contain a pair of colons
(::), then an FTP daemon is started for the user. If colons are included, the
DECnet–Internet Gateway searches for the name to the left of the colons in the
/etc/isoapplications file. If the name is not found in the file,
the name is a DECnet node name and the DECnet–Internet daemon is started. If
the name is in the file, the name is an FTAM alias and the FTP–FTAM daemon is
started.
An
/etc/isoapplicationsfile containing the desired FTAM aliases must exist on the system running the DECnet–Internet daemon.If this file does not exist, all file specifications are assumed to be for the DECnet–Internet Gateway.
On the target FTAM system, an FTAM responder must be listening on the address specified by the alias on the gateway system.
If an FTAM responder is not listening on the target system, all attempts to establish an FTAM association will fail.
If an alias exists in the
/etc/isoapplicationsfile, the DECnet–Internet daemon cannot be accessed for the duration of the Internet connection to the FTAM system. The user must close the connection by typing thebyecommand and restart FTP to connect to either a DECnet or Internet system.If an alias exists in the
/etc/isoapplicationsand it is a synonym for a DECnet node, it will be used to connect to an OSI network. Make sure your aliases are unique if you want to avoid this problem.- Make sure that the FTP-FTAM daemon has been properly configured on your system by verifying that the
/etc/inetd.conffile contains the following lines:#ftp stream tcp nowait root /usr/sbin/ftpd ftpd ftp stream tcp nowait root /usr/sbin/ftpd.gw ftpd
12.6. Managing the Virtual Terminal Gateways
The VT Gateways support communication to non-OSI systems by means of Telnet and CTERM, and support communication from non-OSI systems by means of LAT, Telnet, and CTERM.
The VT/Telnet and VT/CTERM Gateways are enabled when the installation of the OSI Applications Gateways subset is complete, and both the DECnet and OSI applications have been configured. The Telnet/VT and CTERM/VT Gateways are enabled when the installation of the DECnet-Internet Gateway and the OSI applications base subset is complete and both DECnet and the OSI applications have been configured.
If the Telnet/VT gateway is invoked with an alias that does not existing
/etc/isoapplications, then a CTERM connection is attempted to the
DECnet system identified by the input alias.
Before users can access the LAT/VT Gateway, you need to announce the gateway service.
12.6.1. Enabling The LAT/VT Gateway Service
Define the LAT/VT service.
Use thelatcpcommand to define the LAT/VT service. For example:/usr/sbin/latcp -A -a vt -i "LAT/VT gateway" -o
The
-oflag specifies that this service is an optional service. Optional services are not like default services. They cannot be used to connect to the UNIX local LAT host throughgettyroutines spawned in the/etc/inittabfile.You can include this command in the
/etc/latstartup.conffile to have this service automatically defined at system startup. Note that you must create the/etc/latstartup.conffile if it does not already exist.Edit the
/etc/inittabfile.Select the LAT terminals to dedicate to the gateway, for example: tty30, tty31, and tty32. The number of terminals selected determines the maximum number of simultaneous LAT/VT Gateway sessions the system can deliver.
Edit the system's/etc/inittabfile to include entries to spawnlat2vtdon the select devices. For example:lat30:3:respawn:/usr/sbin/lat2vtd tty30 vt lat31:3:respawn:/usr/sbin/lat2vtd tty31 vt lat32:3:respawn:/usr/sbin/lat2vtd tty32 vt
Note that in the previous example, the last entry in each line (
vt) is the name of the optional service defined in step 1.Start up the gateway.
Use the
init qcommand to make the changes take effect to start up the gateway, as follows:# init qUse the
ps(1)command to verify that thelat2vtdprocess has started.Note that the
lat2vtdprogram uses thesyslog(3)mechanism to log messages to the/var/adm/syslog.dated/*/daemon.logfile. Check this file to verify that no error messages have been generated.Use the
/usr/sbin/latcp -scommand to ensure that a multicast for the new service has been sent.You can now to connect to the LAT/VT Gateway.
Chapter 13. Lower-Layer Addressing Information (OpenVMS)
Open-systems communication requires you to share addressing information with the managers of other systems. You must be able to identify and gather lower-layer addressing information for each type of network access: X.25, IEEE 802, and Internet.
This chapter assumes that your system's lower-layer addresses are already properly configured. Therefore, ensure that your system's OSI Transport templates, X.25 services, and IEEE 802 services, are correctly configured and operational.
13.1. Overview of Open-System Networks
Open systems communicate within or between subnetworks. A subnetwork is a communications medium in which all participating systems use a common addressing format; for example, an IEEE 802 LAN or an X.25 network. Sometimes, for subnetworks with compatible addressing formats, it is possible to combine two or more subnetworks to form a single, extended subnetwork. Thus, X.25 network vendors can agree to allow communication between their networks to create an extended X.25 subnetwork. Similarly, a bridge can connect two or more IEEE 802 LANs to make a single subnetwork from an extended LAN.
In addition to communicating within a single subnetwork, open systems can often communicate between multiple subnetworks. The Internet service spans subnetworks that have distinct addressing rules and communication protocols. Internet allows the system that creates a message (the source system) to route messages between subnetworks. Internet uses one or more intermediate systems to reach a target system on a remote subnetwork. An intermediate system can receive messages from a system on one subnetwork and pass them on to a system on another subnetwork. The target system is the intended destination of the messages and, thus, the final system in a routing sequence.
The first system to receive a message in the routing sequence is called an adjacent system in OpenVMS usage. An adjacent system must share a subnetwork with the source system. An adjacent system can be either an intermediate system spanning two subnetworks or a target system that shares a subnetwork with the source system. If an adjacent system is an intermediate system, it relays messages to a system on another subnetwork. If the adjacent system is the target system, it keeps the incoming messages.
The addressing information required to reach a target system depends on the network service to be accessed. Your OSI application can communicate with any other compatible OSI application that shares an X.25 or IEEE 802 subnetwork with your system. Using the OSI Transport Internet service, your system can also communicate with systems on remote subnetworks that are linked by a series of intermediate systems.
13.2. OSI Transport Templates
For a given network service, your network manager configures the network parameters by associating them with a unique OSI Transport template. The OSI Transport template is an NCL database entry that manages network access. The OSI Transport template stores some information and may reference information located elsewhere. This OSI Transport template exists in the OSI Transport database.
|
Network Service |
OSI Transport Template Type |
|---|---|
|
Internet |
Internet OSI Template |
|
Direct X.25 |
X.25 OSI Template |
|
Direct IEEE 802 |
Null OSI Template |
13.3. OSI Transport Addresses
Accessing any target system from an OpenVMS system requires an OSI Transport address. An OSI Transport address, which forms part of each remote-application address in your alias database, allows you to select a type of network access. OSI Transport addresses contain an OSI Transport template name from the local FTAM system and the address of the target system.
An X.25 address is the address of a specific piece of data terminal equipment (DTE) that allows network access on an X.25 network.
A physical address is the unique address of a specific system on any IEEE 802 network.
An NSAP address is the address of the network service access point (NSAP) of an Internet system; this address identifies a transport implementation that uses Internet.
|
OSI Transport Template Type |
Destination Address Type |
|---|---|
|
Internet OSI Template (CLNS) |
NSAP address |
|
X.25 OSI Template (CONS) |
X.25 address or NSAP |
|
Null OSI Template |
Physical address |
13.4. Gathering Lower-Layer Addressing Information
This section discusses how to identify and gather the necessary addressing information for communicating with another system.
The lower-layer addressing information that you need depends on the type of network service that you select: X.25, IEEE 802, or Internet. To access target systems within a local subnetwork, you can select your X.25, IEEE 802, or Internet network service. To access target systems on other subnetworks, you must use the Internet service.
13.4.1. Selecting the OSI Transport Template Type
mcr ncl by placing the following line in your login command
file:$ ncl := mcr ncl
$ ncl ncl> sho osi transport template * all
Determine from the following chart which network service to use. Then you must either request that your system manager create a transport template for that service, or use NET$CONFIGURE to create the template yourself.
Does the target system share a subnetwork with your system?
If NO
Use an Internet OSI Template and one or more intermediate systems for routing.
If YES
Does the target system require Internet?
If YES
Use an Internet OSI Template and use the target system as the adjacent system (that is, the first and only system in the routing sequence).
If NO
Does the target system lack Internet support?
If YES
Use an X.25 or null OSI Template for direct access over your common subnetwork.
If NO
Do you prefer Internet to direct access?
If YES
Use an Internet OSI Template with the target system as the adjacent system.
If NO
Use an X.25 or null OSI Template for direct access to your common subnetwork.
13.4.2. Addressing Requirements for Direct X.25 Access
Note
For your system to use X.25, both OSI Transport and X.25 must be properly configured as described in your DECnet-Plus management documentation and the VSI X.25 for OpenVMS Management Guide. Also, both OSI Transport and X.25 must be running.
13.4.2.1. Addressing Elements
X.25 addressing involves the following elements.
X.25 DTE Destination Addresses
The DTE Address
The DTE address identifies a system as a unique termination point on an X.25 network. The DTE address of the target system is assigned by its X.25 network vendor. A DTE address is a number containing from 1 to 15 digits.
The Transport Subaddress
The Transport subaddress (if used) identifies the target Transport service provider within the target system. The subaddress consists of either two or four digits.
An X.25 destination address has the following format:
DTE-ADDRESS transport-subaddress
|
DTE-ADDRESS |
The target system's DTE address (supplied by the X.25 network vendor). |
|
transport-subaddress |
The subaddress of the target system's Transport service provider, or null. |
Address Component | Value |
|---|---|
DTE address | 3130608555194 |
Transport subaddress | 10 |
X.25 destination address | 3130608555194 + 10 → 313060855519410 |
The Call Value and Call Mask
Your X.25 subnetwork may also require a call value to identify the peer Transport service provider for an X.25 connection. For an ISO connection-oriented Network layer specification (CONS) connection, this value is usually 03010100, but not all OSI implementations use that value. Also, some X.25 network vendors lack support for sending call values on connection requests. For more information on call values, see Section 13.4.2, ''Addressing Requirements for Direct X.25 Access '', and refer to your DECnet-Plus X.25 Management documentation.
- Do the system managers of your subnetwork have an established call value?
- If YES
- Ensure that your local X.25 Access Template uses the established call data value. If the values in the OSI Template display are incorrect, you can use the ncl
set x25 access templatecommand to reset them, as follows:ncl> set x25 access template template-name call data '03010100'h - If NO
No user action required.
|
X.25 NETWORK ADDRESSING INFORMATION | |
|---|---|
|
Network name |
Date |
|
Source system: |
Target system: |
|
Manager(s): | |
|
OSI Transport Address for Remote-Application Addresses | |
|
Source's X.25 OSI Template name | |
|
Target's X.25 destination address | |
|
DTE-ADDRESS transport-subaddress | |
|
Target System's Network Address Components | |
|
DTE address [1 - 15 digits] | |
|
Transport subaddress [2/4 digits, if set] |
###### |
|
Call Information | |
|
call mask [FFFFFFFF / other value / not set] | |
|
call value [03010100 / other value / not set] | |
|
Target System's Upper-Layer Address | |
|
PSAP: . SSAP: . TSAP: . | |
|
AP-title (if used): |
AE-qualifier (if used): |
13.4.2.2. Gathering Remote Addressing Information
This section summarizes the information you need for accessing a remote system directly over an X.25 network. Refer to your DECnet-Plus X.25 management documentation for more information on configuring X.25.
The X.25 OSI Transport Address
OSI Transport template name
From the OSI Transport template database, choose the Transport template that points to the X.25 Access Template for use with the subnetwork shared by your system and the target system. If the necessary OSI Transport template is lacking on your system, refer to your DECnet/OSI for UNIX management documentation for information on setting up OSI Transport templates.
Destination address
Use the destination address of the target system in the OSI Transport address for X.25 network access (the X.25 OSI Transport address). To form the X.25 destination address, obtain the target system's DTE address and the shared network's transport subaddress (if used).
Use this destination address in the OSI Transport address for X.25 network access (the X.25 OSI Transport address).
X.25 OSI Transport Address Format Variables
|
Variable |
Explanation |
|---|---|
|
x.25-transport_template-name |
The name of the X.25 OSI template selected from the OSI Transport template database. |
|
x.25-destination-address |
The target system's X.25 destination address. |
For more information on X.25 OSI Transport templates, see Section 13.4.1, ''Selecting the OSI Transport Template Type ''.
Call Value and Call Mask
You must also ensure that the call value and call mask of the target system reflect the agreements regulating your X.25 subnetwork. For information on call values, see Section 13.4.2, ''Addressing Requirements for Direct X.25 Access '' and your DECnet/OSI for UNIX management documentation.
13.4.2.3. Gathering Local Addressing Information
You may need to provide a remote system manager with your system's X.25 destination address to allow direct X.25 access to your system. You also need to ensure that your call values agree. Part or all of the local addressing information resides in the OSI Transport template, or X.25 Access template databases. Identify the OSI Transport template of the X.25 network shared by your system and the target system. If the necessary OSI Transport template is lacking on your system, see your DECnet-Plus management documentation for information on setting up OSI Transport templates.
net$configure command procedure to configure an OSI Transport
template, you can display the template information using the show osi transport
template command. The following example shows the information for a sample OSI
Transport template named
x25.NCL>show osi transport template x25 all
Node 0 OSI Transport Template x25
at 1994-04-20-10:48:19.777-06:00I0.555
Identifiers
Name = x25
Characteristics
Keepalive Time = 60
Retransmit Threshold = 8
Initial Retransmit Time = 5
CR Timeout = 30
ER Timeout = 30
Network Service = CONS
Security = <Default value>
Classes =
{
0 ,
2 ,
4
}
Checksums = False
Maximum NSDU Size = 2048
Expedited Data = True
CONS Template = "OSI Transport"
Use CLNS Error Reports = False
Acknowledgement Delay Time = 1
Local NSAP = <Default value>
CLNS Inactive Area Address =
{
}
Inbound = True
Loopback = False
Send Implementation Id = True
Extended Format = True
Network Priority = 0
Send Preferred maximum TPDU size = True
Send Request Acknowledgement = True-
Simple name assigned to the template when it is created.
-
Type of network service.
-
Name of the X.25 Access template to be used when establishing a
network connection over the CONS. This characteristic points to the X.25 Access template
called
osi transport(shown in the next example).
Note
Refer to your DECnet-Plus management documentation for more information on CONS and CLNS network services, and X.25 Access templates.
Refer to VSI DECnet-Plus for OpenVMS Network Control Language Reference Guide for a full description of the characteristics for the OSI Transport template.
NCL>show x25 access template "OSI Transport" all
Node 0 X25 Access Template "OSI Transport"
at 1994-04-20-10:50:25.227-06:00I0.568Identifiers
Name = "OSI Transport"Characteristics
DTE Class = accunet
Destination DTE Address =
Call Data = '03010100'H
Local Subaddress =
Selected Group = ""
Packet Size = 0
Window Size = 0
Throughput Class Request = [0..0]
Reverse Charging = False
Fast Select = Not Specified
Network User Identity = ''H
Charging Information = False
RPOA Sequence =
{
}
Transit Delay Selection = 2
Calling Address Extension = /00
Target Address Extension = /00
End-to-End Delay = [0..0]
Expedited Data = Not Specified
NSAP Mapping = False
Local Facilities = ''H
Quality Of Service = ''H-
Address of the remote DTE, including the remote subaddress (if
any), to which the call is directed.
Note
Refer to VSI DECnet-Plus for OpenVMS Network Control Language Reference Guide for a full description of the characteristics for the X.25 Access Template.
13.4.3. Addressing Requirements for Direct IEEE 802 Access
Your system can establish direct IEEE 802 access to systems that support the null Internet protocol and share an IEEE 802 subnetwork with your system. For both inbound and outbound communications that directly use an IEEE 802 network service, your system requires a null OSI Transport template for that service. If your system uses more than one IEEE 802 network, identify the OSI Transport template of the network shared by your system and the target system. If your system lacks a properly configured OSI Template for that network, see your DECnet-Plus management documentation for information on setting up null OSI Transport templates.
Using an IEEE 802 network service requires a physical address that uniquely identifies a specific system on any IEEE 802 network. A physical address contains six pairs of hexadecimal digits.
|
IEEE 802 NETWORK ADDRESSING INFORMATION | |
|---|---|
|
Network name |
Date |
|
Source system: |
Target system: |
|
Manager(s): | |
|
OSI Transport Address for Remote-Application Addresses | |
|
Source's null OSI Template name | |
|
Target's physical address | |
|
Target System's Upper-Layer Address | |
|
PSAP: . SSAP: . TSAP: . | |
|
AP-title (if used): |
AE-qualifier (if used): |
13.4.3.1. Gathering Remote Addressing Information
OSI Transport template name
The OSI Transport template name must belong to the null OSI Transport template of the IEEE 802 network shared by your system and the target system. If the necessary OSI Transport template is lacking on your system, refer to your DECnet-Plus management documentation for information on setting up OSI Transport templates.
Destination address
The destination address associated with a null OSI Transport template is a physical address (that is, the physical destination address). To form the physical destination address, obtain the target system's physical address, which contains six pairs of hexadecimal digits.
Use the null OSI Transport template name and physical destination address in the OSI Transport address for IEEE 802 network access (the IEEE 802 OSI Transport address).
13.4.3.2. IEEE 802 OSI Transport Address Variables
null-transport-template % physical-destination-address
|
Variable |
Explanation |
|---|---|
|
null-transport-template |
The name of the null OSI Transport template selected from the OSI Transport template database. |
|
physical-destination-address |
The target system's physical address, which consists of six pairs of hexadecimal digits. |
For more information on IEEE 802 OSI Transport addresses, see Section 13.4.1, ''Selecting the OSI Transport Template Type ''.
lan, used for 802 connections. It uses the CLNS service so there is no CONS
template
specified.NCL>show osi transport template lan all
Node 0 OSI Transport Template lan
at 1994-04-20-11:05:10.817-06:00I0.646
Identifiers\
Name = lan
Characteristics
Keepalive Time = 60
Retransmit Threshold = 8
Initial Retransmit Time = 5
CR Timeout = 30
ER Timeout = 30
Network Service = CLNS
Security = <Default value>
Classes =
{
4
}
Checksums = False
Maximum NSDU Size = 2048
Expedited Data = True
CONS Template = "OSI Transport"
Use CLNS Error Reports = False
Acknowledgement Delay Time = 1
Local NSAP = <Default value>
CLNS Inactive Area Address =
{
49::FF-00
}
Inbound = True
Loopback = False
Send Implementation Id = True
Extended Format = True
Network Priority = 0
Send Preferred maximum TPDU size = True
Send Request Acknowledgement = True13.4.4. Addressing Requirements for Internet Access
Internet adds only a small amount of overhead. Therefore, even when the local and target system are on a common subnetwork, it is reasonable to use Internet for addressing consistency. Alternatively, you can create a separate alias to access each OSI Template type and allow users to choose the type of access they prefer.
Accessing a given Internet service provider requires its NSAP address. When an Internet service provider receives a message for its local NSAP address, the service provider passes the message to the local Transport implementation. For information on the components of NSAP addresses, see your DECnet-Plus management documentation.
|
INTERNET NETWORK ADDRESSING INFORMATION | |
|---|---|
|
Network name |
Date |
|
Source system: |
Target system: |
|
Manager(s): | |
|
OSI Transport Address for Remote-Application Addresses | |
|
Source's Internet OSI Template name | |
|
Target's NSAP address | |
|
Target System's Upper-Layer Address | |
|
PSAP: . SSAP: . TSAP: . | |
|
AP-title (if used): |
AE-qualifier (if used): |
13.4.4.1. Gathering Remote Addressing Information
OSI Transport template name
Identify the Internet OSI Template of your system. If the necessary OSI Template is lacking on your system, see your DECnet/OSI for UNIX management documentation for information on setting up OSI Transport templates.
Destination address
The destination address associated with an Internet OSI Template is the target system's NSAP address (that is, the NSAP destination address).
When getting an NSAP address from other system managers, you must ensure that you get all of its components. See your DECnet/OSI for UNIX management documentation for a description of the components of the NSAP address.
Use the Internet OSI Template name and the NSAP destination address in the OSI Transport address for Internet network access (the Internet OSI Transport address).
Internet OSI Transport Address Variables
|
Variable |
Explanation |
|---|---|
|
transport-template |
The name of your system's Internet OSI Template. |
|
nsap-address |
The target system's NSAP address, which consists of up to 15 pairs of hexadecimal digits that uniquely identify the target system within the entire OSI network ?. |
For more information on Internet OSI Transport addresses, see Section 13.4.1, ''Selecting the OSI Transport Template Type ''.
13.4.4.2. Gathering Local Addressing Information
You may need to provide a remote system manager with the Internet address of your system.
Internet addressing information is in the OSI Transport template display. Determine your
Internet address by using the ncl show node 0 address command. This section
assumes that an Internet OSI Template is already defined by the OSI Transport system manager.
If the necessary OSI Transport template is lacking on your system, see your DECnet/OSI for UNIX
management documentation for information on creating Internet OSI Templates.
13.5. Alternative Addressing Terminology
|
Addressing Concepts |
OpenVMS OSI Term |
Possible Alternative Terms ? |
|---|---|---|
|
The address of a specific piece of data terminal equipment (DTE) that allows network access on X.25 networks |
X.25 address |
DTE address NTN address |
|
The unique address of a single system on any IEEE 802network |
Physical address |
IEEE address 802.3 address 802 address Device address (OSI Transport) Ethernet address Hardware address MAC address |
|
An address that identifies the network service access point (NSAP) of an Internet system |
NSAP address |
Internet address IP address |
|
A string that identifies a transport service access point (SAP)? |
Transport selector |
T selector Transport address Transport ID TSAP TSEL |
|
A string that identifies a session SAP? |
Session selector |
S selector Session address Session ID SSAP SSEL |
|
A string that identifies a presentation SAP? |
Presentation selector |
P selector Presentation address Presentation ID PSAP PSEL |
Chapter 14. Lower-Layer Addressing Information (UNIX)
Open-systems communication requires you to share addressing information with the managers of other systems. You must be able to identify and gather lower-layer addressing information for each type of network access: X.25, IEEE 802, and Internet.
This chapter assumes that you understand the basic concepts of transport selectors, NSAP addresses, and that your system's lower-layer addresses are already properly configured. Therefore, ensure that your system's OSI Transport templates are correctly configured, and ensure that your X.25 services, IEEE 802 services, or both are correctly configured and operational. For more information, refer to VSI DECnet-Plus for OpenVMS Network Control Language Reference Guide.
14.1. Overview of Open-System Networks
Open systems communicate within or between subnetworks. A subnetwork is a communications medium in which all participating systems use a common addressing format. For example, an IEEE802 LAN, and an X.25 network are two examples of subnetworks. Sometimes, for subnetworks with compatible addressing formats, it is possible to combine two or more subnetworks to form a single, extended subnetwork. Thus, X.25 network vendors can agree to allow communication between their networks to create an extended X.25 subnetwork. Similarly, a bridge can connect two or more IEEE 802 LANs to make a single subnetwork from an extended LAN.
In addition to communicating within a single subnetwork, open systems can often communicate between multiple subnetworks. This function is provided by the network layer. The OSI Connectionless Network Service (CLNS) spans subnetworks that have distinct addressing rules and communication protocols. CLNS allows the system that creates a message (the source system) to route messages between subnetworks. CLNS uses one or more intermediate systems to reach a target system on a remote subnetwork. An intermediate system can receive messages from a system on one subnetwork and pass them to a system on another subnetwork. The target system is the intended destination of the messages and, thus, is the final system in a routing path.
The routing layer on DECnet/OSI for UNIX end system transmits data PDUs to an adjacent system. The adjacent system must share a subnetwork with the source system. An adjacent system can be either an intermediate system spanning two subnetworks or a target system. If an adjacent system is an intermediate system, it relays messages to a system on another subnetwork. If the adjacent system is the target end system, it keeps the incoming message and passes it up to the transport layer.
OSI Transport provides end-to-end communication, and guarantees data integrity. It makes sure that all messages are passed between the applications in the correct order. This service is called Class-4. A Class-4 service is needed because CLNS is only a data gram service, and does not guarantee that each data message will be delivered. However, OSI Transport has the capability of operating directly over X.25 through the Connection-Orientated Network Service (CONS). When configured to do so, the OSI Transport can operate with a subset of its functions, relying on X.25 to guarantee data integrity. OSI Transport Class-2 provides message sequencing and flow control, while Class-0 relies only on X.25 for data integrity.
The addressing information required to reach a target system depends on the network service to be accessed. Your FTAM system can communicate with any compatible FTAM system that shares one or more of the same network configurations supported by DECnet/OSI for UNIX. These services are selected by specifying the name of a template (discussed in Section 14.2, ''OSI Transport Templates ''). You must also specify a transport address (TSEL) and a network address (NSAP) (discussed in Section 14.3.1, ''OSI Transport Addresses '').
14.2. OSI Transport Templates
For a given network service, the DECnet-Plus for UNIX configures the network parameters by
associating them with a unique OSI Transport Template. The OSI
Transport Template is an NCL database entry that manages network access, and contains information
describing how to make a transport connection. The installation procedure creates three templates
named default, CONS, and any.
The default template is used to establish OSI Transport Class-4 connections
operating over CLNS.
The CONS template is used to create OSI Transport Class-2, or Class-0 connections
operating over CONS/X.25.
The any template can be specified by a listener to accept incoming connections
over either CLNS or CONS/X.25 network services. Note that this template cannot be used for
outgoing connections.
|
Transport Class |
Network Service |
OSI Transport Template |
|---|---|---|
|
4 |
CLNS |
|
|
0, 2, 4 |
CONS/X.25 |
|
|
4, 2, 0 (listener only) |
CLNS, CONS/X.25 |
|
14.3. Overview of OSI Lower-Layer Addressing
OSI lower-layer addressing involves several types of addresses: OSI Transport addresses, NSAP
addresses, LAN or DTE addresses. Along with these addresses, the name of an OSI Transport
Template may be passed by the application to the transport layer. If no template name is passed,
OSI transport uses the default template when establishing the connection.
14.3.1. OSI Transport Addresses
Accessing any target system requires an OSI Transport address or T-selector (TSEL). The TSEL is used by transport to specify the transport client (in this case FTAM), and can be from 0 to 32 bytes long.
14.3.2. Network Addresses
The target system's network address is an NSAP address. An NSAP address is the address of the network service access point (NSAP) of an OSI system. This address identifies a specific transport implementation that is a client of the network service. The NSAP address can be up to 20 octets, or bytes long. NSAP addresses are always used regardless of the underlying network service (CONS or CLNS).
14.3.3. IEEE 802 LAN Addresses
If your end system is attached to a LAN, then it will have a 6 octet datalink address assigned to it. The address will either be the hardware address assigned to the device by the manufacturer, or it will be Phase IV style LAN address created when DECnet is installed and Phase IV backward compatibility is required. The normal configuration does not require the OSI application to know about LAN addresses. CLNs will automatically determine the correct LAN address to use when it forwards a PDU.
The one exception is when an application wants to use a subset, or null internet. In this case, the destination NSAPs must be derived by concatenating the inactive area address, the target's LAN address, and its network selector, for example: 0x21. For more information on the inactive subset, and inactive area address, refer to VSI DECnet-Plus for OpenVMS Network Control Language Reference Guide.
14.3.4. X.25 Addressing Elements
If OSI Transport is configured to operate directly over CONS/X.25, then you must configure your system to use DTE addresses to access the remote X.25 system. The DTE address identifies a system or a unique termination point on an X.25 network. It is usually supplied by the X.25 network vendor providing access to the system, and it can contain from 1 to 15 digits.
By using an X.121 NSAP address which contains the DTE address (X.25 Address Extension Facility supported).
By using an X.121 NSAP address which contains the DTE address (X.25 Address Extension Facility not supported).
By creating X.25 Access Reachable Address entries that map non X.121 NSAP address to DTE addresses.
By using an X.121 NSAP address
By creating a Routing Circuit Reachable address that maps NSAP addresses to DTE addresses.
Section 14.4, ''Gathering Lower-Layer Addressing Information'' explains these addresses and shows examples.
For additional information, refer to the X.25 documentation.
14.4. Gathering Lower-Layer Addressing Information
This section discusses how to identify and gather the necessary addressing information for communicating with another system.
14.4.1. Selecting the OSI Transport Template Type
The following description of how to select an OSI Transport Template type assumes that your local OSI Transport Template database is correctly configured as described in the DECnet/OSI for UNIX management documentation. The Network Control Language (NCL) allows you to display information about the OSI Templates on your system.
$ ncl ncl> sho osi transport template * all
Does the target system require TP4 using CLNS?
If YES
Use the default OSI Transport Template.
If NO
Does the target system require TP0, TP2, or TP4 using CONS/X.25 support?
If YES
Use CONS OSI Transport Template for direct access over your X.25 network.
14.4.2. Determining the Target System's NSAP Address
If connectivity to the target system requires full CLNS support you will need that system's NSAP address. Contact the target system manager for this information.
If you are using the inactive subset support provided by CLNS, the target system's NSAP address is divided by concatenating the inactive area address with the target system's LAN address and network selector.
ncl> show routing circuit circuit-1 inactive area address
To obtain the target system LAN address and network selector, contact the target system manager.
If connectivity to the target system requires OSI Transport over CONS/X.25, contact the target system manager to obtain the NSAP or DTE address.
14.4.3. Addressing Requirements for Direct X.25 Access (CONS)
Note
For your system to use X.25, both OSI Transport and X.25 access must be properly configured as described in your installation and configuration documentation. Also, both OSI Transport and X.25 must be running.
14.4.3.1. The Call Data Value and Call Mask
Your X.25 subnetwork may also require a call data value to identify the peer transport service provider for an X.25 connection. This call data value can be found in the X.25 access template used for outgoing calls, and the X.25 access filter used for incoming calls.
The ISO Connectionless Network layer (CLNS) specification (ISO 8473) defines this value as 0X81, and CONS defines this value as 03010100. Some X.25 network vendors lack support for sending call data values on connection requests.
For more information on call data values, refer to your DECnet-Plus management documentation.
Do the system managers of your subnetwork have an established call data value?
If YES
Ensure that your local X.25 Access Template and filter uses the established call data value. Also, ensure that the X.25 Access filter call mask agrees with the instructions in the VSI DECnet-Plus for OpenVMS Network Control Language Reference Guide. If the values in the Template display are incorrect, you can use the NCLset x25 access templatecommand to set them, as follows:ncl> disable x25 access template template-name ncl> set x25 access template template-name call_data (need a value for call_data & example of call mask) ncl> enable x25 access template template-name
If NO
Clear your local X.25 Access Template's call data value and call mask fields, as follows:ncl> disable x25 access template template-name ncl> clear x25 access template template-name CALL_VALUE ncl> enable x25 access template template-name
Clearing a call data value or call mask causes its value to appear as "not set" on a display.
Note
X.25 Access Templates and filters must be enabled to be used. If the display indicates
that the "State" is "Disabled", enable them by entering the ncl enable x25 access
template template-name and ncl enable x25 access filter
filter-name commands.
|
X.25 NETWORK ADDRESSING INFORMATION | |
|---|---|
|
Network name |
Date |
|
Source system: |
Target system: |
|
Manager(s): | |
|
Target System's Upper-Layer Address | |
|
PSAP: . SSAP: . TSAP: . | |
|
AP-title (if used): |
AE-qualifier (if used): |
|
OSI Transport Address for Remote-Application Addresses | |
|
OSI Transport address | |
|
Source's CONS OSI Template name | |
|
Target's NSAP destination address (if available) | |
|
Target System's Network Address Components | |
|
DTE address [1 - 15 digits] | |
|
Call Information | |
|
call mask [FF / other value / not set] | |
|
call data value [00 / other value / not set] | |
14.4.3.2. Gathering Remote Addressing Information for TP/CONS Configuration
This section summarizes the information you need for accessing a remote system directly over an X.25 network. Refer to the DECnet-Plus management documentation for more information on configuring X.25.
The X.25 OSI Transport Address
OSI Transport Template name
From the OSI Transport Template database, choose the OSI Transport Template to be used with the subnetwork shared by your system and the target system. If the necessary OSI Transport Template is not on your system, refer to the DECnet-Plus management documentation for information on setting up OSI Templates.
NSAP Destination address
Use the destination NSAP address of the target system in the OSI Transport address for X.25 network access (the X.25 OSI Transport address).
14.4.3.3. Gathering Local Addressing Information
You may need to provide a remote system manager with your system's X.25 DTE and NSAP addresses to allow direct X.25 access to your system. You also need to ensure that your call data values agree. Part or all of the local addressing information resides in the OSI Transport Template, and the X.25 Access and X.25 protocol DTE databases. Identify the OSI Transport Template of the X.25 network shared by your system and the target system. If the necessary OSI Transport Template is not on your system, refer to the DECnet-Plus management documentation for information on setting up OSI Transport Templates.
show osi transport template
command. The following example shows the information for a sample OSI Transport Template named
cons.ncl> show osi transport template cons all Show Node 0 OSI Transport Template cons at 1992-04-14-08:09:00.69049 + 00:00 I 00.00000 Identifiers
-
Simple name assigned to the template when it is created.
-
Type of network service.
-
Name of the X.25 Access module template to be used when
establishing a network connection over CONS. This characteristic points to an X.25 Access
module's template called
OSI Transport(shown in the next example).
Note
Refer to your DECnet-Plus Management documentation for more information on CONS and CLNS network services, and X.25 Access module templates.
Refer to your DECnet-Plus Network Control Language documentation for a full description of the characteristics for the OSI Transport Template.
ncl>sho x25 access template * all
Show Node 0 X25 Access Template "osi transport"
at 1992-04-14-08:09:16.96049 + 00:00 I 00.00000
Identifiers
Name = "osi transport"
Characteristics
DTE Class = "accunet"
Destination DTE Address =
Call Data = %X03010100
Local Subaddress =
Selected Group = ""
Packet Size = 0
Window Size = 0
Throughput Class Request = [0..0]
Reverse Charging = False
Fast Select = Not Specified
Network User Identity = %X
Charging Information = False
RPOA Sequence = {}
Transit Delay Selection = [0..0]
Calling Address Extension
Target Address Extension
End-to-End Delay = [0..0]
Expedited Data = Not Specified
NSAP Mapping = False
Local Facilities = %X
Quality Of Service = %X-
DTE Class is a required field.
Note
Refer to your DECnet-Plus Network Control Language documentation for a full description of the characteristics for the X.25 Access template and protocol DTE Class.
|
IEEE 802 NETWORK ADDRESSING INFORMATION | |||
|---|---|---|---|
|
Network name |
Date | ||
|
Source system: |
Target system: | ||
|
Manager(s): | |||
|
OSI Transport Address for Remote-Application Addresses | |||
|
OSI Transport address | |||
|
| |||
|
Source's null OSI Template name | |||
|
Target's physical address | |||
|
Target System's Upper-Layer Address | |||
|
PSAP: | . SSAP: | . TSAP: | . |
|
AP-title (if used): |
AE-qualifier (if used): | ||
14.4.4. Gathering Remote Addressing Information for TP4/Null IP Configuration
Destination address
The destination address (802.3 MAC address) is the physical destination address and contains six pairs of hexadecimal digits.
You use this destination address to form an NSAP address.
14.4.5. Addressing Requirements for CLNS Access
Accessing a given CLNS provider requires its NSAP address. When a CLNS provider receives a message for its local NSAP address, the service provider passes the message to the local transport implementation. For information on the components of NSAP addresses, refer to the appendixes of your DECnet-Plus management documentation.
|
INTERNET NETWORK ADDRESSING INFORMATION | |
|---|---|
|
Network name |
Date |
|
Source system: |
Target system: |
|
Manager(s): | |
|
OSI Transport Address for Remote-Application Addresses | |
|
OSI Transport address | |
|
Target's NSAP address | |
|
Target System's Upper-Layer Address | |
|
PSAP: . SSAP: . TSAP: . | |
|
AP-title (if used): |
AE-qualifier (if used): |
14.4.5.1. Gathering Remote Addressing Information
For CLNS access, the default OSI Transport Template is automatically used, and need not be specified. However you must specify the target system's NSAP address.
|
Variable |
Explanation |
|---|---|
|
transport-template |
The default template |
|
nsap-address |
The target system's NSAP address, which consists of up to 20 pairs of hexadecimal digits that uniquely identify the target system within the entire OSI network |
14.4.5.2. Gathering Local Addressing Information
Full CLNP header
Null IP
ncl> show address
DNA_OSI network are the system's NSAPs. For
example: (
[ DNA_CMIP-MICE ] ,
[ DNA_SessionControlV3 , number=19 ] ,
[ DNA_OSItransportV1 , 'DEC0'H ] ,
[ DNA_OSInetwork , 41:45418715:00-41:08-00-2B-37-65-51:21 ]
) ,14.5. Alternative Addressing Terminology
|
Addressing Concepts |
OSI Term |
Possible Alternative Terms ? |
|---|---|---|
|
The address of a specific piece of data terminal equipment (DTE) that allows network access on X.25 networks |
X.25 address |
DTE address NTN address |
|
The unique address of a single system on any IEEE 802 network |
Physical address |
IEEE address 802.3 address 802 address Device address (OSI Transport) Ethernet address Hardware address MAC address |
|
An address that identifies the network service access point(NSAP) of an Internet system |
NSAP address |
Internet address IP address |
|
A string that identifies a transport service access point (SAP) ? |
Transport selector |
T selector Transport address Transport ID TSAP TSEL |
|
A string that identifies a session SAP ? |
Session selector |
S selector Session address Session ID SSAP SSEL |
|
A string that identifies a presentation SAP ? |
Presentation selector |
P selector Presentation address Presentation ID PSAP PSEL |
Appendix A. FTAM Command Summary (OpenVMS)
|
Command |
Function |
|---|---|
|
|
Concatenate file data. |
|
|
Copy file data. |
|
|
Remove file data. |
|
|
List files. |
|
|
Change the name of a file. |
Note
If a remote file is specified as part of the input/output file specifications, the actions taken by the command and its qualifiers depend on the remote FTAM responder functionalities and support.
append
append — append file data
Syntax
append/app=ftam [/qualifier(s)] input-file-spec
[,...] output-file-spec See the copy command summary for a description of the append
command variables and qualifiers.
Description
The append command appends files from a remote system to a local system, from
a local system to a remote system, or from a remote system to another remote system.
Restriction
See the copy command summary for a description of the append
command restrictions.
Multiple input files are not currently supported.
Example
$ append/app=ftam/new_ver freunde::"^vol>main>file.ext"- _$ ,test.dat largetest.dat
This command appends the input file, ^vol>main>file.ext, from
freunde, and the local input file, test.dat (assuming the files have
a single contents type), to the local output file, largetest.dat.
^vol>main>file.ext, DCL would interpret the symbol ^ as a parameter delimiter and
would generate the following
error:%DCL-W-PARMDEL, invalid parameter delimiter - check ... \^VOL\
copy
copy — copy file data
Syntax
copy/app=ftam [/qualifier(s)] input-file-spec
[,...] output-file-spec |
[/qualifier(s)]
|
A qualifier of the command. |
|
input-file-spec
|
A file specification of an input (source) file, which can be either local or remote. |
|
[[,...]]
|
A list of file specifications for one or more additional input files. Within a list, you must precede each additional file specification with a comma (,) or a plus sign (+) with or without a space. To end an input file list, omit the comma or plus sign between the last input file specification and the output file specification, or press Return. Input files can be from the same or different FTAM systems, or from the local system. |
|
output-file-spec
|
The name of an output file. Because FTAM always creates only one output file, both
the For local output files, copying or appending a file into a local directory is controlled by the same rules that control the RMS copy and append utilities. If you specify no directory, the utility places the output file in your default directory. If you specify another local directory for which you have write privileges, the utility places the output file in that directory. For remote output files, always specify the full file designation. For information on where a remote FTAM system places an output file that is created remotely using FTAM, see the documentation of the remote system. |
|
|
This qualifier sets the initial allocation for the output file to the number of 512-byte blocks specified by n. If you omit a number, the allocation equals the size of the input file. The allocated blocks are equated to the FTAM file attribute of future-filesize. The
number of 512-byte blocks specified with the The FTAM responder does not allocate files based on the future-filesize parameter received on F-CREATE-REQUEST. Instead, the FTAM responder saves this parameter in the ACL of the created file. When the FTAM COPY facility is used to transfer a file from a remote FTAM system, it receives the future-filesize parameter from the F-READ-ATTRIB-RESPONSE and saves it in the ACL of the created file. FTAM always allocates files based on the filesize parameter of the F-CREATE-REQUEST and F-READ-ATTRIB-RESPONSE primitives. Default value: Size of input file |
|
|
This qualifier works only with Default date:
|
|
|
This qualifier selects only those files that are dated before the value specified for
Default value:
|
|
|
This qualifier selects only files whose user identification code (UIC) is specified
for the Default value: UIC of current process |
|
|
This qualifier specifies which character set the file data belongs to, and instructs
FTAM to encode the data accordingly. For example, to copy file data of the Japanese
character sets Kanji and Katakana, the user must supply the Default action: No character set specified |
|
|
(For Default action:
|
|
|
This qualifier controls whether the copying or appending facilities ask you to copy
or append each input file. For each input file, the FTAM either queries: "Copy
filename? [N]" or "Append filename to
filename? [N]". Issue one of the following responses:
Abbreviations and any mixture of uppercase and lowercase letters are acceptable for responses. Default action:
|
|
|
This qualifier indicates whether the output file must occupy consecutive physical
disk blocks. For the Default action:
|
|
|
This qualifier works only with Default date:
|
|
|
(For copy command only.) This qualifier causes the copying facility to delete the input file(s) after the input file(s) have been copied to the output file. Default action:
|
|
|
This qualifier causes the copying or appending facilities to ignore any file whose file specification matches an excluded file specification. When excluding a single file, you can omit the parentheses. Device names and version numbers are unsupported. Using wildcards for file name and type is permitted. Default action: No exclusion; all input files are copied. |
|
|
This qualifier works only with Default date:
|
|
|
This qualifier specifies the number of blocks ( n) to be added
to the output file whenever it is extended. For the Default value: The default extension for the local system — usually 3 (not the RMS default) |
|
|
This qualifier controls whether you want the FTAM service provider to negotiate
Recovery and Restart with the peer FTAM entity (if it supports Recovery). When the
If an error occurs during data transfer and the image has not exited, the FTAM protocol machine attempts to recover from the error, using the information in the docket. Default action: No journalling |
|
|
This qualifier controls whether the copying or appending facility displays the input
and output file designations of each copied (or appended) file. The
/log
qualifier displays the following information:
Default action:
|
|
|
This qualifier works only with Default action:
|
|
|
(For Default action:
|
|
|
This qualifier gives users the ability to specify the file-locking parameters and
values that are defined in ISO standard 8571. The possible file-locking parameters are:
The allowed values for these file-locking parameters are: The file-locking value of Default action: No |
|
|
This qualifier gives users the ability to pass a password value, if the responding FTAM entity (an FTAM listener) requires a password in order for anyone to create a file on its file system. This file system password is not the same as a password for logging into an account. Default action: No |
|
|
This qualifier allows the user to implement FTAM security group functions. These functions only apply for local to remote, or remote to remote file copying. The string list specified on the command line must be enclosed within single or double quotes. All white space appearing within these quotes is ignored. The entire security string must be enclosed within parentheses, and multiple entries within the parentheses must be separated by commas. You can abbreviate parameter values as long as there are enough characters for a unique value. You can use a dash ( You can specify more than one security group; however you must flag each new group
list element with its own The The allowed values for The allowed values for The expected input for Default action: No security is used |
|
|
(For The Default action:
|
|
|
This qualifier selects only those files that are dated after the specified value,
Default value:
|
|
|
(For Default value: Arbitrary position within multivolume set |
Description
The copy command copies files from a remote system to a local system, from a
local system to a remote system, or from a remote system to another remote system.
Restrictions
Multiple input files are not currently supported.
copy and
append commands.|
Null Qualifier |
FTAM Functioning for Remote Files |
|---|---|
|
|
FTAM writes an output file onto newly allocated disk space for FTAM-1 and FTAM-3 document types. For an FTAM-2 document type, FTAM creates a new file. |
|
|
FTAM specifies the protection of the output file as the current default protection. |
|
|
FTAM does not check for differences between an input and an output file; instead, it relies on the underlying OSI layers to ensure the integrity of user data. |
|
|
Unless you allocate extra blocks using the |
copy and append command qualifiers varies
substantially for local and remote files. For local files, the facilities support most of the
DCL command qualifiers. However, for remote FTAM files, the copying and appending facilities
support only a few of those qualifiers. This section describes the qualifiers that are supported
for each type of file. For a summary of supported DCL copy qualifiers, see Table A.1, ''DCL copy and append Command Qualifiers''. For an explanation of the qualifiers supported by the DAP–FTAM
Gateway, see Section 3.3, ''Supported Qualifiers for OpenVMS Systems''. More detailed descriptions of supported qualifiers
follow the summary.Note
The FTAM copying facility generally implements standard RMS defaults, with the exception
of the /[no]contiguous, /created, /expired, /extension= n
and /modified qualifiers, which have a nonstandard (non-RMS) default value or
action with the copy command.
|
Support for FTAM Files | ||||
|---|---|---|---|---|
|
Qualifier |
Qualifier Type |
DAP–FTAM Gateway |
Remote Files |
Local Files |
|
|
Output |
y |
y |
y |
|
|
Input |
y | ||
|
|
Input |
y | ||
|
|
Input |
y | ||
|
|
Output |
y | ||
|
|
Output |
y |
y |
y |
|
|
Global? |
y |
y |
y |
|
|
Output |
y | ||
|
|
Input |
y | ||
|
|
Global? |
y |
y | |
|
|
Input |
y | ||
|
|
Input |
y | ||
|
|
Output |
y | ||
|
|
Global? |
y | ||
|
|
Global? |
y |
y |
y |
|
|
Input |
y | ||
|
|
Output |
y |
y |
y |
|
|
Global? |
y | ||
|
|
Global? |
y | ||
|
|
Global? |
y | ||
|
|
Output |
y |
y |
y |
|
|
Input |
y | ||
|
|
Output |
y | ||
Examples
$ copy/app=ftam test.dat amiguita::"\dir\file"
This command copies the single local file test.dat to \dir \file on
amiguita.
\dir \file, RMS
would generate the following error:
%COPY-F-OPENIN, error opening AMIGUITA::\DIR\FILE as input
-RMS-F-SYN, file specification syntax error$ copy/app=ftam test.dat lesamies::"test.dat"test.dat to test.dat on
lesamies.Because the output-file designation is enclosed in double quotation
marks(" "), the lowercase characters entered in the command are retained in the output-file
designation sent to the remote FTAM
system.$ copy/concat/app=ftam *.dat freunde::newfile.dat
.dat files in the local default
directory into newfile.dat on system freunde. Concatenation ceases if
any file differs in file organization, record format, or record attributes from those of the
first .dat file listed in the
directory.$ copy/app=ftam mitra::file.dat [main.sub]
file.dat to the local RMS directory
[main.sub]. The resulting file specification is
[main.sub]file.dat.$ copy/app=ftam mala::"\dir\file" mala::"\new\file"
\dir \file on mala to the output file
\new \file on the same system. Note that the file passes through the local FTAM
system but is not opened or stored
locally.$ copy/app=ftam test.dat lente::"/dir/sub/test/dat"- _$ /alloc=90
This command sets the future file size of /dir/sub/test/dat on remote node
lente to 90 blocks.
/dir/sub/test/dat, DCL would interpret /dir as a qualifier and would
generate the following
error: %DCL-W-IVQUAL, unrecognized qualifier - check ...
\DIR\$ copy/app=ftam/confirm pungyo::file.dat file.dat Copy PUNGYO::FILE.DAT? [N] Y
y, it copies the file
file.dat from the system pungyo to the local
system.$ copy/concat/app=ftam /exclude=(*.dir,*.log) [...]- _$ pungyo::"dir/sub/file.ext"
.dir or .log. The output file is a remote file
dir/sub/file.ext on the remote FTAM system
pungyo.$ copy/app=ftam /replace lente::"/dir/file/ext" file.dat;5
/dir/file/ext, from the remote
FTAM system lente, to replace the contents of a local file,
file.dat;5. The local file retains the original file name,
file.dat;5.$ copy/app=ftam/param=concurrency_control=(read:shared,- _$ read_attribute:shared, erase:not-required) - _$ /param=create_password=mypassword- _$ amiguita::"/dir/file/ext" amiguita::"file_a.dat"
/dir/file/ext on remote FTAM
system amiguita to another remote file named file_a.dat. It specifies
three concurrency control (file-locking) parameters on the input file,
/dir/file/ext, during this operation and provides a file-creation password to the
FTAM
listener.$ copy/app=ftam/delete remote_system::remote_file.dat mydata.dat
The file remote_file.dat is copied from the alias remote_system to a
local file named mydata.dat. After the copy operation is complete, FTAM deletes the
remote file remote_file.dat.
delete
delete — delete file data
Syntax
delete/app=ftam [/qualifier(s)] file-spec [,...] |
[/qualifier(s)]
|
A qualifier for the |
|
file-spec
|
A file specification for a local or remote file. |
|
[[,...]]
|
One or more additional local or remote file specifications, each of which is
separated from the preceding file specification by a comma |
|
|
This qualifier controls whether the facility asks you to confirm the deletion of each
file. The local system prompts you by asking, "Delete filename? [N]."
Issue one of the following responses:
A responding FTAM system can alter the file name specified in an FTAM DCL command.
Therefore, the file actually selected by the remote FTAM system may not be the intended
target. It is recommended that you use the Default value:
|
|
|
This qualifier controls whether the FTAM deletion facility displays the file specification of each deleted file. Default value:
|
Description
The delete command deletes files from both remote and local systems.
Restrictions
FTAM does not support certain qualifiers when the delete command operates on
remote files. These null qualifiers for the delete command are:
-
/backup -
/before -
/by_owner -
/created -
/erase -
/exclude -
/expired -
/modified -
/since
Examples
$ delete/app=ftam /confirm amiguita::"/main/sub/file/ext" Delete AMIGUITA::"/MAIN/SUB/FILE/EXT"? [N]
$ delete/app=ftam/log/confirm amor::"^vol>main>file.ext",- _$ test.dat;4 Delete AMOR::"^VOL>MAIN>FILE.EXT"? [N] Y %DELETE-I-FILDEL, AMOR::"^VOL>MAIN>FILE.EXT" deleted (98 blocks) %Delete TEST.DAT;4? [N] N
This command requests confirmation about deleting the remote file
^vol>main>file.ext on amor and, receiving a positive response (Y),
deletes that file. The command then requests confirmation about deleting the local file
test.dat;4 and, receiving a negative response (N), leaves that file intact.
directory
directory — display directory data
Syntax
directory/app=ftam [/qualifier(s)] file-spec [,...] |
[/qualifier(s)]
|
A qualifier for the |
|
file-spec
|
The file specification for a local or remote file. |
|
|
This qualifier produces a brief directory display. The brief display format is the
default display format for the For additional information about a file, use the Default value: brief | |
|
|
This qualifier controls the number of columns in a brief directory display, which has
four columns by default. In practice, the number of columns displayed depends on the
interplay of column widths and display widths(controlled by the The Default value: A four-column display | |
|
|
This qualifier displays either the creation or modification date of the specified files according to the date option that you specify. The available date options and their effects are as follows: | |
|
|
Displays the creation date of a file. | |
|
|
Displays the last modification date of a file (that is, when it was last written to). | |
|
The FTAM directory facility does not support the other date options of RMS. To select
the modification date, specify Default format:
| ||
|
|
This qualifier generates a complete display of supported file attributes in a standard DCL full directory format. Default format:
| |
|
|
This qualifier suppresses both individual file listings and individual directory
totals when multiple directories are involved. The Default format: Both file attributes and directory totals displayed | |
|
|
This qualifier controls whether a header consisting of an FTAM application name is
displayed separately from file designations. Each FTAM system specified in a
When you specify You may find the combination of the Default format:
| |
|
|
This qualifier controls where the output of the command goes. The
Default action:
| |
|
|
This qualifier controls whether the file owner's UIC is listed. The OpenVMS file owner corresponds to the FTAM file attribute"identity of creator." The default size of the owner field is 20 characters. If the owner information exceeds the length of the owner field, the directory facility truncates the owner information. To alter the width of the owner field use the Default format:
| |
|
|
This qualifier places the directory output into a temporary output file for printing
on the default printer used by the local system. By default, the output file is called
Default action: No printing | |
|
|
This qualifier provides the file size in blocks used, allocated, or both, for each
specified file. The default option for size is the blocks already used. However, you can
use the | |
|
|
Displays the file size both in blocks used and blocks allocated. | |
|
|
Displays the file size in blocks allocated. Blocks allocated equates to the FTAM attribute "future file size." | |
|
|
Displays the file size in blocks used (default measurement). Blocks used equates to the FTAM attribute "file size." | |
|
You can alter the width of the display field for file size by including the
| ||
|
|
This qualifier suppresses individual file listings and displays only the summary
information that is described under the Default format: Information about individual files displayed | |
|
|
This qualifier controls whether summary information (totals) appears in a trailing
line at the end of a directory display. By default, the summary information appears.
Totals include some or all of the following:
Default format:
| |
|
|
This qualifier allows you to control the display width allotted to four elements: the entire display, file name, owner information, and file size. If you specify only one display-element option, you can omit the parentheses. The display-element options are: | |
|
|
Controls the total width for a directory display. The default value for n is 0, which matches the display width to the terminal width. You can change the width from 1 through 255 spaces. However, if the total width of the display exceeds the terminal width, the directory facility truncates the display on the right side. | |
|
|
Controls the width of the file-name field for a brief directory display. The default
width is 19 characters. By default, if you request additional information (such as owner),
a file name that exceeds the file-name width appears in full and the additional
information appears on the following line. However, when you request additional
information and also request multiple columns (using the
| |
|
|
Controls the width of the owner field for a brief directory display. The default width is 20 characters. If the owner information exceeds the length of the owner field, the directory facility truncates the owner information on the right side. | |
|
|
Controls the width of the size field for a brief directory display. The default width
is 6 characters for each type of size (blocks used and blocks allocated). If the number of
blocks exceeds the width of the size field, the directory facility substitutes a string of
asterisks (*) in place of a single type of size. If you use the | |
Description
The directory command displays local and remote directories. For remote files,
the directory facility replaces the directory with the application name.
Restrictions
FTAM does not support certain qualifiers when the directory command operates
on remote files. These null qualifiers for the directory command are:
-
/acl -
/backup -
/before -
/by_owner -
/created -
/exclude -
/expired -
/file_id -
/modified -
/protection -
/security -
/select -
/since -
/versions
Examples
$ directory/app=ftam amiguita::"\dir\file\ext", test.dat
amiguita,
and the file name \dir \file \ext. Next, the command produces a standard OpenVMS
directory display with the local directory and device information and the local file
designation. In this example, the most recent version of the file is test.dat;7.
The output resembles the
following: Directory AMIGUITA::
\DIR\FILE\EXT
Total of 1 file
Directory USER$75:[USERNAME] TEST.DAT;7
Total of 1 file
Grand total of 2 directories, 2 files.
$ directory/app=ftam /full hava::test.dattest.dat. The
full directory display for such a remote file resembles the following:
Directory HAVA::
TEST.DAT File ID: None
Size: 1/3 Owner: <Unknown>
Created: 25-FEB-1996 11:36
Revised: 25-FEB-1996 11:36
Expires: <None specified>
Backup: <No backup done>
File organization: Sequential
File attributes: Allocation: 3, Extend: 0, Global buffer count: 0
No version limit
Record format: Variable length
Record attributes: Carriage return carriage control
Journaling enabled: None
File protection: System: , Owner: , Group: , World:
Access Cntrl List: None
Total of 1 file, 1/3 blocks.rename
rename — rename remote or local files
Syntax
rename/app=ftam [/qualifier] input-file-spec [,...] output-file-spec |
[/qualifier]
|
A qualifier for the |
|
input-file-spec
|
A file specification of an input (source) file, which can be local or remote. |
|
[[,...]]
|
A file list containing file specifications for one or more additional input files. Within a file list, you must precede each additional file specification with a comma (,) or a plus sign (+) with or without a space. To end an input file list, either omit the comma or plus sign between the last input file specification and the output file specification, or press Return. Input files can be from the same or different FTAM systems. |
|
output-file-spec
|
The name of an output file. Because FTAM always creates only one output file, the
For local output files, renaming a file to a local directory is controlled by the same rules that control the RMS renaming utility. If you do not specify a directory, the utility places the output file in your default directory. If you specify another local directory for which you have write privileges, the utility places the output file in the specified directory. For remote output files, always specify the file designation. For information on where a remote FTAM system places an output file that is created remotely using FTAM, see the documentation for the remote system. |
The qualifiers are:
|
|
This qualifier controls whether the facility asks you to confirm the renaming of each file. The local system prompts you by asking, "filename –> filename? (Y,N,Q,All):." These are the first letters of the valid responses: Yes, No, Quit, and All. A responding FTAM system can alter the file name specified in a VAX FTAM DCL command.
Therefore, the file actually selected by the remote FTAM system may not be the intended
target. You should use the Default value:
|
|
|
This qualifier controls whether the FTAM renaming facility displays the file specification of each renamed file. Default value:
|
Description
The rename command renames files that reside on the same remote system, or
local files that reside on the same device.
The rename command works only when both the input files and the output files
reside on the same remote system or on the same device, for
local files. Therefore, you may omit the name of the remote system before the output file
specification, because it must be the same as that for the input file specification. For
example:
$ rename/app=ftam remote::"/file1.ext" "/file2.ext"
$ rename/app=ftam remote::"/file1.ext" remote::"/file2.ext"
rename command operates on
remote files. These null qualifiers for the rename command are:-
/backup -
/before -
/by_owner -
/created -
/exclude -
/expired -
/modified -
/new_version -
/since
Examples
$ rename/app=ftam /confirm ami::"/main/file"- _$ "/new/file" AMI::"/MAIN/FILE" –> AMI::"/NEW/FILE"? (Y,N,Q,All): Y
/main/file is renamed to the remote file
/new/file on the same system after the system receives a positive response (Y).
Note that it is not necessary to include the name of the remote system (AMI) in the output file
specification because it must be the same system as that of the input file
specification.$ rename/app=ftam/log/confirm freund::"^vol>main>file.ext" - _$ test.dat FREUND::"^VOL>MAIN>FILE.EXT" –> TEST.DAT ? (Y,N,Q,All): Y %RENAME-I-RENAMED, FREUND::"^VOL>MAIN>FILE.EXT" renamed to TEST.DAT
This command requests confirmation about renaming the remote file called
^vol>main>file.ext on freund. After receiving a positive response
(Y), the system renames the file to test.dat. The informational message is
displayed because the /log qualifier is used.
Appendix B. FTAM Command Summary (UNIX)
|
Command |
Function |
|---|---|
|
|
Concatenate and print data. |
|
|
Copy file data. |
|
|
List and generate statistics for files. |
|
|
Move or rename files. |
|
|
Remove files. |
ocat
ocat — concatenate and print data
Syntax
ocat [options] application-address::file [application-address::file...]|
application-address::file
|
Specifies the FTAM system on which the remote files are
located. See Section 2.1.2.1, ''Application Address (UNIX)'' for additional
details on application-addresses. The format of an
application address is
| |
|
|
defines a remote system and maps to a specific
application-entity (AE) title and service access point (SAP)
selectors. Valid aliases are stored in the ISO application
entity database, | |
|
|
is the remote login ID. This value is optional for some responders but is required for the UNIX FTAM responder. | |
|
|
is the password for the remote login ID. If you specify | |
|
|
is the FTAM account name. This value is optional. | |
|
file
|
Specifies the remote files to be concatenated or printed. | |
|
|
Ignores blank lines and precedes each output line with its line number. |
|
|
Displays a dollar sign ($) at the end of each output line. |
|
|
Precedes all output lines (including blank lines) with line numbers. |
|
|
Squeezes adjacent blank lines from output and single spaces output. |
|
|
Displays nonprinting characters (including tabs) in
output. In addition to those representations used with the
|
|
|
Unbuffers output. |
|
|
Displays nonprinting characters (excluding tabs). For example, Ctrl/X displays on the screen as ^X. The delete character (octal 0177) displays as ^?. Non-ASCII characters (with the high bit set) display as M- (which is the meta character) followed by the low 7 bits. |
|
|
Creates a trace file with the indicated file name. You
must use the |
Description
The ocat command reads a remote file and displays its contents on the
standard output.
You can only append the contents of remote files by redirecting the output to a local file.
Restriction
The ocat command does not print local files.
Examples
% ocat petrie/username/password::/users/amis/tester
tester
located on the remote UNIX system
petrie.% ocat LESAMIES::test.dat
This command displays on the standard output the file test.dat on the
remote OpenVMS system LESAMIES.
ocp
ocp — copy file data
Syntax
ocp [options] [application-address] file1 [application-address]file2 |
[application-address]
|
Specifies the FTAM system on which the remote files are
located. See Section 2.1.2.1, ''Application Address (UNIX)'' for additional
details on application-addresses. The format of an
application address is
| |
|
|
defines a remote system and maps to a specific
application-entity (AE) title and service access point (SAP)
selectors. Valid aliases are stored in the ISO application
entity database, | |
|
|
is the remote login ID. This value is optional for some responders but is required for the UNIX FTAM responder. | |
|
|
is the password for the remote login ID. If you specify
| |
|
|
is the FTAM account name. This value is optional. | |
|
file1
|
Specifies the file to be copied. If it is a remote file, the application address must be included as part of the file specification. | |
|
file2
|
Specifies the file to which the input file is to be copied. If it is a remote file, the application address must be included as part of the file specification. | |
|
|
Forces existing destination path names to be removed
before copying, without prompting for confirmation. The
| |
|
|
Prompts users with the name of a file whenever the copy
causes an old file to be overwritten. A | |
|
|
Allows the user to specify a document type of one of the following flags. Note that these flags are not case-sensitive. Table 7.1, ''Supported Document Types '' describes these document types. | |
|
|
Indicates that the FTAM-1 document type should be used. | |
|
|
Indicates that the FTAM-2 document type should be used. | |
|
|
Indicates that the FTAM-3 document type should be used. | |
|
|
Allows the user to override the default file contents
(universal class number parameter).
| |
|
|
Allows the user to override the default | |
|
|
Specifies that string significance is variable. | |
|
|
Specifies that string significance is fixed. | |
|
|
Specifies that string significance is not significant. | |
|
|
Allows the user to override the default | |
|
|
Specifies the password that an FTAM responder might require before creating a file on its file system. It is used by an FTAM responder to validate that the specified user has permission to create files on the current file system. | |
|
|
Creates a trace file with the indicated file name. The syntax for the ocp -T trace-file remote-src-spec remote-dest-spec | |
|
|
Specifies that | |
|
|
Default is 180 seconds. The number of seconds that the initiating entity will "sleep" or wait after a Class-3 error is received and before attempting to recover the association. This reinitialize sleep value may alternatively be set via the OSIF_REINIT_SLEEP environmental variable. | |
|
|
Default is 5. The number of times that the initiating entity will "retry" to establish the association with the responding entity after a Class-3 failure. This value indicating the maximum number of reinitialize attempts may alternatively be set via the OSIF_REINIT_MAX_RETRY environmental variable. | |
|
|
Default is 120 seconds. The number of seconds that initiating entity will wait for a response from the responding entity after attempting to recover the association. This value indicating the wait for reinitialize response may alternatively beset via the OSIF_REINIT_TIMEOUT environmental variable. | |
|
|
Allows the user to create a file with deferred availability. | |
|
|
Allows the user to create a file with immediate
availability. Note that if both options | |
|
|
Allows the user to implement FTAM security group functions. These functions only apply for local to remote, or remote to remote file copying. The syntax for the
-s option is:
-s ’(action-list=(access-request [,access-request...]); [concurrency=(ca-name:ca-key[,ca-name:ca-key...]);] [passwords=(apwd-name:apwd-string[,apwd-name:apwd-string...]);] [identity=user-identity-string;] [legal-qual=legal-qual-string;])’ The following list explains the
-ssyntax
rules:
The following list describes the valid parameters for the
security group options:
| |
|
|
Specifies the maximum size, in bytes, of the output file. | |
|
|
Allows the user to rename (move) files from one remote system to a different remote system. The input file is deleted after the operation completes. | |
|
|
This option controls whether you want the FTAM service
provider to negotiate Recovery and Restart with the peer
FTAM entity (if it supports Recovery). When the
| |
|
|
Specifies concurrency control and lock parameter pairs for
concurrency control. If you use spaces between the
parenthesis, enclose the parameter values within quotation
marks. If you have more than one concurrency control and
lock parameter pair, separate each pair with a comma. You
can abbreviate parameter values as long as there are enough
characters for a unique value. The default value for the
lock parameter is | |
|
Concurrency Control |
Lock | |
|
|
| |
|
|
| |
|
|
| |
|
|
| |
|
| ||
|
| ||
|
| ||
|
| ||
Description
The ocp command copies files from a remote system to a local system,
from a local system to a remote system, or from a remote system to a remote system.
The remote systems specified in the last case may be the same or different
systems.
Note
Unlike the DECnet-Plus dcp command, the FTAM ocp
command does not use ASCII, binary, or image as terms to describe FTAM file
types. Instead, FTAM describes these characteristics in terms of document types
that are specified using the -D option. The -a and
-i options of the DECnet-Plus dcp command will be
supported through the new document type option by specifying FTAM-1 for stream
text files (ASCII) and FTAM-3 for stream binary files (binary or image).
If the -D, -C, -S, and -M
options are not specified by the user, the ocp command determines
the correct document type.
-D is specified without the other FTAM file type options,
then the default values for those other options are:For FTAM–1 files (any stream text files): the universal class number is
GeneralString, the maximum string length isunlimited, and the string significance isnot significant.For FTAM–2 files (any stream text files): the universal class number is
GraphicString, the maximum string length isunlimited, and the string significance isnot significant.For FTAM–3 files (any files that are not stream text files): the maximum string length is
512and the string significance isnot significant.
You can use the -D, -C, -S, and
-M options to override the default file options. However, you can
specify the -C, -S, and -M options only if
you also specify the -D option.
Restriction
The ocp command does not copy a local file onto the local
system.
Examples
% ocp test.dat AMIGUITA::'\DIR\FILE'
test.dat to \DIR
\FILE on AMIGUITA. Note that without the single quotation
marks (') enclosing \DIR \FILE, UNIX File System would treat this as a
normal UNIX specification and ignore the backslashes as part of the file name.
% ocp TEST.DAT LESAMIES::'test.dat;25'
TEST.DAT to
test.dat;25 on LESAMIES. Because the output-file
designation is enclosed in single quotation marks ('), the characters entered in the
command are retained in the output-file designation sent to the remote FTAM
system.% ocp MITRA::FILE.DAT /MAIN/SUB
FILE.DAT to the local UNIX
directory /MAIN/SUB. The resulting file specification is
/MAIN/SUB/FILE.DAT.% ocp AMIGUITA::'\DIR\FILE' AMIGUITA::'\NEWMAIN\FILE'
\DIR \FILE on AMIGUITA to
the output file \NEWMAIN\FILE on the same remote system. The single
quotation marks indicate that the enclosed characters are retained in the
output-file designation sent to the remote FTAM system.
% ocp -i PUNGYO::FILE.DAT FILE.DAT overwrite PUNGYO::FILE.DAT? y
After you confirm the command, it copies the file FILE.DAT from the
system PUNGYO to the local system.
ols
ols — list and generate statistics for files
Syntax
ols [options] application-address::file [application-address::file...]|
application-address::file
|
Specifies the FTAM system on which the remote files are
located. See Section 2.1.2.1, ''Application Address (UNIX)'' for additional
details on application-addresses. The format of an
application address is
| |
|
|
defines a remote system and maps to a specific
application-entity (AE) title and service access point (SAP)
selectors. Valid aliases are stored in the ISO application
entity database, | |
|
|
is the remote login ID. This value is optional for some responders but is required for the UNIX FTAM responder. | |
|
|
is the password for the remote login ID. If you specify
| |
|
|
is the FTAM account name. This value is optional. | |
|
|
Specifies a remote file. | |
|
|
Gives all the information available on the remote file. This information includes the file's permitted actions, storage account, FTAM document type, maximum string length, string significance, universal class number, creation and revision dates, date last read, date last revised, identity of creator, identity of last modifier, identity of last reader, identity of last attribute modifier, file availability, file size, future filesize, access control, and legal qualification. Note that the constraint set name and abstract syntax name pair could be printed instead of the FTAM document type, the maximum string length, the string significance, and the universal class number attributes. | |
|
|
Displays all entries including those beginning with a period (.). This option is the default. | |
|
|
Lists the document type, owner, size in bytes, and time of last modification for each file. The document type field indicates the file's document type (FTAM-1, FTAM-2, FTAM-3, or NBS-9). The next field contains ten characters. The first character indicates whether the file is a directory (d) or a regular file (-). The remaining characters are interpreted as three sets of three characters each. The first set of three characters refers to file-access permissions for the user; the next set, for the user group; and the last set, for all others. You will see only the permissions for the user. The other permissions and those that are unsupported are indicated by a dash (-). The permissions are indicated as follows: | |
|
r |
if the file is readable. | |
|
w |
if the file is writeable. | |
|
x |
if the file is executable. | |
|
- |
if the indicated permission is not granted. | |
|
|
Displays one entry per line. This is the default when output is not to a terminal. | |
|
|
Displays names of directories only, not contents. Use this
option with | |
|
|
Displays names in the order they exist in a directory. See
| |
|
|
Creates a trace file with the indicated file name. You
must use the | |
Description
Each file has a set of file attributes. File
attributes are characteristics whose values identify and describe a
file and record its history. The FTAM directory utility allows you to display FTAM
file attributes for files by using the ols command. The basic
ols command produces a minimal display containing only the file
designation as it appears on the remote system. The -A option produces
a full directory display, which contains information on all the supported FTAM file
attributes.
Restriction
The ols command does not list local file attributes.
Examples
% ols petrie/username/password::/
NBS-9 dr--------        512     Jan 25 14:01 /.
NBS-9 dr--------        512     Jan 25 14:01 /..
NBS-9 dr--------        2048    Jul 30 1996 /bin
NBS-9 dr--------        4608    Jan 28 13:21 /etc
NBS-9 drw-------        512     Jan 30 09:57 /tmp
NBS-9 dr--------        512     Jan 25 15:31 /usr
NBS-9 dr--------        2560    Jan 24 13:01 /dev
FTAM-3 -r--------       3418740 Jan  4 16:11 /vmunix
FTAM-3 -r--------       512     May 23 1996 /var
FTAM-1 -r--------       172     Apr  5 1996 /.profile
FTAM-3 -r--------       512     May 23 1996 /sys
NBS-9 dr--------        512     May 23 1996 /opr
FTAM-3 -r--------       2560    Jan 28 13:27 /lib
FTAM-1 -r--------       89      Apr  1 1996 /.login
FTAM-1 -r--------       241     Apr  1 1996 /.cshrc
% ols -A hava::test.dat
test.dat that resembles the following:
Filename: TEST.DAT;1
Permitted actions: read, replace, extend, erase,
read attributes, change attributes,
delete, traversal
Storage account: <Not supported>
FTAM doc-type: FTAM-3
Max string length: <Not supported>
String significance: Not significant
Universal class number: <Not supported>
Created: Tue May 4 10:59:43 1996
Revised: Tue May 6 11:59:44 1996
Last read: <Not supported>
Last attrib revised: <Not supported>
Identity of creator: <Not supported>
Identity of last modifier: <Not supported>
Identity of last reader: <Not supported>
Identity of last attrib modifier: <Not supported>
File availability: Immediate
File size: 315 Bytes
Future filesize: 1536 Bytesomv
omv — move or rename files
Syntax
omv [options] application-address::file1 file2 |
application-address::file1
file2
|
Specifies the FTAM system on which the remote files are
located. See Section 2.1.2.1, ''Application Address (UNIX)'' for additional
details on application-addresses. The format of an
application address is
| |
|
|
defines a remote system and maps to a specific
application-entity (AE) title and service access point (SAP)
selectors. Valid aliases are stored in the ISO application
entity database, | |
|
|
is the remote login ID. This value is optional for some responders but is required for the UNIX FTAM responder. | |
|
|
is the password for the remote login ID. If you specify
| |
|
|
is the FTAM account name. This value is optional. | |
|
file1
|
Specifies the remote file to be renamed or moved. | |
|
file2
|
Specifies the new name of the file on the same remote system. | |
|
|
Force. This option overrides any mode restrictions or the
|
|
|
Interactive mode. Whenever a move is to supersede an existing file, the user is prompted by the name of the file followed by a question mark. If the user answers with a line starting with 'y', the move continues. Any other reply prevents the move from occurring. |
|
|
Interprets all following arguments as file names to allow file names starting with a minus sign. |
|
|
Creates a trace file with the indicated file name. You
must use the |
Description
The omv command moves (changes the name of) the remote file specified
by file1 to
file2 on that same remote system.
If the -i has been specified and
file2 already exists, the omv
command prompts for confirmation before overwriting the file if the user does not
have write permission on file2.
Restriction
The omv command does not move or rename a local file on a local
system or across systems.
Example
% omv -i amigo::'/main/file/ext' '/new/file' omv: rename amigo::'/main/file/ext'? y
This command allows you to review your renaming request before it is executed.
In this example, the remote file /main/file/ext is renamed to the
remote file /new/file on the same system after the system receives a
positive response (y).
orm
orm — remove (unlink) files
Syntax
orm [options] application-address::file [application-address::file...]|
application-address
|
Specifies the FTAM system on which the remote files are
located. See Section 2.1.2.1, ''Application Address (UNIX)'' for additional
details on application-addresses. The format of an
application address is
| |
|
|
defines a remote system and maps to a specific
application-entity (AE) title and service access point (SAP)
selectors. Valid aliases are stored in the ISO application
entity database, | |
|
|
is the remote login ID. This value is optional for some responders but is required for the UNIX FTAM responder. | |
|
|
is the password for the remote login ID. If you specify
| |
|
|
is the FTAM account name. This value is optional. | |
|
|
Specifies the file to be removed. This variable must specify a file and not a directory. | |
|
|
Forces the removal of a file or directory without first requesting confirmation. Only system or usage messages are displayed. This option is the default. |
|
|
Prompts for a yes or no response before removing each
entry. Does not ask when combined with the |
|
|
Creates a trace file with the indicated file name. You
must use the |
|
|
Specifies that the named arguments have aliases beginning
with a minus sign (for example |
Description
The orm command removes or deletes from the remote system each of the
remote files specified.
Restriction
The orm command does not remove a local file from the local
system.
Examples
% orm petrie/username/password::/users/freunden/myfile
myfile from the remote
system
petrie.% orm - -gorp/username/password::/usr/users/robin/nester
% orm -i petrie/username/password::/users/amigos/testfile orm: remove /users/amigos/testfile? y
This example shows how confirmation is requested for overwriting an existing file.
Appendix C. VT Command Summary (OpenVMS)
|
Command |
Function |
|---|---|
|
|
Accesses a remote system through a terminal server and LAT/VT Gateway. |
|
|
Starts a remote OSI association. |
|
|
Accesses a LAT environment through a VT/LAT Gateway. |
|
|
Accesses a remote Internet system through a VT/Telnet Gateway. |
|
|
Access a remote system from a PC through the LAT/VT Gateway. |
|
|
Accesses a remote system through a Telnet/VT Gateway. |
connect
connect — Access a remote system through a terminal server and LAT/VT Gateway.
Syntax
connect service-name [node node-name [destination
port-name]]|
|
The name of the gateway service. System administrators assign this name when they enable a LAT/VT Gateway. The local system uses this name to determine which gateway node to use for the connection. |
|
|
The name of the local node. |
|
|
The name of the remote OSI system you want to access. |
The connect command has no qualifiers.
Description
The connect command connects with a remote OSI system through a
terminal server by using the LAT/VT Gateway.
Restrictions
Your network must have one or more LAT/VT or VT/LAT Gateways enabled on a system that runs Local Area Transport (LAT) protocol. Also, the remote system must have a Virtual Terminal responder enabled.
Example
local> connect vt node serchr dest discvr
This command connects from a local node called serchr to a remote OSI
system called discvr on a gateway service called vt. A
successful LAT connect command results in a login prompt from the
specified destination system, followed by a password prompt.
set host/vtp (OSI)
set host/vtp (OSI) — Start a remote association.
Syntax
set host/vtp alias [qualifiers] where alias is the name of the remote node with
which the VT initiator negotiates an association.
|
|
This qualifier sets the break character. When you type this character, a VT-BREAK message is sent to the responder. The break character can be any ASCII character between @ and z, except c, m, q, s, y, the left bracket ([) and any character already defined as the command or escape characters. Default character: Ctrl/] |
|
|
This qualifier sets the command character. When you type this character, you gain access to VT command mode. The default character can be any ASCII character between @ and z, including the alphabetic characters in both uppercase and lowercase, the right bracket (]), circumflex (^), underscore (_), and grave accent (`), but not a character already defined as the break or escape character. Default character: Ctrl/@ |
|
|
This qualifier sets the escape character. When you type this character, a VT-RELEASE message is sent to the responder. The default for this character can be any ASCII character between @ and z, including the alphabetic characters in both uppercase and lowercase, the right bracket (]), circumflex (^), underscore (_), and grave accent (`), but not a character already defined as the command or break character. Default character: Ctrl/ \ |
|
|
This qualifier saves the entire screen output of the
current DECnet-Plus Virtual Terminal association in a
specified file. The default is Default action:
|
|
|
This qualifier selects the desired Virtual Terminal
Protocol profile to be used. The default profile is
Generalized Telnet, but can be one of the
following:
Default profile:
|
|
|
This qualifier displays the Virtual Terminal association statistics when the association is terminated. Default:
|
Description
The set host/vtp command tells the Virtual Terminal initiator to
start an association with the specified remote OSI system.
Restriction
An OSI-compliant Virtual Terminal responder must reside on the remote system.
Example
$ set host/vtp rnode /log= myfile.out
This command invokes a Virtual Terminal association with the remote host node
called rnode, and stores the screen output in the file called
myfile.out.
set host/vtp (LAT)
set host/vtp (LAT) — Access a LAT environment through a VT/LAT Gateway.
Syntax
set host/vtp gateway-alias where gateway-alias is the name of the remote
gateway.
The set host/vtp command has no qualifiers.
Description
The set host/vtp command accesses a LAT environment through the
VT/LAT Gateway.
Restrictions
You must know both the alias of the gateway and the LAT service name of the destination system.
Example
$ set host/vtp smaug$lat_gateway Welcome to the VT/LAT gateway on smaug Enter LAT Service Name: LATVAX
This example shows a user on a remote OpenVMS VT system accessing a gateway called
smaug$lat_gateway, and then connecting to a LAT service called
latvax.
At the login prompt, enter your name and password as you would on your local system. The password is not echoed to the display.
set host/vtp (Internet)
set host/vtp (Internet) — Access a remote Internet system.
Syntax
set host/vtp gateway-alias-name where gateway-alias-name is the name of the
VT/Telnet Gateway.
The set host/vtp command has no qualifiers.
Description
The set host/vtp command accesses a remote Internet system from a
local OSI system, even if the remote Internet system does not have a VTP
implementation.
Restriction
Your network must have one or more enabled VT/Telnet Gateways.
Example
$ set host/vtp intrpd$telnet
intrpd$telnet. At the gateway prompt, enter the host name of the
remote Internet system to which you want to connect. In this example, the host name
is
serchr: Welcome to the VT/Telnet gateway on intrpd
Enter Remote Host Name: serchrEnter your name and password at the user prompt as you would on your local system.
sethost
sethost — Access a remote system from a PC through the LAT/VT Gateway.
Syntax
sethost service-name where service-name is the name of the gateway
service. System administrators assign this name when they enable a LAT/VT
Gateway.
The sethost command has no qualifiers.
Description
The sethost command from a PC, accesses a remote OSI system by means
of the LAT/VT Gateway.
Restriction
You cannot use the LAT/VT Gateway to access a remote LAT system from an OSI system.
Example
c:> sethost vt
This command connects from a PC to a remote OSI system on a gateway service called
vt.
telnet
telnet — Access a remote OSI system through the Telnet/VT Gateway.
Syntax
telnet gateway-host-name where gateway-host-name is the name of the
system on which the Telnet/VT Gateway resides.
The telnet command has no qualifiers.
Description
The telnet command accesses a remote system by means of the Telnet/VT
Gateway. If the gateway system is an OpenVMS system, you may need to specify the
port number. The default port number on OpenVMS is 30324. If the gateway system is
UNIX, you do not need to specify the port.
Restriction
To use the Telnet/VT Gateway, your local OpenVMS system must have the TCP/IP Services for OpenVMS product installed.
Example
$ telnet intrpd 30324
intrpd on an OpenVMS
system. At the gateway prompt, enter the alias of the remote OSI system to which you
want to connect, as
shown: Trying...16.63.96.230
connected to INTRPD
Escape character is '^]'.
No data to write to network
Welcome to the Telnet/VT gateway on intrpd
Enter Remote Alias Name: serchr
Welcome to VAX/VMS 5.5 on node SERCHR
Username:At the user-name prompt, enter your name and password as you would on your local system.
Appendix D. VT Command Summary (UNIX)
|
Command |
Function |
|---|---|
|
|
Access a remote system through a terminal server through the LAT/VT Gateway. |
|
|
Start a remote association. |
|
|
Access an Internet system from a remote system through the VT/Telnet Gateway. |
|
|
Access a remote system from a PC through the LAT/VT Gateway. |
|
|
Access a remote system through LAT on VMS by way of the LAT/VT Gateway. |
|
|
Access a remote system from an Internet system through the Telnet/VT Gateway. |
connect
connect — Access a remote system through a terminal server through the LAT/VT
Gateway.
Syntax
connect service-name [node node-name
[destination port-name]]|
|
The name of the gateway service. System administrators assign this name when they enable a LAT/VT Gateway. The local system uses this name to determine which gateway node to use for the connection. |
|
|
The name of the local node. If you do not specify
|
|
|
The name of the remote OSI system that you want to access.
If you specify |
Description
The connect command accesses a remote OSI system through a terminal
server, by means of the LAT/VT Gateway.
Note
The LAT/VT Gateway operates in one direction only; from a LAT system to a remote OSI system.
Restriction
You cannot use the LAT/VT Gateway to access a remote LAT system from an OSI system.
Example
local> c vt node serchr dest discvr
This command connects from a local node called serchr to a remote
OSI system called discvr on a gateway service called
vt.
ologin (OSI)
ologin (OSI) — Start a remote association.
Syntax
ologin application [options]where application specifies an alias listed in
the /etc/isoapplications file, or an X.500 Distinguished Name.
If the input is an alias, then it is looked up in the
/etc/isoapplications file.
If the input is a Distinguished Name, then an X.500 Directory System Agent is queried for the presentation address associated with the entry specified by the input Distinguished Name. If the query is successful and a complete and syntactically correct address is returned, then the address is used by VT to establish a Virtual Terminal association with the remote application. If the query fails, then the FTAM or Virtual Terminal operation has failed.
|
|
Sets the break character. When this character is typed, a VT-BREAK message is sent to the responder. This message causes all messages that have been received, but not processed, to be discarded. The default for this character is Ctrl/6, which appears on the display as a double circumflex (^^). | |
|
|
Sets the escape character. When this character is typed,
| |
|
|
Displays the usage of the DECnet-Plus Virtual Terminal initiator command. | |
|
|
Saves the entire screen output of the current DECnet-Plus Virtual Terminal association in a specified file. | |
|
|
Tells DECnet-Plus Virtual Terminal to specify the
| |
|
|
for A-mode Default profile | |
|
|
for Telnet profile | |
|
|
for Transparent profile | |
|
|
for Generalized Telnet profile | |
Description
The ologin command tells the Virtual Terminal initiator to start an
association with the specified remote OSI system.
Restrictions
An OSI-compliant Virtual Terminal responder must reside on the remote system.
If you are using the ologin command in a DECterm window and you wish
to enable sending and receiving of 8-bit data by specifying the Telnet or
Generalized Telnet profile and using the set binary command in command mode, you
must set the DECterm's terminal mode to VT300 with 7-bit controls.
On a loopback connection, 8-bit data is not properly sent or received when the Transparent profile is used.
On a loopback connection, the terminal characteristics may be set incorrectly. They may indicate a value for the rows characteristic, which is incorrect. This problem manifests itself when any shell command or program makes use of this characteristic. You can fix the problem by entering the following command at the shell prompt:
% stty rows <correct number of rows>
Examples
% ologin discvr -o myfile.out
discvr, and stores the screen output in the file called
myfile.out.% ologin /c=us/o=remote1/cn=serchr/cn=vt:
/c=us/o=remote1/cn=serchr/cn=vt,
and uses the transport template
"default".% ologin template=my_template:/c=us/o=abacus/cn=rnode/cn=vtp:
This command invokes a VT association with the remote VT application
identified by the Distinguished Name /c=us/o=abacus/cn=rnode/cn=vtp and
uses the transport template my_template.
ologin (Telnet)
ologin (Telnet) — Access an Internet system from a remote system through the VT/Telnet
Gateway.
Syntax
ologin gateway-host-name where gateway-host-name specifies an alias
listed in the /etc/isoapplications file, or an X.500 Distinguished
Name.
If the input is an alias, then it is looked up in
the/etc/isoapplications file.
If the input is a Distinguished Name, then an X.500 Directory System Agent is queried for the presentation address associated with the entry specified by the input Distinguished Name. If the query is successful and a complete and syntactically correct address is returned, then the address is used by VT to establish a Virtual Terminal association with the remote application. If the query fails, then the FTAM or Virtual Terminal operation has failed.
Description
Use the ologin command from a remote OSI system to access an Internet
system that has a Virtual Terminal responder installed.
Restriction
Your network must have one or more VT/Telnet Gateways enabled.
Examples
% ologin discvr
This example shows a user accessing a gateway on the system called
discvr.
serchr:Login: serchr:
At the second login prompt, enter your name and password as you would on your local system. The password is not echoed to the display.
% ologin /c=us/o=remote1/cn=serchr/cn=vt:
This command invokes a VT association with the remote VT/Telnet Gateway
identified by the Distinguished Name /c=us/o=remote1/cn=serchr/cn=vt,
and uses the transport template "default".
serchr:Login: serchr:
At the second login prompt, enter your name and password as you would on your local system. The password is not echoed to the display.
% ologin template=my_template:/c=us/o=abacus/cn=rnode/cn=vtp:
This command invokes a VT association with the remote VT/Telnet Gateway
identified by the Distinguished Name /c=us/o=abacus/cn=rnode/cn=vtp and
uses the transport template my_template.
serchr:Login: serchr:
At the second login prompt, enter your name and password as you would on your local system. The password is not echoed to the display.
sethost
sethost — Access a remote system from a PC through the LAT/VT Gateway.
Syntax
sethost service-name where service-name is the name of the gateway
service. System administrators assign this name when they enable a LAT/VT
Gateway.
Description
The sethost command from a PC accesses a remote OSI system by means
of the LAT/VT Gateway.
Restriction
You cannot use the LAT/VT Gateway to access a remote LAT system from a UNIX system.
Example
c:> sethost vt
This command connects from a PC to a remote OSI system on a gateway service
called vt.
set host /LAT
set host /LAT — Access a remote system through LAT on OpenVMS by way of the LAT/VT Gateway
Syntax
set host /lat [/node= node-name] [/destination_port= port-name] service-name |
|
The name of the local node. If you do not specify
|
|
|
The name of the remote OSI system you want to access. If
you specify |
|
|
The name of the gateway service. |
Description
Use the set host command to access a remote system by means of the
LAT/VT Gateway.
Restriction
You cannot use the LAT/VT Gateway to access a remote LAT system from an OSI system.
Example
$ set host /lat /node=serchr /dest_port=discvr vt
This command connects from a local node called serchr to a remote
OSI system called discvr on a gateway service called
vt.
telnet
telnet — Access a remote system from an Internet system through the Telnet/VT
Gateway
Syntax
telnet gateway-host-name where gateway-host-name is the name of the
system on which the Telnet/VT Gateway resides. (See telnet(1c) for more
information about the telnet command.)
Description
Use the telnet command to access a remote system by means of the
Telnet/VT Gateway.
Note
Unlike the LAT/VT Gateway, the Telnet/VT Gateway operates in two directions: from an Internet system to a remote OSI system (Telnet/VT) or from a remote OSI system to an Internet system (VT/Telnet).
Restriction
Your network must have one or more Telnet/VT Gateways enabled.
Examples
% telnet discvr
This example shows a user accessing a gateway on the system called
discvr.
serchr:Login: serchr::
At the second login prompt, enter your name and password as you would on your local system. The password is not echoed to the display.
Appendix E. Mapping of FTAM to RMS File Attributes (OpenVMS)
|
RMS File Attributes |
FTAM Document Types | |||||
|---|---|---|---|---|---|---|
|
RMS File Org.? |
RFM |
RAT? |
Name |
Parameters | ||
|
FTAM Doc. Type |
Class No. |
String Length? |
String Significance | |||
|
SEQ |
Stream |
CR |
FTAM-1 |
22, 27 |
|
Not signif. |
|
SEQ |
Stream with max string length |
CR |
FTAM-1 |
22, 25, 26, 27 |
|
Variable |
|
SEQ |
Fixed length records |
CR |
FTAM-1 |
22, 25, 26, 27 |
|
Fixed |
|
SEQ |
Variable |
CR |
FTAM-2 |
25, 26 |
|
Not signif. |
|
SEQ |
Undefined with max string length |
None |
FTAM-3 |
— |
|
Not signif. |
|
SEQ |
Fixed length records |
None |
FTAM-3 |
— |
|
Fixed |
|
SEQ |
Variable with max string length 512 |
NOCC |
NBS-9 |
— |
— |
— |
|
FTAM File Attributes |
RMS File Attributes |
|---|---|
|
File name |
File specification |
|
Contents type |
File organization Record format Record attributes |
|
Date/time creation |
Date of creation |
|
Date/time last modification |
Date of revision |
|
Permitted actions |
Derived from contents type and system restrictions |
|
File size |
The number of bytes to which a file can grow |
|
Future file size |
The actual number of bytes in the file (highest block count and block size) |
|
FTAM Attributes |
OpenVMS FTAM Mapping | |||||||
|---|---|---|---|---|---|---|---|---|
|
File name |
The file name received on an F-SELECT or F-CREATE resides in the
FAB$L_FNA/FAB$B_FNSRMS fields. After
opening or creating the file, the responder returns one of the following:
| |||||||
|
Permitted actions |
The responder ignores permitted actions on a CREATE request. For FTAM-2 files, the responder always returns the value "read, insert, read-attribute, delete-file, and traversal." It always returns the value "read, replace, extend, read-attribute, delete-file, and traversal" for FTAM-1 and FTAM-3 files on the CREATE and READ-ATTRIBUTE responses. The actions actually allowed on the file are further restricted by local filestore security. | |||||||
|
Contents type |
On a CREATE request, the RMS attributes stored for the contents-type attribute are as follows: | |||||||
|
DocType |
StrSig |
Max |
CharSet |
ORG |
RFM |
RAT |
MRS | |
|
FTAM-1 |
Not |
any |
GeneralString, IA5String |
SEQ |
STM |
CR |
None | |
|
FTAM-1 |
VAR |
n |
GeneralString, IA5String, GraphicString, VisibleString |
SEQ |
VAR |
CR |
n | |
|
FTAM-1 |
FIX |
n |
GeneralString, IA5String, GraphicString, VisibleString |
SEQ |
FIX |
CR |
n | |
|
FTAM-2 |
Not |
any |
GraphicString |
SEQ |
VAR |
CR |
None | |
|
FTAM-3 |
Not |
any |
Not applicable |
SEQ |
UDF |
None |
None | |
|
FTAM-3 |
FIX |
n |
Not applicable |
SEQ |
FIX |
None |
n | |
|
In the preceding table, a maximum string length of "any" means an integer less than or equal to 32,767 and "n" means an integer less than or equal to 6,143. For information on character sets, see the Note at the end of this table. | ||||||||
|
The responder rejects a request to create a file with any other document type (or other parameters). | ||||||||
|
OpenVMS FTAM stores document-type parameters that do not map directly to any RMS fields. When retrieved using FTAM, the file has its original document-type parameters. | ||||||||
|
In the following table, the document-type parameters are the defaults returned for a file that was created locally. Files created by OpenVMS FTAM store the document-type parameters, and these are returned if present. All other types of local files (including other organizations such as IDX, REL; other RFMs such as FIX, STMCR, STMLF, and so forth; and other record-attributes such as PRN) are treated as FTAM-3 files, with the same default parameters listed here. | ||||||||
|
By default, on a READ-ATTRIBUTES and OPEN response, the document type and its parameters are returned as follows: | ||||||||
|
ORG |
RFM |
RAT |
DocType |
StrSig |
MAX |
CharSet | ||
|
SEQ |
UDF |
any |
FTAM-3 |
Not |
None |
Not applicable | ||
|
SEQ |
STM |
CR |
FTAM-1 |
Not |
None |
GeneralString | ||
|
SEQ |
VAR |
CR, FTN |
FTAM-2 |
Not |
None |
GeneralString | ||
Note
- An IA5String is a string of characters from the IA5 character set. This 7-bit character set contains both graphic characters (printable) and control characters (nonprintable format-effecting characters).
- A GeneralString is a string composed of a definable character set; by default, a GeneralString is an IA5String. OpenVMS FTAM defines a GeneralString as being a string of characters from the ISO 8859 character set, which is an 8-bit character set containing both graphic characters and control characters.
- A GraphicString is a string of printable characters taken from the GeneralString character set.
- A VisibleString is a string composed of a definable character set that includes alphanumeric characters, punctuation, and graphics.
FTAM Attributes | OpenVMS FTAM Mapping |
|---|---|
Storage account | This parameter does not map to any RMS attribute; the responder ignores it in a CREATE indication, and the responder always returns, "No value available" in a CREATE or READ-ATTRIBUTE response. |
Date and time of creation | This parameter maps to the RMS file creation date and time attribute (XAB$Q_CDT), which contains the local system date and time when the file was created. The responder always returns this value as a Generalized Time. |
Date and time of last modification | This parameter maps to the RMS file revision date and time attribute (XAB$Q_RDT), which contains the local system date and time when the file was last modified. The responder always returns this value as a Generalized Time. |
Date and time of last read access | This parameter does not map to any RMS attribute; the responder always returns, "No value available." |
Date and time of last attribute modification | This parameter does not map to any RMS attribute; the responder always returns, "No value available." |
Identity of creator | This parameter does not map to any RMS attribute; the responder always returns, "No value available." |
Identity of last modifier | This parameter does not map to any RMS attribute; the responder always returns, "No value available." |
Identity of last reader | This parameter does not map to any RMS attribute; the responder always returns, "No value available." |
Identity of last attribute modifier | This parameter does not map to any RMS attribute; the responder always returns, "No value available." |
File availability | File availability is only partially supported. The responder ignores it in a CREATE indication. The responder always returns the value, "Immediate availability" in a CREATE or READ-ATTRIBUTE response. |
File size | This attribute is readable only by using the READ-ATTRIBUTES request. The value returned is the actual number of bytes in the file, which is determined as follows: filesize = (XAB$L_EBK - 1) * 512 + XAB$W_FFB |
Future file size | This attribute maps to the RMS FAB$L_ALQ field. For a CREATE request, the RMS allocation quantity is rounded up to the next block boundary as follows: FAB$L_ALQ = (future-filesize + 511) / 512 For the CREATE or READ-ATTRIBUTES response, the value returned is the number of bytes in the quantity of blocks allocated: future-filesize = FAB$L_ALQ * 512 |
FTAM Attributes | OpenVMS FTAM Mapping |
|---|---|
Access control | Security group attributes are unsupported. |
Legal qualification | Security group attributes are unsupported. |
FTAM Attributes | OpenVMS FTAM Mapping |
|---|---|
Private use | The private group attribute is unsupported. |
Some FTAM document-type parameters do not map directly to RMS file attributes. For instance, RMS cannot store the character-set parameter on FTAM-1 files. Also, direct mapping between the RMS maximum record size (MRS) attribute and the maximum-string-size document-type parameter is sometimes absent.
When creating a file, the OpenVMS FTAM responder uses access control elements (ACEs) to hold FTAM document-type parameters that do not map to RMS file attributes. An ACE is part of an access control list (ACL) that is attached to an object such as a file. OpenVMS FTAM uses an application-independent ACE, which has a fixed portion containing flags, type indicator, length, and an application mask, followed by information that is specific to an application.
FTAM ACEs must remain intact, because deleting an FTAM ACE can erase the values of document-type parameters. Modifying the information in an FTAM ACE can cause FTAM protocol errors such as access violations.
A DCL user without the SECURITY privilege cannot display a file's FTAM ACEs. However, a user
whose process has the SECURITY privilege enabled can display FTAM ACEs by entering the DCL
directory/full or directory/acl
commands. The FTAM ACEs are application specific, so OpenVMS does not interpret the
information and displays it as hexadecimal bytes. This section describes the FTAM ACE to
help you recognize it in directory displays.
The
acetype (first word in an ACE display) is alwaysapplication.The value of
flagsis always%X0600.The value of
accessis always%X000002E2(which is the FTAM facility code and is unique to FTAM ACEs).
Note that the values of size and
data vary from file to file.
In the following examples of a brief and a full directory display for the file
file.dat, the constant values are in bold
type.
FTAM ACE in a Brief Directory Display
$ directory /acl file.dat Directory USER$1:[USERNAME] FILE.DAT;1 APPLICATION,SIZE=%D44,FLAGS=%X0600, ACCESS=%X000002E2,DATA=%X00130024,%X0014000C, %X54460006,%X312D4D41,%X006B0014,%X006C0008,%X0000001B,%X006E0008,%X00000002 Total of 1 file.
FTAM ACE in a Full Directory Display
$ directory /full file.dat
Directory USER$1:[USERNAME]
FILE.DAT;1 File ID: (3293,8,0)
Size: 4/6 Owner: [GRP,USERNAME]
Created: 28-MAR-1996 13:04:52.83
Revised: 28-MAR-1996 13:04:55.16 (1)
Expires: <None specified>
Backup: 29-MAR-1996 00:32:19.77
File organization: Sequential
File attributes: Allocation: 6, Extend: 0, Global buffer count: 0, No version
limit
Record format: Stream
Record attributes: Carriage return carriage control
RMS attributes: None
Journaling enabled: None
File protection: System:RWED, Owner:RWED, Group:RE, World:
Access Cntrl List: (APPLICATION,SIZE=%D44,FLAGS=
%X0600,ACCESS=%X000002E2,DATA=%X00130024,
%X0014000C,%X544600 06,%X312D4D41,%X006B0014,%X006C0008,%X0000001B,%X006E0008,%X
00000002)
Total of 1 file, 4/6 blocks.Appendix F. Virtual Terminal Profile Mapping
Profiles are used with VT to establish a common context for data transfer. Both the initiator and responder must agree on this context (profile) before establishing an association. (See Chapter 1, "OSI Applications Overview".)
Mapping refers to how each profile translates characters from one system to another. Mapping occurs in a directional flow. That is, a local system sends a character to a VT where it is translated within the context of the profile in use, and the VT then updates a display object (local to virtual). The same happens when a character is sent from the display object to the VT and then back to the local system (virtual to local). In addition, the effect of mapping is often different if you are using a terminal implementation, or a host implementation.
For example, on a host implementation, the key sequence <CR> <LF> sent in a
local to VT direction, might be translated to a VT NEXT-X-ARRAY operation. While on a
terminal implementation, it would be typical to see a <CR> character by
itself map to a VT NEXT-X-ARRAY operation.
Sending data in the other direction (virtual to local) on an OpenVMS host, NEXT-X-ARRAY might
translate to the <CR> character, and a terminal implementation might
translate NEXT-X-ARRAY to a <CR> <LF> key sequence.
|
System |
Character/VT Operation |
Maps to: |
|---|---|---|
|
Host (local to virtual) |
All characters |
TEXT |
|
Host (virtual to local) |
TEXT |
character |
|
Terminal (local to virtual) |
All characters |
TEXT |
|
Terminal (virtual to local) |
TEXT |
characters |
|
System |
Character/VT Operation |
Maps to: |
|---|---|---|
| ||
|
Host (local to virtual) |
|
NEXT-X-ARRAY |
|
|
NEXT-X-ARRAY | |
|
|
PTR-RELATIVE Y:=Y+24 | |
|
|
PTR-RELATIVE to next tab stop. X:=x+8 - (X mod 8) | |
|
|
PTR-RELATIVE Y:=Y+3 | |
|
G0 characters |
TEXT | |
|
All other characters are removed prior to transmission. | ||
|
Host (virtual to local) |
NEXT-X-ARRAY |
|
|
TEXT |
characters | |
|
PTR-RELATIVE X:=X+x |
| |
|
PTR-RELATIVE Y:=Y+y |
| |
|
Terminal (local to virtual) |
|
NEXT-X-ARRAY |
|
|
NEXT-X-ARRAY | |
|
|
PTR-RELATIVE Y:=Y+24 | |
|
|
PTR-RELATIVE to next tab stop. X:=X+8 - (X mod 8) | |
|
|
PTR-RELATIVE Y:=Y+3 | |
|
All other characters are removed prior to transmission. | ||
|
Terminal (virtual to local) |
NEXT-X-ARRAY |
|
|
TEXT |
characters | |
|
PTR-RELATIVE X:=X+x |
| |
|
PTR-RELATIVE Y:=Y+y |
| |
|
System |
Character/VT Operation |
Maps to: |
|---|---|---|
| ||
|
Host (local to virtual) |
|
NEXT-X-ARRAY |
|
|
NEXT-X-ARRAY | |
|
|
PTR-RELATIVEX:=X-1/ERASE (current) | |
|
All other characters ? |
TEXT | |
|
Host (virtual to local) |
NEXT-X-ARRAY |
|
|
PTR-RELATIVE X:=X-1/ERASE (current) |
| |
|
ERASE (startx, (Yc, Xc-1))/PTR-ABSOLUTE (X:=1) |
Ctrl/U | |
|
TEXT |
Characters | |
|
Terminal (local to virtual) |
|
NEXT-X-ARRAY |
|
|
PTR-RELATIVE X:=X-1/ERASE (current) | |
|
Ctrl/U |
ERASE (startx, (Yc, Xc-1))/PTR-ABSOLUTE (X:=1) | |
|
Ctrl/O |
Telnet AO | |
|
Ctrl/C |
Telnet IP | |
|
Ctrl/T ? |
Telnet AYT | |
|
All other characters ? |
TEXT | |
|
Terminal (virtual to local) |
NEXT-X-ARRAY |
|
|
PTR-RELATIVE X:=X-1/ERASE (current) |
| |
|
TEXT |
Characters | |
|
ERASE (startx, (Yc, Xc-1))/PTR-ABSOLUTE (X:=1) |
| |
|
Telnet (binary mode) |
See Transparent | |
Appendix G. G0 C0 Character Table
Figure G.1, ''G0 C0 Character Sets'' shows the G0 and C0 character sets.
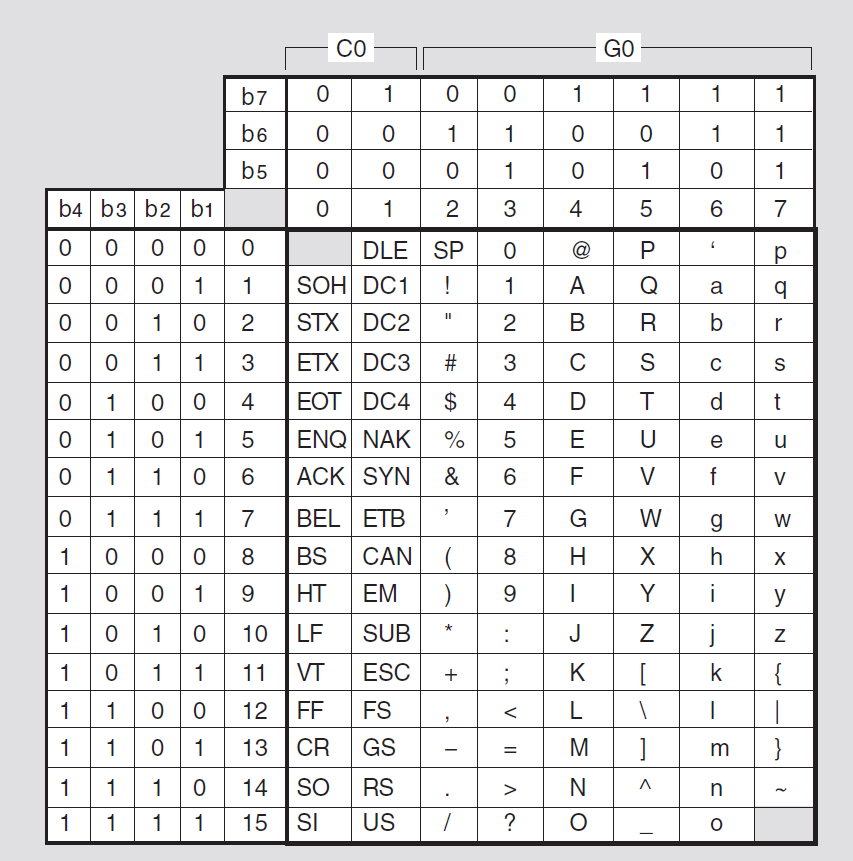
Appendix H. FTAM Error Messages
This appendix describes the FTAM error messages. They are listed alphabetically in Section H.1, ''Error Messages in Alphabetical Order'' and numerically in Section H.2, ''Error Messages in Numerical Order''.
H.1. Error Messages in Alphabetical Order
A provider ABORT has been received
Explanation: A lower-level service provider aborted, which severed the connection.
User Action: Investigate the status of the lower-level services and act accordingly.
Abort diagnostic: code
Explanation: The responder aborted with the specified diagnostic code.
User Action: The code will describe the reason for the abort. Enable tracing, retry the failed request, and study the trace file.
Access context not available
Explanation: The requested access context is unavailable.
FTAM diagnostic identifier: 5024
User Action: None.
Access context not supported
Explanation: The requested access context is not supported.
FTAM diagnostic identifier: 5025
User Action: None.
Access control inconsistent
Explanation: The requested access control is inconsistent.
FTAM diagnostic identifier: 3016 or 6015
User Action: Enable tracing, retry the failed request, and check the trace file to determine the source of the inconsistency between the access control parameters and the requested access or permitted actions parameters.
Access control not available
Explanation: The requested access control is unavailable.
FTAM diagnostic identifier: 3014 or 6013
User Action: Disable the sending of access control parameters and retry the failed request.
Access control not supported
Explanation: The requested access control is not supported.
FTAM diagnostic identifier: 3015 or 6014
User Action: Disable the sending of access control parameters and retry the failed request.
Access request violates VFS security
Explanation: The requested file access has violated virtual filestore security.
FTAM diagnostic identifier: 10
User Action: Compare protection on the file and the privileges of the requestor's account.
Access request violates local security
Explanation: The requested access violates the security checks of the responding system.
FTAM diagnostic identifier: 11
User Action: Check access allowed to the account or file in question.
ACSE — Application name absent
Explanation: The ACSE layer could not find the application name.
User Action: None.
ACSE — Bad diagnostic code
Explanation: The ACSE layer encountered a bad diagnostic code.
User Action: None.
ACSE — Error decoding APDU
Explanation: The ACSE layer encountered an error when decoding the application protocol data unit.
User Action: Enable tracing, retry the failed request, and check the trace file to determine the bad APDU.
ACSE — Error generating an ABORT event
Explanation: The ACSE layer encountered an error when generating an ABORT event.
User Action: Enable tracing, retry the failed request, and check the trace file to determine the bad APDU.
ACSE — Invalid access code
Explanation: The ACSE layer encountered an invalid access code.
User Action: Collect as much pertinent information as possible to identify the error message, describe the error and conditions preceding it, then contact your support representative.
ACSE — Invalid connection block
Explanation: The ACSE layer encountered an invalid connection block.
User Action: Collect as much pertinent information as possible to identify the error message, describe the error and conditions preceding it, then contact your support representative.
Activity no longer exists
Explanation: The requested activity no longer exists.
FTAM diagnostic identifier: 6003
User Action: None.
Activity not recognized
Explanation: The requested activity is not recognized.
FTAM diagnostic identifier: 6004
User Action: None.
Activity not unique
Explanation: The requested activity is not unique.
FTAM diagnostic identifier: 6001
User Action: None.
Alias not specified for remote file
Explanation: The initiator did not specify an alias for the remote file.
User Action: Specify an alias for the remote file.
Ambiguous file specification
Explanation: The file specification is ambiguous.
FTAM diagnostic identifier: 3024
User Action: Check the file specification on the command line.
An error occurred while saving negotiated FTAM association information
Explanation: An error occurred while trying to process one of the following negotiated responses: service class, functional units, storage groups, contents type list.
User Action: Check trace for more information.
An F-CANCEL has been received
Explanation: A cancel request arrived before expected file data. The data transfer is incomplete.
User Action: Enable tracing, retry the failed request, and check the trace file to determine the reason for the F-CANCEL.
Association management (unspecific)
Explanation: An association-management problem occurred for an unknown reason. Either the problem or its cause is unknown.
FTAM diagnostic identifier: 2008
User Action: Collect as much pertinent information as possible to identify the error message, describe the error and conditions preceding it, then contact your support representative.
Association management — bad account
Explanation: A bad account was specified for the association. Association establishment failed.
FTAM diagnostic identifier: 2010
User Action: Specify a valid initiator ID, filestore password, and account combination on the command line.
Association management — bad address
Explanation: A bad address was specified for the association. Association establishment failed.
FTAM diagnostic identifier: 2009
User Action: Look for incorrect addressing information in the alias database file. Ask the system manager to correct the error.
Association with user not allowed
Explanation: The association with the remote system was denied.
FTAM diagnostic identifier: 2000
User Action: Check factors that can affect association establishment: for example, the system protection of the target system (that is, the user ID and password), the remote application address, or the security information in a file specification.
at least one argument must be remote
Explanation: Neither argument was a remote file.
User Action: Reissue the command, specifying a remote system.
At least one byte of the end-of-contents string is not zero
Explanation: The ASN.1 component found at least one byte of the end-of-contents string that was not zero.
User Action: Enable tracing, retry the failed request, and check the trace file to determine the bad PDU.
Attribute cannot be changed
Explanation: The real filestore cannot alter a specified attribute.
FTAM diagnostic identifier: 4002
User Action: None.
Attribute cannot be read
Explanation: The real filestore cannot read the requested attribute.
FTAM diagnostic identifier: 4001
User Action: None.
Attribute group error (unspecific)
Explanation: An attribute-group error occurred for an unknown reason.
FTAM diagnostic identifier: 2004
User Action: None.
Attribute group not allowed
Explanation: A requested attribute group is prohibited.
FTAM diagnostic identifier: 2006
User Action: None.
Attribute group not supported
Explanation: The responder does not support a requested attribute group.
FTAM diagnostic identifier: 2005
User Action: None.
Attribute non-existent
Explanation: The requested attribute does not exist.
FTAM diagnostic identifier: 4000
User Action: None.
Attribute not supported
Explanation: The real filestore does not support a requested attribute.
FTAM diagnostic identifier: 4003
User Action: None.
Bad account
Explanation: A bad account is being used to establish an association.
FTAM diagnostic identifier: 2007 or 3019
User Action: Use the correct account along with the correct initiator ID and filestore password pair on the command line.
Bad attribute name
Explanation: An attribute name specified in a read-attribute request is invalid.
FTAM diagnostic identifier: 3003 or 4004
User Action: None.
Bad attribute value
Explanation: A bad value exists for one or more file attributes.
FTAM diagnostic identifier: 3027 or 4005
User Action: None.
Bad checkpoint (unspecific)
Explanation: A checkpoint is bad for unknown reasons.
FTAM diagnostic identifier: 6000
User Action: None.
Bad data element type
Explanation: An incorrect data-element type occurred.
FTAM diagnostic identifier: 5014
User Action: This message is returned by another vendor's responder. Check that vendor's FTAM documentation for information about the error.
Bad FADU (unspecific)
Explanation: A file-access data unit (FADU) is bad for unknown reasons.
FTAM diagnostic identifier: 5000
User Action: None.
Bad FADU — bad location
Explanation: The specified file-access data unit (FADU) location is incorrect.
FTAM diagnostic identifier: 5004
User Action: None.
Bad FADU — poorly specified
Explanation: The requested file-access data unit (FADU) is improperly specified.
FTAM diagnostic identifier: 5003
User Action: None.
Bad FADU — size error
Explanation: The specified record size is incorrect.
FTAM diagnostic identifier: 5001
User Action: None.
Bad FADU — type error
Explanation: The specified file-access data unit (FADU) type is incorrect.
FTAM diagnostic identifier: 5002
User Action: None.
Bad open flags flag-value
Explanation: The responder encountered the specified bad flag value.
User Action: Collect as much pertinent information as possible to identify the error message, describe the error and conditions preceding it, then contact your support representative.
Bad read (unspecific)
Explanation: An attempt to read data from the specified file failed for an unknown reason.
FTAM diagnostic identifier: 5027
User Action: None.
Bad recovery point
Explanation: A recovery point is bad.
FTAM diagnostic identifier: 6008
User Action: None.
Bad write (unspecific)
Explanation: An attempt to write data into the specified file failed for an unknown reason.
FTAM diagnostic identifier: 5026
User Action: None.
Buffer too small
Explanation: The received data is greater than 7K. The remote implementation has sent a buffer greater than the 7K maximum suggested by NIST.
User Action: Notify the vendor.
BUGCHECK at line line in module module/ reason
Explanation: A BUGCHECK was found at the specified line in the specified module. The specific reason is given on the next line.
User Action: Collect as much pertinent information as possible to identify the error message, describe the error and conditions preceding it, then contact your support representative.
Cancel received during data transfer
Explanation: The peer system has canceled the data transfer.
User Action: None.
cannot open local file file-name
Explanation: The specified local file could not be opened using this command.
User Action: None.
cannot open remote file file-name
Explanation: The specified remote file could not be opened using this command.
User Action: None.
Cannot simplify contents type
Explanation: The FTAM initiator can simplify files in this hierarchy:
FTAM-2 –> FTAM-1
FTAM-1 –> FTAM-3
No simplification path exists for this file to a file type supported by the remote responder.
User Action: None.
cannot specify unlimited string length for fixed length files
Explanation: Fixed length files require a string length.
User Action: Reissue the command with the -M option.
Checkpoint outside of window
Explanation: The checkpoint is outside of the window.
FTAM diagnostic identifier: 6002
User Action: None.
Checkpoint window error — too large
Explanation: The checkpoint is too large for the window.
FTAM diagnostic identifier: 2011
User Action: None.
Checkpoint window error — too small
Explanation: The checkpoint is too small for the window.
FTAM diagnostic identifier: 2012
User Action: None.
Checkpoint window error — unsupported
Explanation: The checkpoint is unsupported.
FTAM diagnostic identifier: 2013
User Action: None.
Communications QoS not supported
Explanation: The requested communications quality of service is unsupported.
FTAM diagnostic identifier: 2014
User Action: None.
Concurrency control inconsistent
Explanation: Concurrency control is inconsistent.
FTAM diagnostic identifier: 5020
User Action: Retry without concurrency control parameters.
Concurrency control not available
Explanation: Concurrency control is unavailable.
FTAM diagnostic identifier: 3008 or 5018
User Action: Retry without concurrency control parameters.
Concurrency control not possible
Explanation: Concurrency control is not possible.
FTAM diagnostic identifier: 3010
User Action: Retry without concurrency control parameters.
Concurrency control not supported
Explanation: Concurrency control is not supported.
FTAM diagnostic identifier: 3009 or 5019
User Action: Retry without concurrency control parameters.
Conflicting parameter values
Explanation: An internal software error occurred.
FTAM diagnostic identifier: 1000
User Action: Collect as much pertinent information as possible to identify the error message, describe the error and conditions preceding it, then contact your support representative.
Contents type inconsistent
Explanation: The requested contents type violates the negotiation rules or is inconsistent with the real contents type of the file.
FTAM diagnostic identifier: 5036 or 6016
User Action: Retry the
copy command with the correct document type
parameters.
Contents type list cut by initiator
Explanation: Presentation cut or reduced the requested contents type list. Some document types might not be supported.
FTAM diagnostic identifier: 2019
User Action: None.
Contents type list cut by responder
Explanation: The responding FTAM entity cut the requested list of contents types. Some requested document types might not be supported.
FTAM diagnostic identifier: 2018
User Action: None.
Contents type simplified
Explanation: The initiator opened the file with a simplified contents type, which the responder accepted. Simplification can involve the document type, the parameters, or both.
FTAM diagnostic identifier: 5037 or 6017
User Action: None.
Context management refused
Explanation: The requested presentation-context management was invalid. Once an FTAM regime exists, you cannot change the negotiated presentation context.
FTAM diagnostic identifier: 2016
User Action: None.
Corrupt docket
Explanation: The docket is corrupt.
FTAM diagnostic identifier: 6006
User Action: None.
Damage to select/open regime
Explanation: The select or open regime was damaged for an unknown reason.
FTAM diagnostic identifier: 5039
User Action: None.
Decoded length larger then amount of remaining data in PDU
Explanation: The ASN.1 component found a decoded length that is larger than the amount of remaining data in the protocol data unit.
User Action: Enable tracing, retry the failed request, and check the trace file for the bad PDU.
Decoded length won't fit into an unsigned longword
Explanation: The ASN.1 component found a decoded length that does not fit into an unsigned longword.
User Action: Enable tracing, retry the failed request, and check the trace file for the bad PDU.
Delay may be encountered
Explanation: The action may take more time than usual.
FTAM diagnostic identifier: 6
User Action: None.
directory copies are not supported
Explanation: FTAM does not support copying a directory file.
User Action: Do not try to copy a directory file.
document type must be specified when specifying universal , class number, string significance, or maximum string length
Explanation: The document type must be specified when specifying universal class number, string significance, or maximum string length using this command.
User Action: Reissue the command with a document type.
Duplicate FADU name
Explanation: A duplicate record has been detected.
FTAM diagnostic identifier: 5038
User Action: None.
Duplicated parameter
Explanation: A parameter in an FTAM PDU has been specified twice.
FTAM diagnostic identifier: 1004
User Action: Collect as much pertinent information as possible to identify the error message, describe the error and conditions preceding it, then contact your support representative.
Encoded integer value too long
Explanation: The ASN.1 component found an encoded integer value that is too long.
User Action: Enable tracing, retry the failed request, and check the trace file for the bad PDU.
End of transition list reached without a state change
Explanation: FTAM reached the end of the transition list without a state change.
User Action: Collect as much pertinent information as possible to identify the error message, describe the error and conditions preceding it, then contact your support representative.
Ending guard zone of block address has been modified, The block was created in module-name at line line-number
CMN_DEALLOCATE was called from module-name at line line-number
Explanation: The ending guard zone of the specified block address has been modified. The block was created at the specified line of the specified module. CMN_DEALLOCATE was called from the specified line of the specified module.
User Action: Collect as much pertinent information as possible to identify the error message, describe the error and conditions preceding it, then contact your support representative.
Error allocating connect block
Explanation: The responder encountered an error when allocating the connect block.
User Action: Collect as much pertinent information as possible to identify the error message, describe the error and conditions preceding it, then contact your support representative.
Error allocating parameter block
Explanation: The responder encountered an error when allocating the parameter block.
User Action: Collect as much pertinent information as possible to identify the error message, describe the error and conditions preceding it, then contact your support representative.
Error allocating space for type information
Explanation: FTAM encountered an error when allocating space for the specified information, which is either a contents type list or a file name.
User Action: Collect as much pertinent information as possible to identify the error message, describe the error and conditions preceding it, then contact your support representative.
Error calling state machine action routine
Explanation: FTAM encountered an error when calling the state machine action routine.
User Action: Collect as much pertinent information as possible to identify the error message, describe the error and conditions preceding it, then contact your support representative.
Error closing trace file file-name
Explanation: An error was encountered when closing the specified trace file.
User Action: Check for a full file system or file protection.
Error decoding FTAM PDU
Explanation: The initiator encountered an error while decoding the FTAM protocol data unit.
User Action: Enable tracing, retry the failed request, and check the trace file for the bad PDU.
Error decoding length
Explanation: The ASN.1 component encountered an error when decoding the length.
User Action: Enable tracing, retry the failed request, and check the trace file for the bad PDU.
Error decoding nested value within SEQUENCE ' ASN.1-field-name'
Explanation: The ASN.1 component encountered an error when decoding a nested value within the specified SEQUENCE field.
User Action: Enable tracing, retry the failed request, and check the trace file for the bad PDU. Subsequent messages will describe the bad element in the sequence.
Error decoding nested value within SET ' ASN.1-field-name'
Explanation: The ASN.1 component encountered an error when decoding a nesting value within the specified SET field.
User Action: Enable tracing, retry the failed request, and check the trace file for the bad PDU. Subsequent messages will describe the bad element in the set.
Error decoding nested value within tagged value ' ASN.1-field-name'
Explanation: The ASN.1 component encountered an error when decoding a nesting value within the specified tagged value.
User Action: Enable tracing, retry the failed request, and check the trace file for the bad PDU. Subsequent messages will describe the bad element in the tagged value.
Error decoding parameter ' ASN.1-field-name'
Explanation: The ASN.1 component encountered an error decoding the specified parameter.
User Action: Enable tracing, retry the failed request, and check the trace file for the bad parameter. Subsequent messages will describe the problem.
Error decoding tag value
Explanation: The ASN.1 component encountered an error when decoding a tag value.
User Action: Enable tracing, retry the failed request, and check the trace file for the tag value. Subsequent messages will describe the problem.
Error encoding nested value within SEQUENCE ' ASN.1-field-name'
Explanation: The ASN.1 component encountered an error when encoding a nesting value within the specified SEQUENCE field.
User Action: Enable tracing, retry the failed request, and check the trace file for the bad value in the sequence. Subsequent messages will describe the problem.
Error encoding nested value within SET ' ASN.1-field-name'
Explanation: The ASN.1 component encountered an error when encoding a nesting value within the specified SET field.
User Action: Enable tracing, retry the failed request, and check the trace file for the bad value in the set. Subsequent messages will describe the problem.
Error encoding nested value within tagged value ' ASN.1-field-name'
Explanation: The ASN.1 component encountered an error when encoding a nesting value within the specified tagged value.
User Action: Enable tracing, retry the failed request, and check the trace file for the bad value. Subsequent messages will describe the problem.
Error encoding parameter ' ASN.1-field-name'
Explanation: The ASN.1 component encountered an error when encoding the specified parameter.
User Action: Collect as much pertinent information as possible to identify the error message, describe the error and conditions preceding it, then contact your support representative.
Error encoding tag for parameter ' ASN.1-field-name'
Explanation: The ASN.1 component encountered an error when encoding a tag for the specified parameter.
User Action: Collect as much pertinent information as possible to identify the error message, describe the error and conditions preceding it, then contact your support representative.
Error encoding universal class type for parameter ' ASN.1-field-name'
Explanation: The ASN.1 component encountered an error when encoding the universal class type for the specified parameter.
User Action: Collect as much pertinent information as possible to identify the error message, describe the error and conditions preceding it, then contact your support representative.
Error logging in
Explanation: The responder encountered an error when logging in.
User Action: None.
Error logging out
Explanation: The responder encountered an error when logging out.
User Action: None.
Error looking up current directory
Explanation: The responder encountered an error looking up the current directory.
User Action: The directory might not exist. Check the user's home directory and the protection or availability of the file.
Error occurred while trying to assign an API port
Explanation: FTAM encountered an error while trying to assign a port for the Application Programming Interface.
User Action: See further messages for more details.
Error occurred while trying to receive an API event
Explanation: FTAM encountered an error while trying to receive an event from the Application Programming Interface. Subsequent error messages will describe the error.
User Action: None.
Error opening trace file file-name
Explanation: An error was encountered when opening the specified trace file.
User Action: Check for full file system or file protections.
Error reading attributes
Explanation: The responder or the initiator encountered an error when reading attributes.
User Action: None.
Error sending a PDU, return code is XXXXX
Explanation: No response was received for the named parameter requested in either an f-read-attributes request or the f-open request FTAM PDU (protocol data unit).
FTAM diagnostic identifier: See osif.h for text that
describes the named return code.
User Action: Check trace for more information.
Error sending a PDU, return code is osif-error-code
Explanation: The responder encountered an error with the specified return code when sending a protocol data unit.
User Action: Enable tracing and retry the failed request. If you cannot find the problem, collect as much pertinent information as possible to identify the error message, describe the error and conditions preceding it, then contact your support representative.
Error sending an F-BEGIN-GROUP request
Explanation: The initiator encountered an error sending an F-BEGIN-GROUP request.
User Action: Enable tracing and retry the failed request. If you cannot find the problem, collect as much pertinent information as possible to identify the error message, describe the error and conditions preceding it, then contact your support representative.
Error sending an F-CANCEL request
Explanation: The initiator encountered an error sending an F-CANCEL request.
User Action: Enable tracing and retry the failed request. If you cannot find the problem, collect as much pertinent information as possible to identify the error message, describe the error and conditions preceding it, then contact your support representative.
Error sending an F-CHANGE-ATTRIBUTE request
Explanation: The initiator encountered an error sending an F-CHANGE-ATTRIBUTE request.
User Action: Enable tracing and retry the failed request. If you cannot find the problem, collect as much pertinent information as possible to identify the error message, describe the error and conditions preceding it, then contact your support representative.
Error sending an F-CLOSE request
Explanation: The initiator encountered an error sending an F-CLOSE request.
User Action: Enable tracing and retry the failed request. If you cannot find the problem, collect as much pertinent information as possible to identify the error message, describe the error and conditions preceding it, then contact your support representative.
Error sending an F-CREATE request
Explanation: The initiator encountered an error sending an F-CREATE request.
User Action: Enable tracing and retry the failed request. If you cannot find the problem, collect as much pertinent information as possible to identify the error message, describe the error and conditions preceding it, then contact your support representative.
Error sending an F-DATA request
Explanation: The initiator encountered an error sending an F-DATA request.
User Action: Enable tracing and retry the failed request. If you cannot find the problem, collect as much pertinent information as possible to identify the error message, describe the error and conditions preceding it, then contact your support representative.
Error sending an F-DATA-END request
Explanation: The initiator encountered an error sending an F-DATA-END request.
User Action: Enable tracing and retry the failed request. If you cannot find the problem, collect as much pertinent information as possible to identify the error message, describe the error and conditions preceding it, then contact your support representative.
Error sending an F-DELETE request
Explanation: The initiator encountered an error sending an F-DELETE request.
User Action: Enable tracing and retry the failed request. If you cannot find the problem, collect as much pertinent information as possible to identify the error message, describe the error and conditions preceding it, then contact your support representative.
Error sending an F-DESELECT request
Explanation: The initiator encountered an error sending an F-DESELECT request.
User Action: Enable tracing and retry the failed request. If you cannot find the problem, collect as much pertinent information as possible to identify the error message, describe the error and conditions preceding it, then contact your support representative.
Error sending an F-END-GROUP request
Explanation: The initiator encountered an error sending an F-END-GROUP request.
User Action: Enable tracing and retry the failed request. If you cannot find the problem, collect as much pertinent information as possible to identify the error message, describe the error and conditions preceding it, then contact your support representative.
Error sending an F-OPEN request
Explanation: The initiator encountered an error sending an F-OPEN request.
User Action: Enable tracing and retry the failed request. If you cannot find the problem, collect as much pertinent information as possible to identify the error message, describe the error and conditions preceding it, then contact your support representative.
Error sending an F-READ request
Explanation: The initiator encountered an error sending an F-READ request.
User Action: Enable tracing and retry the failed request. If you cannot find the problem, collect as much pertinent information as possible to identify the error message, describe the error and conditions preceding it, then contact your support representative.
Error sending an F-READ-ATTRIBUTE request
Explanation: The initiator encountered an error sending an F-READ-ATTRIBUTE request.
User Action: Enable tracing and retry the failed request. If you cannot find the problem, collect as much pertinent information as possible to identify the error message, describe the error and conditions preceding it, then contact your support representative.
Error sending an F-SELECT request
Explanation: The initiator encountered an error sending an F-SELECT request.
User Action: Enable tracing and retry the failed request. If you cannot find the problem, collect as much pertinent information as possible to identify the error message, describe the error and conditions preceding it, then contact your support representative.
Error sending an F-TERMINATE request
Explanation: The initiator encountered an error sending an F-TERMINATE request.
User Action: Enable tracing and retry the failed request. If you cannot find the problem, collect as much pertinent information as possible to identify the error message, describe the error and conditions preceding it, then contact your support representative.
Error sending an F-TRANSFER-END request
Explanation: The initiator encountered an error sending an F-TRANSFER-END request.
User Action: Enable tracing and retry the failed request. If you cannot find the problem, collect as much pertinent information as possible to identify the error message, describe the error and conditions preceding it, then contact your support representative.
Error sending an F-WRITE request
Explanation: The initiator encountered an error sending an F-WRITE request.
User Action: Enable tracing and retry the failed request. If you cannot find the problem, collect as much pertinent information as possible to identify the error message, describe the error and conditions preceding it, then contact your support representative.
Error sending node descriptor data element for FTAM-2 file
Explanation: The initiator encountered an error when sending a node descriptor data element for an FTAM-2 file.
User Action: Enable tracing and retry the failed request. If you cannot find the problem, collect as much pertinent information as possible to identify the error message, describe the error and conditions preceding it, then contact your support representative.
Error translating transport address address
Explanation: The listener encountered an error when translating the specified transport address.
User Action: None.
Error trying to allocate an API buffer
Explanation: FTAM encountered an error when trying to allocate an API buffer.
User Action: Collect as much pertinent information as possible to identify the error message, describe the error and conditions preceding it, then contact your support representative.
FADU cannot be inserted
Explanation: The real filestore cannot insert a file-access data unit (FADU) at the current location.
FTAM diagnostic identifier: 5011
User Action: None.
FADU cannot be located
Explanation: The record identified by the file-access data unit (FADU) ID could not be found.
FTAM diagnostic identifier: 5013
User Action: None.
FADU cannot be replaced
Explanation: The real filestore cannot replace the file-access data unit (FADU) at the current location.
FTAM diagnostic identifier: 5012
User Action: None.
FADU does not exist
Explanation: The requested file-access data unit (FADU) is nonexistent.
FTAM diagnostic identifier: 5005
User Action: None.
FADU locking not available on file
Explanation: The file system does not support record locking.
FTAM diagnostic identifier: 5040
User Action: None.
FADU not available for erasure
Explanation: The record could not be erased.
FTAM diagnostic identifier: 5010
User Action: None.
FADU not available for location
Explanation: The record could not be located.
FTAM diagnostic identifier: 5009
User Action: None.
FADU not available for reading
Explanation: The requested file-access data unit (FADU) is unavailable for reading.
FTAM diagnostic identifier: 5007
User Action: None.
FADU not available for writing
Explanation: The requested file-access data unit (FADU) is unavailable for writing.
FTAM diagnostic identifier: 5008
User Action: None.
FADU not available (unspecific)
Explanation: The requested file-access data unit (FADU) is unavailable for an unknown reason.
FTAM diagnostic identifier: 5006
User Action: None.
File already exists
Explanation: The file being created already exists, and an override was not requested.
FTAM diagnostic identifier: 3005
User Action: None.
File busy
Explanation: Another user has locked the specified file.
FTAM diagnostic identifier: 3012
User Action: Try later.
File cannot be created
Explanation: The file cannot be created.
FTAM diagnostic identifier: 3006
User Action: None.
File cannot be deleted
Explanation: The file cannot be deleted.
FTAM diagnostic identifier: 3007
User Action: None.
File created but not selected
Explanation: The file is created, but it is not selected.
FTAM diagnostic identifier: 3030
User Action: None.
file names are identical
Explanation: Identical file names were found using this command.
User Action: Reissue the command with a different name for the destination file.
File not available
Explanation: The requested file is unavailable to the initiator.
FTAM diagnostic identifier: 3013
User Action: None.
File waiting restart
Explanation: The file is waiting for restart.
FTAM diagnostic identifier: 6007
User Action: None.
file-name: permission denied
Explanation: Permission to access the specified file was denied while using this command.
User Action: Check the protection on the file and try again.
Filename not found
Explanation: The file name was not found.
FTAM diagnostic identifier: 3000
User Action: None.
Filename truncated
Explanation: The file name specified on the command line was too long and was truncated by the responder.
FTAM diagnostic identifier: 3017
User Action: Use a shorter file name.
filename was not supplied by the remote system
Explanation: The requested file name was not returned by the remote system.
User Action: Report the problem to the other vendor.
FTAM — Bad Parameter
Explanation: The FTAM layer found a bad parameter.
User Action: Enable tracing and retry the failed request. If you cannot find the problem, collect as much pertinent information as possible to identify the error message, describe the error and conditions preceding it, then contact your support representative.
FTAM – Can't create the contents type database
Explanation: An error occurred while trying to process the information found in the /ftamoids
file.
User Action: Refer to other messages displayed for more information.
FTAM – Can't open file contents_type_database file
Explanation: Can't open /ftamoids file.
User Action: Verify that the /ftamoids exists and is readable.
FTAM — Contents Type invalid
Explanation: The FTAM layer found an invalid contents type.
User Action: Enable tracing and retry the failed request. If you cannot find the problem, collect as much pertinent information as possible to identify the error message, describe the error and conditions preceding it, then contact your support representative.
FTAM — CTDB context not negotiated
Explanation: The FTAM layer did not negotiate the contents type database context.
User Action: Enable tracing and retry the failed request. If you cannot find the problem, collect as much pertinent information as possible to identify the error message, describe the error and conditions preceding it, then contact your support representative.
FTAM — Extra Contents Type
Explanation: The FTAM layer found an extra contents type.
User Action: Enable tracing and retry the failed request. If you cannot find the problem, collect as much pertinent information as possible to identify the error message, describe the error and conditions preceding it, then contact your support representative.
FTAM — FTAM quality of service not provided
Explanation: The FTAM layer did not provide the FTAM quality of service.
User Action: Notify the vendor of the problem.
FTAM — Functionality not supported
Explanation: The FTAM layer does not support this functionality.
User Action: None.
FTAM — Group threshold violations
Explanation: The FTAM layer found grouping threshold violations.
User Action: Enable tracing and retry the failed request. If you cannot find the problem, notify the vendor.
FTAM – Invalid abstract syntax reference
Explanation: An abstract syntax, associated with a document type definition in the /ftamoids
file, is not defined.
User Action: An abstract syntax used to define a document type must be defined before it can be referenced in a document type definition.
FTAM – Invalid constraint set reference
Explanation: A constraint set, associated with a document type definition in the /ftamoids
file, is not defined.
User Action: A constraint set used to define a document type must be defined before it can be referenced in a document type definition.
FTAM – Invalid constraint set handler reference
Explanation: An unknown constraint set handler was specified in the
/ftamoids file.
User Action: Valid constraint set handler references are: osif_user_cs_handler.
FTAM — Invalid context identifiers
Explanation: The FTAM layer found invalid context identifiers.
User Action: Enable tracing and retry the failed request. If you cannot find the problem, notify the vendor.
FTAM – Invalid document type handler reference
Explanation: A unknown document type handler was specified in the
/ftamoids file.
User Action: Valid document type handler references are: osif_ftam1_handler, osif_ftam2_handler, osif_ftam3_handler, osif_nbs9_handler, and osif_user_dt_handler.
FTAM – Invalid file model reference
Explanation: A file model, associated with a document type definition in the /ftamoids file,
is not defined.
User Action: A file model used to define a document type must be defined before it can be referenced in a document type definition.
FTAM – Invalid object identifier type reference
Explanation: An invalid object identifier type was specified in the
/ftamoids file.
User Action: Valid object identifiers define: file models, FTAM FADU, FTAM PCI, constraint sets, abstract syntaxes, and document types.
FTAM — Invalid String Significance
Explanation: The FTAM layer found an invalid string significance.
User Action: Enable tracing and retry the failed request. If you cannot find the problem, notify the vendor.
FTAM — Invalid Universal Class Number
Explanation: The FTAM layer found an invalid universal class number.
User Action: Enable tracing and retry the failed request. If you cannot find the problem, notify the vendor.
FTAM — Lower Layer Connect Failure
Explanation: The FTAM layer failed when trying to connect to a lower layer.
User Action: None.
FTAM — No more memory available
Explanation: The FTAM layer failed due to lack of memory.
User Action: Collect as much pertinent information as possible to identify the error message, describe the error and conditions preceding it, then contact your support representative.
FTAM — Presentation Context Missing
Explanation: The FTAM layer could not find a presentation context.
User Action: Enable tracing, retry the failed request, and check the trace file.
FTAM — Protocol Error
Explanation: The FTAM layer encountered a protocol error.
User Action: Enable tracing, retry the failed request, and check the trace file.
FTAM — Request violates negotiated options
Explanation: The FTAM layer found a request that violates negotiated options.
User Action: Find out what the application was trying to do and which options had been negotiated. If appropriate, try to use another command.
FTAM — Unsupported Parameter Value
Explanation: The FTAM layer found an unsupported parameter value.
User Action: Try to find the bad value and change it.
FTAM Listener start on TSAP ' tsap'
Explanation: An FTAM listener is starting up at the specified transport service access point.
User Action: None.
FTAM management problem (unspecific)
Explanation: An unknown FTAM-management problem occurred. Either the problem or its cause is unknown.
FTAM diagnostic identifier: 3
User Action: None.
FTAM management, bad account
Explanation: A bad account was specified for the FTAM regime. Regime establishment failed.
FTAM diagnostic identifier: 4
User Action: Specify a valid initiator ID, filestore password, and account combination on the command line.
FTAM management, security not passed
Explanation: Required security information is absent or incorrect.
FTAM diagnostic identifier: 5
User Action: On your command line, specify a valid initiator ID and filestore password pair that allows access to the specified file.
FTAM protocol error (unspecific)
Explanation: An unknown protocol error occurred.
FTAM diagnostic identifier: 1007
User Action: The remote FTAM application of the current association produced this error. Collect as much pertinent information as possible and report the FTAM diagnostic message and the conditions preceding its occurrence to the vendor of that remote FTAM application.
FTAM protocol error, corruption error
Explanation: An FTAM protocol error was detected.
FTAM diagnostic identifier: 1010
User Action: The remote FTAM application of the current association produced this error. Collect as much pertinent information as possible and report the FTAM diagnostic message and the conditions preceding its occurrence to the vendor of that remote FTAM application.
FTAM protocol error, functional unit error
Explanation: A violation of the negotiations for functional units caused an FTAM protocol error.
FTAM diagnostic identifier: 1009
User Action: The remote FTAM application of the current association produced this error. Collect as much pertinent information as possible and report the FTAM diagnostic message and the conditions preceding its occurrence to the vendor of that remote FTAM application.
FTAM protocol error, procedure error
Explanation: An FTAM protocol error was detected.
FTAM diagnostic identifier: 1008
User Action: The remote FTAM application of the current association produced this error. Collect as much pertinent information as possible and report the FTAM diagnostic message and the conditions preceding its occurrence to the vendor of that remote FTAM application.
FTAM Provider Abort message received
Explanation: The local FTAM protocol machine detected an error.
User Action: Collect as much pertinent information as possible and notify the vendor about the error message and describe the error and the conditions preceding it.
FTAM User Abort message received
Explanation: The remote FTAM implementation detected an error.
User Action: Collect as much pertinent information as possible and notify the vendor about the error message and describe the error and the conditions preceding it.
Functional unit invalid in processing mode
Explanation: The functional units negotiated within the FTAM regime are invalid for the processing mode of the current open regime.
FTAM diagnostic identifier: 5035
User Action: None.
Functional unit not available for requested access
Explanation: The requested access violates the negotiated set of functional units.
FTAM diagnostic identifier: 3029
User Action: None.
Further details: diagnostic-text-string
Explanation: This message provides more information about the received diagnostic. The diagnostic text string is textual information sent by the remote application.
User Action: None.
Future filesize exceeded
Explanation: The file being created exceeds the allocated future file size.
FTAM diagnostic identifier: 5032
User Action: Recreate the file with a larger future file size.
Future filesize increased
Explanation: When creating a file, the real filestore automatically increased the file's future file size.
FTAM diagnostic identifier: 5034
User Action: None.
Grouping threshold violation
Explanation: The number of primitives within a service grouping differs from the value specified for the grouping threshold.
FTAM diagnostic identifier: 1016
User Action: Collect as much pertinent information as possible to identify the error message, describe the error and conditions preceding it, then contact your support representative.
illegal concurrency control access name — , valid choices are: read, insert, replace, extend, erase, read-attribute, change-attribute, delete-file
Explanation: An illegal concurrency control access name was found using this command.
User Action: Reissue the command with the correct concurrency control access name.
illegal concurrency control key name — , valid choices are: not-required, shared, exclusive, no-access
Explanation: An illegal concurrency control key name was found using this command.
User Action: Reissue the command with the correct concurrency control key name.
illegal concurrency control syntax; missing colon(:)
Explanation: A missing colon resulted in an illegal concurrency control syntax while using this command.
User Action: Reissue the command with the correct syntax.
illegal concurrency control syntax; missing comma(,)
Explanation: A missing comma resulted in an illegal concurrency control syntax while using this command.
User Action: Reissue the command with the correct syntax.
illegal concurrency control syntax; missing parenthesis
Explanation: A missing parenthesis resulted in an illegal concurrency control syntax while using this command.
User Action: Reissue the command with a parenthesis.
illegal document type specified — , valid choices are FTAM-1, FTAM-2, FTAM-3, NBS-9, or INTAP-1
Explanation: An illegal document type was specified using this command.
User Action: Reissue the command with the correct document type.
Illegal grouping sequence
Explanation: The requested grouping contains an illegal sequence of FTAM primitives.
FTAM diagnostic identifier: 1015
User Action: Collect as much pertinent information as possible to identify the error message, describe the error and conditions preceding it, then contact your support representative.
Illegal length value of 255 found
Explanation: The ASN.1 component found an illegal length value of 255.
User Action: Collect as much pertinent information as possible to identify the error message, describe the error and conditions preceding it, then contact your support representative.
Illegal parameter type
Explanation: A parameter type in a call to the file service is illegal.
FTAM diagnostic identifier: 1005
User Action: Collect as much pertinent information as possible to identify the error message, describe the error and conditions preceding it, then contact your support representative.
illegal string significance specified — , valid choices are v (variable), f (fixed), or n (no string significance)
Explanation: An illegal string significance was specified using this command.
User Action: Reissue the command with the correct string significance.
illegal string significance specified - stringvalid choices are v(variable), f (fixed), or n (no string significance)
Explanation: Explanation: Invalid FTAM document type string significance was specified. The only valid entries are "v", "f", or "n".
User Action: Re-enter utility, specifying a valid string significance value.
illegal universal class number specified — , valid choices are printable, IA5, graphic, visible, or general
Explanation: An illegal universal class number was specified using this command.
User Action: Reissue the command with the correct universal class number.
Incompatible service classes
Explanation: The negotiated service classes are not correct.
FTAM diagnostic identifier: 2021
User Action: Collect as much pertinent information as possible to identify the error message, describe the error and conditions preceding it, then contact your support representative.
Initial attributes altered
Explanation: The responder altered the initial attributes specified in the F-CREATE request, but the file creation succeeded.
FTAM diagnostic identifier: 3018
User Action: None.
Initial attributes not possible
Explanation: A file could not be created with the initial attributes specified on the F-CREATE request.
FTAM diagnostic identifier: 3002
User Action: None.
Initiator error (unspecific)
Explanation: An unknown error occurred in the initiator.
FTAM diagnostic identifier: 7
User Action: None.
Initiator identity unacceptable
Explanation: The specified initiator identity is not acceptable.
FTAM diagnostic identifier: 2015
User Action: None.
Insufficient buffer space to receive data
Explanation: FTAM has insufficient buffer space to receive data.
User Action: Collect as much pertinent information as possible to identify the error message, describe the error and conditions preceding it, then contact your support representative.
Invalid access password specified
Explanation: The access password specified by the user is invalid.
User Action: Check the access password used on the command line.
Invalid address address string
Explanation: The OpenVMS psap.ssap.tsap.nsap address format is invalid.
User Action: Modify OpenVMS address so it conforms to the
required psap.ssap.tsap.nsap format.
Invalid create password
Explanation: The password used for file creation is not valid.
FTAM diagnostic identifier: 3025
User Action: Check the password used on the command line.
invalid create password specified
Explanation: An invalid create password was specified using this command.
User Action: Check the create password. If you are using hexadecimal values (preceded by %x), make sure there are an even number of bytes in the value (for example, %x01).
Invalid delete password on override
Explanation: The password used for deleting a file (to be overridden) is invalid. It does not match the remote file store's delete password.
FTAM diagnostic identifier: 3026
User Action: Check the password used on the command line.
Invalid filestore password
Explanation: The specified filestore password is not valid.
FTAM diagnostic identifier: 2020
User Action: Use the correct password on the command line.
Invalid FTAM access control list - missing mandatory action-list parameter
Explanation: ocp security group was specified but the specification did not include the
mandatory action-list parameter.
User Action: Enter command with action-list. Refer to
ocp reference page.
Invalid FTAM security group parameter:concurrency=(ca-name:ca-key[,ca-name:ca-key...],); passwords=(apwd-type:apwd-value[,apwd-type:apwd-value...]);identity=user-identity-string; legal-qual=legal-qual-string
Explanation: Invalid syntax was entered for the security group parameter specification.
User Action: Check syntax specification and re-enter command.
Invalid parameter specified for file file-name
Explanation: The initiator found that the specified file name contains the invalid parameter specified. The possible invalid parameters are alias, account, password, or user name.
User Action: Reissue the command with the correct values.
Invalid SAP length
Explanation: FTAM found an invalid service access point length.
User Action: Check the service access points. If you are using hexadecimal values (preceded by %x), SAPs must be an even number of bytes long (for example, %x01).
Length size for number is too big by number octets
Explanation: The ASN.1 component encountered a length size for the number of bytes of data that was too large by the specified number of octets.
User Action: Collect as much pertinent information as possible to identify the error message, describe the error and conditions preceding it, then contact your support representative.
Local failure (unspecific)
Explanation: The responder reports a failure with an unknown reason.
FTAM diagnostic identifier: 5028
User Action: None.
Local failure — data corrupted
Explanation: The responder reports that the data being transferred is corrupted.
FTAM diagnostic identifier: 5030
User Action: None.
Local failure — device failure
Explanation: The responder reports that a local device failed.
FTAM diagnostic identifier: 5031
User Action: Check the devices in use for any failures and take proper actions.
Local failure — filespace exhausted
Explanation: The responder reports that the specified device lacks space.
FTAM diagnostic identifier: 5029
User Action: Clear some space on the device or specify a different device.
local fstat error
Explanation: A local fstat error was encountered using this command.
User Action: Check the local file specification.
local read error
Explanation: A local read error was encountered using this command.
User Action: Enable tracing, retry the failed request, and check the trace file.
local write error
Explanation: A local write error was encountered using this command.
User Action: Enable tracing, retry the failed request, and check the trace file.
Lower layer addressing error
Explanation: An incorrect address was used for lower layers.
FTAM diagnostic identifier: 1012
User Action: Ask the system manager to verify and correct the addressing information specified for the remote system in the alias database file.
Lower layer failure
Explanation: Either an FTAM lower level or the transport service has indicated an error condition. The facility code of the error message indicates the location of the condition.
FTAM diagnostic identifier: 1011
User Action: For transport service messages, see the explanation for the message ID in the OpenVMS documentation.
Mandatory parameter not set
Explanation: A required parameter was not set in one of the protocol data units.
FTAM diagnostic identifier: 1002
User Action: Enable tracing and retry the failed request. If you cannot find the problem, collect as much pertinent information as possible to identify the error message, describe the error and conditions preceding it, then contact your support representative.
maximum string length may not exceed 7K
Explanation: The maximum string length cannot exceed the specified length using this command.
User Action: Reissue the command with a smaller maximum string length.
Missing alias argument on command line
Explanation: The listener did not find an alias argument on the command line.
User Action: Reissue the ftam_listener
command with an alias argument using an alias found in the alias database
file.
Missing FTAM access control action list parameter
Explanation: One or more of the copy security group parameters was specified but the name corresponding mandatory action-listparameter was not.
User Action: Enter command with action-list. Refer to
copy reference page.
Missing p-address for alias ' alias'
Explanation: The listener did not find a presentation-address for the specified alias.
User Action: Check the alias database file.
Missing value for mandatory CHOICE ' ASN.1-field-name'
Explanation: The ASN.1 component did not find a value for the specified mandatory CHOICE field.
User Action: Enable tracing and retry the failed request. If you cannot find the problem, collect as much pertinent information as possible to identify the error message, describe the error and conditions preceding it, then contact your support representative.
Missing value for mandatory parameter ' ASN.1-field-name'
Explanation: The ASN.1 component did not find a value for the specified mandatory parameter.
User Action: Enable tracing and retry the failed request. If you cannot find the problem, collect as much pertinent information as possible to identify the error message, describe the error and conditions preceding it, then contact your support representative.
Missing value for mandatory parameter param-name
Explanation: No value was supplied for the named mandatory parameter.
FTAM diagnostic identifier: See osif.h for text that
describes the named return code.
User Action: Check trace for more information.
Missing value for mandatory SET-OF/SEQUENCE-OF ' ASN.1-field-name'
Explanation: The ASN.1 component did not find a value for the specified mandatory SET-OF/SEQUENCE-OF field.
User Action: Enable tracing and retry the failed request. If you cannot find the problem, collect as much pertinent information as possible to identify the error message, describe the error and conditions preceding it, then contact your support representative.
More restrictive lock
Explanation: The initiator has been refused access to the file, probably due to the file's protection.
FTAM diagnostic identifier: 3011
User Action: Check the protection on the file, directory, and system that you are trying to access. If protection is the cause of the error, have the system manager or account owner change the incorrect protection.
No alias was specified on the command line
Explanation: The responder did not find an alias specified on the command line.
User Action: Reissue the command with an alias.
No digit string found in object sub-identifier ' object-identifier'
Explanation: The ASN.1 component did not find a digit string in the specified object sub-identifier.
User Action: Object identifiers require numeric values. Check the AP-title and make sure it has the following form: { 1 22 333 }.
Non-existent file
Explanation: The file being selected does not exist.
FTAM diagnostic identifier: 3004
User Action: None.
No Reason
Explanation: A failure occurred for an unknown reason.
FTAM diagnostic identifier: 0
User Action: None.
No response was received for the param-string parameter from the remote system
Explanation: No response was received for the named parameter requested in either an F-READ-ATTRIBUTES request or the F-OPEN request FTAM protocol data unit (PDU).
FTAM diagnostic identifier:
User Action: Check trace for more information.
No value found to encode/decode
Explanation: The ASN.1 component did not find a value to encode or decode.
User Action: Collect as much pertinent information as possible to identify the error message, describe the error and conditions preceding it, then contact your support representative.
Operation inconsistent
Explanation: The requested operation violates the negotiation rules.
FTAM diagnostic identifier: 5017
User Action: None.
Operation not available
Explanation: The requested operation is unavailable.
FTAM diagnostic identifier: 5015
User Action: None.
Operation not supported
Explanation: The requested operation is unsupported.
FTAM diagnostic identifier: 5016
User Action: None.
Override not possible
Explanation: The create override parameter is not possible on remote systems.
FTAM diagnostic identifier: 3023
User Action: Check the protection for the remote file system.
Override recreated file with new attributes
Explanation: The create override parameter is not possible on remote systems.
FTAM diagnostic identifier: 3022
User Action: None.
Override recreated file with old attributes
Explanation: The create override parameter is not possible on remote systems.
FTAM diagnostic identifier: 3021
User Action: None.
Override selected existing file
Explanation: The file to be created already exists. Instead of creating a new file, the real filestore selected the existing file.
FTAM diagnostic identifier: 3020
User Action: None.
protocol error on read
Explanation: A protocol error was encountered when trying to read a file.
User Action: Enable tracing, retry the failed request, and check the trace file.
protocol error on write
Explanation: A protocol error was encountered when trying to write a file.
User Action: Enable tracing, retry the failed request, and check the trace file.
Premature end of buffer found
Explanation: The ASN.1 component found a premature end of buffer.
User Action: Enable tracing, retry the failed request, and check the trace file.
Presentation — Abstract syntax not found
Explanation: The Presentation layer did not find the abstract syntax.
User Action: Enable tracing, retry the failed request, and check the trace file.
Presentation — Bad abstract syntax
Explanation: The Presentation layer found a bad abstract syntax.
User Action: Enable tracing, retry the failed request, and check the trace file.
Presentation — Error decoding PPDU
Explanation: The Presentation layer encountered an error decoding the presentation protocol data unit (PPDU).
User Action: Enable tracing, retry the failed request, and check the trace file.
Presentation — Error generating an ABORT event
Explanation: The Presentation layer encountered an error when generating an ABORT event.
User Action: Enable tracing, retry the failed request, and check the trace file.
Presentation — Invalid function
Explanation: The Presentation protocol machine does not recognize a presentation protocol data unit that it has received.
User Action: Collect as much pertinent information as possible to identify the error message, describe the error and conditions preceding it, then contact your support representative.
Presentation — Invalid functional units
Explanation: The Presentation layer detected an invalid combination of negotiated functional units.
User Action: Enable tracing, retry the failed request, and check the trace file.
Presentation — Transfer syntax not found
Explanation: The Presentation layer did not find a transfer syntax.
User Action: Enable tracing, retry the failed request, and check the trace file.
Presentation — Unsupported
Explanation: The presentation context restoration functional unit was requested. It is not supported.
User Action: Collect as much pertinent information as possible and notify the vendor of the remote FTAM application about the error message and describe the error and the conditions preceding it.
Previous FTAM legal qualification has been superseded
Explanation: The security group legal qualification parameter may only be entered once. Only the last
occurrence of the legal qualification parameter in an ocp
security group list will be accepted.
FTAM diagnostic identifier:
User Action: Only enter one occurrence
of the security group legal qualification parameter per
ocp command.
Processing mode inconsistent
Explanation: The requested processing mode violates the negotiation rules.
FTAM diagnostic identifier: 5023
User Action: None.
Processing mode not available
Explanation: The requested processing mode is unavailable.
FTAM diagnostic identifier: 5021
User Action: None.
Processing mode not supported
Explanation: The responder does not support the requested processing mode.
FTAM diagnostic identifier: 5022
User Action: None.
proposed protocol versions not supported
Explanation: Session refused the connection because the proposed protocol versions are not supported.
User Action: Enable tracing, retry the failed request, and check the trace file.
reason not specified
Explanation: Session refused the connection because of an unspecified reason.
User Action: Enable tracing, retry the failed request, and check the trace file.
Recovery file could not be opened
Explanation: FTAM is unable to open the file containing the recovery related information.
User Action: Check that the recovery file exists and is readable.
Recovery not supported by peer
Explanation: The peer system does not support recovery.
User Action: None
Recovery mode inconsistent
Explanation: The recovery mode is inconsistent with the negotiated value.
FTAM diagnostic identifier: 6011
User Action: Enable tracing, retry the failed request, and check the trace file.
Recovery mode not available
Explanation: The proposed recovery mode is not supported.
FTAM diagnostic identifier: 6010
User Action: Enable tracing, retry the failed request, and check the trace file.
Recovery mode reduced
Explanation: The remote system has reduced recovery mode.
FTAM diagnostic identifier: 6012
User Action: None.
Recovery in progress
Explanation: An error has occurred during the transfer and FTAM is tryingto recover from the error.
User Action: None.
rejection by called SS-user
Explanation: Session refused the connection because of a rejection by the called Session service user.
User Action: Enable tracing, retry the failed request, and check the trace file.
rejection by called SS-user due to temporary congestion
Explanation: Session refused the connection because of a rejection by the called Session service user due to temporary congestion.
User Action: Try again later.
Requested access violates permitted actions
Explanation: The requested access violates the negotiation rules for permitted actions.
FTAM diagnostic identifier: 3028
User Action: Collect as much pertinent information as possible to identify the error message, describe the error and conditions preceding it, then contact your support representative.
Requested length size ( number) smaller than calculated size ( number)
Explanation: The ASN.1 component found the specified requested length size to be smaller than the specified calculated size.
User Action: Enable tracing, retry the failed request, and check the trace file.
Responder error (unspecific)
Explanation: An unknown error occurred in the responder.
FTAM diagnostic identifier: 1
User Action: None.
Selection attributes not matched
Explanation: The file was not found; the requested file attributes do not match any existing file.
FTAM diagnostic identifier: 3001
User Action: Resubmit your request with the correct file attributes.
Session — Bad Protocol
Explanation: The Session layer received an abort (AB) SPDU, indicating that a protocol error has occurred (bit 3 of the transport disconnect field in the AB SPDU is set to one).
User Action: Enable tracing, retry the failed request, and check the trace file.
Session — Invalid connection block
Explanation: The Session layer received an event, but the Session Connect Block (SCB) is missing from the Session Parameter Block (SPB).
User Action: Collect as much pertinent information as possible to identify the error message, describe the error and conditions preceding it, then contact your support representative.
Session — Invalid enclosure specified
Explanation: The Session layer detected an invalid specification of the enclosure field of the data (DT) SPDU.
User Action: Enable tracing, retry the failed request, and check the trace file. Since Session does not support segmenting, the enclosure field should not be present in the trace.
Session — Invalid function
Explanation: The Session layer has received an invalid SPDU event.
User Action: Collect as much pertinent information as possible to identify the error message, describe the error and conditions preceding it, then contact your support representative.
Session — Invalid functional units
Explanation: The Session layer detected an invalid combination of negotiated functional units.
User Action: Enable tracing, retry the failed request, and check the trace file.
Session — Invalid NSAP
Explanation: The Session layer detected an illegally constructed network service access point.
User Action: Enable tracing, retry the failed request, and check the trace file. Verify the format of the NSAP with the expected format described in your installation documentation. If the NSAP was part of an alias, make the appropriate corrections to the alias database file.
Session — Invalid parameter
Explanation: The Session layer received an SPDU with a field whose value is out of the expected range of valid values.
User Action: Enable tracing, retry the failed request, and check the trace file. Consult ISO 8327 for the valid range of values for the out-of-bounds field indicated in the trace.
Session — Invalid SSAP identifier
Explanation: The Session layer detected a discrepancy between the session service access point (SSAP) waiting for the connection (in the FTAM listener or responder) and the SSAP in the Session connect (CN) SPDU.
User Action: Enable tracing, retry the failed request, and check the trace file. Locate the discrepancy between the SSAP in CN SPDU and the SSAP used by the FTAM listener or responder. If the SSAP was part of an alias, make the appropriate corrections to the alias database file.
Session — Invalid sync point serial number
Explanation: The Session layer received an illegal sync point serial number. The value might be out of range or a serial number might have been proposed when the appropriate functional units were not set.
User Action: Enable tracing, retry the failed request, and check the trace file.
Session — Invalid token
Explanation: The Session layer detected the presence of an illegal set of tokens based on the negotiated functional units. Since the Session layer currently supports only the kernel functional unit, which does not require a token, the Session layer should never be in possession of any tokens.
User Action: Enable tracing, retry the failed request, and check the trace file.
Session — Missing sync point
Explanation: The Session layer received a connect (CN) or accept (AC) SPDU with a set functional units that requires a sync point serial number to be specified. Session, however, supports only the kernel functional unit, which does not require that a sync point serial number be specified.
User Action: Enable tracing, retry the failed request, and check the trace file. Check the functional units negotiated and include only the kernel functional unit.
Session — Netnostate
Explanation: The Session layer received an SPDU whose Session Identifier code is not defined in ISO 8327.
User Action: Enable tracing, retry the failed request, and check the trace file.
Session — Proposed protocol versions not supported
Explanation: The Session layer received a refuse (RF) SPDU with a reason code that indicates that the proposed protocol versions are not supported.
User Action: Enable tracing, retry the failed request, and check the trace file. Only versions one and two are currently supported by the Session layer.
Session — Protocol Error
Explanation: The Session layer received an invalid SPDU event.
User Action: Collect as much pertinent information as possible to identify the error message, describe the error and conditions preceding it, then contact your support representative.
Session — reason not specified
Explanation: The Session layer received a refuse (RF) SPDU with a reason code indicating that no reason was specified for the connection refusal.
User Action: Enable tracing, retry the failed request, and check the trace file.
Session — Rejection by called SS-user.
Explanation: The Session layer received a refuse (RF) SPDU with a reason code indicating that the rejection was initiated by the called session service-user.
User Action: Enable tracing, retry the failed request, and check the trace file.
Session — Rejection by called SS-user due to temporary congestion
Explanation: The Session layer received a refuse (RF) SPDU with a reason code indicating that the rejection was initiated by the called session service-user due to temporary congestion.
User Action: Retry request.
Session — SPM congestion at connect time
Explanation: The Session layer received a refuse (RF) SPDU with a reason code indicating that the rejection was due to SPM congestion at the time of request.
User Action: Retry request.
Session — SSAP identifier unknown
Explanation: The Session layer received a refuse (RF) SPDU with a reason code that indicates that the rejection was due to an unmatched session service access point (SSAP).
User Action: Enable tracing, retry the failed request, and check the trace file. Verify that the SSAP in CN SPDU matches the SSAP specified by the listener or responder entity.
Session — SS-user not attached to SSAP
Explanation: The Session layer received a refuse (RF) SPDU with a reason code that indicates that the session service-user is not attached to the session service access point (SSAP).
User Action: Enable tracing, retry the failed request, and check the trace file.
Session — Unexpected reason code
Explanation: The Session layer received a refuse (RF) SPDU with a reason code that is not defined in ISO 8327.
User Action: Enable tracing, retry the failed request, and check the trace file.
Session — Unknown error
Explanation: The Session layer received an abort (AB) SPDU, indicating no reason was given for the abort (bit 4 of the transport disconnect field in the AB SPDU is set to one).
User Action: Enable tracing, retry the failed request, and check the trace file.
Session — Unsupported versions
Explanation: The Session layer received a connect (CN) SPDU or accept (AC) SPDU which specifies a protocol version that is not supported.
User Action: Enable tracing, retry the failed request, and check the trace file. Only versions one and two are currently supported by the Session layer.
Source bit offset of number too large by number bits
Explanation: The ASN.1 component found that the specified source bit offset was too large by the specified number of bits.
User Action: Enable tracing, retry the failed request, and check the trace file.
Specific PDU request inconsistent with current requested access
Explanation: The PDU request violates the negotiation rules for requested access.
FTAM diagnostic identifier: 1017
User Action: Enable tracing, retry the failed request, and check the trace file.
SPM congestion at connect time
Explanation: Session refused the connection because there was SPM congestion.
User Action: Try again later.
SSAP identifier unknown
Explanation: Session refused the connection because the session service access point (SSAP) identifier is unknown.
User Action: The listener is not listening on the specified SSAP. Reissue the request with the correct SSAP.
SS-user not attached to SSAP
Explanation: Session refused the connection because the Session service user was not attached to the session service access point.
User Action: Check addressing information and retry the request.
Starting guard zone of block address has been modified , The block was created in module-name at line line-number
Explanation: FTAM found that the starting guard zone of the specified block had been modified. The block was created in the specified line of the specified module. CMN_DEALLOCATE was called from the specified line of the specified module.
User Action: Collect as much pertinent information as possible to identify the error message, describe the error and conditions preceding it, then contact your support representative.
Subsequent error
Explanation: A previously encountered error condition caused a later error.
FTAM diagnostic identifier: 8
User Action: None.
Superuser privileges are required to run this command.
Explanation: The listener requires superuser privileges to run this command.
User Action: Run this command as root.
System shutdown
Explanation: One of the FTAM systems has shut down.
FTAM diagnostic identifier: 2 or 1014
User Action: Reboot the system or contact the system manager.
Tag value too long
Explanation: The ASN.1 component found the tag value to be too long.
User Action: Enable tracing, retry the failed request, and check the trace file.
Temporal insufficiency of resources
Explanation: Resources are temporarily insufficient.
FTAM diagnostic identifier: 9
User Action: Try again later.
The file does not consist of an even number of fixed records. Do you want to pad the file?
Explanation: FTAM found a file that does not consist of an even number of fixed records.
User Action: Answer yes or no.
The value passed in the direction parameter was, not among the list of valid values.
Direction value number is invalid, range is number — number
Explanation: The tracing utility found an invalid value passed in the direction parameter.
User Action: Collect as much pertinent information as possible to identify the error message, describe the error and conditions preceding it, then contact your support representative.
The value passed in the layer parameter was , not among the list of valid values.
Layer value number is invalid, range is number — number
Explanation: The tracing utility found an invalid value passed in the layer parameter.
User Action: Collect as much pertinent information as possible to identify the error message, describe the error and conditions preceding it, then contact your support representative.
The string document type is not supported
Explanation: The specified document type is not supported by the peer implementation.
User Action: None.
Timeout
Explanation: One of the timers ran out.
FTAM diagnostic identifier: 1013
User Action: None.
Too many aliases specified
Explanation: The listener found too many aliases being specified.
User Action: Use only one alias for the listener.
Too many command line arguments
Explanation: The responder found too many command line arguments.
User Action: Reissue the command with the correct number of arguments.
Too many queue lengths specified
Explanation: The listener found too many queue lengths being specified.
User Action: Reissue the command with only one queue length argument.
Too many responder names specified
Explanation: The listener found too many responder names being specified.
User Action: Reissue the command with only one responder name.
Too many unused bits (number specified, 7 maximum)
Explanation: The ASN.1 component found too many unused bits.
User Action: Enable tracing, retry the failed request, and check the trace file.
Tried to copy more bytes from the PDU than were left
Explanation: The ASN.1 decoder could not decode the protocol data unit.
User Action: Enable tracing, retry the failed request, and check the trace file.
unable to append to destination file - document type of source file is string and destination file is string
Explanation: Both source and destination files must be of the same document type in order to append one to another.
User Action: Convert the source file to be the same document type as the destination file, and re-enter the copy command.
Unable to open recovery file
Explanation: FTAM is unable to find the file containing the recovery related information.
User Action: Check that the recovery file exists and is readable.
unable to open source file as string - document type of source file is string
Explanation: Document type of source file does not match the document type specified by the user on the command line.
User Action: Don't specify a document type on the command line. The copy utility determines which document type the source file will be opened as.
unable to open source file as XXXX - maximum string length XXXX of source file is XXXX
Explanation: The actual maximum string length of source file does not match the maximum string length specified by the user on the command line.
User Action: Don't specify a maximum string length on the command line. The copy utility
determines which maximum string length the source file should be opened
as.
unable to open source file as XXXX - string significance XXXX of source file is XXXX
Explanation: The actual string significance of source file does not match the string significance specified by the user on the command line.
User Action: Don't specify a string significance on the command line. The ocp utility
determines which string significance the source file should be opened
as.
unable to open source file as XXXX - universal class number XXXX of source file is XXXX
Explanation: The actual universal class of source file does not match the universal class specified by the user on the command line.
User Action: Don't specify a universal class on the command line. The ocp utility determines
which universal class the source file should be opened as.
unexpected-ppdu
Explanation: Presentation found an unexpected presentation protocol data unit(PPDU).
User Action: Enable tracing, retry the failed request, and check the trace file.
unexpected-ppdu-parameter
Explanation: Presentation found an unexpected presentation protocol data unit(PPDU) parameter.
User Action: Enable tracing, retry the failed request, and check the trace file.
unexpected-session-service-primitive
Explanation: Session found an unexpected Session service primitive.
User Action: Enable tracing, retry the failed request, and check the trace file.
Unexpected API response received
Explanation: The initiator received an unexpected API response.
User Action: None.
Unexpected close error, system-error-message
Explanation: The responder found an unexpected close error. A system error message is displayed also.
User Action: None.
Unexpected command line option: option-name
Explanation: The responder found the unexpected command line option specified.
User Action: Check the command line option.
Unexpected document type document-type-name
Explanation: The initiator found the unexpected document type specified.
User Action: Check the specified document type.
Unexpected errno value
Explanation: The responder found an unexpected errno value.
User Action: None.
Unexpected error creating file, system-error-message
Explanation: The responder found an unexpected error while creating the specified file. A system error message is displayed also.
User Action: None.
Unexpected error opening file, system-error-message
Explanation: The responder found an unexpected error while opening the specified file. A system error message is displayed also.
User Action: None.
Unexpected override parameter value: number
Explanation: The responder found the unexpected override parameter value specified.
User Action: Check the override parameter value.
Unexpected override parameter value: create-failure
Explanation: The responder found the unexpected override parameter value of create-failure.
User Action: None.
Unexpected read error, system-error-message
Explanation: The responder found the unexpected read error specified. A system error message is displayed also.
User Action: None.
Unexpected string significance of number for document type document-type-name
Explanation: The initiator found the unexpected string significance specified for the specified document type.
User Action: Check the string significance value.
Unexpected tag value ' number'
Explanation: The ASN.1 component found the unexpected tag value specified.
User Action: Enable tracing, retry the failed request, and check the trace file.
universal class number specification with FTAM-3 files is not allowed
Explanation: A universal class number specification is not allowed with FTAM-3 files.
User Action: Reissue the command without the
-C option.
Unknown alias ' alias'
Explanation: The listener did not know the specified alias.
User Action: Check the alias database file.
Unknown ASN.1 universal class number number
Explanation: The ASN.1 component did not know the specified ASN.1 universal class number.
User Action: Enable tracing, retry the failed request, and check the trace file.
Unknown diagnostic (diagnostic id= number, local error id= number)
Explanation: The responder did not know the specified diagnostic and its local error ID.
User Action: Collect as much pertinent information as possible to identify the error message, describe the error and conditions preceding it, then contact your support representative.
Unknown service class number
Explanation: The responder did not know the specified service class.
User Action: Enable tracing, retry the failed request, and check the trace file.
Unknown state machine event ( number)
Explanation: FTAM did not know the specified state machine event.
User Action: Enable tracing, retry the failed request, and check the trace file.
unrecognized-ppdu
Explanation: Presentation did not recognize the presentation protocol data unit (PPDU).
User Action: Enable tracing, retry the failed request, and check the trace file.
unrecognized-ppdu-parameter
Explanation: Presentation did not recognize the presentation protocol data unit (PPDU) parameter.
User Action: Enable tracing, retry the failed request, and check the trace file.
Unsupported Document Type Parameters
Explanation: The initiator found unsupported document type parameters.
User Action: Enable tracing, retry the failed request, and check the trace file.
Unsupported functional unit
Explanation: The responder does not support a requested functional unit.
FTAM diagnostic identifier: 2003
User Action: None.
Unsupported parameter
Explanation: An unsupported parameter was encountered.
FTAM diagnostic identifier: 1003
User Action: Enable tracing, retry the failed request, and check the trace file.
Unsupported parameter types
Explanation: A parameter type in a call to the file service is not supported.
FTAM diagnostic identifier: 1006
User Action: None.
Unsupported parameter values
Explanation: An unsupported parameter was encountered.
FTAM diagnostic identifier: 1001
User Action: Enable tracing, retry the failed request, and check the trace file.
Unsupported service class
Explanation: The responder does not support the requested service class.
FTAM diagnostic identifier: 2002
User Action: None.
Usage: ftam_listener [-q queue-length] [-r responder] AE-title
Explanation: You did not specify the command syntax correctly.
User Action: Use the command as shown.
User data queue unexpectedly empty
Explanation: The ASN.1 component found the user data queue to be unexpectedly empty.
User Action: Enable tracing, retry the failed request, and check the trace file.
Zero length filename
Explanation: The initiator found a file name of zero length.
User Action: Specify a file name after the pair of colons (::).
H.2. Error Messages in Numerical Order
|
FTAM Diagnostic Identifier |
Message Text |
|---|---|
|
0 |
No Reason |
|
1 |
Responder error (unspecific) |
|
2 |
System shutdown |
|
3 |
FTAM management problem (unspecific) |
|
4 |
FTAM management, bad account |
|
5 |
FTAM management, security not passed |
|
6 |
Delay may be encountered |
|
7 |
Initiator error (unspecific) |
|
8 |
Subsequent error |
|
9 |
Temporal insufficiency of resources |
|
10 |
Access request violates VFS security |
|
11 |
Access request violates local security |
|
1000 |
Conflicting parameter values |
|
1001 |
Unsupported parameter values |
|
1002 |
Mandatory parameter not set |
|
1003 |
Unsupported parameter |
|
1004 |
Duplicated parameter |
|
1005 |
Illegal parameter type |
|
1006 |
Unsupported parameter types |
|
1007 |
FTAM protocol error (unspecific) |
|
1008 |
FTAM protocol error, procedure error |
|
1009 |
FTAM protocol error, functional unit error |
|
1010 |
FTAM protocol error, corruption error |
|
1011 |
Lower layer failure |
|
1012 |
Lower layer addressing error |
|
1013 |
Timeout |
|
1014 |
System shutdown |
|
1015 |
Illegal grouping sequence |
|
1016 |
Grouping threshold violation |
|
1017 |
Specific PDU request inconsistent with current requested access |
|
2000 |
Association with user not allowed |
|
2002 |
Unsupported service class |
|
2003 |
Unsupported functional unit |
|
2004 |
Attribute group error (unspecific) |
|
2005 |
Attribute group not supported |
|
2006 |
Attribute group not allowed |
|
2007 |
Bad account |
|
2008 |
Association management (unspecific) |
|
2009 |
Association management — bad address |
|
2010 |
Association management — bad account |
|
2011 |
Checkpoint window error — too large |
|
2012 |
Checkpoint window error — too small |
|
2013 |
Checkpoint window error — unsupported |
|
2014 |
Communications QoS not supported |
|
2015 |
Initiator identity unacceptable |
|
2016 |
Context management refused |
|
2018 |
Contents type list cut by responder |
|
2019 |
Contents type list cut by initiator |
|
2020 |
Invalid filestore password |
|
2021 |
Incompatible service classes |
|
3000 |
Filename not found |
|
3001 |
Selection attributes not matched |
|
3002 |
Initial attributes not possible |
|
3003 |
Bad attribute name |
|
3004 |
Non-existent file |
|
3005 |
File already exists |
|
3006 |
File cannot be created |
|
3007 |
File cannot be deleted |
|
3008 |
Concurrency control not available |
|
3009 |
Concurrency control not supported |
|
3010 |
Concurrency control not possible |
|
3011 |
More restrictive lock |
|
3012 |
File busy |
|
3013 |
File not available |
|
3014 |
Access control not available |
|
3015 |
Access control not supported |
|
3016 |
Access control inconsistent |
|
3017 |
Filename truncated |
|
3018 |
Initial attributes altered |
|
3019 |
Bad account |
|
3020 |
Override selected existing file |
|
3021 |
Override recreated file with old attributes |
|
3022 |
Override recreated file with new attributes |
|
3023 |
Override not possible |
|
3024 |
Ambiguous file specification |
|
3025 |
Invalid create password |
|
3026 |
Invalid delete password on override |
|
3027 |
Bad attribute value |
|
3028 |
Requested access violates permitted actions |
|
3029 |
Functional unit not available for requested access |
|
3030 |
File created but not selected |
|
4000 |
Attribute non-existent |
|
4001 |
Attribute cannot be read |
|
4002 |
Attribute cannot be changed |
|
4003 |
Attribute not supported |
|
4004 |
Bad attribute name |
|
4005 |
Bad attribute value |
|
5000 |
Bad FADU (unspecific) |
|
5001 |
Bad FADU — size error |
|
5002 |
Bad FADU — type error |
|
5003 |
Bad FADU — poorly specified |
|
5004 |
Bad FADU — bad location |
|
5005 |
FADU does not exist |
|
5006 |
FADU not available (unspecific) |
|
5007 |
FADU not available for reading |
|
5008 |
FADU not available for writing |
|
5009 |
FADU not available for location |
|
5010 |
FADU not available for erasure |
|
5011 |
FADU cannot be inserted |
|
5012 |
FADU cannot be replaced |
|
5013 |
FADU cannot be located |
|
5014 |
Bad data element type |
|
5015 |
Operation not available |
|
5016 |
Operation not supported |
|
5017 |
Operation inconsistent |
|
5018 |
Concurrency control not available |
|
5019 |
Concurrency control not supported |
|
5020 |
Concurrency control inconsistent |
|
5021 |
Processing mode not available |
|
5022 |
Processing mode not supported |
|
5023 |
Processing mode inconsistent |
|
5024 |
Access context not available |
|
5025 |
Access context not supported |
|
5026 |
Bad write (unspecific) |
|
5027 |
Bad read (unspecific) |
|
5028 |
Local failure (unspecific) |
|
5029 |
Local failure — filespace exhausted |
|
5030 |
Local failure — data corrupted |
|
5031 |
Local failure — device failure |
|
5032 |
Future filesize exceeded |
|
5034 |
Future filesize increased |
|
5035 |
Functional unit invalid in processing mode |
|
5036 |
Contents type inconsistent |
|
5037 |
Contents type simplified |
|
5038 |
Duplicate FADU name |
|
5039 |
Damage to select/open regime |
|
5040 |
FADU locking not available on file |
|
6000 |
Bad checkpoint (unspecific) |
|
6001 |
Activity not unique |
|
6002 |
Checkpoint outside of window |
|
6003 |
Activity no longer exists |
|
6004 |
Activity not recognized |
|
6006 |
Corrupt docket |
|
6007 |
File waiting restart |
|
6008 |
Bad recovery point |
|
6010 |
Recovery mode not available |
|
6011 |
Recovery mode inconsistent |
|
6012 |
Recovery mode reduced |
|
6013 |
Access control not available |
|
6014 |
Access control not supported |
|
6015 |
Access control inconsistent |
|
6016 |
Contents type inconsistent |
|
6017 |
Contents type simplified |
Appendix I. Virtual Terminal Error Messages
%VT-L-IDENT, message-text
VT is the facility.
- L is the severity of the error:
S - success
I - informational
E - error
W - warning
IDENT is a symbol that represents the message.
message-text explains the cause of the message.
In addition, you may also see messages with the facility code of OSAK or SYSTEM. These messages usually further clarify the Virtual Terminal error messages.
For a description of errors from the OSAK facility, refer to the OSAK documentation.
OSAK — refer to the OSAK documentation.
TELNET — refer to TCP/IP for OpenVMS Management.
LAT — refer to the OpenVMS I/O Drivers Reference Manual.
OTHER — refer to the OpenVMS System Messages Manual.
Note
In the following list, many of the messages indicate that they are not normally displayed. If such a message is found, you may contact your VSI support representative for assistance. Also, many of the User Action lines suggest initiating a trace. Refer to your problem solving documentation for more information on generating trace files.
Success Messages
END, control returned to local node
Explanation: Indicates that the VT association has been terminated normally and control returned to local end system.
User Action: None
NORMAL, normal successful completion
Explanation: Not normally displayed; indicates that the operation completed normally.
User Action: None
STALLED, operation stalled
Explanation: Not normally displayed; indicates an internal function has been temporarily stalled.
User Action: Submit an SPR.
Information Messages
ABORTREASON, reason for abort: (text)
Explanation: The VT association was aborted by the peer and textual information about the abort was provided.
Normal termination initiated by responder
Message indicates that association was terminated by the peer as a result of the user logging out. Because of a discrepancy between ISO 9040 and 9041, it is not possible for a responder to use the normal release mechanism to terminate an association. This message is normal and may be ignored.
Protocol error detected
A VTP protocol error was detected and the peer aborted the association. Additional information may be provided in the message indicating what type of VTP protocol data unit (PDU) was being processed. A trace is needed for full analysis of the problem.
INCHARMODE, already in character mode
Explanation: While using the Generalized Telnet or Telnet-1988 profile, the user issued
a mode char command when already in character mode.
User Action: None
INDEFINITE, indefinite length encoding
Explanation: Not normally displayed; indicates a length indicator was encountered, which specified indefinite form length encoding.
User Action: None
INLINEMODE, already in line mode
Explanation: While using the Generalized Telnet or Telnet-1988 profile, the user issued
a mode line command when already in line mode.
User Action: None
LONG, long length encoding
Explanation: Not normally displayed; indicates a length indicator was encountered which specified long form length encoding.
User Action: None
NOABORTREASON, no abort reason specified
Explanation: The VT association was aborted by the peer and a reason for the abort was not specified.
User Action: If this message is displayed when logging out of a remote system, it may be considered a normal event and ignored. If the message is displayed during an association, first determine if the event is reproducible. If the event can be reproduced, a trace should be initiated to help determine why the peer aborted the association.
NOEVENT, no event was detected
Explanation: Not normally displayed; indicates that an internal VT request completed, but insufficient information was available to process a complete event.
User Action: None
PADEXIT, exiting PAD
Explanation: Displayed when leaving the VT command prompt (VT_PAD> on
OpenVMS, ologin> on UNIX).
User Action: None
SHORT, short length encoding
Explanation: Not normally displayed; indicates a length indicator was encountered which specified short form length encoding.
User Action: None
Error Messages
ABOPT, Ambiguous command option - supply more characters
Explanation: You typed an argument to a VT command that was too short to be unique.
User Action: Re-enter the command, using more characters for the option.
ABVERB, Ambiguous command verb - supply more characters
Explanation: You typed a VT command that was too short to be unique.
User Action: Re-enter the command, using more characters for the command.
ASQERR, error encoding/decoding ASQ
Explanation: An error was encountered in the encoding or decoding operation related to the specified VTP protocol data unit.
User Action: Initiate a trace to gather additional information leading up to the event.
ASRERR, error encoding/decoding ASR
Explanation: An error was encountered in the encoding or decoding operation related to the specified VTP protocol data unit.
User Action: Initiate a trace to gather additional information leading up to the event.
AUQERR, error encoding/decoding AUQ
Explanation: An error was encountered in the encoding or decoding operation related to the specified VTP protocol data unit.
User Action: Initiate a trace to gather additional information leading up to the event.
BADGETTYENT, Bad gettytab entry
Explanation: An attempt to parse an entry from /etc/gettydefs (on UNIX)
failed.
User Action: Have your system manager examine the file's first entry for correct formatting.
BADPARAM, bad parameter value
Explanation: Not normally displayed; indicates a parameter value used by an internal VT routine was incorrect.
User Action: None
CHRINUSE, character already in use
Explanation: An attempt was made to set the break, disconnect, or command character to a character already being used as a special character (for example, trying to set the break character to be CTRL/\ when the disconnect character already has this value).
User Action: Re-enter the set command with another value.
CHRNOTALLOWED, character specified not from allowed set
Explanation: An attempt was made to set the break, disconnect, or command character to a character already being used as a special character (for example, trying to set the break character to be CTRL/\ when the disconnect character already has this value).
User Action: Re-enter the set command with another value.
COUPDATEMISMATCH, CO update category mismatch
Explanation: Not normally displayed; indicates that a CO update was requested, but the CO specified was not of the same category as the update expected. This can be a result of a protocol error.
User Action: Initiate a trace to gather additional information leading up to the event.
CREATEERR, create error
Explanation: Not normally displayed; an error was encountered when creating a Display object, Control object, or Device object.
User Action: None
DAQERR, error encoding/decoding DAQ
Explanation: An error was encountered in the encoding or decoding operation related to the specified VTP protocol data unit.
User Action: Initiate a trace to gather additional information leading up to the event.
DLQERR, error encoding/decoding DLQ
Explanation: An error was encountered in the encoding or decoding operation related to the specified VTP protocol data unit.
User Action: Initiate a trace to gather additional information leading up to the event.
EMPTYDATA, attempt to send empty P-DATA
Explanation: Not normally displayed; indicates that the VT software attempted to send a P-DATA with nothing in it; probably a result of a state machine error.
User Action: Initiate a state machine trace to gather additional information leading up to the event.
ENVERR, environment error
Explanation: An error occurred when trying to read or write information from or to the terminal (in the initiator) or the pseudo-terminal (in the responder) or the gateway code (in any of the gateways).
User Action: See further messages for more information.
ERRCALSYS, Error calling system service service
Explanation: An error occurred when VT tried to call the named system service.
User Action: See further messages for more information.
ERRSTAGWY, Error starting gateway
Explanation: When VT attempted to start the gateway software an error was encountered.
User Action: See further messages for more information.
EXPAPPL1TAG, expected [APPLICATION 1] tag
Explanation: Indicates that a protocol error was encountered; the VT decoder expected an APPLICATION 1 tag and did not encounter it.
User Action: Initiate a trace to gather additional information leading up to the event.
EXPAPPL30TAG, expected [APPLICATION 30] tag
Explanation: Indicates that a protocol error was encountered; the VT decoder expected an APPLICATION 30 tag and did not encounter it.
User Action: Initiate a trace to gather additional information leading up to the event.
EXPBITSTRINGTAG, expected BITSTRING tag
Explanation: Indicates that a protocol error was encountered; the VT decoder expected a BITSTRING tag and did not encounter it.
User Action: Initiate a trace to gather additional information leading up to the event.
EXPBOOLEANTAG, expected BOOLEAN tag
Explanation: Indicates that a protocol error was encountered; the VT decoder expected a BOOLEAN tag and did not encounter it.
User Action: Initiate a trace to gather additional information leading up to the event.
EXPGRAPHICSTRINGTAG, expected GRAPHICSTRING tag
Explanation: Indicates that a protocol error was encountered; the VT decoder expected a GRAPHICSTRING tag and did not encounter it.
User Action: Initiate a trace to gather additional information leading up to the event.
EXPINTEGERTAG, expected an INTEGER tag
Explanation: In decoding a VTP protocol data unit, the VT decoder expected an INTEGER tag and did not encounter it.
User Action: Initiate a trace to gather additional information leading up to the event.
EXPNULL, expected a NULL
Explanation: Indicates that a protocol error was encountered; the VT decoder expected a NULL encoding and did not encounter it.
User Action: Initiate a trace to gather additional information leading up to the event.
EXPNULLTAG, expected NULL tag
Explanation: Indicates that a protocol error was encountered; the VT decoder expected a NULL tag and did not encounter it.
User Action: Initiate a trace to gather additional information leading up to the event.
EXPOCTETSTRINGTAG, expected OCTETSTRING tag
Explanation: Indicates that a protocol error was encountered; the VT decoder expected an OCTETSTRING tag and did not encounter it.
User Action: Initiate a trace to gather additional information leading up to the event.
EXPOIDTAG, expected OID tag
Explanation: Indicates that a protocol error was encountered; the VT decoder expected an OBJECT IDENTIFIER tag and did not encounter it.
User Action: Initiate a trace to gather additional information leading up to the event.
EXPPRINTABLESTRINGTAG, expected PRINTABLESTRING tag
Explanation: Indicates that a protocol error was encountered; the VT decoder expected a PRINTABLESTRING tag and did not encounter it.
User Action: Initiate a trace to gather additional information leading up to the event.
GETENTLON, Geetytab entry too long
Explanation: An attempt to look at the /etc/gettydefs on a UNIX system
resulted in reading an entry that was too long for the VT software to
handle.
User Action: Have your system administrator look at the first entry in the file appropriate to your operating system.
GTQERR, error encoding/decoding GTQ
Explanation: An error was encountered in the encoding or decoding operation related to the specified VTP protocol data unit.
User Action: Initiate a trace to gather additional information leading up to the event.
HELPFILERR, Could not open help file
Explanation: The VT Help file could not be opened. Either the file does not exist, or the protections on the file do not allow it to be accessed.
User Action: On OpenVMS, verify the existence of the file in
sys$help:vt.hlb and check that it allows W:RE (world read
and execute) access. On UNIX systems, verify the existence of the file in
/usr/lib and check that it allows world read access.
INFINTC, Getty: infinite tc= loop
Explanation: The /etc/gettydefs on your UNIX system has circular table
continuation references.
User Action: Have your system administrator look at the first entry in the file appropriate to your operating system.
INSDECSPC, insufficient decoding space
Explanation: Not normally displayed; indicates a protocol data unit (PDU) received from the peer could not be decoded properly, possibly as a result of a protocol error.
User Action: A trace should be initiated to gather additional information.
INSENCSPC, insufficient encoding space
Explanation: Not normally displayed; indicates that the VT software attempted to encode a protocol data unit (PDU) and did not have sufficient space.
User Action: If this happens during an association attempt, it could indicate that a corrupt application entity (AE) title has been supplied (check the alias), or that identification information is too long (check the logical VT$IMPLIDENT in the VT$NAMES logical name table).
INSPWS, insufficient port workspace
Explanation: Not normally displayed; indicates that insufficient workspace existed for a port-related operation. This may be the result of an undetected protocol error.
User Action: Initiate a trace to gather additional information leading up to the event.
INSWS, insufficient workspace
Explanation: Not normally displayed; indicates that insufficient workspace existed for the processing of a protocol data unit. This may be the result of an undetected protocol error.
User Action: Initiate a trace to gather additional information leading up to the event.
INSVIRMEM, insufficient virtual memory
Explanation: Indicates that insufficient virtual memory was available for dynamic allocation. In some cases, this error can be caused by an undetected protocol error.
User Action: Increase the process PGFLQUO (pagefile quota) via AUTHORIZE, or the system VIRTUALPAGECNT via SYSGEN, as needed. If the error is still reported, initiate a trace to determine if an undetected protocol error is being encountered.
INTEGERTOOLONG, INTEGER encoded in too many octets
Explanation: The encoded integer is longer than 32 bits. This may be a result of a protocol error.
User Action: Initiate a trace to gather additional information leading up to the event.
INVALIAS, invalid alias information
Explanation: Either an alias was not provided, or the provided alias did not exist.
User Action: For the responder and gateways, check that the proper local alias has been created. For the initiator, verify that the alias specified has been created.
INVARGNUM, Invalid number of arguments for command
Explanation: Too few or too many arguments were supplied for the requested command.
User Action: Re-enter the command with the appropriate number of arguments.
INVCHRNOTINREP, invalid character; not in repertoire
Explanation: An attempt was made to issue the User Command Interface SEND command which specified a character that is not allowed in the current repertoire.
User Action: Verify that the character being sent (COMMAND, BREAK, DISCONNECT) is in the repertoire currently in use for the specified profile. If appropriate for the profile (for example, Telnet-1988 or Generalized Telnet), request that the repertoire be changed so that the character may be transmitted.
INVCOCATAGORY, invalid CO category
Explanation: Not normally displayed; indicates the control object specified an invalid category.
User Action: None
INVFORPROFILE, invalid request for the profile currently in use
Explanation: An attempt was made to execute a User Command Interface command which is
not appropriate for the profile currently in use; for example, the user
attempted a send ao (only appropriate for Telnet-1988 or
Generalized Telnet) and the profile in use was Transparent.
User Action: Terminate the current association and establish a new association using the appropriate profile.
INVHOSTNAME, invalid host name
Explanation: When using the TELNET gateway, VT was unable to use the host name given by the user.
User Action: Verify that the TELNET host name typed in at the gateway prompt is correct, and actually exists in the TCP/IP Services for OpenVMS remote host database.
INVIMPLIDENT, invalid implementation identification
Explanation: Not normally displayed; an implementation identification specified via the logical VT$IMPLIDENT was considered invalid.
User Action: Check that the logical name is properly defined.
INVLENENCODING, invalid length encoding
Explanation: Indicates that the VT decoder encountered a length that was longer the 32 bits; usually cause by a protocol error.
User Action: Initiate a trace to gather additional information leading up to the event.
INVMODEOPT, invalid mode option, use: LINE or CHARACTER
Explanation: The option of the mode command is unrecognized.
User Action: Re-enter the command with a valid option.
INVOFFEREDVALUE, invalid offered value type
Explanation: Indicates that a profile argument offer was invalid. This may be a result of a protocol error.
User Action: Initiate a trace to gather additional information leading up to the event.
INVOPTION, Invalid option -option-character
Explanation: An invalid option was entered for the ologin command
(UNIX).
Explanation: Re-enter the command with valid options.
INVPADCMD, invalid PAD command: unknown or ambiguous
Explanation: A command was entered at the VT_PAD> (OpenVMS) or
ologin (UNIX) prompt. The command was either unrecognized,
or too short to be unambiguous.
User Action: Re-enter the command with either a valid command or a longer keyword.
INVPORTTYPE, invalid port type specified
Explanation: Not normally displayed; an internal VT operation specified a request that was either not valid for the particular port, or the port itself was no longer valid.
User Action: None
INVREQ, invalid request
Explanation: Not normally displayed; indicates that an unexpected internal operation was requested, which could not be satisfied.
User Action: None
INVRESULT, invalid result code
Explanation: A VTP result code encoding was not valid. This error is usually due to a protocol error.
User Action: Initiate a trace to gather additional information leading up to the event.
INVSENDOPT, invalid SEND option
Explanation: The option specified in a send command is not recognized.
User Action: Re-enter the command with a valid send option. Enter send ?
to see a list of valid options.
INVSETOPT, invalid SET option. user: SET {break |escape |command}
Explanation: The option specified in a set command is not recognized.
User Action: Re-enter the command with a valid set option. Enter set ? to
see a list of valid options.
INVSHOWOPT, invalid SHOW option
Explanation: The option specified in a show command is not recognized.
User Action: Re-enter the command with a valid show option. Enter show ?
to see a list of valid options.
INVTOGGLEOPT, invalid TOGGLE option, use BINARY or INBINARY or OUTBINARY
Explanation: The option specified in a toggle command is not recognized.
User Action: Re-enter the command with a valid toggle option. Enter toggle
? to see a list of valid options.
INVUNSET, Invalid UNSET option
Explanation: The option specified in an unset command is not recognized.
User Action: Re-enter the command with a valid unset option. Enter unset ?
to see a list of valid options.
INVVALUE, The specified value is invalid
Explanation: A value specified in a User Command Interface command is not valid.
User Action: Specify a valid value.
INVVALUEVALUE, invalid value type
Explanation: Not normally displayed; indicates that a value specified for a value type is invalid.
User Action: None
INVVTCLASS, invalid VT class
Explanation: Not normally displayed; indicates a VTP class was requested, which the VT software does not support.
User Action: Verify the requested profile.
INVVTFUNCUNITS, invalid functional units
Explanation: Not normally displayed; indicates VTP functional units were requested, which the VT software does not support.
User Action: Verify the requested profile.
INVVTPROFILE, invalid VT profile
Explanation: Not normally displayed; a profile was requested, which the VT software does not support.
User Action: Verify that the set host/vtp/profile= command specifies a
supported profile.
INVVTVERSION, invalid VT version
Explanation: Not normally displayed; a VTP protocol version was specified which the VT software does not support.
User Action: Verify the requested profile.
IVOPT, Invalid command option - check validity and spelling
Explanation: A User Command Interface command option specified was invalid.
User Action: Supply a valid command option.
LITOOLONG, LI longer than PDU
Explanation: Indicates a protocol error was encountered, and that the length encoding is not valid, since it specifies a value that is larger than the length of the protocol data unit (PDU).
User Action: Initiate a trace to gather additional information leading up to the event.
MISSINGEOC, missing EOC
Explanation: Indicates a protocol error was encountered, and that the EOCs that were expected to terminate an indefinite length encoding were not found.
User Action: Initiate a trace to gather additional information leading up to the event.
MSGCAT_OPENERR, The message catalog could not be opened
Explanation: An error occurred when trying to open the error message catalog on UNIX.
User Action: Have your system administrator check to ensure that the VT message catalog has been placed in the proper directory and has the correct protection code.
MUSTBEONECHR, only one character allowed
Explanation: When setting a character such as the command/escape character, only one character may be entered. An attempt was made to use more than one character when setting a special character.
User Action: Re-enter the command using only one character or the circumflex-character notation (for example, ^B) to specify a control character.
NDQERR, error encoding/decoding NDQ
Explanation: An error was encountered in the encoding or decoding operation related to the specified VTP protocol data unit.
User Action: Initiate a trace to gather additional information leading up to the event.
NOALIAS, No alias given on command line
Explanation: The UNIX ologin command did not have an alias specified as
the first argument.
User Action: Re-enter the command with an alias.
NOERROR, Call returned without an error
Explanation: When starting up a UNIX gateway, the exec system call
returned without an error. This call should not return at all.
User Action: Contact your VSI support representative for assistance and describe the events causing the message.
NOGATEWAY, Gateway access is unavailable
Explanation: An attempt was made to start one of the VT gateways, but the gateway software was not installed.
User Action: Ask your system administrator to install the gateway software.
NOPARAM, required parameter value absent
Explanation: Not normally displayed; indicates a parameter value required by an internal VT routine was missing.
User Action: None
NOSTATECHG, no state change
Explanation: Not normally displayed; indicates that the internal VT state machine did not execute a state transition as expected.
User Action: Initiate a state machine trace to gather additional information leading up to the event.
NOSUCHCO, no such control object
Explanation: Not normally displayed. A COupdate requested a control object that does not exist. This may be the result of a protocol error.
User Action: Initiate a trace to gather additional information leading up to the event.
NOSUCHDO, no such display object
Explanation: Not normally displayed. A DOupdate requested a display object that does not exist. This may be a result of a protocol error.
User Action: Initiate a trace to gather additional information leading up to the event.
OPSYSERR, undefined operating system error
Explanation: An operating-system-specific error was encountered. Additional error text should be supplied that further defines the error.
User Action: None
OSAKERR, OSAK error encountered
Explanation: An error was encountered by OSAK; examine the OSAK error code for additional information.
User Action: None
OSK_SLCT_DSRPTD, A disruptive event has occurred during call to
osak_select
Explanation: This is an internal error that should not normally be encountered.
User Action: Call your local support center.
OSK_SLCT_TRANSERR, Error in transport provider found during call
to osak_select
Explanation: This is an internal error that should not normally be encountered.
User Action: Call your local support center.
PABIND, supporting services abort indication received
Explanation: A lower layer abort caused the VT association to terminate abnormally. Additional error text may indicate more information about the abort.
User Action: This may be a normal way for some vendors' implementations to terminate an association when the user requests the association be terminated. If a request was not made to end the association, then a trace should be performed, and your local support center contacted for assistance.
PDATAERR, internal p-data error
Explanation: Not normally seen; indicates an internal error was encountered when starting or finishing a P-DATA.
User Action: None
PNS, profile not supported
Explanation: Not normally displayed; the profile specified is not supported by the VT software.
User Action: Check the requested profile.
PORTERR, error initializing VT port
Explanation: Not normally displayed; indicates that an attempt to initialize a port failed.
User Action: None
PREFUSED, presentation connection refused
Explanation: The peer refused the association request at the Presentation layer.
User Action: Check that the address associated with the alias is correct.
PROGERR, Internal programming error
Explanation: An internal programming error has been encountered.
User Action: Contact your VSI support representative.
PROTOCOLERR, protocol encoding error detected
Explanation: An unspecified protocol encoding error was detected.
User Action: Initiate a trace to gather additional information leading up to the event.
PTERMINALERR, pterminal error
Explanation: An error was encountered by the pseudo-terminal interface. Additional information should be supplied indicating what type of error was encountered.
User Action: None
QUEUEERR, queue mismatch error
Explanation: Not normally displayed; indicates that an internal queue operation failed.
User Action: None
REJECTED, VT Association Rejected
Explanation: The attempt to establish a VT association with the remote end system implementation failed.
User Action: Look for additional text providing additional reasons for the cause of the failure.
RLQERR, error encoding/decoding RLQ
Explanation: An error was encountered in the encoding or decoding operation related to the specified VTP protocol data unit.
User Action: Initiate a trace to gather additional information leading up to the event.
RLRERR, error encoding/decoding RLR
Explanation: An error was encountered in the encoding or decoding operation related to the specified VTP protocol data unit.
User Action: Initiate a trace to gather additional information leading up to the event.
RTQERR, error encoding/decoding RTQ
Explanation: An error was encountered in the encoding or decoding operation related to the specified VTP protocol data unit.
User Action: Initiate a trace to gather additional information leading up to the event.
TOOMANYPORTS, too many ports in port list
Explanation: An attempt has been made to set VT$VT_RJOBLIM, VT$LAT_RJOBLIM or VT$TELNET_RJOBLIM to a value higher than 512.
User Action: Reduce the value
UNEXPECTEDTAG, encountered an unexpected tag
Explanation: indicates that a protocol error was encountered; the VT decoder expected a particular tag and did not encounter it.
User Action: Initiate a trace to gather additional information leading up to the event.
UNKACTION, unknown action
Explanation: Not normally displayed; an action request was made during a state transition in the VT state machine, which could not be performed.
User Action: Initiate a state machine trace to gather additional information leading up to the event.
UNKEVENT, unknown event
Explanation: Not normally displayed; an event was encountered that the VT state machine was not prepared to handle, either because the event had not been defined or because the event happened in an unexpected state.
User Action: Initiate a state machine trace to gather additional information leading up to the event.
UNKNOWNIRTYPE, unknown IR type
Explanation: Not normally displayed; the VT software cannot determine if the port type is an initiator or a responder.
User Action: None
UNKOBJUPD, unknown objectupdate type
Explanation: An object update request was made but the object being updated was not a Control Object, Display Object or RIOreference. Possibly a result of a protocol error.
User Action: Initiate a trace to gather additional information leading up to the event.
UNKOSAKEVENT, unknown OSAK event
Explanation: This is an internal error that should not normally be encountered.
User Action: Call your local support center.
UNKRESULT3, unknown result3
Explanation: An invalid code was specified for a VTP result3 encoding.
User Action: Initiate a trace to gather additional information leading up to the event.
UNKWAVAR, unknown WAVAR owner
Explanation: Not normally displayed; indicates that the specified WAVAR owner is not known. This error could be the result of a protocol error or an invalid profile.
User Action: Initiate a trace to gather additional information leading up to the event.
UNSCOUPDATE, unsupported COupdate
Explanation: A DO, CO or RIOreference operation was requested, which the VT software does not support. This can be the result of a protocol error.
User Action: Initiate a trace to gather additional information leading up to the event.
UNSDOUPDATE, unsupported DOupdate
Explanation: A DO, CO or RIOreference operation was requested, which the VT software does not support. This can be the result of a protocol error.
User Action: Initiate a trace to gather additional information leading up to the event.
UNSRIOREF, RIOreference is not supported
Explanation: Not normally displayed; a request was made for an RIOreference operation. The VT software does not currently support RIOreference.
User Action: None
UNSRIOREFERENCE, unsupported RIOreference
Explanation: A DO, CO or RIOreference operation was requested, which the VT software does not support. This can be the result of a protocol error.
User Action: Initiate a trace to gather additional information leading up to the event.
UNSVTEPARAMS, vteparams are not supported
Explanation: Not normally displayed; indicates a request was made for
vteparams. The VT software does not currently support
vteparams.
User Action: None
USRREJCALLINGAPTITLE, user reject; unknown calling AP-TITLE
Explanation: The attempt to establish a VT association with the remote end system implementation failed. The application-process (AP) title we specified was not recognized by the remote system.
User Action: Check the AP-title being sent.
USRREJNOREASON, user reject; no reason
Explanation: The attempt to establish a VT association with the remote end system implementation failed and no reason was given for the failure.
User Action: Get a trace, call your local support center.
USRREJNULL, user reject; null reason
Explanation: See USRREJNOREASON
User Action: See USRREJNOREASON
USRREJUNSACNAME, user reject; unsupported application context name
Explanation: The attempt to establish a VT association with the remote end system implementation failed because the responding implementation did not like the application context name we supplied. This can indicate that the other implementation is based on an older version of the International Standard (IS) 9041, namely Draft International Standard (DIS) 9041. This error can also occur if an attempt is made to connect to an OSI application other that VT (for example, FTAM).
User Action: Check the other open system to see what application is waiting for a connection on the address you to which you are trying to connect. If the other implementation is, in fact a Virtual Terminal implementation of IS 9041, then get a trace and call your local support center.
VUABIND, VT-USER-ABORT indication received
Explanation: A VT-USER-ABORT indication was received.
User Action: Examine the following error message for information about the abort.
Warning Messages
USERLIMITREDUCED, user limit reduced
Explanation: An attempt was made to exceed the maximum number of associations and the value was lowered.
User Action: None
When the word TELNET appears in uppercase, it refers to the TCP/IP TELNET protocol, and not the VT profile of the same name.
See Appendix G, "G0 C0 Character Table" for a G0 C0 character set table.
These are the only qualifiers that could have
significance for directory commands passing
through the Gateway.
The command and escape
functions are the same.
Applies only to Telnet and Generalized Telnet profiles.
OpenVMS only.
For information on which services are supported, refer to the conformance statement in the Software Product Description.
Initiator or responder.
Confirmed or unconfirmed.
P/S indicates paired Presentation and Session services; for example, P/S-P-ABORT indicates that both P-P-ABORT (Presentation layer) and S-P-ABORT (Session layer) exist.
Confirmed or unconfirmed.
P-ALTER-CONTEXT is the only nonpaired service in the Presentation and Session layers.
osit$default is the original user
name of the OpenVMS OSI default account but the OSI
Transport installer may use a different account. In
that case, attempts to use the IVP's default local
application address fail unless it is deleted and
recreated with a valid user name and
password.
The OpenVMS account is currently a meaningless parameter on OpenVMS.
For OSI Transport, an NSAP address requires a routing record that specifies an adjacency address for the adjacent system.
Often the alternative terms are not true synonyms of the OpenVMS OSI terms; therefore, you should use the OpenVMS OSI terminology whenever possible.
See Chapter 9, "The OSI Application-Entity Database" for more information on SAP selector formats.
Often the alternative terms are not true synonyms of the OSI terms; therefore, you should use the OSI terminology whenever possible.
See Chapter 9 for more information on SAP selector formats.
The /backup, /created, /expired, and/modified qualifiers, which work
only with the /beforeor the /since qualifier, are mutually
exclusive.
This qualifier applies only to the
copy command.
Global indicates that a qualifier operates independently of the input and output files.
This qualifier applies only to the
append command.
Other RMS file types are only partially supported by OpenVMS FTAM. The OpenVMS FTAM responder treats unsupported files as FTAM-3 files, which can change the original file structure.
Record attribute.
<any>, as a description of string length, is actually ≤ 32,767, which is the maximum record size for SEQ files. <n>, as a description of string length, is actually ≤ 6,143.
DECnet-Plus for OpenVMS only.
DECnet-Plus for OpenVMS only.
If the G0 character set is selected (versus the G0 and C0), then only the C0 characters are discarded before transmission.