POLYCENTER Software Installation Utility Manual
- Operating System and Version:
- VSI OpenVMS Alpha Version 8.4-2L1 or higher
VSI OpenVMS IA-64 Version 8.4-1H1 or higher
VSI OpenVMS x86-64 Version 9.2-2 or higher
Preface
This guide describes how to package software products using the POLYCENTER Software Installation utility. It describes the product description language, product description files, product text files, and other relevant concepts.
1. About VSI
VMS Software, Inc. (VSI) is an independent software company licensed by Hewlett Packard Enterprise to develop and support the OpenVMS operating system.
2. Intended Audience
This guide is intended for individuals who are responsible for packaging software products. You do not need to be a programmer to package kits for software products, but you do need to understand the POLYCENTER Software Installation utility commands and concepts.
3. Document Structure
This guide is organized as follows:
Chapter 1, "Overview" provides an overview of the POLYCENTER Software Installation utility.
Chapter 2, "Basic Concepts" defines some key terms and concepts.
Chapter 3, "Creating the Product Description File" describes writing the product description file. It also contains sample product descriptions.
Chapter 4, "Creating the Product Text File" describes writing the product text file. It also contains sample product text files.
Chapter 5, "Packaging the Kit" describes how to package your product and manipulate the kit.
Chapter 6, "Advanced Topics" presents advanced topics such as use of command procedures and testing.
Chapter 7, "Product Description Language Statements" provides detailed reference material on product description language statements and functions.
Appendix A, "Migrating from VMSINSTAL to the POLYCENTER Software Installation Utility" contains information about migrating from the VMSINSTAL utility to the POLYCENTER Software Installation utility.
Appendix B, "Product Description Language Evolution" contains a summary of PDL statements from earlier versions of OpenVMS.
4. Related Documents
The VSI OpenVMS System Manager's Manual, Volume 1: Essentials describes the tasks that system managers perform using the POLYCENTER Software Installation utility. It explains operations such as software installation and removal.
5. VSI Encourages Your Comments
You may send comments or suggestions regarding this manual or any VSI document by sending electronic mail to the following Internet address: <docinfo@vmssoftware.com>. Users who have VSI OpenVMS support contracts through VSI can contact <support@vmssoftware.com> for help with this product.
6. OpenVMS Documentation
The full VSI OpenVMS documentation set can be found on the VMS Software Documentation webpage at https://docs.vmssoftware.com.
7. Typographical Conventions
The following conventions may be used in this manual:
| Convention | Meaning |
|---|---|
|
Ctrl/x |
A sequence such as Ctrl/x indicates that you must hold down the key labeled Ctrl while you press another key or a pointing device button. |
|
Return |
A key name enclosed in a box indicates that you press a key on the keyboard. |
|
… |
A horizontal ellipsis in examples indicates one of the
following possibilities:
|
| ⋮ |
A vertical ellipsis indicates the omission of items from a code example or command format; the items are omitted because they are not important to the topic being discussed. |
|
() |
In command format descriptions, parentheses indicate that you must enclose the options in parentheses if you choose more than one. |
|
[] |
In command format descriptions, brackets indicate optional choices. You can choose one or more items or no items. Do not type the brackets on the command line. However, you must include the brackets in the syntax for OpenVMS directory specifications and for a substring specification in an assignment statement. |
|
| |
In command format descriptions, vertical bars separate choices within brackets or braces. Within brackets, the choices are options; within braces, at least one choice is required. Do not type the vertical bars on the command line. |
|
Bold Type |
Bold type represents the name of an argument, an attribute, or a reason. It also represents the introduction of a new term. |
|
Italic Type |
Italic type indicates important information, complete titles
of manuals, or variables. Variables include information that
varies in system output (Internal error
number), in command lines
( |
|
UPPERCASE TYPE |
Uppercase type indicates the name of a routine, the name of a file, or the abbreviation for a system privilege. |
|
|
Monospace type indicates code examples and interactive screen displays. In the C programming language, monospace type in text identifies the following elements: keywords, the names of independently compiled external functions and files, syntax summaries, and references to variables or identifiers introduced in an example. |
|
Bold monospace type indicates a command, command qualifier, or statement. |
|
- |
A hyphen at the end of a command format description, command line, or code line indicates that the command or statement continues on the following line. |
|
Numbers |
All numbers in text are assumed to be decimal unless otherwise noted. Nondecimal radixes—binary, octal, or hexadecimal—are explicitly indicated. |
Chapter 1. Overview
The POLYCENTER Software Installation utility is a complete software installation and management tool for OpenVMS systems. It can package, install, remove, and manage software products on Alpha, IA-64, and x86-64 systems. It can also save information about software products such as system requirements and installation options.
The POLYCENTER Software Installation utility is intended to be used by people creating (packaging) kits for software products and by system managers who install and maintain these products. This guide describes how to package software products using the POLYCENTER Software Installation utility. It describes the product description language, product description files, product text files, and other relevant concepts.
System managers should refer to the VSI OpenVMS System Manager's Manual, Volume 1: Essentials for general use information.
1.1. Features for Software Providers
The POLYCENTER Software Installation utility improves the task of packaging software for software providers in the following ways:
Reduces effort
Installations require less packaging effort than most conventional installation methods, resulting in performance gains and reduced development time over conventional installations.
Provides more user information
You can include both brief and detailed installation text to guide users through an installation, resulting in a higher installation success rate.
Simplifies installation
Related products can easily be packaged as a product suite, resulting in one operation installation.
Version tracking
The utility tracks which products and which product versions have been installed and removed. You can design your installation procedure to check for and manage version dependencies, resulting in easy version tracking.
1.2. Coexistence with VMSINSTAL
The POLYCENTER Software Installation utility is integrated into OpenVMS and coexists with the VMSINSTAL utility. Today, you use the POLYCENTER Software Installation utility to install the OpenVMS operating system and many layered products on Alpha, IA-64, and x86-64 systems. The POLYCENTER Software Installation utility is the preferred installation mechanism for future layered product and OpenVMS releases.
The POLYCENTER Software Installation utility offers the following features:
Typically faster installation and upgrade operations than the VMSINSTAL utility
Removal (de-installation) of previously-installed software products
A query-capable database of information on installed products
Dependency checking of software products based on the product version number
If you currently use VMSINSTAL to package your software product, see Appendix A, "Migrating from VMSINSTAL to the POLYCENTER Software Installation Utility" for information about migrating from VMSINSTAL to the POLYCENTER Software Installation utility.
1.3. Creating an Installable Kit
As a software provider, you can use the POLYCENTER Software Installation utility to create an installable kit for your software product. This kit may be either a new software product or an update to an existing product; the POLYCENTER Software Installation utility provides features for each case.
Once you have created an installable kit, your OpenVMS user will be able to use the POLYCENTER Software Installation utility to install your product with a minimum of documentation and effort.
Generally, the installable kit you create is packaged in one "container" file.
This container file has a file extension of .PCSI and is in the
binary format recognized by the POLYCENTER Software Installation utility. The person
installing your product issues the PRODUCT INSTALL command to install
the .PCSI file on their OpenVMS system.
The following sections describe the main steps to create an installable kit.
1.3.1. Step 1: Make A Plan
To create an installable .PCSI file, you must determine the required characteristics of the execution environment for your product or platform. Questions you need to consider:
Where will the files be placed?
Will DCL tables or help libraries need to be updated?
Will system or process parameters need to be checked?
Will you need to provide any command procedures to perform product specific tasks?
When you have the answers to these questions, proceed to Section 1.3.2, ''Step 2: Gather the Product Material''.
1.3.2. Step 2: Gather the Product Material
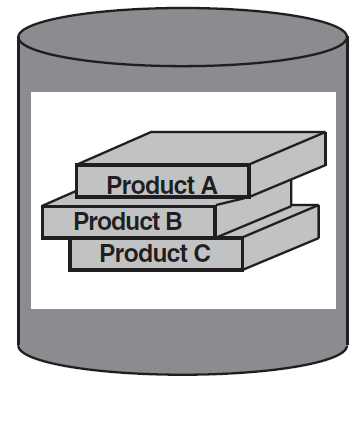
Next, you need to gather all the product material.
Locate all product-related files that will be installed on the user's system. Collect any command procedures you may have written to perform product-specific tasks. These include command procedures that will remain on the user's system and those that will be executed from a temporary directory and then deleted. Together, the product files and any associated command procedures are called the product material.
You can organize the product material for input to the packaging operation in any way that is meaningful and convenient for you. For example, you can organize the material in one of the following ways:
Keep the product material in the directory structure used by the software engineering team.
Organize the product material into one or more staging directories that mirror the directory structure of the product on the user's disk after installation.
Place the product material in a single directory tree.
Each approach has its merits and limitations. However, if you have special requirements, such as the need to install different files with the same name in different directories, your options for organizing the files before packaging might be restricted.
1.3.3. Step 3: Create a Product Description File
Create a product description file (PDF) using a text editor. This step is discussed in more detail in Chapter 3, "Creating the Product Description File". PDF files do the following:
Identify all of the files and other objects (such as directories, accounts, library modules, and others) that the product provides
Specify configuration choices the product offers, including default answers
Specify product requirements (such as dependencies on other software products, minimum hardware configurations, and system parameter values)
PDF files use Product Description Language (PDL) statements (described in Chapter 7, "Product Description Language Statements") to convey all of the information the POLYCENTER Software Installation utility needs for installing either a software product or a set of software products.
Example 1.1, ''PDF for C++ Software Kit'' shows a sample PDF. Chapter 7, "Product Description Language Statements" describes each PDL statement in detail.
product VSI X86VMS CXX V10.1-1 full ;
    information RELEASE_NOTES phase after with helptext ;
    if (<software VSI X86VMS VMS version maximum V9.2>) ;
    error VMS_VERSION_TOO_OLD abort ;
    end if ;
    scope global ;
    file [SYSEXE]CLANG.EXE size 153965 ;
    file [SYSEXE]CXX$COMPILER.EXE size 154208 ;
    file [SYSEXE]CXX$DEMANGLE.EXE size 2319 ;
    module [000000]CXX$CLD.CLD type command module CXX ;
    module [SYSHLP]CXX$HELP.HLP type help module CXX ;
    file [SYSHLP]CXX.RELEASE_NOTES release notes size 82 ;
    file [SYSHLP]CXX.CHANGELOG size 50 ;
    file [SYSLIB]LIBCXXABI.OLB generation 2147483647 size 1439 ;
    file [SYSLIB]LIBCXX.OLB generation 2147483647 size 4033 ;
    file [SYSLIB]LIBCXXABI.EXE generation 2147483647 image library size 766 ;
    file [SYSLIB]LIBCXX.EXE generation 2147483647 image library size 2820 ;
    file [SYSHLP.EXAMPLES]CXX.OPT size 1 ;
    file "[VSICXX$LIB.INCLUDE.ARTIFICIAL]sched.h" size 0 ;
    file "[VSICXX$LIB.INCLUDE.ARTIFICIAL]sysexits.h" size 11 ;
    file "[VSICXX$LIB.INCLUDE.ARTIFICIAL]features.h" size 0 ;
    file "[VSICXX$LIB.INCLUDE.ARTIFICIAL]standards.h" size 0 ;
    file "[VSICXX$LIB.INCLUDE.ARTIFICIAL]endian.h" size 0 ;
    file "[VSICXX$LIB.INCLUDE.ARTIFICIAL]pthread.h" size 149 ;
    file "[VSICXX$LIB.INCLUDE.ARTIFICIAL]pthread_exc.h" size 41 ;
    file "[VSICXX$LIB.INCLUDE.ARTIFICIAL]builtins.h" size 114 ;
    file "[VSICXX$LIB.INCLUDE.lib_cxx.include]sstream." size 66 ;
    file "[VSICXX$LIB.INCLUDE.lib_cxx.include]streambuf." size 30 ;
    file "[VSICXX$LIB.INCLUDE.lib_cxx.include]stdexcept." size 16 ;
    file "[VSICXX$LIB.INCLUDE.lib_cxx.include]__tuple." size 41 ;
    file "[VSICXX$LIB.INCLUDE.lib_cxx.include]limits.h" size 4 ;
    file "[VSICXX$LIB.INCLUDE.lib_cxx.include]iostream." size 4 ;
    file "[VSICXX$LIB.INCLUDE.lib_cxx.include]new." size 29 ;
    file "[VSICXX$LIB.INCLUDE.lib_cxx.include]csetjmp." size 3 ;
    file "[VSICXX$LIB.INCLUDE.lib_cxx.include]stdint.h" size 6 ;
    file "[VSICXX$LIB.INCLUDE.lib_cxx.include]__libcpp_version." size 1 ;
    file "[VSICXX$LIB.INCLUDE.lib_cxx.include]mutex." size 36 ;
    file "[VSICXX$LIB.INCLUDE.lib_cxx.include]ctime." size 4 ;
    file "[VSICXX$LIB.INCLUDE.lib_cxx.include]forward_list." size 123 ;
    file "[VSICXX$LIB.INCLUDE.lib_cxx.include]cstddef." size 6 ;
    file "[VSICXX$LIB.INCLUDE.lib_cxx.include]climits." size 3 ;
    file "[VSICXX$LIB.INCLUDE.lib_cxx.include]cstring." size 6 ;
    file "[VSICXX$LIB.INCLUDE.lib_cxx.include]__bsd_locale_fallbacks.h" size 10 ;
    file "[VSICXX$LIB.INCLUDE.lib_cxx.include]__functional_base." size 36 ;
    file "[VSICXX$LIB.INCLUDE.lib_cxx.include]ctgmath." size 2 ;
    file "[VSICXX$LIB.INCLUDE.lib_cxx.include]cstdarg." size 3 ;
    file "[VSICXX$LIB.INCLUDE.lib_cxx.include]filesystem." size 161 ;
    file "[VSICXX$LIB.INCLUDE.lib_cxx.include]unordered_map." size 195 ;
    file "[VSICXX$LIB.INCLUDE.lib_cxx.include]cwchar." size 13 ;
    file "[VSICXX$LIB.INCLUDE.lib_cxx.include]list." size 158 ;
    file "[VSICXX$LIB.INCLUDE.lib_cxx.include]errno.h" size 11 ;
    file "[VSICXX$LIB.INCLUDE.lib_cxx.include]setjmp.h" size 3 ;
    file "[VSICXX$LIB.INCLUDE.lib_cxx.include]wchar.h" size 18 ;
    file "[VSICXX$LIB.INCLUDE.lib_cxx.include]fenv.h" size 5 ;
    file "[VSICXX$LIB.INCLUDE.lib_cxx.include]clocale." size 3 ;
    file "[VSICXX$LIB.INCLUDE.lib_cxx.include]__nullptr." size 4 ;
    file "[VSICXX$LIB.INCLUDE.lib_cxx.include]stdio.h" size 8 ;
    file "[VSICXX$LIB.INCLUDE.lib_cxx.include]istream." size 95 ;
    file "[VSICXX$LIB.INCLUDE.lib_cxx.include]vector." size 219 ;
    file "[VSICXX$LIB.INCLUDE.lib_cxx.include]unordered_set." size 136 ;
    file "[VSICXX$LIB.INCLUDE.lib_cxx.include]typeinfo." size 23 ;
    file "[VSICXX$LIB.INCLUDE.lib_cxx.include]atomic." size 167 ;
    file "[VSICXX$LIB.INCLUDE.lib_cxx.include]span." size 48 ;
    file "[VSICXX$LIB.INCLUDE.lib_cxx.include]utility." size 98 ;
    file "[VSICXX$LIB.INCLUDE.lib_cxx.include]cinttypes." size 8 ;
    file "[VSICXX$LIB.INCLUDE.lib_cxx.include]compare." size 53 ;
    file "[VSICXX$LIB.INCLUDE.lib_cxx.include]ciso646." size 2 ;
    file "[VSICXX$LIB.INCLUDE.lib_cxx.include]exception." size 19 ;
    file "[VSICXX$LIB.INCLUDE.lib_cxx.include]ctype.h" size 3 ;
    file "[VSICXX$LIB.INCLUDE.lib_cxx.include]module.modulemap" size 24 ;
    file "[VSICXX$LIB.INCLUDE.lib_cxx.include]scoped_allocator." size 51 ;
    file "[VSICXX$LIB.INCLUDE.lib_cxx.include]float.h" size 4 ;
    file "[VSICXX$LIB.INCLUDE.lib_cxx.include]tuple." size 112 ;
    file "[VSICXX$LIB.INCLUDE.lib_cxx.include]typeindex." size 7 ;
    file "[VSICXX$LIB.INCLUDE.lib_cxx.include]locale." size 304 ;
    file "[VSICXX$LIB.INCLUDE.lib_cxx.include]condition_variable." size 16 ;
    file "[VSICXX$LIB.INCLUDE.lib_cxx.include]limits." size 80 ;
    file "[VSICXX$LIB.INCLUDE.lib_cxx.include]__debug." size 17 ;
    file "[VSICXX$LIB.INCLUDE.lib_cxx.include]ccomplex." size 2 ;
    file "[VSICXX$LIB.INCLUDE.lib_cxx.include]stdlib.h" size 8 ;
    file "[VSICXX$LIB.INCLUDE.lib_cxx.include]__undef_macros." size 3 ;
    file "[VSICXX$LIB.INCLUDE.lib_cxx.include]string_view." size 69 ;
    file "[VSICXX$LIB.INCLUDE.lib_cxx.include]string.h" size 10 ;
    file "[VSICXX$LIB.INCLUDE.lib_cxx.include]__locale." size 97 ;
    file "[VSICXX$LIB.INCLUDE.lib_cxx.include]__tree." size 206 ;
    file "[VSICXX$LIB.INCLUDE.lib_cxx.include]queue." size 56 ;
    file "[VSICXX$LIB.INCLUDE.lib_cxx.include]ostream." size 65 ;
    file "[VSICXX$LIB.INCLUDE.lib_cxx.include]memory." size 328 ;
    file "[VSICXX$LIB.INCLUDE.lib_cxx.include]array." size 35 ;
    file "[VSICXX$LIB.INCLUDE.lib_cxx.include]valarray." size 265 ;
    file "[VSICXX$LIB.INCLUDE.lib_cxx.include]type_traits." size 280 ;
    file "[VSICXX$LIB.INCLUDE.lib_cxx.include]ios." size 52 ;
    file "[VSICXX$LIB.INCLUDE.lib_cxx.include]__mutex_base." size 33 ;
    file "[VSICXX$LIB.INCLUDE.lib_cxx.include]deque." size 213 ;
    file "[VSICXX$LIB.INCLUDE.lib_cxx.include]stack." size 21 ;
    file "[VSICXX$LIB.INCLUDE.lib_cxx.include]string." size 318 ;
    file "[VSICXX$LIB.INCLUDE.lib_cxx.include]__hash_table." size 205 ;
    file "[VSICXX$LIB.INCLUDE.lib_cxx.include]map." size 166 ;
    file "[VSICXX$LIB.INCLUDE.lib_cxx.include]cctype." size 4 ;
    file "[VSICXX$LIB.INCLUDE.lib_cxx.include]any." size 38 ;
    file "[VSICXX$LIB.INCLUDE.lib_cxx.include]tgmath.h" size 2 ;
    file "[VSICXX$LIB.INCLUDE.lib_cxx.include]algorithm." size 399 ;
    file "[VSICXX$LIB.INCLUDE.lib_cxx.include]strstream." size 23 ;
    file "[VSICXX$LIB.INCLUDE.lib_cxx.include]cmath." size 34 ;
    file "[VSICXX$LIB.INCLUDE.lib_cxx.include]regex." size 438 ;
    file "[VSICXX$LIB.INCLUDE.lib_cxx.include]__std_stream." size 22 ;
    file "[VSICXX$LIB.INCLUDE.lib_cxx.include]random." size 443 ;
    file "[VSICXX$LIB.INCLUDE.lib_cxx.include]bitset." size 67 ;
    file "[VSICXX$LIB.INCLUDE.lib_cxx.include]__functional_base_03." size 14 ;
    file "[VSICXX$LIB.INCLUDE.lib_cxx.include]execution." size 2 ;
    file "[VSICXX$LIB.INCLUDE.lib_cxx.include]set." size 113 ;
    file "[VSICXX$LIB.INCLUDE.lib_cxx.include]fstream." size 107 ;
    file "[VSICXX$LIB.INCLUDE.lib_cxx.include]initializer_list." size 7 ;
    file "[VSICXX$LIB.INCLUDE.lib_cxx.include]wctype.h" size 4 ;
    file "[VSICXX$LIB.INCLUDE.lib_cxx.include]optional." size 84 ;
    file "[VSICXX$LIB.INCLUDE.lib_cxx.include]chrono." size 228 ;
    file "[VSICXX$LIB.INCLUDE.lib_cxx.include]future." size 143 ;
    file "[VSICXX$LIB.INCLUDE.lib_cxx.include]cstdlib." size 11 ;
    file "[VSICXX$LIB.INCLUDE.lib_cxx.include]thread." size 23 ;
    file "[VSICXX$LIB.INCLUDE.lib_cxx.include]complex.h" size 3 ;
    file "[VSICXX$LIB.INCLUDE.lib_cxx.include]cerrno." size 2 ;
    file "[VSICXX$LIB.INCLUDE.lib_cxx.include]bit." size 29 ;
    file "[VSICXX$LIB.INCLUDE.lib_cxx.include]cwctype." size 4 ;
    file "[VSICXX$LIB.INCLUDE.lib_cxx.include]shared_mutex." size 31 ;
    file "[VSICXX$LIB.INCLUDE.lib_cxx.include]__bsd_locale_defaults.h" size 5 ;
    file "[VSICXX$LIB.INCLUDE.lib_cxx.include]__functional_03." size 88 ;
    file "[VSICXX$LIB.INCLUDE.lib_cxx.include]complex." size 92 ;
    file "[VSICXX$LIB.INCLUDE.lib_cxx.include]__node_handle." size 13 ;
    file "[VSICXX$LIB.INCLUDE.lib_cxx.include]cfenv." size 4 ;
    file "[VSICXX$LIB.INCLUDE.lib_cxx.include]__threading_support." size 36 ;
    file "[VSICXX$LIB.INCLUDE.lib_cxx.include]cstdio." size 9 ;
    file "[VSICXX$LIB.INCLUDE.lib_cxx.include]cstdint." size 7 ;
    file "[VSICXX$LIB.INCLUDE.lib_cxx.include]__string." size 69 ;
    file "[VSICXX$LIB.INCLUDE.lib_cxx.include]stddef.h" size 4 ;
    file "[VSICXX$LIB.INCLUDE.lib_cxx.include]inttypes.h" size 9 ;
    file "[VSICXX$LIB.INCLUDE.lib_cxx.include]iosfwd." size 18 ;
    file "[VSICXX$LIB.INCLUDE.lib_cxx.include]csignal." size 3 ;
    file "[VSICXX$LIB.INCLUDE.lib_cxx.include]ratio." size 33 ;
    file "[VSICXX$LIB.INCLUDE.lib_cxx.include]__config_site.in" size 4 ;
    file "[VSICXX$LIB.INCLUDE.lib_cxx.include]__sso_allocator." size 6 ;
    file "[VSICXX$LIB.INCLUDE.lib_cxx.include]version." size 30 ;
    file "[VSICXX$LIB.INCLUDE.lib_cxx.include]charconv." size 36 ;
    file "[VSICXX$LIB.INCLUDE.lib_cxx.include]functional." size 194 ;
    file "[VSICXX$LIB.INCLUDE.lib_cxx.include]__errc." size 19 ;
    file "[VSICXX$LIB.INCLUDE.lib_cxx.include]iterator." size 141 ;
    file "[VSICXX$LIB.INCLUDE.lib_cxx.include]cassert." size 2 ;
    file "[VSICXX$LIB.INCLUDE.lib_cxx.include]__split_buffer." size 45 ;
    file "[VSICXX$LIB.INCLUDE.lib_cxx.include]locale.h" size 3 ;
    file "[VSICXX$LIB.INCLUDE.lib_cxx.include]iomanip." size 37 ;
    file "[VSICXX$LIB.INCLUDE.lib_cxx.include]__config." size 103 ;
    file "[VSICXX$LIB.INCLUDE.lib_cxx.include]math.h" size 100 ;
    file "[VSICXX$LIB.INCLUDE.lib_cxx.include]variant." size 122 ;
    file "[VSICXX$LIB.INCLUDE.lib_cxx.include]cfloat." size 4 ;
    file "[VSICXX$LIB.INCLUDE.lib_cxx.include]__bit_reference." size 105 ;
    file "[VSICXX$LIB.INCLUDE.lib_cxx.include]system_error." size 29 ;
    file "[VSICXX$LIB.INCLUDE.lib_cxx.include]cstdbool." size 2 ;
    file "[VSICXX$LIB.INCLUDE.lib_cxx.include]numeric." size 41 ;
    file "[VSICXX$LIB.INCLUDE.lib_cxx.include]codecvt." size 41 ;
    file "[VSICXX$LIB.INCLUDE.lib_cxx.include]stdbool.h" size 3 ;
    file "[VSICXX$LIB.INCLUDE.lib_cxx.include.experimental]coroutine." size 21 ;
    file "[VSICXX$LIB.INCLUDE.lib_cxx.include.experimental]propagate_const." size 41 ;
    file "[VSICXX$LIB.INCLUDE.lib_cxx.include.experimental]forward_list." size 3 ;
    file "[VSICXX$LIB.INCLUDE.lib_cxx.include.experimental]filesystem." size 19 ;
    file "[VSICXX$LIB.INCLUDE.lib_cxx.include.experimental]unordered_map." size 5 ;
    file "[VSICXX$LIB.INCLUDE.lib_cxx.include.experimental]list." size 3 ;
    file "[VSICXX$LIB.INCLUDE.lib_cxx.include.experimental]vector." size 3 ;
    file "[VSICXX$LIB.INCLUDE.lib_cxx.include.experimental]unordered_set." size 5 ;
    file "[VSICXX$LIB.INCLUDE.lib_cxx.include.experimental]utility." size 3 ;
    file "[VSICXX$LIB.INCLUDE.lib_cxx.include.experimental]memory_resource." size 27 ;
    file "[VSICXX$LIB.INCLUDE.lib_cxx.include.experimental]simd." size 121 ;
    file "[VSICXX$LIB.INCLUDE.lib_cxx.include.experimental]type_traits." size 12 ;
    file "[VSICXX$LIB.INCLUDE.lib_cxx.include.experimental]deque." size 3 ;
    file "[VSICXX$LIB.INCLUDE.lib_cxx.include.experimental]string." size 5 ;
    file "[VSICXX$LIB.INCLUDE.lib_cxx.include.experimental]map." size 4 ;
    file "[VSICXX$LIB.INCLUDE.lib_cxx.include.experimental]algorithm." size 4 ;
    file "[VSICXX$LIB.INCLUDE.lib_cxx.include.experimental]regex." size 5 ;
    file "[VSICXX$LIB.INCLUDE.lib_cxx.include.experimental]set." size 4 ;
    file "[VSICXX$LIB.INCLUDE.lib_cxx.include.experimental]__memory." size 6 ;
    file "[VSICXX$LIB.INCLUDE.lib_cxx.include.experimental]functional." size 36 ;
    file "[VSICXX$LIB.INCLUDE.lib_cxx.include.experimental]iterator." size 9 ;
    file "[VSICXX$LIB.INCLUDE.lib_cxx.include.experimental]__config." size 8 ;
    file "[VSICXX$LIB.INCLUDE.lib_cxx.include.ext]hash_set." size 49 ;
    file "[VSICXX$LIB.INCLUDE.lib_cxx.include.ext]hash_map." size 77 ;
    file "[VSICXX$LIB.INCLUDE.lib_cxx.include.ext]__hash." size 7 ;
    file "[VSICXX$LIB.INCLUDE.lib_cxx.include.support.vms]xlocale.h" size 3 ;
    file "[VSICXX$LIB.INCLUDE.lib_cxx.include.support.xlocale]__nop_locale_mgmt.h" size 4 ;
    file "[VSICXX$LIB.INCLUDE.lib_cxx.include.support.xlocale]__posix_l_fallback.h" size 10 ;
    file "[VSICXX$LIB.INCLUDE.lib_cxx.include.support.xlocale]__strtonum_fallback.h" size 6 ;
    end scope ;
    file [SYS$STARTUP]CXX$STARTUP.COM size 2 ;
    file [SYSHLP.EXAMPLES]CXX$SETUP.COM size 1 ;
    file [SYSEXE]CXX$GENERATE_HEADERS.COM size 3 ;
    execute postinstall "@pcsi$destination:[SYSEXE]CXX$GENERATE_HEADERS" ;
    file [SYS$STARTUP]CXX$UPGRADE.COM size 4 ;
    file [SYS$STARTUP]CXX$UNINSTALL.COM size 1 ;
    execute install "@pcsi$destination:[SYS$STARTUP]CXX$UPGRADE" remove "@pcsi$destination:[SYS$STARTUP]CXX$UNINSTALL" ;
    file [SYSTEST]CXX$IVP.COM size 17 ;
    execute test "@pcsi$destination:[SYSTEST]CXX$IVP.COM" ;
end product ;
1.3.4. Step 4: Create a Product Text File (Optional)
Create a product text file (PTF) with a text editor. This optional step is fully described in Chapter 4, "Creating the Product Text File". The PTF provides information about the product in brief and detailed formats. The information includes product identification, copyright notice, configuration choice descriptions, and message text used primarily during product installation and configuration operations.
The PTF file format is similar to that of modules used with the Librarian utility (LIBRARY) to create, modify, or describe a help library. Example 1.2, ''PTF for C++ Software Kit'' shows a product text file.
=PRODUCT VSI X86VMS CXX V10.1-1 Full
1 'LICENSE
=prompt PAKs used: CXX-V
1 'NOTICE
=prompt © Copyright 2024 VMS Software, Inc.
1 'PRODUCER
=prompt This software product is sold by VMS Software, Inc.
1 'PRODUCT
=prompt CXX
1 RELEASE_NOTES
=prompt Text form of the release notes are located in the file SYS$HELP:CXX.RELEASE_NOTES
1 VMS_VERSION_TOO_OLD
=prompt OpenVMS version is below the supported minimum
VSI CXX requires VSI OpenVMS V9.2-1 or later
1.3.5. Step 5: Package the Software Components
Package the software components to create a .PCSI file. This step is fully described in
Chapter 5, "Packaging the Kit". Use the PRODUCT PACKAGE command
and its qualifiers. The PRODUCT PACKAGE command determines if the
PDF and PTF are syntactically correct and verifies that all listed product material
files can be found.
1.3.6. Step 6: Test and Debug the Installable Kit
When a kit has been successfully produced, use the PRODUCT INSTALL,
PRODUCT SHOW, and PRODUCT REMOVE commands
to verify the installation and removal of the product. Check for correct file
placement and protection, test user input, review message text, modify configuration
options, verify that execution environment requirements are satisfied, and so
forth.
Test your installable kit to make sure that it properly handles any software version dependencies.
Chapter 2. Basic Concepts
This chapter defines key terms and concepts. Read this chapter before creating your installable kit.
If you are familiar with the POLYCENTER Software Installation utility terms and concepts, you can start with Chapter 3, "Creating the Product Description File".
2.1. The Product Database
The product database (PDB) refers to a set of interrelated files located in SYS$SYSDEVICE:[VMS$COMMON.SYSEXE] with a .PCSI$DATABASE file extension. The POLYCENTER Software Installation utility automatically creates the PDB the first time a product is installed or registered on the system, such as when the OpenVMS operating system is installed. Once created, the utility updates the database as operations are performed to install, reconfigure, register, or remove products.
The PDB is the single source of information about operations performed on products using the POLYCENTER Software Installation utility. This information includes a history of operations performed, which products are installed, which files and other managed objects are owned by each product, software dependencies among products, and so forth.
PCSI$FILE_SYSTEM.PCSI$DATABASE
PCSI$PROCESSOR.PCSI$DATABASE
PCSI$ROOT.PCSI$DATABASE
Note
The format and content of the database files are controlled by the POLYCENTER Software Installation utility. If an OpenVMS system manager uses the POLYCENTER Software Installation utility to install your product, the utility will expect the database files to exist from that point on.
Caution your product's users not to delete these files or the POLYCENTER Software Installation utility will not be able to detect and manage your product. The complete set of database files must be intact for the utility to access the information in the database.
2.1.1. Querying the Product Database
     if (<software VSI OPENVMS-X86 VMS version minimum V9.0> AND
         <software VSI OPENVMS-X86 VMS version below A9.2>) ;
         file [SYSEXE]MY$SERVER.EXE generation 5
              source [000000]MY$SERVER_V90.EXE ;
         file [SYSEXE]MY$UTILITY.EXE generation 1
              source [000000]MY$UTILITY_V90.EXE ;
         file [SYSTEST.MY$PRODUCT]MY$SERVER_IVP.EXE generation 5
              source [000000]MY$SERVER_IVP_V90.EXE ;
     end if;
      if (<software VSI OPENVMS-X86 VMS version minimum V9.2> AND
         <software VSI OPENVMS-X86 VMS version below A9.3>) ;
         file [SYSEXE]MY$SERVER.EXE generation 5
              source [000000]MY$SERVER_V92.EXE ;
         file [SYSEXE]MY$UTILITY.EXE generation 1
              source [000000]MY$UTILITY_V92.EXE ;
         file [SYSTEST.MY$PRODUCT]MY$SERVER_IVP.EXE generation 5
              source [000000]MY$SERVER_IVP_V92.EXE ;
     end if;
OpenVMS users can use the DCL command PRODUCT SHOW either to
query the product database to show what products are installed and the dependencies
between them, to list the files and other objects that make up each product, or to
show the history of installation and upgrade activity.
If your installation procedure or the OpenVMS user removes a product, information about the files and objects associated with the product are removed from the database. However, the history of the product's activity from installation to removal is retained in the database.
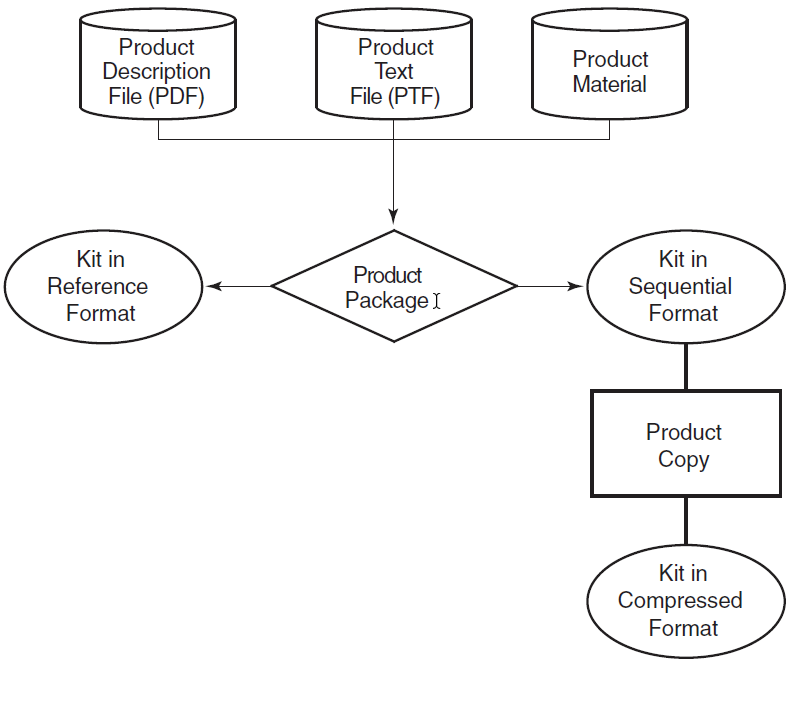
2.2. Software Product Kit Formats
When you create a software product kit, you must also choose a distribution format. You may choose one of three distribution formats:
Sequential format. In this format, the PDF, PTF, kit-specific command procedures, and all files that comprise the product are packaged into a single container file that is identified by a .PCSI file type. You can ship a sequential kit on either a random-access device, such as a CD–ROM, or on a sequential access device, such as magnetic tape. Most layered products and patch kits are distributed in this format. Use the
PRODUCT PACKAGE/FORMAT=SEQENTIALcommand to generate a kit in sequential format.Compressed format. This format is a variant of sequential format in which a compression technique is used to reduce the size of the kit. To create a kit in compressed format, first package the product in sequential format using the
PRODUCT PACKAGE
                        /FORMAT=SEQUENTIAL
command. Next, use thePRODUCT COPY /FORMAT=COMPRESSEDcommand to create a compressed kit from the sequential kit. The resulting container file has a file type of .PCSI$COMPRESSED. ThePRODUCT INSTALLcommand and all otherPRODUCTcommands that read software product kits automatically decompress records from a compressed kit as they are needed.Reference format. In this format, the PDF, PTF, kit-specific command procedures, and all files that comprise the product are placed in a directory tree on a random-access device. The directory tree mirrors the directory structure of the product on the user's disk after installation. The top-level directory contains the PDF and PTF. The PDF has a file type of .PCSI$DESCRIPTION and it is used to identify the kit. Use the
PRODUCT PACKAGE /FORMAT=REFERENCEcommand to generate a kit in reference format. You can also use thePRODUCT COPY /FORMAT=REFERENCEcommand to expand a kit in either sequential or compressed format to one in reference format where all extracted files are placed in a directory tree.
The OpenVMS operating system product is packaged in reference format for Alpha and compressed format for IA-64 and x86-64. While layered products and patch kits can be distributed in reference format, this is rarely done because it is much simpler to ship a kit in the form of a single container file in either sequential or compressed format. Moreover, reference kits cannot be signed, whereas sequential kits (whether compressed or not) can be signed.
Figure 2.1, ''Package Operation'' shows how the package operation uses the PDF, PTF, and product material to create a product kit in reference or sequential format. Subsequently, the copy operation can be used to transform a sequential kit into a kit in compressed format.
2.3. Software Product Kit Naming Conventions
The POLYCENTER Software Installation utility adheres to the following file-naming conventions when either creating a software product kit or processing PDF and PTF files.
2.3.1. Sequential Format
A software product kit created in sequential format is a single file whose name is
in the following format:
producer-base-product-version-kittype.PCSI.
VSI-AXPVMS-DWMOTIF-V0102-6-1.PCSI
Note that the file name is constructed of components delimited by hyphens (-). The version component is further divided into subfields and includes an additional hyphen as explained in Section 2.3.5, ''More About the Version Field''.
2.3.2. Compressed Format
producer-base-product-version-kittype.PCSI$COMPRESSEDVSI-AXPVMS-DWMOTIF-V0102-6-1.PCSI$COMPRESSED
2.3.3. Reference Format
producer-base-product-version-kittype.PCSI$DESCRIPTION producer-base-product-version-kittype.PCSI$TLB
VSI-AXPVMS-DWMOTIF-V0102-6-1.PCSI$DESCRIPTION VSI-AXPVMS-DWMOTIF-V0102-6-1.PCSI$TLB
2.3.4. Kit Naming Rules and Conventions
Each field in the file name is separated by a hyphen.
The length of the file name string (including all required hyphens) cannot exceed 39 characters.
The
producer-base-productportion of the string must uniquely identify the software product.
produceris the legal owner of the software product. For VSI software products this component of the file name is VSI, although it may be HP, CPQ, or DEC for products that were originally developed for older versions of OpenVMS.basedenotes the hardware and operating system combination that the product requires. The following table references the strings used as the base field values and their meanings.String Meaning X86VMS An OpenVMS x86-64 product I64VMS An OpenVMS IA-64 product AXPVMS An OpenVMS Alpha product VMS A product applicable for any VSI supported system productis the name of the software product. For example, DWMOTIF.versionidentifies the version of the software product expressed in tmn-ue format. For example, V0102-6 denotes V1.2-6. See Table 2.1, ''Format of tmn-ue Version Identification'' for more information.kittypeidentifies a kit type specified as a value from 1 through 7, as shown in Table 2.2, ''PDF Kit Types and Values''.
2.3.5. More About the Version Field
|
t |
The type of version (a single uppercase alphabetic character A through V; the letters W, X, Y, and Z are reserved for use by VSI). Evaluated by ascending ASCII value. Pre-release versions of a product usually begin with the letters A through U and V is used to indicate the formal release version. |
|
m |
The major version number (decimal integer 01 through 99). |
|
n |
The minor version number (decimal integer 00 through 99). |
|
- |
The hyphen is required in all cases. When both update level (u) and maintenance edit level (e) are omitted, the version string will end with a hyphen and the file name will have a double hyphen (- -) preceding the kit type. |
|
u |
The update level (decimal integer 1 through 999999999). This is optional. If not present, the utility evaluates this component as 0. |
|
e |
The maintenance edit level (up to 16 alphanumeric characters beginning with an alphabetic character). This is optional. If not present, the utility evaluates this component as a null string. |
- Compares the components of the version field in the following order:
Major version number (m)
Minor version number (n)
Update level (u)
Maintenance edit level (e)
Version type (t)
It is important to note that version type (t) is the last component to be evaluated. Because it indicates the delivery status (internal, external, beta, and so on) of the product in the development cycle, it is considered the least important component.
Stops when it finds two components that are not equal, or determines that all five components are equal.
Evaluates alphabetic characters and numbers in ascending order.
Once you use an update level (u) or a maintenance edit level (e) in the product version field, that component must be carried throughout the release cycle of the product to ensure proper evaluation by the utility.
The utility stops the comparison after it finds two components that are not equal. In this case, it stops at the update level.
Because the update level is not present in V7.3, it is evaluated as 0. Ten (10), the update level in E7.3-10, is greater than zero (0).
Since version type is evaluated last, it is not a factor here.
D7.3-10A, because A is greater than the null string.
V7.3-10, because V is greater than E.
A7.3-11, because 11 is greater than 10.
2.3.6. Version Information Visible to the OpenVMS Users
The tmn-ue format used in file names is similar to the format used to
display versions to OpenVMS users, or as entered by the OpenVMS user with the
/VERSION qualifier.
Leading zeros are omitted in m and n.
If neither u nor e is present, the hyphen (-) is omitted.
If a hyphen is present and the first character after the hyphen is a digit, then the leading digits after the hyphen are the update level. If nondigit characters are present, the maintenance edit level consists of the first nondigit character and all following characters. If nondigit characters are not present, the maintenance edit level is blank.
If a hyphen is present and the first character after the hyphen is a nondigit character, the update level is zero (0) and the maintenance edit level consists of all of the characters after the hyphen.
If no hyphen is present, the update level is zero (0) and the maintenance edit level is blank.
2.3.7. More About the Kit Type
|
Value |
Type of Kit |
Description |
|---|---|---|
|
1 |
Full |
Layered product (application) software. |
|
2 |
Operating system |
Operating system software. |
|
3 |
Partial |
An upgrade to currently installed software that replaces or provides new files. Installation of this kit changes the version of the product. |
|
4 |
Patch |
A correction to currently installed software that replaces or provides new files. Installation of this kit does not change the version of the product. |
|
5 |
Platform |
An integrated set of software products (also known as a software product suite). |
|
6 |
Transition |
Product information used to register (in the POLYCENTER Software Installation database) a product that was installed by VMSINSTAL or other mechanism. This kit includes only a PDF and (optionally) a PTF; it does not provide product material. |
|
7 |
Mandatory update |
A required correction to currently installed software that replaces or provides new files. Installation of this kit does not change the version of the product. Functionally the same as a patch kit. |
2.3.8. Looking at Software Product Name Examples
- A sequential format kit for the VSI Softwindows for OpenVMS x86-64 product that requires a double hyphen has the following format:
VSI-X86-SOFTWIN-V0101-1.PCSI
This format shows that the
produceris VSI, thebaseis X86VMS (OpenVMS x86-64), theproductis SOFTWIN, and theversionis V1.1. The type of version is V, the major and minor version numbers are each 1. There are no update or maintenance edit levels. Thekittypeis 1 (full). - A product description file in a reference format kit for OpenVMS Alpha has the following format:
HP-AXPVMS-VMS-V0602-1H2-2.PCSI$DESCRIPTION
This format shows that the
produceris HP, thebaseis AXPVMS (OpenVMS Alpha), theproductis VMS, and theversionis V6.2-1H2. The type of version is V, the major version number is 6, the minor version number is 2, the update level is 1, and the maintenance edit level is H2. Thekittypeis 2 (operating system).
2.3.9. Input and Output Versions of the PDF and PTF
Although you provide the product description file (PDF) and the product text file (PTF) as input to the package operation, they also exist in modified (output) form in the kit you create. You need to be aware that two versions of these files do exist and that they perform specific tasks.
You create the input version as input to the package operation, and the POLYCENTER Software Installation utility creates the output version for its own use.
The package operation changes the format of the output PTF file. For more information, see Section 4.2, ''Structure of a PTF''.
The output PDF is in the same format as the input PDF, but the package operation may modify statements in the output PDF. For example, the package operation adds the size option to FILE statements in the output PDF.
2.4. User-Defined Logical Names
Defining logical names
Specifying
/SOURCEand/DESTINATIONqualifiers on the command line
The system manager can also define logical names, and then override them by using the /SOURCE and /DESTINATION qualifiers.
PCSI$SOURCE defines the location of the software kits to install. By default, the user's default device and directory are used. PCSI$DESTINATION defines the location in which to install the software.
/DESTINATION qualifier, the utility installs the software product
in SYS$SYSDEVICE:[VMS$COMMON] and directories under it. If this
is not appropriate for your product, make sure that your installation instructions
describe how to specify the /DESTINATION qualifier, or how to define
the PCSI$DESTINATION logical name. Note
When you package your product, the logical names
PCSI$SOURCE and
PCSI$DESTINATION are not used. You must use the
/SOURCE and /DESTINATION qualifiers on
the PRODUCT PACKAGE command.
2.5. Utility-Defined Logical Names
This section discusses the logical names defined by the POLYCENTER Software Installation utility for use by kit-supplied command procedures.
2.5.1. PCSI$SOURCE, PCSI$DESTINATION, and PCSI$SCRATCH
Several Product Description Language (PDL) statements execute command procedures in the context of a subprocess. The POLYCENTER Software Installation utility defines the logical names PCSI$SOURCE, PCSI$DESTINATION, and PCSI$SCRATCH for use by these command procedures. Note that these logical names are accessible only within the subprocess and do not interfere with similar names that the user may have defined. Note also that the user's definition of PCSI$SOURCE is not the same as that defined by the utility for the command procedure. See Figure 6.1, ''EXECUTE Statement Summary'' and the descriptions of various EXECUTE statements in the PDL reference section for additional information.
2.5.2. PCSI$$RECOVERY_MODE and PCSI$$SAVE_RECOVERY_DATA
With the introduction of the /RECOVERY_MODE and
/SAVE_RECOVERY_DATA qualifiers to the PRODUCT
INSTALL and PRODUCT RECONFIGURE commands for
OpenVMS Version 7.3-2, the utility defines logical names to increase product
developers' control over the product installation process. These new logical names
are PCSI$$RECOVERY_MODE and
PCSI$$SAVE_RECOVERY_DATA. The
PCSI$$RECOVERY_MODE logical name represents the
/RECOVERY_MODE qualifier while the
PCSI$$SAVE_RECOVERY_DATA qualifier represents the
/SAVE_RECOVERY_DATA command-line qualifier. They are defined
in the system-wide logical name table whenever the user specifies their equivalent
qualifiers and are deassigned when the PRODUCT command
terminates.
For the /RECOVERY_MODE qualifier, the
PCSI$$RECOVERY_MODE logical name is defined with a YES
value. If the user specifies /NORECOVERY_MODE, the
PCSI$$RECOVERY_MODE logical name is defined with a NO
value. If the user does not use the /RECOVERY_MODE qualifier at
all, the logical name is not defined. The same process applies to the
PCSI$$SAVE_RECOVERY_DATA logical name.
The /RECOVERY_MODE qualifier forces product installation to be
performed in recovery mode, which allows recovery from a failed product installation
or reconfiguration through a rollback of files and library modules displaced by the
failed operation. By default, the installation and reconfiguration operations are
not performed in recovery mode.
The /SAVE_RECOVERY_DATA qualifier applies only to the
installation of patch and mandatory update kits. It is similar to
/RECOVERY_MODE in that it forces files displaced during
installation to be saved in a specially designated directory tree. Those saved
objects can later be used to uninstall patch products by executing the
PRODUCT UNDO PATCH command. By default, the patch kit
installation triggers patch recovery data to be saved for future use. This is the
reason the PCSI$$RECOVERY_MODE and
PCSI$$SAVE_RECOVERY_DATA logical names have been
introduced.
Using these logical names, the product developer can control whether the product
installation is performed in recovery mode or whether the patch recovery data is
being saved for potential patch kit removal. Using a command procedure supplied with
the PDL statement EXECUTE PRECONFIGURE in your PDF, you can examine the logical
names and determine if the user has specified the /RECOVERY_MODE
or /SAVE_RECOVERY_DATA qualifiers.
If, for example, the user did not use the /SAVE_RECOVERY_DATA
qualifier, and you believe that it is important that your patch kit be installed in
a manner allowing its uninstallation in case of a problem, you can set the
PCSI$$SAVE_RECOVERY_DATA logical name in your EXECUTE
PRECONFIGURE command and force the recovery data to be saved for future use.
2.5.3. PCSI$$COMMAND_LINE
Starting with OpenVMS Version 8.2, the utility defines the logical name
PCSI$$COMMAND_LINE to be the DCL command line entered
by the user that initiated the PRODUCT command. This logical name
is defined in the system-wide logical name table and is deassigned when the
PRODUCT command terminates.
2.5.4. PCSI$$CONFIRM
Starting with OpenVMS Version 8.2, the utility defines the logical name
PCSI$$CONFIRM with a NO value when the user specifies
the /OPTIONS=NOCONFIRM qualifier on the command line. This
logical name is defined in the system-wide logical name table and is deassigned when
the PRODUCT command terminates.
2.6. Managed Objects
Managed objects are the files, directories, accounts, network objects, and so forth that support the proper functioning of your product. The POLYCENTER Software Installation utility must directly create them.
As an example, if you use a PDF FILE statement to create a file, that file is considered to be a managed object.
However, if your product creates directories, files, and so forth after the installation is completed, the POLYCENTER Software Installation utility has no way to know about those files or directories and cannot manage them. For example, if your product dynamically creates an error log as a result of a specific error condition, the POLYCENTER Software Installation utility will not be able to manage (for example, remove) this log file. This means that if the OpenVMS user uses the POLYCENTER Software Installation utility to remove your software product, the user would have to manually delete the error log.
In addition, if your PDF includes command procedures in EXECUTE statements that create files, directories, accounts, and so forth, the POLYCENTER Software Installation utility has no way to know about these objects and cannot manage them.
2.6.1. Creating Managed Objects
To create managed objects using PDL statements, you can specify the names and properties of the managed objects that are necessary for your product. At installation time, the POLYCENTER Software Installation utility uses your product description file (PDF) to create the managed objects for your product and records information about these objects in the product database.
directory [SYSTEST.FORTRAN] ; file [SYSTEST]FORT$IVP.COM ; file [SYSHLP]FORTRAN-V86-001.RELEASE_NOTES release notes ; file [SYSHLP]HELPLIB.HLB generation 40069227 release merge ; module [000000]CPQC.CLD type command module CC ;
When the POLYCENTER Software Installation utility removes a software product, it uses the data in the product database to delete managed objects from the system.
PRODUCT SHOW OBJECT command to display the names of
objects installed on a system. For example:
$ PRODUCT SHOW OBJECT *COPY* ----------------------------------------------- ----------------- ----- OBJECT NAME OBJECT TYPE STATUS ----------------------------------------------- ----------------- ----- [SYSEXE]COPY.EXE file OK [SYSHLP.EXAMPLES.DECW.UTILS]COPYRIGHT.H file OK COPY module OK
2.6.2. Managed Object Conflict
If it was provided by an earlier instance of your product.
If it was not created by the
PRODUCTcommand. (It is not a managed object in the product database.)
However, if the file is a managed object identified in the product database, and is owned by some other product, it might not be appropriate to replace it.
An interproduct conflict occurs when two or more products provide an object with the same name in the same directory. (Files with the same name can coexist in different directories.)
An intraproduct conflict occurs when two or more patch or partial kits for a product update the same object.
ACCOUNT
DIRECTORY
FILE
LINK
LOADABLE IMAGE
MODULE
NETWORK OBJECT
REGISTER MODULE
RIGHTS IDENTIFIER
2.6.3. Preventing Managed Object Conflict
FILE
MODULE
REGISTER MODULE
Managed object conflict is resolved differently, depending on what type of object is involved. The description of these statements in Chapter 7, "Product Description Language Statements" indicates how each one resolves managed object conflict.
For example, some statements provide a generation option (using the GENERATION keyword) that lets you assign a generation number to an object. During installation, if the utility attempts to create an object that already exists, it compares the generation numbers of the objects, selecting the object with the highest generation number.
When two or more products provide the same file or module, the one with the highest generation number must implement a superset of the capabilities found in the objects having lower generation numbers. This is required so that all products installed that use this object will continue to function properly.
When one of these products is removed, the POLYCENTER Software Installation utility retains the object with the highest generation number and reassigns the ownership of the object to the product remaining on the system.
Thus, when products update one or more objects in common (indirectly modify each other), removal of one product might result in not restoring the other product to its former state. This is because the objects with the highest generation numbers are left on the system.
product CPQ AXPVMS TEST1 V1.0 full;
file [SYSEXE]TEST.EXE generation 100;
end product; product CPQ AXPVMS TEST2 V1.0 full;
file [SYSEXE]TEST.EXE generation 200;
end product;If you first install product TEST1 and then install TEST2, the TEST.EXE file with generation number 200 will supersede the previously installed file TEST.EXE with generation number 100. However, if you subsequently remove product TEST2, the utility will retain generation 200 of file TEST.EXE and list product TEST1 as its owner. It is assumed that the file having the higher generation number is a functional superset of the file with the lower generation number; therefore, product TEST1 will continue to work properly. To restore product TEST1 to its original state, you will need to reinstall it. This will remove all the installed files associated with the product and replace them with files from the kit.
2.6.4. Multiple File Versions
When installing a product while /RECOVERY_MODE is enabled (the
default), PCSI saves the highest version of each applicable file and purges any
lower versions. When a product is removed, PCSI restores each previously saved file,
potentially superseding any versions that may have been created in the interim. When
installing VMS ECO kits, /RECOVERY_MODE is always enabled.
2.6.5. Managed Object Replacement and Merging
When upgrading a product using a full operating system or platform kit, the utility deletes the existing object and replaces it with the object and characteristics provided by the new version of the product.
When upgrading a product using a partial kit or modifying a product using a patch or mandatory update kit, the utility preserves the characteristics of existing objects. For example, the security environment you establish for your product is preserved when you install a partial, patch, or mandatory update kit.
If you want to provide new characteristics for a managed object in a partial, patch, or mandatory update kit, use the REMOVE statement to delete the existing object and then respecify the object with the desired characteristics.
For more information about kit types, see Table 2.2, ''PDF Kit Types and Values''.
2.6.6. Managed Object Scope and Lifetime
The scope of a managed object defines the degree of sharing that the managed object permits. For example, some objects are available only to certain processes, and some can be shared by all processes. The utility usually ensures that managed objects have the correct scope.
Occasionally, you might need to use the SCOPE statement to give a managed object a scope other than its default. For more information about specifying the scope of a managed object, see the description of the SCOPE statement in Chapter 7, "Product Description Language Statements".
2.7. Creating an Integrated Platform (Product Suite)
In addition to packaging individual products, the POLYCENTER Software Installation utility gives you the means to assemble integrated platforms. An integrated platform is a combination of several products, such as a suite of complementary management products that you might bundle together.
Functionally, a platform is the same as a full kit, except that it has the designation "PLATFORM". A platform is intended to reference other products, but it can also supply files.
Figure 2.2, ''Integrated Platform Example'' shows an example of an integrated platform.
To package a platform, you create a platform PDF and platform PTF. In addition to other statements, the platform PDF contains SOFTWARE statements that specify the products that make up the platform. The individual products have their own PDFs and PTFs (independent of the platform PDF and PTF). For more information about platform PDFs, see Section 3.5.3, ''The Platform Kit Type''.
Chapter 3. Creating the Product Description File
Specifies all files that make up the product
Identifies configuration options that are presented to the user at installation time
Specifies any dependencies the product may have on other software products
Defines various actions that must be performed during installation
3.1. General Guidelines
Minimize installation activity (such as linking images and building databases). Instead, include all material required for product execution on the reference.
Make your products adapt to the target environment at execution time rather than installation time. This practice keeps products consistent across varying configurations.
Avoid requiring system parameter settings on the target system that would require rebooting the system.
Minimize configuration choices at installation time.
Ensure that the PDF expresses all the known requirements that your product needs to execute. Use the checklist in Section 3.2, ''Defining Your Environment'' to define the requirements for the target environment.
3.2. Defining Your Environment
- Does your product depend on other software?
- For example, your product may require a specific version of the operating system or optional software products. To express these software requirements, use the SOFTWARE function or statement.
Note
Note the distinction between the SOFTWARE statement and the SOFTWARE function. The statement and function serve different purposes and are not interchangeable. See Table 7.8, ''Summary of SOFTWARE Statement and SOFTWARE Function Differences'' for a summary of differences.
The SOFTWARE statement specifies a software product that should be installed on the system to satisfy a software product dependency. It also specifies a software product that is a part of an integrated platform (product suite) and should be included in the platform product installation.
The SOFTWARE function tests for the presence of a product. You can also specify the version of the product that must be present. The SOFTWARE function, unlike the SOFTWARE statement, does not create a permanent software reference to another product and does not force the installation of the other product.
Also note that software you reference with a SOFTWARE statement must be registered in the product database to be recognized by the POLYCENTER Software Installation utility. If you install a product using a mechanism other than the POLYCENTER Software Installation utility, the product database will not contain information about the product unless you register it using a full or transition PDF. For more information about creating transition product descriptions, see Section 3.5.7, ''The Transition Kit Type''.
- If you are creating a platform, what software products make up the platform?
If you are creating a platform, you must specify the software products that make up the platform. To specify the products that make up your platform, use the SOFTWARE statement with the component option.
- Does your product require specific hardware devices?
For example, your product may require that the system has access to certain peripheral devices, such as a compact disc drive or printer. To display a message to users expressing these hardware requirements, use the HARDWARE DEVICE statement.
- Does your product run only on specific computer models?
Some products run only on certain computer models. If this is the case with your product, use the HARDWARE PROCESSOR statement to display a message to users.
- Does your product require specific images, files, or directories?
All the files, images, and directories that your product requires should be expressed in FILE or DIRECTORY statements.
- Does your product require a special account on the system?
Some products require a dedicated account on the system. Use the ACCOUNT statement to supply the account.
- Does your product require network objects?
Some products require network objects on the system. If your object is designed for DECnet Phase IV, use the NETWORK OBJECT statement to supply the required network objects. For DECnet-Plus you might want to use a different mechanism. For example, supply an NCL script with a PDL file statement.
- Do you want to set up rights identifiers?
Use the RIGHTS IDENTIFIER statement.
- Does your product supply an image to the system loadable images table?
Use the LOADABLE IMAGE statement.
- Does your product have several options that the user can choose?
Although it is a good practice to limit the number of user options, you may need to present the user with options during installation. To present options to the user, use the OPTION statement.
- Does your product have specific security requirements?
If the files and directories for your product require special protection or access controls, you can express this in the product description. See the descriptions of the DIRECTORY statement and the FILE statement. You can also supply a rights identifier using the RIGHTS IDENTIFIER statement.
- Does your product require certain values for system parameters?
Many software products require that system parameters have certain values for the product to function properly. Use the SYSTEM PARAMETER statement to display system parameter requirements to users.
- Does your product require certain values for process parameters?
Use the PROCESS PARAMETER statement to display these requirements to users.
- Does your product require certain values for process privileges?
Use the PROCESS PRIVILEGE statement to display these requirements to users.
- Do you want to include a functional test with your product?
You can include it in the product material to verify that your product installed correctly. To execute the functional test for your product, use the EXECUTE TEST statement.
- Are there commands that your installation procedure needs to execute that are outside the domain of the POLYCENTER Software Installation utility?
Use the EXECUTE statement.
- Does your product have specific pre- or post-installation tasks?
You can use the POLYCENTER Software Installation utility to automate these tasks; however, there may be some tasks you want users to perform that are outside the capabilities of the utility. You can inform users of such tasks using the INFORMATION statement. You can also use several of the EXECUTE statements to perform these tasks.
- Does your product require command, help, macro, object, or text library modules?
- You should express the following types of modules in your PDF:
DIGITAL Command Language (DCL) command definition modules
DCL help modules
Macro modules
Object modules
Text modules
You can express these types of modules using the MODULE statement.
- What happens to existing product files?
Make sure that your product's files are handled correctly during an installation or upgrade. The POLYCENTER Software Installation utility deletes all those files that are replaced by newly-installed products. When upgrading a full, an operating system, or a platform product, non-replaced files of the older product version are also deleted. When installing partial, patch, or mandatory update kits, files that are not replaced by new versions are preserved.
To remove obsolete files, enclose FILE statements representing them in the REMOVE group statement.
- Does your product require documentation?
You may want to include online documentation (such as release notes) with your product. To express the documentation requirements for your product, use the RELEASE NOTES option to the FILE statement.
3.3. PDF File-Naming Conventions
PRODUCT PACKAGE command. The PDF can
have any valid OpenVMS file name and file type. We recommend that you give the input PDF
file the extension .PCSI$DESC. For example:
TEST.PCSI$DESC
When you execute the PRODUCT PACKAGE command, it creates an output PDF. See
Section 2.3.9, ''Input and Output Versions of the PDF and PTF'' for the distinction between input and output files.
The output PDF file format is the same as the input PDF; that is, a sequential file containing PDL statements. The contents of the output PDF, however, may differ slightly from that of the input PDF. For example, the POLYCENTER Software Installation utility adds the size option to every FILE statement and supplies the actual size of the file in disk blocks.
producer-base-product-version-kittype.PCSI$DESCRIPTIONABC_CO-AXPVMS-BLACKJACK-V0201-17-1.PCSI$DESCRIPTIONSee Section 2.3, ''Software Product Kit Naming Conventions'' for a description of the product-naming syntax.
3.4. Structure of a PDF
product VSI X86VMS test v1.0 full ;
file [sysexe]test.exe ; end product ;3.4.1. Overview of PDL Statements
Statement groups are defined by a pair of opening and closing statements; by convention, the closing statement is the keyword END followed by the keyword of the opening statement. Statement groups operate on statements lexically contained within their begin-end pair. Many statement groups can be nested within other groups.
The following statement groups are used to conditionally process other statements:IF and END IF (ELSE and ELSE IF statements optionally can be used within the statement group). Used to evaluate the Boolean value of a statement function or expression as a condition to process enclosed statements or a group of statements.
OPTION and END OPTION.
The following statement groups unconditionally process all statements at their inner level:PART and END PART
PRODUCT and END PRODUCT
REMOVE and END REMOVE
SCOPE and END SCOPE
- Statements that create or modify managed objects include:
ACCOUNT
DIRECTORY
FILE
LINK (create an alias directory entry)
LOADABLE IMAGE
MODULE
NETWORK OBJECT
REGISTER MODULE
RIGHTS IDENTIFIER
- Statements that enforce software dependencies and hardware requirements by testing the execution environment and taking appropriate action include:
APPLY TO
HARDWARE DEVICE
HARDWARE PROCESSOR
INFER
SOFTWARE
UPGRADE
- Statements whose main purpose is to display a message to the user and in some cases query the user for a response are as follows:
ERROR
INFORMATION
PROCESS PARAMETER
PROCESS PRIVILEGE
SYSTEM PARAMETER
- Statements that cause producer-supplied command procedures to execute or instruct the user to manually perform a task include:
EXECUTE ABORT
EXECUTE INSTALL …REMOVE
EXECUTE LOGIN
EXECUTE POSTINSTALL
EXECUTE POST_UNDO
EXECUTE PRECONFIGURE
EXECUTE PRE_UNDO
EXECUTE REBOOT
EXECUTE START …STOP
EXECUTE TEST
EXECUTE UPGRADE
- Statement functions that are used to provide a Boolean value when evaluated in the expression part of an IF statement:
<HARDWARE DEVICE>
<HARDWARE PROCESSOR>
<LOGICAL NAME>
<OPTION>
<SOFTWARE>
<UPGRADE>
PRODUCT and END PRODUCT (required in every PDF)
FILE
MODULE
SOFTWARE
OPTION and END OPTION
IF and END IF
EXECUTE INSTALL …REMOVE
EXECUTE TEST
3.4.2. PDL Statement Syntax
A keyword phrase that identifies the statement (required)
Zero or more parameter values (which may be expressions in certain contexts)
Zero or more options each specified as a keyword phrase and value pair
A semicolon (;) that terminates the statement (required)
Additional Syntax Rules
Statements can span multiple lines and whitespace can be used freely to improve readability or show relationship through indentation levels.
Case is not significant, except within a quoted string.
A keyword phrase consists of one or more keywords as defined by the PDL statement.
A comment is a sequence of two consecutive hyphens (- -) followed by characters up to and including end-of-line.
When a string containing consecutive hyphens is passed as a parameter or option value, enclose the string in quotes, for example, "
a–b.dat". This prevents the hyphens from being parsed as the start of a comment.Lexical element separators are used to set off keywords, values, expressions, and so on. They include end-of-line, comment, and the following characters: space, horizontal tab, form feed, and vertical tab (except when they appear within a quoted string).
Delimiters are required syntax in many situations. They consist of the following characters: semicolon (;), comma (,), left parenthesis ((), right parenthesis ()), left angle bracket (<), and right angle bracket (>).
When a string contains a delimiter character that is passed as a parameter or option value, enclose the string in quotes. For example, to pass the numeric UIC string [1,1] as an option value, use the quoted string form of "[1,1]", because it contains a comma character.
3.4.3. PDL Function Syntax and Expressions
Certain PDL statements have a function form that tests for a condition in the execution environment and returns a Boolean value of true or false. A function is syntactically similar to its corresponding statement except that a function is enclosed in left and right angle brackets (<...>), instead of being terminated by a semicolon (;).
HARDWARE DEVICE
HARDWARE PROCESSOR
OPTION
SOFTWARE
UPGRADE
The LOGICAL NAME function does not have a corresponding statement form.
Expressions are used in IF statements to produce a Boolean value for the if-condition test. An expression is delimited by opening and closing parentheses ((...)). It contains one or more functions and, optionally, one or more of the keywords AND, OR, and NOT, which are used as logical operators.
(term)
(term AND term)
(term OR term)
(NOT term)
if ( (not
<hardware device MUA0:>) and (
<software ABC I64VMS TEST version below 2.0>) ) ;
.
.
.
end if ;3.4.4. PDL Data Types and Values
|
Data Type |
Values |
|---|---|
|
Boolean |
The number 0 (false), the number 1 (true), the keywords false, true, no, and yes. |
|
String |
A sequence of 0 to 255 ISO Latin-1 characters. In the
context of PDF language statements:
You must use the quoted string form if the string contains any PDL delimiters (open/close parentheses, comma, open/close angle brackets, and semicolons) or lexical element separators (double hyphen, space, horizontal tab, form feed, or vertical tab). For example, "/privilege=(tmpmbx, netmbx)". Table 3.2, ''String Data Type Constraints'' lists the additional constraints on PDL strings. |
|
Signed integer |
Specifies a positive, negative, or zero integral value in the range of -2147483648 to 2147483647. |
|
Unsigned integer |
Specifies a zero or positive integral value in the range of 0 through 4294967295. |
|
Version identifier |
See the description in Section 2.3, ''Software Product Kit Naming Conventions''. |
|
Text module name |
Specifies a unique name for a text module using the printable ISO Latin-1 characters, excluding horizontal tab, space, exclamation point, and comma. The name can be from 1 to 31 characters. |
| String Type | Values | Examples |
|---|---|---|
|
Unconstrained |
None; any character may appear in any position. | |
|
Access control entry (ACE) |
Specifies an ACE for a directory or file. |
"(IDENTIFIER=[KM], ACCESS=READ)" |
|
Command |
Specifies an operating system command that you want to execute during a specific operation. |
@PCSI$DESTINATION:[SYSTEST] PROD$IVP.COM |
|
Device name |
Specifies the name of a hardware device. |
DUB6: |
|
File name |
Specifies a file name (without a device or directory specification). |
STARTUP.DAT |
|
Identifier name |
Specifies a rights identifier. |
DOC |
|
Module name |
Specifies the name of a module in a library. |
FMSHELP |
|
Processor model name |
Specifies the model identification of a particular computer system. |
7 |
|
Relative directory specification |
Specifies the directory name and, if necessary, the directory path, relative to the root directory specification. |
[MY_PRODUCT] |
|
Relative file specification |
Specifies the directory path and file name, relative to the root directory path. |
[MY_PRODUCT]DRIVER.DAT |
|
Root directory specification |
Specifies the directory name and a trailing period (.). If you specify a directory name and omit the period, it is inserted. If necessary, you can add the device name. |
[TEST.]SYS$SYSDEVICE:[VMS$COMMON.] |
3.5. Kit Types and Usage
- Primary kit – Used to install or upgrade a product. Primary kits can require prerequisite products to be installed before or concurrently. Kit types in this category include:
Full (layered product or application software)
Operating system
Platform (product suite)
- Secondary kit – Used to modify installed products. Kits types in this category include:
Partial (changes the product's version)
Patch (maintenance update)
Mandatory update
- Transition kit – Used to register a product that has been installed using VMSINSTAL or some method other than the DCL command
PRODUCT INSTALL. The kit type in this category is as follows:Transition
PRODUCT PACKAGE command to package (or build) a product
kit. The output of the packaging process is an installable kit (in either sequential
copy format or reference format) that contains: - Product material (usually present) – The files that make up the product. Usually, the installation of a product kit copies files to the target disk. However, there are exceptions:
A transition kit never provides files.
A platform kit references other products; it may or may not provide common files for the product suite.
Since product material is not a requirement for any type of kit, you may create "skeleton" kits for testing purposes that do not modify the target disk.
A product description file (required) that drives the installation process – It defines the managed objects that are provided or created and contains directives for the installation utility. In addition, it can include options for the installer to select, declare software references to other prerequisite products, and invoke command procedures you write to augment the installation process.
A product text file (optional) that provides text modules for use during the installation process.
Temporary files such as command procedures (optional) that are used during the installation process but are not left on the user's system.
The full product name (that is, the string
producer-base-product) must be unique among
all products installed on a system. This implies, for example, that there could be two
FORTRAN compilers installed from different companies (such as VSI-AXPVMS-FORTRAN and
XYZCORP-AXPVMS-FORTRAN), but there cannot be two patch kits with the same full name that
are intended to apply to different products (such as ABC-AXPVMS-ECO1 for
ABC-AXPVMS-COBOL and ABC-AXPVMS-ECO1 for ABC-AXPVMS-C).
The following sections describe each type of kit and provide examples of their product description files.
3.5.1. The Full Kit Type
product CPQ AXPVMS TEST_A V2.0 full ; . . . end product ;
It contains all of the material for the product. Therefore, it can be used to install the product for the first time or it can upgrade a previously installed version of the product.
The product can be removed, configured, or reconfigured.
Its PDF can contain OPTION and SOFTWARE statements.
product AXPVMS FORTRAN V7.1-1 full ;if (not <software AXPVMS VMS version minimum V7.1>) ;
software AXPVMS FORRTL version minimum V7.1 ; end if ; information STARTUP_TASK phase after ; information RELEASE_NOTES phase after ;
file [SYSHLP]FORTRAN.RELEASE_NOTES release notes ;
file [SYSHLP]FORTRAN_RELEASE_NOTES.PS ; file [SYSHLP]FORTRAN_RELEASE_NOTES.DECW$BOOK ; if (<software VSI AXPVMS FORTRAN90>) ;
error REMFORT90 ; end if ; option FORTRAN_90 ;
file [SYSEXE]F90$MAIN.EXE generation 2 ; file [SYSMSG]F90$MSG.EXE generation 2 ; module [000000]F90CLD.CLD type command generation 2 module F90 ; module [000000]F90HELP.HLP type help generation 2 module F90 ;
end option ; option FORTRAN_77 ; file [SYSEXE]FORT$MAIN.EXE generation 1 ; file [SYSEXE]FORT$FSPLIT.EXE generation 1 ; file [SYSMSG]FORT$MSG.EXE generation 1 ; file [SYSMSG]FORT$MSG2.EXE generation 1 ; module [000000]DEC_FORTCLD.CLD type command generation 1 module FORTRAN ; module [000000]DEC_FORHELP.HLP type help generation 1 module FORTRAN ; end option ; file [SYSLIB]FORSYSDEF.TLB generation 5 ; file [SYS$STARTUP]FORT$STARTUP.COM generation 1 protection private ;
file [SYSTEST]FORT$IVP.COM generation 1 protection private ; execute test "@PCSI$DESTINATION:[SYSTEST]FORT$IVP.COM" ;
end product ;
| The PRODUCT statement identifies this as a complete layered product kit for installation of (or upgrade to) FORTRAN V7.1-1 on an OpenVMS Alpha system. |
| The IF …END IF group conditionally executes statements within the group based on the evaluation of the IF function. In this example, the SOFTWARE statement is executed only if the system is running a version of OpenVMS earlier than V7.1. This SOFTWARE statement creates a software reference to the product FORRTL. If FORRTL V7.1 or later is already installed, the software dependency is satisfied; otherwise, FORRTL is automatically installed concurrently with FORTRAN. |
| This INFORMATION statement causes a message to be displayed after the product has been installed. Text is obtained from the module RELEASE_NOTES in the PTF: 1 RELEASE_NOTES =prompt Type HELP FORTRAN Release_notes for release notes location |
| This FILE statement copies file FORTRAN.RELEASE_NOTES to
SYS$SYSDEVICE:[VMS$COMMON.][SYSHLP] (the
same as SYS$COMMON:[SYSHLP]) unless the user
specifies a different destination. The RELEASE NOTES keyword phrase tags
this file in the kit so that the |
| This IF statement determines whether or not the product FORTRAN90 is
installed. If it is installed, text from the module REMFORT90 in the PTF
is displayed and the user is asked if he wants to terminate the
operation: 1 REMFORT90
=prompt PRODUCT REMOVE FORTRAN90 before installing VSI Fortran
The obsolete DEC Fortran 90 product must be removed before VSI Fortran is installed. To do this, use the command:
PRODUCT REMOVE FORTRAN90Note that if the ABORT keyword had been used on the ERROR statement, the operation would terminate unconditionally. ABORT was not used because the ABORT keyword was introduced in OpenVMS V7.1 and this kit can be installed on earlier versions of OpenVMS. |
| This OPTION …END OPTION group conditionally provides files and
library modules associated with the FORTRAN 90 compiler. The user is
asked a question from text module FORTRAN_90 in the PTF:
1 FORTRAN_90 =prompt Compaq Fortran 90 compiler This option selects the Compaq Fortran 90 compiler. By default, the OPTION statement displays only text from the prompt
line. However, if the user specifies the |
| The MODULE statement installs the help text module F90 from the file F90HELP.HLP in the default help library [SYSHLP]HELPLIB.HLB. The file F90HELP.HLP is not left on the system because a FILE statement is not used. |
| The PROTECTION PRIVATE keyword phrase on this FILE statement sets the file protection to (S:RWED, O:RWED, G, W), giving general users no access. |
| The EXECUTE TEST statement executes the functional test for the
product (the installation verification procedure) after the product has
been installed. If the test fails, the user is informed but the product
is not removed. The user can use the |
product AXPVMS FORRTL V7.1-427 full ;
| The PRODUCT statement identifies this as a complete layered product kit for installation of (or upgrade to) FORRTL V7.1-427 on an OpenVMS Alpha system. |
| The IF …ELSE …END IF group conditionally executes statements within the group based on the evaluation of the IF function. In this example, two files named [SYSLIB]FOR$DEC$FORRTL.EXE and [SYSLIB]FOR$DEC$FORRTL.OBJ are always provided. However, the contents of these files vary depending on the version of the OpenVMS product that is installed. Notice the use of the SOURCE option on the FILE statements to select the desired file from the kit to copy to the target disk. |
| The EXECUTE INSTALL …REMOVE statement executes the command procedure PCSI$DESTINATION:[SYSUPD]FOR$INSTALL_FORRTL.COM during installation or upgrade of the product, and also during removal of the product. Instead of providing two command procedures, one is used and a parameter is passed to it to indicate the operation. |
3.5.2. The Operating System Kit Type
product VSI AXPVMS VMS V7.2 operating system ; . . . end product ;
It contains all of the material for the product. Therefore, it can be used to install the product for the first time or it can upgrade a previously installed version of the product.
The product cannot be removed unless the
PRODUCT REMOVEcommand contains the/REMOTEqualifier to remove the operating system on a disk that is not the running system.The product can be configured or reconfigured.
Its PDF can contain OPTION and SOFTWARE statements.
There can be only one product of type operating system installed on a system disk.
Except for the kit type designation, the structure of an operating system kit is the same as a full kit; all PDL statements that are allowed in a full kit can be used in an operating system kit.
product AXPVMS VMS V7.1 operating system ;
| The PRODUCT statement identifies this as a complete operating system kit for installation of (or upgrade to) OpenVMS V7.1 on an Alpha system. |
| The UPGRADE statement specifies that if this kit is being used to upgrade the VMS product then the previous version must be within the stated range of versions. However, if this is an initial installation of the operating system, the UPGRADE statement is ignored. |
| This DIRECTORY statement creates the directory [SYS0.SYSCOMMON.SYSEXE], that is, SYS$COMMON:[SYSEXE]. |
| These FILE statements copy files to the target system disk. The VMS product places generation numbers on all objects that it provides to aid in object conflict detection and resolution when other products (or patch and partial kits to the operating system) that may replace these objects are installed. |
| This FILE statement provides [SYSMGR]SYLOGIN.COM from a template file. The WRITE option indicates that customers are allowed to edit this file. On upgrade, if this file exists it will not be replaced. |
| This OPTION…END OPTION group demonstrates how options can be nested. The MAIL option is presented to the user only if the UTILITIES option is selected. |
| The FILE statement that provides [SYSHLP]HELPLIB.HLB is enclosed in a SCOPE GLOBAL …END SCOPE group to allow other products to freely make updates to this library. The RELEASE MERGE keyword phrase indicates that library modules propagate during an upgrade. For example, if a layered product adds a module to HELPLIB.HLB, this module is automatically inserted into the new library file that is provided by the VMS product during an upgrade of the operating system. |
| The REMOVE …END REMOVE group within an OPTION …END OPTION group deletes all objects specified in the remove group if the user selects the option. |
3.5.3. The Platform Kit Type
The platform kit installs a product suite, which is an integrated set of software products. It may provide files that are common to all products in the suite, or it may not provide any files. It does, however, contain software references to one or more other products. These references can be either required, optional, or a combination of required and optional. For example, the OPENVMS platform kit always installs the OpenVMS operating system product and asks whether to optionally install system integrated products such as VSI DECwindows Motif and VSI TCP/IP Services for OpenVMS.
product AXPVMS OPENVMS V7.2 platform ; . . . end product ;
It contains all of the material that is common to the product suite. Therefore, it can be used to install the product suite for the first time or it can upgrade a previously installed version of the platform. As stated, product material is optional for a platform kit. It should, however, contain one or more SOFTWARE statements to reference other products.
Products referenced do not have to be present when the platform kit is packaged because referenced products are not bundled into the platform kit. However, when you copy a platform, products that are referenced by SOFTWARE statements with the COMPONENT option must be present.
The platform product can be removed, configured, or reconfigured.
Its PDF can contain OPTION and SOFTWARE statements.
Except for the kit type designation, the structure of a platform kit is the same as a full kit; all PDL statements that are allowed in a full kit can be used in a platform kit.
product AXPVMS OPENVMS F7.1 platform ;
| The PRODUCT statement identifies this as the OPENVMS F7.1 product
suite for installation or upgrade on an OpenVMS Alpha system. The
version type Note that VMS (the operating system product) is different from OPENVMS (the product suite). |
| The UPGRADE statement specifies that if this kit is being used to upgrade the OpenVMS product then the previous version must be within the stated range of versions. However, if the OpenVMS product is not currently installed, then the UPGRADE statement is ignored. |
| The SOFTWARE statement specifies that the operating system (OpenVMS F7.1) is a required component of the product suite that will be implicitly installed. Should the OpenVMS F7.1 product kit not be accessible, an error message is displayed and the installation terminated before any files from any products are copied to the system. |
| The OPTION …END OPTION group conditionally executes statements
within the group based on the user's response to a question. In this
example, the OPTION statement displays text associated with the label
DWMOTIF_KIT from the PTF:
1 DWMOTIF_KIT
=prompt DECwindows Motif for OpenVMS Alpha
This option installs VSI DECwindows Motif for OpenVMS Alpha, which provides the X Window system graphical user interface.An affirmative response to the question causes the DWMOTIF V1.2-4 product to be installed (or upgraded if a version is already installed); otherwise, the SOFTWARE statement is ignored. Should the DWMOTIF V1.2-4 product kit not be accessible when the platform is installed, this option is marked as unselectable and skipped over. |
3.5.4. The Partial Kit Type
product AXPVMS TEST_A V2.1 partial ;
upgrade version required V2.0 ;
.
.
.
end product ;It does not contain all of the material for the product. Therefore, it can be used only to upgrade a previously installed version of the product.
It can upgrade a full, operating system, or platform product. More than one partial kit can be applied to the same product.
The full product name (the producer-base-product string) must be the same as the product it upgrades.
After installation, the version of the product is changed to the one specified in the partial kit's PDF.
The product can be removed, in which case the managed objects provided by the product's full and partial kits are deleted.
The product can be configured or reconfigured.
Its PDF can contain OPTION and SOFTWARE statements.
Generally, a new version of a product is provided as a full kit instead of a partial kit because a full kit can be used for either an initial installation or for an upgrade of the product. A partial kit is limited to an upgrade path.
A partial kit, however, is usually much smaller in disk block size than its corresponding full kit. For a very large product, this reduction in size may significantly reduce the time it takes to distribute the kit over the network.
product AXPVMS FORTRAN V7.2 partial ;
| The PRODUCT statement identifies this as a partial kit for the FORTRAN product that will upgrade FORTRAN to V7.2 on an OpenVMS Alpha system. |
| The UPGRADE statement (required for a partial kit) specifies that FORTRAN V7.1-1 must be installed before installing this upgrade kit. |
| The GENERATION keyword in this FILE statement is used to supply sequencing information to aid file conflict detection and resolution should a patch kit for this product or another product supply the same file name. |
| The MODULE statement installs the command definition module FORTRAN from the file DEC_FORTCLD.CLD in the default command library [SYSLIB]DCLTABLES.EXE. The file DEC_FORTCLD.CLD is not left on the system because a FILE statement is not used to place it there. (In Example 3.7, ''PDF for a Patch Kit That Modifies the Operating System'' a CLD file is put into DCLTABLES and a copy of the file is left on the target disk.) Note that if this partial kit is installed after the patch kit in Example 3.6, ''PDF for a Patch Kit'', the module FORTRAN from this partial kit will supersede the module FORTRAN from the patch kit because it has the higher generation number. Conversely, if the patch kit is installed after this partial kit, the module will not be updated. Conflict detection between patch kits and between patch and partial kits for the same product is new for OpenVMS Version 7.2. Previously, conflict detection only occurred between full, platform, and operating system products. |
| FORT$IVP.COM already exists on the system disk, provided earlier by the full version of FORTRAN V7.1-1. |
3.5.5. The Patch Kit Type
product AXPVMS TEST_A_ECO1 V1.0 patch ;
apply to AXPVMS TEST_A version minimum A2.0 version maximum V2.0 ;
.
.
.
end product ;It usually does not contain all of the material for the product. Therefore, it can be used only to modify a previously installed version of the product.
It can modify a full, operating system, or platform product. Also, it can modify a product that has been upgraded by a partial kit. More than one patch kit can be applied to the same product.
Its full product name (the producer-base-product string) must be different than the full product name of the product it updates. Further, its full product name must be unique among all products and patches installed on the system.
After installation, the version of the product that it modifies is not changed. Use the
PRODUCT SHOW PRODUCT /FULLcommand to display all patch kits that have been installed on the system.Because it is not a product, you cannot remove a patch kit individually using a
PRODUCT REMOVEcommand. Patches to a product are automatically removed when the product is removed or upgraded. They can also be uninstalled using thePRODUCT UNDO PATCHcommand, but only if they were installed with the/SAVE_RECOVERY_DATAqualifier and the recovery data is intact.The patch kit cannot be configured or reconfigured, but the product that it modifies can be configured or reconfigured.
Its PDF cannot contain OPTION or SOFTWARE statements.
Patch kits are intended for making small updates to a product. Since the installation of a patch kit does not change the version number of the product, you should distribute a new version of the product kit (full, operating system, or platform) or a partial kit to make large updates or functional enhancements.
product AXPVMS FORTECO_03 V1.0 patch ;
| The PRODUCT statement identifies this as V1.0 of a patch kit named FORTECO_03. The name of this kit must be unique among all products and patches applied to the system. |
| The APPLY TO statement (required for a patch kit) specifies that this patch can be applied only to the installed product FORTRAN V7.1-1. |
| The MODULE statement installs the FORTRAN CLD module in the default command library [SYSLIB]DCLTABLES.EXE. The file FORTCLD.CLD is not left on the system because a FILE statement is not used to place it there. (In Example 3.7, ''PDF for a Patch Kit That Modifies the Operating System'' a CLD file is put into DCLTABLES and a copy of the file is left on the target disk.) |
product AXPVMS VMS61TO71U2_PCSI B1.0 patch ;
| The PRODUCT statement identifies this as B1.0 (a field test version) of a patch kit named VMS61TO71U2_PCSI. The name of this kit must be unique among all products and patches applied to the system. |
| The APPLY TO statement (required for a patch kit) specifies that this patch can be applied only to versions V6.1 through V7.1-2 of the VMS product. |
| The double hyphen (–) identifies a comment line. |
| This FILE statement provides [SYSUPD]PCSI.CLD. The following MODULE statement installs the command definition module PRODUCT from this file in the default command library [SYSLIB]DCLTABLES.EXE. A FILE statement is not required to provide the file specified in the MODULE statement unless you want the file left on the system. |
| This REMOVE …END REMOVE group deletes the obsolete file [SYSLIB]PCSI$MOTIFSHR.EXE. |
3.5.6. The Mandatory Update Kit Type
product AXPVMS TEST_A_ECO1 V1.0 mandatory update ;
apply to AXPVMS TEST_A version minimum A2.0 version maximum V2.0 ;
.
.
.
end product ;A mandatory update kit is functionally identical to a patch kit except for its kit type designation. It is used for corrections that must be applied to the product.
The characteristics of a mandatory update kit are the same as for a patch kit, as described in Section 3.5.5, ''The Patch Kit Type''.
3.5.7. The Transition Kit Type
product AXPVMS FMS V2.4 transition ; . . . end product ;
product X86VMS VMS V9.2 transition operating system ; . . . end product ;
It cannot be installed with a
PRODUCT INSTALLcommand; instead, it is registered with aPRODUCT REGISTER PRODUCTcommand.Optionally, it can reference managed objects such as files, directories, modules, and so forth. However, none of these objects is created or modified when the kit is registered, nor does the installation utility verify that any of these objects actually exist on the system.
Files specified in FILE statements do not need to be present when a transition kit is packaged because product material is not included in this type of kit.
The registered product can be removed with the
PRODUCT REMOVEcommand. If the transition kit references any managed objects, these objects will be removed as if the transition kit had been a full kit.The registered product cannot be configured or reconfigured.
The INFER statement can be used only in a PDF for a transition kit.
The product name is displayed with the
PRODUCT SHOW PRODUCTandPRODUCT SHOW HISTORYcommands.Other software products that require this product as a prerequisite can specify it in a SOFTWARE statement and have this software dependency satisfied.
If all of the managed objects for the product are specified in the transition kit, then the product can be completely removed with a
PRODUCT REMOVEcommand.
product AXPVMS FMS V2.4 transition ;
| The TRANSITION keyword to the PRODUCT statement indicates that this is a transition PDF. |
| The INFER VERSION statement tests the execution environment to determine whether the file FDVSHR.EXE is present. If it is, the utility infers the version that is installed. |
| The FILE statement indicates that the [SYSLIB]FDVSHARE.OPT file is part of the FMS kit. |
| The MODULE statements describe object modules in the default object library [SYSLIB]STARLET.OLB that are part of the FMS kit. |
3.5.8. The PCSI$REGISTER_PRODUCT.COM Command Procedure
PRODUCT REGISTER PRODUCT command) is
to execute the SYS$UPDATE:PCSI$REGISTER_PRODUCT.COM command
procedure. This procedure prompts the user to enter product name, version, producer,
and base system information, as shown in the following example:
$ @SYS$UPDATE:PCSI$REGISTER_PRODUCT.COM Product name: FMS Version: V2.6 Producer [VSI] : Base System [X86VMS] : . . . The following product has been registered: X86VMS FMS V2.6 Transition (registration)
Registering a product using the command procedure allows another software product to reference this product with a SOFTWARE statement. However, use of this command procedure does not allow objects (such as files) to be registered along with the product name in the product database.
Chapter 4. Creating the Product Text File
ERROR
INFORMATION
OPTION
PART
PRODUCT
/HELP qualifier on
the PRODUCT INSTALL command line. If you choose to provide only a brief,
one-line prompt for a given text module and the user asks for detailed help text, the brief
prompt is displayed. By providing detailed help text, you can reduce or eliminate hardcopy
installation documentation. Note
option EXAMPLE default YES with helptext;
4.1. PTF File-Naming Conventions
PRODUCT PACKAGE command must: Reside in the same directory as the PDF
Have the same file name as the PDF and a file type of .PCSI$TEXT
TEST.PDF TEST.PCSI$TEXT ABC_CO-AXPVMS-BLACKJACK-V0201-17-1.PCSI$DESC ABC_CO-AXPVMS-BLACKJACK-V0201-17-1.PCSI$TEXT
PRODUCT PACKAGE command transforms the input PTF into
an output PTF. The input PTF is a text file containing header lines and text module
lines. The output PTF is an OpenVMS text library file. Its name consists of the
product's stylized file name and a file type of .PCSI$TLB as
follows:
producer-base-product-version-kittype.PCSI$TLBABC_CO-AXPVMS-BLACKJACK-V0201-17-1.PCSI$TLB
You can convert the output PTF from an OpenVMS library file back to a text file by executing the PCSI$EXTRACT_TLB.COM command procedure, which is located in SYS$COMMON:[SYSUPD]. You must supply the PTF library file as a parameter to the procedure.
4.2. Structure of a PTF
A module header line that identifies the name of the text module
An =prompt directive line that includes text for a brief display
Zero or more lines of text that are combined with the brief text to form the detailed display associated with the text module
The user chooses whether to receive brief or detailed explanations using the
/HELP qualifier on the PRODUCT INSTALL
command.
Brief text format (the default) is restricted to one line of text, that is, the text in the =prompt directive line. To avoid carrying the single-line text over to the next line, try to keep your brief message to no more than 60 characters.
Detailed or help text can include any number of lines of text. The formatting of the information is preserved on output, except that the POLYCENTER Software Installation utility may indent the entire block of text displaying information about configuration options or software requirements.
Comment lines are not permitted in a PTF.
4.2.1. Specifying the Product Name
You must use the =product directive to specify product information in the PTF. The information that you specify with the =product directive must match the information you specify with the PRODUCT statement in the PDF.
=product producer base product version kittypeSee Section 2.3, ''Software Product Kit Naming Conventions'' for the naming conventions.
4.2.2. PTF Modules and the Relationship with the PDF
PTF text modules are text blocks that you want to present to the user. The POLYCENTER Software Installation utility does not process text blocks sequentially, so the order of the text modules in the PTF does not matter.
1 module-name
module-name must be from 1 to 31 ISO
Latin-1 characters, excluding the horizontal tab, space, exclamation point
(!), and comma (,) characters. For example:
1 SAMPLE
option SAMPLE ;
4.2.3. PTF Modules Not Related with the PDF
The 'LICENSE module specifies licensing information.
The 'NOTICE module specifies copyright, ownership, and similar legal information.
The 'PRODUCER module specifies a brief description of the producer of the product.
The 'PRODUCT module specifies a brief functional description of the product.
=product VSI I64VMS TCPIP V6.0-24 full
1 'PRODUCT
=prompt VSI TCP/IP Services for OpenVMS.
1 'NOTICE
=prompt Copyright 2021, 2024 VMS Software, Inc.
Confidential computer software. Valid license from VSI and/or its
subsidiaries required for possession, use, or copying.
Consistent with FAR 12.211 and 12.212, Commercial Computer Software,
Computer Software Documentation, and Technical Data for Commercial
Items are licensed to the U.S. Government under vendor's standard
commercial license.
Neither VSI nor any of its subsidiaries shall be liable for technical
or editorial errors or omissions contained herein. The information
in this document is provided "as is" without warranty of any kind
and is subject to change without notice. The warranties for VSI
products are set forth in the express limited warranty statements
accompanying such products. Nothing herein should be construed as
constituting an additional warranty.
1 'LICENSE
=prompt VSI TCP/IP Services is enabled by the OpenVMS operating system PAK.
TCP/IP Services requires that a valid OpenVMS operating system Product
Authorization Key (PAK) be registered and loaded in order to execute.
1 'PRODUCER
=prompt VMS Software, Inc.
Boston, Massachusetts
1 DCLEMBED
=prompt Applications
The Application component includes the popular user-oriented protocols for
file transfer, remote processing, remote printing and mail: File Transfer
Protocol (FTP), Telnet Protocol (Telnet), Network File Systen (NFS), Serial
Line Interface Protocol (SLIP), Point to Point Protocol (PPP), Berkerley R
commands (rsh,rlogin,rexec and rcp), remote printing, Simple Mail Transfer
Protocol (SMTP), Simple Network Management Protocol (SNMP), Post Office
Protocol (POP3), Domain Name Service (DNS), Network Time Protocol (xNTP),
Dynamic Host Configuration Protocol (DHCP), Secure Shell (SSH), failSAFE IP
and Finger Utility.4.2.4. Including Prompt and Help Text
You can include prompt text in your PTF using the =prompt directive. Prompt text cannot exceed one line of text. (The suggested line length is 60 characters.) Help text is similar to prompt text, except that it can span multiple lines. The help text follows the =prompt line. You can also include blank lines in help text.
=prompt This option provides files for programming support.
=PRODUCT VSI I64VMS APACHEWS V2.4-59 Full 1 'PRODUCER =prompt VMS Software Inc. & The Apache Software Foundation. The Apache Web Server for OpenVMS is supplied by VMS Software Inc., based on the open source distributed by the Apache Software foundation. 1 NO_MIN_VMS =prompt Minimum OpenVMS software version not found on this system, abort installation This kit requires a minimum OpenVMS software version of V8.4-1H1. 1 NO_ODS5_DISKS =prompt ODS-5 disk(s) not found on this system, abort installation This kit requires an ODS-5 disk to be correctly installed in this system. 1 RELEASE_NOTES =prompt Release notes are available in SYS$HELP:APACHEWS_2_4_59.release_notes. VMS Software Inc. highly recommends that you read these release notes.
Chapter 5. Packaging the Kit
Use the PRODUCT PACKAGE command to create a software product kit. This
operation uses a product description file (PDF), an optional product text file (PTF), and
product material files as input to produce a software product kit in either sequential or
reference format.
The syntax of the PRODUCT PACKAGE command is documented in the
VSI OpenVMS System Management Utilities Reference Manual.
Sequential copy is an optional form your product takes as a result of a package operation. It consists of a set of container files that can be placed on a sequential-access device (for example, a magnetic tape drive). The POLYCENTER Software Installation utility converts the product to reference format during an installation.
Note
If you are creating a reference copy, do not use the same directory as the source for your product material and the destination for the reference copy.
5.1. Creating Reference and Sequential Copies
This chapter shows you how to create a product kit in sequential format from
product materials that are spread across several directories. A game application named
CHESS is used throughout this chapter to illustrate the steps required to package the
kit. You will also be introduced to the PRODUCT LIST,
PRODUCT EXTRACT, and PRODUCT COPY commands,
which are useful for manipulating the product kit.
$ DIRECTORY /COLUMN=1 /NOTRAILING DKA300:[TEST.*] Directory DKA300:[TEST.COM] CHECK_SPACE.COM;1 CHESS_IVP.COM;1 Directory DKA300:[TEST.KIT] CHESS.PCSI$DESC;1 CHESS.PCSI$TEXT;1 PACKAGE.COM;1 Directory DKA300:[TEST.LIS] CHESS.LIS;1 Directory DKA300:[TEST.OBJ] CHESS.EXE;1 CHESS.OBJ;1 Directory DKA300:[TEST.SRC] CHESS.C;1 CHESS.GAMES;1 CHESS.OPENINGS;1 HEADER.H;1
5.2. Description of the Product Material
The product material for the CHESS application consists of the files that will be installed on the user's system along with any command procedures included in the kit to perform product-specific tasks during installation.
An executable image named CHESS.EXE is located in [TEST.OBJ]. It will be placed in [SYSEXE] on the target disk when the product is installed.
Two data files, CHESS.OPENINGS and CHESS.GAMES, reside in [TEST.SRC]. The first file, an opening book, will always be copied to [SYSEXE] on the user's system. However, the second file, a large games collection, is an optional component of the product. Users determine at install time whether or not to install this file. If they choose not to install it, they can later reconfigure the product to obtain this optional file.
Two command procedures, CHESS_IVP.COM and CHECK_SPACE.COM, are placed in [TEST.COM]. CHESS_IVP.COM will be copied to [SYSTEST] on the destination device and executed to verify the correct installation of the product. CHECK_SPACE.COM will be executed early during the installation but it will not be left on the user's system. It checks for adequate space on the destination device for large work files that will be used when the product is used.
$ TYPE [TEST.COM]*.* DKA300:[TEST.COM]CHECK_SPACE.COM;1 $! This command procedure is executed from an EXECUTE PRECONFIGURE statement $! with the INTERACTIVE keyword specified. Therefore, all output lines $! generated will be displayed. $! $ write sys$output "*** Output from execute preconfigure ***" $ exit 1 DKA300:[TEST.COM]CHESS_IVP.COM;1 $! This command procedure is executed from an EXECUTE TEST statement without $! the INTERACTIVE keyword specified. Therefore, only output lines that $! look like an OpenVMS message (that is, those starting with %) will be $! displayed. By default, all other output from this $! procedure will be suppressed unless the /TRACE qualifier is used on the $! PRODUCT INSTALL command. For testing purposes you can force a line $! of text to be displayed by putting a percent sign in column 1. $! $ write sys$output "%%% Output from execute test %%%" $ exit 1
5.3. Files Required to Package the Kit
CHESS.PCSI$DESC, the product description file
CHESS.PCSI$TEXT, the product text file
PACKAGE.COM, as a convenience
A specific directory — Only one directory is searched.
A root directory — A period (.) following the directory name denotes a root directory specification. For example, TEST$:[ABC.FT2.] limits the search path to subdirectories of [ABC.FT2].
A wildcard directory — The directory name includes one or more of the wildcard characters; asterisk (*), percent sign (%), or ellipsis (...). All directories that satisfy the wildcard specification are searched.
Note that when you use either a wildcard directory or a list of path names, if files in different directories have the same name, only the first file found in the search path is used.
When either a specific directory or a wildcard directory is used, the relative file specification on the file statement in the PDF is not used to locate the file. However, when a root directory is used, the utility appends the relative file specification from the file statement in the PDF to the root directory in the material search path to locate files.
PACKAGE.COM has been created to simplify the task of entering the
PRODUCT PACKAGEcommand with the appropriate qualifiers.The content of the packaging files for the CHESS product might be similar to the following:$ TYPE [TEST.KIT]*.* DKA300:[TEST.KIT]CHESS.PCSI$DESC;1 product ABC_CO AXPVMS CHESS V1.0 full ; execute preconfigure "@pcsi$source:[000000]check_space.com" uses [000000]check_space.com interactive ; file [sysexe]chess.exe ; file [sysexe]chess.openings ; option master_games ; file [sysexe]chess.games ; end option ; file [systest]chess_ivp.com ; execute test "@pcsi$destination:[systest]chess_ivp.com" ; end product ; DKA300:[TEST.KIT]CHESS.PCSI$TEXT;1 =product abc_co axpvms chess v1.0 full 1 'PRODUCT =prompt ABC Company's Chess for OpenVMS Alpha Chess V1.0 provides a chess playing engine with 50 selectable user levels (rated playing strength from 1200 to 2450), a graphical interface with 2D and 3D boards, an extensive database of openings, plus thousands of complete master games, and three modes of operation: play, analyze, and tutorial. 1 MASTER_GAMES =prompt Do you want the database of master games? Answer YES to install a database containing 16000 complete games played by GMs and IMs (25000 blocks). Your choice does not affect the quality or size of the opening database which s always installed in its entirety. DKA300:[TEST.KIT]PACKAGE.COM;1 $! This command file packages product CHESS into a sequential format kit. $! $! Note that by default the package command searches for the input PDF and $! input PTF in the source directory using file name and type of: $! <producer-base-product-version-edit-type> .pcsi$desc (for PDF) [1] $! <producer-base-product-version-edit-type> .pcsi$text (for PTF) $! For example: $! abc_co-axpvms-chess-v0100–1.pcsi$desc $! abc_co-axpvms-chess-v0100–1.pcsi$text $! $! You can override this default by specifying the file name of the PDF and $! PTF (and optionally the file type of the PDF) in the /source qualifier $! (for example, /source=dev:[dir]chess.pdf). The file type of the PTF, however, $! must be .pcsi$text. The approach used in this command procedure is $! to specify the file name of the PDF and PTF in the /source qualifier and $! let the file types be defaulted. For example, /source=dev:[dir]chess $! causes the package command to search for input PDF and input PTF named: $! chess.pcsi$desc $! chess.pcsi$text $! $! [1] For OpenVMS V6.1-V7.1, the default input PDF file type was $! .pcsi$description (the same as the output PDF), but beginning with $! OpenVMS V7.1-2, the utility looks for .pcsi$desc; if not found it $! then searches for .pcsi$description. $! $ product package chess - /base=axpvms - /producer=abc_co - /source=dka300:[test.kit]chess - ! where to find PDF and PTF /destination=dka300:[test.kit] - ! where to put .PCSI file /material=dka300:[test.*] - ! where to find product material /format=sequential $ exit$ TYPE [TEST.COM]*.* DKA300:[TEST.COM]CHECK_SPACE.COM;1 $! This command procedure is executed from an EXECUTE PRECONFIGURE statement $! with the INTERACTIVE keyword specified. Therefore, all output lines $! generated will be displayed. $! $ write sys$output "*** Output from execute preconfigure ***" $ exit 1 DKA300:[TEST.COM]CHESS_IVP.COM;1 $! This command procedure is executed from an EXECUTE TEST statement without $! the INTERACTIVE keyword specified. Therefore, only output lines that $! look like an OpenVMS message (i.e., those starting with %) will be $! displayed. By default, all other output from this $! procedure will be suppressed unless the /TRACE qualifier is used on the $! PRODUCT INSTALL command. For testing purposes you can force a line $! of text to be displayed by putting a percent sign in column 1. $! $ write sys$output "%%% Output from execute test %%%" $ exit 1
5.4. Creating the Product Kit
PRODUCT PACKAGE
command (via a command procedure listed in Section 5.3, ''Files Required to Package the Kit'') to
create the product kit in sequential format. The full kit name for CHESS V1.0 produced
by ABC_CO to run on OpenVMS Alpha is
ABC_CO-AXPVMS-CHESS-V0100–1.PCSI.$ SET DEFAULT [TEST.KIT] $ @PACKAGE.COM The following product has been selected: ABC_CO AXPVMS CHESS V1.0 Layered Product Do you want to continue? [YES] The following product will be packaged: ABC_CO AXPVMS CHESS V1.0 Portion done: 0%...100% The following product has been packaged: ABC_CO AXPVMS CHESS V1.0 Layered Product $ DIRECTORY /COLUMN=1 /NOTRAILING Directory DKA300:[TEST.KIT] ABC_CO-AXPVMS-CHESS-V0100–1.PCSI;1 CHESS.PCSI$DESC;1 CHESS.PCSI$TEXT;1 PACKAGE.COM;1
5.5. Listing the Contents of the Product Kit
PRODUCT LIST command. In the following example, note: During the packaging operation, the input PTF has been converted to a text library file with a file type of .PCSI$TLB.
The input PDF with a file type of .PCSI$DESC has been packaged as an output PDF with a file type of .PCSI$DESCRIPTION.
During the packaging operation, the output PDF has the same format as the input PDF, but comments have been removed and additional information such as file size has been added to the file.
$ PRODUCT LIST CHESS The following product has been selected: ABC_CO AXPVMS CHESS V1.0 Layered Product Do you want to continue? [YES] Product kit in sequential format: _KRYSYS$DKA300:[TEST.KIT]ABC_CO-AXPVMS-CHESS-V0100–1.PCSI -------------------------------------------------------- CONTENTS OF KIT USING RELATIVE FILE SPECIFICATION -------------------------------------------------------- [000000]ABC_CO-AXPVMS-CHESS-V0100–1.PCSI$TLB [000000]CHECK_SPACE.COM [SYSEXE]CHESS.EXE [SYSEXE]CHESS.GAMES [SYSEXE]CHESS.OPENINGS [SYSTEST]CHESS_IVP.COM [000000]ABC_CO-AXPVMS-CHESS-V0100–1.PCSI$DESCRIPTION --------------------------------------------------------
/FULL qualifier
with the PRODUCT LIST command. The expanded output lists the
following: The size of most files.
Certain files, such as the PDF, PTF, temporary command procedures, and files created at install time with an ASSEMBLE USES option, will not have a file size listed.
Additional information on certain files in a comments field.
Note
Prior to OpenVMS Version 7.3, the PRODUCT LIST command did
not list files in the kit that were associated with the USES or ASSEMBLE USES
option.
5.6. Extracting Files from the Kit
You can extract one or more files from a product kit using the PRODUCT
EXTRACT and PRODUCT COPY commands. The PRODUCT
EXTRACT command is often used with the PRODUCT LIST
command to identify a file or a set of files to extract.
5.6.1. Extracting Files by Name
PRODUCT EXTRACT FILE command, you can obtain a single
file by name or a set of files with a wildcard file specification from a product
kit. For example: $ PRODUCT EXTRACT FILE CHESS /SELECT=*.EXE /LOG The following product has been selected: ABC_CO AXPVMS CHESS V1.0 Layered Product Do you want to continue? [YES] Portion done: 0% %PCSI-I-CREFIL, created DISK$WORK7:[TEST.KIT.][000000]CHESS.EXE;1 Portion done: 100% %PCSIUI-I-SUCEXTRFIL, EXTRACT FILE operation completed successfully
5.6.2. Extracting the PDF, PTF, or Release Notes
EXTRACT commands: PRODUCT EXTRACT PDFPRODUCT EXTRACT PTFPRODUCT EXTRACT RELEASE_NOTES
Every product kit contains a PDF. A PTF and a file designated as the release notes are optionally present in a kit.
$ SET DEFAULT [TEST.KIT] $ PRODUCT EXTRACT PDF CHESS /DESTINATION=[TEMP] /LOG The following product has been selected: ABC_CO AXPVMS CHESS V1.0 Layered Product Do you want to continue? [YES] Portion done: 0% %PCSI-I-CREFIL, created DISK$WORK7:[TEMP.][000000]ABC_CO-AXPVMS-CHESS-V0100–1.PCSI$DESCRIPTION;1 Portion done: 100% Product Description File has been extracted from the following product: ABC_CO AXPVMS CHESS V1.0 Layered Product %PCSIUI-I-SUCEXTRPDF, EXTRACT PDF operation completed successfully
The output form of the PTF as a text library file
A recreation of the input form of the PTF as a sequential text file
$ PRODUCT EXTRACT PTF CHESS /LOG The following product has been selected: ABC_CO AXPVMS CHESS V1.0 Layered Product Do you want to continue? [YES] Portion done: 0% %PCSI-I-CREFIL, created DISK$WORK7:[TEST.KIT.][000000]ABC_CO-AXPVMS-CHESS-V0100–1.PCSI$TLB;1 %PCSI-I-CREFIL, created DISK$WORK7:[TEST.KIT.][000000]ABC_CO-AXPVMS-CHESS-V0100–1.PCSI$TEXT;1 Portion done: 100% Product Text File has been extracted from the following product: ABC_CO AXPVMS CHESS V1.0 Layered Product %PCSIUI-I-SUCEXTRPTF, EXTRACT PTF operation completed successfully
PRODUCT EXTRACT RELEASE_NOTES command to examine any
release notes file that may be present in the kit. This command always places the
release notes in the user's default directory. By default, the name of the release
notes file is preserved. $ SET DEFAULT [TEMP] $ PRODUCT EXTRACT RELEASE_NOTES CHESS /SOURCE=[TEST.KIT] The following product has been selected: ABC_CO AXPVMS CHESS V1.0 Layered Product Do you want to continue? [YES] Portion done: 0%...100%
5.6.3. Converting a Sequential Kit into Reference Format
You can use the PRODUCT COPY command to extract files from a
kit in sequential format and place them in reference format. This differs in a
number of ways from extracting all files from a sequential kit into a specific
directory using the PRODUCT EXTRACT FILE command. When copying a
kit into reference format, the files are placed in a directory tree as they would
appear after installation on the user's system. Unlike the installation of a
sequential kit, however, temporary files from the kit are placed in the directory
tree and files pertaining to all options are extracted.
You can also use the PRODUCT COPY command to convert a
reference kit into sequential format, and for copying a kit while preserving its
format.
5.6.4. Converting a Sequential Kit into Compressed Format
PRODUCT COPY command to convert a sequential
kit into compressed format. The following example illustrates this technique:
$ PRODUCT COPY CHESS /SOURCE=[TEST.KIT] -
/DESTINATION=[TEST.KIT] /FORMAT=COMPRESSEDThe /SOURCE qualifier points to the location of the sequential
kit you want to convert to the compressed format. The
/DESTINATION= qualifier points to the location where the
newly-created compressed kit will reside.
5.7. Displaying Information from the Product Database
PRODUCT SHOW
PRODUCT command to list the products installed on the system. Use the
/FULL qualifier for additional information about software
references and patches that may have been applied to the products. Additional commands
(not shown here) that are useful for obtaining more information about installed products
are the PRODUCT SHOW HISTORY /FULL, PRODUCT SHOW OBJECT
/FULL, and PRODUCT SHOW RECOVERY_DATA commands.
$ PRODUCT INSTALL CHESS ! /LOG and /TRACE are useful for debugging . . . $ PRODUCT SHOW PRODUCT ----------------------------------- ----------- ------------ PRODUCT KIT TYPE STATE ----------------------------------- ----------- ------------ ABC_CO AXPVMS CHESS V1.0 Full LP Installed VSI AXPVMS DECNET_PHASE_IV V7.1 Full LP Installed VSI AXPVMS DWMOTIF V1.2-4 Full LP Installed VSI AXPVMS VMS V7.1 Transition Installed ----------------------------------- ----------- ------------ 4 items found
Chapter 6. Advanced Topics
Using command procedures
Testing and debugging
In addition, it presents flow diagrams depicting the execution of several
PRODUCT commands.
6.1. Using Command Procedures in PDL Statements
The Product Description Language (PDL) provides statements that perform common kit installation tasks such as creating directories, copying files to the target disk, updating libraries, displaying informational messages, and so on. There are times, however, when you might need to perform tasks that are unique to your product. For example, a new version of a product might need to detect the existence of a data file from a previous version and convert it to a new format. Or, you might want to probe the operating environment or ask the user specific questions before an installation may proceed.
EXECUTE ABORT
Runs error recovery commands just before the utility exits when an error condition causes the operation to terminate. For example, the following will activate the EXECUTE ABORT statement:An error or fatal error condition that results from running commands from an EXECUTE statement (except EXECUTE TEST and EXECUTE REBOOT).
The user terminates the operation by pressing Ctrl/Y or Ctrl/C.
After an error is reported during material placement on the target disk, the user answers
YESto the question "Do you want to terminate?".
EXECUTE INSTALL …REMOVE
Runs commands during the execution phase when changes are made to the target disk (such as creating directories and moving files).The INSTALL portion is performed during an installation, upgrade, or reconfiguration of the product after product material has been moved from the kit to the target disk.
The REMOVE portion is performed during removal of the product before any files are deleted from the target disk.
EXECUTE LOGIN
Does not run any commands. It only displays a predefined message telling users to update their LOGIN.COM file with the specified commands.
EXECUTE POSTINSTALL
Runs commands that perform additional tasks at the end of the execution phase of an installation, upgrade, or reconfiguration of the product.
EXECUTE POST_UNDO
Runs commands that perform additional tasks at the end of a patch kit removal in the UNDO PATCH operation.
EXECUTE PRECONFIGURE
Runs commands after the user has selected the product for installation, upgrade, or reconfiguration, but before the utility begins the configuration phase where the user is asked to select options for the product. If you need to run a command procedure in preparation for installing your product, consider using an EXECUTE PRECONFIGURE statement. This lets you embed preconfiguration work in the kit and relieves users of performing this task themselves.
EXECUTE PRE_UNDO
Runs commands that perform additional tasks at the beginning of a patch kit removal in the
UNDO PATCHoperation.EXECUTE REBOOT
Runs commands that initiate a system reboot at the conclusion of a
PRODUCT INSTALLorPRODUCT RECONFIGUREoperation.EXECUTE START …STOP
Runs commands during the execution phase.The START commands are executed during an installation or upgrade. In addition, a predefined message is displayed telling the user to add these commands to their SYSTARTUP_VMS.COM file.
The STOP commands are executed when the product is removed or upgraded. In addition, a predefined message is displayed telling the user to add these commands to their SYSHUTDWN.COM file whenever the product is installed, upgraded, or reconfigured.
EXECUTE TEST
Runs an installation verification procedure (or functional test of the product) after the installation has completed. Prior to running the test, the product database is updated and closed. The user can prevent the running of the installation verification procedure by specifying the
/NOTESTqualifier with thePRODUCT INSTALLcommand.EXECUTE UPGRADE
Runs commands when the product is upgraded by another version of the product. Commands are run before product material from the previously installed version of the product is deleted.
ASSEMBLE EXECUTE option of a FILE statement
Runs commands that create the specified file in a scratch directory at execution time, then copies the file to the target disk. This replaces the usual process of extracting a packaged copy of the file from the kit. A typical use of the ASSEMBLE EXECUTE option is to dynamically link an image at installation time.
| PDL Statements Listed in the Order of Execution | PRODUCT INSTALL 1st Time | PRODUCT INSTALL Upgrade | PRODUCT RECON FIGURE | PRODUCT REMOVE | PRODUCT UNDO PATCH |
|---|---|---|---|---|---|
| EXECUTE PRECONFIGURE | yes | yes | yes | no | no |
| EXECUTE …STOP | no |
yes? | no | yes | no |
| EXECUTE …REMOVE | no | no | no | yes | no |
| EXECUTE UPGRADE | no |
yes? | no | no | no |
| FILE statement using ASSEMBLE EXECUTE | yes | yes | yes? | no | no |
| EXECUTE INSTALL … | yes | yes | yes | no | no |
| EXECUTE START … | yes | yes | no | no | no |
| EXECUTE POSTINSTALL | yes | yes | yes | no | no |
| EXECUTE TEST | yes | yes | yes | no | no |
| EXECUTE LOGIN | no? | no? | no? | no | no |
| EXECUTE START…STOP | no? | no? | no? | no | no |
| EXECUTE ABORT | yes? | yes? | yes? | no | no |
| EXECUTE REBOOT | yes? | yes? | yes? | no | no |
| EXECUTE PRE_UNDO | no | no | no | no | yes |
| EXECUTE POST_UNDO | no | no | no | no | yes |
6.1.1. Noninteractive and Interactive Mode
The type of subprocess used to run your command procedures (or individual DCL commands)
How a command procedure interacts with the user
execute postinstall "@PCSI$DESTINATION:[SYSUPD]CONFIGURE.COM" interactive ;
In both noninteractive and interactive modes, the utility checks the final exit status of a command procedure (or individual DCL command) to determine whether or not the EXECUTE statement completed successfully or failed. Although error messages generated by a command procedure are displayed to the user, this does not determine its success or failure. The utility bases this decision solely on the final exit status. It is the kit developer's responsibility to ensure that proper status is conveyed to the utility upon termination of any command procedure incorporated into the kit.
|
Noninteractive Mode (default) |
Interactive Mode |
|---|---|
|
Used when you do not specify the INTERACTIVE option |
Used when you specify the INTERACTIVE option |
|
At the start of processing a |
The utility creates a new subprocess using the LIB$SPAWN run-time library routine for each EXECUTE statement whose commands are to run interactively. All the commands specified for the same EXECUTE statement are performed, then the subprocess is terminated. |
|
Interaction with the user is not possible. The utility communicates with the subprocess through mailboxes. It filters all output from the subprocess, only displaying lines of output to the user that resemble error messages (that is, lines beginning with a percent sign). All other lines of output are discarded. |
Communication with the subprocess is performed through the user's terminal connection. The utility does not monitor input to or output from the subprocess. This enables a command procedure to enter into a dialog with the user (that is, display text and solicit responses from the user). |
|
The utility obtains exit status from the value of the
$STATUS symbol received in
response to a |
Exit status is obtained from the final status value returned from the LIB$SPAWN routine (the value of the $STATUS symbol from the last DCL command executed). Since a new subprocess is created for the execution of each command procedure (or individual DCL commands) you specify, the same level of status checking is performed for interactive mode as is done for noninteractive mode, although the technique is different. |
6.1.2. Packaging a Command Procedure
With a separate FILE statement
For most EXECUTE statements, you can specify a command procedure in a FILE statement. For example:file [SYSUPD]EXEC_PREC.COM; execute install "@PCSI$DESTINATION:[SYSUPD]EXEC_PREC.COM";
This causes the utility to copy the command procedure to the target disk and execute it from there. The command procedure remains on the target disk.
The technique of using a FILE statement cannot be used for the EXECUTE PRECONFIGURE statement because EXECUTE PRECONFIGURE is processed before files are copied to the target disk.
With the USES option
For most EXECUTE statements, you can specify a command procedure with the USES option (instead of using a FILE statement). For example:execute install "@PCSI$SOURCE:[000000]EXEC_PREC.COM" uses [000000]EXEC_PREC.COM;
In this case, the utility extracts the command procedure from the kit and places it in a temporary directory (pointed to by the logical name PCSI$SOURCE) where it is executed. Afterwards, the command procedure is automatically deleted.
The USES option also lets you list additional files needed by the command procedure. For example, if you link an image during the installation, you can use the USES option to package required object files for the link operation. They are also placed in the temporary directory and deleted after the statement is processed.
Do not use a FILE statement and the USES option to specify the same file. Specifying both results in the file being packaged twice in the kit.
The USES option is not available for EXECUTE statements that are run when the product is removed (because the product kit is not referenced).
Do not use the USES option when the customer may run the command procedure at a later time (for example, a startup command procedure).
The only exception to these rules are the EXECUTE PRE_UNDO and EXECUTE POST_UNDO statements, which require the USES option even though the commands are not run during the product installation.
6.1.3. Logical Names for Subprocess Environments
PCSI$SOURCE
PCSI$DESTINATION
PCSI$SCRATCH
Command procedures use these logical names in the context of the subprocess in which they are run. The logical name environment differs depending on the EXECUTE statement being used. For more information, see the descriptions for individual EXECUTE statements in Chapter 7, "Product Description Language Statements".
6.1.4. EXECUTE Statement Summary
Figure 6.1, ''EXECUTE Statement Summary'' lists the EXECUTE statements and summarizes information about them.
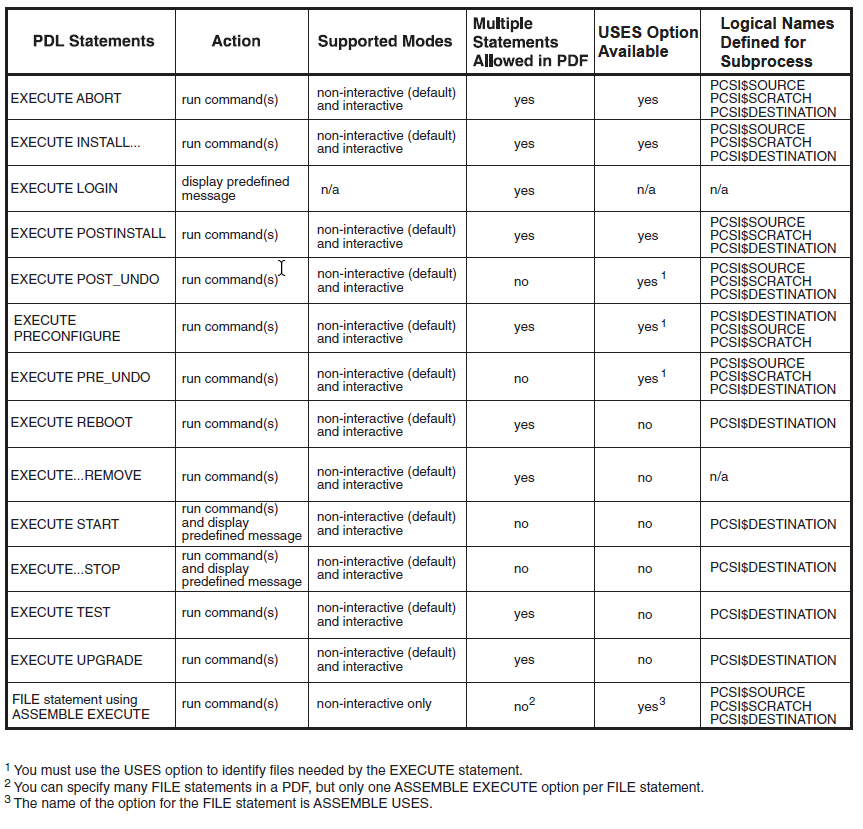 |
6.1.5. Processing EXECUTE Statements
This section provides flow diagrams for the PRODUCT INSTALL,
PRODUCT RECONFIGURE, and PRODUCT REMOVE
commands. There is a separate diagram for a first time installation of a product and
for an upgrade of a product.
These diagrams illustrate the processing of EXECUTE statements in relation to events that occur during the major phases of an operation. Shaded boxes show typical output from these commands to help establish the timeline of events.
Configuration
Execution
Postprocessing
In contrast, the remove operation has only an execution phase. Following are brief descriptions of the major phases of an operation.
Configuration Phase
During the configuration phase, the user selects any options the product might provide and answers any questions that might be asked to complete the configuration process. Informational messages from the kit may be displayed at this time.
Execution Phase
During the execution phase, in a new installation, upgrade, or reconfiguration operation, the utility analyzes managed objects supplied by the product for conflicts. The utility uses generation information to resolve these conflicts. Any conflicts that cannot be resolved cause the utility to terminate the operation. In a remove operation, the utility does not perform any conflict detection or conflict resolution.
For all operations, the next step in the execution phase is to place the objects from all participating products in execution order. The utility merges the requirements of all affected products to produce a sequenced list of actions to perform. Note that the order in which the utility performs installation tasks might not correspond to the order in which PDL statements appear in the PDF, even when only one product is participating in an operation.
Finally, the utility modifies the target disk according to the execution order of the objects. Directories are created as required. The utility moves files to their destination directories as new or replacement files and merges library modules into existing libraries. When all actions have been successfully completed, the utility updates the SYS$SYSTEM:*.PCSI$DATABASE files that make up the product database. During the execution phase, in a new installation, upgrade, or reconfiguration operation, the utility analyzes managed objects supplied by the product for conflicts. The utility uses generation information to resolve these conflicts. Any conflicts that cannot be resolved cause the utility to terminate the operation. In a remove operation, the utility does not perform any conflict detection or conflict resolution.
For all operations, the next step in the execution phase is to place the objects from all participating products in execution order. The utility merges the requirements of all affected products to produce a sequenced list of actions to perform. Note that the order in which the utility performs installation tasks might not correspond to the order in which PDL statements appear in the PDF, even when only one product is participating in an operation.
Finally, the utility modifies the target disk according to the execution order of the objects. Directories are created as required. The utility moves files to their destination directories as new or replacement files and merges library modules into existing libraries. When all actions have been successfully completed, the utility updates the SYS$SYSTEM:*.PCSI$DATABASE files that make up the product database.
Postprocessing Phase
During the postprocessing phase, actions such as running a functional test of the product or displaying informational messages to the user are performed. Since the postprocessing phase occurs after the installation or reconfiguration operation has completed and the product database has been updated on disk, any errors that might occur during this phase (such as failure of the functional test) do not affect the state of the product. Also, any error that occurs during the postprocessing phase will not trigger an EXECUTE ABORT statement.
 |
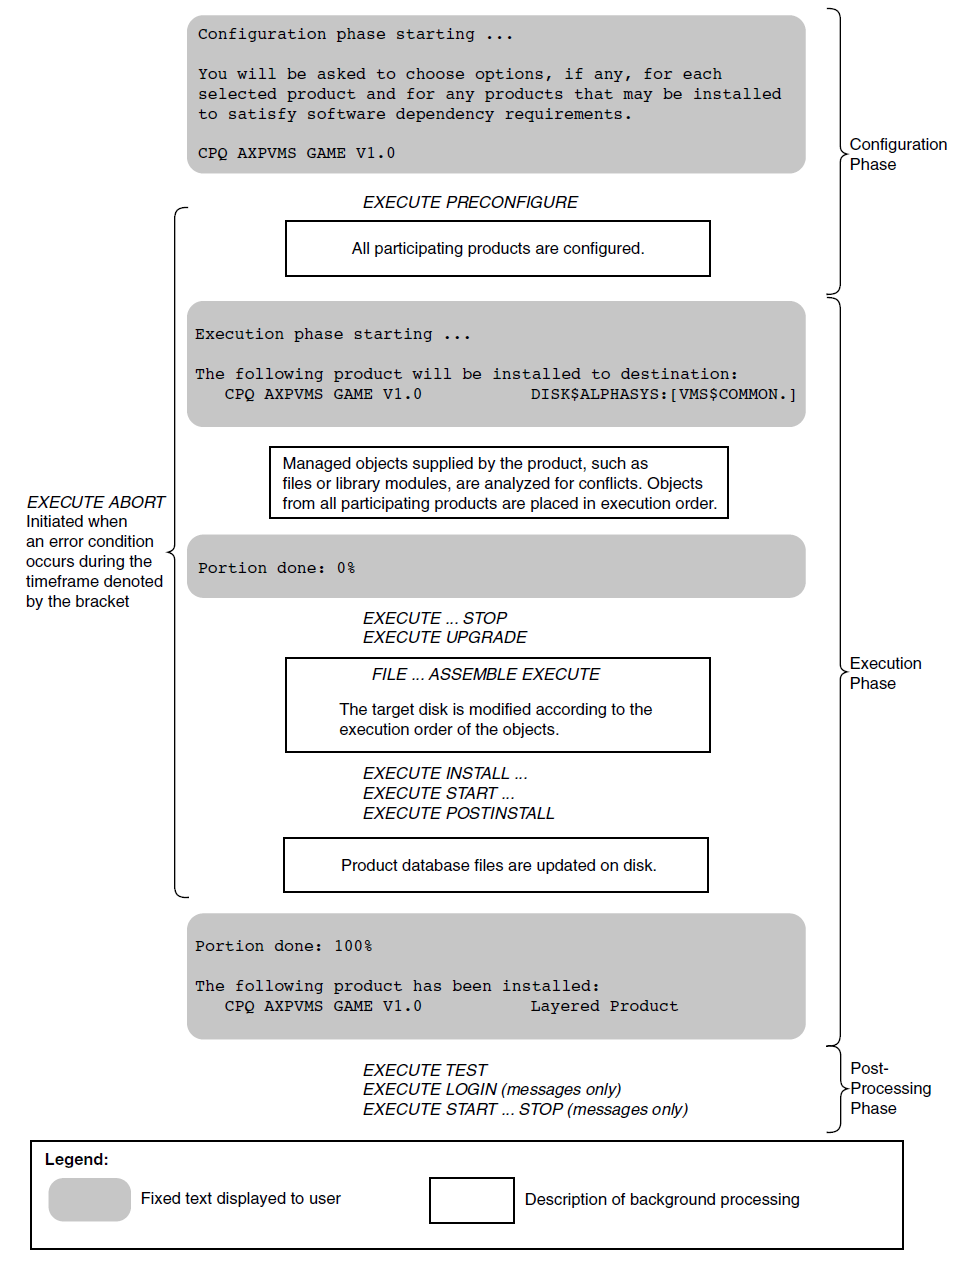 |
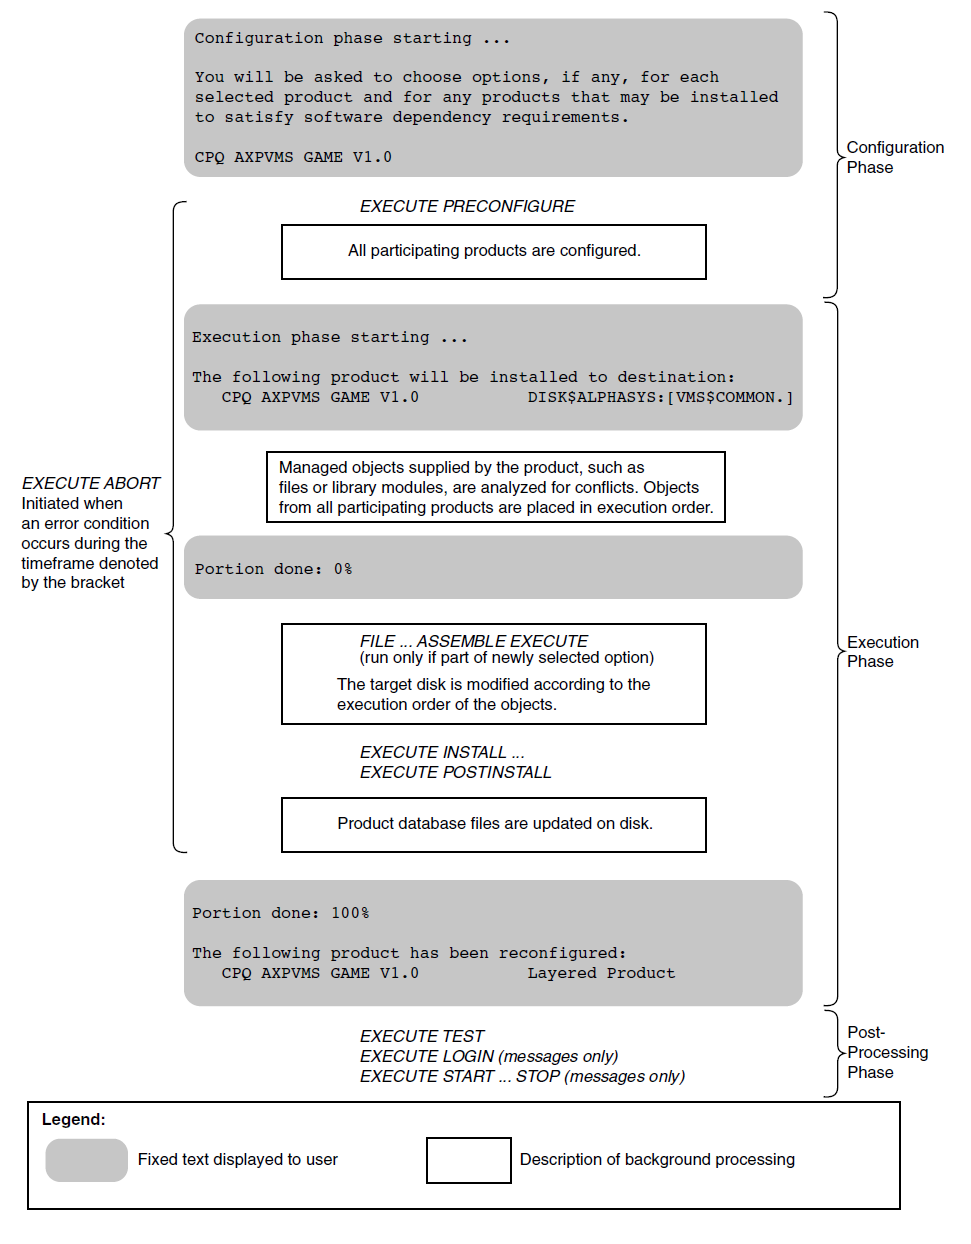 |
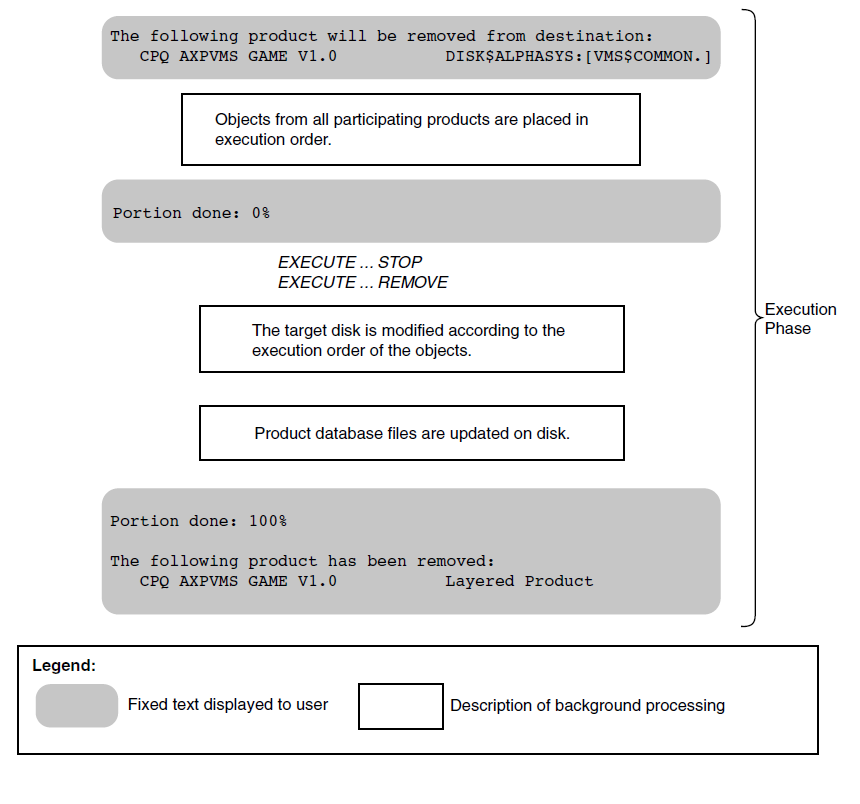 |
6.2. Forcing Operation Termination from A Command Procedure
There may be times when the command procedure you have included in your PDF determines
during execution that the product processing environment is inadequate and cannot
successfully complete the operation. In this case, you may want to abort the execution.
You may do this by exiting your command procedure with the status code
%X053D9301.
This status code is intercepted by the installation utility and gracefully and cleanly aborts the operation. It is recommended that you include an appropriate message explaining why the operation is being terminated in your command procedure.
This status code is recommended for procedures run with the EXECUTE PRECONFIGURE and
EXECUTE PRE_UNDO statements. It may also be successfully used with the EXECUTE INSTALL,
EXECUTE POSTINSTALL, EXECUTE START, and EXECUTE UPGRADE statements, but it is important
the operation is run with the /RECOVERY_MODE qualifier. The abort
code is ignored by the installation utility when used in the command procedure run with
the EXECUTE TEST statement.
6.3. Testing and Debugging Tips
/LOGqualifier/TRACEqualifier/DEBUG=CONFLICTqualifier
6.3.1. The /LOG Qualifier
/LOG qualifier for the PRODUCT INSTALL,
PRODUCT RECONFIGURE, PRODUCT REMOVE, and
PRODUCT UNDO PATCH commands causes an informational message
to be displayed whenever a file is created, modified, or deleted on the destination
disk. Using this qualifier, you can verify that product material from your kit has
been placed in the proper directories, and that files have been correctly deleted,
modified, or renamed. The information logged includes: Creation and deletion of directories
Creation, deletion, and renaming of files
Insertion and removal of modules from libraries
File conflict detection and resolution when two or more products provide the same file (or two or more patches for a product provide the same file)
Module conflict detection and resolution when two or more products provide the same module (or two or more patches for a product provide the same module)
Use the /LOG qualifier with the PRODUCT
PACKAGE, PRODUCT COPY, and PRODUCT
EXTRACT commands to list the files being processed.
6.3.2. The /TRACE Qualifier
The /TRACE qualifier for the PRODUCT
INSTALL, PRODUCT RECONFIGURE, PRODUCT
REMOVE, and PRODUCT UNDO PATCH commands is used to
display information about the execution of DCL commands run in the context of a
subprocess during the processing of the PRODUCT command.
In an interactive subprocess created by LIB$SPAWN where input and output is directed to the user's terminal.
In a noninteractive subprocess created by SYS$CREPRC where input and output is performed through mailboxes under the control and monitoring of the POLYCENTER Software Installation utility.
In addition, the utility performs certain actions (such as library updates) by sending commands to a noninteractive subprocess. See Section 6.1, ''Using Command Procedures in PDL Statements'' for more information about interactive and noninteractive modes of execution.
For interactive mode, the /TRACE qualifier logs the creation
and deletion of the subprocess used to run the command, identifies the command line
being executed, and displays the final exit status of the subprocess. Any output
that DCL produces is displayed with or without the use of
/TRACE.
For noninteractive mode, the /TRACE qualifier logs the creation
and deletion of the subprocess used to run commands, identifies commands the utility
sends to the subprocess to set up the environment, identifies commands sent from the
EXECUTE statement, and displays the completion code of each command processed. It
also directs the utility to send all mailbox output to the user's terminal.
/TRACE qualifier directs the utility to
display all output from the subprocess. This allows you to use SET
VERIFY in command procedures that are run in noninteractive mode to
have their commands echoed as they are executed. Also, you can insert WRITE
SYS$OUTPUT commands to provide additional information for debugging.
Specifically, the /TRACE qualifier does the following to log
input and output for noninteractive mode: Identifies input to the subprocess by prefacing lines with the message: "
%PCSI-I-PRCINPUT, input to subprocess follows …"Lists each command sent to the subprocess, including the definition of logical names for the subprocess environment such as PCSI$SCRATCH.
Lists each command you specify in EXECUTE statements as it is sent to the subprocess.
Identifies output from the subprocess by prefacing lines with the message: "
%PCSI-I-PRCOUTPUT, output from subprocess follows …"Displays all output from DCL commands as they are executed, including status messages that are normally suppressed in noninteractive mode.
Displays the output from the
SHOW SYMBOL $STATUScommand that is sent to the subprocess to obtain final exit status from a command procedure; this value determines the success or failure of the execute statement.
6.3.3. The /DEBUG=CONFLICT Qualifier
/DEBUG=CONFLICT qualifier with the
/LOG qualifier to obtain detailed information on file and
module conflict resolution. You can use the /DEBUG=CONFLICT
qualifier with the PRODUCT INSTALL and PRODUCT
RECONFIGURE commands. With this qualifier you can see: The generation numbers used in the comparison
Whether the object is retained or replaced and the name of the product that supplies the object
Note
If neither product uses a generation number attribute and an interproduct conflict occurs, the utility will not be able to resolve the conflict and the installation will terminate.
For intraproduct conflict, you need only coordinate the use of generation numbers by your full, partial, and patch kits so that your customers can apply updates to the product in any order. For example, if you do not use generation numbers in your patch kits for objects, then the objects from the current patch kit will supersede the others. To avoid having the order of patch kit installation affect the final results, we recommend that you always assign generation numbers to files and modules provided by patch kits.
6.3.4. Installing Your Product on Older Versions of OpenVMS
The POLYCENTER Software Installation utility has evolved since it was first released with OpenVMS V6.1. New PDL statements and options have been added in subsequent releases and are summarized in Appendix B, "Product Description Language Evolution". While backward compatibility is a strong goal, occasionally software corrections and improvements in internal algorithms have resulted in slight differences in behavior when a product kit is installed on different version of OpenVMS (specifically different versions of the POLYCENTER Software Installation utility).
For example, a change was made in the utility that ships with OpenVMS Version 7.3
that affects the file chosen in conflict detection when there is a tie in generation
numbers. Previously, the file already installed on the target disk was retained; now
the file from the kit replaces the file on the target disk. In both cases, the file
is considered to be the same (because the nonzero generation numbers declare the
files to be identical), but use of the /LOG qualifier would show
procedural differences in how the conflict is handled.
Therefore, if your product is supposed to install on a range of versions of
OpenVMS, we strongly recommend that you verify the installation and removal of your
kit on each version that you support. In particular, perform these operations with
the /LOG and /TRACE qualifiers to ascertain
that your files are processed as you intended.
Chapter 7. Product Description Language Statements
This chapter describes the individual Product Description Language (PDL) statements and functions.
7.1. PDL Conventions
Brackets ([]) indicate optional elements. You can choose one, none, or all of the options.
The vertical bar (|) separates optional elements. It functions as a logical OR between two options, as in
A | B, orA | B | C.Horizontal ellipsis points (
...) in examples indicate that the preceding item or items can be repeated one or more times, or that additional parameters, values, or other information can be entered.The semicolon (;) in syntax diagrams is required syntax.
Angle brackets (<>) in syntax diagrams are required syntax.
A double hyphen (--) indicates that the rest of the line is a comment.
Unless otherwise indicated, extra space and tab characters may be used freely between syntax elements for the purposes of formatting and readability.
A statement may span more than one line.
Note
The space is required between the [NO] qualifier and its
option, for example [NO] ACCESS CONTROL. This differs from
standard DCL syntax.
7.2. PDL Reference Section
The rest of this chapter describes each PDL statement in detail and provides examples of its use. The PDL statements are presented in alphabetical order. Certain statements can be used as functions in the evaluation of an IF statement. The functional form of a statement is documented along with the definition of the statement.
ACCOUNT
ACCOUNT — The ACCOUNT statement uses a command procedure to
create a system account.
Syntax
Parameters
name Indicates the user name of the account as a 1- to 12-character string. The user name is passed to the command procedure as P1.
WITH (parameters,...) Indicates the list of parameters that are passed to the command procedure that creates the account. Each parameter must be a single unquoted or quoted string that specifies P2 through P8, in order. If there are no qualifiers to pass, specify a null string (" "). See the Description section for the meaning of the parameters.
Description
The ACCOUNT statement uses a command procedure
(SYS$UPDATE:PCSI$CREATE_ACCOUNT.COM) to create an
account. The parameters that you pass to the command procedure that creates the
accounts are as follows:
P1 specifies the user name of the account (using the name parameter).
P2 specifies general AUTHORIZE qualifiers. If there are no qualifiers to pass, specify a null string (" ").
P3 specifies a comma-separated list of rights identifiers to grant to the user name. These identifiers must already exist, or be created with a separate
RIGHTS IDENTIFIERstatement.P4 through P8 specify other general AUTHORIZE qualifiers.
Certain AUTHORIZE qualifiers must be used with care. For example,
/DIRECTORY=dir-name assigns a
default directory name to be used by the account. However, the POLYCENTER
Software Installation utility does not create this directory for you; you must
make sure that it exists.
When you remove a product that created accounts, the utility uses a command procedure (SYS$UPDATE:PCSI$DELETE_ACCOUNT.COM) to delete accounts associated with your product. This happens regardless of whether the SYSUAF.DAT file is shared by another system disk.
Note
In a future version, the utility may create and delete these managed objects directly without the use of command procedures. If this is the case, these statements will continue to function, but the command procedures may not be maintained or shipped with future versions of the utility.
The ACCOUNT statement specifies an account managed object
that has the following characteristics:
Its name is the value of the name parameter. The name must be unique among all account names.
It has operating lifetime.
Managed object conflict is not recoverable.
See Also
Example
account TEST with ("/priv=(tmpmbx, netmbx)",
"PCSI_TEST",
"/account=PCSI",
"/astlm=500/biolm=200/bytlm=96000",
"/wsdefault=4000",
"/flags=(nodisuser,genpwd)",
"/pwdminimum=8");In this example, the ACCOUNT statement creates the
TEST account.
| Parameter P2 specifies the TMPMBX and NETMBX privileges to be assigned
to the |
| Parameter P3 is a rights identifier. This name must exist on the
system prior to executing the |
| Parameters P4 to P8 assign certain values to the |
APPLY TO
APPLY TO — The APPLY TO statement specifies a product or product
version that you want to update with a patch or mandatory update kit. You must
include an APPLY TO statement in a patch or mandatory update
PDF to identify the product that is being updated. This statement is not valid
in other types of PDFs.
Syntax
Parameters
producer Indicates the legal owner of the software product. This parameter must be a single quoted or an unquoted string.
base Indicates the base hardware/software system on which the product is intended to be installed. This parameter must be a single quoted or an unquoted string.
| String | Meaning |
|---|---|
| X86VMS | An OpenVMS x86-64 product |
| I64VMS | An OpenVMS IA-64 product |
| AXPVMS | An OpenVMS Alpha product |
| VMS | A product applicable for any VSI supported system |
name Indicates the name of the product. This parameter must be a single quoted or an unquoted string. The combination of producer, base, and name parameters must be unique among products installed on the system.
Options
VERSION ABOVE version Establishes a lower version limit. The version identifier must be a single quoted or an unquoted string. Use this option to specify that the product version must be greater than (but not equal to) the specified version. You cannot use this option with either the VERSION MINIMUM or VERSION REQUIRED option. By default, there is no lower version limit.
VERSION BELOW version Establishes an upper version limit. The version identifier must be a single quoted or an unquoted string. Use this option to specify that the product version must be less than (but not equal to) the specified version. You cannot use this option with either the VERSION MAXIMUM or VERSION REQUIRED option. By default, there is no upper version limit.
VERSION MAXIMUM version Establishes an upper version limit. The version identifier must be a single quoted or an unquoted string. Use this option to specify that the product version must be less than or equal to the specified version. You cannot use this option with either the VERSION BELOW or VERSION REQUIRED option. By default, there is no upper version limit.
VERSION MINIMUM version Establishes a lower version limit. The version identifier must be a single quoted or an unquoted string. Use this option to specify that the product version must be greater than or equal to the specified version. You cannot use this option with either the VERSION ABOVE or VERSION REQUIRED option. By default, there is no lower version limit.
VERSION REQUIRED version Establishes a required version. The version identifier must be a single quoted or an unquoted string. Use this option to specify that the product version must be equal to the specified version. You cannot use this option with either the VERSION ABOVE, VERSION BELOW, VERSION MAXIMUM, or VERSION MINIMUM option. By default, there is no required version constraint.
Description
The APPLY TO statement specifies the name of an installed
product that a patch or mandatory update kit modifies. You can use options on
this statement to limit the application of the patch or mandatory update either
to a specific version of the product or to a range of versions. If you do not
use version constraints, then you can modify any version of the product by
installing a patch or mandatory update kit.
The APPLY TO statement is a utility directive and does not
specify a managed object.
Example
product AXPVMS CSCPAT57 V1.0 patch ;
apply to AXPVMS FORTRAN version required V2.0 ;
file [SYSEXE]FORTRAN.EXE ;
end product ;This example shows part of the product description for a patch to VSI Fortran.
As shown in the APPLY TO statement, you must have VSI Fortran
Version 2.0 installed to apply this patch.
DIRECTORY
DIRECTORY — The DIRECTORY statement creates the specified
directory if it does not already exist.
Syntax
Parameter
name Indicates the directory name.
Options
- [NO] ACCESS CONTROL (access-control-entry...)
Indicates the minimum access control entries (ACEs) that the directory will have. You must specify the ACEs as a quoted string. By default, directories have no added ACEs.
- OWNER name
Indicates the account name that owns the directory. By default, the directory is owned by the SYSTEM account. If you specify a numeric value for name, you must enclose the string in quotation marks, for example
"[11,7]".- PROTECTION EXECUTE
Sets the directory protection to (S:RWE, O:RWE, G:E, W:E) so that users have execute access.
- PROTECTION PRIVATE
Sets the directory protection to (S:RWE, O:RWE, G, W) so that users have no access.
- PROTECTION PUBLIC
Sets the directory protection to (S:RWE, O:RWE, G:RE, W:RE) so that users have read and execute access. This is the default.
- [NO] VERSION LIMIT maximum
Indicates the maximum number of file versions in the directory as an unsigned integer from 1 through 32767. The default is no version limit.
Description
The DIRECTORY statement creates the specified directory if
it does not already exist. You use the DIRECTORY statement to
create a directory, and to specify characteristics about the directory such as
ownership and protection. However, use of the DIRECTORY
statement is optional because the FILE statement will
implicitly create a directory, if it does not already exist, to contain the file
it provides.
The DIRECTORY statement specifies the name of a directory
managed object. Check the other statements in your PDF to make sure the name you
specify is unique among all directory, file, and link managed objects in all
scopes.
The scope and lifetime of the directory managed object depend on whether it is
lexically contained in a SCOPE, END SCOPE
pair, as shown in Table 7.1, ''Directory Managed Object Scope and Lifetime''. See the SCOPE statement for additional
information.
|
Type of Scope Group |
Lifetime |
Scope |
|---|---|---|
|
Product |
Product |
Product |
|
Global |
Assembly |
Global |
|
Bootstrap |
Operating |
Bootstrap |
|
Processor |
Operating |
Processor |
If you use the access control option, the DIRECTORY
statement specifies one access control entry (ACE) managed object that
references the directory managed object for each entry specified with the ACCESS
CONTROL option. The ACE managed object has the following characteristics:
It is unnamed.
It has operating lifetime.
It has the same scope as the directory.
Examples
directory [SYSHLP.EXAMPLES.FMS.MESSAGE] protection private access control ("(IDENTIFIER=[FMS], ACCESS=READ)");This example specifies the directory [SYSHLP.EXAMPLES.FMS.MESSAGE]. The
PROTECTION PRIVATEoption specifies that no users have access to this directory. TheACCESS CONTROLoption grants the userFMSread access to the directory.directory [AL] owner PCSI$TEST version limit 3;
In this example the directory
[AL]is owned by the accountPCSI$TESTand holds the maximum of three file versions.directory [JIM] owner "[11,7]";
This example specifies the directory
[JIM]owned by the account whose UIC is[11,7].
END
END — The END statement terminates a statement
group.
Syntax
Parameters
None.
Options
None.
Description
The END statement terminates a statement group. See the specific statement
referenced by the END statement for information about the
statement group.
Example
product AXPVMS TEST V1.0 full ; . . . end product ;
The END PRODUCT statement identifies the end of the
PRODUCT group.
ERROR
ERROR — The ERROR statement displays an error message during
an installation or reconfiguration operation. The text is from a PTF text
module. The ERROR statement must be contained within an
IF group.
Syntax
Parameter
name Indicates, as a quoted or unquoted string, the name of the associated PTF text module. The name you specify can be from 1 to 31 characters in length and must be unique among all names in the same product description.
Option
ABORT Forces an unconditional termination of the operation when the
ERROR statement is
executed.
Description
The ERROR statement specifies a text module you want to
display during an installation or reconfiguration operation. The
ERROR statement must be contained within an
IF group.
The utility processes ERROR statements in lexical order.
The utility displays both prompt and help text during the validation phase. The
validation phase occurs before and after the configuration of a product.
During execution of an ERROR statement that does not
contain an ABORT option, the utility prompts the user to continue or terminate
the operation. If the ABORT option is present, or the operation is executed in
batch mode, the ERROR statement causes the operation to
terminate unconditionally.
The ERROR statement is a utility directive and does not
specify a managed object.
You must supply text in the associated product text module. The module must contain an =prompt directive line.
Examples
Suppose the PDF for a product contains the following lines:
if (<hardware processor model 7>) ; error UNSPROC abort ; end if ;The corresponding module in the PTF contains the following lines:
1 UNSPROC =prompt This product is not supported on a MicroVAX I processor. Please read the installation guide that accompanies the software to determine minimum system requirements for running this product.
If the user attempts to install the product on processor model 7, the following message is displayed and the installation is terminated:
This product is not supported on a MicroVAX I processor. Please read the installation guide that accompanies the software to determine minimum system requirements for running this product. %PCSI-E-S_OPFAIL, operation failed %PCSIUI-E-ABORT, operation terminated due to an unrecoverable error condition
The following PDF fragment illustrates how to check for prerequisite software and issue an error message if the requirement is not met:
if (not <software AXPVMS TCPIP >) and (not <software AXPVMS UCX version minimum V4.0>) ) ; error TCPIP_NOT_INSTALLED ; end if;The corresponding module in the PTF contains the following lines:
1 TCPIP_NOT_INSTALLED =prompt TCPIP software is not installed on your system. This product requires TCPIP networking software. Please terminate this operation, install any version of TCPIP (or UCX version V4.0 or higher), then install this product.
On installation of the product containing the previous PDL statements, if neither the TCP/IP nor the UCX product is already installed (or will not be installed at the completion of the current operation), the following messages are displayed:
TCPIP software has not been installed on your system. This product requires TCPIP networking software. Please terminate this operation, install any version of TCPIP (or UCX version V4.0 or higher), then install this product. Terminating is strongly recommended. Do you want to terminate? [YES] %PCSI-E-S_OPCAN, operation cancelled by request %PCSIUI-E-ABORT, operation terminated due to an unrecoverable error condition
Since the ABORT option is not used on the
ERRORstatement, the user was given the opportunity to continue installation of the product. Use of the ABORT option would have caused unconditional termination of the installation as shown in the first example.
EXECUTE ABORT
EXECUTE ABORT — The EXECUTE ABORT statement specifies commands to
execute when an error condition causes an installation or reconfiguration
operation to terminate.
Syntax
Parameter
(command,...) Indicates the commands that the utility passes to the command interpreter whenever the operation fails.
Options
- INTERACTIVE
Allows communication between the user and the specified command or commands executing in a subprocess.
- USES (file,...)
Indicates the files required to execute the commands you specified in the command parameter. Use a separate
FILEstatement to specify required files that are permanently placed in the user's destination directory tree. Use the USES option to specify required files that are placed in a temporary directory and deleted after use. By default, this statement does not require files.
Description
The EXECUTE ABORT statement specifies commands to execute
when an error condition causes an installation or reconfiguration operation to
terminate. For example, the following conditions activate the EXECUTE
ABORT statement:
An error or fatal error condition returned as the final status from the subprocess in which commands are run from an
EXECUTEstatement, excluding theEXECUTE TESTstatement.The user terminates the operation by pressing Ctrl/Y or Ctrl/C.
The user answers
YESto the question"Do you want to terminate?"Typically, this question is asked after an error is reported during material placement on the target disk.
You specify recovery actions to perform by including one or more DCL command
lines in the EXECUTE ABORT statement. These commands are
passed for execution to the DCL interpreter running in a subprocess. Enclose
each action, whether specified as a single DCL command or a command procedure,
in double quotes (""). If more than one action is given, use parentheses to
enclose the list.
Enclosing the EXECUTE ABORT statement in a
SCOPE group (consisting of SCOPE and
END SCOPE statements) has no effect on the way
EXECUTE ABORT commands are processed.
If you want your commands to prompt the user and accept the user's input,
specify the EXECUTE ABORT statement with the INTERACTIVE
option. The INTERACTIVE option causes all output from DCL to be displayed,
unless you prevent it. In contrast, when the INTERACTIVE option is not
specified, output generated by DCL commands is displayed only for lines that are
interpreted as DCL messages; that is, those beginning with a percent sign (%) in
column one.
If you need files for the EXECUTE ABORT statement, specify
them in the USES option. Each file you specify with the USES option must be
present in the product material.
Note that the USES option will not cause the listed files to be placed
permanently in your file system. As soon as the installation operation
completes, the files listed with the USES option are deleted. For this reason,
you must use the FILE statement for this execute operation,
and any other operation, in which you want your EXECUTE
command procedures placed permanently in your file system.
The EXECUTE ABORT statement causes the utility to define
logical names for use by the subprocess that executes the specified commands.
The commands should use these logical names to reference files, as
follows:
PCSI$SOURCE is a subdirectory in the root format under the user's login directory that points to the location of the files specified by the USES option. This logical name is defined for the subprocess in which product-supplied commands execute. It is not the same PCSI$SOURCE logical name that can be defined by a user, in the user's process, pointing to the location of a product kit.
PCSI$DESTINATION is a root directory specification that points to the root directory where product material will be placed. The PCSI$DESTINATION logical is available except when the
EXECUTE ABORTstatement is called when theEXECUTE PRECONFIGUREstatement fails. The PCSI$DESTINATION logical is not available until the configuration phase.PCSI$SCRATCH is a subdirectory under the user's login directory that can be used by commands for temporary working space. This directory and any files placed in it are automatically deleted at the end of the operation.
The EXECUTE ABORT statement is a utility directive and does
not specify a managed object.
Example
execute install "@PCSI$SOURCE:[SYSUPD]EXEC_INSTALL.COM"
remove "" uses [SYSUPD]EXEC_INSTALL.COM ;
execute abort "@PCSI$SOURCE:[SYSUPD]EXEC_ABORT.COM"
uses [SYSUPD]EXEC_ABORT.COM ; In this example, the EXECUTE ABORT statement sets up a
command procedure to run whenever the operation fails after the EXECUTE
INSTALL command has been executed. It is intended to clean the
user environment in case the commands supplied by EXECUTE
INSTALL have left the user's system modified. The
USES option specifies the file name of the command procedure
that is deleted after use.
EXECUTE INSTALL…REMOVE
EXECUTE INSTALL…REMOVE — The EXECUTE INSTALL…REMOVE statement is a
compound statement that performs two distinct actions: the install portion
specifies commands to execute when the product is installed or reconfigured; the
remove portion specifies commands to execute when the product is removed, but
not when the product is upgraded. The REMOVE part of the
statement is required syntax even if there are no commands that you want to
execute when the product is removed. To indicate no command, use remove
"".
Syntax
Parameter
(command,...) Indicates the commands that the utility passes to the command interpreter in the execution environment.
Options
- INTERACTIVE
Allows communication between the user and the specified command or commands executing in a subprocess.
- USES (file,...)
Indicates the files required to execute the commands you specified in the command parameter. Use a separate
FILEstatement to specify required files that are permanently placed in the user's destination directory tree; use the USES option to specify required files that are placed in a temporary directory and deleted after use. By default, this statement does not require files.
Description
The EXECUTE INSTALL…REMOVE statement is a compound
statement consisting of an install portion and a remove portion.
The install portion specifies commands to execute when the product is
installed or reconfigured. These commands are run after all product material has
been placed on the target disk (that is, after all DIRECTORY,
FILE, and MODULE statements have been
processed).
The remove portion specifies commands to execute when the product is removed.
These commands are run before any product material is deleted from the target
disk. The EXECUTE INSTALL…REMOVE statement has no
effect when the product is upgraded. To execute commands when the product is
upgraded by another version of the product, use the EXECUTE
UPGRADE statement.
Note
Previous versions of this manual incorrectly stated that EXECUTE
INSTALL…REMOVE commands are also run when the product
is upgraded.
You specify the install and remove actions to perform by including one or more
DCL command lines in the EXECUTE INSTALL…REMOVE
statement. These commands are passed for execution to the DCL interpreter
running in a subprocess. Enclose each action, whether specified as a single DCL
command or a command procedure, in double quotes (" "). If more than one action
is given, use parentheses to enclose the list.
If you want your commands to prompt the user and accept the user's input,
specify the EXECUTE INSTALL…REMOVE statement with the
INTERACTIVE option. The INTERACTIVE option causes all output from DCL to be
displayed, unless you prevent it. In contrast, when the INTERACTIVE option is
not specified, output generated by DCL commands is displayed only for lines that
are interpreted as DCL messages, that is, those beginning with a percent sign
(%) in column one.
If you need files for the EXECUTE INSTALL statement,
specify them in the USES option or in separate FILE
statements. However, if you need files for the EXECUTE REMOVE
statement, you must provide them with FILE statements so that
they are available on the user's system for use when the product is removed.
Each file you specify with the USES option must be present in the product
material.
Note that the USES option will not cause the listed files to be placed
permanently in your file system. As soon as the installation operation
completes, the files listed with the USES option are deleted. For this reason,
you must use the FILE statement for this execute operation,
and any other operation, in which you want your execute command procedures
placed permanently in your file system.
The EXECUTE INSTALL…REMOVE statement causes the
utility to define logical names for use by the subprocess that executes the
specified commands. The commands should use these logical names to reference
files, as follows:
PCSI$SOURCE is a subdirectory in the root format under the user's login directory that points to the location of the files specified by the USES option. This logical name is defined for the subprocess in which product-supplied commands execute. It is not the same PCSI$SOURCE logical name that can be defined by a user, in the user's process, pointing to the location of a product kit.
Note
The PCSI$SOURCE logical name is available only for the
EXECUTE INSTALLoperation. You cannot use it for anEXECUTE REMOVEoperation.PCSI$SCRATCH is a subdirectory under the user's login directory that can be used by commands for temporary working space. This directory and any files placed in it are automatically deleted at the end of the operation.
The EXECUTE INSTALL…REMOVE statement is a utility
directive and does not specify a managed object.
Example
file [SYSUPD]UNLOAD_LOADABLE_IMAGE.COM ;
execute
install "@PCSI$SOURCE:[SYSUPD]LOAD_LOADABLE_IMAGE.COM"
remove "@PCSI$DESTINATION:[SYSUPD]UNLOAD_LOADABLE_IMAGE.COM"
uses ([SYSUPD]LOAD_LOADABLE_IMAGE.COM) ; In this example, the EXECUTE INSTALL…REMOVE
statement sets up command procedures to run when the product is installed and
removed. The USES option specifies the file name of the command
procedure for use on installation of the product. The file is deleted after use.
The FILE statement specifies the file name of the command
procedure for use on removal of the product. This file is placed in the user's
destination directory tree during installation and executed during
removal.
EXECUTE LOGIN
EXECUTE LOGIN — The EXECUTE LOGIN statement displays a message when the product is installed or reconfigured, informing the installer that the specified commands need to be added to the login command procedure of every user of this product.
Syntax
Parameter
(command,...) Indicates the commands that the utility displays in a message to the user.
Description
The EXECUTE LOGIN statement displays a message when the
product is installed or reconfigured, advising the installer that the specified
commands need to be added to the login command procedure of every user of this
product. The specified commands are not run during the installation or
reconfiguration operation. The message is displayed after the operation has
completed successfully.
The EXECUTE LOGIN statement is a utility directive and does
not specify a managed object.
Example
execute login "$ @USER_START" ;
In this example, the EXECUTE LOGIN statement displays the
following message to users:
Users of this product require the following lines in their login procedure:
$ @USER_STARTEXECUTE POSTINSTALL
EXECUTE POSTINSTALL — The EXECUTE POSTINSTALL statement specifies commands
to execute when the product is installed or reconfigured. These commands are run
after any commands from EXECUTE INSTALL… and
EXECUTE START… statements are run.
Syntax
Parameter
(command,...) Indicates the command that the utility passes to the command interpreter in the execution environment.
Options
- INTERACTIVE
Allows communication between the user and the specified command or command procedure executing in a subprocess.
- USES (file,...)
Indicates the files required to execute the commands you specified in the command parameter. Use a separate
FILEstatement to specify required files that are permanently placed in the user's destination directory tree; use the USES option to specify required files that are placed in a temporary directory and deleted after use. By default, this statement does not require files.
Description
The EXECUTE POSTINSTALL statement specifies commands to
execute when the product is installed or reconfigured. These commands are run
after any commands from EXECUTE INSTALL… and
EXECUTE START… statements are run.
You specify actions to perform by including one or more DCL command lines in
the EXECUTE POSTINSTALL statement. These commands are passed
for execution to the DCL interpreter running in a subprocess. Enclose each
action, whether specified as a single DCL command or a command procedure, in
double quotes (" "). If more than one action is given, use
parentheses to enclose the list.
If you want your commands to prompt the user and accept the user's input,
specify the EXECUTE POSTINSTALL statement with the
INTERACTIVE option. The INTERACTIVE option causes all output from DCL to be
displayed, unless you prevent it. In contrast, when the INTERACTIVE option is
not specified, output generated by DCL commands is displayed only for lines that
are interpreted as DCL messages, that is, those beginning with a percent sign
(%) in column one.
If you need files for the EXECUTE POSTINSTALL statement,
specify them in the USES option or in separate FILE
statements. Each file you specify with the USES option must be present in the
product material.
Note that the USES option will not cause the listed files to be placed
permanently in your file system. As soon as the installation operation
completes, the files listed with the USES option are deleted. For this reason,
you must use the FILE statement for this execute operation,
and any other operation, in which you want your execute command procedures
placed permanently in your file system.
The EXECUTE POSTINSTALL statement causes the POLYCENTER
Software Installation utility to define logical names for use by the subprocess
that executes the specified commands. The commands should use these logical
names to reference files, as follows:
PCSI$SOURCE is a subdirectory in the root format under the user's login directory that points to the location of the files specified by the USES option. This logical name is defined for the subprocess in which product-supplied commands execute. It is not the same PCSI$SOURCE logical name that can be defined by a user, in the user's process, pointing to the location of a product kit.
PCSI$DESTINATION is a root directory specification that points to the root directory for the current scope where product material will be placed.
PCSI$SCRATCH is a subdirectory under the user's login directory that can be used by commands for temporary working space. This directory and any files placed in it are automatically deleted at the end of the operation.
The EXECUTE POSTINSTALL statement is a utility directive
and does not specify a managed object.
Example
execute
postinstall "@pcsi$source:[sysupd]product_cleanup.com"
uses [sysupd]product_cleanup.com ;In this example, the EXECUTE POSTINSTALL statement sets up
a command procedure to run after the product is installed. The USES
option specifies the file name of the command procedure that is deleted after
use.
EXECUTE POST_UNDO
EXECUTE POST_UNDO — The EXECUTE POST_UNDO statement specifies commands to
execute when one or more patch kits are uninstalled by executing the
PRODUCT UNDO PATCH command. These commands are run after
all directories, files, and modules are processed.
Syntax
Parameter
(command,...) Indicates the commands that the utility passes to the command interpreter after uninstalling patch kits indicated in the recovery data set being processed.
Options
- INTERACTIVE
Allows communication between the user and the specified command or commands executing in a subprocess.
- USES (file,...)
Indicates the files required to execute the commands you specified in the command parameter. The files listed with the USES option are saved in the recovery data set. When the
UNDO PATCHoperation is executed, these files are moved to a temporary directory for processing and deleted after use.
Description
The EXECUTE POST_UNDO statement specifies commands to
execute when one or more patch kits are uninstalled by executing the
PRODUCT UNDO PATCH command. These commands are run near
the end of operation, after all directories, files, and modules are processed.
This statement is useful for automatically running a command procedure to
perform cleanup or restore the system environment after one or more patch or
mandatory product updates have been removed.
You specify actions to perform by including one or more DCL command lines in
the EXECUTE POST_UNDO statement. These commands are passed
for execution to the DCL interpreter running in a subprocess. Enclose each
action, whether specified as a single DCL command or a command procedure, in
double quotes. If more than one action is given, use parentheses to enclose the
list.
Enclosing the EXECUTE POST_UNDO statement in a
SCOPE group (consisting of SCOPE and
END SCOPE statements) has no effect on the way
EXECUTE POST_UNDO commands are processed.
If you want your commands to prompt the user and accept the user's input,
specify the EXECUTE POST_UNDO statement with the INTERACTIVE
option. The INTERACTIVE option causes all output from DCL to be displayed,
unless you prevent it. In contrast, when the INTERACTIVE option is not
specified, output generated by DCL commands is displayed only for lines that are
interpreted as DCL messages; that is, those beginning with a percent sign (%) in
column one.
If you need files for the EXECUTE POST_UNDO statement, you
must specify each one of them with the USES option. Files listed with the USES
option are placed in the recovery data set (the [PCSI$UNDO_001] directory tree)
when the patch kit is installed and retrieved during the PRODUCT UNDO
PATCH operation.
There are certain restrictions on the use of the EXECUTE
POST_UNDO statements:
They can be packaged in a product kit only if the product is of a patch or mandatory update type.
Only one
EXECUTE POST_UNDOstatement is allowed per product.
The DCL commands supplied with the EXECUTE POST_UNDO
statement are not executed during the product installation; they are merely
registered in the patch recovery data set description file for use in the
PRODUCT UNDO PATCH operation.
The EXECUTE POST_UNDO statement causes the POLYCENTER
Software Installation utility to define logical names for use by the subprocess
that executes the specified commands. The commands should use these logical
names to reference files, as follows:
PCSI$SOURCE is a subdirectory in the root format under the user's login directory that points to the location of the files specified by the USES option. This logical name is defined for the subprocess in which product-supplied commands execute.
PCSI$DESTINATION is a root directory specification that points to the root directory where the patch or mandatory update product material was placed in the installation operation.
PCSI$SCRATCH is a subdirectory under the user's login directory that commands can use for temporary working space. The utility automatically deletes this directory and any files placed in it at the end of the operation.
The EXECUTE POST_UNDO statement is a utility directive and
does not specify a managed object.
Example
execute post_undo "@PCSI$SOURCE:[SYSUPD]EXEC_POST_UNDO.COM"
uses [SYSUPD]EXEC_POST_UNDO.COM ;In this example, the EXECUTE POST_UNDO statement sets up a
command procedure to run after the patch kit files are removed from the system
as a result of the PRODUCT UNDO PATCH command execution. The
USES option specifies the file name of the command procedure
that is deleted after use.
EXECUTE PRECONFIGURE
EXECUTE PRECONFIGURE — The EXECUTE PRECONFIGURE statement specifies commands
to execute after the user has selected the product for installation or
reconfiguration, but before the user is asked to select options for the
product.
Syntax
Parameter
(command,...) Indicates the commands that the utility passes to the command interpreter in the preconfiguration environment.
Options
- INTERACTIVE
Allows communication between the user and the specified command or commands executing in a subprocess.
- USES (file,...)
Indicates the files required to execute the commands you specified in the command parameter. Files for the
EXECUTE PRECONFIGUREstatement cannot be supplied by a separateFILEstatement becauseEXECUTE PRECONFIGUREis processed before files are copied to the target disk.
Description
The EXECUTE PRECONFIGURE statement specifies commands to
execute after the user has selected the product for installation or
reconfiguration, but before the user is asked to select options for the product.
This statement is useful for automatically running a command procedure in
preparation for installing your product. This command procedure is packaged in
the kit and is run before the standard configuration dialog with the user
begins. The EXECUTE PRECONFIGURE statement gives you the
ability to do such things as probe the system environment, ask the user
questions, and define logical names for use later in the processing of LOGICAL
NAME functions. The ability to conditionally provide product material, or to
perform other actions based on decisions made at the very start of the
operation, is a powerful and flexible mechanism.
Note
If you want to use LOGICAL NAME functions, the logical names must be
either defined by the action of EXECUTE PRECONFIGURE
statements, or by the user before the installation or reconfiguration
operation is initiated. The processing of an EXECUTE
PRECONFIGURE statement cannot be conditionalized by including
it within an IF group that is controlled by a LOGICAL
NAME function. In such a case, the EXECUTE PRECONFIGURE
statement is always executed.
You specify actions to perform by including one or more DCL command lines in
the EXECUTE PRECONFIGURE statement. These commands are passed
for execution to the DCL interpreter running in a subprocess. Enclose each
action, whether specified as a single DCL command or a command procedure, in
double quotes. If more than one action is given, use parentheses to enclose the
list.
Enclosing the EXECUTE PRECONFIGURE statement in a
SCOPE group (consisting of SCOPE and
END SCOPE statements) has no effect on the way
EXECUTE PRECONFIGURE commands are processed.
If you want your commands to prompt the user and accept the user's input,
specify the EXECUTE PRECONFIGURE statement with the
INTERACTIVE option. The INTERACTIVE option causes all output from DCL to be
displayed, unless you prevent it. In contrast, when the INTERACTIVE option is
not specified, output generated by DCL commands is displayed only for lines that
are interpreted as DCL messages, that is, those beginning with a percent sign
(%) in column one.
If you need files for the EXECUTE PRECONFIGURE statement,
specify them in the USES option. Each file you specify with the USES option must
be present in the product material.
Note that the USES option does not cause the listed files to be placed permanently in your file system. As soon as the installation operation completes, the files listed with the USES option are deleted.
The EXECUTE PRECONFIGURE statement causes the POLYCENTER
Software Installation utility to define logical names for use by the subprocess
that executes the specified commands. The commands should use these logical
names to reference files, as follows:
PCSI$SOURCE is a subdirectory in the root format under the user's login directory that points to the location of the files specified by the USES option. This logical name is defined for the subprocess in which product-supplied commands execute. It is not the same PCSI$SOURCE logical name that can be defined by a user, in the user's process, pointing to the location of a product kit.
PCSI$DESTINATION is a root directory specification that points to the root directory for the current scope where product material will be placed.
PCSI$SCRATCH is a subdirectory under the user's login directory that commands can use for temporary working space. The utility automatically deletes this directory and any files placed in it at the end of the operation.
The EXECUTE PRECONFIGURE statement is a utility directive
and does not specify a managed object.
Example
execute preconfigure "@PCSI$SOURCE:[SYSUPD]EXEC_PREC.COM"
uses [SYSUPD]EXEC_PREC.COM ;In this example, the EXECUTE PRECONFIGURE statement sets up
a command procedure to run before the product configuration begins. The
USES option specifies the file name of the command procedure
that is deleted after use.
EXECUTE PRE_UNDO
EXECUTE PRE_UNDO — The EXECUTE PRE_UNDO statement specifies commands to
execute when one or more patch kits are uninstalled by executing the
PRODUCT UNDO PATCH command. These commands are run before
any directories, files, and modules are processed.
Syntax
Parameter
(command,...) Indicates the commands that the utility passes to the command interpreter prior to uninstalling patch kits indicated in the recovery data set being processed.
Options
- INTERACTIVE
Allows communication between the user and the specified command or commands executing in a subprocess.
- USES (file,...)
Indicates the files required to execute the commands you specified in the command parameter. The files listed with the USES option are saved in the recovery data set. When the
UNDO PATCHoperation is executed, these files are moved to a temporary directory for processing and deleted after use.
Description
The EXECUTE PRE_UNDO statement specifies commands to execute when one or
more patch kits are uninstalled by executing the PRODUCT UNDO
PATCH command. These commands are run before any directories,
files, and modules are processed. This statement is useful for automatically
running a command procedure in preparation for uninstalling one or more patch or
mandatory product updates. The EXECUTE PRE_UNDO statement
gives you the ability to do such things as ask the user questions, probe, or set
the system environment before a patch kit is uninstalled.
You specify actions to perform by including one or more DCL command lines in the
EXECUTE PRE_UNDO statement. These commands are passed for
execution to the DCL interpreter running in a subprocess. Enclose each action,
whether specified as a single DCL command or a command procedure, in double
quotes (" "). If more than one action is given, use parentheses to enclose the
list.
Enclosing the EXECUTE PRE_UNDO statement in a SCOPE
group (consisting of SCOPE and END SCOPE
statements) has no effect on the way EXECUTE PRE_UNDO
commands are processed.
If you want your commands to prompt the user and accept the user's input, specify the
EXECUTE PRE_UNDO statement with the INTERACTIVE option.
The INTERACTIVE option causes all output from DCL to be displayed, unless you
prevent it. In contrast, when the INTERACTIVE option is not specified, output
generated by DCL commands is displayed only for lines that are interpreted as
DCL messages; that is, those beginning with a percent sign (%) in column
one.
If you need files for the EXECUTE PRE_UNDO statement, you must specify each
one of them with the USES option. Files listed with the USES option are placed
in the recovery data set (the [PCSI$UNDO_001] directory
tree) when the patch kit is installed and retrieved during the PRODUCT
UNDO PATCH operation.
There are certain restrictions on the use of the EXECUTE PRE_UNDO
statements:
They can be packaged in a product kit only if the product is a patch or mandatory update type.
Only one
EXECUTE PRE_UNDOstatement is allowed per product.
The DCL commands supplied with the EXECUTE PRE_UNDO statement are not
executed during the product installation; they are merely registered in the
patch recovery data set description file for use in the PRODUCT UNDO
PATCH operation.
The EXECUTE PRE_UNDO statement causes the POLYCENTER Software Installation
utility to define logical names for use by the subprocess that executes the
specified commands. The commands should use these logical names to reference
files, as follows:
PCSI$SOURCE is a subdirectory in the root format under the user's login directory that points to the location of the files specified by the USES option. This logical name is defined for the subprocess in which product-supplied commands execute.
PCSI$DESTINATION is a root directory specification that points to the root directory where the patch or mandatory update product material was placed in the installation operation.
PCSI$SCRATCH is a subdirectory under the user's login directory that commands can use for temporary working space. The utility automatically deletes this directory and any files placed in it at the end of the operation.
The EXECUTE PRE_UNDO statement is a utility directive and does not specify
a managed object.
Example
execute pre_undo "@PCSI$SOURCE:[SYSUPD]EXEC_PRE_UNDO.COM"
uses [SYSUPD]EXEC_PRE_UNDO.COM
interactive ;In this example, the EXECUTE PRE_UNDO statement sets up a command procedure
to run before patch kit files are removed from the system as a result of the
PRODUCT UNDO PATCH command execution. The
USES option specifies the file name of the command procedure
that is deleted after use. The INTERACTIVE option allows dialog
between the user and the command procedure.
EXECUTE REBOOT
EXECUTE REBOOT — The EXECUTE REBOOT statement specifies commands that
initiate a system reboot procedure at the conclusion of the PRODUCT
INSTALL or PRODUCT RECONFIGURE operations.
Syntax
Parameter
(command,...) Indicates the commands that the utility passes to the command interpreter after completing product installation or reconfiguration, but just before exiting the operation with final status.
Options
- INTERACTIVE
Allows communication between the user and the specified command or command procedure executing in a subprocess.
- MANDATORY
Indicates that the system must be rebooted after the product installation or reconfiguration. If the MANDATORY option is not present, the system reboot is not required.
Regardless of whether this option is specified, the user is prompted in the configuration phase as to whether a reboot will be allowed at the end of the operation. If the MANDATORY option is set and the user does not want to perform a system reboot, the operation terminates before any product files are handled. If the MANDATORY option is not specified, and the user does not want to perform a system reboot, the operation is not terminated and continues until successful conclusion. No system reboot is performed.
Description
The EXECUTE REBOOT statement specifies commands to execute
at the conclusion of the PRODUCT INSTALL or PRODUCT
RECONFIGURE commands. These commands can perform any action the
product developer desires, but the last one should invoke the system shutdown
procedure.
You specify actions to perform by including one or more DCL command lines in
the EXECUTE REBOOT statement. These commands are passed for
execution to the DCL interpreter running in a subprocess. Enclose each action,
whether specified as a single DCL command or a command procedure, in double
quotation marks (" "). If more than one action is desired, use parentheses to
enclose the list.
Enclosing the EXECUTE REBOOT statement in a
SCOPE group (consisting of SCOPE and
END SCOPE statements has no effect on the way
EXECUTE REBOOT commands are processed.
If you want your commands to prompt the user and accept the user's input,
specify the EXECUTE REBOOT statement with the INTERACTIVE
option. The INTERACTIVE option causes all output from DCL to be displayed,
unless you prevent it. In contrast, when the INTERACTIVE option is not
specified, output generated by DCL commands is displayed only for lines that are
interpreted as DCL messages, that is, those beginning with a percent sign (%) in
column one.
If you want to force a system reboot at the end of your product installation, you must use the MANDATORY option. Whether this option is present or not, the user is warned that the system shutdown may take place at the end of the operation and is prompted to accept it. If the MANDATORY option is set, the following message is issued:
* Product VSI AXPVMS EXRT V1.0 requires a system reboot.
If the MANDATORY option is not used, the following message is issued:
* Product VSI AXPVMS EXRT V1.0 recommends a system reboot.
In either case, the message is followed by this prompt:
* Can the system be REBOOTED after the installation completes? [YES]
If the MANDATORY option is set and your response to the prompt is
No, the operation terminates. If the MANDATORY option is not
set and your response to the prompt is No, the operation continues,
but the EXECUTE REBOOT statement will not be
processed.
The EXECUTE REBOOT statement causes the POLYCENTER Software
Installation utility to define logical names for use by the subprocess that
executes the specified commands. The logical name
PCSI$DESTINATION is a root directory specification
that points to the root directory where the product material was placed in the
installation operation.
The EXECUTE REBOOT statement is a utility directive and
does not specify a managed object.
Example
execute reboot "@SYS$COMMON:[SYSEXE]SHUTDOWN.COM"
interactive ;In this example, the EXECUTE REBOOT statement sets up the
system shutdown command procedure to run after successful product installation,
but before the utility exits the operation with the final status code.
EXECUTE RELEASE
EXECUTE RELEASE — The EXECUTE RELEASE statement specifies commands to
execute when the product is installed or reconfigured. These commands are run
after any commands from EXECUTE INSTALL… statements
are run.
Additional Information
As of OpenVMS V7.3, the EXECUTE RELEASE statement is
obsolete. To support existing product kits that may have used this statement,
the POLYCENTER Software Installation utility continues to process this statement
in a backward compatible manner. However, VSI recommends that you do not use the
EXECUTE RELEASE statement in new or revised product kits.
Instead, use the EXECUTE UPGRADE, EXECUTE
INSTALL…REMOVE, or the EXECUTE
POSTINSTALL statements, as appropriate. Documentation of the
EXECUTE RELEASE statement may be discontinued in a future
release of this manual.
Syntax
Parameter
(command,...) Indicates the commands that the utility passes to the command interpreter in the execution environment.
Options
- INTERACTIVE
Allows communication between the user and the specified command or command procedure executing in a subprocess.
- USES (file,...)
Indicates the files required to execute the commands you specified in the command parameter. Use a separate
FILEstatement to specify required files that are permanently placed in the user's destination directory tree; use the USES option to specify required files that are placed in a temporary directory and deleted after use. By default, this statement does not require files.
Description
The EXECUTE RELEASE statement specifies commands to execute
when the product is installed or reconfigured. These commands are run after any
commands from EXECUTE INSTALL… statements are run. The
name of this statement could imply that it only runs when a product is upgraded
or removed; however, this is not the case. The EXECUTE
RELEASE statement is run under the same situations that the
EXECUTE INSTALL… statement is run. Due to its
misleading name and duplicate functionality, EXECUTE RELEASE
is now obsolete.
Use the EXECUTE UPGRADE statement or the
REMOVE portion of the EXECUTE
INSTALL…REMOVE statement to perform actions when your
product is upgraded or removed. To perform actions when your product is
installed or reconfigured, use either the EXECUTE
INSTALL… or EXECUTE POSTINSTALL
statement.
You specify actions to perform by including one or more DCL command lines in
the EXECUTE RELEASE statement. These commands are passed for
execution to the DCL interpreter running in a subprocess. Enclose each action,
whether specified as a single DCL command or a command procedure, in double
quotes (" "). If more than one action is given, use parentheses to enclose the
list.
If you want your commands to prompt the user and accept the user's input,
specify the EXECUTE RELEASE statement with the INTERACTIVE
option. The INTERACTIVE option causes all output from DCL to be displayed,
unless you prevent it. In contrast, when the INTERACTIVE option is not
specified, output generated by DCL commands is displayed only for lines that are
interpreted as DCL messages, that is, those beginning with a percent sign (%) in
column one.
If you need files for the EXECUTE RELEASE statement,
specify them in the USES option or in separate FILE
statements. Each file you specify with the USES option must be present in the
product material.
The USES option will not cause the listed files to be placed permanently in
your file system. As soon as the installation operation completes, the files
listed with the USES option are deleted. For this reason, you must use the
FILE statement for this execute operation and any other
operation in which you want your execute command procedures placed permanently
in your file system.
The EXECUTE RELEASE statement causes the POLYCENTER
Software Installation utility to define logical names for use by the subprocess
that executes the specified commands. The commands should use these logical
names to reference files, as follows:
PCSI$SOURCE is a subdirectory in the root format under the user's login directory that points to the location of the files specified by the USES option. This logical name is defined for the subprocess in which product-supplied commands execute. It is not the same PCSI$SOURCE logical name that can be defined by a user, in the user's process, pointing to the location of a product kit.
PCSI$DESTINATION is a root directory specification that points to the root directory for the current scope where product material will be placed.
PCSI$SCRATCH is a subdirectory under the user's login directory that can be used by commands for temporary working space. This directory and any files placed in it are automatically deleted at the end of the operation.
The EXECUTE RELEASE statement is a utility directive and
does not specify a managed object.
Example
execute release "@pcsi$source:[sysupd]config.com" uses [sysupd]config.com ;
In this example, the EXECUTE RELEASE statement sets up a
command procedure to run when the product is installed or reconfigured. The
USES option specifies the file name of the command procedure
that is deleted after use.
EXECUTE START…STOP
EXECUTE START…STOP — The EXECUTE START…STOP statement is a compound
statement that performs two distinct actions: the "start" portion either
specifies commands to execute when the product is installed for the first time
or upgrades a previously installed version of the product; the "stop" portion
specifies commands to execute when the product is either removed or upgraded by
another version of the product. The EXECUTE START…STOP
statement also displays a message at the successful conclusion of the operation,
advising the user to add the specified commands to the appropriate systemwide
startup or shutdown command procedure. The STOP part of the
statement is required syntax even if there are no commands you want to execute
when the product is removed. To indicate no command, use stop
"".
Syntax
Parameter
(command,...) Indicates the commands that the utility displays in a message to the user and also passes to the command interpreter in the execution environment.
Option
- INTERACTIVE
Allows communication between the user and the specified command or commands executing in a subprocess.
Description
The EXECUTE START…STOP statement is a compound
statement consisting of a "start" portion and a "stop" portion.
The "start" portion either specifies commands to execute when the product is
installed for the first time or upgrades a previously installed version of the
product. These commands are run after any EXECUTE
INSTALL… statements have been processed, but before any
EXECUTE POSTINSTALL statements. In addition, a message is
displayed at the end of the operation telling users to add these commands to
their SYSTARTUP_VMS.COM file.
The "stop" portion specifies commands to execute when the product is either
removed or upgraded by another version of the product. These commands are run
before any product material is deleted from the target disk and before any
EXECUTE INSTALL…REMOVE statements are processed.
In addition, a message is displayed at the end of the operation telling users to
add these commands to their SYSHUTDWN.COM file.
If you need files for the EXECUTE START…STOP
statement, you must provide them with FILE statements so that
they are available on the user's system for use after the installation
completes.
If you want your commands to prompt the user and accept the user's input,
specify the EXECUTE START statement with the INTERACTIVE
option. The INTERACTIVE option causes all output from DCL to be displayed,
unless you prevent it. In contrast, when the INTERACTIVE option is not
specified, output generated by DCL commands is displayed only for lines that are
interpreted as DCL messages, that is, those beginning with a percent sign (%) in
column one.
The EXECUTE UPGRADE statement causes the POLYCENTER
Software Installation utility to define a logical name for use by the subprocess
that executes the specified commands. It defines
PCSI$DESTINATION as a root directory specification
that points to the root directory for the current scope where product material
will be placed.
The EXECUTE START…STOP statement is a utility
directive and does not specify a managed object.
Examples
file [SYS$STARTUP]PRODUCT_STARTUP.COM ; file [SYS$STARTUP]PRODUCT_SHUTDOWN.COM ; execute start "@sys$startup:product_startup.com" stop "@sys$startup:product_shutdown.com" ;In this example, the
EXECUTE START…STOPstatement displays a message to users about command procedures they should run to start and stop the product:Insert the following lines in SYS$MANAGER:SYSTARTUP_VMS.COM: @SYS$STARTUP:PRODUCT_STARTUP.COM Insert the following lines in SYS$MANAGER:SHUTDOWN.COM: @SYS$STARTUP:PRODUCT_SHUTDOWN.COMThe
PRODUCT_STARTUP.COMcommand procedure is executed during the installation. ThePRODUCT_SHUTDOWN.COMcommand procedure is executed during theREMOVEoperation or during a product upgrade.file [SYS$STARTUP]ABS_STARTUP.COM ; execute start "@sys$startup:abs_startup.com" stop "" ;In this example, the
EXECUTE START…STOPstatement displays a message to users about command procedures they should run to start the product. Note that there are no commands executed when the product is stopped. The command procedureABS_STARTUP.COMexecutes during theINSTALLoperation, then the following message is issued:Insert the following lines in SYS$MANAGER:SYSTARTUP_VMS.COM: @SYS$STARTUP:ABS_STARTUP.COM
EXECUTE TEST
EXECUTE TEST — The EXECUTE TEST statement specifies an installation
verification procedure (IVP) to run after the product has been successfully
installed or reconfigured to perform a functional test of the
product.
Syntax
Parameter
(command,...) Indicates the commands that the utility passes to the command interpreter in the execution environment.
Option
- INTERACTIVE
Allows communication between the user and the specified command or command procedure executing in a subprocess.
Description
The EXECUTE TEST statement specifies an IVP to run after
the product has been successfully installed or reconfigured to perform a
functional test of the product. Prior to running this test, the product database
is updated and closed. The product remains installed or reconfigured even if the
functional test fails.
The user can prevent the running of the IVP by specifying the
/NOTEST qualifier on the PRODUCT
INSTALL or PRODUCT RECONFIGURE command.
You specify test actions to perform by including one or more DCL command lines
in the EXECUTE TEST statement. These commands are passed for
execution to the DCL interpreter running in a subprocess. Enclose each action,
whether specified as a single DCL command or a command procedure, in double
quotes (" "). If more than one action is given, use parentheses to enclose the
list.
If you need files for the EXECUTE TEST statement, you must
provide them with FILE statements.
If you want your commands to prompt the user and accept the user's input,
specify the EXECUTE TEST statement with the INTERACTIVE
option. The INTERACTIVE option causes all output from DCL to be displayed,
unless you prevent it. In contrast, when the INTERACTIVE option is not
specified, output generated by DCL commands is displayed only for lines that are
interpreted as DCL messages, that is, those beginning with a percent sign (%) in
column one.
The EXECUTE TEST statement causes the POLYCENTER Software
Installation utility to define a logical name for use by the subprocess that
executes the specified commands. It defines
PCSI$DESTINATION as a root directory specification
that points to the root directory for the current scope where product material
will be placed.
The EXECUTE TEST statement is a utility directive and does
not specify a managed object.
Example
file [SYSTEST]PROD$IVP.COM ;
execute
test "@sys$test:prod$ivp.com" ;In this example, the EXECUTE TEST statement runs a command
procedure to perform an installation verification test of the product.
EXECUTE UPGRADE
EXECUTE UPGRADE — The EXECUTE UPGRADE statement specifies the commands
to execute when the product is upgraded by another version of the
product.
Syntax
Parameter
(command,...) Indicates the commands that the utility passes to the command interpreter in the execution environment.
Option
- INTERACTIVE
Allows communication between the user and the specified command or command procedure executing in a subprocess.
Description
The EXECUTE UPGRADE statement specifies the commands to
execute when the product is upgraded by another version of the product. These
commands are run for the version of the product that is being replaced, not for
the new version of the product. To run commands when the product is removed (but
not upgraded by another version), use the remove portion of the EXECUTE
INSTALL…REMOVE statement to specify the commands.
If you need files for the EXECUTE UPGRADE statement, you
must provide them with FILE statements so that they are
available on the user's system when the product is upgraded.
The EXECUTE UPGRADE statement causes the POLYCENTER
Software Installation utility to define a logical name for use by the subprocess
that executes the specified commands. It defines
PCSI$DESTINATION as a root directory specification
that points to the root directory for the current scope where product material
will be placed.
The EXECUTE UPGRADE statement is a utility directive and
does not specify a managed object.
Example
file [sysupd]UPG_TASKS.COM ; execute upgrade "@PCSI$DESTINATION:[SYSUPD]UPG_TASKS.COM" interactive ;
In this example, the FILE statement places the command
procedure UPG_TASKS.COM on the destination disk during the product
installation. The EXECUTE UPGRADE statement specifies that
this command procedure is run only when this product is upgraded by the
installation of the same or different version of the product. In the future, if
an upgrade of the product is performed, this command procedure is run before any
product material is deleted from the destination disk. Use of the
INTERACTIVE option on the EXECUTE UPGRADE
statement allows the command procedure to interact with the user via the
SYS$INPUT and SYS$OUTPUT
I/O channels.
FILE
FILE — The FILE statement creates a file on the target disk.
If a file of the same name already exists, the POLYCENTER Software Installation
utility may replace the file, depending on the options specified.
Syntax
Parameter
name Specifies the name of the file object to install on the user's system. The name consists of a relative file directory specification, file name, and file type. The file version is ignored because the utility determines the file version to use at installation time.
If the file name contains two subsequent hyphens (--), mixed case, or lowercase, it must be enclosed in double quotes.
Options
- [NO] ACCESS CONTROL (access-control-entry...)
Indicates the minimum access control entries (ACEs) that the file will have. By default, files have no added ACEs (no access control).
- [NO] ARCHIVE
Allows you to preserve existing files during an upgrade. The POLYCENTER Software Installation utility appends _OLD to the end of the file type. For example, if you archived an existing file named STARTUP_TEMPLATE.SYS, the utility would rename it STARTUP_TEMPLATE.SYS_OLD. Note that the utility does not keep track of archived files as managed objects, or delete them when the product is upgraded or removed.
If there are several versions of the existing file, the utility renames the latest file type before deleting all of the remaining file versions. By default, the POLYCENTER Software Installation utility does not preserve existing file versions (no archive). You cannot use this option with the RELEASE MERGE or WRITE option.
- ASSEMBLE EXECUTE (command,...)
Establishes the contents of the file by executing the specified commands. Specify the command lines as quoted or unquoted strings.
- ASSEMBLE USES (file,...)
Indicates a list of additional files required by the ASSEMBLE EXECUTE option. You must include the relative file specification. Files specified with this option are placed in a temporary directory for use by the ASSEMBLE EXECUTE option and are automatically deleted after use. By default, the ASSEMBLE EXECUTE option does not require additional files.
- [NO] GENERATION generation
Indicates that the file has an explicit generation number. Specify the number as an unsigned integer in the range 0 through 4294967295. See the Description section for the meaning of this value. By default, the file does not have an explicit generation number (no generation), which is equivalent to 0.
- IMAGE LIBRARY
Indicates that the file's symbols are inserted into the system shareable image symbol table library. The file must be a shareable image.
- OWNER owner
Indicates the account name that owns the file. By default, the file is owned by the SYSTEM account. If you specify a numeric value for name, you must enclose the string in quotation marks, for example
"[11,7]".- PROTECTION EXECUTE
Sets the file protection to (S:RWED, O:RWED, G:E, W:E) giving general users execute access.
- PROTECTION PRIVATE
Sets the file protection to (S:RWED, O:RWED, G, W), giving general users no access.
- PROTECTION PUBLIC
Sets the file protection to (S:RWED, O:RWED, G:RE, W:RE), giving general users read and execute access. This is the default.
- RELEASE MERGE
Indicates that library modules propagate during a version upgrade. If modules are present in the existing library but not in the new library, they are propagated to the new library. The file you specify with the name parameter must be a library. You cannot use this option with the ARCHIVE, RELEASE REPLACE, or WRITE option.
- RELEASE NOTES
Indicates that the file is a release notes file. Users can extract the release notes to a file using the DCL command
PRODUCT EXTRACT RELEASE_NOTES. The release notes are created in the file DEFAULT.PCSI$RELEASE_NOTES in the current directory, or in the file specified by the user with the/FILEqualifier.- SIZE size
Do not specify this option in your PDF. When you package your product, the utility calculates the size (in blocks) of the files you specify and provides this option in the output PDF. If you specify this option in the input PDF to a
PRODUCT PACKAGEcommand, the option is ignored.- SOURCE source
Specifies the name of the file to package that supplies the contents for the file specified in the name parameter of the file statement.
The source file name consists of a relative directory specification, file name, and file type of a file in the materials directory path. File version number is not used because the file with the highest version is packaged. Use this option when the input file for the package operation has a different relative file specification than the output file your kit installs on the user's system. By default, the name of the input file for the package operation is the same as the output file created in the execution environment when the kit is installed.
- [NO] WRITE
Indicates that you expect users to modify the file during system operation. If you specify this option during a version upgrade, if the file already exists, it remains the active version. For example, the OpenVMS operating system PDF uses this option for [SYSMGR]SYSLOGIN.COM. The default is no write. You cannot use this option with the ARCHIVE or RELEASE MERGE options.
Description
The FILE statement creates a file object on the target
disk. You specify a file managed object with either the
name parameter or the SOURCE option. The file must be
supplied as product material, unless the ASSEMBLE EXECUTE option is used to
dynamically create the file. The LINK and LOADABLE
IMAGE statements can also specify references to a file-managed
object.
File Conflict
Two types of file conflict can occur:
An interproduct file conflict occurs when two or more products provide a file with the same name in the same directory. Files with the same name can co-exist in different directories.
An intraproduct file conflict occurs when two or more patch or partial kits for a product update the same file.
For example, OpenVMS provides the file DUDRIVER.EXE. If you install two different remedial kits for a particular version of OpenVMS that both update this file, an intraproduct file conflict results.
Intraproduct file conflict detection and resolution was introduced in the version of the utility that shipped with OpenVMS Alpha Version 7.1-2 and OpenVMS VAX Version 7.2. This enhancement allows patch and partial kits to be installed "out-of-order" while providing the most up-to-date files. Prior to this change, files from patch or partial kits always superseded the previously installed files.
The utility resolves a file conflict by comparing the generation numbers of the files involved.
Do not confuse generation numbers with file versions. A generation number is an optional attribute you supply on a file statement using the GENERATION option. A generation number can be any integer in the range of 0 to 4294967295. For example:
file [SYSEXE]ABC.EXE generation 100;
If you do not specify a generation number, its default value is 0. Table 7.2, ''Resolving File Conflict with Generation Numbers'' shows how the utility resolves a file conflict.
|
If the generation numbers... |
Then |
|---|---|
|
… are different |
The file with the largest non-zero number is selected. |
|
… are the same and are not zero |
The file from the kit replaces the previously installed file. |
|
… are zero |
Unresolvable file conflict, an error is reported to the user. |
Generation information is not used for intraproduct conflict detection when a product is upgraded. In this case, all files from the old version are deleted, and new files from the kit are placed on the target disk. However, generation information is used during an upgrade for interproduct conflict detection when any files from the product conflict with files from another product.
Logical Names
PCSI$SOURCE is a root directory specification under the user's login directory. It is used for temporary placement of the files specified by the ASSEMBLE USES option. This logical name is defined for the subprocess in which product-supplied commands execute. It is not the same PCSI$SOURCE logical name that can be defined by a user, in the user's process, pointing to the location of a product kit.
PCSI$DESTINATION is a root directory specification under the user's login directory used as a staging area. The commands specified in the ASSEMBLE EXECUTE option are responsible for creating a file in this directory tree whose name matches the one specified in the file name parameter. After the commands are executed, the utility moves the file to the product's destination directory for the current scope. This logical name is defined for the subprocess in which product-supplied commands execute. It is not the same PCSI$DESTINATION logical name pointing to the target disk that can be defined by a user in the user's process.
PCSI$SCRATCH is a subdirectory under the user's login directory that can be used by commands for temporary working space. This directory and any files placed in it are automatically deleted at the end of the operation.
Scope and Lifetime
The scope and lifetime of the file managed object depend on whether it is contained within a SCOPE, END SCOPE pair as shown in Table 7.3, ''File Managed Object Scope and Lifetime''.
|
Type of Scope Group |
Lifetime |
Scope |
|---|---|---|
|
Product ? |
Product |
Product |
|
Global |
Assembly |
Global |
|
Bootstrap |
Operating |
Bootstrap |
|
Processor |
Operating |
Processor |
Access Control Managed Object
You can include an ACCESS CONTROL option in a FILE
statement to control access to a file managed object. Each access control entry
(ACE) you specify creates an ACE managed object with the following
characteristics:
It is unnamed.
It has operating lifetime. It has the same scope as the file managed object.
The system resolves managed object conflict by managed object collection.
Image Library Managed Object
For a FILE statement that provides a shareable image, you
can specify the IMAGE LIBRARY option to direct the utility to insert the file's
symbols into the system shareable image symbol table library. This action
creates an image library module object with the following
characteristics:
It must be unique within the global scope.
It has assembly lifetime and global scope.
Managed object conflict is not recoverable.
See Also
Examples
file [SYSMGR]PROD01.DAT access control ("(IDENTIFIER=[TEST],ACCESS=READ)", "(IDENTIFIER=[PROD_USER],ACCESS=READ+WRITE)", "(IDENTIFIER=*,ACCESS=NONE)") write;The
FILEstatement in this example specifies that the filePROD01.DATcannot be accessed by any user account other thanTEST, which is allowed to read it, andPROD_USER, which is allowed to read and write the file.file [SYSLIB]FDVSHR.EXE image library ;
The
FILEstatement in this example specifies that the symbols for the shareable image[SYSLIB]FDVSHR.EXEare inserted into the system shareable image symbol table library.file [SYSMGR]DECW$STARTUP.COM protection public ;
The
FILEstatement in this example creates the file[SYSMGR]DECW$STARTUP.COM, giving users read and execute access.file [SYSMGR]DECW$SYLOGIN.COM protection public source [SYSMGR]DECW$SYLOGIN.TEMPLATE ;The
FILEstatement in this example creates the file[SYSMGR]DECW$SYLOGIN.COMin the execution environment using the contents of the file[SYSMGR]DECW$SYLOGIN.TEMPLATEfrom product material packaged in the kit. You do not have to specify the source file with a separateFILEstatement. ThePACKAGEcommand always requires a/MATERIALqualifier.file [SYSMGR]DECW$SYSTARTUP.COM generation 56 archive ;
The
FILEstatement in this example creates the file[SYSMGR]DECW$SYSTARTUP.COM. If a version of the file already exists in the directory, the existing file is renamed[SYSMGR]DECW$SYSTARTUP.COM_OLDinstead of being deleted. It also assigns a generation number to the file for conflict resolution. For example, if a version of the file already exists with a generation number of 60, the utility will preserve the copy with generation number 60 and will not create a new one.file [SYSEXE]CALIBRATE.EXE assemble execute "@PCSI$SOURCE:[TEMP]CALIBRATE_LINK.COM" assemble uses ("[TEMP]CALIBRATE.OBJ", "[TEMP]CALIBRATE_LINK.COM") ;The
FILEstatement in this example creates the file[SYSEXE]CALIBRATE.EXEin the execution environment by executing a command procedure to link the image. The link command procedure and object file are obtained from product material packaged in the kit. The link command inCALIBRATE_LINK.COMuses the link qualifier/EXECUTABLE=PCSI$DESTINATION:[SYSEXE]CALIBRATE.EXEto create the image file.file "[EXAMPLES.C_CODE]ERROR–42-49.C" ;
The relative file specification in the
FILEstatement above is enclosed in quotes because the file name contains consecutive hyphen characters. A double hyphen usually indicates a comment delimiter in the PDF, unless it is part of a quoted string.if (<software AXPVMS VMS version minimum V7.1 version below A7.2>) ; file [syslib]debugshr.exe source [syslib]debugshr_v71.exe ; else if (<software AXPVMS VMS version minimum A7.2>) ; file [syslib]debugshr.exe source [syslib]debugshr_v72.exe ;The PDL statements above conditionally provide a file named
DEBUGSHR.EXEbased on the version of the OpenVMS operating system that is installed. Separate shareable images linked to run on OpenVMS Version 7.1 and OpenVMS Version 7.2 (or later) are packaged in the kit. If the version of OpenVMS is at least Version 7.1, the appropriate image is selected and installed asDEBUGSHR.EXE.
HARDWARE DEVICE
HARDWARE DEVICE — The HARDWARE DEVICE statement identifies a required
hardware device that must be present in the execution environment. If the device
is not present, the utility prompts the user either to continue or to terminate
the operation. The HARDWARE DEVICE function tests whether a specified device is
present. The value is true if the device is present; otherwise, the value is
false.
Statement Syntax
Function Syntax
Parameter
name Indicates the device name of the hardware device. You must include the colon (:) at the end of the device name.
Description
Statement
The HARDWARE DEVICE statement specifies a required hardware
device. If the device is not present, the utility prompts the user to continue
or to terminate the operation.
If the operation executes in batch mode and requires user interaction, the operation terminates.
Function
The HARDWARE DEVICE function tests whether the specified device is present. The value is true if the device is present; otherwise, the value is false.
See Also
Examples
hardware device LPA0: ;
The
HARDWARE DEVICEstatement in this example specifies that if the device namedLPA0:is not present in the execution environment, then the utility displays a message prompting the user either to continue or to terminate the operation.if (<hardware device GAA0:>) ; file [SYSEXE]SMFDRIVER.EXE ; end if ;The
HARDWARE DEVICEfunction in this example provides the file[SYSEXE]SMFDRIVER.EXEif the deviceGAA0:is present.
HARDWARE PROCESSOR
HARDWARE PROCESSOR — The HARDWARE PROCESSOR statement identifies a system
processor model that must be present in the execution environment. If the model
is not present, the utility prompts the user either to continue or to terminate
the operation. The HARDWARE PROCESSOR function tests whether the specified
system processor model is present. The value is true if the model is present;
otherwise, the value is false.
Statement Syntax
Function Syntax
Parameter
MODEL (model,...) Indicates processor model identifiers as integer values. You can obtain the processor model number by using the DCL lexical function F$GETSYI("CPU").
Description
Statement
The HARDWARE PROCESSOR statement specifies a system
processor model. If the model is not present, the utility prompts the user to
either continue or terminate the operation.
If the operation executes in batch mode and requires user interaction, the operation terminates.
Function
The HARDWARE PROCESSOR function tests whether the specified system processor model is present. The value is true if the model is present; otherwise, the value is false.
See Also
Example
Suppose the PDF contains the following lines:
if (<hardware processor model 7>) ;
error UNSPROC ;
end if ;You would have an UNSPROC module in the PTF similar to the following:
1 UNSPROC =prompt Not supported on MicroVAX I. This product is not supported on the MicroVAX I processor.
If the processor model is 7, the system displays a message supplied by the text module UNSPROC indicating that the product is not supported on the MicroVAX I computer. The user is then prompted to continue or terminate the operation.
IGNORE DESTINATION_PATH
IGNORE DESTINATION_PATH — The IGNORE DESTINATION_PATH statement always installs
the software product to the default path.
Syntax
Description
The IGNORE DESTINATION_PATH statement installs the software
product to the default path (SYS$SYSDEVICE:[VMS$COMMON]
and the directories below it). If the system manager specifies
PCSI$DESTINATION or uses the
/DESTINATION qualifier when entering the installation
command, the user will be shown a message that the product should be installed
to the default destination, and if the user does not agree to this, the
installation will be aborted.
Example
IGNORE DESTINATION_PATH ;In this example,
IGNORE DESTINATION_PATH will ignore the installation
destination path if one is specified.IF
IF — The IF statement conditionally processes a group of
statements based on the evaluation of an expression. The IF,
ELSE, ELSE IF, and END
IF statements are used together to form an IF
group.
Syntax
Parameter
expression <HARDWARE DEVICE>
<HARDWARE PROCESSOR>
<LOGICAL NAME>
<OPTION>
<SOFTWARE>
<UPGRADE>
(term)
(term AND term)
(term OR term)
(NOT term)
Option
PDL-statements Any product description language statement or a group of statements described
in this reference section, except the PRODUCT and
END PRODUCT statements.
Required Terminator
Description
The IF group conditionally processes a group of statements
based on the evaluation of an expression. The utility executes the statements
contained in the IF group up to the first occurrence of an
ELSE IF statement (if present), an
ELSE statement (if present), or END IF
statement if the expression evaluates to true. The utility skips these
statements if the expression evaluates to false.
ELSE IF
The ELSE IF statement is valid only if it is immediately
contained in an IF group and is not lexically preceded by an
ELSE statement.
The utility executes the statements lexically contained in the
IF group between the ELSE IF statement
and the next occurrence of an ELSE, ELSE
IF, or END IF statement if all of the following
conditions exist:
The result of evaluating the expression in the
IFstatement is false.The result of evaluating the expression in all lexically preceding
ELSE IFstatements in the sameIFgroup (if present) is false.The result of evaluating the
ELSE IFexpression is true.
If any of these conditions are not satisfied, the utility also does not
execute statements lexically contained in the IF group
between the ELSE IF statement and the next occurrence of an
ELSE, ELSE IF, or END
IF statement.
ELSE
The ELSE statement is valid only if it is immediately
contained in an IF group and is the only
ELSE statement in the IF group. The
utility executes the statements following the ELSE statement
(in the same IF group) if both of the following conditions
exist:
The result of evaluating the expression in the
IFstatement is false.The result of evaluating the expression in all lexically preceding
ELSE IFstatements in the sameIFgroup (if present) is false.
If either of these conditions is not satisfied, the utility does not execute
statements lexically contained in the IF group between the
ELSE statement and the END IF
statement.
Examples
if (<software AXPVMS DECWINDOWS>) ; file [SYSEXE]PRO$DW_SUPPORT.EXE ; else if (<software VSI AXPVMS MOTIF>) ; file [SYSEXE]PRO$MOTIF_SUPPORT.EXE ; else ; file [SYSEXE]PRO$CC_SUPPORT.EXE ; end if ;This example uses the
IFstatement in conjunction with theSOFTWAREfunction to determine which file to provide, as follows:If DECwindows is present, the utility provides the file
[SYSEXE]PRO$DW_SUPPORT.EXE.If DECwindows is not present and DECwindows Motif is present, the utility provides the file
[SYSEXE]PRO$MOTIF_SUPPORT.EXE.If neither DECwindows nor DECwindows Motif is present, the utility provides the file
[SYSEXE]PRO$CC_SUPPORT.EXE.
if ((NOT <hardware device MUA0:>) AND (<software ABC AXPVMS TEST version below 2.0>)); . . . end if;In this example, the group of statements enclosed within the
IF…END IFstatements is executed if noMUA0:device is available on the target system and the productTESTwith a version belowV2.0is present. The expression evaluates to false either if there is anMUA0:device, the productTESTisV2.0or above, or no such product is installed.
INFER
INFER — The INFER statement tests the target system to
determine if a product or product version is available. The
INFER statement is valid only in a transition
PDF.
Syntax
Parameters
file Indicates the relative file specification of the file you want to test.
logical-name Indicates the logical name you want to test.
Description
The INFER statement tests the target system to determine if
a product or product version is available. This statement is valid only in a
transition PDF.
There are several types of INFER statements:
- The
INFER AVAILABLEstatement tests the target system to determine if the product named in the product directive of the transition PDF is available.The
INFER AVAILABLE FROM INSTALLstatement tests whether the product is available only if the specified file is installed as a known image. TheSCOPEstatement controls execution of this statement; the test executes in the specified scope.The
INFER AVAILABLE FROM LOGICAL NAMEstatement tests whether the product is available only if the logical name you specify has a translation.
The
INFER VERSIONstatement tests the target system to determine the presence and active version of the product named in the product directive of the transition PDF. The product is inferred to be present if the specified file is present on the system and absent otherwise. If the product is present, the active version is inferred to be the internal version number of the specified file. TheSCOPEstatement controls execution of this statement; the test executes in the specified scope.
See Also
Examples
infer available from logical name DOC$ROOT ;
The
INFER AVAILABLEstatement in this example determines if the product is available by checking to see if there is a translation for the logical nameDOC$ROOT. The name of the product that the statement is testing for is contained in the product directive in the transition PDF.infer version from [SYSEXE]FORTRAN.EXE
The
INFER VERSIONstatement in this example determines the active version of the product by checking to see if the file[SYSEXE]FORTRAN.EXEis present.
INFORMATION
INFORMATION — The INFORMATION statement displays a message from the
specified text module in the PTF either before or after the execution of an
installation, configuration, or reconfiguration operation.
Syntax
Parameter
name Indicates, as a quoted or unquoted string, the name of the associated PTF text module. The name you specify can be from 1 to 31 characters in length and must be unique among all names in the same product description.
Options
- [NO] CONFIRM
Displays the contents of the text module and prompts the user for a response. The user can continue or terminate the operation. The CONFIRM option does not have any effect in batch mode. The default is NO CONFIRM.
- PHASE AFTER
Displays the contents of the text module after the execution phase of the operation finishes. This option cannot be used with the PHASE BEFORE option.
- PHASE BEFORE
Displays the contents of the text module during the configuration phase. This option is the default and cannot be used with the PHASE AFTER option.
- WITH HELPTEXT
Forces the display of the full help text module during the installation or configuration of the product.
Description
The INFORMATION statement displays a message from the
specified text module in the PTF either before or after the execution of an
installation, configuration, or reconfiguration operation as directed by the
phase option. The PHASE BEFORE option causes the message to be displayed during
the configuration phase of the operation; the PHASE AFTER option causes the
message to be displayed after the execution phase of the operation.
By default, the prompt text string is displayed without help text. However,
help text is displayed after the prompt text when the user specifies the
/HELP qualifier on the command line, or the
INFORMATION statement contains the WITH HELPTEXT
option.
You must supply prompt text for the INFORMATION statement
in the PTF using the =prompt directive. Help
text is optional. If provided, it must immediately follow the prompt text
line.
If you have INFORMATION statements that specify the PHASE
BEFORE option and they are lexically contained in a group with configuration
choices, they are processed in lexical order and may be nested.
Information statements that specify the PHASE AFTER option do not display text
if they are lexically contained in an OPTION group that is
not selected.
The CONFIRM option to the INFORMATION statement causes the
utility to prompt the user to continue or terminate the operation.
The INFORMATION statement declares a name; it is not a
variable.
Example
Suppose the product text file for VSI Rdb for OpenVMS software contains the following lines:
1 RELEASE_NOTES =prompt Release notes for Rdb/VMS available. The release notes for Rdb/VMS are available in the file SYS$HELP:RDBVMSV4.RELEASE_NOTES. 1 STOP_RDB_VMS_MONITOR =prompt The Rdb for OpenVMS monitor must be stopped before installation The Rdb for OpenVMS monitor must be stopped before you install Rdb for OpenVMS. Perform the following operation: $ @SYS$MANAGER:RMONSTOP
The product description file could contain the following information statements:
information RELEASE_NOTES phase after ; information STOP_RDB_VMS_MONITOR phase before with helptext confirm;
If the user requests help, the first INFORMATION statement
displays the following text after the operation finishes:
Release notes for Rdb for OpenVMS available. The release notes for Rdb for OpenVMS are available in the file SYS$HELP:RDBVMSV4.RELEASE_NOTES.
If the user does not request help, the first INFORMATION
statement displays only the prompt text after the operation finishes:
Release notes for Rdb for OpenVMS available.
Regardless of whether the user requests help or not, the second
INFORMATION statement displays the following text for the
user during the configuration phase:
The Rdb for OpenVMS monitor must be stopped before installation The Rdb for OpenVMS monitor must be stopped before Rdb for OpenVMS may be installed. Perform the following operation: $ @SYS$MANAGER:RMONSTOP Do you want to continue [YES]?
Regardless of whether the HELP DISPLAY option is set, the confirm
option in the second statement forces the user to respond to the prompt before
continuing.
LINK
LINK — The LINK statement specifies a second directory entry
for a file or directory.
Syntax
Parameters
name Indicates the file specification of the second directory entry.
FROM source Indicates the file specification of an existing directory entry for the file
or directory. The parameter string must be a single quoted or unquoted string.
The referenced file or directory must be defined by a
DIRECTORY or FILE statement in the
same product description.
Description
The LINK statement specifies a second directory entry for a
file or directory. The managed object type of the file with the second directory
entry is "link".
The scope and lifetime of the link managed object depend on whether it is
contained in a SCOPE group, as shown in Table 7.4, ''Link Managed Object Scope and Lifetime''.
|
Type of Scope Group |
Lifetime |
Scope |
|---|---|---|
|
Product |
Product |
Product |
|
Global |
Assembly |
Global |
|
Bootstrap |
Operating |
Bootstrap |
|
Processor |
Operating |
Processor |
If the LINK statement is not contained in a
SCOPE, END SCOPE pair or it is
contained in a SCOPE PRODUCT group, the link managed object
has product lifetime and product scope.
Managed object conflict is unrecoverable.
Examples
file [SYS$EXE]FMS.EXE; link [SYSEXE]FMS.EXE from [SYS$EXE]FMS.EXE ;
The statement in this example specifies that the file
[SYSEXE]FMS.EXEis linked to the file[SYS$EXE]FMS.EXE. Both files,[SYS$EXE]FMS.EXEand[SYSEXE]FMS.EXE, have the same file ID.directory [ABC] ; directory [DEF] ; link [DEF]ABC.DIR from [000000]ABC.DIR;
This example illustrates how to create a second directory entry
[DEF.ABC]for a directory[ABC].
LOADABLE IMAGE
LOADABLE IMAGE — The LOADABLE IMAGE statement places an image into the system loadable images table, SYS$LOADABLE_IMAGES:VMS$SYSTEM_IMAGES.DATA, and also into SYS$UPDATE:VMS$SYSTEM_IMAGES.IDX for compatibility with the System Management utility (SYSMAN).
Syntax
Parameters
image Indicates the file name of the system loadable image. The name you specify must be defined in the same product description and must have bootstrap scope and product or assembly lifetime.
PRODUCT product Indicates the product mnemonic (as a single quoted or unquoted string of 1 to 8 characters) that uniquely identifies the loadable image. For user-written images, this should typically contain the string _LOCAL_.
Options
- STEP INIT
Indicates that the system load the image during the INIT step of the booting process.
- STEP SYSINIT
Indicates that the system load the image during the SYSINIT step of the booting process. This is the default.
- MESSAGE text
Indicates the message you want displayed using the severity option. The message must be a single quoted or unquoted string. Case is significant. By default, the severity option displays the message "system image load failed".
- SEVERITY FATAL
Indicates that if an error occurs while the image is being loaded, the system displays the message and bugchecks; if no error occurs, processing continues.
- SEVERITY SUCCESS
Indicates that the system continue processing and not display a message regardless of whether an error occurs while the image is being loaded.
- SEVERITY WARNING
Indicates that if an error occurs while the image is being loaded, the system displays the message and continues; if no error occurs, the system continues and does not display the message. This is the default.
Description
The LOADABLE IMAGE statement places an image into the
system loadable images table,
SYS$LOADABLE_IMAGES:VMS$SYSTEM_IMAGES.DATA, and
also into SYS$UPDATE:VMS$SYSTEM_IMAGES.IDX for
compatibility with the System Management utility (SYSMAN).
The LOADABLE IMAGE statement specifies a loadable image
module managed object that has the following characteristics:
It must be unique within the global scope.
It has assembly lifetime and global scope.
It does not recover from managed object conflict.
The LOADABLE IMAGE statement also refers to a file managed
object specified using the image parameter.
See Also
Example
loadable image DDIF$RMS_EXTENSION product _LOCAL_
message "DDIF Extension not loaded"
severity warning ;The statement in this example places the user-written image
DDIF$RMS_EXTENSION in the system loadable images table. If an
error occurs while loading this image, the system displays the error message
"DDIF Extension not loaded" and continues.
LOGICAL NAME
LOGICAL NAME — The LOGICAL NAME function tests whether the specified
logical name is defined in the designated logical name table and optionally has
an equivalence string with a particular value. There is no corresponding
LOGICAL NAME statement.
Function Syntax
Parameter
NAME name Indicates the logical name string.
Options
EQUALS value Specifies the value of the equivalence name string that must match the translation of the logical name to cause the function to evaluate as TRUE. If you do not use the EQUALS option to specify an equivalence name, the presence of the logical name in the specified or default logical name table is sufficient to make the function evaluate as TRUE.
TABLE table-name Specifies the name of the logical name table to search. If you do not use the TABLE option to designate a logical name table, LNM$SYSTEM_TABLE becomes the default table to search.
Description
The LOGICAL NAME function tests whether the specified
logical name is defined in the designated logical name table and optionally has
an equivalence string with a particular value.
The function evaluates as TRUE if the logical name is defined in the designated logical name table (or the system logical name table by default) and, if a value for the logical name is specified, the translation of the logical name provides an equivalence string that matches that value. Otherwise, the function evaluates as FALSE. Note that only one logical name table is searched.
The LOGICAL NAME function is evaluated immediately after processing all
EXECUTE PRECONFIGURE statements that may be present in
the PDF. This has the following implications:
- For the logical name function to evaluate as TRUE, it must be defined in one of the following ways:
By the user before the
PRODUCTcommand is invokedBy the action of a command procedure run by the processing of an
EXECUTE PRECONFIGUREstatement.
A logical name defined during the processing of any other type of
EXECUTEstatement will not be used in the evaluation of a logical name function. A logical name function cannot be used to conditionalize the execution of an
EXECUTE PRECONFIGUREstatement. If anEXECUTE PRECONFIGUREstatement is enclosed in anIFgroup that tests for a logical name, theEXECUTE PRECONFIGUREstatement will always be executed.
The primary purpose of the logical name function is to provide a mechanism for
the product developer to conditionalize the execution of PDL statements based on
the definition of a logical name that can be established dynamically after the
user selects a product kit, but before the configuration phase begins. By using
an EXECUTE PRECONFIGURE command procedure, you can probe the
system environment or interact with the user to gather information to define a
logical name as appropriate. This allows you to affect the processing of PDL
statements within an IF group during the execution phase of
an installation, configuration, or reconfiguration operation.
Example
execute preconfigure "@PCSI$SOURCE:[SYSUPD]EXEC_PREC.COM"
uses [SYSUPD]EXEC_PREC.COM interactive ;
if ( < logical name YOUR_ANSWER equals MENU_ITEM_1 > ) ;
file [SYSEXE]FILE1.EXE ;
else if ( < logical name YOUR_ANSWER equals MENU_ITEM_2 > ) ;
file [SYSEXE]FILE2.EXE ;
else if ( < logical name YOUR_ANSWER equals MENU_ITEM_3 > ) ;
file [SYSEXE]FILE3.EXE ; end if ;The utility limits your configuration options to accept only true or false values. This example illustrates how to program multiple choice questions.
The EXECUTE PRECONFIGURE statement runs commands from the
EXEC_PREC.COM file in an interactive mode. The user is prompted to select one of three
menu items. The answer is stored by the command procedure as an equivalence name
to a logical name YOUR_ANSWER. The logical name is evaluated
immediately after the EXECUTE PRECONFIGURE statement and the
result is stored internally. During the execution phase, the LOGICAL
NAME function is evaluated and, based on the result, the
IF group installs the appropriate file.
MODULE
MODULE — The MODULE statement adds or replaces one or more
modules in a command, help, macro, object, or text library file.
Syntax
Parameters
file Indicates the relative file specification of the file that contains the modules.
TYPE type The library type. Table 7.5, ''Library Types for Module Statement'' lists the keywords you can specify with this parameter.
|
Keyword |
Library Type |
Default Library File |
|---|---|---|
|
Command |
Command definition library |
[SYSLIB]DCLTABLES.EXE |
|
Help |
Help library |
[SYSHLP]HELPLIB.HLB |
|
Macro |
Macro library |
[SYSLIB]STARLET.MLB |
|
Object |
Object library |
[SYSLIB]STARLET.OLB |
|
Text |
Text library |
[SYSLIB]STARLETSD.TLB |
MODULE module-name The list of module names you are specifying.
Options
- [NO] GENERATION generation
Indicates that the file has an explicit generation number. Specify the number as an unsigned integer in the range of 0 through 4294967295. See the Description section for the meaning of this value. By default, the file does not have an explicit generation number (no generation), which is equivalent to 0.
- [NO] GLOBALS
Indicates whether the global symbol names of the modules you are inserting into an object library are included in the global symbol table. You can use this option with object libraries only. By default, the global symbols of the module are inserted into the global symbol table.
- LIBRARY library
Indicates the relative file specification of the library. The file you specify must be a library of the type you specified with the TYPE parameter.
- [NO] SELECTIVE SEARCH
Indicates whether the input modules being inserted into the library are available for selective searches by the linker (by default, they are not). You cannot use this option with the command and help libraries. For more information about selective searches, refer to the VSI OpenVMS Linker Utility Manual.
Description
The MODULE statement adds or replaces one or more modules
in a command library file, or a single module in a help, macro, object, or text
library file. The MODULE statement adds the module name to
the product database. You do not need to use a REGISTER
MODULE statement in addition to a MODULE
statement to register the module name.
Use the MODULE parameter to specify the name of the module object. For a help, macro, object, or text library, the name specified with the MODULE parameter should be the same as the name of the module itself.
The module object has assembly lifetime, and its scope is the same as the library.
A module inserted into a command, help, object, text, or macro library can conflict with another module having the same name that is already resident in the library. Two types of module conflict can occur:
An interproduct module conflict occurs when two or more products provide a module with the same name.
An intraproduct module conflict occurs when two or more patch or partial kits for a product update the same module.
The utility resolves a module conflict by comparing the generation numbers of the modules involved.
A generation number is an optional attribute you supply on either the
MODULE or REGISTER MODULE statement
using the GENERATION option. A generation number can be any integer in the range
of 0 to 4294967295. If you do not specify a generation number, its default value
is 0.
|
If the generation numbers |
Then |
|---|---|
|
Are different |
The module with the largest non-zero number is selected. |
|
Are the same and are not zero |
The module from the kit replaces the previously installed module. |
|
Are zero |
Unresolvable file conflict, an error is reported to the user. Note that for V6.1-V6.2 a module with an explicit generation number of 0 might be selected over a module with a default value of 0. |
Generation information is not used for intraproduct conflict detection when a product is upgraded. In this case, all modules from the old version are deleted, and new modules from the kit are placed on the target disk. However, generation information is used during an upgrade for interproduct conflict detection when any modules from the product conflict with modules from another product.
Examples
module [SYSUPD]CDD.CLD type COMMAND module CDD ;
The statement in this example creates the command module
CDDin the default command library[SYSLIB]DCLTABLES.EXEusing the file[SYSUPD]CDD.CLD.module [SYSUPD]HELP.HLP type HELP module HELP ;
The statement in this example creates the help module in the default help library
[SYSHLP]HELPLIB.HLBusing the file[SYSUPD]HELP.HLP.module [SYSUPD]SPI$CONNECT.MAR type MACRO library [SYSLIB]LIB.MLB module SPI$CONNECT ;The statement in this example creates the macro module
SPI$CONNECTin the macro library[SYSLIB]LIB.MLBusing the file[SYSUPD]SPI$CONNECT.MAR.module [SYSUPD]COBRTL.OBJ type OBJECT module COBRTL;
The statement in this example creates the object module
COBRTLin the default object library[SYSLIB]STARLET.OLBusing the file[SYSUPD]COBRTL.OBJ.module [SYSUPD]PROTOTYPE_BOOK.TXT type TEXT library [SYSLIB]LPS$FONT_METRICS.TLB module PROTOTYPE_BOOK;The statement in this example creates the text module
PROTOTYPE_BOOKin the text library[SYSLIB]LPS$FONT_METRICS.TLBusing the file[SYSUPD]PROTOTYPE_BOOK.TXT.
NETWORK OBJECT
NETWORK OBJECT — The NETWORK OBJECT statement uses a command procedure
to create a DECnet network object.
Syntax
Parameters
name Indicates the name of the network object. The network object name is passed to the command procedure as P1.
WITH (parameters,...) Indicates the list of parameters that are passed to the command procedure that creates the network object. Each parameter must be a single quoted string that specifies P2 through P5, in order. See the Description section for the meaning of the parameters.
Description
The NETWORK OBJECT statement uses a command procedure
(SYS$UPDATE:PCSI$CREATE_NETWORK_OBJECT.COM) to
create network objects. The command procedure determines whether DECnet Phase IV
or DECnet-Plus is running on the system. If Phase IV is being used, the command
procedure runs the Network Control Program (NCP) utility to create the network
object. Otherwise, it runs the Network Control Language (NCL) utility.
In the case of DECnet-Plus, the network object created during the product installation will exist only in memory. It is recommended that DECnet-Plus objects be supplied in the form of an NCL script with a FILE statement and activated with a product startup procedure.
The utility passes the following parameters to the command procedure:
P1 specifies the name of the network object (using the name parameter).
P2 specifies the object number (for DECnet Phase IV systems only).
P3 specifies the user name associated with the object. If you specify a user name, it must already exist.
Note
The password of the specified user account is changed when the network object is created by PCSI$CREATE_NETWORK_OBJECT.COM. The new password is system generated, and can be viewed with the NCP command
SHOW OBJECT.P4 specifies optional parameters to use with the NCP command
DEFINE OBJECTfor DECnet Phase IV objects.P5 specifies optional parameters to use with the NCL command
CREATE SESSION CONTROL APPLICATIONfor DECnet-Plus objects.
When you remove a product that created network objects, the POLYCENTER Software Installation utility uses a command procedure (SYS$UPDATE:PCSI$DELETE_NETWORK_OBJECT.COM) to delete network objects associated with your product
Note
In a future version, the utility may create and delete these managed objects directly without the use of command procedures. If this is the case, these statements will continue to function, but the command procedures may not be maintained or shipped with future versions of the utility.
The NETWORK OBJECT statement specifies a network object
managed object that has the following characteristics:
Its name is the value of the name parameter. The name must be unique with respect to all network object names in the processor scope.
It has operating lifetime and processor scope.
Managed object conflict is not recoverable.
Examples
network object k$test with ("number 107", "user KRYPTON") ;In this example, the
NETWORK OBJECTstatement creates a network DECnet Phase IV object namedk$test. Its object number is107and it will execute as userKRYPTON.file [SYSMGR]NETOBJ_TEST.NCL; file [SYS$STARTUP]PRODUCT_STARTUP.COM ; execute start "@sys$startup:product_startup.com" stop "";In this example, the first
FILEstatement supplies the DECnet-Plus NCL script file. This script can contain NCL directives that create a DECnet-Plus network object, that is, session control application. For example, the script file might contain the following NCL commands:. . . delete session control application k_test create session control application k_test set session control application k_test . . .
The network object name is
k_test.The second
FILEstatement supplies a command procedure, which is executed as a result of processing theEXECUTE STARTstatement during the product installation. The startup command procedure may contain the following DCL command that forces the NCL script file to be executed:. . . $ MCR NCL DO NETOBJ_TEST.NCL . . .
The startup command procedure can be placed later into the system startup procedure to execute each time the user's system is rebooted.
OPTION
OPTION — The OPTION statement conditionally processes a group
of statements based on the user's response to a question. The
OPTION and END OPTION statements form
an OPTION group.
Statement Syntax
Function Syntax
Parameter
name Indicates, as a quoted or unquoted string, the name of the associated PTF text module. This text module contains the text of a question that will be displayed to the user. The name you specify can be from 1 to 31 characters and must be unique among all text modules in the PDF; that is, two PDL statements cannot refer to the same text module.
Options
- DEFAULT value
Indicates the default value for the option. The value must be either 1 (true), 0 (false), yes, no, true, or false; the default is 1 (true).
If you specify an
OPTIONstatement with the default value 0, and theOPTIONgroup contains otherOPTIONstatements, any defaults for the enclosedOPTIONstatements apply only when the top-levelOPTIONstatement is selected.- WITH HELPTEXT
Forces the display of the full help text module during the installation or configuration of the product.
- PDL-statements
Any product description language statement or a group of statements described in this reference section can be used, except the
PRODUCTandEND PRODUCTstatements.
Required Terminator
Description
Statement
The OPTION statement conditionally processes a group of
statements based on the user's response to a question. The user is prompted to
choose options during the configuration phase of an operation. If the user
accepts an option, the utility executes the statements contained in the
OPTION group. If the user declines the option, the
utility skips these statements.
You can nest OPTION groups. The user must process and
select an OPTION group containing other
OPTION statements before any inner
OPTION statements are processed. That is, if the user
declines an option, any OPTION groups contained within it are
also treated as being declined.
When an option is processed, the utility displays the prompt text line from
the specified module in the PTF and waits for a response. The response can be
Yes, No, or Return to accept the
default answer.
Default answers come from one of three places:
A product configuration file (PCF), if one is supplied with the
/CONFIGURATION=INPUT=pcf-namequalifier on the command line of aPRODUCT INSTALL,PRODUCT CONFIGURE, orPRODUCT RECONFIGUREcommand.The product database (PDB) for an upgrade of a previously installed product where the PDB contains the answers from the previous installation.
The product description file (PDF) from the product kit.
If an input PCF is used and it contains an answer for an option, that answer is the default. Depending on the entry in the PCF, the user may or may not be allowed to change the default value.
If no input PCF is supplied, or if the input PCF does not contain an answer for an option, the default answer is obtained from either the PDB or the PDF. If the PDB does not contain information about the product (for example, this is a new installation), or a product specific PDB entry exists but does not contain the option (a new option), then the default comes from the PDF. Default answers that come from either the PDB or PDF may be changed by the user.
In addition to the prompt text line, the utility displays help text (if
present in the PTF), when the user specifies the /HELP
qualifier on the command line, or the OPTION statement
contains the WITH HELPTEXT option.
You must supply prompt text for the OPTION statement in the
PTF using the =prompt directive. Help text is
optional. If provided, it must immediately follow the prompt text line.
You cannot use the OPTION statement in a patch, mandatory
update, partial, or transition PDF. It is valid only in a full, platform, or
operating system PDF.
Function
The user is prompted to choose options during the configuration phase of the operation. If the user selects an option, the OPTION function returns true. If the user declines the option, the OPTION function returns false.
Examples
option NET ; file [SYSEXE]NETSERVER.COM ; file [SYSEXE]NETSERVER.EXE ; file [SYSHLP]NCPHELP.HLB ; option NET_A default 0 ; file [SYSEXE]FAL.COM ; file [SYSEXE]FAL.EXE ; end option ; option NET_B ; file [SYSEXE]REMACP.EXE ; file [SYSMGR]RTTLOAD.COM ; file [SYS$LDR]CTDRIVER.EXE ; file [SYS$LDR]RTTDRIVER.EXE ; end option ; end option ;If the product description file contains the previous lines, the product text file contains the corresponding text:
1 NET =prompt network support This option allows you to participate in a DECnet network. 1 NET_A =prompt incoming remote file access This option allows file access from other nodes in a DECnet network. 1 NET_B =prompt incoming remote terminal access This option allows users on other nodes in a DECnet network to log in.
The user must select option
NETbeforeNET_AorNET_Bare available for selection. Therefore,NETis processed beforeNET_AorNET_B.if (<option A>) ; file [SYSEXE]A.EXE ; else ; file [SYSEXE]B.EXE ; end if ;The product text file contains the corresponding text:
1 A =prompt the X capability This feature provides the A capability, but you will not get the B capability.
In this example, if the user selected the
Aoption, the utility provides the file[SYSEXE]A.EXE. Otherwise, the utility provides the file[SYSEXE]B.EXE.
PART
PART — The PART statement displays a message from the
specified text module in the PTF about a group of statements during the
configuration phase of an installation, configuration, or reconfiguration
operation. The PART and END PART
statements form a PART group.
Syntax
Parameter
name Indicates, as a quoted or unquoted string, the name of the associated PTF text module. The name you specify can be from 1 to 31 characters in length and must be unique among all names in the same product description.
Option
PDL-statements Any product description language statement or a group of statements described
in this reference section, except the PRODUCT and
END PRODUCT statements.
Required Terminator
Description
The PART statement displays a message from the specified
text module in the PTF about a group of statements during the configuration
phase of an installation, configuration, or reconfiguration operation. You can
nest PART groups, which are processed in lexical
order.
Although the syntax of the PART group and the
OPTION group is similar, their purpose is quite
different. The PART group simply displays a message and does
not affect the processing of PDL statements contained within the group. In
contrast, the OPTION group prompts the user to accept or
decline the option, causing the PDL statements that make up the option to be
processed or ignored.
By default, the prompt text string is displayed without help text. However,
help text is displayed after the prompt text when the user specifies the
/HELP qualifier on the command line.
You must supply prompt text for the PART statement in the
PTF using the =prompt directive. Help text is
optional. If provided, it must immediately follow the prompt text line.
Example
Suppose the product description file contains the following lines:
part CSWS ;
software AXPVMS CSWS
version required V1.0 component ;
software AXPVMS MOD_JSERV
version required V1.0 component ;
software AXPVMS MOD_PERL
version required V1.0 component ;
end part;The product text file contains the corresponding text:
1 CSWS =prompt Secure Web Server This platform provides the following products: * Compaq Secure Web Server software (Based on Apache) * HP Secure Web Server software (Based on Apache) * MOD_JSERV software * MOD_PERL software
This example shows how to use the PART statement to display
a message about the required software products that this platform
provides.
PATCH TEXT
PATCH TEXT — The PATCH TEXT statement updates a text file using
SUMSLP commands.
Additional Information
As of OpenVMS Version 7.3, the PATCH TEXT statement is
obsolete. To support existing product kits that may have used this statement,
the POLYCENTER Software Installation utility continues to process this statement
in a backward-compatible manner. However, VSI recommends that you do not use the
PATCH TEXT statement in new or revised product kits. If
possible, provide a replacement file with a FILE statement.
If this is not practical, and you must edit an existing file, consider using a
FILE statement with the ASSEMBLE EXECUTE and ASSEMBLE
USES options to run a command procedure that places a copy of the previously
installed file in the PCSI$DESTINATION scratch
directory and performs the editing function there. Documentation of the
PATCH TEXT statement may be discontinued in a future
release of this manual.
Syntax
Parameters
name Indicates the relative file specification of the text file you want to update.
WITH source Indicates the file specification of the file containing the update commands (as a single quoted or unquoted string). The file must contain SUMSLP commands for use by the EDIT/SUM editor.
Description
The PATCH TEXT statement updates a text file using SUMSLP
commands. Use this statement when it is inconvenient to provide a new
file.
You must supply the file containing the update commands as part of the product material. You must also supply the file that you want to update, but this file is not propagated to the product kit. The POLYCENTER Software Installation utility uses it to calculate the input and output checksum values.
The PATCH TEXT statement creates a temporary directory,
identified by the logical name PCSI$SCRATCH, to compute
a checksum value. The PCSI$SCRATCH directory is created
as a subdirectory of SYS$SCRATCH.
The PATCH TEXT statement specifies a managed object that
has the following characteristics:
Its name is the same as the name parameter of the
PRODUCTgroup in which the statement is lexically contained; it is a multicomponent name qualified by the relative file specification of the file that is being updated. It must be unique with respect to all managed objects in all scopes.It has assembly lifetime, and its scope is the same as that of the file being updated.
Managed object conflict is unrecoverable.
Example
patch text [SYSUPD]VMSINSTAL.COM with [SYSUPD]VMSINSTAL.SLP ;
This statement provides a file, [SYSUPD]VMSINSTAL.SLP, to patch
the text file [SYSUPD]VMSINSTAL.COM.
PROCESS PARAMETER
PROCESS PARAMETER — The PROCESS PARAMETER statement displays a message to
users about process parameter requirements. The utility does not adjust process
parameters.
Syntax
Parameter
name Indicates the process parameter name. The name you specify must be valid on the system where the product executes.
Options
- CONSUME value
Indicates that the process parameter must be increased by the specified value. Use this option when the product consumes a resource that is controlled by the process parameter. The value must be a single unquoted string that specifies an unsigned integer value. You cannot use this option with either the MAXIMUM, MINIMUM, or REQUIRE option.
- MAXIMUM value
Indicates that the process parameter must have a value less than or equal to the specified value. The value must be a single unquoted string that specifies an integer value.
- MINIMUM value
Indicates that the process parameter must have a value greater than or equal to the specified value. The value must be a single unquoted string that specifies an integer value.
- REQUIRE value
Indicates that the process parameter must have the specified value. The value must be a single string that specifies a value of the parameter's type. This option is valid for any parameter data type. You cannot use this option with either the MAXIMUM, MINIMUM, or CONSUME option.
Description
The PROCESS PARAMETER statement displays a message to users
after the installation about process parameter requirements. Note that the
utility does not adjust process parameters.
Example
process parameter ASTLM minimum 6; process parameter BYTLM require 32768; process parameter PRCLM consume 2; process parameter FILLM maximum 40;
ASTLMgreater than or equal to6BYTLMset to32768PRCLMincreased by2FILLMless than or equal to40
PROCESS PRIVILEGE
PROCESS PRIVILEGE — The PROCESS PRIVILEGE statement displays a message to
users about process privilege requirements. The utility does not adjust process
privileges.
Syntax
Parameter
name Indicates the process privilege names as a list. The privileges you specify must be valid on the system where the product executes.
Description
The PROCESS PRIVILEGE statement displays a message to users after the
installation about process privilege requirements. The utility does not adjust
process privileges.
Example
process privilege (group, oper, tmpmbx, sysnam) ;
The statement in this example displays a message to the user that processes using the product
must have the GROUP, OPER, TMPMBX, and
SYSNAM privileges.
PRODUCT
PRODUCT — The PRODUCT statement specifies product
identification and other descriptive information about the product. The
PRODUCT and END PRODUCT statements
form a PRODUCT group.
Syntax
Parameters
producer Indicates the legal owner of the software product. This parameter must be a single quoted or unquoted string.
base Indicates the base hardware and operating system combination on which the product is intended to be installed. This parameter must be a single quoted or unquoted string.
| String | Meaning |
|---|---|
| X86VMS | An OpenVMS x86-64 product |
| I64VMS | An OpenVMS IA-64 product |
| AXPVMS | An OpenVMS Alpha product |
| VMS | A product applicable for any VSI supported system |
Although any base system name can be used when you package a product, VSI recommends that you use the names X86VMS, AXPVMS, I64VMS, and VMS when developing products for use on OpenVMS.
name Indicates the name of the product. This parameter must be a single quoted or unquoted string. The combination of the producer, base, and name parameters must be unique among products installed on the system.
version Indicates the version of the product. This parameter must be a single quoted or unquoted string.
kit-type FULL – A complete description of a layered product (application software) that can be used to install or upgrade the product.
OPERATING SYSTEM – A complete description of an operating system that can be used to install or upgrade the product. Only one product or operating system type can be installed on the system.
PARTIAL – A partial (incomplete) description of a product that can be used only to upgrade an existing version of the same product. Installation of a partial kit changes the version number of the product and can upgrade a product of type full, operating system, or platform. A partial kit must contain an
UPGRADEstatement and have the same producer-base-name identification string as the product it upgrades.PATCH – A partial (incomplete) description of a product that can be used only to update an existing version of a product. Installation of a patch kit does not change the version number of the product and can update a product type: full, operating system, or platform. A patch kit must contain an
APPLY TOstatement and have a different producer-base-name identification string than the product it updates.PLATFORM – A complete description of a suite of products that can be used to install or upgrade the entire set of products.
TRANSITION – A complete or incomplete description of a product that was installed on the system by another installation method, such as VMSINSTAL. A transition kit is used only to register a previously installed product; it does not contain any product material. Registration using a transition kit defines the name of a product and its managed objects in the POLYCENTER Software Installation product database. After a product is registered, the utility can use this information to satisfy software dependency requirements that other products may have on the availability of this product.
The keyword TRANSITION used alone denotes a layered product; the keyword phrase TRANSITION OPERATING SYSTEM denotes an operating system.
MANDATORY UPDATE – Functionally identical to a patch kit. Its type implies that the patch must be applied to the product it updates.
See Section 3.5, ''Kit Types and Usage'' for a more detailed description of kit types and example PDFs.
Option
- PDL-statements
Any product description language statement or a group of statements described in this reference section, except the
PRODUCTandEND PRODUCTstatements.
Required Terminator
Description
The PRODUCT statement specifies product identification and
other descriptive information about the product. The PRODUCT
and END PRODUCT statements form the
PRODUCT group. A product description file consists of a
PRODUCT group and any other PDL statements that this
group might enclose.
The PRODUCT statement is a utility directive and does not
specify a managed object.
Examples
product AXPVMS FMS V2.6 full ; file [sysmsg]fdvshr.exe image library ; file [sysmsg]fmsmsg.exe ; file [sysexe]fmsfed.exe ; file [sysexe]fmsfaa.exe ; file [sysexe]fmsfte.exe ; directory [systest.fms] ; file [systest.fms]ivp.exe ; file [systest.fms]samp.flb ; end product ;The
PRODUCTstatement in this example identifies the product asFMSVersion2.6that is intended to be installed on an OpenVMS Alpha system.product AXPVMS INTERNET_PRODUCTS V1.1 platform ; . . . end product ;
The
PRODUCTstatement in this example identifiesINTERNET_PRODUCTSVersion1.1as a suite of products (that is, a platform) for installation on an OpenVMS Alpha system.
REGISTER MODULE
REGISTER MODULE — The REGISTER MODULE statement registers in the
product database one or more existing modules in a command, help, macro, object,
or text library file.
Syntax
Parameters
TYPE type Indicates the library type. Table 7.7, ''Library Types for Register Module Statement'' lists the keywords you can use with this parameter.
|
Keyword |
Library Type |
Default Library File |
|---|---|---|
|
Command |
Command definition library |
[SYSLIB]DCLTABLES.EXE |
|
Help |
Help library |
[SYSHLP]HELPLIB.HLB |
|
Macro |
Macro library |
[SYSLIB]STARLET.MLB |
|
Object |
Object library |
[SYSLIB]STARLET.OLB |
|
Text |
Text library |
[SYSLIB]STARLETSD.TLB |
MODULE module-name Indicates the names of the modules contained within the library.
Options
- [NO] GENERATION generation
Indicates that the module has an explicit generation number. Enter the number as an unsigned integer in the range of 0 through 4294967295. See the Description section of the
MODULEstatement for the meaning of this value. By default, the module does not have an explicit generation number (no generation), which is equivalent to 0.- LIBRARY library
The file specification of the library. The file you use must be a library of the type you specified with the type parameter.
Description
The REGISTER MODULE statement registers in the product
database one or more existing modules in a command, help, macro, object, or text
library file. Typically, REGISTER MODULE statements are used
when a product provides a library file with a FILE statement
that is already populated with modules. Registering these modules in the product
database allows the utility to detect conflicts with other modules.
Do not use REGISTER MODULE statements to register
information about modules specified in a MODULE statement.
When a MODULE statement is processed, module information is
automatically placed in the product database. Therefore, use of
REGISTER MODULE statements in this context would be
redundant.
See Also
Examples
register module type HELP module (":=","=","@",ACCOUNTING,ALLOCATE,ANALYZE,APPEND,...) ;In this example, the
REGISTER MODULEstatement registers several help modules in[SYSHLP]HELPLIB.HLB.register module type OBJECT generation 1 module (BAS$$CB,BAS$$COPY_FD,BAS$$DISPATCH_T,...) ;In this example, the
REGISTER MODULEstatement registers several object modules. The generation option allows the utility to perform conflict resolution with these object modules.
REMOVE
REMOVE — The REMOVE statement deletes objects from the user's
system. The REMOVE and END REMOVE
statements form a REMOVE group. You cannot use the
REMOVE statement in a transition PDF.
Syntax
Option
- PDL-statements
Any product description language statement or a group of statements described in this reference section, except the
PRODUCTandEND PRODUCTstatements.
Required Terminator
Description
The REMOVE group is used to delete objects from the user's
system. Statements that normally provide managed objects (such as
FILE and DIRECTORY statements) cause
these objects to be deleted when the statements are enclosed in a
REMOVE group.
By using the REMOVE group in a partial, patch, or mandatory
update kit, you can eliminate obsolete files from a previous version of your
product. By using the REMOVE group in a full kit, you can
eliminate objects provided by a previous installation mechanism (for example,
VMSINSTAL). You can also use a REMOVE group to delete objects
that were created by a previous version of your product, but which were not
recorded in the product database as managed objects. These include archived
files (those saved as *.*_OLD) and files created by
command procedures invoked through EXECUTE statements.
REMOVE group in a full kit, you can eliminate objects
provided by a previous installation mechanism (for example, VMSINSTAL). You can
also use a REMOVE group to delete objects that were created
by a previous version of your product, but which were not recorded in the
product database as managed objects. These include archived files (those saved
as *.*_OLD) and files created by command procedures
invoked through EXECUTE statements.
Statements that do not provide managed objects function normally within a
REMOVE group.
You can nest REMOVE, END REMOVE within
SCOPE, END SCOPE, if necessary.
Examples
remove ; directory [SYSHLP.EXAMPLES.FOO] ; file [SYSHLP.EXAMPLES.FOO]SMLUS.COM ; file [SYSHLP.EXAMPLES.FOO]SMLUT.COM ; file [SYSHLP.EXAMPLES.FOO]SMLUU.COM ; end remove ;
The statements in this example remove some files and a directory (if they exist) from the product database and the running system.
scope bootstrap ; remove ; file [SYSEXE]PROD_PROC.EXE ; end remove ; file [SYSEXE]PROD_PROC_V2.EXE ; end scope ;The statements in this example remove a file in the bootstrap scope and then provide a new file.
RIGHTS IDENTIFIER
RIGHTS IDENTIFIER — The RIGHTS IDENTIFIER statement uses a command
procedure to create a rights identifier.
Syntax
Parameters
name Indicates the name of the rights identifier. The rights identifier name is passed to the command procedure as P1.
WITH (parameters,...) Indicates the list of parameters that are passed to the command procedure that creates the rights identifier. Each parameter must be a single unquoted or quoted string that specifies P2 and P3, in order. If there are no qualifiers to pass, specify a null string (" "). See the Description section for the meaning of the parameters.
Description
The RIGHTS IDENTIFIER statement invokes a command procedure
(SYS$UPDATE:PCSI$CREATE_RIGHTS_IDENTIFIER.COM) to
create rights identifiers. This command procedure runs the AUTHORIZE utility to
perform the function. The utility passes the following parameters to the command
procedure:
P1 specifies the name of the rights identifier (using the name parameter).
P2 specifies the optional qualifiers to use with the AUTHORIZE command
ADD/IDENTIFIER. If there are no qualifiers to pass, specify a null string (" ").P3 specifies the
/VALUEqualifier to use with the AUTHORIZE commandADD/IDENTIFIER. You can specify this parameter only if the identifier does not already exist on the system.
When you remove a product that created rights identifiers, the POLYCENTER Software Installation utility uses a command procedure (SYS$UPDATE:PCSI$DELETE_RIGHTS_IDENTIFIER.COM) to delete rights identifiers associated with your product. This happens regardless of whether the SYSUAF.DAT is shared by another system disk.
Note
In a future version, the utility may create and delete these managed objects directly without the use of command procedures. If this is the case, these statements will continue to function, but the command procedures may not be maintained or shipped with future versions of the utility.
The RIGHTS IDENTIFIER statement specifies a rights
identifier managed object that has the following characteristics:
Its name is the value of the name parameter. The name must be unique with respect to all rights identifier names in the operating scope.
It has operating lifetime.
It does not recover from managed object conflict.
See Also
Example
rights identifier PCSI_TEST
with ("/attributes=DYNAMIC",
"/value=IDENTIFIER:14600926") ;In this example, the RIGHTS IDENTIFIER statement creates a
rights identifier named PCSI_TEST with a value of
14600926.
SCOPE
SCOPE — The SCOPE statement establishes the scope of one or
more managed objects. The SCOPE and END
SCOPE statements form a SCOPE
group.
Syntax
Option
- PDL-statements
Any product description language statement or a group of statements described in this reference section, except the
PRODUCTandEND PRODUCTstatements.
Required Terminator
Description
The SCOPE statement establishes the scope of one or more
managed objects. The scope of a managed object defines the degree of sharing
that the managed object permits. For example, some objects are available only to
certain processes; whereas others are shared by all processes.
The SCOPE and END SCOPE statements form
a SCOPE group. The type of scope indicated in the
SCOPE statement pertains to all objects within the
SCOPE group. You can nest SCOPE
groups.
Note
In almost all cases, the POLYCENTER Software Installation utility defaults
establish the correct scope for each type of managed object. As
unnecessarily or incorrectly using SCOPE statements can
cause problems, we recommend that you use explicit SCOPE
statements only when you are sure product scope is not sufficient, as
explained here or stated in the description of certain PDL
statements.
The different types of scope that a managed object can have are as follows:
Global scope is the largest scope in which a single POLYCENTER Software Installation utility operation can have an effect. A single file that must be shared by every process in the computing facility must exist in global scope. Modules in system object libraries are examples of managed objects that must be in global scope. Writable databases might be in global scope.
When placing file or modules in global scope, see Section 2.6, ''Managed Objects'' and the descriptions of the
FILEandMODULEstatements regarding conflict resolution and the GENERATION option.Bootstrap scope managed objects function during system bootstrap when operating system facilities are unable to locate and use larger scopes. Drivers and loadable images that must be present before startup executes are examples of files that should be in the bootstrap scope.
Use bootstrap scope for products that use device drivers, especially those drivers that must be read by the primitive file system. Because files in bootstrap scope are read by the primitive file system, they are read when not synchronized with the file system on other cluster members that might access the same disk. Therefore, those files must retain stable positions as long as the disk is in use by any system and must not be manipulated by online disk defragmentation operations, including those that use the MOVEFILE primitive.
Product scope managed objects are product specific. Most managed objects for a product reside in product scope. Product scope is the default scope for most objects; therefore, it is not necessary to specify product scope. Product scope managed objects for different products can be stored together or separately.
Processor scope managed objects exist in all processes executing on a single computer. For example, a logical name might exist in processor scope.
When you update your product with a partial, patch, or mandatory update kit, you can either explicitly state the scope of the file managed objects you are updating or let the utility determine the scope of the file managed objects:
You can use the
SCOPEstatement to ensure that the utility looks in a specific scope for the file managed object you want to update.If you do not use the
SCOPEstatement, the utility searches the execution environment for a file managed object with the same name. If the utility finds the object, it replaces the object; if the utility does not find the file managed object, it provides a new file in product scope.
If you use the PATCH statement, the object you are updating
must have been provided by your product. If you use the
MODULE statement, the object you are updating either must
have been provided by your product or must be in global or bootstrap
scope.
Example
scope bootstrap ;
file [SYSEXE]SYSBOOT.EXE ;
file [SYSEXE]VMB.EXE ;
end scope;The statements in this example specify that the files VMB.EXE and
SYSBOOT.EXE must be placed on every bootstrap disk.
SOFTWARE
SOFTWARE — The SOFTWARE statement signals a software dependency
on the specified product: the specified product must be installed prior to, or
concurrently with, the installation of the product that contains the
SOFTWARE statement. Upon successful installation, the
SOFTWARE statement causes a permanent software reference
to be recorded in the product database. The SOFTWARE function tests for the
presence of the specified product, including any version constraints that you
may impose. In contrast to the SOFTWARE statement, the
SOFTWARE function does not create a permanent software reference to the
specified product in the product database. The SOFTWARE function also does not
cause the referenced product to be implicitly installed.
Additional Information
Take note of the distinction between the SOFTWARE statement
and the SOFTWARE function. The statement and function serve different purposes
and are not interchangeable. See the Description section for a full discussion of the differences.
Statement Syntax
Function Syntax
Parameters
producer Indicates the legal owner of the software product. This parameter must be a single quoted or unquoted string.
base Indicates the base hardware/software system on which the product is intended to be installed. This parameter must be a single quoted or unquoted string.
| String | Meaning |
|---|---|
| X86VMS | An OpenVMS x86-64 product |
| I64VMS | An OpenVMS IA-64 product |
| AXPVMS | An OpenVMS Alpha product |
| VMS | A product applicable for any VSI supported system |
name Indicates the name of the product. This parameter must be a single quoted or unquoted string. The combination of producer, base, and name parameters must be unique among products installed on the system.
Options
- [NO] COMPONENT
Indicates that if the product is copied (using the
PRODUCT COPYcommand), the component products will be copied along with the product. The default is NO COMPONENT (the product does not need to be present during a copy operation).- INSTALLED AFTER
Directs the utility to test whether the specified software product will be installed on the system at the conclusion of the current operation. This option is available only for the SOFTWARE function. You cannot use this option with either the INSTALLED BEFORE or KIT ACCESSIBLE option. This option is the default when neither the INSTALLED BEFORE nor the KIT ACCESSIBLE option is used.
- INSTALLED BEFORE
Directs the utility to test whether the specified software product was installed on the system before the current operation began. This option is available only for the SOFTWARE function. You cannot use this option with either the INSTALLED AFTER or KIT ACCESSIBLE option.
Take special note of the fact that INSTALLED BEFORE is not the default. When neither the INSTALLED BEFORE nor the INSTALLED AFTER option is used, the default is INSTALLED AFTER. Therefore, if you want to determine if a product is already installed, you must use the INSTALLED BEFORE option.
- KIT ACCESSIBLE
Directs the utility to test whether the specified software product kit, either in sequential or reference format, is present in the source directory. This option is available only for the SOFTWARE function. You cannot use this option with either the INSTALLED AFTER or INSTALLED BEFORE option. By default, availability of the kit is not tested.
- VERSION ABOVE version
Establishes a lower version limit. The version identifier must be a single quoted or unquoted string. Use this option to specify that the product version must be greater than (but not equal to) the specified version. You cannot use this option with either the VERSION MINIMUM or VERSION REQUIRED option. By default, there is no lower version limit.
- VERSION BELOW version
Establishes an upper version limit. The version identifier must be a single quoted or unquoted string. Use this option to specify that the product version must be less than (but not equal to) the specified version. You cannot use this option with either the VERSION MAXIMUM or VERSION REQUIRED option. By default, there is no upper version limit.
- VERSION MAXIMUM version
Establishes an upper version limit. The version identifier must be a single quoted or unquoted string. Use this option to specify that the product version must be less than or equal to the specified version. You cannot use this option with either the VERSION BELOW or VERSION REQUIRED option. By default, there is no upper version limit.
- VERSION MINIMUM version
Establishes a lower version limit. The version identifier must be a single quoted or unquoted string. Use this option to specify that the product version must be greater than or equal to the specified version. You cannot use this option with either the VERSION ABOVE or VERSION REQUIRED option. By default, there is no lower version limit.
- VERSION REQUIRED version
Establishes a required version. The version identifier must be a single quoted or unquoted string. Use this option to specify that the product version must be equal to the specified version. You cannot use this option with either the VERSION ABOVE, VERSION BELOW, VERSION MAXIMUM, or VERSION MINIMUM option. By default, there is no required version constraint.
Description
SOFTWARE Statement
The SOFTWARE statement signals a software dependency on the
specified product: the specified product must be installed prior to (or
concurrently with) the installation of the product that contains the
SOFTWARE statement. Upon successful installation, the
SOFTWARE statement causes a permanent software reference
to be recorded in the product database.
One of three situations may occur when a product with a
SOFTWARE statement is installed:
If the referenced product is already installed, the software dependency is satisfied, so no action is performed on the referenced product.
If the referenced product is not installed, but a product kit for it is available in the source directory, the referenced product is implicitly installed to satisfy the software dependency.
If the referenced product is not installed and the source directory does not contain a product kit for it, then an error message is displayed advising the user to terminate the installation process.
If a referenced product is not available, VSI recommends that users accept the default prompt and terminate the operation.
If you intend only to check whether a certain software product is installed on the system and alert the user if it is not, use the SOFTWARE function.
You use the SOFTWARE statement for the following
purposes:
To specify a software product that should be installed on the system to satisfy a software product dependency. For example, if Product A has a dependency on Product B, install Product B before installing Product A.
To specify that a software product that is a part of a platform (product suite) is to be included in the platform product installation.
To satisfy a special use of the
MODULEstatement when the following conditions are met:The product updates (with a
MODULEstatement) a library that is supplied by the referenced productBoth products could be installed concurrently
Since it provides a library that another product updates, the referenced product must be installed first. The
SOFTWAREstatement forces the referenced product to be installed first when the products are installed together in one operation. If the products were to be installed separately, you could use the SOFTWARE function to make sure that the referenced product was already installed.For example, installing the OpenVMS platform product results in the installation of the OpenVMS operating system and, optionally, selected layered products such as DECwindows Motif. DECwindows Motif updates HELPLIB.HLB, which is originally provided by OpenVMS. Therefore, DECwindows Motif must use a statement such as
software AXPVMS VMS ;in its product description file to explicitly reference the OpenVMS operating system and guarantee that OpenVMS is installed before DECwindows Motif.
If two products reference each other (creating a circular reference list), the utility issues an error message.
If you use the component option, the utility creates a copy of the referenced
product when you use the PRODUCT COPY command.
If the operation executes in batch mode and a referenced product is not available, the operation terminates.
Software Function
The SOFTWARE function tests for the presence of a product. You can also specify the version of the product that must be present.
You can use different options to determine whether the specified product:
Is currently installed
Will be installed on successful completion of the operation
Has a product kit in the source directory
The SOFTWARE function, unlike the SOFTWARE statement, does
not create a permanent software reference to another product and does not force
the installation of the other product.
By default, the SOFTWARE function tests the state the product will be in when the operation finishes, not when the operation begins. The same effect is obtained when you include the INSTALLED AFTER option. To test the state of the referenced product when the operation begins, you must specify the INSTALLED BEFORE option. If you specify the KIT ACCESSIBLE option, the function tests whether the referenced product kit is present in the source directory.
Note
The default option INSTALLED AFTER, is reliably tested only after the user configuration phase concludes and the utility is about to begin the execution phase. Use caution when including this option with the SOFTWARE function.
The function value is true if the following conditions exist; otherwise, the value is false:
The product specified by the producer, base, and name parameters is available according to one of the following options: INSTALLED BEFORE, INSTALLED AFTER, or KIT ACCESSIBLE.
The VERSION option is omitted, or the available version satisfies the specified constraints.
The SOFTWARE function is more appropriate than the SOFTWARE
statement if you need only verify the existence of a certain product.
You use the SOFTWARE function with the IF statement, as
shown in the following example:
if ( not < software AXPVMS PROD_A version minimum V4.0 > ) ;
information NO_PROD_A confirm ;
file [SYSEXE]PROD_A_SUBSTITUTE.EXE ;
end if ;Using the SOFTWARE function with the IF statement gives you
much more flexibility in forming expressions with other functions, and allows
you to perform multiple actions in the form of groups of statements.
If the SOFTWARE function reference is not satisfied, you can display an error
message with an ERROR statement. This message allows a
message of any size and contents. Note that an error message induced by an
unsatisfied SOFTWARE statement is rigid, short, and
potentially less informative.
You can use the ABORT option on an ERROR statement to
unconditionally terminate the SOFTWARE function operation, while the failed
SOFTWARE statement leaves the user with an option to
continue the product installation:
if ( < software AXPVMS PROD_B version below V7.0 > ) ;
error NO_PROD_B abort ;
end if ;Summary of Differences Between the Statement and Function
Table 7.8, ''Summary of SOFTWARE Statement and SOFTWARE Function Differences'' summarizes the differences between the
SOFTWARE statement and the SOFTWARE function.
|
Statement |
Function |
|---|---|
|
If the referenced product is not installed and its kit is available to the utility during the installation of the referencing product, it will be installed by the utility just prior to the referencing product. |
If the referenced product is not installed, the function will evaluate to the boolean value FALSE (0). The referenced product will not be installed even though the kit may be available to the utility. |
|
Causes the utility to create a permanent software reference in the database. |
Does not create any reference from the referencing to the referenced product. |
|
Creates a risk of software reference conflicts. |
Because no permanent software reference is created, there is no risk of conflict. |
|
Causes the utility to create a software reference and user interface related data structures in memory for the duration of the operation, thereby consuming additional system memory. |
Does not cause the utility to create software reference or user interface related data structures in memory. |
|
Requires additional processing to check for software reference conflicts and for processing error messages. |
Requires no additional processing other than searching for the presence of the referenced products. |
|
If software reference cannot be satisfied, a one-sentence message is displayed to the user. |
Allows any processing based on the value of the SOFTWARE function; error messages can be tailored in any desired way and size. |
|
With the failure of a software reference, continuation of the operation is still possible. |
With the failure of a software reference, processing may be unconditionally aborted with an "error <message> abort" statement. |
|
Use only if you are willing to install the referenced product. |
Use whenever you want only to check for the referenced product availability, but do not intend to install the referenced product. |
Avoiding Common Mistakes
A common mistake is for a layered product's PDF to include a
SOFTWARE statement reference to a VMS (OpenVMS operating
system) product, or to an OPENVMS platform (product suite that includes the
OpenVMS operating system).
It is acceptable to reference the OpenVMS operating system from a
SOFTWARE statement if your product relies on the presence
of the library files supplied by the operating system. However, do not reference
the OpenVMS platform from a SOFTWARE statement.
If you need to verify the OpenVMS operating system version before the installation of the layered product can proceed and complete successfully, use the SOFTWARE function instead:
if ( < software VSI OPENVMS-X86 VMS version below V9.0 > ) ;
error UNSUPP_VMS_VER abort ;
else ;
– include your PDL statements here end if ;If you do use the SOFTWARE statement, you should expect the
following results:
If the installed version of OpenVMS is different than the one specified by the
SOFTWAREstatement, and the OpenVMS product kit is not available, an error message prompting the user to terminate the session is issued. This might be the result you are trying to achieve, but the SOFTWARE function is still the better choice.If the installed version of OpenVMS is different than the one specified by the
SOFTWAREstatement, and an OpenVMS product kit satisfying the software reference criteria is available, the utility may attempt an upgrade of the operating system.If the installed version of OpenVMS is within constraints specified by the
SOFTWAREstatement, the installation of the layered product may complete successfully, but a permanent software reference is made in the database from the layered product to the OpenVMS operating system. This can lead to software reference conflicts if the OpenVMS operating system is upgraded in the future.Another drawback is that a significantly greater amount of memory is consumed and additional processing is done to check for software reference conflicts when processing the
SOFTWAREstatements, which leads to diminished performance.
Examples
software I64VMS FORTRAN version minimum V3.0 version maximum V5.0 ;
The
SOFTWAREstatement in this example specifies that this product requires VSIFortransoftware. The version must be between3.0and5.0.software I64VMS FORTRAN version below V5.0 ;
The
SOFTWAREstatement in this example specifies that this product requires VSIFortransoftware. The version must be less than (but not equal to)5.0.if ( < software AXPVMS COOL_PRODUCT version minimum V3.0 kit accessible > ) ; software AXPVMS COOL_PRODUCT version minimum V3.0 ; else if ( < option NO_COOL_REFERENCE default YES with helptext > ) ; file [SYSEXE]COOL_SUBSTITUTE.EXE ; else ; error MISSING_COOL ; end if ;In this example, the SOFTWARE function is used to search the source directory for the
COOL_PRODUCTkit. If the POLYCENTER Software Installation utility finds the software package with Version3.0or higher on the system, the reference to it is created with a separateSOFTWAREstatement.If the
COOL_PRODUCT V3.0or higher is not found, an option to install its substitute (file [SYSEXE]COOL_SUBSTITUTE.EXE]) is offered to the user. If the user declines to accept the substitute image, an error is issued and the user is prompted to either terminate or continue the current session.
SYSTEM PARAMETER
SYSTEM PARAMETER — The SYSTEM PARAMETER statement allows you to display
a message to users that expresses system parameter requirements for your
product. The utility does not change system parameters.
Syntax
Parameter
name Indicates the name of the system parameter. The parameter you specify must be valid on the system where the product executes.
Options
- CONSUME value
Indicates that the system parameter must be increased by the specified value. Use this option when the product consumes a resource that is controlled by the system parameter. The value must be a single unquoted string that specifies an unsigned integer value. You cannot use this option with either the MAXIMUM, MINIMUM, or REQUIRE options.
- MAXIMUM value
Indicates that the system parameter must have a value less than or equal to the specified value. The value must be a single unquoted string that specifies an integer value.
- MINIMUM value
Indicates that the system parameter must have a value greater than or equal to the specified value. The value must be a single unquoted string that specifies an integer value.
- REQUIRE value
Indicates that the system parameter must have the specified value. The value must be a single string that specifies a value of the parameter's type. This option is valid for any parameter data type. You cannot use this option with either the MAXIMUM, MINIMUM, or CONSUME options.
Description
The SYSTEM PARAMETER statement displays a message to users
about system parameter requirements for your product after the installation.
Note that the utility does not adjust system parameters.
Example
system parameter vaxcluster require 1 ; system parameter tty_classname require "TT" ; system parameter pagedyn consume 200 ;
The statements in this example display the following messages:
This product requires the following system parameters VAXCLUSTER value 1 This product requires the following system parameters TTY_CLASSNAME value TT This product requires the following system parameters PAGEDYN add 200
UPGRADE
UPGRADE — The UPGRADE statement specifies the versions of the
product that can be upgraded by the product kit being installed. If the product
is currently installed but its version does not meet the version selection
criteria in the UPGRADE statement, the installation is
terminated. The UPGRADE statement has no effect when the
product is being installed for the first time. The UPGRADE function tests
whether a version of the product in the specified range is being upgraded by the
current operation. If a version of the product in the specified range is
currently installed, the function returns true; otherwise it evaluates to false.
If no version criteria are given, the function tests whether any version of the
product is currently installed.
Statement Syntax
Function Syntax
Options
VERSION ABOVE version Establishes a lower version limit. The version identifier must be a single quoted or unquoted string. Use this option to specify that the product version must be greater than (but not equal to) the specified version. You cannot use this option with either the VERSION MINIMUM or VERSION REQUIRED option. By default, there is no lower version limit.
VERSION BELOW version Establishes an upper version limit. The version identifier must be a single quoted or unquoted string. Use this option to specify that the product version must be less than (but not equal to) the specified version. You cannot use this option with either the VERSION MAXIMUM or VERSION REQUIRED option. By default, there is no upper version limit.
VERSION MAXIMUM version Establishes an upper version limit. The version identifier must be a single quoted or unquoted string. Use this option to specify that the product version must be less than or equal to the specified version. You cannot use this option with either the VERSION BELOW or VERSION REQUIRED option. By default, there is no upper version limit.
VERSION MINIMUM version Establishes a lower version limit. The version identifier must be a single quoted or unquoted string. Use this option to specify that the product version must be greater than or equal to the specified version. You cannot use this option with either the VERSION ABOVE or VERSION REQUIRED option. By default, there is no lower version limit.
VERSION REQUIRED version Establishes a required version. The version identifier must be a single quoted or unquoted string. Use this option to specify that the product version must be equal to the specified version. You cannot use this option with either the VERSION ABOVE, VERSION BELOW, VERSION MAXIMUM, or VERSION MINIMUM option. By default, there is no required version constraint.
Description
Statement
In a full, platform, or operating system PDF, the UPGRADE
statement is optional. When present, the UPGRADE statement
specifies the versions of the product that can be successfully upgraded by the
product kit. If a version of the product is currently installed but does not
meet the version selection criteria in the UPGRADE statement,
the installation is terminated. The UPGRADE statement has no
effect when the product is being installed for the first time. If an
UPGRADE statement is not present in the PDF, the kit
being installed is allowed to upgrade (or replace) any version of the product
that might be installed. This includes a lower version, a higher version, or the
same version of the product.
In a partial PDF, the UPGRADE statement is required. The
statement specifies which versions of the product must be installed for the
partial kit to be applied successfully.
You cannot use the UPGRADE statement for a patch, mandatory
update, or transition PDF.
Function
The UPGRADE function tests whether a version of the product in the specified range is being upgraded by the current operation. If a version of the product in the specified range is currently installed, the function returns true; otherwise it evaluates to false. If no range is given, the function tests whether any version of the product is currently installed.
The UPGRADE function is not meaningful for a patch, mandatory update, or transition PDF. If included in these PDFs, the UPGRADE function always evaluates to false.
Examples
product AXPVMS ABC V4.0 full ; upgrade version minimum V2.0 ; . . . end product ;The
UPGRADEstatement in this example does not allow productABC V4.0to upgrade versions of the product prior toV2.0. ProductABC, however, can upgrade toV2.0or later of the product. Or, if a previous version of the product is not currently installed, it can perform a new installation.product AXPVMS DEF V4.2 partial ; upgrade version required V4.1 ; . . . end product ;The
UPGRADEstatement in this PDF is required because this is a partial kit. It specifies that productDEF V4.1must already be installed in order to apply this partial kit to upgrade the product toV4.2.product I64VMS JKL V2.5 full ; if (<upgrade>) ; information UPG_MSG ; end if ; . . . end product ;In this example, if any version of product
JKLis currently installed, an informational message will be displayed to the user.product I64VMS JKL V2.5 full ; if (<upgrade version minimum A1.0 version below A2.0>) ; file [sysupd]jkl_convert.com ; end if ; . . . end product ;If version
1of the product (from beta test through final release) is being upgraded, the UPGRADE function in this PDF is used to conditionally provide a file.
Appendix A. Migrating from VMSINSTAL to the POLYCENTER Software Installation Utility
VMSINSTAL is an installation mechanism supplied by VSI. This appendix contains information about VMSINSTAL options and callbacks and their POLYCENTER Software Installation utility equivalents.
A.1. VMSINSTAL Options and Equivalents
|
Task |
VMSINSTAL Option |
POLYCENTER Software Installation Utility Equivalent |
|---|---|---|
|
Creating a file that specifies answers to installation questions |
OPTIONS A |
Create a product configuration file (PCF). This is similar to an auto-answer file in VMSINSTAL. |
|
Specifying a temporary work directory |
OPTIONS AWD |
Specify the /WORK qualifier to the PRODUCT command. |
|
Starting the system |
OPTIONS B ? |
No equivalent. |
|
Tracing callbacks during installation |
OPTIONS C ? |
Use the /LOG and /TRACE qualifiers on the PRODUCT INSTALL command. |
|
Manipulating product kits |
OPTIONS G |
Use the PRODUCT COPY /FORMAT=keyword command to convert a kit into a different format (see Chapter 5, "Packaging the Kit"). |
|
Suppressing VMSINSTAL prompts |
OPTIONS I ? |
Use the /OPTIONS=NOCONFIRM qualifier. |
|
Debugging a kit |
OPTIONS K ? |
Use the /LOG and /TRACE qualifiers to assist in debugging a PDF. |
|
Providing a log of installation operations |
OPTIONS L |
Use the /LOG and /TRACE qualifiers. This provides more information than OPTIONS L with VMSINSTAL. |
|
Displaying or printing release notes |
OPTIONS N |
Use the RELEASE NOTES option to the FILE statement and the PRODUCT EXTRACT RELEASE_NOTES command. The release notes are created in the current directory, using the file's original specification as the default name. |
|
Performing an installation in test mode |
OPTIONS Q ? |
No equivalent. |
|
Installing a product in an alternate root |
OPTIONS R |
Use the /DESTINATION qualifier or a logical name, PCSI$DESTINATION, defined before product installation. |
|
Pausing the installation at various points |
OPTIONS RSP ? |
No equivalent. |
|
Compiling information about the installation |
OPTIONS S ? |
Use the /LOG and /TRACE qualifiers to the PRODUCT command. |
A.2. VMSINSTAL Callbacks and Equivalents
Task | VMSINSTAL Callback | Option | POLYCENTER Software Installation Utility Equivalent |
|---|---|---|---|
Adding an identifier to the rights database | ADD_IDENTIFIER | Use the RIGHTS IDENTIFIER statement. | |
Prompting the installer for information | ASK | To confirm the completion of preinstallation tasks, use the CONFIRM option to the INFORMATION statement. The product text file (PTF) contains the prompt and help text. | |
Not recording responses to installation questions | A | No equivalent. | |
Forcing a Boolean answer | B | No equivalent. | |
Preceding a prompt with blank line | D | No equivalent. | |
Disabling terminal echo | E | No equivalent. | |
Displaying help text before the prompt | H | The INFORMATION statement. | |
Requiring an integer as the answer | I | No equivalent. | |
Returning input in lowercase | L | No equivalent. | |
Returning input in the same case | M | No equivalent. | |
Indicating a null response is acceptable | N | No equivalent. | |
Ringing the terminal bell before the prompt | R | No equivalent. | |
Indicating the response can be a string | S | No equivalent. | |
Returning input in uppercase | U | No equivalent. | |
Indicating the response can be Ctrl/Z | A | No equivalent. | |
Determining whether a license for the product is installed on the system | CHECK_LICENSE | No equivalent. License management is outside the domain of the utility. | |
Determining whether the network is running | CHECK_NETWORK | No equivalent. If you use a statement that references the DECnet network, the utility ensures that the network is available. | |
Determining whether there is sufficient disk space on the target device | CHECK_NET | No equivalent. The utility ensures that sufficient disk space is available. | |
Determining whether a minimum version of software is present in the execution environment |
CHECK_PRODUCT | Use the VERSION MINIMUM option to the SOFTWARE function. | |
Limiting an installation to specified versions of the OpenVMS operating system | CHECK_VMS | Use the VERSION MINIMUM and VERSION MAXIMUM options to the SOFTWARE function, specifying VSI as the producer name, X86VMS, I64, or AXPVMS as the base, and VMS as the product name. | |
Determining which is the most recent version of an image | COMPARE_IMAGE | You can manage file versions using the generation option to the FILE statement. | |
Determining whether the user has loaded the license for the product being installed on the system | CONFIRM_LICENSE | No equivalent. License management is outside the domain of the utility. | |
Providing for orderly exit from an installation | CONTROL_Y | No equivalent necessary; the utility provides this automatically. | |
Creating an account on the system | CREATE_ACCOUNT | Use the ACCOUNT statement. | |
Deleting obsolete files from a previous installation | DELETE_FILE | In full and operating system kits, the utility deletes files that are replaced during an upgrade. However, in a partial kit, you can remove obsolete files using the REMOVE statement. | |
Locating files | FIND_FILE | If you want to determine whether an optional software product is available, use the SOFTWARE function. You do not need to determine whether a file is present before performing an operation that references it; the utility does this automatically. | |
Generating structure definition language (SDL) definition files | GENERATE_SDL | No equivalent. | |
Extracting the image file identification string for a file | GET_IMAGE_ID | If you want to determine the available version of a software product, use the SOFTWARE function. | |
Obtaining a password for an account | GET_PASSWORD | No equivalent necessary; the utility provides this function. | |
Placing requirements on system parameters | GET_SYSTEM | Use the SYSTEM PARAMETER statement. | |
Displaying messages to the user | MESSAGE | Use the INFORMATION statement to display information about pre- and post-installation tasks. You do not need to provide error messages and progress information; the utility does this automatically. | |
Patching an image as part of the installation | PATCH_IMAGE | No equivalent. Use the FILE statement to provide the modified file. | |
Moving a shareable image's symbol table to the system shareable image library when the patch is complete | I | No equivalent necessary. The IMAGE LIBRARY option to the FILE statement controls its replacement in the image library. | |
Creating a journal file of patches | J | No equivalent. | |
Saving old versions of the image file | K | No equivalent necessary. The utility deletes existing versions. | |
Moving the file to the SYS$SPECIFIC directory | O | No equivalent necessary. The placement of the FILE statement that originally described the image within a scope group determines its placement. | |
Reinstalling the image when the patch is complete | R | No equivalent necessary; the utility does this automatically. | |
Queuing a print job to SYS$PRINT | PRINT_FILE | No equivalent. | |
Invoking a command procedure of product-specific callbacks | PRODUCT | No equivalent. | |
Adding a command to the system DCL table | PROVIDE_DCL | Use the MODULE statement with the TYPE COMMAND parameter. You do not need to reinstall the system command table as a known image; the utility does this automatically. | |
Adding help to the DCL help library | PROVIDE_DCL_HELP | Use the MODULE statement with the TYPE HELP parameter. | |
Adding a new file to the system | PROVIDE_FILE | Use the FILE statement. | |
Adding a new image to the system | PROVIDE_IMAGE | Use the FILE statement. The utility can distinguish whether a file is a valid executable image. | |
Placing the file in more than one location | C | No equivalent necessary. | |
Dynamically patching ECOs into the new image file | E | No equivalent necessary. You should package the file with the correct ECO numbers already set. | |
Moving a shareable image's symbol table to the system shareable image library | I | Use the IMAGE LIBRARY option to the FILE statement. | |
Preserving old versions | K | No equivalent necessary. The utility deletes existing versions. | |
Moving the file to the SYS$SPECIFIC directory | O | Enclose the FILE statement in a SCOPE PROCESSOR group. | |
Specifying an input file that contains a list of logical names for the source image files and their respective destinations | T | No equivalent necessary. Use one FILE statement for each file. | |
Changing the file name and file type of all versions of a file | RENAME_FILE | Use the archive option of the FILE statement to preserve an existing version of a file during an upgrade. | |
Restoring save sets of a product that is divided among several save sets | RESTORE_SAVESET | No equivalent necessary. | |
Running an image during installation | RUN_IMAGE | Use the EXECUTE statement or the ASSEMBLE EXECUTE option to the FILE statement. | |
Specifying a UIC or protection code for product files | SECURE_FILE | Use the OWNER and PROTECTION options to the DIRECTORY and FILE statements. | |
Modifying the access control list (ACL) of a device, directory, or file | SET | ACL | Use the ACCESS CONTROL option of the FILE and DIRECTORY statements. |
Determining the default case (upper or lower) in which text from the installer is returned to the installation procedure | SET | ASK_CASE | No equivalent. |
Running an installation verification procedure (IVP) | SET | IVP | No equivalent necessary. You can specify the EXECUTE TEST statement and invoke the functional test for a product with the /TEST qualifier to the PRODUCT INSTALL command. |
Calling a product's installation procedure after files have been moved to their target directories | SET | POSTINSTALL | Depending on your application, you can use the EXECUTE POSTINSTALL statement. |
Purging files replaced by an installation | SET | PURGE | No equivalent necessary. The utility deletes existing versions. |
Rebooting the system after the installation | SET | REBOOT | Use the EXECUTE REBOOT statement. |
Ensuring a high level of installation success | SET | SAFETY | No equivalent necessary. The utility provides the necessary disk management and reliability features. |
Rebooting the system after the installation | SET | SHUTDOWN | Use the EXECUTE REBOOT statement. |
Specifying a product-specific startup command procedure | SET | STARTUP | Use the EXECUTE START statement. |
Editing text files | SUMSLP_TEXT | No equivalent. Use the FILE statement to provide the modified file. | |
Identifying installation peculiarities | TELL_QA | No equivalent necessary. | |
Exiting the installation procedure | UNWIND | No equivalent necessary. The utility controls the flow of the installation. | |
Updating an existing user account | UPDATE_ACCOUNT | Use the ACCOUNT statement to modify existing user accounts. | |
Making a file available for updating by copying it to a working directory | UPDATE_FILE | No equivalent necessary. | |
Modifying an identifier in the rights database | UPDATE_IDENTIFIER | Use the RIGHTS IDENTIFIER statement to modify an existing rights identifier. | |
Updating a library | UPDATE_LIBRARY | Use the MODULE statement with the appropriate parameter for the type of library you are updating. To update the shareable image library, use the IMAGE LIBRARY option to the FILE statement. No equivalent exists to update RSX libraries. |
Appendix B. Product Description Language Evolution
The POLYCENTER Software Installation utility is an integrated component of OpenVMS Version 6.1 and later. After its introduction, subsequent releases of the OpenVMS operating system have incorporated various enhancements to PDL statements and functions. It is likely that we will make further enhancements over time.
Earlier versions of the OpenVMS operating system do not support the new utility features provided in later versions of the operating system. This creates a challenge for the developer who must devise a kit that will install as expected in a variety of customer environments.
You can write a product description file based on the earliest version of OpenVMS at your customer sites. If you choose this approach, you must have or acquire knowledge about customer environments. It means you can use only the statements and functions (and their parameters and options) available for the earliest customer installed version of OpenVMS.
Another option you have is to require your customers to apply a software patch kit, available from VSI, that back ports utility functionality to earlier versions of OpenVMS. With this strategy, you can use the latest utility enhancements in your product installation.
|
PDL Statements |
V7.1 |
V7.1-2 (Alpha) V7.2 (VAX) |
V7.3 | V9.2-3 |
|---|---|---|---|---|
| IGNORE DESTINATION_PATH | New statement | |||
|
APPLY TO |
New option: VERSION ABOVE | |||
|
BOOTSTRAP BLOCK |
Obsolete: not available for layered products | |||
|
ERROR |
New option: ABORT |
New behavior: performs action before the configuration dialog, when possible | ||
|
EXECUTE ABORT |
New statement | |||
|
EXECUTE INSTALL …REMOVE |
New option: INTERACTIVE | |||
|
EXECUTE POSTINSTALL |
New option: INTERACTIVE |
New behavior: runs also on reconfigure operation | ||
|
EXECUTE PRECONFIGURE |
New statement | |||
|
EXECUTE REBOOT |
New statement | |||
|
EXECUTE RELEASE |
New option: INTERACTIVE |
Obsolete: new kits should use EXECUTE UPGRADE or other EXECUTE statements | ||
|
EXECUTE START…STOP | ||||
|
EXECUTE TEST |
New option: INTERACTIVE New logical name: PCSI$DESTINATION | |||
|
EXECUTE UPGRADE |
New statement | |||
|
FILE |
New behavior: supports intra-product conflict detection |
New behavior: file from kit selected to resolve conflict on non-zero generation number tie | ||
|
INFORMATION |
New option: WITH HELPTEXT | |||
|
MODULE |
New behavior: supports intraproduct conflict detection |
New behavior: module from kit selected to resolve conflict on non-zero generation number tie | ||
|
OPTION |
New option: WITH HELPTEXT | |||
|
PATCH IMAGE |
Obsolete: new kits should use FILE statement to replace file | |||
|
PATCH TEXT |
Obsolete: new kits should use FILE statement to replace file | |||
|
SOFTWARE |
New option: VERSION ABOVE | |||
|
UPGRADE |
New option: VERSION ABOVE |
|
Function |
V7.1 |
V7.1-2 (Alpha) V7.2 (VAX) |
V7.3 |
|---|---|---|---|
|
LOGICAL NAME |
New function | ||
|
SOFTWARE |
New behavior: detects whether or not a patch or mandatory update kit has been installed New options:
| ||
|
UPGRADE |
New option: VERSION ABOVE |
New behavior: version range checking fully supported |
Only commands from the EXECUTE statement of the product being removed are run.
The file is created only if the statement is part of a configuration option that the reconfiguration operation selects for the first time.
The only action performed at this time is to display a message to the user.
Commands from the EXECUTE ABORT statement are run only when an error condition causes the operation to terminate.
Commands from the EXECUTE REBOOT statement are run if the user allows it during the operation.
The utility may also perform other actions in the same subprocess, such as the updating of libraries using the LIBRARIAN command.
If the file option is ASSEMBLE EXECUTE, the file managed object has assembly lifetime and product scope.
OpenVMS startup use only
Developer's use only