System Manager’s Manual, Volume 1: Essentials
- Operating System and Version:
- VSI OpenVMS x86-64 Version 9.2-2 or higher;
VSI OpenVMS IA-64 Version 8.4-1H1 or higher
VSI OpenVMS Alpha Version 8.4-2L1 or higher
Preface
1. About VSI
VMS Software, Inc. (VSI) is an independent software company licensed by Hewlett Packard Enterprise to develop and support the OpenVMS operating system.
2. Intended Audience
This guide is intended for VSI OpenVMS system managers.
3. Document Structure
For more information about the structure of VSI OpenVMS System Manager’s Manual, Volume 1: Essentials, see Section 1.1, ''Using the VSI OpenVMS System Manager's Manual''.
4. Related Documents
VSI OpenVMS System Management Utilities Reference Manual
VSI OpenVMS User's Manual
The current version of the Upgrade and Installation Manual for your system
VSI OpenVMS Guide to System Security
Guide to OpenVMS Performance Management
VSI OpenVMS Cluster Systems Manual and Guidelines for OpenVMS Cluster Configurations
VSI TCP/IP Services for OpenVMS Installation and Configuration
VSI TCP/IP Services for OpenVMS Management
VSI TCP/IP Services for OpenVMS Management Command Reference
VSI TCP/IP Services for OpenVMS Tuning and Troubleshooting
VSI DECnet-Plus for OpenVMS Installation and Configuration
VSI DECnet-Plus Planning Guide
DECnet-Plus for OpenVMS Applications Installation and Advanced Configuration Guide
VSI DECnet-Plus for OpenVMS Network Control Language Reference Guide
5. VSI Encourages Your Comments
You may send comments or suggestions regarding this manual or any VSI document by sending electronic mail to the following Internet address: <docinfo@vmssoftware.com>. Users who have VSI OpenVMS support contracts through VSI can contact <support@vmssoftware.com> for help with this product.
6. OpenVMS Documentation
The full VSI OpenVMS documentation set can be found on the VMS Software Documentation webpage at https://docs.vmssoftware.com.
7. Typographical Conventions
| Convention | Meaning |
|---|---|
|
Ctrl/x |
A sequence such as Ctrl/x indicates that you must hold down the key labeled Ctrl while you press another key or a pointing device button. |
|
PF1 x |
A sequence such as PF1 x indicates that you must first press and release the key labeled PF1 and then press and release another key or a pointing device button. |
... |
A horizontal ellipsis in examples indicates one of the
following possibilities:
|
. . . |
A vertical ellipsis indicates the omission of items from a code example or command format; the items are omitted because they are not important to the topic being discussed. |
|
( ) |
In command format descriptions, parentheses indicate that you must enclose the options in parentheses if you choose more than one. |
|
[ ] |
In command format descriptions, brackets indicate optional choices. You can choose one or more items or no items. Do not type the brackets on the command line. However, you must include the brackets in the syntax for OpenVMS directory specifications and for a substring specification in an assignment statement. |
|
[ |] |
In command format descriptions, vertical bars separate choices within brackets or braces. Within brackets, the choices are options; within braces, at least one choice is required. Do not type the vertical bars on the command line. |
|
{ } |
In command format descriptions, braces indicate required choices; you must choose at least one of the items listed. Do not type the braces on the command line. |
|
bold text |
This typeface represents the introduction of a new term. It also represents the name of an argument, an attribute, or a reason. |
|
italic text |
Italic text indicates important information, complete titles of manuals, or variables. Variables include information that varies in system output (Internal error number), in command lines (/PRODUCER= name), and in command parameters in text (where dd represents the predefined code for the device type). |
|
UPPERCASE TEXT |
Uppercase text indicates a command, the name of a routine, the name of a file, or the abbreviation for a system privilege. |
|
|
Monospace type indicates code examples and interactive screen displays. In the C programming language, monospace type in text identifies the following elements: keywords, the names of independently compiled external functions and files, syntax summaries, and references to variables or identifiers introduced in an example. |
|
- |
A hyphen at the end of a command format description, command line, or code line indicates that the command or statement continues on the following line. |
|
numbers |
All numbers in text are assumed to be decimal unless otherwise noted. Nondecimal radixes—binary, octal, or hexadecimal—are explicitly indicated. |
Chapter 1. Overview of This Manual
Together, the two parts of this manual explain tasks and concepts related to managing a VSI OpenVMS system. This chapter describes this manual and how to use it.
User-level tasks such as creating and editing files and command procedures. For more information, refer to the VSI OpenVMS System Manager's Manual.
DIGITAL Command Language (DCL) commands. For more information, refer to the VSI OpenVMS DCL Dictionary.
Information Provided in This Chapter
|
Task |
Section |
|---|---|
|
Using the VSI OpenVMS System Manager's Manual |
Section 1.1, ''Using the VSI OpenVMS System Manager's Manual'' |
|
Finding information about managing complex environments |
Section 1.3, ''Finding Information About Managing Complex Environments'' |
|
Finding information about managing small systems |
Section 1.4, ''Finding Information About Managing Small Systems'' |
|
Concept |
Section |
|---|---|
|
How this manual relates to other system management documentation |
Section 1.2, ''How This Manual Relates to Other System Management Documentation'' |
1.1. Using the VSI OpenVMS System Manager's Manual
This book, VSI OpenVMS System Manager's Manual, Volume 1: Essentials.
A second book, VSI OpenVMS System Manager's Manual, Volume 2: Tuning, Monitoring, and Complex Systems.
Use these two books to get step-by-step instructions for general system management tasks.
The first page of each chapter in these books provides two tables to help you find information within the chapter.
The Task Table
|
Task |
Section |
|---|---|
|
Using the VSI OpenVMS System Manager's Manual |
Section 1.1, ''Using the VSI OpenVMS System Manager's Manual'' |
|
Finding information about managing complex environments |
Section 1.3, ''Finding Information About Managing Complex Environments'' |
|
Finding information about managing small systems |
Section 1.4, ''Finding Information About Managing Small Systems'' |
The Concept Table
|
Concept |
Section |
|---|---|
|
How this manual relates to other system management documentation |
Section 1.2, ''How This Manual Relates to Other System Management Documentation'' |
1.2. How This Manual Relates to Other System Management Documentation
This manual is intended to be used as a companion to other OpenVMS system management manuals. The Preface of this manual lists the books you should be prepared to use along with the VSI OpenVMS System Manager's Manual.
1.3. Finding Information About Managing Complex Environments
|
Task |
Manual |
|---|---|
|
Networked environments |
VSI TCP/IP Services for OpenVMS Management VSI DECnet-Plus for OpenVMS Network Management Guide |
|
OpenVMS Cluster environments |
VSI OpenVMS Cluster Systems Manual and Guidelines for OpenVMS Cluster Configurations |
|
Migrating from VAX to Alpha environment |
Migrating an Environment from OpenVMS VAX to OpenVMS Alpha ? |
|
Performance management |
VSI OpenVMS Performance Management Manual |
|
System security |
VSI OpenVMS Guide to System Security |
1.4. Finding Information About Managing Small Systems
If you are managing a small standalone system – for example, a desktop workstation – you probably need to perform only basic system management tasks.
|
Task |
Chapter, Section, or Other Manual |
|---|---|
|
Installing and upgrading the operating system |
The current Installation and Upgrade Manual |
|
Installing layered products | |
|
Loading software licenses | |
|
Booting the system |
Section 4.1.3.1, ''Nonstop Boot: The Most Common Booting Operation'' |
|
Shutting down the system |
Section 4.8.1, ''Performing an Orderly Shutdown with SHUTDOWN.COM'' |
|
?Using VMSTAILOR to remove files from the system disk | |
|
Modifying site-specific startup command procedures |
Section 5.2, ''Modifying Site-Specific Startup Command Procedures'' |
|
Modifying login command procedures |
Section 5.3, ''Modifying Login Command Procedures to Customize User Environments'' |
|
Setting up user accounts | |
|
Backing up workstation disks | |
|
Backing up and restoring the system disk | |
|
Starting the queue manager and creating the queue database |
Section 13.5, ''Starting the Queue Manager and Creating a Queue Database'' |
|
Setting up and starting simple queues | |
|
Setting system parameters with AUTOGEN |
VSI OpenVMS System Manager's Manual, Volume 2: Tuning, Monitoring, and Complex Systems |
|
Tuning the system |
VSI OpenVMS System Manager's Manual, Volume 2: Tuning, Monitoring, and Complex Systems |
Chapter 2. Using OpenVMS System Management Utilities and Tools
This chapter provides general information about system management utilities and tools that are provided with the VSI OpenVMS Operating System.
Procedures for using utilities and tools to perform specific tasks are provided in the respective chapters that describe those tasks. For example, this chapter contains a general description of the System Management utility (SYSMAN). Section 9.12.2, ''Establishing Disk Quotas'' describes how to use SYSMAN to manage disk quotas. VSI OpenVMS System Manager's Manual, Volume 2: Tuning, Monitoring, and Complex Systems describes how to use SYSMAN to manage system parameters.
Online help for online information about commands and qualifiers for DCL and system management utilities
The VSI OpenVMS System Management Utilities Reference Manual for detailed information about commands and qualifiers for system management utilities
The VSI OpenVMS DCL Dictionary for detailed information about DCL commands and qualifiers
Information Provided in This Chapter
|
Task |
Section |
|---|---|
|
Logging in to the SYSTEM account | |
|
Using SYSMAN to centralize system management |
Section 2.3, ''Using SYSMAN to Centralize System Management'' |
|
Using OPCOM to communicate with system users |
Section 2.4, ''Using OPCOM to Communicate with System Users'' |
|
Using VMSKITBLD.COM to modify a system disk |
Section 2.5, ''Using VMSKITBLD.COM to Modify a System Disk'' |
|
Concept |
Section |
|---|---|
|
OpenVMS system management tools |
Section 2.1, ''Understanding OpenVMS System Management Tools'' |
|
DCL commands for system management | |
|
System messages | |
|
DCL command procedures for system management | |
|
System management utilities | |
|
MGRMENU.COM command procedure | |
|
System Management utility (SYSMAN) | |
|
Understanding a SYSMAN management environment |
Section 2.3.3, ''Understanding a SYSMAN Management Environment'' |
|
Understanding a SYSMAN profile | |
|
Understanding OPCOM |
2.1. Understanding OpenVMS System Management Tools
|
Tool |
For More Information |
|---|---|
|
OpenVMS Management Station | |
|
DIGITAL Command Language (DCL) commands; for example, COPY and MOUNT | |
|
System messages | |
|
Command procedures; for example, AUTOGEN.COM and STARTUP.COM | |
|
System management utilities; for example, the Authorize utility (AUTHORIZE) and the Backup utility (BACKUP) | |
|
MGRMENU.COM command procedure | |
|
OPCOM |
Section 2.4, ''Using OPCOM to Communicate with System Users'' |
2.1.1. OpenVMS Management Station
The OpenVMS Management Station is a powerful, Microsoft Windows based management tool for system managers and others who perform account management tasks on OpenVMS systems. OpenVMS Management Station software provides a comprehensive user interface to OpenVMS account management across multiple systems. You can manage multiple systems from a single source.
OpenVMS Management Station software coexists with all of the existing OpenVMS system management utilities. Figure 2.1, ''Sample OpenVMS Management Station Screen'' shows a sample OpenVMS Management Station screen.

Add a UAF entry
Grant rights identifiers
Create a directory
Create disk quotas
Grant network proxies
These steps require that you use DCL, the Authorize utility, and the DISKQUOTA component of the SYSMAN utility. OpenVMS Management Station provides an easy-to-use interface to this process.
The client. This is Microsoft Windows based software that you install on a PC and use to perform management operations.
The server. This software must be installed on all OpenVMS systems to be managed. You do not interact directly with the server, the client does that.
Documentation for the OpenVMS Management Station
The Microsoft Windows help files completely describe features, functions, instructions, and examples of using the OpenVMS Management Station. The OpenVMS Management Station Overview and Release Notes document provides an over view of OpenVMS Management Station and describes how to get started using the software.
VSI OpenVMS Version 8.2 Upgrade and Installation Manual
2.1.1.1. Managing Resources
OpenVMS Management Station allows you to organize the systems you need to manage in ways that are meaningful to you and your environment, and allows you to manage user accounts on those systems.
You can easily manage user accounts across multiple OpenVMS systems, depending on your needs. The systems might be some of the clusters in a network, all of the systems on one floor of a building, a mix of clusters and nonclustered nodes, and so forth.
You can use OpenVMS Management Station to manage OpenVMS user accounts in a convenient, easy manner. For example, when creating an account on multiple systems, OpenVMS Management Station can add a user authorization file (UAF) entry, grant rights identifiers, create an OpenVMS directory, set a disk quota, set up OpenVMS Mail characteristics, and so forth, for each instance of the account.
The SYSUAF.DAT user authorization file
The RIGHTSLIST.DAT user rights file
The network proxy database
Account login-directory trees
User account disk quotas
The OpenVMS Mail VMSMAIL_PROFILE.DATA file
2.1.1.2. Managing Operations
Creating user accounts
Modifying user accounts (any aspect)
Deleting user accounts
Renaming user accounts
Displaying user account attributes
2.1.2. DCL Commands
You perform many system management tasks by entering DCL (DIGITAL Command Language) commands. For example, enter the DCL command MOUNT to make disks and tapes available to the system. Most of the DCL commands used by system managers require special privileges (such as OPER privilege).
command-name[/qualifier[, ...]] [parameter[, ...]] [/qualifier[, ...]]
Because a command can be continued on more than one line, the term command string is used to define the entire command. A command string is the complete specification of a command, including the command name, command qualifiers, parameters, and parameter qualifiers.
For complete descriptions of each DCL command, refer to online DCL help or the VSI OpenVMS DCL Dictionary. If you are not familiar with DCL command syntax, refer to the VSI OpenVMS User's Manual.
2.1.3. System Messages
Successful completion of a command
Information about the effect of the command
Warning about the effect of the command
Failure to successfully complete the command
At times, you might need to interpret a system message, for example, to find out how to recover from a warning or failure. The Help Message utility allows you and system users to quickly access online descriptions of system messages from the DCL prompt.
For more information about the Help Message utility, refer to the OpenVMS System Messages: Companion Guide for Help Message Users. In addition, the OpenVMS System Messages and Recovery Procedures Reference Manual provides detailed descriptions of system messages.
2.1.4. DCL Command Procedures
You can use command procedures to efficiently perform routine tasks. A command procedure is a file containing DCL commands and, optionally, data used by those DCL commands. When you execute a command procedure, the system reads the file and executes the commands it contains. This eliminates the need for you to enter each command interactively. You can create command procedures to automate some of the routine system management tasks specific to your site.
$ SET DEFAULT [PERRY.WORK]
$ DIRECTORY
$ EXIT
When you execute this command procedure with the command @GO_WORK, you set your default directory to [PERRY.WORK] and display a list of files in that directory.
With complex command procedures, you can use DCL instead of a high-level programming language. For more information about creating command procedures, refer to the VSI OpenVMS User's Manual.
2.1.4.1. Executing Command Procedures in Batch Mode
You can execute command procedures in batch modeby submitting the procedure to a batch queue. When resources are available, the system creates a batch process to execute the commands in the procedure. Usually, processes running in batch mode execute at a lower process priority to avoid competing with interactive users for system resources.
To automate a task
To process work at a lower scheduling priority, so as not to compete with interactive users for system resources
To perform a task during off hours, such as at night or on weekends
To allow an operation to continue without having a terminal logged in, thereby increasing the security of the system
$ SET NOON
$! Resubmit this procedure to run again tomorrow.
$!
$ SUBMIT/KEEP/NOPRINT/QUEUE=SYS$BATCH/AFTER="TOMORROW+1:00"/USER=SYSTEM -   SYS$MANAGER:SYSTEM-DAILY.COM;
$!
$! Purge the log files
$ PURGE/KEEP=7 SYS$MANAGER:SYSTEM-DAILY.LOG
$!
$! Analyze public disks
$!
$ ANALYZE/DISK/LIST=SYS$MANAGER:WORK1.LIS;  WORK1:
$ ANALYZE/DISK/LIST=SYS$MANAGER:WORK2.LIS;  WORK2:
$!
$! Print listings
$!
$ PRINT/QUEUE=SYS$PRINT SYS$MANAGER:WORK1.LIS; , SYS$MANAGER:WORK2.LIS;
$ EXIT
2.1.4.2. Using VSI-Supplied Command Procedures for System Management
|
Command Procedure |
Function |
|---|---|
|
SYS$SYSTEM:STARTUP.COM |
The system uses this command procedure to automatically perform certain tasks that are required to start up an OpenVMS system. This procedure is executed when the system boots. Do not modify this command procedure. |
|
SYS$STARTUP:SYSTARTUP_VMS.COM |
STARTUP.COM executes this procedure when the system boots. Add commands to this procedure to perform site-specific tasks each time the system boots. |
|
SYS$SYSTEM:SHUTDOWN.COM |
Use to shut down the system in an orderly fashion. |
|
SYS$UPDATE:AUTOGEN.COM |
Use to automatically set system parameters and page, swap, and dump file sizes to values appropriate for the system configuration and work load. |
|
SYS$UPDATE:VMSINSTAL.COM |
Use to install software on a running system. |
2.1.5. System Management Utilities
With the operating system, VSI supplies a number of system management utilities to help perform system management tasks. A system management utility is a program that performs a set of related operations. For example, the Mount utility (MOUNT) makes disks and tapes available to the system, and the Backup utility (BACKUP) saves and restores files.
Most system management utilities require special privileges. Generally, you run these utilities from the SYSTEM account, which has all privileges by default. Section 2.2, ''Logging In to the SYSTEM Account'' describes logging in to the SYSTEM account.
RUN SYS$SYSTEM:utility_nameTo invoke other utilities, such as MOUNT and ANALYZE/DISK_STRUCTURE, enter a DCL command. For example:
$ ANALYZE/DISK_STRUCTURETable 2.2, ''System Management Utilities and Tools'' lists the system management utilities and their purposes. This manual describes how to use most of these utilities. For detailed information about utility commands and qualifiers, refer to the VSI OpenVMS System Management Utilities Reference Manual.
|
Utility |
Purpose |
|---|---|
|
Accounting utility (ACCOUNTING) |
To produce reports of resource use. |
|
ACL editor (access control list editor) |
To create and maintain ACLs. |
|
Analyze/Disk_Structure utility (ANALYZE/DISK_STRUCTURE) |
To check the validity of Files–11 Structure Levels 1, 2, and 5 disk volumes, and to report errors and inconsistencies. Also used to repair these inconsistencies. |
|
Audit Analysis utility (ANALYZE/AUDIT) |
To produce reports and summaries of security events from the system security audit log file. Use this utility to interpret the large amounts of auditing information that the system might generate. |
|
Authorize utility (AUTHORIZE) |
To add and modify records in the existing user authorization and network authorization files, or to create new files. Also used to add and modify records in the rights database. |
|
Backup utility (BACKUP) |
To copy or save files and disk volumes. Also used to restore saved files and volumes. |
|
Bad Block Locator utility (BAD) |
To analyze block-addressable devices and record the location of blocks that cannot reliably store data. |
|
?Crash Log Utility Extractor (CLUE) |
On VAX systems, to obtain information about crash dumps. ?On Alpha and IA-64 systems, some commands in the System Dump Analyzer facility (SDA) contain CLUE functionality. |
|
DECevent Event Management utility |
To produce ASCII reports derived from entries in system event log files. |
|
Error Log utility (ERROR LOG) |
To report the contents of a system error log file. |
|
Exchange utility (EXCHANGE) |
To transfer data to and from mass storage volumes that are written in formats other than standard formats recognized by the operating system. |
|
Help Message utility (MSGHLP) |
To quickly access information about system messages returned by DCL commands. |
|
Install utility (INSTALL) |
To improve performance or enhance privileges of images. |
|
LAT Control Program utility (LATCP) |
To set up and control the LAT software on OpenVMS host systems. LAT software allows you to connect terminals and printers to multiple remote systems. |
|
Log Manager Control Program utility (LMCP) |
To create and manage the transaction logs used by DECdtm services. |
|
Multipurpose Internet Mail Extension utility (MIME) |
To read and compose MIME-encoded mail messages on OpenVMS system. |
|
Monitor utility (MONITOR) |
To monitor systemwide performance. |
|
Mount utility (MOUNT) |
To make a disk or magnetic tape volume available for processing. |
|
Network Control Program (NCP) |
To set up, control, monitor, and test a DECnet network. |
|
Network Control Language (NCL) |
To set up, control, monitor, and test a DECnet-Plus network. |
|
Operator Communication Manager (OPCOM) tool |
To communicate with system users. |
|
System Generation utility (SYSGEN) |
To create and install page, swap, and dump files and to manage system parameters. ?On VAX systems, to load and connect device drivers. |
|
System Management utility (SYSMAN) |
To centralize system management. Allows you to perform system management tasks simultaneously on one or more nodes. ?On Alpha and IA-64 systems, to load and connect device drivers. |
|
TCP/IP Services management control interfaces |
To configure and manage TCP/IP Services. |
|
Utility |
For More Information |
|---|---|
|
Bad Block Locator utility (BAD) |
OpenVMS Bad Block Locator Utility Manual, Online help |
|
Exchange utility (EXCHANGE) |
OpenVMS Exchange Utility Manual, Online help |
|
LASTCP and LADCP utilities |
InfoServer Client for OpenVMS LASTCP and LADCP Utilities Manual |
|
Network Control Program utility (NCP) |
VSI OpenVMS DECnet Network Management Utilities, Online help |
|
Network Control Language utility (NCL) |
VSI DECnet-Plus for OpenVMS Network Control Language Reference Guide |
|
TCP/IP Services management control interfaces |
VSI TCP/IP Services for OpenVMS Management |
2.1.6. MGRMENU.COM Command Procedure
Add a user account
Build a standalone BACKUP kit
Shut down your system
You can use this command procedure as is, or modify it to serve your own site-specific needs. If you modify this procedure, VSI recommends you first copy the procedure to another directory (for example, SYS$MANAGER), so that an original version of MGRMENU.COM is always available in the SYS$EXAMPLES directory.
$ @SYS$EXAMPLES:MGRMENU
2.2. Logging In to the SYSTEM Account
Caution
VSI recommends that you change the password for the SYSTEM account frequently to maintain system security. Because the SYSTEM account has full privileges by default, exercise caution when using it.
If your site has strong security requirements, VSI recommends that you disable all but batch use of the SYSTEM account and set up separate privileged accounts for individuals who must perform privileged activities on the system. This will allow you to more closely account for privileged activity on the system.
How to Perform This Task
Press Return on the console terminal.
At the Username prompt, enter SYSTEM.
At the Password prompt, enter the password that you chose for the SYSTEM account when you installed or upgraded the operating system, or the current password if you changed it since then.
The system displays a welcome message on the console terminal. If you have logged in previously, the system also prints the time of your last login. When the dollar sign ($) prompt appears, login is complete and you can enter commands.
Example
Username: SYSTEM
Password:
        Welcome to OpenVMS VAX Version n.n on node x
    Last interactive login on Thursday, 20-FEB-2000 16:41
Last non-interactive login on Friday, 21-FEB-20000 17:06Username: SYSTEM
Password:
Welcome to OpenVMS Alpha (TM) Operating System, Version n.n on node x
Last interactive login on Thursday, 20-FEB-2000 16:41
Last non-interactive login on Friday, 21-FEB-2000 17:06on IA-64 systems:
Username: SYSTEM
Password:
        Welcome to HP OpenVMS Industry Standard I64 Operating System, Version n.n on node x
    Last interactive login on Thursday, 20-FEB-2004 16:41
    Last non-interactive login on Friday, 21-FEB-2004 17:06
2.3. Using SYSMAN to Centralize System Management
If you manage more than one computer, you can use the System Management (SYSMAN) utility to centralize system management.
The following table lists some major SYSMAN features and points to sections in this chapter that contain more information.
|
Function |
For More Information |
|---|---|
| Enable a system to execute SYSMAN commands from remote nodes |
Section 2.3.2, ''Enabling a Remote System to Execute SYSMAN Commands'' |
| Define your SYSMAN management environment |
Section 2.3.4, ''Defining the SYSMAN Management Environment'' |
| Adjust your SYSMAN profile to set privileges, default device and directory, and DCL verification | |
| Execute DCL commands from SYSMAN | |
| Create SYSMAN command procedures | |
| Set up SYSMAN with an initialization file |
Section 2.3.10, ''Setting Up SYSMAN with an Initialization File'' |
2.3.1. Understanding SYSMAN
SYSMAN centralizes system management, so that you, as system manager, can manage nodes or clusters from one location. Rather than logging in to individual nodes and repeating a set of management tasks, SYSMAN enables you to define your management environment to be a particular node, a group of nodes, or an OpenVMS Cluster environment. With a management environment defined, you can perform traditional system management tasks from your local node; SYSMAN executes these tasks on all nodes in the target environment.
2.3.1.1. Privileges Required
You must have the following to run SYSMAN:
OPER and TMPMBX privileges
A separate account with no more than 125 rights, or enough identifiers removed from the current account so the total number of rights falls within the appropriate range.
The rights limitation of 125 includes a minimum of three identifiers that are granted during login when the process rights list is created:A UIC identifier
A system identifier
At least one environmental identifier, depending upon the environment in which the process is operating
2.3.1.2. Usage Restriction
If you run SYSMAN from an account with more than 125 rights identifiers, and the environment is set to a remote node, the following error message is displayed:
SMI-E-RIGHTSLIM, Rights limit exceeded.
Note that this rights identifier limitation includes a minimum of three identifiers besides the rights identifiers that are associated with a user authorization record:
A UIC identifier
A system identifier
Depending upon the environment in which the process is operating, at least one environmental identifier
To run SYSMAN, you must have either of the following:
A separate account with no more than 125 rights identifiers
Enough identifiers removed from your current account so that the total number of rights falls within the appropriate range
2.3.1.3. Tools and Commands
SYSMAN uses many of the same software tools that you traditionally use to manage a system. It can process most DCL commands, such as MOUNT and INITIALIZE. It can also execute many system management utilities and command procedures, such as AUTHORIZE and AUTOGEN.
SYSMAN also includes its own commands that let you perform the following tasks:
| Command | Task | For More Information |
|---|---|---|
| ALF (automatic login facility) | Associate a terminal or port with a user name | Section 3.2.2, ''Registering and Loading Licenses'' |
| CONFIGURATION | Inspect or modify OpenVMS Cluster parameters | VSI OpenVMS System Manager's Manual, Volume 2: Tuning, Monitoring, and Complex Systems |
| DISKQUOTA | Control and monitor disk usage | Section 9.12.2, ''Establishing Disk Quotas'' |
| IO (Alpha specific) | Control and display the I/O configuration of an Alpha system | Section 8.5.1, ''Manually Connecting Devices and Loading Device Drivers (VAX Only)'' |
| LICENSE | Load and unload licenses | Section 3.2.2, ''Registering and Loading Licenses'' |
| PARAMETERS | Inspect and modify system parameters | VSI OpenVMS System Manager's Manual, Volume 2: Tuning, Monitoring, and Complex Systems |
| STARTUP | Customize startup databases by inspecting and modifying software startup components | Section 5.4, ''Customizing Startup Databases with SYSMAN'' |
2.3.2. Enabling a Remote System to Execute SYSMAN Commands
The SMISERVER process must be running on a remote node for SYSMAN commands to execute on that node. SMISERVER is the detached process responsible for executing SYSMAN commands on remote nodes.
Any node that is part of an OpenVMS Cluster system normally starts the SMISERVER process in the system startup procedure SYS$SYSTEM:STARTUP.COM. (The system parameter CLUSTER on the node must have a value of 1 or more.)
To start the SMISERVER process on a workstation that is not part of an OpenVMS Cluster system, include the following command line in the site-specific startup command procedure SYSTARTUP_VMS.COM:
$ @SYS$SYSTEM:STARTUP SMISERVER
For more information about SYSTARTUP_VMS.COM, see Section 5.2.7, ''Modifying SYSTARTUP_VMS.COM to Perform General Operations''.
You can also enter this command interactively to restart the SMISERVER process without rebooting the system.
2.3.3. Understanding a SYSMAN Management Environment
When you use SYSMAN, you must define the management environment you will be working in. The management environment is the node or nodes on which subsequent commands will execute.
By default, the management environment is the local node (the node from which you execute SYSMAN). To execute commands on one or more other nodes, you can redefine the management environment to be any of the following:
Your own OpenVMS Cluster system
A subset of nodes in your OpenVMS Cluster system
A nonclustered node available through DECnet
Another OpenVMS Cluster system
A subset of nodes in another OpenVMS Cluster system
Any group of individual nodes
Refer to Figure 2.2, ''Sample SYSMAN Management Environment'' during the following discussion of management environments.
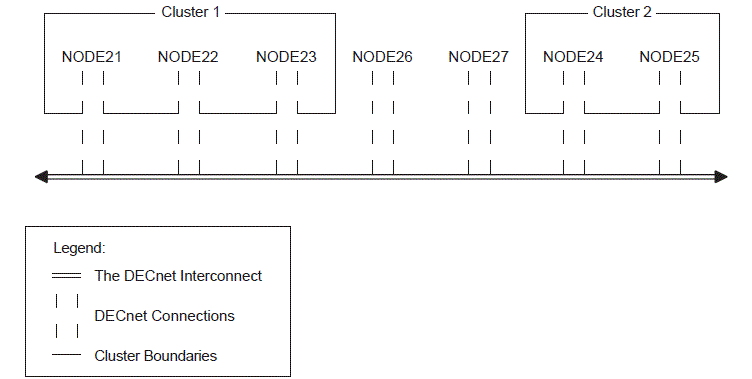
You can use NODE21 as the management environment, or you can define the environment to be any node, group of nodes, or cluster shown in Figure 2.2, ''Sample SYSMAN Management Environment''.
If you execute SYSMAN from NODE21, then NODE21 is the local node; it is the management environment when SYSMAN starts. All other nodes are remote nodes.
2.3.4. Defining the SYSMAN Management Environment
To define the management environment, use the SYSMAN command SET ENVIRONMENT. Whenever you redefine an environment, SYSMAN displays the new context. You can always verify the current environment with the SHOW ENVIRONMENT command.
When you are not working on your local node or within your own cluster, your environment is a nonlocal environment. SYSMAN makes this distinction for security reasons; when you are defining a nonlocal environment, such as a different cluster, SYSMAN prompts for a password. SYSMAN also prompts for a password when you attempt to manage a system under a different user name. You can change your user name by using the /USERNAME qualifier with SET ENVIRONMENT.
A SYSMAN environment remains in effect until you change it or exit from SYSMAN.
2.3.4.1. Defining Another Node as the Environment
You can define a management environment to be any node available through DECnet. To define one or more nodes to be your management environment, use the SET ENVIRONMENT/NODE command.
For the following examples, refer to Figure 2.2, ''Sample SYSMAN Management Environment''; assume you are logged in to NODE 21.
Examples
$ RUN SYS$SYSTEM:SYSMAN
SYSMAN> SET ENVIRONMENT/NODE=NODE22
%SYSMAN-I-ENV, current command environment:
        Individual nodes: NODE22
        Username ALEXIS will be used on nonlocal nodes
The SET ENVIRONMENT command in this example defines the management environment to be NODE22. (The command does not, however, set the environment to be Cluster 1.)
SYSMAN> SET ENVIRONMENT/NODE=(NODE23, NODE24, NODE25)
Remote Password:
%SYSMAN-I-ENV, Current Command Environment:
        Individual nodes: NODE23, NODE24, NODE25
        At least one node is not in local cluster
        Username ALEXIS   will be used on nonlocal nodes
The SET ENVIRONMENT command in this example defines the management environment to be a group of nodes --- NODE23, NODE24, and NODE25 --- that are in two separate clusters.
SYSMAN> SET ENVIRONMENT/CLUSTER/NODE=NODE24
Remote Password:
%SYSMAN-I-ENV, current command environment:
 Clusterwide on remote cluster NODE24
 Username ALEXIS will be used on nonlocal nodes
SYSMAN> DO SHOW TIME
%SYSMAN-I-OUTPUT, command execution on node NODE24
  13-AUG-1996 13:07:54
%SYSMAN-I-OUTPUT, command execution on node NODE25
  13-AUG-1996 13:10:28
The SET ENVIRONMENT command in this example defines the management environment to be a cluster that includes NODE24---that is, Cluster 2.
2.3.4.2. Using Logical Names to Organize Management Environments
If you want to organize the nodes in your cluster according to specific categories (for example, all CI-based nodes or all nodes with C installed), you can define logical names to use with the SET ENVIRONMENT/NODE command, as follows:
Create the logical name table SYSMAN$NODE_TABLE by putting the following command into the file SYS$MANAGER:SYLOGICALS.COM, which is executed during system startup:
$ CREATE/NAME_TABLE/PARENT=LNM$SYSTEM_DIRECTORY SYSMAN$NODE_TABLE
Define one or more logical names to be a node or list of nodes by putting a command similar to the following into SYS$MANAGER:SYLOGICALS.COM:
$ DEFINE CI_NODES NODE21, NODE22, NODE23/TABLE=SYSMAN$NODE_TABLE
When you set your SYSMAN environment from the DCL level, specify one of the logical names you created for this purpose. For example:
$ RUN SYS$SYSTEM:SYSMAN
SYSMAN> SET ENVIRONMENT/NODE=(CI_NODES)

Remote Password:

%SYSMAN-I-ENV, current command environment:
        Individual nodes: NODE21, NODE22, NODE23
        At least one node is not in the local cluster.
        Username SYSTEM       will be used on nonlocal nodes.
You can also define logical names for VAX and Alpha nodes in a dual-architecture OpenVMS Cluster system, as explained in VSI OpenVMS System Manager's Manual, Volume 2: Tuning, Monitoring, and Complex Systems.
Example
The following example demonstrates how you can define multiple logical names to organize several management environments:
$ CREATE/NAME_TABLE/PARENT=LNM$SYSTEM_DIRECTORY SYSMAN$NODE_TABLE
$ DEFINE CI_NODES SYS2, SYS8/TABLE=SYSMAN$NODE_TABLE
$ DEFINE C NODE21, NODE22, NODE23/TABLE=SYSMAN$NODE_TABLE
$ DEFINE PASCAL NODE23, NODE18, CI_NODES/TABLE=SYSMAN$NODE_TABLE
$ RUN SYS$SYSTEM:SYSMAN
SYSMAN> SET ENVIRONMENT/NODE=(C, PASCAL)
Remote Password:

%SYSMAN-I-ENV, current command environment:
        Individual nodes: NODE21, NODE22, NODE23, NODE18, SYS2, SYS8
        At least one node is not in the local cluster.
        Username SYSTEM       will be used on nonlocal nodes.
2.3.4.3. Defining an OpenVMS Cluster Environment
To define your management environment to be an OpenVMS Cluster system, use the SET ENVIRONMENT/CLUSTER command.
| OpenVMS Cluster Environment | Definition |
| Local | Cluster from which you are using SYSMAN |
| Nonlocal | Any cluster other than the one from which you are executing SYSMAN |
To expand the management environment in Figure 2.2, ''Sample SYSMAN Management Environment'' from NODE21 to Cluster 1, enter the following command from NODE21:
SYSMAN> SET ENVIRONMENT/CLUSTER
%SYSMAN-I-ENV, Current Command Environment:
        Clusterwide on local cluster
        Username ALEXIS   will be used on nonlocal nodes
In the OpenVMS Cluster environment shown in Figure 2.2, ''Sample SYSMAN Management Environment'', SYSMAN executes commands on all nodes in Cluster 1, namely NODE21, NODE22, and NODE23.
To manage a nonlocal cluster with SYSMAN, use the /NODE qualifier to identify the cluster. If you define an OpenVMS Cluster alias, the /NODE qualifier can use the alias rather than the node name.
If you use the /CLUSTER and /NODE qualifiers together, the environment becomes the OpenVMS Cluster system where the given node is a member. For example, to perform management tasks on Cluster 2 in Figure 2.2, ''Sample SYSMAN Management Environment'', enter SET ENVIRONMENT with the /CLUSTER qualifier and name one node within Cluster 2 using the /NODE qualifier:
SYSMAN> SET ENVIRONMENT/CLUSTER/NODE=NODE24
Remote Password:
%SYSMAN-I-ENV, Current Command Environment:
        Clusterwide on remote node NODE24
        Username ALEXIS   will be used on nonlocal nodes
For information about using SYSMAN to manage an OpenVMS Cluster system that contains both Alpha and VAX nodes, see VSI OpenVMS System Manager's Manual, Volume 2: Tuning, Monitoring, and Complex Systems.
2.3.5. Understanding Your SYSMAN Profile
When you use SYSMAN across OpenVMS Cluster systems, SYSMAN establishes a profile that contains your rights, privileges, and defaults, and verifies that you are an authorized user. If you encounter privilege problems when using SYSMAN, it helps to know how SYSMAN determines your profile.
SYSMAN looks for three possible scenarios when determining your profile:
If the environment is an OpenVMS Cluster system that has common SYSUAF and RIGHTSLIST databases, SYSMAN assigns the profile in effect on the local node to the SMISERVER process on the target node or nodes. This profile includes both authorized and current privileges.
If the environment is an OpenVMS Cluster system and does not have common SYSUAF and RIGHTSLIST databases, SYSMAN checks the SYSUAF on the target nodes to see if you are an authorized user. If you are an authorized user, SYSMAN copies your profile from the SYSUAF on the target nodes to the SMISERVER process on the target nodes.
If the environment has nodes that are not part of your local cluster, or if you have recently changed your user name, SYSMAN prompts you for a password before it checks the SYSUAF on the target node. If you enter the correct password and the SYSUAF shows that you are an authorized user, SYSMAN copies your profile from the SYSUAF on the target nodes to the SMISERVER process on the target nodes.
The profile does not include symbolic names, logical names, preset terminal characteristics, or key definitions established through a login command procedure. The only environment that has the attributes defined in a login command procedure is the local node from which you are executing SYSMAN.
2.3.6. Adjusting Your SYSMAN Profile
| Attribute | Qualifier | For More Information |
|---|---|---|
| Current privileges | /PRIVILEGES | Section 2.3.6.1, ''Changing Your Current Privileges'' |
| Default device and directory | /DEFAULT | Section 2.3.6.2, ''Changing Your Default Device and Directory'' |
| DCL verification of DO commands | /VERIFY | Section 2.3.7, ''Setting DCL Verification'' |
This profile is in effect until you change it with SET PROFILE, reset the environment (which may change your profile automatically), or exit from SYSMAN.
The SET PROFILE command temporarily changes the attributes of your current local process. However, when you exit from SYSMAN, all attributes are restored to the values that were current when SYSMAN was invoked.
2.3.6.1. Changing Your Current Privileges
The SYSMAN command SET PROFILE/PRIVILEGES temporarily changes your current privileges in an environment.
Frequently, system management commands require special privileges. You might need to add privileges before you execute certain commands in an environment. System managers usually have the same privileges on all nodes; if you do not have the required privileges on a node, SYSMAN cannot execute the command and returns an error message.
Example
The following example makes SYSPRV one of your current privileges:
SYSMAN> SET PROFILE/PRIVILEGES=SYSPRV
SYSMAN> SHOW PROFILE
%SYSMAN-I-DEFDIR, Default directory on node NODE21  -- WORK1:[MAEW]
%SYSMAN-I-DEFPRIV, Process privileges on node NODE21 --
        TMPMBX
        OPER
        NETMBX
        SYSPRV
2.3.6.2. Changing Your Default Device and Directory
Use the SET PROFILE/DEFAULT command to reset the default device and directory specification for your process and all server processes in the environment.
Most often, the default device and directory specified in your UAF record is a first-level directory in which you create and maintain files and subdirectories. SYSMAN uses this default device and directory name when resolving file specifications. It also assigns the default device and directory name to any files that you create during a session.
In some cases, you might need to change the default device and directory in your SYSMAN profile. For example, you might have a directory containing command procedures as well as some system management utilities that require the default directory to be SYS$SYSTEM.
Example
The following example sets the default device and directory to DMA1:[SMITH.COM]:
$ RUN SYS$SYSTEM:SYSMAN
SYSMAN> SET PROFILE/DEFAULT=DMA1:[SMITH.COM]
2.3.7. Setting DCL Verification
Use the SET PROFILE/VERIFY command to turn on DCL verification, which displays DCL command lines and data lines as they execute.
SYSMAN can execute DCL commands using the DO command. By default, SYSMAN DCL verification is turned off.
Example
$ RUN SYS$SYSTEM:SYSMAN
SYSMAN> SET PROFILE/VERIFY
2.3.8. Executing DCL Commands from SYSMAN
The SYSMAN command DO executes DCL command procedures and SYSMAN command procedures on all nodes in an OpenVMS Cluster environment. In an OpenVMS Cluster environment or in any environment with multiple nodes, you enter a set of commands once, and SYSMAN executes the commands sequentially on every node in the environment. SYSMAN displays the name of each node as it executes commands, or an error message if the command fails.
If a node does not respond within a given timeout period, SYSMAN displays a message before proceeding to the next node in the environment. You can specify a timeout period with the SET TIMEOUT command.
Each DO command executes as an independent subprocess, so no process context is retained between DO commands. For this reason, you must express all DCL commands in a single command string, and you cannot run a procedure that requires input.
In an OpenVMS Cluster environment, SYSMAN executes DO commands sequentially on all nodes in the cluster. After a command completes or times out on one node, SYSMAN sends it to the next node in the environment. Any node that is unable to execute a command returns an error message.
For more information about using the DO command to manage an OpenVMS Cluster system, see VSI OpenVMS System Manager's Manual, Volume 2: Tuning, Monitoring, and Complex Systems. You can also refer to the VSI OpenVMS System Management Utilities Reference Manual for a complete description of the SYSMAN command DO.
Example
In the following example, SYSMAN runs the INSTALL utility and makes a file known on all nodes in the cluster when you enter the commands from the local node:
$ RUN SYS$SYSTEM:SYSMAN
SYSMAN> SET ENVIRONMENT/CLUSTER
SYSMAN> SET PROFILE/PRIVILEGE=CMKRNL
SYSMAN> DO INSTALL ADD/OPEN/SHARED WORK4:[CENTRAL]STATSHR
.
.
.
%SYSMAN-I-OUTPUT, Command execution on node NODE21
%SYSMAN-I-OUTPUT, Command execution on node NODE22
2.3.9. Creating SYSMAN Command Procedures
The SYSMAN execute procedure (@) command executes SYSMAN command procedures on each node in the environment.
Example
The following example creates and executes a SYSMAN command procedure to display the current date and system time for each OpenVMS Cluster node:
$ CREATE TIME.COM
SET ENVIRONMENT/CLUSTER
CONFIGURATION SHOW TIME[Ctrl/Z]
$ RUN SYS$SYSTEM:SYSMAN
SYSMAN> @TIME
%SYSMAN-I-ENV, Current command environment:
            Clusterwide on local cluster
            Username SYSTEM   will be used on nonlocal nodes
System time on node NODE21: 19-JUN-1996 13:32:19.45
System time on node NODE22: 19-JUN-1996 13:32:27.79
System time on node NODE23: 19-JUN-1996 13:32:58.66
SYSMAN>
2.3.10. Setting Up SYSMAN with an Initialization File
You can create an initialization file that is used each time you invoke SYSMAN. In the initialization file, you can perform tasks such as defining keys and setting up your environment.
The default file specification for the SYSMAN initialization file is SYS$LOGIN:SYSMANINI.INI. If you want your SYSMAN initialization file to have a different file specification, you must define the logical name SYSMANINI to point to the location of the file. The following is a sample initialization file that defines several keys:
$ TYPE SYSMANINI.INI
DEFINE/KEY/TERMINATE KP0 "SET ENVIRONMENT/CLUSTER/NODE=(NODE21, NODE22)"
DEFINE/KEY/TERMINATE KP1 "CONFIGURATION SHOW TIME"
DEFINE/KEY/TERMINATE KP2 "SHOW PROFILE"
   ...
2.4. Using OPCOM to Communicate with System Users
|
Function |
For More Information |
|---|---|
|
To broadcast messages to users who are logged in | |
|
To control the use of OPA0: as an operator terminal |
Section 2.4.4, ''Controlling the Use of OPA0: as an Operator Terminal'' |
|
To designate terminals as operator terminals, enabling them to display messages broadcast by OPCOM | |
|
To record messages broadcast by OPCOM in a log file |
VSI OpenVMS System Manager's Manual, Volume 2: Tuning, Monitoring, and Complex Systems |
|
To send requests to an operator ? | |
|
To reply to operator requests ? |
2.4.1. Understanding OPCOM
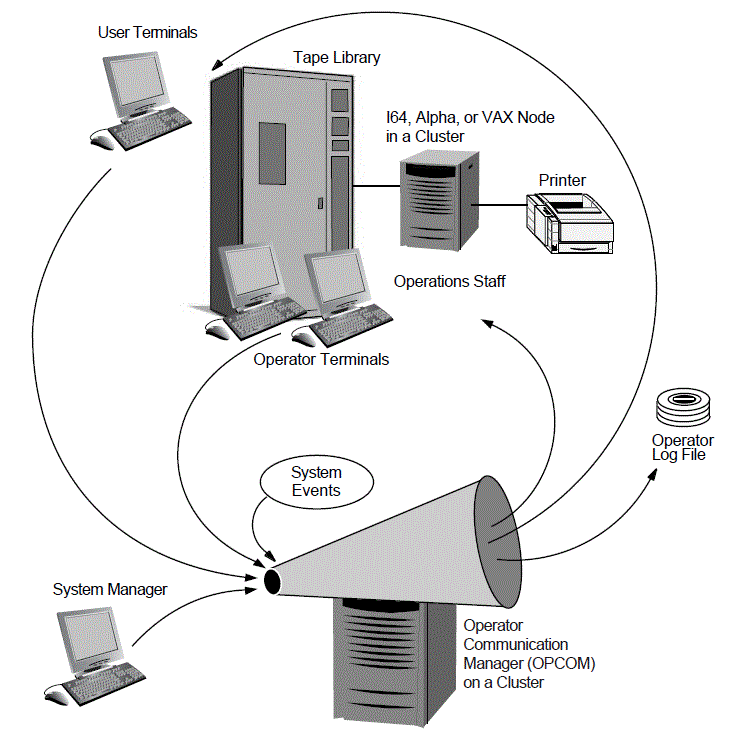
Figure 2.3, ''Operator Communication Manager (OPCOM)'' illustrates the function of OPCOM.
OPCOM Components
|
Component |
Description |
For More Information |
|---|---|---|
|
OPCOM process |
The system process that manages OPCOM operations. Unless you disable it, the OPCOM process starts automatically at system startup time. | |
|
Operator terminals |
Terminals designated to display messages broadcast by OPCOM. Usually, the console terminal (with the device name OPA0:) is the operator terminal. However, you can designate any user terminal as an operator terminal. | |
|
Operator log file |
A file that records messages broadcast by OPCOM. The file is named SYS$MANAGER:OPERATOR.LOG. |
VSI OpenVMS System Manager's Manual, Volume 2: Tuning, Monitoring, and Complex Systems> |
|
OPCOM messages |
Messages broadcast by OPCOM. These messages are displayed on operator terminals and written to the operator log file. The messages might be general messages sent by you, user requests, operator replies, or system events. |
VSI OpenVMS System Manager's Manual, Volume 2: Tuning, Monitoring, and Complex Systems |
|
REPLY and REQUEST commands |
DCL commands that allow you to use and control OPCOM. |
Section 2.4.3, ''Sending Messages to Users'', Section 2.4.6, ''Sending Requests to an Operator'', and Section 2.4.7, ''Replying to Operator Requests'' |
OPCOM Defaults
OPCOM is started by default on all systems.
Except for workstations in an OpenVMS Cluster environment, OPCOM logs messages to OPA0:, which is enabled by default as an operator terminal. The log file SYS$MANAGER:OPERATOR.LOG is opened, and all OPCOM classes are enabled on both the operator terminal and the log file.
Section 2.4.4, ''Controlling the Use of OPA0: as an Operator Terminal'' explains how to control the use of OPA0: as an operator terminal. The VSI OpenVMS System Manager's Manual, Volume 2: Tuning, Monitoring, and Complex Systems explains how to specify the default state of operator log files.
OPCOM Requirements
To execute a REPLY command, OPCOM must be running, and you must enter REPLY from a terminal device designated as an operator terminal.
The REPLY command requires at least OPER privilege. You must have SHARE privilege if another process is logged in to the designated operator terminal. To enable or disable the security class, you must have SECURITY privilege.
To designate an operator terminal in batch or SYSTARTUP, you must assign SYS$COMMAND to a valid terminal device.
2.4.2. Starting OPCOM
The OPCOM process starts automatically during system startup, unless it is disabled. You might need to start OPCOM interactively if a software problem causes the process to fail and prevents OPCOM from restarting automatically.
$ @SYS$SYSTEM:STARTUP OPCOM
If a software problem causes OPCOM to fail, contact your VSI support representative. Be sure to keep the process dump file named SYS$SYSTEM:OPCOM.DMP. (When OPCOM fails, it creates this file.)
2.4.3. Sending Messages to Users
REPLY [/qualifier...] ["message-text"]
$ REPLY/ALL/BELL "Please log off"
|
Qualifier |
Description |
|---|---|
|
/ALL |
Broadcasts a message to all terminals that are attached to the system or cluster. These terminals must be turned on and have broadcast-message reception enabled. |
|
/BELL |
Rings a bell at the terminal receiving a message when entered with the /ALL, /TERMINAL, or /USERNAME qualifier; two bells when entered with the /URGENT qualifier; and three bells when entered with the /SHUTDOWN qualifier. |
|
/NODE[=( node-name[, ...]) |
Broadcasts a message to the local cluster node only, or to a node or nodes you specify. |
|
/SHUTDOWN |
Sends a message beginning "SHUTDOWN..."; if used with the /BELL qualifier, rings three bells at terminals receiving the message. |
|
/TERMINAL=( terminal-name[, ..]) |
Broadcasts the message to the specified terminals. |
|
/URGENT |
Broadcasts a message beginning "URGENT..."; if used with the /BELL qualifier, rings two bells at terminals receiving the message. |
|
/USERNAME=( username[, ...]) |
Broadcasts a message to all terminals at which users are logged in to the system (or cluster), or only to the terminals of the specified users. |
For more information, refer to the VSI OpenVMS DCL Dictionary.
Examples
$ REPLY/ALL/BELL/NODE=WLDWND "Please log off"
$ REPLY/BELL/TERMINAL=TTC1: "Your file has completed printing"
2.4.4. Controlling the Use of OPA0: as an Operator Terminal
By default, OPCOM enables OPA0: as an operator terminal except on workstations in clusters (unless the workstation is the first system into the cluster). OPCOM determines whether a system is a workstation by testing the system for a graphics device. Specifically, this test is:
F$DEVICE (“*”, “WORKSTATION”, “DECW_OUTPUT”)
|
Logical Name |
Function |
|---|---|
|
OPC$OPA0_ENABLE |
Defined as True or False; if True, specifies that OPA0: is to be enabled as an operator terminal. |
|
OPC$OPA0_CLASSES |
Specifies the operator classes that are enabled for OPA0. The logical name can be a search list of the allowed classes, a comma-separated list, or a combination of the two. If you specify an invalid class, all classes are enabled, and a message similar to the following is displayed on the console at system startup and logged to the OPERATOR.LOG file: %%%%%%%%%%% OPCOM 18-MAY-2000 13:28:33.12 %%%%%%%%%%% “BADCLASS” is not a valid class name in OPC$OPA0_CLASSES See Section 2.4.5, ''Designating Operator Terminals'' for a description of the valid operator classes. |
The logicals take effect the next time you boot the system.
2.4.5. Designating Operator Terminals
Normally, the console terminal (with the device name OPA0:) is automatically an operator terminal except for workstations in an OpenVMS Cluster environment. However, you can designate any terminal as an operator terminal. You can also disable a previously designated operator terminal.
Enabling Operator Terminals
$ REPLY/ENABLE
$
%%%%%%%%%%%  OPCOM  13-JUL-2000 11:30:30.56  %%%%%%%%%%%
Operator _BHAK$FTA20: has been enabled, username SYSTEM
To designate an operator's terminal in batch or in startup command procedures, SYS$COMMAND must be assigned to a valid terminal device.
REPLY/ENABLE=(keyword[, ...])
|
Keyword |
Description |
|---|---|
|
CARDS |
Displays messages sent to the card readers. |
|
CENTRAL |
Displays messages sent to the central system operator. |
|
CLUSTER |
Displays messages from the connection manager pertaining to OpenVMS Cluster system state changes. |
|
DEVICES |
Displays messages pertaining to mounting disks. |
|
DISKS |
Displays messages pertaining to mounting and dismounting disk volumes. |
|
LICENSE |
Displays messages pertaining to software licenses. |
|
NETWORK |
Displays messages pertaining to networks; the keyword CENTRAL must also be specified to inhibit network messages. |
|
OPER1 to OPER12 |
Displays messages sent to operators identified as OPER1 to OPER12. |
|
PRINTER |
Displays messages pertaining to print requests. |
|
SECURITY |
Allows messages pertaining to security events; requires SECURITY privilege. |
|
TAPES |
Allows messages pertaining to mounting and dismounting tape volumes. |
$ REPLY/ENABLE=(PRINTER, OPER3)
Disabling Operator Terminals
A terminal that you designate as an operator's terminal remains enabled even when the operator logs out. To return the terminal to normal (nonoperator) status, enter the REPLY/DISABLE command from the terminal.
Example
$ REPLY/ENABLE=(PRINTER, DISKS, TAPES, CENTRAL)
$
%%%%%%%%%%%  OPCOM  13-JUL-2000 11:37:09.52  %%%%%%%%%%%
Operator TTA3 has been enabled, username SYSTEM

$
%%%%%%%%%%%  OPCOM  13-JUL-2000 11:37:09.53  %%%%%%%%%%%
Operator status for operator TTA3
CENTRAL, PRINTER, DISKS, TAPES
$ REPLY/DISABLE=TAPES
%%%%%%%%%%%  OPCOM  13-JUL-2000 11:37:09.53  %%%%%%%%%%%
Operator status for operator TTA3
CENTRAL, PRINTER, DISKS
$ REPLY/DISABLE
%%%%%%%%%%%  OPCOM  13-JUL-2000 11:38:50.68  %%%%%%%%%%%
Operator TTA3 has been disabled, username SYSTEM
2.4.6. Sending Requests to an Operator
|
Qualifier |
Description |
|---|---|
|
/REPLY |
Sends a request and requests a reply to the message. Requests sent with this command are issued a unique identification number to which the operator sends the response. The user cannot enter any commands until the operator responds. |
|
/TO=(operator[, ...]) |
If your facility is large, there may be several operators, each of whom has specific tasks. The /TO qualifier lets users send requests to a specific operator. Options are as follows: CARDS, CENTRAL, CLUSTER, DEVICES, DISKS, NETWORK, OPER1 to OPER12, PRINTER, SECURITY, TAPES. |
For MOUNT requests, see Section 9.5.3, ''Assisting Users in Mounting Volumes''.
For BACKUP requests, see Section 11.9.1, ''Requesting Operator Assistance''.
Example
$ PRINT/COPIES=2/QUEUE=LQ_PRINT  REPORT.OUT/FORM=LETTER
Job REPORT (queue LQA1, entry 401) pending
$ REQUEST/REPLY/TO=PRINTER -
_$ "Have queued job 401 as FORM=LETTER;   can you print it?"
%OPCOM-S-OPRNOTIF, operator notified, waiting...10:42:16.10
%OPCOM-S-OPREPLY, AFTER 11:00
19-APR-2000 10:25:32.40, request 3 completed by operator OPA0
2.4.7. Replying to Operator Requests
|
Qualifier |
Description |
|---|---|
|
/ABORT= identification-number |
Replies to the request specified by the identification number and cancels the request. |
|
/PENDING= identification-number |
Replies to the request specified by the identification number and prevents the user from entering other commands until the operator fulfills or aborts the request. The current terminal must be enabled as an operator terminal. |
|
/STATUS |
Reports which classes are enabled, and all outstanding user requests for the terminal from which this command was entered. The current terminal must be enabled as an operator terminal. |
|
/TO= identification-number |
Replies to the request specified by the identification number and completes the request. The current terminal must be enabled as an operator terminal. Note that you can also use a variation of the REPLY/TO command in response to a MOUNT/ASSIST and BACKUP/ASSIST commands. For more information, see Section 9.5.3, ''Assisting Users in Mounting Volumes'' and Section 11.9.1, ''Requesting Operator Assistance''. |
An operator working with magnetic tapes would also use additional REPLY qualifiers specific to magnetic tape operations. For more information, see Section 9.9.2.4, ''Sending Messages Back to Users''. For detailed information about the REPLY command and its qualifiers, refer to the VSI OpenVMS DCL Dictionary.
Example
%%%%%%%%%%  OPCOM, 19-APR-2000 10:20:50.39  %%%%%%%%%%%
           request 5 from user ROBINSON
           Please mount volume GRAPHIC_FILES in device _DUA11:
           Shelf 4 - slot B
$ REPLY/TO=5 "SUBSTITUTE  DUA4"
2.5. Using VMSKITBLD.COM to Modify a System Disk
On VAX systems, the command procedure SYS$UPDATE:VMSKITBLD.COM allows you to duplicate system files from an existing system disk on another disk.
|
Option |
Description |
For More Information |
|---|---|---|
|
BUILD |
Builds a new common system disk after destroying all existing files on the disk. |
Section 2.5.1, ''Using VMSKITBLD.COM to Build a New System Disk'' |
|
COPY |
Copies the operating system files to an existing disk without destroying nonsystem files that are currently on the disk. |
Section 2.5.2, ''Using VMSKITBLD.COM to Copy System Files to an Existing Disk'' |
|
ADD |
Adds a new system root directory to an existing system disk. |
Section 2.5.3, ''Using VMSKITBLD.COM to Add an Alternate System Root Directory'' |
|
Disk |
Description |
|---|---|
|
Source disk |
The disk from which you copy system files. The source disk must be an existing system disk. |
|
Target disk |
The disk to which you move the system files. |
Caution
Do not attempt to use VMSKITBLD with the current system disk as the target disk. VMSKITBLD.COM deletes files that are required for a running system.
2.5.1. Using VMSKITBLD.COM to Build a New System Disk
At some point, you might want to create a new system disk. For example, suppose that your existing system disk is an RA81 disk. If you purchase a larger RA90 disk and want to use it as your system disk, you could use the VMSKITBLD BUILD option to build a new system disk on the RA90 disk.
Caution
The VMSKITBLD BUILD option initializes the target disk, deleting all of its previous contents. For information about copying files to an existing system disk without destroying files, see Section 2.5.2, ''Using VMSKITBLD.COM to Copy System Files to an Existing Disk''.
If you want to build your operating system on another disk and you are not concerned about losing the current contents of the target disk, use the BUILD option as described in the following procedure.
How to Perform This Task
If the source disk is not the current booted system disk, boot the operating system from the source disk.
Log in to the SYSTEM account.
Make sure the disk is spun up and on line. If you are using a removable disk, you must also place the disk into the appropriate drive.
- Enter the following command to invoke VMSKITBLD:
$ @SYS$UPDATE:VMSKITBLD
VMSKITBLD prompts you to choose one of the following options:* Operation [BUILD, ADD, COPY]?
- Enter BUILD and press Return. VMSKITBLD displays messages that either prompt you for information needed to complete the operation or inform you of the procedure's status.
- In response to the following prompt, enter the name of the source disk:
* Enter mounted SOURCE disk name (ddcu:):
- In response to the following prompt, enter the top-level system directory for the source disk:
* Enter SOURCE disk top-level system directory [default = SYS0]:
In most cases, you can choose the default value [SYS0].
- In response to the following prompt, enter the name of the target disk:
* Enter TARGET disk name (ddcu:):
- In response to the following prompt, enter the volume label of the target disk:
* Enter the TARGET disk's label [default = VAXVMSRL5]:
- In response to the following prompt, enter the top-level system directory:
* Enter TARGET disk top-level system directory [default = SYS0]:
In most cases, you can choose the default value [SYS0].
- The procedure displays the following message to warn you that the target disk will be initialized and to allow you to stop the procedure:
    The target disk will be initialized.
* Target disk, _DUA0:, ready to be initialized? (Y/N): Y
Make sure it is safe to destroy the contents of the target disk, and enter Y to continue.
When the system displays the dollar sign ($) prompt, the system disk is built. VMSKITBLD automatically dismounts the target disk. At this point, the target disk contains all the operating system files required for a complete system.
Complete the system disk by creating a rights database and network proxy database and configuring the system with appropriate system parameters. For instructions, see Section 2.5.1.1, ''Completing a System Disk Built with VMSKITBLD.COM''.
To use the new system disk, reboot the system with the new system disk.
Example
* Enter mounted SOURCE disk name (ddcu:): SYS$SYSDEVICE:
* Enter SOURCE disk top level system directory [default = SYS0]:
* Enter TARGET disk name (ddcu:): DUA0:
* Enter the TARGET disk's label [default = VAXVMSRL5]:
* Enter TARGET disk top level system directory [default = SYS0]:
    The target disk will be initialized.
* Target disk, _DUA0:, ready to be initialized? (Y/N): Y
    Target disk, _DUA0:, has been initialized.
%MOUNT-I-MOUNTED, VAXVMSRL5   mounted on _DUA0:
    Creating system specific directories ...
    Creating cluster common directories ...
    Creating SYSGEN files ...
%SYSGEN-I-CREATED, _DUA0:SWAPFILE.SYS; 1 created
%SYSGEN-I-CREATED, _DUA0:PAGEFILE.SYS; 1 created
%SYSGEN-I-CREATED, _DUA0:SYSDUMP.DMP; 1 created
    Copying files from source disk ...
    Copying DECwindows file from source disk ...
    Writing a boot block ...
    System disk complete.
$
2.5.1.1. Completing a System Disk Built with VMSKITBLD.COM
Boot the new system disk using a conversational boot. For instructions, refer to the upgrade and installation supplement for your computer.
When the SYSBOOT> prompt appears, enter the USE DEFAULT command to boot with default values for all system parameters.
To avoid starting all layered products on a system that is not tuned for them, possibly causing the system to hang, enter SET STARTUP_P1 "MIN" after the SYSBOOT> prompt.
Enter the CONTINUE command to continue booting.
After the system boots, log in to the SYSTEM account. The password for the system account will be the default password, MANAGER. Make sure you change this password.
Use the Authorize utility to create a rights database and a network proxy database. For more information, refer to the VSI OpenVMS Guide to System Security.
Run AUTOGEN from the SAVPARAMS phase to set appropriate values for system parameters. Be sure to specify the CHECK_FEEDBACK option. See VSI OpenVMS System Manager's Manual, Volume 2: Tuning, Monitoring, and Complex Systems and the AUTOGEN section of the VSI OpenVMS System Management Utilities Reference Manual> for detailed information about running AUTOGEN.
To reboot from the former system disk, specify REBOOT as the end phase when invoking AUTOGEN.
To reboot the system from the new system disk, specify SHUTDOWN as the end phase and reboot manually, specifying the new system disk.
Example
SYSBOOT> USE DEFAULT

SYSBOOT> SET STARTUP_P1 "MIN"
SYSBOOT> CONTINUE
.
.
.
$ SET DEFAULT SYS$COMMON:[SYSEXE]
$ RUN AUTHORIZE
UAF> CREATE/RIGHTS
UAF> CREATE/PROXY
UAF> EXIT
$ @SYS$UPDATE:AUTOGEN SAVPARAMS REBOOT CHECK_FEEDBACK
.
.
.
2.5.2. Using VMSKITBLD.COM to Copy System Files to an Existing Disk
You can use VMSKITBLD to copy the operating system files to a target disk without deleting the files already existing on the target disk. For example, if you accidentally delete a large number of system files from a system disk, you can use VMSKITBLD to copy the system files from another system disk.
To do this, the operating system must be running and the source disk that you intend to copy from must be mounted.
When you use the COPY option of VMSKITBLD.COM, the user-modified files (including SYSUAF.DAT and site-specific command files) are notcopied from the source disk; VMSKITBLD uses the unaltered TEMPLATE versions of these files. In addition, the procedure does not create the system-specific files SWAPFILE.SYS, PAGEFILE.SYS, or SYSDUMP.DMP.
Before VMSKITBLD copies each new system file, it deletes the older version of the file from the target disk.
How to Perform This Task
Log in to the SYSTEM account.
Place the target disk into the appropriate drive.
Note the device name of the target disk.
- Enter the following command to invoke VMSKITBLD:
$ @SYS$UPDATE:VMSKITBLD
VMSKITBLD prompts you to choose one of the following options:Operation [BUILD, ADD, COPY]?
- Enter COPY and press Return. VMSKITBLD displays messages that either prompt you for information needed to complete the copy operation or inform you of the procedure's status.
- In response to the following prompt, enter the name of the source disk.
* Enter mounted SOURCE disk name (ddcu:):
- In response to the following prompt, enter the top-level system directory for the source disk:
* Enter SOURCE disk top level system directory [default = SYS0]:
In most cases, you can choose the default value [SYS0].
- In response to the following prompt, enter the name of the target disk:
* Enter TARGET disk name (ddcu:):
- In response to the following prompt, enter the top-level system directory:
* Enter TARGET disk top level system directory [default = SYS0]:
In most cases, you can choose the default value [SYS0].
When the system displays the dollar sign ($) prompt, the files have been copied and the system disk is complete. VMSKITBLD automatically dismounts the target disk.
Example
* Enter mounted SOURCE disk name (ddcu:): SYS$SYSDEVICE:
* Enter SOURCE top level system directory [default = SYS0]:
* Enter TARGET disk name (ddcu:): DUA0:
* Enter TARGET disk top level system directory [default = SYS0]: SYSA
%DCL-I-ALLOC, _DUA0: allocated
%MOUNT-I-MOUNTED, VAXVMSRL5 mounted on _DUA0:
    Copying files from source disk ...
    Copying DECwindows files from source disk ...
    Writing a boot block ...
    System disk complete.
$
2.5.3. Using VMSKITBLD.COM to Add an Alternate System Root Directory
Use the ADD option to create an alternate system root directory on a target system disk. You might use this option to create a test environment where you can test software without interfering with the current version of the system.
Note
Do not use the ADD option to create a system root to add a new system to an OpenVMS Cluster environment. Instead, use the SYS$MANAGER:CLUSTER_CONFIG.COM procedure.
The ADD option creates only new specific root directories. The current common directory is linked to the new root.
How to Perform This Task
Log in to the SYSTEM account.
Check the number of free blocks on the system disk to make sure you have adequate space for the new files, including SWAPFILE.SYS, PAGEFILE.SYS, and SYSDUMP.DMP. The sizes of these files are determined by the type of computer you use. For information about calculating size for page, swap, and dump files, see VSI OpenVMS System Manager's Manual, Volume 2: Tuning, Monitoring, and Complex Systems.
Make sure the target system disk is dismounted and on line.
- Enter the following command to invoke VMSKITBLD:
$ @SYS$UPDATE:VMSKITBLD
VMSKITBLD prompts you to choose one of the following options:Operation [BUILD, ADD, COPY]?
- Enter ADD and press Return. VMSKITBLD displays messages that either prompt you for information needed to complete the operation or inform you of the procedure's status.
- In response to the following prompt, enter SYS$SYSDEVICE and press Return:
* Enter mounted SOURCE disk name (ddcu:):
- In response to the following prompt, press Return to choose the default:
* Enter SOURCE disk top level system directory [default = SYS0]:
- In response to the following prompt, enter the name of the target disk:
* Enter TARGET disk name (ddcu:):
- In response to the following prompt, enter the new root directory specification:
* Enter TARGET disk top level system directory [default = SYS0]:
Do not specify directories SYSE or SYSF:SYSE is reserved for storing standalone BACKUP.
SYSF is reserved for VSI use.
When the system displays the dollar sign ($) prompt, the target system directory contains the new system root directory. VMSKITBLD automatically dismounts the target disk.
Configure the new system root by booting the target disk and running AUTOGEN. For instructions, see Section 2.5.3.1, ''Configuring a System Root Added with VMSKITBLD''.
Example
* Enter mounted SOURCE disk name (ddcu:): SYS$SYSDEVICE:
* Enter SOURCE top level system directory [default = SYS0]:
* Enter TARGET disk name (ddcu:): SHEMP$DUA5:
* Enter TARGET disk top level system directory [default = SYS0]:
%DCL-I-ALLOC, _SHEMP$DUA5: allocated
%MOUNT-I-MOUNTED, VAXVMSRL5   mounted on _SHEMP$DUA5:
    Creating system specific directories ...
    Creating SYSGEN files ...
%SYSGEN-I-CREATED, _SHEMP$DUA5:SWAPFILE.SYS; 1 created
%SYSGEN-I-CREATED, _SHEMP$DUA5:PAGEFILE.SYS; 1 created
%SYSGEN-I-CREATED, _SHEMP$DUA5:SYSDUMP.DMP; 1 created
    System disk complete.
$
2.5.3.1. Configuring a System Root Added with VMSKITBLD
Shut down the system and halt your computer. For instructions on shutting down your system, see Section 4.8.1, ''Performing an Orderly Shutdown with SHUTDOWN.COM''.
Perform a conversational boot, as described in the upgrade and installation supplement for your computer.
- When the conversational boot prompt (SYSBOOT>) appears, enter the following commands:
SYSBOOT> USE DEFAULT
SYSBOOT> SET STARTUP_P1 "MIN"
SYSBOOT> CONTINUE
After the system boots, log in to the SYSTEM account and execute AUTOGEN from the SAVPARAMS phase to set appropriate values for system parameters.
To reboot from the former root, specify REBOOT as the end phase when invoking AUTOGEN.
To reboot from the new root directory, specify SHUTDOWN as the AUTOGEN end phase, and reboot manually. See VSI OpenVMS System Manager's Manual, Volume 2: Tuning, Monitoring, and Complex Systems and the VSI OpenVMS System Management Utilities Reference Manual (AUTOGEN) for detailed information about AUTOGEN.
Example
SYSBOOT> USE DEFAULT
SYSBOOT> SET STARTUP_P1 "MIN"
SYSBOOT> CONTINUE
.
.
.
$ @SYS$UPDATE:AUTOGEN SAVPARAMS REBOOT CHECK_FEEDBACK
.
.
.
Chapter 3. Installing, Upgrading, and Updating Software
This chapter describes the concepts related to installing, upgrading, and updating OpenVMS layered products.
Note
Instructions for installing, upgrading, and updating the OpenVMS operating system software are in the current OpenVMS Upgrade and Installation Manual for VAX, Alpha, or IA-64 systems.
Two methods are available for installing or upgrading layered-product software:
The VMSINSTAL.COM command procedure
The POLYCENTER Software Installation utility
Each layered product is packaged to use one of these. Refer to the layered product's documentation for information about which to use.
Information Provided in This Chapter
|
Task |
Section |
|---|---|
|
Installing layered product software | |
|
Using VMSINSTAL.COM to install layered software |
Section 3.2, ''Preparing Your System to Run VMSINSTAL.COM'' through Section 3.5, ''Selecting VMSINSTAL.COM Options in Detail'' |
|
Using the POLYCENTER Software Installation utility |
Section 3.5, ''Selecting VMSINSTAL.COM Options in Detail'' through Section 3.8.8, ''Removing Installed Software Products and Kits'' |
|
Concept |
Section |
|---|---|
|
VMSINSTAL.COM | |
|
POLYCENTER Software Installation utility |
Section 3.6, ''Using the POLYCENTER Software Installation Utility'' |
3.1. Installing or Upgrading Layered Products
|
Task |
Section |
|---|---|
|
Preparing your system to run VMSINSTAL.COM | |
|
Running VMSINSTAL.COM | |
|
Recovering from a system failure | |
|
Selecting VMSINSTAL.COM options |
Note that these sections do not describe specific VMSINSTAL.COM procedures. The examples used are for illustration only. For details of a particular product, refer to the installation documentation for the specific product.
|
Task |
Section |
|---|---|
|
Using the POLYCENTER Software Installation utility |
Section 3.6, ''Using the POLYCENTER Software Installation Utility'' |
|
Installing software |
Section 3.7, ''Installing with the POLYCENTER Software Installation utility'' |
|
Performing operations on installed software | |
|
Removing installed software |
Section 3.8.8, ''Removing Installed Software Products and Kits'' |
3.2. Preparing Your System to Run VMSINSTAL.COM
This section provides guidelines for preparing your system for using VMSINSTAL.COM. Note that each software product that you install might not require you to follow all of the guidelines listed in this section.
3.2.1. Performing Preliminary Operations
Back up your system disk, as described in Section 11.17, ''Backing Up and Restoring the System Disk''. Use the backup copy as a working copy for the installation.
VMSINSTAL.COM might delete the older version of the product before it installs the newer version. If the system fails during installation, you might have to make a new working copy of the system disk and restart the installation.
Log in to the SYSTEM account at the console terminal.
- Be sure all users have logged out and all batch jobs have completed by using, respectively, the SHOW USERS and SHOW SYSTEM/BATCH commands. Keep users off the system until VMSINSTAL.COM completes by using the following command:
$ SET LOGINS/INTERACTIVE=0
Note
If you cannot log off all users during the installation of a layered product that updates the DCL help library, note that the help files for that layered product will not be installed if a user on the system is accessing DCL help. The installation procedure generates warning messages and stores the help files in a working directory.
Shut down network software.
Check system parameters. (GBLPAGES, GBLSECTIONS and NPAGEDYN often need to be adjusted.) Read the documentation supplied with each layered product to be installed, and find out if the product has any specific resource requirements.
If you must change parameter values, increase the values by adding ADD_
parameter-namesymbols to MODPARAMS.DAT. (See VSI OpenVMS System Manager's Manual, Volume 2: Tuning, Monitoring, and Complex Systems.)Use AUTOGEN with feedback to size the system resources properly. (See VSI OpenVMS System Manager's Manual, Volume 2: Tuning, Monitoring, and Complex Systems.)
Make sure the limits in the SYSTEM account authorization record are equal to or greater than the recommended limits.
To check these limits, run the Authorize utility (AUTHORIZE) to display the current limits of the SYSTEM account's user authorization file.
To run AUTHORIZE, enter the following commands:$ SET DEFAULT SYS$SYSTEM $ RUN AUTHORIZE
At the UAF prompt (UAF>), enter the following command:UAF> SHOW SYSTEM
See Section 7.1.2, ''Limits and Quotas'' for details.
If necessary, use the Authorize utility to modify the SYSTEM account limits. Changes you make do not take effect until you log out and log in again.
For example, to increase the DIOLM limit to 100, enter the following command:UAF> MODIFY SYSTEM/DIOLM=100
See Section 7.1.2, ''Limits and Quotas'' for details.
Physically mount the first distribution media that contains the software product. See Section 9.5, ''Mounting Volumes'' for details.
Register and load licenses, as explained in the next section.
3.2.2. Registering and Loading Licenses
A license refers to the authorization you have to use a product. The License Management Facility (LMF) enables you to register, manage, and track software licenses on line.
A Product Authorization Key (PAK) contains information that is provided for many VSI products. The data provided in the PAK allows you to register a software license in the license database on a system.
Log in to the system manager's account, SYSTEM.
- Register the license in one of two ways:
Invoke the SYS$UPDATE:VMSLICENSE.COM procedure. When it prompts you for information, respond with data listed on your operating system PAK. (You can register other software product licenses at this time as well.)
At the DCL prompt, enter the LICENSE REGISTER command with the appropriate qualifiers that correspond to License PAK information.
- Use either of the following utilities to load a license:
License Management Facility (LMF), which loads the PAK only on the local node.
System Management utility (SYSMAN), which allows you to load the PAK throughout an entire cluster. (SYSMAN LICENSE commands are a subset of LMF commands.)
Only the local node requires the installation of a license before you use VMSINSTAL.COM.
For more information about loading licenses, refer to the VSI OpenVMS License Management Utility Guide.
3.2.3. Preventing Nodes from Sharing PAKs
The /NO_SHARE qualifier for the LICENSE MODIFY command lets you add the NO_SHARE option to a PAK registered in a license database (LDB). NO_SHARE PAKs are assigned to a single node in an OpenVMS Cluster system. A NO_SHARE PAK cannot be shared with other OpenVMS Cluster nodes.
This qualifier remedies problems that occasionally occur when you attempt to use the PAK of a software product for which you already have other PAKs in your LDB. The PAK does not combine with the other PAKs for the same software product, resulting in LICENSE-W-NOCOMB warnings. Often, the license is not loaded on the nodes on which you want it loaded.
Add the NO_SHARE option to the PAK or PAKs causing the NOCOMB warnings.
Assign each PAK to a specific OpenVMS Cluster node.
3.3. Running VMSINSTAL.COM
Read the installation instructions for the specific product or update. If you need assistance during an installation, enter a question mark (?) for an explanation of possible responses.
When you first start VMSINSTAL.COM, the procedure displays several prompts and messages that direct and explain the installation. These prompts and messages differ, depending on the software product that you are installing.
When the procedure asks if you are satisfied with the backup of your system disk, back up your system disk before continuing with the installation if you do not have a recent backup of your system disk.
- If you do not satisfy all conditions required to start VMSINSTAL.COM, the procedure displays a warning message explaining the problem and asks you if you want to continue. VSI strongly recommends that you satisfy these conditions before you try to start VMSINSTAL.COM again.
Caution
If you continue the procedure without making the required corrections, VSI cannot guarantee that the installation will be supported.
How to Perform This Task
@SYS$UPDATE:VMSINSTAL product-list source: [OPTIONS option-list] [destination] [qualifiers]
Example
$ @SYS$UPDATE:VMSINSTAL CALENDAR020 MUA0:
The command in this example installs the product CALENDAR, from save sets named CALENDAR020, on a magnetic tape on the MUA0: drive. (This command shows the simplest case, in which you use no options or qualifiers.)
|
Parameter |
Section |
|---|---|
|
Product list | |
|
Source | |
|
Options | |
|
Destination | |
|
Backup qualifiers |
Section 3.3.5, ''Verifying, Logging, and Confirming the Operation'' and Section 3.5.3.3, ''Specifying Backup Qualifiers'' |
Section 3.3.6, ''Completing the Installation'' explains how to complete an installation.
3.3.1. Selecting a Product List
Products are stored in a save set, which is a specially formatted file that contains a group of files. Installation and upgrade procedures move the files from the save set to your system disk.
The product-list parameter lists the products that you want to install. You can use this parameter when you install layered products or update the operating system. (When you perform an upgrade procedure, you can list only one product, VMSvvu.)
Note
Do not use the wildcard character (*) if you are installing layered products and updating the operating system at the same time. In this case, update the system first. If you use the wildcard character, VMSINSTAL sorts the product list in alphabetical order; the operating system would probably not be installed first.
facvvu
|
fac |
The product name code (1 to 36 alphanumeric characters) |
|
vv |
The major version number (2 digits) |
|
u |
The minor version number (1 digit), also known as update number |
If you are installing from a distribution kit, the list of products on your distribution media is included with the bill of materials for the distribution kit. If the list is not available, you can obtain one by using the DIRECTORY command; the distribution media then finds and displays the products that are included.
How to Perform This Task
To obtain the product list, enter commands in the following format:
MOUNT/OVERRIDE=ID device: DIRECTORY device:[0,0]
where device is the drive that holds the distribution media.
DIRECTORY node::device:[directory]
Examples
$ MOUNT/OVERRIDE=ID MUA0: %MOUNT-I-MOUNTED, VMS071 mounted on _MUA0: $ DIRECTORY MUA0:[0,0]The DIRECTORY command in this example directs the distribution media to find the products included on the MUA0: drive; for example:Directory MUA0:[000,000] 000000.DIR;1 BACKUP.SYS;1 BADBLK.SYS;1 BADLOG.SYS;1 BITMAP.SYS;1 CONTIN.SYS;1 CORIMG.SYS;1 DECW071.C;1 DECW071.D;1 DECW071.E;1 DECW071.F;1 INDEXF.SYS;1 ISL_SCRIPT.ESS;1 SECURITY.SYS;1 SYS0.DIR;1 VMS071.A;1 VMS071.B;1 VMS071.C;1 VMS071.D;1 VMS071.E;1 VMS071.F;1 VOLSET.SYS;1 Total of 22 files.
$ DIRECTORY BRAVO::DUA1:[0,0]
The DIRECTORY command in this example directs the distribution media to find the products on the node BRAVO, which is on the DUA1: device.
Note
To access a remote node, you must have read and execute access (R,E) to the directory.
3.3.2. Selecting the Source
A drive that holds the distribution media; for example, a TK50 drive designated as the MUA0: drive.
A disk directory to which the product save set has been transferred from the distribution media for later installation.
You specify a disk directory as the source when you select the Get Save Set option. For more information about this option, see Section 3.5.3, ''Using the Get Save Set Option (G) (Layered Products Only)''
A disk directory on another node.
* Where will the distribution volumes be mounted:
3.3.3. Selecting Options
|
Letter Choice |
Option |
Description |
|---|---|---|
|
A |
Autoanswer |
Makes it easier to reinstall a product after an upgrade by providing responses to the questions and prompts during the reinstallation. (Specify this option only when installing layered products.) |
|
AWD= |
Alternate Working Device |
Lets you specify an alternate working device for the temporary working directory. (You can specify this option when installing layered products or applying updates.) |
|
G |
Get Save Set |
Saves you time by allowing you to store product save sets temporarily on a magnetic tape or in a disk directory. (Specify this option only when installing layered products.) |
|
L |
File Log |
Logs all file activity to the terminal during installation. |
|
N |
Release Notes |
Displays or prints the online release notes file supplied by the layered product. |
|
R |
Alternate Root |
Lets you install the product on a system disk other than that of the running system. |
You specify each option by entering the appropriate option letter after the keyword OPTIONS in the command that starts VMSINSTAL.COM. The OPTIONS keyword is optional. However, if you have an option list, you must enter OPTIONS before it. If you enter an option list without the OPTIONS keyword, VMSINSTAL.COM displays an informational error message and the installation ends. (The option-list parameter lists the options requested.)
How to Perform This Task
Invoke the VMSINSTAL.COM procedure, entering appropriate option letters after the keyword OPTIONS.
Press Return.
If you specify more than one option, separate the options with commas. Do not separate the options with spaces.
Example
$ @VMSINSTAL.COM NEWAID021 MTA0: OPTIONS A,N
3.3.4. Selecting the Destination
- To install the product in an alternate root. The product is installed on a system disk other than that on which the target system is running. Specify the alternate system root in the following format:
device:[SYSn.]
where:device
The device on which the alternate root resides
SYSn.
The top-level directory of the alternate system root
You can also specify a previously defined logical name for the alternate root.
To copy the product kit save sets into a storage directory for later installation. For more information about the Get Save Set option, see Section 3.5.3, ''Using the Get Save Set Option (G) (Layered Products Only)''.
Specify the destination directory in the following format:device:[directory]
where:device
The destination disk device
directory
Usually a directory dedicated to product save sets on the specified disk
3.3.5. Verifying, Logging, and Confirming the Operation
The VMSINSTAL.COM command procedure includes a BACKUP command that copies the save sets to the destination directory. You can verify, log, and confirm the copy operation by specifying BACKUP qualifiers with the VMSINSTAL.COM Get Save Set option. See Section 3.5.3, ''Using the Get Save Set Option (G) (Layered Products Only)'' for more information.
3.3.6. Completing the Installation
Performs an automatic shutdown of the system; you might be instructed to reboot manually.
Returns you to the system prompt.
When the product is installed, back up the updated system disk. For instructions, see Section 11.17, ''Backing Up and Restoring the System Disk''.
3.4. Recovering from a System Failure
The system disk was not altered before the system failure. In this case, VMSINSTAL.COM instructs you to restart the installation.
The system disk or a library used by the installation was corrupted. In this case, VMSINSTAL.COM instructs you to restore either the system disk or the corrupted library from the backup copy and to restart the installation.
VMSINSTAL.COM continues the installation. In this case, the procedure performs most of the installation. In addition, VMSINSTAL.COM might tell you that you must perform some tasks manually to complete the installation.
3.5. Selecting VMSINSTAL.COM Options in Detail
When you use VMSINSTAL.COM, the command procedure allows you to select up to six options (summarized previously in Table 3.2, ''VMSINSTAL.COM Options''.) The following sections describe those VMSINSTAL.COM options in detail.
3.5.1. Using the Autoanswer Option (A) (Layered Products Only)
The Autoanswer option makes it easier to reinstall a product by providing responses to VMSINSTAL.COM questions and prompts during the reinstallation. You use the Autoanswer option most often to reinstall products after an upgrade.
If you specify the Autoanswer option when you install a product initially, an answer file is created in the form product.ANS in the SYS$UPDATE directory, where product is the product name parameter that you provide when you start VMSINSTAL.COM.
The answer file contains a record of your responses to questions and prompts from VMSINSTAL.COM. For example, if you install the product NEWAID010 with the Autoanswer option, VMSINSTAL.COM creates an answer file called NEWAID010.ANS.
When you reinstall the product and specify the Autoanswer option (typically after upgrading your operating system), VMSINSTAL.COM reads the answer file instead of asking you questions.
If you want to create a new answer file when you reinstall a product, you must first delete the existing answer file.
Example
$ SYS$UPDATE:VMSINSTAL.COM NEW$PRODUCT010 CSA1: OPTIONS AYou can then examine the file:
$ TYPE SYS$COMMON:[SYSUPD]NEW$PRODUCT010.ANS;1 * Do you want to install the entire kit [Y]? \ * Are these selections correct [Y]? \ * Does this product have an authorization key registered and loaded? \Y * Will you allow a system shutdown after this product is installed [YES]? \ * How many minutes for system shutdown [0]: \ * Do you want to do an automatic system reboot [YES]? \ $
3.5.2. Using the Alternate Working Device Option (AWD=)
Restriction
Before using this option, check with the product's installation guide to be sure this option is supported by that product.
You can use the Alternate Working Device option to specify an alternate working device for the temporary working directory (defined as the logical name VMI$KWD). This option allows you to perform an installation with fewer free blocks on the system disk than are otherwise required.
SYS$SPECIFIC:[SYSUPD.facvvu]
Table 3.1, ''Format of facvvu Save-Set File Name'' explains the format of facvvu.
How to Perform This Task
AWD=dev:[dir]
|
dev |
Specifies the alternate working device |
|
dir |
Specifies the directory under which the facvvu subdirectory will be created |
Specifying a directory is optional. If you do not specify a directory, VMSINSTAL.COM creates the working directory on the specified device with the following directory specification: [000000. facvvu]. If you specify a directory, VMSINSTAL.COM creates the working directory as a subdirectory within the directory that you specify (for example, [WORK. facvvu]). If the directory that you specify does not exist, VMSINSTAL.COM does not create it.
Example
$ @SYS$UPDATE:VMSINSTAL.COM NEWAID010 CSA1: OPTIONS AWD=DUA2:[INSTALL]
3.5.3. Using the Get Save Set Option (G) (Layered Products Only)
Note
You cannot use this option to copy operating system kits.
Installing products either from a distribution tape or from console media directly onto your system disk is time-consuming. The Get Save Set option saves you time by allowing you to copy product save sets and store them temporarily while you do other work; you can then perform an update more quickly at a time that is convenient for you.
You might consider dedicating a user disk on a node that other licensed system users can access. You can store product save sets on this dedicated user disk to give other licensed system users fast access to the product save-set directory.
3.5.3.1. Storing a Product Save Set
@SYS$UPDATE:VMSINSTAL.COM product-list source OPTIONS G device:[directory]
The directory you specify must exist, and the device must be mounted.
Examples
$ @SYS$UPDATE:VMSINSTAL.COM NEWAID010 CSA1: OPTIONS G USER1:[PRODUCTS]
$ @SYS$UPDATE:VMSINSTAL.COM NEWAID010 CSA1: OPTIONS G,N USER1:[PRODUCTS]
facvvu.x
x) is:|
|
A literal file type that identifies save-set files, where A is the first save set, B the second, and so forth |
3.5.3.2. Installing a Product
@SYS$UPDATE:VMSINSTAL product-list device:[directory]
Example
$ @SYS$UPDATE:VMSINSTAL NEWAID010 USER1:[PRODUCTS]
VMSINSTAL.COM installs the NEWAID product on your system disk.
3.5.3.3. Specifying Backup Qualifiers
$ @SYS$UPDATE:VMSINSTAL TEST042 DUA0:[KITS] OPTIONS G DUB0:[KITS] - _$ "VERIFY/LOG/CONFIRM"
|
Qualifier |
Explanation |
|---|---|
|
/VERIFY |
Compares the contents of the output specifier with the contents of the input specifier after a save, restore, or copy operation completes. If a file does not compare successfully, an error message reporting this fact is displayed. |
|
/LOG |
Causes the file specification of each file processed to be displayed at the terminal during the operation. The default is /NOLOG. |
|
/CONFIRM |
Displays a prompt on your terminal before each file is processed. To process the file, enter Y or YES and press the Return key. The system interprets any other response, including simply pressing the Return key, as NO. |
Refer to the VSI OpenVMS System Management Utilities Reference Manual for more information about the BACKUP command and its qualifiers.
3.5.4. Using the File Log Option (L)
The File Log option logs all file activity to the terminal during installation. File activity as any action that alters the disposition of a file, such as creating a new file, updating a library, or deleting a file.
3.5.5. Using the Release Notes Option (N)
Note
Not all layered products provide online release notes.
The release notes file receives the file name facvvu.
release_notes, where facvvu represents the product name
code, version, and update numbers (see Table 3.1, ''Format of facvvu Save-Set File Name''); for example,
NEWAID010.RELEASE_NOTES.
How to Perform This Task
Release notes included with this kit are always copied to SYS$HELP.
Additional Release Notes Options:
1. Display release notes
2. Print release notes
3. Both 1 and 2
4. None of the above.
 *Select option [2]:
 *Queue name [SYS$PRINT]:
 *Do you want to continue the installation [N]:
| This prompt allows you to choose options 1 through 4. |
| This prompt is displayed only if you select option 2 or option 3. If you enter the name of a print queue, the system displays a message saying that the release notes have been queued successfully to the printer. If you do not specify a print queue, the release notes are sent to SYS$PRINT by default. |
| This prompt allows you either to continue or to end the installation. The default is to end the installation. If the product does not supply release notes, VMSINSTAL.COM displays two error messages.
It also asks whether you want to continue or to end the installation, as
follows: %VMSINSTAL.COM-W-NOFILE, New File facvvu.RELEASE_NOTES does not exist. %VMSINSTAL.COM-W-NORELNOTE, unable to locate release notes. *Do you want to continue the installation [N]: To continue the installation (whether or not release notes are available), enter Y (for YES) and press Return. |
3.5.6. Using the Alternate Root Option (R)
You can use the Alternate Root option to install the product on a system disk other than that of the running system. You might use this option to test a layered product without disturbing the running system
Note
Not all optional software products allow you to install a product on an alternate root. Consult the documentation of the specific product to determine whether you can install the product on an alternate root.
Also, VSI does not support the installation of a product on an alternate root on the existing system disk.
$ PURGE/LOG SYS$SYSROOT:[*...]*.*
3.6. Using the POLYCENTER Software Installation Utility
The POLYCENTER Software Installation utility is used to install, remove, and manage layered software products on Alpha or VAX systems. It can also save information about software products such as system requirements, installation options, and your answers to questions asked during the product installation procedure.
Perform POLYCENTER Software Installation utility operations from the DCL prompt. Use the following command format to invoke each operation:
$ PRODUCT subcommand product-name[/qualifier1,...]
For example, to install COBOL Version 2.2 and the latest version of Fortran, enter the following command:
$ PRODUCT INSTALL COBOL/VERSION=2.2,FORTRAN [Return]
The following products have been selected:
DEC AXPVMS COBOL V2.2 Layered Product
DEC AXPVMS FORTRAN V7.0 Layered Product
Do you want to continue? [YES] [Return]Section 3.7, ''Installing with the POLYCENTER Software Installation utility'' describes installation.
You can enter PRODUCT commands at the DCL prompt ($) or in a DCL command procedure. See the VSI OpenVMS System Management Utilities Reference Manual for subcommand syntax information.
To run the POLYCENTER Software Installation utility as a batch job, see Section 3.7.6, ''Performing the Installation as a Batch Job''.
Table 3.3, ''DCL Commands and Descriptions'' lists DCL commands the POLYCENTER Software Installation utility can perform and describes each of them.
| DCL Command | Description |
|---|---|
| PRODUCT CONFIGURE | Create a product configuration file (PCF) |
| PRODUCT COPY | Copy a software product kit or convert it to another format |
| PRODUCT EXTRACT FILE | Retrieve a specified file or files from a software product kit packaged in sequential format |
| PRODUCT EXTRACT PDF | Retrieve the product description file (PDF) from a software product kit packaged in sequential format |
| PRODUCT EXTRACT PTF | Retrieve the product text file (PTF) from a software product kit packaged in sequential format |
| PRODUCT EXTRACT RELEASE_NOTES | Retrieve the release notes for a selected product |
| PRODUCT FIND | Display the name of product kits found in a specified directory |
| PRODUCT INSTALL | Install one or more software products and updates the product database |
| PRODUCT LIST | List a file or files contained in a specified product kit that is packaged in sequential format |
| PRODUCT PACKAGE | Create a software product kit. |
| PRODUCT RECONFIGURE | Modify the configuration choices for an installed product and update the product database |
| PRODUCT REGISTER PRODUCT | Record product information in the product database |
| PRODUCT REGISTER VOLUME | Record a volume label change of the volume containing the installed products |
| PRODUCT REMOVE | Remove a product from the system and from the product database |
| PRODUCT SHOW HISTORY | Display in chronological order the operations performed on software products |
| PRODUCT SHOW OBJECT | Display information about objects created during software product installation |
| PRODUCT SHOW PRODUCT | Display information about installed products |
| PRODUCT SHOW UTILITY | Display information about the POLYCENTER Software Installation utility |
Privileges required
The POLYCENTER Software Installation utility requires specific privileges to perform certain operations, as shown in the following table:
| Operations | Privileges Required |
|---|---|
| COPY, EXTRACT, FIND, LIST, PACKAGE | None |
| CONFIGURE, SHOW | SYSLCK |
| REGISTER | SYSLCK and SYSPRV (or a system UIC) |
| INSTALL, RECONFIGURE, REMOVE | SYSLCK, SYSPRV (or a system UIC), TMPMBX, and CMKRNL |
Some commands might also require BYPASS or NETMBX privileges.
The execution of command procedures from the kit you are installing might require additional privileges. Check the installation guides that you receive with product kits for these privileges.
3.6.1. Product Files and Databases
The following files are used by the POLYCENTER Software Installation utility:
The product description file (PDF), is provided by the software manufacturer. It contains all the information the POLYCENTER Software Installation utility needs for installing either a software product or a set of software products. The PDF includes a list of configuration choices the product offers, default choices, and product requirements (such as minimum hardware configurations and system parameter values).
A product text file (PTF), is optionally supplied by the software manufacturer. It provides information about the product. The information includes product name, producer, configuration choice descriptions, and message text used during product installation.
A product configuration file (PCF), is optional. It may be supplied by software manufacturer, or you can create it by using the CONFIGURE operation. A PCF contains responses to some or all of the installation questions for a product. It can provide default or required choices, which may differ from the default choices provided in the PDF.
The product database (PDB), is created automatically by the POLYCENTER Software Installation utility. When products are installed, the files and other objects that make up the product, such as directories and accounts, are recorded in the PDB. The configuration choices made during installation are also recorded.
You can access the PDB to show what products are installed and the dependencies between them. You can also list the files and other objects that make up each product, or the history of installation and upgrade activity.
Patch recovery data sets are created automatically by the POLYCENTER Software Installation utility. When products are installed in recovery mode or when patch kits are installed with a request to save recovery data, the files and other objects that are displaced by the current installation are saved in a specially designated directory tree for future use.
You can display information about recovery data sets and learn which patch kits can be uninstalled using the SHOW RECOVERY_DATA operation.
3.6.2. Format of Software Product Kits
Software products compliant with the POLYCENTER Software Installation utility are distributed in one of three formats:
Compressed format. In this form, a data compression technique has been applied to a sequential kit. A compressed kit has a .PCSI$COMPRESSED file type.
Sequential format. In this form, the PDF, the PTF, and all files that comprise the product are packaged in a single container file. This container file can be placed either on a random-access device, such as a compact disc, or on a sequential access device, such as a magnetic tape. Most layered products are distributed in sequential format.
Reference format. In this form, the PDF, the PTF, and all files that comprise the product are placed in a directory tree on a random-access device. OpenVMS is distributed in reference copy format on CD-ROM.
3.6.3. Software Product Name Conventions
A software product kit packaged in sequential copy format has a container file named in the following format:
producer-base-product-version-kit_type.PCSI
A software product kit packaged in reference copy format has a product description file in the root directory named in the following format:
producer-base-product-version-kit_type.PCSI$DESCRIPTION
Each subfield is separated by a hyphen and is defined as follows:
producer is the legal owner of the software product (for example, DEC)
base is the base system that specifies the hardware and software platform on which the product runs (for example, AXPVMS, VAXVMS, or I64VMS).
product is the name of the software product.
version identifies the version according to the format tmmnn-ue.
kit_type identifies a kit type specified as a value from 1 through 7, as shown in Table 3.4, ''PDF Kit Types and Values''.
| Value | Type | Description |
|---|---|---|
| 1 | Full | Application software. |
| 2 | Operating system | Operating system software. |
| 3 | Partial | An update for the operating system or for a product that is currently installed. |
| 4 | Patch | A correction to existing software. |
| 5 | Platform | A software system that has more than one product. |
| 6 | Transition | A kit that is intended to register a product that was not installed by the POLYCENTER Software Installation utility. Transition kits include only a product definition file and (optionally) a product text file. |
| 7 | Mandatory update | A required update, which produces functionally updated software that has the same version number. |
3.6.3.1. Version Identification Format
The version of the software product kit is in the format tmmnn-ue. This format is described in the Table 3.5, ''Format of tmmnn-ue Version Identification''.
| t | The type of version (a single uppercase alphabetic character). |
| mm | The major version number (decimal integer 01 through 99). |
| nn | The minor version number (decimal integer 00 through 99). |
| - | The hyphen is required in all cases. When both update level (u) and maintenance edit level (e) are omitted, the version will end with a hyphen and the file name will have a double hyphen (- -) preceding the kit type. |
| u | The update level (decimal integer 1 through 999). The level is optional. |
| e | The maintenance edit level (one or more alphanumeric characters beginning with an alphabetic character). This level is optional. |
The following table of examples shows how to use the format:
| Example | Description |
|---|---|
| V6.1 |
In this example:
|
| V6.1-1H2 |
In this example:
|
| T6.2-FT2 |
In this example:
|
3.6.3.2. Software Product Name Examples
The following examples show how the format is used for one sequential and two reference copy format kits:
- A sequential format kit for DEC Softwindows for OpenVMS VAX that requires a double hyphen has the following format:
DEC-VAXVMS-SOFTWIN-V0101--1.PCSI
This format shows that the producer is DEC (Digital), the base is VAXVMS (OpenVMS VAX), the product is SOFTWIN, and the version is V1.1. The type of version is V, the major and minor version numbers are each 1. There are no update or maintenance edit levels. The kit_type is 1 (full).
- A product description file in a reference copy format kit for OpenVMS Alpha has the following format:
DEC-AXPVMS-VMS-V0601-1H2-2.PCSI$DESCRIPTION
This format shows that the producer is DEC (Digital), the base is AXPVMS (OpenVMS Alpha), the product is OpenVMS, and the version is V6.1-1H2. The type of version is V, the major version number is 6, the minor version number 1, the update level is 1, and the maintenance edit level is H2. The kit_type is 2 (operating system).
- A product description file in a reference format kit for a field test version of OpenVMS Alpha has the following format:
DEC-AXPVMS-VMS-T0700-FT2-2.PCSI$DESCRIPTION
This format shows that the producer is DEC (Digital), the base is AXPVMS (OpenVMS Alpha), the product is OpenVMS, and the version is V7.0-FT2. The type of version is T, the major version number is 7, and the minor version number is 0. There is no update level because the first character after the hyphen is not a digit. The maintenance edit level is FT2 and the kit_type is 2 (operating system).
A compressed kit for VSI Kerberos has the following format:
VSI-AXPVMS-KERBEROS-V0200-6-1.PCSI$COMPRESSED
This format shows that the producer is VSI, the base is AXPVMS (OpenVMS Alpha), the product is KERBEROS, and the version is V2.0-6. The type of version is V, the major version number is 2, the minor version number is 0, and the update level is 6. There is no maintenance edit level. The kit_type is 1 (full).
3.6.4. Creating a Product Configuration File (PCF)
You can create a PCF before or during an installation. You can also create more than one PCF for each product, thereby helping you to customize software installations for unique hardware situations or for different usage patterns within a group.
If a PCF is present and it contains a response for a configuration choice, the default for that choice comes from the PCF. The PCF specifies whether the choice can be changed or whether it is required.
If a PCF is not present or does not contain a response for a configuration choice, the default choice comes from one of two places:
If the product database (PDB) contains an entry for the choice that was made in a previous installation, then the PDB entry becomes the default configuration choice. It can be changed.
If the PDB does not contain an entry for the choice, either because the product was not previously installed or because this is a new choice, then the default configuration choice comes from the PDF. It can be changed.
3.6.4.1. Configuration Options
Some options available for customizing the PCF are:
Saving your answer. You can specify that your response to a question (rather than the current default value) be stored in the PCF.
Not saving your answer. When creating a PCF during an installation, you can answer a question without recording your answer in the PCF. This is useful for responding to questions that are specific to a single system or installation.
Deferring a question so that it is asked again during a future installation. For example, you might want an installer to verify that a particular response is still valid for the systems on which each installation is being performed.
Preventing a question from being asked again. If you do not defer a question when you create a PCF, the response recorded in the PCF is used during future installations. The installer is not prompted for the information. This reduces the length and complexity of the actual installation procedure.
3.6.4.2. Configuration Commands
To create a PCF, use the PRODUCT CONFIGURE command. For example:
$ PRODUCT CONFIGURE CHESSMASTER
The POLYCENTER Software Installation utility creates a PCF in your current default directory. The default PCF is named DEFAULT.PCSI$CONFIGURATION. To override the default file name or directory, use the /CONFIGURATION=OUTPUT qualifier. Refer to the sample procedure in the next section.
3.6.4.3. Recording Configuration Choices
After defining the PCF, the POLYCENTER Software Installation utility prompts you with questions about the product. Determine how and whether your responses are recorded in the PCF by responding to the questions and using two predefined function keys. The following table shows how your responses configure the PCF:
| Key | Action by the POLYCENTER Software Installation utility |
| Return |
Accepts the default or explicitly entered choice for the current operation and for entry into the PCF, and then moves to the next choice. If the Defer option is in effect, this entry can be changed when the PCF is used for future installations or upgrades. If the Defer option is not in effect, this entry cannot be changed when the PCF is used for future installations or upgrades. If the Write option is in effect, this entry, including the Defer option, is written into the PCF and used when the PCF is used for future installations or upgrades. If the Write option is not in effect, this entry, including the Defer option, is not written into the PCF and is not used when the PCF is used for future installations or upgrades. In this case, the default for the future installation or upgrade will come from the PDF or PDB. |
| F17 | Toggles the Defer option. By default, the Defer option is not in effect. |
| F18 | Toggles the Write option. By default, the Write option is in effect. |
Press the Return key after each response.
Example 3.1, ''Example 3-1 Sample Procedure for Creating a PCF'' shows how to use keys F17 and F18 in the PCF. Note that this is an example only and does not necessarily represent an actual PCF for a product. A description of the callouts follows the example.
$ PRODUCT CONFIGURE VMS/SOURCE=SYS$SYSDEVICE:[VMS$COMMON]/LOG -
_$ /CONFIGURATION=(OUTPUT=MYPCF)[Return]
The following product has been selected:
DEC AXPVMS VMS V7.1 [Available]
Do you want to continue [YES] [Return]
Configuration phase starting ...
You will be asked to choose options, if any, for each selected product and for
any products that may be installed to satisfy software dependency requirements.
*** DEC AXPVMS VMS V7.1: OpenVMS Operating System
Copyright © 1996 Digital Equipment Corporation
Digital Equipment Corporation
Do you want the defaults for all options? [YES] N [Return] (1)
Accounting Log Report Generator Utility [YES] [F17] (2)
%PCSIUI-I-DEFER, that item has been deferred; please set the default value
Accounting Log Report Generator Utility [YES] [F17] (3)
%PCSIUI-I-UNDEFER, that item is no longer deferred; please set the value
Accounting Log Report Generator Utility [YES] [F17] (3)
%PCSIUI-I-DEFER, that item has been deferred; please set the default value.
Accounting Log Report Generator Utility [YES] [Return] (4)
Access Control List Utilities [YES] [F18] (5)
%PCSIUI-I-UNWRITE, that item will not be written to configuration file;
please set the value.
Access Control List Utilities [YES] [Return] (6)
Print and Batch Queue Utilities [YES] NO (7)
DECdtm Distributed Transaction Manager [YES] [Return] (8)
Do you want the defaults for all suboptions? [YES] NO
.
.
.
Programming Support [YES] [Return]
Do you want the defaults for all suboptions? [YES] NO
.
.
.
Do you want to review the options ?[NO] [Return] (9)
%PCSI-I-WRICON, writing configuration file
SYS$SYSDEVICE:[VMS$COMMON]MYPCF.PCSI$CONFIGURATION;1 (10)
%PCSIUI-I-SUCCONFIG, CONFIGURE operation completed successfully
$
The callouts in the example mark the following actions:
Chooses to select values for individual options instead of accepting default values for all of the options.
Requests (by using the defer key, F17) that the installer be given the choice of whether or not to install the optional example files.
Toggles the defer option (twice to illustrate the toggle effect).
Records the default response [Yes] in the PCF. Because the defer option was in effect, when the PCF is used during a future installation, the installer can select the Accounting Log Report Generator utility by default, or can choose not to select it.
Requests the nowrite option key (F18) so that this choice will not be written to the PCF.
Chooses not to install the Access Control List utilities. Because the nowrite option is in effect, this choice is not written to the PCF.
Chooses not to install the Print and Batch Queue utilities. Because the nowrite option is not in effect (by default) and the defer option is in effect (by default), this choice is written to the PCF and the question is not asked again when the PCF is used during a future installation.
Accepts the default to install the DECdtm Distributed Transaction Manager. Because the nowrite option is not in effect (by default) and the defer option is in effect (by default), this choice is written to the PCF, and the question is not asked again.
Requests that the configuration options be displayed.
Displays the name of the PCF that has been created, MYPCF.PCSI$CONFIGURATION. The POLYCENTER Software Installation utility displays this message only when you enable message logging by using /LOG with PRODUCT CONFIGURE.
When you use a single DCL command to install or configure more than one product and write the responses to a PCF, the information for all the products that are installed or configured is in a single PCF. Use separate operations to install or configure a set of products when you want to keep each product's configuration values in its own PCF.
3.6.4.4. Modifying an Existing PCF
You can use DCL to modify an existing file. Specify the name of the PCF to be modified and the name of the PCF to be created. Include both the INPUT and the OUTPUT keywords with the /CONFIGURATION qualifier on the PRODUCT CONFIGURE command line. For example, read the default values in the file PRODUCTA_REV1.DAT, make changes to the file, and save the changes to PRODUCTA_REV2.DAT, the output file:
$ PRODUCT CONFIGURE - _$ /CONFIGURATION=(INPUT=PRODUCTA_REV1.DAT,OUTPUT=PRODUCTA_REV2.DAT) - _$ PRODUCTA
3.6.5. Using a Product Database
The POLYCENTER Software Installation utility automatically stores information about product installation, configuration choices, and objects, such as files and directories, that make up the product in the product database. The product database is useful for recalling information about products installed on your system and for detecting and tracking product dependencies.
3.6.5.1. Adding Information to the Database
Although the POLYCENTER Software Installation utility stores product information for you automatically, you can also add your own information. When you perform a task, you can include a remark—a comment to be recorded in the product database—along with the other information about the task being performed.
To add a remark to the product database, use the /REMARK qualifier with any of the following DCL commands:
PRODUCT RECONFIGURE
PRODUCT INSTALL
PRODUCT REMOVE
PRODUCT REGISTER PRODUCT
See the VSI OpenVMS System Management Utilities Reference Manual for information about this command and the /REMARK qualifier.
3.6.5.2. Registering a Noncompliant Product
To register a product that was installed with a tool other than the POLYCENTER Software Installation utility, enter PRODUCT REGISTER PRODUCT. This command records information that a PDF provides. For example:
$ PRODUCT REGISTER PRODUCT TOOLCHEST
If you do not have a PDF for a product you want to register, enter the following command:
$ @SYS$UPDATE:PCSI$REGISTER_PRODUCT.COM
This procedure prompts you for the product name, version, and producer. For example, the producer for Digital products is DEC. The procedure uses this information to create a temporary, minimal PDF. It then executes the PRODUCT REGISTER PRODUCT command to register the product, and deletes the temporary PDF.
Because PCSI$REGISTER_PRODUCT.COM creates only a minimal PDF, it cannot register with the POLYCENTER Software Installation utility database all the information about the product. For this reason, if a PDF for the product is available, use it.
Although a transition PDF is intended specifically for PRODUCT REGISTER PRODUCT, you can also register full and operating system PDFs.
3.6.5.3. Detecting and Tracking Software Dependencies
Some software products depend on other software products to work correctly. For example, a product might work only when a specific version of another product is installed on the system. The POLYCENTER Software Installation utility detects and tracks the dependencies of the products that you install. The utility also attempts to satisfy the requirements of multiple products. In some instances, the POLYCENTER Software Installation utility is unable to resolve product dependency issues. In such instances, the utility provides feedback on the nature of the conflict and asks you to decide how to proceed.
3.6.6. Understanding Recovery Data Sets
You can use recovery data sets in the following circumstances:
When the installation of a patch kit fails
When you want to undo (or uninstall) one of more patch kits that have been installed using the POLYCENTER Software Installation utility
A recovery data set is, in a sense, an extension of the POLYCENTER Software Installation utility product database. A recovery data set consists of the following types of files:
Saved product files
Supplementary data files that catalog actions that reverse the effect of installing a patch kit
Database files as they were at the beginning of the installation of the patch kit
A recovery data set is, in other words, a combination of the directories and files that are replaced by newer ones when a patch kit is installed. Recovery data set files are saved in a designated directory for possible future use. The data files that describe the replaced files and directories and their contexts are also saved.
Recovery data sets are stored in the following directory tree on the same system disk as the product database files, where nnn is the recovery data set number:
[PCSI$UNDO_nnn]
The two major uses of recovery data sets are discussed in the next two sections.
3.6.6.1. Recovering from a Failed Installation of a Patch Kit
To be able to recover completely from a failed installation of a patch kit, you must install the kit using the following command:
$ PRODUCT INSTALL/RECOVERY_MODE
When you enter this command, the POLYCENTER Software Installation utility installs the patch kit in what is called recovery mode. When you install a kit in recovery mode, the files that the installation modifies or replaces are saved; they make up a recovery data set. If an error condition interrupts the installation or if you intentionally terminate the installation, the POLYCENTER Software Installation utility can use the recovery data set to roll back the original files. This action restores the product environment that existed prior to the interrupted installation.
Once the rollback completes, the POLYCENTER Software Installation utility destroys the recovery data set. The utility also destroys the recovery data set at the end of a successful product installation or reconfiguration. You can, however, prevent the deletion of the recovery data set by using the /SAVE_RECOVERY_DATA qualifier with the PRODUCT INSTALL command. The next section explains how to do this.
3.6.6.2. Undoing One or More Patch Kit Installations
You can create a recovery data set when you install a patch kit, and, at the same time, explicitly request the POLYCENTER Software Installation utility to save recovery data. You do this by entering the following command:
$ PRODUCT INSTALL/SAVE_RECOVERY_DATA
When you enter this command, the POLYCENTER Software Installation utility permanently saves the files that the installation of the patch has removed. You can subsequently use the recovery data set to uninstall the patch product; you enter the PRODUCT UNDO PATCH command to do this. However, once you use the recovery data set to uninstall the patch product, the POLYCENTER Software Installation utility deletes it, and you cannot use recovery data set files again.
The POLYCENTER Software Installation utility also destroys the recovery data set when you enter any of the following (unrelated) DCL commands:
$ PRODUCT INSTALL (without the /SAVE_RECOVERY_DATA qualifier) $ PRODUCT RECONFIGURE $ PRODUCT REGISTER PRODUCT $ PRODUCT REMOVE
3.6.6.2.1. Using Other Recovery Data Set Commands
You can use the following PRODUCT commands to view and delete recovery data sets:
To view information in a recovery data set, enter the following command:
$ PRODUCT SHOW RECOVERY_DATA
To delete selected recovery sets (if you are concerned that the recovery data takes up too much space), enter the following command:
$ PRODUCT DELETE RECOVERY_DATA
By deleting one or more recovery data sets, you do not disturb your current product environment. However, you cannot uninstall the patch products that correspond to the recovery data that you delete.
3.7. Installing with the POLYCENTER Software Installation utility
The basic steps for installing a software product are:
Perform the preliminary steps.
Review the product's release notes and installation information.
Start the installation.
Respond to installation questions about product options. The product is not installed on your system until you confirm your selections.
Confirm your selections to install the product.
3.7.1. Performing Preliminary Steps
Before installing software, follow these steps:
Back up your system disk.
Optionally identify source and destination locations.
Install prerequisite software.
Note that the POLYCENTER Software Installation utility will perform this automatically if the kits are available.
Identify post-installation procedures.
3.7.1.1. Specifying Locations
For many operations, you must specify a location where the software kit resides and a location where you want to install the software. Two methods are available for identifying these locations:
Define logical names
Specify /SOURCE and /DESTINATION qualifiers on the command line.
You can also define logical names, and then override them by using the /SOURCE and /DESTINATION qualifiers on the PRODUCT command.
Note
If you do not deassign logical names after they are used, they can cause unexpected results in future operations of the POLYCENTER Software Installation utility. VSI recommends that you use the /SOURCE and /DESTINATION qualifiers.
Logical name PCSI$SOURCE defines the location of the software kits you want to install. Logical name PCSI$DESTINATION defines the location where you want to install the software. For example, if the software is located in DISK1:[KITS] and you want to install it in DISK2:[APPLICATIONS], use the following commands:
$ DEFINE PCSI$SOURCE DISK1:[KITS] $ DEFINE PCSI$DESTINATION DISK2:[APPLICATIONS]
You can override the logical name definitions by using /SOURCE and /DESTINATION qualifiers on the PRODUCT command to specify a different source and destination.
If you do not define PCSI$DESTINATION, the utility installs the software product in SYS$COMMON:[VMS$COMMON] and directories under it.
3.7.1.2. Installing Prerequisite Software
Install any prerequisite software or perform any prerequisite tasks. This information should be in the software product's installation instructions or release notes.
Note that the POLYCENTER Software Installation utility will perform this automatically if the kits are available.
3.7.1.3. Identifying Post-installation Procedures
Note any post-installation procedures. This information should also be in the software product's installation instructions or release notes.
3.7.2. Extracting a Product's Release Notes
To read a product's release notes, extract the notes to a file. For example, use either of the following commands to copy the CMS product release notes to a text file:
$ PRODUCT EXTRACT RELEASE_NOTES CMS/FILE=CMS_RELNOTES.TXT $ PRODUCT EXTRACT RELEASE_NOTES CMS/SOURCE=WORK_DISK:[KITS]/FILE=CMS_RELNOTES.TXT
If you do not specify a file name, the release notes are written to a file in the current directory. The name specified in the kit is used. It is not necessary to install a software product before you use the POLYCENTER Software Installation utility to extract its release notes.
3.7.3. Installing a Product
To start an installation, enter the PRODUCT INSTALL command. For example:
$ PRODUCT INSTALL CMS
To install more than one product at a time, enter a list of product names separated by commas. You can use asterisk (*) wildcard characters in the product names. For example:
$ PRODUCT INSTALL CMS/VERSION=3.4,LSE,COB*/VERSION=5.0
Table 3.6, ''Features You Can Request During an Installation'' lists some of the features you can control with command qualifiers. A complete list is in the VSI OpenVMS System Management Utilities Reference Manual and in online help.
| Feature | Qualifier |
|---|---|
| Supply answers from a PCF | /CONFIGURATION=INPUT=pcf-name |
| Create a new PCF | /CONFIGURATION=OUTPUT=pcf-name? |
| Specify where to install the files | /DESTINATION=location |
| Display full descriptions of all product installation options and information | /HELP |
| Display log messages on your terminal | /LOG |
| Include a remark in the product database | /REMARK |
| Specify where the distribution kit is located | /SOURCE |
| Specify configuration variables | /CONFIGURATION=keyword? |
| Specify a work area for temporary files | /WORK=device |
3.7.3.1. Using an Existing PCF
Chapter 3, "Installing, Upgrading, and Updating Software" describes how to create a PCF before installing a product. To use this existing PCF during the installation, use the /CONFIGURATION=INPUT qualifier with PRODUCT INSTALL. For example, to install CMS and use configuration choices recorded in the PCF named DEC-VAXVMS-CMS.PCSI$CONFIGURATION:
$ PRODUCT INSTALL/CONFIGURATION=INPUT=DEC-VAXVMS-CMS.PCSI$CONFIGURATION - _$ CMS/VERSION=3.4
3.7.3.2. Creating a New PCF During the Installation
If you did not create a PCF before the installation, you can create one during the installation. Use the /CONFIGURATION=OUTPUT=pcf-name qualifier with PRODUCT INSTALL. For example:
$ PRODUCT INSTALL/CONFIGURATION=OUTPUT=CMSV3.DAT CMS/VERSION=3.0
As you respond to questions about the options for CMS Version 3.0, your responses are recorded in the PCF named CMSV3.DAT in your current default directory.
For more information about product configuration files, see Section 3.8.4, ''Converting a Software Kit from One Format to Another'' and Section 3.8.1, ''Reconfiguring an Installed Product''.
3.7.4. Responding to Installation Questions
During an installation, you can request a full description of product options or an explanation to any single question. You can also accept the default value to any single question or to an entire subset of questions.
3.7.4.1. Requesting an Explanation to Questions
To request a full description of all product options and information, use the /HELP qualifier with PRODUCT INSTALL. To request help about an individual question, press the Help key or PF2 in response to the question. The POLYCENTER Software Installation utility displays a description (if one is available) and a summary of disk and memory requirements for the option.
The following example uses the Help key:
$ PRODUCT INSTALL UCX . . . Optional example files may be installed... [YES] [Help] The example files include client server programming examples. Block Size - Total: 507 Optional: 0 Required: 507 Global Pages - Total: 0 Optional: 0 Required: 0 Global Sections - Total: 0 Optional: 0 Required: 0 Optional example files may be installed... [YES] . . .
The amount of information varies; some products provide more information than others, and some products provide no information.
3.7.4.2. Accepting Default Answers
Default answers come from one of three places:
A product configuration file (PCF), if one is supplied
The product database (PDB), for upgrades of previously installed products
The product description file (PDF)
If you specify an input PCF and it contains an answer for an option, the default answer from the PCF is used. Depending on the entry in the PCF, the default answer may or may not be allowed to change.
If no input PCF exists, or if the input PCF does not contain an answer for an option, the default answer comes from either the PDB or the PDF. If the PDB is present and contains the option, then the default answer comes from the PDB. If the PDB is not present (a new installation) or does not contain the option (a new option), then the default comes from the PDF. Default answers that come from either the PDB or PDF may be changed.
To answer an option, either press Return to accept the default answer, or supply your own answer and then press Return.
Some products contain a subset of questions or options. During an installation procedure, you can accept the default values for an entire subset or you can answer each option in the subset.
When you select an option that has suboptions, the POLYCENTER Software Installation utility will ask:
Do you want the defaults for all options? [YES]
If you answer YES, you will not be asked about the subitems. Instead, the utility will use the defaults for the subitems. If you answer NO, the utility asks you about each subitem.
3.7.5. Confirming Your Answers
After you respond to questions about product options, the POLYCENTER Software Installation utility can display a summary of your answers. For example:
Do you want to review the options? [YES]
DEC TCP/IP Services for OpenVMS
Optional example files may be installed...: NO
Optional NFS files may be installed...: NO
Optional applications may be installed...: YESThe POLYCENTER Software Installation utility then asks:
Are you satisfied with these options? [YES]
If you are not, answer NO to this question. You can then either enter your answers again or exit the installation procedure:
Do you want to change any options? [YES] NO %PCSIUI-I-USERABORT, operation terminated by user
By answering NO to this question, you can end the installation procedure. The product is not installed; your system remains unchanged.
3.7.5.1. Updating DCL Help Text
When you install a layered product that updates DCL Help text, the PRODUCT INSTALL command requires exclusive access to the DCL Help library file, SYS$HELP:HELPLIB.HLB. For example, if a user is accessing HELP while an installation is trying to update the help library, you see several messages and are asked to respond to several questions. These messages and questions appear in the following order:
The system displays the following messages if the PRODUCT INSTALL command fails to obtain exclusive access to the help library after waiting for two minutes:
%PCSI-I-PRCOUTPUT, output from subprocess follows ... %LIBRAR-F-OPENIN, error opening disk:[SYS0.SYSCOMMON.] [SYSHLP]HELPLIB.HLB;1 as input -RMS-E-FLK, file currently locked by another user %PCSI-E-MODREPLFLK1, error replacing module module-name in library disk:[SYS0.SYSCOMMON.][SYSHLP]HELPLIB.HLB -PCSI-E-MODREPLFLK2, library update failed because it is currently accessed by one or more users -PCSI-E-MODREPLFLK3, after the file is closed, answer YES at the prompt to retry the update
Either retry the library update operation or terminate the installation:
- To retry the library update, ask users to exit HELP. Then answer YES to the following question:
Do you want to take this action? [YES] YES
If users do not exit HELP within two minutes, the question is repeated.
- To terminate the installation, answer NO to the following two questions:
Do you want to take this action? [YES] NO Do you want to continue? [YES] NO %PCSI-E-CANCEL_WIP, termination resulted in an incomplete modification to the system
The last message indicates that some files might have been moved to their target directories, but the product has not been completely installed. Installation of the product at a later time will delete the files from the aborted installation and will then perform a full installation.
3.7.6. Performing the Installation as a Batch Job
To run the POLYCENTER Software Installation utility as a batch job, include PRODUCT commands in a command procedure file and then submit the file to a batch queue. In the command procedure, include the /CONFIGURATION qualifier to specify an existing PCF so the POLYCENTER Software Installation utility can respond to questions about product options and configuration choices. If you do not specify /CONFIGURATION, the defaults are used.
Example 3.2, ''Example 3-2 Sample Command Procedure for Installing a Product'' shows how a product might be installed using a command procedure. The example sets and restores VERIFY, and times the installation.
$ SAVE_PROC_VERIFY = F$ENVIRONMENT("VERIFY_PROCEDURE")
$ SAVE_IMAGE_VERIFY = F$ENVIRONMENT("VERIFY_IMAGE")
$ SET VERIFY
$ ON ERROR THEN GOTO ERROR_EXIT
$ START_TIME = F$TIME()
$ WRITE SYS$OUTPUT "START TIME -- ''START_TIME'"
$ PRODUCT INSTALL CHESSMASTER -
/CONFIGURATION=PRODUCER -
/HELP -
/LOG
$ERROR_EXIT:
$ END_TIME = F$TIME()
$ TEMP = F$VERIFY(SAVE_PROC_VERIFY,SAVE_IMAGE_VERIFY)
$ WRITE SYS$OUTPUT " --------------------------------"
$ WRITE SYS$OUTPUT " END TIME -- ''END_TIME'"
$ WRITE SYS$OUTPUT " START TIME -- ''START_TIME'"
$ WRITE SYS$OUTPUT " --------------------------------"
$ EXIT3.7.7. Installing a Patch Kit to Allow for its Removal
A patch kit is not like common software products that you can easily remove from the system using the PRODUCT REMOVE command after the product is installed. In most cases, a patch kit is simply a subset of the full product you apply it to and usually does not force a change in the version number of the product.
Because of these characteristics, the POLYCENTER Software Installation utility treats patch kits in a special way. If you want to be able to uninstall a patch kit that turns out to be defective, for example, you first need to install the patch kit with the /SAVE_RECOVERY_DATA qualifier. This qualifier forces all the files and modules that the installation modifies or replaces to be saved in a specially designated area on the system disk. These files include the product database of the utility and special data files that describe the saved environment. Together, they form a recovery data set.
Later, if you decide to uninstall the patch kit using the PRODUCT UNDO PATCH command, the patch kit objects are deleted and the saved recovery data set is used to reinstate the displaced files along with the database.
3.8. Performing Other Operations on Installed Software Products Using the POLYCENTER Software Installation Utility
You can perform other operations on installed software products – for example, reconfiguring choices made during the installation, recording changes in volume label, or copying the software to a new location or to different media. You might also want to convert a kit to a new format, display product information, display recovery details to see which patch kits can be uninstalled, delete recovery data sets to save disk space, display the contents of a sequentially packaged product kit, or extract any file from a sequentially packaged kit.
3.8.1. Reconfiguring an Installed Product
After you install a product, you can change the configuration choices made during the installation. This is called reconfiguration. You choose the options you want; the POLYCENTER Software Installation utility makes all the necessary changes.
To change the configuration choices for an installed product, use the PRODUCT RECONFIGURE command. The product kit must be present in the user's default directory or specified by the /SOURCE qualifier or by the PCSI$SOURCE logical name.
3.8.2. Recording a Change in Volume Label in the Product Database
To record a changed volume label in the product database, enter the PRODUCT REGISTER VOLUME command. You will be prompted for the old volume label and the name of the device where the volume is mounted.
This command replaces all occurrences of the old volume label with the new volume label. (The POLYCENTER Software Installation utility reads the new label from the disk.)
Note that PRODUCT REGISTER VOLUME changes the information in the product database only; it does not change the label on the volume. To rename a volume, use the DCL command SET VOLUME. Then use PRODUCT REGISTER VOLUME to record the new name.
You can also use the PRODUCT REGISTER VOLUME command to record a change in the physical or logical device name.
3.8.3. Copying a Software Kit to a New Location
You can use the POLYCENTER Software Installation utility to copy product distribution kits from one location to another. If you transfer a kit from tape to disk, you can change the format from a sequential copy to a reference copy.
To copy a software kit from one location to another, use the PRODUCT COPY command. Specify the current location with the /SOURCE qualifier and the new location with the /DESTINATION qualifier. For example:
$ PRODUCT COPY/SOURCE=WORK_DISK:[KITS]/DESTINATION=LOCAL_DISK:[KIT_INSTALL] CMS
3.8.4. Converting a Software Kit from One Format to Another
You can convert a software kit from reference format (on disk or CD-ROM) to sequential format, from sequential format to reference format, or from sequential format to compressed format by using the /FORMAT qualifier with PRODUCT COPY.
For example, to convert CMS from sequential format to reference format, enter the following command:
$ PRODUCT COPY/FORMAT=REFERENCE/SOURCE=MUA1:/DESTINATION=LOCAL_DISK:[KIT_INSTALL] - _$ CMS
3.8.5. Retrieving Product Information
All of the information stored by the product database (PDB) can be accessed by using the SHOW OBJECT, SHOW PRODUCT, and SHOW HISTORY commands. This section describes how to use these commands to retrieve information from the PDB.
3.8.5.1. Displaying Information About Objects
To display information about the managed objects (for example, files, accounts, and directories) associated with the products installed on your system, use the SHOW OBJECT command. Table 3-8 lists questions that can be answered with SHOW OBJECT.
| Question | Command |
|---|---|
|
What files or other objects did this product create? |
PRODUCT SHOW OBJECT * /PRODUCT=product-name |
|
What product created this file or other object? | PRODUCT SHOW OBJECT object-name/FULL |
3.8.5.2. Displaying Information About the Products
You can obtain information about products installed on your system with the SHOW PRODUCT and SHOW HISTORY commands. Table 3-9 lists some of the questions that can be answered with these commands.
| Question | Command |
|---|---|
|
Which products have been installed? |
PRODUCT SHOW HISTORY * /OPERATION=INSTALL PRODUCT SHOW PRODUCT * |
|
Product interdependencies: Is product A referenced by product B? |
PRODUCT SHOW PRODUCT A /FULL PRODUCT SHOW PRODUCT * /REFERENCED_BY=B |
|
Which user installed a product? |
PRODUCT SHOW HISTORY product-name /FULL |
|
Which products were installed before March 31, 2000? |
PRODUCT SHOW HISTORY * /BEFORE=31-MAR-2000 |
|
Were any software patches applied to a product? |
PRODUCT SHOW PRODUCT product-name /FULL |
3.8.6. Retrieving Patch Recovery Information
You can access certain information in the patch recovery data set by using the SHOW RECOVERY_DATA command. Table 3-10 lists questions that this command can answer.
| Question | Command |
|---|---|
|
How many recovery data sets have been saved? Which patch kits can you uninstall? |
PRODUCT SHOW RECOVERY_DATA |
|
What is the total size of objects saved in recovery data sets? |
PRODUCT SHOW RECOVERY_DATA /FULL |
|
Which three newest patches can be uninstalled? |
PRODUCT SHOW RECOVERY_DATA /NEWEST=3 |
|
Which two oldest recovery data sets can be deleted? |
PRODUCT SHOW RECOVERY_DATA /OLDEST=2 |
|
Are there any patches installed after 12-DEC-2002 that can be uninstalled? |
PRODUCT SHOW RECOVERY_DATA /SINCE=13-DEC-2002 |
|
Are there any recovery data sets saved before 01-DEC-2002? |
PRODUCT SHOW RECOVERY_DATA /BEFORE=01-DEC-2002 |
3.8.7. Deleting Patch Recovery Data
You might discover that you are running low on free system disk space and, at the same time, have a stable software product environment after installation of a number of patches. To increase the size of the free disk space, you might want to consider deleting some patch recovery data that you do not expect to use. The PRODUCT DELETE RECOVERY_DATA command allows you to do this. Table 3-11 lists options that are available with this command.
| Option | Command |
|---|---|
| To delete all recovery data sets |
PRODUCT DELETE RECOVERY_DATA PRODUCT DELETE RECOVERY_DATA /ALL |
| To delete the oldest three recovery data sets |
PRODUCT DELETE RECOVERY_DATA/OLDEST=3 |
|
To delete all recovery data sets save before 01-DEC-2002 |
PRODUCT DELETE RECOVERY_DATA/BEFORE=01-DEC-2002 |
3.8.8. Removing Installed Software Products and Kits
When you use the POLYCENTER Software Installation utility to remove an installed product, all of the files, accounts, and other objects that were created for the product when it was installed are removed from your system and from the product database.
To remove an installed product, enter PRODUCT REMOVE. For example:
$ PRODUCT REMOVE CMS
3.8.9. Uninstalling Patch Kits
To uninstall patch kits, you can use the PRODUCT UNDO PATCH command. However, this command works only if you have installed the kits with the /SAVE_RECOVERY_DATA qualifier. Also, the saved recovery data must be available on the system, which is possible only if, after installing the patch kits, you did not perform another operation that deleted the patch recovery data. Operations that automatically destroy recovery data sets are the following:
PRODUCT DELETE RECOVERY_DATA
PRODUCT INSTALL (without the /SAVE_RECOVERY_DATA qualifier)
PRODUCT RECONFIGURE
PRODUCT REMOVE
PRODUCT REGISTER PRODUCT
After using the PRODUCT SHOW RECOVERY_DATA command to verify that patch recovery data is available, you can perform the uninstall operation using the PRODUCT UNDO PATCH command. This command allows for some flexibility:
By default, if you do not use any qualifiers, only the latest installed patch kit or kits are removed.
If you want to uninstall all patch kits to the extent that recovery data allows, use the /ALL qualifier.
To limit the number of patch kits to be uninstalled, specify the /NEWEST=n qualifier, where n is the number of the newest recovery sets.
To uninstall patch kits that have been installed after a certain date, use the /SINCE=date qualifier.
Chapter 4. Starting Up and Shutting Down the System
This chapter describes various ways to start up and shut down your system.
On VAX systems, refer to the most recent version of the OpenVMS VAX Upgrade and Installation Manual and the upgrade and installation supplement for your VAX computer.
On Alpha and IA-64 systems, refer to the VSI OpenVMS Version 8.2 OpenVMS Alpha Upgrade and Installation Manual.
Information Provided in This Chapter
|
Concept |
Section |
|---|---|
|
Booting and startup processes | |
|
Nonstop boot: the most common booting operation |
Section 4.1.3.1, ''Nonstop Boot: The Most Common Booting Operation'' |
|
Conversational boot: for special booting functions |
Section 4.1.3.2, ''Conversational Boot: For Special Booting Functions'' |
|
System startup and STARTUP.COM | |
|
System shutdown procedures | |
|
The order of shutdown events |
Section 4.8.2, ''Understanding the Order of Shutdown Events'' |
| Reconfiguration of boot, dump, and debug devices on OpenVMS IA-64 systems | Section 4.9, ''Reconfiguring Devices on OpenVMS IA-64 Systems'' |
4.1. Understanding Booting and System Startup
Booting is the process of loading system software from the system disk into processor memory. When you boot your system, it automatically performs a series of tasks to start up your system. These tasks are collectively known as system startup.
You must have installed the operating system before you boot the system for the first time.
Booting procedures vary for different computers. For example, computers with console storage devices use a boot command procedure. You can copy and edit this command procedure to specify the location of the system disk. Other computers have an internal memory device that provides the name of the system disk.
On Alpha and IA-64 systems, you cannot boot from a magnetic tape device.
4.1.1. Booting and Startup Processes
You enter the BOOT command. The boot block, a fixed location on disk, points to the primary bootstrap image, which is loaded from disk into main memory.
On VAX systems, the primary bootstrap image is VMB.EXE.
On Alpha systems, the primary bootstrap image is APB.EXE.
on IA-64 systems, the primary bootstrap image is IPB.EXE.
The primary bootstrap image allows access to the system disk by finding the secondary bootstrap image, SYS$SYSTEM:SYSBOOT.EXE, and loading it into memory.
SYSBOOT.EXE loads the system parameters stored in the default parameter file into memory. (For more information about the default parameter file and loading of system parameters at boot time, see Section 4.2, ''Booting with Modified System Parameter Values''.)
If you are performing a conversational boot, the procedure stops and displays the SYSBOOT> prompt. (For information about conversational booting, see Section 4.1.3.2, ''Conversational Boot: For Special Booting Functions''.) Otherwise, SYSBOOT.EXE loads the operating system executive into memory and transfers control to the executive.
When the executive finishes, it executes the SWAPPER process.
The SWAPPER creates the SYSINIT process.
Among other actions it performs, SYSINIT creates the STARTUP process.
STARTUP executes SYS$SYSTEM:STARTUP.COM (unless you indicated another file using SYSMAN, SYSGEN, or conversational boot). STARTUP.COM executes a series of other startup command procedures, including SYSTARTUP_VMS.COM. (For more information about STARTUP.COM, see Section 4.1.4, ''System Startup and STARTUP.COM''. For more information about other startup procedures, see Section 5.2.1, ''Understanding Site-Specific Startup Command Procedures''.)
The current values of system parameters are written back to the default parameter file.
The boot process finishes, and you can log in to the operating system.
Note
On VAX and Alpha systems, you can reconfigure boot and dump devices only by shutting down the system and entering commands from the console.
on IA-64 systems, you can reconfigure boot and dump devices either before you shut down the system or after you shut it down. These methods are explained in Section 4.9, ''Reconfiguring Devices on OpenVMS IA-64 Systems''.
4.1.2. Deferring Memory Testing on AlphaServer 4100 Computers
To speed up the time between system power-on and user login, you can now defer a portion of memory testing on AlphaServer 4100 computers. When you choose this option, the console tests a minimum amount of memory and leaves the rest for the operating system to test.
|
Value |
Description |
|---|---|
|
FULL (off) |
The console does all the testing. |
|
NONE |
32 MB of memory are tested before booting. |
|
PARTIAL |
256 MB of memory are tested before booting. |
While the operating system is booting
In the scheduler idle loop when no processes are available to run
Change the value of MEMORY_TEST (if desired).
Issue the INIT command from the console.
Boot the operating system.
If the bit is clear (the default), OpenVMS tests memory in the background and not necessarily before the bootstrap process has completed.
If you set the bit, OpenVMS guarantees that all memory will be tested by the end of EXEC_INIT in the system bootstrap process; that is, before IPL is lowered from 31.
4.1.3. Types of Booting Operations
|
Type |
Purpose |
For More Information |
|---|---|---|
|
Nonstop boot |
To boot without stopping to perform special operations. Use this kind of boot in most cases. |
Section 4.1.3.1, ''Nonstop Boot: The Most Common Booting Operation'' |
|
Conversational boot |
To perform special boot operations—for example, to change system parameters before booting. |
Section 4.1.3.2, ''Conversational Boot: For Special Booting Functions'' |
4.1.3.1. Nonstop Boot: The Most Common Booting Operation
The most common boot operation is a nonstop boot from the system disk. You perform a nonstop boot after changing certain system parameters or installing certain layered products, or after a standalone backup.
On VAX systems, refer to the most recent versions of the OpenVMS VAX Upgrade and Installation Manual and the upgrade and installation supplement for your VAX computer.
On Alpha and IA-64 systems, refer to the VSI OpenVMS Alpha Upgrade and Installation Manual.
4.1.3.2. Conversational Boot: For Special Booting Functions
|
Operation |
For More Information |
|---|---|
|
Boot after showing or modifying individual system parameter values.? |
Section 4.2.1, ''Booting After Showing or Modifying Individual System Parameter Values'' |
|
Boot using system parameter values from an alternate parameter file. ? |
Section 4.2.2, ''Booting with an Alternate System Parameter File'' |
|
Boot with default values for system parameters; for example, when modified system parameter values have caused the system to become unbootable. ? | |
|
Boot without running startup or login procedures; for example, when modified startup or login procedures have caused the system to become unbootable. |
Section 4.4.2, ''Booting Without Startup and Login Procedures'' |
|
Boot without the user authorization file; for example, when the user authorization file has been modified so that you cannot log in. |
Section 4.4.3, ''Booting Without the User Authorization File'' |
|
Boot with an alternate site-independent startup procedure. |
Section 4.5.1, ''Booting with an Alternate Site-Independent Startup Procedure'' |
|
Boot with a minimum startup. | |
|
Display startup procedure commands while booting. |
Section 4.5.4, ''Booting While Displaying Startup Procedure Commands'' |
On VAX systems, refer to the most recent versions of the OpenVMS VAX Upgrade and Installation Manual and the upgrade and installation supplement for your VAX computer.
On Alpha and IA-64 systems, refer to the VSI OpenVMS Alpha Upgrade and Installation Manual.
4.1.4. System Startup and STARTUP.COM
Caution
Do not modify SYS$SYSTEM:STARTUP.COM. This file is deleted and replaced each time you upgrade your system to the next version of the operating system. Leaving STARTUP.COM intact prevents you from inadvertently altering any commands in the file, which in turn could cause the startup procedure to fail.
Although you should not modify STARTUP.COM, sometimes you may want to control site-independent startup when booting your system. For information, see Section 4.5, ''Booting with Controlled Startup''.
Define systemwide logical names required for the symbolic debugger, language processors, linker, image activator, and help processor.
Start processes that control error logging, SMISERVER (the system management server), the job controller, the operator log file, and security auditing.
- Connect devices that are physically attached to the system by invoking the SYCONFIG.COM procedure. Configure devices and load their I/O drivers.
Note
STARTUP.COM creates the CONFIGURE process only on a full boot. If external devices are needed on any other boot (such as a minimum or an upgrade boot), add the following line to SYS$MANAGER:SYLOGICALS.COM:$IF P1 .NES. "FULL" THEN @SYS$SYSTEM:STARTUP CONFIGURE
Install known images to reduce I/O overhead in activating the most commonly run images or to identify images that must have special privileges.
SYS$MANAGER:SYCONFIG.COM
SYS$MANAGER:SYLOGICALS.COM
SYS$MANAGER:SYPAGSWPFILES.COM
SYS$MANAGER:SYSECURITY.COM
SYS$MANAGER:SYSTARTUP_VMS.COM
For information about site-specific startup command procedures, see Section 5.2, ''Modifying Site-Specific Startup Command Procedures''.
4.1.5. Messages Indicating Booting and Startup Progress
- The following message indicates that the system is executing the command procedure SYS$SYSTEM:STARTUP.COM:
The OpenVMS system is now executing the system startup procedure.
This procedure configures and initializes the system and executes several site-specific command procedures. For more information, see Section 4.1.4, ''System Startup and STARTUP.COM''.
- A short time later (up to a few minutes), the system displays a message similar to the following message:
The OpenVMS system is now executing the site-specific system startup commands.
This message indicates that the system is executing SYSTARTUP_VMS.COM. You can modify this file to perform various operations at startup time. For more information, see Section 5.2.7, ''Modifying SYSTARTUP_VMS.COM to Perform General Operations''.
- Finally, the procedure displays informational messages and accounting information. For example:
%SET-I-INTSET, login interactive limit=64, current interactive value = 0 19-APR-2000 15:00:00.00 SYSTEM job terminated at 19-APR-2000 15:00:00.00 Accounting information: Buffered I/O count: 133 Peak working set size: 401 Direct I/O count: 12 Peak pagefile size: 2379 Page faults: 325 Mounted volumes: 0 Charged CPU time: 0 00:00:55.23 Elapsed time: 0 00:01:31.24
After the system displays this information, you can log in.
4.2. Booting with Modified System Parameter Values
|
Task |
For More Information |
|---|---|
|
Boot after showing or modifying individual system parameter values |
Section 4.2.1, ''Booting After Showing or Modifying Individual System Parameter Values'' |
|
Boot with an alternate system parameter file |
Section 4.2.2, ''Booting with an Alternate System Parameter File'' |
|
Boot with default values for system parameters |
|
Term |
Definition |
|---|---|
|
Active values |
System parameter values stored in memory and used by the active system. |
|
Current values |
System parameter values stored in the default parameter file. When the system boots, it sets active values for system parameters using the current values. |
|
On VAX systems, the default system parameter file is SYS$SYSTEM:VAXVMSSYS.PAR.? | |
|
On Alpha systems, the default system parameter file is SYS$SYSTEM:ALPHAVMSSYS.PAR.? | |
| on IA-64 systems, the default system parameter files is IA64VMSSYS.PAR.? | |
|
Default values |
System parameter values stored in the default list and used by default. |
For more information about system parameters, see VSI OpenVMS System Manager's Manual, Volume 2: Tuning, Monitoring, and Complex Systems.
4.2.1. Booting After Showing or Modifying Individual System Parameter Values
In a conversational boot operation, you can show and modify values for individual parameters?. The system modifies the values both in memory and in the system parameter file.
How to Perform This Task
- Follow the instructions for performing a conversational boot in one of the following manuals:
On VAX systems, refer to the most recent versions of the OpenVMS VAX Upgrade and Installation Manual and the upgrade and installation supplement for your VAX computer.
On Alpha and IA-64 systems, refer to the VSI OpenVMS Version 8.2 OpenVMS Alpha Upgrade and Installation Manual.
- At the SYSBOOT> prompt, enter SHOW and SET commands to show and change the value of system parameters. For example:
SYSBOOT> SET UAFALTERNATE 1
For information about SET and SHOW commands, refer to the VSI OpenVMS System Manager's Manual, Volume 2: Tuning, Monitoring, and Complex Systems (SYSGEN).
- Enter the CONTINUE command to continue booting:
SYSBOOT> CONTINUE
Example
SYSBOOT> SHOW UAFALTERNATE Parameter Name Current Default Min. Max. Unit Dynamic -------------- ------- ------- ------- ------- ---- UAFALTERNATE 0 0 0 1 Boolean SYSBOOT> SET UAFALTERNATE 1 SYSBOOT> CONTINUE
4.2.2. Booting with an Alternate System Parameter File
In programming research and development environments where you must alter operating conditions for experimentation, testing, and debugging, you might want to temporarily boot your system using system parameter values stored in a parameter file other than the default parameter file. The conversational boot operation lets you reset active values using a different parameter file.
How to Perform This Task
- Follow the instructions for performing a conversational boot in one of the following manuals:
On VAX systems, refer to the most recent versions of the OpenVMS VAX Upgrade and Installation Manual and the upgrade and installation supplement for your VAX computer.
On Alpha and IA-64 systems, refer to the VSI OpenVMS Alpha Upgrade and Installation Manual.
- At the SYSBOOT> prompt, enter a command in the following format:
USE file-spec
wherefile-specspecifies the file name and type of the alternate parameter file. The file must be in SYS$SYSTEM. You cannot specify a device name. For example:SYSBOOT> USE ALTPARAMS.DAT
- Enter the CONTINUE command to continue booting:
SYSBOOT> CONTINUE
Example
SYSBOOT> USE ALTPARAMS.DAT SYSBOOT> CONTINUE
4.3. Assigning Port Allocation Classes with SYSBOOT
SYSBOOT> SET/CLASS PKB 152
SYSBOOT> SET DEVICE_NAMING 1
SYSBOOT> SET/CLASS PKA
4.4. Booting in an Emergency
|
Operation |
Use |
For More Information |
|---|---|---|
|
Booting with default system parameters |
When parameter values in the parameter file have been modified so that the system is unbootable | |
|
Booting without startup and login procedures |
If an error in the startup or login procedures prevents you from logging in |
Section 4.4.2, ''Booting Without Startup and Login Procedures'' |
|
Booting without the user authorization file |
If you have forgotten the password and cannot log in to a privileged account |
Section 4.4.3, ''Booting Without the User Authorization File'' |
4.4.1. Booting with Default System Parameters
If the current values stored in the parameter file have been incorrectly modified, these incorrect values might cause the system to become unbootable. With a conversational boot operation, you can reset the active values for all system parameters to the default value.
Note that in most cases, VSI recommends that you use AUTOGEN to modify system parameters. In special cases, however, you can use a conversational boot to modify a parameter value temporarily. To change a parameter value permanently, you must edit MODPARAMS.DAT and run AUTOGEN. For instructions, see VSI OpenVMS System Manager's Manual, Volume 2: Tuning, Monitoring, and Complex Systems.
How to Perform This Task
- Perform a conversational boot by following the instructions in one of the following manuals:
On VAX systems, refer to the most recent versions of the OpenVMS VAX Upgrade and Installation Manual and the upgrade and installation supplement for your VAX computer.
On Alpha and IA-64 systems, refer to the VSI OpenVMS Version 8.2 OpenVMS Alpha Upgrade and Installation Manual.
- At the SYSBOOT> prompt, enter the following command:
SYSBOOT> USE DEFAULT
This command specifies that default values should be used for all parameters.
Enter the following command to ensure that the operating system does not record the STARTUP_P1 parameter change made in Step 2 for subsequent reboots:
SYSBOOT> SET WRITESYSPARAMS 0
- To avoid starting all layered products on a system that is not tuned for them, possibly causing the system to hang, set the STARTUP_P1 system parameter as follows:
SYSBOOT> SET STARTUP_P1 "MIN"
- Enter the CONTINUE command to continue booting:
SYSBOOT> CONTINUE
When the system finishes booting, determine which changed parameter caused the problem, and reset the parameter value. If you specified the value for the parameter in the AUTOGEN parameter file MODPARAMS.DAT, fix the value in that file and run AUTOGEN. For more information, see VSI OpenVMS System Manager's Manual, Volume 2: Tuning, Monitoring, and Complex Systems.
Shut down and reboot the system.
Example
SYSBOOT> USE DEFAULT SYSBOOT> SET WRITESYSPARAMS 0 SYSBOOT> SET STARTUP_P1 "MIN" SYSBOOT> CONTINUE Username: SYSTEM Password: $ EDIT SYS$SYSTEM:MODPARAMS.DAT [Insert the following line in MODPARAMS.DAT:] MIN_NPAGEDYN = 2999808 $ @SYS$UPDATE:AUTOGEN SAVPARAMS REBOOT
4.4.2. Booting Without Startup and Login Procedures
If the system does not complete the startup procedures or does not allow you to log in, bypass the startup and login procedures. The startup and login procedures provided by VSI should always work. However, if you introduce an error when modifying the startup or login procedures, you can accidentally lock yourself out of the system. The following instructions tell you what to do in such a situation.
How to Perform This Task
- Perform a conversational boot operation by following the instructions in one of the following manuals:
On VAX systems, refer to the most recent versions of the OpenVMS VAX Upgrade and Installation Manual and the upgrade and installation supplement for your VAX computer.
On Alpha and IA-64 systems, refer to the VSI OpenVMS Version 8.2 OpenVMS Alpha Upgrade and Installation Manual.
- Enter the following command at the SYSBOOT> prompt:
SYSBOOT> SET/STARTUP OPA0:
Enter the following command to ensure that the operating system does not record the STARTUP_P1 parameter change made in Step 2 for subsequent reboots:
SYSBOOT> SET WRITESYSPARAMS 0
- Enter the CONTINUE command to continue booting:
SYSBOOT> CONTINUE
When the system is booted, the operator console displays the DCL command prompt ($). You are logged in.
- Enter the following DCL command:
$ SET NOON
This command directs the operating system to ignore any errors that might occur. If you do not enter this command and you invoke an error, the system will log you out.
Correct the error condition that caused the login failure. That is, make the necessary repairs to the startup or login procedures, or to the UAF.
Invoke a text editor to correct the file. Note that some system consoles might not supply a screen-mode editor. You can also copy a corrected file and delete the incorrect version by using the RENAME and DELETE commands.
- Invoke SYSMAN and enter the following commands to reset the startup procedure:
$ RUN SYS$SYSTEM:SYSMAN SYSMAN> PARAMETERS USE CURRENT SYSMAN> PARAMETERS SET/STARTUP SYS$SYSTEM:STARTUP.COM SYSMAN> PARAMETERS WRITE CURRENT SYSMAN> EXIT $
- Perform a normal startup by entering the following command:
$ @SYS$SYSTEM:STARTUP
Example
SYSBOOT> SET/STARTUP OPA0: SYSBOOT> SET WRITESYSPARAMS 0 SYSBOOT> CONTINUE $ SET NOON $ SET DEFAULT SYS$SYSROOT:[SYSEXE] $ RUN SYS$SYSTEM:SYSMAN SYSMAN> PARAMETERS USE CURRENT SYSMAN> PARAMETERS SET/STARTUP SYS$SYSTEM:STARTUP.COM SYSMAN> PARAMETERS WRITE CURRENT SYSMAN> EXIT $ @SYS$SYSTEM:STARTUP
4.4.3. Booting Without the User Authorization File
Note
You can use this method only to log in to the system from the console terminal; you cannot use other terminal lines.
Setting the system parameter UAFALTERNATE defines the logical name SYSUAF to refer to the file SYS$SYSTEM:SYSUAFALT.DAT. If this file is found during a normal login, the system uses it to validate the account and prompts you for the user name and password.
If it cannot find this file, the system assumes that the UAF is corrupt and accepts any user name and any two passwords to log you in to the system from the system console. Logins are prohibited from all other terminal lines.
|
Field |
Value |
|---|---|
|
Name |
User name |
|
UIC |
[001, 004] |
|
Command interpreter |
DCL |
|
Login flags |
None |
|
Priority |
Value of the system parameter DEFPRI |
|
Resources |
Values of the PQL system parameters |
|
Privileges |
All |
How to Perform This Task
- Perform a conversational boot by following the instructions in one of the following manuals:
On VAX systems, refer to the most recent versions of the OpenVMS VAX Upgrade and Installation Manual and the upgrade and installation supplement for your VAX computer.
On Alpha and IA-64 systems, refer to the VSI OpenVMS Version 8.2 OpenVMS Alpha Upgrade and Installation Manual.
- At the SYSBOOT> prompt, enter the following command:
SYSBOOT> SET UAFALTERNATE 1
- If your system is running DECwindows Motif for OpenVMS systems, you must also disable the windowing system by entering the following command:
SYSBOOT> SET WINDOW_SYSTEM 0
- Enter the CONTINUE command to continue booting:
SYSBOOT> CONTINUE
When the startup procedure completes, log in on the console terminal by entering any user name and any two passwords in response to the Username: and Password: prompts.
- Enter the following command to use the default UAF:
$ DEFINE/SYSTEM/EXECUTIVE_MODE SYSUAF SYS$SYSTEM:SYSUAF.DAT
Use the Authorize utility to fix the problem that caused you to be locked out of the system (for example, a forgotten password). Enter HELP MODIFY at the UAF> prompt for information about modifying passwords. For more details, refer to the VSI OpenVMS System Management Utilities Reference Manual.
- Enter the following commands to invoke SYSMAN and clear the UAFALTERNATE system parameter you set in step 2:
$ RUN SYS$SYSTEM:SYSMAN SYSMAN> PARAMETERS USE CURRENT SYSMAN> PARAMETERS SET UAFALTERNATE 0
In most cases, VSI recommends that you use AUTOGEN to modify system parameters. However, since this parameter is being changed only temporarily, you can use SYSMAN or SYSGEN to change it back.
- If you disabled the windowing system in step 3, re-enable it by entering the following command:
SYSMAN> PARAMETERS SET WINDOW_SYSTEM 1
- Enter the following command to save the changed system parameter values:
SYSMAN> PARAMETERS WRITE CURRENT
Shut down and reboot the system.
Example
SYSBOOT> SET UAFALTERNATE 1 SYSBOOT> SET WINDOW_SYSTEM 0 SYSBOOT> CONTINUE Username: [Return] Password: [Return] Password: [Return] $ DEFINE/SYSTEM/EXECUTIVE_MODE SYSUAF SYS$SYSTEM:SYSUAF.DAT $ SET DEFAULT SYS$SYSTEM $ RUN AUTHORIZE AUTHORIZE> MODIFY SYSTEM/PASSWORD=FGLFTUTU AUTHORIZE> EXIT $ RUN SYS$SYSTEM:SYSMAN SYSMAN> PARAMETERS USE CURRENT SYSMAN> PARAMETERS SET WINDOW_SYSTEM 1 SYSMAN> PARAMETERS SET UAFALTERNATE 0 SYSMAN> PARAMETERS WRITE CURRENT SYSMAN> EXIT $ @SYS$SYSTEM:SHUTDOWN
4.5. Booting with Controlled Startup
|
Task |
For More Information |
|---|---|
|
Boot with an alternate site-independent startup procedure |
Section 4.5.1, ''Booting with an Alternate Site-Independent Startup Procedure'' |
|
Boot with an alternate site-independent startup command procedure by default |
Section 4.5.2, ''Specifying an Alternate Default Startup Command Procedure'' |
|
Boot with minimum startup | |
|
Display startup procedure commands as they execute |
Section 4.5.4, ''Booting While Displaying Startup Procedure Commands'' |
Caution
Do not modify STARTUP.COM. The system requires this procedure to correctly start up the system. For information about modifying site-specific startup procedures to perform site-specific operations, see Section 5.2, ''Modifying Site-Specific Startup Command Procedures''.
4.5.1. Booting with an Alternate Site-Independent Startup Procedure
The default system startup procedure is SYS$SYSTEM:STARTUP.COM. VSI recommends you do not modify STARTUP.COM. However, in special environments, you might want the system to perform special startup commands. The conversational boot lets you specify that the system temporarily use an alternate startup procedure.
You can also perform site-specific startup events by adding commands to the site-specific startup command procedures. For more information, see Section 5.2, ''Modifying Site-Specific Startup Command Procedures''.
How to Perform This Task
- Follow the instructions for performing a conversational boot in one of the following manuals:
On VAX systems, refer to the most recent versions of the OpenVMS VAX Upgrade and Installation Manual and the upgrade and installation supplement for your VAX computer.
On Alpha and IA-64 systems, refer to the VSI OpenVMS Version 8.2 OpenVMS Alpha Upgrade and Installation Manual.
- Enter the following command to show the current startup file:
SYSBOOT> SHOW/STARTUP
- Enter a command in the following format to specify the alternate site-independent startup command procedure:
SET/STARTUP file-spec
where file-spec specifies the entire file specification for the startup file to be used, including the device and directory. For example:SYSBOOT> SET/STARTUP SYS$SYSTEM:XSTARTUP.COM
If the startup file specified as file-spec does not exist, the system displays the following message:Error opening primary input file SYS$INPUTFile not found
Check the file name you entered. Make sure you specified it correctly.
- Enter the following command to verify the change:
SYSBOOT> SHOW/STARTUP
- Enter the following command to continue booting:
SYSBOOT> CONTINUE
To make your alternate site-independent startup procedure the default startup procedure, see Section 4.5.2, ''Specifying an Alternate Default Startup Command Procedure''.
Example
SYSBOOT> SHOW/STARTUP Startup command file = SYS$SYSTEM:STARTUP.COM SYSBOOT> SET/STARTUP SYS$SYSTEM:XSTARTUP.COM SYSBOOT> SHOW/STARTUP Startup command file = SYS$SYSTEM:XSTARTUP.COM SYSBOOT> CONTINUE
4.5.2. Specifying an Alternate Default Startup Command Procedure
The default system startup procedure is SYS$SYSTEM:STARTUP.COM. However, in special environments, you might want the system to perform special startup commands. If you frequently require a startup command procedure other than SYS$SYSTEM:STARTUP.COM, you can specify that the alternate procedure be used by default.
How to Perform This Task
Edit the file SYS$SYSTEM:MODPARAMS.DAT. AUTOGEN uses this file to modify parameters.
- Add a line to MODPARAMS.DAT assigning the name of your alternate procedure to the symbol STARTUP. For example:
STARTUP = "SYS$SYSTEM:MY_STARTUP.COM"
At a convenient time, invoke AUTOGEN. When the system reboots, the procedure specified in step 2 becomes the default startup command procedure.
Example
$ EDIT SYS$SYSTEM:MODPARAMS.DAT . . . [Insert the following line in MODPARAMS.DAT:] STARTUP = "SYS$SYSTEM:MY_STARTUP.COM" . . . $ @SYS$SYSTEM:AUTOGEN SAVPARAMS REBOOT
4.5.3. Booting with Minimum Startup
In special cases, you might want to boot your system without performing the full sequence of startup events. For example, if a startup event prevents you from logging in, you might want to boot the system without executing the startup, so that you can log in and fix the problem.
Note
$IF P1 .NES. "FULL" THEN @SYS$SYSTEM:STARTUP CONFIGURE
How to Perform This Task
- Follow the instructions for performing a conversational boot in one of the following manuals:
On VAX systems, refer to the most recent versions of the OpenVMS VAX Upgrade and Installation Manual and the upgrade and installation supplement for your VAX computer.
On Alpha and IA-64 systems, refer to the VSI OpenVMS Version 8.2 OpenVMS Alpha Upgrade and Installation Manual.
- At the SYSBOOT> prompt, enter the following command:
SYSBOOT> SET STARTUP_P1 "MIN"
- Enter the following command to continue booting:
SYSBOOT> CONTINUE
- After the system boots, log in and enter the following commands to invoke SYSMAN and clear the STARTUP_P1 parameter you set in step 2:
$ RUN SYS$SYSTEM:SYSMAN SYSMAN> PARAMETERS USE CURRENT SYSMAN> PARAMETERS SET STARTUP_P1 "" SYSMAN> PARAMETERS WRITE CURRENT
Example
[perform a conversational boot] SYSBOOT> SET STARTUP_P1 "MIN" SYSBOOT> CONTINUE [system completes booting] Username: [Return] Password: [Return] $ RUN SYS$SYSTEM:SYSMAN SYSMAN> PARAMETERS USE CURRENT SYSMAN> PARAMETERS SET STARTUP_P1 "" SYSMAN> PARAMETERS WRITE CURRENT
Caution
If you boot with minimum startup with the VAXCLUSTER system parameter set to 0, the only HSC or DSSI devices that will be accessible will be the boot device and then only if the boot device is controlled by an HSC or a DSSI controller.
- Use this command:
$ RUN SYS$SYSTEM:CONFIGURE/DETACH
This makes the devices accessible without rebooting the system.
Reboot the system setting the STARTUP_P1 system parameter to "".
Reboot the system with the VAXCLUSTER system parameter set to 1 or 2.
4.5.4. Booting While Displaying Startup Procedure Commands
In some cases—for example, when you are trying to test a startup command procedure, or when troubleshooting startup problems—it is helpful to display the startup commands as they are executed.
How to Perform This Task
- Follow the instructions for performing a conversational boot in one of the following manuals:
On VAX systems, refer to the most recent versions of the OpenVMS VAX Upgrade and Installation Manual and the upgrade and installation supplement for your VAX computer.
On Alpha and IA-64 systems, refer to the VSI OpenVMS Version 8.2 OpenVMS Alpha Upgrade and Installation Manual.
- At the SYSBOOT> prompt, enter the following command:
SYSBOOT> SET STARTUP_P2 "YES"
- Enter the following command to continue booting:
SYSBOOT> CONTINUE
- After the system boots, log in and enter the following commands to invoke SYSMAN and clear the STARTUP_P2 parameter you set in step 2:
$ RUN SYS$SYSTEM:SYSMAN SYSMAN> PARAMETERS USE CURRENT SYSMAN> PARAMETERS SET STARTUP_P2 "" SYSMAN> PARAMETERS WRITE CURRENT
Example
[perform a conversational boot] SYSBOOT> SET STARTUP_P2 "YES" SYSBOOT> CONTINUE [system completes booting] Username: [Return] Password: [Return] $ RUN SYS$SYSTEM:SYSMAN SYSMAN> PARAMETERS USE CURRENT SYSMAN> PARAMETERS SET STARTUP_P2 "" SYSMAN> PARAMETERS WRITE CURRENT
4.5.5. Displaying Startup Procedure Commands with SYSMAN
In addition to performing a conversational boot to display startup procedures, you can use SYSMAN to display startup status with the STARTUP SET OPTIONS command. The advantage of using SYSMAN is that you can obtain verification and logging for multiple nodes at a time.
SYSMAN startup logging redefines STARTUP_P2 to specify:
The amount of debugging information STARTUP.COM displays
Whether to keep a log of the startup
The STARTUP SET OPTIONS command provides the options shown in Table 4.2, ''Startup Logging Options''.
| Option | Function |
|---|---|
| /VERIFY=FULL | Displays every line of DCL executed by component startup procedures and by STARTUP.COM. |
| /VERIFY=PARTIAL | Displays every line of DCL executed by component startup procedures, but does not display DCL executed by STARTUP.COM. |
|
/OUTPUT=FILE /OUTPUT=CONSOLE | Creates SYS$SPECIFIC:[SYSEXE]STARTUP.LOG, which contains all of the output generated by startup procedures. Alternatively, you can display the output on the console. |
| /CHECKPOINTING | Displays informational messages describing the time and status of each startup phase and component file. |
How to Perform This Task
At the DCL prompt ($), enter the following command:
$ RUN SYS$SYSTEM:SYSMAN
At the SYSMAN> prompt, enter the following command:
SYSMAN> STARTUP SET OPTIONS/[qualifier]
Qualifiers can be any of the options specified in Table 4.2, ''Startup Logging Options''. These options take effect the next time you boot the system.
Example
$ RUN SYS$SYSTEM:SYSMAN SYSMAN> STARTUP SET OPTIONS/VERIFY=FULL/OUTPUT=FILE/CHECKPOINTING
This example requests startup logging with:
Full verification
Output to the STARTUP.LOG file
Checkpointing
To show the current startup options, enter the following command:
SYSMAN> STARTUP SHOW OPTIONS
For more information, refer to the VSI OpenVMS System Management Utilities Reference Manual.
4.6. Solving Booting Problems
A hardware or software malfunction can prevent the operating system from booting when you enter the BOOT command.
Hardware Problems
Consult the hardware manual for your computer.
Contact your VSI support representative.
Software Problems
The OpenVMS system is now executing the system startup procedure.
- Try again, by repeating the boot procedure. For instructions, refer to one of the following manuals:
On VAX systems, refer to the most recent versions of the OpenVMS VAX Upgrade and Installation Manual and the upgrade and installation supplement for your VAX computer.
On Alpha and IA-64 systems, refer to the most recent version of the OpenVMS Alpha Upgrade and Installation Manual.
If you have a removable system disk, replace it with a backup copy of the system disk. Try to boot the system again.
Leave the system disk in the original drive. Restore a backup copy of the system disk. For instructions, see Section 11.17, ''Backing Up and Restoring the System Disk''.Try to boot the system again.
4.7. Writing a New Boot Block on the System Disk
Block 0 on a system disk is the boot block. It contains the size and location of the primary bootstrap image, which is used to boot the system.
On VAX systems, the primary bootstrap image is VMB.EXE.
On Alpha systems, the primary bootstrap image is APB.EXE.
on IA-64 systems, the primary bootstrap image is IPB.EXE.
VAX–11/750
VAX 8200, 8250, 8300, and 8350
VAX 6000–200, 6000–300, 6000–400, 6000–500, and 6000–600
VAX 7000 and VAX 10000
All Alpha and IA-64 systems (subject to change for future systems)
On VAX systems, refer to the most recent versions of the OpenVMS VAX Upgrade and Installation Manual and the upgrade and installation supplement for your VAX computer.
On Alpha and IA-64 systems, refer to the VSI OpenVMS Version 8.2 OpenVMS Alpha Upgrade and Installation Manual.
Modifying the primary bootstrap image with the SET FILE/MOVE command or the $MOVEFILE system service.
Restoring a backup of the system disk created without the /IMAGE qualifier.
Adding a new version of the primary bootstrap image, for example, during an operating system upgrade. (When the upgrade procedure adds a new version of the primary bootstrap image, it automatically uses WRITEBOOT to write a new boot block.)
Adding a new version of the primary bootstrap image that is not contiguous on disk. (Use the DIRECTORY/FULL command to determine this.)
Note
Instructions for using the WRITEBOOT utility are somewhat different on VAX and Alpha systems. Instructions for performing this task on VAX and Alpha systems follow. You must have LOG_IO privilege to use WRITEBOOT.
on IA-64 systems, you use SETBOOT to write a boot block. Instructions for performing this task are also in this section.
How to Perform This Task
- To start the Writeboot utility, enter the following command:
$ RUN SYS$SYSTEM:WRITEBOOT
- The procedure displays the following message:
Target system device (and boot file if not VMB.EXE):?
On VAX systems, VMB.EXE is the default bootstrap image. Enter a response in the following format:device:[VMS$COMMON.SYSEXE]VMB.EXE;
Use the device name format described in the upgrade and installation documentation for your processor. If you want to boot using a bootstrap image other than the default, you must specify the full file specification of the image, including device and directory.
- The procedure displays the following message:
Enter VBN of boot file code (default is one):
Ordinarily, the boot code is located at virtual block number (VBN) 1of the bootstrap image. Press Return to accept the default value of 1.
- The procedure displays the following message:
Enter load address of primary bootstrap in HEX (default is 200):
The load address is the location in memory (specified in hexadecimal notation) to which the system loads the bootstrap image. Ordinarily you copy the bootstrap image to address 200. Press Return to accept the default value of 200.
The Writeboot utility writes the information you specified to the boot block (block 0)on the system disk.
On VAX systems, the Writeboot utility might display one or more of the following error messages:
“You lack LOG_IO privilege.”
This message means you do not have the correct privilege to use the Writeboot utility.
“You lack READ and/or WRITE access to TARGET DEVICE. DISMOUNT and reMOUNT it.”
This message means that access to the target device is limited. Check the WRITE PROTECT button on the disk drive.
“Boot file is not contiguous.”
This message means that the primary bootstrap image, VMB.EXE, is not contiguous on disk. Enter the following command:
$ COPY/CONTIGUOUS device:[VMS$COMMON.SYSEXE]VMB.EXE; - _$ device:[VMS$COMMON.SYSEXE]
Rewrite the boot block for the new image by running WRITEBOOT again.
“VBN must be >= 1.”
This message means you cannot specify a 0 as the virtual block number (VBN).
Example:
On VAX systems, the following example writes a boot block on a system disk:
$ RUN SYS$SYSTEM:WRITEBOOT Target system device (and boot file if not VMB.EXE):? DUA0:[VMS$COMMON.SYSEXE]VMB.EXE Enter VBN of boot file code (default is one):[Return] Enter load address of primary bootstrap in HEX (default is 200): [Return]
How to Perform This Task on Alpha Systems
- To start the Writeboot utility, enter the following command:
$ RUN SYS$SYSTEM:WRITEBOOT
The procedure asks you whether you want to write the VAX portion of the boot block:Update VAX portion of boot block (default is Y):
Enter NO.
- The utility displays the following prompt:
Update Alpha portion of boot block (default is Y):
Press Return to accept the default value of Y.
- The utility prompts you for the Alpha bootstrap image:
Enter Alpha boot file:
On Alpha systems, APB.EXE is the default bootstrap image. Enter a response in the following format:device:[VMS$COMMON.SYSEXE]APB.EXE;
where device specifies the device name of the system disk.
The Writeboot utility writes the information you specified to the boot block (block 0) on the system disk.
"You lack LOG_IO privilege."
This message means you do not have the correct privilege to use the Writeboot utility.
"You lack READ and/or WRITE access to TARGET DEVICE. DISMOUNT and reMOUNT it."
This message means that access to the target device is limited. Check the WRITE PROTECT button on the disk drive.
"Boot file is not contiguous."
This message means that the primary bootstrap image, APB.EXE, is not contiguous on disk. Enter the following command:
$ COPY/CONTIGUOUS device:[VMS$COMMON.SYSEXE]APB.EXE; - _$ device:[VMS$COMMON.SYSEXE]
Rewrite the boot block for the new image by running WRITEBOOT again.
Example:
On Alpha systems, the following example writes a boot block on a system disk:
$ RUN SYS$SYSTEM:WRITEBOOT Update VAX portion of boot block (default is Y): N Update Alpha portion of boot block (default is Y): [Return] Enter Alpha boot file: DUA0:[VMS$COMMON.SYSEXE]APB.EXE;
How to Perform This Task on IA-64 Systems
To write a boot block for OpenVMS IA-64 systems, VSI provides the DCL SET BOOTBLOCK command, which functions similarly to the Writeboot utility (WRITEBOOT.EXE) used on OpenVMS Alpha systems. (Do not use the Writeboot utility on OpenVMS IA-64 systems.)
SET BOOTBLOCK allows you to create a bootable OpenVMS Alpha system disk from one that was originally created by one of the following methods:
A nonimage backup of an OpenVMS IA-64 system disk (possibly corrupting the boot block)
A nonimage restore of an OpenVMS IA-64 system disk from an image save set
The SET BOOTBLOCK command also allows you to rewrite the boot block of an OpenVMS IA-64 system disk to point to a new version of the OpenVMS IA-64 primary bootstrap file (SYS$EFI.SYS) that you have previously copied to the disk. (Note that the file must be contiguous.)
To write a boot block onto a disk, enter the following command:
$ SET BOOTBLOCK
You can specify a boot file with the command. By default, the command creates the bootfile SYS$SYSDEVICE:[VMS$COMMON.SYS$LDR]SYS$EFI.SYS. The boot file must be contiguous. If it is not contiguous, use the DCL COPY/CONTIGUOUS command or similar to recreate a contiguous version of the boot file. In addition, the boot file must also be marked NOMOVE (use the DCL SET FILE/NOMOVE command) to avoid bootstrap failures that could otherwise arise from the normal and expected operations of disk defragmentation tools.
Alternatively, you can write a boot block by entering the following command:
$ RUN SYS$SYSTEM:SYS$SETBOOT
The utility prompts you for the required input (as does the OpenVMS Alpha Writeboot utility).
4.8. Shutting Down the System
|
Procedure |
Purpose |
For More Information |
|---|---|---|
|
SHUTDOWN.COM |
An orderly shutdown procedure. This procedure shuts down the system while performing housekeeping functions such as disabling future logins, stopping the batch and output queues, dismounting mounted volumes, and stopping user processes. |
Section 4.8.1, ''Performing an Orderly Shutdown with SHUTDOWN.COM'' |
|
OPCCRASH.EXE |
An emergency shutdown program. Run the OPCCRASH emergency shutdown program if you are unable to perform an orderly shutdown with SHUTDOWN.COM. |
Section 4.8.5, ''Performing an Emergency Shutdown with the OPCCRASH.EXE Program'' |
|
Shutdown using console commands |
Emergency shutdown commands. Use these console shutdown commands only if OPCCRASH.EXE fails. |
Section 4.8.6, ''Performing an Emergency Shutdown Using Console Commands'' |
4.8.1. Performing an Orderly Shutdown with SHUTDOWN.COM
Use SYS$SYSTEM:SHUTDOWN.COM to shut down the system in an orderly fashion. See Section 4.8.2, ''Understanding the Order of Shutdown Events'' for the order of shutdown events.
Do not modify SHUTDOWN.COM. To perform site-specific operations during shutdown, see Section 4.8.3, ''Customizing SHUTDOWN.COM to Perform Site-Specific Operations''.
- AUDIT
- CMKRNL
- EXQUOTA
- LOG_IO
- NETMBX
- OPER
- SECURITY
- SYSNAM
- SYSPRV
- TMPMBX
- WORLD
%SHUTDOWN-I-SITESHUT, The site-specific shutdown procedure will now be invoked.
If you press Ctrl/Y after this display, certain system components might have already been shut down, and you will need to recover manually. For example, you might have to manually restart processes, mount disks, or reboot the system.
How to Perform This Task
- Log in to the system manager's account (SYSTEM), or any privileged account, and enter the following command:
$ @SYS$SYSTEM:SHUTDOWN.COM
This command invokes the orderly shutdown procedure. The procedure prompts you with a series of questions and messages. The default responses appear in brackets at the end of each question. Press Return to select the default response.
- The system displays the following question:
How many minutes until final shutdown [0]?
Enter an integer. If you have defined the system logical name SHUTDOWN$MINIMUM_MINUTES, its integer value is the minimum value that you can enter. For example, if the logical name is defined as 10, you must specify at least 10 minutes to final shutdown or an error message is returned. If you do not enter a value, SHUTDOWN.COM uses the logical name value.Caution
The default is 0 minutes. If you have not defined the logical name SHUTDOWN$MINIMUM_MINUTES, and you do not enter a value, the system will beshut down immediately after you answer the last question.
- The system displays the following question:
Reason for shutdown [standalone]:
Enter a one-line reason for shutting down the system. For example, "Monthly preventive maintenance."
- The system displays the following question:
Do you want to spin down the disk volumes [No]?
Enter YES or NO (Y or N). Note, however, that you cannot spin down the system disk. Also, many disks, particularly SCSI disks, do not spin down in response to this option.
- The system displays the following question:
Do you want to invoke the site-specific shutdown procedure [Yes]?
If you have entered site-specific commands in SYSHUTDWN.COM, press Return to accept the default answer, YES. For more information, see Section 4.8.3.2, ''Modifying the Site-Specific Shutdown Command Procedure''.
- The system displays the following question:
Should an automatic system reboot be performed [No]?
By default, the system does not automatically reboot. However, if you respond YES, the system attempts to reboot automatically when the shutdown is complete. For example, you would specify YES if you are rebooting the system after modifying values for nondynamic system parameters with SYSMAN or SYSGEN. (When you change nondynamic system parameters, you must reboot the system for the new values to take effect.)
- The system displays a question similar to the following one:
When will the system be rebooted [later]?
If you entered YES in step 6, the default answer to this question is "[shortly via automatic reboot]".
Press Return to take the default, or enter the expected reboot time in the format you want users to see. For example, you could specify IMMEDIATELY, or IN 10MINUTES, or a time such as 2 P.M. or 14:00. If you do not know when the system will be available again, press Return to specify "later" as the time when the system will reboot.
- The procedure prompts you to specify one or more shutdown options, as follows (if your system is not a member of an OpenVMS Cluster environment, the procedure lists only the REBOOT_CHECK and SAVE_FEEDBACK options):
Shutdown options (enter as a comma-separated list): REMOVE_NODE Remaining nodes in the cluster should adjust quorum CLUSTER_SHUTDOWN Entire cluster is shutting down REBOOT_CHECK Check existence of basic system files SAVE_FEEDBACK Save AUTOGEN feedback information from this boot DISABLE_AUTOSTART Disable autostart queues Shutdown options [NONE]
Specify the options you want to use. Choose from the options in the following table:Option
Description
REMOVE_NODE
Causes other nodes in the cluster to decrease the value of the EXPECTED_VOTES system parameter. (This parameter is automatically increased each time a node joins the cluster.)Specifying REMOVE_NODE will not decrease the EXPECTED_VOTES below the quorum value.
Use this option if the node you are shutting down will be out of the cluster a considerable period of time.
When you use this option, all locally attached disks are dismounted clusterwide. Therefore, you must shut down applications on other nodes that have open files on the locally attached disks. Failure to do so might cause mount verify timeout problems as well as application problems.
CLUSTER_SHUTDOWN
Synchronizes the shutdown of a cluster; only when the shutdown of each node has progressed to a certain point will the shutdown be completed.
Use this option on each node in the cluster to synchronize the shutdown.
REBOOT_CHECK
Verifies the presence of files necessary to reboot the system after shutdown completes.
The procedure checks for the necessary files and notifies you if any are missing. Replace missing files before proceeding.
SAVE_FEEDBACK
Records feedback data collected from the system since it was last booted and creates a new version of the AUTOGEN feedback data file, which AUTOGEN can use the next time it runs.
For detailed information about using the AUTOGEN feedback mechanism, see VSI OpenVMS System Manager's Manual, Volume 2: Tuning, Monitoring, and Complex Systems.
DISABLE_AUTOSTART
Specifies the time interval between the DISABLE AUTOSTART/QUEUES command and system shutdown. For more information, see Section 14.7.1.9, ''Stopping Queues Before Shutting Down a System''.
Example
$ @SYS$SYSTEM:SHUTDOWN
SHUTDOWN – Perform an Orderly System Shutdown
How many minutes until final shutdown [0]: 10
Reason for shutdown: [Standalone] MONTHLY PREVENTIVE MAINTENANCE
Do you want to spin down the disk volumes [No]?
Do you want to invoke the site-specific shutdown procedure [Yes]?
Should an automatic system reboot be performed [No]?
When will the system be rebooted [later]? 12:30
Shutdown options (enter as a comma-separated list):
REMOVE_NODE Remaining nodes in the cluster should adjust quorum
CLUSTER_SHUTDOWN Entire cluster is shutting down
REBOOT_CHECK Check existence of basic system files
SAVE_FEEDBACK Save AUTOGEN feedback information from this boot
DISABLE_AUTOSTART Disable autostart queues
Shutdown options [NONE]
SHUTDOWN message on AVALON, from user SYSTEM at _AVALON$OPA0: 12:00:00.20
AVALON will shut down in 10 minutes; back up 12:30. Please log off node AVALON.
MONTHLY PREVENTIVE MAINTENANCE
%SHUTDOWN-I-OPERATOR, This terminal is now an operator's console.
%%%%%%%%%%% OPCOM, 16-MAY-2000 12:01:00.15 %%%%%%%%%%%
Operator status for operator _AVALON$OPA0:
CENTRAL, PRINTER, TAPES, DISKS, DEVICES, CARDS, NETWORK, OPER1, OPER2,
OPER3, OPER4, OPER5, OPER6, OPER7, OPER8, OPER9, OPER10, OPER11,
OPER12
%SHUTDOWN-I-DISLOGINS, Interactive logins will now be disabled.
%SET-I-INTSET, login interactive limit = 0 current interactive value = 17
%SHUTDOWN-I-SHUTNET, The DECnet network will now be shut down.
SHUTDOWN message on AVALON, from user SYSTEM at _AVALON$OPA0: 12:05:00.20
AVALON will shut down in 5 minutes; back up 12:30. Please log off node AVALON.
MONTHLY PREVENTIVE MAINTENANCE
17 terminals have been notified on AVALON.
SHUTDOWN message on AVALON from user SYSTEM at
_AVALON$OPA0: 12:06:55.28
AVALON will shut down in 3 minutes; back up 12:30. Please log off node AVALON.
MONTHLY PREVENTIVE MAINTENANCE
%%%%%%%%%%% OPCOM, 16-MAY-2000 12:07:12.30 %%%%%%%%%%%
Message from user DECnet on AVALON
DECnet event 2.0, local node state change
From node 2.161 (AVALON), 16-MAY-2000 12:07:22.26
Operator command, Old state = On, New state = Shut
SHUTDOWN message on AVALON user SYSTEM at
_AVALON$OPA0: 12:08:12.56
AVALON will shut down in 2 minutes; back up 12:30. Please log off node AVALON.
MONTHLY PREVENTIVE MAINTENANCE
%%%%%%%%%%% OPCOM, 16-MAY-2000 12:08:12:30 %%%%%%%%%%%
Message from user SYSTEM on AVALON-SYSTEM-S-NORMAL, normal successful completion
%%%%%%%%%%% OPCOM, 16-MAY-2000 12:08:42.30 %%%%%%%%%%%
Message from user DECNET on AVALONDECnet shutting down
%SYSTEM-I-STOPQUEUES, The queues on this node will now be stopped.
SHUTDOWN message on AVALON from user SYSTEM at
_AVALON$OPA0: 12:09:12.56
AVALON will shut down in 1 minute; back up 12:30. Please log off node AVALON.
MONTHLY PREVENTIVE MAINTENANCE
SHUTDOWN message on AVALON, from user SYSTEM at
_AVALON$OPA0: 12:10:00.20
AVALON will shut down in 0 minutes; back up 12:30. Please log off node AVALON.
MONTHLY PREVENTIVE MAINTENANCE
17 terminals have been notified on AVALON
%SHUTDOWN-I-SITESHUT, The site-specific shutdown procedure will now be invoked.
%SHUTDOWN-I-STOPUSER, All user processes will now be stopped.
%SHUTDOWN-I-REMOVE, All installed images will now be removed.
%SHUTDOWN-I-DISMOUNT, All volumes will now be dismounted.
%%%%%%%%%%% OPCOM, 16-MAY-2000 12:09:42.30 %%%%%%%%%%%
Message from user System on AVALON_AVALON$OPA0:, AVALON shutdown was requested by the operator.
%%%%%%%%%%% OPCOM, 16-MAY-2000 12:10:02.44 %%%%%%%%%%%
Logfile was closed by operator _AVALON$OPA0:Logfile was SYS$SYSROOT:[SYSMGR]OPERATOR.LOG;8
%%%%%%%%%%% OPCOM, 16-MAY-2000 12:10:32.20 %%%%%%%%%%%
Operator _AVALON$OPA0: has been disabled, username SYSTEM
SYSTEM SHUTDOWN COMPLETEUSE CONSOLE TO HALT SYSTEM
Halt the system after you see this message.
4.8.2. Understanding the Order of Shutdown Events
At decreasing time intervals, SHUTDOWN.COM broadcasts, to all users on the system, a message requesting users to log out.
SHUTDOWN.COM defines the system logical name SHUTDOWN$TIME to be the absolute time of shutdown. For example, if you execute SHUTDOWN.COM, and at 12:00 you specify the value 10 in response to the first question, SHUTDOWN defines the logical name to be 12:10 on that day. To see if a shutdown is in progress or to determine the actual time of shutdown, you can enter the command SHOW LOGICAL SHUTDOWN$TIME. This feature is useful if you miss a shutdown broadcast message.
At 6 minutes or less before system shutdown, the terminal from which you invoked SHUTDOWN becomes an operator's console. SHUTDOWN disables all future non-operator logins and shuts down the DECnet network if it is running. At this point, users logged in to the system with the SET HOST command lose their sessions.
One minute before shutdown, SHUTDOWN.COM stops batch and output execution queues and stops the queue manager.
At the absolute time of shutdown, SHUTDOWN.COM invokes the site-specific shutdown command procedure SYS$MANAGER:SYSHUTDWN.COM, if you requested it.
SHUTDOWN.COM stops all remaining user processes; however, system processes continue. Ancillary control processes (ACPs) might delete themselves when their mounted volumes are finally dismounted.
On multiprocessor systems, SHUTDOWN.COM stops the secondary processors.
SHUTDOWN.COM removes all installed images.
SHUTDOWN.COM dismounts all mounted volumes and, if you requested it, spins down the disks. If you defined SHUTDOWN$VERBOSE, the procedure lists each disk as it is dismounted.
The procedure does not spin down the system disk, nor does it dismount or spin down the quorum disk (if one exists on your system).
SHUTDOWN.COM closes the operator log file.
SHUTDOWN.COM runs the program SYS$SYSTEM:OPCCRASH.EXE to shut down the system.
- If you requested an automatic reboot, the system reboots, provided you set the necessary controls. You requested an automatic reboot if you answered YES to the following question:
Should an automatic system reboot be performed [No]?
If you did not request an automatic reboot, a message similar to the following one appears on the system console:SYSTEM SHUTDOWN COMPLETE
On VAX systems, the following message is also displayed:USE CONSOLE TO HALT SYSTEM
Halt the system after you see this message.
4.8.3. Customizing SHUTDOWN.COM to Perform Site-Specific Operations
|
Method |
For More Information |
|---|---|
|
Defining logical names | |
|
Modifying the site-specific shutdown command procedure |
Section 4.8.3.2, ''Modifying the Site-Specific Shutdown Command Procedure'' |
4.8.3.1. Defining Logical Names
|
Logical Name |
Description |
|---|---|
|
SHUTDOWN$DECNET_MINUTES |
Defines the number of minutes remaining before DECnet is shut down; must be defined with the /SYSTEM qualifier. The default is 6 minutes. |
|
SHUTDOWN$DISABLE_AUTOSTART |
Specifies the number of minutes between the time autostart is disabled for queues and the time the system is shut down; must be defined with the /SYSTEM qualifier. For more information, see Section 14.7.1.9, ''Stopping Queues Before Shutting Down a System''. |
|
SHUTDOWN$INFORM_NODES |
Specifies a list of OpenVMS Cluster nodes to be notified when the system is shutting down. This logical name is described in detail in this section. |
|
SHUTDOWN$MINIMUM_MINUTES |
Defines the minimum number of minutes you can specify as number of minutes to shutdown. For example, if your users require 30 minutes' notice before a system shutdown, define this logical name to be 30. This logical must be defined with the /SYSTEM qualifier. |
|
SHUTDOWN$QUEUE_MINUTES |
Defines the number of minutes remaining before shutdown when queues are shut down; must be defined with the /SYSTEM qualifier. The default is 1 minute. |
|
SHUTDOWN$TIME |
Defines the absolute time of the shutdown; must be defined with the /SYSTEM qualifier. |
|
SHUTDOWN$VERBOSE |
If defined to any string, specifies that the shutdown command procedure is to list each disk as it is dismounted. |
If you plan to use an option every time you use SHUTDOWN.COM, define the logical name in the site-specific startup command procedure SYLOGICALS.COM. For more information, see Section 5.2.5, ''Modifying SYLOGICALS.COM to Define Systemwide Logical Names''.
Specifying a List of Nodes to Be Notified When the System Is Shutting Down
You can define the logical name SHUTDOWN$INFORM_NODES to be a list of OpenVMS Cluster nodes that are notified when the system is shut down. You must define SHUTDOWN$INFORM_NODES before executing SYS$SYSTEM:SHUTDOWN.COM.
DEFINE SHUTDOWN$INFORM_NODES "node-list"
$ DEFINE SHUTDOWN$INFORM_NODES "NODE1, NODE2, NODE3"
If you plan to inform the same nodes every time you shut down the system, add the command to the site-specific startup command procedure SYLOGICALS.COM. For more information, see Section 5.2.5, ''Modifying SYLOGICALS.COM to Define Systemwide Logical Names''.
If you define SHUTDOWN$INFORM_NODES, all member nodes included in the list are notified when you execute SHUTDOWN.COM. Users on the node that is being shut down are always notified, regardless of whether you define SHUTDOWN$INFORM_NODES. If you omit the name of the node that is being shut down from the list specified in the DEFINE command, SHUTDOWN.COM automatically adds the name to the list.
|
Shutdown Phase |
If SHUTDOWN$INFORM_NODES Is Not Defined |
If SHUTDOWN$INFORM_NODES Is Defined |
|---|---|---|
|
First shutdown notification |
Notify all terminals on all nodes |
Notify all terminals on all listed nodes |
|
Between first shutdown notification and 2minutes before final shutdown |
Notify all terminals logged in to the node that is shutting down |
Notify all users logged in on all listed nodes |
|
Between 2 minutes before final shutdown notification until final shutdown |
Notify all users logged in on all nodes |
Notify all users logged in on all listed nodes |
|
Shutdown canceled |
Notify all terminals on all nodes |
Notify all terminals on all listed nodes |
4.8.3.2. Modifying the Site-Specific Shutdown Command Procedure
You can add site-specific commands to the site-specific shutdown procedure SYS$MANAGER:SYSHUTDWN.COM. An empty SYSHUTDWN.COM file is included in your distribution kit.
Do you want to invoke the site-specific shutdown procedure [Yes]?
Press Return to accept the default answer YES.
4.8.3.2.1. Using the SYSHUTDWN_0010.TEMPLATE Procedure
Some applications use batch queues and print queues heavily to meet the application requirements. In these heavy use environments, it is recommended to run the optional procedure SYSHUTDWN_0010.COM to stop all the application activity prior to the SYSHUTDWN.COM procedure terminating queue operations.
The file SYS$MANAGER:SYSHUTDWN_0010.TEMPLATE illustrates three different functions a system administrator might want to perform before shutting down the queue system.
The RESET_QUEUES function checks for queues and jobs that could hang or significantly delay shutdown and cleans them off the system.
The QMAN_CHECKPOINT function requests the queue manager shrink the queue journal file, file type .QMAN$JOURNAL, to the smallest possible size.
The KILL_SYMBIONTS function searches for any symbiont processes that are not stopping and kills them. Some symbionts may have long wait times to connect to devices over a WAN and refuse to stop until a network response is received.
Rename SYSHUTDWN_0010.TEMPLATE to SYSHUTDWN_0010.COM and the procedure will be executed at the next system shutdown.
4.8.3.3. Dismounting Shadow Sets in Site-Specific Shutdown Procedures
The default SHUTDOWN.COM procedure that ships with the operating system performs a DISMOUNT/ABORT/OVERRIDE=CHECKS operation on all mounted volumes. If files are left open on any mounted shadow sets, a merge operation is required for these shadow sets when the system is rebooted.
To prevent such unnecessary merge operations, VSI recommends that you modify each site-specific SYSHUTDWN.COM command procedure to dismount the shadow sets without using the /ABORT/OVERRIDE=CHECKS command qualifiers. If you find open files, close them.
4.8.4. Performing an Orderly Shutdown with SYSMAN
The advantage of using the System Management Utility (SYSMAN) for shutdown is that you can shut down a group of nodes quickly. SYSMAN enables you to enter all of the shutdown parameters in one command line, rather than responding to the interactive dialog in SHUTDOWN.COM. SYSMAN does not wait for the nodes to shut down before you can use other SYSMAN commands; the interface returns immediately.
How to Perform This Task
Enter the following command at the DCL prompt ($):
$ RUN SYS$SYSTEM:SYSMAN
At the SYSMAN> prompt, enter the following command:
SYSMAN> SHUTDOWN NODE/[qualifier]
Qualifiers can be any of the following options:
| Qualifier | Function |
|---|---|
| MINUTES_TO_SHUTDOWN | Indicates the number of minutes until shutdown occurs. |
| REASON | Indicates the reason for the shutdown. |
| REBOOT_TIME | Indicates the time you expect to reboot the system, such as LATER, 2 P.M., or 14:00. This time is displayed in the shutdown message to users. |
| [NO]SPIN_DOWN_DISKS | Spins down disks. The default is NO. You cannot spin down the system disk. |
| [NO]INVOKE_SYSHUTDOWN | Invokes the site-specific shutdown procedure. The default is INVOKE_SYSHUTDOWN. |
| [NO]AUTOMATIC_REBOOT | Reboots the system automatically when the shutdown is complete. The default is NO. |
| [NO]REBOOT_CHECK | Checks for basic operating system files and notifies you if any are missing. The default is NO. |
| [NO]CLUSTER_SHUTDOWN | Shuts down the entire OpenVMS Cluster system. The default is NO. |
| [NO]REMOVE_NODE | Removes the node from the active cluster quorum; use this when you do not expect the shut-down node to rejoin the cluster for an extended period. The default is NO. |
| [NO]SAVE_FEEDBACK | Records feedback data from the system since it was last booted and creates a new version of the AUTOGEN feedback data file, which you can use the next time you run AUTOGEN. The default is NO. |
Example
$ RUN SYS$SYSTEM:SYSMAN SYSMAN> SHUTDOWN NODE/MINUTES_TO_SHUTDOWN=10/REBOOT_TIME="later" - _SYSMAN> /REASON="DISK CORRUPTION PROBLEMS"/REBOOT_CHECK/SAVE_FEEDBACK
If you enter this command example on NODE21, it requests a shutdown on NODE21 with:
A message to users on all the cluster nodes, specifying:
SHUTDOWN message on node NODE21, from user SYSTEM at _NODE21$0PA0: 12:00:00:20. NODE21 will shut down in 10 minutes; back up later. Please log off node NODE21. DISK CORRUPTION PROBLEMS
A check for any missing operating system files and notification any are missing
Creation of a new AUTOGEN feedback data file based on the feedback data collected since the system was last booted
For more information, see the VSI OpenVMS System Management Utilities Reference Manual.
4.8.5. Performing an Emergency Shutdown with the OPCCRASH.EXE Program
Writes the modified page list back to disk. This ensures that all writable section files are updated to their correct state before the system crashes and all in-memory data is lost.
Unless the logical name OPC$NODUMP is defined, creates a crash dump by writing physical memory to the system dump file. For more information about the system dump file, see VSI OpenVMS System Manager's Manual, Volume 2: Tuning, Monitoring, and Complex Systems.
Note
Run the OPCCRASH.EXE program directly only if SHUTDOWN.COM fails.
How to Perform This Task
Log in to any privileged account.
- Enter the following command:
$ RUN SYS$SYSTEM:OPCCRASH
- If the system fails to respond after a few minutes, use the CRASH procedure or, if your system does not have a CRASH procedure, enter the emergency shutdown commands described in one of the following manuals:
On VAX systems, refer to the most recent versions of the OpenVMS VAX Upgrade and Installation Manual and the upgrade and installation supplement for your VAX computer.
On Alpha and IA-64 systems, refer to the VSI OpenVMS Version 8.2 OpenVMS Alpha Upgrade and Installation Manual.
- A message similar to the following one is displayed at the console:
SYSTEM SHUTDOWN COMPLETE
On VAX systems, the following message is also displayed:USE CONSOLE TO HALT SYSTEM
Halt the system when you see this message.
Example
$ RUN SYS$SYSTEM:OPCCRASH
SYSTEM SHUTDOWN COMPLETE
Ctrl/P
>>>HALT
HALTED AT 8000708AUSE CONSOLE TO HALT SYSTEM
Halt the system when you see this message.
4.8.6. Performing an Emergency Shutdown Using Console Commands
P00>>> CRASH
Note
Use CRASH commands from the console only if the OPCCRASH.EXE program fails.
P00>>> D PSL 041F0000 P00>>> D PC FFFFFFFF P00>>> CON
P00>>> D PS 1F00 P00>>> D PC FFFFFFFFFFFFFF00 P00>>> CON
on IA-64 systems, you can do either of the following:
Enter Ctrl/P. The system then prompts you to Crash if the XDELTA boot flag is not set.
Go to the MP console and type TC (Take Crash) from the Command Menu.
On VAX systems, see the most recent versions of the OpenVMS VAX Upgrade and Installation Manual and the upgrade and installation supplement for your VAX computer.
On Alpha and IA-64 systems, refer to the VSI OpenVMS Version 8.2 OpenVMS Alpha Upgrade and Installation Manual.
4.9. Reconfiguring Devices on OpenVMS IA-64 Systems
You can reconfigure boot and dump devices on IA-64 systems at either of two times:
After you shut down the system following an installation – but before the system is booted. To use this method, you issue EFI Utilities for OpenVMS commands starting at the EFI Shell> option of the EFI Boot Manager.
This method is explained in Appendix B of the VSI OpenVMS Version 8.2 Upgrade and Installation Manual. The EFI utilities commands are explained in the “EFI Utilities for OpenVMS” chapter in the VSI OpenVMS System Management Utilities Reference Manual, Volume I: A–L.
Before you shut down the system following installation and initial booting. For this method, you enter DCL commands from the DCL command prompt and select options from the OpenVMS IA-64 Boot Manager Utility, BOOT_OPTIONS.COM, menu. Using the BOOT_OPTIONS command procedure, you can reconfigure boot, dump, or debug devices before you shut down the system prior to rebooting.
4.9.1. Understanding the OpenVMS IA-64 Boot Manager Utility, BOOT_OPTIONS. COM
The OpenVMS IA-64 Boot Manager Utility is a command procedure called BOOT_OPTIONS.COM, which displays menus from which you can select options to manipulate the entries on the following lists that are maintained on OpenVMS IA-64 systems:
Boot device list
Dump device list
Debug device list
After selecting the list you want to modify, you can add, display, and remove entries from the list and change the position of an entry on the list. On the boot device list, you can also validate and correct entries.
4.9.2. Starting to Use BOOT_OPTIONS.COM
After installing an OpenVMS system using Option 1 of the operating system menu, the system displays an operating system menu that contains eight options. (The steps prior to this are explained in more detail in the VSI OpenVMS Version 8.2 Upgrade and Installation Manual.)
On the operating system menu, select Option 7, Execute DCL commands and procedures. Enter the following from the DCL prompt:
$ @SYS$MANAGER:BOOT_OPTIONS
The system then displays the BOOT_OPTIONS main configuration menu shown in Example 4.1, ''Default BOOT_OPTIONS Configuration Menu''.
OpenVMS I64 Boot Manager Boot Options List Management Utility (1) ADD an entry to the Boot Options list (2) DISPLAY the Boot Options list (3) REMOVE an entry from the Boot Options list (4) MOVE the position of an entry on the Boot Options list (5) VALIDATE Boot Options and fix them as necessary (6) Modify the Boot Options TIMEOUT setting (B) Set to operate on the Boot Device Options list (D) Set to operate on the Dump Device List (G) Set to operate on the Debug Device List (E) EXIT configuration procedure You can also enter CTRL/Y at any time to abort this utility Enter your choice:
Table 4.4, ''Options on the BOOT_OPTIONS Configuration Menu'' explains the options in Example 4.1, ''Default BOOT_OPTIONS Configuration Menu'' in more detail.
| Option | Description | |
|---|---|---|
| 1 | ADD | Add an entry to the option list you have selected. |
| 2 | DISPLAY | Display the contents of the option list you have selected. |
| 3 | REMOVE | Remove an entry from the option list you have selected. |
| 4 | MOVE | Change the position of an entry in the option list you have selected. |
| 5 | VALIDATE | Verify an entry in a selected option list and correct entries in the list, as necessary. |
| 6 | TIMEOUT | Modify the timeout value. |
| B | BOOT | Select the Boot (Device) Options List. (Default) |
| D | DUMP | Select the Dump Device List. |
| G | DEBUG | Select the Dubug Device List. |
| E | EXIT | Return to the DCL prompt. |
The BOOT_OPTIONS Configuration menu contains the following types of lists:
Boot (Device) Options list
This list contains devices that are available for the EFI Boot Manager to boot from. The list is also used by some EFI drivers for selective configuration of boot devices. For example, the VSI 2Port 2Gb Fibre Channel Adapter EFI driver searches the boot device options list for entries that contain the adapter path for the fibre channel device. Any matching entries on the SAN Name Server are logged in and reported to the EFI Shell.
Dump Device Options list
This list is used specifically for configuring Dump Off the System Disk (DOSD). For instructions, refer to VSI OpenVMS System Manager’s Manual, Volume 2: Tuning, Monitoring, and Complex Systems.
Debug Device Options list
This list is specifically used for configuring the Debug Device for the System Code Debugger. This option is currently not supported in this release.
The name of the currently selected option list is displayed in the banner of the BOOT_OPTIONS configuration menu, shown in Example 4.1, ''Default BOOT_OPTIONS Configuration Menu''. The configuration menu displays only those commands that are available with the type of list you have selected. The default selection option list when you first execute the command procedure is the Boot (Device) Options List.
To change the selected option list, enter one of the following:
B or BOOT for the Boot (Device) Options list
D or DUMP for the Dump Device List
G or DEBUG for the Debug Device List
4.9.3. Using BOOT_OPTIONS Configuration Menu Options
The following sections show how to use BOOT_OPTIONS Configuration Menu options to perform these operations:
Add an entry to the Boot (Device) Options list
Display the Boot (Device) Options list
Remove an entry from an options list
Change the position of an entry on an options list
Validate an entry of the Boot (Device) Options list
Modifying the timeout period on the Boot (Device) Options list
Add an entry to the Dump Device Options list
As the list indicates, you can use some operations for more than one option list; others apply to only one; and, in the case of Adding an entry, the instructions for adding an entry to the Boot (Device) Options list are different from adding an entry to the Dump Device Options list.
4.9.3.1. Adding an Entry to the Boot (Device) Options List
Select 1 on the default Boot Options Configuration Menu (see Example 4.1, ''Default BOOT_OPTIONS Configuration Menu'') to add an entry to the Boot (Device) Options list.
This list requires several inputs to add an entry to the Boot (Device) Options list. Table 4.5, ''Required Inputs to Add an Entry to the Boot (Device) Options List'' indicates the inputs that are required.
| Option | Input | Description |
|---|---|---|
| Position | # | Hex position of the entry to be added to the list. The default value is 1, which places the entry at the top of the list. |
| ? | Display the current contents of the Boot (Device) Option list. | |
| Device | Dxy#: |
Device Name of the System Disk NoteThe device must fulfill the following requirements:
|
| ? | Display all available disks. | |
| Boot Flags | x, y |
OpenVMS Boot flags The default value is NULL, which is the same as -fl 0,0. |
| Description | “any string” |
String description of the Boot (Device) entry The default value is the device name string. For a Fibre device, the Port Name and WWID of the target Fibre disk are appended at the end of the Description string. For a SCSI device, the Port Name of the SCSI disk is appended at the end of the Description string. For a multipath Fibre Channel device, the automatically adds all possible paths to a given device. |
Sample output for adding an entry to the Boot (Device) Options list is in Example 4.2, ''Output from Adding an Entry to the Boot (Device) Options List''.
Enter the device name (Enter “?” for a list of devices): $1$DGA1
Enter the desired position number (1,2,3,,,) of the entry.
To display the Boot Options list, enter “?” and press Return.
Position [1]:
Enter the value for VMS_FLAGS in the form n,n.
VMS_FLAGS [NONE}:
Enter a short description (do not include quotation marks).
Descrition [“$1$DGA1”]:
efi$bcfg: $1!dga1: {Boot0002) Option successfully added
efi$bcfg: $1$dga1: (Boot0003) Option successfully added
efi$bcfg: $1$dga1: (Boot0004) Option successfully added4.9.3.2. Displaying the Boot (Device) Options List
Select 2 on the default Boot Options Configuration Menu (see Example 4.1, ''Default BOOT_OPTIONS Configuration Menu'') to display entries on the Boot (Device) Options list. You can do one of the following:
Display all entries
Enter the number of entry you want to display
Enter the device name of the entries you want to display
You can select one of these options on any one of the options. Depending on which type of options list you have selected, the system displays one of the following:
The Boot (Device) Option list displays the entry number, the device name, the PCI address, the characteristics of the device, the string description of the entry, and the optional OpenVMS boot flags.
The Dump and Debug Device Options List displays the entry number, the device name, the PCI address, and the characteristics of the device.
Sample output from displaying entries in the Boot (Device) Options list is in Example 4.3, ''Output from Displaying Entries in the Boot (Device) Options List''.
To display all entries in the Boot Options list, press Return, To display specific entries, enter the entry number or device name. (Enter "?" for a list of devices): EFI Boot Options list: Timeout = 10 secs. ----------------------------------------------------------------------- 01. $1$DGA1 PCI(0|60|1|1) Fibre(50001FE10011B158,LunE000000000000) "OpenVMS V8.2 FGD0.5000-1FE1-0011-B158" OPT -fl 0,0 02. $1$DGA1 PCI(0|60|1|0) Fibre(50001FE10011B15C,LunE000000000000) "OpenVMS V8.2 FGC0.5000-1FE1-0011-B15C" OPT -fl 0,0 03. $1$DGA1 PCI(0|40|1|1) Fibre(50001FE10011B15D,LunE000000000000) "OpenVMS V8.2 FGB0.5000-1FE1-0011-B15D" OPT -fl 0,0 04. VenHw(d65a6b8c-71e5-4df0-d2f009a9) "EFI Shell [Built-in]" ----------------------------------------------------------------------- 4 entries found.
4.9.3.3. Removing an Entry from an Options List
Select 3 on the default Boot Options Configuration Menu (see Example 4.1, ''Default BOOT_OPTIONS Configuration Menu'') to remove entries on the one of the options lists. You can do either of the following:
• Remove all entries from the options list
If you decide to remove all entries, the Options list creates an entry for the EFI Shell.
Enter the number of the entry you want to remove
If you select an entry for removal, the Options list displays the selected entry and asks that you confirm a removal before it proceeds.
Sample output from removing an entry from the Boot (Device) Options list is in Example 4.4, ''Sample Output from Removing an Entry from the Boot (Device) Options List''.
Enter the entry number to delete. To clear the Boot Options list, enter "ALL". (Enter "?" to display Boot Options list): 1 EFI Boot Options list: Timeout = 10 secs. ----------------------------------------------------------------------- 01. $1$DGA1 PCI(0|60|1|1) Fibre(50001FE10011B158,LunE000000000000) "OpenVMS V8.2 FGD0.5000-1FE1-0011-B158" OPT -fl 0,0 ----------------------------------------------------------------------- 1 entries found. Do you really want to delete this option? (Yes/No) y efi$bcfg: Entry 5 Boot0005 removed.
4.9.3.4. Changing the Position of an Entry on an Options List
Select 4 on the default Boot Options Configuration Menu (see Example 4.1, ''Default BOOT_OPTIONS Configuration Menu'') to change the position of entries on one of the options lists.
The system prompts you to enter the number of the entry you want to move. You can enter either that entry number or "?" to display the list of options. You are then asked to enter the destination number of the entry you want to move.
Sample output of moving entry 4 to position 1 from the Boot Options list is in Example 4.5, ''Moving an Entry on the Boot (Device) Options List''. (You can also change the position of entries on the Dump and Debug Options lists as well.) In the example, Entry 4 becomes the top-most selection on the Boot (Device) Options List.
Enter the entry number to move. (Enter "?" to display the Boot Options list): 2 Enter the position to which this entry will be moved: 1 efi$bcfg: Option moved from 2 to 1
4.9.3.5. Validating Entries on the Boot (Device) Options List
This option is available only for the Boot (Device) Options list (see Example 4.1, ''Default BOOT_OPTIONS Configuration Menu'').
This option allows you to verify that the entries on the Boot (Device) Options list are acceptable. You would usually do this if you wanted to re-use an entry after an OpenVMS installation or upgrade, or, under certain circumstances, when the Disk Partition Table has changed.
Select 5 on the Boot Options Configuration Menu (see Example 4.1, ''Default BOOT_OPTIONS Configuration Menu'') to validate the entries on the Boot (Device) Option list. Selecting this option also corrects problems when necessary. You can perform any of the following operations:
Validate all entries.
Enter the number of entry you want to validate.
Enter the device name of the entries you want to validate.
After the validation operation, boot entries that have been validated display the following message on the console:
efi$bcfg: Option Validated. Success.
If the utility determines that a boot entry needs to be corrected, it automatically updates the boot entry to become valid.
Sample output of validating entries in the Boot (Device) Options list is in Example 4.6, ''Validating All Entries in the Boot (Device) Options List''.
To validate all entries in the Boot Options list, press Return. To validate specific entries, enter the entry number or device name. (Enter "?" to display Boot Options list): Return Do you really want to validate all list entries? (Yes/No) Yes Validate EFI Boot Options list: Timeout = 100 secs. ----------------------------------------------------------------------- 01. $1$DGA1 PCI(0|60|1|1) Fibre(50001FE10011B158,LunE000000000000) "OpenVMS V8.2 FGD0.5000-1FE1-0011-B158" OPT -fl 0,0 efi$bcfg: Option Validated. Success. 02. $1$DGA1 PCI(0|60|1|0) Fibre(50001FE10011B15C,LunE000000000000) "OpenVMS V8.2 FGC0.5000-1FE1-0011-B15C" OPT -fl 0,0 efi$bcfg: Option Validated. Success. 03. $1$DGA1 PCI(0|40|1|1) Fibre(50001FE10011B15D,LunE000000000000) OpenVMS V8.2 FGB0.5000-1FE1-0011-B15D" OPT -fl 0,0 efi$bcfg: Option Validated. Success. 04. VenHw(d65a6b8c-71e5-4df0-d2f009a9) "EFI Shell [Built-in]" efi$bcfg: Option Validated. Success. 05. DQA0 PCI(0|0|2|0) ATA(Primary,Master) "DVD-ROM " efi$bcfg: Option Validated. Success. 06. EWA0 PCI(0|20|2|0) Mac(00306e3967a5) "GigB Ethernet " efi$bcfg: Option Validated. Success. 07. DKB0 PCI(0|20|1|1) Scsi(Pun0,Lun0) "dkb0: PKB0.0" efi$bcfg: Option Failed. Fixing Boot Entry automatically. efi$bcfg: Boot0007 removed 7 efi$bcfg: DKB0 PCI(0|20|1|1) Scsi(Pun0,Lun0) (Boot0007) Option successfully added ----------------------------------------------------------------------- 7 entries validated.
In this example, entry 07 failed and a Boot Entry correction was performed.
4.9.3.6. Modifying the Timeout Period
This option is available only for the Boot (Device) Options list (see Example 4.1, ''Default BOOT_OPTIONS Configuration Menu'').
The TIMEOUT option allows users to modify the timeout period, in seconds, before the EFI Boot Manager tries to boot each entry on the Boot (Device) Options List. A value of 0 disables the timer.
Select 6 (Modify Boot Options TIMEOUT setting) on the BOOT_OPTIONS main Configuration Manual to modify the timeout.
Sample output for modifying the timeout period to be 20 seconds is in Example 4.7, ''Modify the Timeout Period in the Boot (Device) Options List''.
Enter your choice: 6 efi$bcfg: Boot Timeout period is 10 secs Would you like to modify the Timeout value? (Yes/No) [NO] Y Please enter the Timeout value in seconds: 20 efi$bcfg: Boot Timeout period is 20 secs
4.9.3.7. Adding an Entry to the Dump Device Options List
Enter D for DUMP on the default Boot Options Configuration Menu (see Example 4.1, ''Default BOOT_OPTIONS Configuration Menu'') to select the Dump Device Options list. The system then displays the Dump Device Options Menu.
The instructions for adding the Dump Device Options List is discussed further in Chapter 2, "Using OpenVMS System Management Utilities and Tools" of VSI OpenVMS System Manager’s Manual, Volume 2: Tuning, Monitoring, and Complex Systems.
Chapter 5. Customizing the Operating System
After you install the operating system, you can customize it for site-specific requirements.
Information Provided in This Chapter
|
Task |
Section |
|---|---|
|
Adding and deleting optional files | |
|
Modifying site-specific startup command procedures |
Section 5.2, ''Modifying Site-Specific Startup Command Procedures'' |
|
Modifying login command procedures |
Section 5.3, ''Modifying Login Command Procedures to Customize User Environments'' |
|
Customizing startup databases | |
|
?Registering images that have system version dependencies |
Section 5.5, ''Registering Images that Have System Version Dependencies'' |
|
Customizing the Help Message database | |
|
Customizing Mail | |
|
Setting up the Multipurpose Internet Mail Extension (MIME) utility |
Section 5.8, ''Setting Up the Multipurpose Internet Mail Extension (MIME) Utility'' |
|
Saving your customization |
|
Concept |
Section |
|---|---|
|
Site-specific startup command procedures |
Section 5.2.1, ''Understanding Site-Specific Startup Command Procedures'' |
|
The order of startup events |
Section 5.2.2, ''Understanding the Order of Startup Events'' |
|
Startup databases | |
|
The layered product startup database |
Section 5.4.2, ''Understanding the Layered Product Startup Database'' |
5.1. Adding and Deleting Optional Files
OpenVMS lets you customize the size of the operating system by deleting or adding optional system files, including support for DECwindows. This is particularly valuable for small systems or systems with limited disk space.
For example, if your system is a MicroVAX II computer with an RD54 system disk and you will not use system programming features such as the Delta/XDelta Debugger (DELTA/XDELTA) or the System Dump Analyzer utility (SDA), you might remove these files from the system disk.
- On VAX systems, you can use the OpenVMS Tailoring utilities, VMSTAILOR and DECW$TAILOR:
VMSTAILOR – applies to optional system files
DECW$TAILOR – applies to support for DECwindows
Delete files from and add files to the system disk by identifying classes and subclasses of operating system files that you want to add or delete. You might delete or add an entire class or selected subclasses of files within a class.
If you delete files, you can add them again at any time using VMSTAILOR or DECW$TAILOR and your operating system distribution media.
Refer to the Installation and Upgrade Manual for more information about VMSTAILOR and DECW$TAILOR.
On Alpha and IA-64 systems, you can use the POLYCENTER Software Installation utility to add or delete optional system files. Add or delete files by selecting or deselecting options and suboptions.
To invoke the POLYCENTER Software Installation utility for this purpose, you can use either of the following methods:Use the DCL command PRODUCT RECONFIGURE.
Use the DECwindows Motif interface from the POLYCENTER Software Installation utility and select the Reconfigure option on the Mode menu.
For more information about using the POLYCENTER Software Installation utility, see Section 3.6, ''Using the POLYCENTER Software Installation Utility''.
5.2. Modifying Site-Specific Startup Command Procedures
An important part of customizing your system is to create or modify site-specific startup command procedures. Adding commands to these procedures ensures that the commands are executed each time the system reboots.
5.2.1. Understanding Site-Specific Startup Command Procedures
|
Term |
Definition |
|---|---|
|
Startup command procedure |
A command procedure that executes when the system starts up. |
|
Site-independent startup command procedure |
A startup command procedure that is required for and provided with all OpenVMS systems, regardless of site-specific requirements. This procedure is named SYS$SYSTEM:STARTUP.COM. Do not modify this procedure. When your system boots, it automatically executes STARTUP.COM. For more information, see Section 4.1.4, ''System Startup and STARTUP.COM''. |
|
Site-specific startup command procedures |
Startup command procedures that you can modify to perform operations specific to your site. Use any text editor to add or modify commands in these procedures. STARTUP.COM executes several site-specific startup command procedures that VSI provides. These procedures are listed in Table 5.1, ''Site-Specific Startup Command Procedures''. You can also create your own procedures and execute them from SYSTARTUP_VMS.COM. |
|
Order |
Command Procedure |
Function |
|---|---|---|
|
1 |
SYCONFIG.COM |
A file to which you add commands for site-specific device configuration. For more information, see Section 5.2.4, ''Modifying SYCONFIG.COM to Configure Devices''. |
|
2 |
SYLOGICALS.COM |
A file to which you add commands to define your site-specific system logical names. For more information, see Section 5.2.5, ''Modifying SYLOGICALS.COM to Define Systemwide Logical Names''. |
|
3 |
SYPAGSWPFILES.COM |
A file to which you add commands to install page and swap files (other than the primary page and swap files in SYS$SYSTEM, which are installed automatically).For more information, see Section 5.2.3, ''Modifying SYPAGSWPFILES.COM to Install Page and Swap Files''. |
|
4 |
SYSECURITY.COM |
A file to which you add commands to define the location of security auditing and security archive files before starting the security auditing server. For more information, see Section 5.2.6, ''Modifying SYSECURITY.COM to Set Up Security Auditing''. |
|
5 |
SYSTARTUP_VMS.COM |
A general-purpose command procedure to which you add commands to perform miscellaneous operations for setting up your site. For example, you might mount public disks in SYSTARTUP_VMS.COM. For more information, see Section 5.2.7, ''Modifying SYSTARTUP_VMS.COM to Perform General Operations''. |
5.2.1.1. Using Template Files
An executable version with the file type .COM (for example, SYS$MANAGER:SYCONFIG.COM). The system executes files with the file type .COM; you can edit .COM files (except for STARTUP.COM) to meet your site-specific needs.
A backup version with the file type .TEMPLATE (for example, SYS$MANAGER:SYCONFIG.TEMPLATE).
Note
Do not modify or delete the VSI-supplied template command files with the .TEMPLATE file type. The VMSKITBLD.COM procedure uses these files to create a new system disk. If you must use the .TEMPLATE version of the file because your .COM version is damaged, copy the .TEMPLATE file to a file with the .COM file type, and edit the copy.
5.2.1.2. Rules for Modifying Startup Command Procedures
Conform to the rules of command procedures, as described in the VSI OpenVMS User's Manual.
Keep the files in the SYS$MANAGER directory.
Keep the file names given to the command procedures.
Modify only the executable version of the files (with the file type .COM), not the template version (with the file type .TEMPLATE).
Do not modify the site-independent startup command procedure STARTUP.COM.
Before modifying command procedures, understand the order of startup events. For information, see Section 5.2.2, ''Understanding the Order of Startup Events''.
Caution
The startup procedures provided by VSI should always work. However, if you introduce an error in the startup or login procedures, you can accidentally lock yourself out of the system. Section 4.4.2, ''Booting Without Startup and Login Procedures'' describes a boot procedure you can use in such an emergency.
5.2.2. Understanding the Order of Startup Events
Before modifying the site-specific startup command procedures, you should understand the order of system startup events.
Caution
Do not modify VMS$PHASES.DAT. To start up correctly, the system requires that the contents of this file remain intact.
Starts the CLUSTER_SERVER process.
Defines logical names needed for basic operations, and installs images listed in SYS$MANAGER:VMSIMAGES.DAT.
Executes SYCONFIG.COM.
- Adds any new drivers by executing one of the following commands:
On VAX systems, the SYSGEN command AUTOCONFIGURE ALL. This command automatically configures the device driver database, locates all standard devices attached to the system, and loads and connects their device drivers.
On Alpha and IA-64 systems, the SYSMAN command IO AUTOCONFIGURE. This command automatically configures the device driver database, locates all standard devices attached to the system, and loads and connects their device drivers.
If the symbol STARTUP$AUTOCONFIGURE_ALL is defined as 0 or FALSE by SYS$MANAGER:SYCONFIG.COM, this step is not performed.
Installs the primary swap file, if the file is present.
Starts the CONFIGURE process (swappable). If the system parameter NOAUTOCONFIG is set to 1, the CONFIGURE process is not started. If the symbol STARTUP$AUTOCONFIGURE_ALL is defined as 0 or FALSE by SYS$MANAGER:SYCONFIG.COM, this step is not performed.
Executes SYLOGICALS.COM. At this point, all devices have been made available through the AUTOCONFIGURE ALL command (step 4) or will be made available by the CONFIGURE process (started in step 6).
If the system is a satellite node in a VAX cluster or an OpenVMS Cluster environment, executes SATELLITE_PAGE.COM to install page and swap files on a local disk. SATELLITE_PAGE.COM is created when you execute the CLUSTER_CONFIG.COM procedure.
Executes SYPAGSWPFILES.COM.
- Performs the following steps in no specified order:
Installs required images
Starts various operating system processes (OPCOM, CACHE_SERVER, ERRFMT, JOBCTL)
Executes SYSECURITY.COM and starts the AUDIT_SERVER process
On VAX systems, starts the security server, SECURITY_SERVER, which manages the proxy database and intrusion database
Starts LMF (License Management Facility) and loads all appropriate Product Authorization Keys (PAKs) from the LMF database
- Performs the following steps in no specified order:
Enables operator consoles and the operator log files
Starts the SMISERVER process
Note
The order of events within system startup might change in future releases of the operating system.
5.2.3. Modifying SYPAGSWPFILES.COM to Install Page and Swap Files
When the system boots, it automatically installs the primary page and swap files, if they are present in the SYS$SYSTEM directory. If the page and swap files are not in SYS$SYSTEM, or if secondary page and swap files are located on a disk other than the system disk, you must install these files each time the system boots. To install these files, add commands to SYPAGSWPFILES.COM.
Before performing this task, you should understand page and swap files and why you might want to move them. For more information, see VSI OpenVMS System Manager's Manual, Volume 2: Tuning, Monitoring, and Complex Systems.
The SYPAGSWPFILES.COM file can also include commands other than INSTALL commands, such as SYSGEN CREATE commands and the DCL commands INITIALIZE and MOUNT, to set up the page and swap files. Note that, at the time STARTUP.COM invokes SYPAGSWPFILES.COM, only the system disk is mounted. Therefore, you might need to add MOUNT commands to SYPAGSWPFILES.COM to mount the disks that hold the page and swap files.
%STARTUP-E-NOPAGFIL, no page files have been successfully installed.
Caution
If a system dump file with the name SYSDUMP.DMP does not exist in the SYS$SPECIFIC:[SYSEXE] directory, the primary page file PAGEFILE.SYS must exist in SYS$SPECIFIC:[SYSEXE]PAGEFILE.SYS for writing crash dumps. If neither SYSDUMP.DMP nor PAGEFILE.SYS is located in SYS$SPECIFIC:[SYSEXE], no crash dump file is produced.
You can also use SATELLITE_PAGE.COM to install page and swap files on a satellite node's local disk. SATELLITE_PAGE.COM is created when you run CLUSTER_CONFIG.COM. For more information about installing page and swap files on a satellite node's local disk, refer to VSI OpenVMS Cluster Systems Manual.
How to Perform This Task
- Enter SYSGEN CREATE commands in the following format to create secondary system files in the desired locations:
CREATE file-spec/SIZE=block-count
For example:SYSGEN> CREATE DUA2:[PAGE_SWAP]PAGEFILE_1.SYS/SIZE=100000 SYSGEN> CREATE DUA2:[PAGE_SWAP]SWAPFILE_1.SYS/SIZE=100000
The CREATE command creates or extends files that can be used as a page, swap, or dump file. You create these files only once.
For more information about creating page and swap files, see VSI OpenVMS System Manager's Manual, Volume 2: Tuning, Monitoring, and Complex Systems. For more information about the SYSGEN command CREATE, refer to the SYSGEN section of the VSI OpenVMS System Management Utilities Reference Manual.
Invoke any editor to edit SYS$MANAGER:SYPAGSWPFILES.COM.
If necessary, add a MOUNT command to mount the disk or disks that are to hold the secondary page and swap files. Disks other than the system disk are not yet mounted at the time SYPAGSWPFILES.COM is invoked. For information about the MOUNT command, refer to the MOUNT section of the VSI OpenVMS System Management Utilities Reference Manual.
- Add the following command to make it easier to invoke SYSGEN:
$ SYSGEN := $SYSGEN
Add commands in the following format to SYPAGSWPFILES.COM to install the secondary files each time the system boots.
For page files, use the following format:SYSGEN INSTALL file-spec /PAGEFILE
For swap files, use the following format:SYSGEN INSTALL file-spec /SWAPFILE
The INSTALL command activates secondary page and swap files. Page and swap files not located in SYS$SYSTEM must be installed each time the system boots.
Example
$ MOUNT/SYSTEM/NOASSIST DUA10: SYS2 PAGE_SWAP $ SYSGEN := $SYSGEN $ SYSGEN INSTALL PAGE_SWAP:[SYSTEM]PAGEFILE1.SYS/PAGEFILE $ if $status then write sys$output "Installed page file PAGEFILE1.SYS" $ SYSGEN INSTALL PAGE_SWAP:[SYSTEM]SWAPFILE1.SYS/SWAPFILE $ if $status then write sys$output "Installed swap file swapfile1.sys"
5.2.4. Modifying SYCONFIG.COM to Configure Devices
You can add commands to SYCONFIG.COM to perform site-specific device configuration, including connecting nonstandard devices and suppressing autoconfiguration.
5.2.4.1. Connecting Nonstandard Devices
Standard devices are automatically connected and configured by STARTUP.COM each time the system boots. Nonstandard devices (devices not supplied by VSI) are not automatically connected and configured; you must connect and configure these devices manually by entering certain commands. To execute these commands each time the system starts up, add the commands to SYCONFIG.COM.
On VAX systems, add SYSGEN CONNECT commands. For more information about connecting devices, see Section 8.5, ''Connecting Devices and Loading Device Drivers''. For more information about the SYSGEN CONNECT command, refer to the SYSGEN section of the VSI OpenVMS System Management Utilities Reference Manual.
On Alpha and IA-64 systems, add SYSMAN IO CONNECT commands. For more information about connecting devices, see Section 8.5, ''Connecting Devices and Loading Device Drivers''. For more information about the SYSMAN IO CONNECT command, refer to the SYSMAN section of the VSI OpenVMS System Management Utilities Reference Manual.
Example
$ SYSGEN := $SYSGEN $ SYSGEN CONNECT QQA0
5.2.4.2. Suppressing Autoconfiguration of Devices
To customize the order in which you configure devices
To troubleshoot booting problems
To allow Small Computer System Interface (SCSI) based workstations to use devices on another workstation's SCSI bus without causing conflicts during boot time
You can define a symbol in SYCONFIG.COM to suppress autoconfiguration. For more information, see Section 8.5.3, ''Suppressing the Autoconfiguration of Devices''.
5.2.5. Modifying SYLOGICALS.COM to Define Systemwide Logical Names
A systemwide logical name applies to the entire system. It is defined in the system logical name table and can be used by any process in the system. A clusterwide system logical name applies to every node in the cluster at a system level. It is defined in the clusterwide system logical name table of every node and can be used by any process in the system.
In general, system managers edit the SYLOGICALS.COM command procedure to define site-specific logical names that take effect at system startup. However, this is not the appropriate command procedure for defining clusterwide logical names, which is, rather, SYSTARTUP_VMS.COM. Refer to "Preparing a Shared Environment" in VSI OpenVMS Cluster Systems Manual for more information.
As supplied by VSI, SYLOGICALS.COM contains commands that assign systemwide logical names on a MicroVAX system that is not in an OpenVMS Cluster environment. If your system is not a standalone MicroVAX system, you can ignore the procedure at the beginning of the template file and add systemwide logical name assignments to the end of the file.
|
Logical Name |
For More Information |
|---|---|
|
CLUE$DOSD_DEVICE? |
VSI OpenVMS System Manager's Manual, Volume 2: Tuning, Monitoring, and Complex Systems |
|
LMF$LICENSE |
VSI OpenVMS License Management Utility Guide |
|
MAIL$SYSTEM_FLAGS | |
|
NETNODE_REMOTE |
VSI OpenVMS DECnet Networking Manual |
|
NETPROXY |
VSI OpenVMS Guide to System Security |
|
NET$PROXY |
VSI OpenVMS Guide to System Security |
|
QMAN$MASTER |
Section 13.3, ''Specifying the Location of the Queue Database'' |
|
RIGHTSLIST |
VSI OpenVMS Guide to System Security |
|
SYS$ERRORLOG |
VSI OpenVMS System Manager's Manual, Volume 2: Tuning, Monitoring, and Complex Systems |
|
SYS$MONITOR |
VSI OpenVMS System Manager's Manual, Volume 2: Tuning, Monitoring, and Complex Systems |
|
SYSUAF |
VSI OpenVMS Guide to System Security |
|
VMSMAIL_PROFILE |
VSI OpenVMS User's Manual |
VSI recommends that you define logical names for system components (for example, public disks and directories) in executive mode, using the /EXECUTIVE_MODE qualifier with the ASSIGN or DEFINE command. This type of logical name, known as a trusted logical name, is available during system operations such as the activation of privileged mode images (LOGINOUT, Mail, and so on).
For detailed information about logical name assignments and the privilege modes (executive, kernel, supervisor, and user), refer to the VSI OpenVMS User's Manual.
How to Perform This Task
Invoke any editor to edit the file SYS$MANAGER:SYLOGICALS.COM.
- Add logical name definitions in the following format to the end of the file, immediately preceding the EXIT command:
DEFINE/SYSTEM/EXECUTIVE/NOLOG logical-name equivalence-name
For example:DEFINE/SYSTEM/EXECUTIVE/NOLOG FINANCE_DISK DRAC$DRA2:
For more information about the DEFINE command, refer to the VSI OpenVMS DCL Dictionary.
Exit the editor to create a new version of the file. The highest version will automatically be invoked by STARTUP.COM each time the system boots.
Example
$ DEFINE/SYSTEM/EXECUTIVE/NOLOG FINANCE_DISK DRAC$DRA2: $ DEFINE/SYSTEM/EXECUTIVE/NOLOG SYSDSK SYS$SYSDEVICE:
In this example, any user on the system (and any program running on the system) could use the name FINANCE_DISK (the logical name) in place of DRAC$DRA2: (the physical device name). Similarly, you can refer to the system disk (SYS$SYSDEVICE:) as SYSDSK.
5.2.6. Modifying SYSECURITY.COM to Set Up Security Auditing
SYSECURITY.COM runs prior to starting the security audit server process. You can add commands to this file to mount or define any disks that you want to hold security auditing log files or local security archive files. For more information about security auditing, see VSI OpenVMS System Manager's Manual, Volume 2: Tuning, Monitoring, and Complex Systems.
Ordinarily, the system turns on auditing in VMS$LPBEGIN just before SYSTARTUP_VMS.COM executes. However, you can change this behavior by redefining the logical name SYS$AUDIT_SERVER_INHIBIT.
$ DEFINE/SYSTEM/EXECUTIVE SYS$AUDIT_SERVER_INHIBIT YES
$ SET AUDIT/SERVER=INITIATE
For information about editing SYSTARTUP_VMS.COM, see Section 5.2.7, ''Modifying SYSTARTUP_VMS.COM to Perform General Operations''.
5.2.7. Modifying SYSTARTUP_VMS.COM to Perform General Operations
To perform any site-specific command not performed by another startup command procedure, you can add or modify commands in the general-purpose, site-specific startup command procedure, SYSTARTUP_VMS.COM.
|
Task |
For More Information |
|---|---|
|
Mounting public disks | |
|
Setting the characteristics of terminals and printer devices |
Section 5.2.7.3, ''Setting Terminal and Printer Characteristics'' |
|
Starting queues and enabling autostart for queues |
Section 5.2.7.4, ''Starting Queues and Enabling Autostart for Queues'' |
|
Installing known images | |
|
?Installing resident images |
Section 5.2.7.6, ''Installing Resident Images (Alpha Only)'' |
|
Setting up the OpenVMS InfoServer Client software |
Section 5.2.7.7, ''Setting Up the OpenVMS InfoServer Client Software'' |
|
Running the System Dump Analyzer | |
|
Purging the operator's log file | |
|
Submitting batch jobs that are run at system startup time |
Section 5.2.7.10, ''Submitting Batch Jobs to Run at Startup Time'' |
|
Creating systemwide announcements | |
|
Starting up the LAT protocol software |
Section 5.2.7.12, ''Starting Up and Customizing the LAT Protocol Software'' |
|
Starting a DECnet or TCP/IP network | |
|
Starting up the DIBOL Message Manager |
Section 5.2.7.14, ''Starting the DIBOL Message Manager(VAX and Alpha)'' |
|
Defining the number of interactive users |
Section 5.2.7.15, ''Defining the Number of Interactive Users'' |
How to Perform This Task
Invoke any editor to edit the file.
To prevent the command procedure from exiting if it invokes an error, include the DCL command SET NOON at the beginning of the file. This command disables error checking after the execution of each command in the procedure. For more information about error checking, refer to the VSI OpenVMS User's Manual.
Add commands to perform site-specific operations. Sections 5.2.7.1 to 5.2.7.15 describe operations that are typically performed by this command procedure.
Exit the editor to create a new version of the file. The highest version will automatically be invoked by STARTUP.COM each time the system boots.
5.2.7.1. Mounting Public Disks
Physically load and spin up the disk.
If the disk is new, initialize it.
Mount the disk for systemwide access using the DCL command MOUNT. (Using the MOUNT command for the system disk is not necessary – the system disk is already mounted when the system starts.)
How to Perform This Task
MOUNT/SYSTEM device-name: volume_label logical_name
device-name is the physical device name (including a colon immediately after the device name). For information about physical device names, see Section 8.1, ''Understanding Device Names''.
volume_label is an alphanumeric identification that you assign with the INITIALIZE command.
logical_name is the logical name that you want to assign to the device. Consider the advantages of using logical volume names to conceal the physical device names. If you and the users consistently use the logical volume name, it is not necessary to know on which physical drive the volume is mounted. Thus, you can avoid including physical device names in programs and command procedures.
The /SYSTEM qualifier makes the disk available for systemwide access.
DISK$volume_label
In many cases, using the default logical name will meet your needs.
Note
When SYSTARTUP_VMS.COM executes (and only then), the MOUNT command default includes the /NOASSIST qualifier. This qualifier means that operator-assisted mounts are disabled. To enable this feature during SYSTARTUP_VMS.COM, specify /ASSIST with each MOUNT command.
For a DSA disk, you must also insert a WAIT statement in the command procedure prior to the first MOUNT statement. The wait time is controller-dependent. If you omit a WAIT statement, the MOUNT request might fail with a "no such device" status. Refer to the VSI OpenVMS I/O User's Reference Manual for more information.
For more information about public volumes, see Section 9.1.4, ''Public and Private Disk Volumes'' and Section 9.5, ''Mounting Volumes''. For more information about the MOUNT command, refer to the MOUNT section of the VSI OpenVMS System Management Utilities Reference Manual.
5.2.7.2. Mounting Disks That Must Be Available Early in Startup
If you have any disks that must be mounted early in startup, you can add MOUNT commands to SYCONFIG.COM. For example, your site might require that certain files be available before SYSTARTUP_VMS.COM executes. For more information about SYCONFIG.COM, see Section 5.2.4, ''Modifying SYCONFIG.COM to Configure Devices''.
5.2.7.3. Setting Terminal and Printer Characteristics
To establish the device characteristics of the terminals and printers on the system, use a series of SET commands in your startup command procedure. For more information about the commands you use to set up devices, see Section 8.7.1, ''Setting Terminal Characteristics'' and Section 8.9.1, ''Setting Printer Characteristics''.
If your configuration is simple, you can add the commands to SYSTARTUP_VMS.COM. If your configuration requires a large number of commands, create a separate command procedure (for example, DEVICE_SETUP.COM) and execute it from SYSTARTUP_VMS.COM. When the device setup command procedure finishes executing, control returns to SYSTARTUP_VMS.COM.
5.2.7.4. Starting Queues and Enabling Autostart for Queues
Enable autostart for queues
Start non-autostart execution queues
If your configuration is simple, you can add these commands to SYSTARTUP_VMS.COM. On systems with a large number of queues, you might want to include the commands in a separate file named, for example, STARTQ.COM, and include a command in SYSTARTUP_VMS.COM to invoke the queue startup command procedure. The autostart feature simplifies queue startup, and allows you to start queues with fewer commands. VSI recommends you use autostart queues whenever possible to simplify queue startup. For more information about autostart queues, see Section 14.1.3, ''Understanding Autostart Queues''.
For more information about starting queues and enabling autostart for queues in system startup, see Section 14.4.1, ''Creating and Starting Autostart Execution Queues''.
5.2.7.5. Installing Known Images
You can install commonly used programs as known images to reduce the I/O overhead in activating those images and to assign attributes or privileges to the images. Use the Install utility (INSTALL) to install known images, which you must reinstall each time the system boots.
STARTUP.COM includes a series of INSTALL commands that install certain system programs as known images. You should include any site-specific INSTALL commands in SYSTARTUP_VMS.COM to install images each time the system boots.
For information about installing known images, see VSI OpenVMS System Manager's Manual, Volume 2: Tuning, Monitoring, and Complex Systems.
Example
$ INSTALL ADD/OPEN/SHARED/HEADER_RESIDENT BASIC ADD/OPEN/SHARED/HEADER_RESIDENT FORTRAN EXIT
5.2.7.6. Installing Resident Images (Alpha Only)
Resident images must be installed each time the system boots. You can add commands to SYSTARTUP_VMS.COM to automatically perform this task. VSI OpenVMS System Manager's Manual, Volume 2: Tuning, Monitoring, and Complex Systems explains how you can use the Install utility (INSTALL) to install resident images on Alpha and IA-64 systems.
5.2.7.7. Setting Up the OpenVMS InfoServer Client Software
Start the InfoServer Client for OpenVMS software
Make remote compact discs available on your system each time the system boots
VSI OpenVMS System Manager's Manual, Volume 2: Tuning, Monitoring, and Complex Systems explains the InfoServer system and its uses.
5.2.7.8. Running the System Dump Analyzer
You run the System Dump Analyzer utility (SDA) each time the system boots to analyze the system crash dump in case the system failed the last time it was running. You can do this by adding command lines to SYSTARTUP_VMS.COM.
Caution
If you use the page file for the crash dump file, you must enter the SDA command COPY when the system reboots, to copy the dump from the page file to another file suitable for analysis.
If you fail to perform the copy operation, pages used to save the crash dump information are not released for paging, and your system might hang because it has insufficient paging space. For more information, see VSI OpenVMS System Manager's Manual, Volume 2: Tuning, Monitoring, and Complex Systems.
Example
$ ANALYZE/CRASH_DUMP SYS$SYSTEM:SYSDUMP.DMP
COPY SYS$SYSTEM:SAVEDUMP.DMP ! Save dump file
SET OUTPUT DISK1:SYSDUMP.LIS ! Create listing file
READ/EXECUTIVE ! Read in symbols for kernel
SHOW CRASH ! Display crash information
SHOW STACK ! Show current stack
SHOW SUMMARY ! List all active processes
SHOW PROCESS/PCB/PHD/REGISTERS ! Display current process
EXIT5.2.7.9. Purging the Operator Log File
$ PURGE/KEEP=2 SYS$MANAGER:OPERATOR.LOG
For more information about the operator log file, see VSI OpenVMS System Manager's Manual, Volume 2: Tuning, Monitoring, and Complex Systems.
5.2.7.10. Submitting Batch Jobs to Run at Startup Time
$ SUBMIT [/qualifier,...] SYS$MANAGER:file-spec
Example
$ SUBMIT/PRIORITY=255 SYS$MANAGER:SYSDISK_REBUILD
See Section 14.6.5.2, ''Changing the Scheduling Priority of a Job'' for information about scheduling of jobs. Refer to the VSI OpenVMS DCL Dictionary for information about the SUBMIT command.
5.2.7.11. Creating Systemwide Announcements
$ REPLY/ALL/BELL "OpenVMS Operating System at ANDROMEDA, INC. ready for use."
Before the procedure exits, you can provide site-specific definitions for one or both of the logical names SYS$ANNOUNCE and SYS$WELCOME. Whenever a user logs in, the user's terminal screen displays the messages associated with SYS$ANNOUNCE and SYS$WELCOME.
Defining SYS$ANNOUNCE
You can define SYS$ANNOUNCE to print an announcement at the beginning of the login procedure for each user. The text prints immediately after a successful dial-in, Ctrl/Y, or carriage return is received. It also prints on LAT terminals when a user connects to a service using the CONNECT command. The text can contain up to 63 characters. For longer messages, precede the name of a text-containing file with an at sign(@) so that the login command procedure prints the entire file as an announcement.
$ DEFINE/SYSTEM SYS$ANNOUNCE "SIRIUS OPENVMS CLUSTER AT ANDROMEDA, INC."
$ DEFINE/SYSTEM SYS$ANNOUNCE "@SYS$MANAGER:ANNOUNCE.TXT"
Caution
Sites requiring moderate or high security should restrict the amount of information displayed in system announcements.
Defining SYS$WELCOME
You can define SYS$WELCOME to display a welcome message whenever a user logs in. The text prints immediately after the user enters the correct password. The text can contain up to 63 characters. For longer messages, precede the name of a text-containing file with an at sign (@) so that the login command procedure displays the entire file as a welcoming announcement.
$ DEFINE/SYSTEM SYS$WELCOME "Welcome to Node RANDOM"
$ DEFINE/SYSTEM SYS$WELCOME "@SYS$MANAGER:WELCOME.TXT"
Welcome to OpenVMS Version n.n
You can add the DECnet node name to this message by including a translation of the logical name SYS$NODE. When DECnet starts, it creates the logical name assignment for SYS$NODE.
SYSTARTUP_VMS.COM, supplied as a template with your distribution kit, includes additional command examples for SYS$ANNOUNCE and SYS$WELCOME.
5.2.7.12. Starting Up and Customizing the LAT Protocol Software
$ @SYS$STARTUP:LAT$STARTUP.COM
When the procedure executes this command, it invokes LAT$STARTUP.COM, which in turn invokes the LAT$CONFIG and LAT$SYSTARTUP command procedures. For more information, see VSI OpenVMS System Manager's Manual, Volume 2: Tuning, Monitoring, and Complex Systems.
5.2.7.13. Starting a DECnet or TCP/IP Network
Before starting the network, you must register your DECnet license and configure your network. See VSI OpenVMS System Manager's Manual, Volume 2: Tuning, Monitoring, and Complex Systems for information about setting up DECnet network.
- If you are running DECnet for OpenVMS on your system, edit SYSTARTUP_VMS.COM to delete the exclamation point (!) at the beginning of the following command line:
$ @SYS$MANAGER:STARTNET.COM
If you are running DECnet-Plus on your system, DECnet is started automatically each time you boot your system.
|
@SYS$STARTUP:TCPIP$STARTUP |
! TCP/IP SERVICES |
|
@SYS$STARTUP:NET$STARTUP |
! DECnet-Plus |
|
@SYS$STARTUP:STARTNET |
! DECnet Phase IV |
5.2.7.14. Starting the DIBOL Message Manager(VAX and Alpha)
Each node that will execute DIBOL programs must contain a line in SYS$STARTUP:SYSTARTUP_VMS.COM that executes the command procedure SYS$STARTUP:DBLSTRTUP.COM. This command procedure starts the DIBOL Message Manager, used by DIBOL programs as an intermediary in passing messages.
Example
$ @SYS$STARTUP:DBLSTRTUP.COM
5.2.7.15. Defining the Number of Interactive Users
By default, when the system starts up, it limits to 64 the number of interactive users allowed to log in.
STARTUP$INTERACTIVE_LOGINS == n
Note
The number of interactive users is determined by the value authorized by your VAX, Alpha or I64 computer license. Therefore, setting the number higher than the license limit has no effect.
The maximum number of interactive users influences the service rating that the LAT software assigns to a service node. The LAT software uses a ratio of current users to maximum users in calculating a rating. An artificially high user limit results in a high service rating, indicating—erroneously—that the service node is more able to provide services. For information about LAT software, see VSI OpenVMS System Manager's Manual, Volume 2: Tuning, Monitoring, and Complex Systems.
Example
$ STARTUP$INTERACTIVE_LOGINS == 200
5.3. Modifying Login Command Procedures to Customize User Environments
In addition to modifying site-specific startup command procedures, you can add commands to login command procedures to perform operations each time a user logs in.
|
Command Procedure |
Description |
|---|---|
|
SYS$MANAGER:SYLOGIN.COM |
A file to which you can add common commands to execute whenever any user logs in. If SYS$MANAGER:SYLOGIN.COM exists and the logical name SYS$SYLOGIN points to this file, SYLOGIN.COM automatically executes when any user logs in. |
|
SYS$LOGIN:LOGIN.COM |
A file to which you or users can add commands that are to be executed only when individual users log in to their accounts. If a file named LOGIN.COM exists in a user's SYS$LOGIN directory, it automatically executes when the user logs in. |
Caution
If you introduce an error in login procedures, you can accidentally lock yourself out of the system. Section 4.4.2, ''Booting Without Startup and Login Procedures'' describes a boot procedure you can use in such an emergency.
SYLOGIN.COM Procedure
As system manager, you create and maintain SYLOGIN.COM. This file is supplied on your distribution kit as a template, and contains commands that you can modify and add to as the needs of your site dictate.
$ DEFINE/SYSTEM/EXEC/NOLOG SYS$SYLOGIN SYS$MANAGER:SYLOGIN.COM
Note
If SYLOGIN.COM exits with an error, the user's login command procedure is not executed. If this occurs while the user is logging in to a captive account, the process is terminated because the system environment might not have been set up properly.
If you expect SYLOGIN.COM to cause an error, you must use either SET NOON or ON ERROR commands, and explicitly exit the command procedure with a successful status so that the user's login command procedure can be executed.
LOGIN.COM Procedures
Each user creates and maintains a personal copy of the login command procedure LOGIN.COM. This file must be in the top-level directory for the user's account. You might need to help users set up a personal copy of LOGIN.COM.
See Section 7.7.1, ''Using Command Procedures for Interactive Accounts'' for a sample SYLOGIN command file and a sample LOGIN.COM procedure. Refer to the VSI OpenVMS User's Manual for sample LOGIN.COM procedures.
5.4. Customizing Startup Databases with SYSMAN
Startup databases contain information used to start up system software. For example, STARTUP.COM uses information in a startup database named STARTUP$STARTUP_VMS to start the OpenVMS operating system. It uses information in a startup database named STARTUP$STARTUP_LAYERED to start layered products. For more information about startup databases, see Section 5.4.1, ''Understanding Startup Databases''.
You can use the STARTUP command of the System Management utility (SYSMAN) to customize startup databases as follows:
Display information in any startup database.
Create a site-specific startup database.
Add, modify, or remove elements in the layered product database or site-specific database. (VSI recommends that you do not modify the OpenVMS startup database.)
The following sections describe these tasks.
Before performing these tasks, it helps to understand SYSMAN. For more information about SYSMAN, see Section 2.3.1, ''Understanding SYSMAN''. You should also understand startup databases, in particular, the layered product startup database. For information, see Section 5.4.1, ''Understanding Startup Databases'' and Section 5.4.2, ''Understanding the Layered Product Startup Database''.
5.4.1. Understanding Startup Databases
Three startup database files are provided with the operating system, in the location defined by the logical name SYS$STARTUP:
| File | Description |
|---|---|
| VMS$PHASES.DAT | Determines the order of the phases of startup in a sequential list. This file includes a series of four basic phases (INITIAL, CONFIGURE, DEVICE, and BASEENVIRON) needed to bring the operating system up to a basic working environment, followed by a series of phases for layered products. STARTUP.COM uses this list of phases for startup. Do not modify this file. |
| VMS$VMS.DAT |
Equivalent to the logical name STARTUP$STARTUP_VMS. This file contains information about the files used to start the base operating system environment during system startup. Do not modify this file. STARTUP$STARTUP_VMS is provided for your information only. Use SYSMAN to display information in this file. For more information, see Section 5.4.5, ''Showing the Contents of a Startup Database''. |
| VMS$LAYERED.DAT |
Equivalent to the logical name STARTUP$STARTUP_LAYERED. This file contains information about files that start site-specific products and layered products. The system uses the information in this file to start layered products during system startup. Section 5.4.2, ''Understanding the Layered Product Startup Database'' provides more information about this file. Use SYSMAN to modify this file so that it contains information about all the layered product startup files you want to execute on your system. |
If you have site-specific software that you want to manage separately from your layered products, you can use SYSMAN to create an additional startup database.
5.4.2. Understanding the Layered Product Startup Database
The layered product startup database file (referred to by the logical name STARTUP$STARTUP_LAYERED) lists the files and command procedures that start site-specific products and layered products. It contains the following characteristics of each startup file:
Name of the component file to be run. The file type must be either .EXE or .COM.
- Phase in which the component file is to run. Each phase describes a minimum environment that exists at that point in the startup process, as follows:
BASEENVIRON – Startup tasks execute here. These must be performed before the site-specific startup command procedure, SYSTARTUP_VMS.COM, executes.
LPBEGIN – SYSTARTUP_VMS.COM, the site-specific startup command procedure, executes here, as do any other files that prepare an environment necessary for layered products.
LPMAIN – The majority of layered products execute here. This phase is the default.
LPBETA – Layered products that have a dependency on previously installed products execute here.
END – Products that are dependent on layered products execute here.
Each phase must meet the prerequisites of the following phase; therefore, the order of the phases is extremely important. Components that occur in a phase cannot have dependencies on components that are in the same phase or in subsequent phases. When installing layered products using SYSMAN, be sure that all requisite components occur in a previous phase.
Mode (or method) by which the component file is to run. Choose one of the following modes:
DIRECT (the default, where the command procedure or image is executed immediately)
BATCH (valid only for command procedures)
SPAWN
Node restrictions for the component. This is either the node or nodes on which the component file should be run, or the node or nodes on which the component file should not be run.
- Parameters passed to the component file for execution. You can pass up to eight parameters, using the following format:
(P1:args,P2:args,...)
You can omit the parentheses if you pass only a single parameter.
5.4.3. Specifying the Current Startup Database
With SYSMAN, the current database is the one that will be the target for the SYSMAN commands.
You can display or modify STARTUP$STARTUP_LAYERED or database files that you create. You can display STARTUP$STARTUP_VMS, but you should not modify it.
By default, the layered product database is the current database. To perform commands on another database, specify it as the current database by entering the STARTUP SET DATABASE command in the following format:
STARTUP SET DATABASE database
where database specifies the name of the database.
Example
$ RUN SYS$SYSTEM:SYSMAN SYSMAN> STARTUP SET DATABASE STARTUP$STARTUP_LOCAL %SYSMAN-I-NEWCOMPFIL, current component file is now STARTUP$STARTUP_LOCAL
5.4.4. Showing the Name of the Target Startup Database
To display which database is the target database, enter the STARTUP SHOW DATABASE command.
Example
$ RUN SYS$SYSTEM:SYSMAN SYSMAN> STARTUP SHOW DATABASE
5.4.5. Showing the Contents of a Startup Database
To display the contents of the current database, enter the STARTUP SHOW FILE command. You can specify various qualifiers for this command to control the amount of information displayed. For more information, see the VSI OpenVMS System Management Utilities Reference Manual.
Example
$ RUN SYS$SYSTEM:SYSMAN SYSMAN> STARTUP SHOW FILE/FULL
5.4.6. Adding Startup Files to a Startup Database
To add a file to the layered product startup database, use the STARTUP ADD command. The /MODE qualifier specifies the mode of execution for the file. The /PHASE qualifier specifies the phase within system startup when the file is to be executed. For information on the layered product startup phases, see Section 5.4.2, ''Understanding the Layered Product Startup Database''.
Do not use this command to modify STARTUP$STARTUP_VMS; this command procedure starts the operating system. The STARTUP MODIFY command requires read and write access to the startup database.
When adding layered product startup files using SYSMAN, be sure that all requisite components occur in a previous phase.
Enter the STARTUP ADD command with appropriate qualifiers. For information on the valid qualifiers, see the SYSMAN section of the VSI OpenVMS System Management Utilities Reference Manual.
Example
$ RUN SYS$SYSTEM:SYSMAN SYSMAN> STARTUP SHOW DATABASE %SYSMAN-I-DATANAME, STARTUP database is STARTUP$STARTUP_LAYERED SYSMAN> STARTUP ADD FILE/MODE=DIRECT/PHASE=LPMAIN FOR$LPMAIN_043_STARTUP.COM
5.4.7. Changing Information Associated with a Startup File
Once a file is included in the layered product startup database, you can modify the information associated with the file by entering the STARTUP MODIFY command. (The command requires read and write access to the startup database.)
Note
Do not use STARTUP MODIFY to modify STARTUP$STARTUP_VMS.
You can specify any of the following qualifiers to specify the information that is to be changed:
/MODE
/NAME=filespec
/PARAMETER=(P1:arg1, P2:arg2,...)
/PHASE
For information on the qualifiers for this command, see the VSI OpenVMS System Management Utilities Reference Manual.
Example
$ RUN SYS$SYSTEM:SYSMAN SYSMAN> STARTUP ADD/MODE=DIRECT/PHASE=LPMAIN FOR$LPMAIN_043_STARTUP.COM SYSMAN> STARTUP SHOW FILE/NODE SYSMAN> STARTUP MODIFY FILE FOR$LPMAIN_043_STARTUP.COM/NODE=ZNODE
5.4.8. Deleting a Record from a Startup Database
Deleting a record from a startup database prevents a product from starting up. To delete a record, use the STARTUP REMOVE FILE command. This command leaves the startup file intact, but the file is not used in system startup. (The command requires read and write access to the startup database.)
Note
Do not use STARTUP REMOVE FILE to modify STARTUP$STARTUP_VMS.
To delete a record from a startup database, enter a STARTUP REMOVE FILE command in the following format:
STARTUP REMOVE FILE filespec
where filespec specifies the name of the startup file to be removed.
Example
$ RUN SYS$SYSTEM:SYSMAN SYSMAN> STARTUP SHOW FILE/FULL SYSMAN> STARTUP REMOVE FILE FOR$LPMAIN_043_STARTUP.COM SYSMAN> STARTUP SHOW FILE/FULL SYSMAN> EXIT
5.4.9. Preventing a Startup File from Executing
To temporarily prevent a startup file from executing, enter the STARTUP DISABLE command. You can specify the /NODE qualifier to disable the startup file on certain nodes.
This command requires read and write access to the startup database. Do not use this command to modify STARTUP$STARTUP_VMS.
To delete a record from a startup database, enter the STARTUP DISABLE command as follows:
STARTUP DISABLE FILE filespec
where filespec specifies the name of the startup file to be disabled.
Example
$ RUN SYS$SYSTEM:SYSMAN SYSMAN> STARTUP SHOW FILE SYSMAN> STARTUP DISABLE FILE FOR$LPMAIN_043_STARTUP.COM/NODE=ZURICH
5.4.10. Allowing a Previously Disabled Startup File to Execute
If you have disabled a startup file from executing, you can enable it again by using the STARTUP ENABLE command. You can specify the /NODE qualifier to enable the startup file on certain nodes.
This command requires read and write access to the startup database. Do not use this command to modify STARTUP$STARTUP_VMS.
To enable a previously disabled file, enter the STARTUP ENABLE FILE command in the following format:
STARTUP ENABLE FILE filespec
where filespec specifies the name of the file to be enabled.
Example
$ RUN SYS$SYSTEM:SYSMAN SYSMAN> STARTUP ENABLE FILE FOR$LPMAIN_043_STARTUP.COM/NODE=ZURICH
5.5. Registering Images that Have System Version Dependencies
Applications that run on the OpenVMS operating system sometimes depend on the internal interfaces of a previous version of the operating system. For example, an application might call system routines, reference system data cells, or system data structures. New versions of the operating system might include changes that can break applications depending on those interfaces.
Registering an image records information about the image in a file called the image registry. The image activator, INSTALL, and SYSGEN do not check the versions of images that are recorded in the image registry.
The image registry allows you to continue to run application images (including main images, shared libraries, and device drivers) that were linked on prior versions of the operating system. Use extreme care with this capability. If the image needs to use a data structure that has a changed format, then results from running the image will be unpredictable and might result in a system crash. Register an image only if you are sure that none of the referenced system routines, data cells, and data structures have changed.
The Image Registry facility allows you to register different versions of an image independently. It also allows you to deregister, analyze, and show images in the image registry.
5.5.1. Understanding System Version Dependency and the Image Registry
The major version number of the operating system
A set of component version numbers (version numbers of loadable executive images)
When you attempt to run an image, the system checks to determine if the image requires a certain version of the operating system or of system components. If the version of the running system does not match the version requirements of the image, the image fails.
The system also checks version numbers when you attempt to install an image using the Install utility (INSTALL) or connect a device driver using the System Generation utility (SYSGEN).
Note
FILES_VOLUMES
MEMORY_MANAGEMENT
SECURITY
As a result, many version-dependent images built in VMS VAX Version 5. x systems (that is, images that do not reference FILES_VOLUMES, MEMORY_MANAGEMENT, or SECURITY) will run on OpenVMS Version 6.0 without registering the images. However, version-dependent images that do reference these components must be registered with the image registry, as explained in this section.
In OpenVMS VAX Version 6.1, no version numbers were changed. However, images built on VMS VAX Version 5. x systems needed to be registered if they referenced FILES_VOLUMES, MEMORY_MANAGEMENT, or SECURITY.
Caution
You must inspect and test an image carefully to avoid system crashes and data corruption. Registering an image does not necessarily make it work; registering only by passes the version checks.
5.5.2. Using the Image Registry Facility
$ @SYS$UPDATE:REGISTER_PRIVILEGED_IMAGE keyword filenamewhere:
|
keyword |
Specifies one or more of the keywords described in Table 5.3, ''REGISTER_PRIVILEGED_IMAGE.COM Keywords'', separated by commas. |
|
filename |
Specifies the name and location of the image you want to register. The filename parameter accepts wildcard characters. |
|
Keyword |
Action |
|---|---|
|
ANALYZE |
Displays version-dependent image names and their subsystem dependencies. |
|
REGISTER |
Registers images on the local system. |
|
DEREGISTER |
Deletes images from the registry on the local system. |
|
SHOW |
Lists the registry content. To display the complete registry content, specify a wildcard (*) for the file name. |
|
CONFIRM |
Confirms that each specified image be added to or deleted from the registry (used only with REGISTER and DEREGISTER). |
|
TRACE |
Lists each image file for verification purposes (used only with REGISTER and DEREGISTER). |
|
HELP |
Describes the supported keywords and provides examples. |
REGISTER-I-SUMMARY n images examined, n have dependenciesIn this message, n is the number of images examined and the number of images that have dependencies.
Example
$ @SYS$UPDATE:REGISTER_PRIVILEGED_IMAGE REGISTER SYS$LIBRARY:V6USRAPP %REGISTER-I-ADDED added V6USRAPP to registry
5.6. Customizing the Help Message Database
The Help Message utility (MSGHLP) allows users to quickly access online descriptions of system messages from the DCL prompt. Users with write access to VSI-supplied .MSGHLP$DATA files can customize the Help Message database in more radical ways than general users can. The following sections describe how to perform the following customization tasks:
| Task | For More Information |
|---|---|
| Accessing $STATUS values for uninstalled messages | Section 5.6.1, ''Accessing $STATUS Values for Uninstalled Messages'' |
| Creating system-level Help Message database search paths | Section 5.6.2, ''Creating System-Level Database Search Paths'' |
| Deleting VSI-supplied messages | Section 5.6.3, ''Deleting VSI-supplied Messages from the Database'' |
| Adding comments to VSI-supplied messages | Section 5.6.4, ''Adding Comments to VSI-supplied Messages'' |
| Changing text in VSI-supplied messages | Section 5.6.5, ''Changing VSI-supplied Data'' |
| Adding messages to VSI-supplied database files | Section 5.6.6, ''Adding Messages to VSI-supplied Database Files'' |
Before performing these tasks, you should be familiar with the Help Message utility. For a complete description of Help Message features, basic tasks, and the HELP/MESSAGE command and qualifiers, see the OpenVMS System Messages: Companion Guide for Help Message Users. Also see that manual for a description of the files that you must manipulate to customize the Help Message database.
Note
Currently, user-supplied comments or additions to VSI-supplied .MSGHLP$DATA files are not preserved through the next upgrade. However, your own .MSGHLP$DATA files are not affected by future releases. You can reuse .MSGHLP files to insert your own messages into future VSI-supplied database files. Depending on the data format in future databases, you might also be able to reuse some .MSGHLP files to insert comments.
5.6.1. Accessing $STATUS Values for Uninstalled Messages
Any messages that are not installed as part of the OpenVMS operating system cannot be equated with a value stored in $STATUS until they are recognized by the system. When the Help Message utility attempts to translate the value stored in $STATUS or a value specified with the /STATUS qualifier, the search can fail if the value does not equate to an installed message or a message that was linked into the Help Message utility when it was originally created. You can make your system recognize such uninstalled messages. These messages include user-supplied messages, third-party messages, and messages from layered products and certain other OpenVMS facilities.
How to Perform This Task
- Use the Help Message qualifier /SECTION_FILE=* to include all the OpenVMS supplied message section files that have not already been linked into the main Help Message program, MSGHLP$MAIN.EXE:
$ HELP/MESSAGE/SECTION_FILE=*
This command generates a user-modifiable object library, SYS$LIBRARY:MSGHLP$MESSAGE_SECTIONS.OLB. Each module in this library contains a pointer to a message section .EXE file. You can use the /SECTION_FILE qualifier to insert additional modules into this library. (See the following steps.)
Note
This HELP/MESSAGE command produces results similar to, but entirely separate from those effected by the SET MESSAGE filespec command. The Help Message utility does not interact with the Message utility. If you want both utilities to translate the same set of message sections, you must separately code each utility to do so. It is perfectly acceptable to have each utility point to different message section files.
When you use the /SECTION_FILE qualifier to create the object library or add modules to it, the MSGHLP$MESSAGE_SECTIONS.EXE file is also automatically created from all the modules in the object library and is placed in your default directory. When you finish modifying the object library, you must copy the final .EXE file to SYS$COMMON:[SYSLIB] (logical name SYS$LIBRARY).
Thereafter, if Help Message cannot translate a status code and the SYS$LIBRARY:MSGHLP$MESSAGE_SECTION.EXE image exists, Help Message activates it and searches all message section files to which it points. The impact on Help Message search time depends upon the number of files searched.
- Use the following command as many times as you want to add pointer modules for any other specific message section files to SYS$LIBRARY:MSGHLP$MESSAGE_SECTIONS.OLB and MSGHLP$MESSAGE_SECTIONS.EXE:
HELP/MESSAGE/SECTION_FILE=disk:[directory]file-name.EXE
The default file specification is SYS$MESSAGE:.EXE.
- Review the contents of the resulting SYS$LIBRARY:MSGHLP$MESSAGE_SECTIONS.OLB file:
$ LIBRARY/LIST MSGHLP$MESSAGE_SECTIONS.OLB
The names of the modules in the .OLB file are derived from strings specified in the /SECTION_FILE qualifier.
Help Message can search a maximum of 42 message section files. Files are searched in this order:The last file activated by a SET MESSAGE command (if any).
The message section files that Help Message is linked with before it is shipped:
SYSMSG.EXE
SYSMGTMSG.EXE
CLIUTLMSG.EXE
PRGMSG.EXE
Any message section files explicitly linked with MSGHLP$MAIN.EXE or with any shareable image that MSGHLP$MAIN.EXE references.
Any nonduplicate message section files linked with SYS$LIBRARY:MSGHLP$MESSAGE_SECTIONS.EXE.
Message section files are searched in the order in which they are listed in the .OLB file. (Order is alphabetical.) If the total count of message section files exceeds 42, message section files listed near the end of the .OLB file might not be searched.
- If you want, remove any references to message section files in the .OLB file to control which 42 message section files are included in the Help Message search. You might delete a file that you rarely use earlier in the alphabet to ensure that a file later in the alphabet is among the 42 files searched. For example, to delete the NCP (Network Control Program) messages from the .OLB file, use this command:
$ LIBRARY/DELETE=NETWRKMSG SYS$LIBRARY:MSGHLP$MESSAGE_SECTIONS.OLB
If you delete a module from the .OLB file, you must execute the HELP/MESSAGE command with the /SECTION_FILE qualifier to generate an updated .EXE file. The qualifier argument can specify either a new file or a file that is already listed in the .OLB file.
When your .OLB file reflects the message section files you want Help Message to search, copy the final .EXE file from your account to SYS$LIBRARY:.
Example
The following example demonstrates this sequence of events:
Link all OpenVMS supplied message section files.
Review the resulting .OLB file.
Delete the VVIEFMSG module from the .OLB file.
Add the file USERS:[TOOLS]NEW_MSGS.EXE to the list in the .OLB file.
Review the revised contents of the .OLB file.
Copy the final .EXE file from the local account to SYS$LIBRARY:.
Note that the output from the LIBRARY/LIST commands is omitted from the example.
$ HELP/MESSAGE/SECTION_FILE=* $ LIBRARY/LIST SYS$LIBRARY:MSGHLP$MESSAGE_SECTIONS.OLB $ LIBRARY/DELETE=VVIEFMSG SYS$LIBRARY:MSGHLP$MESSAGE_SECTIONS.OLB $ HELP/MESSAGE/SECTION_FILE=USERS:[TOOLS]NEW_MSGS.EXE $ LIBRARY/LIST SYS$LIBRARY:MSGHLP$MESSAGE_SECTIONS.OLB $ COPY MSGHLP$MESSAGE_SECTIONS.EXE SYS$LIBRARY:MSGHLP$MESSAGE_SECTIONS.EXE
5.6.2. Creating System-Level Database Search Paths
Help Message database files need not reside on the system disk. You can create system logical names to define one or more Help Message search paths to access multiple .MSGHLP$DATA files in different locations.
When Help Message is installed, the OpenVMS messages database file is installed by default at SYS$COMMON:[SYSHLP]MSGHLP$LIBRARY.MSGHLP$DATA. However, this file can optionally be installed on or moved to another disk. The alternate location must be pointed to by logical name MSGHLP$LIBRARY. Use this command to define the logical name:
DEFINE/SYSTEM MSGHLP$LIBRARY disk:[directory]MSGHLP$LIBRARY
By default, Help Message attempts to look up messages in the default location unless the logical name MSGHLP$LIBRARY is defined. If you do not use the default database location, include the logical name definition command in SYS$MANAGER:SYLOGICALS.COM so that the database is defined each time the system is booted.
Note
If you move MSGHLP$LIBRARY.MSGHLP$DATA to a new location after installation, be sure to set the proper protections on the file and directory so that the database cannot be accidentally deleted or modified. The protections at installation are (RWE, RWE, RE, RE) for the directory and (RWE, RWE, RWE, RE) for the file.
You and other system users can create additional .MSGHLP$DATA files, as described in the OpenVMS System Messages: Companion Guide for Help Message Users. None of the .MSGHLP$DATA files need reside on the system disk. You can add new files to a systemwide default database search path defined by MSGHLP$LIBRARY, or you can create specialized search paths to include different configurations of .MSGHLP$DATA files.
A search path definition can include individual file names or can point to one or more directories. If you specify a directory with no file name, Help Message searches all .MSGHLP$DATA files currently found in that directory. Pointing to a directory instead of individual files can minimize your bookkeeping when .MSGHLP$DATA files are added or removed.
To use system resources more efficiently, you can create different search paths for different user groups, depending on which .MSGHLP$DATA files they need to access. You can also set up different directories for different types of messages or for different user groups. For example, you could use three unique logical names to define three different search paths tailored to different user groups:
DEFINE/SYSTEM logical-name-1 file-a,file-b,file-c
DEFINE/SYSTEM logical-name-2 file-a,directory-z
DEFINE/SYSTEM logical-name-3 file-x,file-a,directory-y
Note
The first file you list in a search path is the default database for /INSERT and /DELETE operations that operate on that search path. By default, all other operations access all files in a search path. Specifying a directory first in a search path risks setting up a default moving target for /INSERT and /DELETE operations if files are added to or deleted from the directory.
Users can select an alternate to the system default database by specifying the /LIBRARY qualifier in the HELP/MESSAGE command. Individual users can also create their own logical name search paths at the process level.
Example
The following example defines a Help Message search path that accesses .MSGHLP$DATA database files in three locations: the VSI-supplied OpenVMS messages at USERS:[TOOLS], the user-supplied file USERS:[NEW_PROJ]OUR_MESSAGES.MSGHLP$DATA, and all .MSGHLP$DATA files in directory TEST:[TRY_ME].
$ DEFINE/SYSTEM MSGHLP$LIBRARY USERS:[TOOLS]MSGHLP$LIBRARY,- _$ USERS:[NEW_PROJ]OUR_MESSAGES.MSGHLP$DATA,TEST:[TRY_ME]
5.6.3. Deleting VSI-supplied Messages from the Database
You can delete VSI-supplied messages from the database to conserve system resources or improve response time.
How to Perform This Task
Use the /EXTRACT qualifier to create a .MSGHLP file containing the messages you want to delete from the database. (See the OpenVMS System Messages: Companion Guide for Help Message Users for a full description of how to select the contents of the .MSGHLP file.) Some examples follow.
Use the following syntax to extract all the messages for a specified facility:HELP/MESSAGE/FACILITY=facility-name/EXTRACT=filename.MSGHLP
Use this syntax to extract one or more messages specified by the search string:HELP/MESSAGE/EXTRACT=filename.MSGHLP search-string
Check the contents of the resulting .MSGHLP file to be sure that it contains only the data that you want to delete from the database. Edit out any messages that you do not want to delete from the database.
- Use /DELETE to delete the contents of the .MSGHLP file from the database. Include /LIBRARY if the MSGHLP$LIBRARY.MSGHLP$DATA file is not the default database or if it is not the first file in the search path defined by logical name MSGHLP$LIBRARY.
HELP/MESSAGE/DELETE=filename.MSGHLP
HELP/MESSAGE/DELETE=filename.MSGHLP/LIBRARY=disk:[directory]filename.MSGHLP$DATA
Save the .MSGHLP file if you might ever want to add the deleted messages back into the database prior to the next upgrade. You can store the file on tape to conserve disk space. If you delete and then reinsert messages, these messages are treated like user-supplied messages and are displayed with change bars.
Any VSI-supplied messages that you delete are currently reinserted into the database at the next upgrade. You can delete the messages again using a saved .MSGHLP file or you can create a new .MSGHLP file. Note that if you keep a .MSGHLP file for future deletion purposes only, you need save only the lines prefixed by 1 and 2.
To save disk space, you can compress the .MSGHLP$DATA file to close up any free space created by the deletions. Use the following command sequence to compress the file:
CONVERT disk:[directory]filename.MSGHLP$DATA disk:[directory]filename.MSGHLP$DATA
PURGE disk:[directory]filename.MSGHLP$DATA
Example
The following example extracts and then deletes all messages for the DDTM (DECdtm services) facility from the default database. The last two commands compress the VSI-supplied database file to conserve disk space after the deletions.
$ HELP/MESSAGE/FACILITY=DDTM/EXTRACT=DDTM.MSGHLP $ HELP/MESSAGE/DELETE=DDTM.MSGHLP $ CONVERT SYS$COMMON:[SYSHLP]MSGHLP$LIBRARY.MSGHLP$DATA - _$ SYS$COMMON:[SYSHLP]MSGHLP$LIBRARY.MSGHLP$DATA $ PURGE SYS$COMMON:[SYSHLP]MSGHLP$LIBRARY.MSGHLP$DATA
5.6.4. Adding Comments to VSI-supplied Messages
You can add comments to VSI-supplied messages documentation. Comments display with change bars immediately following the VSI-supplied description. This feature is a handy way to publicize a site-specific solution for a common problem.
Note
Currently, user-supplied comments to VSI-supplied .MSGHLP$DATA files are not preserved through the next upgrade. However, if the VSI-supplied message descriptions do not change during the upgrade, you can reuse .MSGHLP files to reinsert comments after the upgrade.
How to Perform This Task
Extract the message to which you want to add a comment. The following example extracts hypothetical message NOSNO:
$ HELP/MESSAGE/EXTRACT=NOSNO.MSGHLP NOSNO
- Edit the .MSGHLP file to add your comment. The .MSGHLP file format uses a unique numerical prefix to designate the message, facility, explanation, and user action sections of the message description. Add your comments at the end using a "5" prefix.
1NOSNO, can't ski; no snow 2XCSKI, XCSKI Program 3Your attempt to ski failed because there is no snow. 4Wait until there is snow and attempt the operation again. 5If you don't want to wait, go to a location where there is 5snow and ski there. 5 5Or, try ice skating instead!
Tips for modifying files:Limit your comments to 60 characters per line so that they do not exceed the terminal display area.
Use a "5" prefix on blank lines too.
Do not edit VSI-supplied data. Any such edits are ignored when the comment is added to the database.
Section 5.6.5, ''Changing VSI-supplied Data'' describes how you can alter VSI-supplied data.
- Update the database by inserting the updated message:
$ HELP/MESSAGE/INSERT=NOSNO.MSGHLP
The comment is now displayed following the VSI-supplied message description.
Example
$ HELP/MESSAGE/EXTRACT=ACCVIO.MSGHLP ACCVIO
[Edit ACCVIO.MSGHLP to add your comment.]
$ HELP/MESSAGE/INSERT=ACCVIO.MSGHLP
5.6.5. Changing VSI-supplied Data
You cannot use the procedure described in Section 5.6.4, ''Adding Comments to VSI-supplied Messages'' to alter VSI-supplied information. The recommended way to permanently change VSI-supplied information is to send your comments to the OSSG Documentation Group (see the Preface for Internet and mail addresses) or contact a VSI support representative.
The sequence described in this section allows you to modify VSI-supplied data, with the following results:
The VSI-supplied message is deleted from the database and your version of the message is inserted.
The message you modify subsequently displays with change bars to designate it as unsupported, user-supplied data.
Note
Currently, the VSI-supplied message is reinserted into the database at the next upgrade and the user-supplied text is overwritten.
How to Perform This Task
Extract the message having the text or description you want to change:
HELP/MESSAGE/EXTRACT=filename.MSGHLP search-string
Check the .MSGHLP file to ensure that your search did not pick up any messages that you do not want to change. Delete any such messages that you want to preserve out of the .MSGHLP file.
Delete the VSI-supplied version of the message from the Help Message database by specifying the .MSGHLP file as input. The following command deletes all messages in the .MSGHLP file from the default .MSGHLP$DATA file:
HELP/MESSAGE/DELETE=filename.MSGHLP
Edit the .MSGHLP file to make your changes.
- Insert the revised message description into the Help Message database:
HELP/MESSAGE/INSERT=filename.MSGHLP
Your version of the message now appears in the database with change bars to indicate that it is not a VSI-supplied message.
Example
$ HELP/MESSAGE/EXTRACT=NOFILES.MSGHLP NOFILES $ HELP/MESSAGE/DELETE=NOFILES.MSGHLP
[Edit NOFILES.MSGHLP to change the text.]
$ HELP/MESSAGE/INSERT=NOFILES.MSGHLP
5.6.6. Adding Messages to VSI-supplied Database Files
The OpenVMS System Messages: Companion Guide for Help Message Usersdescribes how to create your own .MSGHLP$DATA files to add new messages to the Help Message database. Keeping your messages in a separate file can simplify your messages bookkeeping and ensure that your messages are preserved through future upgrades.
With write access to VSI-supplied .MSGHLP$DATA files, you can alternatively insert your own messages into the VSI-supplied MSGHLP$LIBRARY.MSGHLP$DATA file. However, messages inserted using this technique will currently be overwritten at the next upgrade. You can, however, save your input .MSGHLP files and repeat the insertion process at the next upgrade.
How to Perform This Task
Create a .MSGHLP file with your message descriptions in it. (Section 5.6.4, ''Adding Comments to VSI-supplied Messages'' includes an example of the .MSGHLP file format.)
Specify your .MSGHLP file as input to update the VSI-supplied .MSGHLP$DATA file. Assuming that MSGHLP$LIBRARY.MSGHLP$DATA is the default, all you must enter is:
HELP/MESSAGE/INSERT=filename.MSGHLP
Example
$ HELP/MESSAGE/INSERT=MYMESSAGES.MSGHLP
5.7. Customizing Mail
OpenVMS contains two logical names to enable you to customize the operation of certain Mail functions on your system. This includes checking the network address format to use and sending mail directly to a user on an OpenVMS Cluster (rather than through the network) if the sender and recipient are both on the same node.
MAIL$SYSTEM_FLAGS
$ DEFINE/SYSTEM/EXECUTIVE_MODE MAIL$SYSTEM_FLAGS 1
|
Value |
Meaning |
|---|---|
|
1 |
Indicates that this node is part of a homogeneous OpenVMS Cluster system. In other words, all disks are accessible to the cluster, and a common SYSUAF file and a common mail file exist for the cluster. When this bit is set, the system checks the node to which you are sending mail to see if it is currently in the cluster. If the node is in the cluster, the system bypasses DECnet, and the message is written directly to the recipient's mail file. (Note that the node must be up to determine whether it is part of the cluster.) |
|
2 |
Directs Mail to set the OpenVMS Cluster system breakthrough flag when issuing the $BRKTHRU service to notify the recipient of new mail. This flag is used only in OpenVMS Cluster systems and, typically, only in homogeneous OpenVMS Cluster systems (in other words, flag 1 is also set). |
|
4 |
Directs Mail to include the time the message was delivered in the notification message displayed on the recipient's terminal. |
|
8 |
Directs Mail to use DECnet VAX address syntax when the system is running DECnet-Plus. |
|
16 |
Directs Mail to use DECnet-Plus address syntax. |
| 32 | Indefinitely retry reading a UAF record when the record is locked by another user. Default (bit not set) behavior is to return UAFGETERR and not retry. |
For example, if MAIL$SYSTEM_FLAGS translates to 7, the system selects the first three flags. If the logical name does not translate, the default is 0, which indicates that no flags are set.
On VAX systems, if neither 8 nor 16 is in the value for MAIL$SYSTEM_FLAGS, the system checks to see whether DECnet for OpenVMS or DECnet-Plus is running on the system and operates as if the appropriate bit were set. If MAIL$SYSTEM_FLAGS accidentally specifies both DECnet and DECnet-Plus, the Mail utility defaults to DECnet-Plus.
MAIL$INTERNET_MODE
The address does not contain double quotation marks (")
The address contains an at sign (@)
There are no periods to the right of the at sign
You can control the default system interpretation of those names with the MAIL$INTERNET_MODE logical name.
$ DEFINE/SYSTEM MAIL$INTERNET_MODE address_mode|
Address Mode |
Effect |
|---|---|
|
HYBRID (default) |
If the node component of the address contains a period (.),Mail uses SMTP address mode. If there are no periods, Mail uses DECnet address mode. |
|
DECNET |
Mail always interprets the node component of the address as a DECnet node specification. |
|
SMTP |
Mail always interprets the node component of the address as an Internet address specification. The default address mode is SMTP unless you use logical name MAIL$INTERNET_TRANSPORT to define a different transport (and therefore different address mode). |
For more information about using logical names to control the use of internet address modes by the Mail utility, see the VSI OpenVMS User's Manual.
5.8. Setting Up the Multipurpose Internet Mail Extension (MIME) Utility
MIME is the standard used to attach nontext files to mail messages to send them over the Internet. The MIME utility allows users to read and compose MIME-encoded mail messages on OpenVMS systems.
Understanding the MIME Utility
With MIME, users can encode and send nontext files such as graphics or audio files encoded as plain text; however, those files are often unreadable. The MIME utility decodes MIME files sent over the Internet to their original form. MIME also allows users to create MIME-encoded files, which can be sent as mail messages using the OpenVMS Mail utility.
For more information on how users can use the MIME utility, refer to the VSI OpenVMS User's Manual.
5.8.1. Defining a Foreign Command
MIME:== $SYS$SYSTEM:MIME.EXE
You can establish systemwide defaults for displaying MIME-encoded messages by creating two files: MIME$MAILCAP.DAT and MIME$FILETYPES.DAT.
MIME$MAILCAP.DAT identifies an application to display each locally recognized content-type of incoming MIME-encoded files. MIME$FILETYPES.DAT associates a content-type with the file extension of outgoing files.
A user can override those defaults by creating these files in SYS$LOGIN. See the VSI OpenVMS User's Manual for details about those files.
5.9. Saving Your Customization
Once you have installed and customized your system, VSI recommends that you back up your system disk. To do so, follow the instructions in Section 11.17, ''Backing Up and Restoring the System Disk''.
On VAX systems, back up the console volume (if applicable). If your computer has a console storage device, make a backup copy of your console volume in case your original becomes corrupted. The operating system provides a command procedure called CONSCOPY.COM (in the SYS$UPDATE directory), which copies your console volume to a blank one.
The procedure for backing up the console volume varies for different computers. For specific instructions on backing up the console volumes, refer to the upgrade and installation supplement for your VAX computer.
Chapter 6. Setting System Time
This chapter describes how to control system time on OpenVMS systems, describes how system time relates to Coordinated Universal Time (UTC), and tells how to ensure that local system time remains correct when local time changes, as it does for daylight saving time.
For a complete list of support time zones that are referenced by VMS services, see the VSI OpenVMS System Manager’s Manual, Volume 2: Tuning, Monitoring, and Complex Systems.
|
Task |
System |
Section |
|---|---|---|
|
Setting time zone information |
OpenVMS Alpha Version 7.3 and later Open VMS I64 |
Section 6.2, ''Setting Time Zone Information on OpenVMS Alpha Version 7.3 and Later'' |
|
Setting time zone information |
OpenVMS Alpha before Version 7.3 OpenVMS VAX |
Section 6.3, ''Setting Time Zone Information on OpenVMS VAX Systems'' |
|
Setting time zone information |
OpenVMS Cluster |
Section 6.4, ''Setting Time in an OpenVMS Cluster Environment'' |
|
Controlling daylight saving time conversions |
All | |
|
Setting time using the Battery-Backed Watch (BBW) |
OpenVMS Alpha Open VMS I64 |
Section 6.6, ''Setting Time Using the Battery-Backed Watch (BBW) (Alpha Only)'' |
|
Choosing languages, and date and time formats |
OpenVMS |
Section 6.7, ''Choosing Languages, and Date and Time Formats'' |
|
Saving your time customizations |
OpenVMS VAX OpenVMS Alpha Open VMS I64 | |
|
Using SYSMAN to manage system time |
6.1. Setting Correct Time Zone Information on Your System
Note
Even if you do not use the VSI C RTL directly, you must set correct time zone information on your system because other system utilities written in the VSI C language might require it.
6.1.1. Distributed Time Synchronization Service (DTSS)
Your system may be using Distributed Time Synchronization Service (DTSS).DTSS is provided as an option with DECnet-Plus and the Distributed Computing Environment (DCE). If you are using DTSS, you must not use the procedures described in this chapter. Instead, use the procedures supplied with DTSS to set time zone information.
6.1.2. Understanding Time-Setting Concepts
Understanding some time concepts will help you see the importance of setting correct time zone information on your system.
6.1.2.1. Coordinated Universal Time
Coordinated Universal Time (UTC) is similar in most respects to Greenwich Mean Time (GMT). Under the UTC time standard, zero hours occurs when the Greenwich Meridian is at midnight. Unlike local time, which can go backward and forward depending on daylight saving time, UTC always increases.
Local times can be up to 12 hours behind Greenwich Mean Time or 13 hours ahead of it.
Because UTC is independent of time zones, you can use UTC around the world; for example, it is 2:00 UTC at the same moment in Paris as it is in Tokyo. You can examine data that is time-stamped with UTC values in Paris and Tokyo without performing complicated conversions to deal with local time zones.
6.1.2.2. Time Zones
Time zones for geographical areas that share the same local time also share the same rule or rules for seasonal changes between standard time and daylight saving time.
6.1.2.3. Daylight Saving Time and Standard Time
Typically, you make seasonal changes to the local system time (for example, for daylight saving time and standard time). You usually adjust the local time one hour forward or backward.
6.1.2.4. Time Differential Factor
One of the steps in setting the correct time on your system is to calculate a time differential factor (TDF) for your time zone.
The TDF associates each local time zone with UTC;it is the difference between your local system time and UTC. When your system time changes to reflect a local time change between standard time and daylight saving time, the TDF must also change to compensate for the new local system time. The TDF changes in the same direction as the local time;that is, if you add an hour to the local time, you must also add an hour to the TDF. Note, however, that the UTC does not change.
The TDF value is expressed in signed (+ or -) hh:mm format.
The Americas have negative TDFs, while Europe, Africa, Asia, and Australia have
positive TDFs.
OpenVMS procedures calculate the normal TDFs for standard and daylight saving time (if any) for your time zone. These are presented as the default for your TDF setting. VSI recommends that you accept this default.
You can also use the map in Figure 6.1, ''Time Differential Factor Map'' to determine the TDF for your time zone. If you prefer, you can use the tables in Appendix B in the VSI OpenVMS System Manager's Manual to determine the standard or daylight saving time TDF for your time zone.
Find your location on the map and notice the time zone band at that location.
Follow the time zone band to the top of the map and note the TDF that corresponds to your time zone. For example, the TDF for California is –8:00; the TDF for Italy is +1:00.
Some time zones do not have full-hour TDFs. In these cases, find the specific value on the map itself. For example, if you live in Adelaide, Australia, your TDF is +9:30.
In a time zone with daylight saving time, the TDF for daylight saving time is typically +1:00 from the standard time. For example, if the standard time TDF is +2:00,the daylight saving time TDF is +3:00;if the standard time TDF is -7:00, the daylight saving time TDF is -6:00.
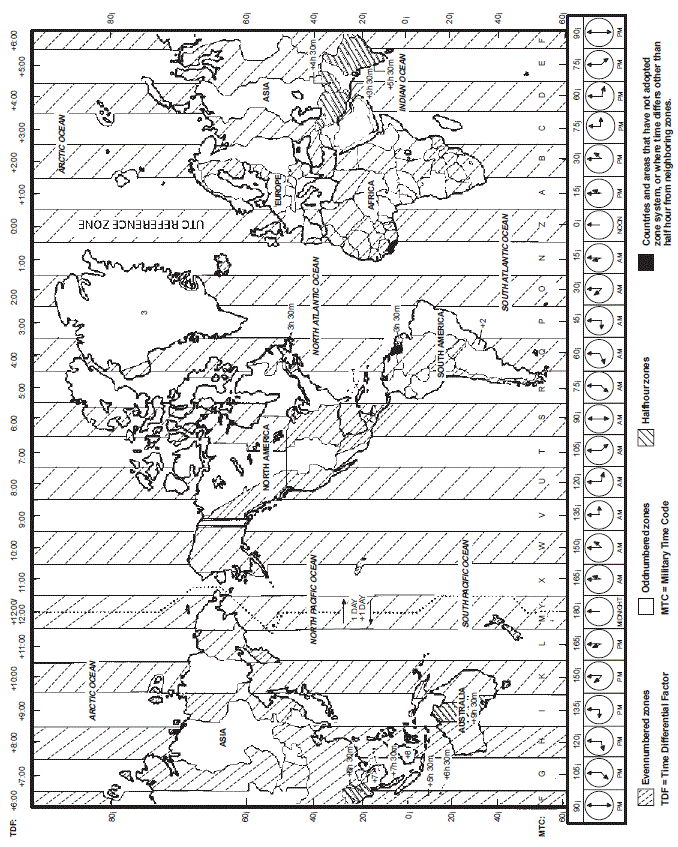
Note
http://aa.usno.navy.mil/AA/faq/docs/world_tzones.html
6.1.2.5. Time Zone Rules
A time zone rule is used to define the short name (usually three letters) for the time zone, the daylight saving time and standard time TDFs, and the rule for determining when changes are made between daylight saving time and standard time. The format of the time zone rules are defined in the VSI C Run-Time Library Reference Manual for OpenVMS Systems.
6.1.2.6. Setting Time Zone Information
Whether DTSS is in use
The version of OpenVMS
The architecture (VAX, Alpha, or OpenVMS Cluster)
Note
If you are using the Distributed Time Synchronization Service (DTSS), use the procedures supplied with DTSS to set time zone information. See Section 6.1.1, ''Distributed Time Synchronization Service (DTSS)''.
|
OpenVMS Version |
Architecture |
See |
|---|---|---|
|
7.3 and later |
Alpha |
Section 6.2, ''Setting Time Zone Information on OpenVMS Alpha Version 7.3 and Later'' |
|
7.3 and later |
VAX |
Section 6.3, ''Setting Time Zone Information on OpenVMS VAX Systems'' |
|
7.2 and earlier |
VAX or Alpha |
Section 6.3, ''Setting Time Zone Information on OpenVMS VAX Systems'' |
|
All |
OpenVMS Cluster Environment |
Section 6.4, ''Setting Time in an OpenVMS Cluster Environment'' |
6.2. Setting Time Zone Information on OpenVMS Alpha Version 7.3 and Later
Note
If you are using the Distributed Time Synchronization Service (DTSS), you must use the procedures supplied with DTSS to set time zone information. See Section 6.1.1, ''Distributed Time Synchronization Service (DTSS)''.
Note
SYS$MANAGER:UTC$TIME_SETUP.COM has some undocumented uses that are not supported and can lead to inconsistent or incorrect time zone information. For this reason, you should use SYS$MANAGER:UTC$TIME_SETUP.COM only in the ways that are documented here.
$ SET PROCESS/PRIVILEGES=(OPER,LOG_IO,SYSPRV,SYSNAM,CMEXEC)
If these privileges are not enabled, you can encounter errors or incorrect results.
You can use SYS$MANAGER:UTC$TIME_SETUP.COM to display current time zone information or to set time zone information.
6.2.1. Displaying Time Zone Information
$ @SYS$MANAGER:UTC$TIME_SETUP SHOW
AUTO_DLIGHT_SAV is set to "1".
OpenVMS will automatically change to/from Daylight Saving Time.
(in timezones that use Daylight Saving Time)
LOCAL TIME ZONE = EASTERN / US -- STANDARD TIME
LOCAL SYSTEM TIME = 20-MAR-2003 13:23:22.21 (EST)
TIME DIFFERENTIAL FACTOR = -5:00
TIME ZONE RULE = EST5EDT4,M4.1.0/02,M10.4.0/02
Change EST to EDT on the First Sunday of April (6-Apr-2003) at 02:00
Change EDT to EST on the Fourth Sunday of October (26-Oct-2003) at 02:00AUTO_DLIGHT_SAV is set to "0" and DTSS is not in use.
You will have to manually change to/from Daylight Saving Time.
You can do this by executing SYS$MANAGER:UTC$TIME_SETUP.COM,
or you can use SYS$EXAMPLES:DAYLIGHT_SAVING.COM.
LOCAL TIME ZONE = ROC -- STANDARD TIME
LOCAL SYSTEM TIME = 19-MAR-2003 13:02:03.91 (CST)
TIME DIFFERENTIAL FACTOR = 8:00
TIME ZONE RULE = CST-8
This time zone does not use Daylight Saving Time.You may also receive messages indicating that some time zone parameters are not correctly set. If so, correct the time zone information and rerun the procedure.
6.2.2. Setting Time Zone Information
For local time zone support to work correctly, you must set the time zone that accurately describes the location you want to be considered as your default time zone. Usually, this is the time zone in which your system is running. In addition, your system must be correctly configured to use a valid OpenVMS time differential factor (TDF).
$ @SYS$MANAGER:UTC$TIME_SETUP
Do not include any parameters with this command. When the main time zone menu is displayed, you can select the time zone in either of two ways: (1) by selecting the number in the main time zone menu that best represents the time zone desired (if multiple time zones exist for the selection you make, you will have to select the exact time zone from another menu), or (2) by using a search option that allows you to bypass the time zone menu and search by name.
If you select one of the numbers in the time zone menu, the corresponding time zone is selected. An asterisk (*) next to a number indicates that more than one time zone exists for that selection. If you select such a number, an additional menu displays with choices that allow you to select the appropriate time zone. For example, if you choose the United States (US) time zone from the main menu, a second menu displays the specific time zones within the United States. You then select the menu item that best represents the desired time zone.
The following example shows how you would select the Eastern time zone for the United States by using the menu numbers:
Configuring the Local Time Zone TIME ZONE SPECIFICATION -- MAIN Time Zone Menu “*” indicates a menu 0* GMT 1* AFRICA 12) EET 23) JAPAN 34) ROK 2* AMERICA 13) EGYPT 24) LIBYA 35) SINGAPORE 3* ANTARCTICA 14) FACTORY 25) MET 36* SYSTEMV 4* ASIA 15) GB-EIRE 26* MEXICO 37) TURKEY 5* ATLANTIC 16) GREENWICH 27) NAVAJO 38) UCT 6* AUSTRALIA 17) HONGKONG 28) NZ-CHAT 39) UNIVERSAL 7* BRAZIL 18) ICELAND 29) NZ 40* US 8* CANADA 19* INDIAN 30* PACIFIC 41) UTC 9) CET 20) IRAN 31) POLAND 42) W-SU 10* CHILE 21) ISRAEL 32) PRC 43) WET 11) CUBA 22) JAMAICA 33) ROC 44) ZULU Press “Return” to redisplay, enter “=” to search or “?” for help, or Select the number above that best represents the desired time zone: 40 US Time Zone Menu “*” indicates a menu 0* RETURN TO MAIN TIME ZONE MENU 1) ALASKA 4) CENTRAL 7) HAWAII 10) MOUNTAIN 2) ALEUTIAN 5) EAST-INDIANA 8) INDIANA-STARKE 11) PACIFIC 3) ARIZONA 6) EASTERN 9) MICHIGAN 12) SAMOA Press “Return” to redisplay, enter “=” to search or “?” for help, or Select the number above that best represents the desired time zone: 6 You selected EASTERN / US as your time zone. Is this correct? (Yes/No) [YES]:
|
Time Zone Acronym |
Description |
|---|---|
|
CET |
Central European Time |
|
EET |
Eastern European Time |
|
Factory |
Specifies no time zone |
|
GB-Eire |
Great Britain/Ireland |
|
GMT |
Greenwich Mean Time |
|
MET |
Middle European Time |
|
NZ |
New Zealand |
|
NZ-CHAT |
New Zealand, Chatham Islands |
|
PRC |
People's Republic of China |
|
ROC |
Republic of China |
|
ROK |
Republic of Korea |
|
SystemV |
Specific to System V operating system |
|
UCT |
Coordinated Universal Time |
|
US |
United States |
|
UTC |
Coordinated Universal Time |
|
Universal |
Coordinated Universal Time |
|
W-SU |
Middle European Time |
|
WET |
Western European Time |
To use the search option instead of menu numbers to select the time zone, enter an equal string (=) at the menu prompt instead of a number. The procedure then prompts you for the full or partial name of the time zone you want to select. After you enter that information, the procedure displays all matching time zones, and you can then select the appropriate one.
Note
Search only for a specific submenu name, such as US or INDIAN, or for a menu entry, such as POLAND (or partial name POL, for example) or EASTERN. Attempts to search for EASTERN / US or REUNION / INDIAN will fail to bring up choices for you.
The following example shows how you would select the Eastern time zone for the United States by using the search option:
Configuring the Local Time Zone
TIME ZONE SPECIFICATION -- MAIN Time Zone Menu “*” indicates a menu
0* GMT
1* AFRICA 12) EET 23) JAPAN 34) ROK
2* AMERICA 13) EGYPT 24) LIBYA 35) SINGAPORE
3* ANTARCTICA 14) FACTORY 25) MET 36* SYSTEMV
4* ASIA 15) GB-EIRE 26* MEXICO 37) TURKEY
5* ATLANTIC 16) GREENWICH 27) NAVAJO 38) UCT
6* AUSTRALIA 17) HONGKONG 28) NZ-CHAT 39) UNIVERSAL
7* BRAZIL 18) ICELAND 29) NZ 40* US
8* CANADA 19* INDIAN 30* PACIFIC 41) UTC
9) CET 20) IRAN 31) POLAND 42) W-SU
10* CHILE 21) ISRAEL 32) PRC 43) WET
11) CUBA 22) JAMAICA 33) ROC 44) ZULU
Press “Return” to redisplay, enter “=” to search or “?” for help, or
Select the number above that best represents the desired time zone: =EAST
Search for Time Zone by Full or Partial Name
“*” indicates a menu
1) EAST / BRAZIL
2) EAST-SASKATCHEWAN / CANADA
3) EASTERN / CANADA
4) EASTERISLAND / CHILE
5) EASTER / PACIFIC
6) EAST-INDIANA / US
7) EASTERN / US
Press “Return” to redisplay this menu,
enter “=” to search for a new zone,
enter “0” to return to the Main Time Zone Menu,
enter “?” for help, or
Select the number above that best represents the desired time zone: 7
You selected EASTERN / US as your time zone.
Is this correct? (Yes/No) [YES]If you enter No, you are returned to the Main Time Zone Menu.
- The following system logical names, which are set with the time zone information:
SYS$LOCALTIME
SYS$POSIXRULES
SYS$TIMEZONE_DAYLIGHT_SAVING
SYS$TIMEZONE_NAME
SYS$TIMEZONE_RULE
- The following files, which are written so that time zone information can be reset when the system is rebooted:
[VMS$COMMON.SYSEXE]SYS$TIMEZONE_SRC.DAT
[VMS$COMMON.SYS$STARTUP]TDF$UTC_STARTUP.COM
The TDF is the difference between your system time and Coordinated Universal Time (UTC), which is an international standard (similar to Greenwich Mean Time) for measuring time of day. The system next displays the TDFs for standard and daylight saving time that correspond to the time zone you have selected, and information about the TDF. For example:
Default Time Differential Factor for standard time is -5:00.
Default Time Differential Factor for daylight saving time is -4:00.
The Time Differential Factor (TDF) is the difference between your
system time and Coordinated Universal Time (UTC). UTC is similar
in most repects to Greenwich Mean Time (GMT).
The TDF is expressed as hours and minutes, and should be entered
in the hh:mm format. TDFs for the Americas will be negative
(-3:00, -4:00, etc.); TDFs for Europe, Africa, Asia and Australia
will be positive (1:00, 2:00, etc.).
Is Daylight Savings time in effect? Y
Enter the Time Differential Factor [-4:00]: Return
If this is a seasonal time change, it may also be necessary to
modify the system time. Generally, seasonal time changes result
in adding 1:00 hour, or adding -1:00 hour to the system time.Do you wish to modify the local system time [N]: Yes
Enter the time adjustment value you would like to add to
the local time. You can enter hours only (hh) or hours and
minutes (hh:mm) The value can be positive (hh:mm or +hh:mm)
or negative (-hh:mm). Enter the time adjustment value: -1:00
NEW SYSTEM TIME DIFFERENTIAL FACTOR = -4:00
ADDING -1:00 TO THE LOCAL TIME.Is this correct? [Y]:
If you answer Yes, the TDF is set, and the system logical name SYS$TIMEZONE_DIFFERENTIAL is defined.
If you answer No, you are returned to the TDF information display, from which you can reenter your TDF and time adjustment choices.
6.3. Setting Time Zone Information on OpenVMS VAX Systems
This section presents instructions for setting time zone information on OpenVMS VAX and on OpenVMS Alpha prior to Version 7.3. For instructions about setting time zone information on OpenVMS Alpha Version 7.3 and later, and on IA-64, see Section 6.2, ''Setting Time Zone Information on OpenVMS Alpha Version 7.3 and Later''.
Setting your local time zone, your TDF, or both
Modifying your system's local time to adjust for daylight saving or standard time
Displaying the local time and TDF for your system
If you set the time zone and the TDF on one node in a cluster, the values you set take effect on other nodes in the cluster when those nodes are rebooted.
Setting the time zone
Setting the TDF
Beginning the Procedure
- Log in to the SYSTEM account or enter the following command to enable LOG_IO and OPER privileges:
$ SET PROCESS/PRIVILEGES=(LOG_IO,OPER)
- Enter the following command to start UTC$TIME_SETUP.COM:
$ @SYS$MANAGER:UTC$TIME_SETUP.COM
%UTC-I-UPDTIME, updating Time Zone information in SYS$COMMON:[SYSEXE]
- Press Return to accept the default of BOTH or enter one of the other choices in answer to the following question:
Configure which time parameter (TIMEZONE/TDF/BOTH/NONE)? [BOTH]
Note
VSI recommends that you set both the time zone and the TDF. If you set the TDF without setting the time zone, the procedure cannot provide default TDF values.
If you answer BOTH or TIMEZONE to the time parameter question in the command procedure, continue in Section 6.3.1, ''Setting the Time Zone on Your System''.If you answer TDF to the question, continue in Section 6.3.2, ''Setting the TDF on Your System''.
6.3.1. Setting the Time Zone on Your System
The local time zone is the location you want to consider your default local time zone. Usually this local time zone is the same as the local time zone in which your system is located.
You set the local time zone by making choices in a command procedure.
Configuring the Local Time Zone
TIME ZONE SPECIFICATION – Main Time Zone Menu
1) Australia 11) GMT 21) Mexico 31) Turkey
2) Brazil 12) Greenwich 22) NZ 32) UCT
3) CET 13) Hong Kong 23) NZ-CHAT 33) US
4) Canada 14) Iceland 24) Navajo 34) UTC
5) Chile 15) Iran 25) PRC 35) Universal
6) Cuba 16) Israel 26) Poland 36) W-SU
7) EET 17) Jamaica 27) ROC 37) WET
8) Egypt 18) Japan 28) ROK 38) Zulu
9) Factory 19) Libya 29) Singapore
10) GB-Eire 20) MET 30) SystemV
0) None of the aboveTable 6.1, ''Time Zone Acronyms'' lists and describes the acronyms that appear in the Main Time Zone Menu.
- Enter a number after the following question; for example, 33, for the United States:
Select the number above that best describes your location: 33
If you enter 0, the system defaults to GMT.
- If you enter a country that has more than one time zone, the system displays a message and asks for a confirmation like the following one (if not, skip to the explanation following step 4):
You selected US as your time zone. Is this correct? (Yes/No) [YES]: [Return]
- The system displays areas with different time zones and asks you to select your area. Enter a number, for example, 6:
US Time Zone Menu 1) Alaska 4) Central 7) Hawaii 10) Mountain 2) Aleutian 5) East-Indiana 8) Indiana-Starke 11) Pacific 3) Arizona 6) Eastern 9) Michigan 12) Samoa 0) None of the above
Select the number above that best describes your location: 6
- Confirm the displayed information or enter another number after the following prompt; for example:
You selected US/Eastern as your time zone.Is this correct? (Yes/No) [YES]: [Return]
When you confirm the last statement, the system redefines the following system logical names:sys$localtime
sys$posixrules
The VSI C RTL uses these logical names to compute the time zone rules for your applications. The system also writes this information to SYS$TIMEZONE.DAT. The system uses this file to reset SYS$LOCALTIME and SYS$POSIXRULES when you reboot.
The system then displays the TDFs for standard and daylight saving time that correspond to the time zone you have selected:Default Time Differential Factor for standard time is -5:00. *Default Time Differential Factor for daylight saving time is -4:00.
* The system displays daylight saving time only for time zones that use daylight saving time.
6.3.2. Setting the TDF on Your System
If you answer TDF or BOTH to the time parameter question at the beginning of the command procedure, the system displays prompts for the TDF on your system.
- Select option 2 to display the TDF the system has calculated for you:
Configuring the Time Differential Factor (TDF) Enter ? anytime for help [0] Exit [1] Set the Time Differential Factor [2] Display the Time Differential FactorPlease pick an option number [2]:2The system displays information similar to the following items:SYSTEM TIME DIFFERENTIAL FACTOR = -4:00 (-14400 seconds). LOCAL SYSTEM TIME = 22-JAN-2001 10:49:45.20. - Select option 1 to verify the TDF displayed or to enter a new one:
Configuring the Time Differential Factor (TDF) Enter ? anytime for help [0] Exit [1] Set the Time Differential Factor [2] Display the Time Differential FactorPlease pick an option number [2]:1The system then displays the following information:The Time Differential Factor (TDF) is the difference between your system time and Coordinated Universal Time (UTC). UTC is similar in most respects to Greenwich Mean Time (GMT). The TDF is expressed as hours and minutes, and should be entered in the hh:mm format. TDFs for the Americas will be negative (-3:00, -4:00, etc.); TDFs for Europe, Africa, Asia and Australia will be positive (1:00, 2:00, etc.).The system displays the following question only if you set the time zone as well. However, some time zones do not have daylight saving time; if they do not, the system also does not display this question.
- Answer Yes or No to the following question:
Is Daylight Saving time in effect? (Yes/No):
- After the following prompt, either press Return to accept the displayed default or enter the correct TDF. (If you have not set the time zone, the system does not display a default TDF value.)
Enter the Time Differential Factor [-4:00]:
The system then explains the need to modify the system time as well for season time changes:If this is a seasonal time change, it may also be necessary to modify the system time. Generally, seasonal time changes result in adding 1:00 hour, or adding -1:00 hour to the system time. - To the following question, answer Yes if you need to modify the local system time or No if you do not:
Do you wish to modify the local system time [N]:
If you answer Yes, the system leads you through a dialogue similar to the one in Section 6.5.3, ''Adjusting for Daylight Saving Time on OpenVMS Version 7.2''
If you answer No, the system next displays the new TDF:NEW SYSTEM TIME DIFFERENTIAL FACTOR = -4:00.
- Answer Yes to confirm the displayed TDF or No if it is incorrect:
Is this correct? [Y]:
If you answer No, the system returns to step 1 in this section.
If you answer Yes, the system displays both the TDF and the local system time.SYSTEM TIME DIFFERENTIAL FACTOR = -4:00 (-14400 seconds). LOCAL SYSTEM TIME = 22-JAN-2001 10:52:37.36.
6.4. Setting Time in an OpenVMS Cluster Environment
Display time zone information
Set or change the time zone information
SYSMAN> SET ENVIRONMENT /NODE=(<node_list>)
Then, after you have run UTC$TIME_SETUP.COM for one architecture, reset the environment to the other architecture and run UTC$TIME_SETUP.COM for that architecture.
6.5. Adjusting for Daylight Saving Time
Whether DTSS is in use
The version of OpenVMS
The architecture (VAX, Alpha or I64)
System parameter AUTO_DLIGHT_SAV (OpenVMS Alpha Version 7.3 only)
Note
If you are using the Distributed Time Synchronization Service (DTSS), DTSS makes the necessary changes between daylight saving time and standard time. See Section 6.1.1, ''Distributed Time Synchronization Service (DTSS)''.
| OpenVMS Version | Architecture | AUTO_DLIGHT_SAV | See |
|---|---|---|---|
|
7.3 and later |
Alpha and I64 |
1 | |
|
7.3 and later |
Alpha and I64 |
0 | |
|
7.3 and later |
VAX |
n/a | |
|
7.2 and earlier |
VAX or Alpha |
n/a |
Section 6.5.3, ''Adjusting for Daylight Saving Time on OpenVMS Version 7.2'' |
6.5.1. Automatically Adjusting for Daylight Saving Time (OpenVMS Alpha Version 7.3 and Later, OpenVMS IA-64)
OpenVMS Alpha Version 7.3 and later and OpenVMS IA-64 contain a system parameter, AUTO_DLIGHT_SAV, that controls automatic switching between standard time and daylight saving time.
If AUTO_DLIGHT_SAV is set to 1, an OpenVMS Alpha Version 7.3 (and later) or IA-64 system automatically sets the time forward or back when local time changes between daylight saving time and standard time.
If AUTO_DLIGHT_SAV is set to 0 (the default), OpenVMS does not automatically change between daylight saving time and standard time.
The AUTO_DLIGHT_SAV parameter and the automatic changes between daylight saving time and standard time are implemented only on OpenVMS Alpha Version 7.3 and later and on IA-64 systems.
For this to work correctly, you must set a time zone rule for your time zone. See Section 6.2, ''Setting Time Zone Information on OpenVMS Alpha Version 7.3 and Later'' for information about setting time zone rules on OpenVMS Alpha Version 7.3 and later systems and on IA-64 systems.
Note
Automatic changes between daylight saving time and standard time work only on OpenVMS Alpha Version 7.3 and later systems and on IA-64 systems. VSI recommends that you do not enable automatic daylight saving time conversion on mixed-version or mixed-architecture OpenVMS Clusters.
For details on manually adjusting for daylight saving time on OpenVMS Version 7.3 systems, see Section 6.5.2, ''Manually Adjusting for Daylight Saving Time (OpenVMS Version 7.3 and Later Systems, IA-64 systems)''.
6.5.2. Manually Adjusting for Daylight Saving Time (OpenVMS Version 7.3 and Later Systems, IA-64 systems)
This section contains instructions for adjusting system time between standard time and daylight saving time on OpenVMS Version 7.3 and later when DTSS is not in use. Use these instruction for OpenVMS VAX Version 7.3 and for OpenVMS Alpha Version 7.3 and later and for IA-64 systems when automatic daylight saving time switching is disabled (system parameter AUTO_DLIGHT_SAV is set to 0).
Adjust the TDF
Modify the local time by one hour forward or backward
Make the changes immediately.
Queue a batch job to make the changes at a future time. (This is the most common use of this command procedure.)
DAYLIGHT_SAVINGS.COM creates a command procedure, DST$CHANGE.COM, in the current directory. DST$CHANGE.COM can execute on the current node only. To change the time for all nodes in an OpenVMS Cluster, DAYLIGHT_SAVINGS.COM also creates command procedure DST$SYSMAN.COM that executes DST$CHANGE.COM by executing a SYSMAN DO command. Note that to change all nodes, you must run DAYLIGHT_SAVINGS.COM on a node that has OpenVMS Alpha Version 7.3 or later or I64 installed.
You can run DAYLIGHT_SAVINGS.COM interactively and respond to prompts for input, or run the command procedure with parameters.
$ @SYS$EXAMPLES:DAYLIGHT_SAVINGS P1 P2 P3 P4
|
P1 |
DAYLIGHT |
Change from standard time to daylight saving time |
|
STANDARD |
Change from daylight saving time to standard time | |
|
P2 |
NODE |
Change time on this node only |
|
CLUSTER |
Change time on the entire OpenVMS Cluster | |
|
P3 |
EXECUTE |
Change time immediately |
|
QUEUE |
Submit the job to SYS$BATCH for execution at the date and time specified by P4 | |
|
SAVE |
Save the procedure for later modification | |
|
P4 |
date-time |
If P3 is QUEUE, date and time that the submitted batch job is to run, in DD-MMM-YYYY:HH:MM:SS format; otherwise P4 is unused |
Note that you need enter only the first letter of parameters P1, P2, and P3.
$ @SYS$EXAMPLES:DAYLIGHT_SAVINGS
DAYLIGHT_SAVINGS.COM prompts you for the parameters specified above.
When executing DAYLIGHT_SAVINGS.COM to change the time on all nodes in an OpenVMS Cluster at a future time, you can specify SAVE for parameter P3. This causes DAYLIGHT_SAVINGS.COM to save command procedures DST$SYSMAN.COM and DST$CHANGE.COM. You can then submit DST$SYSMAN.COM to the correct queue.
6.5.3. Adjusting for Daylight Saving Time on OpenVMS Version 7.2
Note
If you are using the Distributed Time Synchronization Service (DTSS), DTSS makes the necessary changes between daylight saving time and standard time. See Section 6.1.1, ''Distributed Time Synchronization Service (DTSS)''.
Adjust the TDF
Modify the local time
Make the changes immediately. (Usually, however, you would use UTC$TIME_SETUP.COM to make changes immediately by answering Yes to Question 5 in Section 6.3.2, ''Setting the TDF on Your System''.)
Queue a batch job to make the changes at a future time. (This is the most common use of this command procedure.)
The following example of DAYLIGHT_SAVINGS.COM shows answers that cause the procedure to queue a batch job, DST_CHANGE, which will execute when the time changes from standard time to daylight saving time. Many of the questions are similar to those explained in Section 6.3.2, ''Setting the TDF on Your System''.
$ SYS$EXAMPLES:DAYLIGHT_SAVINGS
This procedure queues a batch job that changes the system time
and system time differential around a daylight saving time
change. Press the question mark (?) key at any time for help;
hit Control-C to exit.
The Time Differential Factor (TDF) is the difference
between your system time and Coordinated Universal Time (UTC).
The difference is expressed in hh:mm format. The Americas
have negative offsets from UTC, while Europe, Africa, Asia
and Australia have positive offsets from UTC.
* Enter the Time Differential Factor: -4:00
If this is a seasonal time change, it may also be
necessary to modify the system time. Generally,
seasonal time changes result in adding 1:00 hour,
or adding -1:00 hour to the local time.
* Do you wish to modify the local system time [N]: Y
Enter the time value you would like to add to
the local time. The value can be a positive or
a negative (-hh:mm) value.
* Enter the time value: +1:00
The process to modify your time zone offset and local
time (if supplied) can occur now or in the future.
Press Return to run the job now.
* Enter the run time in the DD-MMM-YYYY:HH:MM:SS format:
01-apr-2001:02:00
NEW SYSTEM TIME DIFFERENTIAL FACTOR = -4:00
ADDING 1:00 TO THE LOCAL TIME.
JOB RUN TIME : 1-APR-2001:02:00
* Continue? [Y]: Y
Job DST_CHANGE (queue SYS$BATCH, entry 2) holding until 1-APR-2001 02:00
Batch Job DST_CHANGE scheduled to run at 1-APR-2001:02:00
$
$!!The batch job DST_CHANGE will run on 1-Apr-2001 at 02:00
6.6. Setting Time Using the Battery-Backed Watch (BBW) (Alpha Only)
The OpenVMS Alpha and I64 architectures maintain the current date and time in the Battery-Backed Watch (BBW) across power failures and system downtime. The BBW is functionally equivalent to the Time of Day Register (TODR) that the VAX architecture uses. One difference, however, is the BBW's constraint on the date range.
The BBW provides sufficient storage capability for only a century. The OpenVMS Alpha and IA-64 systems date range has been redefined as 1957 to 2056 to maintain correct leap-year processing and to provide for the millennial transition.
$ SET TIME = 1-NOV-98
$ SET TIME = 1-NOV-05
In this example, 05 is the equivalent of 2005.
6.7. Choosing Languages, and Date and Time Formats
You can specify languages other than English. From the list that the system manager defines, users can later select a language that they want to display.
Note
The SHOW TIME command does not include this feature because the SHOW TIME command is processed completely by DCL, which does not have access to the LIB$ routines necessary to format the output.
In addition, the SHOW commands for batch and print operations were modified to include, in the default time-stamp, seconds as well as hours and minutes. These new features were not previously documented.
$ SHOW USERS
OpenVMS User Processes at JANUARY 15, 2001 10:16 AM
Total number of users = 7, number of processes = 11
Username Node Interactive Subprocess Batch
MCDERMOT ARD26B 1
PASTERNAK ARD26B - 2 1
.
.
.Later, users can override the system defaults set up by the system manager and select their own date and time formats.
Steps to Change Languages, and Dates and Times
Note
VSI recommends that you include these steps within the command procedure SYS$MANAGER:SYSTARTUP_VMS.COM.
Define the logical name SYS$LANGUAGES (plural) to specify the list of languages the users on your system might want to use. (If the language is English, skip this step.)
- Invoke the command procedure SYS$MANAGER:LIB$DT_STARTUP.COM, which:
Defines output formats you can use to customize the display of dates and times
Loads support for languages other than English that you define with the SYS$LANGUAGES logical
- Define date and time formats for the system using either:
User-defined formats
Predefined formats
6.7.1. Specifying Languages Other Than English
Note
Help/Message language variants might become available in a future release of OpenVMS or on a per-country basis.
You use the SYS$LANGUAGES (plural) logical to define a list of languages other than English. (From this list, users can later select a language to be displayed on their processes, as explained in Section 6.7.4, ''User Definitions of Language, and Date and Time Formats''.)
Because English is the default language and must therefore always be available, English spellings are not taken from logical name translations; rather, they are looked up in an internal table.
$ DEFINE SYS$LANGUAGES FRENCH, GERMAN, ITALIAN
To add another language, for example, FINNISH, you must add FINNISH to the definition of SYS$LANGUAGES and execute the command procedure again.
6.7.2. Invoking LIB$DT_STARTUP.COM
SYS$LANGUAGES
The system loads the languages you have selected using the SYS$LANGUAGES (plural) logical.
Users can later select their own choice of languages by defining the SYS$LANGUAGE (singular) logical, as explained in Section 6.7.4, ''User Definitions of Language, and Date and Time Formats''.
LIB$DT_FORMAT
The system loads output formats that you can then use to specify default system formats.
Users can later define their own formats, as explained in Section 6.7.4, ''User Definitions of Language, and Date and Time Formats''.
$ @SYS$MANAGER:LIB$DT_STARTUP
If the translation of SYS$LANGUAGES fails, then English is used. If the translation of LIB$DT_FORMAT or any logical name relating to format fails, the OpenVMS standard ($ASCTIM) representation of the date and time is used, that is, dd-mmm-yyyy hh:mm:ss.cc.
6.7.3. Defining System Default Date and Time Formats
To define default date and time formats, you can use either user-defined formats, which are shown in Table 6.2, ''Format Mnemonics'', or predefined formats, which are shown in Table 6.3, ''Predefined Output Date Formats'' and Table 6.4, ''Predefined Output Time Formats''.
LIB$DATE_FORMAT_ nnn, where nnn ranges from 001 to 040
LIB$TIME_FORMAT_ nnn, where nnn ranges from 001 to 020
$ DEFINE/SYSTEM LIB$DT_FORMAT LIB$DATE_FORMAT_006, LIB$TIME_FORMAT_012
13 JAN 97 9:13 AM
Section 6.7.4, ''User Definitions of Language, and Date and Time Formats'' explains how users can select their own date and time formats to be displayed for their process.
6.7.3.1. Defining Your Own Format
Note
For user-defined formats, VSI recommends that you use values of _500 and above for _ nnn.
|
Date |
Explanation |
|---|---|
|
!D0 |
Day, Zero-Filled |
|
!DD |
Day, No Fill |
|
!DB |
Day, Blank-Filled |
|
!WU |
Weekday, Uppercase |
|
!WAU |
Weekday, Abbreviated, Uppercase |
|
!WC |
Weekday, Capitalized |
|
!WAC |
Weekday, Abbreviated, Capitalized |
|
!WL |
Weekday, Lowercase |
|
!WAL |
Weekday, Abbreviated, Lowercase |
|
!MAU |
Month, Alphabetic, Uppercase |
|
!MAAU |
Month, Alphabetic, Abbreviated, Uppercase |
|
!MAC |
Month, Alphabetic, Capitalized |
|
!MAAC |
Month, Alphabetic, Abbreviated, Capitalized |
|
!MAL |
Month, Alphabetic, Lowercase |
|
!MAAL |
Month, Alphabetic, Abbreviated, Lowercase |
|
!MN0 |
Month, Numeric, Zero-Filled |
|
!MNM |
Month, Numeric, No Fill |
|
!MNB |
Month, Numeric, Blank-Filled |
|
!Y4 |
Year, 4 Digits |
|
!Y3 |
Year, 3 Digits |
|
!Y2 |
Year, 2 Digits |
|
!Y1 |
Year, 1 Digit |
|
Time |
Explanation |
|
!H04 |
Hours, Zero-Filled, 24-Hour Clock |
|
!HH4 |
Hours, No Fill, 24-Hour Clock |
|
!HB4 |
Hours, Blank-Filled, 24-Hour Clock |
|
!H02 |
Hours, Zero-Filled, 12-Hour Clock |
|
!HH2 |
Hours, No Fill, 12-Hour Clock |
|
!HB2 |
Hours, Blank-Filled, 12-Hour Clock |
|
!M0 |
Minutes, Zero-Filled |
|
!MM |
Minutes, No Fill |
|
!MB |
Minutes, Blank-Filled |
|
!S0 |
Seconds, Zero-Filled |
|
!SS |
Seconds, No Fill |
|
!SB |
Seconds, Blank-Filled |
|
!C7 |
Fractional Seconds, 7 Digits |
|
!C6 |
Fractional Seconds, 6 Digits |
|
!C5 |
Fractional Seconds, 5 Digits |
|
!C4 |
Fractional Seconds, 4 Digits |
|
!C3 |
Fractional Seconds, 3 Digits |
|
!C2 |
Fractional Seconds, 2 Digits |
|
!C1 |
Fractional Seconds, 1 Digit |
|
!MIU |
Meridiem Indicator, Uppercase |
|
!MIC |
Meridiem Indicator, Capitalized (mixed case) |
|
!MIL |
Meridiem Indicator, Lowercase |
6.7.3.2. Using Predefined Formats
|
Date Format Logical |
Format |
Example |
|---|---|---|
|
LIB$DATE_FORMAT_001 |
!DB-!MAAU-!Y4 |
13-JAN-1998 |
|
LIB$DATE_FORMAT_002 |
!DB !MAU !Y4 |
13 JANUARY 1998 |
|
LIB$DATE_FORMAT_003 |
!DB.!MAU !Y4 |
13.JANUARY 1998 |
|
LIB$DATE_FORMAT_004 |
!DB.!MAU.!Y4 |
13.JANUARY.1998 |
|
LIB$DATE_FORMAT_005 |
!DB !MAU !Y2 |
13 JANUARY 98 |
|
LIB$DATE_FORMAT_006 |
!DB !MAAU !Y2 |
13 JAN 98 |
|
LIB$DATE_FORMAT_007 |
!DB.!MAAU !Y2 |
13.JAN 98 |
|
LIB$DATE_FORMAT_008 |
!DB.!MAAU.!Y2 |
13.JAN.98 |
|
LIB$DATE_FORMAT_009 |
!DB !MAAU !Y4 |
13 JAN 1998 |
|
LIB$DATE_FORMAT_010 |
!DB.!MAAU !Y4 |
13.JAN 1998 |
|
LIB$DATE_FORMAT_011 |
!DB.!MAAU.!Y4 |
13.JAN.1998 |
|
LIB$DATE_FORMAT_012 |
!MAU !DD, !Y4 |
JANUARY 13, 1998 |
|
LIB$DATE_FORMAT_013 |
!MN0/!D0/!Y2 |
01/13/98 |
|
LIB$DATE_FORMAT_014 |
!MN0-!D0-!Y2 |
01-13-98 |
|
LIB$DATE_FORMAT_015 |
!MN0.!D0.!Y2 |
01.13.98 |
|
LIB$DATE_FORMAT_016 |
!MN0 !D0 !Y2 |
01 13 98 |
|
LIB$DATE_FORMAT_017 |
!D0/!MN0/!Y2 |
13/01/98 |
|
LIB$DATE_FORMAT_018 |
!D0/!MN0-!Y2 |
13/01-98 |
|
LIB$DATE_FORMAT_019 |
!D0-!MN0-!Y2 |
13-01-98 |
|
LIB$DATE_FORMAT_020 |
!D0.!MN0.!Y2 |
13.01.98 |
|
LIB$DATE_FORMAT_021 |
!D0 !MN0 !Y2 |
13 01 98 |
|
LIB$DATE_FORMAT_022 |
!Y2/!MN0/!D0 |
98/01/13 |
|
LIB$DATE_FORMAT_023 |
!Y2-!MN0-!D0 |
98-01-13 |
|
LIB$DATE_FORMAT_024 |
!Y2.!MN0.!D0 |
98.01.13 |
|
LIB$DATE_FORMAT_025 |
!Y2 !MN0 !D0 |
98 01 13 |
|
LIB$DATE_FORMAT_026 |
!Y2!MN0!D0 |
980113 |
|
LIB$DATE_FORMAT_027 |
/!Y2.!MN0.!D0 |
/98.01.13 |
|
LIB$DATE_FORMAT_028 |
!MN0/!D0/!Y4 |
01/13/1998 |
|
LIB$DATE_FORMAT_029 |
!MN0-!D0-!Y4 |
01-13-1998 |
|
LIB$DATE_FORMAT_030 |
!MN0.!D0.!Y4 |
01.13.1998 |
|
LIB$DATE_FORMAT_031 |
!MN0 !D0 !Y4 |
01 13 1998 |
|
LIB$DATE_FORMAT_032 |
!D0/!MN0/!Y4 |
13/01/1998 |
|
LIB$DATE_FORMAT_033 |
!D0-!MN0-!Y4 |
13-01-1998 |
|
LIB$DATE_FORMAT_034 |
!D0.!MN0.!Y4 |
13.01.1998 |
|
LIB$DATE_FORMAT_035 |
!D0 !MN0 !Y4 |
13 01 1998 |
|
LIB$DATE_FORMAT_036 |
!Y4/!MN0/!D0 |
1998/01/13 |
|
LIB$DATE_FORMAT_037 |
!Y4-!MN0-!D0 |
1998-01-13 |
|
LIB$DATE_FORMAT_038 |
!Y4.!MN0.!D0 |
1998.01.13 |
|
LIB$DATE_FORMAT_039 |
!Y4 !MN0 !D0 |
1998 01 13 |
|
LIB$DATE_FORMAT_040 |
!Y4!MN0!D0 |
19980113 |
|
Time Format Logical |
Format |
Example |
|---|---|---|
|
LIB$TIME_FORMAT_001 |
!H04:!M0:!S0.!C2 |
09:13:25.14 |
|
LIB$TIME_FORMAT_002 |
!H04:!M0:!S0 |
09:13:25 |
|
LIB$TIME_FORMAT_003 |
!H04.!M0.!S0 |
09.13.25 |
|
LIB$TIME_FORMAT_004 |
!H04 !M0 !S0 |
09 13 25 |
|
LIB$TIME_FORMAT_005 |
!H04:!M0 |
09:13 |
|
LIB$TIME_FORMAT_006 |
!H04.!M0 |
09.13 |
|
LIB$TIME_FORMAT_007 |
!H04 !M0 |
09 13 |
|
LIB$TIME_FORMAT_008 |
!HH4:!M0 |
9:13 |
|
LIB$TIME_FORMAT_009 |
!HH4.!M0 |
9.13 |
|
LIB$TIME_FORMAT_010 |
!HH4 !M0 |
9 13 |
|
LIB$TIME_FORMAT_011 |
!H02:!M0 !MIU |
09:13 AM |
|
LIB$TIME_FORMAT_012 |
!HH2:!M0 !MIU |
9:13 AM |
|
LIB$TIME_FORMAT_013 |
!H04!M0 |
0913 |
|
LIB$TIME_FORMAT_014 |
!H04H!M0m |
09H13m |
|
LIB$TIME_FORMAT_015 |
kl !H04.!M0 |
kl 09.13 |
|
LIB$TIME_FORMAT_016 |
!H04H!M0' |
09H13' |
|
LIB$TIME_FORMAT_017 |
!H04.!M0 h |
09.13 h |
|
LIB$TIME_FORMAT_018 |
h !H04.!M0 |
h 09.13 |
|
LIB$TIME_FORMAT_019 |
!HH4 h !MM |
9 h 13 |
|
LIB$TIME_FORMAT_020 |
!HH4 h !MM min !SS s |
9 h 13 min 25 s |
6.7.4. User Definitions of Language, and Date and Time Formats
$ DEFINE SYS$LANGUAGE FRENCH
$ DEFINE LIB$DT_FORMAT LIB$DATE_FORMAT_002, LIB$TIME_FORMAT_006
6.8. Saving Your Customization
Once you have installed and customized your system, VSI recommends that you back up your system disk. To do so, follow the instructions in Section 11.17, ''Backing Up and Restoring the System Disk''.
On VAX systems, back up the console volume (if applicable).If your computer has a console storage device, make a backup copy of your console volume in case your original becomes corrupted. The operating system provides a command procedure called CONSCOPY.COM (in the SYS$UPDATE directory), which copies your console volume to a blank one.
The procedure for backing up the console volume varies for different computers. For specific instructions on backing up the console volumes, refer to the upgrade and installation supplement for your VAX computer.
6.9. Using SYSMAN to Manage System Time
Command | Function |
|---|---|
CONFIGURATION SET TIME | Updates system time |
CONFIGURATION SHOW TIME | Displays current system time |
6.9.1. Modifying the System Time
[dd-mmm-yyyy[:]] [hh:mm:ss.cc]
You can also enter delta time values. Refer to the VSI OpenVMS User's Manual for more information about time formats.
In a cluster environment, SYSMAN sets the time on each node to the value you specify. However, if you do not specify a value, SYSMAN reads the clock on the node from which you are executing SYSMAN and assigns this value to all nodes in the cluster. In a remote cluster, SYSMAN reads the clock on the target node in the cluster and assigns that value to all nodes. Note that the time-of-year clock is optional for some processors; refer to your processor's hardware handbook for more information.
SYSMAN tries to ensure that all processors in the cluster are set to the same time. Because of communication and processing delays, it is not possible to synchronize clocks exactly. However, the variation is typically less than a few hundredths of a second. If SYSMAN cannot set the time to within one-half second of the specified time, you receive a warning message that names the node that failed to respond quickly enough.
As a result of slight inaccuracies in each processor clock, times on various members of a cluster tend to drift apart. The first two examples show how to synchronize system time in a cluster.
Examples
- The following procedure sets the time on all cluster nodes to the value obtained from the local time-of-year clock, waits 6 hours, then resets the time for the cluster:
$ SYNCH_CLOCKS: $ RUN SYS$SYSTEM:SYSMAN SET ENVIRONMENT/CLUSTER CONFIGURATION SET TIME EXIT $ WAIT 6:00:00 $ GOTO SYNCH_CLOCKS - The next example sets the environment to NODE21, NODE22, and NODE23, sets privilege, and modifies the system time on all three nodes:
SYSMAN> SET ENVIRONMENT/NODE=(NODE21,NODE22,NODE23) SYSMAN> SET PROFILE/PRIVILEGE=LOG_IO SYSMAN> CONFIGURATION SET TIME 12:38:00
- The following example sets the environment to cluster and displays the system time for all nodes:
SYSMAN> SET ENVIRONMENT/CLUSTER/NODE=NODE23 SYSMAN> CONFIGURATION SHOW TIME System time on node NODE21: 19-APR-2001 13:32:19.45 System time on node NODE22: 19-APR-2001 13:32:27.79 System time on node NODE23: 19-APR-2001 13:32:58.66
6.9.1.1. Resetting System Time After January 1
- The first time in a new year that you reboot an OpenVMS Cluster system or a node in the system, one or more nodes display any of the following system times:
A year in the past
A year in the future, which might cause passwords to expire and other difficulties
A correct time, but a SHOW SYSTEM command indicates that the system has been up since a time in the 1800s
- Even if you correct the system time during system boot, the following problems might remain:
A SHOW SYSTEM command displays an incorrect up time such as a date in the 1800s
The error log report (ERRLOG) shows errors for a year in the future
Batch jobs are waiting for a year in the future
Files have a creation or modification date in the future
01-JAN-CURRENT_YEAR 00:00:00.00
Because all TODRs ordinarily have the same base, multiple CPUs can boot off the same system disk, and you can use multiple system disks on one CPU; the system sets the time correctly.
Writes the current time to the system image file
Resets the TODR as an offset within the current year
Note
The system issues the SET TIME command when it boots and as a part of the normal SHUTDOWN command procedure.
By December, each node has a very large offset stored in the TODR (from the base time of 1-JAN of that year). When the time advances to a new year, the system image still has the old year and the TODR values are still large.
The new year becomes the base year.
The system resets the TODR on that node.
The other nodes still have a large value in the TODR.
After these three events occur, if a node that has a large TODR crashes and rejoins the cluster, its system time is initially in the next year (applying the large TODR to the new year).This system time is recorded as the system's boot time. When the node joins the cluster, its time is set to the correct value but the boot time remains one year in the future. Certain forms of the SHOW SYSTEM command compare current time to boot time; in this instance, SHOW SYSTEM displays incorrect values.
Sharing a system disk across multiple CPUs pushes the time into the future
Using multiple disks on one CPU pushes the time into the past
Example
$ RUN SYS$SYSTEM:SYSMAN SYSMAN> SET ENVIRONMENT/CLUSTER SYSMAN> SET PROFILE/PRIVILEGE=(LOG_IO,SYSLCK) SYSMAN> CONFIGURATION SET TIME 05-JAN-2001:12:00:00 SYSMAN> EXIT
Notes
In a node that is not part of a cluster, use the SET TIME command and specify a time. If you do not specify a time, the SET TIME command updates the system time using the time in the TODR.
If you are running the DIGITAL Distributed Time Service (DECdts) on your system, you must use it to set the time.
Chapter 7. Managing User Accounts
This chapter describes how to grant access to users on your system. It tells you how to add and maintain user accounts, and it describes the privileges that you can give and the resources that you can allocate to the users on your system. It also describes the system management features of the OpenVMS Mail utility (MAIL).
Information Provided in This Chapter
|
Task |
Section |
|---|---|
|
Managing system-supplied UAF accounts | |
|
Preparing to add user accounts | |
|
Adding user accounts | |
|
Using command procedures for interactive accounts |
Section 7.7.1, ''Using Command Procedures for Interactive Accounts'' |
|
Modifying a user account | |
|
Listing user accounts | |
|
Maintaining the user environment | |
|
Deleting a user account | |
|
Restricting the use of accounts | |
|
Using login procedures for restricted accounts |
Section 7.8.5, ''Using Login Command Procedures for Restricted or Captive Accounts'' |
|
Setting up special accounts | |
|
Managing Mail | |
|
Managing system resources |
|
Concept |
Section |
|---|---|
|
Understanding the user authorization file | |
|
Understanding the protection of authorization files |
Section 7.2, ''Understanding the Protection of Authorization Files'' |
|
Understanding UAF login checks | |
|
Understanding system-supplied UAF accounts |
Section 7.4.1, ''Understanding System-Supplied UAF Accounts'' |
|
Understanding account security | |
|
Understanding network proxy accounts | |
|
Understanding pages and pagelets |
7.1. Understanding the User Authorization File
The system user authorization file (UAF), SYS$SYSTEM:SYSUAF.DAT, contains user account records. Each record consists of fields that provide information about the account's user name, login characteristics, login restrictions, and resource control attributes. You specify the account user name as a parameter to AUTHORIZE commands; the other fields are specified as qualifiers to AUTHORIZE commands.
The system uses the UAF to validate login requests and to setup processes for users who successfully log in. You create, examine, and modify UAF records with the Authorize utility (AUTHORIZE).
Priority
Limits and quotas
Privileges
The following sections briefly discuss these resource control attributes.
7.1.1. Priority
A user's priority is the base process priority that the system uses to schedule computer time for the process associated with the user's account.
On VAX systems, priorities range in value from a low of 0 to a high of 31. 0 through 15 are timesharing priorities; 16 through 31 are real-time priorities.
On Alpha and IA-64 systems, priorities range in value from a low of 0 to a high of 63. 0 through 15 are timesharing priorities; 16 through 63 are real-time priorities.
The system schedules processes with real-time priorities strictly according to base priority—the executable real-time process with the highest base priority executes first. Processes with timesharing priorities are scheduled according to a slightly different principle, to promote equitable service to all users.
Leave the base priority at the default of 4 for timesharing accounts.
7.1.2. Limits and Quotas
Limits are set on system resources that can be reused; for example, the amount of memory that a process can use for I/O requests. Most limits restrict the use of physical memory. You set limits for processes associated with accounts through the appropriate UAF fields. You can change some of these limits later with DCL commands or by calling system services from programs.
|
Resource Type |
Description of Limit |
|---|---|
|
Pooled |
A process and its subprocesses share the resource on a first-come, first-served basis until the limit is reached. |
|
Nondeductible |
A subprocess receives the same limit on the resource as the creator receives. The creator's limit is not affected. |
|
Deductible |
A subprocess receives a portion of the creator's resource. That portion is deducted from the creator's limit. |
|
Systemwide |
A process and all created subprocesses with the same user name or account share the total limit on a first-come, first-served basis. |
Normally, leave limits at their default values. For the default values for the system and user accounts, see the sample SYSTEM and DEFAULT user authorization file records supplied with the Authorize utility on your distribution kit. Also see Section 7.11, ''Managing System Resources''for a full description of limits and quotas.
7.1.3. Privileges
Privileges determine what functions users are authorized to perform on the system. System manager functions require privileges that are denied to most users. Because the SYSTEM account has full privileges by default, exercise caution in using it. For example, if you log in to the SYSTEM account, you can modify and delete any file regardless of its protection.
| Category | Privilege | Activity Permitted |
|---|---|---|
| None | None | None requiring privileges |
| Normal | NETMBX | Create network connections |
| TMPMBX | Create temporary mailbox | |
| Group | GROUP | Control processes in the same group |
| GRPPRV | Group access through system protection field | |
| Devour | ACNT | Disable accounting |
| ALLSPOOL | Allocate spooled devices | |
| BUGCHK | Make machine check error log entries | |
| EXQUOTA | Exceed disk quotas | |
| GRPNAM | Insert group logical names in the name table | |
| PRMCEB | Create/delete permanent common event flag clusters | |
| PRMGBL | Create permanent global sections | |
| PRMMBX | Create permanent mailboxes | |
| SHMEM | Create/delete structures in shared memory | |
| System | ALTPRI | Set base priority higher than allotment |
| AUDIT | Generate audit records | |
| OPER | Perform operator functions | |
| PSWAPM | Change process swap mode | |
| SECURITY | Control any process | |
| SYSLCK | Perform security-related functions | |
| WORLD | Lock systemwide resources | |
| Objects | DIAGNOSE | Diagnose devices |
| IMPORT | Mount a non-labeled tape volume | |
| MOUNT | Execute mount volume QIO | |
| SYSGBL | Create systemwide global sections | |
| VOLPRO | Override volume protection | |
| READALL | Bypass existing restrictions to read an object | |
| All | BYPASS | Disregard protection |
| CMEXEC | Change to executive mode | |
| CMKRNL | Change to kernel mode | |
| DETACH | Create detached processes of arbitrary UIC | |
| DOWNGRADE | Write to a lower secrecy object or lower an object's classification | |
| LOG_IO | Issue logical I/O requests | |
| PFNMAP | Map to specific physical pages | |
| PHY_IO | Issue physical I/O requests | |
| READALL | Possess read access to all system objects | |
| SETPRV | Enable any privilege | |
| SHARE | Access devices allocated to other users | |
| SYSNAM | Insert system logical names in the name table | |
| SYSPRV | Access objects through system protection field | |
| UPGRADE | Write to a higher integrity object or raise an object's integrity level |
Because certain images (such as SET.EXE) require access to the system UAF and are normally installed with the SYSPRV privilege, make sure you always grant system access to SYSUAF.DAT.
7.2. Understanding the Protection of Authorization Files
To display the protection codes for any file, use the DCL command DIRECTORY/PROTECTION.
User authorization file, SYSUAF.DAT
The user authorization file, SYSUAF.DAT, is created with the following default protection:SYSUAF.DAT S:RWED, O:RWED, G, W
Proxy authorization files, NETPROXY.DAT and NET$PROXY.DAT
Two proxy authorization files, NETPROXY.DAT and NET$PROXY.DAT, are created with the following default protections:
NETPROXY.DAT S:RWED, O:RWED, G, W NET$PROXY.DAT S, O, G, W
The primary proxy database that the system uses is the NET$PROXY.DAT file. NETPROXY.DAT is maintained:For use by DECnet for OpenVMS
For backward compatibility
See Section 7.9.3, ''Understanding Network Proxy Accounts'' for more details about network proxy accounts.
Rights database file, RIGHTSLIST.DAT
The RIGHTSLIST.DAT authorization file is created with the following default protection:RIGHTSLIST.DAT S:RWED, O:RWED, G, W
The procedures for adding a user account are discussed in detail in Section 7.6, ''Adding User Accounts''. Because the UAF is the prime repository for storing information about user accounts, it is important to understand its components before you add accounts.
7.3. Understanding UAF Login Checks
This section describes the system checks the login fields of the UAF when a user attempts to login.
|
Step |
Action |
Result |
|---|---|---|
|
1. |
System examines the login flags. |
The system begins with DISUSER. If the DISUSER flag is set, the login attempt fails. Note that setting this flag for powerful, infrequently used accounts (such as Field Service accounts) eliminates the risk of guessed passwords for those accounts. |
|
2. |
System verifies primary or secondary day restrictions. |
After checking the current day type, the system determines whether hourly login restrictions are in effect (as defined by the /ACCESS,/DIALUP, /INTERACTIVE, /LOCAL, and /REMOTE qualifiers). If the current hour is restricted, the login fails immediately. VSI recommends that you limit nonbatch access of the SYSTEM account by using access times and day types. See Section 7.8.1, ''Setting Day Types'' and Section 7.8.2, ''Restricting Logins to Specific Times''. |
|
3. |
System passes control to the command interpreter. |
The command interpreter is named in the user's UAF record; for example, DCL. |
|
4. |
System checks whether SYS$LOGIN is defined. |
If SYS$LOGIN is defined, the logical name is translated (in the case of DCL, to SYS$MANAGER:SYLOGIN.COM) and that procedure executes. If SYS$SYLOGIN is not defined, no system login is run. If a command procedure is specified in the LGICMD field and that procedure exists, it executes. Otherwise, if the LGICMD field is blank, the user's command file (named LOGIN.COM if the CLI is DCL), which is located in the SYS$LOGIN directory, executes automatically (if it exists). The system will not execute both a command procedure specified in the LGICMD field and a user's LOGIN file; if a procedure is specified in the LGICMD field, the system uses that procedure by default. You can, however, instruct the system to execute a user's LOGIN by calling it from within the procedure specified in LGICMD. |
After a successful login, the command interpreter prompts for user input (DCL usually displays a dollar sign), and the user responds with commands acceptable to the command interpreter. (DCL accepts those commands documented in the VSI OpenVMS DCL Dictionary.) However, the system prohibits activities that violate the user's privilege allowance or exceed resource quotas.
7.4. Managing System-Supplied UAF Accounts
Typically, you use the UAF supplied with the distribution kit. (You can, however, rename the UAF with the DCL command RENAME, and then create a new UAF with AUTHORIZE.) Allow access to this file only to those with SYSTEM privileges. See the AUTHORIZE section in the VSI OpenVMS System Management Utilities Reference Manual for guidelines on protecting system files.
The UAF is accessed as a shared file. Updates to the UAF are made on aper-record basis, which eliminates the need for both a temporary UAF and a new version of the UAF after each AUTHORIZE session. Updates become effective as soon as you enter AUTHORIZE commands, not after the termination of AUTHORIZE.(For this reason, do not enter temporary values with the intent of fixing them later in the session.)
The Authorize utility (AUTHORIZE) provides a set of commands and qualifiers to assign values to any field in a UAF record. See the Authorize utility section in the VSI OpenVMS System Management Utilities Reference Manual for complete information about UAF record fields and the commands and qualifiers used to assign attributes to these fields.
7.4.1. Understanding System-Supplied UAF Accounts
On VAX systems, the UAF on software distribution kits contains five accounts: DEFAULT, FIELD, SYSTEM, SYSTEST, and SYSTEST_CLIG.
On Alpha and IA-64 systems, DEFAULT and SYSTEM accounts are created for you. You can use SYS$MANAGER:CREATE_SPECIAL_ACCOUNTS.COM to create SYSTEST, SYSTEST_CLIG, and Field Service accounts, as explained in Section 7.4.2, ''Creating Accounts On Alpha and IA-64 systems (Alpha and IA-64 systems)''.
|
UAF Record |
Description |
|---|---|
|
DEFAULT |
Serves as a template for creating new user accounts. A new user account is assigned the values of the DEFAULT account except where you explicitly override those values. Thus, whenever you add a new account, you need only specify values for fields that you want to be different. You cannot rename or delete the DEFAULT account from the UAF. The following AUTHORIZE command creates a new account
having the same values as the DEFAULT account, except that
the password, UIC, and default directory fields are
changed:
UAF> ADD MARCONI/PASSWORD=QLP6YT9A/UIC=[033,004]/DIRECTORY=[MARCONI] Section 7.6, ''Adding User Accounts'' gives an example of how to use AUTHORIZE to add a user account. Section 7.7.4, ''Maintaining the User Environment'' explains how to create and use additional default templates. |
|
FIELD |
Permits VSI support representatives to test a new system. On VAX systems, the default Field Service account has the user name FIELD. On Alpha and IA-64 systems, you name Field Service accounts for specific VSI support representatives; for example, Mary_Smith or John_Jones. |
|
SYSTEM |
Provides a means for you to log in with full privileges.
You can modify the record for the system manager's account
but you cannot rename it or delete it from the UAF.
CautionDo not change the SYSTEM account UAF record fields for the default device, directory, and privileges. Installation of maintenance releases of the operating system and optional software products depends on certain values in these fields. Note any hourly or daily restrictions that you have implemented on the SYSTEM account when performing upgrades from the SYSTEM account. |
|
SYSTEST |
Provides an appropriate environment for running UETP, a User Environment Test Package, on standalone systems. (See VSI OpenVMS System Manager's Manual, Volume 2: Tuning, Monitoring, and Complex Systems.) |
|
SYSTEST_CLIG |
Provides an appropriate environment for running UETP in an OpenVMS Cluster environment. SYSTEST_CLIG accounts have no passwords associated with them.(See VSI OpenVMS System Manager's Manual, Volume 2: Tuning, Monitoring, and Complex Systems.) |
7.4.2. Creating Accounts On Alpha and IA-64 systems (Alpha and IA-64 systems)
On Alpha and IA-64 systems, you can use the SYS$MANAGER:CREATE_SPECIAL_ACCOUNTS.COM command procedure to create SYSTEST, SYSTEST_CLIG, and multiple Field Service accounts.
7.4.2.1. Creating Field Service Accounts (Alpha Only)
Create an account for each VSI support (Field Service) representative rather than just one account called FIELD for all the representatives. Note that you must use the command procedure for each account you want to create.
Use account names that represent the actual names of support representatives, not a generic name such as FIELD.
$ @CREATE_SPECIAL_ACCOUNTS.COM
This procedure creates accounts.
Passwords may be needed for the following accounts:
SYSTEST, Field Service
Passwords must be a minimum of 8 characters in length. All passwords
will be checked and verified. Any passwords that can be guessed easily
will not be accepted.
* Do you want to create an account for SYSTEST (Y/N): N [Return]
* Do you want to create an account for SYSTEST_CLIG (Y/N): N [Return]
* Do you want to create an account for Field Service (Y/N): Y [Return]
* Enter username for Field Service account: john_jones [Return]
* Enter password for JOHN_JONES: * Re-enter for verification:
* Re-enter for verification:
$Note that the system does not display the password or password verification that you enter.
Disabling Field Service Accounts (Alpha Only)
You can use the Authorize utility (AUTHORIZE) to disable VSI support representative accounts when these accounts are not in use and enable them again when they are needed.
MODIFY username/FLAGS=DISUSER
$ RUN SYS$SYSTEM:AUTHORIZE UAF> MODIFY JOHN_JONES/FLAGS=DISUSER
The login flag DISUSER disables the account and prevents anyone from logging in to the account.
Reenabling Field Service Accounts (Alpha Only)
MODIFY username /FLAGS=NODISUSER
UAF> MODIFY JOHN_JONES/FLAGS=NODISUSER
7.4.2.2. Creating SYSTEST and SYSTEST_CLIG Accounts (Alpha and I64)
$ @CREATE_SPECIAL_ACCOUNTS.COM
This procedure creates accounts.
Passwords may be needed for the following accounts:
SYSTEST, Field Service
Passwords must be a minimum of 8 characters in length. All passwords
will be checked and verified. Any passwords that can be guessed easily
will not be accepted.
* Do you want to create an account for SYSTEST (Y/N): Y
* Enter password for SYSTEST:
* Re-enter for verification:
* Do you want to create an account for SYSTEST_CLIG (Y/N): Y
The SYSTEST_CLIG account will be disabled. You must reenable
it (/FLAGS=NODISUSER) before running UETP but do not assign a password.
* Do you want to create an account for FIELD_SERVICE (Y/N): N
$Enabling SYSTEST_CLIG Accounts (Alpha and I64)
UAF> MODIFY SYSTEST_CLIG/FLAGS=NODISUSER
Disabling SYSTEST_CLIG Accounts (Alpha and I64)
UAF> MODIFY SYSTEST_CLIG/FLAGS=DISUSER
7.4.3. Maintaining System-Supplied Accounts (VAX Only)
Disable the FIELD and SYSTEST accounts. Also disable any infrequently used accounts.
To disable an account, use the AUTHORIZE command in the following format:MODIFY username/FLAGS=DISUSER
For example:$ RUN SYS$SYSTEM:AUTHORIZE UAF> MODIFY WOLF/FLAGS=DISUSER
The login flag DISUSER disables the account and prevents anyone from logging in to the account.
To enable the account when it is needed, run AUTHORIZE and enter the command in the following format:MODIFY username /FLAGS=NODISUSER
- Optionally, change fields in the DEFAULT account. For example:
UAF> MODIFY DEFAULT/DEVICE=DISK$USER/WSQUO=750
In this example, the default device is set to the name most commonly used for user accounts that will be added. Likewise, the working set value is set to a value appropriate for most users on the system.
7.4.4. Using the SYSTEM Account
Use the SYSTEM account only for system functions such as performing backups and installing maintenance updates. The SYSTEM account has full privileges enabled by default, so exercise caution when you use it. For example, because you have BYPASS privilege, the system allows you to delete any file, no matter what its protection. If you enter an incorrect name or spurious asterisk, you might destroy files that you or other users need to keep. Consider using an account with fewer privileges for daily system management activities.
SET FORWARD node::username
$ MAIL MAIL> SET FORWARD WINSTON::WOLF MAIL> EXIT
Caution
Do not use DISUSER for user name SYSTEM if SYSTARTUP_VMS.COM submits batch jobs. Disable all access except Batch in these cases.
Also, be careful not to disable all of your privileged system accounts. If you inadvertently do so, you can recover by setting the system parameter UAFALTERNATE during a conversational boot operation. See Chapter 4, "Starting Up and Shutting Down the System" for information about emergency startup procedures.
7.4.5. Using AUTHORIZE to Maintain UAF Accounts
Identify the user
Define the user's work environment
Control use of system resources
How to Perform This Task
Set your default to the directory that contains the SYSUAF.DAT file, typically, SYS$SYSTEM.
Gain access to a specific user record by running AUTHORIZE.
Enter the SHOW command (see example) to display a specific user record.
Enter AUTHORIZE commands such as ADD and MODIFY to create or change the information in the fields of the UAF record.
See Section 7.11, ''Managing System Resources'' for a list of privileges, limits, and quotas that you can specify in the resource control and privileges fields of the UAF record.
Example
$ RUN SYS$SYSTEM:AUTHORIZE UAF> SHOW WELCH
Username: WELCH Owner: ROB WELCHMaxacctjobs: 0 Shrfillm: 0 Pbytlm: 0 Maxdetach: 0 BIOlm: 10 JTquota: 1024 Prclm: 2 DIOlm: 10 WSdef: 150 Prio: 4 ASTlm: 10 WSquo: 256 Queprio: 4 TQElm: 10 WSextent: 512 CPU: (none) Enqlm: 100 Pgflquo: 10240 Authorized Privileges: TMPMBX NETMBX
Default Privileges: TMPMBX NETMBX Identifier
Value Attributes
PROJECT_X %X8001001E RESOURCE NODYNAMIC DOCU_PROC %X80010044 NORESOURCE NODYNAMIC
| User identification fields contain information used by the system for accounting purposes and user identification. |
| Default fields contain the default
specifications for the following elements:
|
| Login characteristics fields impose
specific login restrictions that perform the following actions:
|
| Resource control fields control
system resources by:
|
| Privileges fields specify the privileges that allow use of restricted and sensitive system functions. |
| Identifier fields list the ACL identifiers that the user holds and that are recorded in the rights database file. |
| Attributes fields list the characteristics specified when adding identifiers to the rights database or when granting identifiers to users. |
7.5. Preparing to Add User Accounts
This section describes what to do before adding a user account.
7.5.1. Choosing an Account Type
|
Account Type |
Characteristics | |
|---|---|---|
|
Interactive |
This account has access to the system software. Work of a general nature, such as program development or text editing, is performed in this account. Usually, such an account is considered an individual account. | |
|
Limited Access |
This account provides controlled login to the system and, in some cases, has only a subset of user software available. Limited-access accounts ensure that the system login command procedure (SYLOGIN.COM) and the process login command procedure (specified by the /LGICMD qualifier in the UAF), as well as any command procedures they call, are executed. (See the VSI OpenVMS Guide to System Security for information about writing limited access account command procedures.) The two types of limited accounts are: restricted and captive. | |
|
Restricted |
Used for network objects like Mail, for network proxy accounts, or for implementing user authentication systems like smart cards. | |
|
Captive |
Limited by function; that is, only those who perform a particular function can use it (for example, an inventory system). Anyone whose job entails inventory control can access your system, but that person cannot access other subsystems or the base software. You might also use a captive account to run batch operations during unsupervised periods or to run applications programs with information you want to keep private. | |
7.5.2. Performing Additional Tasks
Select a user name and password.
Select a user identification code (UIC).
Decide where the account's files will reside (which device and directory).
Use the System Management utility (SYSMAN) to add a disk quota entry for this UIC, if disk quotas are in effect. You can do this only after you have created the user's account with the Authorize utility.
- Create a default directory on the appropriate volume, using the following DCL command format:
CREATE/DIRECTORY directory-spec/OWNER_UIC=uic
Determine the security needs of the account (that is, the level of file protection, privileges, and access control).
Establish any login/logout command procedures.
These tasks are described in detail in the sections that follow. When you have completed the tasks for preparing to add a user account, you are ready to add the account by following one of the methods described in Section 7.6, ''Adding User Accounts''.
7.5.2.1. Selecting a User Name and Password
To determine a user name and password, use naming conventions that take into consideration the nature of the account. For example, some installations use the name of the person who will use the account.
Captive accounts, on the other hand, often use a name that describes the function of the account. Thus, an interactive or restricted account for Robert Jones might have a user name of JONES, while a captive account for an inventory system might be called INV103289, which gives some indication of the function of the account but is not easy to guess. Remember to assign unique user names.
For interactive accounts, it is best to let the person using the account control the password. Initially, provide a password that is not easy to guess. The user will be forced to change the password at first login. Only the person using the account should know the password. Encourage all users to set obscure passwords of at least eight characters and to change them frequently, or force the use of generated passwords with the /FLAGS=GENPWD and /GENERATE_PASSWORD qualifiers.
|
Qualifier |
Action |
|---|---|
|
/PWDMINIMUM |
Specifies the minimum password length in characters (default is 6 for VSI versions of OpenVMS V8.4 and 8 for OpenVMS V9 and above). |
|
/PWDLIFETIME |
Specifies a delta-time value. One week before that date, the system issues a warning message to the user. On that date, the password expires if it has not been changed. |
|
/GENERATE_PASSWORD |
Invokes a password generator to generate user passwords. |
|
/FLAGS=GENPWD |
Allows you to force use of the automatic password generator when a user changes a password. Consider using the password generator for privileged accounts or whenever a user has access to sensitive data. |
For captive accounts, the degree of sensitivity of the data used by the account should determine the type of password. For example, the password for a payroll application should be obscure, while the password for a suggestions account might not even be required; it could be null (in which case users would not be prompted for the password).
Prohibit users from changing the passwords of captive accounts. To do this, specify /FLAGS=LOCKPWD when you create the captive account. Change the password whenever you feel it might be compromised (for example, if a person using the account moves to another job).
MODIFY user-name/PASSWORD=new_password
See the VSI OpenVMS System Management Utilities Reference Manual for more information about AUTHORIZE.
7.5.2.2. Assigning the User Identification Code
Assign each account a unique user identification code (UIC). A UIC has two formats: alphanumeric and numeric.
The alphanumeric UIC consists of a member name and, optionally, a group name separated by a comma and enclosed within brackets (for example, [DOCO,PRICE]). These identifiers might also appear as numeric characters consisting of a group identifier and a member identifier in octal (for example, [11,200]).
Note
VSI reserves UIC group 1 and groups 300–377.
7.5.2.3. Adding a Disk Quota Entry
Invoke SYSMAN.
Define the management environment to be node LARRY.
Add a disk quota entry on the volume DISK$USER for UIC [014,JONES].The entry has a permanent quota of 2000 blocks and an overdraft of 500 blocks.
Exit from the utility.
Example
$ RUN SYS$SYSTEM:SYSMAN SYSMAN> SET ENVIRONMENT/NODE=LARRY SYSMAN> DISKQUOTA ADD [014,JONES]/DEVICE=DISK$USER/PERMQUOTA=2000/OVERDRAFT=500 SYSMAN> EXIT
The sum of the quota and overdraft values is the absolute maximum number of blocks allotted to the user, which in this example is 2500 blocks. For more information about SYSMAN and establishing disk quotas, see the VSI OpenVMS System Management Utilities Reference Manual.
7.5.2.4. Setting the User Default Device for an Interactive Account
For each interactive account, create a top-level (default) directory (using the DCL command CREATE/DIRECTORY). In the directory place a login file, login file template, and/or logout file, as appropriate. The interactive user creates and maintains files and subdirectories in this directory. Make the owner of the directory the UIC for the new account. Usually, you also use the name of the account for the default directory.
Example
$ CREATE/DIRECTORY DISK$USER:[JONES]/OWNER_UIC=[014,1]
The volume on which the directory is established depends on which devices you reserve for interactive accounts and how much space is available on each.
The default file specification you provide the new account (when you run AUTHORIZE) should be the name of the device and the name of the top-level directory you used in the DCL command CREATE/DIRECTORY.
7.5.2.5. Setting the User Default Device for a Captive Account
For a captive account, whether you create a top-level directory depends on the nature of the user system. If people use files in a particular directory, make that directory the default directory specification. For example, if the inventory system uses the files DISK$DATA:[INV]STOCK1.DATand DISK$DATA:[INV]STOCK2.DAT, make the default device specification DISK$DATA: and make the default directory specification [INV].
7.5.3. Understanding Account Security
The level of security that you establish for an account depends on the purpose of the account and whether it is shared with other users or groups. For an interactive user account, the default UIC-based protection is usually adequate.
Protecting Users' Files
The default protection for top-level directories is no world access. However, for new user directories, you might want to change the default to world executeaccess so that users will not have to change directory protection to allow other users read access to files in that directory.
Users can further protect their files and subdirectories on an individual basis with the DCL command SETSECURITY.
Using Access Control Lists (ACLs)
In some cases, such as project accounts, you might want to set up an additional level of protection by using access control lists (ACLs). ACL-based protection provides a more refined level of security in cases where different groups or members of overlapping groups share access to an account such as a project account. ACLs offer a way to grant or deny users access to any security-relevant object.
Section 7.9.2, ''Setting Up a Project Account with ACL Identifiers'' describes how to set up a project account with ACL-based protection. For more information about how to set up and edit ACLs, see the VSI OpenVMS Guide to System Security and the VSI OpenVMS System Management Utilities Reference Manual.
Using AUTHORIZE to Maintain the Rights Database
The rights database (RIGHTSLIST.DAT) is a file that associates users of the system with access-controlling identifiers. When a user logs in, the system checks the rights database for the identifiers that the user holds. You use the Authorize utility (AUTHORIZE) to maintain the rights database by adding or deleting identifiers as needed.
By allowing a group of users to hold common identifiers, you can create a group protection scheme that is more intricate than that provided by the UIC-based protection.
Using Protected Subsystems
Protected subsystems provide conditional access to data. In a protected subsystem, an application protected by normal access controls serves as a gatekeeper to objects belonging to the subsystem. While users are running the application, their process rights list contains identifiers giving them access to objects owned by the subsystem. As soon as users exit from the application, these identifiers and, therefore, the users' access rights to objects are taken away. For more information, see the VSI OpenVMS Guide to System Security.
7.6. Adding User Accounts
The Authorize utility (AUTHORIZE)
A command procedure
7.6.1. Adding a User Account with AUTHORIZE
Once you analyze the purpose of a user account and decide which attributes and resources it requires, you can use the Authorize utility (AUTHORIZE) to create the account.
How to Perform This Task
- Give yourself the SYSPRV privilege:
$ SET PROCESS/PRIVILEGE=SYSPRV
- Enter the following commands to set your default device and directory to SYS$SYSTEM and invoke AUTHORIZE:
$ SET DEFAULT SYS$SYSTEM $ RUN AUTHORIZE UAF>
- Use the AUTHORIZE command ADD to specify attributes in the UAF fields as shown in the following example:
UAF> ADD JONES/PASSWORD=LPB57WM/UIC=[014,1] - _UAF> /DEVICE=DISK$USER/DIRECTORY=[JONES] - _UAF> /LGICMD=DISK$USER:[NEWPROD]GRPLOGIN - _UAF> /OWNER="ROBERT JONES"/ACCOUNT=DOC
Choosing Qualifiers
|
Limits and Quotas? | ||
|
/ASTLM |
/FILLM |
/PRCLM |
|
/BIOLM |
/JTQUOTA |
/TQELM |
|
/BYTLM |
/MAXACCTJOBS |
/WSDEFAULT |
|
/CPUTIME |
/MAXDETACH |
/WSEXTENT |
|
/DIOLM |
/MAXJOBS |
/WSQUOTA |
|
/ENQLM |
/PGFLQUOTA | |
|
Priority? | ||
|
/PRIORITY | ||
|
Privileges | ||
|
/DEFPRIVILEGES |
/PRIVILEGES | |
|
Login Access Controls? | ||
|
/ACCESS |
/FLAGS? |
/PRIMEDAYS |
|
/DIALUP |
/INTERACTIVE |
/REMOTE |
|
/EXPIRATION |
/LOCAL | |
7.6.2. Adding a User Account with a Command Procedure
As an alternative to using the Authorize utility, you can use a command procedure to create user accounts. The ADDUSER.COM procedure, which is located in the SYS$EXAMPLES directory, is an example of such a procedure;it supplies prompts and several default values for creating the new account.
$ @SYS$EXAMPLES:ADDUSER.COM
|
UAF Field |
Default Value |
|---|---|
|
User name |
No default; must supply |
|
Owner |
No default; must supply |
|
Password |
User name specified |
|
UIC group number |
200 |
|
UIC member number |
No default; must supply number |
|
Account name |
Optional |
|
Privileges |
TMPMBX, NETMBX |
|
Login directory |
User name specified |
|
Login device |
$DISK1 |
|
Disk quota |
1000 |
|
Overdraft quota |
100 |
Is everything satisfactory with the account [YES]?
Note
If you press Ctrl/Y before, during, or directly after the system displays the characteristics of the account (that is, before you respond to the "satisfactory?" prompt), the account, or portions of it, will still be added.
Make sure users log in to their accounts promptly to change the password.
7.7. Maintaining User Accounts
|
Task |
Section |
|---|---|
|
Using command procedures for interactive accounts |
Section 7.7.1, ''Using Command Procedures for Interactive Accounts'' |
|
Modifying a user account | |
|
Listing user accounts | |
|
Maintaining the user environment | |
|
Deleting a user account | |
|
Using BACKUP to remove user files | |
|
Disabling a user account |
7.7.1. Using Command Procedures for Interactive Accounts
Define symbols
Assign logical names
Display messages and the time of day
Set terminal characteristics
Define keys to perform certain functions
Set process default file protection (SET PROTECTION/DEFAULT)
Login command procedures are useful for saving keystrokes and standardizing operations.
|
Login Command Procedure |
Description |
|---|---|
|
System |
As system manager, you normally create and maintain a standard login command procedure in the system directory (the file is usually named SYS$MANAGER:SYLOGIN.COM). You then assign the logical name SYS$SYLOGIN to the name of the file so that whenever a user logs in, the procedure is executed. |
|
Individual |
For any or all accounts, you can specify an additional login command procedure with the /LGICMD qualifier of the AUTHORIZE commands ADD, MODIFY, or COPY. You can give the login command procedure any valid file specification. Whenever the user logs in, the additional procedure is executed after SYS$SYLOGIN. |
|
User-specified command file |
If system (and, optionally, individual) login command
procedures are not implemented, the system looks for a
command file called LOGIN.COM in the user's login directory
as defined by the UAF (user authorization file) record
device and directory fields. If the file is found, the
system executes it. The user develops and maintains this
command file, which should follow these conventions:
You can provide an aid to new users by copying a login command procedure template into newly created top-level directories. However, to ensure proper ownership of the file, change the owner UIC (user identification code) of the file to that of the user. Make this change with the DCL command SET FILE/OWNER. |
$ V = F$VERIFY(0)
$START:
$ !
$ SET NOCONTROL=Y ! Do not allow Ctrl/Y to exit procedure
$ SET NOON
$ !
$ ! Allow network jobs to start faster
$ !
$ IF F$MODE() .EQS. "NETWORK" THEN GOTO EXIT
$ !
$ ! Enable Ctrl/T handling by DCL
$ !
$ SET CONTROL=T
$ !
$ ! Define Foreign Commands For Installed Utilities
$ !
$ USERS == "SHOW USERS"
$ DISPLAY == "MONITOR PROCESSES/TOPCPU"
$ INFO == "SHOW PROCESS/CONTINUOUS"
$ SUSPEND == "SET PROCESS/SUSPEND"
$ RESUME == "SET PROCESS/RESUME"
$ SETNAME == "SET PROCESS/NAME"
$ !
$ ! Define a symbol indicating whether the terminal
$ ! is on a dialup port
$ !
$ TT == F$GETDVI("TT","DEVNAM")-"_"
$ DIALUP == ((TT .GES. "TTG0:" .AND. TT .LES. "TTG4:") -
.OR. (TT .GES. "TTH1:" .AND. TT .LES. "TTH4:") -
.OR. (TT .EQS. "TTI5:"))
$ IF DIALUP THEN SET TERMINAL/INQUIRE
$ !
$EXIT:
$ IF V THEN SET VERIFY
.
.
.
$ SET CONTROL=Y
$ EXITAs the example shows, you can disable the Ctrl/Y function (which suspends execution of the current image and invokes the command interpreter) to force execution of the complete login command procedure whenever the user logs in. Do this with the DCL command SETNOCONTROL=Y. Before the login command procedure exits, add the DCL command that resets the Ctrl/Y function (SET CONTROL=Y).
$ SET NOON $ SET PROTECTION=(S=RD,O=RWED,G=R,W=R)/DEFAULT $ ! $ ! Define abbreviations for often used commands $ ! $ DIR*ECTORY == DIRECTORY/DATE/SIZE $ PU*RGE == PURGE/LOG $ DE*LETE == DELETE/LOG/CONFIRM $ ! $ ! $ ! Other useful abbreviations $ ! $ SHP == "SHOW PROCESS/PRIVILEGES" $ PRI*NT == "PRINT/NOTIFY" $ SHD == "SHOW DEFAULT" $ UP == "SET DEFAULT [-]" $ SP == "SET PROCESS/PRIVILEGES=" $ SQ == "SHOW QUEUE/BATCH/ALL/DEVICE" $ H*OME == "SET DEFAULT SYS$LOGIN" $ SUB*MIT == "SUBMIT/NOTIFY" $ SYS == "SHOW SYSTEM" $ DAY == "SHOW TIME" $ ! $ ! Set /LOG for all commands $ ! $ BACK*UP == "BACKUP/LOG" $ DEL*ETE == "DELETE/LOG" $ LIB*RARY == "LIBRARY/LOG" $ PUR*GE == "PURGE/LOG" $ REN*AME == "RENAME/LOG" $ ! $ ! End of LOGIN.COM processing $ ! $ GOTO 'F$MODE() $NETWORK: $ EXIT $INTERACTIVE: $ VN == "SET TERMINAL/WIDTH=80" $ VW == "SET TERMINAL/WIDTH=132" $ EXPERT == "SET MESSAGE/NOFACIL/NOSEVER/NOIDENT" $ NOVICE == "SET MESSAGE/FACILITY/SEVERITY/IDENTIF" $ NOVICE $ ! $ ! Symbols for network users $ ! $ SYSA == "SET HOST SYSA" $ SYSB == "SET HOST SYSB" $ SYSC == "SET HOST SYSC" $ EXIT ! End of interactive login $BATCH: $ SET VERIFY ! End of batch login $ EXIT
Using Logout Command Procedures
The system does not provide for automatic execution of a command procedure at logout time. However, you can supply one as follows.
How to Perform This Task
Create a systemwide logout command procedure that executes whenever a user logs out. (The file is usually named SYS$MANAGER:SYLOGOUT.COM.)
To ensure that this command procedure executes, include a command in SYS$MANAGER:SYLOGIN.COM that equates the most commonly used abbreviation of the LOGOUT command (often LO) to the execution of the logout command procedure.
Example
$ LO*GOUT:==@SYS$MANAGER:SYLOGOUT
$ DELETE/SYMBOL/GLOBAL LOGOUT
Note that this technique works in some situations but it is not foolproof;there are many alternative ways to terminate a process.
7.7.2. Modifying a User Account
To change a user account's quotas, default directory, password, authorized privileges, or any other characteristics assigned by AUTHORIZE, use the MODIFY command. You can use the MODIFY command to change any field in an existing user account. However, a user must log out and log in again for the modifications to take effect.
Examples
- When a user forgets a password and cannot log in, use the AUTHORIZE command MODIFY/GENERATE_PASSWORD to reset a user password. For example, the following command generates a new password for user WELCH:
UAF> MODIFY WELCH/GENERATE_PASSWORD
By default, after logging in, user WELCH must change the password.
- Any changes that you make to a user's record will take effect afterthe user next logs in. For example, suppose that user JONES currently has an open file quota (FILLM) of 20. To increase user Jones' open file limit to 40,you would use the following command in AUTHORIZE:
UAF> MODIFY JONES/FILLM=40
Any process of user JONES that is logged in at the time that you modify the user authorization file continues to have a file limit of 20. In order to have an open file limit of 40, user JONES must log out and then log in again, after you have made the modification to the user authorization file (UAF) using AUTHORIZE.
7.7.3. Listing User Accounts
Account owner
User name
UIC
Account names
Privileges
Process priority
Default disk and directory
Use the /FULL qualifier to create a full report of all the information (except user passwords) contained within the UAF.
Example
UAF> LIST %UAF-I-LSTMSG1, writing listing file %UAF-I-LSTMSG2, listing file SYSUAF.LIS complete
The system displays the same messages when you use the /FULL qualifier. However, a full report is written to the output file.
7.7.4. Maintaining the User Environment
Create additional default records to serve as templates for new categories of users
Delete or disable the accounts of users who leave your site
Impose login restrictions to limit system use by certain accounts
With the Authorize utility, you can perform these maintenance operations by modifying or deleting records in the UAF.
Creating Additional Default Record Templates
On systems where all users perform the same type of work, you typically use the system-supplied default record, DEFAULT, as the template for adding new user records. You might find, however, that your system supports several different user categories, each category performing a specific type of work and requiring unique record attributes. Instead of always using the system-supplied default record as a template and making numerous changes each time you add a user record, you can create additional default UAF records to serve as templates for each user category.
What the individual user categories are
What attributes are common to each category
What to name the default records
How to Perform This Task
Once you define a user category and establish which record attributes are needed, you can create the default record.
Examples
- The following command creates a default record for a category of user that requires a special captive account:
UAF> ADD DEFAULT2/LGICMD=ALT_COM_PROC/FLAGS=CAPTIVE - _UAF> /DEVICE=USER3:/DIRECTORY=[PRODUCT]
The command in this example uses the system-supplied default record DEFAULT to create the record DEFAULT2 and changes the LGICMD, login flags, default device, and default directory fields.
- You can then use the AUTHORIZE command COPY to create additional records having the same attributes as DEFAULT2. The COPY command creates a new UAF record that uses the specified default record except where you explicitly override field values.
UAF> COPY DEFAULT2 PALOOKA/PASSWORD=W7YA84MI/UIC=[360,114]
This example uses DEFAULT2 as a template to create a duplicate record for the user PALOOKA. Notice that only the password and UIC values are changed.
7.7.5. Deleting a User Account
The main problem in deleting an account, especially an interactive or restricted account, is deleting the files used by the account.
How to Perform This Task
Copy (or have the outgoing user of the account copy) any files of value to the ownership of another account. Be sure to change the owner UIC of the files to match the owner UIC of the new owner. You can also use the Backup utility (BACKUP) to save the files to a backup tape or disk.
Change the password and log in as a user of that account if you are working from a nonprivileged account. This avoids inadvertently deleting files that might point to other files of different ownership.
- Delete the account's files and directories from the deepest level up to the top level, using the following procedure:
Locate and examine all subdirectories using the DCL command DIRECTORY [directory-spec …], where directory-spec is the name of the account's default directory.
Delete the files in each subdirectory, and then delete the subdirectory. Note that directory files are protected against owner deletion; therefore, you must change the protection before deleting directory files.
Delete the account's top-level directory. The command procedure in the next example deletes an account's files from the bottom level up. Do not, however, execute this command procedure from a privileged account.
Exit from the user account and return to a privileged account. Remove the user's account, using the Authorize utility (AUTHORIZE).
When you run AUTHORIZE to remove a user's UAF record, AUTHORIZE also removes the user's connections as a holder of identifiers in the rights database. However, if a departed user is the only remaining holder of a given identifier, remove that identifier to avoid future confusion. See the VSI OpenVMS Guide to System Security.
Remove the user's disk quota entry from the disk quota file, if one existed, with SYSMAN.
Remove associated mail information by entering the MAIL command REMOVE username. (See the VSI OpenVMS User's Manual for more information.)
Note
Do not execute this command procedure from a privileged account.
$ ! DELTREE.COM - deletes a complete directory tree
$ !
$ ! P1 = pathname of root of tree to delete
$ !
$ ! All files and directories in the tree, including
$ ! the named root, are deleted.
$ !
$ IF "''DELTREE'" .EQS. "" THEN DELTREE = "@SYS$LIBRARY:DELTREE"$ ON CONTROL_Y THEN GOTO DONE
$ ON WARNING THEN GOTO DONE
$ DEFAULT = F$LOGICAL("SYS$DISK") + F$DIRECTORY()
$10:
$ IF P1 .NES. "" THEN GOTO 20
$ INQUIRE P1 "Root"$ GOTO 10
$20:
$ IF F$PARSE(P1) .EQS. "" THEN OPEN FILE 'P1'
$ SET DEFAULT 'P1'
$LOOP:
$ FILESPEC = F$SEARCH("*.DIR;1")
$ IF FILESPEC .EQS. "" THEN GOTO LOOPEND
$ DELTREE [.'F$PARSE(FILESPEC,,,"NAME")']
$ GOTO LOOP
$LOOPEND:
$ IF F$SEARCH("*.*;*") .NES. "" THEN DELETE *.*;*
$ DIR = (F$DIRECTORY()-"]"-">")-F$PARSE("[-]",,,-
"DIRECTORY")-"]"-">")-"."-"["-"<"$ SET PROTECTION=WORLD:RWED [-]'DIR'.DIR;1
$ DELETE [-]'DIR'.DIR;1
$DONE:
$ SET DEFAULT 'DEFAULT'7.7.6. Using BACKUP to Remove User Files
If each user has a unique UIC, you can use the Backup utility (BACKUP) to remove the user's files, even if the files are scattered throughout the directory structure. See the Backup utility section in the VSI OpenVMS System Management Utilities Reference Manual for more information.
Examples
- The following example of a BACKUP command is used to remove files:
$ BACKUP/DELETE PUBLIC:[...]/BY_OWNER=[21,103] MTA0:PUBLICUIC.SAV
This BACKUP command copies and deletes only those files owned by the specified UIC on disk PUBLIC. The files are copied into a save set named PUBLICUIC.SAV on device MTA0. Note that the BACKUP/DELETE command does not delete the directory files (file type .DIR) for the account.
- To recover lost files, enter the ANALYZE/DISK_STRUCTURE command in the following format:
ANALYZE/DISK_STRUCTURE/REPAIR/CONFIRM device-name:
See Section 9.13.3, ''Recovering Lost Files'' for a complete description of how to recover lost files. See the VSI OpenVMS System Management Utilities Reference Manual for information on using the Analyze/Disk_Structure utility.
7.7.7. Disabling a User Account
To disable an account without deleting it, set the disable user flag (/FLAGS=DISUSER) using AUTHORIZE. If the user is logged in, the account is disabled only after the user logs out.
7.8. Restricting the Use of Accounts
Workload schedules often dictate the days and times your system is used to perform specific operations. Depending on the nature of the work performed at your site, you might want to control when certain users are allowed to log in. Use the Authorize utility (AUTHORIZE) to place controls in the login characteristics fields of the UAF record to restrict the days and times a user can log in and to inhibit certain login functions.
|
Task |
Section |
|---|---|
|
Setting day types | |
|
Restricting logins to specific times | |
|
Restricting CPU time | |
|
Restricting login functions | |
|
Using login command procedures for restricted or captive accounts |
Section 7.8.5, ''Using Login Command Procedures for Restricted or Captive Accounts'' |
|
Setting priorities for user processes |
For a detailed description of the qualifiers used to restrict the use of accounts, see the Authorize utility section in the VSI OpenVMS System Management Utilities Reference Manual.
7.8.1. Setting Day Types
You can restrict the use of certain accounts by defining the days of the week as either PRIMARY or SECONDARY, and then assigning login restrictions to these day types. For example, if you define the days Saturday and Sunday as SECONDARY days, then any restrictions you assign to the SECONDARY day type apply to both.
|
Restriction |
Description |
|---|---|
|
Time restrictions |
Limits logins to specific hours of the day |
|
Function restrictions |
Limit types of login |
The default user record defines the five weekdays (Monday through Friday) as PRIMARY days, and the two weekend days (Saturday and Sunday) as SECONDARY days.
/PRIMEDAYS=([NO]day[,...])
The /PRIMEDAYS qualifier uses a list of day names to define the PRIMARY and SECONDARY days of the week. To define a day as a SECONDARY day, use the prefix NO before the day name. Any days you omit from the list take their default value.
7.8.2. Restricting Logins to Specific Times
|
Qualifier |
Meaning |
|---|---|
|
/[NO]ACCESS |
Specifies access hours for all modes of logins |
|
/[NO]DIALUP |
Specifies access hours for interactive logins from dial up terminals |
|
/[NO]INTERACTIVE |
Specifies access hours for interactive logins from any terminal |
|
/[NO]LOCAL |
Specifies access hours for interactive logins from local terminals |
|
/[NO]REMOTE |
Specifies access hours for interactive logins from network remote terminals (SET HOST) |
JBC-W-RESTRICT, UAF restricts access at this time, please log out immediately
Note that network connections are treated differently than interactive connections and batch jobs. See the documentation for the network software you are running for information about disconnecting established network connections.
7.8.3. Restricting CPU Time
OpenVMS Version 7.3 and later enables you to perform class scheduling using the SYSMAN interface.
You can limit the amount of CPU time that a user receives on the system by placing the user into a scheduling class. Each scheduling class is assigned a percentage of the overall CPU time on the system. As the system runs, the set of users in each scheduling class is limited to the percentage of CPU execution time allocated to that class. Users in a scheduling class can get additional CPU time if windfall is enabled for their scheduling class. Enabling windfall allows the system to give a small amount of CPU time to a scheduling class when a CPU is idle and the time allotted to that scheduling class has already been depleted.
|
Sub-command |
Function |
|---|---|
|
Add |
Creates a new scheduling class |
|
Delete |
Deletes a scheduling class |
|
Modify |
Modifies the characteristics of a scheduling class |
|
Show |
Shows the characteristics of a scheduling class |
|
Suspend |
Suspends temporarily a scheduling class |
|
Resume |
Resumes a scheduling class |
By using a permanent class scheduler, a process is placed into a scheduling class, if appropriate, at process creation time. When anew process is created, it needs to be determined whether this process belongs to a scheduling class. Since to determine this relies upon data in the SYSUAF file, and the Loginout image already has the process' information from this file, Loginout class schedules the process if it determines that the process belongs to a scheduling class.
Create a scheduling class
Identify users in the class, by account name, user name, or UIC
Specify the percent of CPU time allotted to processes run by users in this scheduling class on primary days and secondary days and specify hourly ranges on during which the CPU time restriction applies
Specify days as either primary days or secondary days, and specify different CPU time restrictions for primary days and secondary days
Allow a scheduling class to receive additional CPU time when the CPU is idle
SYSMAN> CLASS_SCHEDULE ADD MAINCLASS - _SYSMAN> /ACCOUNT = (ACCTNAME1, ACCTNAME2) - _SYSMAN> /USERNAME = HOTSHOT - _SYSMAN> /CPU_LIMIT = (PRIMARY, 08-17=15, SECONDARY, 00-23=30) - _SYSMAN> /WINDFALL
Creates scheduling class MAINCLASS
Adds users in accounts ACCTNAME1 and ACCTNAME2 to MAINCLASS
Adds user HOTSHOT to MAINCLASS
Allots processes run by users in MAINCLASS 15 percent of CPU time between 8 am and 6 pm on primary days (default Monday through Friday)
Allots processes run by users in MAINCLASS 30 percent of CPU time all day (24 hours) on secondary days (default SATURDAY and SUNDAY)
Allows process run by users in MAINCLASS to receive extra CPU time during the specified days and times when the CPU is idle
Note that you can use the /PRIMEDAYS qualifier to change the primary and secondary days assigned to a scheduling class.
CPU time restrictions created with the class scheduler do not apply to system users (see Section 12.4.2, ''Understanding Protection Codes'').
For more detailed information about the SYSMAN CLASS_SCHEDULE command, see the VSI OpenVMS System Management Utilities Reference Manual, Volume II: M–Z.
7.8.4. Restricting Login Functions
|
Keyword |
Meaning |
|---|---|
|
[NO]AUDIT |
[Do not] audit all security-relevant actions. |
|
[NO]AUTOLOGIN |
[Do not] prevent access except by automatic login when automatic logins are enabled. |
|
[NO]CAPTIVE |
[Do not] prevent user from changing any defaults at login (implies DISCTLY). [Do not] deny user access to the DCL command level. |
|
[NO]DEFCLI |
[Do not] prevent user from changing default CLI or CLI tables. |
|
[NO]DISCTLY |
[Do not] disable Ctrl/Y interrupts. |
|
[NO]DISFORCE_PWD_CHANGE |
[Do not] remove requirement that user must change an expired password at login. |
|
[NO]DISIMAGE |
[Do not] prevent user from using the RUN or MCR commands or from executing "foreign" commands. |
|
[NO]DISMAIL |
[Do not] prevent mail delivery to the user. |
|
[NO]DISNEWMAIL |
[Do not] suppress "New Mail . . . "announcements. |
|
[NO]DISPWDDIC |
[Do not] disable automatic screening of new passwords against a system dictionary. |
|
[NO]DISPWDHIS |
[Do not] disable automatic checking of new passwords against list of user's old passwords. |
|
[NO]DISRECONNECT |
[Do not] disable automatic reconnection to an existing process when a terminal connection has been interrupted. |
|
[NO]DISREPORT |
[Do not] disable reporting of login information (last login date, login failures, and so on). |
|
[NO]DISUSER |
[Do not] disable account completely. |
|
[NO]DISWELCOME |
[Do not] suppress "Welcome to . . . " login message. |
|
[NO]GENPWD |
[Do not] require user to use generated passwords. |
|
[NO]LOCKPWD |
[Do not] prevent user from changing password. |
|
[NO]PWD_EXPIRED |
[Do not] mark password as expired. |
|
[NO]PWD2_EXPIRED |
[Do not] mark second password as expired. |
|
[NO]RESTRICTED |
[Do not] prevent user from changing any defaults at login. |
7.8.5. Using Login Command Procedures for Restricted or Captive Accounts
Using the /LGICMD qualifier with the AUTHORIZE commands ADD, MODIFY, or COPY defines the login procedure for a restricted or captive account. A person logging in to such an account cannot modify the procedure with any of the login qualifiers: /CLI, /DISK, /COMMAND, /NOCOMMAND, /TABLES.
Disable the use of Ctrl/Y (/FLAG=DISCTLY); however, a system manager can enable the Ctrl/Y sequence for a restricted account by adding the DCL command SET CONTROL=Y at the end of the login procedure.
Prevent the use of the SPAWN command from Mail or the use of the SPAWN built-in procedure from the DEC Text Processing Utility (DECTPU).
Once logged in, a person using a restricted account operates from the DCL level and can access any available software.
When you need to prompt for and accept direct user input, do not execute the text entered by the user directly; rather, first screen the input, and specifically permit only the set of characters that is valid for the intended use. Reject all characters that are not appropriate for the intended use.
Prohibit the following character set from user input, as these characters have special meanings to the DCL command interpreter:- ampersand (&) and double ampersand (&&)
- angle brackets (<) (>)
- apostrophe (')
- at-sign (@)
- dollar sign ($)
- hyphen (-)
- quotation mark (")
- semicolon (;)
- vertical bar (|) and double vertical bar (||)
Use the DCL command READ/PROMPT in captive account login command procedures because the INQUIRE command is not allowed.
Set the subprocess limit to 0 to prevent the user from spawning out of the account. Set both the /PRCLM qualifier and the SYSGEN parameter PQL_MPRCLM.
Example
$ DEFINE SYS$DISK DISK$INVENT $ RUN INVENTORY $ LOGOUT
The application program INVENTORY assumes control when the user logs in to the account. Assign the CAPTIVE flag to the login flags field of the captive account UAF record by specifying the AUTHORIZE qualifier/FLAGS=CAPTIVE. Section 7.7.4, ''Maintaining the User Environment'' shows how to use AUTHORIZE to create a UAF record for a captive account.
Example 7.4, ''Sample Captive Command Procedure'' is a command procedure for a highly secure captive account, which restricts the user to a very limited set of commands. System managers must be sure to deny the account owner any write access to the login command procedure and its directory. Note also that the security manager would use the AUTHORIZE qualifier /NOINTERACTIVE when establishing this account.
$ deassign sys$input
$ previous_sysinput == f$logical("SYS$INPUT")
$ on error then goto next_command
$ on control_y then goto next_command
$ set control=(y,t)
$
$next_command:
$ on error then goto next_command
$ on control_y then goto next_command
$
$ if previous_sysinput .nes. f$logical("SYS$INPUT") then deassign sys$input
$ read/end=next_command/prompt="$ " sys$command command
$ command == f$edit(command,"UPCASE,TRIM,COMPRESS")
$ if f$length(command) .eq. 0 then goto next_command
$
$ delete = "delete"$ delete/symbol/local/all
$ if f$locate("@",command) .ne. f$length(command) then goto illegal_command
$ if f$locate("=",command) .ne. f$length(command) then goto illegal_command
$ if f$locate("F$",command) .ne. f$length(command) then goto illegal_command
$ verb = f$element(0," ",command)
$
$ if verb .EQS. "LOGOUT" then goto do_logout
$ if verb .EQS. "HELP" then goto do_help
$
$ write sys$output "%CAPTIVE-W-IVVERB, unrecognized command \",verb,"\"
$ goto next_command
$
$illegal_command:
$ write sys$output "%CAPTIVE-W-ILLEGAL, bad characters in command line"
$ goto next_command
$
$do_logout:
$ logout
$ goto next_command
$
$do_help:
$ define sys$input sys$command
$ help
$ goto next_command7.8.6. Setting Priorities for User Processes
A user's priority is the base priority used in scheduling the process that the system creates for the user.
On VAX systems, priorities range in value from a low of 0 to a high of 31; 0 through 15 are timesharing priorities; 16 through 31 are real-time priorities.
On Alpha and IA-64 systems, priorities range in value from a low of 0 to a high of 63; 0 through 15 are timesharing priorities; 16 through 63 are real-time priorities.
Processes with real-time priorities are scheduled strictly according to base priority; in other words, the executable real-time process with the highest base priority is executed first. Processes with timesharing priorities are scheduled according to a slightly different principle to promote overlapping of computation and I/O activities.
In the user's account record of the UAF, the default value of a user's priority is 4; for practical purposes, the minimum value is 0. Ensure that the priority for timesharing users remains at the default. Note that if you give some users an advantage over other users by raising their priorities, ragged performance results, because the system reacts sharply to even small base priority differences.
7.9. Setting Up Special Accounts
|
Task |
Section |
|---|---|
|
Setting up an automatic login account with SYSMAN |
Section 7.9.1, ''Setting Up an Automatic Login Account with SYSMAN'' |
|
Setting up a project account with ACL identifiers |
Section 7.9.2, ''Setting Up a Project Account with ACL Identifiers'' |
|
Creating network proxy authorization files |
Section 7.9.4, ''Creating Network Proxy Authorization Files'' |
|
Adding proxy accounts | |
|
Removing proxy accounts | |
|
Displaying proxy accounts | |
|
Controlling proxy logins |
Section 7.9.3, ''Understanding Network Proxy Accounts'' explains what network proxy accounts are.
7.9.1. Setting Up an Automatic Login Account with SYSMAN
The System Management utility (SYSMAN) includes the functions of the automatic login facility (ALF). Using SYSMAN ALF commands, you can set up a terminal that automatically logs in a user to a certain user name. For example, a terminal might be set up for the account INVENTORY, which automatically logs in a user to a captive account when the user presses the Return key.
ALF ADD device user [/TERMINAL] [/PORT] [/PROXY] [/LOG]
|
device |
is the terminal or port name that you want to assign to a user name. Note that device must be a terminal name if you do not specify qualifiers on the command line. |
|
user |
is the account user name that you want to assign to a particular terminal or port. |
|
/TERMINAL |
causes SYSMAN to treat device as a terminal name. This is the default behavior. |
|
/PORT |
causes SYSMAN to treat device as a port name. If the port name contains a special character such as a slash ( / ) or if it contains lowercase letters that you want to preserve, you must enclose the port name within quotation marks. Be aware that anything within quotation marks is written literally to the ALF database file. For example, if the actual port name contains uppercase letters as well as special characters, be sure to specify uppercase letters within the quotation marks. Otherwise, a mismatch will occur between the actual port name and what is specified in the SYSALF.DAT file. |
|
/PROXY |
causes SYSMAN to check that device is in the NODE::USERNAME format, which can be up to 63 characters in length. |
|
/LOG |
causes SYSMAN to display a message that the device and user have been added to the ALF database. |
To protect automatic login accounts, set the AUTOLOGIN flag in the account's UAF record. This flag makes the account available only by autologin, batch, and network proxy.
Examples
$ RUN SYS$SYSTEM:SYSMAN SYSMAN> ALF ADD TTA0 INVENTORY25
SYSMAN> ALF ADD VMS:.ZKO.VMSORG.SYSMAN.CLIENT1::SYSTEM FOOBAR
In this command, VMS:.ZKO.VMSORG.SYSMAN.CLIENT1::SYSTEM is the value of the device parameter.
For more information about autologin accounts and the SYSMAN ALF commands, see the VSI OpenVMS System Management Utilities Reference Manual and the VSI OpenVMS Guide to System Security.
7.9.2. Setting Up a Project Account with ACL Identifiers
This section describes how to set up a project account that uses access control lists (ACLs) to control access to files shared by members of a project group. See the VSI OpenVMS Guide to System Security for complete details on setting up accounts with ACLs.
How to Perform This Task
You must first add an identifier to the rights database for the project account. Use the AUTHORIZE command ADD/IDENTIFIER to add identifiers to the rights database and then associate users as holders of existing ACL identifiers with the AUTHORIZE command GRANT/IDENTIFIER. All users who hold the project's identifier can use the disk space of the project account.
You can set up the project account so that disk space is charged to the project, rather than to individual users, by assigning the resource attribute to the project identifier.
Example
Set up individual user accounts for each member sharing the project account (as described in Section 7.5, ''Preparing to Add User Accounts'' and Section 7.6, ''Adding User Accounts'' on adding a user account).
- Create the project identifier with the resource attribute and grant it to those users who will have access to the project account. In the example that follows, the project identifier KITE_FLYING is given the resource attribute. This identifier is then granted to users GEORGE and LINDORF:
$ RUN SYS$SYSTEM:AUTHORIZE UAF> ADD/IDENTIFIER KITE_FLYING/ATTRIBUTES=RESOURCE {message} UAF> GRANT/IDENTIFIER KITE_FLYING GEORGE/ATTRIBUTES=RESOURCE {message} UAF> GRANT/IDENTIFIER KITE_FLYING LINDORF/ATTRIBUTES=RESOURCE {message} UAF> EXIT - Create the disk quota authorization for the project identifier. For example, the following command invokes SYSMAN and assigns the identifier KITE_FLYING 2000 blocks of disk quota with 200 blocks of overdraft:
$ RUN SYS$SYSTEM:SYSMAN SYSMAN> DISKQUOTA ADD KITE_FLYING/PERMQUOTA=2000/OVERDRAFT=200 SYSMAN> EXIT
- Create the project directory. For example, the following DCL command creates the project directory [KITE_FLYING] and establishes the identifier KITE_FLYING as the owner:
$ CREATE/DIRECTORY [KITE_FLYING]/OWNER=[KITE_FLYING]
- Set up the necessary ACL and default ACL on the project directory. For example, the following DCL command places an ACL on the directory[KITE_FLYING] that permits any holder of the identifier KITE_FLYING to gain read, write, or execute access to the directory; it also ensures that files created in the directory receive the same ACE (access control list entry) as a default:
$ SET SECURITY [000000]KITE_FLYING.DIR;1 - _$ /ACL=((DEFAULT_PROTECTION,S:RWED,O:RWED,G,W) - _$ (IDENTIFIER=KITE_FLYING, ACCESS=READ+WRITE+EXECUTE), - _$ (IDENTIFIER=KITE_FLYING,OPTIONS=DEFAULT,ACCESS=READ+WRITE+EXECUTE))
Access must be granted through ACL entries, because the owner identifier of the directory and the files (KITE_FLYING) does not match the UIC of any of the project members; thus, only world access is available through the UIC-based protection mask. The first ACE of the specified ACL gives all project members read, write, and execute access to the directory; the second ACE gives them read, write, and execute access for all files created in the directory.
Note that project members are not allowed to delete (or control) files created by others. However, the members each have complete access to files that they have created in the directory, because the file system supplies an additional default ACL entry that grants to the creator control access plus the access specified in the OWNER field of the UIC-based protection mask. This ACE appears only when the owner of the created file does not match the UIC of the creator.
(IDENTIFIER=LINDORF,OPTIONS=NOPROPAGATE, ACCESS=READ+WRITE+EXECUTE+CONTROL (IDENTIFIER=KITE_FLYING,ACCESS=READ+WRITE+EXECUTE)
The file being created is not owned by the user identification code (UIC) of the process creating the file.
The process creating the file does not have system privileges.
See the VSI OpenVMS System Management Utilities Reference Manual and the VSI OpenVMS Guide to System Security for more information about the Creator ACE.
7.9.3. Understanding Network Proxy Accounts
A network proxy account allows users on a remote node in a network to access data by way of a local account on your system. Proxy accounts are useful when you want to grant one or more users on a remote node access to specific files, but you do not want to give them a private account on your system. Very often, system managers set up proxy accounts as restricted. You establish and control proxy accounts with the Authorize utility (AUTHORIZE).
With proxy accounts, you can authorize one or more users on a remote node to enter DCL commands that access data from a particular account on your system. Proxy accounts allow remote users to access specific local data (for example, type and print files) without having to log in to your system or use an access control string. Remote users assume the same file access rights as the local account and also receive the default privileges of the local account. The following sections explain the procedures for setting up proxy accounts.
For more information about proxy accounts, see the VSI OpenVMS Guide to System Security.
7.9.4. Creating Network Proxy Authorization Files
Note
This section contains information for network proxies on DECnet Phase IV and DECnet-Plus. For information about proxies and user authentication when using TCP/IP Services, see VSI TCP/IP Services for OpenVMS Management.
A proxy account permits an authorized user from a remote node to log in to a local node, as if the user owned an account on the local node. Proxy accounts are created and maintained using the Authorize utility (AUTHORIZE).See the VSI OpenVMS System Management Utilities Reference Manual for more information about the Authorize utility.
On systems running DECnet for OpenVMS, both NETPROXY.DAT and NET$PROXY.DAT contain proxy information stored using DECnet VAX node names.
- On systems running DECnet-Plus:
NET$PROXY.DAT contains proxy information stored using DECnet-Plus full names.
NETPROXY.DAT contains proxy information stored using DECnet-Plus node synonyms.
Note
Deleting either NETPROXY.DAT or NET$PROXY.DAT will result in incorrect functioning of proxy access on systems running DECnet for OpenVMS Phase IV. Also, many applications such as ALL-IN-1 rely on NETPROXY.DAT.
The SYSUAF.DAT file, on your local system, must associate proxy accounts with user accounts. You will probably want to create a "standard access"account in the UAF for proxy accounts. For example, you could create an account named REMOTE_MKT with limited privileges, which allows access to certain data files on your local system.
Suppose you have a group of users on your local system who prepare marketing reports and who rely on input from users on other systems. You would assign the REMOTE_MKT account in SYSUAF.DAT the same group number and default privileges you assign to the local marketing group. In this way, the remote contributors could access any data files that are "owned" by users in your marketing group and that are not protected from group access.
How to Perform This Task
UAF> CREATE/PROXY
7.9.5. Adding Proxy Accounts
Create a proxy account by adding entries to the network proxy authorization file; these entries equate one or more users on a remote node to users on your home node.
How to Perform This Task
ADD/PROXY node::remote-user local-user/DEFAULT [,...]
You can allow remote users access to up to 16 total local accounts: 1 default proxy account and 15 alternate proxy accounts. Use the /DEFAULT qualifier to specify the default proxy account.
Examples
- The following command adds a user proxy account:
UAF> ADD/PROXY HAL::WALTER REMOTE_MKT/DEFAULT,PROXY2,PROXY3
Assume that you have created three accounts named REMOTE_MKT, PROXY2, and PROXY3 on your home node. The entry in this example permits the user WALTER on remote node HAL to access data by way of the REMOTE_MKT account on your home node. WALTER can access any data from his node that REMOTE_MKT can access locally. To access data through either PROXY2 or PROXY3, WALTER must specify the desired proxy account in the access control string of the DCL command used to perform network file operations.Caution
Because the remote user receives the same privileges as the local user, do not set up proxy accounts associated with local accounts that have special privilege. Granting remote users such access powers poses a threat to the security of your system.
- You can specify remote users by user name or, for remote systems that do not recognize the user name syntax, by UIC. The following example allows the user associated with the UIC [360,54] on remote node RSTS32 proxy access to the GENERIC account on the local node:
UAF> ADD/PROXY RSTS32::[360,54] GENERIC/DEFAULT
- A number of your users might have accounts on a remote node and require ready access to their local files. You can create a network proxy authorization file record that grants access to each of them, provided the user name on your system is the same as the user name on the remote node. The following form of the ADD/PROXY command adds such a record:
UAF> ADD/PROXY HAL::* */DEFAULT
This command authorizes any user on the remote node HAL to access any account with the same user name on your system.Similarly, you might want to permit this sort of access for just one user:UAF> ADD/PROXY HAL::BARBARA */DEFAULT
- On systems running DECnet-Plus, the system adds network proxies to the network proxy authorization file NET$PROXY.DAT using DECnet-Plus full names. For example:
UAF> ADD/PROXY RUBY::DELAPORT DELAPORT/DEFAULT,SYSTEM %UAF-I-NAFADDMSG, proxy from OMNI:.US.RUBY::DELAPORT to DELAPORT added %UAF-I-NAFADDMSG, proxy from OMNI:.US.RUBY::DELAPORT to SYSTEM added
This example adds proxy access from RUBY::DELAPORT to the local accounts DELAPORT (the default) and SYSTEM.
The system additionally stores node synonyms in NETPROXY.DAT for use by DECnet for OpenVMS and for backward compatibility for layered products.
7.9.6. Removing Proxy Accounts
UAF> REMOVE/PROXY RUBY::DELAPORT SYSTEM
This command removes proxy access from RUBY::DELAPORT to the local SYSTEM account.
7.9.7. Displaying Proxy Accounts
To display proxy accounts, use the AUTHORIZE command SHOW/PROXY. This command displays only the first 255 characters of the node name, although the command can handle a maximum of 1024 characters.
The following examples assume that proxy access from RUBY::DELAPORT to the local account DELAPORT has been added to the network proxy authorization file as the default. (The second example shows the DECnet-Plus equivalent of RUBY::DELAPORT.)
Examples
- On systems running DECnet for OpenVMS, the system displays the following type of information:
UAF> SHOW/PROXY *::*
RUBY::DELAPORT DELAPORT (D)
(D) indicates that DELAPORT is the default proxy.
- On systems running DECnet-Plus, the system displays information in full names format:
UAF> SHOW/PROXY *::*
OMNI:.US.RUBY::DELAPORT DELAPORT (D)
(D) indicates that DELAPORT is the default proxy.
You can display information in the old format NETPROXY.DAT database by using the /OLD qualifier with the SHOW/PROXY command; for example:UAF> SHOW/PROXY/OLD *::*
7.9.8. Controlling Proxy Logins
Whenever a proxy login request occurs, the system verifies that proxy access on the participating nodes is enabled. (By default, both incoming and outgoing proxy access is enabled for each node.)
On systems running DECnet for OpenVMS, you can change proxy access or disable it totally by using the Network Control Program (NCP).The VSI OpenVMS DECnet Networking Manual describes how to use NCP to control proxy access.
Note
For information about proxies and user authentication when using TCP/IP Services, see the VSI TCP/IP Services for OpenVMS Management.
7.10. Managing Mail
Change a user's mail profile; for example, change a user name or specify a default print queue for the account
Set a forwarding address for a user who has moved to another location
Disable a user's account from receiving mail
Customize a user's mail environment by setting flags in a user's UAF record
The following sections explain how to perform all of these tasks.
7.10.1. Modifying a User Record
All users can modify and display information about their own records using various SET and SHOW commands available within Mail. These commands access SYS$SYSTEM:VMSMAIL_PROFILE.DATA, which is a single-key indexed sequential file containing information for each user.
With SYSNAM, you can change the mail forwarding address for a user (including one without an account) on the system with the Mail utility command SET FORWARD/USER= user.
7.10.2. Removing a User Record
Typically, once you have deleted a user's record in the UAF, you will also want to remove that user's information from the user profile database. You can remove a record from the user profile database with the REMOVE command.
7.10.3. AUTHORIZE Flags and Mail
|
Flag |
Meaning |
|---|---|
|
[NO]DISNEWMAIL |
Enables or disables the display of the new mail count when the user logs in to the system. |
|
[NO]DISMAIL |
Allows or restricts the receipt of new mail. |
7.11. Managing System Resources
This section contains detailed descriptions of the resource control attributes you can assign to a user process when creating a record in the UAF.
7.11.1. Understanding Pages and Pagelets
VAX, Alpha, and IA-64 systems allocate and deallocate memory for processes in units called pages. A page on a VAX system is 512 bytes. Both Alpha and IA-64 systems support a variety of page sizes. The OpenVMS operating system currently uses 8KB (8192 bytes) pages on Alpha and IA-64 systems.
One Alpha or I64 pagelet = one VAX page = 512 bytes One Alpha or I64 page = 16 Alpha or I64 pagelets = 16 VAX pages = 8192 bytes
Authorize utility commands, parameters, and default values are identical. However, the default values for process quotas related to memory use might be inappropriate for some Alpha and IA-64 system users.
See A Comparison of System Management on OpenVMS AXP and OpenVMS VAX for more information about Alpha and IA-64 system management. (This manual has been archived.)
7.11.2. Setting Limits on System Resources
Each system user is limited in the consumption of such resources as system memory, volatile (pagefile) disk space, number of processes, and I/O requests. You set limits when you create an account for the user with the Authorize utility.
Limits control the way in which a process shares its allotment of a resource with the subprocesses it creates. In addition to restricting the number of processes that a single user or account has at any given time, the system uses four types of limits for sharing resources. Table 7.1, ''Resource Type Limits'' describes these limits.
When you create an account, you assign values to the limits shown in Table 7.8, ''Limits and Suggested Values for SYSTEM and DEFAULT Accounts''. These limits are described in the following sections. Usually, you simply assign the default values for these quotas. However, see the VSI OpenVMS Performance Management Manual for a discussion of how to evaluate and adjust the limits in the context of performance optimization strategies.
|
Quota |
Type |
Description |
|---|---|---|
|
ASTlm? |
Nondeductible |
AST queue limit |
|
BIOlm? |
Nondeductible |
Buffered I/O count limit |
|
Bytlm? |
Pooled |
Buffered I/O byte count limit |
|
CPU? |
Deductible |
CPU time limit (0 = no limit) |
|
DIOlm? |
Nondeductible |
Direct I/O count limit |
|
Enqlm? |
Pooled |
Enqueue quota |
|
Fillm? |
Pooled |
Open file limit |
|
JTquota? |
Pooled |
Initial byte quota for jobwide logical name table |
|
Maxacctjobs |
Systemwide |
Maximum active processes for a single account(0 = no limit) |
|
Maxdetach |
Systemwide |
Maximum detached processes for a single user name (0 = no limit) |
|
Maxjobs |
Systemwide |
Maximum active processes for a single user name (0 = no limit) |
|
Pgflquo? |
Pooled |
Page file limit |
|
Prclm |
Pooled |
Subprocess creation limit |
|
TQElm? |
Pooled |
Timer queue entry limit |
|
WSdef? |
Nondeductible |
Default working set size |
|
WSextent? |
Nondeductible |
Working set extent |
|
WSquo? |
Nondeductible |
Working set quota |
|
Account |
Description |
|---|---|
|
AST Queue Limit (ASTlm) |
Limits the sum of the following amounts:
This limit affects all system services that accept an AST address as an argument, and the Schedule Wakeup ($SCHDWK) system service. If the deferred write option (DFW) is enabled, the number of ASTs used per file is equal to 1, plus the number of record streams, plus the multibuffer count. Otherwise, the number is 1 plus the number of record streams. Note that PQL_MASTLMoverrides the account's value for ASTlm if PQL_MASTLM is larger than ASTlm. |
|
Buffered I/O Count Limit (BIOlm) |
Limits the number of outstanding buffered I/O operations permitted for a user's process. In a buffered I/O operation, the data transfer takes place from an intermediate buffer in the system pool, not from a process-specified buffer. Buffered operations for a user process include terminal I/O, file system and network I/O, card reader input, and unspooled printer output. During a buffered I/O operation, the pages containing the process-specified buffer need not be locked in memory. Note that PQL_MBIOLM overrides the account's value for BIOlm if PQL_MBIOLM is larger than BIOlm. |
|
Buffered I/O Byte Count Limit (Bytlm) |
Limits the amount of buffer space that a user's process can use. This buffer space is used for buffered I/O operations and for the creation of temporary mailboxes. It also limits the number of mapping windows the user can create as segmented (or cathedral) windows. Cathedral windows are primarily useful for reducing the overhead required to read large files. Note that PQL_MBYTLM overrides the account's value for Bytlm if PQL_MBYTLM is larger than Bytlm. |
|
CPU Time Limit (CPU) |
Limits the amount of CPU time that a user's process can use per session. The time must be specified in abbreviated delta format hh:mm:ss.cc. CPU is a deductible limit with a suggested typical value of 0 (no limit) but the value applies only to this instance or to other instances of the user's processes. CPU is not cumulative across separate sessions or batch jobs. Note that PQL_MCPULM overrides the account's value for CPU if PQL_MCPULM is larger than CPU. |
|
Direct I/O Count Limit (DIOlm) |
Limits the number of outstanding direct I/O operations permitted to a user's process. In a direct I/O operation, the data transfer takes place directly from a process-specified buffer. Direct I/O operations for a user process typically include disk and tape I/O. The pages containing this buffer are locked in memory by the operating system during the direct I/O operation. DIOlm is a nondeductible limit. Note that PQL_MDIOLM overrides the account's value for DIOlm if PQL_MDIOLM is larger than DIOlm. |
|
Enqueue Quota (Enqlm) |
Limits the number of locks a process (and its subprocesses) can own. OpenVMS Record Management Services (RMS) uses the Lock Management facility to synchronize shared file access, global buffers, and record locks. Because RMS removes one lock for every shared file, local buffer, global buffer section, and outstanding record lock, users who expect to perform large amounts of RMS file sharing should have Enqlm set to a large value. If your process performs extensive RMS file sharing without sufficient enqueue quota, you could receive the SS$_EXENQLM error message. Furthermore, if your system performs extensive RMS file sharing and the value of the LOCKIDTBL system parameter is too low, you could receive the SS$_NOLOCKID error message. Note that whenever you increase the value of LOCKIDTBL, you might have to increase the value of the RESHASHTBL system parameter. (See the VSI OpenVMS System Management Utilities Reference Manual.) For shared files, the value of Enqlm should represent the
number of files open as shared multiplied by the number of
locks per process per file.
Prior to OpenVMS Version 7.1, the limit for Enqlm was 32767. Setting Enqlm to this former maximum value automatically scales Enqlm internally to the architectural maximum value. Thus, in effect, the process has an unlimited enqueue quota but does not need the privilege to ignore quotas. Use the DCL command SHOW RMS_DEFAULT to display the default multibuffer counts. Enqlm is a pooled limit. Note that PQL_MENQLM overrides the account's value for Enqlm if PQL_MENQLM is larger than Enqlm. |
|
Expiration Date and Time (EXPIRATION) |
Qualifier that specifies the expiration date and time of the account. The /NOEXPIRATION qualifier removes the expiration date on the account or resets the expiration time for expired accounts. The /EXPIRATION qualifier does not affect the expiration of passwords. |
|
Open File Limit (Fillm) |
Limits the number of files that a user's process can have open at one time. This limit includes the number of network logical links that can be active at the same time. Fillm is a pooled limit. Note that each open file also requires at least 96 bytes of Bytlm. Note that PQL_MFILLM overrides the account's value for Fillm if PQL_MFILLM is larger than Fillm. |
|
Job Table Quota (JTquota) |
Specifies the initial byte quota with which the jobwide logical name table is to be created. JT quota is a pooled quota. Note that PQL_MJTQUOTA overrides the account's value for JTquota if PQL_MJTQUOTA is larger than JTquota. |
|
Maximum Account Jobs Limit (Maxacctjobs) |
Specifies the maximum number of batch, interactive, and detached processes that might be active at one time for all users of a single account. Maxacctjobs is a systemwide limit. |
|
Maximum Detached Processes Limit (Maxdetach) |
Specifies the maximum number of detached processes with the cited user name that can be active at one time. MAXDETACH can also be used to control the number of virtual terminals a user can have. To prevent the user from creating detached processes, specify the keyword NONE. By default, a user has a value of 0, which represents an unlimited number. Maxdetach is a systemwide limit. |
|
Maximum Process Jobs Limit (Maxjobs) |
Specifies the maximum number of interactive, batch, and detached processes that can be active at one time for the cited user name. Maxjobs is a systemwide limit. |
|
Page File Limit (Pgflquo) |
Limits the number of pages that the user's process can use in the system page file. The page file provides temporary disk storage for pages forced out of memory by a memory management operation. Pgflquo limits the total virtual address space that can be created using the Create Virtual Address Space ($CRETVA) or Expand Program/Control Region($EXPREG) system services. Pgflquo is a pooled limit. Note that PQL_MPGFLQUOTA overrides the account's value for Pgflquo if PQL_MPGFLQUOTA is larger than Pgflquo. |
|
Subprocess Creation Limit (Prclm) |
Limits the number of subprocesses a user's process can create. The process created when a user logs in to the system can in turn create subprocesses. These subprocesses are all accountable to the user and share the resources allotted to the initial process. Prclm is a pooled limit. |
|
Timer Queue Entry Limit (TQElm) |
Limits either of the following amounts:
This limit does not govern the creation of permanent event flag clusters. Timer queue entries are used in time-dependent scheduling; common event flags are used in synchronizing activities among groups of cooperating processes. TQElm is a pooled limit. Note that PQL_MTQELM overrides the account's value for TQElm if PQL_MTQELM is larger than TQElm. |
|
Default Working Set Size (WSdef) |
Sets the initial working set size limit for a user's process. WSdef is a nondeductible limit. If the value specified exceeds the value of WSquo, the lesser value is used. |
|
Working Set Extent (WSextent) |
Specifies the maximum size to which a user's physical memory usage can grow, independent of the system load. This enlargement of the physical memory for a user is accomplished by the Adjust Working Set Limit ($ADJWSL) system service, and is normally done for the user by the operating system in response to heavy page faulting by the user. WSextent is a nondeductible quota. This value should always be greater than or equal to WSquo. The value is controlled by the system parameter WSMAX. Note that PQL_MWSEXTENT will overwrite the account's value for WSextent if PQL_MWSEXTENT is larger than WSextent. |
|
Working Set Quota (WSquo) |
Specifies the working set quota. This is the maximum amount of physical memory a user process can lock into its working set. It also represents the maximum amount of swap space that the system reserves for this process and the maximum amount of physical memory that the system allows the process to consume if the systemwide memory demand is significant. This parameter guarantees the user that the number of physical pages specified will be available. The maximum value of WSquo is 64K pages. WSquo is a nondeductible quota. This value should be greater than or equal to WSdef. The value is capped by the system parameter WSMAX. Note that PQL_MWSQUOTA overrides the account's value for WSquo if PQL_MWQUOTA is larger than WSquo. |
Chapter 8. Managing Peripheral Devices
System managers are often responsible for setting up and managing peripheral devices such as terminals and printers. This chapter describes these tasks. For information about managing storage media such as disks and tapes, see Chapter 9, "Managing Storage Media".
Information Provided in This Chapter
|
Task |
Section |
|---|---|
|
Getting information about devices on the system |
Section 8.3, ''Getting Information About Devices on the System'' |
|
Setting security protection characteristics on devices |
Section 8.4, ''Setting Security Protection Characteristics on Devices'' |
|
Connecting devices and loading device drivers |
Section 8.5, ''Connecting Devices and Loading Device Drivers'' |
|
Automatically configuring devices for OpenVMS Alpha systems |
Section 8.6, ''Automatically Configuring Devices for OpenVMS Alpha Systems'' |
|
Managing terminals | |
|
Managing modems | |
|
Managing printers | |
|
Managing tape drives | |
|
?Managing card readers |
|
Concept |
Section |
|---|---|
|
Device names | |
| Add-on I/O adapter and console names | |
|
Device configuration | |
|
Spooled printers |
8.1. Understanding Device Names
On some systems, device names follow the format ddcu, where dd is the device code, c is the controller designation, and u is the unit number.
All local DSA disk devices are named DUA n, where n is a unique disk unit number.
All local DSA tape devices are named MUA n, where n is a unique tape unit number.
Use of a single controller letter requires that the unit number for each local DSA device be unique. Duplicate unit numbers are possible if the local disks reside on different controllers.
If the device is attached to a single computer or hierarchical storage controller (HSC) subsystem, the device name includes the node name in the format node$ddcu, where node refers to the node name of the system that the device resides on.
If the device is to be accessed (or dual-ported) by two computers or HSC subsystems, you must identify the device with a unique, path-independent name that includes an allocation class.
The allocation class is a numeric value from 1 to 255, which is used to create a device name in the form $allocation-class$device-name. For example, the allocation class device name $11$DUA8 identifies a disk that is accessed by two computers or HSC subsystems, both having an allocation class of 11.
If the device is connected to a SCSI bus and the system parameter DEVICE_NAMING is set to 1, you can assign the device a port allocation class, a number from 0 to 32767 inclusive.
If the device is assigned port allocation class 0, its name will be in the form node $ddcuuu. The device cannot be located on a SCSI bus that is also attached to another CPU.
If the device is assigned a nonzero port allocation class, its name will be in the form $allocation-class$ddAuuu. The device can be located on a SCSI bus attached to another CPU, provided the other CPU has assigned the same port allocation class to the SCSI bus.
For more information about the device name format in VAXcluster or OpenVMS Cluster environments, refer to VSI OpenVMS Cluster Systems Manual.
For information about the naming conventions for Fibre Channel disk and tape devices, see Guidelines for OpenVMS Cluster Configurations.
8.2. Names of Add-on I/O Adapters and Consoles
OpenVMS Version 6.2 and higher supports various add-on I/O adapters and consoles. VSI's AlphaGeneration platforms typically support one or more integral SCSI or network adapters, with the option of installing additional adapters. Because of differences in device-naming conventions used by the Alpha or I64 consoles and OpenVMS, depending on the platform, the OpenVMS device name might not match the name the console displays.
For example, on platforms prior to the EV6 systems (except the GS AlphaServer 140), the console designation for a SCSI device on the integral SCSI adapter might be DKA100. However, when two additional add-on SCSI adapters are added, the A designation becomes C, and DKA100 appears as DKC100 when OpenVMS is running.
This discrepancy in device naming does not exist on EV6 and higher platforms.
Note that even when the console and OpenVMS device names are different, the unique specification of a device name from the console to the device name under OpenVMS stays the same, provided add-on SCSI or network adapters are not added or removed.
8.3. Getting Information About Devices on the System
Use the DCL command SHOW DEVICES to retrieve information about devices on your system.
Note
If a device does not appear in the display, it is not recognized by the system. The device may not be connected, or the driver may not be loaded. For certain devices, you must manually connect them and load their device drivers. For more information, see Section 8.5, ''Connecting Devices and Loading Device Drivers''.
If you specify a device name with the SHOW DEVICE command, the system displays information about the device you specified. If you use certain qualifiers with SHOW DEVICES, information is displayed about those devices that currently have volumes mounted or that have been allocated to processes. Refer to the VSI OpenVMS DCL Dictionary for a list of qualifiers that can be used with the SHOW DEVICES command.
The following examples use the SHOW DEVICES command. Device protection is RWPL (read, write, physical, logical).
The SHOW DEVICES/FULL examples include both volume protection and device protection. In addition, if a volume has a protected subsystem enabled, it also appears in the display.
Examples
- The following command shows all devices on the system:
$ SHOW DEVICES Device Device Error Volume Free Trans Mnt Name Status Count Label Blocks Count Cnt $11$DUA9: (SNAP) Online 0 $11$DUA10: (SNAP) Mounted 2 PAGE 83643 3 26 $11$DUA13: (SNAP) Mounted 0 WORK1 192297 36 26 $11$DUA23: (SNAP) Online 0 $11$DUA24: (SNAP) Mounted 0 MONITORPLUS 776808 86 26 DAD0: (TULIP) Online 0 DAD9: (TULIP) Online 0 DAD44: (TULIP) Mounted wrtlck 0 CDBIN06JUL23 97947 1 1 ROSE$MUA0: Online 0 LAVNDR$MUA0: Online 0 TULIP$MUA1: Online 0 IRIS$MUA1: HostUnavailable 0 OPA0: Online 0 DBA0: Offline 0 FTA0: Offline 0 FTA239: Online 0 LTA0: Offline 0 LTA3401: Online spooled 0 LTA3402: Online spooled 0 RTA0: Offline 0 RTA1: Mounted 1 RTA2: Mounted 0 RTB0: Offline 0 TXA0: Online 0 TXA1: Online 0 XT0: Offline 0
- The following command requests a full listing of the status of the DAD42: RRD40 device. The device is located on node IRIS in an OpenVMS Cluster environment.
$ SHOW DEVICES/FULL DAD42: Disk DAD42: (IRIS), device type RRD40, is online, mounted, software write- locked, file-oriented device, shareable, error logging is enabled. Error count 0 Operations completed 146 Owner process "" Owner UIC [SYSTEM] Owner process ID 00000000 Dev Prot S:RWPL, O:RWPL, G:RWPL, W:RWPL Reference count 1 Default buffer size 512 Total blocks 1218000 Sectors per track 4 Total cylinders 50750 Tracks per cylinder 6 Allocation class 11 Volume label "CDBIN06JUL21" Relative volume number 0 Cluster size 3 Transaction count 1 Free blocks 15153 Maximum files allowed 152083 Extend quantity 5 Mount count 1 Mount status System Cache name "_$11$DUA21:XQPCACHE" Extent cache size 64 Maximum blocks in extent cache 1515 File ID cache size 64 Blocks currently in extent cache 0 Quota cache size 0 Maximum buffers in FCP cache 1330 Volume status: ODS-2, subject to mount verification, file high-water marking, write-through caching enabled. - The following command requests a full informational display about each DG device. This display shows only the first two devices: the mounted $1$DGA5001: device and the unmounted $1$DGA5004: device.
$ SHOW DEVICES/FULL DG Disk $1$DGA5001: (CEAGLE), device type HSV110, is online, mounted, file-oriented device, shareable, device has multiple I/O paths, served to cluster via MSCP Server, error logging is enabled. Error count 0 Operations completed 5773 Owner process "" Owner UIC [SYSTEM] Owner process ID 00000000 Dev Prot S:RWPL,O:RWPL,G:R,W Reference count 1 Default buffer size 512 Current preferred CPU Id 0 Fastpath 1 WWID 01000010:6005-08B4-0001-42DC-0001-F000-0111-0000 Total blocks 20971520 Sectors per track 128 Total cylinders 1280 Tracks per cylinder 128 Host name "CEAGLE" Host type, avail AlphaServer ES40, yes Alternate host name "CLETA" Alt. type, avail AlphaServer ES40, yes Allocation class 1 Volume label "5001" Relative volume number 0 Cluster size 21 Transaction count 1 Free blocks 19598208 Maximum files allowed 476625 Extend quantity 5 Mount count 9 Mount status System Cache name "“_$1$DGA3105:XQPCACHE" Extent cache size 64 Maximum blocks in extent cache 1959820 File ID cache size 64 Blocks currently in extent cache 0 Quota cache size 0 Maximum buffers in FCP cache 3444 Volume owner UIC [SYSTEM] Vol Prot S:RWCD,O:RWCD,G:RWCD,W:RWCD Volume Status: ODS-2, subject to mount verification, file high-water marking, write-back caching enabled. Volume is also mounted on VMSROC, PAVER, VMSROL, CLETA, VMSJO, VMSMO, NOME, FARKLE. I/O paths to device 5 Path PGA0. 5000-1FE1-0015-22AC (CEAGLE), primary path. Error count 0 Operations completed 0 Path PGA0. 5000-1FE1-0015-22A9 (CEAGLE). Error count 0 Operations completed 0 Path PGB0. 5000-1FE1-0015-22A8 (CEAGLE). Error count 0 Operations completed 0 Path PGB0. 5000-1FE1-0015-22AD (CEAGLE), current path. Error count 0 Operations completed 5773 Path MSCP (CLETA). Error count 0 Operations completed 0 Disk $1$DGA5004: (CEAGLE), device type HSV110, is online, file-oriented device, shareable, device has multiple I/O paths, served to cluster via MSCP Server, error logging is enabled. Error count 0 Operations completed 0 Owner process Owner UIC [SYSTEM] Owner process ID 00000000 Dev Prot S:RWPL, O:RWPL, G:R, W Reference count 0 Default buffer size 512 Current preferred CPU Id 0 Fastpath 1 WWID 01000010:6005-08B4-0001-42DC-0001-F000-0120-0000 Host name CEAGLE Host type, avail AlphaServer ES40, yes Alternate host name CLETA Alt. type, avail AlphaServer ES40, yes Allocation class 1 I/O paths to device 5 Path PGA0. 5000-1FE1-0015-22AC (CEAGLE), primary path. Error count 0 Operations completed 0 Path PGA0. 5000-1FE1-0015-22A9 (CEAGLE). Error count 0 Operations completed 0 Path PGB0. 5000-1FE1-0015-22A8 (CEAGLE), current path. Error count 0 Operations completed 0 Path PGB0. 5000-1FE1-0015-22AD (CEAGLE). Error count 0 Operations completed 0 Path MSCP (CLETA). Error count 0 Operations completed 0
8.3.1. Determining If Volumes Need Rebuilding
If a volume was improperly dismounted, it may require rebuilding. Volumes are improperly dismounted when, for example, the system crashes. Use the/REBUILD_STATUS qualifier with the SHOW DEVICES command to determine if a volume needs rebuilding. Do not use the /REBUILD_STATUS qualifier with any other SHOW DEVICES qualifiers, except the /OUTPUT qualifier.
|
Value |
Meaning |
|---|---|
|
Yes |
Rebuild needed |
|
No |
Rebuild not needed |
|
Not applicable |
The volume cannot be rebuilt; the volume is not a disk or the volume is write-locked |
|
Information unavailable |
Rebuild information is not available; the volume is not mounted or mount verification is taking place |
Use SET VOLUME/REBUILD
Dismount the volume and then mount the volume again using MOUNT /REBUILD
$ SHOW DEVICES/REBUILD_STATUS Device Name Rebuild needed? ADU15$DKA300: Information unavailable EDIV$DKA300: Information unavailable EMUL$DKB200: No EMUL$DKB300: No EMUL$DKB500: Yes FTA0: Not applicable OPA0: Not applicable
8.3.2. Getting Information About ISO 9660-Formatted Devices
$ SHOW DEVICE DKA1/FULL
Disk $1$DKA1: (VMSRMS), device type RRD40, is online, allocated,
deallocate on dismount, mounted, software write-locked, file-oriented
device, shareable, served to cluster via MSCP Server.
Error count 0 Operations completed 9
Owner process "_FTA5:" Owner UIC [FIN, USER]
Owner process ID 20200066 Dev Prot S:RWPL, O:RWPL, G:R, W
Reference count 2 Default buffer size 512
Total blocks 256 Sectors per track 32
Total cylinders 1 Tracks per cylinder 8
Allocation class 1
Volume label "VOLUME_1" Relative volume number 1
Cluster size 0 Transaction count 1
Free blocks 0 Maximum files allowed 0
Extend quantity 0 Mount count 1
Mount status Process ACP process name "DKA1CACP"
Volume status: ISO 9660.
Members of this volume set are $1$DKA1: (rvn 1), $1$DKA7: (rvn 64), $1$DKA16:
(rvn 65535)8.4. Setting Security Protection Characteristics on Devices
INITIALIZE
MOUNT
SET SECURITY/PROTECTION
SET VOLUME
For more information about these commands, refer to the VSI OpenVMS DCL Dictionary.
Set device protection to grant control access to group or world, as appropriate.
Add an ACL to the device and grant a general identifier to all users who should have access.
Section 9.3.4, ''Assisting Users in Accessing and Initializing Volumes'' has more information about the VOLPRO privilege.
8.4.1. Granting Access to a Specific Device
$ SET SECURITY/CLASS=DEVICE DKA300/PROT=W:RWC
$ SET SECURITY/CLASS=DEVICE DKA300/ACL=(IDENTIFIER=CHEKOV, ACCESS=CONTROL)
This example grants control access for the device DKA300 to users with the CHEKOV identifier.
8.4.2. Granting Access to All Devices
- Set the security template for a particular device type to allow access to a desired class of users. Use a command such as the following one, which sets the template for disk devices:
$ SET SECURITY/CLASS=SECURITY_CLASS/PROFILE=TEMPLATE=DISK - _$ DEVICE/ACL=(ID=CHEKOV, ACCESS=R+W+D+C)
This access will apply to all specified devices initialized in the future.
- Run the following command procedure:
SYS$EXAMPLES:RESET_DEVICE_PROTECTION. COM
This command procedure applies the protection specified in the security template to all current devices.
8.5. Connecting Devices and Loading Device Drivers
The system uses a software component called a device driverto control I/O operations for a particular device type. For a device to function on a system, the device must be connected, and the device driver must be loaded into memory.
The AUTOCONFIGURE command connects all devices physically attached to the system and loads their device drivers. Using AUTOCONFIGURE saves effort and reduces the possibility of error.
The site-independent startup command procedure, STARTUP. COM, automatically configures devices, because it includes the AUTOCONFIGURE command.
$ SYSGEN := $SYSGEN$ SYSGEN AUTOCONFIGURE ALL
$ SYSMAN := $SYSMAN$ SYSMAN IO AUTOCONFIGURE
Detect any devices connected to HS x devices (storage controllers)
Load the drivers for HS x devices
Make the HS x devices known to the system
Make disk and tape devices served by OpenVMS hosts known to the system
Note
For this discussion, an HS x device can be an HSC, HSG, or HSJ device.
In general, when you add a SCSI disk or tape, you should shut down the system and power down the machine before you connect the device. When you power the system up, OpenVMS automatically configures the device.
Some controllers, such as the HSZ series, allow you to quiesce the SCSI bus and then add or remove a device. When you add a device, you must rerun AUTOCONFIGURE. Note however, that for served storage devices, your system must be running the CONFIGURE process.
|
Topic |
For More Information |
|---|---|
|
? Manually connecting devices and loading drivers |
Section 8.5.1, ''Manually Connecting Devices and Loading Device Drivers (VAX Only)'' |
|
?Manually connecting devices and loading drivers |
Section 8.5.2, ''Manually Connecting Devices and Loading Device Drivers (Alpha and I64)'' |
|
Suppressing autoconfiguration |
Section 8.5.3, ''Suppressing the Autoconfiguration of Devices'' |
8.5.1. Manually Connecting Devices and Loading Device Drivers (VAX Only)
Console storage device
Network communications logical device
Virtual terminals
In addition to these devices, other devices and drivers might be present that AUTOCONFIGURE does not connect and load. On VAX systems, use the System Generation utility (SYSGEN) to manually connect devices and load device drivers.
Caution
Use extreme care when issuing SYSGEN CONNECT and LOAD commands because the system does little error checking. An incorrect vector address or misspelled device name, for example, will damage the I/O database and could cause the system to fail.
To manually connect special devices each time the system starts up, add these SYSGEN commands to the site-specific startup command procedure SYCONFIG. COM. For more information, see Section 5.2.4.1, ''Connecting Nonstandard Devices''.
Console Storage Device
$ RUN SYS$SYSTEM:SYSGEN SYSGEN> CONNECT CONSOLE SYSGEN> EXIT
Note
This command may be different on some platforms. See the VAX installation and upgrade manual for information about the console commands available for your specific platform.
Network Communication Device
|
@SYS$STARTUP:TCPIP$STARTUP |
! TCP/IP Services |
|
@SYS$STARTUP:NET$STARTUP |
! DECnet-Plus |
|
@SYS$STARTUP:STARTNET |
! DECnet Phase IV |
Virtual Terminals
For information about connecting virtual terminals and loading their driver, see Section 8.7.2, ''Managing Virtual Terminals''.
For information about configuring virtual terminals in conjunction with TCP/IP Services Telnet, see VSI TCP/IP Services for OpenVMS Management.
Event-Handling Device Driver
A VSI-supplied driver named SYS$SYSTEM:CONINTERR. EXE permits real-time processes to connect to interrupt vectors for quick response to and special handling of real-time events. The driver is not associated with any specific device type. Refer to the OpenVMS VAX Device Support Manual for more information. (This manual has been archived)
Example
$ RUN SYS$SYSTEM:SYSGEN SYSGEN> AUTOCONFIGURE ALL SYSGEN> CONNECT CONSOLE SYSGEN> EXIT $ @SYS$MANAGER:STARTNET
8.5.2. Manually Connecting Devices and Loading Device Drivers (Alpha and I64)
On Alpha and IA-64 systems, commands for connecting devices and loading their drivers are in the System Management utility (SYSMAN). All SYSMAN commands that control and display the I/O configuration on an Alpha and IA-64 system contain the prefix IO.
Whenever possible, it is preferable to use the IO AUTOCONFIGURE command to connect standard devices and load device drivers.
IO AUTOCONFIGURE does not connect or load the device driver for the network communications logical device. In addition, other devices and drivers might exist that IO AUTOCONFIGURE does not connect and load.
You can connect unattached devices and devices that have nonstandard names, as well as load device drivers with the SYSMAN commands IO CONNECT and IO LOAD.
For more information, refer to the SYSMAN section of VSI OpenVMS System Manager's Manual, Volume 2: Tuning, Monitoring, and Complex Systems
Caution
Exercise great care in issuing IO CONNECT and IO LOAD commands. Incorrect use of these commands could cause the system to fail.
Network Communication Device
To connect the network communications logical device on Alpha, run the appropriate startup files for the particular network protocol. For example, three common net stack startups are:
|
@SYS$STARTUP:TCPIP$STARTUP |
! TCP/IP Services |
|
@SYS$STARTUP:NET$STARTUP |
! DECnet-Plus |
|
@SYS$STARTUP:STARTNET |
! DECnet Phase IV |
The commands in the following example autoconfigure the devices physically attached to the Alpha or IA-64 system, load their drivers, and connect the network software device:
SYSMAN> IO AUTOCONFIGURE ALL SYSMAN> EXIT $ @SYS$MANAGER:STARTNET
Virtual Terminals
For information about connecting virtual terminals and loading their driver, see Section 8.7.2, ''Managing Virtual Terminals''.
For information about configuring virtual terminals in conjunction with TCP/IP Services Telnet, see VSI TCP/IP Services for OpenVMS Management
8.5.3. Suppressing the Autoconfiguration of Devices
To customize the order in which you configure devices
To troubleshoot booting problems
To allow Small Computer System Interface (SCSI) based workstations to use devices on another workstation's SCSI bus without causing conflicts during boot time
$ STARTUP$AUTOCONFIGURE_ALL == 0
Caution
If you set STARTUP$AUTOCONFIGURE_ALL to 0 in the last line of SYCONFIG. COM, the CONFIGURE phase of STARTUP. COM will not execute. As a result, DSSI or HSC controllers (except for a controller through which the system booted) and MSCP-served devices on remote nodes will not be available and satellite nodes will not be able to access network devices and boot disks. This could prevent satellite nodes from booting.
$ STARTUP$AUTOCONFIGURE_ALL == 0 $ @SYS$SYSTEM:STARTUP CONFIGURE$ EXIT
These commands suppress autoconfiguration but still execute the CONFIGURE phase of STARTUP. COM.
%RUN-F-CREPRC, process creation failed-SYSTEM-F-DUPLNAM, duplicate name
This error is caused because SYCONFIG. COM is invoked by both STARTUP. COM and AUTOGEN. When AUTOGEN runs, the CONFIGURE process already exists (it was started when SYCONFIG. COM was executed by STARTUP. COM). When AUTOGEN invokes SYCONFIG. COM, the command you added attempts to start a second CONFIGURE process. This command fails, causing AUTOGEN to fail.
8.6. Automatically Configuring Devices for OpenVMS Alpha Systems
Autoconfiguration is the process of discovering the hardware devices on a system and loading the appropriate device drivers. File-based autoconfiguration is a feature that enables OpenVMS Alpha or I64 to automatically configure third-party hardware devices.
Beginning with OpenVMS Alpha Version 7. 1, device configuration tables are constructed from ASCII text files on the OpenVMS Alpha and I64 operating system disk. By adding simple descriptions of their devices in the appropriate ASCII text file, third parties and end users can configure supported third-party devices and load user-written device drivers.
The following sections briefly explain device configuration and describe how to use the new file-based autoconfiguration method to configure supported third-party devices.
8.6.1. Understanding Device Configuration
A device is configured on OpenVMS when system code is able to locate it on a bus, give it a name, and load a device driver for it. When a device is autoconfigured, all these steps happen without any user intervention.
OpenVMS discovers devices during the boot process in a bus-specific manner. The discovery process includes storing data about detected devices in bus-specific data structures. These data structures are later used to search configuration tables of known devices. The configuration table provides the information necessary to determine the driver name, the device name, and other parameters for loading and connecting the appropriate driver.
Prior to OpenVMS Alpha Version 7. 1, configuration tables were built into the OpenVMS kernel and could not be modified without replacing a system image. As of OpenVMS Alpha Version 7. 1 and I64, the configuration tables are constructed from ASCII text files on the system disk. A system file (SYS$SYSTEM:SYS$CONFIG. DAT) is provided for all OpenVMS supported devices, and a user file (SYS$SYSTEM:SYS$USER_CONFIG. DAT) is provided for all third-party, layered-product, and user-written device drivers. The system reads these files during the boot process and uses the files to create a set of configuration tables. These tables are used for subsequent autoconfiguration of hardware devices. Although the tables are built from two files and collected by bus type, they can be considered one logical configuration table of known devices.
Section 8.6.2, ''Using File-Based Autoconfiguration'' describes how to use the SYS$SYSTEM:SYS$USER_CONFIG. DAT file to autoconfigure devices.
8.6.2. Using File-Based Autoconfiguration
- SYS$SYSTEM:SYS$USER_CONFIG. DAT
- SYS$SYSTEM:SYS$CONFIG. DAT
Both files use the same format, and the data from both files are combined to create the configuration tables for each bus on the system. The SYS$USER_CONFIG. DAT file is read first, and takes precedence over any duplicate device descriptions contained in both files. If multiple device descriptions exist in a single file, the first occurrence of the description is used.
The configuration files consist of device description blocks, each of which provides the information needed to configure the correct device driver for a device.
Each device description block consists of a series of statements starting with a DEVICE keyword and ending with the END_DEVICE keyword. Between these two keywords, additional keywords define the hardware ID, the device name, the driver name, the bus type, and any other required or optional information.
Note
The SYS$CONFIG. DAT file is read-only and should not be modified by users or by third parties. It should only be modified by VSI, and it might be replaced by OpenVMS upgrades. Inappropriate edits to this file could result in the inability to boot the system.
8.6.2.1. Adding Descriptions to SYS$USER_CONFIG. DAT
KEYWORD = value
DEVICE = "My device" NAME = UU DRIVER = USER$UUDRIVER ID = 0x0005111 ADAPTER = PCI FLAGS = NOVECTOR END_DEVICE
In this example, the description indicates that when a device with the hardware ID of 5111 (hex) is found on a PCI bus, the device named UU should be configured, and the USER$UUDRIVER device driver should be loaded. This example also specifies that the driver does not want to be connected to an interrupt vector. (If the bus information had a vector, it would be ignored. )
UNITS = 1 NUM_VECTORS = 1
These values usually default to the correct values for a single unit controller.
8.6.2.2. Configuration File Syntax
All white space is equivalent to a single space. Blank lines, multiple spaces, and tabs may be used for clarity, but they are treated by the parser as a single space.
All strings are converted to uppercase unless within quotes.
A quotation mark cannot be passed within a string (it will be deleted).
All numbers are in the C language format: the default is decimal, octal may be specified by providing a leading "0", hex by providing a leading "0x".
Comments can occur anywhere in the file and can begin with an exclamation point (!). All text on the line from the exclamation point to the end of the line is ignored.
8.6.2.3. Device Descriptions
DEVICE = string
The DEVICE keyword starts a device description. The DEVICE keyword takes a string argument, which is an arbitrary description of the device being defined.
Example: DEVICE = "NI (Tulip)"
The string argument is used by utilities such as the CLUE CONFIG command in $ANALYZE/SYSTEM. It should be kept short enough to look correct.SDA> CLUE CONFIG . . . Adapter Configuration:---------------------- TR Adapter ADP Hose Bus BusArrayEntry Node Device Name/HW-Id – ----------- -------- ---- -------------------- ---- ----------------- . . . 4 PCI 80949900 60 PCI 80949B50 1 MERCURY 80949BC0 GQA: 3 S3 Trio32/64 80949C30 EWA: 5 NI (Tulip)END_DEVICE
The END_DEVICE terminates the current device description, and causes the parser to create a new table entry if all required keywords have been supplied. No parameters are required.
ID = {number {, number} | string}
The ID keyword specifies the hardware ID of the device. The hardware ID is a 64-bit quantity and can be specified by a pair of 32-bit values (low-order, high-order), or can be specified as an ASCII string of up to 8 characters. If only one numeric value is provided, the high-order 32 bits are set to zero.
Example: ID = 0x00051000 ! HW ID of NCR810 in hex
Example: ID = FLOPPY ! HW ID of Floppy in ASCII
Example: ID = 0x906010B5, 0x113310DF ! 64-bit ID => low-32, high-32
The number of bits used by the system depends on the adapter type. EISA and PCI use 32 bits. ISA uses 64 bits. PCI can be extended to64 bits by using the FLAGS=EXTENDED_ID keyword.
NAME = string
The NAME keyword specifies the mnemonic for the device. This is usually a two-character name, but it can be more.
Example: NAME = PK
DRIVER = string
The DRIVER keyword specifies the file name of the device driver for the device.
Example: DRIVER = SYS$PKEDRIVER
ADAPTER = string
The ADAPTER keyword indicates the bus type of the device. The current adapters are: PCI, EISA, ISA, TC (TURBOchannel).
Example: ADAPTER = PCI
UNITS = number
The UNITS keyword indicates the number of units (UCBs) that are created for the controller. If not specified, the default is 1.
Example: UNITS = 1
FLAGS = string
The FLAGS keyword shows optional information about how to load the driver. More than one flag may be specified, separated by a comma (, ).
Example: FLAGS = NOVECTOR, CASE_BLIND, EXTENDED_ID, ISA_ON_EISANOVECTOR
Device has no interrupt vector.
CASE_BLIND
Causes the ID to be treated as an ASCII string and converted to uppercase. In addition, the ID from the hardware will also be converted to uppercase before comparing. This flag is useful for ISA device strings because the console ISACFG command will not convert the HANDLE to uppercase. If this flag is specified, the ID must be entered in the description as a string, and not as a number, or an error will be displayed and the description ignored.
EXTENDED_ID
The flag is valid only for devices on the PCI bus. Normally, only 32-bit hardware IDs are used for PCI. If you have a PCI board that supports the V2. 1 PCI bus specification, set this flag. The upper 32 bits of the hardware ID should contain the subsystem ID and the subsystem vendor ID. For example, in the following example, 1133 is the subsystem ID, and 10DF is the subsystem vendor ID.FLAGS = EXTENDED_ID ID = 0x906D1OB5, 0 x 113310DFIf the EXTENDED_ID flag will be used to load a special driver, but the same ID without the EXTENDED_ID bit will be defined to load a generic driver, the description with the EXTENDED_ID should be located before the generic description.ISA_ON_EISA
This flag is valid only when the value EISA is given to the ADAPTER keyword, and the device is an ISA device. ISA devices should set this flag to ensure that the value given to the ID keyword is interpreted correctly. For ISA devices, the system keeps the ID value as an ASCII string. When the system believes that this is an EISA device, the ID value is compressed into binary format.
PRIVATE_DATA = string
This keyword is supported only when the value ISA is given to the ADAPTER keyword. The statement may not span lines. If the string contains more than one word, the string should be in quotes. The quotes are not passed as part of the string. An ISA driver can retrieve this string by calling IOC$NODE_DATA and passing the function code IOC$K_ISA_USER_PARAM.
BEGIN_PRIVATE
This keyword is supported only when the value ISA is given to the ADAPTER keyword. The BEGIN_PRIVATE and END_PRIVATE keywords can be used instead of PRIVATE_DATA. They are not used as part of a PRIVATE_DATA statement. When using BEGIN_PRIVATE and END_PRIVATE, all data contained between the keywords is passed to the driver. The data may contain special characters like quotation marks. The data may span multiple lines. When multiple lines are used, the driver will find a line-feed character to indicate a new line.
BEGIN_PRIVATE and END_PRIVATE must be used when trying to convert some entries in ISA_CONFIG. DAT to file; for example, the statement in ISA_CONFIG. DAT:USER_PARAM = "some data"
must be converted to
BEGIN_PRIVATE "some data" END_PRIVATE.
The USER_PARAM keyword in ISA_CONFIG. DAT passes the quotation marks, so PRIVATE_DATA cannot be used to do the conversion.
An ISA driver can retrieve the data between BEGIN_PRIVATE and END_PRIVATE by calling IOC$NODE_DATA with the function code IOC$K_ISA_USER_PARAM.
END_PRIVATE
The END_PRIVATE keyword can only be used to terminate data that is added after a BEGIN_PRIVATE statement.
NUM_VECTORS = number
The NUM_VECTORS keyword specifies the number of vectors that the device uses. The default if not specified is 1.
Example: NUM_VECTORS = 4
|
Keyword |
Required |
Description |
|---|---|---|
|
DEVICE |
Yes |
Begins a device description |
|
END_DEVICE |
Yes |
Ends a device description |
|
ID |
Yes |
Specifies the hardware ID |
|
NAME |
Yes |
Device name |
|
DRIVER |
Yes |
Driver name |
|
ADAPTER |
Yes |
Adapter type |
|
UNITS |
No |
Units Default: 1 |
|
FLAGS |
No |
Device flags: Default: No flags |
|
PRIVATE_DATA |
No |
Specifies private data |
|
BEGIN_PRIVATE |
No |
Specifies start of private data |
|
END_PRIVATE |
No |
Specifies end of private data |
|
NUM_VECTORS |
No |
Number of vectors Default: 1 |
8.6.2.4. Rebuilding the SYS$USER_CONFIG. DAT File
$ MC SYSMAN IO REBUILD $ MC SYSMAN IO AUTOCONFIGURE
Note that once a driver has been loaded for a device, it cannot be reloaded.
The MC SYSMAN IO REBUILD/VERIFY command causes SYSMAN to read and process the SYS$SYSTEM:SYS$USER_CONFIG.DAT and SYS$SYSTEM:CONFIG.DAT files, but not to rebuild the configuration files for OpenVMS. Messages will be displayed for any errors that are encountered. This command can be used by developers to test new changes to SYS$SYSTEM:SYS$USER_CONFIG.DAT without modifying the current system.
8.6.3. Supported Buses for User Devices
File-based autoconfiguration is supported for user-written device drivers on PCI, ISA, EISA, and TURBO channel buses. This section includes additional information specific to configurations.
8.6.3.1. ISA Device Configuration
ISA devices do not provide a readable device ID that can be discovered during bus probing. A user must explicitly indicate the presence of the device at the console and must also reserve resources for the device at the console (IRQs, I/O ports, etc. ). Once the device is known to the console, OpenVMS can then autoconfigure it using file-based autoconfiguration.
ISA devices may be used on either an ISA bus or an EISA bus. If the system has an ISA bus, the device is configured at the console using ISACFG. If the system has an EISA bus, the ISA device is configured using ECU. Both console utilities allow the users to reserve device resources.
8.6.3.1.1. Configuring ISA Devices on the ISA Bus
Caution
Beginning with OpenVMS Alpha Version 7.2, the ISA_CONFIG. DAT file is no longer supported. Refer to Section 8.6.4, ''SYS$MANAGER:ISA_CONFIG. DAT Unsupported'' for more information.
8.6.3.1.2. Configuring ISA Devices on the EISA Bus
ISA devices must be manually configured using the EISA Configuration Utility (ECU) which is run from the console. Devices must have a CFG file provided on a DOS floppy. The CFG file provides a string (up to7 characters) as the device ID.
See your card manufacturer, or the EISA Bus Specification for details on CFG file format.
The ECU floppy (DOS format) contains an example ISA CFG file (ISA000. CFG) that may be used as a model for new configuration files. For more information, refer to the EISA Bus Support chapter in Writing OpenVMS Alpha Device Drivers in C.
Note
ISA devices cannot be easily autoconfigured on EISA bus systems on versions prior to OpenVMS Alpha Version 7.1 because the ID is not copied from the ECU data into the OpenVMS bus structures.
8.6.4. SYS$MANAGER:ISA_CONFIG. DAT Unsupported
Support for using the SYS$MANAGER:ISA_CONFIG.DAT file to configure ISA devices was discontinued in OpenVMS Alpha Version 7.2. If you use this file, you should convert to using the ISACFG utility from the console and the file-based autoconfiguration method described in the following sections.
|
ISA_CONFIG. DAT |
File-based Autoconfigure |
ISACFG |
|---|---|---|
|
Not used |
ID |
-handle |
|
NAME |
NAME | |
|
DRIVER |
DRIVER | |
|
IRQ |
irq x | |
|
NODE |
slot | |
|
DMA |
dmachan x | |
|
PORT |
iobase x | |
|
MEM |
membase x | |
|
FLAGS |
Bit 1 (unsupported) | |
|
Bit 2 (FLAG=NOVECTOR) | ||
|
USER_PARAM |
PRIVATE_DATA |
An entry in ISA_CONFIG. DAT is matched to internal data kept for an ISA device using the number specified with the NODE keyword. When you use the SYS$USER_CONFIG. DAT file to configure an ISA device, however, the ID keyword is used to match the block, which defines the device, to data entered from the console with the ISACFG command. The value given to the ID keyword must be the same as the value specified with the ISACFG-handle keyword.
Any identification string can be used for an ISA device. It should be eight characters or less. The ISACFG command does not set the -handle value to upper case, so two methods can be used to force the value to match one specified using the configuration keyword ID. You can specify the ID value in the correct case inside of quotation marks (matching the case you used for the -handle value). Or you can use the configuration keyword FLAGS=CASE_BLIND, which will cause a blind comparison to be done.
>>>isacfg -slot 3 -dev 0 -mk -enadev 1 -type 1 -handle MyDevice
DEVICE = "My Device"
ID = MYDEVICE
FLAGS = CASE_BLIND
.
.
.
END_DEVICEDescriptions of the conversion for each parameter in ISA_CONFIG.DAT are as follows:
- NAME = xx
Use the NAME keyword in SYS$USER_CONFIG. DAT. Use the same value, where xx is the device code. (The device code is usually 2 letters. )
Example: NAME = ER
- DRIVER = driver_name
Use the DRIVER keyword in SYS$USER_CONFIG. DAT. Use the same value for file-based autoconfiguration. driver_name is the name of the driver in SYS$LOADABLE_IMAGES.
Example: DRIVER = SYS$ERDRIVER
- IRQ = i
Use IRQ x in the ISACFG utility. You can express four IRQs: -IRQ0 through -IRQ3. Use the same value used for ISA_CONFIG. DAT. The IRQ is a value from 0 to 15, which specifies which ISA IRQ the device uses to report interrupts.
Example:
This example assigns IRQs 10 and 5 to the device.>>>isacfg -slot 3 -dev 0 -mk -handle MYDEV -enadev 1 -etyp 1 -irq0 10 -irq1 5
- NODE = n
Use -slot in the ISACFG utility. The slot number (n) does not represent the slot in which the device resides. It is a logical, not a physical number. However, the number must be between 1 and the maximum number of slots on the machine. Slot number 0 is not available to users.
Example:>>>isacfg -slot 3 -dev 0 -mk -enadev 1 -etyp 1 -handle MYDEV -dmachan0 1 -irq0 10
This example assigned values to a device represented by slot 3. There must be at least 3 slots on the machine on which this command is executed. To see which logical slots are being used, enter the following command:>>>isacfg -all
- DMA = (j, k, . . . )
Use -dmachan x in the ISACFG utility. Values j, k, and so on are values 0 through 7, which specify the channels of the DMA controller that the device is using to relay information. Use the same values for j, k, and so on with ISACFG, but assign each one to a different DMA channel. You can specify four DMA channels, using the keywords-dmachan0 through -dmachan3.
Example:>>>isacfg -slot 3 -dev 0 -mk -enadev 1 -etyp 1 -handle MYDEV -irq0 10 -dmachan0 1 -dmachan1 3
This example assigned two dma channels, 1 and 3, to the device.
- PORT = (aa:b, cc:d, . . . )
Use -iobasex in the ISACFG utility. You can specify six ports using the keywords -iobase0 through -iobase5. There is no equivalent for the length fields b, d etc. The ISACFG utility assumes that the driver knows the length of the port. Drivers that called the IOC$NODE_DATA routine with the keyword IOC$K_EISA_IO_PORT to obtain the length in the upper word of the returned longword should stop examining the upper word. With ISA_CONFIG. DAT, the length was returned; but with ISACFG, the length is always 8.
Example:>>>isacfg -slot 3 -dev 0 -mk -enadev 1 -etyp 1 -handle AAA321 -irq0 10 -iobase0 2F8
This example assigned port 2F8 to the device.
- MEM = (ee:f, gg:h, . . . )
Use the ISACFG keywords -membasex to specify the memory base, and -memlenx to specify the memory length. Use the same values for ee, gg etc. and f, h etc. as you used for ISA_CONFIG. DAT. You can specify three memory regions using the keywordsmembase0 through membase2 and memlen0 through memlen2.
Example:>>>isacfg -slot 3 -dev 0 -mk -enadev 1 -etyp 1 -handle MYDEV -irq0 10 -membase0 80000 -memlen0 20
- FLAGS = n
The FLAGS field in ISA_CONFIG. DAT had 2 meaningful bits:
Bit 0 indicates the device being configured is a SCSI adapter.
Bit 1 indicates that no interrupt is required for the device.
Because it was never possible to use bit 0, it is not currently supported in file-based autoconfiguration. Bit 1 can be expressed with the file-based autoconfiguration FLAGS=NOVECTOR statement.
- USER_PARAM = text
Use the PRIVATE_DATA keyword in file-based autoconfiguration to represent this value. If you used quotation marks with the USER_PARAM value, you must use BEGIN_PRIVATE and END_PRIVATE to continue to pass the quotation marks to the driver. For ISA devices, the PRIVATE_DATA values can be obtained the same way as USER_PARAM (that is, by using the IOC$NODE_DATA routine with the IOC$K_ISA_USER_PARAM keyword).
While using ISACFG, you must also be familiar with the following commands:
To return the configuration to its initial state:>>>isacfg -init
To save your changes:>>>init
To delete an entry:>>>isacfg -slot 1 -dev 0 -rm
To see all the devices currently configured:>>>isacfg -all
To modify a device, use -mod:>>>isacfg -slot 2 -dev 0 -mod (etc. )
The following keywords do not have equivalents in ISA_CONFIG. DAT:-enadev a_number
Takes the numbers 0 (disabled) and 1 (enabled). It allows you to disable a device so that it will not be used in resource allocation calculations.
-etyp a_number
Defines an entry type for this entry. OpenVMS supports only the values 0 and 1. It should always be specified as a 1. It takes the following values:- 0 Causes the entry to be deleted
- 1 Single option
- 2 Embedded multiport device
- 3 Multiport option device
8.7. Managing Terminals
Physically attach terminals to the system
Set terminal characteristics
Set up virtual terminals
The following sections explain setting terminal characteristics and setting up virtual terminals.
8.7.1. Setting Terminal Characteristics
Terminal device characteristics—for example, the number of characters displayed on a line—have certain default values. Changing these values might be necessary, depending on the characteristics you use with each terminal.
SET TERMINAL[/qualifier, . . . ] [device-name[:]]
$ SET TERMINAL/WIDTH=132/PAGE=60/NOBROADCAST/PERMANENT
For more detailed information about the SET TERMINAL command and its qualifiers, refer to the VSI OpenVMS DCL Dictionary.
8.7.1.1. Setting Default Characteristics with System Parameters
To change the default terminal characteristics for all terminals on a node, you can specify values for the system parameters TTY_DEFCHAR and TTY_DEFCHAR2. For more information about setting and using system parameters, see VSI OpenVMS System Manager's Manual, Volume 2: Tuning, Monitoring, and Complex Systems.
8.7.1.2. Setting Characteristics in System Startup
Caution
VSI recommends that you limit the number of SET TERMINAL commands you include in startup command procedures. Large numbers (for example, hundreds) of SET TERMINAL commands can significantly slow down system startup. If you have a large number of terminals, change the default characteristics using the system parameters TTY_DEFCHAR and TTY_DEFCHAR2 as explained in Section 8.7.1.1, ''Setting Default Characteristics with System Parameters''.
You may want to include comments to provide the names of terminal owners, as shown in the following example.
Example
$ SET TERMINAL TTC2:/SPEED=300/DEVICE_TYPE=LA36/PERMANENT !JONES $ SET TERMINAL TTD1:/SPEED=9600/PERMANENT !WRENS $ SET TERMINAL TTD4:/SPEED=1200/PERMANENT !JRSMITH $ SET TERMINAL TTG4:/SPEED=1200/MODEM/PERMANENT !DIALUP1
8.7.2. Managing Virtual Terminals
To reconnect to a process when a modem line connection is lost
To maintain sessions on more than one disconnected terminal
To use dynamic asynchronous DECnet communication
Enabling Virtual Terminals
$ RUN SYS$SYSTEM:SYSGEN SYSGEN> CONNECT VTA0/NOADAPTER/DRIVER=TTDRIVER SYSGEN> EXIT
$ RUN SYS$SYSTEM:SYSMAN SYSMAN> IO CONNECT VTA0/NOADAPTER/DRIVER=SYS$TTDRIVER SYSMAN> EXIT
Note
LAT terminals (LTA n:) can be disconnected if the TT2$M_DISCONNECT characteristic is set, but remote terminals (RTAn:) cannot be disconnected.
Enable the feature on a systemwide basis by setting the appropriate bit in the system parameter TTY_DEFCHAR2. You must use this method for dynamically created terminal devices; for example, LTAn: devices.
Enable the feature on a per-terminal basis by using the DCL command SET TERMINAL/DISCONNECT.
Controlling the Use of Virtual Terminals
In SYLOGIN, include a user-written DCL procedure that enforces a system-wide or user-specific policy for the use of virtual terminals at your site.
Specify the maximum number of detached processes that individual users can create by specifying a value for the UAF resource limit MAXDETACH. See the documentation of the MAXDETACH user quota in Table 7.9, ''Descriptions of SYSTEM and DEFAULT Accounts'' for the implications of using this quota, as well as information about how to set this quota.
Using the system parameter TTY_TIMEOUT, specify the length of time a disconnected session remains before being logged out.
Restrict the use of virtual terminals by enabling them on a per-terminal basis.
Restrict individual users from being able to reconnect to disconnected terminal sessions by specifying the UAF flag DISRECONNECT.
Create a site-specific LGI callout module that provides the preferred policy at your site. Information about LGI callouts is in the VSI OpenVMS Utility Routines Manual.
8.7.2.1. Using Virtual Terminals for Dynamic Asynchronous DECnet for OpenVMS (VAX Only)
Both nodes have DECnet licenses registered and loaded
Both nodes have the asynchronous DDCMP driver NODRIVER loaded
Both nodes have DYNSWITCH installed as a privileged shareable image
The remote node has virtual terminals enabled
See the DECnet-Plus for OpenVMS Applications Installation and Advanced Configuration Guide for a detailed description of the procedure for setting up dynamic asynchronous DECnet lines.
8.7.2.2. Determining the Physical Terminal Type of a Virtual Terminal
Note
Using the command SET TERMINAL/INQUIRE clears the type-ahead buffer.
$ DEVCLASS = 'F$GETDVI ("SYS$COMMAND", "DEVCLASS")'
$ IF DEVCLASS . ne. 66 then goto alldone !Not a terminal
$ DEVTYPE = 'F$GETDVI ("SYS$COMMAND", "DEVTYPE")'
$ IF DEVTYPE . ne. 0 then goto got_devtype
$ SET TERMINAL/INQUIRE !Try to determine the device type
$ DEVTYPE = 'F$GETDVI ("SYS$COMMAND", "DEVTYPE")'
$ got_devtype:
$! Can now dispatch on 'devtype' to do different things depending
$! on the type of terminal.
$ alldone:You can uniquely identify a LAT terminal by using the F$GETDVI lexical function and specifying the item TT_ACCPORNAM. The function returns the terminal server node name and port name.
8.8. Managing Modems
A modem is a device that converts electronic signals from one data format to another. Modems usually perform conversions bidirectionally, that is, they can convert the local data into another data format and transmit the results; modems can also receive and convert data back to the local data format. Most modems convert data from digital format to analog format, and from analog format back to digital format.
With a pair of modems, you can transmit digital communications over analog media such as telephone lines, and then convert the communications back into digital signals at a remote location. Pairs of modems are used to connect a terminal or a local computer to a remote computer system, and to connect two remote computers to each other.
Understanding modems
Setting up modems
Troubleshooting modems
8.8.1. Understanding Modems
A modem converts a digital signal to an analog signal by modulating the digital information on a carrier signal; a modem converts analog to digital signals by demodulating – or extracting – digital information from analog signals on an analog transmission facility such as a telephone line. The two words MOdulator and DEModulator form the basis for the device name: modem.
Figure 8.1, ''Basic Modem Configuration'' represents communications between a terminal and a remote computer system, but the principles apply equally to communications between two computer systems. One modem converts digital to analog signals on the local end of the analog telephone connection, and another modem converts analog to digital signals on the remote end of the connection.
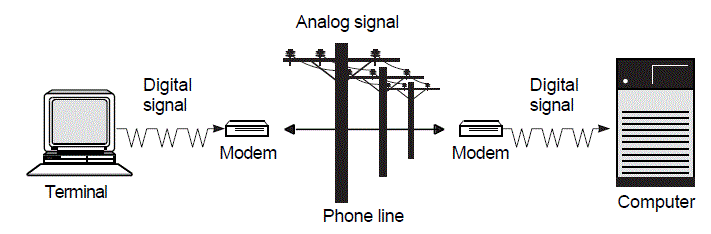
Modems are always used in pairs; each one of the pair can act as both a transmitter and a receiver.
The receiving and transmitting modems are wired correctly.
The modems support compatible analog data formats and speeds.
Each modem supports a digital format compatible with the attached terminal or computer.
Once a modem connection has been established, you can layer data communications over the connection. You can layer at least one, and sometimes more, of a wide variety of communications protocols on the basic asynchronous serial ASCII protocol that most modems provide. Point-to-Point Protocol (PPP) and asynchronous DECnet are examples of protocols that can operate over a modem link.
|
Reference |
Description |
|---|---|
|
DECnet-Plus for OpenVMS Network Management |
Explains the use of modems to establish a dynamic asynchronous DECnet connection between two nodes. Asynchronous DECnet is a protocol that can operate over a modem datalink. |
|
VSI TCP/IP Services for OpenVMS Management |
Explains the use of modems to establish a serial connection using the PPP (Alpha and I64 only) and SLIP protocols and TCP/IP Services. |
|
VSI OpenVMS Guide to System Security |
Discusses how to maintain the security of DECnet modem connections and dial-in modem lines. |
|
VSI TCP/IP Networking on OpenVMS Systems |
Explains the use of PPP on OpenVMS Alpha, I64, and OpenVMS VAX to communicate with remote systems. |
|
VSI OpenVMS System Management Utilities Reference Manual, Volume II: M–Z |
Describes the PPP utility and associated commands. |
|
Explains how to configure and manage virtual terminals. | |
|
VSI OpenVMS DCL Dictionary> and online help |
The DCL command SET HOST/DTE discusses the use of modems to connect to a remote system. The DCL commands CONNECT and DISCONNECT explain how to set up and disconnect virtual terminals. |
Direct and Indirect Connections
Part of the job of configuring a modem to a computer or a terminal is to decide what type of access the modem will have to your computing environment and which serial communications ports best meet your requirements.
Direct connection
A direct connection dedicates the modem to a particular host system. This reduces the amount of access available to the modem caller, and can reduce to one the number of systems that you must protect against unauthorized access through this modem.
This is often the configuration of choice for smaller computing environments, or for connecting a modem to a single computer or terminal.
Indirect connection
An indirect connection creates a pool of modems for a variety of computer systems on the local area network, including servers that communicate with the host computers using protocols such as LAT and Telnet. This type of connection makes better use of the available telephone lines but increases security requirements.
This is often the configuration of choice for larger computing environments. An indirect connection is commonly used when you use LAT or Telnet protocols to configure a number of modems, called a modem pool, to share access to a number of computer systems.
With either type of connection, you cannot use the modem if the host or the server the modem is connected to is not operational.
Figure 8.2, ''Direct and Indirect Modem Configurations'' depicts direct and indirect modem configurations. The remote devices T1 and T2 are indirectly connected to both Host1and Host2 host computers using the DECserver and the LAT protocol;T3 is connected directly to Host2.
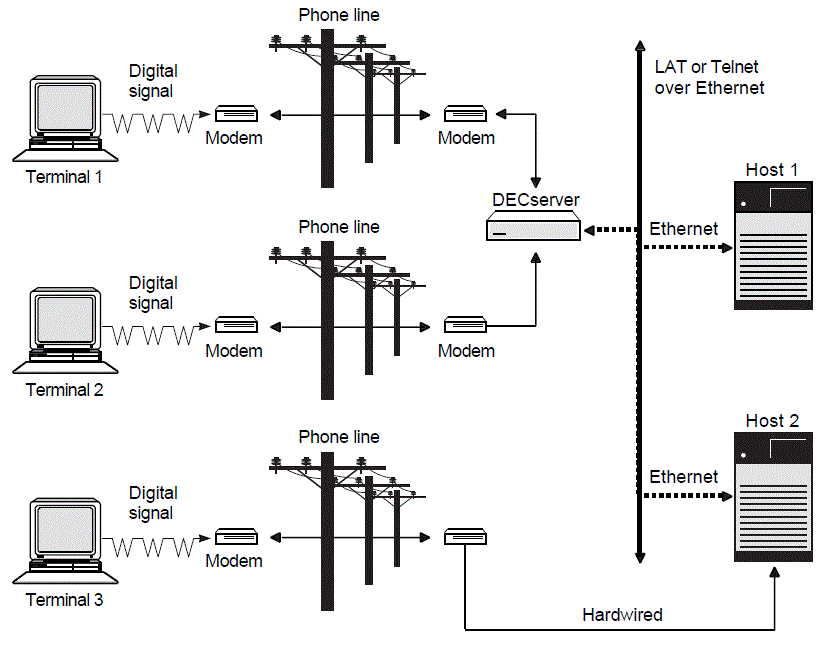 |
Once you decide which serial communications port to use, either on a host or a terminal server, you need to determine the connectors and the pinouts for the port and how to wire the modem to the port. Refer to the documentation for the modem and for the port; also see Section 8.8.2, ''Setting Up Modems''.
8.8.2. Setting Up Modems
Determine connections and wiring pinouts.
The connector and pinout determine the specific wiring adapters and cables you need to connect the modem to the port. To determine the pinout and the connector on the modem, and the pinout and connector on the port you are connecting the modem to, refer to the modem and the port documentation.
Two common pinouts found on the EIA-232 DB25 connection are shown in Table 8.4, ''Common Pinouts on the EIA-232 DB23 Connection''.Table 8.4. Common Pinouts on the EIA-232 DB23 Connection Pinout
Description
Data Terminal Equipment (DTE)
Transmit information through pin 2, and receive information through pin 3, among other standardized pin assignments.
Data Communications Equipment (DCE)
Transmit information through pin 3, and receive information through pin 2, among other EIA-232 pin assignments.
Straight-Through and Cross-Over Wiring
Descriptions of straight-through and cross-over wiring follow:DCE devices communicate straight-through with DTE devices: the transmit pin on each end of the cable is wired to the corresponding receive pin on the other end. Pin 2 on one cable is connected to pin 2 on the other cable, and pin 3 on one cable is connected to pin 3 on the other cable.
Equipment wired with a DCE pinout requires a cross-overto communicate with another connector wired DCE; pins 2 and 3 on one cable are connected to pins 3 and 2 on the other cable, respectively. A cross-over is required in certain situations, because two transmit pins or two receive pins cannot be wired together. As a specific example, you need a cross-over to wire two DTE devices together, or to wire two DCE devices together.
A cable with cross-over wiring is sometimes referred to as a null modem cable, because a null modem cable of an appropriate length could logically replace all components of a modem-based communications connection; that is, it could replace the local serial cable, the local modem, the intervening telephone circuit, the remote modem, and the remote serial cable.
Table 8.5, ''Connectors'' describes the most common connectors used to wire a modem.Table 8.5. Connectors Connector ?
Description
DB9
A 9-pin connector, containing a row of four pins, and a row of five pins. The DB9 can have the EIA-574commonly used on PC systems or an older standard connection used on MicroVAX consoles.
DB25
A 25-pin connector, with a row of twelve pins and a row of thirteen pins. The DB25 typically uses the EIA-232 pinout and can be wired as Data Terminal Equipment (DTE) or as Data Communications Equipment (DCE).
MMJ
A 6-pin modular jack, which uses DEC-423 signaling, commonly referred to as DECconnect wiring. DECconnect wiring greatly simplifies wiring devices, as one need consider only the appropriate adapter for the device connection;the associated BC16E cabling is wired consistently.
The pinouts and applications for the common connectors are shown in Table 8.6, ''Connector Applications''.Table 8.6. Connector Applications Connector and Pinout
Example
Adapter ?
A DB9 9-pin connector with an EIA-574 PC-compatible pinout
The DB9 connectors found on most PC, AlphaStation, and AlphaServer systems
Use the H8571-J or compatible MMJ adapter.
A DB9 9-pin connector that predates the EIA-574 pinout
The console connector on various MicroVAX systems uses a pinout that predates the EIA-574 pinout
Use the H8575-B or compatible MMJ adapter.
A DB25 25-pin connector with the EIA-232 wiring
The communications ports on many terminals
Use the appropriate adapters from the following list, ? or contact a VSI sales representative or VSI reseller for information on adapters not listed below:
H8575-A
DB25 female to MMJ adapter, straight-through ?
H8571-C
DB25 male to MMJ adapter, cross-over ?
H8575-E
DB25 male to MMJ, straight-through ?
An 8-pin DIN (round) connector
Use the H8584-AB or compatible MMJ adapter.
A Modified Modular Jack (MMJ) DECconnect socket
If your application does not use one of the serial wiring connections shown in the table, you need to determine the specific requirements of the device, as well as the specific pinout. You also need to determine the cabling appropriate for the application. Contact your hardware support organization, your VSI support representative, or your local VSI reseller.
MMJ Accessories
Table 8.7, ''DECconnect Accessories'' lists order numbers and descriptions of some DECconnect accessories available from VSI.Table 8.7. DECconnect Accessories Order Number
Description
BC16E-02 BC16E-10 BC16E-25 BC16E-50 BC16E-A0
DEC-423 (based on EIA-423) MMJ office cable, available in various lengths.
H8571-C
25-pin male EIA-232 to DEC-423 DECconnect adapter.
H8571-E
DEC-423 DECconnect 25-pin adapter with jack screws.
H8571-J
9-pin MMJ adapter. Used with the PC-compatible EIA-574 DB9 wiring.
H8572-00
MMJ cable extender. Allows the direct connection of two BC16E cables.
H8575-A
Female 25-pin DEC-423 DECconnect MMJ to EIA-232 general-purpose adapter.
H8575-B
Female 9-pin DEC-423 DECconnect to printer adapter. Also used with theDB9 wiring found on some MicroVAX console ports.
H8584-AB
8-pin DIN to DEC-423 DECconnect adapter. Most commonly used with various Apple computers.
Choose a type of modem control.
As part of connecting a modem to a device, you can add wires to the host port and the modem. These wires are used to pass signals called the modem control signals.
When you connect to a local terminal for dial out, modem control is not particularly significant: either the modem is wired or configured to ignore modem control, or the wiring is set up to pass the modem control signals from the terminal to the modem.
When you connect a modem to a computer, modem control is far more significant, because the host uses the modem control signals to direct the modem to accept incoming telephone calls. The modem control signals also enable the modem to signal the host that a call has been received or that a call has ended. These signals allow the host and the modem to take the appropriate actions for a particular event.Note
In addition to their use by modems, modem control signals are also often used to communicate device status between the host and other serial devices such as serial printers. Various serial printers use modem control signals as modems do: to indicate to the host that the printer is powered up and ready to accept output, or that the printer is powered down or otherwise unable to process output.
Table 8.8, ''Types of Modem Control That Devices Support'' contains descriptions of types of modem control that devices can support.Table 8.8. Types of Modem Control That Devices Support Type of Modem Control
Description
No modem control
The host and the modem cannot intercommunicate the status of the host or the modem. It is possible to use a modem on this port; however, this type of port is not recommended for a modem. Without modem control, the modem cannot signal the host that the telephone call has been disconnected and that the host must take appropriate action: suspend or log out the associated user process. (See Step 5 for the associated security implications. ) Furthermore, without modem control, you must set or wire the modem so that it always answers incoming calls, because the modem cannot know if the host is able to respond. (This too has security and modem control implications. )
Limited modem control
The host and the modem can intercommunicate and can take actions based on the status of the other device. Limited modem control is the best choice for most applications.
Full modem control
The host and the modem can intercommunicate and can pass an extensive amount of control and status information. Both the host and the modem can take actions based on the status of the other device. Limited modem control, which has similar capabilities, has largely superseded this configuration. Limited modem control also requires fewer wires on the connection, making it the more economical choice.
Refer to the device documentation to determine the type of modem control signal that the device and modem support. This determines the number of wires and the wiring connections needed for communications. The following examples show types of modem control and the wires they require:- DECconnect supports limited modem control, which requires two of the six wires in the DECconnect cabling. The other four wires are used for the following purposes:
Transmitting data
Receiving data
The transmit ground
The receive ground
Full modem control requires more than two wires dedicated to the modem control signaling.
Devices that do not support modem control require no wires dedicated to modem signaling.
With modem commands or custom-wired cabling, you can force a modem to operate with a device that does not support modem control. However, this is not recommended for general use on a host system, because this wiring can potentially result in security problems.
Determine the command set used by the modem.
The command set includes the commands used to request that the modem place a telephone call, the telephone number to be called, and the commands used to configure the modem.
Examples of command sets follow:- AT command set:
ATDT phone-number
where:AT indicates "attention" – to get the attention of the modem
DT indicates "dial tone"; (PT would indicate "pulse tone").
- DMCL command set:
Ctrl/B Ready DIAL T phone-number
where:T represents "tone"; ( Pwould represent "pulse").
phone-number represents the phone number you are dialing.
The command set is used to communicate with the modem to request that the modem perform some action, such as dialing a telephone number and connecting to a remote modem. You can enter direct modem commands at a terminal directly connected to a modem, or you can communicate indirectly with the modem using DCL commands such as SET HOST/DTE.
Configure the port.
After wiring the modem to the connector on the OpenVMS computer or DECserver, you must configure the port to recognize and properly operate the modem, and to enable autobaud speed detection.Note
The autobaud operation detects the speed – the baud rate – of the communications. Including the /AUTOBAUD qualifier is not required; however, if autobaud detection is disabled, you must configure both the host terminal or DECserver port, and the modem, for the same baud rate.
The commands you give depend on whether you are using an OpenVMS host system or a DECserver:- On an OpenVMS host system, execute the following command interactively, and also place this command in the system-wide startup file, SYS$MANAGER:SYSTARTUP_VMS. COM:
$ SET TERMINAL /MODEM /AUTOBAUD /PERMANENT TTAO:
where TTA0: is the name of the terminal device the modem is wired to.This command requires privileges.
- On a DECserver, configure the port using the following commands:
DECserver> SET PORT n MODEM ENABLE DECserver> SET PORT n FLOW CONTROL XON ENABLE DECserver> SET PORT n AUTOBAUD ENABLE
where n is the port number.The commands enable the modem, XON, and autobaud. These commands require privileges on the DECserver.
Ensure security with your modems.
Dial-in lines allow remote, unauthorized users access to your system. You need to maintain consistent security and good system and user password management to keep your system secure from unauthorized users.
The following list contains some ways to increase security on your system:You can configure a DECserver with a password to prevent a modem from accessing any other feature. This password prevents an unauthorized user from accessing or seeing any information about the local network configuration until after the user enters the password. You can enable this password on specific ports.
With OpenVMS, you can establish a system-wide password requiring the user to specify a password before the system prompts for a password. This additional password helps reduce the security risk caused by users with poor passwords. You can enable a system-wide password on specific host ports.
With OpenVMS, you can establish minimum password lengths, and you can enable system-generated passwords. These measures can help reduce the security risk caused by users with poor passwords.
Always use and configure some form of modem control. Without modem control, a telephone connection that is disconnected for any reason might be left logged into the host, and a subsequent modem caller will receive the logged-in session without specifying a password. Also, without modem control, the host cannot request that a modem session be dropped when certain system events such as a process logout occur.
These and other techniques for protecting your system from unauthorized access are discussed in detail in the VSI OpenVMS Guide to System Security.
8.8.3. Troubleshooting Modems
In troubleshooting any serial communications problems, particularly those problems with a modem, attempt to isolate the problem as much as possible, testing one component, wire, or device at a time.
|
Problem |
Considerations |
|---|---|
|
Modem does not answer |
Check that the telephone number being called is correct. |
|
Check that the modem has power. | |
|
Check that the host system or device has power and is operating. | |
|
If possible, directly connect a standard terminal in place of the modem, and test the operation directly. | |
|
Check that the host modem control signals are present, and correctly wired. | |
|
Check that the host device is configured correctly for a modem by using a SET TERMINAL, SET PORT, or other appropriate host command. | |
|
Check the wiring. Look for a broken, miswired, or disconnected wire. | |
|
Look for a disconnected connector or a broken, missing, or bent connector pin. | |
|
Telephone malfunction |
Using a standard telephone handset, test that voice calls can be established on the telephone line. |
|
Is static or other interference noticeable on the telephone line? | |
|
No modem indicator lights |
Check the power connection. |
|
Check to see that the modem is turned on. | |
|
Check to see that the modem has passed applicable self-tests. | |
|
Try swapping the modem for another device. | |
|
No response, or garbled response to typing |
Check that the modem status lights indicate received data on the transmit line, and transmitted data on the receive line. This can point to the miswiring of the transmitted and received data. You can wire serial cables and adapters straight-through or with a cross-over. |
|
Check for crossed signals. | |
|
Check for incorrect speed detection. Autobaud detection sometimes sets the speed incorrectly. On lines that are not enabled for autobaud detection, check that the line is set for the correct speed. On ports that support it, check the speeds for both the transmitted and the received data. | |
|
Make sure that the port has autobaud enabled, and that the port and the modem are configured for the same data rate. | |
|
Check for interference or a disconnection in the wiring. | |
|
Check the wiring for any problems. | |
|
Check for any adjacent wiring, power, or video signals that might interfere with the serial communications. |
8.9. Managing Printers
|
Task |
For More Information |
|---|---|
|
Set printer characteristics | |
|
Spool printers | |
|
Despool printers | |
|
Test spooling of printers |
8.9.1. Setting Printer Characteristics
Printer characteristics must be set prior to starting queues for the printers. The DCL command SET PRINTER establishes characteristics for a line printer. The DCL command SET TERMINAL sets characteristics for a printer connected to a terminal or LAT port.
In addition, if you want to spool your printers, you must do so before starting the queues to be associated with those printers. For information about spooled printers, see Section 8.9.2, ''Using Spooled Printers''.
To execute these commands each time your system boots, add these commands to your site-specific startup command procedure. If your configuration is simple, you can add the commands to SYSTARTUP_VMS. COM. If your configuration requires a large number of commands, create a separate command procedure (for example, PRINTER_SETUP. COM) and execute it from SYSTARTUP_VMS. COM. When the device setup command procedure finishes executing, control returns to SYSTARTUP_VMS. COM.
Example
$! Set up line printer devices $! $ SET PRINTER/PAGE=60/LOWERCASE/TRUNCATE LPA0: $ SET PRINTER/LA11/UPPERCASE/WRAP LPB0: $ SET DEVICE/SPOOLED=(LINE_PRINT, SYS$SYSDEVICE) LPA0: $ SET DEVICE/SPOOLED=(SYS$PRINT, SYS$SYSDEVICE) LPB0: $! $! Set up LAT printers $! $ SET TERMINAL LTA331:/SPEED=9600/DEVICE=LN03 - /NOBROADCAST/NOECHO/HARDCOPY/NOTYPE_AHEAD/PERMANENT $ SET DEVICE LTA331:/SPOOLED=(MKTG$LN03_1, SYS$SYSDEVICE) $! $ SET TERMINAL LTA332:/DEVICE=LA210/PAGE=66 - /NOBROADCAST/PERMANENT $ SET DEVICE LTA332:/SPOOLED=(LA210$PRINT, SYS$SYSDEVICE)
8.9.2. Using Spooled Printers
Certain application programs print output by writing or copying data directly to a printer rather than submitting it to a queue. A spooled printer causes such an application program to write output to an intermediate storage device (such as a disk) so that the printer targeted to print the output remains available to other system users while the program is running.
When you spool a printer, you specify a storage device and an output queue to be associated with that printer. When a process running an application directs its output to the spooled printer, the output is instead placed in a temporary file on the storage device. When the file is closed, the system submits the file for printing on the associated output queue. Both the spooling of the output file to an intermediate storage device and the subsequent queuing of a job consisting of this file occur without the direct intervention of the user.
If your system runs application programs that might write output directly to a printer, VSI recommends that you spool your printers. VSI recommends that you also spool your LAT printers to prevent privileged users from writing directly to a LAT printer. Writing directly to a LAT printer can cause problems for output queues that use the printer.
Figure 14.9, ''Queue Configuration with Spooled Devices'' illustrates a sample configuration using spooled printers. Section 8.9.2.1, ''Spooling Printers'' describes how to set up a spooled printer.
8.9.2.1. Spooling Printers
To spool a printer, use the SET DEVICE/SPOOLED command. This command associates the printer with a storage device (such as a disk) and an output queue.
You must spool a printer before you start the queue to be associated with the printer.
SET DEVICE/SPOOLED[=(queue-name[:], intermediate-disk-name[:])] output-device-name
You should always specify the intermediate disk and queue explicitly. If the queue you associate with the spooled output device is a generic queue, a file written to that device is sent to the generic queue, which in turn places the job in one of its target queues. As a result, a job copied to the LPA0: device, for example, might not necessarily print on the printer LPA0:, but instead might print on one of the other printers targeted by the generic queue.
When you select an intermediate storage device, make sure that it has sufficient free space for the volume of spooled output. If you plan to enforce disk quotas on the intermediate device, make sure that all expected users have a quota authorized on the intermediate device. The intermediate device must be mounted before files can be written to it.
After establishing an output device as spooled, you should test the device, because errors in disk or queue names are not detected until spooling is attempted. This step is described in Section 8.9.2.3, ''Testing a Spooled Printer''.
You should create a command procedure to set up your output devices each time the system reboots. Include the commands to set up spooled devices in this command procedure. For more information, see Section 8.9.1, ''Setting Printer Characteristics''.
Example
$! Set up and spool line printer devices $! $ SET PRINTER/PAGE=60/LOWERCASE/TRUNCATE LPA0: $ SET PRINTER/LA11/UPPERCASE/WRAP LPB0: $ SET DEVICE/SPOOLED=(SYS$PRINT, SYS$SYSDEVICE) LPA0:
| Spools the output device LPA0: by associating it with the storage device SYS$SYSDEVICE and the queue SYS$PRINT. When output from an application is directed to LPA0:, the data is temporarily stored on SYS$SYSDEVICE until the application completes. This keeps the output device LPA0: available for other jobs until the application's output is ready for printing. When the application completes, its output is submitted to the queue SYS$PRINT. |
| Spools the LN03 device on LAT port LTA331: by associating it with the storage device SYS$SYSDEVICE and the queue MKTG$LN03_1. |
| Spools the LA210 device on LAT port LTA332: by associating it with the storage device SYS$SYSDEVICE and the queue LA210$PRINT. |
8.9.2.2. Despooling a Spooled Printer
Occasionally, you might need to disable spooling on a device. For example, the SET TERMINAL command can be executed only on a despooled output device. If you need to disable spooling to an output device, use the SET DEVICE command with the /NOSPOOLED qualifier.
You must stop the corresponding queues before you can change the spooling status.
For more information about the SET DEVICE/NOSPOOLED command, refer to the VSI OpenVMS DCL Dictionary.
8.9.2.3. Testing a Spooled Printer
$! *****TESTING SPOOLED DEVICE***
$!
$! set the device spooled
$ SET DEVICE/SPOOLED=(SYS$PRINT, SYS$SYSDEVICE:) LPA0:
$!
$! create a test file
$ CREATE TEST. LIS
!Add the first test record here.
!Ctrl/Z to exit the file
$!
$! write the file to the output device
$ COPY TEST. LIS LPA0:
$ EXIT8.10. Managing Tape Drives
|
Task |
For More Information |
|---|---|
|
Get information about tape drives |
Section 8.10.1, ''Getting Magnetic Tape Device Information'' |
|
Change tape drive characteristics |
Section 8.10.2, ''Modifying Magnetic Tape Device Characteristics'' |
For information about managing volumes on tape drives, see Section 9.2, ''Allocating and Deallocating Drives''.
For information about managing Fibre Channel tape devices, see Guidelines for OpenVMS Cluster Configurations.
8.10.1. Getting Magnetic Tape Device Information
You can enter the SHOW DEVICES command to find available magnetic drives on your system. The SHOW DEVICES/FULL command enables you to retrieve additional information about the characteristics of a particular magnetic tape device.
8.10.2. Modifying Magnetic Tape Device Characteristics
Use the DCL command SET MAGTAPE to define the default characteristics associated with a specific magnetic tape device for subsequent file operations. The device must not be currently allocated to any other user.
The following examples illustrate uses of the SET MAGTAPE command in conjunction with the MOUNT command
Examples
$ MOUNT MTB1:/FOREIGN $ SET MAGTAPE MTB1:/DENSITY=800
The MOUNT command mounts a tape on the MTB1: device. The /FOREIGN qualifier indicates that the tape is not in the standard format used by the operating system. For example, certain Backup utility (BACKUP) operations require you to mount a tape with the /FOREIGN qualifier.
The SET MAGTAPE command defines the density at 800 bpi for writing to the magnetic tape. (The density is reset only if the magnetic tape has never been written before. )
$ MOUNT MTA0:/FOREIGN $ SET MAGTAPE MTA0:/SKIP=FILES:4
The MOUNT command mounts a foreign magnetic tape on the MTA0: device; the SETMAGTAPE command directs the I/O subsystem to position the magnetic tape to skip four files.
$ MOUNT MTA1:/FOREIGN $ SET MAGTAPE/REWIND MTA1:
The MOUNT command mounts a foreign tape on the MTA1: device; the SET MAGTAPE/REWIND command rewinds the volume.
8.11. Managing a Card Reader (VAX Only)
Batch job card decks
Data card decks
To ensure that card decks are processed efficiently, you must understand their characteristics and the use of the card reader. The following sections describe which cards you should check before processing a deck through a card reader, and how to determine which cards are damaged.
8.11.1. Distinguishing the Type of Card Deck (VAX Only)
Whether the deck is a batch job or a data deck, because their processing requirements differ
Whether the card reader is set to the correct translation mode
The following sections describe how to make these determinations.
8.11.1.1. Batch Job Card Deck (VAX Only)
Initial cards
Program cards
Last card
The initial two cards in a batch job card deck are the $JOB and the $PASSWORD cards. These cards log in the user and the batch job to the system. Following the initial two cards are program cards. Program cards contain instructions that direct the system to libraries, routines, and data needed to complete the batch job. The last card must be either an end-of-job command ($EOJ) card or an end-of-file (EOF) card. Either of these cards tells the system that this is the end of the job.
Checking Input
The system cannot execute the job without $JOB and $PASSWORD cards. If you are given a card deck with these cards omitted, return the deck so that the user can insert them.
Since the card deck contains the user's password, you must ensure that it is always handled with care to preserve the security of the user's account.
The last card in the deck must be either an $EOJ or an EOF card.
If the last card is not one of these end cards, you can type an end card on the card punch (12-11-0-1-6-7-8-9 overpunch in column 1) and place it at the end of the deck.
Checking Output
The log file produced by a card reader batch job is queued for printing to the default system printer queue, SYS$PRINT. To have the log file queued to a different queue, the user can specify the /PRINTER qualifier on the $JOB card.
If an error occurs while the system is attempting to validate the $JOB and$PASSWORD cards, the operator communication manager (OPCOM) sends to the card operator an error message that reports the job card and the error.
8.11.1.2. Data Card Deck (VAX Only)
A data deck contains data that will be either read by a program or copied to a file for later use. The process that reads the data deck is usually associated with an interactive user at a terminal or with a batch job submitted by an interactive user. Since the user and process already are logged in to the system, the first card can contain any data the user specifies. Then, either the program must read the exact number of cards supplied, or the last card must be an EOF card to inform the program that this is the end of the data deck.
When a user wants a data deck to be read, you must make sure the user has allocated the card reader. If the card reader is not allocated, the system tries to submit the deck as a batch job and subsequently flushes the deck through the reader, rejecting the job.
If the program does not read the exact number of cards (as with the COPY command), the EOF card must be the last card in the deck, to inform the program that this is the end of the deck. Without this card, the program waits indefinitely for more cards, and the system prints "card reader off line"messages on the operator's terminal. If the card deck lacks an EOF card, you can type one on a card punch and insert it at the end of the deck.
8.11.1.3. Setting Card Reader Translation Modes (VAX Only)
For the system to read input properly, the card reader must be set to the correct translation mode—the same as the translation mode of the card punch that prepares the deck. The system supports 026 and 029 card punches.
The first card in the deck must be the translation mode card.
You must know the mode in which the cards were punched.
To set the translation mode of the card reader for many decks of the same type, use the SET CARD_READER command. This command is described in the VSI OpenVMS DCL Dictionary. By default, when the system is booted, the translation mode is set to 029.
8.11.2. Running the Input Symbiont Interactively (VAX Only)
- Enter a command in the following format:
DEFINE/USER_MODE SYS$INPUT filename
For example:$ DEFINE/USER_MODE SYS$INPUT SPECIAL_FILE. DAT
- Enter the following command:
$ RUN SYS$SYSTEM:INPSMB
CMKRNL privilege
Read access to the UAF
Write access to the default directory of the user
All messages are displayed to the terminal rather than to the card operator.
Chapter 9. Managing Storage Media
Storage media terms and concepts
Volumes and volume sets
Tasks related to setting up both disks and magnetic tape drives: initializing and mounting
Disks
Tasks related to disk maintenance: the management of disk space and methods for detecting and repairing disk errors
Information Provided in This Chapter
|
Task |
Section |
|---|---|
|
Allocating and deallocating disk and tape drives | |
|
Initializing volumes | |
|
Protecting volumes | |
|
Mounting volumes | |
|
Setting up disk volume sets | |
|
Mounting ISO 9660 volume sets and groups | |
|
Mounting tape volume sets | |
|
Dismounting volumes and volume sets | |
|
Using command procedures for media setup | |
|
Managing disk space | |
|
Using the Analyze/Disk_Structure utility to check and repair disks |
Section 9.13, ''Using the Analyze/Disk_Structure Utility to Check and Repair Disks'' |
|
Using mount verification for recovery | |
|
Using Interrupt Priority Level C (IPC) | |
|
Using the Bad Block Locator utility to detect media errors |
Section 9.16, ''Using the Bad Block Locator Utility to Detect Media Errors'' |
|
Concept |
Section |
|---|---|
|
Disks and CD–ROMs | |
|
Extended File Specifications on OpenVMS Alpha and IA-64 systems |
Section 9.1.2, ''Extended File Specifications on OpenVMS Alpha and IA-64 systems'' |
|
Magnetic tape | |
|
Public and private disk volumes | |
|
Tape and disk volume protection | |
|
Disk volume sets | |
|
Disk quotas | |
|
Mount verification |
9.1. Understanding Storage Media Concepts
|
Term |
Definition |
|---|---|
|
Device (or Drive) |
Hardware that allows access to storage media. |
|
Media |
Physical items on which you can store data. |
|
Volume |
Logical unit of data storage; one or more media units. A disk or tape must be mounted on a device for the operating system to recognize it as a volume. |
The following sections use these terms to explain media concepts.
9.1.1. Disk and CD–ROM Concepts
This section defines terms related to disks and CD–ROMs. It also compares on-disk file structures and explains the ISO 9660 standard.
9.1.1.1. Disk Terminology
Disks are physical media on which files reside. On–Disk Structure (ODS) refers to a logical structure given to information stored on a disk; it is a hierarchical organization of files, their data, and the directories needed to gain access to them. The OpenVMS file system implements the ODS and provides access control to the files located on the disk.
Compact disc read-only memory (CD–ROM) discs and readers used with computers are very similar to the CD–ROMs used for audio applications. The major differences are that CD–ROM drives have a digital (rather than an audio) interface, and that CD–ROM discs employ additional layers of error correction and formatting to encode data blocks.
You can access data directly, which you cannot do with tape.
CD–ROMs are much less expensive than other direct-access media. They are typically used for publishing and distribution.
CD–ROMs have exceptional storage space capability. A CD–ROM can hold approximately 650 megabytes of data.
|
Term |
Definition |
|---|---|
|
Sector |
Uniquely addressable unit. Each sector on a CD–ROM comprises a sequence of 2048 8-bit bytes; on most disks, a sector is equivalent to a block (512 bytes). |
|
Logical block |
Organizational unit of volume space containing 512 8-bit bytes. A CD–ROM sector comprises 4 blocks. |
|
Logical block numbering |
Logical blocks are numbered from 0 to n-1. |
|
Cluster ? |
Logical grouping of blocks;basic unit by which disk (not CD–ROM) space is allocated. |
|
Extent |
Contiguous logical blocks allocated to a particular file. |
|
File |
Array of consecutive virtual blocks ?, numbered 1 to n, plus a set of attributes with values. A file is either a data file or a directory file. Directories can contain both data files and directory files. |
|
Volume |
Disk that has been prepared for use by placing a new file structure on it. |
|
Volume set |
Combination of several volumes; has the appearance of one large volume. |
Information on a disk or CD–ROM can be accessed as logical blocks on the disk or as virtual blocks of files on the disk.
9.1.1.2. Disk and CD–ROM File Structures
On-Disk Structure (ODS) refers to a logical structure given to information stored on a disk or CD–ROM. It is a hierarchical organization of files, their data, and the directories needed to gain access to them. The OpenVMS file system implements the On-Disk Structure and provides access control to the files located on the disk.
Figure 9.1, ''On-Disk Structure Hierarchy of a File'' shows the hierarchy of blocks, clusters, extents, and files in the On-Disk Structure. The number of blocks in anyone extent is a multiple of the cluster size. The figure assumes a cluster size of 2 blocks.
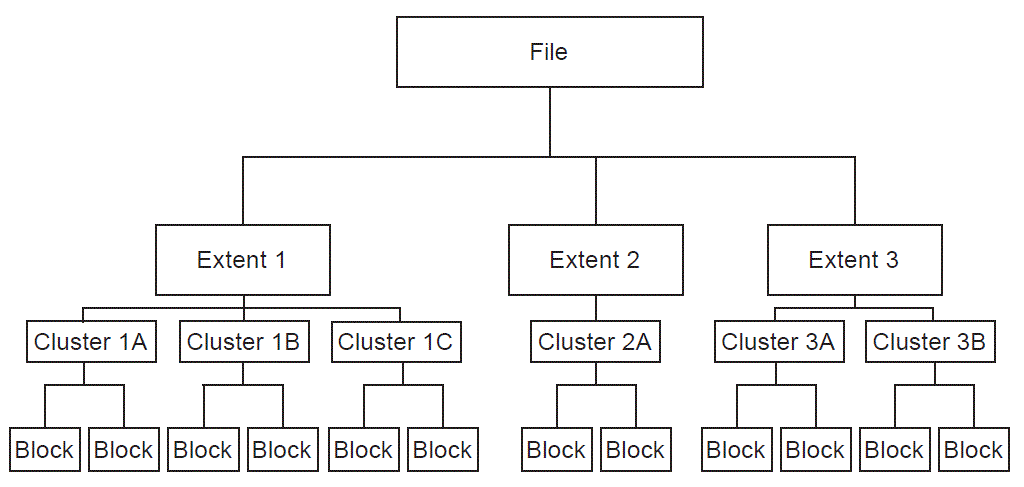
OpenVMS File Structure Options
On-Disk Structures include Levels 1, 2, and 5. (Levels 3 and 4 are internal names for ISO 9660 and High Sierra CD formats.) ODS-1 and ODS-2 structures have been available on OpenVMS systems for some time. With OpenVMS Version 7.2 on Alpha and IA-64 systems, you can now specify ODS-5 to format disks as well.
|
Structure |
Disk or CD |
Description |
|---|---|---|
|
ODS-1 |
Both |
VAX only; use for RSX compatibility: RSX–11M, RSX–11D, RSX–11M–PLUS, and IAS operating systems. |
|
ODS-2 |
Both |
Use to share data between VAX and Alpha with full compatibility; default disk structure of the OpenVMS operating system. |
|
ODS-5 |
Both |
Superset of ODS-2;use on Alpha systems when working with systems like NT that need expanded character sets or deeper directories than ODS-2. |
|
ISO 9660 CD |
CD |
ISO format files: use for platform-independent publishing and distribution; supported by other systems. |
|
High Sierra |
CD |
A variant of ISO 9660. |
|
Dual format |
CD |
Single volume with both ISO 9660 CD and ODS formats. You can use both formats to access files whose directories might point to the same data. |
|
Foreign |
Both |
Unknown file structure. When you specify a foreign structure, you make the contents of a volume known to the system, but the system makes no assumptions about its file structure. The application is responsible for supplying a structure. |
When you create a file, you normally specify a file name to OpenVMS Record Management Services (RMS), which assigns this name to the file on an on-disk volume. RMS places the file name and file ID associated with the newly created file in a directory, which contains an entry defining the location for each file.
When you access a file, you supply the file name, which supplies a path to the file identifier through the directory entry. The file identifier, in turn, points to the location of the file header, which contains a listing of the extent or extents that locate the actual data.
Reserved Files on OpenVMS Systems
Reserved files control the structure of a On-Disk Structure (ODS) Levels 2and 5 volumes. (Only five of these files are used for a Level 1 volume.) Table 9.3, ''Reserved Files'' identifies all reserved files, and indicates to which ODS level they pertain.
|
Reserved File |
File Name |
?Structure Level 1 |
Structure Levels 2 and 5 |
|---|---|---|---|
|
Index file |
INDEXF.SYS;1 |
X |
X |
|
Storage bit map file |
BITMAP.SYS;1 |
X |
X |
|
Bad block file |
BADBLK.SYS;1 |
X |
X |
|
Master file directory |
000000.DIR;1 |
X |
X |
|
Core image file |
CORIMG.SYS;1 |
X |
X |
|
Volume set list file |
VOLSET.SYS;1 |
X | |
|
Continuation file |
CONTIN.SYS;1 |
X | |
|
Backup log file |
BACKUP.SYS;1 |
X | |
|
Pending bad block |
BADLOG.SYS;1 |
X | |
|
Volume security profile |
SECURITY.SYS;1 |
X |
Limits of Storage and Index File Bitmaps
In previous versions of OpenVMS, both storage and index file bitmaps were limited to 255 blocks. This size, in turn, limited a volume to approximately one million allocation units, or clusters. Larger disks were required to have a larger cluster factor to accommodate the limit;for example, a 9 GB disk required a cluster factor of 18.
|
Type of Bitmap |
Limit |
|---|---|
|
Storage bitmap |
65535 blocks |
|
Index file bitmap |
4095 blocks |
They allow you to use space more efficiently with small files.
They increase the number of files allowed on a volume to the architectural maximum of approximately 16 million.
The behaviors of the INITIALIZE and BACKUP commands reflect the larger bitmap sizes. Refer to the VSI OpenVMS DCL Dictionary for INITIALIZE command details and the VSI OpenVMS System Management Utilities Reference Manual for BACKUP utility details.
Message Displayed with Earlier Versions
%MOUNT-F-FILESTRUCT, unsupported file structure level
The increased size of the BITMAP field is incompatible with earlier versions of OpenVMS.
Check the size of BITMAP.SYS on the disk you want to access. If the size is 256 or greater and you want to access the disk from a pre-Version 7.2 system, you must copy the data to a disk with a BITMAP.SYS that is less than 256 blocks. If you use the DCL command BACKUP/IMAGE, be sure to use the /NOINITIALIZE qualifier.
9.1.1.3. Comparison of ODS-1, ODS-2, and ODS-5 Formats
|
Characteristic |
ODS-1 (VAX only) |
ODS-2 |
ODS-5 |
|---|---|---|---|
|
File name length |
9.3 |
39.39 |
238 bytes, including the dot and the file type. For Unicode, 236 bytes is 119 characters, including the dot and the file type. |
|
Character set |
Uppercase alphanumeric |
Uppercase alphanumeric plus hyphen (-), dollar sign ($), and underscore (_) |
ISO Latin-1, Unicode (refer to the description in VSI OpenVMS User's Manual.) |
|
File versions |
32, 767 limit; version limits are not supported |
32, 767 limit;version limits are supported. |
32, 767 limit;version limits are supported. |
|
Directories |
No hierarchies of directories and subdirectories;directory entries are not ordered ? |
Alpha: 255 ?VAX: 8 (with rooted logical, 16) |
Alpha: 255 VAX: 8 (with rooted logical, 16) |
|
System disk |
Cannot be an ODS-1 volume |
Can be an ODS-2volume |
ODS-5 volume not supported for Version 7.2 |
|
Page file, swap file, dump file, parameter (.PAR) file, and other system files |
Supported |
Supported |
Not supported |
|
OpenVMS Cluster access |
Local access only; files cannot be shared across a cluster |
Files can be shared across a cluster |
Files can be shared across a cluster. However, only computers running OpenVMS Version 7.2 or later can mount ODS-5 volumes. VAX computers running Version 7.2 or later can see only files with ODS-2 style names. |
|
Disk |
Unprotected objects |
Protected objects |
Protected objects |
|
Disk quotas |
Not supported |
Supported |
Supported |
|
Multivolume files and volume sets |
Not supported |
Supported |
Supported |
|
Placement control |
Not supported |
Supported |
Supported |
|
Caches |
No caching of file identification slots or extent entries |
Caching of file header blocks, file identification slots, and extent entries |
Caching of file header blocks, file identification slots, and extent entries |
|
Clustered allocation |
Not supported |
Supported |
Supported |
|
Backup home block |
Not supported |
Supported |
Supported |
|
Protection code E |
E means "extend" for the RSX–11M operating system but is ignored by OpenVMS |
E means "execute access" |
E means "execute access" |
|
Enhanced protection features (for example, access control lists) |
Not supported |
Enhanced protection features supported |
Enhanced protection features supported |
Note
Future enhancements to OpenVMS software will be based primarily on Structure Levels 2 and 5; therefore, Structure Level 1 volumes might be further restricted in the future. However, VSI does not intend for ODS-5 to be the default OpenVMS file structure. The principal function of ODS-5is to enable an OpenVMS system to be a server for other systems (such as Windows NT) that have extended file names.
9.1.1.4. The ISO 9660 Standard for CD–ROMs
|
Term |
Description |
|---|---|
|
Volume space |
Set of all logical blocks on a volume containing information about the volume. |
|
System area |
One of two divisions of CD–ROM volume space; includes logical sectors 0 through 15; reserved for system use. |
|
Data area |
One of two divisions of CD–ROM volume space;includes the remaining volume space, beginning with logical sector 16. |
Partially recorded data blocks
ISO 9660 files are recorded in the data area of the media, using extents that consist of blocks. A block might not be filled with data but also might not be the final block of a file. The OpenVMS implementation of Files–11 ensures that the system does not treat an unfilled block as the end of the file unless it actually is the final file block. This is not visible to the user.
Data interleaving
Within an extent, data is recorded using file units separated by an interleave gap, which consists of a specified number of blocks. Data interleaving allows you to control the speed of access to file data.
9.1.2. Extended File Specifications on OpenVMS Alpha and IA-64 systems
Extended File Specifications allows files with Windows 95 style or Windows NT style file names and attributes to reside on, and to be managed from, OpenVMS Alpha and IA-64 systems. Extended File Specifications support can also be selected on aper-volume basis.
Traditional and Extended File Names
Traditional file names are allowed on both ODS-2 andODS-5 volumes.
Extended file names are allowed on ODS-5, but not onODS-2 volumes.
For detailed definitions of traditional and extended file names as well as other introductory information about Extended File Specifications, refer to the VSI OpenVMS User's Manual.
The following sections describe the current levels of disk, mixed-version, mixed-architecture, and network support for Extended File Specifications on OpenVMS systems.
9.1.2.1. System and User Disk Support
You can mount an ODS-5 volume only on an OpenVMS VAX or an Alpha Version 7.2 or later system. Most applications can access only traditionally named files on a VAX system.
VSI does not support creating the system disk as (or changing it to) an ODS-5 volume.
9.1.2.2. Mixed-Version Support
Users on OpenVMS Version 7.2 and later systems can take advantage of Extended File Specifications capabilities. In contrast, systems running prior versions of OpenVMS cannot mount ODS-5 volumes or correctly handle extended file names.
The following sections describe support on OpenVMS Version 7.2 and on prior versions of OpenVMS in a mixed-version cluster.
Users on OpenVMS Version 7.2 Systems
Create and access deep directory structures on ODS-2 volumes.
Read a BACKUP save set created on an earlier version of OpenVMS.
Use DECnet to copy a file with an ODS-5 name to a file with an ODS-2 name on a system running an earlier version of OpenVMS.
Users on Systems with Versions Prior to OpenVMS 7.2
Cannot access any files on an ODS-5 volume. This is true regardless of whether the volume is connected physically on a CI or SCSI, or by an MSCP or QIO server.
Cannot successfully create or restore an ODS-5 image save set. However, these users can successfully restore ODS-2-compliant file names from an ODS-5 save set.
9.1.2.3. Mixed-Architecture Support
All Extended File Specifications capabilities are available on OpenVMS Alpha and IA-64 systems. Nearly all the current ODS-2 disk and file management functions remain the same on both VAX, Alpha Version 7.2, and IA-64 systems; however, extended file naming and parsing are not available on VAX systems.
The following sections describe support on OpenVMS VAX and Alpha systems in a mixed-architecture cluster.
Limited Extended File Specifications Capabilities on VAX Systems
Ability to mount and manage an ODS-5 disk
Ability to write and manage ODS-2-compliant files on an ODS-5 disk
BACKUP Limitations
On an OpenVMS VAX system, users cannot successfully create or restore an ODS-5 image save set. However, these users can successfully restore ODS-2-compliant file names from an ODS-5 save set.
Users can also perform a disk-to-disk copy from ODS-5 to ODS-2 as long as they do not specify /IMAGE.
For more information, refer to the VSI OpenVMS System Management Utilities Reference Manual.
9.1.2.4. Network Support
For OpenVMS Version 7.2 and later, the length of a file specification that can be sent over the network using DECnet is shorter than the maximum size of a file specification without the use of a network.
9.1.2.5. Enabling Extended File Specifications Features
|
Task |
Reference |
|---|---|
|
Initialize a new volume as ODS-5 |
Section 9.3.3, ''Initializing a New Volume with ODS-5 Format'' |
|
Convert an existing volume from ODS-2 to ODS-5 |
Note
Extended File Specifications are not available on systems running versions of OpenVMS Alpha prior to Version 7.2. On these systems, you cannot mount ODS-5 volumes nor take advantage of extended file names on an OpenVMS file system.
9.1.3. Tape Concepts
The file storage system for magnetic tapes is based on the standard magnetic tape structure as defined by ISO 1001–1986, which is compatible with several national standards such as ANSI X3.27–1987.
For more information about tape concepts, refer to the Guide to OpenVMS File Applications.
|
Term |
Definition |
|---|---|
|
Block |
On magnetic tape, the size of a block is determined by the user. On ODS disks, a block is fixed at a size of 512 bytes. |
|
bpi |
Bits per inch; measure used for characters of data on tape on OpenVMS systems. Also called density. |
|
IRG |
Interrecord gap; interval of space between blocks. |
|
Record blocking |
Grouping of individual records into a block, thereby reducing wasted space. |
|
Sequential |
Organization of magnetic tape data; that is, data is organized in the order in which it is written to the tape. |
|
Magnetic Tape Ancillary Control Process (MTACP) |
Internal software process that interprets the logical format of standard labeled volumes. |
|
Beginning-of-tape (BOT) marker and end-of-tape (EOT) marker |
Pieces of photo-reflective tape that appear on every volume to delimit the writable area on the volume. ANSI standards require that a minimum of 14 feet to a maximum of 18feet of magnetic tape precede the BOT marker; a minimum of 25 feet to a maximum of 30 feet of tape, of which 10 feet must be writable, must follow the EOT marker. The EOT marker indicates the start of the end of the writable area of the tape, rather than the physical end of the tape. Therefore, data and labels can be written after the EOT marker. |
|
Data record storage |
Within tape files, data records are stored in variable-size data blocks. Each block contains one or more records. RMS provides management of records. |
|
Header labels |
Set of labels that the tape file system writes on the tape immediately preceding the data blocks when you create a file on tape. These labels contain information such as the user-supplied file name, creation date, and expiration date. To access a file on magnetic tape by the file name, the file system searches the tape for the header label set that contains the specified file name. |
|
Trailer labels |
Set of labels that the tape file system writes on the tape following the file. |
|
Multivolume file |
Additional volume on which a file is continued when the data blocks of a file or related files do not physically fit on one volume (a reel of magnetic tape). |
|
Volume set |
The volumes on which a set of files is recorded. |
9.1.3.1. Record Blocking
Figure 9.2, ''Record Blocking'' shows how record blocking can save space.
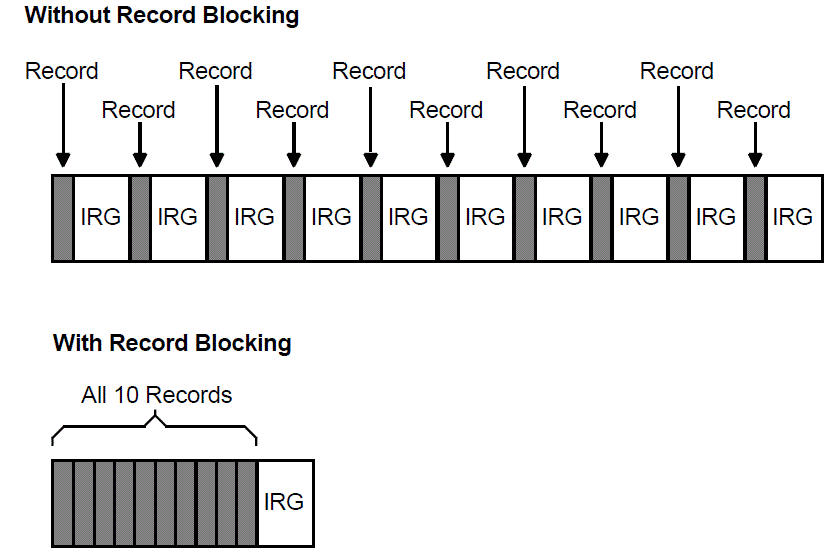
Assume that a 1600-bits-per-inch magnetic tape contains 10 records that are not grouped into a block. Each record is 160 characters long (0.1 inch at 1600 bits per inch) with a0.6-inch IRG after each record, which uses 7 inches of tape. However, placing the same 10 records into one block uses only 1.6 inches of tape (1 inch for the data records and 0.6 inch for the IRG).
Record blocking also increases the efficiency of the flow of data into the computer. For example, 10 unblocked records require 10 separate physical transfers, while 10 records placed in a single block require only one physical transfer. Moreover, a shorter length of magnetic tape is traversed for the same amount of data; thus, the operation is completed in less time.
However, record blocking requires more buffer space to be allocated for your program. The greater the number of records in a block, the greater the buffer size requirements. You must determine the point at which the benefits of record blocking cease. Base this determination on the configuration of your computer system and your environment.
9.1.3.2. Multiple Tape Densities (Alpha and I64)
In versions of OpenVMS Alpha prior to Version 7.2, the range of densities that users were able to set for magnetic tape devices was limited. On OpenVMS Version 7.2 and later Alpha systems and on IA-64 systems, that range includes any density that a specific tape drive supports. Because of this enhancement, exchanging tapes among tape drives with different default settings for density is much easier.
$ INITIALIZE
$ SET MAGTAPE (for tapes only)
Refer to the VSI OpenVMS DCL Dictionary for details about using the /DENSITY qualifier with these DCL commands.
$ MOUNT (with /FOREIGN qualifier for mounted tapes)
$ BACKUP
Refer to the MOUNT command in the VSI OpenVMS DCL Dictionary and to the BACKUP utility in the VSI OpenVMS System Management Utilities Reference Manual for details about using the /DENSITY qualifier. Also refer to Chapter 11, "Using BACKUP" for details about using the /DENSITY qualifier with BACKUP.
Example
$ INITIALIZE/DENSITY=tk85 MKA500: TEST
The command in this example initializes the media in the MKA500: drive to tk85 density with a label of TEST.
Densities Supported
The following densities are valid in the command strings for DCL commands and system management utilities: 800, 1600, 6250, DAT, 833, DDS1, DDS2, DDS3, DDS4, TK50, TK70, TK85, TK86, TK87, TK88, TK89, 8200, 8500, 3480, 3490E, AIC, AIT, and DEFAULT.
Usage Notes
You cannot use multiple tape densities on one piece of media. In other words, one density applies to one piece of media. If you do not specify a density, the default density is used; the default is the highest density a particular drive supports.
Density changes can occur only at beginning-of-tape (BOT). Once media is initialized to a density, the media remains at that density until it is reinitialized to a different density.
If a density is not supported on a particular device, depending on the drive, the density field either remains the same or takes the default. If a drive does not support the density you select, the system displays an invalid density error. Some drives do not report the error and simply ignore your selection, leaving the media at the previous density.
$ SHOW DEVICE/FULL MKA300:, for example, displays the
corresponding ASCII string for density.
Magtape JENSO3$MKA300:, device type TZ87, is online, file-oriented device, error
logging is enabled, controller supports compaction (compaction, disabled),
device supports fastskip.
Error count 0 Operations completed 0
Owner process "" Owner UIC [SYSTEM]
Owner process ID 00000000 Dev Prot S:RWPL, O:RWPL, G:R, W
Reference count 0 Default buffer size 2048
Density TK85 Format Normal-11
Volume status: no-unload on dismount, position lost, odd parity.9.1.4. Public and Private Disk Volumes
A volume is one or more units of storage media that you can mount on a device. The volume is the largest logical unit of disk file structure.
This section explains the concepts of public and private volumes.
9.1.4.1. Public Disk Volumes
|
Type of Volume |
Description |
|---|---|
|
System volumes |
Available to all the users on a system |
|
Group volumes |
Available to all the users in a group |
As long as file protections permit it, all users have access to public volumes and to the files on them.
One way to permit users to create and store files on a public volume is to create a default directory on the public volume for each authorized user. You control access to public files and volumes by the protection codes that you establish.
Volume and file protection allow access, or you have privileges that allow you to access the files.
The user has appropriate access to a directory on the volume.
Disk quota permits usage.
The following sections contain guidelines for setting up and maintaining public files and volumes.
Planning Public Volumes
|
Configuration |
Characteristics |
|---|---|
|
Small mass storage |
Both system files and user files are on the same public volume. You might want to set disk quotas to ensure that user files do not exhaust the free space on the disk volume. |
|
Large mass storage |
Keep all system files on one disk volume (known as a system disk or a system volume), and keep all user files on separate volumes. The system disk is kept active reading system images, paging and swapping, spooling files, maintaining system logs, and so forth. |
The most common arrangement is to have one public volume with system files and the directories of privileged users, and other public volumes dedicated to user directories, databases, and applications required by your site.
Be sure the system disk has enough space for the operating system to boot and accept updates.
Once the system is running, use the Monitor utility (MONITOR) to analyze disk use to determine whether disk I/O is balanced across the configuration. VSI OpenVMS System Manager's Manual, Volume 2: Tuning, Monitoring, and Complex Systems discusses this utility in detail.
You can often move system files off the system disk and use search lists or logical names to access them. See VSI OpenVMS System Manager's Manual, Volume 2: Tuning, Monitoring, and Complex Systems for more information.
In large configurations, you can place secondary paging and swapping files on other devices to balance disk load. See VSI OpenVMS System Manager's Manual, Volume 2: Tuning, Monitoring, and Complex Systems for more information. The VSI OpenVMS Performance Management Manual provides detailed information about redistributing system files and achieving a balanced disk load.
9.1.4.2. Private Disk Volumes
A private volume is a file-structured volume that contains only private files.
Under some circumstances, users might want to perform their work on a device that unauthorized users cannot access. By creating a private volume and mounting it on a device allocated exclusively to a user's process, you ensure that users can perform their work without fear of interference from others.
Users can often prepare and manipulate their own private volumes. They might, however, need your assistance if the computer and its peripheral devices are off limits to or remotely located from them. Users requiring assistance can use the operator communication manager (OPCOM) to communicate with an operator. See Section 9.5.3, ''Assisting Users in Mounting Volumes'' for instructions on answering users' requests for assistance.
9.2. Allocating and Deallocating Drives
This section explains how to allocate and deallocate drives. The only situation in which the ALLOCATE command is required, however, is when you must retain control of the same volume across dismounts. An example of this is when you alternate between mounting a tape using the /FOREIGN and/NOFOREIGN qualifiers.
9.2.1. Allocating Drives
Use the DCL command ALLOCATE to logically assign a disk drive or a tape drive to your process. You might do this if you suspect an error and want to reserve a disk while you repair the error.
The ALLOCATE command allocates only one device to a process. To allocate several devices, you must use multiple commands.
How to Perform This Task
ALLOCATE device-name[:] [logical-name]
|
device-name |
Specifies the drive on which the volume will be loaded. The device name can be a physical, generic, or logical name. |
|
logical-name |
Specifies an optional logical name to be associated with the specified disk or tape drive. |
Examples
$ ALLOCATE DUA2: %DCL-I-ALLOC, _MARS$DUA2: allocated
In this example, the ALLOCATE command specifies a physical device named DUA2:, which requests the allocation of a specificRK10 disk drive; that is, unit 2 on controller A. The response from the ALLOCATE command indicates that the device was successfully allocated.
$ ALLOCATE/GENERIC RA90 MYDISK
This example shows how to use the /GENERIC qualifier with the ALLOCATE command to allocate a particular type of device. In this case, the system allocates the first available RA90 drive to your process.
For further discussion of the /GENERIC qualifier and other qualifiers that you can use with the ALLOCATE command, refer to the VSI OpenVMS DCL Dictionary. The VSI OpenVMS User's Manual contains additional examples of the ALLOCATE command.
9.2.2. Deallocating Drives
Allocating a device reserves that device for exclusive use by your process. The device remains allocated to your process until you explicitly deallocate it or until you log out.
Logging out of a process from which drives have been allocated automatically deallocates all explicitly and implicitly allocated drives;therefore, explicitly deallocating a disk or a tape drive that has been allocated to your process is not necessary. VSI, however, recommends that you use the DEALLOCATE command (or a command procedure containing this command) explicitly to deallocate all the drives you allocated with the ALLOCATE command.
How to Perform This Task
Use the DCL command DEALLOCATE to explicitly deallocate a disk drive or tape drive that has been allocated to your process. A complement to the ALLOCATE command, the DEALLOCATE command logically disconnects a drive from your process and returns it to the pool of devices.
DEALLOCATE device-name[:]
|
device-name |
Specifies the drive on which the volume will be loaded. The device name can be a physical, generic, or logical name. |
Example
$ DEALLOCATE MUA1:
In this example, the DEALLOCATE command logically disconnects tape drive MUA1: from your process. The system returns you to DCL level.
9.3. Initializing Volumes
To delete all old information from the volume.
To give the volume a structure that is recognized by the operating system.
This structure prepares a volume to receive data and stores it so that the operating system can locate it easily.
Before you or any user can write files or data to a disk, tape, or CD-ROM volume, you must set up that volume. The steps for doing this are somewhat different for disk and tape volumes or for CD-ROM volumes, as explained in the next two sections.
Steps for Setting Up Disk or Tape Volumes
|
1. INITIALIZE |
Formats the volume and writes an identifying label on it. This effectively removes the previous contents of the volume. (Initializing a volume each time you use it is not necessary.) |
|
2. MOUNT |
Provides the user's process with access to a volume's files or data. |
Caution
Initializing a disk volume removes links to existing files on the volume, which, in effect, deletes (but does not erase) the files. To erase the data in a file, use the INITIALIZE/ERASE command.
Do not initialize a volume that contains data that users want to keep. (Initializing a volume each time you use it is not necessary.)
Section 9.5, ''Mounting Volumes'' contains instructions for mounting volumes. Before you initialize a volume, you might want to refer to Section 9.4, ''Protecting Volumes'', which contains information about volume protection.
Steps for Setting Up CD-ROM Volumes
To set up a CD-ROM volume using an OpenVMS CD-RW drive, you need to follow these steps:
| 1. Run CDRECORD.COM |
Replaces the INITIALIZE command in the the section called “Steps for Setting Up Disk or Tape Volumes”. |
| 2. MOUNT | Provides the user's process with access to a volume's files or data. |
For more information about running CDRECORD.COM, see Section 10.11, ''Creating a CD-ROM''.
Setting Up Media on a Workstation
|
Task |
Description |
|---|---|
|
Load |
Insert the media into the drive. |
|
Initialize |
Remove all previous contents from the media. (VOLPRO privilege is required for most operations.) |
|
Mount |
Logically mount the media and allocate the device (requires SYSNAM, GRPNAM, or VOLPRO privilege for various operations). To mount a volume on a device, you must have read (R), write (W), or control (C) access to that device. |
|
Perform file operations |
Access files and perform the desired operations on them. |
|
Dismount |
Logically dismount the media and deallocate the device (requires GRPNAM and SYSNAM user privileges to dismount group and system volumes). |
|
Unload |
Remove the media from the drive compartment. |
For additional information about manipulating removable media on your workstation, refer to the hardware manuals that accompany your workstation.
On VAX systems, also refer to the upgrade and installation supplement for your computer.
9.3.1. Using the INITIALIZE Command
INITIALIZE device-name[:] volume-label
|
device-name |
Specifies the name of the device on which the volume is to be physically mounted and then initialized. To prevent initializing another user's volume, allocate a device before you initialize the volume. (Prior allocation is not required, however.) |
|
volume-label |
Specifies the identification to be encoded on the volume. For a disk volume, you can specify a maximum of 12 ANSI characters; for a magnetic tape volume, you can specify a maximum of 6 alphanumeric characters. |
INITIALIZE/SYSTEM device name[:] volume-label
For more details on INITIALIZE command format, refer to the VSI OpenVMS DCL Dictionary.
Examples
$ INITIALIZE DUA2: TEMP
The command in this example initializes the disk volume DUA2: and labels the volume TEMP.
$ INITIALIZE MUB2: TEST
The command in this example initializes the tape volume on MUB2: and labels the volume TEST.
The VSI OpenVMS User's Manual contains additional examples of the INITIALIZE command.
9.3.2. Using INITIALIZE Command Qualifiers
|
Qualifier |
Description |
|---|---|
|
/CLUSTER_SIZE= |
Specifies minimum allocation unit in blocks. |
|
/HEADERS= |
Specifies the number of file entries, called file headers, that you expect to have in INDEXF.SYS, the index file. It controls how much space is initially allocated to INDEXF.SYS for headers.(The system accesses the index file each time it locates a file on disk.) Each file on a disk requires at least 1 file header and each header occupies 1 block within INDEXF.SYS. Files that have many access control entries (ACEs) or that are very fragmented might use more than 1 header. The default value of 16 leaves room for fewer than 10 files to be created before INDEXF.SYS must extend. Therefore, estimate the total number of files that will be created on the disk and specify it here. A good estimate improves performance of disk access. Setting the number too low can result in a fragmented index file. However, if you set the number too high, space allocated to headers cannot be made available later for file storage and can lead to wasted disk space. This value cannot be changed without reinitializing the volume. INDEXF.SYS is limited as to how many times it can extend. When the map area in its header (where the retrieval pointers are stored) becomes full, files cannot be created and the message SYSTEM-W-HEADERFULL is displayed. |
|
/INDEX= |
Determines the location of the index file on a volume, using the keyword BEGINNING, MIDDLE, END, or BLOCK: n. The index file lists the names and addresses of all disk files, so it is constantly referenced. |
|
/MAXIMUM_FILES= |
Specifies the maximum number of entries in the index file, and therefore limits the number of files that a volume can contain. Once set, the maximum number of files for a volume cannot be increased without reinitializing the disk. |
|
/PROTECTION= |
Specifies the protection code to be assigned to a volume. See Section 9.4, ''Protecting Volumes'' for details. |
|
/WINDOWS= |
Sets the default number of mapping pointers to be allocated for file windows. When a file is opened, the file system uses mapping pointers to access data in the file. The file system can read one file segment into memory for each available pointer. |
Caution
The default value for the /HEADER qualifier is generally insufficient for ODS-2 volumes. To improve performance and avoid SYSTEM-F-HEADERFULL errors, VSI strongly recommends that you set this value to be approximately the number of files that you anticipate having on your disk. However, grossly overestimating this value will result in wasted disk space.
Examples
$ INITIALIZE/HEADERS=100000 DUA3:
This example shows how many entries to allocate in the index files for a large disk (a small disk might allocate 2000 entries).
$ INITIALIZE/MAXIMUM_FILES=20000 DUA3:
This example shows how to specify the characteristics of a small disk. Note that each directory and each extension header of a multiheader file counts as a file against this maximum value.
$ INITIALIZE/WINDOWS=10 DUA3:
This example shows how to cite a large number of pointers for a large disk of 500 MB.
9.3.3. Initializing a New Volume with ODS-5 Format
$ INITIALIZE /STRUCTURE_LEVEL=5 device-name volume-label$ INITIALIZE /STRUCTURE_LEVEL=5 DKA300: DISK1 $ MOUNT DKA300: DISK1 /SYSTEM %MOUNT-I-MOUNTED, DISK1 mounted on _STAR$DKA300:
The first command initializes the DKA300: device as an ODS-5 volume and assigns the volume-label DISK1. The second command mounts the DISK1 volume as a public volume.
$ SHOW DEVICE DKA200:/FULL
Disk $10$DKA200:, device type RZ74, is online, allocated, deallocate
on dismount, mounted, file-oriented device, shareable.
Error count 0 Operations completed 155
.
.
.
Volume Status: ODS-5, subject to mount verification, file high-water marking, write-back caching enabled.$ WRITE SYS$OUTPUT F$GETDVI ("DKA200:", "ACPTYPE")F11V2Note
Structure level on device ... is inconsistent with volume set.
9.3.4. Assisting Users in Accessing and Initializing Volumes
If the volume previously contained data, the protection code might prevent users from accessing and initializing the volume.
If the first file section on the volume has not reached its expiration date, users might not be able to initialize a tape volume.
If the volume is owned by anyone except [0, 0], the user must have VOLPRO privilege to override volume protection. If users do not have VOLPRO privilege, they must ask the previous owner of the volume or you, as system manager, to initialize it for them.
If a tape is blank, the user must have VOLPRO and OPER privileges to access and initialize it.
9.4. Protecting Volumes
Protection based on user identification codes (UICs) restricts users' access to volumes. By assigning access types to volumes, you determine the kinds of actions various groups of users can perform on volumes. Section 9.4.1, ''Protecting Disk Volumes'' and Section 9.4.2, ''Protecting Tape Volumes'' explain the differences between UIC-based protection for disk and tape volumes.
For additional access control, you can set access control lists (ACLs) on volumes. Volume ACLs are copied from the VOLUME.DEFAULT security class template. See Section 12.6, ''Creating Access Control Lists'' for more information about ACLs.
|
Access Type |
Gives you the right to... |
|---|---|
|
Read |
Examine file names, print, or copy files from the volume. System and owner categories always have read access to tape volumes. |
|
Write |
Modify or write to existing files on a volume. The protection of a file determines whether you can perform a particular operation on the file. To be meaningful, write access requires read access. System and owner categories always have write access to tape volumes. |
|
Create |
Create files on a disk volume and subsequently modify them. Create access requires read and write access. This type of access is invalid for tape volumes. |
|
Delete |
Delete files on a disk volume, provided you have proper access rights at the directory and file level. Delete access requires read access. This type of access is invalid for tape volumes. |
|
Control |
Change the protection and ownership characteristics of the
volume. Users with the VOLPRO privilege always have control
access to a disk volume, with the following exceptions:
Control access is not valid with tapes. |
For more information about specifying protection codes, refer to the VSI OpenVMS Guide to System Security. Chapter 12, "Security Considerations" discusses protection in general.
|
Task |
Section |
|---|---|
|
Protecting disk volumes | |
|
Protecting tape volumes | |
|
Auditing volume access |
9.4.1. Protecting Disk Volumes
For file-structured ODS-2 volumes, the OpenVMS operating system supports the types of access shown in Table 9.9, ''Access Types for Disk and Tape Volumes''. The system provides protection of ODS-2 volumes at the volume, directory, and file levels. Although you might have access to the directories and files on the volume, without the proper volume access, you are unable to access any part of a volume.
The default access types for the disk volume owner [0, 0] are:
S:RWCD, O:RWCD, G:RWCD, W:RWCD.
The system establishes this protection with the default qualifier of the INITIALIZE command (/SHARE). Any attributes that you do not specify are taken from the current default protection.
Ways to Specify Protection
Use ACLs. The entire security profile (owner UIC, protection code, and ACL) is stored on the volume. If you change the volume security profile for a volume mounted clusterwide, the change is distributed to all nodes in the cluster. If you dismount and remount a volume, the security profile for the volume is preserved.
Use the DCL command SET SECURITY to modify the default security profile after a volume is mounted, including UIC- and ACL-based protection.
Use protection qualifiers with the DCL command INITIALIZE to specify UIC-based protection when you initialize a volume.
You can also specify protection when you mount disk volumes, but you ordinarily do not do so because the protection that you specify is in effect only while the volume is mounted. For details, refer to the Mount utility (MOUNT) in the VSI OpenVMS System Management Utilities Reference Manual.
Use the DCL command SET VOLUME after you mount a volume to change UIC-based volume protection.
|
Task |
Section |
|---|---|
|
Specify protection when you initialize volumes |
Section 9.4.1.1, ''Specifying Protection When You Initialize Disk Volumes'' |
|
Change protection after volumes are mounted |
Section 9.4.1.2, ''Changing Protection After Disk Volumes Are Mounted'' |
|
Display protection |
Section 9.4.1.3, ''Displaying UIC- and ACL-Based Protection'' |
9.4.1.1. Specifying Protection When You Initialize Disk Volumes
This section explains how to specify UIC-based volume protection and ISO 9660-formatted media protection when you initialize volumes.
Specifying UIC-Based Protection
- Use the /PROTECTION qualifier with the INITIALIZE command. For example:
$ INITIALIZE DUA7: ACCOUNT1/PROTECTION=(S:RWCD, O:RWCD, G:R, W:R)
This example specifies a protection code for the disk volume ACCOUNT1 on the DUA7: device. The UIC of the volume is set to your process UIC.
Use one or more of the qualifiers shown in Table 9.10, ''INITIALIZE Command Qualifiers for Protection''with the INITIALIZE command. However, the protection that you set using the /PROTECTION qualifier overrides any of the defaults set when you use any other qualifier.
Using INITIALIZE Command Qualifiers for Protection
You usually do not change volume protection after you initialize a volume. By specifying a protection qualifier with the INITIALIZE command, you can establish the default protection of a volume. (The default qualifier of the INITIALIZE command is /SHARE, which grants all types of ownership all types of access.)
Table 9.10, ''INITIALIZE Command Qualifiers for Protection'' explains the qualifiers you can use to specify disk volume protection when you initialize disk volumes.Table 9.10. INITIALIZE Command Qualifiers for Protection Qualifier
Explanation
/PROTECTION
The protection you specify with this qualifier overrides any protection you specify with other qualifiers.
/SYSTEM
All processes have read, write, create, and delete access to the volume, but only system processes can create first-level directories. ([1, 1] owns the volume.) See the note following this table.
/GROUP
System, owner, and group processes have read, write, create, and delete access to the volume. World users have no access.
/NOSHARE
System and owner processes have read, write, and delete access to the volume. World users have no access. Group users also have no access unless you specify the /GROUP qualifier.
Note
The /SYSTEM qualifier grants all users complete access. However, users cannot create directories or files unless you perform one of the following actions:Change the protection on the newly created master file directory (MFD), [000000]000000.DIR;1 to allow users to create their own directories under this parent directory.
Under the master file directory, create user directories that give users write access so that they, in turn, can create their own directories.
System managers usually choose the second method.
Specifying ISO 9660-Formatted Media Protection
The OpenVMS implementation of ISO 9660 does not include volume or volume set protection. The protection specified for the device on which the media is mounted determines accessibility to the ISO 9660 volumes or volume sets.
By default, the device protection is assigned to ISO 9660 files and directories. When you mount the volume, you can specify additional file protection using the UIC and PERMISSION protection fields included in the Extended Attribute Records (XARs) that might be associated with each file.
- XAR mount option, using the following format:
MOUNT/PROTECTION=XAR
When you specify the XAR option for a file that has an associated XAR, the protection fields in the XAR are enabled.
- DIGITAL System Identifier (DSI) mount option, using the following format:
MOUNT/PROTECTION=DSI
If you specify the DSI option, you enable the XAR permissions Owner and Group for XARs containing DSI.
For more information about the XAR and DSI options, refer to the VSI OpenVMS Record Management Utilities Reference Manual.
9.4.1.2. Changing Protection After Disk Volumes Are Mounted
You can change protection by using the SET SECURITY/CLASS=VOLUME command with the /PROTECTION, /OWNER, or /ACL qualifier to change any aspect of the volume security profile.
Changing UIC-Based Protection
$ SET SECURITY/CLASS=VOLUME/PROTECTION=(S:RWCD, O:RWCD, G:RC, W:RC) DUA0:
The protection set in this example allows the system and owner all types of access. Group and world access types can only read files and run programs. Any category not specified in the protection code (S, O, G, W) is unchanged.
Changing ACL-Based Protection
$ SET SECURITY/CLASS=VOLUME/ACL=(IDENTIFIER=DOC, ACCESS=READ+WRITE+EXECUTE) - _$ $1$DSA7:
This example gives holders of the DOC identifier read, write, and execute access to the $1$DSA7: volume.
9.4.1.3. Displaying UIC- and ACL-Based Protection
$ SHOW SECURITY/CLASS=VOLUME $1$DSA27:
$1$DSA27: object of class VOLUME
Owner: [1, 1] Protection: (System: RWCD, Owner: RWCD, Group: RWCD, World: RWCD)
Access Control List:
(IDENTIFIER=[ABC, SADAMS], ACCESS=READ+WRITE+CREATE+DELETE)In the display are the name and profile of the VOLUME class object $1$DSA27. The profile includes the owner UIC, the protection code, and the access control list (ACL) of the protected object.
9.4.2. Protecting Tape Volumes
The system protects magnetic tapes only at the volume level. You establish protection when you initialize tape volumes; after that, the Mount utility (MOUNT) enforces the protection that you have established.
|
Level of Protection |
Description |
|---|---|
|
Guidelines of the ISO standard |
The ISO standard, which is the first level of protection, is encoded in the accessibility field of the first volume label written on the magnetic tape. With this protection scheme, you can protect tape volumes in environments where interchange exists between the OpenVMS system and the operating system that is not OpenVMS. |
|
UIC-based protection scheme supported by system software |
This second level of protection is encoded in the second volume label written on the magnetic tape. Only OpenVMS systems check this scheme; it is ignored in any interchange with operating systems that are not OpenVMS. |
Standard-Labeled Tape Protection
The OpenVMS tape file system bases its accessibility protection on the ISO standards. This protection allows an installation routine to use a routine that interprets the contents of the volume- and header-label accessibility field. Refer to the $MTACCESS system service in the VSI OpenVMS System Services Reference Manual for more information about installation routines.
Access Types with Default Protection
|
Access Type |
Gives you the right to... |
|---|---|
|
Read |
Examine, print, or copy files from the volume. |
|
Write |
Append or write files to the volume. |
The security profile of a tape volume is stored in the ANSI VOL1 and VOL2labels written on the tape. The VOL2 label contains system-specific information. To override the creation of VOL2 labels, specify the /INTERCHANGE qualifier with the INITIALIZE command or the INIT$_INTERCHANGE item code on the $INIT_VOL system service.
Foreign Volume Protection
The operating system also supports foreign tape volumes. ( Foreign volumes either lack the standard volume label or have been mounted with the /FOREIGN qualifier.)When a tape volume is mounted with the /FOREIGN qualifier, users in the system and owner categories are always given full access (read, write, logical, and physical), regardless of what is specified in the protection code.
9.4.2.1. Using the /PROTECTION Qualifier with Tape Volumes
If you use the /PROTECTION qualifier when you initialize tape volumes, the protection code is written to a system-specific volume label.
With the /PROTECTION qualifier, the system applies only read (R) and write (W) access restrictions. (Execute [E]and delete [D] access do not apply.) The system and the owner always receive both read (R) and write (W) access to magnetic tapes, regardless of the protection code you specify.
9.4.2.2. Protecting Tape Volumes for Interchange Environments
You can protect tape volumes for interchange between OpenVMS and other operating systems.
With tapes processed on any operating system that supports a version of the ANSI standard later than Version 3, the system processes accessibility information in the first volume label.
- To process magnetic tapes created on an operating system other than the OpenVMS operating system Version 4.0 or later, a user must have VOLPRO privilege and must explicitly override the check on the protection as follows:
If the tape was created with a specified accessibility, then a user must have the appropriate privilege and must explicitly override the check on accessibility.
If the tape volume was not created with such a protection scheme, then a user is granted read and write access to that tape volume.
The tape file system allows you to specify values for the fields in which other operating systems currently write their protection information. Except under the conditions described in the last bulleted item, the OpenVMS operating system does not process these fields. Thus, you can use these fields to store the protection values for another operating system without affecting the system protection characteristics on that particular volume.
9.4.3. Auditing Volume Access
The system does not audit volume creation or deletion.
The system does not audit access for tapes, ODS-1, or foreign-mounted volumes.
9.5. Mounting Volumes
Mounting a disk or tape volume establishes a relationship between the volume and the device on which the volume is physically loaded. After you mount a volume, the system knows it exists, and users can access it. (This section assumes that you are performing the mount operation yourself.)
File-Structured and Foreign Volumes
Ordinarily, when you mount volumes, the system imposes a format on each volume that allows you to read, write, create (or execute), and delete files. These mounted volumes have the format of the OpenVMS operating system.
If you specify the /FOREIGN qualifier when you mount a volume, the system does not impose a format on the media, and you cannot access the files on the mounted volume. Use the /FOREIGN qualifier to mount volumes with formats of operating system that are not OpenVMS or with private formats.
Disks – sequentially or by logical block number
Tapes – sequentially
At times, the Backup utility (BACKUP) requires you to mount volumes with the /FOREIGN qualifier, when you restore an entire disk, for example. For details, refer to the VSI OpenVMS System Management Utilities Reference Manual.
How to Perform This Task
Physically mount all disks and put them on line.
- Enter the MOUNT command (which invokes the Mount utility), using the following format:
MOUNT device-name volume-label logical-name
where:device-name
Specifies the physical device name or logical name of the device on which the volume is to be mounted.
volume-label
Specifies the label on the volume.
logical-name
Defines a logical name to be associated with the device.
Allocates the device
Checks to see that the device is correctly loaded
Reads and verifies the volume identification
Using Qualifiers with the MOUNT Command
- To mount a public volume, use the /SYSTEM qualifier with the DCL command MOUNT using the following format:
MOUNT/SYSTEM device-name volume-label logical-name
- In an OpenVMS Cluster environment, also specify the /CLUSTER qualifier:
MOUNT/SYSTEM/CLUSTER device-name volume-label logical-name
Table 9.13, ''MOUNT Command Qualifiers for Mounting Disks'' and Table 9.14, ''MOUNT Command Qualifiers for Mounting Tapes'' show, respectively, the qualifiers you can use when you mount disks and tapes.
|
Task |
Section |
|---|---|
|
Use MOUNT command qualifiers when you mount disks |
Section 9.5.1, ''Using MOUNT Command Qualifiers When You Mount Disks'' |
|
Use MOUNT command qualifiers when you mount tapes |
Section 9.5.2, ''Using MOUNT Command Qualifiers When You Mount Tapes'' |
|
Assist users with mounting | |
|
Mount a volume with a protected subsystem |
Section 9.5.4, ''Mounting a Volume with Protected Subsystems'' |
|
Convert an existing volume from one ODS format to another |
Section 9.5.5, ''Converting an Existing Volume from One ODS Format to Another'' |
|
Modify disk volume characteristics |
9.5.1. Using MOUNT Command Qualifiers When You Mount Disks
|
Qualifier |
Description |
|---|---|
|
/ACCESSED= |
Requires OPER privilege; specifies the approximate number
of directories that will be in use concurrently on the
volume. (This qualifier is obsolete for ODS-2.) For example,
on a large 500 megabyte (MB) disk you might select a value
of 40, but on a small disk you might specify the following
value:
$ MOUNT/ACCESSED=2 DUA3: |
|
/ASSIST |
Directs the mount operation to allow operator or user intervention if the mount request fails. The /ASSIST qualifier is the default except during system startup. Encourage users to take advantage of this feature, which repeatedly alerts the operator of a mount request until the request is satisfied. To disable operator-assisted mounts, enter a command
similar to the
following:
$ MOUNT/SYSTEM/NOASSIST DUA1: SALES_98 |
|
/BIND= |
Creates a volume set of one or more disk volumes or adds
one or more volumes to an existing volume set. For example:
$ MOUNT/SYSTEM/BIND=CLIENTS DUA0:, DUA1: EUROPE, ASIA See Section 9.6.1.2, ''Using the /BIND Qualifier'' for details. |
|
/CACHE= |
Controls whether caching limits established at system
generation are disabled or overridden. For example:
$ MOUNT/CACHE=(EXTENT=60, FILE_ID=60, QUOTA=20) - _$ DMA0: FILES WORK %MOUNT-I-MOUNTED, FILES mounted on _NODE$DMA0: This command mounts a device labeled FILES and assigns the logical name WORK. The /CACHE qualifier enables an extent cache of 60 entries, a file identification cache of 60 entries, and a quota cache of 20 entries. |
|
/CLUSTER |
Requires SYSNAM privilege; specifies that after a volume
is successfully mounted on the local node, or if it is
already mounted with the /SYSTEM qualifier on the local
node, it is to be mounted on every other node in the
existing OpenVMS Cluster environment (that is, the volume is
to be mounted clusterwide). For
example:
$ MOUNT/SYSTEM/CLUSTER DUA1: SALES_95 |
|
/COMMENT= |
Specifies additional information to be included with the
operator request when the mount operation requires operator
assistance. For
example:
$ MOUNT/SYSTEM DYA1: SALES_95/COMMENT="Vol. in Rack 2." |
|
/EXTENSION= |
Requires OPER privilege; specifies the number of blocks by
which disk files are to be extended on the volume unless
otherwise specified by an individual command or program
request. The cluster size sets the initial disk block
allocation; the /EXTENSION qualifier determines how the file
grows. For example, for a small disk with a cluster size of
1 disk block, you might select an extension size of 2 disk
blocks:
$ MOUNT/EXTENSION=2 DUA3: |
|
/FOREIGN |
Indicates that the volume is not in the standard format
used by the operating system. Use this qualifier if you want
to mount a disk volume with a file structure other than
Files–11 or ISO 9660; for example (using DISK as a
logical
name):
$ MOUNT/FOREIGN DISK |
|
/MEDIA_FORMAT=CDROM |
Mounts a volume assuming the media to be ISO 9660 (or High Sierra) formatted. |
|
/[NO]MOUNT_VERIFICATION |
Enables or disables the mount verification feature on disks. By default, the mount verification feature is enabled. If a device goes off line or becomes write-locked, mount verification notifies the operator of the error condition, and then checks to see that the volume identification before and after the error condition are identical. To disable mount verification, enter a command like the
following
one:
$ MOUNT/SYSTEM/NOMOUNT_VERIFICATION DUA1: ACCOUNTS_DUE |
|
/OVERRIDE= |
Inhibits one or more protection checks that the MOUNT command performs. |
|
/PROTECTION= |
Specifies the protection code to be assigned to the
volume. Keywords are in the following list:
See Section 9.4.1, ''Protecting Disk Volumes'' for details. |
|
/SHARE |
Specifies that other users can access the volume.
(However, you must use the /SYSTEM qualifier to mount public
volumes.) Two users can access a private volume
simultaneously if they both use MOUNT/SHARE. For
example:
$ MOUNT/SHARE DLA0: COST_ACCOUNT Using the MOUNT/SHARE command on disks already mounted with the/SYSTEM qualifier retains a lock on disk availability even if the disk is dismounted on a systemwide basis. This practice is not usually used for the system disk, but it can occur as a result of invoking a general-purpose command procedure that is sometimes used on system and nonsystem disks. If the DISMOUNT.EXE program is opened by a user and another user enters the MOUNT/SHARE command on the system disk, a subsequent dismount may produce a warning message that the disk cannot be dismounted. To prevent the message, install the DISMOUNT.EXE image. |
|
/SUBSYSTEM |
Enables the processing of subsystem ACEs. (The command
MOUNT/SUBSYSTEM requires the SECURITY privilege.) By
default, the disk from which you boot has /SUBSYSTEM enabled
but other disks do not. The following command uses the MOUNT
command with the /SUBSYSTEM qualifier to enable the
processing of subsystem ACEs on the DUA0: device (DOC is the
volume label; WORK8 is an optional logical name for the
volume):
$ MOUNT/SUBSYSTEM/SYSTEM DUA0: DOC WORK8 |
|
/SYSTEM |
Requires SYSNAM privilege; makes the volume public, that
is, available to all users of the system, as long as the
UIC-based volume protection allows them access. The
following command mounts the volume labeled WORK and makes
it available
systemwide:
$ MOUNT/SYSTEM DUA1: WORK |
|
/UCS_SEQUENCE= escape_sequence |
Supplies the escape sequence to select the coded graphic character set, a requirement when mounting an ISO 9660 volume for one of its Supplementary Volume Descriptors (SVDs). |
|
/UNDEFINED_FAT |
Establishes default file attributes to be used for records on ISO 9660 media for which no record format has been specified. |
|
/WINDOWS= |
Requires OPER privilege; specifies the number of mapping
pointers to be allocated for file windows. The default
number of windows is set with the INITIALIZE command. The
following example specifies a modest number of
pointers:
$ MOUNT/WINDOWS=4 DUA3: |
9.5.2. Using MOUNT Command Qualifiers When You Mount Tapes
Table 9.14, ''MOUNT Command Qualifiers for Mounting Tapes'' lists MOUNT command qualifiers you can use to mount a tape volume. For a complete list of MOUNT command qualifiers, refer to the VSI OpenVMS System Management Utilities Reference Manual.
|
Qualifier |
Description |
|---|---|
|
/BLOCKSIZE= |
Specifies the block size for the magnetic tape. The range
of valid values for |
|
/CACHE=TAPE_DATA |
Requires OPER privilege; enables the write cache for a tape device if the tape controller supports one. /NOCACHE is the default for mounting tape devices. You must specify TAPE_DATA to enable write caching. The write buffer stays enabled even after you dismount the tape. |
|
/FOREIGN |
Indicates that the volume is not in the standard format used by the operating system. |
|
/HDR3 |
Controls whether special header labels are written on a tape volume. This is the default. |
|
/[NO]MOUNT_VERIFICATION |
Enables or disables the mount verification feature on magnetic tapes. By default, the mount verification feature is enabled. If a device goes off line or becomes write-locked, mount verification notifies the operator of the error condition, and then checks to see that the volume identification before and after the error condition are identical. To disable mount verification, enter a command similar to
the
following:
$ MOUNT/SYSTEM/NOMOUNT_VERIFICATION MUA1: ACCOUNTS_DUE |
|
/OVERRIDE= |
Inhibits one or more of the access checks that the MOUNT
command performs. For
example:
$ MOUNT/OVERRIDE=IDENTIFICATION MFA0: This command overrides the volume identification field, thus mounting a magnetic tape on MFA0: without a label specification. |
|
/OWNER_UIC= |
Requests that the specified UIC be assigned ownership of the volume while it is mounted, overriding the ownership recorded on the volume. Or, if you are mounting a volume using the /FOREIGN qualifier, requests an owner UIC other than your current UIC. |
|
/PROCESSOR= |
For magnetic tapes and Files–11Structure Level 1 disks, requests that the MOUNT command associate an ancillary control process (ACP) to process the volume. You must have the operator user privilege OPER to use the /PROCESSOR qualifier. Keywords are in the following list:
The /PROCESSOR qualifier causes MOUNT to override the
default manner in which ACPs are associated with devices.
For
example:s
$ MOUNT/PROCESSOR=SAME:MTA1: MFA0: This command directs MOUNT to mount a magnetic tape on MFA0: using the same ACP process currently associated with the MTA1: device. |
|
/PROTECTION= |
Specifies the protection code to be assigned to the volume for the duration of the mount. See Section 9.4.2, ''Protecting Tape Volumes'' for details. |
|
/RECORDSIZE= |
Specifies the number of characters in each record of a magnetic tape volume. Use this qualifier when you mount a volume that has a file without a second header label (such as RT–11 volumes), or when you mount volumes with the /FOREIGN qualifier, to provide RMS with the size of fixed-length records or the maximum size of variable-length records. |
Two other qualifiers that are important for mounting tape volumes are /INITIALIZE and /AUTOMATIC, which are explained in Section 9.9.2.2, ''Enabling Automatic Volume Switching'' and Section 9.9.2.3, ''Disabling Automatic Switching'', respectively.
Example
$ MOUNT MU: TEST_FILES %MOUNT-I-OPRQST, Please mount volume TEST_FILES in device _MUA2: %MOUNT-I-MOUNTED, TEST_FILES mounted on _MUA2:
In this example, the MOUNT command requests an available RA90 device for the volume labeled TEST_FILES. After you physically mount the volume in the device named in the response from MOUNT, the system completes the operation. Note that the device is automatically allocated by MOUNT.
Upon successful completion of the operation, MOUNT notifies you with a message sent to SYS$OUTPUT. If the operation fails for any reason, MOUNT notifies you with an error message.
9.5.3. Assisting Users in Mounting Volumes
Large sites often have operators assigned to assist users with mounting volumes. Section 2.4.6, ''Sending Requests to an Operator'' explains how users can send requests to operators. Section 2.4.7, ''Replying to Operator Requests'' briefly explains how operators reply to those requests.
%%%%%%%%%%% OPCOM, %%%%%%%%%%% request <request-id>, from user <user-name>
- A user requests that you mount the volume TEST_FILES on the device DUA2: by entering the following command:
$ MOUNT DUA2: TEST_FILES/COMMENT="Shelf slot 6B" - OPCOM notifies you of the request by displaying a message similar to the following one at the operator terminal:
%%%%%%%%%%% OPCOM, 28-MAY-2000 15:47:50.26 %%%%%%%%%%% request 5, from user MALCOLM Please mount volume TEST_FILES in device _DUA2: Shelf slot 6B
- Once you receive the request, OPCOM delivers a confirmation to the user, in a format similar to the following:
%MOUNT-I-OPRQST, Please mount volume TEST_FILES in device _DUA2: Shelf slot 6B
- After you locate the volume and place it on the device, OPCOM notifies the user that the volume is on the device and that the task is complete:
%MOUNT-I-MOUNTED, TEST_FILES mounted on _DUA2: %MOUNT-I-RQSTDON, operator request canceled–mount completed successfully.
$ MOUNT MU: CITIES/COMMENT="Slot 12c"
If the user has already allocated a drive whose name begins with MU, the Mount utility requests that you mount CITIES on that particular drive. If no device has been allocated, the Mount utility allocates the first available MU tape drive it finds and requests you to mount CITIES on that drive.
Sending Messages Back to Users
Use the operator communication manager (OPCOM) to communicate with system users. OPCOM is a system process that receives input from a process that wants to inform an operator of a particular status or condition; OPCOM passes the message to the operator, and tracks the message.
To use OPCOM, you must use a terminal that has been designated as an operator terminal. See Section 2.4.5, ''Designating Operator Terminals''for instructions.
- Enter the REPLY command in one of the following forms:
REPLY Command Qualifiers
Description
/ABORT=
identification-number"message-text"Indicates that the user request is canceled. (The user's MOUNT command exits with an error status.)
/PENDING=
identification-number"message-text"Indicates that the request has been put in a wait state until it can be completed. This command implies that the originating request was either a REQUEST/REPLY or a MOUNT command. The user cannot enter other commands until the operator fulfills or aborts the request.
/TO=
identification-number"message-text"Indicates that the request is fulfilled.(Processing continues.)
If a user enters a MOUNT/ASSIST command and the desired device is unavailable, you can substitute another device. Whenever you must substitute a device, load the requested volume on the alternate device and prepare the device for connection before you enter the REPLY command. Use the following format:REPLY/TO=identification-number "SUBSTITUTE device-name"You can abbreviate the word SUBSTITUTE to "S" and use uppercase or lowercase letters. After a space, use the remainder of the message-text space to name the substituted device.
Examples
$ REPLY/TO=24 "SUBSTITUTE DUA1:"
This example shows how an operator redirects the mount operation to the DUA1: device.
$ MOUNT/ASSIST MKB500: MYDATA %MOUNT-I-OPRQST, Please mount volume MYDATA in device _MKB500: %MOUNT-I-OPREPLY, Substitute MKA100: 11:44:28.71, request 1 was completed by operator _FTA8:
This is an example of a user's request and the substitution information the user receives. In this example, the MKA100: device has been substituted for the MKB500:device.
Refer to the VSI OpenVMS DCL Dictionary for a complete list of REPLY qualifiers and their functions. See Section 9.9.2.4, ''Sending Messages Back to Users''for instructions for entering REPLY commands after you mount a volume set with automatic switching disabled.
9.5.4. Mounting a Volume with Protected Subsystems
Security is usually based on control rights that are granted or denied to the user. In a protected subsystem, however, security is based on access controls assigned to the subsystem. The subsystem acts as a gatekeeper that grants or denies users access to objects belonging to the subsystem.
To create the necessary identifiers for the subsystem. Refer to the VSI OpenVMS Guide to System Security for details.
To mount the volume with the protected subsystem, which is explained in this section.
Caution
Anyone who mounts a subsystem is responsible for knowing what is on the volume being mounted. VSI strongly recommends that you find out what is on a volume before you mount a subsystem. Without this knowledge, you might inadvertently subvert system security and jeopardize the privacy of users' data.
For example, a user with malicious intent who has privileges on one OpenVMS Cluster node might place an application with a subsystem identifier on a volume and then request an unsuspecting operator or system manager to mount the volume on another node. Because the application has a subsystem identifier, the application appears to belong to a subsystem for which it is unauthorized.
How to Enable Protected Subsystems on a Trusted Volume
The system enables protected subsystems by default only on the system disk. For other disks, you must enable subsystems every time you mount a volume. A person with the SECURITY privilege can enable subsystems on a volume by using the /SUBSYSTEM qualifier on the MOUNT command.
You can dynamically turn on and off the processing of Subsystem ACEs with the DCL command SET VOLUME/SUBSYSTEM. This command is especially useful for the system disk, which is not mounted using the MOUNT command.
Example
$ MOUNT/SUBSYSTEM/SYSTEM DUA0: DOC WORK8
9.5.5. Converting an Existing Volume from One ODS Format to Another
The following sections contain instructions for converting an existing volume from one ODS file format to another.
9.5.5.1. Converting from ODS-2 to ODS-5
- Dismount the volume throughout the cluster; for example:
$ DISMOUNT /CLUSTER DKA300:
- Mount the volume as a private volume, for example:
$ MOUNT DKA300: DISK1%MOUNT-I-MOUNTED, DISK1 mounted on _STAR$DKA300:
Omitting the /SYSTEM qualifier causes the system to mount the volume as a private, not a public, volume.
You can check that the volume is ODS-2 by entering a SHOWDEVICE/FULL command and seeing a display like the following:$ SHOW DEVICE DKA200:/FULL Disk $10$DKA200:, device type RZ47, is online, allocated, deallocate on dismount, mounted, file-oriented device, shareable. Error count 0 Operations completed 232 . . . Volume Status: ODS-2, subject to mount verification, file high-water marking, write-back caching enabled.An alternative method for displaying the volume type is to issue a command and receive a response similar to the following:$ WRITE SYS$OUTPUT F$GETDVI ("DKA200:", "ACPTYPE")F11V2F11V2 indicates that the volume is ODS-2.
- VSI strongly recommends that you back up the volume. You cannot go back to ODS-2 format once you change to ODS-5 except by restoring a backup, as described in Section 9.5.5.3, ''Converting from ODS-5 Files to ODS-2 ''. For example:
$ BACKUP /IMAGE DKA300: SAV.BCK /SAVE_SET
- Set the characteristics of the disk by using a command in the following format:
SET VOLUME /STRUCTURE_LEVEL=5 device-name
For example:$ SET VOLUME /STRUCTURE_LEVEL=5 DKA300:
Note
You cannot use the SET VOLUME command to change a volume from ODS-5 to ODS-2. To reset a volume to ODS-2, you must use BACKUP as described in Section 9.5.5.3, ''Converting from ODS-5 Files to ODS-2 ''.
If a failure occurs after you enter the SET VOLUME/STRUCTURE_LEVEL command, refer to the instructions at the end of this section.
When you enter the SET VOLUME command, the system verifies that the volume can be converted by testing for the following items:The device must be a disk, and its on-disk structure must be ODS-2or ODS-5.
If the volume fails these tests, the system displays messages similar to the following:%SET-E-NOTMOD, DKA300: not modified -SET-E-NOTDISK, device must be a Files-ll format disk %SET-E-NOTMOD, DKA300: not modified -SET-W-INVODSLVL, Invalid on-disk structure level
The disk must be privately owned; the owner process-ID (PID) must be the same as the PID of the parent process that issues the SET VOLUME command.
If the volume fails this test, the system displays a message similar to the following:%SET-E-NOTMOD, DKA300: not modified -SET-W-NOTPRIVATE, device must be mounted privately
The mount count must indicate that the device was mounted only once, which protects against anyone mounting the device over a cluster.
If the volume fails this test, the system displays a message similar to the following:%SET-E-NOTMOD, DKA300: not modified -SET-W-NOTONEACCR, device must be mounted with only one accessor
Warning
After using the SET VOLUME /STRUCTURE_LEVEL=5 command, do not access the disk further until the disk is dismounted and remounted.
- Dismount the private volume and remount the volume publicly by entering commands similar to the following:
$ DISMOUNT DKA300: $ MOUNT /CLUSTER DKA300: DISK1 %MOUNT-I-MOUNTED, DISK1 mounted on _STAR$DKA300:
$ SHOW DEVICE DKA300:/FULL
Disk $10$DKA300:, device type RX74, is online, allocated, deallocate
on dismount, mounted, file-oriented device, shareable.
Error count 0 Operations completed 155
.
.
.
Volume Status: ODS-5, subject to mount verification, file high-water marking, write-back caching enabled.$ WRITE SYS$OUTPUT F$GETDVI ("DKA500:", "ACPTYPE")F11V5F11V5 indicates that the volume is ODS-5.
What to Do if a Failure Occurs
Inconsistent file structure level on device ...
Structure level on device ... is inconsistent with volume setIf either condition is true, you can enter the MOUNT command only with the /NOSHARE qualifier (or with no qualifier, because /NOSHARE is the default). When you do, the system displays the same error message but only as a warning.
To recover from the error condition, reenter the SETVOLUME/STRUCTURE_LEVEL=5 command, and then dismount and remount the disk. As a last resort, you can restore the backup you made.
9.5.5.2. Converting from ODS-1 to ODS-2
Back up the entire disk or disks.
Initialize the disk or disks as ODS-2 file structure.
Restore the disk or disks.
9.5.5.3. Converting from ODS-5 Files to ODS-2
Two types of BACKUP operations, file and image, support converting ODS-5 file names to ODS-2 file names. (File and image operations are described more completely in Chapter 11, "Using BACKUP".)
- Conversions during image operations
Restoring an ODS-5 image save set to an ODS-2 disk
You can use this method if you have an image backup of an ODS-5 disk, and you want to restore it to an ODS-2 disk.
In the command line in the following example, IMAGE.BCK is the ODS-5 save set, and DKA200: is the ODS-2 disk. When you use this conversion method, you must pre-initialize the output disk to ODS-2 and then include the /NOINIT qualifier in your command line in order to preserve the ODS-2 structure level.$ BACKUP/LOG/IMAGE/CONVERT DKA500:[000000]IMAGE.BCK/SAVE DKA200:/NOINIT %BACKUP-I-ODS5CONV, structure level 5 files will be converted to structure level 2 on DKA200: -BACKUP-I-ODS5LOSS, conversion may result in loss of structure level 5 file attributes %BACKUP-S-CREATED, created DKA200:[000000]000000.DIR;1 %BACKUP-S-CREATED, created DKA200:[000000]BACKUP.SYS;1 %BACKUP-S-CREATED, created DKA200:[000000]CONTIN.SYS;1 %BACKUP-S-CREATED, created DKA200:[000000]CORIMG.SYS;1 %BACKUP-S-CREATED, created DKA200:[000000]SECURITY.SYS;1 %BACKUP-S-CREATED, created MDA2:[000000]TEST_FILES.DIR;1 %BACKUP-S-CREATEDAS, created DKA200:[TEST_FILES]SUB^_^{DIR^}.DIR;1 as DKA200:[TEST_FILES]SUB$$DIR$.DIR;1 %BACKUP-S-CREATEDAS, created DKA200:[TEST_FILES.SUB^_^{DIR^}]SUB^&_~_FILE_~.DAT;1 as DKA200:[TEST_FILES.SUB$$DIR$]SUB$_$_FILE_$.DAT;1 %BACKUP-S-CREATEDAS, created DKA200:[TEST_FILES]THIS^_IS^_A^_TEST^{_FILE_^}.DAT;1 as DKA200:[TEST_FILES]THIS$IS$A$TEST$_FILE_$.DAT;1 %BACKUP-S-CREATED, created DKA200:[000000]VOLSET.SYS;1Saving an ODS-5 disk to an ODS-2 image save set
You can use this method to make an ODS-2 image save set of an ODS-5 disk that can be read by a system running a version of OpenVMS prior to Version 7.2.
In the following example, DKA500: is an ODS-5 disk, and IMAGE.BCK is an ODS-2 save set on the DKA200: disk.$ BACKUP/LOG/CONVERT/IMAGE DKA500: DKA200:[000000]IMAGE.BCK/SAVE %BACKUP-I-ODS5CONV, structure level 5 files will be converted to structure level 2 on DKA200: -BACKUP-I-ODS5LOSS, conversion may result in loss of structure level 5 file attributes %BACKUP-S-COPIED, copied DKA200:[000000]000000.DIR;1 %BACKUP-S-COPIED, copied DKA200:[000000]BACKUP.SYS;1 %BACKUP-S-HEADCOPIED, copied DKA200:[000000]BADBLK.SYS;1 header %BACKUP-S-HEADCOPIED, copied DKA200:[000000]BADLOG.SYS;1 header %BACKUP-S-HEADCOPIED, copied DKA200:[000000]BITMAP.SYS;1 header %BACKUP-S-COPIED, copied DKA200:[000000]CONTIN.SYS;1 %BACKUP-S-COPIED, copied DKA200:[000000]CORIMG.SYS;1 %BACKUP-S-HEADCOPIED, copied DKA200:[000000]INDEXF.SYS;1 header %BACKUP-S-COPIED, copied DKA200:[000000]SECURITY.SYS;1 %BACKUP-S-COPIED, copied DKA200:[000000]TEST_FILES.DIR;1 %BACKUP-S-COPIEDAS, copied DKA200:[TEST_FILES]Sub^_^{Dir^}.DIR;1 as DKA200:[TEST_FILES]SUB$$DIR$.DIR;1 %BACKUP-S-COPIEDAS, copied DKA200:[TEST_FILES.Sub^_^{Dir^}]Sub^&_~_File_~.Dat;1 as DKA200:[TEST_FILES.SUB$$DIR$]SUB$_$_FILE_$.DAT;1 %BACKUP-S-COPIEDAS, copied DKA200:[TEST_FILES]This^_is^_a^_Test^{_File_^}.Dat;1 as DKA200:[TEST_FILES]THIS$IS$A$TEST$_FILE_$.DAT;1 %BACKUP-S-COPIED, copied DKA200:[000000]VOLSET.SYS;1Copying the contents of an ODS-5 disk to an ODS-2 disk
You can use this method to create an ODS-2 disk from an ODS-5 disk without creating an intermediate save set.
When you use this conversion method, you must pre-initialize the output disk to ODS-2 and include the /NOINIT qualifier in your command line in order to preserve the ODS-2 structure level.
In the following example, DKA500: is the ODS-5 disk, and DKA200: is the ODS-2 disk.$ BACKUP/LOG/CONVERT/IMAGE DKA500: DKA200:/NOINIT %BACKUP-I-ODS5CONV, structure level 5 files will be converted to structure level 2 on DKA200: -BACKUP-I-ODS5LOSS, conversion may result in loss of structure level 5 file attributes %BACKUP-S-CREATED, created DKA200:[000000]000000.DIR;1 %BACKUP-S-CREATED, created DKA200:[000000]BACKUP.SYS;1 %BACKUP-S-CREATED, created DKA200:[000000]CONTIN.SYS;1 %BACKUP-S-CREATED, created DKA200:[000000]CORIMG.SYS;1 %BACKUP-S-CREATED, created DKA200:[000000]SECURITY.SYS;1 %BACKUP-S-CREATED, created DKA200:[000000]TEST_FILES.DIR;1 %BACKUP-S-CREATED, created DKA200:[TEST_FILES]SUB$$DIR$.DIR;1 %BACKUP-S-CREATED, created DKA200:[TEST_FILES.SUB$$DIR$]SUB$_$_FILE_$.DAT;1 %BACKUP-S-CREATED, created DKA200:[TEST_FILES]THIS$IS$A$TEST$_FILE_$.DAT;1 %BACKUP-S-CREATED, created DKA200:[000000]VOLSET.SYS;1
- Conversions during file operations
Copying individual ODS-5 files to an ODS-2 disk
This conversion method allows you to interchange files between ODS-5 and ODS-2 volumes. You can, for example, select a directory tree for a disk-to-disk "copy" operation.
In the following example, DKA500: is the ODS-5 disk, and DKA200: is the ODS-2 disk.$ BACKUP/LOG/CONVERT DKA500:[*...]*.*;* DKA200:[*...]*.*;* %BACKUP-I-ODS5CONV, structure level 5 files will be converted to structure level 2 on DKA200: -BACKUP-I-ODS5LOSS, conversion may result in loss of structure level 5 file attributes %BACKUP-S-CREDIR, created directory DKA200:[TEST_FILES.SUB$$DIR$] %BACKUP-S-CREATED, created DKA200:[TEST_FILES.SUB$$DIR$]SUB$_$_FILE_$.DAT;1 %BACKUP-S-CREATED, created DKA200:[TEST_FILES]THIS$IS$A$TEST$_FILE_$.DAT;1Saving individual ODS-5 files in an ODS-2 save set
You can use this method to save ODS-5 files in a save set that can be read on a system running a version of OpenVMS prior to Version 7.2.
In the following example, DKA500: is an ODS-5 disk, and DKA200: is an ODS-2 disk; FILES.BCK is the ODS-2 save set.$ BACKUP/LOG/CONVERT DKA500:[*...]*.*;* DKA200:FILES.BCK/SAVE %BACKUP-I-ODS5CONV, structure level 5 files will be converted to structure level 2 on DKA200: -BACKUP-I-ODS5LOSS, conversion may result in loss of structure level 5 file attributes %BACKUP-S-COPIED, copied DKA200:[000000]000000.DIR;1 %BACKUP-S-COPIED, copied DKA200:[000000]TEST_FILES.DIR;1 %BACKUP-S-COPIEDAS, copied DKA200:[TEST_FILES]Sub^_^{Dir^}.DIR;1 as DKA200:[TEST_FILES]SUB$$DIR$.DIR;1 %BACKUP-S-COPIEDAS, copied DKA200:[TEST_FILES.Sub^_^{Dir^}]Sub^&_~_File_~.Dat;1 as DKA200:[TEST_FILES.SUB$$DIR$]SUB$_$_FILE_$.DAT;1 %BACKUP-S-COPIEDAS, copied DKA200:[TEST_FILES]This^_is^_a^_Test^{_File_^}.Dat;1 as DKA200:[TEST_FILES]THIS$IS$A$TEST$_FILE_$.DAT;1
%BACKUP-I-RECOVCNT, 5 files could not be converted into a directory on DKA100: -BACKUP-I-RECOVCMD, use the Analyze/Disk_Structure/Repair command to recover files
In this case, you need to move the file from [SYSLOST] to the appropriate directory. Refer to the created as log messages to see where the file would logically be placed and place it there manually.
9.5.6. Modifying Disk Volume Characteristics
Use the DCL command SET VOLUME to modify the characteristics of one or more mounted Files–11 disk volumes. To use this command, you must have write access to the index file on the volume. If you are not the owner of the volume, you must have either a system UIC or the user privilege SYSPRV. You must then specify the name of one or more mounted Files–11 volumes.
The following examples illustrate how you can use the SET VOLUME command.
Examples
$ SET VOLUME/DATA_CHECK=(READ, WRITE) DKA100:
This command requests that data checks be performed following all read and write operations to the DKA100: volumes.
$ SET VOLUME/LABEL=LICENSES DKA100:
This command encodes the label LICENSES on the DKA100: volume. Note that, if characters in labels are entered in lowercase, the /LABEL qualifier changes them to uppercase.
9.5.7. Speeding Up Disk Mounting
Note
DISKMOUNT.C does not support mounting of disks connected to an InfoServer, disks served using DFS, or stripe sets.
Copy the files DISKMOUNT.H, DISKMOUNT.C, and DISKMOUNT_CHILD.C in SYS$EXAMPLES to a directory.
Define a logical name "SRC$"that points to this directory.
Assemble the DISKMOUNT.C and DISKMOUNT_CHILD.C files.
Link DISKMOUNT.OBJ and DISKMOUNT_CHILD.OBJ to produce the DISKMOUNT.EXE and DISKMOUNT_CHILD.EXE executable image files.
Copy these executable images to a directory, preferably SYS$MANAGER on the target system.
For additional information, see the comments in the DISKMOUNT.H file.
9.6. Setting Up Disk Volume Sets
|
Task |
Section |
|---|---|
|
Create a disk volume set from new volumes |
Section 9.6.2, ''Creating a Disk Volume Set from New Volumes'' |
|
Create a shadowed disk volume set | |
|
Create a disk volume set from an existing volume |
Section 9.6.4, ''Creating a Disk Volume Set from an Existing Volume and a New Volume'' |
|
Add volumes to a disk volume set |
Section 9.6.5, ''Adding Volumes to an Existing Disk Volume Set'' |
9.6.1. Understanding Disk Volume Sets
Files are automatically located anywhere on the volume set that space is available.
Disk quotas are enforced over the entire set.
A single directory structure covers the whole volume set.
Use a volume set to provide a large, homogeneous public file space. You must use a volume set to create files that are larger than a single physical disk volume. (The file system attempts to balance the load on the volume sets, for example, by creating new files on the volume that is the least full at the time.)
If you want several distinct areas of file storage, with different types of users or different management policies, you must use a separate volume or volume set for each area. For example, you might want one volume for permanent user storage, with limited disk quotas and regular backups. You might want another volume for "scratch" use, which means that the volume has liberal or no quotas and is not backed up; also, its files are purged on a periodic basis. Each separate volume or volume set must contain a top-level user file directory for each user who keeps files on that volume.
An advantage of separate volumes is their modularity. If one of the drives holding a volume set is out of service, the whole volume set is unavailable because of its interconnected directory structure. When a drive holding a single volume is not functioning, only the files on that volume are not available.
A disadvantage of volume sets is the large size of an image backup of a multivolume set, which might affect your backup schedule. For example, if backing up each of five separate volumes takes 5 hours in the evening, backing up these same volumes in a volume set will take 25 hours, which cannot be done overnight, thus possibly causing a scheduling problem.
9.6.1.1. Guidelines for Creating Disk Volume Sets
You can turn any single volume into a volume set by binding it with a newly initialized volume. Likewise, you can add another newly initialized volume to an existing volume set.
- Do not include a system disk in a volume set.
Caution
Do not make the system disk part of a volume set because updates, upgrades, and optional product installations do not install correctly, and the operating system will no longer boot successfully.
You cannot bind two existing separate volumes containing files into a volume set. (The MOUNT command appears to let you do this, but the result is not a coherent volume set.)
Enter the MOUNT/BIND command only once to bind a volume set; thereafter, the volume set association is recorded on the volumes.(See Section 9.5, ''Mounting Volumes'' for details.)
Once you bind two or more volumes into a volume set, you cannot separate them. The only way to separate a volume set is to use the Backup utility (BACKUP) to copy sets of directories selectively. (See Section 11.13, ''Backing Up Files and Directories'' for more information.)
When you mount a disk volume set, the volume label specified in the list must correspond to a device name in the same position in the device name list.
You can bind two or more disk volumes into a volume set. The first volume in the set is called the root volume. Each volume in the set is identified by a volume number relative to the root volume, which is always relative to volume 1.
Device name of the device on which the root volume is mounted
Logical name assigned to the volume set when it was mounted
9.6.1.2. Using the /BIND Qualifier
MOUNT/BIND=volume-set-name
|
|
Specifies a 1- to12-alphanumeric-character name identifying the volume set. |
The volume set name must be different from all volume labels within the set, and all labels in the set must be unique.
The /BIND qualifier identifies a volume set by assigning it a volume set name that applies to all volumes in the set. The qualifier also identifies the root volume and creates the directory structure for the volume.
When you create files on a volume set, the file system allocates space for the files anywhere on the set, wherever the most space exists. When existing files on any volume are extended, extension occurs on the same volume unless the volume is physically full.
Note
Do not bind your system disk into a volume set. System software updates and optional product installations do not support volume sets. If certain system files move or extend to other volumes in the set, the system might fail to boot.
You do not need special privileges to create volume sets. However, you must have write access to the index file on all volumes you are attempting to bind into a volume set; this usually means you also must have a system UIC, have the user privilege SYSPRV, or be the owner of the volumes.
|
Task |
Section |
|---|---|
|
Create a disk volume set from new volumes |
Section 9.6.2, ''Creating a Disk Volume Set from New Volumes'' |
|
Create a shadowed disk volume set | |
|
Create a disk volume set from an existing volume and a new volume |
Section 9.6.4, ''Creating a Disk Volume Set from an Existing Volume and a New Volume'' |
|
Add volumes to an existing disk volume set |
Section 9.6.5, ''Adding Volumes to an Existing Disk Volume Set'' |
9.6.2. Creating a Disk Volume Set from New Volumes
Allocate the necessary devices and physically load the volumes.
Initialize each volume in the set.
When you initialize volumes for a volume set, you can use qualifiers with the INITIALIZE command to define the volume ownership and protection. Protection and ownership information is obtained from the root (first) volume. The protection and ownership of the other volumes is ignored.
Enter the MOUNT/BIND command to create the volume set. The MOUNT/BIND command both creates the volume set and mounts the volumes. When this command completes successfully, all volumes in the set are ready for use; in other words, you can now create user file directories.
Use the /BIND qualifier only once to create the volume set. Subsequently, you can mount the volume set with a single MOUNT command.
Examples
$ INITIALIZE DUA1: PAYVOL1 $ INITIALIZE DUA2: PAYVOL2 $ INITIALIZE DUA3: PAYVOL3 $ MOUNT/BIND=MASTER_PAY DUA1:, DUA2:, DUA3: PAYVOL1, PAYVOL2, PAYVOL3
This example assumes that the volumes to be bound contain no files or data. The INITIALIZE command initializes each volume in the set. The MOUNT/BIND command defines the volume set name, MASTER_PAY, and defines the relative volume numbers of the volumes PAYVOL1, PAYVOL2, and PAYVOL3.
The order of the device names corresponds to the volume labels specified:PAYVOL1 must be physically loaded on DUA1:, PAYVOL2 on DUA2:, and PAYVOL3 on the DUA3: device.
PAYVOL1, which is listed first in the list of labels, becomes the root volume of the set. The master file directory (MFD) for PAYVOL1 contains the directory structure for the entire volume set.
$ MOUNT DUA1:, DUA2:, DUA3: PAYVOL1, PAYVOL2, PAYVOL3
This example illustrates the use of one MOUNT command to mount a previously created volume set.
9.6.3. Creating a Shadowed Disk Volume Set
MOUNT/BIND=TEST3013 DSA3011/SHADOW=($1$DUA402:, $1$DUA403:), DSA3012/SHADOW=($1$DUA404:, $1$DUA405:) TEST3011, TEST3012 TEST3013
This command creates a volume set with the logical name TEST3013. The volume set TEST3013 is shadowed, and each element of the shadow set (TEST3011 andTEST3012) is itself a volume set.
9.6.4. Creating a Disk Volume Set from an Existing Volume and a New Volume
Use the DISMOUNT command to dismount the existing volume. Use the/NOUNLOAD qualifier to logically dismount the volume from the drive. (The volume, however, remains physically loaded on the drive.)
Use the INITIALIZE command to initialize the new volume, specifying the device on which the volume is to be mounted and the volume label.
Use the MOUNT/BIND command to bind the new volume to the existing volume, specifying the volume set name, the devices on which the volumes are mounted, and the volume labels.
Specify the volume label of the existing volume first; it becomes the root volume of the set. When you create a volume set from an existing volume, you must specify the label of the existing volume first because the file system must build on the existing directory structure.
Example
$ DISMOUNT/NOUNLOAD DUA1: $ INITIALIZE DUA2: USERFILES2 $ MOUNT/BIND=USERS DUA1:, DUA2: USERFILES, USERFILES2
Caution
If you attempt to create a volume set from two or more volumes that already contain files and data, the file system does not issue an error message when you enter the MOUNT/BIND command. However, the volumes are unusable as a volume set because the directory structures are not properly bound.
9.6.5. Adding Volumes to an Existing Disk Volume Set
You can add volumes to an existing volume set at any time. The maximum number of volumes in a volume set is 255.
This section contains examples that show how to add volumes to an existing volume set.
Examples
$ INITIALIZE DUA4: PAYVOL4 $ MOUNT/BIND=MASTER_PAY DUA4: PAYVOL4
In this example, the volume set named MASTER_PAY is on line and mounted and has volumes named PAYVOL1, PAYVOL2, and PAYVOL3.
The MOUNT/BIND command binds the volume PAYVOL4 with the existing volume set and makes the volume ready and available for use. Note that, if the volume set MASTER_PAY is mounted with the /SYSTEM, /GROUP, or /SHARE qualifier, the MOUNT/BIND command that adds a volume to the set must also specify the appropriate qualifier.
When you add a volume to an existing set, the only volume in the set that you must mount is the root volume, relative volume 1 (in this example, DUA4:). Mounting any of the other volumes is not necessary.
$ INITIALIZE DUA4: PAYVOL4 $ MOUNT/BIND=MASTER_PAY DUA1:, DUA2:, DUA3:, DUA4: - _$ PAYVOL1, PAYVOL2, PAYVOL3, PAYVOL4/SYSTEM
In this example, a set named MASTER_PAY already exists, with volumes named PAYVOL1, PAYVOL2, and PAYVOL3.
You can add a volume to a set at the same time that you mount the volume set, as this example shows. Note that the first device/volume pair listed in the MOUNT/BIND command is the root volume of the set, the DUA1: volume. When you add a volume to a set while mounting the set, you must list the root volume first.
9.7. Expanding Volumes Dynamically
Dynamic Volume Expansion (DVE), introduced in OpenVMS Version 7.3-2, allows you to explicitly expand a file system if its corresponding storage container has additional space and has been initialized for expansion. With Dynamic Volume Expansion, you do not need to take an application offline if that application suddenly needs more storage space. The file system expansion occurs while the application remains online.
File system expansion consists of the following steps:
Reserve additional bitmap space on a disk.
Enlarge your storage container.
Dynamically expand a volume.
These steps are discussed in the following sections.
9.7.1. Reserving Additional Bitmap Space
To expand your file system dynamically, you must first perform a one-time allocation of additional bitmap space. To do this, you allocate space to the maximum size that can ever be used on a volume; OpenVMS imposes an upper limit of 1TB.
You can perform the one-time allocation of additional bitmap space at either of the following times:
At disk initialization time
To allocate additional bitmap space when you initialize a disk, enter the INITIALIZE /LIMIT command; for example:
$ INITIALIZE /LIMIT $1$DGAnnn !Allocates 1TB bitmap space
On a privately mounted volume
To allocate additional bitmap space later, enter the SET VOLUME /LIMIT command for a privately mounted volume; for example:
$ SET VOLUME /LIMIT $1$DGAnnn !Allocates 1TB bitmap space
Once allocated, the volume can be expanded while the disk is mounted as shareable (MOUNT /SHARE).
Notes about using these commands:
The default size of /LIMIT for both commands in the preceding examples is 1TB, which is also the maximum size currently supported on OpenVMS. Under special circumstances, you might want to specify a smaller size.
Enter the SET VOLUME /LIMIT command to increase the expansion limit of the disk.
When you enter either DCL command to expand bitmap space, you create a BITMAP.SYS file that is large enough for all future growth.
You can allocate additional bitmap space whether or not the physical volume has room for expansion. The commands for allocating extra bitmap size and for expanding the volume size are introduced in OpenVMS Alpha Version 7.3-2.
Volumes that use the dynamic volume expansion feature can be used by any AlphaServer or VAX system running OpenVMS Version 7.2 or higher.
9.7.2. Enlarging Storage Containers
You can enlarge storage containers in either of the following ways:
By using the HSV controller to add storage. These controllers expand volume size online.
By using Dissimilar Device Shadowing (DDS), which allows you to combine disks of varying sizes into a shadow set.
With DDS, which is a new feature in OpenVMS Version 7.3-2, you can shadow one disk with other disks that are larger than the original one. You can, for example, shadow an RA90 disk with Fibre Channel disks. The only restriction is that additional shadow members must be at least as large as the first member. No limit exists, however, on how much larger additional disks can be.
For more information about DDS, refer to Volume Shadowing for OpenVMS.
9.7.2.1. Using Additional INITIALIZE Qualifiers for Dynamic Volume Expansion
For better performance, you might want to create a file system that is smaller than the current physical size of the volume. If you have a 36 Gb disk, but you anticipate adding an 18 GB disk in the future, you might initialize the disk with the INITIALIZE /LIMIT command and then enter the following command to reserve 18 GB of bitmap space:
$ INITIALIZE /SIZE=18000000 $1$DGAnnn
This command initializes the disk at 18 Gb of file system space. You can expand the file system later, if the need arises.
To increase the expansion limit on volumes already in use, plan to increase the expansion limit during the next convenient maintenance period using the SET VOLUME /LIMIT command.
When you use the /LIMIT qualifier with the INITIALIZE or SET VOLUME command, you increase the BITMAP.SYS file by a few hundred blocks, which gives you much greater flexibility in the future. You can later expand the volume (using the SET VOLUME /SIZE command) quickly if your storage requirements increase unexpectedly.
9.7.2.2. Increasing the Expansion Limit of Volumes in a Cluster
To increase the expansion limit of volumes in a cluster, do the following:
Verify that all systems in the cluster are running OpenVMS Version 7.2 or higher.
If the disk is mounted shareable (if you specified one of the following qualifiers when you mounted it: /CLUSTER, /GROUP, /SYSTEM, or /SHARE), dismount the disk and remount it for private use. Do not specify /CLUSTER, /GROUP, /SYSTEM, or /SHARE.
Remount the disk as shareable.
The following example shows how to increase the expansion limit of a volume mounted in a cluster:
$ DISMOUNT /CLUSTER /NOUNLOAD $252$DUA716: $ MOUNT $252$DUA716: TST716 $ SET VOLUME /LIMIT $252$DUA716: $ DISMOUNT /NOUNLOAD $252$DUA716: $ MOUNT /CLUSTER $252$DUA716: TST716
9.8. Mounting ISO 9660 Volume Sets and Groups
Directly, using the Mount utility (MOUNT)
Indirectly, using the DCL command MOUNT
The Mount utility (MOUNT) builds the I/O database structures that are needed to access ISO 9660 directories and files. MOUNT also verifies the presence of an appropriate ACP to perform $QIO functions specific to ISO 9660. Currently, you cannot mount ISO 9660 media as a system disk. Refer to the VSI OpenVMS System Management Utilities Reference Manual for details.
For more information about ISO 9660 volume structure on CD–ROM media, refer to the Guide to OpenVMS File Applications.
9.8.1. Mounting ISO 9660 Volume Sets
ISO 9660 supports volume sets of up to 65, 535 volume set members. At any one time, users can mount a 255-member subset of the total volume set of 65, 535.
If your volume set is greater than the number of CD–ROM readers available to you, you can swap volume set members, for example, as you might when you have a single reader with multiple volume set members.
9.8.2. Mounting ISO 9660 Volume Groups
A volume group consists of one or more consecutively numbered volumes within a volume set. Affinity between the members of a volume group is established by the fact that the volumes are recorded together and are subject to the same maximum-volume-set-size parameter.
The first group includes Volumes 1 and 2, which were recorded together, prior to the second group.
Volumes 1 and 2 each contain information only about their volume group; they have no information about the volumes in the second volume group.
The second group includes Volumes 3, 4, and 5, which were recorded together at a later date.
Volumes 3, 4, and 5 each contain information about all of the volumes in the volume set, including Volumes 1 and 2.
How to Perform This Task
When you mount a volume set, you must first mount a member of the highest-numbered volume group (the most recently recorded group – in the example, Volume 3, 4, or 5), because only a member of the highest-numbered group has the information needed to mount all members of the volume set.
If you do not follow this requirement, you must dismount all of the volumes and start again by specifying a member of the highest-numbered volume group as the first volume to be mounted.
9.8.3. Handling Partially Mounted ISO 9660 Volume Sets
OpenVMS systems support partially mounted ISO 9660 volume sets. Data is usually read from all mounted volumes in a manner that is transparent to the user program.
When a volume-set member is not mounted because the volume set is partially mounted, OPCOM sends a message to the OPERATOR class DISK requesting that the unmounted volume be mounted. If you do not honor the request within a specified time period, or if you do not enable the option to provide for dynamically mounting a volume, the I/O process fails, and an error message is issued.
9.8.4. Mounting ISO 9660 Volumes Using SVDs
All ISO 9660 volumes contain a Primary Volume Descriptor (PVD) that uses ASCII (ISO 646-IRV) as the character set. Both ISO 9660 and OpenVMS file naming conventions use the same subset of ASCII characters when displaying the directories and file names of a volume.
In addition to mounting ISO 9660 volumes using the default PVD, you can also mount ISO 9660 volumes using a Supplementary Volume Descriptor (SVD).
This capability allows access to an ISO 9660 volume with directories and file names containing characters from character sets other than the ISO 9660 limited set, which includes only A through Z, underscore (_), period (.) and semicolon (;).
The author of the ISO 9660 volume set must record the volume with the required PVD, and optionally with one or more SVDs. Each SVD must contain a unique volume label and escape sequence.
MOUNT device-name volume-label /UCS_SEQUENCE=escape_sequence
|
device-name |
Specifies the physical device name or logical name of the device on which the ISO 9660 volume is to be mounted. |
|
volume-label |
Specifies the SVD volume label obtained from the author's label on the CD–ROM. |
|
escape-sequence |
Specifies the escape sequence obtained from the author's label on the CD–ROM. |
If an ISO 9660 volume contains SVDs with no escape sequence specified, the default character set is assumed to be ISO 646 (ASCII). This default character set allows the use of the file specification character set supported by OpenVMS, which includes these additional characters:dollar sign ($) and dash (-).
MOUNT device-name volume-label /UCS_SEQUENCE=""
Note
If an ISO 9660 volume contains SVDs with escape sequences other than ISO 646, ISO 2022 or ISO 13646 (formats on CDs), the character set might not interoperate with the OpenVMS file specification syntax.
Refer to the Guide to OpenVMS File Applications for more information about ISO 9660 volume structure on CD–ROM media.
9.8.5. Handling ISO 9660 Restrictions
| Media Affected | Description and Resolution |
|---|---|
| Volume Labels |
These can contain from 1 to 32 characters. The first 12
characters are used to produce a unique volume identity. If
the label is not unique within the first 12 characters, the
volume will not mount and the following error message is
displayed:
%SYSTEM-F-VOLALRMNT, another volume of the same label already mounted How to resolve this problem: Mount the volume specifying a different volume label and use the /OVERRIDE=IDENTIFICATION qualifier. This will override the volume's label so as not to conflict with the label of an already-mounted volume. |
|
Volume Set Labels |
These can be from 1 to 128 characters in length. The first
12 characters are used to produce a unique volume set
identity. If the volume set label is not unique within the
first 12 characters, the volume will not mount and one of
the following error messages will be
displayed:
%SYSTEM-F-VOLINSET, volume is already part of another volume set %MOUNT-F-DUPRVN, duplicate volume number already mounted How to resolve this problem: Mount the volume specifying a new volume set label with the /BIND= volume-set-name command qualifier. |
|
Volume Label and Volume Set Label Duplication |
The first 12 characters of both the volume label and the
volume set label are used to produce different lock manager
resource names, which are then used to coordinate volume and
volume set associations. If both the volume label and the
volume set label are the same (within the first 12
characters, including null labels), a lock manager deadlock
error occurs and the following error message is
displayed:
%SYSTEM-F-DEADLOCK, deadlock detected How to resolve this problem: Mount the volume specifying a different volume label and use the /OVERRIDE=IDENTIFICATION command qualifier. This will override the volume's label so as not to conflict with the volume set's label. |
|
Undefined Record Format Errors |
Many ISO 9660 CD–ROMs are mastered without a specified record format because the ISO 9660 media can be mastered from platforms that do not support the semantics of files containing predefined record formats. OpenVMS file system utilities (such as TYPE and COPY), language RTLs, and applications that use RMS for record access may report RMS errors, utility errors, and language errors when accessing files whose record format is undefined or appears illegally specified. How to resolve this problem: Use the following command syntax at mount time to force
all files of type UNDEFINED to the STREAM record format
having a maximum record length of 512
bytes:
MOUNT/MEDIA=CDROM/UNDEFINED=(STREAM:512) device label For more information about RMS record formatting, refer to the VSI OpenVMS Record Management Utilities Reference Manual and the VSI OpenVMS Record Management Services Reference Manual. |
9.9. Mounting Tape Volume Sets
The procedure for mounting a tape volume set is similar to the procedure for mounting a single tape volume, described in Section 9.5, ''Mounting Volumes''. The number of volume identifiers does not need to equal the number of device names you specify. In other words, when you mount a tape volume set, you can specify more volume identifiers than device names or more device names than volumes.
The number of devices you specify directly affects the action taken by the tape file system when processing continuation volumes in a volume set. For example, when the number of devices is greater than the number of volumes, the tape files system requests a continuation volume to be mounted on the first drive from the list that does not have a volume mounted.
When mounting a volume set, make sure that all the volumes in the set contain write rings if the user intends to write to any of the volumes in the set. (If even one of the volumes in the set does not contain a write ring at mount time, all volumes are write-locked; the system is unable to write to any of them.) Load the volumes on the drives that have been allocated and place the drives on line.
|
Task |
Section |
|---|---|
|
Create a tape volume set | |
|
Mount continuation volumes in a volume set |
Section 9.9.2, ''Mounting Continuation Volumes in a Tape Volume Set'' |
|
Mount volume sets with automatic switching disabled |
9.9.1. Creating a Tape Volume Set
If you do not create a volume set explicitly, the operating system creates one when necessary. If you have not mounted a volume set and a continuation volume is required, the tape file system requests that a continuation volume be mounted and implicitly creates a volume set. For example, if the tape file system encounters an EOT mark while writing a volume, it sends a message to the operator console requesting that another volume be mounted.
After you mount the next volume, the tape file system writes the volume and header labels and then reissues the pending write requests to the continuation volume. The file-set identifier in the first file-header label of all files written to the continuation volume is the file-set identifier of the first file on the first volume. The file-set identifier for volume sets is always that of the first file of the first volume that is mounted in the set.
How to Perform This Task
Allocate devices on which you will load the volumes.
Initialize the volumes. Specify the density and the access protection in addition to the device name and the volume identifier in the INITIALIZE commands.
Mount the volumes, including the device names and volume identifiers. Specifying a logical name for the volume set is optional. The system not only confirms which volumes have been mounted, but also indicates on which drive each volume has been mounted.
The system mounts and verifies only the volumes that are physically loaded on the devices at mount time. However, the volume identifiers of additional volumes that you specify are not verified until the volumes are accessed.
You can check the densities, volume labels, UICs, and relative volume numbers of the volumes that are mounted on devices. To do so, specify the SHOWDEVICES/FULL command. If you specify a generic device code for the tape drives, such as MU, information is displayed for all drives of that type configured in the system.
To display information for a volume mounted on a specific drive, specify the physical device code, consisting of the generic device code, the controller designation, and the unit number followed by a colon.
For more information about the SHOW DEVICES command, including examples of displays returned by the SHOW DEVICES/FULL command, see Section 8.3, ''Getting Information About Devices on the System'' or the VSI OpenVMS DCL Dictionary.
Examples
$ ALLOCATE MUA0: %DCL-I-ALLOC, _MARS$MUA0: allocated $ ALLOCATE MUA1: %DCL-I-ALLOC, _MARS$MUA1: allocated $ ALLOCATE MUA2: %DCL-I-ALLOC, _MARS$MUA2: allocated
The commands in this example allocate a drive on which you will load each volume.
$ INITIALIZE/DENSITY=1600/PROTECTION=(G:RW) MUA0: TAPE1 $ INITIALIZE/DENSITY=1600/PROTECTION=(G:RW) MUA1: TAPE2 $ INITIALIZE/DENSITY=1600/PROTECTION=(G:RW) MUA2: TAPE3
The commands in this example initialize the volumes. The commands specify the density and the access protection in addition to the device name and the volume identifier.
$ MOUNT MUA0:, MUA1:, MUA2: TAPE1, TAPE2, TAPE3 TEST %MOUNT-I-MOUNTED, TAPE1 mounted on _MUA0: %MOUNT-I-MOUNTED, TAPE2 mounted on _MUA1: %MOUNT-I-MOUNTED, TAPE3 mounted on _MUA2:
The commands in this example mount the volumes. The commands include the device name and volume identifier.
9.9.2. Mounting Continuation Volumes in a Tape Volume Set
When mounting a tape volume set, follow the general procedures described in Section 9.9.1, ''Creating a Tape Volume Set''. Once you create the volume set, you do not need to initialize the volumes when you mount the volume set.
Allocating a drive for each volume in the volume set is not necessary. The tape file system requests that volumes be switched to appropriate drives when continuation volumes are required.
The operating system stores, but cannot verify, the identifiers of volumes you specify but do not physically mount on drives at mount time. The system later verifies the volume identifiers when the volumes are accessed.
The operating system supports the continuous processing of mounted volumes in a tape volume set through automatic volume switching and automatic volume labeling (AVL).
9.9.2.1. Creating Labels
If the file system is writing to the volume set, it creates a label for the magnetic tape and initializes the tape with that label and the protection characteristics set for the first volume of the volume set.
If the tape file system is reading the volume set, it tries to mount the next tape in the volume set with that label.
If the drive has no tape loaded on it, or the wrong tape, the tape file system sends a message to the operator console notifying the operator either to mount a tape or to mount the correct tape.
Before processing continuation volumes, the tape file system processes the protection on that volume (as described in Section 9.4.2, ''Protecting Tape Volumes''). If the file system determines that the user does not have access to the volume, it sends a message to the operator.
Characters 1 to 4 of the field contain the first four characters of the label specified for the previous volume in the volume set. (If the label is less than four characters, the volume identifier field is padded with underscores; for example, if the volume identifier is XXX, the padded field is XXX_.)
Characters 5 and 6 contain the relative volume number for that reel in the volume set.
Note that the system can generate only 99 unique labels for a given volume set.
With automatic volume switching enabled, the operator can load a tape on the next drive allocated to the tape volume set anytime before the volume being processed reaches the EOT mark. The tape file system mounts and initializes (if INITIALIZE was specified originally) the next tape in the volume set and then notifies the operator that the switch has occurred.
9.9.2.2. Enabling Automatic Volume Switching
To use automatic volume switching, you must allocate more than one tape drive to your volume set. After you do so, the tape file system switches volumes for you automatically by selecting the next tape drive allocated to the volume set. The tape file system expects you to load the next volume in the volume set on that drive.
Examples
$ MOUNT MUA0:, MUA1:, MUA2: TAPE
In this example, the volume with the identifier TAPE is mounted on the MUA0: drive. Load continuation volumes for this set on the tape drives in the following order: MUA1:, MUA2:, MUA0:, MUA1:, MUA2:, and so forth.
$ INITIALIZE MUA0: MAIN $ MOUNT/OVERRIDE=IDENTIFICATION/INITIALIZE=CONTINUATION MUA0:, MUA1:
This example shows the use of the /INITIALIZE=CONTINUATION qualifier for mounting volume sets. It also shows how the system creates volume identifiers for continuation volumes.
The volume labeled MAIN is mounted on the MUA0: drive. The second volume in the set receives the volume identifier MAIN02 and is mounted on the MUA1: drive. The third volume in the set receives the volume identifier MAIN03 and is mounted on the MUA0: drive.
To ensure that any volume added to the tape volume set is initialized prior to being written to, mount the volume with the /INITIALIZE=CONTINUATION qualifier. The default is /NOINITIALIZE.
$ MOUNT MUA0:, MUA1: SUN
In this example, the first volume in the set is labeled SUN and is mounted on the MUA0: drive. The second volume receives the identifier SUN_02 and is mounted on the MUA1: drive. The third volume receives the identifier SUN_03 and is mounted on the MUA0: drive.
$ MOUNT MUA0:, MUA1: SUN, MOON
In this example, a continuation volume with two volume identifiers, SUN and MOON, is mounted on MUA0: and MUA1:, respectively. If a third volume is added to the set, it is given the identifier MOON03 and is mounted on the MUA0: drive.
9.9.2.3. Disabling Automatic Switching
If your site prelabels volumes, you must disable automatic volume switching to avoid overwriting these labels. To explicitly override automatic volume switching, specify the /NOAUTOMATIC qualifier when mounting a tape volume. (The default is /AUTOMATIC.) Note that if you allocate only one drive to the tape volume set, automatic volume switching is implicitly disabled.
%%%%%%%%%%% OPCOM, 28-MAY-2000 15:23:31.78 %%%%%%%%%%% request 3, from user PLAW MOUNT new relative volume 2 (DW0QT2) on MUA1:
The user does not see this message and might not realize that another tape is needed to complete the read or write operation.
Example
$ MOUNT/NOAUTOMATIC MUA0: ABCD, EFGH
The command in this example tells MOUNT not to supply its own label for the second volume but, instead, to use the ones specified in the MOUNT command.
9.9.2.4. Sending Messages Back to Users
|
Qualifier |
Description |
|---|---|
|
/BLANK_TAPE=
|
Use with an unformatted volume for write operations.
This qualifier initializes the volume and requires the
VOLPRO and OPER privileges to avoid a runaway tape or
timeout condition. Either of the following REPLY
commands is
valid:
$ REPLY/BLANK_TAPE=3 $ REPLY/BLANK_TAPE=3 "DW0QT2" The first command does not specify a volume identifier; the second does. |
|
/INITIALIZE_TAPE=
|
Use with a formatted volume for write operations if the volume identifier on the continuation volume does not match the one specified in the mount request. The file system reinitializes the tape and mounts the volume with the new volume identifier. The tape file system then performs access checks and initializes the volume as if the INITIALIZE command had been specified. Any data on the tape prior to specifying the /INITIALIZE_TAPE qualifier is lost. The current terminal must be enabled as an operator terminal for TAPES. Either of the following commands is
valid:
$ REPLY/INITIALIZE_TAPE=3 $ REPLY/INITIALIZE_TAPE=3 "DW0QT2" The first command does not specify a volume identifier; the second does. |
|
/TO= |
Use with a formatted volume for both read and write operations. During a write operation, use the /TO qualifier if you want the volume identifier that is specified in the mount request to be written on the continuation volume. For example, to respond to the mount request 3, mount volume DW0QT2 on drive MTA1: and enter one of the following commands: $ REPLY/TO=3 $ REPLY/TO=3 "DW0QT2" The first command does not specify a volume identifier; the second does. |
Specifying the Volume Identifier with the MOUNT Command
Specifying the volume identifier in the MOUNT command is essential during write operations because it ensures that the correct volume is mounted on the drive and links the continuation volume to the volume set.
Omitting the Volume Identifier with the REPLY/TO Command
To preserve the accessibility character on a volume, you must omit the volume identifier with the REPLY/TO command during a write operation. (When you read from tape, the volume identifier is optional.)
If you initialize and mount a volume set in which each volume has a unique accessibility character that you want to maintain, avoid using the volume identifier because it causes the accessibility character of the first volume in the set to overwrite the accessibility character on the continuation volume.
$ REPLY/TO=3
Once the tape file system receives the REPLY command, the system performs checks on the continuation volume to ensure that the volume is the correct one. If it is the correct volume with proper access codes, the system mounts the volume and reissues pending read or write requests to the continuation volume. If the volume fails any of these access checks, the system does not mount the volume (or initialize and mount it in the case of a blank tape).
9.9.3. Modifying Magnetic Tape Characteristics
Use the DCL command SET MAGTAPE to define the default characteristics associated with a specific tape device for subsequent file operations. The SET MAGTAPE command is valid only for magnetic tape devices mounted with foreign volumes.
SET MAGTAPE device-name
|
|
Specifies the name of the tape device for which the characteristics are to be set. The device must not be currently allocated to any other user. |
The following examples illustrate uses of the SET MAGTAPE command in conjunction with the MOUNT command.
Examples
$ MOUNT MUB1:/FOREIGN $ SET MAGTAPE MUB1:/DENSITY=800
In this example, the MOUNT command mounts a foreign tape on the MUB1: drive. The SET MAGTAPE command defines the density at 800 bits per inch for writing to the magnetic tape. (The density is reset only if the tape has never been written before.)
$ MOUNT MUA0: USER_VOL $ SET MAGTAPE MUA0:/SKIP=FILES:4
In this example, the MOUNT command mounts a tape called USER_VOL on the MUA0: drive. The SETMAGTAPE command directs the I/O subsystem to position the tape to skip four files.
On local SCSI tape drives, you can use the /FAST_SKIP=option qualifier to skip by file mark or by record. See the VSI OpenVMS DCL Dictionary for more information.
$ MOUNT MUA1:/FOREIGN $ SET MAGTAPE/REWIND MUA1:
In this example, the MOUNT command mounts a foreign tape on the MUA1: drive. The SET MAGTAPE command rewinds the volume.
9.10. Dismounting Volumes and Volume Sets
When you finish processing the files or data on a disk or tape volume, use the DISMOUNT command to explicitly dismount a single volume or an entire volume set.
DISMOUNT device-name
|
|
Name of the device containing the volume – either a logical name or a physical name. If you specify a physical name, the controller defaults to A and the unit defaults to 0. If the volume currently mounted on the device is a member of a disk or tape volume set, all volumes in the set are dismounted unless you specify the /UNIT qualifier. |
You can dismount a volume on a local node or on all the nodes throughout a cluster.
Installed swap and page files
Installed images
Devices spooled to the volume
Open user file (any files not falling into one of the first three groups)
If none of these conditions is found, the volume is marked for dismount. If any of these conditions exists, the DISMOUNT command does not mark the volume for dismount but, instead, displays error messages indicating the conditions that exist, the number of instances of each condition, and the fact that the volume cannot be dismounted.
%DISM-W-CANNOTDMT, AXP27$DKA300: cannot be dismounted %DISM-W-USERFILES, 1 user file open on volumeThe message occurs because the file DISMOUNT.EXE is opened as a "user" file in the course of the dismount operation. To eliminate the error message, install the file DISMOUNT.EXE.
In some cases, you might want to mark a volume for dismount even though files are open on the volume. Marking the volume for dismount prevents users from opening any new files, thereby allowing activity to wind down. You can use the qualifier /OVERRIDE=CHECKS to mark the volume for dismount even if files are open.
Dismounting with Cached Information
As a performance enhancement, the system stores volume information in memory, including information about free space on a disk volume, file identifications, quota file entries, and file headers. This storing of information is called caching. Cached information can include blocks allocated but not yet in a file, or files created but not yet in a directory.
Avoid write-locking a volume while it is mounted.
Do not remove a volume from a drive before it has been dismounted.
Do not halt the system without performing an orderly shutdown procedure (see Section 4.8.1, ''Performing an Orderly Shutdown with SHUTDOWN.COM'').
Delete all known images associated with the volume using the Install utility DELETE command. For more information, see VSI OpenVMS System Manager's Manual, Volume 2: Tuning, Monitoring, and Complex Systems.
- Wait for:
All processes using those images to release the images.
The system to write writable images back to their files.
Use the DCL command SHOW DEVICES/FILES to determine the status of the files.
|
Task |
Section |
|---|---|
|
Dismount a single volume | |
|
Dismount a volume set | |
|
Dismount foreign volumes | |
|
Dismount a volume in a cluster |
Section 9.10.4, ''Dismounting a Volume in an OpenVMS Cluster System'' |
9.10.1. Dismounting a Single Volume
This section explains procedures to follow in dismounting a single volume and also describes some of the qualifiers you can use with the DISMOUNT command.
9.10.1.1. Dismounting Before Unloading a Volume
Always explicitly dismount a volume or volume set with the DISMOUNT command, or with a command procedure containing that command, before physically unloading that volume. Always wait for the drive to unload before you remove the volume. (You can verify that the dismount is complete by entering the DCL command SHOW DEVICES.)
A private volume is dismounted and unloaded automatically if you log out of the job from which you mounted the volume. If the system fails, however, the drive is not automatically dismounted.
%MTACP-magnetic tape position lost
You can access all the files that precede the file whose file-trailer labels have not been written. However, you cannot access the file that does not have file-trailer labels.
9.10.1.2. Dismounting Allocated Devices
If the device you are dismounting was allocated with an ALLOCATE command, it remains allocated after you dismount it with the DISMOUNT command. If the device was implicitly allocated with the MOUNT command, the DISMOUNT command deallocates it.
9.10.1.3. Using DISMOUNT Command Qualifiers
|
Qualifier |
Description |
|---|---|
|
/UNIT |
Explicitly dismounts a single volume in the volume set without dismounting the entire set. (By default, the system dismounts all the volumes in the set when you explicitly dismount a single volume in a volume set.) Using this qualifier dismounts a volume but does not "unbind" the volume from the volume set; if you remount the volume, it becomes part of the volume set again. |
|
/NOUNLOAD |
Overrides the default automatic unloading of your volume from the drive. With this qualifier, your volume is logically dismounted from the drive; however, the volume remains physically loaded on the drive. If you use this qualifier to dismount a tape volume, the volume remains loaded on the tape drive and the tape reel is rewound to the BOT mark. Using this qualifier can save time and eliminate unnecessary handling of a volume if you plan to remount or reinitialize a volume you are dismounting. |
Example
$ DISMOUNT/NOUNLOAD MUA1:
In this example, the tape volume is logically dismounted and remains loaded on the MUA1: device. Also, the tape reel is rewound to the beginning-of-tape mark. The operating system returns you to DCL level.
9.10.2. Dismounting a Volume Set
$ DISMOUNT DUA3:
9.10.3. Dismounting Foreign Volumes
$ DISMOUNT DUA0:
In this example, the volume that had been mounted with the /FOREIGN qualifier on DUA0: is dismounted and automatically unloaded. The system returns you to DCL level.
9.10.4. Dismounting a Volume in an OpenVMS Cluster System
$ DISMOUNT/CLUSTER $10$DJA100:
The DISMOUNT/CLUSTER command first checks for conditions that prevent the volume from dismounting on the local node. If none is found, the command then checks for such conditions on all the other nodes. If a condition is found on any node, the command sends error messages identifying the device, the node on which the error occurred, and the error.
For more information about the DISMOUNT command, refer to the VSI OpenVMS DCL Dictionary.
9.11. Using Command Procedures for Media Setup
Many of the operations that you perform on disk and tape media are routine. It is worthwhile to identify those routine tasks and design command procedures to assist you in performing them. To become familiar with the syntax used to design and execute command procedures, refer to the VSI OpenVMS User's Manual.
You might, for example, want to design command procedures to set up private disk and tape volumes. The command procedure examples in this section, although general in nature, can serve as guiding strategies for you. You can tailor these command procedures to meet the needs of your own setup tasks.
9.11.1. Sample Command Procedure for Setting Up Disk Volumes
Use a text editor to create a file named SETUP.COM.
- Enter the following command procedure, which, when executed, allocates and mounts a disk:
$ ! Place a disk in the drive $ IF P1 .EQS. "" THEN INQUIRE P1 "enter device name" $ IF P2 .EQS. "" THEN INQUIRE P2 "enter volume label" $ IF P3 .EQS. "" THEN INQUIRE P3 "enter logical name" $ ALLOCATE 'P1'$ MOUNT 'P1' 'P2' 'P3'
This command procedure, although very simple, accomplishes the task of allocating and mounting a disk each time you execute it. It prompts you for the device name, volume label, and logical name of the disk device that you want to allocate and mount. By assigning logical names to your disks, you can use this command procedure to allocate and mount devices repeatedly.
You can take further advantage of the power of a command procedure by including a few additional tasks as well. For example, you might design the SETUP.COM command procedure to deallocate and dismount the disk. The command procedure example used to set up a magnetic tape (described in Section 9.11.2, ''Sample Command Procedure for Setting Up Tape Volumes'') takes advantage of some of these options.
- To execute the SETUP.COM command procedure, enter the following command:
$ @SETUP
9.11.2. Sample Command Procedure for Setting Up Tape Volumes
$ ! First mount the tape on the drive
$ ON CONTROL_Y THEN GOTO EXIT
$ ON ERROR THEN GOTO EXIT
$ WRITE SYS$OUTPUT "Welcome to FETCH."
$ WRITE SYS$OUTPUT " "
$ L1: INQUIRE/NOPUNC PHYS "Have you placed the volume in the drive? "
$ IF .NOT. PHYS THEN GOTO L1
$ INQUIRE/NOPUNC DRIVE "Which drive is the volume mounted on? "
$ DRIVE = DRIVE - ":"
$ ALLOCATE 'DRIVE'
$ MOUNT/FOREIGN 'DRIVE'
$ ON ERROR THEN GOTO COMMAND_LOOP
$ !
$ COMMAND_LOOP: INQUIRE/NOPUNC OPTION "FETCH> "
$ IF OPTION .EQS. "DIR" THEN GOTO DIR
$ IF OPTION .EQS. "EXIT" THEN GOTO EXIT
$ IF OPTION .EQS. "FETCH" THEN GOTO FETCH
$ IF OPTION .EQS. "HELP" THEN GOTO HELP
$ IF OPTION .EQS. "LIST" THEN GOTO LIST
$ GOTO COMMAND_LOOP
$ !
$ DIR: INQUIRE SPEC "Filespec"$ DIR 'SPEC'
$ GOTO COMMAND_LOOP
$ HELP:
$ WRITE SYS$OUTPUT "Enter any of the following commands at the prompt:"
$ WRITE SYS$OUTPUT " "
$ WRITE SYS$OUTPUT " "
$ WRITE SYS$OUTPUT "DIR (To search for a file)"
$ WRITE SYS$OUTPUT " "
$ WRITE SYS$OUTPUT "EXIT (To exit this program)"
$ WRITE SYS$OUTPUT " "
$ WRITE SYS$OUTPUT "FETCH (To perform a BACKUP RESTORE operation)"
$ WRITE SYS$OUTPUT " "
$ WRITE SYS$OUTPUT "HELP (To read this text)"
$ WRITE SYS$OUTPUT " "
$ WRITE SYS$OUTPUT "LIST (To perform a BACKUP LIST operation)"
$ GOTO COMMAND_LOOP
$ !
$ FETCH: INQUIRE FILE "Filespec"
$ INQUIRE SAVESET "Save set name"
$ LINE := BACKUP/LOG 'DRIVE':'SAVESET'/SELECT='FILE'
$ INQUIRE EXCLUDE "Enter any filespecs you want excluded"
$ IF EXCLUDE .EQS. "" THEN GOTO L2
$ LINE := 'LINE'/EXCLUDE=('EXCLUDE')
$ !
$ L2: INQUIRE/NOPUNC TO "Where do you want the file(s)? (RET for current directory)
"$ IF TO .EQS. "" THEN GOTO REPLACE
$ LINE := 'LINE' 'TO'
$ GOTO L3
$ REPLACE: LINE := 'LINE' []
$ !
$ L3: INQUIRE/NOPUNC NEW "Create a new version if file already exists? "
$ IF .NOT. NEW THEN GOTO NOT
$ LINE := 'LINE'/NEW_VERSION
$ !
$ NOT: LINE := 'LINE'/OWNER_UIC=ORIGINAL
$ LINE$ GOTO COMMAND_LOOP
$ !
$ LIST: INQUIRE SPEC "Filespec"
$ INQUIRE SAVESET "Save set name"
$ INQUIRE/NOPUNC OUTPUT "What do you want to call the list file? (RET for SYS$OUTPUT )"
$ IF OUTPUT .EQS. "" THEN GOTO NOOUT
$ LINE := BACKUP/LIST='OUTPUT' 'DRIVE':'SAVESET'/SELECT=('SPEC')
$ GOTO L4
$ NOOUT: LINE := BACKUP/LIST 'DRIVE':'SAVESET'/SELECT=('SPEC')
$ !
$ L4: INQUIRE EXCLUDE "Enter any filespecs you want excluded"
$ IF EXCLUDE .EQS. "" THEN GOT L5
$ LINE := 'LINE'/EXCLUDE=('EXCLUDE')
$ !
$ L5: LINE
$ GOTO COMMAND_LOOP
$ !
$ EXIT:
$ DISMOUNT 'DRIVE'
$ DEALLOCATE 'DRIVE'$ @FETCH
In addition to allocating and mounting functions, as in the previous example, FETCH.COM prompts you for input. For example, it specifically asks you if the tape is on the drive. Also note that FETCH.COM implements a BACKUP restore operation. It prompts you for specific options on the restore operation. Finally, FETCH.COM explicitly dismounts your magnetic tape volume and deallocates the drive after your task completes.
9.12. Managing Disk Space
Disk space available for files is finite. You share responsibility with your users for making the best use of disk space.
|
Method |
Section |
|---|---|
|
Establish disk quotas | |
|
Purge files | |
|
Set version limits on files | |
|
Set file expiration dates | |
|
Analyze and repair error conditions |
Section 9.13, ''Using the Analyze/Disk_Structure Utility to Check and Repair Disks'' |
9.12.1. Understanding Disk Quotas
A disk quota is a method for maintaining and enforcing limits on the amount of disk space available to users on a public volume. You limit the amount of space available to individual users on public volumes (or volume sets) by creating and maintaining a quota file on each volume. Individual users can similarly restrict usage on private volumes.
Quotas are maintained and enforced on a per-volume basis. Each volume or volume set has its own quota file. A volume on which quotas are not maintained has no quota file. On a volume set, volume 1 contains the quota file.
With OPER privilege, you (or the user maintaining the volume) supply identifiers and assign quotas and overdrafts with the System Management utility (SYSMAN). (During normal file activities, the system automatically maintains usage counts.)
If users run out of disk space during the creation of a file, they receive a system message. If they cannot obtain sufficient space by purging or deleting unnecessary files, they might contact you to increase their disk quota. If they attempt to write a file to a spooled printer, they must have write access and have sufficient quota on the disk associated with that printer.
Disk Quota File
A quota file records all users who are allowed to use the disk, and shows their current disk usage and their maximum disk allocation. A quota file, QUOTA.SYS, which is stored in directory [000000] with other system files, requires one block of disk storage for every 16 entries.
UIC (
| User identification code (UIC) of each user entitled to maintain files on the volume. UIC [0, 0] appears in all quota files; use it as a template to set default values for quotas and overdrafts. |
| Number of disk blocks currently dedicated to a user's files. This
number includes the blocks allocated (shown by the DCL command DIRECTORY
/SIZE=ALL /BY_OWNER= |
| Maximum number of blocks on the volume that a user's files can occupy. When the maximum number is exceeded, the system issues an error message when a file is created. |
| Number of blocks by which a user can exceed the quota. |
|
Item |
Description |
|---|---|
|
General Identifier or UIC |
Identification code of a user entitled to maintain files on the volume |
|
Usage |
Number of blocks on the volume taken up by the user's files |
|
Quota |
Maximum number of blocks on the volume that the user's files can take up before an error message is issued |
|
Overdraft |
Number of blocks over the quota that the user's files can take up |
The maximum number of blocks permitted to a user on a volume is the sum of the quota and the overdraft.
A quota file is initialized with an entry for UIC [0, 0]. The usage count for this UIC should not change from 0; in other words, UIC [0, 0] should own no files. Its quota and overdraft, however, serve as defaults in certain situations; set them to values most likely to be assigned to other UICs as quotas and overdrafts.
How Quotas Are Maintained
During normal use of a volume with a quota file, the system automatically updates the usage counts as users create, delete, extend, and truncate files. Users without entries in the quota file are not allowed to create files or allocate space on the volume unless they have the EXQUOTA privilege.
To create new files, a user must have disk space usage below quota (not overdraft). If adding a new file or expanding a current file exceeds a user's quota, the system prohibits the operation and issues an error message.
A user with an overdraft might be able to extend an open file after exceeding the disk quota (for example, during an editing session). A user can extend an open file until usage exceeds the sum of the quota and the overdraft. At this point, the system prohibits further extensions to the file.
Quota restrictions are not enforced for users with the EXQUOTA privilege;however, their usage counts are maintained.
How the Rebuild Operation Ensures Quota File Accuracy
The system fails
The volume is physically removed before being dismounted
A user presses the WRITE PROTECT button
9.12.2. Establishing Disk Quotas
Disk quota operations are enabled by default. However, you can use SYSMAN DISKQUOTA commands to control disk usage. You can assign disk quotas to users and maintain an accurate record of disk use for ODS Level 2 or 5 disks. You create a quota file for each disk except the system disk. The quota file records the current usage and the maximum disk usage for all users.
SYSMAN allows you to access disks that are normally unavailable from your local node. With SYSMAN, you can obtain a display of all disks on the other nodes, including those that are mounted privately or used as system disks. You can run DISKQUOTA on any available disk without logging in to each node.
9.12.2.1. Creating a Quota File
The first step in allocating disk space is to create a quota file for each volume or each volume set. The absolute maximum number of blocks permitted a user on a volume is the sum of the quota and the overdraft. Only users with the EXQUOTA privilege can bypass disk quota restrictions.
How to Perform This Task
- Use the DISKQUOTA CREATE command and specify the target disk with the /DEVICE qualifier using the following format:
DISKQUOTA CREATE/DEVICE=device-spec
Note
To use the DISKQUOTA ENABLE command on a disk that has been mounted on multiple nodes in a cluster, you must first specify the nodes in the SET ENVIRONMENT command.
- Use the DISKQUOTA MODIFY command to adjust [0, 0] to an appropriate value for the device using the following format:
DISKQUOTA MODIFY/DEVICE=device-spec/PERMQUOTA=value
Note
If you create a quota file or enable disk quotas on a disk that has files on it, use the DISKQUOTA REBUILD command to update the disk quota entries with the current usage information.
- Use the DISKQUOTA SHOW command to display the quota file using the following format:
DISKQUOTA SHOW owner/DEVICE=device-spec
Examples
$ MCR SYSMAN SYSMAN> SET ENVIRONMENT/CLUSTER SYSMAN> DISKQUOTA CREATE/DEVICE=DUA12:
The first SYSMAN command in this example sets the environment for all nodes in the cluster. The second SYSMAN command sets up the quota file, QUOTA.SYS, in directory [000000] on the DUA12: device.
The quota file has one entry, UIC [0, 0], that stores default values for quotas and overdrafts.
SYSMAN> DISKQUOTA MODIFY/DEVICE=DUA12: [0, 0]/PERMQUOTA=3000
The command in this example edits the entry for UIC [0, 0] in the quota file on the DUA12:device, setting the default permanent quota to 3000 blocks.
SYSMAN> DISKQUOTA SHOW [0, 0]/DEVICE=DUA12:
The command in this example shows quotas, overdrafts, and usage counts for UIC [0, 0] on the DUA12: device.
9.12.2.2. Monitoring Disk Quotas
|
Command |
Description |
|---|---|
|
MOUNT /QUOTA |
Use to enforce quotas on a specified disk volume. You must have the VOLPRO user privilege, or your UIC must match the UIC written on the volume. |
|
SHOW QUOTA |
Use to determine whether a quota exists for any specific user on a specific disk. The display that results from the SHOW QUOTA command gives the quotas used, authorized, and available. Enter the DCL command SHOW QUOTA using the following
format:
SHOW QUOTA/USER=uic (or identifier) The results of the SHOW QUOTA command depend on
whether you have read access to the quota file:
|
Examples
$ SHOW QUOTA User [DOCUMENTATION, MALCOLM] has 2780 blocks used, 7220 available, of 10000 authorized and permitted overdraft of 500 blocks on DISK$
The SHOW QUOTA command displays the amount of disk space authorized, used, and still available on the current default disk for the present user. The permitted overdraft in this example is 500 blocks.
$ SHOW QUOTA/USER=[DOCUMENTATION, JONES]/DISK=XXX1: %SYSTEM-F-NODISKQUOTA, no disk quota entry for this UIC
This SHOW QUOTA command shows that the user with UIC[DOCUMENTATION, JONES] has no disk quota allocation on the XXX1: device.
$ SHOW QUOTA/USER=[DOCUMENTATION, ELAINE] User [DOCUMENTATION, ELAINE] has 27305 blocks used, 2305 OVERDRAWN, of 25000 authorized and permitted overdraft of 4000 blocks on DISK$
This SHOW QUOTA command indicates that a user has an overdrawn quota.
9.12.2.3. Suspending Quota Operations
The SYSMAN command DISKQUOTA DISABLE (which requires SYSPRV privilege, a system UIC, or ownership of the volume), suspends quota operations on a volume in the current management environment; the DISKQUOTA ENABLE command lifts the suspension. You can also suspend quota operations on a volume at mount time by specifying the /NOQUOTA qualifier with the DCL command MOUNT. Disabling quotas requires privileges.
Whenever quotas are enabled on a volume – either implicitly with the MOUNT command or explicitly with the DISKQUOTA ENABLE command – you must update disk quota information using the command DISKQUOTA REBUILD. In updating the quota file, the system adds new UICs and corrects usage counts for each user. (Refer to the VSI OpenVMS System Management Utilities Reference Manual for more information.)
How to Perform This Task
Log in to SYSMAN.
- Use the following format to execute the DISKQUOTA DISABLE command on each member of the cluster that is mounting the volume:
SYSMAN> DISKQUOTA DISABLE
Exit from SYSMAN.
Delete the QUOTA.SYS file in the top-level directory
disk:[000000].
Note that the system does not suspend quotas across disk mounts if the QUOTA.SYS file is still present.
9.12.3. Purging Files
Old versions of files
Before purging files, make sure that the most recent versions are the ones you want to preserve.
System log files that the system generates automatically, such as the operator log and accounting log files
Log files created by the PRINT and SUBMIT commands
Encourage individual users to purge files in their own areas and directories. If necessary, you can purge files from some or all directories. The following examples show purge commands.
Examples
$ PURGE/LOG $DISK1:[JONES...]
The command in this example purges all files in the directory [JONES] and all the subdirectories below [JONES] on the $DISK1: device. It logs the files that are deleted (displaying their names on the terminal as they are deleted).
$ PURGE/KEEP=3 $DISK1:[*...]
This example uses wildcard characters to perform global purges and uses the /KEEP qualifier to retain only three versions of each file.
9.12.4. Setting Version Limits on Files
SET DIRECTORY/VERSION_LIMIT=n
Example
$ CREATE/DIRECTORY $DISK1:[JONES]/OWNER_UIC=[200, 1]/VERSION_LIMIT=3
Note
Be careful about setting a version limit on the master file directory (MFD). Because the system uses the version limit that you set on the MFD on any directory you create beneath the MFD, users might inadvertently lose important data.
9.12.5. Setting File Expiration Dates
Files–11 uses the expiration date of each file to track the use of the file. The expiration dates aid the disposal of seldom-used files when you use the DCL command BACKUP/DELETE.
File expiration is a file system feature that is available only on Files-11 Structure Level2 disks.
When a user creates a file, the expiration date of the file is the current time plus the maximum time set on the volume.
Every time a user accesses a file (for either a read or write operation), the current time is added to the minimum time. If the total is greater than the expiration date, the new expiration date is used. (The new expiration date is calculated from the maximum retention period.)
The expiration date of a frequently accessed file fluctuates between the minimum and maximum period plus the current date. When you set a suitable interval between minimum and maximum retention periods, you can balance between accuracy and efficiency in maintaining expiration dates. Be careful about setting expiration dates; either be very specific, or set the expiration date in the simplest way.
$ BACKUP/DELETE PUBLIC:[*...]/BEFORE=TODAY/EXPIRED MUA0:ARCH20JUN
In this example, the BACKUP command copies to tape and then deletes all expired files. Users might not be aware of file expiration dates, so retain the tape for a substantial period of time.
For more information about the Backup utility, see Section 11.13.2, ''Backing Up Files and Directories to a Save Set''.
How to Perform This Task
SET VOLUME device-name[:][, ...]/RETENTION=(min, max)
where min and max specify the minimum and maximum retention periods for files on the volume, expressed as delta time values.
$ SET VOLUME PAYVOL1:/RETENTION=(3)
The system uses 3 as the minimum retention period. Twice the minimum is 6 days; the minimum plus 7 is 10. Because the system uses the smaller of the two numbers, the retention period is set to 6.
You can simulate the maintenance of "access dates", which are available in some other operating systems, by setting the retention periods to very small values (for example, 1 hour). Note, however, that doing so substantially increases overhead in the file system.
Note
If you start maintaining expiration dates on a previously existing volume, be aware that the expiration dates on existing files are 0 until the files are accessed. Files with expiration dates of 0 are considered expired.
Refer to the VSI OpenVMS DCL Dictionary for details on the parameters and qualifiers of the SET VOLUME command.
Example
$ SET VOLUME DUA0:/RETENTION=(15-0:0, 20-0:0)
In this example, the command sets the minimum retention period to 15 days and the maximum to 20 days.
9.13. Using the Analyze/Disk_Structure Utility to Check and Repair Disks
You can reclaim disk space by using the Analyze/Disk_Structure utility (ANALYZE/DISK_STRUCTURE) to identify and delete lost files and files marked for deletion. Use this utility on a regular basis to check disks for inconsistencies and errors, and to recover lost files.
Verifies the Files-11 structure on disk volumes
Reports errors
Repairs errors when you specify the /REPAIR qualifier
ANALYZE/DISK_STRUCTURE performs the verification of a volume or volume set in eight distinct stages. During these stages, the utility collects information used in reporting errors or performing repairs. However, the utility repairs volumes only when you specify the /REPAIR qualifier.
To report all errors
With the /REPAIR and/CONFIRM qualifiers to repair selected errors
Directing ANALYZE/DISK_STRUCTURE Output
File identification (FID)
File name
Owner
Errors associated with the file
|
Task |
Section |
|---|---|
|
To report errors (but not repair them) | |
|
To both report and repair errors | |
|
To recover lost files | |
|
To create a disk usage file |
The VSI OpenVMS System Management Utilities Reference Manual contains additional information about this utility.
9.13.1. Reporting Errors
By default, ANALYZE/DISK_STRUCTURE reports errors but does not make repairs. In this mode, ANALYZE/DISK_STRUCTURE runs through eight stages of data collection and then, by default, prints a list of all errors and lost files to your terminal.
%VERIFY-I-BACKLINK, incorrect directory back link [SYSEXE]SYSBOOT.EXE;1
How to Perform This Task
ANALYZE/DISK_STRUCTURE device-name:[/qualifier]
Example
$ ANALYZE/DISK_STRUCTURE DUA1:
9.13.2. Reporting and Repairing Errors
ANALYZE/DISK_STRUCTURE device-name/REPAIR
ANALYZE/DISK_STRUCTURE device-name/REPAIR/CONFIRM
When you enter this command, ANALYZE/DISK_STRUCTURE displays a description of each error and prompts you for confirmation before making a repair.
Examples
$ ANALYZE/DISK_STRUCTURE DUA1:/REPAIR
In this example, the command reports and repairs all errors on the DUA1: device.
$ ANALYZE/DISK_STRUCTURE DUA1:/REPAIR/CONFIRM
The command in this example might produce the following messages and prompts:%VERIFY-I-BACKLINK, incorrect directory back link [SYS0]SYSMAINT.DIR;1
Repair this error? (Y or N): Y
%VERIFY-I-BACKLINK, incorrect directory back link [SYSEXE]SYSBOOT.EXE;1]
Repair this error? (Y or N): N
For complete descriptions of all errors and recommended actions, refer to the VSI OpenVMS Command Definition, Librarian, and Message Utilities Manual.
9.13.3. Recovering Lost Files
A lost file is not linked to a directory. Under normal circumstances, files are not lost. However, files occasionally lose their directory links because of disk corruption, hardware problems, or user error.
For example, in cleaning up files and directories, you might inadvertently delete directories that still point to files. When you delete a directory file (a file with the file type .DIR) without first deleting its subordinate files, the files referred to by that directory become lost files. Though lost, these files remain on the disk and consume space.
Use ANALYZE/DISK_STRUCTURE periodically to check for disk structure errors such as lost files
on the disk. When you run ANALYZE/DISK_STRUCTURE specifying the /REPAIR qualifier,
the utility places lost files in disk:[SYSLOST] and issues a
message about each file, shown in the example that follows. (Refer to the
VSI OpenVMS System Management Utilities Reference Manual for more information.)
Another opportunity to check for lost files on your system is during a backup operation. See Section 11.13.3, ''Comparing Files'' for details.
Example
$ ANALYZE/DISK_STRUCTURE/REPAIR/CONFIRM DDA0:
The command in this example analyzes and repairs all errors and lost files on the DDA0: device.
%VERIFY-W-LOSTHEADER, file (16, 1, 1) []X.X;1
not found in a directory
%VERIFY-W-LOSTHEADER, file (17, 1, 1) []Y.Y;1
not found in a directory
%VERIFY-W-LOSTHEADER, file (18, 1, 1) []Z.Z;1
not found in a directory
%VERIFY-W-LOSTHEADER, file (19, 1, 1) []X.X;2
not found in a directory
%VERIFY-W-LOSTHEADER, file (20, 1, 1) []Y.Y;2
not found in a directory
%VERIFY-W-LOSTHEADER, file (21, 1, 1) []Z.;1
not found in a directory
%VERIFY-W-LOSTHEADER, file (22, 1, 1) []Z.;2
not found in a directory
%VERIFY-W-LOSTHEADER, file (23, 1, 1) LOGIN.COM;163
not found in a directory
%VERIFY-W-LOSTHEADER, file (24, 1, 1) MANYACL.COM;1
not found in a directoryAll lost files in this example are automatically moved to DDA0:[SYSLOST].
Renumbering of Files in the [SYSLOST] Directory
When a lost file is placed in the [SYSLOST] directory, ANALYZE/DISK/REPAIR might renumber that file so that it has a different version number than it had originally. The reason for the renumbering is that VERIFY does not know which directory a file has come from. For example, two files from different directories might have the same name. So that errors do not occur when entering files with the same name, type, and version, files are created with new or higher version numbers. Once files have been moved to [SYSLOST], the system manager (perhaps with users' help) needs to examine these files to decide on the appropriate action for each file. In most cases, the system manager moves the file to an appropriate directory or deletes the file.
9.13.4. Erasing Old Home Blocks
When you initialize a volume, the initialize operation might not erase old home blocks. These are blocks that were created by previous initialize operations. If a volume that has old home blocks is damaged, you might not be able to recover the volume without erasing the blocks.
$ ANALYZE/DISK_STRUCTURE/REPAIR/HOMEBLOCKS
Note that this operation can take up to 30 minutes to complete.
9.13.5. Creating a Disk Usage File
You can create a disk usage file by using the /USAGE. The identification record in the file header contains a summary of disk and volume characteristics. Following the identification record is a series of summary records; one summary record is created for each file on the disk. A summary record contains the owner, size, and name of the file.
Example
$ ANALYZE/DISK_STRUCTURE/USAGE=[ACCOUNT]USAGE_DDA0.DAT DDA0:
In this example, the /USAGE qualifier creates a disk usage file, USAGE_DDA0.DAT, and places it in the [ACCOUNT] directory.
9.14. Using Mount Verification for Recovery
Mount verification is a recovery mechanism for disk and tape operations. If a device goes off line or is write-locked while mount verification is enabled, you can correct the problem and continue the operation.
Without mount verification, a write lock or offline error causes a volume to be dismounted immediately. All outstanding I/O to the volume is canceled, and all open files on the volume are closed. Any data not yet written to the volume is lost.
You can also use mount verification to perform switched path on multipath fibre channel or SCSI disk or tape devices. See Guidelines for OpenVMS Cluster Configurations.
9.14.1. Understanding Mount Verification
When the system or a user attempts to access a device after it has gone off line, mount verification is initiated. Usually a device goes off line as the result of a hardware or user error. Once a device is off line, the hardware (and for some disks, the software) marks the disk or tape as "invalid", and I/O requests for that device fail.
The software marks the volume to indicate that it is undergoing mount verification.
The software stalls all I/O operations to the disk or tape until the problem is corrected.
- The operator communication manager (OPCOM) issues a message to operators enabled for DISKS and DEVICES or TAPES and DEVICES. The message announces the unavailability of the disk or tape in the following format:
%%%%%%%%%%% OPCOM, <dd-mmm-yyyy hh:mm:ss.cc> %%%%%%%%%%% Device <device-name> is offline. Mount verification in progress.
One message goes to OPCOM.
The other message, distinguished by the prefix %SYSTEM-I-MOUNTVER, goes directly to the system console (OPA0:), bypassing OPCOM.
The second message is a form of insurance in cases in which OPCOM is unavailable. For example, if the system disk undergoes mount verification or if OPCOM is not present on a system, you at least receive the messages with the %SYSTEM-I-MOUNTVER prefix. Under normal circumstances, the operator terminal receives both messages, with the %SYSTEM-I-MOUNTVER message arriving first.
%%%%%%%%%%% OPCOM, <dd-mmm-yyyy hh:mm:ss.cc> %%%%%%%%%%% Mount verification aborted for device <device-name>.
Note
Mount verification caused by a write-lock error does not time out.
Mount Verification and Write-Locking
If anyone write-locks a volume at mount time, the system additionally applies a software write-lock. To write-enable a volume that was mounted while the WRITE LOCK switch was on, dismount the volume, write-enable the drive, and remount the volume. Suppose, for example, that a volume is mounted on a drive with write-lock off, and someone toggles the WRITE LOCK switch. If mount verification is enabled for the volume, the volume enters mount verification, and all I/O operations to the volume are suspended until you recover the operation, as explained in Section 9.14.2.4, ''Recovering from Write-Lock Errors''.
At mount time, if the system detects that the caches were not written back the last time the volume was used, the system automatically rebuilds the file information by scanning the contents of the volume. However, files being written at the time of the improper dismount might be partially or entirely lost. See Section 9.13, ''Using the Analyze/Disk_Structure Utility to Check and Repair Disks'' for details about analyzing and repairing these problems.
With the mount verification feature of disk and tape handling, users are generally unaware that a mounted disk or tape has gone off line and returned on line, or in some other way has become unreachable and then restored.
9.14.2. Using Mount Verification
|
Task |
Section |
|---|---|
|
Enable and disable mount verification | |
|
Control timeout periods for mount verification |
Section 9.14.2.2, ''Controlling Timeout Periods for Mount Verification'' |
|
Recover from offline errors | |
|
Recover from write-lock errors | |
|
Cancel mount verification using the DISMOUNT command | |
| Control the number of mount verification messages | Section 9.14.2.6, ''Controlling Mount Verification Messages'' |
9.14.2.1. Enabling Mount Verification
Mount verification is enabled by default when you mount a disk or tape. To disable mount verification, you must specify /NOMOUNT_VERIFICATION when you mount a disk or tape.
Note that this feature applies to standard mounted tapes, foreign mounted tapes, and Files-11 disks.
9.14.2.2. Controlling Timeout Periods for Mount Verification
You can control the amount of time (in seconds) that is allowed for a mount verification to complete before it is automatically canceled. The MVTIMEOUT system parameter for disks and the TAPE_MVTIMEOUT system parameter for tapes define the time (in seconds) that is allowed for a pending mount verification to complete before it is automatically canceled.
The default time limit for tapes is 600 seconds (10 minutes); for disks, it is 3600 seconds (1 hour). (Refer to the VSI OpenVMS System Management Utilities Reference Manual for more information about system parameters.)
Always set either parameter to a reasonable value for the typical operations at your site. Note that resetting the value of the parameter does not affect a mount verification that is currently in progress.
9.14.2.3. Recovering from Offline Errors
Try to put the device back on line by toggling the START or RUN button on disks or the LOAD button on tapes. If the device has failed, terminate mount verification.
Take the disk or tape out of the offline and verification-pending state by shutting down mount verification with one of the three techniques described in Section 9.14.2.5, ''Canceling Mount Verification''. These techniques include canceling the mount request, dismounting the volume, and allowing mount verification to time out.
The system checks to see that the currently mounted disk or tape has the same identification as the previously mounted volume. In this way, mount verification confirms that this is the same disk or tape that was previously mounted and no switching has occurred.
If the drive contains the wrong volume, OPCOM issues a message in this format:%%%%%%%%%%% OPCOM, <dd-mmm-yyyy hh:mm:ss.cc> %%%%%%%%%%% Device <device-name> contains the wrong volume. Mount verification in progress.
- Once mount verification completes, the disk is marked as valid, and OPCOM issues a message in the following format:
%%%%%%%%%%% OPCOM, <dd-mmm-yyyy hh:mm:ss.cc> %%%%%%%%%%% Mount verification completed for device <device-name>.
- I/O operations to the disk or tape proceed, as shown in the following example:
%%%%%%%%%%% OPCOM, 28-MAY-2000 11:54:54.12 %%%%%%%%%%% Device DUA0: is offline. Mount verification in progress. %%%%%%%%%%% OPCOM, 28-MAY-2000 11:57:34.22 %%%%%%%%%%% Mount verification completed for device DUA0:.
In this example, the message from OPCOM informs the operator that device DUA0:went off line and mount verification was initiated. The operator finds that the drive was accidentally powered down and successfully powers it up again.
The last message in the example indicates that mount verification is satisfied that the same volume is on the drive as before the error. All I/O operations to the volume resume.
9.14.2.4. Recovering from Write-Lock Errors
Devices become write-locked when a hardware or user error occurs while a disk or a tape volume is mounted for a write operation. For example, if a disk is write-locked or a tape is missing a write ring, the hardware generates an error. As soon as the software discovers that the disk or tape is write-locked (for example, when an I/O operation fails with a write-lock error), mount verification begins.
%%%%%%%%%%%% OPCOM, <dd-mmm-yyyy hh:mm:ss.cc>%%%%%%%%%%% Device <device-name> has been write-locked. Mount verification in progress.
Enable the drive for writing by toggling the hardware WRITE LOCK switch of the disk, or check to see that a tape volume has a write ring.
If the disk or tape drive is faulty, but another functioning drive is available on the same controller, move the disk or tape to the functioning drive and swap the unit select plugs. (Note that switching to another drive causes the volume to undergo offline mount verification; once this completes, the write-lock mount verification continues.)
Terminate the mount operation by shutting down mount verification with one of the techniques described in Section 9.14.2.5, ''Canceling Mount Verification''.
Once the mount verification software determines that the volume is in a write-enabled state, I/O operations to the tape or disk resume with no further messages.
9.14.2.5. Canceling Mount Verification
Dismount the volume with the DCL command DISMOUNT from a process that is not hung.
If the device is off line, allow mount verification to time out. The default time limit for tapes is 600 seconds (10 minutes); for disks, it is 3600 seconds (1 hour).However, you can use the system parameter MVTIMEOUT (for disk) or TAPE_MVTIMEOUT (for tape) to set the value to whatever you want. When the time expires, the system automatically cancels the pending mount verification. Note that a mount verification initiated by a write-lock condition does not time out.
Invoke a special canceling routine, IPC, from the console terminal.
The following section describes the first method, using the DISMOUNT command, in more detail. See Section 9.15.2, ''Canceling Mount Verification'' for details about using the last method, IPC, to cancel mount verification.
Using the DISMOUNT Command
Log in at another terminal, or use any logged-in terminal that has access to the volume. (It does not need to be an operator terminal.)
Enter the DISMOUNT/ABORT command for the volume.(To use the /ABORT qualifier with a volume that is not mounted group or system, you must have volume ownership or the user privilege VOLPRO.)
If your system is in an OpenVMS Cluster environment, also specify the /CLUSTER qualifier.
When you cancel a pending mount verification by dismounting the volume, OPCOM issues a message in the following format:%%%%%%%%%%%% OPCOM, <dd-mmm-yyyy hh:mm:ss.cc> %%%%%%%%%%% Mount verification aborted for device <device-name> .
If you do not have access to the volume, you receive an error message. You can try again if you can find an appropriate process to use. If your process hangs, the system file ACP is hung, and you cannot use this technique to cancel mount verification.
When the cancellation is complete, remove the volume from the drive.
9.14.2.6. Controlling Mount Verification Messages
In a Storage Area Network (SAN), mount verification takes place for a variety of reasons, including:
Path switch by another cluster node
Dropped Fibre Channel packets (an infrequent occurrence)
Rezone of a SAN, which causes in-flight I/O to be dropped
Mount verification now suppresses the messages that were previously displayed for mount verification events from which devices immediately recovered. These messages unduly alarmed some customers.
The number of messages logged to the operator’s log is now controlled by two system parameters:
- MVSUPMSG_NUM, which specifies a number of mount verification messages
- MVSUPMSG_INTVL, which specifies a duration in seconds
If the number of mount verification messages that have been suppressed for a given device meets or exceeds the number specified by MVSUPMSG_NUM within the time specified by MVSUPMSG_INTVL, then an OPCOM message is displayed, as shown in the following examples:
%SYSTEM-I-MOUNTVER, $1$DGA9999: 5 Mount verification messages have been suppressed in past 51 seconds. %%%%%%%%%%% OPCOM 18-MAY-2003 13:50:09.72 %%%%%%%%%%% $1$DGA9999: 5 Mount verification messages have been suppressed in past 51 seconds. ************************************************************************************ %SYSTEM-I-MOUNTVER, $1$DGA9999: 5 Mount verification messages have been suppressed in past 3 seconds. %%%%%%%%%%% OPCOM 18-MAY-2003 13:50:13.17 %%%%%%%%%%% $1$DGA9999: 5 Mount verification messages have been suppressed in past 3 seconds.
Customers who prefer prior behavior or who would like to increase or decrease the number of messages that are logged can adjust the system parameter settings.
For more information about these new system parameters, refer to the VSI OpenVMS System Management Utilities Reference Manual.
9.15. Using Interrupt Priority Level C (IPC)
Note
IPC commands are intended to be used only for debugging and laboratory implementation. Use of the commands might cause unexpected results.
The IPC program converts lowercase letters to uppercase, issues the terminal bell character whenever it receives illegal characters (such as most control characters), compresses multiple spaces, and ignores leading spaces.
How to Invoke IPC
- On both OpenVMS VAX, Alpha, and IA-64 systems, enter the following command from the console terminal:
$ [Ctrl/P]
This command does not echo. Responses to this command will be implementation-specific, which are indicated in the examples by ellipses:
. . .
- Enter subsequent commands specific to the hardware you are using:
- On VAX systems, enter the following commands:
>>> D/I 14 C >>> CONT IPC>
The first command tells the hardware to generate a software interrupt at level C (#12).
- On Alpha and IA-64 systems, enter the following commands:
>>> D SIRR C >>> CONT IPC>
- To exit from IPC, press Ctrl/Z:
IPC> [Ctrl/Z]
9.15.1. Recalculating Quorum
- On VAX systems:
>>> D/I 14 C >>> CONT IPC> Q IPC> [Ctrl/Z]
- On Alpha and IA-64 systems, enter the following commands:
>>> D SIRR C >>> CONT IPC> Q IPC> [Ctrl/Z]
On OpenVMS VAX systems, DECamds
On OpenVMS Alpha and IA-64 systems, the Availability Manager
9.15.2. Canceling Mount Verification
IPC> C device-nameIPC> C MUA1:
%%%%%%%%%%% OPCOM, <dd-mmm-yyyy hh:mm:ss.cc> %%%%%%%%%%% Mount verification aborted for device <device-name>.
After you successfully cancel a pending mount verification using this technique, you must dismount and then remount the volume before you can access it again.
Examples
%%%%%%%%%%% OPCOM, 28-MAY-2000 10:54:54.12 %%%%%%%%%%%
Device DUA0: is offline.
Mount verification in progress.$ [Ctrl/P] . . . >>> D/I 14 C >>> CONT IPC> C DUA0: IPC> [Ctrl/Z] %SYSTEM-I-MOUNTVER, _DUA0: has aborted mount verification. %%%%%%%%%%% OPCOM, 28-MAY-2000 10:56:26.13 %%%%%%%%%%% Mount verification aborted for device DUA0:
$ [Ctrl/P] . . . >>> D SIRR C >>> CONT IPC> C DUA0: IPC> [Ctrl/Z] %SYSTEM-I-MOUNTVER, _DUA0: has aborted mount verification. %%%%%%%%%%% OPCOM, 28-MAY-2000 10:56:26.13 %%%%%%%%%%% Mount verification aborted for device DUA0:
In both examples, device DUA0: is off line, but you are unable to spin the disk back up. No other drive is available on the controller, so you cannot switch the unit select plugs of the two drives.
Do not enter a DISMOUNT command for the disk because it was mounted as a private volume, and you do not have access to it. The %SYSTEM-I-MOUNTVER message also appears because this is the console terminal.
9.15.3. Entering the Debugger
IPC> X
IPC> X IPC>
To exit from the debugger, press Ctrl/Z.
For information about the XDelta debugger, refer to the VSI OpenVMS Delta/XDelta Debugger Manual.
9.16. Using the Bad Block Locator Utility to Detect Media Errors
Note
Many newer devices automatically check for bad blocks; therefore, BAD is more useful with older devices that do not check for bad blocks.
Writes a test pattern to each block on the media
Reads the contents of the block into a buffer
Compares the data read back with the data written
If the data does not compare exactly, a block cannot reliably store data.
Caution
Testing a volume for bad blocks destroys its contents. However, you can update the detected bad block file (DBBF) without erasing the contents of the volume by using the ANALYZE /MEDIA qualifiers /NOEXERCISE and /BAD_BLOCKS.
How to Perform This Task
Allocate the device with the DCL command ALLOCATE (to ensure that the device is not accessed by any other programs).
Enter the DCL command MOUNT/FOREIGN.
When the device is mounted as foreign, the system does not recognize it as a Files–11 volume, and BAD can execute.
Enter the DCL command ANALYZE /MEDIA.
Refer to online help or to the archived manual OpenVMS Bad Block Locator Utility Manual for details on using the Bad Block Locator utility.
Chapter 10. Using Files and Directories
Information Provided in This Chapter
|
Task |
Section |
|---|---|
|
Using Extended File Specifications features | |
|
Controlling access to ODS-5 volumes | |
|
Getting file information | |
|
Protecting disk files | |
|
Protecting disk directories | |
|
Protecting magnetic tape files | |
|
Accessing disk files | |
|
Accessing tape files | |
|
Copying and transferring files | |
| Creating CD-ROMs | Section 10.11, ''Creating a CD-ROM'' |
|
Concept |
Section |
|---|---|
|
Extended File Specifications features |
Section 10.1, ''Understanding Extended File Specifications Features'' |
|
Considerations Before Enabling ODS-5 Volumes |
Section 10.2, ''Considerations Before Enabling ODS-5 Volumes'' |
|
Guidelines for Using Extended File Specifications on OpenVMS Applications |
Section 10.3, ''Guidelines for Using Extended File Specifications on OpenVMS Applications'' |
|
DCL commands with files | |
|
File protection | |
|
Tape file names | |
| Hard links | Section 10.12, ''Understanding Hard Links'' |
10.1. Understanding Extended File Specifications Features
|
Feature |
Description |
|---|---|
|
New on-disk structure |
Extended File Specifications support the latest volume On-Disk Structure (ODS): Level 5 (ODS-5). This volume structure provides the basis for creating and storing files with extended file names. |
|
Additional character set support |
A broader set of characters is available for naming files on OpenVMS. Extended File Specifications offers support for file names that use the 8-bit ISO Latin-1 character and 16-bit Unicode (UCS-2) character sets. |
|
Extended file naming |
File names can now exceed the traditional 39. 39 character limit up to a maximum of 236 bytes. |
|
Case preservation |
Extended File Specifications preserve the case of file specifications created with ODS-5 attributes. However, the system still performs case-insensitive string matching. |
|
Deep directory levels |
To support deep directory levels, the length of directory specifications has been extended to a maximum of 512 characters. |
For more information about each feature, refer to VSI OpenVMS User's Manual.
10.1.1. Using Extended File Specifications
Beginning with OpenVMS Version 7. 2, RMS allows you to use directory levels deeper than 8 as well as the new RMS API extensions on both ODS-2 and ODS-5 volumes by default. However, you can create extended file names only on an ODS-5 volume. Section 9.3.3, ''Initializing a New Volume with ODS-5 Format'' and Section 9.5.5.1, ''Converting from ODS-2 to ODS-5 '', respectively, explain how to create a new ODS-5 volume and how to convert an ODS-2 volume to an ODS-5 volume.
Once you change a volume to ODS-5, your programs can create and read extended file names. However, by default, DCL (as well as some applications) does not accept all extended names?. DCL also capitalizes any lowercase file names that users enter at the command line prompt?.
Enabling the Extended File Specifications Parsing Feature
$ SET PROCESS/PARSE_STYLE=EXTENDED
$ CREATE MY^[FILE
For more details on setting parse styles, refer to the VSI OpenVMS DCL Dictionary. The VSI OpenVMS Record Management Services Reference Manual contains additional information about RMS default Extended File Specifications features.
Ways to Enable Case Sensitivity
Traditionally, OpenVMS has stored all alphabetic characters in file name specifications as uppercase characters. In addition, file system operations using file name specifications were case insensitive.
The introduction of Extended File Specifications has allowed system tools and applications to store and display file specifications containing lowercase as well as uppercase alphabetic characters on ODS-5 volumes. File name specification operations, however, remained case-insensitive.
Beginning with OpenVMS Version 7.3-1, it has been possible for tools and applications to distinguish among file name specifications containing the same alphabetic characters that differ only in case.
You can set processes to ignore or notice the case sensitivity of file names.
Note
Enable case sensitivity only when it is known to be supported by the layered product or application you are working with.
You can use any of three ways to enable case sensitivity on OpenVMS, as described in the following sections.
Using the DCL Command SET PROCESS/CASE_LOOKUP=BLIND (or CASE_LOOKUP=SENSITIVE)
If you set your process to CASE_LOOKUP=BLIND and you create more than one file with the same name differing only in case, DCL treats these files as new versions of the older file and converts them to the same case as the original file.
In the following example, DKA500 is an ODS-5 disk.
$ SET DEFAULT DKA500:[TEST] $ SET PROCESS /CASE_LOOKUP=BLIND/PARSE_STYLE=EXTENDED $ CREATE NEWfile.txt <Ctrl/z> $ CREATE NEWFILE.txt <Ctrl/z> $ CREATE NeWFILE.txt <Ctrl/z> $ DIRECTORY Directory DKA500:[TEST] NEWfile.txt;3 NEWfile.txt;2 NEWfile.txt;1
If your process is set to CASE_LOOKUP=SENSITIVE and you create more than one file with the same name differing only in case, DCL treats subsequent files as new files and lists them as such.
In the following example, DKA500 is an ODS-5 disk.
$ SET DEFAULT DKA500:[TEST] $ SET PROCESS /CASE_LOOKUP=SENSITIVE /PARSE_STYLE=EXTENDED $ CREATE NEWfile.txt <Ctrl/z> $ CREATE NEWFILE.TXT <Ctrl/z> $ CREATE NeWfIlE.txt <Ctrl/z> $ DIRECTORY NeWfIle.txt;1 NEWFILE.TXT;1 NEWfile.txt;1
Although an ODS-5 volume preserves the case of a file as it is first entered, file searches are performed in a case-blind manner. Therefore, be careful when you do file comparisons, such as using DCL string functions like .EQS. and F$LOCATE, in a DCL command procedure.
If you are using an application that expects case sensitivity, or if you depend on case sensitivity in your environment, set your process to /CASE_LOOKUP=SENSITIVE. Be aware that using case sensitivity can create problems if you do not pay attention to your environment.
The default is SET PROCESS /CASE_LOOKUP=BLIND /PARSE_STYLE=EXTENDED. RMS uses this process default for case sensitivity.
Setting an Option Within your Application in the NAML Block for Files Opened or Created Using RMS
The NAML block was introduced in OpenVMS Alpha Version 7.2 to support long file names. Beginning in OpenVMS Version 7.3-1, the NAML block has a new field, NAML$V_CASE_LOOKUP, to override the process default case sensitivity.
Within NAML$V_CASE_LOOKUP, you can set the following values for case sensitivity:
Table 10.1. Values for Case Sensitivity Field Name Description NAML$C_CASE_LOOKUP_BLIND Set by the user to tell RMS to ignore case when creating, deleting, or searching for files. NAML$C_CASE_LOOKUP_SENSITIVE Set by the user to tell RMS to include case as a criteria when creating, deleting, or searching for files. If NAML$V_CASE_LOOKUP is zero, or if a NAML block is not used, the current process setting is used.
Making a Call to Either $SET_PROCESS_PROPERTIES or $GETJPI Within Your Application
The $SET_PROCESS_PROPERTIES system service sets a simple value associated with a service. Beginning with Version 7.3-1, OpenVMS Alpha (and I64) have supported the following new property codes for case sensitivity.
Table 10.2. Property Codes for Case Sensitivity Property Code Description PPROP$C_CASE_LOOKUP_TEMP Sets a value for only the life of the image. The value reverts to the permanent style on image rundown. Valid values are: PPROP$K_CASE_BLIND and PPROP$K_CASE_SENSITIVE. PPROP$C_CASE_LOOKUP_PERM Sets a value for the life of the process unless the style is set again. The value reverts to the permanent style on image rundown. Valid values are: PPROP$K_CASE_BLIND and PPROP$K_CASE_SENSITIVE.
The new item codes for the $GETJPI system service are the following:
- JPI$CASE_LOOKUP_TEMP
- JPI$CASE_LOOKUP_PERM
For more information about the $SET_PROCESS_PROPERTIESW system service, refer to the VSI OpenVMS System Services Reference Manual.
These item codes return the values that are set by the system service $SET_PROCESS_PROPERTIESW, which can be either PROP$K_CASE_BLIND or PPROP$K_CASE_SENSITIVE.
10.1.2. Setting Users' Expectations of Extended File Specifications
A system manager can help users become accustomed to Extended File Specifications by explaining the differences between ODS-2 and ODS-5 file names. These differences become most apparent when users change from ODS-2 to ODS-5 styles.
New Extended File Specifications characteristics
ODS-2 and ODS-5 used together
Architecture-related notes
10.1.2.1. New Extended File Specifications Characteristics
The following notes discuss issues related to new Extended File Specifications characteristics that are unfamiliar to users.
Be Aware of Volume Structure
Make sure you know whether a disk is an ODS-2 or ODS-5 volume so that you can place ODS-5 files on ODS-5 volumes.
$ SHOW DEVICE DKA500:/FULL
Disk AABOUT$DKA500:, device type DZ25 Disk, is online, allocated, deallocate
on dismount, mounted, file-oriented device, shareable.
Error count 0 Operations completed 155
.
.
.
Volume Status: ODS-5, subject to mount verification, file high-water
marking, write-back caching enabled.
$ SHOW DEVICE DKA200:/FULL
Disk AABOUT$DSA200:, device type RZ25 Disk, is online, allocated, deallocate
on dismount, mounted, file-oriented device, shareable.
Error count 0 Operations completed 232
.
.
.
Volume Status: ODS-2, subject to mount verification, file high-water
marking, write-back caching enabled. After each command, the Volume Status: that is displayed indicates whether the volume is ODS-5 or ODS-2.
Do Not Use Extended File Names on ODS-2 Volumes
You cannot create a file with an ODS-5 extended file name on an ODS-2 volume.
$ SET DEFAULT DKA200:[TEST] $ CREATE x. x. x. x %CREATE-E-OPENOUT, error opening DKA200:[TEST]X^. X^. X. X; as output -RMS-E-CRE, ACP file create failed -SYSTEM-W-BADFILEVER, bad file version number
Case Is Determined by the First Instance of an Extended File Name
On an ODS-5 volume, the case for all versions of a file name is identical; the case is preserved as the file name was first created.
$ SET DEFAULT DKA500:[TEST] $ SET PROCESS /PARSE_STYLE=EXTENDED $ CREATE myfile. txt Ctrl/Z $ CREATE MYFILE. TXT Ctrl/Z $ DIRECTORY Directory DKA500:[TEST] myfile. txt;2 myfile. txt;1
Be Aware of Case Preservation but Case Blindness of Extended File Specifications
Keep in mind that although an ODS-5 disk preserves the case of a file as it is
first entered, it searches for files in a case-blind manner. Similarly, users
must also be careful when they do comparisons, such as when they use DCL string
functions like .EQS and F$LOCATE in a DCL command
procedure.
The following example demonstrates the importance of case-blind matching of file names in DCL. In the program, notice that you specify no argument to do a case-sensitive match but that you specify an argument to do a case-blind match.
F$SEARCH to find all the files that have a file
type of .TXT. Because RMS (and therefore F$SEARCH as well does
case-blind matching, F$SEARCH also finds files with the file type
.txt.F$SEARCH then uses F$LOCATE to
search the file name for TEST. Because F$LOCATE does
case-sensitive comparisons, it fails to match unless you first change the string
to
uppercase.$ case_blind = 0 $ if p1 . nes. "" then case_blind = 1
| Set |
| Get a file ending in |
| If a case-blind comparison was selected in Step 1, change the file name to uppercase to make a case-blind comparison. |
| If |
$ @test Search returns DKA300:[FISHER]test. txt;1 Did not find file matching TEST $ @test case-blind Search returns DKA300:[FISHER]test. txt;1 Found a file matching TEST
Abbreviated and Full Directory Names Listed Separately with CONDENSED File Names
If the style is CONDENSED, file names up to 255 bytes in length are displayed. When a file specification reaches the 255-byte limit, the directory name is abbreviated to a directory ID (DID).
If the style is EXPANDED, file names up to 4095 bytes in length are displayed.
$ DIR/STYLE=CONDENSED Directory DKA300:[DEEPER.aaaa.bbbb.cccc.dddd.eeee.ffff.gggg.hhhh.iiii._ten.aaaa. bbbb.cccc.dddd.eeee.ffff.gggg.hhhh.iiii._ten.aaaa.bbbb.cccc.dddd.eeee.ffff.gggg. hhhh.iiii._ten.aaaa.bbbb.cccc.dddd.eeee.ffff.gggg.hhhh.iiii._ten]
| With the CONDENSED style, if the combination of the directory name and file name does not exceed 255 bytes, the directory name is not shortened to a DID abbreviation. |
| With the CONDENSED style, if the combination of the directory name and file name exceeds 255 bytes, the directory name is shortened to a DID abbreviation. |
| When you issue a DIRECTORY command that displays both a full and an abbreviated directory format for the same directory name, DIRECTORY counts these as two different directories. |
For more information about DIRECTORY commands, refer to the VSI OpenVMS DCL Dictionary.
10.1.2.2. ODS-2 and ODS-5 Used Together
The following notes discuss issues related to using ODS-2 and ODS-5 together in a cluster.
Use Traditional File Names in a Mixed-Volume Environment
To avoid ODS-2 and ODS-5 file name incompatibility when working with both ODS-2 and ODS-5 volumes, and to assure backward compatibility with prior versions of OpenVMS, use only ODS-2 traditional file names.
Error Messages Can Vary Depending on Parse Style
Error messages displayed to users might vary depending on the parse style. Syntax errors that were formerly detected at the DCL level are now passed on to the file system level, RMS and XQP, for example, if the parse style is EXTENDED. As a result, the messages users receive for file syntax errors might be slightly different depending on the parse style and volume structure.
- Examples of TRADITIONAL and EXTENDED styles on an ODS-5 volume:
$ SHOW DEVICE DKA500:/FULL Disk AABOUT$DKA500:, device type RZ25 Disk, is online, allocated, deallocate on dismount, mounted, file-oriented device, shareable. Error count 0 Operations completed 155 . . . Volume Status: ODS-5, subject to mount verification, file high-water
marking, write-back caching enabled.
$ SET PROCESS /PARSE_STYLE=TRADITIONAL
$ OPEN /WRITE FILE z. z. z. z
%DCL-W-PARMDEL, invalid parameter delimiter - check use of special
characters \. Z\
$ SET PROCESS /PARSE_STYLE=EXTENDED
$ OPEN /WRITE FILE z. z. z. z
$ The volume is ODS-5.
The parse style is set to TRADITIONAL.
DCL returns an error on some ODS-5 file names such as this one.
The parse style is set to EXTENDED.
DCL creates the file.
- Examples of TRADITIONAL and EXTENDED styles on an ODS-2 volume:
Disk AABOUT$DKA200:, device type RZ25 Disk, is online, allocated, deallocate on dismount, mounted, file-oriented device, shareable. Error count 0 Operations completed 232 . . . Volume Status: ODS-2, subject to mount verification, file high-water
marking, write-back caching enabled.
$ SET PROCESS /PARSE_STYLE=TRADITIONAL
$ OPEN /WRITE FILE z. z. z. z
%DCL-W-PARMDEL, invalid parameter delimiter - check use of special
characters \. Z\
$ SET PROCESS /PARSE_STYLE=EXTENDED
$ OPEN /WRITE FILE z. z. z. z
%DCL-E-OPENIN, error opening
-RMS-E-CRE, ACP file create failed
-SYSTEM-W-BADFILEVER, bad file version number The volume is ODS-2.
The parse style is set to TRADITIONAL.
DCL returns an error message.
The parse style is set to EXTENDED.
DCL allows the file name, but XQP returns an error.
- Examples of different error messages for the same syntax error:
$ SHOW DEVICE DKA500:/FULL Disk AABOUT$DKA500:, device type RZ25 Disk, is online, allocated, deallocate on dismount, mounted, file-oriented device, shareable. Error count 0 Operations completed 155 . . . Volume Status: ODS-5, subject to mount verification, file high-water
marking, write-back caching enabled.
$ SET PROCESS /PARSE_STYLE=TRADITIONAL
$ CREATE a^<b. c>
%DCL-W-PARMDEL, invalid parameter delimiter - check use of special
characters \^\
$ SET PROCESS /PARSE_STYLE=EXTENDED
$ CREATE a^<b. c>
%CREATE-E-OPENOUT, error opening a^<b. c> as output
-RMS-F-SYN, file specification syntax error The volume is ODS-5.
The parse style is set to TRADITIONAL.
DCL returns an error message for a syntax error.
The parse style is set to EXTENDED.
RMS returns a different error message for the same syntax error.
Be Aware of Implicit File Name Output
Be wary of defaults when you allow utilities to create output files based on the file name being processed. Be sure you know where a file is being placed so you will not inadvertently try to place a file with an extended name on an ODS-2 volume.
An error results if an application or a utility attempts to write an ODS-5 extended file name to an ODS-2 (DKA200:) volume; for example:
$ SHOW DEFAULT DKA200:[DOREO] $ DUMP /OUTPUT DKA500:[DOREO]This^_is^_a^_file. Dat %DUMP-E-OPENOUT, error opening DKA200:[DOREO]THIS^_IS^_A^_FILE. DMP;as output -RMS-E-CRE, ACP file create failed -SYSTEM-W-BADFILENAME, bad file name syntax
- A batch command file fails to execute if all of the following conditions are true:
A log file is requested implicitly or explicitly.
The implicit or explicit log file specification has an extended name (that is, the name is non-ODS-2-compliant).
The log file is to be created on an ODS-2 volume.
The batch command file does not execute because a log file cannot be created. Most frequently, this situation occurs when the logical name SYS$LOGIN refers to an ODS-2 volume;this is because log files are implicitly created on the SYS$LOGIN device. In addition, if notification is disabled, you are not notified that your batch job did not execute.
To avoid the problem, use the /LOG= qualifier and an ODS-2-compliant log file specification when you submit command files with ODS-5 extended names.
10.1.2.3. Architecture-Related Notes
The following notes discuss Extended File Specifications issues related to system architecture.
Extended File Names Are Not Visible from a VAX System
On VAX, if you attempt to display a file name that contains 2-byte Unicode characters, the pseudoname displayed is the following: \PUNICODE\. ???
Any other name that is not a legal ODS-2 name is displayed as \PISO_LATIN\. ???
- On an Alpha or IA-64 system:
$ DIRECTORY DPA100:[TEST] Directory DPA100:[TEST] Accounting^_data. lis;1 atest. txt;1
- On a VAX system:
$ DIRECTORY DPA200:[TEST] Directory DPA200:[TEST] \PISO_LATIN\. ??? ATEST. TXT
In addition, the directory depth on a VAX is limited to 8 (or 16, using rooted logicals).
Physical Backups of ODS-5 Volumes on VAX Systems
On OpenVMS VAX systems, BACKUP supports ODS-5 volumes only when you specify the /PHYSICAL qualifier. The BACKUP /PHYSICAL command causes BACKUP to make a block-by-block physical backup of the disk, ignoring the structured contents of the disk.
On Alpha and IA-64 systems, you can use either the BACKUP /IMAGE or BACKUP /PHYSICAL command.
10.2. Considerations Before Enabling ODS-5 Volumes
ODS-5 is implemented on OpenVMS primarily to provide enhanced file sharing capabilities for users of Advanced Server for OpenVMS 7.2? DCOM and Java applications.
Once ODS-5 volumes are enabled, some of the new capabilities can potentially impact certain applications or layered products, as well as some areas of system management. The new syntax for file names that is allowed on ODS-5 volumes cannot be fully utilized on ODS-2 volumes. Because pre-Version 7.2 Alpha systems cannot access ODS-5 volumes, and Open VMS Version 7.2 VAX systems have limited ODS-5 functionality, you must be careful where and how you enable ODS-5 volumes in mixed-version and mixed-architecture OpenVMS Clusters.
The following sections comprise a summary of how enabling ODS-5 volumes can impact system management, users, and applications.
10.2.1. Considerations for System Management
RMS access to deep directories and extended file names is available only on ODS-5 volumes mounted on OpenVMS Alpha V7.2 systems. VSI recommends that ODS-5 volumes be enabled only on a homogeneous OpenVMS Cluster running Alpha V7.2 and later.
In versions of OpenVMS prior to Version 7.3-1, ODS-5 volumes could not be used as system disks, and it was recommended that ODS-5 volumes be used in homogeneous Alpha clusters only. These restrictions have been removed. OpenVMS Version 7.3-1 and higher support the use of ODS-5 volumes as system disks and in heterogeneous Alpha clusters.
Users must access ODS-5 files and deep directories from OpenVMS Alpha V7.2 systems only, because these capabilities are not supported on earlier versions.
Users who have created deep directories can view those directories only from OpenVMS Alpha V7.2 systems.
Pre-Version 7.2 systems cannot mount an ODS-5 volume nor read ODS-2 or ODS-5 file names on that volume.
Section 10.2.2, ''Considerations for Users'' describes in greater detail the limitations of ODS-5 support for users in a mixed-version or mixed-architecture OpenVMS Cluster.
Most unprivileged applications will work with most extended file names, but some may need modifications to work with all extended file names. Privileged applications that use physical or logical I/O to disk and applications that have a specific need to access ODS-5 file names or volumes may require modifications and should be analyzed. See the website TBS for a list of fully supported OpenVMS applications. Section 10.2.3, ''Considerations for Applications'' describes in greater detail the impact of ODS-5 on OpenVMS applications.
Section 10.3.1, ''Levels of Support for Extended File Specifications'' contains more information for determining the levels of support for Extended File Specifications.
10.2.2. Considerations for Users
A user on an OpenVMS Alpha Version 7.2 system can take advantage of all Extended File Specifications capabilities on ODS-5 volumes mounted on an OpenVMS Alpha Version 7.2 system.
A user on a mixed-version or mixed-architecture OpenVMS Cluster is subject to some limitations in ODS-5 functionality. Section 9.1.2.2, ''Mixed-Version Support'' lists those restrictions that exist on a mixed-version OpenVMS Cluster. Section 9.1.2.3, ''Mixed-Architecture Support'' lists those restrictions that exist on a mixed-architecture OpenVMS Cluster.
10.2.3. Considerations for Applications
OpenVMS file handling and command line parsing have been modified to enable them to work with extended file names on ODS-5 volumes while still being compatible with existing applications. The majority of existing, unprivileged applications will work with most extended file names, but some may need modifications to work with all extended file names.
Privileged applications that use physical or logical I/O to disk may require modifications and should be analyzed. Applications that have a specific need to access ODS-5 file names or volumes should be analyzed to determine if they require modification.
On ODS-5 volumes, existing applications and layered products that are coded to documented interfaces, as well as most DCL command procedures, should continue to work without modification.
- Internal knowledge of the file system, including knowledge of:
- The data layout on disk
- The contents of file headers
- The contents of directory files
File parsing tailored to a particular on-disk structure.
Assumptions about the syntax of file specifications, such as the placement of delimiters and legal characters.
Assumptions about the case of file specifications. Mixed and lowercase file specifications will not be converted to uppercase, which can affect string matching operations.
Assumptions that file specifications are identical between RMS and the file system.
Note
All unmodified XQP applications running on an OpenVMS VAX or Alpha system that access an ODS-5 volume will see pseudonames returned in place of Unicode or ISO Latin-1 names that are not ODS-2 compliant. This can cause applications to act in an unpredictable manner.
Applications that specify or retrieve file names with the XQP interface using ODS-5 volumes must be modified in order to access files with extended names.
See VSI OpenVMS Programming Concepts Manual for further discussion of the support status of OpenVMS applications.
10.3. Guidelines for Using Extended File Specifications on OpenVMS Applications
Review all ODS-5 considerations. (See Section 10.2.1, ''Considerations for System Management''.)
Understand the support levels for different OpenVMS (See Section 10.3.1, ''Levels of Support for Extended File Specifications''.) applications.
Segregate applications that do not support ODS-5 or have not been tested with ODS-5 names or volumes. (See Table 10.4, ''Non-Supported OpenVMS Components (No Extended File Naming Support)''.)
Review the guidelines for setting users' expectations in Section 10.1.2, ''Setting Users' Expectations of Extended File Specifications''.
Note
VSI recommends that you enable ODS-5 volumes in a homogeneous OpenVMS Version 7. 2 Alpha (or I64) cluster only.
10.3.1. Levels of Support for Extended File Specifications
To help determine the expected behavior of OpenVMS utilities and commands for ODS-5, the following levels of support have been established. Each level outlines the acceptable behavior of a utility or command when it encounters an extended (ODS-5 compliant) file specification.
The levels of support for ODS-5, from full support to no support, are defined in Sections 10.3.1.1 through 10.3.1.4.
10.3.1.1. Full Support
OpenVMS utilities and commands that offer full support for ODS-5 have been specifically modified to take advantage of all the features of extended file naming. These utilities and commands should accept and handle extended file specifications without error while maintaining the case as created?.
In addition, OpenVMS commands and utilities that fully support Extended File Specifications can accept and produce long file specifications that exceed the traditional 255-byte limit in their original form? —without requiring them to be abbreviated in Directory ID (DID) or File ID (FID) format.
- ANALYZE /AUDIT
- ANALYZE /DISK
- ANALYZE /RMS
- BACKUP
- CONVERT
- CONVERT /RECLAIM
- COPY
- CREATE /DIRECTORY
- DELETE
- DIRECTORY
- DUMP
- EDIT /ACL
- EXCHANGE /NETWORK
- FDL
- PURGE
- RECOVER/RMS
- RENAME
- SEARCH
- SET SECURITY
- SYSMAN
- TYPE
10.3.1.2. Default Support
OpenVMS utilities and commands with default support have had little or no modification to take advantage of Extended File Specifications. These utilities and commands are expected to handle most of the attributes of extended file specifications (such as new characters and deep directory structures) correctly. However, file names may be created or displayed with the wrong case.
Matching operations in an environment where FID abbreviation is used may not always work as expected. For example, wildcard matching operations may not capture all target file names because the long file names may be represented in their numeric FID-abbreviated form. This restriction specifically applies to matching operations that are performed outside of RMS.
- Wildcards and sticky defaults cannot be used with a FID abbreviation. For example, the following commands are illegal:
$ DIRECTORY a[1, 2, 3]*. txt $ COPY a[1, 2, 3]. txt *. txt2
Because a FID abbreviation is a unique numeric representation of one file, it cannot be used to represent or match any other file.
Creating a file using a FID abbreviation is illegal.
For more information about DID abbreviations and FID abbreviations, see Guide to OpenVMS File Applications.
10.3.1.3. No Support for Extended File Naming
OpenVMS utilities and commands that do not support extended file names can function on ODS-5 volumes; however, they are restricted to operating with traditional file specifications only. These utilities and commands should be used carefully on ODS-5 volumes because VSI cannot ensure that they will function successfully when they encounter extended file specifications.
Table 10.3, ''Non-Supported OpenVMS Components (No ODS-5 Support)'' and Table 10.4, ''Non-Supported OpenVMS Components (No Extended File Naming Support)'' list the OpenVMS utilities and commands that do not support Extended File Specifications because of limitations with either handling extended file names or the ODS-5 volume structure.
10.3.1.4. No Support for ODS-5
OpenVMS utilities and commands that do not support the ODS-5 volume structure cannot handle extended file names. These utilities and commands should be used carefully on ODS-5 volumes because VSI cannot ensure that they will function successfully even when they only encounter traditional file specifications.
| Component | Notes |
|---|---|
|
Disk defragmenters |
Unsupported unless a specific defragmentation tool documents that it has been updated to support an ODS-5 volume?. |
|
Component |
Notes |
|---|---|
|
Code compilers |
Cannot use extended file names for object files. However, code compilers can create applications that support extended names. |
|
INSTALL Known images |
Do not install an image with an extended file name as a known image. |
|
LINK |
Cannot output an image with an extended file name. |
|
MONITOR |
Cannot reliably process extended file names. |
|
Network files (NET*.DAT) |
Do not rename to an extended file name. |
|
Object modules (.OBJ) |
Do not rename to an extended file name. |
|
Page and swap files |
Do not use an extended file name. |
|
SYSGEN |
Do not write a parameter file with an extended file name. |
|
System startup files |
Do not rename to an extended file name. |
10.4. Controlling Access to ODS-5 Volumes
Prevent users on a VAX from accessing files on an ODS-5 volume.
Prevent untested applications from accessing files on an ODS-5 disk. (You can allow certain users to override this access control on an ODS-5 volume. )
The system manager can impose either of these restrictions by using normal OpenVMS discretionary controls. Refer to the VSI OpenVMS Guide to System Security for more information.
The following sections contain examples of restrictions you can impose.
10.4.1. Preventing VAX Users from Accessing an ODS-5 Volume
- Define an identifier (for example, VAX_NODE) to identify users running on an OpenVMS VAX nod, for example:
$ RUN SYS$SYSTEM:AUTHORIZE UAF> ADD /IDENTIFIER VAX_NODE %UAF-I-RDBADDMSG, identifier VAX_NODE value %X80010037 added to rights database
- On each VAX node, add VAX_NODE to the system rights list; for example:
$ SET RIGHTS_LIST /ENABLE /SYSTEM VAX_NODE
The /ENABLE qualifier in the command adds VAX_NODE to the system rights list.
Also add this command to the SYSTARTUP_VMS. COM command procedure.
- To prevent anyone on a VAX node from gaining access to an ODS-5 volume, place an Access Control Entry (ACE) on the volume that denies access to holders of the VAX_NODE identifier, for example:
$ SET SECURITY /CLASS=VOLUME ODS5_DISK /ACL=(ID=VAX_NODE, ACCESS=NONE)
10.4.2. Preventing an Untested Application from Accessing an ODS-5 Volume
- Define an identifier (for example, ODS5_UNSAFE) to identify applications that you do not want to access an ODS-5 volume, for example:
UAF> ADD /IDENTIFIER ODS5_UNSAFE /ATTR=SUBSYSTEM %UAF-I-RDBADDMSG, identifier ODS5_UNSAFE value %X80010039 added to rights database
- Attach a protected subsystem ACE to the application with the ODS5_UNSAFE identifier, for example:
$ SET SECURITY /CLASS=FILE SYS$SYSTEM:APPLICATION. EXE - _$ /ACL=(SUBSYSTEM, ID=ODS5_UNSAFE)
- To each ODS-5 volume, attach an ACE denying access to the ODS-5 volume to holders of the ODS5_UNSAFE identifier, for example:
$ SET SECURITY /CLASS=VOLUME ODS5_DISK/ ACL=(ID=ODS5_UNSAFE, ACCESS=NONE)
- Create another identifier (for example, ODS5_UNTRAINED):
UAF> ADD /IDENTIFIER ODS5_UNTRAINED %UAF-I-RDBADDMSG, identifier ODS5_UNTRAINED value %X80010038 added to rights database
- Assign this identifier to all users, for example:
UAF> GRANT/IDENTIFIER ODS5_UNTRAINED * %UAF-I-GRANTMSG, identifier ODS5_UNTRAINED granted to *
- Instead of Step 3, place an Access Control Entry (ACE) on the volume that denies access to holders of the ODS5_UNTRAINED identifier; for example:
$ SET SECURITY /CLASS=VOLUME ODS5_DISK/ - _$ ACL=(ID=ODS5_UNSAFE+ODS5_UNTRAINED, ACCESS=NONE)
This command prevents ODS5_UNTRAINED users from accessing the volume with ODS5_UNSAFE applications.
- Remove the identifier from individual users when you are willing to let them use any application on an ODS-5 volume, for example:
UAF> REVOKE/IDENTIFIER ODS5_UNTRAINED SHEILA_USER %UAF-I-REVOKEMSG, identifier ODS5_UNTRAINED revoked from SHEILA_USER
An untrained user can use an untested application only to access ODS-2 volumes.
A trained user can access ODS-5 volumes with any application.
10.5. Using DCL Commands with Files
|
Operation |
DCL Command |
|---|---|
|
Retrieve disk and magnetic tape file information, such as device and protection characteristics, and display this information on your terminal screen |
SHOW commands listed in Table 10.5, ''DCL Commands to Display Ownership and Protection'' |
|
Modify disk file characteristics, such as protection or UIC information |
SET commands listed in Table 10.7, ''DCL Commands to Modify File Protection Characteristics'' |
|
Display the contents of a directory |
DIRECTORY |
|
Display the contents of a file |
TYPE |
|
Copy files to and from disk and magnetic tape volumes |
COPY |
Most DCL commands require file-structured devices. (The VSI OpenVMS DCL Dictionary lists commands that do not require file-structured devices. )
In addition to manipulating files through DCL, you can write programs to assist you in routine file-manipulation tasks. You can write these programs in any of the languages supported by the operating system.
To manipulate individual records within files (that is, to access files at the record level), write programs that include OpenVMS Record Management Services (RMS) facilities. Refer to the VSI OpenVMS Record Management Services Reference Manual for examples of RMS facilities used to manipulate files at the record level.
10.6. Getting File Information
DIRECTORY [filespec[, . . . ]]
When you include certain command qualifiers with the DIRECTORY command, you can retrieve information in addition to a list of the names of the files in the directory. Refer to the VSI OpenVMS DCL Dictionary for a list of qualifiers that you can use with the DIRECTORY command.
The following examples illustrate three cases of retrieving information from the [MALCOLM] directory, which resides on a disk with the logical name DISK$DOCUMENT.
Examples
$ DIRECTORY AVERAGE. * Directory DISK$DOCUMENT:[MALCOLM] AVERAGE. EXE;6 AVERAGE. FOR;6 AVERAGE. LIS;4 AVERAGE. OBJ;12 Total of 4 files.
The DIRECTORY command in this example lists all file types of the AVERAGE file and the version number of each file. The command would also list all versions of these files;however, only one version of each file exists.
$ DIRECTORY/SIZE/DATE/VERSIONS=1/PROTECTION AVERAGE Directory DISK$DOCUMENT:[MALCOLM] AVERAGE. EXE;6 6 10-APR-2000 15:43 (RWED, RWED, RWED, RE) AVERAGE. FOR;6 2 2-APR-2000 10:29 (RWED, RWED, RWED, RE) AVERAGE. LIS;4 5 9-APR-2000 16:27 (RWED, RWED, RWED, RE) AVERAGE. OBJ;6 2 9-APR-2000 16:27 (RWED, RWED, RWED, RE) Total of 4 files, 15 blocks.
The DIRECTORY command in this example displays all the file types of the AVERAGE file and the version number of each file. The /SIZE qualifier displays the size of each file in blocks used. The /DATE qualifier displays the creation date of the version of the file that is listed. The VERSIONS=1 qualifier limits the number of versions of the file displayed to one (the most recent) version. The /PROTECTION qualifier displays the file protection for each file.
$ DIRECTORY/FULL/VERSIONS=1 [MALCOLM. . . ]AVERAGE. EXE Directory DISK$DOCUMENT:[MALCOLM] AVERAGE. EXE;6 File ID: (4098, 149, 0) Size: 36/36 Owner: [DOCUMENTATION, MALCOLM] Created: 27-MAY-2000 12:22:26. 30 Revised: 27-MAY-2000 12:22:51. 35 (2) Expires: <None specified> Backup: 3-JUN-2000 22:03. 09 Effective: <None specified> Recording: <None specified> File organization: Sequential Shelved state: Online File attributes: Allocation: 36, Extend: 36, Global buffer count: 0 No version limit Record format: Variable length, maximum 255 bytes Record attributes: Carriage return carriage control Journaling enabled: None File protection: System:RWED, Owner:RWED, Group:RE, World: Access Cntrl List: None Total of 1 file, 36/36 blocks. Directory DISK$DOCUMENT:[MALCOLM. TEST] AVERAGE. EXE;1 File ID: (7714, 29, 0) Size: 36/36 Owner: [DOCUMENTATION, MALCOLM] Created: 15-APR-2000 10:12 Revised: 15-APR-2000 10:12 (1) Expires: <None specified> Backup: 15-APR-2000 22:41 Effective: <None specified> Recording: <None specified> File organization: Sequential Shelved state: Shelved File attributes: Allocation: 36, Extend: 36, Global buffer count: 0 No version limit Record format: Variable length, maximum 255 bytes Record attributes: Carriage return carriage control Journaling Enabled : None File protection: System:RWED, Owner:RWED, Group:RE, World: Access Cntrl List: None Total of 1 file, 36/36 blocks. Grand total of 2 directories, 2 files, 72/72 blocks.The DIRECTORY command in this example displays a full directory listing of one version of the AVERAGE. EXE file in the top-level directory [MALCOLM] and subdirectories under it.
10.6.1. Displaying Access Dates
ATR$C_ACCDATE — corresponds to POSIX
st_atime— reflects the last time a file was accessed.ATR$C_ATTDATE — corresponds to POSIX
st_ctime— reflects the last time a file attribute was modified.ATR$C_MODDATE — corresponds to POSIX
st_mtime— reflects the last time data was modified.
Note
Using the following keywords: ATTDATE, ACCDATE, and REVDATE with the SET FILE/ATTRIBUTES command, has no effect on ODS-2 volumes.
Modifications to the file header are recorded as ATTDATE, unless the file is actually accessed. The REVDATE ACP-QIO attribute is the most recent of the MODDATE and ATTDATE timestamps. A new ACP-QIO attribute returns the stored REVDATE.
Note
On ODS-5 volumes, setting the REVDATE modifies both the revision date and the last attributes change date. The SET FILE/ATTRIBUTES=REVDATE=anydate sets the revision date to the current date.
When a file is closed, if "norecord" is set, ACCDATE and REVDATE are not altered. Otherwise, if data has been read from the file, closing a file updates the file's access date. If data has been written to the file, closing a file updates the file's modification date.
$ SET VOLUME/VOLUME_CHARACTERISTICS=()[[NO]]HARDLINKS, ][[NO[ACCESS_DATES[=$deltatime]]
To limit the performance impact if a file is accessed frequently, update of the access time may be suppressed if the change is small. A delta time is used to determine when a new access time is significant.
See Section 10.6.1.1, ''DCL Access Dates'' for an example of how to set access dates using the SET VOLUME/VOLUME_CHARACTERISTICS command.
10.6.1.1. DCL Access Dates
$ SET VOLUME/VOLUME_CHARACTERISTICS=ACCESS_DATES=[deltatime] NODE$COE1
The default value for deltatime is 1 second, chosen to comply with the
"seconds since EPOCH " time interface required by POSIX
st_atime. A site may choose a larger delta time to reduce
overhead if 1 second granularity is not required.
$ INITIALIZE/VOLUME_CHARACTERISTICS=ACCESS_DATES NODE$COE1 $ MOUNT NODE$COE1
Use the SET VOLUME/VOLUME_CHARACTERISTICS=NOACCESS_DATES command to disable access date support on a volume. The SET VOLUME/VOLUME_CHARACTERISTICS=NOACESS_DATES command effects only the node where the command is issued. Other nodes are not effected by the change until the next time the volume is mounted.
10.6.1.2. Viewing Dates
$ DIRECTORY/DATE=ACCESSED
The /DATE=ACCESSED qualifier specifies the last access data — the last time data was read from the file. Two other qualifiers also provide information on the new timestamps. Use the /DATE=ATTRIBUTES qualifier to specify the last attribute modification date. Use the /DATE=DATA_MODIFIED qualifier to specify the last data modification date.
10.7. Protecting Files
|
Task |
Section |
|---|---|
|
Display file ownership and protection |
Section 10.7.2, ''Displaying File Ownership and Protection'' |
|
Protect disk files | |
|
Protect disk directories | |
|
Protect magnetic tape files |
10.7.1. Understanding File Protection Concepts
|
Level of Protection |
Description | |
|---|---|---|
|
Device level |
For information about setting device protection characteristics, see the descriptions of the DCL commands INITIALIZE, MOUNT, SET DEVICES, SET SECURITY/PROTECTION, and SET VOLUME in Chapter 9, "Managing Storage Media" and in the VSI OpenVMS DCL Dictionary. Refer to Chapter 8, "Managing Peripheral Devices" for additional information about peripheral devices. | |
|
Volume level |
The system provides protection for disk and tape volumes. For more information, see the following sections: | |
|
Disk volume protection | ||
|
Tape volume protection | ||
|
File level |
The system provides protection for disk files and directory files. For more information, see the following sections: | |
|
Individual disk files | ||
|
Directory files that reside on disk volumes | ||
|
Type of Protection |
For More Information |
|---|---|
|
UIC-based protection codes | |
|
Access control lists (ACLs) | |
|
ISO 9660-formatted media protection | |
|
ANSI-standard accessibility protection (magnetic tape only) |
You own the file.
You have control access to the file.
You have SYSPRV privilege.
The group part of your UIC is less than or equal to MAXSYSGROUP.
You have GRPPRV and you have the same group UIC as the file.
10.7.2. Displaying File Ownership and Protection
|
Command |
Use to Display |
|---|---|
|
DIRECTORY/ACL |
ACL of file |
|
DIRECTORY/OWNER_UIC |
UIC of owner of file |
|
DIRECTORY/PROTECTION |
UIC-based protection of file |
|
DIRECTORY/SECURITY |
All of the above |
|
DIRECTORY/FULL |
All of the above and other, nonsecurity information |
|
SHOW DEVICES/FULL |
Device UIC and protection |
|
SHOW PROCESS |
Process UIC |
|
SHOW PROTECTION |
Default file protection |
|
SHOW SECURITY |
All of the above |
Directory structures do not apply to tape volumes. However, you can use the DIRECTORY command to search for files on tape volumes. Section 10.9, ''Accessing Tape Files'' describes how to access tape files for read and write operations and also explains the use of the DIRECTORY command for tapes.
Note
To use the SHOW PROTECTION command to display the default protection of magnetic tapes, you must specify the /PROTECTION qualifier with the INITIALIZE command when you initialize the magnetic tape volume. Otherwise, the protection is not written to the magnetic tape volume. See the description of initializing magnetic tape volumes in Section 9.3, ''Initializing Volumes''.
The next example illustrates how you can use the SHOW PROTECTION command to display the default protection characteristics for disk files.
Example
$ SHOW PROTECTION SYSTEM=RWED, OWNER=RWED, GROUP=RE, WORLD=NO ACCESS
In this example, the SHOW PROTECTION command requests a display of the current protection defaults.
10.7.3. Protecting Disk Files
|
Access Type |
Gives you the right to. . . |
|---|---|
|
Read |
Read, print, or copy a disk file. Read access automatically includes execute access to a specified file or group of files on disk. |
|
Write |
Write to or change the contents of a file, but not delete it. Write access allows modification of the file characteristics that describe the contents of the file. |
|
Execute |
Execute a file that contains an executable program image or DCL command procedure. |
|
Delete |
Delete the file. To delete a file, you must have delete access to the file and write access to the directory that contains the file. |
|
Control |
Change file characteristics, including the protection code and ACL. Special restrictions apply to changing the owner of a file. |
If you do not define a protection code for a file when you create it, the system applies default protection. If a version of the file already exists, protection is taken from the previous version.
If the directory where the file is to be cataloged has an associated access control entry (ACE) that specifies the default protection, the system uses the specified protection.
If the directory does not have the default protection ACE, the system uses the default process protection. You establish the default process protection explicitly with the SET PROTECTION/DEFAULT command, or by default when you log in.
Note
To protect a file completely, you must protect both the file itself and the directory that lists the file. To protect a file against unauthorized access, specify the proper protection both for the directory that lists the file and for the file itself. See Section 10.7.4, ''Protecting Disk Directories'' for instructions on protecting directories.
|
Task |
Section |
|---|---|
|
Set default disk file protection | |
|
Set explicit disk file protection | |
|
Modify disk file protection characteristics |
Section 10.7.3.3, ''Modifying Disk File Protection Characteristics'' |
10.7.3.1. Setting Default Disk File Protection
A new file receives default UIC-based protection and the default access control entries (ACEs), if any, of its parent directory. A new version of an existing file receives the UIC-based protection and ACL of the previous version.
The protection of a renamed file is unchanged unless you use the RENAME/INHERIT command.
How to Change Default UIC Protection
SET PROTECTION[=(code)]/DEFAULT
|
code |
Defines the protection to be applied to the specified files. If you omit the code, the access is set to the current default protection. |
$ SET PROTECTION = (S:RWED, O:RWED, G:RE, W:RE)/DEFAULT(Remember that you must execute the login command procedure for this command to take effect.)
10.7.3.2. Setting Explicit Disk File Protection
$ CREATE MAST12. TXT/PROTECTION=(S:RWED, O:RWED, G, W)
After a file is created and you have created an ACL for the file, you can modify the ACL and add as many ACEs to the ACL as you want. The protection specified by the ACL overrides the UIC protection of the file.
The following examples show how to check and specify protection codes.
Examples
$ SHOW PROTECTION SYSTEM=RWED, OWNER=RWED, GROUP=RE, WORLD=NO ACCESS
The SHOW PROTECTION command displays the current default protection. In this example, the response shows the system default protection, which indicates that the system and owner have all types of access, group users have read and execute access, and world users have no access.
$ SHOW SECURITY IMAGES. DIR DBA1:[SADAMS]IMAGES. DIR;1 object of class FILE Owner: [SAM, SADAMS] Protection: (System: RWE, Owner: RWE, Group: RE, World: E) Access Control List: (IDENTIFIER=[SAM, SADAMS], ACCESS=READ+WRITE+EXECUTE+DELETE+CONTROL)In this example, the SHOW SECURITY command displays the current protection associated with the file IMAGES. DIR.
$ DIRECTORY/SECURITY IMAGES. DIR Directory DBA1:[SADAMS] IMAGES. DIR;1 [VMS, SADAMS] (RWE, RWE, RE, E) (IDENTIFIER=[VMS, SADAMS], ACCESS=READ+WRITE+EXECUTE+DELETE+CONTROL) Total of 1 file.In this example, the /SECURITY qualifier with the DIRECTORY command displays the current protection associated with the IMAGES. DIR file.
$ COPY/PROTECTION=(SYSTEM:RW, OWNER:RWED, GROUP:RW, WORLD) ABC. DAT XYZ. DAT
In this example, the /PROTECTION qualifier specifies a protection code when the ABC. DAT file is copied to XYZ. DAT.
$ SET SECURITY/PROTECTION=(SYSTEM:RWE, OWNER:RWED, GROUP:RE, WORLD) ABC.DAT
In this example, the SET SECURITY/PROTECTION command changes the protection for an existing file. The command gives the following instructions regarding the file ABC. DAT: system users have read, write, and execute access; the owner has read, write, execute, and delete access; group users have only read and execute access;world users have no access.
Control access is implied and unchangeable for system and owner categories but not for group and world.
10.7.3.3. Modifying Disk File Protection Characteristics
|
Command |
Description |
For More Information |
|---|---|---|
|
SET DIRECTORY |
Modifies the characteristics of one or more directories. The directory protection can override the protection of individual files within the directory. | |
|
SET FILE |
Modifies the characteristics of one or more files, including the version limits on files. | |
|
SET PROTECTION/DEFAULT |
Sets the default UIC protection on files. |
Refer to the VSI OpenVMS Guide to System Security. |
|
SET SECURITY |
Modifies the security profile of an object. Such a
profile contains the following characteristics:
|
Refer to the VSI OpenVMS Guide to System Security and the VSI OpenVMS DCL Dictionary. |
|
SET VOLUME |
Changes the characteristics of one or more mounted Files-11 volumes. The /FILE_PROTECTION qualifier sets the default protection to be applied to all files on the specified disk volume. |
See Section 9.4.1.2, ''Changing Protection After Disk Volumes Are Mounted''. |
For a complete list of the command qualifiers and parameters applicable to each of these DCL commands, refer to the VSI OpenVMS DCL Dictionary.
10.7.3.3.1. Changing File Protection Characteristics
SET SECURITY/PROTECTION = code file-spec[, . . . ]
|
code |
Defines the protection to be applied to the specified files. You cannot omit the code. |
|
file-spec |
Specifies one or more files for which the protection is to be changed. A file name and file type are required. If you omit a version number, the protection is changed only for the highest existing version of the file. Wildcard characters are allowed. |
The following examples show ways to change file protection.
Examples
$ DELETE INCOME. DAT;3 %DELETE-W-FILNOTDEL, error deleting DISK1:[SMITH]INCOME. DAT;3 -RMS-E-PRV, insufficient privilege or file protection violation $ SET SECURITY/PROTECTION=OWNER:D INCOME. DAT;3 $ DELETE INCOME. DAT;3
In this example, the file INCOME. DAT;3 is protected against deletion. The SET SECURITY/PROTECTION command changes only the owner's delete access for the file INCOME. DAT;3. Now the owner can delete the file.
$ SET SECURITY/PROTECTION=(SYSTEM:R, OWNER:RWED, GROUP:RW) PAYROLL.LIS
In this example, the SET SECURITY/PROTECTION command changes the protection codes applied to the PAYROLL. LIS file. To the file, the command gives the system read access; the owner has read, write, execute, and delete access; and users in the owner's group have read and write access.
10.7.3.3.2. Using the SET FILE Command
You can use the DCL command SET FILE to modify the characteristics of one or more files or to assign an additional name, or alias, to a file. The following examples illustrate ways you can use the SET FILE command.
Examples
$ SET FILE/EXPIRATION_DATE=15-APR-2000:11:00 BATCH.COM;3
This SET FILE command requests that the expiration date of the file BATCH. COM;3 be set to 11:00 a. m., April 15, 2000.
$ SET FILE/BEFORE=15-APR-00/ERASE_ON_DELETE PERSONNEL*. SAL
This SET FILE command erases disk locations for files that are deleted with commands such as DELETE or PURGE when applied to all files that match the file specification PERSONNEL*.SAL and are dated before April 15, 2000.
$ SET FILE/OWNER_UIC=[DOCUMENTATION, GRAY]/VERSION_LIMIT=100 MYFILE. DAT
This SET FILE command modifies the characteristics of the file MYFILE. DAT, changing the owner UIC and assigning a file version limit of 100. Note that the /OWNER_UIC qualifier requires SYSPRV or GRPPRV privilege for changing the ownership at the system or group level.
$ SET FILE OLD_FILENAME. DAT/ENTER=NEW_FILENAME.DAT
This SET FILE command assigns an additional name, or alias (NEW_FILENAME. DAT), to the file OLD_FILENAME. DAT. Both the original name and the alias refer to the same file. For this reason, be careful when you delete files with aliases. To keep the file, but to remove one of its names, use the /REMOVE qualifier with the SET FILE command. You cannot use wildcards in the file name. (Refer to the VSI OpenVMS DCL Dictionary for details.)
10.7.4. Protecting Disk Directories
Each directory has a protection associated with it. Directory protection can override the protection of individual files within the directory. For example, if a directory denies world access, world users cannot look up files in that directory even though the files permit world access.
|
Access Type |
Gives you the right to. . . |
|---|---|
|
Read |
Examine, print, or copy a file. If you have read access to
a directory, you can display the contents of the directory
with the DIRECTORY command. For example, if you have read
access to the directory [JONES], you can enter the following
command:
$ DIRECTORY [JONES] This command displays the files contained in the [JONES] directory. With read access, you can access any file listed in the directory, unless the protection on that file denies you access. If the protection applied to the whole directory denies you read access, then you cannot access even those files in the directory that permit access to users in your group. |
|
Write |
Modify or write to a directory. However, you must have both read and write access to a directory to create files in the directory, to rename files in the directory, or to perform any file operation that involves changes to the directory file. |
|
Execute |
Access files by name but not list all the entries in a
directory (that is, to use specific or implied wildcards)
when applied to directories. For example, assume that you
have execute access to the [JONES] directory, and you enter
the following
command:
$ DIRECTORY [JONES] The system responds with an error message of
"insufficient privilege or file protection
violation"and does not list the files in
the[JONES] directory. However, if you know that the file
DATAFILE. DAT resides in the [JONES] directory, you can
enter the following
command:
$ TYPE [JONES]DATAFILE. DAT The system displays the contents of the file. Thus, with execute access, you can perform some, but not all, of the operations that you can with read access. (Access to individual files is still controlled by their file protection. ) As another example, to display the contents of the
EXPENSES. DAT file, you must have read or execute access to
each directory in the directory tree, that is, to the JONES,
REPORTS, and JUNE
directories:
$ TYPE [JONES.REPORTS.JUNE]EXPENSES.DAT |
|
Delete |
Delete a directory file. You must remove all entries from a directory before you can delete the directory file. When you create a directory with the CREATE/DIRECTORY command, you do not, by default, get delete access. If you want to be able to delete a directory file, you must use the DCL command SET SECURITY/PROTECTION to explicitly assign delete access to the owner category. |
|
Control |
Change the characteristics of a directory. |
Using UIC Directory Protection
Note
To protect sensitive files, the directory protection alone is not adequate. You must also protect each individual file contained within the directory. Section 10.7.3, ''Protecting Disk Files'' contains instructions for protecting disk files.
By default, top-level directories receive UIC-based protection (S:RWE, O:RWE, G:RE, W:E) and no ACL. A newly created subdirectory receives the same protection as its parent directory, but delete access is removed from all categories.
To specify UIC-based protection explicitly when creating a directory, use the /PROTECTION qualifier with the CREATE/DIRECTORY command. You cannot specify an ACL for the directory before you create the directory.
To change the UIC-based protection of an existing directory, use the SET SECURITY/PROTECTION command for the directory file.
You can limit but not prohibit directory access by specifying execute access but not read access. Execute access on a directory permits you to examine and read files that you know are in the directory (that is, you know the file specifications) but prevents you from displaying a list of the files in the directory.
The following sections explain how to change directory protection characteristics and default ACL protection.
10.7.4.1. Changing Directory UIC Protection Characteristics
The DCL command SET DIRECTORY modifies the characteristics of one or more directories.
Example
$ SET DIRECTORY/OWNER_UIC=[360, 020] [DAVIS], [USERS]
The SET DIRECTORY command in this example modifies both the [DAVIS] and [USERS] directories, changing their owner UICs. Using the /OWNER_UIC qualifier requires SYSPRV (system privilege).
10.7.4.2. Changing Default ACL Protection
You can override default UIC protection for specified directories or subdirectories by placing a default protection ACE in the ACL of the appropriate directory file. The default protection specified in the ACE is applied to any new file created in the specified directory or in any subdirectory of the directory.
Example
DEFAULT_PROTECTION, S:RWED, O:RWED, G:RE, W:
10.7.5. Protecting Magnetic Tape Files
Because tapes are single-user devices, tape protection is only at the volume level. The protection codes for magnetic tape volumes are usually assigned with the INITIALIZE command.
You cannot use DCL commands to change protection characteristics on magnetic tape volumes. See Section 9.5.1, ''Using MOUNT Command Qualifiers When You Mount Disks'' for more information.
10.8. Accessing Disk Files
This section describes how to use DCL commands to access files at the file level, not at the record level. This applies to reading files on disks, which is explained in this section, as well as to copying tape files, which is explained in Section 10.10.1, ''Copying Files to Disk Volumes''.
Although DCL does allow you to manipulate files at the record level, for reasons of performance, you probably want to use a conventional programming language instead. VSI recommends that you write programs using the OpenVMS Record Management Services (RMS) facilities, which are specifically designed to access files at the record level. You can write these programs in any higher-level language that the operating system supports.
To access disk files at the file level, you can use DCL commands. You cannot, however, use DCL commands to read or write files that are not in the standard formats supported by the operating system. If the file formats are not standard, you must mount the volumes on which they reside with the /FOREIGN qualifier to have read and write access.
Although the examples used in this section show how to access disk files on RA90 disk packs, they also apply to other devices.
To read the contents of a disk file, use the DCL command TYPE, which displays the contents of a file on your terminal. To find the exact location of the disk file you want to read, use the DCL command DIRECTORY.
How to Perform This Task
- Look for the exact location of HISFILE by entering the following command:
$ DIRECTORY DISK$DOCUMENT:[CHARLES. . . ]HISFILE. *
This command instructs the operating system to search the entire [CHARLES] directory, including all the subdirectories, for all file types and version numbers of HISFILE.
The following information is displayed on your terminal:Directory DISK$DOCUMENT:[CHARLES. MEMO] HISFILE. UPD;1 Total of 1 file.
This display informs you that only one version of HISFILE exists, that its file type is UPD, and that it resides in the [CHARLES. MEMO] directory.
- To read the contents of this file, enter the following command:
$ TYPE [CHARLES. MEMO]HISFILE. UPD
The contents of HISFILE are displayed on your terminal.
10.9. Accessing Tape Files
This section describes file-level access for tapes. When you request access to a standard-labeled volume or a file, the operating system checks at the volume and file level to ensure that your process can access the volume or file. The level at which the system checks access depends on the operation you request and the type of access the operation requires.
When you access a volume or a file, the operating system software reads the volume- and file-header labels to determine whether access to the volume or file is restricted. Which label is read depends on the operation requested. For example, if you want to mount a volume, your process must have access to it.
The protection set on a file determines your access to the file. The expiration date field in the header can prevent you from overwriting or appending to a file immediately preceding the one in question. If the expiration date field has not been reached, a file has not expired.
To overwrite an unexpired file, you must specify the /OVERRIDE=EXPIRATION qualifier when you mount the volume. Performing this operation requires that you have read or write access.
|
Task |
Section |
|---|---|
|
Locate standard-labeled tape files | |
|
Use wildcards with tape files |
Section 10.9.3, ''Using Wildcard Characters with Tape Volumes'' |
|
Read files on tape volumes | |
|
Write files to tape volumes |
10.9.1. Understanding Tape File Names
OpenVMS extended names
Use OpenVMS extended names if your files are to remain on media using only the OpenVMS operating system.
Standard names
Use standard names if you want to move files to media on operating systems other than OpenVMS.
|
Characteristic |
OpenVMS Extended Names |
Standard Names |
|---|---|---|
|
Valid with... |
Tape and disk volumes |
Tape volumes |
|
Format |
filename.type;version |
filename.;version (Version is optional.) |
|
Length |
39. 39; |
17.; |
|
Valid Characters |
A through Z; 0 through 9; ampersand (&), hyphen (-), underscore ( _ ), and dollar sign ($); wildcard characters asterisk (*)and percent sign (%) |
ASCII "a"? characters enclosed in quotation marks (" "). Note that within a file name, DCL interprets a double set of quotation marks ("") as a single set ("). If a name has fewer than 17 characters, the system pads the name on the right with spaces to arrive at the 17-character maximum length. |
|
Examples |
OPENVMS_FILENAME.DAT;23 |
"GENLABEL#123";2 |
10.9.2. Locating Standard-Labeled Tape Files
Before accessing a particular file for a read or write operation, you might want to search the magnetic tape volume for that file. Use the DCL command DIRECTORY to locate a file or group of files on a tape volume.
- Compares the file name with the file header labels of each file until it finds a match in the file identifier field of the file header labels.
If you supply a version number in the file name, the magnetic tape file system compares it with the generation number and generation version-number fields in the first file header label.
If you do not specify a version number, the system neither defaults a version number nor checks the generation number and generation version-number fields.
The system selects the first file on the magnetic tape whose file name in the file identifier field matches the specified file name.
The operating system supports neither the directory nor the latest version number concept for magnetic tape volumes. The system does not search for or list the latest version of a specified file. The magnetic tape file system cannot increment version numbers of files written to tape; therefore, two or more files in the same volume set can have the same file name and version number.
Because the tape file system selects the first matching file name and version number (if specified), the position of the magnetic tape within the volume set determines which file is returned on a search operation. A search operation begins at the current position, so you might want to rewind the volume set before accessing a file.
The search for a matching file and version number (if specified) continues at the beginning of the header-label set of the next file. The search ends when the magnetic tape is positioned at the file where the search began.
If the system does not find the requested file on the current volume, it searches the remaining volumes in the volume set sequentially and then searches from the beginning of the first volume of the volume set. If the system still does not find the file name, it reports an error.
10.9.3. Using Wildcard Characters with Tape Volumes
The OpenVMS operating system supports a limited use of wildcard characters in file specifications for tape volumes.
|
Wildcard Character |
OpenVMS Extended Names |
Standard Names |
Description |
|---|---|---|---|
|
Asterisk (*) |
X |
X |
In OpenVMS extended names, you can use an asterisk anywhere in the file name and file type field to match a field or portion of a field. You can also use the asterisk in the version number field. In standard names, you can use only a single asterisk in a field. |
|
Percent sign (%) |
X |
In OpenVMS extended names, you can use a percent sign in a file specification only to match character positions within a field. You cannot use the percent sign in the version number field. |
Unlike OpenVMS extended names, which can consist of up to 39 characters each for the file name and file type, standard names can have a maximum of 17 characters.
The following examples show how to use wildcard characters in file specifications to search for files on tape volumes. These examples also show how you can use the DIRECTORY command with tapes. Note that the DIRECTORY command does not work the same with tape files as with disk files.
Examples
$ DIRECTORY MFA1:*. *;*
This command instructs the system to search a volume set. Because asterisks are used in the file specification and the asterisk is a valid wildcard character for both standard and OpenVMS extended names, the system returns both OpenVMS extended names and standard names. Note that the system returns tape file names within quotation marks.
$ DIRECTORY MTA1:%*. *;* $ DIRECTORY MTA0:*. %*;*
In these two commands, the search can match only with OpenVMS extended names because the percent sign is not valid for standard names. In the second command, the file type field must contain at least one character. Files with no file type are not returned.
$ DIRECTORY MTA0:*. ;*
In this example, the DIRECTORY command instructs the system to search for files with both standard names and OpenVMS extended names that do not have a file type.
10.9.4. Reading Files on Tape Volumes
Selects the file identifiers from the header labels
Returns the file attributes to your process
Positions the tape after the header labels of the last file accessed
|
Method |
Description |
|---|---|
|
Implicitly |
The file is closed implicitly when the drive encounters a tape mark while the system reads a file. The tape file system then reads the trailer labels, closes the file, and positions the tape at the next file. |
|
Explicitly |
The file is closed explicitly when you finish accessing the file before all the data in the file is read. The tape file system then closes the file without reading the trailer labels, and the tape remains at the current position. |
Example
$ TYPE MTA1:TEST*. %*;*
MTA1:TESTFILE. DOC;1This is a test file.
10.9.5. Writing Files to Tape Volumes
When you write files to a tape volume, the tape file system performs access checks, writes labels, and, if necessary, switches volumes.
10.9.5.1. Writing New Files That Overwrite Existing Files
Checks the expiration date and accessibility fields of the existing file.
- If overwriting is allowed, the tape file system performs the following task:
Overwrites the header label set of the existing file
Creates the file section
Writes the trailer labels
Writes two tape marks to denote the logical end-of-volume (EOV)
All files following the newly created file are lost.
To close a tape file that was opened for write access, the tape file system issues commands to the driver to write the labels, followed by a double tape mark that indicates the logical EOV.
10.9.5.2. Appending or Updating Files
|
Access Method |
Description |
|---|---|
|
Append |
When you access a file for an append operation, the tape is positioned before the tape mark that precedes the trailer labels. After the file is appended and closed, all files beyond the appended file are lost. When the positioning is complete, the processing is handled as if the file had been created. |
|
Update |
When you access a file for an update operation, the tape is positioned after the tape mark that follows the header labels. After the file is written to and closed, all files beyond the updated file are lost. The processing is handled as if the file had been created. |
Note that you can update or append tape files only when the header label contains a value of 0 for the buffer offset length. For more information about how to update and append tape files, see Section 10.10, ''Copying and Transferring Files''.
If you do not specify the /OVERRIDE=EXPIRATION qualifier when you update a file, the tape file system checks the expiration date field on the file before it allows you to write to that file.
In addition, before you append a file, the tape file system checks the expiration dates of both the file being appended and the file immediately following it. If the expiration date of either file has not been reached, the magnetic tape file system does not allow you to append the file.
Example
$ CREATE MTA0:MYFILE
Enter the contents of the file.
Press Ctrl/Z to close the file and write it to the tape volume without leaving the DCL command level.
10.10. Copying and Transferring Files
With the OpenVMS operating system, you can copy files on disks and tapes both within the system and across other operating systems. The OpenVMS operating system provides a number of facilities to assist you in both types of information transfer.
|
Method |
Description |
|---|---|
|
DCL command COPY |
Most frequently used method for transferring information. |
|
Convert utility (CONVERT) |
On a local system, allows you to change the organization of a file from sequential to indexed, for example. |
|
Exchange utility (EXCHANGE) |
On a local system, allows you to access disk and tape volumes that are formatted for operating systems other than OpenVMS. You can use EXCHANGE to transfer files between foreign volumes and standard Files–11 volumes. |
|
DCL command EXCHANGE /NETWORK |
Allows you to transfer files via the network between OpenVMS and other operating systems. The command is useful for transferring files between nodes that use OpenVMS and those that do not. The file is copied in such a way that it is meaningful on OpenVMS and other operating systems as well. |
|
Backup utility (BACKUP) |
With tapes, the only means of copying entire directory trees or files that are not sequentially structured. See Section 11.13.2, ''Backing Up Files and Directories to a Save Set'' for information about using BACKUP to copy files. |
|
CDRECORD.COM |
Lets you transfer files to a CD-R disk to create your own CD-ROM. Available on some AlphaServers. |
The COPY command, the Exchange utility, the DCL command EXCHANGE /NETWORK, and CDRECORD.COM are explained in the following sections.
In many cases, you can copy information without physically transporting media. Perhaps you want to copy files between systems that are not connected by a communications link. If so, you must be able to move your files physically from one location to another. A convenient way is to copy your files to a portable volume, such as a tape reel, tape cartridge, or disk pack, and then carry that volume to the location of the other system.
|
Task |
Section |
|---|---|
|
Copy files to disk volumes | |
|
Copy files to tape volumes | |
|
Continue to copy at the end of a tape |
Section 10.10.3, ''Continuing to Copy at the End of a Tape'' |
|
Use the Exchange utility to copy files | |
|
Use the DCL command EXCHANGE/NETWORK to transfer files over a network | |
|
Use CDRECORD. COM to create a CD-ROM |
10.10.1. Copying Files to Disk Volumes
Prepare the volume, as explained in Section 9.3, ''Initializing Volumes''.
Because disks are random-access devices, and because files must be listed in directories, you must create a directory to contain your files on the disk volume after you initialize the volume.
Copying from Disks
The default format for files on disk volumes is Files–11 Structure Level 2. You can also initialize disks in the Files–11 Structure Level 1 format, which is the format used by other operating systems, including RSX–11M, RSX–11M-PLUS, RSX–11D, and IAS.
Directory specifications
Individual file protections
User identification codes (UICs)
Creation times (but the dates are preserved)
Revision and backup dates and times
You can use the COPY command to copy the highest version of all the files in your default directory to another directory on that volume.
Copying from Tapes
The default format for files on tapes is the standard-labeled volume. The OpenVMS system supports sequential, relative, and indexed files on disks, but you can copy only sequential files to standard-labeled disk volumes. The only valid record formats are variable-length and fixed-length.
RMS-F-FNM, error in file name
This message indicates that the tape file name is not a valid OpenVMS file name.
If you enter the COPY command with the /LOG qualifier, the system sends a message to the current SYS$OUTPUT device after each file has been copied. To verify that the files were successfully copied, use the DIRECTORY command.
Examples
$ CREATE/DIRECTORY DMA3:[PUBS] $ DEFINE P DMA3:[PUBS] $ COPY *.* P $ COPY [PRIMER]*.* P $ COPY [COMMANDS]*.* P
The CREATE/DIRECTORY command in this example creates a disk directory file named [PUBS] on DMA3:, and the DEFINE command defines the logical name P as DMA3:[PUBS]. The COPY command copies the highest version of each file in the current default directory and in the directories [PRIMER] and [COMMANDS] to the newly created directory.
$ COPY *.* DMA5:[PRIVATE]
For this example, assume that the disk device DMA5: has been allocated to your process and that a disk volume has been initialized and mounted on that device. Also assume that you have a directory called PRIVATE already created on that volume.
$ COPY/LOG MTA1:"%&*?!SKI! """ SEASON.DAT %COPY-S-COPIED, MTA1:[]"%&*?!SKI! """. ;1copied to WRKD:[MANUAL]SEASON.DAT;1 (120 records)
The COPY/LOG command in this example copies the tape file %&*?!SKI!#" (# means space) to the file SEASON. DAT on the default disk and directory, WRKD:[MANUAL]. To copy the file to disk, you must specify a new file name. (The OpenVMS software provides defaults for segments of the file specification that are not specified.)
Because this example uses the /LOG qualifier, the system returns a message that confirms the file was copied from the MTA1: tape volume; the message also tells how many records were copied.
$ COPY/LOG MTA0:*.* * %COPY-S-COPIED, MTA0:[]TASTETEST. DAT;1copied to WRKD:[FOOD]TASTETEST. DAT;1 (249 records) %COPY-S-COPIED, MTA0:[]ALLAT;1 copied to WRKD:[FOOD]ALALL;1 (48 records) %COPY-S-NEWFILES, 2 files created
In this example, the COPY/LOG command specifies wildcard characters for the file name and file type. Therefore, the system copies the only two files on the tape volume to the disk volume.
$ COPY/LOG MTA1:*. * [EX] %COPY-S-COPIED, MTA1:[]. DAT;1 copied to WRKD:[EX]TEST. DAT21 records %COPY-E-OPENOUT, error opening WRKD:[EX]"%&*()!SKI! """. ;1 as output -RMS-F-FNM, error in file name %COPY-W-NOTCOPIED, MTA1:[]"%&*()!SKI! """. ;1 not copied %COPY-E-OPENOUT, error opening WRKD:[EX]"SANFRAN%%%""". ;1 as output -RMS-F-FNM, error in file name %COPY-W-NOTCOPIED, MTA1:[]"SANFRAN%%%""". ;1 not copied %COPY-S-COPIED, MTA1:[]OPENVMS_LONG$FILE_NAME. LONG_EXT;1copied to WRKD$:[EX]OPENVMS_LONG$FILE_NAME. LONG_EXT;1 (80 records) %COPY-S-COPIED, MTA1:[]C6. JOU;1 copied to WRKD:[EX]C6. JOU;1 (4 records) %COPY-S-NEWFILES, 2 files created
The COPY/LOG command string specifies that all files on the volume mounted on tape volume MTA1: are to be copied to the current default disk and directory WRKD:[EX]. However, the system does not copy files with tape file names, but, instead, returns an error message.
$ COPY/FTP sys$login:login. com - $_ system. bldg. corp. com" username password"::sys$login:login. tmpThis example transfers the OpenVMS RMS file SYS$LOGIN:LOGIN. COM to the remote file SYS$LOGIN:LOGIN. TMP over a TCP/IP connection while specifying the user name and password on the remote system.
10.10.2. Copying Files to Tape Volumes
You can use the COPY command to copy files from a disk volume to a tape volume. The procedures are similar to those for copying files from one disk volume to another. One difference, however, is that magnetic tapes are sequential-access devices and do not have directories. You must set up (initialize and mount) a tape device before copying disk files to a tape volume. (The characteristics of tape files are described in Section 10.9, ''Accessing Tape Files''. )
THIS_IS$AN_OPENVMSLONG_FILE. LONG_TYPE
Note
Most systems that are not OpenVMS do not use file names longer than 17 characters.
Although the OpenVMS system supports stream and variable with fixed-length control (VFC) records, it encodes these records in a variable-length format on standard-labeled volumes. Systems that are not OpenVMS do not distinguish stream records or VFC records from variable-length records; instead, they interpret both as variable-length records. Therefore, do not create either stream or VFC records on volumes that will be used for information interchange to a system that is not OpenVMS.
The following steps show how to use DCL commands to copy files from a default directory on a disk volume to a standard-labeled magnetic tape volume. Included in the steps are examples showing how to allocate, initialize, and use a magnetic tape to copy a set of your disk files.
How to Perform This Task
- First, allocate a drive as follows:
$ ALLOCATE MT: TAPE_DEVICE %DCL-I-ALLOC _MARS$MTA2: allocated
This ALLOCATE command requests the allocation of a tape drive whose name begins with MT. The logical name TAPE_DEVICE in this case refers to the MARS$MTA2: drive.
The system response indicates that unit 2 on controller A was available and is now allocated to you. You can now physically load the tape on the drive. Be sure the write ring on the tape is in place; if it is not, you cannot write to the tape.
- Initialize the tape by entering a command similar to the following:
$ INITIALIZE TAPE_DEVICE: GMB001/PROTECTION=(GROUP:R, WORLD)
The INITIALIZE command specifies the logical name for the volume (TAPE_DEVICE, which in this case refers to MTA2:) and the volume label for the tape volume (GMB001). The label can be no longer than six characters. The /PROTECTION qualifier defines a protection code restricting group access to read and allowing no world access.
- Enter the MOUNT command to mount the volume and write files to it, as in the following example:
$ MOUNT TAPE_DEVICE: GMB001 %MOUNT-I-MOUNTED, GMB001 mounted on _MTA2: $ COPY *.* TAPE_DEVICE:
The MOUNT command specifies the device name and volume label of the volume on the device. The COPY command copies the highest version of each file in your default directory onto the tape. The file names, file types, and version numbers of the output files default to the same file names, file types, and version numbers as the input files.
If you enter the COPY command with the /LOG qualifier, the system sends a message to the current SYS$OUTPUT device after it copies each file.
- You can also use the DIRECTORY command to verify that the files were copied successfully.
$ DIRECTORY TAPE_DEVICE:
This DIRECTORY command lists the file names and file types of all files on the tape.
- When you finish using the magnetic tape, dismount and deallocate it as follows:
$ DISMOUNT TAPE_DEVICE: $ DEALLOCATE TAPE_DEVICE:
If you do not dismount and deallocate the magnetic tape, the system does so automatically when you log out.
The following examples illustrate ways of copying files to tape volumes.
Examples
$ COPY *.* MTA2:
For this example, assume that MTA2: has been allocated to your process and that a tape volume has been initialized and mounted on that device. The COPY command writes files to the MTA2:tape volume.
The highest versions of all files in your default disk directory are copied to the tape volume. The file names, file types, and version numbers of the output files default to the same file names, file types, and version numbers as the input files.
$ COPY/LOG FORTAP.DAT MTA1:"%&*?!SKI! "" " %COPY-S-COPIED, WRKD:[MANUAL]FORTAP.DAT;1 copied to MTA1:[]"%&*?!SKI! """.;0 (120 records)
In this command for copying from disk to tape, a tape file name is specified as the output file specification. Note that the trailing space in the file name %&*?!SKI!#"# (where # means space) is not present because trailing spaces are not significant in tape names.
$ COPY/LOG OPENVMS_LONG$FILE_NAME. LONG_EXT MTA1: %COPY-S-COPIED, WRKD:[MANUAL]OPENVMS_LONG$FILE_NAME_EXT;1 copied to MTA1:OPENVMS_LONG$FILE_NAME. LONG_EXT;1 (80 records)
In this example, a long file name with a long file type is copied to the tape volume MTA1: with the same file name and type as on the disk volume.
$ COPY/LOG %%. JOU;* MTA1:*. * %COPY-S-COPIED, WRKD:[MANUAL]C6. JOU;1 copied to MTA1:[]C6. JOU;1 (4 records)
In this example, all files with a two-character file name and a file type of .JOU are copied to the tape volume MTA1: with the same file name and type as on the disk volume. Version numbers are preserved.
10.10.3. Continuing to Copy at the End of a Tape
%%%%%%%%%%% OPCOM, 14-MAY-2000 15:23:31. 78 %%%%%%%%%%% request 3, from user PLAW MOUNT new relative volume 2 (DW0QT2) on MTA1:
Note
Because messages are sent only to the operator's terminal that is enabled for tape messages, you do not usually see this message and might not realize that another tape is needed to complete the read or write operation.
If automatic volume switching is disabled or if the tape file system cannot mount a given volume, you might need to mount a continuation volume in a volume set. See Section 9.9.2, ''Mounting Continuation Volumes in a Tape Volume Set'' for information about mounting continuation volumes.
10.10.4. Using the Exchange Utility (EXCHANGE)
The Exchange utility (EXCHANGE) converts the format of files, as appropriate, when copying files between volumes of different structures. EXCHANGE recognizes all Files-11 and RT-11 disk volumes on OpenVMS devices, as well as all DOS-11 and RT-11 formatted volumes on 9-track tape devices.
For more information about how to use EXCHANGE and for a description of all EXCHANGE commands, qualifiers, and parameters, refer to online help or the archived manual OpenVMS Exchange Utility Manual.
10.10.5. Using the EXCHANGE/NETWORK Command
Use the DCL command EXCHANGE/NETWORK to transfer files to and from operating systems that do not support OpenVMS file organizations. This transfer occurs over a DECnet communications link that connects nodes that are both OpenVMS and not OpenVMS operating systems.
Transfer files between an OpenVMS node and a node that is not OpenVMS.
Transfer a group of input files to a group of output files.
Transfer files between two nodes that are not OpenVMS, provided those nodes share DECnet connections with the OpenVMS node that issues the EXCHANGE/NETWORK command.
For details on using the EXCHANGE/NETWORK command, refer to online help or the VSI OpenVMS DCL Dictionary.
How to Perform This Task
EXCHANGE/NETWORK input-filespec[, . . . ] output-filespec
|
input-filespec |
Specifies the name of an existing file to be transferred. (Wildcard characters are allowed. ) |
|
output-filespec |
Specifies the name of the output file into which the input is to be transferred. |
Example
$ EXCHANGE/NETWORK MYSYS_FILE. DAT FOO::FOREIGN_SYS. DAT
The command in this example transfers the file MYSYS_FILE.DAT, which is located in the current default device and directory, to the file FOREIGN_SYS.DAT on node FOO, which is not an OpenVMS node. By default, the command automatically determines whether the transfer method should be block or record I/O.
10.11. Creating a CD-ROM
CD-ROM is an alternative vehicle for distributing or backing up files. To create a CD-ROM, you need a CD-Recordable (CD-R or CD-RW) drive and a blank CD-R disk. CD-R and CD-RW drives use a laser beam to write (or burn) data to a blank CD-R disk. This differs from the audio compact discs you buy, which are pressed in a factory from a glass master. A CD-R disk is “write once.” This means you can write data on it one time only. It is not rewritable.
Read and write-once support for CD-R and CD-RW drives was introduced in OpenVMS Alpha Version 7. 3-1 on the AlphaServer DS25 system. OpenVMS supports only qualified CD-R and CD-RW drives. For more information on Alpha and IA-64 systems and the drives they support, refer to the appropriate page at the following Web site:
link is to be supplied
The write process creates a CD-ROM in Files-11 format. Any supported CD-ROM reader on a computer running OpenVMS will be able to read the CD-ROMs you create. The write process does not create a CD-ROM in ISO 9660 format. For more information, refer to the Guide to OpenVMS File Applications.
Note
You can create a CD-ROM that contains data file; however, audio recording is not supported at this time. Writing to CD-RW disks, which are rewritable, is also not supported at this time.
You cannot use COPY commands to transfer files from a hard drive to a CD-R disk. There is a two step process you must follow and a special program called CDRECORD.COM? that you must use.
The first step is to create a logical disk and container file on your hard drive. Organize the directory structure, volume information, and files on the logical disk as you want them to appear on the CD-ROM.
The second step is to run CDRECORD.COM to transfer the contents of the container file to a blank CD-R disk. CDRECORD.COM provides a set of commands you can use to:
Display information about the CD-R drive
Set up the logical disk and container file
Write to a CD-R disk
Reuse an existing container file
View online help
To view online help about CDRECORD.COM, enter the HELP command at the DCL prompt ($), as follows:
$ @SYS$MANAGER:CDRECORD H
10.11.1. Preparation
When you are ready to create a CD-ROM, make sure you have:
A CD-R or CD-RW drive connected to a system running OpenVMS Alpha Version 7.3-1 or later and I64.
A blank CD-R disk.
The device name of the CD-R drive (DQnn). If you do not know the device name, use the SHOW DEVICE DQ command. The device name for a CD-R drive is typically DQA0, DQA1, DQB0, or DQB1.
The DIAG, PHY_IO, and SYSPRV privileges. If you want to run at a higher priority level, you need the ALTPRI privilege as well.
To verify that you have the device name for the drive, enter the INQUIRE command followed by the device name. For example:
$ @SYS$MANAGER:CDRECORD INQUIRE DQA1:
The system verifies that DQA1 (or whatever device name you entered) is a CD-R or CD-RW drive. It also displays the read and write speed of the drive.
10.11.2. Setting Up a Logical Disk and Container File
You set up the structure and data you want on the hard drive, then use CDRECORD.COM to transfer everything to a blank CD-R disk. You do this by first creating a logical disk on the hard drive that you can mount, dismount, and generally treat as an actual disk. You also create a container file because CDRECORD.COM needs to work with the files on the logical disk as a single entity.
For best performance, clean up and defragment the hard drive on which you will create the logical disk and container file. For more information, see BACKUP/IMAGE in the VSI OpenVMS System Management Utilities Reference Manual.
Use the SETUP command in the following format to create a logical disk and a container file:
@SYS$MANAGER:CDRECORD SETUP filename LDAn: label nnnn
where:
filename is the name of the container file. Follow the usual rules
for naming files and include a file extension.
LDAn: is the name of the logical disk and can have a value of LDA1 to
LDA9999.
label is the volume label you want to give the logical disk and the
CD-ROM you will write. Follow the usual rules for assigning volume labels.
nnnn is the number of 512-byte blocks you want to allocate for the
container file. The number must be a multiple of 4. The default value is 1250000
(640 MB).
The container file must not be larger than the available space on the CD-R disk you are going to write to. Also, check the available space on your hard drive to make sure you have enough room for the container file.
In the following example:
$ @SYS$MANAGER:CDRECORD SETUP TESTFILE. DSK LDA1: FRED 1250000
TESTFILE. DSK is the container file name and extension.
LDA1: is the device name of the logical disk.
FRED is the volume label of the logical disk and the CD-ROM you will write.
1250000 is the space (in 512-byte units) that will be allocated on the hard drive for the container file.
Once you have created a logical disk and container file on your hard drive, you can populate the logical disk with directories and files.
10.11.3. Populating the Logical Disk
Mount the logical disk and use OpenVMS commands such as CREATE/DIR, COPY, etc., or Record Management Services (RMS), to create files on the logical disk. You can dismount and remount the logical disk any number of times and update its contents as often as necessary. You can also apply UIC-based security and access control lists (ACLs) to files.
Once you are satisfied with the contents of the logical disk, you are ready to write it to a CD-R disk.
10.11.4. Writing to a CD-R Disk
When you are ready to write to a CD-R disk, do the following:
Turn off other applications to ensure that the write operation will not be interrupted. An interruption might result in unreadable space on the CD-R disk. The write operation must complete to create a readable CD-ROM. You cannot reclaim the space used by an unfinished write operation.
Enter the WRITE command in the following format:
@SYS$MANAGER:CDRECORD WRITE filename LDAn: DAQnn: laser speed priority
where:
filenameis the file name and file extension of the container file.LDAn:is the name of the logical disk and can have a value of LDA1 to LDA9999.DQnn:is the device name of the CD-R or CD-RW drive.laserturns the laser beam on or off and can have a value of 0 (enable) or 1 (disable). The default is 0. Set this parameter to 1 (disable) when you want to test the process before actually writing to a CD-R disk.speedis the recording speed for the write operation and can have a value from 0 to 99. The default value is 0. CDRECORD.COM automatically determines the maximum recording speed based on the speed of the drive and the media speed rating. When speed is set to 0 (the default), CDRECORD.COM uses the maximum recording speed it automatically calculates. You can override this recording speed by entering a number from 1 to 99.Note
A CD-R or CD-RW drive might write at one of a number of fixed speeds (for example, at 2x, 4x, 8x, 16x, and 20x). Enter an override speed to set the drive to one of the speeds that it is capable of using. If you enter an unsupported speed for the drive, CDRECORD. COM picks a supported speed close to what you specified.
prioritylets you increase the base priority for the current process. Increase the priority to avoid buffer under runs that could cause a failure in the write operation. You can specify a priority between 1 and 63. If you do not specifypriority, your base priority is retained. If you increase the base priority, after the write operation completes you are asked if you want to reset the priority to its original level. If you answer no, the increased priority level is retained.
You should know whether or not your drive is required to record at a specific
speed. With some drives, to minimize errors, you might need to record at a slower
speed, depending on the ability of your computer to keep up the pace. You do not
want the write operation to pause because the computer cannot provide the data
quickly enough. Some drives can accommodate sporadic recording activity
(“burn-proof” drives). Raising the priority parameter can also
alleviate problems.
In the following example:
$ @SYS$MANAGER:CDRECORD WRITE TESTFILE. DSK LDA1: DQA0: 0 12
TESTFILE.DSK is the container filename and extension.
LDA1: is the device name of the logical disk.
DQA0: is the device name of the CD-R drive.
0 enables the laser beam.
12 is the recording speed.
10.11.5. Verifying a Write Operation
After you create CD media, you can verify that the data written to a CD-ROM can be read back and that it matches the original data. To verify data, enter the VERIFY command, using following format:
@SYS$MANAGER:CDRECORD VERIFY filename LDA1: label DQA0:
where:
filename is the name of the container file and its extension.
LDA1: is the device name of the logical disk.
label is the volume label of the logical disk (and the CD-R media).
DQA0: is the OpenVMS CD device name.
10.11.6. Reusing a Container File
When you have finished writing the contents of a logical disk to one or more CD-ROMs, you can delete the container file or reuse it, if you plan to create more CD-ROMs in the future. The advantages of reusing it are:
The space on the hard drive is already allocated. It is better to keep it intact, especially if space is an issue.
It saves steps.
Note
Reusing a container file DELETES the current contents of the file.
To reuse a container file, enter the REUSE command in the following format:
@SYS$MANAGER:CDRECORD REUSE filename LDAn: label
where:
filename is the name of the container file and its extension.
LDAn: is the device name of the logical disk.
label is the volume label of the logical disk.
In the following example:
$ @SYS$MANAGER:CDRECORD REUSE TESTFILE. DSK LDA1: FRED
TESTFILE.DSK is the name of the container file.
LDA1: is the device name of the logical disk.
FRED is the volume label of the logical disk.
Use OpenVMS commands to create directories and files. Once you are satisfied with the contents, you are ready to write to a CD-R disk with the CDRECORD WRITE command.
10.11.7. CDRECORD Command Summary
The format for the CDRECORD. COM command line is:
@ SYS$MANAGER:CDRECORD command [parameter1|parameter2|...]
The CDRECORD commands are:
HELP
Displays online help.
INQUIRE
Displays information about the CD-R or CD-RW drive.
REUSE
Lets you repopulate an existing logical disk and container file.
SETUP
Establishes a logical disk and container file on the hard drive.
VERIFY
Lets you check the results of a WRITE operation.
WRITE
Records the contents of a logical disk to a CD-R disk.
Table 10.12, ''CDRECORD. COM Commands and Parameters'' summarizes the parameters for each command.
| Command | Parameters | |
|---|---|---|
| HELP | OVERVIEW | Displays online help on using CDRECORD. COM to create a CD-ROM. |
| INQUIRE | Displays online help for the INQUIRE command. | |
| SETUP | Displays online help for the SETUP command. | |
| REUSE | Displays online help for the REUSE command. | |
| VERIFY | Displays online help for the VERIFY command. | |
| WRITE | Displays online help for the WRITE command. | |
| INQUIRE | DQnn: | Device name of the CD-R or CD-RW drive. The first two characters must be DQ. The third character is an alphabetic character from A to Z. The fourth character must be 0 or 1. The default is DQA0. |
| REUSE | filename | File name and extension of the container file. |
| LDAn: | Name of the logical disk. Can have a value of LDA1 to LDA9999. The default is LDA1. | |
| label | Volume label of the logical disk. | |
| VERIFY | filename | File name and extension of the container file. |
| LDAn: | Name of the logical disk. Can have a value of LDA1 to LDA9999. The default is LDA1. | |
| label | Volume label for the logical disk and the CD-ROM. Follow the usual rules for assigning volume labels. | |
| DQnn: | Device name of the CD-R drive. The first two characters must be DQ. The third character is an alphabetic character from A to Z. The fourth character must be 0 or 1. The default is DQA0. | |
| SETUP | filename | Name of the container file. Follow the usual rules for naming files and include a file extension. |
| LDAn: | Name of the logical disk. Can have a value of LDA1 to LDA9999. The default is LDA1. | |
| label | Volume label for the logical disk and the CD-ROM. Follow the usual rules for assigning volume labels. | |
| nnnn: | Number of 512-byte blocks to allocate for the container file. The number must be a multiple of 4. The default value is 1250000 (640 MB). | |
| WRITE | filename | File name and extension of the container file. |
| LDAn: | Name of the logical disk. Can have a value of LDA1 to LDA9999. The default is LDA1. | |
| DQnn: | Device name of the CD-R or CD-RW drive. The first two characters must be DQ. The third character is an alphabetic character from A to Z. The fourth character must be 0 or 1. The default is DQA0. | |
| laser | Turns the laser beam on or off. Can have a value of 0 (enable) or 1 (disable). The default is 0. | |
| speed | Recording speed for the write operation. Can have a value from 0 to 99. The default value is 0 to accept the maximum recording speed calculated by CDRECORD.COM. A value of 1 to 99 manually sets the recording speed (to that value). | |
| priority | Changes the base priority for the current process. Can have a value of 1 to 63. If you do not specify a value, your base priority is retained. If you change the base priority, you are asked if you want to reset the priority to its original level. If you answer no, the increased priority level is retained. Requires ALTPRI privilege. |
The steps for creating a CD-ROM are:
Use the INQUIRE command to verify the device name of the CD-R drive. For example:
$ @SYS$MANAGER:CDRECORD INQUIRE DQA0:
Use the SETUP command to set up a logical disk and container file on the hard drive. For example:
$ @SYS$MANAGER:CDRECORD SETUP TESTFILE. DSK LDA1: FRED 1250000
Populate the logical disk by using OpenVMS commands such as CREATE /DIR and COPY.
Use the WRITE command to write the contents of the logical disk to a CD-R disk. For example:
$ @SYS$MANAGER:CDRECORD WRITE TESTFILE. DSK LDA1: DQA0:
10.12. Understanding Hard Links
A link, or directory entry, is an object in a directory that associates a file name and a version number with a specific file. All links on a volume must represent files on the same volume.
primary links
aliases
hard links
OpenVMS Alpha and I64 supports files with 0 or more links. The first link to a file is referred to as the "primary link, " and is distinguished by having the directory ID and name of the link stored in the file header. Additional links are either aliases or hard links, depending on whether the volume the file resides on has hard links enabled or disabled.
On OpenVMS Alpha and IA-64 systems, you can enable hard links on particular volumes. On volumes where hard links are not enabled, non-primary links are aliases. If you choose to enable hard link capability, you cannot create VMS aliases for files on that volume. A volume can support either hard links or aliases, but not both. The SET FILE /ENTER command is used to create either a hard link or an alias for a file.
The essential difference between hard links and aliases is in the effect of a delete operation. What is usually referred to as deleting a file is more precisely deleting a linkto that file. When a link to a file is deleted, the associated file might also be deleted. Whether a file is deleted or not depends on if the volume that the file is on has hard links enabled, and if a hard link to that file has been created.
If you have hard links enabled, a file is actually deleted when there are no more links to file. If you do not have hard links enabled, and you have not created an alias for a file, essentially only one link to that file exists: the primary link. If you create an alias for that file, and you delete the alias, the file still exists because the primary link to that file has not been deleted. The alias is just another name in a directory for this link. Deleting the primary link deletes the file, leaving the alias entries.
Attempting to access a file through an alias link to a deleted file results in a "no such file " error. With a primary link and hard links, many links exist. You actually delete a file when you delete both the primary link and all hard links to that file.
An important related consideration is disk quota. On OpenVMS, the size of each file is charged to the file owner's disk quota. If other users create hard links to a file, they are not charged disk quota. The owner may delete any links to the file in directories he can access, while hard links in other user's directories may cause the file to be retained; the owner will continue to be charged for its quota.
When you enable hard link support on an existing volume, be sure to also execute the ANALYZE /DISK /REPAIR command to ensure the proper operation of hard links.
OpenVMS supports hard links, or aliases, to directories as well as to files. Most UNIX systems limit hard links only to normal files.
10.12.1. Hard Link Examples (INIT and SET VOLUME)
You can enable hard link support using either the INITIALIZE command or the SET VOLUME command.
$ INIT/VOLUME_CHARACTERISTICS=HARDLINKS
$ SET VOLUME/VOLUME_CHARACTERISTICS=HARDLINKS
$ SET VOLUME SYS$DISK/VOLUME_CHARACTERISTICS=NOHARDLINKS
$ CREATE FOO. A $ SET FILE FOO. A/ENTER=FOO. B
$ DELETE FOO. A;1
$ DIR FOO. B
$ ANALYZE/DISK/REPAIR
ANALYZE/DISK/REPAIR counts the number of directory entries that references each file, and sets the link count if it is incorrect. Before creating aliases for files on disks that have previously had hard link support enabled, be sure to use the ANALYZE/DISK/REPAIR command to set the link count correctly. If you are unsure as to whether hard links are currently enabled or disabled, issue the SHOW DEVICE/FULL command.
$DIRECTORY/LINK
Chapter 11. Using BACKUP
You can guard against data loss or corruption by using the OpenVMS Backup utility (BACKUP) to create copies of your files, directories, and disks. In case of a problem—for example, a disk drive failure—you can restore the backup copy and continue your work with minimal disruption.
Information Provided in This Chapter
|
Task |
Section |
|---|---|
|
Formulating a BACKUP strategy | |
|
Setting software parameters for efficient backups |
Section 11.7, ''Setting Software Parameters for Efficient Backups'' |
|
Using disks and tapes | |
|
Listing the contents of a BACKUP save set |
Section 11.10, ''Listing the Contents of a BACKUP Save Set'' |
|
Backing up user disks and volume shadow sets | |
|
Restoring user disks and volume shadow sets | |
|
Backing up and restoring the system disk | |
|
Ensuring data integrity | |
|
Troubleshooting |
|
Concept |
Section |
|---|---|
|
Types of backups | |
|
The BACKUP command line | |
|
The Backup Manager | |
|
Save sets | |
|
BACKUP file formats | |
|
Volume initialization | |
|
OPCOM and volumes | |
|
Multivolume BACKUP operations |
Section 11.11, ''Understanding Multivolume BACKUP Operations'' |
|
BACKUP tape label processing |
Section 11.12, ''Understanding BACKUP Tape Label Processing'' |
|
Standalone BACKUP (VAX only) |
Section 11.17.2, ''Understanding Standalone BACKUP (VAX Only)'' |
See Guidelines for OpenVMS Cluster Configurations for information about using BACKUP when your backup medium is connected to a Fibre Channel interconnect.
11.1. Overview of BACKUP Tasks
For BACKUP to effectively guard against data loss, you must back up important data on a regular basis and be familiar with how to restore the data when necessary.
Besides backing up your own files, directories, and disks, you should also back up your system disk. If you have a standalone workstation, backing up your system disk is probably your responsibility. If your system is part of a large clustered computer system, an operator or system manager is probably responsible for backing up the system disk.
Use the menu system described in Section 11.17.1, ''Starting the Menu System''.
- Use a special version of the OpenVMS Backup utility called standalone BACKUP, described in Section 11.17.2, ''Understanding Standalone BACKUP (VAX Only)''. Use standalone BACKUP if you do not have access to the OpenVMS VAX operating system distribution compact disc.
Note
Standalone BACKUP is not supported on OpenVMS Alpha systems beginning with Version 6.1; you must use the menu system provided on the distribution CD–ROM.
Performing an image backup using BACKUP also eliminates disk fragmentation. Fragmentation can occur as you create and extend files on a disk. If the file system cannot store files in contiguous blocks, it stores them in noncontiguous pieces. Eventually, the disk can become severely fragmented and system performance suffers.
Note
Some layered products have their own special backup procedures. For more information, refer to the layered product documentation.
11.2. Understanding Types of Backups
|
Operation |
Description |
|---|---|
|
File operation |
Processes individual files or directories. Section 11.13, ''Backing Up Files and Directories'' describes file operations. |
|
Selective operation |
Processes files or volumes selectively, according to criteria such as version number, file type, UIC, date and time of creation, expiration date, or modification date. Performs selective save operations by using wildcard characters and input file-selection qualifiers (for example, /BACKUP, /BEFORE, /BY_OWNER [/OWNER_UIC], /CREATED, /EXCLUDE, /EXPIRED, /MODIFIED, and /SINCE). Section 11.13, ''Backing Up Files and Directories'' describes selective operations. |
|
Physical operation |
Copies, saves, restores, or compares an entire volume in terms of logical blocks, ignoring any file structure. |
|
Image operation |
Processes all files on the input disk. The types of image operations are:
Because an image copy or backup operation processes all files on the input volume, you cannot specify file-selection qualifiers for these operations. You can, however, restore files and directories selectively from an image save set. |
|
Incremental operation |
The two types of incremental operations are:
|
Two types of BACKUP operations, file and image, support converting ODS-5 file names to ODS-2 file names. Refer to Section 9.5.5.3, ''Converting from ODS-5 Files to ODS-2 '' for more information.
11.3. Formulating a Backup Strategy
The resources you can devote to backups
The importance of the data
The volatility of the data
For example, if you have a standalone workstation, a nightly image backup might be your best approach.
Under other circumstances, you might want to choose some combination of image and incremental backups. For example, daily image backups might be inconvenient if your system always has interactive users logged in. You could choose to perform a weekly image backup and nightly incremental backups.
|
Backup Type |
Advantages |
Disadvantages |
|---|---|---|
|
Image |
Faster to restore than incremental backups. Backs up entire disk. |
Uses more space and time than incremental backups. Requires that no interactive users are logged in because of the effect on system performance and because of open file considerations (see Section 11.15.1, ''Preparing to Back Up User Disks''). |
|
Incremental |
Takes less time and media storage space. |
More difficult to restore files. Still requires periodic image backups. |
Note
The first time you back up a disk, you must perform an image backup using the BACKUP/IMAGE/RECORD command before you perform regular incremental backups. The image backup saves a copy of the entire disk and marks each file as being saved. Subsequent incremental backups assume that an image backup has been performed; only new or modified files are saved.
If an image backup is not performed first, the incremental backups save more files than might be necessary to ensure that an incremental restore operation will be successful.
- If you perform an ANALYZE/DISK operation immediately after a BACKUP/IMAGE restore operation of a disk, the system might display a warning message similar to the following one:
%ANALDISK-W-ALLOCCLR, blocks incorrectly marked allocated LBN 97 to 105, RVN 1This can occur if you attempt to perform a BACKUP/IMAGE restore operation where alias file entries are restored as separate (primary) file entries. (The primary file, which uses the same file header but allocates different data storage blocks, is also restored.)
However, despite the error message, note that there is no BACKUP error or loss of data.
All of the files fit on a single piece of storage media.
Your site uses a tape loader.
You have several disk or tape drives available.
In these cases, the backup can be performed by a batch job that runs late at night or at some other time when interactive use of the system is likely to be at a minimum. Section 11.15.7, ''Backing Up Your Workstation Disk'' contains some sample command procedures that you can run in a batch job to back up your disks.
11.4. Understanding the Backup Interfaces
The BACKUP command, which is a command in the DCL command line interface
The Backup Manager, which is an interactive screen-oriented interface
11.4.1. The BACKUP Command Line
BACKUP/qualifiers input-specifier/qualifiers output-specifier/qualifiers
|
Type |
Position |
Effect |
|---|---|---|
|
Command qualifier |
Anywhere on the command line |
Affects both input and output specifiers. |
|
Input specifier qualifier |
Directly after the input specifier |
Affects only the input specifier. |
|
Output specifier qualifier |
Directly after the output specifier |
Affects only the output specifiers. |
When you use BACKUP, make sure you place BACKUP qualifiers in their correct positions on the command line. For more information about the BACKUP command line, refer to the VSI OpenVMS System Management Utilities Reference Manual.
11.4.1.1. Using Extended Character Sets
ODS-2 standard file name
ISO Latin-1
Unicode (UCS-2)
For additional information about extended character sets, refer to the VSI OpenVMS User's Manual.
11.4.1.2. Specifying Input Files
$ BACKUP FILE.DAT;-2 SAVED_FILE.DAT
This example shows that you can choose the second-from-the-most-recent version of the input file and assign it a different file name.
With BACKUP, you cannot use -0 as a relative file version to specify the earliest version of the file. BACKUP processes -0 as if it were 0, saving the most recent version of the file for processing.
11.4.2. The Backup Manager
Backup Manager is a screen-oriented interface to the OpenVMS Backup utility (BACKUP) that presents BACKUP's capabilities in an intuitive, task-oriented, self-documenting manner. Backup Manager can ease backup tasks by guiding you through the backup process. No real performance differences exist between using the Backup Manager and using the BACKUP command line.
Any VSI VTxxx-series video display terminal or equivalent terminal emulator
VMS VAX Version 5.4 or higher systems, and OpenVMS Alpha Version 1.5 or higher systems
The Backup Manager interface is based on the OpenVMS Screen Management Run-Time Library (RTL) routines.
11.4.2.1. Backup Manager Features
Save an entire volume to a save set
Save selected files from a volume to a save set
Restore an entire volume from a save set
Restore selected files from a save set
List a save set
Context-sensitive help
Press PF2 or the Help key to get help about the object at which the display cursor is currently located.
Context-sensitive hints
You are prompted for input by a one-line "hint" about the field where the display cursor is currently located.
Pull-down help
Choose the pull-down Help menu bar item for more extensive help on a variety of Backup Manager topics.
11.4.2.2. Getting Started with Backup Manager
$ RUN SYS$SYSTEM:BACKUP$MANAGER
Output from the Backup utility is automatically displayed when an operation starts. You can suspend output at any time (Ctrl/P) and scroll through it. You can also use Ctrl/T to display status or Ctrl/C to stop the current BACKUP operation.
11.5. Understanding Save Sets
|
Media Type |
For More Information |
|---|---|
|
Magnetic tape | |
|
Files–11 disk | |
|
Files–11 disk on a remote node (network save set) | |
|
Sequential disk |
11.5.1. Magnetic Tape Save Sets
Magnetic tape is the most commonly used media for storing BACKUP save sets. It is less expensive than disk media, and its compact size makes it easy to store. You can use more than one tape device at a time to save or restore data; this allows processing to continue on another tape while the one most recently used is rewinding.
BACKUP treats all magnetic tape files as BACKUP save sets. Because you cannot use save-set specifications as both the input and output specifiers in a BACKUP command line, you cannot perform a BACKUP operation from one magnetic tape to another.
VSI recommends that you copy magnetic tape save sets to disk with the BACKUP command; however, you can use the DCL command COPY on magnetic tape save sets that were created with the /INTERCHANGE qualifier.
Save-set specifications on magnetic tape are limited to 17 characters, including the period delimiter (.) and file type. The following text is a valid save-set specification:
WKLY27JAN2000.BCK
When restoring data from tape, if you do not include a save-set name with an input magnetic tape, BACKUP reads the next save set it encounters on the tape. (If you specify the input save-set qualifier /REWIND, BACKUP rewinds the tape and reads the first save set on the tape.)
11.5.2. Files–11 Disk Save Sets
To write save sets on a Files–11 disk, you must include the output save-set qualifier /SAVE_SET. The /SAVE_SET qualifier indicates to BACKUP that you want to create a save set, rather than a copy of the selected files, on the output volume. The disk must be mounted as a Files–11 volume; all volumes in a volume set must be mounted.
When BACKUP reads a save set as a Files–11 save set, all volumes of the save set must be mounted. To read a save set that is not located in your process default directory, you must specify the directory in which the save set is located.
When BACKUP reads a Files–11 save set as a sequential-disk save set, you can mount the volumes one at a time. You must specify the master file directory [000000] in the save-set specification when reading a Files–11 save set as a sequential-disk save set.
A save set stored on a Files–11 disk is a standard file, however, and can be copied, renamed, deleted, or backed up.
11.5.3. Network Save Sets
You can create or read a network save set on a Files–11 disk attached to a remote node by specifying the node name of a remote node in the save-set specification. A remote node is accessible to the node you are working on (the host node) over a network. The network save set must be located on a publicly accessible disk (a disk mounted from the remote node with the /SYSTEM, /GROUP, or /CLUSTER qualifier) on the remote node.
remote_nodename"username password"::device_name:[directory]
Example
$ BACKUP _FROM: [MY_DIR] _TO: DOUBLE"username password"::DBA0:SAVEIT.BCK/SAVE_SET
Omit the access control string if it is not required to gain access to the remote node, such as in the case of proxy network access. Refer to the VSI OpenVMS DECnet Networking Manual for more information about access control strings and proxy network access.
11.5.4. Sequential-Disk Save Sets
Sequential-disk save sets allow you to treat a Files–11 disk volume sequentially, (like a magnetic tape volume). The primary advantage of using sequential-disk save sets is that you can mount multivolume save sets one volume at a time. This is particularly useful on systems without tape drives that have a large fixed-media disk and a small removable disk.
When one sequential disk is full, BACKUP prompts you to mount another disk. You can use more than one disk device at a time to save or restore data; this allows processing to continue on another disk while the one most recently used is spinning down.
You must have the privilege LOG_IO or PHY_IO to read or write a multivolume sequential-disk save set.
Before creating a sequential-disk save set, mount the first volume of the sequential-disk save set using the DCL command MOUNT /FOREIGN. Although the disk is mounted with the /FOREIGN qualifier, BACKUP manages the disk using Files–11 structure.
%BACKUP-F-IMGFILSPE, /IMAGE specification must only have device name
Do not specify a directory name for the save set; sequential-disk save sets are always entered in the master file directory [000000]. Even if you specify a directory other than the master file directory in a save operation, the save set is entered in the master file directory. If you specify a directory other than the master file directory in a restore or list operation, BACKUP returns an error message indicating that it cannot locate the file.
The disk must be Files–11 Structure Level 2 or 5.
The disk must not be part of a volume set.
The cluster factor of the disk must be 1.
The free space on the disk cannot be fragmented into more than 100 contiguous extents.
The index file cannot be extended.
The master file directory cannot be extended.
Volumes you use for sequential-disk save sets should contain only save sets. You must initialize a volume that has been used for general file processing before using it as a sequential-disk volume. You can place a maximum of 12 save sets on a single sequential disk. Use Files–11 disk save sets if you want to create more than 12 save sets on a single disk.
When BACKUP reads a save set as a sequential-disk save set, the save set can be mounted one volume at a time. The default directory for the save set file specification is the master file directory [000000] on the disk.
When BACKUP reads a save set as a Files–11 save set, all volumes of the save set must be mounted. The default directory is your process default directory. Therefore, you must specify the master file directory [000000] in order to read a sequential-disk save set as a Files–11 save set.
11.6. Understanding BACKUP File Formats
On VAX systems, BACKUP saves files and directories from Files–11 Structure Level 1 and 2 disks to disks or magnetic tapes. If necessary, you can use BACKUP to restore the saved files and directories to Files–11 Structure Level 1 and 2 disks.
If a VAX system performs image backup of an Alpha system disk, a restore operation causes the Alpha system to reboot successfully.
Note
The OpenVMS Alpha operating system does not support the Files–11 Structure Level 1 format.
You cannot back up files on ISO 9660-formatted media, but you can restore save sets stored on ISO 9660-formatted media.
For more information about the Files–11 disk structure, see Section 9.1.1.2, ''Disk and CD–ROM File Structures''. For more information about ISO 9660 devices, see Section 8.3.2, ''Getting Information About ISO 9660-Formatted Devices''.
11.7. Setting Software Parameters for Efficient Backups
Primary limitations on the performance of backup in save operations are the speed of the hardware components involved and the layout of the files being saved. You can speed up backup operations twofold or more by replacing all or some of the hardware components with ones that perform faster.
Most save operations are limited by the time required to open a file and read its extents into memory. Hardware or software caches cannot help to improve disk performance because the data is read only once. Therefore, how files are laid out on disk is important.
File Sizes and Extents
Input file processing in BACKUP results in a minimum of two 1-block read I/Os to open the file and to read the file attributes. This overhead is the same for small as for large files. Therefore, saving the same amount of data from large files can be as much as three times more efficient than saving data from small files.
In issuing one I/O for each file extent or file fragment on disk, BACKUP must break down I/Os for larger extents to fit the internal buffer size that the /BLOCKSIZE parameter specifies. The maximum I/O that BACKUP can issue is 127 blocks, or 63.5K. Files with just one extent (contiguous file) can be saved most efficiently. The more extents per file, the longer it takes to save the file.
BACKUP reads files from disk in alphabetic order by directory path and file name. You can obtain the best performance by placing files and all their extents on disk in alphabetic order and make the files contiguous. You can accomplish this by using BACKUP/IMAGE when you do an image save-and-restore. Most defragmentation utilities do not arrange files in alphabetic order, and, in some cases, these utilities decrease the performance gains that result from consolidating files into larger extents.
The Effect of File Size on BACKUP Performance
File size can have a great effect on BACKUP performance when creating save sets, copies, and image backups, but file size has not effect on physical backups. The graph in XXXXX illustrates that, under certain circumstances, a set of small files can take up to 40 times longer to back up than a set of large files containing the same amount of data. This is due to file system overhead. The four different curves in the figure show that the effect varies with the type of BACKUP and the components involved.
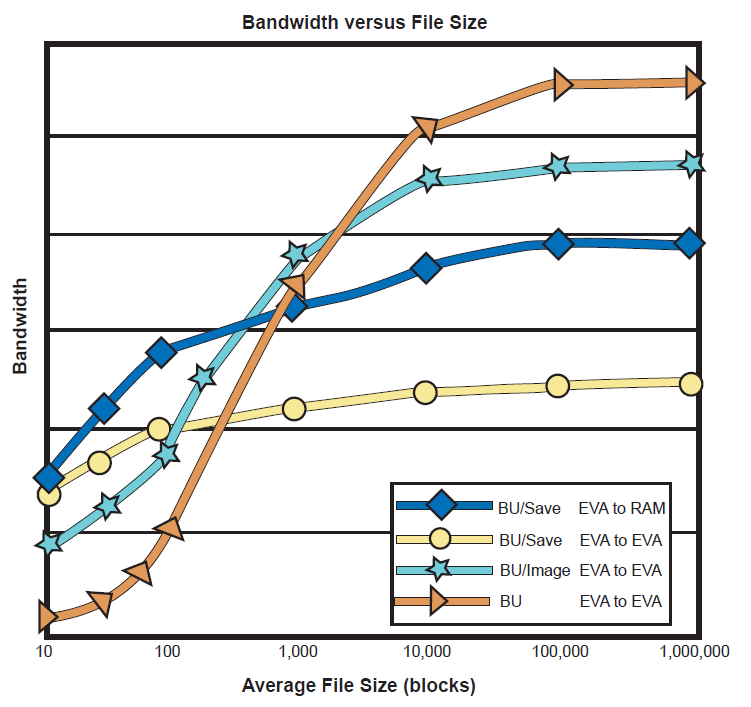
File Layout: Fragmentation
Fragmentation can also slow down BACKUP considerably. On HSJ50s, fragmented files can take over twice as long to back up as non-fragmented files. The effect on performance of EVAs and other storage arrays has not been quantified but should, nevertheless, be taken into consideration when you look at performance that fails to meet expectations.
CPU Consumption
With advances in disk and tape drives, backups can run fast enough to consume substantial CPU, especially when creating save sets. This load can be considerable if multiple backups are run simultaneously on the same machine. Under certain circumstances, tests with 8 parallel backup processes can saturate a 4-CPU machine.
Software Tuning
You can gain some performance improvements with the current design of OpenVMS BACKUP by adjusting system and process parameters. This is not, however, a simple, straightforward task, and you can expect a performance improvement of, typically, less than 15%. Changing system and process parameters can also result in worse performance. Disks with different file fragmentation and file sizes might require different process quotas to save these files efficiently.
Software tuning parameters are only for save operations; they have no impact on restore performance.
Qualifiers That Can Affect Performance
The qualifiers listed in Table 11.4, ''BACKUP Qualifiers That Affect Performance'' can influence BACKUP performance.
| Qualifier | Description |
|---|---|
| /BLOCKSIZE |
To write a save set to a tape device, always use /BLOCKSIZE = 65,024, the largest block size you can use with save sets on tape. Note: To be able to copy save sets from tape to disk, use a maximum block size of 32,768. |
| /GROUP |
Today’s tape and disk drive technology makes the XOR group feature of BACKUP obsolete. Use /GROUP=0. (If you do not specify the /GROUP qualifier, the default of 10 is used, which adds 10% more data to a save set). |
| /CRC |
Keep the default of /CRC, which does not add extra data to the save set. A 32-bit field is always reserved in a save set whether you enable CRC or not. However, adding a small amount of CPU time helps to ensure the integrity of a backup save set. |
| /FAST |
This qualifier does not imply that your backup will go faster! /FAST forces BACKUP to read [000000]INDEXF.SYS to build a decision table to speed up the file selection process. If you select only a few files, reading all of INDEXF.SYS results in unnecessary disk I/Os; in this case, do not use /FAST. Time a save operation with and without using /FAST. The /IMAGE qualifier implicitly includes /FAST. |
Disk Settings That Affect BACKUP Performance
The disk settings in Table 11.5, ''Disk Settings That Affect BACKUP Performance'' can influence BACKUP performance when writing a save set to disk.
| Disk Setting | Description |
|---|---|
|
SET RMS/BUFFER=127/EXTEND=5000 |
This setting allows BACKUP to use more larger buffers when writing save set blocks to disk. The larger extend value reduces the impact of extending the save set file during a save operation. Enter this command before the BACKUP command line. |
|
SET VOLUME/NOHIGHWATER_MARKING |
Disabling highwater marking reduces the overhead of extending a save set file. Enter this command once for each volume. |
Using WSQUOTA
WSQUOTA is the most sensitive parameter to influence the save performance of BACKUP. While tuning,, set a high value for WSQUOTA (set it to WSMAX) for the account running the backups. To change WSQUOTA, use the DCL command SET WORKING_SET command before the BACKUP command line. This is a more convenient way to change WSQUOTA than to change the quota using the AUTHORIZE utility.
WSQUOTA and /BLOCKSIZE, together, create the in-memory buffers at the start of a save operation. Refer to the output of /LIST for the actual number of buffers used. Although you might assume that more buffers are better, keep in mind that BACKUP scans the input disk for files to be saved and maps these files to the available buffer space. The more buffers you have, the longer this operation takes. At the same time, the output tape drive or disk drive is idle. The fewer buffers created (by using smaller WSQUOTA values) tends to result in better overlap of input and output I/Os and, hence, better performance, especially when the save set is written to a tape device.
Recommended Process Quotas
Table 11.6, ''Process Quotas Recommended for Efficient Backups'' indicates how to set process quotas for efficient backups.
| Process Quotas | Tuning Impact | Pooled Quota? | Recommended Setting |
|---|---|---|---|
| WSQUOTA | High | No |
|
| FILLM | Low | Yes |
|
| DIOLM | Low | No |
|
| WSEXTENT | None | No | Equal to WSMAX |
| PGFLQUOTA | None | Yes | Equal to or greater than WSQUOTA + 25,000 |
| ASTLM | None | No | Equal to or greater than DIOLM + 100 |
| BIOLM | None | No | Equal to or greater than FILLM + 100 |
| BYTLM | None | Yes | Equal to or greater than 256 * FILLM + 6 * DIOLM + 10,000 |
| ENQLM | None | Yes | Equal to or greater than FILLM + 100 |
How to Perform This Task
To set process quotas for efficient backups, perform the following actions:
Use the Authorize utility (AUTHORIZE) to determine the current quota values for the account you will use for backups. For example, if you are using the SYSTEM account for backups, enter the following commands:
$ SET DEFAULT SYS$SYSTEM $ RUN AUTHORIZE UAF> SHOW SYSTEM
Using the System Management utility (SYSMAN), determine the value of the system parameter WSMAX, as follows:
$ RUN SYS$SYSTEM:SYSMAN SYSMAN> PARAMETERS SHOW WSMAX %SYSMAN-I-USEACTNOD, a USE ACTIVE has been defaulted on node DIEM Node DIEM: Parameters in use: ACTIVE Parameter Name Current Default Minimum Maximum Unit Dynamic -------------- ------- ------- ------- ------- ---- ------- WSMAX 100000 4096 1024 134217728 Pagelets SYSMAN> EXIT $
In this case, the value for WSMAX, as shown in the column marked Current, is 100000. Use this value to help set the correct values for the process quotas.
Use AUTHORIZE to compare the values for the process quotas to the recommended values for efficient backups, as shown in Table 11.6, ''Process Quotas Recommended for Efficient Backups''.
If necessary, change process quotas using the AUTHORIZE command MODIFY. If you change process quotas, you must log out and log in again for the changes to take effect.
Table 11.7, ''Sample Process Quotas for Efficient Backups'' lists a set of process quota values that are appropriate for many configurations. If your disks are highly fragmented or if your backups will be performed during periods of heavy system use, you should reduce the values shown for WSQUOTA and FILLM.
Table 11.7. Sample Process Quotas for Efficient Backups Process Quota Suggested Value WSQUOTA 32768 FILLM 128 DIOLM 100 WSEXTENT 50000 PGFLQUOTA 100000 ASTLM 1000 BIOLM 1000 BYTLM 100000 ENQLM 1000
Example
The following steps show the commands that you would use to run the Authorize utility and set process quotas for the SYSTEM account (if you plan to run backups from a different account, determine the process quotas for that account):
Determine the current quota values:
$ SET DEFAULT SYS$SYSTEM $ RUN AUTHORIZE UAF> SHOW SYSTEM Username: SYSTEM Owner: SYSTEM MANAGER Account: SYSTEM UIC: [1,4] ([SYSTEM]) CLI: DCL Tables: DCLTABLES Default: SYS$SYSROOT:[SYSMGR] . . . Maxjobs: 0 Fillm: 40 Bytlm: 32768 Maxacctjobs: 0 Shrfillm: 0 Pbytlm: 0 Maxdetach: 0 BIOlm: 18 JTquota: 1024 Prclm: 10 DIOlm: 18 WSdef: 256 Prio: 4 ASTlm: 24 WSquo: 512 Queprio: 0 TQElm: 20 WSextent: 2048 CPU: (none) Enqlm: 200 Pgflquo: 20480 . . . UAF> EXIT %UAF-I-NOMODS, no modifications made to system authorization file %UAF-I-NAFNOMODS, no modifications made to network authorization file %UAF-I-RDBNOMODS, no modifications made to rights database $In this example, SYSTEM has the following quotas:WSQUOTA 512 WSEXTENT 2048 PGFLQUOTA 20480 FILLM 40 DIOLM 18 ASTLM 24 BIOLM 18 BYTLM 32768 ENQLM 200 Using the System Management utility (SYSMAN), determine the value of the system parameters WSMAX, as follows:
$ RUN SYS$SYSTEM:SYSMAN SYSMAN> PARAMETERS SHOW WSMAX %SYSMAN-I-USEACTNOD, a USE ACTIVE has been defaulted on node DIEM Node DIEM: Parameters in use: ACTIVE Parameter Name Current Default Minimum Maximum Unit Dynamic -------------- ------- ------- ------- ------- ---- ------- WSMAX 100000 4096 1024 134217728 Pagelets SYSMAN> EXIT $
In this case, the value for WSMAX, as shown in the column marked Current, is 100000.
Compare the values for SYSTEM to the values in Table 11.6, ''Process Quotas Recommended for Efficient Backups'', and set the appropriate values:
$ SET DEFAULT SYS$SYSTEM $ RUN AUTHORIZE UAF> MODIFY SYSTEM/WSQUOTA=32768 UAF> MODIFY SYSTEM/FILLM=128 UAF> MODIFY SYSTEM/DIOLM=100 UAF> MODIFY SYSTEM/WSEXTENT=100000 UAF> MODIFY SYSTEM/PGFLQUOTA=200000 UAF> MODIFY SYSTEM/ASTLM=1000 UAF> MODIFY SYSTEM/BIOLM=1000 UAF> MODIFY SYSTEM/BYTLM=100000 UAF> MODIFY SYSTEM/ENQLM=1000 UAF> EXIT
Log out and then log in again so that these process quotas take effect.
11.8. Using Disks and Tapes
Determine the device name.
Allocate the device.
Initialize the volume (optional).
Mount the device (for disks only; BACKUP mounts tapes automatically).
These tasks are described in Chapter 9, "Managing Storage Media". This chapter describes specifically how these tasks relate to BACKUP. Note that all disk operations in this chapter also apply to diskettes.
11.8.1. Understanding Volume Initialization
Formats it in the OpenVMS Files–11 format
Assigns it an ANSI label
Removes links to any existing files (effectively erasing them)
Writes a tape expiration date and volume protection data to the volume header record of the tape
Caution
Initializing a volume removes links to existing files on the volume, effectively erasing the files. Do not initialize a volume that contains data you want to keep.
11.8.1.1. When to Initialize Volumes
The volume is new and has not been formatted in the Files–11 format.
You want to remove access to data stored on the volume.
You want to change the volume label, expiration date, or volume protection data.
The volume contains a non-ANSI or non-ISO label.
|
Method |
For More Information |
|---|---|
|
Before a backup operation with the DCL command INITIALIZE | |
|
On the BACKUP command line with the /REWIND qualifier (for tapes only) | |
|
On the BACKUP command line with the /INITIALIZE qualifier (for disks only) |
11.8.1.2. Initializing Tapes
Instead of using the INITIALIZE command and then performing a backup operation, you can initialize a tape and perform a backup operation by entering one BACKUP command.
How to Perform This Task
To initialize a tape volume on the BACKUP command line, add the /REWIND and /LABEL qualifiers to the output specifier. The /REWIND qualifier rewinds and initializes the volume. The /LABEL qualifier allows you to specify the volume label.
! " % ' ( ) * + , _ . / : ; < = > ?
If you use any non-alphanumeric characters, you must enclose the volume label with quotation marks.
|
Label |
Type of Backup |
Expiration Date |
|---|---|---|
|
DLY101 |
Daily, group 1, volume number 1 |
Expires in 7 days |
|
DLY102 |
Daily, group 1, volume number 2 |
Expires in 7 days |
|
WKY101 |
Weekly, group 1, volume number 1 |
Expires in 4 weeks |
|
WKY201 |
Weekly, group 2, volume number 1 |
Expires in 4 weeks |
|
MTH101 |
Monthly, group 1, volume number 1 |
Expires in 12 months |
|
YRY101 |
Yearly, group 1, volume number 1 |
Expires in 5 years |
If the tape volume has already been initialized with a label that is different from the label you specify on the BACKUP command line, BACKUP displays an error message about the label mismatch. For more information, see Section 11.12, ''Understanding BACKUP Tape Label Processing''.
- If the tape is not expired, BACKUP displays the following error message:
%INIT-F-FILNOTEXP, file is not expired
If you have either VOLPRO privilege or write access to the volume, or you are the owner of the volume, you can use the DCL command INITIALIZE/OVERRIDE=EXPIRATION to initialize the magnetic tape.
You can also reenter the BACKUP command line using the /IGNORE=LABEL_PROCESSING qualifier (refer to the VSI OpenVMS System Management Utilities Reference Manual).
If the volume was previously initialized with the output save-set qualifiers /REWIND and /PROTECTION, you must either own the volume (your UIC matches the owner UIC of the volume) or have VOLPRO privilege.
Example
$ BACKUP [ACCOUNTS.JUNE] MUA0:JUNE.BCK/REWIND/LABEL=MTH101
11.8.1.3. Initializing Disks
Instead of using the INITIALIZE command and then performing a backup operation, you can initialize a disk and perform a backup operation by entering one BACKUP command.
How to Perform This Task
When you perform an image copy to disk, BACKUP automatically initializes the output disk, effectively erasing any existing files and volume-initialization data on the disk. To preserve volume-initialization data on the output disk, use the /NOINITIALIZE qualifier.
When you create a sequential disk save set, BACKUP does not initialize the output volume (by default). You can, however, instruct BACKUP to initialize the output volume using the /INITIALIZE qualifier.
Examples
- The following command shows how to initialize a disk on the BACKUP command line:
$ BACKUP/IMAGE DUA1: DUA2:
This command initializes DUA2: using the volume-initialization data from DUA1. BACKUP then copies the contents of DUA1: to DUA2:, effectively erasing any existing files on DUA2. Note that the files on DUA2: are stored contiguously, eliminating disk fragmentation.
- The following command shows how to preserve volume-initialization data on the output disk during an image copy:
$ BACKUP/IMAGE DUA1: DUA2:/NOINITIALIZE
This command causes BACKUP to initialize DUA2:, preserving the initialization data on that volume. BACKUP then copies the contents of DUA1: to DUA2:, effectively erasing any existing files on DUA2.
- These commands cause BACKUP to initialize DJA2:, effectively erasing any existing files:
$ MOUNT/FOREIGN DJA2: %MOUNT-I-MOUNTED, USER1 mounted on _DJA2: $ BACKUP/IMAGE DUA1: DJA2:DAILY.SAV/INITIALIZE
BACKUP then creates an image backup of DUA1: in the sequential disk save set DUA2:[000000]DAILY.SAV. If the save set exceeds the available disk space, BACKUP prompts for another volume. BACKUP initializes the new volume and extends the save set in the master file directory ([000000]) of the new volume. (For more information about save sets, see Section 11.5, ''Understanding Save Sets''. For more information about the /INITIALIZE qualifier, refer to the VSI OpenVMS System Management Utilities Reference Manual.)
11.8.2. Mounting a Volume
Mounting a volume makes it available to the system. BACKUP automatically mounts tapes when you use them for a backup operation. Most disks on your system are mounted at system startup. This section describes how to explicitly mount volumes.
If the save set will be written in standard Files–11 format, the target disk must be mounted as a Files–11 disk.
If a save set will be written in sequential-disk format (for example, if the save set occupies more than one disk), the target disk must be mounted as a foreign device by specifying the command qualifier /FOREIGN to the DCL command MOUNT.
How to Perform This Task
- Enter the SHOW DEVICES command in the following format to check whether the device is already mounted:
SHOW DEVICES device-name
- Enter the MOUNT command in the following format:
MOUNT [/FOREIGN] device-name [volume-label] [logical-name]
where:device-name
is the name of the drive that holds the volume you want to mount.
volume-label
is the alphanumeric identification you assigned to the volume with the INITIALIZE command. For disk volumes, labels can have a maximum of 12 characters; for magnetic tape volumes, labels can have a maximum of 6 characters. You do not need to add this parameter if you are mounting the volume with the /FOREIGN qualifier.
logical-name
is an optional 1- to 255-character alphanumeric specification that you want to associate with the volume.
Example
$ SHOW DEVICE MU Device Device Error Volume Free Trans Mnt Name Status Count Label Blocks Count Cnt DAD$MUA6: Online 0 MOM$MUA6: Online 0 FRED$MUA6: Online 0 $ MOUNT/FOREIGN FRED$MUA6: TEST DRIVE1 %MOUNT-I-MOUNTED, TEST mounted on _FRED$MUA6:
This command mounts the tape in FRED$MUA6: and assigns it the logical name DRIVE1.
11.8.3. Dismounting a Volume
BACKUP does not dismount the last volume of a backup operation (unless you use the /RELEASE_TAPE qualifier). When you finish using a volume, you should dismount it.
How to Perform This Task
DISMOUNT device-name
Example
$ DISMOUNT MUB6:
$ DISMOUNT/NOUNLOAD MUB6:
11.9. Understanding OPCOM and Volumes
If you have a standalone workstation or easy access to disk and tape drives at your facility, you probably can mount and initialize your own volumes. At some sites, however, an operator performs these tasks. Using the services of an operator might be necessary because the drive you want to use is located remotely or because you do not have the necessary privileges to manipulate a volume.
To communicate with the operator at your site, consult the operator about site-specific procedures. Depending on how your system is customized, using the operator communication manager (OPCOM) might be necessary. The OPCOM system process allows you to request assistance from the operator and allows the operator to respond to your requests. ( Section 2.4, ''Using OPCOM to Communicate with System Users'' explains OPCOM.)
11.9.1. Requesting Operator Assistance
Note
Please consult your operator about your site-specific procedures. Your site may not use OPCOM or may use it differently from the examples in this section.
If you want the operator to mount a tape for you, use OPCOM to ask the operator to mount the tape.
How to Perform This Task
The /REPLY qualifier assigns your request a unique number to which the operator can respond.
If your facility is very large, several operators might each have specific tasks. If this is the case, use the REQUEST/TO command, which allows you to send a message to a specific operator (identified by a keyword).
%MOUNT-I-NOOPR, no operator available to service request
This indicates that the operator has disabled the operator's terminal. To abort your request, press Ctrl/Z.
If a mount request fails and you specified /ASSIST, mount failure messages appear on the operator terminal (if OPCOM is enabled). The /ASSIST qualifier is the default for both the BACKUP and MOUNT commands.
If you specified /NOASSIST, mount failure messages appear on your terminal instead of on the operator terminal.
If you are on a workstation but forget to specify /NOASSIST, OPCOM (if OPCOM is running) requests that the operator load the next volume.
If you have the OPER privilege, you can respond to the request by using another terminal window to enter the following commands:$ REPLY/ENABLE=TAPES $ REPLY/TO=identification-number "message text"
Examples
- To request the operator to mount a tape, enter a command similar to the following one:
$ REQUEST/REPLY "Is anyone using drive MUA12?" %OPCOM-S-OPRNOTIF, operator notified, waiting...12:21:12.46 %OPCOM-S-OPREPLY, PLEASE DIRECT YOUR REQUEST TO THE TAPE OPERATOR 2-APR-2000 12:26:13.12. request 2 completed by operator OPA0 $
The /REPLY qualifier assigns your request a unique number (in this case, 2) to which the operator can respond. Note that you cannot enter any additional commands until the operator responds.
- The following example shows you how to direct your request to a specific operator using the /TO qualifier:
$ REQUEST/TO=TAPES "Is anyone using drive MUA12?" %OPCOM-S-OPRNOTIF, operator notified, waiting...12:40:11.32 %OPCOM-S-OPREPLY, I'M DONE GO AHEAD 2-APR-2000 12:45:26.18. request 5 completed by operator OPA0 $
11.10. Listing the Contents of a BACKUP Save Set
BACKUP allows you to obtain information about save sets and the files in a save set. You can display this information at your terminal or send it to an output file.
Because BACKUP writes save sets in a format that only BACKUP can interpret, a list operation is the only way to determine the contents of a save set without restoring the save set. You can perform a list operation in conjunction with any other BACKUP operation.
By default, a save-set listing supplies information about files in the save set similar to the information supplied by the DCL command DIRECTORY/DATE/SIZE, including the actual number of blocks used for each file.
You can also perform a BACKUP list operation to list the contents of a BACKUP journal file.
BACKUP journal files, which are created during a save operation by using the command qualifier
/JOURNAL[= file-spec], contain on-disk records of BACKUP save operations and
the file specifications of the files saved during each operation. Section 11.13.4, ''Creating and Listing BACKUP Journal Files''
contains more information about creating and listing BACKUP journal files.
How to Perform This Task
Insert the media containing the save set into the drive.
If the volume is a disk, mount the disk as described in Section 11.8.2, ''Mounting a Volume'' (BACKUP mounts tapes automatically).
Enter the BACKUP/LIST command in the format specified in the VSI OpenVMS System Management Utilities Reference Manual. The /REWIND qualifier rewinds the tape to the beginning before searching for the save set. To list all the save sets on a volume, include the asterisk wildcard character (*) with the device specification.
To list the contents of save sets does not require you to know the names of save sets on magnetic tape. Enter the device specification of the drive in which the tape is inserted with the BACKUP/LIST command. BACKUP reads the next save set it encounters on the magnetic tape and stops processing when it reaches the end of that save set. BACKUP does not automatically rewind to the beginning-of-tape marker unless you include the /REWIND qualifier in your command. Therefore, you can list the next save set (if one exists) by repeating the BACKUP/LIST command. If no more save sets exist on the tape, BACKUP issues the following error messages:%BACKUP-F-OPENIN, error opening MUA0:[000000].; as input -SYSTEM-W-NOSUCHFILE, no such file
Examples
- To obtain save-set information about a magnetic tape save set named 2MAR1555.BCK in the drive MIA0:, enter the following command:
$ BACKUP/LIST MIA0:2MAR1555.BCK/REWIND Listing of save set(s) Save set: 2MAR1555.BCK Written by: POLYANNA UIC: [000200,000207] Date: 21-MAY-2000 09:36:14.68 Command: BACKUP/LOG [USER.SAVE] MIA0:2MAR555.BCK/REWIND/LABEL=WKY201 Operating system: OpenVMS Alpha Version 7.3 BACKUP version: 7.3 CPU ID register: 08000000 Node name: _SUZI:: Written on: _MIA0: Block size: 8192 Group size: 10 Buffer count: 3 [USER.SAVE]ANOTHER.DAT;1 1 18-MAY-2000 14:10 [USER.SAVE]LAST.DAT;1 1 18-MAY-2000 14:11 [USER.SAVE]THAT.DAT;1 7 18-MAY-2000 14:10 [USER.SAVE]THIS.DAT;2 1 18-MAY-2000 13:44 Total of 4 files, 10 blocks End of save set
- The following command rewinds the tape to the beginning and lists all save sets on the volume MIA0:
$ BACKUP/LIST MIA0:*.*/REWIND
- The following command combines a list operation with a save operation to magnetic tape:
$ BACKUP/LIST=MYBACK.DAT [PRAMS] MTA0:2MAR1555.BCK/LABEL=DLY201
BACKUP verifies that the volume label is DLY201 and copies the contents of the directory [PRAMS] to a save set named 2MAR1555.BCK. The command qualifier LIST causes BACKUP to write save-set information to the file MYBACK.DAT as the save operation proceeds.
11.11. Understanding Multivolume BACKUP Operations
- If you specified only one drive in the BACKUP command line and you are not using a tape loader or operator assistance, BACKUP prompts you to remove the tape that is in the drive and insert another one:
%BACKUP-I-RESUME, resuming operation on volume 2 %BACKUP-I-READYWRITE, mount volume DAILY02 on MUA0: for writing Respond with YES when ready:
Note
If you are using OPCOM and the /ASSIST qualifier (the default), the following message appears on your terminal screen:%BACKUP-I-RESUME, resuming operation on volume 2 %MOUNT-I-OPRQST, Please mount volume DAILY02 in device MUA0: BACKUP requests: Saveset DAILY.SAV, Volume number 02, write ENABLED
After you insert and load the second volume (or an operator fulfills the mount request), BACKUP continues writing data to the second volume.
- If you specified multiple drives on the command line, BACKUP continues writing data to the second volume, assuming the drive is loaded, is on line, and has the correct volume label. BACKUP unloads the first volume and displays the following message:
%BACKUP-I-RESUME, resuming operation on volume 2
- If you are using a tape loader, BACKUP continues writing data to the tape in the next slot, assuming the tape loader has an adequate supply of correctly labeled tapes. BACKUP rewinds and unloads the first tape and displays the following message:
%BACKUP-I-RESUME, resuming operation on volume 2 . . .
11.11.1. Multivolume Tape Labeling
If you did not specify a label on the command line, BACKUP uses the first six characters of the save-set name to create a label for the first volume (unless you use the /EXACT_ORDER qualifier, in which case BACKUP preserves the volume label on the tape). For subsequent volumes, BACKUP uses the first four characters from the label of the first volume plus the number of the volume in the sequence. For example, suppose you are saving files that require three tapes and the save-set name is BACKUP. If you do not specify a label, the first tape is labeled BACKUP, the second BACK02, and the third BACK03.
If you specified a single label on the command line using the /LABEL qualifier and it matches the label of the first volume, BACKUP labels subsequent volumes with the first four characters of the label from the first volume plus the number of the volume in the sequence. For example, suppose you are saving files that require three tapes and the first tape is labeled TAPE. The second tape gets the label TAPE02, and the third tape gets the label TAPE03.
If you specified multiple labels on the command line using the /LABEL qualifier (without the /EXACT_ORDER qualifier), BACKUP uses the labels you specify. If the operation requires more labels than you specified, BACKUP uses the first four characters of the last volume label and the volume number of the tape.
You can use the /EXACT_ORDER qualifier in conjunction with the /LABEL qualifier to specify the order in which you want BACKUP to use the labels. BACKUP continues the operation as long as the label of the tape in the drive matches the corresponding label on the command line. If you do not specify enough labels on the command line to complete the operation, BACKUP prompts you to enter a label for the tape in the drive.
As a safeguard against initializing or writing the wrong tape, BACKUP compares the label that you specify on the command line to the label of the tape in the drive. Section 11.12, ''Understanding BACKUP Tape Label Processing'' describes how BACKUP processes tape labels and handles a label mismatch.
11.11.2. MOUNT Messages When Backing Up Tapes
%MOUNT-I-MOUNTED, ABCD03 mounted on _$4$MUA3: (HSC70) %BACKUP-I-RESUME, resuming operation on volume 4 %MOUNT-F-VOLINV, volume is not software enabled %BACKUP-I-READYWRITE, mount volume 4 on _$4$MUA3: for writing Enter "YES" when ready: yes %MOUNT-I-MOUNTED, ABCD04 mounted on _$4$MUA3: (HSC70)
Once the devices are put back on line or the media is made ready, the backup session continues or finishes as expected. This problem will be addressed in a future release.
11.12. Understanding BACKUP Tape Label Processing
Checks the volume protection information to ensure that you have the right to access the volume in the manner you requested.
Checks the tape expiration date to prevent you from initializing a magnetic tape that has not yet expired.
- Compares the volume label specified in the BACKUP command line (either explicitly with the /LABEL qualifier or implicitly through the save-set name) to the volume label of the tape to prevent you from creating a save set on the wrong magnetic tape. BACKUP uses the following guidelines when processing tape labels:
If you specify a label that is longer than six characters, BACKUP truncates the label to six characters.
If the volume label is less than six characters long, BACKUP pads the volume label with the blank character to six characters.
The first four characters of the volume label either must match the first four characters of the label specified in the BACKUP command line exactly, or must end with one or more underscore characters. If the first four characters of the volume label end with one or more underscore characters, and the label specified in the command line matches the part of the volume label that appears before the underscore characters, BACKUP accepts the match. (For example, the volume label ABN_ matches the command line label ABN but does not match the command line label ABNE.)
If the fifth and sixth characters of the volume label are numbers between 0 and 9, BACKUP does not compare these characters with corresponding characters in the label specified in the BACKUP command line. Otherwise, the fifth and sixth characters in the volume label must exactly match the corresponding characters in the label specified in the BACKUP command line.
If the labels match, you have the proper protection, and the tape is expired, BACKUP performs the designated operation.
/LABEL=(MA1684,MA1685,MA1686)
%MOUNT-I-MOUNTED, DKA0 mounted on _SODAK$MUA0: %BACKUP-W-MOUNTERR, volume 1 on _SODAK$MUA0 was not mounted because its label does not match the one requested %BACKUP-W-EXLABEER, volume label processing failed because volume MB1684 is out of order, Volume label MA1684 was expected specify option (QUIT, NEW tape, OVERWRITE tape, USE loaded tape) BACKUP>
Depending on the option you specify, you can quit the backup operation (QUIT), dismount the old tape and mount a new one (NEW), overwrite the data on the tape (OVERWRITE), or USE the loaded tape.
If you specify more than one label with the /LABEL qualifier and you also specify the /EXACT_ORDER qualifier, BACKUP compares the label of the loaded tape with the first label that you specified with the /LABEL qualifier. If the labels match, BACKUP begins the operation. If the labels do not match, BACKUP prompts you with the previous message.
Assuming the volume labels of the tapes you use match the corresponding labels on the command line, BACKUP continues processing until it completes the operation or runs out of volume labels. If you do not specify enough labels on the command line to complete the operation or if the tape loaded does not have an ANSI label, BACKUP prompts you to enter a label for the tape in the drive.
If you use blank tapes or tapes that you intend to overwrite, use the /IGNORE=LABEL_PROCESSING qualifier. This suppresses the previous BACKUP message, which normally occurs if BACKUP encounters a non-ANSI-labeled tape during a save operation.
For more information about the /EXACT_ORDER, /IGNORE, and /LABEL qualifiers, refer to the VSI OpenVMS System Management Utilities Reference Manual.
11.13. Backing Up Files and Directories
Note
When you use the Backup utility with files, BACKUP processes relative version -0 as if it were 0, saving the most recent version instead of the earliest version of the file for processing.
11.13.1. Copying Files to Other Files
You can copy files using BACKUP. The copy function of the BACKUP command differs from the DCL command COPY because it preserves certain file information such as the version number, creation dates, revision dates, and protection codes (although, by default, the owner UIC of the copies is the UIC of the current process). Also, unlike the DCL command COPY, you can use BACKUP to copy entire directory trees, maintaining the directory structure.
How to Perform This Task
BACKUP input-specifier output-specifier
Examples
- The following command copies the file EMPLOYEES.DAT in the current directory to the directory [BATES.TEST]:
$ BACKUP EMPLOYEES.DAT USER1:[BATES.TEST]EMPLOYEES.DAT
- You can also create copies of entire directory trees. For example:
$ BACKUP USER1:[BATES...] USER2:[BATES...]
This command re-creates the directory structure of user BATES on the disk named USER2:
- The following command copies all files in the directory tree [LYKINS...] to the directory tree [OWLCR...] on the same disk:
$ BACKUP [LYKINS...]*.*;* [OWLCR...]*.*;*
Note
Disk-to-disk copy operations initiated using the /VERIFY qualifier might attempt to verify files that are not copied. For example, if an error prevents you from successfully copying a file from one disk to another location and you specified the /VERIFY qualifier for that operation, the system displays two error messages: one indicates that the file was not copied, and the other indicates that the file was not verified.
11.13.2. Backing Up Files and Directories to a Save Set
One of the most common BACKUP operations is to save files to a save set. There are several types of save sets. For more information about save sets, see Section 11.5, ''Understanding Save Sets''.
How to Perform This Task
BACKUP input-specifier output-specifier [/SAVE_SET] [/LABEL=label]
The input-specifier specifies the file you want to back up, and the output-specifier specifies the device and save-set name.
When you save data to disk, use the output save-set qualifier /SAVE_SET. If you do not specify /SAVE_SET, BACKUP copies files in standard file format rather than creating a BACKUP save set. When you save data to tape, you do not need to specify /SAVE_SET; BACKUP treats all magnetic tape files as save sets. Use the /LABEL qualifier to specify the label of the tape you are using.
Examples
- The following commands back up the file EMPLOYEES.DAT to a save set:
$ ALLOCATE MUA0: TAPE1
%DCL-I-ALLOC, MUA0: allocated
$ INITIALIZE TAPE1 DLY101
$ BACKUP/LOG EMPLOYEES.DAT MUA0:EMPL_MAY91.BCK/LABEL=DLY101
%MOUNT-I-MOUNTED, BACKUP mounted on _MUA0: BACKUP-S-COPIED, copied DUA0:[SCHULT]EMPLOYEES.DAT;32
$In this example, the individual commands performs the following actions: Allocate the tape drive MUA0: and assign it the logical name TAPE1.
Initialize the tape in the drive and assign it the label DLY101.
Save the file EMPLOYEES.DAT to a save set on the tape in MUA0. The /LOG qualifier causes BACKUP to display the file specification of the file that BACKUP copies. The /LABEL qualifier indicates the volume label that you assigned with the INITIALIZE command.
- To create a magnetic-tape save set named NOV13SAVE.BCK that contains all files and subdirectories of a directory tree named [LYKINS...], enter the following command:
$ BACKUP [LYKINS...] TAPE:NOV13SAVE.BCK/LABEL=NOV13
- You can also specify a list of files that you want to back up:
$ BACKUP _From: DUA0:[MGR]EMPLOYEES.DAT,USER1:[RECORDS]DOOHAN.DAT,EVANS.DAT _To: MUA1:MONTHLY_AUG.BCK/LABEL=TAPE1
- If you are backing up large amounts of data, you can also specify more than one output device:
$ BACKUP _From: DUA0:[000000]*.* _To: MTA1:BACKUP.BCK,MTA2:
In this example, if BACKUP uses all of the space on the tape in MTA1:, it continues writing the save set on the tape in MTA2: (assuming MTA2: contains a tape that has never been initialized or one that has been initialized with the label BACK02).
- As shown in the following example, you can create a Files–11 save set that consists of a single file; DUA1: is already mounted:
$ BACKUP STRATCOL1.DAT DUA1:STRATDAT1.BCK/SAVE_SET
- To create a network save set, add the node, user name, and password to the output specifier in the following format:
remote_nodename"username password"::device_name:[directory]
For example:$ BACKUP From: STRATCOL1.DAT To: NIMBL"ROGERS SANFRANCISCO"::WORK1:[ROGERS]STRATDAT1.BCK/SAVE_SET
- To create a sequential-disk save set on DUA0: named NOV12SAVE.BCK that consists of all files in the current default directory, enter the following commands:
$ MOUNT/FOREIGN DUA0: $ BACKUP [] DUA0:NOV12SAVE.BCK/SAVE_SET
- The following example backs up the directory tree [REPORTS...] to a save set:
$ BACKUP [REPORTS...] MIA11:REPORT.BCK/REWIND/IGNORE=LABEL_PROCESSING
The /REWIND qualifier in this command line rewinds the tape and initializes it. The /IGNORE=LABEL_PROCESSING qualifier causes BACKUP to ignore any existing label information on the tape. Because the command does not include the /LABEL qualifier, BACKUP uses the first six characters of the save-set name (REPORT) as the label.
- You can also back up a directory to a disk that is mounted in the Files–11 format. For example:
$ MOUNT DUA1: PAYROLL %MOUNT-I-MOUNTED, PAYROLL mounted on _DUA1: $ MOUNT DUA21: DISK21 %MOUNT-I-MOUNTED, DISK21 mounted on _DUA21: $ BACKUP From: DUA1:[PAYROLL] To: DUA21:[PAYROLL_BACKUPS]PAY22MAY2000.SAV/SAVE_SET
If the contents of the [PAYROLL] directory exceed the capacity of the disk DUA21:, the backup operation fails.
- If you are backing up more data than the output volume can contain, mount the output volume using the /FOREIGN qualifier and create a sequential disk save set. For example:
$ MOUNT DUA1: PAYROLL %MOUNT-I-MOUNTED, PAYROLL mounted on _DUA1: $ MOUNT/FOREIGN DJA21: %MOUNT-I-MOUNTED, WEEKLY mounted on _DJA21: $ BACKUP From: DUA1:[PAYROLL] To: DJA21:[PAYROLL_BACKUPS]PAY22MAY2000.SAV/SAVE_SET
In this example, if the contents of the [PAYROLL] directory exceed the capacity of the disk DJA21:, BACKUP prompts you to remove the volume in the drive and insert another one. For more information about Files–11 and sequential disk save sets, see Section 11.5, ''Understanding Save Sets''.
Note
Prior to OpenVMS Version 7.2, 32 levels of directories were supported. Beginning with OpenVMS Version 7.2 on VAX and Alpha systems, the number of levels of directories can be as high as RMS allows; for OpenVMS Version 7.2 and later, that number is 255 levels.
11.13.3. Comparing Files
Note
Because BACKUP processes files by blocks, comparing files not produced by BACKUP is likely to cause mismatch errors in files that are apparently identical.
How to Perform This Task
- You can perform a compare operation in conjunction with a save, restore, copy, or list operation by specifying the command qualifier /VERIFY. When you specify /VERIFY, BACKUP first performs the save, restore, copy, or list operation and then compares the output with the input. When you use /VERIFY in a copy or list operation, BACKUP displays no message when it begins the compare operation. When you use /VERIFY in a save or restore operation, BACKUP displays the following message when it begins the compare operation:
%BACKUP-I-STARTVERIFY, starting verification pass
You can perform a compare operation independently of other BACKUP operations by specifying the command qualifier /COMPARE. In addition, you can use the /COMPARE and /IMAGE qualifiers to instruct BACKUP to perform an image compare operation. This operation compares files on two different disks by using the file identifications (FIDs).
An image compare operation may not work correctly when you create two disks with identical files by incrementally backing up and restoring the files from one disk to the other disk. This is because BACKUP does not ensure that the incrementally restored files have the same FIDs as the incrementally saved files. This is true regardless of whether the /OVERLAY, /NEW_VERSION, or /REPLACE qualifiers are used in the restore command.
Examples
- The following example compares a save set on tape with files on disk. The command directs BACKUP to compare the contents of the save set 2MAR1555.BCK with the directory [LYKINS].
$ BACKUP/COMPARE MTA0:2MAR1555.BCK [LYKINS]
- The following example compares files on disk; note the inconsistency in block 16 between UPLIFT.EXE;4 and UPLIFT.EXE;3:
$ BACKUP/COMPARE UPLIFT.EXE;3 UPLIFT.EXE;4 %BACKUP-E-VERIFYERR, verification error for block 16 of WRKD$:[LYKINS]UPLIFT.EXE;4
- To compare two entire Files–11 volumes, use an image compare operation, as follows:
$ BACKUP/IMAGE/COMPARE DBA1: DBA2:
- To compare a physical save set with a Files–11 volume, use a physical compare operation, as follows. All disks in a physical compare operation must be mounted as foreign volumes.
$ MOUNT/FOREIGN DBA2: $ BACKUP/PHYSICAL/COMPARE MIA0:PHYSBACK.BCK DBA2:
- The following example combines a compare operation with a copy operation:
$ BACKUP/VERIFY/LOG FRED.DAT [FRIENDS]OLDFRED.DAT %BACKUP-S-CREATED, created DISK$:[FRIENDS]OLDFRED.DAT;3 %BACKUP-S-COMPARED, compared DISK$:[FRIENDS]OLDFRED.DAT;3
11.13.4. Creating and Listing BACKUP Journal Files
To keep a record of BACKUP operations, create a journal file. A BACKUP journal file contains records of BACKUP save operations and the file specifications of the files saved during each operation.
How to Perform This Task
To create a journal file, use the command qualifier /JOURNAL=[file-spec]
in a BACKUP save operation.
BACKUP/LIST[=file-spec]/JOURNAL[=file-spec]
You cannot specify an input or output specifier with a BACKUP/LIST/JOURNAL command. If you omit the file specification from the command qualifier /LIST, BACKUP directs the output to your terminal; if you omit the file specification from the command qualifier /JOURNAL, the journal file receives the default BACKUP journal file name (SYS$DISK:[]BACKUP.BJL).
For more information about creating and listing BACKUP journal files, refer to the description of the /JOURNAL qualifier in the VSI OpenVMS System Management Utilities Reference Manual.
Example
$ BACKUP/JOURNAL/LOG/IMAGE DRA2: MIA0:3OCT.FUL
%BACKUP-S-COPIED, copied DRA2:[COLLINS]ALPHA.DAT;4
%BACKUP-S-COPIED, copied DRA2:[COLLINS]EDTINI.EDT;5
.
.
.
%BACKUP-I-RESUME, resuming operation on volume 2
%BACKUP-I-READYWRITE, mount volume 2 on _MIA0: for writing
Press return when ready:
%BACKUP-S-COPIED, copied DRA2:[LANE]MAIL.MAI;1
%BACKUP-S-COPIED, copied DRA2:[LANE]MEMO.RNO;5
.
.
.
$ BACKUP/JOURNAL/LIST
Listing of BACKUP journal
Journal file _DB2:[SYSMGR]BACKUP.BJL;1 on 3-OCT-2000 00:40:56.36
Save set 3OCT.FUL created on 3-OCT-2000 00:40:56.36
Volume number 1, volume label 3OCT01
[COLLINS]ALPHA.DAT;4
[COLLINS]EDTINI.EDT;5
[COLLINS]LOGIN.COM;46
[COLLINS]LOGIN.COM;45
[COLLINS]MAIL.MAI;1
[COLLINS]MAR.DIR;1
[COLLINS.MAR]GETJPI.EXE;9
[COLLINS.MAR]GETJPI.LIS;14
.
.
[LANE]LES.MAI;1
.
.
Save set 3OCT.FUL created on 3-OCT-2000 00:40:56.36
Volume number 2, volume label 3OCT02
[LANE]MAIL.MAI;1
[LANE]MEMO.RNO;5
[LANE]MEMO.RNO;4
.
.
[WALTERS.VI]KD.RNO;52
End of BACKUP journal11.14. Restoring Files and Directories
A BACKUP restore operation takes a save set and restores it to its original condition. Often a restore operation is the result of a crisis (you have deleted an important file or a disk has become corrupted, for example). When you restore files, BACKUP places the contents of the save set in the location that you specify.
To restore an entire disk, see Section 11.16, ''Restoring User Disks''.
How to Perform This Task
BACKUP save-set-specifier [/SAVE_SET] /SELECT=[dir...] output-specifier:[dir...]
Use the /SAVE_SET qualifier if the save set is on a disk or diskette. The /SELECT qualifier lets you specify the exact file you want to restore.
%BACKUP-W-NOT1STVOL, tape 'name' is not the start of a save set
You can use the command qualifier /LOG to monitor the files as they are restored. To restore only a small number of files from a large save set, press Ctrl/Y to terminate processing once the files you need have been restored.
Examples
- If you mistakenly delete the file USER1:[WORK.SEPT]INVOICES.DAT but it has been backed up to a save set named NIGHTLY.BCK, you could restore it using the following command:
$ BACKUP _From: MUA0:NIGHTLY.BCK/SELECT=[WORK.SEPT]INVOICES.DAT _To: USER1:[WORK.SEPT]INVOICES.DAT
- You can also use wildcard characters to restore more than one file. For example:
$ BACKUP/LOG _From: MUA0:NIGHTLY.BCK/SELECT=[WORK.SEPT]INVOICES*.* _To: USER1:[WORK.SEPT]INVOICES*.* %BACKUP-S-CREATED, created USER1:[WORK.SEPT]INVOICES_01.TXT;1 %BACKUP-S-CREATED, created USER1:[WORK.SEPT]INVOICES_02.TXT;1 %BACKUP-S-CREATED, created USER1:[WORK.SEPT]INVOICES_03.TXT;1 %BACKUP-S-CREATED, created USER1:[WORK.SEPT]INVOICES_04.TXT;1 %BACKUP-S-CREATED, created USER1:[WORK.SEPT]INVOICES_05.TXT;1 %BACKUP-S-CREATED, created USER1:[WORK.SEPT]INVOICES_06.TXT;1 . . .
The /LOG qualifier displays the file specification of the files that you restored.
- The following example restores files from the magnetic tape save set NOV12SAVE.BCK to subdirectories of the directory [LYKINS]:
$ BACKUP TAPE:NOV12SAVE.BCK [LYKINS...]
- To restore a specific file from a save set, use the input save-set qualifier /SELECT. In the following example, the file STRAT1.DAT in the directory [LYKINS.GLENDO] was deleted accidentally. The user, who previously saved the file to a save set named NOV2SAVE.BCK, uses BACKUP to restore the file to the directory. Next, the user enters the DIRECTORY command to confirm that the file has been restored to the subdirectory [LYKINS.GLENDO].
$ BACKUP _From: MIA0:NOV2SAVE.BCK/SELECT=[LYKINS.GLENDO]STRAT1.DAT;5 _To: STRAT1.DAT;5 $ DIRECTORY STRAT1.DAT Directory [LYKINS.GLENDO] STRAT1.DAT;5 Total of 1 file. $
- Suppose you deleted the entire [REPORTS] directory, which previously contained the following subdirectories:
$ SET DEFAULT [REPORTS] $ DIRECTORY *.DIR Directory USER3:[REPORTS] INTERNAL.DIR 2 PUBLIC.DIR 5 SUMMARIES.DIR 1 TEST.DIR 3 WEEKLY.DIR 2 Total of 5 files, 13 blocks. $
If you made a backup save set of the directory and subdirectories, you could restore them. For example:$ BACKUP MUA0:MAY-10.BCK/SELECT=[REPORTS...] USER3:[REPORTS...]
This command restores all the files in the [REPORTS] directory and the subdirectories ([.INTERNAL], [.PUBLIC], [.SUMMARIES], [.TEST], and [.WEEKLY]).
- To restore all files from a magnetic-tape save set named NOV12SAVE.BCK to the directory tree from which they were saved, enter the following command:
$ BACKUP TAPE:NOV12SAVE.BCK/REWIND [*...]
The /REWIND qualifier directs BACKUP to rewind the tape to the beginning-of-tape before beginning the restore operation. This ensures that the save set will be restored even if it is located before the current tape position.
11.14.1. Accessing Files in Deep Directory Structures
$ BACKUP MTA1:T.BCK/SAV/SELECT=[A.B.C.D.E.F.G.H.I.J.K.L]*.* DISK:[DIR]*.*;*
11.15. Backing Up User Disks
Note
Do not use the menu system (which displays when you boot the OpenVMS VAX operating system CD–ROM) to back up user disks. Use the menu system to back up system disks only.
In addition, if you back up large user disks on VAX systems, BACKUP might need to page and thereby cause the operation to fail. If this occurs, use online BACKUP to back up those VAX user disks.
11.15.1. Preparing to Back Up User Disks
Note
The first time you back up a disk, you must perform an image backup using the BACKUP/IMAGE/RECORD command before you perform regular incremental backups. The image backup saves a copy of the entire disk and marks each file as being saved. Subsequent incremental backups assume that an image backup has been performed; only new or modified files are saved.
If an image backup is not performed first, the incremental backups save more files than might be necessary to ensure that an incremental restore operation will be successful.
The file was modified while BACKUP was reading the file
The file is accessed for writing on the local node when BACKUP finishes reading the file
RMS-E-FEX, file already exists, not superseded
How to Perform This Task
$ REPLY/ALL "System Backup About to Begin – Open Files Will Not Be Backed Up"
Reply received on MYNODE from user SYSTEM at VTA28:23:35:11 System Backup About to Begin – Open Files Will Not Be Backed Up
11.15.2. Performing Image Backups to Tape
As described in Section 11.2, ''Understanding Types of Backups'', an image backup of a disk provides you with an exact logical copy of all the files on the disk. You should perform image backups with no interactive users on the system because of open file considerations (described in Section 11.15.1, ''Preparing to Back Up User Disks''). Also, system performance can be affected during the backup process, so it is best to schedule the backup during the least busy times for your system. You can optimize the speed of the backup procedure by ensuring that certain process and system parameters are set properly (as described in Section 11.7, ''Setting Software Parameters for Efficient Backups'').
How to Perform This Task
BACKUP/IMAGE [/RECORD] input-device output-specifier [/LABEL=label] [/REWIND]
The /IMAGE qualifier identifies the backup operation as an image backup. The /RECORD qualifier is optional and records the current date and time in the file header record of each file that is backed up. You must use the /RECORD qualifier if you are planning to perform future incremental backups. Specify the name of the disk you are backing up as the input-device; do not specify individual files. The /REWIND qualifier is optional depending on whether you want to initialize the tape. The /LABEL qualifier identifies the label of the tape.
Examples
- The following example shows how to create an image backup of a disk on your workstation. If the disk is named DKA100:, and the tape cartridge drive is named MKB100:, you could perform the image backup by entering the following commands:
$ INITIALIZE MKB100: WKLY
$ MOUNT DKA100: DISK$1
%MOUNT-I-MOUNTED, DISK$1 mounted on _DKA100:
$ BACKUP/IMAGE/RECORD/VERIFY
_From: DKA100:
_To: MKB100:FULL02.SAV/LABEL=WKLY
%BACKUP-I-STARTVERIFY, starting verification passIn this example, the individual commands perform the following actions: Initialize the tape in MKB100: with the label WKLY.
Mount the disk DKA100: (BACKUP will mount the tape drive).
Back up the disk DKA100: to the save set FULL02.SAV on MKB100. The /IMAGE qualifier indicates that this is an image backup. The /RECORD qualifier records the current date and time of the backup in the file header record of each file that is backed up. The /VERIFY qualifier causes BACKUP to check the contents of the output specifier against the input specifier after the files are written to the volume. The /LABEL qualifier indicates the label of the tape.
- If you are backing up a large disk, you may want to use several tape drives for the backup. For example:
$ ALLOCATE MUA0:,MUA1:,MUA2:
%DCL-I-ALLOC, MUA0: allocated
%DCL-I-ALLOC, MUA1: allocated
%DCL-I-ALLOC, MUA2: allocated
$ BACKUP/IMAGE/RECORD/NOASSIST/RELEASE_TAPE
_From: DKA100:
_To: MUA0:FULL02.SAV,MUA1,MUA2/LABEL=MNTH
%MOUNT-I-MOUNTED, MNTH mounted on _MUA0:
%BACKUP-I-RESUME, resuming operation on volume 2
%MOUNT-I-MOUNTED, MNTH02 mounted on _MUA1:
%BACKUP-I-RESUME, resuming operation on volume 3
%MOUNT-I-MOUNTED, MNTH03 mounted on _MUA2:
$In this example, the individual commands perform the following actions: Allocate the tape drives that will be used in the backup.
Back up DKA100: to a save set. The /IMAGE qualifier indicates this operation is an image backup. BACKUP begins writing data to a save set on the tape in MUA0. If the tape in MUA0: becomes full, BACKUP initializes the tape in MUA1: and continues writing the save set. The tape in MUA1: gets the label MNTH02. If necessary, BACKUP also uses the tape in MUA2.
The /RELEASE_TAPE qualifier dismounts and unloads an output tape device after BACKUP writes the save set. The /RECORD qualifier records the current date and time in the file header record of each file that is backed up.
11.15.3. Performing Image Backups to Disk
As described in Section 11.2, ''Understanding Types of Backups'', an image backup of a disk provides you with an exact logical copy of all the files on the disk. You should perform image backups with no interactive users on the system because of open file considerations (described in Section 11.15.1, ''Preparing to Back Up User Disks''). Also, system performance can be affected during the backup process, so it is best to schedule the backup during the least busy times for your system. You can optimize the speed of the backup procedure by ensuring that certain process and system parameters are set properly (as described in Section 11.7, ''Setting Software Parameters for Efficient Backups'').
How to Perform This Task
BACKUP/IMAGE/RECORD input-device output-specifier/SAVE_SET
The /IMAGE qualifier identifies the backup operation as an image backup. The /RECORD qualifier records the current date and time in the file header record of each file that is backed up. This information is essential for future incremental backups. The /SAVE_SET qualifier indicates that you are creating a save set on a disk.
Examples
- For example, if you want to create an image backup save set of the disk named DUA1: on a disk named DUA2:, you could enter the following commands:
$ MOUNT DUA1: USER1 %MOUNT-I-MOUNTED, USER1 mounted on _DUA1: $ MOUNT DUA2: USER2 %MOUNT-I-MOUNTED, USER2 mounted on _DUA2: $ BACKUP/IMAGE/RECORD _From: DUA1: _To: DUA2:[USER.BACKUPS]USER1.SAV/SAVE_SET
- You can also specify multiple disk drives as the output specifier in the BACKUP command line. For example:
$ BACKUP/IMAGE/RECORD _From: DUA0: _To: DUB24:[USER.BACKUPS]USER1.SAV,DUB25/SAVE_SET
11.15.4. Performing Incremental Backups to Tape
As described in Section 11.2, ''Understanding Types of Backups'', an incremental backup of a disk provides you with an exact copy of only those files that have been created or modified since the last image or incremental backup in which the /RECORD qualifier was used.
How to Perform This Task
Perform an image backup using the /RECORD qualifier (see Section 11.15.2, ''Performing Image Backups to Tape'').
- To determine the date of the last backup that used the /RECORD qualifier, enter the DIRECTORY/FULL command and the file name. For example:
$ DIRECTORY/FULL LOGIN.COM Directory WORK204:[HIGGINS] LOGIN.COM;31 File ID: (23788,1,0) Size: 7/9 Owner: [ACC,HIGGINS] Created: 30-APR-2000 14:37:33.98 Revised: 30-APR-2000 14:37:34.44 (1) Expires: <None specified> Backup: 30-APR-2000 20:20:57.37 File organization: Sequential File attributes: Allocation: 9, Extend: 0, Global buffer count: 0, No version limit Record format: Variable length, maximum 94 bytes Record attributes: Carriage return carriage control RMS attributes: None Journaling enabled: None File protection: System:RWED, Owner:RWED, Group:RE, World: Access Cntrl List: None Total of 1 file, 7/9 blocks.
The date of the last /RECORD backup is indicated in the Backup field of the display. In this example, a /RECORD backup was performed on 30-APR-2000 20:20:57.37.Note
If you used the /IGNORE=INTERLOCK qualifier to back up open files during your last image backup or incremental backup in which the /RECORD qualifier was used, see Section 11.18.3, ''/IGNORE Qualifier''. If the files remain open, they will not be included in the incremental backup because their backup date fields are not as recent as the last image backup or incremental backup in which the /RECORD qualifier was used.
- Enter the BACKUP command in the following format:
BACKUP/RECORD/SINCE=BACKUP input-specifier output-specifier[/LABEL=label] [/REWIND]
The /RECORD qualifier records the current date and time in the file header record of each file that is backed up. This information is essential for future incremental backups. The /SINCE=BACKUP qualifier backs up files dated later than the last /RECORD backup. The /REWIND qualifier is optional depending on whether you want to initialize the tape. The /LABEL qualifier identifies the label of the tape.
Example
$ BACKUP/RECORD/SINCE=BACKUP/RELEASE_TAPE From: DRA1:[000000...] To: MIA0:20APR2000.SAV/LABEL=20JUNE
The /LABEL qualifier identifies the volume label of the tape. Also, because BACKUP is performing an incremental rather than an image backup, it is necessary to explicitly use the notation DRA1:[000000 ... ] to specify all the files on DRA1. The /SINCE=BACKUP qualifier saves all files created or modified since the last /RECORD backup. The /RELEASE_TAPE qualifier dismounts and unloads an output tape device after BACKUP writes the save set and before it performs the action of the /RECORD command.
11.15.5. Performing Incremental Backups to Disk
As described in Section 11.2, ''Understanding Types of Backups'', an incremental backup of a disk provides you with an exact copy of only those files that have been created or modified since the last image or incremental backup in which the /RECORD qualifier was used.
How to Perform This Task
To perform an incremental backup, you must first perform an image backup using the /RECORD qualifier (see Section 11.15.2, ''Performing Image Backups to Tape'').
- To determine the date of the last backup that used the /RECORD qualifier, enter the DIRECTORY/FULL command and the file name. For example:
$ DIRECTORY/FULL LOGIN.COM Directory WORK204:[HIGGINS] LOGIN.COM;31 File ID: (23788,1,0) Size: 7/9 Owner: [ACC,HIGGINS] Created: 30-APR-2000 14:37:33.98 Revised: 30-APR-2000 14:37:34.44 (1) Expires: <None specified> Backup: 30-APR-2000 20:20:57.37 File organization: Sequential File attributes: Allocation: 9, Extend: 0, Global buffer count: 0, No version limit Record format: Variable length, maximum 94 bytes Record attributes: Carriage return carriage control RMS attributes: None Journaling enabled: None File protection: System:RWED, Owner:RWED, Group:RE, World: Access Cntrl List: None Total of 1 file, 7/9 blocks. $
The date of the last /RECORD backup is indicated in the Backup field of the display. In this example, a /RECORD backup was performed on 30-APR-2000 20:20:57.37.Note
If you used the /IGNORE=INTERLOCK qualifier to back up open files during your last image backup or incremental backup in which the /RECORD qualifier was used, see Section 11.18.3, ''/IGNORE Qualifier''. If the files remain open, they will not be included in the incremental backup because their backup date fields are not as recent as the last image backup or incremental backup in which the /RECORD qualifier was used.
- Enter the BACKUP command in the following format:
BACKUP/RECORD/SINCE=BACKUP input-specifier output-specifier/SAVE_SET
The /RECORD qualifier records the current date and time in the file header record of each file that is backed up. The first step in an incremental backup is an image backup (see Section 11.15.2, ''Performing Image Backups to Tape''). If you plan to perform incremental backups, you must use the /RECORD qualifier when you perform image backups. The /SINCE=BACKUP qualifier backs up files dated later than the last /RECORD backup. The /SAVE_SET qualifier indicates that you are creating a save set on a disk.
Examples
- To create an incremental backup of a disk named DUA55: on a sequential disk save set on a disk named DJC12:, you could enter the following commands:
$ MOUNT DUA55: DISK1 %MOUNT-I-MOUNTED, DISK1 mounted on _DUA55: $ MOUNT/FOREIGN DJC12: %MOUNT-I-MOUNTED, DISK2 mounted on _DJC12: $ BACKUP/RECORD/SINCE=BACKUP _From: DUA55:[000000...] _To: DJC12:USER1.SAV/SAVE_SET
- You can also specify multiple disk drives as the output device in the BACKUP command line. For example:
$ MOUNT DUA0: USER1 %MOUNT-I-MOUNTED, USER1 mounted on _DUA0: $ MOUNT/FOREIGN DUB24: %MOUNT-I-MOUNTED, DISK2 mounted on _DUB24: $ MOUNT/FOREIGN DUB25: %MOUNT-I-MOUNTED, DISK3 mounted on _DUB25: $ BACKUP/RECORD/SINCE=BACKUP _From: DUA0:[000000...] _To: DUB24:USER1.SAV,DUB25/SAVE_SET
11.15.6. Performing Incremental Backups Using PATHWORKS for OpenVMS Servers
An incompatibility between the operating procedures of the PATHWORKS for OpenVMS (Macintosh) server and OpenVMS incremental backup operations can cause BACKUP to save entire disks or directory structures, including subdirectories and files.
BACKUP can detect whether a directory file has been modified since the date indicated by the Backup Date field in the file header. If a directory file has been modified, all subdirectories and files of that directory are saved for possible later restore operations.
Updating the modification date of directory files is unusual for OpenVMS systems. However, it can happen if, for example, you rename a directory file from one location to another. In contrast, the PATHWORKS Macintosh server maintains the modification date of directory files for Macintosh users; that is, it updates the modification date for each directory change, file creation, and file deletion.
Thus, an incremental backup of a disk where PATHWORKS is used to serve files to Macintosh users may result in saving the entire disk or entire directories (including their subdirectories and files) instead of just the user files that were created or modified since the last incremental backup operation.
By using the /NOINCREMENTAL qualifier.
On a save operation, you can use the BACKUP qualifier /NOINCREMENTAL to avoid saving all the files and subdirectories under directories that have been modified. (Some files will, however, still be saved.) Use this qualifier only if you are sure that you do not want to save all data.
Prior to OpenVMS Version 6.2, the system, by default, did not save the files and subdirectories that were under directories that had been modified. In OpenVMS Versions 7.0 and 7.1, to ensure a successful restore, the system saved all files and subdirectories under directories that had been modified. This behavior, however, sometimes resulted in saving files and subdirectories that were not needed for later restore operations. The /NOINCREMENTAL qualifier allows you more control over the amount of file data that is saved.
- By performing a "dummy" BACKUP/RECORD operation on all directory files immediately before performing the incremental backup. For example:
$ BACKUP/RECORD/IGNORE=(INTERLOCK) - _$ disk:[000000...]*.DIR;* - _$ NLA0:DUMMY.BCK/SAVE/NOCRC/GROUP_SIZE=0 $ $ BACKUP/VERIFY/FAST/RECORD/IGNORE=(INTERLOCK) - _$ /NOASSIST/COMMENT="Incremental backup of DISK:" - _$ disk:[000000...]*.*;*/SINCE=BACKUP - _$ tape:incr.bck/LABEL=incr/SAVE
In this example, the first BACKUP command performs the dummy backup operation, and the second command performs the actual incremental backup. The first command updates the Backup Date field for all the directory files. Specifying the null output device NLA0:[000000...] causes a save set file not to be written. Because no file information needs to be retained from this operation, the /NOCRC and /GROUP_SIZE=0 qualifiers are specified to avoid CRC and XOR block calculation.
11.15.7. Backing Up Your Workstation Disk
On a standalone workstation, you are probably responsible for backing up files on your user disks. Section 11.15.7.1, ''Using a Command Procedure for Nightly Image Backups'', Section 11.15.7.2, ''Using a Command Procedure for Nightly Incremental Backups'', and Section 11.15.7.3, ''Using an Interactive Command Procedure for Backups'' contain command procedures for making image, incremental, and interactive backups of user disks on your workstation.
VSI also provides two template command procedures in the SYS$EXAMPLES directory for you to use in designing BACKUP command procedures. These command procedures are called BACKUSER.COM and RESTUSER.COM.
If you are not familiar with using command procedures, refer to the VSI OpenVMS User's Manual.
11.15.7.1. Using a Command Procedure for Nightly Image Backups
The following command procedure performs nightly image backups, backing up all the files on disk DUA2: to a tape in MUA0. The files are copied to a magnetic tape save set named FULL_BACKUP.SAV. This procedure is particularly useful for backing up files on a MicroVAX system or workstation.
How to Perform This Task
Ensure that you have a batch queue available on your system. (See Section 14.3, ''Planning Your Queue Setup'' for information about setting up a batch queues.) You submit the command procedure only once, and it will execute daily at 2:00 a.m. The command procedure automatically resubmits itself at 2:00 each morning; however, you must physically load a tape each day or the backup procedure will fail. Even if the backup procedure fails, however, the command procedure will continue to resubmit itself.
- From the SYS$MANAGER directory, create the command procedure as shown and call it SYSTEM_BACKUP.COM.
$! $! Resubmit this procedure – $ SUBMIT/AFTER="TOMORROW+2:0" SYS$MANAGER:SYSTEM_BACKUP $! $ ON ERROR THEN GOTO FAILURE $ SET PROCESS/PRIVILEGES=ALL $! $ REPLY/ALL - "Full Backup About to Begin. Open Files Will Not Be Saved" $! $ BACKUP /IMAGE DUA2: MUA0:FULL_BACKUP.SAV /REWIND /IGNORE=LABEL_PROCESSING $ DISMOUNT MUA0: $ EXIT $! $FAILURE: $ WRITE SYS$OUTPUT "—> Backup failed" $ WRITE SYS$OUTPUT "" $ DISMOUNT MUA0: $ EXIT
- Edit the command procedure to reflect:
- The name of the disk that you want to back up. To back up more than one disk, list each of the devices in the BACKUP command line. For example, you could substitute the following lines for the BACKUP command line in the preceding example:
. . . $! $ BACKUP/IMAGE WORK_DISK MIA0:WORK_BACK.SAV/REWIND $ BACKUP/IMAGE PAYROLL_DISK MIA0:PAYROLL_BACK.SAV $! . . .
If you plan to perform any incremental backups later, include the /RECORD qualifier in the BACKUP command line.
The name of the tape drive that you will use.
The name that you want to assign to the save set.
Write down the name of the save set that you assigned.
- Submit the command procedure using the following command line (if you gave your procedure a file name other than SYS$MANAGER:SYSTEM_BACKUP.COM, substitute the appropriate file name):
SUBMIT/NOPRINT/AFTER="TOMORROW+2:0"/QUEUE=queue_name SYS$MANAGER:SYSTEM_BACKUP
Be sure to change the tape daily and make sure that a tape is physically loaded on the device that you specified. When the backup is complete, keep the backup tape in a safe place and do not use the tape again until after you make another image backup of your disks.
$ SHOW ENTRY
Entry Jobname Username Blocks Status
----- ------- -------- ------ ------
14 SYS_BACKUP TPROULX Holding until 19-APR-2000 02:00
On generic batch queue CLUSTER_BATCH
$ DELETE/entry=58311.15.7.2. Using a Command Procedure for Nightly Incremental Backups
Interactive users are on your system at all times, and system performance is noticeably affected by backups.
A full backup does not fit on a single magnetic tape, but an incremental backup does. In this case, an image backup requires the presence of an operator (to change the tape), whereas an incremental backup can be run as a batch job.
Suppose that you want to do nightly incremental backups at 11:00 p.m., except on Friday night, when you want to do an image backup. The following command procedure executes an incremental backup on three disks and automatically resubmits itself to run again the following night, except for Friday night.
How to Perform This Task
- From the SYS$MANAGER directory, create the command procedure as shown and call it INCREMENTAL_BACKUP.COM.
$! $! Resubmit this procedure – – $ SUBMIT/AFTER="TOMORROW+23:0" SYS$MANAGER:INCREMENTAL_BACKUP $! $ TODAY = f$cvtime("today",,"weekday") $ IF TODAY .EQS. "Friday" THEN GOTO DONE $! $ ON ERROR THEN GOTO FAILURE $ SET PROC/PRIV=(OPER,BYPASS) $! $ REPLY/ALL - "Incremental Backup About to Begin. Open Files Will Not Be Saved" $! $ BACKUP/RECORD/SINCE=BACKUP DRA0:[000000...] - MIA0:INCREMENT1.SAV /LABEL=INC1 $ BACKUP/RECORD/SINCE=BACKUP DRA1:[000000...] - MIA1:INCREMENT2.SAV /LABEL=INC2 $ BACKUP/RECORD/SINCE=BACKUP DRA2:[000000...] - MIA2:INCREMENT3.SAV /LABEL=INC3 $ DISMOUNT MIA0: $ DISMOUNT MIA1: $ DISMOUNT MIA2: $ EXIT $! $FAILURE: $ WRITE SYS$OUTPUT "—> Backup failed" $ WRITE SYS$OUTPUT "" $ DISMOUNT MIA0: $ DISMOUNT MIA1: $ DISMOUNT MIA2: $ EXIT - Edit the procedure to reflect:
The names of the disks that you want to back up
The name of the tape drive that you will use
The volume label of the tape
The name that you want to assign to the save set
The day of the week (if any) to be omitted in the incremental backup
In this example, the incremental backup will not be performed on Friday, reserving that day for an image (full) backup.
Be sure that an image backup has been made and also be sure that you continue to make regular image backups. When you make your image backups, be sure to use the /RECORD qualifier (as well as the /IMAGE qualifier) in your BACKUP command line.
- Submit the command procedure using the following command line (if you gave your procedure a file name other than SYS$MANAGER:INCREMENTAL_BACKUP.COM, substitute the appropriate file name):
$ SUBMIT/AFTER=23 SYS$MANAGER:INCREMENTAL_BACKUP
Be sure that a tape is physically loaded on the device that you specified. When the incremental backup is complete, keep the tape in a safe place and do not use the tape again until you make another image backup.
11.15.7.3. Using an Interactive Command Procedure for Backups
You can use the following command procedure to interactively back up a disk to a magnetic tape.
How to Perform This Task
- Create the command procedure in your directory:
$ ! Command procedure DAILYBACK.COM $ ! $ ! Execute this command procedure interactively $ ! by entering the command @[directory]DAILYBACK $ ! at the DCL prompt. $ ! $ ! The BACKUP command in this procedure contains the $ ! output save-set qualifier /REWIND. Therefore, this $ ! command procedure always initializes the output tape. $ ! $ ON ERROR THEN GOTO FAILURE $ INQUIRE DRIVE "Enter the drive name (without a colon)" $ ALLOCATE 'DRIVE' $ INQUIRE SAVESET_SPEC "Enter the save-set specifier" $ INQUIRE LBL "Enter the tape label" $ INQUIRE EXP "Enter the tape expiration date" $ BACKUP/NOASSIST/RECORD/IGNORE=INTERLOCK/SINCE=BACKUP - [...] 'DRIVE':'SAVESET_SPEC'/REWIND/LABEL='LBL'/TAPE_EXPIRATION='EXP' $ DISMOUNT 'DRIVE' $ EXIT $! $FAILURE: $ WRITE SYS$OUTPUT "—> Backup failed" $ WRITE SYS$OUTPUT "" $ DISMOUNT 'DRIVE' $ EXIT
Run the procedure and enter the drive, save set, tape label, and tape expiration information.
After the specified tape drive is allocated, BACKUP searches the tape's volume header record for a volume label and compares the label you specified with the /LABEL qualifier. If the volume header record contains no volume label, BACKUP writes the label and expiration date you specified to the volume header record and initializes the tape. Otherwise, BACKUP compares the tape's volume label with the label you specified and ensures that the tape is expired.
If the tape is not expired or the label does not match, the command procedure exits. If the tape is expired and the label matches, BACKUP writes the expiration date you specified to the volume header record and initializes the tape. After initializing the tape, BACKUP saves all files in the current default directory tree that have been created or modified since the last save operation to a save set with the name you specified.
11.15.8. Backing Up Volume Shadow Sets
Volume shadowing maintains multiple copies of the same data on two or more disk volumes. If you use volume shadowing on your system, you can form a shadow set by uniting individual disk volumes (shadow set members). Volume shadowing duplicates data on each member of the shadow set. Per-disk licensing is available for each disk you will be including in a shadow set. This option is effective in a cluster where you intend to shadow only a small number of disks. However, if you have larger systems with many more disks to shadow, traditional capacity (per-CPU) licenses may be more appropriate.
|
Type of Shadow Set |
Sets Supported |
|---|---|
|
Single member |
Unlimited sets |
|
Multimember |
Total of 400 disks in two- and three-member sets, or both |
These limits apply per cluster. For example, 400 total disks could be configured into 200 two-member shadow sets or into 133 three-member shadow sets per cluster. If single, two-member, and three-member shadow sets are all present on a single cluster, then a maximum of 400 disks may be contained in the two- and three-member shadow sets.
You can use the firmware implementation of RAID level 1 (shadowing) to create shadow sets using the SCSI (Small Computer Systems Interface) disks attached locally to a single SWXCR- xx controller. The StorageWorks RAID Array 210 Subsystem (SWXCR-EA or SWXCR-EB EISA Backplane RAID controllers) and the StorageWorks PCI Backplane RAID controller (SWXCR-PA or SWXCR-PB) have their own firmware implementations of RAID, levels 0, 1, and 5.
SCSI disks connected to these controllers can also be included in shadow sets created using host-based volume shadowing for OpenVMS. For example, with host-based volume shadowing, you can create a RAID1 shadow set containing two like disks, each of which is attached to a separate SWXCR-xx RAID controller located within a cluster. SCSI disks can be configured as shadow sets when attached to systems running volume shadowing for OpenVMS.
For directly connected SCSI devices that have been powered down or do not answer to polling, the elapsed time before a device is removed from a shadow set approaches one minute. In all other situations, the elapsed time closely approximates the number of seconds specified in the SHADOW_MBR_TMO parameter.
Volume shadowing checks for geometries and maximum logical block numbers (LBNs) on devices. This enables devices such as the RZ28 and the RZ28B to operate in the same shadow set. Even though their device IDs differ, their geometries and maximum LBNs will match when configured on like controllers (two HSJ controllers, for example).
When you create a shadow set, individual users access it as a virtual unit. For example, you could create a virtual unit DSA1 that consists of the disks named DUA1:, DUA2:, and DUA3. Users cannot access the individual shadow set members directly, but can perform operations on the virtual unit (DSA1:).
Caution
Do not attempt to back up a shadow set by dismounting an individual shadow set member or by backing up an active shadow set member. You must dismount the entire shadow set and re-create it less one shadow set member. If you do not follow this restriction, the resultant backup copy may contain inconsistent data.
How to Perform This Task
Note
You cannot perform an incremental backup using this procedure because the backup record date is overwritten when you add the disk volume back into the existing shadow set.
Make sure that all shadow set members are full members; none of the members should be in a merge or copy state.
Dismount the entire shadow set.
Re-create the shadow set less one member. The data on the excluded member will mirror the data on the shadow set members.
Mount the former shadow set member for the backup.
Perform an image backup on the former shadow set member.
Dismount the former shadow set member when the backup is complete.
Add the shadow set member that you backed up.
11.15.8.1. Mounting a Disk in a Host-Based Shadow Set
To mount a disk in the StorageWorks RAID Array 110 Subsystem in a host-based shadow set, you must use the /OVERRIDE=NO_FORCED_ERROR qualifier with the MOUNT command.
The StorageWorks RAID Array 110 Subsystem does not support the READ/WRITE LONG SCSI commands that are necessary for implementing the FORCED ERROR function in SCSI. Without FORCED ERROR, you must override that check by the shadowing driver.
11.15.8.2. Assisted Merging in Mixed-Architecture Clusters
Assisted merging, also known as minimerge, is disabled if shadow sets are mounted on an OpenVMS Alpha node and also on other types of nodes in the same cluster. To reenable assisted merging, apply the CSCPAT (TIMA) kit to all OpenVMS Cluster nodes mounting the shadow set.
With minimerge disabled, shadowing will continue to function normally. However, a full merge will always be done when a merge operation is required. A full merge takes considerably longer to complete than a minimerge operation; VSI recommends that you install the CSCPAT (TIMA) kit.
11.16. Restoring User Disks
Occasionally you may want to restore the backup copy of an entire disk. For example, if the disk drive fails, you could restore the backup copy to a working disk. By occasionally saving and restoring an image backup, you can also prevent disk fragmentation.
The way in which you restore a disk depends on whether the most recent backup was an image (full) or incremental backup. Section 11.16.1, ''Restoring Image Backups'' describes the process for restoring a disk when the most recent backup was an image backup. Section 11.16.2, ''Restoring Incremental Backups'' describes the process for restoring a disk when one or more incremental backups were performed since the most recent image backup.
11.16.1. Restoring Image Backups
This section describes how to restore the entire contents of a disk when your most recent backup was an image backup (using the /IMAGE qualifier, as described in Section 11.15.2, ''Performing Image Backups to Tape'').
How to Perform This Task
Caution
When you use the /IMAGE qualifier in a restore operation, the disk to which you are restoring the files is initialized. Initializing the disk removes links to the existing files, effectively erasing them. To restore individual files or directories rather than the entire disk, see Section 11.14, ''Restoring Files and Directories''.
Mount the disk to which you will restore the files, using the MOUNT/FOREIGN command as described in Section 11.8.2, ''Mounting a Volume''.
Load and mount the volume. If the backup is contained in a Files–11 save set, make sure you mount the volume in the Files–11 format. If the backup is contained in a sequential disk save set, make sure you load the volume and mount it using the MOUNT/FOREIGN command. If the backup copy is on a tape save set, load the first tape.
- If you do not know the name of the save set, perform one of the following actions:
- If the save set is on a disk, make sure the disk is mounted in the Files–11 format and use the DIRECTORY command to determine the name of the save set. For example:
$ DIRECTORY BACKUP_DISK:[BACKUPS] Directory SYS$SYSDEVICE:[BACKUPS] 19APRIL2000.SAV;1 Total of 1 file.
The save set is named 19APRIL2000.SAV.
- If the save set is on magnetic tape, load the tape and then enter the following command, substituting the name of your tape drive for MIA1:
$ BACKUP/LIST/REWIND MIA1: Listing of save set(s) Save set: 19APRIL2000.SAV Written by: SYSTEM UIC: [000001,000004] Date: 19-APR-2000 22:03:03.63 . . .
The save set is named 19APRIL2000.SAV.
- To restore the save set, enter the BACKUP command with the /IMAGE qualifier, using the following syntax:
BACKUP/IMAGE device:save-set-specifier [/SAVE_SET] output-device
If your backup save set is on a disk or diskette, then you must also use the /SAVE_SET qualifier immediately after the save-set specifier (device:save-set-specifier).
If your backup save set is on more than one tape, disk, or diskette, BACKUP dismounts and unloads the current volume. Load the next volume when BACKUP prompts for it.
Use the /NOUNLOAD qualifier to dismount the disk onto which you just restored the files.
Example
The saved files are contained in a tape save set named FULL_BACKUP.SAV. This save set is the result of an image backup.
The tape containing the saved copy of the disk contents is loaded on MIA1.
DUA2: is the device name of the disk to which the files will be restored.
$ MOUNT/FOREIGN DUA2:
| Mount the disk DUA2. The files will be restored to this disk. |
| Initialize DUA2:, effectively erasing any previous data on the disk. Restore the directory structure and all the files from the save set FULL_BACKUP.SAV to the disk DUA2. BACKUP restores the files contiguously on DUA2:, eliminating any disk fragmentation on that device. The /IMAGE qualifier restores a logical duplicate of the original disk so that the entire directory structure is restored and the files are placed in the proper directories. |
| Dismount the disk. |
11.16.2. Restoring Incremental Backups
Restoring files after making an image backup and one or more incremental backups is a two-step process. First, restore the most recent image backup. Then, restore each subsequent incremental backup, starting with the most recent.
For the number of directory structure levels you can access see Section 11.14.1, ''Accessing Files in Deep Directory Structures''.
How to Perform This Task
Mount the disk to which you will restore the files, using the MOUNT /FOREIGN command. (See Section 11.8.2, ''Mounting a Volume'' for information about the MOUNT command.)
Load the tape, disk, or diskette that contains the most recent image backup of the disk. If the backup save set spans more than one volume, load the first volume of the set. If the backup copy is on a disk or diskette, mount the volume.
- If you do not know the name of the save set, perform one of the following actions:
- If the save set is on a disk, make sure the disk is mounted and use the DIRECTORY command to determine the name of the save set. For example:
$ DIRECTORY BACKUP_DISK:[BACKUPS] Directory SYS$SYSDEVICE:[BACKUPS] 19APRIL2000.SAV;1 Total of 1 file.
The save set is named 19APRIL2000.SAV.
- If the save set is on magnetic tape, load the tape and enter the following command, substituting the name of the tape drive you use for MIA0:
$ BACKUP/LIST/REWIND MIA0: Listing of save set(s) Save set: 19APRIL2000.SAV Written by: SYSTEM UIC: [000001,000004] Date: 19-APR-2000 22:03:03.63 . . .
The save set is named 19APRIL2000.SAV.
- Enter the BACKUP command using the following syntax:
BACKUP/IMAGE device:save-set-specifier[/SAVE_SET] output-specifier
The /IMAGE qualifier indicates that you are restoring an image backup. If your backup copy is on a disk or diskette, then you must also use the /SAVE_SET qualifier immediately after the save-set specifier (device:save-set-specifier).
If your backup copy is on more than one tape or diskette, load each subsequent tape or diskette when BACKUP prompts for the next volume.
Use the /NOUNLOAD qualifier to dismount the disk onto which you have just restored the files from the image backup.
- Mount the disk that you are restoring as a file-structured volume, using the following syntax:
MOUNT device-name: volume-label
The parameter device-name is the name of the drive that holds the volume you want to mount. The parameter volume-label is the 1- to 6-character alphanumeric identification you assigned to the volume with the INITIALIZE command.
Dismount the media that contained the image backup and mount the tape, disk, or diskette that contains the most recent incremental backup of the disk.
- Restore your incremental save sets, beginning with the most recent backup. Use the following syntax to restore an incremental backup:
BACKUP/INCREMENTAL save-set-specifier[/SAVE_SET] device-specifier
Remember that you must use the /SAVE_SET qualifier after the save-set specifier if your backup copies are on a disk or diskette.
Continue restoring the incremental backups, from the most recent to the oldest, until you have processed all of the incremental backups since the most recent image backup. If the incremental backups are on more than one tape, diskette, or disk, then you must load each one successively when prompted by BACKUP.
When you have processed the oldest incremental backup, the restore operation is complete.
Example
The save set for the image backup is named WORK_BACKUP.SAV. This save set was created using the BACKUP/IMAGE/RECORD command.
- The save sets for the incremental backups are named as follows:
- WORK_16_JAN.SAV
- WORK_17_JAN.SAV
- WORK_18_JAN.SAV
Both the image and the incremental backup save sets are on the disk named DUA3:, which is already mounted.
The disk to which the files will be restored is named DUA2.
$ MOUNT/FOREIGN DUA2:
| Mount the disk DUA2: with the /FOREIGN qualifier. The files will be restored to this disk. |
| Restore the directory structure and all the files from the save set WORK_BACKUP.SAV to the disk DUA2. This was an image backup, so it must be the first save set you restore when you want to restore incremental backup save sets. |
| Logically dismount the disk DUA2. |
| Remount the disk DUA2:, this time as a Files–11 volume. |
| Restore the most recent incremental backup. |
| Restore the next incremental backup. |
| Restore the oldest incremental backup. Restoring the incremental backups in reverse chronological order is the most efficient way to restore files. When you have restored the last incremental backup, the restore operation is complete. |
11.16.2.1. Restoring to Target Disk Structures
BACKUP examines the target disk and the save-set contents to determine which save-set entries to ignore and which target disk entries to delete. If BACKUP encounters a privilege error when attempting to delete directories or other files from the target disk, BACKUP attempts to change the protection of the files so they can be deleted.
Note
Renaming directories is not recommended. Also, changing security information for a directory changes its modification date. Thus, a directory might appear to be "renamed" and its contents included in incremental save sets if the file protection or security information is changed. The addition of renamed directory contents might increase the size of some incremental save sets.
BACKUP processes the target disk directory structure by directory levels, in alphabetical order. Thus, circumstances can occur that prevent BACKUP from correctly restoring an incremental save set to a target disk. For example, the target disk does not have sufficient space to hold newly "renamed" directories and their contents prior to deleting the original directories and their contents on the target disk.
If incremental restore fails due to insufficient disk space, a possible solution is to apply the incremental save set a second time (before doing anything else). This causes the first incremental restore to continue and delete directories and their contents, making more space available on the target disk. A second solution is to selectively restore files from the save set.
BACKUP attempts to restore alias or synonym file entries in incremental restore operations that do not specify multiple processing of alias or synonym file entries (/NOALIAS). In cases where the alias entry cannot be restored properly, BACKUP issues an error message indicating the alias file entry, its primary file, and a secondary status of the cause of the failure.
If you specify the /LOG qualifier, then BACKUP issues a message upon successful restoration of alias file entries.
If you specify the /VERIFY qualifier, BACKUP attempts alias entry restoration during the verify pass. Otherwise, alias entry restoration is attempted along with the normal file restoration. The reason for this behavior is that BACKUP attempts to restore all primary files before attempting to restore alias entries that will eventually reference those files.
11.16.3. Restoring Volume Shadow Sets
Note
Because the BACKUP output device (the shadow set) must be mounted using the /FOREIGN qualifier, VSI does not support a restore operation from an image save set to a virtual unit.
11.17. Backing Up and Restoring the System Disk
A system disk could become inoperable if a problem occurs during a software upgrade, update, or installation. Before you attempt any of these operations, back up the system disk. If a problem occurs, you can restore the backup copy of the system disk.
System files could inadvertently be deleted. After you install, upgrade, or update the operating system or any other software products, back up the system disk. If a system file is deleted, you can restore the backup copy and continue to use the system.
The drive that holds the system disk could malfunction. If you have a backup copy of the operating system and your other software, you can restore it to a functioning disk and continue to use the system.
Disk fragmentation could occur if files are stored noncontiguously on the disk. Perform an image backup of the system disk to a magnetic tape or another disk and then restore the files to the original system disk. This restores the system disk and contiguously stores files. You can also eliminate fragmentation by performing a disk-to-disk image backup without using the /SAVE_SET qualifier. This creates a functionally equivalent copy of the entire system disk, on which files are stored contiguously. (See Section 11.17.5, ''Backing Up the System Disk to a Disk''.)
Note
If you use the menu system to back up large system disks on low memory VAX systems (those with less than 32 MB of memory), BACKUP might need to page and thereby cause the operation to fail. If this problem occurs, use standalone BACKUP to back up system disks on VAX systems.
If you do not have access to the OpenVMS VAX operating system distribution compact disc, use standalone BACKUP to back up and restore your system disk. For more information about standalone BACKUP, see Section 11.17.2, ''Understanding Standalone BACKUP (VAX Only)''.
11.17.1. Starting the Menu System
Use the menu system in this section to back up or restore system disks and user disks if you have access to the OpenVMS Alpha or VAX Version operating system distribution compact disc.
How to Perform This Task
If the operating system is not running, go to step 2.
If the operating system is running, log in to the SYSTEM account. Enter the following command and press Return:$ @SYS$SYSTEM:SHUTDOWN
Answer the questions. When the procedure asks if an automatic system boot should be performed, press Return for NO. When the procedure is finished, it displays the following message:SYSTEM SHUTDOWN COMPLETE
On VAX systems, the following message is also displayed:USE CONSOLE TO HALT SYSTEM
Halt the system if you see this message.
- Boot the system:
On OpenVMS Alpha systems, boot the distribution compact disc.
On OpenVMS VAX systems, boot the distribution compact disc from the SYS1 directory.
Note
The boot command you use for your computer depends on the type of system you have. For more information about booting your system, see the installation and operations supplement for your computer.
When the system boots, it displays a menu. Choose the menu item that allows you to execute DCL commands and procedures.
At the DCL prompt, you can back up or restore the system and user disks.
To make a backup copy of the system disk, see Section 11.17.3, ''Backing Up the System Disk to Tape''.
To restore the system disk, see Section 11.17.4, ''Restoring the System Disk from Tape''.
11.17.1.1. Example
>>> B/R5:10000100 ESA0
Bootfile: ISL_SVAX_071
-ESA0
Network Initial System Load Function
Version 1.1
FUNCTION FUNCTION
ID
1 - Display Menu
2 - Help
3 - Choose Service
4 - Select Options
5 - Stop
Enter a function ID value: 3
OPTION OPTION
ID
1 - Find Services
2 - Enter known Service Name
Enter an Option ID value: 2
Enter a Known Service Name: VMS071
OpenVMS VAX Version 7.3 Major version id = 3 Minor version id = 0
%SYSINIT-E, error opening page file, status = 0000025C
%SYSINIT-E, error opening swap file, status = 0000025C
%SYSINIT, primary PAGEFILE.SYS not found; system initialization continuing
%SYSINIT, no dump file - error log buffers not saved
%SYSINIT-E, error mounting system device, status = 00000F64
$! Copyright (c) 2018 VMS Software, Inc. (VSI) All rights reserved.
$set noverify
Copyright (c) 2018 VMS Software, Inc. (VSI) All rights reserved.
Installing required known files...
Configuring devices...
****************************************************************
The menu can be used to execute DCL commands and procedures for
various "standalone" tasks, such as backing up the system disk.
Please choose one of the following:
1) Execute DCL commands and procedures
2) Shut down this system
Enter CHOICE or "?" to repeat menu: (1/2/?)) 1
WARNING –
The normal VMS startup procedure has not executed.
Some commands and utilities will not work as documented.
Enter DCL commands – Enter "LOGOUT" when done.
When you enter "LOGOUT" a logout message will be displayed,
and you will be returned to the menu.
$$$11.17.2. Understanding Standalone BACKUP (VAX Only)
|
Type |
Qualifier |
Default |
|---|---|---|
|
Command Qualifiers |
/BRIEF |
/BRIEF |
|
/COMPARE |
None | |
|
/FULL |
/BRIEF | |
|
/IMAGE |
/IMAGE | |
|
/[NO]INITIALIZE |
Refer to the VSI OpenVMS System Management Utilities Reference Manual | |
|
/LIST[=file-spec] |
Refer to the VSI OpenVMS System Management Utilities Reference Manual | |
|
/[NO]LOG |
/NOLOG | |
|
/PHYSICAL |
None | |
|
/RECORD |
None | |
|
/[NO]TRUNCATE |
/NOTRUNCATE | |
|
/VERIFY |
None | |
|
/VOLUME=n |
None | |
|
Input Save-Set Qualifiers |
/[NO]CRC |
/CRC |
|
/[NO]REWIND |
/NOREWIND | |
|
/SAVE_SET |
None | |
|
Output Save-Set Qualifiers |
/BLOCK_SIZE=n |
Refer to the VSI OpenVMS System Management Utilities Reference Manual |
|
/BY_OWNER=uic |
Refer to the VSI OpenVMS System Management Utilities Reference Manual | |
|
/COMMENT=string |
None | |
|
/[NO]CRC |
/CRC | |
|
/DENSITY=n |
Refer to the VSI OpenVMS System Management Utilities Reference Manual | |
|
/[NO]EXACT_ORDER |
/NOEXACT_ORDER | |
|
/GROUP_SIZE=n |
/GROUP_SIZE=10 | |
|
/LABEL=(string[,...]) |
Refer to the VSI OpenVMS System Management Utilities Reference Manual | |
|
/PROTECTION[=(code)] |
Refer to the VSI OpenVMS System Management Utilities Reference Manual | |
|
/[NO]REWIND |
/NOREWIND | |
|
/SAVE_SET |
None | |
|
/TAPE_EXPIRATION |
Today |
You should have a standalone BACKUP kit that came with your OpenVMS distribution kit; however, depending on the type of media you have, standalone BACKUP boots faster if you build it on the system disk or a user disk. The installation and upgrade supplement for your computer contains instructions for building and booting standalone BACKUP on several types of media.
This section provides information about building standalone BACKUP on a disk or tape and using it to back up your system disk.
11.17.2.1. Building Standalone BACKUP on a Disk (VAX Only)
Standalone BACKUP boots faster on disk than it does on tape. For this reason, you should create a standalone BACKUP kit on disk.
You can build standalone BACKUP on either the system disk or a user disk. If you build standalone BACKUP on a user disk, the kit occupies more disk space than if you build it on the system disk. This is because certain files that boot the system already exist on the system disk.
To build standalone BACKUP, execute SYS$UPDATE:STABACKIT.COM. The procedure copies the files for booting standalone BACKUP to a new directory on the target device that you specify, creating the directory if necessary. When you build a kit on the system disk, the procedure copies the files to the [SYSE] directory. When you build the kit on a user disk, the procedure copies the files to the [SYS0] directory.
How to Perform This Task
Log in to the SYSTEM account.
- Enter the following command and press Return:
$ @SYS$UPDATE:STABACKIT Enter the name of the device on which to build the kit:
- Enter the device name of the disk that you are building standalone BACKUP on. If you are building standalone BACKUP on the system disk, enter SYS$SYSDEVICE. For example:
Enter the name of the device on which to build the kit: SYS$SYSDEVICE:
- The procedure places the files in the appropriate directories on the disk that you are using to build standalone BACKUP. It lists the files as they are copied. When the procedure finishes, it displays the following message:
The kit is complete.
Performing Image Backups from an RF73 Disk
When you perform an image backup from an RF73 disk (or a disk with a cluster size of 4 blocks) to an RF74 disk (or a disk with a cluster size of 7 blocks), the Backup utility does not check the file size when it allocates space for the file being copied. Therefore, if the file has an allocation greater than the value of the CLUSTER_SIZE attribute established during initialization, BACKUP allocates one more cluster size number of blocks to the allocation size even though the actual file size is less than the cluster size. For example, during an image backup, a file that uses 6 blocks and is allocated 8 blocks (which displays as 6/8 on the screen if you enter a DIRECTORY/SIZE=ALfter it is copied to the target disk.
- SYS$COMMON:[SYS$LDR]LIDRIVER.EXE
- SYS$COMMON:[SYS$LDR]LPDRIVER.EXE
This incorrect allocation size causes standalone BACKUP to fail on the booted image system disk.
$ COPY/ALLOCATION=7 SYS$COMMON:[SYS$LDR]LIDRIVER.EXE $ COPY/ALLOCATION=7 SYS$COMMON:[SYS$LDR]LPDRIVER.EXE
11.17.2.2. Booting Standalone BACKUP from a Disk (VAX Only)
If the operating system is not running, go to step 2.
If the operating system is running, log in to the SYSTEM account. Enter the following command and press Return:$ @SYS$SYSTEM:SHUTDOWN
Answer the questions. When the procedure asks if an automatic system boot should be performed, press Return for NO. When the procedure is finished, it displays the following message:SYSTEM SHUTDOWN COMPLETE – USE CONSOLE TO HALT SYSTEM
Halt the system.
Boot standalone BACKUP from the root where the kit is located. The exact commands for booting standalone BACKUP differ among the various computer models. Refer to the upgrade and installation supplement for your computer for booting information.
For example, to boot a MicroVAX 3100 computer, use the following format:>>> B/n0000000 device-name
where:nis the number of the root on the disk containing the standalone backup.device-nameis the device name of the disk.
For example, if the disk has a device name of DKA400:, and the standalone BACKUP kit was created in the [SYSE] directory, enter the following command:>>> B/E0000000 DKA400
For more information about device names, see Section 8.1, ''Understanding Device Names''.
- Standalone BACKUP displays the following message:
OpenVMS VAX Version Vn.n Major version id = 01 Minor version id = 00
- The procedure asks you for the date and time. Enter the date and time using the 24-hour clock format and press Return. For example:
PLEASE ENTER DATE AND TIME (DD-MMM-YYYY HH:MM) 19-JAN-2000 15:00
- The procedure displays a list of the local devices on your system. For example:
Available device MKA500: device type TK50 Available device DKA100: device type RRD40 . . .Check the list of devices. If the list is incomplete, make sure that all the drives are properly connected to the system. Refer to your hardware manuals for details.
- When standalone BACKUP finishes booting, it displays an identification message followed by the dollar sign prompt ($):
%BACKUP-I-IDENT, Standalone BACKUP Vn.n; the date is 19-APR-2000 15:00 $
To make a backup copy of the system disk, see Section 11.17.3, ''Backing Up the System Disk to Tape''.
To restore the system disk, see Section 11.17.4, ''Restoring the System Disk from Tape''.
11.17.2.3. Building Standalone BACKUP on a Tape Cartridge (VAX Only)
On VAX systems with a tape cartridge distribution kit, the tape cartridge that came with your distribution kit contains standalone BACKUP. Use the procedure in this section if your copy of standalone BACKUP becomes damaged or if you want to make extra copies.
How to Perform This Task
Obtain a blank, initialized tape cartridge. Write the name S/A BKUP V7.3 on the paper label. Insert the label into the label slot.
Write-enable the tape cartridge by sliding the write-protect switch away from the label slot.
Insert the tape cartridge labeled S/A BKUP V7.3 into the drive.
Log in to the SYSTEM account.
- Enter the following command:
$ @SYS$UPDATE:STABACKIT
- The procedure asks you for the name of the target device. Enter the device name of the tape cartridge drive you are using to build standalone BACKUP. For example:
Enter the name of the device on which to build the kit: MUA0
- The procedure displays the following message:
Please place the scratch tape cartridge in drive _MUA0: This volume will receive the volume label SYSTEM. Enter "YES" when ready:
When you are ready to continue, enter YES.
The system displays verification messages informing you that files are being copied.
- When standalone BACKUP is built, the procedure displays a message similar to the following one:
Ending time 19-MAY-2000 16:44:29.90 Starting time 19-MAY-2000 16:30:39.05 The Kit is complete. $
Remove the tape cartridge labeled S/A BKUP V7.3 from the tape cartridge drive.
Write-protect the tape cartridge by sliding the write-protect switch toward the label slot. Store the cartridge in a safe place.
11.17.2.4. Booting Standalone BACKUP from a Tape Cartridge (VAX Only)
If the disk containing standalone BACKUP becomes unusable (for example, if the drive fails), you can boot standalone BACKUP from a tape cartridge. Booting standalone BACKUP from a tape cartridge takes approximately 20 minutes.
How to Perform This Task
If the operating system is not running, see step 2.
If the operating system is running, log in to the SYSTEM account. Enter the following command and press Return:$ @SYS$SYSTEM:SHUTDOWN
Answer the questions. When the procedure asks if an automatic system boot should be performed, press Return for NO. When the procedure is finished, it displays the following message:SYSTEM SHUTDOWN COMPLETE – USE CONSOLE TO HALT SYSTEM
Halt the system.
Insert the tape cartridge that contains standalone BACKUP into the tape cartridge drive.
- To boot standalone BACKUP, enter the BOOT command followed by the device name of the tape cartridge drive that contains standalone BACKUP. For example:
>>> BOOT MUA0
- Standalone BACKUP displays the following message:
OpenVMS VAX Version V7.3 Major version id = 3 Minor version id = 0
- The procedure might ask you for the date and time. Enter the date and time using the 24-hour clock format and press Return. For example:
PLEASE ENTER DATE AND TIME (DD-MMM-YYYY HH:MM) 19-MAY-2000 15:00
- The procedure displays a list of the local devices on your system and, if you have them, HSC and MSCP-served devices. For example:
Available device DUA0: device type Generic_DU Available device MUA0: device type TK50
- When standalone BACKUP finishes booting, it displays an identification message followed by the dollar sign prompt ($):
%BACKUP-I-IDENT, standalone BACKUP V7.3; the date is 19-MAY-2000 15:50 $
Remove the tape cartridge containing standalone BACKUP from the tape cartridge drive.
To make a backup copy of the system disk, see Section 11.17.3, ''Backing Up the System Disk to Tape''.
To restore the system disk, see Section 11.17.4, ''Restoring the System Disk from Tape''.
11.17.3. Backing Up the System Disk to Tape
|
Qualifier |
Function |
|---|---|
|
/IMAGE |
Lets you create a functionally equivalent copy of the entire system disk. When restored, files from an image backup are placed contiguously on the system disk, eliminating disk fragmentation. |
|
/PHYSICAL |
Copies, saves, restores, or compares the entire system disk in terms of logical blocks, ignoring any file structure. |
For a complete description of the Backup utility qualifiers, refer to the VSI OpenVMS System Management Utilities Reference Manual.
How to Perform This Task
Obtain blank tape cartridges or magnetic tapes that you can use for the backup operation.
Write-enable the tape. To write-enable a tape cartridge, slide the write-protect switch away from the tape cartridge label. To write-enable a tape, insert a write-enable ring in the back of the tape reel.
Insert a tape into the tape drive.
Determine the device name of the system disk you are backing up. (See Section 8.3, ''Getting Information About Devices on the System'' for information about determining the names of your devices.) To display the device name of the system disk you are booted from, enter the DCL command SHOW LOGICAL SYS$SYSDEVICE.
- Depending on your configuration, either boot standalone BACKUP or start the menu system:
If you have access to the OpenVMS Alpha or VAX operating system distribution compact disc, start the menu system described in Section 11.17.1, ''Starting the Menu System''.
If you do not have access to the OpenVMS VAX operating system distribution compact disc, boot standalone BACKUP as described in either Section 11.17.2.2, ''Booting Standalone BACKUP from a Disk (VAX Only)'' or Section 11.17.2.4, ''Booting Standalone BACKUP from a Tape Cartridge (VAX Only)''.
- Enter the BACKUP command in the following format:
BACKUP/IMAGE/VERIFY input-specifier: output-specifier:saveset.BCK/REWIND/LABEL=label
where:input-specifier is the device name of the system disk.
output-specifier is the device name of the drive that you want to hold the backup copy.
saveset.BCK is the name of the save set. The name should reflect the contents of the tape (for example, OCT_31_2000.BCK) and cannot exceed 17 characters in length.
label is the volume label of the tape in the drive. If the tape has been initialized already, use the same volume label that was assigned by the INITIALIZE command.
For example:$ BACKUP/IMAGE/VERIFY DUA1: MUA0:DEC_31_BACKUP.BCK/REWIND/LABEL=WKY101
- The following message indicates that BACKUP has transferred the files and is verifying the accuracy of the backup copy:
%BACKUP-I-STARTVERIFY, starting verification pass
- If your system disk contains more data than a single tape cartridge or magnetic tape can store, the procedure displays the following messages and prompt:
%BACKUP-I-RESUME, Resuming operation on volume 2 %BACKUP-I-READYWRITE, Mount volume 2 on _MUA0: for writing Enter "YES" when ready.
If you do not receive these messages, see step 9. If you do receive these messages, perform the following steps:Remove the backup tape from the drive.
Label it COMPLETE SYSTEM BACKUP and include the date and the number of the tape in the sequence.
Write-protect the backup tape.
Write-enable another scratch tape and insert it into the drive.
When you are ready to continue, enter Y (for YES) and press Return.
- The procedure displays the following message, which indicates that it has transferred the files and is verifying the accuracy of the backup copy:
%BACKUP-I-STARTVERIFY, starting verification pass
Each time the procedure displays a mount request, follow steps a through e.
- If you are using standalone BACKUP, when the backup is finished, the system displays the following message:
%BACKUP-I-PROCDONE, Operation completed. Processing finished at 19-MAY-2000 15:30. If you do not want to perform another standalone BACKUP operation, use the console to halt the system. If you do want to perform another standalone BACKUP operation, ensure the standalone application volume is online and ready. Enter "YES" to continue:
Continue with step 11.
If you are using the menu system, the DCL prompt appears after the backup is finished. Log out and choose the Shutdown option from the menu.
Remove the backup tape from the drive. Label it COMPLETE SYSTEM BACKUP, number it (if you used more than one cartridge), and include the date.
Write-protect the tape cartridge or magnetic tape.
Halt the system.
Reboot the system.
Store the backup tapes in a safe place.
11.17.4. Restoring the System Disk from Tape
If a problem occurs that renders your system disk unbootable, you can restore the system disk from your backup copy.
How to Perform This Task
Note
The BACKUP restore operation creates a system disk that includes a set of volume parameters provided by VSI, including a cluster size (disk access scheme). You can change most volume parameters later with the SET VOLUME command. For cluster-mounted volumes, changes occur to the nodes on which the SET VOLUME command is issued.
To change the cluster size, back up the system disk to a disk that has been previously initialized with the cluster size that you want. For more information about initializing a disk, see Section 9.3, ''Initializing Volumes''. For more information about the BACKUP command qualifiers, refer to the VSI OpenVMS System Management Utilities Reference Manual.
- Depending on your configuration, either boot standalone BACKUP or start the menu system:
If you have access to the OpenVMS Alpha or VAX operating system distribution compact disc, start the menu system described in Section 11.17.1, ''Starting the Menu System''.
If you do not have access to the OpenVMS VAX Version operating system distribution compact disc, boot standalone BACKUP as described in either Section 11.17.2.2, ''Booting Standalone BACKUP from a Disk (VAX Only)'' or Section 11.17.2.4, ''Booting Standalone BACKUP from a Tape Cartridge (VAX Only)''.
Determine the device name of the system disk you want to restore. (See Section 8.3, ''Getting Information About Devices on the System'' for information about determining the names of your devices.)
Insert the first tape of the complete system disk backup into the drive. Make sure the tape is write-protected.
- Enter the BACKUP command in the following format:
BACKUP/IMAGE/VERIFY input-specifier:saveset.BCK/REWIND output-specifier:
where:input-specifier is the device name of the drive that holds the backup copy.
saveset.BCK is the name of the save set.
output-specifier is the device name of the system disk that you are restoring.
For example:$ BACKUP/IMAGE/VERIFY MUA0:DEC_31_BACKUP.BCK/REWIND DUA0:
- The procedure displays the following message:
%BACKUP-I-STARTVERIFY, starting verification pass
- If your system disk contained more data than one tape could store, you receive the following messages and prompt:
%BACKUP-I-RESUME, Resuming operation on volume 2 %BACKUP-I-READYREAD, Mount volume 2 on MUA0: for reading Enter "YES" when ready.
If you do not receive these messages, see step 7. If you do receive these messages, perform the following steps:Remove the backup tape from the drive.
Insert the next backup tape into the drive.
When you are ready to continue, enter Y (for YES) and press Return.
- The procedure displays the following message:
%BACKUP-I-STARTVERIFY, starting verification pass
Each time the procedure displays a mount request, follow steps a through c.
- If you are using standalone BACKUP, when the restore is finished the system displays the following message:
%BACKUP-I-PROCDONE, Operation completed. Processing finished at 19-MAY-2000 15:30. If you do not want to perform another standalone BACKUP operation, use the console to halt the system. If you do want to perform another standalone BACKUP operation, ensure the standalone application volume is online and ready. Enter "YES" to continue:
Continue with step 9.
If you are using the menu system, the DCL prompt appears after the restore is finished. Log out and choose the shutdown option from the menu.
Remove the last backup tape from the drive.
Halt the system.
Reboot the system.
Store the backup tapes in a safe place.
11.17.5. Backing Up the System Disk to a Disk
Note
This procedure initializes the output disk, effectively erasing the files on the disk.
How to Perform This Task
Obtain a disk with enough storage capacity to use for the backup. Make sure the disk does not contain files you need, because standalone BACKUP initializes the output disk.
Determine the device name of the system disk you are backing up. (See Section 8.3, ''Getting Information About Devices on the System'' for information about determining the names of your devices.) To display the device name of the system disk you are booted from, enter the DCL command SHOW LOGICAL SYS$SYSDEVICE.
- Depending on your configuration, either boot standalone BACKUP or start the menu system:
If you have access to the OpenVMS Alpha or VAX operating system distribution compact disc, start the menu system described in Section 11.17.1, ''Starting the Menu System''.
If you do not have access to the OpenVMS VAX operating system distribution compact disc, boot standalone BACKUP as described in either Section 11.17.2.2, ''Booting Standalone BACKUP from a Disk (VAX Only)'' or Section 11.17.2.4, ''Booting Standalone BACKUP from a Tape Cartridge (VAX Only)''.
- Enter the BACKUP command in the following format:
BACKUP/IMAGE/VERIFY input-specifier: output-specifier:
where:input-specifier is the device name of the system disk.
output-specifier is the device name of the drive that you want to hold the backup copy.
For example:$ BACKUP/IMAGE/VERIFY DUA0: DUA1:
- BACKUP displays the following message, which indicates that it has transferred the files and is verifying the accuracy of the backup copy:
%BACKUP-I-STARTVERIFY, starting verification pass
- If you are using standalone BACKUP, when the backup is finished the system displays the following message:
%BACKUP-I-PROCDONE, Operation completed. Processing finished at 19-MAY-2000 15:30. If you do not want to perform another standalone BACKUP operation, use the console to halt the system. If you do want to perform another standalone BACKUP operation, ensure the standalone application volume is online and ready. Enter "YES" to continue:
Continue with step 8.
If you are using the menu system, the DCL prompt appears after the backup is finished. Log out and choose the shutdown option from the menu.
You can use the backup output disk as the system disk. Files are stored contiguously on the output disk, eliminating disk fragmentation.
Store the original system disk.
Halt the system.
Reboot the system using the newly created system disk.
11.17.6. Using InfoServer Tapes to Back Up and Restore System Disks
On VAX systems, you can back up the system disk to an InfoServer tape and restore the system disk from an InfoServer tape.
How to Perform This Task
- Boot the system from the SYS1 directory using the current version of the OpenVMS CD–ROM, which can be in a reader on the InfoServer or on a local drive.
Note
The boot command you use for your computer depends on the type of system you have. For more information about booting your system, refer to the installation and operations supplement for your computer.
Choose option 1 from the menu system.
At the prompt, you can perform the backup of your system disks.
>>> B/R5:10000100 ESA0
Bootfile: ISL_SVAX_071
-ESA0
Network Initial System Load Function
Version 1.1
FUNCTION FUNCTION
ID
1 - Display Menu
2 - Help
3 - Choose Service
4 - Select Options
5 - Stop
Enter a function ID value: 3
OPTION OPTION
ID
1 - Find Services
2 - Enter known Service Name
Enter an Option ID value: 2
Enter a Known Service Name: VMS072
OpenVMS VAX Version 7.3 Major version id = 3 Minor version id = 0
%SYSINIT-E, error opening page file, status = 0000025C
%SYSINIT-E, error opening swap file, status = 0000025C
%SYSINIT, primary PAGEFILE.SYS not found; system initialization continuing
%SYSINIT, no dump file - error log buffers not saved
%SYSINIT-E, error mounting system device, status = 00000F64
$! Copyright (c) 2018 VMS Software, Inc. (VSI) All rights reserved.
$set noverify
Copyright (c) 2018 VMS Software, Inc. (VSI) All rights reserved.
Installing required known files...
Configuring devices...
****************************************************************
The menu can be used to execute DCL commands and procedures for
various "standalone" tasks, such as backing up the system disk.
Please choose one of the following:
1) Execute DCL commands and procedures
2) Shut down this system Enter CHOICE or "?" to repeat menu: (1/2/?) 1
WARNING ––
The normal VMS startup procedure has not executed.
Some commands and utilities will not work as documented.
Enter DCL commands –– Enter "LOGOUT" when done.
When you enter "LOGOUT" a logout message will be displayed,
and you will be returned to the menu.
$$$ MCR ESS$LADCP SHOW SERVICE/TAPE
$$$ MCR ESS$LADCP BIND/WRITE/TAPE TZL04_TAPE
$$$ MOUNT/FOREIGN MADn
$$$ BACKUP/IMAGE DKA100: MADn:SYS_DISK.BCK/SAVE_SET
.
.
.
$$$ LOGOUT
Process SYSTEM_1 logged out at 2-FEB-2000 23:35:17.52
****************************************************************
The menu can be used to execute DCL commands and procedures for
various "standalone" tasks, such as backing up the system disk.
Please choose one of the following:
1) Execute DCL commands and procedures
2) Shut down this system Enter CHOICE or "?" to repeat menu: (1/2/?)11.18. Ensuring Data Integrity
BACKUP has several qualifiers for further ensuring the integrity of your backups. VSI recommends using these qualifiers if you want to achieve maximum data integrity. This section describes some of the ways you can increase data integrity with BACKUP. For more information about these qualifiers, refer to the VSI OpenVMS System Management Utilities Reference Manual.
11.18.1. /CRC Qualifier
The /CRC qualifier enables the software cyclic redundancy check (CRC). The default is /CRC; you must specify /NOCRC to disable checking. Disabling checking reduces processing time, but increases the risk of data error.
As an output save-set qualifier, /CRC writes the CRC checking code into the blocks of the output save set.
As an input save-set qualifier, /CRC checks the CRC information in the input save set.
VSI recommends that you use the CRC. Although it increases processing time, it also improves data integrity.
11.18.2. /GROUP_SIZE Qualifier
$ BACKUP/IMAGE/RECORD _From: DKA100: _To: MKB100:BACKUP.SAV/LABEL=WKY101/GROUP_SIZE=20
This command adds a recovery block after every 20 blocks of saved data. This allows BACKUP to recover a corrupted data block for every 20 blocks of saved data. The value of the /GROUP_SIZE qualifier defaults to 10.
Although using this qualifier increases the size of the save set and the processing time for the operation, VSI recommends using the /GROUP_SIZE qualifier to increase data integrity.
11.18.3. /IGNORE Qualifier
VSI recommends that you back up your system when no interactive users are logged in. This is because if BACKUP encounters an open file during a save operation, it issues an error message and does not copy the file.
You can instruct the backup procedure to save open files by using the /IGNORE=INTERLOCK qualifier on the BACKUP command. When you use the /IGNORE=INTERLOCK qualifier, the contents of the file at the moment of the backup are saved.
The /IGNORE=INTERLOCK qualifier is useful for files that are constantly open (and would therefore not otherwise be saved). However, you must recognize that you might be saving inconsistent data, depending on the applications that are writing to the open files (for example, open application transactions or file data cached in memory). Also, because of the way BACKUP scans directories, any activity in a directory (such as creating or deleting files) can cause files to be excluded from the backup. In general, it is best to back up your system when a minimum number of files are open.
Also, because of the way the file system works, using the /IGNORE=INTERLOCK qualifier to back up open files affects subsequent incremental backups. For example, you can back up an open file with the BACKUP/IMAGE/RECORD/IGNORE=INTERLOCK command. However, the backup date field of the file is not updated until you close the file. If the file remains open during subsequent incremental backups, it is not included in those backups because its backup date field is not as recent as the last image backup.
11.18.4. /LOG Qualifier
$ BACKUP/LOG _From: WORK3:[OCONNELL]*.* _To: WORK1:[OCONNELL.SCRATCH]*.* %BACKUP-S-CREDIR, created WORK1:[OCONNELL.SCRATCH.COM] %BACKUP-S-CREATED, created WORK1:[OCONNELL.SCRATCH]DECW$MAIL.DAT;2 %BACKUP-S-CREATED, created WORK1:[OCONNELL.SCRATCH]DECW$SM.LOG;42 %BACKUP-S-CREATED, created WORK1:[OCONNELL.SCRATCH]DECW$SM.LOG;41 . . .
11.18.5. /VERIFY Qualifier
%BACKUP-I-STARTVERIFY, starting verification pass
If BACKUP finds differences between the input and output files, it issues an error message.
VSI recommends that you use the /VERIFY qualifier. Although it increases processing time, it also improves data integrity.
Backing Up a Save Set Twice Using /VERIFY Qualifier
The two save sets have the same name.
You use the /VERIFY qualifier with the BACKUP command.
The second BACKUP command has a /BLOCKSIZE of less than 4096 bytes (8*512).
%BACKUP-I-STARTVERIFY, starting verification pass %BACKUP-E-READERR, error reading MKB300:[]SET.SAV; -SYSTEM-W-DATAOVERUN, data overrun %BACKUP-E-INVBLKSIZE, invalid block size in save set %BACKUP-E-INVRECSIZ, invalid record size in save set %BACKUP-F-READERRS, excessive error rate reading MKB300:[]SET.SAV; -SYSTEM-W-DATAOVERUN, data overrun
11.19. Troubleshooting
This section describes some common BACKUP errors and how to recover from them.
11.19.1. BACKUP Fatal Error Options
%BACKUP-I-SPECIFY, specify option (CONTINUE, RESTART, QUIT) BACKUP>
Note
If BACKUP is running interactively and you used the command qualifier /NOASSIST, you can
enter an option in response to the BACKUP> prompt. If BACKUP is executing
as a batch job or you specified the command qualifier /ASSIST, the operator must use the DCL
command REPLY to enter an option.
|
Option |
Restrictions |
Result |
|---|---|---|
|
CONTINUE |
May compromise data reliability. Use only if the position of the tape has not changed since the original error and if the error does not imply that data has already been lost. |
If possible, BACKUP ignores the error and continues processing. |
|
RESTART |
Not valid if the output volume is the first volume in the backup operation. |
BACKUP unloads the current tape from the drive and prompts for another volume. After you load another tape, BACKUP restarts the save operation from the point at which the original tape was mounted. |
|
QUIT |
None. |
BACKUP terminates the operation and you can reenter the command. |
- BACKUP indicates that the magnetic tape has an excessive number of media errors and displays the following error message and prompt:
%BACKUP-F-WRITEERRS, excessive error rate writing VOL3 %BACKUP-I-SPECIFY, specify option (CONTINUE, RESTART, QUIT) BACKUP>
Enter RESTART.
BACKUP dismounts VOL3 and prompts for a new tape. Remove VOL3 from the drive and discard this tape.
Place a new tape into the drive and enter YES in response to the prompt for a new tape.
BACKUP restarts the save operation from the beginning of VOL3; no data is lost.
11.19.2. Tape Label Errors
%MOUNT-I-MOUNTED, DKA0 mounted on _SODAK$MUA0: %BACKUP-W-MOUNTERR, volume 1 on _SODAK$MUA0 was not mounted because its label does not match the one requested %BACKUP-W-EXLABEER, volume label processing failed because volume TAPE4 is out of order, Volume label TAPE1 was expected specify option (QUIT, NEW tape, OVERWRITE tape, USE loaded tape) BACKUP>
Depending on the option you specify, you can quit the backup operation (QUIT), dismount the old tape and mount a new one (NEW), overwrite the data on the tape (OVERWRITE), or USE the loaded tape.
If you use blank tapes or tapes that you intend to overwrite, use the /IGNORE=LABEL_PROCESSING qualifier. This suppresses the previous BACKUP message, which normally occurs if BACKUP encounters a non-ANSI-labeled tape during a save operation.
11.19.3. VMS$COMMON.DIR File Restore Problems
On an OpenVMS system disk, the file [SYSx]SYSCOMMON.DIR is an alias directory of the file [000000]VMS$COMMON.DIR. This means that both files point to the same file header. Prior to OpenVMS VAX Version 5.5-2 and OpenVMS Alpha Version 1.5, because it operated on files in alphabetic order, BACKUP did not properly restore the relationship between the VMS$COMMON.DIR file and the [SYSx]SYSCOMMON.DIR alias. Although this does not affect the system disk, it can produce errors with DCL lexical functions.
OpenVMS VAX Version 5.5-2 and OpenVMS Alpha Version 1.5 corrected this problem. However, if you restore image backups that were created with an older version of OpenVMS, the problem can recur.
You can check both the save set and the system disk to determine whether either of these has an incorrect relationship between the VMS$COMMON.DIR file and the [SYSx]SYSCOMMON.DIR alias.
Note
If you delete any files listed under [SYSx]SYSCOMMON.DIR, you must restore the system disk from the save set, and verify that the relationship between the VMS$COMMON.DIR file and the [SYSx]SYSCOMMON.DIR alias is correct as described in the section called “Checking the System Disk”.
Checking the Save Set
To determine if a save set has an incorrect relationship between the VMS$COMMON.DIR file and the [SYSx]SYSCOMMON.DIR alias, enter a BACKUP/LIST command to display information about the files contained in the VMS$COMMON directory in the save set. For example, here is the relevant portion of the output of the BACKUP/LIST command:
. . . [000000]VOLSET.SYS;1 0 24-SEP-2002 19:31 []000000.DIR;1 1 24-SEP-2002 19:31 []SYSCOMMON.DIR;1 2 24-SEP-2002 19:31 []SYSLIB.DIR;1 18 24-SEP-2002 19:31 []SYSTEST.DIR;1 1 24-SEP-2002 19:31 []SYSMAINT.DIR;1 1 24-SEP-2002 19:31 []SYSMGR.DIR;1 6 24-SEP-2002 19:31 []SYSHLP.DIR;1 6 24-SEP-2002 19:31 []EXAMPLES.DIR;1 1 24-SEP-2002 19:31 []SYSUPD.DIR;1 4 24-SEP-2002 19:31 []SYSMSG.DIR;1 3 24-SEP-2002 19:31 . . . []SECURITY_AUDIT.AUDIT 3 3-FEB-2003 15:23 []SECURITY_AUDIT.AUDIT 11 3-FEB-2003 15:23 []BACKUP.EXE;33 273 4-FEB-2003 09:37 []STABACKUP.EXE;9 486 4-FEB-2003 09:38
If the display lists lost files in the VMS$COMMON directory, as indicated by an empty directory specification ([]), the system disk information in this save set is affected by this problem. Whenever you perform a system restore using this save set, you must subsequently perform the procedure described in the section called “Correcting the Problem” to correct it.
If you have access to the system from which the save set was created, perform the procedure described in the section called “Checking the System Disk” to determine whether that system still has the problem. If so, perform the procedure described in the section called “Correcting the Problem”.
Checking the System Disk
To check the relationship between the VMS$COMMON.DIR file and the [SYSx]SYSCOMMON.DIR alias on the system disk, enter a DIRECTORY/HEADER command. For example:
$ DUMP/HEAD/BLOCK=COUNT:0 dr301:[000000]VMS$COMMON.DIR;1
Dump of file $4$DKA301:[000000]VMS$COMMON.DIR;1 on 14-FEB-2002 09:59:14.02
File ID (15,1,0) End of file block 3 / Allocated 9
File Header
Header area
Identification area offset: 40
.
.
.
Identification area
File name: VMS$COMMON.DIR;1
.
.
.If the name displayed in the File name: field is VMS$COMMON.DIR;1, as shown in the example, the relationship is correct, and you need take no further action.
However, if the name displayed in the File name: field is SYSCOMMON.DIR;1, the relationship is not correct, and you must perform the procedure described in the section called “Correcting the Problem” to correct it.
Correcting the Problem
To restore VMS$COMMON to its proper state, enter the following commands:
$ SET FILE/ENTER=SYSCOMMON.DIR VMS$COMMON.DIR $ SET FILE/REMOVE VMS$COMMON.DIR; $ RENAME SYSCOMMON.DIR VMS$COMMON.DIR
Chapter 12. Security Considerations
This chapter outlines the security features available with the OpenVMS operating system and suggests procedures to reduce the threat of a break-in on your system or cluster. It also tells how to use the access control list editor (ACL editor) to create and modify access control list entries (ACEs) on protected objects. For a more detailed description of security management, refer to the VSI OpenVMS Guide to System Security.
Information Provided in This Chapter
|
Task |
Section |
|---|---|
|
Managing passwords | |
|
Adding to the system password dictionary | |
|
Setting up intrusion detection | |
|
Interpreting a user identification code (UIC) | |
|
Parsing a protection code | |
|
Creating access control lists (ACLs) | |
|
Using the access control list editor (ACL editor) | |
|
Auditing security-relevant events |
|
Concept |
Section |
|---|---|
|
What security management involves | |
|
Aspects of password management | |
|
Ways to protect objects | |
|
Construction of access control lists (ACLs) | |
|
Audit log file analysis |
For full descriptions of all these tasks and concepts, refer to the VSI OpenVMS Guide to System Security.
12.1. Understanding Security Management
As the person responsible for the day-to-day system management, you play an important role in ensuring the security of your system. Therefore, you should familiarize yourself with the security features available with the OpenVMS operating system and implement the features needed to protect systems, users, and files from damage caused by tampering. Effective operating system security measures help prevent unauthorized access and theft of proprietary software, software plans, and computer time. These measures can also protect equipment, software, and files from damage caused by tampering.
Types of Security Problems
Security problems on most systems are generally caused by irresponsibility, probing, or penetration. The tolerance that your site might have to a breach of security depends on the type of work that takes place at your site.
Environmental Considerations
A secure system environment is a key to system security. VSI strongly encourages you to stress environmental considerations when reviewing site security.
Operating System Protections
Controlling access to the system; for example, interactively, through batch processing jobs, or over the network
Controlling access to information and resources that are kept on the system; for example, files, application programs, or system utilities
Managing the auditing system so security-relevant events are logged, the log file is reviewed on a regular basis, and the log is kept to a reasonable size
The following sections describe measures to control access to your system and its resources.
12.2. Managing Passwords
A site needing average security protection always requires the use of passwords. Sites with more security needs frequently require generated passwords and system passwords. Highly secure sites sometimes choose to use secondary passwords to control network access.
This section describes basic elements of the standard OpenVMS password policy and how to manage them. For information about how to manage extensions to the standard password policy (also known as external authentication), refer to the chapter Managing System Access in the VSI OpenVMS Guide to System Security.
12.2.1. Initial Passwords
When you open an account for a new user with the Authorize utility, you must give the user a user name and an initial password. When you assign temporary initial passwords, observe all guidelines recommended in Section 12.2.5, ''Guidelines for Protecting Passwords''. You should consider using the automatic password generator. Avoid any obvious pattern when assigning passwords.
Using the Automatic Password Generator
To use the automatic password generator while using the Authorize utility to open an account, add the /GENERATE_PASSWORD qualifier to either the ADD or the COPY command. The system responds by offering you a list of automatically generated password choices. Select one of these passwords, and continue setting up the account.
Using the System Dictionary and the Password History List
The OpenVMS operating system automatically compares new passwords with a system dictionary to ensure that a password is not a native language word. It also maintains a password history list of a user's last 60 passwords. The operating system compares each new password with entries in the password history list to ensure that an old password is not reused.
The system dictionary is located in SYS$LIBRARY. You can enable or disable the dictionary search by specifying the DISPWDDIC or NODISPWDDIC option with the /FLAGS qualifier in AUTHORIZE. The password history list is located in SYS$SYSTEM. To enable or disable the history search, specify the DISPWDHIS or NODISPWDHIS option to the /FLAGS qualifier.
Adding to the System Password Dictionary
- Create a file containing passwords you want to add to the dictionary. Each password should be on a separate line and in lowercase, as follows:
$ CREATE LOCAL_PASSWORD_DICTIONARY.DATA somefamous localheroes (Ctrl/Z)
- Enable SYSPRV and merge your local additions:
$ SET PROCESS/PRIVILEGE=SYSPRV $ CONVERT/MERGE/PAD LOCAL_PASSWORD_DICTIONARY.DATA - _$ SYS$LIBRARY:VMS$PASSWORD_DICTIONARY.DATA
Defining Preexpired Passwords
When you add a new user to the UAF, you might want to define that user's password as having expired previously using the AUTHORIZE qualifier /PWDEXPIRED. This forces the user to change the initial password when first logging in.
(pre-expired)
By default, the OpenVMS operating system forces new users to change their passwords the first time they log in. Encourage your site to use a training program for its users that includes information about changing passwords.
12.2.2. System Passwords
All terminals using dial-up lines or public data networks for access
Terminals on lines that are publicly accessible and not tightly secured, such as those at computer laboratories at universities
Terminals the security manager wants to reserve for security operations
Implementing system passwords is a two-stage operation involving the DCL commands SET TERMINAL and SET PASSWORD. First, you must decide which terminals require system passwords. Then, for each terminal, you enter the DCL command SET TERMINAL/SYSPASSWORD/PERMANENT. To enable system passwords for all terminals, set the appropriate bit in the system parameter TTY$DEFCHAR2.
12.2.3. Primary and Secondary Passwords
The use of dual passwords is cumbersome and mainly needed at sites with high-level security concerns. The effectiveness of a secondary passwords depends entirely on the trustworthiness of the supervisor who supplies it. A supervisor can easily give out the password or worse yet, change it to a null string.
The main advantage of a second password is that it prevents accounts from being accessed through DECnet for OpenVMS using simple access control.
Another advantage of a second password is that it can serve as a detection tool when a site has unexplained break-ins after the password has been changed and the use of the password generator has been enforced. Select problem accounts, and make them a temporary target of this restriction. If the problem goes away when you institute personal verification through the secondary password, you know you have a personnel problem. Most likely, the authorized user is revealing the password for the account to one or more other users who are abusing the account. Refer to the VSI OpenVMS Guide to System Security for an explanation of how to add secondary passwords.
12.2.4. Enforcing Minimum Password Standards
Security managers can use AUTHORIZE to impose minimum password standards for individual users. Specifically, qualifiers and login flags provided by AUTHORIZE control the minimum password length, how soon passwords expire, and whether the user is forced to change passwords at expiration.
Password Expiration
With the AUTHORIZE qualifier /PWDLIFETIME, you can establish the maximum length of time that can elapse between password changes before the user will be forced to change the password or lose access to the account.
The use of a password lifetime forces the user to change the password regularly. The lifetime can be different for different users. Users who have access to critical files generally should have the shortest password lifetimes.
Forcing Expired Password Changes
By default, users are forced to change expired passwords when logging in. Users whose passwords have expired are prompted for new passwords at login. A password is valid for 90 days unless a site modifies the value with the /PWDLIFETIME qualifier.
Minimum Password Length
With the AUTHORIZE qualifier /PWDMINIMUM, you can direct that all password choices must be a minimum number of characters in length. Users can still specify passwords up to the maximum length of 32 characters for VSI versions of OpenVMS V8.4, and 64 characters for OpenVMS V9 and above.
Requiring the Password Generator
The /FLAGS=GENPWD qualifier in AUTHORIZE allows you to force the use of the automatic password generator when a user changes a password. At some sites, all accounts are created with this qualifier. At other sites, the security manager can be more selective.
12.2.5. Guidelines for Protecting Passwords
Make certain the password for the SYSTEM account, which is a standard account on all OpenVMS systems, is secure and is changed regularly.
Disable any accounts that are not used regularly with the AUTHORIZE qualifier /FLAGS=DISUSER (for example, SYSTEST and FIELD).
Do not permit an outside or an in-house service organization to choose the password for an account they use to service your system. Such service groups tend to use the same password on all systems, and their accounts are usually privileged. On seldom-used accounts, set the AUTHORIZE flag DISUSER, and enable the account only when it is needed. You can also change the password immediately after each use and notify the service group of the new password.
Set appropriate account expiration dates, especially when you know a user has only short-term requirements for an account.
Delete accounts no longer in use.
If you have an account on a system that stores passwords in plaintext (unencrypted), choose a different password on all of your accounts on other machines. Passwords should not even be shared between machines that encrypt the password. A compromised machine can be used to read plaintext on its way into the machine, thereby gaining access to the other machine.
Do not leave listings of operator logs, accounting logs, or audit logs where they could be read or stolen.
Maintain adequate protection of authorization files. Note that the system user authorization file (SYSUAF.DAT) and network proxy authorization file (NETPROXY.DAT) are owned by the system account ([SYSTEM]). There should be no other users in this group. Accordingly, the categories SYSTEM, OWNER, and GROUP are synonymous. Normally the default UIC-based file protection for these authorization files is adequate.
Avoid giving multiple users access to the same account.
Separate users into distinct user groups.
Protect telephone numbers for dial-up lines connected to your system.
Make all accounts that do not require a password captive accounts.
Extend privileges to users carefully.
Ensure that the files containing components of the operating system are adequately protected.
12.2.6. Password History
The password history database maintains a history of previous passwords associated with each user account. By default, the system retains these records for one year. Password history records that are older than the system password history lifetime are allowed as valid password choices. When a user account is deleted, the system removes the associated password history records from the history database.
12.3. Using Intrusion Detection Mechanisms
This section describes how to set up intrusion detection and evasion and how to display the intrusion database.
Controlling the Number of Retries on Dial-ups
You can control the number of login attempts the user is allowed through a dial-up line. If the user makes a typing mistake after obtaining the connection, the user does not automatically lose the connection. This option is useful for authorized users, while still restricting the number of unauthorized attempts.
To implement control of retries, use the following two LGI system parameters: LGI_RETRY_TMO and LGI_RETRY_LIM. If you do not change the values of these system parameters, the default values allow the users three retries with a 20-second interval between each.
Keep in mind that controlling dial-up retries is only a part of an overall security program and is not, in itself, sufficient to avoid break-ins. An obstacle like redialing is not going to prove an effective deterrent to a persistent intruder.
Discouraging Break-In Attempts Further
|
Parameter |
Description |
|---|---|
|
LGI_BRK_LIM |
Defines a threshold count for login failures. When the count of login failures exceeds the LGI_BRK_LIM value within a reasonable time interval, the system assumes that a break-in is in progress. |
|
LGI_BRK_TERM |
Controls the association of terminals and user names for counting failures. |
|
LGI_BRK_TMO |
Controls the time period in which login failures are detected and recorded. |
|
LGI_HID_TIM |
Controls the duration of the evasive action. |
|
LGI_BRK_DISUSER |
Makes the effects of intrusion detection more severe. If you set this parameter to 1, the OpenVMS operating system sets the DISUSER flag in the UAF record for the account where the break-in was attempted. Thus, that user name is disabled until you manually intervene. |
Refer to the VSI OpenVMS Guide to System Security for a full description of these parameters.
Displaying the Intrusion Database
Creates and manages the system's intrusion database
Maintains the network proxy database file (NET$PROXY.DAT)
The intrusion database keeps track of failed login attempts. This information is scanned during process login to determine if the system should take restrictive measures to prevent access to the system by a suspected intruder.
Use the DCL command SHOW INTRUSION to display the contents of the intrusion database. Use the DCL command DELETE/INTRUSION_RECORD to remove entries from the intrusion database.
The network proxy database file (NET$PROXY.DAT) is used during network connection processing to determine if a specific remote user may access a local account without using a password. The information contained in this database is managed by the Authorize utility.
$ SHOW INTRUSION Intrusion Type Count Expiration Source NETWORK SUSPECT 1 21-MAY-2000 12:41:01.07 DEC:.ZKO.TIDY::SYSTEM
12.4. Understanding Ways to Protect Objects
The OpenVMS operating system offers two primary protection mechanisms. The first, UIC-based protection, is based on the user identification code (UIC) and is applied to all protected objects.
The second protection mechanism uses access control lists (ACLs), which employ a more refined level of protection than that available with UIC-based protection. ACLs can be used to grant or deny access to individual users or groups of users.
12.4.1. Interpreting a User Identification Code
Your user identification code (UIC) tells what group you belong to and what your unique identification is within that group.
The Authorize utility assigns each user process in the system a unique UIC in the user authorization file (UAF). Each object on the system is also associated with a UIC (typically the UIC of its creator).
[group,member]
A UIC can be either numeric or alphanumeric. A numeric UIC consists of a group number in the range 0 through 37776 (octal) and a member number in the range 0 through 177776 (octal). VSI reserves group 1 and groups 300–377.
12.4.2. Understanding Protection Codes
[user category: list of access allowed (, user category: list of access allowed,...)]
user category
- System: Members of this category can include any of the following users:
Users with low group numbers, usually from 1 to 10 (octal). These group numbers are generally for system managers, security administrators, and system programmers. (The exact range of system group numbers is determined by the security administrator in the setting of the system parameter MAXSYSGROUP. It can range as high as 37776 (octal).)
Users with the SYSPRV privilege.
Users with the GRPPRV privilege whose UIC group matches the UIC group of the object's owner.
In access requests to files on a disk volume, users whose UIC matches the UIC of the volume's owner.
Owner: The user with the same UIC as the user who currently owns the object. In general, the creator of an object is entitled to owner access unless explicit action is taken to secure the object from its creator.
Group: All users who are in the same UIC group as the object's owner.
World: All users, including those in the first three categories.
When specifying more than one user category, separate the categories with commas, and enclose the entire code in parentheses. You can specify user categories and access types in any order.
A null access specification means no access, so when you omit an access type for a user category, that category of user is denied that type of access. To deny all access to a user category, specify the user category without any access types. Omit the colon after the user category when you are denying access to a category of users.
When you omit a user category from a protection code, the current access allowed that category of user remains unchanged.
access-list
Access types are object-dependent and are described in the VSI OpenVMS Guide to System Security. For files, the access types include read (R), write (W), execute (E), and delete (D). The access type is assigned to each user category and is separated from its user category by a colon (:).
Example
$ SET SECURITY/PROTECTION=(S:RWED,O:RWE,G,W) [JONES]MY_FILE.TXT
How to Change the Default Protection
$ SET PROTECTION=(S:RWED,O:RWED,G:RE,W:RE)/DEFAULT
12.5. Creating Intra-Cluster Communications Security Objects
OpenVMS provides SYS$MANAGER:ICC$SYSTARTUP.COM. This command procedure allows you to customize the ICC characteristics by creating ICC security objects and adding additional registry tables.
The ICC$CREATE_SECURITY_OBJECT procedure creates permanent ICC security objects and optionally issues an initial SET SECURITY command for the object. Specify node::association to create a security object for an association before it exists. For example, specify MYNODE::BOB_SERVER. Use the special node name ICC$ to create a security object for an entry in the ICC clusterwide registry.
Before creating an association through ICC, you need the OPEN security attribute on the node::association pair. A security object created by ICC$CREATE_SECURITY_OBJECT is not deleted until the system reboots.
The ability to connect to an association is controlled by the ACCESS security attribute on the security object.
Every process using ICC must open an association. If you have SYSNAM privilege, you can open associations without calling ICC$CREATE_SECURITY_OBJECT, however the object is not permanent. No privileges are required, therefore anyone can create access named ICC$ pid* (for example, ICC$20203F9A_FOO).
ICC$CREATE_SECURITY_OBJECT can also be used to regulate creating names in the ICC clusterwide registry using the special node name ICC$. For creating names in the registry, the security access attributes OPEN and CONTROL are relevant.
Note that SYS$MANAGER: also contains file SYS$SYSTARTUP.TEMPLATE so that you can customize the procedure to your specific requirements.
12.6. Creating Access Control Lists
For most interactive user accounts, the default UIC-based protection is adequate. However, in some cases (such as project accounts) you may want to set up an additional level of protection by using access control lists (ACLs). ACL-based protection provides a more refined level of security in cases where different groups or members of overlapping groups share access to an account.
12.6.1. Kinds of Entries in an ACL
An access control list (ACL) is a list of entries, each of which defines some attribute of an object. Each entry is called an access control entry (ACE).
|
ACE |
Description |
|---|---|
|
Identifier ACE |
Controls the types of access allowed to specific users based on the user's identification. Each Identifier ACE includes one or more rights identifiers and a list of the types of access the user holding the identifier has permission to exercise. See Section 12.6.2, ''Types of Identifiers'' for a summary of identifiers. For example, the following ACE grants the user Jones read, write, and execute access
to an object:
(IDENTIFIER=[ACCOUNTING,JONES],ACCESS=READ+WRITE+EXECUTE) |
|
Default Protection ACE |
Allows you to specify a protection code for a directory file that is propagated to all files created within that directory and its subdirectories. For example, the following ACE assigns a protection code to newly created files in a
directory. The code gives users in the system and owner categories full access, it gives
group users both read and execute access, and it denies access to users in the world
category.
(DEFAULT_PROTECTION,S:RWED,O:RWED,G:RE,W:) |
|
Creator ACE |
Adds an extra ACE to the ACL of a file created within the directory to which you assign the Creator ACE. The Creator ACE applies when the file being created is not owned by the user identification code (UIC) of the process creating the file, such as when the directory is owned by a resource identifier. The following ACE, for example, specifies that any user creating a file in the
directory will receive read, write, execute, and delete access to it:
(CREATOR,ACCESS=READ+WRITE+EXECUTE+DELETE) The Creator ACE applies to directory files only. |
|
Security Alarm ACE |
Allows you to request that a security alarm message be sent to the operator's terminal if an object is accessed in a particular way. For example, the following ACE causes an alarm message whenever a particular file is
successfully read:
(ALARM=SECURITY,ACCESS=SUCCESS+READ)The security Alarm ACE has no effect unless ACL alarms are enabled with the following command: $ SET AUDIT/ALARM/ENABLE=(ACL) |
|
Security Audit ACE |
Specifies the access criteria that cause a security alarm message be sent to the system security audit log file if an object is accessed in a particular way. For example, the following ACE causes an alarm message whenever a particular file is
successfully read:
(AUDIT=SECURITY,ACCESS=SUCCESS+READ) A message is recorded only if ACL audits are enabled with the DCL command SET AUDIT/AUDIT/ENABLE=ACL. |
|
Subsystem ACE |
Grants additional identifiers to a process while it is running the image to which the Subsystem ACE applies. Users with execute access to the image can access objects that are in the protected subsystem, such as data files and printers, but only when they run the subsystem image. The Subsystem ACE applies to executable images only. For example, the following ACE adds the identifier ACCOUNTING to processes that are
executing a particular subsystem image. The identifier entitles the processes to access
objects owned by the subsystem.
(SUBSYSTEM, IDENTIFIER=ACCOUNTING) |
Refer to the VSI OpenVMS System Management Utilities Reference Manual for a complete description of each kind of ACE. The VSI OpenVMS Guide to System Security provides further details on how to construct and apply ACEs.
12.6.2. Types of Identifiers
|
Type |
Descripton |
Example |
|---|---|---|
| UIC identifiers |
Based on a user's identification code (UIC), which uniquely identifies a user on the system and defines the group to which the user belongs. |
[GROUP1,JONES] [JONES] GROUP1 JONES |
| General identifiers |
Defined by the security administrator. |
SALES RESERVE_DESK |
| Environmental identifiers |
Describe different types of users based on their initial entry into the system. These identifiers are automatically created by the system. |
BATCH, NETWORK INTERACTIVE LOCAL, DIALUP REMOTE |
| Facility identifiers |
Defined by a facility during installation |
RDB$ENTRY |
In addition to the environmental identifiers, a system node identifier of the form SYS$NODE_node_name is created by the system startup procedure (STARTUP.COM in SYS$SYSTEM).
12.7. Assigning ACLs
- Capability
- Common event flag cluster
- Device
- File
- Group global section
- Logical name table
- Queue
- Resource domain
- Security class
- System global section
- Volume
Typically, ACLs are used when you want to provide access to an object for some, but not all, users, or if you want to deny access to specific, unprivileged users. When the operating system receives a request for access to an object having an ACL, it searches each access control list entry in the ACL, stopping at the first match. If another match occurs in the ACL, it has no effect. Therefore, ACEs granting or denying access to a protected object for specific users should appear in the ACL before ACEs identifying broader classes of users.
12.8. Using the ACL Editor
The access control list editor (ACL editor) is a screen-oriented editor used to create and maintain ACLs. Use the ACL editor to define an ACL for a protected object or to edit an existing ACL.
$ EDIT/ACL INVENTORY.DAT
$ EDIT/ACL/CLASS=DEVICE DOCD$
You can invoke the ACL editor to modify an existing ACL or to create a new ACL on the object. If an object has an ACL, the ACL will appear on the screen when the ACL editor is invoked.
The ACL editor can be invoked from within a program written in any OpenVMS common language that generates calls using the OpenVMS calling standard. Refer to the VSI OpenVMS Utility Routines Manual for more information about using the callable interface to the ACL editor.
12.8.1. Adding an Identifier ACE
(IDENTIFIER=identifier[,options][,access])
(IDENTIFIER=[SALES,PAT],ACCESS=READ+WRITE+EXECUTE)
(IDENTIFIER=PERSONNEL,OPTIONS=DEFAULT,ACCESS=READ+WRITE)
(IDENTIFIER=PERSONNEL,ACCESS=READ+WRITE)
Refer to the VSI OpenVMS Guide to System Security for further discussion of the Default attribute and its effect on the processing of an ACL.
12.8.2. Setting a Default Protection Code
(DEFAULT_PROTECTION[,options],protection-code)
(DEFAULT_PROTECTION,S:RWED,O:RWED,G,W)
Note
The Default Protection ACE does not apply to existing subdirectories. It applies to subdirectories created after the ACE is applied to the parent directory.
12.8.3. Generating Security Alarms and Audits
Security ACEs allow you to specify that an event message be sent when a protected object is accessed in a particular manner. The security Alarm ACE directs the event message to the security operator's terminal and the security Audit ACE directs the event message to the system security audit log file.
Refer to the VSI OpenVMS Guide to System Security for more information about how to use these types of ACEs.
12.9. Auditing Security-Relevant Events
System managers can select the destination for security-relevant event messages. Alarm messages are sent to the operator's terminal and audit messages are sent to the system security audit log file. You can choose to have an event reported as an alarm, as an audit, or as both.
12.9.1. Enabling Classes of Security Alarms
The OpenVMS operating system automatically monitors a certain number of events, as listed in VSI OpenVMS System Manager's Manual, Volume 2: Tuning, Monitoring, and Complex Systems.
|
Event Class |
Description |
|---|---|
|
Access |
Specifies access events for all objects in a class. You can audit selected types of access, both privileged and nonprivileged, to all protected objects of a particular class. |
|
ACL |
Events requested by a security Audit or Alarm ACE in the access control list (ACL) of an object. |
|
Authorization |
Modification of any portion of SYSUAF.DAT, NETPROXY.DAT, NET$PROXY.DAT, or RIGHTSLIST.DAT. |
|
Breakin |
Break-in attempts. |
|
Connection |
Logical link connections or terminations through SYSMAN, DECnet for OpenVMS Phase IV, DECwindows products, or an interprocess communication (IPC) call. |
|
Create |
Creation of a protected object. |
|
Deaccess |
Deaccess from a protected object. |
|
Delete |
Deletion of a protected object. |
|
Identifier |
Use of identifiers as privileges. |
|
Install |
Modifications made to the known file list through the Install utility. |
|
Logfailure |
Failed login attempts. |
|
Login |
Successful login attempts. |
|
Logout |
Logouts. |
|
Mount |
Volume mounts and dismounts. |
|
NCP |
Modification to the network configuration database, using the network control program (NCP). |
|
Privilege |
Successful or unsuccessful use of privilege. |
|
Process |
Use of one or more of the process control system services. |
|
SYSGEN |
Modification of a system parameter with the System Generation utility (SYSGEN) or AUTOGEN. |
|
Time |
Modification of system time. |
Refer to the VSI OpenVMS DCL Dictionary for more information about the SET AUDIT command.
12.10. Analyzing Audit Log Files
The Audit Analysis utility (ANALYZE/AUDIT) enables system managers and site security administrators to selectively extract and display information from security audit log files. Using ANALYZE/AUDIT qualifiers, you can choose from among a variety of report formats and select the event criteria to be included in the report. Refer to the VSI OpenVMS Guide to System Security for a description of how to use the utility.
Chapter 13. Managing the Queue Manager and Queue Database
Before you can create and start queues, you must set up the queue manager and the queue database. This chapter tells how to set up and manage the queue manager and queue database for the OpenVMS batch and print queuing system.
Information Provided in This Chapter
|
Task |
Section |
|---|---|
|
Specifying the location of the queue database |
Section 13.3, ''Specifying the Location of the Queue Database'' |
|
Displaying information about queue managers |
Section 13.4, ''Displaying Information About Queue Managers'' |
|
Starting the queue manager and creating the queue database |
Section 13.5, ''Starting the Queue Manager and Creating a Queue Database'' |
|
Customizing queue manager failover | |
|
Stopping and restarting the queue manager | |
|
Using multiple queue managers | |
|
Saving and restoring the queue database | |
|
Maximizing queuing system performance | |
|
Solving queue manager problems | |
|
Reporting a queuing system problem to VSI |
Section 13.12, ''Reporting a Queuing System Problem to VSI'' |
|
Concept |
Section |
|---|---|
|
The queue manager | |
|
The queue database | |
|
Multiple queue managers |
Note that this chapter contains many references to DCL commands. You can find additional information about all DCL commands in the VSI OpenVMS DCL Dictionary.
13.1. Understanding the Queue Manager
To use a printer or batch processing on your system, you must use queues. The queue manager controls queue activity. The queue database consists of a master file as well as queue and journal files, which store information about queues and jobs.
Before you can perform any queue operation, you must start the queue manager and create the queue database. Section 13.5, ''Starting the Queue Manager and Creating a Queue Database'' contains instructions for doing this.
Figure 13.1, ''OpenVMS Batch and Print Queuing System'' illustrates how the queue manager works to manage queue activity in an OpenVMS Cluster environment.
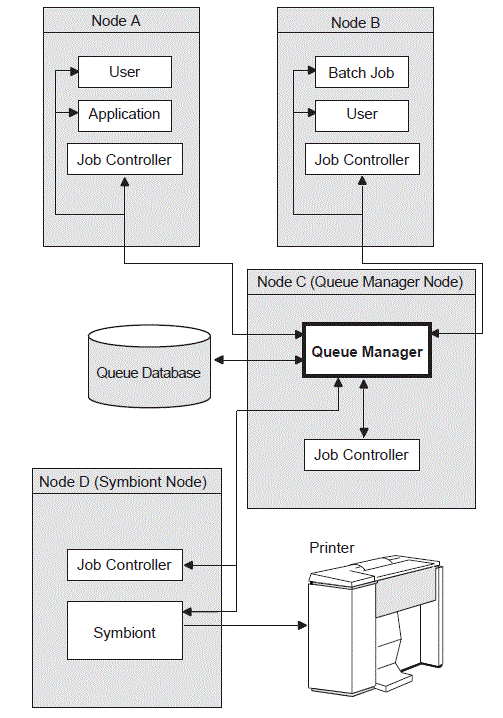
Receives the user's queue request, including information about the type of job, the file name or names, the name of the queue, and any special options.
Stores and retrieves appropriate information from the queue database to print or execute the job.
- Places the job in the appropriate queue to await its turn for processing:
Print jobs are sent to an independent process, called a symbiont, for formatting and are then sent to the printer for printing.
For batch jobs, the job controller creates a batch job process.
One or more queue manager processes control queuing for all processes on a node or in an OpenVMS Cluster environment. Jobs can be submitted from one node and executed on a queue running on another cluster node. User processes, symbionts, and job controllers on each node communicate directly with queue managers.
Create and monitor batch, symbiont, and queue manager processes
Restart the queue manager process on reboot
Handle failover of the queue manager in an OpenVMS Cluster environment
Queue Manager Failover
By default, in an OpenVMS Cluster environment, the queue manager tries to fail over to another node if the node on which the queue manager is running leaves the cluster.
You can specify the order in which OpenVMS Cluster nodes claim the queue manager process; you can also limit the nodes that can run the queue manager. For more information, see Section 13.6, ''Customizing Queue Manager Failover''.
Multiple Queue Managers
To work around CPU, disk space, or memory limitations, you can use multiple queue managers to distribute the batch and print work load among nodes as well as to distribute the database files among disks.
For example, you might create separate queue managers for batch queues and print queues. Run the batch queue manager on one node and the print queue manager on a different node. You can also maintain queue and journal files on separate disks.
For information about creating additional queue managers, including reasons and restrictions for using multiple queue managers, see Section 13.8, ''Using Multiple Queue Managers''.
13.2. Understanding the Queue Database
|
File |
Description |
|---|---|
|
Master file, QMAN$MASTER.DAT |
Contains:
|
|
Queue file, SYS$QUEUE_MANAGER.QMAN$QUEUES |
Contains the queue definitions formed when you create, start, or modify queues. |
|
Journal file, SYS$QUEUE_MANAGER.QMAN$JOURNAL |
Contains information allowing the queue manager to return to
the last known state if:
The journal file also contains job definitions. |
On systems with multiple queue managers, the queue database contains an additional queue file and journal file for each additional queue manager. Additional queue files are named in the format name_of_manager.QMAN$QUEUES. Additional journal files are named in the format name_of_manager.QMAN$JOURNAL.
Figure 13.2, ''Queue Database'' shows a queue database containing a master file that lists two queue managers, PRINT_MANAGER and BATCH_MANAGER. Each queue manager has its own queue and journal files.
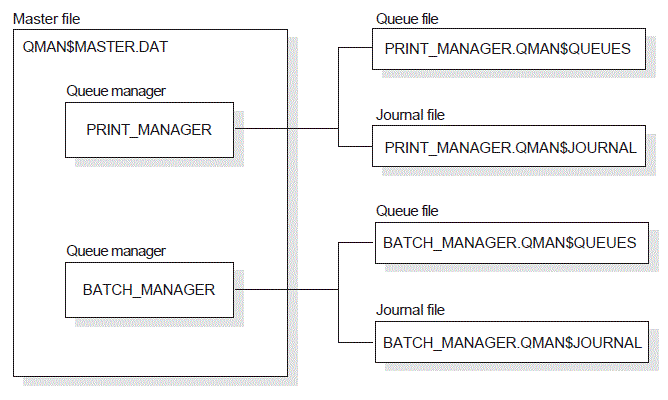
SYS$COMMON:[SYSEXE] is the default location for all queue database files. However, you can store the files in another location. The next section explains why and how to do this.
13.3. Specifying the Location of the Queue Database
In an OpenVMS Cluster environment with multiple system disks, the default location does not work because it has a different physical location on each system disk. You need to store the files on a disk that is shared by all cluster member nodes.
You must also make sure the disk holding the master file, QMAN$MASTER.DAT, is available to all nodes using the queue database at the beginning of system startup.
To save space on the system disk or to help improve performance. Moving just the queue and journal files is usually sufficient.
Ways to Move Queue Database Files
- When you create the queue database files the first time, create them in an alternate location:
Define the logical name QMAN$MASTER in the SYLOGICALS.COM command procedure (to specify where the master file is to be created).
Start the queue manager with the START/QUEUE/MANAGER command, specifying the dirspec parameter (to specify where the queue and journal files are to be created).
For detailed information, see Section 13.5, ''Starting the Queue Manager and Creating a Queue Database''.
- If you previously created the files in the default location:
Stop the queue manager.
Copy the files to the new location.
Verify that the files have been successfully copied to the new location, and then delete the files in the old location.
If you move the master file, define the logical name QMAN$MASTER on all nodes (to specify where the master file is located), and add this logical name definition to SYLOGICALS.COM on all nodes.
Restart the queue manager with the START/QUEUE/MANAGER command, specifying the dirspec parameter (to specify where the queue and journal files are located).
Section 13.3.1, ''Specifying the Location of the Queue Master File'' explains how to specify the location of the master file; Section 13.3.2, ''Specifying the Location of Queue and Journal Files'' explains how to specify the locations of queue and journal files.
13.3.1. Specifying the Location of the Queue Master File
- Enter a command in the following format:
DEFINE/SYSTEM/EXECUTIVE_MODE QMAN$MASTER equivalence-name
where equivalence-name specifies the device and directory where the master file is to be created or located.
In an OpenVMS Cluster environment, enter this command on every node in the cluster.Note
In an OpenVMS Cluster environment, the directory you specify for the master file must be available to all nodes in the cluster. If the directory specification is a concealed logical name, you must define it identically on all nodes in the cluster; you must also mount the disk on all cluster member nodes early in system startup.
On every node in the OpenVMS Cluster environment, add the command that you entered in step 1 to SYS$MANAGER:SYLOGICALS.COM.
If the location you specify is on a disk other than the node's system disk, add a command in SYLOGICALS.COM to mount the disk. SYLOGICALS.COM is normally used to define logical names; however, it is important that SYLOGICALS.COM contain the command to mount the disk holding the master file so that the master file is available before the job controller starts the queue manager.
For more information about defining systemwide logical names in SYLOGICALS.COM, see Section 5.2.5, ''Modifying SYLOGICALS.COM to Define Systemwide Logical Names''.
13.3.2. Specifying the Location of Queue and Journal Files
$ START/QUEUE/MANAGER DUA2:[SYSQUE]
Note
In an OpenVMS Cluster environment, the directory you specify for the queue and journal files must be available to all nodes that can run the queue manager. If the directory specification is a concealed logical name, you must define it identically on all nodes in the cluster. You must also mount the disk on all nodes capable of running the queue manager.
The directory location you enter with START/QUEUE/MANAGER is stored in the queue database master file and becomes the default. Therefore, if you must restart the queue manager, you do not need to respecify this directory location.
13.4. Displaying Information About Queue Managers
To obtain information about one or more queue managers, enter the SHOW QUEUE/MANAGERS command.
Examples
- The following example displays default (/BRIEF) information about two queue managers, PRINT_MANAGER and SYS$QUEUE_MANAGER.
$ SHOW QUEUE/MANAGERS Queue manager PRINT_MANAGER, running, on NODEA:: Queue manager SYS$QUEUE_MANAGER, running, on NODED::
Use the /FULL qualifier to display complete information about queue managers on the system or cluster.
In the following example, the master file is in one location, while the queue and journal files belonging to two queue managers are in a different location.$ SHOW QUEUE/MANAGERS/FULL Master file: SYS$SPECIFIC:[SYSEXE]QMAN$MASTER.DAT; Queue manager PRINT_MANAGER, running, on NODEA:: /ON=(NODEA,NODEB,*) Database location: DUA2:[SYSQUE] Queue manager BATCH_MANAGER, running, on NODED:: /ON=(NODEC,NODED,NODEE,*) Database location: SYS$SYSROOT:[SYSEXE]
Figure 13.3, ''Locations of Queue Database Files'' shows the locations of the queue database files shown in the second example.
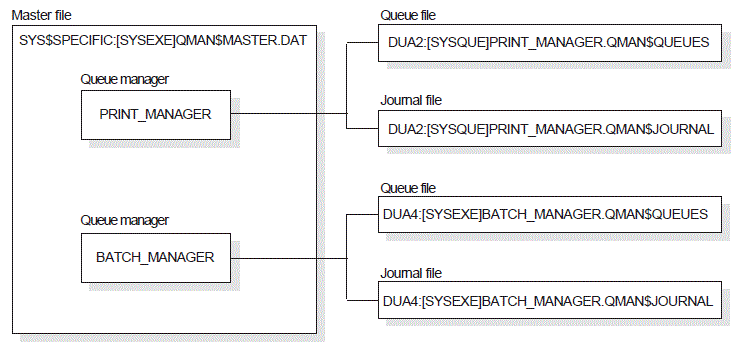 |
13.5. Starting the Queue Manager and Creating a Queue Database
START/QUEUE/MANAGER/NEW_VERSION[/ON=(node,...)] [dirspec]
|
/NEW_VERSION |
Specifies that new queue database files are to be created:
Specify the /NEW_VERSION qualifier only if you want to create new database files. If your queuing system is already functioning, creating new database files is not necessary. |
|
/ON= (node,...) |
Allows you to customize failover of the queue manager. For more information, see Section 13.6, ''Customizing Queue Manager Failover''. |
|
dirspec |
Specifies the location of the queue and journal files, as explained in Section 13.3.2, ''Specifying the Location of Queue and Journal Files''. Use this parameter if you are creating the queue and journal files in a location other than the default. |
Caution
Specify the /NEW_VERSION qualifier only if you do not have a currently functioning queue database. If you specify this qualifier and you already have queue database files, the system overwrites your current queue database files.
You normally perform this task only once because when you enter the command, the system stores it, along with any qualifier or parameter you enter, in the queue database.
Note
This section describes how to start the queue manager and create the queue database files on systems and clusters with a single system disk. For systems in a cluster with multiple system disks, including mixed-architecture OpenVMS Cluster systems, you must prepare a shared environment, as described in VSI OpenVMS Cluster Systems Manual.
How to Perform This Task
- Make sure the values of the system address parameters SCSNODE and SCSSYSTEMID match the DECnet for OpenVMS node name and node ID. These values must be correctly defined for the queuing system to operate correctly:For more specific instructions, see the second example in Section 13.11.5.1, ''Investigating the Problem''.
The PARAMETERS SHOW command of the System Management utility (SYSMAN) determines the value of the system address parameters SCSNODE and SCSSYSTEMID.
The Network Control Program (NCP) SHOW EXECUTOR SUMMARY command shows the DECnet for OpenVMS node name and node ID.
To create queue database files in the default location, SYS$COMMON:[SYSEXE], go to step 3.
To create queue database files in a location other than the default, follow the instructions in Section 13.3.1, ''Specifying the Location of the Queue Master File'' or Section 13.3.2, ''Specifying the Location of Queue and Journal Files'', or both.
To start the queue manager and create queue database files, enter a START/QUEUE/MANAGER command. This command starts the queue manager process and, optionally, creates queue and journal files.
If the queue manager does not start, see Section 13.11.1, ''Avoiding Common Problems: A Troubleshooting Checklist'' for a troubleshooting checklist.
Example
The master file is to located in the directory DUA4:[MASTER].
The queue and journal files are to be located in the directory DUA2:[SYSQUE]. (The master file, however, will remain in DUA4:[MASTER].)
$ DEFINE/SYSTEM/EXECUTIVE_MODE QMAN$MASTER DUA4:[MASTER] $ MOUNT/SYSTEM/NOASSIST DUA4: $ ! $ ! Add the two previous commands to SYLOGICALS.COM $ ! $ START/QUEUE/MANAGER/NEW_VERSION DUA2:[SYSQUE]
For information about creating one or more additional queue managers, see Section 13.8, ''Using Multiple Queue Managers''.
13.6. Customizing Queue Manager Failover
By default, all nodes in an OpenVMS Cluster environment are able to run the queue manager, in no specified order of preference. The /ON qualifier of the START/QUEUE/MANAGER command lets you specify a list of OpenVMS Cluster member nodes in the order that they should claim the queue manager process. VSI recommends that you specify an asterisk (*) at the end of the node list to make sure that at least one node is always available to run the queue manager.
13.7. Stopping and Restarting the Queue Manager
To stop and restart the queue manager, you need to enter DCL commands.
13.7.1. Stopping the Queue Manager
$ STOP/QUEUE/MANAGER/CLUSTER
Aborts all current jobs that cannot be restarted and requeues all current restartable jobs
Stops all execution queues
Disables autostart on all nodes
Closes all queue database files associated with that queue manager
Once you enter STOP/QUEUE/MANAGER/CLUSTER, the queue manager process remains stopped; requests to that queue manager are denied until you restart the queue manager by entering START/QUEUE/MANAGER. (Note that the queue system remains running as long as one or more queue managers are running.)
OpenVMS Cluster transitions do not change the state of the queue manager. Newly available nodes do not attempt to start the queue manager (unless you enter START/QUEUE/MANAGER).
Use the /CLUSTER qualifier to stop a clusterwide queue manager. If you enter the obsolete command STOP/QUEUE/MANAGER (without the /CLUSTER qualifier), the command performs the same function as STOP/QUEUES/ON_NODE. (Use STOP/QUEUES/ON_NODE to stop all queues on a single node without stopping the queue manager.)
13.7.2. Restarting the Queue Manager
If STOP/QUEUE/MANAGER/CLUSTER has been executed, enter START/QUEUE/MANAGER to restart the queue manager.
In an OpenVMS Cluster environment, enter START/QUEUE/MANAGER with the /ON qualifier to modify the list of preferred nodes on which the queue manager can run. For more information, see Section 13.6, ''Customizing Queue Manager Failover''.
In an OpenVMS Cluster environment, enter START/QUEUE/MANAGER to ensure that the queue manager process executes on the most preferred, available node. If it does not, the queue manager will be moved to the most preferred, available node without interruption of service. If you are using the default node list (*), the queue manager will not be moved.
How to Perform This Task
START/QUEUE/MANAGER[/ON=(node,...)] [dirspec]
Specify the /ON=(node,...) qualifier and
dirspec parameter only if you want to change the value you
are currently using for the qualifier or parameter. The command you enter to start
the queue manager is stored in the queue database, with any qualifier or parameter
you specify. If you do not specify a qualifier or parameter, the queue manager is
started using the node list and location (if any) stored in the queue
database.
If the queue manager does not start, see Section 13.11.1, ''Avoiding Common Problems: A Troubleshooting Checklist'' for a troubleshooting checklist.
13.8. Using Multiple Queue Managers
You can use multiple queue managers to distribute the batch and print work load among nodes and disk volumes. You need to understand what multiple queue managers are and how to create additional queue managers.
13.8.1. Understanding Multiple Queue Managers
Explanations of items related to the operation of multiple queue managers follow.
Restrictions on Using Multiple Queue Managers
Queues running on one queue manager cannot reference queues running on a different queue manager. For example, a generic queue running on queue manager A cannot direct jobs to an execution queue running on queue manager B.
You cannot move a job from a queue on one queue manager to a queue on a different queue manager.
The operating system allows a maximum of five queue managers in an OpenVMS Cluster environment.
Names of Multiple Queue Managers
The process name for a queue manager is the first twelve characters of the queue manager name. The default queue manager name is SYS$QUEUE_MANAGER; the default queue manager process name is QUEUE_MANAGE. If you create an additional queue manager named PRINT_MANAGER, the process name is PRINT_MANAGE.
Know the process names of all your queue managers so that you can troubleshoot queue manager problems, as explained in Section 13.11, ''Solving Queue Manager Problems''.
Multiple Queue Managers' Use of Queue Database Files
Multiple queue managers share a single master file. However, a queue database with multiple queue managers contains a queue file and a journal file for each queue manager, as explained in Section 13.2, ''Understanding the Queue Database''.
Commands for Managing Multiple Queue Managers
START/QUEUE/MANAGER
ENABLE AUTOSTART/QUEUES and DISABLE AUTOSTART/QUEUES
STOP/QUEUES/ON_NODE
STOP/QUEUE/MANAGER/CLUSTER
DELETE/QUEUE/MANAGER
The /NAME_OF_MANAGER qualifier allows you to specify a different queue manager for these commands.
13.8.2. Creating Additional Queue Managers
To create one or more additional queue managers, follow these steps:
Follow steps 1 and 2 in Section 13.5, ''Starting the Queue Manager and Creating a Queue Database''.
- To create an additional queue manager, enter a command in the following format:
START/QUEUE/MANAGER/ADD/NAME_OF_MANAGER=name[/ON=(node,...)] [dirspec]
where:/ADD
Creates an additional queue manager in the existing master file and creates new queue and journal files
/NAME_OF_MANAGER= name
Creates a non-default queue manager with a name up to 31 characters long. You can create a maximum of five queue managers.
/ON= (node,...)
Allows you to customize failover of the queue manager. For more information, see Section 13.6, ''Customizing Queue Manager Failover''.
dirspec
Specifies the location of the queue and journal files, as explained in Section 13.3.2, ''Specifying the Location of Queue and Journal Files''. Use this parameter if you are creating the queue and journal files in a location other than the default.
Caution
Do not specify the /NEW_VERSION qualifier when you create an additional queue manager: multiple queue managers share a single master file. An additional queue file and journal file are created automatically for each additional queue manager.
Example
$ START/QUEUE/MANAGER/ADD/NAME_OF_MANAGER=BATCH_MANAGER/ON=(A,B,*) DUA2:[QUEUES]
13.8.2.1. Creating and Moving Queues with Multiple Queue Managers
When you create a queue with the INITIALIZE/QUEUE command, specify the name of the queue manager on which it is to run by including the /NAME_OF_MANAGER qualifier. If you do not specify the /NAME_OF_MANAGER qualifier, the queue is created to run on the default queue manager, SYS$QUEUE_MANAGER.
To move an existing queue from its original queue manager to a different queue manager, delete the queue with the DELETE/QUEUE command and re-create the queue with the INITIALIZE/QUEUE command.
13.8.2.2. Maintaining Queue Managers
When entering DCL commands to maintain the queue manager, be sure to specify the /NAME_OF_MANAGER qualifier to specify the queue manager to which the command is to apply. If you do not specify the /NAME_OF_MANAGER qualifier, the command is executed on the default queue manager, SYS$QUEUE_MANAGER.
Example
The first command creates and starts the queue manager PRINT_MANAGER and creates master, queue, and journal files.
The second command creates and starts an additional queue manager, BATCH_MANAGER; queue and journal files are created for it automatically.
The default queue manager SYS$QUEUE_MANAGER is not defined.
The SHOW QUEUE/MANAGERS command displays information about the queue managers running on your system, as explained in Section 13.4, ''Displaying Information About Queue Managers''.
$ START/QUEUE/MANAGER/NEW_VERSION/NAME_OF_MANAGER=PRINT_MANAGER - _$ /ON=(JADE,RUBY,*) $ START/QUEUE/MANAGER/ADD/NAME_OF_MANAGER=BATCH_MANAGER - _$ /ON=(OPAL,PEARL,*) $ SHOW QUEUE/MANAGERS/FULL Master file: SYS$COMMON:[SYSEXE]QMAN$MASTER.DAT; Queue manager PRINT_MANAGER, running, on JADE:: /ON=(JADE,RUBY,*) Database location: SYS$COMMON:[SYSEXE] Queue manager BATCH_MANAGER, running, on OPAL:: /ON=(OPAL,PEARL,*) Database location: SYS$COMMON:[SYSEXE]
Example
$ SHOW QUEUE/MANAGER Queue manager PRINT_MANAGER, running, on NODEA:: Queue manager SYS$QUEUE_MANAGER, running, on NODED:: $ SHOW QUEUE/MANAGER/FULL Master file: SYS$SPECIFIC:[SYSEXE]QMAN$MASTER.DAT; Queue manager PRINT_MANAGER, running, on NODEA:: /ON=(NODEA,NODEB,*) Database location: SYS$COMMON:[SYSEXE] Queue manager SYS$QUEUE_MANAGER, running, on NODED:: /ON=(NODEC,NODED,NODEE,*) Database location: SYS$SYSROOT:[SYSEXE]
Example
In the following example:
The first command creates and starts the queue manager PRINT_MANAGER and creates master, queue, and journal files.
The second command creates and starts an additional queue manager, BATCH_MANAGER; queue and journal files are created for it automatically.
The default queue manager SYS$QUEUE_MANAGER is not defined.
The SHOW QUEUE/MANAGERS command displays information about the queue managers running on your system, as explained in Section 13.4, ''Displaying Information About Queue Managers''.
$ START/QUEUE/MANAGER/NEW_VERSION/NAME_OF_MANAGER=PRINT_MANAGER - _$ /ON=(JADE,RUBY,*) $ START/QUEUE/MANAGER/ADD/NAME_OF_MANAGER=BATCH_MANAGER - _$ /ON=(OPAL,PEARL,*) $ SHOW QUEUE/MANAGERS/FULL Master file: SYS$COMMON:[SYSEXE]QMAN$MASTER.DAT; Queue manager PRINT_MANAGER, running, on JADE:: /ON=(JADE,RUBY,*) Database location: SYS$COMMON:[SYSEXE] Queue manager BATCH_MANAGER, running, on OPAL:: /ON=(OPAL,PEARL,*) Database location: SYS$COMMON:[SYSEXE]
13.9. Saving and Restoring the Queue Database
Each time you want to preserve changes to your queue configuration, save a copy of your queue database files. In this way, if your queue database files are not accessible, you can restore the queue database you have saved; you thus avoid having to redefine forms and characteristics and reinitialize each queue.
13.9.1. Saving Queue Database Files
To save a record-by-record copy of your queue database files while the queuing system is functioning, perform the following steps. This procedure saves definitions of queues, forms, and characteristics. No job information is preserved. (VSI recommends not saving the journal file because timed and pending jobs might be reexecuted after the journal file is restored.)
How to Perform This Task
- To save the master file, enter an OpenVMS Convert utility (CONVERT) command in the following format:
CONVERT/SHARE QMAN$MASTER.DAT master-filename
where master-filename is the name of the file to which QMAN$MASTER.DAT is to be copied.
For more information about CONVERT, refer to the VSI OpenVMS Record Management Utilities Reference Manual.
- Enter a CONVERT command in the following format to save the queue file:
CONVERT /SHARE SYS$QUEUE_MANAGER.QMAN$QUEUES queue-filename
where queue-filename is the name of the file to which SYS$QUEUE_MANAGER.QMAN$QUEUES is to be copied.
- Use the Backup utility (BACKUP) to save the files created with CONVERT. Use a command in the following format:
BACKUP /LOG masterfile-name, queue-filename device:saveset-name/LABEL=label
For more information about the Backup utility, refer to the VSI OpenVMS System Management Utilities Reference Manual.
Example
$ SET DEFAULT SYS$COMMON:[SYSEXE] $ CONVERT/SHARE QMAN$MASTER.DAT MASTERFILE_9SEP.KEEP; $ CONVERT/SHARE SYS$QUEUE_MANAGER.QMAN$QUEUES QFILE_9SEP.KEEP; $ INITIALIZE MUA0: QDB $ MOUNT/FOREIGN MUA0: %MOUNT-I-MOUNTED, QDB mounted on _LILITH$MUA0: $ BACKUP/LOG MASTERFILE_9SEP.KEEP,QFILE_9SEP.KEEP MUA0:QDB_9SEP.SAV/LABEL=QDB %BACKUP-S-COPIED, copied SYS$COMMON:[SYSEXE]MASTERFILE_9SEP.KEEP; %BACKUP-S-COPIED, copied SYS$COMMON:[SYSEXE]QFILE_9SEP.KEEP; $ DISMOUNT MUA0:
13.9.2. Restoring Queue Database Files
When you restore queue database files, all queue, form, characteristic, and queue manager information is restored. However, information about jobs in the queues is not restored.
How to Perform This Task
If the queue manager is running, stop it by entering the STOP/QUEUE/MANAGER/CLUSTER command.
- Delete all three queue database files. (You must delete all three files, even if only one or two of them are lost.)
Caution
When starting a queue manager on OpenVMS, the queue manager process always opens version number one of the queue journal file (SYS$QUEUE_MANAGER.QMAN$JOURNAL;1). For this reason, when you restore the queue system files with the Backup utility, you must ensure that the latest version of the queue journal file is version number one.
Use the MOUNT command to mount the disk or tape containing the queue database backup.
- Use the Backup utility (BACKUP) to restore the queue file and master file from the save set you created in step 3 of Section 13.9, ''Saving and Restoring the Queue Database''. If the master file or queue file is stored in a location other than the default, make sure you restore it to the correct location or that you specify the new location when you start the queue manager.
Caution
When starting a queue manager on OpenVMS, the queue manager process always opens version number one of the queue journal file (SYS$QUEUE_MANAGER.QMAN$JOURNAL;1). For this reason, when you restore the queue system files with the Backup utility, you must ensure that the latest version of the queue journal file is version number one.
Note
When you restore your queue database, you must always restore both the master and queue files, even if you lost only one of those files.
Start the queue manager with the START/QUEUE/MANAGER command. Do not enter the /NEW_VERSION qualifier: a new, empty journal file will be created automatically.
Example
$ STOP/QUEUE/MANAGER/CLUSTER $ SET DEFAULT SYS$COMMON:[SYSEXE] $ DELETE SYS$QUEUE_MANAGER.QMAN$JOURNAL;,SYS$QUEUE_MANAGER.QMAN$QUEUES;, - _$ QMAN$MASTER.DAT; $ MOUNT/FOREIGN MUA0: %MOUNT-I-MOUNTED, QDB mounted on _LILITH$MUA0: $ BACKUP/LOG MUA0:QDB_9SEP.SAV/SELECT=[SYSEXE]MASTERFILE_9SEP.KEEP; - _$ QMAN$MASTER.DAT; %BACKUP-S-CREATED, created SYS$COMMON:[SYSEXE]QMAN$MASTER.DAT;1 $ SET MAGTAPE/REWIND MUA0: $ BACKUP/LOG MUA0:QDB_9SEP.SAV/SELECT=[SYSEXE]QFILE_9SEP.KEEP; - _$ SYS$QUEUE_MANAGER.QMAN$QUEUES %BACKUP-S-CREATED, created SYS$COMMON:[SYSEXE]SYS$QUEUE_MANAGER.QMAN$QUEUES;1 $ DISMOUNT MUA0: $ START/QUEUE/MANAGER
13.10. Maximizing Queuing System Performance
CPUs — CPU speed and availability are important on the nodes on which the queue managers are running. The more time the queue manager has and the faster the CPU, the faster the queue manager can process information.
Disks — Disk speed as well as nonqueuing activity (such as paging and heavy access to the database) on the database disk can affect performance.
Maintain queue manager processes on the fastest and most available nodes in a cluster. (See Section 13.1, ''Understanding the Queue Manager''.)
Create an additional queue manager to run on another node to distribute the CPU load on heavily used queuing systems. (See Section 13.8, ''Using Multiple Queue Managers''.)
Move queue and journal files to disks with less activity or higher speeds. (See Section 13.5, ''Starting the Queue Manager and Creating a Queue Database''.)
Note that moving the master file provides little difference in performance.
13.11. Solving Queue Manager Problems
|
Topic |
For More Information |
|---|---|
|
Avoiding common problems: a troubleshooting checklist |
Section 13.11.1, ''Avoiding Common Problems: A Troubleshooting Checklist'' |
|
If the queue manager does not start | |
|
If the queuing system stops or the queue manager does not run on specific nodes |
Section 13.11.3, ''If the Queuing System Stops or the Queue Manager Does Not Run on Specific Nodes'' |
|
If the queue manager becomes unavailable |
Section 13.11.4, ''If the Queue Manager Becomes Unavailable'' |
|
If the queuing system does not work on a specific OpenVMS Cluster node |
Section 13.11.5, ''If the Queuing System Does Not Work on a Specific OpenVMS Cluster Node'' |
|
If you see inconsistent queuing behavior on different OpenVMS Cluster nodes |
Section 13.11.6, ''If You See Inconsistent Queuing Behavior on Different OpenVMS Cluster Nodes'' |
|
Reporting a queuing system problem to VSI support representatives |
Section 13.12, ''Reporting a Queuing System Problem to VSI'' |
13.11.1. Avoiding Common Problems: A Troubleshooting Checklist
|
Requirement |
For More Information |
|---|---|
|
QMAN$MASTER is identically defined on all nodes in the cluster. |
Section 13.3, ''Specifying the Location of the Queue Database'' |
|
The queue database is in the specified location. |
Section 13.3, ''Specifying the Location of the Queue Database'' |
|
The queue database disk is mounted and available. |
Section 13.3, ''Specifying the Location of the Queue Database'' |
|
The node list specified with the /ON qualifier contains a sufficient number of nodes. If you specify a node list, VSI recommends that you include an asterisk (*) at the end of the node list. |
Section 13.11.4, ''If the Queue Manager Becomes Unavailable'' |
|
The system address parameters SCSNODE and SCSSYSTEMID match the DECnet for OpenVMS node name and node ID. |
Section 13.11.5, ''If the Queuing System Does Not Work on a Specific OpenVMS Cluster Node'' |
13.11.2. If the Queue Manager Does Not Start
%JBC-E-QMANNOTSTARTED, queue manager could not be started
13.11.2.1. Investigating the Problem
$ SEARCH SYS$MANAGER:OPERATOR.LOG/WINDOW=5 QUEUE_MANAGE, JOB_CONTROL,BATCH_MANAGE
Use the information provided with these messages to further investigate the problem, making sure you have met the requirements listed in Section 13.11.1, ''Avoiding Common Problems: A Troubleshooting Checklist''.
13.11.2.2. Cause
%%%%%%%%%%% OPCOM 13-MAR-2000 15:53:52.84 %%%%%%%%%%% Message from user SYSTEM on ABDCEF %JBC-E-OPENERR, error opening SYS$COMMON:[SYSEXE]QMAN$MASTER.DAT %%%%%%%%%%% OPCOM 13-MAR-2000 15:53:53.04 %%%%%%%%%%% Message from user SYSTEM on ABDCEF -SYSTEM-W-NOSUCHFILE, no such file
13.11.2.3. Correcting the Problem
On systems with multiple queue managers, search for messages displayed by additional queue managers by including their process names in the search string. To display information about queue managers running on your system, use the SHOW QUEUE/MANAGERS command as explained in Section 13.4, ''Displaying Information About Queue Managers''. Correct any problem indicated in the displayed information.
Example
$ START/QUEUE/MANAGER DUA55:[SYSQUE]
| This command attempts to start the queue manager, specifying DUA55:[SYSQUE] as the location of the queue and journal files. |
| The error message indicates that the queue manager did not start. |
| This command searches the operator log file for relevant messages. The SEARCH command does not include a second queue manager name, such as BATCH_MANAGE. |
| This message indicates that the queue file could not be opened because device DUA55: does not exist. |
| This command, which correctly specifies DUA5:[SYSQUE] as the location for the queue and journal files, successfully starts the queue manager. |
For more information about multiple queue managers and their process names, see Section 13.8.1, ''Understanding Multiple Queue Managers''.
13.11.3. If the Queuing System Stops or the Queue Manager Does Not Run on Specific Nodes
The node on which the queue manager was running leaves the cluster.
A new node boots into the cluster.
You change the node list specified with the /ON qualifier of the START/QUEUE/MANAGER command.
You start the queue manager after moving the queue database.
13.11.3.1. Investigating the Problem
Check the operator log that was current at the time the queue manager started up or failed over. Search the log for operator messages from the queue manager.
On systems with multiple queue managers, also search for messages displayed by additional queue managers by including their process names in the search string. To display information about queue managers running on your system, use the SHOW QUEUE/MANAGERS command, as explained in Section 13.4, ''Displaying Information About Queue Managers''.
For more information about multiple queue managers and their process names, see Section 13.8.1, ''Understanding Multiple Queue Managers''.
%%%%%%%%%%% OPCOM 4-FEB-2000 15:06:25.21 %%%%%%%%%%% Message from user SYSTEM on MANGLR %QMAN-E-OPENERR, error opening CLU$COMMON:[SYSEXE]SYS$QUEUE_MANAGER.QMAN$QUEUES; %%%%%%%%%%% OPCOM 4-FEB-2000 15:06:27.29 %%%%%%%%%%% Message from user SYSTEM on MANGLR -RMS-E-FNF, file not found %%%%%%%%%%% OPCOM 4-FEB-2000 15:06:27.45 %%%%%%%%%%% Message from user SYSTEM on MANGLR -SYSTEM-W-NOSUCHFILE, no such file
%%%%%%%%%%% OPCOM 4-FEB-2000 15:36:49.15 %%%%%%%%%%% Message from user SYSTEM on MANGLR %QMAN-E-OPENERR, error opening DISK888:[QUEUE_DATABASE]SYS$QUEUE_MANAGER.QMAN$QUEUES; %%%%%%%%%%% OPCOM 4-FEB-2000 15:36:51.69 %%%%%%%%%%% Message from user SYSTEM on MANGLR -RMS-F-DEV, error in device name or inappropriate device type for operation %%%%%%%%%%% OPCOM 4-FEB-2000 15:36:52.20 %%%%%%%%%%% Message from user SYSTEM on MANGLR -SYSTEM-W-NOSUCHDEV, no such device available
13.11.3.2. Cause
If the dirspec parameter specified with the START/QUEUE/MANAGER command (specifying the location of the queue and journal files) is not translated exactly the same on all nodes, and the queue manager starts on one of the affected nodes. You typically find this problem in an OpenVMS Cluster environment when you add a system disk or move the queue database.
If the queue database disk is not mounted for the node on which the queue manager attempts to run.
In general, the queuing system will be shut off completely if the queue manager encounters a serious error and forces a crash or failover twice in two minutes consecutively on the same node. Therefore, the queuing system may have stopped, or it may continue to run if the queue manager moves to yet another node on which it can access the database after the original failed startup.
13.11.3.3. Correcting the Problem
- If the queue manager is stopped, enter START/QUEUE/MANAGER and include the following information:
An appropriate list of nodes with the /ON qualifier.
The appropriate dirspec parameter (to specify the location of the queue and journal files). All the nodes included in the node list with the /ON qualifier must be able to access this directory.
On all nodes specified in the node list (except on any nodes that boot from the disk where the queue database files are stored), add a MOUNT command to the SYLOGICALS.COM procedure to mount the disk that holds the master file. You do not need to explicitly mount the disk on a node where it is the system disk.
13.11.4. If the Queue Manager Becomes Unavailable
The queue manager becomes unavailable if it does not start or has stopped running.
13.11.4.1. Investigating the Problem
To investigate the problem, enter SHOW CLUSTER to see if the nodes on the list are available.
13.11.4.2. Cause
An insufficient failover node list might have been specified for the queue manager, so that none of the nodes in the failover list is available to run the queue manager.
13.11.4.3. Correcting the Problem
Make sure the queue manager list contains a sufficient number of nodes by entering START/QUEUE/MANAGER with the /ON qualifier to specify a node list appropriate for your configuration.
If you are in doubt about what nodes to specify, VSI recommends that you specify an asterisk (*) wildcard character as the last node in the list; the asterisk indicates that any remaining node in the cluster can run the queue manager. Specifying the asterisk prevents your queue manager from becoming unavailable because of an insufficient node list.
13.11.5. If the Queuing System Does Not Work on a Specific OpenVMS Cluster Node
Use this section if the queuing system does not work on a specific node when it starts up.
13.11.5.1. Investigating the Problem
- Search the operator log that was current when the problem existed for the following messages. These messages are broadcast every 30 seconds after the affected node boots.
%%%%%%%%%%% OPCOM 4-FEB-2000 15:36:49.15 %%%%%%%%%%% Message from user SYSTEM on ZNFNDL %QMAN-E-COMMERROR, unexpected error #5 in communicating with node CSID 000000 %%%%%%%%%%% OPCOM 4-FEB-2000 15:36:49.15 %%%%%%%%%%% Message from user SYSTEM on ZNFNDL -SYSTEM-F-WRONGACP, wrong ACP for device_
- Compare the node's value for the system address parameters SCSNODE and SCSSYSTEMID with the values for the DECnet node name and node ID, as follows:
$ RUN SYS$SYSTEM:SYSMAN SYSMAN> PARAMETERS SHOW SCSSYSTEMID Parameter Name Current Default Min. Max. Unit Dynamic -------------- ------- ------- ------- ------- ---- ------- SCSSYSTEMID 19941 0 -1 -1 Pure-numbe SYSMAN> PARAMETERS SHOW SCSNODE Parameter Name Current Default Min. Max. Unit Dynamic -------------- ------- ------- ------- ------- ---- ------- SCSNODE "RANDY " " " " " "ZZZZ" Ascii SYSMAN> EXIT $ RUN SYS$SYSTEM:NCP NCP> SHOW EXECUTOR SUMMARY Node Volatile Summary as of 5-FEB-2000 15:50:36 Executor node = 19.45 (DREAMR) State = on Identification = DECnet for OpenVMS V7.2 NCP> EXIT $ WRITE SYS$OUTPUT 19*1024+45 19501
13.11.5.2. Cause
If the DECnet node name and node ID do not match the SCSNODE and SCSSYSTEMID system address parameters, IPC (interprocess communication, an operating system internal mechanism) cannot work properly and the affected node will not be able to participate in the queuing system.
13.11.5.3. Correcting the Problem
Modify the system address parameters SCSNODE and SCSSYSTEMID or modify the DECnet node name and node ID, so the values match.
For more information about these system parameters, refer to the VSI OpenVMS System Management Utilities Reference Manual. For more information about the DECnet node name and node ID, refer to the VSI OpenVMS DECnet Guide to Networking?.
Reboot the system.
13.11.6. If You See Inconsistent Queuing Behavior on Different OpenVMS Cluster Nodes
After submitting a print job, you can display the job with a SHOW ENTRY command on the same node, but not on other nodes in the OpenVMS Cluster environment.
After defining or modifying a queue, the changes appear in a SHOW QUEUE display on some nodes, but not on others.
You can successfully submit or print a job on some nodes, but on other nodes, you receive a JOBQUEDIS error.
13.11.6.1. Investigating the Problem
Enter SHOW LOGICAL to translate the QMAN$MASTER logical name within the environment of each node in the cluster. If there is no translation on any given node, then translate the default value of SYS$COMMON:[SYSEXE].
If the SHOW LOGICAL translations show a different physical disk name on one or more nodes, you have identified the problem.
- Check the operator log files that were current at the time that one of the affected nodes booted. Search for an OPCOM message similar to the following one from the process JOB_CONTROL:
%%%%%%%%%%% OPCOM 4-FEB-2000 14:41:20.88 %%%%%%%%%%% Message from user SYSTEM on MANGLR %JBC-E-OPENERR, error opening BOGUS:[QUEUE_DIR]QMAN$MASTER.DAT; %%%%%%%%%%% OPCOM 4-FEB-2000 14:41:21.12 %%%%%%%%%%% Message from user SYSTEM on MANGLR -RMS-E-FNF, file not found
13.11.6.2. Cause
This problem may be caused by different definitions for the logical name QMAN$MASTER on different nodes in the cluster, causing multiple queuing environments. You typically find this problem in OpenVMS Cluster environments when you have just added a system disk or moved the queuing database.
13.11.6.3. Correcting the Problem
If only one queue manager and queue database exist, skip to step 2.
If more than one queue manager and queue database exist, perform the following steps:- Enter a command in the following format on one of the nodes where the QMAN$MASTER logical name is incorrectly defined:
STOP/QUEUE/MANAGER/CLUSTER/NAME_OF_MANAGER=name
where /NAME_OF_MANAGER specifies the name of the queue manager to be stopped.
Delete all three files for the invalid queue database. (On systems with multiple queue managers, you might have more than three invalid files.)
Reassign the logical name QMAN$MASTER on the affected systems and correct the definition in the startup procedure where the logical name is defined (usually SYLOGICALS.COM).
Enter STOP/QUEUE/MANAGER/CLUSTER on an unaffected node to stop the valid queue manager.
Enter START/QUEUE/MANAGER on any node and verify that the queuing system is working properly.
13.12. Reporting a Queuing System Problem to VSI
|
Information |
Description |
|---|---|
|
Summary of the problem |
Include the following information:
|
|
Steps for reproducing the problem |
Specify the exact steps and include a list of any special hardware or software required to reproduce the problem. |
|
Configuration information |
For example:
|
|
Output from the SHOW QUEUE/MANAGERS/FULL command |
Use SYSMAN to enter the command on all nodes, as
follows:
$ RUN SYS$SYSTEM:SYSMAN SYSMAN> SET ENVIRONMENT/CLUSTER SYSMAN> DO/OUTPUT SHOW QUEUE/MANAGERS/FULL SYSMAN> EXIT $ TYPE SYSMAN.LIS Type the output file SYSMAN.LIS to verify that the output for all nodes match. |
|
Location of the queue and journal files |
If possible, find out the most recent value that was specified in the dirspec parameter of the START/QUEUE/MANAGER command (to specify the location of the queue and journal files). If none was specified, the default is SYS$COMMON:[SYSEXE]. |
|
Translation of QMAN$MASTER logical name |
Verify that the translation is the same on all nodes. Enter the following commands, and include the resulting
output:
$ RUN SYS$SYSTEM:SYSMAN SYSMAN> SET ENVIRONMENT/CLUSTER SYSMAN> DO SHOW LOGICAL QMAN$MASTER If the translations returned from the SHOW LOGICAL command are not physical disk names, repeat the SHOW LOGICAL command within the environment of each node to translate the returned value until you reach a translation that includes the physical device name. |
|
Operator log file output |
Enter the following commands to search the operator log for
any message output by the job controller or queue
manager:
$ SEARCH SYS$MANAGER:OPERATOR.LOG/WINDOW=5 - _$ JOB_CONTROL,QUEUE_MANAGE On systems with multiple queue managers, for queue managers
other than the default, specify the first 12 characters of the
queue manager name of any additional queue manager. For example,
for a queue manager named PRINT_MANAGER, specify PRINT_MANAGE as
follows:
$ SEARCH SYS$MANAGER:OPERATOR.LOG/WINDOW=5 - _$ JOB_CONTROL,QUEUE_MANAGE,PRINT_MANAGE |
|
Information returned from relevant DCL commands |
Include this information if entering a DCL command shows evidence of the problem. |
|
A copy of the journal file of the queue database |
Use the Backup utility (BACKUP) with the /IGNORE=INTERLOCK qualifier to create a copy of the file SYS$QUEUE_MANAGER.QMAN$JOURNAL, and provide this copy to VSI. On systems with multiple queue managers, include copies of journal files for all queue managers. Journal files for queue managers other than the default are named in the format name_of_manager.QMAN$JOURNAL. |
|
Copies of any process dumps that might have been created |
Enter the following commands to find any related process
dumps, and provide copies of the files to
VSI:
$ RUN SYS$SYSTEM:SYSMAN SYSMAN> SET ENVIRONMENT/CLUSTER SYSMAN> DO DIRECTORY/DATE SYS$SPECIFIC:[SYSEXE]JBC$*.DMP, - _SYSMAN> QMAN$*.DMP,PRTSMB.DMP,LATSYM.DMP $ RUN SYS$SYSTEM:SYSMAN SYSMAN> SET ENVIRONMENT/CLUSTER SYSMAN> DO DIRECTORY/DATE SYS$SPECIFIC:[SYSEXE]JBC$*.DMP, - _SYSMAN> QMAN$*.DMP,PRTSMB.DMP,LATSYM.DMP If the problem involves an execution queue using a symbiont other than PRTSMB or LATSYM, also include process dump files from the symbiont. The file name has the format image_file_name.DMP. |
|
Output from the SHOW QUEUE command |
If your problem affects individual queues, enter the SHOW QUEUE command to show each affected queue. |
|
Any other relevant information |
For example:
|
Chapter 14. Setting Up and Maintaining Queues
If you have a printer connected to your system, or if you want to use batch processing, you must use queues. A queue allows users to submit requests for printing or batch processing at any time; the system then prints or processes jobs as resources allow.
Before setting up queues, you need to understand how the queue manager and the queue database operate and how to create them for the OpenVMS queuing system. These are explained in Chapter 13, "Managing the Queue Manager and Queue Database".
Information Provided in This Chapter
|
Task |
Section |
|---|---|
|
Managing queues on small systems | |
|
Designing your batch queue environment | |
|
Designing your output queue environment | |
|
Planning your queue setup | |
|
Creating and starting queues | |
|
Restarting execution queues on reboot | |
|
Using queue options | |
|
Using and creating forms | |
|
Using queue management commands | |
|
Managing jobs in queues | |
|
Solving queue problems |
|
Concept |
Section |
|---|---|
|
Queuing process | |
|
Types of queues |
Section 14.1.2, ''Understanding Classes and Types of Queues'' |
|
Autostart feature | |
|
Options for controlling access to queues | |
|
Job retention | |
|
Queue characteristics | |
|
Batch processing options | |
|
Job scheduling options | |
|
Banner pages | |
|
Forms and stock | |
|
Page and line overflow | |
|
Initial form feed | |
|
Device control libraries |
Note
This chapter contains many references to DCL commands. You can find additional information about all DCL commands in the VSI OpenVMS DCL Dictionary.
14.1. Understanding Queuing
A batch or print job submitted either by entering the DCL command SUBMIT or PRINT or through an application is sent to a queue for processing. Information about the user's queue request, including the type of job, the file name or names, the name of the queue, and any special options, is sent to the queue manager. The queue manager stores and retrieves appropriate information from the queue database to print or execute the job.
The queue manager places the job in the appropriate queue to await its turn for processing. Only one print job can be printed on a printer at a single time. However, more than one batch job can execute simultaneously in a batch queue.
For more information about the queue manager and queue database, and the operation of batch and print queues, including print symbionts, see Chapter 13, "Managing the Queue Manager and Queue Database".
14.1.1. Managing Queues on Small Systems
|
Topic |
Section |
|---|---|
|
Simple batch queue configuration |
Section 14.2.1.1, ''Using a Simple Batch Queue Configuration'' |
|
Simple output queue configuration |
Section 14.2.2.1, ''Using a Simple Output Queue Configuration'' |
|
Setting up and starting queues | |
|
Choosing and specifying queue options | |
|
Managing queues | |
|
Managing jobs in queues |
14.1.2. Understanding Classes and Types of Queues
|
Class |
Description |
|---|---|
|
Execution queues |
Queues that accept batch or print jobs for processing. |
|
Generic queues |
Queues that hold jobs until an appropriate execution queue becomes available. The queue manager then requeues the job to the available execution queue. |
The following sections provide more details about execution and generic queues.
14.1.2.1. Execution Queues
Batch execution queues accept only batch jobs. A batch job executes as a detached process that sequentially runs one or more command procedures. The user defines the list of command procedures when submitting the job.
Output execution queues accept jobs that a symbiont processes. The queue manager sends the symbiont a list of files, which the user defines when submitting the job. An output symbiont transfers data from a disk to an output device. As the symbiont processes each file, it produces output for the device it controls, such as a printer or a terminal.
The operating system provides a standard print symbiont named PRTSMB, which prints files on hardcopy devices. The LAT print symbiont LATSYM prints files on output devices attached to LAT ports. You can also design symbionts for this or any other file-processing activity that the OpenVMS batch and print queuing system manages. (Refer to the VSI OpenVMS Utility Routines Manual for more information.)
Output execution queues include the following types:Type
Description
Printer execution queue
Uses a symbiont to direct output to a printer.
Terminal execution queue
Uses a symbiont to direct output to a terminal printer.
Server execution queue
Uses a user-modified or user-written symbiont to process the files that belong to jobs in the queue.
When you create an output execution queue, you designate it as either a printer, a terminal, or a server execution queue; you can also specify the symbiont to be associated with the queue. However, when the queue is started, the symbiont process associated with the queue can override the queue designation if the queue type specified does not match the type of device.
The standard symbiont provided with the operating system determines whether it is controlling a printer or a terminal. The symbiont communicates this information to the queue manager, which, if necessary, changes the type designation of the output execution queue. By convention, a user-written or user-modified symbiont that does not deliver output to a printer defines its queue as a server queue.
14.1.2.2. Generic Queues
Generic batch queues direct jobs only to batch execution queues. Generic batch queues are typically used in OpenVMS Cluster environments to distribute the batch work load across several nodes (see Section 14.2.1.3, ''Using Generic Batch Queues in an OpenVMS Cluster Environment'').
Generic batch queues are not automatically stopped when a node shuts down. Therefore, they do not need to be started when a node reboots.
Generic output queues direct jobs to any of the three types of output execution queues: print, terminal, or server. Generic output queues are typically used to distribute the output work load among several like printers (see Section 14.2.2.5, ''Using Generic Output Queues'').
Generic output queues are not automatically stopped when a node shuts down. Therefore, they do not need to be started when a node reboots.
Logical queues are a special type of generic output queue that transfers jobs to another output execution queue. You might use a logical queue to temporarily redirect a queue when the device on which it runs is broken.
A logical queue transfers its jobs into the execution queue specified with the ASSIGN/QUEUE command. For information about setting up a logical queue, see Section 14.7.1.10, ''Assigning a Logical Queue''.
14.1.3. Understanding Autostart Queues
With a single command, start all autostart queues on a node
Specify a list of nodes (in an OpenVMS Cluster environment) to which a queue can automatically attempt to fail over
Autostart failover is particularly useful on LAT queues. Because LAT printers are usually shared among users of multiple systems or OpenVMS Cluster systems, many users are affected if a LAT queue is unavailable. For highest availability, set up your LAT queues with a list of nodes to which the queue can fail over, so the queue can continue to run even if a node becomes unavailable.
| Task |
Description |
|---|---|
| 1 |
Create the queue as an autostart queue and, optionally, specify a failover list. |
| 2 |
Activate the queue for autostart. You can do this either when you create a queue, or after you create one. |
| 3 |
Enable autostart on a node. You can do this before or after you create a queue. When you enable autostart on a node, the queue manager automatically starts all stopped, active autostart queues capable of running on the node. Any autostart queue that fails over to the node is also automatically started. |
Section 14.3, ''Planning Your Queue Setup'' explains these steps in detail.
14.2. Designing Queue Environments
The following sections describe how to design batch queue and output queue environments.
14.2.1. Designing a Batch Queue Environment
|
Configuration |
For More Information |
|---|---|
|
A single queue for limited batch processing |
Section 14.2.1.1, ''Using a Simple Batch Queue Configuration'' |
|
Multiple queues for heavy batch processing, or customized queues for specialized batch processing | |
|
An OpenVMS Cluster environment |
Section 14.2.1.3, ''Using Generic Batch Queues in an OpenVMS Cluster Environment'' |
14.2.1.1. Using a Simple Batch Queue Configuration
You can use this simple configuration, which is suitable for limited batch needs, for a standalone system supporting mainly interactive processing.
Figure 14.1, ''Default Batch Queue'' shows a single, default batch queue.
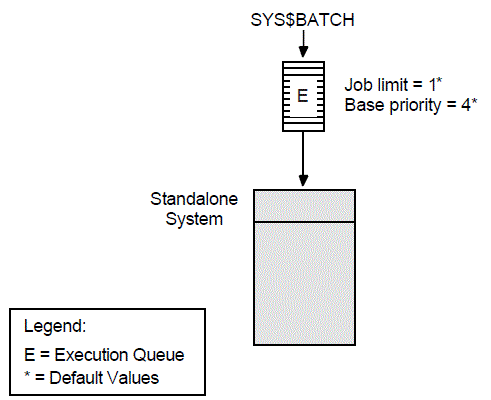
By default, when a user submits a batch job with the SUBMIT command, the job is placed in the queue named SYS$BATCH. To set up a single default queue on a standalone system, name the queue SYS$BATCH.
14.2.1.2. Using Specialized Batch Queues
If your users rely on batch processing or have special processing needs, you might want to set up more than one queue. You can customize batch queues to handle specialized jobs by specifying performance and resource options for jobs in the queue.
Figure 14.2, ''Multiple Batch Queues with Special Resource and Performance Options'' shows a configuration of several queues, each customized to process certain types of batch jobs.
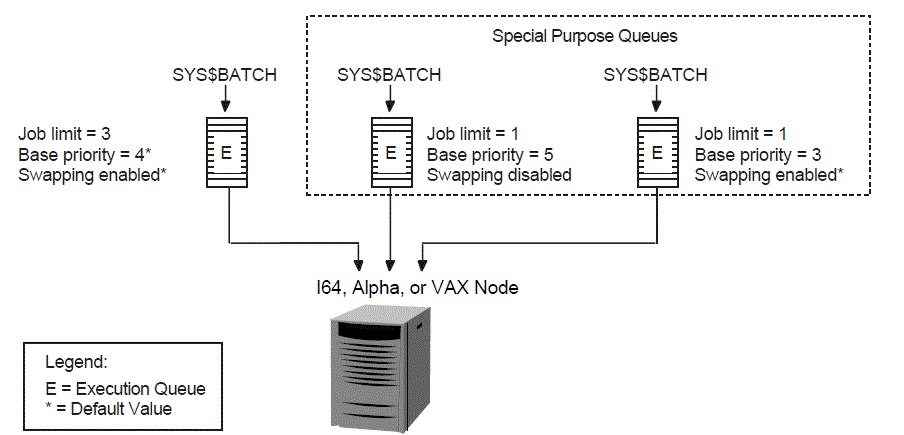
In Figure 14.2, ''Multiple Batch Queues with Special Resource and Performance Options'', SYS$BATCH is the default queue. Normal batch jobs would be submitted to this queue. The FAST queue executes high-priority jobs that should not be swapped out of memory. SLOW is a background queue for processing low-priority jobs. These are large jobs with large requirements for physical memory.
Be conservative when changing base priority and swapping on a queue. Even a slight change can have a significant negative effect on batch and interactive performance. For example, even an increase of 1 in a queue's base priority can affect performance significantly.
For information about specifying these options for a batch queue, see Section 14.6.4, ''Specifying Batch Processing Options''.
14.2.1.3. Using Generic Batch Queues in an OpenVMS Cluster Environment
You can use generic queues in a OpenVMS Cluster environment to balance processing resources by distributing batch processing across nodes in the cluster. (For an explanation of generic queues, see Section 14.1.2, ''Understanding Classes and Types of Queues''.)
Figure 14.3, ''Batch Queue Configuration with Clusterwide Generic Queue'' shows a typical configuration.
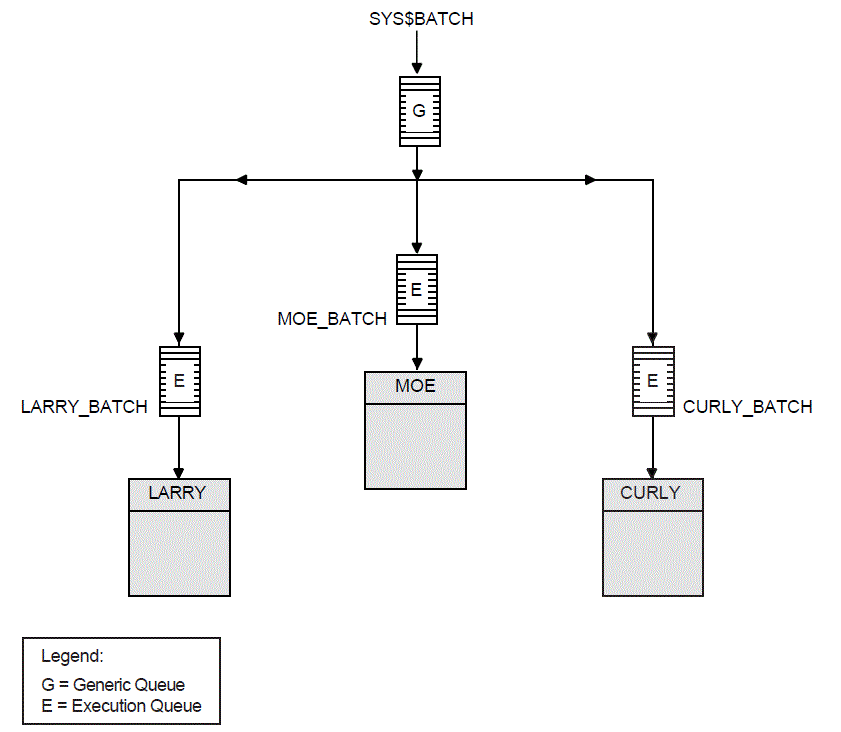 |
In Figure 14.3, ''Batch Queue Configuration with Clusterwide Generic Queue'', a generic clusterwide batch queue named SYS$BATCH feeds jobs to execution queues on each node in the OpenVMS Cluster environment. A job submitted to SYS$BATCH is placed in the appropriate execution queue to minimize the ratio of executing jobs to job limits for all execution queues fed by SYS$BATCH.
For example, suppose execution queues MOE_BATCH, LARRY_BATCH, and CURLY_BATCH all have a job limit of 5. If MOE_BATCH and LARRY_BATCH are executing four jobs and CURLY_BATCH is executing one job, the generic queue SYS$BATCH feeds the next job to CURLY_BATCH.
Refer to VSI OpenVMS Cluster Systems Manual for more information about OpenVMS Cluster queue configurations. For information about how to create a generic queue, see Section 14.4.3, ''Creating and Starting Generic Queues''.
14.2.2. Designing an Output Queue Environment
|
Configuration |
For More Information |
|---|---|
|
A single print queue for limited printing |
Section 14.2.2.1, ''Using a Simple Output Queue Configuration'' |
|
Printers of different types | |
|
PostScript printing | |
|
Access to printers from multiple systems | |
|
Multiple printers of the same type | |
|
An OpenVMS Cluster environment | |
|
Applications that print output by writing directly to a printer rather than submitting to an output queue | |
|
Distributed printing |
14.2.2.1. Using a Simple Output Queue Configuration
Figure 14.4, ''Simple Output Queue'' shows a simple queue configuration for limited printing needs. This configuration is appropriate for a standalone system supporting a single printer.
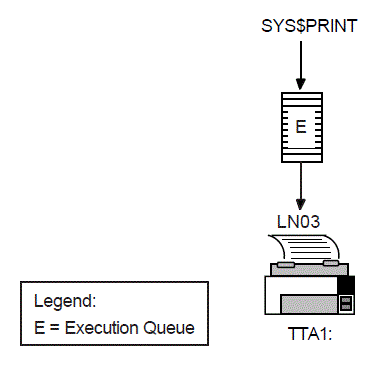
By default, when a user submits a print job with the PRINT command, the job is placed in the queue named SYS$PRINT. To set up a single default printer queue on a standalone system, name the queue SYS$PRINT.
14.2.2.2. Mixing Printers
If you have several different types of printers (for example, an LN03 printer, an LA210 printer, and an LP27 line printer), you must set up a separate queue for each printer. The options, such as the default form or device control library, that you use with these queues will probably differ according to the printer to which the queue's output is sent. For example, the default form for a line printer might have a width of 132 columns, while the default form for an LN03 printer might have a width of 80 columns.
Figure 14.5, ''Queue Configuration with Mixed Printers'' shows such a configuration.
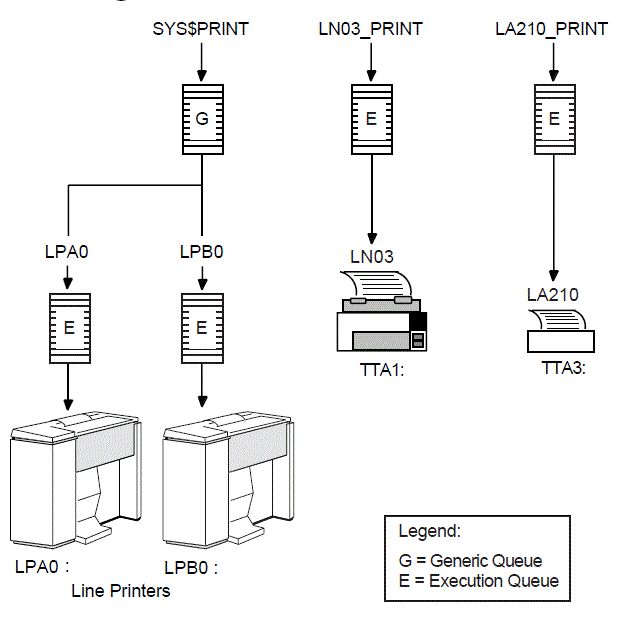
14.2.2.3. Printing PostScript Files
A printer capable of printing PostScript files, and supporting software
Software that provides PostScript-to-sixel printing, and a supported printer
For more information, see your VSI support representative.
14.2.2.4. Using LAT Printers
To share printers among multiple systems or OpenVMS Cluster environments, you can connect printers to a LAT port on a terminal server. Figure 14.6, ''Configuration for Remote Printers on a Terminal Server'' shows an output queue configuration with a remote printer on a terminal server.
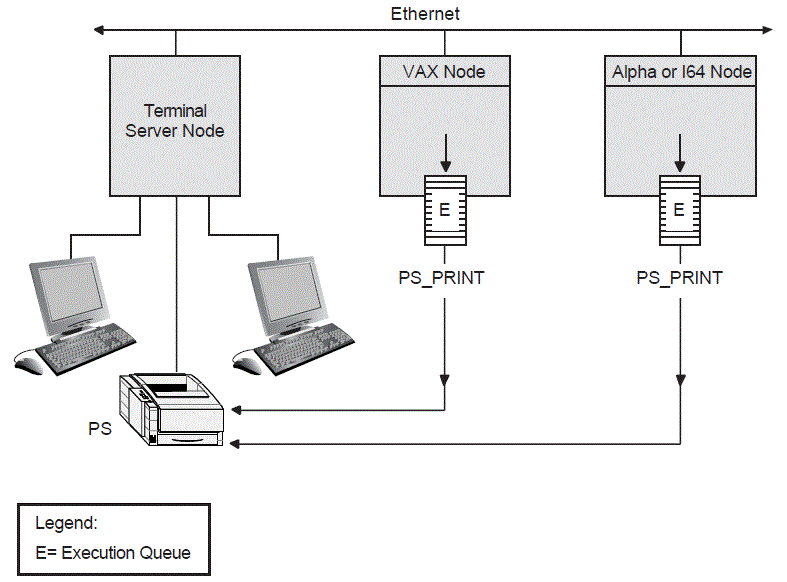 |
VSI recommends that you set up your LAT queues as autostart queues with failover lists to ensure that these queues are highly available. Because LAT printers are usually shared among users of multiple systems or clusters, many users will be affected if a LAT queue is unavailable.
For information about how to create autostart queues with failover lists, see Section 14.4.2, ''Creating and Starting Nonautostart Execution Queues''.
14.2.2.5. Using Generic Output Queues
If you have more than one printer of the same type (for example, if you have three line printers), use generic queues to balance the print load among the printers. Figure 14.7, ''Queue Configuration with Three Like Printers and a Generic Queue'' shows such a configuration.
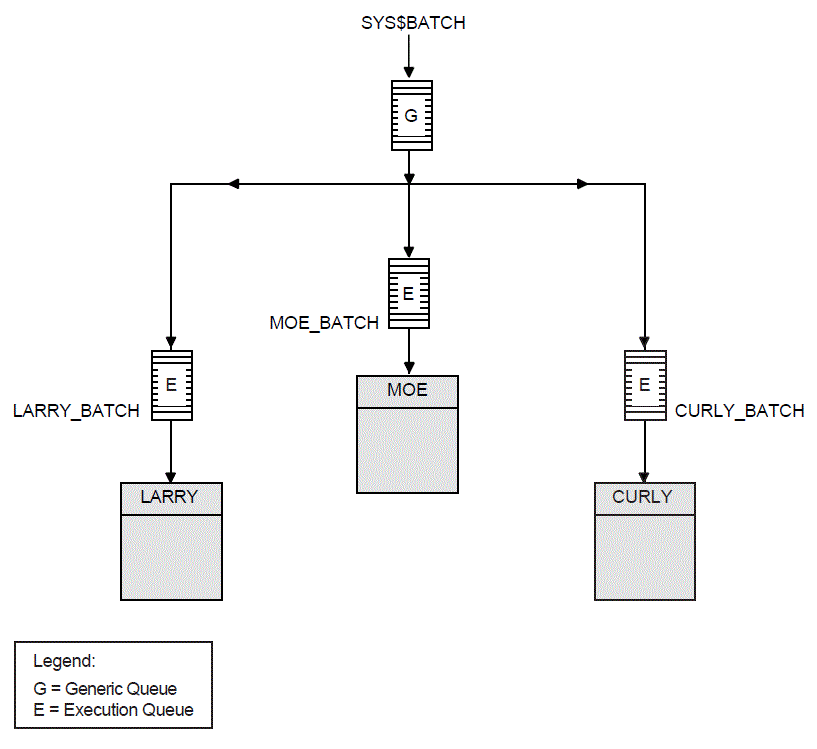 |
For information about how to create a generic queue, see Section 14.4.3, ''Creating and Starting Generic Queues''.
14.2.2.6. Using OpenVMS Cluster Queues
Figure 14.8, ''Output Queue Configuration in an OpenVMS Cluster'' shows a typical OpenVMS Cluster output queue configuration. For information about OpenVMS Cluster queue configurations, refer to VSI OpenVMS Cluster Systems Manual.
 |
14.2.2.7. Spooling Printers
If your system runs application programs that write output directly to a printer rather than submit it to an output queue, or if you will be using LAT queues, spool your printers. Spooling your printers causes application programs to write output to an intermediate storage device so that the printer remains available to other users while the program is running.
Figure 14.9, ''Queue Configuration with Spooled Devices'' shows an output configuration with spooled printers.
 |
For more information about spooling printers, see Section 8.9.2.1, ''Spooling Printers''.
14.2.2.8. Distributing Printing
The OpenVMS batch and print queuing system enables users to print files on output devices attached to the local system or OpenVMS Cluster system.
The Distributed Queuing Service (DQS) layered product extends the printing capabilities of the OpenVMS queuing system to a distributed environment. DQS enables users to print files on output devices attached to remote nodes in your network.
For more information, refer to the DQS documentation or your VSI support representative.
14.3. Planning Your Queue Setup
| Step |
Task |
For More Information |
|---|---|---|
| 1 |
Make sure you have started the queue manager and created the queue database. |
Section 13.5, ''Starting the Queue Manager and Creating a Queue Database'' |
| 2 |
If your configuration includes output queues, set up output devices and create a command procedure to set up the devices on reboot. | |
| 3 |
If you plan to use any queue options, such as forms, characteristics, and banner pages, determine the qualifiers needed to specify those options. In addition, define any forms and characteristics you will use before you create queues. (Because of the length of the instructions for this step, the corresponding section in the manual follows the section for step 5.) | |
| 4 |
Create and start queues. | |
| 5 |
Create a command procedure to perform the necessary setup tasks each time your system reboots. |
14.3.1. Setting Up Output Devices
Before creating output queues, you must set up the devices to which the queues will direct output.
How to Perform This Task
Install any printers, plotters, and other output devices to which your users will have access. For information, refer to the documentation provided with the hardware.
If you will use LAT printers, create logical LAT ports. You must create a logical LAT port on each service node to which a LAT printer is to be available, and associate the logical port with a physical port or service on the terminal server node. To do so, use the LATCP commands CREATE PORT and SET PORT. For more information, refer to the VSI OpenVMS System Management Utilities Reference Manual.
Set device characteristics for line printers and printers attached to terminal ports. To do so, use a series of SET commands. For more information, see Section 8.9.1, ''Setting Printer Characteristics''. In step 5, you create a command procedure to set up your devices each time the system reboots. The commands you enter to set device characteristics must be included in this command procedure.
Spool printers. If you use LAT printers, or if you run applications that write output directly to a printer, spool your printers. For more information about spooled printers, see Section 14.2.2.7, ''Spooling Printers''.
To spool a printer, use the SET DEVICE/SPOOLED command, as explained in Section 8.9.2.1, ''Spooling Printers''.
Create a command procedure to set up your device characteristics and spool printers each time the system reboots. You must include the commands you entered in steps 3 and 4 in the command procedure. (Include the commands you entered to set up logical ports in step 2 in your site-specific LAT startup command procedure SYS$MANAGER:LAT$SYSTARTUP.COM.)
If your configuration is simple, you can add the commands to SYSTARTUP_VMS.COM. If your configuration requires a large number of commands, create a separate command procedure (for example, DEVICE_SETUP.COM), and execute it from SYSTARTUP_VMS.COM. In the command procedure, a SET TERMINAL command must precede a SET DEVICE/SPOOLED command for the same output device.
Example
$ SET PRINTER/TAB/PAGE=66/WIDTH=132/LOWER/FF/NOCR - _$ /FALLBACK/NOWRAP/NOTAB LPA0:
| Sets parameters for the line printer device |
| Sets parameters for the LAT printer device |
| Spools device and creates queue called LPA0 |
| Spools device and creates queue called LN03_1 |
14.4. Creating and Starting Queues
Execution queues
Generic queues
|
Task |
For More Information |
|---|---|
|
Autostart execution queues |
Section 14.4.1, ''Creating and Starting Autostart Execution Queues'' |
|
Nonautostart execution queues |
Section 14.4.2, ''Creating and Starting Nonautostart Execution Queues'' |
|
Generic queues |
14.4.1. Creating and Starting Autostart Execution Queues
Create the queue as an autostart queue and, optionally, specify a failover list.
Activate the queue for autostart. You can do this either when you create a queue, or after you create one.
Enable autostart on a node. You can do this before or after you create a queue.
Example
$ INITIALIZE/QUEUE/START/DEFAULT=(NOBURST,FLAG=ALL,TRAILER=ONE) - _$ /AUTOSTART_ON=(LILITH::LPA0:,SMITTN::LPA0:) LPA0
| Creates an autostart queue named LPA0 and activates it for autostart. Because this is an autostart queue with a failover list, this queue can run on either LILITH::LPA0 or SMITTN::LPA0. |
| Creates an autostart queue named LN03_1 for LAT printers and activates it for autostart. Because this is an autostart queue with a failover list, this queue can run on either of the printers attached to LAT ports LTA3331: on node LILITH or LTA555: on node SMITTN. |
| Enables autostart on the node on which the process is running. Assume this is node LILITH. Because both LPA0 and LN03_1 are active autostart queues capable of running on node LILITH, these queues will start up on this node. |
| Enables autostart on node SMITTN. If LILITH becomes unavailable, both LPA0 and LN03_1 can fail over to node SMITTN. |
Detailed explanations of each task follow.
14.4.1.1. Creating an Autostart Queue
|
Type of Queue |
Command |
|---|---|
|
Output queues |
INITIALIZE/QUEUE/AUTOSTART_ON=(node::[device:] [,...]) queue-name For node::, specify the name of the node on which the queue is to run. For device:, specify the name of the output device to which the queue's output is sent. To allow the autostart queue to fail over to another node and device, specify a list of nodes and devices, separated by commas. |
|
Batch queues |
INITIALIZE/QUEUE/BATCH/AUTOSTART_ON=(node:: [,...]) queue-name The /BATCH qualifier creates a batch queue. For node::, specify the name of the node on which the queue is to run. To allow the autostart queue to fail over to another node, specify a list of nodes, separated by commas. |
Caution
The system does not check the node name you specify as node:: to
determine if it is an existing node name, so be sure to specify the node name
correctly.
How to Specify a Failover List
For output queues, replace device with a list of failover devices.
For batch queues, replace node with a list of failover nodes.
14.4.1.2. Activating an Autostart Queue
- Use the /START qualifier in the INITIALIZE/QUEUE command used to create the queue, as follows:
INITIALIZE/QUEUE/START/AUTOSTART_ON[/qualifiers,...] queue-name
- Enter START/QUEUE after you create the queue, as follows:
START/QUEUE[/qualifiers,...] queue-name
How to Start a Deactivated Queue
Immediately if a node on which the queue can run is enabled for autostart
As soon as a node on which the queue can run is enabled for autostart
14.4.1.3. Enabling an Autostart Queue
- For each node on which you want autostart queues to run (including those to which the queues can later fail over), enter the following command:
$ ENABLE AUTOSTART/QUEUES
Enabling autostart on a node notifies the queue manager to automatically perform the following tasks:Start all active and valid autostart queues on the node
Start any active autostart queue that fails over to the node
By default, the command affects the node from which it is entered. Specify the /ON_NODE qualifier to enable autostart on a different node.Note
The ENABLE AUTOSTART/QUEUES command starts only valid, active autostart queues capable of running on a node. If an autostart queue does not start when you enter this command, the queue might not be active for autostart. You must activate autostart queues, as explained in Section 14.4.1.2, ''Activating an Autostart Queue''.
Add the ENABLE AUTOSTART/QUEUES command to your startup command procedure on each node that is to run autostart queues to ensure that autostart is enabled each time the node reboots.
How to Start Stopped Autostart Queues
You can start all stopped active autostart queues on a node by enabling autostart for queues with ENABLE AUTOSTART/QUEUES. Including a separate START/QUEUE command to start an active autostart queue is not necessary.
When a node reboots, autostart is disabled until you enter ENABLE AUTOSTART/QUEUES.
14.4.1.4. Adding Commands to Your Startup Procedure
VSI recommends that you add ENABLE AUTOSTART/QUEUES to your startup procedure on all of your nodes. Add this command following the commands that configure printer devices and mount important disks. Adding the command eliminates the necessity of adding it later, if you need to add autostart queues or add nodes to autostart queue failover lists.
$! Start the nonautostart batch queue $ START/QUEUE SYS$BATCH $! Start all autostart queues $ ENABLE AUTOSTART/QUEUES
For more examples, see the SYS$MANAGER:SYSTARTUP_VMS.COM template on your system disk.
14.4.2. Creating and Starting Nonautostart Execution Queues
This section describes how to create and start a nonautostart queue.
Example
$ INITIALIZE/QUEUE/START/BATCH/ON=LILITH::SYS$BATCH
14.4.2.1. Creating a Nonautostart Queue
|
Type of Queue |
Command |
|---|---|
|
Output queues |
INITIALIZE/QUEUE/ON=node::device: queue-name For node::, specify the node on which the queue is to execute. For device:, specify the device to which the queue's output is sent. |
|
Batch queues |
INITIALIZE/QUEUE/BATCH/ON=node:: queue-name The /BATCH qualifier is required to create a batch queue. For node::, specify the node on which the queue is to execute. |
14.4.2.2. Starting a Nonautostart Queue
- Enter the /START qualifier in the INITIALIZE/QUEUE command that you use to create the queue, with the following format:
INITIALIZE/QUEUE/START/ON[/qualifiers,...] queue-name
- Enter START/QUEUE after you create the queue, using the following format:
START/QUEUE[/qualifiers,...] queue-name
For each nonautostart queue, you must include a START/QUEUE command naming the queue in your startup command procedure.
14.4.3. Creating and Starting Generic Queues
This section describes how to create and start a generic queue.
14.4.3.1. Creating a Generic Queue
|
Type of Queue |
Command |
|---|---|
|
Output queue |
INITIALIZE/QUEUE/GENERIC[=(queue-name[,...])] queue-name The /GENERIC qualifier specifies that the queue is a generic queue. For the first queue-name, specify the execution queue to which the generic queue sends jobs. For the second queue-name, specify the generic queue to which output is sent. |
|
Batch queues |
INITIALIZE/QUEUE/BATCH/GENERIC[=(queue-name[,...]) queue-name The /BATCH qualifier is required to create a batch queue. For queue-name, specify the execution queue to which the generic queue sends jobs. The execution queue must be a batch queue. |
You can also set up a generic queue without explicitly naming the execution queues to which it may send jobs. Instead, use the /ENABLE_GENERIC qualifier with INITIALIZE/QUEUE, START/QUEUE, or SET QUEUE for the execution. This method is not normally recommended. However, if your queue configuration is simple, you can use this method.
Example
$ INITIALIZE/QUEUE/GENERIC=(LN03_1,LN03_2,LN03_3) LN03_PRINT
14.4.3.2. Starting a Generic Queue
- Use the /START qualifier in the INITIALIZE/QUEUE command used to create the queue, using the following format:
INITIALIZE/QUEUE/START/GENERIC(=queue-name[,...])[/qualifiers, ...] queue-name
- Enter START/QUEUE after you create the queue, using the following format:
START/QUEUE[/qualifiers,...] queue-name
14.5. Restarting Execution Queues on Reboot
Information about forms, characteristics, and queues is stored in the queue database. For this reason, creating forms, queues, and characteristics each time the node or OpenVMS Cluster system reboots is unnecessary. However, you must start nonautostart execution queues and enable autostart each time a node reboots. To do so, create a command procedure.
If your configuration is simple, you can add the commands to the site-specific startup command procedure SYSTARTUP_VMS.COM. If your configuration requires a large number of commands, create a separate command procedure and execute it from SYSTARTUP_VMS.COM.
Generic queues are not automatically stopped when a node shuts down. Therefore, including commands to start generic queues in your startup command procedure is unnecessary.
14.6. Using Queue Options
|
Options |
Type of queue |
Reference |
|---|---|---|
|
Control of access to queues |
Batch and output | |
|
Job retention |
Batch and output | |
|
Characteristics |
Batch and output | |
|
Control of batch processing |
Batch | |
|
Control of job scheduling |
Output | |
|
Banner pages |
Output | |
|
Forms |
Output | |
|
Control of line and page overflow |
Output | |
|
Suppression of initial form feed |
Output | |
|
Device control library modules |
Output |
Specify appropriate qualifiers with INITIALIZE/QUEUE when you create a queue.
Specify options after you create a queue by including qualifiers with START/QUEUE or SET QUEUE.
|
Qualifier |
Type of Queue |
Description |
For More Information |
|---|---|---|---|
|
/AUTOSTART_ON |
Batch and output |
Creates an autostart execution queue and specifies the node or nodes (and for output queues, the device or devices) on which the queues can run. |
Section 14.4.1, ''Creating and Starting Autostart Execution Queues'' |
|
/BASE_PRIORITY |
Batch and output |
Specifies a base process priority (not the same as the job scheduling priority). For a batch queue, specifies the base priority for processes executing jobs in the queue. For output queues, specifies the base priority of the symbiont process. | |
|
/BLOCK_LIMIT |
Output |
Limits the size of print jobs that can be processed on an output execution queue. |
Section 14.6.5.1, ''Setting Job Scheduling Priorities and Limits'' |
|
/CHARACTERISTIC /CHARACTERISTICS |
Batch and output |
Specifies one or more characteristics associated with the queue. | |
|
/CPUDEFAULT |
Batch |
Defines the default CPU time limit for batch jobs executed in the queue. | |
|
/CPUMAXIMUM |
Batch |
Defines a maximum CPU time limit for batch jobs executed in the queue. | |
|
/DEFAULT |
Output |
Establishes defaults for certain options of the PRINT command. After you set an option for the queue with the /DEFAULT qualifier, users do not have to specify that option in their PRINT commands. However, they can specify options to override the defaults set on the queues. Possible default options are as follows: | |
|
BURST | |||
|
FEED | |||
|
FLAG | |||
|
FORM | |||
|
TRAILER | |||
|
/DESCRIPTION |
Batch and output |
Specifies a text string to provide users with information about the queue. | |
|
/DEVICE |
Output |
Specifies the type of output execution queue. The keywords are as follows: PRINTER (default) TERMINAL SERVER | |
|
/DISABLE_SWAPPING |
Batch |
Specifies whether batch jobs executed from a queue can be swapped in and out of memory. | |
|
/FORM_MOUNTED |
Output |
Specifies the mounted form for an output execution queue. | |
|
/GENERIC |
Batch and output |
Creates a generic queue and names the execution queues it feeds. | |
|
/JOB_LIMIT |
Batch |
Indicates the number of batch jobs that can be executed concurrently from a batch queue. | |
|
/LIBRARY |
Output |
Specifies the file name for a device control library. | |
|
/NAME_OF_MANAGER |
Batch and output |
Specifies the name of the queue manager with which the queue will be associated. | |
|
/NO_INITIAL_FF |
Output |
Specifies the qualifier for an output execution queue; suppresses the initial form feed sent to an output execution queue. | |
|
/ON |
Batch and output |
Creates a nonautostart execution queue and specifies the node (and, for output queues, the device) on which the queue is to run. | |
|
/OWNER_UIC |
Batch and output |
Specifies the user identification code (UIC) for the queue. |
Section 14.6.1.2, ''Setting and Showing UIC-Based Queue Protection'' |
|
/PROCESSOR |
Output |
Specifies the symbiont to be used with an output execution queue. The default is the standard operating system print symbiont PRTSMB. |
Section 14.4.1, ''Creating and Starting Autostart Execution Queues'' |
|
/PROTECTION |
Batch and output |
Specifies a protection for the queue. |
Section 14.6.1.2, ''Setting and Showing UIC-Based Queue Protection'' |
|
/RAD |
Batch |
Specifies the RAD number on which to run batch jobs assigned to the queue. |
Section 14.6.4.8, ''Assigning a Batch Queue to a Resource Affinity Domain (RAD)'' |
|
/RECORD_BLOCKING |
Output |
Determines whether the symbiont can concatenate (or block together) output records for transmission to the output device. |
Section 14.4.1, ''Creating and Starting Autostart Execution Queues'' |
|
/RETAIN |
Batch and output |
Holds jobs in the queue after they have executed. | |
|
/SCHEDULE |
Output |
Specifies whether pending jobs in a queue are scheduled based on the size of the job. | |
|
/SEPARATE |
Output |
Specifies required job separation or job reset options for an output execution queue. Required options cannot be overridden by the PRINT command. Possible options are as follows: | |
|
BURST | |||
|
FLAG | |||
|
RESET | |||
|
TRAILER | |||
|
/WSDEFAULT |
Batch and output |
For batch queues, specifies a default working set size for batch jobs executed in the queue. For output queues, specifies a default working set size for the symbiont process. The value set by this qualifier overrides the value defined in the UAF of any user submitting a job to the queue. | |
|
/WSEXTENT |
Batch and output |
For batch queues, specifies the working set extent for batch jobs executed in the queue. For output queues, specifies a working set extent for the symbiont process. The value set by this qualifier overrides the value defined in the UAF of any user submitting a job to the queue. | |
|
/WSQUOTA |
Batch and output |
For batch queues, specifies the working set quota for batch jobs executed in the queue. For output queues, specifies a working set quota for the symbiont process. The value set by this qualifier overrides the value defined in the UAF of any user submitting a job to the queue. |
14.6.1. Controlling Access to Queues
Queues are permanent security objects. They are stored in the system queue database together with their security profiles.
As with a file or directory, you can use UIC-based or ACL-based protection to control access to a queue.
Refer to the VSI OpenVMS Guide to System Security for detailed information about establishing system security.
14.6.1.1. Understanding UIC-Based Queue Protection
UIC-based protection restricts the jobs and the users who have access to a queue. Operations that apply to queues are controlled by UIC-based protection in the same way that access to other protected objects (such as files) is controlled.
When you create a queue, the queue is assigned an owner UIC and a protection code. The default owner is [SYSTEM], but you can specify another owner with the /OWNER_UIC qualifier.
System:Manager,Owner:Delete,Group:Read,World:Submit
Jobs are assigned an owner UIC equal to the UIC of the process that submitted the job, unless the job was submitted with the /USER qualifier. Each job in a queue (and each operation that is performed on a queue) is checked against the UIC of the owner, the protection of the queue, and the privileges of the requester.
|
Operations that apply to... |
Are checked against... |
|---|---|
|
Jobs |
The read and delete protection specified for the queue and the owner UIC of the job. |
|
Queues |
The submit and manage protection specified for the queue and the owner UIC of the queue. |
|
Access Type |
Gives you the right to... |
|---|---|
|
Read |
See the security elements of a queue or a job in a queue. |
|
Submit |
Place jobs in the queue. |
|
Delete |
Delete a job in the queue or modify the elements of a job. |
|
Manage |
Affect any job in the queue. You can start, stop, or delete a queue and change its status and any elements that are unrelated to security. |
|
Control |
Modify the protection elements and owner of a queue. |
Note that when a process receives read or delete access through a protection code, it can operate on only its job in the queue. However, when granted through an ACL, read and delete access allow a process to operate on all jobs in the queue.
Privileges Required
You need SYSNAM and OPER privilege to stop or start the queue manager. OPER is necessary to create and delete queues, or to change the symbiont definition.
Kinds of Auditing Performed
|
Event Audited |
Audit Occurs When... |
|---|---|
|
Access |
A job is submitted to the queue and when either a job or queue is modified. |
|
Creation |
A queue is initialized. |
|
Deletion |
A process deletes a job from the queue or when the queue itself is deleted. (To enable auditing for queue deletions, enable auditing for manage [M] access to the queue.) |
For more information about queue security, refer to the VSI OpenVMS Guide to System Security.
14.6.1.2. Setting and Showing UIC-Based Queue Protection
|
Command |
Description |
|---|---|
|
INITIALIZE/QUEUE/PROTECTION=(ownership[:access],...) START/QUEUE/PROTECTION=(ownership[:access],...) SET QUEUE/PROTECTION=(ownership[:access],...) |
Specifies the protection of a queue:
|
|
INITIALIZE/QUEUE/OWNER_UIC= uic START/QUEUE/OWNER_UIC= uic SET QUEUE/OWNER_UIC= uic |
Enables you to change the UIC of a queue. The default UIC is [1,4]. |
|
SHOW QUEUE/FULL |
Displays complete information about a queue, including the protection currently set for the queue. |
|
SET SECURITY/CLASS=QUEUE/OWNER= uic |
Modifies the owner element of a queue. Specify the UIC in the standard format. |
|
SET SECURITY/CLASS=QUEUE/ PROTECTION= ownership[:access] |
Modifies the protection code of a queue. The protection code defines the type of access allowed to users, based on their relationship to the object's owner. |
|
SHOW SECURITY/CLASS=QUEUE |
Shows protection currently set for objects of the queue class. |
Examples
- The following example sets protection on a queue, and then displays full information about the queue:
$ INITIALIZE/QUEUE/GENERIC=(SYS_QUE1,SYS_QUE2)/ PROTECTION=(S:M,O:D,G:R,W:R) - _$ /OWNER_UIC=[1,8]/RETAIN=ERROR SYS_PRINT $ SHOW QUEUE/FULL SYS_PRINT Generic printer queue SYS_PRINT/GENERIC=(SYS_QUE1,SYS_QUE2) - _$ /OWNER=[1,8]/PROTECTION=(S:M,O:D,G:R,W:R)/RETAIN=ERROR
- The following example gives the owner manage and delete access to this queue and makes user AGBELL the owner. With manage access, the owner AGBELL can manage the queue, but cannot modify security information.
$ SET SECURITY/CLASS=QUEUE/OWNER=[AGBELL]/PROTECTION=O:MD - _$ TELEPHONE_QUE $ SHOW SECURITY/CLASS=QUEUE TELEPHONE_QUEUE TELEPHONE_QUEUE object of class QUEUE Owner: [INVENTORS,AGBELL] Protection: (System: M, Owner: MD, Group: R, World: S) Access Control List: <empty>
14.6.1.3. Understanding ACL-Based Queue Protection
In addition to UIC-based protection, you can associate access control lists (ACLs) with a queue. ACL-based protection provides a more refined level of protection when certain members of a project group require access to a queue, excluding others of the same UIC group or of other groups.
Refer to the VSI OpenVMS Guide to System Security for detailed information about establishing ACLs for protected objects.
14.6.1.4. Setting and Showing ACL-Based Queue Protection
|
Command |
Description |
|---|---|
|
SET SECURITY/ACL=(IDENTIFIER=( identifier, - _ACCESS= access-type)[,...])CLASS=QUEUE |
Sets ACL protection on a queue. |
|
SHOW QUEUE/FULL |
Shows any ACLs set on a queue. |
|
SHOW SECURITY/CLASS=QUEUE |
Shows any ACLs set on a queue. |
For more information about ACL-based security, refer to the VSI OpenVMS Guide to System Security.
Examples
- The SET QUEUE/PROTECTION command in the following example modifies the default protection of queue SYS_QUE1 to prevent access by nonprivileged users. The SET SECURITY/ACL command then restricts access to only those members of a project group who hold the ULTRA_LITE or MINUTES identifiers. Members with the MINUTES identifier have only read and submit access to the queue. The SHOW QUEUE/FULL command displays information, including security information, about the queue.
$ SET QUEUE/PROTECTION=(S,O,G,W) $ SET SECURITY/CLASS=QUEUE SYS_QUE1 - _$/ACL=((IDENTIFIER=ULTRA_LITE, ACCESS=READ+SUBMIT+MANAGE+DELETE), - _$(IDENTIFIER=MINUTES, ACCESS=READ+SUBMIT)) $ SHOW QUEUE/FULL SYS_QUE1 Batch queue SYS_QUE1, stopped /BASE_PRIORITY=4 /JOB_LIMIT=1 /OWNER=[1,4] /PROTECTION=(S,O,G,W) (IDENTIFIER=ULTRA_LITE,ACCESS=READ+SUBMIT+MANAGE+DELETE) (IDENTIFIER=MINUTES,ACCESS=READ+SUBMIT) - The following example shows how to use ACLs to restrict queue access to members of a particular project group:
$ SET QUEUE/PROTECTION=(S,O,G,W) $ SET SECURITY/CLASS=QUEUE SYS_QUE1 - _$/ACL=((IDENTIFIER=ULTRA_LITE, ACCESS=READ+SUBMIT+MANAGE+DELETE), - _$(IDENTIFIER=MINUTES, ACCESS=READ))
- The following example shows a queue that has only UIC-based protection, and then gives user AGBELL control access with an ACL. Control access allows user AGBELL to modify security information.
$ SHOW SECURITY/CLASS=QUEUE TELEPHONE_QUEUE TELEPHONE_QUEUE object of class QUEUE Owner: [INVENTORS,AGBELL] Protection: (System: M, Owner: MD, Group: R, World: S) Access Control List: <empty> $ SET SECURITY/CLASS=QUEUE/ACL=(ID=[AGBELL],ACCESS=CONTROL) TELEPHONE_QUEUE $ SHOW SECURITY/CLASS=QUEUE TELEPHONE_QUEUE TELEPHONE_QUEUE object of class QUEUE Owner: [INVENTORS,AGBELL] Protection: (System: M, Owner: MD, Group: R, World: S) Access Control List: (IDENTIFIER=[INVENTORS,AGBELL],ACCESS=CONTROL)
14.6.1.5. Understanding How Privileges Affect Queues
|
Privilege |
Access |
|---|---|
|
OPER |
Manage and control access to all queues. |
|
BYPASS |
Manage and control access to all queues. |
|
READALL |
Read access to all jobs and to queue security information. |
|
SYSPRV |
The access specified for users with system UICs. |
|
GRPPRV |
The access specified for users with system or group UICs. |
14.6.2. Using Job Retention Options
Job retention options allow users to retain a job in a queue after the job completes. System managers can use job retention options to keep information about all jobs in the queue after the jobs complete; this is helpful when tracking jobs submitted by other users.
14.6.2.1. Setting Job Retention
Users can set job retention, as can system managers. The following sections explain how each can perform this task.
User Commands
PRINT/RETAIN
SUBMIT/RETAINSystem Manager Commands
INITIALIZE/QUEUE/RETAIN=optionSTART/QUEUE/RETAIN=optionSET QUEUE/RETAIN=option
|
Option |
Description |
|---|---|
|
ALL |
Holds all jobs in the queue after execution (default). |
|
ERROR |
Holds jobs in the queue only if they complete unsuccessfully. |
$ SET QUEUE/RETAIN=ERROR BATCH_QUE
For example, if you need to know all batch jobs that do not complete successfully on a specific queue, set the queue to retain jobs that complete with an error status. You can enter SHOW QUEUE to display a list of jobs (including their completion status) that completed unsuccessfully. If a job completes unsuccessfully, this message helps determine why. The displays also include the date and time at which a retained job completed.
The job retention option you specify on a queue overrides any job retention option requested by a user for a job in that queue. Figure 14.10, ''Determining Job Retention'' shows how job retention affects a job submitted to a generic queue.
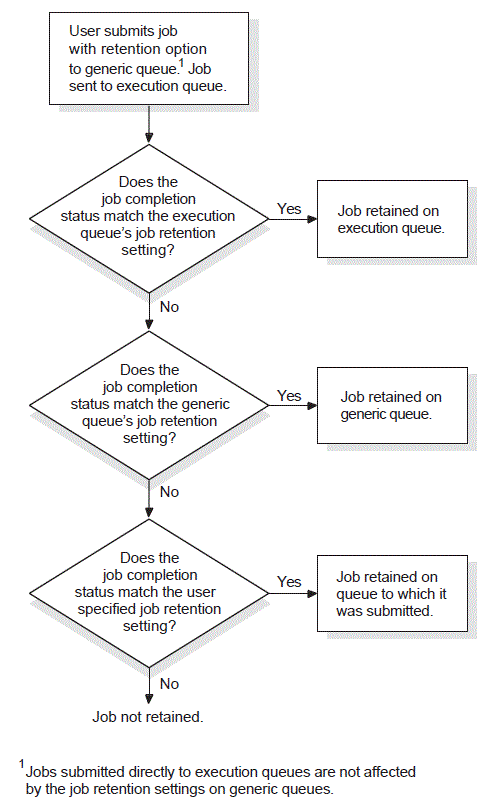
The retention setting on the execution queue in which the job executes
The retention setting on the generic queue (if the job is submitted to a generic queue)
The completion status of the job
The retention requested by the user upon submitting the job (if retention was requested)
If jobs are retained in queues, periodically delete the jobs that no longer need to be retained.
14.6.2.2. Specifying Timed Job Retention
$ SUBMIT/RETAIN=UNTIL=19-MAY-2000:07:31:0.0 MYFILE.DAT
This eliminates the need to delete retained jobs from queues. Encourage users who include the /RETAIN qualifier to also use timed retention.
14.6.2.3. Changing Job Retention
option qualifier with the SET ENTRY command in the following
format:SET ENTRY/RETAIN=option entry-number
|
Option |
Description |
|---|---|
|
ALWAYS |
Holds the job in the queue regardless of the job's completion status. |
|
DEFAULT |
Holds the job in the queue as specified by the queue's retention option. If no option has been set on the queue, the job is not retained. |
|
ERROR |
Holds the job in the queue only if the job completes unsuccessfully. |
|
UNTIL= |
Holds the job in the queue for a specified length of time, regardless of the job's completion status. This lets you retain the job in the queue only as long as the job is needed and eliminates the need to delete the job from the queue later. The time value you specify is interpreted first as a delta time, then as a combination time, and finally as an absolute time. For information about specifying time values, refer to the VSI OpenVMS User's Manual. |
$ SET ENTRY/RETAIN=UNTIL="+3:00" 172
To remove a job retention option from a queue, use the /NORETAIN qualifier with INITIALIZE/QUEUE, START/QUEUE, or SET QUEUE.
14.6.3. Specifying Queue Characteristics
A characteristic is any attribute of a print or batch job that is relevant to your environment. For example, characteristics for a printer could refer to the color of the ink, the type of paper, or the location of the printer. Once you define the characteristics for a queue, users can specify the characteristics they want to associate with their job when they enter the PRINT or SUBMIT command.
A print job can be processed on an execution queue if the job's characteristics are a subset of the queue's characteristics. However, if any of the characteristics associated with the job are not associated with the queue, the job remains pending until you correct the characteristic mismatch as explained in Section 14.8.2.2, ''Fixing Jobs That Are Pending Because of Characteristics Mismatch''.
How to Perform This Task
Create characteristics with DEFINE/CHARACTERISTIC.
Assign characteristics to a queue.
Example
You manage three LN03 printers in each of the four corners of a building. A generic queue LN03$PRINT feeds execution queues for each printer. You can define the characteristics EAST, WEST, NORTH, and SOUTH.
When a user submits a print job to LN03$PRINT with the EAST characteristic, the job prints on the first idle LN03 printer in the eastern corner of the building. If the system has queues for printers on multiple floors, you can further define a characteristic for each floor, for example, FIRST, SECOND, and THIRD.
Commands for Specifying Queue Characteristic Options
|
Command |
Description |
|---|---|
|
DEFINE/CHARACTERISTIC |
Creates a characteristic and assigns a name and number. |
|
DELETE/CHARACTERISTIC |
Deletes a characteristic. |
|
SHOW QUEUE/CHARACTERISTICS |
Displays information about characteristics defined for the system. |
|
INITIALIZE/QUEUE/CHARACTERISTICS SET QUEUE/CHARACTERISTICS START/QUEUE/CHARACTERISTICS |
Specifies one or more characteristics for processing jobs on a queue. |
|
SHOW QUEUE/FULL |
Displays information about a queue, including any characteristics assigned to the queue. |
|
PRINT/CHARACTERISTICS SUBMIT/CHARACTERISTICS SET ENTRY/CHARACTERISTICS |
Specifies the name or number of one or more characteristics to be associated with the job. |
The following sections describe how to specify queue characteristics.
14.6.3.1. Defining Characteristics
DEFINE/CHARACTERISTIC characteristic-name characteristic-number
You cannot define more than one characteristic name to a number.
If your queue configuration requires more than one characteristic name for a single number, you can define logical names to achieve the same result.
Note
If you want to define a characteristic name that is also an existing logical name, read the description of logical names in the VSI OpenVMS User's Manual.
Example
$ DEFINE/CHARACTERISTIC SECOND_FLOOR 2 $ DEFINE/SYSTEM/EXECUTIVE_MODE SALES_FLOOR SECOND_FLOOR $ DEFINE/SYSTEM/EXECUTIVE_MODE SALES_DEPT SECOND_FLOOR
14.6.3.2. Displaying Characteristics Defined on a System
To see the characteristics defined on a system, enter SHOW QUEUE/CHARACTERISTICS.
Example
$ SHOW QUEUE/CHARACTERISTICS Characteristic name Number ------------------- ------ EAST 1 WEST 2 NORTH 3 SOUTH 4
14.6.3.3. Assigning Characteristics to a Queue
No characteristics are assigned to a queue by default. To assign characteristics to a queue, include the /CHARACTERISTICS qualifier with INITIALIZE/QUEUE, START/QUEUE, or SET QUEUE.
Example
$ SET QUEUE/CHARACTERISTICS=(EAST) LN03_1
14.6.3.4. Displaying Characteristics Assigned to a Queue
To determine the characteristics defined for a queue, enter SHOW QUEUE/FULL.
Example
$ SHOW QUEUE/FULL LN03_1 <Printer queue LN03_1, idle, on HERA::TTA3, mounted form DEFAULT> /BASE_PRIORITY=4 /CHAR=(1) /DEFAULT=(FLAG=ONE,FORM=LN03$PORTRAIT (stock=DEFAULT)) /LIBRARY=LN03LIBRARY Lowercase /OWNER=[SYSTEM] /PROCESSOR=LATSYM /PROTECTION=(S:M,O:D,G:R,W:R) /SEPARATE=(RESET=(ANSI$RESET))
14.6.3.5. Canceling Characteristics Assigned to a Queue
To cancel characteristics assigned to a queue, specify the /NOCHARACTERISTICS qualifier with INITIALIZE/QUEUE, START/QUEUE, or SET QUEUE.
14.6.3.6. Deleting Characteristics
To delete a characteristic definition, enter DELETE/CHARACTERISTIC. You must specify the characteristic-name with DELETE/CHARACTERISTIC.
If you know the number assigned to the characteristic but do not know the name, enter SHOW QUEUE/CHARACTERISTICS to display the names and numbers assigned to characteristics on the system.
%DELETE-E-NOTDELETED, error deleting characteristic
-JBC-E-REFERENCED, existing references prevent deletionYou must remove all references to the characteristic before you can delete the characteristic. For information about removing references to a characteristic, see Section 14.8.5, ''Solving Problems Deleting a Queue, Form, or Characteristic''.
14.6.4. Specifying Batch Processing Options
You can use queue options to control batch job performance and the use of system resources by processes executing batch jobs.
|
Qualifier |
Description |
|---|---|
|
/JOB_LIMIT= |
Specifies the number of jobs that can execute concurrently in the queue. |
|
/[NO]DISABLE_SWAPPING |
Specifies whether the processes running jobs on the queue can be swapped in and out of memory. |
|
/CPUDEFAULT= |
Specifies the default CPU time limit for all jobs in the queue. The time cannot exceed the time limit set with the /CPUMAXIMUM qualifier. |
|
/CPUMAXIMUM= |
Specifies the maximum CPU time limit for all jobs in the queue. |
|
/RAD= n |
Specifies the RAD number on which to run batch jobs assigned to the queue. |
|
Option |
Description |
|---|---|
|
/BASE_PRIORITY= |
Specifies the base process priority at which jobs are initiated from a batch queue. |
|
/WSDEFAULT= |
Specifies the default working set size for jobs executed in a batch queue. (For output queues, specifies the default working set size for symbiont processes.) |
|
/WSEXTENT= |
Specifies the working set extent for jobs executed in a batch queue. (For output queues, specifies the working set extent for symbiont processes.) |
|
/WSQUOTA= |
Specifies the working set quota for jobs executed in a batch queue. (For output queues, specifies the working set quota for symbiont processes.) |
The INITIALIZE/QUEUE command in the VSI OpenVMS DCL Dictionary
The VSI OpenVMS Performance Management Manual
By default, a process running a batch job uses values taken from the UAF record of the user submitting the job or from system parameter settings. If you specify values for any of these options, processes for jobs executed in the queue will use the values you set unless the user specifies values when the job is submitted. (A user can specify values for CPU time and for the working set options default, quota, and extent.)
A user-specified value cannot exceed the value you set for the queue. If you did not specify a value, the user-specified value cannot exceed the value specified in the associated UAF limit or system parameter.
|
Option |
For More Information |
|---|---|
|
Base process priority | |
|
Job limit | |
|
Working set default, quota, and extent |
Section 14.6.4.3, ''Working Set Default, Quota, and Extent'' |
|
CPU default and maximum | |
|
Swapping | |
|
Options for memory-constrained systems |
Section 14.6.4.6, ''Options for Memory-Constrained Systems'' |
|
Optimizing for the Sort/Merge utility |
Section 14.6.4.7, ''Optimizing Batch Queues for the Sort/Merge Utility'' |
14.6.4.1. Base Process Priority
Choose a value based on how quickly you will allow batch jobs to progress. If you choose a value equal to the system parameter value DEFPRI (typically 4), jobs in this queue will progress at the same rate as typical interactive jobs. This choice might be appropriate for systems that have an abundance of available CPU time.
If you choose a value less than DEFPRI, jobs in this queue will potentially progress more slowly than the typical interactive job. CPU time will be allocated to jobs in this queue only after servicing jobs of DEFPRI priority.
If a queue is defined for a very special purpose – for example, high-priority jobs – a value greater than DEFPRI (for example, 5) might be appropriate. However, this choice can have a significant negative effect on the performance of other users and batch jobs.
14.6.4.2. Job Limit
Keep this value low when using a base process priority of DEFPRI or greater, because each batch job can affect the performance of interactive jobs.
14.6.4.3. Working Set Default, Quota, and Extent
|
Process Limit |
Description |
|---|---|
|
Working set default |
The value to which the working set returns at the exit of each image. The value should be relatively small and is usually best left at the value specified in the user's UAF record. |
|
Working set quota |
The value that approximates the amount of physical memory used by each batch job in the queue in a memory-constrained system. |
|
Working set extent |
The value that approximates the amount of physical memory in a memory-rich system. You should set this to a high value. The working set extent value is an upper limit for the size of the working set; the working set cannot be expanded beyond this value even if more memory is required by the job. If you set this value too low, a job might page fault heavily even if the system has plenty of memory available. To be safe, choose a working set extent value equal to the system parameter value of WSMAX, which specifies the maximum working set size possible for your system. |
Set a large working set size for batch jobs by specifying larger WSQUOTA and WSEXTENT values when you create the batch queue.
Restrict the working set size of interactive jobs by providing smaller WSQUOTA and WSEXTENT values in users' UAF records.
14.6.4.4. CPU Default and Maximum
You can restrict and expand the amount of time a job is allowed in the CPU by setting CPU limit values.
Do not set CPU time limit values too low. When a job's CPU time limit is exceeded, the job is terminated with an error status. If working set values (explained in Section 14.6.4.3, ''Working Set Default, Quota, and Extent'') are set too low, the system might use memory less efficiently but the jobs can still complete normally. However, if CPU time limit values are set too low, the system might terminate jobs that are making legitimate and authorized use of the CPU.
For example, you might use a CPU time limit on a batch queue devoted to execution of newly coded software that could unexpectedly enter a CPU loop. The CPU time limit would terminate infinitely looping jobs so they do not waste the CPU resource. However, you must be careful to choose a sufficiently high time limit so normally executing jobs do not terminate prematurely.
Another way to control allocation of the CPU resource is to create a special-purpose batch queue that shifts execution of its jobs to a less busy time of day when CPU time is more available.
14.6.4.5. Swapping
Typically, swapping is enabled on batch queues. However, for a special-purpose, high-priority queue, you might disable swapping. This provides a favorable status to jobs in this queue by removing them from consideration when memory must be reclaimed from processes (through the operating system's swapping and trimming mechanism).
For more information, refer to the VSI OpenVMS Performance Management Manual.
14.6.4.6. Options for Memory-Constrained Systems
On memory-constrained systems, total the pages required for the batch working sets on all batch queues. Also make sure that enough fluid memory remains for interactive jobs.
Fluid memory can be reassigned from one process to another through swapping and paging. (You can calculate fluid memory as the space that remains when you subtract the number of pages permanently allocated to the operating system from the total memory. To obtain these values, enter SHOW MEMORY.)
14.6.4.7. Optimizing Batch Queues for the Sort/Merge Utility
You can improve the efficiency of the OpenVMS Sort/Merge utility (SORT/MERGE) by designating one batch queue for sorting jobs and giving this queue a very large working set quota.
Working set extent per process (WSEXTENT system parameter)
For maximum sorting efficiency, use the /WSEXTENT qualifier with INITIALIZE/QUEUE, START/QUEUE, or SET QUEUE to set this value on the queue to the largest value any sorting job would ever need. Generally, the smaller the working set, the slower the sort.
If you want to sort large files in batch mode, you need to set the WSEXTENT system parameter to a large value to accommodate the sort.
Virtual page count per process (VIRTUALPAGECNT system parameter)
For maximum sorting efficiency, set this system parameter to at least 1000 pages (on VAX systems) or pagelets (on Alpha systems) more than the maximum working set extent. Although SORT limits the size of the sort data structure to the process's working set extent, if work files are required, SORT can use the extra memory for I/O buffers. If this parameter is too low relative to the working set extent, SORT might be unable to create buffers for the work files when the files cannot be sorted in memory.
14.6.4.8. Assigning a Batch Queue to a Resource Affinity Domain (RAD)
System managers can assign batch queues to specific resource affinity domains (RADs) in a NUMA environment. (See the VSI OpenVMS Alpha Partitioning and Galaxy Guide> for more information about RADs.)
The RAD value is a positive integer between 0 and SYI$_RAD_MAX_RADS. The SHOW/QUEUE/FULL command displays the RAD in its output.
- The following INITIALIZE/QUEUE command creates or reinitializes the batch queue BATCHQ1 to run on node QUEBID. All jobs assigned to this queue will run on RAD 0.
$ INITIALIZE/QUEUE/ON=QUEBID::/BATCH/RAD=0 BATCHQ1 $ SHOW QUEUE/FULL BATCHQ1 Batch queue BATCHQ1, stopped, QUEBID:: /BASE_PRIORITY=4 /JOB_LIMIT=1 /OWNER=[SYSTEM] /PROTECTION=(S:M,O:D,G:R,W:S) /RAD=0
- The following START/QUEUE command modifies BATCHQ1 to run all assigned jobs on RAD 1 of QUEBID, and readies the queue to accept jobs for processing:
$ START/QUEUE/RAD=1 BATCHQ1 $ SHOW QUEUE/FULL BATCHQ1 Batch queue BATCHQ1, idle, on QUEBID:: /BASE_PRIORITY=4 /JOB_LIMIT=3 /OWNER=[SYSTEM] /PROTECTION=(S:M,O:D,G:R,W:S) /RAD=1
- The following SET/QUEUE command modifies the batch queue to run all assigned jobs on RAD 0 of QUEBID. Any new jobs assigned to the queue will run on RAD 0. Jobs already executing on the queue will continue to completion executing on the previous RAD value.
$ SET/QUEUE/RAD=0 BATCHQ1 $ SHOW QUEUE/FULL BATCHQ1 Batch queue BATCHQ1, idle, on QUEBID:: /BASE_PRIORITY=4 /JOB_LIMIT=3 /OWNER=[SYSTEM] /PROTECTION=(S:M,O:D,G:R,W:S) /RAD=0
- To erase the RAD value for a batch queue, use the SET/QUEUE/NORAD command:
$ SET/QUEUE/NORAD BATCHQ1 $ SHOW QUEUE/FULL BATCHQ1 Batch queue BATCHQ1, idle, on QUEBID:: /BASE_PRIORITY=4 /JOB_LIMIT=3 /OWNER=[SYSTEM] /PROTECTION=(S:M,O:D,G:R,W:S)
When you change the RAD value on a batch queue, the jobs currently in the batch queue are not dynamically updated with the new RAD value specified on the queue. Any executing jobs complete processing using the original RAD value. Jobs in the pending, holding, or timed execution states retain the old RAD value on the job; however, when such a job becomes executable, the job is updated with the new RAD value and runs on the RAD specified on the queue.
14.6.5. Specifying Job Scheduling Options
Job scheduling priority
The queue manager checks the job's scheduling priority. The job with the highest scheduling priority value is processed first. The job scheduling priority is different than the base process priority or current process priority. The user can specify job scheduling priority with the /PRIORITY qualifier of the PRINT or SUBMIT command.
Size (optional, and applies only to output jobs)
By default, the job size of an output job is checked. Among jobs of identical scheduling priority, the smallest job is processed first.
The job size is not checked if the queue has been created, started, or modified to use the /SCHEDULE=NOSIZE option.
Submission time
If the jobs' scheduling priorities are identical, the job that was submitted first is processed first.
How to Perform This Task
Decide if you want the order of print jobs to be based on size.
Decide if you want to set a block limit on jobs to be printed.
Commands for Job Scheduling Options
|
Command |
Description |
|---|---|
|
INITIALIZE/QUEUE/SCHEDULE=[NO]SIZE START/QUEUE/SCHEDULE=[NO]SIZE SET QUEUE/SCHEDULE=[NO]SIZE |
Specifies whether pending jobs in an output execution queue are scheduled for printing based on the size of the job. (Shorter jobs print before longer ones.) |
|
INITIALIZE/QUEUE/[NO]BLOCK_LIMIT=([lowlim,]uplim) START/QUEUE/[NO]BLOCK_LIMIT=([lowlim,]uplim) SET QUEUE/[NO]BLOCK_LIMIT=([lowlim,]uplim) |
Limits the size of print jobs that can be processed on an output execution queue. |
|
PRINT/PRIORITY=n SUBMIT/PRIORITY=n SET ENTRY/PRIORITY=n |
Specifies the job scheduling priority of the print job. The value of n can be from 0 through 255, where 0 is the lowest priority and 255 is the highest. |
14.6.5.1. Setting Job Scheduling Priorities and Limits
The sections explain how to set job printing priorities and sizes.
How to Prioritize Jobs by Size
To prioritize jobs based on their sizes, use the /SCHEDULE=SIZE qualifier with INITIALIZE/QUEUE, START/QUEUE, or SET QUEUE. (The /SCHEDULE=NOSIZE qualifier prints jobs in the order they were submitted, regardless of size.)
$ INITIALIZE/QUEUE/SCHEDULE=SIZE LPA0_PRINT
If you enter this command while pending jobs are in any queue, its effect on future jobs is unpredictable.
How to Limit the Size of Jobs
To limit the size of print jobs, use the /BLOCK_LIMIT qualifier with INITIALIZE/QUEUE, START/QUEUE, or SET QUEUE. By default, printer and terminal queues are created with no block limit, so jobs of any size will be printed. You can specify only an upper limit or both upper and lower limits.
$ INITIALIZE/QUEUE/BLOCK_LIMIT=50 LPB0_PRINT
You might also want to limit the size of jobs during certain hours of the day. You can submit a batch job that runs a command procedure to set a maximum block limit of 500 blocks for a queue at 8:00 a.m. The command procedure might resubmit itself and remove the block limit after 5:00 p.m. each day. This lets users print jobs of any size after normal work hours, when the printing work load is lighter. Users can specify the /AFTER qualifier with the PRINT command to specify that a job is to be printed after a specific time.
14.6.5.2. Changing the Scheduling Priority of a Job
If a batch or print job cannot be processed, it is placed in a pending state and is not processed until the cause of the pending state is resolved. For more information, see Section 14.8.2, ''Making Pending Jobs Eligible for Scheduling''.
SET ENTRY/PRIORITY=n entry-number
$ SET ENTRY/PRIORITY=50 1131
Do not confuse the job scheduling priority with the base process priority on a queue. The job scheduling priority value must be in a range of 0 through 255, where 0 is the lowest priority and 255 is the highest. The default value for /PRIORITY, which refers to the job scheduling priority, is the value of the system parameter DEFQUEPRI (usually set at 100).
14.6.6. Using Banner Pages
Banner pages are specially formatted pages that you can set up for queues, to help identify and separate output jobs when they exit a printer. Banner pages also help identify and separate files within jobs.
Job pages are banner pages that identify and separate jobs.
File pages are banner pages that identify and separate files within a job.
|
Type |
Description |
For More Information |
|---|---|---|
|
Job Pages | ||
|
Flag page |
A single page printed before each job. | |
|
Burst page |
Two flag pages, divided by a separation (burst) bar, printed before each job. | |
|
Trailer page |
A page printed after each job. | |
|
File Pages | ||
|
Flag page |
A single page printed before each file in a job. | |
|
Burst page |
Two flag pages, divided by a separation (burst) bar, printed before each file in a job. | |
|
Trailer page |
A page printed after each file in a job. | |
Note
If you do not need to burst pages of a printer's output – for example, if your printer uses cut sheet paper – avoid the burst page option. Flag pages, or flag and trailer pages, are usually sufficient for identifying the end of a job.
|
Item |
Description |
|---|---|
|
Header bar |
A segmented bar composed of: For a job flag page: A single-segment bar composed of:
For a file flag page: A three-segment bar composed of:
For a job trailer page: A three-segment bar composed of:
For a file trailer page: A five-segment bar composed of the following elements:
|
|
Note |
A user-specified string of up to 255 characters using the PRINT/NOTE command. |
|
Identification banner |
Includes the user name of the process submitting the job, the job name, and the job number. |
|
Qualifier phrase (file trailer page only) |
Indicates the print, queue, and form qualifiers active when the job was submitted; nonactive qualifiers (except /NORECORD_BLOCKING and /NOFEED) are not included. |
|
File sentence (file flag and file trailer pages only) |
Indicates the following information:
|
|
Receipt box (job trailer page only) |
Contains the following signoff fields: Received:, Date:, and Operator:. |
|
Job sentence |
Indicates the following information:
|
|
Footer bar |
A segmented bar composed of: For a job flag page: Identical to the job flag header bar except the definition of the system logical name (PSM$ANNOUNCE) is not used as the embedded string. The default text is always used as the embedded string. For a file flag page: Identical to the file flag header bar except that the embedded text string is "VMS Software Inc." followed by the operating system version number. For a job trailer page: Identical to the job flag header bar except the definition of the system logical name (PSM$ANNOUNCE) is not used as the embedded string. For a file trailer page: Identical to the file flag header bar except that the embedded text string is "VMS Software Inc." followed by the operating system version number. |
|
Ruler (file trailer and job trailer pages only) |
A sequence of numbers counting to the end of the form. |
Figure 14.11, ''Job Flag and Burst Pages'' shows job flag and burst pages. Figure 14.12, ''File Flag and Burst Pages'' shows file flag and burst pages. Figure 14.13, ''File and Job Trailer Pages'' shows file trailer and job trailer pages.
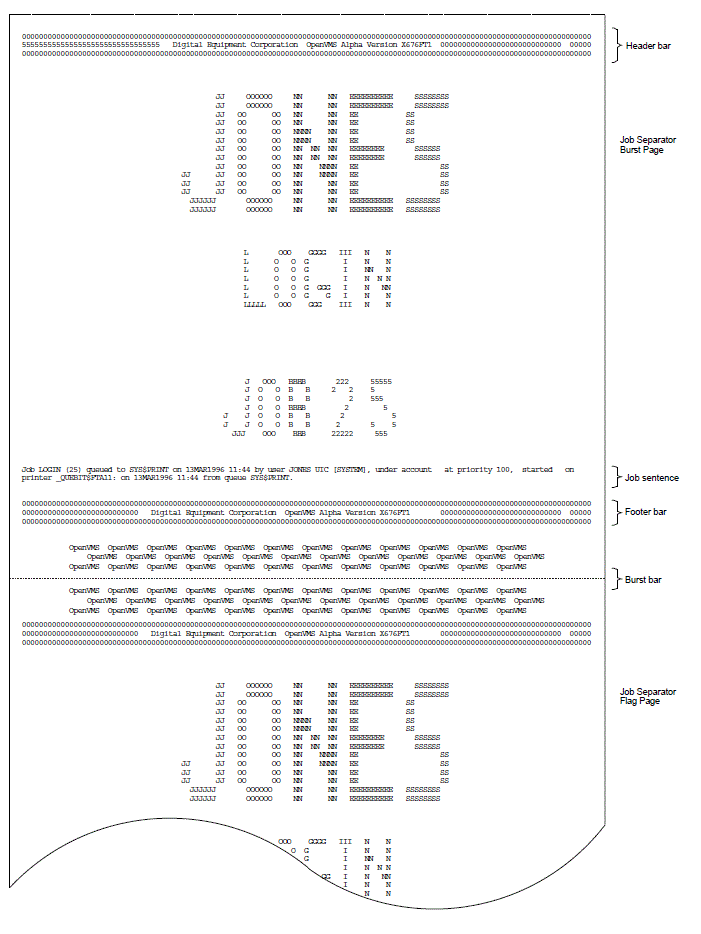 |
 |

Note
All banner pages format information to the width and length of the default form size of 80 characters by 51 lines. Therefore, information might be truncated, depending on the form sizes you specify. See Section 14.6.7.8, ''Controlling Line and Page Overflow'' for information about controlling line and page overflow.
Commands for Specifying Banner Pages
|
Command |
Description |
|---|---|
|
INITIALIZE/QUEUE/SEPARATE= |
Specifies one or more of the following job banner page options:
Users cannot override the job banner pages you specify for a queue. |
|
INITIALIZE/QUEUE/DEFAULT= |
Specifies one or more of the following file banner page options:
Users can override the file banner page settings you specify for a queue by specifying the /BURST, /FLAG, and /TRAILER qualifiers with the PRINT command. |
|
PRINT/BURST[= |
Specifies the ALL or ONE keyword to override, for the job, the file burst pages specified for the queue. |
|
PRINT/FLAG[= |
Specifies the ALL or ONE keyword to override, for the job, the file flag pages specified for the queue. |
|
PRINT/TRAILER[= |
Specifies the ALL or ONE keyword to override, for the job, the file trailer pages specified for the queue. |
14.6.7. Using and Creating Forms
Print forms determine certain page formatting attributes (such as margins, page length, and wrapping lines). Also, the paper stock specified in the form definition is used in determining whether a job is eligible to print.
A systemwide default form
If your printing needs are limited, use the systemwide default form (named DEFAULT) for all queues. Note that you can make changes to the systemwide default form.
Forms that you create and assign to specific queues
To format output or indicate special paper, you can create customized forms. Users can then request a form for a print job by specifying the form when they submit a job.
Mounting Forms
The stock of a form affects whether a job is eligible to print. The stock must match the queue's mounted form. The mounted form is the form of the current job or, if no job is processing, the form of the last job printed in a queue.
If the stock of a job's form matches the stock of the queue's mounted form, the job is processed using the options in the job's form. The mounted form changes automatically to the form of the job being processed in the queue. If the stock does not match the stock of the mounted form, the job remains pending until you perform special steps. (See Section 14.6.7.6, ''Mounting a Form on a Queue''.)
Commands for Specifying Forms
|
Command |
Description |
|---|---|
|
DEFINE/FORM |
Creates a form and assigns a name and number. |
|
SHOW QUEUE/FORM/FULL |
Displays information about forms available on a system. |
|
DELETE/FORM |
Deletes a form. |
|
INITIALIZE/QUEUE/DEFAULT=FORM START/QUEUE/DEFAULT=FORM SET QUEUE/DEFAULT=FORM |
Specifies the name or number of the default form for an output execution queue. |
|
PRINT/FORM SET ENTRY/FORM |
Specifies the name or number of the form to be associated with a print job. |
|
INITIALIZE/QUEUE/FORM_MOUNTED START/QUEUE/FORM_MOUNTED SET QUEUE/FORM_MOUNTED |
Specifies the name or number of the mounted form for an output execution queue. |
|
SHOW QUEUE/FULL |
Displays information about a queue, including the default form for the queue and the form mounted on the queue. |
Systemwide Default or Customized Forms
To use the systemwide default form with no changes, do nothing. The system will automatically use the systemwide default form, DEFAULT, for all queues.
If you want to change the default form, however, do so before creating any queues that reference the form. For more information about how to make changes, see Section 14.6.7.3, ''Changing the Systemwide Default Form''.
To create customized forms, perform the steps explained in Section 14.6.7.4, ''Creating a Customized Form''.
|
Task |
Type of Form |
Reference |
|---|---|---|
|
Display forms defined on a system |
All | |
|
Display the form assigned to a queue |
All |
Section 14.6.7.2, ''Displaying the Form Assigned to a Queue'' |
|
Change the systemwide default form |
Default | |
|
Create a form |
Customized | |
|
Assign a default form for a queue |
Customized | |
|
Mount a form on a queue |
Customized | |
|
Delete a form |
Customized | |
|
Control line and page overflow |
All | |
|
Suppress initial form feed |
All |
14.6.7.1. Displaying Forms Defined on a System
To display forms defined on a system, enter SHOW QUEUE/FORM/FULL. If you know the name of the form, you can specify the form name as a parameter.
Example
$ SHOW QUEUE/FORM/FULL MEMO
Form name Number Description
--------- ------ -----------
MEMO (stock=DEFAULT) 110 LN03 indented memo format
/LENGTH=66 /MARGIN=(TOP=2,BOTTOM=2,LEFT=5) /STOCK=DEFAULT /TRUNCATE
/WIDTH=8014.6.7.2. Displaying the Form Assigned to a Queue
To display the default form for a queue, enter SHOW QUEUE/FULL.
Example
$ SHOW QUEUE/FULL JEAN_PRINT Printer queue JEAN_PRINT, idle, on BAY::TTA3:, mounted form 8_5x11 <Queue for printer in Jean's office> /BASE_PRIORITY=4 /DEFAULT=(FEED,FORM=REPORT (stock=8_5X11)) /OWNER=[SYSTEM] /PROTECTION=(S:M,O:D,G:R,W:R)
14.6.7.3. Changing the Systemwide Default Form
- /MARGIN=(BOTTOM=6)
- /STOCK=DEFAULT
- /TRUNCATE
- /WIDTH=132
- /LENGTH=66
Table 14.3, ''DEFINE/FORM Qualifiers'' explains these options in detail.
DEFINE/FORM DEFAULT 0 /qualifier[s]
Example
$ DEFINE/FORM DEFAULT 0/MARGIN=(BOTTOM=4)/LENGTH=55
Note
Once a queue or job references a form, you cannot change the stock for that form. Change the stock of the default form before you create any queues.
14.6.7.4. Creating a Customized Form
- Enter the DEFINE/FORM command in the following format:
DEFINE/FORM form-name form-number [/qualifiers]
Assign a default form for each output execution queue. Use the /DEFAULT=FORM= type qualifier with INITIALIZE/QUEUE, START/QUEUE, or SET QUEUE, as explained in Section 14.6.7.5, ''Assigning a Default Form for a Queue''.
If you do not assign a default form to a queue, the queue uses the systemwide default form.
- Inform users of the available forms and the queues with which they should be used. You can, if you like, create symbols to automatically include the form with the PRINT command; for example:
$ PRINT_REPORT :== PRINT/FORM=REPORT
|
Qualifier |
Purpose |
|---|---|
|
/WIDTH= |
Specifies the width of the paper in characters. |
|
/LENGTH= |
Specifies the length of a form page in lines. |
|
/[NO]TRUNCATE |
Discards characters exceeding the line length specified by /WIDTH and /MARGIN. |
|
/[NO]WRAP |
Wraps to the next line the characters exceeding the line length specified by /WIDTH and /MARGIN. |
|
/MARGIN=( |
Specifies the number of blank spaces for one or more of the four margin options: BOTTOM, LEFT, RIGHT, and TOP. |
|
/[NO]PAGE_SETUP=( |
Specifies one or more device control modules that set up a device at the start of each page. |
|
/SETUP=( |
Specifies one or more device control modules that set up the device at the start of each file. |
|
/[NO]SHEET_FEED |
Specifies that print jobs pause at the end of every physical page so that a new sheet of paper can be inserted. |
|
/STOCK= |
Specifies the type of paper stock to be associated with the form. |
|
/DESCRIPTION= |
Specifies a string used to provide information about the form. |
If you create forms only to provide different formatting options (and not to specify paper stock), specify the same stock type for each form. That way, jobs requesting any of these forms will print on the same queue without requiring you to enter any additional commands to modify the queue.
Note
If you want to define a form name that is also an existing logical name, read the description of logical names in the VSI OpenVMS User's Manual.
Example
$ DEFINE/FORM MEMO 3/STOCK=DEFAULT - _$ /MARGIN=(TOP=2,BOTTOM=2,LEFT=6)/WIDTH=80/LENGTH=66/TRUNCATE - _$ /DESCRIPTION="LN03 indented memo format"
14.6.7.5. Assigning a Default Form for a Queue
If a user does not specify the /FORM qualifier when submitting a job with the PRINT command, the job uses the default form for the execution queue on which the job is printed.
Note
The queue's default form is associated with a print job at the time the job is processed unless the user specifies a specific form when the job is submitted. Therefore, if a user submits a job to a generic queue without specifying the /FORM qualifier, no form is associated with the job until it is transferred to an execution queue.
If you do not establish a default form for a queue, the queue uses the systemwide default form, DEFAULT.
Example
$ SET QUEUE/DEFAULT=FORM=LN03_PROTRAIT LN03_PRINT
14.6.7.6. Mounting a Form on a Queue
INITIALIZE/QUEUE/FORM_MOUNTED=type
where type is the form name or number defined by the DEFINE/FORM command.
If you see a print job pending because of a stock mismatch, change the stock of the printer to the requested stock and mount the form associated with the requested stock on the queue, or perform one of the other steps explained in Section 14.8.2.1, ''Fixing Print Jobs That Are Pending Due to Stock Mismatch''.
14.6.7.7. Deleting a Form
$ DELETE/FORM MEMO
You must specify the form name with DELETE/FORM (not the form number). If you know the number assigned to the form but do not know the name, enter SHOW QUEUE/FORM to display the names and numbers assigned to forms on the system.
%DELETE-E-NOTDELETED, error deleting form-name
-JBC-E-REFERENCED, existing references prevent deletionYou must remove all references to the form before you can delete the form. For information about removing references to a form, see Section 14.8.5, ''Solving Problems Deleting a Queue, Form, or Characteristic''.
14.6.7.8. Controlling Line and Page Overflow
Under certain conditions, lines and pages formatted by the print symbiont might exceed the length of lines and pages for a printer. You can use queue options to control line and page overflow.
Line Overflow
Note
The print symbiont uses the form to determine the width of a line. Once the print symbiont has finished formatting the data, if the width of the line exceeds the /WIDTH setting for the device, the device driver will use the /TRUNCATE or /WRAP settings (if set) to truncate or wrap the line.
Different forms can have different right, left, top, and bottom margin settings. By using forms to control page and line overflow, users can switch from one form to another without requiring operators to stop the queue, alter the device setup, and restart the queue. The queue manager automatically mounts any forms with the same stock as the currently mounted form. Operator assistance is needed only to mount a form that has a stock that differs from the stock of the currently mounted form. For more information, see Section 14.8.2.1, ''Fixing Print Jobs That Are Pending Due to Stock Mismatch''.
To control line overflow, create forms using DEFINE/FORM with the /[NO]TRUNCATE and /[NO]WRAP qualifiers described in Table 14.3, ''DEFINE/FORM Qualifiers''.
Page Overflow
To control page overflow errors, use the /DEFAULT=[NO]FEED qualifier with INITIALIZE/QUEUE, START/QUEUE, or SET QUEUE. This qualifier controls whether a form-feed character is automatically inserted when the symbiont detects overflow into the bottom margin area. Users can use the PRINT/[NO]FEED command to override the default feed option specified for a queue.
Users can specify the /PASSALL qualifier with the PRINT command to bypass all formatting, including carriage control, that the print symbiont performs. The default is /NOPASSALL. Use this qualifier when the print symbiont formatting might interfere with the desired formatting of the file. The /PASSALL qualifier causes the print symbiont to send I/O to the device driver with all formatting suppressed.
14.6.7.9. Suppressing Initial Form Feed
When you start a print queue, a form feed is sent to the output device to ensure that the paper is at the top of the page before printing begins. The initial form feed causes a blank form to be printed when a queue starts.
To suppress the initial form feed, use the /NO_INITIAL_FF qualifier with INITIALIZE/QUEUE, SET QUEUE, or START/QUEUE.
14.6.8. Using Device Control Libraries
With programmable printers, to insert device-dependent escape sequences that set up a printer for selected print options such as point size, character set, and bold or italic print
With programmable and nonprogrammable printers, to insert text at specific points in the processing of a print job
|
Module Type |
Placement |
|---|---|
|
Setup |
Inserted at the beginning of a file. |
|
Page setup |
Inserted at the beginning of each page. |
|
Reset |
Inserted at the end of each job. Use reset modules to reset a printer to a known state at the end of a job. |
How to Perform This Task
Create a library and insert modules.
Assign the device control library to a queue. (This step is not necessary if you use the default library name SYSDEVCTL.TLB.)
Create one or more forms with setup or page setup modules.
Assign reset modules to a queue.
Commands for Processing Print Jobs
|
Command |
Description |
|---|---|
|
DEFINE/FORM/SETUP |
Specifies one or more modules that set up the device at the start of each file of a job. |
|
DEFINE/FORM/[NO]PAGE_SETUP |
Specifies one or more modules that set up the device at the start of each page of a job. |
|
INITIALIZE/QUEUE/LIBRARY START/QUEUE/LIBRARY |
Specifies the file name of the device control library. |
|
INITIALIZE/QUEUE/SEPARATE=[NO]RESET START/QUEUE/SEPARATE=[NO]RESET SET QUEUE/SEPARATE=[NO]RESET |
Specifies one or more device control library modules that contain the job reset sequence for the queue. |
|
PRINT/FORM |
Specifies the name or number of the form to be associated with the print job. |
14.6.8.1. Understanding the Order of Device Control Module Output
Reset modules assigned to the queue. (Reset modules are only used at this point for the first job printed after a queue is started.)
Setup modules specified in the form definition.
Page setup modules specified in the form definition.
Setup modules specified with the PRINT command.
Page 1 of file 1.
Page setup modules specified in the form definition.
Page 2 of file 1, and so forth.
Page setup modules specified in the form definition.
Last page of file 1.
Setup modules specified in the form definition.
Page setup modules specified in the form definition.
Setup modules specified with the PRINT command.
Page 1 of file 2.
Page setup modules specified in the form definition.
Page 2 of file 2, and so forth.
Page setup modules specified in the form definition.
Last page of file 2.
Reset modules assigned to the queue.
The following sections describe how to manage device control libraries.
14.6.8.2. Creating a Device Control Library and Inserting Modules
- Create a device control library by entering a command in the following format:
LIBRARY/CREATE/TEXT SYS$COMMON:[SYSLIB] filename.TLB
Determine the contents of the module—either the text to be inserted or the escape sequences needed for the printer setup you want. To determine the proper escape sequences for a printer option, refer to the operation guide for the specific printer.
Create a module file and enter the appropriate escape sequences, carriage control characters, or text. Create and edit a module file as you would any other text file. Make sure your text editor does not insert a carriage return or line feed at the end of your file. This will affect your printer output.
- Insert the module into the device control library by entering a command in the following format:
LIBRARY/INSERT/TEXT library-file module-file
Note
To add a module to or delete it from a library, you must stop all output queues assigned to that library.
Refer to the VSI OpenVMS Command Definition, Librarian, and Message Utilities Manual for more information about creating libraries and inserting modules.
14.6.8.3. Assigning a Library to a Queue
INITIALIZE/QUEUE/LIBRARY=filename queue-name
where filename is the name of the library file that contains the selected modules.
$ INITIALIZE/QUEUE/LIBRARY=LN03DEVCTL LN03_A_QUE
Note
If you specify a value for the /LIBRARY qualifier, do not include the directory, file type, or version number. The system assumes that the file is in SYS$LIBRARY and has the type .TLB. If you copy a library file from another node, be sure that the new library has a unique file name.
If you have a small configuration of printers and normally use only a few modules, you usually store all modules in a single library and assign that same library to each printer queue.
If you use a single library to store modules for different types of printers, make sure that each module has a unique name.
For sites with a large number of different printers, you usually create and assign a separate device control library for each type of printer. In this case, VSI recommends that you give modules that perform the same function an identical name in all libraries, even though the modules contain escape sequences unique to the specific type of printer.
Example
If three libraries contained modules that set up a printer for landscape orientation, these modules might be named LANDSCAPE in all three libraries. This allows you to use the same form on any queue for which a library contains a module of the specified name, even though the modules might contain different device-specific sequences.
LIBRARY/LIST/FULL SYS$LIBRARY:library-name.TLB
14.6.8.4. Creating Forms for Setup and Page Setup Modules
To specify a setup or page setup module for a queue, use the /SETUP=
module or /PAGE_SETUP= module qualifier with
DEFINE/FORM. The modules you specify with /SETUP are sent to the printer when the form is
mounted, before each file of a job is printed. Similarly, the modules you specify with
/PAGE_SETUP are sent to the printer before each page of a job.
- The /FORM qualifier in the following format:
PRINT/FORM=form /QUEUE=queue-name filespec
When the user enters PRINT/FORM, the form name is checked for validity.
- The /SETUP qualifier in the following format:
PRINT/SETUP=module filespec
When the user enters PRINT/SETUP, the module names are not checked until the job attempts to print. If there is an error in the module name, the job will not print and the user will not be notified unless the /NOTIFY qualifier was specified.
14.6.8.5. Assigning a Reset Module to a Queue
To assign a module to an output execution queue to reset the printer to a known state at
the end of each job, use the /SEPARATE=RESET= module qualifier with
INITIALIZE/QUEUE, START/QUEUE, or SET QUEUE.
Because the /SEPARATE qualifier specifies mandatory queue options, the RESET module you specify is sent to the queue at the end of every job. The user cannot override this option.
Examples
$ INITIALIZE/QUEUE/LIBRARY=MYDEVCTL/SEPARATE=RESET=MODULE2 PDQ_QUE
$ LIBRARY/CREATE/TEXT SYS$LIBRARY:MYDEVCTL.TLB
$ EDIT MODULE1.TXT
!enter printer escape sequences or text for module1
$ EDIT MODULE2.TXT
!enter printer escape sequences or text for module2
$ LIBRARY/INSERT SYS$LIBRARY:MYDEVCTL.TLB/TEXT MODULE1
$ LIBRARY/INSERT SYS$LIBRARY:MYDEVCTL.TLB/TEXT MODULE2
$ INITIALIZE/QUEUE/START/ON=TTA9:/LIBRARY=MYDEVCTL PDQ_QUE
$ SET QUEUE/SEPARATE=RESET=MODULE2 PDQ_QUE
$ SHOW QUEUE/FULL PDQ_QUE
Terminal queue PDQ_QUE, idle on TOAD::TTA9, mounted form DEFAULT
/BASE_PRIORITY=4/DEFAULT=(FEED,FORM=DEFAULT)/LIBRARY=MYDEVCTL
/OWNER=[1,4]/PROTECTION=(S:M,O:D,G:R,W:R)/SEPARATE=(RESET=(MODULE2))
$ DEFINE/FORM/SETUP=MODULE1/STOCK=DEFAULT FORM1 1
$ PRINT/FORM=FORM1 REPORT.TXT,MEMO.TXT/QUEUE=PDQ_QUE
Job REPORT (Queue PDQ_QUE, entry 619) started on PDQ_QUE14.7. Maintaining Queues
Once you set up your queues, you must monitor and modify them according to the needs of your site.
Also, setting up queues is not restricted to startup time. During normal operation, you can create and start queues as your needs dictate. If you decide to set up queues at a later time, refer to the instructions in Section 14.4, ''Creating and Starting Queues''.
Add commands to set device characteristics to the startup command procedure on the node on which the device is located.
For devices attached to a LAT port, add commands to the startup procedures on all nodes with queues for the device.
For additional nonautostart queues, add appropriate START/QUEUE commands to the startup command procedure on the node on which the queue will run. If you do not add appropriate START/QUEUE commands, the queues will not be started when the system reboots.
14.7.1. Using Queue Management Commands
|
Command |
Effect on | |
|---|---|---|
|
Autostart Queues |
Nonautostart Queues | |
|
ASSIGN/MERGE |
Moves jobs from one queue to another. |
Moves jobs from one queue to another. |
|
ASSIGN/QUEUE |
Redirects jobs in a logical queue to an execution queue. |
Redirects jobs in a logical queue to an execution queue |
|
DELETE/QUEUE |
Deletes a queue. |
Deletes a queue. |
|
DISABLE AUTOSTART /QUEUES |
After allowing jobs to complete, fails over all autostart queues to the next available node in each queue's node list. If a queue has no list specified, the queue is stopped. |
No effect. |
|
ENABLE AUTOSTART /QUEUES |
Starts all stopped, active autostart queues capable of running on the node. |
No effect. |
|
INITIALIZE/QUEUE |
Creates the queue. The /AUTOSTART_ON qualifier specifies one or more nodes or nodes and devices on which the queue can run. |
Creates the queue. The /ON qualifier specifies a single node or node and device on which the queue is to run. |
|
INITIALIZE/QUEUE /START |
Creates the queue and activates it for autostart. The /AUTOSTART_ON qualifier specifies one or more nodes or nodes and devices on which the queue can run. |
Creates and starts the queue. The /ON qualifier specifies a single node or node and device on which the queue is to run. |
|
SET QUEUE |
Modifies a queue. |
Modifies a queue. |
|
SHOW QUEUE |
Displays information about a queue. |
Displays information about a queue. |
|
START/QUEUE |
Activates the queue for autostart. |
Starts the queue. |
|
STOP/QUEUE |
Pauses a queue. |
Pauses a queue. |
|
STOP/QUEUES/ON_NODE |
Aborts current jobs and stops all queues on a node without stopping the queue manager. |
Aborts current jobs and stops all queues on a node without stopping the queue manager. |
|
STOP/QUEUE/NEXT |
Stops a queue after allowing the current jobs to complete, and deactivates the queue for autostart. |
Stops a queue after allowing the current jobs to complete. |
|
STOP/QUEUE/RESET |
Stops a queue abruptly and deactivates the queue for autostart. |
Stops a queue abruptly. |
|
Task |
For More Information |
|---|---|
|
Monitoring queue information | |
|
Modifying a queue | |
|
Pausing a queue | |
|
Closing a queue | |
|
Stopping a queue | |
|
Preventing autostart queues from starting |
Section 14.7.1.6, ''Preventing Autostart Queues from Starting'' |
|
Disabling autostart on a node | |
|
Stopping all queues on a node | |
|
Stopping queues before shutting down a system |
Section 14.7.1.9, ''Stopping Queues Before Shutting Down a System'' |
|
Assigning a logical queue | |
|
Moving all jobs from one queue to another |
Section 14.7.1.11, ''Moving All Jobs from One Queue to Another'' |
|
Deleting a queue |
14.7.1.1. Monitoring Queue Information
SHOW QUEUE [/qualifier,...] [queue-name]
If you do not specify a qualifier or a queue name, the system displays the status of all queues on the system and all jobs you own. The SHOW QUEUE qualifiers let you select the type of queue and the amount of information you want to display.
|
Qualifier |
Description |
|---|---|
|
/BY_JOB_STATUS[= |
Displays queues that contain jobs of the specified status. You can specify one or
more of the following keywords:
If no keyword is specified, by default the jobs of all status are displayed. For more information about job status, see Table 14.6, ''Job Statuses Returned by SHOW ENTRY''. |
|
/BATCH |
Displays batch execution queues. |
|
/DEVICE[= |
Displays output execution queues. You can select a specific type of execution queue
by entering one or more of the following keywords:
If no keywords are specified, all types of output queue are displayed. |
|
/GENERIC |
Displays the status of generic queues. |
|
Qualifier |
Description |
|---|---|
|
/ALL_JOBS |
Displays information about all jobs for the selected queues. |
|
/BRIEF |
Displays a brief listing of information about job entries in the queue. The brief listing is the default for the SHOW QUEUE command. |
|
/FILES |
Adds a list of files associated with each job to the display. |
|
/FULL |
Displays complete queue and job information (also displays any ACLs set for the queues). |
|
/SUMMARY |
Displays the total number of executing, pending, holding, retained, and timed release jobs. The jobs themselves are not displayed. |
You can also combine certain qualifiers to further delineate the queue information you want to display.
|
Queue Status |
Description |
|---|---|
|
Aligning |
Queue manager is processing a START/QUEUE/ALIGN command. |
|
Autostart inactive |
Queue was stopped and needs to be activated. For more information, see Section 14.8.4, ''Determining Why an Autostart Queue Does Not Start''. |
|
Available |
Queue is processing at least one job but is capable of processing additional concurrent jobs. |
|
Busy |
Queue cannot process additional jobs because of one or more jobs in progress. |
|
Closed |
Queue is closed and will not accept new jobs until it is set open. For more information, see Section 14.7.1.4, ''Closing a Queue''. |
|
Device unavailable |
Device to which the queue is assigned is not available. |
|
Idle |
Queue is not processing any jobs and is capable of doing so. |
|
Paused |
A STOP/QUEUE command has been executed. |
|
Pausing |
Queue manager is processing a STOP/QUEUE command. |
|
Remote |
Queue is assigned to a physical device that is not connected to the local system. |
|
Resuming |
Queue manager is processing a START/QUEUE command on a paused queue. |
|
Server |
Queue processing is directed to a server symbiont. |
|
Stalled |
Symbiont processing temporarily halted due to device-related problem. |
|
Starting |
Queue has been started, but the symbiont process is not yet active. |
|
Stopped |
Queue is stopped and will not process work until started. |
|
Stop pending |
Queue will be in the stopped state when current jobs have finished executing. |
|
Stopping |
Queue is being stopped. |
To display the forms or characteristics available on a system, use the SHOW QUEUE/FORM or SHOW QUEUE/CHARACTERISTICS command.
You can further customize the type of queue information you want to monitor by writing a command procedure that uses the F$GETQUI lexical function. F$GETQUI invokes the $GETQUI system service to return information stored in the queue database.
- Characteristics
- Forms
- Queues
- Jobs contained in queues
- Files of jobs contained in queues
For example, you could write a command procedure to display the total number of blocks of jobs in a pending state in all printer queues. You must have read access to the job or SYSPRV or OPER privilege to obtain job and file information.
For more information about the system service invoked by the F$GETQUI lexical function, refer to the description of the $GETQUI system service in the VSI OpenVMS System Services Reference Manual.
Examples
- The following example displays summary information for all printer and terminal queues:
$ SHOW QUEUE/SUMMARY/DEVICE=(PRINTER,TERMINAL) Printer queue HERA_LPA0, busy, on HERA::LPA0, mounted form DEFAULT <Printer queue on node HERA for a line printer> Job summary: 1 executing Printer queue HERA_LPB0, busy, on HERA::LPB0, mounted form DEFAULT <Printer queue on node HERA for a line printer> Job summary: 1 executing Generic printer queue CLUSTER_PRINT <Generic printer queue for LPA0: and LPB0:> Job summary: 1 holding Terminal queue LQ_PRINT, stopped, on HERA::TXA7:, <Letter quality printer in Bob's office> mounted form PORTRAIT_INDENTED (stock=DEFAULT) Job summary: 2 pending (445 blocks), 1 holding - The following example displays the full status and options of all executing jobs:
$ SHOW QUEUE/FULL/ALL/BY_JOB_STATUS=EXECUTING Batch queue HERA_BATCH, available, on HERA:: /AUTOSTART_ON=(HERA::) /BASE_PRIORITY=3 /JOB_LIMIT=25 /OWNER=[SYSTEM] /PROTECTION=(S:M,O:D,G:R,W:R) Entry Jobname Username Status ----- ------- -------- ------ 700 VUE SMITH Executing Submitted 25-FEB-2000 14:46 /KEEP /NOLOG /NOPRINT /PRIORITY=100 File: _$333$DISK1:[SMITH.COM]VUE.COM;19 (executing) Batch queue ZZ_BATCH, available, on ZZ:: /AUTOSTART_ON=(ZZ::) /BASE_PRIORITY=3 /JOB_LIMIT=25 /OWNER=[SYSTEM] /PROTECTION=(S:M,O:D,G:R,W:R) Entry Jobname Username Status ----- ------- -------- ------ 874 PIPE FITZGERALD Executing Submitted 26-FEB-2000 11:25 /KEEP /NOTIFY /NOPRINT /PRIORITY=100 /RESTART=CLUSTER_BATCH /RETAIN=UNTIL="0 01:00" File: _$333$DISK1:[FITZGERALD]PIPE.COM;2 (executing) Server queue NM$QUE01, available, on HERA::, mounted form DEFAULT /BASE_PRIORITY=4 /DEFAULT=(FEED,FORM=DEFAULT) /OWNER=[DOC,SMITH] /PROCESSOR=NM$DAEMON /PROTECTION=(S:M,O:D,G:R,W:R) /RETAIN=ERROR Entry Jobname Username Blocks Status ----- ------- -------- ------ ------ 236 NM ROSENBERG 12 Processing Submitted 23-FEB-2000 08:42 /FORM=DEFAULT /PRIORITY=100 File: _$5$DISK3:[FOLK$.NM]NM$J1991072308340647.WRK;1
14.7.1.2. Modifying a Queue
You can use the INITIALIZE/QUEUE, START/QUEUE, and SET QUEUE commands to change queue options; as you change queue options, information about the queue in the queue database is updated. You can use the INITIALIZE and START commands only on stopped queues.
$ SET QUEUE/JOB_LIMIT=4/DISABLE_SWAPPING SYS$BATCH
The command in this example changes the job limit for the queue and disables swapping for all jobs processed in SYS$BATCH. All other options of the queue remain the same. The changed options do not affect the execution of current jobs; however, all subsequent jobs are executed with the new options in effect.
How to Perform This Task
Stop the queue with STOP/QUEUE/NEXT.
Restart the queue with START/QUEUE or INITIALIZE/QUEUE/START, specifying the appropriate qualifiers for your options.
Any qualifiers that you do not specify remain as they were when the queue was previously initialized, started, or set.
Note that initializing an existing queue does not delete any current jobs in that queue. Any new queue settings established by the new INITIALIZE/QUEUE command affect all jobs waiting in the queue or subsequently entering the queue.
See Table 14.1, ''Qualifiers for Specifying Queue Options'' for a list of the options that you can use for batch and output queues.
14.7.1.3. Pausing a Queue
The STOP/QUEUE command, when used without qualifiers, temporarily suspends the execution of all current jobs in the queue and places the queue in a paused state. Pausing an output queue lets you enter print job positioning and alignment commands to the print symbiont. (See Section 14.7.2.7, ''Pausing an Output Queue to Control Print Job Position and Alignment'' for more information about using STOP/QUEUE to control print jobs.)
To resume the execution of a paused queue, enter START/QUEUE.
14.7.1.4. Closing a Queue
$ PRINT/QUE=$PRINTER_1 REPORT.TXT; %PRINT-F-CREJOB, error creating job -JBC-E-QUE_CLOSED, queue closed, jobs not accepted
Jobs currently in the queue are not affected.
When the queue is available again, use the /OPEN qualifier to open the queue for incoming jobs.
14.7.1.5. Stopping a Queue
|
Command |
Description |
|---|---|
|
STOP/QUEUE/NEXT |
Lets all currently executing jobs complete and then stops the queue. Once you enter this command, all new jobs are prevented from executing. |
|
STOP/QUEUE/RESET |
Abruptly stops the queue and returns control to the system. Any jobs that are currently executing are stopped immediately. If the queue is not set to retain jobs completed with an error status, use SET QUEUE/RETAIN=ERROR to do so before stopping the queue with STOP/QUEUE/RESET. This causes the queue to retain information about aborted jobs. For print jobs retained on error, use SET ENTRY/RELEASE/NOCHECKPOINT to restart the interrupted jobs from the beginning. Print jobs are restartable by default; batch jobs are not restartable unless submitted with the /RESTART qualifier. |
For autostart queues, these commands deactivate a queue for autostart as explained in Section 14.7.1.6, ''Preventing Autostart Queues from Starting''. To restart a stopped nonautostart queue or to reactivate a deactivated autostart queue, enter START/QUEUE.
14.7.1.6. Preventing Autostart Queues from Starting
The STOP/QUEUE/NEXT or STOP/QUEUE/RESET command stops an autostart queue and marks it inactive for autostart until you enter START/QUEUE. This feature prevents an autostart output queue from accidentally restarting when a printer is being serviced.
14.7.1.7. Disabling Autostart on a Node
Prevent autostart queues from failing over to the node.
Mark all autostart queues on the node as "stop pending" in preparation for a planned shutdown. This lets jobs currently executing on the queues complete.
Upon completion of any jobs currently executing on one of the node's autostart queues, force the queue to fail over to the next available node in the queue's failover list on which autostart is enabled. (An autostart queue can only fail over if you have set it up to run on more than one node.)
By default, DISABLE AUTOSTART/QUEUES affects the node from which it is entered. Specify the /ON_NODE qualifier to disable autostart on a different node.
Use DISABLE AUTOSTART/QUEUES prior to shutting down a node. For more information, see Section 14.7.1.9, ''Stopping Queues Before Shutting Down a System''.
14.7.1.8. Stopping All Queues on a Node
STOP/QUEUES/ON_NODE=node
When you enter STOP/QUEUES/ON_NODE, nonautostart queues and autostart queues without a failover list are stopped. Autostart queues created or started with a failover list fail over to the next available node in that list that has autostart enabled. In all cases, currently executing jobs are aborted.
However, you can allow jobs executing on autostart queues to complete by entering the DISABLE AUTOSTART/QUEUES command and waiting for jobs to complete before entering the STOP/QUEUES/ON_NODE command. For more information, see Section 14.7.1.9, ''Stopping Queues Before Shutting Down a System''.
14.7.1.9. Stopping Queues Before Shutting Down a System
DISABLE AUTOSTART/QUEUES
STOP/QUEUES/ON_NODE
Allowing Jobs to Complete Before Stopping Autostart Queues
STOP/QUEUES/ON_NODE aborts jobs and stops all queues on a node; DISABLE AUTOSTART allows jobs on autostart queues to finish processing before failing over or stopping autostart queues. If your configuration uses autostart queues, you might want to allow jobs on those queues to complete before stopping your queues.
In SHUTDOWN.COM, STOP/QUEUES/ON_NODE is executed shortly before the node is shut down. When using SHUTDOWN.COM, you can ensure that jobs on autostart queues have time to complete before the queues are stopped by specifying the time interval between DISABLE AUTOSTART/QUEUES and the shutdown.
|
Timing |
Method |
|---|---|
|
Before executing SHUTDOWN.COM |
Define the logical name SHUTDOWN$DISABLE_AUTOSTART to be the number of minutes in the following format: DEFINE/SYSTEM/EXECUTIVE_MODE SHUTDOWN$DISABLE_AUTOSTART number-of-minutes |
|
While executing SHUTDOWN.COM |
Specify the number of minutes as a shutdown option as
follows:
Shutdown options [NONE]:DISABLE_AUTOSTART=number-of-minutes |
Determine an appropriate number of minutes for your configuration, based on the number and type of jobs in the autostart queues.
If you shut down a node without using SHUTDOWN.COM, you might want to enter DISABLE AUTOSTART/QUEUES and wait a few minutes to allow jobs on autostart queues to finish processing before you enter STOP/QUEUES/ON_NODE.
14.7.1.10. Assigning a Logical Queue
- Stop the queue associated with the malfunctioning print device by entering a command in the following format:
STOP/QUEUE/NEXT queue-name[:]
This command inhibits new jobs from processing but lets the current job finish processing, unless the print device is not operating at all. If the device is inoperable, use STOP/QUEUE/RESET to halt the queue and immediately cancel all output from the device.
Take the device off line.
- Reroute existing jobs from the malfunctioning print device to another print device by entering a command in the following format:
ASSIGN/QUEUE queue-name[:] logical-queue-name[:]
Ensure that the options of the new print device are appropriate for processing the new jobs.
How to Deassign a Logical Queue
DEASSIGN/QUEUE logical-queue-name[:]
14.7.1.11. Moving All Jobs from One Queue to Another
ASSIGN/MERGE target-queue source-queue
where target-queue is the queue to which you are moving the jobs; source-queue is the queue to be deleted.
The ASSIGN/MERGE command moves all jobs currently in the source queue. If new jobs are entered into the source queue before it is deleted, those new jobs remain in the source queue, and are not transferred to the target queue. You might want to close the queue to prevent new jobs from being entered in the queue, as explained in Section 14.7.1.4, ''Closing a Queue'', before entering ASSIGN/MERGE.
For ongoing redirection of jobs, use the ASSIGN/QUEUE command as explained in Section 14.7.1.10, ''Assigning a Logical Queue''.
14.7.1.12. Deleting a Queue
Stop the queue by entering STOP/QUEUE/NEXT. (Use STOP/QUEUE/RESET to abort all executing jobs.)
Wait for executing jobs to complete.
Requeue the entries still pending in the queue. If you do not perform this step, jobs will be deleted along with the queue.
Remove all references to the queue from generic queues or jobs. See Section 14.8.5, ''Solving Problems Deleting a Queue, Form, or Characteristic'' for more information about removing references to queues.
Delete the queue by entering DELETE/QUEUE.
14.7.2. Managing Jobs in Queues
|
Task |
Reference |
|---|---|
|
Monitoring jobs | |
|
Modifying job processing options | |
|
Holding and releasing a job | |
|
Requeuing an executing job | |
|
Requeuing a pending job | |
|
Deleting a job | |
|
Pausing an output queue to control print job position and alignment |
Section 14.7.2.7, ''Pausing an Output Queue to Control Print Job Position and Alignment'' |
14.7.2.1. Monitoring Jobs
Use the SHOW ENTRY command to monitor the status of batch and print jobs. (For information about job status, see Table 14.6, ''Job Statuses Returned by SHOW ENTRY''.)
SHOW ENTRY [entry-number[,...]], [job-name[,...]]
If you do not specify an entry number or job name, the system displays all jobs owned by you or by the user specified with the /USER_NAME qualifier. If you specify a job name, the system displays all jobs owned by you or by the user specified with /USER_NAME that match the specified character string. You can also display a group of jobs by entering a list of entry numbers or job names, or both, on the command line.
Specify qualifiers with the SHOW ENTRY command to specify the type of job information you want to display. For more information, refer to the VSI OpenVMS DCL Dictionary.
|
Status |
Description |
|---|---|
|
Aborting |
Executing job is halting prior to normal completion and will not continue processing. |
|
Executing |
Job is executing from a batch queue. |
|
Holding |
Job is being held in the queue indefinitely. For more information, see Section 14.7.2.3, ''Holding and Releasing a Job''. |
|
Pending |
Job is waiting its turn to execute. For more information, see Section 14.8.2, ''Making Pending Jobs Eligible for Scheduling''. |
|
Printing |
Job is executing from a printer or terminal queue. |
|
Processing |
Job is executing from a server queue. |
|
Retained |
Job remains in the queue upon completion. For more information, see Section 14.6.2.3, ''Changing Job Retention''. |
|
Stalled or Suspended |
Job stopped during processing but should continue when the cause is resolved. |
|
Starting |
Job is beginning to be processed. |
|
Timed_release |
Job is being held in the queue for execution at a specified time. |
Examples
- The following command displays jobs owned by user GARDNER:
$ SHOW ENTRY/USER_NAME=GARDNER Entry Jobname Username Blocks Status ----- ------- -------- ------ ------ 4 TEST GARDNER Holding On available batch queue OPAL_BATCH 611 SET GARDNER 140 Pending On stopped printer queue LQPRINT - In the following example, the /FULL qualifier displays job status information, the time the job was submitted, the file specification, and the job processing options:
$ SHOW ENTRY/FULL 4,611 Entry Jobname Username Blocks Status ----- ------- -------- ------ ------ 4 TEST GARDNER Holding On available batch queue OPAL_BATCH Submitted 15-JAN-2000 16:12 /LOG=_$5$DUA1:[GARDNER]TEST.LOG; /PRIORITY=100 File: _$5$DUA1:[GARDNER]TEST.COM;8 611 SET GARDNER 140 Pending (queue stopped) On stopped printer queue LQPRINT Submitted 21-JAN-2000 16:23 /FORM=DEFAULT /PRIORITY=200 File: _$5$DUA1:[GARDNER]SET.TXT;5 File: _$5$DUA1:[GARDNER]WAIT.TXT;1
14.7.2.2. Modifying Job Processing Options
SET ENTRY/qualifier[,...] entry-number
|
Qualifier |
Description |
For More Information |
|---|---|---|
|
/[NO]AFTER= |
Controls whether a job is held until after a specified time. | |
|
/CHARACTERISTICS =( |
Specifies the name or number of one or more characteristics associated with a batch or print job. | |
|
/FORM= |
Specifies the name or number of the form to be associated with a print job. | |
|
/[NO]HOLD |
Controls whether a job is available for immediate processing or held until it is released for processing. | |
|
/PRIORITY= |
Specifies the scheduling priority of the job. |
Section 14.6.5.2, ''Changing the Scheduling Priority of a Job'' |
|
/RELEASE |
Releases a previously held job. | |
|
/REQUEUE= |
Requests that the job be moved from the original queue to the specified queue; you can also do this by using the STOP/QUEUE/REQUEUE/ENTRY command. | |
|
/RESTART |
Specifies whether a batch or print job is restarted after a system failure or a STOP/QUEUE/REQUEUE command. Print jobs are restartable by default. Batch jobs are restartable only if submitted or modified with the /RESTART qualifier. |
14.7.2.3. Holding and Releasing a Job
/AFTER=
timeholds a job until the specified time./HOLD holds a job indefinitely.
|
Command |
Purpose |
|---|---|
|
SET ENTRY/HOLD |
Holds a job in a queue indefinitely before processing. |
|
SET ENTRY/AFTER= |
Holds a job in a queue for processing after a specified time. To specify /AFTER for a job on hold, you must also specify /NOHOLD to cause the job to be held only until the specified time. |
|
SET ENTRY/NOHOLD |
Releases a job that is held in a queue for any of the following reasons:
|
|
SET ENTRY/NOAFTER |
Releases a job before the time specified with the SET ENTRY command. |
|
SET ENTRY/RELEASE |
Releases a job that is held in a queue for any of the following reasons:
|
Examples
- The following example holds a job until the specified time and subsequently releases the job after that time:
$ SET ENTRY 1121/AFTER=12-FEB-2000:17:30 $ SET ENTRY/NOAFTER
- The following example holds a job until the end of the current day (00:00:00.00 o'clock) and subsequently releases the job before that time:
$ SET ENTRY 1121/AFTER=TODAY $ SET ENTRY/NOAFTER
- The following example holds a job indefinitely and subsequently releases it:
$ SET ENTRY 1234/HOLD $ SET ENTRY 1234/RELEASE
14.7.2.4. Requeuing an Executing Job
Note
The STOP/QUEUE/REQUEUE command stops only the job currently executing in the queue. The queue is not stopped.
Examples
- A job is executing in output execution queue BETA_LPB0 when the printer on which the queue is running jams. If no other jobs are pending in the queue, you might want to stop and requeue the job to a queue running on another printer. Because the printer in this example is jammed, you might also want to stop the queue. To do so, enter commands similar to the following ones:
$ STOP/QUEUE/REQUEUE=BETA_LPA0 BETA_LPB0 $ STOP/QUEUE/RESET BETA_LPB0
The first command stops the executing print job on BETA_LPB0 and requeues it to BETA_LPA0. The second command stops queue BETA_LPB0.
- If you are requeuing a job on a batch queue, you must include the /ENTRY=
nqualifier. For example:$ STOP/QUEUE/ENTRY=1251/REQUEUE=FRED_BATCH WILMA_BATCH
STOP/QUEUE/REQUEUE[=queue-name]/HOLD[/ENTRY=entry-number] queue-name
The /HOLD qualifier places the aborted job in a hold state for later release with the SET ENTRY/RELEASE or SET ENTRY/NOHOLD command.
STOP/QUEUE/REQUEUE[=queue-name]/PRIORITY=n[/ENTRY=entry-number] queue-name
Specify the new priority as n.
14.7.2.5. Requeuing a Pending Job
$ SET ENTRY/REQUEUE=LN03$PRINT 196
This command moves job 196 to the queue LN03$PRINT.
14.7.2.6. Deleting a Job
- Determine the entry number of the job by entering a command using one of the following formats:
SHOW ENTRY/USER_NAME=username [entry-number]
SHOW QUEUE/ALL_JOBS [queue-name]
If you do not know the job name, user name, or queue name, enter the following command:$ SHOW QUEUE/BATCH/ALL_JOBS/BY_JOB_STATUS=EXECUTING
- Delete the job by entering a command in the following format:
DELETE/ENTRY=(entry-number)[,...]
Example
$ SHOW QUEUE/BATCH/ALL_JOBS/BY_JOB_STATUS=EXECUTING
Batch queue JADE_BATCH, available, on JADE::
Entry Jobname Username Status
----- ------- -------- ------
312 ARTWORK HUNTER Executing
Batch queue OPAL_BATCH, available, on OPAL::
Entry Jobname Username Status
----- ------- -------- ------
317 STOCKS CHANDLER Executing
Batch queue RUBY_BATCH, available, on RUBY::
Entry Jobname Username Status
----- ------- -------- ------
888 TEMPO ENGLISH Executing
$ DELETE/ENTRY=31714.7.2.7. Pausing an Output Queue to Control Print Job Position and Alignment
Specify the position at which a suspended job is to resume printing. For example, suppose a printer has a paper jam and the first several pages of a print job are destroyed. You can pause the queue and restart the job, resuming printing at the beginning of the file.
For more information, see Section 14.7.2.7.1, ''Specifying the Position of Print''.
Specify the number of pages and the type of data for aligning printer forms. For example, suppose a printer uses a paper stock that is a preprinted continuous-form paper. When you begin printing a job, you notice the paper is not correctly aligned, so output does not print in the correct space on the preprinted form. You can pause the queue and print sample data to help you correct the paper alignment.
For more information, see Section 14.7.2.7.2, ''Aligning Print Forms''.
Note
To perform these tasks, you must enter STOP/QUEUE after the job has begun printing.
14.7.2.7.1. Specifying the Position of Print
|
Qualifier |
Description |
|---|---|
|
/BACKWARD[= |
Restarts a print queue n pages before the current page; n defaults to 1. If you omit the value, printing resumes at the top of the current page. |
|
/FORWARD[= |
Advances the specified number of pages before resuming printing the current file in the current job; the default is 1. If you omit the page value, printing resumes at the top of the next page. |
|
/SEARCH= |
Specifies that printing is to resume at the page containing the specified string. The search for the string moves forward, beginning on the page following the current page. During the search, consecutive tabs and spaces are treated as a single space, and character case is ignored. The string can be from 1 to 63 characters and must be enclosed in quotation marks (" "). |
|
/TOP_OF_FILE |
Resumes printing at the beginning of the file that was current when the output execution queue paused. |
/TOP_OF_FILE
/FORWARD
/BACKWARD
/SEARCH
Examples
- In the following example, STOP/QUEUE suspends the job that is currently printing on the printer queue JADE_PRINT and places that queue in the paused state. The START/QUEUE command releases the queue from the paused state. The /TOP_OF_FILE qualifier causes the job that was suspended to resume printing at the beginning of the file rather than at where it was interrupted.
$ STOP/QUEUE JADE_PRINT $ START/QUEUE/TOP_OF_FILE JADE_PRINT
- In the following example, START/QUEUE resumes output on printer SYS_LPA0 after advancing 15 pages from the beginning of the file:
$ START/QUEUE/TOP_OF_FILE/FORWARD=15 SYS_LPA0
14.7.2.7.2. Aligning Print Forms
START/QUEUE/ALIGN[=(option[,...])]
|
Option |
Description |
|---|---|
|
MASK |
Specifies that input data is masked by replacing alphabetic characters with the character X and numbers with the number 9. Mask characters let you prevent the printing of sensitive information. If you omit the MASK option, data is printed unaltered. |
|
|
A decimal number in the range 1 to 20 that specifies the number of alignment pages to print. By default, one page of alignment data is printed. |
You can use the /ALIGN qualifier with any of the file positioning qualifiers described in the previous section. File positioning is performed before alignment data is printed. After the alignment is complete, the queue enters a paused state until you restart it by reentering START/QUEUE. Printing resumes from the point that alignment data started; that is, the task is backspaced over the pages printed for alignment.
Example
$ START/QUEUE/BACKWARD=2/ALIGN=(MASK,4) SYS_LPA0
14.8. Solving Queue Problems
|
Problem |
Section |
|---|---|
|
General printer problems |
Section 14.8.1, ''Determining the Cause of General Printer Problems'' |
|
Scheduling pending jobs |
Section 14.8.2, ''Making Pending Jobs Eligible for Scheduling'' |
|
Stock mismatch problems |
Section 14.8.2.1, ''Fixing Print Jobs That Are Pending Due to Stock Mismatch'' |
|
Characteristics mismatch problems |
Section 14.8.2.2, ''Fixing Jobs That Are Pending Because of Characteristics Mismatch'' |
|
Stalled output queues | |
|
Autostart queues that do not start |
Section 14.8.4, ''Determining Why an Autostart Queue Does Not Start'' |
|
Problems deleting queues, forms, and characteristics |
Section 14.8.5, ''Solving Problems Deleting a Queue, Form, or Characteristic'' |
|
Problems deleting files following printing | |
|
Problems adding or deleting a module from a device control library |
Section 14.8.7, ''Adding or Deleting a Device Control Library Module'' |
|
Queue is disabled |
14.8.1. Determining the Cause of General Printer Problems
- Enter a command in the following format to determine the status of the queue with which the printer is associated:
SHOW QUEUE/FULL queue-name
Table 14.5, ''Queue Statuses Displayed in the SHOW QUEUE Command'' lists and describes queue statuses.
Enter the SHOW LOGICAL/FULL SMBSRVSHR command to determine whether the logical name SMBSRVSHR is assigned, and, if it is assigned, its access mode (SUPERVISOR_MODE or EXECUTIVE_MODE). In most cases, this logical name should not be defined. However, if SMBSRVSHR is assigned, deassign it by entering the DEASSIGN SMBSRVSHR command with the /USER_MODE, /SUPERVISOR_MODE, or /EXECUTIVE_MODE qualifier.
- If a print request returns a fatal error or does not print, perform the following steps:
Stop the queue by entering STOP/QUEUE/RESET.
If the output device is spooled, despool it using the SET DEVICE/NOSPOOLED command.
- Copy the file you are attempting to print by entering the COPY command in the following format:
COPY input-filespec output-filespec
If the COPY command does not produce output, a PRINT request will not work.
If the problem is on a queue using the LATSYM symbiont, try using the default symbiont, PRTSMB, and see if the problem persists. You can use the PRTSMB symbiont for printers on LAT ports. However, only one queue at a time will be able to send jobs to the printer.
To determine whether a queue is using the LATSYM symbiont, enter SHOW QUEUE/FULL. If the queue is using the LATSYM symbiont, the display shows the following words: /PROCESSOR=LATSYM.
To change the queue's symbiont to PRTSMB, perform the following steps:If a PRINT request succeeds when the queue is using PRTSMB, the problem is with LATSYM or with the LAT driver LTDRIVER.Stop the queue by entering STOP/QUEUE/RESET.
Restart the queue by entering START/QUEUE/NOPROCESSOR.
Attach a terminal at the end of the cable that is being used for the printer. If the data shows up on the terminal, the Hold Screen key works, and no data is lost, the problem is probably with the printer (an incorrect setting, for example). If the problem exists with the terminal, it might be caused by the cable, the hardware interface port, or a hardware port setting.
14.8.2. Making Pending Jobs Eligible for Scheduling
If a job does not execute when expected, the job might have a pending or holding status. The SHOW QUEUE/FULL/ALL_JOBS command displays the status for all jobs on a queue.
If the job is in a holding status, see Section 14.7.2.3, ''Holding and Releasing a Job'' for information about holding and releasing a job.
If the job is in the pending state, the /FULL qualifier enables you to see the reason why the job is ineligible to execute. (Use a 132-character wide display to make sure that all the information is displayed.)
$ SHOW QUEUE/FULL/ALL_JOBS/BY_JOB_STATUS=PENDING
Generic printer queue REG$GENERIC
/GENERIC=(REG$Q1,REG$Q2,REG$Q3)/OWNER=[SYSTEM]/PROTECTION=(S:M,O:D,G:R,W:R)
Entry Jobname Username Blocks Status
----- ------- -------- ------ ------
684 PROBLEMS CHURCHILL 3118 Pending (check execution queues)
Submitted 7-MAR-2000 17:49 /FORM=DEFAULT /NOTIFY /PRIORITY=100
File: _$5$DUA174:[CHURCHILL]PROBLEMS.TXT;2
Printer queue REG$Q1, stopped, on LONDON::NPA1, mounted form DEFAULT
/BASE_PRIORITY=4/DEFAULT=(FEED,FORM=DEFAULT)/OWNER=[SYSTEM]
/PROTECTION=(S:M,O:D,G:R,W:R)
Entry Jobname Username Blocks Status
----- ------- -------- ------ ------
687 PM$SPEECH CHURCHILL 3558 Pending (queue stopped)
Submitted 7-MAR-2000 17:51 /FORM=DEFAULT /NOTIFY /PRIORITY=100
File: _$5$DUA174:[CHURCHILL]PM$SPEECH.TXT;1 (checkpointed)|
Problem |
Solution |
|---|---|
|
The queue is currently processing as many jobs as it can. |
Wait until intervening jobs complete. |
|
The queue is stopped or stalled. |
If a SHOW QUEUE/FULL command shows the queue status as stopped or stalled, determine why the queue is stopped or stalled. If the queue is stopped, start it with START/QUEUE. If the stopped queue is an autostart queue, use START/QUEUE to activate the queue and ENABLE AUTOSTART/QUEUES to start the queue. If the queue is stalled, follow the steps in Section 14.8.3, ''Fixing a Stalled Output Queue''. |
|
The stock of the print job's form does not match the stock of the queue's mounted form. |
Perform the steps in Section 14.8.2.1, ''Fixing Print Jobs That Are Pending Due to Stock Mismatch''. |
|
The job was submitted or modified with characteristics not associated with the queue. |
Perform the steps in Section 14.8.2.2, ''Fixing Jobs That Are Pending Because of Characteristics Mismatch''. |
|
The queue has a block limit set and the size of the print job does not fall within the specified range. |
Use SET ENTRY/REQUEUE to move the job to another queue, or use SET QUEUE/[NO]BLOCK_LIMIT to change or remove the block limit on the queue. |
|
The owner of the job does not have write access to the execution queue. |
Use SET ENTRY/REQUEUE to move the job to another queue, or change the access to the queue as explained in Section 14.6.1, ''Controlling Access to Queues''. |
|
The print job is in a logical queue that is assigned to a stopped execution queue. |
Use SET ENTRY/REQUEUE to requeue the job to another queue or start the execution queue to which the logical queue is assigned. |
|
An output job requires an output device that is enabled for lowercase printing. |
If the printer supports lowercase printing, use the /LOWERCASE qualifier with SET PRINTER or SET TERMINAL. Otherwise, use SET ENTRY/REQUEUE to move the job to an execution queue that sends its output to a printer with lowercase printing enabled. |
14.8.2.1. Fixing Print Jobs That Are Pending Due to Stock Mismatch
$ SHOW ENTRY 133/FULL
Entry Jobname Username Blocks Status
----- ------- -------- ------ ------
133 SET RANDOM 74 Pending (stock type mismatch)
On idle printer queue SUE$PRINT
Submitted 21-JAN-2000 16:14 /FORM=MANUAL (stock=HQ) /PRIORITY=100
File: _$5$DUA1:[RANDOM]SET.TXT;5Make the stocks match by mounting a different form on the queue (for example, using SET QUEUE/FORM_MOUNTED) or by specifying a different form with the job (for example, using SET ENTRY/FORM).
Move the job to a queue on which the stock of the mounted form matches the stock of the job's form (for example, using SET ENTRY/REQUEUE).
Delete the job (for example, using DELETE/ENTRY).
See Section 14.6.7, ''Using and Creating Forms'' for more information about forms.
14.8.2.2. Fixing Jobs That Are Pending Because of Characteristics Mismatch
$ SHOW ENTRY 882/FULL
Entry Jobname Username Blocks Status
----- ------- -------- ------ ------
882 SETHOST RANDOM 5 Pending (characteristics mismatch)
On idle printer queue $PRINTER_1
Submitted 28-MAR-2000 15:21 /CHAR=(5) /FORM=DEFAULT /PRIORITY=100
File: _$5$DUA1:[RANDOM]SETHOST.LOG;5Move the job to a queue on which the characteristics match those of the job (for example, using SET ENTRY/REQUEUE).
Delete the job (for example, using DELETE/ENTRY).
Make the characteristics match by assigning new characteristics to the queue (for example, using SET QUEUE/CHARACTERISTICS).
See Section 14.6.3, ''Specifying Queue Characteristics'' for more information about characteristics.
14.8.3. Fixing a Stalled Output Queue
If an output queue is in the stalled state, the device on which the queue is running is malfunctioning. Check the device and fix the problem. Once the problem is fixed, the queue will leave the stalled state.
If you cannot fix the problem immediately, stop the queue by entering STOP/QUEUE/RESET. While the queue is stopped, you might want to reroute the jobs in the queue to a functioning queue, as explained in Section 14.7.1.10, ''Assigning a Logical Queue''. When the problem is fixed, deassign the logical queue and start the queue by entering START/QUEUE.
14.8.4. Determining Why an Autostart Queue Does Not Start
If you attempt to start an autostart queue with ENABLE AUTOSTART/QUEUES and the queue does not start, the queue might not be active for autostart. ENABLE AUTOSTART/QUEUES starts only active autostart queues capable of running on a node. To activate an autostart queue, you must include the /START qualifier with INITIALIZE/QUEUE or enter START/QUEUE.
Example
$ ENABLE AUTOSTART/QUEUES/ON_NODE=KATY::
| ENABLE AUTOSTART/QUEUES attempts to start autostart queues on node KATY. |
| The SHOW QUEUE display shows that the autostart batch queue KATY_BATCH did not start. The display also reveals that the queue is inactive for autostart; the queue was either not activated initially or it was deactivated with STOP/QUEUE/NEXT or STOP/QUEUE/RESET. |
| START/QUEUE activates the queue for autostart. |
| SHOW QUEUE informs you that the queue is started. |
14.8.5. Solving Problems Deleting a Queue, Form, or Characteristic
When deleting a form or characteristic with DELETE/FORM or DELETE/CHARACTERISTICS, you must specify the name assigned to the form or characteristic. (The form or characteristic number cannot be used with the DELETE command.) To determine the name of a form or characteristic, enter SHOW QUEUE/FORM or SHOW QUEUE/CHARACTERISTICS.
A queue must be stopped before being deleted.
All references to a queue, form, or characteristic must be removed before you can delete the queue, form, or characteristic.
%DELETE-E-NOTDELETED, error deleting object-name
-JBC-E-REFERENCED, existing references prevent deletionFor example, the queue you are attempting to delete might be named as a target for a generic queue, or the form you are attempting to delete might be specified for a print job. All references to a queue, form, or characteristic must be removed before you can delete the queue, form, or characteristic.
How to Perform This Task
Enter SHOW QUEUE/FULL/ALL_JOBS/OUTPUT=
filespec, wherefilespecis a name of a file to which the display output of the command is to be sent.Use the SEARCH command to search the output file for the name of the form or queue, or the number of the characteristic to be deleted. The result of your search will include all references to the queue, form, or characteristic.
- If the SEARCH command reveals any queues with references to the queue, form, or characteristic you are trying to delete, perform the following steps:
Use STOP/QUEUE/NEXT to stop each queue with an offending reference.
Use START/QUEUE with the appropriate qualifiers to restart each queue without the reference.
- If the SEARCH command reveals any jobs with references to the queue, form, or characteristic you are trying to delete, perform the following steps to eliminate the job reference:
Wait for the job to complete. (You might want to raise the priority of the job as explained in Section 14.6.5.2, ''Changing the Scheduling Priority of a Job'', so the job will be scheduled for processing sooner.)
- Perform either of the following actions:
Delete the job as explained in Section 14.7.2.6, ''Deleting a Job''.
Modify the options for the job as explained in Section 14.7.2.2, ''Modifying Job Processing Options'', or ask the owner of the job to do so.
Example
$ DELETE/QUEUE JADE_BATCH$ DELETE/QUEUE JADE_BATCH

| The DELETE/QUEUE command attempts to delete the queue. |
| The message indicates that the queue is not stopped. |
| The STOP/QUEUE/NEXT command stops the queue after allowing the current job to complete. |
| The DELETE/QUEUE command again attempts to delete the queue. |
| This time, the message indicates that references to the queue exist. |
| The SHOW QUEUE/FULL command shows information about all queues. However, the only reference to JADE_BATCH names the queue as a target queue for the generic queue CLUSTER_BATCH. |
| The STOP/QUEUE/NEXT command stops the generic queue that targets JADE_BATCH. |
| The START/QUEUE command eliminates the reference to JADE_BATCH by restarting the generic queue without specifying JADE_BATCH as a target. |
| The DELETE/QUEUE command successfully deletes the queue. |
14.8.6. Solving Problems Deleting Files
To delete a file using the PRINT/DELETE or SUBMIT/DELETE command, the clusterwide queue manager process must have access to the file specified. Otherwise, the file is printed or submitted but not deleted.
You can ensure that the PRINT/DELETE or SUBMIT/DELETE command deletes the specified files by mounting the disks on which the files reside clusterwide. To mount a disk clusterwide, use the /CLUSTER qualifier with the MOUNT command.
However, if your operating environment does not allow you to mount a disk clusterwide, you can resolve this problem by running the queue manager process on a node that has access to the disk. You can specify the node on which the queue manager process runs by specifying the /ON= node qualifier with the START/QUEUE/MANAGER command. For more information about this qualifier, refer to the VSI OpenVMS DCL Dictionary.
14.8.7. Adding or Deleting a Device Control Library Module
$LIBRAR-F-OPENIN, error opening module-name
-RMS-E-FLK, file currently locked by another user- Enter a command in the following format:
SHOW QUEUE/FULL/OUTPUT=filespec
where
filespecis the name of a file to which the display output of the command is to be sent. Use the SEARCH command to search the output file for the name of the library.
Note
The SHOW QUEUE/FULL display shows the library assigned to a queue only if you explicitly assigned a library for the queue by including the /LIBRARY qualifier with INITIALIZE/QUEUE or START/QUEUE. If you do not explicitly assign a library to a queue, the default library, SYSDEVCTL, is used.
If the module you are trying to delete is in the default library, SYSDEVCTL, you must stop all queues for which SHOW QUEUE/FULL displays no library. To make sure the SYSDEVCTL library appears in the SHOW QUEUE/FULL display in the future, specify /LIBRARY=SYSDEVCTL when you restart the queue.
Use the COPY command to copy the library to be modified into your own directory.
Add the module to the copy, or delete the module from the copy.
Use the COPY command to copy the library back to the directory SYS$COMMON:[SYSLIB]. As long as you use the same name for the modified library, the library will be picked up by each queue when the queue is stopped and restarted.
If your site has a large number of different printers, you can help prevent this problem by using more libraries, so that each library is assigned to fewer queues. For example, you should create and assign a different library for each type of printer, as explained in Section 14.6.8.3, ''Assigning a Library to a Queue''.
14.8.8. Fixing a Disabled Queue
%QMAN-I-QUEDISCOR, queue’queue_name’ has been disabled due to database corruption
%JBC-E-QUEDISABLED, disabled queue cannot be modified, nor can a job be submitted to it
Contact your VSI support representative
Delete the queue and create a new queue to replace it.
14.8.9. Reporting Queue Problems to VSI
If you encounter a problem with your queues, and you want to report it to VSI, please provide as much information as possible. Section 13.12, ''Reporting a Queuing System Problem to VSI'' specifies the information that is most useful to VSI in diagnosing your queuing system problems.
This manual has been archived but is available on the OpenVMS Documentation CD-ROM.
VAX specific
VAX specific
Alpha and I64 specific
These functions are used in sites where operators are assigned to help users mount disk or tape volumes and printer forms.
The F17 (defer) and F18 (write) keys have no effect when you use the PRODUCT INSTALL command.
Can be either current or producer. For details, refer to the VSI OpenVMS System Management Utilities Reference Manual, Volume II: M–Z.
In most cases, VSI recommends that you use AUTOGEN to modify system parameters. In special cases, however, you can use a conversational boot to modify a parameter value temporarily. To change a parameter value permanently, you must edit MODPARAMS.DAT and run AUTOGEN. For instructions, see VSI OpenVMS System Manager's Manual, Volume 2: Tuning, Monitoring, and Complex Systems.
VAX specific
Alpha specific
I64 specific
In most cases, VSI recommends that you use AUTOGEN to modify system parameters. In special cases, however, you can use a conversational boot to modify a parameter value temporarily. To change a parameter value permanently, you must edit MODPARAMS.DAT and run AUTOGEN. For instructions, see the VSI OpenVMS System Manager's Manual, Volume 2: Tuning, Monitoring, and Complex Systems.
VAX specific
Alpha and I64 specific
Alpha specific
Default values are adequate in most cases.
Default values are usually adequate for accounts not running real-time processes.
By default, users are allowed to log in at any hour of any day. To override the setting of a particular day, use the DCL command SET DAY. Use this command if a holiday occurs on a day that would normally be treated as a primary day and you want it treated as a secondary day. See Section 7.8, ''Restricting the Use of Accounts'' for a discussion of using these fields to restrict login times and functions.
Not all FLAGS fit into this category.
LOGINOUT uses the larger value of the AUTHORIZE quota for this account or the corresponding PQL_M*quota system parameters, as described in Table 7.9, ''Descriptions of SYSTEM and DEFAULT Accounts''.
VAX specific
VAX specific
Alpha and I64 specific
All connectors in this table are available in both male and female genders.
This table contains only a subset of the DECconnect adapters available. The adapters listed in this table might not be suitable for your particular application requirements; additional DECconnect adapters are available from VSI.
The genders listed are those of the connector on the adapter.
Straight-through indicates that the EIA-232 Transmit Data signal is wired to the DEC-423Transmit Data signal, and so on.
Cross-over indicates the EIA-232 Transmit Data is connected to the DEC-423 Receive Data, and vice versa, and that DTR and DSR are similarly connected.
Straight-through indicates that the EIA-232 Transmit Data signal is wired to the DEC-423Transmit Data signal, and so on.
This usage of cluster does not refer to a set of nodes that form an OpenVMS Cluster environment; it refers only to disks.
A logical block resides at an absolute address on a disk; a virtual block, on the other hand, resides at an address relative to a file.
VAX specific
RSX–11M, RSX–11D, RSX–11M–PLUS, and IAS systems do not support subdirectories and alphabetical directory entries.
Prior to OpenVMS Version 7.2, RMS limited directory levels to 8 or 16, although PATHWORKS and other programs that did not use RMS could use unlimited directory depth.
x, x is the UIC of the process that performs the initialization.
Even with the TRADITIONAL parse style, DCL allows some ODS-5 file names; for example, DCL accepts x.x.x.
Some applications also use DCL internally to read file names that users type after an application prompt.
The VSI file and print server that evolved from the PATHWORKS for OpenVMS (Advanced Server) to support the Windows NT integration features introduced with OpenVMS Version 7.2 on Alpha.
When creating the first version of a new file, the case of the new file matches that case specified by the user. When creating subsequent versions of an existing file, the case remains the same as the original version.
If you are typing a long file specification on a DCL command line, DCL limits the command line length to 255 bytes on earlier versions of OpenVMS. Beginning in Version 8.2, the limitation of DCL line limits and tokens (individual file names) has been extended with SET PROCESS/TOKEN=EXTENDED.
Note that DFO has been modified to support ODS-5 volumes.
The ASCII "a" character set is defined in Clause 7. 4. 1 of the ISO 9660 Standard.
The CDRECORD software internals were developed outside VSI and are protected by the GNU General Public License Version 2. Copies of the sources and the GNU license are on the Open Source Tools CD, which ships with each version of OpenVMS and is also on the OpenVMS web site.
Rounded to nearest hundred
This manual has been archived.