VSI OpenVMS Version 8.4-2 Installation and Upgrade Manual
- Operating System and Version:
- VSI OpenVMS Version 8.4-2 for HPE Integrity Servers
Preface
1. About VSI and this document
This document explains how to install, or upgrade to, VSI OpenVMS Version 8.4-2 for HPE Integrity Servers. Please note that VSI OpenVMS Version 8.4-2 does not support HPE Alpha systems.
Also described are the prerequisites for installing or upgrading your software plus the required and optional tasks you can perform after completing the software installation or upgrade.
VMS Software, Inc., (VSI) is an independent software company licensed by Hewlett Packard Enterprises to develop and support the OpenVMS operating system. As such, VSI does not produce computer hardware. In an effort to remain focused on software installation, this manual attempts to describe procedures in a manner that is compatible with industry standard console interfaces, such as UEFI (Unified Extensible Firmware Interface). All current models of HPE Integrity servers use the UEFI console, so with only minor variations among models, users should have little trouble relating the information and examples to their systems.
Users of this manual are expected to obtain and reference as needed, any additional documentation specific to their hardware. Users are expected to know how to identify the various devices involved in their installation and be familiar with the console commands that are available on their system.
2. A Proud Heritage
Users familiar with our product have known it as simply "VMS" ever since it's inception in the mid 1970's by Digital Equipment Corporation (DEC). VMS stands for "Virtual Memory System", which is a revolutionary technological innovation of that period. The original "VAX" (Virtual Address eXtension) architecture was a predominant 32-bit architecture for nearly a decade until it was superceded by the high-performance Alpha 64-bit architecture in the late 1990's. In the first decade of this century, VMS was ported to the Intel Itanium (IA64) architecture where it runs today on the full lineup of HPE Integrity servers.
Over the years, VMS has seen its owner and its name change several times, yet it continues to enjoy a dedicated global customer base. VMS and VMS Clusters are well known for their high availability, unparalleled security (virus-free, "Cool and Unhackable" {quote from DEFCON}) and scalability. For these reasons and more, VMS has found its way into some of the world's most demanding corporate, government and military applications.
With the formation of VMS Software Inc., we are extending our proud heritage and bringing the virtues of this great operating system to a wider customer base, including a future port to the Intel x86 architecture. Considering the state of our world today, surely a mature, virus-free, totally secure, user-friendly, high-performance operating system has a place among businesses of all sizes.
3. What's in a Name?
VMS has brandished a few marketing prefixes and suffixes during its evolution. Version 8.4-1H1 (known as the BOLTON release) was the version where product development passed from Hewlett-Packard to VMS Software Inc. Both companies marketed this transitional version. The full product name from Hewlett-Packard was: HPE OpenVMS Version 8.4-1 for Integrity Servers. As you might imagine, this lenghy title does not make for a readable document when the product name is referenced hundreds of times!
To distinguish the VMS Software Inc. product, we shall refer to it throughout this document as VSI OpenVMS and its predecessor as HPE OpenVMS. If specific versions need to be referenced, a version number will appear. Lacking a specific version reference, readers should note that we are referring to the current release, VSI OpenVMS Version 8.4-2 (known as the MAYNARD release). Future product naming is a topic for the future...
At this time, VSI is not currently licensed to develop or support the HPE Alpha architecture, therefore we do not typically distinguish among architectures in this manual. However, in certain sections of this manual, we discuss compatibility among versions and therefore, we will identify HPE Alpha where necessary.
Note that both VSI and HPE will market future releases of VSI OpenVMS. This arrangement allows customers with existing HPE contracts to receive VMS updates per terms of their contracts. These HPE customers will receive VMS license keys that will be validated by VSI. Customers also have the option of purchasing VMS products and services directly from VSI. All ongoing VMS development for operating system and layered products will be performed by VSI's engineering team.
4. New and Changed Information in this Guide
The following information in this Installation Guide is new or revised for VSI OpenVMS Version 8.4-2, refer to the SPD for a list of new features in the operating system itself:
For this release, VSI supports two Operating Environment (OE) names:
The Base Operating Environment, containing the essential components required by all customers, including the OS, several layered products, networking options, languages, etc.
The High Availability Operating Environment, containing the Base Operating Environment plus additional components to support mission critical computing requirements, including OpenVMS Clustering, Volume Shadowing, Reliable Transaction Router, etc.
For more information, see the VSI OpenVMS Version 8.4-2 Software Product Description (SPD).
Hewlett Packard Development Company (HP) has rebranded its server division as Hewlett Packard Enterprises (HPE). As with all rebranding, it will take some time to sort out all the references, web sites, etc. Beware that some HP and HPE references may be out of sync.
Re-branding is ongoing and evident everywhere from documentation to licensing and the operating system itself. This is an iterative process that will take some time to sort out. Although VMS Software Inc. is an independent entity, our products remain closely tied to Hewlett Packard Enterprises, therefore you will see a lot of both brands, VSI and HPE. This is particularly evident in documentation and licensing.
The OpenVMS operating system loader (vms_loader.efi) and related firmware utilities have been upgraded. Assuming that you have kept your system firmware up to date, the platform firmware environment, previously known as EFI (Extensible Firmware Interface), licensed by Intel Corporation, has been superceded by UEFI (Unified Extensible Firmware Interface). UEFI is an Open-Source project initiated by Intel to handle ongoing development of this common platform firmware interface. HPE Integrity Servers running OpenVMS are required to run platform firmware UEFI Version 2.0 or greater. The terms UEFI and EFI may be used interchangeably in this document. Note also that while UEFI is "unified", it is also "extensible". This means that individual hardware platforms may implement platform-specific extensions to the command set they support. Hewlett Packard is one such vendor that has implemented HPE-specific extensions on most, if not all, of their systems. This guide makes great effort to remain platform-neutral, but inevitably, some platform-specific commands are necessary and these commands will not apply to all systems. Your hardware documentation is the ultimate reference.
The various examples provided in this document may show version information for layered products that do not necessarily reflect the latest versions of these products.
5. Software Licensing and Rebranding
The Software Product Description (SPD) mentioned in the previous section, contains a wealth of information related to products and licenses. Refer to the SPD for official licensing details.
Much work has gone into branding and licensing now that VSI owns ongoing development of OpenVMS. We have rebranded licenses for VSI OpenVMS to list "VSI" as the license Producer for the OS and the layered products VSI supports. If existing customers are updating to the VSI OpenVMS, their existing HPE branded licenses will continue to work after the upgrade. New installations of the OS and VSI supported layered products will receive VSI branded licenses. We are working closely with HPE to assure a smooth transition, regardless of where these products are purchased.
When you perform an upgrade from HPE OpenVMS to VSI OpenVMS, the PCSI installed product database, excluding any HPE patch entries, will be re-branded. This occurs one time only and is required to assure consistency for license management functions.
The example below, shows what you will see during upgrade re-branding.
The target disk contains a Hewlett-Packard Enterprise (HPE) branded OPENVMS platform.
The Platform, the Operating System, and all System Integrated Products
must be rebranded as VMS Software, Inc. (VSI), and all Layered Products
must have their dependencies updated from HPE to VSI.

-------------------- Rebranding started --------------------
Identifying System Integrated Products...
Identifying additional Layered Products and Patches...
Creating PDFs for VSI System Integrated Products...
Identifying Layered Products now available from VSI...
Extracting PDFs for Layered Products and Patches from PCSI Database...
Determining interdependence of Layered Products and Patches...
Converting PDFs for all Layered Products and Patches to VSI dependence...
Saving and then removing the existing PCSI database...
Creating the new PCSI database by registering the OPENVMS Platform...
Registering all remaining Layered Products and Patches...
Ensuring validity of the resulting PCSI database...

-------------------- Rebranding finished --------------------

Rebranding successfully completed. A BACKUP save set
of the original PCSI database has been created in:
$1$DGA2105:[000000]SAVED_PCSI_DATABASE.BCK

This will be deleted after the upgrade is complete.

Continuing the upgrade...

The following products have been installed:

VSI I64VMS CDSA V2.4-322A              Layered Product
VSI I64VMS DECNET_PLUS V8.4-A          Layered Product
VSI I64VMS DWMOTIF V1.7-A              Layered Product
VSI I64VMS DWMOTIF_SUPPORT V8.4-2      Layered Product
VSI I64VMS HPBINARYCHECKER V1.1-A      Layered Product
VSI I64VMS KERBEROS V3.2-256           Layered Product
VSI I64VMS OPENVMS V8.4-2              Platform (product suite)
VSI I64VMS SSL V1.4-496                Layered Product
VSI I64VMS TCPIP V5.7-13ECO4           Layered Product
VSI I64VMS VMS V8.4-2                  Operating System
VSI I64VMS WBEMCIM V2.99-B100614       Layered Product
VSI I64VMS WBEMPROVIDERS V2.2-3A       Layered Product

The following products have been removed:

HP I64VMS VMS84I_PCSI V4.0             Patch (maintenance update)
HP I64VMS VMS84I_UPDATE V10.0          Patch (maintenance update)
VSI I64VMS AVAIL_MAN_BASE V8.4         Layered Product
VSI I64VMS CDSA V2.4-322               Layered Product
VSI I64VMS DECNET_PLUS V8.4            Layered Product
VSI I64VMS DWMOTIF V1.7                Layered Product
VSI I64VMS DWMOTIF_SUPPORT V8.4        Layered Product
VSI I64VMS HPBINARYCHECKER V1.1        Layered Product
VSI I64VMS KERBEROS V3.1-152           Layered Product
VSI I64VMS OPENVMS V8.4                Platform (product suite)
VSI I64VMS SSL V1.4-334                Layered Product
VSI I64VMS TCPIP V5.7-13               Layered Product
VSI I64VMS TDC_RT V2.3-20              Layered Product
VSI I64VMS VMS V8.4                    Operating System
VSI I64VMS WBEMCIM V2.96-A100211       Layered Product
VSI I64VMS WBEMPROVIDERS V2.0-4        Layered Product
Note
You may notice that the VSI brand appears in the names of removed products. This is only a side-effect of the way the re-branding works. These were HPE branded products.
Part I. Before Installing or Upgrading
We anticipate that the typical user of this document will be following along with an actual installation as it progresses. Readers will require some preliminary information based on their computing environment then, as they proceed, quick-references to specific steps. After the basic installation, additional details are required to customize their installation.
With this scenario in mind, this document is structured in this same order, using four parts:
PART I - Before Installing or Upgrading.
Readers are encouraged to review information pertaining to their computing environment with regards to type of installation or upgrade and clustered or non-clustered configuration.
PART II - During Installation or Upgrade.
After review of the preliminary details, the reader should begin the activity and follow along with the sections pertaining to the Installation Menu.
PART III - After Installing or Upgrading.
Following the installation or upgrade, the reader should refer to these post-installation details pertaining to their specific computing environment.
PART IV - Booting.
This part describes the variety of boot methods, boot options, boot flags and boot related tools.
The various appendices contain additional information that may be relevant to specific computing environments.
Once you have been through the process a few times, this document becomes less important, but it should remain useful as a reference and checklist.
Throughout this manual, examples are taken from installations performed on HPE Integrity servers. The reader may be required to identify minor command differences based on their specific system model.
Note
There are several system management utilities offered by HPE to assist with provisioning, partitioning, and installation of operating systems on HPE hardware. It is beyond the scope of this manual to describe these vendor-specific programs. If you are interested in using these programs and procedures, you are encouraged to refer to specific documentation provided by HPE.
Chapter 1. Getting Started
1.1. System Shutdown
It may seem strange to begin with a section on shutting down the system but this important advice is applicable any time you shut down your system, before, during and after installation.
VMS systems, whether clustered or stand-alone nodes, should be shut down using the SYSMAN utility. Alternatively, system managers may invoke the VMS Shutdown command procedure directly. Be advised that system shutdown can be quite complex and modifications to these procedures should be carefully considered and thoroughly tested. For example, beware of the following scenario.
The VMS Shutdown command procedure is invoked via the command: $ @SYS$SYSTEM:SHUTDOWN. This procedure does not stop processes using the network until very late in the shutdown process. However, if you modify SYSHUTDWN.COM and invoke network shutdown (i.e. TCPIP$SHUTDOWN) from within this command procedure, and you are connected to the system from an SSH Terminal (or, if using DECnet, a SET/HOST session) the network shutdown may cause your terminal session or your system itself, to hang.
Simply avoid doing this, or run your procedure with /DETACH, or better yet, use the SYSMAN utility to shutdown your system, as this utility is designed to avoid these types of problems.
1.2. Obtaining the Distribution Image and Creating Installation Media
If you purchased OpenVMS from Hewlett-Packard, follow their recommended procedures for obtaining your distribution image. You may still benefit from reviewing the rest of this section.
If you purchased an official VSI OpenVMS distribution DVD, proceed with the next section: System Preparation.
If you purchased OpenVMS from VMS Software Inc. and would prefer to download the distribution image via internet, you will need to select a local disk to place the image on and then prepare it as a bootable installation disk.
Two examples are provided. The first example demonstrates one way to acquire the image and prepare an installation disk. The second example demonstrates using OpenVMS to burn a DVD. At sites that do not allow ftp access, you will need to use whatever methods are approved by your site for accessing the disk image, or request a physical DVD kit.
Note
If you have any problems downloading and burning a DVD, we ask that you try the second example, burning the DVD using OpenVMS, before seeking support. Always use a high-quality blank DVD.
As a VSI customer, you should have received information regarding setting up a customer account. Contact your VSI sales representative if you have not received this information.
Visit www.vmssoftware.com and log into your customer account using the provided username and password. Select the appropriate menu item for downloading images.
Review the End User License Agreement (EULA). You will be asked to enter identification details and to accept the terms of the EULA.
Click on the button to download VSI OpenVMS V8.4-2 to your local system. The actual downloaded file will be named similar to: OpenVMS V8.4-2 ISO.ZIP or a self-extracting zip file with a shorter name such as: I64V0842OE.ZIPEXE. This is quite a large file, so plan accordingly.
Using the same procedure, download copies of the Cover Letter, Software Product Description, and Installation Manual.
If you are using a self-extracting ZIPEXE file, continue. If you are using a regular ZIP file and do not have a copy of UNZIP for OpenVMS, download UNZIP.EXE for your local system.
If you intend to install layered products, download the Layered Products disk image zip file also.
Be sure to have any license keys (PAKS) required for your installation. You can install licenses later, but it is generally easier to do so during the installation or upgrade.
Once the downloads have completed, you can log out of your customer account.
- You now have two options:
Burn a DVD using the ISO image contained in the zip file (and another for layered products).
Use the ISO image as a Virtual Device to install from a local VMS disk.
- DVD Method:
Choose a system having a DVD reader/writer and related utilities.
Transfer the zip file/s (and if needed, the UNZIP utility) to that system. If you use FTP, be sure to specify BINARY or IMAGE mode before issuing your GET command.
Install the UNZIP utility if needed. We recommend putting it in SYS$UPDATE. This is not needed if you are starting with a self-extracting ZIPEXE file.
To unzip a ZIPEXE file on OpenVMS, just execute the file: $ RUN I64V0842OE.ZIPEXE to extract the IMG file, then skip ahead to step “e” to burn your DVD.
- Define a symbol: $ UNZIP :== $SYS$UPDATE:UNZIP.EXE
- To get help: $ UNZIP -h
- Typical command: $ UNZIP -V zipfilename -d ddcu:[directory]
Note
Various Browsers and file transfer utilities may rename files if a version of the file already exists on your system. Simply beware of this when reading through the examples below.
UNZIP the downloads to create local files using the typical command syntax shown above. Substitute your filename, device and directory as needed.
Using your burner utility, burn the IMG file onto a DVD.
Proceed with the installation or upgrade.
Caution
IMPORTANT: Now that you have created a bootable DVD, the remaining instructions that describe the initial os loader DVD boot path: fsn:\efi\boot\bootia64.efi should apply to your installation process.
Once the image has been installed, your normal os loader boot path will be: fsn:\efi\vms\vms_loader.efi
- Virtual Disk Method:
Transfer the zip file/s (and if needed, the UNZIP utility) to that system. If you use FTP, be sure to specify BINARY or IMAGE mode.
- Install the UNZIP utility if needed. We recommend putting it in SYS$UPDATE.
- Define a symbol: $ UNZIP :== $SYS$UPDATE:UNZIP.EXE
- To get help: $ UNZIP -h
- Typical command: $ UNZIP -V zipfilename -d ddcu:[directory]
Note
Various Browsers and file transfer utilities may rename files if a version of the file already exists on your system. Simply beware of this when reading through the examples below.
UNZIP the downloads into their local IMG files.
Start the LD (logical disk) utility if needed. The command: $ SHOW DEV LD will determine if the utility is running. To start the utility, enter: $ @SYS$STARTUP:LD$STARTUP
Use LD to create a virtual disk whose content is the IMG file.
$ LD CONNECT file.IMG where file is the name of your kit image file.
%LD-I-UNIT, Allocated device is LDA1
Mount the device:
$ MOUNT/OVER=ID LDA1
%MOUNT-I-MOUNTED, label mounted on _LDA1:
If installing the Operating System (not layered products), prepare a destination disk:
$ MOUNT/FOREIGN/OVER=ID ddcu
%MOUNT-I-MOUNTED, label mounted on destdevice
Move the installation kit to the destination device:
$ BACKUP/IMAGE LDA1: destdevice:/INITNote
When performing this backup, you may see informational messages regarding volume structure and files that are marked NOBACKUP. These messages can be safely ignored.
$ DISMOUNT destdevice
$ MOUNT/OVER=ID destdevice
Ensure that the boot device is available:
$ @SYS$MANAGER:BOOT_OPTIONS- Select "B" to assign boot devices
- Select "1" to add a new boot device
- or, if there is already an entry for this device, either delete and recreate it, or select "5" to review and validate the entry.
- Select "E" to exit
If you are using the Virtual Disk methods for installing layered products, you can access the product kits directly from the Virtual Disk via: $ DIR LDA1:[README]
When you are done with the Virtual Disk, dismount it and disconnect via:- $ DISMOUNT LDA1
- $ LD DISCONNECT LDA1
You may choose to delete the zip and img files.
Caution
IMPORTANT: Now that you have created a bootable hard drive, the remaining instructions that describe the initial os loader DVD boot path: fsn:\efi\boot\bootia64.efi no longer apply to your installation process.
Instead, your normal os loader boot path will be: fsn:\efi\vms\vms_loader.efi. Keep this in mind as you continue.
You may now continue with System Preparation.
This example assumes that you have downloaded a distribution kit as a ZIPEXE or IMG file and wish to burn an installation DVD using OpenVMS and an attached DVD Burner.
If you are starting with a self-extracting ZIPEXE file named: I64V0842OE.ZIPEXE, unzip it using the following command:
$ RUN I64V0842OE.ZIPEXE
You will be using the Logical Disk (LD) facility to prepare your DVD image. If you have not yet started this facility, from a suitably privileged account, execute the following command:
$ @SYS$STARTUP:LD$STARTUP.COM
$ LD CONNECT I64V0842OE.IMG
LD will respond with a disk name such as LDA1. We will refer to it as LDAn: in this example.
$ MOUNT/NOASSIST/OVER=ID LDAn
Insert a high-quality blank writable DVD into the burner. If you have trouble burning the DVD, we suggest trying a “write once” type of DVD rather than a re-writable type. For this example, we will assume the DVD burner is named: $40$DNA0:
$ COPY/RECORDABLE/FORMAT/LOG LDAn: $40$DNA0:
You will see a lot of output messages. Expect the process to take approximately 30 minutes.
$ DISMOUNT LDAn
$ LD DISCONNECT LDAn
Your DVD is ready!
You may now continue with System Preparation.
This example assumes that you have downloaded a distribution kit as a ZIPEXE or IMG file and wish to create a bootable flash drive.
$ LD CONNECT <image-file> LDA1:
$ MOUNT/FOR LDA1: ! ISO disk logical disk
$ MOUNT/FOR DNA1: ! USB drive
$ ! Copy all LBNs to flash drive; flash drive size must be >= image size.
$ ! Extra space on the flash drive is wasted.
$ BACKUP/PHYSICAL LDA1: DNA1:
$ DISMOUNT DNA1:
$ DISMOUNT LDA1:
1.3. System Preparation
It is convenient to set up a work area nearby your system as you will need to insert and remove the distribution media for the operating system and layered products and you may need to gather additional system details. Plan on spending approximately 1 hour for the basic installation; more for layered products.
Next you need to have access to the system console. Depending on your system, this may require installing a serial communication cable (null-modem cable) between your system's console port and a portable laptop computer or other suitable device capable of acting as a terminal or terminal-emulator (PuTTY, Kermit, Hyperterm, etc.). Directly connecting a physical terminal (ie. VT220 etc.) is also an option, but most people will prefer the convenience of having online access to documentation and other information on a laptop computer.
More advanced systems are likely to have remote management ports and management processors that provide for console access. You may need to set up and enable network access methods, such as TCP/IP and Telnet or SSH to access these systems. As always, refer to your system documentation.
You will need to be familiar with your computer system and console command environment. Specifically, you must be able to identify the physical location and logical name of the DVD drive that will contain the distribution media or an Infoserver-enabled system that serves the DVD, and the target drive where the installation will occur. Systems that do not have a built-in DVD reader may require temporary installation of a portable USB-DVD drive. There are numerous subtle console command variations among system models, so be sure to become comfortable with your console environment before proceeding.
HPE Integrity servers take advantage of an industry standard console interface known as UEFI (Unified Extensible Firmware Interface). This manual provides examples of UEFI commands using general syntax which may have minor variations among system models. You should be able to figure out any of these minor variations easily enough based on the command verb and descriptions provided.
It is recommended that you record the installation procedure. A transcript is helpful if a problem occurs during installation. If you are using terminal emulation software, set the software to log the session. Otherwise, set up your system to record the installation procedure on either a hardcopy terminal or a printer attached to the console terminal.
In general, your system should be running the latest revision of firmware. Contact your hardware vendor if you need to verify or update firmware revisions. System Firmware is no longer provided on the operating system distribution media.
To determine the installed firmware version on servers supporting the UEFI console, you can use the following command at the UEFI Shell prompt:
Shell>info fw
As installation begins, the procedure will present a simple text script and menus of installation options. After answering the various prompts, you will shutdown and reboot the system. Aside from setting up the boot command details (optional boot flags, device names, etc.), very little additional console commands are required.
Various boot options can be configured during installation or while the operating system is running by using the OpenVMS Boot Manager procedure: SYS$MANAGER:BOOT_OPTIONS.COM, as explained in: “Setting Boot Options for Your System Disk”. This utility is easier to use than issuing individual UEFI commands, and it allows you to configure the most pertinent options for your system. In addition, the installation and upgrade procedure can assist you in establishing and validating boot options for your system disk.
Of course you will want to read the release notes!
1.4. Device-Naming Conventions
Various console operations will ask for a device name for the source drive and one for the target drive. When specifying those device names, note the following naming conventions:
When the source drive is a local DVD drive, the device name is similar to the following:
DQA0 (IDE drive) or DNA0 (USB drive)
For a device name, such as DQA0:, note the following conventions:
DQ is the device code.
A is the device controller designation.
0 is the unit number of the device.
When the target drive is a local disk, the device name is similar to the following:
DKA0:
When the source drive is a virtual DVD drive served by the InfoServer, the device name is similar to the following:
DAD1:
On systems configured in certain OpenVMS Cluster or HSx environments, the device naming convention is similar to the following:
DUA20.14.0.2.0
The values you specify identify components such as the boot device, controller, unit number of the boot device, HSx controller node number, and channel numbers. Because these values vary depending on your specific hardware configuration, see the owner, operator, and technical service manuals that came with your computer for detailed information.
Within the UEFI console environment, file system oriented devices will be assigned sequential names such as fs0, fs1, etc. The numeric part of these names will appear in hexidecimal notation. Refer to your hardware documentation if you cannot identify the target device.
1.5. Determine your Environment
Prior to starting your installation or upgrade, refer to the following sections for details specific to your system environment, then proceed to PART II to begin your installation or upgrade.
| IF YOU ARE... | THEN REVIEW: |
|---|---|
|
INSTALLING in a non-clustered environment | |
|
UPGRADING in a non-clustered environment | |
|
INSTALLING in an OpenVMS Cluster environment | |
|
UPGRADING in an OpenVMS Cluster environment | “Before Clustered System Upgrade” |
|
BACKING UP or RESTORING your system |
Chapter 2. Before Non-Cluster Installation
This chapter contains information to review and steps to perform before installing VSI OpenVMS in a non-clustered environment.
If you purchased a system with the operating system preinstalled, then most of the information in this chapter does not apply. The first time you power up a preinstalled system, you are prompted to enter only the information necessary to customize your installation. See the documentation provided with your system.
Note
Before you install the VSI OpenVMS operating system, ensure that your system firmware is up to date.
2.1. Before Non-Clustered Installation
Use the checklist below to ensure that you perform all necessary preinstallation tasks.
| TASK | SECTION | |
|---|---|---|
|
|
Determine how to boot the distribution media. | |
|
| Prepare your console. | Section 2.3 |
|
| Set the ACPI Configuration (Cell-based servers). | Section 2.4 |
|
| Select your target system disk. | Section 2.5 |
|
|
Determine your network requirements. | |
|
| Gather Product Authorization Key (PAK) licenses. | Section 2.7 |
|
| Begin the installation. | Part II |
Click on the Section links in the above table to go to specific sections, or just skim through the remainder of this chapter in sequence before proceeding to Part II.
2.2. Distribution Media Boot Methods
Determine how you wish to boot the VSI OpenVMS distribution media. Once you have decided and have reviewed the relevant sections, return to Section 2.1.
You can boot the distribution media in any of the following ways. Detailed instructions on each method are provided in corresponding sections to follow.
From your local DVD drive (Section 6.1.1)
From a DVD drive served over the network by the OpenVMS InfoServer utility (Section 6.1.2)
From an image on a PC running Microsoft Windows™ in a network, accessed through the HPE SIM interface (Not described here).
From an image on a PC running Microsoft Windows™ in a network, using virtual media (vMedia) through a browser connected to your HPE Integrity servers iLO 2 MP port (Not described here).
Note
The latter two options can be used for entry-class HPE Integrity servers that support such means (you can use these options when a local DVD drive is not available on your HPE Integrity server). Refer to the HPE documentation for these utilities.
2.3. Preparing the Console
Before booting your OpenVMS distribution media, make sure your console is configured correctly. Once your console has been configured, return to Section 2.1.
If you are already using the system console, you can disregard the remainder of this section and return to Section 2.1.
If your machine has OpenVMS preinstalled, your console selection has been made by the factory, but you can change this if you like. If you have changed your system configuration, or if you are installing, OpenVMS on a new (uninstalled) machine, or if you are reinstalling OpenVMS using the INITIALIZE option (removing all prior software and data files on the system disk), you might need to select the correct console, otherwise OpenVMS might use an unexpected console device, causing your system to appear to be hung; or with output sent to the wrong location.
On power-up, firmware displays information to the Primary and Secondary console devices. If you do not see the UEFI Boot Manager displayed shortly after powering up, your console device is probably not selected as a Primary or Secondary device; you will need to connect your console terminal cable to the appropriate device. When booting OpenVMS, if you do not see OpenVMS console output and the system appears to be hung, your console terminal device might be connected to a Secondary console device instead of the Primary console device.
System Serial Port
MP (or iLO MP) Serial Port
The MP interface is only visible to OpenVMS if the MP Serial Port is selected as the Primary console.
MP (or iLO MP) Network Port
The MP, being an independent processor itself, offers a Network Port and thus supports remote access to the console using Telnet or SSH connection.
Graphics (VGA) device
Graphics console support allows you to use a Monitor, USB keyboard and mouse connected directly to the server. Certain older (legacy) servers, such as the rx2600, do not support a graphics console because they lack the required firmware capabilities. Other servers lack an integral VGA device, in which case a graphics option card is required for VGA console support.
The MP port is typically used by the OpenVMS operating system on HPE Integrity servers. Connect a serial cable or network cable depending on which MP port you intend to use.
If using the serial port, you must connect a VT100capable terminal or terminal emulator. On servers that do not have an MP port, the console serial port is enabled (generally located on the back of the server).
With the exception of some older server models, the firmware provides a text menu-based interface. The firmware also identifies console interfaces as “Primary”,“Secondary” and “Not Configured.” The Primary console is the console enabled for interacting with the operating system. Although the firmware can interact with multiple console devices, OpenVMS uses only one of these devices as its console and requires that one device be selected.
You select one device to serve as the Primary console, as explained in Section 2.3.3 where more details are also given about the Primary, Secondary, and Not Configured console selections.
2.3.1. MP Console
You can use the MP to establish remote console access, such as through the TELNET utility provided with TCP/IP Services for OpenVMS. Alternatively, you can access the MP console interface through the Internet using a browser.
If you intend to set up LAN or remote access for the MP console, you must initially use the serial port for console operations when you set up the machine for the first time. (See your hardware documentation for instructions on setting LAN or remote access for the MP console interface.)
On systems which support iLO-MP, OpenVMS enables the Integrated Console which provides a virtual keyboard, video and mouse (vKVM) to operate from a remote iLO browser window. The Integrated Console functionality allows both pre-boot (UEFI), OpenVMS boot, and runtime (both text console and DECwindows) display and interaction from the iLO browser window.
2.3.2. Graphics Console
Most HPE Integrity servers support multiple VGA graphics options. A graphics option consists of a graphics card and a graphics display interface (monitor). When multiple graphics devices are present, you can select only one device for use as a console device. The other graphics devices must be set to Not Configured (NC).
When DECwindows is used on a system booted using the VGA as the OpenVMS console, DECwindows selects the VGA console as the default screen. When enabling multihead DECwindows graphics operation, the VGA console defaults to screen 0. If no VGA device is configured as a console, DECwindows selects a default screen based on the HPE Integrity server model and device bus ordering.
By default, the maximum resolution of the graphics display in DECwindows is 1024x768. This is a restriction of the iLO-MP firmware. To use the Integrated Console, the system must be set up with VGA as the primary console. Both the local keyboard, video and mouse can be used in addition to (or at the same time) with the remote iLO Integrated Console. Performance of DECwindows graphics using the iLO Integrated Console will vary depending on the speed of the LAN, and in general is only recommended for doing occasional system management functions that do not require performance sensitive graphics.
OpenVMS supports up to four add-on graphics devices plus any built-in graphics, depending on the server model and available slots. The firmware available on some servers might limit which devices can be used as a VGA console device. For information about your specific configuration's platform and graphics configuration rules, see your hardware documentation .
For correct operation of the VGA console, OpenVMS requires that at least one other non-VGA device be configured as the Secondary console.
XDELTA (low-level system debugger) is not available when using the VGA console.
Conversational (interactive) boot (SYSBOOT>) is not supported with the VGA console. To change SYSGEN parameters, use SYSGEN from OpenVMS, or boot OpenVMS from a non-VGA console.
When using a VGA console and installing from a USB DVD drive with the keyboard plugged into a USB hub, the keyboard might not be operational initially. To enable keyboard operation, simply unplug the hub and plug it back in.
2.3.3. Selecting a Primary and Secondary Console
PRIMARY CONSOLEThe device enabled as a console for the firmware interface and used as the OpenVMS console (OPA0). If a VGA device is selected as the Primary console, at least one serial device path must be set as a Secondary console in order to use the VGA device to boot OpenVMS.
SECONDARY CONSOLEA device enabled as a console for the firmware but not used as the OpenVMS console during or after booting. The device is configured as a normal serial port device. If you specify an MP port as the Secondary console, it will not be visible to OpenVMS. The MP port is visible to OpenVMS only when selected as a Primary console. If multiple serial ports are available as a console on your HPE Integrity servers and you select one for a Secondary console, do not use that console for transmission of binary data.
NOT CONFIGUREDA device that is not enabled as a console for the firmware or operating system.
Using the UEFI Boot Manager, as described in Section 2.3.3.1
Using the UEFI shell, as described in Section 2.3.3.2
2.3.3.1. Using the UEFI Boot Manager to Select the OpenVMS Console
Note
The (slightly fuzzy) examples in the following two subsections show how to select a VGA device for the OpenVMS console.
To select the device for your OpenVMS console using the UEFI Boot Manager, follow these steps.
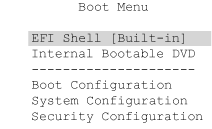
From the UEFI Boot Manager screen, use the up or down arrow key to select the Boot Configuration menu and press Enter:
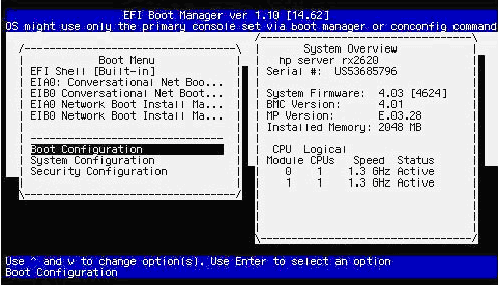
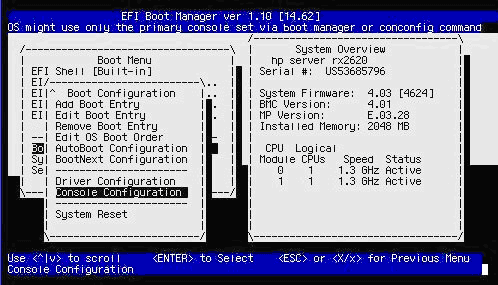
From the Boot Configuration menu, select the Console Configuration menu and press Enter:
If the Console Configuration menu shows that your preferred device is already configured as the Primary console, you need not continue; otherwise, select the device that you want as the OpenVMS Primary console. In the following screen, the VGA device is selected:
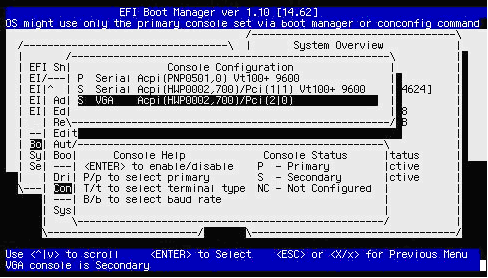
- Enter P to configure the selected device as the Primary console. You then see the selected device as the Primary console:
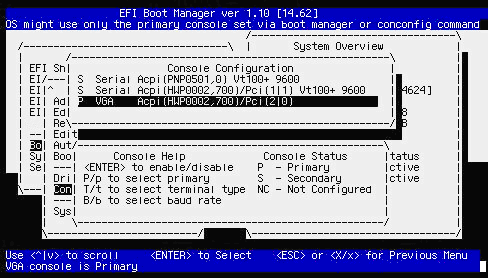
Press the Esc key to return to the previous menu. When prompted whether to save changes to NVRAM, enter Y:
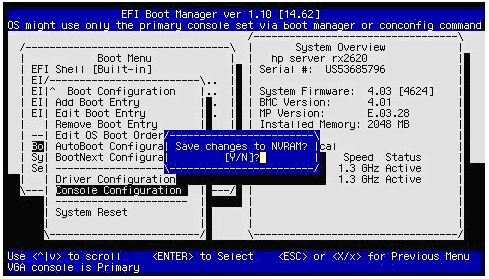
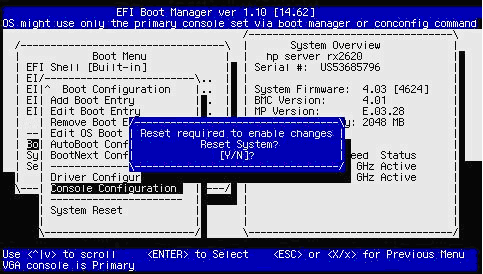
When prompted whether to reset the system, enter Y to make the changes take effect:
2.3.3.2. Using the UEFI Shell to Select the OpenVMS Console
To select the device for your OpenVMS console using the UEFI shell, follow these steps:
At the UEFI Shell prompt, enter the
conconfigcommand to view the index number for the available console devices, as in the following example (the column titled “Primary” displays how the device is configured (P for Primary, S for Secondary, NC for Not Configured):Shell>conconfigCONSOLE CONFIGURATION Index Primary Type Device Path ----- ------- ----- ---------- 1 P Serial Acpi (PNP0501,0) 2 S Serial Acpi (HWP0002,700)/Pci (1|1) 3 S VGA Acpi (HWP0002,700)/Pci (2|0)If your preferred device is already configured as the Primary console, you need not continue. If your preferred device is not currently configured as the Primary console, enter the
conconfigcommand in the following format:conconfigindexprimarywhere
indexis the index number of the device preferred for the OpenVMS console. In the following example, the VGA device is selected as the Primary console, and the resulting display reflects the configuration change:Shell>conconfig 3 primaryCONSOLE CONFIGURATION Index Primary Type Device Path ----- ------- ----- ---------- 1 S Serial Acpi (PNP0501,0) 2 S Serial Acpi (HWP0002,700)/Pci (1|1) 3 P VGA Acpi (HWP0002,700)/Pci (2|0)Enter the reset command to make the changes active, as in the following example:
Shell>reset
Once your console has been configured, return to Section 2.1.
2.3.4. Selecting a Console on Legacy HPE Integrity servers
This section describes how to select a console on rx2600 HPE Integrity servers or other servers with outdated firmware. On such servers, you must configure a Console Input, Console Output, and Console Error Device for your OpenVMS console. There is no concept of the Primary console that automatically configures these devices. In addition, on such servers OpenVMS does not support graphics consoles.
Note
The following instructions assume that OpenVMS is not installed on your server and that boot options are not defined.
Decide what console you want to use.
Power on the system. If using an MP serial port, log in to the MP and access UEFI.
If you are setting the system serial port as your system console, go to the next step now.
If you are setting the MP serial port as your system console and you have just powered on your server, the MP console interface prompts you to log in. (By default, both user name and password are set to Admin. For security purposes, change the password immediately. See your hardware documentation.)Note
To see the MP login user name and password prompts, you might need to press Enter one or more times on your console keyboard. If this does not work, try pressing Ctrl/B.
If you see only the MP password prompt, press Enter to get to the MP login prompt.
If you see a message similar to the following, another user has the console (only one user can write to the console, although multiple users can view it).[Read only - use Ctrl-Ecf for console write access]
To gain control of the console from the other user, press Ctrl/E, release the key combination, and then immediately type the letters
cf. Alternatively, you can have the other user log off.When the MP> prompt is displayed, move to the UEFI interface by entering the
co(console mode) command. If the power or initialization sequence has not completed, wait until the menu reappears, at which point reenter thecocommand to get to the UEFI Boot Manager menu.At the UEFI Boot Manager menu, select the UEFI Shell interface.
On HPE Integrity servers without nPartitions, the
cocommand brings you directly to the UEFI Boot Manager screen. If you do not enter a command before the UEFI countdown timer expires (typically 10 seconds), the UEFI Shell prompt is displayed. When the operating system is running, thecocommand brings you to the console port of the operating system (OPA0).On cell-based servers, unless you are using a single-partition user account, thecocommand first brings you to a console menu that lists the available nPartitions. Select the appropriate nPartition to access the UEFI Boot Manager console for that nPartition. The following example shows a console menu (menus and displays such as this might vary from system to system):Partitions available: # Name --- ---- 1) MIA1 2) MIA2 3) TESTING 4) LAN 5) AMYS 6) ACCNTS Q) Quit Please select partition number:If the
cocommand results in a screen that is unexpected or difficult to interpret, pressing Enter might help. If you are at a UEFI submenu instead of the main menu, navigate to the main menu by exiting from the submenu and any subsequent submenus until you return to the UEFI main menu.Access the UEFI Boot Configuration menu. The UEFI Boot Manager screen includes a boot menu. The default menu option is highlighted, as shown in the following example:
Note
The appearance of UEFI Boot Manager screens and menus differs from version to version of the firmware.
From the UEFI boot menu, select the Boot Configuration option (or Boot Option Maintenance Menu). To move to an option, use the up or down arrow key. (With some terminal emulators, you might have to use the letter v to scroll down or the caret (^) to scroll up.) Press Enter to toggle the selection. If you do not select an option within the countdown period, UEFI moves to the default optionthe UEFI Shell in the boot menu example, in which case the UEFI Shell prompt is displayed.
Exit the UEFI Shell to return to the Boot Configuration menu. If lines from the preceding screen linger and obscure the UEFI Shell prompt, press Enter to bring the UEFI Shell prompt into view.
Configure the Console Input, Console Output, and Console Error Devices. Select the Console Configuration option from the Boot Configuration menu to list the console input, console output, and console error device options. Some versions of UEFI list the three console device options directly in the Boot Option Maintenance Menu. Configure each console option one at a time, as follows:
Note
OpenVMS requires that the input, output, and error console all must point to the same serial-line console device. New systems might be shipped with multiple devices selected for each of the console types, so make sure only one device is selected for each. If you see an error message that mentions multiple device-path instances for the console input or output device, perform the following steps to select a single console only.
On rx2600 HPE Integrity servers and certain other servers with firmware that is not up to date, OpenVMS might not boot using a USB keyboard or a VGA graphics display device. The system might boot with these devices but does not display any indication that the system is booting. You might receive a warning when the system begins to boot. You might also see other errors in later stages of the boot. Additionally, you might lose output that you normally see during booting.
Select the console input device. UEFI displays a list of devices (device paths) available for console input. Select only one device from this list, and deselect any unused devices. The following is a sample list of devices, annotated with explanatory text below the list. This example shows the devices for an entry-class HPE Integrity server.

- System Serial Port
These four lines indicate any of the valid devices that you can define for the console using the system serial port. Any line that has the notation UART but not the notation PCI is one of the system serial ports. Notice that the lines are almost identical except for the text following the VenMsg portion indicating the terminal emulation protocol such as VT100. Thus, each of the four entries is the same device with different emulation protocols.
- MP Console
These four lines appear only on systems that have an MP port. Any lines that include both UART and PCI are MP serial port devices. As with the serial port devices, these four lines refer to the same device with different emulation protocols.
- VGA Device
This is the graphic console device. Do not select this. OpenVMS does not support VGA graphics as a console output device for booting on rx2600 and older servers.
Select a device using the protocol appropriate for your terminal emulator (in most cases, VT100+ is the best choice). Select only one device line. OpenVMS does not operate if more than one device is selected.
Save your settings to NVRAM.
Select the console output device. Repeat steps a and b to configure the console output device. Select the same device you selected for the console input device.
Select the console error device. Repeat steps a and b to configure the console error device (also referred to as the standard error device). Select the same device you selected for the console input and output devices.
Perform a cold reset if required. Your system might require a cold reset. Newer versions of UEFI do not require a cold reset. For more information, see your hardware documentation.
Note
Whenever new console devices are added to a system, or the NVRAM on a system is cleared, review your console selections. When you change serial devices, you must also make changes to the input, output, and error console device options to ensure proper operation.
Once your console has been configured, return to Section 2.1.
2.4. Checking the ACPI Configuration (Cell-Based Servers)
Caution
To boot your operating system on an HPE cell-based server (midrange servers such as rx8640 and rx7640), the ACPI configuration must be set correctly.
Shell> acpiconfig defaultreset
command:Shell> resetIf the ACPI configuration value is not set properly, when the operating system boots, it fails with bugcheck code INCONSTATE.
acpiconfig
command with no
arguments:Shell>acpiconfigAcpiconfig settings: default
Once your ACPI Configuation has been set, return to Section 2.1.
2.5. Selecting your Target Disk
Identify the target disk for your installation or upgrade and locate the logical name of the disk from your UEFI console.
You will need to identify both the UEFI logical name (fxx) and the
eventual OpenVMS device name (i.e. DKA100). Refer to Section 1.4 for help with device naming conventions.
Note
If you are installing a new copy of OpenVMS, you can select the INITIALIZE option from the Installation Menu to initialize the target disk, or if you prefer, you can initialize the disk prior to its use. Note that you cannot install OpenVMS in a disk partition shared with another type of operating system.
Once your target disk has been identified, return to Section 2.1.
2.6. Determining your Network Requirements
During installation, you will need to decide whether you want to use TCP/IP Services for OpenVMS, DECnet Phase IV, DECnet Plus for OpenVMS (DECnet over IP), or a combination of these products. It is common to configure network adapters for both TCP/IP and DECnet, although DECnet Plus allows you to use the DECnet protocols over IP.
These network products are licensed as part of the base operating environment and as such, they do not require separate licenses.
Any of the network products can be installed after the base OS installation, but it is often easier to install them along with the base OS. To do this, you will need to gather details for your network addresses (IP Address and Mask and/or DECnet Address) and if using DECnet, a DECnet SCS Node Name. Consult with your network administrator to determine these details.
You should also determine which network adapters in your system that you wish to assign. These will be assigned with OpenVMS device names, i.e. EWA0, etc. Again, these details can be configured after the base OS installation if you prefer.
Determine what, if any, TCP/IP Services you wish to enable or disable, such as Telnet, SSH, routing etc.
Once your network requirements are known, return to Section 2.1.
2.7. Product Licensing Keys
During the installation, you will be prompted to enter Product Authorization Keys (Licenses) for the base operating environment and any layered products that are not already included in the base OS.
A PAK is represented as a text structure containing a series of named fields and unique values that were generated by VSI (or HPE). During installation or upgrade you will be asked to enter the PAK for the Base Operating Environment and then for any layered products that you are installing. You have the option of deferring PAK entry until after the installation and entering them using the OpenVMS LICENSE utility. If you choose to enter your PAKs, you can either type the values of each requested field, or cut-and-paste the values into the console (assuming your console connection supports this action (i.e. Terminal Emulators do).
Below is an example of a typical PAK:
$ LICENSE REGISTER OPENVMS-I64-BOE -
/ISSUER=VSI -
/AUTHORIZATION=AUTHORITY-2-I64-123456 -
/PRODUCER=VSI -
/UNITS=0 -
/TERMINATION_DATE=31-OCT-2015
/OPTIONS=(IA64) -
/CHECKSUM=X-XXXX-XXXX-XXXX-XXXX
This concludes the Before Installation Tasks.
Gather any PAKs you intend to register, then return to Section 2.1.
Chapter 3. Before Non-Cluster Upgrade
This chapter contains information to review and steps to perform before upgrading an existing system in an non-cluster environment.
3.1. Before Non-Clustered Upgrade
Use the checklist below to ensure that you perform all necessary tasks prior to upgrading your system.
| TASK | SECTION | |
|---|---|---|
|
| Review relevant documentation. | Section 3.2 |
|
|
Review notes and restrictions about the following:
| Section 3.3 |
|
| Save files that you do not want deleted by the upgrade procedure. | Section 3.5 |
|
| Prepare the system disk. | Section 3.7 |
|
| Ensure that you have a recent FEEDBACK.DAT file. | Section 3.8 |
|
| Perform required actions before upgrading in a volume shadowing environment. | Section 3.9 |
|
| Back up the current system disk. | Section 3.10 |
|
| Shut down the current system to begin upgrade. | Section 3.11 |
3.2. Documentation References
In addition to reviewing the information in this chapter, you might need to refer to the following sources of information as well.
Cover Letter for VSI OpenVMS Version 8.4-2
Software Product Descriptions included with your distribution kit
VSI OpenVMS Version 8.4-2 Release Notes
VSI OpenVMS Version 8.4-2 New Features and Documentation Overview
VSI OpenVMS System Manager's Manual, Volume 2: Tuning, Monitoring, and Complex Systems (specifically, the chapter entitled Managing System Parameters), for information about using AUTOGEN, modifying the system parameters file (MODPARAMS.DAT), and related operations
VSI OpenVMS System Management Utilities Reference Manual, for information about using system management utilities such as SYSMAN and ANALYZE/DISK_STRUCTURE
VSI OpenVMS Guide to System Security, for information about reestablishing your security environment after the upgrade
3.3. Notes, Cautions, and Restrictions
This section provides important information that can affect the success of your upgrade. Review the cautions, restrictions, and notes carefully before you begin the upgrade.
3.3.1. Upgrade Paths
You can upgrade directly to VSI OpenVMS Version 8.4-2 from the following versions of OpenVMS:
VSI OpenVMS 8.4-1H1
HPE OpenVMS Version 8.4U900
HPE OpenVMS Version 8.4U1000
HPE OpenVMS Version 8.4U1100
If you are running versions prior to these, you must incrementally upgrade to one of these versions before upgrading to VSI OpenVMS 8.4-2, or you can choose to perform a complete installation rather than an upgrade.
Important
Additional upgrade paths may be qualified over time.
3.3.2. Update License Requirements
Important
Before upgrading to VSI OpenVMS Version 8.4-2, you must register the appropriate OE license on your system using the OpenVMS LICENSE utility.
VSI software licenses grant the right to use the current version of a product or any previous version of the product at the time of purchase.
Note
When you initially purchase the OpenVMS software and license, VSI (or HPE) provides a Product Authorization Key (PAK) that is required to enable the License Management Facility (LMF) to register the license and to validate and authorize subsequent use of the product. A PAK does not provide license or new version rights. For more information about licensing and the License Management Facility, see the VSI OpenVMS License Management Utility Manual.
Note
As mentioned in the preface of this manual (Section 5), the first time you install or upgrade your system to VSI OpenVMS 8.4-2 your existing product license database entries will be re-branded to list VSI as the Producer. This change affects only the license names (to avoid confusion in the License Management Facility) and does not alter the terms of existing licenses or the behavior of the existing products.
If you need an Update License, please contact your VSI Sales representative
<info@vmssoftware.com>.
3.3.3. Components You Choose Not to Install
Note
Unless you have specific reasons to do otherwise, VSI recommends that you accept the defaults and install all VSI OpenVMS options. VSI OpenVMS and layered products have various dependencies on many of these options. Even if you think you do not need certain options, some VSI OpenVMS or layered product operations might not work correctly if other VSI OpenVMS options are not installed.
Note that the availability of certain options depends on the OE you have purchased. For more information, see the VSI OpenVMS Software Product Description (SPD V8.4-2).
3.3.4. Licenses and Layered Products
The upgrade procedure is designed so that you do not need to reinstall most layered products after the upgrade. However, you might need to reinstall certain layered products because of product-specific installation procedures.
The upgrade procedure leaves your OpenVMS license and layered product licenses intact. You do not need to reinstall these licenses after you upgrade.
3.4. Software That Must Be Manually Removed
Before upgrading, if you are currently using DECram or TDC V2.0, these products must be removed manually; otherwise, the upgrade might fail. For other information about software that might need to be removed manually, see the VSI OpenVMS Version 8.4-2 Release Notes.
3.5. Software That Must be Deconfigured
Before upgrading, if you are using or have configured WBEM Providers for OpenVMS, you must manually deconfigure WBEM Providers by entering the following command:
$
                @SYS$COMMON:[WBEMPROVIDERS]WBEMPROVIDERS$DECONFIGURE.COM
3.6. Preventing Archived Files from Being Deleted
By default, the upgrade procedure deletes files that were archived as filename.type_OLD by OpenVMS remedial kits. If you do not want these files deleted, you can rename them before you perform the upgrade. Alternatively, you can have the upgrade procedure save them by responding to the prompts, as described below.
When the installation procedure asks whether you want the defaults for all options, answer NO. (This script is shown in the example in Section 7.2.4.) Step through the options and answer NO to the option for deleting files archived by remedial kits. This action saves all such files.
Before beginning the upgrade, rename any _OLD files that you want to save. Files that you do not rename are deleted.
Note
OpenVMS patches save these _OLD files in VMS$REMEDIAL_OLD_FILES.TXT in the SYS$UPDATE directory. All files listed in this file are supposed to have _OLD appended to their names; however, some patch kits add the files without this extension. If the upgrade procedure detects files without _OLD appended, it displays a message similar to the following:
%UPGRADE-I-FIXUP, appending _OLD to file names in
 PCSI$DESTINATION:[SYSUPD] VMS$REMEDIAL_OLD_FILES.TXT
    [SYSUPD]VMSKITBLD.DAT
    [SYSHLP]XFC$SDA.HLP
    [SYS$LDR]SYSTEM_SYNCHRONIZATION.EXE-OLD
    [SYS$LDR]SYS$XFCACHE.DSF
    [SYS$LDR]SHELL9K.EXE_STB
    [000000]HP-I64VMS-VMS-V0820-1-2.PCSI$DESCRIPTION
3.7. Preparing the System Disk for Upgrade
The following tasks are required to prepare the system disk for the upgrade.
Check the directory structure and preserve security protections
Check the SYSCOMMON directories
Purge duplicate files from the system disk
Examine the system disk
Check the size of the system disk
Return Authorization and AGEN$INCLUDE files to the system disk
Verify System Parameters
3.7.1. Checking the Directory Structure and Preserving Your Security Protections
If you changed the directory structure on your system disk, the upgrade procedure does not work correctly. Restore your system disk to a standard directory structure before you attempt an upgrade.
The OpenVMS upgrade procedure provides new files and directories in the directory [VMS$COMMON...]. If you have any special protections and access control lists (ACLs), you need to reapply them to reestablish the security environment you currently have. For more information about creating and maintaining a secure environment, see the VSI OpenVMS Guide to System Security manual.
3.7.2. Checking the SYSCOMMON Directories
For the upgrade to be successful, the SYSCOMMON directories in all system roots must be aliases (or hard links) for the VMS$COMMON directory. To check whether this is the case, enter the following commands if you are booted from the system disk that you are upgrading, and compare the displayed file identifiers to ensure that they are all the same:
$DIRECTORY/FILE_ID/NOHEADING/NOTRAILING SYS$SYSDEVICE:[000000]VMS$COMMON.DIR$DIRECTORY/FILE_ID/NOHEADING/NOTRAILING SYS$SYSDEVICE:[SYS*]SYSCOMMON.DIR
If you did not boot from the system disk that you are upgrading, mount the disk to be upgraded and specify the actual device name in the command. For example, if the system disk to be upgraded is mounted on DKA100, you would use commands similar to the following:
$DIRECTORY/FILE_ID/NOHEADING/NOTRAILING DKA100:[000000]VMS$COMMON.DIR$DIRECTORY/FILE_ID/NOHEADING/NOTRAILING DKA100:[SYS*]SYSCOMMON.DIR
Output from the first command should list a single file. Output from the second command should list one file for each system root on the disk. Check whether the file ID is the same for all of the listed files and take action as follows:
If all the file IDs are the same, continue with the procedure described in the next section.
If all the file IDs are not the same, this system disk does not have the directory structure that OpenVMS requires, and the upgrade will not succeed. For assistance on resolving this, contact your software support representative.
3.7.3. Purging Duplicate Files from the System Disk
To free up disk space and file headers, purge the system disk of certain large files. VSI recommends that you enter the following commands, as shown:
$PURGE/LOG/BEFORE=TODAY SYS$SYSDEVICE:[000000...]*.LOG$PURGE/LOG SYS$SYSTEM:PAGEFILE*.SYS$PURGE/LOG SYS$SYSTEM:SWAPFILE*.SYS$PURGE/LOG SYS$SYSTEM:SYSDUMP.DMP
Check the system disk for application and system dump files by entering the following command:
$DIRECTORY/SIZE/DATE SYS$SYSDEVICE:[000000...]*.DMP
If any .DMP files are found, use your discretion and delete them. Unless these files are important for a current problem investigation, they are unlikely to be applicable after the new version upgrade and they may consume a significant amount of disk space.
3.7.4. Examining the System Disk
Examine and repair if necessary, the system disk using the ANALYZE/DISK_STRUCTURE command. (See the VSI OpenVMS System Management Utilities Reference Manual: A-L for more information about this command.) Use the following procedure:
Analyze the system disk for inconsistencies and errors in the file structure by entering the following command:
$ANALYZE/DISK_STRUCTURE SYS$SYSDEVICEIgnore the following message:
%ANALDISK-I-OPENQUOTA, error opening QUOTA.SYS
If you find any other errors on the system disk, repair the errors by entering the following command:
$ANALYZE/DISK_STRUCTURE/REPAIR SYS$SYSDEVICERepeat steps 1 and 2 until no errors (other than the one shown in step 1) are returned.
3.7.5. Checking the Size of the System Disk
It is difficult to determine in advance how many blocks of disk space you need for the upgrade. It depends on how many files you have on the target disk already and on how many components you select during the upgrade procedure. However, the following information will help:
The maximum amount of disk space you need is approximately 18,000,000 blocks, but your system might use substantially less.
- After you select the components you want installed on the system for the upgrade, the upgrade procedure calculates whether you have enough disk space, displaying the number of available blocks and the number required for the upgrade. If the procedure determines that your disk does not have enough space to perform the upgrade, it displays a message to alert you and allows you to terminate the upgrade so you can create more disk space and try the upgrade again.
Note
If the files on your system disk are badly fragmented, you might not be able to complete an upgrade, even when the amount of disk space appears to be sufficient. VSI recommends that you back up and restore the system disk prior to upgrading. Restoring the system disk from an image backup defragments the disk. For information about backing up and restoring your system disk, see Appendix A.
To see how much space you have on the system disk, enter the following command:
$SHOW DEVICE SYS$SYSDEVICE
3.7.6. Returning Authorization and AGEN$INCLUDE Files to the System Disk
If you place authorization and AGEN$INCLUDE files on disks other than the system disk, the upgrade procedure will not find these files. This is because the other disks are not mounted during the upgrade. In addition, the logical names you set up to point to these files are not defined during the upgrade. The following sections explain how to make these files available to the upgrade procedure.
3.7.6.1. Authorization Files
OpenVMS allows you to relocate certain system files (mostly authorization files) off the system disk. You do this by copying the files to another location and then defining logical names as documented in the file SYS$MANAGER:SYLOGICALS.TEMPLATE. The logical names are defined in SYS$STARTUP:SYLOGICALS.COM.
When you boot your system from the OpenVMS operating system media, the logical names pointing to these files are not defined, and the disks where they are located are not mounted. Because of this, the upgrade cannot access the relocated files, possibly resulting in an incorrect or incomplete upgrade. The upgrade might finish without error, but the files might not be in place as expected.
Before upgrading your system, check the definitions of these logical names on your system. (If a file has not been relocated, the corresponding logical name might not be defined. This is acceptable.)
If any logical name points to a location or file name other than the location and file name listed in Table 3.2, return the file to the default location and file name.
To prevent the system from referencing the files located off the system disk, either delete the associated logical name (using the DCL command DEASSIGN/SYSTEM/EXEC), or shut down the operating system and reboot from the operating system media.
After the upgrade and before booting the operating system, you can move these files back to their original locations off the system disk, using the DCL option (8) from the OpenVMS operating system menu.
Note
Some files listed in Table 3.2, such as SYS$SYSTEM:VMS$PASSWORD_HISTORY.DATA and SYS$LIBRARY:VMS$PASSWORD_POLICY.EXE, might not exist on your system, depending on certain configuration settings. For information about these files, see the VSI OpenVMS Guide to System Security manual.
| LOGICAL NAME | LOCATION AND FILE NAME |
|---|---|
| LAN$NODE_DATABASE | SYS$SYSTEM:LAN$NODE_DATABASE.DAT |
| LMF$LICENSE | SYS$SYSTEM:LMF$LICENSE.LDB |
| NETNODE_REMOTE | SYS$SYSTEM:NETNODE_REMOTE.DAT |
| NETNODE_UPDATE | SYS$MANAGER:NETNODE_UPDATE.COM |
| NETOBJECT | SYS$SYSTEM:NETOBJECT.DAT |
| NETPROXY | SYS$SYSTEM:NETPROXY.DAT |
| NET$PROXY | SYS$SYSTEM:NET$PROXY.DAT |
| RIGHTSLIST | SYS$SYSTEM:RIGHTSLIST.DAT |
| SYSUAF | SYS$SYSTEM:SYSUAF.DAT |
| SYSUAFALT | SYS$SYSTEM:SYSUAFALT.DAT |
| SYSALF | SYS$SYSTEM:SYSALF.DAT |
| VMSMAIL_PROFILE | SYS$SYSTEM:VMSMAIL_PROFILE.DATA |
| VMS$AUDIT_SERVER | SYS$MANAGER:VMS$AUDIT_SERVER.DAT |
| VMS$OBJECTS | SYS$SYSTEM:VMS$OBJECTS.DAT |
| VMS$PASSWORD_DICTIONARY | SYS$LIBRARY:VMS$PASSWORD_DICTIONARY.DATA |
| VMS$PASSWORD_HISTORY | SYS$SYSTEM:VMS$PASSWORD_HISTORY.DATA |
| VMS$PASSWORD_POLICY | SYS$LIBRARY:VMS$PASSWORD_POLICY.EXE |
| QMAN$MASTER | SYS$COMMON:[SYSEXE]QMAN$MASTER.DAT |
Note
QMAN$MASTER defines settings for your queue files, including pending jobs, queue characteristics and forms. If you fail to save this file, you will need to establish a new one and restore all of your settings.
To create new queue files, define your QMAN$MASTER logical name to point to your desired directory, typically SYS$COMMON:[SYSEXE] or if clustered, CLU$COMMON:[SYSEXE], then issue the command: $ INIT/QUEUE/MANAGER/NEW_VERSION to create a new QMAN$MASTER.DAT file.
After your first boot, you can then set up all of your queues, characteristics, forms, etc.
3.7.6.2. AGEN$INCLUDE Files
Move the files to the system disk.
Update the AGEN$INCLUDE entries to reflect the new locations of these files. For these entries, do not use logical names that you defined in SYS$STARTUP:SYLOGICALS.COM or elsewhere for your normal startup procedure. When you boot the system from the OpenVMS operating system media for an upgrade, your normal startup procedure is not run, and so these logical names are not defined for the upgrade. In addition, when you first boot the upgraded system, a special startup procedure is used.
After the upgrade is complete, you can move these included files back to their original locations. If you do so, remember to re-set the AGEN$INCLUDE entries in SYS$SYSTEM:MODPARAMS.DAT.
3.7.7. Verifying System Parameters
Verify (and modify if necessary) system parameters. (For information about verifying and modifying system parameters, see the VSI OpenVMS System Manager's Manual, Volume 2: Tuning, Monitoring, and Complex Systems.)
During an upgrade, AUTOGEN initially generates parameter values based on parameter defaults. However, during the GETDATA phase, AUTOGEN modifies parameter values based on entries stored in SYS$SYSTEM:MODPARAMS.DAT. In addition, AUTOGEN analyzes feedback information stored in the AGEN$FEEDBACK.DAT file and, if the data is valid, adjusts any related parameter values accordingly. (AUTOGEN considers data as valid if the system has been up at least for 24 hours and the feedback is no more than 30 days old.)
Important
Any system parameters that you modified and did not enter in the SYS$SYSTEM:MODPARAMS.DAT file are lost during the upgrade.
To retain these parameters, enter their names and the values that you have in use for them in SYS$SYSTEM:MODPARAMS.DAT. When AUTOGEN runs after the upgrade, it uses the entered values.
For example, if the current value of GBLPAGES is 30000, and you modified GBLPAGES by 128 pages above the default, add the following line to SYS$SYSTEM:MODPARAMS.DAT:
MIN_GBLPAGES=30128 !Increased by 128 by PLM for product z 12/12/04AUTOGEN compares the computed value of GBLPAGES with this MIN_ value (30128). If the computed value is less than the specified MIN_ value, AUTOGEN increases the value of GBLPAGES to the MIN_ value. Each time AUTOGEN runs, it makes the same comparison and adjusts the value of GBLPAGES, but never below the minimum indicated by MIN_GBLPAGES.
Important
If you modify system parameters, note the following:
In general, you should allow AUTOGEN to calculate system parameters. You can hardcode values (such as GBLPAGES=value), but doing so overrides AUTOGEN and might not allow it to set an optimal value based on observed usage.
Whenever possible, use MIN_parameter values (such as MIN_GBLPAGES) to set the minimum value that can be set for a parameter by AUTOGEN. AUTOGEN increases the value if necessary. It also adjusts related parameters, unless they are hardcoded, in which case information is provided in the AGEN$PARAMS.REPORT file. Use MAX_parameter values to set a maximum value when you need to limit a parameter to a known maximum value.
Enter numeric values as integers, without commas (for example, 10000). Enter alphabetic characters in lowercase or uppercase.
VSI recommends that you include comments in the MODPARAMS.DAT file indicating who changed the value, when it was done, and why it was done. An exclamation point serves as a comment starter and can appear anywhere on a line. The following is an example illustrating the modifications recommended in the preceding bulleted items:
! the following changes made by K.Olsen on 9/20/78
!
SWAPFILE=0                 ! dont re-size the SWAPFILE on AUTOGEN runs
MIN_gblsections=750        ! required for DECwindows MOTIF
MIN_NPAGEDYN=2750000       ! set npagedyn to a min of 2.75 million
For more information about using AUTOGEN as recommended, see Section 8.4.
If your system was upgraded previously, a new SYS$SYSTEM:MODPARAMS.DAT file was created then. This file has comments and possibly duplicated entries that were created during that upgrade. If you upgrade again, SYS$SYSTEM:MODPARAMS.DAT can become unnecessarily large and potentially confusing. VSI recommends that you edit and reorganize SYS$SYSTEM:MODPARAMS.DAT before you upgrade again.
Note
On a cluster system disk, the MODPARAMS.DAT file should exist in SYS$SYSROOT:[SYSEXE] for each root. You must edit MODPARAMS.DAT as necessary for each root.
3.8. Ensuring a Recent FEEDBACK.DAT File
Before upgrading your system, VSI recommends that you have a recent AGEN$FEEDBACK.DAT file. This file is in SYS$SPECIFIC:[SYSEXE] (that is, in [SYSx.SYSEXE], where x is the root; for example, SYS0 or SYS1). In OpenVMS Cluster systems, this file should exist in each nodes SYS$SPECIFIC directory. When the system (or each system in a cluster) is rebooted after the upgrade, AUTOGEN runs. If a recent AGEN$FEEDBACK.DAT file is available, it is used. The data in this file helps AUTOGEN set system parameters for your specific applications and workload.
Note
If you do not have a current AGEN$FEEDBACK.DAT file, AUTOGEN might calculate system parameters that do not reflect your system's requirements. In that case, multiple cycles of running AUTOGEN and rebooting might be necessary before all layered products can be started. In some cases, successful startup can require additional entries in MODPARAMS.DAT. This should not be necessary if a current AGEN$FEEDBACK.DAT file is available.
If you do not have the AGEN$FEEDBACK.DAT file on your system, VSI recommends that you create a current AGEN$FEEDBACK.DAT file during a time when your system is running under a typical workload. To ensure the greatest data reliability, the system should be running for more than 24 hours but less than 30 days. Enter the following command:
$RUN SYS$SYSTEM:AGEN$FEEDBACK.EXE
This runs very quickly and should not affect the performance of your system while it executes.
You can also specify the SAVE_FEEDBACK option when you execute the system shutdown procedure; however, the data captured might not fully reflect the typical workload on your system.
Important
If you start AUTOGEN without specifying the execution-mode parameter (FEEDBACK, NOFEEDBACK, or CHECK_FEEDBACK), AUTOGEN uses the feedback information in its calculations. However, if the feedback information reflects system up time of less than 24 hours, or if the feedback information is more than 30 days old, AUTOGEN includes warnings in the AGEN$PARAMS.REPORT file to alert you to potential problems with the feedback data. If you wrongly assume the feedback is valid, the parameter settings might vary significantly from your expectations.
If you specify FEEDBACK (or NOFEEDBACK), AUTOGEN uses (or does not use) the feedback regardless of the datas reliability. AUTOGEN proceeds through the SETPARAMS phase (if you specified SETPARAMS, SHUTDOWN, or REBOOT as the end phase) and sets system parameters to the values it computed.
If you specify CHECK_FEEDBACK, AUTOGEN checks the validity of the feedback data. If AUTOGEN determines the feedback is suspect, then AUTOGEN ignores the feedback when computing parameter values. It stops at the TESTFILES phase and issues a warning in the report that parameters have not been changed. You must read the report and decide whether the calculated values are acceptable. You can either use them (by running the AUTOGEN SETPARAMS phase) or rerun AUTOGEN with valid feedback data.
3.9. Shadowing Environment
Because you cannot upgrade the operating system on a shadowed system disk (the upgrade will fail), you need to disable shadowing of the system disk and perform other operations before you can upgrade the operating system.
There are several methods for creating a nonshadowed target disk. This section describes how to change one of your existing shadowed system disks in a multiple-member shadow set to a nonshadowed disk that you can use as your target disk for the upgrade.
If you have a larger configuration with disks that you can access physically, you might want to use a copy of the system disk as your target disk. Volume Shadowing for OpenVMS describes two methods you can use to create this copy (using volume shadowing commands or BACKUP commands) and how to disable volume shadowing.
3.9.1. Setting the Boot Device
Be sure your system is set to boot by default from the disk you intend to upgrade.
VSI recommends using the OpenVMS Boot Manager utility (SYS$MANAGER:BOOT_OPTIONS.COM) to add shadowed system disks in a multiple-member shadow set to the UEFI boot device list and dump device list. Be sure to add all members to both lists. For more information about setting boot options and using this utility, see Section 9.4.1.
3.9.2. Creating a Nonshadowed Target Disk
Perform the steps described in this section to change one of your existing shadowed system disks to a nonshadowed disk.
Warning
If you simply use a MOUNT/OVERRIDE=SHADOW_MEMBERSHIP command to mount the volume to be upgraded, volume shadowing can overwrite the newly upgraded disk with information from a prior volume that has not been upgraded.
Shut down all systems booted from the shadowed system disk.
Perform a conversational (interactive) boot (see Section 9.10) on the system disk you have chosen for your target disk. Enter the following command at the UEFI Shell prompt, where fsn: is the device associated with the system disk (such as fs1:):
Shell>fsn:\efi\vms\vms_loader.efi -flags 0,1At the SYSBOOT> prompt, enter the following command to disable volume shadowing of the system disk:
SYSBOOT>SET SHADOW_SYS_DISK 0Enter the CONTINUE command to resume the boot procedure. For example:
SYSBOOT>CONTINUEAfter the boot completes, go to Section 3.11.
You now have a nonshadowed system disk that you can use for the upgrade.
3.10. Backing Up the System Disk
Caution
VSI strongly recommends that you make a backup copy of the system disk and, if your configuration allows it, upgrade the backup copy. Then, if there are problems, you still have a working system disk.
VSI OpenVMS Engineering has encountered cases where recovery from a failed upgrade has been difficult, expensive, or impossible because no backup of the preupgrade system disk was available. Various hardware or software failures or a power failure can make a partially upgraded system disk unusable. A backup copy might be the only route to recovery. The minimal time required to make a backup is a very wise investment.
To back up the system disk, follow these steps:
Shut down the system.
Boot the operating system distribution media, following the instructions in Section 2.2
Select Option 8 of the menu to enter the DCL environment.
- Mount the system device and the target device on which you will make the backup copy. (If you are backing up to tape, skip to the next step.) For example, if your system disk is on DKA0: and the target device is on DKA100:, you might use the following commands. The /OVERRIDE qualifier used in this example allows you to mount the system disk without entering its volume label. The /FOREIGN qualifier is required for the target disk when you use the BACKUP /IMAGE command.
$$$MOUNT /OVERRIDE=IDENTIFICATION DKA0:$$$MOUNT /FOREIGN DKA100: - To back up the system disk to a magnetic tape, enter the following commands, where MTA0: is the magnetic tape drive and label is the volume label. Note that the BACKUP command automatically mounts the tape and begins the backup to it.
$$$INITIALIZE MTA0:label$$$MOUNT /OVERRIDE=IDENTIFICATION DKA0:$$$BACKUP /IMAGE /LOG DKA0: MTA0:label.BCK - To back up to a device other than a magnetic tape drive, enter the BACKUP command. For example, if your system disk is on DKA0: and your target disk is on DKA100:, use the following command (the colons are required):
$$$BACKUP /IMAGE /LOG DKA0: DKA100:The /IMAGE qualifier causes the Backup utility to produce a functionally equivalent copy of the system disk, which is also bootable. The /LOG qualifier causes the procedure to display the specification of each save set file being processed. To compare the backed up files to the source files, use the /VERIFY qualifier. If any discrepancies are detected, the Backup utility displays an error message indicating the discrepancies.
Log out from the DCL environment.
Shut down the system by selecting Option 9 on the menu.
For more complete information about backup operations, including a description of an alternative method that does not require booting from the operating system media, see Appendix A. For more information about the Backup utility, see the VSI OpenVMS System Management Utilities Reference Manual: A-L.
3.11. Finishing the Before Upgrade Tasks
Shutdown the system as follows, depending on whether you are upgrading in a non-clustered or OpenVMS Cluster environment:
| IF UPGRADING A... | THEN... |
|---|---|
|
CLUSTER SYSTEM |
|
|
NON-CLUSTERED SYSTEM |
|
Chapter 4. Before Clustered System Installation
This chapter contains information to review and steps to perform before installing VSI OpenVMS in an OpenVMS Cluster environment.
4.1. Before Clustered Installation Tasks
Use the checklist below to ensure that you perform all necessary tasks prior to installing your system in an OpenVMS Cluster environment.
| TASK | SECTION | |
|---|---|---|
|
| Review relevant OpenVMS operating system and OpenVMS Cluster documentation. | Section 4.2 |
|
| Familiarize yourself with mixed-version, mixed-architecture, and migration support in OpenVMS Cluster systems. | Section 4.3 |
|
| Have information ready to provide at the system prompt during an installation. | Section 4.6 |
|
| Make sure the target system disk is not mounted elsewhere in the cluster. | Section 4.7 |
|
| Begin the installation. | Part II |
4.2. Cluster Documentation References
Before you install the operating system in an OpenVMS Cluster environment, review any relevant OpenVMS Cluster information contained in the following documents.
Cover Letter for VSI OpenVMS Version 8.4-2
Software Product Descriptions included with your distribution kit
VSI OpenVMS Version 8.4-2 Release Notes
VSI OpenVMS Cluster Systems
Guidelines for OpenVMS Cluster Configurations
Be sure to consult your network or system manager as well.
4.3. Mixed Version and Architecture Cluster Systems
VSI and HPE provide support for specific configurations of mixed-version and mixed-architecture (HPE Alpha/HPE Integrity) OpenVMS Cluster systems. These support options include: Warranted Support and Migration Support.
Warranted Support means that the installation has been fully qualified and the specified versions can coexist in an OpenVMS Cluster and the support contract will address all problems identified by customers using this configuration.
Migration Support means that the versions have been qualified for use together in configurations that are migrating in a staged fashion to a newer version of OpenVMS. Problem reports submitted against these configurations will be answered by support. However, in exceptional cases, support may request that you move to a Warranted configuration as part of the problem resolution. Migration Support helps customers move to Warranted OpenVMS Clusters.
4.4. Single Architecture Cluster Support
The following matrix shows the versions of OpenVMS that may coexist and the type of support they qualify for.
| V8.2 | V8.2-1 | V8.3 and V8.3-1H1 | V8.4 | V8.4-1H1 and V8.4-2 | |
|---|---|---|---|---|---|
|
V8.2 |
Warranted |
Warranted |
Migration |
Migration |
Migration |
|
V8.2-1 |
Warranted |
Warranted |
Migration |
Migration |
Migration |
|
V8.3 and V8.3-1H1 |
Migration |
Migration |
Warranted |
Migration |
Migration |
|
V8.4 |
Migration |
Migration |
Migration |
Warranted |
Warranted |
|
V8.4-1H1 and V8.4-2 |
Migration |
Migration |
Migration |
Warranted |
Warranted |
4.5. Mixed Architecture Cluster Support
The following matrix shows the versions and architectures of OpenVMS that may coexist and the type of support they qualify for.
| Alpha V7.3-2 | Alpha V8.2 | Alpha V8.3 | Alpha V8.4 | |
|---|---|---|---|---|
|
I64 V8.2 |
Warranted |
Warranted |
Migration |
Migration |
|
I64 V8.2-1 |
Warranted |
Warranted |
Migration |
Migration |
|
I64 V8.3 and V8.3-1H1 |
Migration |
Migration |
Warranted |
Migration |
|
I64 V8.4 |
Migration |
Migration |
Migration |
Warranted |
|
I64 V8.4-1H1 and V8.4-2 |
Migration |
Migration |
Migration |
Warranted |
Note
Only two architectures are supported in the same OpenVMS Cluster.
System disks are architecture specific and can be shared only by systems of the same architecture. An HPE Alpha and HPE Integrity system, or an HPE Alpha and VAX system, cannot boot from the same system disk. However, cross-architecture satellite booting is supported between an HPE Alpha and VAX system. When you configure an OpenVMS Cluster to take advantage of cross-architecture booting, make sure that at least one system from each architecture is configured with a disk that can be used for installations and upgrades. For more information, see the Guidelines for OpenVMS Cluster Configurations and VSI OpenVMS Cluster Systems.
4.6. Required OpenVMS Cluster Information
If during the installation you answer YES to the system prompt asking whether your system will be a member of an OpenVMS Cluster, you need to provide the following information after you boot the system disk:
| Required Information | Explanation |
|---|---|
|
Type of configuration |
Configuration types (CI, DSSI, SCSI, local area, or mixed-interconnect) are distinguished by the interconnect device that the VAX, HPE Alpha, or HPE Integrity server computers in the OpenVMS Cluster use to communicate with one another. HPE Integrity servers do not support CI, DSSI, or MEMORY CHANNEL devices. |
|
DECnet node name and node address |
To obtain the DECnet node name and node address for the computer on which you are installing the VSI OpenVMS operating system, consult your network or system manager. If you install DECnet-Plus for OpenVMS (Phase V) software and do not plan to use DECnet Phase IV for OpenVMS addresses, then you do not need to provide this information. |
|
Allocation class value |
During the installation procedure, you might be asked for the allocation class value (ALLOCLASS) of the computer on which you are installing the VSI OpenVMS operating system. For example:
In an OpenVMS Cluster environment, the allocation class value cannot be zero if the node serves DSSI or CI disks to other cluster members, or if volume shadowing will be used on this system or in the cluster. In either case, the ALLOCLASS value must be a number from 1 to 255 and cannot be a number in use by another system in the cluster. After you enter the allocation class value, the installation procedure uses it to automatically set the value of the ALLOCLASS system parameter. VSI recommends that you thoroughly review the chapter on cluster storage devices in the VSI OpenVMS Cluster Systems manual. This manual also includes the rules for specifying allocation class values. |
|
Whether you want a quorum disk |
To help you determine whether you need a quorum disk in the cluster, see the VSI OpenVMS Cluster Systems manual. |
|
Location of the page and swap files |
On a non-clustered system, the page and swap files are on one or more local disks, but on a clustered system, the files might be on one or more local or clustered disks. See the VSI OpenVMS Cluster Systems manual to help you determine where the page and swap files will be located for the system on which you are installing the VSI OpenVMS operating system software. |
|
Systems that will be a MOP server?, disk server, or tape server |
If you are going to set up either a local area or a mixed-interconnect cluster, you need to make these determinations. |
|
Cluster group number and cluster password? |
If you are going to set up a local area or mixed-interconnect
cluster that is LAN-based (Gigabit Ethernet), use the following rules to
determine the cluster group number and password:
|
4.7. Dismounting the Target System Disk in the Cluster
Before installing VSI OpenVMS on a target drive in an OpenVMS Cluster, make sure the target system disk is not mounted elsewhere in the cluster. The target system disk must be dismounted clusterwide (except on the system from which the installation is being performed) and must remain so during the installation. For instructions on dismounting cluster disks, see Section 5.4.
4.8. Finishing the Before Cluster Install Tasks
After you have completed all the tasks in this chapter, go to Part II to begin the installation.
Chapter 5. Before Clustered System Upgrade
This chapter describes how to prepare to upgrade in an OpenVMS Cluster environment. If you are not upgrading in an OpenVMS Cluster environment, go to Chapter 7.
5.1. Before Clustered Upgrade Tasks
Note
Be sure you have performed the tasks described in Chapter 3 before you upgrade your OpenVMS Cluster system.
Use the checklist below to ensure that you perform all necessary tasks prior to upgrading your system in an OpenVMS Cluster environment.
| TASK | SECTION | |
|---|---|---|
|
|
Review relevant OpenVMS Cluster documentation. | Section 5.2 |
|
|
Familiarize yourself with mixed-version, mixed-architecture, and migration support in OpenVMS Cluster systems. | Section 5.3 |
|
|
Perform the preliminary tasks required for the type of upgrade: | |
|
- CONCURRENT upgrade. | ||
|
- ROLLING upgrade. | ||
|
|
Begin the upgrade. | Part II |
5.2. Cluster Documentation to Review
When you upgrade the operating system in an OpenVMS Cluster environment, be sure you review any relevant OpenVMS Cluster information contained in the following documents.
Cover Letter for VSI OpenVMS Version 8.4-2
Software Product Descriptions included with your distribution kit
VSI OpenVMS Version 8.4-2 Release Notes
VSI OpenVMS Version 8.4-2 New Features and Documentation Overview
VSI OpenVMS Cluster Systems
Guidelines for OpenVMS Cluster Configurations
Be sure to consult your network or system manager as well.
5.3. Mixed-Version Support in a Cluster
HPE and VSI provide two levels of support for mixed-version and mixed-architecture OpenVMS Cluster systems: Warranted support and Migration support.
For details refer to the Section 4.3.
For information about valid upgrade paths, see Section 3.3.1.
Note
VSI OpenVMS Version 8.4-2 does not currently require any patch kits to be installed on your system prior to introducing it into an existing OpenVMS Cluster.
Before adding a new system running VSI OpenVMS Version 8.4-2 to an existing OpenVMS Cluster configuration, all existing nodes in the cluster must be running compatible versions of VSI OpenVMS or HPE OpenVMS. Any node in the cluster that is running an older version of OpenVMS must be upgraded appropriately before you can add a Version 8.4-2 node.
Alternatively, any HPE Integrity node that needs to be upgraded can be removed temporarily from the cluster and added back after it has been upgraded. This allows you to form a supported cluster immediately, adding nodes back into the cluster as they are upgraded.
Note
Depending on the number of nodes being added, you might need to adjust the EXPECTED_VOTES system parameter to reflect the number of voting nodes and any quorum disk votes (if a quorum disk is being used). In addition, for any node being removed from the cluster, you should specify the REMOVE_NODE option during system shutdown so that the quorum for the remaining nodes is correctly adjusted.
5.4. Types of Upgrades
Two types of cluster upgrades are available: a CONCURRENT upgrade and a ROLLING upgrade. The type of upgrade you use depends on whether you want to maintain the availability of the cluster during the upgrade and whether you have more than one system disk.
5.4.1. CONCURRENT Upgrade
During a concurrent upgrade, you must shut down the entire cluster and upgrade each system disk. No one can use the cluster until you upgrade each system disk and reboot each computer. When the cluster reboots, each computer will run the upgraded version of the OpenVMS operating system.
If all systems in the OpenVMS Cluster environment are booted from one system disk, you must perform a concurrent upgrade.
To prepare for a concurrent upgrade, follow these steps:
Log in locally to the SYSTEM account.
If you have more than one system disk, make sure that you have performed the preupgrade tasks on each system disk that you are upgrading. Make sure the target system disk is not mounted on any other node in the cluster and remains dismounted during the upgrade. It should be mounted only on the system that is performing the upgrade. Then go to Part II and perform an upgrade on each system disk. You do not have to reboot the operating system media for each upgrade. You only need to choose option 1 on the menu for each upgrade.
Shut down all systems by entering the following command on each system (satellite nodes first, then the boot nodes):
$@SYS$SYSTEM:SHUTDOWNWhen the procedure asks whether an automatic system reboot should be performed, enter N (NO).
After all satellite nodes have shut down, select the CLUSTER_SHUTDOWN option.
When the shutdown procedure is finished on all nodes, halt each system by either pressing Ctrl/P or Halt.
If you have only one system disk for your cluster, go to Part II to begin the upgrade procedure.
After the upgrade is complete, you are instructed to reboot each computer in the OpenVMS Cluster environment before beginning other postupgrade procedures.
5.4.2. ROLLING Upgrade
A rolling upgrade allows you to have a mixed-version cluster. During a rolling upgrade, you keep some of the computers in the cluster running and available while you upgrade others. You must have more than one system disk. You upgrade each system disk individually, allowing old and new versions of the operating system to run together in the same cluster.
For additional compatibility issues and restrictions information, see the VSI OpenVMS Version 8.4-2 Release Notes.
The following restrictions apply to rolling upgrades:
The system being upgraded must not attempt to access any disk that is being accessed by one or more of the remaining OpenVMS Cluster systems.
The remaining OpenVMS Cluster systems must not attempt to access the target disk of the system being upgraded.
If the target disk being upgraded is locally attached to the system performing the upgrade, then it is not accessible to the remaining OpenVMS Cluster systems. (The OpenVMS system booted from the operating system media does not MSCP serve local disks.) VSI recommends that, whenever possible, you perform the upgrade on a local disk or that you perform a concurrent upgrade.
Warning
Any attempt to access the target system disk from the remaining OpenVMS Cluster members will corrupt the target disk. Even if the target system disk is mounted only by a remaining cluster member and no file access is performed, the target disk will probably be corrupted. If a disk is corrupted in this way, the only supported recovery is to restore the backup copy of the corrupted disk.
VSI recommends that all HPE Alpha computers in a cluster run the same (preferably the latest) version of the HPE OpenVMS Alpha operating system, and that all HPE Integrity servers run the same version of the VSI OpenVMS operating system.
You cannot perform a rolling upgrade if all systems boot from a single system disk. Perform a concurrent upgrade instead.
The upgrade procedure affects the queuing system as follows:
The queuing system is not active on the system you are upgrading; do not attempt to execute a START/QUEUE/MANAGER command.
You cannot create a queue database on the operating system CD/DVD (because it is not writable).
The queue manager process on other nodes in the cluster can continue to run during the upgrade if the queue database is not on the disk being upgraded.
To prepare for a rolling upgrade, follow these steps:
Log in to any node where the target disk is mounted as a data disk rather than as the system disk. (That disk must be the one on which you already performed the pre-upgrade tasks described in Chapter 3.)
Check the votes and make adjustments to maintain the proper quorum so the cluster can continue to operate throughout the upgrade. (VSI OpenVMS Cluster Systems describes this procedure in detail.)
Use the DCL command
DISMOUNT/CLUSTERto dismount the data disk. (You can also perform this operation using the SYSMAN utility.)Note that you can ignore messages from nodes where the specified data disk is being used as the system disk.
Verify that the data disk has been dismounted successfully by entering the following commands:
$MCR SYSMANSYSMAN>SET ENVIRONMENT/CLUSTERSYSMAN>DO SHOW DEVICEdisk-nameExamine the display to be sure the disk is not mounted on any nodes as a data disk. Noting the value listed in the Trans Count field can help you make that determination: A value of less than 50 indicates that the disk is mounted as a data disk rather than as the system disk; a much larger value (for example, 300) indicates that the disk most likely is the system disk.
If the disk is still mounted on any nodes as a data disk, use the SYSMAN utility to dismount the disk; otherwise, exit the SYSMAN utility.
- Use the following command to shut down any nodes that boot from the system disk you are upgrading (shut down satellite nodes first):
$@SYS$SYSTEM:SHUTDOWNWhen the procedure asks whether an automatic system reboot should be performed, enter N (NO).
After all satellite nodes have shut down, select the REMOVE_NODE option.
If a proper quorum is not maintained at any time during the upgrade procedure, the shutdown procedure hangs the cluster. If the cluster hangs during a shutdown, you can use the Interrupt Priority C (IPC) facility to adjust quorum from the system console of a system that is still a cluster member.
From an HPE Alpha cluster member, press Ctrl/P. The IPC facility displays help information about IPC commands. Enter the commands at the console:
$Ctrl/P>>>D SIRR C>>>CInterrupt Priority C Commands: C device Cancel Mount Verification Q Adjust Quorum CTRL-Z Exit IPC CTRL-P Prompt for CrashIPC>QIPC>Ctrl/Z
$Ctrl/PInterrupt Priority C Commands: C device Cancel Mount Verification Q Adjust Quorum CTRL-Z Exit IPC CTRL-P Prompt for CrashIPC>QIPC>Ctrl/Z
You can also adjust quorum using Availability Manager. The method is equivalent to that used by IPC except you do not have to use the console (this assumes the Data Analyzer is running on a system outside the OpenVMS Cluster, which is recommended). For more information, see the “Adjust Quorum” section in the VSI Availability Manager User's Guide.
After the shutdown procedure is finished on all nodes, go to Part II to begin the upgrade procedure.
Caution
During the upgrade it is very important that the system disk being upgraded is accessed only by the node on which the upgrade is being performed. If the disk can be accessed from other nodes in the cluster, for example, through an HSC or HSJ device, you must ensure that this does not happen. Even if the disk is only mounted and no file access is performed, the disk can still become corrupted.
Ensure that any users who might mount disks know that they must not access the system disk being upgraded. Also make sure that any procedures that might mount the disk do not run during the upgrade. If you have automatic procedures that periodically check and remount disks, it would be wise to disable them during the upgrade.
5.5. Finishing the Before Cluster Upgrade Tasks
After you have completed all the tasks in this chapter, go to Part II to begin the installation.
Part II. During Installation or Upgrade
This part of the manual covers the actual installation or upgrade process. Use this part to follow along with your activity and to locate any additional details you may require along the way.
Before starting the procedures described in this chapter, be sure to review and perform as necessary, the BEFORE installation or upgrade steps listed in Part I of this manual.
The following sections provide examples of booting the distribution media from DVD and also from an Infoserver utility located on another system within your LAN.
Greater details of booting methods and Infoserver setup are located in Part IV of this manual.
Chapter 6. INSTALLATION Procedure
This chapter explains how to INSTALL the OpenVMS operating system from a local DVD drive or via a network Infoserver.
6.1. Booting the VSI OpenVMS Distribution Media
The VSI OpenVMS Version 8.4-2 distribution DVD includes procedures and tools that enable you to install, upgrade and configure the operating system. These tools become available once you boot the distribution media (DVD or Network Infoserver boot).
6.1.1. Booting from a Local DVD Drive
Boot the VSI OpenVMS OE DVD from a local DVD drive by performing the steps included in this section. To boot the DVD on a cell-based server, a DVD device must be accessible by the nPartition on which OpenVMS is being installed and console commands must be issued from the console of that nPartition.
Make sure your server is powered on. If your system has an attached external device, make sure it is turned on and operational.
Insert the DVD into the drive.
Cycle power (so the firmware will mount the DVD).
From the main UEFI boot menu, select the appropriate entry for your DVD from the boot options list. The UEFI boot menu is timed; press any key to stop the timeout count.
For some systems, the boot option to select is the Internal Bootable DVD option. If that option is not listed in your UEFI boot menu, move to the Boot From a File menu item and select the Removable Media Boot option, if present.
Alternatively (and this method is recommended for cell-based servers), boot the DVD drive from the UEFI Shell prompt by entering the command shown in the following example, where fsn: corresponds to the servers DVD drive (such as fs0:). If you have navigated to a particular file system, the UEFI Shell prompt reflects that file system; for example, if the current file system is fs0:, the UEFI Shell prompt is fs0:>.
Shell>fsn:\efi\boot\bootia64.efiTo determine which device is the bootable DVD drive, examine the list of mapped devices and look for an fs device listing that includes the letters “CDROM”, as in the following line. In this line, fs
nis the file system associated with the drive, which is usually fs0: (instead of "fsn", you might see something similar to "V8.4-2"; instead of Ata, you might see Scsi, depending on the server model):fsn: Acpi(HWP0002,400)/Pci(4|1)/Ata(Primary,Master)/CDROM(Entry0)You can use the following command to display the mapping of various UEFI device names to OpenVMS device names, where fsn is the device you want to check (such as fs0:):
Shell>fsn:\efi\vms\vms_show dev -fsOn most HPE Integrity servers, the DVD drive is DQA0: (IDE) or DNA0: (USB). On systems that include a SCSI bus, the DVD drive is typically DKA0:. For more information about the
vms_showcommand, see the VSI OpenVMS System Management Utilities Reference Manual.Note
By default, certain versions of UEFI might interpret the Delete (or Backspace) key differently than do OpenVMS Alpha systems or Microsoft Windows computers. In such cases, press Ctrl/H to delete the last character entered. For more information, see Section 9.1.3.
Note
When booting OpenVMS from the installation DVD for the first time on any OpenVMS HPE Integrity server system with a SAN storage device, you might experience a delay in UEFI initialization because the entire SAN is scanned. Depending on the size of the SAN, this delay might range from several seconds to several minutes.
6.1.2. Booting from a Network InfoServer Utility
To use the InfoServer utility to boot over a network, certain configuration steps are required initially (one time only); see Section 9.17. The instructions on booting over the network from a virtual DVD are also included in that section.
6.2. Performing the INSTALLATION
After booting the distribution media, you can create an operating system disk by using Option 1 of the Installation Menu.
6.2.1. Responding to Installation Prompts
At different points during the installation, you must respond to prompts that ask for specific information. This manual and the help text available during the installation procedure tell you how to obtain most of this information and how to make decisions when responding to specific prompts.
To repeat an explanation provided by the installation procedure, type a question mark (? ) at the prompt. To change or correct a response made to an earlier question, enter the caret (^) character as many times as needed. Entering this character might take you back more than one question. To return to the main menu, press Ctrl/Y, which aborts the installation.
VSI recommends that you review the following summary before you begin the installation so that you understand beforehand the types of information you need to provide.
During the installation, you will be prompted to supply the following information:
Name of the target drive, and LAN device(if booting via InfoServer).
Whether you want to INITIALIZE or PRESERVE the target disk(as described in Section 6.3.1).
Volume label for the target disk (or default label).
Password for the SYSTEM account.
Whether to form or join a OpenVMS Cluster and, if so, what kind (described in Section 4.6).
DECnet node name and address (or values for the system parameters, SCSNODE and SCSSYSTEMID).
Note
If you install the DECnet-Plus for OpenVMS, but you want to use addresses compatible with DECnet Phase IV software, you still need to provide this information. These settings identify your system by name and number in a DECnet or cluster environment. If you supply a DECnet Phase IV address, the SCSSYSTEMID value will be automatically calculated. This should be coordinated with your network or system manager to avoid use of conflicting addresses.
Product Authorization Keys (PAKs) for your OpenVMS licenses. To register your licenses, you must enter the information listed on the PAK for each license. You may register your licenses after installing OpenVMS.
Optional components that you want to install. You can install all components (by default), or you can select components from this list:
DECwindows Motif for OpenVMS (G)
If you install this product, you must also include the DECwindows Server Support component. If you are not installing DECwindows as part of the OpenVMS installation now, but you plan to install it later, install the DECwindows Server Support component now.
TCP/IP Services for OpenVMS
Either DECnet-Plus for OpenVMS or DECnet Phase IV for OpenVMS (but not both)
If you install either DECnet implementation, you must also include the Support for DECnet component. If you are not installing DECnet-Plus or DECnet Phase IV now, but you plan to install one of them later, you should install the Support for the DECnet-Plus or DECnet Phase IV component now. (The same support component applies to both implementations of DECnet.)
For a list of component options included with the OpenVMS operating system, see Example 6.1.
6.3. Using the VSI OpenVMS Installation Menu
Recognizing that most installers will prefer to reference the on-screen Installation Menu, as opposed to a large document, the following sections show the menu as it will appear, with pointers to additional details in case you encounter a step or prompt that is not obvious to you. After you have installed OpenVMS once, you are less likely to require this manual, but we have tried to organize it in a way that it will still provide a useful quick-reference if needed.
The examples provided are from an HPE Integrity Server installation using the UEFI console environment.
The OpenVMS Installation Menu displays automatically when you boot the operating system from the distribution media. From the Installation Menu, you can choose options to perform specific tasks.
Readers can skim through the following descriptions, or if preferred, go directly to a step-by-step example in Section 6.3.8
The following is a sample display of the OpenVMS Installation Menu:
***************************************************************
You can install or upgrade the OpenVMS operating system
or you can install or upgrade layered products that are included
on the OpenVMS distribution media (DVD).
You can also execute DCL commands and procedures to perform
"standalone" tasks, such as backing up the system disk.
Please choose one of the following:
1)Upgrade, install or reconfigure OpenVMS Version 8.4-2
2)Display layered products that this procedure can install
3)Install or upgrade layered products
4)Show installed products
5)Reconfigure installed products
6)Remove installed products
7) Find, Install or Undo patches; Show or Delete recovery data
8)Execute DCL commands and procedures
9)Shut down this system
Enter CHOICE or ? for help: (1/2/3/4/5/6/7/8/9/? )The following sections (Option 1 through Option 9) describe each of the main menu options in the order listed. Refer to these sections as needed.
6.3.1. OPTION 1: Upgrade, install or reconfigure OpenVMS
Select Option 1 on the main Installation Menu to upgrade, install or reconfigure your OpenVMS software. Selecting Option 1 implements a PCSI utility concept called a platform.
The VSI OpenVMS platform contains System Integrated Products (SIP's) that may be automatically installed and optional products for which you will be prompted whether to install. Refer to the Software Product Description for details regarding product versions.
The current platform includes the following products:
The VSI OpenVMS Base Operating Environment
Common Data Security Architecture (CDSA)
Common Internet File System (CIFS)
DECnet-Plus (optional)
DECnet Phase IV (optional)
DECprint Supervisor (DCPS)
DECram
DECwindows Motif (optional)
Distributed Computing Environment Runtime (DCE)
J2SE Development Kit for Java (JDK)
Kerberos Encryption
NetBeans Suite (Distributed NetBeans and Plug-ins)
OPC Transport for HPE Integrity servers
OpenVMS Enterprise Directory
OpenVMS I18N
Performance Data Collector (TDC)
Secure Sockets Layer (SSL)
TCP/IP Services for OpenVMS
WBEM/CIM
WBEM Providers
- Web Server Suite, including:
Secure Web Server
Secure Web Browser
CSWS_Java (Tomcat)
CSWS_Perl (mod_Perl)
CSWS_PHP (mod_PHP)
Perl
Mozilla Firefox
- Web Services Toolkit, including:
ANT (Another Neat Tool)
AXIS2
SOAP Toolkit (Simple Object Access Protocol)
UDDI Client Toolkit
Web Services Integration Toolkit (WSIT)
XML C++
XML Java
If you are installing the VSI OpenVMS High Availability Operating Environment (HAOE) you will receive the contents of the base environment listed above, as well as the following products:
Availability Manager
gWLM Agent
RMS Journalling for OpenVMS
Volume Shadowing for OpenVMS
VMS Cluster Client
VMS Cluster Software
Including the optional products in the OpenVMS platform allows you to install or upgrade these products along with the operating system.
When you choose to upgrade the system disk, and the software on the disk is the same version, you are given options to reinstall or to reconfigure the system or reconfigure the OpenVMS platform.
Caution
Before installing or upgrading VSI OpenVMS on a target drive in an OpenVMS Cluster, make sure the target system disk is not mounted elsewhere in the cluster. The target system disk must be dismounted clusterwide (except on the system from which the installation or upgrade is being performed) and must remain so during the installation or upgrade.
When you select Option 1 on the Installation Menu, the system asks whether you want to preserve or initialize the system disk. The display is similar to the following:
There are two choices for Installation/Upgrade:
INITIALIZE - Removes all software and data files that were
previously on the target disk and installs VSI OpenVMS.
PRESERVE -- Installs or upgrades VSI OpenVMS on the target disk
and retains all other contents of the target disk.
* Note: You cannot use PRESERVE to install VSI OpenVMS on a disk on
which any other operating system is installed. This includes
implementations of OpenVMS for other architectures.
Do you want to INITIALIZE or to PRESERVE? [PRESERVE]6.3.1.1. INITIALIZE Option
When you specify the INITIALIZE option, the following operations take place:
All software and data files that already exist on the target disk are removed. The software can only be recovered from a backup of the disk, so make sure that you either have a backup or will not need the data again.
The operating system is installed.
Specify the INITIALIZE option and perform a full installation under any of the following conditions:
If your computer is new (it has never had any version of any operating system running on it, including factory-installed software).
If your computer is already running a version of the OpenVMS operating system and you want to overwrite the entire contents of the system disk (the operating system, application software, and any user files on the system disk).
If you want to keep an existing system disk and install OpenVMS on a different disk.
If you are running the OpenVMS operating system but cannot upgrade. For example, if you changed the names of system directories on the system disk, the upgrade procedure will not work correctly. Therefore, unless you restore the system disk to its original directory structure, you must reinstall the operating system using the INITIALIZE option.
Note
During initialization of VSI OpenVMS the installation process creates a diagnostic partition, visible only at the console prompt. For more information about this partition and options you can take, see Appendix C.
6.3.1.2. PRESERVE Option
When you specify the PRESERVE option, the following operations take place:
| IF ... | THEN ... |
|---|---|
|
The OpenVMS operating system is not already installed on the target disk and no other operating system is installed on the disk |
|
|
The OpenVMS operating system is installed on the target disk |
The operating system is upgraded, as follows:
|
Note
You cannot install VSI OpenVMS on a disk where another operating system is installed. For example, you cannot take a UNIX disk, select the PRESERVE option, and then install OpenVMS on the disk. The UNIX disk is not structured in the format that OpenVMS requires.
If you intend to choose the PRESERVE option (because there are certain files on the disk that you want to retain), VSI recommends that you first make a backup copy of your system disk. If there is any problem during the installation or upgrade that might affect the integrity of the disk, you will have the backup copy as a safeguard.
RECONFIGURE the operating system if you want to change the options you selected when the operating system was installed.
REINSTALL the operating system if you think that your system files have become corrupted.
6.3.2. OPTION 2: Display layered products that this procedure can install
Use Option 2 to display the layered products and patch kits that can be installed. Generally speaking, products that can be installed or upgraded along with the operating system, should be.
Note
Although Option 2 displays any patch kits available on the distribution media, VSI recommends using Option 7 to display patch kits; Option 7 enables you to specify locations to search in addition to the standard location.
In the following example, WBEMCIM is the file name used in the PCSI kit for the WBEM Services for OpenVMS product. CIM stands for the Common Information Model, which differentiates the current OpenVMS WBEM product from the original one that is based on the Simple Network Management Protocol (SNMP). The version numbers in this example do not necessarily reflect the version numbers of the products actually shipped with VSI OpenVMS Version 8.4-2.
The following versions of the OpenVMS operating system,
required components and other optional products
are available on the VSI OpenVMS distribution media DVD.
They can be installed by selecting Option 1:
VSI I64VMS OpenVMS Version 8.4-2
VSI I64VMS AVAIL_MAN_BASE V8.4-2
VSI I64VMS CDSA version V2.4
VSI I64VMS KERBEROS version V3.2
VSI I64VMS SSL V1.4-284
VSI I64VMS TDC_RT version V2.3-20
VSI I64VMS BINARYCHECKER version V1.0
VSI I64VMS WBEMCIM version V2.9-9
VSI I64VMS WBEMPROVIDERS version V2.2-3
VSI I64VMS DWMOTIF version V1.7
VSI I64VMS DECNET_PLUS version V8.4-2
VSI I64VMS DECNET_PHASE_IV version V8.4-2
VSI I64VMS TCPIP version V5.7
The following Layered Product kits are available on the VSI OpenVMS
Distribution media (DVD).They can be installed by selecting
Option 3.If they are already installed, they can be reconfigured
by selecting Option 5, or removed by selecting Option 6.
----------------------------------- ----------- ----------
PRODUCT KIT TYPE KIT FORMAT
----------------------------------- ----------- ----------
VSI I64VMS AVAIL_MAN_BASE V8.4-2 Full LP Compressed
VSI I64VMS CDSA V2.3-306 Full LP Compressed
VSI I64VMS DECNET_PHASE_IV V8.4-2 Full LP Compressed
VSI I64VMS DECNET_PLUS V8.4-2 Full LP Compressed
VSI I64VMS DWMOTIF V1.7 Full LP Compressed
VSI I64VMS HPBINARYCHECKER V1.0 Full LP Compressed
VSI I64VMS DWMOTIF_SUPPORT V8.4-2 Full LP Compressed
VSI I64VMS KERBEROS V3.1-152 Full LP Compressed
VSI I64VMS SSL V1.4-284 Full LP Compressed
VSI I64VMS TCPIP V5.7 Full LP Compressed
VSI I64VMS TDC_RT V2.3-1 Full LP Compressed
VSI I64VMS WBEMCIM V2.91-A070728 Full LP Compressed
VSI I64VMS WBEMPROVIDERS V2.0-31 Full LP Compressed
----------------------------------- ----------- ----------
13 items found
Press Return to continue...6.3.3. OPTION 3: Install or upgrade layered products
Use Option 3 on the Installation Menu for normal installations or upgrades of layered products.
Note
Although Option 3 installs any patch kits available from the VSI OpenVMS distribution media, VSI recommends using Option 7 to install patch kits; Option 7 enables you to install patch kits that are not located in the standard location. In addition, Option 7 saves recovery data; when you use Option 7 to remove patch kits, only kits with recovery data are removed.
You can use Option 1 to install or upgrade the DECwindows graphical user interface and networking products along with the operating system.
When you select Option 3, the PCSI utility allows you to choose whether to install layered products or to register layered products that are on the target disk but are not in the Product Database. If you attempt to reinstall the same version of a product that is already installed, the product is reinstalled. Any patches that were applied to the product are removed. If you want to reconfigure, select the RECONFIGURE (Option 5) on the Installation Menu.
Most of the software kits included on the VSI OpenVMS distribution media are signed using Secure Delivery. When you use Option 3 of the Installation Menu, these kits are validated by the PCSI utility. You can install kits created before the secure delivery process was enabled in HPE OpenVMS Version 8.3. However, after you install or upgrade to OpenVMS Version 8.3 or later, signed kits that you install subsequently are validated, including any signed kits included on the distribution media.
The DCL command PRODUCT SHOW HISTORY displays the validation
status of these kits as unsigned rather than as a validated
kit.
As shown in the following example, you are also prompted for a target disk and asked whether you want brief or detailed descriptions. The procedure presents a list of products and allows you to select any or all of these products. Alternatively, you can exit without installing or upgrading any products.
*********************************************************** The procedure will ask a series of questions. () - encloses acceptable answers [] - encloses default answers Type your response and press the <Return> key.Type: ? - to repeat an explanation ^ - to change prior input (not always possible) Ctrl/Y - to exit the installation procedure Do you want to INSTALL or REGISTER? (INSTALL/REGISTER/? ) [INSTALL]INSTALL*********************************************************** If you choose to install or upgrade DECwindows Motif, please note the following: o If you did not select the DECwindows server support and workstation files options, DECwindows Motif will not run. You must add these options to use DECwindows Motif. If you choose to install or upgrade DECnet-Plus or DECnet Phase IV, please note the following: o If you did not select the DECnet option, neither version of DECnet will run.You must add this option to use DECnet. If you want to install a patch kit, please use main menu option 7. Press Return to continue... You must enter the device name for the target disk on which the layered product(s) installation will be performed. Enter device name for target disk: [DKB300] (? for choices)DKB300DKB300: is labeled V84SYS. The install operation can provide brief or detailed descriptions. In either case, you can request the detailed descriptions by typing "? ". Do you always want detailed descriptions? (Yes/No) [No]NO1 - VSI I64VMS AVAIL_MAN_BASE V8.4-2 Layered Product 2 - VSI I64VMS CDSA V2.4 Layered Product 3 - VSI I64VMS DECNET_PHASE_IV V8.4-2 Layered Product 4 - VSI I64VMS DECNET_PLUS V8.4-2 Layered Product 5 - VSI I64VMS DWMOTIF V1.7 Layered Product 6 - VSI I64VMS DWMOTIF_SUPPORT V8.4-2 Layered Product 7 - VSI I64VMS BINARYCHECKER V1.0 Layered Product 8 - VSI I64VMS KERBEROS V3.2 Layered Product 9 - VSI I64VMS SSL V1.4-284 Layered Product 10 - VSI I64VMS TCPIP V5.7 Layered Product 11 - VSI I64VMS TDC_RT V2.3-20 Layered Product 12 - VSI I64VMS WBEMCIM V2.99 Layered Product 13 - VSI I64VMS WBEMPROVIDERS V2.2-3 Layered Product 14 - All products listed above ? - Help E - Exit Choose one or more items from the menu separated by commas:9
Note
When you boot the VSI OpenVMS distribution media and select the option to install layered products, the installation procedure for the selected layered product(s) does not run the Installation Verification Procedure (IVP) for layered products. Because the operating system is booted from the distribution media and the layered products are installed on a different device (the target drive), the IVPs cannot execute correctly. However, you can run the IVP for each layered product after you boot the target system (see the layered product installation documents for information about running their IVP).
6.3.4. OPTION 4: Show installed products
Use Option 4 on the Installation Menu to display a list of products that have been installed on a selected target disk by the PCSI utility. Products that were installed by VMSINSTAL or other installation methods do not appear in this display unless they have been registered in the PCSI utilitys product database.
The following is a sample display of the prompts and information that appear when you select Option 4 and WBEM Services for OpenVMS and WBEM Providers for OpenVMS. The version numbers in this example do not necessarily reflect the version numbers of the products actually shipped with VSI OpenVMS Version 8.4-2.
You must enter the device name for the system disk for which you want to display installed products. If you enter an invalid device or one which is not a system disk an error will occur. (Enter "^" and press Return to return to main menu.) Enter device name for system disk:[DKB300] (? for choices)DKB300%MOUNT-I-MOUNTED, V84SYS mounted on _DKB300: The default is an 80-column display that does not include Maintenance (patches) or Referenced by information. Do you want the full, 132-column display? (Yes/No) [No]NO------------------------------------- ------------ ------------ PRODUCT KIT TYPE STATE ------------------------------------- ------------ ------------ VSI I64VMS AVAIL_MAN_BASE V8.4-2 Full LP Installed VSI I64VMS CDSA V2.3-306 Full LP Installed VSI I64VMS DECNET_PLUS V8.4-2 Full LP Installed VSI I64VMS DWMOTIF V1.7 Full LP Installed VSI I64VMS DWMOTIF_SUPPORT V8.4-2 Full LP Installed VSI I64VMS HPBINARYCHECKER V1.0 Full LP Installed VSI I64VMS KERBEROS V3.1-152 Full LP Installed VSI I64VMS OpenVMS V8.4-2 Platform Installed VSI I64VMS TCPIP V5.7 Full LP Installed VSI I64VMS VMS V8.4-2 Oper System Installed VSI I64VMS SSL V1.4-284 Full LP Installed VSI I64VMS TDC_RT V2.3-1 Full LP Installed VSI I64VMS WBEMCIM V2.91-A070728 Full LP Installed VSI I64VMS WBEMPROVIDERS V2.0-31 Full LP Installed ------------------------------------- ------------ ------------ 12 items found Do you wish to display product history? (Yes/No) [No]YES----------------------------------- ----------- ----------- -------------------- PRODUCT KIT TYPE OPERATION DATE AND TIME ----------------------------------- ----------- ----------- -------------------- VSI I64VMS AVAIL_MAN_BASE V8.4-2 Full LP Install 25-JAN-2015 18:04:23 VSI I64VMS CDSA V2.3-306 Full LP Install 25-JAN-2015 18:04:23 VSI I64VMS DECNET_PLUS V8.4-2 Full LP Install 25-JAN-2015 18:04:23 VSI I64VMS DWMOTIF V1.7 Full LP Install 25-JAN-2015 18:04:23 VSI I64VMS KERBEROS V3.1-152 Full LP Install 25-JAN-2015 18:04:23 VSI I64VMS OpenVMS V8.4-2 Platform Install 25-JAN-2015 18:04:23 VSI I64VMS TCPIP V5.7 Full LP Install 25-JAN-2015 18:04:23 VSI I64VMS VMS V8.4-2 Oper System Install 25-JAN-2015 18:04:23 VSI I64VMS SSL V1.4-284 Full LP Install 25-JAN-2015 18:04:23 VSI I64VMS WBEMCIM V2.91-A070728 Full LP Install 25-JAN-2015 18:04:23 VSI I64VMS WBEMPROVIDERS V2.0-31 Full LP Install 25-JAN-2015 18:04:23 VSI I64VMS TDC_RT V2.3-1 Full LP Install 25-JAN-2015 18:04:23 HP I64VMS AVAIL_MAN_BASE V8.3 Full LP Remove 25-SEP-2009 18:04:23 HP I64VMS CDSA V2.2 Full LP Remove 25-SEP-2009 18:04:23 HP I64VMS DECNET_PHASE_IV V8.3 Full LP Remove 25-SEP-2009 18:04:23 HP I64VMS DWMOTIF V1.6 Full LP Remove 25-SEP-2009 18:04:23 HP I64VMS OpenVMS V8.3 Platform Remove 25-SEP-2009 18:04:23 HP I64VMS VMS V8.3 Oper System Remove 25-SEP-2009 18:04:23 HP I64VMS KERBEROS V3 Transition Remove 25-SEP-2009 18:04:23 HP I64VMS KERBEROS V3 Transition Reg Product 25-SEP-2008 17:20:44 HP I64VMS CDSA V2.1 Full LP Install 27-AUG-2004 21:07:15 HP I64VMS DECNET_PHASE_IV V8.2 Full LP Install 27-AUG-2004 21:07:15 HP I64VMS DWMOTIF V1.5 Full LP Install 27-AUG-2004 21:07:15 HP I64VMS OpenVMS V8.3 Platform Install 27-AUG-2004 21:07:15 HP I64VMS TCPIP V5.4-18 Full LP Install 27-AUG-2004 21:07:15 HP I64VMS VMS V8.3 Oper System Install 27-AUG-2004 21:07:15 ----------------------------------- ----------- ----------- -------------------- 26 items found Press Return to continue...
Note
The products listed in the product history vary from system to system, depending on the actual history of the system.
6.3.5. OPTION 5: Reconfigure installed products
Use Option 5 of the Installation Menu to reconfigure layered products, including the DECwindows graphical user interface and networking products. This allows you to change the product choices you made during a previous installation or upgrade.
You can reconfigure a product only if all of the following conditions are true:
The product is available for installation while your system is booted from the operating system media. For information about displaying products that are available for installation, see Section 6.3.2 (Option 2 on the Installation Menu).
The product is installed. For information about displaying installed products, see Section 6.3.4 (Option 4 on the Installation Menu).
The version of the product that is available for installation is the same as the version of the product that is installed.
When you select Option 5 on the Installation Menu, the procedure prompts you for a target disk name and asks whether you want brief or detailed descriptions about the reconfiguration options. The procedure then lists the products you can configure. You can select any or all of these products, or you can exit without reconfiguring products.
The following is a sample display of the prompts and information that might appear when you select Option 5. The version numbers in this example do not necessarily reflect the version numbers of the products actually shipped with VSI OpenVMS Version 8.4-2.
This procedure will ask a series of questions. () - encloses acceptable answers [] - encloses default answers Type your response and press the <Return> key.Type: ? - to repeat an explanation ^ - to change prior input (not always possible) Ctrl/Y - to exit the installation procedure You must enter the device name for the target disk on which the layered product(s) reconfiguration will be performed. Enter device name for target disk: [DKB300] (? for choices)DKB300DKB300: is labeled V84SYS. The reconfigure operation can provide brief or detailed descriptions. In either case, you can request the detailed descriptions by typing "? ". Do you always want detailed descriptions? (Yes/No) [No]NO1 - VSI I64VMS AVAIL_MAN_BASE V8.4-2 Layered Product 2 - VSI I64VMS CDSA V2.3-306 Layered Product 3 - VSI I64VMS DECNET_PHASE_IV V8.4-2 Layered Product 4 - VSI I64VMS DECNET_PLUS V8.4-2 Layered Product 5 - VSI I64VMS DWMOTIF V1.7 Layered Product 6 - VSI I64VMS DWMOTIF_SUPPORT V8.4-2 Layered Product 7 - VSI I64VMS HPBINARYCHECKER V1.0 Layered Product 8 - VSI I64VMS KERBEROS V3.1-152 Layered Product 9 - VSI I64VMS SSL V1.4-284 Layered Product 10 - VSI I64VMS TCPIP V5.7 Layered Product 11 - VSI I64VMS TDC_RT V2.3-1 Layered Product 12 - VSI I64VMS WBEMCIM V2.91-A070728 Layered Product 13 - VSI I64VMS WBEMPROVIDERS V2.0-31 Layered Product 14 - All products listed above ? - Help E - Exit Choose one or more items from the menu separated by commas:
6.3.6. OPTION 6: Remove installed products
Important
Do NOT remove the following system-integrated products (SIPs):
Availability Manager
CDSA
Binarychecker
Kerberos
SSL
TDC_RT
WBEM Services for OpenVMS (WBEMCIM)
WBEM Providers for OpenVMS
These products are tightly bound with the operating system. Attempts to remove any of these products might not work as expected and can create undesirable side effects.
When you select Option 6, you are prompted for a target disk name and whether you want brief or detailed descriptions about the remove options. The procedure then lists the products you can remove. You can select any or all of these products, or you can exit without removing any products.
The following is a sample display of the prompts and information that appear when you select Option 6. The version numbers in this example do not necessarily reflect the version numbers of the products actually shipped with VSI OpenVMS Version 8.4-2.
This procedure will ask a series of questions. () - encloses acceptable answers [] - encloses default answers Type your response and press the <Return> key.Type: ? - to repeat an explanation ^ - to change prior input (not always possible) Ctrl/Y - to exit the installation procedure You must enter the device name for the target disk on which the layered product(s) removal will be performed. Enter device name for target disk: [DKB300:] (? for choices)DKB300DKB300: is labeled V84SYS. The remove operation can provide brief or detailed descriptions. In either case, you can request the detailed descriptions by typing "? ". Do you always want detailed descriptions? (Yes/No) [No]NO1 - HP I64VMS AVAIL_MAN_BASE V8.3 Layered Product 2 - HP I64VMS CDSA V2.3-306 Layered Product 3 - HP I64VMS DECNET_PHASE_IV V8.3 Layered Product 4 - HP I64VMS DECNET_PLUS V8.3 Layered Product 5 - HP I64VMS DWMOTIF V1.6 Layered Product 6 - HP I64VMS DWMOTIF_SUPPORT V8.3 Layered Product 7 - HP I64VMS HPBINARYCHECKER V1.0 Layered Product 8 - HP I64VMS KERBEROS V3.1-152 Layered Product 9 - HP I64VMS SSL V1.4-284 Layered Product 10 - HP I64VMS TCPIP V5.7 Layered Product 11 - HP I64VMS TDC_RT V2.3-1 Layered Product 12 - HP I64VMS WBEMCIM V2.91-A070728 Layered Product 13 - HP I64VMS WBEMPROVIDERS V2.0-31 Layered Product 13 - All products listed above ? - Help E - Exit Choose one or more items from the menu separated by commas:
6.3.7. OPTION 7: Find, Install or Undo Patches; Show or Delete recovery data
This procedure can perform one of the following operations:
1)Install one or more patches
2)Undo recent patches for which there is recovery data
3)Show recovery data
4)Delete recovery data
5)Find patch kits
Enter CHOICE or X to return to main menu: (1/2/3/4/5/X)Note the following about these options:
When you choose submenu Option 1, the following information is displayed:
NOTE: Some patch kits cannot be correctly installed by this procedure; this includes patch kits for versions of OpenVMS prior to V8.4-2. Patches for VSI OpenVMS V8.4-2 and later install correctly. For patches to other products, check with the patch kit provider, or install the patch from the running system. Options 2 through 5 (undo, show, delete, and find) will work correctly for all patch kits.- When you choose submenu option 1, 2, 3, or 4, you are prompted for the target device on which to perform the operation:
You must enter the device name for the target disk on which the operation will be performed. Enter device name for target disk: (? for choices) [DKB300]
- When you choose submenu Option 1, you are prompted to choose detailed or brief descriptions, as follows:
The patch operation can provide brief or detailed descriptions. In either case, you can request the detailed descriptions by typing ?. Do you always want detailed descriptions? (Yes/No) [No]
- For each of the submenu options (1 through 5), you are prompted for the patch kit source. You can specify alternate locations. You can use wildcards when you specify the location. The prompt and introductory information are displayed as follows:
This procedure will look for patch kits in SYS$SYSDEVICE:[KITS.*] If you want to add an additional location, enter the device and directory specification and press return. Wildcards are allowed. For example: dka100:[dir1] dkb0:[dir1,dir2] dka200:[dir1,*] dkb300:[dir1...] Enter the single letter "D" to reset the default location. If you do not want to add an additional location, just press return without entering anything. Enter additional location, D, or just press Return:
After you provide the necessary information, a PCSI/PRODUCT command automatically performs the operation you requested. If you chose options 1, 2, or 4 from the submenu, the PCSI utility prompts you for additional input and displays additional information.
6.3.7.1. OPTION 8: Execute DCL Commands and Procedures
When you select Option 8 of the Installation Menu, you are allowed to access a subset of DCL commands (such as SHOW DEVICE, MOUNT, and BACKUP) to perform specific preinstallation and maintenance operations. Note, however, that this is a restricted DCL environment in that certain DCL commands (such as PRODUCT) and certain utilities (such as VMSINSTAL) do not function as expected because you are booting from read-only or write-locked distribution media, and because a full system startup has not been performed.
A triple dollar sign prompt ($$$) indicates that you are in this restricted DCL environment, as in the following example:
$$$SHOW DEVICE
To exit the DCL environment and return to the main menu, enter the LOGOUT command.
6.3.7.2. OPTION 9: Shut down this system
When you select Option 9 of the Installation Menu, your system shuts down and you are returned to the console prompt. The system displays a message similar to the following:
Shutting down the system
SYSTEM SHUTDOWN COMPLETE
**** Primary HALTED with code HWRPB_HALT$K_REMAIN_HALTED
**** Hit any key to cold reboot ****
P00>>>6.3.8. STEP-BY-STEP Installation Example
A few seconds after you boot the distribution media DVD, several informational messages will appear, followed by the OpenVMS banner and eventually by the Installation Menu, as shown in the following example:
. . . **************************************************************** You can install or upgrade the OpenVMS I64 operating system or you can install or upgrade layered products that are included on the OpenVMS I64 distribution media (CD/DVD).You can also execute DCL commands and procedures to perform "standalone" tasks, such as backing up the system disk. Please choose one of the following: 1) Upgrade, install or reconfigure OpenVMS I64 Version 8.4-2 2) Display layered products that this procedure can install 3) Install or upgrade layered products 4) Show installed products 5) Reconfigure installed products 6) Remove installed products 7) Find, Install or Undo patches; Show or Delete recovery data 8) Execute DCL commands and procedures 9) Shut down this system Enter CHOICE or ? for help: (1/2/3/4/5/6/7/8/9/? )
To install OpenVMS, follow these steps:
Select Option 1 on the Menu: Respond to the menu prompt by entering 1.
Enter CHOICE or ? for help: (1/2/3/4/5/6/7/8/9/? )1The OpenVMS operating system kit might contain patch kits. If it does, information similar to the following is displayed:
The following PATCH kits are present on the OpenVMS I64 distribution media. ----------------------------------- ----------- ---------- PRODUCT KIT TYPE KIT FORMAT ----------------------------------- ----------- ---------- DEC I64VMS TCPIP_ECO V5.n-nnn Patch Compressed ----------------------------------- ----------- ---------- 1 item found Please consult the OpenVMS I64 Upgrade and Installation Manual, the Release Notes, and the Cover Letter to determine if any or all of these patches may be required for your system.If you have not already done so, determine whether you need to install any patches.
*********************************************************** This procedure will ask a series of questions. () - encloses acceptable answers [] - encloses default answers Type your response and press the <Return>key. Type: ? - to repeat an explanation ^ - to change prior input (not always possible) Ctrl/Y - to exit the installation procedure- Create the System Disk: You can choose to initialize or preserve data on the target disk.
There are two choices for Installation/Upgrade: INITIALIZE - Removes all software and data files that were previously on the target disk and installs OpenVMS I64. PRESERVE -- Installs or upgrades OpenVMS I64 on the target disk and retains all other contents of the target disk. * NOTE: You cannot use preserve to install OpenVMS I64 on a disk on which any other operating system is installed. This includes implementations of OpenVMS for other architectures. Do you want to INITIALIZE or to PRESERVE? [PRESERVE]INITIALIZERespond to the INITIALIZE or PRESERVE prompt as follows:
IF ... THEN ... Your disk is new
Type INITIALIZE and press Enter.
You want to remove all files from an existing system disk
Type INITIALIZE and press Enter.
You want to retain prior OpenVMS files on an existing disk
Type PRESERVE and press Enter.
Note
You cannot install OpenVMS on a disk where another operating system is installed. For example, you cannot take a UNIX disk, select the PRESERVE option, and then install OpenVMS on the disk. The UNIX disk is not structured in the format that OpenVMS requires.
During initialization of an OpenVMS target system disk, the installation process creates a diagnostic partition, visible only at the console prompt.
Specify the System Disk (Target Disk): If you do not know the name of the disk, enter a question mark (? ) to list devices on your system. Select the appropriate disk and respond to the prompt. For example:
You must enter the device name for the target disk on which OpenVMS I64 will be installed. Enter device name for target disk: (? for choices)DKB400If this is the first installation on this system, no default device is indicated, as in this example. A default device name is listed if this is not the first installation (for example, [DKB400] or, for a Fibre Channel disk device, [$1$DGA567]).
If you select a device that is not available or that cannot be used for some other reason, you will see a message indicating why the device cannot be used. For example, if you enter MKA500, a tape device, a message similar to the following is displayed:
MKA500 is not a disk device
Specify the Volume Label: The procedure displays the volume label currently assigned to this device and asks whether you want to keep that label. If you choose not to, you are prompted for a new label, as shown in the following example. OpenVMS uses the volume label to identify and reference the disk.
DKB400: is now labeled V84SYS.Do you want to keep this label? (Yes/No) [Yes]NOEnter volume label for target system disk: [I64SYS]I640842You can keep the label already assigned to the disk, accept the default label assigned by the system (I64SYS), or specify a new volume label (limited to 12 characters, A to Z, 0 through 9, the dollar sign ($), hyphen (-), and underscore (_).
Warning
OpenVMS requires that the volume labels for all disks on your system or OpenVMS Cluster have unique labels. If a disk having the same label as the system disk is mounted, various OpenVMS components do not function as intended or a node might crash during boot.
Specify On-Disk Structure Level: If you enter the volume label for the target disk, you are asked whether you want to initialize the system disk with On-Disk Structure Level 2 (ODS-2) or Level 5 (ODS-5).
The target system disk can be initialized with On-Disk Structure Level 2 (ODS-2) or Level 5 (ODS-5). (? for more information) OpenVMS I64 systems include WBEM Services for OpenVMS; the WBEM data repository requires an ODS-5 disk. If you choose to initialize the target system disk with ODS-5 the repository can be on the system disk; otherwise you will need to provide an additional ODS-5 disk. (? for more information). Do you want to initialize with ODS-2 or ODS-5? (2/5/? )For details about ODS-2 and ODS-5 file systems, see the VSI OpenVMS System Manager's Manual, Volume 1: Essentials. A brief summary follows.
Note
VSI recommends that your system disk be initialized in ODS-5 format, unless you plan to use software that requires ODS-2.
Although WBEM Services for OpenVMS can be installed on an ODS-2 disk, the WBEM Services for OpenVMS data repository requires an ODS-5 disk. A system disk in ODS-5 format can store everything; if you choose to have your disk in ODS-2 format, the procedure asks you to provide an ODS-5 disk for the data repository.
ODS-2 allows for compatibility with OpenVMS VAX and HPE Alpha systems that use ODS-2 disks (as well as HPE Integrity Server systems using ODS-2 disks). Choose ODS-2 if you do not need the new features of ODS-5 disks, including the support of applications ported from other operating systems (such as UNIX, Linux, and Microsoft Windows).
ODS-5 supports file names that are longer, have a wider range of legal characters, and allow for mixed-case file names. This feature permits use of file names similar to those in a Microsoft Windows or UNIX environment.
ODS-5 supports hard links to files, access dates, and files whose names differonly by case.
ODS-5 volumes cannot be mounted on any version of OpenVMS prior to HPE OpenVMS Version 7.2.
Systems running HPE OpenVMS VAX Version 7.2 and higher can mount ODS-5 volumes, but cannot create or access files having extended names. (Lowercase file names are seen in uppercase on OpenVMS VAX systems.)
Select ODS-2 or ODS-5 by entering 2 or 5 at the prompt.
Enable Hard Links (ODS-5 Only): If you select ODS-5, you have the option to enable hard links (if you selected ODS-2, skip to the next step). When you install VSI OpenVMS, the procedure advises you that WBEM Services for OpenVMS does not require hard links, as shown in the following example. Enter YES or NO to indicate your choice.
Hard links can be enabled on ODS-5 disks. WBEM Services for OpenVMS does not require hard links. (? for more information) Do you want to enable hard links? (Yes/No/? )YESBoth ODS-2 and ODS-5 support aliases, which are additional names for a file or directory. Only ODS-5 supports hard links.
One of the differences with hard links enabled is the way the DCL DELETE command works. With hard links enabled, if you enter the DELETE command to delete a file that has one or more aliases associated with it, the command only deletes the alias by which the file is being accessed. The actual file continues to exist and is accessible by any remaining alias. The file is deleted only when the last remaining alias is deleted.
Without hard links enabled, the DELETE command deletes both the alias by which the file is being accessed and the file itself. Any other aliases remain but the file is no longer accessible because it is no longer present. Thus, the remaining aliases are unusable.
If enabling hard links has any drawbacks, they are minor and probably of concern only in rare circumstances. For example, if disk quotas are in effect, though owners of a file can delete any links to a file in a directory they can access, hard links in other users directories might cause a file to be retained, and the file size continues to be charged against that owners disk quota.
In general, be aware that enabling hard links does change the file systems behavior and that applications and management practices should respond accordingly (instead of being alias-specific, for example).
For more information about hard links, see the VSI OpenVMS System Manager's Manual, Volume 1: Essentials.
Confirm Target System Disk Choices: Your target system disk choices are listed and you are asked to confirm that they are correct. In the following example, the choices made were to initialize the disk with ODS-5 and with hard links. The volume label is I640842.
You have chosen to install OpenVMS I64 on a new disk. The target system disk, DKB400:, will be initialized with structure level 5 (ODS-5). Hard links WILL be enabled. It will be labeled I640842. Any data currently on the target system disk will be lost. Is this OK? (Yes/No)YESInitializing and mounting target.... %UEFI-I-VOLINIT, FAT volume DIAGNOSTICS has been initialized Creating page and swap files....Configure and Validate Boot Options .
Boot options in the UEFI Boot Manager boot option menu can provide a convenient way to boot your system. The installation procedure can automatically create a new boot option (if none exists) or validate existing boot options. Do you want to create or validate boot options? (Yes/No) [Yes]YESIf your newly installed system disk will be booted on this system disk, and if you want the installation procedure to assist you in setting up boot options in the UEFI Boot Manager menu, answer YES. The procedure will create and validate a new boot option if one does not exist.
When you answer YES and no boot option exists, the procedure allows you to set OpenVMS boot flags (VMS_FLAGS), as shown in the following example. Enter the OpenVMS flags (for example, 0,1), or press Enter to set no flags (the default). If a boot option exists, you can change boot flags after the installation completes (for information about changing boot flags, see Section 9.4.1).You can set VMS_FLAGS or accept the default, 0,0. Enter the value for VMS_FLAGS: (n,n) [0,0]If you do not want the installation procedure to assist you in setting up or validating boot options on the UEFI console, answer NO.
VSI recommends that you allow the installation procedure to assist you in setting up and validating boot options.
Note
If your newly installed system disk is a Fibre Channel device, VSI recommends that you add it as a boot option in the UEFI boot menu. If you do not allow the installation procedure to add the device to the boot menu, you can add it by using the OpenVMS Boot Manager utility (SYS$MANAGER:BOOT_OPTIONS.COM) after the installation completes. (To add Fibre Channel devices to the UEFI boot menu, use the OpenVMS Boot Manager utility instead of UEFI.)
VSI recommends using the OpenVMS Boot Manager utility to add shadowed system disks in a multiple-member shadow set to the UEFI boot device list and dump device list. Be sure to add all members to both lists.
For information about the OpenVMS Boot Manager utility, see Section 9.4.1. For more information about configuring and booting Fibre Channel devices, see Section 9.23.
Specify SYSTEM Account Information (Initialized Disks Only): If you are initializing the target disk, you are prompted for SYSTEM account information. Before you respond to the prompt asking you to enter a password for the SYSTEM account, note the following:
Passwords must be at least 8 characters in length (but must not exceed 31 characters). Valid characters for the password include A through Z, 0 through 9, the dollar sign ($), and underscore (_). Passwords must contain at least one alphabetic character (A through Z). The system converts all characters to uppercase, so the case of characters you enter does not matter.
Press Enter after you enter the password. (The password does not display as you type it.)
After you enter the password, the procedure checks to make sure it meets the requirements for a valid password.
Reenter the password for verification.
The following is a sample display:
You must enter a password for the SYSTEM account. The password must be a minimum of 8 characters in length, and may not exceed 31 characters. It will be checked and verified. The system will not accept passwords that can be guessed easily. The password will not be displayed as you enter it. Password for SYSTEM account: Re-enter SYSTEM password for verification:If you reenter the password incorrectly or if the password is too easy for another user to guess, an error message is displayed and you must specify a valid password.
Declare OpenVMS Cluster Membership: Determine whether your system will be part of an OpenVMS Cluster. The display is similar to the following:
Will this system be a member of an OpenVMS Cluster? (Yes/No)
Answer YES if the system will be a member of an OpenVMS Cluster. Answering YES, causes SYS$MANAGER:CLUSTER_CONFIG.COM to run automatically when your newly installed system is first booted. The CLUSTER_CONFIG procedure asks further questions about the cluster. Your response to this question determines how the VAXCLUSTER system parameter is set. (The VAXCLUSTER system parameter is set for VSI OpenVMS systems.) For more information, see the Guidelines for OpenVMS Cluster Configurations manual.
If you answer YES to the cluster question, the display is similar to the following:When your new system is first booted you will be required to answer additional questions in order to configure the OpenVMS Cluster.If you answer NO to the cluster question, the system can still be a member of an OpenVMS Cluster. However, in this case you must explicitly configure the node into the cluster after the installation is completed. For more information, see Section 8.7.
For more information about cluster configuration, see the VSI OpenVMS Cluster Systems manual.
Set SCSNODE System Parameter: The procedure now asks you to specify a value for the first of two system parameters, the SCSNODE parameter. (Step 12 describes the output and prompts for the second system parameter, SCSSYSTEMID.) SCSNODE is a name that can be from one to six letters or numbers; it must include at least one letter. If this system is part of an OpenVMS Cluster, SCSNODE must be unique within the cluster. If you are using DECnet Phase IV for OpenVMS or DECnet-Plus for OpenVMS with DECnet Phase IV addresses, then SCSNODE must be the same as your DECnet node name.
The following is an example of the display and a valid response:
For your system to operate properly, you must set two parameters: SCSNODE and SCSSYSTEMID. SCSNODE can be from 1 to 6 letters or numbers.It must contain at least one letter. If you plan to use DECnet, SCSNODE must be the DECnet Phase IV node name, or the DECnet-Plus (Phase V) node synonym. If you have multiple OpenVMS systems, the SCSNODE on each system must be unique. Enter SCSNODE:I64CSIDeclare Use of DECnet; Setting SCSSYSTEMID System Parameter: The next prompt asks whether you plan to use DECnet. It also informs you that the SCSYSYSTEMID system parameter is based on the DECnet Phase IV address. SCSSYSTEMID must also be unique within an OpenVMS Cluster.
If you plan to use DECnet, SCSSYSTEMID must be set based on the DECnet Phase IV address. Do you plan to use DECnet (Yes/No) [YES]:YESIf you answer YES, the information about the DECnet Phase IV addresses is displayed along with a prompt for a DECnet Phase IV address. Enter a valid DECnet Phase IV address, as in the following example:DECnet Phase IV addresses are in the format DECnet_area_number.DECnet_node_number DECnet_area_number is a number between 1 and 63. DECnet_node_number is a number between 1 and 1023. If you plan to use DECnet WITHOUT Phase IV compatible addresses, enter 0.0. Enter DECnet (Phase IV) Address [1.1]:63.180A display such as the following informs you of the value assigned to SCSSYSTEMID:SCSSYSTEMID will be set to 64692. This was calculated as follows: (DECnet_area_number * 1024) + DECnet_node_numberIf you are not using DECnet, or if you enter 0.0 as the DECnet Phase IV address, you are prompted to enter a SCSSSYSTEMID in the range of 1 to 65535. If this is a standalone system, the default of 65534 is acceptable. However, if this system is part of an OpenVMS Cluster, you must enter a SCSSYSTEMID that is unique within the cluster. The following is a sample display:
The system cannot calculate SCSSYSTEMID from an address that is not compatible with DECnet Phase-IV. You will have to choose a value for SCSSYSTEMID.If you plan to use LAT software, you may have to add /NODECNET to any CREATE LINK commands in SYS$MANAGER:LATSYSTARTUP.COM. Please choose a SCSSYSTEMID between 1 and 65535.If you have multiple OpenVMS systems, the SCSSYSTEMID on each system must be unique. Enter SCSYSTEMID [65535]:12345Set Local Time Zone: Now the procedure asks you to configure the local time zone. For local time zone support to work correctly, the installation procedure must set the time zone that accurately describes the location you want to be your default time zone. Usually, this is the time zone in which your system is running. In addition, you may need to set the time differential factor (TDF).
The main time zone menu is displayed. You can select the time zone in either of two ways:If you select one of the numbers in the time zone menu, the corresponding time zone is selected. At any prompt, you can enter a question mark (? ) for help information.Select the number in the main time zone menu that best represents the time zone desired. (If multiple time zones exist for the selection you make, you must select the exact time zone from another menu.)
Use a search option that allows you to bypass the time zone menu and search by name (partial or full).
Note
An asterisk (*) next to a number indicates that more than one time zone exists for that selection. If you select such a number, an additional menu displays choices that allow you to select the appropriate time zone. For example, if you choose the United States (US) time zone from the main time zone menu, a second menu displays the specific time zones within the United States.
The following example shows how you would select the Eastern time zone for the United States by using the menu number:
Configuring the Local Time Zone TIME ZONE SPECIFICATION -- MAIN Time Zone Menu "*" indicates a menu 0* GMT 1* AFRICA 17) EST 33) IRAN 49) PORTUGAL 2* AMERICA 18) EST5EDT 34) ISRAEL 50) PRC 3* ANTARCTICA 19* ETC 35) JAMAICA 51) PST8PDT 4* ARCTIC 20* EUROPE 36) JAPAN 52) ROC 5* ASIA 21) FACTORY 37) KWAJALEIN 53) ROK 6* ATLANTIC 22) GB-EIRE 38) LIBYA 54) SINGAPORE 7* AUSTRALIA 23) GB 39) MET 55) TURKEY 8* BRAZIL 24) GMT-0 40* MEXICO 56) UCT 9* CANADA 25) GMT 41* MIDEAST 57) UNIVERSAL 10) CET 26) GMT0 42) MST 58* US 11* CHILE 27) GMTPLUS0 43) MST7MDT 59) UTC 12) CST6CDT 28) GREENWICH 44) NAVAJO 60) W-SU 13) CUBA 29) HONGKONG 45) NZ-CHAT 61) WET 14) EET 30) HST 46) NZ 62) ZULU 15) EGYPT 31) ICELAND 47* PACIFIC 16) EIRE 32* INDIAN 48) POLAND Press "Return" to redisplay, enter "=" to search or "? " for help, or Select the number above that best represents the desired time zone:58US Time Zone Menu "*" indicates a menu 0* RETURN TO MAIN TIME ZONE MENU 1) ALASKA 5) EAST-INDIANA 9) MICHIGAN 13) SAMOA 2) ALEUTIAN 6) EASTERN 10) MOUNTAIN 3) ARIZONA 7) HAWAII 11) PACIFIC-NEW 4) CENTRAL 8) INDIANA-STARKE 12) PACIFIC Press "Return" to redisplay, enter "=" to search or "? " for help, or Select the number above that best represents the desired time zone:6You selected US /EASTERN as your time zone. Is this correct? (Yes/No) [YES]:To use the search option instead of menu numbers to select the time zone, enter an equals sign (=) at the menu prompt instead of a number. You can enter one or more words or partial words immediately after the equals string, or you can enter the equals sign alone, in which case you are prompted for the words or partial words of the time zone you want to select. After you enter that information, all matching time zones are displayed, and you can then select the appropriate one.
The following example shows how you would select the Eastern time zone for the United States by using the search option:
Configuring the Local Time Zone TIME ZONE SPECIFICATION -- MAIN Time Zone Menu "*" indicates a menu 0* GMT 1* AFRICA 17) EST 33) IRAN 49) PORTUGAL 2* AMERICA 18) EST5EDT 34) ISRAEL 50) PRC 3* ANTARCTICA 19* ETC 35) JAMAICA 51) PST8PDT 4* ARCTIC 20* EUROPE 36) JAPAN 52) ROC 5* ASIA 21) FACTORY 37) KWAJALEIN 53) ROK 6* ATLANTIC 22) GB-EIRE 38) LIBYA 54) SINGAPORE 7* AUSTRALIA 23) GB 39) MET 55) TURKEY 8* BRAZIL 24) GMT-0 40* MEXICO 56) UCT 9* CANADA 25) GMT 41* MIDEAST 57) UNIVERSAL 10) CET 26) GMT0 42) MST 58* US 11* CHILE 27) GMTPLUS0 43) MST7MDT 59) UTC 12) CST6CDT 28) GREENWICH 44) NAVAJO 60) W-SU 13) CUBA 29) HONGKONG 45) NZ-CHAT 61) WET 14) EET 30) HST 46) NZ 62) ZULU 15) EGYPT 31) ICELAND 47* PACIFIC 16) EIRE 32* INDIAN 48) POLAND Press "Return" to redisplay, enter "=" to search or "? " for help, or Select the number above that best represents the desired time zone:=EASTSearch for Time Zone by Full or Partial Name"*" indicates a menu 1) BRAZIL / EAST 2) CANADA / EAST-SASKATCHEWAN 3) CANADA / EASTERN 4) CHILE / EASTERISLAND 5) MIDEAST / RIYADH87 6) MIDEAST / RIYADH88 7) MIDEAST / RIYADH89 8) PACIFIC / EASTER 9) US / EAST-INDIANA 10) US / EASTERN Press "Return" to redisplay this menu, enter "=" to search for a new zone, enter "0" to return to the Main Time Zone Menu, enter "? " for help, or Select the number above that best represents the desired time zone:10You selected US / EASTERN as your time zone. Is this correct? (Yes/No) [YES]:The procedure prompts you for the TDF.
For more information about local time zone support, see the VSI OpenVMS System Manager's Manual, Volume 1: Essentials.
Set Time Differential Factor (TDF): Here you are prompted to enter the time differential factor (TDF). The TDF is the difference between your system time and Coordinated Universal Time (UTC), which is an international standard (similar to Greenwich Mean Time) for measuring time of day. The procedure supplies a default for TDF, which is generally the correct response. If the time zone you selected supports daylight saving time, you are asked whether daylight saving time is currently in effect. The following example shows TDF information and prompts:
Configuring the Time Differential Factor (TDF) Default Time Differential Factor for standard time is -5:00. Default Time Differential Factor for daylight saving time is -4:00. The Time Differential Factor (TDF) is the difference between your system time and Coordinated Universal Time (UTC). UTC is similar in most respects to Greenwich Mean Time (GMT). The TDF is expressed as hours and minutes, and should be entered in the hh:mm format. TDFs for the Americas will be negative (-3:00, -4:00, etc.); TDFs for Europe, Africa, Asia and Australia will be positive (1:00, 2:00, etc.). This time zone supports daylight saving time. Is this time zone currently on daylight saving time? (Yes/No):YESEnter the Time Differential Factor [-4:00]: NEW SYSTEM TIME DIFFERENTIAL FACTOR = -4:00 Is this correct? [Y]:For more information about TDF support, see the VSI OpenVMS System Manager's Manual, Volume 1: Essentials. Once OpenVMS has been installed and booted from the system disk, you can determine whether your system is set for daylight saving time by using the following DCL command to display the translation for the daylight saving time logical:$SHOW LOGICAL *TIMEZONE*"SYS$TIMEZONE_DAYLIGHT_SAVING"="1" . . .Register Licenses (Optional at this time): After setting the TDF, Product Authorization Keys (PAKs) may be entered:
If you have Product Authorization Keys (PAKs) to register, you can register them now. Do you want to register any Product Authorization Keys? (Yes/No) [Yes]
You can register the PAKs now by responding YES to the prompt, or later by responding NO. You register licenses later by following the directions in Section 8.9.
To register your licenses now, be sure you have the following before proceeding:A copy of the Product Authorization Key (PAK) for each license that you are registering.
The VSI OpenVMS License Management Utility Manual, which contains complete, detailed information about the licensing procedure.
For the OpenVMS operating system, a single Operating Environment (OE) license grants the right to use all the components bundled in the purchased OE. Sufficient PCL (Per Core License) units are required to license all processor cores in a socket.
The OE license must contain PCL units sufficient to activate all licensed sockets in the system or hard partition. (If additional cores are added later to the system or hard partition, each requires additional PCL units.) The License Management utility supports these licensing practices. The OpenVMS Unlimited User License is included with the Base Operating Environment (BOE) and, therefore, is included with the other OEs available. For more information, see the VSI OpenVMS Software Product Description (SPD).
For more information about licensing terms and policies, contact your VSI sales office at
<info@vmssoftware.com>When you answer YES to the prompt to register your licenses now, the installation procedure launches the SYS$UPDATE:VMSLICENSE.COM procedure, which displays the following options menu:VMS License Management Utility Options: 1. REGISTER a Product Authorization Key 2. AMEND an existing Product Authorization Key 3. CANCEL an existing Product Authorization Key 4. LIST Product Authorization Keys 5. MODIFY an existing Product Authorization Key 6. DISABLE an existing Product Authorization Key 7. DELETE an existing Product Authorization Key 8. COPY an existing Product Authorization Key 9. MOVE an existing Product Authorization Key 10. ENABLE an existing Product Authorization Key 11. SHOW the licenses loaded on this node 12. SHOW the unit requirements for this node 99. Exit this procedure Type '? ' at any prompt for a description of the information requested. Press Ctrl/Z at any prompt to return to this menu. Enter one of the above choices [1]Select the REGISTER option and enter each license key until you have successfully registered all required PAKs. After you register all your licenses, exit the License Management procedure by entering 99 at the prompt.
Install Windowing, Networking, and Related Products:
You are asked whether you want to install the optional DECwindows GUI (DECwindows Motif for OpenVMS) and networking software (DECnet and TCP/IP) included with OpenVMS. The software that you choose to install (including the required software) is installed along with the OpenVMS operating system. You can change the default values for these products later in the installation procedure.
Note
The following display shows what you will see during an OpenVMS installation.
The following products are part of the OpenVMS installation; they will be installed along with the OpenVMS operating sytem: o Availability Manager (base) for OpenVMS I64 o CDSA for OpenVMS I64 o KERBEROS for OpenVMS I64 o SSL for OpenVMS I64 o Performance Data Collector (base) for OpenVMS I64 o HP Binary Checker for OpenVMS I64 o WBEM Services for OpenVMS (WBEMCIM) o WBEM Providers for OpenVMS (WBEMPROVIDERS) You can also install the following optional products along with the OpenVMS operating system: o DECwindows Motif for OpenVMS I64 o DECnet-Plus for OpenVMS I64 o DECnet Phase IV for OpenVMS I64 o TCP/IP Services for OpenVMS If you want to change your selections, you can do so later in the installation by answering "NO" to the following question: "Do you want the defaults for all options? " Do you want to install DECwindows Motif for OpenVMS I64 V1.7? (Yes/No) [Yes]YIf you want to install the OpenVMS graphical user interface and you have the hardware that supports it and the license to use it, answer YES; otherwise, answer NO.
You may install any of the optional software products separately after the OpenVMS installation completes.
Note
DECwindows client files are made available through the DWMOTIF_SUPPORT kit. The OpenVMS installation procedure installs this kit automatically. The DWMOTIF_SUPPORT kit name is listed during the installation.
The OpenVMS Installation Menu offers the choice to install DECnet-Plus for OpenVMS or DECnet Phase IV for OpenVMS networking software. You cannot have both installed on your system at the same time. You can also choose to install neither DECnet product; however, certain products that depend on DECnet might be adversely affected.
If you have installed DECnet-Plus and TCP/IP on your system, you can run DECnet applications over your TCP/IP network. For more information about DECnet over TCP/IP, see the DECnet-Plus for OpenVMS Network Management manual.
The software products display is similar to the following:
The DECnet-Plus kit is provided with the OpenVMS operating system kit. VSI strongly recommends that DECnet users install DECnet-Plus. DECnet Phase IV applications are supported by DECnet-Plus. DECnet Phase IV is also provided as an option. If you install DECnet-Plus and TCP/IP you can run DECnet applications over a TCP/IP network. Please see the OpenVMS Management Guide for information on running DECnet over TCP/IP. Do you want to install DECnet-Plus for OpenVMS I64 V8.4-2? (Yes/No) [YES]If you answer NO to the DECnet-Plus prompt, you are prompted to install DECnet Phase IV:
Do you want to install DECnet Phase IV for OpenVMS I64 V8.4-2? (Yes/No) [Yes]Finally, you are asked whether you want to install TCP/IP Services for OpenVMS:Do you want to install TCP/IP Services for OpenVMS V5.7? (Yes/No) [Yes]YChoose Descriptive Help Text (Optional): After you respond to the prompt for TCP/IP Services for OpenVMS, the final stages of the installation proceed. First, the procedure asks whether you want detailed descriptions:
The installation can provide brief or detailed descriptions. In either case, you can request the detailed descriptions by typing ?. Do you always want detailed descriptions? (Yes/No) [No]If you answer YES, the procedure displays additional explanatory text with each prompt.
PCSI kits included on the OpenVMS distribution media are signed using Secure Delivery. Each target file includes an associated digital signature file that is used for Secure Delivery validation. This validation involves authenticating the originator (VSI, in this case) and verifying the contents of the target file. (The digital signature file is also referred to as a manifest; it has the same file name as the target file plus _ESW appended to the file extension, as in filename.PCSI$COMPRESSED_ESW.) When you install OpenVMS from the distribution media, the procedure validates any signed PCSI kits that are being installed. For each kit successfully validated, you see a message similar to the following:
Prior to Version 8.4:Performing product kit validation ...%PCSI-I-HPCVALPASSED, validation of DKB400:[KITS.CDSA]HP-I64VMS-CDSA-Vnnnn-nnn-n.PCSI$COMPRESSED;1 succeeded . . .VSI Version 8.4-1H1 onwards:Performing product kit validation ...%PCSI-I-VSICVALPASSED, validation of DKB400:[KITS.BINARYCHECKER]VSI-I64VMS-BINARYCHECKER-Vnnnn-nnn-n.PCSI$COMPRESSED;1 succeeded . . .Note
Any signed PCSI kits that you install susbsequently (including any signed kits on the distribution media) are validated. In addition, the DCL command PRODUCT SHOW HISTORY displays the validation status of installed products.
Select Product Component Options (Accept All Defaults or Select Individually): The procedure displays the following:
The following product has been selected: VSI I64VMS OpenVMS V8.4-2 Platform (product suite) Configuration phase starting ... You will be asked to choose options, if any, for each selected product and for any products that need to be installed to satisfy software dependency requirements. VSI I64VMS OpenVMS V8.4-2: OpenVMS and related products Platform COPYRIGHT ... VMS Software, Inc. Do you want the defaults for all options? [YES]
When selecting options, note the following:
If you want all the default values, press Enter.
If you want to select options individually, answer NO. The procedure then prompts you for each option and suboption shown in Example 6.1.
Review the list of options and compare them with the requirements for your system. If you are selecting components individually, be sure that you include all components necessary to support the needs of your users. Note also that certain components depend on the installation of other components.
If you are not sure whether you want certain options, request help by entering a question mark (? ) at the prompt for that option.
After you select all the options you want, you can view your selections and make changes (if necessary).
If you decide after the installation to change which options you want installed on your system, you must run the installation procedure again, but this time select the PRESERVE option as described in Section 6.3.1.2.
After you boot the new system disk and log in, you can obtain information about individual system files by entering HELP SYS_FILES at the dollar sign prompt ($).
Note
Unless you have specific reasons to do otherwise, VSI recommends that you accept the defaults and install all OpenVMS options. OpenVMS and layered products have various dependencies on many of these options. Even if you think you do not need certain options, some OpenVMS or layered product operations might not work correctly if other OpenVMS options are not installed.
Note also that the availability of certain options depends on the OE you have purchased. For more information, see the Operating Environments for VSI OpenVMS Software Product Description (SPD 82.34.xx).
If you answer YES to accept the defaults for all options, the procedure displays a message similar to the following, the contents of which depend on the products you chose to install. If you answer NO, you are prompted for each option and suboption.
Availability Manager (base) for OpenVMS I64 CDSA for OpenVMS I64 KERBEROS for OpenVMS I64 SSL for OpenVMS I64 Performance Data Collector for OpenVMS HP Binary Checker for OpenVMS I64 WBEM Services for OpenVMS (WBEMCIM) VSI I64VMS WBEMCIM V2.91-A070728: VSI WBEM Services for OpenVMS Copying WBEM Services for OpenVMS Release Notes to SYS$HELP ....There are post-installation tasks you must complete. WBEM Providers for OpenVMS (WBEMPROVIDERS) VSI I64VMS DWMOTIF V1.7: DECwindows Motif If a Language Variant is installed, refer to the Installation Guide.Finish Installation onto System Disk Review and Confirm Options: When you have answered all the prompts and selected the options you want installed, the procedure displays information about the products you have selected and allows you to review your selections and make changes if necessary, then it installs the product, provides informational messages, and returns you to the original menu.
Do you want to review the options? [NO]
If you answer YES, the selected options and suboptions are displayed. If you answer NO, the installation continues as described with the sample script (beginning with "Execution phase starting ...") that follows.
Example 6.1. Component Options and Suboptions DECdtm Distributed Transaction Manager Support for DECnet-Plus or DECnet for OpenVMS Programming Support Debugger Utility Image Dump Utility Macro libraries TLB intermediary form of STARLETC Header Files VMS text libraries of Ada declarations RMS Journaling Recovery Utility System Programming Support Delta Debugger System Dump Analyzer Utility Miscellaneous Symbol Table Files Utilities Phone UtilityXPG4 Internationalization Utilities World Wide PostScript Printing Subsystem Bliss Require Files Example Files Message Facility Files (HELP/MESSAGE) Translated Image Support UETP Files DECwindows Server Support Delete any obsolete OpenVMS files Delete files archived by OpenVMS remedial kitsThe component options listed in Example 6.1 are included within the OpenVMS Version 8.4-2 operating system. Depending on the products you chose to install with the operating system, additional components are included as well. After the selected options and suboptions are displayed, you are prompted as follows:
Are you satisfied with these options? [YES]
If you answer NO to this question, you are allowed to selectively configure options and suboptions, even if you did not do so previously. When you finish, you are asked again whether you are satisfied with the options you selected. When you answer YES to indicate you are satisfied with the selections, the installation begins installing OpenVMS onto the target disk as shown below:Execution phase starting ... The following products will be installed to destinations: VSI I64VMS AVAIL_MAN_BASE V8.4-2 DISK$I64SYS:[VMS$COMMON.] VSI I64VMS CDSA V2.3-306 DISK$I64SYS:[VMS$COMMON.] VSI I64VMS DECNET_PLUS V8.4-2 DISK$I64SYS:[VMS$COMMON.] VSI I64VMS DWMOTIF V1.7 DISK$I64SYS:[VMS$COMMON.] VSI I64VMS DWMOTIF_SUPPORT V8.4-2 DISK$I64SYS:[VMS$COMMON.] VSI I64VMS BINARYCHECKER V1.0 DISK$I64SYS:[VMS$COMMON.] VSI I64VMS KERBEROS V3.1-152 DISK$I64SYS:[VMS$COMMON.] VSI I64VMS OpenVMS V8.4-2 DISK$I64SYS:[VMS$COMMON.] VSI I64VMS SSL V1.4-284 DISK$I64SYS:[VMS$COMMON.] VSI I64VMS TCPIP V5.7 DISK$I64SYS:[VMS$COMMON.] VSI I64VMS TDC_RT V2.3-1 DISK$I64SYS:[VMS$COMMON.] VSI I64VMS VMS V8.4-2 DISK$I64SYS:[VMS$COMMON.] VSI I64VMS WBEMCIM V2.91-A070728 DISK$I64SYS:[VMS$COMMON.] VSI I64VMS WBEMPROVIDERS V2.0-31 DISK$I64SYS:[VMS$COMMON.] Portion done: 0%..10%..20%..30%..40%..50%..60%..70%..80%..90% %PCSI-I-PRCOUTPUT, output from subprocess follows ... % - Execute SYS$MANAGER:TCPIP$CONFIG.COM to proceed with configuration of % VSI TCP/IP Services for OpenVMS. % Portion done: 100%Depending on the options you selected, certain messages such as the preceding TCP/IP message might be displayed at this point.
Final Installation Confirmation and Information Messages: The installation continues, displaying the products that have been installed and post-installation tasks that might need to be performed. The version numbers in this example do not necessarily reflect the version numbers of the products actually shipped with OpenVMS Version 8.4-2.
The following products have been installed: VSI I64VMS AVAIL_MAN_BASE V8.4-2 Layered Product VSI I64VMS CDSA V2.3-306 Layered Product VSI I64VMS DECNET_PLUS V8.4-2 Layered Product VSI I64VMS DWMOTIF V1.7 Layered Product VSI I64VMS DWMOTIF_SUPPORT V8.4-2 Layered Product VSI I64VMS BINARYCHECKER V1.0 Layered Product VSI I64VMS KERBEROS V3.1-152 Layered Product VSI I64VMS OpenVMS V8.4-2 Platform (product suite) VSI I64VMS SSL V1.4-284 Layered Product VSI I64VMS TCPIP V5.7 Layered Product VSI I64VMS TDC_RT V2.3-1 Layered Product VSI I64VMS VMS V8.4-2 Operating System VSI I64VMS WBEMCIM V2.91-A070728 Layered Product VSI I64VMS WBEMPROVIDERS V2.0-31 Layered Product VSI I64VMS OpenVMS V8.4-2: OpenVMS and related products Platform VSI I64VMS KERBEROS V3.1-152 Configure and set up Kerberos If Kerberos will be run on this system, but has not been used previously, you need to perform the following steps. o Run the Kerberos configuration procedure: @SYS$STARTUP:KRB$CONFIGURE.COM o Add the following line to SYS$MANAGER:SYSTARTUP_VMS.COM: $ @SYS$STARTUP:KRB$STARTUP o Add the following line to SYS$MANAGER:SYLOGIN.COM: $ @SYS$MANAGER:KRB$SYMBOLS Press RETURN to continue: VSI I64VMS SSL V1.4-284: SSL for OpenVMS I64 V1.4 (Based on OpenSSL 0.9.8h) There are post-installation tasks that you must complete after upgrading from previous SSL versions including verifying startup command procedures and logical names. Refer to SYS$HELP:SSL014.RELEASE_NOTES for more information. VSI I64VMS TDC_RT V2.3-1: The Performance Data Collector (base) for OpenVMS Users of this product require the following privileges: (CMKRNL,LOG_IO,WORLD,PHY_IO,SYSPRV,SYSLCK) Users of this product require the following process resource limits: WSQUO minimum 7000 A read-me file is available in SYS$COMMON:[TDC]TDC_README.TXT Release notes are available in SYS$COMMON:[TDC]TDC_RELEASE_NOTES.TXT VSI I64VMS TCPIP V5.7 : VSI TCP/IP Services for OpenVMS. Check the release notes for current status of the product.Installation Creates and Validates Boot Options : At this point in an installation, the procedure creates and validates boot options if you chose to have it do so (see step 8).
- If you answered NO in Step 8, the following message is displayed:
If there is an existing boot option that was used to boot this system disk, you may be able to use it. Otherwise, you will have to use the UEFI Shell the first time that you boot the newly installed system. After booting, use the OpenVMS Boot Manager to create a Boot Option. To do this log in to a privileged account and execute this command:$ @SYS$MANAGER:BOOT_OPTIONSThe procedure then informs you that the installation is complete and prompts you to press Return (Enter) to continue, at which point it returns you to the OpenVMS main menu. You can select Option 8 (“Execute DCL commands and procedures”) on the OpenVMS Installation Menu and enter the command at the DCL triple dollar sign prompt ($$$) to start the OpenVMS Boot Manager utility.
If you answered YES in step 8, the installation procedure determines whether a boot entry already exists for the system disk (in this example, DKB400:):
- If an entry is found, a message similar to the following is displayed:
The UEFI Boot Manager menu includes the following boot option(s) for DKB400: UEFI Boot Options list: Timeout = 0 secs. ---------------------------------------------------------------------- 01. DKB400 PCI(0|20|1|0) Scsi(Pun1,Lun0) "OpenVMS on DKB400: PKA0.1" ---------------------------------------------------------------------- 1 entries found.In this example, one boot option is found. If multiple entries are found and if they are all SCSI devices, the following message appears and then the installation is complete:Please use the OpenVMS Boot Manager to ensure that you have a valid boot option for the system you have just installed.
When one entry is found, or when multiple Fibre Channel entries are found, the procedure validates the boot options, as in the following example, in which the found entry fails to boot and is then fixed and validated:Validate UEFI Boot Options list: Timeout = 0 secs. ------------------------------------------------------------------- 1 OpenVMS on DKB400: PKA0.1 DKB400 PCI(0|20|1|0) Scsi(Pun1,Lun0) efi$bcfg: Option Failed. Fixing Boot Entry automatically. efi$bcfg: Entry 1 Boot0001 removed. efi$bcfg: DKB400 PCI(0|20|1|0) Scsi(Pun1,Lun0) (Boot0001) Option successfully added ----------------------------------------------------------------------- 1 entries validated. If no existing entry is found, a boot option is created and the procedure displays the validation text, as in the following example:
efi$bcfg: DKB400: (Boot0003) Option successfully added The Boot Option is called OpenVMS on DKB400:; it is the first entry in the Boot Options menu, and is configured (by default) to boot from SYS0. VMS_FLAGS are set to -fl 0,30000
- Installation Completes and Returns to OpenVMS Menu: The installation procedure is now complete. The procedure displays information about the special startup procedure that runs when the newly installed system is first booted. It then prompts you to press Return (Enter) to continue. After you do so, you are returned to the OpenVMS operating system menu. The following is a sample display:
The installation is now complete. When the newly installed system is first booted, a special startup procedure will be run. This procedure will: o Configure the system for standalone or OpenVMS Cluster operation. o Run AUTOGEN to set system parameters. o Reboot the system with the newly set parameters. You may shut down now or continue with other operations. Process I64VMS_INSTALL logged out at 12-MAR-2015 14:45:49.54 Press Return to continue... **************************************************************** You can install or upgrade the OpenVMS I64 operating system or you can install or upgrade layered products that are included on the OpenVMS I64 distribution media (CD/DVD). You can also execute DCL commands and procedures to perform "standalone" tasks, such as backing up the system disk. Please choose one of the following: 1) Upgrade, install or reconfigure OpenVMS I64 Version 8.4-2 2) Display layered products that this procedure can install 3) Install or upgrade layered products 4) Show installed products 5) Reconfigure installed products 6) Remove installed products 7) Find, Install or Undo patches; Show or Delete recovery data 8) Execute DCL commands and procedures 9) Shut down this system Enter CHOICE or ? for help: (1/2/3/4/5/6/7/8/9/? ) Shut Down the System: Unless you want to perform other operations prior to booting the new system disk, choose the shutdown Option 9 on the OpenVMS main menu to shut down the operating system, as shown in the following example. If you want to install layered products that have not been installed yet, VSI recommends doing so during the postinstallation phase, as described in Section 8.1.
Enter CHOICE or ? for help: (1/2/3/4/5/6/7/8/9/? )9Shutting down the system SYSTEM SHUTDOWN COMPLETEAfter you complete the installation and shut down the system, you can boot your new operating system disk. Make sure you remove the DVD from the drive before booting the system disk.
6.3.9. Next Steps
Gives you the opportunity to configure the system for standalone or OpenVMS Cluster operation (see Section 8.7).
Runs AUTOGEN to evaluate your hardware configuration, estimate typical workloads, and set system parameters (see Section 8.4).
Reboots your system with the new parameters (see Section 8.6).
After the system is rebooted with the new parameters, you can log into your SYSTEM account, as explained in Section 8.3. If you did not allow the installation procedure to create a boot option for your system disk, you can set up such an option now, as explained in Section 9.4. Chapter 9 includes additional information regarding setting up and booting your system.
This completes the basic installation. Next, we recommend that you review the information in the AFTER INSTALLATION part of this manual: Part III.
Chapter 7. UPGRADE Procedure
This chapter explains how to UPGRADE the OpenVMS operating system and includes information about reinstalling or reconfiguring your system.
NOTE: refer to Section 6.1 if you need instruction on booting, then return to this section.
Note also that some of the descriptions for UPGRADE steps that are common with the INSTALLATION procedure have been abbreviated in this chapter and you may be referred to the INSTALLATION chapter for details.
7.1. Performing the UPGRADE
The following sections describe how to upgrade OpenVMS from the distribution media.
7.1.1. Upgrading the System Using Option 1 of the Installation Menu
A few seconds after you boot the VSI OpenVMS OE DVD, several informational messages followed by the OpenVMS banner and eventually the Installation and Upgrade Menu appears.
To upgrade the OpenVMS operating system, choose Option (1) on the menu:
. . . **************************************************************** You can install or upgrade the OpenVMS I64 operating system or you can install or upgrade layered products that are included on the OpenVMS I64 distribution media (CD/DVD).You can also execute DCL commands and procedures to perform "standalone" tasks, such as backing up the system disk. Please choose one of the following: 1) Upgrade, install or reconfigure OpenVMS I64 Version 8.4-2 2) Display layered products that this procedure can install 3) Install or upgrade layered products 4) Show installed products 5) Reconfigure installed products 6) Remove installed products 7) Find, Install or Undo patches; Show or Delete recovery data 8) Execute DCL commands and procedures 9) Shut down this system Enter CHOICE or ? for help: (1/2/3/4/5/6/7/8/9/? )1
7.1.2. Selecting INITIALIZE or PRESERVE
The procedure displays the following information and prompts:
***********************************************************
This procedure will ask a series of questions.
() - encloses acceptable answers
[] - encloses default answers
Type your response and press the <Return>key. Type:
? - to repeat an explanation
^ - to change prior input (not always possible)
Ctrl/Y - to exit the installation procedure
There are two choices for installation/upgrade:
Initialize - removes all software and data files that were
previously on the target disk and installs OpenVMS I64.
Preserve -- installs or upgrades OpenVMS I64 on the target disk
and retains all other contents of the target disk.
* NOTE: You cannot use preserve to install OpenVMS I64 on a disk on
which any other operating system is installed. This includes
implementations of OpenVMS for other architectures.
Do you want to INITIALIZE or to PRESERVE? [PRESERVE]) For an upgrade, enter PRESERVE or press Enter (or Return) to accept the default (PRESERVE).
7.1.3. Specifying the Target Disk
Next the procedure asks for the name of the target disk. If you enter a question mark (? ), the system displays a list of devices on your system. Select the appropriate disk being upgraded and respond to the prompt:
You must enter the device name for the target disk on which OpenVMS I64 will be installed. Enter device name for target disk: [DKB300] (? for choices)DKB400
If you select a device that is not available or that cannot be used for some other reason, the system displays information indicating why the device cannot be used.
Caution
If the selected target disk includes .EXE or .COM files installed by a previous upgrade or installation in one or more system-specific root directories in SYS$COMMON, the upgrade procedure tells you that when you boot from a root that contains any of these files, they are used instead of the files provided by the newer version of OpenVMS. This can make the upgraded system unbootable or cause errors after booting.
Unless a VSI representative has advised you to keep one or more of these files where they are, you must delete, rename, or move these files from the system-specific root directory. The procedure lists the names and locations of these files. Record these if you are not using a hardcopy terminal.
The procedure gives you the option of terminating the upgrade so that you can do what is necessary for these files: Select Option 8 (“Execute DCL commands and procedures”) on the OpenVMS main menu and enter the appropriate DCL commands.
7.1.4. Selecting Reinstallation and Reconfiguration Options
If you are using the VSI OpenVMS Version 8.4-2 operating system media and you selected a target disk that already has Version 8.4-2 installed, you are presented with several configuration options. A sample display follows.
Version 8.4-2 of the OpenVMS operating system is already installed
on DKB400:.
Please choose one of the following:
1) Reconfigure the OpenVMS platform.
2) Reconfigure the OpenVMS operating system.
3) Reinstall the OpenVMS operating system.
4) Return to the Main Menu (abort the upgrade/installation).
Enter a "? " for more information.If you enter a question mark (? ), the following information is displayed:
o Reconfigure the OpenVMS platform. This action will allow you to change your selections of which products you installed along with the OpenVMS operating system installation. This will NOT change any options in the OpenVMS operating system, nor will it reinstall any operating system files. o Reconfigure the OpenVMS operating system. This action will allow you to change your choices about which options you included for the OpenVMS operating system. This will NOT change any options for the products you installed along with the OpenVMS operating system installation, nor will it reinstall or upgrade any of them. o Reinstall the OpenVMS operating system. This action will cause ALL operating system files to be replaced. You can also change your choices about which options you included for the OpenVMS operating system. This will NOT change any options for the products you installed along with the OpenVMS operating system installation, nor will it reinstall or upgrade any of them. Reinstall will take longer than Reconfigure. Reinstall may be appropriate if you suspect that files in the operating system, or in the windowing and network products have become corrupted. If you want to reinstall or upgrade any of the products you installed along with the OpenVMS operating system installation, choose "Install or upgrade layered products" (Option 3) from the Installation Menu. If you want to change your choices about which options you included for any of the products you installed along with the OpenVMS operating system installation, choose "Reconfigure installed products" (Option 5) from the Installation Menu.
Next the menu is redisplayed:
Please choose one of the following:
1) Reconfigure the OpenVMS platform.
2) Reconfigure the OpenVMS operating system.
3) Reinstall the OpenVMS operating system.
4) Return to the Main Menu (abort the upgrade/installation).
Enter choice or ? for help: (1/2/3/4/? )7.1.5. Checking for Recovery Data
When you specify the /SAVE_RECOVERY_DATA qualifier with the PRODUCT INSTALL command, the PCSI utility saves information that can be used for removing patches and mandatory update kits at a later time. The PRODUCT UNDO PATCH command removes the patches and kits.
The upgrade procedure, after entering the PRODUCT INSTALL command, checks the target disk for recovery data that was saved by the PCSI utility during patch installations. If no recovery data is present, the upgrade continues.
If recovery data is present and all the data found applies only to the OpenVMS operating system, the upgrade procedure deletes the data and continues. The data is deleted because it becomes invalid after the upgrade and the disk space freed up might be needed during the upgrade. (The procedure does not display the deletion of the files because earlier patches to OpenVMS are always removed as part of the upgrade.)
If any of the recovery data applies to products other than the OpenVMS operating system, then the upgrade procedure displays a message similar to the following:
The target system has recovery data from PRODUCT operations which
used the /SAVE_RECOVERY_DATA qualifier. This data must be deleted
to continue the OpenVMS upgrade.
Please examine the following display.
If you wish to delete this data and continue the OpenVMS upgrade,
answer YES to the question "Do you want to continue? "
If you do not wish to delete this data, answer NO. A NO answer
will preserve the recovery data and abort the OpenVMS upgrade.
The following patch recovery data has been selected:
RECOVERY DATA SET 001 created 25-JUL-2014 15:23:39.69
-------------------------------------- ---------------------------------
PATCH APPLIED TO
-------------------------------------- ---------------------------------
JAK VMS RM1 V1.0 JAK VMS RMTEST V1.0
-------------------------------------- ---------------------------------
* If you continue, recovery data for the patches listed above will be deleted.
* The deletion of recovery data does not affect the installation status of
* patches applied to products that are not participating in this operation.
* However, continuing with this operation prevents you from uninstalling
* these patches at a future time by use of the PRODUCT UNDO PATCH command.
Do you want to continue? [YES]If you answer YES (the default), the recovery data sets are deleted and the OpenVMS upgrade continues.
Deleting RECOVERY DATA SET 001 ...
If you answer NO, the recovery data sets are not deleted and the OpenVMS upgrade aborts.
Do you want to continue? [YES] NO
%PCSIUI-I-USERABORT, operation terminated by user request
You chose to retain recovery data on the target system disk.
The OpenVMS upgrade cannot continue.
Please correct the situation that prevents you from deleting the
recovery data and then retry the upgrade.7.1.6. Specifying the Volume Label
After you specify the target disk and if applicable, check for recovery data, the procedure informs you of the volume label currently assigned to the target disk and asks whether you want to keep that label. As shown in the following example, if you choose not to keep the label, you are prompted for a new label. The OpenVMS operating system uses the volume label to identify and reference the disk. Make sure the label you use is unique; problems occur if the same label is used by different disk volumes.
DKB400: is now labeled I64SYS.
Do you want to keep this label? (Yes/No) [Yes]NOEnter volume label for target system disk: [I64SYS]I640842
You can accept the default label assigned by the system or specify a different volume label. (The label name has a limit of 12 characters that can include A to Z, 0 to 9, the dollar sign ($), hyphen (-), and underscore(_) characters).
Warning
OpenVMS requires that the volume labels for all disks on your system or OpenVMS Cluster have unique labels. If a disk that has the same label as the system disk is mounted, various OpenVMS components will not function as intended or a node might crash during boot.
If you change the volume label for a disk in an OpenVMS Cluster, be sure to change the command that mounts the disk on other nodes in the cluster; otherwise, the disk will not mount on those nodes once they are rebooted.
7.1.7. Specifying the On-Disk Structure Level
Note
$SET VOLUME/VOLUME_CHARACTERISTICS=HARDLINKS SYS$SYSDEVICE$ANALYZE DISK_STRUCTURE/REPAIR SYS$SYSDEVICE
The target system disk is currently at On-Disk Structure Level 2 (ODS-2). It can be converted to On-Disk Structure Level 5 (ODS-5). OpenVMS I64 systems include WBEM Services for OpenVMS; the WBEM data repository requires an ODS-5 disk. If you choose to convert the target system disk to ODS-5, the repository can be on the system disk; otherwise you will need to provide an additional ODS-5 disk. (? for more information.)Do you want to convert the target system disk to ODS-5? (Yes/No/? )
If you answer YES, the disk will be converted to ODS-5. The procedure informs you that you can use the BACKUP/CONVERT command to convert ODS-5 disks back to ODS-2 format; for more information, see the VSI OpenVMS System Management Utilities Reference Manual: A-L.
Note
VSI recommends that your system disk be structured in ODS-5 format unless you use software that requires ODS-2. A brief comparison of ODS-2 and ODS-5, including advantages and disadvantages is in Section 6.3.8. See also: VSI OpenVMS System Manager's Manual, Volume 1: Essentials.
Note also that although WBEM Services for OpenVMS can be installed on an ODS-2 disk, the WBEM Services for OpenVMS data repository requires an ODS-5 disk. A system disk in ODS-5 format can store everything; if you choose to have your disk in ODS-2 format, the procedure asks you to provide an ODS-5 disk for the data repository.
If you choose not to change to ODS-5, the upgrade continues and the target disk is mounted:
Do you want to convert the target system disk to ODS-5? (Yes/No/? )NO...OpenVMS I64 will be upgraded on DKB400:.
If you choose to change to ODS-5, you are given the option to enable hard links. (For more information about hard links, see the VSI OpenVMS System Manager's Manual, Volume 1: Essentials.) The upgrade then continues.
Do you want to convert the target system disk to ODS-5? (Yes/No/? )YESDKB400: has been converted to ODS-5. You can use the BACKUP/CONVERT command to convert ODS-5 disks back to ODS-2 format. For more information, refer to the OpenVMS System Management Utilities Reference Manual. Hard links can be enabled on ODS-5 disks. WBEM Services for OpenVMS does not require hard links. (? for more information) (***Enabling hard links can take from 5-10 minutes to an hour or more.***) Do you want to enable hard links? (Yes/No/? )YES
If you choose to enable hard links, the procedure automatically executes an ANALYZE/DISK_STRUCTURE/REPAIR operation to correctly set the reference (link) counts. ANALYZE/DISK/REPAIR counts the number of directory entries that reference each file, and sets the link count if it is incorrect. This operation can take from 5 to 10 minutes to an hour or more, depending on the complexity of the system disk configuration, the number of layered products installed, and the number of user files. During the process, messages similar to the following are displayed:
Hard links have been enabled on DKB400:. The newly enabled hard links are not correct and need to be updated. The Analyze/Disk_Structure utility will now be run to do this. This can take from 5 - 10 minutes to an hour or more. It is a normal requirement when hard links are enabled on an existing disk. %ANALDISK-I-COUNT, 1000 hard link updates completed %ANALDISK-I-COUNT, 2000 hard link updates completed %ANALDISK-I-COUNT, 3000 hard link updates completed %ANALDISK-I-COUNT, 4000 hard link updates completed %ANALDISK-I-COUNT, 5000 hard link updates completed %ANALDISK-I-COUNT, 6000 hard link updates completed OpenVMS I64 will be upgraded on DKB400:.
7.1.8. Create and Validate Boot Options
On upgrades, the procedure next asks whether you want to create or validate boot options.
Boot options in the UEFI Boot Manager boot option menu can provide a convenient way to boot your system. The installation procedure can automatically create a new boot option (if none exists) or validate existing boot options. Do you want to create or validate boot options? (Yes/No) [Yes]YES
If this is your normal system disk and you want the upgrade procedure to assist you in setting up or validating boot options in the UEFI Boot Manager menu, answer YES.
You can set VMS_FLAGS or accept the default, 0,0.
Enter the value for VMS_FLAGS: (n,n) [0,0]Note
If your newly upgraded system disk is a Fibre Channel device, VSI recommends that you add it as a boot option in the UEFI boot menu. If you do not allow the upgrade procedure to add the device to the boot menu, you can add it by using the OpenVMS Boot Manager utility (SYS$MANAGER:BOOT_OPTIONS.COM) after the upgrade completes. (To add Fibre Channel devices to the UEFI boot menu, you must use this utility instead of UEFI.)
VSI recommends using the OpenVMS Boot Manager utility to add shadowed system disks in a multiple-member shadow set to the UEFI boot device list and dump device list. Be sure to add all members to both lists.
For information about the OpenVMS Boot Manager utility, see Section 9.4.1. For more information about configuring and booting Fibre Channel devices, see Section 9.23.
7.1.9. Setting OpenVMS Cluster Membership Information
The procedure now asks whether your system will be part of an OpenVMS Cluster. For example:
Will this system be a member of an OpenVMS Cluster? (Yes/No)
If you answer YES to this question, the procedure will ask whether your system will use IP for Cluster Communications.
Will this system use IP for Cluster Communications ? (Yes/No)
If the system being upgraded is member of an existing cluster, answering YES to this
question causes the
SYS$MANAGER:CLUSTER_CONFIG.COM
procedure to run automatically when your upgraded system is first booted. However,
correct cluster membership information is required by the upgrade procedure. Note that
you can run this procedure manually to configure or reconfigure your system as a member
of an OpenVMS Cluster. For more information about configuring a member of an OpenVMS
Cluster, see the Guidelines for OpenVMS Cluster Configurations manual.
7.1.10. License Rebranding
At this point, if you are upgrading from an HPE OpenVMS release to a VSI OpenVMS release, you will see information pertaining to the re-branding of installed product licenses. This process is required to maintain consistency in the installed product license database. Refer to Section 5 if you would like more information.
7.1.11. Updating Time Zone Information
For local time zone support to work correctly, the time zone that accurately describes the location you want to be considered as your default time zone must be set. In addition, your system must be configured correctly to use a valid OpenVMS time differential factor (TDF).
If the installation procedure determines that time zone information is incomplete, it prompts you to set the correct default time zone and TDF for your system. For information about setting the time zone information, see Section 6.3.8.
For more information about TDF and local time zone support, see the VSI OpenVMS System Manager's Manual, Volume 1: Essentials.
7.1.12. Upgrading Windowing, Networking, and Related Products
Note
The following display shows what you might see during an installation.
The following products are part of the OpenVMS installation;
if necessary they will be installed or upgraded along with the OpenVMS operating system:
o Availability Manager (base) for OpenVMS I64
o CDSA for OpenVMS I64
o KERBEROS for OpenVMS I64
o SSL for OpenVMS I64
o Performance Data Collector (base) for OpenVMS I64
o HP Binary Checker for OpenVMS I64
o WBEM Services for OpenVMS (WBEMCIM)
o WBEM Providers for OpenVMS (WBEMPROVIDERS)
If necessary, the following optional products will also be upgraded
along with the OpenVMS operating system:
o DECwindows Motif for OpenVMS I64
o DECnet-Plus for OpenVMS I64
o DECnet Phase IV for OpenVMS I64
o TCP/IP Services for OpenVMS
If you want to add or delete optional products, you can do so later
in the upgrade by answering NO to the following question:
"Do you want the defaults for all product options? "
Availability Manager (base) for OpenVMS I64
is already installed on your system. An upgrade is not required.
CDSA for OpenVMS I64 ...
is installed on your system. It will be upgraded.
KERBEROS for OpenVMS I64...
is installed on your system. It will be upgraded.
SSL for OpenVMS I64...
is installed on your system. An upgrade is not required.
Performance Data Collector (base) for OpenVMS I64...
is installed on your system. It will be upgraded.
HP Binary Checker for OpenVMS I64
DECwindows Motif for OpenVMS I64 V1.7
is installed on your system. An upgrade is not required.
The DECnet-Plus kit is provided with
the OpenVMS operating system kit. VSI strongly recommends that
DECnet users install DECnet-Plus. DECnet Phase IV applications are
supported by DECnet-Plus.
DECnet Phase IV is also provided as an option.
If you install DECnet-Plus and TCP/IP you can run DECnet
applications over a TCP/IP network. Please see OpenVMS
Management Guide for information on running DECnet over TCP/IP.
Do you want to install DECnet-Plus for OpenVMS I64 V8.4-2? (Yes/No) [Yes]
VSI TCP/IP Services for OpenVMS
is already installed on your system. An upgrade is not required.
WBEM Services for OpenVMS (WBEMCIM)
is installed on your system. It will be upgraded.
WBEM Providers for OpenVMS (WBEMPROVIDERS)
is installed on your system. It will be upgraded.Note
DECwindows client files are made available through the DWMOTIF_SUPPORT kit. The OpenVMS installation procedure installs this kit automatically. The DWMOTIF_SUPPORT kit name is listed during the installation.
Required versions of some of the windowing and networking products might already be installed on the system. If so, you will see a message to this effect, as seen for most of the products in the previous example. For some of the windowing and networking products, earlier versions might be installed that still work on OpenVMS Version 8.4-2. In this case, you will see a message indicating the software is already installed and asking whether you want to install the newer version. You can keep the currently installed version or upgrade to the newer version supplied with OpenVMS Version 8.4-2. If you choose to keep the currently installed version, you should verify what level of support for this version is available from HPE or VSI.
Some windowing and networking products might have versions installed that do not work with VSI OpenVMS Version 8.4-2. In this case, you are not given a choice to upgrade; the software is upgraded automatically.
7.2. Completing the Upgrade
The following sections describe the remaining steps that you need to perform to complete the upgrade.
7.2.1. Selecting Descriptive Help Text
The procedure next prompts you as follows:
The installation operation can provide brief or detailed descriptions.
In either case, you can request the detailed descriptions by typing ?.
Do you always want detailed descriptions? (Yes/No) [No] If you answer YES, the procedure displays additional explanatory text with each prompt.
7.2.2. Removing Older Versions of ENCRYPT
HP I64VMS ENCRYPT will now be removed.
This is required because VSI OpenVMS now includes ENCRYPT.
The following product has been selected:
HP I64VMS ENCRYPT V1.6 Layered Product
The following product will be removed from destination:
HP I64VMS ENCRYPT V1.6 DISK$I640842:[VMS$COMMON.]
Portion done: 0%...20%...30%...40%...50%...60%...70%...80%...90%...100%
The following product has been removed:
HP I64VMS ENCRYPT V1.6 Layered Product7.2.3. Secure Delivery Validation
PCSI kits included on the OpenVMS distribution media are signed using Secure Delivery. Each target file includes an associated digital signature file (also referred to as a manifest) that is used for Secure Delivery validation. This validation involves authenticating the originator and verifying the contents of the target file. The digital signature file has the same file name as the target file plus _ESW appended to the file extension, as in filename.PCSI$COMPRESSED_ESW.
When you upgrade from the distribution media (and if the re-branding procedure has not already done this), the upgrade procedure validates any PCSI kits that are being installed. For each kit successfully validated, you may see a message similar to the following:
Performing product kit validation of signed kits...%PCSI-I-HPCVALPASSED, validation of DKB400:[KITS.CDSA]HP-I64VMS-CDSA-Vnnnn-nnn-n.PCSI$COMPRESSED;1 succeeded . . .
Performing product kit validation ...%PCSI-I-VSICVALPASSED, validation of DKB400:[KITS.BINARYCHECKER]VSI-I64VMS-BINARYCHECKER-Vnnnn-nnn-n.PCSI$COMPRESSED;1 succeeded . . .
Signed PCSI kits that are installed subsequent to the initial boot of the OpenVMS DVD (including signed kits on the distribution media) are validated. In addition, the DCL command PRODUCT SHOW HISTORY displays the validation status of installed products.
7.2.4. Selecting Product Component Options
As you begin the upgrade procedure, the procedure asks whether you want all the default values (meaning all the files and subgroups of files for each component included in the operating system). The display is similar to the following:
The following product has been selected:
VSI I64VMS OpenVMS V8.4-2 Platform (product suite)
Configuration phase starting ...
You will be asked to choose options, if any, for each selected product and for
any products that may be installed to satisfy software dependency requirements.
VSI I64VMS OpenVMS V8.4-2: OpenVMS and related products Platform
COPYRIGHT 1976, 2015 ...
VMS Software, Inc.
Do you want the defaults for all options? [YES]During an upgrade, the PCSI utility defines default values as the values that you selected when you last installed or upgraded the OpenVMS operating system on your system. Therefore, before you respond to the prompt, note the following:
If you accept the default values, you receive the same components that you selected when you last installed or upgraded the system (instead of all the components currently available) plus any new components that were not in the previous version of the OpenVMS operating system.
If you want to include or exclude any components differently than you did in the last installation or upgrade, you must answer NO and then respond to the prompts for each option, even those that you are not changing.
If you want to review the current defaults first, answer NO. Then answer YES when the procedure asks whether you want to view the values.
If you review the defaults and are satisfied, answer YES to the prompt asking whether you are satisfied with the values. If you want to make changes, answer NO to that question and then answer YES when the procedure asks whether you want to reenter the values.
When you select component options, also note the following:
Whether you choose all the default values or select individual files, the procedure allows you to view your selections and make changes.
If you are not sure whether you want certain component options, you can request help by entering a question mark (? ) at the prompt for that component (or group of components).
You should review the list of options and compare them with the requirements for your procedure. If you are selecting components individually, be sure that you include all components necessary to support the needs of your users. Note also that certain components depend upon the installation of other components.
If you decide after the upgrade to change which OpenVMS operating system components you want installed on your system, you must reconfigure the installation as described in Section 8.23.
After you boot the upgraded system disk and log in, you can obtain information about individual system files by entering HELP SYS_FILES at the dollar sign prompt ($).
Note
Unless you have specific reasons to do otherwise, VSI recommends that you accept the defaults and install all OpenVMS options. OpenVMS and layered products have various dependencies on many of these options. Even if you think you do not need certain options, some OpenVMS or layered product operations might not work correctly if other OpenVMS options are not installed.
If you answer YES to accept the defaults for all options, the procedure displays a message similar to the following, the contents of which depend on the products you chose to install. If you answer NO, the procedure prompts you for each option and suboption.
Availability Manager (base) for OpenVMS I64
CDSA for OpenVMS I64
KERBEROS for OpenVMS I64
SSL for OpenVMS I64
Performance Data Collector (base) for OpenVMS I64
HP Binary Checker for OpenVMS I64
WBEM Services for OpenVMS (WBEMCIM)
WBEM Providers for OpenVMS (WBEMPROVIDERS)For a list of component options included with VSI OpenVMS Version 8.4-2 operating system, see Example 6.1.
7.2.5. Component and Product Installation Confirmation Messages
When you have answered all the prompts and selected the components you want installed, the procedure allows you to review your selections and make changes, and then displays information about the various components and products that were installed, as shown in the following sample display in which the review is not chosen. You might see an %UPGRADE-I-FIXUP message, which indicates that obsolete files on the system were incorrectly saved by remedial kits. The "fixup" allows them to be correctly removed.
Do you want to review the options? [NO]NOExecution phase starting ... The following products will be installed to destinations: VSI I64VMS CDSA V2.4-322A DISK$I640842:[VMS$COMMON.] VSI I64VMS DECNET_PLUS V8.4-2 DISK$I640842:[VMS$COMMON.] VSI I64VMS HPBINARYCHECKER V1.1-A DISK$I640842:[VMS$COMMON.] VSI I64VMS KERBEROS V3.2-256 DISK$I640842:[VMS$COMMON.] VSI I64VMS OpenVMS V8.4-2 DISK$I640842:[VMS$COMMON.] VSI I64VMS VMS V8.4-2 DISK$I640842:[VMS$COMMON.] VSI I64VMS WBEMCIM V2.99-B100614 DISK$I640842:[VMS$COMMON.] VSI I64VMS WBEMPROVIDERS V2.2-3A DISK$I640842:[VMS$COMMON.] The following products will be removed from destinations: HP I64VMS CDSA V2.2 DISK$I640842:[VMS$COMMON.] HP I64VMS DECNET_PLUS V8.3 DISK$I640842:[VMS$COMMON.] HP I64VMS KERBEROS V3.0 DISK$I640842:[VMS$COMMON.] HP I64VMS OpenVMS V8.3 DISK$I640842:[VMS$COMMON.] HP I64VMS VMS V8.3 DISK$I640842:[VMS$COMMON.] Portion done: 0%..10%..20%..30%..40%..50%..60%..70%..80%..90%..100% The following products have been installed: VSI I64VMS CDSA V2.4-322A Layered Product VSI I64VMS DECNET_PLUS V8.4-2 Layered Product VSI I64VMS HPBINARYCHECKER V1.1-A Layered Product VSI I64VMS KERBEROS V3.2-256 Layered Product VSI I64VMS OpenVMS V8.4-2 Platform (product suite) VSI I64VMS VMS V8.4-2 Operating System VSI I64VMS WBEMCIM V2.99-B100614........Layered Product VSI I64VMS WBEMPROVIDERS V2.2-3A........Layered Product The following products have been removed: HP I64VMS CDSA V2.2 Layered Product HP I64VMS DECNET_PLUS V8.2 Layered Product HP I64VMS KERBEROS V3.0 Layered Product HP I64VMS OpenVMS V8.3 Platform (product suite) HP I64VMS VMS V8.3 Operating System VSI I64VMS OpenVMS 8.4-2: OpenVMS and related products Platform VSI I64VMS KERBEROS V3.1-152 Configure and set up Kerberos If Kerberos will be run on this system, but has not been used previously, you need to perform the following steps. o Run the Kerberos configuration procedure: @SYS$STARTUP:KRB$CONFIGURE.COM o Add the following line to SYS$MANAGER:SYSTARTUP_VMS.COM: $ @SYS$STARTUP:KRB$STARTUP o Add the following line to SYS$MANAGER:SYLOGIN.COM: $ @SYS$MANAGER:KRB$SYMBOLS ...similar messages will appear for other installed products... Press RETURN to continue:
7.2.6. Upgrade Creates and Validates Boot Options
At this point in an upgrade, the procedure creates and validates boot options if you chose to have the procedure do so (see Section 7.1.8).
- If you answered NO, the following message is displayed
If there is an existing boot option that was used to boot this system disk, you may be able to use it. Otherwise, you will have to use the UEFI Shell the first time that you boot the newly installed system. After booting, use the OpenVMS Boot Manager to create a Boot Option. To do this log in to a privileged account and execute this command:$ @SYS$MANAGER:BOOT_OPTIONSThe procedure then informs you that the upgrade is complete and prompts you to press Return (Enter) to continue, at which point it returns you to the OpenVMS main menu. You can select option 8 (“Execute DCL commands and procedures”) on the OpenVMS main menu and enter the command at the DCL triple dollar sign prompt ($$$) to start the OpenVMS Boot Manager utility.
- If you answered YES, the procedure determines whether a boot entry already exists for the system disk (in this example, DKB400:):
- If an entry is found, a message similar to the following is displayed:
The UEFI Boot Manager menu includes the following boot option(s) for DKB400: Validate UEFI Boot Options list: Timeout = 0 secs. ---------------------------------------------------------------------- 1 DKB400 PCI(0|20|1|0) Scsi(Pun1,Lun0) "OpenVMS on DKB400: PKA0.1" ---------------------------------------------------------------------- 1 entries found.In this example, one boot option is found. If multiple entries are found and if they are all SCSI devices, the procedure displays the following message and then notifies you that the upgrade is complete:The UEFI Boot Manager menu includes multiple Boot Options for $1$DGA1200: Boot Options cannot be created or validated automatically. Please use the OpenVMS Boot Manager to ensure that you have a valid boot option for the system you have just installed.When one entry is found, or when multiple Fibre Channel entries are found, the procedure validates the boot options, as in the following example, in which the found entry fails to boot and is then fixed and validated:Validate UEFI Boot Options list: Timeout = 0 secs. ------------------------------------------------------------------- 1 DKB400: PKA0.1 DKB400 PCI(0|20|1|0) Scsi(Pun1,Lun0) efi$bcfg: Option Failed. Fixing Boot Entry automatically. efi$bcfg: Entry 1 Boot0001 removed. efi$bcfg: DKB400 PCI(0|20|1|0) Scsi(Pun1,Lun0) (Boot0001) Option successfully added ----------------------------------------------------------------------- 1 entries validated. - If no existing entry is found, a boot option is created and the procedure displays validation text as in the following example:
efi$bcfg: DKB400: (Boot0003) Option successfully added The Boot Option is called OpenVMS on DKB400:; it is the first entry in the Boot Options menu, and is configured (by default) to boot from SYS0. VMS_FLAGS are set to -fl 0,0
7.2.7. Upgrade Completed
The upgrade is now complete.
When the newly upgraded system is first booted, a special
startup procedure will be run. This procedure will:
o Run AUTOGEN to set system parameters.
o Reboot the system with the newly set parameters.
You may shut down now or continue with other operations.
Process I64VMS_INSTALL logged out at 12-MAR-2015 14:45:49.54
Press Return to continue...
****************************************************************
You can install or upgrade the OpenVMS I64 operating system
or you can install or upgrade layered products that are included
on the OpenVMS I64 distribution media (CD/DVD).
You can also execute DCL commands and procedures to perform
"standalone" tasks, such as backing up the system disk.
Please choose one of the following:
1) Upgrade, install or reconfigure OpenVMS I64 Version 8.4-2
2) Display layered products that this procedure can install
3) Install or upgrade layered products
4) Show installed products
5) Reconfigure installed products
6) Remove installed products
7) Find, Install or Undo patches; Show or Delete recovery data
8) Execute DCL commands and procedures
9) Shut down this system
Enter CHOICE or ? for help: (1/2/3/4/5/6/7/8/9/? )7.2.8. Shutting Down the System
Enter CHOICE or ? for help: (1/2/3/4/5/6/7/8/9/? )9Shutting down the system . . . SYSTEM SHUTDOWN COMPLETE
After the system shuts down, you can boot the newly upgraded system disk. AUTOGEN will run automatically, after which the system shuts down again and automatically reboots. If you are doing a concurrent or rolling upgrade in an OpenVMS Cluster environment, do not boot any other cluster members now.
Now go to Chapter 8 and check for any postupgrade tasks that need to be performed before the system and cluster can be used. Once you have completed all required postupgrade tasks, you can reboot and then use other cluster members.
Part III. After Installing or Upgrading
This part of the manual provides information you should review following your installation or upgrade. Skim through the section titles in this part of the manual and review those which apply to your computing environment.
Chapter 8. After Installing or Upgrading OpenVMS
After you have installed or upgraded the OpenVMS operating system, you must perform several important tasks to prepare the system for operation.
8.1. After Installation or Upgrade Tasks
Use the following checklist to ensure that you perform any necessary post-installation or upgrade tasks.
| TASK | SECTION |
|---|---|
|
For a newly installed system disk, you can back up the disk or re-install OpenVMS on a backup disk. For a newly upgraded system disk, if it is not going to be a shadow set member, back up the system disk as a safeguard before proceeding with the next steps. If your newly upgraded system disk is going to be a shadow set member, you can re-form it in a later step. As an optional precaution, you can back up the system disk as well. | Section 8.8 |
|
Register any licenses that were not registered during the installation; for an upgrade, register any new licenses. | Section 8.9 |
|
New installations only (optional): Set system parameters to enable volume shadowing. | Section 8.10 |
|
If you set system parameters to enable volume shadowing, run AUTOGEN and reboot. | Section 8.4 |
|
If you want to form a shadow set for a system disk, you can do this now or later. If you upgrade a disk in a volume shadowing environment, re-form the shadow set. | Section 8.11 |
|
New installations, some upgrades: Perform the following tasks that generally apply to new installations only but could also apply after an upgrade: | |
| |
| |
| Section 8.13 |
| |
| Section 8.12.4 |
| |
|
Initialize or configure the following products, as needed: | |
| Section 8.14 |
| Section 8.15 |
| Section 8.16 |
| Section 8.17 |
| Section 8.18 |
| Section 8.19 |
| Section 8.20 |
| Section 8.21 |
| Section 8.22 |
| Section 8.23 |
| Section 8.24 |
| Section 8.25 |
| Section 8.26 |
| Section 8.27 |
| Section 8.28 |
| Section 8.29 |
| Section 8.30 |
| Section 8.31 |
| Section 8.32 |
| Section 8.33 |
| Section 8.4 Section 8.34 |
8.2. Booting the newly installed VSI OpenVMS System Disk
Note
Be sure to remove the DVD from the DVD drive before booting the system disk.
The actions you take to boot the system disk depend on whether you have configured your system with a boot option for your system disk:
If you have configured your system with a boot option for your system disk, your system disk is displayed as a boot option in the UEFI Boot Manager menu. Select your system disk and press Enter. If your system disk is the first option in the UEFI Boot Manager menu, it might boot automatically after the 10-second countdown.
If you have not configured your system with a boot option for your disk, follow these steps:
Press Enter or any other key. (You might see text that instructs you to "hit any key to cold reboot.") The machine displays several boot-related messages and then displays the UEFI Boot Manager menu.
Go to the UEFI Shell prompt by selecting the UEFI Shell [Built-in] option from the UEFI Boot Manager menu. (This might be selected automatically if you do not make a selection before the UEFI countdown completes.) A display similar to the following appears. An explanation of the two types of devices shown (blk and fs) follows the example.
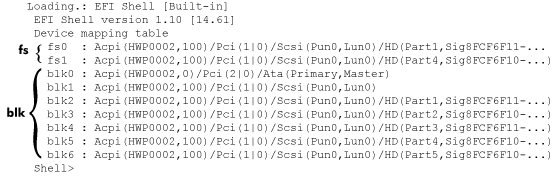
- fs
The fs devices are file-structured logical partitions on physical disks that are included with your system. One or more fs device exists for each volume with a bootable partition or diagnostic partition. Generally, fs0: corresponds to the target disk on which you installed the operating system (unless the DVD was not removed, in which case fs1: corresponds to the target disk). For example, if the target disk is DKA0, then fs0: most likely corresponds to the target disk. On the other hand, if the target disk is a DKA100 or DKB200 or similar, the corresponding UEFI device depends on what partitions are configured on the target disk.
- blk
The blk devices are block devices. Multiple blk devices exist for each volume that has a bootable partition or diagnostic partition. These devices may include the DVD device as well as the diagnostic partitions on VSI OpenVMS system disks. Diagnostic partitions are intended and reserved for use by VSI Services.
To boot the VSI OpenVMS system disk, enter the following command at the UEFI Shell prompt, where fsn: is the device associated with the system disk (probably fs0:):
Shell>fsn:\efi\vms\vms_loader.efiThe VSI OpenVMS operating system now starts booting. After indentifying itself, the operating system will prompt for user name and password:VSI OpenVMS Industry Standard 64 Operating System, Version 8.4-2 Copyright 2015, VMS Software, Inc.
HPE Integrity servers maintain a system event log (SEL) within system console storage, and VSI OpenVMS servers automatically transfer the contents of the SEL into the OpenVMS Error Log. On certain machines, during a successful boot operation while using a console, you might see a message indicating that the Baseboard Management Controller (BMC) SEL is full. You can safely continue when the BMC SEL is full by following the prompts; OpenVMS processes the contents of the SEL.
8.3. Logging In to the SYSTEM Account
The following two sections explain how to log in to the SYSTEM account from a character-cell terminal and from a workstation.
8.3.1. Logging In from a Character-Cell Terminal
Log in from a character-cell terminal by entering the user name SYSTEM followed by the password. The display is similar to the following:
OpenVMS I64 Operating System, Version 8.4-2 Username:SYSTEMPassword: . . . OpenVMS I64 Operating System, Version 8.4-2
If you forget your password for the SYSTEM account, follow the instructions in Section 9.14 to perform an emergency startup.
8.3.2. Logging In from a Workstation
If you installed the DECwindows Motif for OpenVMS software on your workstation, do the following after the login window is displayed on your screen:
Enter the user name SYSTEM, press Tab, and then enter the password.
Press Enter or click OK with your mouse.
At this point, you can create a DECterm session or initiate other management functions. For information about creating a DECterm session, see the DECwindows Motif for OpenVMS Applications Guide.
8.4. Running AUTOGEN
After an installation or upgrade, the system automatically runs AUTOGEN to evaluate your hardware configuration and estimate typical workloads. AUTOGEN then sets system parameters, the sizes of page, swap, and dump files, and the contents of VMSIMAGES.DAT. When AUTOGEN finishes and your system reboots, the installation procedure is complete.
Although AUTOGEN may have already run during installation or upgrade, you have the option of running it again after making any significant changes to the system configuration or installed products. AUTOGEN should also be run again after your system has been in active use under normal loads as it uses feedback mechanisms to more precisely tune system parameters.
The installation procedure displays messages similar to the following:
AUTOGEN will now be run to compute the new system parameters. The system
will then shut down and reboot, and the installation or upgrade will be
complete.
After rebooting you can continue with such system management tasks as:
Configuring networking software (TCP/IP Services, DECnet, other)
Using SYS$MANAGER:CLUSTER_CONFIG.COM to create an OpenVMS Cluster
Creating FIELD, SYSTEST, and SYSTEST_CLIG accounts if needed
%AUTOGEN-I-BEGIN, GETDATA phase is beginning.
%AUTOGEN-I-NEWFILE, A new version of SYS$SYSTEM:PARAMS.DAT has been created.
You may wish to purge this file.
%AUTOGEN-I-END, GETDATA phase has successfully completed.
%AUTOGEN-I-BEGIN, GENPARAMS phase is beginning.
%AUTOGEN-I-NEWFILE, A new version of SYS$MANAGER:VMSIMAGES.DAT has been created.
You may wish to purge this file.
%AUTOGEN-I-NEWFILE, A new version of SYS$SYSTEM:SETPARAMS.DAT has been created.
You may wish to purge this file.
%AUTOGEN-I-END, GENPARAMS phase has successfully completed.
%AUTOGEN-I-BEGIN, GENFILES phase is beginning.
%SYSGEN-I-EXTENDED, SYS$SYSROOT:[SYSEXE]PAGEFILE.SYS;1 extended
%SYSGEN-I-EXTENDED, SYS$SYSROOT:[SYSEXE]SWAPFILE.SYS;1 extended
%SYSGEN-I-CREATED, SYS$SYSROOT:[SYSEXE]SYSDUMP.DMP;1 created
%AUTOGEN-I-REPORT, AUTOGEN has produced some informational messages that
have been stored in the file SYS$SYSTEM:AGEN$PARAMS.REPORT. You may
wish to review the information in that file.
%AUTOGEN-I-END, GENFILES phase has successfully completed.
%AUTOGEN-I-BEGIN, SETPARAMS phase is beginning.
%AUTOGEN-I-SYSGEN, parameters modified
%AUTOGEN-I-END, SETPARAMS phase has successfully completed.
%AUTOGEN-I-BEGIN, REBOOT phase is beginning.
The system is shutting down to allow the system to boot with the
generated site-specific parameters and installed images.Note
After booting and running AUTOGEN, several messages are displayed at DECwindows startup. For information about these messages and how to avoid them, see the HPE DECwindows Motif for OpenVMS Release Notes.
8.5. Running AUTOGEN to Tune the System
When you install or upgrade the OpenVMS operating system, the system executes the AUTOGEN.COM procedure to set the values of system parameters and the sizes of the page, swap, and dump files according to the system configuration.
After running your system for at least 24 hours with users or a typical application workload on the system, run the AUTOGEN.COM procedure again to tune the system properly. Run AUTOGEN as follows. (In an OpenVMS Cluster, you must follow these steps to run AUTOGEN on each cluster node.)
- Run AUTOGEN in feedback mode, examine AGEN$PARAMS.REPORT, and reboot the system. To run AUTOGEN in feedback mode, use the following command:
$@SYS$UPDATE:AUTOGEN SAVPARAMS SETPARAMS FEEDBACKTo view AGEN$PARAMS.REPORT on your screen, enter the following command:$TYPE SYS$SYSTEM:AGEN$PARAMS.REPORTYou can print this file or examine it using the EDIT/READ_ONLY command.
If the report includes a message similar to the following, you might need to modify the size of the page, swap, or dump file:
%AUTOGEN-W-DSKSPC, The disk on which DKA0:[SYS0.SYSEXE]PAGEFILE.SYS resides would be over 95% full if it were modified to hold 20000 blocks.
For more information about AGEN$PARAMS.REPORT, see the VSI OpenVMS System Manager's Manual, Volume 2: Tuning, Monitoring, and Complex Systems.
Run AUTOGEN again in feedback mode two work days later and examine AGEN$PARAMS.REPORT, and then reboot the system. For information about the importance of having a current AGEN$FEEDBACK.DAT file, see Section 3.8.
VSI recommends that you run AUTOGEN from the SAVPARAMS phase through the TESTFILES phase weekly thereafter until the system stabilizes (that is, until AUTOGEN finds nothing that needs to be adjusted). Make sure you run AUTOGEN when your system is running under a typical workload. Examine AGEN$PARAMS.REPORT to determine the need for additional changes.
Important
If you start AUTOGEN without specifying the execution-mode parameter (FEEDBACK, NOFEEDBACK, or CHECK_FEEDBACK), AUTOGEN uses the feedback information in its calculations. However, if the feedback information reflects system up time of less than 24 hours, or if the feedback information is more than 30 days old, AUTOGEN includes warnings in the AGEN$PARAMS.REPORT file to alert you to potential problems with the feedback data. If you wrongly assume the feedback is valid, the parameter settings might vary significantly from your expectations.
If you specify FEEDBACK (or NOFEEDBACK), AUTOGEN uses (or does not use) the feedback regardless of the datas reliability. AUTOGEN proceeds through the SETPARAMS phase (if you specified SETPARAMS, SHUTDOWN, or REBOOT as the end phase) and sets system parameters to the values it computed.
If you specify CHECK_FEEDBACK, AUTOGEN checks the validity of the feedback data. If AUTOGEN determines the feedback is suspect, then AUTOGEN ignores the feedback when computing parameter values. It stops at the TESTFILES phase and issues a warning in the report that parameters have not been changed. You must read the report and decide whether the calculated values are acceptable. You can either use them (by running the AUTOGEN SETPARAMS phase) or rerun AUTOGEN with valid feedback data.
After the system has stabilized, VSI recommends that you run AUTOGEN at least monthly to save feedback information for future use. Use the following command:
$@SYS$UPDATE:AUTOGEN SAVPARAMSIf you do not maintain current feedback information for AUTOGEN, you will not have the needed information the next time you upgrade your system. As a result, you may have to reboot and rerun AUTOGEN several times to make your upgraded system operational.
For more information about running AUTOGEN, see the VSI OpenVMS System Manager's Manual, Volume 2: Tuning, Monitoring, and Complex Systems.
8.6. Rebooting After AUTOGEN
After AUTOGEN finishes, the system automatically shuts down and displays messages similar to the following:
The system will automatically reboot after the shutdown and the
installation will be complete.
SHUTDOWN -- Perform an Orderly System Shutdown
on node I64CSI
%SHUTDOWN-I-BOOTCHECK, performing reboot consistency check...
%SHUTDOWN-I-CHECKOK, basic reboot consistency check completed
.
.
.After a shut down, OpenVMS reboots automatically if you have set the system disk boot option accordingly; otherwise, you must boot the system manually, as described in Section 8.2.
When the system reboots, it displays informational messages and accounting information indicating that your OpenVMS operating system has finished booting and is now ready for use. For example:
%SET-I-INTSET, login interactive limit = 64, current interactive value = 0 SYSTEM job terminated at 12-MAR-2015 14:51:23.47 Accounting information: Buffered I/O count: 2177 Peak working set size: 6848 Direct I/O count: 1358 Peak page file size: 179552 Page faults: 1805 Mounted volumes: 0 Charged CPU time: 0 00:00:13.37 Elapsed time: 0 00:01:06.20
8.7. Joining an OpenVMS Cluster
At installation, you are prompted to determine if the node will join an OpenVMS cluster. If you answered as No, and if the node will not be a cluster member, you can skip to Section 8.4.
If you answered NO to the question about joining an OpenVMS Cluster, but you do intend to add this node to a new or existing OpenVMS Cluster, you can do so only after the system has rebooted (at the end of this phase of the installation). You must manually run the cluster configuration utility.
You can do this by entering the following command:
$@SYS$MANAGER:CLUSTER_CONFIG_LAN
For more information about cluster configuration, see the VSI OpenVMS Cluster Systems manual or the Guidelines for OpenVMS Cluster Configurations manual.
If you answered YES to the question about joining an OpenVMS Cluster, the system now prompts you for information about your configuration. The following table lists the OpenVMS Cluster prompts and suggested responses. These prompts appear if you answered YES to the question about joining an OpenVMS Cluster or if you manually execute SYS$MANAGER:CLUSTER_CONFIG_LAN.COM. Note that, depending on your responses and the particular cluster configuration, some prompts are not displayed.
| QUESTION | RESPONSE |
|---|---|
|
Enter Y. | |
|
Enter the DECnet node name (for example, MYNODE). The DECnet node name can be from one to six alphanumeric characters in length and cannot include dollar signs ($) or underscores (_). This is the name you specified in step 11 of the installation procedure. | |
|
What is the node's DECnet node address? |
Enter the DECnet node address; for example, 2.2. This is the address you specified in step 12 of the installation procedure. |
|
Enter this cluster's group number:? |
Enter a number in the range of 1 to 4095 or 61440 to 65535. |
|
Enter this cluster's password:? |
Enter the cluster password. The password must be from 1 to 31 alphanumeric characters in length and can include dollar signs ($) and underscores (_). |
|
Reenter this cluster's password for verification: |
Reenter the password. |
|
Will MYNODE be a disk server (Y/N)? |
Enter Y if you want local disks to be served to the cluster (mandatory for local area and mixed-interconnect configurations). See the VSI OpenVMS Cluster Systems manual for information about served cluster disks. |
|
Enter a value for MYNODEs ALLOCLASS parameter. |
In an OpenVMS Cluster environment, the allocation class value cannot be zero if volume shadowing will be used on this system. The ALLOCLASS value must be a number from 1 to 255. VSI recommends that you thoroughly review the chapter on cluster storage devices in the VSI OpenVMS Cluster Systems manual. This manual also includes the rules for specifying allocation class values. |
|
Does this cluster contain a quorum disk (Y/N)? |
For SCSI, local area, and mixed-interconnect configurations, enter Y or N, depending on your configuration. If you enter Y, the system asks for the name of the quorum disk. Enter the device name of the quorum disk. For information about quorum disks, see the VSI OpenVMS Cluster Systems manual. |
8.8. Backing Up Your System Disk
Unless your newly installed or upgraded system disk will be part of a shadow set, it is recommended that you back up the system disk before performing the tasks described in this chapter. If you encounter problems while performing any of these tasks, having a backup copy of the system disk ensures that you can restore it to a known condition without having to repeat the installation or upgrade.
If your system disk will be part of a multiple-member shadow set, then a backup is not necessary. Either form or re-form the shadow set, as described in Section 8.11; this creates a backup copy of the newly installed or upgraded system disk through the shadow copy operation. Remember to dismount any added shadow set members after the shadow copy has completed, complete any steps described in this chapter that you need to perform and, when you are finished, re-form the shadow set.
If your newly installed or upgraded system disk will not be in a shadow set, back up the system disk by performing the following steps. (For a newly installed system disk, it might be just as easy to reinstall the operating system.)
Shut down the system (as described in Section 9.15.2).
Boot the operating system media, as described in Section 6.1.
Use the OpenVMS operating system menu to enter the DCL environment (option 8).
- Mount the system device and the target device on which you are making the backup copy. (If you are backing up to tape, skip to the next step.) For example, if your system disk is on DKA0: and the target device is on DKA100:, you might use the following commands (colons are required). The /OVERRIDE qualifier used in this example enables you to mount the system disk without entering its volume label. The /FOREIGN qualifier is required for the target disk when you use the BACKUP /IMAGE command.
$$$MOUNT /OVERRIDE=IDENTIFICATION DKA0:$$$MOUNT /FOREIGN DKA100:$$$BACKUP /IMAGE /LOG DKA0: DKA100:The /IMAGE qualifier causes the Backup utility to produce a functionally equivalent copy of the system disk, which is also bootable. The /LOG qualifier causes the procedure to display the specification of each save set file being processed. To compare the backed up files to the source files, use the /VERIFY qualifier. If any discrepancies are detected, the Backup utility displays an error message.
- To back up the system disk to a magnetic tape, enter the following commands, where MTA0: is the magnetic tape drive and label is the volume label. Note that the BACKUP command automatically mounts the tape and begins the backup to it.
$$$INITIALIZE MTA0:label$$$MOUNT /OVERRIDE=IDENTIFICATION DKA0:$$$BACKUP /IMAGE /LOG DKA0: MTA0:label.BCK Log out from the DCL environment.
Shut down the system by selecting option 9 on the menu.
Boot from the disk on which you either upgraded or installed OpenVMS.
In addition to backing up the system disk now before you customize it, you should back up your system disk again after you successfully complete your customization tasks and install layered products.
For more complete information about backup operations, including a description of an alternative method that does not require booting from the operating system media and that enables you to back up a shadowed disk without disabling the shadow set, see Appendix A. For more information about the Backup utility, see the VSI OpenVMS System Management Utilities Reference Manual: A-L.
8.9. Registering Your Licenses
If you did not register your OpenVMS licenses during the installation, you must do so before you can use the OpenVMS operating system. You must also register the licenses for OpenVMS layered products. If your operating system came preinstalled, you must register licenses. The licenses are not preinstalled. If you plan to form a volume shadow set for your newly installed system disk, you must enter and load the VOLSHAD license.
If you have upgraded your operating system, register any new OpenVMS or layered product licenses. For VSI OpenVMS systems, a single OE license grants the right to use all the components bundled in the purchased OE. Each OE is offered with Per Core Licenses (PCLs).
For information about registering licenses, see the following documents:
VSI OpenVMS License Management Utility Manual
VSI OpenVMS Version 8.4-2 Release Notes
Operating Environments for OpenVMS for HPE Integrity Servers Software Product Description (SPD 82.34.xx).
To register licenses, use the OpenVMS License utility as follows:
Start the OpenVMS License utility by entering the following command at the OpenVMS system prompt. (You can also use the LICENSE REGISTER command.)
$@SYS$UPDATE:VMSLICENSEThe utility displays a menu screen similar to the following. Select the REGISTER option (press Enter or enter 1 at the prompt), and enter each license key until you have successfully registered all required PAKs.
VMS License Management Utility Options: 1. REGISTER a Product Authorization Key 2. AMEND an existing Product Authorization Key 3. CANCEL an existing Product Authorization Key 4. LIST Product Authorization Keys 5. MODIFY an existing Product Authorization Key 6. DISABLE an existing Product Authorization Key 7. DELETE an existing Product Authorization Key 8. COPY an existing Product Authorization Key 9. MOVE an existing Product Authorization Key 10. ENABLE an existing Product Authorization Key 11. SHOW the licenses loaded on this node 12. SHOW the unit requirements for this node 99. Exit this procedure Type '? ' at any prompt for a description of the information requested. Press Ctrl/Z at any prompt to return to this menu. Enter one of the above choices [1]After each license is successfully registered, the procedure asks whether the license should be loaded. Answer YES.
After you have registered and loaded all your licenses, exit the License Management procedure by entering option 99.
8.10. Set System Parameters for Volume Shadowing (Optional)
SHADOWING=2 !Enable volume shadowing SHADOW_SYS_DISK=1 !Enable shadowing of the system disk SHADOW_SYS_UNIT=n!Optional: default is 0, which creates DSA0 SHADOW_MAX_COPY=4 !Allow up to 4 simultaneous shadow copies or merges ALLOCLASS=x!This number must be non-zero if local non-FC !devices are going to be shadow set members
If a non-zero ALLOCLASS value is already assigned to your system, do not change the ALLOCLASS value. For more information about these and other system parameters you can set for volume shadowing, see the Volume Shadowing for OpenVMS manual. For more information about setting ALLOCLASS for clusters, see the VSI OpenVMS Cluster Systems manual.
If you modified MODPARAMS.DAT to enable or modify shadowing parameters (see Section 8.10), then run AUTOGEN and reboot the system by performing the following steps to make the changes take effect.
Run AUTOGEN by entering the following command:
$@SYS$UPDATE:AUTOGEN GETDATA TESTFILES NOFEEDBACKAfter AUTOGEN completes, display or print the SYS$SYSTEM:AGEN$PARAMS.REPORT file and review it. This file lists changes being made to SYSGEN parameters or changes that AUTOGEN wanted to make but could not because of a hardcoded or maximum value that was specified in MODPARAMS.DAT.
If other changes need to be made to MODPARAMS.DAT based on a review of the AGEN$PARAMS.REPORT file, make them now and then resume at step 1.
Once you are satisfied with the parameter settings, enter the following AUTOGEN command:
$@SYS$UPDATE:AUTOGEN GENPARAMS SETPARAMS NOFEEDBACKThis command makes the parameter changes permanent so that they are used on subsequent reboots.
Reboot the system by entering the following command:
$@SYS$SYSTEM:SHUTDOWN
For more information about AUTOGEN, see VSI OpenVMS System Management Utilities Reference Manual: A-L.
8.11. Forming the Shadow Set
If you have upgraded a disk in a volume shadowing environment, you must now re-form the shadow set. If you want to form a shadow set for a newly installed system disk, you can do this now or later. To do so requires that the VOLSHAD license has been entered and loaded. In addition, you must set several system parameters, as explained in Section 8.10, and then you must run AUTOGEN and reboot the system, as explained in Section 8.4.
Forming the shadow set with the newly installed or upgraded disk as the master causes the other disks in the shadow set to be updated with a copy of the disk. (In a single-member shadow set, although no other disks exist to be updated, the shadow set can be used to facilitate replacement of a failed drive.)
After forming the shadow set, dismount one of the shadow set members and keep it as a backup. After you perform the steps recommended in this chapter, you can place another volume into the shadow set instead of doing the final backup, or re-add the volume that was dismounted.
Form the shadow set as follows:
Enter the SHOW DEVICE D command to display a list of disks available on your system. For example:
$SHOW DEVICE DDevice Device Error Volume Free Trans Mnt Name Status Count Label Blocks Count Cnt $11$DKB100: (NODE1) Online 0 $11$DKB200: (NODE1) Mounted 0 I640842 918150 1 31Enter a command in the following format:
MOUNT/CONFIRM/SYSTEM DSAn: /SHADOW=(upgraded-disk:,new-member:) volume-labelwhere:
DSAn: is the virtual unit name of the shadow set, where n is a unique number from 0 to 999.
upgraded-disk: is the name of the shadowed system disk on which you just upgraded or installed OpenVMS.
new-member: is the name of the disk you want to add as a member of the shadow set.
volume-label is the volume label of the shadow set you just upgraded or the disk you are creating.
Note
When you form the shadow set, the contents of the new member are replaced by the contents of the disk you upgraded. Specifying the /CONFIRM qualifier reminds you of this fact, confirming that you are specifying the correct name of a disk that either is blank or contains files you no longer need.
Example
$MOUNT/CONFIRM/SYSTEM DSA54: /SHADOW=($11$DKB200:,$11$DKB100:) I640842%MOUNT-F-SHDWCOPYREQ, shadow copy required Virtual Unit - DSA54 Volume label I64A0842 Member Volume label Owner UIC $11$DKB100: (NODE1) SCRATCH [100,100] Allow FULL shadow copy on the above member(s)? [N]:YES
Note
Before continuing with the next step in this chapter, after the shadow copy completes, dismount one of the shadow set members to use as a backup. Normally, this should be the unit you just added to the upgraded volume when you formed the shadow set (in the preceding example, $11$DKB100:).
To add a shadowed system disk in a multiple-member shadow set to the UEFI boot device list and dump device list, VSI recommends using the OpenVMS Boot Manager utility (SYS$MANAGER:BOOT_OPTIONS.COM). Be sure to add all members to both lists.
8.12. Customizing the System (New Installations, Some Upgrades)
You can customize the system to meet your site-specific needs. In addition, if your system is part of an OpenVMS Cluster environment, you must prepare the cluster environment and configure the cluster. The following subsections describe the customization tasks you can perform at this time. In general, these tasks apply to new installations only; however, in some cases, they apply to upgrades. The tasks are as follows:
Create network proxy authorization files (Section 8.12.1).
Set up the queue manager, configure shared files (when multiple system disks are present), and start the default batch and print queues (Section 8.12.2).
Configure your multihead system, if applicable (Section 8.13).
Configure DECnet if it was installed or added during an upgrade (Section 8.12.3).
Configure TCP/IP Services for OpenVMS if it was installed or added during an upgrade (Section 8.12.4).
If neither DECnet nor TCP/IP Services for OpenVMS is being used, install and configure third-party networking software, if necessary (Section 8.12.5).
Update SYSTARTUP_VMS.COM to have networking software (and, optionally, any other additional products you have installed) start at boot (Section 8.28).
For instructions on customizing the system, review the following documentation:
Note that other customization tasks are described later in this chapter.
8.12.1. Creating Network Proxy Authorization Files
Message from user SYSTEM on HOMER
%SECSRV-E-NOPROXYDB, cannot find proxy database file NET$PROXY.DAT
%RMS-E-FNF, file not foundThe NET$PROXY.DAT file is the primary network proxy authorization file. The other network authorization file to be created is NETPROXY.DAT. To create the network proxy authorization files, enter the following commands:
$SET DEFAULT SYS$COMMON:[SYSEXE]$MC AUTHORIZE CREATE/PROXY$SET DEFAULT SYS$LOGIN
Note
Be sure you create the network proxy authorization files before starting the queue manager (as described in Section 8.12.2).
%UAF-W-NETCHANERR, error assigning a channel to NET:
-SYSTEM-W-NOSUCHDEV, no such device availableFor more information about network proxy accounts and files, see the VSI OpenVMS System Manager's Manual, Volume 1: Essentials. For more information about the Authorize utility, see the VSI OpenVMS System Management Utilities Reference Manual: A-L.
8.12.2. Setting Up the Queue Manager and Default Queues
The initial installation of OpenVMS does not create the queue manager or any queues. VSI recommends that you create the queue manager and your default batch and print queues now. When you install layered products (as described in Section 8.26), some of these products expect such queues to be present or try to create queues themselves.
Note
Normally, you create a queue manager only once. The system stores the START QUEUE command in the queue database to enable the queue manager to start automatically whenever the system reboots. If the queue manager has been started before on your system, do not specify this START QUEUE command again; the /NEW_VERSION qualifier causes your system to overwrite your current queue database files.
To configure shared files on multiple system disks or off the system disk, edit the SYS$MANAGER:SYLOGICALS.COM file as described in VSI OpenVMS System Manager's Manual, Volume 1: Essentials.
To set up the queue manager and a batch queue for new installations, enter the following commands at the DCL prompt.
$START QUEUE /MANAGER /NEW_VERSION$INITIALIZE /QUEUE /START /BATCH SYS$BATCH
Note
If you did an upgrade of the operating system, do not specify the START QUEUE command with the /NEW_VERSION qualifier.)
- Before:
$!$ START /QUEUE SYS$BATCH- After:
$ START /QUEUE SYS$BATCH
For more information about starting and creating queues, see the VSI OpenVMS System Manager's Manual, Volume 1: Essentials.
8.12.3. Configuring DECnet
If you installed DECnet, or if you added DECnet during an upgrade, you must now configure DECnet. Follow the instructions provided for the version of DECnet you installed. The DECnet End System License is included with the Base Operating Environment (BOE). If you want your system to take advantage of the advanced features of DECnet (such as routing, DTSS server, DNS server), you must register and install the DECnet-Plus Extended Function License.
To load and register licenses, perform the steps described in Section 8.9.
If you installed DECnet-Plus for OpenVMS software, see the DECnet-Plus for OpenVMS Release Notes and the DECnet-Plus for OpenVMS Installation and Configuration manual for information about how to configure this software using the NET$CONFIGURE procedure.
If you installed DECnet Phase IV, see the DECnet for OpenVMS Guide to Networking manual for information about configuring this software using the NETCONFIG command procedure.
Once you have configured DECnet Phase IV, edit SYS$COMMON:[SYSMGR]SYSTARTUP_VMS.COM so that the software starts when the system reboots. (This step is not required if you are running DECnet-Plus.) You can have the software start interactively or in batch mode by making one of the following changes:
Locate and uncomment the line:
$!$ START/NETWORK DECNET
So it now appears as:
$ START/NETWORK DECNET
To start the network in a batch job (speeds up startup) locate and uncomment the line:
$!$ SUBMIT
SYS$MANAGER:STARTNET.COM
So it now appears as:
$ SUBMIT
SYS$MANAGER:STARTNET.COM
Important
If you intend to run both DECnet Phase IV and a TCP product, DECnet must start first. In this case, VSI recommends starting DECnet using interactive mode.
For information about editing STARTUP-VMS.COM, see Section 8.28.
8.12.4. Configuring TCP/IP Services for OpenVMS
If you plan to run TCP/IP Services for OpenVMS software, note the following:
Configure your system for networking by executing the interactive command procedure SYS$MANAGER:TCPIP$CONFIG.COM. Be sure to consult the TCP/IP Services for OpenVMS Installation and Configuration manual for specifics about configuring TCP/IP Services for OpenVMS and for configuring IPv6 support.
After completing the configuration, edit the command pertaining to TCP/IP Services for OpenVMS in SYS$COMMON:[SYSMGR]SYSTARTUP_VMS.COM (as instructed in Section 8.28) so that the TCP/IP Services software starts automatically when your system is rebooted.
Important
Do not configure TCP/IP Services for OpenVMS without first starting the queue manager.
8.12.5. Installing and Configuring Third-Party Networking Software
You need networking software to download patches and as a requirement for certain layered products. If you are using neither DECnet nor TCP/IP Services for OpenVMS, you should install and configure third-party networking software now. See the appropriate vendors product documentation.
8.13. Configuring a Multihead System (Optional)
A multihead configuration consists of a single system that supports multiple graphics options. A graphics option consists of a graphics controller (card) and a graphics display interface (monitor).
Your system can be configured automatically for multihead use if you copy the private server setup template file to a command procedure file type (.COM). The DECwindows Motif server loads this command procedure on startup or restart.
To set up your system for multihead support, perform these steps:
Note
The DECwindows Motif software must already be installed on the system prior to completing this procedure. If DECwindows is not installed, you must install the software, load the license and reboot the system prior to completing this procedure.
Copy the private server setup template file to a new .COM file by entering the following command:
$COPY SYS$MANAGER:DECW$PRIVATE_SERVER_SETUP.TEMPLATE_To:SYS$MANAGER:DECW$PRIVATE_SERVER_SETUP.COMRestart the DECwindows server by entering the following command:
$@SYS$STARTUP:DECW$STARTUP RESTART
For more information about customizing your DECwindows environment using the SYS$MANAGER:DECW$PRIVATE_SERVER_SETUP.COM file, see the most recent version of the DECwindows Motif for OpenVMS Installation Guide and Managing DECwindows Motif for OpenVMS Systems.
8.14. Initializing CDSA (Optional)
The Common Data Security Architecture (CDSA) software is installed, configured, and initialized automatically with the operating system installation or upgrade. CDSA is required for Secure Delivery purposes and other security features; otherwise, use of CDSA is not required.
Note that if you installed a new CDSA kit without upgrading the base operating system, you must enter the following command to initialize CDSA prior to its first use. Enter the command from an account that has both SYSPRV and CMKRNL privileges (for example, the SYSTEM account).
$@SYS$STARTUP:CDSA$UPGRADE
Module uninstalled successfully. CDSA-I-Init, CDSA has previously been initialized on this system. CDSA-I-Init, Re-initializing CDSA. CDSA-I-Init, Initializing CDSA MDS installed successfully. . . CDSA-I-Init, CDSA Initialization complete CDSA-I-Init, Initializing Secure Delivery Install completed successfully. Install completed successfully. Module installed successfully. Module installed successfully. CDSA-I-Init, Secure Delivery Initialization complete
Note
Do not attempt to explicitly remove CDSA from your system. The PRODUCT REMOVE command is not supported for CDSA although there appears to be an option to remove CDSA. CDSA is installed with the operating system and is tightly bound with it. Attempts to remove it might not work as expected and can create undesirable side effects. An attempt to remove it results in a message similar to the following:
%PCSI-E-HRDREF, product VSI I64VMS CDSA V2.3 is referenced by
VSI I64VMS OpenVMS V8.4-2
The two products listed above are tightly bound by a software dependency.
if you override the recommendation to terminate the operation, the
referenced product will be removed, but the referencing product will have
an unsatisfied software dependency and may no longer function correctly.
Please review the referencing products documentation on requirements.
Answer YES to the following question to terminate the PRODUCT command.
However, if you are sure you want to remove the referenced product then
answer NO to continue the operation.
Terminating is strongly recommended. Do you want to terminate? [YES]For more information about CDSA, see Open Source Security for OpenVMS, Volume 1: Common Data Security Architecture.
8.15. Configuring the Availability Manager Base Software (Optional)
The Availability Manager base kit is installed automatically with the operating system; however, use of Availability Manager is not required. If you do not plan to use Availability Manager or any products that depend on it, skip to the next section.
The files in the Availability Manager base kit make up what is called the Data Collector. The Data Collector is used to collect data for the Availability Manager product. To display the data, you need to install an Availability Manager Data Analyzer kit on an OpenVMS or Microsoft Windows™ node in the local LAN. The kit is included in the OpenVMS upgrade media.
For more information refer to the (Availability Manager Installation Instructions). This and other Availability Manager documents are available at the website mentioned previously. Update documents will be available from the VSI website soon.
Warning
Do not attempt to explicitly remove the Availability Manager from your system. The PRODUCT REMOVE command is not supported for Availability Manager although there appears to be an option to remove Availability Manager. The Availability Manager base software is installed with the operating system and is tightly bound with it. Attempts to remove it might not work as expected and can create undesirable side effects.
8.16. Configuring Kerberos (Optional)
The Kerberos for OpenVMS software, which is based on MIT Kerberos, is installed automatically with the operating system; however, use of Kerberos is not required. If you do not plan to use Kerberos or any products that depend on Kerberos, skip to the next section.
To configure Kerberos, perform the following steps from a privileged OpenVMS user account (for example, SYSTEM).
Run the following command procedure to configure the Kerberos clients and servers:
$@SYS$STARTUP:KRB$CONFIGURE.COMAdd the following line to your SYLOGIN command procedure or to the LOGIN.COM of each user who will use Kerberos:
$@SYS$MANAGER:KRB$SYMBOLS- Edit SYS$MANAGER:SYSTARTUP_VMS.COM to remove the exclamation point from the KRB$STARTUP.COM line so that it appears as shown in the following example. (Note that SYSTARTUP_VMS.COM has TCP/IP Services for OpenVMS starting before Kerberos. This is required.)
$@SYS$STARTUP:KRB$STARTUP.COM
For additional setup and configuration information, see the Open Source Security for OpenVMS, Volume 3: Kerberos manual. This document contains links to the MIT Kerberos documentation and is available from the OpenVMS Version 8.4-2 kit.
Note
Do not attempt to explicitly remove Kerberos from your system. The PRODUCT REMOVE command is not supported for Kerberos although there appears to be an option to remove Kerberos. Kerberos is installed with the operating system and is tightly bound with it. Attempts to remove it might not work as expected and can create undesirable side effects. An attempt to remove it results in a message similar to the following:
%PCSI-E-HRDREF, product VSI I64VMS Kerberos V3.1 is referenced by VSI I64 OpenVMS V8.4-2 The two products listed above are tightly bound by a software dependency. If you override the recommendation to terminate the operation, the referenced product will be removed, but the referencing product will have an unsatisfied software dependency and may no longer function correctly. Please review the referencing products documentation on requirements. Answer YES to the following question to terminate the PRODUCT command. However, if you are sure you want to remove the referenced product then answer NO to continue the operation. Terminating is strongly recommended. Do you want to terminate? [YES]
8.17. Configuring SSL for OpenVMS (Optional)
The VSI SSL for OpenVMS software is installed automatically with the operating system; however, use of SSL is not required. If you do not plan to use SSL or any products that depend on it, skip to the next section.
The SSL$STARTUP.COM command procedure has been added to VMS$LPBEGIN-050 to enable SSL to start automatically.
$ @SYS$STARTUP:SSL$SHUTDOWN.COMIf you are upgrading and have an earlier version of SSL installed, copy your SSL$STARTUP.TEMPLATE file (located in SYS$STARTUP) to SSL$STARTUP.COM in the SYS$STARTUP directory.
Several other post-installation and post-upgrade tasks are required, as described in
the SSL release notes, available in
SYS$HELP:SSLnnn.RELEASE_NOTES, where
nnn is the version of the SSL software, such as 013.
For more information about SSL, see Open Source Security for OpenVMS, Volume 2: HP SSL for OpenVMS.
Note
Do not attempt to explicitly remove SSL from your system. The PRODUCT REMOVE command is not supported for SSL although there appears to be an option to remove SSL. SSL is installed with the operating system and is tightly bound with it. Attempts to remove it might not work as expected and can create undesirable side effects. An attempt to remove it results in a message similar to the following:
%PCSI-E-HRDREF, product VSI I64VMS SSL V1.4 is referenced by VSI I64 OpenVMS 8.4-2 The two products listed above are tightly bound by a software dependency. If you override the recommendation to terminate the operation, the referenced product will be removed, but the referencing product will have an unsatisfied software dependency and may no longer function correctly. Please review the referencing products documentation on requirements. Answer YES to the following question to terminate the PRODUCT command. However, if you are sure you want to remove the referenced product then answer NO to continue the operation. Terminating is strongly recommended. Do you want to terminate? [YES]
8.18. Configuring WBEM Services for OpenVMS (Optional)
WBEM Services for OpenVMS is installed automatically with OpenVMS installation. As with other similar products, an OpenVMS upgrade does not automatically include WBEM Services for OpenVMS if it is not already installed on the target system disk. In this case, you must install the product separately using the PCSI PRODUCT INSTALL command. If you do not plan to use WBEM Services for OpenVMS or any products that depend on it, simply do not configure the software; if you have already configured the software, you can choose not to start it.
You must configure WBEM Services for OpenVMS to obtain the services provided by HPE SIM (Version 5.2 or later) and products such as HPE Instant Capacity and HPE gWLM. To provide services over the network, both TCP/IP Services for OpenVMS and SSL (for security purposes) are required and must be configured and running. (For information about configuring TCP/IP Services for OpenVMS, see Section 8.12.4.
To configure WBEM Services for OpenVMS on a system on which WBEM Services for OpenVMS has never been installed and configured, follow the steps described in “Section 8.18.1.” If you are configuring the product on a system on which it has been configured previously, see Section 8.18.2.
Note
VSI recommends that you do not remove the WBEM Services for OpenVMS product even if you do not have a need for it. If you attempt to use the PRODUCT REMOVE command to remove this product, you might see a message similar to the following. This message is automatically displayed for any product that is required with OpenVMS. The consequences of removing WBEM Services for OpenVMS might not be as severe as implied by the message unless other software is using the product on your server.
%PCSI-E-HRDREF, product VSI I64VMS WBEMCIM V2.91 is referenced by VSI I64VMS OpenVMS V8.4-2 The two products listed above are tightly bound by a software dependency. If you override the recommendation to terminate the operation, the referenced product will be removed, but the referencing product will have an unsatisfied software dependency and may no longer function correctly. Please review the referencing products documentation on requirements. Answer YES to the following question to terminate the PRODUCT command. However, if you are sure you want to remove the referenced product then answer NO to continue the operation. Terminating is strongly recommended. Do you want to terminate? [YES]
8.18.1. Configuring WBEM Services for OpenVMS (Where Not Configured Previously)
To configure WBEM Services for OpenVMS on a system for the first time, follow these steps:
Enter the following command
$RUN SYS$SYSROOT:[WBEM_SERVICES]WBEM_SERVICES$CONFIGThis command invokes the utility that configures and initializes the environment for WBEM Services for OpenVMS.
- After displaying the initial configuration utility banner, the utility informs you where it will store the configuration files and repository and asks if you want to change the location.
The configuration files and repository will be placed in the following location: SYS$SPECIFIC:[WBEM_Services]. Do you want to change this location (Yes/No) [No]? :Note
The repository, a compiled version of the Common Information Model (CIM) class schema, requires an ODS-5 formatted disk (the repository uses UNIX-style file names, which are not supported on ODS-2 formatted disks). If the default location is on an ODS-2 formatted disk, you must change the location to an ODS-5 disk.
When you accept the default location, the utility informs you that all configuration questions have been answered and asks whether you want to continue, as shown in the following example. If you choose to continue, the utility creates the CIMServer repository tree in the location indicated earlier. The CIMServer is the WBEM Services for OpenVMS process that runs on the system to support certain applications. It also creates the following command files:
- SYS$STARTUP:WBEM_Services$Startup.com
- SYS$STARTUP:WBEM_Services$Shutdown.com
- SYS$SYSROOT:[WBEM_SERVICES]WBEM_Services$Define_Commands.com
The SYS$STARTUP:WBEM_Services$Startup.com file defines system logicals for the WBEM Services for OpenVMS environment.
All configuration questions have been answered. Do you want to continue (Yes/No) [YES]? : %WBEMCONFIG-I-CREREPBEGIN, Create Repository Begins... %WBEMCONFIG-I-CREREPCOMPLETE, Create Repository Complete. This utility creates: SYS$STARTUP:WBEM_Services$Startup.com which should be added to SYS$STARTUP:SYSTARTUP_VMS.COM. This utility creates: SYS$STARTUP:WBEM_Services$Shutdown.com which should be added to SYS$STARTUP:SYSHUTDWN.COM. This utility creates: SYS$SYSROOT:[wbem_services]WBEM_Services$Define_Commands.com which users who use this product can add to their login.com. - The utility asks whether to start the CIMServer:
Do you want to start the CIMServer now (Yes/No) [Yes]? :CIMServer must be running so that your system can use such applications as HPE Instant Capacity and HPE gWLM. You can start CIMServer now, or you can perform other postinstallation or postupgrade tasks first and then start CIMServer. If you choose to start CIMServer now, the utility displays the progress and operating system information, as in the following example:
%RUN-S-PROC_ID, identification of created process is 21A00599 %WBEMCIM-I-STARTUPWAIT, Waiting for CIMServer to start... 120 seconds remaining. %WBEMCIM-S-CSSTARTED, CIMServer successfully started. OperatingSystem Information Host: vmssoftware.com Name: OpenVMS Version: V8.4-2 UserLicense: Unlimited user license Number of Users: 1 users Number of Processes: 29 processes OSCapability: 64 bit LastBootTime: Jan 1, 2015 10:52:55 (-0400) LocalDateTime:Jan 3, 2015 10:14:58 (-0400) SystemUpTime: 256923 seconds = 2 days, 23 hrs, 22 mins, 3 secs %RUN-S-PROC_ID, identification of created process is 21A00599 To ensure that CIMServer starts automatically at each reboot, add the following line to SYS$MANAGER:SYSTARTUP_VMS.COM after the line that starts TCP/IP:
$ @SYS$STARTUP:WBEM_Services$Startup.comTo have CIMServer shut down automatically with the operating system, add the following line to the SYS$MANAGER:SYSSTARTUP:SYSHUTDWN.COM file:
$ @SYS$STARTUP:WBEM_Services$Shutdown.comAll users who use this product should also add the following line to their LOGIN.COM file:
$ @SYS$STARTUP:WBEM_Services$Define_Commands.comIn an OpenVMS Cluster, each member that runs WBEM Services for OpenVMS needs its own repository. Therefore, you must perform the WBEM Services for OpenVMS configuration procedure on each of those cluster members.
8.18.2. Configuring WBEM Services for OpenVMS (Where Configured Previously)
To configure WBEM Services for OpenVMS on a system where it has been configured previously, follow these steps:
Enter the following command
$RUN SYS$SYSROOT:[WBEM_SERVICES]WBEM_SERVICES$CONFIGThis command starts the utility that configures and initializes the environment for WBEM Services for OpenVMS.
If the WBEM Services for OpenVMS product is already configured on your system, the following error message and the recommended remedial actions appear:
%WBEMCONFIG-E-SYSCOMMONLOGICAL, WBEM_VAR can no longer be defined to point to a location in SYS$COMMON. The repository files in WBEM_VAR should not be shared with other cluster members. Follow these manual steps to move the repository out of the SYS$COMMON area and complete the post installation configuration tasks: o Delete the sys$common:[WBEM_Services.var...] directory tree. o Deassign the WBEM_VAR system logical. o Run this procedure again.Perform the recommended steps, as in the following example:
$DELETE SYS$COMMON:[WBEM_SERVICES.VAR...]*.*;*$DELETE SYS$COMMON:[WBEM_SERVICES]VAR.DIR;*$DEASSIGN/SYS WBEM_VAR$RUN SYS$SYSROOT:[WBEM_SERVICES]WBEM_SERVICES$CONFIGAfter you start the configuration procedure, go to Section 8.18.1 and follow the steps described there, starting with step 2.
- After displaying the initial configuration utility banner, the utility informs you where it will store the configuration files and repository and asks if you want to change the location.
The configuration files and repository will be placed in the following location: SYS$SPECIFIC:[WBEM_Services]. Do you want to change this location (Yes/No) [No]? :The repository is a compiled version of the CIM class schema. This example assumes you accept the current location.
As shown in the following example, the utility informs you that all configuration questions have been answered and asks whether you want to continue.
If the utility determines that the repository schema has not changed, the utility informs you and continues. The utility does not need to upgrade the repository.
If the utility determines that the current repository needs upgrading, or if the utility does not find a repository (perhaps WBEM Services for OpenVMS had been installed but not configured), the utility displays a message informing you that the repository will be upgraded or created and that this will take 10 to 15 minutes depending on your processor and disk I/O speed. In the following example, the utility needs to create the repository tree.
The utility also creates the SYS$STARTUP:WBEM_Services$Startup.com, SYS$STARTUP:WBEM_Services$Shutdown.com, and SYS$SYSROOT:[WBEM_SERVICES]WBEM_Services$Define_Commands.com command files. The SYS$STARTUP:WBEM_Services$Startup.com file defines system logicals for the WBEM Services for OpenVMS environment.
All configuration questions have been answered. Do you want to continue (Yes/No) [Yes]? : %WBEMCONFIG-I-CREREPBEGIN, Create Repository Begins... %WBEMCONFIG-I-CREREPCOMPLETE, Create Repository Complete. This utility creates: SYS$STARTUP:WBEM_Services$Startup.com which should be added to SYS$STARTUP:SYSTARTUP_VMS.COM. This utility creates: SYS$STARTUP:WBEM_Services$Shutdown.com which should be added to SYS$STARTUP:SYSHUTDWN.COM. This utility creates: SYS$SYSROOT:[wbem_services]WBEM_Services$Define_Commands.com which users who use this product can add to their login.com.- The utility now asks you whether to start the CIMServer:
Do you want to start the CIMServer now (Y/N) {Y}? :CIMServer must be running so that your system can use such applications as HPE Instant Capacity and HPE gWLM. You can start CIMServer now, or you can perform other postinstallation or postupgrade tasks first and then start CIMServer. If you choose to start CIMServer now, the utility displays the progress and operating system information, as in the following example:
%RUN-S-PROC_ID, identification of created process is 21A00599 %WBEMCIM-I-STARTUPWAIT, Waiting for CIMServer to start... 120 seconds remaining. %WBEMCIM-S-CSSTARTED, CIMServer successfully started. OperatingSystem Information Host: bolton.vmssoftware.com Name: OpenVMS Version: V8.4-2 UserLicense: Unlimited user license Number of Users: 1 users Number of Processes: 29 processes OSCapability: 64 bit LastBootTime: Jan 1, 2015 10:52:55 (-0400) LocalDateTime: Jan 3, 2015 10:14:58 (-0400) SystemUpTime: 256923 seconds = 2 days, 23 hrs, 22 mins, 3 secs %RUN-S-PROC_ID, identification of created process is 21A00599 To ensure that CIMServer starts automatically at each reboot, add the following line to the SYS$MANAGER:SYSTARTUP_VMS.COM file:
$ @SYS$STARTUP:WBEM_Services$Startup.comTo have CIMServer shut down automatically with the operating system, add the following line to the SYS$MANAGER:SYSSTARTUP:SYSHUTDWN.COM file:
$ @SYS$STARTUP:WBEM_Services$Shutdown.comAll users who use this product should also add the following line to their LOGIN.COM file:
$ @SYS$STARTUP:WBEM_Services$Define_Commands.comIn an OpenVMS Cluster, each member that will run WBEM Services for OpenVMS needs its own repository. Therefore, you must perform the WBEM Services for OpenVMS configuration procedure on each of those cluster members.
8.19. Configuring WBEM Providers for OpenVMS (Optional)
WBEM Providers for OpenVMS is installed automatically with OpenVMS installation. As with other similar products, an OpenVMS upgrade does not include WBEM Providers for OpenVMS if it is not currently installed on the target system disk. In this case, you must install the product separately using the PCSI PRODUCT INSTALL command.
You must configure WBEM Providers for OpenVMS to obtain the services provided by HPE SIM and HPE GiCAP. WBEM Providers for OpenVMS requires WBEM Services for OpenVMS.
Note
If you are using WBEM Providers for OpenVMS, and have performed an OpenVMS upgrade, you must re-configure WBEM Providers by following the steps below.
If not done so already, define the WBEM Services logicals by entering the following command:
$@SYS$COMMON:[WBEM_SERVICES]WBEM_Services$Define_Commands.comEnsure that the CIM Server is running and verify the list of providers installed by entering the following command:
$CIMPROVIDER -L -SThis displays output similar to the following:
MODULE STATUS OperatingSystemModule OK ComputerSystemModule OK ProcessModule OK IPProviderModule OKTo configure the WBEM Providers for OpenVMS software, enter the following command:
$@SYS$COMMON:[WBEMPROVIDERS]WBEMPROVIDERS$CONFIGURE.COMYou are prompted to enter the primary owner name and contact information.
%WBEMPROVIDERS-I-STARTING, Info:Starting WBEMPROVIDERS Configuration. Enter Primary Owner name of the system: system Enter Primary owner contact information: 25166235 %WBEMPROVIDERS-I-CONTINUECONFIG, Info:configuration of EventIndicationConsumerModule... %WBEMPROVIDERS-I-CONTINUECONFIG, Info:configuration of EMSWrapperProviderModule... %WBEMPROVIDERS-I-CONTINUECONFIG, Info:configuration of VMSLANIndicationProviderModule... %WBEMPROVIDERS-I-CONTINUECONFIG, Info:configuration of StateChangeIndicationProviderModule... %WBEMPROVIDERS-I-CONTINUECONFIG, Info:configuration of ChassisProviderModule... %WBEMPROVIDERS-I-CONTINUECONFIG, Info:configuration of cpuprovidermodule... %WBEMPROVIDERS-I-CONTINUECONFIG, Info:configuration of MemoryModule... %WBEMPROVIDERS-I-CONTINUECONFIG, Info:configuration of FirmwareRevisionProviderModule... %WBEMPROVIDERS-I-CONTINUECONFIG, Info:configuration of MPProviderModule... %WBEMPROVIDERS-I-CONTINUECONFIG, Info:configuration of EnclosureProviderModule... %WBEMPROVIDERS-I-CONTINUECONFIG, Info:configuration of HPHealthStateProviderModule... %WBEMPROVIDERS-I-CONTINUECONFIG, Info:configuration of HPVMSLANProviderModule... %WBEMPROVIDERS-I-CONTINUECONFIG, Info:configuration of HPVMSLANCSProviderModule... %WBEMPROVIDERS-I-CONTINUECONFIG, Info:configuration of CSChassisProviderModule... %WBEMPROVIDERS-I-CONTINUECONFIG, Info:configuration of HPVMProviderModule... %WBEMPROVIDERS-I-CONTINUECONFIG, Info:configuration of HP_UtilizationProviderModule... %RUN-S-PROC_ID, identification of created process is 00006939 %WBEMPROVIDERS-I-WAIT, Info:Waiting for 1 Minute for the Inventory to Initialize %RUN-S-PROC_ID, identification of created process is 0000693F %RUN-S-PROC_ID, identification of created process is 00006940 %WBEMPROVIDERS-I-PROVCONFIG, Info:Completed configuration of WBEMPROVIDERS.The configuration process takes a few minutes to complete and displays output similar to the following:
Starting WBEMPROVIDERS Configuration. This would take around 5 minutes Starting WBEMPROVIDERS. This would take around 2 minutes Inventory is not ready! Waiting for 2 Minutes %RUN-S-PROC_ID, identification of created process is 23800EC2 WBEMPROVIDERS configuration is completed.This command procedure registers the WBEM Providers software with the CIM Server and copies the node specific files to SYS$SPECIFIC:[WBEMPROVIDERS].
Verify the list of providers installed and their status by entering the following command:
$CIMPROVIDER -L -SThis displays output similar to the following:
MODULE STATUS OperatingSystemModule OK ComputerSystemModule OK ProcessModule OK IPProviderModule OK EventIndicationConsumerModule OK EMSWrapperProviderModule OK HPVMSLANIndicationProviderModule OK StateChangeIndicationProviderModule OK ChassisProviderModule OK cpuprovidermodule OK MemoryModule OK FirmwareRevisionProviderModule OK MPProviderModule OK EnclosureProviderModule OK HPHealthStateProviderModule OK HPVMSLANProviderModule OK HPVMSLANCSProviderModule OK CSChassisProviderModule OK HPVMProviderModule OK HP_UtilizationProviderModule OK
To configure WBEM Providers for OpenVMS, follow the directions provided in the HPE WBEM Providers Installation and Administrator's Guide, available in the SYS$COMMON:[WBEMPROVIDERS.DOCUMENTATION] directory on your OpenVMS system disk.
Note
VSI recommends that you do not remove the WBEM Providers for OpenVMS product even if you do not have a need for it. If you attempt to use the PRODUCT REMOVE command to remove this product, you might see a message similar to the following. This message is automatically displayed for any product that is required with OpenVMS; the consequences of removing WBEM Providers for OpenVMS might not be as severe as implied by the message unless other software (such as HPE SIM) is using the product on your system.
%PCSI-E-HRDREF, product VSI I64VMS WBEMPROVIDERS V2.0 is referenced by VSI I64VMS OpenVMS V8.4-2 The two products listed above are tightly bound by a software dependency. If you override the recommendation to terminate the operation, the referenced product will be removed, but the referencing product will have an unsatisfied software dependency and may no longer function correctly. Please review the referencing products documentation on requirements. Answer YES to the following question to terminate the PRODUCT command. However, if you are sure you want to remove the referenced product then answer NO to continue the operation. Terminating is strongly recommended. Do you want to terminate? [YES]
8.20. Configuring and Running the Performance Data Collector Base Software (Optional)
The Performance Data Collector for VSI OpenVMS (TDC) collects and manages configuration and performance data for analysis by other applications. TDC_RT Version 2.3-20 is a run-time only (base) variant of the TDC software that is installed automatically with the OpenVMS operating system for use on specific operating system platforms.
Use of the TDC_RT software is not required. If you do not plan to use TDC_RT or any products that depend on it, you can skip to the next section.
TDC_RT does not run automatically when the system starts, but any suitably privileged user can start the software manually. This section includes information about system parameters, privileges and quotas, startup, and installation in OpenVMS Clusters.
Note
Do not attempt to explicitly remove TDC_RT from your system. The PRODUCT REMOVE command is not supported for TDC_RT although there appears to be an option to remove it. TDC_RT is installed with the operating system and is tightly bound with it. HPE or third-party applications might require TDC_RT. Attempts to remove it might not work as expected and can create undesirable side effects. An attempt to remove it results in a message similar to the following:
%PCSI-E-HRDREF, product VSI TDC_RT V2.3 is referenced by VSI I64VMS OpenVMS V8.4-2 The two products listed above are tightly bound by a software dependency. If you override the recommendation to terminate the operation, the referenced product will be removed, but the referencing product will have an unsatisfied software dependency and may no longer function correctly. Please review the referencing products documentation on requirements. Answer YES to the following question to terminate the PRODUCT command. However, if you are sure you want to remove the referenced product then answer NO to continue the operation. Terminating is strongly recommended. Do you want to terminate? [YES]
8.20.1. User Privileges and Quotas
Users of TDC_RT require various privileges, depending on the types of data to be collected. Online help is available when running the collector application and specifies the privileges required to collect each type of data. Enabling the following set of privileges enables collection of all data items: CMKRNL, LOG_IO, NETMBX, PHY_IO, SYSLCK, SYSPRV, WORLD.
Users of the product also require working set quotas (WSQUO) greater than 7000 pagelets.
8.20.2. Startup File
TDC_RT provides a startup file that should be launched during system startup. The startup file defines several logical names required for use of the product, but the startup file does not actually start the data collector.
$ @SYS$STARTUP:TDC$STARTUPTo directly run TDC$STARTUP.COM, SYSNAM privilege is required.
8.20.3. Compatibility with Prior Releases
TDC Version 1.
nFor users of some third-party system-management applications, TDC Version 1.
nwas distributed by web download. Applications developed using TDC Version 1.nwill not work with TDC Version 2.2 software until they are rebuilt using the TDC Version 2.2 Software Developers Kit (SDK).Data files created using TDC Version 1.
ncannot be read by TDC_RT Version 2.2. Data files created using TDC_RT Version 2.2 cannot be read using TDC Version 1.n.When TDC_RT Version 2.1 or any newer version of TDC is installed, files associated with TDC Version 1.
nare not removed. In any case, TDC_RT Version 2.1 (or later) and TDC Version 1.ncan safely coexist on a system. You can remove the older TDC files by uninstalling TDC (use the DCL command PRODUCT REMOVE).TDC Version 2.2 on an earlier version of OpenVMS
If you upgrade to OpenVMS Version 8.4-2 from an earlier version of OpenVMS on which TDC Version 2.2 was installed, files shared by TDC_RT Version 2.2 and TDC Version 2.2 are updated; these files are the documentation and support files listed in SYS$COMMON:[TDC]README.TXT as common to all kit variants. Unless the TDC and TDC_RT kits share the same base level number (for example, 102), image files installed with TDC Version 2.2 are retained in their installed locations. Most likely, the downloaded TDC Version 2.2 software will be more recent (higher base level number) than the TDC_RT Version 2.2 software installed with OpenVMS Version 8.4-2. The TDC Version 2.2 SDK (if installed) and any additional documentation files installed with TDC Version 2.2 are retained.
Running SYS$STARTUP:TDC$STARTUP.COM causes the most recent TDC/TDC_RT Version 2.2 images to be used at runtime, regardless of whether they were installed with TDC Version 2.2 or with TDC_RT Version 2.2.
You can remove TDC Version 2.2 without affecting the integrity of the TDC_RT Version 2.2 installation if their base level numbers differ.
As of OpenVMS Version 8.2, TDC and TDC_RT use the same naming scheme for image files. A build number is tagged to the image file names. For example, if the version of TDC_RT that ships with your operating system is Version 2.2-60 (where 60 is the build number), then the files that are installed will have names such as TDC$APISHR$I_V842-0060.EXE, where $I denotes HPE Integrity servers), V842 denotes the version of OpenVMS (8.4-2), and 0060 is the build number. The SYS$STARTUP:TDC$STARTUP.COM startup file, which is also identical for both TDC and TDC_RT, uses this build number to determine which image files to use. When a subsequent installation is performed with software that has higher build numbers, the TDC$STARTUP.COM startup file uses the image files with the highest build number appropriate for the current platform.
8.20.4. Running TDC_RT
$ SET COMMAND SYS$COMMON:[TDC]TDC$DCLEach user can add this SET command to their LOGIN.COM file. However, because elevated privileges are required for most data collection operations, it might not be appropriate to add this command to SYS$MANAGER:SYLOGIN.COM.
$ TDCFor more information about running the application, see the file SYS$COMMON:[TDC]TDC_README.TXT. Release notes are located in the file SYS$COMMON:[TDC]TDC_RELEASE_NOTES.TXT. See both of these files before running the collector application.
8.20.5. Installation in OpenVMS Clusters
TDC_RT is installed in SYS$COMMON:[TDC] by default. Included are only those files required to run the data collector with the particular operating system version it was distributed with. Once TDC_RT is installed and SYS$STARTUP:TDC$STARTUP.COM has been run on each cluster member, then all cluster members in a single-version, single-architecture OpenVMS Cluster should be able to run the software.
For mixed-version and mixed-architecture clusters, you should obtain and install a complete Performance Data Collector kit (TDC Version 2.2).
The complete kit provides an SDK and run-time environments for all supported OpenVMS configurations. It supports installation on a cluster-wide basis in mixed-version and mixed-architecture OpenVMS Clusters.
8.21. Creating a System-Specific Login Welcome Message (Optional)
You can use SYS$WELCOME to display a system-specific welcome message at login. The message could inform users of scheduled down time, recent updates to the system, whom to contact about system problems, and so forth. A template file is provided by the operating system. To create your own SYS$WELCOME file, do the following:
- Copy the template file using the following command:
$COPY SYS$MANAGER:WELCOME.TXT SYS$SPECIFIC:[SYSMGR]WELCOME.TXTFor a cluster-wide welcome message, you can copy the file to SYS$COMMON:[SYSMGR].
Replace the text in SYS$SPECIFIC:[SYSMGR]WELCOME.TXT with text specific to your system.
Edit SYS$MANAGER:SYSTARTUP_VMS.COM to remove the exclamation point (!) from the line that defines SYS$WELCOME.
If you do not want to use a node-specific welcome file, you can optionally define the logical in SYS$MANAGER:SYSTARTUP_VMS.COM to display a message, such as in the following example:
$ DEFINE SYS$WELCOME Welcome to node HOMERFor more information about creating login welcome messages, see the VSI OpenVMS System Manager's Manual, Volume 1: Essentials.
8.22. Examining Your Command Procedures (Upgrades Only)
The upgrade procedure retains the site-specific versions of the following files located in the [VMS$COMMON] directory:
[SYSMGR]LAT$SYSTARTUP.COM
[SYSMGR]LOGIN.COM
[SYSMGR]SYCONFIG.COM
[SYSMGR]SYLOGICALS.COM
[SYSMGR]SYLOGIN.COM
[SYSMGR]SYPAGSWPFILES.COM
[SYSMGR]SYSECURITY.COM
[SYSMGR]SYSHUTDWN.COM
[SYSMGR]SYSTARTUP_VMS.COM
[SYSMGR]TFF$SYSTARTUP.COM
[SYSMGR]WELCOME.TXT
[SYS$STARTUP]ESS$LAST_STARTUP.DAT
The upgrade procedure might provide new templates for some of these files with the .TEMPLATE file extension. The new templates might include features that are not in your site-specific files. Check the templates against your site-specific files and edit your files as necessary.
Note
The DCL command DECRAM has been removed because it conflicts with the newer DECRYPT command (DECRYPT overwrites the default definition of DECR, which you might have been using to run DECram). You should update any command procedures that use the DECRAM command so that they use the foreign command style of DCL to run DECRAM:
$ DECRAM == "$MDMANAGER"This change affects only the use of the DCL command; all other aspects of the DECram product remain the same.
8.23. Adding and Removing Operating System Files (Optional)
If you decide after the installation or upgrade to change which OpenVMS operating system files you want installed on your system, you can use the menu system contained on the OpenVMS distribution media to add or remove files.
Note
You can obtain information about individual system files by entering the HELP SYS_FILES command at the dollar sign prompt ($).
Caution
Unless you have a specific need to exclude operating system files from your system disk, VSI strongly recommends that you accept the defaults and install all files that are part of OpenVMS. In general, limited disk space is not a good reason to exclude files; problems encountered when needed files are missing can cost much more than the cost of a larger disk.
To add or remove operating system files:
Mount and boot the OpenVMS distribution media.
Choose Option 1 on the Installation Menu.
Select the PRESERVE option.
Enter the name of the device that contains the system disk and answer the questions.
After you answer the question Do you want detailed descriptions? , information regarding reconfiguring or reinstalling is displayed. Read the instructions, then choose the desired entry on the menu of options.
The following is a sample display:
Please choose one of the following: 1) Upgrade, install or reconfigure OpenVMS I64 Version 8.4-2 2) Display layered products that this procedure can install 3) Install or upgrade layered products 4) Show installed products 5) Reconfigure installed products 6) Remove installed products 7) Find, Install or Undo patches; Show or Delete recovery data 8) Execute DCL commands and procedures 9) Shut down this system Enter CHOICE or ? for help: (1/2/3/4/5/6/7/8/9/? )1*********************************************************** . . . Do you want to INITIALIZE or to PRESERVE? [PRESERVE]PRESERVE. . . Version 8.4-2 of the OpenVMS operating system is already installed on the target disk. You may choose one of the following actions: o Reconfigure the OpenVMS platform. This action will allow you to change your selections of which of the windowing and network products you included with your OpenVMS operating system installation. o Reconfigure the OpenVMS operating system.This action will allow you to change your choices about which options you included for the OpenVMS operating system. o Reinstall the OpenVMS operating system. This action will cause ALL operating system files to be replaced. You can also change your choices about which options you included for the OpenVMS operating system. Reinstall will take longer than Reconfigure. Reinstall may be appropriate if you suspect that files in the operating system, or in the windowing and network products have become corrupted. If you want to reinstall any of the windowing and network products, choose "Install or upgrade layered products" from the main menu. If you want to change your choices about which options you included for any of the windowing and network products, choose "Reconfigure installed products" (option 5) from the main menu. Please choose one of the following: 1) Reconfigure the OpenVMS platform. 2) Reconfigure the OpenVMS operating system. 3) Reinstall the OpenVMS operating system. 4) Return to the Main Menu (abort the upgrade/installation). Enter choice or ? for help: (1/2/3/4/? )2The following product has been selected: VSI I64VMS VMS V8.4-2 Operating System Configuration phase starting ... You will be asked to choose options, if any, for each selected product and for any products that may be installed to satisfy software dependency requirements. VSI I64VMS OpenVMS V8.4-2: OpenVMS and related products Platform COPYRIGHT 1976,2015... VMS Software, Inc. Do you want the defaults for all options? [YES]NO
Do you want to review the options? [NO]Execution phase starting ... The following product will be reconfigured: VSI I64VMS VMS V8.4-2 Portion done: 0%...10%...20%...30%...40%...50%...60%...80%...90%...100% The following product has been reconfigured: VSI I64VMS VMS V8.4-2 . . .
For detailed instructions on how to remove the OpenVMS operating system from your disk, see Appendix B.
8.24. Compressing the System Libraries (Optional; Not Recommended)
The libraries included with OpenVMS are installed in expanded (uncompressed) format. VSI recommends keeping the libraries in expanded format. Compressing them can hinder system performance. If you decide that you need to compress or decompress or list the files and size of these libraries, use the command procedure SYS$UPDATE:LIBDECOMP.COM.
$ @SYS$UPDATE:LIBDECOMP HELP$ @SYS$UPDATE:LIBDECOMP LISTFor complete information about expanding and reducing system library files and using LIBDECOMP.COM, see the VSI OpenVMS System Manager's Manual, Volume 2: Tuning, Monitoring, and Complex Systems.
8.25. Installing Patches (Optional but Recommended)
VSI recommends installing any relevant OpenVMS and networking patches that are available. Most patches are optional, but some layered products might require one or more patches on the system before their software is installed. For more information about patches that might be required on your system, see the VSI OpenVMS Version 8.4-2 Release Notes, and the documentation provided for the relevant layered products.
VSI OpenVMS patch files are validated using the Secure Delivery feature. Each patch file includes an associated digital signature file (also referred to as a manifest) that is used to validate the patch file. This validation involves authenticating the originator (VSI, in this case) and verifying the contents of the file.
Caution
VSI strongly recommends backing up your system disk before installing patches.
To download and install OpenVMS patches, do the following:
Create a directory on a non-system disk called [PATCHES] and set default to that directory.
Using the established support procedures, access and download the appropriate patches to the [PATCHES] directory.
Note
As of the date of this publication, VSI has not issued any patches and has not yet established a formal location for accessing patches. Because HPE may post relevant patches pertaining to layered products, we suggest that you check for any relevant HPE patches using their established support procedures.
The patches are downloaded as compressed files. To decompress them, use the RUN command, as in the following example:
$RUN VMS84I_MX2-V0100.ZIPEXEThis decompresses the patch into an installable file.
Install the decompressed patches as described in the patch release notes.
8.26. Installing and Configuring Layered Products
Availability Manager (base) for OpenVMS (required)
CDSA for OpenVMS (required)
Kerberos for OpenVMS (required)
SSL for OpenVMS (required)
Performance Data Collector base software, TDC_RT (required)
HP Binary Checker for OpenVMS
WBEM Services for OpenVMS
WBEM Providers for OpenVMS
OpenVMS Clusters
RMS Journalling
Volume Shadowing
Always refer to the Software Product Description for exact details of what is included in each operating environment.
DECwindows Motif for OpenVMS
DECnet-Plus for OpenVMS
DECnet Phase IV for OpenVMS
TCP/IP Services for OpenVMS
These layered products are included on the OpenVMS distribution media and can be installed using either the steps shown in this section or the alternative procedure described in Section 8.26.1. Other layered products, whether provided by VSI on other distribution DVDs in the Software Product Library DVD set, or on a DVD provided by a third-party companyshould be installed using the steps shown in Section 8.26.1.
In addition to the SIPs, the VSI OpenVMS OE DVD includes kits for various products that are part of the OpenVMS OEs. VSI does not support installing these OE product kits while booted from the OE DVD. To install these OE products, you must use the procedure described in Section 8.26.1.
Most PCSI kits included on the OpenVMS distribution media are signed using Secure Delivery. Signed PCSI kits that are installed from the distribution media are validated. Signed PCSI kits that you install subsequently are validated (including signed kits on the distribution media).
Note
To use the OpenVMS Installation Menu Option 3 to install products, the target system must have the identical version of OpenVMS as the distribution media. If you need to install layered products on a target system that has a different version of the operating system, use the alternative procedure.
To use the OpenVMS Installation Menu Option 3, follow these steps:
Before you install any layered products, be sure you back up the system disk.
Boot the OpenVMS distribution media. The Installation Menu will be displayed.
To view a list of products that can be installed, choose Option 2 on the menu. If the layered product that you want to install is not listed in the display, install the product by using the alternative procedure described in Section 8.26.1, or see the documentation you received with the layered product. Note that VSI does not support VMSINSTAL, PRODUCT INSTALL, or other PRODUCT commands from the DCL option on the operating system menu.
To install layered products, choose Option 3 on the menu. For more instructions, see Section 6.3.3.
After the installation completes, shut down the system by selecting Option 9 on the menu. When you boot the target system, the layered products you installed will be present.
For additional information about installing layered products, see the VSI OpenVMS System Manager's Manual.
8.26.1. Alternative Procedure
Layered products on a target system that has a different operating system version than that of the operating system media DVD
Layered products that require VMSINSTAL (indicated in the directories by save-set file names with file types of .A, .B, and so on)
OpenVMS OE products
SIP kits (as an alternative to using menu option 3 of the operating system menu on the media)
Third-party software products (such as database products, accounting software, and so forth)
For a list of layered products you can install, see the Software Product Descriptions included with your operating system kit. Note that some products require a license key (PAK) from VSI.
Follow these steps:
Before you install all your layered products, be sure you back up the system disk. In addition, ensure that a license has been loaded for the software. Note also that most layered products require changes to SYSGEN parameters or AUTHORIZE values, and to system files such as SYLOGICALS.COM, SYLOGIN.COM, and SYSTARTUP_VMS.COM. For more information, see the following:
Installation guides for these layered products
VSI OpenVMS System Manager's Manual, Volume 1: Essentials
Section 8.34 in this manual
Section 8.28 in this manual
After your target system disk runs AUTOGEN and boots (if necessary), mount the OpenVMS operating system media. For example, if the device with the operating system media is DKA400:, use the following command:
$MOUNT/OVERRIDE=IDENTIFICATION DKA400Locate the directories and files containing the available layered products. For example, if the device name is DKA400:, enter the following command:
$DIRECTORY /NOHEAD/NOTRAIL DKA400:[*.KIT]You can use the PRODUCT FIND command to locate kits by using the PCSI utility. For example:
$PRODUCT FIND * /SOURCE=DKA400:[*.KIT]To install layered products that require VMSINSTAL (indicated in the directories by save-set file names with file types of .A, .B, and so on), enter the @SYS$UPDATE:VMSINSTAL command and then specify the device name and directory at the prompt. For example:
$@SYS$UPDATE:VMSINSTAL* Where will the distribution volumes be mounted:DKA400:[DIAA032.KIT]To install layered products that require the PCSI utility (indicated in the directories by file names with file types of .PCSI or .PCSI$COMPRESSED), use the PRODUCT INSTALL command to specify the device name and directory. Following is an example of the PRODUCT INSTALL command:
$PRODUCT INSTALL FORTRAN /SOURCE=DKB400:[I64_FORT075.KIT]
8.27. Creating Print Queues
If you have a large number of print queues to add and you need to get the system in use quickly, you can set up one print queue per area or work group and then add the other print queues later, after the user accounts are added (Section 8.29). For more information about adding print queues, see the VSI OpenVMS System Manager's Manual, Volume 1: Essentials.
8.28. Updating SYSTARTUP_VMS.COM to Start Layered Products and Print Queues
After installing and configuring any layered products or adding new print queues, you should update the SYSTARTUP_VMS.COM file to start these products and print queues. For more about updating the SYSTARTUP_VMS.COM file, see the VSI OpenVMS System Manager's Manual, Volume 1: Essentials.
8.29. Creating Accounts (New Installations, Some Upgrades)
During installation, DEFAULT and SYSTEM accounts are created automatically. You should create additional user accounts now. If you plan to have VSI (or HPE) service representatives test your system or if you plan to run testing software such as UETP (User Environment Test Program), you must create accounts for each representative and a SYSTEST (standalone system) or SYSTEST_CLIG (OpenVMS Cluster system) account to run UETP.
For complete information about creating and managing user accounts and about creating accounts for HPE service representatives and UETP, see the VSI OpenVMS System Manager's Manual, Volume 1: Essentials.
8.30. Testing the System with UETP (Optional)
The User Environment Test Package (UETP) is a software package that tests whether the OpenVMS operating system is installed correctly. It tests the hardware, including disk drives, tape drives, CD drives, line printers (if any), network cards, and so forth. Running UETP is optional; but we recommend that you run UETP after an installation or if new hardware was added as part of an upgrade.
Before using UETP, you must create a SYSTEST (standalone system) or SYSTEST_CLIG (OpenVMS Cluster system) account. You should also create an account for your service representatives to use. You can use the CREATE_SPECIAL_ACCOUNTS.COM file to create these accounts, as explained in VSI OpenVMS System Manager's Manual, Volume 1: Essentials.
For complete information about using UETP, see the VSI OpenVMS System Manager's Manual, Volume 2: Tuning, Monitoring, and Complex Systems.
8.31. Backing Up the Customized System Disk and Initiating System Backups
After you customize the OpenVMS operating system to your satisfaction and perform the other steps recommended thus far in this chapter that are relevant to your system, protect your work by making a standalone backup copy of the system disk to tape or other suitable backup media. To do so, follow the instructions in Section 8.8. If you are going to be saving to disk, specify a disk that will not be (or is not) part of a shadow set.
For complete information about backup operations, including a description of an alternative method that does not require booting from the OpenVMS distribution media, see Appendix A.
VSI also recommends creating a systematic routine for backing up the application, data, and user disks. For more information, see the VSI OpenVMS System Manager's Manual, Volume 1: Essentials.
8.32. Reforming the Shadow Set as Final Postupgrade Backup
If your system disk participates in a volume shadowing environment, re-form the shadow set again to generate another shadow copy onto the other disks in the set. To do so, follow the instructions in Section 8.11.
8.33. Rebooting Cluster Members (Upgrades Only)
If you are performing a rolling upgrade in an OpenVMS Cluster environment and have completed all the postupgrade tasks required thus far for your upgraded system disk, reboot each system that boots from that system disk.
For more information about booting your system, see Chapter 9.
At this point, your system is ready for general use.
8.34. Modifying System Parameters
Based on your examination of an AUTOGEN report (AGEN$PARAMS.REPORT), you might need to modify parameter values in MODPARAMS.DAT. Read the notes in Section 8.34.1. These notes apply to modifications being made after a new installation and after an upgrade. If you are modifying system parameters after an upgrade, also see Section 8.34.2.
8.34.1. General Notes About Modifying System Parameters
When modifying system parameters, note the following:
In general, let AUTOGEN calculate system parameters. You can hard-code values (such as GBLPAGES=value), but doing so overrides AUTOGEN and might not allow it to set an optimal value based on observed usage.
Whenever possible, use MIN_parameter values (such as MIN_GBLPAGES) to set the minimum value that can be set for a parameter by AUTOGEN. AUTOGEN increases the value if necessary. It also adjusts related parameters unless they are hard-coded, in which case information is provided in the AGEN$PARAMS.REPORT file. Use MAX_parameter values to set a maximum value when it is necessary to limit a parameter to a known maximum value (this is rarely necessary).
Enter numeric values as integers without commas (for example, 10000). Enter alphabetic characters in lower or uppercase.
- We suggest that you include comments in the MODPARAMS.DAT file indicating who changed the value, when it was done, and why it was done. An exclamation point (!) serves as a comment starter and can appear anywhere on a line. The following example illustrates the modifications recommended in the preceding bulleted items:
! the following changes made by K.Frog on 3/27/15 ! SWAPFILE=0 ! Dont re-size the SWAPFILE on AUTOGEN runs MIN_gblsections=750 ! Required for DECwindows MOTIF MIN_NPAGEDYN=2750000 ! Set npagedyn to a min of 2.75 million
For more information about the MODPARAMS.DAT file and about using AUTOGEN in general, see the VSI OpenVMS System Manager's Manual, Volume 2: Tuning, Monitoring, and Complex Systems.
8.34.2. Modifying System Parameters After an Upgrade
Review the file SYS$SYSTEM:MODPARAMS.DAT. The upgrade procedure created a new version of this file. The old version is named SYS$SYSTEM:MODPARAMS.DAT_OLD. The new MODPARAMS.DAT file contains all the parameters in the old file, plus various parameters that the upgrade procedure added to ensure that all necessary system parameters are properly propagated from the earlier version of OpenVMS. The upgrade procedure also adds comment lines to explain the source of the parameters in each section of the new MODPARAMS.DAT file.
Note that the old MODPARAMS.DAT is included in the new MODPARAMS.DAT each time an upgrade is performed. Because of this, if MODPARAMS.DAT is not reviewed and cleaned up after each upgrade, it might eventually contain many levels of duplicated parameters. For this reason, you should review MODPARAMS.DAT after each upgrade. This enables you to eliminate any duplication. You can also take this opportunity to modify any parameters, if necessary.
Based on your examination of AUTOGEN's AGEN$PARAMS.REPORT, you might need to modify parameter values in MODPARAMS.DAT.
The following subsections are examples of instances where you need to modify parameters in MODPARAMS.DAT.
8.34.2.1. System File Sizes
AUTOGEN sets the following files at sizes appropriate for your system:
[SYSEXE]SYSDUMP.DMP
[SYSEXE]PAGEFILE.SYS
[SYSEXE]SWAPFILE.SYS
If you have special workloads or configurations, you can specify different sizes for these files by performing the following steps:
Log in to the SYSTEM account.
Enter the following command:
$@SYS$UPDATE:AUTOGEN SAVPARAMS TESTFILESIf the file sizes displayed need to be adjusted, add symbols to the MODPARAMS.DAT file (described in detail in the VSI OpenVMS System Manager's Manual, Volume 2: Tuning, Monitoring, and Complex Systems), and repeat step 2 until you are satisfied with the file sizes.
When you are satisfied with the file sizes, enter the following command to ensure that the modified system files are installed when the system is rebooted:
$@SYS$UPDATE:AUTOGEN GENPARAMS SETPARAMS
8.34.2.2. OpenVMS Cluster Parameters
If you are upgrading an OpenVMS Cluster system, note the following:
The upgrade procedure creates a new MODPARAMS.DAT for each system root on your system disk. Normally, there is one root for each computer that boots from the system disk. You must review and adjust each of these MODPARAMS.DAT files individually.
The MODPARAMS.DAT file for the system on which you are running is located in the SYS$SYSROOT:[SYSEXE]MODPARAMS.DAT file. The MODPARAMS.DAT files for other roots on the same system disk can be found in SYS$SYSDEVICE:[SYS
x.SYSEXE]MODPARAMS.DAT, where x represents the root number; for example, SYS0, SYS1, SYS2, and so forth. (Valid root numbers might include hexadecimal digitsSYSA, SYSB, and so forth.)Be sure the EXPECTED_VOTES value is correct. This value is the sum of all votes in the cluster. For example, if there are five computers in the cluster and each has one vote, the value is 5.
Part IV. Boot Methods and Tools
This part of the manual describes the configuration and management tools that may be available and also explains how to set up the system console, configure boot options, boot and shut down the operating system. This part also includes a brief section on troubleshooting procedures.
Although you have probably booted your system enough times by now to know the basics, there are many variations of booting that may help you at some point. Consider this section as a reference, should you ever need these options.
Chapter 9. OpenVMS, Hardware and Boot Operations
This chapter contains the following information:
Hardware/firmware configuration management interfaces and features
Setting up your system console
Overview of the Unified Extensible Firmware Interface (UEFI)
Enabling or disabling Hyper-Threading on nPartitions that have multi-core processors that support it
Configuring and managing boot operations such as the following:
Setting the system for automatic booting
Setting and showing boot devices
Setting boot parameters
Writing a new boot block
Booting operations, including the following:
Booting the OE DVD
Booting the system disk
Performing a conversational (interactive) boot
Booting with minimum startup
Booting with the XDelta utility (XDELTA)
Booting from a different root directory
Booting in an emergency
Halting and shutting down operations
Troubleshooting procedures
Note
Any information about hardware and utilities is provided in this manual for your convenience and is not intended to replace the hardware documentation included with your HPE Integrity system or the latest documentation available on the Web. HPE Integrity servers are available in many different configurations. Hardware, utilities, and certain hardware configuration procedures might differ significantly across models, and even across versions of the same model. Please see your hardware documentation for the most up-to-date information specific to your particular model and version. Note that the hardware documentation includes model-specific illustrations to guide you. The latest version of documentation for your server can be found online at:
9.1. Configuration and Management Utilities
This section provides a brief overview of the configuration and management utilities that are typically available for your system.For more information, see the appropriate hardware documentation.
9.1.1. Overview of Utilities and Console Options
The Unified Extensible Firmware Interface (UEFI).
The Management Processor (MP).
The Integrated Lights Out (iLO) Management Processor.
The Baseboard Management Control (BMC) utility.
The Insight Power Management (IPM) interface>
Note
IPM provides centralized monitoring and control of server power consumption and thermal output. (Although OpenVMS still supports the SYSGEN parameter CPU_POWER_MGMT, the iLO interface takes precedence over this parameter.) Before installing OpenVMS, check that power management is set in the state that you prefer. For more information, see the VSI OpenVMS Utility Routines Manual..
UEFI is the main boot and preboot interface; it is the core interface to the system firmware and console commands on all models. BMC is provided on entry-class HPE Integrity servers (although on a few systems the interface itself is hidden). BMC provides basic management capabilities and access to UEFI. MP (or iLO) is available on most systems. In addition to providing access to UEFI, MP provides advanced management functionality, including remote management, network console with Web-based access, and enhanced diagnostic capabilities. Both BMC and MP (iLO) can operate on standby powereven when the main power switch is turned off.
You can use MP (iLO) or BMC to interact with the capabilities of the UEFI console interface.
The following list briefly describes some of the main features of UEFI, MP, and BMC.
Unified Extensible Firmware Interface (UEFI)
UEFI is a menu and command-line interface between the operating system and the system firmware. The UEFI interface is available only when the operating system is not booted. To configure UEFI boot options while the operating system is running, OpenVMS provides the OpenVMS Boot Manager utility (SYS$MANAGER:BOOT_OPTIONS.COM). Changes made by this utility do not take effect until the system is rebooted.
The UEFI Boot Manager, like the OpenVMS Boot Manager, provides support for operating system loaders and enables you to configure the firmware and control the booting environment. A FAT formatted partition on the boot disk stores the system loader. The Boot Configuration menu (or in some versions of UEFI, the Boot Option Maintenance Menu) enables you to add or delete a boot option, change the boot order, select the active console, and more.
After you power up the server, the UEFI boot manager presents different ways to bring up the system, depending on how you have set up the boot options. For example, you can boot to the UEFI Shell instead of an operating system. When you select the UEFI Shell option, you can enter UEFI commands at the Shell> prompt. For more information about UEFI options and commands, see Section 9.2 and the appropriate hardware documentation.
Management Processor (MP)
Management Processor (or, on entry-class HPE Integrity servers, iLO) provides both local and remote access for controlling the system console, reset/power management, and transfer of control (TOC) capabilities. It also enables you to monitor tasks and display detailed information about various internal subsystems.
On cell-based servers, MP is a complex-wide tool and is always available, even if nPartitions are not configured or booted in the server complex. In contrast, UEFI does not operate as a complex-wide tool and is only available when the nPartition is in an active state but has not booted an operating system; each nPartition has its own UEFI interface. Using MP, you can select the partition for which you want UEFI access. You can access all hardware and nPartitions in the complex.
The following is a brief summary of MPs main features:Console Connectivity
As a console interface, MP enables you to interact with UEFI and to power the server on or off; ultimately, it can function as the OPA0: terminal port on OpenVMS.
Virtual Front Panel (VFP)
MP provides a virtual front panel that you can use to monitor the front panel LEDs from a remote location.
Command Interface
MP provides an extensive menu system and a command-line interface.
Multiple, Simultaneous Viewers
Multiple users can access the MP console or a particular nPartition console. Only one user at a time is allowed interactive access. All other users have read-only access. Output from the interactive user is reflected to the read-only users currently accessing the console. Access to MP can be restricted by password-protected user accounts.
Availability/standby Power
MP is available whenever the system is connected to a power source, even if the servers main power switch is in the off position.
Accessibility
MP is accessible in several ways, including by direct monitor connection using a terminal, PC, laptop or desktop computer connected to the MP serial port (with certain HPE Integrity servers, you can also use a VGA monitor and USB keyboard and mouse); by modem through an EIA-232 port; or by Telnet or Web browser on the LAN. MP is accessible through Secure Shell (SSH), which is provided by TCP/IP Services for OpenVMS. The SSH method of access is more secure than any of the other methods.
Console Log
MP records recent output from the system console. The
clcommand enables you to view the recorded information.Event Logs
MP includes event logs that include information about system events and booting. The
slcommand displays the contents of system status logs.
Baseboard Management Controller (BMC)
BMC is more limited in functionality than MP. BMC enables you to control some management features built into the system board, such as diagnostics, configuration, and hardware management. BMC provides a console connection on some systems. As with MP, BMC enables you to interact with UEFI; it can function as the OPA0: terminal port on OpenVMS. BMC also operates on standby power. However, BMC is accessible only through the serial port on the back of the system.
BMC commands enable you to control the BMC interface, view logs, get help, display firmware revisions, reset the system, turn the system locator LED on or off, and change the BMC password. BMC is not provided on cell-based HPE Integrity servers. On some systems, the BMC user interface is hidden but is still present and functional. For more information about BMC commands, see the appropriate hardware documentation.
9.1.2. Configuration and Management Utilities on Cell-Based Servers
For the complex environments of cell-based servers, a wider variety of tools are provided. Systems with multiple nPartitions provide a separate UEFI interface for each nPartition. MP provides access to, and allows management across, the complex and each nPartition UEFI interface.
In addition to MP and UEFI (cell-based servers do not provide BMC), these systems offer Partition Manager and other tools that vary from system to system and operating system to operating system. The Partition Manager (parmgr) utility provides a graphical interface for managing nPartitions and complex hardware. It centralizes all nPartition management functions in one place, providing the system manager with the tools to dynamically reconfigure, power on, power off, create, delete, and modify nPartitions.
Partition Manager is a free product that can be run on HP-UX or Microsoft Windows™ systems. You can use either of these to manage nPartitions for OpenVMS. Partition
9.1.3. Using the Delete or Backspace Key
Some versions of the UEFI, MP and BMC console interfaces still interpret the Delete (or Backspace) key as do UNIX systems, which is different from the way OpenVMS or Microsoft Windows™ systems interpret it. Whereas the OpenVMS operating system uses the ASCII DEL/RUBOUT character (7F hexadecimal) to delete the last character typed in a command line, these facilities use Ctrl/H.
When you enter commands for these servers, if you press Delete at a VTxxx terminal (or the key you have mapped to send the DEL/RUBOUT character code in your terminal emulator), the last character typed is not deleted.
You can remap a terminal so that the Delete key removes the last character typed by adding the following DCL command to your login command procedure (generally, LOGIN.COM):
$ SET TERMINAL/BACKSPACE=DELETE
Terminal attribute is set to PASSALL
Terminal attribute is set to PASTHRU
IO$_READALL
IO$_READPBLK
Ctrl/V is entered, which tells the driver to pass the next character and skip the remap check.
Alternatively, you can set up your terminal emulator so that the Backspace key deletes the last character typed. However, for the key to work properly on OpenVMS, you must still enter the SET TERMINAL command described earlier.
9.2. UEFI Usage Overview
UEFI is the basic interface between the operating system and firmware on all HPE Integrity systems; it is similar to SRM (Standards Reference Manual) on HPE Alpha systems. UEFI provides a boot option menu and the ability to configure boot options. UEFI is accessible when the operating system is not booted.
On cell-based servers, UEFI is available when the nPartition is in an active state but has not booted an operating system. Each nPartition has its own UEFI interface and system boot environment that enables you to interact with the nPartition before an operating system has booted on it.
Note
On some systems that include MP, you might first see the MP login screen. In addition, on cell-based servers, you initially must select the console for the nPartition you want to access. As noted previously, the behavior of HPE Integrity server systems can vary significantly from model to model as well as from version to version of the firmware.
For the first boot of a system on which OpenVMS is not pre-installed, you probably need to use UEFI to get started. When you select the UEFI Shell, the console displays much activity before the UEFI Shell prompt is displayed. If you do not see the UEFI Shell prompt, press Enter.
The UEFI boot menu lists boot options. Each item in the boot options list references a specific boot device and provides a specific set of boot options or arguments to be used when booting the device. You can add boot options to the boot menu . The OpenVMS installation and upgrade procedure can assist you in adding and validating a boot option for your newly installed system disk. The procedure uses the OpenVMS Boot Manager utility (SYS$MANAGER:BOOT_OPTIONS.COM) to add and validate boot options. You can use this utility directly at the OpenVMS DCL prompt.
Display boot options known to the UEFI Boot Manager.
Add a boot option to the UEFI Boot Manager so that your system disk boots automatically when the system is powered on or rebooted.
Remove or change the position of a boot option in the UEFI Boot Manager list.
Validate and fix the boot option list.
Change how long UEFI pauses before booting or rebooting.
Use of this utility is optional for most devices but is required for configuring boot options on Fibre Channel devices. VSI recommends using this utility to add members of a multiple-member shadow set to the boot list and dump device list. (Be sure to add all members to both lists.)
For instructions on how to use the utility, see Section 9.4. For more information about configuring Fibre Channel devices with this utility, see Section 9.23. For information about using the OpenVMS Boot Manager utility to display boot options, see Section 9.4.1.2. For information about setting the pause length, see Section 9.4.1.3. The OpenVMS Boot Manager utility also enables you to configure dump off the system disk (DOSD) devices and debug devices; for more information about this, see the VSI OpenVMS System Manager's Manual, Volume 2: Tuning, Monitoring, and Complex Systems.
9.2.1. General Notes About Using UEFI
Using UEFI on cell-based servers: A separate UEFI interface exists for each nPartition. Be sure to access the appropriate nPartition console.
To determine which nPartition UEFI interface you are using, use the
info syscommand at the UEFI Shell prompt. This lists the local nPartition number and details about active cells. For processor details, use theinfo cpucommand.You can use the MP console interface to access any nPartitions UEFI console. Press Ctrl/B to move from UEFI (or from your OpenVMS session) to the MP interface. Log in to MP if you are prompted. A menu then displays the names of all available nPartitions. Select from this list the nPartition that you want to access. To gain console write access for an nPartition console, press Ctrl/E and enter the letters
cf. You can use the MPpdcommand to set a default nPartition for MP login; this helps to ensure you are brought to the intended nPartition.To return to the UEFI console (when OpenVMS is not booted), enter the
cocommand at the MP> prompt.- Navigating UEFI file system directories: To switch to a different file system, enter the file system name. The following example shows how to switch to fs3: from the current location (top level of the UEFI Shell):
Shell>
fs3:fs3:\>Note that the prompt is now
fs3:\. The UEFI Shell prompt changes to reflect the file system currently accessed. The Shell prompt is displayed again if you reset the system. Also note that the file system number might change when remapped after hardware changes are made to the server (for example, after an I/O drive is added to the server and the nPartition boots or themap -rcommand is issued). - File structure of UEFI file systems: The file structure of an fs disk is identical to MS-DOS (FAT) and the commands to move around the structure are similar to MS-DOS commands. For example, to move to directory
\efion disk fs0:, enter thecdcommand:fs0:\>
cd EFIfs0:\efi>To display the contents of the
EFIdirectory, use thedircommand. - UEFI commands for OpenVMS: Most commands that you issue for OpenVMS purposes at the UEFI Shell prompt are issued from
\efi\vmson the file system associated with the system disk. You can enter such commands directly from the top level by specifying\efi\vmsin the path for subsequent commands, or by first moving to\efi\vmsand entering the commands without the path specification. The first example that follows shows how to enter commands from the top level. The second example shows how to move to\efi\vmsbefore entering the commands. Thevms_showcommand displays the equivalent OpenVMS device name for devices mapped by UEFI, and thevms_setcommand can be used to set a debug or dump device. These UEFI commands for OpenVMS, known as UEFI Utilities for OpenVMS, are usable only when the operating system is not running. To display and set UEFI-mapped devices while the operating system is running, use the OpenVMS Boot Manager utility (SYS$MANAGER:BOOT_OPTIONS.COM), as described in Section 9.4. The UEFI Utilities for OpenVMS are described in the VSI OpenVMS System Management Utilities Reference Manual.Example 1 From Top Levelfs0:\>\efi\vms\vms_show device. . fs0:\>\efi\vms\vms_set dump_dev dga3730
Example 2 First Moving to\efi\vmsfs0:\>cd \efi\vmsfs0:\efi\vms>vms_show device. . . fs0:\efi\vms>vms_set dump_dev dga3730
Note
The directory structure and contents of the OpenVMS system disk differs from those of the VSI OpenVMS OE DVD. Note also that the bootstrap on the system disk is located at
\efi\vms\vms_loader.efi, while on the DVD it is at\efi\boot\bootia64.efi. (These two files are identical in content.) - UEFI aliases: You can define aliases for UEFI commands that are easier to remember. For example, to define the alias
dirfor thelscommand, use thealiascommand as follows:fs0:\>
alias dir "ls"To define an alias for the command that boots OpenVMS from fs0:, enter the following command:fs0:\>alias bvms "fs0:\efi\vms\vms_loader.efi"Note
Setting an alias to point to a specific device can lead to unexpected results. For example, if you insert a DVD, fs0: now points to the DVD drive. VSI recommends using the OpenVMS HPE Boot Manager utility to set your system disk as a boot device for UEFI, as explained in Section 9.4.
To list the aliases currently defined, enter the
aliascommand:fs0:\>aliasdir : ls bvms : fs0:\efi\vms\vms_loader.efi Boot device list: Any changes in storage configuration after the system is booted to UEFI (such as inserting a DVD into a drive or adding SCSI drives on storage enclosures) is not automatically detected by the UEFI Shell environment. To have the UEFI Shell recognize the device, you must reconnect the device driver (on cell-based servers, use the UEFI
searchcommand; on other servers, use the UEFIreconnector UEFImap -rcommand).The UEFI shell environment creates default mappings for all the device handles that support a recognized file system. After you change the system configuration or add a new device, you must regenerate these mappings. For information about reconnecting devices and regenerating mappings, see Section 9.6 and your hardware documentation.
Moving between UEFI and MP: To move from MP interface to UEFI, type
co(for Console) at the MP> prompt. If you are in command mode (at the MP:CM> prompt), first press Ctrl/B to return to the MP> prompt.When you move to UEFI from MP, confirm that you are at the UEFI main menu. If you are at a sub-menu, to access the main menu exit from the sub-menu and any subsequent sub-menus until you return to the main menu.
To move from the UEFI to MP, press Ctrl/B (this assumes MP is present and configured).
9.3. Enabling or Disabling Hyper-Threading on Dual-Core Processors
Systems that have Intel Itanium Dual-Core processors can support Hyper-Threading. Hyper-Threading provides the ability for processors to create an additional logical CPU that might allow additional efficiencies of processing. For example, a dual-core processor with Hyper-Threading active provides four logical CPUs, two on each core. The effect that Hyper-Threading has on performance depends heavily on the applications running on your system. Start with Hyper-Threading disabled and experiment later, if you wish.
Note
VSI OpenVMS V8.4-2 currently supports up to 64 processing units, be those cores or threads. When you enable threads, the resulting processing units will be assigned logical CPU IDs during boot, up to the maximum of 64. Systems with a greater number of processing units will not be fully enumerated. Future releases will remove this limitation.
info cpu
or cpuconfig command. (The display indicates that “CPU
threads” are turned on or off.) For
example:Shell>cpuconfigPROCESSOR MODULE INFORMATION # of L3 L4 Family/ CPU Logical Cache Cache Model Processor Module CPUs Speed Size Size (hex.) Rev State ----- ------- ------ ------ ------ --------- --- ----- 0 4 1.4 GHz 6 MB None 20/00 CO Active CPU threads are turned on.
To enable or disable Hyper-Threading, use the UEFI cpuconfig threads
on or cpuconfig threads off command. For more information,
enter help cpuconfig at the UEFI Shell prompt or see the appropriate
hardware documentation. The Partition Manager also supports Hyper-Threading.
After enabling or disabling Hyper-Threading, the system must be reset for the change
to take effect. Use the UEFI Shell reset command. When Hyper-Threading
is enabled, it remains active on the next reboot of the system.
9.4. Configuring and Managing OpenVMS Booting
This section explains how to configure and manage the booting behavior of your server. You can use the UEFI Boot Manager (while the operating system is not running) or the OpenVMS Boot Manager (while the operating system is running) to configure boot options.
You can configure multiple boot entries for a single operating system. On cell-based servers running multiple operating systems, you can configure boot options for all currently installed operating systems. On cell-based servers, each nPartition has a local instance of UEFI that is specific to that partition. Each partition can be booted and stopped independently of other nPartitions in the system, and each partition executes its own operating system image.
Important
To configure booting on a Fibre Channel storage device, you must use the OpenVMS Boot Manager utility. (For information about configuring Fibre Channel devices, see Section 9.23.) VSI also recommends using this utility to add members of a multiple-member shadow set to the boot device list and dump device list. Be sure to add all members to both lists.
If you have just completed the initial setup of your server, perform the following steps before continuing:
Power up your system.
Note
If you see a warning that the BMC system event log (SEL) is full, you can safely continue by following the prompts; OpenVMS processes the contents of the SEL after booting. If you want to clear the SEL manually, see the instructions in the first note of Section 2.2.
If you have a cell-based server, check that the ACPI configuration is correct for the OpenVMS operating system. For more information, see Section 2.4.
At the UEFI Boot Manager menu, select the UEFI Shell [Built-in] option. You can now boot your system manually, or you can add a new entry to the UEFI Boot Manager menu to have your system booted automatically whenever you power on or reboot your system.
Checking the ACPI configuration for nPartition booting (Section 2.4)
Setting automatic booting and boot flags for your system disk (Section 9.4.1) (also includes how to set automatic booting using UEFI commands)
Displaying UEFI boot entries and mapped OpenVMS devices, using the OpenVMS Boot Manager utility (Section 9.4.1.2) (also includes how to display boot entries using UEFI commands)
Setting the UEFI boot option timeout value, using the OpenVMS Boot Manager utility (Section 9.4.1.3)
Writing a new boot block, using the OpenVMS SET BOOTBLOCK command (Section 9.4.2)
9.4.1. Setting Boot Options for Your System Disk
During installation or upgrade, allowing the installation/upgrade procedure to automatically establish a UEFI boot option for your system disk
Using the OpenVMS Boot Manager utility (SYS$MANAGER:BOOT_OPTIONS.COM) while the operating system is running
Using UEFI (after the system disk has been created or updated and only while the operating system is not running)
Add your system disk as a UEFI boot option (you can optionally configure it to boot automatically on hardware startup and reboot).
Manage multiple system disks.
Set boot flags.
Display the UEFI boot options.
Add, move, and remove boot options in the UEFI Boot Manager menu.
Enable or disable the UEFI boot countdown timer (timeout) and set the countdown value.
This section explains how to perform most of these operations (except moving and removing boot options). For more information about the OpenVMS Boot Manager utility, see the VSI OpenVMS System Manager's Manual, Volume 1: Essentials. This section also explains how to use UEFI to add a boot option for automatic booting.
VSI recommends that you configure your system with a boot option for your system disk. You can enable automatic reboot of the system disk by specifying your system disk as the first boot option in the UEFI Boot Manager menu. When the UEFI timeout (countdown) occurs, your system disk boots automatically.
Note
To configure booting on Fibre Channel devices, you must use the OpenVMS Boot Manager utility. (Use of this utility is optional for other devices but mandatory for Fibre Channel devices.) VSI also recommends using this utility to add members of a multiple-member shadow set to the boot device list and dump device list. Be sure to add all members to both lists. For more information about the utility, see the VSI OpenVMS System Manager's Manual, Volume 1: Essentials. For more information about configuring and booting Fibre Channel devices, see Section 9.23.
9.4.1.1. Adding a Boot Option and Setting Boot Flags
To add a boot option and set boot flags using the OpenVMS Boot Manager utility, follow these steps:
- At the DCL prompt, enter the following command to start the OpenVMS Boot Manager utility:
$@SYS$MANAGER:BOOT_OPTIONS.COM - When the utility starts, the main menu is displayed. To add your system disk as a boot option, enter 1 at the prompt, as in the following example:
OpenVMS Boot Manager Boot Options List Management Utility (1) ADD an entry to the Boot Options list (2) DISPLAY the Boot Options list (3) REMOVE an entry from the Boot Options list (4) MOVE the position of an entry in the Boot Options list (5) VALIDATE boot options and fix them as necessary (6) Modify Boot Options TIMEOUT setting (B) Set to operate on the Boot Device Options list (D) Set to operate on the Dump Device Options list (G) Set to operate on the Debug Device Options list (E) EXIT from the Boot Manager utility You can also enter Ctrl-Y at any time to abort this utility Enter your choice:1Note
While using this utility, you can change a response made to an earlier prompt by entering the caret (^) character as many times as needed. To end and return to the DCL prompt, press Ctrl/Y.
The utility prompts you for the device name. Enter the system disk device you are using for this installation. In the following example, the device name is DKA0:.
Enter the device name (enter "? " for a list of devices):DKA0:The utility prompts you for the position you want your entry to take in the UEFI boot option list. To see a list of the current boot options, enter a question mark (? ):
Enter the desired position number (1,2,3,,,) of the entry. To display the Boot Options list, enter "? " and press Return. Position [1]:?The list in the following example includes only one boot option. To add your boot option entry to the top of the list (the default) so that your system disk boots automatically when the server starts or the UEFI countdown timer expires, enter 1:
UEFI Boot Options list: Timeout = 0 secs. ----------------------------------------------------------------- 01. VenHw(d65a6b8c-71e5-4df0-d2f009a9) "UEFI Shell [Built-in]" ----------------------------------------------------------------- 1 entries found. Enter the desired position number (1,2,3,...) of the entry. To display the Boot Options list, enter "? " and press Return. Position [1]:1The utility prompts you for OpenVMS boot flags. By default, no flags are set. Enter the OpenVMS flags (for example, 0,1), or press Enter to set no flags, as in the following example:
Enter the value for VMS_FLAGS in the form n,n. VMS_FLAGS [NONE]:Optionally, you can use any of the standard OpenVMS boot flags such as the following:
Flags
Description
0,1Enable SYSBOOT to change system parameters; enable conversational booting for debugging purposes. 0,2Load XDELTA. 0,4Take the initial EXEC_INIT breakpoint. 0,20000Print debug messages on boot. 0,30000Print more debug messages on boot. 0,400000Print even more debug messages on boot (ACPI). 0,430000Print unbelievably more debug messages on boot! The utility prompts you for a description to include with your boot option entry. By default, the device name is used as the description. You can enter more descriptive information as in the following example. This example shows a sample confirmation message (for devices with multiple paths, such as Fibre Channel devices, a separate confirmation message is displayed for each path). EFI$BCFG is the name of the executor file for the OpenVMS Boot Manager utility.
Enter a short description (do not include quotation marks). Description ["DKA0"]:DKA0: OpenVMS V8.4-2 for PLMs Systemefi$bcfg: DKA0: (BOOT003) Option successfully addedWhen you have successfully added your boot option, exit the utility by entering E at the prompt:
Enter your choice:E$
9.4.1.1.1. Using UEFI to Set Automatic Booting of Your System Disk
VSI recommends allowing the OpenVMS installation or upgrade procedure to set your system disk to boot automatically. Or, use the OpenVMS Boot Manager utility (SYS$MANAGER:BOOT_OPTIONS.COM). However, you can also use UEFI directly.
This section explains how to use UEFI to set up your server to automatically
boot your system disk. You should use the OpenVMS Boot Manager utility to set boot
flags. Optionally, you can use the vms_loader.efi -fl n,n command
at the UEFI prompt to set any of the standard OpenVMS boot flags, as documented
earlier in this appendix.
Shell>bcfg boot add 1 fsn:\efi\vms\vms_loader.efi "VSI OpenVMS I64"
This command adds OpenVMS to position 1 in the UEFI Boot Manager menu. The quoted text is the displayed label. You can enter any text that helps you identify the disk. During system power up, the position 1 item is automatically executed after the countdown.
Alternatively, you can add a UEFI boot menu option by using the UEFI menu interface:
Select the Boot Configuration option (or in some versions of UEFI, the Boot Option Maintenance Menu).
Select Add a Boot Option.
Select the boot device and boot file.
Note
All UEFI boot options embed the disk's Globally Unique ID (GUID). Therefore, if you reinstall OpenVMS or restore a system disk from an image backup, you must first delete the old boot options and then add a new boot option. To delete a boot option, use the Delete Boot Option(s) option in the Boot Configuration menu (or Boot Option Maintenance Menu).
Still another method to add a boot entry to the UEFI Boot Manager menu
is to use the UEFI vms_bcfg command, which accepts OpenVMS device
names and also enables you to set flags. However, this command has limited
capabilities; for example, it cannot handle Fibre Channel paths as can the OpenVMS
Boot Manager utility. In the following example, DKA0: is the OpenVMS system disk
being added as the first boot option:
Shell>\efi\vms\vms_bcfg boot add 1 dka0: -fl 0,2 "VSI OpenVMS I64"
For more information about UEFI utilities for OpenVMS, see the VSI OpenVMS System Management Utilities Reference Manual.
9.4.1.2. Displaying UEFI Boot Entries and Mapped OpenVMS Devices
The UEFI Boot Manager shows the various paths to the boot device. You can use the OpenVMS Boot Manager utility to display the OpenVMS boot device options known to UEFI.
Start the utility at the DCL prompt @SYS$MANAGER:BOOT_OPTIONS.COM and select Option 2 on the menu (shown in Section 9.4.1). The utility displays the following prompt. In this example, the listings for the DQA0: device are requested and displayed.
To display all entries in the Boot Options list, press Return. To display specific entries, enter the entry number or device name. (Enter "? " for a list of devices):DQA0UEFI Boot Options list: Timeout = 20 secs. ---------------------------------------------------------------------------- 04. DQA0 PCI(0|0|2|0) ATA(Primary,Master) "DVD-ROM " ---------------------------------------------------------------------------- 1 entries found.
You can also display all bootable devices mapped by the UEFI console and
their equivalent OpenVMS device names by using the UEFI Utilities for OpenVMS
vms_show command at the UEFI Shell prompt (from
\efi\vms). For more information about UEFI utilities for OpenVMS,
see the VSI OpenVMS System Management Utilities Reference Manual.
9.4.1.3. Setting UEFI Boot Option Countdown Timer (Timeout)
Whenever the UEFI Boot Manager menu is displayed, it waits for you to select an option. The wait depends on the current setting of the UEFI countdown timer. After the timer expires, UEFI boots the first boot option. If the first option is not available or does not boot, UEFI waits the same duration before booting the next option in the list.
The OpenVMS Boot Manager utility allows you to change this timeout value and enable or disable the countdown.
Select Option 6 on the OpenVMS Boot Manager main menu (the main menu is shown in Section 9.4.1). The utility displays the following prompt. To change the value, enter YES and then enter the new value. In this example, the timeout value is changed to 20 seconds.
efi$bcfg: Boot Timeout period is 10 secs Would you like to modify the Timeout value? (Yes/No) [NO]YESPlease enter the Timeout value in seconds:20efi$bcfg: Boot Timeout period is 20 secs
Please enter the Timeout value in seconds:0efi$bcfg: Boot Timeout is Disabled
9.4.1.4. Saving and Restoring UEFI Settings
Certain UEFI settings, such as the Hyper-Threading setting, cannot be
restored if lost. VSI recommends that you write down your customized UEFI settings in
case they are lost in a system hardware or firmware failure. You can use the UEFI
info cpu command or the UEFI cpuconfig command
to display current settings, such as the setting of the Hyper-Threading
feature.
You might need to restore boot options, such as if they get lost during a firmware
upgrade. You can save and restore your UEFI boot path settings using the OpenVMS Boot
Manager utility. You can also use the UEFI variable -s command to
save boot option variables and the variable -r command to restore
them. After using the variable command to restore boot options, a
reset might be required. Use the UEFI Shell reset command.
You can use the OpenVMS-specific UEFI utility vms_bcfg
(\efi\vms\vms_bcfg) to set boot options, and the
vms_show utility (\efi\vms\vms_show) to
display them; however, these utilities are more limited in scope than the OpenVMS Boot
Manager utility. For example, they cannot work with Fibre Channel boot paths as can
the OpenVMS Boot Manager utility. You can use the UEFI variable
command to restore the boot options list from a previously saved file.
You could also use the UEFI Shell variable command to restore
variables such as boot path options; you must have first saved them in a known
location by using the variable -save command. For more information,
see the service manual provided for your server.
9.4.2. Writing a New Boot Block
The boot block structures on the system disk contain the size and location of the boot partition and other details relevant to the bootstrap of OpenVMS. The size and location of the boot partition stored within the boot block structures must be maintained and must reference the current location of the OpenVMS file SYS$EFI.SYS.
Current versions of BACKUP maintain the boot block structures as well as the size and location of the boot partition during image operations (analogous to the similar BACKUP/IMAGE operations that maintain the boot block on HPE Alpha disks). Older versions of BACKUP do not maintain these structures and do not correctly locate core OpenVMS bootstrap files.
Note
Do not use the HPE Alpha WRITEBOOT utility to rewrite boot block structures on an HPE Integrity OpenVMS system disk.
The SET BOOTBLOCK command enables you to establish the boot block pointers necessary for the UEFI console to find and bootstrap an HPE Integrity OpenVMS system disk. You must use this command if the target system disk was originally created by one of the following methods:
A version of BACKUP that does not support the OpenVMS system disk structure. VSI recommends that you do not use these versions of BACKUP for archiving or restoring a VSI OpenVMS system disk.
A non-image backup of a system disk (possibly corrupting the boot block and various directory backlinks that must be manually reset). VSI recommends that you do not use non-image backups.
A non-image restore of a system disk from an image save set. VSI recommends that you do not use a non-image restoration.
Note
If the target system disk has an incorrectly-placed [000000]GPT.SYS file, the disk cannot be used reliably as an OpenVMS system disk. Typically, the file gets incorrectly placed due to the use of an older version of BACKUP/IMAGE, a file-based BACKUP disk restoration, or an errant disk defragmentation tool (the file is set with /NOMOVE to disable move operations; defragmentation tools that do not honor this setting will corrupt the file).
$ DUMP/HEADER/BLOCK=END=0 SYS$SYSDEVICE:[000000]GPT.SYS ...
Map area
Retrieval pointers:
Count: 36 LBN: 0
Count: 36 LBN: 71132925
This example is from a disk with 71132960 blocks. The placement of the final extent is 71132924, which is calculated by subtracting 36 (the size of the last extent) from the disk capacity (71132960).
You may be able to temporarily recover from this condition and attempt to bootstrap the target system disk by renaming GPT.SYS to GPT.BAD, and then entering the SET BOOTBLOCK command. To correctly recover from this condition, you must INITIALIZE the target disk and then reload the disk contents using a file-based BACKUP restoration or a file-based COPY operation. No supported means exists for adding a GPT.SYS file onto an existing disk nor for adding the file during a BACKUP/IMAGE restoration operation.
To write the boot block structures onto a system disk, enter the SET BOOTBLOCK command using the following format:
$SET BOOTBLOCK [/PRESERVE=SIGNATURES] [/I64] [boot-partition-name]
You can specify the file name for the boot partition (boot-partition-name). If you do not specify a file or device name, the command defaults to the following file for the boot partition:
SYS$SYSDEVICE:[VMS$COMMON.SYS$LDR]SYS$EFI.SYS
The command also assumes the current architecture. To specify OpenVMS for HPE Integrity servers, include /HP in the command line.
Use the /PRESERVE=SIGNATURES qualifier to preserve the existing GUID disk signature value and the associated root aliases. Using the OpenVMS Backup utility creates a new disk signature when restoring a bootable disk image.
If you reset the boot block structures, you might need to remove any UEFI boot
aliases that reference the disk, and then add them back again. You can use the UEFI
alias command to remove and add aliases; VSI recommends using the
OpenVMS Boot Manager utility (SYS$MANAGER:BOOT_OPTIONS.COM) to
maintain UEFI console boot aliases.
Note
The boot partition file must be contiguous and move file operations on the file must be disabled. If the file is not contiguous, use the DCL command COPY/CONTIGUOUS (or equivalent) to re-create a contiguous version of the file. To disable move file operations, use the DCL command SET FILE/NOMOVE. This prevents bootstrap failures that could result from the normal and expected operations of disk defragmentation tools.
Alternatively, you can write a boot block by entering the following command:
$RUN SYS$SYSTEM:SYS$SETBOOT
The utility prompts you for the required input (in a way similar to the operation of the OpenVMS Alpha Writeboot utility).
9.5. Booting Operations
Note
To boot your OpenVMS operating system, you can use a VGA graphics device (except on servers that lack the firmware capabilities), a serial device, or a network interface for the console. For information about setting up the console on your server, see Section 2.3.3.
When using a VGA console and installing from a USB DVD drive with the keyboard plugged into a USB hub, if the keyboard does not respond, simply unplug the hub and plug it back in.
Note
HPE Integrity servers maintain a system event log (SEL) within system console storage, the operating system automatically transfers the contents of the SEL into the OpenVMS error log. During a successful boot operation while using a console, you might see a message indicating that the BMC SEL is full. You can safely continue when the BMC SEL is full by following the prompts; OpenVMS processes the contents of the SEL.
9.5.1. Overview of Booting on a Cell-Based Server
This section gives an overview of booting the nPartition hardware and booting OpenVMS on an nPartition.
Each nPartition runs its own firmware and has its own system boot environment. You can boot an nPartition independently of any other nPartitions in the same server complex.
Cell boot phaseThis phase occurs when cells are powered on or reset. The main activities during this phase are the power-on-self-test activities. During this phase, cells operate independently of other cells in the complex. Cells do not necessarily proceed through this phase at the same pace, because each cell may have a different amount of hardware to discover and test, or cells might be reset or powered on at different times.
nPartition boot phaseThis phase occurs when an nPartition has been booted, after its cells have completed their self tests. During this phase, “nPartition rendezvous” occurs, in which each cell contacts the other active cells in the nPartition and selects a core cell that is responsible for managing the rest of the nPartition boot process. A processor on the core cell runs the nPartition UEFI system boot environment. When the operating system boot process is initiated, the core cell passes control to the operating system loader.
You can view progress of these phases by using the Virtual Front Panel (VFP) to check the nPartition boot state. Access VFP from the MP main menu.
For information about how to boot the nPartition hardware, see your hardware documentation.
Caution
You must first ensure that the nPartition has its ACPI configuration set to the default (see Section 2.4).
Note
OpenVMS Version 8.4 introduced support for cell local memory (CLM) on HPE Integrity cell-based servers. Prior OpenVMS versions had a restriction they used only interleaved memory (ILM). You can use the Partition Manager to check or configure CLM. For more information on Partition Manager, see the nPartition Administrator's Guide (previously titled HPE System Partitions Guide: Administration for nPartitions).
You can also use the UEFI Shell info mem command to determine
the ILM and CLM configuration. If the reported non-interleaved memory is less than 512
MB, the cell is configured completely as interleaved memory (the indicated amount of
non-interleaved memory is used by the firmware).
From the UEFI Boot Manager, select the OpenVMS boot entry from the boot options list and press Enter.
- From the UEFI Shell, start the OpenVMS system loader by entering the following command at the UEFI Shell prompt, where fsn: (such as fs1:) is the device associated with the OpenVMS system disk:
Shell>fsn:\efi\vms\vms_loader.efiWhen starting the VMS_LOADER.EFI system loader, you must either specify its full path (as shown in this example) or start it from the
\efi\vmsdirectory. For more information, see Section 9.2.1.For booting the VSI OpenVMS OE DVD, the path is different. Enter the following command instead:
Shell>fsn:efi\boot\bootia64.efi
Note
The nPartition must be at UEFI before beginning the boot process. If the
nPartition is not at UEFI, you can use VFP to check the nPartition boot state. An
nPartition might be inactive or cells might be powered off. If VFP indicates that
all cells in the nPartition are in the boot-is-blocked (BIB)
state, the nPartition is inactive and you must use the MP bo
command to boot the nPartition past BIB and make it active. For more information,
see your hardware documentation.
To boot the VSI OpenVMS OE DVD, follow these steps. To boot the DVD on a cell-based server, a DVD device must be accessible for the nPartition that OpenVMS is being installed on.
Make sure your server is powered on. If your system has an attached external device, make sure it is turned on and operational.
Insert the DVD into the drive.
Cycle power so firmware mounts the DVD drive.
From the main UEFI boot menu (for cell-based servers, this must be the UEFI boot menu for the nPartition on which OpenVMS is to be booted), select the appropriate item from the boot options list. The UEFI boot menu is timed; press any key to stop the countdown timer.
For some systems, the boot option to select is the Internal Bootable DVD option. If that option is not listed in your UEFI boot menu, move to the Boot From a File menu and select the Removable Media Boot option, if present.
Alternatively (and this method is recommended for cell-based servers), boot the DVD drive from the UEFI Shell prompt by entering the command shown in the following example, where fsn: corresponds to the servers DVD drive (such as fs0:). If you have navigated to a particular file system, the UEFI Shell prompt would reflect that file system; for example, if the current file system is fs0:, the UEFI Shell prompt would be fs0:>.Shell>fsn:\efi\boot\bootia64.efiTo determine which device is the bootable DVD drive, examine the list of mapped devices and look for an fs device listing that includes the text CDROM, as in the following example, where fsn is the file system associated with the drive, which is usually fs0: (instead of fsn, you might see something like V8.4-2; instead of Ata, you might see Scsi, depending on the server model):
fsn: Acpi(HWP0002,400)/Pci(4|1)/Ata(Primary,Master)/CDROM(Entry0)Use thevms_show devcommand to display the mapping of various UEFI device names to OpenVMS device names, as in the following example where fsn is the device you want to check (such as fs0:):Shell>fsn:\efi\vms\vms_show dev -fsFor more information about the
vms_showcommand, see the VSI OpenVMS System Management Utilities Reference Manual.When the DVD boots properly, the OpenVMS operating system banner is displayed, followed by the operating system menu. You can now install your OpenVMS operating system onto the target disk; see Section 6.2. If the DVD fails to boot properly use the alternate method of booting described in Section 9.6.Note
By default, certain versions of UEFI might interpret the Delete (or Backspace) key differently than do OpenVMS Alpha systems or Microsoft Windows computers. In such cases, press Ctrl/H to delete the last character entered. For more information, see Section 9.1.3.
Note
When booting OpenVMS from the installation DVD for the first time on any system with a SAN storage device, you might experience a delay in UEFI initialization because the entire SAN is scanned. Depending on the size of the SAN, this delay might range from several seconds to several minutes.
9.6. Alternate Method of Booting the DVD with UEFI
If the DVD does not boot using the methods described above, follow these steps:
- To ensure that UEFI can access the DVD, enter the following commands at the UEFI Shell prompt of entry-class or single-cell HPE Integrity servers. Enter the commands in the order shown. (The UEFI Shell prompt may not necessarily be Shell> as in this example; it could be a prompt that reflects the current file system device, such as fs0:>.)
Shell>reconnect -rShell>map -rFor a multiple-cell nPartition on a cell-based server, use the
search allcommand instead of thereconnect -rcommand, followed by themap -rcommand. See your hardware documentation for more information about UEFI commands.The
reconnect -rcommand discovers any devices added after booting the server. Thesearch allcommand discovers all devices including any that were not in the boot options list or connected to the core cells I/O chassis. (On large server systems, thesearch allcommand could take significant time to complete. You can reduce the search time by specifying a more directed search, such as for a specific I/O chassis connected to a cell or a specific PCI card in a chassis. For more information, see the help information provided for thesearchcommand.)The
map -rcommand remaps and rebuilds the list of known devices that have a bootable UEFI system partition. For a multiple-cell nPartition on a cell-based server, if you insert the DVD after UEFI is loaded, you must use the search command to allow UEFI to detect the inserted DVD; otherwise, UEFI would not recognize the DVD in the DVD drive. When UEFI detects a valid, bootable DVD in the DVD drive, it maps an fs device to it and lists that device in the mapping table displayed by themap -rcommand. To boot the DVD, enter the following command at the UEFI Shell prompt, where fsn: is the DVD drive (such as fs0:).
Shell>fsn:\efi\boot\bootia64.efiIf this command does not work, or if you have doubts about which device maps to the DVD drive, you can use the UEFI Boot Manager menu system to boot the OE DVD, as described in the following steps:
From the main UEFI boot menu, select the Boot Configuration option (or in some versions of UEFI, the Boot Option Maintenance Menu).
From the Boot Configuration menu, select the Boot From a File option.
From the Boot From a File menu, select the menu item that includes the text CDROM, as in the following example, and press Enter.
Note
The contents of the screens shown in the following examples vary according to the firmware and devices installed on your server.
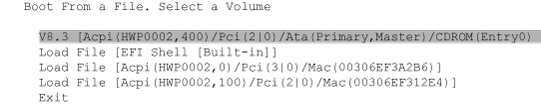
- A screen is displayed that shows the top-level directory structure of the DVD, similar to the screen in the following example. Select the
efidirectory.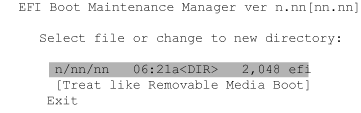
- The next screen to appear shows the first level of subdirectories below the top level, similar to the following example. Select the boot directory (it contains the boot file).
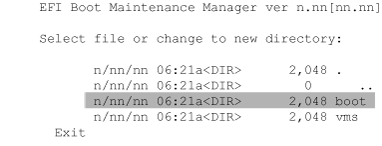
- The next screen displays the files within the boot directory. Select the file named
bootia64.efi.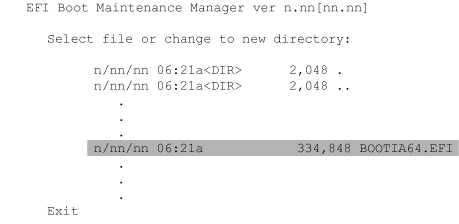
9.7. Booting the VSI OpenVMS OE DVD from the InfoServer
To boot from a virtual DVD drive on the LAN using OpenVMS InfoServer software, you must initially perform certain configuration steps (one time only). These steps and the instructions on performing the network boot are described in Section 9.17.
9.8. Booting from a Fibre Channel Device
For instructions on booting from a Fibre Channel (FC) storage device, see Section 9.23.
9.9. Booting Manually from the Local System Disk
VSI recommends setting up your UEFI console with a boot option for your OpenVMS system disk. In this way, booting the system disk simply requires selecting the boot option from the UEFI Boot Manager boot options list. You can set the UEFI boot option to boot automatically on powering on or rebooting. The OpenVMS installation and upgrade procedures can assist you in adding and validating a boot option for your system disk; you can also use the OpenVMS Boot Manager utility (SYS$MANAGER:BOOT_OPTIONS.COM), as explained in Section 9.4.1.
The steps that follow explain how to boot the OpenVMS operating system disk manually.
Note
If you have recently booted the VSI OpenVMS OE DVD, make sure you remove this DVD before booting the system disk.
The system disk must be mounted locally (on the system you are booting) or on a SAN storage device.
If OpenVMS is not running, skip to the next step. If OpenVMS is running, access the UEFI console by shutting down the operating system (see the instructions in Section 9.15).
- Boot the system disk manually by entering the following command at the UEFI Shell prompt, where fsn: (such as fs1:) is the device associated with the system disk:
Shell>fsn:\efi\vms\vms_loader.efiYou must either specify the full path (as shown in this example) or start the system loader from the
\efi\vmsdirectory. For more information, see Section 9.2.1.
9.10. Performing a Conversational (Interactive) Boot
A conversational boot is most commonly used in research and development environments and during software upgrades. Perform a conversational boot to stop the boot process before it completes. The boot process stops after it loads SYS$SYSTEM:SYSBOOT.EXE and displays the SYSBOOT> prompt. At the SYSBOOT> prompt, you can enter specific OpenVMS System Generation utility (SYSGEN) commands to do the following:
Examine system parameter values
Change system parameter values
Specify another parameter file
Specify another system startup command procedure
Select the default system parameter file (IA64VMSSYS.PAR) if you modified system parameters to values that render the system unbootable
Specify a minimum startup
There are several ways to perform a conversational boot. The following procedure is the most direct:
| IF ... | THEN GO TO... |
|---|---|
|
OpenVMS is running. |
Step 1 |
|
OpenVMS is not running. |
Step 4 |
Log in to the SYSTEM account.
- Enter the following command:
$@SYS$SYSTEM:SHUTDOWN Answer the questions displayed by the system. When the procedure asks whether an automatic reboot should be performed, press Enter for NO. When the procedure is finished, it displays the following message:
SYSTEM SHUTDOWN COMPLETE
Halt the system or nPartition. (See Section 9.15 for more information about how to halt your server).
Begin the conversational boot by entering the following command at the UEFI Shell prompt, where fsn: is the device (such as fs1:) associated with the system disk:
Shell>fsn:\efi\vms\vms_loader.efi -fl 0,1At the SYSBOOT> prompt, you can enter any of the SYSGEN commands listed in Table 9.1. For more information about these SYSGEN commands, see the VSI OpenVMS System Management Utilities Reference Manual: M-Z.
When you finish using the SYSGEN commands, enter the CONTINUE command to complete the boot process.
| COMMAND | DESCRIPTION |
|---|---|
|
CONTINUE |
Resumes the boot procedure. |
|
DISABLE CHECKS |
Inhibits checking of parameter values specified with the SET command. |
|
ENABLE CHECKS |
Permits checking of parameter values specified with the SET command. |
|
HELP |
Displays a summary of the SYSBOOT commands on the terminal screen. |
|
SET |
Establishes the value of a system parameter. |
|
SET/STARTUP |
Sets the name of the system startup command procedure. |
|
SHOW [ |
Displays active, current, default, maximum, and minimum values for specific parameters. (Use qualifiers to display characteristics of parameters grouped by categories.) |
|
USE [ |
Specifies a parameter file to be used as a source of values. You must enter the entire file specification, including device and directory; you cannot specify a logical name. |
|
USE DEFAULT |
Specifies that default values be used for all parameters. |
For examples of conversational booting, see Section 9.11 and Section 9.14.
9.11. Booting with Minimum Startup
In certain cases, you might want to boot your system without performing the full sequence of startup events. For example, if a startup event prevents you from logging in, you might want to boot the system without executing the startup so that you can log in and fix the problem. You can use the conversational boot to specify a minimum startup.
Note
Because this procedure bypasses specific startup operations, it does not auto-configure the system's peripheral devices.
Boot the system with minimum startup as follows:
- Begin the conversational boot by entering the following command at the UEFI Shell prompt, where fsn: is the device (such as fs1:) associated with the system disk and the system root is [SYS0...]:
Shell>fsn:\efi\vms\vms_loader.efi -fl 0,1 Enter the following command:
SYSBOOT>SET STARTUP_P1 "MIN"Enter the following command to ensure that the operating system does not record for subsequent system reboots the STARTUP_P1 parameter change you made in step 2:
SYSBOOT>SET WRITESYSPARAMS 0Enter the following command to continue booting:
SYSBOOT>CONTINUE
9.12. Booting with the XDelta Utility (XDELTA)
The XDelta utility (XDELTA) is a low-level debugging tool that system programmers use. The procedure for booting all servers with XDELTA is the same.
The following table describes the valid values you can specify when booting with XDELTA:
| Value | System Response |
|---|---|
|
0 |
Normal, nonstop boot (default). |
|
1 |
Begins a conversational boot and then displays the SYSBOOT prompt. |
|
2 |
Includes XDELTA but does not take the initial breakpoint. |
|
3 |
Displays the SYSBOOT prompt and includes XDELTA but does not take the initial breakpoint. |
|
6 |
Includes XDELTA and takes the initial breakpoint. |
|
7 |
Includes XDELTA, displays the SYSBOOT prompt, and takes the initial breakpoint at system initialization. |
The following is an example of booting with XDELTA from fs1: at the UEFI prompt:
Shell>fs1:\efi\vms\vms_loader.efi -fl 0,7
For more information about using XDELTA, see the VSI OpenVMS Delta/XDelta Debugger Manual.
9.13. Booting from a Different Root Directory
By default, the OpenVMS operating system is installed in the system root directory [SYS0]. However, if you have created a cluster system disk, you can use the SYS$MANAGER:CLUSTER_CONFIG_LAN.COM procedure to add a copy of the operating system to a different root directory. (For more information about using the SYS$MANAGER:CLUSTER_CONFIG_LAN.COM procedure, see the VSI OpenVMS System Manager's Manual .)
Shell>fsn:\efi\vms\vms_loader.efi -fl 3,0
9.14. Emergency Booting
If a system problem prevents your system from booting, you might need to perform an emergency boot operation. The table below summarizes these emergency boot operations, and the sections that follow describe each boot operation in more detail.
| OPERATION | WHEN TO USE |
|---|---|
|
Booting with default system parameters |
When parameter values in the parameter file have been modified so that the system is unbootable |
|
Booting without startup and login procedures |
If an error in the startup or login procedure prevents you from logging in |
|
Booting without the user authorization file |
If you have forgotten the password and cannot log in to a privileged account |
9.14.1. Booting with Default System Parameters
If the current values stored in the parameter file have been incorrectly modified, these incorrect values might cause the system to become unbootable. With a conversational boot operation, you can reset the active values for all system parameters to the default value. In most cases, VSI recommends that you use AUTOGEN to modify system parameters. In certain cases, however, you can use a conversational boot to modify a parameter value temporarily. To change a parameter value permanently, you must edit MODPARAMS.DAT and run AUTOGEN. For instructions, see the VSI OpenVMS System Manager's Manual, Volume 2: Tuning, Monitoring, and Complex Systems. The default values allow you to boot the system temporarily so you can correct the problem.
- Begin the conversational boot by entering the following command at the UEFI Shell prompt, where fsn: (such as fs1:) is the device associated with the system disk:
Shell>fsn:\efi\vms\vms_loader.efi -fl 0,1 At the SYSBOOT> prompt, enter the following command:
SYSBOOT>USE DEFAULTThe USE DEFAULT command specifies that default values should be used for all parameters.
To avoid starting all layered products on a system that is not tuned for them, possibly causing the system to hang, set the STARTUP_P1 system parameter as follows:
SYSBOOT>SET STARTUP_P1 "MIN"Enter the following command to ensure that the operating system does not record for subsequent system reboots the STARTUP_P1 parameter change you made in step 3:
SYSBOOT>SET WRITESYSPARAMS 0Enter the following command to continue booting:
SYSBOOT>CONTINUEWhen the system finishes booting, determine which changed parameter caused the problem and reset the parameter value. If you specified the value for the parameter in the AUTOGEN parameter file MODPARAMS.DAT, fix the value in that file and run AUTOGEN. For more information, see the VSI OpenVMS System Manager's Manual, Volume 2: Tuning, Monitoring, and Complex Systems.
After your system runs for at least 24 hours, run AUTOGEN in feedback mode, following the steps described in Section 8.4. Be sure to examine the AGEN$PARAMS.REPORT, as recommended. If necessary, modify system parameters as instructed in Section 8.34. If you need assistance, contact your software support representative. Once you feel confident that the problem is corrected, and AUTOGEN has been run through the SETPARAMS phase, reboot the system.
Example
SYSBOOT>USE DEFAULTSYSBOOT>SET STARTUP_P1 "MIN"SYSBOOT>SET WRITESYSPARAMS 0SYSBOOT>CONTINUEUsername:SYSTEMPassword:$EDIT SYS$SYSTEM:MODPARAMS.DAT. . . [Insert line(s) to reset parameter value(s)] . . .
9.14.2. Booting Without Startup and Login Procedures
If the system does not complete the startup procedures or does not allow you to log in, you might need to bypass the startup and login procedures. The startup and login procedures provided by HPE should always work. However, if you introduce an error when you modify the startup or login procedure, you could accidentally lock yourself out of the system.
How to Perform This Task
- Begin the conversational boot by entering the following command at the UEFI Shell prompt, where fsn: (such as fs1:) is the device associated with the system disk:
Shell>fsn:\efi\vms\vms_loader.efi -fl 0,1 Enter the following command at the SYSBOOT> prompt:
SYSBOOT>SET/STARTUP OPA0:Enter the following command to ensure that the operating system does not record for subsequent system reboots the STARTUP_P1 parameter change you made in step 2:
SYSBOOT>SET WRITESYSPARAMS 0Enter the following command to continue booting:
SYSBOOT>CONTINUEWhen the system is booted, the operator console displays the DCL command prompt ($). You are now logged in.
Enter the following two DCL commands:
$SPAWN$SET NOONThe SPAWN command enables you to stay connected to the console, and the second command instructs the operating system to ignore any errors that might occur. If you do not enter these commands and you invoke an error, the system logs you out. Without the SPAWN command, you are logged out when the startup procedure completes in step 8.
Correct the error condition that caused the login failure. (That is, make the necessary repairs to the startup or login procedure, or to the SYSUAF.DAT file.)
Use a text editor to correct the startup or login file. Some system displays might not support a screen-mode editor. You can also copy a corrected file and delete the incorrect version by using the RENAME and DELETE commands.
Perform a normal startup by entering the following command:
$@SYS$SYSTEM:STARTUP
Example
SYSBOOT>SET/STARTUP OPA0:SYSBOOT>SET WRITESYSPARAMS 0SYSBOOT>CONTINUE$SPAWN$SET NOON$SET DEFAULT SYS$SYSROOT:[SYSEXE]$@SYS$SYSTEM:STARTUP
9.14.3. Booting Without a User Authorization File
Ordinarily, the startup and login procedures provided by OpenVMS work; however, certain conditions can cause them to fail. A simple way to lock yourself out of the system is to set passwords to login accounts and forget them. Another way to be locked out is if one or more core system Product Authorization Key (PAK) software licenses are unavailable or expired. In such emergencies, perform a conversational emergency boot by performing the steps given in this section.
How to Perform This Task
Halt the system or nPartition. (See Section 9.15 for more information about how to halt your server.)
- Begin the conversational boot by entering the following command at the UEFI Shell prompt, where fsn: (such as fs1:) is the device associated with the system disk:
Shell>fsn:\efi\vms\vms_loader.efi -fl 0,1You need your hardware systems password for logging in to the console. By default, both the user name and password are set to Admin. If you do not have this password, contact VSI or HPE Customer Support to reset the hardware console password.
Enter the following commands at the SYSBOOT> prompt:
SYSBOOT>SET/STARTUP OPA0:SYSBOOT>SET WINDOW_SYSTEM 0SYSBOOT>SET WRITESYSPARAMS 0SYSBOOT>CONTINUEThe first three commands request the following:OpenVMS read the system startup commands directly from the system console.
The windowing system (if any) not start.
OpenVMS not record the parameter changes for subsequent system reboots.
The last command causes the booting to continue.
At the DCL prompt, the system now accepts startup commands directly from the console. Enter the following two commands. These commands allow a normal system startup while you are left logged in on the console. Without the SPAWN command, you are logged out when the startup completes.
$SPAWN$@SYS$SYSTEM:STARTUPOnce you log out of this session, the system completes the startup and can be used normally. Optionally, you can choose to reboot the system.
Example
SYSBOOT>SET/STARTUP OPA0:SYSBOOT>SET WINDOW_SYSTEM 0SYSBOOT>SET WRITESYSPARAMS 0SYSBOOT>CONTINUE$SPAWN$@SYS$SYSTEM:STARTUP$
Note
Instead of using the SET/STARTUP OPA0: command in emergency conditions, you can set the UAFALTERNATE system parameter to use the alternate authorization file rather than the standard user authorization file. Setting the system parameter UAFALTERNATE defines the logical name SYSUAF to refer to the file SYS$SYSTEM:SYSUAFALT.DAT. If this file is found during a normal login, the system uses it to validate the account and prompts you for the user name and password.
VSI does not recommend this method. If an alternate SYSUAFALT.DAT file has been configured on your system, the UAFALTERNATE method will likely fail (assuming you do not know the password for the privileged account stored within the SYSUAFALT.DAT file). In addition, the OPA0: system console is critical to system operations and system security and allows access when the SYSUAF system authorization database is unavailable or corrupted; when core product license PAKs are not registered, are expired, or are disabled; and in various system failures.
9.15. Halt and Shutdown Procedures
The following sections describe halt and shutdown procedures for OpenVMS on HPE Integrity servers.
9.15.1. Halting a Server to Recover from Hangs and Crashes
If your system hangs and you want to force a crash, you can use MP, if
available. Use the tc command. Confirm your intention when prompted.
The tc command forces a crash dump. You can reset the machine
(without forcing a crash) by using the MP rs command.
For cell-based servers, when you enter the tc or
rs command, you are first prompted to select the partition for
which you want the operating system shut down.
Alternatively, when the operating system controls the console, press Ctrl/P. The next step taken by the system depends on whether XDELTA is loaded:
If XDELTA is loaded, the system enters XDELTA after you press Ctrl/P. The system displays the instruction pointer and current instructions. You can force a crash from XDELTA by entering ;C, as in the following example:
$ Console Brk at 8068AD40 8068AD40! add r16 = r24, r16 ;; (New IPL = 3);CIf XDELTA is not loaded, pressing Ctrl/P causes the system to enter the IPC facility. Pressing Ctrl/P within the utility brings the Crash? (Y/N) prompt. Enter Y to cause the system to crash and to bring you eventually to UEFI. If you enter any other character, the system returns back to the IPC facility.
9.15.2. Shutting Down the System
Before you shut down the operating system, decide if you want it to reboot automatically or if you want to enter console-mode commands after the shutdown completes. If you want the system to reboot automatically after the shutdown, first set up automatic booting, as described in Section 9.4.1.
You can perform the following two types of shutdown operations, as discussed in the indicated sections:
An orderly shutdown with SYS$SYSTEM:SHUTDOWN.COM (see Section 9.15.2.1)
An emergency shutdown with OPCCRASH.EXE (see Section 9.15.2.2)
9.15.2.1. Orderly Shutdown
The SHUTDOWN.COM procedure shuts down the operating system while performing maintenance functions such as disabling future logins, stopping the batch and printer queues, dismounting volumes, and stopping user processes. To use the SHUTDOWN.COM command procedure, log in to the SYSTEM account, enter the following command:
$@SYS$SYSTEM:SHUTDOWN
For more information about the SHUTDOWN.COM command procedure, see the VSI OpenVMS System Manager's Manual, Volume 1: Essentials.
To perform a reboot for reconfiguration from HPE Integrity servers running OpenVMS in an nPartition, enter the OpenVMS @SYS$SYSTEM:SHUTDOWN command, and then answer YES to the prompt that asks whether to perform an automatic system reboot.
On cell-based HPE Integrity servers, an operating system reboot is equivalent to a reboot for reconfiguration. Performing a reboot for reconfiguration enables any cell assignment changes for the nPartition (for example, removing an active cell or activating a newly added cell).
The reboot for reconfiguration takes all cells assigned to the nPartition through a cell boot phase. The cells with a Yes use-on-next-boot attribute proceed through the nPartition boot phase to become active cells whose resources are available to software running on the nPartition.
To perform a shutdown for reconfiguration of an nPartition running OpenVMS, first enter the OpenVMS @SYS$SYSTEM:SHUTDOWN command and then answer NO to the prompt asking whether to perform an automatic system reboot. Next, access MP and use the
rrcommand (specify the OpenVMS nPartition to shut down for reconfiguration).A shutdown for reconfiguration takes all cells assigned to the nPartition through a cell boot phase and then stops their boot progress at the boot-is-blocked (BIB) state. When all cells assigned to the nPartition are at the BIB state, the nPartition is inactive and no software can run on the nPartition until it is manually booted past BIB.
To boot an inactive nPartition past BIB, use the MP
bocommand and specify which nPartition to make active. Booting past the BIB state involves all cells that are assigned to the nPartition and that have a Yes use-on-next-boot attribute. The cells are taken through the nPartition boot phase to become active cells whose resources are available to software running on the nPartition.
For more information about shutting down HPE Integrity servers or an nPartition, see the appropriate hardware documentation.
9.15.2.2. Emergency Shutdown with OPCCRASH.EXE
If you cannot perform an orderly shutdown with the SHUTDOWN.COM procedure, run the OPCCRASH.EXE emergency shutdown program. To run the OPCCRASH.EXE program, log in to the SYSTEM account and enter the following command:
$RUN SYS$SYSTEM:OPCCRASH
For more information about the OPCCRASH program, see the VSI OpenVMS System Manager's Manual, Volume 1: Essentials.
On cell-based HPE Integrity servers, entering the OpenVMS RUN SYS$SYSTEM:OPCCRASH command results in the system dumping memory and then halting at the P00>>> prompt. To reset the nPartition following OPCRASH, access the nPartition console and press any key to reboot.
Using the MP tc command to reset an nPartition results in the
system dumping memory and then automatically resetting the nPartition.
9.16. Troubleshooting Procedures
The following sections describe procedures that you can follow if you encounter problems with your system.
9.16.1. If the System Does Not Boot
If the system does not boot because a hardware problem occurs, a question mark (? )
usually precedes the error message displayed on the console terminal. An example of a
hardware problem is a read error on a disk. Another is a BIB condition in an nPartition
on a cell-based server. You can use VFP to check the nPartition boot state. If VFP
indicates that all cells in the nPartition are at BIB, the nPartition is inactive and
you must use the MP bo command to boot the nPartition past BIB and
make it active.
One way to get to the UEFI Boot Manager to attempt to reboot is to use the MP
rs command.
For more information about using VFP and MP, see your hardware documentation.
9.16.1.1. For Hardware Problems
If you suspect a hardware problem, do the following:
Consult the hardware manual for your server.
Contact Customer Support.
9.16.1.2. For Software Problems
When the operating system is loaded into memory, a message similar to the following is displayed on the terminal screen:
SYSTEM job terminated at 12-MAR-2015 15:05:03.17
If the system does not display this message, a software problem has probably occurred. Do the following:
Turn off the system. Turn it back on and try to reboot.
Perform a conversational boot using the default system parameters or try one of the emergency boot procedures described in Section 9.14.
If the system boots, run the AUTOGEN procedure. For more information about the AUTOGEN procedure, see the VSI OpenVMS System Manager's Manual, Volume 2: Tuning, Monitoring, and Complex Systems.
If the system still doesn't boots, contact Customer Support.
9.16.2. Detecting and Responding to System Problems
If your system exhibits unexpected behavior, note the following:
If the system displays a bugcheck message on the console terminal and shuts itself down, it means the system encountered a problem that made further operation impossible or dangerous. If the system does not reboot automatically, reboot the system manually as described in Section 9.9.
If the system stops responding to your commands (that is, if the system hangs), there is a possible failure in a system software or hardware component or a possible power failure.
If the system exhibits erratic behavior (it does not respond according to specifications), it indicates a possible failure in a system software or hardware component.
To determine whether the failure is a system problem:
Be sure that you did not press F1 (Hold Screen). The Hold Screen light turns on when you press either F1 or Ctrl/S.
Press Ctrl/T to check the status of your process. A status line should appear indicating the name of the program that is executing and other information. If the status line does not appear, the program you are executing might be stalled or hanging. (If you have disabled Ctrl/T by entering the command SET NOCONTROL=T, or if you have set the terminal to NOBROADCAST mode by entering the command SET TERMINAL/NOBROADCAST, this procedure does not work.)
Make sure the cable connecting the terminal or monitor to the system is secure.
If you determine that you have a system problem, take the following steps:
Force an exit from a stalled or hanging program by pressing Ctrl/Y. Pressing Ctrl/Y causes any work performed by the program and not saved on disk to be lost.
If the system is still unresponsive, halt it (see Section 9.15.1 for more information.)
Note in detail the sequence of events that caused the problem and notify Customer Support.
9.17. Setting Up and Performing Network Booting
This section explains the steps required to enable your system to boot over the LAN using the OpenVMS InfoServer utility. It also describes how to boot the virtual DVD drive from the network.
InfoServer network booting is supported for VSI OpenVMS installations and upgrades on any HPE Integrity server having a DVD drive. For HPE Integrity server systems, InfoServer network booting is supported on all LAN cards (also referred to as LAN devices or adapters) that are supported by UEFI.
Warning
Refer to the release notes and contact VSI if you have questions or difficulties.
For both installations and upgrades, you can boot from a virtual DVD drive on the LAN using the OpenVMS InfoServer utility. This support provides the additional advantage of allowing a network administrator to upgrade multiple OpenVMS systems on the network from a single copy of the OpenVMS distribution DVD.
Using the InfoServer utility requires several one-time-only configuration steps.
Booting from the software InfoServer utility differs significantly from booting from the hardware InfoServer system traditionally used with HPE Alpha systems. For example, while HPE Alpha systems use the Maintenance Operations Protocol (MOP) to request the primary bootstrap file (APB.EXE) to start the boot, the HPE Integrity console uses Intel's Pre-boot Execution Environment (PXE) bootstrap protocol in conjunction with the TCP/IP Services for OpenVMS BOOTP server and TFTP.
The UEFI console first loads the primary bootstrap file VMS_LOADER.EFI (a UEFI application). VMS_LOADER.EFI then uses TFTP to request the primary bootstrap IPB.EXE (first IA64 application) from the boot server.
| InfoServer Client Setup | ||
| ARCH | ACTIONS REQUIRED | SECTION |
|
IA64 Clients |
| Section 9.18 |
| InfoServer Utility Setup | ||
| ARCH | ACTIONS REQUIRED | SECTION |
| IA64 Servers |
Designate at least one OpenVMS system in the LAN as the InfoServer server. Upgrade the system if necessary (OpenVMS HPE Integrity must be Version 8.2-1 or later). | |
|
IA64 |
| Section 9.19. |
|
IA64 Servers | Set up the TCP/IP Services for OpenVMS BOOTP server and TFTP server. (For each new release of OpenVMS, update the client entries in the BOOTP database to point to the new version-specific boot file.) The person responsible for setting up the boot server needs information about your InfoServer client. OpenVMS boot files are unique for each version of OpenVMS. Latest boot files must be available and referenced in the BOOTP server database. | Section 9.20. |
Note
The discussion of InfoServer booting in this manual pertains to environments where the boot clients and servers are located in the same LAN. For more complex circumstances, consult with Customer Support.
9.18. Setting Up Your System as an InfoServer Client
To set up your local OpenVMS system as an InfoServer client for network booting, you must perform the following steps.
Determine the LAN I/O card to be used on your local HPE Integrity server for the network boot. Report the associated OpenVMS device name and its IP address and MAC address to the network administrator responsible for setting up the BOOTP server.
Optionally (and recommended), add the network device as a boot option in the UEFI Boot Manager menu.
Verify that the network device is supported by UEFI as a bootable device.
Note
The ability to boot over the network requires that the nearest switch or router be configured to auto-negotiate.
9.18.1. Determining the Local Network I/O Card to Be Used
Select a LAN I/O card (also referred to as a LAN I/O device or adapter) on your HPE Integrity server. This device must be supported by UEFI firmware. At minimum, UEFI supports the core I/O LAN cards installed in an HPE Integrity server. On all HPE Integrity servers, devices supported by OpenVMS are either EI or EW devices (for example, EIA0 or EWA0). The UEFI firmware might also support variants of the core I/O cards, such as additional network interface cards (NICs) of the same type. It might also support other NICs that are installed in the system but not classified as core I/O cards. In any case, you can verify that the device you select is supported by UEFI.
If multiple I/O cards are available on your system, you can choose more than one to serve for network booting.
To list the installed LAN I/O devices known to your system, follow these steps:
If your operating system is not running, access the OpenVMS DCL triple dollar sign prompt ($$$) from your VSI OpenVMS OE DVD Installation Menu by selecting Option 8 (Execute DCL commands and procedures). Otherwise, skip to the next step.
- At the DCL prompt, enter the following command to start the OpenVMS Boot Manager utility.
@SYS$MANAGER:BOOT_OPTIONS Start the LANCP utility and enter the LANCP command SHOW CONFIGURATION at the LANCP prompt, as in the following example. The resulting display lists four LAN devices, two of which are available (connected), as indicated by the Link column (Up means the device is available; Down means it is not). You can use a device that is in use by other protocols. Decide which available devices you want to use for network booting and record the devices name, MAC address, and IP address. (The MAC address should be labeled on the physical device.) Once the LAN device is verified as bootable by UEFI, you provide this information to the person responsible for maintaining the BOOTP server database (see Section 9.20).
$$$RUN SYS$SYSTEM:LANCPLANCP>SHOW CONFIGURATIONLAN Configuration: Parent or Device PrefCPU Medium/User Version Link Speed Duplex Auto BufSize MAC Address Type ... ------ ------- ----------- ------- ---- ----- ------ ---- ------- ---------------- ------------ ... EIA0 0 Ethernet X-21 Up 1000 Full Yes 1500 AA-00-04-00-A5-38 UTP i82546 ... 00-13-21-5B-85-E4 (default) ... EIB0 1 Ethernet X-21 Up 1000 Full Yes 1500 AA-00-04-00-A5-38 UTP i82546 ... 00-13-21-5B-85-E5 (default) ... EWA0 0 Ethernet X-59 Down - - Yes 1500 00-11-0A-43-23-D8 UTP AB465A ... EWB0 1 Ethernet X-59 Down - - Yes 1500 00-11-0A-43-23-D9 UTP AB465A ...
9.18.2. Adding the Network Boot Option to the UEFI Boot Manager
To add the LAN device (virtual DVD drive) as a network boot option, use the OpenVMS Boot Manager utility, as follows:
- At the DCL prompt, enter the following command to start the OpenVMS Boot Manager utility:
$@SYS$MANAGER:BOOT_OPTIONSNote
When booting OpenVMS Version 8.4 or later, you need to specify a special boot flag and the name of InfoServer service name. The BOOT_OPTIONS.COM procedure now accepts InfoServer service name in addition to the boot flags.
- The OpenVMS Boot Manager Boot Options main menu is displayed. To add a network boot option, enter 1 at the prompt:
OpenVMS Boot Manager Boot Options List Management Utility (1) ADD an entry to the Boot Options list (2) DISPLAY the Boot Options list (3) REMOVE an entry from the Boot Options list (4) MOVE the position of an entry in the Boot Options list (5) VALIDATE boot options and fix them as necessary (6) Modify Boot Options TIMEOUT setting (B) Set to operate on the Boot Device Options list (D) Set to operate on the Dump Device Options list (G) Set to operate on the Debug Device Options list (E) EXIT from the Boot Manager utility You can also enter Ctrl-Y at any time to abort this utilityEnter your choice:1Note
While using this utility, you can change a response made to an earlier prompt by entering the caret (^) character as many times as needed. To end and return to the DCL prompt, press Ctrl/Y.
- Enter the device name. In the following example, the device name is EIA0:.
Enter the device name (enter "? " for a list of devices):EIA0: - Enter the position you want your entry to take in the UEFI boot option list. Enter any position number other than 1. (The number 1 position sets the device for automatic rebooting, which is not desirable for upgrades.)
Enter the desired position number (1,2,3,,,) of the entry. To display the Boot Options list, enter "? " and press Return. Position [1]:4 - Enter boot flags. By default, no flags are set. Enter the OpenVMS flags (for example, 0,1), or accept the default (NONE) to set no flags as in the following example:
Enter the value for VMS_FLAGS in the form n,n. VMS_FLAGS [NONE]:If you are booting OpenVMS Version 8.4 onwards, VSI recommends the value of VMS_FLAGS be set to 0,200400.
Enter the service name from OpenVMS Version 8.4 onwards if you have entered 0,200400 as the boot flags. The service name is mandatory.
INFOSERVER_SERVICE:Note
The service name entered must be in uppercase.
- The utility asks whether the device will be used for cluster satellite booting. Answer NO as in the following example:
Will EIA0 be used for cluster satellite boot? (Yes/No):NO(For information about establishing a device for cluster satellite booting, see the VSI OpenVMS Cluster Systems manuals.)
- Enter a description to include with your boot option entry. By default, the device name and MAC address is used as the description. You can enter more descriptive information, as in the following example. As shown in the display of boot entries that follows, the device name and MAC address (without dashes) are included anyway in the boot entry line.
Enter a short description (do not include quotation marks). Description ["EIA0"]:I64 UPGRADE VIA NETefi$bcfg: eia0 (Boot0002) Option successfully addedUsing the utility to display the devices at this point (selecting 2 on the main menu), you see your device listed, as in the following example:Enter your choice: 2 To display all entries in the Boot Options list, press Return. To display specific entries, enter the entry number or device name. (Enter "? " for a list of devices): UEFI Boot Options list: Timeout = 10 secs. ---------------------------------------------------------------------------- 01. DKB0 PCI(0|20|1|1) Scsi(Pun0,Lun0) "Boot VMS from DKB0" OPT 02. DKB200 PCI(0|20|1|1) Scsi(Pun2,Lun0) "Boot VMS from DKB200" OPT 03. VenHw(d65a6b8c-71e5-4df0-d2f009a9) "UEFI Shell [Built-in]" 04. EIA0 PCI(0|0|2|0) Mac(0013215b85e4) "I64 Upgrade VIA NET" ---------------------------------------------------------------------------- 4 entries found.
- Exit the utility by entering E at the prompt:
Enter your choice:E
Note
The Boot Configuration Menu provided by UEFI or the UEFI tool VMS_BCFG are other alternatives for adding a boot entry. For more information on UEFI tools, see the System Management Utilities Reference Manual.
9.18.3. Verifying the Network I/O Device Is Bootable by UEFI
Finally, verify that the LAN device you selected for your systems InfoServer client is bootable by UEFI. Verification is recommended if the selected device is not one of the core I/O LAN devices installed on your server. To verify that the selected LAN device is bootable by UEFI, follow these steps:
Access the UEFI console for your server. If your operating system is running, you must shut down your system to access UEFI. (For details about accessing and using UEFI, see your hardware documentation.)
From the UEFI main menu, select the Boot Configuration option (or in some versions of UEFI, the Boot Option Maintenance Menu). Make a selection before the UEFI timeout expires; otherwise, the first entry of the UEFI Boot Manager is selected automatically. If you are brought to the UEFI Shell prompt, enter the
exitcommand at the prompt to move back to the UEFI main menu. If an auto-boot begins, you can perform a cold reset of the server to get back to the UEFI console. (For more information, see your hardware documentation.) Otherwise, you must wait for your system to boot and shut it down again.- At the UEFI Boot Configuration menu, select the Boot From a File option. In the Boot From a File list, look for the load file that corresponds to the LAN device you selected for network booting. This is the load file with a matching MAC address, as in the following example:
Load File [Acpi(HWP0002,0)/Pci(2|0)/Mac(0013215b85e4)]The MAC address of the EIA0 network device selected earlier was 00-13-21-5B-85-E4, which matches the MAC address shown (without dashes). This verifies that the selected device is visible to the UEFI console. If none of the Boot From a File options listed matches your selected device, then try another available device (as listed with the LANCP command SHOW CONFIGURATION in Section 9.18.1).
Provide the device name and its IP address and MAC address to the person responsible for setting up the BOOTP server.
9.19. Setting Up the InfoServer Server
At least one system in the LAN must be designated as the InfoServer SERVER. For OpenVMS Version 8.4 and later, if you select to boot via memory disk by specifying the appropriate boot flag and service name, make sure that the LAN server and the Boot server are the same system. This is the system that hosts the physical DVD drive from which network booting is performed. This system must be running OpenVMS Version 8.2-1 or later for HPE Integrity. The InfoServer software comes as part of the base operating system on these systems.
The following steps are necessary to set up the InfoServer software on the designated system:
Copy SYS$STARTUP:ESS$LAD_STARTUP.TEMPLATE to ESS$LAD_STARTUP.DAT (save the ESS$LAD_STARTUP.TEMPLATE file as a backup).
- Edit SYS$STARTUP:ESS$LAD_STARTUP.DAT to modify parameters as needed. This file configures InfoServer parameters affecting the OpenVMS LASTport/Disk (LAD) server, which allows access to the DVD drive. The following is an example of the configuration file (with default settings):
!++ ! ESS$LAD_STARTUP.TEMPLATE ! ! Copy this file to SYS$STARTUP:ESS$LAD_STARTUP.DAT and edit it ! to suit your local situation. ! ! This file is used by SYS$STARTUP:ESS$LAD_STARTUP.COM to set up ! the parameters for the InfoServer Application on OpenVMS ! LASTport/Disk (LAD) server. ! ! Note: ! The LAD disk block cache is structured as a number of fixed-size ! buckets. You must specify both the bucket size and the number of ! buckets for the cache. ! ! The LAD cache is allocated from non-paged pool and is in no way ! associated with the XFC cache. The total LAD cache size in bytes ! may be determined by the formula: ! ! cache-bytes = bucket-size-in-blocks * number-of-buckets * 512 ! ! Be sure the SYSGEN parameters NPAGDYN/NPAGEVIR are sized appropriately. ! ! The following keywords with values are accepted by this procedure: ! ! BUFFER_SIZE - A number between 3 and 8 denoting the ! bucket size in blocks as follows: ! 3 - 8 blocks ! 4 - 16 blocks ! 5 - 32 blocks ! 6 - 64 blocks ! 7 - 128 blocks ! 8 - 256 blocks ! CACHE_BUCKETS - Number of buckets ! MAXIMUM_SERVICES - Maximum number of services (max=1024) ! WRITE_LIMIT - Server wide count of asynchronous writes !-- BUFFER_SIZE = 3 ! default (8 block buckets) CACHE_BUCKETS = 512 ! Default setting WRITE_LIMIT = 0 ! No async writes MAXIMUM_SERVICES = 256 ! default (typically more than enough)
The following table provides a short description of each of the parameters:PARAMETER DESCRIPTION BUFFER_SIZE The InfoServer block cache is structured as an array of fixed-size buffers (also called buckets). The BUFFER_SIZE parameter determines the size of each buffer or bucket. The numeric value of this parameter is an integer in the range 3 through 8, representing the bucket size in 512-byte blocks as follows. Bucket sizes larger than 32 blocks might not be appropriate for most users. The OpenVMS client segments I/O requests larger than 31 blocks into 31-block chunks, which could result in excessive I/O activity to the disk. The cache is allocated from nonpaged pool and is dedicated solely to the LAD driver.
3 8 blocks (default)
4 16 blocks 5 32 blocks 6 64 blocks 7 128 blocks 8 256 blocks CACHE_BUCKETS
Determines the number of buckets in the cache. The default is 512. Numbers larger than 16384 might adversely affect performance. To reach a desirable cache size, consider increasing the BUFFER_SIZE parameter. MAXIMUM_SERVICES
Sets the maximum number of services that can be defined at one time for the server. The value of this parameter must be a power of 2. The default and minimum value is 256 (adequate for most circumstances); the maximum value is 1024. Each service descriptor consumes nonpaged pool; however, unused services consume 4 bytes each.
WRITE_LIMIT The number of asynchronous write operations that can be outstanding for the server at any time. The default is 0 (no outstanding asynchronous write operations).
Note
As indicated in the file comments, the LAD cache comes out of nonpaged pool. If you increase the cache significantly, you might need to increase the nonpaged pool SYSGEN parameters (NPAGEDYN and NPAGEVIR).
Determine which network device will be used for InfoServer LAD operations. You can use any network device that is visible to OpenVMS. Typically, any network device that works with DECnet or TCP/IP Services for OpenVMS should work. Use the LANCP command SHOW CONFIGURATION to determine which device to use, as described in Section 9.18.1.
For this release of OpenVMS, the LASTport protocol runs on only a single network device. To enable this device, copy the SYS$STARTUP:ESS$LAST_STARTUP.TEMPLATE file to the SYS$STARTUP:ESS$LAST_STARTUP.DAT file, and then open the SYS$STARTUP:ESS$LAST_STARTUP.DAT file and make the following changes:
Remove the comment character (!) from the line that has the following text: DEVICE = (). Within the parentheses, specify the device name. For example: DEVICE = (EIA).
Comment out the line that specifies ALL_CONTROLLERS = ON (comment out a line by inserting an exclamation point (!) at the beginning of the line).
The following example shows the SYS$STARTUP:ESS$LAST_STARTUP.DAT file with the suggested changes made (shown in bold):!++ !ThisfilewillbeusedtosettheappropriateLASTCPqualifiers.Thefollowing !LASTCPqualifiers:ALL_CONTROLLERS,CHECKSUM,TRANSMIT_QUOTA,orSLOW_MODE !canbesetbyusingthefollowingstatementformat: !LASTCPqualifier=1toenablee.g.SLOW_MODE=1enablesSLOW_MODE !LASTCPqualifier=0todisablee.g.SLOW_MODE=0disablesSLOW_MODE !TheremainingLASTCPqualifierswillrequiretheappropriatevaluesettings.DEVICE = (EIA) ! Uncommented; device name specified!TIMEOUT=nminimumintervalinseconds !CIRCUIT_MAXIMUM=nmaximumnumberofnodes !GROUP=nGroupnumber !NODE_NAME=nameNodename !CONTROLLERS=([{controllerletter,}...])Controllerlist !TRANSMIT_QUOTA=nNumberoftransmitbuffers !--!ALL_CONTROLLERS=ON! Commented out- Add the following line to the system startup file SYS$MANAGER:SYSTARTUP_VMS.COM:
@SYS$STARTUP:ESS$LAD_STARTUP.COM
If you changed any SYSGEN parameters, run AUTOGEN and reboot (for information about running AUTOGEN, see Section 8.4). If no SYSGEN parameters were changed, you can skip the reboot and execute the SYS$STARTUP:ESS$LAD_STARTUP.COM file manually.
After you complete these steps, the InfoServer server software is running and available to serve boot requests. The network devices are LAD0 (the LAD Server Virtual Device) and LAST0 (the LAST Transport Layer Virtual Device).
- The InfoServer server can run on the same system as the InfoServer client. You might want to start the InfoServer client on this system, allowing the system to mount InfoServer devices. To start the InfoServer on this system, enter the following command at the DCL prompt:
@SYS$STARTUP:ESS$STARTUP DISKTo have the InfoServer client start at system boot, include the command in SYS$MANAGER:SYSTARTUP_VMS.COM.
Now that you have set up and enabled the InfoServer server, you must use the InfoServer control program to create a service for the DVD drive. Follow these steps:
Mount the OpenVMS distribution media system-wide. In the following example, DQA0 is the DVD drive name (typically, DQA0 or DNA0 is the drive name) and I640842 is the OpenVMS volume label:
$MOUNT/SYSTEM DQA0 I640842Enter the following command at the DCL prompt to define the InfoServer control program as a foreign command, or enter the line in a startup or login command file:
$INFOSERVER :== $ESS$INFOSERVERAlternatively, you can enter the following command to start the program:$RUN SYS$SYSTEM:ESS$INFOSERVERStart the InfoServer control program and create the service, as in the following example (the colon after the device name DQA0 is required):
$INFOSERVERINFOSERVER>CREATE SERVICE I640842 DQA0:INFOSERVER>EXITThe created service should now be available for any InfoServer clients in the same LAN (these clients broadcast service solicitations over the LAN).
Started as in this example, the InfoServer control program accepts multiple commands until you exit by entering the EXIT command (or pressing Ctrl/Z). You can also enter a single command at the DCL prompt, returning you immediately to the DCL prompt again:
$INFOSERVER CREATE SERVICE I640842 DQA0:$The InfoServer control program commands are similar, though not identical, to those supported by the hardware InfoServer used traditionally by OpenVMS Alpha systems. For more information, see the InfoServer help (at the
InfoServerprompt, enterHELP) or the VSI OpenVMS System Management Utilities Reference Manual.
9.20. Setting Up the BOOTP Boot Server and TFTP Server
The BOOTP boot server for the OpenVMS InfoServer utility can be on the same system or on any system in the same LAN as the InfoServer application for OpenVMS Version 8.3-1H1 and lower. For OpenVMS Version 8.4 onwards, when booting via memory disk, make sure that the BOOTP server and LAN server is the same system. TFTP is required on the boot server for supplying the boot files to the client systems.
Note
All instructions and examples assume the use of TCP/IP Services for OpenVMS. Other IP products might work but have not been tested and are not supported at this time.
Important
You do not have to perform steps 2 and 3 when booting an HPE Integrity server running OpenVMS Version 8.4 or later if boot flags are set to 0,200400.
- Make sure TCP/IP Services for OpenVMS is installed and that:
At least one IP interface is defined.
The BOOTP server and TFTP server are configured and started.
Optionally, make sure TELNET and FTP are configured and started.
To display IP interface information, use the TCPIP SHOW INTERFACE command.
To verify that the BOOTP and TFTP servers are configured and started, use the TCP/IP Services for OpenVMS SYS$MANAGER:TCPIP$CONFIG.COM configuration procedure. From the Main Configuration menu, select option 3 (Server components). If a BOOTP or TFTP service is not enabled and started, select the appropriate server option, and then enable and start the service accordingly. For more information about configuring and starting TCP/IP Services for OpenVMS components, see the TCP/IP Services for OpenVMS Installation and Configuration and TCP/IP Services for OpenVMS Management manuals.
Note
If you are currently using the DHCP service, you must disable it. The BOOTP service must be enabled instead. For information about disabling or enabling services, see the TCP/IP Services for OpenVMS Management manual.
- Set up a location for boot files by creating the directory accessible by TFTP, as in the following example. (VSI recommends that you create a separate boot file directory for each version of the operating system.)
$CREATE/DIRECTORY TCPIP$TFTP_ROOT:[V842]Important
For each subsequent upgrade of OpenVMS, you must create a separate directory for the boot files specific to the OpenVMS version and, where appropriate, modify the path specified for each clients boot files (as in step 6). To make subsequent upgrades easier, you can use system-wide or cluster-wide logical names.
- Copy the following two files from the DVD to the TCPIP$TFTP_ROOT:[V842] directory:
[SYS0.SYSCOMMON.SYSEXE]VMS_LOADER.EFI[SYS0.SYSCOMMON.SYSEXE]IPB.EXE
- Gather data for each boot client (that is, each node that is going to boot the DVD over the network), including the following information for the clients network device (the client servers' core I/O card):
IP address
MAC address
- Define each boot clients host name in the TCP/IP Services for OpenVMS local host database using the TCPIP SET HOST command. In the following example,
hostnameis the host name of the boot client andipaddressis its IP address.$TCPIP SET HOSThostname/ADDRESS=ipaddressThe IP address does not have to be the actual address you plan to use for the boot client host; it must be in the same LAN as the BOOTP server and must not be currently in use. However, if you use statically assigned IP addresses, VSI recommends (for simplicity) using the assigned address of the boot clients network device. To display and verify the assigned IP address, use the TCPIP SHOW HOST command.
- For each boot client, add an entry in the BOOTP database to associate the MAC address of the clients LAN device with the boot file to be loaded from the boot server, as in the following example. In this example, hostname is the host name of the boot client, and MACaddress is the clients MAC address in the format xx-xx-xx-xx-xx. The boot file specification need not include “TCPIP$TFTP_ROOT:”, if steps 2 and 3 were performed and VMS_LOADER.EFI and IPB.EXE are copied to the newly created directory. Otherwise, the boot file specification is the complete path for VMS_LOADER.EFI and in the below example, it is in the DVD identified by device DQA0:.
$TCPIP SET BOOTP(For Version 8.3-1H1 and lower)hostname/HARDWARE=ADDRESS=MACaddress-_$/FILE=[V842]VMS_LOADER.EFI$TCPIP SET BOOTP(For Version 8.4 and higher)hostname/HARDWARE=ADDRESS=MACaddress-_$/FILE=DQA0:[SYS0.SYSCOMMON.SYSEXE]VMS_LOADER.EFIYou might need to specify a gateway (/GATEWAYS) and network mask (/NETWORK_MASK). To determine the names of the gateways and the subnet information, consult your network administrator. For more information about this command, see the TCP/IP Services for OpenVMS documentation. To display and verify your BOOTP server configuration, use the TCPIP SHOW BOOTP/FULL command.
Important
For each new version of OpenVMS, you must modify the client entry in the BOOTP database to point to the new, version-specific boot file.
The following example shows the commands for setting up a boot server for a client named MOZART. An explanation of each command follows the example.
$CREATE/DIRECTORY TCPIP$TFTP_ROOT:[V831H1]
$COPY DQA0:[SYS0.SYSCOMMON.SYSEXE]VMS_LOADER.EFI TCPIP$TFTP_ROOT:[V831H1]VMS_LOADER.EFI
$COPY DQA0:[SYS0.SYSCOMMON.SYSEXE]IPB.EXE TCPIP$TFTP_ROOT:[V831H1]IPB.EXE
$TCPIP SET HOST MOZART/ADDRESS=1.1.110.117
$TCPIP SET BOOTP MOZART/HARDWARE=ADDRESS=00-13-21-5B-85-E4 -_TCPIP>/FILE=[V831H1]VMS_LOADER.EFI
$TCPIP SHOW HOST MOZART
BIND Database Server: 1.1.128.41 Host address Host name 16.32.110.117 MOZART...$TCPIP SHOW BOOTP MOZART/FULL
Host: 1.1.110.117 mozart Hardware Address: 00-13-21-5B-85-E4 Network mask: 255.0.0.0 Type: Ethernet File: [V831H1]VMS_LOADER.EFI Time offset: 0 Vendor: ACME, Inc. Gateways: not defined Servers: . . .
| Creates the directory TCPIP$TFTP_ROOT:[V831H1] on the system to be the TFTP and BOOTP server. |
| Copies [SYS0.SYSCOMMON.SYSEXE]VMS_LOADER.EFI from the DVD to TCPIP$TFTP_ROOT:[V831H1]. |
| Copies [SYS0.SYSCOMMON.SYSEXE]IPB.EXE from the DVD to TCPIP$TFTP_ROOT:[V831H1]. |
| Adds the boot client host MOZART to the TCP/IP hosts database, specifying MOZARTs IP address as 1.1.110.117. |
| Adds host MOZART as a client entry in the BOOTP database, where the MAC address of the clients LAN device is 00-13-21-5B-85-E4 (as was determined in the example for the client in Section 9.18.1) and the boot file for the client is [V831H1]VMS_LOADER.EFI. |
| Displays information about the boot client MOZART as stored in the local host database (use this command to verify that the client has been configured appropriately). |
| Displays information about the boot client MOZART as stored in the BOOTP database (use this command to verify that the client has been configured appropriately). |
$TCPIP SET HOST MOZART/ADDRESS=1.1.110.117$TCPIP SET BOOTP MOZART/HARDWARE=ADDRESS=00-13-21-5B-85-E4 -$_TCPIP> /FILE=DQA0:[SYS0.SYSCOMMON.SYSEXE ]VMS_LOADER.EFI$$ TCPIP SHOW HOST MOZARTBIND Database Server: 1.1.128.41 Host address Host name 16.32.110.117 MOZART...$TCPIP SHOW BOOTP MOZART/FULLHost: 1.1.110.117 mozart Hardware Address: 00-13-21-5B-85-E4 Network mask: 255.0.0.0 Type: Ethernet File: [DQA0: [SYS0.SYSCOMMON.SYSEXE ]VMS_LOADER.EFI Time offset: 0 Vendor: ACME, Inc. Gateways: not defined Servers: . . .
| Adds the boot client host MOZART to the TCP/IP hosts database, specifying MOZARTs IP address as 1.1.110.117. |
| Adds host MOZART as a client entry in the BOOTP database, where the MAC address of the clients LAN device is 00-13-21-5B-85-E4 (as was determined in the example for the client in Section B.2.1 (page 191)) and the boot file for the client is DQA0:[SYS0.SYSCOMMON.SYSEXE ]VMS_LOADER.EFI. |
| Displays information about the boot client MOZART as stored in the local host database (use this command to verify that the client has been configured appropriately). |
| Displays information about the boot client MOZART as stored in the BOOTP database (use this command to verify that the client has been configured appropriately). |
After you complete these steps, in addition to the required steps in the preceding sections, you can boot a client over the network using the InfoServer application. Instructions on performing the InfoServer boot are in Section 9.21. A troubleshooting section is included in Section 9.22.
9.21. Booting OpenVMS from the InfoServer
After you set up the InfoServer software and the boot server properly and ensure that the InfoServer service is available, you can boot the remote DVD served by the InfoServer by following these steps:
Note
You can copy the DVD to an LD device and boot from the LD device. This process is faster than using a DVD.
- Make sure the DVD is mounted system-wide on the OpenVMS system serving as the InfoServer, and make sure an InfoServer service for the DVD drive is available on the network and accessible from your client system (the system to be booted from the InfoServer). The service should point to the server DVD drive on which the OpenVMS DVD is mounted. To ensure that the InfoServer service is available on the network, use the following command:
$MC ESS$LADCP SHOW SERVICESThe following is a sample display:
Interrogating network for Disk services, please wait... . . . Disk services offered by node MOOSIC (LAD V3.1, Address: AA-00-04-00-AB-4E) Current Writes Service: Device: Rating: Connects: Allowed? : I640842 OpenVMS 65535 0 No . . .In this example, the service I640842 is the virtual disk unit that corresponds to the DVD drive on the InfoServer server named MOOSIC. This is the drive from which the OpenVMS distribution media is booted. The display shows that this service is available and that a service binding to the InfoServer DVD drive is established.
- Access UEFI on your server. If you added a boot option for network (InfoServer) booting to the UEFI Boot Manager options list, as described in Section 9.18.2; then select the appropriate boot option from the list. To move to the option, use the up or down arrow key. (Depending on how your terminal emulator is set up, you might have to use the letter v to scroll down or the caret (^) to scroll up.) Press Enter to toggle the selection. After selecting the boot option, skip to step 3.
Note
If you do not select an option within the default 10-second limit, the first option in the list is selected automatically.
If you did not add a boot option for InfoServer booting to the UEFI Boot Manager options list, then initiate the boot by either following the steps in the section called “Booting with the UEFI Boot Manager” or, on some of the more recent HPE Integrity servers, using the simpler method described in the section called “Booting with UEFI
lanboot selectcommand”.Booting with the UEFI Boot Manager
From the UEFI Boot Manager screen, select the Boot Configuration option (or in some versions of UEFI, the Boot Option Maintenance Menu).
From the UEFI Boot Configuration menu, select the Boot From a File option.
The Boot From a File menu lists the bootable devices (in UEFI terminology, load files), including their MAC addresses. The composition of the list depends on how your server is set up. Select the appropriate device (search for the correct MAC address). For example, the following load file listed in the Boot From a File menu corresponds to the LAN device with MAC address 00-13-21-5B-85-E4:
Load File [Acpi(HWP0002,0)/Pci(2|0)/Mac(0013215b85e4)]Each device is identified by the unique MAC address assigned to the device by the hardware vendor. Normally, the MAC address is labeled on the physical device. See your hardware documentation for more information.
To further help you identify the LAN devices, you can use the UEFI
pcicommand, which displays all PCI devices. Alternatively, you can try each of the LAN devices one at a time until you find the right one. Finally, you can make sure all LAN devices are connected to the appropriate network and are bootable using the InfoServer, in which case it does not matter which one you select. Note also that once you have OpenVMS running, you can display the devices and their corresponding MAC addresses by using the LANCP command SHOW CONFIG at the DCL prompt. The command lists the OpenVMS device names along with the MAC address and other characteristics. Likewise, with OpenVMS running, the UEFI Utilities for OpenVMSvms_showcommand might provide additional information about any devices on the local system.
Booting with UEFI
lanboot selectcommandFor OpenVMS Version 8.3-1H1 and lower:
From the UEFI Boot Manager screen, select the UEFI Shell [Built-in] option.
At the Shell prompt, enter the
lanboot selectcommand.When prompted, enter the number for the LAN device that has the MAC address.
For OpenVMS Version 8.4 and later:
From the UEFI Boot Manager screen, select the UEFI Shell [Built-in] option.
- At the Shell prompt, enter the following commands to setup appropriate boot flags and service name:
(where I640842 is the InfoServer service name to be used for booting/installation. The service name entered must be in uppercase.)Shell> SET VMS_FLAGS 0,200400Shell> SET INFOSERVER_SERVICE I640842 Now enter
lanboot selectat the shell prompt. When prompted, enter the number for the LAN devices that have the MAC address specified when you configured BOOTP in Section 9.20.
An alternate to this is to setup a Directed Boot profile by specifying the flags and InfoServer service name as part of optional data in the following manner (enter this on a single line).
dbprofile -dn <profile name> -sip <server IP address> -cip <Client IP address> -m <subnet mask> -gip <gateway IP> -b <full path to VMS_LOADER.EFI in the boot server> -od -fl 0,200400 -service I640842For more information on the DBPROFILE command, see the UEFI online help. Now execute the
lanboot selectcommand as follows:lanboot select -dn <profile name> When you select the appropriate entry, you see several lines of messages and then the InfoServer boot menu (the same boot menu you would see on an Alpha system), as in the following examples. The DHCP (Dynamic Host Communication Protocol) message indicates the loading of the loader image (VMS_LOADER.EFI) that uses the UEFI console to load and start the OpenVMS bootstrap (IPB.EXE). The Trivial File Transfer Protocol (TFTP) loads the bootstrap. In the first example, HPE Integrity Server Upgrade VIA NET is the boot option for the InfoServer service. It was selected from the UEFI Boot Manager options list (not shown). In the second example, you notice the loading of memory disk message prior to IPB load. Since the service name is pre-decided by setting the environment variable or have specified it through BOOT_OPTIONS.COM, the InfoServer service menu is not displayed in the second example.
Example 9.3. DHCP Messages Loading.: Network Boot, 10/100 Running LoadFile() CLIENT MAC ADDR: 00 13 21 5H 85 E4 DHCP./ CLIENT IP: 1.1.24.219 MASK: 255.0.0.0 DHCP IP: 0.240.0.0 Running LoadFile() Starting: I64 Upgrade VIA NET %EIA-I-BOOTDRIVER, Starting auto-negotiation %EIA-I-BOOTDRIVER, Auto-negotiation selected 100BaseTX FDX Network Initial System Load Function Version 1.2 FUNCTION FUNCTION ID 1 - Display Menu 2 - Help 3 - Choose Service 4 - Select Options 5 - Stop Enter a function ID value:Respond to the prompts by pressing Enter after each entry; use the default service name indicated or one suggested by the system manager:
Enter 3 for the function ID.
Enter 2 for the option ID.
Enter the service name (I640842 is the default service name for the VSI OpenVMS OE DVD; check with your system or network manager for the service name to specify).
A sample display follows:
Enter a function ID value:3OPTION OPTION ID 1 - Find Services 2 - Enter known Service Name Enter an Option ID value:2Enter a Known Service Name:I640842
After you boot, the system displays the OpenVMS Installation Menu. To install your OpenVMS operating system, follow the instructions in Section 6.2. To upgrade your system, follow the instructions in Section 7.1.
Loading.: Network Boot Mac(00-15-60-04-f4-1e) Client MAC Address: 00 15 60 04 F4 1E .- Client IP Address: 1.1.238.63 Subnet Mask: 255.255.240.0 BOOTP Server IP Address: 1.1.238.239 DHCP Server IP Address: 0.240.0.0 Boot file name: LDA3:[VMS$COMMON.SYSEXE]VMS_LOADER.EFI Retrieving File Size.| Retrieving File (TFTP).Loading memory disk from IP 1.1.238.239 .............. .................................................................. Loading file: LDA3:[VMS$COMMON.SYSEXE]IPB.EXE from IP 1.1.238.239 %IPB-I-SUCCESS, VSI OpenVMS IPB version 8.4-2 successfully loaded. VSI OpenVMS Industry Standard 64 Operating System, Version 8.4-2 Copyright 2015 VMS Software, Inc. %SMP-I-CPUTRN, CPU #1 has joined the active set. %SMP-I-CPUTRN, CPU #2 has joined the active set. %SMP-I-CPUTRN, CPU #3 has joined the active set. %SMP-I-CPUTRN, CPU #4 has joined the active set. %EIA0, Link up: 100 mbit, full duplex, flow control (receive only) Installing required known files... Configuring devices... %PKA0, Copyright (c) 1998 LSI Logic PKW V3.2.20 ROM 4.19 %PKA0, SCSI Chip is SYM53C1010/66, Operating mode is LVD Ultra3 SCSI %PKB0, Copyright (c) 1998 LSI Logic PKW V3.2.20 ROM 4.19 %PKB0, SCSI Chip is SYM53C1010/66, Operating mode is LVD Ultra3 SCSI %EIB0, Link up: 100 mbit, full duplex, flow control (receive only) **************************************************************** You can install or upgrade the OpenVMS I64 operating system or you can install or upgrade layered products that are included on the OpenVMS I64 distribution media (CD/DVD). You can also execute DCL commands and procedures to perform "standalone" tasks, such as backing up the system disk. Please choose one of the following: 1) Upgrade, install or reconfigure OpenVMS I64 Version 8.4-2 2) Display layered products that this procedure can install 3) Install or upgrade layered products 4) Show installed products 5) Reconfigure installed products 6) Remove installed products 7) Find, Install or Undo patches; Show or Delete Recovery Data 8) Execute DCL commands and procedures 9) Shut down this system Enter CHOICE or ? for help: (1/2/3/4/5/6/7/8/9/? )
Note
If you boot the VSI OpenVMS OE DVD from an InfoServer but lose your connection during the installation or upgrade procedure (the system is unresponsive and pressing Ctrl/Y does not return you to the menu), do the following:
| IF... | THEN... |
|---|---|
|
You previously chose the INITIALIZE option |
|
|
You previously chose the PRESERVE option |
|
9.22. Troubleshooting InfoServer Boot Problems
For problems using the OpenVMS InfoServer software for network booting, consider the following:
When you attempt to boot over the network, check your console display for the following:
The IP address of the boot server that sends your UEFI console the OpenVMS loader file (VMS_LOADER.EFI). If this IP address is not as expected, your client host might be in the database of the wrong boot server. Enter your client host IP address in the database of the correct boot server (see step 5 of Section 9.20), and remove your client from the database of any other boot servers.
The version number of the IPB.EXE bootstrap file that is loaded (for this release, the version should be 8.4-2). If this version number is not the correct version of OpenVMS, a message indicates there is a mismatch. The boot server might be the source of the problem. Make sure that it is configured correctly. Make sure the client entry in the boot servers database has been updated to point to the current version of the loader file (see step 3 and step 6 of Section 9.20).
Evidence that DHCP is not responding. If you do not see a message indicating auto-negotiation has been started, make sure the closest network device or switch is set for auto-negotiation.
If the network boot succeeds but your attempt to choose a service or to display services at the InfoServer menu fails, a device might be filtering the LASTport/Disk (LAD) protocol. This protocol does not provide routing functions and only works within a LAN. If filtering devices are used in an extended LAN, the devices must allow this protocol (protocol type is 80-41) to pass through unfiltered so that clients can access the InfoServer across the filtering device.
For LANCP and LANACP problems, see the VSI OpenVMS System Manager's Manual, Volume 2: Tuning, Monitoring, and Complex Systems for more information.
9.23. Setting Up and Booting Fibre Channel Storage Devices
This section describes how to set up and boot from a Fibre Channel (FC) Storage Area Network (SAN) storage device. You may prefer booting from an FC storage device because of its speed and because it can serve as a common cluster system disk in a SAN. FC storage is supported on all storage arrays that are supported on OpenVMS systems. For a list of supported devices, see the VSI OpenVMS Version 8.4-2 Software Product Description.
This section describes how to check the firmware version of the flash memory of the FC storage device and how to configure the boot device paths for the storage device.
First, verify that your UEFI firmware is set to scan the SAN for devices. Refer to the appropriate documentation and command help for your system.
The HBA requires the latest RISC firmware and UEFI firmware and driver.
Fibre Channel device booting supports point-to-point topology. There is no plan to support FC arbitrated loop topology.
9.23.1. Checking the Firmware Version
Important
If you have an entry-class HPE Integrity server, you can update the firmware yourself. If you have a cell-based HPE Integrity server, you must contact HPE Customer Support to update the firmware for you. Please refer to the appropriate documentation for update procedures specific to your device.
To flash the memory of the FC HBA on an entry-class server, update the UEFI driver and RISC firmware to the latest versions available. In addition, to enable the HBA factory default settings, update the NVRAM resident in the FLASH ROM on the HBA, if necessary.
If you have a valid HPE Service Contract covering your system hardware, you can
determine the most current supported versions of firmware and drivers by referring to
the README text file provided on the latest HPE IPF Offline Diagnostics and Utilities
CD. For example, for a 2 GB FC device, locate this file by navigating to the
\efi\hp\tools\io_cards\fc2 directory. To update the driver and
firmware, you can use a script on the CD that updates the driver and firmware
automatically. Use the following command in the directory previously mentioned:
fcd_update2.nsh
For a 4 GB FC device, navigate to the fc4 directory
(\efi\hp\tools\io_cards\fc4) to locate the README text file. To
update the driver and firmware, use the following command (located in the
fc4 directory:
fcd_update4.nsh
You can also use the efiutil.efi utility located in either
directory (not available on all systems).
Similar procedures will exist for newer versions. For instructions on obtaining the Offline Diagnostics and Utilities CD, see Section 9.23.2. For additional information about updating the bootable firmware of the FC device, see the Guidelines for OpenVMS Cluster Configurations.
You can determine the versions of the driver and RISC firmware currently in place on
your server in two ways: from the console during system initialization or by using the
efiutil utility (not available on all systems).
- The driver and RISC firmware versions are shown in the booting console message that is displayed during system initialization, as in the following example. The RISC firmware version is indicated in the format
n.nn.nnn.HP 2 Port 2Gb Fibre Channel Adapter (driver n.nn, firmware n.nn.nnn) The driver and RISC firmware versions are also shown in the display of the efiutil
infocommand:fs0:\efi\hp\tools\io_cards\fc2\efiutil>infoFibre Channel Card Efi Utility n.nn (11/1/2004) 2 Fibre Channel Adapters found: Adapter Path WWN Driver (Firmware) A0 Acpi(000222F0,200)/Pci(1|0) 50060B00001CF2DC n.nn (n.nn.nnn) A1 Acpi(000222F0,200)/Pci(1|1) 50060B00001CF2DE n.nn (n.nn.nnn)
9.23.2. Obtaining the IPF Offline Diagnostics and Utilities
Order the CD free of charge from the HPE Software Depot site main page at:
http://www.hpe.com/go/softwaredepot
Type
ipf offlinein the Search bar and select the latest version listed (dates are indicated in the listed product names).Burn your own CD locally after downloading a master ISO image of the IPF Offline Diagnostics and Utilities CD from the following website:
http://www.hpe.com/support/itaniumservers
Select your server product from the list provided.
From the HPE Support page, select “Download drivers and software”.
From the “Download drivers and software page”, select “Cross operating system (BIOS, Firmware, Diagnostics, etc)”.
Download the Offline Diagnostics and Utilities software. Previous versions of the software might be listed along with the current (latest) version. Be sure to select the latest version.
Alternatively, you can select the appropriate Offline Diagnostics and Utilities link under the Description heading on this web page. Then you can access the installation instructions and release notes as well as download the software. The README text file on the CD also includes information about how to install the software and update the firmware.
Burn the full ISO image onto a blank CD, using a CD burner and suitable CD burning software. To complete the recording process, see the operating instructions provided by your CD burner software. The downloaded CD data is a single ISO image file. This image file must be burned directly to a CD exactly as is. This creates a dual-partition, bootable CD.
9.23.3. Configuring and Booting FC Boot Device
The process of setting up an FC boot device has been automated by the OpenVMS installation and upgrade procedures.
Note
On certain entry-level servers, if no FC boot device is listed in the UEFI boot menu, you might experience a delay in UEFI initialization because the entire SAN is scanned. Depending on the size of the SAN, this delay might range from several seconds to several minutes. Cell-based systems (such as rx7620, rx8620) are not affected by this delay.
When booting OpenVMS from the installation DVD for the first time on any OpenVMS system, you might also experience a similar delay in UEFI initialization.
If you did not allow the OpenVMS installation or upgrade procedure to automatically set up your FC boot device, or if you want to modify the boot option that was set up for that device, use the OpenVMS Boot Manager utility, by following these steps:
If your operating system is not running, access the OpenVMS DCL triple dollar sign prompt ($$$) from the OpenVMS operating system main menu by choosing option 8 (Execute DCL commands and procedures). Otherwise, skip to the next step.
- At the DCL prompt, enter the following command to start the OpenVMS Boot Manager utility:
$$$@SYS$MANAGER:BOOT_OPTIONS - When the utility is launched, the main menu is displayed. To add your FC system disk as a boot option, enter 1 at the prompt, as in the following example:
OpenVMS Boot Manager Boot Options List Management Utility (1) ADD an entry to the Boot Options list (2) DISPLAY the Boot Options list (3) REMOVE an entry from the Boot Options list (4) MOVE the position of an entry in the Boot Options list (5) VALIDATE boot options and fix them as necessary (6) Modify Boot Options TIMEOUT setting (B) Set to operate on the Boot Device Options list (D) Set to operate on the Dump Device Options list (G) Set to operate on the Debug Device Options list (E) EXIT from the Boot Manager utility You can also enter Ctrl-Y at any time to abort this utilityEnter your choice:1Note
While using this utility, you can change a response made to an earlier prompt by entering the caret (^) character as many times as needed. To end and return to the DCL prompt, press Ctrl/Y.
- The utility prompts you for the device name. Enter the FC system disk device you are using for this installation. In the following example, the device is a multipath FC device named $1$DGA1:. This ensures that the system will be able to boot even if a path has failed.
Enter the device name (enter "? " for a list of devices):$1$DGA1: - The utility prompts you for the position you want your entry to take in the UEFI boot option list. Enter 1 to enable automatic reboot, as in the following example:
Enter the desired position number (1,2,3,,,) of the entry. To display the Boot Options list, enter "? " and press Return. Position [1]:1 - The utility prompts you for OpenVMS boot flags. By default, no flags are set. Enter the OpenVMS flags (for example, 0,1), or accept the default (NONE) to set no flags, as in the following example:
Enter the value for VMS_FLAGS in the form n,n. VMS_FLAGS [NONE]: - The utility prompts you for a description to include with your boot option entry. By default, the device name is used as the description. You can enter more descriptive information. In the following example, the default is taken:
Enter a short description (do not include quotation marks). Description ["$1$DGA1"]:efi$bcfg: $1$dga1 (Boot0001) Option successfully added efi$bcfg: $1$dga1 (Boot0002) Option successfully added efi$bcfg: $1$dga1 (Boot0003) Option successfully added efi$bcfg: $1$dga1 (Boot0004) Option successfully addedThis display example shows four different FC boot paths were configured for your FC system disk.
- After you successfully add your boot option, exit the utility by entering E at the prompt.
Enter your choice:E Log out from the DCL level and shut down the system.
When you next see the boot option list displayed at your console by UEFI, it should look similar to the following (assuming you took the default in step 7). In this example, the device is $1$DGA1 for two dual-ported SAN storage arrays (the four separate boot paths are identified in the display). The following figure illustrates the host FC ports (FGA0 and FGB0) on the server and the corresponding FC SAN storage controller configuration.
Please select a boot option $1$dga1 FGA0.5000-1FE1-0011-B15C $1$dga1 FGA0.5000-1FE1-0011-B158 $1$dga1 FGB0.5000-1FE1-0011-B15D $1$dga1 FGB0.5000-1FE1-0011-B159 UEFI Shell [Built-in]The text to the right of $1$dga1 identifies the boot path from the host adapter to the storage controller, where:FGA0 or FGB0 are the FC ports (also known as host adapters).
Each 5000-1FE1-0011-B15
nnumber (wherenis C, 8, D, or 9, respectively) is the factory-assigned FC storage port 64-bit worldwide identifier (WWID), otherwise known as the FC port name.
If you get confused, simply boot the OpenVMS OE distribution DVD and use the OpenVMS Boot Manager utility to remove the current boot options (Option 3) and then to add your boot options again.
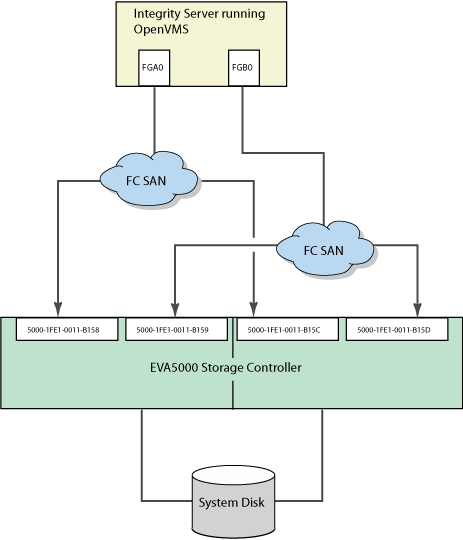
For more information about this utility, see the VSI OpenVMS System Manager's Manual, Volume 1: Essentials.
Boot the FC system disk by selecting the appropriate boot option from the UEFI Boot Manager menu and pressing Enter. If your FC boot path is the first option in the menu, it might boot automatically after the countdown timer expires.
9.23.4. Configuring Additional Nodes to Boot into a Cluster Using a Shared Disk
If you have booted the VSI OpenVMS OE DVD and installed the operating system onto an FC (SAN) disk and configured the system to operate in an OpenVMS Cluster environment, you can configure additional HPE Integrity systems to boot into the OpenVMS Cluster by following these steps:
Run the cluster configuration utility on the initial cluster system to add the new node to the cluster.
$@SYS$MANAGER:CLUSTER_CONFIG_LANBoot the VSI OpenVMS OE DVD on the target node (the new node).
Select Option 8 from the operating system menu to access OpenVMS DCL.
Start the OpenVMS Boot Manager utility by entering the following command at the DCL prompt:
Note
The OpenVMS Boot Manager utility requires the shared FC disk be mounted. If the shared FC disk is not mounted cluster-wide, the utility tries to mount the disk with a /NOWRITE option. If the shared FC disk is already mounted cluster-wide, user intervention is required.
$$$@SYS$MANAGER:BOOT_OPTIONSUse the utility to add a new entry for the shared cluster system disk. Follow the instructions provided in Section 9.23.3.
Boot the new system into the cluster.
Appendix A. Backing Up and Restoring the System Disk
This appendix describes how to perform backup and restore operations on the system disk. You perform these tasks by entering commands from a specialized backup environment. You access this environment through the menu that is displayed when you boot the VSI OpenVMS OE DVD, or through an alternative method that does not require the DVD.
This specialized backup environment is required because it allows you to create an exact copy of the system disk. You cannot create an exact copy in a standard operating system environment because the OpenVMS Backup utility saves only what is on the disk at the moment the BACKUP command is executing, excluding portions of open files contained in memory or data about files not yet written back to the disk (cache).
For more information about backup operations, including procedures for backing up and restoring files and directories, see the VSI OpenVMS System Manager's Manual, Volume 1: Essentials.
A.1. Reasons for Backing Up the System Disk
The primary reason for having a backup copy of the system disk is so you can fully restore your system in case any hardware or software problem affects the integrity of your original system disk or your ability to access it. For example, use the backup copy to restore your system under the following conditions:
When a problem occurs during an OpenVMS upgrade or update, or during the installation of other software products. If you back up the system disk before you attempt any of those procedures, you can restore the system disk and attempt the procedure again.
When a system file that is accidentally deleted renders the system disk nonoperational. If you back up the system disk after you installed or upgraded the OpenVMS operating system and any other software products, you can restore the system disk.
When the drive that holds the system disk malfunctions. If you have a backup copy of the system disk, you can restore it to a functioning disk and continue to use the system.
Another reason for backing up the system disk is to eliminate disk fragmentation, which occurs when files are stored non-contiguously on the disk. The BACKUP/IMAGE command creates a copy on which files are stored contiguously.
A.2. Suggested Procedures
VSI recommends the following:
The preferred method for performing system disk backup and restore operations is to boot the operating system media, choose the DCL option from menu, and then enter the appropriate backup commands. The detailed procedures are described in Section A.4 and Section A.5.
However, if you do not have access to the CD or if you want to back up a shadowed system disk without disabling the shadow set, you can use a different procedure, which is described in Section A.6.
If you have an OpenVMS Cluster environment with more than one system disk, be sure the volume labels on each system disk and on backup copies of system disks are unique. Use the SET VOLUME/LABEL command to change a volume label, if necessary.
A.3. OpenVMS Cluster Caution
If any nodes except the node used to run BACKUP are booted during the backup operations described in this appendix, your cluster will become partitioned, where nodes in the existing cluster divide into two or more independent clusters. This condition can cause data file corruption.
In addition, these backup environments do not restrict your use of DCL commands to the BACKUP command only, which further increases your risk of accidentally destroying or corrupting data on a disk. Therefore, to avoid jeopardizing the integrity of your data in any way, you should shut down the entire OpenVMS Cluster system before you back up your system disk.
A.4. Backing Up the System Disk
The following sections describe how to back up the system disk.
A.4.1. Getting Started
Before you back up the system disk, do the following:
In an OpenVMS Cluster environment, dismount the system disk from all systems in the cluster that have the disk mounted as a data disk (rather than as the system disk).
Shut down all systems booted from that disk.
Boot the operating system media. (For booting the VSI OpenVMS OE DVD, see Section 2.2.
Choose the DCL option (8) on the menu. For example:
**************************************************************** You can install or upgrade the OpenVMS I64 operating system or you can install or upgrade layered products that are included on the OpenVMS I64 distribution media (CD/DVD). You can also execute DCL commands and procedures to perform "standalone" tasks, such as backing up the system disk. Please choose one of the following: 1) Upgrade, install or reconfigure OpenVMS I64 Version 8.4-2 2) Display layered products that this procedure can install 3) Install or upgrade layered products 4) Show installed products 5) Reconfigure installed products 6) Remove installed products 7) Find, Install, or Undo patches; Show or Delete recovery data 8) Execute DCL commands and procedures 9) Shut down this system Enter CHOICE or ? for help: (1/2/3/4/5/6/7/8/9/? )8At the triple dollar sign prompt ($$$), enter the SHOW DEVICES command.
Examine the list of devices to determine which device is the source drive (the system disk you want to back up) and which device is the target drive (the supported disk or tape device that will hold the backed up files).
A.4.2. Mounting Devices
After you determine the source drive and target drive, mount those devices (and any other output devices you plan to use) before you perform any backup operations. Enter the MOUNT commands in the following format:
$$$MOUNT/OVERRIDE=IDENTIFICATIONsource-drive$$$MOUNT/FOREIGNtarget-drive
In these commands:
A.4.3. Performing the System Disk Backup
When the system disk and output devices are mounted, back up the system disk by entering the BACKUP command in the following format:
$$$BACKUP/IMAGE/VERIFYsource-drive:target-drive:
Example 1
In this example, the system disk and a target disk are mounted so the BACKUP command can create a backup disk. (You can use a backup disk as a system disk.)
$$$MOUNT/OVERRIDE=IDENTIFICATION DKA200$$$MOUNT/FOREIGN DKA300$$$BACKUP/IMAGE/VERIFY DKA200: DKA300:
Example 2
In this example, the system disk and a target tape device are mounted so the BACKUP command can create a backup tape.
$$$INITIALIZE MKA300:label$$$MOUNT/OVERRIDE=IDENTIFICATION DKA200$$$MOUNT/FOREIGN MKA300$$$BACKUP/IMAGE/VERIFY DKA200: MKA300:SEP_08_BACKUP.BCK/SAVE_SET/REWIND
A.4.4. Changing the Disk Volume Cluster Size
The BACKUP/IMAGE command maintains a set of disk volume parameters from the input volume, altering attributes such as the disk volume cluster size as appropriate for the target device. (Cluster size refers to the basic unit of space allocation on the disk, not to OpenVMS Cluster environments.)
To change the disk volume cluster size, you must restore the disk contents to a disk that has been previously initialized with the desired cluster size (using BACKUP/IMAGE/NOINITIALIZE). For more information about initializing a disk and using the BACKUP command, see the VSI OpenVMS System Manager's Manual, Volume 1: Essentials and the VSI OpenVMS System Management Utilities Reference Manual: A-L, and see the description of the INITIALIZE and BACKUP commands in the VSI OpenVMS DCL Dictionary.
A.4.5. Logging Out, Shutting Down, and Rebooting
After you complete the backup operation:
Enter the LOGOUT command to exit the DCL environment and return to the menu.
Choose the shutdown option (9).
After the shutdown completes, boot from the system disk.
A.5. Restoring the System Disk
The following sections describe how to restore the system disk. Note that restoring a system disk also serves to defragment the disk. In addition, it validates the backup, ensuring that the backed up system disk is usable.
A.5.1. Getting Started
Before you can restore the system disk, follow these steps:
Shut down the system.
Boot the operating system media. (see Section 2.2).
Choose the DCL option (8) on the menu. For example:
You can install or upgrade the OpenVMS I64 operating system or you can install or upgrade layered products that are included on the OpenVMS I64 distribution (CD/DVD). You can also execute DCL commands and procedures to perform "standalone" tasks, such as backing up the system disk. Please choose one of the following: 1) Upgrade, install or reconfigure OpenVMS I64 Version 8.4-2 2) Display layered products that this procedure can install 3) Install or upgrade layered products 4) Show installed products 5) Reconfigure installed products 6) Remove installed products 7) Find, Install, or Undo patches; Show or Delete recovery data 8) Execute DCL commands and procedures 9) Shut down this system Enter CHOICE or ? for help: (1/2/3/4/5/6/7/8/9/? )8At the triple dollar sign prompt ($$$), enter the SHOW DEVICES command.
Examine the list of devices to determine which device is the source drive (the drive holding the backed up files you want to restore) and which device is the target drive (the disk on which you want the files restored).
A.5.2. Mounting Devices
After you determine the source drive and target drive, mount those devices (and any other output devices you plan to use) before you perform any restore operations. Enter the MOUNT commands in the following format:
$$$MOUNT/OVERRIDE=IDENTIFICATIONsource-drive$$$MOUNT/FOREIGNtarget-drive
In these commands:
source-drive is the device holding the files you want to restore
(Note, however, that you must use the MOUNT/FOREIGN command if the source drive is a tape device.)
target-drive is the destination
A.5.3. Performing the System Disk Restore
Enter the BACKUP command in the following format to restore the system disk:
$$$BACKUP/IMAGE/VERIFYsource-drive:target-drive:
Example 1
In this example, a backup disk and a target disk are mounted so the BACKUP command can restore the system disk from the backup disk:
$$$MOUNT/OVERRIDE=IDENTIFICATION DKA300$$$MOUNT/FOREIGN DKA200$$$BACKUP/IMAGE/VERIFY DKA300: DKA200:
Example 2
In this example, a backup tape and a target disk are mounted so the BACKUP command can restore the system disk from the backup tape:
$$$MOUNT/FOREIGN MKA300$$$MOUNT/FOREIGN DKA200$$$BACKUP/IMAGE/VERIFY MKA300:SEP_08_BACKUP.BCK/SAVE_SET DKA200:
A.5.4. Logging Out, Shutting Down, and Rebooting
After you complete the restore operation, follow these steps:
Enter the LOGOUT command to exit the DCL environment and return to the menu.
Choose the shutdown option (9).
After the shutdown completes, boot from the system disk.
A.6. Alternative Backup and Restore Procedure (Minimum OpenVMS Environment)
This section describes an alternative method of performing backup and restore operations. This method is similar to creating a Standalone Backup directory on a disk, as supported by OpenVMS VAX systems and certain earlier versions of OpenVMS Alpha (using SYS$UPDATE.STABACKIT.COM). This method installs a Minimum OpenVMS Environment (install with no options) on another disk from which you can perform your backup and restore operations on the system disk. The Minimum OpenVMS Environment is created in the SYSE root ([SYSE]) on the disk, which runs a subset of OpenVMS and is indicated by the triple dollar sign ($$$) system prompt. Use this method under the following conditions:
If you do not have access to the operating system media and its menu system
If you want to back up a shadowed system disk without disabling the shadow set
Note
You can back up your running system disk by using the /IGNORE=INTERLOCK qualifier with the BACKUP command and ignoring warning messages. However, that method requires that all other use of the system be suspended, including disabling logins, stopping print and batch queues, and turning off networking software. In addition, you cannot use this method to restore files to the running system disk. Because of these limitations, VSI recommends that, if you must use an alternative backup or restore method, you use the method described in this section.
A.6.1. Preparing an Alternate System Disk
Prepare an alternate system disk as follows:
Log in to a privileged account on your running OpenVMS system.
- Using the SHOW DEVICE command, identify a data disk on which you can install the operating system, with no options. This is your target disk during that installation. To install the operating system with no options on your target disk, you need the following amount of free disk space:
OpenVMS Alpha: approximately 5,21,552 blocks (267 MB)
Approximately 10,09,762 blocks (517 MB)
Existing data remains on the disk.
The target disk must be mounted privately to your process. (This prevents other users from accessing this disk during the installation and backup procedures.) Therefore, if the target disk was mounted with the /SYSTEM, /CLUSTER, /GROUP, or /SHARE qualifier, dismount that disk and mount it without those qualifiers or the /FOREIGN qualifier. For example:
$MOUNT/OVERRIDE=IDENTIFICATION DKA200Enter the following command:
$@SYS$SYSTEM:I64VMS$PCSI_INSTALL_MIN.COM [target-disk](The procedure prompts you for a device name if you do not specify it on the command line.)
As the procedure completes the installation, the display is similar to the following:
HPE I64VMS OpenVMS V8.4-2: OpenVMS and related products platform COPYRIGHT (c) ... Hewlett-Packard Enterprises, Execution phase starting ... The following product will be installed: HP I64VMS VMS V8.4-2 Portion Done: 0%..10%..20%..30%..40%..50%..60%..70%..80%..90%..100% The following product has been installed: HP I64VMS VMS V8.4-2 . . . The installation of minimum OpenVMS I64 is now complete. Use UEFI or the boot option you just created or validated (if any) to boot minimum OpenVMS. If you use UEFI remember to set VMS_FLAGS to E,0 before booting, and to reset VMS_FLAGS to 0,0 (or as required by your system). BOOT -FLAGS E,O device-name (Some configurations may require a boot option to boot.)Caution
If your system is a cluster member, you should shut down the entire OpenVMS Cluster system before you back up your system disk. This will prevent you from creating a partitioned cluster and from jeopardizing the integrity of your data in any other way.
A.6.2. Using the Alternate System Disk
Use the alternate system disk (on which you installed the operating system with no options) to perform backup and restore operations as follows:
Shut down your system.
Boot the alternate system disk from the SYSE root.
You can add the alternate system disk as a boot option in the UEFI Boot Manager menu by using the OpenVMS Boot Manager utility (SYS$MANAGER:BOOT_OPTIONS.COM), as described in Section 9.4.1. When prompted, set the flags as e,0. Alternatively, boot the alternate system disk manually by entering the following command at the UEFI Shell prompt, where fsn: (such as fs1:) is the device associated with the system disk:Shell>fsn:\efi\vms\vms_loader.efi -fl e,0The system automatically logs you in to the SYSTEM account and then displays a triple dollar sign prompt ($$$).
Note
During the boot and login operations on this minimum version of the operating system, you can ignore license messages that are similar to the following:
%LICENSE-I-NOLICENSE, no license is active for this software product
If your system disk is shadowed, install and load a Volume Shadowing for OpenVMS license on this data disk. Then you can back up the shadowed system disk from this data disk without disabling the shadow set.
Note
VSI recommends that you do not install any other licenses, including OpenVMS licenses, on this alternate system. You can use the system only from the console.
Mount the system disk and any output devices you plan to use during the backup or restore operations. See Section A.5.2 for more information.
Perform the necessary backup or restore operations by entering the appropriate BACKUP commands. For examples of using the BACKUP command to back up the system disk, see Section A.4.3; for examples of using the BACKUP command to restore the system disk, see Section A.5.3.
Shut down the system.
Boot from your original system disk.
Appendix B. Removing the OpenVMS Operating System
This appendix explains how to remove the OpenVMS operating system from your disk.
You can remove the OpenVMS operating system from your disk in the following ways:
If the disk contains a small number of user files, copy those user files elsewhere and then reinitialize the disk.
If the disk contains many user files, use the PRODUCT REMOVE command to remove an obsolete or extra copy of the OpenVMS operating system without removing any of the user files. You must also delete or archive certain operating system files that the PRODUCT REMOVE command cannot delete.
Follow these steps to remove OpenVMS operating system files:
If your system disk has multiple system-specific roots, boot the system and execute SYS$MANAGER:CLUSTER_CONFIG_LAN.COM to remove all roots except the one from which you are booted.
Shut down and boot from the distribution media or from a system disk other than the one from which OpenVMS is being removed. Then do one of the following:
If OpenVMS is not running from the distribution media, log in to a privileged account.
If OpenVMS is running from the distribution media, choose the option to execute DCL commands.
Enter the following DCL commands:
$DEFINE/NOLOG PCSI$SYSDEVICEtarget-disk$DEFINE/NOLOG PCSI$SPECIFICtarget-disk:[SYSx.]$DEFINE/NOLOG PCSI$DESTINATIONtarget-disk:[VMS$COMMON]where:
If the disk also contains layered products that were installed using the PCSI utility, VSI recommends that you remove them as well. Remove any layered products before using the PRODUCT REMOVE VMS command.
Use the following command to remove all the products at once. Select the layered products you want to remove from the menu.
$PRODUCT REMOVE * /REMOTEUse the following commands to remove individual products:
$PRODUCT SHOW PRODUCT/REMOTE$PRODUCT REMOVEproduct-name/REMOTEEnter the following DCL command:
$PRODUCT REMOVE VMS /REMOTEBecause the PRODUCT REMOVE command does not delete certain files, review the target disk to determine whether you want to delete, move, or archive the operating system files that still remain on the disk.
Following are lists of the files that the PRODUCT REMOVE command does not delete:
In target-disk:[SYS*.SYSEXE], where * is the hexadecimal number of any additional OpenVMS Cluster root on the target disk:
IA64VMSSYS.PAR
MODPARAMS.DAT
PAGEFILE.SYS
SWAPFILE.SYS
In target-disk:[VMS$COMMON.SYSEXE]:
LMF$LICENSE.LDB
PCSI$FILE_SYSTEM.PCSI$DATABASE
PCSI$PROCESSOR.PCSI$DATABASE
PCSI$ROOT.PCSI$DATABASE
RIGHTSLIST.DAT
SYSUAF.DAT
As you examine the preceding lists of files, you might want to archive, rather than delete, the following files:
IA64VMSSYS.PAR (VSI OpenVMS)
MODPARAMS.DAT
LMF$LICENSE.LDB
RIGHTSLIST.DAT
SYSUAF.DAT
Also, if you previously removed layered products, those products might have created additional files that you might want to delete, move, or archive.
Review the target disk for the directory structures [VMS$COMMON...] and [SYS
x...] that remain after you remove the OpenVMS operating system. You might want to delete these directories.The directories [SYSx]SYSCOMMON.DIR (in all [SYS
x]) are aliases for the file [000000]VMS$COMMON.DIR. Do not delete these SYSCOMMON.DIR files. Instead, use the SET FILE /REMOVE command as follows:$SET FILE /REMOVE [SYS*]SYSCOMMON.DIRAfter you execute this command and delete, move or archive all the files in [VMS$COMMON...], you can delete [000000]VMS$COMMON.DIR. Then you can delete, move, or archive the files in each [SYS
x] directory.
Appendix C. Alternative Ways to Initialize the System Disk
The usual way to create a new OpenVMS system disk is to install OpenVMS with the INITIALIZE option. When you do this, the installation process responds as follows:
A diagnostic partition is created. The diagnostic partition is visible only from the console; it corresponds to the contents of SYS$MAINTENANCE:SYS$DIAGNOSTICS.SYS on the system disk. The partition is intended and reserved for use by VSI Services (it is used with the IPF Offline Diagnostics and Utilities CD provided with the purchase of your HPE Integrity server). For more information about offline diagnostics, see your hardware documentation.
VSI recommends creating the system disk with this partition and not removing it. However, it is not required for operation of OpenVMS.
If you do not want the diagnostic partition, you can prevent its creation by initializing the disk before installing OpenVMS, performing the steps in Section C.1. Alternatively, if you have already created the system disk and the partition, you can remove it by performing the steps in Section C.2.
The disk is initialized with volume expansion (INITIALIZE/LIMIT).
This method of initialization (using the /LIMIT qualifier) might make your target system disk incompatible with versions of OpenVMS prior to 7.2. VSI recommends that you create your system disk in the default manner unless you need to mount the disk on a version of OpenVMS prior to 7.2.
You can avoid use of the /LIMIT qualifier by initializing your target system disk before you install OpenVMS, performing the steps in Section C.1. As a result of this alternate method, your new system disk might include a relatively large minimum allocation size (as defined by /CLUSTER_SIZE). Small files will use more space than would be used otherwise. Therefore, perform these steps only for system disks that must be mounted on versions of OpenVMS prior to Version 7.2.
C.1. Alternative Method of Initialization
Note
When you initialize your target disk using the following method, you must use the PRESERVE option during the installation of OpenVMS on the disk. If you use the INITIALIZE option, the disk is reinitialized using the defaults.
After booting the operating system media, and before installing the operating system, select Option 8 (Execute DCL commands and procedures) on the main menu.
Initialize the intended target disk with the following command:
$$$INIT/SYSTEM/HEADERS=150000/STRUCTURE=ods-leveldisk labelwhere:ods-level is 2 (for ODS-2) or 5 (for ODS-5).
disk is the device for the target disk (such as DKA100:).
label is the label for the target disk (you can change the label later).
If you specified ODS-5 and you want support for hard links, include the /VOLUME_CHARACTERISTICS=HARDLINKS qualifier with the INITIALIZE command.
If you are using this method of initialization to prevent creation of a diagnostic partition, and you do not intend to mount the disk on an OpenVMS system prior to version 7.2, include the /LIMIT qualifier with the INITIALIZE command. If you do not use the /LIMIT qualifier, your new system disk might be initialized with a relatively large minimum allocation size. This can cause small files to use more space than necessary.
Exit DCL (log off), and then select option 1 (Upgrade, install or reconfigure OpenVMS) on the main menu.
When you are asked whether to initialize or preserve the target disk, choose PRESERVE (the default).
Continue with the installation.
C.2. Removing the Diagnostic Partition File
To remove the diagnostic partition on a system disk and to recover the disk space occupied, delete the file SYS$MAINTENANCE:SYS$DIAGNOSTICS.SYS and then reset the boot block. This file can contain hardware diagnostics but is not essential for operations. To delete the file, enter the following command:
$DELETE SYS$MAINTENANCE:SYS$DIAGNOSTICS.SYS;*/LOG
Reset the boot block by entering the SET BOOTBLOCK command at the DCL prompt, as in the following example, where target-disk is the device on which your target system disk is mounted:
$SET BOOTBLOCK /PRESERVE=SIGNATUREtarget-disk: [VMS$COMMON.SYS$LDR]SYS$EFI.SYS
Servers that use the Maintenance Operations Protocol (MOP).
Cluster group number and password are required by any cluster nodes that use the local area network for cluster communications. In a cluster that uses mixed interconnects, if any of the interconnects require the cluster number and password, then you must set the cluster number and password for all nodes.
Cluster group number and password are required by any cluster nodes that use the local area network. In a cluster that uses mixed interconnects, if any of the interconnects require the cluster number and password, then you must set the cluster number and password for all nodes.