VSI Reliable Transaction Router Installation Guide
- Software Version:
- VSI Reliable Transaction Router Version 5.1
- Operating System and Version:
- VSI OpenVMS IA-64 Version 8.4-1H1 or higher
VSI OpenVMS Alpha Version 8.4-2L1 or higher
Preface
This guide explains how to install Reliable Transaction Router (RTR) on supported platforms. If you are installing RTR on only one platform, you need only read the sections that apply to that platform.
Keep this guide with your distribution kit. You may need it to install maintenance updates or to reinstall RTR for some other reason.
1. About VSI
VMS Software, Inc. (VSI) is an independent software company licensed by Hewlett Packard Enterprise to develop and support the OpenVMS operating system.
2. Structure of this Document
Chapter 1, "Quick Installation" gives brief installation instructions for RTR on HP-UX I64, Linux I64, Linux I32, OpenVMS, and Windows. For a complete list of versions for each supported operating system, refer to the relevant Software Product Description (SPD). The brief installation instructions include sample installation output.
Chapter 2, "Upgrade Process" includes instructions on how to perform an upgrade to RTR.
- Chapter 3, "Full Installation on HP-UX I64" describes a full installation for HP-UX I64, including:
Preparing for installation
Installing RTR and reading the Release Notes
Completing RTR setup
- Chapter 4, "Full Installation on Linux I64" describes a full installation for Linux I64, including:
Preparing for installation
Installing RTR and reading the Release Notes
Completing RTR setup
- Chapter 5, "Full Installation on Linux Frontend" describes a full installation for LINUX I32 (Frontend), including:
Preparing for installation
Installing RTR and reading the Release Notes
Completing RTR setup
- Chapter 6, "Full Installation on OpenVMS " describes a full installation for OpenVMS, including:
Preparing for installation
Installing RTR and reading the Release Notes
Completing RTR setup
- Chapter 7, "Full Installation on Windows" describes a full installation for Windows, including:
Preparing for installation
Installing RTR and reading the README
Completing RTR setup
Appendix A provides information on recovering from errors.
Appendix B provides instructions on how to remove (uninstall) RTR from your system.
3. Related Documentation
|
Document |
Content |
|---|---|
|
For all users: | |
|
VSI Reliable Transaction Router Release Notes ? |
Describes new features, corrections, restrictions, and known problems for RTR. |
|
VSI Reliable Transaction Router Getting Started |
Provides an overview of RTR technology and solutions, and includes the glossary that defines all RTR terms. |
|
VSI Reliable Transaction Router Software Product Description |
Describes product features. |
|
For the system manager: | |
|
VSI Reliable Transaction Router Installation Guide |
Describes how to install RTR on all supported platforms. |
|
VSI Reliable Transaction Router System Manager’s Manual |
Describes how to configure, manage, and monitor RTR. |
|
For the application programmer: | |
|
VSI Reliable Transaction Router Application Design Guide |
Describes how to design application programs for use with RTR, with both C++ and C interfaces. |
|
JRTR Getting Started ? |
Provides an overview of the object-oriented JRTR Toolkit including installation, configuration and Java programming concepts, with links to additional online documentation. |
|
VSI Reliable Transaction Router C++ Foundation Classes |
Describes the object-oriented C++ interface that can be used to implement RTR object-oriented applications. |
|
VSI Reliable Transaction Router C Application Programmer’s Reference Manual |
Explains how to design and code RTR applications using the C programming language and the RTR C API. Contains full descriptions of the basic RTR API calls. |
4. OpenVMS Documentation
The full VSI OpenVMS documentation set can be found on the VMS Software Documentation webpage at https://docs.vmssoftware.com.
5. VSI Encourages Your Comments
You may send comments or suggestions regarding this manual or any VSI document by sending electronic mail to the following Internet address: <docinfo@vmssoftware.com>. Users who have VSI OpenVMS support contracts through VSI can contact <support@vmssoftware.com> for help with this product.
6. Conventions
|
Convention |
Meaning |
|---|---|
|
# |
A number sign (#) is the default superuser prompt. |
|
% |
A percent sign (%) is the default user prompt for many UNIX and Linux systems. |
|
$ |
A dollar sign ($) is the default user prompt for OpenVMS systems. |
|
In examples, a boxed symbol indicates that you must press the named key on the keyboard. | |
|
Ctrl/C |
This symbol indicates that you must press the Ctrl key while you simultaneously press another key (in this case, C). |
|
In interactive examples, this typeface indicates input entered by the user. |
|
|
In text, this typeface indicates the exact name of a command, routine, partition, pathname, directory, or file. This typeface is also used in interactive examples and other screen displays. |
|
UPPERCASE lowercase |
The UNIX operating system differentiates between lowercase and uppercase characters. Examples, syntax descriptions, function definitions, and literal strings that appear in text must be typed exactly as shown. Commands typed to the RTR CLI are not case sensitive unless enclosed in quotation marks. |
|
|
In a prompt, square brackets indicate that the enclosed item is the default
response. For example, |
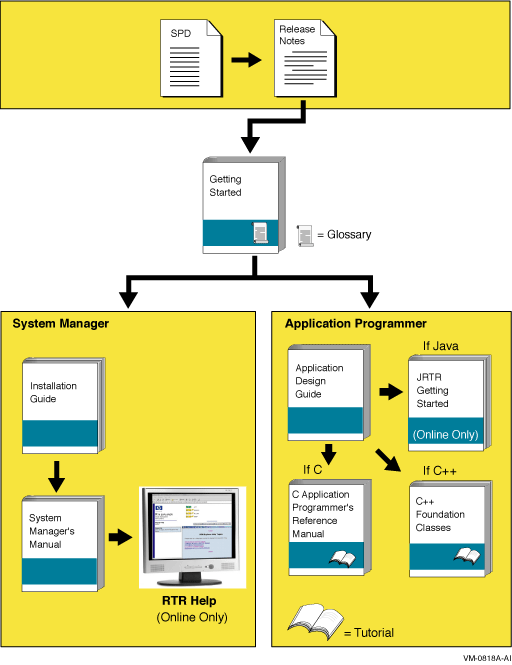
7. Reading Path
The reading path to follow when using the Reliable Transaction Router information set is shown in Figure 1, ''RTR Reading Path''.
Chapter 1. Quick Installation
HP-UX I64
Linux I64
Linux I32 (Frontend)
OpenVMS
Windows 2000, Windows 2003, Windows XP
User-Changed Monitor Files
For non-Linux platforms,if you have changed any RTR monitor (*.mon) files,
you must rename them or they will be overwritten during installation.
To avoid this, always work from renamed copies of RTR monitor files when making local
modifications. For the Linux platform, see Chapter 5, "Full Installation on Linux Frontend".
1.1. Installing RTR for HP-UX I64
/usr/share/doc directory; you are advised to read the Release Notes
file before using RTR.
User-Changed Monitor Files
If you have changed any RTR monitor (*.mon) files, they will automatically
be renamed when using swremove to uninstall.
For more information, see Chapter 3, "Full Installation on HP-UX I64".
1.1.1. Disk and Time Requirements
The installation of the RTR base product requires about 22 MB (megabytes) of disk space. The installation procedure takes about two minutes to complete.
1.1.2. Installation Procedure
If RTR is already installed on your system, see Section B.1, ''Uninstalling on HP-UX I64'' for information on uninstalling RTR and removing related processes.
To install on HP-UX, log in as the root user.
Insert the RTR CD-ROM into the drive.
The Reliable Transaction Router for HP-UX installs in the standard way on HP-UX systems. You may run
swinstalland select the Local CD as the Source depot and install RTR or on the command line you can specify the depot file asswinstall -s /FULL-SOURCE-PATH/packagename.depotas the root user. If you previously installed an RTR HP-UX kit, you will need to uninstall the old one before installing the new one.
1.2. Installing RTR for Linux I64
User-Changed Monitor Files
If you have changed any RTR monitor (*.mon) files, they will
automatically be renamed when using rpm to uninstall.
For more information, see
Chapter 4, "Full Installation on Linux I64".
1.2.1. Disk and Time Requirements
The installation of the RTR base product requires about 22 MB (megabytes) of disk space. The installation procedure takes about two minutes to complete.
1.2.2. Installation Procedure
If RTR is already installed on your system, see Section B.2, ''Uninstalling on Linux I64'', for information on uninstalling RTR and removing related processes.
To install on Linux, log in as the root user.
Insert the RTR CD-ROM into the drive.
If Red Hat does not automatically mount your CD-ROM, you will need to mount it before proceeding to the next step.
CD to your CD-ROM drive.
The Reliable Transaction Router for Linux installs in the standard way on Red Hat systems. You may use gnorpm on Red Hat Workstation for a graphical install, or, on the command line with Red Hat use
rpm -i packagename.rpmas the root user. If you previously installed an RTR Linux kit, you will need to uninstall the old one before installing the new one.
1.3. Installing RTR for Linux I32 (Frontend)
User-Changed Monitor Files
If you have changed any RTR monitor (*.mon) files, they will automatically
be renamed when using rpm to uninstall.
For more information, see Chapter 5, "Full Installation on Linux Frontend".
1.3.1. Disk and Time Requirements
The installation of the RTR base product requires about 22 MB (megabytes) of disk space. The installation procedure takes about two minutes to complete.
1.3.2. Installation Procedure
If RTR is already installed on your system, see Section B.3, ''Uninstalling on Linux I32 (Frontend)'', for information on uninstalling RTR and removing related processes.
To install on Linux, log in as the root user.
Insert the RTR CD-ROM into the drive.
If Red Hat does not automatically mount your CD-ROM, you will need to mount it before proceeding to the next step.
CD to your CD-ROM drive.
The Reliable Transaction Router for Linux Frontend installs in the standard way on Red Hat systems. You may use gnorpm on Red Hat Workstation for a graphical install, or, on the command line with Red Hat 9, use
rpm -i packagename.rpmas the root user. If you previously installed an RTR Linux kit, you will need to uninstall the old one before installing the new one.
1.4. Installing RTR for OpenVMS
Your Reliable Transaction Router for OpenVMS kit is supplied on CD-ROM. After installation, the
Release Notes are located in the directory
SYS$COMMON:[SYSHLP];
you are advised to read the Release Notes before using RTR.
1.4.1. Disk and Time Requirements
The installation of the RTR base product requires about 53000 blocks during installation, and about 36000 blocks after installation is done. The installation takes less than five minutes to complete. For more detailed instructions, see Chapter 6, "Full Installation on OpenVMS ".
1.4.2. Installation Procedure
- If RTR is already installed on your system, see Section B.4, ''Uninstalling on OpenVMS'', for information on uninstalling RTR and removing related processes.
Retaining the RTR V2 Help File
If you plan to keep the RTR V2 help file in addition to the help file for the current release, see Chapter 6, "Full Installation on OpenVMS " for instructions.
User-Changed Monitor Files
If you have changed any RTR monitor (*.mon) files, you must rename them or they will be over-written during installation. To avoid this, always work from renamed copies of RTR monitor files when making local modifications.
Log in to the System Manager's account.
Check disk space and system parameters GBLPAGES and GBLSECTIONS.
- Check OpenVMS version number.
$ SHOW CLUSTER
Minimum Required Version of OpenVMS
The minimum VMS version on which you can install RTR Version 5.1 is OpenVMS 7.3-2. If you attempt to install RTR Version 5.1 on an earlier version of OpenVMS, you will receive an error message of the following form:This system does not meet the RTR minimum required VMS version. The minimum required version is V7.3-2. Terminating is strongly recommended. Do you want to terminate? [YES]If you see this error message, end your attempted RTR installation and upgrade your OpenVMS system to version 7.3-2.
- Start the installation with the following command:
$ PRODUCT INSTALL RTR
1.4.2.1. Sample OpenVMS Installation
This sample installation includes running the IVP.
$ product install rtr
The following product has been selected:
DEC AXPVMS RTR V5.1-zzz Layered Product
Do you want to continue? [YES] y
Configuration phase starting ...
You will be asked to choose options, if any, for each
selected product and for
any products that may be installed to satisfy software
dependency requirements.
DEC AXPVMS RTR V5.1-zzz: Reliable Transaction Router for OpenVMS
Copyright 2005 Hewlett-Packard Development Company, L.P.
Do you want the defaults for all options? [YES] n
Have all RTR processes on the system been stopped? [YES] y
Run installation verification procedure [NO] y
DECnet users: Have you read the Release Note regarding
minimum version? [YES] y
Do you want the V2 programming kit Installed? [NO] yes
Do you want to review the options? [NO] y
DEC AXPVMS RTR V51-zzz: Reliable Transaction Router for OpenVMS
Have all RTR processes on the system been stopped?: YES
Run installation verification procedure: YES
DECnet users: Have you read the Release Note regarding
minimum version?: YES
Do you want the V2 programming kit Installed ?: YES
Are you satisfied with these options? [YES]
Execution phase starting ...
The following product will be installed to destination:
DEC AXPVMS RTR V5.1-zzz <logical for SYS$COMMON>
Portion done: 0%
...10%
...20%
...30%
...40%
...50%
...60%
...70%
...80%
...90%
...100%
The following product has been installed:
DEC AXPVMS RTR V5.1-zzz Layered Product
%PCSI-I-IVPEXECUTE, executing test procedure for DEC AXPVMS RTR V5.1-zzz ...
%PCSI-I-IVPSUCCESS, test procedure completed successfully
DEC AXPVMS RTR V5.1-zzz: Reliable Transaction Router for OpenVMS
Insert the following lines in SYS$MANAGER:SYSTARTUP_VMS.COM:
@sys$startup:rtr$startup.com
Insert the following lines in SYS$MANAGER:SYSHUTDWN.COM:
@sys$manager:rtr$shutdown
See the Release Notes and documentation for use of the optional
rtr$startup.com P1 parameter.  $
$
| For information on the optional preferred protocol (P1) parameter, see Section 6.3.1.1, ''Establishing Protocol Preference''. |
For additional information, see Chapter 6, "Full Installation on OpenVMS ".
1.5. Installing RTR for Windows Systems
User-Changed Monitor Files
If you have changed any RTR monitor (*.mon) files, you must rename them or they will be over-written during installation. To avoid this, always work from renamed copies of RTR monitor files when making local modifications.
1.5.1. Disk and Time Requirements
The installation of the RTR base product requires about 22 MB (megabytes) of disk space. The installation procedure takes about two minutes to complete.
1.5.2. Installation Procedure
If RTR is already installed on your system, see Section B.5, ''Uninstalling on Windows Systems'', for information on uninstalling RTR and removing related processes.
To install on Windows, log in as the Administrator or with administrator privileges.
Insert the RTR CD-ROM into the drive.
From Windows Explorer, choose the drive letter of your CD-ROM and open the directory RTRV51.
Double click on SETUP.EXE to start the InstallShield that takes you through the setup process.
Chapter 2. Upgrade Process
Shut down RTR
Upgrade to new version
Run the IVP (optional)
Start RTR
2.1. Rolling Upgrade Restrictions
Migrating from V2
See Chapter 6, "Full Installation on OpenVMS " for how to retain the V2 help file when migrating to a later version of RTR. Refer to the Reliable Transaction Router Migration Guide for information on performing this migration.
The RTR recovery protocol consists of messages sent from one backend, via a router, to the target backend. If either of the RTR backends is upgraded to RTR Version 5.1, then the router that will be used for recovery must also be running RTR Version 5.1. This generally means that any RTR router nodes should be upgraded to RTR Version 5.1 before any RTR backend nodes. There is no restriction in the order that RTR backends should be upgraded to Version 5.1.
Frontend-only nodes can be upgraded at any time
Router-only and mixed frontend/router nodes
Mixed router/backend nodes
Router-only nodes
Backend-only nodes
For more complex configurations, where a node may have combinations of
facilities with different backend/router groupings, use the command
SET NODE/RECOVERY=V32 to set the recovery protocol to the V3.2 algorithm.
Once RTR has been upgraded on all nodes, the recovery protocol can be reset to its default value (V4.0), and RTR restarted at a convenient time on each node. This need not be a simultaneous restart on all nodes. RTR can be restarted on each node one by one after resetting the default recovery protocol, maintaining continuous application availability.
Chapter 3. Full Installation on HP-UX I64
Preparing for installation
Installing RTR
Completing RTR setup
3.1. Prepare for Installation
User-Changed Monitor Files
On the HP-UX platform,if you have changed any RTR monitor (*.mon) files,
any customized monitor files are renamed during uninstall with the extension
.rpmsave. Except for such customized monitor files,
uninstalling RTR removes the RTR monitor files.
3.1.1. Check Software Distribution Kit
Reliable Transaction Router is distributed on CD-ROM. Use the Bill of Materials (BOM) received with your kit to verify the contents of your software distribution kit.
3.1.2. Check Login Privileges
You must be logged in as the root user to install RTR on HP-UX.
For more information on RTR privileges, see the VSI Reliable Transaction Router System Manager’s Manual section on RTR Privileges.
3.1.3. Check Required Hardware
Any IA-64 system that runs HP-UX version 11i-v2.
For ACTIVE/STANDBY configuration, any storage system that supports Serviceguard CFS Version A11.17.
3.1.4. Check Required Software
HP-UX version 11i-v2
For ACTIVE/STANDBY configuration Serviceguard CFS Version A11.17 (T2775BA)
TCP/IP support as provided by the operating system
At least one Reliable Transaction Router Backend license for a supported operating system for development and application deployment
3.1.5. Check Required Disk Space
The installation of the RTR base product requires about 22 megabytes of disk space. The installation procedure takes about two minutes to complete.
3.1.6. Check System Parameters
RTR has basic memory requirements. This section references setup instructions for the relevant system parameters.
3.1.6.1. Check Memory-Mapped I/O Requirements
For information on how to size memory-mapped I/O appropriately, refer to VSI Reliable Transaction Router System Manager’s Manual, RTR Shared Memory Sizing.
3.1.6.2. Check Virtual Memory Requirements
The basic memory requirement for an unconfigured RTRACP is 5.6 MB. Additional memory may be required.
3.2. Install RTR
If you are installing on HP-UX Integrity servers (I64), ensure that you are logged in as the root user.
If RTR is already installed on your system, see Section B.1, ''Uninstalling on HP-UX I64'' for information on uninstalling RTR and removing related processes.
Insert the RTR CDROM to the drive.
- The Reliable Transaction Router for HP-UX installs in the standard way on HP-UX systems:
run
swinstalland select the Local CD for source depot orrun
swinstall -s /FULL-SOURCE-PATH/packagename.depoton the command line as the root user.
If you previously installed an RTR HP-UX I64 kit, you will need to uninstall the old one before installing the new one.
# swinstall -s /rtrkit/rtr51_417_ia64.depot
Starting the terminal version of swinstall...
To navigate in swinstall:
- use the "Tab" key to move between screen elements
- use the arrow keys to move within screen elements
- use "Ctrl-F" for context-sensitive help anywhere in swinstall
On screens with a menu bar at the top as displayed below:
------------------------------------------------------
|File View Options Actions Help|
| ---- ---- ------- ------------------------------- —|
- use "Tab" to move from the list to the menubar
- use the arrow keys to navigate
- use "Return" to pull down a menu or select a menu item
- use "Tab" to move from the menubar to the list without selecting a menu item
- use the spacebar to select an item in the list
On any screen, press "CTRL-K" for more information on how to use the keyboard.
Press "Return" to continue...
The sample installation is as shown in the Figure 3.1, ''HP-UX Sample Installation''

# cd /opt/rtr/examples/IVP
# ./rtr_ivp_osf.sh
Starting Reliable Transaction Router V5.1 for HP-UX
Installation Verification Procedure
keeping any existing log file settings (RTR_DBG not set)
starting RTR . . .
%RTR-S-RTRSTART, RTR started on node bng100
creating a journal, if not already created . . .
%RTR-S-JOURNALINI, journal has been created on device /dev/vg00/lvol3
creating test facility . . .
%RTR-S-FACCREATED, facility rtr_ivp_facility created
stopping RTR.
%RTR-S-RTRSTOP, RTR stopped on node bng100
[OPTIONAL] attempting to compile and link rtr test applications . . .
If this system is not configured with an application development
environment, or the platform does not support threads, then some
messages about application compilation not succeeding are normal.
multithreaded server rtr application compiled
single-threaded client rtr application compiled
applications rtrreq and rtrsrv available
starting rtr and creating default facility
%RTR-I-NOLOGSET, logging not set
%RTR-S-RTRSTART, RTR started on node bng100
%RTR-I-TRMCENTRYNFND, no termcap-entry for terminal-type : xterm
%RTR-S-FACCREATED, facility RTR$DEFAULT_FACILITY created
starting an rtr server application
running an rtr client application, should complete in a few seconds
stopping rtr
%RTR-I-TRMCENTRYNFND, no termcap-entry for terminal-type : xterm
%RTR-S-RTRSTOP, RTR stopped on node bng100
Reliable Transaction Router V5.1 for HP-UX
Installation Verification Procedure successful
#
3.3. Complete RTR Setup
Give the RTR root directory and all its subdirectories ''Full Control'' access for all RTR users. You may then restrict access on individual files to read only. (All RTR users require write access to the RTR journal directory.)
- RTR_CLU_MEM_NODES: This variable enables RTR to recognize the backend nodes of the cluster participating in ACTIVE/STANDBY mode. For example:
RTR_CLU_MEM_NODES="BE1, BE2"
- RTR_CLU_LCK_DISK: This variable enables RTR to maintain the "cluster node locks" on a common shared disk in the cluster. All backend nodes in the cluster should use the same disk for maintaining "cluster node locks". For example:
RTR_CLU_LCK_DISK= "/dev/vx/dsk/rtrdata/rtr_files"
3.3.1. Check Network Availability
RTR cannot start until after the network has started. Check the network status before using RTR.
3.3.2. Check Installed Files
3.3.3. Enable RTR Remote Commands
While this is not required to use RTR for HP-UX, to make it possible
to execute RTR commands on remote systems, you must use the remote shell (RSH).
In case of HP-UX REMSH is the remote shell program,
you can create a soft link or alias so that rsh points to remsh.
See the documentation on remote shell on your HP-UX system.
The RSH service runs commands on remote computers running the RSH service.
This command is available only if the TCP/IP protocol has been installed.
You can also execute remote commands with /NODE qualifiers on
certain RTR commands, and in conjunction with the RTR SET ENVIRONMENT
command.
3.3.4. Display Documentation
Soft copy documentation for Reliable Transaction Router is available on the RTR Software Kit in distilled PostScript (.pdf) file format. You can display .pdf files withAcrobat Reader, a free reader of electronic files from Adobe Systems.
Release Notes are placed in the /usr/share/doc directory
with the .pdf files.
3.3.5. Run RTR
rtroper group to run RTR.
For more information on RTR privileges, see the VSI Reliable Transaction Router System Manager’s Manual section on RTR Privileges.
To run RTR, follow these steps:
- To run RTR, enter the following command at the system prompt:
# rtr RTR> To start RTR, enter Start RTR at the
RTR>prompt.
3.3.5.1. Configure RTR Facilities and Partitions
For information on configuring RTR facilities and setting up partitions, refer to the VSI Reliable Transaction Router Getting Started and the VSI Reliable Transaction Router System Manager’s Manual.
3.3.6. Install and Run Applications
Once applications that use RTR have been designed and tested, they can be deployed on the systems configured for use with RTR. For information on designing applications, refer to the VSI Reliable Transaction Router Application Design Guide; for information on deployment and monitoring, refer to the VSI Reliable Transaction Router System Manager’s Manual.
Chapter 4. Full Installation on Linux I64
Preparing for installation
Installing RTR
Completing RTR setup
4.1. Prepare for Installation
User-Changed Monitor Files
On the Linux platform,if you have changed any RTR monitor (*.mon)
files, any customized monitor files are renamed during uninstall with the extension
.rpmsave. Except for such customized monitor files,
uninstalling RTR removes the RTR monitor files.
4.1.1. Check Software Distribution Kit
Reliable Transaction Router is distributed on CD-ROM. Use the Bill of Materials (BOM) received with your kit to verify the contents of your software distribution kit.
4.1.2. Check Login Privileges
You must be logged in as the root user to install RTR on Linux.
For more information on RTR privileges, see the VSI Reliable Transaction Router System Manager’s Manual section on RTR Privileges.
4.1.3. Check Required Hardware
Any Itanium system that runs Redhat Enterprise Linux ES/AS Version 4.0.
For ACTIVE/STANDBY configuration, any storage system that supports Redhat Cluster suite and GFS of version 6.1
4.1.4. Check Required Software
Redhat Enterprise Linux ES/AS Version 4.0
TCP/IP support as provided by the operating system
For ACTIVE/STANDBY configuration Redhat Cluster suite and GFS of version 6.1
At least one Reliable Transaction Router Backend license for a supported operating system for development and application deployment
4.1.5. Check Required Disk Space
The installation of the RTR base product requires about 22 megabytes of disk space. The installation procedure takes about two minutes to complete.
4.1.6. Check System Parameters
RTR has basic memory requirements. This section references setup instructions for the relevant system parameters.
4.1.6.1. Check Memory-Mapped I/O Requirements
For information on how to size memory-mapped I/O appropriately, refer to VSI Reliable Transaction Router System Manager’s Manual, RTRShared Memory Sizing.
4.1.6.2. Check Virtual Memory Requirements
The basic memory requirement for an unconfigured RTRACP is 5.6 MB. Additional memory may be required.
4.2. Install RTR
If you are installing on Linux I64, ensure that you are logged in as the root user.
If RTR is already installed on your system, see Section B.2: Uninstalling on Linux I64, for information on uninstalling RTR and removing related processes.
Insert the RTR CD-ROM into the drive.
If Redhat does not automatically mount your CD-ROM, you will need to mount it before proceeding to the next step.
CD to the CDROM drive.
- The HP Reliable Transaction Router for Linux installs in the standard way on Redhat systems:
use
gnorpmfor a graphical install on Redhat Workstation systemsuse
rpm -i packagename.rpmon the command line with Redhat 9 as the root user.
If you previously installed an RTR Linux I64 kit, you will need to uninstall the old one before installing the new one.
# rpm -i rtr-5.1-416.ia64.rpmRTR for Linux is licensed per processor, with one license required for each processor in the system. If more processors or systems are added, then additional RTR licenses must be purchased.
# ./rtr_ivp_osf.sh
Starting Reliable Transaction Router V5.1 for Linux
Installation
Verification Procedure
keeping any existing log file settings (RTR_DBG not set)
starting RTR . . .
%RTR-S-RTRSTART, RTR started on node localhost
creating a journal, if not already created . . .
%RTR-S-JOURNALINI, journal has been created on device /dev/sda7
creating test facility . . .
%RTR-S-FACCREATED, facility rtr_ivp_facility created
stopping RTR.
%RTR-S-RTRSTOP, RTR stopped on node localhost
[OPTIONAL] attempting to compile and link rtr test applications . . .
If this system is not configured with an application development
environment, or the platform does not support threads, then some
messages about application compilation not succeeding are normal.
multithreaded server rtr application compiled
single-threaded client rtr application compiled
applications rtrreq and rtrsrv available
starting rtr and creating default facility
%RTR-I-NOLOGSET, logging not set
%RTR-S-RTRSTART, RTR started on node localhost
%RTR-S-FACCREATED, facility RTR$DEFAULT_FACILITY created
starting an rtr server application
running an rtr client application, should complete in a few seconds
stopping rtr
%RTR-S-RTRSTOP, RTR stopped on node localhost
Reliable Transaction Router V5.1 for Linux
Installation Verification Procedure successful
4.3. Complete RTR Setup
Give the RTR root directory and all its subdirectories "Full Control" access for all RTR users. You may then restrict access on individual files to read only. (All RTR users require write access to the RTR journal directory.
- RTR_CLU_MEM_NODES: This variable enables RTR to recognize the backend nodes of the cluster participating in ACTIVE/STANDBY mode. For example:
RTR_CLU_MEM_NODES="BE1, BE2"
- RTR_CLU_LCK_DISK: This variable enables RTR to maintain the "cluster node locks" on a common shared disk in the cluster. All backend nodes in the cluster should use the same disk for maintaining "cluster node locks". For example:
RTR_CLU_LCK_DISK= "/dev/mapper/rtrvg-lvol0"
4.3.1. Check Network Availability
/etc/init.d/network statusTo start your network, execute the command
/etc/init.d/network start
4.3.2. Check Installed Files
Navigate to the directory where you installed RTR. The default is
/var/opt/rtr.
# rpm -q -l rtr
4.3.3. Enable RTR Remote Commands
While this is not required to use RTR for Linux I64, to make it possible to execute RTR commands on remote systems, you must use the remote shell (RSH). On a Linux system, see the documentation on remote shell for more information.
The RSH service runs commands on remote computers running the RSH service. This command is available only if the TCP/IP protocol has been installed.
You can also execute remote commands with /NODE qualifiers on
certain RTR commands, and in conjunction with the RTR SET ENVIRONMENT
command. For more information on executing RTR commands remotely,
refer to the VSI Reliable Transaction Router System Manager’s Manual.
4.3.4. Display Documentation
Soft copy documentation for Reliable Transaction Router is available on the RTR Software Kit in distilled PostScript (.pdf) file format. You can display .pdf files with Acrobat Reader, a free reader of electronic files from Adobe Systems.
Release Notes are placed in the /usr/share/doc directory with
the .pdf files.
4.3.5. Run RTR
rtroper group to run RTR.
For more information on RTR privileges, see the VSI Reliable Transaction Router System Manager’s Manual section on RTR Privileges.
To run RTR, follow these steps:
- To run RTR, enter the following command at the system prompt:
# rtrRTR>
To start RTR, enter Start RTR at the
RTR>prompt.
4.3.5.1. Configure RTR Facilities and Partitions
For information on configuring RTR facilities and setting up partitions, refer to the VSI Reliable Transaction Router Getting Started and the VSI Reliable Transaction Router System Manager’s Manual.
4.3.6. Install and Run Applications
Once applications that use RTR have been designed and tested, they can be deployed on the systems configured for use with RTR. For information on designing applications, refer to the VSI Reliable Transaction Router Application Design Guide; for information on deployment and monitoring, refer to the VSI Reliable Transaction Router System Manager’s Manual.
Chapter 5. Full Installation on Linux Frontend
Preparing for installation
Installing RTR
Completing RTR setup
5.1. Prepare for Installation
User-Changed Monitor Files
On the Linux platform, if you have changed any RTR monitor (*.mon) files,
any customized monitor files are renamed during uninstall with the extension
.rpmsave. Except for such customized monitor files,
uninstalling RTR removes the RTR monitor files.
5.1.1. Check Software Distribution Kit
Reliable Transaction Router is distributed on CD-ROM. Use the Bill of Materials (BOM) received with your kit to verify the contents of your software distribution kit.
5.1.2. Check Login Privileges
You must be logged in as the root user to install RTR on Linux.
For more information on RTR privileges, see the VSI Reliable Transaction Router System Manager’s Manual section on RTR Privileges.
5.1.3. Check Required Hardware
For client functionality, any Intel32 system that runs Redhat Enterprise Linux WS Version 3.0.
5.1.4. Check Required Software
Redhat Enterprise Linux WS Version 3.0
TCP/IP support as provided by the operating system
At least one Reliable Transaction Router Backend license for a supported operating system for development and application deployment
5.1.5. Check Required Disk Space
The installation of the RTR base product requires about 22 megabytes of disk space. The installation procedure takes about two minutes to complete.
5.1.6. Check System Parameters
RTR has basic memory requirements. This section references setup instructions for the relevant system parameters.
5.1.6.1. Check Memory-Mapped I/O Requirements
For information on how to size memory-mapped I/O appropriately, refer to VSI Reliable Transaction Router System Manager’s Manual, RTR Shared Memory Sizing.
5.1.6.2. Check Virtual Memory Requirements
The basic memory requirement for an unconfigured RTRACP is 5.6 MB. Additional memory may be required.
5.2. Install RTR
If you are installing on Linux, ensure that you are logged in as the root user.
If RTR is already installed on your system, see Section B.3, ''Uninstalling on Linux I32 (Frontend)'', for information on uninstalling RTR and removing related processes.
Insert the RTR CD-ROM into the drive.
If Redhat does not automatically mount your CD-ROM, you will need to mount it before proceeding to the next step.
CD to the CDROM drive.
- The Reliable Transaction Router for Linux Frontend installs in the standard way on Redhat systems:
use
gnorpmfor a graphical install on Redhat Workstation systemsuse
rpm -i packagename.rpmon the command line with Redhat 9 as the root user.
If you previously installed an RTR Linux kit, you will need to uninstall the old one before installing the new one.
For example, the following shows the installation display:
# rpm -i rtr_frontend-x_y-zzz.i386.rpm RTR for Linux Front End is licensed per processor, with one license required for each processor in the system. If more processors or systems are added, then additional RTR licenses must be purchased. #
# cd /opt/rtr/examples/IVP # ./rtr_ivp_osf.sh Starting Reliable Transaction Router V5.1 for Linux Installation Verification Procedure keeping any existing log file settings (RTR_DBG not set) starting RTR . . . %RTR-S-RTRSTART, RTR started on node bznbzn creating a journal, if not already created . . . %RTR-S-JOURNALINI, journal has been created on device /dev/hda3 creating test facility . . . %RTR-S-FACCREATED, facility rtr_ivp_facility created stopping RTR. %RTR-S-RTRSTOP, RTR stopped on node bznbzn [OPTIONAL] attempting to compile and link rtr test applications . . . If this system is not configured with an application development environment, or the platform does not support threads, then some messages about application compilation not succeeding are normal. multithreaded server rtr application compiled single-threaded client rtr application compiled applications rtrreq and rtrsrv available starting rtr and creating default facility %RTR-I-NOLOGSET, logging not set %RTR-S-RTRSTART, RTR started on node bznbzn %RTR-S-FACCREATED, facility RTR$DEFAULT_FACILITY created starting an rtr server application running an rtr client application, should complete in a few seconds stopping rtr %RTR-S-RTRSTOP, RTR stopped on node bznbzn Reliable Transaction Router Vx.y for Linux Installation Verification Procedure successful #
5.3. Complete RTR Setup
Give the RTR root directory and all its subdirectories "Full Control" access for all RTR users. You may then restrict access on individual files to read only. (All RTR usersrequire write access to the RTR journal directory.)
5.3.1. Check Network Availability
/etc/init.d/network statusTo start your network, execute the command
/etc/init.d/network start
5.3.2. Check Installed Files
Navigate to the directory where you installed RTR. The default is
/var/opt/rtr.
# rpm -q -l rtr_frontend
# rpm -q -i rtr_frontend
Name : rtr_frontend Relocations: /opt/rtr
Version : x.y Vendor: VSI
Release : zzz Build Date: Fri 07 Feb 2020 01:27:4T
Install date: Fri 07 Feb 2020 02:13:13 PM Build Host: hostnm
Group : Development/Middleware Source RPM: rtr_frontend-x_y-zzz.nom
Size : 22029958 License: Per Processor License fd
Packager : RTR Engineering
URL : https://www.vmssoftware.com
Summary : Reliable Transaction Router
Description :
Reliable Transaction Router(TM) (RTR) is an open client/server
software fault tolerant middleware for continuous high performance
distributed transaction processing.
#
5.3.3. Enable RTR Remote Commands
While this is not required to use RTR for Linux Frontend, to make it possible to execute RTR commands on remote systems, you must use the remote shell (RSH). See the documentation on remote shell on your Linux system.
The RSH service runs commands on remote computers running the RSH service. This command is available only if the TCP/IP protocol has been installed.
You can also execute remote commands with /NODE qualifiers
on certain RTR commands, and in conjunction with the RTR SET ENVIRONMENT command.
For more information on executing RTR commands remotely, refer to the VSI Reliable Transaction Router System Manager’s Manual.
5.3.4. Display Documentation
Soft copy documentation for Reliable Transaction Router is available on the RTR Software Kit in distilled PostScript (.pdf) file format. You can display .pdf files with Acrobat Reader, a free reader of electronic files from Adobe Systems.
Release Notes are placed in the /usr/share/doc directory
with the .pdf files.
5.3.5. Run RTR
rtroper group to run RTR. For more information
on RTR privileges, see the VSI Reliable Transaction Router System Manager’s Manual section on RTR Privileges.
To run RTR, follow these steps:
- To run RTR, enter the following command at the system prompt:
# rtr RTR> To start RTR, enter Start RTR at the
RTR>prompt.
5.3.5.1. Configure RTR Facilities and Partitions
For information on configuring RTR facilities and setting up partitions, refer to the VSI Reliable Transaction Router Getting Started and the VSI Reliable Transaction Router System Manager’s Manual.
5.3.6. Install and Run Applications
Once applications that use RTR have been designed and tested, they can be deployed on the systems configured for use with RTR. For information on designing applications, refer to the VSI Reliable Transaction Router Application Design Guide; for information on deployment and monitoring, refer to the VSI Reliable Transaction Router System Manager’s Manual.
Chapter 6. Full Installation on OpenVMS
Preparing for installation
Installing RTR
Completing RTR setup
6.1. Prepare for Installation
User-Changed Monitor Files
For all non-Linux platforms,if you have changed any RTR monitor (*.mon) files, you must rename them or they will be overwritten during installation. To avoid this, always work from renamed copies of RTR monitor files when making local modifications.
RTR V2 Command-line API Help
To retain RTR V2 help when installing later versions of RTR, before
uninstalling RTR make a copy of the RTR V2 help file that is on
SYS$COMMON:[SYSHLP]RTRHLP.HLB. Rename it, for example, to
RTRHLPV2.HLB.
After completing installation of the later version of RTR with its current help
file, copy the oldRTRHLPV2.HLB file back. You can then access the old file
from the DCL command line with the DCL command HELP @RTRHLPV2.
6.1.1. Check Software Distribution Kit
Reliable Transaction Router is distributed on CD-ROM. Use the Bill of Materials (BOM) received with your kit to verify the contents of your software distribution kit.
6.1.2. Check Login Privileges
You must have RTR$OPERATOR privileges to install and run RTR. For more information on RTR privileges, see the VSI Reliable Transaction Router System Manager’s Manual section on RTR Privileges.
6.1.3. Check Required Hardware
Software distribution device such as a CD-ROM
Terminal
You can use a character-cell or video terminal or a workstation when installing RTR.
An Alpha Server or Itanium that runs OpenVMS
See the VSI Reliable Transaction Router Software Product Description for additional hardware requirements.
6.1.4. Check Required Software
|
Prerequisite Products |
Purpose |
|
OpenVMS IA-64 Version 8.2-1 minimum |
System Software |
|
or | |
|
OpenVMS Alpha Version 7.3-2 minimum |
System Software |
|
One of the following must be present on your system to use RTR: | |
|
Networking Products | |
|
TCP/IP Services for OpenVMS (version depends on the platform and version of OpenVMS. Refer to the relevant SPD.) |
Network Transport |
|
DECnet or DECnet-Plus (version depends on the platform and version of OpenVMS. Refer to the relevant SPD.) |
Network Transport |
The Installation Verification Procedure (IVP) will complete successfully only if at least one of the supported network protocols (DECnet or TCP/IP) is installed.
For OpenVMS Alpha, there is no requirement that you must register a software license for RTR for OpenVMS. However, for OpenVMS IA-64, a license is required to run RTR. For further details, refer to the RTR for OpenVMS SPD.
6.1.5. Check Required Disk Space
|
Kit |
Blocks During Installation |
Blocks After Installation |
|---|---|---|
|
Reliable Transaction Router for OpenVMS |
53000 |
36000 |
$SHOW DEVICE SYS$SYSDEVICE
6.1.6. Check System Parameters
Value of CHANNELCNT
In rare instances and only as directed by VSI, you may need to change the value of CHANNELCNT, which is typically set at 256. CHANNELCNT specifies the number of permanent I/O channels available to the system. For details on how to set this, see the VSI Reliable Transaction Router System Manager’s Manual.
6.1.6.1. Size Global Pages and Sections Appropriately
|
System Parameter |
Required Amount |
|---|---|
|
GBLPAGES |
4000 |
|
GBLSECTIONS |
4 |
6.2. Install RTR
If RTR is already installed on your system, see Section B.4, ''Uninstalling on OpenVMS'', for information on uninstalling RTR and removing related processes.
Log on to the System Manager's account to do the installation.
The Reliable Transaction Router installation procedure uses the POLYCENTER Software Installation Utility (PCSI). For details on using PCSI, refer to the VSI OpenVMS System Manager's Manual, Section "Installing with the POLYCENTER Software Installation Utility."
PCSI$SOURCE is used to define the location of the
software kits you want to install. For example, if the Reliable Transaction Router software is located
in DISK1:[KITS], enter the following at the DCL prompt
(or include the line in the system manager's login command file):
$DEFINE PCSI$SOURCE DISK1:[KITS]
Installing on an ODS-5 Disk
RTR can be installed on an ODS-5 disk.
6.2.1. Installation Example
Minimum Required Version of OpenVMS
This system does not meet the RTR minimum required VMS version. The
minimum required version is V7.3-2.
Terminating is strongly recommended. Do you want to terminate? [YES]
If you see this error message, end your attempted RTR installation and upgrade your OpenVMS system to version 7.3-2.
$PRODUCT INSTALL RTR
The following product has been selected: DEC AXPVMS RTR Vx.y-zzzRun installation verification procedure [NO] yes
DECnet users: Have you read the Release Note regarding minimum version? [YES] yes Do you want the V2 programming kit installed? [NO] yes
Do you want to review the options? [NO] yes DEC AXPVMS RTR Vx.y-zzz: Reliable Transaction Router for OpenVMS Have all RTR processes on the system been stopped?: YES Run installation verification procedure: YES DECnet users: Have you read the Release Note regarding minimum version?: YES Do you want the V2 programming kit Installed ?: YES Are you satisfied with these options? [yes] Execution phase starting ... The following product will be installed to destination: DEC AXPVMS RTR Vx.y-zzz <logical for SYS$COMMON>
Portion done: 0% ...10% ...20% ...30% ...40% ...50% ...60% ...70% ...80% ...90% ...100% The following product has been installed: DEC AXPVMS RTR Vx.y-zzz Layered Product %PCSI-I-IVPEXECUTE, executing test procedure for DEC AXPVMS RTR Vx.y-zzz ...
%PCSI-I-IVPSUCCESS, test procedure completed successfully DEC AXPVMS RTR Vx.y-zzz: Reliable Transaction Router for OpenVMS Insert the following lines in SYS$MANAGER:SYSTARTUP_VMS.COM:
@sys$startup:rtr$startup.com Insert the following lines in SYS$MANAGER:SYSHUTDWN.COM: @sys$manager:rtr$shutdown See the Release Notes and documentation for use of the optional rtr$startup P1 parameter.
$
| Kit name, version and number. |
| All RTR processes must be stopped before a successful installation. |
| Optional request to run IVP after installation. |
| Answer yes if you need definition files required for programming to theV2 API. Otherwise, answer no. |
| The destination defaults to the logical defined for SYS$COMMON. |
| Indicates that the installation verification procedure (IVP) has started. |
| Add the indicated lines for automatic startup and shutdown of RTR. |
| See Section 6.3.1.1, ''Establishing Protocol Preference'' for information on use of the optional P1 parameter. |
6.2.2. Read Release Notes
$PRODUCT EXTRACT RELEASE_NOTES RTR /file=rtr_relnotes.txt
You should read the VSI Reliable Transaction Router Release Notes before using Reliable Transaction Router.
6.3. Complete RTR Setup
Edit system files
Verify user account requirements
6.3.1. Edit System Files
You must edit the system startup and shutdown files to provide for automatic startup and the installation of Reliable Transaction Router images when your system is rebooted.
Add the command line that starts Reliable Transaction Router to the system startup file, SYS$MANAGER:SYSTARTUP_VMS.COM. Reliable Transaction Router cannot start until after the network has started. You must position this new command line after the lines that invoke the network startup command procedures.
Add the command line that stops Reliable Transaction Router to the system shutdown file, SYS$MANAGER:SYSHUTDWN.COM.
6.3.1.1. Establishing Protocol Preference
- RTR_DNA_FIRST (DECnet first)
- RTR_DNA_ONLY (DECnet only)
- RTR_TCP_FIRST (TCP first)
- RTR_TCP_ONLY (TCP only)
|
If SYS$NODE is defined (DECnet installed), the default is: |
If SYS$NODE is not defined, the default is: |
|---|---|
|
RTR_DNA_FIRST |
RTR_TCP_ONLY |
This default behavior is the same as in previous versions of RTR and is backwards compatible with previous versions of RTR.
@sys$startup:rtr$startup.com
                        preferred_protocol (P1)
|
To use the following protocol: |
Set the value as: |
|---|---|
DECnet first | RTR_DNA_FIRST |
DECnet only | RTR_DNA_ONLY |
TCP/IP first | RTR_TCP_FIRST |
TCP/IP only | RTR_TCP_ONLY |
@sys$startup:rtr$startup.com RTR_TCP_FIRST
@sys$startup:rtr$shutdown.com preferred_protocol
@sys$startup:rtr$shutdown.com RTR_TCP_FIRST
6.3.2. Verify User Account Requirements
To work with Reliable Transaction Router, user accounts on your system must have certain quotas and privileges. The next two sections contain information on these requirements. If current settings are less than those required, increase them to the amounts required.
6.3.2.1. Check User Account Quotas
Account Quota | Value |
|---|---|
ASTLM | At least 2000 |
BIOLM | At least 2000 |
BYTLM | At least 500000 ? |
DIOLM | At least 2000 |
TQELM | At least 2000 |
6.3.2.2. Check User Account Privileges
NETMBX
TMPMBX
SYSLCK
On Identifiers
A fresh installation of RTR adds RTR$INFO and RTR$OPERATOR identifiers to those on your system (they are removed during an uninstall).
6.3.2.3. Check System Manager Account Privileges
The RTR System Manager (that is, the account that starts up RTR and creates facilities) must also have either OPER privilege or have the Rights Identifier RTR$OPERATOR.
6.3.3. Check Installed Files
$PRODUCT LIST RTR/SOURCE=[pcsi kit location]
6.3.4. Enable RTR Remote Commands
To make it possible to execute RTR commands on remote systems, enable the
capability with the SYSMAN Utility. See the documentation for SYSMAN in the OpenVMS
documentation set for information on this utility.
You can also execute remote commands with /NODE qualifiers on
certain RTR commands,and in conjunction with the RTR SET ENVIRONMENT command.
For more information on executing RTR commands remotely, refer to the VSI Reliable Transaction Router System Manager’s Manual.
6.3.5. Run RTR
$ run SYS$COMMON:[SYSEXE]RTR
RTR>
$ RTR
RTR>
You can then enter commands at the RTR prompt to configure RTR facilities and partitions, and run applications that use RTR.
6.3.5.1. Configure RTR Facilities and Partitions
For information on configuring RTR facilities and setting up partitions, refer to the VSI Reliable Transaction Router Getting Started and the VSI Reliable Transaction Router System Manager’s Manual.
6.3.6. Install and Run Applications
Once applications that use RTR have been designed and tested, they can be deployed on the systems configured for use with RTR. For information on designing RTR applications, refer to the VSI Reliable Transaction Router Application Design Guide; for information on deployment and use, refer to the VSI Reliable Transaction Router System Manager’s Manual.
Chapter 7. Full Installation on Windows
Preparing for installation
Installing RTR
Completing RTR setup
7.1. Prepare for Installation
User-Changed Monitor Files
For non-Linux platforms,if you have changed any RTR monitor (*.mon) files,
you must rename them or they will be overwritten during installation.
To avoid this, always work from renamed copies of RTR monitor files when making local
modifications. For the Linux platform, see Chapter 5, "Full Installation on Linux Frontend".
7.1.1. Check Software Distribution Kit
Reliable Transaction Router is distributed on CD-ROM. Use the Bill of Materials (BOM) received with your kit to verify the contents of your software distribution kit.
7.1.2. Check Login Privileges
You must have RTROperator and RTRInfo privileges to run RTR, and Windows Administrator privileges to install RTR. For more information on privileges, see the VSI Reliable Transaction Router System Manager’s Manual section on RTR Privileges.
7.1.3. Check Required Hardware
For client/server/router functionality, any Intel system that runs Windows 2000, Windows 2003or Windows XP.
For client functionality, any Intel system that runs Windows 2000, Windows 2003, or Windows XP.
7.1.4. Check Required Software
Windows 2000, Service Pack 1
Windows 2003
Windows XP
All systems must include TCP/IP support
7.1.5. Check Required Disk Space
The installation of the RTR base product requires about 19 megabytes of disk space. The installation procedure takes about two minutes to complete.
7.1.6. Check System Parameters
RTR has basic memory requirements. This section references setup instructions for the relevant system parameters.
7.1.6.1. Check Memory-Mapped I/O Requirements
For information on how to size memory-mapped I/O appropriately, refer to VSI Reliable Transaction Router System Manager’s Manual, RTR Shared Memory Sizing.
7.1.6.2. Check Virtual Memory Requirements
The basic memory requirement for an unconfigured RTRACP is 5.6MB. Additional memory may be required. For additional information, refer to the VSI Reliable Transaction Router System Manager’s Manual, RTRACP Virtual Memory Sizing for All Systems.
7.2. Install RTR
If you are installing on Windows 2000, Windows 2003, or Windows XP, ensure that you are logged in as the Administrator, or have administrator privileges.
If RTR is already installed on your system, see Section B.5: Uninstalling on Windows Systems, for information on uninstalling RTR and removing related processes.
Insert the RTR CD-ROM into the drive.
Exit all Windows programs to run Setup.
From the Start button, invoke Windows Explorer to view files.
Choose the drive letter of your CDROM and open the directory I386. Double click on the file
SETUP.EXE. This starts the InstallShield that takes you through the setup process.The InstallShield wizard steps you through the installation. Click on the Next button to continue installation or on the Cancel button to stop it.
Select the Typical, Compact or Custom installation as shown in Figure 7.1: Setup Type Screen.
Figure 7.1. Setup Type Screen 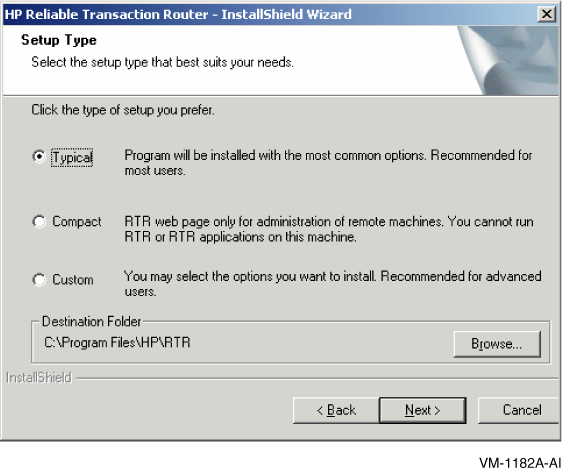
The typical installation provides the most common options. This choice is recommended for most users.
The Compact installation installs only those parts of RTR that are needed for administration of remote systems. You cannot run RTR or RTR applications on the machine where you do the Compact installation. You will have access to a web browser from which you can administer remote systems running RTR.
If you select the Custom installation, you can choose to install only certain parts of RTR, as shown in Figure 7.2, ''Select Features Screen ''.
Figure 7.2. Select Features Screen 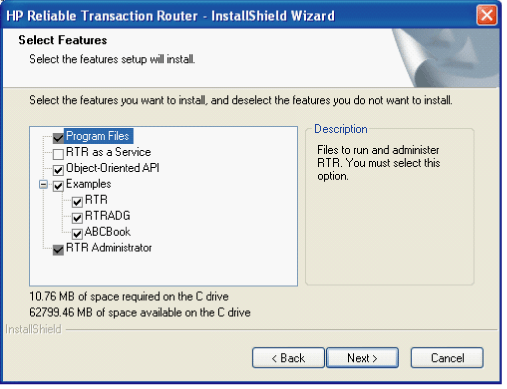 All Custom installations must include Program Files and the RTR Administrator. Other selections are optional.
Select this choice:
To install
RTR as a Service
A backend or router
Object-Oriented API
The C++ API
Examples
Working examples for RTR (C API code), RTRADG (C API code described in the VSI Reliable Transaction Router Application Design Guide), or ABCBook (C++ API code).
Accept the terms of the License Agreement. If you reject the terms, installation is stopped.
- Follow the screen instructions to enter the name of the directory where you want to install RTR. The default is:
C:\Program Files\HP\RTR
VSI recommends that you install RTR on a local hard disk (NTFS or FAT).
RTR as a Service runs only on Windows 2000, Windows 2003 or Windows XP; the InstallShield does not register the service but RTR provides batch procedures to do so in the target directory.
To use the batch procedures for RTR as a Service, follow this sequence:
Start -> Programs -> HP -> RTR -> Service -> Register
Setup adds a program icon to the Program Folder you select and installs files in the appropriate location.
The InstallShield completes the installation, displaying a progress graphic until installation is complete.
Click on Finish to complete the installation of RTR.
7.2.1. Read the Readme File
The Readme file provides information about RTR that could not be included in the printed documentation. The Readme file is located in the directory where you installed RTR. You should read the Readme before you use RTR. You can also open the RTR Readme from the Start menu as follows:
7.3. Complete RTR Setup
Note
The Windows registry is modified slightly as a result of a RTR installation.
7.3.1. Check Network Availability
RTR cannot start if the network is not available. Check that the network has started before starting RTR.
7.3.2. Check Installed Files
Navigate to the directory where you installed RTR.
Tree/F
7.3.3. Enable RTR Remote Commands
To make it possible to execute RTR commands on remote systems, you must use the remote shell (RSH). See the documentation on remote shell on your Windows system.
The RSH service runs commands on remote computers running the RSH service. This command is available only if the TCP/IP protocol has been installed.
You can also execute remote commands with /NODE qualifiers on certain RTR commands, and in conjunction with the RTR SET ENVIRONMENT command. For more information on executing RTR commands remotely, refer to the VSI Reliable Transaction Router System Manager’s Manual.
7.3.4. Display Documentation
Soft copy documentation for Reliable Transaction Router is available on the RTR Software Kit
in distilled PostScript (.pdf) file format. You can display .pdf
files with Acrobat Reader, a free reader of electronic files from Adobe Systems.
7.3.5. Run RTR
RTROperator or RTRInfo
privileges, which must be set by the Administrator. For more information
on RTR Privileges, see the VSI Reliable Transaction Router System Manager’s Manual section on RTR Privileges.
To run RTR, follow these steps:
Click on Start -> Programs -> HP -> RTR -> Reliable Transaction Router
This brings up a DOS-style RTR command window. To start RTR, enter Start RTR at the
RTR>prompt.Click on Start -> Programs -> HP -> RTR -> Web Browser Interface
This brings up the browser-based RTR screens with which you monitor and manage RTR.
7.3.5.1. Configure RTR Facilities and Partitions
For information on configuring RTR facilities and setting up partitions, refer to the VSI Reliable Transaction Router Getting Started and the VSI Reliable Transaction Router System Manager’s Manual.
7.3.6. Install and Run Applications
Once applications that use RTR have been designed and tested, they can be deployed on the systems configured for use with RTR. For information on designing applications, refer to the VSI Reliable Transaction Router Application Design Guide; for information on deployment and monitoring, refer to the VSI Reliable Transaction Router System Manager’s Manual.
Appendix A. Recovering from Errors
This appendix provides information to help you deal with problems that might occur during product installation or product use.
If you find an error in the documentation, send an email message to the internet address on the last pageof this appendix. Include the manual title, publication date, section, and page numbers where the error occurred.
A.1. Problems During Product Installation
If errors occur during the installation, the system displays failure messages.
The operating system version is incorrect.
The prerequisite software version is incorrect.
There is insufficient disk space.
The system parameter values for successful installation are insufficient.
For descriptions of error messages generated by these conditions, see the operating system documentation on system messages, recovery procedures, and software installation. For information on system software requirements, see the software and disk space requirements for your operating system.
A.2. Problems After Installation
U.S. customers who encounter a problem while using Reliable Transaction Router can report it to VSI Customer Support Service.
Customers without a service contract can arrange for per-call support.
The name and version number of the operating system you are using
The Reliable Transaction Router version number you are using
The hardware system you are using (such as a model number)
A brief description of the problem (one sentence, if possible)
Whether or not the problem is critical
Any other information that is helpful, such as the specific commands you used to run the software, the error messages displayed, and source listings of the relevant software module or lines of code
If the problem is related to Reliable Transaction Router documentation, send comments electronically
to the following email address: <info@vmssoftware.com>.
If you are reporting a specific documentation error, be sure to include the manual title, date from title page, section, and page numbers where the error occurred.
Appendix B. Uninstalling RTR
Remove commands do not remove all RTR files from your disks.
This is particularly important when you are upgrading from one version of RTR to another.
You must eliminate all RTR files from your system, but do not discard any customized monitor
files in /rtr or a journal containing recoverable transactions in /rtrjnl.
Copy these to another directory before completing the uninstall instructions.
If /rtrjnl or /rtr is a symbolic link to another directory,
first remove the target directory and all files contained in it, and then remove the symbolic
link.
B.1. Uninstalling on HP-UX I64
swremove and select RTR for uninstalling. For example, the following
shows the uninstallation display:
# swremove
Starting the terminal version of swremove...
To navigate in swremove:
-use the "Tab" key to move between screen elements
-use the "arrow" keys to move within screen elements
-use "Ctrl-F" for context-sensitive help anywhere in swremove
On screens with a menu bar at the top like this:
--------------------------------------------------------
|File View Options Actions                         Help|
|---- ---- ------- ------------------------------- —|
- use "Tab" to move from the list to the menu bar
- use the "arrow" keys to navigate
- use "Return" to pull down a menu or select a menu item
- use "Tab" to move from the menu bar to the list without selecting a menu item
- use the spacebar to select an item in the list
On any screen, press "CTRL-K" for more information on how to use the keyboard.
Press "Return" to continue...
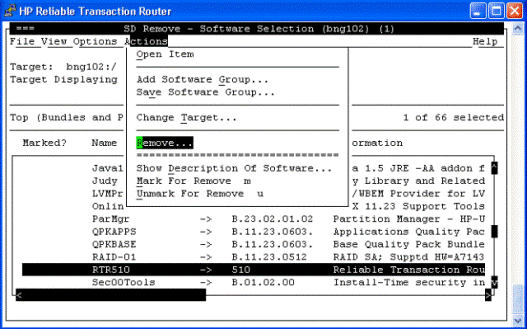
The sample uninstallation is as shown Figure B.1, ''HP-UX Sample Uninstallation''
B.2. Uninstalling on Linux I64
rpm -e rtr
uninstalling RTR...
B.3. Uninstalling on Linux I32 (Frontend)
rpm -e rtr_frontend
uninstalling RTR_FRONTEND...
#
To list all installed packages, issue the command rpm -qa.
B.4. Uninstalling on OpenVMS
- Stop all RTR processes on the system:
$ RTR STOP RTR$ RTR DISCONNECT SERVER/DAEMON
Check for any surviving processes such as
rtrdand applications programmed to handle RTR_STS_NOACP, and terminate any such processes until there are none left. Note that all the RTR ACP and comserver processes must be terminated beforertrd, otherwise they will create a newrtrd.Thertrdprocess can now be terminated with the STOP command or by issuing the following command:$ RTR DISC SERVER/DAEMON
Terminate all application processes linked to RTR. If you are running in a cluster configuration, you must remove RTR application processes from all the cluster members that use the disk where RTR was installed.
Processes can be terminated with the STOP command, or by a program that uses $FORCEX.
To verify that no RTR-related processes are still running on a node or cluster member, use the
SHOW DEVICE/FILEScommand to make sure that there are no remainingSYS$SHARE:LIBRTR*.EXEshareable images.- Remove RTR from your system.
$ PRODUCT REMOVE RTR
B.5. Uninstalling on Windows Systems
If you installed RTR as a service, you must unregister RTR as a service. Do this with the following menu selections from the Program menu:
Programs -> HP -> RTR -> Service -> Unregister
Delete all
*.LCKfiles located in the directory used for the previous installation, and theRTRenvpsfile (shared memory).- Stop all RTR processes on the system:
RTR STOP RTR RTR DISCONNECT SERVER/DAEMON
You can also use the Shutdown command, which executesShutdown.bat.Programs-> HP -> RTR -> Utilities ->Shutdown
Check for any surviving processes such as
rtrdand applications programmed to handle RTR_STS_NOACP, and terminate any such processes until there are none left. Note that all the RTR ACP and comserver processes must be terminated beforertrd, otherwise they will create a newrtrd.To verify that no RTR-related processes are still running on a node or cluster member, check for the existence of the
rtrdll.dllfile. Thertrdll.dllfile cannot be deleted if it is in use.To uninstall RTR, follow this menu selection process:
Control Panel -> Add/Remove Programs -> Reliable Transaction Router -> Remove
Terminate all application processes linked to RTR. If you are running in a cluster configuration, you must remove RTR application processes from all the cluster members that use the disk where RTR was installed.
- Remove previous versions of RTR from the disk:
DEL /S/Q C:\RTR
Distributed on software kit.
In downloadable kit.
At least 80000 for accounts running RTR applications. At least 500000 for accounts running the RTR ACP. These may need to be increased to accommodate large numbers of application programs and/or users. The formula to use is: 32K + 32K * n where n equals the number of application processes plus the number of users in the ACP's group.