Installation Guide
- Operating System and Version:
- VSI OpenVMS x86-64 Version 9.2
Preface
VMS Software, Inc. (VSI) is an independent software company licensed by Hewlett Packard Enterprise to develop and support the OpenVMS operating system.
1. Introducing OpenVMS x86-64 V9.2
This manual provides instructions for booting and installing VSI OpenVMS Version 9.2 for x86-64 (hereafter referred to as OpenVMS x86-64 V9.2) using an ISO file on guest virtual machines.
Note
You cannot upgrade from previous versions of OpenVMS x86-64. You must perform a fresh install of OpenVMS x86-64 V9.2.
2. Intended Audience
Users of this manual are expected to obtain and reference any additional documentation specific to their hardware and environment. Users are expected to know how to identify the various devices involved in their installation and be familiar with the console commands that are available on their system and virtual machines.
Users should be experienced with the different virtual machine platforms where they plan to run OpenVMS x86-64 V9.2 as a guest virtual machine.
Make sure you read the Release Notes, Installation Guide, and Boot Manager Guide prior to installing OpenVMS x86-64 V9.2.
3. Using the VSI Customer Portal
See the VSI OpenVMS x86-64 V9.2 announcement email for information about how to log issues against the VSI OpenVMS x86-64 V9.2 release and for using the VSI Services Portal athttps://sp.vmssoftware.com.
4. Other Related Documentation
VSI OpenVMS x86-64 V9.2 Release Notes
VSI x86-64 Cross-tools Kit Installation and Startup Guide
VSI OpenVMS Linker Manual
VSI Calling Standard Manual
VSI OpenVMS x86-64 Boot Manager User Guide
VSI OpenVMS TCP/IP Services V5.7 documentation at Documentation — VMS Software, Inc.
Third party documentation as cited throughout this document
5. Licensing
During the installation, you will be prompted to enter Product Authorization Keys for the base operating environment and any layered products that are not already included in the base OS.
A PAK is represented as a text structured file containing a series of named fields and unique values that were generated by VSI. You have the option of deferring PAK entry until after the installation and entering them using the OpenVMS LICENSE utility. If you choose to enter your PAKs during the installation, you can either type the values of each requested field, or copy-and-paste the values into the console (assuming your console connection supports this action, such as using a terminal emulator).
Below is an example of a typical PAK:
$ LICENSE REGISTER OPENVMS-X86-BOE -
/ISSUER=VSI -
/AUTHORIZATION=1-VSI-SAMPLAUTH-0001 -
/PRODUCER=VSI -
/UNITS=32 -
/TERMINATION_DATE=31-OCT-2022
/OPTIONS=(PCL,X86_64) -
/CHECKSUM=X-XXXX-XXXX-XXXX-XXXX
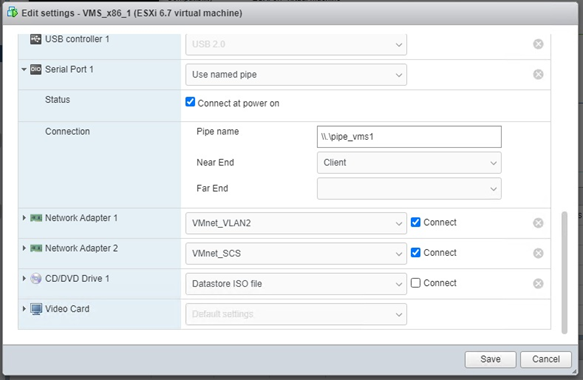
5.1. Using VMware vSphere Hypervisor Licenses
Use this procedure to run VMware vSphere Hypervisor on an ESXi server with a basic license (not Enterprise or Enterprise Plus). You must use serial ports within the same ESXi server.
Use the named pipe functionality to map COM1/OPA0: on the VMS virtual machine to a pipe on a management server on which a terminal emulator is installed.
With the VM system in client mode, use the following syntax:
\\.\pipe_xxx
With the management system in server mode, use the following syntax:
\\.\pipe_xxx, where xxx is a unique string for each VM.
The terminal emulator should be set for serial connection at 115200 baud.
The following two figures show how to set up pipes for a local terminal emulator-based console.
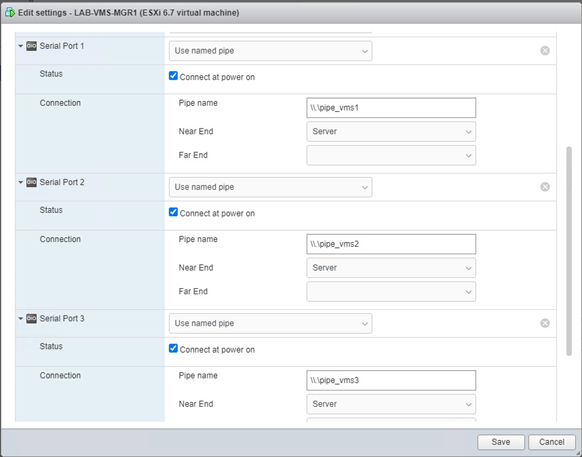
The following two figures show how to set up pipes between two local virtual machines where one plays the role of VMS console. This could be a virtual machine guest running any OS that supports a terminal emulator.

Chapter 1. Preparing to Install V9.2
1.1. Tested Platforms
VSI has tested VSI OpenVMS x86-64 V9.2 with the following VMware products:
| VMware Product | Minimum Versions Tested by VSI |
|---|---|
| Workstation Pro | V15.5.7 |
| Workstation Player | V16.1.0 |
| Fusion Pro | V11.5.7 |
| Fusion Player | V12.1.0 |
| ESXi | V6.7.0, V7.0.2 |
Important
Note that not all VMware license types are currently supported for running OpenVMS x86-64 V9.2.
VSI has tested VSI OpenVMS x86-64 V9.2 with the following Kernel-based Virtual Machine (KVM) products. The following table includes the Linux version and QEMU version:
| Linux Distribution | QEMU Version (Package Information) |
|---|---|
| CentOS Linux release 7.9.2009 (Core) | 2.12.0 (qemu-kvm-ev-2.12.0-44.1.el7_8.1) |
| Linux Mint 20.2 | 4.2.1 (Debian 1:4.2-3ubuntu6.21) |
| OpenSUSE Leap 15.3 |
5.2.0 (qemu-5.2.0-150300.112.4.src) |
| Rocky Linux 8.5 |
4.2.0 (qemu-kvm-4.2.0-59.module+el8.5.0+726+ce09ee88.1) |
| Ubuntu 18.04 LTS | 2.11.1 (Debian 1:2.11+dfsg-1ubuntu7.39) |
| Ubuntu 20.04.4 LTS | 4.2.1 (Debian 1:4.2-3ubuntu6.23) |
VSI has tested OpenVMS x86-64 V9.2 with Oracle VirtualBox 6.1.34 and regularly installs updates when they are available.
See the VSI OpenVMS x86-64 V9.2 Release Notes for more information about supported virtual environments.
1.2. Platforms Documentation
Due to the many third-party platform products that you can use with OpenVMS x86-64 V9.2, VSI cannot provide the complete documentation for these products. The following table lists each product and a URL to its documentation web site:
| Oracle VirtualBox | https://www.virtualbox.org/wiki/End-user_documentation |
| Redhat Enterprise Linux | https://access.redhat.com/documentation/en-us/red_hat_enterprise_linux/9 |
| VMware ESXi Enterprise | https://docs.vmware.com/en/VMware-vSphere/index.html |
| VMware Fusion | https://docs.vmware.com/en/VMware-Fusion/index.html |
| VMware Workstation Pro | https://docs.vmware.com/en/VMware-Workstation-Pro/index.html |
| VMware Workstation Player | https://docs.vmware.com/en/VMware-Workstation-Player/index.html |
1.2.1. Recommended Settings for Virtual Machines
VSI recommends that your OpenVMS virtual machine be configured with:
Memory Minimum of 6 GB
Minimum Number of CPUs: 2
Operating system: Other or 64-bit
At least two 8 GB SATA/AHCI disks
Boot Option: If present, disable Secure Boot, and select/enable UEFI or EFI (BIOS is not supported)
Console Communication
Serial line for non-console login
Network: Adapter Type or Device Model of e1000 (ESXi or KVM); 82540EM (VirtualBox)
CD/DVD (physical or virtual) device with the OpenVMS installation kit (the .ISO file) assigned to it
Chipset, where offered: ICHP (VirtualBox); Q35 (KVM)
Chapter 2. Booting and Installing on a Virtual Machine
This chapter provides instructions to boot and install V9.2 on a guest VM. As a prerequisite, you should use your host system's Platform Firmware Boot Manager (typically blue setup screens and menus) to set your host system up to boot to the UEFI Shell. See the OpenVMS x86-64 Boot Manager User Guide for more information.
Important
Examples shown in this section use VMware ESXi. Although some small differences in terminal behavior, console appearance, and log output exist with other VM environments, these examples should still be applicable regardless of your environment. In some environments, reboots of your VM automatically brings up the OpenVMS Boot Manager prompt instead of the UEFI Shell prompt. To avoid the possibility of odd character output and/or to ensure an accurate list of bootable devices for the OpenVMS Boot Manager, type the EXIT command at the BOOTMGR> prompt, and immediately press the ESC key repeatedly until your system's Platform Firmware Boot Manager screen is displayed. Then simply hit the RETURN key and the BootMgr> prompt will be displayed again.
2.1. Booting the Virtual Machine
Follow the steps in this section to boot your virtual machine.
The following figure shows the graphics console that comes up when the VM is started. At the Shell> prompt, enter the command map fs* to display the file systems available on your system.
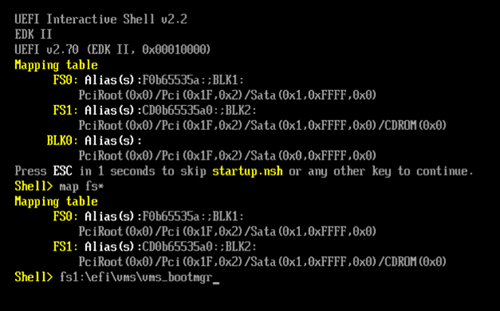
Choose the file system that maps to the .ISO file that you have downloaded and set up as a CDROM/DVD. The shell sees the .ISO file as a CDROM, so you need to choose an FSn that is labeled CDROM. In the above example, we know that fs1 is the .ISO that we want to boot.
Knowing that fs1 is associated with the CDROM that is the .ISO, enter the following command to run the Boot Manager:
fs1:\efi\vms\vms_bootmgr.efi
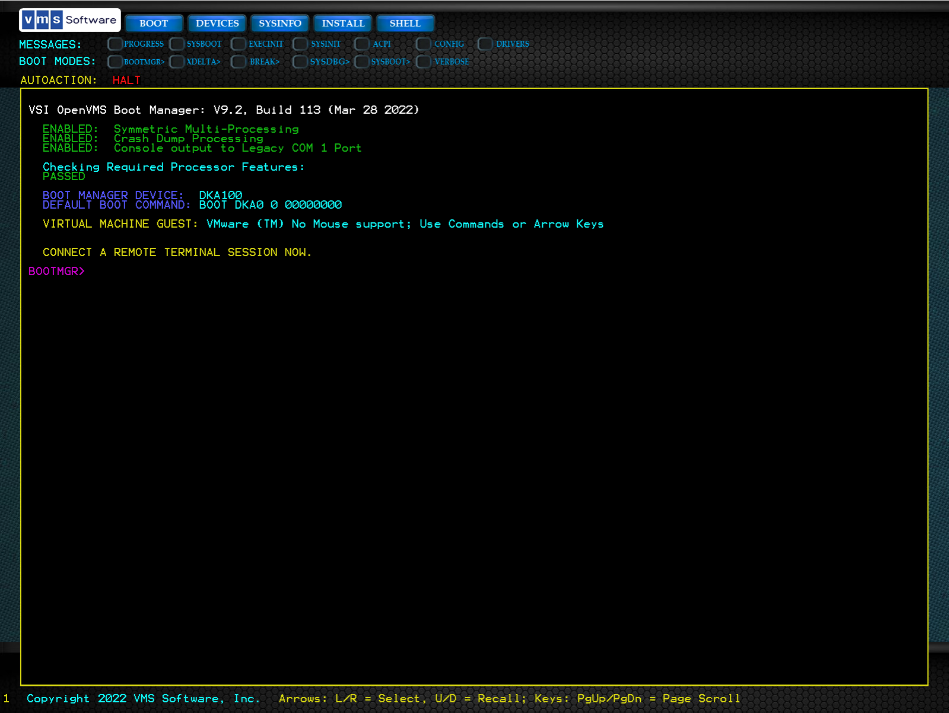
The OpenVMS Boot Manager is displayed in the graphics console as shown in the following figure.
Note
The graphics console may display somewhat differently when your hypervisor is running on a Windows or on a Linux system. In the figure, the OpenVMS Boot Manager is running in an ESXi client VM on an ESXi 7.0 server.
VSI recommends at this time to connect to the remote terminal/emulator of your choice using the VM host's IP address and the port you set up for your VM. Below is the log of a terminal connection using bash and telnet. Note the two telnet commands that are needed, and that a prompt is not yet visible:
 Bash-3.2$ telnet 10.0.1.10 2023
 Trying 10.0.1.10. . .
 Connected to myserver.mycompany.com.
 Escape character is '^]'.
 ^]
 telnet> unset crlf
 Will send carriage returns as telnet <CR><NUL>.
 ^]
 telnet> mode char
At the BOOTMGR> prompt on the graphics console, enter the DEVICES command to show the devices that have bootable VMS file systems on them. You must boot from the one labeled as the DVD, which should be the only device listed if this is your first OpenVMS installation.
At the BOOTMGR> prompt on the graphics console, type BOOTMGR> BOOT DKA0, where DKA0 represents the DVD device.
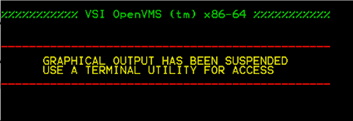
- When the DVD device is booted (that is, the OpenVMS installation kit is booted), the output on the graphics console display is suppressed. The graphics console displays the following message.
You must now use the terminal/emulator screen to continue with the installation. The OpenVMS Installation Menu should be displayed.
2.2. Installing OpenVMS x86-64 V9.2
This section provides a log of an OpenVMS x86-64 V9.2 boot and installation with subsequent reboots to complete the installation while using a remote terminal from a macOS. The user connected via telnet when the graphics console was at the initial BOOTMGR> prompt. The log below is an example of an installation as seen after the initial boot command has been given. This log can be used as a guide to installations where mostly default prompts are selected; exceptions to default selections are noted. The standard time zone prompts and other messages have been removed to improve readability.
 BOOTMGR> BOOT DKA100
 Booting...
 %VMS_BOOTMGR-I-INSTALL, Booting an OpenVMS Installation Kit...
 100%
 %%%%%%%%%%% VSI OpenVMS (tm) x86-64 %%%%%%%%%%%
 _______________________________________________
 GRAPHICAL OUTPUT HAS BEEN SUSPENDED
 USE A TERMINAL UTILITY FOR ACCESS
 _______________________________________________
 VSI Primary Kernel SYSBOOT Jun 2 2022 11:43:57
 %SYSBOOT-I-VMTYPE, Booting as a VMware (tm) Guest
 VMS Software, Inc. OpenVMS (TM) x86_64 Operating System, V9.2
             Copyright 2022 VMS Software, Inc.
   MDS Mitigation active, variant verw (MD_CLEAR)
CPU messages have been removed from this portion of the log.
     Installing required known files...
     Configuring devices...
%EIA0, Link up: 1000 mbit, fdx, flow control (rcv only), 08-00-27-C5-F8-A1
The installation procedure begins.
     ****************************************************************
     You can install or upgrade the OpenVMS X86-64 operating system
     or you can install or upgrade layered products that are included
     on the OpenVMS X86-64 distribution media.

     You can also execute DCL commands and procedures to perform
     "standalone" tasks, such as backing up the system disk.

     Please choose one of the following:

         1)  Upgrade, install or reconfigure OpenVMS X86-64 Version V9.2
         2)  Display layered products that this procedure can install
         3)  Install or upgrade layered products
         4)  Show installed products
         5)  Reconfigure installed products
         6)  Remove installed products
         7)  Find, Install or Undo patches; Show or Delete Recovery Data
         8)  Execute DCL commands and procedures
         9)  Shut down this system

 Enter CHOICE or ? for help: (1/2/3/4/5/6/7/8/9/?) 1
 ***********************************************************
Important
Throughout the procedure the OpenVMS installation menu is displayed. Please note that OpenVMS x86-64 V9.2 does not support menu items # 3, 5, 6, and 7.
     This procedure will ask a series of questions.

           () - encloses acceptable answers
           [] - encloses default answers

     Type your response and press the <Return> key.  Type:

           ? - to repeat an explanation
           ^ - to change prior input (not always possible)
           Ctrl/Y - to exit the installation procedure

     This procedure installs the OpenVMS X86-64 operating system.

     All software and data files that were previously on the
                 target disk will be removed.

     You must enter the device name for the target disk on which
     OpenVMS X86-64 will be installed.

 Enter device name for target disk: (? for choices) ?

 Device Name   Device Type Name           Volume Label    Size (blocks/xB)
 ------------  -------------------------  --------------  -------------------
  DKA100:       ATA VMware Virtual S
  DKA200:       ATA VMware Virtual S


     For volume label and device size enter ??

 Enter device name for target disk: (? for choices) dka100:

     Enter volume label for target system disk: [X86SYS] madrexsys

     OpenVMS V9.0 and later requires that the target system disk be
     initialized with On-Disk Structure Level 5 (ODS-5).

     Hard links can be enabled on ODS-5 disks.  WBEM Services for OpenVMS
     does not require hard links.  (? for more information)

 Do you want to enable hard links? (Yes/No/?) y

     You have chosen to install OpenVMS X86-64 on a new disk.

     The target system disk, DKA100:, will be initialized
     with structure level 5 (ODS-5).
     Hard links WILL be enabled.
     The disk will be labeled MADREXSYS.
     Any data currently on the target system disk will be lost.

 Is this OK? (Yes/No) Yes

     Initializing and mounting target....

     Creating page file....

     You must enter a password for the SYSTEM account.

     The password must be a minimum of 8 characters in length, and may not exceed
     31 characters. It will be checked and verified.
     The system will not accept passwords that can be guessed easily.

     The password will not be displayed as you enter it.

 Password for SYSTEM account:

 Re-enter SYSTEM password for verification:

     For your system to operate properly, you must set two parameters:
     SCSNODE and SCSSYSTEMID.

     SCSNODE can be from 1 to 6 letters or numbers. It must contain at least one letter.

     If you plan to use DECnet, SCSNODE must be the DECnet Phase IV node name, or the DECnet-Plus (Phase V) node synonym.

     If you have multiple OpenVMS systems, the SCSNODE on each system must be unique.

 Enter SCSNODE: madrex
 If you plan to use DECnet, SCSSYSTEMID must be set based on the DECnet Phase IV address.
Do you plan to use DECnet? (Yes/No) [Yes]
DECnet Phase IV addresses are in the format
DECnet_area_number.DECnet_node_number
DECnet_area_number is a number between 1 and 63.
DECnet_node_number is a number between 1 and 1023.
If you plan to use DECnet WITHOUT Phase IV compatible addresses,
enter 0.0.
Enter DECnet (Phase IV) Address: [1.1] 1.177
SCSSYSTEMID will be set to 1201.
This was calculated as follows:
(DECnet_area_number * 1024) + DECnet_node_number
Configuring the Local Time Zone You need to configure your local time zone. Please follow the prompts, which have been removed from this log for brevity, to select your time zone.
     If you have Product Authorization Keys (PAKs) to register,
     you can register them now.

 Do you want to register any Product Authorization Keys? (Yes/No) [Yes] No
Note
You can register the PAKs now by responding YES to the prompt, or later by responding NO. You register licenses later by using the SYS$UPDATE:VMSLICENSE.COM procedure or the LICENSE REGISTER command.
 The following products are part of the OpenVMS installation;
 they will be installed along with the OpenVMS operating system:

        o Availability Manager (base) for OpenVMS X86-64
        o TCP/IP Services for OpenVMS X86-64
        o KERBEROS for OpenVMS X86-64
        o SSL111 V1.1-1N for OpenVMS X86-64 (based on OpenSSL V1.1.1n)
        o OpenSSH for OpenVMS X86-64
        o 64-bit PERL for OpenVMS X86-64


 You can also install the following optional products along with the OpenVMS operating system:

      o DECwindows Motif for OpenVMS X86-64
      o DECnet-Plus for OpenVMS X86-64
      o DECnet Phase IV for OpenVMS X86-64

 If you want to change your selections, you can do so later in the installation by answering "NO" to the following question:

     "Do you want the defaults for all options?"
Do you want to install DECwindows Motif for OpenVMS X86-64 V1.8? (Yes/No) [Yes]
The DECnet-Plus kit is provided with the OpenVMS operating system kit.
DECnet Phase IV applications are supported by DECnet-Plus.
DECnet Phase IV is also provided as an option.
If you install DECnet-Plus and TCP/IP you can run DECnet
applications over a TCP/IP network. Please refer to the
VSI DECnet-Plus for OpenVMS Planning Guide for information
on running DECnet over TCP/IP.
Do you want to install DECnet-Plus for OpenVMS X86-64 V9.2-B?
(Yes/No) [Yes] no
Do you want to install DECnet Phase IV for OpenVMS X86-64 V9.2? (Yes/No) [Yes]
The installation operation can provide brief or detailed descriptions. In either case, you can request the detailed descriptions by typing ?.
Do you always want detailed descriptions? (Yes/No) [No] The kit validation information has been removed from this log for brevity.
The following product has been selected:

     VSI X86VMS OPENVMS V9.2                Platform (product suite)

 Configuration phase starting ...

 You will be asked to choose options, if any, for each selected product and for
 any products that may be installed to satisfy software dependency requirements.

 Configuring VSI X86VMS OPENVMS V9.2: OPENVMS and related products Platform

    Copyright 2015-2022 VMS Software, Inc.

    VMS Software, Inc.

 Do you want the defaults for all options? [YES]

    Availability Manager (base) for OpenVMS X86-64

    TCP/IP Services for OpenVMS X86-64

* Product VSI X86VMS TCPIP X6.0-16 requires a system reboot.
  Can the system be REBOOTED after the installation completes? [YES]
Important
VSI recommends to accept the default for the reboot. Responding with No will abort the installation.
    KERBEROS for OpenVMS X86-64
    SSL111 V1.1-1N for OpenVMS X86-64 (based on OpenSSL V1.1.1n)
    OpenSSH for OpenVMS X86-64
    64-bit PERL for OpenVMS X86-64

 Do you want to review the options? [NO]
 Execution phase starting ...
At this point, the installation procedure begins the execution phase and provides a list of products that will be installed and other informational messages. This information has been removed from this log for brevity.
 Portion done: 0%...10%...20%...30%...40%...50%...60%...70%...80%...90%

 %PCSI-I-PRCOUTPUT, output from subprocess follows ...
 % - Execute SYS$MANAGER:TCPIP$CONFIG.COM to proceed with configuration of
 %   VSI TCP/IP Services for OpenVMS.
 %
  Portion done: 100%

 % - Execute SYS$MANAGER:TCPIP$CONFIG.COM to proceed with configuration of
 %   VSI TCP/IP Services for OpenVMS.
 %

 Portion done: 100%

 The following products have been installed:
     VMSPORTS X86VMS PERL534 T5.34-0        Layered Product
     VSI X86VMS AVAIL_MAN_BASE V9.2         Layered Product
     VSI X86VMS DECNET_PHASE_IV V9.2        Layered Product
     VSI X86VMS DWMOTIF V1.8                Layered Product
     VSI X86VMS DWMOTIF_SUPPORT V9.2        Layered Product
     VSI X86VMS KERBEROS V3.3-2             Layered Product
     VSI X86VMS OPENSSH V8.9-1B             Layered Product
     VSI X86VMS OPENVMS V9.2                Platform (product suite)
     VSI X86VMS SSL111 V1.1-1N              Layered Product
     VSI X86VMS TCPIP X6.0-16               Layered Product
     VSI X86VMS VMS V9.2                    Operating System

VSI X86VMS OPENVMS V9.2: OPENVMS and related products Platform

     VSI X86VMS OPENVMS V9.2: OPENVMS and related products Platform

     VSI X86VMS TCPIP X6.0-16: VSI TCP/IP Services for OpenVMS.

     VSI X86VMS SSL111 V1.1-1N: SSL111 for OpenVMS X86-64 V1.1-1N (Based on OpenSSL 1.1.1n)

     Review the Installation Guide and Release Notes for post install directions.

     Review the Installation Guide and Release Notes for post upgrade verification suggestions.

     Refer to SYS$HELP:SSL111-N-X86.RELEASE_NOTES for more information.

     Check the release notes for current status of the product.
 VSI X86VMS KERBEROS V3.3-2

     Configure and set up Kerberos

     If Kerberos will be run on this system, but has not been used previously, you need
     to perform the following steps.

      o Run the Kerberos configuration procedure:

        @SYS$STARTUP:KRB$CONFIGURE.COM

      o Add the following line to SYS$MANAGER:SYSTARTUP_VMS.COM:

        $ @SYS$STARTUP:KRB$STARTUP

      o Add the following line to SYS$MANAGER:SYLOGIN.COM:

        $ @SYS$MANAGER:KRB$SYMBOLS

     Press RETURN to continue:

      VSI X86VMS SSL111 V1.1-1N: SSL111 for OpenVMS X86-64 V1.1-1N (Based on OpenSSL 1.1.1n)

      Review the Installation Guide and Release Notes for post install directions.

      Review the Installation Guide and Release Notes for post upgrade verification suggestions.

      Refer to SYS$HELP:SSL111-N-X86.RELEASE_NOTES for more information.

  VMSPORTS X86VMS PERL534 T5.34-0

     Post-installation tasks are required for Perl for OpenVMS.

     To use the Perl provided with this kit, run the following set-up command procedure,
     assuming you installed in SYS$COMMON.

        $ @sys$common:[perl-5_34]perl_setup.com

     You may wish to put that command in SYS$MANAGER:SYLOGIN.COM to make Perl available
     to all users on the system.

     Perl includes its own help system called perldoc.  Type

        $ perldoc perldoc

     for the documentation to perldoc itself.  Type

        $ perldoc perldelta

     for the changes that are new in version T5.34-0 of Perl.

     There are many Perl-related resources on the web; point your browser at:

        http://www.perl.org

     to get started, and thank you for using Perl for OpenVMS.

    %PCSI-I-SYSTEM_REBOOT, executing reboot procedure ...

     Shutdown/reboot deferred when this product is
    installed as part of the O/S installation/upgrade

    %PCSI-I-SYSTEM_REBOOT, executing reboot procedure ...
    Running SYS$UPDATE:SYS$MD.COM to update the memory disk...


    DKA0:[VMS$COMMON.SYS$LDR]SYS$MD.DSK;1 created (177712 blocks in 1 extent),
        mounted on LDM7113: (volume label MD22159DF16A) with 1018 free blocks,
        containing OpenVMS V9.2.


     %LD-I-UNIT, Allocated device is LDM7114:


     The installation is now complete.

     When the newly installed system is first booted, a special startup procedure will be
     run.  This procedure will:

        o  Configure the system for standalone or OpenVMS Cluster operation.
        o  Run AUTOGEN to set system parameters.
        o  Reboot the system with the newly set parameters.

     You may shut down now or continue with other operations.

  Process X86VMS_INSTALL logged out at 8-JUN-2022 15:52:14.84

 Press Return to continue...
 ****************************************************************
 You can install or upgrade the OpenVMS X86-64 operating system or you can install or upgrade layered products that are included on the OpenVMS X86-64 distribution media.

 You can also execute DCL commands and procedures to perform "standalone" tasks, such as backing up the system disk.

 Please choose one of the following:

  1) Upgrade, install or reconfigure OpenVMS X86-64 Version V9.2
  2) Display layered products that this procedure can install
  3) Install or upgrade layered products
  4) Show installed products
  5) Reconfigure installed products
  6) Remove installed products
  7) Find, Install or Undo patches; Show or Delete Recovery Data
  8) Execute DCL commands and procedures
  9) Shut down this system

 Enter CHOICE or ? for help: (1/2/3/4/5/6/7/8/9/?) 9
Important
Throughout the procedure the OpenVMS installation menu is displayed. Please note that OpenVMS x86-64 V9.2 does not support menu items # 3, 5, 6, and 7.
 Shutting down the system

 VSI Dump Kernel SYSBOOT Jun 2 2022 11:43:57

 %ENTROPY, Entropy collection disabled for dump.

** Dumping error logs to the system disk (MADREX$DKA100:)
** Error logs dumped to MADREX$DKA100:[SYS0.SYSEXE]SYS$ERRLOG.DMP
** (used 36 out of 48 available blocks)

 Restarting the system...
You must return back to the graphics console screen, and at the Shell> prompt, type the following to bring up the VMS Boot Manager:
vms_bootmgr.efi
Note
You will observe that whatever is typed in the graphics console screen is echoed on your terminal/emulator screen.
vms_bootmgr.efi


 VSI OpenVMS Boot Manager: V9.2, Build 113 (Mar 28 2022)

 ENABLED: Symmetric Multi-Processing
 ENABLED: Crash Dump Processing
 ENABLED: Console output to Legacy COM 1 Port

 Checking Required Processor Features:
 PASSED

 BOOT MANAGER DEVICE:  DKA100
 DEFAULT BOOT COMMAND: BOOT DKA0 0 00000000

 VIRTUAL MACHINE GUEST: VMware (TM) No Mouse support; Use Commands or Arrow Keys

 CONNECT A REMOTE TERMINAL SESSION NOW.
Still on the graphics console screen, enter the DEVICES command to see the list of bootable devices and ensure the HD/SATA Disk with the OpenVMS label you used during your installation is listed.
Type the BOOT command using the DKxn device with the correct label:
 BOOTMGR>DEVICES
  BOOTABLE DEVICES (System Disks, Installation Kits, other):

  DKA0     (DVD) = FS1    UEFI: V9_2         OpenVMS: None         1338  MB  SATA DVD
  DKA100   (HD) = FS0     UEFI: V9_2         OpenVMS: MADREXSYS    12288 MB  SATA Disk

  BOOTMGR> BOOT DKA100
Return to your terminal screen when you see the message that the graphical output has been suspended.
Booting...
 %VMS_BOOTMGR-I-INSTALL, Booting an OpenVMS Installation Kit...

 %%%%%%%%%%% VSI OpenVMS (tm) x86-64 %%%%%%%%%%%

_______________________________________________

      GRAPHICAL OUTPUT HAS BEEN SUSPENDED
      USE A TERMINAL UTILITY FOR ACCESS
_______________________________________________

 VSI Primary Kernel SYSBOOT Jun 2 2022 11:43:57

 %SYSBOOT-I-VMTYPE, Booting as a VMware (tm) Guest

    VMS Software, Inc. OpenVMS (TM) x86_64 Operating System, V9.2

         Copyright 2022 VMS Software, Inc.

 MDS Mitigation active, variant verw(MD_CLEAR)
CPU messages have been removed from this portion of the log.
Installing required known files...

 Configuring devices...
Informational system messages have been removed from this portion of the log.
 AUTOGEN will now be run to compute the new system parameters. The system will then shut down and reboot, and the installation or upgrade will be complete.

 After rebooting you can continue with such system management tasks as:

     Configuring networking software (TCP/IP Services, DECnet, other)
     Using SYS$MANAGER:CLUSTER_CONFIG.COM to create an OpenVMS Cluster
     Creating FIELD, SYSTEST and SYSTEST_CLIG accounts if needed

 %AUTOGEN-I-BEGIN, GETDATA phase is beginning.
AUTOGEN informational messages have been removed from this portion of the log.
 %AUTOGEN-I-SYSGEN, parameters modified
 %AUTOGEN-I-END, SETPARAMS phase has successfully completed.
 %AUTOGEN-I-BEGIN, REBOOT phase is beginning.

 The system is shutting down to allow the system to boot with the generated site-specific parameters and installed images.

 The system will automatically reboot after the shutdown and the upgrade will be complete.

     SHUTDOWN -- Perform an Orderly System Shutdown on node MADREX
System informational messages have been removed from this portion of the log.
 VSI Dump Kernel SYSBOOT Jun 2 2022 11:43:57

 ** Dumping error logs to the system disk (MADREX$DKA100:)
 ** Error logs dumped to MADREX$DKA100:[SYS0.SYSEXE]SYS$ERRLOG.DMP
 ** (used 36 out of 160 available blocks)

 Restarting the system...
Once again you must return to the graphics console to boot your device. At the Shell> prompt, type VMS_BOOTMGR.EFI then at the BOOTMGR> prompt, enter the DEVICES command to see the list of bootable devices and ensure the HD/SATA Disk with the OpenVMS label you used during your installation is listed.
Type the BOOT command using the DKxn device with the correct label:
BOOTMGR>BOOT DKA100
Return to your terminal screen when you see the message that the graphical output has been suspended.
VSI OpenVMS Boot Manager: V9.2, Build 113 (Mar 28 2022)

 ENABLED: Symmetric Multi-Processing
 ENABLED: Crash Dump Processing
 ENABLED: Console output to Legacy COM 1 Port

 Checking Required Processor Features:
 PASSED

 BOOT MANAGER DEVICE:  DKA0
 DEFAULT BOOT COMMAND: BOOT DKA100 0 00000000


 VIRTUAL MACHINE GUEST: VMware (TM) No Mouse support; Use Commands or Arrow Keys

 CONNECT A REMOTE TERMINAL SESSION NOW.

 BOOTMGR> DEVICES
 BOOTABLE DEVICES (System Disks, Installation Kits, other):

 DKA100        (HD) = FS0    UEFI: V9_2         OpenVMS: MADREXSYS    12288 MB  SATA Disk
 DKA0     (DVD) = FS1    UEFI: V9_2         OpenVMS: None         1338  MB  SATA DVD

 BOOTMGR>BOOT DKA100

 Booting...

 %%%%%%%%%%% VSI OpenVMS (tm) x86-64 %%%%%%%%%%%
 _______________________________________________

 GRAPHICAL OUTPUT HAS BEEN SUSPENDED
 USE A TERMINAL UTILITY FOR ACCESS
 _______________________________________________

 VSI Primary Kernel SYSBOOT Jun 2 2022 11:43:57

 %SYSBOOT-I-VMTYPE, Booting as a VMware (tm) Guest

     VMS Software, Inc. OpenVMS (TM) x86_64 Operating System, V9.2

                  Copyright 2022 VMS Software, Inc.
 MDS Mitigation active, variant verw(MD_CLEAR)
CPU messages have been removed from this portion of the log.
 %EIA0, Link up: 1000 mbit, fdx, flow control (rcv only), 08-00-27-C5-F8-A1
 %RUN-S-PROC_ID, identification of created process is 00000404
 %RUN-S-PROC_ID, identification of created process is 00000405
OPCOM messages have been removed from this portion of the log.
The OpenVMS system is now executing the site-specific startup commands.
OPCOM messages have been removed from this portion of the log.
  Accounting information:
  Buffered I/O count:               2864      Peak working set size:      13968
  Direct I/O count:                 1444      Peak virtual size:         274624
  Page faults:                      3612      Mounted volumes:                0
  Charged CPU time:        0 00:00:02.16      Elapsed time:       0 00:00:07.22
The installation is complete. The Welcome to OpenVMS banner and the Username: prompt is displayed after pressing the Return/Enter key.
<enter>
 Welcome to OpenVMS (TM) x86_64 Operating System, Version V9.2

 Username: SYSTEM

 Password:

 VMS Software, Inc. OpenVMS (TM) x86_64 Operating System, V9.2
$
2.3. Post-Installation Steps for OpenSSH
OpenSSH has been integrated into the OpenVMS x86-64 V9.2 installation as a required layered product and installed unconditionally. However, before OpenSSH can be used, several manual steps are needed after installation:
Boot the target disk of the OpenVMS x86-64 V9.2 installation.
Log into the system with the SYSTEM account.
Configure and start up TCP/IP.
Execute the following OpenSSH command procedures in the exact order listed:
$ @sys$common:[openssh.bin]ssh$create_account.com$ @sys$common:[openssh.bin]ssh$create_startup_file.com$ @sys$common:[openssh.bin]ssh$generate_keys.com$ @sys$common:[openssh.bin]ssh$install_info.com
To begin using OpenSSH, it must also be started, which can be done by updating the system files as described by SSH$INSTALL_INFO.COM and rebooting or by executing the following startup procedure explicitly:
$ @SYS$STARTUP:SSH$STARTUP.COM
Also, you can define logical names for the SSH commands using:
$ @SSH$ROOT:[BIN]SSH$DEFINE_COMMANDS.COM
OpenSSH is now ready for use.
Note
The SSH$INSTALL_INFO.COM procedure, above, describes post-installation steps, first an update if the system is part of a cluster, and then updates to apply to the system startup and shutdown command files for any system, as follows:
In a cluster, on all the nodes that are going to use the same common ssh$root installation directory as the current node, copy the following files to the SYS$STARTUP directory of each node:
SYS$STARTUP:SSH$STARTUP.COM
SYS$STARTUP:SSH$SHUTDOWN.COM
SYS$STARTUP:SSH$DEFINE_ROOT.COM
To automatically start OpenVMS OpenSSH during system startup, add the following line to the file SYS$MANAGER:SYSTARTUP_VMS.COM after the TCPIP startup command procedure:
$ @SYS$STARTUP:SSH$STARTUP.COM
To shut down OpenVMS OpenSSH during system shutdown, add the following line to the file SYS$MANAGER:SYSHUTDWN.COM:
$ @SYS$STARTUP:SSH$SHUTDOWN.COM
Running the command procedure SSH$DEFINE_COMMANDS.COM creates logical names for the OpenSSH utility commands, as listed below. Individual users may add this command procedure to their LOGIN.COM file, or it can be added to SYLOGIN.COM to define these logical names for all users.
SCP
SFTP
SSH_ADD
SSH_AGENT
SSH_KEYGEN
SSH_KEYSCAN
SSH
The command procedure SYS$COMMON:[OPENSSH.BIN]SSH$DEASSIGN_COMMANDS.COM can be used to deassign these commands.
Note
If SSH$DEFINE_COMMANDS.COM is run with the parameter "ALL", the following additional commands will be defined. These commands are intended primarily for administrative purposes and generally are not used by other users.
SSHSTART
Starts and creates (if necessary) OpenSSH services. Before running this command, check the file SSH$ROOT:[ETC]SSHD_CONFIG to ensure that SSH server configuration details are correct. You may also need to modify the client configuration file SSH$ROOT:[ETC]SSH_CONFIG before starting the services.
SSHSTO*P
Stops OpenSSH services. If the parameter "ALL" is specified with this command, the service definitions will be removed from the TCP/IP configuration.
SSHSH*OW
Shows details of running OpenSSH processes including SSH connections, number of connected clients, and so on. Note that each client connection consists of two processes, namely a process with a name of the form SSHD_BGxxxxx (where xxxxx is the number of the associated BG device), and a user process with a name of the form FTAxxx_USERNAME for the USERNAME in question. The name of the user process can be changed by the user.
SSHVER*SION
Displays information about the various OpenSSH programs, including version details and related data.
Chapter 3. Networking on V9.2
This chapter provides information about networking options and instructions for DECnet Phase IV and for VSI TCP/IP Services on OpenVMS x86-64 V9.2.
3.1. Setting Up DECnet Phase IV
During the installation, if you chose to install DECnet Phase IV, you need to configure this software using the NETCONFIG command procedure. See the DECnet for OpenVMS Guide to Networking manual for more information.
Once you have configured DECnet Phase IV, edit SYS$COMMON:[SYSMGR]SYSTARTUP_VMS.COM so that the software starts when the system reboots. You can have the software start interactively or in batch mode by making one of the following changes:
Locate and uncomment the line:
$!$ START/NETWORK DECNET
So it now appears as:
$ START/NETWORK DECNET
To start the network in a batch job (speeds up startup) locate and uncomment the line:
$!$ SUBMIT SYS$MANAGER:STARTNET.COM
So it now appears as:
$ SUBMIT SYS$MANAGER:STARTNET.COM
For more DECnet Phase IV documentation, visit Documentation — VMS Software, Inc.
3.2. Configuring TCP/IP Services V6.0
This section provides information about configuring VSI TCP/IP Services for OpenVMS V6.0. The following is an example, and you should apply settings that are appropriate for your environment.
Log in to your SYSTEM account and enter:
 $ @tcpip$config

       VSI TCP/IP Services for OpenVMS Configuration Menu

       Configuration options:

             1 - Core environment
             2 - Client components
             3 - Server components
             4 - Optional components

             5 - Shutdown VSI TCP/IP Services for OpenVMS
             6 - Startup VSI TCP/IP Services for OpenVMS
             7 - Run tests

             A - Configure options 1 - 4
           [E] - Exit configuration procedure

 Enter configuration option: a

 VSI TCP/IP Services for OpenVMS Core Environment Configuration Menu

       Configuration options:

             1 - Domain
             2 - Interfaces
             3 - Routing
             4 - BIND Resolver
             5 - Time Zone

             A - Configure options 1 - 5
           [E] - Exit menu

 Enter configuration option: 1

 DOMAIN Configuration

 Enter Internet domain: node1.example.com

 VSI TCP/IP Services for OpenVMS Core Environment Configuration Menu

       Configuration options:

             1 - Domain
             2 - Interfaces
             3 - Routing
             4 - BIND Resolver
             5 - Time Zone

             A - Configure options 1 - 5
           [E] - Exit menu

 Enter configuration option: 2

 VSI TCP/IP Services for OpenVMS Interface & Address Configuration Menu

 Hostname Details: Configured=Not Configured, Active=Not Configured

 Configuration options:

    0 - Set The Target Node (Current Node: <your_node>)
    1 - IE0 Menu (EIA0: TwistedPair 1000mbps)
  [E] - Exit menu

 Enter configuration option: 1

VSI TCP/IP Services for OpenVMS Interface IE0 Configuration Menu (
Node: <your_node>

 Configuration options:

          1 - Add a primary address on IE0
          2 - Add an alias address on IE0
          3 - Enable DHCP client to manage address on IE0

        [E] - Exit menu

 Enter configuration option: 1
 * Is this address used by Clusters over IP (IPCI) [NO]:

     IPv4 Address may be entered with CIDR bits suffix.
     E.g. For a 16-bit netmask enter 192.0.2.1/16

 Enter IPv4 Address []: 192.0.2.15
 Default netmask calculated from class of IP address: 255.0.0.0

     IPv4 Netmask may be entered in dotted decimal notation,
     (e.g. 255.255.0.0), or as number of CIDR bits (e.g. 16)

 Enter Netmask or CIDR bits [255.0.0.0]: 255.0.0.0
 Enter hostname []: <your_node>

 Requested configuration:

       Node     : <your_node>
       Interface: IE0
       IPCI     : No
       Address  : 192.0.2.15/8
       Netmask  : 255.0.0.0 (CIDR bits: 8)
       Hostname : <your_node>

 * Is this correct [YES]:

 Added hostname <your_node> (192.0.2.15) to host database

 NOTE: The system hostname is not configured.
  It will now be set to <your_node> (192.0.2.15)
  This can be changed later via the Interface Configuration Menu.

 Updated system hostname in configuration database

 Added Address IE0: 192.0.2.15 to configuration database

 VSI TCP/IP Services for OpenVMS Interface & Address Configuration Menu

 Hostname Details: Configured=<your_node>, Active=Not Configured

 Configuration options:

    0 - Set The Target Node (Current Node: <your_node>)
    1 - IE0 Menu (EIA0: TwistedPair 1000mbps)
    2 - 192.0.2.15/8      <your_node>             Configured
  [E] - Exit menu

 Enter configuration option: e


 VSI TCP/IP Services for OpenVMS Core Environment Configuration Menu

       Configuration options:

             1 - Domain
             2 - Interfaces
             3 - Routing
             4 - BIND Resolver
             5 - Time Zone

             A - Configure options 1 - 5
           [E] - Exit menu

 Enter configuration option: 3


 DYNAMIC ROUTING Configuration


       Dynamic routing has not been configured.

       You may configure dynamic ROUTED or GATED routing.
       You cannot enable both at the same time. If you want
       to change from one to the other, you must disable the
       current routing first, then enable the desired routing.

       If you enable dynamic ROUTED routing, this host will use the
       Routing Information Protocol (RIP) - Version 1 to listen
       for all dynamic routing information coming from other
       hosts to update its internal routing tables.
       It will also supply its own Internet addresses to
       routing requests made from remote hosts.

       If you enable dynamic GATED routing, you will be able to
       configure this host to use any combination of the following
       routing protocols to exchange dynamic routing information
       with other hosts on the network:
          Routing Information Protocol (RIP) - Version 1 & 2
             Router Discovery Protocol (RDISC)
             Open Shortest Path First (OSPF)
             Exterior Gateway Protocol (EGP)
             Border Gateway Protocol (BGP-4)
             Static routes

 * Do you want to configure dynamic ROUTED or GATED routing [NO]:

       A default route has not been configured.
 * Do you want to configure a default route [YES]:
 Enter your Default Gateway host name or address: 192.0.2.2

       192.0.2.2 is not in the local host database.
       If you want to enter the default gateway in the local host
       database, enter its host name. Otherwise, enter <CR>.

 Enter the Default Gateway host name []:

 VSI TCP/IP Services for OpenVMS Core Environment Configuration Menu

       Configuration options:

             1 - Domain
             2 - Interfaces
             3 - Routing
             4 - BIND Resolver
             5 - Time Zone

             A - Configure options 1 - 5
           [E] - Exit menu

 Enter configuration option: e

    VSI TCP/IP Services for OpenVMS Configuration Menu
        Configuration options:

             1 - Core environment
             2 - Client components
             3 - Server components
             4 - Optional components
             5 - Shutdown VSI TCP/IP Services for OpenVMS
             6 - Startup VSI TCP/IP Services for OpenVMS
             7 - Run tests

             A - Configure options 1 - 4
           [E] - Exit configuration procedure
Enter configuration option: 2

 VSI TCP/IP Services for OpenVMS Client Components Configuration Menu

       Configuration options:

             1 - DHCP Client      Disabled Stopped
             2 - FTP Client       Disabled Stopped
             3 - NFS Client       Disabled Stopped
             4 - REXEC and RSH    Disabled Stopped
             5 - RLOGIN           Disabled Stopped
             6 - SMTP             Disabled Stopped
             7 - TELNET           Disabled Stopped
             8 - TELNETSYM        Disabled Stopped

             A - Configure options 1 - 8
           [E] - Exit menu

 Enter configuration option: 2


 FTP CLIENT Configuration

 Service is not enabled.
 Service is stopped.

       FTP CLIENT configuration options:

             1 - Enable service on this node

           [E] - Exit FTP_CLIENT configuration

 Enter configuration option: 1

 The FTP SERVER is not enabled.

 * Do you want to configure FTP SERVER [NO]: Y

 FTP Configuration

 Service is not defined in the SYSUAF.
 Service is not defined in the TCPIP$SERVICE database.
 Service is not enabled.
 Service is stopped.

       FTP configuration options:

             1 - Enable service on this node

           [E] - Exit FTP configuration

 Enter configuration option: 1


 %TCPIP-I-INFO, creating TCPIP$AUX identifier (uic=[3655,*])
 Creating FTP Service Entry

 VSI TCP/IP Services for OpenVMS Client Components Configuration Menu

       Configuration options:

             1 - DHCP Client      Disabled Stopped
             2 - FTP Client       Enabled Stopped
             3 - NFS Client       Disabled Stopped
             4 - REXEC and RSH    Disabled Stopped
             5 - RLOGIN           Disabled Stopped
             6 - SMTP             Disabled Stopped
             7 - TELNET           Disabled Stopped
             8 - TELNETSYM        Disabled Stopped

             A - Configure options 1 - 8
           [E] - Exit menu

 Enter configuration option: 7


 TELNET Configuration

 Service is not defined in the SYSUAF.
 Service is not defined in the TCPIP$SERVICE database.
 Service is not enabled.
 Service is stopped.

       TELNET configuration options:

             1 - Enable service on this node

           [E] - Exit TELNET configuration

 Enter configuration option: 1

 Creating TELNET Service Entry

 VSI TCP/IP Services for OpenVMS Client Components Configuration Menu

       Configuration options:

             1 - DHCP Client      Disabled Stopped
             2 - FTP Client       Enabled Stopped
             3 - NFS Client       Disabled Stopped
             4 - REXEC and RSH    Disabled Stopped
             5 - RLOGIN           Disabled Stopped
             6 - SMTP             Disabled Stopped
             7 - TELNET           Enabled Stopped
             8 - TELNETSYM        Disabled Stopped

             A - Configure options 1 - 8
           [E] - Exit menu

 Enter configuration option: e

 VSI TCP/IP Services for OpenVMS Configuration Menu
        Configuration options:

             1 - Core environment
             2 - Client components
             3 - Server components
             4 - Optional components
             5 - Shutdown VSI TCP/IP Services for OpenVMS
             6 - Startup VSI TCP/IP Services for OpenVMS
             7 - Run tests

             A - Configure options 1 - 4
           [E] - Exit configuration procedure
 Enter configuration option: 3

 VSI TCP/IP Services for OpenVMS Server Components Configuration Menu

  Configuration options:

 1 - BIND      Disabled Stopped   12 - NTP          Disabled Stopped
 2 - BOOTP     Disabled Stopped   13 - PC-NFS       Disabled Stopped
 3 - DHCP      Disabled Stopped   14 - POP          Disabled Stopped
 4 - FINGER    Disabled Stopped   15 - PORTMAPPER   Disabled Stopped
 5 - FTP       Enabled Stopped    16 - RLOGIN       Disabled Stopped
 6 - IMAP      Disabled Stopped   17 - RMT          Disabled Stopped
 7 - LBROKER   Disabled Stopped   18 - SNMP         Disabled Stopped
 8 - LPR/LPD   Disabled Stopped   29 - TELNET       Enabled Stopped
 9 - METRIC    Disabled Stopped   20 - TFTP         Disabled Stopped
10- NFS        Disabled Stopped   21 - XDM          Disabled Stopped
11- LOCKD/STATD Disabled Stopped


      A - Configure options 1 - 21
    [E] - Exit menu

 Enter configuration option: e

 VSI TCP/IP Services for OpenVMS Configuration Menu

      Configuration options:

             1 - Core environment
             2 - Client components
             3 - Server components
             4 - Optional components
             5 - Shutdown VSI TCP/IP Services for OpenVMS
             6 - Startup VSI TCP/IP Services for OpenVMS
             7 - Run tests

             A - Configure options 1 - 4
           [E] - Exit configuration procedure
 Enter configuration option: 4

 VSI TCP/IP Services for OpenVMS Optional Components Configuration Menu

       Configuration options:

             1 - Configure PWIP Driver (for DECnet-Plus and PATHWORKS)
             2 - Configure SRI QIO Interface (INET Driver)
             3 - Set up Anonymous FTP Account and Directories
             4 - Configure Kerberos Applications
             5 - Configure failSAFE IP
             6 - Configure IPsec (not present)

             A - Configure options 1 - 6
           [E] - Exit menu

 Enter configuration option: e


       VSI TCP/IP Services for OpenVMS Configuration Menu

       Configuration options:

             1 - Core environment
             2 - Client components
             3 - Server components
             4 - Optional components

             5 - Shutdown VSI TCP/IP Services for OpenVMS
             6 - Startup VSI TCP/IP Services for OpenVMS
             7 - Run tests

             A - Configure options 1 - 4
           [E] - Exit configuration procedure

 Enter configuration option: 6

 Begin Startup...

 %TCPIP-I-INFO, TCP/IP Services startup beginning at 08-Mar-2022 20:50:11.20
 %TCPIP-I-INFO, creating UCX compatibility file SYS$COMMON:[SYSEXE]UCX$SERVICE.DAT
 %TCPIP-I-NORMAL, timezone information verified

 %RUN-S-PROC_ID, identification of created process is 0000045C
 %TCPIP-I-SETLOCAL, setting domain and/or local host
 %TCPIP-I-STARTCOMM, starting communication
 %TCPIP-I-SETPROTP, setting protocol parameters
 %TCPIP-I-DEFINTE, defining interfaces
 %TCPIP-I-STARTNAME, starting name service
 %TCPIP-S-STARTDONE, TCP/IP Kernel startup completed
 %TCPIP-I-PROXYLOADED, loaded 0 NFS proxy records
 %TCPIP-I-LOADSERV, loading TCPIP server proxy information
 %TCPIP-I-SERVLOADED, auxiliary server loaded with 0 proxy records
 -TCPIP-I-SERVSKIP, skipped 0 communication proxy records
 -TCPIP-I-SERVTOTAL, total of 0 proxy records read
 %TCPIP-S-STARTDONE, TCPIP$PROXY startup completed
 %TCPIP-S-STARTDONE, TCPIP$FTP startup completed
 %TCPIP-S-STARTDONE, TCPIP$FTP_CLIENT startup completed
 %TCPIP-S-STARTDONE, TCPIP$TELNET startup completed
 %TCPIP-S-STARTDONE, TCP/IP Services startup completed at 08-Mar-2022 20:50:14.94

 Startup request completed.
 Press <ENTER> key to continue ...
 VSI TCP/IP Services for OpenVMS Configuration Menu

       Configuration options:

             1 - Core environment
             2 - Client components
             3 - Server components
             4 - Optional components

             5 - Shutdown VSI TCP/IP Services for OpenVMS
             6 - Startup VSI TCP/IP Services for OpenVMS
             7 - Run tests

             A - Configure options 1 - 4
           [E] - Exit configuration procedure

 Enter configuration option: e
Confirm that your TCP/IP network has started and is configured. Enter:
$ show network
The system displays network information similar to the following:
Product: TCP/IP        Node: node1.example.com Address(es): 192.0.2.15
$
Appendix A. Setting up a VMS Cluster
This appendix provides instructions to create a VMS cluster with two Oracle VirtualBox VMs both running on a Windows 10 system host with each using its own system disk.
Note
VSI development is providing the information in this appendix as one example of how to set up a cluster on a virtual machine. There may be other or better ways to do this. VSI encourages our customers to find other methods and to share them with us.
Use the following worksheet to list the names and addresses for your specific cluster environment. Variables in monospace font are used throughout the instructions.
| Item | Your specific environment name | |
|---|---|---|
| Location of the V9.2 ISO file (X86092OE) |
__________________________ | |
|
Your node names | ||
|
<VM1_nodename> |
__________________________ | |
|
<VM2_nodename> |
__________________________ | |
|
Names for your virtual machines | ||
|
<VM1_name> |
__________________________ | |
|
<VM2_name> |
__________________________ | |
|
Names for your system and paging disks | ||
|
<VM1_sysdisk_name> |
__________________________ | |
|
<VM1_paging_disk_name> |
__________________________ | |
|
<VM2_sysdisk_name> |
__________________________ | |
|
<VM2_paging_disk_name> |
__________________________ | |
|
DECnet addresses of your virtual machines | ||
|
<VM1_DECnet_address> |
__________________________ | |
|
<VM2_DECnet_address> |
__________________________ | |
|
SCSSYSTEMID | ||
|
<VM1_SCSSYSTEMID> |
__________________________ | |
|
<VM2_SCSSYSTEMID> |
__________________________ | |
|
MAC addresses? | ||
|
<VM1_DECnet_mac_address> |
__________________________ | |
|
<VM2_DECnet_mac_address> |
__________________________ | |
|
TCP/IP addresses for your virtual machines | ||
|
<your_domain_name> |
__________________________ | |
|
<VM1_TCPIP_address_1> |
__________________________ | |
|
<VM1_TCPIP_address_2> |
__________________________ | |
|
<VM2_TCPIP_address_1> |
__________________________ | |
|
<VM2_TCPIP_address_2> |
__________________________ | |
|
Port numbers? | ||
|
<VM1_port_number_1> |
__________________________ | |
|
<VM1_port_number_2> |
__________________________ | |
|
<VM2_port_number_1> |
__________________________ | |
|
<VM2_port_number_2> |
__________________________ | |
|
Number and password for the cluster | ||
|
<cluster_number> |
__________________________ | |
|
<cluster_password> |
__________________________ | |
A.1. Initial Preparation
Follow these steps:
Locate the V9.2 ISO file. You may have a zipped copy, which you should unzip.
On an existing OpenVMS system, enter these commands to create a 2GB disk file that can be replicated as needed for each of the disks required:
 $ LD CREATE EMPTY2GBDISK.DSK/SIZE=4194304/ERASE
 $ LD CONNECT EMPTY2GBDISK.DSK LDA EMPTY$
 $ INITIALIZE EMPTY$ EMPTY2GBDISK
 $ LD DISCONNECT EMPTY$
 $ ZIP EMPTY2GBDISK EMPTY2GBDISK.DSK
Copy the resulting EMPTY2GBDISK.ZIP file to your host system.
Unzip this archive four times to a folder where VirtualBox can access the DSK files. After each Unzip, rename the resulting EMPTY2GBDISK.DSK to:
<VM1_sysdisk_name>.DSK
<VM1_paging_disk_name>.DSK
<VM2_sysdisk_name>.DSK
<VM2_paging_disk_name>.DSK
Make a VMDK file for each one using the following command:
vboxmanage internalcommands createrawvmdk -filename <x>.vmdk -rawdisk <x>.dsk
A.2. Creating the First Virtual Machine
Follow these steps:
In the Oracle VM VirtualBox Manager window, click Machine, then New.
In the Name field, enter <VM1_name>. Accept the default for the Machine Folder field, set Type to Other, and Version to Other/Unknown (64-bit).
Click Next. VSI recommends that you set the memory size to 6144MB, then click Next again.
Select “Do not add a virtual hard disk”, then click Create and Continue from the warning.
Select Settings for the new VM and click System.
In the Motherboard tab, uncheck Floppy and Optical, choose Chipset ICH9, and check Enable EFI.
In the Processor tab, VSI recommends that you set the CPU count to at least 2.
Select Storage from the settings menu.
Click Add controller, select the AHCI (SATA) type controller. Add four disks to this controller in the following order:
<VM1_sysdisk_name>.VMDK (as a hard disk)
<VM1_paging_disk_name>.VMDK (as a hard disk)
X86092OE.ISO (as an optical drive)
<VM2_sysdisk_name>.VMDK (as a hard disk)
You must add each disk to the available drives first, and then select it for the VM.
From the Settings menu, select Network.
Enable the first three adapters. The first adapter is used to connect to your extended network using TCP/IP, and might include a VPN. The second adapter is used to connect to your local network (which may be entirely within your host system) using TCP/IP. The third adapter is used to connect your virtual machines using DECnet IV. All three adapters are used for cluster communication.
For Adapter 1, select the NAT adapter type (default value).
Note
This setting is determined by how your computer accesses the rest of your network from the VM. In the example described here, the target machines are connected via VPN, which requires the NAT adapter type. If you are using a local network, change the adapter type to Bridged.
Under Advanced, make sure Adapter Type is set to Intel PRO/1000 MT Desktop (82540EM), use default MAC address, and make sure Cable Connected is checked.
Adapter 2 is a Bridged Adapter; accept the default name.
Under Advanced, specify the same settings as Adapter 1 with the default MAC address, but make sure Promiscuous is set to Deny.
Set up Adapter 3 the same way as Adapter 2 but override the MAC address with <VM1_DECnet_mac_address>. This MAC address matches the DECnet address <VM1_DECnet_address>.
From the Settings menu, select Ports. With our method, two ports with distinct port numbers are used on each system. Ports 1 and 2 are COM1 and COM2 respectively. The Port Mode is TCP. “Connect to existing pipe/socket” option should be unchecked, and Path/Address are set to <VM1_port_number_1> and <VM1_port_number_2>.
A.3. Starting the Virtual Machine
Follow these steps:
Start the VM that you have just set up.
In the Virtual Machine console window that is created, the VM boot process should stop at the Shell> prompt. If it does not, press ESC.
Click View, then click Scaled Mode. Close the Virtual Machine window.
In the Close Virtual Machine pop-up window, select Power Off the machine, and then click OK. This sets “Power off” as the default action on close.
Restart the VM.
Connect your COM1 port.
To find the CD-ROM and invoke the Boot Manager from it, enter the map -r command at the Shell> prompt. Because the only bootable disk is the ISO kit file, just VMS_BOOTMGR should be sufficient.
Enable auto-boot and set Flags to 800 before entering the BOOT DKA200 command to begin the installation. You should install to the DKA0: disk with the following settings:
Set the volume label to <VM1_nodename>_V92
Enable hard links if you need them
Set SCSNODE to <VM1_nodename>
Set SCSSYSTEMID to <VM1_SCSSYSTEMID>
Important: When the system reboots to perform AUTOGEN, abort AUTO BOOT and manually boot the new system disk with the command BOOT DKA0. Once the AUTOGEN step is done and the system boots, log in and invoke CLUSTER_CONFIG_LAN.COM, option 1.
Answer Yes to the SCSI bus prompt and enter <cluster_number> and <cluster_password> when requested.
Answer Yes to the disk server prompt.
Answer No to the quorum disk prompt. Skip the port allocation class and set EXPECTED_VOTES to 1. You can safely ignore the warnings.
Run AUTOGEN again and let the system reboot as a single-node cluster.
At this point, you should modify several of the SYSGEN parameters. Refer to the VSI OpenVMS System Management Utilities Reference Manual for the description of MODPARAMS.DAT and update its contents and the CURRENT parameter settings. The values used should be from the following list:
WINDOW_SYSTEM=1
DISK_QUORUM=""
NISCS_LOAD_PEA0=1
VAXCLUSTER=2
EXPECTED_VOTES=1
MSCP_LOAD=1
MSCP_SERVE_ALL=5
INTERCONNECT="NI"
BOOTNODE="NO"
TTY_TYPAHDSZ=512
TTY_BUF=132
SCSNODE="<VM1_nodename>"
SCSSYSTEMID=<VM1_SCSSYSTEMID>
VOTES=1
A.4. Adding a Node Using a Copy of an Existing System Disk
On VSI OpenVMS x86-64 systems, if you use a copy of an existing system disk as the initial system disk of a new node that is being added to a cluster, you must perform an additional step, which is changing the label for the memory disk. Follow these steps (which assume that the new system disk is DKA300:, and it is not already mounted):
Identify a system disk for VM2, <VM2_sysdisk_name>.
To copy DKA0: (system disk of VM1) to DKA300: (this will become system disk of VM2), type in the following commands:
$ MOUNT/FOREIGN DKA300:
$ BACKUP/IMAGE/IGNORE=INTERLOCK DKA0: DKA300:
To be able to change the label of DKA300:, first type in the following commands:
$ DISMOUNT DKA300:
$ MOUNT DKA300/OVERRIDE=ID
Change the label to <VM2_nodename>_V92.
Dismount the disk again and enter:
$ MOUNT/SYSTEM DKA300: <VM2_nodename>_V92Connect and mount the memory disk container file using the following commands:
$ LD CONNECT DKA300:[VMS$COMMON.SYS$LDR]SYS$MD.DSK LDM LDDEV
$ MOUNT/OVER=ID LDDEV
Note the label of the memory disk. It will be of the form “MD20345927FD”. Change the last letter to create a unique name. For example:
$ SET VOLUME LDDEV /LABEL=MD20345927FE
This gets a unique volume label into <VM2_sysdisk_name>’s memory disk. Before dismounting the memory disk or the system disk, update several parameters, including SCSNODE and SCSSYSTEMID:
$ MCR SYSGEN
SYSGEN> USE LDDEV:[SYS0.SYSEXE]X86_64VMSSYS.PAR
SYSGEN> SET SCSNODE "<VM2_nodename>"
SYSGEN> SET SCSSYSTEMID <VM2_SCSSYSTEMID>
SYSGEN> SET VOTES 0
SYSGEN> WRITE LDDEV:[SYS0.SYSEXE]X86_64VMSSYS.PAR
SYSGEN> EXIT
Dismount the memory disk before completing the other setup tasks for the new system disk.
$ DISMOUNT LDDEV
$ LD DISCONNECT LDDEV
A.5. Creating the Second Virtual Machine
Before you start, shut down and power off the VM you are currently running (VM1).
Go into VM1 Settings, click Storage and remove disk <VM2_sysdisk_name> (you will need to use that disk in the new VM).
The process of creating VM2 is mostly the same as VM1 (as described in Section A.2, ''Creating the First Virtual Machine''), with a few differences:
VM’s name is <VM2_name>.
Add three disks to its SATA controller: <VM2_sysdisk_name>.VMDK and <VM2_paging_disk_name>.VMDK (as hard disks), and an empty optical drive.
Under Network, set the MAC address for Adapter 3 to <VM2_DECnet_MAC_address>, which translates to DECnet address <VM2_DECnet_address> or SCSSYSTEMID <VM2_SCSSYSTEMID>. (See earlier footnote).
Under Ports, use port numbers <VM2_port_number_1> and <VM2_port_number_2>.
Start VM1 again. Allow it to boot completely.
Start VM2 and perform steps 2 through 4 from Section A.3, ''Starting the Virtual Machine'' of this document, so that the default action on Close is Power Off instead of Save.
Restart VM2 and connect VM2’s COM1 port.
Locate and start the boot manager as for VM1. Enable auto-boot and set Flags to 800.
Then boot DKA0:.
At this point, you should have a two-node cluster, running off separate system disks.
A.6. Finalizing Cluster Setup
Perform the following system management tasks as follows:
Initialize and mount the paging disk on each system, then create PAGEFILE.SYS and SYSDUMP.DMP in [SYS0.SYSEXE] for each one.
Use 1,000,000 blocks for each file. Also, create a [SYSMGR] directory on this disk as a place to save dumps from SDA.
On VM1, enter the following:
$ INITIALIZE DKA100: <VM1_nodename>_PAGE
$ MOUNT/SYSTEM DKA100: <VM1_nodename>_PAGE
$ CREATE/DIRECTORY DKA100:[SYS0.SYSEXE]
$ MCR SYSGEN
SYSGEN> CREATE DKA100:[SYS0.SYSEXE]PAGEFILE.SYS/SIZE=1000000
SYSGEN> CREATE DKA100:[SYS0.SYSEXE]SYSDUMP.DMP/SIZE=1000000
SYSGEN> EXIT
$ CREATE/DIRECTORY DKA100:[SYSMGR]
Repeat these commands on VM2 using <VM2_nodename>_PAGE.
Edit SYPAGSWPFILES.COM to install the page file.
On VM1, type in:
$ mount/system dka100: <VM1_nodename>_page
$ mcr sysgen install dka100:[sys0.sysexe]pagefile.sys/page
On VM2, type in:
$ mount/system dka100: <VM2_nodename>_page
$ mcr sysgen install dka100:[sys0.sysexe]pagefile.sys/page
During the installation of OpenVMS, a minimal pagefile was created on the system disk. Use the SHOW MEMORY command to confirm the exact location. You may want to delete this (which is now on both system disks), and you should do this by renaming the file (to PAGEFILE.TMP, for example), then rebooting each system before deleting the renamed file.
To set up the dump device, enter the following command on both systems:
$ SET DUMP_OPTIONS/DEVICE=DKA100:
Update MODPARAMS.DAT on each node for the changes that have been made. The following lists are taken from the MODPARAMS contents generated by the installation and running CLUSTER_CONFIG_LAN.COM:
Common to both nodes VM1 only VM2 only WINDOW_SYSTEM=1
DISK_QUORUM=""
NISCS_LOAD_PEA0=1
VAXCLUSTER=2
EXPECTED_VOTES=1
MSCP_LOAD=1
MSCP_SERVE_ALL=5
INTERCONNECT="NI"
BOOTNODE="NO"
TTY_TYPAHDSZ=512
TTY_BUF=132
SCSNODE="<VM1_nodename>"
SCSSYSTEMID=
<VM1_SCSSYSTEMID>
VOTES=1
SCSNODE="<VM2_nodename>"
SCSSYSTEMID=
<VM2_SCSSYSTEMID>
VOTES=0
Note
Some of these values may not have been set to the desired values (probably MSCP_SERVE_ALL, TTY_TYPAHDSIZ, and TTY_BUF). You need to edit both copies of MODPARAMS.DAT and use SYSGEN to update the values in use. Do not forget to enter WRITE CURRENT.
To set the terminal (and any other) features you want, create a SYLOGIN.COM and/or LOGIN.COM. Among other things, we use:
$ SET TERMINAL/WIDTH=132/PAGE=48/INSERT/INQUIRE
The values above match the PuTTY setup of the terminal window used in these instructions.
Set up TCP/IP Services and enter the command @TCPIP$CONFIG.COM:
Set Domain to <your_domain_name>
Set IE0 to <VM1_TCPIP_address_1>/24 = <VM1_nodename> and <VM2_TCPIP_address_1>/24 = <VM2_nodename> (mask = 255.255.255.0). VirtualBox works with 10.0.2.15 and similar addresses.
Set IE1 to static addresses that work with your local host’s network, so you can issue a TELNET command to each node from your local host (but leave the node name associated with IE0). These are <VM1_TCPIP_address_2> and <VM2_TCPIP_address_2>.
Set IE2 to “No TCP/IP”, this adapter is for DECnet.
Set Default route to an appropriate gateway value. VirtualBox works with 10.0.2.2.
Set DNS to your extended network’s name servers’ addresses.
Make sure FTP and TELNET are both set as CLIENT and SERVER.
Set up DECnet IV using NETCONFIG.COM and start it with STARTNET.COM:
Set <VM1_nodename> = <VM1_DECnet_address> and <VM2_nodename> = <VM2_DECnet_address>
Define LINE and CIRCUIT EIA-2 only (STATE ON)
Define the other node in the NODE database.
On VM1, enter:
$ MCR NCP DEFINE NODE <VM2_DECnet_address> NAME <VM2_nodename>
On VM2, enter:
$ MCR NCP DEFINE NODE <VM1_DECnet_address> NAME <VM1_nodename>
At this point, we have a two-node cluster, with each node running from its own system disk. Each node has a private page/dump disk. The first node (VM1) also has the kit ISO as a third disk (optical drive). For symmetry, the second node (VM2) also has an empty optical drive. For safety, only VM1 has a cluster vote.
A.7. Saving Your Cluster Setup
At this point, it’s worth saving all the work that’s been done so far. The following method is the easiest way to save the current VMS cluster setup (however, note that it does not save any of the VirtualBox VM configuration data).
Shut down and power off both nodes. Then create a ZIP file of the four DSK files:
<VM1_sysdisk_name>.DSK
<VM1_paging_disk_name>.DSK
<VM2_sysdisk_name>.DSK
<VM2_paging_disk_name>.DSK
Perform the following steps:
Use the CLUSTER_SHUTDOWN and POWER_OFF options in SHUTDOWN.COM. Once the virtual machines have exited, use the host to create the ZIP file.
On Windows 10, open your “VirtualBox VMs” folder, select all four files, and right-click the selection.
In “Send to”, choose “Compressed (Zipped) folder”.
The ZIP file is named after one of the files, so when the ZIP file is populated, rename it.
Note
If you need to restore just one disk from here, that does not mean you have to restore all of them. Simply navigate to the ZIP folder and drag the disk file you need back to the original folder to overwrite it.
The pseudo-MAC address used by DECnet comprises the fixed hex digits AA-00-04-00 followed by nn-nn that is the DECnet address in big-endian format. For example, 01-28 -> 0x2801 -> 10241 (also SCSSYSTEMID) -> (1024 * 10) + 1 -> DECnet address 10.1.
In this article, we are using PuTTY as terminal emulator and have ports <VM1_name> COM1, <VM1_name> COM2, <VM2_name> COM1, <VM2_name> COM2, all using Host name 127.0.0.1, Connection Type: Raw, and ports <VM1_port_number_1>, <VM1_port_number_2>, <VM2_port_number_1>, and <VM2_port_number_2> respectively.