VSI TCP/IP Services for OpenVMS User's Guide
- Software Version:
- VSI TCP/IP Services Version 5.7
- Operating System and Version:
- VSI OpenVMS IA-64 Version 8.4-1H1 or higher
VSI OpenVMS Alpha Version 8.4-2L1 or higher
Preface
The TCP/IP Services product is the VSI implementation of the TCP/IP networking protocol suite and internet services for OpenVMS Alpha and OpenVMS VAX systems.
TCP/IP Services provides a comprehensive suite of functions and applications that support industry-standard protocols for heterogeneous network communications and resource sharing.
This manual explains how to use the user utilities and commands provided with the TCP/IP Services product. It assumes that these services have been installed and configured on your OpenVMS system and that you have a basic understanding of the OpenVMS operating system.
See the VSI TCP/IP Services for OpenVMS Installation and Configuration manual for information about installing, configuring, and starting this product.
1. About VSI
VMS Software, Inc. (VSI) is an independent software company licensed by Hewlett Packard Enterprise to develop and support the OpenVMS operating system.
2. Intended Audience
This manual is for OpenVMS users who want to communicate with remote hosts on a private internet or on the worldwide Internet.
3. Document Structure
Chapter 1, "Getting Started" introduces the services included in the TCP/IP Services product and explains how to enter command lines to use these services.
Chapter 2, "Working with Files Using the File Transfer Protocol (FTP)" explains how to use FTP and provides FTP command descriptions.
Chapter 3, "Using Remote (R) Commands " explains how to use Remote Copy, Remote Login, Remote Shell, and Remote Execute and provides command descriptions.
Chapter 4, "Establishing Network Terminal Sessions Using TELNET/TN3270" explains how to use TELNET and IBM 3270 model terminal emulation (TN3270, using TELNET) and provides command descriptions.
Chapter 5, "Sending and Receiving Mail Using SMTP" explains how to use SMTP to send and receive electronic mail.
Chapter 6, "Printing Files Using LPR/LPD" explains how to use LPR/LPD for remote printing and provides command descriptions.
Chapter 7, "Accessing User Information Using the FINGER Utility" explains how to use the FINGER utility to display information about users on a remote or local host.
4. Related Documents
|
Manual |
Contents |
|---|---|
|
VSI TCP/IP Services for OpenVMS Concepts and Planning |
This manual provides conceptual information about TCP/IP networking on OpenVMS systems, including general planning issues to consider before configuring your system to use the TCP/IP Services software. This manual also describes the manuals in the TCP/IP Services documentation set and provides a glossary of terms and acronyms for the TCP/IP Services software product. |
|
VSI TCP/IP Services for OpenVMS Installation and Configuration |
This manual explains how to install and configure the TCP/IP Services product. |
|
VSI TCP/IP Services for OpenVMS User's Guide |
This manual describes how to use the applications available with TCP/IP Services such as remote file operations, email, TELNET, TN3270, and network printing. |
|
VSI TCP/IP Services for OpenVMS Management |
This manual describes how to configure and manage the TCP/IP Services product. |
|
VSI TCP/IP Services for OpenVMS Management Command Reference |
This manual describes the TCP/IP Services management commands. |
|
VSI TCP/IP Services for OpenVMS ONC RPC Programming |
This manual presents an overview of high-level programming using open network computing remote procedure calls (ONC RPC). This manual also describes the RPC programming interface and how to use the RPCGEN protocol compiler to create applications. |
|
VSI TCP/IP Services for OpenVMS Sockets API and System Services Programming |
This manual describes how to use the Sockets API and OpenVMS system services to develop network applications. |
|
VSI TCP/IP Services for OpenVMS SNMP Programming and Reference |
This manual describes the Simple Network Management Protocol (SNMP) and the SNMP application programming interface (eSNMP). It describes the subagents provided with the TCP/IP Services, utilities provided for managing subagents, and how to build your own subagents. |
|
VSI TCP/IP Services for OpenVMS Guide to IPv6 |
This manual describes the IPv6 environment, the roles of systems in this environment, the types and function of the different IPv6 addresses, and how to configure TCP/IP Services to access the IPv6 network. |
For a comprehensive overview of the TCP/IP protocol suite, refer to the book Internetworking with TCP/IP: Principles, Protocols, and Architecture, by Douglas Comer.
5. OpenVMS Documentation
The full VSI OpenVMS documentation set can be found on the VMS Software Documentation webpage at https://docs.vmssoftware.com.
6. VSI Encourages Your Comments
You may send comments or suggestions regarding this manual or any VSI document by sending electronic mail to the following Internet address: <docinfo@vmssoftware.com>. Users who have VSI OpenVMS support contracts through VSI can contact <support@vmssoftware.com> for help with this product.
7. Conventions
| Convention | Meaning |
|---|---|
|
Ctrl/ x |
A sequence such as Ctrl/ x indicates that you must hold down the key labeled Ctrl while you press another key or a pointing device button. |
|
PF1 x |
A sequence such as PF1 x indicates that you must first press and release the key labeled PF1 and then press and release another key or a pointing device button. |
|
Return |
In examples, a key name enclosed in a box indicates that you press a key on the keyboard. (In text, a key name is not enclosed in a box.) |
... |
A horizontal ellipsis in examples indicates one of the following possibilities:
|
. . . |
A vertical ellipsis indicates the omission of items from a code example or command format; the items are omitted because they are not important to the topic being discussed. |
|
( ) |
In command format descriptions, parentheses indicate that you must enclose the options in parentheses if you choose more than one. |
|
[ ] |
In command format descriptions, brackets indicate optional choices. You can choose one or more items or no items. Do not type the brackets on the command line. However, you must include the brackets in the syntax for OpenVMS directory specifications and for a substring specification in an assignment statement. |
|
[ |] |
In command format descriptions, vertical bars separate choices within brackets or braces. Within brackets, the choices are options; within braces, at least one choice is required. Do not type the vertical bars on the command line. |
|
{ } |
In command format descriptions, braces indicate required choices; you must choose at least one of the items listed. Do not type the braces on the command line. |
|
bold text |
This typeface represents the introduction of a new term. It also represents the name of an argument, an attribute, or a reason. |
|
italic text |
Italic text indicates important information, complete titles of manuals, or variables. Variables include information that varies in system output (Internal error number), in command lines (/PRODUCER= name), and in command parameters in text (where dd represents the predefined code for the device type). |
|
UPPERCASE TEXT |
Uppercase text indicates a command, the name of a routine, the name of a file, or the abbreviation for a system privilege. |
|
|
Monospace type indicates code examples and interactive screen displays. In the C programming language, monospace type in text identifies the following elements: keywords, the names of independently compiled external functions and files, syntax summaries, and references to variables or identifiers introduced in an example. |
|
- |
A hyphen at the end of a command format description, command line, or code line indicates that the command or statement continues on the following line. |
|
numbers |
All numbers in text are assumed to be decimal unless otherwise noted. Nondecimal radixes—binary, octal, or hexadecimal—are explicitly indicated. |
All numbers are decimal unless otherwise noted.
All Ethernet addresses are hexadecimal.
Chapter 1. Getting Started
TCP/IP is an open communications standard that enables any connected host to communicate with any other connected host. The TCP/IP Services software is the VSI OpenVMS implementation of industry-standard TCP/IP networking protocols.
The TCP/IP Services software allows you to communicate and share resources with remote OpenVMS systems, UNIX systems, and other systems that support the TCP/IP protocol suite.
|
Remote Computing | |
|
FINGER |
Display information about users logged in to a remote host, such as their login user names or programs they are using. |
|
RCP |
Copy files between the local host and a remote host or between two remote hosts. Requests are authenticated on the remote host or hosts using the user name supplied by RCP. |
|
RLOGIN |
Connect to a remote host, which starts an interactive login session. Requests are authenticated on the remote host using the user name supplied by RLOGIN. |
|
RMT/RCD |
Access magnetic tape and CD drives on a remote host as though they are available locally. |
|
RSH |
Connect to a remote host, which executes the command you specify. Requests are authenticated on the remote host using the user name supplied to RSH. |
|
RSH/PASSWORD |
Use the REXEC facility to connect to the remote host, which executes the command you specify. Requests are authenticated on the remote host using the user name and password supplied by RSH. |
|
RMT/RCD |
Access magnetic tape and CD drives on a remote host as though they are available locally. |
|
TELNET |
Log in to a remote host in a network using
various options to customize the session, control
output from the remote host, and negotiate
compatibility differences. To start a TELNET
session, enter the following command:
$ TELNET |
|
File Transfer | |
|
FTP |
Create, delete, and copy files and
directories between hosts. To start an FTP
session, enter the following
command:
$ FTP |
|
TFTP |
Transfer files using the UDP protocol and no authentication. Typically used during the bootstrap process of diskless systems. |
|
Resource Sharing | |
|
LPD/LPR |
Print files on remote and local hosts. |
|
NFS |
Authenticate requests and provide access to remote files. |
|
TELNETSYM |
Print files on remote hosts using the TELNET protocol. |
|
Electronic Mail | |
|
IMAP |
View, move, copy, and delete electronic mail from your PC, and in conjunction with SMTP, create and send mail. |
|
POP |
Send and receive electronic mail from your PC. |
|
SMTP |
Send and receive electronic mail from remote hosts. |
|
Programming Utilities | |
|
MIBCOMP |
Compile SNMP subagent source files in ASN.1 format. |
|
RPCGEN |
Create programming skeletons that implement the RPC mechanism. |
|
Network Services | |
|
BIND |
Name and address resolution service to distribute and manage host information. |
|
BOOTP |
Answer bootstrap requests from remote devices. |
|
DHCP |
Configure and maintain your IP address space including the temporary assignment of IP addresses. |
|
Management commands |
Manage your TCP/IP environment. To start the
management control program, enter the following
command:
$ TCPIP For online descriptions of the management
commands, enter the following
command:
$ TCPIP HELP |
|
NSLOOKUP |
Determine if your local name server is running correctly or retrieve information from remote servers. |
|
NTP |
Synchronize time between hosts. |
|
PPP |
Connect a node to a network using IP or other supported network protocols. |
|
SLIP, CSLIP |
Connect a node to a network over a serial connection using IP. |
|
SNMP |
Monitor and manage network devices from across an internetwork. |
|
TCPDUMP |
Analyze dumps and capture packets. |
|
TCPTRACE |
Trace packets going in and out of the system. |
Your particular installation may include some or all of the above components. For information about the components available to you, see your system or network manager.
System or network managers are generally authorized to install, configure, and manage the various TCP/IP components on your system. And, as such, many of the TCP/IP components are used primarily by system or network managers and are seldom needed by TCP/IP users. You can find the details of system management components and commands in the VSI TCP/IP Services for OpenVMS Management guide and the VSI TCP/IP Services for OpenVMS Management Command Reference manual.
If you are a TCP/IP user and want to manipulate files on remote systems, send and receive electronic mail, log in to remote systems, or enter commands remotely, this user guide provides the information and commands you need.
1.1. Which Service Should You Use?
|
To obtain user information, if you need to... |
Use... |
Refer to... |
|
Get information about users logged in to a remote host, such as their login user names, current program being used, and last login. |
FINGER | |
|
Get information about users logged in to your OpenVMS Cluster. |
FINGER | |
|
To copy files, if you need to... |
Use... |
Refer to... |
|
Perform other operations on the files, such as deleting, renaming, appending, and viewing files. |
FTP |
Section 2.9, ''Renaming and Deleting Files'', Section 2.10, ''Viewing the Contents of a File'', Section 2.11, ''Appending Files'' |
|
Copy multiple files to or from one or more unrelated directories on the remote host. |
FTP |
Section 2.3.1, ''Making a Remote Connection'', Section 2.6, ''Displaying and Changing the Default Directory'', Section 2.8, ''Copying Files'' |
|
Copy every file and subdirectory in a directory on a host, preserving the directory hierarchy. |
RCP | |
|
Create or delete directories, and display the contents of directories. |
FTP |
Section 2.5, ''Viewing Directories on the Remote Host'', Section 2.7, ''Creating and Deleting Directories'' |
|
Copy files between two remote hosts. |
RCP | |
|
Perform fast file transfers between two OpenVMS hosts. |
FTP |
Section 2.8.5, ''Transferring Files Between OpenVMS Hosts: VMS Plus Mode'' |
|
Copy files to and from a remote UNIX system, preserving RMS file attributes. |
FTP | |
|
Copy files, preserving the protection mode and modification date. |
RCP | |
|
Copy and work with files using DECnet file specifications. |
FTP | |
|
To print files, if you need to... |
Use... |
Refer to... |
|
Send local files to a remote host printer or print queue, using the OpenVMS printing options such as customizing the printed page with special print forms and specifying the number of copies to print. |
DCL PRINT | |
|
Display the status of remote print queue jobs and cancel print jobs in that queue. |
LPQ, LPRM |
Section 6.2, ''Displaying the Status of Jobs in a Remote Print Queue'', Section 6.3, ''Removing Jobs from the Print Queue'' |
|
Send remote UNIX files to a local print queue. |
| |
|
To log in to remote accounts, if you need to... |
Use... |
Refer to... |
|
Log in to a remote host that runs Remote (R) protocols. |
RLOGIN |
Section 3.5, ''Starting a Remote Login Session with RLOGIN'' |
|
Log in to a remote host, using many options to customize the session, control output from the remote host, and negotiate compatibility differences. |
TELNET |
Section 4.10, ''Customizing TELNET/TN3270 Transmissions, Control Characters, and Displays'' |
|
Establish multiple, simultaneous login connections with one or more hosts, and toggle between the sessions. |
TELNET | |
|
Log in using IBM 3270 Information System (IDS) terminal emulation with a host that uses IBM 3270 model terminals. |
TN3270 |
Section 4.12, ''IBM 3270 Model Terminal Emulation (TN3270)'' |
|
To enter remote commands, if you need to... |
Use... |
Refer to... |
|
Enter a command on a remote host, including a command that invokes a remote shell script or command procedure, with any output displayed at your terminal. |
RSH, REXEC |
Section 3.6, ''Issuing a Remote Command with RSH'', Section 3.7, ''Issuing a Remote Command with a Password (REXEC Feature)'' |
|
Enter a command, without specifying user authentication information, on a remote host that has authentication files. |
RSH | |
|
Enter a command and password to a host that does not have authentication files for you. |
RSH/PASSWORD ? |
Section 3.7, ''Issuing a Remote Command with a Password (REXEC Feature)'' |
|
To send and receive mail, if you need to... |
Use... |
Refer to... |
|
Send mail to, and receive mail from, a remote host using SMTP. |
| |
|
Send and receive OpenVMS mail, at your PC. |
MAIL, POP, IMAP |
1.1.1. Services for Working with Files
FTP allows you to establish a session with a remote host and enter an unlimited number of commands that copy, display, or manipulate files and directories. The Anonymous FTP feature (See Section 2.3.2, ''Anonymous User Access (Anonymous FTP)'') allows you to connect to a remote host without specifying user authentication information. If that feature is not enabled, you must supply user authentication information for a remote host only once: when you first establish the FTP connection with a remote host. FTP allows you to determine or change the working directory on your host and on the remote host, and to perform various other operations on files and directories.
In contrast, RCP is limited to copying files. To copy files, each RCP command that you enter establishes a separate link for each file transfer with the specified remote host. With each RCP command, you must specify the remote host to or from which you want to copy files. As with FTP, RCP has a feature that allows you to connect to remote hosts without specifying user authentication information. However, if that feature is not enabled, you must enter user authentication information with each RCP command, rather than just once (as with FTP) for any number of subsequent commands for a connected host.
1.1.2. Services for Remote Logins
The RLOGIN, TELNET, and TN3270 services each allow you to log in to a remote host and enable your terminal to perform as if directly connected to the remote host. Use RLOGIN for simple logins in which you do not require much customization or control of the terminal-to-host interaction. Use TELNET if you want to use its extensive terminal features and controls, or if you want to open several terminal sessions with one or more remote hosts. TELNET supports a wider variety of terminal features and behaviors between disparate, otherwise incompatible, systems than RLOGIN.
Use TN3270 to connect your terminal to a remote host that supports IBM 3270 IDS terminals. TN3270 assigns IBM 3270 functions to your keyboard and allows you to redefine keys.
1.1.3. Services for Issuing Commands at a Remote Host
The RSH and REXEC services allow you to send any commands supported by the remote host operating system. RSH and REXEC issue one command per link. If user authentication is required, you must enter the authentication information with each command. There is no REXEC command. Rather, you invoke REXEC when you enter the RSH command with a password (RSH/PASSWORD).
Note that RLOGIN, TELNET, and TN3270 allow you to log in to a remote host once and then perform any number of commands supported by the remote host's operating system. TELNET and TN3270 also allow you to send certain commands to the connected remote host during a terminal session. However, these are a limited range of commands dealing with communication between hosts; they are not operating system commands. For example, you can send a command that aborts output or interrupts execution of a command you entered previously.
1.2. Client/Server Software
The user services include client and server software that communicates between host systems. Your local host includes client software that responds to your commands by requesting the appropriate services from the remote host you specify. If the remote host has the appropriate server software, the server on that host responds with the requested service.
For example, Figure 1.1, ''FTP Client/Server Software Interacting'' shows the interaction between the FTP
local client and remote server. The FTP client
requests the FTP server on hostb to
open a connection.
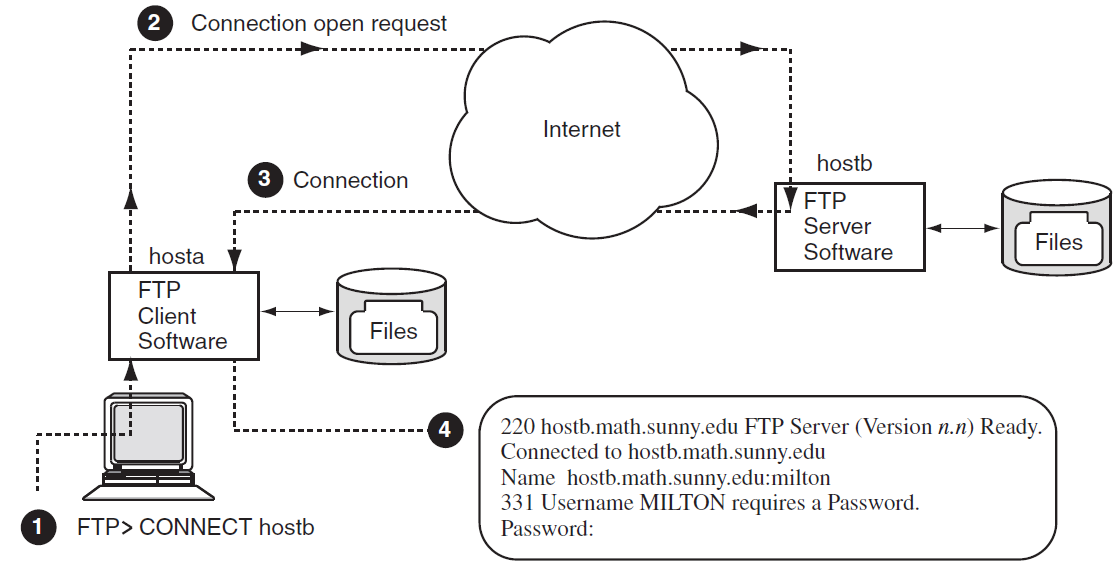
 – User MILTON enters an FTP CONNECT command from local host
hostato connect to remote hosthostb. – The FTP local client sends a connection request to the FTP
server on
– The FTP local client sends a connection request to the FTP
server on hostb. – The remote server grants the request, sending a data
connection status message back to the local client.
– The remote server grants the request, sending a data
connection status message back to the local client. – The client displays at user MILTON's terminal the server
connection status message and the remote host prompt for login information.
– The client displays at user MILTON's terminal the server
connection status message and the remote host prompt for login information.
Once the connection is made, user MILTON can then log in to the remote system and use FTP to
copy files and perform other related services.
Note that both server and client software exist on
each system supporting FTP. Thus, a user on
hostb could connect to
hosta and copy files to and from
hostb.
1.3. User Commands
The FTP, TELNET, and TN3270 components include a wider variety of commands than do the other user services.
- Specify the component name followed by the Enter key. The component's prompt appears, and you can then enter the CONNECT command. For example, to start an FTP session and then connect to a remote host named FATHM, type:
$ FTP RETURN FTP> CONNECT FATHM . . . FTP> - Specify the service name and host name in one line, as in the following example:
$ FTP FATHM RETURN
   .
   .
   .
FTP>
In either case, you are prompted for user authentication information. (FTP includes a feature that allows you to connect to a remote host without specifying user authentication information (see Section 2.3.2, ''Anonymous User Access (Anonymous FTP)'').) You can also start these services by using a command procedure.
Start the Remote (R) and network printer services by specifying the appropriate command, host name, and parameters or qualifiers in one command line. If you specify the service command only (RCP, RSH, RLOGIN, PRINT, LPQ, or LPRM), the service prompts you for the information required for the command. The PRINT command supports remote printing using TCP/IP protocols and supporting the DCL PRINT qualifiers, with a few exceptions and additional features, as explained in Section 6.1, ''Printing at Remote Print Queues''.
When you enter the FINGER command without any host or user information, the command displays information about users on your local system. To display information about remote users, you need to specify the remote host name. For more details and options, see Chapter 7, "Accessing User Information Using the FINGER Utility".
$ MAIL
MAIL> send Return
To: MALCOLM@PHILOS.BU.ORG Return
Subj: FINAL EXAMS Return
   .
   .
   .
FTP>
1.4. Command Syntax
OpenVMS and UNIX command syntax
Most command descriptions specify both a DCL syntax and a UNIX syntax. You can, therefore, use command lines in either syntax. For example, the following two command lines achieve the same results:TELNET> CONNECT BENTLEY TELNET> open bentley
Keyword abbreviations
You can abbreviate commands and qualifiers to the fewest number of characters, usually three, that uniquely identifies the keyword. For example, the following two command lines achieve the same results:$ RL RENT /USE=BUNNINGS $ RLOGIN RENT /USER_NAME=BUNNINGS
Quotation marks
Due to differences in OpenVMS and UNIX command syntax, some commands require quotation marks for selected keywords. These requirements apply to case sensitivity, slashes, and certain special characters (such as &, =, and \).
UNIX is case sensitive; UNIX host names, user names, and passwords are usually lowercase. Enclosing them in quotation marks preserves the correct casing. For the requirements for individual services, see the discussions about quotation marks in the following chapters:Chapter 2, "Working with Files Using the File Transfer Protocol (FTP)" (FTP)
Chapter 3, "Using Remote (R) Commands " (R commands)
Chapter 4, "Establishing Network Terminal Sessions Using TELNET/TN3270" (TELNET, TN3270)
Chapter 5, "Sending and Receiving Mail Using SMTP" (electronic mail (SMTP))
Chapter 6, "Printing Files Using LPR/LPD" (network printing)
Names and addresses
Unless otherwise stated, whenever you specify a host on a command line, you can use its host name, a fully qualified domain name, or its IP address. The following examples show two ways to enter the TELNET command to connect to host VENDOR at IP address 17.22.3.4.$ TELNET VENDOR Trying...17.22.3.4 Connected to VENDOR. Escape character is '^]'. () UNIX V5 (vendor.goods.igcorp.com) login:
or$ TELNET 17.22.3.4 Trying...17.22.3.4 Connected to 17.22.3.4. Escape character is '^]'. () UNIX V5 (vendor.goods.igcorp.com) login:
File and directory names
When you specify OpenVMS directory names and file names, follow OpenVMS file specification rules, as explained in the OpenVMS documentation. Likewise, when you specify UNIX directory names and file names, follow UNIX file specification rules, as explained in the documentation supplied with the UNIX system.
Multiple values for parameters
To specify multiple values for command parameters, such as host names and directories, follow these guidelines:Separate elements with commas.
Wildcards are valid.
A space between multiple elements is optional.
The following FTP GET command copies the files PROJ1.TXT and GROUP1.TXT, using a comma to separate the file names in the command line:FTP> GET PROJ1.TXT, GROUP1.TXT
The following FTP GET command uses the asterisk (*) wildcard to copy all files starting with the letters "PROJ1":FTP> GET PROJ1*.*
Multiple values for qualifiers
To specify multiple values for qualifiers, enclose them in parentheses as follows:
/ qualifier=(value1, value2, value3)
For example, the following LPRM command deletes three jobs from a remote print queue:$ LPRM EST_4_1997_Q /ENTRY=(555,556,558)
Numeric values
Unless stated otherwise, all values are decimal.
Braces and brackets
Command format descriptions in this manual include elements that are enclosed by braces and brackets. You should understand the meaning of the braces and brackets:Braces ( { } ) — Indicate that you must specify at least one of the enclosed values. Each element is either listed on a separate line or separated by vertical bars (|). Occasionally, you may need to specify all of the enclosed values (this case is always noted).
Example:
The command SET MODE requires you to specify either CHAR or LINE.
SET MODE {CHAR} |
                                                  {LINE}
Brackets ( [ ] ) — Indicate that the enclosed values are optional.
Example 1:
The last two parameters for the TELNET CONNECT command are enclosed in brackets, which means they are optional. In this example, the port can be specified without a terminal type, and the host without a port.
CONNECT host [
                                                  port [
                                                  terminal_type ]
                                                  ]
Example 2:
The format of the RSH command shows that all the qualifiers and the
remote_commandparameter are optional.RSH host [ /EIGHTBIT ] [ /ESCAPE_CHARACTER=character ] [ /LOG_FILE=file ] [ /[NO]LOWERCASE ] [ /PASSWORD=password ] [ /[NO]SYSERROR ] [ /TERMINAL_SPEED=n ] [ /TERMINAL_TYPE=type ] [ /[NO]TRUNCATE_USER_NAME ] [ /USER_NAME=remote_user_name ] [ remote_command ]
1.5. Online Help
$ HELP TCPIP_Services
Options under this heading include introductory information about the TCP/IP services.
$ HELP FTP
- FTP
$ FTP
FTP> HELP
- TELNET
$ TELNET
TELNET> HELP
- Management commands
$ TCPIP
TCPIP> HELP
Chapter 2. Working with Files Using the File Transfer Protocol (FTP)
List remote directories
Change the current local and remote directory
Transfer multiple files in a single request
Create and remove directories
Provide security by sending passwords to a remote host
Permit automatic login, file transfer, and log off
Preserve RMS file attributes
COPY [...]*.TXT *.*
If you need this function, you can use the RCP command.
A user account on the OpenVMS system with access to TCP/IP Services for OpenVMS
- One of the following:
A user account on the remote FTP host
Access to the remote host's ANONYMOUS user account (Section 2.3.2, ''Anonymous User Access (Anonymous FTP)'')
|
Capability |
Section |
|---|---|
|
Allow use of DCL or UNIX command syntax. | |
|
Customize the way FTP processes commands and file transfers. | |
|
Display all FTP commands sent to the remote host during command processing. | |
|
Display all replies from the remote host during command processing. | |
|
Access OpenVMS files without specifying your user name or a password. | |
|
Allow use of either OpenVMS or UNIX command syntax in command procedures that use FTP. | |
|
Set and display the default (working) directory on the local or remote host. | |
|
Create and delete remote directories. | |
|
View remote directories. | |
|
Delete a remote file. | |
|
Rename a remote file. | |
|
Append a local file to a remote file. | |
|
Display the contents of a file on a remote host. | |
|
Copy files from a connected remote host to your local host. | |
|
Copy files from your local host to the connected remote host. | |
|
Preserve OpenVMS file attributes when copying files to a UNIX system and back again. | |
|
Copy files to and from a DECnet node. | |
|
Suspend FTP to spawn a subprocess at the DCL prompt. |
|
DCL Command |
Equivalent UNIX Command |
Description |
|---|---|---|
|
Starting and Exiting (at the DCL Prompt) | ||
|
FTP |
|
Invokes FTP. |
|
FTP remote_host |
|
Invokes FTP and establishes a connection to a remote host. |
|
Starting and Exiting (at the FTP> Prompt) | ||
|
CONNECT |
|
Establishes a connection to a remote host. |
|
DISCONNECT |
|
Closes the connection with a remote host. |
|
EXIT Ctrl/Z |
|
Closes the connection with a remote host and exits FTP. |
|
Sending Commands to the Remote Host | ||
|
APPEND |
|
Concatenates a local file to a remote file. |
|
CREATE/DIRECTORY |
|
Creates a remote directory. |
|
DELETE |
|
Deletes remote files. |
|
DIRECTORY |
|
Lists remote file names and related information. |
|
GET |
|
Copies files from the remote host to the local host. |
|
LOGIN |
|
Logs you in to a remote host. |
|
PUT |
|
Copies files from the local host to the remote host. |
|
RENAME |
|
Changes file names on remote systems. |
|
SET DEFAULT SET DEFAULT/LOCAL |
|
Sets the remote working directory or the local working directory. |
|
SHOW DEFAULT SHOW DEFAULT/LOCAL |
|
Displays the name of the remote current working directory or the local working directory. |
|
VIEW |
|
Displays the contents of a file on the current output device. |
|
Suspending FTP to Return to DCL Prompt | ||
|
SPAWN |
|
Suspends FTP to create a subprocess at the local DCL prompt. |
|
Customizing Your Session's Environment | ||
|
DISABLE LOG |
|
Disables the display of all the protocol commands sent to the remote host. |
|
DISABLE PARSE |
|
Disables the expansion of file names. |
|
DISABLE PORT_COMMAND |
|
Disables the sending of the FTP protocol PORT command. |
|
DISABLE REPLY |
N/A |
Disables the display of all responses from the remote host. |
|
DISABLE TRANSFER_VERIFICATION |
|
Disables the display of the pound sign |
|
DISABLE VMS_PLUS |
N/A |
Disables the special OpenVMS-to-OpenVMS transfer mode. |
|
ENABLE LOG |
|
Enables the display of protocol commands sent to the remote host. |
|
ENABLE PARSE |
|
Enables the expansion of file names. |
|
ENABLE PORT_COMMAND |
|
Enables the sending of the FTP protocol PORT command. |
|
ENABLE REPLY |
N/A |
Enables the display of responses from the remote host. |
|
ENABLE TRANSFER_VERIFICATION |
|
Enables the display of the pound |
|
ENABLE VMS_PLUS |
N/A |
Enables the OpenVMS-to-OpenVMS transfer mode. |
|
HELP |
|
Invokes help. |
|
QUOTE |
|
Sends FTP commands to the remote host without local interpretation. |
|
SET TYPE |
|
Defines the data representation for file transfers. |
|
SHOW STATUS |
|
Displays the current FTP parameter settings and, if you have an open connection, the name of the connected host. |
|
SPAWN |
|
Starts a subprocess at the DCL prompt. |
2.1. Using FTP Commands
Use the following rules for command syntax, quotation marks, and wildcard characters when you type FTP command lines.
2.1.1. DCL and UNIX Command Syntax
ls commands produce the same results, as shown in the following
example:FTP> DIRECTORY/BRIEF *.DIR 200 PORT command successful. 150 Opening data connection for WORK1$:[VANA]*.DIR;* (130.180.4.8,1797) BIN.DIR;1 MAIL.DIR;1 NEWS.DIR;1 NSLOOKUP.DIR;1 USER.DIR;1 226 NLST Directory transfer complete 63 bytes received in 00:00:00.02 seconds (2.12 Kbytes/s) FTP> ls *.DIR 200 PORT command successful. 150 Opening data connection for WORK1$:[VANA]*.DIR;* (130.180.4.8,1798) BIN.DIR;1 MAIL.DIR;1 NEWS.DIR;1 NSLOOKUP.DIR;1 USER.DIR;1 226 NLST Directory transfer complete 63 bytes received in 00:00:00.03 seconds (2.05 Kbytes/s)
2.1.2. Quotation Marks
UNIX path names
UNIX file names with slashes
Lowercase or mixed-case host names, user names, passwords, file names, and command lines
FTP> put MY.DOC "/usr/users/evt/my.doc"
200 PORT command successful.
150 Opening ASCII mode data connection for /usr/users/evt/mydoc
(130.180.4.8,1789).
226 Transfer complete.
local: WORK1$:[VANA]MY.DOC;2  remote: /usr/users/evt/my.doc
289 bytes sent in 00:00:00.01 seconds (20.15 Kbytes/s)
2.1.3. Wildcards
You can use wildcards in the following FTP commands: DELETE, DIRECTORY, GET, PUT, MGET, MPUT, MDELETE, and MLS.
The percent sign (%) to represent an individual character
The question mark (?) to represent an individual character
The asterisk (*) to represent multiple characters
If any of these characters are part of a file name but are not used as a wildcard,
you can disable recognition of these characters as wildcards by either enclosing the
file name in quotation marks or using the DISABLE PARSE command.
2.1.4. Qualifiers
In DCL command lines, you can place a command qualifier anywhere on the command line. It is a good practice to follow the OpenVMS recommendation of placing the qualifier after the command name.
FTP> GET TEMP. *.* /CONFIRMFTP> GET /CONFIRM TEMP. *.*
FTP> GET/CONFIRM TEMP. *.*
Get TEMP. ? [Y or N ] [Y]:Y 200 TYPE set to IMAGE. 200 PORT command successful. 150 Opening data connection for TEMP. (130.180.4.8,2634) 226 Transfer complete. local: WORK10$:[MILGROM]TEMP.;13 remote: TEMP. 153 bytes received in 00:00:00.01 seconds (9.33 Kbytes/s) FTP>
| The /CONFIRM qualifier follows the file name parameters rather than the GET command. |
| The /CONFIRM qualifier follows the GET command, but with a space between the command and the qualifier. |
| The /CONFIRM qualifier immediately follows the GET command, with no space between the two. FTP prompts the user to confirm that file TEMP. is to be copied and then sends a copy of the file from the remote host. |
2.2. Obtaining Online Help
- At the DCL prompt:
$ HELP TCPIP_SERVICES FTP
$ HELP FTP
- At the FTP prompt:
FTP> HELP
FTP>
- At the FTP prompt you can type a question mark to get a list of UNIX commands:
FTP> ?
- For DCL commands:
FTP> HELP APPEND APPEND Appends a local file to a remote file. The remote file can reside on any system that supports FTP. To use this command, you must have an FTP session with a remote host. DCL Syntax APPEND local_file [ remote_file ] UNIX Syntax append local_file [ remote_file ] Additional information available: Restrictions Parameters Example APPEND Subtopic? - For UNIX commands:
FTP> ? append
append           append to a file

FTP>
2.3. Starting FTP Sessions
At the DCL prompt, enter the FTP command and specify a remote host.
At the DCL prompt, enter the FTP command with no parameters.
At the FTP prompt, enter the CONNECT or
opencommand, specifying a remote host.By using the /FTP qualifier on the DCL commands COPY and DIRECTORY.
Invoke and use FTP from a command procedure (Section 2.14, ''Command Procedures'').
You must connect to a remote host before you can enter an FTP command that affects or displays files on the remote host. You can invoke FTP and, without first connecting to a remote host, enter the FTP commands that customize the FTP environment.
2.3.1. Making a Remote Connection
When you establish an FTP connection, the remote user name defaults to your user name on the local system.
On the FTP command line, enter the /USERNAME qualifier.
- At the user name prompt, type your remote user name. For example:
$ FTP SITE1

220 site1.midwest.billing.bench.com FTP server (Version 5.0) ready
Connected to SITE1.midwest.billing.bench.com.
Name (SITE1:antel): crowe Return
331 Username CROWE requires a Password
Password:         Return
230 User logged in
If your connection is with another OpenVMS host, it executes your LOGIN.COM procedure. You can use your LOGIN.COM command procedure to customize the environment for your FTP sessions.
$ FTP XENO /USER="bennings" /PASSWORD="keysimpl"Return
220 xeno FTP Server (UNIX Version 5.60) ready
Connected to XENO.site1.acctg.com.
230 User logged in
FTP>sanfran using the CONNECT
command:$ FTP Return FTP> CONNECT SANFRAN Return 220 sanfran.golden.com FTP server (UNIX Version 5.60) ready Connected to sanfran.golden.com. Name (sanfran:dave): Return 331 Password required for dave Password: Return 230 User logged in FTP>
2.3.2. Anonymous User Access (Anonymous FTP)
A registered user account on the remote host
To use your own user account, if you have one
To supply a password
- View remote directories
View the guest and public directories with the FTP command DIRECTORY.
If set up, the public directory called GUEST$PUBLIC has general bulletin-board information. It contains files of interest to FTP users.
- Copy files
Enter GET and PUT commands to copy files to and from GUEST$PUBLIC.
The public area is read-only. You can enter the GET command to copy files from the remote host to your local system.
Optionally, there may be an ANONYMOUS$USER directory where you can perform the following actions:Delete files
Create directories
Delete directories
Rename files
Rename directories
The system manager sets up the access restrictions for Anonymous FTP that determine the availability of features.
Note
GUEST$PUBLIC and ANONYMOUS$USER are devices names for directories that may be set up by the system manager. See the VSI TCP/IP Services for OpenVMS Management manual for more information.
williams uses Anonymous FTP to
connect to the ANONYMOUS account on OpenVMS host TRACTPLAN. Rather than prompt for a
password, TRACTPLAN asks for the user
name.% ftp tractplan Connected to tractplan.green_dev.org. 220 tractplan FTP Server (Version 5.1) ready Name (tractplan:williams): anonymous 331 Guest login ok, send ident as password Password: williams@tractplan.edu 230 Guest login ok, access restrictions apply
2.4. Exiting FTP
quit, or bye commands or by pressing Ctrl/Z. The following
examples close a connection with the remote host and exit
FTP.FTP> EXIT 221 Goodbye. $
FTP> quit
221 Goodbye.
$
To close a connection and remain at the FTP prompt, use the DISCONNECT or
close command.
FTP> DISCONNECT
221 Goodbye.
FTP>
FTP> CLOSE
221 Goodbye.
FTP>
2.5. Viewing Directories on the Remote Host
FTP> DIRECTORY
200 PORT command successful
150 Opening ASCII mode data connection for /bin/ls (130.180.4.8,1312)
total 6303
-rw-rw-r–   1 milgrom  users          1 Jan  9  2002 #UNTITLED#
-rw-------   1 milgrom  users          4 Apr 11  2002 .Xauthority
-rwxr-xr-x   1 milgrom  users       1499 Feb  3  2002 .cshrc
drwxr-xr-x  11 milgrom  users       8192 Jan  9  2002 .dt
-rwxr-xr-x   1 milgrom  users       3970 Dec 13  2002 .dtprofile)
2.6. Displaying and Changing the Default Directory
During an FTP session, you can display or change the current default directory either on the remote host or on your local host.
FTP> SHOW DEFAULT
257 "/usr/users" is the current directory.
FTP> SHOW DEFAULT/LOCAL
Local directory is DISK$6:[MANAGER].
/usr/users/robert:FTP> SET DEFAULT "/usr/users/robert" 250 CWD command successful.
FTP> SET DEFAULT "~robert"
FTP> SET DEFAULT ~
250 CWD command successful.
FTP> pwd
257 "/usr/users/robert" is current directory.
/usr/flyers/localads to
/usr/flyers/localads/music:FTP> SET DEFAULT MUSIC
FTP> SET DEFAULT/LOCAL USER$1:[PLANS.CHECKS]
Local Directory now USER$1:[PLANS.CHECKS]
FTP> SET DEFAULT/LOCAL [.HEARTS]
2.7. Creating and Deleting Directories
LOCAL_ACCTS in the current
working directory on the connected remote OpenVMS
host.FTP> CREATE/DIRECTORY [.LOCAL_ACCTS]
FTP> DELETE/DIRECTORY LOCAL_ACCTS.DIR;*
2.8. Copying Files
To copy files from a remote host to your local host, use the GET command. To copy files from your local host to a remote host, use the PUT command. To use these commands, you must have an active FTP session with a remote host. You can enter any number of commands during the session. For information on using these commands to copy files to and from a remote DECnet host, see Section 2.15, ''Using FTP with DECnet''. You can also use the COPY/FTP command to copy files across the network using TCP/IP. For more information on this command, type HELP COPY/FTP at the DCL prompt.
2.8.1. Using the GET Command to Copy Remote Files to the Local Host
acct.pay,
located in the remote working directory, to your local OpenVMS
host:FTP> GET ACCT.PAY
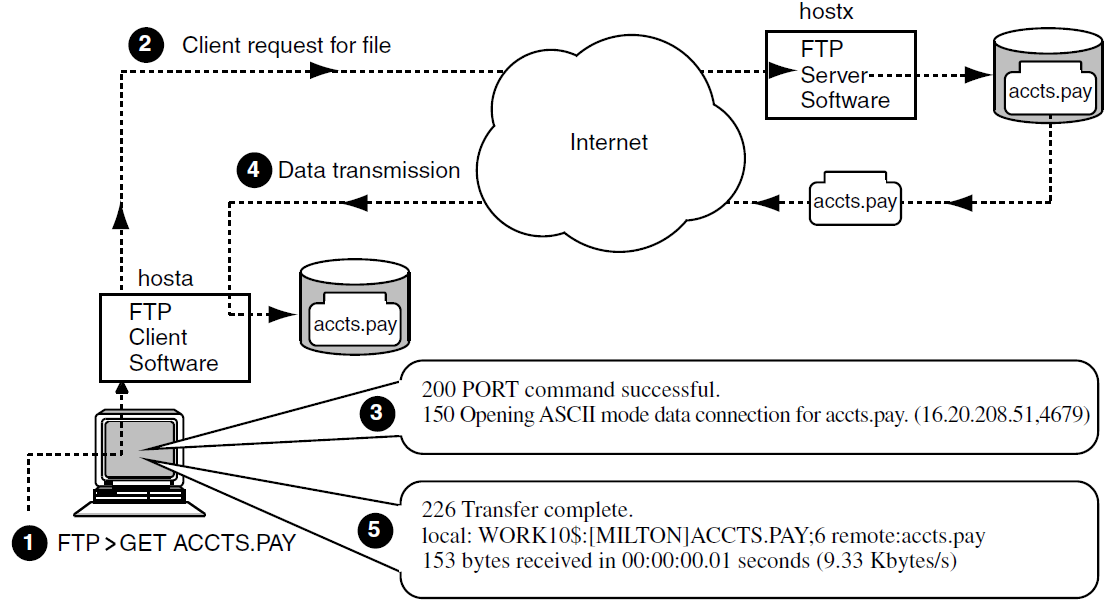
- – The user at local host
hosta, who is connected through FTP to remote UNIX hosthostx, enters a GET command. - – The FTP client software on
hostasends a request to the remote FTP server onhostxto send the requested file. - – The FTP
PORT command successfulmessage and the following line indicate the remote server is opening a data connection to send the requested file. - – The remote FTP server sends the requested file,
acct.pay, tohosta.  – A message indicates the file transfer was
complete and provides additional information about the transfer.
– A message indicates the file transfer was
complete and provides additional information about the transfer.
For more information about the GET command, see Section 2.16, ''Command Descriptions''.
2.8.2. Using the PUT Command to Copy Local Files to the Remote Host
FTP> PUT ACCTS.LIS
To prevent record attributes from being lost in the transfer from an OpenVMS to a UNIX system, use the /FDL qualifier to the PUT command. For more information about the /FDL qualifier, see Section 2.8.6, ''Preserving OpenVMS File Attributes''.
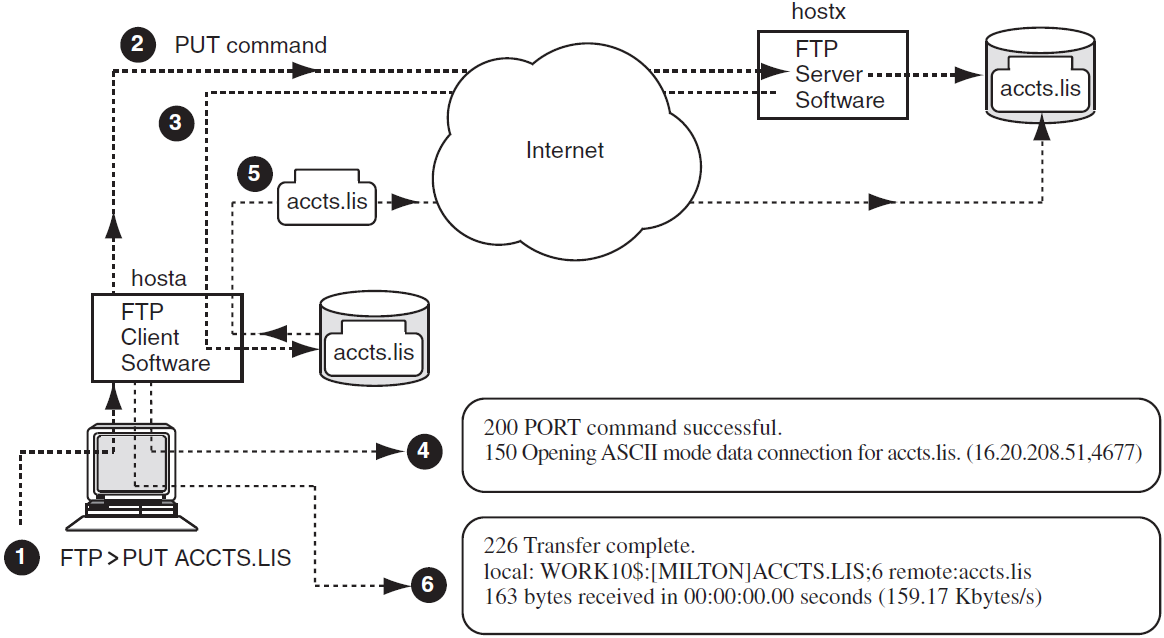
- – The user at local host
hosta, who is connected through FTP to remote UNIX hosthostx, enters a PUT command. - – The FTP client software on
hostarequests the FTP server onhostxto receive the specified file (accts.lis). - – The remote FTP server establishes a data
connection with the local host.
- – The
PORT command successfulmessage and the following line indicate the remote server will receive the file. - – The client sends the requested file,
accts.lis, tohostx.  – A message indicates the file transfer is complete
and provides additional information about the transfer.
– A message indicates the file transfer is complete
and provides additional information about the transfer.
For more information about the PUT command, see Section 2.16, ''Command Descriptions''.
2.8.3. How FTP Copies Files
The version numbers become the last element of the copied files.
Semicolons are converted to periods.
2.8.4. Using the Store Unique Feature
sunique command at the FTP prompt, as
follows:FTP> sunique Store unique on. FTP> sunique Store unique off. FTP> sunique Store unique on.
The Store Unique feature behaves differently when copying files between OpenVMS and UNIX. It also behaves differently if you use wildcards or specify version numbers.
text.txt
from OpenVMS to UNIX.|
FTP Command |
File |
Store Unique On |
Store Unique Off |
|---|---|---|---|
|
|
No |
|
|
|
|
Yes |
|
|
text.txt;*
from OpenVMS to UNIX.|
FTP Command |
Files |
Store Unique On |
Store Unique Off |
|---|---|---|---|
|
|
No |
|
|
|
|
Yes |
|
|
2.8.5. Transferring Files Between OpenVMS Hosts: VMS Plus Mode
FTP performs fast file transfers between two OpenVMS systems by using VMS Plus Mode.
When FTP identifies file transfers between two OpenVMS hosts running TCP/IP Services, it transfers files in large blocks rather than in small records. VMS Plus Mode greatly increases the transfer speed and preserves all Record Management Services (RMS) file attributes.
FTP automatically disables VMS Plus Mode when your session is with a UNIX host or with an OpenVMS host not running TCP/IP Services.
2.8.6. Preserving OpenVMS File Attributes
When you transfer OpenVMS files to a UNIX system and back again, some record attributes might be lost. To preserve all RMS file attributes, use the /FDL qualifier (File Definition Language) with the GET and PUT commands.
Specifying SET TYPE ASCII results in a sequential file with variable records. Select this type when transferring ASCII text files.
Specifying SET TYPE IMAGE results in a sequential file with fixed records of 512 bytes. Select this type when transferring non-ASCII files, such as binary files or executable image files.
- Specify the IMAGE data type:
FTP> SET TYPE IMAGE
- Transfer the file to the remote host. At the same time, create and transfer a secondary file with the file's OpenVMS record attributes:
FTP> PUT/FDL file
- Specify the IMAGE data type:
FTP> SET TYPE IMAGE
- Retrieve the file from the remote host after retrieving and using the secondary file containing the file's OpenVMS record attributes:
FTP> GET/FDL file.dat
Creates the FDL file
cygnet.bckfdlon the remote host with the RMS attributes of file STAT.BCK.- Transfers the data in STAT.BCK and puts it in to
cygnet.bckfdlon the remote host.FTP> PUT/FDL STAT.BCK CYGNET.BCK 200 TYPE set to ASCII 200 PORT command successful 150 Opening data connection for cygnet.bckfdl (130.180.4.8,1028) 226 Transfer complete local: cygnet.bckfdl remote: cygnet.bckfdl 846 bytes sent in 00:00:00.03 seconds 200 TYPE set to IMAGE 200 PORT command successful 150 Opening data connection for cygnet.bck (130.180.4.8,1029) 226 Transfer complete local: STAT.BCK remote: cygnet.bck 8152 bytes sent in 00:00:00.12 seconds
Transfers the FDL file
cygnet.bckfdlfrom the remote host to the local host.Uses this file to re-create the file STAT.BCK, with all of its original RMS attributes, on the local host.
- Transfers the data in
cygnet.bckto the new local file STAT.BCK.FTP> GET/FDL CYGNET.BCK STAT.BCK 200 TYPE set to ASCII 200 PORT command successful 150 Opening data connection for cygnet.bckfdl (130.180.4.8,1028) 226 Transfer complete local: cygnet.bckfdl remote: cygnet.bckfdl 846 bytes sent in 00:00:00.03 seconds 200 TYPE set to IMAGE 200 PORT command successful 150 Opening data connection for cygnet.bck (130.180.4.8,1029) 226 Transfer complete local: STAT.BCK remote: cygnet.bck 8152 bytes sent in 00:00:00.12 seconds
2.8.7. Transfer Mode
TCP/IP Services supports only STREAM mode for data transfer. STREAM mode transmits the data as a stream of bytes.
2.8.8. File Structure
TCP/IP Services supports transfers of ASCII (stream, records with variable length) and IMAGE (binary, records fixed at 512 bytes) files.
2.9. Renaming and Deleting Files
FTP> RENAME YEAR.DAT YEAR96.DAT
FTP> DELETE YEAR.DAT;*
2.10. Viewing the Contents of a File
To display the contents of a file on a connected remote host, use the FTP command VIEW and specify the file name. If the file is not in your current working directory, include the directory name in the file specification.
FTP> VIEW/PAGE ENG.DIS
usrm::"khuna@jnet.com"
pobox::bearse
yield::timms
usrm::"lerry@muster.cudenver.edu"
sam
nm%us1rmc::"ldutton@TopCom.com"

   .
   .
   .
2.11. Appending Files
FTP> APPEND JUL_DEC.DAT YEAR.DAT
200 PORT command successful
150 Opening data connection for year.dat. (130.180.4.8,1108)
226 Append transfer complete
local:large.txt   remote:remote.dat
15596 bytes sent in 00:00:00.10 seconds (152.30 Kbytes/s)
2.12. Suspending FTP to Return to the Local DCL Prompt
- Use the SPAWN command to suspend your current session and create a subprocess at the local DCL prompt. At the DCL prompt, you can then enter any number of DCL commands. To return to your suspended FTP session (exiting the DCL subprocess), enter the LOGOUT command, as shown in the following example:
FTP> SPAWN
$ DIRECTORY

Directory WORK1$:[VANA.FTP]

TELNETINIT.INI;2    TELNETINIT.INI;1

Total of 2 files.
$ SHOW TIME
2-OCT-2002 13:16:32
$ LOGOUT
Process VANA_1 logged out at  2-OCT-2002 13:16:48.26
FTP>
- Specify a DCL command in the SPAWN command line. After the DCL command is executed, FTP prompts for further input, as shown in the following example:
FTP> SPAWN DIR

Directory WORK1$:[VANA.FTP]

TELNETINIT.INI;2    TELNETINIT.INI;1

Total of 2 files.

FTP>
- Use the exclamation point (!) character to spawn a new process to execute a command, as shown in the following example:
FTP> ! DIR

Directory WORK1$:[VANA.FTP]

TELNETINIT.INI;2    TELNETINIT.INI;1

Total of 2 files.
FTP>
2.13. Customizing FTP Command Processing
The operating system of the remote host
The applications you use
Whether you want wildcard name expansion
The information you want displayed during processing
ENABLE/DISABLE LOG
Enables or disables the display of FTP commands sent to the remote host.
ENABLE/DISABLE PARSE
Enables or disables the expansion of file name specifications.
ENABLE/DISABLE REPLY
Enables or disables the display of all responses from the remote host.
QUOTE
Sends FTP commands directly to the remote host without local interpretation.
The preceding commands control the way FTP displays command processing information and status. The SHOW STATUS command displays the current status of the FTP client (your local host) and, if you have a connection, of the remote host.
$ FTP /USER=SALINGER /PASSWORD=-LETMEIN HAGELS
Use the FTP command SHOW STATUS to determine whether the MULTILINE feature is enabled.
You can modify the way FTP reacts to errors by using the SET ERROR_LEVEL command. By default, the error level setting is SUCCESS, which means that when FTP is running in batch mode, a warning or error message will cause FTP to exit. (FTP runs in batch mode when FTP commands are executed by a command procedure rather than interactively.) If you do not want FTP to exit upon a warning or error message, you can set the error level to ERROR.
$ FTP CONNECT HAGELS
cd [MILLER.USERS]
DEL *.*;*
EXIT
$
If the error level had been set to ERROR, FTP would not exit, and the DELETE command in the command procedure would delete all files in your current working directory. Note that you can also set the error level to WARNING, which causes FTP to tolerate warning messages (but not error messages).
2.14. Command Procedures
You can use either OpenVMS or UNIX command syntax in DCL command procedures that use FTP. You can use command procedures to invoke FTP tasks, connecting to a remote host and performing assorted file operations with the remote host (see Section 2.14.1, ''Task Command Files''). You can also use command procedures to customize the FTP environment (see Section 2.14.2, ''Initialization Command File'').
2.14.1. Task Command Files
needs.lis from host
dave:$! FTP_TO_SANFRAN.COM $! This command procedure uses FTP from within $! a DCL command file. Note that the password "letmein" $! does not need quotation marks, but it is case sensitive. $! $ FTP CONNECT sanfran LOGIN dave letmein GET "nest.lis" EXIT $ EXIT $
$!
$!  FTP_PASS_PARAMETER.COM
$! This method is useful for automated BATCH queue jobs.
$!
$ WS =="WRITE SYS$OUTPUT"
$ IF P1 .EQS "" .OR. P2 .EQS. "" .OR. P3 .EQS. "" .OR. P4 .EQS. ""
$ THEN
$ WS "@FTP_PASS_PARAMETER LOCAL-FILE SYSTEM USERNAME PASSWORD"
$ EXIT
$ ENDIF
$!
$ COM == "FTP_TEMP.COM"
$ LOG == "FTP_TEMP_COM.LOG"
$ FILE == "''P1'"
$ USER == F$EDIT("''P3'","LOWERCASE")
$ PASSW == F$EDIT("''P4'","LOWERCASE")
$!
$ ON WARNING THEN GOTO ERR
$ OPEN/WRITE OUTFILE 'COM
$ WRITE OUTFILE "$ DEFINE SYS$OUTPUT ''LOG'"
$ WRITE OUTFILE "$ FTP"
$ WRITE OUTFILE "open ''P2'"
$ WRITE OUTFILE "user ''USER'"
$ WRITE OUTFILE "''PASSW'"
$ WRITE OUTFILE "put ''FILE'"
$ WRITE OUTFILE "quit"
$ WRITE OUTFILE "$ EXIT"
$ CLOSE OUTFILE
$ @'COM
$ DELETE 'COM;*
$ PURGE 'LOG
$!
$! You can open the FTP_TEMP_COM.LOG file to check for errors,
$! for example, checking the initial return code for
$! 4xx (retry condition), or 5xx (failure condition).
$!
$ EXIT
$!
$ ERR:
$ IF F$TRNLNM("OUTFILE") .NES. "" THEN CLOSE OUTFILE

$ EXIT
$
2.14.2. Initialization Command File
Initialization command files can customize your FTP sessions with the SET, ENABLE, and DISABLE commands. These command files are optional. They eliminate the need to enter individual FTP commands, and they run automatically when you invoke FTP.
Contain only OpenVMS commands.
Contain only one command per line.
Are generally named SYS$LOGIN:FTPINIT.INI.
FTP searches for a file specified by the logical TCPIP$FTPINIT.
If not found, FTP then searches for SYS$LOGIN:TCPIP$FTPINIT.INI.
If not found, FTP then searches for the file specified by the logical FTPINIT (provided for backward compatibility).
If not found, FTP then searches for SYS$LOGIN:FTPINIT.INI (provided for backward compatibility).
! This file, FTPINIT.INI, sets my FTP parameters
! the way I like them.
!
ENABLE REPLY
ENABLE TRANSFER_VERIFICATION
SET DEFAULT/LOCAL [MILLER.WORK]
$ FTP
Reply on.
Verbose mode on.
Bell off.
Hash mark printing on (1024/hash mark).
Local directory now SYS$LOGIN_DEVICE:[MILLER.WORK]
2.14.3. Setting Error Level
When you use FTP interactively, you decide what actions to take when an error or warning is generated. In batch mode, however, any error message other than SUCCESS causes the batch process to exit by default.
$ @TEST_FTP
220 rainbw FTP Server (Version 5.60) ready.
Connected to rainbw.tcp.klg.dec.com.
331 Username PETERS requires a Password
230 User logged in.
200 TYPE set to IMAGE.
200 PORT command successful.
550-Failed to open WORK7$:[PETERS]TMP101.TMP; for input.
550 file not found
221 Goodbye.
|
FTP Protocol Reply Code |
OpenVMS System Message |
Explanation |
|---|---|---|
|
1 xx |
%TCPIP-S-FTP_PRELIM |
Success |
|
2 xx |
%TCPIP-S-FTP_COMPLETE |
Success |
|
3 xx |
%TCPIP-S-FTP_CONTINUE |
Success |
|
4 xx |
%TCPIP-W-FTP_TRANSIENT |
Warning |
|
5 xx |
%TCPIP-E-FTP_ERROR |
Error |
When a command is executed, FTP checks the return status. In batch mode, the value of the error level determines whether FTP continues with each of the reply codes.
FTP> SET ERROR_LEVEL xIf x is SUCCESS, then WARNING, ERROR, and FATAL cause FTP to exit.
If x is WARNING, then ERROR and FATAL cause FTP to exit.
If x is ERROR, then only FATAL causes FTP to exit.
Fatal errors always cause FTP to exit.
2.15. Using FTP with DECnet
To copy files to and from a DECnet node, use the standard GET and PUT commands as described in the following paragraphs.
You can copy files to and from DECnet nodes and get remote directory information, if your host and the DECnet node are connected through a host running TCP/IP Services for OpenVMS. Use the full file specification, including the node, device, directory, and file name.
FTP> PUT FAX.TXT CURTAIL::DISK$3:[GEARY.KEEPS]CURRENT.TXT
FTP> GET HABTAT::DISK$2:[NATL.UTAH.SWEST]HOUSING.TXT HOUSE.TXT
2.16. Command Descriptions
To start FTP, enter the FTP command at the DCL prompt.
To use FTP commands, type them at the FTP> prompt.
This section provides complete descriptions of each FTP command. The commands are listed alphabetically. The related ENABLE and DISABLE commands are presented together (see the description for ENABLE).
FTP Command Reference
APPEND
APPEND — Appends a local file to a remote file. The remote file can reside on any system that supports FTP. To use this command, you must have an FTP session with a remote host.
DCL Syntax
APPEND local_file [
                            remote_file ]
UNIX Syntax
append local_file [
                            remote_file ]
Restrictions
No wildcards.
Parameters
local_file
Required.
Name of the local OpenVMS file.
remote_file
Optional.
Name of the remote file (either UNIX or OpenVMS).
Example
FTP>APPEND LARGE.TXT CHRONOS200 PORT command successful. 150 Opening ASCII mode data connection for CHRONOS. (130.180.4.8,1108) 226 Transfer complete local:work1:[samson]large.txt remote:CHRONOS 15596 bytes sent in 00:00:00.10 seconds (152.30 Kbytes/s)
Appends local file LARGE.TXT to UNIX file chronos.
CONNECT
CONNECT — Establishes an FTP connection to a remote host. The remote host can be any operating system that supports FTP.
DCL Syntax
CONNECT remote_host [ port
                        ]
UNIX Syntax
open remote_host [ port
                        ]
Parameters
remote_host
Required.
Remote host to which you want to connect.
port
Optional. Default: 21.
FTP port on the remote host.
Example
FTP>CONNECT RETAIL Return220 retail.good_co.com FTP Server (Tru64 UNIX Version 5.1) ready. Connected to retail. Name (retail:dave):Return331 Password required for dave Password:Return230 User dave logged in. FTP>
Connects user dave to UNIX host retail.
CREATE/DIRECTORY
CREATE/DIRECTORY — Creates a directory on the remote host. The remote directory can be on any operating system that supports FTP. To use this command, you must have an FTP session with a remote host.
DCL Syntax
CREATE/DIRECTORY
                    remote_directory
UNIX Syntax
mkdir remote/path
Parameter
remote_directory
remote_path
Required.
Name for the created directory.
Qualifier
- /DIRECTORY
The /DIRECTORY qualifier must immediately follow the CREATE command without a preceding space.
Creates a new directory or subdirectory. Must have write access to the lowest-level directory under which the new directory is to be created.
Examples
FTP>CREATE/DIRECTORY TERM257 MKD command successful.In this example:The remote host is UNIX.
The working directory is
/usr/staff/dir.The command creates directory
/usr/staff/dir/term.
FTP>CREATE/DIRECTORY [.TRANSFERS]257 MKD command successful.In this example:The remote host is OpenVMS.
The working directory is DUA2:[CENTRAL].
The command creates the OpenVMS directory DUA2:[CENTRAL.TRANSFERS].
DELETE
DELETE — Deletes either UNIX or OpenVMS remote files. To use this command, you
must have an FTP session with a remote host. Use caution with the
mdelete command. The FTP command DIRECTORY does not list hidden
files (files that start with a period). Using the mdelete command
with any wildcard deletes hidden files, which you might need.
DCL Syntax
DELETE remote_files
DELETE/DIRECTORY
                    remote_directory
UNIX Syntax
delete remote_file
mdelete remote_files
rmdir remote_directory
Parameter
remote_file
remote_files
remote_directory
Required.
File, files, or directory to delete.
Qualifier
- /DIRECTORY
Optional. The /DIRECTORY qualifier must follow immediately after the DELETE command without a preceding space.
Deletes an empty directory. To delete a directory that is not empty, you must first delete the contents of the directory.
Examples
FTP>DELETE [MAIN.BRANCH]*.*;*250 DELE of [MAIN.BRANCH]*.*;* successful.Deletes all files in the remote OpenVMS directory [MAIN.BRANCH].
FTP>DELETE/DIRECTORY BRANCH.DIR;1250 RMD command successful.Deletes the directory [MAIN.BRANCH].
FTP>DELETE "/users/venture/carton"250 DELE command successful.Deletes UNIX file with path name
/users/venture/carton.FTP>mdelete /bids/west/january97/c*250 DELE command successful.250 DELE command successful.250 DELE command successful.Deletes three UNIX files starting with the letter "c" from directory
/bids/west/january97. Note that the messages generated depend on the server. For example, for an OpenVMS server, messages would specify the names of the files deleted.
DIRECTORY
DIRECTORY — Lists the names of remote files and other information about them. The remote files can be on any FTP server. To use this command, you must have an FTP session with a remote host. The DCL DIRECTORY command supports the redirecting of output to a file.
DCL Syntax
DIRECTORY [ /BRIEF | /OUTPUT= output_file ] [
                            remote_directory ]
UNIX Syntax
ls [ /remote/path ]
mls [ /remote/path ]
Parameter
remote_directory
/remote/path
Optional. Default: default directory.
Directory with the file names you want to list. Wildcards and multiple directories are valid.
Qualifiers
- /BRIEF
Optional. Default: full display.
Produces output similar to the UNIX
lscommand.- /OUTPUT= output_file
Optional. If you do not specify the /OUTPUT qualifier, FTP displays output to SYS$OUTPUT. If you do specify the /OUTPUT qualifier, you must supply a valid output_file specification.
Name of the file to hold the output.
Examples
FTP>DIRECTORY200 PORT command successful150 Opening data connection for /bin/ls (130.180.9.8,1150)total 76-rwxr-x–x 1 geary users 261 Nov 6 2002 .cshrc-rw-r–r– 1 root users 128 May 21 11:16 .mailrc-rwxr-x–x 1 geary users 182 Nov 6 2002 .profiledrwxr-x–x 2 geary users 512 Nov 6 2002 bin. . .226 Transfer complete.911 bytes received in 00:00:00.07 secondsDisplays a full listing of file names in the current default UNIX directory.
FTP>ls disk3$:[banks.branch.bills]200 PORT command successful150 Opening data connection for DISK3$:[BANKS.BRANCH.BILLS] (11.1.2.3.4)LOCAL_ACCTS.DIS;1GO_FIGURE.EXE;14COMPARE.EXE;4SUMTOTAL.COM;1226 NLST Directory transfer complete.428 bytes received in 00:00:00.41 seconds (10.06 Kbyte/s)FTP>Displays a listing of file names in the directory of the connected host, which is another OpenVMS system.
DISCONNECT
DISCONNECT — Terminates your session with the remote host and returns to the FTP prompt.
DCL Syntax
DISCONNECT
UNIX Syntax
close
disconnect
Example
FTP>DISCONNECT221 Goodbye.
Disconnects the user from an OpenVMS system.
ENABLE (DISABLE) LOG
ENABLE (DISABLE) LOG — Enables or disables the display of all protocol commands sent to the remote host. Default: DISABLE LOG.
DCL Syntax
ENABLE LOG
DISABLE LOG
UNIX Syntax
debug
Example
FTP>ENABLE LOGBell off.Debugging on (debug=1).FTP>ENABLE REPLYReply on.Verbose mode on.FTP>PUT PRICES.TXT YEAR.PRICES—> PORT 1,2,3,4,7,138200 PORT command successful.—> STOR PRICES.TXT150 Opening ASCII mode data connection for small.txt (1,2,3,4,7,138).226 Transfer complete.local: WORK1$:[samson]prices.txt;1 remote: year.prices609 bytes sent in 00:00:00.02 seconds (179.36 Kbytes/s)FTP>GET LAKE.IBIS LAKE_IBIS.DAT—> PORT 1,2,3,4,7,138200 PORT command successful—> RETR lake.ibis150 Opening ASCII mode data connection for lake.ibis (1.2.3.4,193)226 Transfer completelocal: LAKE_IBIS.DAT remote:lake.ibis4 bytes received in 00:00:00.03 seconds (0.13 Kbytes/s)FTP>
Turns on the display of commands sent to the remote host. Shows all the commands sent to the remote host during the execution of PUT and GET.
ENABLE (DISABLE) PARSE
ENABLE (DISABLE) PARSE — Enables or disables the expansion of remote file names during file transfers. PUT operations: expansion is done by the local host. GET operations: expansion is done on the remote host. During GET operations, an expansion of a directory name might be different from the expansion of other file names. The result depends on the operating systems of the remote and local hosts.
DCL Syntax
ENABLE PARSE
DISABLE PARSE
UNIX Syntax
glob
Example
FTP>ENABLE PARSEFTP>PUT BIRDS*.TXTEnables parsing and the expansion of wildcards. Copies all local files starting with the characters BIRDS and ending with .TXT to the remote host.
FTP>ENABLE PARSEFTP>GET *.DOCBecause parsing is enabled, the remote host expands the wildcard. All remote files ending in .DOC are copied to the local system.
The command is equivalent to the following:FTP> ENABLE PARSE FTP> MGET *.DOC
ENABLE (DISABLE) PORT_COMMAND
ENABLE (DISABLE) PORT_COMMAND — Enables or disables the sending of the FTP protocol PORT command to the remote host. By default, FTP sends a PORT command when establishing a connection. If this command fails, FTP uses the default data port (20). Disable the sending of the PORT command when you communicate with remote hosts that ignore PORT commands. Default: ENABLE PORT_COMMAND.
DCL Syntax
ENABLE PORT_COMMAND
DISABLE PORT_COMMAND
UNIX Syntax
sendport
Example
FTP>ENABLE PORT_COMMANDFTP>PUT CODE.TXT200 PORT command successful150 Opening data connection for CODE.TXT (130.180.10.8,1182)226 Transfer completelocal: DISK$PROJECT6:[MANAGEMENT]CODE.TXT;9 remote: CODE.TXT3634 bytes sent in 00:00:00.04 seconds (88.72 Kbytes/s)
FTP enters a PORT command before the file transfer.
ENABLE (DISABLE) REPLY
ENABLE (DISABLE) REPLY — Enables or disables the display of all responses from the remote host. Default: ENABLE REPLY.
DCL Syntax
ENABLE REPLY
DISABLE REPLY
UNIX Syntax
debug
Examples
FTP>ENABLE REPLYReply on.Verbose mode on.FTP> get birds.txt dogs.txt200 PORT command successful.150 Opening ASCII mode data connection for birds.txt (130,180,10,8,1570) (2405 bytes).226 Transfer complete.local: WORK1$:[SAMSON]DOGS.TXT;1 remote: birds.txt2405 bytes received in 00:00:00.03 seconds (60.22 Kbytes/s)FTP>Enables the display of all the responses from the remote host. Copies
birds.txtfrom the remote host to the local filedogs.txt, and shows all the executed FTP commands in progress.FTP>DISABLE REPLYBell off.Reply off.Verbose off.FTP> get birds.txt dogs.txtFTP>Disables the display of all the responses from the remote host. Copies
birds.txtfrom the remote host.
ENABLE (DISABLE) TRANSFER_VERIFICATION
ENABLE (DISABLE) TRANSFER_VERIFICATION — Enables or disables the display of # for each 1000 bytes of
transferred data. Default: DISABLE TRANSFER_VERIFICATION.
DCL Syntax
ENABLE TRANSFER_VERIFICATION
DISABLE TRANSFER_VERIFICATION
UNIX Syntax
hash
Example
FTP>ENABLE TRANSFER_VERIFICATIONBell off.Hash mark printing on (1024/hash mark).FTP>GET FUTURES.DIS FUTURES_H2.DIS200 PORT command successful 150 Opening data connection for futures.dis (11.20.99.100,26) ############### 226 Transfer complete. local: FUTURES_H2.DIS remote: futures.dis 15596 bytes received in 00:00:00.11 seconds (138.45 Kbytes/s) FTP>
Enables the display of # for each 1000 bytes of transferred data.
Copies futures.dis to FUTURES_H2.DIS, showing when 1000 bytes are
transferred.
ENABLE (DISABLE) VMS_PLUS
ENABLE (DISABLE) VMS_PLUS — Enables or disables VMS Plus Mode. This lets you specify a transfer mode based on file type (for example, ASCII or image).
Additional Information
+VMS+ — The client is in VMS Plus mode.
NONE — The client is not in VMS Plus mode.
When you use FTP to connect to an OpenVMS host running TCP/IP Services, VMS Plus Mode is enabled.
When you use FTP to connect to a non-OpenVMS host or to an Open VMS system running software that does not recognize VMS Plus Mode, VMS Plus Mode is disabled.
DCL Syntax
ENABLE VMS_PLUS
DISABLE VMS_PLUS
UNIX Syntax
There is no UNIX equivalent for the ENABLE or DISABLE VMS_PLUS command.
EXIT
EXIT — Closes an open connection and exits from FTP. Pressing Ctrl/Z is equivalent to the EXIT command.
DCL Syntax
EXIT
UNIX Syntax
quit
bye
FTP
FTP — The File Transfer Protocol (FTP) command starts an FTP session and does one of the following: displays the FTP prompt (you can enter FTP commands to customize your environment and FTP command processing) or establishes a connection to the specified remote host.
DCL Syntax
FTP [ host [ port ] ] [
                        /USERNAME= remote_user_name ] [ /PASSWORD=
                            password ] [ /INPUT=
                            input_filespec ]
UNIX Syntax
ftp [ host [ port ]
                        ]
Parameters
host
Optional.
Remote host to which you want to connect.
port
Optional.
Specifies the port to use.
Qualifiers
- /INPUT= input-filespec
Optional. If you do not specify the /INPUT qualifier, FTP takes input from SYS$INPUT. If you specify this qualifier, you must also supply an input file specification. FTP continues to prompt until it has a valid input file specification.
Runs a DCL command file with FTP commands.
- /PASSWORD= password
Optional. Default: your password on the local system.
Password for the remote user account to which you want to connect.
- /USERNAME= remote_user_name
Optional. Default: your user name on the local system.
Name of the remote user account to which you want to connect.
Examples
$FTPFTP>Starts an FTP user session without establishing a connection.
$FTP WKSITE Return220 wksite.texts.wrights.com FTP Server (UNIX 13:34:28 EDT) ready Connected to wren.nest.willow.com. Name (wksite:parks)Return331 Password required for parks. Password:Return230 User parks logged in. FTP>User PARKS starts an FTP session and connects to UNIX host
wksite.$FTP NEWY /USERNAME=BENSON /PASSWORD=WMSWMS220 NEWY.LINK1.MOA.COM FTP Server (Version 5.0) ready Connected to NEWY.LINK1.MOA.COM. 331 Username BENSON requires a password. 230 User logged in. FTP>Starts an FTP session and connects to remote OpenVMS host NEWY in user account BENSON.
GET
GET — The GET command does the following: copies remote files to the local host or copies files from a DECnet node. To use this command, you must have an FTP session with a remote host.
DCL Syntax
GET remote_file [ local_file ] [ /[NO]CONFIRM ] [ /FDL] [ /[NO]LOWERCASE ]
UNIX Syntax
get remote_file [
local_file ]
mget remote_files
Parameters
remote_file
Required.
To copy multiple files, separate the file names with commas or plus signs.
When you specify multiple remote files, you cannot specify a local file name.
To copy a file from a remote DECnet node, use the full specification: node name, device, directory, and file name.
local_file
Optional. Default: Same name (without any device or directory names).
Multiple remote files
Wildcards in the remote file name
Qualifiers
- /CONFIRM
Optional. Default: immediate execution.
Asks you for confirmation before executing the copy operation.
- /FDL
Optional. Default: no secondary file created.
Uses a secondary file with the copied file's OpenVMS RMS record attributes (if you previously entered a PUT/FDL command). The SET TYPE command determines the type of file:Specifying ASCII results in a sequential file with variable records. Select this type when transferring ASCII text files.
Specifying IMAGE results in a sequential file with fixed records of 512 bytes. Select this type when transferring non-ASCII files such as executable image files.
- /[NO]LOWERCASE
Optional. Default: /LOWERCASE
Forces a file name to lowercase at the destination. Use the /NOLOWERCASE qualifier to make sure the file name is preserved in the existing case.
Examples
FTP>get "/seasons/standings/spring.deliveries" SPORTS.TXT200 PORT command successful 150 Opening ASCII mode data connection for spring.stats. . . .Copies the UNIX file
spring.deliveriesto an OpenVMS host, where it is named SPORTS.TXT.FTP>GET spring.deliveries SPORTS.TXTCopies the same file (
spring.deliveries) when it is in your remote working directory.FTP>mget *.doc200 PORT command successful 150 Opening ASCII mode data connection for cast.doc;1 (130.180.4.8,27) 226 Transfer complete. local:cast.doc;1 remote: cast.doc;1 1222 bytes received in 00:00:00.01 seconds (70.19 Kbytes/s) 200 PORT command successful 150 Opening ASCII mode data connection for director.doc;3 (130.180.4.8,28) 226 Transfer complete. local: director.doc;1 remote: director.doc;3 90 bytes received in 00:00:00.01 seconds (5.49 Kbytes/s) FTP>Copies all the UNIX files ending with
doc.FTP>get/confirm *.*;*Get EDTINI.EDT ? [Y or N] [Y]:Y. . .Before executing the copy operation for every file in the remote default directory, FTP asks, one by one, to confirm that you want to copy each file.
To confirmmput,mget, andmdeleteoperations, use the FTP prompt command before entering themput,mget, andmdeletecommands.FTP> prompt Interactive mode on. FTP> mget C* Get CHRONOS ? [Y or N or Q or G] [Y]: y 200 PORT command successful. 150 Opening ASCII mode data connection for CHRONOS (130.180.4.8,2150) (1596 bytes). 226 Transfer complete. local: WORK1$:[VANA]CHRONOS.;2 remote: CHRONOS 1596 bytes received in 00:00:00.04 seconds (31.80 Kbytes/s)
FTP>get/fdl feathers.disCopies and preserves the record attributes of
feathers.dis. (A put/fdl command was entered previously.)
HELP
HELP — Displays information about how to enter FTP commands.
Additional Information
HELP — Displays all DCL FTP commands
HELP ftp_command — Displays DCL help information for the specified command
? — Displays all the UNIX FTP commands
? command — Displays help for the specified UNIX command
DCL Syntax
HELP [ /REMOTE ] [ command ]
UNIX Syntax
help [ command ]
? [ command ]
Parameters
command
Optional.
FTP command about which you would like information.
Qualifiers
- /REMOTE
Optional. Default: local host.
The remote host displays FTP help information. If the remote host is a UNIX host, the FTP help is all UNIX style. If you want to display information about a specific command, the /REMOTE qualifier must follow the HELP command and precede the name of any command for which you want information, as shown in example 2.
Examples
FTP>HELPInformation available: APPEND CONNECT CREATE DELETE DIRECTORY DISABLE DISCONNECT ENABLE EXIT GET HELP LOGIN PUT QUOTE RENAME SET SHOW SPAWN VIEW Topic?The local system displays all DCL FTP commands.
FTP>HELP/REMOTE214-The following commands are recognized (* =>'s unimplemented) USER PORT STOR MSAM* RNTO NLST MKD CDUP LPSV PASS PASV APPE MRSQ* ABOR SITE XMKD XCUP EPRT ACCT* TYPE MLFL* MRCP* DELE SYST RMD STOU EPSV SMNT* STRU MAIL ALLO CWD STAT XRMD SIZE REIN* MODE MSND* REST* XCWD HELP PWD MDTM QUIT RETR MSOM* RNFR LIST NOOP XPWD LPRT 214 End of help FTP>The remote host, a UNIX system, displays the FTP commands you can use in your FTP session with this system.
FTP>HELP/REMOTE USER214 Syntax: USER <sp> username FTP>The remote host displays information about the FTP command USER.
FTP> ? Commands may be abbreviated. Commands are: append disconnect mkdir remotehelp view ascii form mls rename view/p bell get mode reset view/pa binary glob mput rmdir view/pag bye hash open rstatus view/page case image prompt send vms cd lcd sendport status ? cdup ls put struct ! close lpwd pwd sunique delete mdelete quit type debug mdir quote user dir mget recv verbose FTP>
Displays FTP HELP about UNIX commands.
LOGIN
LOGIN — Initiates the login process and completes it if no password is required. If a password is required, enter it at the password prompt. Use this command if the connection is active but the login procedure fails when you request a connection.
DCL Syntax
LOGIN user_name
UNIX Syntax
user user_name
Parameter
user_name
Required.
Your account on the connected remote host.
Example
$ FTP FTP> open bygnet 220 bygnet.band2.stat.com FTP server (UNIX Version 5.60) ready Connected to bygnet. Name (bygnet:vana): evt 331 Password required for evt. Password: 530 Login incorrect. %TCPIP-E-FTP_LOGREJ, login request rejected FTP> LOGIN "evt" 331 Password required for evt. Password: 230 User evt logged in. FTP>
While trying to connect and log in to remote UNIX host bygnet,
user evt enters an incorrect password. Although host
bygnet completes the connection, bygnet rejects
the login request. The LOGIN command successfully completes the login to the
remote host.
PUT
PUT — The PUT command does the following: copies local files to a remote host or copies files to a DECnet node. File names are copied in lowercase without version numbers. To use this command, you must have an FTP session with a remote host. For information about file version numbers, see Section 2.8.4, ''Using the Store Unique Feature''.
DCL Syntax
PUT [ /CONFIRM | /CONVERT | /FDL | /[NO]LOWERCASE | /RAW] (
                            local_file [ remote_file ]
                        )
UNIX Syntax
put local_file [
                            remote_file ]
send local_file [
                            remote_file ]
mput local_files
Parameters
local_file
Required.
To specify multiple files, separate the names with commas.
- To use wildcards, first enable parsing (see the ENABLE PARSE command).
-
putfile_name.ext — Copies the latest version -
putfile_name.ext;* — Copies all versions
-
To copy a file to a remote DECnet node, use the full specification: node name, device, directory, and file name.
remote_file
Optional. Default: same name, same case, no version number on UNIX systems.
Name of the new file on the remote host. You cannot use wildcards.
Qualifiers
- /CONFIRM
Optional. Default: immediate execution. The /CONFIRM qualifier must immediately follow the PUT command, without a preceding space.
This qualifier asks you for confirmation before copying the file.
- /CONVERT
Optional.
Translates the internal file-formatting characters of Variable Forms Control (VFC) files. The /CONVERT qualifier must immediately follow the PUT command, without a preceding space.
- /FDL
Optional. Default: no secondary file created. The /FDL qualifier must immediately follow the PUT command, without a preceding space.
Creates a secondary file with the file's OpenVMS record attributes. The SET TYPE command determines the type of file.Specifying ASCII results in a sequential file with variable-length records. Select this type when transferring ASCII text files.
Specifying IMAGE results in a sequential file with fixed-length records of 512 bytes. Select this type when transferring non-ASCII files, such as executable image files.
- /[NO]LOWERCASE
Optional. Default: /LOWERCASE
Forces a file name to lowercase at the destination. Use the /NOLOWERCASE qualifier to make sure the file name is preserved in the existing case.
- /RAW
Optional.
Maintains block mode of files regardless of the TCPIP$FTP_RAW_BINARY logical name definition. The /RAW qualifier must immediately follow the PUT command, without a preceding space.
Examples
FTP>PUT SALES.LIS;*200 PORT command successful 150 Opening ASCII mode data connection for sales.lis.2 (130.180.4.8,1028) 226 Transfer complete local: DISK3$:[TRANS]SALES.LIS;2 remote: sales.lis.2 3634 bytes sent in 00:00:00.01 seconds (394.31 Kbytes/s) 200 PORT command successful 150 Opening ASCII mode data connection for sales.lis.1 (130.180.4.8,1029) 226 Transfer complete local: DISK3$:[TRANS]SALES.LIS;1 remote: sales.lis.1 3634 bytes sent in 00:00:00:01 seconds (394.31 Kbytes/s) FTP>Copies all versions of the local file SALES.LIS to the remote UNIX host.File names are copied in lowercase.
OpenVMS file version numbers become the last element of the copied files.
Semicolons are converted to periods.
If the Store Unique feature is toggled on (
sunique), when you copy a file to an OpenVMS host, the host FTP server gives the file a new, unique version number. When you specify the version number of a file to be copied (PUT) to a remote UNIX host, the file retains the version number on the remote host, with the semicolon (;) replaced by a period (.). The UNIX host adds another version number to the file name as well. For example, if you copy (PUT) file BASES.TMP;2 to a UNIX host, the file name on the UNIX host will bebases.tmp.2.1.
FTP>PUT/FDL STAT.BCK "cygnet.bck"200 PORT command successful 150 Opening data connection for cygnet.bckfdl (130.180.4.8,1028) 226 Transfer complete local: cygnet.bckfdl remote: cygnet.bckfdl 21700 bytes sent in 00:00:00.03 seconds (662.23 Kbytes/s) 200 TYPE set to IMAGE 200 PORT command successful 150 Opening data connection for cygnet.bck (130.180.4.8,1029) 226 Transfer complete local: STAT.BCK remote: cygnet.bck 8152 bytes sent in 00:00:00.12 seconds FTP>Copies the local file STAT.BCK to a UNIX host, giving the copy the name
cygnet.bck. Also creates a secondary file with the RMS record attributes of filecygnet.bckfdl.
QUOTE
QUOTE — Sends your input directly to the remote host. Lets you use FTP commands
that are implemented by the remote host but not known to the local host. To use
the QUOTE command, you must have an FTP session with a remote host. The QUOTE
command is not valid for file transfer. For a list of commands implemented by
the remote host, enter: FTP> HELP/REMOTE
DCL Syntax
QUOTE command_line
UNIX Syntax
quote command_line
Parameter
command_line
Required.
Remote command you want to execute.
Example
FTP>QUOTE CDUP250 CWD command successful. FTP>
FTP sends the cdup command to the UNIX host to change the remote
directory up one level.
RENAME
RENAME — Renames a remote file. To use this command, you must have an FTP session with a remote host.
DCL Syntax
RENAME old_name
                        new_name
UNIX Syntax
rename old_name
                        new_name
Parameters
old_name
Required.
File name on the remote host to rename.
new_name
Required.
New name for the remote file.
Examples
FTP>rename STUDENTS.LIS TEST_STUDENTS.LIS350 File exists, ready for destination name 250 RNTO command successful. FTP>Renames a file on a UNIX system.
FTP> RENAME STUDENT.LIS TEST_STUDENT.LIS350 File WORK1$:[VANA[STUDENT.LIS; will be renamed. 250 File WORK1$:[VANA]STUDENT.LIS;1 renamed to WORK1$:[VANA]TEST_STUDENT.LIS;1 FTP>Renames a file on an OpenVMS system.
SET DEFAULT
SET DEFAULT — Sets your default directory on either the remote host or the local host. To set the default directory on a remote host, you must have an FTP session with a remote host.
DCL Syntax
SET DEFAULT [ /LOCAL ]
                    directory
UNIX Syntaxs
cd directory
lcd directory
Parameter
directory
Required.
Name of the directory to which to change the default.
Qualifier
- /LOCAL
Optional. Default: remote.
Changes the working directory on the local host.
Examples
FTP>SET DEFAULT "/USR/USERS/ROLLINGS"250 CWD command successful.Changes the remote working directory to
/usr/users/rollings.FTP>SET DEFAULT ~250 CWD command successful.250 New default directory is /USR/USERSChanges the remote working directory back to the default login directory.
FTP>SET DEFAULT /LOCAL USER$1:[PRESS.CHECK]Local Directory now USER$1:[PRESS.CHECK]Changes your local working directory to USER$1:[PRESS.CHECK].
SET ERROR_LEVEL
SET ERROR_LEVEL — Sets maximum tolerance level for errors.
Additional Information
The error tolerance levels are:
ERROR — FTP tolerates errors and warnings and does not exit when running in batch mode.
SUCCESS — The default. FTP does not tolerate errors and exits when running in batch mode.
WARNING — FTP tolerates warnings and does not exit when running in batch mode.
DCL Syntax
SET ERROR_LEVEL error_level
UNIX Syntax
There is no UNIX equivalent for the SET ERROR_LEVEL command.
Parameters
error_level
Required.
Severity of errors tolerated. Specify ERROR, SUCCESS, or WARNING. The default is SUCCESS.
Example
FTP>SET ERROR_LEVEL ERRORError level is ERROR.
Sets the error level tolerance to ERROR.
SET PASSIVE
SET PASSIVE — Controls whether the FTP client or server initiates data connections.
DCL Syntax
SET PASSIVE keyword
UNIX Syntax
passive keyword
Parameter
keyword
ALL
Does nothing.
AUTO
The FTP client uses the version of network protocol in use on the control connection to determine how the data connection is initiated. If the network protocol is IPv4, FTP client behaves as though SET PASSIVE OFF had been specified. If the network protocol is IPv6, FTP client behaves as though SET PASSIVE ON had been specified.
OFF
The FTP server initiates the data connection.
ON
The FTP client initiates the data connection. This is often useful when a network firewall exists on the path between the client and the server and prevents the FTP server from making outbound connections.
Example
FTP>SET PASSIVE ONPassive is ONSets passive mode to ON. The FTP client always initiates the data connection.
FTP>PASSIVE AUTOPassive is AUTO (IPv4: OFF, IPv6: ON).Sets passive mode back to AUTO.
SET TYPE
SET TYPE — Defines the data representation type: ASCII (appropriate for text files, default) or IMAGE (appropriate for transferring binary files, such as executable images.).
DCL Syntax
SET TYPE type
UNIX Syntax
type type
Parameter
type
Required.
Data representation type. Specify ASCII or IMAGE. If you do not use the SET TYPE command, the default is SET TYPE ASCII.
Example
FTP>SET TYPE IMAGE200 Type set to I.
Sets the data representation type to IMAGE for files you transfer during the current FTP session.
SHOW DEFAULT
SHOW DEFAULT — Displays the name of the working directory on the remote host or the local host. To use the SHOW DEFAULT command to display the working directory on the remote host, you must have an FTP session with a remote host.
DCL Syntax
SHOW DEFAULT [ /LOCAL ]
UNIX Syntax
pwd
Qualifier
- /LOCAL
Optional. Default: remote directory.
Displays the local working directory.
Examples
FTP>SHOW DEFAULT257 "/usr/staff/hurry/items" is current directory.Displays the name of the working directory on the connected remote host.
FTP>SHOW DEFAULT /LOCALLocal directory is WORKS$:[CROWE].Displays the name of the working directory on the local host.
SHOW PASSIVE
SHOW PASSIVE — Displays the current setting of the FTP client passive parameter.
Syntax
SHOW PASSIVE
Example
FTP>SHOW PASSIVEPassive is AUTO (IPv4: OFF, IPv6: ON).
Shows that passive mode is on for IPv6.
SHOW STATUS
SHOW STATUS — Displays the current FTP parameter settings and, if you have an open connection, the name of the connected host and parameter settings relative to the connection.
DCL Syntax
SHOW STATUS
STATUS
UNIX Syntax
status
rstatus
Examples
FTP>SHOW STATUS211-FTP Server Status. 211-SITE set to +VMS+. 211-TYPE set to ASCII. 211-STRU set to FILE. 211-MODE set to STREAM. 211 Multiline responses are enabled. Connected to: HANKS.ABC.UCB.EDU VMS Plus mode enabled Mode = stream, Type = ascii, Form = non_print, Structure = file Error level is SUCCESS Passive is AUTO (IPv4: OFF, IPv6: ON)Displays the status of the connection with remote OpenVMS host HANKS. By default, FTP sets VMS Plus Mode for rapid file transfers between two OpenVMS systems running TCP/IP Services for OpenVMS.
FTP>status211-FTP Server Status. 211-SITE set to +VMS+. 211-TYPE set to ASCII. 211-STRU set to FILE. 211-MODE set to STREAM. 211 Multiline responses are enabled. Local client's status: Connected to:HANKS.ABC.UCB.EDU VMS Plus mode enabled Mode = stream, Type = ascii, Form = non_print, Structure = file Error level is SUCCESS Passive is AUTO (IPv4: OFF, IPv6: ON) Reply display is on Parsing is on Prompting is off Port command is on Case: MPUT will preserve typographical case in destination filenames, if possibleIs a superset of the SHOW STATUS command. The output is consistent with running the
statuscommand on other platforms.FTP>show status211-eagle.store1.equip.com FTP server status: Version 5.60 Connected to eagle.store1.equip.com Logged in as jones TYPE: Image; STRUcture: File; transfer MODE: Stream 211- No data connection 211 End of status Connected to: eagle VMS Plus mode disabled Mode = stream , Type = image, Form = non_print, Structure = file Error level is SUCCESS Passive is AUTO (IPv4: OFF, IPv6: ON)Displays the current FTP parameters, which control data transfers with the connected UNIX host
eagle.
SPAWN
SPAWN — Suspends the current FTP session, creates a subprocess, and runs the DCL command that you type. Use the LOGOUT command to end the subprocess and return to the FTP prompt.
DCL Syntax
SPAWN[ command ]
UNIX Syntax
! [ command ]
Examples
FTP>SPAWN SHOW DEFAULTSYS$LOGIN_DEVICE:[PERCY.DISTR]Interrupts the FTP process to display your default directory.
FTP>! SHOW DEFAULT WORK1$:[VANA.FTP] FTP>You can also use the exclamation point (!) to spawn a command.
For more examples, see Section 2.12, ''Suspending FTP to Return to the Local DCL Prompt''.
VIEW
VIEW — Displays the contents of a file on your current output device.
DCL Syntax
VIEW [ /PAGE ] filespec
UNIX Syntax
view filespec
Parameter
filespec
Required.
Specifies the file to be displayed. Wildcard characters (*, %) are not allowed in place of the directory name, file name, file type, or file version number.
Qualifier
- /PAGE
Optional.
Displays one screen at a time until the end of file (EOF) is reached. You can terminate the display at any time by pressing Ctrl/Z.
Examples
FTP>VIEW FUNDING.TXTScrolls through the contents of the
FUNDING.TXTfile in the current working directory, and displays the contents on the current output device.FTP>VIEW/PAGE FUNDING.TXTDisplays the contents of the
FUNDING.TXTfile, one screen at a time, on the current output device.
Chapter 3. Using Remote (R) Commands
The Remote (R) commands provided by TCP/IP Services allow you to work in user accounts on remote systems that support the Remote (R) protocols. You can also use commands, shell scripts, and command procedures on these remote host systems without logging in to the hosts. The R commands include RCP (Remote Copy), RLOGIN (Remote Login), RSH (Remote Shell), and REXEC (Remote Execute, invoked by RSH). You enter these commands at your system command-line prompt.
An entry in the remote host's authentication or proxy files
Knowledge of a valid remote account and its password
|
Command |
Description |
|---|---|
|
RCP |
Copies files between the local host and a remote host or between two remote hosts. Authentication is performed on the remote host or hosts using the user name supplied by RCP or by authentication or proxy files. |
|
RLOGIN |
Connects to the remote host, which starts an interactive login session. Authentication is performed on the remote host using the user name supplied by RLOGIN. |
|
RSH |
Connects to the remote host, which executes the command you specified. Authentication is performed on the remote host using the user name supplied to RSH. |
|
RSH/PASSWORD |
Uses the REXEC facility to connect to the remote host, which executes the command you specify. Authentication is performed on the remote host using the user name and password supplied by RSH. |
3.1. Providing Account and Password Information
Automatically: You do not need to take any action if your user name is the same on the remote host as it is on the local host. The remote commands automatically supply your local user name as the requested user name on the remote system.
- Using the /USER_NAME qualifier: Specify the user name with the /USER_NAME qualifier if your user name is:
Different on the remote host
In mixed case (only for remote hosts that support case-sensitive user names)
The same on the remote host but you want to access the remote host using another user name
By default, the R commands send all user names in lowercase letters. If you access a host that supports case-sensitive user names, and the user name you specify has uppercase letters, you can use the /NOLOWERCASE qualifier to maintain these letters as uppercase, or you can specify the /USER_NAME qualifier and enclose the user name within quotation marks.
- Accessing remote hosts by providing your password:
Certain systems have case-sensitive passwords. To send your lowercase or mixed-case password to these hosts, enclose it within quotation marks ( " " ). On systems that are not case sensitive, you do not need to enclose your password within quotation marks.
- You can specify the password on the command line, as follows:
$ RSH WOODS /PASSWORD="Downy" LS
You can specify the password when the remote system prompts, as follows:$ RSH WOODS /PASSWORD DIR REXEC password: (password not echoed)
Accessing remote hosts as a trusted user:
Most systems use authentication files or proxy accounts that allow trusted users on trusted hosts to access the system by specifying only the user name they want to use. To access a host without specifying the corresponding password, your originating host and user name must have an entry in these authentication files.
The authentication file entries contain your originating user name. The R commands convert your originating user name to lowercase unless you use the /NOLOWERCASE qualifier. You may have to contact the system manager of the remote system to determine whether the system is case sensitive and, if so, what case is used in the authentication files.
Notes
To use the REXEC feature, you must always use the /PASSWORD qualifier.
The RLOGIN command does not recognize the /PASSWORD qualifier. If you are a trusted user, you are automatically logged in to the remote system.
If you are not a trusted user, the remote host (REXEC) prompts you to enter a user name and password on the remote system.
3.1.1. Quotation Marks
Use quotation marks (" ") for UNIX host path names that include slashes (/), such
as user/simms/offers, and for user/host specifications that include the
username@hostname syntax.
User names and passwords are mixed case.
Passwords are lowercase.
User names are uppercase, unless you use the /NOLOWERCASE qualifier.
3.1.2. Examples
- OpenVMS user STALLINGS accesses the file
accntson UNIX hostufemismas userstallings, and copies the file to the current directory on the OpenVMS system. Because /LOWERCASE is the default, the /LOWERCASE and /USER_NAME=STALLINGS qualifiers are not needed. In the following example, the user is a trusted user.$ RCP UFEMISM:ACCNTS [] $
- From OpenVMS, user STALLINGS accesses the account
crisonufemism. Because /LOWERCASE is the default, the /LOWERCASE and /USER_NAME=STALLINGS qualifiers are not needed. In the following example, the user is a trusted user.$ RLOGIN /USER_NAME=CRIS UFEMISM Welcome to UNIX system ufemism. . . . ufemism%
- User FINCH has the same uppercase name for both an OpenVMS account and a UNIX account. For RSH to send the uppercase OpenVMS account name to remote host
ufemismin uppercase, FINCH uses the /NOLOWERCASE qualifier. In the following example, the user is a trusted user.$ RSH /NOLOWERCASE UFEMISM CAT -N GRANTS
- User BACH has the account
bachon the UNIX hostclassics. To invoke the REXEC feature, BACH specifies the password on hostclassics. Note that the passwordMagNificatis enclosed in quotes to prevent RSH from sending it all uppercase.$ RSH /PASSWORD="MagNificat" CLASSICS LS
3.2. Specifying Qualifiers
- Enter the qualifiers on the command line, as follows:
$ RCP /LOG TRANQUIL:VULTURES []
$ RSH /EIGHTBIT /ESCAPE_CHAR="+" /TRUNCATE HERON CAT -N STREAMS
- Add the same information to your LOGIN.COM file, as shown in the following example:
$ ! To customize my R commands:
$ !
$ RCP :== RCP /LOG
$ RLOGIN :== RLOGIN /EIGHTBIT/ESCAPE_CHAR="+" /TRUNCATE_USER_NAME
$ RSH :== RSH /EIGHTBIT /ESCAPE_CHAR="+" /TRUNCATE_USER_NAME
$ !
3.3. Obtaining Online Help
$ HELP TCPIP_SERVICES REMOTE_COMMANDS
$ HELP RCP
$ HELP RLOGIN
$ HELP RSH
$ HELP REXEC
3.4. Copying Files with RCP
If you do not have proxy login accounts (or authentication file entries) for both the source and remote hosts, you must have the same user name and password on both source and destination hosts. Use the /PASSWORD qualifier and, if necessary, the /USER_NAME qualifier, to specify the authentication information for the remote hosts.
If you have a proxy login account (or authentication file entry) on one of the remote hosts only, use the /PASSWORD qualifier and, if necessary, the /USER_NAME qualifier to specify the authentication information for the other host.
To recursively copy every file and subdirectory in a directory, use the /RECURSIVE qualifier with the RCP command.
To preserve file format and other attributes when copying files between two OpenVMS systems, use the /VMS qualifier (UNIX format: -v option). For more information, see Section 3.4.1, ''Notes About File Formats''.
You can also use the COPY/RCP command to copy files across the network. For more information on this command, enter HELP COPY/RCP at the DCL prompt.
Note that you can also use FTP to transfer files. To determine the best file transfer service to use for your needs, see Section 1.1.1, ''Services for Working with Files''. For more information about FTP, see Chapter 2, "Working with Files Using the File Transfer Protocol (FTP)".
3.4.1. Notes About File Formats
FILE;ORGA SEQU;RECO;CARR CARR;FORM STREAM_LF;SIZE 0;BLOCK YES
Convert FIXED and UNDEFINED format files to STREAM_LF
You can change the behavior of RCP to convert FIXED and UNDEFINED format files to STREAM_LF format by using the following logical name:TCPIP$RCP_SEND_FIX_FORMAT_AS_ASCII
If this logical name is set to the value 1, RCP converts FIXED and UNDEFINED files to STREAM_LF format. If this logical name is set to a value other than 1, RCP will not convert those files that have a fixed-length record size that matches the value of the logical name; RCP will convert all other FIXED and UNDEFINED files.
For example, if you set this logical name to 512, RCP will not convert FIXED or UNDEFINED files with a fixed-length record size of 512 (such as OpenVMS executable image files); RCP will convert all other FIXED and UNDEFINED files.
Preserve File Attributes in OpenVMS-to-OpenVMS File Transfer.
In an OpenVMS-to-OpenVMS transfer, the receiving peer creates the file as a STREAM_LF file by default. You can preserve the file type and other attributes of a file transferred between two OpenVMS systems by using the /VMS qualifier (UNIX format: use the-voption) with the RCP command.Warning
Specify this qualifier only for file copy operations between two OpenVMS systems; otherwise, the operation will fail.
3.4.2. Notes About File Size
When transferring files, the RCP protocol requires that the length of the file be sent as part of the protocol. The length is interpreted as a signed 32-bit integer. Therefore, files transferred using RCP must be less than 4 GB minus 1 byte.
3.4.3. Example RCP Commands
- User BEST has the account
beston the UNIX hosthaven. User BEST's password for that account is IMusici, which must be enclosed in quotation marks because it is mixed case. The following command copies the file/symph/nineonhavento the local directory on the OpenVMS system (the UNIX file specification also must be enclosed in quotation marks):$ RCP /PASSWORD="IMusici" "haven:/symph/nine"
- User BEST has a proxy account on the remote UNIX host
musicx. The following command copies the file/symph/pastoralfrom hostmusicxto the directory [SYMPH6] on the device DKA300: on BEST's local OpenVMS system:$ RCP "musicx:/symph/pastoral" ":DKA300:[SYMPH6]"
- With the following command, user BEST copies each subtree rooted at the
/symphdirectory to the directory [SYMPHS] on the device DKA300: on BEST's local OpenVMS system.$ RCP/RECURSIVE "haven:/symph" ":DKA300:[SYMPHS]"
- With the following command, user BEST copies all files from the directory
/symphonieson remote hostmusicxto the directory/symphon remote hosthaven:$ RCP /PASSWORD="IMusici" "musicx:/symphonies/*" "haven:/symph/*"
- In the following example, user BEST uses the DCL command COPY/RCP to transfer the complete subdirectory tree
/symphfrom remote UNIX hosthavento remote OpenVMS host FRAM. Both hosts require a password. (When using the RCP command to transfer files between two remote hosts, you need a proxy account or an entry in the authentication file for at least one of the two remote hosts.) User BEST has an account under the same name on both hosts.$ COPY/RCP haven"BEST IMusici"::"/symph/*" To: FRAM"VAUGHN MYLES"::[classic.compositions]*"
3.5. Starting a Remote Login Session with RLOGIN
The RLOGIN (Remote Login) command connects your terminal to the remote host you specify and requests a login. If the remote host has an entry in its authentication files for your host and user name, it may bypass its login and password prompts. (See Section 3.1, ''Providing Account and Password Information''.)
Note that you can also use TELNET to log in to remote internet hosts. To determine the best remote login service to use for your needs, see Section 1.1.2, ''Services for Remote Logins''. For more information about TELNET, see Chapter 4, "Establishing Network Terminal Sessions Using TELNET/TN3270".
3.5.1. Logging Out
Log out from the remote host.
On a new line, enter the escape character and a period.
The default escape character is a tilde ( ~ ). To set another escape character, use the /ESCAPE_CHARACTER qualifier on the RLOGIN command line.
3.5.2. Example RLOGIN Sessions
- The following command logs in to node CONDO:
$ RLOGIN CONDO CONDO - Unauthorized access is prohibited Username: KING Password: (password not echoed) Welcome to OpenVMS (TM) Alpha Operating System, Version V7.3 on node CONDO Last interactive login on Thursday, 24-SEP-2001 15:20:29.60 Last non-interactive login on Wednesday, 23-SEP-2001 14:25:04.12 $ RUN ... $ ~. (characters not echoed) %RLOGIN-S-LCLCLOSED, Local connection closed $ - The following command logs in to host
petreland changes the character used to close the RLOGIN session:$ RLOGIN /ESCAPE_CHARACTER="+" PETREL . . . Last login: Mon Mar 14 18:34:27 from phoebe.edu UNIX System petrel: Fri Mar 19 11:02:20 EST 2002 Mon Jun 28 18:44:42 EST 2002 % ls ... % +. (characters not echoed) %RLOGIN-S-REMCLOSED, Remote connection closed $
3.6. Issuing a Remote Command with RSH
The RSH (Remote Shell) command connects your terminal to a remote host and requests it to execute the command, script, or command procedure that you specify. If the command generates output, you see it as if it were produced locally. If you omit a remote command when you enter an RSH command line, RSH initiates an RLOGIN session. However, if the command line includes the /PASSWORD qualifier, the remote login attempt fails. Using the /PASSWORD qualifier invokes REXEC. (See Section 3.7, ''Issuing a Remote Command with a Password (REXEC Feature)''.)
Syntax rules require that you enter your RSH command line so that the remote command is the last word.
3.6.1. Quotation Marks in Commands
Mixed-case UNIX commands
Uppercase UNIX commands
If you enter one double quotation mark on a command line, RSH removes it.
If you enter two consecutive double quotation marks on the command line, RSH removes the first quotation mark and leaves the second.
If you enclose text within double quotation marks on a command line, RSH disables the default conversion of characters to lowercase and removes the quotation marks.
Note that, as a general rule, if you are uncertain about whether or not to use quotation marks, you should use them.
3.6.2. Interrupting a Command's Execution
To stop remote execution of a command, press either Ctrl/C or Ctrl/Y.
3.6.3. Example RSH Commands
In the first example, the remote system manager previously created an entry in the authentication files for remote user
STANon hostoster, givingSTANpermission to access userrolly.From the local OpenVMS host, user STAN viewsrolly's directory, which resides on UNIX systemoster. No quotation marks are required around the user name and host name because RSH by default sends them in lowercase.$ RSH /USER_NAME=ROLLY OSTER LS
- On the following RSH command line, the uppercase UNIX qualifier
-Ris entered within quotation marks to preserve the uppercaseR. This example assumes that the user's originating host and user name are in the authentication files on the remote hostdebts.$ RSH DEBTS LS "-R"
- The following commands show how RSH sends quotation marks to a remote UNIX host and how quotation marks affect case. All examples assume that the user's originating host and user name are in the authentication files on the remote host.
$ RSH DEBTS ECHO TEST MESSAGE
test message
$ RSH DEBTS ECHO "
\""test
\"" message"
"test" message
RSH DEBTS ECHO "TEST" MESSAGE
TEST message
$ RSH DEBTS "echo '""test"" message'"
"test" message
- Because a remote command is not specified on the RSH command line, TCP/IP Services executes RLOGIN.
$ RSH MOON01
Password:     Return(password not echoed)
Last successful login for jjones: Fri Sep 25 10:58:31 2003 from nebula
    Last unsuccessful login for jjones: Fri Sep 25 11:59:43 2003 on ttyp5
    Tru64 UNIX V5.0  (Rev. 148); Tue Apr  7 18:32:54 EST 2003
                        Compaq Computer Corporation
                             Internal Use Only
moon01>
In this example, the OpenVMS system manager of host
WR2previously created an entry in the authentication files for remote userSIMMSon hostWR1.From OpenVMS hostWR1, userSIMMSenters the DIRECTORY command to execute at hostWR2.$ RSH WR2 DIRECTORY
In this example, the OpenVMS system manager of host
WR2previously created an entry in the authentication files for remote userSIMMSon hostWR1, allowing userSIMMSaccess to the user nameROGERS.UserSIMMSenters the DIRECTORY command from hostWR1to execute at hostWR2in user accountROGERS.$ RSH WR2 /USER=ROGERS DIRECTORY
3.7. Issuing a Remote Command with a Password (REXEC Feature)
Use the REXEC feature to send a command to execute on a remote host that does not have, or might not have, the authentication information that RSH requires. The remote system's authentication files are not used.
Along with the remote command, REXEC sends the password you specify on the command line to the remote host. This password is used for security checking.
The Remote Shell program (RSH) invokes REXEC. To use REXEC, enter RSH /PASSWORD. REXEC then functions like the RSH command.
3.7.1. Example of Using REXEC
The following example shows how to provide password information for the RSH command, thereby invoking the REXEC feature on the remote host.
GRANT, user STANTON enters the file
tops.holdings that resides on UNIX host oster. Because
STANTON is not listed in oster's authentication files,
user STANTON must use the REXEC feature and supply the /USER_NAME and
/PASSWORD qualifiers. Quotation marks are required around the password because it
contains uppercase
letters.$ RSH OSTER /USER_NAME=STANTON /PASSWORD="KeepingSaneJoy" - _$ CAT TOPS.HOLDINGS
3.8. Command Descriptions
This section provides complete descriptions of each R command. Included with each command description is the UNIX equivalent of the command. These equivalents are valid on UNIX systems only. They are presented here for users who are familiar with the UNIX environment to help them understand the nature of R commands.
RCP
RCP — Copies files between internet hosts. Enter the RCP command at the DCL prompt. You can copy files as follows: from a remote host to your host, from your host to a remote host, from one remote host to another remote host. You can specify qualifiers in either DCL format or UNIX format, but do not mix both types on the same command line.
DCL Syntax
RCP [qualifier(s)[...]] source_file destination_file
    [/[NO]LOG ]
    [ /PASSWORD[=password] ]
    [ /[NO]PRESERVE ]
    [ /[NO]RECURSIVE ]
    [ /TRUNCATE_USER_NAME[=n] ]
UNIX Syntax
rcp [ -p ] [ -r ] /[ source_file] /[
                            destination_file]
This format is valid only on UNIX systems.
Parameters
source_file
Required.
[username@]"host:file, where:username@ is the user name on a remote UNIX system. This is needed only if the UNIX system has the name in its
/etc/hosts.equivfile or in the UNIX user's.rhostsfile. Enclose the username@ portion, or the entire specification containing the username@ syntax, in quotation marks (" ").host is the remote host.
file is the name of the file to copy. A file name without the full path specification defaults to the default (or home) directory. Table 3.2, ''Specifying Source Files with the RCP Command '' shows the possible formats.
|
Host |
Possible Formats |
|---|---|
|
UNIX hosts |
Specify the following, enclosing UNIX path names that
include slashes (/) in quotation marks (" "):
|
|
OpenVMS hosts |
Specify the following:
|
destination_file
Required.
Destination host and file specification information is of the same form as the source parameter, unless the file specification is completely omitted or the file name portion of the file specification is omitted. In these cases, the default file name used is the same as specified in the source parameter, the directory being the default (home) directory of the user.
Qualifiers
- /LOG
/NOLOG Optional. Default: no logging.
Displays information about files as they are copied to or from the local system.
- /PASSWORD= password
Required if /USER_NAME qualifier is used.
Password on the source or destination host system (whichever requires authentication).
- /PRESERVE
/NOPRESERVE Optional.
Preserves the file protection mode and modification date during a copy. The creation date and modification date of the output file are set to the modification date of the input file. The dates are truncated to the second on transfer. When these dates are displayed on OpenVMS, the "hundredths of a second" field will always be zero.
When a file is created by RCP/PRESERVE on an OpenVMS system running TCP/IP Services, WRITE permission on the input file grants both WRITE and DELETE permission on the output file.
- /RECURSIVE
/NORECURSIVE Optional.
Recursively copies each subtree rooted at the directory you specify in the UNIX file specification. For OpenVMS hosts, specify [ directory...] (with three trailing periods) in the file specification instead of using this qualifier.
- /TRUNCATE_USER_NAME[= n]
/NOTRUNCATE_USER_NAME Optional. Default: no truncation.
Truncates the user name to the specified number of characters. If you omit n, the default is 8 characters.
- /USER_NAME= remote_user_name
Optional. Default: current name on local host in lowercase.
Specify user name on the source or destination remote host. Use only if an entry allowing access to this user has not been added to the remote host's authentication files. You must also specify the /PASSWORD qualifier with the /USER_NAME qualifier. Specifying "username@" with the source or destination parameter is the equivalent UNIX style method.
Examples
$RCP/LOG NYX:STATS.BNT []Copies file
stats.bntfrom remote UNIX systemnyxfrom under its home directory to a local file of the same name in the current directory. The /LOG qualifier causes information for the copy to be displayed. This command assumes the user has an entry in the authentication file on hostnyx.$RCP HIAIR1:AIRFRS.TXT [FLTAT.STATS]FARES1.TXTCopies file AIRFRS.TXT from its home directory on remote OpenVMS system HIAIR1, to a local file of a different name (FARES1.TXT) in the specified directory. This command assumes the user has an entry in the authentication file on host HIAIR1.
$RCP /PRESERVE HIAIR1:[FARES.SUMMER]FARES_SU.TXT ":DKA300:[]"Copies file FARES_SU.TXT from directory [FARES.SUMMER] on remote OpenVMS system HIAIR1 to the specified device and directory on the local system. The new file maintains the same name as the original. The copy preserves the source file's protection mode and modification date.
Note the use of quotation marks (" ") to specify the device and directory on the destination.
$RCP /USER=MILLER /PASS="AirOut" ":SYS$LOGIN:PILOTS.LIS" FALCON:Copies file PILOTS.LIS from the login directory of user MILLER on the local system to the user's login directory on a remote UNIX system. The user specifies the user name and password for access to the UNIX system (the password is specified in quotation marks to preserve the mixed case letters).
Note the use of quotation marks (" ") to specify the SYS$LOGIN device and file name on the destination.
$RCP /RECURSIVE ":DKA300:[MILES...]" "nyx:/usr/tmp"Copies all files and any subdirectories in local directory [MILES] to a remote UNIX host's destination directory. All the files in the subdirectories are copied as well, creating subdirectories as appropriate on the remote host. The directory hierarchy is preserved on the UNIX host by default. This command assumes the user has an entry in the authentication file on host
nyx.$RCP /LOG /RECURSIVE [MILES...] BOSTON:[FRFL...]Copies the complete local subdirectory tree ([MILES...] and all subdirectories) to the destination directory on remote OpenVMS host BOSTON, while preserving the directory hierarchy and logging each file copy. This command assumes the user has an entry in the authentication file on host BOSTON.
$RCP /LOG /RECURSIVE [MILES...] BOSTON:[FRFL]Same as example 6, except that all files in the local directory tree are copied directly to the destination directory itself. The command does not preserve the directory hierarchy of [MILES...] in [FRFL] on host BOSTON. That is, the command does not create new subdirectories in BOSTON:[FRFL]; it copies all the files in [MILES] and all its subdirectories to directory [FRFL].
$RCP /USER=VAUGHN /PASSWORD=MYLES /TRUNCATE=6 STATS.TXT FRAM:TISTICSCopies the local file STATS.TXT to a remote user's login directory. Note the truncation of the remote user name. A user name and password are necessary if no entries for the user are present in the remote host's authentication files.
$RCP BOSTON:NAMES.LIS FRAM:ROSTER.LISCopies file NAMES.LIS from remote host BOSTON to remote host FRAM (naming the file ROSTER.LIS). Assumes that appropriate entries for the user have been made in each remote host's authentication files.
$RCP "MILLER@BOSTON:SYS$DIR:T2.TXT" "nelson@nyx:/usr/nelson/T2.TXT"Copies file T2 from remote OpenVMS system BOSTON in the directory pointed to by the logical name SYS$DIR to remote UNIX system
nyxin the specified directory. Different user names are used on the two remote systems. Entries in the remote host's authentication files must be set up properly because the passwords are not being passed.$RCP /USER=ROSS /PASSWORD=LC12LC BOS:CLIENT.LIS "BEX:/usr"Copies file CLIENT.LIS from OpenVMS host BOS to UNIX host
bex. The user has a proxy account on the UNIX host. The specified authentication information allows access to the account for ROSS on host BOS.
REXEC
REXEC — Sends a command line to a specified remote host for execution.
Additional Information
REXEC — The remote host bases authentication on the supplied user name and password.
RSH — The remote host bases authentication on user name and information in the remote system's authentication files.
To invoke the REXEC feature, enter one of the following:
RSH /PASSWORD=passwordor
RSH /PASSWORD
For more information, see the RSH command with the /PASSWORD qualifier.
RLOGIN
RLOGIN — Initiates an interactive login session with a remote host.
DCL Syntax
RLOGIN /DROP_TIMEOUT=seconds host
       [ /EIGHTBIT ]
       [ /ESCAPE_CHARACTER=character ]
       [ /LOG_FILE=file ]
       [ /[NO]LOWERCASE ]
       [ /PROBE_TIMEOUT=seconds ]
       [ /TERMINAL_SPEED=baud ]
       [ /TERMINAL_TYPE=type ]
       [ /[NO]TRUNCATE_USER_NAME ]
       [ /USER_NAME=remote_user_name])
UNIX Syntax
rlogin host [ -8 ] [ -e c ]
                        [ -l remote_user_name ]
Parameter
host
Required.
Remote host to which you want to connect.
Qualifiers
- /DROP_TIMEOUT= seconds
Required if you set /PROBE_TIMEOUT.
Maximum interval, in seconds, that your network link can be down before the software closes it.
- /EIGHTBIT
-8 (valid only on UNIX systems) Optional. Default: only 7-bit data is sent.
Accepts 8-bit data from the terminal and sends it to the remote system.
- /ESCAPE_CHARACTER= character
-e c (valid only on UNIX systems) Optional. Default: ~ (tilde).
New escape character if you want to close your RLOGIN session from the remote host.
To close your session from your local host, use a period ( . ) as the escape command.
- /LOG_FILE= file
Optional. Default: no logging.
Logs a copy of the output to the specified file. Output continues to be directed to SYS$OUTPUT while it is being recorded in the log file.
- /LOWERCASE
/NOLOWERCASE Optional. Default: /LOWERCASE.
Sends your local user name to the remote host in lowercase.
To send your user name in uppercase, do either of the following:Specify /NOLOWERCASE.
Enclose the user name in quotation marks ( " " ). (See the /USER_NAME qualifier.)
To send your user name in mixed case, enclose it in quotation marks.
- /PROBE_TIMEOUT= seconds
Required if you set /DROP_TIMEOUT.
Interval, in seconds, that TCP/IP Services checks to see whether your network link and the remote host are still up.
- /TERMINAL_SPEED= baud
Optional. Default: current speed of your terminal.
Terminal speed in baud rate.
- /TERMINAL_TYPE= type
Optional. Default: type of physical terminal you are using.
Terminal type. Use this qualifier if the remote host does not recognize your terminal.
- /TRUNCATE_USER_NAME
/NOTRUNCATE_USER_NAME Optional. Default: /NOTRUNCATE_USER_NAME.
Abbreviates the user name sent to the remote host to eight characters. (Required for older UNIX hosts, which limit user names to eight characters.)
- /USER_NAME= remote_user_name
-l remote_user_name (valid only on UNIX systems) Optional. Default: current name on local host, but in lowercase.
Your user name on the remote host. Specify this qualifier if your user names on the remote host and local host are different.
To send your user name in uppercase, do either of the following:Specify /NOLOWERCASE.
Enclose the user name in quotation marks ( " " ).
To send your user name in mixed case, enclose it in quotation marks.
Examples
$RLOGIN /USER_NAME="BlissTon" ROLLSAn OpenVMS user logs in to account
BlissTonon UNIX hostrolls. The mixed-case remote user name is enclosed in quotation marks so that RLOGIN does not send it all lowercase. This example assumes the user has a proxy account on the remote host.$RLOGIN /NOLOWERCASE /USER_NAME=DAVE PLETHORAUser DAVE starts an interactive login session with UNIX host
plethora. Because this user has an uppercase user name, it is specified with the /NOLOWERCASE qualifier. This example assumes the user has a proxy account on the remote host.$RLOGIN /ESCAPE_CHARACTER="+" PJARO ReturnPassword:(password not echoed) ReturnLast login: Fri Aug 21 16:50:40 from world.wide.webber.com Compaq Tru64 System - 4: Tues Aug 25 11:02:20 EST 2003 You have mail. Tues Aug 25 11:02:20 EST 2002 pjaro>who Returnblack ttyp0 Aug 20 11:02 grades.philosophy.ucd.edu. bristow ttyp1 Aug 12 09:00 grades.biology.ucd.edu. cutler ttyp2 Aug 24 08:55 grades.math.ucd.edu. pjaro>pwd Return/usr/users/black pjaro>ls Returnbin Sem1.paper Sem2.paper pjaro>+.(characters not echoed)%RLOGIN-S-REMCLOSED, Remote connection closed $OpenVMS user BLACK, with UNIX user name
black, logs in to UNIX hostpjaroand resets the escape character to a plus sign. By default, TCP/IP Services passes the user name and commands to the remote host in lowercase.$RLOGIN FANTAC ReturnOpenVMS Version 7.3 - Unauthorized access is prohibited.Username:TDERR ReturnPassword:(password not echoed) Return. . .$User TDERR logs in to remote OpenVMS host FANTAC.
$RLOGIN QANCE /DROP_TIMEOUT=45%RLOGIN-E-INETERROR, Internet interface error -RLOGIN-I-INETCALL, setsockopt(TCP_DROP_IDLE) -SYSTEM-F-BADPARAM, bad parameter value $The command fails because the /DROP_TIMEOUT and /PROBE_TIMEOUT qualifiers must both be set.
RSH
RSH — Sends a command to a remote host for execution, including a command that invokes a remote shell script or remote command procedure.
Additional Information
Any command recognized by the remote host is valid. When using the RSH command, consider the following:
If you omit a command for remote execution, RSH initiates a remote login session (see the RLOGIN command).
If you specify the /PASSWORD qualifier, with or without a value, RSH executes the REXEC facility (see the /PASSWORD qualifier and the REXEC command).
DCL Syntax
RSH host [/EIGHTBIT ] [ remote_command ]
    [ /ESCAPE_CHARACTER=character ]
    [ /LOG_FILE=file ]
    [ /[NO]LOWERCASE ]
    [ /PASSWORD[=password] ]
    [ /[NO]SYSERROR ]
    [ /TERMINAL_SPEED=n ]
    [ /TERMINAL_TYPE=type ]
    [ /TRUNCATE_USER_NAME ]
    [ /USER_NAME=remote_user_name ]
UNIX Syntax
rsh host [ -l
                            remote_user_name ] [
                            remote_command ]
Parameters
host
Required.
Remote host at which you want the command to execute.
remote_command
Optional. Default: none.
Note
The remote_command parameter must be the last item on the command line.
Qualifiers
- /EIGHTBIT
Optional. Default: only 7-bit data is sent.
Accepts 8-bit data from the terminal and sends it to the remote system.
- /ESCAPE_CHARACTER= character
Optional. Default: Tilde (~).
RSH escape character. This character lets you exit the RSH process without entering the remote host's typical logout sequence, such as LOGOUT or Ctrl/D.
Typing the escape character and a period (.) breaks the connection with the remote host. For example:remote> ~. (characters not echoed) %RSH-S-LCLCLOSED, Local connection closed local_vms>
- /LOG_FILE= file
Optional. Default: no logging.
Logs a copy of the output to the specified file. Output continues to be directed to SYS$OUTPUT while it is being recorded in the log file.
Not valid with /SYSERROR.
- /LOWERCASE
/NOLOWERCASE Optional. Default: /LOWERCASE.
Sends your local user name to the remote host in lowercase letters.
To send your user name in uppercase letters, do one of the following:Specify /NOLOWERCASE.
Enclose the user name in quotation marks ( " " ). (See the /USER_NAME qualifier.)
To send your user name in mixed case, enclose it in quotation marks ( " " ).
- /PASSWORD[= password]
Optional.
Your password on the remote host.
Invokes the local REXEC facility that directs your RSH command to the REXEC server on the remote host. This server does authentication checking using the user name and password that you specified on the RSH command line.Enclose the password in quotation marks ( " " ) if it is lowercase or mixed case.
If you omit password, RSH (REXEC) prompts you for one.
Do not use this qualifier if you want to initiate an RLOGIN session.
- /[NO]SYSERROR
Optional. Default: /NOSYSERROR
Directs diagnostics to SYS$ERROR and output to SYS$OUTPUT.
When SYS$ERROR and SYS$OUTPUT both output to the same terminal, the output might be garbled.
/NOSYSERROR directs output only to SYS$OUTPUT.
- /TERMINAL_SPEED= n
Optional. Default: your terminal's current speed.
Terminal speed passed to the remote host during an RLOGIN session.
- /TERMINAL_TYPE= type
Optional. Default: your terminal's current type.
Terminal type passed to the remote host during an RLOGIN session.
- /TRUNCATE_USER_NAME
Optional. Default: User names are not truncated
Abbreviates the user name sent to the remote host to eight characters.
- /USER_NAME= remote_user_name
-l remote_user_name (valid only on UNIX systems) Optional. Default: same name on local host, but in lowercase letters.
Your user name on the remote host. Specify this qualifier if your user names on the remote host and local host are different.
To send your user name in uppercase letters, do one of the following:Specify /NOLOWERCASE.
Enclose the user name in quotation marks ( " " ).
To send your user name in mixed case, enclose it in quotation marks ( " " ).
Examples
$RSH HENCE MAN CPcp(1) Name cp - copy file data Syntax cp [ -f ] [ -i ] [ -p ] file1 file2 ⋮ See Also cat(1), pr(1), mv(1) $A user sends the
man cpcommand to UNIX hosthencefor execution.$RSH /USER_NAME=ROGERS DELPHI LSOpenVMS user PHILIPS enters the
lscommand for execution at remote UNIX hostdelphi. PHILIPS is accessing an account calledrogers.$RSH /PASSWORD=BLOOMER AVOC8N DIRECTORYOpenVMS user PANTO sends the DIRECTORY command to remote OpenVMS host AVOC8N. The remote directory listing is of PANTO's home directory.
RSH /PASSWORD invokes REXEC, which authenticates PANTO's remote password.
$RSH /PASSWORD MAGIC CAT BUZZ.TXTREXEC password:(password not echoed) ReturnA user sends the
catcommand to hostmagic. /PASSWORD invokes REXEC, which requires a password. Because the password was omitted from the command line, REXEC prompts the user for it.
Chapter 4. Establishing Network Terminal Sessions Using TELNET/TN3270
With the TELNET software in TCP/IP Services, you can log in to a remote internet system. This is called establishing a TELNET session. Your terminal appears to be attached directly to the remote system.
You can establish a TELNET session with a host that uses IBM 3270 model terminals (TN3270).
Note that you can also use RLOGIN to log in to remote internet hosts. However, RLOGIN does not have the ability to manage a 3270 session. To determine the best remote login service for your needs, see Section 1.1.2, ''Services for Remote Logins''. For more information about RLOGIN, see Chapter 3, "Using Remote (R) Commands ".
|
Capability |
Section |
|---|---|
|
Use either DCL or UNIX command syntax. | |
|
Establish a network terminal session with any other host that uses TCP/IP as a transport. | |
|
Log all terminal output to a file. | |
|
Toggle between the remote host and the local TELNET prompt. | |
|
Suspend TELNET/TN3270 to spawn a subprocess at the DCL prompt. | |
|
Establish multiple TELNET sessions. | |
|
Toggle between open sessions. | |
|
Customize the way TELNET interprets control characters, sends and receives transmissions, and displays processing on your terminal. | |
|
Send commands to the remote host that affect processing of commands you have entered. | |
|
Run IBM 3270 model terminal emulation (TN3270). | |
|
Record a TN3270 screen's contents. |
A user account on the remote host also running TELNET
A user account on the OpenVMS system that runs TCP/IP Services
|
DCL Style |
UNIX Style |
Description |
|---|---|---|
|
Starting (at the DCL Prompt) | ||
|
TELNET |
|
Invokes TELNET. |
|
TELNET remote_host |
|
Invokes TELNET and establishes a connection to a remote host. |
|
TN3270 |
N/A |
Invokes TELNET and TN3270. |
|
TN3270 remote_host |
N/A |
Invokes TELNET, runs TN3270, and establishes a connection to a remote host. |
|
Getting In and Out of Sessions | ||
|
CONNECT |
|
Establishes a connection between the local host and a remote host. |
|
CREATE_SESSION |
N/A |
Establishes a pseudo device and connects it to a remote listener port. |
|
DELETE_SESSION |
N/A |
Deletes a pseudo device created by the CREATE_SESSION command. |
|
DISCONNECT |
|
Terminates your current session. |
|
Ctrl/] |
Ctrl/] |
Takes you from the remote host back to the TELNET prompt. |
|
EXIT |
|
Closes open connections and exits from TELNET. |
|
HELP |
|
Invokes online help. |
|
RESUME |
|
Resumes an open connection. |
|
SPAWN |
|
Suspends your TELNET session and takes you to the DCL prompt. |
|
Customizing the TELNET Environment | ||
|
DISABLE AUTOFLUSH |
|
Disables the automatic flushing of output when interrupt characters are sent. |
|
DISABLE AUTOSYNCH |
|
Disables the automatic sending of interrupt characters in urgent mode. |
|
DISABLE BINARY |
|
Disables transmission in binary mode. |
|
DISABLE CRLF |
|
Disables the sending of carriage returns as Return LF. |
|
DISABLE CRMOD |
|
Disables the mapping of received carriage returns. |
|
DISABLE DEBUG |
|
Disables the display of data flow information in hexadecimal. |
|
DISABLE LOCAL_CHARS |
|
Disables the interpretation of certain control characters by your local TELNET client and passes them to the remote TELNET server. |
|
DISABLE OPTIONS_VIEW |
|
Disables the display of option negotiations between the client and server. |
|
ENABLE AUTOFLUSH |
|
Enables the automatic flushing of output when interrupt characters are sent. |
|
ENABLE AUTOSYNCH |
|
Enables the automatic sending of interrupt characters in urgent mode. |
|
ENABLE BINARY |
|
Enables transmission in binary mode. |
|
ENABLE CRLF |
|
Enables the sending of carriage returns as Return LF. |
|
ENABLE CRMOD |
|
Enables the mapping of received carriage returns. |
|
ENABLE DEBUG |
|
Enables the display of data flow information in hexadecimal. |
|
ENABLE LOCAL_CHARS |
|
Enables the interpretation of certain control characters by your local TELNET client and prohibits them from being passed to the remote TELNET server. |
|
ENABLE OPTIONS_VIEW |
|
Enables the display of option negotiations between the client and server. |
|
SHOW DEVICE |
Displays the current devices. | |
|
SHOW PARAMETERS |
|
Displays the current parameter settings. |
|
SHOW SESSION |
Displays the current sessions. | |
|
SHOW STATUS |
|
Displays the current status. |
|
SET ECHO |
|
Sets the echo character to the specified character. |
|
SET ERASE |
|
Sets the erase character to the specified character. |
|
SET ESCAPE |
|
Sets the escape character to the specified character. |
|
SET FLUSHOUTPUT |
|
Sets the flush output character to the specified character. |
|
SET INTERRUPT |
|
Sets the interrupt character to the specified character. |
|
SET KILL |
|
Sets the kill character to the specified character. |
|
SET MODE |
|
Sets the transmission mode to character or line. |
|
SET QUIT |
|
Sets the quit character (an alternate interrupt character) to the specified character. |
|
SET TERMINAL |
Sets the terminal type to the specified model. | |
|
Sending Commands to the Remote Host | ||
|
SEND AO |
|
Sends the Abort Output command. |
|
SEND AYT |
|
Sends the Are You There command, testing the path to the remote application and eliciting connection status information from the remote host. |
|
SEND BRK |
|
Sends the Break command. |
|
SEND EC |
|
Sends the Erase Character command. |
|
SEND EL |
|
Sends the Erase Line command. |
|
SEND GA |
|
Sends the Go Ahead command. |
|
SEND IP |
|
Sends the Interrupt character. |
|
SEND NOP |
|
Sends the No Operation command to test whether data can be sent to the remote host, eliciting an error if the connection is not open. |
|
SEND SYNCH |
|
Sends the Synchronize character. |
4.1. Typing TELNET/TN3270 Commands
Use the following rules when you enter a TELNET command line.
4.1.1. DCL and UNIX Command Formats
$ TELNET
TELNET> SHOW PARAMETERS
$ TELNET
TELNET> DISPLAY
4.1.2. Quotation Marks
- The TELNET command line:
$ TELNET CENTRAL
- The TN3270 command line:
$ TN3270 CENTRAL
- Commands at the TELNET prompt:
TELNET> CONNECT CENTRAL
migain and sets a
terminal type with the /TERMINAL_TYPE qualifier. No quotation marks are needed to
pass a terminal type to migain in lowercase, as demonstrated with the
remote host's printenv
command.$ TELNET MIGAIN /TERMINAL_TYPE=vt300 %TELNET-I-Trying, Trying ...11.90.208.56 %TELNET-I-SESSION, Session 01, host migain, port 23 -TELNET-I-Escape, Escape character is '^]' Hello from UNIX host migain login: root Password:... . . . migain# printenv TERM=vt300 HOME=/ SHELL=/bin/csh USER=root PATH=/bin:/usr/bin:/usr/ucb:/etc:/usr/etc:. LOGNAME=root PWD=/ migain#
4.2. Obtaining Online Help
$ HELP TELNET
$ HELP TN3270
$ HELP TCPIP_SERVICES TELNET
TELNET> HELP
4.3. Starting TELNET and TN3270
At the DCL prompt, enter either the TELNET or the TN3270 command and specify a remote host.
At the DCL prompt, enter either the TELNET or the TN3270 command with no parameters. At the TELNET or TN3270 prompt that appears, enter the CONNECT or
opencommand, and specify a remote host.Invoke and use TELNET or TN3270 from a command procedure (see Section 4.6.1, ''Starting TELNET/TN3270'').
$ TELNET CENTRAL /TERMINAL_TYPE=IBM-3278-2
$ TELNET
TELNET> CONNECT CENTRAL 23 VT200
$ TN3270 CENTRAL /TERMINAL_TYPE=IBM-3278-3
$ TELNET
TELNET> SHOW STATUS
%TELNET-E-NOSESSION, No active session
Escape character: '^]'
TELNET>SET DEVICE TERMINAL=VT300
TELNET> OPEN GALAXY
%TELNET-I-TRYING, Trying ... 1.20.208.10
%TELNET-I-SESSION, Session 01, host galaxy, port 23
-TELNET-I-ESCAPE, Escape character is ^]
Compaq Tru64 UNIX (galaxy.udb.com) (ttyp5)
login:
4.3.1. Establishing Kerberos-Based Secure Connections
Kerberos is a network authentication protocol designed to provide strong authentication for client/server applications by using secret-key cryptography. Kerberos uses strong cryptography so that a client can prove its identity to a server (and vice versa) across an insecure network connection. The TCP/IP TELNET service uses Kerberos to make sure the identity of any user who requests access to a remote host is authentic.
Before you can use the Kerberos TELNET client, the OpenVMS Security Client software must be configured on the OpenVMS system. For more information about installing and configuring the OpenVMS Security Client software, see the VSI OpenVMS Alpha Version 7.3-2 Upgrade and Installation Manual.
4.3.1.1. Kerberos Principal Names
Before you use the Kerberos TELNET client, make sure the local host name is
fully qualified in the local hosts database. Kerberos realms form principal
names using fully-qualified domain names. For example,
terse.mbs.com is a fully qualified domain name;
terse is a simple host name.
TCP/IP Services is usually configured so that the host name is entered in the
hosts database as a simple host name. That is, on host TERSE, the TCP/IP
management command SHOW HOST TERSE returns terse, not
terse.mbs.com.
- Find the host's numeric address. For example:
$ TCPIP TCPIP> SHOW HOST terse LOCAL database Host address Host name 15.28.311.11 terse - Remove the simple host name. For example:
TCPIP> SET NOHOST terse/CONFIRM
- Use the SET HOST command to associate the fully qualified domain name with the IP address, as shown in the following example:
TCPIP> SET host "terse.mbs.com"/ADDRESS=15.28.311.11 -
_TCPIP> /ALIAS=("TERSE.MBS.COM", "terse", "TERSE")
Specify the /ALIAS qualifier to ensure that applications can handle host names in uppercase and lowercase.
- Confirm that the first name returned is fully qualified.
TCPIP> SHOW HOST terse

     LOCAL database

Host address    Host name

15.28.311.11   terse.mbs.com, TERSE.MBS.COM, terse, TERSE
4.3.1.2. Initiating an Authenticated TELNET Connection
- On a Kerberos-enabled system, enter a KINIT username command. Enter your password when prompted.
Note
Always specify the user name on the KINIT command line. Kerberos realms are usually set up with lowercase user names, but on OpenVMS, user names are stored in uppercase. When you specify the user name, it will be accepted as lowercase.
- To initiate an authenticated connection, enter the following command:
$ TELNET/AUTHENTICATE host-name - To use the same ticket on a remote system, you can forward your ticket by entering the following command:
$ TELNET/AUTHENTICATE/FORWARD host-name - To use your credentials in another realm, enter the following command:
$ TELNET/AUTHENTICATE/REALM=realm-name.
4.4. Exiting TELNET and TN3270
At the remote host's system prompt, log out.
- At the remote host's system prompt, return to the TELNET or TN3270 prompt and disconnect the session, as follows:
At the remote host's system prompt, press the TELNET/TN3270 escape character (Ctrl/] is the default).
At the TELNET or TN3270 prompt, enter either the DISCONNECT or the
closecommand.
% logout
%TELNET-S-REMCLOSED, Remote connection closed
-TELNET-I-SESSION, Session 01, host galaxy, port 23
TELNET>
TELNET> EXIT
$
%
Ctrl/] (characters not echoed)
TELNET> DISCONNECT
galaxy.udp.com>
TELNET> DISCONNECT
%TELNET-S-LCLCLOSED, Local connection closed
-TELNET-I-SESSION, Session 01, host galaxy, port 23
TELNET>
4.5. Keeping a Log of Your TELNET Session
To keep a log of your TELNET session, use the /LOG_FILE qualifier. (You cannot use this qualifier with a TN3270 session.)
central,
sets the terminal type to VT200, and logs all session output to the file CENT.LOG in
your current
directory.$ TELNET/LOG_FILE=CENT.LOG/TERMINAL_TYPE=VT200 CENTRAL
4.6. Command Procedures
With DCL command files, you can start TELNET and TN3270 sessions (see Section 4.6.1, ''Starting TELNET/TN3270'') and customize the TELNET/TN3270 environment (see Section 4.6.2, ''Initialization Command Files'').
4.6.1. Starting TELNET/TN3270
You can create a command procedure containing the DCL commands DEFINE and TELNET (or TN3270) commands.
$! My TELNET startup command file, START_TELNET.COM.
$!
$! This command procedure establishes a TELNET session
$! with UNIX host central.
$!
$ DEFINE /USER_MODE SYS$INPUT TT:
$ TELNET CENTRAL
4.6.2. Initialization Command Files
Are optional. They eliminate the need to enter individual TELNET commands.
- Have the following requirements:
Location: Your login directory
Name: TELNETINIT.INI
Format: one command per line
Run automatically when you invoke TELNET or TN3270.
Let you specify the logical name, TELNETINIT, to point to an initialization file.
! This file, TELNETINIT.INI, sets my TELNET parameters
! the way I like them.
!
DISABLE AUTOFLUSH
ENABLE BINARY
ENABLE DEBUG
SET DEVICE /TERMINAL=VT300
SET ESCAPE "^p"
4.7. Toggling Between the Remote Host and Local TELNET/TN3270
To return to the local TELNET or TN3270 prompt (TELNET command mode), enter the TELNET escape sequence (the default is Ctrl/]) at the remote host's prompt (TELNET input mode).
- To resume your session with the remote host, enter one of the following at the TELNET (or TN3270) prompt.
TELNET> ReturnorTELNET> RESUME
orTELNET> RESUME nwhere n is the number of the session to which you want to return.
- To change the default escape sequence, enter the following at the TELNET (or TN3270) prompt:
TELNET> SET ESCAPE "^escape_character"
biway and the
local OpenVMS system.
biway> Ctrl/]  (characters not echoed)
TELNET> SHOW STATUS
Session  1 Active  Host biway Port 23
    Operating Mode: Character-at-a-time
    Escape character: '^]'
    Options:
       Echo - Remote
       Terminal Type - Local
       Terminal Type - VT300
       Suppress Go Ahead - Local
       Suppress Go Ahead - Remote
    Terminal Dataoveruns:    0
    Suspended Network I/Os:  0

   .
   .
   .

TELNET>  Return
biway>
Establish a connection to UNIX host
fern.Return to the local TELNET prompt.
Display status.
Establish a connection to host
gannet.Return to the TELNET prompt.
Display status.
Connect to
sands. Butsandscloses the connection because BENTLEY incorrectly enters the password three times.- Try to resume the session with
gannet
. However, RESUME without specifying a session number fails:With multiple sessions, RESUME's default is the "active" session, the one with the most recently opened connection.
- The host to which BENTLEY connected most recently is
sands. However, because BENTLEY incorrectly typed the password during login,sandsclosed the TELNET connection and displayed the following:No current session.
Because no connection is active (or current), BENTLEY must specify a session number on the RESUME command line.
$ TELNET FERN
   .
   .
   .
fern> Ctrl/]   (characters not echoed)
TELNET> SHOW STATUS
Session  1 Active  Host FERN
   .
   .
   .
TELNET> CONNECT GANNET
   .
   .
   .
gannet> Ctrl/] (characters not echoed)
TELNET> SHOW STATUS
Session  2 Active  Host GANNET
    Operating Mode: Character-at-a-time
    Escape character: '^]'
   .
   .
   .
Session  1 Waiting Host FERN
TELNET> CONNECT SANDS
%TELNET-I-Trying, Trying...11.18.222.95
%TELNET-I-SESSION, Session 03, host sands, port 23
-TELNET-I-Escape, Escape character is '^]'.
   .
   .
   .
Username: BENTLEY
Password:
User authorization failure
Username: BENTLEY
Password:
User authorization failure
Username: BENTLEY
Password:
User authorization failure
Remote connection closed
TELNET> RESUME
No current session
TELNET> SHOW STATUS
Session  1 Waiting Host FERN
Session  2 Waiting Host GANNET
   .
   .
   .
TELNET> RESUME 2
gannet> Ctrl/]   (characters not echoed)
TELNET> SHOW STATUS
Session  2 Active  Host GANNET

    Operating Mode: Character-at-a-time
    Escape character: '^]'
   .
   .
   .
Session  1 Waiting Host FERN
TELNET>
4.8. Suspending TELNET to Return to the Local DCL Prompt
While using TELNET, you can use the SPAWN command to suspend your current session and create a subprocess at the local DCL prompt. At the DCL prompt, you can then enter any number of DCL commands. To return to your suspended TELNET session (exiting the DCL subprocess), enter the LOGOUT command.
TELNET> SPAWN
$ DIR
   .
   .
   .
$ DEL TR3.TXT:*
$ LOGOUT
Process FERN_1 logged out at 17-JAN-2002 11:08:24.90
TELNET>
4.9. Multiple Sessions
Multiple simultaneous connections
10 or more simultaneous sessions
Only one session at a time if it uses TN3270
|
Term |
Meaning |
|---|---|
|
Active host |
Host from which you entered the escape sequence to return to the TELNET prompt. |
|
Current session |
If you log out of the active host at its system prompt, or enter the TELNET command DISCONNECT, no current session exists. To resume a connection, even if only one exists, enter the
following
command:
TELNET> RESUME n |
|
Waiting hosts |
Other hosts with whom you have open sessions, numbered in the order that you connected to them. To resume a connection with a waiting host, even if only one
exists, enter the following
command:
TELNET> RESUME n |
At the system prompt of the remote host, enter the TELNET escape sequence (default is Ctrl/]).
TELNET returns to the TELNET prompt.
Start another session by issuing the CONNECT command.
finder and
keeper.$ TELNET FINDER . . . finder> () . . . finder> Ctrl/] (characters not echoed) TELNET> CONNECT KEEPER . . . keeper> () . . . keeper> Ctrl/] (characters not echoed) TELNET> ()
4.9.1. Toggling Between Open Sessions
Enter the TELNET escape sequence.
If necessary, use the SHOW STATUS command to check the number of your session with the other host.
Enter the TELNET RESUME n command, where n is the number of the session to which you want to return.
For an example, see Section 4.7, ''Toggling Between the Remote Host and Local TELNET/TN3270''.
4.9.2. Displaying Session Information
TELNET> SHOW SESSION Return
Session 01, host finder, port 23
Session 02, host keeper, port 23 (default active session)%TELNET-E-NOSESSION, No active session
4.10. Customizing TELNET/TN3270 Transmissions, Control Characters, and Displays
Send and receive transmissions
Display processing on your terminal
Interpret certain control characters
Echo
Erase
Escape
Flush output
Interrupt
Kill
Quit
TELNET> SET INTERRUPT "^a"
TN3270 allows you to redefine your keyboard. You can redefine most IBM 3270 model functions and all emulated functions and characters. You can create a key definition file with DEFINE/KEY statements to redefine the keyboard. Alternatively, you can redefine a key interactively by using the DEF KEY function (Ctrl/K on VT100-and VT200-series terminals) (see Section 4.12.9, ''Redefining Your Keyboard''.)
The remote host to which you are connecting
The applications you use
|
Mode |
Function |
|---|---|
|
Local Characters Mode |
The local host interprets control characters, translating them to TELNET protocol sequences (ENABLE LOCAL_CHARS). Use this mode when the local and remote hosts implement different control characters. By default, characters are interpreted by the remote host (DISABLE LOCAL_CHARS). |
|
Binary Mode |
The local host sends transmissions in binary mode (ENABLE BINARY). Use this mode when the remote host expects each line of data to end with a carriage return/line feed combination. By default, the local host sends transmissions with the end-of-line (EOL) character mapped to the carriage return/line feed combination (DISABLE BINARY). |
|
Debug Mode |
TELNET displays data flow in both hexadecimal and readable text (ENABLE DEBUG). By default, TELNET displays data in readable text only (DISABLE DEBUG). |
|
Character Transmission Mode |
TELNET transmits data one character at a time (SET MODE CHAR) rather than line by line. Use this mode when you run a text editor (on the remote host) that does character processing. Character transmission mode is the default. |
|
Line Transmission Mode |
TELNET transmits data one line at a time (SET MODE LINE). Most clients send a character at a time. The remote host server must support line transmission mode. This allows you to do signal trapping as well as local-character editing and tab expansion. |
4.11. Sending Commands to the Connected Remote Host
|
Function |
Command |
When to Use |
|---|---|---|
|
Abort output of the last remote command you entered, without discontinuing execution of the process. |
SEND AO |
You want to terminate output but not the execution of the process. After already aborting output, you want to resume output. The remote host does not recognize the Ctrl/O sequence as the flush output character. |
|
Determine if your connection with the remote host is still established. The remote host replies with connection status information. |
SEND AYT |
Test the connection to the remote host application and verify that the remote host application is responding. You are notified on success. |
|
Terminate execution of the last command you entered at the remote host. |
SEND BRK |
The remote host does not recognize the Ctrl/C sequence as an interrupt character. |
|
Delete the last character you entered at the remote host. |
SEND EC |
The remote host does not recognize your Delete key. |
|
Delete the last line of text you entered at the remote host. |
SEND EL |
The remote host does not recognize your Delete key or command-line recall. |
|
Signal the remote host that your local system is ready. |
SEND GA |
The application requires GA commands in either one or both directions. |
|
Interrupt execution of the last command you entered at the remote host. |
SEND IP |
Your terminal or the remote host does not recognize the default interrupt character (Ctrl/C). |
|
Determine whether your local host can send data to the connected remote host and whether the remote host can receive that data. |
SEND NOP |
Check the communication path to the remote host. You are notified on error. |
|
Interrupt the current process you are executing at the remote host, and in urgent mode (out-of-band), get a quicker response time to the interrupt. |
SEND SYNCH |
You want to clear immediately the communications path between your system and the remote host, with the remote host ignoring any incoming data not yet processed. |
4.12. IBM 3270 Model Terminal Emulation (TN3270)
Provides IBM 3270 Information Display System (IDS) terminal emulation.
Assigns IBM 3270 functions to your keyboard.
Assigns IDS functions to specific keys.
Record your sessions (Section 4.12.5, ''Recording Sessions'').
Redefine keys permanently (Section 4.12.9.5, ''Creating a Key Definition File'').
Redefine keys interactively (Section 4.12.9.5.1, ''Interactive Definitions: DEF KEY Function'').
Troubleshoot problems (Section 4.12.9.6, ''TN3270 Problem Solving'').
Note
When you run TN3270, you can only have one session. You cannot have other sessions running simultaneously, as you can when running normal TELNET sessions.
4.12.1. Supported IBM Terminal Models
|
Model |
Screen Size (Rows x Columns) |
|---|---|
|
IBM 3278 Model 2 |
24 x 80 |
|
IBM 3278 Model 3 |
32 x 80 |
|
IBM 3278 Model 4 |
43 x 80 |
|
IBM 3278 Model 5 |
27 x 132 |
4.12.2. Setting Up Your PC or Terminal for IBM 3270 Terminal Emulation
The type of terminal that you are using or that your PC is emulating
The features you set on it
Sections 4.12.2.1 and 4.12.2.2 explain how to set up VT200- and VT100-series terminals (or emulation on PCs), respectively.
4.12.2.1. VT200-Series Terminal Setup
At the Set-up Directory menu, select the keyboard type that corresponds to the keyboard layout you are using (for example, North American).
- At the Display Set-up menu, select the following:
Interpret controls
Light text, dark screen
Cursor (visible)
- At the General Set-up menu, select the following:
VT200 or VT100 mode (if VT100 mode, set VT100 ID)
7-bit or 8-bit controls
Multinational/national
Normal cursor keys
No new line
- At the Communications Set-up menu, select the following:
XOFF at 64 or XOFF at 128
8-bit communication line
8-bit (any) parity
No local echo
At the Keyboard Set-up menu, select warning bell ON.
$ SET TERMINAL /INQUIRE
The software determines the terminal's characteristics and sets the appropriate parameters.
$ SET TERMINAL /NOEIGHTBIT
4.12.2.2. VT100-Series Terminal Setup
Set your terminal to ANSI mode (see the user's guide for your terminal).
- Enter the following command at the DCL prompt:
$ SET TERMINAL/INQUIRE
This command causes the terminal to be questioned about its characteristics. The appropriate parameters for the terminal are set up according to its response.
TN3270 requires terminal windows that support at least 24 lines and 80 columns.
4.12.3. Starting and Exiting from TN3270
- To use the default terminal type:
$ TN3270 CENTRAL
- To use a terminal type other than the default:
$ TN3270/TERMINAL_TYPE=IBM-3278-4 CENTRAL
You can invoke TN3270 and, without first connecting to a remote host, enter certain commands that customize the sessions and display parameters or status. You can also use a command file to invoke TN3270 and the customization.
Character-set translation tables file (/CHARACTER_SET= file) that translates between EBCDIC and the DMCS. The default file, if set up by your system manager, is SYS$LIBRARY:TN3270DEF.TBL. If this file does not exist, and you do not specify a file, TN3270 uses its own translation table.
Keyboard definition file (/KEY_DEFINITIONS= file) that you create as an alternative to the default keyboard layout.
National Replacement Character Set (NRCS) file (/NATIONAL_CHARACTERS= n) for which your terminal is configured. The default for 8-bit terminals is MULTINATIONAL. The default for 7-bit terminals is US_ASCII.
At the remote host's system prompt, log out.
- At the remote host's system prompt, return to the TN3270 prompt and disconnect the session as follows:
At the remote host's system prompt, press the TN3270 escape character (Ctrl/] is the default).
At the TN3270 prompt, enter either the DISCONNECT or the
closecommand.
4.12.4. Clearing Error Messages
REFR
HELP
SET FIL
DEF KEY
4.12.5. Recording Sessions
During a TN3270 session, you can record your screen's contents. The PRINT function directs your screen's contents to either a file or a spooled printer.
Invoke the PRINT keyboard function, as described in Section 4.12.8, ''Keyboard Functions''.
The screen display is recorded in a file in a compressed state. Null lines (lines with only nulls and attribute characters) do not appear.
Invoke the ENTER function or any function that transmits the screen contents to the remote host's application, as described in Section 4.12.8, ''Keyboard Functions''.
Each time you start a TELNET session that runs TN3270, TELNET opens a new TN3270PRINT.LIS file.
Each time you use PRINT during a session, TELNET appends new output from the screen to the end of TN3270PRINT.LIS.
Each time you use PRINT, if you direct the output to a printer, TELNET creates a separate entry in the print queue.
If the printer is spooled, TELNET immediately prints the output.
- When you start a TN3270 session, use the /PRINTER qualifier, as shown in the following example:
$ TN3270 [ host ] /PRINTER=file
- During a TN3270 session, follow these steps:
Use the SET FIL keyboard function, as explained in Section 4.12.8, ''Keyboard Functions''.
At the prompt for a new file name, enter a name.
If you specify the same name that is already in use, subsequent PRINT operations direct output to a new version of the same file.
Use the NEW LINE keyboard function, as explained in Section 4.12.8, ''Keyboard Functions''.
4.12.6. Online Help
A picture of the keypad
A list of TN3270 keyboard functions
The key combinations that invoke the TN3270 keyboard functions
Top-row keys
Editing keypad
Application keypad
Up to 32 control or extended character definitions
All your definitions and changes, including those you make interactively
To see the Help screen, use the HELP function key F15.
4.12.7. If the Keyboard Locks
Inhib
To unlock the keyboard, press the KP0 key to invoke the RESET function. (KP0 refers to the zero (0) key in the application keypad on the right hand side of the keyboard.)
DELETE
DUP
ER EOF
FM
Any graphic character
4.12.8. Keyboard Functions
This section describes the keyboard functions. Preceding each function description are the key sequences for VT100 and VT200 terminals and the function name to use in a DEFINE/KEY command. In many of the key sequences, TN3270 allows use of the extended function (EXT) feature. Used in conjunction with another key, EXT allows access to an extended function for that key. The following illustrates the extended function feature in more detail.
|
VT100: EXT + E |
VT200: EXT + Find |
|
DEFINE_KEY Function: ATTACH | |
Changes control from one subprocess to another subprocess or to the parent process. When you invoke the ATTACH function, TN3270 uses the name of the last process to which you attached as the default process name.
If you want to attach to a different process, press Ctrl/U to erase the default process name. You can then enter the process name of your choice at the prompt. The process name can be a quoted string. Use the quotation marks to preserve spaces, tabs, or lowercase letters in strings.
|
VT100: EXT + A |
VT200: F19 |
|
DEFINE_KEY Function: ATTENTION | |
Provides a way to "get the attention of" the remote application program that you are running by sending a SIGNAL RU command to the remote host. See the user's guide of the particular application program to learn what response the program gives when you use this key.
|
VT100: BACKSPACE |
VT200: F12 |
|
DEFINE_KEY Function: BACK_TAB | |
If the cursor is in a field, but not at the first position of the field, it moves to the beginning of the unprotected field that it is in.
If the cursor is in the first position of a field, it moves to the beginning of the preceding unprotected field. If the cursor is in the first position of the first unprotected field, the cursor moves to the first position of the last unprotected field on the screen.
On an unformatted screen, the cursor returns to the first position on the screen.
|
VT100: EXT + C |
VT200: EXT + C |
|
DEFINE_KEY Function: (None) | |
Enters a cent sign. If your terminal does not have this character, your screen displays a hyphen ( - ).
|
VT100: EXT + Enter |
VT200: EXT + F20 |
|
DEFINE_KEY Function: CLEAR | |
Clears the screen and moves the cursor to the first position on the screen. When you invoke the CLEAR function, the software notifies the application program that this function has been used.
|
VT100: Ctrl/K |
VT200: Ctrl/K |
|
DEFINE_KEY Function: DEFINE_KEY | |
Lets you interactively define or redefine a key. You get a prompt for the name of the key to define and for a function you want to assign to that key. Refer to Section 4.12.9, ''Redefining Your Keyboard'' for more information about using the DEF KEY function.
|
VT100: Delete |
VT200: <X] |
|
DEFINE_KEY Function: DELETE | |
Deletes the character at the cursor. The cursor remains where it is, and the other characters to the right of the cursor in the same field move one position to the left. The end of the field fills with blanks. Note that this is not the action normally associated with the Delete key on keyboards.
|
VT100: Ctrl/V |
VT200: EXT + F17 |
|
DEFINE_KEY Function: DISPLAY_ATTRIBUTES | |
Enables and disables the visible attribute mode. This mode of operation forces display of the attribute characters (that is, the characters at the start of a field that indicate the display and data type of that field). In IBM 3270 model terminal emulation (TN3270), you can use the DSP ATT function to debug application programs, as explained in Section 4.12.10, ''Debugging Application Programs Using the IBM 3270 Model Terminal Emulator''.
|
VT100: EXT + * |
VT200: EXT + F12 |
|
DEFINE_KEY Function: DUP | |
Lets you enter a value in the same field in several forms without needing to repeat the entry for each form.
After entering the data in the field on the first form, use the DUP function when at the same field on succeeding forms. The application program makes the necessary translation, filling in these fields with the same value. For details about the use of this key, refer to the user's guide of the particular application program.
Displays an asterisk (*).
|
VT100: EXT + U |
VT200: EXT + Remove |
|
DEFINE_KEY Function: DVCNCL | |
Cancels the RECORD function. Use the DV CNCL function if you begin using the RECORD function and then decide you want to stop. If you want to delete a sequence that has already been recorded on a PF key, use the RECORD function, press the PF key, and then use the DV CNCL function.
|
VT100: Line Feed + Enter |
VT200: Do + Enter |
|
DEFINE_KEY Function: ENTER | |
Sends your input to the remote application program. While this communication is
active, the keyboard locks and indicator Inhib appears on the status
line. Usually the application program releases the keyboard when it has finished
processing your input.
|
VT100: EXT + KP, |
VT200: F18 |
|
DEFINE_KEY Function: ERASE_EOF | |
Erases the contents of the current field, from the location of the cursor to the end of the field. The cursor remains in the same location.
|
VT100: EXT + KP- |
VT200: EXT + F18 |
|
DEFINE_KEY Function: ERASE_INPUT | |
On a formatted screen, clears all the data in the unprotected fields on your screen and moves the cursor to the first position in the first unprotected field on the screen.
On an unformatted screen, clears all the data and moves the cursor to the first position on the screen.
You can also use the ER INP function to remove all previously recorded key sequences by using the RECORD function and then the ER INP function.
|
VT100: Ctrl/Z or F10 |
VT200: Ctrl/Z or F10 |
|
DEFINE_KEY Function: EXIT | |
Terminates the remote TELNET/TN3270 session. Aborts any exchange of data in progress between the local and remote hosts. Note that terminating a session with the IBM host in this way may result in improper termination of the session. For the appropriate log-off command string, see the user's guide for the IBM application with which you are communicating.
|
VT100: KP. |
VT200: KP. |
|
DEFINE_KEY Function: EXTEND | |
Used in conjunction with another key, allows access to an extended function for that key. First invoke the EXT function, and then press the second key. If you invoke EXT accidentally, invoke the RESET function to cancel the EXT function.
If the status display is enabled when you invoke the EXT function, the word
Extend appears on the status line.
|
VT100: EXT + ; |
VT200: EXT + F13 |
|
DEFINE_KEY Function: FM | |
Specifies the end of a field on an unformatted screen or the end of part of an unprotected field on a formatted screen. Refer to the user's guide of the remote application program for specific use of this key.
Displays a semicolon ( ; ).
|
VT100: EXT + H |
VT200: Help |
|
DEFINE_KEY Function: HELP | |
Displays online help and an illustration of the TN3270 keyboard.
|
VT100: EXT + B |
VT200: F13 |
|
DEFINE_KEY Function: HOME | |
Repositions the cursor to the first position in the first unprotected field on the screen (that is, to the beginning of the input area on the screen).
|
VT100: Right arrow or Left arrow |
VT200: Right arrow or Left arrow |
|
DEFINE_KEY Function: RIGHT, RIGHT_NOWRAP, LEFT, or LEFT_NOWRAP | |
If the cursor is at the end of a line when you use the Right arrow function, the cursor moves to the start of the next line.
If the cursor is at the beginning of a line when you use the Left arrow function, the cursor moves to the end of the previous line.
If the screen display you receive is wider than 80 columns, you can use the Right arrow and Left arrow functions to move through the display.
If you want the cursor to wrap to the opposite edge of the display, use one of the following function sequences:
EXT + Right arrow
EXT + Left arrow
|
VT100: EXT + PF4 |
VT200: F14 |
|
DEFINE_KEY Function: INSERT_MODE | |
Enables insert mode. Use insert mode to edit what you entered. If the status
display is enabled, the word Insert appears.
The cursor
The character at the cursor location
All the characters to the right of the cursor in the field
An unformatted screen
An unprotected field on a formatted screen until it is full
If you attempt to insert characters after the field is full, the keyboard locks,
the terminal bell rings, and the word Inhib appears on the status line.
If the keyboard locks when you try to insert characters into a field that looks
empty, the field might have trailing spaces. To delete these spaces, use the ER EOF
function.
RESET
CLEAR
ENTER
Any PA key
Any PF key
|
VT100: EXT + N |
VT200: EXT + N |
|
DEFINE_KEY Function: (None) | |
Represents the remote host's symbol for a logical NOT; displayed as a circumflex ( ^ ).
|
VT100: EXT + O |
VT200: EXT + O |
|
DEFINE_KEY Function: (None) | |
Represents the remote host's symbol for a logical OR; displayed as a solid vertical line from the terminal's graphics set. Press Ext + O if the vertical bar is not available on your keyboard.
|
VT100: Return |
VT200: Return |
|
DEFINE_KEY Function: NEWLINE | |
Moves the cursor to the first unprotected position on the next line of your screen. If no unprotected fields are on the screen when you invoke the new line function, the cursor moves to the first location on the screen. If the screen has no fields, this key has the same function as the Return key.
|
VT100: EXT + J |
VT200: Remove |
|
DEFINE_KEY Function: NUMOVR | |
Lets you enter nonnumeric characters into numeric fields. Once you enable this
function, use NUM OVR again to disable it. If you do not disable the numeric lock
override, it remains enabled even after you exit from TN3270. The letter
O appears on the status line to indicate that the numeric lock
override is in effect.
|
VT100: PF4 , KP- , KP, |
VT200: PF4 , KP- , KP, |
|
DEFINE_KEY Function: PA1–PA3 | |
These program access keys are defined by the program you are using. These keys request attention from the remote application program without sending any data. You should refer to the user's guide of your application program to learn how the PA keys are defined.
|
VT100: see table |
VT200: see table |
|
DEFINE_KEY Function: PF1–PF24 | |
|
To Implement this Function |
Press This Key or Key Combination |
|---|---|
|
PF1 |
PF1 |
|
PF2 |
PF2 |
|
PF3 |
PF3 |
|
PF4 |
KP7 |
|
PF5 |
KP8 |
|
PF6 |
KP9 |
|
PF7 |
KP4 |
|
PF8 |
KP5 |
|
PF9 |
KP6 |
|
PF10 |
KP1 |
|
PF11 |
KP2 |
|
PF12 |
KP3 |
|
PF13 |
EXT + PF1 |
|
PF14 |
EXT + PF2 |
|
PF15 |
EXT + PF3 |
|
PF16 |
EXT + KP7 |
|
PF17 |
EXT + KP8 |
|
PF18 |
EXT + KP9 |
|
PF19 |
EXT + KP4 |
|
PF20 |
EXT + KP5 |
|
PF21 |
EXT + KP6 |
|
PF22 |
EXT + KP1 |
|
PF23 |
EXT + KP2 |
|
PF24 |
EXT + KP3 |
|
VT100: EXT + M |
VT200: Insert Here |
|
DEFINE_KEY Function: PLAY | |
Recalls keystroke sequences stored on PF keys using the RECORD function. Invoke the PLAY function and then press the PF key on which the desired key sequence is stored. The PLAY function executes all commands included in the keystroke sequence.
If the HELP utility is invoked in your key sequence, the PLAY function continues until you exit from the HELP utility. Also, if you use functions that require you to respond to prompts (such as ATTACH, DEF KEY, SET FIL, or SPAWN), the information you enter at the prompt is not recorded. When you recall the sequence, the system prompts you for this information again.
The letter P appears on the status line if the status display is
enabled.
|
VT100: EXT + P |
VT200: F11 |
|
DEFINE_KEY Function: PRINT | |
Records the contents of your screen in a file or at a printer. (This is a local
print feature.) If the status display is enabled when you use the PRINT function,
the word Print appears on the status line. Your screen refreshes when
the printing process completes.
The first use of PRINT in a given run of TN3270 creates a new version of the output file. Successive uses of PRINT in the same program cause the screen contents to append to the existing file. If the output is directed to a printer, each use of PRINT creates a separate entry in the printer queue. If the printer is a spooled printer, the output is released for printing immediately.
To specify where to direct the output file, use the command qualifier /PRINTER= file. The SET FIL function allows you to change the name of the output file each time you invoke the PRINT function.
|
VT100: EXT + L |
VT200: EXT + Insert Here |
|
DEFINE_KEY Function: RECORD | |
Saves a keystroke sequence on a specific PF key. Invoke the RECORD function with
the appropriate key sequence, press the PF key as prompted, enter the keystroke
sequence, and then invoke the RECORD function again. You can save a maximum number
of 127 keystrokes on each PF key. If the status display is enabled when you use the
RECORD function, the letter R appears on the status line.
To recall the keystroke sequence, use the PLAY function. To cancel the RECORD function, use the DV CNCL function. To erase all previously recorded key sequences, use the ER INP function.
|
VT100: Ctrl/W |
VT200: Ctrl/W or F20 |
|
DEFINE_KEY Function: REFRESH | |
Removes TN3270 error messages, operating system messages, or other messages that appear on your screen. This key function deletes extraneous characters from your screen and redisplays the fields and data that were on the screen before the interruption.
This function does not transmit or receive data from the remote host. It is a local OpenVMS function.
|
VT100: KP0 |
VT200: KP0 |
|
DEFINE_KEY Function: RESET | |
Returns the keyboard to normal input mode from insert mode. Also, the RESET function returns the keyboard to your control after it locks when you try to enter data in to a protected or a full field, or when you try to enter the wrong type of data in a field.
Invoking RESET turns off the Inhib indicator. The cursor remains
where it is and the screen remains unchanged.
|
VT100: EXT + K |
VT200: Select |
|
DEFINE_KEY Function: SELECT | |
Lets you choose items from a menu, table, or list and then notify the program of your selection. Use the arrow keys to position the cursor on the field designator character, then use the SELECT function. For more information on using SELECT, refer to the user's guide of the remote application.
|
VT100: EXT + F or Ctrl/F |
VT200: EXT + F11 |
|
DEFINE_KEY Function: SET_PRINTFILE | |
Lets you change the name of the file or device that receives output each time you invoke the PRINT function. After you invoke SET FIL, you are prompted for the name of a new output device, emulating the remote host's IDENT function.
Note that if you specify the same name that is already in use, subsequent PRINT operations direct output to a new version of the same file.
|
VT100: EXT + G |
VT200: EXT + F14 |
|
DEFINE_KEY Function: SHOW_MESSAGE | |
Displays the broadcast messages that have been posted on a separate screen. If the
status line is enabled, the indicator Msg appears on the status line.
If you do not read the messages before they fill up the screen, the messages begin
to scroll up out of view and you can no longer read them. These broadcast messages
are not saved after you either read them or exit TN3270.
|
VT100: EXT + D |
VT200: Find |
|
DEFINE_KEY Function: SPAWN | |
Creates a subprocess under the current process. Use the LOGOUT command to terminate the subprocess. Because a tree of subprocesses can be established using the SPAWN function, you must be careful when terminating any process in the tree. When a process is terminated, all subprocesses below that point in the tree are terminated automatically.
When you create a subprocess, you can specify an optional command string. The command string is executed within the created subprocess, and the subprocess terminates upon completion of the command.
|
VT100: EXT + S |
VT200: F17 |
|
DEFINE_KEY Function: STATUS | |
Lets you enable and disable the display of status information.
When you enable STATUS, the last line on your screen is painted over with a
reverse video strip. This line may conceal remote host system or application
information. If this occurs, the word Hidden appears in the status
line.
You can disable the status display by using the STATUS function again.
|
VT100: EXT + R |
VT200: EXT + F19 |
|
DEFINE_KEY Function: SYS_REQUEST | |
Lets you shift between the application program (the LU-LU session) and the control
program (the SSCP-LU session). If the status display is enabled, the
Appl or SSCP indicator appears on the status line to
indicate the type of session. Appl appears when you are in an LU-LU
session, and SSCP appears when you are in the SSCP-LU session.
The screen is refreshed when you use the SYS REQ function.
|
VT100: Tab |
VT200: Tab |
|
DEFINE_KEY Function: TAB | |
Moves the cursor to the first character location of the next unprotected field on your screen. If the screen has no fields, the Right arrow function moves the cursor to the first location on the screen.
If the cursor is within the last unprotected field on the screen, the cursor moves to the first position of the first unprotected field on the screen.
|
VT100: Up arrow or Down arrow |
VT200: Up arrow or Down arrow |
|
DEFINE_KEY Function: UP, UP_NOWRAP, DOWN, or DOWN_NOWRAP | |
Moves the cursor vertically on your screen without altering the data you have already entered. Note the following about the cursor behavior:
If the cursor is at the top of the screen when you press the Up arrow, the cursor appears in the same column at the bottom of the screen.
If the cursor is at the bottom of the screen when you press the Down arrow, the cursor appears in the same column at the top of the screen
If the screen display you receive is larger than 24 rows deep, you can use the Up arrow and the Down arrow keys to move through the display. These keys scroll the screen display up or down.
If you want the cursor to wrap to the opposite edge of the display, use the key sequence EXT + Up arrow or EXT + Down arrow.
4.12.8.1. Associated Documentation
IBM 3270 Information Display System
IBM 3270 Information Display System: Operator's Guide
IBM 3270 Information Display System: 3278 Display Station Operator's Guide
4.12.9. Redefining Your Keyboard
You can reassign functions and keys.
4.12.9.1. Functions You Can Redefine
All emulated functions
Most IBM 3270 model functions
All emulated alphanumeric and graphic characters
4.12.9.2. Keys You Can Define
|
Type of Key |
Key Name |
|---|---|
|
Function keys (VT100 and VT200) |
PF1 through PF4 |
|
Application keys (VT100 and VT200) |
KP0 through KP9 ENTER MINUS COMMA PERIOD |
|
Top-row function keys (VT200) |
F6 through F20 HELP (F15) DO (F16) |
|
Editing keypad (E1 through E6) (VT200) |
FIND (E1) INSERT_HERE (E2) REMOVE (E3) SELECT (E4) PREV_SCREEN (E5) NEXT_SCREEN (E6) |
|
Cursor keys (VT100 and VT200) |
UP DOWN LEFT RIGHT |
|
Control keys (VT100 and VT200) |
Ctrl/A through Ctrl/Z, including: Ctrl/H (BS) Ctrl/I (HT) Ctrl/J (LF) Ctrl/M (CR) Excluding: Ctrl/Y – Interrupt Ctrl/C – Cancel/interrupt Ctrl/O – Output off/on Ctrl/S – Suspend output Ctrl/Q – Resume output |
4.12.9.3. Keys You Cannot Define
Ctrl/Y – Interrupt
Ctrl/C – Cancel/interrupt
Ctrl/O – Output off/on
Ctrl/S – Suspend output
Ctrl/Q – Resume output
F1–F5
4.12.9.4. Redefining Keys
Create a key definition file. This is a text file with individual key definitions in the form of DEFINE/KEY statements and DELETE/KEY statements (see Section 4.12.9.5, ''Creating a Key Definition File'').
Use the DEF KEY function (see Section 4.12.9.5.1, ''Interactive Definitions: DEF KEY Function'').
$ TN3270 JUNCO /KEY_DEFINITION=NEW_KEYS.DAT
4.12.9.5. Creating a Key Definition File
Use the DEFINE/KEY and DELETE/KEY statements to create your own key definition file, as described in the following sections.
DEFINE/KEY Statement
DEFINE/KEY [/STATE=EXTEND] key_name function|
/STATE |
Optional. Default: nonextend mode. Redefines the key in extend mode. |
|
key_name |
Standard key name. |
|
function |
TN3270 function you want mapped to this key. |
You can define most of the named keys both in normal (nonextend) mode and in extend mode.
You can define the control keys (and the synonyms for them) in normal mode only. Do not specify the qualifier /STATE=EXTEND.
$ DEFINE/KEY/STATE=EXTEND "Z" EXIT
DELETE/KEY Statement
DELETE/KEY [/STATE=EXTEND] key_name
|
/STATE |
Optional. Default: nonextend mode. Deletes the key in extend mode. |
|
key_name |
Standard key name. |
Example:
$ DELETE/KEY Ctrl/ZKey Definition File: Example
By default, TN3270 maps 3270 functions to the numeric keypad.
DEFINE/KEY     KP0 "0"
DEFINE/KEY     KP1 "1"
DEFINE/KEY     KP2 "2"
DEFINE/KEY     KP3 "3"
DEFINE/KEY     KP4 "4"
DEFINE/KEY     KP5 "5"
DEFINE/KEY     KP6 "6"
DEFINE/KEY     KP7 "7"
DEFINE/KEY     KP8 "8"
DEFINE/KEY     KP9 "9"
DEFINE/KEY     period "."
DEFINE/KEY     comma ","
DEFINE/KEY     minus "-"
DEFINE/KEY     Select extend
DEFINE/KEY     Prev_screen reset
This example restores the key normally associated with the EXT function (KP.) as the keypad decimal point. When you assign a key another function, you remove its default value. Therefore, because some TN3270 functions rely on an EXT function, the EXT function is defined to correspond to the Select key. This example also restores the key normally associated with the RESET function (KP0) as the keypad 0 key. The example then defines the RESET function to correspond to the Prev Screen key
4.12.9.5.1. Interactive Definitions: DEF KEY Function
Use the DEF KEY function to define or redefine a key interactively. Your new definition exists until you log out from the remote host or disconnect from it.
When you invoke the DEF KEY function, TN3270 displays a prompt in the status line at the bottom of your screen.
Example:
Ctrl/K
Press the key that you want to define:
Enter the function name or quoted character:Enter the function name or quoted character:
What you enter during the DEF KEY dialog is subject to translation from the National Character Set to the DMCS.
You cannot redefine a key that exists on your terminal if it lacks a DMCS equivalent.
4.12.9.6. TN3270 Problem Solving
During a TELNET session in which you have invoked TN3270, you might experience the following problems:
Problem
The keyboard keys do not work properly.
Messages, such as the status line messages, do not appear in reverse video.
You receive a message indicating that your terminal is an unsupported model.
You cannot use TN3270 on a VT131 model terminal that is running in block mode.
Solution for a VT100-Series Terminal
$ SET TERMINAL /INQUIRE
Solution for a VT200-Series Terminal or a Terminal Connected to Either a Personal Computer or a Workstation
- Use Set-Up mode to verify that your terminal is:
In ANSI mode
Set to VT100 or VT200 emulation mode
Check the Communications Menu:
The terminal communications line must be set for 8-bit characters. To check, enter the following command:$ SET TERMINAL /INQUIRE
Solution for a Terminal with a National Language Keyboard
Ensure that your terminal is set up to correspond to your keyboard.
Problem
You receive a message indicating that the screen size (or the alternate screen size) specified by the remote host is too big.
Solution
Use Set-Up mode to change to a valid screen size (see Section 4.12.1, ''Supported IBM Terminal Models'').
Problem
You try to use the RECORD or PLAY function, but you get an error message indicating that you have a bad key-sequence file.
Solution
The file that stores the recorded key sequence is incompatible with the current version of the software or is corrupted.
Correct TCPIP$RECSEQ.DAT in your SYS$LOGIN directory.
Delete TCPIP$RECSEQ.DAT.
If the system manager must delete this file, rerecord all the key sequences you had stored on the PF keys.
4.12.10. Debugging Application Programs Using the IBM 3270 Model Terminal Emulator
- How the field appears on the screen:
At normal intensity
At high intensity
Invisibly
- What type of data the application expects in the field:
Numeric
Alphabetic
Alphanumeric
How to enter and exit visible attribute mode (see Section 4.12.10.1, ''Entering and Exiting Visible Attribute Mode'')
The screen displays (see Section 4.12.10.2, ''Visible Attribute Mode Displays'')
4.12.10.1. Entering and Exiting Visible Attribute Mode
The displays described in this section rely on your terminal's ability to produce reverse video and bold characters.
- The first time you invoke this function, the following actions take place:
The screen is refreshed.
The attribute characters appear either in reverse video or underlined.
- The second time you invoke this function, the following actions take place:
This mode is turned off.
The screen is refreshed and returns to normal mode.
4.12.10.2. Visible Attribute Mode Displays
|
Character |
Meaning |
|---|---|
|
n |
Unprotected field with normal intensity follows. |
|
N |
Protected field with normal intensity follows. |
|
d |
Following unprotected field is light-pen-detectable. |
|
D |
Following protected field is light-pen-detectable. |
|
h |
Following unprotected field has high intensity. |
|
H |
Following protected field has high intensity. |
|
i |
Unprotected nondisplay field follows. |
|
I |
Protected nondisplay field follows. |
4.13. Command Descriptions
To start TELNET, enter either the TELNET command or the TN3270 command at the DCL prompt.
To use TELNET commands, enter them at the TELNET> prompt.
This section provides complete descriptions of each TELNET command. The related ENABLE and DISABLE commands are presented together (see the description for ENABLE).
CONNECT
CONNECT — Establishes a TELNET connection between your local system and a remote host. You can run one session or 10 or more simultaneous sessions (only one session if you invoke TN3270).
DCL Syntax
CONNECT host [ port* [
                            terminal_type ] ]
* Required if you specify terminal type.
UNIX Syntax
open host [ port ] [
                            terminal_type ]
Parameters
host
Required.
Remote host to which you want to connect.
port
Optional without terminal_type. Required with terminal_type. Default: 23.
You are invoking TN3270.
You are connecting to a host that does not use the standard TELNET port.
terminal_type
Optional. Default: model of your physical terminal.
- For a session running TN3270, the terminal model to emulate. Enter one of the following:
IBM-3278-2
IBM-3278-3
IBM-3278-4
IBM-3278-5
For a non-TN3270 session, any terminal type recognized by the remote host, such as VT100, VT200, VT300, VT400, and VT500.
Examples
TELNET>CONNECT MYBUDEstablishes a TELNET connection to remote host MYBUD.
TELNET>CONNECT DEBTS 23 IBM-3278-2Establishes a TELNET connection to remote host DEBTS and runs TN3270. Your terminal functions as an IBM-3278-2 model terminal. For syntax reasons, specifying a port number is required.
TELNET>CONNECT 130.180.5.5Establishes a TELNET connection to the host at IP address 130.180.5.5.
TELNET>CONNECT REVIN 31Establishes a TELNET connection to remote host
revin. The connection is at port 31 onrevin.%Ctrl/]TELNET>CONNECT QUIK. . .%During a TELNET session with a UNIX host, pressing Ctrl/] escapes to the TELNET prompt. Another CONNECT command establishes a second session, this one to UNIX host
quik.
BIND_SESSION
BIND_SESSION — Creates a TELNET terminal device (TNA x:) and connects to a network device (BG x:). If successful, returns the TNA device name (TNA x:) in the DCL symbol $TELNET_DEVICE. Network input and output operations can then be performed through the created TELNET device using terminal driver $QIO operations.
DCL Syntax
BIND_SESSION network_device [ /PROTOCOL=
                            option ]
Parameters
network_device
Required.
An existing network device.
Qualifiers
- /PROTOCOL= option
Optional. Default: NONE.
Options include:NONE
Data is sent with no interpretation (raw).
NVT
Network Virtual Terminal (NVT), TELNET's internal representation of a standard network terminal. NVT format is standard 7-bit ASCII code transmitted in 8-bit octets, the canonical form of data representation used by both the client and server.
TELNET
Standard TELNET protocol.
RLOGIN
Standard RLOGIN protocol.
Example
TELNET>BIND_SESSION BG393: /PROTOCOL=NVT
CREATE_SESSION
CREATE_SESSION — Establishes an outbound TELNET pseudo device (network terminal) and connects it to a remote listener (port). This is also known as a reverse TELNET connection.
DCL Syntax
CREATE_SESSION host port [ unit ]
               [ /[ NO ]TIMEOUT= option ]
               [ /PERMANENT ]
               [ /PROTOCOL= option ]
Parameters
host
Required.
Remote host to which you want to connect.
port
Required.
TELNET port on the remote host.
unit
Optional. Default: 0
The decimal number specifying the unit number for the pseudo device (TNA x). The default 0 specifies that TCP/IP Services should pick the next available unit number. If the requested unit number is already in use, the next available unit number is used. In all cases, the software notifies you of the unit number chosen.
Qualifiers
- /TIMEOUT
/NOTIMEOUT - Optional. Default: /NOTIMEOUT
/TIMEOUT
Creates a TNA device that has the following connection attributes:NOIDLE – The connection is broken when the device is finally deassigned. The device will automatically reconnect when data is written to it.
IDLE – Specifies the idle time for the device. If the device is idle for at least the specified amount of time (note that the time has a granularity of one second), then the connection will be broken. Idle means that the device has neither received nor sent any data for the idle period.
NORECONNECTION – The device does not automatically retry reconnections if they fail.
RECONNECTION – When data is written to the device and the device is not connected, this value determines the interval between reconnection attempts. For example, if an application writes to a TNA with a RECONNECTION-0:1:00, and if the first connection attempt fails, then subsequent connection attempts will be made in 1-minute intervals.
/NOTIMEOUT
Creates a TNA device that breaks the connection when the device is finally deassigned (the last channel assignment is deassigned).
- /PERMANENT
Optional.
Creates a TNA device that disconnects on deassignment and reconnects on assignment.
- /PROTOCOL= options
- Optional. Default: NONE. Options include:
NONE
Data is sent with no interpretation (raw).
NVT
Network Virtual Terminal (NVT), TELNET's internal representation of a standard network terminal. NVT format is standard 7-bit ASCII code transmitted in 8-bit octets, the canonical form of data representation used by both the client and server.
TELNET
Standard TELNET protocol.
RLOGIN
Standard RLOGIN protocol.
Examples
TELNET>CREATE_SESSION DEBTS 23 2Establishes a network terminal known as TNA2, and connects this device to port 23 on remote host DEBTS.
TELNET>CREATE_SESSION /TIMEOUT=(NOIDLE, RECONNECTION=nn)Creates a device that disconnects on deassignment and reconnects when data is written to it.
TELNET>CREATE_SESSION /NOTIMEOUTCreates a device that is not reusable; the device disconnects on deassignment and is deleted.
TELNET>CREATE_SESSION /TIMEOUT=(IDLE=0:0:30, RECONNECTION=0:2:00)Creates a device that times out after being idle for 30 seconds and that retries connection attempts at 2-minute intervals.
DELETE_SESSION
DELETE_SESSION — Deletes an outbound TELNET pseudo device (network terminal) created by the CREATE_SESSION command. If the device was not created with the CREATE_SESSION command, the command returns an error.
DCL Syntax
DELETE_SESSION unit
Parameters
unit
Required.
The decimal number specifying the unit number of the pseudo device (TN x) to be deleted.
Example
TELNET>DELETE_SESSION 2
Deletes the network terminal known as TNA2.
DISCONNECT
DISCONNECT — Terminates the current remote connection. If you terminate a session with a remote OpenVMS host, the connection is closed by your local host. However, the process on the remote host is still running. To terminate it, enter a LOGOUT command.
DCL Syntax
DISCONNECT
UNIX Syntax
close
ENABLE (DISABLE) AUTOFLUSH
ENABLE (DISABLE) AUTOFLUSH — Enables or disables the automatic flushing of output when you send the interrupt character. Enabled — The data in the data buffer remains visible until the buffer is empty. Disabled — The data buffer is emptied and the display is terminated. This provides fast system response to the interrupt character. Default: ENABLE AUTOFLUSH.
DCL Syntax
ENABLE AUTOFLUSH
DISABLE AUTOFLUSH
UNIX Syntax
toggle autoflush
ENABLE (DISABLE) AUTOSYNCH
ENABLE (DISABLE) AUTOSYNCH — Enables or disables the sending of the synchronization and interrupt characters in urgent mode. Enabled — The local host sends an interrupt character in urgent mode, and the remote host immediately processes it. Disabled — TELNET sends the interrupt character in sequence with the other characters in the stream, and the remote host processes this character in the sequence received. Default: DISABLE AUTOSYNCH.
DCL Syntax
ENABLE AUTOSYNCH
DISABLE AUTOSYNCH
UNIX Syntax
toggle autosynch
ENABLE (DISABLE) BINARY
ENABLE (DISABLE) BINARY — Enables or disables the transmission of data in binary mode. Enabled — The EOL (end-of-line) character is not mapped to Return LF (the carriage return/line feed combination). Use ENABLE BINARY when the remote host expects each line to end with a carriage return/line feed combination. Binary mode provides interaction when the remote host expects special characters or does not support automatic negotiation of the TELNET binary option. Disabled — EOL is sent as Return LF (the carriage return/line feed combination). Default: DISABLE BINARY
DCL Syntax
ENABLE BINARY
DISABLE BINARY
UNIX Syntax
toggle binary
ENABLE (DISABLE) CRLF
ENABLE (DISABLE) CRLF — Enables or disables the sending of carriage returns as Return LF (the carriage return/line feed combination) at the end of each line. Use ENABLE CRLF if the remote host expects Return LF at the end of each line. Use DISABLE CRLF if the remote host interprets Return as Return LF, which is CR mode. Default: ENABLE CRLF.
DCL Syntax
ENABLE CRLF
DISABLE CRLF
UNIX Syntax
toggle crlf
ENABLE (DISABLE) CRMOD
ENABLE (DISABLE) CRMOD — Enables or disables the mapping of received carriage returns. With this mapping, the remote host sends each line with Return LF (the carriage return/line feed combination) at the end of each line. Use ENABLE CRMOD if your terminal expects each line to end with Return LF. Use DISABLE CRMOD if your terminal expects Return null at the end of each line. Default: DISABLE CRMOD.
DCL Syntax
ENABLE CRMOD
DISABLE CRMOD
UNIX Syntax
toggle crmod
ENABLE (DISABLE) DEBUG
ENABLE (DISABLE) DEBUG — Enables or disables the display of data in hexadecimal. Enabled — Data is displayed in both hexadecimal and readable text. Disabled — Data is displayed in readable text. Default: DISABLE DEBUG.
DCL Syntax
ENABLE DEBUG
DISABLE DEBUG
UNIX Syntax
toggle netdata
EXAMPLE
%Ctrl/Z(characters not echoed)TELNET>enable debug ReturnTELNET>display Return. . .Will print network data flow in hexadecimal . . .TELNET>)resume ReturnSEND [ 0] D A RCVD [ 0] D A RCVD [ 0] 746E7069782E6C6B672E6465632E636F6D3E20 %lsReturnSEND [ 0] 6C RCVD [ 0] 6C l SEND [ 0] 73 RCVD [ 0] 73 s SEND [ 0] D A RCVD [ 0] D A RCVD [ 0] 62696E20202020202020... RCVD [ 32] 7074 D A french.estud.oiseau russian.estud.ptitsa fences typescript verio %
Escapes from a session with a UNIX host, enables debug mode, resumes the session, and asks for a list of files in the working directory. Both hexadecimal data and readable data are displayed.
ENABLE (DISABLE) LOCAL_CHARS
ENABLE (DISABLE) LOCAL_CHARS — Enables or disables the translation of the certain terminal control characters in to TELNET protocol sequences.
Additional Information
The following terminal control characters can be translated:
Interrupt
Flush Output
Are You There
Kill
Erase
Quit
Enabled — The local host sends the control characters (in the preceding text) translated into TELNET sequences. For example, Ctrl/T becomes IAC AYT.
Enabled mode is appropriate when the remote and local hosts implement different control characters. The remote host does not recognize certain control characters. Therefore, the local host interprets these control characters before sending them to the remote host.
Disabled — The local host sends these control characters uninterpreted. They are interpreted by the remote host.
Before you communicate in disabled mode, ensure that the remote and local hosts use the same control characters.
Default: DISABLE LOCAL_CHARS
DCL Syntax
ENABLE LOCAL_CHARS
DISABLE LOCAL_CHARS
UNIX Syntax
toggle localchars
ENABLE (DISABLE) OPTIONS_VIEW
ENABLE (DISABLE) OPTIONS_VIEW — Enables or disables the display of option negotiations between the local system and the remote host during the session. Enabled — TELNET displays the option negotiations between your local system and the remote host. Disabled — TELNET does not display the option negotiations. This mode is suitable for most communications. Default: DISABLE OPTIONS_VIEW.
DCL Syntax
ENABLE OPTIONS_VIEW
DISABLE OPTIONS_VIEW
UNIX Syntax
toggle options
EXIT
EXIT — Closes any open sessions, exits from TELNET, and returns to the DCL prompt. If you terminate a session with a remote OpenVMS host, the connection is closed by your local host. However, the process on the remote host is still running. To terminate it, enter the LOGOUT command.
DCL Syntax
EXIT
UNIX Syntax
quit
HELP
HELP — Displays online help for TELNET or TN3270 commands.
Syntax
HELP [ telnet_command ]
Parameter
telnet_command
Optional.
Specific DCL TELNET command about which you want information.
Examples
TELNET>HELP CONNECTProvides information about the CONNECT command.
TELNET>HELP OPENDisplays the message
Sorry, no documentation on OPEN.To get help for a command, enter the DCL command name.
RESUME
RESUME — Resumes an open TELNET or TN3270 session that you interrupted with the escape sequence.
Additional Information
When you run simultaneous multiple sessions (TELNET only):
To resume a particular session, specify a session number.
To resume the active session, omit the session number.
- If no session is active, you must specify a session number.
Note
TELNET interprets the active session as the last session with which you communicated. If that communication ended with you logging out, you have no active sessions. However, you might have other waiting (alive) sessions.
DCL Syntax
RESUME [ session_number ]
                    Return
UNIX Syntax
Return
Parameters
session_number
Optional. Default: the active session.
Use session_number when you run multiple TELNET sessions. It resumes the session with the specified number.
Examples
$Ctrl/] (characters not echoed)TELNET>SHOW STATUS ReturnSession 1 Active Host FINDER. . .TELNET>RESUME Return$This example:Starts at the prompt of remote OpenVMS host FINDER.
Escapes from FINDER and returns to the local TELNET prompt.
Issues SHOW STATUS, which displays one active session.
Returns to FINDER's prompt.
%Ctrl/] (characters not echoed)TELNET>SHOW STATUS ReturnSession 2 Active Host LUNA. . .Session 1 Waiting Host SOLARTELNET>RESUME 1 Return%This example:Starts at the prompt of UNIX host
luna.Escapes from
luna.At the TELNET prompt, issues SHOW STATUS, which displays two active sessions, the active one with
lunaand another with hostsolar, whose status is "waiting."The RESUME 1 command returns to "waiting" host
solar.
SEND AO
SEND AO — SEND AO (Abort Output) aborts the output of the last remote command you entered, while the command continues to execute. If you issue another SEND AO, the output resumes if the command is still executing. Use this command when the remote host does not recognize Ctrl/O as the flush output character or if you want to terminate the output but not the execution of the process.
DCL Syntax
SEND AO
UNIX Syntax
send ao
Example
%cd /bin%ls -ltotal 3464-rwxr-xr-x 2 root 32768 Oct 19 1996 STTY-rwxr-xr-x 2 root 5120 Oct 19 1996 Ctrl/](characters not echoed)TELNET>SEND AO^O%
During a directory listing, the TELNET escape sequence (not echoed to the
screen) returns to TELNET prompt. The SEND AO command aborts the UNIX
ls command.
SEND AYT
SEND AYT — SEND AYT (Are You There) reports if you are still connected to an established connection.
DCL Syntax
SEND AYT
UNIX Syntax
send ayt
Examples
$Ctrl/]TELNET>send ayt%TELNET-I-SESSION, Session 01, host d45lt, port 23 $ $:_TNA375: 13:53:18 (DCL) CPU=00:00:00.28 PF=448 IO=104 MEM=53 $OpenVMS client to OpenVMS server.
%Ctrl/]TELNET>send ayt%TELNET-I-SESSION, Session 01, host LUNA, port 23 % [YES] Return %OpenVMS client to UNIX server.
$Ctrl/]telnet>send ayt$:_TNA37: 13:50:20 (DCL) CPU=00:00:00.12 PF=331 IO=98 MEM=66 $UNIX client to OpenVMS server.
%Ctrl/]telnet>send ayt[Yes] Return %UNIX client to UNIX server.
SEND BRK
SEND BRK — SEND BRK (Break) terminates execution of the last command you entered at the remote host. Use this command when the remote host does not recognize Ctrl/C as an interrupt character.
DCL Syntax
SEND BRK
UNIX Syntax
send brk
Example
%cd /bin%ls -1total 1464-rwxr-xr-x 2 root 32768 Oct 19 1988 STTY-rwxr-xr-x 2 root 5120 Oct 19 1988 [-rwxr-xr-x 1 root 45056 Oct 19 1988 adblrwxr-xr-x 1 root 13 Aug 21 17:41 ar -> ../usr/bin/arlrwxr-xr-x 1 root 13 Aug 21 17:41 as -> ../usr/bin/asCtrl/] (characters not echoed)TELNET>SEND BRK
Enters the UNIX
lscommand.Enters the TELNET escape sequence.
Enters the TELNET SEND BRK command, which terminates execution of
lsat the remote host.
SEND EC
SEND EC — SEND EC (Erase Character) deletes the last character you typed at the remote host. Use this command when the remote host does not recognize your Delete key.
DCL Syntax
SEND EC
UNIX Syntax
send ec
Examples
%mail Ctrl/] (characters not echoed)TELNET>SEND EC ReturnMail $Revision 4.2.4.2 $ Type ? for help."/usr/spool/mail/debts": 1 message 1 new>N 1 debts Tue Sep 15 13:39 8/161 "Team Building"&
Misspells the UNIX
mailcommand.Enters the TELNET escape sequence (not echoed to the screen) to return to the TELNET prompt.
Enters the TELNET SEND EC command, which deletes the last character typed (l) and returns to the remote host.
SEND EL
SEND EL — SEND EL (Erase Line) deletes the last line of text you entered on the remote host. Use this command when the remote host does not recognize your Delete key or command-line recall.
DCL Syntax
SEND EL
UNIX Syntax
send el
Example
%mail Ctrl/] (characters not echoed)TELNET>SEND EL ReturnMail version 2.18 5/19/83. Type ? for help."/usr/spool/mail/finder": 1 message 1 new>N 1 finder Tue Sep 15 13:39 8/161 "Getting Together"&
Misspells the UNIX
Mailcommand.Enters the TELNET SEND EL command, which deletes the incorrect line mail and returns you to the remote host.
Enters the
Mailcommand.
SEND GA
SEND GA — SEND GA (Go Ahead) signals the remote host that your local system is ready. Some applications require GA commands in either one or both directions. (Usually, Go Ahead is suppressed, so sending a GA has no effect.)
DCL Syntax
SEND GA
UNIX Syntax
send ga
SEND IP
SEND IP — SEND IP (Interrupt Program) interrupts the execution of the last command you entered on the remote host. The interrupt character clears the input and output paths to the remote host. The remote host interrupts the program that is processing. (This command has no effect in binary mode.) Use this command if either your terminal or the remote host does not recognize the default interrupt character, Ctrl/C.
DCL Syntax
SEND IP
UNIX Syntax
send ip
SEND NOP
SEND NOP — SEND NOP (No Operation) tells you whether your local host can send data
to the remote host and the remote host can receive the data. If you get an
%TELNET-E-INETERROR error message, there is a problem with the
connection; the remote host is not able to receive data. If you get an
%TELNET-S-REMCLOSED status message, the connection with the
remote host has been closed. If you do not get an error message, the connection
is active.
DCL Syntax
SEND NOP
UNIX Syntax
send nop
Examples
%Ctrl/] (characters not echoed)TELNET>SEND NOP Return%TELNET-I-SESSION, Session 01, host nyx, port 23No error message indicates the connection is active. (The information message also indicates the connection is active.)
%Ctrl/] (characters not echoed)TELNET>SEND NOP%TELNET-S-REMCLOSED, Remote connection closed -TELNET-I-SESSION, Session 01, host nyx, port 23 TELNET>Indicates your connection has been broken.
SEND SYNCH
SEND SYNCH — The SEND SYNCH command clears the communications path between your local system and the remote host.
Additional Information
The SYNCH is sent in urgent mode (out-of-band, OOB). As a result, the following actions occur:
The local host immediately sends an interrupt character, placing it at the front of the data stream sent to the remote host.
The remote host immediately processes the interrupt character, ignoring any incoming data not yet processed, and then including a TELNET synchronization or interrupt character in the data stream it sends back to the local host.
The local host throws away all incoming data (rather than processing that data) until it detects the synchronization or interrupt character. This provides faster response time to the synchronization and interrupt characters.
DCL Syntax
SEND SYNCH
UNIX Syntax
send synch
SET ECHO
SET ECHO — Sets the echo character.
Additional Information
Opening quotation marks
A circumflex ( ^ )
The new echo character
Closing quotation marks
DCL Syntax
SET ECHO "^ character"
UNIX Syntax
set echo "^ character"
Parameters
"^ character"
Required.
Character you want to use as the echo character.
EXAMPLE
TELNET>SET ECHO "^m"Echo character is '^M'.
Sets the echo control character to either m or M.
SET ERASE
SET ERASE — Sets the erase character.
Additional Information
The erase character deletes, either locally or remotely, the last character in the type-ahead buffer. (This character has no effect in binary mode.)
Use this command if either your terminal or the remote system does not recognize the default erase character, the Delete key.
Opening quotation marks
A circumflex ( ^ )
The new erase character
Closing quotation marks
DCL Syntax
SET ERASE "^character"
UNIX Syntax
set erase "^character"
Parameters
"^character"
Required.
Character you want to use as the erase character.
Example
TELNET>SET ERASE "^P"Erase character is '^p'.
Sets the erase control character to either p or P.
SET ESCAPE
SET ESCAPE — Sets the escape character.
Additional Information
The escape character returns you to the TELNET prompt. When you run multiple sessions, you can set different escape sequences for each connection.
Opening quotation marks
A circumflex ( ^ )
The new escape character
Closing quotation marks
DCL Syntax
SET ESCAPE "^ character"
UNIX Syntax
set escape "^ character"
Parameters
"^ character"
Required.
Character you want to use as the escape character.
Example
TELNET>SET ESCAPE "^P"Escape character is '^p'.
Sets the escape control character to either p or P.
SET FLUSHOUTPUT
SET FLUSHOUTPUT — Sets the flush output character.
Additional Information
Use this command if either your terminal or the remote host does not recognize the default flush output character, Ctrl/O.
Opening quotation marks
A circumflex ( ^ )
The new flush output character
Closing quotation marks
DCL Syntax
SET FLUSHOUTPUT "^character"
UNIX Syntax
set flushoutput "^character"
Parameter
"^character"
Required.
Character you want to use as the flush output character.
Example
TELNET>SET FLUSHOUTPUT "^P"Flush output character is '^p'.
Sets the flush output control character to either p or P.
SET INTERRUPT
SET INTERRUPT — Sets the interrupt character.
Additional Information
The interrupt character clears the input and output paths to the remote host. The remote host interrupts the program that is processing. (This character has no effect in binary mode.)
Use this command if either your terminal or the remote host does not recognize the default interrupt character, Ctrl/C.
Opening quotation marks
A circumflex ( ^ )
The new interrupt character
Closing quotation marks
DCL Syntax
SET INTERRUPT "^character"
UNIX Syntax
set interrupt "^character"
Parameter
"^character"
Required.
Character you want to use as the interrupt character.
EXAMPLE
TELNET>SET INTERRUPT "^a"Interrupt character is '^A'.
Sets the interrupt control character to either a or A.
SET KILL
SET KILL — Sets the kill character.
Additional Information
The kill character discards, both locally and remotely, the entire type-ahead buffer. (This character has no effect in binary mode.)
Use this command if either your terminal or the remote host does not recognize the default kill character, Ctrl/U.
Opening quotation marks
A circumflex ( ^ )
The new kill character
Closing quotation marks
DCL Syntax
SET KILL "^character"
UNIX Syntax
set kill "^character"
Parameter
"^character"
Required.
Character you want to use as the kill character.
Example
TELNET>SET KILL "^q"Kill character is '^Q'.
Sets the kill control character to either q or Q.
SET MODE
SET MODE — Sets the mode of transmission.
Additional Information
The mode of transmission can be either character mode or line mode. Character mode is the default. Use character mode when you run a character-processing text editor on the remote host. With character mode, your local system sends data a character at a time to the remote host with which you have a connected session, and the remote host echoes the characters back for display on your local system. (Sometimes several characters may be sent in a burst for performance optimization, in which case the remote server usually replies with bursts of characters, but not a line at a time.)
Signal trapping (such as for application programs on remote UNIX hosts that sense traps or special events)
Local character editing
Tab expansion (where a tab is more than simply the TAB character)
This command overrides the ENABLE LOCAL_CHARS command.
Before you enter this command, establish a remote connection.
DCL Syntax
SET MODE {CHAR | LINE}
UNIX Syntax
mode mode
Parameter
CHAR
LINE
Required.
CHAR – Data is transmitted one character at a time.
LINE – Data is transmitted one line at a time.
SET QUIT
SET QUIT — Sets the quit character, an alternate interrupt character.
DCL Syntax
SET QUIT "^ character"
UNIX Syntax
set quit "^ character"
Parameter
"^character"
Required.
Character you want to use as the quit character.
Example
TELNET>SET QUIT "^i"Quit character is '^I'.
Sets the alternate interrupt control character to either i or I.
SET TERMINAL
SET TERMINAL — Sets the default terminal type for future TELNET or TN3270 connections.
Syntax
SET TERMINAL /DEVICE= type
Qualifiers
- /DEVICE= type
Required.
Terminal model. Specify one of the following:A terminal model.
- An IBM terminal to emulate. Enter the full specification for one of the following:
IBM-3278-2
IBM-3278-3
IBM-3278-4
IBM-3278-5
Example
TELNET>SET TERMINAL/DEVICE=IBM-3278-2Terminal type is set to IBM-3278-2TELNET>
Runs TN3270. The terminal is emulating an IBM 3278-2 model terminal.
SHOW DEVICE
SHOW DEVICE — Displays status information about TELNET devices.
DCL Syntax
SHOW DEVICE [ device_name ] [ /FULL
                    ]
Parameter
device_name
Optional. TNA device name. For example, TNA245:.
Qualifier
- /FULL
Optional.
Shows detailed information about TNA devices on the local system.
Examples
TELNET>SHOW DEVICE TNA281:TNA281: BG9526: Temporary Local: condor:23 Remote: freebid:1033Displays status of a particular TNA device.
TELNET>SHOW DEVICE  TNA10: BG495: Temporary Local: condor:23
Remote: freebid:1059
TNA12: BG658: Temporary Local: condor:23
Remote pigdog:1455
TNA13: BG671: Temporary Local: condor:23
Remote: pigdog:1456
TNA35: BG2993: Temporary Local: condor:23
Remote: projector:1044
TNA37: BG2999: Temporary Local: condor:23
Remote: pigdog:1459
TNA38: BG3000: Temporary Local: condor:23
Remote: pigdog:1470
TNA47: BG3393: Temporary Local: condor:23
Remote: l-22-222-37.*.com:1069
TNA58: BG3866: Temporary Local: condor:23
Remote: pcruth.mel.dec.com:1043
TNA59: BG3878: Temporary Local: condor:23
Remote: lexser13.lex.dec.com:1090
TNA60: BG3910: Temporary Local: condor:23
Remote: l-20-244-54.*.com:1635
TNA61: BG3932: Temporary Local: condor:23
Remote: lexser3.lex.dec.com:1093
TNA62: BG3933: Temporary Local: condor:23
Remote: tcpipa:1801
TNA63: TemporaryDisplays status of all TNA devices on the local system. Command output includes:
TNA10: BG495: Temporary Local: condor:23
Remote: freebid:1059
TNA12: BG658: Temporary Local: condor:23
Remote pigdog:1455
TNA13: BG671: Temporary Local: condor:23
Remote: pigdog:1456
TNA35: BG2993: Temporary Local: condor:23
Remote: projector:1044
TNA37: BG2999: Temporary Local: condor:23
Remote: pigdog:1459
TNA38: BG3000: Temporary Local: condor:23
Remote: pigdog:1470
TNA47: BG3393: Temporary Local: condor:23
Remote: l-22-222-37.*.com:1069
TNA58: BG3866: Temporary Local: condor:23
Remote: pcruth.mel.dec.com:1043
TNA59: BG3878: Temporary Local: condor:23
Remote: lexser13.lex.dec.com:1090
TNA60: BG3910: Temporary Local: condor:23
Remote: l-20-244-54.*.com:1635
TNA61: BG3932: Temporary Local: condor:23
Remote: lexser3.lex.dec.com:1093
TNA62: BG3933: Temporary Local: condor:23
Remote: tcpipa:1801
TNA63: TemporaryDisplays status of all TNA devices on the local system. Command output includes: The TNA device (terminal device)
The associated BG device (network device)
Whether the TNA device is permanent or temporary
Local and remote host names and port numbers
TELNET>SHOW DEVICE/FULLDevice TNA7: Access port name: "Host: 16.99.999.140 Port: 1310" Characteristics: (none) Connection attempts: 0 (tries) Connection interval: 0 (seconds) Connection timeout: 0 (seconds) Data high limit: 512 (bytes at VCI port) Data low limit: 256 (bytes at VCI port) Idle interval: 0 (seconds) Idle timeout: 0 (seconds) Network device name: BG266: Protocol: TELNET Local address: 16.99.999.100 (condor) port: 23 Remote address: 16.99.999.140 (pigdog.dec.com) port: 1310 Service type: None . . .Displays detailed information about all TNA devices that exist on the local system. The information shown in the example is output for each TNA device.
SHOW PARAMETERS
SHOW PARAMETERS — Displays current TELNET or TN3270 parameter settings. If you run multiple sessions, the display applies to the active session.
DCL Syntax
SHOW PARAMETERS
UNIX Syntax
display
Example
TELNET>SHOW PARAMETERSWill flush output when sending interrupt characters Won't send interrupt characters in urgent mode Will map carriage return on output Won't recognize certain control characters Won't show option negotiation Won't print network data flow in hexadecimal [^^] echo [^]] escape [^?] erase [^O] flushoutput [^C] interrupt [^U] kill [^Y] quit [^T] areyouthere TELNET>
Automatic flushing (AUTOFLUSH) of output is enabled.
Sending of interrupt characters in urgent mode (AUTOSYNCH) is disabled.
Mapping of received carriage returns (CRMOD) is enabled.
Mapping of carriage returns as Return LP on output (CRLF) is disabled.
Interpretation of control characters (LOCAL_CHARS) is enabled. The remote host does not recognize certain control characters; therefore, the local host interprets them.
Display of option negotiations (OPTIONS_VIEW) between the local and remote hosts is disabled.
The display or printing of data in hexadecimal (DEBUG) is disabled. Therefore, TELNET displays the data in readable text only.
The control characters are interpreted as listed.
SHOW SESSION
SHOW SESSION — Displays the session information about your current TELNET sessions (or TN3270 session) and, if you are running multiple TELNET sessions, about the waiting sessions.
DCL Syntax
SHOW SESSION
UNIX Syntax
status
Examples
TELNET>SHOW SESSION%TELNET-E-NOSESSION, No active sessionTELNET>CONNECT LUNA%TELNET-I-Trying, Trying... 192.1.2.3%TELNET-I-SESSION, Session 01, host luna, port 23-TELNET-I-Escape, Escape character: '^]'LUNA – Unauthorized access is prohibitedUsername:BURNSPassword:(password not echoed)Welcome to OpenVMS Alpha Version 7.3 on node LUNA$Ctrl/] (characters not echoed)TELNET>SHOW SESSIONSession 01, host LUNA, port 23 (default active port)TELNET>Displays information about current sessions. The information returned for the first SHOW SESSION command reveals that the local host has no active sessions. The user then connects to host LUNA and returns to the TELNET prompt to display session information once again. This time, the SHOW SESSION command displays information about the connection with LUNA.
TELNET>CONNECT ESTRELLA 23 IBM-3278-2. . .%Ctrl/] (characters not echoed)TELNET>SHOW SESSIONSession 01, host LUNA, port 23Session 02, host ESTRELLA, port 23 (default active session)TELNET>Here, the same user has established another connection, this time to host ESTRELLA. The SHOW SESSION command displays information about all sessions, revealing that the current active session is with host ESTRELLA.
SHOW STATUS
SHOW STATUS — Displays the status of the current TELNET or TN3270 session and, if you are running multiple sessions, about the waiting sessions. Status information can include information about open sessions, such as which one is active and which ones are waiting, the escape character and options currently set, and the number of data overruns and suspended network I/Os (inputs/outputs) detected.
DCL Syntax
SHOW STATUS
UNIX Syntax
status
Examples
TELNET>SHOW STATUSNo open sessionsEscape character: '^]'TELNET>CONNECT LUNA%TELNET-I-Trying, Trying ... 192.1.2.3%TELNET-I-SESSION, Session 01, host LUNA, port 23-TELNET-I-Escape, Escape character: '^]'LUNA – Unauthorized access is prohibitedUsername:BURNSPassword:(password not echoed)Welcome to OpenVMS Alpha Version 7.3 on node LUNA$Ctrl/]TELNET>SHOW STATUSSession 1 Active Host LUNA Port 23 Operating Mode: Character-at-a-time Escape character: '^]' Options: Echo - Remote Terminal Type - Local Terminal Type - VT300 Suppress Go Ahead - Local Suppress Go Ahead - Remote Terminal Dataoveruns: 0 Suspended Network I/Os: 0 TELNET>Session 1 Active Host LUNAOperating Mode: Character-at-a-timeEscape character: '^]'Options:Echo - RemoteTerminal Type - LocalTerminal Type - DEC-VT300Suppress Go Ahead - LocalSuppress Go Ahead - RemoteTerminal Dataoveruns: 0Suspended Network I/Os: 0TELNET>The user enters a SHOW STATUS command, which reveals that no active sessions have been established. After the user connects to host LUNA, the next SHOW STATUS command displays information about the active session with LUNA.
TELNET>CONNECT ESTRELLA 23 IBM-3278-2...%Ctrl/] (characters not echoed)TELNET>SHOW STATUSSession 2 Active Host ESTRELLA Port 23 Operating Mode: Character-at-a-time Escape character: '^]' Options: Echo - Remote Terminal Type - Local Terminal Type - VT300 Suppress Go Ahead - Local Suppress Go Ahead - Remote Terminal Dataoveruns: 0 Suspended Network I/Os: 0 Session 1 Waiting Host LUNA Port 23 TELNET>Here, the user has established an additional session, this time with host ESTRELLA. The SHOW STATUS command displays information about the currently active session with ESTRELLA and the waiting session.
SPAWN
SPAWN — Suspends your current TELNET or TN3270 session and returns you to the local DCL prompt. To resume your session, log out at the DCL prompt.
DCL Syntax
SPAWN
UNIX Syntax
z
EXAMPLE
%dateFri Sep 11 14:16:39 EDT 2002% Ctrl/] (characters not echoed)TELNET>SPAWN$SHOW TIME11-Sep-2002 14:16:41. . .$LOGOUTProcess GROUP_1 logged out at 11-Sep-2002 14:27:18.63TELNET> RESUME
The user returns to the TELNET prompt from the active session with a remote UNIX host. The user then enters the SPAWN command and, at the DCL prompt, displays the time and several other commands (not shown) before logging out and returning to the TELNET prompt to resume the active session.
TELNET
TELNET — Starts a TELNET session and does one of the following: displays the TELNET prompt, establishes a connection to a remote host, or establishes a connection to a remote host and runs TN3270.
DCL Syntax
TELNET [ host ] qualifier(s) [ port ] [unit ]
[ /AUTHENTICATE]
[ /BIND_SESSION network_device
[ /CREATE_SESSION [ /[NO]TIMEOUT=option [/PERMANENT] /PROTOCOL=protocol]]
[ /FORWARDUNIX Syntax
telnet [ host ]
Parameters
host
Required with the /CREATE_SESSION qualifier; optional in all other cases. Default: None.
Host name
IP address
port
Required with the /CREATE_SESSION qualifier; ignored in all other cases. Default: None.
Specifies the remote port to which you want to connect the pseudo device.
unit
Required with the /DELETE_SESSION qualifier; optional with the /CREATE_SESSION qualifier; ignored in all other cases. Default: 0.
With the /CREATE_SESSION qualifier, specifies the unit number you want associated with the network terminal. The default of 0 allows the TELNET software to select the next available unit number.
With the /DELETE_SESSION qualifier, specifies the unit number of the network terminal you want to delete.
Qualifiers
- /AUTHENTICATE
Optional. Default: None.
Specifies that you want the TELNET session to use Kerberos features.Note
The /AUTHENTICATE qualifier also can be used with the TELNET commands OPEN and CONNECT.
- /BIND_SESSION network_device
Optional. Default: None.
Binds a TELNET terminal device to an existing network device. If the bind is successful, the DCL symbol $TELNET_DEVICE contains the TNA device name.
- /CREATE_SESSION
Optional. Default: None.
Specifies that TELNET should create a pseudo device (network terminal) and connect it to the specified remote port. For additional information, see the CREATE_SESSION command. You can use the following qualifiers with CREATE_SESSION:/NOTIMEOUT
/TIMEOUT= option
Options include:-NOIDLE
-IDLE= delta_time_interval
Specifies the delta time interval to wait with no activity before closing the connection. The general delta time format is hh:mm:ss:cc.
-NORECONNECT
-RECONNECT= delta_time_interval
Specifies the delta time interval to wait before retrying a connect request. The general delta time format is hh:mm:ss:cc.
/PERMANENT Optional.
/PROTOCOL= option
Optional. Default: NONE.
Options include:NONE
Data is sent with no interpretation (raw).
NVT
Network Virtual Terminal (NVT), TELNET's internal representation of a standard network terminal. NVT format is standard 7-bit ASCII code transmitted in 8-bit octets, the canonical form of data representation used by both the client and the server.
TELNET
Standard TELNET protocol.
RLOGIN
Standard RLOGIN protocol.
- /DELETE_SESSION
Optional. Default: None.
Specifies that TELNET should delete the specified pseudo device (network terminal). For additional information, see the DELETE_SESSION command.
- /FORWARD
/NOFORWARD Optional. Default: /NOFORWARD.
Forwards a copy of your Kerberos tickets to the remote host. The /NOFORWARD qualifier overrides any forwarding specified in your machine's configuration files. You must request forwardable tickets at the same time that you issue the KINIT command.
You must use the /AUTHENTICATE qualifier when you specify the /FORWARD qualifier.
- /LOG_FILE= file
Optional. Default: No logging.
An optional log file that contains all session output. Using this option does not affect your terminal output. You cannot use this option for TN3270 sessions.
- /NOINTERACTIVE
Optional. Default: TELNET command mode.
Disables the capability of using the escape character to leave a session and return to the TELNET prompt. This option is useful when the TELNET command is referenced in a command procedure in a captive account.
- /PORT= n
Optional. Default: 23.
Remote port to which you want your TELNET process to connect. Use this qualifier only if you are connecting to a host that does not use the standard TELNET port.
- /REALM= realm-name
Optional.
Requests Kerberos tickets for the remote host in the specified realm, instead of determining the realm itself.
You must use the /AUTHENTICATE qualifier when you specify the /REALM qualifier.
- /TERMINAL_TYPE= type
Optional. Default: None.
The type of terminal to emulate. Enter the full specification for one of these terminals:IBM-3278-2
IBM-3278-3
IBM-3278-4
IBM-3278-5
VT100
VT200
VT300
VT400
VT500
- /UNBIND_SESSION network_device terminal_device
Optional.
Unbinds a network device (BG x:) from a TELNET terminal device (TNA x:) that was initially bound by a BIND_SESSION command or qualifier.
Examples
$TELNETTELNET>ENABLE DEBUGTELNET>SET TERMINAL /DEVICE=VT300Terminal type is set to VT300TELNET>CONNECT DEBTSIn this example, the TELNET command performs the following actions:Starts TELNET.
Customizes the environment.
Establishes a connection to host
DEBTSand sets up the terminal type as VT300.
$TELNET MYCOM /TERMINAL_TYPE=IBM-3278-2Establishes a TELNET connection to remote host MYCOM and runs TN3270.
$TELNET 130.180.5.5Establishes a TELNET connection to the host at IP address 130.180.5.5.
$TELNET UCOM 31Establishes a TELNET connection to remote host
ucomat port 31.$ TELNET/AUTHENTICATE/REALM=jet.mbs.com terse %TELNET-I-TRYING, Trying ... 15.21.308.11 %TELNET-I-SESSION, Session 01, host terse, port 23 %TELNET-I-ESCAPE, Escape character is ^] terse.ucx.ttg.mbs.comThis example logs in to system
tersewith Kerberos credentials.$ TELNET/AUTHENTICATE/FORWARD terse %TELNET-I-TRYING, Trying ... 15.21.308.11 %TELNET-I-SESSION, Session 01, host terse, port 23 %TELNET-I-ESCAPE, Escape character is ^] [Kerberos V5 accepts you as ''j_brown@terse.mbs.com'' ] [Kerberos V5 accepted forwarded credentials ]
This example forwards credentials to host
tersefor userj_brown.
TN3270
TN3270 — Starts a TELNET session that runs TN3270 and does one of the following: displays the TELNET prompt or establishes a connection to a remote host.
Syntax
TN3270 [ host ]
[ /CHARACTER_SET=file ]
[ /KEY_DEFINITIONS=file ]
[ /NATIONAL_CHARACTERS=char_set ]
[ /NOINTERACTIVE ]
[ /PORT=n ]
[ /PRINTER=file ]
[ /STATUS=state ]
[ /TERMINAL_TYPE=IBM-3278-n ]Parameter
host
Optional.
Host name
IP address
Qualifiers
- /CHARACTER_SET= file
Optional. Default: ORIGINAL.
File with the EBCDIC-to-DMCS and the DMCS-to-EBCDIC translation tables.
If you omit this qualifier, TN3270 does the following:Uses the translation table named by the default file SYS$LIBRARY:TN3270DEF.TBL, if your system manager has created it.
Defaults to its own translation table if TN3270DEF.TBL does not exist. The default table maps the EBCDIC set to the equivalent DMCS characters.
If none of these translation tables meets your needs, the system manager can generate a new translation table. (For information about the EBCDIC-to-DMCS translation tables, refer to the VSI TCP/IP Services for OpenVMS Management manual.)Note
To reset the default, do not abbreviate ORIGINAL.
- /KEY_DEFINITIONS= file
Optional. Default: default keyboard layout.
Keyboard definition file you created to redefine how the TN3270 key functions correspond to your keyboard layout. This file holds the definitions for alternative keyboard mapping.
- /NATIONAL_CHARACTERS= character_set
Optional. Defaults: For 8-bit terminals: MULTINATIONAL
For 7-bit terminals: US_ASCII.
National Replacement Character Set (NRCS) for which your terminal is configured. Specify one of the following:Canadian
MULTINATIONAL
Dutch
Norwegian
Finnish
Spanish
French
Swedish
German
Swiss
Italian
UK_ASCII
Japanese
US_ASCII
- /NOINTERACTIVE
Optional. Default: TELNET command mode.
Disables the capability of using the escape character to leave a session and return to the TN3270 prompt. This option is useful when the TN3270 command is referenced in a command procedure in a captive account.
- /PORT= n
Optional. Default: 23.
Remote port to which you want your TELNET/TN3270 process to connect. Use this qualifier only if you are connecting to a host that does not use the standard TELNET port.
- /PRINTER= file
Optional. Default: TN3270PRINT.LIS.
File that records your screen's contents when you use the PRINT function.
Directs printer output to either a file or a spooled printer (not a physical printer or terminal).
- /STATUS= state
Optional. Default: AUTOMATIC.
Determines how the status line operates during your session. Specify one of the following:AUTOMATIC
Status line is displayed.
The status line is disabled automatically if the remote host writes data to the area under the status line, or if you type in that space.
The status line is restored automatically when the data is erased.
ON
Status line is always displayed.
OFF
Status line is not displayed.
To toggle between ON and OFF, invoke the STATUS function.
- /TERMINAL_TYPE=IBM-3278- n
Optional. Default: IBM-3278-2.
IBM terminal to emulate. Enter the full specification for one of the following:IBM-3278-2
IBM-3278-3
IBM-3278-4
IBM-3278-5
Examples
$TN3270 MYCOMEstablishes a TELNET connection to remote host MYCOM. By default, the physical terminal functions as an IBM-3278-2 model terminal.
$TN3270 130.180.5.5 /TERMINAL_TYPE=IBM-3278-3 -_$/KEY_DEFINITIONS=MY_NUMPAD.FILEstablishes a TELNET connection to the host at IP address 130.180.5.5. The terminal functions as if it were an IBM-3278-3 model terminal, and it uses the customized keyboard definition file MY_NUMPAD.FIL.
$TN3270 UCOM 31 /TERMINAL_TYPE=IBM-3278-5 /PRINTER=LOGEstablishes a TELNET connection to remote hostucom:The connection is at port 31 on
ucom.The terminal is functioning as if it were an IBM-3278-5 model terminal.
During the session at
ucom, using the PRINT function records the screen's contents in a file named LOG.LIS.
UNBIND_SESSION
UNBIND_SESSION — Unbinds a network device (BG x:) from a TELNET terminal device (TNA x:) that was previously bound with a BIND_SESSION command or qualifier.
DCL Syntax
UNBIND_SESSION network_device
terminal_device
Parameter
network_device
Required.
Network device (BG x:) to unbind.
terminal_device
Required.
Associated terminal device (TNA x:).
Example
TELNET>SHOW DEVICETNA458: BG2032: Temporary condor:4009 angel:23 TNA460: BG4739: Temporary condor:23 ler13.dec.com:1037 TNA463: Temporary TELNET> UNBIND_SESSION BG2032: TNA458: TELNET>
This example displays the devices and unbinds one of them.
Chapter 5. Sending and Receiving Mail Using SMTP
For exchanging electronic mail (e-mail) with users working on internet hosts, the TCP/IP Services product includes Simple Mail Transfer Protocol (SMTP), Post Office Protocol (POP) software, and Internet Message Access Protocol (IMAP).
|
Capability |
Section |
|---|---|
|
Send mail to users on other internet hosts. | |
|
Specify an SMTP outbound alias. | |
|
Send mail to multiple users, with and without distribution lists. | |
|
Read mail. | |
|
Set a "personal" name. | |
|
Create a carbon copy of your messages. | |
|
Forward messages to other users. | |
|
Forward files to other users. | |
|
Use the UNIX-to-UNIX Copy Program (UUCP) to send mail. | |
|
Get status information about SMTP mail. | |
|
Remove holding-state mail messages from SMTP queues. | |
|
Requeue holding-state mail messages for delivery. | |
|
Use your PC mail software to receive and send messages. |
Knowledge of the OpenVMS Mail utility
User names and host names or IP addresses of the people to whom you want to send mail
5.1. Obtaining Online Help
$ HELP TCPIP_SERVICES SMTP
5.2. Sending Mail
To send mail to another internet host also running SMTP, simply invoke the OpenVMS
Mail utility at the DCL prompt, type SEND at the MAIL> prompt, and enter
the destination. A remote destination consists of the destination user name followed by
an at sign (@) and the destination host (such as user_name@host).
If the user is on your local host, omit the at sign and host name.
$ MAIL MAIL> SEND To: malcolm@philos.bu.edu Subj: Final Exams
$ MAIL MAIL> SEND To: malcolm@16.20.40.59 Subj: Final Exams
The OpenVMS Mail utility automatically detects destination addresses that include fully qualified host names (one in which the node component includes a period [.], such as MALCOLM@PHILOS.BU.EDU) and sends the mail using the SMTP protocol, unless your system has been set up to use a different Internet protocol (by defining an alternate protocol with the MAIL$INTERNET_TRANSPORT logical name).
However, if you use a destination address that is not fully qualified — that is, one in which the node component does not include a period (.) — the Mail utility by default assumes the address is a DECnet address. For example, if you specified MALCOLM@PHILOS as the destination address, the Mail utility converts it to DECnet format (PHILOS::MALCOLM).
You can force the OpenVMS Mail utility to use a specific protocol by defining the MAIL$INTERNET_MODE logical name. This is useful in cases where a mail address, such as MALCOLM@PHILOS, can be valid for either SMTP or DECnet.
SMTP
OpenVMS Mail always interprets the node component of an unqualified address as an Internet address specification. (SMTP is the default mode unless you define an alternate Internet transport with the MAIL$INTERNET_TRANSPORT logical name.)
DECNET
OpenVMS Mail always interprets the node component of an unqualified address as a DECnet node specification.
HYBRID (the default)
OpenVMS Mail uses an Internet protocol if the node component of the address contains a period. If no periods are in the node component, Mail uses the DECnet protocol.
$ DEFINE MAIL$INTERNET_MODE SMTP
$ MAIL MAIL> SEND To: SMTP%"malcolm@philos"
Fully qualify the host name (for example, specify the destination address as MALCOLM@PHILOS.BU.EDU instead of MALCOLM@PHILOS).
Define the MAIL$INTERNET_MODE logical name as SMTP.
Include the SMTP% prefix before the destination address.
For more information about the OpenVMS Mail utility and how it interprets addresses, see the appropriate OpenVMS documentation.
5.3. Specifying the SMTP Outbound Alias
SMTP allows you to specify an outbound alias that is applied to mail as it is sent and also specifies the network address to which a reply is sent.
5.3.1. Defining the Outbound Alias
To specify an outbound alias, define the TCPIP$SMTP_FROM logical to the text you
want your From: header to be.
$ DEFINE TCPIP$SMTP_FROM "bill.smith@xxx.com"
From: bill.smith@xxx.com
Define the TCPIP$SMTP_FROM logical before invoking OpenVMS Mail.
If you always want the header to be sent with the outbound alias, define the logical in your login command procedure (LOGIN.COM).
The outbound alias must be a valid address to which recipients can reply. If it is not valid, recipients cannot reply to you, and bounced mail messages are not returned to you.
If you do not define the TCPIP$SMTP_FROM logical, the From: address
on your mail messages is the same one that you have always had.
Use only simple 7-bit ASCII characters in the value you assign to the TCPIP$SMTP_FROM logical. Do not use control characters.
The address you use to define TCPIP$SMTP_FROM must be an RFC 822 legal SMTP
address; that is, user@domain. If the address is not
interpreted correctly, the SMTP mailer ignores it and uses the From:
address that it has constructed for you.
5.3.2. Appending the Personal Name String to the Outbound Alias
If you have defined an OpenVMS Mail personal name, the SMTP mailer appends that string to the outbound alias.
Bill L. Smith Phone: 123-456-8000
$ DEFINE TCPIP$SMTP_FROM "bill.smith@xxx.com"
From:
header:From: bill.smith@xxx.com (Bill L. Smith Phone: 123-456-8000)
From: address only if both of
the following conditions are met:The value you give for the TCPIP$SMTP_FROM logical does not contain parenthetical phrases (text within parentheses).
The
From: address contains the SMTP domain string (the @ domain portion of the address).
To use a different personal name than the one defined in your OpenVMS Mail personal name, define the personal name string as part of the TCPIP$SMTP_FROM logical in a parenthetical phrase after the user@domain address. Separate the address from the parenthetical phrase with a space. Do not use double quotation marks (" ") in the personal name.
$ DEFINE TCPIP$SMTP_FROM - _$ "bill.smith@xxx.com (Phone: 123-456-8000 FAX: 123-456-9000)"
- The SMTP mailer does not allow you to define the TCPIP$SMTP_FROM logical using the following syntax:
"personal-name" <user@host>
- Do not specify the logical as follows:
$ DEFINE TCPIP$SMTP_FROM """personal-name"" <bill.smith@xxx.com>"Instead, define the logical as follows:$ DEFINE TCPIP$SMTP_FROM "bill.smith@xxx.com (personal-name)"
5.3.3. Appending a Substitute Domain String
If you define TCPIP$SMTP_FROM without an SMTP domain string (the @ domain portion of the address), SMTP appends the substitute domain name to the text you define. If you do not define a substitute domain name, the host name is used.
x.com, and the TCPIP$SMTP_FROM logical is defined as
follows:$ DEFINE TCPIP$SMTP_FROM "bill.smith"
From: bill.smith@x.com
host.x.com, SMTP_FROM is defined as follows:
$ DEFINE TCPIP$SMTP_FROM "bill smith"
From: bill.smith@host.x.com
5.3.4. Disabling Modifications to TCPIP$SMTP_FROM
To disable the modifications that TCPIP SMTP makes to the value you assign to
TCPIP$SMTP_FROM (such as appending the OpenVMS personal name and @
domain to a value with no @ domain),
include the string [VERBATIM].
$ DEFINE TCPIP$SMTP_FROM "[VERBATIM] bill.smith@xxx.com"
From: bill.smith@xxx.com
5.3.5. TCPIP$SMTP_FROM and the Return-Path: Header
The address you define is used for the Return-Path: mail header. The
Return-Path: header is used to bounce undeliverable mail. Note that
the version of the text used for the Return-Path: header is stripped of
comments (such as the personal name string) and always has a domain string. For more
information about the domain name that is supplied, see Section 5.3.3, ''Appending a Substitute Domain String''.
5.3.6. X-VMS-True-From: Header
When the TCPIP$SMTP_FROM logical is used to set the From: header, the
text that would normally have been used for the From: header is added
to the headers as an X-VMS-True-From: header.
5.3.7. Managing Outbound Alias Processing
$ DEFINE/SYSTEM TCPIP$SMTP_PROHIBIT_USER_HEADERS 1
5.4. Sending Mail to Multiple Users
To: prompt:A list of names (Section 5.4.1, ''Entering a List of Names'')
The name of an existing distribution list (Section 5.4.2, ''Distribution Lists'')
5.4.1. Entering a List of Names
Separate the names with a comma ( , ).
If multiple users are on the same remote host, type the full user_name@host combination for each user.
If a user is on your local host, omit the at sign (@) and host name.
MAIL> SEND To: user1,user2,user3@host3,user4@host4
MAIL> SEND To: user1@host5,user2@host5
In the preceding example, both user1 and user2 are located on remote host host5.
Users NOWAK and BRENT on host CENTRAL.GREEN.ORG
User MILLER on host BOSTON.GREEN.ORG
MAIL> SEND MEETINGS.TXT To: NOWAK@CENTRAL.GREEN.ORG,BRENT@CENTRAL.GREEN.ORG, MILLER@BOSTON.GREEN.ORG Subj: SCHEDULE AND AGENDAS
5.4.2. Distribution Lists
The file with the distribution list can be yours or belong to someone else.
The file can reside locally or remotely.
Do not include the names of other distribution lists in the distribution list.
- OpenVMS distribution list
Create a .DIS file in your own directory or use an existing one.
You can include comment lines (lines preceded by an exclamation mark [!]) in the .DIS list file.
You can include both OpenVMS addresses and SMTP addresses. If you want the OpenVMS Mail utility to use SMTP for all SMTP addresses, qualified and unqualified, either set the MAIL$INTERNET_MODE logical name to SMTP, specify fully qualified SMTP addresses only, or use the SMTP% prefix with the destination enclosed in quotation marks.
- To send mail to the people on your distribution list, enter the following command:
MAIL> SEND To: @list_name
- SMTP distribution list
Use an existing .DIS file or create a .DIS file in SYS$SPECIFIC:[TCPIP$SMTP] or, if defined on your system, TCPIP$SMTP_COMMON:.
Give the list a unique name that is not the same as a local user name.
To specify comment lines, use an exclamation mark (!) in the first column.
Include only SMTP addresses.
Use one address per line.
- To send mail to the people on this distribution list, enter the following command:
MAIL> SEND To: list_name@host_where_list_resides
If the MAIL$INTERNET_MODE logical name is not set to SMTP, either specify a fully qualified host name or use the SMTP% prefix.
- This example sends mail to users whose names are on the local OpenVMS distribution list AGENCIES.DIS. The distribution list file is displayed in this example. The MAIL$INTERNET_MODE logical name is not set, so by default unqualified Internet addresses would be sent over DECnet; therefore, the AUDUBON@NY address is included with the SMTP% prefix and quotation marks.
$ TYPE AGENCIES.DIS ! ! This is an OpenVMS distribution file named AGENCIES.DIS. ! SMTP%"audubon@ny" WILLIAMS@BELTWAY.ORG WILDLIFE@DALLAS.ORG jmuir@19.8.7.6 SEC@GP.INTER8.ORG BATES::SCOPE ! $ MAIL MAIL> SEND To: @AGENCIES.DIS Subj: NEWS TO WATCH FOR
- This example sends mail to users whose names are on the local SMTP distribution list SYS$SPECIFIC:[TCPIP$SMTP]NATL_INTEREST.DIS. The distribution list file is displayed in this example.
$ TYPE NATL_INTEREST.DIS green@19.8.7.6 wlf@19.7.6.5 arlo@19.4.3.2 free::monicaL wendell@biolo.ne.edu $ MAIL MAIL> SEND To: natl_interest@main_office.org Subj: News Items
- This example sends mail to the users on SMTP distribution list FINANCE_CENTERS.DIS, which is maintained on remote mail server host HOLBROOK.
$ TYPE FINANCE_CENTERS.DIS ny_accts@23.9.7.4 sf_stocks@23.7.11.2 dallas_pfs@23.1.5.1 denver_accts@holbrook $ MAIL MAIL> SEND To: finance_centers@holbrook Subj: Portfolio Activity
5.5. Reading Mail
At the DCL prompt, type MAIL.
At the
MAIL>prompt, enter the DIRECTORY command to view a list of received messages.Enter the READ command or indicate the message number you want to view in exactly the same way as you would for OpenVMS mail.
$ MAIL You have 3 new messages. MAIL> DIRECTORY NEWMAIL # From Date Subject 1 GWAY::SMTP%"helenm@bhc 10-MAR-2001 Just Checking In 2 GWAY::SMTP%"mays@sfg 11-MAR-2001 Common Bases 3 CBIRD::SMTP%"seaway 12-MAR-2001 Cruises MAIL> 3
5.6. OpenVMS Mail Personal Name String
Enclose the string in double quotation marks.
Do not use additional double quotation marks within the string.
You can use single quotation marks ( ' ' ) within the personal name.
Do not use 8-bit ASCII characters (for example, ä or ö). The eighth bit is truncated. For example, ä becomes d and ö becomes v.
$ MAIL MAIL> SET PERSONAL_NAME "'Wealth' is in the mind"
5.7. Carbon-Copying Messages
CC: prompt:Follow the OpenVMS Mail conventions for copying mail to other people or to yourself.
To enter the correct address, follow the guidelines listed in Section 5.2, ''Sending Mail''.
MAIL> SEND To: al@airways CC: rollins,bond,rich@flight_central.com Subj: Directions for Night Flight
owens and copies
soltau.MAIL> SET CC_PROMPT
MAIL> SEND
To: owens@kezar
CC: soltau@fgtoo.bonkers.org
Subj: Goals for the Week
Enter your message below. Press CTRL/Z when complete, or CTRL/C to quit:
RC: Let's get a jump on the ball this time.
We'll meet before the conference to organize.
- J.B.
Ctrl/Z5.8. Forwarding Messages
You can forward any mail you receive to any internet host. Follow the OpenVMS Mail conventions for forwarding mail.
5.9. SMTP SFF (Send From File)
SMTP allows you to create a mail message in a file and send it to the SMTP mailer to
be delivered with headers you specify. Using this feature, you can create automated
tools that compose and send mail messages. It is also useful for forwarding non-text
files (MIME), because it prevents the mailer from encapsulating the MIME and SMTP
headers in the body of a new mail message. Thus, SMTP can function like the
redirect command on your personal computer, which simply takes the
message as is, without encapsulating it in another message, and sends it to the person
you name.
From OpenVMS MAIL, use EXTRACT/NOHEADER to extract the mail message.
Exit the MAIL program.
Modify the file to include the SMTP commands. For example, put the address of the recipient into the RCPT TO: <> line. For more information about the SFF format, see Section 5.9.1, ''Format of the SFF File''.
Send the file to SFF.
If you want headers like From:, To:, or Message-ID:, you must include them in the file. SFF adds only the Received: header, as described in Section 5.9.3, ''SFF Security Measures''.
5.9.1. Format of the SFF File
You can use SFF to send a text file that complies with RFC 822 by including commands (as described in RFC 821) preceding the RFC 822 message. MIME, by definition, complies with RFC 822; therefore, MIME mail can be delivered using SFF.
$ TYPE TEST_SMTP_SFF.TXT MAIL FROM: <green@abc.com> RCPT TO: <green@abc.com> DATA Date: Sun, 4 Aug 1996 14:48:14 -0400 Message-Id: <96080414481486@abc.com> From: green@abc.com (Charly Green - ABC-Corp engineering) To: green@abc.com Subject: Test of SFF mechanism This is the message text.
The return path of the mail
The recipients
The DATA command
The RFC 822 message
The MAIL FROM command specifies the address to which the mail is bounced if necessary. There must be one and only one MAIL FROM command.
You can specify a blank MAIL FROM command. For example:MAIL FROM:<>
The RCPT TO command specifies the address of a recipient. There must be at least one RCPT TO command but there can be more, one for each recipient.
Do not specify a blank RCPT TO command.
Each RCPT TO command must occupy a separate line and may contain only one address. If the mail is to go to multiple addresses, include one RCPT TO command for each address.
The DATA command follows the last RCPT TO command; it flags the end of the RCPT TO commands and the beginning of the header block. The DATA command is required.
Do not include a Return-Path header in the RFC 822 headers. If the mail is to be delivered locally, SMTP includes a Return-Path header based on the MAIL FROM command. If the mail is relayed to another SMTP host, the return path is determined by the MAIL FROM command on the final destination host.
5.9.2. SFF File Requirements
Variable length
This type of file does not require carriage-return/line-feed characters at the end of each line.
Stream_LF
This type of file requires at least a line-feed character at the end of each line. It is not necessary to add carriage-return characters.
5.9.3. SFF Security Measures
The ability to create messages with arbitrary headers could be used to spoof message headers. To limit this, the SFF mechanism adds a Received: header to the headers you supply. This tells you the origin of an attempted spoofed message.
You can invoke SFF from an application or from DCL, as described below.
5.9.4. Invoking SFF from an Application
unsigned int TCPIP$SMTP_SEND_FROM_FILE(infile_name,logfd,log_level) char *infile_name; FILE *logfd; int log_level;
infile_name
Specifies the name of the text file that contains the RFC 822 mail message and SMTP protocol information.
logfd
Specifies the file to which to log diagnostic messages. This file must be opened by the caller before calling this routine. If no log file is specified, output goes to SYS$OUTPUT. This argument is optional.
log_level
Specifies the level of diagnostics to use: either 1 (on) or 0 (off). The default is 0 (off). This argument is optional.
To call the routine, link with TCPIP$SMTP_MAILSHR.EXE/SHARE.
5.9.5. Invoking SFF from DCL
$ SMTP_SFF:==$TCPIP$SYSTEM:TCPIP$SMTP_SFF.EXE
This command takes UNIX style parameters and passes them to SFF.
SMTP_SFF infile_name [-log logfile_name] [-loglevel log_level]
infile_name
Specifies the name of the text file that contains the RFC 822 mail message and SMTP protocol information.
logfile_name
Specifies the name of the log file for diagnostic messages. (The default is SYS$OUTPUT.)
log_level
Specifies the debug log level: either 1 (on) or 0 (off). (The default is 0 (off).)
5.10. Routing Mail with the UNIX-to-UNIX Copy Program
The UNIX-to-UNIX Copy Program (UUCP) lets a system copy files to and from other systems running UUCP. UUCP is usually used to copy files over a dialup connection (see Section 5.10.1, ''Dialup Connections'').
To route mail using UUCP, ask your system manager to define the general gateway in the SMTP configuration.
MAIL> SEND To: SMTP%"user_name!uucp_host"
geoffrey at host
haldir:$ MAIL MAIL> SEND To: SMTP%"geoffrey!haldir.of.com"
5.10.1. Dialup Connections
Ask your system manager whether you need to specify a gateway host in mail addresses when you work on UUCP dialup lines.
MAIL> SEND To: gateway_host!crandle!watts CC: billw,jenny,ibis Subj: Events Schedule
5.11. Management Commands for Mail
TCPIP> prompt.|
Command |
Function |
|---|---|
|
SHOW MAIL |
Displays information about mail messages queued to your process' user name. |
|
REMOVE MAIL |
Deletes mail messages that are in a holding state in SMTP queues. |
|
SEND MAIL |
Releases for delivery a mail message that is in a holding state. |
The following sections describe how to use these commands. For full command descriptions, refer to the VSI TCP/IP Services for OpenVMS Management Command Reference.
5.11.1. Displaying SMTP Mail Status Information
Message (entry) number of the queued mail
User name of the sender (to display information about other users, you need SYSPRV or BYPASS privilege)
File name of the queued mail
Status of a message
- The following command displays information about message 826 in an SMTP queue. By default, the command returns brief information. Specify /FULL for more detailed information, as shown in example 2:
$ TCPIP SHOW MAIL /ENTRY=826 SMTP Mail Queue Entry 826 User: MARLOW File: _PLUTO$DKD0:[MARLOW]970207015114579_MARLOW.TCPIP_PLUTO;1 Status: Processing
- The following command displays detailed information about all your mail. The /RECIPIENT qualifier, used with the /FULL qualifier, displays selected classes of information, depending on the option you specify:
Option
Description
ALL
Shows failed, sent, and unsent messages.
FAILED
Shows messages that could not be read for a particular recipient.
SENT
Shows successful deliveries to a particular recipient.
UNSENT
Shows messages that as yet are unsent.
$ TCPIP TCPIP> SHOW MAIL /FULL /RECIPIENT=ALL SMTP Mail Queue Entry: 826 User: MARLOW File: _PLUTO$DKD0:[MARLOW]970207015114579_MARLOW.TCPIP_PLUTO;1 Status: Processing Message Destinations: Address: marlow@pluto Message Headers: Return Path: ??? SMTP Mail Queue Entry: 828 User: MARLOW File: _PLUTO$DKD0:[MARLOW]970207015114580_MARLOW.TCPIP_PLUTO;1 Status: Holding Message Destinations: Address: marlow@pluto Message Headers: Return Path: ???
5.11.2. Deleting Holding State Mail Messages from SMTP Queues
Note
Use this command only to release mail messages that are being held; do not use this command to delete mail messages in the processing state.
- The following command deletes mail message 828, a message that is holding (the message corresponds to your process's user name, or you have SYSPRV or BYPASS privileges). You are prompted to confirm that you want the message deleted.
$ TCPIP REMOVE MAIL /ENTRY=828 _PLUTO$DKD0:[MARLOW]970207015114580_MARLOW.TCPIP_PLUTO;1? y
- The following command removes all messages for your process's user name, or deletes everything in the SMTP queue if you have either SYSPRV or BYPASS privilege. The /NOCONFIRM qualifier prevents TCP/IP Services from prompting you for confirmation. Before deletion, TCP/IP Services copies this queued mail to the specified directory.
$ TCPIP REMOVE MAIL /NOCONFIRM /COPY=[MARLOW.OLD_MAIL]
5.11.3. Releasing Holding State SMTP Mail Messages for Delivery
$ TCPIP SEND MAIL /ENTRY=828 _PLUTO$DKD0:[MARLOW]970207015114580_MARLOW.TCPIP_PLUTO;1? y
5.12. Using Mail on Your PC
You can use either the Post Office Protocol (POP) or the Internet Message Access Protocol (IMAP) to access OpenVMS mail from your PC.
5.12.1. POP
With SMTP and the Post Office Protocol (POP) functionality, you can receive and send OpenVMS mail on your PC.
POP is a mail repository that accepts and stores your mail even when the PC is turned off. At your request, the POP server reads mail from your OpenVMS NEWMAIL folder, then moves the mail to your MAIL folder.
To send and receive mail on your PC, make sure the system manager has configured the POP server for use on your PC (the POP client system).
On networks where maximum security is not required, enter your PC mail application and configure a user name and password into the system.
The user name and password pair becomes authorization information for the TCP/IP system, not your POP client system. Your PC client sends the password to the POP server unencrypted.
As an added security measure, POP permits only two user name and password authorization attempts per TCP connection.
On networks where maximum security is required, enter your PC mail account and configure a user name and shared-secret password into the system.
This method is called the APOP authorization method. With this method, you store a shared-secret password in a one-line file named
POP_SECRET.DATin your default OpenVMS mail directory.You can use the DCL command CREATE or your text editor to create the file and specify a password string, then set the file protection to prevent other users from accessing it. For example:$ SET DEFAULT USER$DISK:[JONES.MAIL] $ CREATE POP_SECRET.DAT xyztancreff Ctrl/Z $ SET FILE/PROT=(s,w,g,o:rwed) POP_SECRET.DATThe shared-secret password cannot exceed 500 characters.
Each time you enter your PC mail application, the shared-secret string is sent from the PC client to the POP server using an encryption process.
For more information about the POP process, including information about how POP builds SMTP-compliant mail headers, refer to the VSI TCP/IP Services for OpenVMS Management guide.
5.12.2. IMAP
The IMAP server allows users to access their OpenVMS Mail mailboxes by clients such as Microsoft Outlook so that they can view, move, copy and delete messages. The SMTP server provides the extra functionality of allowing the clients to create and send mail messages.
For information about configuring and managing the IMAP server, refer to the VSI TCP/IP Services for OpenVMS Management guide.
5.12.2.1. How to Access Mail Messages Using IMAP
To access mail messages from the IMAP server, configure a user name and password into your client mail application. If an account is accessible without a password and a password is provided, the password is ignored.
In OpenVMS Mail, a user's mailbox file is, by default, named MAIL.MAI and resides in the user's default OpenVMS directory. In most cases, the user name to be configured is the user's OpenVMS account name.
The file extension of .MAI is not required.
The default MAIL.MAI file is assumed, but if the user adds it to the list, it will not be displayed twice.
SMITH%ACCOUNTS%PRIVATE
Your client system opens the TCP connection and attempts to access the server by entering the IMAP LOGIN command with the configured user name and password. On successful connection, your mail files are the top level of mailboxes. In the preceding example, the mailboxes displayed will be Mail, Accounts, and Private. Unsuccessful attempts are logged in the event log file (described in the VSI TCP/IP Services for OpenVMS Management guide).
Note
When you change your default OpenVMS Mail directory with the OpenVMS Mail command SET MAIL_DIRECTORY, you must manually copy the TCPIP$IMAP_MAILBOXES.DAT file from your old default directory to your new default directory to use the list of folders specified in the TCPIP$IMAP_MAILBOXES.DAT file in the old directory. The OpenVMS Mail command SET MAIL_DIRECTORY is not aware of the TCPIP$IMAP_MAILBOXES.DAT file and does not copy it from the old directory to the new one.
The next time you connect to the IMAP server, you can (optionally) remove percent signs and mailbox names from the user name field, because they are recorded permanently in the TCPIP$IMAP_MAILBOXES.DAT file.
You can add extra mailbox names in a later connection. The TCPIP$IMAP_MAILBOXES.DAT file is automatically updated.
The IMAP client software can create and delete mail files in your directory, either automatically, as in the creation of a "Deleted Items" mailbox, or as specified by the user.
The system manager can provide every user on the system with a preloaded tree of mailboxes by copying to each user's mail directory a preformatted copy of TCPIP$IMAP_MAILBOXES.DAT.
5.12.2.2. OpenVMS Mail Configuration
|
Option |
Description |
|---|---|
|
AUTO_PURGE |
IMAP clients have their own purge command, often called Compact or Compress. When a message is purged from a non-Wastebasket mailbox, it is put in the OpenVMS Mail Wastebasket. If the Wastebasket itself is purged, the messages are permanently deleted (equivalent to OpenVMS Mail PURGE), and disk space is then reclaimed as soon as the IMAP client disconnects. This occurs regardless of the AUTO_PURGE setting, which has no effect for an IMAP client. Any messages that are permanently deleted by an IMAP client briefly appear in your Wastebasket, but those messages are not visible from the IMAP client and are purged each time the client disconnects from that mail file. |
|
CC_PROMPT |
Not applicable. |
|
COPY_SELF |
Not applicable. |
|
EDITOR |
Not applicable. |
|
FILE |
Not used. Instead, you can configure all mail files to be available simultaneously by setting the user name in the IMAP client configuration. You cannot copy or move messages between different mail files. |
|
FOLDER |
Not applicable. |
|
FORM |
Not applicable. |
|
FORWARD |
This is not applicable to the IMAP server, but setting a forwarding address results in messages being forwarded by OpenVMS Mail before being seen by the IMAP server. |
|
MAIL_DIRECTORY |
The directory, with an extension of .MAI, forms the partial file specification used to complete the file names of mail files using the values supplied as part of the user name in the IMAP client configuration. See Section 5.12.2.1, ''How to Access Mail Messages Using IMAP'' for details. |
|
PERSONAL_NAME |
Not applicable. |
|
QUEUE |
Not applicable. |
|
SIGNATURE_FILE |
Not applicable. |
|
WASTEBASKET_NAME |
This folder is always displayed by the IMAP client, even if it is currently empty. |
5.12.2.3. Mapping OpenVMS Mail Folder Names to IMAP Mailbox Names
OpenVMS Mail folders are presented to the IMAP client as IMAP mailboxes. All mailboxes are presented to the client in lowercase characters, beginning with an initial capital letter, and with capital letters following each space, at sign (@), opening parenthesis ( " (" ), underscore (_), and hyphen (-).
The NEWMAIL folder requires special treatment . Because the IMAP protocol requires a top-level mailbox called Inbox, the NEWMAIL folder is mapped to Inbox. When the user opens the mailbox called Mail (which maps to file MAIL.MAI), the NEWMAIL folder is not listed so that the user is not confused by seeing the same folder listed twice.
OpenVMS Mail folder names are usually in all uppercase characters but can contain lowercase characters. Any lowercase characters are mapped to an underscore (_) followed by the character's uppercase equivalent. Underscores are mapped to double underscores (__), and dollar signs are mapped to double dollar signs ($$).
|
OpenVMS Mail Folder Name |
IMAP Mailbox Name |
|---|---|
|
HELLO |
Hello |
|
Hello |
H_e_l_l_o |
|
HELLO-ALL |
Hello-All |
|
HELLO_ALL |
Hello__All |
|
HELLO$ALL |
Hello$$All |
5.12.2.4. Foreign Message Formats
The IMAP server determines the correct format for common file types. It does this by checking the beginning of the file for a recognizable file header that matches a set contained in the configuration file TCPIP$IMAP_HOME:TCPIP$IMAP_MAGIC.TXT (analogous to the magic files found on UNIX systems). If a matching file header is found, the server can let the client know the MIME type and subtype of the file.
Though most common file formats are included, it is possible to add other formats if the structure of the file header is known.
|
Field |
Description |
|---|---|
|
Type |
The type of the data to be tested. Possible values are:
Optionally, types can be followed by an ampersand (&) and a numeric value (mask), expressed in hexadecimal, to specify that the value is to be AND'ed with the numeric value before any comparisons are done. Examples in the configuration file are the two RIFF format files of WAVE and AVI. |
|
Test |
The value to be compared with the value from the file.
The rules for the value depend on the type:
|
|
Type |
The Content-Type type to use in the MIME version of this message. |
|
Subtype |
The Content-Type subtype to use in the MIME version of this message. |
|
Format |
Either "text" or "foreign," indicating what sort of OpenVMS Mail message will be tested for this match. A test with "foreign" in this field is performed on messages only if they are sent using the /FOREIGN qualifier. Note that this implicitly advertises whether base64 or quoted-printable encoding will be used for a given bodypart type; base64 is used only if the message was sent using the /FOREIGN qualifier. |
5.12.2.5. IMAP Message Headers
Mail message headers sent by the IMAP server must conform to the standard specified in RFC 822. Because many of the messages received on an OpenVMS system are not in the RFC 822, or Internet, format (for example, DECnet mail or mail from another message transport system), the IMAP server builds a new set of headers for each message that is not RFC 822 format and is based on the OpenVMS message headers.
|
IMAP Message Header |
Obtained From |
|---|---|
|
|
Arrival date of message. Changed to Internet format,
which shows the day of the week, the date, the time, and
the time zone offset from Greenwich Mean Time (GMT). An
example of the format is |
|
|
OpenVMS Mail |
|
|
OpenVMS Mail |
|
|
OpenVMS Mail |
|
|
OpenVMS Mail |
|
|
OpenVMS Mail |
|
|
Server host name and IMAP version information. Sent only if configuration option Send-ID-Headers is set to True. |
|
|
Message UID. Sent only if configuration option Send-ID-Headers is set to True. |
The configuration option Ignore-Mail11-Headers is set to True or is not defined. (See the VSI TCP/IP Services for OpenVMS Management guide.)
The message text starts with SMTP headers.
5.12.2.6. OpenVMS Mail Address Fields
The IMAP server rebuilds the From: header. This header can be
used as a destination address if a reply is requested from the IMAP client. The
same is true for To: and CC: headers, if you request
that a reply be sent to other listed recipients. Therefore, the IMAP server
rebuilds these fields in compliance with RFC 822 before sending the header to
the IMAP client.
|
Address Type |
Address Format |
|---|---|
|
SMTP |
SMTP%" legal-address", where legal-address is an address that is compliant with RFC 822 and is commonly in the format user@domain. |
|
DECnet |
node::username |
|
User name |
username |
|
DECnet address containing quotation marks |
node::"user@host" |
|
Cluster-forwarding SMTP address |
node::SMTP% "user@domain" |
The host name is the same as the substitute domain specified in the SMTP configuration.
The host name is found in the TCPIP$SMTP_LOCAL_ALIASES.TXT file.
The following sections describe how IMAP rebuilds an address field for each type of address.
5.12.2.6.1. SMTP Address
From: SMTP%"john.smith@federation.gov"becomes:
From: john.smith@federation.gov
From: SMTP%"¢ABCMTS::MRGATE::¢ABCDEF::VIVALDI ¢¢@xyz.org"
From: "ABCMTS::MRGATE::"ABCDEF::VIVALDI""@xyz.org"
5.12.2.6.2. DECnet Address
GENERIC
The entire address is changed to the SMTP format. For example, from hostwidgets.xyzcorp.com, the message headerFrom: ORDERS::J_SMITHbecomes:From: "ORDERS::J_SMITH"@widgets.xyzcorp.com
In this example, instead of
widgets.xyzcorp.com, the value of configuration option Gateway-Node (described in the VSI TCP/IP Services for OpenVMS Management guide) is used if it is defined; if not, the value of the SMTP substitute domain is used. Only if both of these options are undefined is the host namewidgets.xyzcorp.comused.NONE
TheFrom:line is sent unmodified to the IMAP client. For example:From: ORDERS::J_SMITH
You cannot reply to this type of message from an IMAP client because the SMTP server does not accept an address in this form.
TRANSFORM
The IMAP server attempts to translate the DECnet node name to a TCP/IP host name. If the name can be translated, the IMAP server checks whether the translated host name is local. If so, the
From:header becomes an address in the format user@ substitute-domain. If not, theFrom:header becomes an address in the format user@ hostname. Note that the IMAP and SMTP servers call the same routine to determine whether a host name is local.The following examples show some ways the IMAP server translates DECnet node names to TCP/IP node names. In these examples:The local host name is
orders.acme.widgets.com.- ORDERS translates the name to
"orders.acme.widgets.com".- The message header
From: ORDERS::J_SMITHbecomes:From: j_smith@orders.acme.widgets.com
- For a substitute domain of
acme.widgets.com, the message headerFrom: ORDERS::J_SMITHbecomes:From: j_smith@acme.widgets.com
- If HOST12 translates to
host12.acme.widgets.com, which is not local on host nameorders.acme.widgets.com, the message headerFrom: HOST12::J_SMITHbecomes:From: j_smith@host12.acme.widgets.com
- If HOST13 does not translate and host
orders.acme.widgets.comhas no substitute domain defined, the message headerFrom: HOST13::J_SMITHbecomes:From: "HOST13::J_SMITH"@orders.acme.widgets.com
In this example, if the configuration option Gateway-Node is defined, then its value is used instead of
orders.acme.widgets.com.
5.12.2.6.3. User Name-Only Address
If the address under consideration is a recipient address, and the
From: address is a DECnet address, then the recipient
address is prefixed with the same routing information as that of the
From: address. Then it is processed as if it were a DECnet
address, as shown in Section 5.12.2.6.2, ''DECnet Address''.
The value of configuration option Gateway-Node, if defined
An SMTP substitute domain, if defined
The local host name
acme.widgets.com, the message header From:
Smith
becomes:From: smith@acme.widgets.com
5.12.2.6.4. DECnet Address That Contains Quotation Marks
GENERIC
The address is changed to the SMTP format. For example, on hostwidgets.xyzcorp.com, the message headerFrom: ORDERS::"j_smith@acme.com"becomes:From: "ORDERS::"j_smith@acme.com""@widgets.xyzcorp.com
NONE
TheFrom:line is passed unmodified to the IMAP client. For example:From: ORDERS::"j_smith@acme.com"
You cannot reply to this type of mail message because the SMTP server does not accept an address of this form.
TRANSFORM
The IMAP server uses the text inside the quotation marks. For example, the message headerFrom: ORDERS::"j_smith@acme.com"becomes:From: j_smith@acme.com
5.12.2.6.5. Cluster-Forwarding SMTP Address
From: ABCDEF::SMTP%"james.smith@federation.gov"becomes:
From: james.smith@federation.gov
5.12.2.6.6. All Other Addresses
Quotation marks in the address are prefixed with the backslash (\) escape character.
The entire address is placed within quotation marks.
An at sign (@) is appended.
The value of configuration option Gateway-Node, if defined, is appended; if not, the value of the SMTP substitute domain is appended. If both are undefined, then the name of the local host is appended.
xyz.org, the message
header From: ABCMTS::MRGATE::"ORDERS::SPECIAL"
becomes:From: "ABCMTS::MRGATE::"ORDERS::SPECIAL""@xyz.org
If the configuration option Ignore-Mail11-Headers is set to True and the
address is an SMTP address, the rebuilt From: field is not
displayed to the user. In this case, the IMAP server sends the actual
headers from the body of the mail as the mail headers.
5.12.2.7. Uploaded Messages
You can copy mail messages stored on the local client system to OpenVMS Mail. This action is termed uploading and involves the creation of a new OpenVMS Mail message.
When a message is uploaded, OpenVMS Mail treats it as a new mail message, and a "New Mail" broadcast message is issued. You see this message if you also have an OpenVMS VT session open with receipt of broadcast messages enabled.
When a message is uploaded, the entire message is copied along with the header information described in Table 5.7, ''Header Information in Uploaded Messages''. Note that the additional header information is visible only if you read it with MAIL or if the configuration option Ignore-Mail11-Headers is set to False.
|
Header |
Value |
|---|---|
|
|
The entire SMTP message, including headers. |
|
|
The underscore character (_), followed by the name of the user who is uploading the message |
|
|
The underscore character (_), followed by the name of the user who is uploading the message |
|
|
The subject of the uploaded message. |
Chapter 6. Printing Files Using LPR/LPD
The Line Printer/Line Printer Daemon (LPR/LPD) supports the DCL commands PRINT, LPQ, and LPRM for remote printing.
The LPR/LPD service allows you access to print queues on remote hosts and allows users on remote hosts to access print queues on your system.
The name of the remote print queue
Remote Print Server LPD protocol extensions software you need to use the PRINT /PARAMETERS command
TCP/IP Services installed and LPR/LPD enabled on your OpenVMS system
|
DCL Command |
UNIX Command |
Function |
|---|---|---|
|
|
|
Prints files. |
|
LPQ |
|
Displays the status of a remote print queue. |
|
LPRM |
|
Removes jobs from a remote print queue. |
6.1. Printing at Remote Print Queues
Your system manager can configure your system with LPR/LPD network services that allow you to use the DCL command PRINT to send print jobs to a print queue on a remote internet host. The remote host can be a UNIX system or another OpenVMS system running LPR/LPD.
You print a local file at a printer on a remote host by specifying the remote queue name defined on your local host (see your system manager for queue names). LPD copies the file to the appropriate remote printer's spool directory. A copy of the file to be printed remains in the spooling queue until the printer is ready to print it.
|
/AFTER |
/BACKUP |
/BEFORE |
|
/BY_OWNER |
/CONFIRM |
/COPIES |
|
/CREATED |
/DELETE |
/EXCLUDE |
|
/EXPIRED |
/FORM |
/HEADER |
|
/HOLD |
/IDENTIFY |
/JOB_COUNT |
|
/MODIFIED |
/NAME |
/NOTE |
|
/OPERATOR |
/PARAMETERS |
/PASSALL |
|
/PRIORITY |
/QUEUE |
/SETUP |
|
/SINCE |
/USER |
/WIDTH |
/FORM
/PARAMETERS
Note
TCP/IP Services does not support layup definition files for print requests to remote print queues. A layup definition file sets up the layup features: borders, sheet margins, alternating margins, pages per sheet, first page, page order, and page grid.
6.1.1. PRINT /FORM Command
The DCL command PRINT /FORM customizes the look of the printed page. This qualifier associates a form other than the default with the print job.
$ SHOW QUEUE /FORM
$ SHOW QUEUE queue /FULLIf the form associated with a remote LPD queue specifies a /WIDTH value that is not the standard 132, LPD sends a "W" card in the job's control file with the width specified in the form.
6.1.2. PRINT /PARAMETERS Command
$ PRINT/PARAMETERS=(PAGE_SIZE=size) /QUEUE=queue_name filename
Blanks
Nonalphanumeric characters, including spaces and slashes
|
DATA_TYPE |
NUMBER_UP |
PAGE_LIMIT |
|
PAGE_ORIENTATION |
PAGE_SIZE |
SHEET_COUNT |
|
SHEET_SIZE |
SIDES |
$ HELP PRINT_PARAMETER
Note
This help is available only if the DECprint Supervisor (DCPS) software is installed on your system. See your system manager for more information.
|
HOST |
|
|
NOFLAG |
PRINTER |
The options are described in more detail in the following sections.
6.1.2.1. HOST and PRINTER Options
Use the HOST and PRINTER options together to send a print job to any remote host and printer that do not have a specific print queue defined on the local system.
In conjunction with the HOST and PRINTER options, you must also specify the /QUEUE qualifier. The value of /QUEUE should be TCPIP$LPD_OUT.
$ PRINT/PARAMETERS=(HOST=BALT, PRINTER=CT_LN05R) /QUEUE=TCPIP$LPD_OUT PINS.LIS
The HOST and PRINTER options allow you to use any available network printers without your system manager having to set up additional LPD remote queues for each of these printers.
Specify the remote host name either by the host name or by its fully qualified domain name (see Section 1.4, ''Command Syntax'').
6.1.2.2. /PARAMETERS Qualifier: MAIL Option
$ PRINT/PARAMETERS=MAIL /QUEUE=DPR_ANSI PINS.LIS
6.1.2.3. /PARAMETERS Qualifier: NOFLAG Option
The NOFLAG option suppresses printing of a banner (flag) page at an LPD queue. For information about LPD queues, see the VSI TCP/IP Services for OpenVMS Management manual.
$ PRINT/PARAMETERS=NOFLAG /QUEUE=DPR_ANSI PINS.LIS
6.1.3. Remote Queue Printing Examples
- This example sends local file PINS.LIS to the remote print queue defined locally as FAC3_ANSI and requests notification through SMTP when the job completes at the remote printer.
$ PRINT /PARAMETERS=MAIL /QUEUE=FAC3_ANSI PINS.LIS
- This example shows how to send a local file to the remote print queue defined locally as OUR_PS for printing at a remote printer. The command specifies that text be printed on both sides of each sheet. The file name is ROUGH.TXT.
$ PRINT /QUEUE=OUR_PS /PARAMETER=(SIDES=2) ROUGH.TXT
- This command sends a print job to the remote queue defined locally as YOUR_PS.
$ PRINT /QUEUE=YOUR_PS LET.LIS - _$ /PARAMETERS=(DATA_TYPE=POST,PAGE_ORIENTATION=LANDSCAPE,SIDE=2)
- This example sends a print job to Internet host PACE.SATRN.COM to print on printer K1_PRINTER.
$ PRINT /QUEUE=LPD_OUTQ USER$4:[GRANT.FINAN.SALES]ANNUAL.TXT - _$ /PARAMETERS=(HOST=PACE.SATRN.COM,PRINTER=K1_PRINTER)
6.2. Displaying the Status of Jobs in a Remote Print Queue
Your name
Current rank of job in the queue
Names of the files in job
Job identifier
Total size of job in bytes
- This command displays all entries in the LPS40_QUE queue.
$ LPQ LPS40_QUE
- This command displays information about job 4 in the print queue named OFFICE_QUE.
$ LPQ OFFICE_QUE /ENTRY=4
- This command displays information about jobs 1, 2, and 3 in print queue PEACE_Q.
$ LPQ PEACE_Q /ENTRY=(1,2,3)
- This command displays information about user NELSON's jobs in the print queue FRONT_Q.
$ LPQ FRONT_Q /USER=NELSON
6.3. Removing Jobs from the Print Queue
All of your active jobs
All jobs, if you have the required privileges
Selected jobs
- This command deletes job 7 from print queue BASE_Q.
$ LPRM BASE_Q /ENTRY=7
- This command deletes jobs 555, 556, and 558 from queue BASE_Q.
$ LPRM BASE_Q /ENTRY=(555,556,558)
- In this example, the system manager, who has the required privileges, deletes all jobs from queue MAIN_QUE.
$ LPRM /ALL MAIN_QUE
6.4. Printing Remote UNIX Files on Local Queues
Your system manager can set up a local print queue to handle
print jobs for files sent from a remote UNIX host.
To print UNIX files on an OpenVMS printer, the
UNIX user enters the lpr command.
(For more information, see the appropriate UNIX
documentation.)
Local queues that are set up to receive UNIX print jobs support layup definition files. These are files are supported only on OpenVMS and are used to set the following layup features: borders, sheet margins, alternating sheet margins, pages per sheet, first page, page order, and page grid.
/usr/stanton/recent.cnts to OpenVMS
print queue REMOTE_QUEUE4 and specifies the
formatting defined in the layup file called
layup3. The REMOTE_QUEUE4 print queue
is set up as a remote queue in the printcap file
by the system
manager.% lpr -Llayup3 -Premote_queue4 /usr/stanton/recent.cnts
6.5. Obtaining Online Help
$ HELP TCPIP_SERVICES LPR_LPD $ HELP LPQ $ HELP LPRM
6.6. Command Descriptions
This section provides complete descriptions of the commands you can use to send a print job to a remote printer, monitor remote print jobs, and remove remote print jobs.
LPQ
LPQ — Displays the status of your jobs in a remote print queue. The status information includes: current rank of your job in the queue, names of your queued files, job identifier, and size of jobs in bytes.
Syntax
LPQ queue [ /ENTRY=n ]
[ /HOST=host ]
[ /PRINTER=remote_printer ]
[ /USER=user_name ]Parameter
queue
Required.
Queue for which you want status.
Qualifiers
- /ENTRY= n
Optional. Default: all jobs. You can specify a list of values.
Displays status for the specified jobs.
- /HOST= host
Optional. Default: host defined in the printcap file.
Displays status for the jobs you sent to the specified host. This is the host you also specified in the PRINT /PARAMETERS=(HOST= host) command.
- /PRINTER= remote_printer
Optional. Default: printer defined in the printcap file.
Displays status for the jobs you sent to the specified remote printer. This is the queue you also specified in the PRINT /PARAMETERS=(PRINTER= queue) command.
- /USER= user
Optional. Default: all users.
Displays status for the jobs sent by the specified user. You can specify a list of values.
Example
$LPQ LPS40_QUEShows all entries in the LPS40_QUE queue.
$LPQ MAIN_QUE /ENTRY=4Shows information about job 4 in the print queue named MAIN_QUE.
$LPQ PEACE_8 /ENTRY=(1,2,3)Shows information about jobs 1, 2, and 3 in print queue PEACE_8.
$LPQ 3RD_FLOOR_Q /USER=MILLERShows information about user MILLER's jobs in the print queue called 3RD_FLOOR_Q.
LPRM
LPRM — Removes one or more jobs from a remote print queue.
Syntax
LPRM queue {/ALL /ENTRY=n /USER=user_name}
[/HOST=host]
[/PRINTER=remote_printer]Parameter
queue
Required.
Print queue with waiting jobs you want to delete.
Qualifiers
- /ALL
Required, unless you specify /ENTRY or /USER.
Removes all jobs for all users from the specified queue. Requires SYSPRV, OPER, or BYPASS privilege. Comparable to the UNIX command
lprm -Pqueue -when performed by the root user on the UNIX system.- /ENTRY= n
Required, unless you specify /ALL or /USER.
Removes the specified job. Specify only your own jobs. You can specify a list of values.
- /USER= user
Required, unless you specify /ALL or /ENTRY.
Removes jobs by user name. You can specify a list of values.
- /HOST= host
Optional. Default: host defined in the printcap file.
Removes jobs by host for the host you specified in the PRINT /PARAMETERS=(HOST=host) command.
- /PRINTER= remote_printer
Optional. Default: printer defined in the printcap file.
Removes jobs from the remote printer you specified in the PRINT /PARAMETERS=(PRINTER= queue) command.
Examples
$LPRM BASE_Q /ENTRY=7Deletes job 7 from print queue BASE_Q.
$LPRM FRONT_Q /ENTRY=(555,556,558)Deletes entries 555, 556, and 558 from queue FRONT_Q.
Chapter 7. Accessing User Information Using the FINGER Utility
For displaying information about users on remote systems and your local system, TCP/IP Services includes the FINGER utility. For example, you can use the FINGER utility to determine which users are logged on to a system or to refresh your memory about the correct login name to use before using FTP or another service to connect to an account on a remote host.
User name
Account name
Program the user is running
User's home directory
User's plans, activities, and other information
User's project
|
Capability |
Section |
|---|---|
|
Display brief information about all users on a host. | |
|
Display detailed information about one or more specific users on a host. | |
|
Display information about all users logged into an OpenVMS Cluster system. | |
|
Get information from a host that is not directly accessible to your local host. | |
|
Make planning and project information about yourself available to other FINGER users. |
The FINGER software must be enabled on your local OpenVMS host (see your system manager). If FINGER has not been started, then attempts to use the FINGER command might cause an error message because of missing privileges. You must start the utility before attempting to use it.
7.1. Typing FINGER Commands
Use the following rules for command syntax and wildcards when you enter FINGER command lines.
7.1.1. Wildcards
Wildcards are not accepted for OpenVMS hosts but may be valid for some UNIX hosts.
7.1.2. Qualifiers
$ FINGER ROLLINS /FULL Username Program Login Term/Location ROLLINS $ Mon 15:02 64626::ROLLINS Login name: ROLLINS In real life: Professor Rollins Account: RES9 Directory: WORK1$:[ROLLINS] Last login: Tue 3-MAR-2002 09:05:29 Unread mail: 25 Project: Homeopathic medicine/Silica No Plan. Login name: /FULL In real life: ???
$ FINGER /FULL ROLLINS
[stlab1.bastyr.edu]
Username Real Name Program Login Term/Location
ROLLINS Ben Rollins $ Mon 15:02 64606::ROLLINS
$ Mon 09:42 64606::ROLLINS
Login name: ROLLINS In real life: Professor Rollins
Account: RES9 Directory: WORK1$:[ROLLINS]
Last login: Tue 3-MAR-2002 09:05:29
Unread mail: 27
Project: Homeopathic medicine/Silica
No Plan.7.2. Obtaining Online Help
$ HELP TCPIP_SERVICES FINGER $ HELP FINGER
7.3. Displaying Information about Users
|
If you need ... |
Use this command... |
|---|---|
|
Brief information about all users on a remote host |
FINGER @ hostname |
|
Brief information about all users on your local host |
FINGER |
|
Brief information about all users on your cluster |
FINGER/CLUSTER |
|
Detailed information about a specific user on a remote host |
FINGER username@ hostname |
|
Detailed information about several users on a remote host |
FINGER user1name@ hostname user2name@ hostname |
|
Detailed information about a specific user on your local host |
FINGER username |
|
Detailed information about several users on your local host |
FINGER user1name user2name |
|
More detailed information about users on the local host, including their real name and all logins |
FINGER/FULL |
|
Brief information about all local users and detailed information about a specific local user |
FINGER/ALL username |
7.3.1. Displaying Information about All Users
$ FINGER @SCIENCE [science.ucd.edu] Username Program Login Term/Location BRADY $ Thu 07:50 dialin_706_101.ucd.lab.edu CORRIT $ Tue 13:30 64334::CORRIT DAVE MAIL Mon 15:02 64334::DAVE DAWSON $ Thu 14:57 FLOYD $ Mon 17:00 KITT TPU Mon 16:57 62555::KITT MIRTH $ Wed 16:04 UCDVAX::MIRTH NATALIE $ Tue 09:23 64222::NATALIE RAPSONG $ Mon 18:50 64442::RAPSONG
7.3.2. Displaying Detailed Information about Specific Users
Login name
Full name (real name)
Working directory
Last (previous) login
Number of unread mail messages
Plans and project, if the user has made the information available
- This example shows how to receive detailed information about user HOWE on host BEARINGS. The second line of information indicates user HOWE is logged in and using the OpenVMS Mail utility.
$ FINGER HOWE@BEARINGS [bearings.us.beacorp.com] Username Program Login Term/Location HOWE MAIL Mon 15:02 84640::HOWE Login name: HOWE In real life: Abe Howe Account: INVENT Directory: DISK$1:[HOWE] Last login: Tue 3-MAR-2002 10:15:39 No unread mail Project: Inventory No Plan.
- This example displays information about several specific users on a remote host. The command displays detailed information about users HOWE and JESSE on host BEARINGS, and user
billingson UNIX hostclass. Note that user HOWE is not currently logged in to host BEARINGS. JESSE is logged in, so FINGER displays a line of information for JESSE, including the program JESSE is using (DCL at present) and the time of login.$ FINGER HOWE@BEARINGS JESSE@BEARINGS BILLINGS@CLASS [bearings.us.beacorp.com] Login name: HOWE In real life: Abe Howe Account: INVENT Directory: DISK$1:[HOWE] Last login: Tue 3-MAR-2002 10:15:39 No unread mail Project: Inventory No Plan. [bearings.us.beacorp.com] Username Program Login Term/Location JESSE $ Thu 09:24 Login name: JESSE In real life: JESSE BOYD Account: PLAN3 Directory: DISK$1:[JESSE] Last login: Mon 2-MAR-2002 16:48:50 Unread mail: 1 Project: Planning Plan: Next phase: December E-mail: jesse@bearings.us.beacorp.com Phone: 526-5444 [class.ucb.beacorp.com] Login name: billings (messages off) In real life: M. T. Billings Office: BLDG2-2, 555-7873 Home phone: 111-222-3333 Directory: /usr/users/billings Shell: /usr/bin/csh On since Jan 17 14:33:06 on :0 On since Jan 17 14:33:13 15 days Idle Time on ttyp1 On since Jan 17 14:33:13 2 days 23 hours Idle Time on ttyp2 On since Feb 4 13:13:50 2 days 23 hours Idle Time on ttyp5 No Plan. - This command displays detailed information about one or more specific users and brief information about all other users who are logged in to a remote host. For example:
$ FINGER DALB@BEARINGS @BEARINGS Username Program Login Term/Location Login name: DALB In real life: Bob Dalb Account: ENG_3 Directory: WORK1$:[DALB] Last login: Thu 5-MAR-2002 16:26:06 No unread mail Project: TCP/IP Services for OpenVMS No Plan. BRADY $ Thu 07:50 dialin_706_101.lkg.dec.com BYRD $ Mon 17:00 CORTEZ $ Tue 13:30 60121::CORTEZ DALB TCPIP$FINGER Thu 16:26 54242::DALB KURT $ Mon 16:57 32556::KURT LARSON SHWCLSTR Mon 17:01 MUELLER $ Wed 16:04 VALVE::MUELLER NASAN $ Tue 09:23 44500::NASON PHILLIPS $ Tue 02:42 REMHST::PHILLIPS ROLLINS $ Mon 18:50 46142::ROLLINS SIMMEL MAIL Thu 14:12 VALVE::SIMMEL
- This command displays detailed information about a specific user and brief information about the remaining logged-in users on a local host. Note use of the /ALL qualifier which displays specific information about user HOWE at the local host plus brief information about all other users logged in. The output of this command is similar to that shown in the preceding example.
$ FINGER/ALL HOWE
7.3.3. Displaying Information about Users on Your Cluster
- This example shows the default display for the FINGER/CLUSTER command.
$ FINGER/CLUSTER Username Node Program Login Term/Location ANND UCDAXP $ Mon 17:00 BRADY UCDAXP $ Thu 07:50 dialin_101.ads.com CALLING UCDALP RTPAD Thu 14:50 CALLING UCDAXP $ Thu 14:57 CURREN UCDAXP $ Tue 13:30 84051::CURREN DOBB UCDWON TCPIP$FINGER Mon 11:50 GILBERT UCDVAX MAIL Thu 14:34 pcgil.admin.ucd.edu IMMIN UCDALP $ Wed 16:21 BIXBY::IMMIN KITT UCXAXP $ Mon 16:57 62555::KITT KITTEL UCXALP $ Thu 14:12 AGGIE::KITTEL LEVINE UCDUNI DECW$SESSION Thu 10:50 LEVINE UCDALP TCPIP$UCP Thu 10:30 llevine.ads.com MILLLER UCDALP TCPIP$FINGER Thu 15:00 AGGIE::MILLER MIRTH UCDVAX $ Tue 17:09 MIRTH UCDVAX RTPAD Mon 17:27 NATALIE UCDAXP $ Tue 09:23 64222::NATALIE POFF UCXAXP $ Tue 02:42 AGGIE::POFF RAPSONG UCDAXP $ Mon 18:50 64442::RAPSONG TIBBS AGGIE $ Tue 20:43 UCXAXP::TIBBS
- This example displays each user's real name and every login to cluster members by including the /FULL qualifier.
$ FINGER/CLUSTER/FULL Username Real Name Node Program Login Term/Location ANND Ann Darin UCDAXP $ Mon 17:00 UCDAXP $ Tue 11:51 BRADY Robert Brady UCDAXP $ Thu 07:50 dialin_101.ads.com UCDWON $ Fri 08:31 CALLING Alvin Calling UCDALP RTPAD Thu 14:50 UCDAXP $ Thu 14:57 CURREN Steve Curren UCDAXP $ Tue 13:30 84051::CURREN UCDVAX $ Tue 14:20 DOBB Barry Dobb UCDWON TCPIP$FINGER Mon 11:50 UCDAXP $ Wed 09:20 GILBERT Joanne Gilbert UCDVAX MAIL Thu 14:34 pcgil.ads.com IMMIN Armen Immin UCDALP $ Wed 16:21 BIXBY::IMMIN KITT Evelyn Kitt UCXAXP $ Mon 16:57 62555::KITT UCDALP SEARCH Mon 16:43 62555::KITT KITTEL Herb Kittel UCXALP $ Thu 14:12 AGGIE::KITTEL LEVINE Larry Levine UCDUNI DECW$SESSION Thu 10:50 UCDALP TCPIP$UCP Thu 10:30 slevine.ads.com MILLLER Paul Miller UCDALP TCPIP$FINGER Thu 15:00 AGGIE::MILLER MIRTH Phil Anson UCDVAX $ Tue 17:09 UCDVAX RTPAD Mon 17:27 NATALIE Natalie Beardsley UCDAXP $ Tue 09:23 64222::NATALIE POFF Pamela Offred UCXAXP $ Tue 02:42 AGGIE::POFF RAPSONG Aaron Feller UCDAXP $ Mon 18:50 64442::RAPSONG TIBBS Eugene Tibbs AGGIE $ Tue 20:43 UCXAXP::TIBBS
7.4. Forwarding Information from Host to Host
$ FINGER JONES@UNION.CTSTATEU.EDU@U-GW.PA.ABCORP.COM
By default, the FINGER server does not allow queries to be forwarded from one host to another. To enable forwarding on the FINGER server, see your system manager.
7.5. Making Your Information Available to Other Users
I will be in my office Monday through Wednesday working at the S.F. lab. On Thursday and Friday, I will be at UC Irvine for a conference. Web site http://bio.ucd.edu/peters/r_peters.html
|
|
A file that contains your plans, whereabouts, and other information you want to have displayed. The file can contain more than one line. |
|
|
A file that specifies your project or work group. The file can contain only one line. |
7.6. Command Description
To use FINGER commands, enter them at the DCL prompt.
This section provides a complete description of the FINGER command, its parameters, and its qualifiers.
FINGER
FINGER — Displays the following information about users on a host: brief listings of all users on a host, detailed listings about specific users, and listing of users on a cluster. Specifying the FINGER command without a user or host specification displays information about users logged in on your local system.
Syntax
FINGER [/ALL | /CLUSTER | /FULL] [ username][@
hostname]
Parameters
username
Optional. Required for detailed information about a user.
Specify the user login name. For information about a user on your local system, do not include the @ hostname. For information about a user on a remote system, include the host name (username@ hostname).
@ hostname
Optional. Required for information about users on a remote system.
For information about a specific user on a remote host, include the user name with the host name (username@ hostname). For information about all users on the remote host, specify the host name only (@ hostname). Omit the host name to display information about users on your local host.
Qualifiers
- /ALL
Optional. Use when specifying a local user name. The /ALL qualifier immediately follows the FINGER command.
Displays a brief listing of all users in addition to detailed information about any specified users. Use this qualifier primarily for displaying information about users on the local host. The /ALL qualifier is ignored by most remote FINGER servers when you specify a remote host name in the command line. To display brief information about all users on a remote host in addition to detailed information about specific users, specify the user@hostname format for each user, along with @hostname (to list brief information about all users). Separate each user@hostname and @hostname specification with a space.
- /CLUSTER
Optional. The /CLUSTER qualifier must immediately follow the FINGER command. Do not specify a remote host name with this qualifier.
Displays information about all users logged in to the local OpenVMS Cluster system.
- /FULL
Optional. The /FULL qualifier must immediately follow the FINGER command.
Displays detailed information, such as the user's real name and all the user's logins. (Without /FULL, the display includes the last login only.) Use this qualifier primarily for displaying information about users on the local host.
Examples
$FINGER FRANKEL@KCRAUsername Program Login Term/Location FRANKEL $ Mon 15:10 KCRA::FRANKEL Login name: frankel In real Life: Sam Frankel Account: CC_Y9M Directory: WORK1$:[FRANKEL] Last login: Mon 30-MAR-1998 13:10:22 No unread mail No planDisplays detailed information about user FRANKEL at host KCRA.
$FINGER @OXYGEN[oxygen.gp.org] Username Program Login Term/Location BARD $ Mon 17:00 CASON LSEDIT Thu 14:57 CORR $ Tue 13:30 24151::CORR DUDLEY $ Mon 15:02 24646::DUDLEY GRAND $ Thu 07:50 NITROGEN::GRAND KURT $ Mon 16:57 22556::KURT KYLIE MAIL Thu 14:12 ELEMENT::KYLIE MYRA $ Wed 16:04 BIGVAX::MYRA NASON $ Tue 09:23 24200::NASON PHILLIPS $ Tue 02:42 BIGALP::PHILLIPS RAWLINGS $ Mon 18:50 24042::RAWLINGSDisplays brief information about users logged in to host OXYGEN.
$FINGER/FULLUsername Real Name Program Login Term/Location BAIRD Randall Baird $ Mon 17:00 CARR Rich Carr LSEDIT Thu 14:57 SHWCLSTR Mon 17:01 CORTEZ Julia Cortez $ Tue 13:30 23441::CORTEZ DANBOY Dan Keller $ Thu 16:12 ogrady.ucsb.edu GANDHI T.J. Gandhi TPU Mon 16:57 12556::GANDHI TPU Tue 15:27 12556::GANDHI LIMO Michael Limorley MAIL Thu 14:12 TOPDAY::LIMO LSEDIT Thu 19:03 TOPDAY::LIMO MENNING Mark Menning $ Wed 16:04 TOPDAY::MENNING $ Mon 18:58 HAPDAY::MENNING NELSON Anne Nelson $ Tue 09:23 22200::NELSON ROBERTS Michael Roberts $ Mon 18:50 22042::ROBERTS $ Mon 18:34 HAPDAY::ROBERTSDisplays the real name and all logins for each user.
$FINGER/CLUSTERUsername Node Program Login Term/Location SMITH MOUNTB TPU Fri 09:47 MOUNTB::SMITH JONES MOUNTC $ Tue 18:02 BROWN MOUNTC $ Mon 17:04 TAYLOR MOUNTB EDT Thu 15:59 CROSBY MOUNTC RTPAD Thu 14:59 CARPENTER MOUNTB $ Wed 17:23 MOUNTB::SYSTEM BLACK MOUNTC $ Tue 10:42 MOUNTC::BLACKDisplays information about all users on all members of the cluster.
This command must be entered at the remote UNIX host. A queue on your local OpenVMS system must be set up by the system manager to receive the UNIX print jobs. The queue must be identifiable by the UNIX system.
Issuing the /PASSWORD qualifier with the RSH command invokes the REXEC facility, which sends the password to the specified remote host.
This command toggles the value between enabled and disabled.