RMS Journaling for OpenVMS Manual
- Operating System and Version:
- VSI OpenVMS IA-64 Version 8.4-1H1 or higher
VSI OpenVMS Alpha Version 8.4-2L1 or higher
Preface
This manual describes RMS Journaling for OpenVMS and how to use it. It also includes information about other OpenVMS components that support RMS Journaling.
1. About VSI
VMS Software, Inc. (VSI) is an independent software company licensed by Hewlett Packard Enterprise to develop and support the OpenVMS operating system.
2. Intended Audience
This manual is intended for application programmers and designers who want to use RMS Journaling in their applications and system managers who have RMS Journaling installed on their systems.
3. Document Structure
This manual has nine chapters and four appendixes:
Chapter 1, "Overview of RMS Journaling" introduces you to RMS Journaling; it provides an overview of the three types of journaling.
Chapter 2, "Getting Journaling Information" describes how to get information on the journaling status of a file.
Chapter 3, "Using After-Image Journaling" describes how to use after-image journaling.
Chapter 4, "Using Before-Image Journaling" describes how to use before-image journaling.
Chapter 5, "Using Recovery Unit Journaling" describes how to use recovery unit journaling.
Chapter 6, "Combining Journaling Types" describes issues for combining different types of journaling.
Chapter 7, "System Management Considerations" discusses system management considerations for systems on which RMS Journaling is used.
Chapter 8, "DCL Command Reference" contains reference information about the RECOVER/RMS_FILE and SET FILE commands.
Chapter 9, "RMS Blocks and Fields" contains reference information about RMS blocks and fields specific to RMS Journaling.
Appendix A, "Support for RMS Services" summarizes the support for RMS services under the three types of journaling.
Appendix B, "Obsolete Recovery Unit Services Routines" describes the obsolete recovery unit services.
Appendix C, "Sample Application Program" contains three implementations of a sample application program showing the use of DECdtm transaction services, written in VSI C (two versions) and VSI COBOL.
Appendix D, "Recovery Unit Recovery with RMS Journaling Versions Earlier than 5.4 " describes limitations on recovery unit recovery on systems running versions of RMS Journaling earlier than Version 5.4.
4. Related Documents
Use this manual with the OpenVMS documentation set and the documentation for your programming language and application development tools. In addition:
| For information about... | See the... |
|---|---|
| using OpenVMS Record Management Services (RMS) in designing and developing your application and files | Guide to OpenVMS File Applications and the VSI OpenVMS Record Management Services Reference Manual |
| the Analyze/RMS_File utility | VSI OpenVMS Record Management Utilities Reference Manual |
| DECdtm software | VSI OpenVMS System Manager's Manual |
5. OpenVMS Documentation
The full VSI OpenVMS documentation set can be found on the VMS Software Documentation webpage at https://docs.vmssoftware.com.
6. VSI Encourages Your Comments
You may send comments or suggestions regarding this manual or any VSI document by sending electronic mail to the following Internet address: <docinfo@vmssoftware.com>. Users who have VSI OpenVMS support contracts through VSI can contact <support@vmssoftware.com> for help with this product.
7. VSI Encourages Your Comments
You may send comments or suggestions regarding this manual or any VSI document by
sending electronic mail to the following Internet address:
<docinfo@vmssoftware.com>. Users who have OpenVMS support contracts
through VSI can contact <support@vmssoftware.com> for help with this
product.
8. Conventions
| Convention | Meaning |
|---|---|
|
Ctrl/ x |
A sequence such as Ctrl/ x indicates that you must hold down the key labeled Ctrl while you press another key or a pointing device button. |
|
PF1 x |
A sequence such as PF1 x indicates that you must first press and release the key labeled PF1 and then press and release another key or a pointing device button. |
|
Return |
In examples, a key name enclosed in a box indicates that you press a key on the keyboard. (In text, a key name is not enclosed in a box.) |
... |
A horizontal ellipsis in examples indicates one of the
following possibilities:
|
. . . |
A vertical ellipsis indicates the omission of items from a code example or command format; the items are omitted because they are not important to the topic being discussed. |
|
( ) |
In command format descriptions, parentheses indicate that you must enclose the options in parentheses if you choose more than one. |
|
[ ] |
In command format descriptions, brackets indicate optional choices. You can choose one or more items or no items. Do not type the brackets on the command line. However, you must include the brackets in the syntax for OpenVMS directory specifications and for a substring specification in an assignment statement. |
|
[ |] |
In command format descriptions, vertical bars separate choices within brackets or braces. Within brackets, the choices are options; within braces, at least one choice is required. Do not type the vertical bars on the command line. |
|
{ } |
In command format descriptions, braces indicate required choices; you must choose at least one of the items listed. Do not type the braces on the command line. |
|
bold text |
This typeface represents the introduction of a new term. It also represents the name of an argument, an attribute, or a reason. |
|
italic text |
Italic text indicates important information, complete titles of manuals, or variables. Variables include information that varies in system output (Internal error number), in command lines (/PRODUCER= name), and in command parameters in text (where dd represents the predefined code for the device type). |
|
UPPERCASE TEXT |
Uppercase text indicates a command, the name of a routine, the name of a file, or the abbreviation for a system privilege. |
|
|
Monospace type indicates code examples and interactive screen displays. In the C programming language, monospace type in text identifies the following elements: keywords, the names of independently compiled external functions and files, syntax summaries, and references to variables or identifiers introduced in an example. |
|
- |
A hyphen at the end of a command format description, command line, or code line indicates that the command or statement continues on the following line. |
|
numbers |
All numbers in text are assumed to be decimal unless otherwise noted. Nondecimal radixes—binary, octal, or hexadecimal—are explicitly indicated. |
Chapter 1. Overview of RMS Journaling
RMS Journaling is a tool that helps to protect your data from being lost or becoming inconsistent.
Journaling is applied on a file-by-file basis, not on an application basis.
You can use RMS Journaling for any RMS (Record Management Services) file that is updated. You can use any of the journaling types with sequential, relative, or Prolog 3 indexed file organizations.
You cannot use RMS Journaling for:
File operations that do not use RMS services
RMS files that are rewritten with a new version number (such as text files that are modified by a text editor) rather than updated in place
1.1. Marking Files for Journaling
To use journaling for a file, you must mark the file for journaling with the DCL command SET FILE. The SET FILE command allows you to mark a file for one, two, or all three journaling types.
1.2. Journaling Types
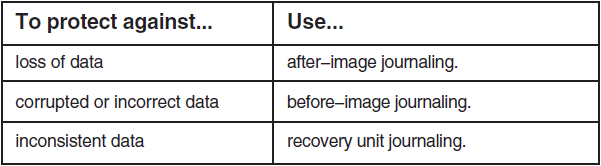
There are three types of RMS Journaling: after-image, before-image, and recovery unit. All three types allow the re-creation of a previous state of a data file by using information kept in a separate file called a journal. Each journaling type protects against a different kind of problem, as summarized in the following table.
1.2.1. After-image journaling
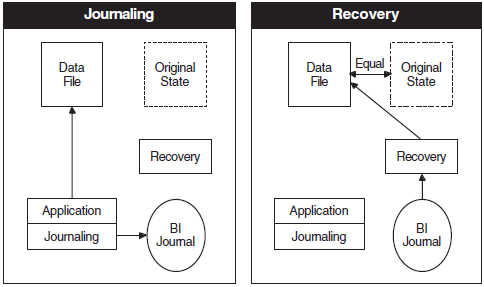
After-image journaling lets you redo changes that were applied to a data file.
When a file is marked for after-image journaling, a continuous record of all changes that are made to that file is maintained in a journal.
If a data file becomes unusable, either because the files were corrupted (for example, by a disk head crash) or because the files were lost (for example, due to inadvertent deletion), you can use after-image recovery to restore the file. In after-image recovery, the data file is rolled forward by reapplying the journalled changes to a backup copy of the file.
The following diagram illustrates the overall operation of after-image journaling and recovery.

1.2.2. Before-image journaling
Before-image journaling lets you undo changes that were applied to a data file and restore the records to a previous state.
When a file is marked for before-image journaling, a continuous history of the state of the records in the file is maintained in a journal.
If bad data is introduced into the file (for example, through operator error or communications problems), you can use before-image recovery to restore the file to a previous, valid state. In before-image recovery, the data file is rolled backward from the current time to a point prior to the introduction of the bad data.
The following diagram illustrates the overall operation of before-image journaling and recovery.
1.2.3. Recovery unit journaling
Recovery unit journaling lets you ensure the internal consistency of data being used by an application by defining a set of related RMS operations within the application, called a transaction, that must either be completed in its entirety, or not performed at all.
A typical transaction is a transfer of funds that involves debiting one account and crediting a second account. If a system failure occurs during a funds transfer, causing the first account to be debited without crediting the second account, recovery unit journaling rolls back both accounts to their previous, consistent state.
A recovery unit consists of all the RMS operations performed by a single process within a transaction. A transaction can include more than one recovery unit.
When a file is marked for recovery unit journaling, a continuous history of the state of each record involved in a transaction is maintained in a journal until that transaction is completed.
If a transaction is not successfully completed, before the records accessed in the transaction are made available for further processing, recovery unit recovery restores those records to their states prior to the beginning of the transaction.
The following diagram illustrates the overall operation of recovery unit journaling and recovery.

Chapter 2. Getting Journaling Information
There are several ways to get the current journaling status of a file.
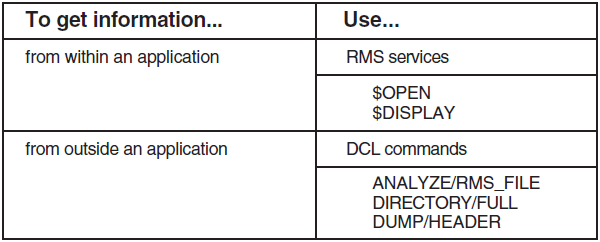
2.1. Using RMS Services
The RMS services $OPEN and $DISPLAY provide the current journaling characteristics of a file from within an application. Both of these services set the FAB$B_JOURNAL field in the file access block (FAB) to indicate whether the file is a journal or whether it is marked for after-image, before-image, or recovery unit journaling. For information on using these RMS services, see the VSI OpenVMS Record Management Services Reference Manual.
For more information on the FAB$B_JOURNAL field, see Chapter 9, "RMS Blocks and Fields".
2.2. Using the ANALYZE/RMS_FILE Command
Note
The ANALYZE/RMS_FILE command does not provide the journal file names for remote files.
Example
The following example shows the partial output for this command for a file that is marked for both after-image and before-image journaling:
$ANALYZE/RMS_FILE [PAYROLL]WEEKLY.DATCheck RMS File Integrity 15-JUN-1990 08:08:27.80 Page 1 FINANCE_DISK:[PAYROLL]WEEKLY.DAT;1 FILE HEADER . . . Journaling Enabled: After-Image, Before-Image RMS FILE ATTRIBUTES . . . After-Image Journaling Journal Name: JOURNAL_DISK:[FINANCE]PAYROLL.RMS$JOURNAL;1Journal Creation Date: 10-JUN-1990 12:05:33.95 Journal Stream Index: 1
Before-Image Journaling Journal Name: JOURNAL_DISK:[FINANCE]PAYROLL.RMS$JOURNAL;1
This example shows that after-image journaling and before-image journaling are using the
same journal ( ). Note that after-image journaling and
before-image journaling use different record stream identifiers ( ), allowing RMS Journaling to distinguish the updates that are journalled.
2.2.1. Using the /RU_JOURNAL qualifier
The /RU_JOURNAL qualifier provides information about recovery unit journaling for the file that you analyze. If a file is unavailable because it is part of an unresolved transaction (for example, because a recovery unit journal or a data file that was included in the transaction is unavailable), you can use the ANALYZE/RMS_FILE/RU_JOURNAL command to identify the recovery unit journal and all data files involved in the transaction. This command is the only means of access to the RMS file until the transaction is resolved.
Note
The ANALYZE/RMS_FILE/RU_JOURNAL command provides information about the status of RMS recovery units, not DECdtm transactions. However, each recovery unit is begun in the context of a transaction and remains active until that transaction is completed.
Your process must have both CMEXEC privilege and access to the [SYSJNL] directory (either SYSPRV [system privilege] privilege, or access for UIC [1,4]) to use the ANALYZE/RMS_FILE/RU_JOURNAL command.
Example
$ANALYZE/RMS_FILE/RU_JOURNAL CHECKING.DATCheck RMS File Integrity 30-MAY-1990 09:33:14.35 DISK$WORK:[ACCOUNTING]CHECKING.DAT;1 FILE HEADER . . . Journaling Enabled: Recovery Unit RMS FILE ATTRIBUTES . . . Recovery Unit Journaling Default RU Journal Volume: none specified ACTIVE RMS RECOVERY UNITSFile Spec: DISK$WORK:[ACCOUNTING]CHECKING.DAT;1
Volume name: WORK File ID: (974,40,0) Creation Date: 22-MAR-1990 09:30:36.82 Status: Normal Recovery Unit State: Started
The analysis uncovered NO errors.
The following table explains the numbered items in the example.
| Phase | Meaning | Actions Required |
|
The heading Active RMS Recovery Units lists all active recovery units that involve the file. If the file that you analyze has been marked for recovery unit journaling but has no active recovery units, then the ANALYZE/ RMS_FILE/RU_JOURNAL command displays a message stating "No Active RMS Recovery Units" after the Active RMS Recovery Unit heading. | |
| The Journal Spec field provides the file specification for the recovery unit journal that was in use for the file CHECKING.DAT. | Verify that the volume DISK$WORK is on line and available, and that the [SYSJNL] directory is available and contains the journal named. |
| If the file name in the ANALYZE/RMS_FILE/RU_JOURNAL command has one or more active transactions, the output of the command lists all of the files with record streams joined to each of those 5 4 3 2 1 transactions. | Verify that any file listed as being in the recovery unit is available. |
| In this case, there is only one file connected to the transaction. | |
| The Recovery Unit State field provides the primary information about the status of recovery units and the possible reasons for the unavailability of the file. |
2.2.2. Recovery unit states
If there are active recovery units on the file, then the active recovery units will be in one of the following states, as indicated in the Recovery Unit State field:

2.3. Using the DIRECTORY/FULL Command
You can use the DIRECTORY/FULL command to:
Determine if a file is marked for one or more types of journaling
Identify the journals for after-image and before-image journaling
Example: local files
The following example shows how to get information about the file SALES.DAT:
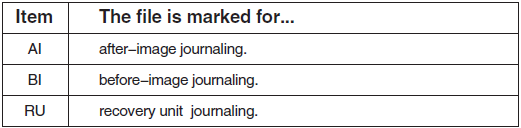
$DIRECTORY/FULL SALES.DATDirectory DISK1:[FINANCE] SALES.DAT;1 File ID: (332,10,0) Size: 265/265 Owner: [335,310] Created: 27-MAR-1990 10:15 Revised: 12-APR-1990 07:30 (9) Expires: <None specified> Backup: 13-APR-1990 00:16 File organization: Indexed, Prolog: 3, Using 1 key File attributes: Allocation: 6, Extend: 0, Maximum bucket size: 2, Global buffer count: 0, No version limit Record format: Fixed length 18 byte records Record attributes: Carriage return carriage control Journaling enabled: AI, BI, RU AI journal: JOURNAL_DISK:[FINANCE]NEW_SALES.RMS$JOURNAL;1 BI journal: JOURNAL_DISK:[FINANCE]SALES.RMS$JOURNAL;1 File protection: System:RWED, Owner:RWED, Group:RE, World: Total of 1 file, 265/265 blocks.
The Journaling Enabled field can include the following items:
The next two fields, AI journal and BI journal, list the respective journals for SALES.DAT. These fields are displayed only when a file is marked for after-image or before-image journaling.
Example: remote files
If you use the DIRECTORY/FULL command for a remote network file, the long-term journals are not identified, as in the following example:
$DIRECTORY/FULL BOSTON::DISK1:[FINANCE]SALES.DATDirectory BOSTON::DISK1:[FINANCE] SALES.DAT;1 File ID: (332,10,0) Size: 265/265 Owner: [335,310] Created: 27-MAR-1990 10:15 Revised: 12-APR-1990 07:30 (9) Expires: <None specified> Backup: 13-APR-1990 00:16 File organization: Indexed, Prolog: 3, Using 1 key File attributes: Allocation: 6, Extend: 0, Maximum bucket size: 2, Global buffer count: 0, No version limit Record format: Fixed length 18 byte records Record attributes: Carriage return carriage control Journaling enabled: AI, BI, RU AI journal: Not available BI journal: Not available File protection: System:RWED, Owner:RWED, Group:RE, World: Total of 1 file, 265/265 blocks.
2.3.1. Determining whether journaling is enabled
You can also use the DIRECTORY/FULL command to determine whether journaling is enabled or disabled (by the Backup utility [BACKUP]) for a particular file. Remember that when a file is backed up using BACKUP, the backup copy of the file is marked for journaling (in the same way that the original file is marked for journaling), but journaling is automatically disabled.
Example: DIRECTORY/FULL command
For example, suppose that file DISK1:[PERSONAL]SAVINGS.DAT had been marked for after-image, before-image, and recovery unit journaling, and it was then backed up using BACKUP. The DIRECTORY/FULL output for the original file and its backed-up version might look like the following example:
$SET FILE/AI_JOURNAL=(FILE=JOURNAL_DISK:CHECKING) SAVINGS.DAT$SET FILE/BI_JOURNAL/RU_JOURNAL SAVINGS.DAT$BACKUP/RECORD SAVINGS.DAT JOURNAL_DISK:SAVINGS.BCK$DIRECTORY/FULL SAVINGS.DATDirectory DISK1:[PERSONAL] SAVINGS.DAT;1 File ID: (675,35,0) Size: 6/6 Owner: [200,201] Created: 27-JAN-1990 12:54 Revised: 19-MAY-1990 14:31 (17) Expires: <None specified> Backup: 12-MAY-1990 07:57 File organization: Indexed, Prolog: 3, Using 1 key File attributes: Allocation: 6, Extend: 0, Maximum bucket size: 2, Global buffer count: 0, No version limit Record format: Fixed length 18 byte records Record attributes: Carriage return carriage control Journaling enabled: AI, BI, RU AI journal: JOURNAL_DISK:[PERSONAL]CHECKING.RMS$JOURNAL;1 BI journal: DISK1:[PERSONAL]SAVINGS.RMS$JOURNAL;1 File protection: System:RWE, Owner:RWED, Group:RE, World:RE Total of 1 file, 426/426 blocks.$DIRECTORY/FULL SAVINGS.BCKDirectory JOURNAL_DISK:[PERSONAL] SAVINGS.BCK;1 File ID: (906,37,0) Size: 6/6 Owner: [200,201] Created: 27-JAN-1990 12:54 Revised: 12-MAY-1990 07:50 (17) Expires: <None specified> Backup: 12-MAY-1990 07:57 File organization: Indexed, Prolog: 3, Using 1 key File attributes: Allocation: 6, Extend: 0, Maximum bucket size: 2, Global buffer count: 0, No version limit Record format: Fixed length 18 byte records Record attributes: Carriage return carriage control Journaling enabled: AI (disabled by BACKUP), BI (disabled by BACKUP), RU AI journal: JOURNAL_DISK:[PERSONAL]CHECKING.RMS$JOURNAL;1 BI journal: DISK1:[PERSONAL]SAVINGS.RMS$JOURNAL;1 File protection: System:RWE, Owner:RWED, Group:RE, World:RE Total of 1 file, 424/424 blocks.
The output for SAVINGS.BCK indicates that the file is marked for after-image and before-image journaling, but that journaling is disabled because the file is a backup copy.
2.4. Using the DUMP/HEADER Command
The DUMP/HEADER command shows you whether the file is marked for journaling and whether there are any recovery units active.
Example
The following example is a portion of the output from the DUMP/HEADER command for a file that has been marked for after-image journaling:
$DUMP/HEADER PAYROLL.DATDump of file DISK1:[FINANCE]PAYROLL.DAT;1 on 22-AUG-1990 10:49:43.42 File ID (112,2,0) End of file block 179 / Allocated 179 File Header . . . VAX-11 RMS attributes Record type: Variable File organization: Indexed Journal control flags: After image journal Active recovery units: None . . .
Chapter 3. Using After-Image Journaling
In after-image journaling, all changes to a file are recorded in an after-image journal. These changes can be applied to a backup copy of the file to restore data that has become corrupted or lost.
After-image journaling supports most RMS operations that modify data within an application; see Appendix A, "Support for RMS Services" for a discussion of the specific services that are supported.
3.1. How to Use After-Image Journaling
To use after-image journaling for a file, proceed as follows:

3.2. Marking Files for After-Image Journaling
3.2.1. How to mark files
To mark a file for after-image journaling, use the DCL command SET FILE/AI_JOURNAL. This command specifies that all modifications to the file be recorded in a journal.
Example
For example, to mark the file FINANCE_DISK:SALES.DAT for after-image journaling, use the following command:
$ SET FILE/AI_JOURNAL FINANCE_DISK:SALES.DAT
Restrictions
You must use the SET FILE/AI_JOURNAL command from the system where the file is located, which may be different from the system where the application is run.
The file to be journalled must be available with exclusive access (that is, it must already exist and not be currently opened by any process).
3.2.2. Unmarking files for after-image journaling
To discontinue the use of after-image journaling for a file, use the SET FILE/NOAI_JOURNAL command to unmark the file. For example:
$ SET FILE/NOAI_JOURNAL FINANCE_DISK:SALES.DAT
You must use the SET FILE/NOAI_JOURNAL command before deleting a file that is marked for after-image journaling.
3.2.3. Remarking files for after-image journaling
If you issue more than one SET FILE/AI_JOURNAL command for the same file, only the most recent command applies. You cannot mark a file for afterimage journaling to more than one journal at a time. However, you can use the command SET FILE/AI_JOURNAL=FILE to change the journal for a file that is already marked for after-image journaling.
Example
For example, suppose that the file SALES.DAT was originally marked for after-image journaling using the keyword FILE=JNL_DISK: to use the journal JNL_DISK:SALES.RMS$JOURNAL. You can change the journal to a new journal, JNL_DISK:WEEKLY.RMS$JOURNAL, with the following command:
$ SET FILE/AI_JOURNAL=(FILE=JNL_DISK:WEEKLY,CREATE) SALES.DAT
3.2.4. Deleting superseded files
If after-image recovery is required, the RMS Recovery utility uses both the old and newly created journals to restore your file. To save disk space and improve performance during the recovery operation, make a backup copy of the modified file that points to the new journal. Once you have created a new journal and made a backup copy of the modified file, you can delete the previous backup copy of the file and the original journal.
Note
If other files were also using the old journal, or if the journal was also being used for before-image journaling, then you must back up each of the files to point to the new journal before you can safely delete the original journal.
3.3. Creating After-Image Journals
You must make sure that a journal exists when you mark a file for after-image journaling.
To create a new journal, use the SET FILE/AI_JOURNAL command with either or both of the keywords CREATE or FILE.
CREATE keyword
The CREATE keyword causes a new journal to be created. Use the CREATE keyword if no journal exists or to create a new version of an existing journal.
If disk space is limited, you may want to create new journals on a regular basis (making new backup copies of the data file at the same time), to limit the size of the journal.
FILE keyword
The FILE keyword specifies the location and file name of the journal. The FILE keyword is required with the SET FILE/AI_JOURNAL command.
3.3.1. Locating after-image journals
If you are using after-image journaling to protect against a loss of data due to device failure, you should always maintain your after-image journal on a different volume from the one where your data file resides. Then, if a disk head crash or other similar event occurs that corrupts data on one of the volumes, either the original file or its journal and backup copy will remain intact.
3.3.2. Default file specification
The default file specification for an after-image journal is the same as the file specification of the file that you mark for after-image journaling, except that its file type is .RMS$JOURNAL. To maintain the journal on a different volume from the data file, be sure to override the default device specification when you use the FILE keyword. If you mark a file for after-image journaling and specify a journal that is on the same volume as the file, a warning message (INVAILDEV) is issued.
Example
For example, suppose that you want to use after-image journaling on the file FINANCE_DISK:[PAYROLL]WEEKLY.DAT, and that you want to keep the journal on the volume JOURNAL_DISK. To mark this file for after-image journaling and create a new journal, use the following command:
$ SET FILE/AI_JOURNAL=(FILE=JOURNAL_DISK:,CREATE) -
_$ FINANCE_DISK:[PAYROLL]WEEKLY.DAT
This command creates a journal with the file specification JOURNAL_ DISK:[PAYROLL]WEEKLY.RMS$JOURNAL.
3.3.3. After-image journal file protection
When you create a journal for after-image journaling, the file protection for the journal is determined as follows:
If a version of the journal that you specify with the CREATE keyword already exists, then the new version of the journal has the same file protection and access control list (ACL) as the most recent version.
If there is no existing journal, then the file protection and ACL of the journal are the default file protection for the process that creates the journal, except that none of the four ownership categories (system, owner, group, world) is given delete access.
Note
The file protection for the journal is not based on the file protection or ACL for any of the files that you mark for journaling.
3.3.4. Security and access issues
Since the file protection for an after-image journal is not necessarily the same as any of the files marked for after-image journaling, two problems can arise:
The journal may not allow write access to users who have access to one or more data files. This will prevent users from writing to those data files.
The journal may allow access to users who do not have access to one or more data files. This could create a security problem by allowing users access to restricted data.
To avoid both of these problems, ensure that the file protection or ACL for the journal allows write access to all users who might have write access to any of the data files in your application, but only to those users.
3.3.5. Journaling multiple files to the same journal
Each file can point to only one after-image journal at any one time. However, a single after-image journal can record changes from many files. If recovery is required, you can restore any or all of the files by using the single journal.
For performance reasons, you may want to limit the number of journals that you use. In general, you can reduce the amount of journaling-related I/O in your application by reducing the number of journals.
Example
The following example illustrates how to associate more than one file with a single journal:
$ SET FILE/AI_JOURNAL=(FILE=JOURNAL_DISK:WEEKLY,CREATE) -
_$ FINANCE_DISK:PAYROLL.DAT
$ SET FILE/AI_JOURNAL=(FILE=JOURNAL_DISK:WEEKLY) -
_$ FINANCE_DISK:EXPENSES.DAT
$ SET FILE/AI_JOURNAL=(FILE=JOURNAL_DISK:WEEKLY) -
_$ SALES_DISK:SALES.DAT
The first SET FILE/AI_JOURNAL command in this sequence marks the file FINANCE_DISK:PAYROLL.DAT for after-image journaling, and creates the journal JOURNAL_DISK:WEEKLY.RMS$JOURNAL (in the current default directory).
The second and third SET FILE/AI_JOURNAL commands mark the files EXPENSES.DAT and SALES.DAT for after-image journaling, and set JOURNAL_ DISK:WEEKLY.RMS$JOURNAL to be the journal for each of these as well.
Note that the data files are on different volumes (FINANCE_DISK and SALES_ DISK), and that the single journal is on a different volume (JOURNAL_DISK) from both data files.
3.3.6. Setting size parameters for journals
When you create a journal, you can set the initial size and the default extension quantity for the journal to help optimize the performance of your application. Use the ALLOCATION and EXTENSION keywords with the SET FILE_AI_ JOURNAL command to set the size parameters.
ALLOCATION keyword
The ALLOCATION keyword specifies, in blocks, the initial size of the journal. If you do not use the ALLOCATION keyword when you create a journal, the journal will have a small initial allocation.
EXTENSION keyword
The EXTENSION keyword specifies, in blocks, an extension quantity for the journal. If you do not use the EXTENSION keyword when you create a journal, RMS calculates its own EXTENSION value for the journal.
Example: setting journal size
For example, the following SET FILE command specifies an initial allocation of 100 blocks and an extension quantity of 20 blocks:
$ SET FILE/AI_JOURNAL=(FILE=JOURNAL_DISK:,CREATE,ALLOCATION=100, -
_$ EXTENSION=20) FINANCE_DISK:[PAYROLL]WEEKLY.DAT
For more information about using the ALLOCATION and EXTENSION keywords, see the Guide to OpenVMS File Applications.
3.4. Making Backup Copies of Data Files
To recover a file using after-image journaling, you must have a backup copy of the file.
Note
Digital recommends that you back up your file each time you use the SET FILE/AI_JOURNAL command, even if the file contains no data. The backup copy should not reside on the same volume as the original file.
3.4.1. Using the BACKUP command
The backup copy must be made using the BACKUP command. Do not use the COPY command for this, because the copy you make will not have the proper file attributes. When you back up your file, the Backup utility must have exclusive access to the file, so do not use the /IGNORE=INTERLOCK qualifier with the BACKUP command.
You must make the backup copy of the file after you mark the file for after-image journaling, because file header information specific to journaling is generated when you mark the file for journaling, and this information must be included in the backup copy.
3.4.2. Using the /RECORD qualifier
After-image recovery begins at the point where the most recent backup was made. Use the /RECORD qualifier with the BACKUP command to place a marker in the journal where the last backup was made; this reduces the processing required for after-image recovery.
If you back up a file, but do not use the /RECORD qualifier, you can still recover your data using after-image recovery; however, the recovery process will take longer, because you will redo more operations.
Example
For example, suppose that you used the following command to mark the file FINANCE_DISK:WEEKLY.DAT for after-image journaling:
$ SET FILE/AI_JOURNAL=(FILE=JOURNAL_DISK:) WEEKLY.DAT
To back up the file WEEKLY.DAT to a tape on device MTA0, issue the following command:
$ BACKUP/RECORD FINANCE_DISK:[PAYROLL]WEEKLY.DAT -
_$ MTA0:WEEKLY.BCK/LABEL=FIN_BCK
3.4.3. Files disabled for journaling
When you back up a file marked for after-image journaling, the backup copy is marked for after-image journaling, and a bit in the file header is set as disabled for journaling. The backup copy has the same attributes as the original file, except that the backup file cannot be opened for write operations. If the backup copy were not disabled for after-image journaling, then the journal would contain not only the changes to the original file, but also any data written to the backup copy during a recovery operation.
If you attempt to write to the backup copy of a file that has been marked for journaling, RMS returns an error message (with the status RMS$_JND) saying that the file has been marked for journaling and that journaling is disabled.
3.5. RMS I/O Errors During After-Image Journaling
RMS operations can fail, issuing unexpected I/O error messages such as RMS$_ WER, ‘‘file write error,’’ or RMS$_WBE, ‘‘error on write behind.’’ If the file is marked for after-image journaling, these error messages mean that the I/O operation to the file failed but was recorded in the after-image journal.
3.5.1. Making data files consistent
If you are using both after-image and recovery unit journaling, and an RMS I/O operation fails with an unexpected I/O error message, abort the transaction immediately. Aborting the transaction makes the after-image journal consistent with the data file.
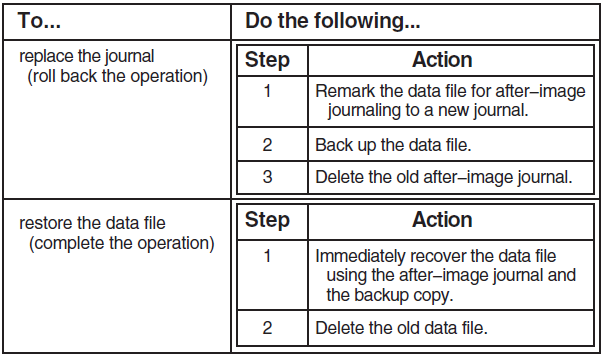
If you are using only after-image journaling, the data file and the journal are not made consistent automatically. You can make them consistent by either replacing the journal or restoring the data file, as shown in the following table.
3.6. After-Image Recovery
In after-image recovery, the changes that have been recorded in the journal are applied to the backup file by the RMS Recovery utility. The backup file is restored to the state of the original file at the time when the last entry was made in the journal, or the time specified with the /UNTIL qualifier.
3.6.1. Requirements
After-image recovery requires the following:
A valid backup copy of the data file.
After-image journals for the entire period from the time the backup was done to the time at which after-image recovery is to end. If the data file was unmarked for after-image journaling at any time between the last backup and the time you specify for ending after-image recovery, after-image recovery can only recover the file to the first time when the file was unmarked.
3.6.2. Using after-image recovery
To invoke after-image recovery for a file, use the DCL command RECOVER/RMS_ FILE/FORWARD, using the backup copy of the file as the parameter to the command. Use the /UNTIL qualifier to specify the date and time to which the file is to be rolled forward.
Caution
Because the backup file is altered during after-image recovery, Digital recommends that you also back up your backup file before beginning the recovery procedure, to protect against system failures during the recovery operation.
Example
For example, suppose you mark a file for after-image journaling and then make a backup copy of the file with the following commands:
$ SET FILE/AI_JOURNAL=(FILE=JOURNAL_DISK:) -
_$ FINANCE_DISK:[PAYROLL]WEEKLY.DAT
$ BACKUP/RECORD FINANCE_DISK:[PAYROLL]WEEKLY.DAT -
_$ BACKUP_DISK:WEEKLY.BCK
Subsequently, a hardware failure on FINANCE_DISK corrupts the file WEEKLY.DAT. To recover the updates that were made to WEEKLY.DAT, enter the following command:
$ RECOVER/RMS_FILE/FORWARD BACKUP_DISK:WEEKLY.BCK
3.6.3. Using the /JOURNAL qualifier
By default, the RECOVER/RMS_FILE command uses the journal that was assigned to the file by the SET FILE/AI_JOURNAL command. In the previous example, the journal JOURNAL_DISK:[PAYROLL]WEEKLY.RMS$JOURNAL is used.
You must use the /JOURNAL qualifier to identify the after-image journal, if the journal:
Has been moved from its original directory
Has a different file name
Has been restored to disk from magnetic tape
3.6.4. Starting point for after-image recovery
After-image recovery always begins at the first entry in the journal after the most recent BACKUP/RECORD command for the data file. If there has never been a BACKUP/RECORD command for the data file, after-image recovery begins with the first entry in the journal.
3.6.5. Ending after-image recovery
By default, after-image recovery continues up to the point of the most recent entry in the journal. However, there may be instances where you want to override this default, such as when you suspect that a recent data entry has corrupted the data file. You can specify the time at which after-image recovery is stopped using the /UNTIL qualifier, as follows:
$ RECOVER/RMS_FILE/FORWARD/UNTIL=8:00 WEEKLY.BCK
In this example, after-image recovery begins at the point where the most recent BACKUP/RECORD command was issued, and it continues only until 8:00 a.m. of the current day.
3.6.6. Using the /UNTIL qualifier more than once
If you restore a file to its state at a specific time using the /UNTIL qualifier, you can perform subsequent after-image recoveries only if you specify a later time with the /UNTIL qualifier.
For example, if you had rolled the backup copy forward to 10:00 a.m., you could then roll the file forward further (for example, to 11:00 a.m.). Once you have rolled the file forward to 11:00 a.m., however, you cannot roll it backward to an earlier time, because the journal no longer contains updates that were made before 11:00 a.m.
3.6.7. Recovering multiple files
If more than one file becomes corrupted, you can recover the files using one or multiple RECOVER commands, whether or not the same after-image journals were used for all files.
For example, suppose you mark two files for after-image journaling and back up the files, as follows:
$ SET FILE/AI_JOURNAL=(FILE=JOURNAL_DISK:WEEKLY_PAY,CREATE) -
_$ FINANCE_DISK:PAYROLL.DAT
$ BACKUP/RECORD FINANCE_DISK:PAYROLL.DAT BACKUP_DISK:PAYROLL.BCK
$ SET FILE/AI_JOURNAL=(FILE=JOURNAL_DISK:WEEKLY_EXPENSE,CREATE) -
_$ FINANCE_DISK:EXPENSES.DAT
$ BACKUP/RECORD FINANCE_DISK:EXPENSES.DAT BACKUP_DISK:EXPENSES.BCK
Subsequently, a system failure corrupts both PAYROLL.DAT and EXPENSES.DAT. To recover the lost updates, you can enter the following commands:
$ RECOVER/RMS_FILE/FORWARD BACKUP_DISK:PAYROLL.BCK
$ RECOVER/RMS_FILE/FORWARD BACKUP_DISK:EXPENSES.BCK
or:
$ RECOVER/RMS_FILE/FORWARD BACKUP_DISK:PAYROLL.BCK, -
_$ BACKUP_DISK:EXPENSES.BCK
In the latter case, the RMS Recovery utility uses the respective journals for each of the files.
3.6.8. Recovery with multiple after-image journals
If you have used a series of journals for after-image journaling and have not made a backup copy of your data file after the most recent SET FILE command that created or identified a new journal, you can still use after-image recovery, as long as:
At least one valid backup copy of the data file is available
After-image journaling has been in effect continuously
To use after-image recovery, enter the same RECOVER command as if there were only a single journal; however, you must enter the command as many times as you have journals. The first RECOVER command uses the journal in effect when the most recent BACKUP/RECORD command was used, and subsequent RECOVER commands use the respective after-image journals. Whenever there are one or more journals remaining to be processed, the RMS Recovery utility issues an informational message to that effect.
Example
For example, suppose that you have used the following sequence of commands, where the ellipsis represents a period when changes were made to the file WEEKLY.DAT:
$ SET FILE/AI_JOURNAL=(FILE=BCK_DISK:FIRST_JNL,CREATE) WEEKLY.DAT
$ BACKUP/RECORD WEEKLY.DAT BCK_DISK:WEEKLY.BCK
   .
   .
   .
$ SET FILE /AI_JOURNAL=(FILE=BCK_DISK:SECOND_JNL,CREATE) WEEKLY.DAT
   .
   .
   .
It then becomes necessary to recover the file, and you enter the recover commands in the following example:
$ RECOVER/FORWARD/LOG BCK_DISK:WEEKLY.BCK
After the first RECOVER command (), the RMS Recovery utility
informs you that an additional journal (SECOND_JNL.RMS$JOURNAL) remains to be processed. No such
message is issued after the next RECOVER command (), which means
that the current after-image journal is the final one to be processed.
3.6.9. Reenabling after-image journaling for recovered files
When you issue the RECOVER/RMS_FILE/FORWARD command, the RMS Recovery utility does not change any of the file attributes of the backup copy that it restores. Because the backup copy is disabled for journaling, the restored file is also disabled for journaling.
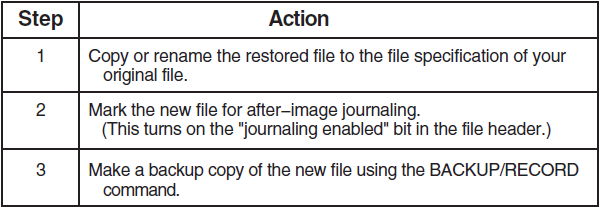
To use after-image journaling with the restored file, you must re-enable afterimage journaling for the file, by using the following procedure:
Example
For example, suppose that you start after-image journaling and back up your data file with the following commands:
$ SET FILE/AI_JOURNAL=(FILE=JOURNAL_DISK:) FINANCE_DISK:[PAYROLL] -
_$ WEEKLY.DAT
$ BACKUP/RECORD FINANCE_DISK:[PAYROLL]WEEKLY.DAT BACKUP_DISK:WEEKLY.BCK
Then, after a system failure, you use the following command to recover the file:
$ RECOVER/RMS_FILE/FORWARD BACKUP_DISK:[PAYROLL]WEEKLY.BCK
The RMS Recovery utility modifies the file BACKUP_DISK:WEEKLY.BCK to restore the data that was lost from the original file. The restored file is marked for journaling because the original file was marked for journaling, but it is also disabled for journaling because it was a backup copy. To use this file as your data file (replacing the old WEEKLY.DAT), issue the following sequence of commands:
$ COPY BACKUP_DISK:[PAYROLL]WEEKLY.BCK FINANCE_DISK:[PAYROLL]WEEKLY.DAT
$ SET FILE/AI_JOURNAL=(FILE=JOURNAL_DISK:) FINANCE_DISK:[PAYROLL] -
_$ WEEKLY.DAT

$ BACKUP/RECORD FINANCE_DISK:[PAYROLL]WEEKLY.DAT BACKUP_DISK:WEEKLY.BCK
Chapter 4. Using Before-Image Journaling
In before-image journaling, copies of records are entered in a before-image journal before the records are changed. If you need to restore a file to a previous state because of the introduction of bad or incorrect data into the file, the changes are undone in reverse chronological order during before-image recovery.
Before-image journaling supports most RMS operations that modify data within an application; see Appendix A, "Support for RMS Services" for a discussion of the specific services that are supported.
4.1. How to Use Before-Image Journaling
To use before-image journaling for a file, proceed as follows:

No backup copy is needed for before-image journaling and recovery. (In afterimage journaling and recovery, a backup copy of the file is required.)
4.2. Marking Files for Before-Image Journaling
To mark a file for before-image journaling, use the DCL command SET FILE/BI_ JOURNAL. This command specifies that a copy of a record be recorded in a journal before the record is modified.
Example
For example, to mark the file FINANCE_DISK:SALES.DAT for before-image journaling, use the following command:
$ SET FILE/BI_JOURNAL FINANCE_DISK:SALES.DAT
Restrictions
You must use the SET FILE/BI_JOURNAL command from the system where the file is located, which may be different from the system where the application is run.
The journal must be on the same system as the data file.
4.2.1. Unmarking files for before-image journaling
To discontinue the use of before-image journaling for a file, use the SET FILE/NOBI_JOURNAL command to unmark the file. For example:
$ SET FILE/NOBI_JOURNAL SALES_DISK:WEEKLY.DAT
You must use the SET FILE/NOBI_JOURNAL command before deleting a file that is marked for before-image journaling.
4.2.2. Remarking files for before-image journaling
If you issue more than one SET FILE/BI_JOURNAL command for the same file, only the most recent command applies. You cannot mark a file for before-image journaling to more than one journal at a time. However, you can use the SET FILE/BI_JOURNAL=FILE command to change the journal for a file that is already marked for before-image journaling.
Example
For example, suppose that the file SALES.DAT was originally marked for before-image journaling using the default journal specification, SALES.RMS$JOURNAL. You can change the journal to a new journal, WEEKLY.RMS$JOURNAL, with the following command:
$ SET FILE /BI_JOURNAL=(FILE=WEEKLY,CREATE) SALES.DAT
4.3. Creating Before-Image Journals
You must make sure that a journal exists when you mark a file for before-image journaling.
To create a new journal, use the SET FILE/AI_JOURNAL command with either or both of the keywords CREATE or FILE.
CREATE keyword
The CREATE keyword causes a new journal to be created. Use the CREATE keyword if no journal exists or to create a new version of an existing journal.
If disk space is limited, you may want to create new journals on a regular basis (making new backup copies of the data file at the same time), to limit the size of the journal.
FILE keyword
The FILE keyword specifies the location and file name of the journal. The default file specification for a before-image journal is the same as the file specification of the file that you mark for before-image journaling, except that its file type is .RMS$JOURNAL. You can override this default using the FILE keyword with the SET FILE/BI_JOURNAL command.
4.3.1. Locating before-image journals
Unlike after-image journaling, there is no need (for data integrity purposes) to keep your data file and journal on different volumes. In before-image journaling, where you are removing bad data from a file that has not been physically corrupted, you are not concerned with the possibility of a device failure.
Example
For example, suppose that you want to use before-image journaling on the file [SALES]WEEKLY.DAT. To mark this file for before-image journaling and create a new journal, use the following command:
$ SET FILE/BI_JOURNAL=(FILE=JOURNAL_DISK:,CREATE) -
_$ FINANCE_DISK:[SALES]WEEKLY.DAT
This command marks the file WEEKLY.DAT for before-image journaling, and it creates the journal WEEKLY.RMS$JOURNAL on the volume JOURNAL_DISK with the default directory specification. Thus, the file specification for the journal will be JOURNAL_DISK:[SALES]WEEKLY.RMS$JOURNAL.
4.3.2. Before-image journal file protection
The security and access issues for before-image journals are the same as for after-image journals. The file protection and ACL for the journal that you create are based on either an existing version of the journal or on the default file protection for the process that creates the journal. The file protection is not based on the file protection of the data file that you mark for before-image journaling.
For more information, see the section Section 3.3.3, ''After-image journal file protection'' in Chapter 3, "Using After-Image Journaling".
4.3.3. Journaling multiple files to the same journal
Each file can point to only one before-image journal at any one time. However, a single before-image journal can record changes from many files. If recovery is required, you can restore any or all of the files by using the single journal.
For performance reasons, you may want to limit the number of journals that you use. In general, you can reduce the amount of journaling-related I/O in your application by reducing the number of journals.
Example
The following example illustrates how to associate more than one file with a single journal:
$ SET FILE/BI_JOURNAL=(FILE=WEEKLY,CREATE) FINANCE_DISK:PAYROLL.DAT
$ SET FILE/BI_JOURNAL=(FILE=WEEKLY) FINANCE_DISK:EXPENSES.DAT
$ SET FILE/BI_JOURNAL=(FILE=FINANCE_DISK:WEEKLY) SALES_DISK:SALES.DAT
The first SET FILE/BI_JOURNAL command in this sequence marks the file FINANCE_DISK:PAYROLL.DAT for before-image journaling, and creates the journal FINANCE_DISK:WEEKLY.RMS$JOURNAL (in the current default directory). The second and third SET FILE/BI_JOURNAL commands mark the files EXPENSES.DAT and SALES.DAT for before-image journaling, and set FINANCE_DISK:WEEKLY.RMS$JOURNAL to be the journal for each of these as well.
4.3.4. Setting size parameters for journals
When you create a journal, you can set the initial size and the default extension quantity for the journal to help optimize the performance of your application. Use the ALLOCATION and EXTENSION keywords to set the size parameters.
ALLOCATION keyword
The ALLOCATION keyword specifies, in blocks, the initial size of the journal. If you do not use the ALLOCATION keyword when you create a journal, then the journal will have a small initial allocation.
EXTENSION keyword
The EXTENSION keyword specifies, in blocks, an extension quantity for the journal. If you do not use the EXTENSION keyword when you create a journal, RMS calculates its own EXTENSION value for the journal.
Example: setting journal size
For example, the following SET FILE command specifies an initial allocation of 100 blocks and an extension quantity of 20 blocks:
$ SET FILE/BI_JOURNAL=(FILE=JOURNAL_DISK:,CREATE,ALLOCATION=100, -
_$ EXTENSION=20) FINANCE_DISK:[PAYROLL]WEEKLY.DAT
For more information about using the ALLOCATION and EXTENSION keywords, see the Guide to OpenVMS File Applications.
4.4. Making Backup Copies of Data Files
When you back up a file marked for before-image journaling, the backup copy is also marked for before-image journaling, and a bit in the file header is set as disabled for journaling. The backup copy has the same attributes as the original file, except that the backup file cannot be opened for write operations.
If you attempt to write to the backup copy of a file that has been marked for journaling, RMS returns an error message (with the status RMS$_JND) saying that the file has been marked for journaling and that journaling is disabled.
4.5. Before-Image Recovery
In before-image recovery, modifications to records in a data file are undone, beginning with the most recent modification and continuing in reverse chronological order to a previous, specified time.
Before-image recovery requires that you have before-image journals for the entire period back to the time when before-image recovery is to end. If the data file was unmarked for before-image journaling at any time between the time you specify for before-image recovery to end and the present, before-image recovery can only restore the file back to the time when the file was most recently unmarked.
Note
In before-image recovery, unlike after-image recovery, journaling continues to take place. For this reason, before-image recovery can be slower than after-image recovery for comparable amounts of data.
To restore a file using before-image recovery, use the RMS Recovery utility (RECOVER/RMS_FILE).
4.5.1. Using before-image recovery
To invoke before-image recovery for a file, use the DCL command RECOVER/RMS_FILE/BACKWARD, using the data file as the parameter to the command. Use the /UNTIL qualifier to specify the date and time to which the data file is to be rolled back.
Example
For example, suppose that you mark a file for before-image journaling with the following command:
$ SET FILE/BI_JOURNAL=(FILE=JOURNAL_DISK:WEEKLY,CREATE) -
_$ WORK_DISK:WEEKLY.DAT
Subsequently, a data entry operator enters information that causes the data in WEEKLY.DAT to be invalid. To restore WEEKLY.DAT to its condition at a previous date and time (for example, its state as of 8:30 a.m. of the current day), enter the following command:
$ RECOVER/RMS_FILE/BACKWARD/UNTIL=8:30 WORK_DISK:WEEKLY.DAT
4.5.2. Using the /JOURNAL qualifier
By default, the RECOVER/RMS_FILE command uses the journal that was assigned to the file by the SET FILE/BI_JOURNAL command. In the previous example, the journal JOURNAL_DISK:WEEKLY.RMS$JOURNAL would be used.
You must use the /JOURNAL qualifier to identify the before-image journal, if the journal:
Has been moved from its original directory
Has a different file name
Has been restored to disk from magnetic tape
4.5.3. Starting and ending points for before-image recovery
Before-image recovery begins by undoing the most recent change, then continuing to undo changes (rolling back the file) to the date and time specified by the /UNTIL qualifier.
If you use the RECOVER/RMS_FILE/BACKWARD command without using the /UNTIL qualifier, the data file is automatically rolled back to the point where the first entry was made in the journal being used.
4.5.4. Using the /UNTIL qualifier more than once
In before-image recovery, there are no restrictions on using the /UNTIL qualifier on successive RECOVER/BACKWARD commands to specify earlier or later times. That is, you can roll back a file until 9:00 a.m., then issue a command to roll the file back until 11:00 a.m. the same day. This is possible because before-image journaling continues to take place during before-image recovery.
If you are not sure when the bad or incorrect data was introduced into the data file, you can issue a series of before-image recovery commands to roll back the data file to successively earlier dates and times.
4.5.5. Recovering multiple files
If more than one data file becomes corrupted, you can recover the files using one or multiple RECOVER commands, whether or not the same before-image journals were used for all files.
For example, suppose you mark two files for before-image journaling, as follows:
$ SET FILE/BI_JOURNAL=(FILE=WEEKLY_PAY,CREATE) PAYROLL.DAT
$ SET FILE/BI_JOURNAL=(FILE=WEEKLY_EXPENSE,CREATE) EXPENSES.DAT
Then, some line noise corrupts records in both of the files. To restore the files to their states as of noon on March 17, 1990, enter the following commands:
$ RECOVER/RMS_FILE/BACKWARD/UNTIL=17-MAR-1990:12 PAYROLL.DAT
$ RECOVER/RMS_FILE/BACKWARD/UNTIL=17-MAR-1990:12 EXPENSES.DAT
or:
$ RECOVER/RMS_FILE/BACKWARD/UNTIL=17-MAR-1990:12 PAYROLL.DAT, -
_$ EXPENSES.DAT
In the latter case, the RMS Recovery utility uses the respective journals for each of the files.
4.5.6. Recovery with multiple before-image journals
If you have used a series of journals for before-image journaling and you use a time value for /UNTIL that is prior to the most recent journal, then you will have to issue a series of RECOVER/BACKWARD commands.
Example
For example, suppose that you have used the following sequence of commands, where the ellipsis represents a time period when changes were made to the file WEEKLY.DAT:
$ SET FILE/BI_JOURNAL=(FILE=WORK_DISK:[SALES]FIRST_JNL,CREATE) WEEKLY.DAT
   .
   .
   .
$ SET FILE/BI_JOURNAL=(FILE=WORK_DISK:[SALES]SECOND_JNL,CREATE) -
_$ WEEKLY.DAT
   .
   .
   .
Then it becomes necessary to use before-image recovery. You give the same RECOVER command as if there were only a single journal; however, you must use as many RECOVER commands as you have journals. The first RECOVER command automatically uses the journal in effect when the most recent SET FILE/BI_JOURNAL command was used, and subsequent RECOVER commands automatically use the respective before-image journals. Whenever there are one or more journals remaining to be processed, the RMS Recovery utility issues an informational message to that effect. For example:
$ RECOVER/BACKWARD/UNTIL=26-JUL-1990:14/LOG WEEKLY.DAT
After the first RECOVER command (), the RMS Recovery utility
informs you that an additional journal (FIRST_JNL.RMS$JOURNAL) remains to be processed. No
such message is issued after the next RECOVER command (), which
means that the current before-image journal is the final one to be processed.
4.5.7. Availability of journalled files
During before-image recovery, data files are available only to the RMS Recovery utility, and no other updates can be made to them. When before-image recovery is complete, you can use both the data files and the before-image journal without any further actions.
Caution
Before-image journaling may not be fully successful in restoring files that use pointers to other files. For example, in the Mail utility, brief messages are maintained in the mail file (generally MAIL.MAI), but longer messages are contained in discrete files with only a pointer in MAIL.MAI. When you delete one of the longer messages, the pointer in MAIL.MAI is deleted and the file containing the message is automatically erased. If you attempt to recover the deleted message, before-image journaling will restore the pointer information that was in the MAIL.MAI file, but it cannot restore the discrete file that contained the actual message, because that file was not marked for before-image journaling.
Chapter 5. Using Recovery Unit Journaling
Recovery unit journaling is used when the consistency of your data can be affected by an interruption of an application that changes the data, and the data consistency depends upon a series of RMS operations, or one or more RMS operations combined with operations on a DEC Rdb or a DEC DBMS database.
5.1. Basic Concepts
5.1.1. Transactions
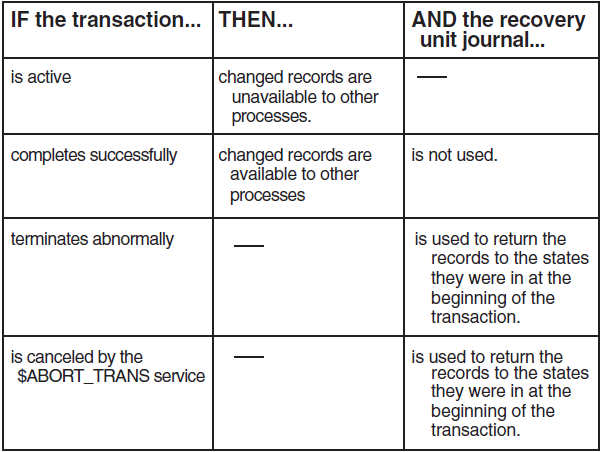
A transaction is a group of related operations that occur in an application program. The operations within a transaction either will all be completed or will not be done at all, as described in the following table.

Transactions are defined using the DECdtm transaction services.
File records that are changed within a transaction cannot be accessed for further processing outside the transaction (for example, by another process) until the transaction is complete.
5.1.2. Recovery units
An RMS recovery unit is a set of RMS operations within a transaction that are performed in the context of a single process. RMS recovery units are started automatically by RMS and are committed or aborted along with the transaction to which they belong.
Both local and remote files can be associated with a transaction. If a transaction includes remote files, each remote file has its own recovery unit, which is journalled and recovered transparently by RMS on the remote node.
5.1.3. Recovery unit journals
In recovery unit journaling, a copy of the original state of each record changed in a recovery unit is kept in a temporary recovery unit journal. If a transaction includes files accessed by more than one process, each process has its own recovery unit journal.
5.1.4. Transaction states
The status of records changed in a transaction and of the recovery unit journal is summarized in the following table.
5.2. DECdtm and RMS Journaling
5.2.1. Resource managers
DECdtm software coordinates transactions among participating resource managers. RMS is considered a resource manager by DECdtm. (DEC Rdb and VAX DBMS are two other resource managers that can participate in transactions managed by DECdtm.) For more information on DECdtm, see the VSI OpenVMS System Manager's Manual and the VSI OpenVMS Programming Concepts Manual.
If RMS is running in more than one process (typically, on different nodes connected by a network), each instance of RMS is considered a different resource manager. A transaction can involve one or more resource managers within a single process, resource managers within multiple processes on the same node, or resource managers within multiple processes on different nodes within a network.
5.2.2. Resource manager responsibilities
Each resource manager is responsible for providing recovery capabilities for its own recoverable resources by performing transaction logging or journaling. The DECdtm transaction manager is responsible for notifying all resource managers participating in a transaction of all relevant transitions between transaction states. DECdtm keeps track of the state of each transaction in case a system or process fails before the transaction is completed. When a resource manager attempts to recover a resource that has been involved in a failed transaction, the resource manager may need to ask DECdtm for the state of a transaction to determine whether to make the effects of the transaction on this resource permanent or to remove them.
Restrictions on recovery unit journaling
All files involved in a transaction must be on nodes that support DECdtm (that is, each node must be running VMS Version 5.4 or later) and that are licensed for RMS Journaling.
5.2.3. Committing a transaction
At the end of a transaction, the DECdtm transaction manager directs RMS to commit the transaction. DECdtm supports both one- and two-phase commit protocols.
Two-phase commit protocol
To ensure that distributed transactions are either completed or, in the case of failure, rolled back, DECdtm provides a two-phase commit protocol for the $END_TRANS service. The two-phase commit protocol ensures that all resource managers participating in a transaction commit the transaction consistently, even when each resource manager is using a separate recovery unit journal. These are the phases of a two-phase commit protocol:
Phase one: prepare phase
Phase one is called the prepare phase. In this phase, DECdtm sends a ‘‘prepare to commit’’ message to all resource managers participating in the transaction and returns a success status to the application. At this point, DECdtm waits while the results from the participants are collected. RMS performs work such as buffer flushing, and RMS Journaling includes a prepare record in its journals and notifies the DECdtm transaction manager that it is prepared. If all resource managers offer to commit, the transaction has reached the prepare state.
If any resource manager fails to prepare, DECdtm orders all resource managers to abort the transaction, and RMS Journaling writes abort records to its journals.
Phase two: commit phase
Phase two is called the commit phase. If all of the resource managers successfully completed the prepare phase, DECdtm orders the resource managers to commit the transaction. Although the resource managers have not finished their commit processing, the transaction is guaranteed to eventually complete. RMS then completes any additional work needed to commit the transaction and writes commit records to its journals.
Prepare, commit, and abort records are written to long-term (after-image or before-image) journals as well as to the recovery unit journal (or journals). Those records can later be used to determine the outcome of a transaction.
One-phase commit protocol
DECdtm also provides a one-phase commit protocol, in which RMS commits the transaction immediately, without using the prepare phase of the two-phase commit protocol. RMS then performs any cleanup required and writes commit records to its journals.
The one-phase commit protocol can be used if all of the following conditions are present in the transaction:
A local RMS file
Only one after-image or before-image journal
Only one resource manager (for example, RMS or DEC Rdb)
5.3. How to Use Recovery Unit Journaling
To use recovery unit journaling, proceed as follows:

Note
To use recovery unit journaling, DECdtm must be started. To start DECdtm, make sure the following logical name is not defined:
SYS$DECDTM_INHIBIT (defined /SYSTEM/EXEC)
5.4. Marking Files for Recovery Unit Journaling
5.4.1. How to mark files
To mark a file for recovery unit journaling, use the DCL command SET FILE/RU_ JOURNAL. This command starts recovery unit journaling for the file when the appropriate DECdtm transaction services are included in the application program.
Example
For example, to mark the file FINANCE_DISK:[PAYROLL]WEEKLY.DAT for recovery unit journaling, use the following command:
$ SET FILE/RU_JOURNAL FINANCE_DISK:[PAYROLL]WEEKLY.DAT
Restriction
You must use the SET FILE/RU_JOURNAL command from the system where the file is located, which may be different from the system where the application is run.
5.4.2. Transactions and unmarked files
If an application program defines a transaction that includes a file that is not marked for recovery unit journaling, then the transaction services have no effect on that file when the program is executed. The transaction services return success messages (because the services themselves were successfully called), even though no recovery unit journaling is actually taking place.
Note
If you mark a file for recovery unit journaling, you must also define transactions for any portions of an application that can change the specified file.
5.4.3. Unmarking files for recovery unit journaling
To discontinue the use of before-image journaling for a file, use the SET FILE/NOBI_JOURNAL command to unmark the file. For example:
$ SET FILE/NORU_JOURNAL SALES_DISK:WEEKLY.DAT
You must use the SET FILE/NORU_JOURNAL command before deleting a file that is marked for recovery unit journaling.
5.5. Recovery Unit Journals
5.5.1. Creating journals
Recovery unit journals are temporary files; they are created and deleted automatically by RMS Journaling. RMS Journaling automatically creates a recovery unit journal when the first record stream associates with a transaction, even if the transaction does not modify any records.
A single recovery unit journal is used for all local files, but each remote file associated with the transaction has its own recovery unit journal.
5.5.2. Idle journals
When a transaction ends, the recovery unit journals used for that transaction become idle. Idle recovery unit journals are not deleted until the application exits. This provides improved performance for an application that uses multiple transactions.
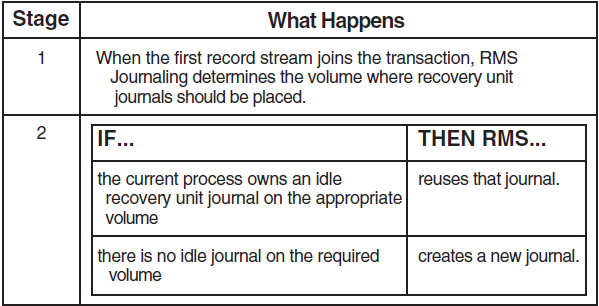
5.5.3. Reusing journals
Each recovery unit has exclusive use of a separate recovery unit journal. Under certain circumstances, however, a journal can be used later by the same process. The following table shows how a journal can be reused by RMS.
5.5.4. Location of recovery unit journals
Recovery unit journals are always created in the [SYSJNL] directory, which is inaccessible to nonprivileged users. In general, you should not modify the file protection for either the [SYSJNL] directory or the journals that are placed in it.
Specifying a location for the recovery unit journal for a file does not guarantee that the recovery unit journal will be located on the named device or volume. Any active transaction has only one recovery unit journal for local files. Thus, if many files are involved in a transaction, a single recovery unit journal is used, even if different locations for the journals were specified (for individual files) with different SET FILE/RU_JOURNAL commands.
5.5.5. Effect on performance
The placement of the recovery unit journal can influence both the performance and the availability of your application. Placing a journal on a volume separate from all data files may improve performance. Remember that the application depends on both volumes being available, to access both the data file and its journal.
5.5.6. Determining volume placement
You can determine the volume placement for a recovery unit journal by using three different methods:
Default placement
SET FILE/RU_JOURNAL=LABEL command
XABITM item list entry XAB$_RUJVOLNAM
5.5.7. Default placement
By default, the recovery unit journal is on the same volume as the file associated with the first record stream that joins the transaction. If RMS journaling does not find a [SYSJNL] directory, it creates one. The file name for the recovery unit journal has the form RMS$process_id (where process_id is the hexadecimal representation of the process ID) and a file type of RMS$JOURNAL.
5.5.8. Multifile transactions
When multiple files are used in a transaction, recovery unit journals are assigned as follows:
Local files
A single recovery unit journal is used for all local files, and its location is determined by the first local file that joins the transaction.
Remote files
Each remote file associated with a transaction has its own recovery unit and recovery unit journal. The recovery unit journal resides on the remote system. The volume is chosen in the same way as for local files. Remote files have no effect in determining where the local recovery unit journal resides.
Example
For example, the following pseudocode illustrates an application that uses the files FINANCE_DISK:SALES.DAT and PAYROLL_DISK:WEEKLY.DAT, which have been marked for recovery unit journaling:
$OPEN FINANCE_DISK:SALES.DAT
The following table explains the numbered items in the example.
| Stage | What Happens | |
| The first file opened is FINANCE_DISK:SALES.DAT. | |
| When the $START_TRANS service is called, a transaction begins. | |
| When the first record stream joins the transaction, RMS Journaling looks for the [SYSJNL] directory on PAYROLL _DISK. A journal is chosen as follows: | |
| If a recovery unit journal is... | THEN... | |
| not found | a journal is automatically created | |
| open on volume PAYROLL_DISK for the process running the application | that journal is used. | |
| When the second stream is associated with the transaction, it uses the recovery unit journal selected for the first record 4 stream at the previous stage. | |
In this example, the recovery unit journaling for files PAYROLL_ DISK:WEEKLY.DAT and FINANCE_DISK:SALES.DAT is recorded in the same recovery unit journal, located on PAYROLL_DISK:[SYSJNL]. Even if you had specified the location of the recovery unit journal for the file SALES.DAT (with the DEVICE or LABEL keywords to the SET FILE/RU_JOURNAL command), the location of the recovery unit journal would be determined by the file WEEKLY.DAT, the first file to join the transaction.
5.5.9. SET FILE /RU_JOURNAL command
You can override the default volume for recovery unit journals by using either the DEVICE or LABEL keywords with the SET FILE/RU_JOURNAL command on a file by file basis. For example:
SET FILEfilename/RU_JOURNAL=(LABEL=(volume_label)
If a stream connected to the file is the first stream in the process to associate with a
given transaction, then the recovery unit journal is created on the device
DISK$volume_label. The logical name
DISK$volume_label can have different equivalence names for
different processes.
For more information about using the keywords DEVICE and LABEL with the SET FILE/RU_JOURNAL command, see Chapter 8, "DCL Command Reference".
5.5.10. XABITM item list entry
You can also control the placement of a recovery unit journal by using the set-mode XABITM item list entry XAB$_RUJVOLNAM.
When an RMS record service associates a stream with a transaction, and this is the first stream in the process to associate with that specific transaction, then RMS checks to see if the set-mode XABITM item list entry XAB$_RUJVOLNAM is specified with the caller’s RAB. If the XAB$_RUJVOLNAM item list entry is found, the volume name it specifies is prefixed with the string "DISK$", and the resultant string is used to determine the location of the recovery unit journal.
The item list entry XAB$_RUJVOLNAM overrides both the default recovery unit journal placement and a setting specified by using the SET FILE/RU_ JOURNAL=DEVICE or the SET FILE/RU_JOURNAL=LABEL command.
5.6. Coding Your Application
5.6.1. Support for RMS services
Appendix A, "Support for RMS Services" lists the support for individual RMS services when they are applied to a file that is marked for recovery unit journaling.
For shared sequential files, you cannot use STREAM formats (STREAM, STREAM_CR, STREAM_LF, or UNDEFINED).
For sequential files, you cannot use the $TRUNCATE service, nor can you use truncation with the $PUT service.
Block I/O can be used only for files that are opened for read-only access. (Block I/O with write access is not permitted.)
You cannot have write access to a file while using the FAB$V_UPI option, because that option disallows record locking.
5.6.2. Records appended to sequential files
If records are appended to a write-shared sequential file containing fixed-length records using recovery unit journaling, and the transaction is not committed (either the $ABORT_TRANS service is called, or a system failure occurs), recovery unit recovery overwrites each appended record in the transaction with zeros. Subsequent readers of the file will read these zeroed records. This behavior is necessary, because other shared accessors may also have appended records to the file following the zeroed records, and those other record numbers cannot be changed. There is no support for deleted records in sequential files.
5.6.3. When to use transactions
When a file is marked for recovery unit journaling, any modifications to that file by an application must be within a transaction. If changes are attempted outside the context of a transaction, a run-time error with the status RMS$_NRU is returned.
5.6.4. Defining transactions
Use the following DECdtm transaction services to define the beginning and end of a transaction and to cancel a transaction.
In this manual, these services will be referred to as $START_TRANS or the Start Transaction service, and so on.
If you start a transaction with $START_TRANS, you must end it with $END_ TRANS or $ABORT_TRANS.
Note
Recovery Unit Facility (RUF) services, which were used in versions of RMS Journaling prior to Version 5.4, are transparently emulated using DECdtm transaction services. However, Digital recommends that you use the DECdtm services when you write new programs.
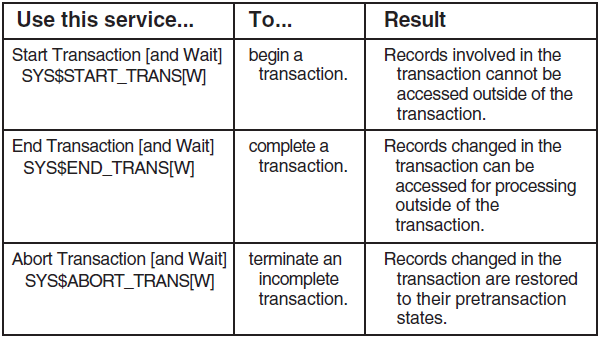
5.6.5. Start transaction [and wait] service
The Start Transaction service, $START_TRANS, starts a transaction and returns a transaction identifier (TID), which uniquely identifies the transaction.
The Start Transaction and Wait service $START_TRANSW is identical to $START_TRANS, but completes synchronously.
5.6.6. End transaction [and wait] service
The End Transaction service, $END_TRANS, commits a transaction to complete. Use the $END_TRANS service when you reach the end of a series of operations that are to be completed either in their entirety or not at all.
The End Transaction service uses the two-phase commit protocol, coordinated by the DECdtm transaction manager, to commit the transaction.
The End Transaction and Wait service $END_TRANSW is identical to $END_ TRANS, but completes synchronously. Unlike the asynchronous version, $END_ TRANSW returns its status after DECdtm issues the order to commit.
5.6.7. Abort transaction [and wait] service
The Abort Transaction service, $ABORT_TRANS, terminates a transaction and restores all records modified during the transaction to their states before the transaction was started. The service invalidates the transaction ID and instructs all participating resource managers to nullify all the actions of the transaction.
If a call to $ABORT_TRANS aborts the transaction, RMS automatically restores the record stream context to its state before the transaction began.
After you abort a transaction, all records modified during the transaction can be accessed for further processing.
Caution
The $ABORT_TRANS service only restores records whose record streams are joined to the transaction and whose files are marked for recovery unit journaling. Changes to files not marked for recovery unit journaling are not undone by the $ABORT_TRANS service.
The Abort Transaction and Wait service $ABORT_TRANSW is identical to $ABORT_TRANS, but completes synchronously.
5.6.8. Calling transaction services
You must call the transaction services in your application program according to the syntax rules of the programming language that you are using.
VSI C
VSI COBOL
You can also run the sample applications on line.
For more information on how to use these services, see the VSI OpenVMS System Services Reference Manual and the documentation for your programming language.
5.6.9. Calling the abort transaction service
The $ABORT_TRANS service can be called by any resource manager (such as RMS) participating in the transaction, as summarized in the following table.

5.7. Associating Record Streams with Transactions
5.7.1. Record streams
A record stream is a logical channel associated with a file. It is generated either by an explicit call to the RMS Connect service, $CONNECT, or by an implicit call to $CONNECT (for example, when you use an OPEN call in a high-level language such as VAX COBOL).
5.7.2. When record streams are associated
An RMS record stream can become associated with a transaction when one of the following RMS services is executed:
$DELETE
$FIND
$FREE
$GET
$PUT
$RELEASE
$REWIND
$UPDATE
These services can associate a stream with a transaction because their work is considered part of the transaction and can be undone if the transaction is aborted.
To be associated with a transaction, a record stream must:
Be connected to a file marked for recovery unit journaling and open for write access
Not be currently associated with a transaction
Note
A stream is only associated with a transaction when a record operation occurs, not when the transaction is started or the stream is established (as was the case using RUF services).
When an application first calls one of the previously mentioned RMS services for a file that is marked for recovery unit journaling, RMS tries to associate the record stream with a transaction in one of two ways:
XABITM item list entry XAB$_TID
Default transaction
5.7.3. Using a XABITM
If a set-mode XABITM with a XAB$_TID item list entry is specified with the caller’s record access block (RAB), RMS associates the record stream with the transaction whose TID is pointed to by the XAB$_TID item list entry.
When you use a high-level language, you can generally use the mask DDTM$M_ NONDEFAULT to set the bit that indicates you are using the XAB$_TID method.
This method is particularly useful for server processes, which are likely to be running multiple transactions concurrently. This method is easy to implement and has low run-time overhead. However, this method may not be available if the application language (for example, COBOL) does not provide access to the RAB.
Examples
The following example shows how a stream can be associated with a specific transaction by using a XABITM:
struct RAB rab1;
The following table explains the numbered items in the example.
| Stage | What Happens |
| RAB1 is a RAB that has been used to connect a record stream to an RMS file that is marked for recovery unit journaling. |
| RAB1 specifies a set−mode XABITM that contains a XAB$_TID item list entry, which in turn specifies the address for a TID. |
| The $START_TRANSW transaction service starts a transaction and returns a TID to the variable TID1. |
| This example does not rely on the default−transaction mechanism for associating record streams, so the transaction is made current by setting the flag DDTM$M_NONDEFAULT to 1. |
| When the $GET service is called, RMS processes the XABITM XAB$_TID item list entry, and the record stream is associated with the transaction specified by the TID in the variable TID1. |
5.7.4. Using the default transaction
If there is no XABITM with a XAB$_TID item list entry specified, RMS associates the record stream with the default transaction. The default transaction is established when the $START_TRANS service is called and the DDTM$M_ NONDEFAULT bit in the flags argument is 0. When the default transaction is ended by using the $END_TRANS or $ABORT_TRANS services, the default transaction becomes undefined.
Examples
The following example shows how a stream can be associated using the default transaction:
struct RAB rab1;
The following table explains the numbered items in the example.
| Stage | What Happens |
| RAB1 is a RAB that has been used to connect a record stream to an RMS file that is marked for recovery unit journaling. |
|
The transaction service $START_TRANSW
|
| When the $GET service is called, the record stream is associated with the default transaction. |
| The $END_TRANSW transaction service commits and ends the transaction. |
5.7.5. When stream association fails
If RMS is unable to select a transaction with either a XAB$_TID item list entry or the default transaction, it responds as follows:
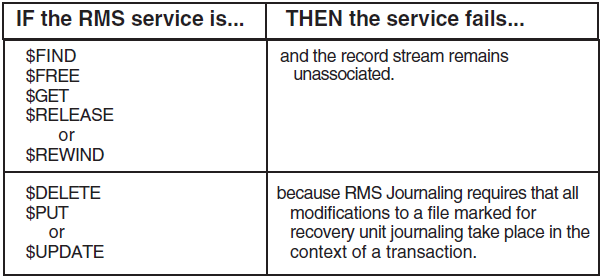
5.7.6. Saving record stream context
When a record stream joins a transaction, RMS stores the current record stream context, including the following:
Current record pointer
Next record pointer
Lock state of all locked records
5.8. Disassociating Record Streams from Transactions
All record streams are disassociated from a transaction by the DECdtm transaction services $END_TRANS and $ABORT_TRANS.
5.8.1. Committed transactions
The transaction service $END_TRANS commits and ends a transaction. When this service is called, DECdtm sends a ‘‘prepare to commit’’ message to all the resource managers participating in the transaction, including RMS.
Busy Streams. If any stream associated with the transaction is still busy, or if RMS encounters an error, RMS refuses to commit by voting NO. When DECdtm receives a NO vote, the following processes take place:

RMS refuses to commit a transaction with associated busy streams, because the outcome of a record operation on a busy stream is not yet determined. Thus, if the application is using asynchronous RMS record operations within a transaction, the application must use the RMS service $WAIT on all associated streams before calling $END_TRANS to commit the transaction.
Only Idle Streams. If all record streams associated with the transaction are idle, RMS proceeds with the preparation to commit. An error during the preparation results in a NO vote. When DECdtm orders RMS to commit, the RMS recovery unit is committed, and all record streams associated with the transaction become disassociated.
5.8.2. Aborted transactions
The transaction service $ABORT_TRANS aborts a transaction. The effects of the transaction are undone and the transaction is ended. When this service is called, DECdtm sends an order to abort to all participating resource managers, including RMS. RMS waits for all record streams associated with the specified transaction to complete any pending activity before proceeding with the abort. When the transaction has been aborted, all record streams associated with the transaction become disassociated.
If a call to $ABORT_TRANS aborts the transaction, RMS automatically restores the record stream context to its state before the transaction began.
5.9. Recovery Unit Recovery
When there is an abnormal interruption of a program and a transaction does not complete successfully, the records modified during that transaction are automatically restored to their pre-transaction states by using copies of the records kept in a recovery unit journal. This process is called recovery unit recovery.
Unlike after-image and before-image recovery, recovery unit recovery takes place automatically. You do not need to enter the RECOVER/RMS_FILE command to start recovery unit recovery.
RMS Journaling has two types of recovery unit recovery: in-place recovery and detached recovery.
5.9.1. In-place recovery
In in-place recovery, the local process performs the recovery as a result of an explicit call to $ABORT_TRANS or of an abnormal termination of the application image. (In the latter case, RMS calls $ABORT_TRANS for all record streams joined to active transactions.)
5.9.2. Detached recovery
In detached recovery, RMS creates a detached process to recover files marked for recovery unit journaling, as a result of process deletion or a node crash. If any process in a VMS cluster system is terminated abnormally with transactions involving an RMS file still active, then detached recovery is required on that file.
When a process is terminated abnormally, active transactions associated with the process are said to be orphaned. When detached recovery is initiated for a file, the detached recovery process adopts any orphaned transactions involving that file.
Detached recovery restores a particular file to a consistent state by undoing the effects of all active transactions whose owning processes were abnormally terminated. Thus, detached recovery can undo the effects of more than one aborted transaction.
5.9.3. Starting detached recovery
Detached recovery is started in one of two ways:
Surviving accessor—If at the time of process deletion or system crash there is at least one surviving accessor of the file, then one of the surviving accessors automatically starts detached recovery.
Any other process that attempts to access records that had been modified by the interrupted process (and are therefore currently locked by detached recovery) must wait until detached recovery completes successfully.
Attempt to access file—If there are no surviving accessors, the recovery takes place when any process next attempts to access the file. (You can start detached recovery by entering the TYPE or DIRECTORY command for the file.)
All $OPEN calls on the file are blocked until detached recovery has restored the file to a consistent state and indicates completion.
Detached recovery can be either asynchronous or synchronous.
5.9.4. Asynchronous recovery
In asynchronous recovery, the detached recovery process performs the following steps to recover a file:
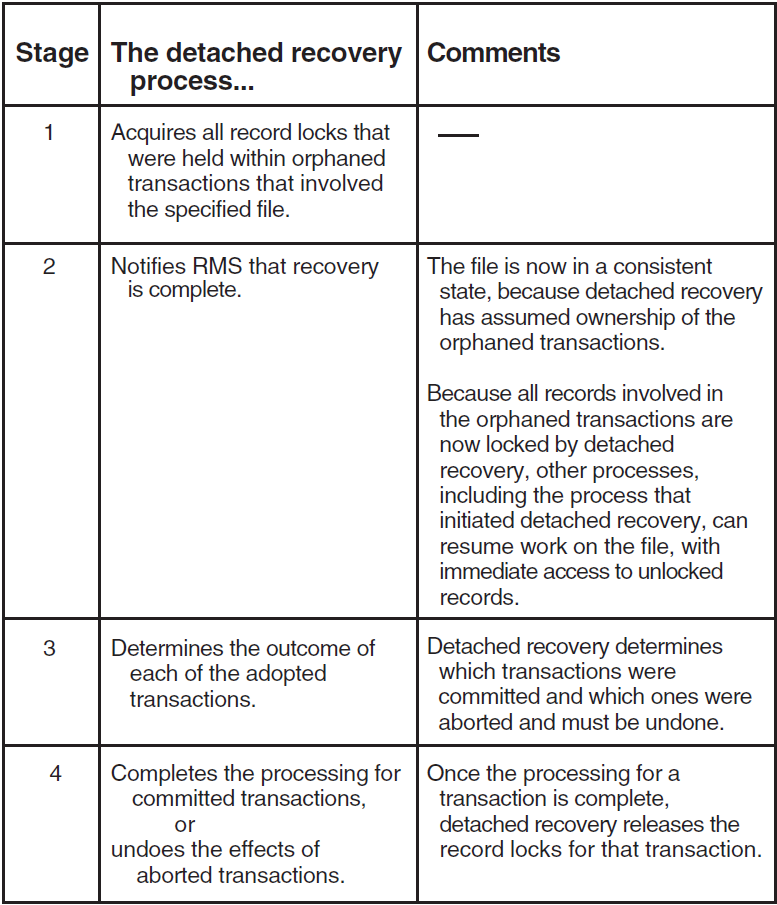
Detached recovery is asynchronous by default. In certain circumstances, synchronous recovery is used.
5.9.5. Synchronous recovery
In synchronous recovery, the detached recovery process does not acquire record locks, but it prohibits access to the file by any other process until recovery is complete. Synchronous recovery is used in the following circumstances:
Limited resources: The detached recovery server does not have enough resources to acquire all of the record locks on the file to be recovered (for example, a very large database with many active transactions).
Exclusive access: The process that starts detached recovery has tried to access the file with exclusive access to modify the file. (It may or may not allow shared read access.) In this case, the accessor will not look for record locks from other processes, and the locks owned by detached recovery can create difficulties for the accessor.
Partial recovery: One or more secondary files are unavailable, so detached recovery cannot acquire all the record locks from an orphaned transaction.
5.9.6. Partial recovery
Full recovery unit recovery cannot take place unless the recovery unit journal and each of the files involved in the recovery unit are available; however, partial recovery is still possible if some of the files are available.
When detached recovery receives a request to recover a file, it tries to recover the effects of all orphaned transactions that involve the file. The specific file for which RMS requests recovery is called the primary file. In addition to the changes made to the primary file, each of the orphaned transactions can also include changes to a number of other files. These additional files are called secondary files.
5.9.7. Recovery of secondary files
Recovery of secondary files is not required to allow access to the primary file. If detached recovery cannot access a secondary file that is referenced in a recovery unit journal for one of the orphaned transactions, then detached recovery cannot adopt that transaction. In this case, detached recovery recovers that particular recovery unit journal in synchronous mode and omits all operations that involve the inaccessible secondary file. Omitting a secondary file is permissible, because it is only necessary to recover the primary file to satisfy the client’s request. All the information necessary to recover the secondary file is left in the recovery unit journal for eventual use in recovering that file.
5.10. Obstacles to Recovery Unit Recovery
5.10.1. Introduction
In several situations, recovery unit recovery can be blocked. These include:
Not knowing the state of a transaction (in-doubt transactions)
Being unable to determine the state of a transaction (limbo state)
Being unable to access recovery unit journals, either temporarily or permanently
5.10.2. In-doubt transactions
In most cases, RMS recovery knows what action to take with a transaction, because a prepare and a commit (or abort) record are included in the recovery unit journal. An in-doubt condition arises if RMS recovery finds a prepare record but does not find a commit or abort record. This happens when a failure occurs after the prepare phase, but before a commit or abort record is written to the recovery unit journal. At this point, RMS is in doubt, because it does not know whether the transaction should be committed or aborted. RMS asks the DECdtm transaction manager for the information required to resolve the issue. The information returned by DECdtm instructs RMS recovery to either commit or abort the transaction.
5.10.3. Limbo state
There are cases when DECdtm cannot determine the outcome of an in-doubt transaction for an indeterminate period of time. If this condition arises, the transaction is said to be in a limbo state.
When detached recovery queries the DECdtm transaction manager about the state of an in-doubt transaction, detached recovery waits until DECdtm can determine whether the transaction should be committed or aborted. If DECdtm cannot determine the result of the transaction (for example, because another node is down), the duration of the wait may be a short or long time, depending on the reason DECdtm cannot gather the information it needs.
RMS does not allow access to records that were modified until the file is properly recovered. However, access to other records in these files is allowed, because the file is in a consistent state once detached recovery reacquires all the record locks on the orphaned transactions. In addition, DECdtm allows the user to force the resolution of limbo transactions by using the REPAIR command in the Log Manager Control Program (LMCP) utility. For more information on LMCP, see the VSI OpenVMS System Management Utilities Reference Manual.
5.10.4. Temporarily unavailable journals
Sometimes the recovery unit journal or one or more other files joined to the recovery unit will be unavailable for recovery. In this case, the ANALYZE/RMS_ FILE/RU_JOURNAL command will give Not Available as the recovery unit state. (Note that the file specifications for the recovery unit journal and any other file connected to the recovery unit are listed in the output for the ANALYZE/RMS_ FILE/RU_JOURNAL command.)
If the volume where the recovery unit journal is located is temporarily unavailable, you can wait until the volume is on line and the recovery unit journal is again available. Once the recovery unit journal is available, you will be able to start detached recovery.
5.10.5. Permanently unavailable journals
In some cases, the recovery unit journal may be permanently unavailable (for example, if the volume has experienced a failure such as a disk head crash, or if the journal has been deleted). Should this occur, the file may contain inconsistent data (due to partially completed transactions). If you have used after-image journaling with the file, then you can recover the file (using the backup copy and the RMS Recovery utility), and restore all changes made up to the time of the beginning of the last transaction. If after-image journaling has not been used, then you can gain access to the data file using the SET FILE/RU_ACTIVE/RU_ FACILITY command. Remember, however, that the data in the file may be inconsistent.
5.11. Record Locking Within a Transaction
When a record stream joins a transaction, RMS stores the current record stream context, including the following information:
Current record pointer
Next record pointer
Lock state of all locked records
5.11.1. Locking records during a transaction
During a transaction, any record locking required by the application is done immediately.
In addition, when a file marked for recovery unit journaling is accessed within a transaction, the records that are accessed are locked automatically by RMS until the end of the transaction. This prevents other processes from accessing potentially inconsistent data.
The status of record locks during a transaction is determined as follows:
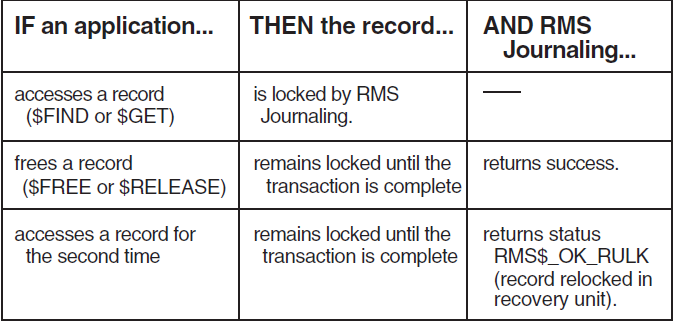
5.11.2. Status of locks at end of transaction
When the transaction is completed with a call to $END_TRANS, all records involved in the transaction are set to the lock states that would have occurred if recovery unit journaling had not been used in the application program.
When a transaction ends with a call to $ABORT_TRANS (either explicitly in the application or because of an abnormal program interruption), all record locks are returned to their states at the beginning of the transaction.
Example
Suppose that your application included the following pseudocode:
$GET record-1$ON ERROR ABORT_TRANS
$END_TRANS
The following table explains the numbered items in the example.
| Stage | What Happens | Record Lock Status |
| The first record (record−1) is retrieved. | Record−1 is locked. |
| The transaction begins. | ––– |
| A second record (record−2) is retrieved. | Record−2 is locked. |
| Both records are modified. | Record−1 and record−2 are both locked. |
| The $RELEASE service is called for record−2. | Record−2 is not released, because the transaction is still ongoing. However, RMS returns a success status for the call to $RELEASE. |
| Record−2 is retrieved a second time. | Record−2 remains locked. |
| The transaction ends with a call to $ABORT_TRANS. | Record−1 is locked, and record−2 is released, because those were their states
at the beginning of the transaction () |
 | The transaction ends with a call to $END_TRANS. |
Record−1 is released, because it would have been in a released state if recovery unit journaling were not used in the application. Record−2 remains locked. |
5.12. Error handling
5.12.1. Introduction
Errors encountered by RMS services performed within a transaction are reported to the caller. In most cases, the correct way of dealing with such errors is for the application to abort the transaction. However, this may not always be the case, so this decision is left up to the application designer.
5.12.2. Errors during RMS services
The DECdtm two-phase commit protocol requires that once a transaction is prepared, RMS must assure that it can either commit or abort its contribution to that transaction. However, unexpected errors can occur in these contexts.
Note
Once the reported error condition is corrected, RMS will be able to complete the required commit, abort, or recovery processing.
5.12.3. Error messages to OPCOM
Sometimes RMS is unable to indicate the details of the error condition back to the caller or user. In these cases, RMS sends the extended status for such failures to the Operator Communication Manager (OPCOM). Therefore, it is essential to have OPCOM running on your processor if you are using recovery unit journaling. (By default, OPCOM starts automatically during the system startup procedure.)
Each line of the extended status of an error message is sent as a separate message to OPCOM. If the system manager has enabled the console terminal as an operator terminal, a sequence of messages appears on the console terminal. (See the description of the REPLY command in the VSI OpenVMS DCL Dictionary for information about enabling the console terminal as an operator terminal.)
The first message of each message sequence is a header message identifying the RMS Journaling software component signaling the message sequence. The second message includes the transaction identifier (TID) of the transaction that caused the error.
5.12.4. TID format
The format of the TID is nonstandard, but the conversion from one format to the other is straightforward. If the bytes of the TID are labeled PONMLKJIHGFEDCBA from highest byte address (P) to lowest byte address (A), the RMS TID display and the standard format are as follows:

5.12.5. Responses to RMS errors
The following table shows recovery actions in response to errors during different phases of a transaction.
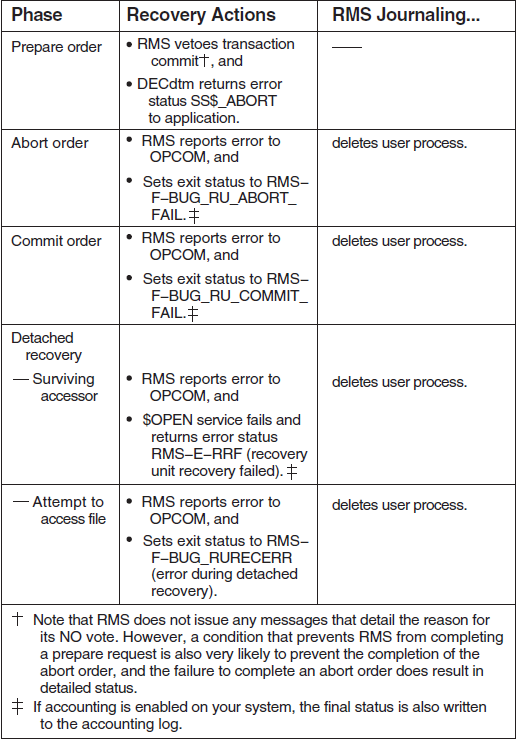
5.12.6. Examples
Example: full disk
If the disk containing one of the data files becomes full during an $ABORT_ TRANS operation, the RMS recovery unit handler sends the following messages to OPCOM:
%%%%%%%%%%%OPCOM 11-MAY-1990 10:46:31.30 %%%%%%%%%%%
Message from user FRENCH
%RMS-E-RUH, error during RMS recovery unit handler

%%%%%%%%%%%OPCOM 11-MAY-1990 10:46:32.31 %%%%%%%%%%%
Message from user FRENCH
-RMS-E-ERRRUHABO, error during RU handler abort of TID F1032FA000900B0E (process ID 23C01485)

%%%%%%%%%%%OPCOM 11-MAY-1990 10:46:33.32 %%%%%%%%%%%
Message from user FRENCH
-RMS-I-RUHOBJ, object name WORKDISK:[FRENCH.MAY]DATA.DAT;10

%%%%%%%%%%%OPCOM 11-MAY-1990 10:46:34.26 %%%%%%%%%%% Message from user FRENCH
-RMSREC-F-WRITERR, error writing to file
The first message in the sequence is the header message for all recovery unit handler message sequences.
The second message indicates that the recovery unit handler was unable to abort the transaction. It lists the TID of the transaction and the process identification (PID) of the process initiating recovery.
The third message lists the file specification of the file that is causing the problem.
The last message indicates the problem: the RMS recovery unit handler is unable to write to the file.
Example: device off line
If the device is off line when in-place recovery is called by the $ABORT_TRANS service, the following message sequence is output to OPCOM along with the messages sent by the RMS recovery unit handler:
%%%%%%%%%%%OPCOM 11-MAY-1990 11:46:31.31 %%%%%%%%%%%
Message from user FRENCH
%RMSREC-F-OPRHDRINP, error occurred during in-place RU Recovery; process ID (PID) 012C9054

%%%%%%%%%%%OPCOM 11-MAY-1990 11:46:32.19 %%%%%%%%%%%
Message from user FRENCH
%RMSREC-F-WRITEERR, error writing to file

%%%%%%%%%%%OPCOM 11-MAY-1990 11:46:33.36 %%%%%%%%%%%
Message from user FRENCH
-RMSREC-F-FILE, file WORKDISK:[FRENCH.MAY]DATA.DAT;6

%%%%%%%%%%%OPCOM 11-MAY-1990 11:46:34.14 %%%%%%%%%%%
Message from user FRENCH
-RMS-E-DNR, device not ready, not mounted, or unavailable
The first message of the sequence is the header message for all in-place recovery message sequences.
The second message indicates that RMS in-place recovery has failed because it is unable to write to the data file.
The third message shows the file specification of the file that is causing the problem.
The last message indicates the problem: the device on which the file is stored is not ready, not mounted, or unavailable.
Example: invalid volume name
If you defined an invalid logical name for the disk on which the recovery unit journal resides, detached recovery would send the following messages to OPCOM:
%%%%%%%%%%%OPCOM 11-MAY-1990 12:46:32.19 %%%%%%%%%%%
Message from user FRENCH
%RMSREC-F-OPRHDRDET, error occurred during detached RU Recovery; initiated by process
ID (PID) 34C12784

%%%%%%%%%%%OPCOM 11-MAY-1990 12:46:33.07 %%%%%%%%%%%
Message from user FRENCH
%RMSREC-F-NORULOGNAM, Recovery Unit volume logical name (DISK$volume_name) not defined correctly

%%%%%%%%%%%OPCOM 11-MAY-1990 12:46:34.13 %%%%%%%%%%%
Message from user FRENCH
-RMSREC-F-INVLOGNAM, error translating logical name BADNAME:
The first message in the sequence is the header message for all detached recovery message sequences.
The second message informs you that the logical name for the recovery unit volume is not defined correctly.
The final message provides the reason for the problem: BADNAME is not the correct logical name for the recovery unit volume.
Chapter 6. Combining Journaling Types
Many applications use more than one type of journaling on a file, because the three types of journaling protect against different losses of data integrity.
You can use any combination of the three journaling types—after-image, before-image, or recovery unit—in your application by following all of the procedures for each type that you use.
For example, if you want to use after-image and recovery unit journaling for a file, do the following:
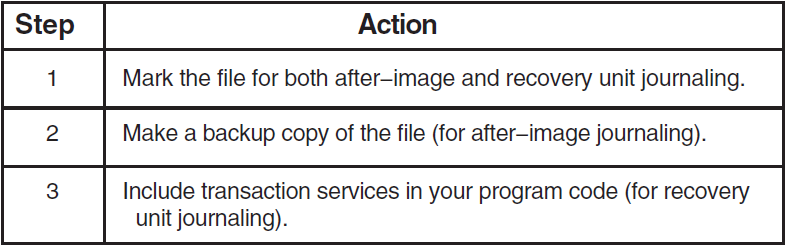
6.1. After-Image and Before-Image Journaling
You can use after-image and before-image journaling for the same file, and you can use the same journal for after-image and before-image journaling. To use after-image and before-image journaling for the same file, you must mark the file for after-image and before-image journaling and follow the appropriate procedures for both types.
6.1.1. Marking files
To mark a file for after-image and before-image journaling, you can either issue separate SET FILE/AI_JOURNAL and SET FILE/BI_JOURNAL commands, or you can issue a single SET FILE command that includes both the /AI_JOURNAL and /BI_JOURNAL qualifiers and their keywords.
6.1.2. Using a single journal
If you want to use a single journal for after-image and before-image journaling, do not use the CREATE keyword with both the /AI_JOURNAL and /BI_JOURNAL qualifiers, because that will create two separate journals. When you create a journal that will be used for more than one file or more than one type of journaling (after-image or before-image), you should first use a SET FILE command to create the journal for a single type of journaling and for a single file. After the journal is created, then you can use a single SET FILE command for multiple files and both after-image and before-image journaling. For example, you might use the following sequence of commands:
$ SET FILE/AI_JOURNAL=(FILE=JNL_DISK:,CREATE) [WEEKLY]SALES.DAT
$ SET FILE/BI_JOURNAL=(FILE=JNL_DISK:[WEEKLY]SALES) -
_$INVOICES.DAT,COMMISSIONS.DAT
When after-image and before-image journaling are directed to the same journal, the after-image and before-image information are directed to different record streams within the journal.
6.2. After-Image and Recovery Unit Journaling
An after-image journal includes records of transactions being started, committed, or aborted. If you use the RECOVER/FORWARD command to recover a file that is marked for after-image and recovery unit journaling, then the recovered file includes changes from all transactions that are completed (committed) on or before the ending time of the after-image recovery. The following table shows the effect of after-image recovery on a file involved in DECdtm transactions.

For example, suppose you issue the command RECOVER/FORWARD/UNTIL=10:30 for a file marked for both after-image and recovery unit journaling, and the following recovery unit journaling has taken place:

Since TRANS-2 was completed on or before 10:30, all of the modifications made within TRANS-2 are applied to the file that is restored with after-image recovery. TRANS-1, although it started before the /UNTIL time, was not completed before 10:30, so none of the modifications made within that transaction is applied to the restored file. TRANS-3 did not begin until after the ending time, so none of the modifications made within that transaction are included.
6.2.1. Multifile applications
If you attempt to recover more than one file marked for both after-image and recovery unit journaling, different rules apply depending on whether you use the /UNTIL qualifier with the RECOVER/FORWARD command.
6.2.2. Recovery without the /UNTIL qualifier
If you do not use the /UNTIL qualifier with the first backup copy that you restore with after-image recovery, restore only those files in the application that are corrupted or lost. However, do not use the /UNTIL qualifier with any of the files that you restore, in order to maintain data consistency among those files.
For example, suppose that the files SALES.DAT, INVENTORY.DAT, and SALARY.DAT are marked for after-image and recovery unit journaling, and that SALES.DAT and INVENTORY.DAT become corrupted. You can then use after-image recovery with the following commands:
$ RECOVER/FORWARD  JNL_DISK:SALES.BCK
$ RECOVER/FORWARD  JNL_DISK:INVENTORY.BCK
Then, after remarking the restored copies for after-image journaling and renaming and backing up the files, you can continue the application without any further processing to SALARY.DAT.
6.2.3. Recovery using the /UNTIL qualifier
If you do use the /UNTIL qualifier with the first file that you restore, then you must restore every file in the application, using the /UNTIL qualifier with the same time value for each file. If you do not use the same time value for the /UNTIL qualifier, then the modifications for one or more transactions may be restored to some of your files, but not to others.
For example, suppose that in the previous example you wanted to roll the file SALES.BCK forward to 9:15 a.m. on March 10, 1990. You would then have to roll the other two files in the application forward to exactly the same time, as follows:
$ RECOVER/FORWARD/UNTIL=10-MAR-1990:9:15  JNL_DISK:SALES.BCK
$ RECOVER/FORWARD/UNTIL=10-MAR-1990:9:15  JNL_DISK:INVENTORY.BCK
$ RECOVER/FORWARD/UNTIL=10-MAR-1990:9:15  JNL_DISK:SALARY.BCK
6.2.4. Multijournal applications
You can use multiple after-image journals within a single transaction, but to assure that the recovered files are consistent, you must recover the files using the after-image journals in their entirety.
The recovered files can be inconsistent if you use the /UNTIL qualifier with the RECOVER command, because the times given for the journal entries may themselves be inconsistent, for either of the following reasons:
Due to normal system delays, the corresponding commit records in the different journals are not written at exactly the same time, so the time stamps will not be exactly the same.
If the journals are on different nodes, the clocks on those nodes may not have exactly the same time.
6.3. Before-Image and Recovery Unit Journaling
A before-image journal includes records of transactions being started, committed, or aborted. If you use the RECOVER/BACKWARD command to recover a file that is also marked for recovery unit journaling, then the recovered file includes changes from all transactions that were completed (committed) on or before the ending time of the before-image recovery. The following table shows the effect of before-image recovery on a file involved in DECdtm transactions.

For example, suppose you issue the command RECOVER/BACKWARD/UNTIL=10:30 for a file marked for both before-image and recovery unit journaling, and the following recovery unit journaling has taken place:
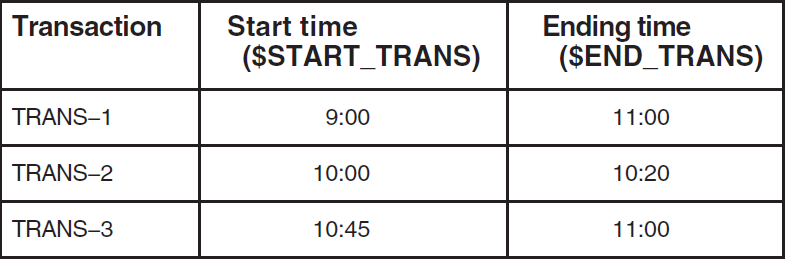
Since TRANS-2 was completed on or before 10:30, all of the modifications made within TRANS-2 are included in the file that is rolled back with before-image recovery. TRANS-1, although it started before the /UNTIL time, was not completed before 10:30, so none of the modifications made within that transaction will remain in the restored file. TRANS-3 did not begin until after the ending time, so none of the modifications made within that transaction is included.
6.3.1. Multifile applications
If you use before-image recovery for more than one file marked for both before-image and recovery unit journaling, the following rules apply:
Use the /UNTIL qualifier with the RECOVER/BACKWARD command in order to specify a time to which the file is rolled back.
Restore each of the files in the application to the same time specified for the first file. If you do not use the same time value for the /UNTIL qualifier, then the modifications for one or more transactions may be restored to some of your files, but not to others.
Example
For example, consider an application that uses the files SALES.DAT, INVENTORY.DAT, and SALARY.DAT. If you want to roll the file SALES.DAT back to 9:15 a.m., on March 10, 1990, use the following series of commands:
$ RECOVER/BACKWARD/UNTIL=10-MAR-1990:9:15  WORK_DISK:SALES.DAT
$ RECOVER/BACKWARD/UNTIL=10-MAR-1990:9:15  WORK_DISK:INVENTORY.DAT
$ RECOVER/BACKWARD/UNTIL=10-MAR-1990:9:15  WORK_DISK:SALARY.DAT
6.3.2. Multijournal applications
You can use multiple before-image journals within a single transaction, but to assure that the recovered files are consistent, you must recover the files using the after-image journals in their entirety.
The recovered files can be inconsistent if you use the /UNTIL qualifier with the RECOVER command, because the times given for the journal entries may themselves be inconsistent, for either of the following reasons:
Due to normal system delays, the corresponding commit records in the different journals are not written at exactly the same time, so the time stamps will not be exactly the same.
If the journals are on different nodes, the clocks on those nodes may not have exactly the same time.
Chapter 7. System Management Considerations
There are a number of system management issues to consider when using RMS Journaling.
7.1. Backing Up Files
Proper use of the Backup utility (BACKUP) is important to effectively use RMS Journaling on your system. You should be aware of the following considerations when using BACKUP with RMS Journaling in your applications:
It is good practice to back up your data files, after-image journals, and before-image journals on a regular basis.
In any application that uses after-image journaling, you must make a backup copy of your data file, as described in Chapter 3, "Using After-Image Journaling" of this manual. Use the /RECORD qualifier to the BACKUP command to optimize performance if after-image recovery becomes necessary. Do not use the /IGNORE=INTERLOCK qualifier when you back up data files used in journaling applications.
Be sure that all files marked for any of the RMS Journaling types (afterimage, before-image, or recovery unit) are closed before you back them up. Any open file that is marked for journaling or open journal will not be backed up.
BACKUP is unable to back up any file with active transactions. To back up a file with active transactions, start detached recovery by attempting to access the file (for example, with the DCL commands TYPE or DIRECTORY). If detached recovery succeeds, you can proceed with the backup procedure.
When you use BACKUP to save or restore a file that is marked for afterimage or before-image journaling, the backup or restored copy of the file is also marked for after-image or before-image journaling, respectively. However, BACKUP automatically disables both after-image and before-image journaling. Note the distinction between a file being marked for journaling and a file being enabled (or disabled) for journaling. The backup copy is marked for journaling, because it has the same characteristics as the original file. However, it is disabled for journaling, to prevent subsequent changes in the backup copy being added to the original journal. If you want to resume journaling on the latest version of a file, use the SET FILE command to mark the restored file for journaling after you use recovery, to re-enable the file for journaling.
Saving and restoring a file marked for recovery unit journaling has a different result from saving and restoring a file marked for after-image or before-image journaling. When you use BACKUP to save a file marked for recovery unit journaling, both the backup copy of the file and the restored copy of the file are marked for recovery unit journaling. You do not need to remark the restored file for recovery unit journaling with the SET FILE/RU_JOURNAL command.
Always use BACKUP to make a backup copy of a file for journaling rather than any other method (for example, the COPY command or the Convert utility). When you use any method other than BACKUP to duplicate a file marked for journaling, the duplicate file will not have the journaling attributes of the source file.
7.2. Managing Disk Space Used by Journals
7.2.1. Long-term journals
After-image and before-image journals can use many blocks of disk storage space. Store journals on disk only if they are required to safeguard your data. Archive old journals by backing them up onto magnetic tape and deleting them from the journal disk.
7.2.2. Creating new after-image journals
Create a new after-image journal when the disk volume containing the journal is nearly full. Depending on the rate of growth of the after-image journal, you may need to create a new journal twice a day, daily, weekly, or monthly.
To create a new after-image journal, do the following:
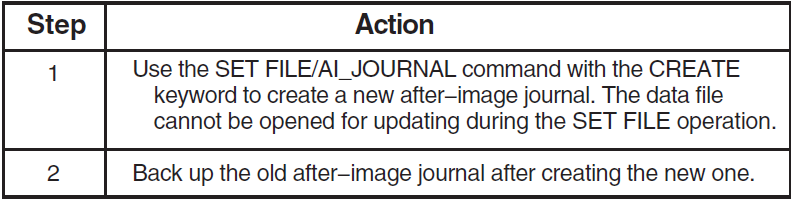
7.2.3. Backing up files
After creating a new after-image journal, decide whether you will perform a full backup of the data file.
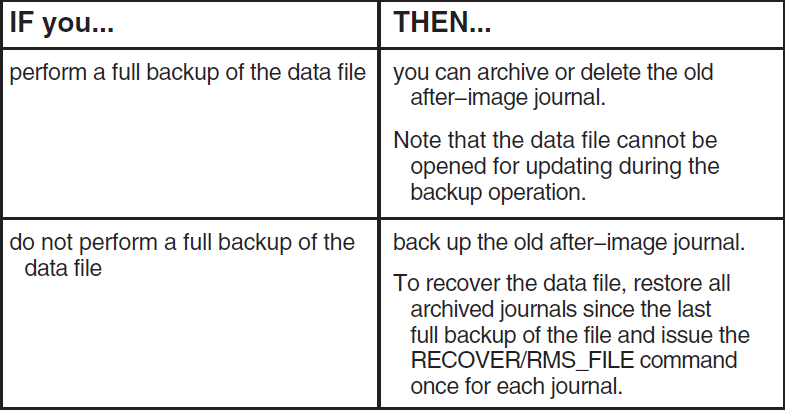
A full backup of a data file can be performed without creating a new after-image journal. This can occur if you forget to issue the SET FILE command before performing the backup, or if someone performs a full backup of the data file without knowing that the file is marked for after-image journaling. The data file cannot be open for updating during the backup operation.
After the backup completes, the after-image journal is still valid. To recover the data file, apply the after-image journal to any full backup performed since the after-image journal was created.
7.2.4. Creating new before-image journals
Create a new before-image journal when the disk volume containing the journal is nearly full. Depending on the rate of growth of the before-image journal, you may need to create a new journal twice a day, daily, weekly, or monthly.
To create a new before-image journal, do the following:

You need not coordinate before-image journaling with backups of the data file.
7.2.5. Recovery unit journals
Recovery unit journaling creates a directory called [SYSJNL] and stores all recovery unit journals in this directory. Normally, recovery unit journals are deleted automatically at image rundown time. Therefore, the system manager does not usually need to maintain recovery unit journals in the [SYSJNL] directory. If the SET FILE/RU_ACTIVE=0 command is used for a data file, however, the associated recovery unit journals for active transactions are not deleted from the [SYSJNL] directory.
7.2.6. How to delete recovery unit journals
Use the following procedure to determine which recovery unit journals in the [SYSJNL] directory are no longer needed and can be deleted.

7.3. Defining Required Volume Labels with the Mount Utility
7.3.1. Volume labels
A volume label is the only device-independent identifier for an OpenVMS volume or volume set. RMS Journaling uses a volume label plus a file ID as the forward pointer from a data file to its journals. Physical device names are not used, because you would be unable to use journals on a disk that was moved or copied from one physical device to another.
7.3.2. Creating volume labels
For RMS to obtain the device name from the volume label, it is necessary that an
executive-mode logical name with the concealed and terminal attributes,
DISK$volume_label, be defined for the device on which the volume is mounted,
where volume_label represents the label for the particular volume. The Mount
utility automatically creates such a logical name when you use it to mount a volume with the
/SYSTEM or /CLUSTER qualifier, even if you also specify a logical name for the device. To use
the /SYSTEM qualifier, you must have the SYSNAM (system logical name) or the SYSPRV (system
privilege) privilege.
Example
For example, the executive-mode logical name DISK$FINANCE_DISK is created if you mount the disk with any of the following MOUNT commands:
$ MOUNT/SYSTEM DBA0: FINANCE_DISK
$ MOUNT/SYSTEM DBA0: FINANCE_DISK DISK1
$ MOUNT/CLUSTER DBA0: FINANCE_DISK
$ MOUNT/CLUSTER DBA0: FINANCE_DISK DISK1
7.3.3. Privately mounted volumes
For volumes mounted privately or with the /GROUP qualifier, the Mount utility creates the
executive-mode logical name (with the concealed and terminal attributes)
DISK$volume_label only as a job logical name. To create journals or to
access files marked for journaling on a privately mounted volume, you must explicitly define the
logical name DISK$volume_label, using the /SYSTEM and /EXECUTIVE_MODE qualifiers, as in the
following example:
$ DEFINE/EXECUTIVE_MODE/TRANSLATION_ATTRIBUTES=(CONCEALED,TERMINAL)
_Log name: DISK$FINANCE_DISK
_Equ name: DBA0:
Caution
Because it is possible to privately mount more than one volume with the same label, there can be ambiguities in referring to journals, because RMS Journaling uses only the volume label to determine the volume that it accesses. If you use a privately mounted volume for any journaling activities, be sure that it has a unique volume label (that is, be sure that no other privately or publicly mounted volume has the same label).
Caution
Using the SET VOLUME/LABEL command destroys any forward pointers to journals on that volume, unless you define the DISK$volume_label logical name using the original volume label.
7.4. Increasing Process Quotas
Processes that run applications using RMS Journaling can require changes to the following process quotas established by the Authorize utility. The following table explains why quotas may need to be increased.

For information about using the Authorize utility to modify the Open File quota, Enqueue quota, or AST limit quota, see the VSI OpenVMS System Manager's Manual.
7.4.1. Increased use of virtual memory
You should also be aware that using RMS Journaling can increase the use of virtual memory for some processes running journaling applications. If system performance seems to be affected by journaling, adjust your system parameters accordingly. See the Guide to OpenVMS Performance Management for information on this topic.
7.5. Ensuring Adequate Security and Access to Journals
When journals are created for after-image and before-image journaling, they may not have the same file protection or ACLs as the data files for which they are recording journaling information. For more information about security and access issues for after-image and before-image journaling, see the sections Section 3.3.3, ''After-image journal file protection'' and Section 3.3.4, ''Security and access issues'' in Chapter 3, "Using After-Image Journaling"
7.6. Monitoring Messages Sent to OPCOM
When you use recovery unit journaling, certain classes of error messages are sent to the Operator Communication Manager (OPCOM). If recovery unit journaling is being used on your system, it is essential that you have OPCOM running. For a discussion of the messages sent to OPCOM, see the section Section 5.12, ''Error handling'' in Chapter 5, "Using Recovery Unit Journaling".
Chapter 8. DCL Command Reference
This chapter contains reference information about DCL commands that are used with RMS Journaling.
8.1. RECOVER/RMS_FILE
8.1.1. Description
The RMS Recovery utility (RECOVER/RMS_FILE) restores RMS files if they have been lost or the data in them has become unusable. You can use RECOVER/RMS_FILE to redo operations (with after-image journaling, using a previously made backup file), or to undo operations (with before-image journaling, using the actual data file).
Rolling an RMS file forward from a backup copy of the data file is called after-image recovery. Rolling the data file back to a previous state is called before-image recovery.
The qualifiers that you use with the RECOVER/RMS_FILE command determine the type of recovery that is applied to your file. You must use either the /FORWARD qualifier (to specify after-image recovery) or the /BACKWARD qualifier (to specify before-image recovery), but you cannot use both. The qualifier /RMS_FILE is the default for the RECOVER command; therefore, you need not include it. Output is always directed to SYS$OUTPUT.
No specific privileges are required to use the RMS Recovery utility. For afterimage recovery, you must have:
Write access to the file being recovered
Read access to the after-image journal
For before-image recovery, you must have:
Write access to the file being recovered
Write access to the before-image journal
Write access to the after-image journal, if the file has also been marked for after-image journaling
Note
The RECOVER command is not supported for remote files. You must use the RECOVER command from the system where the file is located.
8.1.2. Format
RECOVER/RMS_FILE {/FORWARD /BACKWARD} filespec[,...]
8.1.3. Parameter
filespec[,...]
Specifies the file to be recovered. Wildcard characters (* and %) are allowed in the directory specification, file name, file type, and version number fields. If you specify more than one file, separate the file names with commas.
To recover a file using after-image journaling, specify the backup copy of the file. To recover a file using before-image journaling, specify the original file.
The file specification cannot include a node name, since the RECOVER/RMS_ FILE command is not valid for network access.
8.1.4. Qualifiers
/BACKWARD
Rolls a file back to a previous state. Use the /BACKWARD qualifier to recover a file using a before-image journal.
To specify a date and time to which the file is to be rolled back, use the /UNTIL qualifier. You should normally use this qualifier for before-image recovery; if you do not use the /UNTIL qualifier when you specify the /BACKWARD qualifier, the file is automatically rolled back to the time when the first entry was made in your before-image journal.
The file is rolled back using the before-image journal that was specified when the file was marked for journaling with the SET FILE/BI_JOURNAL command. You can override this default by using the /JOURNAL qualifier.
When the recovery operation is complete, the RMS Recovery utility displays the time of the last record it rolled back. This is generally the time of the first record modification after the ending time (as specified with the /UNTIL qualifier); however, it could be an earlier time if there were one or more incomplete transactions at the ending time of the before-image recovery. In this case, changes made within incomplete transactions are automatically undone as part of the before-image recovery operation, and the time of the last record processed would be the time when the first record was changed within one of the incomplete transactions.
/BEFORE[=time]
Selects only those files dated prior to the specified time. You can specify time as an absolute time, as a combination of absolute and delta times, or as one of the following keywords: TODAY (default), TOMORROW, or YESTERDAY. To indicate the time attribute to be used as the basis for selection, specify one of the following qualifiers with /BEFORE: /BACKUP, /CREATED (default), /EXPIRED, or /MODIFIED.
For complete information on specifying time values, see the OpenVMS User’s Manual.
/BI_BUFFER_SIZE=blocks
Specifies the number of blocks that RMS recovery reads for each I/O from the before-image journal. This qualifier is similar in concept to the multiblock count field (RAB$B_MBC) in RMS. The parameter can take values from 1 to 127 blocks.
Use the /BI_BUFFER_SIZE qualifier to tune your application and improve performance during recovery. For more information on how to tune your application using this value, see the Guide to OpenVMS File Applications and the OpenVMS Record Management Services Reference Manual.
You can use the /BI_BUFFER_SIZE qualifier only when you specify the /BACKWARD qualifier.
/BY_OWNER[=uic]
Selects only those files whose user identification code (UIC) matches the specified owner UIC. The default UIC is that of the current process.
Specify the UIC using standard UIC format as described in the OpenVMS User’s Manual.
/CACHE_SIZE=buckets
Specifies the number of indexed file buckets that are retained by in-memory cache during a recovery operation. Use the /CACHE_SIZE qualifier to set the size of a cache to improve performance when recovering indexed files. In general, the performance of the recovery operation improves as the cache size grows larger. However, other system considerations could affect the ideal size.
The /CACHE_SIZE qualifier is similar in concept to the multibuffer count field (RAB$B_MBF) in RMS. For more information on how to tune your application using this value, see the Guide to OpenVMS File Applications and the OpenVMS Record Management Services Reference Manual.
The /CACHE_SIZE qualifier applies only to indexed files. You can use this qualifier with either the /BACKWARD or the /FORWARD qualifier.
/CREATED (default)
Modifies the time value specified with the /BEFORE or /SINCE qualifier. The /CREATED qualifier selects files based on their dates of creation. This qualifier is incompatible with the other qualifiers that allow you to select files according to time attributes: /BACKUP, /EXPIRED, and /MODIFIED. If you specify none of these four time qualifiers, the default is /CREATED.
/EXCLUDE=(file-spec[,...])
Excludes the specified files from the recovery operation. You can include a directory but not a device in the file specification. Wildcard characters are allowed in the file specification. However, you cannot use relative version numbers to exclude a specific version. If you provide only one file specification, you can omit the parentheses.
/FORWARD
Rolls a file forward from a previous state. Use the /FORWARD qualifier to recover a backup file by using the after-image journaling information contained in a journal.
When you use the /FORWARD qualifier, you must use a backup copy of the original file as the file specification in your RECOVER/RMS_FILE command line.
The redoing operation starts at the time the most recent backup was made (assuming that the /RECORD qualifier was used), and the backup file is rolled forward until the time of the most recent entry in the journal. You can override the latter value with the /UNTIL qualifier.
The file is rolled forward using the after-image journal that was specified when the file was marked for journaling with the SET FILE/AI_JOURNAL command. If the after-image journal has been moved from its original directory, or if it has a different file name, or if it has been restored to disk from magnetic tape, then you must use the /JOURNAL qualifier to identify the journal.
If you have more than one journal (for example, if you did not use the BACKUP/RECORD command immediately after creating a new journal), then you must use as many RECOVER/FORWARD commands as there are journals. The RMS Recovery utility uses the correct journal (unless it has been moved or restored from a backup copy, in which case you must use the /JOURNAL qualifier) and prompts you to issue a subsequent RECOVER/FORWARD command by displaying a message indicating that another journal is to be processed.
When the after-image recovery operation is complete, you must remark the restored file for after-image journaling before it can be used for further processing using after-image journaling. Remarking the file for after-image journaling sets the journaling enabled bit in the file header, which was automatically turned off by the Backup utility when the backup copy was made. Immediately after remarking the restored file for after-image journaling, you should make a backup copy of it.
/JOURNAL=journal-filespec
Specifies the journal that is to be used for recovery operations. By default, the RMS Recovery utility uses the journal with the file specification that was specified when the file was marked for journaling (with the SET FILE/AI_JOURNAL or the SET FILE/BI_JOURNAL command).
To override the default and specify a different file specification for the same journal, use the /JOURNAL qualifier. You can use the /JOURNAL qualifier if the journal is in a different location from that originally specified in the SET FILE command (for example, if the original journal becomes unusable and a backup copy of the journal is on another volume).
You can only use a journal that contains valid after-image or before-image data for the specified file.
If you have a series of journals that are to be used in the recovery operation, and the journals have the same file specifications as when the SET FILE commands were issued, then you do not need to use the /JOURNAL qualifier. In this case, simply use a series of RECOVER commands, as explained in Chapter 3, "Using After-Image Journaling", Section 3.6.7, ''Recovering multiple files'' (for after-image recovery) or Chapter 4, "Using Before-Image Journaling", Section 4.5.7, ''Availability of journalled files'' (for before-image recovery).
/LOG
/NOLOG (default)
Generates a log of the recovery operation. When you use the /LOG qualifier, the RMS Recovery utility displays the number of records that were processed during the recovery operation, and the date and time of the last record that was recovered.
/MODIFIED
Modifies the time value specified with the /BEFORE or /SINCE qualifier. The /MODIFIED qualifier selects files according to the dates on which they were last changed. This qualifier is incompatible with the other qualifiers that allow you to select files according to time attributes: /BACKUP, /CREATED, and /EXPIRED. If you specify none of these four time modifiers, the default is /CREATED.
/SINCE[=time]
Selects only those files dated after the specified time. You can specify time as an absolute time, a combination of absolute and delta times, or as one of the following keywords: TODAY (default), TOMORROW, or YESTERDAY. To indicate the time attribute to be used as the basis for selection, specify one of the following qualifiers with /SINCE: /BACKUP, /CREATED (default), /EXPIRED, or /MODIFIED.
For complete information on specifying time values, see the OpenVMS User’s Manual.
/UNTIL=time
Specifies the ending date and time for an after-image or before-image recovery operation. Specify the date and time using either absolute time or delta time. See the OpenVMS User’s Manual for more information about specifying absolute or delta time. The /UNTIL qualifier functions as follows:
For after-image recovery, the /UNTIL qualifier specifies the date and time to which the backup copy of the file is to be restored. If you do not use the /UNTIL qualifier with after-image recovery, then all updates through the most recent update recorded in the after-image journal are restored.
For before-image recovery, the /UNTIL qualifier specifies the date and time to which the file is rolled back. That is, all changes to the file from the present time to the time specified with the /UNTIL qualifier are removed. In most cases, you should use the /UNTIL qualifier with before-image recovery; if you do not, then all changes recorded in the before-image journal are removed.
8.1.5. Examples
$ RECOVER/RMS_FILE/BACKWARD/LOG/UNTIL=30-JUN-1990 WEEKLY.DAT

%RMSREC-I-FILBACKWARD, $DISK1:[PAYROLL]WEEKLY.DAT;17 rolled backward
%RMSREC-I-DATETIME, date/time of last record processed: 30-JUN-1990
07:41:23.27
%RMSREC-I-NUMRECS, 936 records processed
This command rolls the file WEEKLY.DAT back to June 30, 1990 (default time of day of 00:00). The Recovery utility automatically uses the before-image journal that was specified with the most recent SET FILE/BI_JOURNAL command for the file SALES.DAT. The /LOG qualifier provides information about the number of records processed (that is, undone) and the date and time that the last record was written.
$ DIRECTORY/SIZE ACCOUNTS_PAYABLE.RMS$JOURNAL

ACCOUNTS_PAYABLE.RMS$JOURNAL;1       108

$ RECOVER/RMS_FILE/BACKWARD/BI_BUFFER_SIZE=108 ACCOUNTS_PAYABLE.DAT
This command shows that the journal called ACCOUNTS_ PAYABLE.RMS$JOURNAL has a size of 108 blocks. The RECOVER/RMS_ FILE/BI_BUFFER=108 command sets the buffer to be 108 blocks.
$ RECOVER/FORWARD/UNTIL=30-JUN-1990/LOG WEEKLY_BACKUP.DAT
%RMSREC-I-FILFORWARD, $DISK1:[PAYROLL]WEEKLY_BACKUP.DAT;17 rolled
forward
%RMSREC-I-DATETIME, date/time of last record processed: 30-JUN-1990
15:23:44.30
%RMSREC-I-NUMRECS, 2554 records processed
This command rolls the file WEEKLY_BACKUP.DAT forward, beginning at the time that the file was created by the Backup utility. The file is rolled forward until June 30, 1990 (using the default time of day 00:00). The /LOG qualifier provides information about the number of records processed and the date and time of the last record that was restored. This RECOVER command uses the default qualifier /RMS_FILE.
After this operation, the file WEEKLY_BACKUP.DAT is the same as the original file (WEEKLY.DAT) was at midnight on June 30, 1990.
To use the restored file WEEKLY_BACKUP.DAT for further processing with after-image journaling, you must remark the file for after-image journaling.
$ RECOVER/RMS_FILE/FORWARD/LOG BACKUP.DAT

%RMSREC-I-FILFORWARD, $DISK1:[PAYROLL]BACKUP.DAT;17 rolled forward
%RMSREC-I-DATETIME, date/time of last record processed: 4-MAY-1990
11:28:29.74
%RMSREC-I-NUMRECS, 3490 records processed
This command rolls the file forward, beginning at the point at which the last backup was made (using the BACKUP/RECORD command) and continuing through the last record that was written to the journal. At this point, the recovered file has the same data as the data file on May 4, 1990 at 11:28, with the file characteristics of the backup file.
$ RECOVER/FORWARD/JOURNAL=ARCHIVE_DISK:INVENTORY INVENTORY.BCK
This command applies the after-image journal called ARCHIVE_ DISK:INVENTORY.RMS$JOURNAL to the file INVENTORY.BCK, which is a backup copy of a data file. In this case, ARCHIVE_ DISK:INVENTORY.RMS$JOURNAL might be either a backup copy of a valid after-image journal or the original journal itself, which had been moved to a different volume. The /RMS_FILE qualifier is used by default.
8.2. SET FILE/AI_JOURNAL
8.2.1. Description
The SET FILE/AI_JOURNAL command marks one or more RMS files for afterimage journaling. You can specify certain characteristics of the journal with this command, including its file specification, whether it is to be created, its initial size, and an extension quantity.
The SET FILE/NOAI_JOURNAL command unmarks a file for after-image journaling.
Note
The SET FILE command is not supported for remote files. You must use the SET FILE command from the system where the file is located.
8.2.2. Format
SET FILE/[NO]AI_JOURNAL\=(FILE=journal-filespec[,...])
        filespec[,...]
8.2.3. Parameter
filespec[,...]
Identifies the file to be marked for after-image journaling. If you specify more than one file, separate the file specifications with commas. Wildcard characters (* and %) are allowed. The file specification cannot include a node name, because the SET FILE command is not valid for network access.
8.2.4. Qualifier
/LOG
/NOLOG (default)
Controls whether the SET FILE command displays the file specification and the type of journaling that has been set. By default, this information is not displayed.
8.2.5. Using the /NOAI_JOURNAL qualifier
You must use the SET FILE/NOAI_JOURNAL command before you can delete a file that has been marked for after-image journaling.
Note
If the after-image journal has been corrupted, or if backup operations have replaced the journal with another file that is not a journal, the command SET FILE/NOAI_JOURNAL fails with the message:
SET-F-IVJFILE, invalid journal ’file_spec’
The following table explains how to correct the problem.
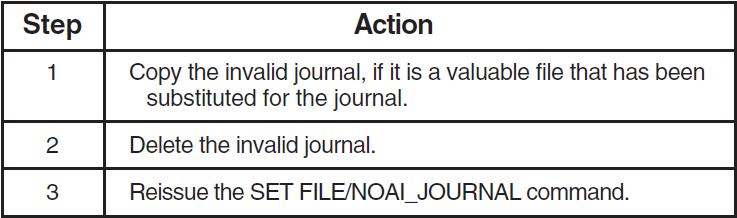
8.2.6. Keywords for /AI_JOURNAL qualifier
Four keywords are used as parameters to the SET FILE/AI_JOURNAL command: ALLOCATION, [NO]CREATE, EXTENSION, and FILE. You must always use the FILE keyword; you can also use any, all, or none of the other three keywords.
Use an equal sign ( = ) immediately after the SET FILE/AI_JOURNAL command to use a keyword. If you use more than one keyword, enclose the list in parentheses and separate the items in the list with commas.
ALLOCATION=n
Specifies the initial size, in blocks, of the journal. The ALLOCATION keyword is meaningful only when the CREATE keyword is also used.
The default allocation is 0 blocks.
CREATE
NOCREATE (default)
Specifies that a new journal is to be created. If no journal exists, using this keyword creates a new one. If a journal with the file name specified by the FILE keyword already exists, using the CREATE keyword creates a new version of the journal. The files named in this SET FILE command use the new journal, but any other files that used the previous version of the journal will continue to do so.
If you specify an existing journal without the CREATE keyword, the SET FILE command issues the following error message:
FLK---file locked by another user
If a journal does not exist, and you do not specify the CREATE keyword, a journal is not automatically created and an error message is displayed.
EXTENSION=n
Specifies an extension quantity, in blocks, for the journal. You can specify a value from 0 to 65,535.
The EXTENSION keyword is meaningful only when you use the CREATE keyword. If the file is extended, the value that you specify is used. If you do not use the EXTENSION keyword when you create a journal, RMS calculates its own EXTENSION value for the journal.
FILE=journal-filespec
Specifies the journal where all modifications to the named file will be recorded. The FILE keyword is required when you use the SET FILE/AI_JOURNAL command.
By default, any portions of the file specification that you omit will be the same as the file that is to be journaled, but with the file type .RMS$JOURNAL. For example, if you issue the following command, then, by default, the file specification for the after-image journal is JOURNAL_ DISK:PAYROLL.RMS$JOURNAL:
$ SET FILE/AI_JOURNAL=(FILE=JOURNAL_DISK:) FINANCE_DISK:PAYROLL.DAT
If the file that you specify with the FILE keyword does not exist, and you do not specify the CREATE keyword, a journal is not automatically created and an error message is displayed.
8.2.7. Examples
$ SET FILE /AI_JOURNAL=(FILE=JOURNAL_DISK:,CREATE) -
_$FINANCE_DISK:[PAYROLL]WEEKLY.DAT
In this example, the file FINANCE_DISK:[PAYROLL]WEEKLY.DAT is marked for after-image journaling. The CREATE keyword generates a new version of the journal and the required FILE keyword places the journal on the disk JOURNAL_DISK. The file specification for the journal will be JOURNAL_DISK:[PAYROLL]WEEKLY.RMS$JOURNAL.
$ SET FILE/AI_JOURNAL=(FILE=JOURNAL_DISK:,CREATE)/LOG SALES.DAT
%SET-I-JCREATED, journal JOURNAL_DISK:[REGION_1]SALES.RMS$JOURNAL;1
created
%SET-I-FILMARKAI, FINANCE_DISK:[REGION_1]SALES.DAT;1 marked for RMS
after-image journaling
-SET-I-JFILE, using journal JOURNAL_DISK:[REGION_1]SALES.RMS$JOURNAL;1
%SET-I-MODIFIED, FINANCE_DISK:[REGION_1]SALES.DAT;1 modified
In this example, the file SALES.DAT in default directory FINANCE_ DISK:[REGION_1] is marked for after-image journaling and the /LOG qualifier causes the result of the SET FILE command to be displayed on the terminal.
$ SET FILE/AI_JOURNAL=(FILE=JNL_DISK:,CREATE)/LOG OVERDUE.DAT
%SET-I-JCREATED, journal JNL_DISK:[PAYABLE]OVERDUE.RMS$JOURNAL;1
created
%SET-I-FILMARKAI, WORK_DISK:[PAYABLE]OVERDUE.DAT;1 marked for RMS
after-image journaling
-SET-I-JFILE, using journal JNL_DISK:[PAYABLE]OVERDUE.RMS$JOURNAL;1
%SET-I-MODIFIED, WORK_DISK:[PAYABLE]OVERDUE.DAT;1 modified

$ SET FILE/BI_JOURNAL=(FILE=JNL_DISK:)/LOG OVERDUE.DAT
%SET-I-FILMARKBI, WORK_DISK:[PAYABLE]OVERDUE.DAT;1 marked for RMS
before-image journaling
-SET-I-JFILE, using journal JNL_DISK:[PAYABLE]OVERDUE.RMS$JOURNAL;1
%SET-I-MODIFIED, WORK_DISK:[PAYABLE]OVERDUE.DAT;1 modified
In this example, the first SET FILE command (
) uses the
/CREATE qualifier to create a new after-image journal,
JNL_DISK:[PAYABLE]OVERDUE.RMS$JOURNAL. The file specification uses the current default
directory [PAYABLE] and the default file type .RMS$JOURNAL.The second SET FILE command (
) checks the disk JNL_DISK to
see whether a journal already exists, and uses the existing after-image journal for
before-image journaling, as well.$ SET FILE/NOAI_JOURNAL/NOBI_JOURNAL WORK_DISK:[PAYABLE]OVERDUE.DAT, - _$ VENDORS.DAT
In this example, the files OVERDUE.DAT and VENDORS.DAT are unmarked for both after-image and before-image journaling. It is not necessary to specify the journals that were used. If more than one journaling type was applied to the files (as in the previous example), then you must cancel each of the journaling types before you can delete the data files.
$ SET FILE/AI_JOURNAL=(FILE=JOURNAL_DISK,CREATE)/RU_JOURNAL -
_$ [FIELD]SALARY.DAT
$ SET FILE/AI_JOURNAL=(FILE=JOURNAL_DISK:[FIELD]SALARY)/RU_JOURNAL -
_$ CHECKS.DAT
In this example, the files SALARY.DAT and CHECKS.DAT are both marked for after-image and for recovery unit journaling. The after-image journaling for both files is written to the same journal, JOURNAL_ DISK:[FIELD]SALARY.RMS$JOURNAL.
8.3. SET FILE/BI_JOURNAL
8.3.1. Description
The SET FILE/BI_JOURNAL command marks one or more RMS files for before-image journaling. You can specify certain characteristics of the journal with this command, including its file specification, whether it is to be created, its initial size, and an extension quantity.
The SET FILE/NOBI_JOURNAL command unmarks a file for before-image journaling.
Note
The SET FILE command is not supported for remote files. You must use the SET FILE command from the system where the file is located.
8.3.2. Format
SET FILE/[NO]BI_JOURNAL\[=(keyword[,...])] filespec[,...]
8.3.3. Parameter
filespec[,...]
Identifies the file to be marked for before-image journaling. If you specify more than one file, separate the file specifications with commas. Wildcard characters (* and %) are allowed. The file specification cannot include a node name, because the SET FILE command is not valid for network access.
8.3.4. Qualifier
/LOG
/NOLOG (default)
Controls whether the SET FILE command displays the file specification and the type of journaling that has been set. By default, this information is not displayed.
8.3.5. Using the /NOBI_JOURNAL qualifier
You must use the SET FILE/NOBI_JOURNAL command before you can delete a file that has been marked for before-image journaling.
Note
If the before-image journal has been corrupted, or if backup operations have replaced the journal with another file that is not a journal, the command SET FILE/NOBI_JOURNAL fails with the message:
SET-F-IVJFILE, invalid journal ’file_spec’
The following table explains how to correct the problem.

8.3.6. Keywords for /BI_JOURNAL qualifier
Four keywords are used as optional parameters to the SET FILE/BI_JOURNAL command: ALLOCATION, [NO]CREATE, EXTENSION, and FILE. You can use any, all, or none of these keywords.
Use an equal sign ( = ) immediately after the SET FILE/BI_JOURNAL command to use a keyword. If you use more than one keyword, enclose the list in parentheses and separate the items in the list with commas.
ALLOCATION=n
Specifies the initial size, in blocks, of the journal. The ALLOCATION keyword is meaningful only when the CREATE keyword is also used.
The default allocation is 0 blocks.
CREATE
NOCREATE (default)
Specifies that a new journal is to be created. If a journal with the same file name already exists, using the CREATE keyword creates a new version of the journal. The data files named in this SET FILE command use the new journal, but any other files that used the previous version of the journal will continue to do so.
If you specify an existing journal without the CREATE keyword, the SET FILE command issues the following error message:
FLK---file locked by another user
If a journal does not exist, and you do not specify the CREATE keyword, a journal is not automatically created and an error message is displayed.
EXTENSION=n
Specifies an extension quantity, in blocks, for the journal. You can specify a value from 0 to 65,535.
The EXTENSION keyword is meaningful only when you use the CREATE keyword. If the file is extended, the value that you specify is used. If you do not use the EXTENSION keyword when you create a journal, RMS calculates its own EXTENSION value for the journal.
FILE=journal-filespec
Specifies the journal where all before-image journal entries for the named file will be recorded.
By default, any portions of the file specification that you omit will be the same as the file that is to be journaled, but with the file type .RMS$JOURNAL. For example, if you issue the following command, then, by default, the file specification for the before-image journal is FINANCE_DISK:PAYROLL.RMS$JOURNAL:
$ SET FILE/BI_JOURNAL FINANCE_DISK:PAYROLL.DAT
Use the FILE keyword if you want to override the default file specification for the journal.
The FILE keyword is optional with the SET FILE/BI_JOURNAL command.
8.3.7. Examples
$ SET FILE/BI_JOURNAL=(FILE=JOURNAL_DISK:,CREATE) -
_$FINANCE_DISK:[PAYROLL]WEEKLY.DAT
In this example, the file FINANCE_DISK:[PAYROLL]WEEKLY.DAT is marked for before-image journaling. The CREATE keyword generates a new version of the journal and the FILE keyword places the journal on the disk JOURNAL_DISK. The file specification of the journal will be JOURNAL_ DISK:[PAYROLL]WEEKLY.RMS$JOURNAL.
$ SET FILE/BI_JOURNAL=CREATE/LOG SALES.DAT
%SET-I-JCREATED, journal FINANCE_DISK:[REGION_1]SALES.RMS$JOURNAL;1
created
%SET-I-FILMARKBI, FINANCE_DISK:[REGION_1]SALES.DAT marked for RMS
before-image journaling
-SET-I-JFILE, using journal FINANCE_DISK:[REGION_1]SALES.RMS$JOURNAL;1
%SET-I-MODIFIED, FINANCE_DISK:[REGION_1]SALES.DAT modified
In this example, the file SALES.DAT in default directory FINANCE_ DISK:[REGION_1] is marked for before-image journaling and the /LOG qualifier causes the result of the SET FILE command to be displayed on the terminal.
$ SET FILE/BI_JOURNAL=(FILE=JNL_DISK:, CREATE)/LOG OVERDUE.DAT
%SET-I-JCREATED, journal JNL_DISK:[PAYABLE]OVERDUE.RMS$JOURNAL;1
created
%SET-I-FILMARKBI, WORK_DISK:[PAYABLE]OVERDUE.DAT;1 marked for RMS
before-image journaling
-SET-I-JFILE, using journal JNL_DISK:[PAYABLE]OVERDUE.RMS$JOURNAL;1
%SET-I-MODIFIED, WORK_DISK:[PAYABLE]OVERDUE.DAT;1 modified

$ SET FILE/AI_JOURNAL=(FILE=JNL_DISK:)/LOG OVERDUE.DAT
%SET-I-FILMARKAI, WORK_DISK:[PAYABLE]OVERDUE.DAT;1 marked for RMS
after-image journaling
-SET-I-JFILE, using journal JNL_DISK:[PAYABLE]OVERDUE.RMS$JOURNAL;1
%SET-I-MODIFIED, WORK_DISK:[PAYABLE]OVERDUE.DAT;1 modified
In this example, the first SET FILE command (
) uses the
/CREATE qualifier to create a new before-image journal,
JNL_DISK:[PAYABLE]OVERDUE.RMS$JOURNAL. The file specification uses the current default
directory [PAYABLE] and the default file type .RMS$JOURNAL.The second SET FILE command (
) checks the disk JNL_DISK to
see whether a journal already exists, and uses the existing before-image journal for
after-image journaling, as well.$ SET FILE/NOBI_JOURNAL/NOAI_JOURNAL WORK_DISK:[PAYABLE]OVERDUE.DAT, - _$ VENDORS.DAT
In this example, the files OVERDUE.DAT and VENDORS.DAT are unmarked for both before-image and after-image journaling. It is not necessary to specify the journals that were used. If more than one journaling type was applied to the files (as in the previous example), then you must cancel each of the journaling types before you can delete the files.
$ SET FILE/BI_JOURNAL=(FILE=JOURNAL_DISK,CREATE)/RU_JOURNAL -
_$ [FIELD]SALARY.DAT
$ SET FILE/BI_JOURNAL=(FILE=JOURNAL_DISK:[FIELD]SALARY)/RU_JOURNAL -
_$ CHECKS.DAT
In this example, the files SALARY.DAT and CHECKS.DAT are both marked for before-image and for recovery unit journaling. The before-image journaling for both files is written to the same journal, JOURNAL_ DISK:[FIELD]SALARY.RMS$JOURNAL.
8.4. SET FILE/RU_ACTIVE
8.4.1. Description
The SET FILE/RU_ACTIVE command specifies a recoverable facility to control active recovery units for a file.
When a file has active recovery units and RMS Journaling cannot determine the outcome of the recovery units (for example, if the recovery unit journal is unavailable), the file cannot be opened or deleted. The presence of active recovery units prevents you from unmarking (or marking) a file for any journaling type. However, with the SET FILE/RU_FACILITY/RU_ACTIVE command, you can clear the recoverable facility that controls active recovery units for the file.
Note
The SET FILE command is not supported for remote files. You must use the SET FILE command from the system where the file is located.
Caution
When you clear the RU_ACTIVE attribute (for example, with the command SET FILE/RU_ACTIVE=0/RU_FACILITY=1), the data in the file is likely to be in an inconsistent state. Digital recommends that you not use the file unless you can ensure that the data is consistent. After clearing the RU_ACTIVE attribute, unmark the file for journaling, delete the file, and recreate a consistent file using a backup copy.
Digital also recommends that you make a new copy of the file using the Convert utility and that you use the converted copy in place of the original.
You can determine the recoverable facility that controls active recovery units (if any) for the file by entering the DCL command DIRECTORY/FULL or DUMP/HEADER. You can use the ANALYZE/RMS_FILE/RU_JOURNAL command to determine the state of any active recovery units.
8.4.2. Format
SET FILE/[NO]RU_ACTIVE\=ru-facility filespec[,...]
8.4.3. Parameters
ru-facility
Specifies a recoverable facility. The value can be an integer from 0 to 255, or it can be the name of a Digital recoverable facility.
Facility numbers 1 to 127 are reserved by Digital; facility numbers 128 to 255 are available for user-written recoverable facilities. Currently, the only recoverable facility defined by Digital is 1 (RMS). Specifying the number 1 is equivalent to using the text RMS.
The number 0 corresponds to no recoverable facility and is equivalent to using the qualifier /NORU_ACTIVE.
filespec[,...]
Specifies the file that is to be modified. If you specify more than one file, separate the file specifications with commas. Wildcard characters (* and %) are allowed. The file specification cannot include a node name, because the SET FILE command is not valid for network access.
8.4.4. Example
$ SET FILE/RU_FACILITY=1/RU_ACTIVE=0 FINANCE_DISK:[PAYROLL]WEEKLY.DAT
If the file WEEKLY.DAT is unavailable due to active recovery units and an unavailable recovery unit journal, you can use this command to gain access to the file. In this example, the recoverable facility is defined as RMS by the /RU_FACILITY=1 qualifier. The RU_ACTIVE attribute that indicates active RMS recovery units for the file WEEKLY.DAT is cleared by the /RU_ ACTIVE=0 qualifier.
8.5. SET FILE/RU_FACILITY
8.5.1. Description
The SET FILE/RU_FACILITY command specifies the recoverable facility that currently controls active recovery units on a file.
When a file has active recovery units and RMS Journaling cannot determine the outcome of the recovery units (for example, if the recovery unit journal is unavailable), the file cannot be opened or deleted. The presence of active recovery units prevents you from unmarking (or marking) a file for any journaling type. However, with the SET FILE/RU_FACILITY/RU_ACTIVE command, you can clear the recoverable facility that controls active recovery units for the file.
Note
The SET FILE command is not supported for remote files. You must use the SET FILE command from the system where the file is located.
Caution
When you specify the RU_FACILITY attribute (for example, with the command SET FILE/RU_ACTIVE=0/RU_FACILITY=1), the data in the file is likely to be in an inconsistent state. Digital recommends that you not use the file unless you can ensure that the data is consistent. After clearing the RU_ACTIVE attribute, unmark the file for journaling, delete the file, and recreate a consistent file using a backup copy. Digital also recommends that you make a new copy of the file using the Convert utility and that you use the converted copy in place of the original.
You can determine the recoverable facility that controls active recovery units (if any) for the file by entering the DCL command DIRECTORY/FULL or DUMP/HEADER. You can use the ANALYZE/RMS_FILE/RU_JOURNAL command to determine the state of any active recovery units.
8.5.2. Format
SET FILE/RU_FACILITY\=ru-facility filespec[,...]
8.5.3. Parameters
ru-facility
Specifies a recoverable facility. The value can be an integer from 0 to 255, or it can be the name of a Digital recoverable facility.
Facility numbers 1 to 127 are reserved by Digital; facility numbers 128 to 255 are available for user-written recoverable facilities. Currently, the only recoverable facility defined by Digital is 1 (RMS). Specifying the number 1 is equivalent to using the text RMS.
The number 0 corresponds to no recoverable facility.
The recoverable facility that you specify for the /RU_FACILITY qualifier is used only to open the file; it does not actually modify any file attributes.
filespec[,...]
Specifies the file that is to be modified. If you specify more than one file, separate the file specifications with commas. Wildcard characters (* and %) are allowed. The file specification cannot include a node name, because the SET FILE command is not valid for network access.
8.5.4. Examples
$ SET FILE/RU_FACILITY=1/NORU_JOURNAL/NOAI_JOURNAL/LOG SAVINGS.DAT
%SET-I-FILUNMARKAI, $DISK1:[PERSONAL]SAVINGS.DAT;1 unmarked for RMS
after-image journaling
%SET-I-FILUNMARKRU, $DISK1:[PERSONAL]SAVINGS.DAT;1 unmarked for RMS
recovery-unit journaling
%SET-I-MODIFIED, $DISK1:[PERSONAL]SAVINGS.DAT;1 modified
$ DELETE SAVINGS.DAT;*
This example shows the use of the /RU_FACILITY qualifier to allow SET FILE access to a file. The SET FILE command identifies the recoverable facility holding the file and unmarks the file for recovery unit and after-image journaling. After these steps, it is possible to delete the file.
$ SET FILE/RU_FACILITY=RMS/RU_ACTIVE=0 SALES.DAT
In this example, the recoverable facility for the file SALES.DAT is identified as RMS by the /RU_FACILITY=RMS qualifier, and the RU_ACTIVE attribute (which indicates active RMS recovery units) is cleared by the /RU_ACTIVE=0 qualifier, so that you can gain access to the file.
8.6. SET FILE/RU_JOURNAL
8.6.1. Description
The SET FILE/RU_JOURNAL command marks an RMS file for recovery unit journaling. You can also use this command to specify the default volume on which recovery unit journals will be created for this file.
The SET FILE/NORU_JOURNAL command unmarks a file for recovery unit journaling.
Note
The SET FILE command is not supported for remote files. You must use the SET FILE command from the system where the file is located.
8.6.2. Format
SET FILE/[NO]RU_JOURNAL\[=volume-name] filespec[,...]
8.6.3. Parameters
volume-name
Specifies the volume on which the recovery unit journals will be located, using one of the following keywords:
DEVICE=
device_namespecifies a device name or logical nameLABEL=
volume-labelspecifies a volume label
By default, recovery unit journals are created temporarily in the [SYSJNL] directory on the same volume as the file that is being journaled. (If such a directory does not exist, RMS Journaling creates it automatically.) You can change the device on which the recovery unit journals are created by using either the DEVICE or LABEL keyword.
Use the DEVICE keyword to specify the location of recovery unit journals using a device name or a logical name. Use the LABEL keyword to specify the location of recovery unit journals using a volume label. You can only use one of these two keywords (LABEL or DEVICE) to specify the recovery unit journal location. In either case, only the volume label is actually stored with the file.
At run time, RMS Journaling attempts to translate the logical name
DISK$volume_label when creating a recovery unit journal. This is the
default logical name created by the Mount utility when you mount the disk using the /SYSTEM
or /CLUSTER qualifier. If you do not mount the disk using the /SYSTEM or /CLUSTER qualifier,
you must define the logical name DISK$volume_label using the DEFINE
command with the /SYSTEM and /EXECUTIVE_MODE qualifiers. You must have the SYSNAM (system
logical name) or the SYSPRV (system privilege) privilege to use the /SYSTEM
qualifier.
Note
The logical name DISK$volume_label can point to any disk device on
the system that is mounted and has for its volume label an executive-mode logical name in
the form DISK$volume_label, with the concealed and terminal
attributes.
filespec[,...]
Specifies the file that is to be marked for recovery unit journaling. If you specify more than one file, separate the file specifications with commas. Wildcard characters (* and %) are allowed. The file specification cannot include a node name, because the SET FILE command is not valid for network access.
8.6.4. Using the /NORU_JOURNAL qualifier
You must use the SET FILE/NORU_JOURNAL command before you can delete a file that has been marked for recovery unit journaling.
8.6.5. Examples
$ SET FILE/RU_JOURNAL FINANCE_DISK:[PAYROLL]WEEKLY.DAT
This command marks the file WEEKLY.DAT for recovery unit journaling. Any operation within an application that modifies this file must be in a transaction defined by DECdtm transaction services.
$ SET FILE/AI_JOURNAL=(FILE=JNL_DISK:, CREATE)/RU_JOURNAL/LOG -
_$ OVERDUE.DAT

%SET-I-JCREATED, journal JNL_DISK:[PAYABLE]OVERDUE.RMS$JOURNAL;1
created
%SET-I-FILMARKAI, WORK_DISK:[PAYABLE]OVERDUE.DAT;1 marked for RMS
after-image journaling
-SET-I-JFILE, using journal JNL_DISK:[PAYABLE]OVERDUE.RMS$JOURNAL;1
%SET-I-FILMARKRU, WORK_DISK:[PAYABLE]OVERDUE.DAT;1 marked for RMS
recovery-unit journaling
%SET-I-MODIFIED, WORK_DISK:[PAYABLE]OVERDUE.DAT;1 modified
$ SET FILE/AI_JOURNAL=(FILE=JNL_DISK:OVERDUE)/RU_JOURNAL/LOG -
_$ CURRENT.DAT

%SET-I-FILMARKAI, WORK_DISK:[PAYABLE]CURRENT.DAT;1 marked for RMS
after-image journaling
-SET-I-JFILE, using journal JNL_DISK:[PAYABLE]OVERDUE.RMS$JOURNAL;1
%SET-I-FILMARKRU, WORK_DISK:[PAYABLE]CURRENT.DAT;1 marked for RMS
recovery-unit journaling
%SET-I-MODIFIED, WORK_DISK:[PAYABLE]CURRENT.DAT;1 modified
In this example, the files OVERDUE.DAT and CURRENT.DAT are marked for after-image and recovery unit journaling using two SET FILE commands. In this example, a single journal (JNL_ DISK:[PAYABLE]OVERDUE.RMS$JOURNAL) is used for after-image journaling.
The first SET FILE command (
) uses the /CREATE qualifier to
create a new after-image journal, JNL_DISK:[PAYABLE]OVERDUE.RMS$JOURNAL, for the file
OVERDUE.DAT. The file specification uses the current default directory [PAYABLE] and the
default file type .RMS$JOURNAL.The second SET FILE command (
) marks the file CURRENT.DAT
for after-image and recovery unit journaling, checks the disk JNL_DISK to see whether an
after-image journal already exists, and uses the existing journal
JNL_DISK:[PAYABLE]OVERDUE.RMS$JOURNAL for the file CURRENT.DAT.
Chapter 9. RMS Blocks and Fields
RMS provides a number of access blocks and fields that contain information specific to RMS Journaling.
9.1. Journaling FAB Field—FAB$B_JOURNAL
RMS Journaling supplies a file access block (FAB) field that indicates whether the opened file is a journal or whether it is marked for after-image, before-image, or recovery unit journaling.
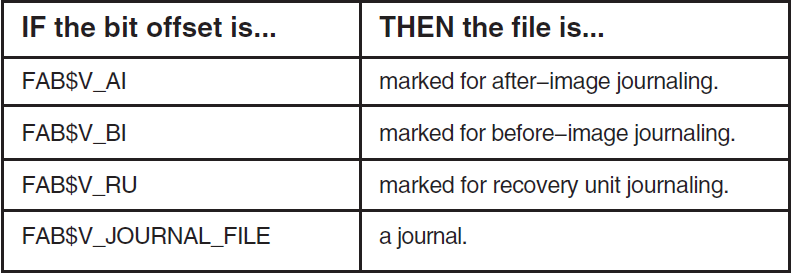
The FAB$B_JOURNAL field is output-only. You cannot use this FAB field to mark a file for journaling.
The FAB$B_JOURNAL field is set by the RMS services $OPEN and $DISPLAY.
The FAB$B_JOURNAL field is also checked by the RMS $CREATE service. If its value is not 0, the $CREATE service returns the error condition RMS$_JNS (operation not supported by RMS Journaling).
9.2. Journaling XABs
You can use two XAB control blocks, XABJNL and XABRU, and two XABITM item list entries to specify and define information related to journaling. The following sections describe the journaling XAB control blocks and the two XABITM item list entries.
9.3. XABJNL
9.3.1. Description
The journaling XAB (XABJNL) contains journaling-specific information for a file. It is an output-only XAB, which is filled in when the file is opened or displayed ($OPEN or $DISPLAY). The XABJNL for the data file has a field that points to the FAB for the journal associated with the data file; that FAB also contains information for the journal.
9.3.2. XABJNL macros
The following macros are defined for XABJNL:
XABJNL_STORE (for VAX MACRO only)
XABJNL_INIT (for BLISS only)
XABJNL_DECL (for BLISS only)
9.3.3. XABJNL fields
The journaling XAB contains the following fields:

The individual XABJNL fields are described in the following sections. For simplicity, the field names are shortened; for example, XAB$B_JNL_TYPE is listed as B_JNL_TYPE.
9.3.4. B_JNL_TYPE
The journaling type field specifies the type of journaling for which you request information. It can contain the string XAB$C_AI, XAB$C_BI, or XAB$C_RU_ DEFAULT. When the $OPEN or the $DISPLAY service is called, RMS uses this field to determine the type of journaling being requested, in order to return the appropriate information.
This is a required, input-only field.
9.3.5. L_JNL_FAB
The journal file access block (FAB) address field points to a FAB that describes the journal associated with the data file. It applies only to XABJNL XABs that have an after-image or before-image journal type.
On $OPEN and $DISPLAY services, the journal FAB, NAM, and XAB blocks are filled in with information about the specified journal. Because the only information stored in the journal access control element (ACE) is the volume name and the file ID of the journal, you will only be able to get the device name and file ID by using the journal FAB and NAM blocks.
This is an optional, input-only field.
9.3.6. W_JNL_FLAGS
The journaling flags field receives information for two flags that are specific to journaling, the journaling-disabled flag and the backup-done flag. It applies only to XABJNL XABs that have an after-image or before-image journal type.
If the XAB$V_JOURNAL_DISABLED flag is set, then journaling cannot be applied to the file. This flag is set by BACKUP on the backup copies of files marked for journaling to prevent the backup copy from being modified. If this flag is set for a data file marked for after-image or before-image journaling, then RMS does not allow the data file to be opened for write access.
If the XAB$V_BACKUP_DONE flag is set, it means that a BACKUP/RECORD operation has been done since the last time the file was opened by RMS for write access. This also tells RMS to write a ‘‘backup done’’ entry in the journal. The setting of this bit is synchronized with the updating of the XAB$L_BACKUP_ SEQNO longword, which is used to provide ‘‘backup-done’’ entries in the journal. If the RMS Recovery utility is used to restore data, then the backup-done entries are used to avoid redoing updates that are already reflected in the backup copy of the data file.
These bits are output-only parameters for the $OPEN and $DISPLAY services.
9.3.7. W_VOLNAM_SIZ
The length of volume name buffer field contains a value corresponding to the size of the
user buffer that is available for receiving the name of the volume label for a journal. For
XABJNL XABs with an after-image or before-image journal type, the value is for the volume
(corresponding to the executive-mode, systemwide logical name
DISK$volume_label) where the journal is located. For an RU_DEFAULT
XABJNL (specified by the XAB$B_JNL_TYPE field), this field contains information on the
default volume name where a recovery unit journal would be created. Note that the volume
where a recovery unit journal ultimately resides is dependent on several factors, and that a
file may be journalled to a recovery unit journal on a volume other than the one specified
at the time the file was marked for recovery unit journaling.
This is an optional, input-only field.
9.3.8. L_VOLNAM_BUF
The journal volume name address field contains the address of the buffer that is to receive the volume name string for the volume where the journal is to be located. For XABJNL XABs with an after-image or before-image journal type, the value returned is for the volume where the journal is located; for an RU_DEFAULT XABJNL (specified by the XAB$B_JNL_TYPE field), this field contains the default volume name where a recovery unit journal is created.
This is an optional, input-only field.
9.3.9. W_VOLNAM_LEN
The returned length of volume name field receives the actual length of the volume name. For XABJNL XABs with an after-image or before-image journal type, the value returned is for the volume where the journal is located. For an RU_DEFAULT XABJNL (specified by the XAB$B_JNL_TYPE field), the value returned is for the default volume name where a recovery unit journal is created.
This is an output-only field returned by calls to the $OPEN or the $DISPLAY service.
9.3.10. Q_JNL_VERIFY _CDATE
The journal creation date field receives the expected creation date of the journal; it is retrieved from the data file being journaled, and not the journal itself. RMS Journaling uses this field to verify that the correct journal is being opened.
This field is used only for XABJNL XABs with an after-image or before-image type; it is an output-only field, used with the $OPEN or the $DISPLAY service.
9.3.11. L_JNLIDX
The journal index field receives a value that uniquely identifies a journal stream within a journal; this value is automatically assigned when the file is marked for journaling.
This is an output-only field returned on calls to the $OPEN or the $DISPLAY service.
9.3.12. L_BACKUP _SEQNO
The backup sequence number field receives the sequence number associated with the most recent backup-done entry that is written to the journal.
This is an output-only field returned on calls to the $OPEN or the $DISPLAY service.
9.3.13. Q_JNL_MOD_TIME
The Recovery utility time stamp field receives the date and time stamp of the last journal entry that was processed by the Recovery utility. It provides a check to verify that the file will not be rolled forward to a time earlier than a previous RECOVER/FORWARD operation.
This is an output-only field.
9.4. XABRU
9.4.1. Description
The recovery unit XAB (XABRU—pronounced "zab-ru") is used to designate a specific recovery unit for use by a particular file operation or stream.
Note
The XABRU is used only by RMS when the process uses the recovery unit facility (RUF) to start transactions. RMS ignores the XABRU if a transaction is started by calling the DECdtm transaction services directly.
For record operations, RMS operations are associated with recovery units on a stream basis.
If a XABRU is present when a $CONNECT call is issued and a valid recovery unit handle
argument (ru_handle) is specified in the XABRU, the stream is joined
to the recovery unit specified by the ru_handle argument. Any further
record operations on that stream will take place as part of the specified recovery
unit.
9.4.2. XABRU macros
The following macros are defined for XABRU:
XABRU (for BLISS and VAX MACRO)
XABRU_STORE (for VAX MACRO only)
XABRU_INIT (for BLISS only)
XABRU_DECL (for BLISS only)
9.4.3. XABRU fields
The XABRU contains the following fields:

The individual XABRU fields are described in the following sections.
9.4.4. L_RU_HANDLE
The recovery unit handle field contains the recovery unit handle returned by the $START_RU service.
If a XABRU is specified in the FAB at the time of an $OPEN call, and this field contains any value other than 0, then the specified recovery unit handle identifies the default recovery unit for all record streams subsequently connected to this FAB. If a XABRU is specified in the record access block (RAB) at the time of a $CONNECT call, and this field contains any value other than 0, then the record stream attempts to join the recovery unit specified by the recovery unit handle.
If a XABRU is specified in both the FAB and the RAB, then the XABRU specified in the RAB takes precedence. (That is, the record stream joins the recovery unit identified by the recovery unit handle specified in the XABRU in the RAB.) If there is no XABRU in either the FAB or the RAB, then the stream joins the default recovery unit (that is, the most recently started recovery unit).
This is an optional, input-only field.
9.4.5. L_RU_HANDLE _JOINED
The recovery unit handle joined field receives the recovery unit handle to which the record stream was joined. This is an output-only field, and it is filled in only for a XABRU specified in the RAB if a record stream joins a recovery unit when the $CONNECT service is called. This field is ignored for XABRU XABs specified in the FAB.
9.4.6. W_RU_FLAGS
The recovery unit flags field is used to specify recovery unit information. The XAB$W_RU_FLAGS field has only one bit that can be set: the XAB$M_NOJOIN bit. When this bit is set during the execution of the RMS services $OPEN or $CONNECT, the record stream does not join any recovery unit.
If a XABRU is specified in the FAB at the time of an $OPEN call, and the XAB$M_NOJOIN bit is set, then no record streams associated with the file join any recovery unit, unless specifically overridden when the call to $CONNECT is made. If a XABRU is specified in the RAB at the time of a $CONNECT call, and the XAB$M_NOJOIN is set, then the record stream does not join any recovery unit.
If a record stream does not join any recovery unit, and the file is marked for recovery unit journaling, only RMS operations that do not modify the contents of the file can be used. Any attempt to modify the file results in the error message "NRU, operation prohibited outside recovery-unit."
If there is no XABRU specified in either the FAB or the RAB, then the record stream attempts to join the default recovery unit (that is, the most recently started recovery unit).
This is an optional, input-only field.
9.5. XABITM
Two XABITM item list entries are associated with RMS Journaling:
XAB$_RUJVOLNAM
XAB$_TID
Note
Both XAB$_RUJVOLNAM and XAB$_TID are connected to a record access block (RAB), not to a file access block (FAB).
For a complete description of the XABITM item list XAB and the other supported item list entries, refer to the VSI OpenVMS Record Management Services Reference Manual.
Both of these item list entries are supported on set-mode and sense-mode XABITM blocks.
9.5.1. XAB$ _RUJVOLNAM
A set-mode XAB$_RUJVOLNAM item list entry specifies a volume name that RMS uses to create a recovery unit journal. A sense-mode XAB$_RUJVOLNAM item list entry returns to the caller the name of the volume where the recovery unit journal is located.
When an RMS record service associates a stream with a transaction, and this is the first stream in the process to associate with that transaction, then RMS checks to see if a set-mode XAB$_RUJVOLNAM item list entry is specified with the caller’s RAB. If one is found, then the volume name specified by the item list entry is prefixed with the string DISK$ and the resultant string is used to determine the required location of the recovery unit journal.
Note that the XAB$_RUJVOLNAM item list entry overrides both the default recovery unit journal placement and any setting specified by using the SET FILE/RU_JOURNAL=LABEL command.
9.5.2. XAB$ _RUJVOLNAM fields: set mode
The fields of a set-mode XAB$_RUJVOLNAM item list entry are defined as follows:

9.5.3. XAB$ _RUJVOLNAM fields: sense mode
The fields of a sense-mode XAB$_RUJVOLNAM item list entry are defined as follows:
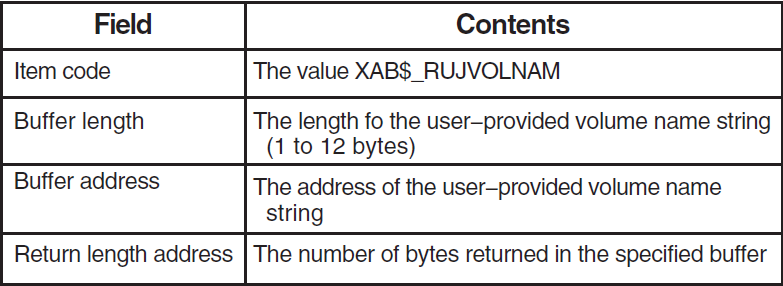
9.5.4. XAB$ _RUJVOLNAM restrictions
The following usage restrictions apply to the XAB$_RUJVOLNAM item list entry:
A set-mode or sense-mode XAB$_RUJVOLNAM item list entry is processed by RMS only when RMS associates a stream with a transaction and this is the first stream in the process to associate with that transaction.
If multiple set-mode XAB$_RUJVOLNAM item list entries are specified on the same service call, the RMS service fails and returns an error status (RMS$_IMX).
9.5.5. XAB$_TID
A set-mode XAB$_TID item list entry selects a specific TID for association with a stream regardless of the process default transaction. A sense-mode XAB$_TID item list entry returns to the caller the TID of the transaction with which a stream has been associated.
9.5.6. XAB$_TID fields: set mode
The fields of a set-mode XAB$_TID item list entry are defined as follows:
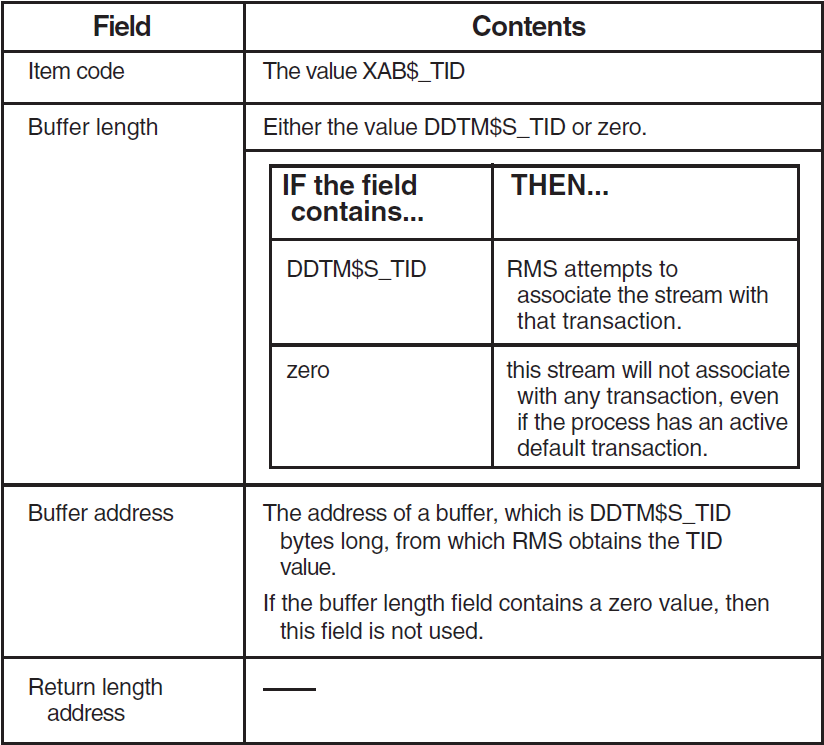
9.5.7. XAB$_TID fields: sense mode
The fields of a sense-mode XAB$_TID item list entry are defined as follows:

9.5.8. XAB$_TID restrictions
The following usage restrictions apply to the XAB$_TID item list entry:
A sense-mode XAB$_TID item list entry connected to a RAB is processed by RMS only when the record service has been successfully associated with a transaction.
A set-mode XAB$_TID item list entry connected to a RAB is processed by RMS only when RMS can associate a stream with a transaction.
A set-mode XAB$_TID item list entry that specifies an invalid TID value causes the RMS service to fail and return an error status.
If multiple set-mode XAB$_TID items are specified on the same service call, the RMS service fails and returns an error status (RMS$_IMX).
Appendix A. Support for RMS Services
|
RMS Service |
After-Image Journaling |
Before-Image Journaling |
Recovery-Unit Journaling |
|---|---|---|---|
|
Key to Support Types
| |||
|
$CLOSE |
NE |
NE |
NE |
|
$CLOSE with delete |
ER |
ER |
ER |
|
$CLOSE with implied disconnect |
NE |
NE |
NE ? |
|
$CONNECT |
NE |
NE |
NE |
|
$CREATE ? |
ER |
ER |
ER |
|
$DELETE |
J |
J |
J ? |
|
$DISCONNECT |
NE |
NE |
NE ? |
|
$DISPLAY |
NE |
NE |
NE |
|
$ENTER |
NJ |
NJ |
NJ |
|
$ERASE |
ER |
ER |
ER |
|
$EXTEND |
J |
NJ |
NJ |
|
$FIND |
NE |
NE |
NE ? |
|
$FLUSH |
NE |
NE |
NE |
|
$FREE |
NE |
NE |
DF ? |
|
$GET |
NE |
NE |
NE ? |
|
$NXTVOL |
NE |
NE |
NE |
|
$OPEN |
NE |
NE |
NE |
|
$PARSE |
NE |
NE |
NE |
|
$PUT |
J |
J |
J ? |
|
$PUT with truncate |
J |
J |
ER |
|
$READ |
NE |
NE |
NE |
|
$RELEASE |
NE |
NE |
DF ? |
|
$REMOVE |
NJ |
NJ |
NJ |
|
$RENAME |
NJ |
NJ |
NJ |
|
$REWIND |
NE |
NE |
NE ? |
|
$SEARCH |
NE |
NE |
NE |
|
$SPACE |
NE |
NE |
NE |
|
$TRUNCATE |
J |
J |
ER |
|
$UPDATE |
J |
J |
J ? |
|
$WAIT |
NE |
NE |
NE |
|
$WRITE |
J |
J |
ER |
Appendix B. Obsolete Recovery Unit Services Routines
This appendix describes the obsolete Recovery Unit Facility (RUF) recovery unit services. The RUF services have been replaced by DECdtm transaction services as follows:
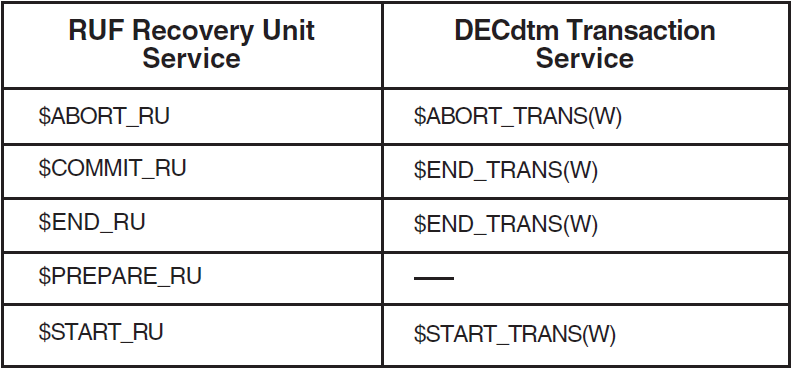
Digital recommends that you use the DECdtm services when you write new programs.
B.1. RUF services emulated
You do not have to recompile or relink your applications to run them on RMS Journaling Version 5.4 or later. On later versions, the recovery unit services are emulated transparently using DECdtm transaction services. Some small differences between the original recovery unit services and the emulations are pointed out in the following descriptions.
B.2. Converting from RUF to DECdtm services
You can convert an application that uses only one active transaction at a time to use the DECdtm services by replacing calls to RUF services with calls to the corresponding DECdtm transaction services.
However, using both DECdtm transaction services and RUF recovery unit services in a single image requires care. You should avoid having transactions that were started using the DECdtm services active at the same time as transactions that were started using the RUF services.
B.2.1. $ABORT_RU—Abort Recovery Unit
Description
The Abort Recovery Unit ($ABORT_RU) service terminates the current recovery unit and restores all record streams joined to the recovery unit to their states before the recovery unit was started. When a stream joins a recovery unit (either at $START_RU or at $CONNECT), RMS stores the current record stream context, including the current record pointer, the next record pointer, and the record lock state.
You can abort a recovery unit at any time after you call the $START_RU service and before you call the $END_RU or $COMMIT_RU service. After you abort the recovery unit, all files associated with record streams joined to the recovery unit are available for further processing.
The emulation calls the DECdtm transaction service $ABORT_TRANS.
Note
The $ABORT_RU call restores only the records for files that were marked for recovery unit journaling and were modified in a record stream joined to the specified recovery unit.
Format
SYS$ABORT_RU ru_handle
Argument
ru-handle
| VMS Usage: | ru_handle |
| type: | longword (unsigned) |
| access: | read only |
| mechanism: | by reference |
The address of a longword that contains the recovery unit handle returned by the $START_RU system service.
Returns
| VMS Usage: | cond_value |
| type: | longword |
| access: | write only |
| mechanism: | by value |
Longword condition value. All system services return (by immediate value) a condition value in R0. The $ABORT_RU service can return the following condition values:

The $ABORT_RU service emulation can also return any status returned by the $ABORT_TRANS transaction service.
B.2.2. $COMMIT_RU—Commit Recovery Unit
Description
The Commit Recovery Unit ($COMMIT_RU) service terminates the current recovery unit and makes the records that were changed within the recovery unit available for further processing. Only use the $COMMIT_RU service after using the $PREPARE_RU service, or after a call to the $END_RU service that has failed with a status of RUF$_RUNOTCOM. If no processing takes place in your application between the $PREPARE_RU and $COMMIT_RU calls, you can replace these two calls with the single $END_RU call.
The emulation calls the DECdtm transaction service $END_TRANS.
Note
In RMS Journaling Version 5.4 and later, the service $COMMIT_RU is exactly the same as the $END_RU service, because the $PREPARE_RU service no longer affects the state of the transaction.
Format
SYS$COMMIT_RU ru_handle
Argument
ru-handle
| VMS Usage: | ru_handle |
| type: | longword (unsigned) |
| access: | read only |
| mechanism: | by reference |
The address of a longword that contains the recovery unit handle returned by the $START_RU system service.
Returns
| VMS Usage: | cond_value |
| type: | longword |
| access: | write only |
| mechanism: | by value |
Longword condition value. All system services return (by immediate value) a condition value in R0. The $COMMIT_RU service can return the following condition values:

The $COMMIT_RU service emulation can also return any status returned by the $END_TRANS transaction service.
B.2.3. $END_RU—End Recovery Unit
Description
The End Recovery Unit ($END_RU) service marks the end of a recovery unit. The $END_RU service is actually a combination of two other recovery unit services, $PREPARE_RU and $COMMIT_RU. Use the $END_RU service when you have no processing that will take place between the Prepare and Commit actions.
When you use $END_RU, the recovery unit is terminated, and the records that were changed within the recovery unit are available for further processing.
The emulation calls the DECdtm transaction service $END_TRANS.
Format
SYS$END_RU ru_handle
Argument
ru-handle
| VMS Usage: | ru_handle |
| type: | longword (unsigned) |
| access: | read only |
| mechanism: | by reference |
The address of a longword that contains the recovery unit handle returned by the $START_RU system service.
Returns
| VMS Usage: | cond_value |
| type: | longword (unsigned) |
| access: | write only |
| mechanism: | by value |
Longword condition value. All system services return (by immediate value) a condition value in R0. The $ENDRU service can return the following condition values:
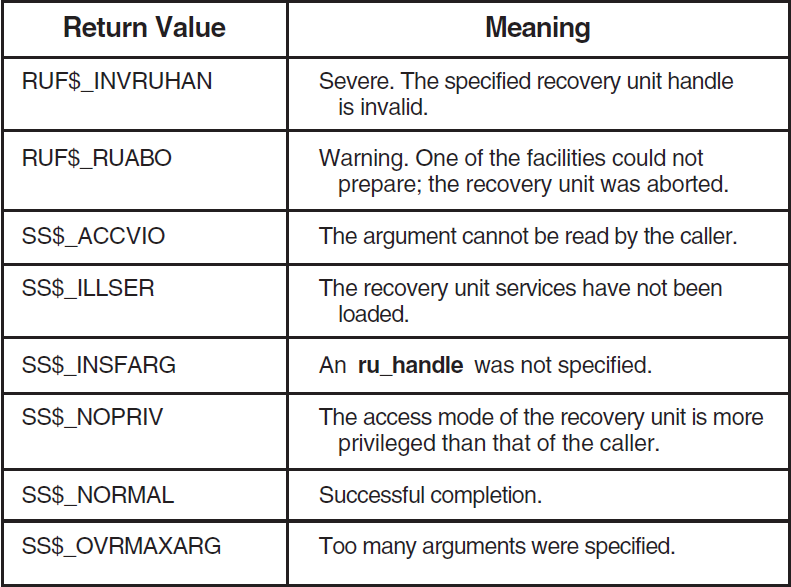
The $END_RU service emulation can also return any status returned by the $END_TRANS transaction service.
B.2.4. $PREPARE_RU—Prepare Recovery Unit
Description
The Prepare Recovery Unit ($PREPARE_RU) service marks a point in a recovery unit when all changes to records within the recovery unit are complete. After you issue a $PREPARE_RU call, the recovery unit must be terminated with a call either to the $ABORT_RU service or the $COMMIT_RU service.
When you issue a call to the $PREPARE_RU service, no further changes are permitted for any files that are connected to the recovery unit until that recovery unit is no longer active. However, you can include other processing (such as data verification) that will determine whether you want to commit or abort the recovery unit.
After using $PREPARE_RU, do not issue a call to the $END_RU service; use $COMMIT_RU to end the recovery unit.
Note
In RMS Journaling Version 5.4 and later, the service $PREPARE_RU has no effect; it does not change the state of the transaction or of the associated record streams.
Format
SYS$PREPARE_RU ru_handle
Argument
ru-handle
| VMS Usage: | ru_handle |
| type: | longword (unsigned) |
| access: | read only |
| mechanism: | by reference |
The address of a longword that contains the recovery unit handle returned by the $START_RU system service.
Returns
| VMS Usage: | cond_value |
| type: | longword |
| access: | write only |
| mechanism: | by value |
Longword condition value. All system services return (by immediate value) a condition value in R0. The $PREPARE_RU service can return the following condition values:
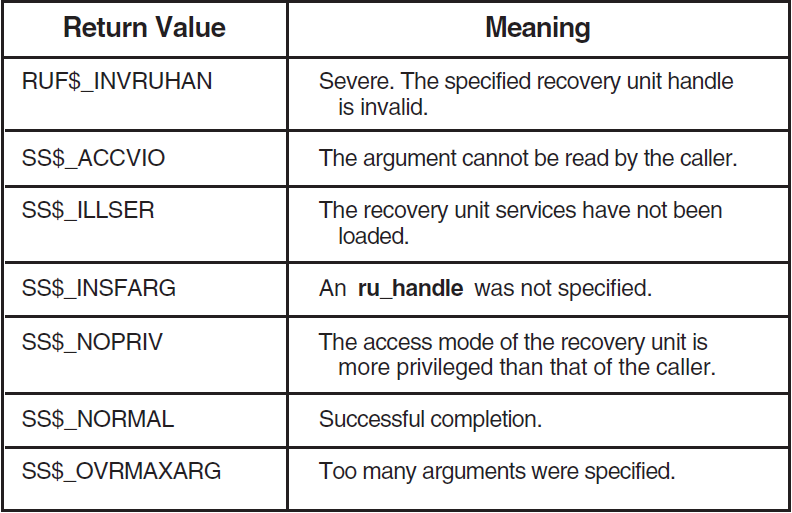
B.2.5. $START_RU—Start Recovery Unit
Description
The Start Recovery Unit ($START_RU) service denotes the beginning of a recovery unit.
When you issue a $START_RU call, a recovery unit handle (ru_handle) unique to the process is assigned to the recovery unit. When a recovery unit is started, streams that are not already in an active recovery unit join the new recovery unit if the connected files meet the following conditions:
Are marked for recovery unit journaling
Are open for write access
Are not accessed through DECnet
All operations involving those files are part of the recovery unit until the recovery unit is completed. If a file is involved in a recovery unit, you cannot close the file before the recovery unit has been completed. (More specifically, you cannot disconnect a stream until the recovery unit has been completed.)
The emulation calls the DECdtm transaction service $START_TRANS.
Format
SYS$START_RU ru_handle
Argument
ru-handle
| VMS Usage: | ru_handle |
| type: | longword (unsigned) |
| access: | write only |
| mechanism: | by reference |
The address of an unsigned longword to which the recovery unit handle is to be returned.
Returns
| VMS Usage: | cond_value |
| type: | longword (unsigned) |
| access: | write only |
| mechanism: | by value |
Longword condition value. All system services return (by immediate value) a condition value in R0. The $START_RU service can return the following condition values:
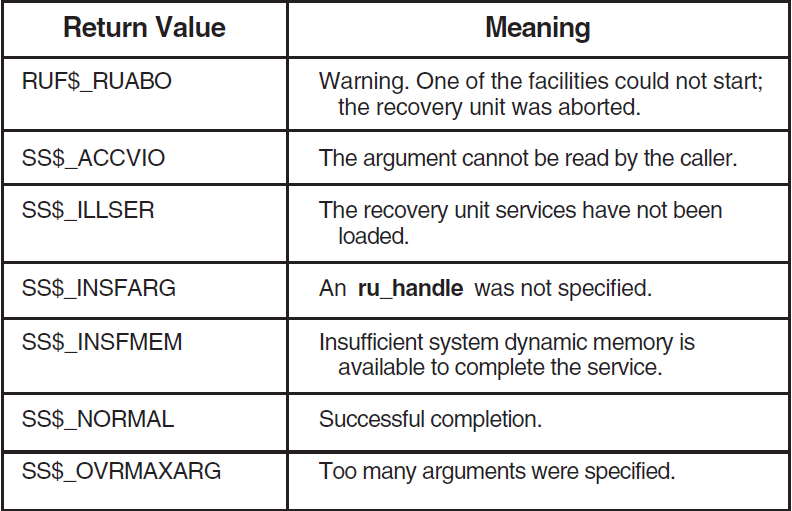
The $START_RU service emulation can also return any status returned by the $START_TRANS transaction service.
Appendix C. Sample Application Program
This appendix contains a sample application program in which DECdtm transaction services are used to define transactions.
The program transfers 10 U.S. dollars from a checking account to a savings account within the context of two transactions.
The sample application is written in each of the following programming languages:
VSI C (using the default transaction)
VSI C (using XAB$_TID)
VSI COBOL
C.1. Accessing program files
The source code for these examples is included in SYS$EXAMPLES, in the following files:
RMSJNL_EXAMPLE.C
RMSJNL_XABTID_EXAMPLE.C
RMSJNL_EXAMPLE.COB
In addition, an executable version of the VSI COBOL program is included in SYS$EXAMPLES. You can either run the example directly using the file RMSJNL_EXAMPLE.EXE, or use the following command, which runs a command procedure that does all the necessary preparation, such as marking files for journaling:
$ @SYS$EXAMPLES:RMSJNL_EXAMPLE
C.2. First transaction
The first transaction is in the section of the program that initializes the checking and savings accounts (the files RMSJNL$CHECKING.IDX and RMSJNL$SAVINGS.IDX).
The beginning of the transaction is defined by the $START_TRANS call, which in this VSI COBOL program is as follows:
TRANSFER-FUNDS.
    CALL "SYS$START_TRANSW" USING BY VALUE EFN
                                  BY VALUE 0
                                  BY REFERENCE IOSB
                                  BY VALUE 0
                                  BY VALUE 0
                                  BY REFERENCE TID
       GIVING RETURN-STATUS.
Following the $START_TRANS call, account numbers and initial balances are assigned to the checking and savings accounts if they did not already exist. Once this is complete, the transaction is completed with an $END_TRANS call:
CALL "SYS$END_TRANSW" USING BY VALUE EFN
                            BY VALUE 0
                            BY REFERENCE IOSB
                            BY VALUE 0
                            BY VALUE 0
                            BY REFERENCE TID
    GIVING RETURN-STATUS.
C.3. Second transaction
The second transaction transfers the funds from the checking account to the savings account. After the transaction is started (with the $START_TRANS service), the following processing occurs:

After each of these steps, the program checks for invalid processing. If an error is detected, then the $ABORT_TRANS service is called. For example:
READ SAVINGS-ACCOUNT-FILE RECORD
    INVALID KEY
        DISPLAY "Cannot read the savings account balance."
        CALL "SYS$ABORT_TRANSW" USING BY VALUE EFN
                                      BY VALUE 0
                                      BY REFERENCE IOSB
                                      BY VALUE 0
                                      BY VALUE 0
                                      BY REFERENCE TID
        STOP RUN
    END-READ.
In the event that an error occurs and $ABORT_TRANS is called, RMSJNL$CHECKING.IDX and RMSJNL$SAVINGS.IDX are restored to their states before the most recent $START_TRANS call was issued.
C.4. Terminating the transaction
After the four stages have been completed, the $END_TRANS call completes the transaction, and the modifications represented in the transactions are committed. (That is to say, the records in RMSJNL$CHECKING.IDX and RMSJNL$SAVINGS.IDX can no longer be restored to their pre-transaction states by recovery unit journaling.)
If there is a system crash or other abnormal termination during the execution of this program, and a transaction has begun but not completed, then the records in RMSJNL$CHECKING.IDX and RMSJNL$SAVINGS.IDX will automatically be restored to a consistent state (that is, their states when the most recent transaction began). This can be demonstrated in the sample program during the pause that has been built into the program during the transaction. The pause occurs after the funds are withdrawn from the checking account, but before they are deposited into the savings account:
REWRITE CHECKING-ACCOUNT-RECORD
   .
   .
   .
DISPLAY "Pausing for five seconds."
CALL "LIB$WAIT" USING BY REFERENCE DELAY.
   .
   .
   .
REWRITE SAVINGS-ACCOUNT-RECORD
C.5. Interrupting the program
If you run the program and press Ctrl/Y to interrupt the program, the system displays the message ‘‘Pausing for five seconds.’’ You can then examine the records in RMSJNL$CHECKING.IDX and RMSJNL$SAVINGS.IDX to demonstrate that recovery unit journaling restored the records to a consistent state.
The remainder of this appendix contains sample programs for the following programming languages:
Sample Program—VSI C (Using the Default Transaction)
Sample Program—VSI C (Using XAB$_TID)
Sample Program—VSI COBOL
C.6. Sample Program—VSI C (Using the Default Transaction)
/************************************************************************
 * Transaction example demonstrates the calls necessary to implement a *
 * transaction for recovery unit journaling. This example uses the *
 * default transaction to associate record streams. *
 ************************************************************************/

/*
 * Include Files
 */

#include rms
#include stsdef
#include ssdef
#include stdio
#include descrip

#define event_flag 0

/*
 * This macro is used to check the status of System Services.
 * If an error occurs the message is printed and the transaction
 * is aborted (if we are in one), The status is then signaled.
 */

#define exit_on_error(expression,mycode) { \
    int \
        sys_status; \
    sys_status=(expression); \
    if ((sys_status & 1) == 0) { \
        fprintf( stderr, "Transaction example error - %s\n", mycode );\
        sys$abort_transw (event_flag,0,&transaction_iosb,0,0,&transaction_tid);\
        lib$signal(sys_status); }}

/*
 * Create the IOSB data type.
 */
typedef struct {
    short int status;
    unsigned char filler [3];
    } IOSB;

/*
 * Describe the record structure of the checking and savings account files.
 */
typedef struct {
    char account_number [9];  /* account number (primary key) */
    int account_balance;      /* balance of the account */
    char filler [5];          /* filler for compatibility with other examples*/
    } RECORD;

/*
 * Create the TID data type.
 */
typedef struct {
    char filler [16]; /* TID is an opaque structure 16 bytes long */
    } TID;

/*
 * Allocate the RMS user structures
 */
struct FAB    checking_fab; /* File Access Block for the checking file   */
struct RAB    checking_rab; /* Record Access Block for the checking file */
struct XABKEY checking_key; /* XABKEY for checking account */

struct FAB    savings_fab; /* File Access Block for the savings file     */
struct RAB    savings_rab; /* Record Access Block for the savings file   */
struct XABKEY savings_key; /* XABKEY for savings account */

    char
        *checking_file_name =     "rmsjnl$checking.idx",
        *savings_file_name  =     "rmsjnl$savings.idx";
    int
        delay,      /* time delay after updating checking account */
        status;     /* Check completion status of RMS operations */
    IOSB
        transaction_iosb;
    RECORD
        checking,savings;
    TID
        transaction_tid;

main () {
/* Initialize RMS user structures for the checking file. */
checking_fab = cc$rms_fab;
checking_fab.fab$l_fna = checking_file_name;
checking_fab.fab$b_fns = strlen (checking_file_name);
checking_fab.fab$b_fac = FAB$M_UPD | FAB$M_PUT | FAB$M_GET;
checking_fab.fab$l_xab = &checking_key;

checking_rab = cc$rms_rab;
checking_rab.rab$l_fab = &checking_fab;
checking_rab.rab$w_rsz = 18;
checking_rab.rab$w_usz = 18;
checking_rab.rab$l_ubf = &checking;
checking_rab.rab$l_rbf = &checking;

checking_key = cc$rms_xabkey;

/*
 * Initialize RMS user structures for the savings file.
 */
savings_fab           = cc$rms_fab;
savings_fab.fab$l_fna = savings_file_name;
savings_fab.fab$b_fns = strlen (savings_file_name);
savings_fab.fab$b_fac = FAB$M_UPD | FAB$M_PUT | FAB$M_GET;
savings_fab.fab$l_xab = &savings_key;

savings_rab           = cc$rms_rab;
savings_rab.rab$l_fab = &savings_fab;
savings_rab.rab$w_usz = 18;
savings_rab.rab$w_rsz = 18;
savings_rab.rab$l_ubf = &savings;
savings_rab.rab$l_rbf = &savings;

savings_key     = cc$rms_xabkey;

/*
 * Open the savings and checking account files.
 */
exit_on_error(sys$open (&checking_fab), "Checking account OPEN failed");
exit_on_error(sys$open (&savings_fab),  "Savings account OPEN failed ");

/*
 * Connect the savings and checking account files.
 */
exit_on_error( sys$connect (&checking_rab),"connecting checking rab ");
exit_on_error( sys$connect (&savings_rab), "connecting savings rab ");

/*
 * Start a transaction on both the checking and savings accounts.
 * The checking and savings accounts will be initialized to $100
 * for account "000001234". Note that any I/O errors in this
 * recovery unit will be ignored.
 */
exit_on_error(sys$start_transw(event_flag,0,
                               &transaction_iosb,0,0,
                               &transaction_tid),
            "couldn’t start the initialization transaction.");
/*
 * Put $100 dollars in the checking account of "000001234"
 * The put will cause this stream to become part of the transaction.
 */
strcpy (checking.account_number, "000001234");
checking.account_balance= 100;

status = sys$put (&checking_rab);
    if ((status & 1) == 0) {
       fprintf (stderr, "Checking account already exists.\n");}

/*
 * Put $100 dollars in the savings account of "000001234"
 * The put will cause this stream to become part of the transaction.
 */
strcpy (savings.account_number, "000001234");
savings.account_balance = 100;

status = sys$put (&savings_rab);
if ((status & 1) == 0) {
fprintf (stderr, "Savings account already exists\n");}

/*
 * End the transaction to initialize the checking and savings accounts.
 */
exit_on_error( sys$end_transw (event_flag,0,
                               &transaction_iosb,0,0,
                               &transaction_tid),
                "couldn’t end the initialization transaction.");

/*
 * Transfer $10.00 from checking to savings using a recovery unit.
 * Note that the recovery unit is aborted if any I/O errors are
 * encountered.
 */
exit_on_error( sys$start_transw(event_flag,0,
                               &transaction_iosb,0,0,
                               &transaction_tid),
                "Could not start the transfer transaction.");

/*
 * Read the checking account record for "000001234". Abort recovery
 * unit if the operation is not successful. This get will cause this
 * stream to become part of the transaction.
 */
exit_on_error(sys$get (&checking_rab),"Checking account not found.\n");
/*
 * Subtract $10 from the checking account balance.
 */
checking.account_balance = checking.account_balance - 10;
/*
 * Update the checking account file reflecting the new balance. Abort
 * the recovery unit if the update is not successful.
 */
exit_on_error(sys$update (&checking_rab),
              "Cannot update checking account.\n");

printf ("Pausing for 5 seconds.\n");
delay = 5;
lib$wait (&delay);
/*
 * Read the savings account record for "000001234". Abort the recovery
 * unit if the get is not successful. The put will cause this stream
 * to become part of the transaction.
 */
exit_on_error(sys$get (&savings_rab), "savings account not found.\n");
/*
 * Add $10 to the savings account.
 */
savings.account_balance = savings.account_balance + 10;
/*
 * Update the savings account file reflecting the new balance. Abort
 * the recovery unit if the update is not successful.
 */
exit_on_error( sys$update (&savings_rab),
               "Cannot update savings account.\n");

/*
 * End the recovery unit.
 */
exit_on_error( sys$end_transw (event_flag,0,
                               &transaction_iosb,0,0,
                               &transaction_tid),
                "Could not end transfer transaction\n");

/*
 * Display the new balances.
 */
printf("The new checking account balance is %d\n",
       checking.account_balance);

printf("The new savings account balance is %d\n",
       savings.account_balance);
}
C.7. Sample Program—VSI C (Using XAB$_TID)
/************************************************************************
 * Transaction example demonstrates the calls necessary to implement a *
 * transaction for recovery unit journaling. This example specifies *
 * the TID of the transaction to which record streams are to associate. *
 ************************************************************************/

/*
 * Include Files
 */

#include rms
#include stsdef
#include ssdef
#include stdio
#include descrip

#define event_flag 0

/*
 * This macro is used to check the status of System Services.
 * If an error occurs the message is printed and the transaction
 * is aborted (if we are in one), The status is then signaled.
 */
#define exit_on_error(expression,mycode) { \
    int \
        sys_status; \
    sys_status=(expression); \
    if ((sys_status & 1) == 0) { \
        fprintf( stderr, "Transaction example error - %s\n", mycode );\
        sys$abort_transw (event_flag,0,&transaction_iosb,0,0,&transaction_tid);\
        lib$signal(sys_status); }}

/*
 * Create the IOSB data type.
 */
typedef struct {
    short int status;
    unsigned char filler [3];
    }   IOSB;

/*
 * Create the ITMLST data type.
 */
typedef struct {
    unsigned short itm$w_bufsiz, itm$w_itmcod;
    void *itm$l_bufadr;
    unsigned short *itm$l_retlen;
    unsigned long terminator;
    } ITMLST;
/*
 * Describe the record structure of the checking and savings account files.
 */
typedef struct {
    char account_number [9]; /* account number (primary key) */
    int account_balance;     /* balance of the account */
    char filler [5];         /* filler for compatibility with other examples*/
    } RECORD;
/*
 * Create the TID data type.
 */
typedef struct {
    char filler [16];        /* TID is an opaque structure 16 bytes long */
    } TID;
/*
 * Create the XABITM data type and supporting constants.
 */
#define cc$rms_xabitm 36
#define xab$k_setmode 2
#define xab$k_itmlen 32
#define xab$_xabtid 320
#define ddtm$m_nondefault 2

typedef struct {
    unsigned char xab$b_cod;
    unsigned char xab$b_bln;
    unsigned short filler;
    void *xab$l_nxt;
    void *xab$l_itemlist;
    unsigned char xab$b_mode;
}     XABITM;
/*
 * Allocate the RMS user structures.
 */
struct FAB checking_fab;     /* File Access Block for the checking file */
struct RAB checking_rab;     /* Record Access Block for the checking file */
struct XABKEY checking_key;  /* XABKEY for checking account */

struct FAB savings_fab;      /* File Access Block for the savings file */
struct RAB savings_rab;      /* Record Access Block for the savings file */
struct XABKEY savings_key;   /* XABKEY for savings account */

    char
        *checking_file_name = "rmsjnl$checking.idx",
        *savings_file_name = "rmsjnl$savings.idx";

    short int
        return_length;

    int
        delay,      /* time delay after updating checking account */
        flags = ddtm$m_nondefault,
                    /* Used to specify a non-default transaction */
        status;     /* Check completion status of RMS operations */

    IOSB
        transaction_iosb;
    ITMLST
        item_list;
    RECORD
        checking,savings;
    TID
        transaction_tid;
    XABITM
        checking_itm,
        savings_itm; /* XABITM for savings account */

main () {
    /* Initialize RMS user structures for the checking file. */
    checking_fab           = cc$rms_fab;
    checking_fab.fab$l_fna = checking_file_name;
    checking_fab.fab$b_fns = strlen (checking_file_name);
    checking_fab.fab$b_fac = FAB$M_UPD | FAB$M_PUT | FAB$M_GET;
    checking_fab.fab$l_xab = &checking_key;

    checking_key           = cc$rms_xabkey;
    checking_key.xab$l_nxt = 0;

    checking_rab           = cc$rms_rab;
    checking_rab.rab$l_fab = &checking_fab;
    checking_rab.rab$w_rsz = 18;
    checking_rab.rab$w_usz = 18;
    checking_rab.rab$l_ubf = &checking;
    checking_rab.rab$l_rbf = &checking;
    checking_rab.rab$l_xab = &checking_itm;
    /*
    * This is a set mode item XAB.
    */
    checking_itm.xab$b_cod      = cc$rms_xabitm;
    checking_itm.xab$b_bln      = xab$k_itmlen;
    checking_itm.xab$l_itemlist = &item_list;
    checking_itm.xab$b_mode     = xab$k_setmode;
    checking_itm.xab$l_nxt      = 0;

    /*
     * Initialize RMS user structures for the savings file.
     */
    savings_fab           = cc$rms_fab;
    savings_fab.fab$l_fna = savings_file_name;
    savings_fab.fab$b_fns = strlen (savings_file_name);
    savings_fab.fab$b_fac = FAB$M_UPD | FAB$M_PUT | FAB$M_GET;
    savings_fab.fab$l_xab = &savings_key;

    savings_key           = cc$rms_xabkey;
    savings_key.xab$l_nxt = 0;

    savings_rab           = cc$rms_rab;
    savings_rab.rab$l_fab = &savings_fab;
    savings_rab.rab$w_usz = 18;
    savings_rab.rab$w_rsz = 18;
    savings_rab.rab$l_ubf = &savings;
    savings_rab.rab$l_rbf = &savings;
    savings_rab.rab$l_xab = &savings_itm; /*chain a XAB off the RAB*/

    /*
     * This is a set mode item XAB.
     */
    savings_itm.xab$b_cod      = cc$rms_xabitm;
    savings_itm.xab$b_bln      = xab$k_itmlen;
    savings_itm.xab$l_itemlist = &item_list;
    savings_itm.xab$b_mode     = xab$k_setmode;
    savings_itm.xab$l_nxt      = 0;

    /*
     * This is the item list. Note that the buffer address points to
     * the TID buffer used in the DDTM calls. This item list entry
     * will force a stream to associate with the transaction specified
     * by the TID.
     */
    item_list.itm$w_bufsiz     = 16;
    item_list.itm$w_itmcod     = xab$_xabtid;
    item_list.itm$l_bufadr     = &transaction_tid; /*point to the TID buffer*/
    item_list.itm$l_retlen     = &return_length;
    item_list.terminator       = 0;

    /*
     * Open the savings and checking account files.
     */
    exit_on_error(sys$open (&checking_fab), "Checking account OPEN failed");
    exit_on_error(sys$open (&savings_fab), "Savings account OPEN failed ");
    /*
    * Connect the savings and checking account files.
    */
    exit_on_error( sys$connect (&checking_rab),"connecting checking rab ");
    exit_on_error( sys$connect (&savings_rab), "connecting savings rab ");
    /*
    * Start a transaction on both the checking and savings accounts.
    * The checking and savings accounts will be initialized to $100
    * for account "000001234". Note that any I/O errors in this
    * recovery unit will be ignored.
    */
    exit_on_error(sys$start_transw(event_flag,flags,
                                   &transaction_iosb,0,0,
                                   &transaction_tid),
                  "couldn’t start the initialization transaction.");

    /*
     * Put $100 dollars in the checking account of "000001234"
     * The put will cause this stream to become part of the transaction.
     */
    strcpy (checking.account_number, "000001234");
    checking.account_balance= 100;
    status = sys$put (&checking_rab);
    if ((status & 1) == 0) {
    fprintf (stderr, "Checking account already exists.\n");}
    /*
    * Put $100 dollars in the savings account of "000001234"
    * The put will cause this stream to become part of the transaction.
    */
    strcpy (savings.account_number, "000001234");
    savings.account_balance = 100;

    status = sys$put (&savings_rab);
        if ((status & 1) == 0) {
           fprintf (stderr, "Savings account already exists\n");}
    /*
     * End the transaction to initialize the checking and savings accounts.
     */
    exit_on_error( sys$end_transw (event_flag,0,
    &transaction_iosb,0,0,
    &transaction_tid),
    "couldn’t end the initialization transaction.");
    /*
    * Transfer $10.00 from checking to savings using a recovery unit.
    * Note that the recovery unit is aborted if any I/O errors are
    * encountered.
    */
    exit_on_error( sys$start_transw(event_flag,flags,
                                    &transaction_iosb,0,0,
                                    &transaction_tid),
                   "Could not start the transfer transaction.");

    /*
     * Read the checking account record for "000001234". Abort recovery
     * unit if the operation is not successful. This get will cause this
     * stream to become part of the transaction.
     */

    exit_on_error(sys$get (&checking_rab),"Checking account not found.\n");
    /*
     * Subtract $10 from the checking account balance.
     */

    checking.account_balance = checking.account_balance - 10;
    /*
     * Update the checking account file reflecting the new balance. Abort
     * the recovery unit if the update is not successful.
     */
    exit_on_error(sys$update (&checking_rab),
                  "Cannot update checking account.\n");

    printf ("Pausing for 5 seconds.\n");
    delay = 5;
    lib$wait (&delay);

    /*
     * Read the savings account record for "000001234". Abort the recovery
     * unit if the get is not successful. The put will cause this stream
     * to become part of the transaction.
     */
    exit_on_error(sys$get (&savings_rab), "savings account not found.\n");
    /*
     * Add $10 to the savings account.
     */
    savings.account_balance = savings.account_balance + 10;
    /*
     * Update the savings account file reflecting the new balance. Abort
     * the recovery unit if the update is not successful.
     */
    exit_on_error( sys$update (&savings_rab),
                   "Cannot update savings account.\n");
    /*
     * End the recovery unit.
     */
    exit_on_error( sys$end_transw (event_flag,0,
                                   &transaction_iosb,0,0,
                                   &transaction_tid),
                   "Could not end transfer transaction\n");
    /*
     * Display the new balances.
     */
    printf("The new checking account balance is %d\n",
           checking.account_balance);
    printf("The new savings account balance is %d\n",
           savings.account_balance);
}
C.8. Sample Program—VSI COBOL
*
* This program demonstrates the calls necessary for RMS transactions.
* It is only an example of use and does not implement complete error
* handling.
*

IDENTIFICATION DIVISION.
PROGRAM-ID. RMSJNL_EXAMPLE.

ENVIRONMENT DIVISION.
*
* Structure used for both the checking and savings account files.
*

INPUT-OUTPUT SECTION.
FILE-CONTROL.
    SELECT CHECKING-ACCOUNT-FILE
        ASSIGN TO "RMSJNL$CHECKING.IDX"
        ORGANIZATION IS INDEXED
        ACCESS MODE IS DYNAMIC
        RECORD KEY IS CHECKING-ACCOUNT-NUMBER.
    SELECT SAVINGS-ACCOUNT-FILE
        ASSIGN TO "RMSJNL$SAVINGS.IDX"
        ORGANIZATION IS INDEXED
        ACCESS MODE IS DYNAMIC
        RECORD KEY IS SAVINGS-ACCOUNT-NUMBER.

DATA DIVISION.
FILE SECTION.
FD CHECKING-ACCOUNT-FILE.
01 CHECKING-ACCOUNT-RECORD.
    02 CHECKING-ACCOUNT-NUMBER
        PICTURE 9(9)
        USAGE IS DISPLAY.
    02 CHECKING-ACCOUNT-BALANCE
        PICTURE S9(7)V99
        USAGE IS DISPLAY.
FD SAVINGS-ACCOUNT-FILE.
01 SAVINGS-ACCOUNT-RECORD.
    02 SAVINGS-ACCOUNT-NUMBER
        PICTURE 9(9)
        USAGE IS DISPLAY.
    02 SAVINGS-ACCOUNT-BALANCE
        PICTURE S9(7)V99
        USAGE IS DISPLAY.
WORKING-STORAGE SECTION.
01 EDITED-CHECKING-ACCOUNT-BALANCE
    PICTURE $$,$$$,$$$.99-
    USAGE IS DISPLAY.
01 EDITED-SAVINGS-ACCOUNT-BALANCE
    PICTURE $$,$$$,$$$.99-
    USAGE IS DISPLAY.
01 TID
    PICTURE X(16)
    USAGE IS DISPLAY.
01 IOSB
    PICTURE X(8)
    USAGE IS DISPLAY.
01 RETURN-STATUS
    PICTURE S9(9)
    USAGE IS COMP.
01 DELAY
    USAGE IS COMP-1
    VALUE IS 5.0.
01 EFN
    PICTURE 9(9)
    USAGE IS COMP
    VALUE IS 7.

PROCEDURE DIVISION.
MAIN SECTION.
*
* Open the checking and savings account files.
*
OPEN-FILES.
    OPEN I-O CHECKING-ACCOUNT-FILE.
    OPEN I-O SAVINGS-ACCOUNT-FILE.
*
* Start a transaction to initialize savings and checking account files.
* Note that any I/O errors in this transaction will be ignored. The
* checking and savings account will be initialized to $100 for account
* "000001234".
*
INITIALIZE-ACCOUNTS.
    CALL "SYS$START_TRANSW" USING BY VALUE EFN
                                  BY VALUE 0
                                  BY REFERENCE IOSB
                                  BY VALUE 0
                                  BY VALUE 0
                                  BY REFERENCE TID
        GIVING RETURN-STATUS.
    IF RETURN-STATUS IS FAILURE
        DISPLAY "Cannot start the transaction to initialize accounts."
        STOP RUN
        END-IF.
*
*   Put $100 dollars in the checking account of "000001234"
*

    MOVE 1234 TO CHECKING-ACCOUNT-NUMBER.
    MOVE 100.00 TO CHECKING-ACCOUNT-BALANCE.
    WRITE CHECKING-ACCOUNT-RECORD
        INVALID KEY
            DISPLAY "Checking account already exists."
        END-WRITE.
    MOVE 1234 TO SAVINGS-ACCOUNT-NUMBER.
    MOVE 100.00 TO SAVINGS-ACCOUNT-BALANCE.
*
*   Put $100 dollars in the savings account of "000001234"
*
    WRITE SAVINGS-ACCOUNT-RECORD
        INVALID KEY
            DISPLAY "Savings account already exists."
        END-WRITE.
*
* End the transaction to initialize the checking and savings accounts
*
    CALL "SYS$END_TRANSW" USING BY VALUE EFN
                                BY VALUE 0
                                BY REFERENCE IOSB
                                BY VALUE 0
                                BY VALUE 0
                                BY REFERENCE TID
        GIVING RETURN-STATUS.
    IF RETURN-STATUS IS FAILURE
        DISPLAY "Cannot end transaction to initialize accounts."
        STOP RUN
        END-IF.
*
* Transfer $10.00 from checking to savings under a transaction.
* Note that the transaction is aborted if any I/O errors are
* encountered.
*
TRANSFER-FUNDS.
    CALL "SYS$START_TRANSW" USING BY VALUE EFN
                                  BY VALUE 0
                                  BY REFERENCE IOSB
                                  BY VALUE 0
                                  BY VALUE 0
                                  BY REFERENCE TID
        GIVING RETURN-STATUS.
    IF RETURN-STATUS IS FAILURE
        DISPLAY "Cannot start the transaction to transfer funds."
        STOP RUN
        END-IF.
*
* Read the checking account record for "000001234". Abort the transaction
* if the operation is not successful.
*
    MOVE 1234 TO CHECKING-ACCOUNT-NUMBER.
    READ CHECKING-ACCOUNT-FILE RECORD
        INVALID KEY
            DISPLAY "Cannot read checking account balance."
            CALL "SYS$ABORT_TRANSW" USING BY VALUE EFN
                                          BY VALUE 0
                                          BY REFERENCE IOSB
                                          BY VALUE 0
                                          BY VALUE 0
                                          BY REFERENCE TID
            STOP RUN
        END-READ.
*
* Subtract $10 from the checking account balance.
*
    SUBTRACT 10.00 FROM CHECKING-ACCOUNT-BALANCE.
    MOVE CHECKING-ACCOUNT-BALANCE TO EDITED-CHECKING-ACCOUNT-BALANCE.
*
* Update the checking account file reflecting the new balance. Abort the
* transaction if the update is not successful.
*
    REWRITE CHECKING-ACCOUNT-RECORD
        INVALID KEY
            DISPLAY "Cannot update the checking account balance."
            CALL "SYS$ABORT_TRANSW" USING BY VALUE EFN
                                          BY VALUE 0
                                          BY REFERENCE IOSB
                                          BY VALUE 0
                                          BY VALUE 0
                                          BY REFERENCE TID
            STOP RUN
        END-REWRITE.
    DISPLAY "Pausing for five seconds."
    CALL "LIB$WAIT" USING BY REFERENCE DELAY.
*
* Read the savings account record for "000001234". Abort the transaction
* if the operation is not successful.
*
    MOVE 1234 TO SAVINGS-ACCOUNT-NUMBER.
    READ SAVINGS-ACCOUNT-FILE RECORD
        INVALID KEY
            DISPLAY "Cannot read the savings account balance."
            CALL "SYS$ABORT_TRANSW" USING BY VALUE EFN
                                          BY VALUE 0
                                          BY REFERENCE IOSB
                                          BY VALUE 0
                                          BY VALUE 0
                                          BY REFERENCE TID
            STOP RUN
        END-READ.
*
* Add $10 to the savings account.
*
    ADD 10.00 TO SAVINGS-ACCOUNT-BALANCE.
    MOVE SAVINGS-ACCOUNT-BALANCE TO EDITED-SAVINGS-ACCOUNT-BALANCE.
*
* Update the savings account file reflecting the new balance. Abort the
* transaction if the update is not successful.
*
    REWRITE SAVINGS-ACCOUNT-RECORD
        INVALID KEY
            DISPLAY "Cannot update the savings account balance."
            CALL "SYS$ABORT_TRANSW" USING BY VALUE EFN
                                          BY VALUE 0
                                          BY REFERENCE IOSB
                                          BY VALUE 0
                                          BY VALUE 0
                                          BY REFERENCE TID
            STOP RUN
        END-REWRITE.
*
* End the transaction.
*
CALL "SYS$END_TRANSW" USING BY VALUE EFN
                            BY VALUE 0
                            BY REFERENCE IOSB
                            BY VALUE 0
                            BY VALUE 0
                            BY REFERENCE TID
        GIVING RETURN-STATUS.
    IF RETURN-STATUS IS FAILURE
        DISPLAY "Cannot end the transaction to transfer funds."
        STOP RUN
        END-IF.
*
* Display the new balances.
*
DISPLAY-BALANCES.
    DISPLAY "Checking account balance is "
        EDITED-CHECKING-ACCOUNT-BALANCE.
    DISPLAY "Savings account balance is "
        EDITED-SAVINGS-ACCOUNT-BALANCE.
*
* Close the checking and savings account files.
*
CLOSE-FILES.
    CLOSE CHECKING-ACCOUNT-FILE.
    CLOSE SAVINGS-ACCOUNT-FILE.
    STOP RUN.
END PROGRAM RMSJNL_EXAMPLE.
Appendix D. Recovery Unit Recovery with RMS Journaling Versions Earlier than 5.4
Nodes using versions of RMS Journaling prior to Version 5.4 can run together in a VMS cluster with nodes using Version 5.4 or later. Shared access to files marked for journaling is supported in such a mixed-version cluster with one exception: you cannot use a node running an earlier version of RMS Journaling to recover a file that participated in a transaction that required a two-phase commit protocol. RMS Journaling Version 5.4 includes certain prepare records in the journal that earlier versions do not understand.
The following examples show the responses to three ways of trying to access the file [FINANCE]PAYROLL.DAT, which has a prepare record in its recovery unit journal, using a version of RMS Journaling earlier than Version 5.4.
D.1. Example: Attempting to access files
If your application tries to access the file directly, RMS returns the following error messages to your application:
$ TYPE PAYROLL.DAT
%TYPE-W-OPENIN, error opening WORK1:[FINANCE]PAYROLL.DAT;1 as input
-RMS-E-RRF, recovery unit recovery failed
-RMSREC-F-INVJNLFIL, invalid journal file
In addition, detached recovery sends the following messages to OPCOM:
%%%%%%%%%%% OPCOM 30-MAY-1990 09:16:20.84 %%%%%%%%%%%
Message from user BEETHOVEN on EROICA
%RMSREC-F-OPRHDRDET, error occurred during detached recovery unit
recovery; initiated by process ID (PID) 4A2004A0

%%%%%%%%%%% OPCOM 30-MAY-1990 09:16:20.91 %%%%%%%%%%%
Message from user BEETHOVEN on EROICA
%RMSREC-F-INVJNLFIL, invalid journal file

%%%%%%%%%%% OPCOM 30-MAY-1990 09:16:20.92 %%%%%%%%%%%
Message from user BEETHOVEN on EROICA
-RMSREC-F-JNLFILE, journal file DISK$WORK1:[SYSJNL]RMS$0000001E.RMS$JOURNAL;24

%%%%%%%%%%% OPCOM 30-MAY-1990 09:16:20.93 %%%%%%%%%%%
Message from user BEETHOVEN on EROICA
-RMSREC-F-INVJNLIDX, invalid journal index number
D.2. Example: Attempting to recover files
If you try to use the Recover utility (RECOVER) on the file, RECOVER responds with the following messages:
%RMSREC-F-NOTCOMREC, file was not completely recovered as requested
%RMSREC-F-LSTVALTIM, time of last valid record: 28-MAY-1990 13:18:06.27
%RMSREC-F-INVJNLFIL, invalid journal file
-RMSREC-F-JNLFILE, journal file DISK$WORK1:[FINANCE]PAYROLL.AIJ1;1
-RMSREC-F-CURNOTSUPP, journal entry: 12 currently not supported
D.3. Example: Detached recovery
If the file is being accessed by both a process on a node running a version of RMS Journaling earlier than 5.4 and a process on a node running Version 5.4 or later, and the Version 5.4 node fails, the surviving accessor on the other node attempts to perform detached recovery. Detached recovery fails, deletes the surviving process, and sends the following messages to OPCOM:
%%%%%%%%%%% OPCOM 30-MAY-1990 09:16:20.84 %%%%%%%%%%%
Message from user BEETHOVEN on EROICA
%RMSREC-F-OPRHDRDET, error occurred during detached recovery unit
recovery; initiated by process ID (PID) 4A2004A0

%%%%%%%%%%% OPCOM 30-MAY-1990 09:16:20.91 %%%%%%%%%%%
Message from user BEETHOVEN on EROICA
%RMSREC-F-INVJNLFIL, invalid journal file

%%%%%%%%%%% OPCOM 30-MAY-1990 09:16:20.92 %%%%%%%%%%%
Message from user BEETHOVEN on EROICA
-RMSREC-F-JNLFILE, journal file DISK$WORK1:[SYSJNL]RMS$0000001E.RMS$JOURNAL;24

%%%%%%%%%%% OPCOM 30-MAY-1990 09:16:20.93 %%%%%%%%%%%
Message from user BEETHOVEN on EROICA
-RMSREC-F-INVJNLIDX, invalid journal index number
To recover the file, you must perform recovery or access the file on a node running RMS Journaling Version 5.4, or upgrade the remaining nodes in your VMS cluster to Version 5.4 or later of RMS Journaling.
Error returned if stream is associated with a transaction; otherwise no effect.
It is not possible to create a file marked for journaling. To mark a file for journaling use the SET FILE command.
May associate the stream with a transaction.