VSI ACMS for OpenVMS Managing Applications
- Software Version:
- ACMS for OpenVMS Version 5.3-3
- Operating System and Version:
- VSI OpenVMS Alpha Version 8.4-2L1 or higher
VSI OpenVMS IA-64 Version 8.4-1H1 or higher
Preface
1. About VSI
VMS Software, Inc. (VSI) is an independent software company licensed by Hewlett Packard Enterprise to develop and support the OpenVMS operating system.
2. Intended Audience
This manual describes how to authorize, install, run, and manage VSI ACMS for OpenVMS (ACMS) applications. It also provides information about controlling the ACMS system and its components. For information about managing ACMS systems remotely across a network, see the VSI ACMS for OpenVMS Remote Systems Management Guide.
3. Document Structure
|
Introduces ACMS application management, explaining the activities that such management involves and the ACMS tools you use in managing applications. | |
|
Explains how to authorize terminals for access to ACMS with the Device Definition Utility (DDU) and how to define local terminals to log in directly to ACMS. | |
|
Explains how to authorize users to access ACMS with the User Definition Utility (UDU). | |
|
Explains how to use the Application Authorization Utility (AAU) to authorize ACMS applications. | |
|
Describes how to create and manage ACMS task queues and queued task elements using the ACMS Queue Manager (ACMSQUEMGR) Utility. | |
|
Describes how to set up ACMS for distributed processing. | |
|
Describes how to use the data compression feature. | |
|
Describes how to start and stop the ACMS system and its components, as well as monitor system resources. | |
|
Describes how to install and run ACMS applications, cancel tasks, and modify active applications. | |
|
Chapter 10, "Setting ACMS Quotas, Parameters, and Privileges" |
Explains how to set and modify the values of ACMS system parameters, OpenVMS SYSGEN parameters affected by ACMS, and ACMS process quotas using the ACMSPARAM.COM and ACMEXCPAR.COM command procedures. |
|
Chapter 11, "Changing ACMS Parameter Values with the ACMSGEN Utility" |
Explains how to change the values of ACMS parameters with the ACMSGEN Utility, independent of the ACMSPARAM.COM command procedure. The second part of the chapter provides reference information for the ACMSGEN Utility commands. |
|
Chapter 12, "Auditing Applications with the Audit Trail Logger" |
Explains how to get information about application and user activity by using the Audit Trail Report (ATR) Utility. |
|
Describes the ACMS Software Event Logger (SWL), which logs ACMS internal software errors. It also describes how to generate SWL reports by using the ACMS Software Event Log Utility Program(SWLUP). | |
|
Describes the major issues in ACMS application performance, ACMS components that affect system performance, and tools for monitoring an ACMS system, and also provides a tuning checklist. | |
|
Describes the use of DECtrace for collecting event-based data gathered from ACMS applications. | |
|
Describes the kits and licenses available in ACMS. It also describes how to manage ACMS systems with concurrent-use licenses, unlimited-use licenses, or both. | |
|
Provides reference information for DDU commands. | |
|
Provides reference information for UDU commands. | |
|
Provides reference information for AAU commands. | |
|
Provides reference information for ACMSQUEMGR Utility commands. | |
|
Provides reference information for ACMS operator commands. | |
|
Provides reference information for ACMSGEN Utility commands. | |
|
Provides reference information for ATR Utility commands. | |
|
Provides reference information for SWLUP commands. | |
|
Appendixes | |
|
Describes the formulas used in the calculation of various parameters and quotas by ACMSPARAM.COM and ACMEXCPAR.COM, as well as further calculations that can be made to fine-tune the system. | |
|
Explains how error message codes are returned by ACMS for the ACMS application management utilities and for messages returned at run time. | |
|
Gives guidelines to ensure successful user logins. | |
4. ACMS Help
ACMS and its components provide extensive online help.
DCL level help
Enter
HELP ACMSat the DCL prompt for complete help about theACMScommand and qualifiers, and for other elements of ACMS for which independent help systems do not exist. DCL level help also provides brief help messages for elements of ACMS that contain independent help systems (such as the ACMS utilities) and for related products used by ACMS (such as DECforms or Oracle CDD/Repository).ACMS utilities help
Each of the following ACMS utilities has an online help system:
ACMS Debugger ACMSGEN Utility
ACMS Queue Manager (ACMSQUEMGR)
Application Definition Utility (ADU)
Application Authorization Utility (AAU)
Device Definition Utility (DDU)
User Definition Utility (UDU)
Audit Trail Report Utility (ATR)
Software Event Log Utility Program (SWLUP)
The two ways to get utility-specific help are:
Run the utility and type
HELPat the utility prompt.Use the DCL
HELPcommand. At the "Topic?" prompt, type@followed by the name of the utility. Use the ACMS prefix, even if the utility does not have an ACMS prefix (except for SWLUP). For example:Topic? @ACMSQUEMGR Topic? @ACMSADU
However, do not use the ACMS prefix with SWLUP:
Topic? @SWLUP
Note
Note that if you run the ACMS Debugger Utility and then type
HELP, you must specify a file. If you ask for help from the DCL level with@, you do not need to specify a file.ACMSPARAM.COM and ACMEXCPAR.COM help
Help for the command procedures that set parameters and quotas is a subset of the DCL level help. You have access to this help from the DCL prompt, or from within the command procedures.
LSE help
ACMS provides ACMS-specific help within the LSE templates that assist in the creation of applications, tasks, task groups, and menus. The ACMS- specific LSE help is a subset of the ADU help system. Within the LSE templates, this help is context-sensitive. Type
HELP/IND
                            (PF1-PF2)
at any placeholder for which you want help.Error help
ACMS and each of its utilities provide error message help. Use
HELP ACMS ERRORSfrom the DCL prompt for ACMS error message help. UseHELP ERRORSfrom the individual utility prompts for error message help for that utility.Terminal user help
At each menu within an ACMS application, ACMS provides help about terminal user commands, special key mappings, and general information about menus and how to select tasks from menus.
Forms help
For complete help for DECforms or TDMS, use the help systems for these products.
5. Related Documents
The following table lists the documents in the VSI ACMS for OpenVMS documentation set.
| ACMS Information | Description |
|---|---|
| VSI ACMS Version 5.0 for OpenVMS Installation Guide | Description of installation requirements, the installation procedure, and postinstallation tasks. |
| VSI ACMS for OpenVMS Getting Started | Overview of ACMS software and documentation. Tutorial for developing a simple ACMS application. Description of the AVERTZ sample application. |
| VSI ACMS for OpenVMS Concepts and Design Guidelines | Description of how to design an ACMS application. |
| VSI ACMS for OpenVMS Writing Applications | Description of how to write task, task group, application, and menu definitions using the Application Definition Utility. Description of how to write and migrate ACMS applications on an OpenVMS system. |
| VSI ACMS for OpenVMS Writing Server Procedures | Description of how to write programs to use with tasks and how to debug tasks and programs. |
| VSI ACMS for OpenVMS Systems Interface Programming | Description of using Systems Interface (SI) Services to submit tasks to an ACMS system. |
| VSI ACMS for OpenVMS ADU Reference Manual | Reference information about the ADU commands, phrases, and clauses. |
| VSI ACMS for OpenVMS Quick Reference | List of ACMS syntax with brief descriptions. |
| VSI ACMS for OpenVMS Managing Applications | Description of authorizing, running, and managing ACMS applications, and controlling the ACMS system. |
| VSI ACMS for OpenVMS Remote Systems Management Guide | Description of the features of the Remote Manager for managing ACMS systems, how to use the features, and how to manage the Remote Manager. |
| Online help | Online help about ACMS and its utilities. |
6. OpenVMS Documentation
The full VSI OpenVMS documentation set can be found on the VMS Software Documentation webpage at https://docs.vmssoftware.com.
7. VSI Encourages Your Comments
You may send comments or suggestions regarding this manual or any VSI document by sending electronic mail to the following Internet address: <docinfo@vmssoftware.com>. Users who have VSI OpenVMS support contracts through VSI can contact <support@vmssoftware.com> for help with this product.
8. Conventions
| Ctrl/x | A sequence such as Ctrl/x indicates that you must press and hold the key labeled Ctrl while you press another key or a pointing device button. |
| PF1 x | A sequence such as PF1 x indicates that you must first press and release the key labeled PF1 and then press and release another key or a pointing device button. |
| Return | In the HTML version of this document, this convention appears as brackets rather than a box. |
| . . . |
A horizontal ellipsis in examples indicates one of the
following possibilities:
|
| ⋮ | A vertical ellipsis indicates the omission of items from a code example or command format; the items are omitted because they are not important to the topic being discussed. |
Monospace text | Monospace type indicates code examples and interactive screen displays. In the C programming language, monospace type in text identifies the following elements: keywords, the names of independently compiled external functions and files, syntax summaries, and references to variables or identifiers introduced in an example. In the HMTL version of this document, this text style may appear as italics. |
| - | A hyphen at the end of a command format description, command line, or code line indicates that the command or statement continues on the following line. |
| numbers | All numbers in text are assumed to be decimal unless otherwise noted. Nondecimal radixes—binary, octal, or hexadecimal—are explicitly indicated. |
| bold text | Bold text represents the introduction of a new term or the name of an argument, an attribute, or a reason. In the HMTL version of this document, this text style may appear as italics. |
| italic text | Italic text indicates important information, complete titles
of manuals, or variables. Variables include information that
aries in system output (Internal error
number), in command lines
(/PRODUCER=name),
and in command parameters in text (where dd
represents the predefined code for the device
type). |
| UPPERCASE | Uppercase text indicates the name of a routine, the name of a file, the name of a file protection code, or the abbreviation for a system privilege. In command format descriptions, uppercase text is an optional keyword. |
| UPPERCASE | In command format descriptions, uppercase text that is underlined is required. You must include it in the statement if the clause is used. |
| lowercase | In command format descriptions, a lowercase word indicates a required element. |
| <lowercase> | In command format descriptions, lowercase text in angle brackets indicates a required clause or phrase. |
| ( ) | In command format descriptions, parentheses indicate that you must enclose the options in parentheses if you choose more than one. |
| [ | | ] | In command format descriptions, vertical bars within square brackets indicate that you can choose any combination of the enclosed options, but you can choose each option only once. |
| { | | } | In command format descriptions, vertical bars within braces indicate that you must choose one of the options listed, but you can use each option only once. |
9. References to Oracle Products
VSI ACMS documentation set, to which this document belongs, refers to the following Oracle products by their full and abbreviated names:
| Full product name | Shortened product name |
|---|---|
| Oracle Common Data Dictionary | CDD |
| Oracle Rdb | Rdb |
| Oracle Database/DBMS | DBMS |
| Oracle Trace | Trace |
Part I. Managing the ACMS System and ACMS Applications
This part of the manual contains information about managing the ACMS system and its components. Part I,''Managing the ACMS System and ACMS Applications'' also contains information about authorizing, installing, running, and monitoring ACMS applications. In addition, it provides information on system tuning and describes how to set up your ACMS system for distributed processing.
Chapter 1. Introduction to Application Management
The ACMS software helps you develop, use, and maintain online applications. Once you define and test an ACMS application, you can make it available to users. Before users can run tasks in the application, you must authorize the users and their terminals for access to ACMS. You can also optionally authorize ACMS applications and the users who can install them. Finally, you can start the ACMS system and applications.
Maintaining the security of applications
Controlling their day-to-day operation
Monitoring applications
Managing ACMS task queues and queued task elements
Tuning the ACMS system
This guide discusses the work involved in managing ACMS applications and the tools ACMS provides for this work. Practice using the ACMS management tools discussed in this book by installing and running the ACMS sample application.
See Chapter 9, "Installing and Managing Applications" for information about how to install and manage ACMS applications.
This manual does not discuss using the ACMS Remote Manager to manage ACMS systems remotely across a network. For information about managing ACMS systems remotely across a network, see the VSI ACMS for OpenVMS Remote Systems Management Guide in the ACMS documentation set.
1.1. ACMS Authorization Tools
When many users share one OpenVMS system, it is important for the ACMS system manager to control the facilities to which each user has access. For example, some users' jobs require access only to ACMS, while others require access to OpenVMS as well as ACMS.
The OpenVMS Authorize Utility authorizes users to log in to OpenVMS. All ACMS users must be authorized OpenVMS users, whether they log in to OpenVMS or directly in to ACMS.
The ACMS User Definition Utility (UDU) controls who can sign in to ACMS and whether a user receives a menu or just a selection prompt after signing in. The system manager must also use UDU to define the user name of ACMS processes. See Chapter 3, "Authorizing Users" for information about UDU.
The ACMS Device Definition Utility (DDU) authorizes the terminals at which users can sign in to ACMS and controls whether a user signs in directly to ACMS, or logs in to OpenVMS and then ACMS. See Chapter 2, "Authorizing and Controlling Terminals" for information about DDU.
The system manager can use the ACMS Application Authorization Utility (AAU) to authorize users to install applications in the directory associated with the logical name ACMS$DIRECTORY. See Chapter 4, "Authorizing Applications" for information about AAU.
The Access Control List (ACL) subclause, used in the application definition, specifies by User Identification Code (UIC) or identifier which users can run certain tasks in an application. See VSI ACMS for OpenVMS ADU Reference Manual for information on the ACCESS application-task subclause.
1.2. Controlling ACMS Operations
Install ACMS applications
Set up terminals as ACMS operator terminals
Control the ACMS system, including starting and stopping the system, and changing system characteristics
Control the queued task initiator (QTI) and ACMS task queues
Control ACMS applications, including starting and stopping applications
Enable and disable tasks
Enable and disable application auditing
Control the terminals from which users can sign in to ACMS by starting and stopping the terminal subsystem controller (TSC)
Cancel tasks when necessary
Cancel users when necessary
Display system and application information
Most ACMS operator commands require the OpenVMS OPER privilege. The only commands that
do not require the OPER privilege are the ACMS/SHOW commands and
ACMS/INSTALL. See Chapter 8, "Controlling the ACMS System", Chapter 9, "Installing and Managing Applications", and Chapter 21, "Operator Commands" for more
information on the ACMS operator commands.
1.3. Monitoring an ACMS System
The Audit Trail Logger gathers information about an active ACMS system (for example, system and application starts and stops, user sign-ins and sign-outs, processing errors, user task selections, task completions and task cancellations) and generates records of ACMS user and application activity. Use the Audit Trail Report (ATR) Utility to produce reports containing audit trail information. See Chapter 12, "Auditing Applications with the Audit Trail Logger" for information about the ATL and the ATR Utility.
The
ACMS/SHOWcommands display information about an active ACMS system and its applications. See Chapter 21, "Operator Commands" for information about theACMS/SHOWcommands.The Software Event Logger (SWL) reports internal software errors that occur during run time. Use the Software Event Log Utility Program (SWLUP) to generate reports containing SWL information. See Chapter 13, "Logging Software Events" for information about SWL and SWLUP.
1.4. Tuning an ACMS System
Normally, you set OpenVMS and ACMS system parameters and ACMS run-time process quotas after an installation or an upgrade, or when the ACMS system load changes with, for example, additional applications or users. Use the ACMSPARAM.COM and ACMEXCPAR.COM command procedures to set parameters and quotas.
After you are familiar with the requirements of your system, you might need to change some of the default system parameter values. For example, you might need to change the value set for the maximum number of users who can sign in to ACMS. You can make system parameter changes with the ACMSPARAM and ACMEXCPAR command procedures.
You can also use the ACMSGEN Utility to set or change ACMS parameters. However, the use of ACMSPARAM.COM is preferred because this command procedure automatically changes other parameters related to the ones you modify. ACMSGEN changes values of ACMS parameters similar to the way the OpenVMS SYSGEN Utility lets you change OpenVMS parameters.
You can use ACMSGEN parameters to control the ACMS TSC, the ACC, the CP, the EXC, and the QTI, as well as ACMS message services and workspace pools. These components start and control other ACMS components.
Chapter 14, "Tuning Your Application" discusses tuning considerations, monitoring tools, and ACMS components that affect ACMS performance. It also provides a tuning checklist. Chapter 10, "Setting ACMS Quotas, Parameters, and Privileges" and Chapter 11, "Changing ACMS Parameter Values with the ACMSGEN Utility" describe the ACMS system parameters in detail and explain how to change their values using the ACMSPARAM.COM and the ACMEXCPAR.COM procedures and the ACMSGEN Utility.
1.5. ACMS Application Management Tools
|
Management Tool |
Function |
|---|---|
|
ACMS Operator Commands |
Perform standard operator functions such as starting and stopping the ACMS system, the TSC, and the QTI. Other operator commands allow you to start and stop ACMS applications and display application and system information. See Chapter 8, "Controlling the ACMS System", Chapter 9, "Installing and Managing Applications", and Chapter 21, "Operator Commands" for information. |
|
ACMSGEN Utility |
Changes the values of ACMS parameters. See Chapter 11, "Changing ACMS Parameter Values with the ACMSGEN Utility" and Chapter 22, "ACMSGEN Commands" for information. |
|
ACMSPARAM.COM and ACMEXCPAR.COM procedures |
Change the values of OpenVMS and ACMS system parameters, and ACMS run-time process quotas. See Chapter 10, "Setting ACMS Quotas, Parameters, and Privileges" for information. |
|
Application Authorization Utility (AAU) |
Authorizes applications to be installed in the directory associated with the logical name ACMS$DIRECTORY. See Chapter 4, "Authorizing Applications" and Chapter 19, "AAU Commands" for information. |
|
Audit Trail Report (ATR) Utility |
Returns records of application and user activity. See Chapter 12, "Auditing Applications with the Audit Trail Logger" and Chapter 23, "ATR Commands" for information. |
|
Device Definition Utility (DDU) |
Authorizes ACMS terminals and, optionally, defines terminals to sign in directly to ACMS. See Chapter 2, "Authorizing and Controlling Terminals" and Chapter 17, "DDU Commands" for information. |
|
Queue Manager Utility (ACMSQUEMGR) |
Creates and manages ACMS task queues and queued task elements. See Chapter 5, "Creating and Managing Queues" and Chapter 20, "ACMSQUEMGR Commands" for information. |
|
Software Event Log Utility Program (SWLUP) |
Creates reports of selected events recorded by the Software Event Logger. See Chapter 13, "Logging Software Events" and Chapter 24, "SWLUP Commands" for information. |
|
User Definition Utility (UDU) |
Authorizes users to sign in to ACMS and assigns sign-in displays, including default menus, to ACMS users. See Chapter 3, "Authorizing Users" and Chapter 18, "UDU Commands" for information. |
1.6. Learning to Manage an ACMS System
Perform other functions with the operator commands, such as enabling and disabling ACMS operator terminals or the Audit Trail Logger.
Run the ATR Utility to examine an ACMS log report and to familiarize yourself with the
LISTcommand and its qualifiers.Run the ACMSPARAM.COM and ACMEXCPAR.COM command procedures to familiarize yourself with ACMS system parameters and run-time process quotas.
It is recommended that you run the ACMS sample applications if you are a new ACMS user.
Chapter 2. Authorizing and Controlling Terminals
Authorized ACMS users must sign in from terminals that have been authorized for access to ACMS. This chapter describes how to use the ACMS Device Definition Utility (DDU) to authorize terminals by creating DDU device definitions. See Section 2.14, ''Summary of DDU Commands and Qualifiers'' for a summary of DDU commands and qualifiers. For reference information on the commands described in this chapter, refer to Chapter 17, "DDU Commands".
2.1. How DDU Works
Device name of the terminal. Use physical device names or group device names to authorize terminals. Table 2.1, ''DDU Group Device Names'' lists the DDU group device names.
Terminal sign-in characteristics.
When a user tries to sign in to ACMS from a terminal, ACMS checks the ACMSDDF.DAT for a device definition for the user's terminal. If the authorization file does not contain a definition for that device, ACMS then checks for the group device name $ALL to see if all devices are authorized for ACMS access. If there is no $ALL definition, ACMS denies access to the terminal. See Table 2.1, ''DDU Group Device Names'' for more information about the $ALL group device name.
ACMS/RESET
                    TERMINALS
is issued, ACMS reads the device authorization file and
establishes the sign-in characteristics for terminals. You can assign the following
sign-in characteristics to ACMS terminals:Controlled or Not Controlled
Users at application port terminals with the Controlled sign-in characteristic sign in directly to ACMS. Users at dedicated service port terminals sign in either directly to ACMS or not, depending on the node they connect to at the "Local>" prompt. See Section 2.11, ''Authorizing LAT Terminal Ports as Controlled Terminals'' for a description of application ports and dedicated service ports. A terminal with a Not Controlled characteristic has access to both OpenVMS and ACMS. See Section 2.10, ''Defining ACMS-Controlled Terminals'' for information on how to assign the
/[NO]CONTROLLEDsign-in characteristic.Autologin or No Autologin
A terminal with the Autologin characteristic allows users to sign in without typing a user name. A terminal with the No Autologin characteristic requires that the user enter a user name before gaining access to ACMS. See Section 2.5.1, ''Enabling Autologin Terminals'' for information on how to assign the Autologin or No Autologin characteristic.
2.2. How to Run DDU
$RUN SYS$SYSTEM:ACMSDDUDDU>
$MCR ACMSDDUDDU>
When you start DDU, ACMS displays the DDU prompt (DDU>). You can then enter any
DDU command (including the DDU command HELP to get online help information) or press
PF1 and PF2 for access to a keypad of DDU
commands. Use Ctrl/B to recall each DDU command you enter. To exit
from DDU, use the DDU command EXIT.
When you run DDU to authorize terminals, DDU searches for the device authorization file in your current default directory. If ACMSDDF.DAT does not exist, ACMS creates it and places it in your current default directory.
DEFINE command and the /SYSTEM and
/EXECUTIVE qualifiers. The following command defines ACMSDDF
to be the directory DISK1:[SMITH]. You need the SYSNAM
privilege to execute this
command.$DEFINE/SYSTEM/EXECUTIVE ACMSDDF DISK1:[SMITH]ACMSDDF.DAT
When you run DDU for the first time, ACMS creates a new device authorization file
and assigns all devices the characteristics defined by the DDU DEFAULT definition.
The initial DEFAULT definition contains the sign-in characteristics Not Controlled
and No Autologin. Because of this default, if you use the DDU command ADD without
qualifiers after running DDU for the first time, all new terminals have access to
both OpenVMS and ACMS.
Since DDU only contains the default definition when you run DDU for the first time, you must authorize a terminal name or a group device name before users have access to the ACMS system.
You can change the sign-in characteristics in the DDU default definition by using
the DDU command DEFAULT. The DEFAULT command is described in Section 2.8, ''DDU DEFAULT Definition''.
2.3. Creating a DDU Definition
ADD and specify a device name.
The ADD command creates a new DDU definition for the device in the device
authorization file. Do not specify a colon at the end of device names. The following
command authorizes terminal TTE6. When this command executes, DDU displays a message
confirming that the device has been added to the device authorization
file.DDU>ADD TTE6Device TTE6 has been added to the database
ADD command, you can quickly create authorizations for all
terminals by specifying the group device name $ALL. The
$ALL device name is described in Table 2.1, ''DDU Group Device Names'', with other DDU group device names.|
Device Name |
Description |
|---|---|
|
$ALL |
Authorizes all terminals. If you create a $ALL definition, you do not need to create any LT, PT, RT, or VT definitions. The $ALL definition authorizes all of those types of terminals as well as any unauthorized local terminals. Restrict terminal access to ACMS by creating individual definitions instead of using the $ALL device name. |
|
LT |
Authorizes all LAT terminals. You can authorize individual LAT terminals. |
|
PT |
Authorizes all pseudoterminals. You should only use pseudoterminals when you run DEC/Test Manager (DTM) sessions. You must authorize the PT device name if you want to run ACMS tasks from DTM. You cannot authorize individual pseudo terminals. |
|
RT |
Authorizes all remote terminals. You cannot authorize individual remote terminals. |
|
TT |
Authorizes all local terminals. You can authorize individual local terminals. |
|
VT |
Authorizes all virtual terminals. You assign virtual terminals for your system with the OpenVMS SYSGEN Utility. You cannot authorize individual virtual terminals. |
Display the device names and sign-in characteristics for authorized devices by
specifying the DDU SHOW command. See Section 2.9, ''Displaying DDU Definitions'' for information on the SHOW
command as well as an example of the output from the SHOW
command.
2.4. Copying DDU Definitions
COPY to create a new
definition based on information in an existing DDU definition. The following command
authorizes all local terminals using the device definition for terminal TTB6. When
this command executes, DDU displays a message confirming that the device definition
has been
copied.DDU>COPY TTB6 TTDevice TTB6 has been copied to device TT
The first device name you specify with the COPY command is the
name of the device in the existing device definition. The second device name is the
name of the new device. A device name can be a logical name, a physical device name,
or a group device name. See Table 2.1, ''DDU Group Device Names'' for a list of DDU
group device names. See Chapter 17, "DDU Commands" for more information on
the COPY command.
2.5. Modifying DDU Definitions
Use the DDU MODIFY command to change the login characteristics in
a device definition. The following subsections explain how to enable Autologin and
how to use the /PRINTFILE qualifier.
2.5.1. Enabling Autologin Terminals
DDU>MODIFY TTE6 /CONTROLLED /AUTOLOGIN=TURKLESDevice(s) has been modified
When users press the Return on terminal TTE6, they are
prompted for a password (if a password is required) and are logged in to ACMS
under the user name TURKLES. The device name you specify with the
MODIFY command can be a logical name, a physical device
name, or a group device name.
2.5.2. Using the /PRINTFILE Qualifier
The /PRINTFILE qualifier feature provides hardcopy
capability for DECforms panels. In other words, DECforms allows users to send a
copy of one or more panel displays to a printer or to a file for subsequent
printing. Using DDU, you can specify a Printfile device or file for a terminal.
If you specify a device, then it must be a spooled device. Specifying a
Printfile for a user is explained in Chapter 3, "Authorizing Users".
/PRINTFILE qualifier to specify a device or a
file name:- Use a DECforms PRINT response step in a form source IFDL file wherever a response step can be used; for example, you can place it in a field exit response or in a panel exit response. You can also define a key that the user can press to issue the PRINT response. See VSI DECforms Programmer's Reference Manual for details about response steps and key definitions.
Note
If you do not enter a
/PRINTFILEqualifier either for a device (using DDU) or for a user (with UDU), DECforms nevertheless creates a file if a user presses the key associated with the PRINT response. DECforms names the file form-name.TXT and places it in the default directory of the agent program. - To use the
/PRINTFILEqualifier to specify a printfile name or a spooled device, you use the DDUMODIFYcommand, the device name, the/PRINTFILEqualifier, and the name of the spooled device or printfile specification:DDU>MODIFY <device-name> /PRINTFILE=<spooled-device-name>orDDU>MODIFY <device-name> /PRINTFILE=<print-file-spec>Following is an example of how you might enter the command for a spooled device:DDU>MODIFY TTE5 /PRINTFILE=SPOOLDEV::TXA0:According to the instructions in the preceding example, ACMS modifies the record for the terminal TTE5 in ACMSDDU.DAT to specify that DECforms panel screens are to be output on spooled device SPOOLDEV::TXA0:.
- After you modify an ACMSDDU.DAT record, use the
SHOWcommand, followed by the device name. DDU displays the/PRINTFILEspecification that you have entered, for example:DDU>SHOW TTE5Device Name: TTE5 NOT CONTROLLED No Autologin Printfile: SPOOLDEV::TXA0:
See Table 2.1, ''DDU Group Device Names'' for a list of DDU group device names.
See Chapter 17, "DDU Commands" for more information on the
MODIFY command.
2.6. Renaming Device Names in DDU Definitions
RENAME
command. The following command changes the device name of terminal TTE6 to TTE7. DDU
displays a confirmation message when the device name is
renamed.DDU>RENAME TTE6 TTE7Device TTE6 has been renamed to device TTE7
A device name can be a logical name, a physical device name, or a group device name. See Table 2.1, ''DDU Group Device Names'' for a list of DDU group device names.
Change the login characteristics of a device by using the
/[NO]CONTROLLED and /[NO]AUTOLOGIN
qualifiers with the RENAME command. See Section 2.10, ''Defining ACMS-Controlled Terminals'' and Section 2.5.1, ''Enabling Autologin Terminals'' for descriptions
of these qualifiers.
You cannot use the RENAME command to modify the default DDU
definition. See Chapter 17, "DDU Commands" for more information on the
RENAME command.
2.7. Removing DDU Definitions
REMOVE command to remove its device definition from the DDU
authorization file. The REMOVE command deletes the device
definition and displays a message confirming the deletion. The following command
removes the DDU definitions for all LAT
terminals:DDU>REMOVE LTDevice LT has been removed from the database
A device name can be a logical name, a physical device name, or a group device name.
See Table 2.1, ''DDU Group Device Names'' for a list of DDU group device names. See
Chapter 17, "DDU Commands" for more information on the
REMOVE command.
2.8. DDU DEFAULT Definition
The DDU command DEFAULT changes information in the DDU default definition. When you
use the ADD command without any qualifiers, all new terminals receive the
characteristics defined in the DDU default definition. The ADD command is the only
command affected by the DDU default definition.
The first time you run DDU, the DDU default definition specifies that terminals
receive the Not Controlled and No Autologin sign-in characteristics. You can use the
/[NO]CONTROLLED, /[NO]AUTOLOGIN, and
/PRINTFILE qualifiers with the DEFAULT
command to change characteristics in the default definition.
DEFAULT command changes the DDU default definition
so that new terminals receive the Controlled sign-in characteristic. You can use the
/NOCONTROLLED qualifier to override the default definition.
DDU displays a confirmation message when this command
executes.DDU>DEFAULT/CONTROLLEDDevice(s) has been modified
SHOW and specifying DEFAULT as
a device name. For
example:DDU>SHOW DEFAULTDevice Name: DEFAULT CONTROLLEDNo AutologinPrintfile:
The output display tells you that the default sign-in characteristics are
Controlled, No Autologin, and No Printfile. All new terminals added with the ADD
command without qualifiers are designated as ACMS-controlled terminals with automatic
sign-ins disabled and No Printfile.
See Section 2.9, ''Displaying DDU Definitions'' and Chapter 17, "DDU Commands" for
more information about the SHOW command.
2.9. Displaying DDU Definitions
SHOW command. Specify a device name with the
SHOW command to display all definitions that contain a
particular device name, or use the wildcard character (*) to display all current DDU
definitions. Example 2.1, ''DDU SHOW Command'' shows the output from the
SHOW command.DDU>SHOW *Device Name: $ALL NOT CONTROLLED Printfile: Device Name: DEFAULT CONTROLLED No Autologin Printfile: Device Name: LT NOT CONTROLLED No Autologin Printfile:Device Name: LTA12 CONTROLLED Autologin Username: SMITH Printfile: Device Name: TT NOT CONTROLLED No Autologin Printfile: Device Name: TTE5 NOT CONTROLLED No Autologin Printfile: SPOOLDEV::TXA0: Device Name: TTE6 CONTROLLED Autologin Username: TURKLES Printfile:Device Name: VTA65 NOT CONTROLLED No Autologin Printfile:
The SHOW command displays the name of the device, the sign-in
characteristic of the device (whether it is controlled or not controlled), whether
the autologin option was chosen for sign-in, whether a Printfile option was used and,
if so, which one: print-file-spec or spooled-device-name. If the autologin option was
chosen for sign-in, the user name used for automatic sign-in also appears.
To have the device information written to a file instead of displayed on a terminal,
use the DDU command LIST. See Chapter 17, "DDU Commands"
for more information about the LIST and SHOW
commands.
2.10. Defining ACMS-Controlled Terminals
You can define local and LAT terminals as ACMS-controlled terminals. Specify the
/CONTROLLED qualifier with the ADD,
COPY, DEFAULT, MODIFY,
or RENAME commands to control ACMS terminals. The
/CONTROLLED qualifier assigns the sign-in characteristic
Controlled to a terminal.
ADD command creates a device definition with the Controlled sign-in
characteristic for local terminal
TTE6:$RUN SYS$SYSTEM:ACMSDDUDDU>ADD TTE6 /CONTROLLEDDevice TTE6 has been added to the databaseDDU>EXIT$
ADD command creates a device definition with the Controlled sign-in
characteristic for LAT terminal
LTA11:$RUN SYS$SYSTEM:ACMSDDUDDU>ADD LTA11 /CONTROLLEDDevice LTA11 has been added to the databaseDDU>EXIT$
You can only use the /CONTROLLED qualifier with physical device
names or the group device names LT or TT. You receive an error if you use the
/CONTROLLED qualifier for definitions with the group device
names $ALL, PT, RT, and VT.
To release a terminal from ACMS control, use the /NOCONTROLLED
qualifier with the MODIFY command. See Section 2.5, ''Modifying DDU Definitions'' for information about the MODIFY
command.
AUTHORIZE
command. Table 2.2, ''OpenVMS AUTHORIZE Qualifiers Affecting Sign-in to ACMS-Controlled
Terminals'' lists the AUTHORIZE
qualifiers affecting sign-in to ACMS-controlled terminals.|
Qualifier |
Description |
|---|---|
|
/PASSWORD=(password1 [,password2]) |
Allows for processing of multiple passwords. |
|
/FLAGS=DISUSER |
Disables account. |
|
/EXPIRATION=time |
Sets user account expiration. |
|
/ACCESS |
Checks user day and hour restrictions. |
|
/FLAGS=DISREPORT |
Disables the display of the last date and time of interactive and non-interactive sign-ins. Also disables the display of the number of failed sign-ins since the last successful sign-in. |
|
/FLAGS=DISNEWMAIL |
Disables the display of the number of new mail messages. |
2.11. Authorizing LAT Terminal Ports as Controlled Terminals
Application ports
With an application port, control passes to ACMS as soon as a key is pressed.
Dedicated service ports
With a dedicated service port, control passes at the connection to the dedicated service associated with ACMS.
Use LATCP to create both application ports and dedicated service ports. Application ports are mapped directly to a physical port on a specific terminal server, while dedicated service ports are mapped to a service name which may be available on a number of nodes. A dedicated service port does not necessarily map to any specific physical terminal port. Rather, a physical terminal becomes associated with an available dedicated service port name (LTAn:) when that terminal's user connects to the service with which the port is associated (the service to which it is "dedicated ").
User sign-in
An application port which is an ACMS-controlled terminal requires only that the user press any typing key to begin signing in to ACMS. When using a dedicated service port as an ACMS-controlled terminal, the user must connect to a predetermined LAT service before pressing any key to begin the ACMS sign-in.
Connections to other LAT services
An application port which is an ACMS-controlled terminal gives access only to ACMS. With a dedicated service port, the terminal can be used for purposes other than ACMS application. The user can connect to other LAT services and the terminal is only controlled by ACMS if the user connects to the LAT service being used by ACMS.
Availability
If the terminal server to which a controlled terminal (application port) is connected suffers a power failure, that terminal can not function again as a controlled terminal until
ACMS/STOP TERMINALSandACMS/START TERMINALScommands are issued. This means that all ACMS terminal users have to be interrupted before those affected by the power failure can continue working.In contrast, dedicated service ports continue to be available as controlled terminals as soon as the terminal server has recovered from the power failure; no intervention is required. If this kind of availability is an important issue, dedicated service ports would be the best choice.
Versatility
When an application port is an ACMS-controlled terminal, it cannot be used for anything else. To do so would require "uncontrolling " it by setting the
/NOCONTROLLEDattribute in ACMSDDU and issuing theACMS/RESET TERMINALScommand. Dedicated service ports, however, are not actually controlled by ACMS in the same sense that application ports are. A dedicated service port which is a controlled terminal behaves in the same way that an application port does once the user chooses to connect to the appropriate service. But the user can also connect to any other service which is available to the terminal server. As a result, dedicated service ports are a better choice if you wish to use the same terminal for ACMS and non-ACMS work on a regular basis. Conversely, application ports would be a better choice if you wish to restrict a terminal to ACMS use exclusively.
2.12. Controlling LAT Terminals
As described in Section 2.10, ''Defining ACMS-Controlled Terminals'', you can use the
/CONTROLLED qualifier to define LAT terminals as
ACMS-controlled terminals. However, before you can control a LAT terminal, you must
use the OpenVMS LAT Control Program (LATCP) Utility to define the terminal as an
applications port or a dedicated service port and map the port to a terminal server.
The following sections explain how to do this.
2.12.1. LAT Setup for an Applications Port
- Invoke the LATCP Utility and use the LATCP command
CREATE PORTwith the/APPLICATIONqualifier to define the LAT terminal as an applications port. For example:$RUN SYS$SYSTEM:LATCPLCP>CREATE PORT LTA11: /APPLICATION - Use the
SET PORTcommand to map the LAT terminal to a port on the terminal server and then exit from the LATCP Utility:LCP>SET PORT LTA11: /APPLICATION /NODE=SAILS /PORT=PORT_1LCP>EXITThis command specifies that the applications port LTA11 is associated with the port named PORT_1 on the server named SAILS.
To use a LAT terminal as an application port, you must set access on the corresponding physical port to remote. Use the
SHOW PORTcommand at the terminal server's "Local > " prompt to determine the access type of the LAT terminal at which you are working. If your terminal is defined as a local or dynamic LAT terminal, you must redefine your terminal to be remote by using theDEFINE PORTcommand. This command is a privileged LAT command that requires you to use theSET PRIVILEGEDcommand and enter the server's privileged password to enable LAT privileges.Use the following commands to define your port to be remote:Local>SHOW PORTLocal>SET PRIVILEGEDPassword>Local>DEFINE PORT<port-number>ACCESS REMOTE- Use the DCL
SET TERMINALcommand to set the device type of the terminal and theACMS/RESET TERMINALScommand to set the new terminal characteristics:$SET TERMINAL LTA11 /PERM /DEVICE=VT200$ACMS/RESET TERMINALSLTA11 can now be used as an ACMS-controlled terminal. See VSI Console Management for OpenVMS Administration Guide for more information about LAT terminals.
Instead of using this sequence of commands to define LAT terminals each time you start OpenVMS, you can create a command file of LATCP Utility commands. Create a file called LAT$SYSTARTUP.COM in SYS$MANAGER, and include the commands. OpenVMS provides you with a template LAT definition command file, LAT$SYSTARTUP.TEMPLATE, which is copied to SYS$MANAGER when you install OpenVMS.
2.12.2. LAT Setup for a Dedicated Service Port
Setup of the terminal server port (using terminal server local mode at the "Local > " prompt)
Creation of a service (using LATCP)
Creation of dedicated service ports (using LATCP)
Association of the dedicated service with the desired service (using LATCP)
2.12.2.1. Setup of the Terminal Server Port
Local>SHOW PORTLocal>SET PRIVILEGEDPassword>Local>DEFINE PORT<port-number>ACCESS LOCAL
See Section 2.12.1, ''LAT Setup for an Applications Port'' for a description of DEFINE
PORT.
CONNECT command. This means that the ACMS user can
connect to an ACMS application by following this sequence:Enter the
CONNECTcommand at the "Local > " promptPress Return
Press any typing key
Local>SET PORT<port-number>PREFERRED<service name>Local>DEFINE PORT<port-number>PREFERRED<service name>
The SET PORT command takes effect immediately and lasts
only until the current user logs out of the terminal server. If you wish to
make any port attribute last beyond the current login, you must also use
the DEFINE PORT command.
When a new LAT login is initiated, the terminal server will automatically attempt to connect to the preferred service (if one has been defined).
If the user attempts to connect to any service which is not currently available, the terminal server will periodically attempt to connect to that service for the user.
Local>SET PORT<port-number>AUTOCONNECT ENABLEDLocal>DEFINE PORT<port-number>AUTOCONNECT ENBABLED
2.12.2.2. Creation of a Service
Note
An "application " LAT service could be ACMS, not to be confused with an application within ACMS.
LCP>CREATE SERVICE /APPLICATION ACMS_SERVICE
The service type (APPLICATION) and service name (ACMS_SERVICE) will be
referred to later when setting up dedicated service ports in LATCP. You can
also associate a dedicated service port with a service which is a node.
This can create complications for other LAT terminal users on the node in
question, however, and is not recommended for that reason. For example, if
you associate a node name with a dedicated service port and not all
dedicated service ports are currently in use, no one will be able to
connect to that node from the "Local >
" prompt without ACMS controlling the terminal.
Care should be taken when creating service names on particular nodes. If a given service is defined on two different nodes known to the terminal server in use, connections will only complete to the node on which the service has the highest rating. If the ACMS Terminal Subsystem Controller (TSC) is not started on the node on which the connection is completed, no connection will occur (unless a program running on the node happens to have opened a channel to the terminal – in that case, the connection will be established and the terminal will be usable by that program). If the service is defined on different nodes with the same static rating, it is unpredictable which node will receive a given connection. Therefore, it is recommended that each service be defined on only one node unless ACMS (including TSC) will generally be started on all nodes on which the service is defined.
2.12.2.3. Creation of Dedicated Service Ports
It is important to understand that there is no direct correlation between a particular physical port on a DECserver and a dedicated service port created with LATCP. When a terminal connects to a service for which dedicated service ports exist, that terminal becomes associated with an available dedicated service port name for the duration of the connection. Typically, there will be a many-to-one mapping between dedicated service ports and a service name.
If a direct correspondence between physical ports and dedicated service ports is desired, it can only be achieved by creating a service for each port, and connecting to only that service when using the given terminal.
LCP>CREATE PORT LTAn: /DEDICATED
2.12.2.4. Association of the Dedicated Service Port with the Desired Service
SET
PORT
command:LCP>SET PORT LTAn: /DEDICATED/SERVICE=<service name>
Note that the /SERVICE qualifier cannot be used with
the CREATE PORT command.
2.12.2.5. Terminal Setup
$SET TERMINAL LTA1: /DEVICE=VT300/PERMANENT
This should be done for all dedicated service ports when they are created in LATCP. It is possible (and most probably desirable) to create dedicated service ports, associate them with a service, and set the terminal type using DCL command procedure(s).
2.12.2.6. Using a Dedicated Service Port
Local>
" prompt, one of three responses should occur. If the connection is
possible, the following message will be
displayed:Local -010- Session 1 to ACMS_CT on node ORANGE establishedThis assumes that this is the user's only current connection and that the service name is ACMS_CT on node ORANGE.
At this point, TSC will begin listening for a keystroke at the terminal. When one is detected, the process of signing the terminal in to ACMS will proceed in the same way as it does for application ports.
Local -011- Connection to ACMS_CT not establishedInsufficient Node resources
This message is displayed when there are no channels open to the dedicated service port on the node with which LAT attempted to establish a connection. In some cases, it is normal to see this message after a hangup occurs; this is because of a necessary delay in opening a new channel to the terminal.
If repeated attempts to connect result in this message, the ACMS terminal subsystem may need to be started on that node. Because the message can be displayed for a variety of reasons, the system manager or person in charge of managing the ACMS application should be notified.
Local -711- Service ACMS_CT not knownIf this occurs, refer to the instructions for creating services with LATCP.
A dedicated service port user signs out of ACMS exactly as if using an
application port. The only difference is that a dedicated service port will
return the user to the "Local >
" prompt; with an application port, TSC would display a logout
message and immediately begin listening again.
The following example illustrates all the steps involved in setting up dedicated service ports for use as ACMS-controlled terminals. A new service is created for controlled terminal connections, and three ports dedicated to the new service are created. Terminal output from LATCP and ACMSDDU is omitted.
$!
$! Create service and ports in LATCP
$!
$ RUN SYS$SYSTEM:LATCP
LCP> CREATE SERVICE /APPLICATION ACMS_CT
LCP> CREATE PORT LTA101: /DEDICATED
LCP> SET PORT LTA101: /DEDICATED/SERVICE=ACMS_CT
LCP> CREATE PORT LTA102: /DEDICATED
LCP> SET PORT LTA102: /DEDICATED/SERVICE=ACMS_CT
LCP> CREATE PORT LTA103: /DEDICATED
LCP> SET PORT LTA103: /DEDICATED/SERVICE=ACMS_CT
LCP> EXIT
$!
$! Define terminal device type
$!
$ SET TERM LTA101: /DEV=VT300/PERM
$ SET TERM LTA102: /DEV=VT300/PERM
$ SET TERM LTA103: /DEV=VT300/PERM
$!
$! Authorize terminals in ACMSDDU
$!
$ RUN SYS$SYSTEM:ACMSDDU
DDU>ADD LTA101: /CONTROLLED
DDU>ADD LTA102: /CONTROLLED
DDU>ADD LTA103: /CONTROLLED
DDU>EXIT
$!
$! Terminals LTA101:, LTA102: and LTA103: are now ready for use
$!The following is an example of what the user sees when using a dedicated service port as an ACMS-controlled terminal.
DECserver 200 Terminal Server V3.0 (BL31) - LAT V5.1Please typeHELPif you need assistanceEnter username>
At the username prompt, the user should enter a string (this is not subject to any verification) and press Return.
If the autoconnect attribute has been enabled for the user's port, the terminal server will immediately attempt to connect to any preferred service that may have been defined; otherwise, the user must connect to the appropriate service (in this example, we assume that the service name for ACMS sign-ins is ACMS_CT).
Local>CONNECT
Local>CONNECT ACMS_CT
The connection will be established or fail, accompanied by the messages detailed earlier.
Between the time the LAT connection is established and when the user signs out of ACMS, there is no visible difference between the types of LAT terminals. In both cases, the user presses any typing key in order to begin signing in to ACMS. A prompt for user name and password may or may not follow, depending on how the user's account and ACMS authorization are defined.
When the user signs out of ACMS, control will be returned to the terminal
server's "Local >
" prompt.
2.13. Enabling Automatic User Sign-ins
Use the /AUTOLOGIN qualifier with the ADD,
COPY, DEFAULT, MODIFY
or RENAME commands to allow users of ACMS-controlled terminals to
sign in directly to ACMS without typing a user name. When a user presses
Return on an ACMS-controlled terminal with Autologin enabled,
ACMS retrieves the user name for that terminal from the device authorization file. If
no password is required, the user is signed in automatically.
The /AUTOLOGIN qualifier enables automatic sign-ins for
controlled terminals only. If a terminal has the Not Controlled sign-in
characteristic, the Autologin characteristic has no effect; users must use the
ACMS/ENTER command for access to ACMS from DCL as
usual.
You can disable automatic sign-ins by using the /NOAUTOLOGIN
qualifier. The /NOAUTOLOGIN qualifier is the default.
2.14. Summary of DDU Commands and Qualifiers
|
Commands and Qualifiers |
Description |
|---|---|
|
Authorizes and assigns sign-in characteristics to ACMS terminals by adding DDU definitions to the device authorization file. If you omit qualifiers, the new definition takes information from the DDU default definition. |
|
Authorizes and assigns sign-in characteristics to ACMS terminals by copying information from an existing DDU definition. |
|
Changes information in the DEFAULT definition. If you
omit qualifiers from the |
|
EXIT |
Ends the DDU session and returns you to the DCL prompt. |
|
Displays information about DDU commands, qualifiers, and parameters. |
|
Writes DDU definitions to ACMSDDU.LIS in your default directory, or to the output file you specify. |
|
Changes information in DDU definitions. |
|
REMOVE |
Removes DDU definitions from the device authorization file. |
|
Changes the device name and, optionally, the sign-in characteristic information in DDU definitions. |
|
Displays DDU definitions at your terminal. |
Chapter 3. Authorizing Users
This chapter describes how to use the ACMS User Definition Utility (UDU) to create or change user definitions that UDU stores in the user authorization file (ACMSUDF.DAT). Section 3.6, ''Summary of UDU Commands and Qualifiers'' provides a summary of UDU commands and qualifiers. For reference information on the commands described in this chapter, refer to Chapter 18, "UDU Commands".
3.1. How UDU Works
The name of the user
Whether or not a user name can submit tasks to ACMS for other users
Whether or not the user runs an initial task when signing in
What the terminal screen displays upon sign-in: either a menu and a selection prompt, or just a selection prompt
Which menu ACMS should display if the initial sign-in screen displays a menu
Whether or not the user runs a final task when signing out
When a user tries to sign in to ACMS, ACMS checks the user authorization file for a definition with that user name. If the authorization file does not contain a definition for that user name, ACMS checks for a $ALL definition to see if all OpenVMS user names are authorized for ACMS access. If there is no $ALL definition, ACMS denies access to the user.
3.2. How to Run UDU
Before using UDU to authorize ACMS users, you must authorize users to log in to the OpenVMS operating system. ACMS users must first be authorized OpenVMS users because their OpenVMS user names and passwords are verified against the OpenVMS SYSUAF.DAT file. See the OpenVMS documentation on the Authorize Utility for information about authorizing OpenVMS users.
When you run UDU to authorize users, UDU creates the user authorization file in your current default directory. By default, at run time ACMS looks in SYS$SYSTEM to find the user authorization file. If you choose to place the authorization file in a directory other than SYS$SYSTEM, you must direct the ACMS system to that location by defining an EXEC mode system logical name, called ACMSUDF, to point to that directory.
$DEFINE/SYSTEM/EXEC ACMSUDF DEVDISK:ACMSUDF.DAT
$RUN SYS$SYSTEM:ACMSUDUUDU>
$MCR ACMSUDUUDU>
ADD user-name /MDB=ACMS.MDB /MENU=EMPLOYEE /AGENT
UDU> ADD user-name - _UDU> /MDB=ACMS.MDB /MENU=EMPLOYEE /AGENT
You can recall each UDU command you enter by pressing Ctrl/B. UDU
also supplies a keypad of UDU commands. Press PF1 and
PF2 to see the keypad display. Type EXIT or
press Ctrl/Z to exit from UDU.
HELP
command followed by the command
name:UDU>HELP ADD
$HELP @ACMSUDU
3.3. Running UDU the First Time
ACMS creates a default definition the first time you run UDU, or when you create a new user authorization file. At run time, ACMS assigns the top-level menu and selection prompt, the menu database file specification ACMS$DIRECTORY:ACMS.MDB, and a blank menu path name to the DEFAULT definition.
When you use the ADD command to create a new UDU definition, the
new definition takes the default information defined in the DEFAULT definition. You can
use qualifiers with the ADD command to override information from the
DEFAULT definition.
DEFAULT or MODIFY command. For
example:UDU>DEFAULT /MDB=PERS_MENUUDU>ADD $ALL
When you authorize the 10 users with the ADD command, you do not
need to use the /MDB qualifier because the ADD
command uses the default value from the UDU DEFAULT definition.
/MDB qualifier, ACMS
assumes the default menu database is in the directory that the logical
ACMS$DIRECTORY points to. However, if the database is in
another location, you must include in the DEFAULT command the device
and directory name where the file is stored. For
example:UDU>MODIFY DEFAULT /MDB=DISKNAME:[GORDON]ACMS.MDB
If you do not specify a file type, UDU assumes the .MDB file type by default.
3.4. Authorizing New Users
The following sections show several different approaches to take when authorizing users. For example, if you have few users to authorize, you may want to write individual authorizations for each user. If you have many users to authorize, you may want to take advantage of the DEFAULT authorization and the $ALL user name.
The next six sections describe the UDU commands you use to authorize new ACMS users and give examples of how to use these commands.
3.4.1. Authorizing Users with ADD, COPY, DEFAULT, and $ALL
ADD or COPY commands to create
definitions that authorize ACMS users. Using the ADD command, you
create a new definition by either allowing the user information to come from the UDU
DEFAULT definition, or typing in the necessary qualifier information yourself. This
example adds the user name RICHARDS to ACMSUDU.DAT, taking all information from the
UDU DEFAULT definition except the menu database
file:UDU>ADD RICHARDS /MDB=DISK02:[USERMENUS]ADDTASKS
COPY command to create a new definition
based on information from the existing UDU definition. This example copies
information from the RICHARDS user definition to create the new GORDON
definition:UDU>COPY RICHARDS GORDON
You can quickly create authorizations for all OpenVMS users by specifying
$ALL as the user name with the ADD
or COPY command. A $ALL definition
authorizes all users at once, assigning them the same sign-in display, default menu,
and menu database file.
If the user authorization file does not contain a $ALL definition, each ACMS user must have a separate user definition. With separate user definitions, you can restrict some OpenVMS users from signing in to ACMS.
Depending on how many users you are authorizing and the characteristics you want to assign them, you might want to use a $ALL definition to provide generic definitions for all users. Then, you can create separate definitions for those users who need characteristics that most other users do not, such as the agent qualifier.
You must create at least two user definitions: one to authorize the ACMS user (or a $ALL definition to authorize all OpenVMS users), and one to authorize the user name of the ACMS Command Process (see Section 3.4.6, ''Authorizing User Names as Agents'' for information on authorizing the Command Process).
3.4.2. Defining User Initial and Final Tasks
As system manager, you can specify that a user runs a specific task when signing in to ACMS and that the user runs a specific task when signing out of ACMS. For example, you can specify that whenever a user signs in, a task asks for the user's name and telephone number. Or, if a user only runs one particular task all the time, you can specify that that task runs whenever the user signs in without having to select that task from a menu. When the user signs out, you can specify that an accounting task runs to log the user's work for the day – sign in and sign out time, number of files created, amount of disk space used, and so forth.
To specify an initial or final task for a user, use the
/INITIAL or /FINAL qualifier with the UDU
ADD, COPY, MODIFY,
DEFAULT, or RENAME commands. The
/INITIAL qualifier specifies the name of a task the user runs
when signing in. The /FINAL qualifier specifies the name of a
task the user runs when signing out.
UDU>ADD FORRESTER/INITIAL=(APPLICATION=RESERVATIONS,TASK -_UDU>=BOOKING_INFO)
UDU>ADD KNUTH/FINAL=(APPLICATION=CLERK_REC,TASK=ACCOUNTING)
/INITIAL and
/FINAL qualifiers to specify how errors are handled if an
error occurs in an initial or final task. By default, if the specified initial task
fails, UDU displays an error message describing the reason for the failure, records
the task's status in the Audit Trail Log, and signs the user out of ACMS. The final
task (if one is specified) does not execute. You can specify that ACMS ignore errors
in an initial task by specifying the IGNORE_ERROR keyword with the
/INITIAL qualifier. When an error occurs in the initial task,
the user remains signed in. For
example:UDU>ADD EINSTEIN/INITIAL=(APPLICATION=RESOURCES,TASK=ACCT, -_UDU>IGNORE_ERROR)
/FINAL qualifier to specify that
ACMS ignore an error in the final task. For
example:UDU>ADD PLATO/FINAL=(APPLICATION=REC_APPL,TASK=UPDATE,IGNORE_ERROR)
When you use the IGNORE_ERROR keyword for a final task, ACMS does not issue an error message or record the error in the Audit Trail Log when an error occurs.
UDU>ADD TOLSTOY/FINAL=(APPLICATION=ACCOUNTING,TASK= -_UDU>SHOW_TRANSACTIONS, SELECTION_STRING="TRANSACTION_OUTPUT.DAT")
SHOW command. For
example:UDU>SHOW TOLSTOYUser Name: TOLSTOY DISPLAY MENUDefault Menu:Default MDB: INVENTORYInitial Task: IGNORE ERRORApplication: RESOURCETask: ACCTSelection:Final Task: IGNORE ERRORApplication: ACCOUNTINGTask: SHOW_TRANSACTIONSSelection: TRANSACTION_OUTPUT.DATLanguage:Printfile:
UDU>MODIFY LAO/MDB=ACMS /MENU=ACMS$EXIT/INITIAL= -_UDU>(APPLICATION=RESERVATIONS,TASK=RESERVE_MENU)
This example defines an initial task for user LAO that serves as a menu control task. When this task exits, user LAO does not have a menu displayed at the terminal. Instead, the user is signed out of the ACMS system.
The TDMS request for the ACMS$EXIT menu returns "Exit" as if it were typed by the user at the selection prompt, but does this without terminal interaction.
3.4.3. Defining the Initial Menu Display
Menu displays help users to select tasks. Upon signing in, each ACMS user sees
either a menu and a selection prompt, or just a selection prompt. For users who need
a menu and a selection prompt, specify a default menu in the user definition by
assigning each user a menu database file with the /MDB qualifier,
and a menu path name with the /MENU qualifier. If you do not
include this information in the UDU definition, the ACMS default is to assign the
user the top-level menu in the menu tree. This feature provides security to the
system, because it enables you to restrict certain menus to selected users.
Menus offer a limited amount of task protection, since a menu can restrict the
tasks that a user can select (if the SELECT command is disabled).
However, other measures are required for adequate task protection. For more
information on task protection, refer to VSI ACMS for OpenVMS ADU Reference Manual.
For users who need only the selection prompt, specify that no menu be displayed by
using the /NODISPLAY_MENU qualifier in the user definition. For
example, you might want to suppress the menu display for more experienced users. Or,
if the default menu is the highest menu in the menu tree, you might want to reduce
the need to page through several levels of menus by having the initial menu display
be lower in the menu tree.
/NODISPLAY_MENU qualifier
suppresses the menu display for the user name
WINSTON:UDU>SHOW WINSTONUser name: WINSTON DISPLAY MENUDefault menu:Default MDB: EMPLOYEEInitial Task:Application:Task:Selection:Final Task: IGNORE ERRORApplication: PAYROLLTask: SHOW_CHANGESSelection: PAYROLL.DATLanguage:Printfile:UDU>MODIFY WINSTON /NODISPLAY_MENUUDU>SHOW WINSTONUser name: WINSTONDefault menu:Default MDB: EMPLOYEEInitial Task:Application:Task:Selection:Final Task: IGNORE ERRORApplication: PAYROLLTask: SHOW_CHANGESSelection: PAYROLL.DATLanguage:Printfile:
The sign-in display you define with UDU is only the initial display
characteristic. Users can modify their sign-in displays at run time by selecting the
MENU and NOMENU commands in the ACMS
command menu.
3.4.4. Specifying a Language for a User
Note
If you define several layouts in a form, you must specify a language for each layout if you want to display any layout other than the first one.
Layout Name:FRENCH_PANEL...Language:FRENCH
You can use the language specification for purposes other than to associate a natural language with a layout. You can, for example, use the layout language specification to distinguish panels designed for novice, experienced, and expert users.
MODIFY command with the /LANGUAGE
qualifier. To select panels in French for the user LeBlanc, for example, you enter
the
following:UDU>MODIFY LEBLANC/LANGUAGE=FRENCH
SHOW
command to display a user's record, for
example:UDU>SHOW LEBLANCUser name: LEBLANC DISPLAY MENU...Language: FRENCH
You can specify a language for DECforms forms that is used both in ACMS tasks and in ACMS menus. The DECforms menu form supplied by ACMS contains a standard layout without any language name. You need to specify a language in a menu form to display the menu to users who enter through the Command Process (CP) and who have a corresponding language specified in the ACMSUDU.DAT file.
By specifying a language for a menu form layout, you can update the prompt and the instruction line of the menu to use the appropriate language. To translate the header and the entries of the menu, however, you must use a different menu definition (.MDF) for each language.
You can display the same menu to all users, whether they have a language specified for them or not. In this case, use only one language for the prompt and instruction line; this saves the step of adding a layout for each language in the menu form. An additional benefit is to keep the size of the menu form to a minimum.
/SKIPMENULANGUAGE qualifier. To select NOVICE forms to be
displayed to Smith for tasks but not for menus, you enter the
following:UDU>MODIFY SMITH/LANGUAGE=NOVICE/SKIPMENULANGUAGE
/SKIPMENULANGUAGE qualifier, it appears on
the user's record when you issue the SHOW
command:UDU>SHOW LEBLANCUser name: LEBLANC DISPLAY MENU...Language: FRENCH SKIPMENULANGUAGE
3.4.5. Specifying a Printfile for a User
Besides using the /PRINTFILE qualifier to specify a printfile
name or a spooled device name for a terminal device (which is explained in Chapter 2, "Authorizing and Controlling Terminals"), you can also use this qualifier to specify a printfile
name or spooled device name for a user.
When a form is enabled, ACMS uses the Printfile characteristic for the terminal
device, if it is available. If the characteristic is not found, ACMS uses the
Printfile characteristic for the user. If neither has been specified, but a PRINT
response and a print key are defined in the form source IFDL file, a file with the
name <form-name>.TXT is placed in the
SYS$MANAGER directory (if the CP is the agent), or in
the default directory of the agent.
/PRINTFILE qualifier for a user, follow these steps:Use a DECforms PRINT response step in a form source IFDL file wherever a response step can be used; for example, you can place it in a field exit response or in a panel exit response. Also define a print key that users press when they want to print a panel. See VSI DECforms Programmer's Reference Manual for details about response steps and defining DECforms keys.
- To specify a printfile for a user in ACMS, use UDU to enter your printfile specification:
UDU> MODIFY <username>/PRINTFILE=<print-file-spec>/<spooled-device-name>
When you enter a printfile specification, ACMS uses this name for the DECforms panel screen. When you enter a spooled device name, ACMS sends any panel screen for this user to the spooled device that you specify.
/PRINTFILE qualifier,
the new specification appears when you display user information using the
SHOW command, for
example:UDU>MODIFY WINSTON /PRINTFILE=SPOOLDEV::TXA0:UDU>SHOW WINSTONUser name: WINSTONDefault menu:Default MDB: EMPLOYEEInitial Task:Application:Task:Selection:Final Task: IGNORE ERRORApplication: PAYROLLTask: SHOW_CHANGESSelection: PAYROLL.DATLanguage:Printfile: SPOOLDEV::TXA0:
When a form is enabled, ACMS uses the printfile specification for a device assigned by the Device Definition Utility (DDU), if it is available. If it is not, ACMS uses the printfile specification for the user, as specified in UDU.
3.4.6. Authorizing User Names as Agents
Normally, ACMS users can submit tasks only under their own user names. An agent is
an OpenVMS process that submits ACMS tasks for processing on behalf of ACMS users
whose user names are different from the agent's user name. For security reasons, you
must authorize agents by adding the user name of the agent process and including the
/AGENT qualifier.
The CP and the Queued Task Initiator (QTI) are agents supplied by ACMS. ACMS
requires that you create separate user definitions using the
/AGENT qualifier to authorize the CP and the QTI as agents.
If your system does not have any agents created with the ACMS Systems Interface
(SI), you need only authorize the user name of the CP and QTI as agents.
UDU>ADD SYSTEM/AGENTUser SYSTEM has been added to the data baseUDU>SHOW SYSTEMUser name: SYSTEM DISPLAY MENU AGENTDefault menu:Default MDB:Initial Task:Application:Task:Selection:Final Task:Application:Task:Selection:Language:Printfile:
/AGENT qualifier. For example, to authorize an SI agent with
the user name SI_AGENT, use these
commands:UDU>ADD SI_AGENT/AGENT -_UDU>/MDB=DISK$:[TOPLEVEL]ACMS.MDB -_UDU>/MENU=PERSONNELUser SI_AGENT has been added to the data baseUDU>SHOW SI_AGENTUser name: SI_AGENT AGENTDefault menu: PERSONNELDefault MDB: DISK$:[TOPLEVEL]ACMS.MDBInitial Task:Application:Task:Selection:Final Task:Application:Task:Selection:Language:Printfile:
As the example shows, when authorizing a user name with the
/AGENT qualifier, you must explicitly assign the display
characteristic and a menu database file to that user name. You can also assign a
default menu path name. With its user name defined in the user authorization file,
SI_AGENT can submit tasks to ACMS under any user name. See VSI ACMS for OpenVMS Systems Interface Programming
for more information on the SI.
3.5. Working with Existing UDU Definitions
From time to time you have to update UDU definitions. During a UDU session you may need to display, list, delete, or rename the user definitions in the user authorization file. This section shows you how to manipulate existing UDU definitions.
3.5.1. Looking at UDU Definitions with SHOW and LIST
When you add or change user information, you can verify information in the
authorization file with either the SHOW or the
LIST command.
SHOW command to display information on your
terminal and a LIST command to copy UDU definitions to an output
file. Use the SHOW and the LIST commands to
verify the names and default menus after you have added several users. For
example:UDU>SHOW *User name: $ALL DISPLAY MENUDefault Menu:Default MDB: INVENTORYInitial Task: IGNORE ERRORApplication: VALIDATE_APPLTask: ACCESS_RIGHTSSelection:Final Task:Application:Task:Selection:Language:Printfile:User name: CRAWFORD DISPLAY MENUDefault Menu:Default MDB: ACCOUNTINGInitial Task:Application:Task:Selection:Final Task: IGNORE ERRORApplication: PAYROLLTask: SHOW_CHANGESSelection: PAYROLL.DATLanguage:Printfile:
When you specify the wildcard character (*), UDU displays all definitions in the
user authorization file. To see a particular user definition, specify the user name
with the SHOW command.
LIST command with the user name or wildcard character (*) at
the UDU
prompt:UDU>LIST GORDON
This command copies the GORDON definition to the ACMSUDU.LIS file in your default directory.
3.5.2. Deleting UDU Definitions
If a user is no longer a valid ACMS user, remove the user definition from the user
authorization file with the REMOVE command. The
REMOVE command deletes the user definition from ACMSUDF.DAT
and displays a message confirming the action. For the user name parameter, you can
use an OpenVMS user name or $ALL.
3.5.3. Renaming UDU Definitions
Use the RENAME command when you want to change a user name.
Because the RENAME command uses the same qualifiers as the
ADD, COPY, DEFAULT, and
MODIFY commands, you can change any of the original
characteristics while you change the user name.
3.6. Summary of UDU Commands and Qualifiers
|
Commands and Qualifiers |
Description |
|---|---|
|
Adds a new user record to the user authorization file. Unless qualifiers are included, the user information comes from the DEFAULT definition. |
|
ADD /PROXY |
Adds a user proxy to the ACMS proxy file (ACMSPROXY.DAT).
Before you can use the |
|
Authorizes and assigns sign-in characteristics to new users by copying information from an existing UDU definition. |
|
CREATE /PROXY |
Creates an empty ACMS proxy file (ACMSPROXY.DAT). |
|
Changes information in the DEFAULT definition. If you omit one
or more qualifiers from the |
|
EXIT |
Ends the UDU session and returns you to the DCL prompt. |
|
Provides online information about UDU commands. |
|
Writes UDU definitions to ACMSUDU.LIS in your default directory or to an output file you specify. |
|
Writes all the proxies in the ACMS proxy file to the output
file ACMSPROXY.LIS. You can use the |
|
Changes information in UDU definitions. |
|
REMOVE |
Removes UDU definitions from the user authorization file, ACMSUDF.DAT. |
|
REMOVE /PROXY |
Removes the specified proxy from the ACMS proxy file (ACMSPROXY.DAT). |
|
Changes the user name and, with qualifiers, other information in UDU definitions. |
|
Displays UDU definitions at your terminal. |
|
SHOW /PROXY |
Displays one or more proxies in the ACMS proxy file (ACMSPROXY.DAT). |
Chapter 4. Authorizing Applications
This chapter describes the use of the ACMS Application Authorization Utility (AAU) to authorize ACMS applications. See Section 4.6, ''Summary of AAU Commands and Qualifiers'' for a summary of AAU commands and qualifiers. For reference information on the commands described in this chapter, refer to Chapter 19, "AAU Commands".
4.1. How AAU Works
Name of the application
UIC and/or identifier of each user authorized to install the application in ACMS$DIRECTORY
User name of the application
User names of the server processes used by the application
Specification for whether the application can run with dynamic user names or the user names of terminal users
Figure 4.1, ''AAU Application Authorization Process'' shows the authorization portion of the AAU process.
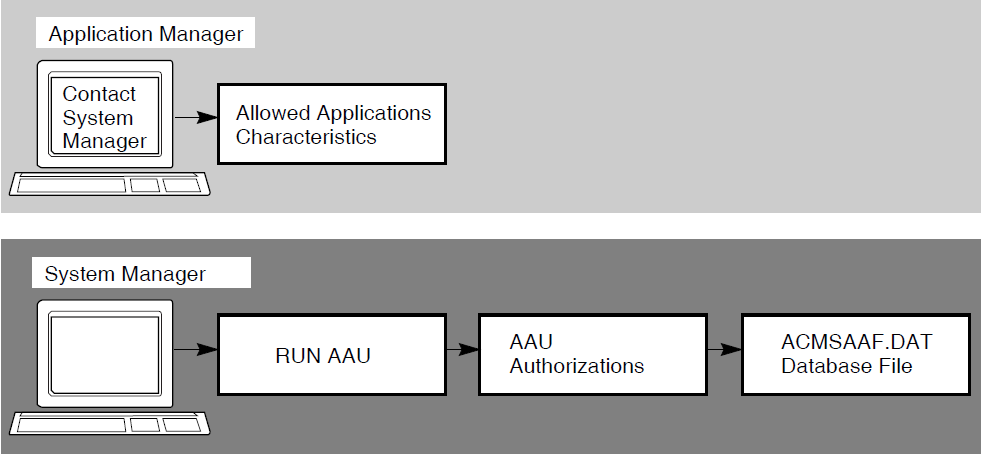
Before users can start an ACMS application, the application database file for that application must be stored in the directory pointed to by the logical name ACMS$DIRECTORY. For security reasons, this directory is set up as a protected directory to prevent an unauthorized user from storing applications containing tasks that run under privileged user names.
With the AAU commands and qualifiers, a system manager can authorize applications and grant
application installation rights to users who otherwise do not have access to
ACMS$DIRECTORY. Users who are authorized to install .ADB files can then
install the application in ACMS$DIRECTORY by using the
ACMS/INSTALL operator command.
Using AAU is optional for users who already have access to
ACMS$DIRECTORY. These users can store .ADB files in
ACMS$DIRECTORY without authorization in the AAU. For example, these
users could use the DCL COPY command to copy an .ADB file into
ACMS$DIRECTORY.
Assigning installation of applications to the users most involved with those applications leaves system managers free for other tasks.
By systematically checking applications, the AAU provides extra security and frees system managers from manually checking applications.
Users can install applications at their convenience without having privileged access to the ACMS$DIRECTORY directory. The system manager can also limit the applications a user is allowed to install.
Users named in the AAU database can use the ACMS/INSTALL operator command
to install any application for which they have installation authorization. When a user issues
this command, ACMS checks the AAU authorization file (ACMSAAF.DAT) to see if the application has
an authorization in the file and if the user running the ACMS/INSTALL command
is authorized to install the application. If either the application or the user trying to install
it is not authorized in the AAU authorization file, ACMS prevents the installation of the
application.
4.2. How to Run AAU
$RUN SYS$SYSTEM:ACMSAAUAAU>
$MCR ACMSAAUAAU>
When you run AAU, ACMS displays the AAU prompt (AAU <!close>). Then enter any AAU
command (including the AAU command HELP to get online help information) or
press the PF1 and PF2 keys for access to a keypad of AAU
commands. Press Ctrl/B to recall each AAU command you enter. To exit from AAU,
use the AAU command EXIT or press Ctrl/Z.
$DEFINE/SYSTEM/EXEC ACMSAAF DEVDISK:ACMSAAF.DAT
|
Qualifier |
Default Setting |
|---|---|
|
/ACL |
|
|
/APPL_USERNAME |
/APPL_USERNAME=* |
|
/[NO]WILD_SUFFIX |
/NOWILD_SUFFIX |
|
/[NO]DYN_USERNAMES |
/NODYN_USERNAMES |
|
/SRV_USERNAMES |
/SRV_USERNAMES=* |
In Table 4.1, ''Initial Settings for the DEFAULT Authorization'', the wildcard character (*) indicates that any user name or ID in the application is acceptable. To ensure that an application is running with the right user names, override the wildcard defaults by assigning user names in application authorizations.
4.3. Before Authorizing Applications
Before starting to authorize applications, you may want to change the initial default values
in the DEFAULT authorization. Do this with either the DEFAULT or the
MODIFY command. The new values should reflect the characteristics that you
intend to assign to the majority of applications you plan to authorize.
For example, suppose you have to authorize five applications and plan to give the same users
the right to install all the applications. Assign a default value to those users in the DEFAULT
authorization. When you authorize the five applications with the ADD command,
you do not need to use the /ACL qualifier. The ADD command
uses the default /ACL value from the DEFAULT authorization.
User name under which an application runs
User names of server processes for an application
Whether or not server processes in an application should run with dynamic user names
For example, suppose an application manager decides that several applications should run only with particular user names and server process user names, and that these applications should run without server processes having dynamic user names. The application manager can use AAU to create applications in such a way that the application is not installed unless these settings match the ones found in the .ADB file.
Figure 4.2, ''Conditions for Installing an Application'' shows the information that must match before an application can be installed.
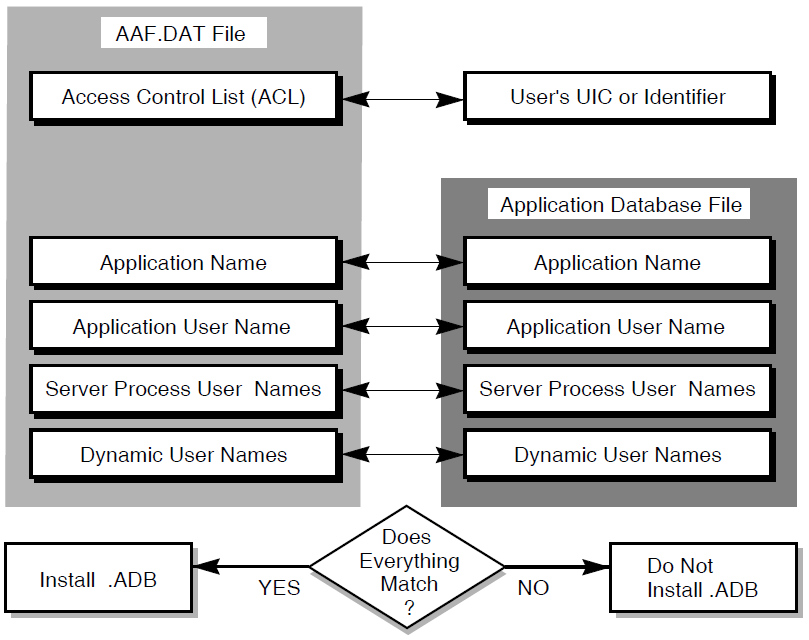
Even if the application information is changed, the application cannot be installed unless it has the same values the application manager originally assigned in the application authorization. This extra layer of security ensures that each application running on an ACMS system has passed a series of tests that protect applications from unauthorized use.
4.4. Authorizing New Applications
The following sections show several different approaches to take when authorizing applications. For example, if you have few applications to authorize, you may want to write individual authorizations for each application. If you have many applications to authorize, you may want to take advantage of the DEFAULT authorization using the $ALL application name.
4.4.1. Authorizing All Applications with $ALL
ADD command in response to the AAU
prompt. For
example:AAU>ADD $ALL /ACL=(IDENTIFIER=[GORDON],ACCESS=CONTROL)
If you have not altered the DEFAULT authorization, the $ALL
authorization takes the default values that ACMS originally sets for all the qualifiers you do
not include with the ADD command. The preceding ADD
command, therefore, creates a $ALL authorization allowing user GORDON
to install any application on the system.
4.4.2. Authorizing Individual Applications
ADD command and assign any necessary qualifiers. For
example:AAU>ADD INVENTORY /ACL=(ID=[GORDON],ACCESS=CONTROL) -_AAU>/APPL_USERNAME=INVTRY -_AAU>/SRV_USERNAMES=(PARTS,STOCK) -_AAU>/DYNAMIC_USERNAMES -_AAU>/NOWILD_SUFFIX
This command authorizes user GORDON to install the application INVENTORY if the application
database file (.ADB) has the application user name INVTRY and two server processes with user
names PARTS and STOCK. The /DYNAMIC_USERNAMES qualifier lets user GORDON
install the INVENTORY application with the dynamic user name characteristic. Because all
qualifiers are included, the ADD command does not use any default values from
the DEFAULT authorization.
COPY command. For
example:AAU>COPY INVENTORY ACCOUNTING /ACL=(ID=[SMITH],ACC=CON)-_AAU>/SRV_USERNAMES=(ADD,SUB)
Here, the COPY command creates an exact copy of the INVENTORY application
authorization and names it ACCOUNTING. The qualifiers with the COPY command
change the authorized user to SMITH and the two server user names to ADD and SUB.
4.4.3. Authorizing Applications with /[NO]WILD_SUFFIX
The /[NO]WILD_SUFFIX qualifier allows a user to install or prevents a user
from installing any application whose name begins with the letters of the application name you
are installing.
/WILD_SUFFIX qualifier can save you time and give you additional flexibility
when you are creating authorizations. For
example:AAU>ADD TEST /WILD_SUFFIX /APPL_USERNAME=TEST_EXE -_AAU>/ACL=(ID=[SMITH],ACCESS=CONTROL) -_AAU>/SRV_USERNAMES=(TEST1,TEST2) -_AAU>/NODYN_USERNAMES
This command lets the authorized user SMITH install any application that starts with the letters TEST. SMITH can install applications such as TEST, TESTA, TESTB, TESTC, TEST1.
4.5. Working with Existing AAU Authorizations
During an AAU session you may need to display, list, delete, or rename the application authorizations in the AAU authorization file. The following sections describe these functions.
4.5.1. Looking at AAU Authorizations with SHOW and LIST
There are many occasions when a quick check of authorizations in the AAU authorization file is
helpful. For example, you may need to check the DEFAULT authorization if you cannot remember its
current settings. To display application authorizations on your terminal screen, use the
SHOW command. The output from the SHOW command is shown
in Example 4.1, ''AAU SHOW Command''.
When you use the wildcard character (*), AAU displays all authorizations in the AAU
authorization file. To see a particular application authorization, include the application name
with the SHOW command.
LIST command with the application name at the AAU> prompt. For
example:AAU>LIST CREDITOR
AAU>SHOW *
==================================================================
Appl Name: $ALL
Appl Username: *
Server Usernames:
*
Access Control List:
(IDENTIFIER=[*,*],ACCESS=CONTROL)
==================================================================
Appl Name: CREDITOR
Appl Username: CREDIT
Server Usernames:
CREDIT1
CREDIT2
Access Control List:
(IDENTIFIER=[PAYUP,*],ACCESS=CONTROL)
===================================================================
Appl Name: DEFAULT WILD SUFFIX
Appl Username: DEBT
Server Usernames:
DEBT1
DEBT2
Access Control List:
(IDENTIFIER=[PERSONNEL,*],ACCESS=CONTROL)
===================================================================
AAU>4.5.2. Deleting Authorizations from ACMSAAF.DAT
If an application is no longer being used, you need to remove its authorization from the
AAU authorization file. When you identify unused applications, you can delete them with the
REMOVE command. The REMOVE command deletes the
application authorization from the authorization file and prints a message confirming the
action. The application name can be that of an application, or it can be
$ALL.
4.5.3. Renaming AAU Authorizations
You can use the RENAME command when you want to change the name of an
authorization. Because the RENAME command uses the same qualifiers as the
ADD, COPY, DEFAULT, and
MODIFY commands, you can change any of the original authorization's
characteristics while you change the authorization's name.
4.6. Summary of AAU Commands and Qualifiers
|
Commands and Qualifiers |
Description |
|---|---|
|
Creates authorizations so that AAU authorized users can install application database files in ACMS$DIRECTORY. If you omit the qualifiers, the new definition takes qualifier information from the DEFAULT definition. |
|
Creates a new authorization by copying information from an existing authorization and, with qualifiers, changes other information. |
|
Changes information in the DEFAULT authorization. If you omit one or more qualifiers
from the |
|
EXIT |
Ends the AAU session and returns you to the DCL prompt. |
|
Displays information about AAU commands, parameters, and qualifiers. |
|
Writes AAU definitions to ACMSAAU.LIS in your default directory or to an output file you specify. |
|
Changes information in AAU authorizations. |
|
REMOVE |
Deletes an authorization from the authorization file (ACMSAAF.DAT). |
|
Changes the name of an application authorization and, with qualifiers, other information in the AAU authorization. |
|
Displays application authorizations at your terminal. |
Chapter 5. Creating and Managing Queues
This chapter describes how to create and manage ACMS queues and how to manage queued task elements using the ACMSQUEMGR Utility. This chapter assumes a general knowledge of the ACMS Queued Task Facility. Please read the description of the ACMS Queued Task Facility in VSI ACMS for OpenVMS Concepts and Design Guidelines before reading this chapter. See Section 5.6, ''Summary of ACMSQUEMGR Commands and Qualifiers'' for a summary of ACMSQUEMGR commands and qualifiers. For reference information on the commands described in this chapter, refer to Chapter 20, "ACMSQUEMGR Commands".
5.1. How ACMSQUEMGR Works
Control the Queued Task Initiator (QTI) to process task queues. The QTI must be started before you can start task queues. See Chapter 8, "Controlling the ACMS System" for information on the operator commands you can use to control the QTI and start task queues.
Set up an OpenVMS user name for the QTI process. See Chapter 11, "Changing ACMS Parameter Values with the ACMSGEN Utility" for information about defining a user name for the QTI.
Monitor the QTI process by reading the QTI audit reports generated by the Audit Trail Logger. See Chapter 12, "Auditing Applications with the Audit Trail Logger" for information about monitoring the QTI process.
Note
ACMS task queues are totally independent from OpenVMS task queues.
Name of the task queue
Whether or not tasks can be queued (the enqueue state)
Whether or not queued task elements in the queue can be read and processed by the QTI (the dequeue state)
Maximum workspace size for a task executing in the task queue
File specification of the task queue repository file
Task name
Application name
Workspace values
Element priority
Queue name
Enqueuer user name
Enqueue time
Enqueue state
Element ID
Error count
The information in a queued task element is specified by using parameters to the ACMS$QUEUE_TASK service. See VSI ACMS for OpenVMS Writing Applications for more information about the ACMS Queued Task Services.
An element ID is assigned to the queued task element when it is created with the ACMS$QUEUE_TASK service. Use the element ID with ACMSQUEMGR commands to set the processing characteristics of a queued task element, delete a queued task element, or display information about queued task elements.
5.2. How to Run ACMSQUEMGR
$RUN SYS$SYSTEM:ACMSQUEMGRACMSQUEMGR>
$MCR ACMSQUEMGRACMSQUEMGR>
When you see the ACMSQUEMGR prompt (ACMSQUEMGR>), you can begin entering ACMSQUEMGR
commands, including the HELP command, to get online help information.
Instead of typing in individual ACMSQUEMGR commands, you can enter ACMSQUEMGR commands by
pressing keypad keys. Press the PF1 and PF2 keypad keys for
access to the ACMSQUEMGR command keypad. Press Ctrl/B to recall each of the last
20 ACMSQUEMGR commands you entered. To exit from the ACMSQUEMGR, press Ctrl/Z or
use the EXIT command.
$ ACMSQUEMGR:==$SYS$SYSTEM:ACMSQUEMGR
$ACMSQUEMGR SHOW ELEMENT * PAYROLL_QUEUE$ACMSQUEMGR DELETE ELEMENT PAYRLL::2F600041 PAYROLL_QUEUE$ACMSQUEMGR SET QUEUE PAYROLL_QUEUE /ENQUEUES=SUSPENDED
See VSI OpenVMS User's Manual for more information on foreign commands.
Read/write access to the ACMS queue definition file (ACMSQDF.DAT)
Access to the queue file or files with which you are going to work
%ACMQUEMGR-I-ERROPNFIL, Unable to open the ACMS Queue Definition File
SYS$SYSROOT:[SYSEXE]ACMSQDF.DAT
-RMS-F-FNF, file not found
Do you want to create a new file?If you answer YES to this question, the ACMSQUEMGR creates a new queue definition file. Otherwise, the ACMSQUEMGR exits.
$DEFINE /SYSTEM /EXEC ACMSQDF $DISK1:[MYDIR]ACMSQDF.DAT
When you are using the ACMSQUEMGR Utility, you can use any access mode for the ACMSQDF logical. However, at run time, ACMS Queued Task Services require that ACMSQDF be an executive-mode logical name. If you expect a queue definition file to exist when you run ACMSQUEMGR, check that the logical name ACMSQDF is pointing to the correct file specification.
5.3. Managing Task Queues
CREATE QUEUESET QUEUEMODIFY QUEUEDELETE QUEUESHOW QUEUE
These commands are described in the following sections.
5.3.1. Creating Task Queues
CREATE QUEUE command to create a task queue. Once you have
created a queue, it can be reached through the ACMS$QUEUE_TASK service
to enqueue elements to the queue, and also by the QTI to process the elements in the queue. The
following command creates a queue called PERS_QUEUE. Because this command does not include a
full file specification for the queue, the ACMSQUEMGR Utility creates the queue
SYS$SYSTEM:PERS_QUEUE.DAT.ACMSQUEMGR>CREATE QUEUE PERS_QUEUE
When you use the CREATE QUEUE command to create a queue, the ACMSQUEMGR
Utility sets the owner of the queue file to [1,4] and sets the protection of the file to
S:RWED,O:RWED,G,W. Therefore, to access the queue file, a user must have a system UIC or must
have the SYSPRV privilege.
5.3.2. Setting the Characteristics of Task Queues
You can dynamically control the availability of task queues by using the SET
QUEUE command. For example, the SET QUEUE command can be used to
prevent queued task elements from being queued to a task queue. Likewise, the SET
QUEUE command can prevent queued task elements from being dequeued from a task
queue.
When you use the SET QUEUE command, you must use either the
/DEQUEUE or /ENQUEUE qualifier.
/ENQUEUE qualifier allows or disallows queued task elements to be
queued. The following example disables the queuing of queued task elements to queue
HISTORY_QUE:ACMSQUEMGR>SET QUEUE /ENQUEUE=SUSPENDED HISTORY_QUE
When the enqueue state of a task queue is set to SUSPENDED, the
ACMS$QUEUE_TASK service returns an error when elements are queued to
the task queue. Use /ENQUEUE=RESUMED to enable queuing of elements.
/DEQUEUE qualifier. Dequeuing is the process whereby the QTI reads and then
deletes a queued task element to make a task available for processing. The
/DEQUEUE qualifier in the following command specifies that no queued task
elements can be dequeued from MY_QUE. No queued task elements are processed until you set the
dequeue state to
RESUMED.ACMSQUEMGR>SET QUEUE /DEQUEUE=SUSPENDED MY_QUE
By using the /DEQUEUE=SUSPENDED qualifier, you can allow tasks to be
queued to a queue, but suspend their processing. When dequeues are suspended, the
ACMS$DEQUEUE_TASK service returns an error. When you want tasks to be
processed by the QTI, specify the /DEQUEUE=RESUMED qualifier.
5.3.3. Modifying Task Queues
You can modify the static characteristics of a task queue by using the MODIFY
QUEUE command. This can include changing the disk where a queue repository file is
located, or increasing the maximum workspace size for a task queue to allow for the size
requirements of a new task in your application. In any case, you do not need to modify the
characteristics of a task queue on a frequent basis.
The MODIFY QUEUE command requires exclusive access to the task queue.
Make sure that no processes have access to the queue by setting the enqueue and dequeue state of
the task queue to suspended. To do this, use the SET QUEUE command and then
stop the queue with the ACMS/STOP QUEUE command.
ACMSQUEMGR>MODIFY QUEUE PAY_QUE/MAX_WORK=450
/FILE_SPECIFICATION qualifier with the MODIFY
QUEUE command to specify the name of a new queue repository file. The queue
repository file contains the queued task elements for a queue and is created when you create the
queue with the CREATE QUEUE command. The following command changes the
location of the queue repository file for queue
MY_QUE:ACMSQUEMGR>MODIFY QUEUE MY_QUE/FILE_SPEC=DISK2:MY_QUE.DAT
5.3.4. Deleting Task Queues
DELETE QUEUE command to delete a task queue. To
delete a task queue, you need to delete access to the queue repository file, and the task queue
must be stopped. The following command deletes task queue
PAY_QUE:ACMSQUEMGR>DELETE QUEUE PAY_QUE
/PURGE qualifier deletes all queued task elements in the queue when
you delete the queue. For
example:ACMSQUEMGR>DELETE QUEUE/PURGE PAY_QUE
If you do not specify the /PURGE qualifier and there are queued task
elements in the task queue, ACMSQUEMGR is unable to delete the task queue and displays an error
message.
5.3.5. Displaying Task Queue Information
SHOW QUEUE command displays information about task queues currently
defined in the queue definition file. The SHOW QUEUE command in Example 5.1, ''ACMSQUEMGR SHOW QUEUE Command'' displays information about the queue PAYROLL_QUE. You can display
information about all queues by using the wildcard character (*).ACMSQUEMGR>SHOW QUEUE PAYROLL_QUE
Queue Name: PAYROLL_QUE
Enqueues State: RESUMED
Dequeues State: RESUMED
Max Wsp Size: 256
File Specification: SYS$SYSTEM:PAYROLL_QUE.DAT
| Queue Name The name of the task queue. |
| Enqueues State Whether or not new tasks can be queued. If the enqueues state is enabled, new tasks can be queued. If it is disabled, they cannot be queued. |
| Dequeues State If the dequeues state is enabled, queued tasks can be removed from the queue. If it is disabled, they cannot be removed. |
| Max Wsp Size The maximum total size (in bytes) of workspaces allowed in a queued task element. |
| File Specification The file specification of the queue repository file. The queue repository file stores
the queued task elements. By default, the queue repository file has the file specification
SYS$SYSTEM: queue-name.DAT; however, you can
specify another file specification by using the |
See Chapter 20, "ACMSQUEMGR Commands" for more information about the SHOW
QUEUE command.
5.4. Managing Queued Task Elements
Alter the processing priority or state of a queued task element
Delete a queued task element
Display information about a queued task element
The commands you can use to perform these operations are described in the following sections.
Associated with each queued task element is an element ID. The element ID is returned by the
ACMS$QUEUE_TASK programming service. ACMSQUEMGR commands that perform
operations on queued task elements require that you specify the element ID of the queued task
element. This implies that your application program, which called the
ACMS$QUEUE_TASK programming service, made available to you the element
ID. Another way to obtain an element ID is to display all queued task elements (or a subset
thereof) using the ACMSQUEMGR command SHOW ELEMENT (see Section 5.4.3, ''Displaying Queued Task Elements''). Then, once you locate the element you are interested in, note its
element ID.
If you specify a partial element ID, the omitted fields are wildcarded. For example, an element ID of ABCD:: matches all element IDs beginning with ABCD::; that is, all elements enqueued from node ABCD. See Chapter 20, "ACMSQUEMGR Commands" for more information about specifying an element ID.
Although you can perform operations on specific queued task elements by specifying element
IDs, you can use the wildcard character (*) instead of an element ID, and then use the
/SELECT, /EXCLUDE, and /CONFIRM
qualifiers to limit the scope of the command to the specified elements. This approach is best if
you do not know the element ID or you want to perform operations on several elements at
once.
ACMSQUEMGR>DELETE ELEMENT * INVENTORY_QUE -_ACMSQUEMGR>/SELECT=(TASK=(UPDATE_PART1,UPDATE_PART2), -_ACMSQUEMGR>SINCE=TODAY) -_ACMSQUEMGR>/EXCLUDE=PRIORITY=(1,2)
5.4.1. Setting the Characteristics of Queued Task Elements
Set the state or priority of a queued task element with the ACMSQUEMGR SET
ELEMENT command. Setting the attributes of a queued task element allows you to
control how it is dequeued.
ACMSQUEMGR>ELEMENT NODE1:22D00082-0000000E PARTS_QUE /PRIORITY=11
/STATE qualifier with the
SET ELEMENT command. For instance, if you set the state of a queued task
element to HOLD, then the element is not dequeued from the queue. For
example:ACMSQUEMGR>SET ELEMENT NODE1:22D00082-0000000E PARTS_QUE -_ACMSQUEMGR>/STATE=HOLD
Setting an element to HOLD is useful when you want to start a queue, but do not want
certain elements to be processed by the QTI. To allow a queued task element to be dequeued,
specify /STATE=NOHOLD.
You can specify a wildcard character (*) instead of an element ID, and use the
/SELECT or /EXCLUDE qualifiers to limit the scope of the
command.
ACMSQUEMGR>SET ELEMENT * INVENTORY_QUE /STATE=NOHOLD -_ACMSQUEMGR>/SELECT=TASK=UPDATE_INVENTORY
ACMSQUEMGR>SET ELEMENT * INVENTORY_QUE /STATE=HOLD -_ACMSQUEMGR>/SELECT=TASK=UPDATE_INVENTORY
5.4.2. Deleting Queued Task Elements
DELETE ELEMENT command to delete one or more queued task
elements in a task queue. Identify a particular element to delete by specifying part or all of
an element ID, or use the wildcard character (*) to delete all queued task elements in a queue.
This command deletes all queued task elements submitted from node AVERTZ in queue
MY_QUE:ACMSQUEMGR>DELETE ELEMENT AVERTZ:: MY_QUE
/SELECT or /EXCLUDE qualifiers to select a
category of queued task elements to delete, or exclude a category from being deleted. The
following command deletes all queued task elements submitted before today on queue
PAY_QUE:ACMSQUEMGR>DELETE ELEMENT * PAY_QUE /SELECT=BEFORE=TODAY
5.4.3. Displaying Queued Task Elements
SHOW ELEMENT command displays one or more queued task elements in a
queue. Unless you specify the /FULL qualifier, brief information is provided
by default. The brief display contains the following information:Task name
Element state
Application name
Element priority
/FULL qualifier, the following additional information
is displayed. See Example 5.2, ''ACMSQUEMGR SHOW ELEMENT/FULL'' for an example of a full display.Enqueuer user name
Time the task element was created
Queue name
Element ID
Error count (if any) for the queue element
Task error (if any)
ACMSQUEMGR>SHOW ELEMENT * INVENTORY_QUE/FULLACMS Queued Tasks Current Date/Time: 2-FEB-1994 13:21:31.13Task: PARTS_AVAILState: NOHOLDAppl: SITE_INVENTPriority: 20Username: NORTHEnq Time: 2-FEB-1994 10:13:17.71Queue Name: PAYROLL_QUEUEElement Id: MYNODE::28C00082-0000000F-FDE272E0-0090AB3FError Cnt: 1Last Error: %ACMS-E-NOSUCH_PKG, There is no such package definedError Time: 2-FEB-1994 11:38:39.24Task: PARTS_REQ State: NOHOLD Appl: SITE_INVENT Priority: 20 Username: JONES Enq Time: 15-JAN-1994 10:13:16.85 Queue Name: PAYROLL_QUEUE Element Id: MYNODE::28C00082-0000000E-FD5F3920-0090AB3F Error Cnt: 0 Queued Task total for this display: 2
| Task The name of the task. |
| State The processing characteristics of the task element – whether it is set to HOLD or NOHOLD. |
| Appl The name of the application containing the task. |
| Priority The priority of the queued task element. |
| Username The enqueuer user name specified explicitly or implicitly with ACMS$QUEUE_TASK service. |
| Enq time The time the queued task element was created. |
| Queue name The name of the task queue. |
| Element ID The ID for the queued task element. |
| Error cnt The number of times this queued task element has failed. |
| Last error The last error that occurred while attempting to process the queued task element. This field is not displayed when the error count is zero. |
| Error time The time that the last error occurred. This field is not displayed when the error count is zero. |
NOHOLD – The element is available for processing by the QTI, or available for dequeuing by the ACMS$DEQUEUE_TASK service.
NOHOLD (LOCKED) – The element is locked because it is currently being processed by the QTI, or it is being dequeued by the ACMS$DEQUEUE_TASK service.
HOLD – The element is not available for processing by the QTI or for dequeuing by the ACMS$DEQUEUE_TASK service. If an element in this state is set to NOHOLD using the ACMSQUEMGR, then the element immediately becomes a candidate for subsequent dequeue operations (either by the QTI or by the ACMS$DEQUEUE_TASK service).
HOLD (RETRY PENDING) – The element has been processed by the QTI and the called task failed. The QTI retries the task call at a later time depending on the value of the ACMSGEN QTI_RETRY_TIMER parameter. At the appropriate time, the QTI sets the element to NOHOLD, allowing the element to become a candidate for subsequent dequeue operations by either the QTI or the ACMS$DEQUEUE_TASK service. If an element in this state is set to HOLD using ACMSQUEMGR, then the QTI does not automatically set the element back to NOHOLD. If an element in this state is set to NOHOLD using the ACMSQUEMGR, then the element immediately becomes a candidate for subsequent dequeue operations.
5.5. Backing Up Task Queue Files Online
Use the ACMS operator command
ACMS/STOP QUEUEto stop each queue that needs to be backed up.Use the ACMSQUEMGR Utility to suspend dequeues and suspend enqueues for each queue that needs to be backed up. This causes ACMS to close the queue files that are opened in processes calling the ACMS$QUEUE_TASK and ACMS$DEQUEUE_TASK services. If the queue file is participating in a transaction at the time ACMSQUEMGR suspends the dequeue or enqueue, the queue file cannot be closed. If the queue file cannot be closed for that reason, another close is retried 10 seconds later. If the queue file is not closed after 10 retries then the file is left open and an error is logged to SWL.
Back up the queue files that need to be backed up.
Use the ACMSQUEMGR Utility to resume dequeues and resume enqueues for each queue that was backed up.
Use the ACMS operator command
ACMS/START QUEUEfor each queue that was backed up.
For programs that call the ACMS$QUEUE_TASK and ACMS$DEQUEUE_TASK services to continue while a backup of a queue file is taking place, the programs must check the return statuses of ACMS$_QUEDEQSUS and ACMS$_QUEENQSUS. See VSI ACMS for OpenVMS Writing Applications for details.
5.6. Summary of ACMSQUEMGR Commands and Qualifiers
|
Commands and Qualifiers |
Description |
|---|---|
|
Creates a queue for queued task elements. |
|
Deletes one or more queued task elements. |
|
Deletes a queue. |
|
EXIT |
Exits the ACMSQUEMGR Utility. |
|
Provides information about ACMSQUEMGR commands. |
|
Modifies the static characteristics of a queue. |
|
Sets the state and/or priority of one or more queued task elements. |
|
Dynamically sets the queue state. |
|
Displays one or more queued task elements in a queue. |
|
Displays the characteristics of a queue. |
Chapter 6. Using Distributed Forms Processing
This chapter describes how to set up applications with distributed forms processing in a transaction processing (TP) system. Applications with distributed forms processing are sometimes called distributed applications.
6.1. What Is Distributed Forms Processing?
An ACMS application consists of forms processing and database processing. In a distributed ACMS TP system, one or more nodes, called the back end, handle the database processing and computation, while the forms processing is offloaded onto another node or set of nodes called the front end. The front end is sometimes referred to as the submitter node or nodes, and the back end is sometimes referred to as the application node or nodes.
This distribution of tasks over more than one node in a distributed system improves the speed and reliability of ACMS transactions by allowing the configuration of a distributed system where more powerful machines are dedicated to database processing and smaller machines handle the forms processing. You can configure each node in the distributed system for the processing of specific tasks.
Reliability of a system can be enhanced by installing applications on more than one node of a system and using search lists so that, if a node fails, users are switched to a second node where the same application is running.
Figure 6.1, ''Distributed Forms Processing'' shows an example of a typical distributed ACMS system.
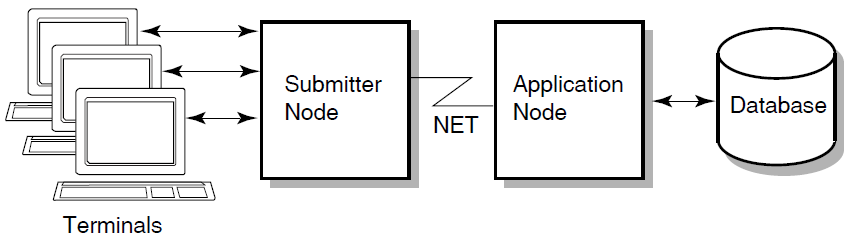
On the front end, or submitter node, terminal users use menus to select tasks for applications running on the application node. The applications, in turn, interact with resource managers such as Rdb, DBMS, and RMS. Resource managers are the tools which manipulate your data. A distributed system can be established in an OpenVMS Cluster, a local-area network, or a wide-area network. ACMS uses DECnet to communicate between the front end and the back end of a distributed system.
The front-end system is often called the submitter node because it refers to a node on which tasks are being selected. The back-end system is often called the application node because it refers to the node where the application is executing and where all the actual processing of an application takes place.
Because many applications can run at a single time on one distributed system, it is important that application specifications in menu definitions on the submitter node point to the correct applications on the application node. Section 6.3, ''Defining Application Specifications'' describes how you define application specifications for a distributed TP system. The following section describes what you must do to enable your system for distributed forms processing.
6.2. Preparing Your System for Distributed Forms Processing
Once you have designed your distributed system to the extent of deciding which nodes are to be used as the front end and which nodes are to be used as the back end, you can configure each node in your system for distributed forms processing. This section describes actions the system manager takes to enable processing of applications with distributed forms. This includes actions that must be taken in all environments and some actions that are specific to an OpenVMS Cluster environment, submitter nodes, or application nodes.
6.2.1. Common Setup Tasks for Distributed Forms Processing
- You must set the node name parameter in the ACMS parameter file before ACMS makes use of DECnet. The recommended way to set the node name parameter is to edit the ACMVARINI.DAT file in SYS$MANAGER to include a line that specifies the DECnet node name of the system. For example:
. . . NODE_NAME="MYNODE" . . .
The node name you specify in the ACMS parameter file must be the same as your DECnet node name. By default, the NODE_NAME parameter is null, and ACMS disables distributed processing. When you assign a node name, ACMS enables distributed processing, provided that DECnet is running.
- Invoke the ACMSPARAM.COM procedure in SYS$MANAGER to apply the change to the ACMS parameter file.
Note
In an OpenVMS Cluster environment, you must ensure that the ACMS parameter file, ACMSPAR.ACM, is stored in the SYS$SPECIFIC directory before invoking the ACMSPARAM.COM command procedure. Because each node has a different DECnet node name, each node must have its own node-specific ACMSPAR.ACM file. Check this on each node of the cluster.
- Alternatively, you can run the ACMSGEN Utility directly. Run the ACMSGEN Utility as follows:
$RUN SYS$SYSTEM:ACMSGENACMSGEN>SET NODE_NAME DOVEACMSGEN>WRITE CURRENT
Note that WRITE CURRENT was used in the preceding example. This ensures
that a new ACMSPAR.ACM file is not created where one already exists. It also
provides a check that the file exists on each node in an OpenVMS Cluster.
Finally, note that regardless of which method you use to set the node name parameter, you must stop and restart the ACMS system for the change to take effect.
6.2.2. Actions Required on Submitter Nodes
Ensure that application specifications in menu definitions point to the application, or back-end, node.
Logical names provide a way to ensure that application specifications in menu database files (.MDB files) refer to the correct applications on the application node. See Section 6.3, ''Defining Application Specifications'' for information about how to use logical names for application specifications.
Place DECforms escape routines in a protected directory.
A DECforms escape routine is an ACMS application program subroutine that is called during the processing of an external DECforms exchange request. See Section 6.6, ''Managing and Caching DECforms Escape Routine Files'' for a description of managing DECforms escape routines.
6.2.3. Actions Required on Application Nodes
Make sure that each step in Section 6.2.1, ''Common Setup Tasks for Distributed Forms Processing'' has been completed. Then, take these additional steps to enable distributed processing by authorizing remote access to ACMS on the application node.
By assigning individual ACMS proxy accounts to task submitters
By assigning individual OpenVMS proxy accounts to task submitters
By assigning a default submitter user name account for those task submitters who do not have individual proxies
By creating a single wildcard proxy account for all submitters in the case where the submitter and application nodes are in a single OpenVMS Cluster
These methods are described in the following paragraphs.
When ACMS uses a proxy account or a default submitter user name for a remote task submitter, tasks executed by the remote submitter are executed as if they were selected by a local task submitter using the same account. If a proxy or default submitter user name does not exist for a remote task submitter, ACMS rejects the remote task selection.
6.2.3.1. Assigning Individual Proxy Accounts
Note
For existing ACMS sites, simply adding a new user proxy to the ACMS proxy file does not make a system more secure. You must also remove the user's proxy from the OpenVMS proxy file to deny users on remote nodes access to other files and OpenVMS resources.
6.2.3.1.1. How ACMS Searches for a User's Proxy
The ACC on the application node checks that the ACMS proxy file, ACMSPROXY.DAT, exists.
If the ACMSPROXY.DAT file exists, the ACC checks the file contents for the proxy of the user on the remote node.
If the remote user's proxy is in the file, the user is authorized to select the task.
If the ACMSPROXY.DAT file does not exist, or if the remote user's proxy is not in the file, the procedure in the next step is followed.
The ACC on the application node checks the OpenVMS proxy file, NETPROXY.DAT, for the remote task submitter's proxy.
If the proxy file exists and the remote user's proxy is in the NETPROXY.DAT file, the user is authorized to select the task.
If the proxy file does not exist or no proxy exists in NETPROXY.DAT, the ACC checks if the USERNAME_DEFAULT parameter is defined in the ACMS parameter file, ACMSPAR.ACM. The USERNAME_DEFAULT parameter defines the default submitter user name account used for remote task submitters that do not have an individual proxy account, or for task submitters from non-ACMS agents.
If the parameter is defined in ACMSPAR.ACM, the remote user is authorized to select tasks.
If the USERNAME_DEFAULT parameter is not defined and there is no OpenVMS proxy, the ACC rejects the remote user.
6.2.3.1.2. Deciding Which Proxy to Use
To decide which type of proxy is appropriate for a user on a remote node, first determine the type of access to the system that the user needs and what level of security is required. Then, decide whether to create an OpenVMS proxy, an ACMS proxy, or both.
OpenVMS only user
This user needs to access files and other OpenVMS resources on the application node, but does not need to select ACMS tasks on that node.
ACMS only user
This user needs to select ACMS tasks on the application node, but does not require access to OpenVMS.
OpenVMS and ACMS user
This user requires OpenVMS access and also needs to select ACMS tasks on the application node.
|
OpenVMS Proxy |
ACMS Proxy | |
|---|---|---|
|
OpenVMS Only User |
+ | |
|
ACMS Only User |
+ | |
|
OpenVMS and ACMS User |
+ |
+ |
An OpenVMS proxy allows users to select ACMS tasks remotely and users on remote nodes to access other files and OpenVMS resources on the application node.
An ACMS proxy allows users to select ACMS tasks remotely. Unlike an OpenVMS proxy, an ACMS proxy does not grant users on remote nodes access to any other files or OpenVMS resources on the application node, except through an ACMS task.
6.2.3.1.3. Setting Up the ACMS Proxy File
Use the ACMS User Definition Utility (UDU) to create and maintain the ACMS proxy file, ACMSPROXY.DAT. This file contains the mapping of <remote-node>::<remote-user> to <local-user>.
You also use UDU to add, remove, and display the proxy specifications in the ACMS proxy file. The UDU interface, including the command syntax and the use of wildcards, is similar to the proxy command interface in the OpenVMS Authorize Utility.
In the current directory for UDU
In the file location SYS$SYSTEM:ACMSPROXY.DAT for run-time ACMS
UDU looks for the default ACMS proxy file ACMSPROXY.DAT in the current directory. You can define the logical name ACMSPROXY to specify another location for the file, define it in any logical name table in your process directory table, and in any access mode.
$DEFINE/SYSTEM/EXECUTIVE ACMSPROXY SYS$TEST:FOO.BAR
If the ACC encounters any problems the first time it opens the ACMS proxy file, an error message is written to the SWL log file.
If you want the proxy file to be in SYS$SYSTEM and accessible to all nodes in the cluster, you must specify a SYS$COMMON directory, not SYS$SPECIFIC. In order for ACMS to search the file for remote proxies, the ACC process must be able to read the ACMS proxy file.
Set the ACMS proxy file owner UIC to be the same as the UIC of the ACC or the SYSTEM account.
Set the ACMS proxy file protection so that the ACC process has read access.
6.2.3.1.4. Creating ACMS Proxies
Create the proxy file and add entries for remote users who need to select tasks in ACMS applications.
Create proxies in the OpenVMS proxy file for remote users who additionally require access to other files and OpenVMS resources.
Remove proxies in the OpenVMS proxy file for existing users on remote nodes who need only to select tasks in ACMS applications. Add these users to the ACMS proxy instead.
Performing these operations increases security and also ensures that the use of the ACMS proxy mechanism does not cause a degradation in ACMS performance. When ACC needs to search only one proxy file for a proxy, the ACMS performance is the same as in Version 3.2. However, even when ACMS needs to search both the ACMS and OpenVMS proxy files, there is only slight negative impact on the performance of ACMS.
An exact match of remote-node::remote-user
This is the most secure way to set up ACMS proxies. This format allows only a specified user on a specified node to select tasks on the application node.
A match of remote-node::*
Use this format to create ACMS proxies in an OpenVMS Cluster environment, where the submitter and application nodes are in the same cluster.
You can also use this format outside an OpenVMS Cluster environment, but you need to understand its security implications; this format allows any user on the submitter node to select tasks on the application node.
A match of *::remote-user
This format allows a user with a specified user name on any node in the network to select tasks on the application node.
A match of *::*
This is the least secure format; it allows any user on any node to select tasks on the application node.
Submitter terminal is in ACMSDDF.DAT
Submitter user name is in SYSUAF.DAT
Submitter user name is in ACMSUDF.DAT
6.2.3.1.5. Creating OpenVMS Proxies
The OpenVMS proxy file can have more than one <local-user> for each <remote-node>::<remote-user> combination. The ACMS proxy file, on the other hand, can have only one <local-user> for each <remote-node>::<remote-user> combination. Therefore, for an OpenVMS proxy, you must specify a default <local-user>. This allows ACMS, when it searches the OpenVMS proxy file, to find one <local-user> to associate with <remote-node>::<remote-user> for the remote user proxy.
UAF>CREATE/PROXY COWBOY::JONES PERS/DEFAULT
When starting DECnet, to allow remote users access to files and other
OpenVMS resources, issue the NCP command SET KNOWN PROXIES
ALL. If you do not execute this command on a node, remote
users do not have access to files and other OpenVMS resources. However, ACMS
opens and reads the OpenVMS proxy file and the ACMS proxy file whether or
not you enable OpenVMS proxy access to files and OpenVMS resources with
NCP.
6.2.3.2. Assigning a Default Submitter User Name Account
. . . USERNAME_DEFAULT = "ACMS_USER" . . .
Invoke the ACMSPARAM.COM procedure in SYS$MANAGER to apply the change to the ACMS parameter file. Note that in an OpenVMS Cluster environment, you must ensure that the ACMS parameter file, ACMSPAR.ACM, is stored in the SYS$SPECIFIC:[SYSEXE] directory before invoking the ACMSPARAM.COM command procedure. The value you assign to the USERNAME_DEFAULT parameter is used as the submitter user name if ACMS cannot find a specific proxy user name for a remote submitter.
$RUN SYS$SYSTEM:ACMSGENACMSGEN>SET USERNAME_DEFAULT ACMS_USERACMSGEN>WRITE CURRENT
The SET command defines ACMS_USER as the new default submitter user name,
which the WRITE CURRENT command uses to update the current
setting. The user name you set as the USERNAME_DEFAULT must be authorized by the
OpenVMS Authorize Utility, and must exist in the ACMS User Definition
File.
6.2.3.3. Assigning Proxy Accounts in an OpenVMS Cluster Environment
In an OpenVMS Cluster environment, where the submitter and application nodes are in the same cluster, you can create a wildcard proxy account for all users on a submitter node.
UAF>CREATE/PROXY COWBOY::* */DEFAULT
Note that this technique can also be used outside an OpenVMS Cluster environment, but the security implications should be well understood. Specifically, the system manager on the application node must understand that this method allows any user on the submitter node access to the application node.
6.2.4. File Protection for Application and Form Files
You must also ensure that application and form files have the correct file protection assigned.
When a terminal user on the submitter node selects a task in an application on the application node, ACMS automatically copies the application database and forms files used by the application from the application node to the submitter node. For ACMS to automatically distribute these files, they must be accessible by the ACMS Central Controller (ACC) and the CP on the submitter node, or remote task selections fail. You can ensure that these files are accessible on the application node by giving them WORLD:RE protection. See Section 6.4, ''Distributed Operations ACMS Performs Automatically'' for more information about how ACMS performs this automatic distribution.
UAF>ADD/PROXY COWBOY::ACMS$ACC ACMS$ACC/DEFAULTUAF>ADD/PROXY COWBOY::ACMS$CP ACMS$CP/DEFAULT
Note
If a proxy account is created on the application node for the ACC or CP
processes on the submitter node, ensure that the account on the application
node is authorized for network access and that it is not defined with the
/DISUSER qualifier. Failure to do this prevents a
cache operation from taking place and causes the task selection to
fail.
ACMS uses the DFECnet File Access Listener (FAL) object to copy from one node to another. FAL is an object that is defined by default in the DFECnet configuration database. This FAL object must exist and be enabled for ACMS to distribute needed files from one node to another.
SHOW command. First use RUN
SYS$SYSTEM:NCP to obtain the NCP> prompt. At the NCP> prompt,
type SHOW and at the following prompts, type
OBJECT and FAL, as shown in the following
example:$RUN SYS$SYSTEM:NCPNCP>SHOW(ACTIVE, ADJACENT, AREA, CIRCUIT, EXECUTOR, KNOWN, LINE, LOGGING, LOOP, MODULE, NODE, OBJECT):OBJECTObject name (8 characters):FALObject Volatile Summary as of 21-JUL-1989 14:57:57 Object Number File/PID User Id Password FAL 17 FAL.EXE NCP>EXIT$
You must also ensure that files needed for DECforms escape routines have the correct file protection assigned.
Place DECforms escape routines in a restricted directory because they contain user-written code that runs in a privileged process. DECforms escape routines are not distributed automatically by ACMS. Hence, the system manager on the submitter node needs to copy these files manually from the application node. Consequently, make sure the files are accessible to the submitter node. See Section 6.6, ''Managing and Caching DECforms Escape Routine Files'' for a description of managing DECforms escape routines.
6.3. Defining Application Specifications
In a distributed TP system, it is important that the application specifications in menu definitions point to the node on which the application is running.
You can "hardcode" an application file name and node name in the menu definition, or use a logical name to reference the application. Logical names allow you to change the application to which a menu definition or definitions refers by simply redefining a logical name. This avoids the need to redefine and rebuild a menu definition. If an application is installed on more than one node in the system, you can define a logical name to translate to a search list specifying all locations for the application. The following sections describe how to define logical names and search lists.
6.3.1. Using Logical Names for Applications
$ DEFINE/SYSTEM APPL_NODE DOVE::
The menu definitions can refer to APPL_NODE::ACCOUNTING, APPL_NODE::PERSONNEL, and APPL_NODE::BUDGET. Then, if you need to move these applications to another node, you can simply redefine APPL_NODE to be the new node name without changing the menu definitions.
ENTRIES ARE: . . . NEW_EMPLOYEE: TASK IS NEW_EMPL_TASK IN "APPL_NODE::PERSONNEL"; . . . END ENTRIES;
$ DEFINE/SYSTEM PAYROLL DOVE::PAYROLL
ENTRIES ARE: . . . NEW_EMPLOYEE: TASK IS NEW_EMPL_TASK IN "PAYROLL"; . . . END ENTRIES;
When an ACC on a submitter node asks an application node for an application, the ACC process on the application node attempts to translate the application name locally. If a logical name does exist for the application name, then the translation is used to access the application on the application node.
Any name changes that occur on the application node do not affect the submitter's file name. For example, if a logical name on submitter node ARK exists which defines PAYROLL as DOVE::PAYROLL, node ARK asks application node DOVE for application PAYROLL. On node DOVE, ACMS tries to translate the PAYROLL logical again. If the logical translates to NEW_PAYROLL, for instance, the NEW_PAYROLL application is accessed on node DOVE. When files relating to that application are copied to node ARK, they are stored as PAYROLL.
The copying of application database (.ADB) and form files from a remote node to the local node where users are selecting tasks is referred to as caching. This is done to increase system performance, by avoiding the need for network access to the application node for application database and form files. A fuller explanation of this process is found in Section 6.4, ''Distributed Operations ACMS Performs Automatically''.
If an application specification or a translation of a logical application specification does not contain a node name, ACMS looks for the application on the submitter's node. If you do use node names, they cannot contain access control strings. For example, ALPHA"ADAMS JOHNQUINCY"::PAYROLL is not a valid application specification because it includes the access control string, "ADAMS JOHNQUINCY".
ACMS follows OpenVMS conventions when translating logical names. For information about how OpenVMS translates logical names and how it translates logical names interactively, refer to VSI OpenVMS User's Manual. See VSI ACMS for OpenVMS ADU Reference Manual for more information about ACMS application specifications.
6.3.2. Search Lists and Primitive Failover
$DEFINE/SYSTEM PAYROLL DOVE::PAYROLL,RAVEN::PAYROLL
The menu definition then specifies PAYROLL as the application name. ACMS searches for the application on each node listed until it locates an available application, or until it reaches the end of the search list. You can define a search list for an application name, a node name, or both.
$DEFINE/SYSTEM APPL_NODE DOVE::, ARK::, BRANCH::
Menu definitions then specify APPL_NODE::ACCOUNTING. When APPL_NODE::ACCOUNTING is translated, the first available application in the search list is used. Therefore, DOVE::ACCOUNTING is used if it is available. If it is not available, ACMS continues to process the search list from left to right until an available application is located.
Search lists provide a primitive form of failover. When an application goes down, an application node goes down, or the link between the submitter node and the application node is severed for some reason, ACMS cancels all active tasks on the submitter node. When a user attempts to select another task in the same application, ACMS reprocesses the search list for an available application.
Once an available node or application is found, all subsequent task selections are redirected to the available application, and terminal users are once again able to select tasks. No group or user workspace context in the failed application is saved. Users receive an error message when this type of failover situation occurs.
If you want to stop an application and cause users to select tasks in an application executing
on another node, you can force failover to another application by using the
ACMS/REPROCESS APPLICATION command. This command is described
in the next section.
6.3.3. Redirecting Users to Other Applications at Run Time
ACMS translates logical names for applications only when a task is first selected in an application. Once ACMS on a submitter node locates an application node, all task selections from the submitter node go to that application node until that application is either stopped or the link between the submitter node and the application node is broken.
ACMS/REPROCESS APPLICATION command. The
ACMS/REPROCESS APPLICATION command causes ACMS to retranslate
the search list for a logical name. For
example:$ACMS/REPROCESS APPLICATION PAYROLLReprocess Specification for Application PAYROLL (Y/[N]):
This command causes ACMS to retranslate the logical name PAYROLL the next time a task submitter selects a task in the application.
The ACMS/REPROCESS APPLICATION command is especially useful for system
managers who need to install an updated version of an application, but do not want
to cause application downtime during this procedure. Simply redirect user task
selections to an application executing on another node by using the
ACMS/REPROCESS APPLICATION command; install the updated
version; and then issue another ACMS/REPROCESS APPLICATION
command to redirect user task selections back to the original node, which is now
executing the updated application.
The ACMS/REPROCESS APPLICATION command can also be used to switch between
versions of an application where the submitters and the application are running on
the same system, as illustrated in the following example.
A site has two copies of an application, PAYROLL_A and PAYROLL_B, with the logical name PAYROLL defined as PAYROLL_A, PAYROLL_B. Note that no node names are used. The assumption is that the system is running and the system manager wants to make a new version of the payroll application available without interrupting the company's flow of work.
The system manager copies the new application database file (the .ADB file) to
ACMS$DIRECTORY and calls it PAYROLL_B. The order of the
PAYROLL logical is then redefined to PAYROLL_B, PAYROLL_A.
The ACMS/REPROCESS APPLICATION PAYROLL command is then issued,
causing all subsequent task selections to go to the new PAYROLL_B application. When
there are no more submitters using PAYROLL_A, that application can be stopped. To
switch users back to PAYROLL_A after it has been updated, the logical names are
reversed, and the process is repeated.
In a distributed ACMS environment, the process goes as follows: If PAYROLL is defined as the
search list: DOVE::PAYROLL, ARK::PAYROLL, RAVEN::PAYROLL, and you want to install an
updated version of the PAYROLL application on node DOVE (the application currently
being used), redefine the search list to point to ARK::PAYROLL,
RAVEN::PAYROLL and execute the ACMS/REPROCESS
APPLICATION command. Terminal users make new task selections in
ARK::PAYROLL. After you install the updated application on node DOVE, redefine the
search list to point to DOVE::PAYROLL, ARK::PAYROLL, RAVEN::PAYROLL and issue
another ACMS/REPROCESS APPLICATION command. Users make new task
selections in the updated application.
The ACMS/REPROCESS APPLICATION command can also be used to cause submitters
to "failover" to an application that previously failed but has now been
made available. For example, if PAYROLL is defined as the search list:
DOVE::PAYROLL, ARK::PAYROLL, RAVEN::PAYROLL, and node DOVE goes down, ACMS
automatically retranslates the search list for PAYROLL, and terminal users make new
task selections in ARK::PAYROLL. When node DOVE again becomes available, issue the
ACMS/REPROCESS APPLICATION command to redirect subsequent
user task selections back to the DOVE::PAYROLL application.
6.4. Distributed Operations ACMS Performs Automatically
When an ACMS/START APPLICATION command is issued, the application execution
controller (EXC) checks that all form files referenced by task groups in the application
definition exist. The EXC uses the default directory and logical names to locate the
form files.
Once all the form files are found, EXC stores the full file specification for each form file. When EXC makes a DECforms I/O request to the agent process, it passes the full file specification to the agent process.
In ACMS, all DECforms requests run in the agent process, whether the task is submitted locally or remotely. Therefore, the agent process must have access to the form files. If a task is selected from a remote agent, the form files must be distributed to the remote node.
Note
ACMS uses the translation of the SYS$NODE system logical name from an application node to form the directory specification when caching DECforms form files and TDMS request library files. DECnet defines the logical name when it is started. Do not change the definition of this system-defined logical name. If this logical name is changed, then the ACMS caching routines do not function correctly and place files in directories with incorrect names. If this happens, ACMS cannot open the necessary form or request library files and, as a result, cancels tasks.
6.4.1. Automatic File Distribution
When a user selects a task in an application, the ACMS run-time system checks to see if the application and form files are accessible on shared disks available to both the submitter and the application nodes. If the files are not located on shared disks and are not already resident on the submitter node, ACMS automatically copies the application and forms files used by the application from the application node to the submitter node. ACMS does not automatically distribute DECforms escape routines. You must distribute these files manually. See Section 6.5.1, ''Manually Distributing Applications'' and Section 6.6, ''Managing and Caching DECforms Escape Routine Files'' for information on how to manually copy DECforms escape routines and where to store them.
These copies are made automatically by ACMS to increase the performance of the system by avoiding having to access these form and application files over a network.
For ACMS to perform this automatic distribution of application and form files, the ACC and the CP must have access to these files. On the application node, you can use proxies for the remote ACC and CP in combination to allow access to these files by the ACC and CP on the submitter node. Alternatively, assigning the files WORLD:RE protection ensures that these files are accessible.
Using proxies allows a submitter node ACC or CP to access the files on the application node as if they were being accessed by the application node's ACC or CP. In this case, the files do not need WORLD:RE access. However, if proxies are not used, the submitter node's ACC and CP are accessing the files as if they were nonprivileged users on the application node, which is why the files must have WORLD:RE protection. If this no-proxy method is used, the application node must have set up a default DECnet account which does not have privileges, but does allow remote nodes to access files which have WORLD:RE protection on the local node. For ACMS caching to work without the use of proxies, this DECnet default account must exist.
6.4.2. ACMS Systemwide Cache Directory
When ACMS automatically distributes files to the submitter node, it places the files in a special directory hierarchy created by ACMS specially for this purpose. This directory structure is known as the ACMS systemwide cache directory. By default, on the submitter node, ACMS creates this systemwide cache directory structure by using the translated directory specification of ACMS$DIRECTORY with ACMS$CACHE appended as a rooted directory. For example, if ACMS$DIRECTORY translates to DRA1:[ACMSDIR], then the systemwide cache directory on submitter node DOVE is DOVE::DRA1:[ACMSDIR.ACMS$CACHE].
ACMS$ADB_CACHE
ACMS$RLB_CACHE
ACMS$FORMS_CACHE
ACMS defines these logical names as rooted directories. For example, consider a system where the ACMS$DIRECTORY logical is defined to be SYS$SYSDEVICE:[ACMSDIR]. If the physical system disk device name is $1$DUA0:, then ACMS defines ACMS$ADB_CACHE as $1$DUA0:[ACMSDIR.ACMS$CACHE.]. Note that a physical device name must be used when defining a rooted directory logical name.
ACMS creates subdirectories (on the submitter node) for each node to which it copies application databases. Each node needs its own subdirectory in case two nodes have different applications with the same name. ACMS does not create subdirectories if the databases are accessed remotely. The location of these subdirectories is controlled by cache logicals, described in the preceding paragraphs. These subdirectories are used to store the .ADB and form files for applications access on that remote node.
- NODE COMET
Application AVERTZ using DRA1:[TWEETY]INVENTORY.FORM and DRA1:[TWEETY]INVENTORY.EXE Application PAYROLL using DRA1:[HECKLE]PAYROLL.RLB and DRA1:[HECKLE]GENERAL.RLB and DRA1:[HECKLE]PAYROLL_REQ.RLB Application STOCK using DRA1:[JECKLE]GENERAL.RLB and DRA1:[JECKLE]STOCK.RLB - NODE STAR
Application PAYROLL using DRA1:[TWEETY]PAYROLL.RLB Application AVERTZ using DRA1:[TWEETY]GENERAL.FORM and DRA1:[TWEETY]GENERAL.EXE
Once a terminal user on submitter node COMET has selected tasks in each of these applications, the ACMS$CACHE directory on node COMET contains the subdirectories for the applications on each remote node.
Referred to under node COMET is PAYROLL.ADB, PAYROLL.DIR, STOCK.ADB, and STOCK.DIR. Referred to under node STAR is PAYROLL.ADB and PAYROLL.DIR. In this way, the ACMS system can discriminate among applications with the same name running on different nodes.
Also note that each subdirectory contains an .ADB and a .DIR for each application. Each .DIR contains the application's request libraries (.RLB) and/or forms files (.FORM and .EXE).
In most cases, the file name and type of the request libraries and forms files are the same as the file name and type on the remote node. If a remote application uses two different files with the same file name and type, but the files reside in a different disk or a different directory, the file type is modified to include the index of the task group within the application and of the request libraries and/or forms files of the task group.
This information can be obtained from the ADU DUMP APPLICATION and
DUMP GROUP commands. The file type is modified to be
.file-type_g_r, where file-type is the original file type, "g " is the
index of the task group (leading zeros suppressed) as recorded in the .ADB and
"r " is the index of the request library of forms file (leading
zeros suppressed) as recorded in the .TDB.
FORMS ARE
form_a IN "DISK1$:[USER1]FORM_X.FORM" WITH NAME F1,
form_b IN "DISK2$:[USER2]FORM_X.FORM" WITH NAME F2;The first file will retain the file name and type. The second file will have FORM_X.FORM_1_2 as the file type. The same rule applies to request libraries (.RLB) and forms image files (.EXE). However, you should not use the same file name for forms image files (.EXE) because of the restrictions of the OpenVMS image activator. For details about forms image files, see VSI ACMS for OpenVMS Writing Applications.
When files are updated on the application node, ACMS automatically copies the new version of each file to the submitter node and deletes the old version the next time a user on a submitter node selects a task in an application containing updated files.
Note that ACMS does not make the copy at the time the change is made on the application node. The copy is made only when a user on the submitter node selects a task in the updated application. When updating application and form files, ACMS maintains a single copy of each file. It deletes old versions as soon as it makes an updated copy. Once the files are updated, the copies remain on each node until they are superseded by new versions or until they are explicitly deleted.
The Command Process (CP) sends a message to the ACMS Central Controller (ACC) to get information about the application.
The ACC looks at the application specification and attempts to translate it as a logical name.
The ACC then finds out if the application is running on the first, and possibly only, node named in the application specification. If it is, ACC uses that application.
If the node is not reachable, or the application is not running, ACC looks at the next node in the application specification. If there are no more entries in the search list, or the logical name is not a search list, or the application specification contains a single hard-coded node name, then the task selection fails.
- If a usable application is found, however, ACMS then looks for an application database file (.ADB file) in the following manner:
First, ACMS translates the ACMS$ADB_CACHE logical and looks in the first directory specified in the search list (assuming that the logical translates to a search list).
If an up-to-date version of the .ADB is found, the task then executes.
If the .ADB is out-of-date, ACMS tries to update it. If this is impossible, perhaps because the directory is write-protected, then ACMS proceeds to the next translation of the ACMS$ADB_CACHE logical name.
If, in the process described in the preceding paragraphs, a translation is found that equals "NET", then ACMS uses DECnet to access the .ADB file.
If ACMS reaches the end of the search list and has not found a directory that contains the .ADB file, or found an obsolete file and could not update it, then ACMS starts at the beginning of the search list and tries to copy the .ADB file into each directory on the list.
As soon as ACMS finds a directory to which it can copy the .ADB file, it does so, and the task then executes.
However, if the end of the search list is reached and ACMS finds that all the directories are write-protected, or perhaps the disk is full or there is no disk quota left, then the task selection fails.
Note that during the preceding sequence of events, ACMS does not attempt to look for another application using the application specification, because a running application has already been found and it is the cache problem that has caused the task cancellation.
Periodically, you may want to delete little-used files in the system cache directory. This could involve rarely used applications or nodes. This ensures that databases and forms that are infrequently used do not consume disk space. However, deleting files in the cache directory can cause slow response time for the first task selected in a remote application while ACMS copies the application and forms files to the submitter node.
On nodes with large disks, you can allow ACMS to automatically distribute all application database and forms files for all applications accessed by terminal users. On nodes with limited disk space, you may want to manually copy the forms and application files most frequently used and use access over the network for other, less frequently used, applications.
However, remember that performance may be affected when one of these less frequently used applications is selected, due to the need for network access to the form and application database files. The following section describes how to determine whether the manual distribution of application and forms files is advantageous for your particular site.
6.5. Tailoring ACMS Distributed Forms Processing to Your Site
Manually copy the application and forms files for the applications you use most often to the cache directory on the submitter node.
Cause ACMS to search a local cache directory before it searches the systemwide cache directory by redefining cache logical names.
Allow remote access to application files that are infrequently used.
These methods are described in the following sections.
6.5.1. Manually Distributing Applications
Copy .ADB files to ACMS$ADB_CACHE:[node]*
You must use a wildcard file name to preserve the creation date. If the local application name is different from the remote name, you must rename the file.
Copy TDMS .RLB files to ACMS$RLB_CACHE:[node.application]*
You must use a wildcard file name to preserve the creation date. If the local application name is different from the remote name, you must rename the file. If an index must be attached to the file type, use the
RENAMEcommand.Copy DECforms .FORM and .EXE files to ACMS$FORMS_CACHE :[node.application]*
Copy DECforms .FORM and .EXE files to ACMS$FORMS_CACHE:[node.application]*
You must use a wildcard file name to preserve the creation date. If the local application name is different from the remote name, you must rename the file. If an index must be attached to the file type, use the
RENAMEcommand. ACMS does not perform automatic installation of image form files. If you want to make shared image format a known shareable image, you must issue theINSTALLcommand manually.You must also manually distribute escape routine files that are not part of a shareable image. An escape routine can do anything that is allowed in the environment in which it runs; it can, for example, call routines in shared images, use logicals, and use global sections. Because it has no way of knowing what parts of the environment must be duplicated on a remote node, ACMS cannot automatically distribute escape routine files. See Section 6.6, ''Managing and Caching DECforms Escape Routine Files'' for a description of managing DECforms escape routines.
ACMS carefully preserves the original creation date and time on the local copy when it
distributes files. You are responsible for this information if you manually
distribute application and forms files. If you copy the files over the network using
the OpenVMS COPY command, and specify the wildcard output file
name and type, the COPY operation maintains the original creation date and time of
the file.
If the destination application or forms file names differ from the source file names, you must
still use the wildcard output file name and type when you copy the files. You can
then use the OpenVMS RENAME command to add the necessary index to
the file type of these files or to use the fully translated local application name
as the file name of .ADB files. The RENAME command maintains the
original creation date and time.
Destination application and forms file names can be different from the source names when an application uses two or more different application or forms files with the same file name and type, or when the local application name differs from the remote application name. If an application node has an application that uses two different forms files with the same file name and file type, there must be some way to distinguish them. This is done by modifying the file type.
For example, if application PAYROLL has two different files both called GENERAL.FORM, the file
type is modified to include the index of the task group within the application and
the index of the .FORM within the task group. The file index is obtained from the
ADU DUMP APPLICATION and DUMP GROUP
commands.
For example, the file type is modified to be .FORM_g_r, where g is the index of the task group (leading zeros suppressed) as recorded in the .ADB, and r is the index of the form file (leading zeros suppressed) as recorded in the .TDB. This method of indexing file types is the same for both DECforms and TDMS forms files.
ACMS automatically updates distributed files whenever they become outdated, however, you can prevent ACMS from automatically updating files by write-protecting the directories in which the files reside. ACMS does not update DECforms escape routines or their resources.
6.5.2. Creating Agent-Specific Cache Directories
ALL-IN-1
Customer-written agents running the debugger
Customer-written agents being executed directly by terminal users
An agent image can be installed with privileges; however, do not assign privileges to an agent haphazardly, since an agent process executes under the terminal user's OpenVMS user name. Theoretically, the user whose name the agent process is running under could cause problems by adding an incorrect file to the system cache, thereby denying service to another user. For example, if you made ALL-IN-1 a privileged agent, ALL-IN-1 users would then be able to access the system cache directory with ALL-IN-1 commands. This could corrupt the system cache directory and its files, or cause other unexpected results.
You can avoid giving nonprivileged agents access to the system cache by creating an agent-specific cache directory. The agent-specific cache directory could be shared between agents (for example, all ALL-IN-1 users), or could be separate for each agent (for example, customer-written agents running the debugger).
Create the agent-specific cache directory in SYS$DISK. Then, define the logical name ACMS$RLB_CACHE or ACMS$FORMS_CACHE to point to either the agent-specific cache directory or a search list of directories.
$DEFINE/EXEC ACMS$FORMS_CACHE -_$DRB2:[ALLIN1_CACHE.],DRA1:[ACMSDIR.ACMS$CACHE.]
Here, ACMS searches the private cache [ALLIN1_CACHE] for the DECforms file. If ACMS does not find the file there, it searches the public cache [ACMSDIR.ACMS$CACHE.]. If ACMS still does not locate the file, it creates a new version in the local cache.
The logical name ACMS$ADB_CACHE, which is normally a system logical name, must be available to the ACC. The ACMS$RLB_CACHE and ACMS$FORMS_CACHE logical names, however, can be defined as system, group, job, or user logical names, provided the logical name can be translated by the agent. They are usually defined as system logical names.
The ACMS remote request code in the agent process can only allow an agent to update a cache to which it has write access. If ACMS finds an out-of-date file in the central cache, it updates the file in the agent-specific cache.
If you are supporting multiple caches by using search lists, control where application and forms files are placed the first time they are copied from the application node. This is controlled through the use of a write-protected directory in the search list.
6.5.3. Accessing Remote Application Files
$DEFINE ACMS$FORMS_CACHE DRA1:[ACMSDIR.ACMS$CACHE.],NET:
The "NET:" designation tells the ACMS run-time system that if the application or forms file is not found in the local ACMS$CACHE directory, it must open the application or forms file using remote DECnet file access. This requires that there be a process on the application node for each agent for each application and forms file. ACMS reads the .ADB files once and then keeps them in memory. See Section 6.4, ''Distributed Operations ACMS Performs Automatically'' for information on how ACMS updates remote application and forms files.
6.6. Managing and Caching DECforms Escape Routine Files
Making escape routines available to the CP agent
Protecting privileged agents that execute escape routines
Caching escape routines in a distributed environment
Caution
Many agents, including the ACMS-supplied CP agent, perform work on behalf of multiple users. These agents are multithreaded or asynchronous. However, DECforms escape routines provide only a synchronous interface. When you use an escape routine in a multithreaded agent, be careful not to do anything that might delay the CP agent in processing other users' requests. For example, do not use an escape routine to perform terminal or disk I/O, because this stalls other users.
6.6.1. Making Escape Routines Available to the CP Agent
Linking escape routines with the form image
You can make escape routines available to the CP agent by linking them into the same image as the form. An advantage to this method in a distributed processing environment is that the escape routines are automatically cached, with the forms files, to the remote submitter node.
By using this method, however, you allow application code from a remote system to execute in a privileged environment on your system. But if the remote application node and the local submitter node are in a common security domain, this may not be a concern.
To avoid the possible security problem of executing escape routines that are linked with the forms shareable image, ACMS, by default, does not execute these escape routines. To execute them, you must define the following system-level logical:ACMS$ESC_RTN_IN_FORM
If the value of this logical is set to "T", "t", "Y", "y", or "l", then ACMS allows these escape routines to run. If this logical is not defined or has another value, ACMS does not execute the escape routines.
Linking escape routines in a separate image
You can also link escape routines in their own shareable image. You then need to make that image available to the CP agent by defining this logical:FORMS$IMAGE
If you have more than one escape routine image, you can make the logical a search list of all images. For the ACMS-supplied CP agent, this logical must be in either the system group name table or the system name table. Refer to DECforms documentation for more information about defining this logical.
If you use the FORMS$IMAGE logical to specify escape routine images, these escape routines can be shared by all of the applications that the CP agent references. However, sometimes the different applications may have the same escape routine name for different functions. To settle this possible naming conflict, ACMS provides an additional logical:ACMS$ESC_RTN_<node>_<application>
You can use this logical to define an escape routine image for a particular application on a particular node. If the application uses more than one image, this logical can be a search list. When you use this logical name on a system where the NODE_NAME parameter is not defined in ACMSGEN, you must omit the<node>part from the logical name. Therefore, the logical name looks like:ACMS$ESC_RTN_<application>
If you do not define this logical, or the specified logical is not on the search list, DECforms then uses the FORMS$IMAGE logical.
6.6.2. Privileged Agents that Execute Escape Routines
Certain agents, such as the ACMS-supplied CP agent, run in a privileged environment. Any escape routines that execute in a privileged agent also execute in the same privileged environment. Be sure to develop escape routines to execute in a privileged agent in the same way as you develop any other privileged code. Carefully review the code for any possible security violations before you run it live on the system.
Place the escape routine images in a write-protected directory; also write-protect the images themselves. After you place the file in a protected directory, you can define the logicals that make the escape routines available to the agent process.
You may not, however, need to place escape routines executed by a nonprivileged agent in a protected directory. In some cases, such as debugging, you may want the person running the CP agent to be able to change the escape routines executed. Use the methods described previously to make the escape routine images available to the CP agent.
Chapter 7. Using Data Compression
This chapter describes the data compression feature that can improve system response time and reduce the cost of transmitting data across networks.
For information on designing ACMS applications, refer to VSI ACMS for OpenVMS Concepts and Design Guidelines.
7.1. Overview of Data Compression
This section provides an overview of data compression, by describing the purpose of data compression and how this feature works.
7.1.1. Purpose of Data Compression
Provide a faster response time for the user
Providing high-speed links is often far too costly in an application with a widely distributed user base and relatively few users at each of many different sites. As an alternative to providing high-speed links, data compression can reduce the size of network messages, thereby reducing the time taken for the messages to be transmitted over the network. Thus, data compression can result in an improvement in the response time of an application for a user on a distributed front-end system.
Reduce the cost of using the system
Many public networks, such as various X.25 packet-switching networks, charge for data sent over the network from one node to another. Clearly, you can realize a cost savings by transmitting less data over the network while still providing the same service to users of applications on that network.
7.1.2. How ACMS Uses Data Compression
You can enable data compression selectively between systems in a network. You might, for example, have a mixed configuration that has both wide area and local area networks. If both the submitter and application nodes exist on the same local area network, the cost of compressing data far outweighs the cost of transmitting uncompressed data over the network.
You can control data compression on a per-process basis. For example, data compression might be beneficial if you enable it for a forms-based agent such as the Command Process (CP). On the other hand, data compression might not be appropriate for a specialized user-written agent, if that agent processes data that is not compressible using the ACMS data compression algorithm.
ACMS provides system management tools that allow you to control the use of the data compression. One mechanism enables you to verify that data compression is enabled and used correctly. Another mechanism allows you to monitor the efficiency of the data compression algorithm in terms of the amount of data compression that is achieved.
Data in task argument workspaces that an agent sends to and receives from a task
Data in send and receive workspaces, send and receive shadow workspaces, and send and receive control text workspaces passed to DECforms forms
Data in workspaces passed to TDMS requests
Data in workspaces read or written using stream I/O
ACMS does not compress other data such as DECforms send and receive record names or TDMS request names.
7.1.3. How Data Compression Works
The amount that data can be compressed must be offset against the cost involved in compressing the data before it is sent over the network, and decompressing the data after it has been received. The cost is measured by CPU and memory usage.
To implement data compression, ACMS uses a simple run-length encoding algorithm that aims to provide a reasonable data compression ratio in typical applications, while not consuming excessive CPU or memory resources. In most cases, a higher compression ratio provides better performance in terms of less CPU usage and improved response time. See Table 15.2, ''ACMS Data Items'' for more information about the compression ratio.
Due to the overhead of the information necessary to describe the compressed data, compressed data sometimes occupies the same or more space than its original uncompressed form. In this situation, ACMS uses the uncompressed form when constructing a message to transmit over a network. However, when data compression is enabled, ACMS always sends less data, even if the workspaces data cannot be compressed; at the very least, the message overhead is optimized for space rather than for speed of processing.
When minimal data is passed in large workspaces. In this case, the workspace should be space filled or zero filled.
When large workspaces are sent over relatively low speed links.
When the data in the workspaces contain long strings of consecutively identical bytes.
7.2. How to Use Data Compression
Managing data compression by defining the logical names ACMS$ENABLE_DATA_COMPRESSION and ACMS$AUDIT_NETWORK_CONNECTIONS for processes on application and submitter nodes
Enabling data compression in either the restricted or unrestricted mode
Disabling data compression
Enabling logging of data compression
Disabling logging of data compression
Note
You must upgrade both the submitter and the application nodes to ACMS Version 3.3 or higher before you can use data compression for data in workspaces used in exchange steps.
Also, to use data compression for data in task argument workspaces that agents supply, you must rebuild any application database (ADB) files after you install ACMS.
7.2.1. Rules for Defining Logical Names
ACMS$ENABLE_DATA_COMPRESSION
ACMS$AUDIT_NETWORK_CONNECTIONS
You must define both the ACMS$ENABLE_DATA_COMPRESSION and ACMS$AUDIT_NETWORK_CONNECTIONS logical names as executive mode system logical names or as process logical names.
In an agent process, ACMS translates the logical names when the first submitter signs in. Therefore, for an ACMS-supplied CP agent, define the logical names as system logicals in executive mode before you start the ACMS terminal subsystem. For a user-written agent, you must either define the logical names before the agent program is started, or the agent program itself must define the logical names before calling ACMS$SIGN_IN to sign in the first submitter.
In the Application Execution Controller (EXC) process, ACMS translates the logical names as part of the application startup processing. Therefore, you either must define the logical names as system logicals in executive mode before you start the application, or you must define them using the APPLICATION LOGICAL NAME clause in the application definition.
If you need to enable or disable data compression or the auditing of network connections after an agent process or an application process has been started, you must restart the process after you define, redefine, or deassign the appropriate logical names.
7.2.2. Using Restricted and Unrestricted Modes
Unrestricted mode
In unrestricted mode, ACMS uses data compression on all network connections to remote nodes that also have data compression enabled.
Restricted mode
In restricted mode, ACMS uses data compression only on network connections to a specified set of remote nodes.
ACMS never uses data compression automatically. You must always explicitly enable data compression on both the application node and the submitter node before ACMS uses data compression between the two nodes. ACMS never uses data compression for communications between processes on the same node.
7.2.2.1. Enabling Data Compression in Unrestricted Mode
To enable data compression in unrestricted mode, define the ACMS$ENABLE_DATA_COMPRESSION logical name as the wildcard asterisk character (*).
$DEFINE/SYSTEM/EXECUTIVE ACMS$ENABLE_DATA_COMPRESSION *$DEFINE/SYSTEM/EXECUTIVE ACMS$ENABLE_DATA_COMPRESSION *
Figure 7.1, ''Simple Mixed-Interconnect Network'' illustrates a distributed configuration consisting of three submitter nodes, each connected by a wide area network to a local area network consisting of two application nodes and three more submitter nodes.
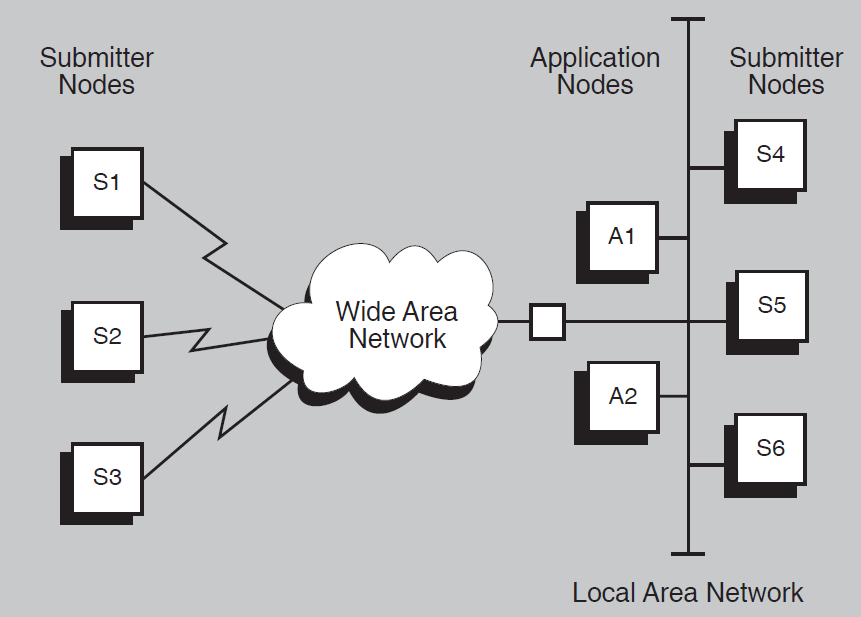
In the configuration in Figure 7.1, ''Simple Mixed-Interconnect Network'', data compression is required between submitter nodes S1, S2, and S3 and application nodes A1 and A2, because the submitter and application nodes are separated by a wide area network. Data compression is not required between submitter nodes S4, S5, and S6 and application nodes A1 and A2, because the submitter and application nodes are on the same local area network.
$DEFINE/SYSTEM/EXECUTIVE ACMS$ENABLE_DATA_COMPRESSION *$DEFINE/SYSTEM/EXECUTIVE ACMS$ENABLE_DATA_COMPRESSION *
Because data compression is not enabled on nodes S4, S5, and S6,data compression is not used between these nodes and application nodes A1 and A2.
7.2.2.2. Enabling Data Compression in Restricted Mode
You might sometimes want to limit the use of data compression to network connections between specific nodes in a network. To enable data compression in restricted mode, define the ACMS$ENABLE_DATA_COMPRESSION logical name as a search list, with each node name separated by a comma. You can specify node names with or without the trailing double-colon (::).
In restricted mode, ACMS uses data compression only for network nodes defined in the ACMS$ENABLE_DATA_COMPRESSION logical name. You do not need to enable data compression in restricted mode on both nodes. For example, you can enable data compression on a submitter node in unrestricted mode, and enable data compression on an application node in restricted mode. To do this, include the name of the submitter node in the list of nodes that the ACMS$ENABLE_DATA_COMPRESSION logical name identifies.
$DEFINE/SYSTEM/EXECUTIVE ACMS$ENABLE_DATA_COMPRESSION S1,S2
$DEFINE/SYSTEM/EXECUTIVE ACMS$ENABLE_DATA_COMPRESSION *
Note
In listing node names as the equivalence names in the search list when you define the ACMS$ENABLE_DATA_COMPRESSION logical name, do not specify the unrestricted mode (*) symbol as a node name. If you use the unrestricted mode (*) symbol in place of a node name in the search list, ACMS writes an error entry to the ACMS audit log and does not enable data compression.
Figure 7.2, ''Complex Mixed-Interconnect Network'' extends the example shown in Figure 7.1, ''Simple Mixed-Interconnect Network'' by adding a second local area network containing two application nodes in addition to three submitter nodes. In the example, users on any submitter node can select tasks on any of the application nodes.
In the configuration shown in Figure 7.2, ''Complex Mixed-Interconnect Network'', data compression is required between submitter nodes S1, S2, and S3 and application nodes A3 and A4, and between submitter nodes S4, S5, and S6 and application nodes A1 and A2. Data compression is not required between any other nodes in this network.
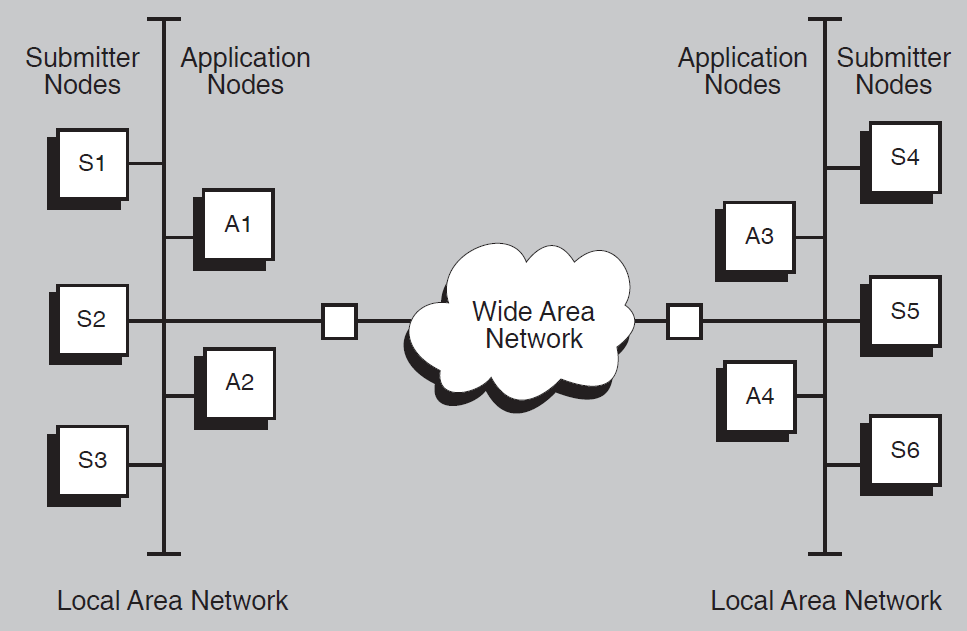
- Enable data compression in unrestricted mode on all the application nodes (A1, A2, A3, and A4) as follows:
$DEFINE/SYSTEM/EXECUTIVE ACMS$ENABLE_DATA_COMPRESSION * - Enable data compression in restricted mode on submitter nodes S1, S2, and S3 as follows:
$DEFINE/SYSTEM/EXECUTIVE ACMS$ENABLE_DATA_COMPRESSION A3, A4 - On submitter nodes S4, S5, and S6, enable data compression in restricted mode as follows:
$DEFINE/SYSTEM/EXECUTIVE ACMS$ENABLE_DATA_COMPRESSION A1, A2
- Enable data compression in unrestricted mode on all the submitter nodes (S1, S2, S3, S4, S5, and S6):
$DEFINE/SYSTEM/EXECUTIVE ACMS$ENABLE_DATA_COMPRESSION * - Enable data compression in restricted mode on application nodes A1 and A2:
$DEFINE/SYSTEM/EXECUTIVE ACMS$ENABLE_DATA_COMPRESSION S4,S5,S6 - Enable data compression in restricted mode on application nodes A3 and A4:
$DEFINE/SYSTEM/EXECUTIVE ACMS$ENABLE_DATA_COMPRESSION S1,S2,S3
7.2.3. Disabling Data Compression
You might sometimes want to enable data compression on a general, system-wide basis, but disable it for specific processes. For example, you might want to disable it for a specialized user-written agent, if that agent processes data that cannot be compressed using the ACMS data compression algorithm.
$DEFINE/PROCESS ACMS$ENABLE_DATA_COMPRESSION "-"
Note
DCL uses the hyphen character (-) to indicate the continuation of a DCL command line; therefore, you must enclose the character in quotation marks to differentiate it.
Do not specify the disable symbol ("-") as a node name when you list node names as the equivalence names in the search list when you define the ACMS$ENABLE_DATA_COMPRESSION logical name. If you use the disable symbol ("-") in place of a node name in the search list, ACMS writes an error entry to the ACMS audit log and does not enable data compression.
7.2.4. Enabling Logging of Data Compression
To verify that data compression is enabled correctly, enable logging of ACMS network connection information. When you do this, ACMS writes an entry to the ACMS audit log every time a new ACMS process is started and every time a process initiates or accepts a new network connection.
You can enable auditing on a submitter node, an application node, or both. You can then use the information written to the audit log to determine if ACMS is using data compression correctly on network connections to the appropriate remote nodes.
ACMS uses the ACMS$AUDIT_NETWORK_CONNECTIONS logical name to enable logging of ACMS network connection information. You must define the ACMS$AUDIT_NETWORK_CONNECTIONS logical name as an executive-mode system logical name or as a process logical name in any mode.
$DEFINE/SYSTEM/EXECUTIVE ACMS$AUDIT_NETWORK_CONNECTIONS Y
7.2.4.1. Entries Written to the Audit Log When a New Process Is Started
When verification of network connection information is enabled, ACMS writes an entry to the audit log whenever a new process is started. The following examples illustrate each type of entry.
********************************************************* Type : OTHER Time : 31-Jul-1992 15:20:01.15 Text : Process ACMS01EXC001000 started Data compression is not enabled *********************************************************
********************************************************* Type : OTHER Time : 31-Jul-1992 15:21:02.16 Text : Process ACMS01EXC002000 started Data compression is explicitly disabled *********************************************************
********************************************************* Type : OTHER Time : 31-Jul-1992 15:22:03.17 Text : Process ACMS01EXC003000 started Data compression is enabled for all nodes *********************************************************
********************************************************* Type : OTHER Time : 31-Jul-1992 15:23:04.18 Text : Process ACMS01EXC004000 started Data compression is enabled for node: SUB1, SUB2, SUB3 *********************************************************
7.2.4.2. Entries Written to the Audit Log When Network Connection Is Established
When logging network connection information to the ACMS audit log, ACMS writes an entry to the log every time a new ACMS network connection is established. Note that ACMS multiplexes ACMS network connections over a single DECnet logical link. This means that you might see multiple entries in the audit log for the same process. The following examples illustrate the format of each type of network connection entry written to the ACMS audit log.
************************************************************ Type : OTHER Time : 31-Jul-1992 15:40:21.45 Text : Process ACMS01CP001000 initiated network connection to remote node APPL1 Data compression is disabled (not enabled at local node) ************************************************************
************************************************************ Type : OTHER Time : 31-Jul-1992 15:41:14.32 Text : Process ACMS01QTI001000 initiated network connection to remote node APPL2 Data compression not fully enabled (not enabled in ADB, please rebuild) ************************************************************
************************************************************ Type : OTHER Time : 31-Jul-1992 15:42:23.76 Text : Process ACMS01EXC001000 accepted network connection from remote node SUB1 Data compression is disabled (not enabled at remote node) ************************************************************
************************************************************ Type : OTHER Time : 31-Jul-1992 15:43:28.54 Text : Process ACMS01EXC002000 accepted network connection from remote node SUB2 Data compression is disabled (not enabled at local node) ************************************************************
************************************************************ Type : OTHER Time : 31-Jul-1992 15:50:42.50 Text : Process ACMS01CP001000 initiated network connection to remote node YRNODE Data compression is enabled ************************************************************
************************************************************ Type : OTHER Time : 31-Jul-1992 15:52:55.42 Text : Process ACMS01EXC003000 accepted network connection from remote node YRNODE Data compression is enabled ************************************************************
7.2.5. Disabling Logging of Network Connections
After you verify that data compression is being used only on network connections with the nodes you specified, you might want to disable logging on a per-process basis. To disable logging of network connection information, deassign the ACMS$AUDIT_NETWORK_CONNECTIONS logical name. Note that ACMS does not automatically log network connection information.
$DEFINE/PROCESS ACMS$AUDIT_NETWORK_CONNECTIONS N
After you disable auditing, any processes logging network connection information do not stop logging this information until the processes or the programs they are executing are restarted.
7.3. Monitoring Data Compression
ACMS uses the DECtrace layered product to monitor the extent to which messages sent over the network are compressed. ACMS logs an DECtrace point event, called the COMPRESSED_MSG event, every time a network message is sent or received.
By default, DECtrace collects items for the COMPRESSED_MSG event whenever data compression is enabled, provided that you specify the PERFORMANCE or ALL collection class in your facility selection. See Section 15.3.1, ''Describing ACMS Events and Items'' for more information about the COMPRESSED_MSG event.
|
Item |
Description |
|---|---|
|
Source node |
Name of the node that sent the message |
|
Destination node |
Name of the node that received the message |
|
Original message length |
Length in bytes of the message before data compression |
|
Compressed message length |
Length in bytes of the message after data compression |
|
Compression ratio |
Factor by which ACMS compressed the message |
Chapter 8. Controlling the ACMS System
Start and stop the ACMS system
Control the Terminal Subsystem Controller (TSC)
Control operator terminals
Control the Queued Task Initiator (QTI)
Start and stop ACMS task queues
Cancel ACMS users
See Section 8.9, ''Summary of Operator Commands and Qualifiers'' for a summary of ACMS operator commands. For reference information about the operator commands described in this chapter, see Chapter 21, "Operator Commands".
8.1. Starting the ACMS System
This section describes how to start the ACMS system automatically and interactively. For a complete list of quotas, privileges, and SYSGEN parameters required by ACMS processes, see Chapter 10, "Setting ACMS Quotas, Parameters, and Privileges".
ACMS Central Controller (ACC)
Terminal Subsystem Controller (TSC)
Command Process (CP)
Application Execution Controller (EXC)
Queued Task Initiator (QTI)
If these processes are not authorized, use the OpenVMS Authorize Utility to set up accounts for the user names and then use the ACMS User Definition Utility (UDU) to authorize the user names. The CP and QTI process user names need to be authorized as agents in the UDU authorization file. See Chapter 3, "Authorizing Users" for information about authorizing these processes as agents.
See Chapter 10, "Setting ACMS Quotas, Parameters, and Privileges" for information on setting privileges and quotas for ACMS process user names. See Chapter 3, "Authorizing Users" for information on authorizing ACMS process user names.
After starting ACMS, check the state of the system by using the ACMS/SHOW
SYSTEM command as described in Section 8.3, ''Displaying System Information''. If the ACMS
system or applications did not start, use the Software Event Logger Utility Program
(SWLUP) and the Audit Trail Report (ATR) Utility for reports of system errors.
8.1.1. Starting ACMS Automatically
In most cases, you want to start ACMS automatically whenever the OpenVMS system starts. Start the ACMS system automatically when you bring up OpenVMS by editing your site-specific system startup file, SYS$MANAGER:SYSTARTUP_VMS.COM.
- Include the command that invokes the ACMS startup file, ACMSTART.COM, in your OpenVMS system startup file. Position this new command line after the line that invokes the network startup command procedure and, if TDMS is installed on your system, after the command that invokes TDMS. For example:
$ @SYS$MANAGER:STARTNET.COM . . . $ @SYS$MANAGER:TDMSTRTUP.COM . . . $ @SYS$STARTUP:ACMSTART.COM
It is important that the network be started before ACMS is started.
- For distributed ACMS applications, run the ACMS startup files by including these pointers in your OpenVMS startup file:
$ @STARTNET.COM ! or SUBMIT STARTNET.COM $ @ACMSTART.COM ! or SUBMIT ACMSTART.COM
- Include the
ACMS/START SYSTEM /QTIoperator command to start the ACMS system and the ACMS QTI:$ ACMS/START SYSTEM /QTI
At this point, you can also include the ACMS operator commands to enable operator terminals and start ACMS applications. For example:$ ACMS/SET SYSTEM /OPERATOR /TERMINAL=(OPA0:) $ ACMS/START APPLICATION DEPARTMENT,INVENTORY
Even if you start ACMS automatically, you can still use ACMS commands to start and stop interactively the ACMS system, ACMS applications, and ACMS components.
Instead of editing SYSTARTUP_VMS.COM and adding the commands in step 2 and step 3 manually, you can invoke the postinstallation command procedure ACMS_POST_INSTALL.COM to define your system's startup options. However, even if you do run ACMS_POST_INSTALL.COM, you need to add the commands described in step 1 to invoke the ACMS startup file ACMSTART.COM.
$@ACMS_POST_INSTALL.COM
ACMS_POST_INSTALL.COM creates the command file ACMS_SETUP.COM which defines ACMS logicals and executes ACMS startup commands each time your system boots. ACMS_POST_INSTALL.COM can also be used to install the ACMS utility images as shared images and to start ACMS applications.
8.1.2. Starting ACMS Interactively
ACMS/START SYSTEM
command:$ACMS/START SYSTEM
Once you enter the ACMS/START SYSTEM command, the ACMS ACC (the
main control point of the ACMS system) and the ACMS TSC are started. The ACC must be
active before you can start an application. The TSC must be active before users can
sign in to ACMS and use an application.
When you start the TSC, ACMS allocates any terminal that is currently free. Before you start ACMS, make sure that ACMS-controlled terminals are not being used by OpenVMS users. If users are logged in to OpenVMS, ACMS cannot allocate their terminals as ACMS-controlled terminals. ACMS lists the terminals it cannot allocate in the Audit Trail Log.
Prevent new users from signing in while you are starting ACMS by specifying the
/NOTERMINALS qualifier with the ACMS/START
SYSTEM command. The /NOTERMINALS qualifier delays
sign-ins by not starting the TSC. Once you have started
ACMS, you can start the TSC separately by using the ACMS/START
TERMINALS command. See Section 8.4, ''Terminal Subsystem Controller '' for more information
about stopping and starting the TSC.
/QTI
qualifier with the ACMS/START SYSTEM command. For
example:$ACMS/START SYSTEM/QTI
Once you start the QTI you can start ACMS task queues. See Section 8.7.1, ''Starting Task Queues'' for more information about starting task queues.
8.2. Stopping the ACMS System
Stop the ACMS system automatically by editing and then executing the
SYS$MANAGER:SYSHUTDWN.COM command file, or interactively by
using the ACMS/STOP SYSTEM command.
8.2.1. Stopping ACMS Automatically
$ ACMS/STOP SYSTEM/CANCEL $ @SYS$STARTUP:ACMSTOP.COM
The first command shuts down the ACMS system, including all applications, the TSC,
and the QTI. The /CANCEL qualifier cancels all tasks running in
applications or being executed by the QTI. Including the ACMS/STOP
SYSTEM/CANCEL command in the system shutdown file ensures that the
ACMS system processes are properly run down. If you omit the
/CANCEL qualifier and there are active tasks, the
ACMS/STOP SYSTEM command does not execute until all tasks
stop or until the command times out after five minutes. Tasks are not canceled when
the ACMS/STOP command times out.
The second command line invokes the command procedure ACMSTOP.COM. ACMSTOP.COM is a shutdown command file for ACMS. It deinstalls ACMS images (using the OpenVMS Install Utility) and deassigns the logical ACMS$EXAMPLES.
8.2.2. Stopping ACMS Interactively
You can use the ACMS/STOP SYSTEM command interactively or from
a command file to stop ACMS without stopping OpenVMS, but you must first stop all
active tasks. Otherwise, ACMS waits for the tasks to complete before executing the
ACMS/STOP SYSTEM command. If tasks do not complete within
five minutes, the command is ignored and ACMS returns you to the DCL prompt.
/CANCEL qualifier with the ACMS/STOP
SYSTEM command. The following command cancels all active tasks and
stops ACMS applications, the TSC, and the ACMS system
software:$ACMS/STOP SYSTEM/CANCEL
REPLY command to ask users
to finish their tasks and sign out before issuing this command.Note
When you specify the ACMS/STOP SYSTEM command, the ACC
stops all ACMS processes and the TSC before stopping itself. If you issue an
ACMS/STOP SYSTEM command when the ACMS Central
Controller is not active, all processes whose names begin with ACMS0 are
deleted. This provides a way to stop an ACMS system that is in an improper
state. If users are signed in with process names that begin with ACMS0,
their processes are also stopped.
If you interrupt the ACMS/STOP SYSTEM command by pressing
Ctrl/Y, the ACMS system may not shut down properly. Issuing
subsequent ACMS/STOP SYSTEM commands can cause the error "message
truncation" to occur. If you receive this error, shut down the ACMS system by
specifying the DCL command STOP to halt the ACC. Then, use the
ACMS/STOP SYSTEM command to stop any remaining ACMS
processes.
8.3. Displaying System Information
ACMS/SHOW SYSTEM command provides you with the following information:- The state of the system. The four ACMS system states are:
Starting
Started
Stopping
Stopped
While an
ACMS/START SYSTEMcommand is processing, ACMS is in the starting state. When the command is through processing, ACMS is in a started state. While anACMS/STOP SYSTEMcommand is processing, ACMS is in the stopping state. When theACMS/STOP SYSTEMcommand is finished processing, ACMS is in a stopped state. - Users currently signed in to the system. Information about each user includes:
OpenVMS user name
Task submitter identification code assigned at sign-in
OpenVMS process identification for the Command Process or agent handling the user's terminal
Device name for the user's terminal
- Active Application Execution Controllers. Information about the EXCs includes:
The names of all active applications
OpenVMS process information for all active applications
ACMS/SHOW
SYSTEM command. To get information about system activity over a period of
time, such as the number of sign-ins in the last hour, you can
use the ATR Utility, which is described in Chapter 12, "Auditing Applications with the Audit Trail Logger". $ACMS/SHOW SYSTEMACMS V4.0 Current System State: STARTED Time: 1-MAY-1994 13:34:35.28Terminal Subsystem State: STARTEDQueued Task Initiator State: STOPPEDSystem Auditing State: ENABLEDActive ACMS Users User Name Submitter ID Agent PID Device JONES ALLDAY::0001000D 22000122 TTB1: ROBINSON ALLDAY::00020013 22000122 TTH0:Active Execution Controllers Application Name Process Name EXC PID DEPARTMENT ACMS01EXC001000 00610046 MARKETING ACMS01EXC003000 2200047C
| System state Current system state |
| Terminal Subsystem State Current state of the TSC |
| Queued Task Initiator State Current state of the QTI |
| System Auditing State Whether system auditing is enabled or disabled |
| Active ACMS Users Information about all active users |
| Active Execution Controllers Information about all active EXCs |
/POOL qualifier with the ACMS/SHOW
SYSTEM command to display pool information for the system. When you
specify the /POOL qualifier, information about current users and
active EXCs is not displayed. Example 8.2, ''ACMS/SHOW SYSTEM/POOL Command'' shows the pool information
displayed with the ACMS/SHOW SYSTEM/POOL command.$ACMS/SHOW SYSTEM/POOLACMS V4.0 Current System State: STARTED Time: 1-MAY-1994 11:20:49.66 Terminal Subsystem State: STARTED Queued Task Initiator State: STOPPED System Auditing State: ENABLED ACMS System Message Switch Pools
Process Pool Free (pct) Largest Allocation Garbage name size bytes block failures collections < Shared Pool > 262144 228056 (86%) 65536 0 0 ACMS01ACC001000 131072 121168 (92%) 65536 0 0 ACMS01ATL001000 131072 127024 (96%) 65536 0 0 ACMS01TSC001000 131072 126544 (96%) 65536 0 0 ACMS01CP001000 131072 123824 (94%) 65536 0 0 ACMS01EXC008000 131072 123312 (94%) 65536 0 0 ACMS008SP001000 131072 125552 (95%) 65536 0 0 ACMS008SP002013 131072 126704 (96%) 65536 0 0
| Process name The process name for which message switch pool information is shown. The pool shared by all processes is shown with the name. |
| Pool size The total size of the pool, in bytes. |
| Free bytes The number of free bytes of pool space available and the percentage available. |
| Largest block The size of the largest block of free pool space, in bytes. |
| Allocation failures The number of times ACMS attempted and failed to allocate pool space. |
| Garbage collections The number of times ACMS attempted to use fragmented pool space. |
8.4. Terminal Subsystem Controller
The Terminal Subsystem Controller (TSC) controls which terminals can sign in to ACMS. It also allocates any ACMS-controlled terminals. Before terminal users can sign in to ACMS and use an application, the Terminal Subsystem Controller must be active.
8.4.1. Starting the TSC
Start the TSC either at the same time you start the ACMS system (as described in
Section 8.1.2, ''Starting ACMS Interactively''), or after you start the ACMS system and some ACMS
applications. If the TSC is not started, users cannot sign in to ACMS. You can start
the TSC separately from the ACMS system by issuing the ACMS/START
TERMINALS command.
ACMS/START
APPLICATION command starts the applications INVENTORY and ACCOUNTING.
After the applications are started, the ACMS/START TERMINALS
command starts the ACMS TSC. Users can then sign in to
ACMS.$ACMS/START SYSTEM/NOTERMINALS$ACMS/START APPLICATION INVENTORY,ACCOUNTING$ACMS/START TERMINALS
You can start the TSC only when ACMS is active. When you start the TSC, make sure
users are not signed in at terminals you have defined to sign in directly to ACMS.
If users are signed in at the designated terminals, the terminals cannot be
controlled by ACMS. ACMS lists the terminals it cannot control in the Audit Trail
Log. Once the users sign out, use the ACMS/RESET TERMINALS
command to control the terminals.
8.4.2. Stopping the TSC
The ACMS/STOP TERMINALS command stops the TSC, canceling active
tasks and signing users out of ACMS. Until you restart the TSC, users cannot sign in
to ACMS. When the TSC is stopped, ACMS-controlled terminals are released. You might
want to stop the TSC if you need to keep users from signing in to ACMS or if you
need to stop all ACMS activity by users.
ACMS/STOP
                                   TERMINALS
command:$ACMS/STOP TERMINALS
Before you stop the TSC, use the DCL REPLY command to ask users
to finish their tasks and sign out. Then, use the ACMS/SHOW TASKS
command to check that tasks have stopped.
8.5. Operator Terminals
ACMS sends status messages and other operational messages to terminals that you define as ACMS operator terminals. Terminals that you define as operator terminals receive messages if an application, the Audit Trail Log, or the TSC stop unexpectedly. An ACMS operator terminal can also be an OpenVMS operator terminal. ACMS also logs status and operational messages in the Software Event Log (SWL) file (see Chapter 13, "Logging Software Events").
8.5.1. Enabling Operator Terminals
Once you start the ACMS system, you can specify the ACMS/SET
SYSTEM command with the /OPERATOR qualifier to
enable ACMS operator terminals. Either place the ACMS/SET
SYSTEM/OPERATOR command in your
SYS$MANAGER:SYSTARTUP_VMS.COM file, or use the command
interactively.
When you use the /OPERATOR qualifier, you must also use either
the /PROCESS or the /TERMINAL qualifier.The
/PROCESS qualifier enables your terminal as an ACMS operator
terminal for the duration of your process, until ACMS stops, or until you disable
the terminal. The /TERMINAL qualifier enables one or more
terminals as ACMS operator terminals until ACMS stops or until you disable the
terminals.
$ACMS/SET SYSTEM/OPERATOR/TERMINAL=(TTE1,TTE2)
When you specify more than one device name with the /TERMINAL
qualifier, separate the device names with commas and enclose them in parentheses.
Specify a terminal with the /TERMINAL qualifier even if no one is
logged in at that terminal.
You can determine which terminals are authorized as ACMS operator terminals by looking at the Audit Trail Log. For each terminal enabled as an operator terminal, the Audit Trail Log contains the entry, "Successful permanent operator enabled ", and shows the device name. See Chapter 12, "Auditing Applications with the Audit Trail Logger" in this manual for more information about the ACMS Audit Trail Log.
8.5.2. Disabling Operator Terminals
To disable ACMS operator terminals, use the ACMS/SET SYSTEM
command with the /NOOPERATOR qualifier. When you specify the
/NOOPERATOR qualifier, you must also specify either the
/PROCESS or the /TERMINAL qualifier. The
/PROCESS qualifier disables your own terminal. The
/TERMINAL qualifier identifies the terminal to be
disabled.
$ACMS/SET SYSTEM/NOOPERATOR/PROCESS
$ACMS/SET SYSTEM/NOOPERATOR/TERMINAL=(TTE1,TTE2)
For each terminal disabled as an operator terminal, the Audit Trail Log contains the entry, "Successful permanent operator disabled" and shows the device name. See Chapter 12, "Auditing Applications with the Audit Trail Logger" in this manual for more information about the ACMS Audit Trail Log.
8.6. Queued Task Initiator
The Queued Task Initiator (QTI) is an ACMS run-time component which processes ACMS task queues by dequeuing queued task elements and initiating the associated task. The QTI user name must be authorized as an agent using the UDU. Before you can start ACMS task queues, you must start the QTI. Start the QTI either when you bring up the ACMS system or after ACMS is started. See VSI ACMS for OpenVMS Concepts and Design Guidelines for detailed information about the QTI and the ACMS queuing facility.
8.6.1. Starting the QTI
ACMS/START
QTI command. For
example:$ACMS/START QTI
Once the ACMS QTI is started, you can then start task queues by specifying the
ACMS/START QUEUE command. See Section 8.7.1, ''Starting Task Queues'' for information about starting task
queues.
8.6.2. Stopping the QTI
ACMS/STOP QTI command. The
ACMS/STOP QTI command also stops all task queues. For
example:$ACMS/STOP QTI
/CANCEL qualifier with the
ACMS/STOP QTI command, ACMS waits for all active tasks to
complete before stopping the QTI. There is no timeout period. The following command
stops the QTI, all task queues, and any active
tasks:$ACMS/STOP QTI/CANCEL
8.6.3. Displaying QTI Information
ACMS/SHOW QTI
command. The ACMS/SHOW QTI command displays the run-time
characteristics of the QTI. Example 8.3, ''ACMS/SHOW QTI Command'' shows the output from an
ACMS/SHOW QTI command.$ACMS/SHOW QTIACMS V4.0 ACMS QTI - QUEUED TASK INITIATOR Time: 1-MAY-1994 16:16:05.52State: STARTEDUser Name: ROLEXPID: 11000211Process Name: ACMS01QTI00400Queues: 2Submitter count: 6
| State Whether the QTI is started or stopped. |
| User Name The OpenVMS user name for the QTI. This is defined by the ACMSGEN parameter QTI_USERNAME. |
| PID Process ID of the QTI process. |
| Process Name Process name of the QTI process. |
| Queues Number of currently active task queues. |
| Submitter count Number of submitters currently signed in by the QTI. |
8.7. Task Queues
Once you create task queues with ACMSQUEMGR and start the QTI, you can start and stop ACMS task queues. See Chapter 5, "Creating and Managing Queues" for information about how to create task queues.
8.7.1. Starting Task Queues
ACMS/START
QUEUE command. The following command starts the queue
MY_QUE:$ACMS/START QUEUE MY_QUE
Once you start a task queue, the QTI begins dequeuing and initiating tasks in the queue.
You must specify at least one queue name with the ACMS/START
QUEUE command. You can start more than one queue by separating the
queue names with commas.
You can specify the /ERROR_QUEUE and
/TASK_THREADS qualifiers with the ACMS/START
QUEUE command. The /ERROR_QUEUE qualifier allows
you to specify the name of an error queue for a task queue. Tasks that do not
complete successfully are placed in the error queue (unless they are to be retried),
and ACMS records any errors in the Audit Trail Log. The
/TASK_THREADS qualifier allows you to determine the maximum
number of concurrent outstanding task elements that the QTI processes for the
specified queue.
The error queue you specify with the /ERROR_QUEUE qualifier
must exist. You can create an error queue with the ACMS Queue Manager (ACMSQUEMGR)
Utility. See Chapter 5, "Creating and Managing Queues" for information about how to create an
error queue.
$ACMS/START QUEUE/ERROR_QUEUE=ERR_QUE MY_QUE,NEW_QUE
/TASK_THREADS qualifier. The default is
/TASK_THREADS=1. The following command starts the queue
YOUR_QUE and specifies that the maximum number of concurrent tasks that can execute
on YOUR_QUE is
12:$ACMS/START QUEUE YOUR_QUE/TASK_THREADS=12
8.7.2. Stopping Task Queues
ACMS/STOP QUEUE command. The
queue you specify must exist and be currently started. You must specify at least one
queue name. The following command stops the queue
MOD_QUE:$ACMS/STOP QUEUE MOD_QUE
You can stop more than one queue by separating the queue names with commas.
/CANCEL qualifier, the
ACMS/STOP QUEUE command does not complete until all
outstanding tasks in the queues have stopped. The following command stops all
outstanding tasks in queue MY_QUE and stops queue
MY_QUE:$ACMS/STOP QUEUE/CANCEL MY_QUE
Queued task elements that have been canceled remain in the queue repository file.
8.7.3. Displaying Task Queue Information
ACMS/SHOW QUEUE command. The ACMS/SHOW
QUEUE command displays information about queues currently being
processed by the QTI. Because no queue name is specified, the ACMS/SHOW
QUEUE command in Example 8.4, ''ACMS/SHOW QUEUE Command'' displays queue
information for all active queues.$ACMS/SHOW QUEUEACMS V4.0 QUEUED TASK QUEUES Time: 1-MAY-1994 16:16:05.52Task Queue: MECCAQUEUEThreads: 4Successful tasks invocations:783Active Tasks: 2Failed tasks invocations: 4Error Queue: MECCAERROR_QUEUE Task Queue: MY_QUE Threads: 6 Successful tasks invocations: 620 Active Tasks: 4 Failed tasks invocations: 2 Error Queue: MYERROR_QUEUE
| Task Queue Name of the queue. |
| Threads Maximum number of concurrent tasks that can be processed by the queue. |
| Successful task invocations Number of tasks that completed successfully. |
| Active tasks Number of currently active tasks. |
| Failed task invocations Number of tasks that failed. |
| Error Queue Name of the error queue associated with the task queue. |
8.8. Canceling ACMS Users
ACMS lets you cancel users manually with the ACMS/CANCEL USER
command or automatically by using the
SYS$MANAGER:ACMSCANCEL.COM command procedure. The
ACMS/CANCEL USER command allows you to sign out an active ACMS
user. The command procedure can be used only to sign out inactive users.
8.8.1. Canceling Users with the ACMS/CANCEL USER Command
Use the ACMS/CANCEL USER command to cancel users before
bringing down the ACMS system. When you use the ACMS/CANCEL USER
command, you not only sign out the users you specify, you also cancel any tasks they
have selected from a menu, plus any tasks that have been called by those
tasks.
Use qualifiers to cancel users by user name, device name, or submitter ID. Use the
ACMS/SHOW USER command to display user information.
If you do not use qualifiers or specify user names, the ACMS/CANCEL
USER command cancels all active users and prompts you to confirm each
cancellation.
ACMS/CANCEL command, you cancel
all users with the name you specify. In this example, only one user has the user
name ADAMS:
$ACMS/CANCEL USER ADAMSUser Name: ADAMS Submitter ID: MONEY::00010030Agent PID: 204002D Device: RTA6:Submitter ID: MONEY::00010030 (Y/[N]):Y
By default, the ACMS/CANCEL USER command asks that you confirm
the cancellation by typing Y, for yes. ACMS cancels users without prompting you if
you use the /NOCONFIRM qualifier, but it is safer to confirm each
cancellation. In either case, you can include the /LOG qualifier
with the ACMS/CANCEL USER command. The /LOG
qualifier displays a message that confirms each successful cancellation.
On a distributed ACMS system, ACMS/CANCEL USER cannot cancel
remote users (submitters).
8.8.2. Canceling Users with ACMSCANCEL.COM
You can use the command procedure ACMSCANCEL.COM to cancel inactive ACMS users. ACMSCANCEL.COM is located in the directory SYS$MANAGER. By default, ACMS writes cancellation information to the file ACMS$CANCEL.LOG in the SYS$MANAGER directory.
$DEFINE/SYSTEM ACMS$CANCEL_DIR $DISK1:[MYDIR]
If you do not define ACMS$CANCEL_DIR, you must have write access to the SYS$MANAGER directory before using ACMSCANCEL.COM.
$SUBMIT SYS$MANAGER:ACMSCANCEL.COM
$DEFINE/SYSTEM ACMS$CANCEL_USER_WAIT 01:45
8.8.3. Displaying User Information
The ACMS/SHOW USER command displays information about ACMS
users. Include one or more user names as parameters. If you include more than one
user name, separate the names with a comma. If you do not include a user name, ACMS
displays information about all users signed in to ACMS.
/DEVICE qualifier to display information about a user
at a specific terminal. The following command displays information about the user
JONES signed in at terminal
TTHO:.$ACMS/SHOW USER JONES/DEVICE=TTH0:
ACMS/SHOW USER command. For information about the tasks that
users are running, specify the /FULL qualifier with the
ACMS/SHOW USER command. However, the ACMS/SHOW USER
/FULL command only displays the task selected by a user from the ACMS
menu. It does not display any tasks called by a task. To display all task instances
in a sequence of task calls, use the ACMS/SHOW TASKS command.
Example 8.5, ''ACMS/SHOW USER/FULL Command'' contains sample output from the
ACMS/SHOW USER/FULL command.$ACMS/SHOW USER/FULLACMS V4.0 CURRENT USERS Time: 1-MAY-1994 20:11:04.21User Name: JONESSubmitter ID: KARAT::00010027Agent PID: 22E000A4Device: VTA5:Task Name: DELETETask ID: KARAT::00010029-0000000FAppl Name: TEST1Appl Node: ALLDAY::
| User Name OpenVMS user name for a user signed in to ACMS. |
| Submitter ID ACMS task submitter identification code assigned to the user at sign-in. Refer to Chapter 12, "Auditing Applications with the Audit Trail Logger" for information about submitter identification codes. |
| Agent PID OpenVMS process ID (PID) for a submitter's agent process. For those submitters signed in to the TSC, this is the process ID of the submitter's Command Process. |
| Device ACMS login device of the submitter. |
| Task Name Name of the task that the user is running. The task name is the name defined for the task in the task group definition. |
| Task ID ACMS task identification code for the task the user is running. Refer to Chapter 12, "Auditing Applications with the Audit Trail Logger" for information on task identification codes. |
| Appl Name Name of the application in which the task is running. |
| Appl Node Name of the node on which the application is running. |
Example 8.5, ''ACMS/SHOW USER/FULL Command'' shows that JONES is running a task named DELETE on node ALLDAY at terminal VTA5. If more than one user is signed in under the user name JONES, the command displays information about all users named JONES.
8.9. Summary of Operator Commands and Qualifiers
|
Commands and Qualifiers |
Description |
|---|---|
|
Stops task instances. |
|
Stops all tasks for the user and logs the user out of ACMS. |
|
Starts the ACMS Task Debugger. |
|
Signs users in to ACMS. This command does not require OPERATOR privilege. |
|
Installs an application database (.ADB) file in ACMS$DIRECTORY. |
|
Modifies the attributes of an active application. |
|
Replaces a server image with a new version of that image. |
|
Causes ACMS to retranslate the file specification of an application. |
|
ACMS/RESET AUDIT |
Creates a new version of the Audit Trail Log file when ACMS is active. |
|
ACMS/RESET TERMINALS |
Makes recently assigned sign-in characteristics in DDU definitions available to ACMS. |
|
Sets the processing characteristics of a started queue. |
|
Depending on the qualifiers used, enables or disables the Audit Trail Log or ACMS operators' terminals. |
|
Displays information about one or more active ACMS applications in static mode. |
|
Displays information about one or more active ACMS applications in continuous refresh mode. |
|
ACMS/SHOW QTI |
Displays the run-time characteristics of the QTI. |
|
ACMS/SHOW QUEUE |
Displays active queue information. |
|
Displays information about one or more servers. |
|
Displays information about the ACMS run-time system. |
|
Displays information about one or more active ACMS tasks executing on the local node. |
|
Displays information about ACMS users on the node where you
specify the |
|
ACMS/START APPLICATION |
Starts one or more ACMS applications. |
|
ACMS/START QTI |
Starts the QTI. |
|
Starts a queue and any tasks in the queue. |
|
Starts the ACMS system. |
|
Starts a detached task in the specified application. |
|
ACMS/START TERMINALS |
Starts the TSC. |
|
Stops one or more ACMS applications. |
|
Stops the QTI and all task queues. |
|
Stops the specified queue. |
|
Stops ACMS applications, the TSC, and ACMS. |
|
ACMS/STOP TERMINALS |
Stops the TSC. |
Chapter 9. Installing and Managing Applications
This chapter describes the ACMS operator commands you can use to install and run ACMS applications, modify active applications, and cancel tasks. For reference information on the commands described in this chapter, refer to Chapter 21, "Operator Commands".
9.1. Installing Applications
Before you can install an application, you must first be authorized by the Application Authorization Utility (AAU). See Chapter 4, "Authorizing Applications" for information on how to use the AAU to authorize users to install applications.
ACMS/INSTALL command. You do not need any special OpenVMS
privileges to install an application. The ACMS/INSTALL command
installs applications in the directory pointed to by the logical name
ACMS$DIRECTORY. All applications must be installed in
ACMS$DIRECTORY before they can run on the ACMS system. When
you enter the ACMS/INSTALL command, ACMS displays a message
confirming that the application has been installed in
ACMS$DIRECTORY. For
example:$ACMS/INSTALL DISK1:[ACCOUNT]INVENTORY.ADB%ACMSINS-S-ADBINS, Application DISK1:[ACCOUNT] - INVENTORY.ADB has been installed in ACMS$DIRECTORY
This command installs the application INVENTORY in ACMS$DIRECTORY.
Figure 9.1, ''Process of Installing an Application'' shows the steps ACMS takes when installing an application.
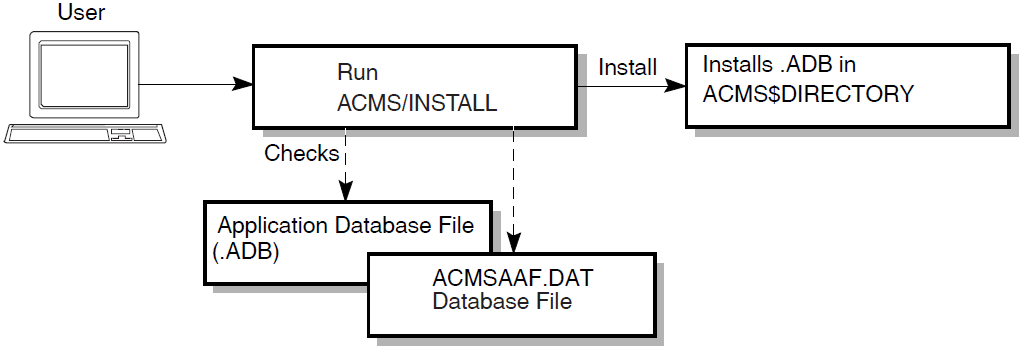
%ACMSINS-E-INSFAIL, INSTALL command failed -SYSTEM-F-NOPRIV, no privilege for attempted operation $
Include either a file specification or the logical name of an application with the
ACMS/INSTALL command. If you specify a logical name that is a
search list, ACMS installs only the first available application in the search
list.
ACMS/INSTALL
command checks the application authorization database file (ACMSAAF.DAT) to confirm that:The application named with the
ACMS/INSTALLcommand has an authorization in the ACMSAAF.DAT file.The user running the
ACMS/INSTALLcommand is authorized by the ACMSAAF.DAT file to install the application.The server user names in the application match the server user names that have been authorized in the ACMSAAF.DAT file.
The application user name in the application matches the name assigned in the ACMSAAF.DAT file.
The dynamic user name characteristic in the application matches the name assigned in the ACMSAAF.DAT file.
Copies the application database file to the directory pointed to by the logical name ACMS$DIRECTORY.
Deletes an earlier version if it exists.
Changes the application database file UIC to [1,4], which is the SYSTEM account.
Once an application is installed, stop and restart ACMS to make the new version of the application available to users. Chapter 8, "Controlling the ACMS System" describes how to start and stop the ACMS system. If you are reinstalling an application, you must stop the application before you reinstall it.
After you stop and restart ACMS, you can run the application by using the
ACMS/START APPLICATION command. See Section 9.3, ''Starting Applications'' for information on how to run an ACMS application.
9.2. Removing Applications
To delete an application from ACMS$DIRECTORY, specify the
/REMOVE qualifier with the ACMS/INSTALL
command and the file name of the application you want to remove. You must be authorized
by the AAU before you can remove an application.
$ACMS/INSTALL INVENTORY/REMOVE%ACMSINS-S-ADBINSREM, Application INVENTORY has been removed from ACMS$DIRECTORY$
ACMS/INSTALL command with the
/REMOVE qualifier to delete an application, ACMS does the following:Checks the ACMSAAF.DAT file to confirm that the user running the
ACMS/INSTALLcommand is authorized to delete the application from ACMS$DIRECTORY.Deletes the application database file from ACMS$DIRECTORY if the user running the
ACMS/INSTALLcommand is authorized.
Specify only a file name when deleting an application from
ACMS$DIRECTORY; do not specify device, directory, or file
type. When you have a number of applications with different file names to remove from
ACMS$DIRECTORY, you must remove them one at a time. You
cannot specify more than one application, use the keyword $ALL,
or use the wildcard character (*) with the /REMOVE qualifier.
9.3. Starting Applications
Once the ACMS system is up and running, you can start ACMS applications provided you have the OpenVMS OPER privilege. When you start an application, ACMS starts the application execution controller and allocates the resources the application needs. The tasks in the application are then ready for terminal users to select. Terminal users cannot select tasks that belong to an application that is not started.
ACMS/START APPLICATION command starts one or more applications.
Use the command interactively or include it in a command file. For example, the
following command starts the application
DEPARTMENT:$ACMS/START APPLICATION DEPARTMENT
Starting an application interactively helps you control the use of resources and the availability of required files and databases. You can start an application whenever ACMS is active.
9.4. Stopping Applications
The ACMS/STOP APPLICATION command stops the applications you name.
You must have the OpenVMS OPER privilege to stop an application. When you stop an
application, ACMS stops the application execution controller and releases the resources
for the application. The tasks in the application are no longer available for users to
select.
Want to free the resources an application has allocated because users are not running tasks in that application.
Want to keep users from running tasks in an application.
Need to replace an application database file in ACMS$DIRECTORY because you have redefined the characteristics of an application, its servers, or its tasks.
Unless you specify the /CANCEL qualifier, the ACMS/STOP
APPLICATION command does not execute until all tasks in that application
finish executing. Before using the /CANCEL qualifier, use the DCL
REPLY command to ask users to finish their tasks. Then, use the
ACMS/SHOW TASK command to check that users have stopped their
tasks. Finally, issue the ACMS/STOP APPLICATION /CANCEL command to
stop any remaining active tasks.
$ACMS/STOP APPLICATION INVENTORY, ACCOUNTING /CANCEL
9.5. Displaying Application Information
ACMS allows you to display information about applications in static or dynamic mode. Static mode displays information reflecting an application's state for an instant in time – that is, the instant in time at which the command executes. Dynamic mode displays information about an application continually as it executes. The following sections describe how to display information about your application in either mode.
To get information about software errors that occur during the execution of ACMS application programs, use the ACMS Software Event Log Utility Program (SWLUP) which is discussed in Chapter 13, "Logging Software Events".
9.5.1. Displaying Static Information
ACMS/SHOW APPLICATION command displays information about
active applications in static mode. You can specify the name of one or several
applications with the ACMS/SHOW APPLICATION command. If you do
not include the name of an application, ACMS displays information about all
currently active applications. Example 9.1, ''ACMS/SHOW APPLICATION Command'' displays information
about the application INVENTORY.$ACMS/SHOW APPLICATION INVENTORYACMS V4.0 CURRENT APPLICATIONS Time: 1-MAY-1994 17:19:40.84Application Name: INVENTORYObject Name: ACMS01EXC001000User Name: ACMSPID: 22000123Max Task Count: 655Max SP Count: 35Cur Task Count: 0Cur SP Count: 7Auditing: ONSP Mon. Interval: 5)


Server Name max SPs min SPs active free waiting SPs SPs tasks INVSRV05 5 0 0 0 0 INVSRV02 1 0 1 0 4 INVSRV06 5 1 1 0 3 INVSRV04 5 2 0 2 0 INVSRV01 5 2 1 1 0 INVSRV03 5 1 1 0 0
| Application Name Name of the application. |
| Object Name Object name for the application. |
| User Name OpenVMS user name for the application. |
| PID Process identification code for the application. |
| Max Task Count Maximum number of task instances allowed for the application. |
| Max SP Count Maximum number of server processes allowed for the application. |
| Cur Task Count Current number of active tasks in the application. |
| Cur SP Count Current number of started server processes in the application. |
| Auditing Whether application auditing is enabled or disabled. |
| SP Mon. Interval Server process monitoring interval. |
| Server Name Lists the names assigned in SERVER clauses in the application definition. Each row of the display contains information about server processes, and information about tasks waiting for those server processes. |
| max SPs Maximum number of server processes allowed for this server. |
| min SPs Minimum number of server processes allowed for the server. |
| active SPs Number of server processes currently allocated to tasks for each server named in the application definition. Example 9.1, ''ACMS/SHOW APPLICATION Command'' shows that four server processes are active in the INVENTORY application. |
| free SPs Number of server processes that are started and available for use for each server named in the application definition. Example 9.1, ''ACMS/SHOW APPLICATION Command'' shows that three server processes are free and thus available in the INVENTORY application for tasks that need them. |
| waiting tasks Number of tasks waiting for server processes for each server named in the application definition. If no server processes are available, ACMS holds tasks that need server processes. Example 9.1, ''ACMS/SHOW APPLICATION Command'' shows that a total of seven tasks are waiting for some server processes. |
/POOL, /SERVER_ATTRIBUTES, or
/TASK_ATTRIBUTES qualifier with the ACMS/SHOW
APPLICATION command to display, respectively, pool information, the
current settings of modifiable server attributes, and the current settings of
modifiable task attributes for an application. Example 9.2, ''ACMS/SHOW APPLICATION/POOL TEST Command''
displays pool information for the application TEST.$ACMS/SHOW APPLICATION/POOL TESTACMS V4.0 CURRENT APPLICATIONS Time: 1-MAY-1994 11:21:04.50 Application Name: TEST State: STARTED Object Name: ACMS01EXC008000 User Name: ACMS$EXC PID: 25C01337 Max Task Count: 65535 Max SP Count: 5 Cur Task Count: 0 Cur SP Count: 2 Auditing: ON SP Mon. Interval: 5 Application Workspace and Control PoolsPool Pool Free (pct.) Largest Allocation Garbage type size bytes block failures collections Group/User workspace poolsControl pool 65536 64848 (98%) 32768 0 0Workspace pool 131072 130560 (99%) 65536 0 0TEST_GRP01Control pool 25600 25088 (98%) 16384 0 0Workspace pool 179200 178688 (99%) 65536 0 0 TEST_GRP02 Control pool 25600 25088 (98%) 16384 0 0 Workspace pool 179200 178688 (99%) 65536 0 0 DBMS_GRP Control pool 25600 25088 (98%) 16384 0 0 Workspace pool 179200 178688 (99%) 65536 0 0
| Pool type Type of pool, either control or workspace pool. |
| Pool size Total size of the pool, in bytes. |
| Free bytes Number of free bytes of pool space available and the percentage available. |
| Largest block Size of the largest block of free pool space, in bytes. |
| Allocation failures Number of times ACMS attempted to allocate pool space but failed. |
| Garbage collections Number of times ACMS attempted to use fragmented pool space. |
| Control pool Control pool information for the application, whose size is controlled by the ACMSGEN parameter WSC_POOLSIZE. |
| Workspace pool Workspace pool information for the application, whose size is controlled by the ACMSGEN parameter WS_POOLSIZE. |
| TEST_GRP01 Name of the task group for which pool information is displayed. |
| Control pool Control pool information for the task group, whose size is controlled by the ACMSGEN parameter TWSC_POOLSIZE. |
| Workspace pool Workspace pool information for the task group, whose size is controlled by the ACMSGEN parameter TWS_POOLSIZE. |
Use the information in the pool display to determine the correct sizes for the ACMSGEN parameters for control and workspace pools. See Chapter 11, "Changing ACMS Parameter Values with the ACMSGEN Utility" for more information.
9.5.2. Displaying Dynamic Information
ACMS/SHOW APPLICATION/CONTINUOUS command. ACMS/SHOW
APPLICATION/CONTINUOUS command allows you to:Specify how often you want an application's statistics refreshed.
Specify when you want the display to begin.
Specify when you want the display to end.
Name a file where you want the SHOW output written.
ACMS/SHOW APPLICATION/CONTINUOUS command,
specify the file name of a started application. If you do not specify an application
name, ACMS returns an error. Specify only the file name; do not include device,
directory, or file type. You cannot specify more than one application name with the
ACMS/SHOW APPLICATION/CONTINUOUS command. Example 9.3, ''ACMS/SHOW APPLICATION/CONTINUOUS Command'' displays dynamic information about the application
STORAGE.$ACMS/SHOW APPLICATION/CONTINUOUS STORAGEACMS V4.0 ACMS CONTINUOUS APPLICATION MONITOR NODE::MYNODE 1-MAY-1994 07:52:04.62Name: STORAGEProcess: ACMS01EXC015000User: ACMS$EXCPID: 22E00563Max Tasks: 65535Max SPs: 22Cur Tasks: 15Cur SPs: 13
SERVER NAME Min SP/Max SP Current Average Minimum Maximum TESTSRV01 3/3 Active Servers 0 0 0 1 Free Servers 3 1 0 3 Waiting Tasks 0 2 0 28 TLOAD001S 3/3 Active Servers 2 1 0 3 Free Servers 1 1 0 3 Waiting Tasks 0 12 0 92
You can control the video display by using the control and arrow keys. Press Ctrl/C, Ctrl/Y, or Ctrl/Z to terminate the display. Press Ctrl/W to refresh the screen. The up and down arrow keys scroll the screen forward and backward.
| Name Name of the application. |
| Process Name of the process. |
| User OpenVMS user name for the application. |
| PID Process ID for the application. |
| Max Tasks Maximum number of task instances allowed for the application. |
| Max SPs Maximum number of server processes allowed for the application. |
| Cur Tasks Current number of active tasks in the application. |
| Cur SPs Current number of started server processes in the application. |
| SERVER NAME List of the names assigned in SERVER clauses in the application definition. Each row of the display contains information about server processes, and information about tasks waiting for those server processes. |
| Min SP/Max SP Minimum number of server processes and maximum number of server processes allowed for this server. |
| Current Current number of processes started for this server. |
| Average Average number of processes for this server. |
| Minimum Minimum number of processes for this server. |
| Maximum Maximum number of processes for this server. |
$ACMS/SHOW APPLICATION/CONTINUOUS/INTERVAL=300 BOOKSALES
Begin or end a continuous application display with the
/BEGINNING_TIME and /ENDING_TIME
qualifiers. Both qualifiers let you specify times in OpenVMS absolute time format,
delta time format, or a combination of the two. Refer to VSI OpenVMS User's Manual for information
about how to create valid time formats.
There are occasions when having hardcopy records of application information is
useful. The /OUTPUT qualifier requests ACMS to copy application
data to a file you name. Then either display the file at your terminal or print it.
If you do not specify a file, ACMS stores information in the file ACMSSHOW.LIS in
your current default directory. When you do not use the /OUTPUT
qualifier, ACMS sends output to the default output device defined by the
SYS$OUTPUT logical name.
9.6. Modifying Active Applications
Use the ACMS/MODIFY APPLICATION command to modify the application,
task, or server attributes of an active application. The attributes you modify are not
permanent. If you want a modification to be permanent, you must modify the application
definition.
9.6.1. Modifying Application Attributes
ACMS/MODIFY APPLICATION command with the
/APPLICATION_ATTRIBUTES qualifier to modify the attributes of
an active application. Keywords to the /APPLICATION_ATTRIBUTES
qualifier specify the application attribute you want to modify. For example, the
MAX_PROCESS keyword in the following example sets the maximum number of server
processes allowed in application AIR_REGISTER to
5:$ACMS/MODIFY APPLICATION AIR_REGISTER -_$/APPLICATION_ATTRIBUTES=MAX_PROCESS=5Apply Modifications to Application AIR_REGISTER (Y/[N]):
/APPLICATION_ATTRIBUTES qualifier to:Enable or disable application-level auditing.
Specify the maximum number of tasks that can execute simultaneously in an application.
Specify the maximum number of server processes that can be active simultaneously in an application.
Specify the interval at which ACMS monitors server processes in an application.
When application-level auditing is enabled, the Audit Trail Logger records any application modifications you make in the Audit Trail Log. See Chapter 12, "Auditing Applications with the Audit Trail Logger" for an example of an audit trail record for a modified application.
To display the currently defined attributes for an application, specify the
ACMS/SHOW APPLICATION command. Section 9.5.1, ''Displaying Static Information''
describes the ACMS/SHOW APPLICATION command and provides some
sample output.
9.6.2. Modifying Server Attributes
Use the ACMS/MODIFY APPLICATION command with the
/SERVER_ATTRIBUTES qualifier to modify the attributes of a
server in an application. Keywords to the /SERVER_ATTRIBUTES
qualifier specify the server attributes you want to modify.
$ACMS/MODIFY APPLICATION SANDAPPL -_$/SERVER_ATTRIBUTES=(NAME=MYSERV,PROCESS_DUMPS)Apply Modifications to Application SANDAPPL (Y/[N]):
/SERVER_ATTRIBUTES qualifier to:Enable or disable server-level auditing in an application.
Specify the interval or delay time ACMS waits before creating new server processes.
Specify the interval or delay time ACMS waits before deleting free server processes.
Enable or disable server process dumps for an application.
Specify the maximum number of server processes allowed for an application.
Specify the minimum number of server processes allowed for an application.
Display currently defined server attributes for an application by specifying the
ACMS/SHOW APPLICATION/SERVER_ATTRIBUTES command.
When application-level auditing is enabled, the Audit Trail Logger records the
modification in the Audit Trail Log file. See Chapter 12, "Auditing Applications with the Audit Trail Logger" for an
example of an audit trail record generated by the ACMS/MODIFY
APPLICATION command.
9.6.3. Modifying Task Attributes
ACMS/MODIFY APPLICATION command with the
/TASK_ATTRIBUTES qualifier modifies the attributes of tasks
in an application. In the following example, the AUDIT keyword to the
/TASK_ATTRIBUTES qualifier enables task-level auditing for
all tasks in the application
PARTS:$ACMS/MODIFY APPLICATION PARTS/TASK_ATTRIBUTES=AUDITApply Modifications to Application PARTS (Y/[N]):
/TASK_ATTRIBUTES qualifier. The
following command, for instance, disables tasks BI_MONTHLY and YEARLY in the
application
PARTS:$ACMS/MODIFY APPLICATION PARTS -_$/TASK_ATTRIBUTES=(NAME=(BI_MONTHLY,YEARLY),DISABLE)Apply Modifications to Application PARTS (Y/[N]):
/TASK_ATTRIBUTES qualifier to:Name a task or tasks whose attributes you wish to modify.
Enable or disable task-level auditing in an application.
Enable or disable specific tasks in an application.
Set a transaction timeout interval or disable transaction timeout for a task or tasks.
If you do not specify a task name or names, all tasks are modified within the selected application with whatever attributes you specify.
When application-level auditing is enabled and you modify the attributes of a task, the modifications are recorded in the Audit Trail Log.
9.7. Replacing a Server Image
Use the ACMS/REPLACE SERVER command to replace a server image in an
active application with a new version of that image. Application availability and task
execution are not affected by the server replacement. The ACMS/REPLACE
SERVER command allows the application manager to dynamically make code
changes to the code executed by a procedure server. The application manager can make
code changes, relink the server image, place the server image in the location specified
by the SERVER IMAGE IS statement in the task group definition,
and issue the ACMS/REPLACE SERVER command.
$ACMS/REPLACE SERVER SORT_IMAGE/APPLICATION=RULES_REGSReplace Server SORT_IMAGE in Application RULES_REGS (Y/[N]):
When the application controller receives the ACMS/REPLACE SERVER
command, it runs down all free server processes for the specified server and requests
all active servers to run down when they are free. A server retaining context does not
run down until the context has been released. New server processes are created to meet
the minimum and maximum server process requirements of the application. If you attempt
to replace an active server image, ACMS replaces it with the new version once it stops
executing or is aborted.
ACMS/SHOW SERVER command to determine the process ID of the
server image, and then issue the DCL command STOP/ID with the server
process
ID:$STOP/ID=22E00563
When application-level auditing is enabled and a server is replaced, the Audit Trail Logger records the event in the Audit Trail Log. See Chapter 12, "Auditing Applications with the Audit Trail Logger" for an example of an audit trail record generated by server replacement.
9.8. Maintaining Application Availability
As system manager, ensure that the processing workload is distributed evenly
throughout all nodes in a cluster. If a heavier workload is concentrated more on one
node in the cluster than on others, use the ACMS/REPROCESS
APPLICATION_SPEC command to redirect application selections to a node
other than the node currently being used. This frees up disk space and memory and allow
tasks to execute faster.
The ACMS/REPROCESS APPLICATION_SPEC command allows you to take
advantage of logical names and search lists to enhance the current ACMS ability to keep
applications available in the event of a system failure.
$ACMS/REPROCESS APPLICATION_SPEC PAYROLL
This command is particularly useful to failback to applications when using search
lists for application specifications. Search lists can be used for application
specifications to provide for automatic failover to one or more backup applications in
the event of a system failure. The ACMS/REPROCESS APPLICATION_SPEC
command can be used to failback to the original application when it becomes available.
See Chapter 6, "Using Distributed Forms Processing" for more information on using search lists in
application specifications.
9.9. Canceling Tasks
You want to cancel all tasks in an application before stopping the application.
The operator wants to cancel a user who has active tasks.
A task is not executing properly.
To stop either an application or the ACMS system and cancel all active tasks, include
a /CANCEL qualifier in the ACMS/STOP SYSTEM or
ACMS/STOP APPLICATION command. The /CANCEL
qualifier always interrupts any active tasks or users in the system or the application
being stopped.
ACMS/CANCEL TASK command. This command results in a
non-recoverable exception. However, in distributed transactions the effect of the
ACMS/CANCEL TASKL command depends upon the task state:If the task is not composed (not participating in a distributed transaction started by a parent task or an agent), ACMS always attempts to abort an active DECdtm transaction.
If a composed task is executing at the time of the cancel, ACMS cancels the task and returns control to the parent task or agent. An exception is returned to the parent task, or the cancel reason is returned to the agent. The parent task or the agent has responsibility for aborting the transaction.
See VSI ACMS for OpenVMS Writing Applications for complete information about task cancellation and exception handling.
When you use this command without a task name or qualifiers, the command affects all
active tasks on the local node, including tasks called by other tasks. By default, ACMS
prompts you to confirm the cancellation before canceling a task. However, if you use the
/NOCONFIRM qualifier, ACMS cancels all tasks without prompting
for confirmation. In either case, include the /LOG qualifier with the
ACMS/CANCEL TASKL command. The /LOG qualifier
displays a message confirming each successful cancellation.
$ACMS/CANCEL TASKTask Name: MARKET_TASK1 Task ID: CARAT::0001000D-00000001 Application: MARKET_APPL User Name: SAMPLE1 Submitter ID: CARAT::0001000D Device: TTB1: Task ID: CARAT::0001000D-00000001 (Y/[N]):Y Task Name: MARKET_TASK2 Task ID: CARAT::00020013-00000001 Application: MARKET_APPL User Name: SAMPLE2 Submitter ID: CARAT::00020013 Device: TTH0: Task ID: CARAT::00020013-00000001 [Y/[N]]:N
Other qualifiers available with the ACMS/CANCEL TASKL command let
you identify which task to cancel by one of several characteristics such as task name or
user name. See the description of the ACMS/CANCEL TASKL command in
Chapter 21, "Operator Commands" for a description of these
qualifiers.
9.10. Displaying Task Information
ACMS/SHOW TASK command displays information about ACMS tasks
running on your node. You can display information about tasks that are selected by a
local or a remote submitter. You can include one or more task names as parameters. If
you include more than one task name, separate the task names with commas. If you do not
include a parameter, ACMS displays information about all active tasks. Example 9.4, ''ACMS/SHOW TASK Command'' shows some sample output from the ACMS/SHOW
TASK command. Because no task name is specified, ACMS displays information
about all active tasks.$ACMS/SHOW TASKACMS V4.0 CURRENT TASKS Time: 1-MAY-1994 20:33:14.93Task Name: PERS_ADD_TASKState: Active; Executing PROCESSING step WORKStep label: $STEP_1Task ID: ALLDAY::00010016-0000002Application: PERSUser Name: SWEETSubmitter ID: ALLDAY::00010016Device: TTB4:Called Task: PERS_CALLED_TASKState: Active, executing BLOCK step WORKStep label: $STEP_2Server(s): PERS_SERVER Executing, PID 0200010BTID: 0012000B-0120-0260-0006-0000050002101Task ID: ALLDAY::00010016-00000002-00000001
| Task Name Name of any task the user is running. The task name is the name defined for the task in the task group definition. |
| State Each task exists in one of these states: Starting, Active, Finishing, Completed, Processing Exception, and Cancelling. The Active, Completed, Processing Exception, and Cancelling states each have variations. See Table 9.1, ''Task States'' for a complete list and description of the task states. |
| Step label Current step label. |
| Task ID ACMS task identification code. The task ID uniquely identifies a task instance. |
| Application Name of the application in which the task is running. |
| User Name User name of the task submitter. The user name is the proxy user name when the submitter selects tasks from a remote ACMS system. |
| Submitter ID ACMS task submitter identification code assigned to the task at sign-in. The node field in the submitter ID lets you distinguish between local and remote submitters. |
| Device ACMS login device of the task submitter. All remote task submitters are signed in with the null device (NL). |
| Called Task Name of the called task. |
| Server(s) List of the servers the task is using. A task can be executing in a
server, retaining a server, or waiting for a server, or any combination of
these three. For tasks executing in or retaining a server, the process
identification number (PID) is supplied. For tasks waiting for a server, the
number of seconds for which it has been waiting is supplied. |
| TID (DECdtm transaction identification number) TID associated with the task. The TID is displayed only for a task containing a distributed transaction, and only if it hasn't already been displayed for the task. |
|
State |
Description | |
|---|---|---|
|
Starting |
Task state while EXC initializes a task instance. Task initialization includes writing a "task start" record to the audit trail log. | |
|
Active |
Task state when a task is currently executing, is not processing an exception, and has not been cancelled. Additional information further specifies the task state in active status. | |
|
The task is executing the work part of a block step. Since the work part of a block step involves executing the nested processing, exchange, and subordinate nested block steps within the block, then a task only maintains this state while ACMS initializes the block step. | |
|
The task is executing the action part of a block step. | |
|
The task is waiting for notification from DECdtm to commit the transaction as the second step in the 2-phase commit process. | |
|
The task is waiting for notification from DECdtm to abort the transaction. | |
|
The task is calling a step procedure in a procedure server, executing a command in a DCL server, or calling another task. | |
|
The task is executing the action part of a processing step. | |
|
The task is waiting for notification from DECdtm to commit the transaction as the second step in the 2-phase commit process. | |
|
The task is waiting for notification from DECdtm to abort the transaction. | |
|
The task is calling a DECforms form, a TDMS request, or performing stream I/O. | |
|
The task is executing the action part of an exchange step. | |
|
Finishing |
The task has finished execution and ACMS is completing the task. Task termination processing includes writing a "task end " record to the ACMS Audit Trail Logger. | |
|
Completed |
A task enters a completed state when it has executed the last step in the task definition and is waiting for a parent task or an agent, such as the QTI, to end or abort the DECdtm transaction in which the task participated. When the transaction completes, EXC frees the servers and ends the task. Additional information further specifies the task state in completed status. | |
|
A composed task has completed, but awaits the end of the transaction. ACMS is waiting to receive a prepare message from DECdtm services as the first step in the 2-phase commit process. | |
|
A composed task has ended and is stalled pending the end of the transaction. ACMS is wating to receive a commit message from DECdtm as the second step in the 2-phase commit process. | |
|
A non-composed task has completed, but awaits the end of the transaction. ACMS is waiting for DECdtm to complete the 2-phase commit process. | |
|
Processing Exception |
A task is processing an exception if it is actively performing the operations necessary to handle a step exception or a transaction exception. Additional information further specifies the task state in processing exception status. | |
|
The task is waiting for an exchange step to be cancelled before the exception handling sequence can continue. | |
|
The task is waiting for a processing step to be cancelled before the exception handling sequence can continue. | |
|
ACMS is aborting a DECdtm transaction as part of the exception handling sequence. | |
|
ACMS is calling one or more server cancel procedures as part of the exception handling sequence. | |
|
The task is associated with a blocked transaction. The task remains in this stalled state until communication is reestablished with the transaction coordinator node, or the LMCP Utility or an Rdb or DBMS utility is used to manually resolve the state of the transaction. | |
|
Cancelling |
A task is cancelling if it is actively performing the operations necessary to cancel the task following a nonrecoverable exception. Additional information further specifies the task state in cancelling status. | |
|
The task is waiting for an exchange step to be cancelled before the processing sequence can continue. | |
|
The task is waiting for a processing step to be cancelled before the processing sequence can continue. | |
|
ACMS is aborting a DECdtm transaction as part of the cancel processing sequence. | |
|
ACMS is calling one or more server cancel procedures as part of the cancel processing sequence. | |
|
ACMS is writing details about the task cancellation to the ACMS Audit Trail Log. | |
|
The task is associated with a blocked transaction. The task remains in this stalled state until communication is reestablished with the transaction coordinator node, or the LMCP Utility or an Rdb or DBMS utility is used to manually resolve the state of the transaction. | |
|
The task is executing the cancel action phrase of the task definition. | |
/APPLICATION qualifier lets you restrict the search ACMS makes
to find a task. When you name an application with the /APPLICATION
qualifier, ACMS searches for the tasks you name in the application you specify. The
application name is the file name of the application. Do not include the device,
directory, or the file type. For
example:$ACMS/SHOW TASK BASIC/APPLICATION=PAYROLL
This command causes ACMS to search only for the task BASIC in the application PAYROLL.
/APPLICATION qualifier but do not name any tasks. The following
command displays information on all active tasks in the application
DEBTS:$ACMS/SHOW TASK/APPLICATION=DEBTS
/DEVICE qualifier. The device name you specify must end with a
colon (:). You can also name the null device (NL:) to display information on all remote
submitter tasks. For example, the following command displays all tasks running at
terminal
TTF0:$ACMS/SHOW TASK/DEVICE=TTF0:
/USER qualifier with the ACMS/SHOW
TASK command to identify all tasks being run by a specific user. For
example, the following command displays all tasks being run by user
KURASOWA:$ACMS/SHOW TASK/USER=KURASOWA
The /IDENTIFIER and /SUBMITTER qualifiers allow
you to display information about particular task instances. The
/IDENTIFIER qualifier displays information about tasks by ACMS
identification code, which is assigned to each task a user selects. Use the
/IDENTIFIER qualifier to display information about a single task
or about a task called by another task.
The /SUBMITTER qualifier displays tasks by submitter identification
code, which is also assigned to each user who signs in to ACMS. Refer to Section 12.6.1, ''Selecting Records by Submitter and Task Identification Code'' for information on submitter and task identification
codes.
/SUBMITTER qualifier but do
not specify a task name, ACMS displays all active tasks submitted from that node. For
example:$ACMS/SHOW TASK/SUBMITTER=WONDER::
Include double colons (::) when specifying a node name.
9.11. Directing TDMS Hardcopy
You can use the ACMS$TSS_HARDCOPY shareable logical name table to direct output from the TDMS hardcopy key (PF4 by default) on a per-user basis.
Normally when you press the hardcopy key while executing a TDMS request, the contents of the current form are copied to a file defined by the TSS$HARDCOPY logical name. However, if you define the ACMS$TSS_HARDCOPY shareable logical name table, you can copy form contents to different files.
ACMS allows you to define multiple locations for different users form outputs by defining a logical name table of user and device names. To specify different hardcopy locations on a per-user basis, define the ACMS$TSS_HARDCOPY shareable logical name table under the system directory name table (LNM$SYSTEM_DIRECTORY). Then define logical names in the ACMS$TSS_HARDCOPY table that specify where the contents of the form are to be copied when you press the hardcopy key.
Logical names in the name table can be either user names or physical device names. When determining where a copy of a form is to be sent, ACMS first translates the device name and then translates the user name.
$ CREATE/NAME_TABLE ACMS$TSS_HARDCOPY/PARENT:LNM$SYSTEM_DIRECTORY $ DEFINE/TABLE=ACMS$TSS_HARDCOPY SMITH DISK$:[DIRECTORY]SMITH.TXT $ DEFINE/TABLE=ACMS$TSS_HARDCOPY TTA5 DISK$:[DIRECTORY]TERMINAL1.TXT
When user SMITH presses the hardcopy key, a copy of the current form is placed in the file SMITH.TXT. Similarly, when the person using terminal TTA5 presses the hardcopy key, a copy of the current form is placed in the file TERMINAL1.TXT. If user SMITH is logged into terminal TTA5 then his form is copied to TERMINAL1.TXT instead of SMITH.TXT.
ACMS translates hardcopy locations when the user signs in. If you define a new location for a particular user or device, the user must sign out of ACMS and then sign back in. The logical name table on the submitter node is used to translate a hardcopy location for the user.
See the TDMS documentation for further information on the TSS$HARDCOPY logical name and the hardcopy key.
Chapter 10. Setting ACMS Quotas, Parameters, and Privileges
This chapter describes the ACMS command procedures ACMSPARAM.COM and ACMEXCPAR.COM which you can use to set ACMS system parameters and process quotas. It also describes the variables used as input to ACMSPARAM.COM and ACMEXCPAR.COM, and how to gather and supply variable values to the command procedures through user prompts, the ACMS monitor, and the ACMVARINI.DAT initialization file.
10.1. Introduction
SYS$MANAGER:ACMSPARAM.COM
This command procedure automates the task of modifying OpenVMS system parameters, ACMS system parameters, and ACMS run-time process quotas.
SYS$MANAGER:ACMEXCPAR.COM.
This command procedure modifies Application Execution Controller (EXC) quotas.
These command procedures let you change ACMS parameters in much the same way that the OpenVMS AUTOGEN Utility lets you change OpenVMS system parameters.
ACMS also provides ACMSGEN as a parallel to the OpenVMS SYSGEN Utility for adjustments to ACMS system parameters (see Chapter 11, "Changing ACMS Parameter Values with the ACMSGEN Utility"). However, perform such adjustments using ACMSPARAM.COM and ACMEXCPAR.COM rather than ACMSGEN, because the command procedures automatically modify any other parameters that relate to the changed parameters.
Installation of a new version of ACMS.
Movement of an application from a development node to a production node.
Addition of users to the ACMS system.
Addition of an application to the ACMS system.
Notification by the Software Event Log Utility Program (SWLUP) that a parameter has been exceeded.
Change in the number of task queues, Queued Task Initiator (QTI) submitters, or task threads per queue.
Warning from the ACMS monitor that quotas are in danger of being exceeded.
If you do not use ACMSPARAM.COM and ACMEXCPAR.COM, ACMS uses default values for the required quotas and parameters.
The two command procedures do not set all of the OpenVMS system parameters required by your ACMS system. There are some OpenVMS system modifications that you might have to perform using OpenVMS AUTOGEN. See VSI OpenVMS System Manager's Manual, Volume 1: Essentials for details of the AUTOGEN Utility and its commands.
The command procedure calculations may provide only rough approximations for some parameters and quotas based on variable calculations. To fine-tune your system even further, you may want to calculate the variables yourself, based on your particular system. Then include the variable values in the input files to the two command procedures and run the procedures. See Appendix A, "Parameter and Quota Calculations" for a description of how the ACMSPARAM.COM and ACMEXCPAR.COM determine these values, and how you can determine alternate values for use by the command procedures.
10.2. Calculating Parameters and Quotas with ACMSPARAM.COM
Generates default values for all variables that are used to calculate ACMS system parameters (if values do not already exist).
Calculates values for OpenVMS system parameters that are affected by ACMS.
Calculates ACMS system parameters.
Calculates quotas for the user names under which the ACMS Command Process (CP), ACMS Central Controller (ACC), Terminal Subsystem Controller (TSC), and QTI execute. ACMSPARAM.COM also adds accounts and assigns privileges for these user names in the SYS$SYSTEM:SYSUAF.DAT file.
Writes the OpenVMS system parameters that need modification to a file. ACMSPARAM.COM gives you the option of automatically updating the OpenVMS AUTOGEN input file MODPARAMS.DAT with values it generates.
10.2.1. Running ACMSPARAM.COM
ACMSPARAM.COM accepts variable values from user input, the ACMS monitor, or the ACMVARINI.DAT initialization file to set OpenVMS and ACMS system parameters and ACMS process quotas. ACMSPARAM.COM is located in the SYS$MANAGER directory. You need SYSPRV privilege to run it. This section shows how you run ACMSPARAM.COM.
$SET DEFAULT SYS$MANAGER$ @ACMSPARAM [phase] [execution-mode]
GENVAR – Accepts input from the user, the running system, and ACMS database files for calculating OpenVMS and ACMS system parameters and ACMS run-time process quotas.
GENPAR – Calculates the parameters and quotas and writes them to a file.
WRITEPAR – Modifies the appropriate ACMS system parameters and process quotas, and puts new values for OpenVMS system parameters in a file. You can choose to have the new OpenVMS system values automatically placed in the AUTOGEN input file, or you can enter them yourself.
ALL – Runs all three phases consecutively. ALL is the default.
- HELP – You can invoke HELP as the first parameter to ACMSPARAM.COM. If you do not specify a second parameter, you receive a help message for the entire ACMSPARAM.COM procedure. Specify HELP as the first parameter to ACMSPARAM.COM, followed by the name of a single phase as a second parameter to get a help message for that phase only. For example, for help on the GENPAR phase, specify:
$@ACMSPARAM HELP GENPARYou can also get help for a particular variable by specifying the variable name as the second parameter. For example, to get help for the REMOTE_AGENT_CNT variable, specify:$@ACMSPARAM HELP REMOTE_AGENT_CNT
INITIAL mode – Prompts for user input for variables used in calculations.
FEEDBACK mode – Gathers information from the running ACMS system for variables used in calculations. FEEDBACK mode is the default.
In either INITIAL or FEEDBACK mode, ACMSPARAM.COM also gathers information from the ACMS database files for use in calculations.
Figure 10.1, ''Setting System Parameters and Process Quotas with ACMSPARAM.COM'' illustrates the interaction of the three phases of ACMSPARAM.COM. This section describes the details of the three phases of ACMSPARAM.COM.
Before running ACMSPARAM.COM, make sure that all logicals used in application and task definitions and all logicals used to specify the MDB for each user in ACMSUDF.DAT are defined. Otherwise, the procedure may fail.
To change intermediate values so that you can increase quotas to allow the application to grow over time without stopping the application.
If you use task-call-task, after running the GENVAR phase, multiply the value for the TOTAL_TK_INSTANCE_CNT variable by the maximum task-call-task depth to get an accurate value for that variable.
The three phases are described in the following sections and summarized in Table 10.1, ''Phases of ACMSPARAM.COM''.
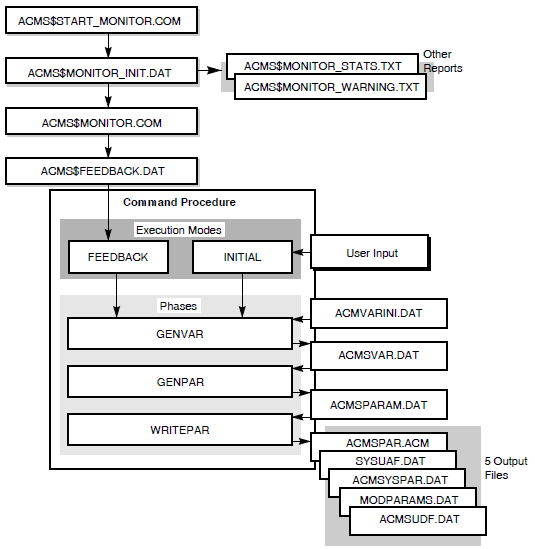
10.2.1.1. GENVAR Phase of ACMSPARAM.COM
By the user, for INITIAL mode.
Run ACMSPARAM.COM in INITIAL mode after installing or upgrading your ACMS system, or at any other time when your system has not had time to experience a typical workload, for example, when you add a new application or new users. When you use INITIAL mode, the command procedure prompts you for the following variables, if they are not specified in the initialization file ACMVARINI.DAT:- APPL_NAME
- REMOTE_APPL_NAME
- REMOTE_NODE_CNT
- REMOTE_SUB_CNT
- TERMINAL_CNT
- TERMINAL_PER_CP
- QTI_TASK_THDS
- QTI_QUEUES
- QTI_SUBMITTERS
By the ACMS$MONITOR.COM command procedure, for FEEDBACK mode.
Run ACMSPARAM.COM in FEEDBACK mode when:FEEDBACK mode uses the data about the running system that was collected by the ACMS$MONITOR.COM procedure, thereby assuring accurate input for parameter and quota calculations for your specific system.ACMS has run long enough to let the ACMS$MONITOR.COM command procedure monitor an average workload.
The ACMS Software Event Log Utility Program (SWLUP) informs you that a parameter was exceeded.
ACMS$MONITOR.COM issues a warning that a parameter or quota is in danger of being exceeded.
See Section 10.2.2.1, ''Supplying Variables with ACMS$MONITOR.COM'' for details about running the monitor procedure.
ACMS$MONITOR.COM returns values to ACMS$FEEDBACK.DAT for the same variables for which INITIAL mode prompts, as well as for the following variables:- ADB_BLKS
- APPL_CNT
- REMOTE_APPL_CNT
Table 10.3, ''Variables Required for ACMSPARAM.COM'' describes each of the variables used in ACMSPARAM.COM.
By the procedure's reading of .ADB, .TDB, ACMSDDF.DAT, and ACMSUDF.DAT files.
By editing the ACMVARINI.DAT files.
Variable values listed in the ACMVARINI.DAT file always take precedence. If you edit ACMVARINI.DAT to include a variable value, ACMSPARAM.COM uses that value as follows:If you use INITIAL mode and ACMVARINI.DAT contains a value for a variable for which INITIAL mode can prompt, INITIAL mode does not prompt for that value.
If you use FEEDBACK mode and ACMVARINI.DAT contains a value for a variable for which the ACMS monitor can gather information, the command procedure ignores the information gathered by the monitor for that variable.
If ACMVARINI.DAT contains any variable values that can be read by the command procedure from .ADB, .TDB, ACMSDDF.DAT, and ACMSUDF.DAT files, the command procedure uses the values in ACMVARINI.DAT.
Section 10.2.2, ''Supplying Variable Values for ACMSPARAM.COM'' describes in detail how to gather the information needed as variable input to ACMSPARAM.COM.
GENVAR places the variable values in ACMSVAR.DAT, the output file for the GENVAR phase.
10.2.1.2. GENPAR Phase of ACMSPARAM.COM
At the beginning of the GENPAR phase, ACMS displays a message explaining the security implications of having multiple accounts with the same UIC. You are then prompted for a unique UIC for each account. If the specified UIC is not a system UIC, the account is granted SYSPRV privilege. The GENPAR phase also takes the variables passed to ACMSVAR.DAT and calculates the system parameters and process quotas needed by the ACMS system. Table 10.3, ''Variables Required for ACMSPARAM.COM'' describes these variables and the parameters and quotas calculated from the variables. Appendix A, "Parameter and Quota Calculations" describes the calculations of several variables that you may want to calculate yourself and provide to ACMSPARAM.COM for even more accurate parameter and quota settings.
10.2.1.3. WRITEPAR Phase of ACMSPARAM.COM
- CHANNELCNT
- GBLPAGES
- GBLPAGFIL
- GBLSECTIONS
- LOCKIDTBL
- VIRTUALPAGECNT
- PQL_DASTLM
- PQL_DBIOLM
- PQL_DDIOLM
- PQL_DWSEXTENT
- PQL_DWSQUOTA
The WRITEPAR phase of ACMSPARAM.COM modifies the ACMS system parameter file and the system user authorization file, sets any ACMSGEN parameters specified, and displays SYS$MANAGER:ACMSYSPAR.DAT. ACMSYSPAR.DAT lists the OpenVMS system parameters that need modification. WRITEPAR allows you to update automatically the AUTOGEN input file SYS$SYSTEM:MODPARAMS.DAT.
ACMSPARAM.COM then reminds you to run AUTOGEN and reboot the system. If you choose not to have ACMSPARAM.COM update MODPARAMS.DAT, ACMSPARAM.COM reminds you to update MODPARAMS.DAT, run AUTOGEN, and reboot the system.
ADD_<system_parameter> statements. ACMSPARAM.COM does not do this
automatically. To ensure that this action takes place, the following informational message is
displayed:Remember to check the new SYS$SYSTEM:MODPARAMS.DAT to resolve any duplicate ADD_parameter entries that occurred due to the appending of ACMSYSPAR.DAT to MODPARAMS.DAT.
If an account for an ACMS process is created during the WRITEPAR phase, the procedure prompts the user for an account password and unique UIC. The password for the account must be 8 or more characters, cannot contain the name of the ACMS product, and should not be an easily guessed word. To protect against typing errors that are not seen when entering the password, users must reenter the password to verify it. Users have three chances to verify the password. Valid characters for a password are: A through Z, a through z, 0 through 9, $ (dollar sign), and _ (underscore).
See Appendix A, "Parameter and Quota Calculations" for the formulas for calculating these OpenVMS system parameter values. Refer to Chapter 11, "Changing ACMS Parameter Values with the ACMSGEN Utility" for information about how these OpenVMS system parameters affect ACMS components.
|
Phase |
Description |
|---|---|
|
GENVAR | |
|
Input file |
SYS$MANAGER:ACMVARINI.DAT (if available), ACMS$FEEDBACK.DAT (if using FEEDBACK mode), user input (if using INITIAL mode) |
|
Output file |
SYS$MANAGER:ACMSVAR.DAT |
|
Function |
GENVAR writes the variables provided by INITIAL or FEEDBACK mode, or by ACMVARINI.DAT, to the ACMSVAR.DAT file. If the ACMVARINI.DAT file does not exist, you can run GENVAR by itself to create a template for ACMVARINI.DAT. GENVAR sets defaults for any variables not set by INITIAL or FEEDBACK mode, or not specified by editing ACMVARINI.DAT. GENVAR overrides the defaults for any variables collected by INITIAL or FEEDBACK mode, or specified in ACMVARINI.DAT. Any variables edited directly in ACMVARINI.DAT override any values collected by INITIAL or FEEDBACK modes. |
|
GENPAR | |
|
Input file |
SYS$MANAGER:ACMSVAR.DAT |
|
Output file |
SYS$MANAGER:ACMSPARAM.DAT |
|
Function |
GENPAR performs the second phase of the ACMSPARAM.COM procedure. GENPAR calculates parameter values for the ACMS system. First, GENPAR reads variable values from the ACMSVAR.DAT file and calculates the system parameter values. Then it calculates the user name quotas for the ACC, the TSC, the CP, and the QTI. Finally, GENPAR writes the calculated parameters and quotas to the ACMSPARAM.DAT file. |
|
WRITEPAR | |
|
Input file |
SYS$MANAGER:ACMSPARAM.DAT |
|
Output Files |
SYS$SYSTEM:ACMSPAR.ACM SYS$SYSTEM:SYSUAF.DAT SYS$MANAGER:ACMSYSPAR.DAT SYS$SYSTEM:MODPARAMS.DAT SYS$SYSTEM:ACMSUDF.DAT |
|
Function |
The WRITEPAR phase is the third phase of the ACMSPARAM.COM procedure. WRITEPAR reads
the parameter values from ACMSPARAM.DAT and uses them to:
|
ACMSPARAM.COM requires information from a variety of sources to calculate parameters and quotas. The following section describes the sources and means of collecting that information.
10.2.2. Supplying Variable Values for ACMSPARAM.COM
ACMSPARAM.COM requires initial variables to calculate the OpenVMS and ACMS system parameter and process quota values needed to run ACMS efficiently. Section 10.2.1, ''Running ACMSPARAM.COM'' explains how to run ACMSPARAM.COM, including when to use INITIAL or FEEDBACK mode. This section offers more detail on how you and the ACMS system gather the information needed by ACMSPARAM.COM.
- Fixed information from ACMS files, such as task size, number of controlled terminals, and number of .MDB and .RLB files. This information comes from sources such as .ADB, .TDB, ACMSUDF.DAT, and ACMSDDF.DAT files.
Note
ACMSPARAM.COM does not support logical name search lists for TDB file specifications.
The two ways to supply the information from the ACMS files are:The GENVAR phase of ACMSPARAM.COM obtains information from the ACMS database files, calculates values based on this information, and places variable values into ACMSVAR.DAT. ACMSVAR.DAT is the input file for the GENPAR phase.
Create and edit ACMVARINI.DAT to include values that you manually calculate for variables based on the fixed information in ACMS files. Any such variables in ACMVARINI.DAT override values collected from database files in GENVAR.
Dynamic information from the running ACMS system, such as the number and size of the .ADB files of concurrently running applications on the current or remote nodes, or the number of concurrently active remote and local users. This information comes from the running processes, as well as from .ADB database files.
There are three ways to gather the variables used to calculate the parameter and quota values based on the running ACMS system:Run ACMSPARAM.COM in INITIAL mode. ACMSPARAM.COM prompts you for values for any variables related to the running system that are not in ACMVARINI.DAT, the GENVAR input file. See Section 10.2.1, ''Running ACMSPARAM.COM'' for details about running ACMSPARAM.COM in INITIAL mode.
Run the SYS$MANAGER:ACMS$MONITOR.COM procedure and then run the ACMSPARAM.COM procedure in FEEDBACK mode. ACMS$MONITOR.COM monitors the running ACMS system to collect the most accurate variables, and places the values in ACMS$FEEDBACK.DAT. See Section 10.2.2.1, ''Supplying Variables with ACMS$MONITOR.COM'' for details about the monitor. When you run ACMSPARAM.COM in the default FEEDBACK mode, ACMSPARAM.COM uses any variables in ACMS$FEEDBACK.DAT that do not exist in ACMVARINI.DAT. See Section 10.2.1, ''Running ACMSPARAM.COM'' for details about running ACMSPARAM.COM in FEEDBACK mode.
Create and edit ACMVARINI.DAT to enter values for the variables based on the running ACMS sytem. Any such variables in ACMVARINI.DAT override the corresponding variable values placed in ACMS$FEEDBACK.DAT for use by the FEEDBACK mode, or gathered by prompts in INITIAL mode.
Section 10.2.2.2, ''Editing ACMVARINI.DAT to Supply Variables to ACMSPARAM.COM'' describes the creation, editing, and use of ACMVARINI.DAT.
10.2.2.1. Supplying Variables with ACMS$MONITOR.COM
ACMS$MONITOR.COM periodically examines the running ACMS system and collects current, average, and peak values for ACMS process quotas and ACMS system load. Run ACMS$MONITOR.COM long enough to gather information about the normal workload. It is recommended that the procedure run at least 24 hours to gather accurate information. Then run ACMSPARAM.COM in the default FEEDBACK mode. See Section 10.2.1, ''Running ACMSPARAM.COM'' for details about running ACMSPARAM.COM in FEEDBACK mode.
Run SYS$MANAGER:ACMS$START_MONITOR.COM to initialize and submit ACMS$MONITOR.COM to batch. To run ACMS$START_MONITOR, you must use an account that has the following default privileges: TMPMBX, NETMBX, WORLD, and SYSPRV. It is recommended that you set the CLISYMTBL system parameter to the maximum value with the OpenVMS SYSGEN utility when you run ACMS$MONITOR.COM on your system. ACMS$START_MONITOR.COM prompts you for the batch queue on which ACMS$MONITOR.COM runs. You must enter a queue that is on the current node, because the monitor must run on the same node as the start procedure.
ACMS$START_MONITOR.COM prompts for parameters that determine the configuration of ACMS$MONITOR.COM. After you answer the prompts, ACMS$START_MONITOR.COM displays the user input and asks if you are satisfied. If you are not satisfied with the input, the procedure offers the choice of continuing or quitting. If you continue, the procedure repeats all the questions; otherwise, the procedure ends. Once you are satisfied with the input, ACMS$START_MONITOR.COM writes the answers to SYS$MANAGER:ACMS$MONITOR_INIT.DAT. ACMS$START_MONITOR.COM creates ACMS$MONITOR_INIT.DAT the first time it runs, supplying default answers for the prompts. Thereafter, the values supplied by the user are stored in ACMS$MONITOR_INIT.DAT and become the defaults for the next running of ACMS$START_MONITOR.COM.
|
Parameter | |
|---|---|
|
INTERVAL | |
|
Description |
The sampling interval between data collection events, specified in minutes. |
|
Default |
15 minutes |
|
START_TIME | |
|
Description |
The time that ACMS$MONITOR begins running, specified as absolute time, delta time, or a combination. |
|
Default |
Immediately |
|
END_TIME | |
|
Description |
The time that ACMS$MONITOR stops running, specified as absolute time, delta time, or a combination. |
|
Default |
The monitor runs until stopped by the user by running ACMS$STOP_MONITOR.COM. |
|
QUEUE | |
|
Description |
The batch queue on which ACMS$MONITOR is entered. |
|
Default |
node$BATCH |
|
REPORT_MAIL_USERNAME | |
|
Description |
User name to receive mail containing the parameter/quota warning reports generated by ACMS$MONITOR when ACMS system parameters or process quotas approach the limits set by QUOTA_THRESHOLD and POOL_THRESHOLD. |
|
Default |
SYSTEM |
|
REPORT_FREQUENCY | |
|
Description |
The interval at which the warning report is mailed: Once every 24 hours (if the threshold was exceeded during the 24 hours) at a time specified by the user, or immediately at every data collection event during which the threshold was exceeded. Enter either DAILY or IMMEDIATELY at the prompt. |
|
Default |
IMMEDIATELY |
|
REPORT_SEND_TIME | |
|
Description |
The time that the daily report is mailed, if you choose the daily option for REPORT_FREQUENCY. The report is mailed only if any quotas or pools exceeded their thresholds in the previous 24 hours. |
|
Default |
08:00 |
|
QUOTA_THRESHOLD | |
|
Description |
Highest percentage of a quota that can be used before the application manager is notified of a possible resource shortage. The threshold must be an integer between 1 and 100, inclusive. |
|
Default |
80 |
|
POOL_THRESHOLD | |
|
Description |
Highest percentage of used bytes in a pool that can be used before the application manager is notified of a possible resource shortage. The threshold must be an integer between 1 and 100, inclusive. |
|
Default |
80 |
SYS$MANAGER:ACMS$FEEDBACK.DAT
This file contains the information about the running ACMS system for ACMSPARAM.COM, such as the number and size of concurrently running applications, and the number of concurrent local and remote users. This is the same information supplied by the user if you use ACMSPARAM.COM in INITIAL mode. See Section 10.2.1, ''Running ACMSPARAM.COM'' for a full description of this information.
SYS$MANAGER:ACMS$MONITOR_STATS.TXT
For each ACMS process, this report provides the following information:Process name, including a string that identifies it as one of the following types: ACC, TSC, QTI, CP, ATL, EXC, SP, ACMS_SWL
Process user name
Process ID
Application name (for EXC)
SYSUAF quota name, quota limit, current quota value, used quota percentage, quota usage average, and quota usage peak for these quotas: PRCLM, FILLM, BIOLM, DIOLM, ASTLM, TQLM, ENQLM, BYTLM, PGFLQUOTA, WSEXTENT
Workspace pool name, pool size, used bytes, used bytes percentage and average, and the peak bytes used for the task instance and group and user workspace pools: WSC_POOLSIZE, WS_POOLSIZE, TWSC_POOLSIZE, and TWS_POOLSIZE.
Report supplies the following information for the ACMS message switch shared and process pools:MSS pool name
Pool size
Current bytes used
Used byte percentage
Average bytes used
Peak bytes used
The report lists the current, average, and peak:Number of remote nodes
Number of concurrently active applications
Value for the sum of the sizes of concurrently active applications
Number of concurrent local users
Number of concurrent remote users
SYS$MANAGER:ACMS$MONITOR_WARNING.TXT
ACMS$MONITOR.COM calculates the pool and quota usage for the ACMS system and application. If the used byte percentage is greater than specified in the POOL_THRESHOLD parameter, the procedure writes the information to the warning report. Similarly, if the quota usage is greater than specified in the QUOTA_THRESHOLD parameter, the procedure issues a warning.
When ACMS$MONITOR.COM issues a warning report, run ACMSPARAM.COM again to recalculate the system parameters. A warning report is created when:A change to the ACMS system requires that ACMSPARAM.COM be rerun to update the variable information.
Pool or quota thresholds are exceeded, even if ACMSPARAM.COM correctly calculated the required values. In this case, if you are sure that the calculation is correct, increase the threshold so that you no longer get reports. If you believe that the calculation is incorrect, increase the parameter or quota manually: use AUTHORIZE to increase a process quota, or specify a higher value for the parameter in ACMVARINI.DAT. Then run all phases of ACMSPARAM.COM. Rerunning ACMSPARAM.COM with higher values may cause other parameters and quotas to be raised. Note that ACMSPARAM.COM never lowers a value for a process quota or an OpenVMS system parameter; however, it may lower an ACMS system parameter.
If any parameters or quotas are in danger of being exceeded, ACMS$MONITOR.COM mails a report to the user name set in the REPORT_MAIL_USERNAME parameter. The procedure issues the warning report as specified in the REPORT_FREQUENCY parameter of ACMS$START_MONITOR.COM (DAILY or IMMEDIATELY).
For quotas that exceed QUOTA_THRESHOLD, the following are reported:Process name, process ID, and process user name
Quota name
Current quota value
Quota limit
Percentage of quota limit that is used
For pool parameters that exceed POOL_THRESHOLD, the following are reported:Process name, process ID, and process user name
Pool parameter name
Current poolsize value
Application name (for EXC processes)
Poolsize limit
Percentage of poolsize limit used
10.2.2.2. Editing ACMVARINI.DAT to Supply Variables to ACMSPARAM.COM
Normally, you run ACMSPARAM.COM in INITIAL or FEEDBACK mode to gather variable values for calculating parameters and quotas. If you use INITIAL mode, the variable values for which you are prompted are used directly in GENVAR phase. If you use FEEDBACK mode, the variable values that are stored in ACMS$FEEDBACK.DAT are used by the GENVAR phase.
- On an active ACMS system, set your default to SYS$MANAGER and run the GENVAR phase of ACMSPARAM.COM:
$@ACMSPARAM.COM GENVARThis command creates the file ACMSVAR.DAT that has ACMS default values assigned to all of the variables shown in Table 10.3, ''Variables Required for ACMSPARAM.COM''. The table contains the variable names and their descriptions.
- Rename ACMSVAR.DAT, the file containing the variable values, to ACMVARINI.DAT:
$RENAME ACMSVAR.DAT ACMVARINI.DAT When the GENVAR phase creates the ACMSVAR.DAT file in step 1, it includes all the variables listed in Table 10.3, ''Variables Required for ACMSPARAM.COM'' and generates a default value for each. It is recommended that you delete any variables whose value you do not need to change.
- ACC_PRIORITY
- TSC_PRIORITY
- CP_PRIORITY
- QTI_PRIORITY
- PERM_CPS
- MIN_CPIS
- USERNAME_DEFAULT
- NODE_NAME
- MSS_NET_RETRY_TIMER
- QTI_POLLING_TIMER
- QTI_SUB_TIMEOUT
- QTI_RETRY_TIMER
APPL_CNT = 10 TERMINAL_CNT = 64 ADB_BLKS = 48 + 3 + 12 + 9 TDB_CNT = 12 + 2 + 3 + 2 TDB_BLKS = 400+ (15 + 45) + (15 + 45 + 33) + (15 + 27) CONTROLLED_TERMINAL_CNT = 0 APPL_NAME := payroll
Table 10.3, ''Variables Required for ACMSPARAM.COM'' describes the variables listed in a complete ACMVARINI.DAT file and required by ACMSPARAM.COM. The table lists the SYSGEN parameters and ACMS process quotas whose calculations are affected, in part or in whole, by these variables when used by ACMSPARAM.COM.
Table 10.3, ''Variables Required for ACMSPARAM.COM'' also lists the ACMSGEN parameters corresponding to the variables in ACMVARINI.DAT. You can set these parameters independently in ACMSGEN. However, it is advisable to use ACMSPARAM.COM to set these parameters, because the command procedure automatically modifies any other parameters relating to the parameters you changed.
- ACC_USERNAME
- AGENT_CNT
- CP_USERNAME
- CP_PROC_CNT
- DBMS_SERVER_CNT
- DEBUGGER_CNT
- OPERATOR_CNT
- REMOTE_AGENT_CNT
- QTI_USERNAME
- TSC_USERNAME
|
Variable | |
|---|---|
|
ACC_USERNAME | |
|
Description |
Maps to the ACMSGEN parameter which defines the OpenVMS username of the ACMS Central Controller (ACC). The name must be enclosed in quotes or be assigned the DCL string operator ":=". |
|
Default |
ACMS$ACC |
|
Affects |
ACMSGEN parameter ACC_USERNAME |
|
ACC user name entry in the system authorization file | |
|
ADB_BLKS | |
|
Description |
Total size in blocks of the application database (.ADB) files of applications in use at the same time on the local system. |
|
Default |
Feedback data, or total size of .ADB files for applications listed in APPL_NAME. |
|
Affects |
SYSGEN parameter GBLPAGES |
|
AGENT_CNT | |
|
Description |
Number of agent processes other than the ACMS Command Process (CP) and the QTI running on the local node. This includes the number of ALL-IN-1 processes selecting tasks in ACMS applications, the number of Request Interface (RI) agents, the number of EXCs executing detached tasks, and any customer-supplied agents. |
|
Default |
2 |
|
Affects |
ACMSGEN parameter MSS_MAXOBJ |
|
AGENT_SUB_CNT | |
|
Description |
Number of users selecting tasks in ACMS applications from agent processes other than the ACMS Command Process (CP) and the QTI. This includes users selecting tasks in ACMS applications from ALL-IN-1, from Request Interface (RI) agents, and from any customer-supplied agents. This also includes the number of detached tasks executing at any one time. |
|
Default |
10 |
|
Affects |
ACMSGEN parameter MSS_MAXOBJ |
|
APPL_CNT | |
|
Description |
Maps to the ACMSGEN parameter which defines the maximum number of applications started on the local system at one time. |
|
Default |
Feedback data, or number of applications listed in APPL_NAME |
|
Affects |
ACMSGEN parameters MAX_APPL and MSS_MAXOBJ |
|
SYSGEN parameter GBLSECTIONS | |
|
ACC process quotas FILLM and PGFLQUOTA | |
|
APPL_NAME | |
|
Description |
Names of the applications started on the local system. Supply the APPL_NAME variable once for each application that will be started on the local system. The application name must be enclosed in quotes or be assigned using the DCL string operator ":=". |
|
Default |
Feedback data, or names of applications prompted for in INITIAL mode. |
|
Affects |
ACMSGEN parameters MAX_APPL and MSS_MAXOBJ |
|
SYSGEN parameter GBLSECTIONS | |
|
ACC process quotas FILLM and PGFLQUOTA | |
|
CONTROLLED_TERMINAL_CNT | |
|
Description |
Number of terminals defined as ACMS-controlled in the ACMS Device Definition file (ACMSDDF.DAT). |
|
Default |
Number of terminals defined as ACMS-controlled in the ACMS Device Definition file (ACMSDDF.DAT). |
|
Affects |
SYSGEN parameter CHANNELCNT |
|
TSC process quota FILLM | |
|
CP_PROC_CNT | |
|
Description |
Maps to the ACMSGEN parameter which defines the maximum number of terminal user command processes (CPs) that can be started on the system at one time. |
|
Default |
TERMINAL_CNT/TERMINALS_PER_CP |
|
Affects |
ACMSGEN parameters CP_SLOTS and MSS_MAXOBJ |
|
SYSGEN parameter LOCKIDTBL and CHANNELCNT | |
|
TSC process quota TQELM | |
|
CP_USERNAME | |
|
Description |
Maps to the ACMSGEN parameter which defines the OpenVMS user name of the ACMS Command Process (CP). The name must be enclosed in quotes or be assigned using the DCL string operator ":=". |
|
Default |
ACMS$CP |
|
Affects |
ACMSGEN parameter CP_USERNAME |
|
CP user name entry in the system authorization file | |
|
DEBUGGER_CNT | |
|
Description |
The maximum number of developers debugging task groups at the same time |
|
Default |
5 |
|
Affects |
ACMSGEN parameter MSS_MAXOBJ |
|
SYSGEN parameters CHANNELCNT, GBLPAGES, GBLPAGFIL, GBLSECTIONS | |
|
DEBUG_TDB_BLKS | |
|
Description |
Total size in blocks of task group database files (.TDB) that can be debugged by developers at one time. |
|
Default |
(Size of largest .TDB * DEBUGGER_CNT) |
|
Affects |
SYSGEN parameter GBLPAGES |
|
DYN_SP_CNT | |
|
Description |
The maximum number of server processes having DYNAMIC USERNAME that can be started on the local system at any one time. |
|
Default |
2 * APPL_CNT |
|
Affects |
SYSGEN parameter LOCKIDTBL |
|
ENTERED_TERMINAL_CNT | |
|
Description |
Total number of terminals signing in to ACMS with
|
|
Default |
TERMINAL_CNT - CONTROLLED_TERMINAL_CNT |
|
Affects |
SYSGEN parameter CHANNELCNT |
|
TSC process quota TQELM | |
|
ESC_RTN_IMAGE_CNT | |
|
Description |
Number of all DECforms escape routine images used by all local applications. |
|
Default |
5 |
|
Affects |
SYSGEN parameter CHANNELCNT |
|
CP process quota FILLM | |
|
FORM_BLKS | |
|
Description |
The total size in blocks of DECforms form files used by applications started on the local system or accessed remotely at any one time. This includes both .FORM files and .EXE files containing forms. Add the size of a form file once for each different application that refers to it. |
|
Default |
Size of .FORM and .EXE form files referred to by local applications, plus the size of .FORM and .EXE form files in ACMS$FORM_CACHE. |
|
Affects |
CP process quota PGFLQUOTA |
|
FORM_CNT | |
|
Description |
The total number of DECforms form files used by applications started on the local system or accessed remotely at any one time. This includes .FORM files and .EXE files containing forms. Count a form file once for each different application that refers to it. |
|
Default |
Number of .FORM and .EXE form files referred to by local applications, plus the number of .FORM and .EXE form files in ACMS$FORM_CACHE. |
|
Affects |
SYSGEN parameter CHANNELCNT |
|
CP process quota FILLM | |
|
FORM_TRACE_FILE_CNT | |
|
Description |
Number of concurrently active DECforms trace files. |
|
Default |
FORM_CNT |
|
Affects |
SYSGEN parameter CHANNELCNT |
|
LARGEST_MESSAGE | |
|
Description |
Size of the largest message sent from an application to the local CP (or other agent) during exchange step processing. LARGEST_MESSAGE differs from MSS_MAXBUF in that it includes only the workspace data portion of the message. If the applications are not distributed, do not use the Request Interface (RI); and use only TDMS request I/O, then LARGEST_MESSAGE is not required. |
|
Default |
Largest message used on any exchange step in the application (determined from ADU
|
|
Affects |
ACMSGEN parameter MSS_MAXBUF |
|
CP process quota PGFLQUOTA | |
|
LARGEST_MESSAGE_NUM_WKSP | |
|
Description |
Number of workspaces passed in the largest remote request message. |
|
Default |
Number of workspaces passed in the exchange step with the largest message. |
|
Affects |
ACMSGEN parameter MSS_MAXBUF |
|
MDB_BLKS | |
|
Description |
Total size (in blocks) of all the different menu database (.MDB) files in use at one time. This includes the default menu database (ACMS.MDB), the ACMS command menu database (ACMSCMD.MDB), and all site-defined menu databases. |
|
Default |
Sum of the sizes of all menu databases referred to in the ACMS User Definition file (ACMSUDF.DAT), plus the sizes of ACMS.MDB and ACMSCMD.MDB. |
|
Affects |
SYSGEN parameter GBLPAGES |
|
CP process quota PGFLQUOTA | |
|
MDB_CNT | |
|
Description |
Total number of all the different menu database (.MDB) files in use at one time. This includes the default menu database (ACMS.MDB), the ACMS command menu database (ACMSCMD.MDB), and all site-defined menu databases. |
|
Default |
Number of menu databases referred to in the ACMS User Definition file (ACMSUDF.DAT), plus ACMS.MDB and ACMSCMD.MDB. |
|
Affects |
SYSGEN parameter GBLSECTIONS |
|
ACC process quota FILLM | |
|
MSS_MAXBUF | |
|
Description |
Maps to the ACMSGEN parameter which defines the largest message that can be sent between ACMS processes without incurring message blocking. Message blocking can have an adverse affect on performance, especially on distributed systems. |
|
Default |
Calculated value (see Appendix A, "Parameter and Quota Calculations") |
|
Affects |
ACMSGEN parameters MSS_MAXBUF, MSS_POOLSIZE, and MSS_PROCESS_POOL |
|
ACC, CP, and QTI process quotas BYTLM and PGFLQUOTA | |
|
MSS_MAXOBJ | |
|
Description |
The maximum number of message switch objects that can be created on the system at one time. Message switch objects are used for communications between ACMS processes. There are a number of message switch objects for each ACMS process, plus one message switch object for each ACMS task submitter. |
|
Default |
Calculated value (see Appendix A, "Parameter and Quota Calculations") |
|
Affects |
ACMSGEN parameter MSS_MAXOBJ and MSS_POOLSIZE |
|
MSS_PROCESS_POOL | |
|
Description |
Maps to the ACMSGEN parameter MSS_PROCESS_POOL which defines the size of the communication pool used in each ACMS process. The MSS process pool is used for sending and receiving messages in both local and remote communications. The required value of MSS_PROCESS_POOL depends on the amount of ACMS activity on the system. |
|
Default |
Calculated value (see Appendix A, "Parameter and Quota Calculations") |
|
Affects |
ACMSGEN parameter MSS_PROCESS_POOL |
|
ACC, CP, TSC, and QTI process quota PGFLQUOTA | |
|
MSS_SHARED_POOL | |
|
Description |
Maps to the ACMSGEN parameter MSS_POOLSIZE which defines the size of the MSS shared pool global section. The MSS shared pool is used for sending and receiving messages in local communications. The required value of MSS_POOLSIZE depends on the amount of ACMS activity on the system. |
|
Default |
Calculated value (see Appendix A, "Parameter and Quota Calculations") |
|
Affects |
ACMSGEN parameter MSS_POOLSIZE |
|
SYSGEN parameters GBLPAGES and GBLPAGFIL | |
|
OPERATOR_CNT | |
|
Description |
Number of users issuing ACMS operator commands (such as
|
|
Default |
5 |
|
Affects |
ACMSGEN parameter MSS_POOLSIZE and MSS_MAXOBJ |
|
ACC process quota ASTLM | |
|
OPR_ENTER_RETURN_CNT | |
|
Description |
Number of users who entered ACMS using the |
|
Default |
5 |
|
Affects |
ACMSGEN parameter MSS_MAXOBJ |
|
QTI_MAX_WSP_SIZE | |
|
Description |
The largest value associated with the ACMSQUEMGR qualifier
|
|
Default |
Largest value defined for a queue in the ACMS Queue Definition File (ACMSQDF.DAT), or 512 if no queues are defined. |
|
Affects |
QTI process quota PGFLQUOTA |
|
QTI_QUEUES | |
|
Description |
The maximum number of queues and error queues active on the local system at the same time. QTI_QUEUES is used to calculate appropriate process quotas for the ACMS Queued Task Initiator (QTI). |
|
Default |
Total number of queues defined in the ACMS Queue Definition File (ACMSQDF.DAT), or 3 if no queues are defined. |
|
Affects |
SYSGEN parameter LOCKIDTBL |
|
QTI process quotas ASTLM, BYTLM, ENQLM, FILLM, PGFLQUOTA | |
|
QTI_SUBMITTERS | |
|
Description |
The maximum number of task submitters signed in to ACMS by the ACMS Queued Task Initiator (QTI) at any one time. Set QTI_SUBMITTERS to the maximum number of different user names enqueuing tasks to active queues. |
|
Default |
Feedback data, or 10 |
|
Affects |
ACMSGEN parameter MSS_MAXOBJ |
|
QTI process quotas ASTLM and PGFLQUOTA | |
|
QTI_TASK_THDS | |
|
Description |
The maximum number of concurrent active tasks that will be processed by the ACMS
Queued Task Initiator (QTI). Set QTI_TASK_THDS to the sum of task threads specified on
the |
|
Default |
Feedback data or 3 |
|
Affects |
SYSGEN parameter LOCKIDTBL |
|
QTI process quotas ASTLM, BIOLM, DIOLM, ENQLM, PGFLQUOTA, TQELM, WSDEFAULT, WSQUOTA, and WSEXTENT | |
|
QTI_USERNAME | |
|
Description |
Maps to the ACMSGEN parameter which defines the OpenVMS user name of the ACMS Queued Task Initiator (QTI). The name must be enclosed in quotes or be assigned using the DCL string operator ":=". |
|
Default |
ACMS$QTI |
|
Affects |
ACMSGEN parameter QTI_USERNAME |
|
QTI user name entry in the system authorization file | |
|
REMOTE_AGENT_CNT | |
|
Description |
Number of remote agent processes submitting tasks to applications running on the local system at any one time. This includes both ACMS Command Processes (CPs) and any other agents (RI, ALL-IN-1, user-written) submitting tasks from remote systems. |
|
Default |
2 * APPL_CNT |
|
Affects |
SYSGEN parameter MSS_PROCESS_POOL |
|
REMOTE_APPL_CNT | |
|
Description |
Number of applications running on remote systems in which task submitters on this node select tasks. |
|
Default |
Feedback data, or number of remote applications listed in REMOTE_APPL_NAME. |
|
Affects |
ACMSGEN parameter MSS_PROCESS_POOL |
|
ACC process quota ASTLM, FILLM, and PGFLQUOTA; CP process quotas ASTLM, FILLM, BIOLM, and BYTLM; QTI process quotas FILLM and BYTLM | |
|
REMOTE_APPL_NAME | |
|
Description |
Names of the applications on remote systems in which task submitters on this node select tasks. Supply the REMOTE_APPL_NAME variable once for each application that will be accessed remotely from the local system. Specify applications using the form <node-name>::<application-name>. The name must be enclosed in quotes or be assigned using the DCL string operator ":=". |
|
Default |
Feedback date, or user-supplied names of remote applications. |
|
Affects |
None directly (used to generate REMOTE_APPL_CNT and REMOTE_NODE_CNT variables) |
|
REMOTE_NODE_CNT | |
|
Description |
Number of remote ACMS systems that access the local ACMS system, or are accessed by the local ACMS system. This includes remote systems running applications that are accessed from the local system, and remote systems accessing applications running on the local system. |
|
Default |
Feedback data, or number of unique remote node names from REMOTE_APPL_NAME. |
|
Affects |
ACC process quotas ASTLM, BYTLM, BIOLM, FILLM, and PGFLQUOTA |
|
REMOTE_RLB_BLKS | |
|
Description |
Total size (in blocks) of request library (.RLB) files used by applications accessed remotely from the local system at any one time. Add the size of a request library once for each different remote application that references it. |
|
Default |
Feedback data, or the size of .RLB files in ACMS$RLB_CACHE. |
|
Affects |
CP process quota PGFLQUOTA |
|
REMOTE_RLB_CNT | |
|
Description |
Total number of request library (.RLB) files used by applications accessed remotely from the local system at any one time. Count a request library once for each different remote application that references it. |
|
Default |
Feedback data, or the number of .RLB files in ACMS$RLB_CACHE. |
|
Affects |
SYSGEN parameter CHANNELCNT |
|
CP process quota FILLM | |
|
REMOTE_SUB_CNT | |
|
Description |
Number of submitters on remote systems who will be selecting tasks in applications running on the local system. |
|
Default |
REMOTE_NODE_CNT * 20 |
|
Affects |
ACMSGEN parameters WSC_POOLSIZE and WS_POOLSIZE |
|
SYSGEN parameter CHANNELCNT | |
|
ACC process quotas ASTLM and BYTLM | |
|
RLB_CNT | |
|
Description |
Total number of request library (.RLB) files used by applications started on the local system at any one time. Count a request library once for each different application that references it (formerly EXC_RLB_CNT) |
|
Default |
Number of .RLB files referenced by task groups in local applications (from ADU
|
|
Affects |
SYSGEN parameters CHANNELCNT and LOCKIDTBL |
|
TDB_BLKS | |
|
Description |
Total size (in blocks) of task group database (.TDB) files used by applications started on the local system. Add the size of a task group database once for each different application that references it. |
|
Default |
Sum of sizes of .TDB files referred to by local applications. |
|
Affects |
SYSGEN parameter GBLPAGES |
|
TDB_CNT | |
|
Description |
Total number of task group database (.TDB) files used by applications started on the local system. Count a task group database once for each different application that refers to it. |
|
Default |
Number of .TDB files referred to by local applications (from ADU |
|
Affects |
ACMSGEN parameter WSC_POOLSIZE |
|
SYSGEN parameters CHANNELCNT, GBLPAGES, GBLPAGFIL and GBLSECTIONS | |
|
TERMINAL_CNT | |
|
Description |
Maps to the ACMSGEN parameter which defines the maximum number of ACMS users that can be signed into ACMS through the terminal subsystem (TSC and CPs) at any one time. |
|
Default |
Feedback data, or the number of devices defined in ACMSDDF.DAT if $ALL is not defined, or the number of TT, RT, LT, WT, VT and OP devices on the system. |
|
Affects |
ACMSGEN parameters MAX_LOGINS, WSC_POOLSIZE, WS_POOLSIZE, CP_SLOTS |
|
SYSGEN parameter CHANNELCNT | |
|
TSC process quotas ASTLM, BIOLM, BYTLM, PGFLQUOTA, and TQELM | |
|
TERMINALS_PER_CP | |
|
Description |
Maps to the ACMSGEN parameter which defines the maximum number of terminals handled by one Command Process (CP). |
|
Default |
20 |
|
Affects |
ACMSGEN parameters MAX_TTS_CP, MSS_MAXOBJ, and CP_SLOTS |
|
SYSGEN parameter CHANNELCNT | |
|
CP process quotas FILLM, DIOLM, BIOLM, BYTLM, ASTLM, ENQLM, PGFLQUOTA, TQELM, WSDEFAULT, WSQUOTA, and WSEXTENT | |
|
TOTAL_SP_CNT | |
|
Description |
The maximum number of server processes that can be started on the local system at any one time. |
|
Default |
Sum of MAXIMUM SERVER PROCESSES from .ADB files, or 5 times the total number of servers defined in local applications (if maximum server process is UNLIMITED). |
|
Affects |
ACMSGEN parameter MSS_MAXOBJ |
|
TOTAL_TK_INSTANCE_CNT | |
|
Description |
Total number of tasks running concurrently for all applications. |
|
Default |
Sum of MAXIMUM TASK INSTANCES from .ADB files. |
|
Affects |
ACMSGEN parameters MSS_POOLSIZE, TWS_POOLSIZE, and TWSC_POOLSIZE |
|
TSC_USERNAME | |
|
Description |
Maps to the ACMSGEN parameter TSC_USERNAME which defines the OpenVMS user name of the ACMS Terminal Subsystem Controller (TSC). The name must be enclosed in quotes or be assigned using the DCL string operator ":=". |
|
Default |
ACMS$TSC |
|
Affects |
ACMSGEN parameter TSC_USERNAME |
|
TSC user name in the system authorization file | |
|
TWS_POOLSIZE | |
|
Description |
Variable that maps to the ACMSGEN parameter TWS_POOLSIZE which defines the size of pools in which workspaces associated with active task instances are stored. There is one task instance workspace pool for each task group in an application. The required value of TWS_POOLSIZE depends on the number of tasks in each group that will be executing concurrently, and the size of workspaces used by those tasks. |
|
Default |
Calculated value (see Appendix A, "Parameter and Quota Calculations") |
|
Affects |
ACMSGEN parameter TWS_POOLSIZE |
|
SYSGEN parameters GBLPAGES and GBLPAGFIL | |
|
TWSC_POOLSIZE | |
|
Description |
Variable that maps to the ACMSGEN parameter TWSC_POOLSIZE which defines the size of pools used for control information for task instance workspaces. There is one control pool for each task instance workspace pool. The required value of TWSC_POOLSIZE depends on the number of tasks in each group that will be executing concurrently, and the number of workspaces used by those tasks. |
|
Default |
Calculated value (see Appendix A, "Parameter and Quota Calculations") |
|
Affects |
ACMSGEN parameter TWSC_POOLSIZE |
|
SYSGEN parameters GBLPAGES and GBLPAGFIL | |
|
WS_POOLSIZE | |
|
Description |
Variable that maps to the ACMSGEN parameter WS_POOLSIZE which defines the size of the pool used for master copies of group and user workspaces. Each application is allocated one group/user workspace pool. The required value of WS_POOLSIZE depends on the number and size of group and user workspaces used by applications. |
|
Default |
Calculated value (see Appendix A, "Parameter and Quota Calculations") |
|
Affects |
ACMSGEN parameter WS_POOLSIZE |
|
SYSGEN parameters GBLPAGES and GBLPAGFIL | |
|
WSC_POOLSIZE | |
|
Description |
Variable that maps to the ACMSGEN parameter WSC_POOLSIZE which defines the size of the pool used for control information for group and user workspaces. There is one control pool for each group/user workspace pool. The required value of WSC_POOLSIZE depends on the number of group and user workspaces used by applications. |
|
Default |
Calculated value (see Appendix A, "Parameter and Quota Calculations") |
|
Affects |
ACMSGEN parameter WSC_POOLSIZE |
|
SYSGEN parameters GBLPAGES and GBLPAGFIL | |
10.3. Calculating EXC Process Quotas with ACMEXCPAR.COM
Ensures that values for all variables necessary to calculate quotas are available in an initialization file created by you or by ACMEXCPAR.COM.
Reads values from the initialization file.
Calculates EXC quota values.
Modifies the system user authorization file SYS$SYSTEM:SYSUAF.DAT using the EXC quota values.
Always run ACMSPARAM.COM before you run ACMEXCPAR.COM. By so doing, ACMEXCPAR.COM uses the correct ACMSGEN parameter values, as set by ACMSPARAM.COM.
10.3.1. Running ACMEXCPAR.COM
ACMEXCPAR.COM accepts initial values from the <application-name>_GENVAR.DAT file, and modifies EXC quotas. ACMEXCPAR.COM is located in the SYS$MANAGER directory. You need the SYSPRV privilege to run it. This section shows how to run ACMEXCPAR.COM.
$SET DEFAULT SYS$MANAGER$@ACMEXCPAR[phase] application-name
The FINDVAL phase creates a file, <application-name>_GENVAR.DAT, that contains initialization values for the ACMEXCPAR.COM procedure. The <application-name> _GENVAR.DAT file also contains the following ACMSGEN parameters: TWS_POOLSIZE, TWSC_POOLSIZE, WS_POOLSIZE, WSC_POOLSIZE, MSS_MAXBUF, MSS_PROCESS_POOL, and MAX_LOGINS, and the OpenVMS SYSGEN parameter MAXPROCESSCNT.
The GENVAR phase checks to make sure that all the variables required for the GENPAR phase are in <application-name>_GENPAR.DAT.
The GENPAR phase prompts you for a unique UIC for each ACMS account and calculates quota values for the EXC.
The WRITEPAR phase reads the quota values created by the GENPAR phase and uses them to modify the system user authorization file, SYSUAF.DAT.
ALL – Runs all four phases consecutively. ALL is the default.
CURRENT – Runs the GENVAR, GENPAR, and WRITEPAR phases without running the FINDVAL phase. Use CURRENT when you want to use values previously gathered by FINDVAL, or manually edited in the command procedure's initialization file.
- HELP – You can invoke HELP as the first parameter to ACMEXCPAR.COM. If you do not specify a second parameter, you receive a help message for the entire ACMEXCPAR.COM procedure. Specify HELP as the first parameter to ACMEXCPAR.COM, followed by the name of a single phase as a second parameter to get a help message for that phase only. For example, for help on the GENPAR phase, specify:
$@ACMEXCPAR HELP GENPARYou can also get help for a particular variable by specifying the variable name as the second parameter. For example, to get help for the FORM_CNT variable, specify:$@ACMEXCPAR HELP FORM_CNT
$SET DEFAULT SYS$MANAGER$@ACMEXCPAR FINDVAL<application-name>
$@ACMEXCPAR CURRENT<application-name>
Using the CURRENT parameter invokes the GENVAR, GENPAR, and WRITEPAR phases consecutively.
The ACMEXCPAR procedure uses information in .ADB and .TDB database files, and ACMSGEN parameters to set the initial variables, and puts them in <application-name>_GENVAR.DAT. The FINDVAL phase takes the application name you supply at the command line and appends "_GENVAR.DAT" to it. This file contains initialization values specific to the application you named.
See Table 10.4, ''Phases of ACMEXCPAR.COM'' for a summary of the four phases.
Figure 10.2, ''Setting EXC Process Quotas with ACMEXCPAR.COM'' illustrates the interaction of the four phases of ACMEXCPAR.COM.
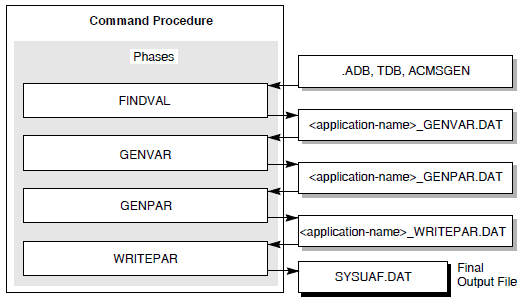
|
Phase |
Description |
|---|---|
|
FINDVAL | |
|
Input file |
None |
|
Output file |
SYS$MANAGER: <application-name>_GENVAR.DAT |
|
Function |
The FINDVAL phase performs the first phase of the ACMEXCPAR.COM procedure. FINDVAL creates a file, <application-name>_GENVAR.DAT, that contains initialization values for the ACMEXCPAR.COM procedure. These values are derived by running ACMSGEN and by using ADU to gather information from the application database and its task group databases. FINDVAL automatically derives the name of the output file from the application name that you supply when you invoke the FINDVAL command procedure. You can also directly create and edit the <application-name>_GENVAR.DAT file. See Section 10.3.2, ''Supplying Variable Values for ACMEXCPAR.COM'' to create the initialization file without using FINDVAL. |
|
GENVAR | |
|
Input file |
SYS$MANAGER: <application-name>_GENVAR.DAT |
|
Output file |
SYS$MANAGER: <application-name>_GENPAR.DAT |
|
Function |
The GENVAR phase performs the second phase of the ACMEXCPAR.COM procedure. GENVAR ensures that values are specified for all variables necessary to calculate EXC quotas. GENVAR automatically derives the names of the input and output files from the application name that you supply when you run the GENVAR command procedure. |
|
GENPAR | |
|
Input file |
SYS$MANAGER: <application-name>_GENPAR.DAT |
|
Output file |
SYS$MANAGER: <application-name>_WRITEPAR.DAT |
|
Function |
The GENPAR phase performs the third phase of the ACMEXCPAR.COM procedure. GENPAR calculates quota values for the Application Execution Controller (EXC). The phase reads the variable values from <application-name>_GENPAR.DAT, calculates the quota values, and writes the values to the file <application-name>_WRITEPAR.DAT. GENPAR automatically derives the names of the input and output files from the application name you supply when you run the command procedure. |
|
WRITEPAR | |
|
Input file |
SYS$MANAGER: <application-name>_WRITEPAR.DAT |
|
Output file |
SYS$SYSTEM:SYSUAF.DAT |
|
Function |
The WRITEPAR phase performs the fourth phase of the ACMEXCPAR.COM procedure. WRITEPAR reads the quota values from <application-name>_WRITEPAR.DAT and uses them to modify the system user authorization file, SYSUAF.DAT. WRITEPAR derives the input file name from the application name you supply when you run the procedure. |
10.3.2. Supplying Variable Values for ACMEXCPAR.COM
Running ACMSGEN to gather ACMSGEN parameters.
Using ADU to gather information from the .ADB file and its .TDB files.
Note
ACMSEXCPAR.COM does not support logical name search lists for TDB file specifications.
Run the ACMEXCPAR.COM FINDVAL phase. FINDVAL derives the variable values by running ACMSGEN and reading from the application and task group databases. FINDVAL creates the file <application-name>_GENVAR.DAT.
- Copy the template file SYS$MANAGER:ACMEXCPAR_GENVAR.DAT to SYS$MANAGER: <application-name>_GENVAR.DAT. Then edit the file and use it for input to the FINDVAL phase rather than having FINDVAL derive the values as described earlier. This allows you to set values for several variables that FINDVAL would otherwise supply with defaults (AGENT_CNT, LOCAL_TDMS_TASK_CNT, REMOTE_AGENT_CNT, REMOTE_TK_INSTANCE_CNT). Example 10.2, ''Variables in ACMEXCPAR_GENVAR.DAT Template'' shows a copy of the SYS$MANAGER:ACMEXCPAR_GENVAR.DAT template.
Example 10.2. Variables in ACMEXCPAR_GENVAR.DAT Template AGENT_CNT = EXC_USERNAME := EXC_TK_INSTANCE_CNT = EXC_RLB_CNT = EXC_MSG_CNT = EXC_TDB_CNT = EXC_RLB_BLKS = EXC_SERVER_CNT = EXC_SP_CNT = FORM_CNT = LOCAL_TDMS_TASK_CNT = REMOTE_AGENT_CNT = REMOTE_TK_INSTANCE_CNT =
Section 10.3.1, ''Running ACMEXCPAR.COM'' describes how to run ACMEXCPAR.COM.
After you become familiar with your ACMS system, you might choose to modify EXC quotas by editing the input or output files of FINDVAL, GENVAR, GENPAR, and WRITEPAR and then running each phase individually. Section 10.3.3, ''Modifying Variable Values for Use by ACMEXCPAR.COM'' describes this method of modifying parameters.
Table 10.5, ''Variables Required for ACMEXCPAR.COM'' describes the variables included in the <application-name>_GENVAR.DAT file and required by ACMEXCPAR.COM. The table lists the ACMS EXC process quotas whose calculations are affected, in part or in whole, by the variables from this file. Most of the variables are application-specific. ACMEXCPAR.COM determines these from information in the .ADB and .TDB database files.
|
Variable | |
|---|---|
|
AGENT_CNT | |
|
Description |
Number of agent processes on the local system submitting tasks to this application. This includes CP, QTI, ALL-IN-1 processes, Request Interface (RI) agents, EXC (if application is using detached tasks), and any other customer-supplied agents submitting tasks to this application. |
|
Default |
2 |
|
Affects |
ASTLM |
|
EXC_ADB_BLKS | |
|
Description |
Size, in blocks, of the application. |
|
Default |
Size, in blocks, of the .ADB file. |
|
Affects |
EXC process quota PGFLQUOTA |
|
EXC_MSG_CNT | |
|
Description |
Number of different message files referred to by all of the task groups in this application. |
|
Default |
Number of message files referred to by task groups in the application (from the ADU
|
|
Affects |
ENQLM, FILLM |
|
EXC_RLB_BLKS | |
|
Description |
Total size (in blocks) of request library (.RLB) files referred to by all of the task groups in this application. Add the size of a request library once for each different task group that refers to it. |
|
Default |
Total size of .RLBs from EXC_RLB_CNT variable. |
|
Affects |
PGFLQUOTA |
|
EXC_RLB_CNT | |
|
Description |
Number of different request library (.RLB) files referred to by all of the task groups in this application. Count a request library once for each different task group that refers to it. |
|
Default |
Number of .RLB files referred to by task groups in the application (from the ADU
|
|
Affects |
ENQLM, FILLM |
|
EXC_SERVER_CNT | |
|
Description |
Number of servers defined in the application database (from the ADU |
|
Default |
Number of servers defined in the application database (from the ADU |
|
Affects |
ASTLM, TQELM |
|
EXC_SP_CNT | |
|
Description |
Number of server processes that can be started for the application at any one time. |
|
Default |
Number of servers defined in the application database (from the ADU |
|
Affects |
ASTLM, TQELM |
|
EXC_TDB_BLKS | |
|
Description |
Size, in blocks, of all the TDBs for the application. |
|
Affects |
EXC process quota PGFLQUOTA |
|
EXC_TDB_CNT | |
|
Description |
Number of task group databases referred to in this application. |
|
Default |
Number of .TDB files referred to in the application database (from the ADU
|
|
Affects |
ENQLM, FILLM, PGFLQUOTA |
|
EXC_TK_INSTANCE_CT | |
|
Description |
The maximum number of currently executing tasks for this application. |
|
Default |
MAXIMUM TASK INSTANCES from the application database, or 64 if none is specified. |
|
Affects |
ASTLM, BIOLM, BYTLM, DIOLM, PGFLQUOTA, TQELM, WSDEFAULT, WSQUOTA, WSEXTENT |
|
EXC_USERNAME | |
|
Description |
User name for the Application Execution Controller (EXC) process. This user name must match the APPLICATION USERNAME specified in the application definition, and be enclosed in quotes or be assigned using the DCL string operator ":=". |
|
Default |
APPLICATION USERNAME from the application database (.ADB) |
|
Affects |
EXC user name entry in the system authorization file |
|
FORM_CNT | |
|
Description |
Number of different DECforms form (.FORM) files referred to by all of the task groups in this application. Count a form file once for each different task group that refers to it. |
|
Default |
Number of .FORM files referred to by task groups in the application (from the ADU
|
|
Affects |
ENQLM, FILLM |
|
LOCAL_TDMS_TASK_CNT | |
|
Description |
Number of concurrently active task instances using TDMS that are submitted by users on the local system. Do not include tasks using TDMS that are submitted from Request Interface (RI) agents. |
|
Default |
10 |
|
Affects |
PGFLQUOTA |
|
REMOTE_AGENT_CNT | |
|
Description |
Number of remote agents (CP, RI, user-written) submitting tasks to this application from remote systems. |
|
Default |
1 |
|
Affects |
BIOLM, BYTLM, FILLM |
|
REMOTE_TK_INSTANCE_CNT | |
|
Description |
Number of concurrently active task instances submitted by users on remote systems. This includes task instances submitted from any type of ACMS agent (including CPs) on remote systems. |
|
Default |
5 |
|
Affects |
BYTLM |
10.3.3. Modifying Variable Values for Use by ACMEXCPAR.COM
$SET DEFAULT SYS$MANAGER$@ACMEXCPAR.COM GENVAR MYAPPL
The ACMEXCPAR procedure uses as input the initialization values in the file MYAPPL_GENVAR.DAT. ACMEXCPAR derives this file name during the GENVAR phase of the procedure. The GENVAR phase takes the MYAPPL application name from the command line and appends "_GENVAR.DAT" to it. The MYAPPL_GENVAR.DAT file contains initialization values that are specific to the MYAPPL application.
Whenever you change a parameter, run all subsequent phases in order to obtain the correct EXC quota values. For example, if you alter a value in the MYAPPL_GENPAR.DAT file, you must invoke GENPAR to perform the calculations, and then invoke WRITEPAR to read the new values and modify the SYSUAF.DAT file.
$@ACMEXCPAR GENPAR MYAPPL
VSI recommends use of the ACMSPARAM.COM and ACMEXCPAR.COM procedures to set system parameters and quotas because these procedures automatically modify other parameters that relate to the parameters that you are changing. However, there are some variables used by ACMSPARAM.COM and ACMEXCPAR.COM that you may want to calculate independently of the command procedures. Appendix A, "Parameter and Quota Calculations" explains in more detail calculations for these variables. Use these formulas for informational or fine-tuning purposes only.
Chapter 11. Changing ACMS Parameter Values with the ACMSGEN Utility
This chapter explains how to use the ACMSGEN Utility to change the values of ACMS system parameters. See Section 11.8, ''Summary of ACMSGEN Commands and Qualifiers'' for a summary of ACMSGEN commands and qualifiers. For reference information on the commands described in this chapter, refer to Chapter 22, "ACMSGEN Commands".
You can also adjust the ACMSGEN-generated parameters using the command procedure ACMSPARAM.COM. It is recommended that you use ACMSPARAM.COM rather than the ACMSGEN Utility, because ACMSPARAM.COM not only adjusts the ACMSGEN parameters, but ACMSPARAM.COM also uses the modified ACMSGEN parameters to modify other related parameters and quotas. Chapter 10, "Setting ACMS Quotas, Parameters, and Privileges" describes the ACMSPARAM.COM and ACMEXCPAR.COM command procedures.
11.1. How ACMSGEN Works
The ACMSGEN Utility is an ACMS tool that lets you modify and display ACMS system parameters. ACMSGEN works in much the same way that the OpenVMS SYSGEN Utility lets you change OpenVMS parameters. The ACMSGEN commands are a subset of the OpenVMS SYSGEN commands, but the ACMSGEN parameters are different.
ACMS keeps a set of systemwide parameter values in parameter files. When the ACMS system starts up, it reads in the current parameter file SYS$SYSTEM:ACMSPAR.ACM.
Once ACMS reads the parameter file, the parameters are stored in the active parameter
global section. The ACMSGEN Utility can place the parameter file and the active
parameter global section in an ACMSGEN work area. Then use ACMSGEN to examine and change
parameter values in the ACMSGEN work area. Finally, you can issue the
WRITE command to have ACMSGEN write out the work area to a
parameter file or to the active parameter global section. By default, ACMSGEN reads the
current parameter file on ACMS system startup and does not write out the work area on
exit.
|
ACMS Component |
Description |
|---|---|
|
ACMS Central Controller (ACC) |
Creates and controls ACMS processes. The ACMSGEN parameters affecting the ACC include the priority of the ACC and its OpenVMS user name. |
|
Command Process (CP) |
Accepts, interprets, and services task selections. With Command Process parameters, you can control which OpenVMS user name the processes run under, and at what priority the processes run. |
|
Terminal Subsystem Controller (TSC) |
Handles ACMS sign-ins and manages Command Processes. With TSC parameters, you can control the maximum and minimum number of Command Processes that can be active, the maximum number of terminals that can be serviced by a single Command Process, the user name the TSC processes run under, and the priority of the TSC processes. |
|
Workspace Pool |
Used by the Application Execution Controller for workspace control and manipulation. Use ACMSGEN to specify the number of pagelets that are allocated to the pools used for workspaces. |
|
Message Switch |
Helps ACMS processes communicate with each other. Use ACMSGEN parameters to control the size of the messages and the amount of memory that can be used to send messages. |
|
Queued Task Initiator (QTI) |
Controls ACMS task queues and dequeues queued task elements for processing. Use ACMSGEN parameters to define the user name and priority for the QTI process. |
11.2. How to Run the ACMSGEN Utility
No special privileges are required to use the ACMSGEN Utility, but to make permanent changes to an ACMS system, you need the OpenVMS SYSPRV privilege. To change parameters for an active system, you must have the OpenVMS OPER privilege.
$MCR ACMSGENACMSGEN>
$RUN SYS$SYSTEM:ACMSGENACMSGEN>
ACMSGEN>SHOW /ALL
HELP
followed by the command name. For
example:ACMSGEN>HELP SHOW
Press Ctrl/B to recall each ACMSGEN command you enter.
EXIT or press
Ctrl/Z to leave ACMSGEN and return to
DCL:ACMSGEN>EXIT$
11.3. Types of Parameter Values
Active values
Values ACMS uses when active. ACMS keeps active values in a system global section. You can change active values for some ACMS system parameters, called dynamic parameters. Change active values for dynamic parameters by writing new values directly to the system global section. The new active values stay in effect as long as ACMS is active, or until you change the active values again.
Current values
Values ACMS uses for initializing the active values. ACMS keeps current values in the parameter file SYS$SYSTEM:ACMSPAR.ACM. You can change current values for all ACMS system parameters.
Work file values
Values you have written to a work file with the ACMSGEN Utility. You can write values to a work file, change the values you have saved, and use the work file values later to update current or active values. See Section 11.5, ''Using a Parameter Work File'' for more information on ACMSGEN work files.
Default values
Values in a default list supplied with the ACMSGEN Utility. Use these default values to reset current, active, or work file values.
11.4. Changing Parameter Values
This section describes how to change current and active parameter values.
11.4.1. Changing Current Values
You can change the current value for any ACMS parameter. However, in addition to SYSPRV privilege, you must have write access to the ACMS parameter file.
To change the current value for one or more parameters, first initialize the work
area with the USE CURRENT, USE ACTIVE,
USE DEFAULT, or USE command. Then, if
necessary, change one or more values in the work area with the
SET command. Finally, update current values with the
WRITE CURRENT command.
SET command if you
are only:Updating current values with values in a work file
Resetting all parameters to default values
Updating current values with active values
ACMSGEN>SET MAX_LOGINS 25ACMSGEN>SET CP_SLOTS 5ACMSGEN>WRITE CURRENT
If this is the first work you do in an ACMSGEN Utility session, the work area
contains current values when you begin, so you do not need to use the USE
CURRENT command. The SET command places new values
for MAX_LOGINS and CP_SLOTS in the work area. The WRITE CURRENT
command writes all values from the work area to the
SYS$SYSTEM:ACMSPAR.ACM file as new current values.
These new current values take effect the next time you start the ACMS system.
Use these same commands (SET and WRITE
CURRENT) to reset some current values to ACMS defaults. If you need to
display default values or other parameter information on the terminal, use the
SHOW command, as described in Section 11.6, ''Displaying Parameter Values''.
USE
DEFAULT and WRITE CURRENT
commands:ACMSGEN>USE DEFAULTACMSGEN>WRITE CURRENT
The USE DEFAULT command places ACMS default values in the work
area. The WRITE CURRENT command writes the default values to the
SYS$SYSTEM:ACMSPAR.ACM file as new current
values.
USE command to
initialize the work area with values from the work file you name as a parameter. For
example:ACMSGEN>USE WORKACMSGEN>WRITE CURRENT
The USE command initializes the work area with values from the
work file SYS$SYSTEM:WORK.ACM. The WRITE
CURRENT command updates current values in the
SYS$SYSTEM:ACMSPAR.ACM file with values from the work
area.
ACMSGEN>USE ACTIVEACMSGEN>WRITE CURRENT
The USE ACTIVE command initializes the work area with active
values from the global section for active values. The WRITE
CURRENT command updates the current values in the
SYS$SYSTEM:ACMSPAR.ACM file with values from the work
area.
11.4.2. Changing Active Values
You can change the active values only for dynamic parameters. To change active
values, you must have SYSPRV privilege. To change the active values for one or more
dynamic parameters, first initialize the work area with the USE,
USE ACTIVE, USE CURRENT, or USE
DEFAULT command. Then, if necessary, change one or more values in the
work area with the SET command. Finally, update active values for
dynamic parameters with the WRITE ACTIVE command.
SET command if you are only:Updating current values with values in a work file
Resetting all parameters to default values
Updating active values for dynamic parameters with current values
ACMSGEN>USE ACTIVEACMSGEN>SET MIN_CPIS 3ACMSGEN>WRITE ACTIVE
The USE ACTIVE command initializes the work area with the
values of the active ACMS system. The SET command places the
value 3 into the work area as the value for MIN_CPIS. The WRITE
ACTIVE command writes values from the work area to the global section
for active values. The value 3 is the active value for MIN_CPIS. That value stays in
effect until ACMS stops or until you change the value again.
Use these same commands to reset some active values to ACMS defaults. To display
default values or other parameter information, use the SHOW
command, described in Section 11.6, ''Displaying Parameter Values''.
USE DEFAULT and WRITE ACTIVE commands. For
example:ACMSGEN>USE DEFAULTACMSGEN>WRITE ACTIVE
The USE DEFAULT command initializes the work area with ACMS
default values for all parameters. The WRITE ACTIVE command makes
the ACMS defaults the active values of ACMS, writing values from the work area to
the global section for active values.
ACMSGEN>USE WORKACMSGEN>WRITE ACTIVE
The USE command initializes the work area with values from the
work file SYS$SYSTEM:WORK.ACM. The WRITE
ACTIVE command updates active values for dynamic parameters with
values from the work area.
ACMSGEN>USE CURRENTACMSGEN>WRITE ACTIVE
The USE CURRENT command initializes the work area with values
from the SYS$SYSTEM:ACMSPAR.ACM file. The WRITE
ACTIVE command updates the active values of dynamic parameters with
values from the work area.
11.5. Using a Parameter Work File
To save current or active values for any reason, copy the values to a work file. Use the ACMSGEN Utility to change values you have saved. Use the values in the work file later as current or active values for ACMS.
WRITE command. The
WRITE command copies values from the work area to the file you
name, creating a new version of the
file:ACMSGEN>WRITE WORK
Because the file specification is not complete, this command writes the values in the work area to the file SYS$SYSTEM:WORK.ACM. If this is the first command in an ACMSGEN session, the command writes the current values of ACMS system parameters to the file.
USE ACTIVE and
WRITE
commands:ACMSGEN>USE ACTIVEACMSGEN>WRITE WORK
The USE ACTIVE command initializes the work area with active values
for parameters. The WRITE command writes the active values for
dynamic ACMS parameters to the file SYS$SYSTEM:WORK.ACM,
creating a new version of the file.
USE DEFAULT and
WRITE
commands:ACMSGEN>USE DEFAULTACMSGEN>WRITE WORK
The USE DEFAULT command initializes the work area with default
values. The WRITE command writes the default values for ACMS system
parameters to the file SYS$SYSTEM:WORK.ACM, creating a new
version of the file.
USE command to copy work file values into the work
area. If you do not include device and directory in your file specification with the
USE command, the default is SYS$SYSTEM.
For
example:ACMSGEN>USE WORKACMSGEN>SET MAX_LOGINS 25ACMSGEN>SET CP_SLOTS 5ACMSGEN>WRITE WORK
The USE command initializes the work area with values from the work
file SYS$SYSTEM:WORK.ACM. The SET command
changes the value for the MAX_LOGINS parameter to 25 and the value for the CP_SLOTS
parameter to 5 in the work area. The WRITE command writes values from
the work area to the file SYS$SYSTEM:WORK.ACM, creating a new
version of the file.
To update current values with values from a work file, use the USE
command and the WRITE CURRENT command. To update active values with
values from a work file, use the USE command and the WRITE
ACTIVE command. These commands are described in Chapter 22, "ACMSGEN Commands".
11.6. Displaying Parameter Values
Use the SHOW command to get information about ACMS parameters,
including their current, active, or default values. You can display values before
changing them.
You must use either a qualifier or the name of an ACMS parameter with the
SHOW command.
SHOW command displays the following information for each
parameter displayed:Name of the parameter
Value in the work area
Default value
Minimum value
Maximum value
Unit of measure
Dynamic/fixed status
ACMSGEN SHOW/ALL command. Example 11.1, ''ACMSGEN SHOW/ALL Command'' shows a
sample display for this command.ACMSGEN>SHOW/ALLParameters in use: CURRENTParameter Name Current Default Minimum Maximum Unit Dynamic -------------- ------- ------- ------- ------- ---- ------- MAX_LOGINS 60 60 0 -1 submitters D MAX_TTS_CP 20 20 0 -1 terminals D PERM_CPS 1 1 0 -1 command prcs D CP_SLOTS 3 3 0 -1 command prcs MIN_CPIS 2 2 0 -1 CP threads DTSC_USERNAME ACMS$TSC SYSTEM TSC_PRIORITY 6 4 0 31 VMS Priority ACC_USERNAME ACMS$ACC SYSTEM ACC_PRIORITY 6 4 0 31 VMS Priority CP_USERNAME ACMS$CP SYSTEM CP_PRIORITY 6 4 0 31 VMS PriorityMAX_APPL 10 10 0 -1 applications MSS_POOLSIZE 512 512 1 -1 Pagelets MSS_MAXBUF 1024 1024 512 65535 Bytes MSS_MAXOBJ 500 500 1 -1 ObjectsWS_POOLSIZE 256 256 1 -1 Pagelets WSC_POOLSIZE 128 128 1 -1 Pagelets TWS_POOLSIZE 1600 1600 1 -1 Pagelets TWSC_POOLSIZE 50 50 1 -1 Pagelets USERNAME_DEFAULT ACMS_USER D NODE_NAME ARKMSS_PROCESS_POOL 256 256 1 -1 Pagelets MSS_NET_RETRY_TIMER 10 10 1 -1 seconds D QTI_USERNAME QTI_NAME SYSTEM VMS username QTI_PRIORITY 4 4 0 31 VMS Priority QTI_SUB_TIMEOUT 7200 7200 1 -1 seconds D QTI_RETRY_TIMER 180 1800 1 -1 seconds D QTI_POLLING_TIMER 5000 5000 1 -1 milliseconds D
| Parameters in use Displays the source of the values now in the work area. The CURRENT,
ACTIVE, or DEFAULT keyword, or a file specification, can follow "Parameters
in use ". At the start of an ACMSGEN session, the keyword CURRENT follows
"Parameters in use" because the work area contains current values by
default. Each |
| Current Shows the values that are currently in the work area. Before you use a
|
| Default Lists ACMS default values. |
| Minimum and Maximum Contain the limits for parameter values. A value of -1 means that a parameter has no maximum value. |
| Unit Displays the units of measure for each parameter value. "CP Threads" refers to Command Process threads. Each user has one Command Process thread. "Submitters" refers to ACMS users. |
| Dynamic Indicates whether a parameter is dynamic or fixed. A blank in the dynamic column means that a parameter is fixed. |
SHOW/TSC command. Example 11.2, ''ACMSGEN SHOW/TSC Command'' shows a sample
display from this command.ACMSGEN>USE ACTIVEACMSGEN>SHOW/TSCParameters in use: ACTIVE Parameter Name Current Default Minimum Maximum Unit Dynamic -------------- ------- ------- ------- ------- ---- ------- MAX_LOGINS 20 60 0 -1 submitters D MAX_TTS_CP 5 20 0 -1 terminals D PERM_CPS 1 1 0 -1 command prcs D CP_SLOTS 3 3 0 -1 command prcs MIN_CPIS 2 2 0 -1 CP threads D TSC_USERNAME SYSTEM SYSTEM VMS username TSC_PRIORITY 6 4 0 31 VMS priority
The ACTIVE keyword after "Parameters in use" indicates that the last
USE command was USE ACTIVE.
SHOW followed by the
name of the parameter. For example, the following SHOW command
displays a value for the MAX_LOGINS parameter from the work file WORK.ACM in
SYS$SYSTEM:ACMSGEN>USE WORKACMSGEN>SHOW MAX_LOGINS
USE command initializes the work area with values from the work
file WORK.ACM. The SHOW command displays the value from the work file
for the MAX_LOGINS parameter. The following is a sample display for the SHOW
MAX_LOGINS
command:ACMSGEN>SHOW MAX_LOGINSMAX_LOGINS 20 60 0 -1 submitters D
When you display information for only one parameter, the display does not contain headers.
11.7. ACMS Parameters
This section lists the types of ACMS parameters and their value ranges, and provides a description of each ACMS parameter.
11.7.1. Types of ACMS Parameters
The six types of ACMS parameters are: ACC, CP, message switch, QTI, TSC, and workspace pool.
|
Command |
Parameter |
|---|---|
|
ACMS Central Controller Parameters | |
|
SHOW/ACC |
ACC_PRIORITY |
|
ACC_USERNAME | |
|
MAX_APPL | |
|
USERNAME_DEFAULT | |
|
Command Process Parameters | |
|
SHOW/CP |
CP_PRIORITY |
|
CP_USERNAME | |
|
Message Switch Parameters | |
|
SHOW/MSS |
MSS_MAXBUF |
|
MSS_MAXOBJ | |
|
MSS_NET_RETRY_TIMER | |
|
MSS_POOLSIZE | |
|
MSS_PROCESS_POOL | |
|
NODE_NAME | |
|
Queued Task Initiator Parameters | |
|
SHOW/QTI |
QTI_POLLING_TIMER |
|
QTI_PRIORITY | |
|
QTI_RETRY_TIMER | |
|
QTI_SUB_TIMEOUT | |
|
QTI_USERNAME | |
|
Terminal Subsystem Controller Parameters | |
|
SHOW/TSC |
CP_SLOTS |
|
MAX_LOGINS | |
|
MAX_TTS_CP | |
|
MIN_CPIS | |
|
PERM_CPS | |
|
TSC_PRIORITY | |
|
TSC_USERNAME | |
|
Workspace Pool Parameters | |
|
SHOW/EXC |
TWS_POOLSIZE |
|
TWSC_POOLSIZE | |
|
WS_POOLSIZE | |
|
WSC_POOLSIZE | |
11.7.2. Parameter Descriptions
ACC_PRIORITY
Is the OpenVMS priority used by the ACMS Central Controller. ACC_PRIORITY overrides the SYSUAF default priority. Usually the ACMS default value for ACC_PRIORITY is adequate. Too high a priority can lock out other OpenVMS users. Too low a priority decreases ACMS performance.
ACC_USERNAME
Is the OpenVMS user name used by the ACMS Central Controller. The default user name is SYSTEM. See Chapter 10, "Setting ACMS Quotas, Parameters, and Privileges" for information about the privileges and quotas you assign to ACC_USERNAME.
CP_PRIORITY
Is the OpenVMS priority used by Command Processes. CP_PRIORITY overrides the SYSUAF default priority. Usually the ACMS default value for CP_PRIORITY is adequate. Too high a priority can lock out other OpenVMS users. Too low a priority decreases ACMS performance.
CP_SLOTS
Limits the number of Command Processes that can be active. Because each terminal must be assigned to a Command Process, too low a value limits the number of terminals an active ACMS system can handle. The value for the CP_SLOTS parameter can be high without decreasing performance.
CP_USERNAME
Is the OpenVMS user name used by Command Processes. The default user name is SYSTEM. The user name you assign must have read access to the file pointed to by the logical name ACMS$NOTICE. See Chapter 10, "Setting ACMS Quotas, Parameters, and Privileges" for information about the privileges and quotas you assign to CP_USERNAME. The CP user name must be authorized as an agent in the UDU authorization file.
MAX_APPL
Limits the number of applications that can be active at any time. When the number of started applications reaches MAX_APPL, any attempt to start an additional application fails. Too high a value allows too many applications to be started, which can decrease system performance. Too low a value unnecessarily restricts the number of applications you can start.
MAX_LOGINS
Limits the number of users who can sign in to ACMS. You can set MAX_LOGINS to 0 if you do not want anyone to sign in. Too high a value for MAX_LOGINS decreases performance by letting too many users sign in to ACMS. See Section A.5.1, ''Calculating the Value of MAX_LOGINS'' for information about changing the value of this parameter.
MAX_TTS_CP
Limits the number of terminals ACMS can assign to a Command Process. ACMS assigns terminals to a Command Process until the number of terminals assigned reaches the MAX_TTS_CP value. Too low a value for MAX_TTS_CP minimizes the advantages of using Command Processes by decreasing the ratio of terminals to processes. Too high a value slows the system.
MIN_CPIS
Prevents delays at sign-in by starting command processes before users need them. ACMS can always assign at least the number of terminals set by the MIN_CPIS value to an active command process. If user's signing in decreases the number of possible assignments to less than the value of MIN_CPIS, ACMS starts another Command Process. If the value for the MIN_CPIS parameter is too low, there is a delay when a user signs in. Too high a value for the MIN_CPIS parameter decreases ACMS performance by increasing overhead.
MSS_MAXBUF
Specifies the maximum size of a message that can be sent without incurring the overhead associated with blocking the message. If MSS_MAXBUF is set at too high a level, there may never be enough memory to allocate to the message. In this case, the message could go into a resource wait state. However, if MSS_MAXBUF is set at too low a level, overhead associated with blocking messages is incurred. See Section A.5.3, ''Calculating the Value of MSS_MAXBUF'' for information about changing the value of MSS_MAXBUF.
MSS_MAXOBJ
Specifies the maximum number of message switch objects that can be created on a system at one time. The MSS_MAXOBJ parameter determines the size of the table set up in the message pool. If MSS_MAXOBJ is set at too high a level, this table uses more of the message switch global pool, whose size is affected by the MSS_POOLSIZE parameter. However, if MSS_MAXOBJ is set at too low a level, message switch created objects will fail and cause some ACMS operations to fail. In this case, the Software Event Log contains the message MSS$_OBJFULL_F_ object table full, indicating that MSS_MAXOBJ has been exceeded.
MSS_NET_RETRY_TIMER
Defines the number of seconds ACMS waits to retry creating a DECnet object when ACMS distributed processing is enabled. The range for this parameter is 1 to -1 seconds. The default is 10 seconds.
MSS_POOLSIZE
Is the maximum amount of memory that can be used to send messages. The MSS_POOLSIZE parameter sets up a global section backed by the page file. If the MSS_POOLSIZE parameter is set at too high a level, system parameters associated with global sections (gblsections and gblpages) and the page file for global sections (gblpagfil) must be increased. However, if the MSS_POOLSIZE is set at too low a level, messages may be put into a resource wait state or may fail.
MSS_PROCESS_POOL
Note
MSS_PROCESS_POOL is overridden by the value of logical name ACMS$MSS_PROCESS_POOLSIZE if that logical name is defined. This can be useful if you need a large process pool, such as for a large number of single-threaded SI agents.
NODE_NAME
Defines the DECnet node name for your ACMS system and enables distributed ACMS processing when defined. When you define NODE_NAME, ACMS allows distributed forms processing provided DECnet is started. By default, the NODE_NAME parameter is null, which disables distributed forms processing.
PERM_CPS
Sets the number of permanently active command processes. The PERM_CPS parameter ensures that some Command Processes are always available when ACMS is active. If the value for PERM_CPS is too low, ACMS can start several Command Processes while ACMS is active. Because the overhead from starting Command Processes is high, too low a value decreases ACMS performance. Too high a value wastes ACMS resources because some Command Processes go unused. See Section A.5.6, ''Calculating the Value of PERM_CPS'' for information about changing the value of PERM_CPS.
QTI_POLLING_TIMER
Specifies how long the QTI waits to try to access a queued task when an RMS locking situation was previously encountered the last time the QTI accessed the queue.
QTI_PRIORITY
Defines the OpenVMS priority for the QTI process. A value that is too high locks out other OpenVMS users; a value that is too low can decrease ACMS performance.
QTI_RETRY_TIMER
Specifies how long the QTI waits before attempting to reinvoke a queued task whose previous invocation failed. For example, if the application is not started, then the QTI waits the specified number of seconds before reinvoking the queued task.
When a queued task element does not complete successfully and is to be retried
later, the QTI process sets the queued task element on HOLD. These elements, which
have been placed on hold by the QTI, have a state value of "HOLD (RETRY
PENDING)" when displayed by the ACMSQUEMGR using the SHOW
ELEMENT command.
When the number of seconds identified by the QTI_RETRY_TIMER parameter has elapsed, the QTI process resets the element to NOHOLD. Thus, the element becomes a candidate for the next dequeue operation on the queue by a task execution thread. Elements are dequeued by highest priority, and are first-in/first-out (FIFO) within priority.
The effective value of QTI_RETRY_TIMER can be slightly greater than the value you set for the QTI_RETRY_TIMER parameter. That is, the amount of time that the QTI waits before retrying a failed task may be slightly longer than you specify. For the QTI to reset the hold state of queued task elements that are to be retried, it periodically scans all the task queues that are started and inspects the queued task elements that are in the HOLD (RETRY PENDING) state. The frequency at which the QTI performs this scan is 1/10 the value of QTI_RETRY_TIMER, but no less than every second and no more than every 5 minutes. For example, if QTI_RETRY_TIMER is set for 1800 seconds (1/2 hour), then the QTI scans all started queues every 180 seconds (3 minutes). In this example, the actual effective value for QTI_RETRY_TIMER could be as long as 33 minutes even though the QTI_RETRY_TIMER value specified is 30 minutes.
QTI_SUB_TIMEOUT
Specifies the amount of time that an inactive submitter remains signed in to the system before being signed out. The QTI caches submitter sign-ins so that it is not necessary to sign in every time a task is submitted.
Because each submitter that is signed in to ACMS consumes memory resources in the QTI, the ACC, and the EXC processes, the QTI process uses a mechanism that enables it to bypass a submitter sign-in for each task. Specifically, when the QTI process dequeues a queued task element, it checks the user name of that element. If it is the first time the QTI process has dequeued an element with that user name, it signs the submitter in to ACMS. However, the QTI process does not sign out of ACMS as usual. Instead, the QTI process leaves the submitter signed in for a certain amount of time before signing it out. That way, if another queue element with the same user name is dequeued, that user name is already signed in.
Use the ACMSGEN parameter QTI_SUB_TIMEOUT to indicate how long a submitter can
remain inactive before the QTI process signs that submitter out of ACMS. To
determine how many submitters are signed in under a QTI process, use the
ACMS/SHOW QTI command.
QTI_USERNAME
Defines the OpenVMS user name for the queuing process. See Chapter 10, "Setting ACMS Quotas, Parameters, and Privileges" for information about the privileges and quotas you assign to QTI_USERNAME. The QTI user name must be authorized as an agent in the UDU authorization file.
TSC_PRIORITY
Specifies the OpenVMS priority used by the TSC. TSC_PRIORITY overrides the SYSUAF default priority. Usually the ACMS default value for TSC_PRIORITY is adequate. Too high a value for TSC_PRIORITY can lock out other users. Too low a value decreases ACMS performance.
TSC_USERNAME
Is the OpenVMS user name used by the TSC. The default user name is SYSTEM. See Chapter 10, "Setting ACMS Quotas, Parameters, and Privileges" in this manual for information about the privileges and quotas you assign to TSC_USERNAME.
TWS_POOLSIZE
Controls the overall size of the temporary pools that task workspaces use when a task is started. When you start a task, the group and user workspaces the task uses, as well as system workspaces and task workspaces, are copied into temporary workspaces for use by the task. At any given time, the sum of all group, user, system, and task workspaces for all active tasks cannot exceed this number. The default value is 1600 pagelets. See Section A.5.7.3, ''ACMS Workspace Pool Requirements'' for more information about workspace pools.
TWSC_POOLSIZE
Controls the overall size of the pool used to store information needed to allocate the task instance workspaces stored in the TWS_POOLSIZE pool. The default value of 50 pagelets causes the same amount of pool to be allocated as in previous versions of ACMS. See Section A.5.7.3, ''ACMS Workspace Pool Requirements'' for more information about workspace pools.
USERNAME_DEFAULT
Defines a default submitter user name account used for remote task submitters that do not have an individual proxy account, or for task submitters from non-ACMS agents. The default submitter user name account must be authorized by the OpenVMS Authorize Utility in the SYSUAF.DAT file.
WS_POOLSIZE
Specifies the number of OpenVMS pages that are allocated to the workspace pool used for the group and user workspaces. This number of pages is allocated for each application. The default value of 256 pagelets causes the same amount of pool to be allocated as in previous versions of ACMS. See Section A.5.7.3, ''ACMS Workspace Pool Requirements'' for more information about workspace pools.
WSC_POOLSIZE
Specifies the number of OpenVMS pages that are allocated to the pool used for the control information for the group and user workspaces. The default value is 128 pagelets. See Section A.5.7.3, ''ACMS Workspace Pool Requirements'' for more information about workspace pools.
11.7.3. Parameter Values
|
Parameter |
Range |
Default |
Dynamic |
|---|---|---|---|
|
ACC_PRIORITY |
0 to 31 |
4 |
No |
|
ACC_USERNAME |
None |
SYSTEM |
No |
|
CP_PRIORITY |
0 to 31 |
4 |
No |
|
CP_SLOTS |
0 to -1 |
3 |
No |
|
CP_USERNAME |
None |
SYSTEM |
No |
|
MAX_APPL |
1 to -1 |
10 |
No |
|
MAX_LOGINS |
0 to -1 |
60 |
Yes |
|
MAX_TTS_CP |
0 to -1 |
20? |
Yes |
|
MIN_CPIS |
0 to -1 |
2 |
Yes |
|
MSS_MAXBUF |
512 to 65K bytes |
1024 bytes |
No |
|
MSS_MAXOBJ |
1 to -1 objects |
500 objects |
No |
|
MSS_PROCESS_POOL |
1 to -1 |
256 |
No |
|
MSS_POOLSIZE |
1 to -1 pages |
512 pages? |
No |
|
1 to -1 pagelets? |
512 pagelets? |
No | |
|
MSS_NET_RETRY_TIMER |
1 to -1 |
10 |
Yes |
|
NODE_NAME |
None |
None |
No |
|
PERM_CPS |
0 to -1 |
1 |
Yes |
|
QTI_POLLING_TIMER |
1 to -1 |
5000 milliseconds |
Yes |
|
QTI_PRIORITY |
0 to 31 |
4 |
No |
|
QTI_RETRY_TIMER |
1 to -1 |
1800 seconds |
Yes |
|
QTI_SUB_TIMEOUT |
1 to -1 |
7200 seconds |
Yes |
|
QTI_USERNAME |
None |
SYSTEM |
No |
|
TSC_PRIORITY |
0 to 31 |
4 |
No |
|
TSC_USERNAME |
None |
SYSTEM |
No |
|
TWS_POOLSIZE |
1 to -1 pages? |
350 pages? |
No |
|
1 to -1 pagelets? |
1600 pagelets? |
No | |
|
TWSC_POOLSIZE |
1 to -1 pages? |
50 pages? |
No |
|
1 to -1 pagelets? |
50 pagelets? |
No | |
|
USERNAME_DEFAULT |
None |
None |
Yes |
|
WS_POOLSIZE |
1 to -1 pages ? |
256 pages? |
No |
|
1 to -1 pagelets? |
256 pagelets? |
No | |
|
WSC_POOLSIZE |
1 to -1 pages? |
128 pages? |
No |
|
1 to -1 pagelets? |
128 pagelets? |
No |
11.8. Summary of ACMSGEN Commands and Qualifiers
|
Commands and Qualifiers |
Description |
|---|---|
|
EXIT |
Ends the ACMSGEN session and returns you to the DCL prompt. |
|
HELP |
Displays help information about ACMSGEN commands, parameters, and qualifiers. |
|
SET |
Places a new parameter value in the ACMSGEN work area. |
|
Displays the value in the work area, the default value, the minimum value, the maximum value, the unit of measure, and the dynamic/fixed status for ACMS system parameters. |
|
USE |
Initializes the ACMSGEN work area with values from a work file. |
|
USE ACTIVE |
Initializes the ACMSGEN work area with active values for all parameters from an ACMS system global section. |
|
USE CURRENT |
Initializes the ACMSGEN work area with current values for all parameters from the SYS$SYSTEM:ACMSPAR.ACM parameter file. |
|
USE DEFAULT |
Initializes the ACMSGEN work area with ACMS default values for all ACMS parameters. |
|
WRITE |
Writes values from the ACMSGEN work area to a work file, creating a new version of the file. |
|
WRITE ACTIVE |
Changes active values for dynamic parameters by writing values from the ACMSGEN work area to an ACMS system global section. |
|
WRITE CURRENT |
Changes current values by writing values from the ACMSGEN work area to the SYS$SYSTEM:ACMSPAR.ACMS file. |
Chapter 12. Auditing Applications with the Audit Trail Logger
This chapter explains how to use the Audit Trail Logger (ATL) and the Audit Trail Report (ATR) Utility to monitor the use and misuse of your application. See Section 12.9, ''Summary of the ATR Commands and Qualifiers'' for a summary of ATR commands and qualifiers. For reference information on the commands described in this chapter, refer to Chapter 23, "ATR Commands".
12.1. Understanding the Audit Trail Logger
ACMS system starts and stops
ACMS application starts and stops
User sign-ins and sign-outs
What tasks users run and where they encounter errors
What activities are taking place on distributed ACMS systems
User errors
Modifications to application, task, and server attributes
Server process dumps
Queued Task Initiator (QTI) process events
Server image replacement
Other significant events
The Audit Trail Logger is automatically started with the ACMS system. Disable the
Audit Trail Logger by using the /NOAUDIT qualifier either on the
ACMS/START SYSTEM command or the ACMS/SET
SYSTEM command. When the Audit Trail Logger is disabled, it only records
file opens and closes. Use the /AUDIT qualifier with either of these
commands to reenable auditing.
Use the ATR Utility to display audit trail records or write them to an output file.
12.2. Using the Audit Trail Log File
Each time the ACMS system starts, it creates a new version of the audit trail log file. ACMS writes Audit Trail Logger information to the file SYS$ERRORLOG:ACMSAUDIT.LOG by default. The default protection for the audit trail log file is (S:RD,O:RWED,G:R). The Audit Trail Logger must have write access to the audit trail log file for you to start your ACMS system.
ACMS$ATL_DEQ_BLOCKS – The default extension quantity (DEQ) specifies the number of blocks to be added when the file is extended. Valid values are 0 through 65535.
ACMS$ATL_ALQ_BLOCKS – The allocation quantity (ALQ) specifies the number of blocks to be initially allocated when the log is created. Valid values are 0 through 4,294,967,295.
See the VSI OpenVMS Record Management Services Reference Manual for additional information about these fields.
$DEFINE/SYSTEM ACMS$AUDIT_LOG SYS$DISK:[ACMS.AUDIT]
Note the logical must be a system logical so that the Audit Trail Logger has access to it.
If you write audit trail information to a file on disk, take the steps needed to process audit trail log files as ACMS creates them. For example, you can purge audit trail log files or store them on a separate volume.
If the Audit Trail Logger runs out of space for audit trail information on disk, the
audit trail logs the error in the software event log (generated by SWL), and the Audit
Trail Logger process stops. ACMS sends a message to ACMS operator terminals. Restart the
Audit Trail Logger process with the ACMS/SET SYSTEM /AUDIT command or
the ACMS/RESET AUDIT command.
MTxn:name.ext
MT – Device type for a magnetic tape drive
x – Controller code for the tape drive
n – Unit number of the tape drive
name – File name for the log file
ext – File type for the log file
$DEFINE /SYSTEM ACMS$AUDIT_LOG MTA0:
The default file name and file type are taken from the file specification SYS$ERRORLOG:ACMSAUDIT.LOG.
ACMS/START
SYSTEM command can time out before the initialization is complete.
Initialize the magnetic tape with a volume name the same as the first six characters of
the file name for the audit trail log file. For
example:$INIT MTA0: ACMSAU
If the file name is longer than six characters, the Audit Trail Logger truncates the
volume name to six characters. Do not use the MOUNT command after
initializing the tape. ACMS logically mounts the magnetic tape when it starts the Audit
Trail Logger. If the tape is already mounted, ACMS returns a fatal error on the
ACMS/START SYSTEM command.
REPLY command. The Audit Trail Logger then logs information to
the new volume.Note
If the audit trail log file is being written to magnetic tape that runs out of space, ACMS may interrupt its work until a new tape is ready. OpenVMS operator terminals are informed that a new tape must be mounted. Eventually, terminal users do not get any system response. To avoid this problem, store your audit information on large magnetic tapes. Inspect the tape regularly to make sure that it is not full.
For information about magnetic tapes, see VSI OpenVMS System Manager's Manual, Volume 1: Essentials. For information
about the REPLY command, see the VSI OpenVMS DCL Dictionary: N–Z.
12.3. Events Recorded by the Audit Trail Logger
Flagged events – Events flagged when auditing is enabled using the application-level AUDIT clause or subclause, or with the AUDIT keyword in ACMS operator commands.
Default events – Events that the Audit Trail Logger logs regardless of application definition or operator command. Table 12.1, ''Events Logged by the Audit Trail Logger'' marks default events in the "When Recorded" column with the word "Always".
|
Events Recorded |
Explanation |
When Recorded |
|---|---|---|
|
Abnormal terminations of applications |
Stopping of applications for any reason other than
|
Always |
|
Abnormal terminations of server processes |
Stopping of server processes due to error |
Always |
|
ACMS errors |
ACMS system internal errors |
Always |
|
Application starts and stops |
Each use of |
Always |
|
Application modifications |
Each use of the |
Application auditing enabled |
|
Open new audit trail log file |
Each use of an |
Always |
|
Enabling and disabling of the Audit Trail Logger |
Each use of the |
Always |
|
Enabling and disabling of ACMS operator terminals |
Each use of the |
Always |
|
Error allocating ACMS-controlled terminals |
Why an ACMS-controlled terminal was unable to be allocated by the ACMS terminal subsystem controller |
Always |
|
Errors returned or signaled by cancel handling procedures |
Each error encountered by user-written cancel handlers |
Always |
|
Errors returned or signaled on initialization and termination procedures |
Each error encountered by user-written initialization and termination procedures |
Always |
|
Errors signaled by processing steps |
Each error signaled during a processing step |
Always |
|
Failure to start a server process |
Why a server process failed to start |
Always |
|
Sign-ins and sign-outs |
Who signed in to or out of ACMS and at what time |
Always |
|
Queue starts and stops |
Each use of the |
Always |
|
Queue modifications |
Each use of the |
Always |
|
Queued task failures |
Each error that caused the task invocation to fail |
Always |
|
Server replacement |
Each use of the |
Always |
|
System starts and stops |
Each use of |
Always |
|
Task calls |
Tasks called by other tasks |
Task subclause |
|
Task chains |
Tasks chained to from another task |
Task auditing enabled |
|
Task cancellations |
Tasks canceled by any method |
Task auditing enabled |
|
Composed task transaction aborts |
When a composed task transaction was aborted |
Always |
|
Task completions |
Completed tasks, who completed each task, and when |
Always |
|
Task selections |
Each task selected by a user |
Task auditing enabled |
|
User errors not elsewhere reported |
User errors, including errors ACMS cannot report back to the user |
Always |
|
Submitter authentications in remote applications |
As a security measure, when a submitter first selects a task in a remote application, the submitter is authenticated by the application execution controller (ACC) on the submitter node |
Always |
Use ATR commands to read the events recorded in the audit trail log file or to produce a report that lists the events. The following sections describe how to run the ATR Utility and use ATR commands.
12.4. Running the ATR Utility
$RUN SYS$SYSTEM:ACMSATRATR>
$MCR ACMSATRATR>
$ATR:==$SYS$SYSTEM:ACMSATR
$ATR LIST /APPLICATION=EXEX_APPL /BEFORE=14-JAN-1991
ATR> prompt, enter ATR commands. Use the
LIST command to display or list audit trail records. Use the
HELP command to get information about ATR commands. For
example:ATR>HELP LIST
Instead of typing ATR commands, you can use keypad keys to enter commands. Press PF1 and PF2 for access to the ATR keypad. Press Ctrl/B to recall the last 20 ATR commands you enter (one at a time).
ATR>EXIT$
HELP
command:$HELP @ACMSATR
12.5. Creating Log Reports
The ATR Utility LIST command generates an ACMS log report consisting of
records from the Audit Trail Logger. Include a file specification with the
LIST command to identify a concatenated file containing several
audit trail log files, or omit the file specification altogether. If you omit the file
specification, ATR searches for a translation for the logical
ACMS$AUDIT_LOG. If ACMS$AUDIT_LOG
is not defined, ATR uses the default file specification,
SYS$ERRORLOG:ACMSAUDIT.LOG.
12.5.1. Creating Full Log Reports
The LIST command with the /OUTPUT qualifier
writes full Audit Trail Logger reports to a listing file. If you do not use the
/OUTPUT qualifier, the ATR Utility displays information on
the terminal.
/OUTPUT
qualifier to send the output to a listing file.ATR>LISTACMS Log Report 5-JAN-1991************************************************************sAppl : TEST
Task : TSK1M2
Type : TASK Time : 1-JAN-1991 12:17:19.06 Appl : TEST Task : TSK1M2 User : LTUSER2 ID : CARAT::00010036-00000001-47E6F8C0-008DDDDE Sub : CARAT::00010036-00000000-47E6F8C0-008DDDDE Text : Task end Task completion status: Task completed normally ************************************************************
| ACMS Log Report The name of the report. |
| Date and time The date and starting time for processing the report. |
| The criteria for selecting the records in the report. An asterisk (*) indicates that you did not use a criterion to select records. "ALL " indicates that you did not select records by record type. |
| File The information included to identify the source file, including the file name or file specification. |
| Type The type of information in the record. |
| Time The time the record was created. |
| Appl The application name for an active task. |
| Task The name of the active task. |
| User The OpenVMS user name of the user who submitted the task. |
| ID The ACMS task identification code for one task instance. |
| Sub The ACMS task submitter identification code for an ACMS user running a task. |
| Text A description of the event recorded. |
| End Report The date and time that report processing concluded. |
12.5.2. Creating Brief Log Reports
/BRIEF qualifier limits how much information is included in the report.
Each record in a brief report contains the time of the entry in the Audit Trail
Logger and the type of information in the entry. For information about record types,
see the description of the /TYPE qualifier. The default is to
include full records in the report. Example 12.2, ''ATR LIST/BRIEF Command'' provides an
example of an ACMS log report containing a brief version of each record in the Audit
Trail Logger.ATR>LIST/BRIEFACMS Log Report 5-JAN-1991************************************************************ Type : OTHER Time : 1-JAN-1991 11:57:35.03 Type : COMMAND Time : 1-JAN-1991 11:57:42.97 Type : COMMAND Time : 1-JAN-1991 11:59:05.42 Type : LOGIN Time : 1-JAN-1991 11:59:34.61 Type : LOGIN Time : 1-JAN-1991 11:59:35.63 Type : LOGIN Time : 1-JAN-1991 11:59:42.04 Type : LOGIN Time : 1-JAN-1991 11:59:43.05Type : TASK Time : 1-JAN-1991 12:00:55.00 Type : TASK Time : 1-JAN-1991 12:00:55.92Type : TASK Time : 1-JAN-1991 12:02:18.22 Type : LOGIN Time : 1-JAN-1991 12:02:19.82 Type : TASK Time : 1-JAN-1991 12:02:19.87 Type : LOGIN Time : 1-JAN-1991 12:02:19.98 Type : TASK Time : 1-JAN-1991 12:02:20.81 Type : TASK Time : 1-JAN-1991 12:02:22.15
| ACMS Log Report The name of the report. |
| Date and time The starting date and time for processing the report. |
| The criteria for selecting the records in the report. An asterisk (*) indicates that you did not use a criterion to select records. "ALL " indicates that you did not select records by record type. |
| File The information included to identify the source file, including the file name or file specification. |
| Type A listing of all records that meet your selection criteria. If you do not use qualifiers to select records for the report, the report contains all records in the input file. |
| End Report The time report processing concluded. |
12.6. Selecting Audit Trail Records
Use LIST command qualifiers to select records from the Audit Trail Logger.
Which qualifier or qualifiers you use depends on the kind of application or task
information you want or on how much information you want.
The /SINCE and /BEFORE qualifiers let you select records
by time range. The /APPLICATION, /IDENTIFICATION,
/SUBMITTER, /TASK,
/TERMINAL, /TYPE, and
/USERNAME qualifiers each select records containing the
information you include on the qualifier. For example, the
/APPLICATION qualifier selects records containing the application
name you include. Combinations of qualifiers further restrict the information in the
report.
12.6.1. Selecting Records by Submitter and Task Identification Code
Every submitter that signs in to ACMS receives a submitter identification code, or submitter ID, that ACMS associates with the submitter until the submitter signs out. Every submitter ID is unique. Similarly, each task instance receives a task identification code, or task ID, that is also unique.
Use submitter and task IDs with operator commands and with the ATR
LIST command. Submitter and task IDs on command qualifiers
limit the scope of the command you use. For example, a submitter ID on the
/SUBMITTER qualifier of the LIST command
defines which audit trail records are extracted from the audit trail log.
Both a submitter ID and a task ID have the following format:
A called task ID has the following format:
CARAT::0455002C-00000000-F7B46260-008DEB44
MYOHMY::0001002F-00000017-F7B46260-008DEB44
MYOHMY::0001002F-00000017-F7B46260-008DEB44-00000001
The sequence number in a submitter ID is always zero. A dash (–) separates boot-time fields for readability, but both fields are considered one field. A task ID is the same as the task submitter's submitter ID, except that the sequence number field contains a hexadecimal number that is incremented for each task selection.
If a task is a called task (that is, a task called by another task) the task ID contains an additional field called the task-call field. The task call field is a hexadecimal number that is incremented each time a task calls another task. This field is only displayed for tasks called by other tasks.
Submitter ID display format:
For example:NODE1::0455002C
- Task ID display format:
node::local-id–sequence-number–task-callFor example:NODE1::0455002C-0000001A-00000001
When you specify a submitter or task ID with an operator or ATR Utility command, any of the fields that you do not specify are implicitly wildcarded. A dash (–) separates fields, such as local-id and sequence-no, to allow you to omit leading fields. You can omit leading zeros in any of the fields, except the node field.
/SUBMITTER qualifier of the ACMS/SHOW TASK
command. For
example:$ACMS/SHOW TASK/SUBMITTER=ROW::
/IDENTIFIER
qualifier of the LIST command. Because you are not specifying the
local ID field, indicate that you are omitting that leading field by using a dash.
For
example:ATR>LIST/IDENTIFIER=-1
When you specify a full task ID, the report only contains records generated by that particular task.
12.6.2. Selecting Application Information
Use the /APPLICATION qualifier to create an audit log report of only
application information.
12.6.3. Selecting Task Information
/APPLICATION/BEFORE/IDENTIFICATION/SINCE/TYPE
The LIST command with the /TYPE=TASK
qualifier causes the ATR Utility to display information about all tasks. Use the
/IDENTIFICATION qualifier to display information about a
particular task by specifying the task ID. See Section 12.6.1, ''Selecting Records by Submitter and Task Identification Code''
for information on specifying a task ID. You can use more than one of these
qualifiers on the LIST command to select information. For
example, the /TASK qualifier and the /BEFORE
and /SINCE qualifiers return information about tasks in a time
range.
LIST/TYPE=TASK command. It includes records about two
different tasks: DBMS_SINGLE_TASK is a task in the TESTB application and TSK0101R is
a task in the TESTB application.ATR>LIST/TYPE=TASKACMS Log Report 4-JAN-1991Type : TASK Time : 1-JAN-1991 13:50:59.58 Appl : TESTB Task : DBMS_SINGLE_TASK User : LTUSER28 ID : CARAT::00010045-0000000A-38A21C80-008DDDE5 Sub : CARAT::00010045-00000000-38A21C80-008DDDE5 Text : Task endType : TASK Time : 1-JAN-1991 13:51:34.88 Appl : TESTB Task : TSK0101R User : LTUSER46 ID : CARAT::0001005B-00000013-38A21C80-008DDDE5 Sub : CARAT::0001005B-00000000-38A21C80-008DDDE5 Text : Task end Task completion status: Task completed normally ************************************************************ End Report 1-JAN-1991 14:10:40.27
| ACMS Log Report The name of the report. |
| Date and time The date and starting time for processing the report. |
| The criteria for selecting the records in the report. An asterisk (*) indicates that you did not use a criterion to select records. "ALL " indicates that you did not select records by record type. |
| File The information you included to identify the source file, including the file name or file specification. |
| Type Type of audit record. |
| Time Date and time the record was written. |
| Appl Application name. |
| Task Task name. |
| User User name of the task submitter. |
| ID Task ID. |
| Sub Submitter ID. |
| Text Message text. |
| Task completion status Additional status text. |
/TASK qualifier to list information about particular
tasks. The following command lists information about all tasks with the name
DBMS_SINGLE_TASK:ATR>LIST/TASK=DBMS_SINGLE_TASK
/APPLICATION qualifier with the /TASK
qualifier to return information about only one of these tasks. For
example:ATR>LIST/TASK=TSK0101R /APPLICATION=TESTB
/IDENTIFICATION qualifier. You only have to enter the node
name and the first two long words to uniquely identify a task instance. This example
uses the task identification code for the DBMS_SINGLE_TASK task from Example 12.3, ''Using the LIST/TYPE=TASK Command to Display Task Information'':ATR>LIST/IDENTIFICATION=CARAT::10045-A
This example shows how you can drop leading and trailing zeros from task identification codes; however, do not drop significant digits.
12.6.4. Selecting User Information
/SUBMITTER/TERMINAL/TYPE=LOGIN/USERNAME
LIST command to return
information. For example, to return information about sign-ins and sign-outs under
one user name, use the /USERNAME qualifier and the
/TYPE qualifier with the LOGIN keyword. Example 12.4, ''ATR LIST/USERNAME/TYPE Command'' shows some sample output from a
LIST command with these qualifiers.ATR>LIST/USERNAME=PERSONNEL/TYPE=LOGINACMS Log Report 4-JAN-1991************************************************************Type : LOGIN Time : 1-JAN-1991 13:04:55.95 User : PERSONNEL Term : TTA5: Sub : ALLDAY::00270001-00000000-BCC34BC0-008DDDE4 Text : Login request ************************************************************Type : LOGIN Time : 1-JAN-1991 13:05:19.05 User : PERSONNEL Term : TTA4: Sub : ALLDAY::00020036-00000000-BCC34BC0-008DDDE4 Text : Successful login ************************************************************Type : LOGIN Time : 1-JAN-1991 13:05:25.25 User : PERSONNEL Term : TTA5: Sub : ALLDAY::00270001-00000000-BCC34BC0-008DDDE4 Text : Successful login ************************************************************
| ACMS Log Report Name of the report. |
| Date and time The date and starting time for processing the report. |
| Criteria for selecting the records in the report. An asterisk (*) indicates that you did not use a criterion to select records. "ALL " indicates that you did not select records by record type. |
| File Information you included to identify the source file, including the file name or file specification. |
| Type Type of audit record. |
| Time Date and time the record was written. |
| User User name of the task submitter. |
| Term Device name. |
| Sub Submitter ID. |
| Text Message text. |
| End Report Date and time report processing concluded. |
The display contains all records of sign-ins or sign-outs involving the user name PERSONNEL from the current version of the Audit Trail Logger.
Qualifiers let you find a small number of user records in the Audit Trail Logger containing the task submitter identification code from that session.
ALLDAY::00020036-00000000-BCC34BC0-008DDDE4
ALLDAY::00270001-00000000-BCC34BC0-008DDDE4
ATR>LIST/SUBMITTER=ALLDAY::20036
You have to type only the node name and the first longword to uniquely identify a submitter. You can even omit leading zeros from the first long word to make entry easier.
ATR>LIST/TERMINAL=TTA4:
12.6.5. Creating an Audit Trail Record for the QTI Process
The error that caused the task invocation to fail
What the QTI has done with the queued task element
***************************************************************************** Type : ERROR Time : 6-APR-1991 13:04:31.81 Queue : KEV_QUE ErrQue : Text : Error processing queued task -ACMSQUE-E-ERRREADQ, Error reading the queue file -SYSTEM-F-ACCVIO, access violation, reason mask=00, virtual address=010E0007, PC=000009B0, PSL=5F56454B ***************************************************************************** Type : ERROR Time : 6-APR-1991 13:04:36.44 Queue : KEV_QUE ErrQue : Appl : SWISS Task : CHEESE User : MCCARTHY Elem Id: 218001A3-00000002-D9F83F60-00910F15 Text : Error processing queued task -ACMSQUE-E-ERRGETPROC, Error returned from ACMS$GET_PROCEDURE_INFO -ACMS-E-NOSUCH_PKG, There is no such package defined -ACMSQUE-I-QTRETRY, Queued task will be retried later ****************************************************************************
See Chapter 8, "Controlling the ACMS System" for information about the operator commands which control the QTI and ACMS task queues. See Chapter 5, "Creating and Managing Queues" for information about managing task queues and queued task elements.
12.6.6. Creating an Audit Trail Record for Application Modification
ACMS/MODIFY
APPLICATION command, the audit trail records any application
modifications you make in the Audit Trail Logger. As described in Chapter 9, "Installing and Managing Applications", you can use the ACMS/MODIFY
APPLICATION command to modify task, application, or server attributes
in active applications. Example 12.6, ''Application Modification Audit Entry'' contains an audit trail
record recording a change in the maximum number of task instances allowed in
application AIR_REGISTER.******************************************************************* Type : COMMAND Time : 26-JAN-1991 16:52:38.00 Appl : AIR_REGISTER User : KINK Text : Attributes for application AIR_REGISTER have been modified Maximum number of task instances has been changed to 5 *******************************************************************
See Chapter 9, "Installing and Managing Applications" for information about the
ACMS/MODIFY APPLICATION command.
12.6.7. Creating an Audit Trail Record for Server Process Dump
**************************************************************
Type : ERROR Time : 27-JAN-1991 09:46:04.95
Appl : SANDAPPL Text : Server process death has generated a VMS process dump
Process dump for server PROC_DUMP_SRV is
DISK1$:[TWEP.TEST]PROC_DUMP_SRV.DMP;
****************************************************************************************************************************
Type : ERROR Time : 27-JAN-1991 09:48:26.95
Appl : SANDAPPL Text : Server process death has generated a VMS process dump
Error writing process dump for server PROC_DUMP_SRV to
SYS$SYSROOT:[SYSERR]PROC_DUMP_SRV.DMP; Insufficient privilege or file protection violation
**************************************************************See VSI ACMS for OpenVMS Writing Applications for information about enabling server process dumps.
12.6.8. Audit Trail Record for Server Replacement
ACMS/REPLACE SERVER command to replace a
server image in an application with a new version of that image, the event is
recorded in the Audit Trail Logger. Example 12.9, ''Server Replacement Audit Entry'' is an example of
an audit report generated by a server replacement.************************************************************ Type : COMMAND Time : 26-JAN-1991 14:58:53.52 Appl : RULES_REGS User : SANDY Text : Replace Server Replace server command issued for RULES_REGS ************************************************************
For more information on the ACMS/REPLACE SERVER command, see
Chapter 9, "Installing and Managing Applications".
12.6.9. Creating an Audit Trail Record for Insufficient Workspace Pool
****************************************************************************** Type : TASK Time : 26-JAN-1991 14:58:53.52 Appl : ORDER_ENTRY Task : ORDER_ENTRY_TASK User : OPER_42 ID : NODEA::00050021-00000002-3D208320-009113BE Sub : NODEA::00050021-00000000-3D208320-009113BE Text : Task start failed during initialization Error starting task: Unable to allocate workspace resources, please try later %ACMSWSP-E-ERRCTLPOO, Error allocating 132 bytes in TWSC pool 3 for workspaces %ACMSPOO-E-POOL_EXHAUSTED, Insufficient free memory available for request ******************************************************************************
See Chapter 11, "Changing ACMS Parameter Values with the ACMSGEN Utility" for information about the causes of workspace pool allocation failures and how to correct such errors.
12.7. Auditing the System
As a security measure, when an application receives the first task selection from a submitter, the application requests submitter authentication from the ACMS Central Controller (ACC) on the submitter node. This authentication checking ensures that malicious code cannot claim to be a valid submitter. If the application is on a node that is different from the node of the submitter (for example, a remote task selection), then auditing occurs on both the submitter and an application node. The audit trail record indicates the success or failure of task submitter attempts to select a task in a remote application. System authentication auditing provides a way to track the task activity of a task submitter selecting tasks in remote applications.
The following sections describe authentication auditing on submitter and application nodes.
12.7.1. Auditing on the Submitter Node
********************************************************************** Type : LOGIN Time : 11-JUL-1991 09:23:24.73 User : JONES Term : LTA38: Sub : CARAT::00020033-00000000-1323F040-008E2DEB Text : Authentication provided to node CARAT for application PAYROLL **********************************************************************
This record indicates that on the submitter node (JONES) was authenticated for task selections in the remote application (PAYROLL on node CARAT).
Because the Audit Trail Logger audits remote task selections on the application node and not the submitter node, the Audit Trail Logger on a submitter node does not show task selections in remote applications. The record includes a pointer to the application node. The Audit Trail Logger on that application node can help you track task activity.
********************************************************************* Type : LOGIN Time : 11-JUL-1991 09:23:24.73 User : Term : Sub : CARAT::00020033-00000000-1323F040-008E2DEB Text : Authentication rejected to node CARAT for application PAYROLL -ACMSACC-W-SUBNOTAUTH, Unable to authenticate submitter **********************************************************************
12.7.2. Auditing on the Application Node
***************************************************************** Type : LOGIN Time : 11-JUL-1991 09:23:23.66 User : Term : Sub : CARAT::00020033-00000000-1323F040-008E2DEB Text : Submitter authentication request for application PAYROLL *****************************************************************
The authentication request record includes the submitter ID and the application that requests authentication.
**************************************************************************
| Type Is the type of information in the record. |
| Time Specifies the time the record was created. |
| User Displays the user name associated with the remote submitter. The user name helps determine the access rights of the submitter (ACMS_USER) for all task selections in the application (tasks run as though they were selected by a local submitter with this user name). The user name is either an OpenVMS proxy or, if an OpenVMS proxy is not found, the default submitter user name (USERNAME_DEFAULT) as specified in ACMSGEN. See Chapter 6, "Using Distributed Forms Processing" for more information about authorizing remote access to ACMS applications. |
| Term Includes the login device associated with the submitter. For remote submitters, this device is used for display purposes only and is always NL. |
| Sub Includes the submitter ID assigned to the submitter upon sign-in. See Section 12.6.1, ''Selecting Records by Submitter and Task Identification Code'' for more information about submitter and task identification codes. |
| Text Shows the node and remote user name of the task submitter (CARAT::JONES). It also shows the application that authenticated the submitter (PAYROLL). |
********************************************************************** Type : LOGIN Time : 11-JUL-1991 09:23:25.86 User : Term : Sub : CARAT::00020033-00000000-1323F040-008E2DEB Text : Unsuccessful submitter authentication for application PAYROLL -SYSTEM-F-NOLINKS, maximum network logical links exceeded **********************************************************************
There is no proxy for the remote submitter and no default submitter user name.
The application cannot send the authentication request message to the submitter node because of a resource failure, as when maximum links for DECnet are exceeded.
12.7.3. Auditing on Remote Nodes
When a known ACMS system on a remote node fails or is terminated, the failure or termination event is audited. A known remote ACMS system is one that is either a submitter node (submitters on the remote system are accessing applications on the local node) or an application node (submitters on the local system are accessing applications on the remote node).
************************************************************ Type : COMMAND Time : 16-FEB-1991 16:54:57.15 Text : Remote system stopped on node MARAT ************************************************************
************************************************************************ Type : ERROR Time : 16-FEB-1991 16:57:19.37 Text : Remote system no longer accessible on node CORDAY -SYSTEM-F-THIRDPARTY, network logical link disconnected by a third party ************************************************************************
12.8. System Messages from Other Products
message number 000288664f
SET MESSAGE command and specifying the name of the product's
system message file. For
example:$SET MESSAGE SYS$MESSAGE:DBMMSG.EXE
Note
%RMS-E-FNF, file not found
This error message may be caused by insufficient privileges on the audit trail log file, even though the log file specified in the command is in the SYS$ERRORLOG directory.
12.9. Summary of the ATR Commands and Qualifiers
|
Commands and Qualifiers |
Description |
|---|---|
|
EXIT |
Ends the ATR session and returns you to the DCL prompt. |
|
Provides online information about ATR commands. |
|
Displays or lists information from a source file. The output of this command is an ACMS log report consisting of audit trail records. With qualifiers, you can select the records to be included in the report. |
Chapter 13. Logging Software Events
This chapter describes the ACMS Software Event Logger (SWL) and tells you how to use Software Event Log Utility Program (SWLUP) commands to generate reports containing SWL error information. See Section 13.3, ''Summary of SWLUP Commands and Qualifiers'' for a summary of SWLUP commands and qualifiers. For reference information on the commands described in this chapter, refer to Chapter 24, "SWLUP Commands".
13.1. How SWLUP Works
$@SYS$MANAGER:ACMSTART.COM
System absolute time
Process ID (PID)
Process image name
User name
Process name
Process UIC
Program processor status longword at the time of the call
Program counter of the event log routine call
Standard OpenVMS condition code
Extended error information
The default SWL log file is SYS$ERRORLOG:SWL.LOG. To redirect the location of the SWL log file, use the logical name ACMS$SWL_LOG. You must define this logical as an executive mode system logical in order for the SWL process to create the file in an alternative location.
When you use this logical name, any pieces of the file specification contained in the equivalence name are used. Parts of the file specification not used take the SYS$ERRORLOG:SWL.LOG default.
If the use of the logical name results in a file that cannot be opened (for example, because of an incorrect directory or device), then SWL opens the SYS$ERRORLOG:SWL.LOG. If this happens, SWL also writes a message to the SWL log describing the problem with the logical name.
SWLUP>LIST/SINCE=25-APR-1994
When you list your reports, specify an output file with the /OUTPUT
qualifier, or let the output default to SYS$OUTPUT.
Use the /INPUT qualifier to cause SWLUP to read a file
specification other than the default SWL log file or one specified by the logical name
ACMS$SWL_LOG. If you do not use the
/INPUT qualifier, SWLUP uses either the default SWL log file
specification, or one specified by the logical name.
13.2. How to Run SWLUP
$RUN SYS$SYSTEM:SWLUPSWLUP>
$MCR SWLUPSWLUP>
SWLUP> prompt, begin entering SWLUP commands. For
example:SWLUP>LIST/PROCESS_NAME=AT_HOME/SEVERITY=W,E/OUTPUT=AT_HOME.LIS
Use the HELP command to access online help information about SWLUP
commands and qualifiers. Press PF1 then PF2 for access
to a keypad of SWLUP commands. Press Ctrl/B to recall each SWLUP
command you enter. To exit from SWLUP, use the EXIT command or press
Ctrl/Z.
$ SWLUP:==$SYS$SYSTEM:SWLUP
$SWLUP LIST
Note
%RMS-E-FNF, file not found
This error message may be caused by insufficient privileges on the SWL log file, even though the log file specified in the command is in the SYS$ERRORLOG directory.
13.3. Summary of SWLUP Commands and Qualifiers
|
Commands and Qualifiers |
Description |
|---|---|
|
@ (At sign) |
Runs an indirect command file that contains SWLUP commands. |
|
EDIT |
Lets you edit the last SWLUP command you typed and lets you create an edit buffer into which you can enter SWLUP commands. |
|
EXIT |
Causes SWLUP to exit or ends the execution of a command file. |
|
Provides online information about SWLUP commands. |
|
Lists information selected by command qualifiers. |
|
RENEW |
Starts a new systemwide SWL log file. |
|
SAVE |
Writes the last command you typed to a file. |
|
SET [NO]LOG |
Enables or disables logging of any commands you type during a SWLUP session. |
|
SET [NO]VERIFY |
Enables or disables the printing of commands stored in an indirect command file. SWLUP sends output to your terminal. |
|
SHOW CURRENT |
Displays the name of the current log file opened by the SWL detached process. |
|
SHOW LOG |
Displays whether or not you are currently logging SWLUP commands and names the log file. |
|
SHOW VERSION |
Displays the current version of SWLUP on your terminal. |
|
STOP |
Stops the Software Event Logger detached process so that it can exit properly. |
Chapter 14. Tuning Your Application
This chapter discusses the major issues in ACMS application performance, ACMS processes that affect system performance, and tools for monitoring your system. This chapter also provides a tuning checklist.
14.1. Major Issues in ACMS Application Performance
Ensure that ACMS processes have the resources they need, by doing such things as setting the working set size of the Application Execution Controller (EXC) to an appropriate value to decrease paging.
- Ensure that limits to system resources, such as lookaside lists (preallocated pieces of dynamic memory for terminal I/O or network I/O) or global pages, do not cause sudden delays in processing. An inadequate lookaside list could:
Cause the ACMS system or task to hang
Prevent new users from signing in
Cause non-ACMS processes to stop
Exhaust dynamic memory
Exhaust workspace pools
Although there is no way to predetermine the correct size for lookaside lists, you can determine adequate limits by routinely observing the ACMS system with the DCL
SHOW MEMORYcommand, the OpenVMS Monitor Utility, or the Software Performance Monitor (SPM) software. Ensure there is enough memory so that ACMS control processes are not subject to swapping.
Determine the optimal number of server processes for each server, minimizing the time that servers wait for tasks and that tasks wait for servers. Then, change the application definition to set the minimum and maximum values for server process count to their optional numbers. This eliminates excessive server process creation and deletion.
- Determine whether or not you can trade off resources to benefit the work of most importance at the expense, if necessary, of other activities. For example, you can:
Use servers of lower priority for less important work
Require certain processing work, such as computations, to be run in batch mode
Set limits on the number of ACMS users and applications to ensure that resources are available on the system for other non-ACMS work
Most of the quotas and SYSGEN parameters established during post-installation are sufficient for your ACMS system. You might have to change them, however, if you modify your hardware, add or delete an application, or change the number of users on your system. If you change SYSGEN parameters or for some reason the system resources are insufficient, the ACMS system might notify you with an error message, or it might not have sufficient resources to send an error message.
The best way to determine the optimal settings for parameters is to monitor your system regularly and establish some base numbers to work with. Only through regular monitoring can you recognize normal and abnormal activity, the effect of different workloads on the system, and changes in throughput rates. Also, by monitoring your system before and after making changes to it, you can measure the effects of the change against a predefined goal.
14.2. Monitoring Tools
ACMS
SHOWcommandsThe displays returned by these commands, especially by
ACMS/SHOW APPLICATIONandACMS/SHOW APPLICATION/CONTINUOUS, provide information you can use to determine the optimal number of server processes required for your ACMS system. By examining the number of tasks waiting for servers and servers waiting for tasks, you can determine whether some servers are not being used, or too many servers are being created to meet increased demand. See Chapter 9, "Installing and Managing Applications" for a detailed discussion about these ACMSSHOWcommands.In setting the minimum server processes, set the value as high as necessary to prevent the too frequent creation of additional server processes during the time of peak application use. Also set the value as low as you can to conserve memory. Once you have determined the optimal setting for the minimum value, you can set the maximum to that same value, to ensure that no additional servers are created, even at times of peak application load. Users queue for the available servers instead. See VSI ACMS for OpenVMS ADU Reference Manual for more information about using ADU to set the optimal number of server processes.
ACMS Audit Trail Logger
The task selections logged in the Audit Trail Logger can help you determine which tasks are most heavily used and the times of heaviest use. This can be useful in determining how to modify an application. See Chapter 12, "Auditing Applications with the Audit Trail Logger" for a detailed discussion on the ACMS Audit Trail Logger and audit trail log files.
OpenVMS Monitor Utility and DCL
SHOWcommandsThe OpenVMS Monitor Utility and the DCL
SHOWcommands are two important performance management tools provided with the OpenVMS operating system.The OpenVMS Monitor Utility returns information that can help identify and isolate resources causing either ACMS or system-level problems: inadequate values for small request packets (SRP), I/O request packets (IRP), and large request packets (LRP), for example, or inadequate values for paged and nonpaged pool. The paging information is useful in determining appropriate working set sizes for ACMS processes. See VSI OpenVMS System Management Utilities Reference Manual, Volume II: M–Z for information about the OpenVMS Monitor Utility.
The
SHOWcommands display the current status of a process, the system, and the devices on the system. Use theSHOW MEMORYcommand, for example, to ensure there is adequate memory available to prevent swapping of the ACMS control processes. See VSI OpenVMS DCL Dictionary: N–Z for information on the DCLSHOWcommands.Software Performance Monitor (SPM)
The SPM is an OpenVMS layered product that provides information on resource usage. SPM is particularly useful in determining working set sizes. Because the CPU cost of running SPM is low, it is a good tool for gathering routine performance information. Also, SPM provides extensive tools for reporting the data it gathers. The SPM reports can provide significant help in identifying and solving performance problems. SPM's graphic representation of the information gathered makes it easier to identify performance problems than with MONITOR. See the documentation provided with SPM for more information on this product.
DEC/Test Manager (DTM)
The DTM is an OpenVMS layered product that is most useful for regression and functional testing. DTM can also be useful in setting up a controlled simulation of application activity to allow you to isolate a performance problem. DTM allows you to have multiple processes on the same CPU run the same script, simulating multiple ACMS users. Although the resources DTM requires can affect the overall performance of the system, this controlled simulation can help you determine which resources are being used. See DTM documentation for more information on this product.
These tools can help identify areas in which adjustment of SYSGEN parameters or user name characteristics can improve ACMS or overall system performance.
14.3. ACMS Processes that Affect Performance
ACMS Central Controller (ACC)
Terminal Subsystem Controller (TSC)
Command Process (CP)
Application Execution Controller (EXC)
Server Process
Audit Trail Logger
Queued Task Initiator (QTI)
Of these processes, the CP, EXC, and server process have the greatest effect on the performance of an application. In addition, the QTI process has a very significant effect on the performance of the ACMS Queued Task Facility.
The CP handles all ACMS sign-ins and ACMS menu displays, performs exchange steps for distributed applications, and interprets commands issued at the ACMS menu level. The EXC controls all server processes and handles all exchange steps for local applications. The server process handles all of the processing step work for an application, including all database I/O and computational work. The QTI dequeues queued task elements from one or more task queues and initiates queued tasks in ACMS applications.
Minimizing the number of ACMS processes without overloading them while providing them sufficient system resources results in the best performance. Since most of the ACMS processes control many users, they need larger working sets to function than a typical interactive process. For the same reason, set the OpenVMS priority of the ACMS processes at least as high as that of an interactive process.
14.4. Configuration of Hardware
This section discusses how the various processes and procedures of an ACMS system use the different components of a computer system. If you understand how ACMS uses memory, CPU power, and disk I/O, you can make better choices about how much and what kind of hardware you need. The section also includes a sample configuration suitable for distributed applications.
Main memory sufficient to contain the working sets of active processes, thus minimizing paging and swapping
CPU power sufficient to support operating system requirements and to carry out computation required by the application fast enough to sustain desired throughput
Disks sufficient in size to store data, application sources, and images, and sufficient in number and speed to support I/O throughput of the application
Note
Estimates based on the discussion in this section are entirely dependent on the nature of the application, and should not be regarded as recommendations. Use your estimates in consultation with VSI support.
14.4.1. Estimating Memory Requirements
When you estimate how much memory your configuration should include, estimate the memory required for the operating system plus the working set sizes of all the processes in your application. The working set size for a process must be sufficient to avoid excessive page faulting.
To estimate how much memory OpenVMS uses, start with a base figure for OpenVMS itself and operating system processes such as ERRFMT, OPCOM, and JOB_CONTROL. Include additional memory for application processes. Remember to include the memory needs of layered products installed on your system, such as DATATRIEVE, TDMS, and COBOL.
When determining the amount of memory each application process needs, consider two
factors: the number of global pages and the number of process-private pages.
Global pages are pages that can be shared among
several similar processes, and should only be counted once. Process-private pages are specific to a single process and should be
counted for each process. The OpenVMS MONITOR PROCESS command can
assist you in determining global and process-private pages for the processes you
need to consider. Monitor a prototype application to estimate memory needs.
ACC
There is one ACC on your computer. The ACC is the central control point for the ACMS system.
CPs
How many Command Processes is your system going to run? Broadly speaking, you can count on 1 CP for every 20 users.
EXC
Consider both global pages used by the EXC and process-private pages needed by each user of the application. The amount of memory is determined by the number of active tasks, but at this level of estimation, the number of users is more likely to be known than the number of active tasks. If this process is short of memory, the performance of the application is adversely affected.
Servers
Include sufficient working sets for each server and for the processing work being done in the server. Memory requirements are determined by the code you write for the processing work, as well as the database management system you use.
Non-ACMS processes
Include global and process-private pages for any non-ACMS processes that may be running on your system.
Add up all of your estimates for an estimate of the total memory required for your application.
You can refine your requirements after the hardware configuration is in place and the system is up and running. Chapter 10, "Setting ACMS Quotas, Parameters, and Privileges" discusses means of monitoring and tuning memory usage for your system. It also contains information helpful in calculating quotas and parameters for the processes discussed in this section.
14.4.2. Estimating CPU Requirements
How big a CPU does your application require? Performance is almost always spoken of in terms of throughput, the rate of processing computer computations. For example, the number of transactions per second is a measure of the speed at which the system works. The performance of an ACMS system is determined by the size and power of the CPU and the specifics of your application design.
ACMS applications conserve CPU energy more than traditional applications because of the way in which ACMS applications share resources. For example, the server initialization procedure binds the database once for a server process that serves many users. This puts less load on the CPU than a traditional timesharing application, in which each user binds the database in individual processes.
An ACMS application can take an existing image, remove the database binds, and put them into an initialization procedure. The resulting image runs in a single-step task. The performance gains are impressive, even before the image is converted to a multiple-step task.
An ACMS application needs to create fewer server processes and to activate fewer images for a group of users than a traditional application, because the task group shares resources among many users. Also, the ACMS use of specialized processes to share memory among many users reduces memory management overhead, another factor in CPU usage.
The design of a task also has an effect on CPU usage. Avoiding scrolled regions and the processing required to map a large array to a TDMS form were discussed in the section on the user interface for the multiple-step task. Database access methods also affect CPU usage. Use DATATRIEVE, RDO, or DBQ to prototype your database access methods, and observe the effect of various methods on CPU usage. Because of the cost of communicating group and user workspaces from server process for computation to Command Process for I/O, the use of such workspaces often requires more CPU resources than the benefits of such use warrants. Take the costs of communication and server use into account as you estimate the size of CPU required for your application.
You may have different CPU requirements, depending on whether throughput or best response time is your primary goal. To get maximum throughput and best response time, you may need more CPU power than for just maximum throughput. Response time increases as the limit of CPU capacity (maximum throughput) is reached.
Again, it is useful to monitor a prototype and to determine from that the additional CPU power required for the fully implemented system.
14.4.3. Estimating Disk Requirements
Applications that are suitable for development with ACMS tend to be I/O-intensive, requiring a significant amount of disk resources. Update and inquiry tasks against a database, for example, use more disk I/O than an application doing scientific computation, which is a heavy user of CPU power.
How much data, application, and operating system space is required
What disks support the I/O throughput required by your system
Determining the number and type of disks needed to support your I/O throughput requirements depends on a number of factors. You need to understand the throughput rate of the disks you are considering. How many I/O requests per second can the disk process before applications have to begin queuing for disk access? The rate varies widely depending on the type of disk and the kind of I/O your application does – for example, whether it is synchronous or asynchronous. The database management system in use also affects the rate of I/O throughput.
Factors in disk configuration specific to ACMS include the location of the audit trail log file. Determine the location of this file by defining the logical name ACMS$AUDIT_LOG before you start up the ACMS system. See Chapter 12, "Auditing Applications with the Audit Trail Logger" for a discussion of the audit trail log file. Be careful not to locate this file on the same disk as your DBMS root file, or Rdb database file, or the file where the index of an RMS indexed file is located. The Audit Trail Logger should not have to contend with database processing for access to the same disk.
You can create a prototype of the database access involved in your application and
monitor the I/O requirements. Use DATATRIEVE, RDO, or DBQ
to model the transactions you plan to include in your application, and use the DCL
command MONITOR/DISK to observe the actual
I/O rate. Proceeding from observed rates of
I/O throughput in the prototype can help you figure out
what the disk requirements are when the system is fully implemented.
((requests/transaction * transactions/second) / throughput rate) = disks
For good response time, the I/O throughput rate must be less than the disk's maximum capacity.
There may be limits imposed on the I/O throughput by your database management system.
14.5. Configuring the Command Process
The CP handles many users at one time. The performance of the CP depends on the number of users it must control and the rate at which those users are selecting menus or tasks. The number of users that the CP controls is determined by the ACMSGEN parameter MAX_TTS_CP.
To determine whether or not the CP is configured properly, monitor one of the command
processes during peak hour conditions using the DCL command SHOW
PROCESS/CONTINUOUS. If the CP remains idle for long periods of time, it
may be able to handle more users. Allowing it to control more users reduces the number
of Command Processes ACMS needs and also the amount of system resources ACMS
uses.
If the CP remains in a computable state for a period of time, it may be overloaded. An overloaded CP can make menu displays and response time seem slow to the users. When this is the case, reduce the number of terminals the CP controls by changing the TERMINALS_PER_CP parameter in the ACMVARINI.DAT file and running the ACMSPARAM.COM procedure. See Chapter 10, "Setting ACMS Quotas, Parameters, and Privileges" for information about running ACMSPARAM.COM.
If the CP seems to be paging heavily, its working set might be set too low. When this is the case, increase the working set size for the CP using the OpenVMS Authorize Utility. Restricting the CP by limiting its working set can result in poor performance for all the users it controls.
Another source of poor CP performance might be the priority at which the CP is running. The ACMSGEN parameter CP_PRIORITY controls the priority at which the CP runs. Set this value at least as high as an interactive user's priority.
As much as possible, perform such adjustments using the ACMSPARAM.COM procedure rather than the ACMSGEN Utility because ACMSPARAM adjusts other related parameters automatically. In some instances, such as adjusting dynamic system parameters, it might be necessary to use ACMSGEN (see Chapter 11, "Changing ACMS Parameter Values with the ACMSGEN Utility").
14.6. Configuring the Application Execution Controller
The performance of the EXC process depends on the rate at which exchange steps are being executed and the complexity of the TDMS requests. Although there is a single EXC process for each application, the EXC process is normally able to handle all users of an application.
Insufficient working sets or an OpenVMS process priority that is too low for the EXC user name can significantly reduce the performance of the application. The EXC might require considerably more system resources than a typical interactive process because it controls many users at one time.
SPM can be used to monitor page faults in the EXC at the time of peak load periods.
You can also use the DCL SHOW PROCESS/CONTINUOUS command, but
restrict its usage to short periods of time because the command affects overall system
performance.
Set the resource quotas for the EXC process on an individual basis using the ACMEXCPAR.COM command procedure (see Chapter 10, "Setting ACMS Quotas, Parameters, and Privileges"). Each EXC process performs a specific function and requires specific resources to perform properly.
The application definitions created with ADU set up the user names under which the EXC controllers run. Use the OpenVMS Authorize Utility to change the working set size and priority for the user name of each EXC, if necessary. By using the OpenVMS Authorize Utility to change the priority and quotas associated with these user names, you can change the performance of the applications and the ACMS system. See the OpenVMS Authorize Utility documentation for more information. VSI ACMS for OpenVMS ADU Reference Manual contains information on using ADU application definition clauses.
14.7. Configuring the Server Process
The performance of the server processes for an application depends mainly on how you define them in the application definition. The number of server processes available to an application can affect its performance. If too many servers are active, system resources are wasted. If too few servers are active, users might have to wait long periods of time before ACMS can allocate a server process to their application.
To determine whether or not there are enough server processes on the system for a
particular application, use the ACMS /SHOW APPLICATION command. This
command shows how many servers are active, how many users are waiting for server
processes, and how many servers are busy. This information indicates whether or not
there are enough servers on the system.
To change the operational characteristics of server processes, use the ADU and the OpenVMS Authorize Utility. The application definitions created with ADU include clauses that determine how many resources the application uses. For example, the MAXIMUM SERVER PROCESSES clause sets an upper limit for all server processes in an application.
An application definition also sets up the user names under which server processes and Application Execution Controllers run. By using the OpenVMS Authorize Utility to change the priority or quotas associated with these user names, you can change the performance of the applications and of the ACMS system. See the OpenVMS documentation on the Authorize Utility for more information. VSI ACMS for OpenVMS ADU Reference Manual contains information on using ADU application definition clauses.
14.8. Tuning and Maintaining the Queued Task Facility
The configuration of the process
The number of concurrent task execution threads
The RMS tuning variables associated with the task queue files
Proper maintenance of the task queue files
14.8.1. Configuring the QTI Process
The OpenVMS process priority
The working set size
Specify the OpenVMS process priority with the ACMSGEN QTI_PRIORITY parameter. Depending on your application, you may want the QTI to run at the same priority as processes serving interactive users (for example, the CP), or you may want the QTI to run at a lower priority than interactive users (similar to a batch process).
Specify the user name of the QTI with the ACMSGEN parameter QTI_USERNAME. This user name, and the quotas for this user name, are defined in the system user authorization file (SYSUAF.DAT) using the OpenVMS Authorize Utility. Ensure that the working set size of the QTI is sufficient so that it does not page excessively.
Use the ACMSPARAM.COM procedure (see Chapter 10, "Setting ACMS Quotas, Parameters, and Privileges") to define the user name of the QTI. This command procedure determines the quotas needed by the QTI depending on application-specific data which you provide. In addition, ACMSPARAM.COM will set the working set size to a reasonable first guess. Monitor the QTI during peak times to determine if the working set size requires adjusting.
14.8.2. QTI Task Execution Threads
When you start a task queue with the ACMS/START QUEUE operator
command, you can specify the number of task execution threads using the
/TASK_THREADS qualifier. By default, if you do not specify
this qualifier, one task execution thread per queue is allocated to each started
queue.
The number of task execution threads controls how many task invocations can be outstanding at any one time. With multiple task execution threads, the dequeuing of queued task elements and the invocation of queued tasks occur concurrently. Therefore, when you increase the number of threads, you increase the throughput. As you increase the number of threads, the QTI uses more system resources such as CPU and disk I/Os. Therefore, balance the usage of these resources as needed among other components of your application.
If you have multiple queues being processed by the QTI, then you can favor one queue over other queues by assigning it more task execution threads.
The rate at which the QTI processes elements of one queue relative to another queue is a function of the number of task threads per queue and the time it takes to execute the queued tasks. Each QTI task thread does its processing loops (dequeue element, invoke queued task) independently of any other thread. Therefore, you have to consider the time delay of the tasks which are being invoked when trying to calculate the rate at which elements are processed in one queue relative to another queue.
For example, assume you have started the task queues MY_QUE and YOUR_QUE, and MY_QUE is assigned one task execution thread and YOUR_QUE is assigned two task threads. If the execution time of the tasks in the two queues is the same, there will be twice as many queued task elements processed in YOUR_QUE than in MY_QUE. If, however, the execution time of the tasks in MY_QUE is twice as long as those in YOUR_QUE, then there will be four times as many queued task elements processed in YOUR_QUE than in MY_QUE.
Although it is possible to specify up to 255 task execution threads per queue, normally you specify a relatively small number. After a certain point, increasing the number of task execution threads does not increase throughput. Each task execution thread consumes memory and requires higher process quotas. Therefore, increasing the number of task execution threads beyond a certain point only wastes these resources. In practice, specifying 1 to 10 task execution threads is sufficient to meet your needs.
14.8.3. Tuning Task Queue Files
The ACMS Queued Task Facility is layered on RMS. Specifically, each task queue repository is an RMS indexed file. Therefore, tune task files just as you would any RMS indexed file.
Generate a File Definition Language (.FDL) file for an existing task queue repository by using the DCL
ANALYZE/RMS_FILE/FDLcommand.For example, assume you have created a task queue using the ACMS Queue Manager and the file specification associated with the task queue is SYS$SYSTEM:PAYROLL_QUEUE.DAT. Generate an .FDL file by issuing the following command:$ANALYZE/RMS_FILE/FDL SYS$SYSTEM:PAYROLL_QUEUE.DATModify the RMS tuning variables in the .FDL file as needed by using the EDIT/FDL Utility.
For example, using the .FDL file generated from the example in the previous step, invoke the EDIT/FDL Utility with:$EDIT/FDL PAYROLL_QUEUE.FDLFrom within the EDIT/FDL Utility, modify the RMS tuning variables as needed. ACMS uses the RMS defaults for all the tuning variables. Specific tuning variables which you might want to modify depending on your application include:Initial file allocation
Contiguity
Default file extension quantity
Multibuffer
Bucket size
Global buffers
For more information on tuning RMS indexed files, see the OpenVMS documentation on RMS.
- Convert the queued task repository file by using the Convert Utility on the .FDL file from the previous step:
$CONVERT/FDL=PAYROLL_QUEUE SYS$SYSTEM:PAYROLL_QUEUE.DAT -_$SYS$SYSTEM:PAYROLL_QUEUE.DATThe Convert Utility generates a new queued task repository file having a higher version number than the original queued task repository file. The Queued Task Facility depends on the original file version. Therefore, you must delete the original file and rename the new converted file to have the old version number. For example:$PURGE SYS$SYSTEM:PAYROLL_QUEUE.DAT$RENAME SYS$SYSTEM:PAYROLL_QUEUE.DAT; ;1For more information on the ANALYZE/RMS_FILE Utility, the EDIT/FDL Utility, and the Convert Utility, see Guide to OpenVMS File Applications.
14.8.4. Maintaining Task Queue Files
The ACMS Queued Task Facility is layered on RMS indexed files. In a running application, elements are enqueued to a task queue, and at some later point in time they are dequeued. These operations translate to write and delete operations on the RMS indexed file. RMS retains buckets in indexed files even if all the records in the bucket have been deleted.
Over time, these empty buckets can accumulate and needlessly waste disk space. In addition, these empty buckets can cause a performance degradation of the QTI process if your application uses multiple priority levels of queued task elements and the highest priority in the task queue changes frequently.
Use the Convert or Convert/Reclaim Utilities on the task queue repository files to reclaim these unused buckets. If you use the Convert Utility, you also need to rename the new task queue repository file to have the original version number. For more information on the Convert and Convert/Reclaim Utilities, see Guide to OpenVMS File Applications.
Perform this file maintenance on a regular basis. Because the Convert Utilities require exclusive access to the file, you need to perform this maintenance during a time when your application needs little access to the queue file.
14.9. Tuning Checklist
- As system manager, routinely:
Use ACMSPARAM.COM and ACMEXCPAR.COM after installations or upgrades to set system parameters, privileges, and quotas. Also run ACMSPARAM and ACMEXCPAR after modifying the ACMS environment, for example, if you add or delete an application or change the number of terminal devices.
Establish realistic standards for system performance by monitoring your system on a regular basis.
Understand the workload and capacity of your system so you can recognize normal and abnormal performance.
Observe how peak load times and complex applications affect ACMS performance.
Avoid performance complaints by notifying users of anticipated workload changes that might slow down the system.
- Use tuning as a last resort to solve a performance problem:
If a performance problem arises, investigate the possible causes using the various OpenVMS and ACMS monitoring tools.
If a performance problem persists, compare the current throughput rates with those rates established during "normal" operations.
Before adjusting system parameters, look for other, simpler solutions, for example, balancing workload peaks by running some jobs as batch jobs at nonpeak times.
- If you find that you must tune your system by adjusting system parameters:
Use the ACMSPARAM.COM and ACMEXCPAR.COM command procedures instead of ACMSGEN. These procedures automatically adjust all other configuration-related parameters to suit your ACMS configuration.
Limit the values you adjust to a few at a time and measure their effect against a predefined goal.
- After you make adjustments:
Plan on monitoring your system to ensure that the adjustments have improved ACMS performance.
If tuning has not improved performance, stop tuning and reevaluate the situation. The cause of the problem may lie in other areas, including the application design or database design.
Chapter 15. Using DECtrace with ACMS Applications
DECtrace is a product that collects and reports on event-based data gathered from any combination of OpenVMS layered products and application programs. If DECtrace is installed on your system, you can use it to collect detailed information about applications that use the ACMS software.
15.1. Overview of DECtrace
DECtrace refers to layered products and applications as facilities. DECtrace allows layered products, such as ACMS and Rdb, to define events. ACMS has many predefined events that occur at run time. An event can have a start and an end (duration event), or it can simply occur (point event).
An easy way to collect and report on the resources utilized by predefined events in an application.
A way to determine the frequency of execution of events, rather than an average or estimated frequency.
Response time measurement on both submitter and application nodes
Logging of processing steps that execute called tasks
Message compression measurement
Resource utilization items such as CPU time
ACMS data items such as the task name, associated with ACMS events
Cross facility items used to relate event data from one facility to another
Section 15.3.1, ''Describing ACMS Events and Items'' contains descriptions of ACMS events and items.
COLLECT . For
example:$COLLECT SHOW VERSIONDECtrace Version V1.2-0$
COLLECT command with no arguments at the DCL prompt. DECtrace
prompts you for commands until you return to DCL command level by entering the
EXIT command. This eliminates binding to the history and administration
databases for each command. For
example:$COLLECTDECtrace>SHOW VERSIONDECtrace Version V1.2-0DECtrace>EXIT$
15.2. Improving Application Management with DECtrace
DECtrace records information about specific events or items within the events in an ACMS application. To record this information, you simply activate the collection of the desired event data with a DECtrace command. See DECtrace documentation for more information.
Resource use
For example, use DECtrace to compare the speed of an arithmetic computation done in a DECforms escape sequence with the same computation done in a procedure. Or, turn on DECtrace at the beginning of an exchange step and at the end of the step to see how much of the response time is network overhead.
User information
You can use DECtrace to trace a task or an exchange to see how fast the user gets through it, test the design of a single form or part of a form to identify areas of concern, or compare the results of two forms that gather the same information with different formats. Or, use DECtrace to count the number of tasks or forms completed by a user.
Audit information
Because granularity is smaller in DECtrace than in ACMS, you can get more detailed auditing information. ACMS auditing operates on the system level, while DECtrace can look at parts. For example, ACMS can indicate only that a task is started or stopped, while DECtrace can give details of parts of the task
15.3. Collecting Event Data for ACMS
To collect event data with DECtrace, you must first create a facility selection and then schedule data collection using that selection. This section describes how to create a facility selection and schedule data collection for ACMS applications.
15.3.1. Describing ACMS Events and Items
Note
DECtrace collects all occurrences of each event in your chosen collection class. You
cannot choose individual events to record. However, you can create reports based on specified
events by using the REPORT command. See Section 15.5, ''Creating a Report Based on Collected Data''
for information on DECtrace reporting.
Note that if you use an agent other than the one provided by ACMS, the agent must be instrumented with DECtrace service routine calls in order to collect the ACMS event data associated with that agent. The following events must be instrumented in the customer-written agent process if you want them to be collected: REMOTE_REQUEST, FORMS_ENABLE, and FORMS_REQUEST.
Each event has various items associated with it. These items include a set of standard DECtrace resource utilization items, a set of facility-specific items and a set of cross facility items. Table 15.1, ''Resource Utilization Items'' lists the standard resource utilization items. Table 15.2, ''ACMS Data Items'' lists the ACMS-specific data items. Table 15.3, ''Cross Facility Items'' lists the cross facility items.
15.3.1.1. ACMS Events
This section describes the events that can occur in your ACMS application.
TASK
A task within the application. This event is written to the data collection file by the EXC. The start event is recorded when the start call is received from the CP. The end event call is recorded immediately preceding the return call to the CP.
ACMS can log chained tasks as separate TASK events. You can use the PARENT_TASK and STEP_NAME items to identify tasks called by other tasks. If a task is not called by another task, ACMS leaves these two items blank.
EXCHANGE_STEP
An exchange step within a task. This event is written to the data collection file by the EXC. The start event is recorded at the beginning of step processing. The end event is recorded at the end of step processing.
PROCESSING_STEP
Executes a procedure call
Executes a DCL server command
Calls another task
The start event is recorded at the beginning of step processing. The end event is recorded at the end of step processing.
REMOTE_REQUEST
Remote request terminal I/O executed by the agent process. This event is written to the data collection file by the ACMS Remote Request Server (RR). The start event is recorded whenever a TDMS request is received. The end event is recorded when the request completes.
PROCEDURE_CALL
User's server procedure in a processing step. This event is written to the data collection file by the SP. The event reflects the time and resources used by the customer-written procedure.
TASK_WAIT
Task waiting for server processes. This event is written to the data collection file by the EXC. The start event is recorded when no server is available to process the request. The end event is recorded when a server becomes available. This event is part of the PROCESSING_STEP event.
TRANSACTION
An ACMS transaction. This event is written to the data collection file by the SP or EXC. This event is started when ACMS starts a transaction and is ended upon completion of the transaction.
FORMS_ENABLE
A DECforms enable performed by the agent process. This event is written to the data collection file by the ACMS DECforms Server (VFS). The first time a user references a form, it must be enabled.
FORMS_REQUEST
A DECforms request executed by the agent process. This event is written to the data collection file by the ACMS DECforms Server (VFS). This event is recorded whenever ACMS executes a DECforms request (SEND, RECEIVE, TRANSCEIVE).
SUB_RESPONSE
ACMS DECforms Server (VFS)
ACMS Remote Request Server (RR)
Stream Services (STRM)
Submitter Services (SUB)
ACMS logs the start of the event whenever a DECforms, TDMS, or stream I/O forms request is completed, and at the start of each task. ACMS logs the end of the event at the start of the next forms request within the same task or, if no forms request follows, when the task is completed. Figure 15.1, ''Measuring the SUB_RESPONSE Event'' shows the point at which ACMS measures the SUB_RESPONSE event: the task start, during the task, and the task end.
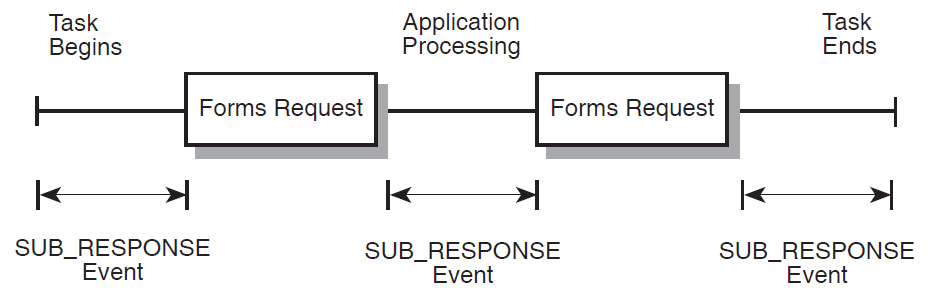
If a task performs no I/O operations, ACMS measures the SUB_RESPONSE event from the beginning of the task to its end. In this case, the SUB_RESPONSE event represents the time ACMS takes to respond to a menu selection.
A SUB_RESPONSE event can continue from one task into a called task. For example, if during application processing, the current (parent) task calls another task that executes a forms request, the SUB_RESPONSE event begins during the parent task and ends during the called task. Similarly, a SUB_RESPONSE event can begin in a called task and end in the parent task.
Task boundaries between chained tasks (those tasks started by either the REPEAT TASK or GO TO TASK clause) do not begin or end a SUB_RESPONSE event. An event started in one task continues into succeeding chained tasks until it reaches another forms request or the last task in the chain, and the task returns control to the ACMS submitter services.
The response time measured by the SUB_RESPONSE event includes the time required for network communications with the application node, and the time required for the node to perform application processing. These values are collected in the NETWORK_TIME and PROCESSING_TIME items, respectively. DECtrace records the total elapsed time for this event, and all events, by default.
Note
When the node name is not specified in ACMSGEN, the SUB_RESPONSE event does not log the APPL_NODE item in most cases. However, if you use TDMS or stream I/O, the SUB_RESPONSE event logs the APPL_NODE item for those operations.
APL_RESPONSE
The APL_RESPONSE event is a duration event that records the time the application node takes to respond to an exchange step, excluding the network and forms product overhead associated with the exchange step. This event is written to the data collection file by the EXC. Having a separate response time event on the back-end node allows you to make adjustments on this node and observe the effects isolated on one node.
ACMS logs the start of the event when an exchange step is completed, or, if no exchange step has executed yet within this task, ACMS logs the start of the event when the Application Execution Controller (EXC) starts the task. ACMS logs the end of the event when the next exchange step within the same task starts, or, if no exchange steps follow, when the task is completed. Figure 15.2, ''Measuring the APL_RESPONSE Event'' shows when ACMS logs the APL_RESPONSE event.

The rules that apply to the SUB_RESPONSE event regarding tasks with no I/O operations, tasks that call other tasks, or chained tasks also apply to the APL_RESPONSE event.
COMPRESSED_MSG
The COMPRESSED_MSG event shows the effect of data compression on network messages sent between the application and submitter nodes. This event is written to the data collection file by the Stream Services (STRM) and Server Services (SER). The COMPRESSED_MSG event is a point event. The purpose of a point event is to mark the occurrence of an operation, rather than to measure the duration of the event.
The network messages contain exchange step and task argument workspace data that is communicated between the EXC process and the agent process. ACMS logs one COMPRESSED_MSG event whenever a message is transmitted or received over a network connection, and logs a second COMPRESSED_MSG event when it receives a compressed message over the network. The size of the original message and the size of the compressed message are logged, together with the compression ratio that indicates the factor by which ACMS compressed the data.
15.3.1.2. DECtrace and ACMS Items
Each event has various items associated with it. These items include a set of standard DECtrace resource utilization items and a set of facility-specific items.
|
Item |
Description |
Data type |
Usage |
|---|---|---|---|
|
BIO |
Number of buffered I/O operations |
Longword |
Counter |
|
DIO |
Number of direct I/O operations |
Longword |
Counter |
|
PAGEFAULTS |
Total number of hard and soft page faults |
Longword |
Counter |
|
PAGEFAULT_IO |
Number of hard page faults (that is, page faults to or from the disk) |
Longword |
Counter |
|
CPU |
Total amount of CPU time in tens of milliseconds |
Longword |
Counter |
|
CURRENT_PRIO |
Current priority of the process |
Word |
Counter |
|
VIRTUAL_SIZE |
Number of virtual pages currently mapped for the process |
Longword |
Counter |
|
WS_SIZE |
Current working set size of the process |
Longword |
Counter |
|
WS_PRIVATE |
Number of pages in the working set that are private to the process |
Longword |
Counter |
|
WS_GLOBAL |
Number of pages in the working set that are globally shared among processes on the system |
Longword |
Counter |
The set of standard resource utilization items is often taken as a whole. To facilitate this, the items can be referred to by the group name: RESOURCE_ITEMS.
|
Item |
Description |
Data type |
Usage |
When Reported |
|---|---|---|---|---|
|
APPL_SPEC |
Application specification |
Fixed ASCIC(39) |
Text |
Start |
|
APPL_NODE |
Node name |
Fixed ASCIC(15) |
Text |
Start |
|
TASK_NAME |
Task name |
Fixed ASCIC(31) |
Text |
Start |
|
STEP_NAME |
Name of exchange or processing step |
Fixed ASCIC(31) |
Text |
Start |
|
REQ_FORM_NAME |
Name of the DECforms request |
Fixed ASCIC(31) |
Text |
Start |
|
DEVICE_NAME |
Name of user's login device |
Fixed ASCIC(8) |
Text |
Start |
|
PROCEDURE_INDEX |
Numeric index uniquely identifying the procedure within the server |
Longword |
Level |
Start |
|
SERVER_NAME |
Name of the server executing the procedure |
Fixed ASCIC(31) |
Text |
Start |
|
SEND_ID |
DECforms send record ID |
Fixed ASCIC(31) |
Text |
Start |
|
RECEIVE_ID |
DECforms receive record ID |
Fixed ASCIC(31) |
Text |
Start |
|
TXN_ID |
Transaction ID |
Fixed ASCIC(36) |
Text |
Start |
|
NETWORK_TIME |
The NETWORK_TIME item is the part of the response time that is spent in communications over the network between the submitter and application nodes. The NETWORK_TIME item is measured in milliseconds. |
Longword |
Level |
End |
|
PROCESSING_TIME |
The PROCESSING_TIME item represents the part of the SUB_RESPONSE response time that is spent in processing on the application node. Together, the NETWORK_TIME and PROCESSING_TIME items make up the entire response time measured by the SUB_RESPONSE event. The PROCESSING_TIME item is measured in milliseconds. |
Longword |
Level |
End |
|
APL_USERNAME |
The submitter's OpenVMS user name on the application node. APL_USERNAME is actually the proxy translation of the front-end OpenVMS user name. In previous versions of ACMS, this item was called the SUBMITTER_NAME item. |
Fixed ASCIC(12) |
Text |
Start |
|
SUB_USERNAME |
The OpenVMS user name of the submitter, taken from the remote node. Note that the SUB_USERNAME item is not the same as the SUBMITTER_NAME item available in previous versions of ACMS. |
Fixed ASCIC(12) |
Text |
Start |
|
EXCH_STEP_NAME |
The label of the most recently executed exchange step. For those events reported at the beginning of a task, before any exchange step has executed, this item holds the string ACMS$TASK_BEGIN. |
Fixed ASCIC(31) |
Text |
Start |
|
PARENT_TASK |
An item used when a task is called by another task. The PARENT_TASK item holds the name of the calling task. ACMS leaves this item blank, if the TASK event is not a called task. |
Fixed ASCIC(31) |
Text |
Start |
|
PROC_STEP_TYPE |
An item that identifies the function of a processing step. The PROC_STEP_TYPE item
holds one of the following strings:
In previous versions of ACMS, PROCESSING_STEP events were logged only on steps that made procedure calls or DCL server commands. |
Fixed ASCIC(20) |
Text |
Start |
|
PROCEDURE_NAME |
The name of the step procedure in the procedure server. The PROCEDURE_NAME item makes the final performance report easier to interpret, in comparison to the PROCEDURE_INDEX item. TDB files built with versions of ACMS previous to Version 3.3 do not contain procedure names. In this case, ACMS logs the following string to DECtrace for the PROCEDURE_NAME item:ACMS$PROCEDURE_ <procedure_index>. |
Fixed ASCIC(31) |
Text |
Start |
|
SERVER_INDEX |
The numeric index of the server in the application. |
Longword |
Level |
Start |
|
TXN_STATUS |
An identifier field that describes the final status of a DECdtm transaction. The field format is ACMS$ <vms-identifier>, where <vms-identifier> is the identifier field of a standard OpenVMS message, for example ACMS$NORMAL. |
Fixed ASCIC(31) |
Text |
End |
|
ORIGINAL_SIZE |
A longword value that represents the size, in bytes, of a network message prior to data compression. |
Longword |
Level |
Point |
|
COMPRESSED_SIZE |
A longword value that represents the size, in bytes, of a network message that has been compressed. |
Longword |
Level |
Point |
|
COMPRESSN_RATIO |
A longword value that represents the percentage of data compression achieved. The compression ratio is expressed as a percentage in the range 0 to 99. A value of 0 indicates that ACMS was not able to compress the message. A value in the range 1 to 99 indicates the amount by which ACMS was able to reduce the size of the message. ACMS uses the following formula to calculate the compression ratio: RATIO=((ORIG_SIZE COMP_SIZE) / ORIG_SIZE) * 100 In the formula, ORIG_SIZE is the size of the original message and COMP_SIZE is the size of the compressed message. |
Longword |
Level |
Point |
|
MESSAGE_SRC |
The name of the node that sends the network message. |
Fixed ASCIC(15) |
Text |
Point |
|
MESSAGE_DEST |
The name of the node that receives the network message. |
Fixed ASCIC(15) |
Text |
Point |
15.3.1.3. DECtrace Cross Facility Items
The DECtrace cross facility items allow users who interpret DECtrace data to better understand the context in which certain events are executed and reported in DECtrace. The cross facility items are DECtrace items whose values can be set by one facility and then collected by any number of facilities. Use of cross facility items enables facilities that operate together to relate events in the final DECtrace report. To relate events across facilities, the events in both facilities must collect the value of the cross facility item in common.
|
Item |
Description |
Data type |
Usage |
|---|---|---|---|
|
CROSS_FAC_2 |
Represents the ACMS SERVER_INDEX data item |
Longword |
Level |
|
CROSS_FAC_7 |
Represents the ACMS PROCEDURE_INDEX data item |
Longword |
Level |
|
CROSS_FAC_14 |
For general, unrestricted use. |
Longword |
Level |
In ACMS, the PROCEDURE_CALL event collects the SERVER_INDEX (CROSS_FAC_2) and PROCEDURE_INDEX (CROSS_FAC_7) items. The PROCEDURE_CALL event is defined in the ALL, PERFORMANCE, and RESPONSE classes.
Note
Make sure that you update your Rdb facility definition with the facility definition shipped with DECtrace Version 1.2. This definition includes the CROSS_FAC_2 and CROSS_FAC_7 items for Rdb.
The DECtrace cross facility items are supported in DECtrace V1.2 or higher.
Additionally, DECtrace provides a cross facility item, CROSS_FAC_14, for general, unrestricted use. You can define this cross facility item for your application needs. ACMS includes collection of the CROSS_FAC_14 item in all events.
15.3.2. How to Use Cross Facility Items
The following description and example shows how DECtrace uses cross facility items to relate the ACMS PROCEDURE_CALL event to Rdb TRANSACTION events.
Just prior to ACMS executing the start of the PROCEDURE_CALL event within the application, ACMS reports a unique identifier to DECtrace. The unique identifier is implemented using two longwords: the ACMS server and procedure indexes. DECtrace stores the longword value for the server index in the CROSS_FAC_2 item, and the value for the procedure index in the CROSS_FAC_7 item.
ACMS logs the start of the PROCEDURE_CALL event, and begins to collect the cross facility item values reported to DECtrace just prior to the start event. The same cross facility items are included in the start event collections for subsequent ACMS PROCEDURE_CALL and Rdb TRANSACTION events, until ACMS reports new values to DECtrace.
Figure 15.3, ''Relating the ACMS PROCEDURE_CALL and Rdb TRANSACTION Events'' illustrates two PROCEDURE_CALL events, each of which includes Rdb TRANSACTION events. The server index for both procedure calls is 5; the procedure indexes are 27 and 14, respectively.
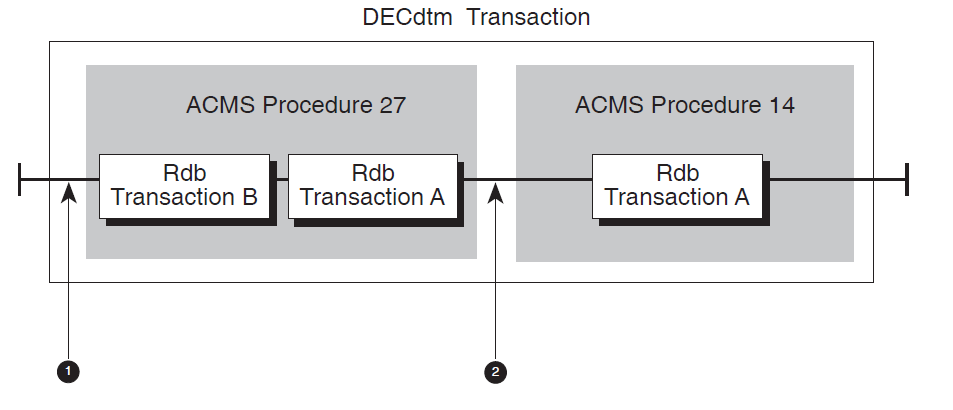
Just before ACMS executes the first procedure, the two index values, 5 and 27, are sent to DECtrace to be stored in two cross facility items. After this, start events for the first PROCEDURE_CALL and two TRANSACTION events collect these item values from DECtrace.
Before the second procedure begins, the indexes 5 and 14 are written to the same cross facility items, replacing their previous values. The PROCEDURE_CALL and TRANSACTION start events that follow include the cross facility item values in their data collection. This continues for all such event occurrences and, in the end, all related PROCEDURE_CALL and TRANSACTION events have these cross facility items in common.
In the final report, DECtrace relates events based on common cross facility item values. As a result, the Rdb TRANSACTION events are grouped with the appropriate ACMS PROCEDURE_CALL events in the report listing. In this way, you can distinguish which transactions are performed within Procedure 27, and which procedures initiated occurrences of Transaction A.
15.4. ACMS Collection Classes
Collection classes are made up of a predefined set of events and associated items. You can collect a set of related events, based on the class in which they are defined.
|
Class Name |
Events Collected |
Items Collected? |
|---|---|---|
|
ALL |
All events |
* |
|
ALL_NO_CF |
All events |
Cross facility items are not collected |
|
PERFORMANCE |
|
* |
|
PERFORMANCE_NO_CF |
|
Cross facility items are not collected |
|
RESPONSE |
|
* |
|
RESPONSE_NO_CF |
|
Cross facility items are not collected |
|
Event |
Event Type |
Items |
|---|---|---|
|
TASK |
Duration |
APPL_SPEC, TASK_NAME, PARENT_TASK, STEP_NAME, SUB_USERNAME, APL_USERNAME, CROSS_FAC_14 |
|
EXCHANGE_STEP |
Duration |
APPL_SPEC, DEVICE_NAME, REQ_FORM_NAME, STEP_NAME, TASK_NAME, SEND_ID, RECEIVE_ID, SUB_USERNAME, APL_USERNAME, CROSS_FAC_14 |
|
PROCESSING_STEP |
Duration |
APPL_SPEC, STEP_NAME, TASK_NAME, TXN_ID, SUB_USERNAME, APL_USERNAME, PROC_STEP_TYPE, EXCH_STEP_NAME, CROSS_FAC_14 |
|
PROCEDURE_CALL |
Duration |
APPL_SPEC, PROCEDURE_INDEX, SERVER_NAME, STEP_NAME, TASK_NAME, RESOURCE_ITEMS, TXN_ID, SUB_USERNAME, APL_USERNAME, PROCEDURE_NAME, SERVER_INDEX, EXCH_STEP_NAME, CROSS_FAC_2, CROSS_FAC_7, CROSS_FAC_14 |
|
REMOTE_REQUEST |
Duration |
APPL_NODE, APPL_SPEC, DEVICE_NAME, REQ_FORM_NAME, TASK_NAME, SUB_USERNAME, EXCH_STEP_NAME, CROSS_FAC_14 |
|
FORMS_ENABLE |
Duration |
APPL_NODE, APPL_SPEC, DEVICE_NAME, REQ_FORM_NAME, SUB_USERNAME, CROSS_FAC_14 |
|
FORMS_REQUEST |
Duration |
APPL_NODE, APPL_SPEC, DEVICE_NAME, SEND_ID, RECEIVE_ID, SUB_USERNAME, TASK_NAME, REQ_FORM_NAME, EXCH_STEP_NAME, CROSS_FAC_14 |
|
TASK_WAIT |
Duration |
APPL_SPEC, TASK_NAME, SERVER_NAME, TXN_ID, STEP_NAME, PROCEDURE_NAME, SUB_USERNAME, APL_USERNAME, EXCH_STEP_NAME, CROSS_FAC_14 |
|
TRANSACTION |
Duration |
APPL_SPEC, TASK_NAME, STEP_NAME, TXN_ID, SUB_USERNAME, APL_USERNAME, TXN_STATUS, EXCH_STEP_NAME, CROSS_FAC_14 |
|
SUB_RESPONSE |
Duration |
APPL_NODE, APPL_SPEC, DEVICE_NAME, TASK_NAME, EXCH_STEP_NAME, NETWORK_TIME, PROCESSING_TIME, SUB_USERNAME, CROSS_FAC_14 |
|
APL_RESPONSE |
Duration |
APPL_SPEC, TASK_NAME, APL_USERNAME, EXCH_STEP_NAME, SUB_USERNAME, CROSS_FAC_14 |
|
COMPRESSED_MSG |
Point |
ORIGINAL_SIZE, COMPRESSED_SIZE, COMPRESSN_RATIO, MESSAGE_SRC, MESSAGE_DEST, CROSS_FAC_14 |
|
Event |
Event Type |
Items? |
|---|---|---|
|
TASK |
Duration |
* |
|
EXCHANGE_STEP |
Duration |
* |
|
PROCESSING_STEP |
Duration |
* |
|
PROCEDURE_CALL |
Duration |
* |
|
REMOTE_REQUEST |
Duration |
* |
|
FORMS_ENABLE |
Duration |
* |
|
FORMS_REQUEST |
Duration |
* |
|
TASK_WAIT |
Duration |
* |
|
TRANSACTION |
Duration |
* |
|
COMPRESSED_MSG |
Point |
* |
|
Event |
Event Type |
Items? |
|---|---|---|
|
SUB_RESPONSE |
Duration |
* |
|
APL_RESPONSE |
Duration |
* |
|
TRANSACTION |
Duration |
* |
|
PROCESSING_STEP |
Duration |
* |
|
TASK_WAIT |
Duration |
* |
|
PROCEDURE_CALL |
Duration |
* |
15.4.1. Registering the Facility Definition
DECtrace can collect event data from a number of layered products and applications. These other products are referred to as facilities, and each has a facility definition registered in the DECtrace administration database.
If DECtrace installation preceded ACMS installation, the ACMS facility definition is registered in the DECtrace administration database. When ACMS is subsequently installed, the ACMS facility definition is registered and you can create a selection and schedule a collection.
If DECtrace is not already installed on the system at the time of ACMS installation, the ACMS facility definition is inserted in the library file SYS$LIBRARY:EPC$FACILITY.TLB. If you later install DECtrace, the DECtrace EPC$INSERT post-installation procedure inserts the ACMS facility definitions in the DECtrace administration database.
SHOW DEFINITION command to list the facilities installed on
your system. The following example shows the facility definitions on the node
TSTVAX:$ COLLECT SHOW DEFINITION /FORMAT=NAMES_ONLY
25-APR-1991 15:58 Facility Definition Information Page 1
Names Only Report DECtrace V1.0-0
Facility: Version: Creation Date: Class:
-------------------- ---------- ------------------ ------------------
ACMS V3.2-0 7-APR-91 17:23 ALL
PERFORMANCE (D)
ATM_SAMPLE V1.0 25-APR-91 14:17 ALL (D)
MY_FACILITY V2.0 12-APR-91 10:27 ALL
WORKLOAD (D)
RDBVMS V3.2-0 20-APR-91 15:21 ALL
PERFORMANCE (D)
WORKLOAD15.4.2. Creating a Selection
CREATE
SELECTION command to create a facility selection
which consists of:Selection name
List of facilities for which to collect data
Class of data to collect for each facility
CREATE SELECTION command
is:CREATE SELECTION selection_name /FACILITY=(facility_name[,. . . ])
$COLLECT CREATE SELECTION MY_SELECTION /FACILITY=ACMS
/OPTIONS qualifier.
This qualifier takes a file name as an argument. The options file lists each facility and the
collection class you want to use. Each facility is described on a separate line. If you specify
/OPTIONS but do not include a file name, DECtrace prompts you for the
options. The format of the facility description in the options file
is:FACILITY facility-name [/VERSION="version-code"] [/CLASS=class-name]The name of the facility for which to collect data. A text string identifying the version of the facility. The string must be enclosed with quotation marks ( " "). The class of data that you want collected for the facility.
$COLLECT CREATE SELECTION SELECT_ALL /OPTIONSOPTION>FACILITY ACMS /CLASS=ALLOPTION>FACILITY MY_FACILITY /CLASS=PERFORMANCEOPTION>CTRL/Z$
15.4.3. Collecting Cross Facility Items
CREATE SELECTION command to:Specify the facilities for which to collect data.
Specify the collection class that includes the cross facility items to be collected for each facility involved.
PERFORMANCE
RESPONSE
ALL
To collect the CROSS_FAC_2 or CROSS_FAC_7 values, specify any one of these classes in the
DECtrace CREATE SELECTION command.
If you are using the CROSS_FAC_14 value in your application, this value is logged to DECtrace during any ACMS event and collected by DECtrace if any of the above classes are selected.
DECtrace>create selection <sel-name> /optionsOption>facility acms /class=performanceOption>facility rdbvms /class=performanceOption>Ctrl/Z
DECtrace>schedule collection <coll-name> <coll-file> -_DECtrace>/selection=<sel-name> /begin= <start-time> -_DECtrace>/end=<end-time>
15.4.4. Scheduling Data Collection
Output file for the collected data
Start and end times (or alternately, the duration)
Facility selection to use
Scope of the collection (the entire cluster or just the local node)
Note that although you can schedule many data collections on a node, only one collection can be active on a node at any time. DECtrace does not allow you to schedule data collections that overlap or run simultaneously.
$COLLECT SCHEDULE COLLECTION MY_COLLECTION MY_DATA.DAT -_$/SELECTION=SELECT_ALL -_$/BEGINNING=11:00 /ENDING=12:00 -_$/NOCLUSTER /PROTECTION=(W:W)%EPC-S-SCHED, Data collection MY_COLLECTION is scheduled
/DURATION qualifier in place of the
/ENDING qualifier. You must specify the duration as a relative OpenVMS time.
For example:
$COLLECT SCHEDULE COLLECTION MY_COLLECTION MY_DATA.DAT -_$/SELECTION=MY_SELECTION -_$/BEGINNING=11:00 /DURATION="1:" -_$/NOCLUSTER /PROTECTION=(W:W)%EPC-S-SCHED, Data collection MY_COLLECTION is scheduled
You can schedule data collection either locally or clusterwide by using the
/[NO]CLUSTER qualifier. By default, the SCHEDULE
COLLECTION command schedules data collection to occur on every node in the cluster.
To schedule data collection on a subset of the cluster, you must log in to each node that you
want data collection to occur on and schedule local data collection on that node by specifying
/NOCLUSTER. Note that on a standalone system the /CLUSTER
qualifier is ignored.
15.4.5. Using Registration IDs
In addition to scheduling when to collect data, you can specify which OpenVMS processes you wish to collect data from during the collection interval.
You select the processes from which to collect data by specifying one or more registration IDs with the SCHEDULE COLLECTION
command. The registration ID is a facility- or process-specific character string that is known
to the process only at run time
On the application node, the registration ID is the name of an ACMS application. It identifies the Application Execution Controller and server processes that make up the application. This allows you to collect data for a specific ACMS application.
DECtrace also registers process-specific information when an image containing DECtrace service routine calls activates. The process-specific registration IDs include the EPID (extended process ID), the image name, the user name, and the process name. This allows you to collect data on a per-process, per-user, or per-image basis.
$COLLECT SCHEDULE COLLECTION MY_COLLECTION MY_DATA.DAT -_$/SELECTION=ACMS_SEL -_$/BEGINNING=11:00 /DURATION="1:" -_$/NOCLUSTER /PROTECTION=(W:W)-_$/REGISTRATION_ID=(JONES,WORK1:[FINANCE]PAYROLL.EXE)%EPC-S-SCHED, Data collection MY_COLLECTION is scheduled
On the submitter node, the registration ID is "ACMS_AGENT." The registration ID "ACMS_AGENT" can be used to record TDMS, Request Interface, or DECforms I/O performed by an agent process.
Use the DECtrace SHOW REGISTER command to display the processes and images
available for data collection on your system.
15.5. Creating a Report Based on Collected Data
Format and merge the data files.
Generate the report.
15.5.1. Formatting and Merging Data Files
FORMAT command to format the data in the data files into an Rdb database.
An RMS formatted file is also available for users who plan to create their own reports based on
the data. See the DECtrace documentation for information. The following example formats the data
in the file MY_DATA.DAT and stores the formatted data in an Rdb database named
FORMATTED_DATA.RDB:$COLLECT FORMAT MY_DATA.DAT FORMATTED_DATA
You can also use the FORMAT command to combine the data files from two or
more collections into one formatted database. However, these collections must have been
scheduled using the same facility selection.
$COLLECT FORMAT MONDAY.DAT,TUESDAY.DAT,WEDNESDAY.DAT WEEK
$COLLECT FORMAT /MERGE THURSDAY.DAT WEEK
See the description of the FORMAT command in the DECtrace documentation for
a list of optimization parameters that you can use to speed up formatting operations.
15.5.2. Generating a Report
|
Type |
Description |
|---|---|
|
DETAIL |
Actual values of the items collected for each event |
|
FREQUENCY |
Event occurrence summary based on a selected time interval |
|
SUMMARY (default) |
Summary statistics about the collected data |
REPORT command creates a Summary Report on all of
the data in the formatted database and displays the report on your current
SYS$OUTPUT device (typically your terminal). For
example:$COLLECT REPORT FORMATTED_DATA.RDB
/FACILITY qualifier. The
following example generates a Summary Report only on ACMS data and writes the report to the file
MY_REPORT.TXT:$COLLECT REPORT FORMATTED_DATA.RDB /FACILITY=ACMS -_$/OUTPUT=MY_REPORT.TXT
19-APR-1991 16:57 Summary Report Page 1
Selection: ACMS_ONLY DECtrace V1.0-0
Event: EXCHANGE_STEP In Facility: ACMS Version: V3.2-0
Elapsed
Minimum 2.17
Maximum 1489.29
Mean 17.90
Std Dev 109.82
95 Prct 233.16
Total 5334.71
Count 298
%EPC-I-RPQU_BAD_95, 95 Prct for events with counts under 1000 are less precise19-APR-1991 16:57 Summary Report Page 2
Selection: ACMS_ONLY DECtrace V1.0-0
Event: PROCEDURE_CALL In Facility: ACMS Version: V3.2-0
Elapsed BUFFERED IO CPU TIME CURREN DIRECT IO PAGEFAULTS
T PRIO
Minimum 0.16 0 5 4 4 0
Maximum 15.64 27 229 5 238 1124
Mean 0.32 0.11 7.89 4.79 6.44 4.03
Std Dev 0.89 1.58 12.95 0.40 13.57 65.31
95 Prct 2.08 3.21 33.29 5.58 33.04 132.04
Total 97.06 35 2346 1424 1914 1199
Count 297
PAGEFAULT Proc Idx VIRTUAL GLOBAL WS PRIVATE WS
IOs SIZE
Minimum 0 1 8148 773 1271
Maximum 25 1 8148 797 1347
Mean 0.08 1.00 8148.00 796.71 1344.20
Std Dev 1.45 0.00 0.00 1.63 12.61
95 Prct 2.92 1.00 8148.00 799.92 1368.93
Total 25 297 2419956 236624 399228
Count 297
WORKING
SET SIZ
Minimum 2824
Maximum 3124
Mean 3113.89
Std Dev 54.20
95 Prct 3220.14
Total 924828
Count 297
%EPC-I-RPQU_BAD_95, 95 Prct for events with counts under 1000 are less precise19-APR-1991 16:57 Summary Report Page 3
Selection: ACMS_ONLY DECtrace V1.0-0
Event: PROCESSING In Facility: ACMS Version: V3.2-0
_STEP
Elapsed
Minimum 0.17
Maximum 15.74
Mean 0.33
Std Dev 0.90
95 Prct 2.11
Total 100.64
Count 297
%EPC-I-RPQU_BAD_95, 95 Prct for events with counts under 1000 are less precise
%EPC-I-NOEND, 1 Start Event Records had no matching End19-APR-1991 16:57 Summary Report Page 4
Selection: ACMS_ONLY DECtrace V1.0-0
Event: TASK In Facility: ACMS Version: V3.2-0
Elapsed
Minimum 5436.31
Maximum 5436.31
Mean 5436.31
Std Dev 0.00
95 Prct 5436.31
Total 5436.31
Count 1
%EPC-I-RPQU_BAD_95, 95 Prct for events with counts under 1000 are less precise19-APR-1990 16:57 Index Page 5 Selection: ACMS_ONLY DECtrace V1.0-0 Report Index Facility Name Event Name Page ACMS EXCHANGE_STEP 1 ACMS PROCEDURE_CALL 2 ACMS PROCESSING_STEP 3 ACMS TASK 4
/STATISTICS qualifier to specify the statistics DECtrace uses in
the Summary Report. This feature allows you to create customized reports that present
information in the manner most suitable to your needs. The valid statistics are:ALL
COUNT (default)
MAXIMUM
MEAN
MINIMUM
STANDARD_DEVIATION
TOTAL
95_PERCENTILE
$COLLECT REPORT FORMATTED_DATA.RDB /FACILITY=ACMS -_$/TYPE=SUMMARY /STATISTICS=(MAXIMUM,MINIMUM,MEAN) -_$/OUTPUT=MY_SUMMARY.TXT
/EVENTS qualifier to restrict the report
to specific events. The following example generates a report based on the data collected for a
subset of the events in
ACMS:$COLLECT REPORT FORMATTED_DATA /OUTPUT=MY_REPORT.TXT -_$/FACILITY=ACMS -_$/EVENTS=(TASK,TASK_WAIT,FORMS_REQUEST)
15.5.3. Generating a Report with Cross Facility Items
Use the DECtrace
REPORTcommand options to select the relevant report data.Use the DECtrace join operation to associate the events with each other.
For example, if you join the CROSS_FAC_2 and CROSS_FAC_7 items of the ACMS PROCEDURE_CALL event with those of an Rdb database TRANSACTION event, DECtrace relates each transaction occurrence with the procedure call in which it occurred.
DECtrace>REPORT /OPTIONS /STATISTICS=ALL /TYPE=SUMMARYOption>event PROCEDURE_CALL /facility=acmsOption>event TRANSACTION /facility=rdbvmsOption>restrict item server_name=<server>Option>restrict item procedure_name=<procedure>Option>join PROCEDURE_CALL.cross_fac_2=TRANSACTION.cross_fac_2Option>join PROCEDURE_CALL.cross_fac_7=TRANSACTION.cross_fac_7Option>Ctrl/Z
>COLLECT REPORT /OPTIONS /STATISTICS=ALL /TYPE=SUMMARYOption>join PROCEDURE_CALL.CROSS_FAC_2=TRANSACTION.CROSS_FAC_2Option>event PROCEDURE_CALL /FACILITY=ACMSOption>event TRANSACTION /FACILITY=RDBVMS11-May-1993 10:00 Summary Report Page 1 Selection: xxx_xxx DECtrace V1.2-0 Event: PROCEDURE_CALL In Facility: ACMS Version: V3.3-0B CROSS_FAC_2 : 1 Elapsed BUFFERED IO CPU TIME CURRENT DIRECT IO PAGEFAULTS PRIO Minimum 0.30 0 6 7 6 1 Maximum 0.47 0 7 7 8 2 Mean 0.38 0.00 6.50 7.00 7.00 1.50 Std Dev 0.12 0.00 0.70 0.00 1.41 0.70 95 Prct 0.62 0.00 7.88 7.00 9.77 2.88 Total 0.77 0 13 14 14 3 Count 2 PAGEFAULT Proc Idx VIRTUAL GLOBAL WS PRIVATE WS IOs SIZE Minimum 0 1 9676 755 1407 Maximum 2 1 9676 776 1407 Mean 1.00 1.00 9679.00 775.5 1407.00 Std Dev 1.41 0.00 0.00 0.70 0.00 95 Prct 3.77 1.00 9679.00 776.88 1407.00 Total 2 2 19358 1551 2814 Count2
WORKING CROSS_FAC_2
SET SIZE
Minimum 4096 1
Maximum 4096 1
Mean 4096.00 1.00
Std Dev 0.00 0.00
95 Prct 4096.00 1.00
Total 8192 2
Count 211-May-1993 10:00 Summary Report Page 1
Selection: xxx_xxx DECtrace V1.2-0
Event: TRANSACTION In Facility: RDBVMS Version: T3.1-2
Elapsed AIJ File BUFFERED Buffer Client PC
Writes IO Pool Rds
Minimum 0.10 0 0 0 3EC8
Maximum 0.16 0 0 2 3EC8
Mean 0.12 0.00 0.00 1.00 3EC8.00
Std Dev 0.04 0.00 0.00 1.41 0.00
95 Prct 0.21 0.00 0.00 3.77 3EC8.00
Total 0.25 0 0 2 7D90
Count 2
WORKING Trans Seq CROSS_FAC_2
SET SIZ Num
Minimum 4096 45 1
Maximum 4096 45 1
Mean 4096.00 45.00 1.00
Std Dev 0.00 0.00 0.00
95 Prct 4096.00 45.00 1.00
Total 8192 90 2
Count 215.5.4. Creating a Customized Report
/OPTIONS qualifier to the REPORT command allows you to
specify characteristics for individual events and items. Example 15.3, ''Using Reporting Options to Generate a Customized Report'' shows
the command to generate a report which uses a different report format for each event.$ COLLECT REPORT MY_DATABASE -
/SINCE = "01-JAN-1991" -
/WIDTH = 80 -
/TYPE = SUMMARY -
/LENGTH = 66 -
/OUTPUT = ACMS.REPORT -
/STATISTICS = ALL -
/TITLE = "ACMS Reports" -
/OPTIONS
EVENT EXCHANGE_STEP -
/FACILITY = ACMS -
/TYPE = FREQUENCY -
/INTERVAL = SECONDS -
/SUBTITLE = "ACMS Exchange Step Frequency Report"
EVENT PROCEDURE_CALL -
/FACILITY = ACMS -
/GROUP_BY = (PROCEDURE_INDEX) -
/STATISTICS = (MINIMUM, MAXIMUM, MEAN, STANDARD_DEVIATION) -
/SUBTITLE = "ACMS Procedure Call Summary Report"
EVENT PROCEDURE_CALL -
/FACILITY = ACMS -
/GROUP_BY = (PROCEDURE_INDEX) -
/TYPE = DETAIL -
/SUBTITLE = "ACMS Procedure Call Detail Report"
ITEM PROCEDURE_INDEX /WIDTH = 9
ITEM PROCEDURE_INDEX /REPORT_HEADER = "Procedure Index"
RESTRICTION COLLECTION ACMS_COLL RESTRICTION EPID 2A8002DF,2A8002C1
RESTRICTION IMAGE PAYROLL, INVENTORY
RESTRICTION NODE ACMS1, ACMS2Data from the MY_DATABASE formatted database is used for this report. The initial report
command modifies several of the default qualifier values, such as the length of each report page
and the date before which all data should be ignored. The /OPTIONS qualifier
allows you to specify event and item qualifiers to either override the main qualifiers or
provide additional restrictions to the report.
Based on the first part of the REPORT command, all subreports, unless
otherwise specified, contain data from the data collection file with a timestamp date greater
than or equal to January 1, 1991. The report is 80 columns wide and 66 lines long. The
subreports are Summary Reports with all possible statistics displayed. The report is written to
a file called ACMS.REPORT in your current directory.
EVENT EXCHANGE_STEP -
/FACILITY = ACMS -
/TYPE = FREQUENCY -
/INTERVAL = SECONDS -
/SUBTITLE = "ACMS Exchange Step Frequency Report"EVENT PROCEDURE_CALL -
/FACILITY = ACMS -
/GROUP_BY = (PROCEDURE_INDEX) -
/STATISTICS = (MINIMUM, MAXIMUM, MEAN, STANDARD_DEVIATION) -
/SUBTITLE = "ACMS Procedure Call Summary Report"The third subreport is a Detail Report based on the PROCEDURE_CALL event. The report is ordered by the PROCEDURE_INDEX item in ascending order. The item width is modified to use 9 columns. The report header is changed to "Procedure Index." In the report, "Start" is added to the beginning of the item header by DECtrace to signify that the value is based on the start event. DECtrace uses end event values for duration events if the item was collected on the end event. In this case, the PROCEDURE_INDEX item is only collected on the start event. If this had been a point event, the item header would not have been changed.
EVENT PROCEDURE_CALL -
/FACILITY = ACMS -
/GROUP_BY = (PROCEDURE_INDEX) -
/TYPE = DETAIL -
/SUBTITLE = "ACMS Exchange Step Detail Report"
ITEM PROCEDURE_INDEX /WIDTH = 9
ITEM PROCEDURE_INDEX /REPORT_HEADER = "Procedure Index"
RESTRICTION EPID 2A8002DF,2A8002C1
RESTRICTION IMAGE PAYROLL, INVENTORY RESTRICTION NODE ACMS1, ACMS2
SQL>CREATE INDEX MY_CLIENT_PC_INDEX ONSQL>EPC$1_253_PROCEDURE_CALL(IMAGE_RECORD_ID,SQL>COLLECTION_RECORD_ID, PROCEDURE_INDEX_START);
RDO>DEFINE INDEX MY_INDEX FOR EPC$1_253_PROCEDURE_CALLRDO>TYPE IS SORTED.RDO>IMAGE_RECORD_ID ASCENDING.RDO>COLLECTION_RECORD_ID ASCENDING.RDO>PROCEDURE_INDEX ASCENDING.RDO>END MY_INDEX INDEX.RDO>COMMIT;
SQL>DROP INDEX MY_INDEX;SQL>COMMIT;
RDO>DELETE INDEX MY_INDEX;RDO>COMMIT;
See the DECtrace documentation for a layout of the formatted database.
12-APR-1991 08:13 ACMS Reports Page 1
Selection: DEBIT_CREDIT_SEL DECtrace V1.0-0
Event: EXCHANGE_STEP In Facility: ACMS Version: V3.2-0
ACMS Exchange Step Frequency Report
Time Period Occurrences
17-SEP-1990 15:30:33 1
17-SEP-1990 15:30:45 1
17-SEP-1990 15:30:48 112-APR-1991 08:13 ACMS Reports Page 2
Selection: DEBIT_CREDIT_SEL DECtrace V1.0-0
Event: PROCEDURE_CALL In Facility: ACMS Version: V3.-0
ACMS Procedure Call Summary Report
Proc Idx : 1
Elapsed BUFFERED IO CPU TIME CURREN DIRECT IO PAGEFAULTS
T PRIO
Minimum 0.30 0 6 7 6 1
Maximum 0.47 0 7 7 8 2
Mean 0.25 0.00 4.33 4.66 4.66 1.00
Std Dev 0.23 0.00 3.78 4.04 4.16 1.00
PAGEFAULT Proc Idx VIRTUAL GLOBAL WS PRIVATE WS
IOs SIZE
Minimum 0 1 9679 775 1407
Maximum 2 1 9679 776 1407
Mean 0.66 0.66 6452.66 517.00 938.00
Std Dev 1.15 0.57 5588.17 447.73 812.33
WORKING
SET SIZ
Minimum 4096
Maximum 4096
Mean 2730.66
Std Dev 2364.82 ================= Grand Total ====================
Elapsed BUFFERED IO CPU TIME CURREN DIRECT IO PAGEFAULTS
T PRIO
Minimum 0.30 0 6 7 6 1
Maximum 0.47 0 7 7 8 2
Mean 0.25 0.00 4.33 4.66 4.66 1.00
Std Dev 0.23 0.00 3.78 4.04 4.16 1.00
PAGEFAULT Proc Idx VIRTUAL GLOBAL WS PRIVATE WS
IOs SIZE
Minimum 0 1 9679 775 1407
Maximum 2 1 9679 776 1407
Mean 0.66 0.66 6452.66 517.00 938.00
Std Dev 1.15 0.57 5588.17 447.73 812.3312-APR-1990 08:13 ACMS Reports Page 3
Selection: DEBIT_CREDIT_SEL DECtrace V1.0-0
WORKING
SET SIZ
Minimum 4096
Maximum 4096
Mean 2730.66
Std Dev 2364.8212-APR-1991 08:13 ACMS Reports Page 4
Selection: DEBIT_CREDIT_SEL DECtrace V1.0-0
Event: PROCEDURE_CALL In Facility: ACMS Version: V3.2-0
For Collections: ACMS_COLL
For Nodes: ACMS1, ACMS2
For Images: PAYROLL, INVENTORY
For EPIDs: 2A8002DF, 2A8002C1
ACMS Procedure Call Detail Report
Timestamp Elapsed
17-SEP-1990 15:30:33.24 0.47
17-SEP-1990 15:30:33.71
Start Appl Spec
DBCR_ALL_APPBUFFERED IO CPU TIME CURREN DIRECT IO PAGEFAULTS PAGEFAULT
T PRIO IOs
59 340 8 231 1778 84
59 347 7 239 1780 86
Start
Procedure
Index
1Start Server Name
DBCR_ALL_SERVER_01
Start Step Name
DBCR_PROCESSING
Start Sub Name
SYSTEM
Start Task Name
DBCR_ALL_TSK_DBCR
VIRTUAL GLOBAL WS PRIVATE WS WORKING
SIZE SET SIZ
9679 769 1405 4096
9679 775 1407 409612-APR-1990 08:13 ACMS Reports Page 5 Selection: DEBIT_CREDIT_SEL DECtrace V1.0-0 Timestamp Elapsed 17-SEP-1990 15:30:45.71 0.30 17-SEP-1990 15:30:46.01 Start Appl Spec DBCR_ALL_APP
BUFFERED IO CPU TIME CURREN DIRECT IO PAGEFAULTS PAGEFAULT
T PRIO IOs
59 347 8 239 1780 86
59 353 7 245 1781 86
Start
Procedure
Index 1
Start Server Name
DBCR_ALL_SERVER_01
Start Step Name
DBCR_PROCESSING
Start Sub Name
SYSTEM
Start Task Name
DBCR_ALL_TSK_DBCR
VIRTUAL GLOBAL WS PRIVATE WS WORKING
SIZE SET SIZ
9679 775 1407 4096
9679 776 1407 409612-APR-1990 08:13 Index Page 6 Selection: DEBIT_CREDIT_SEL DECtrace V1.0-0 Report Index Facility Name Event Name Page ACMS EXCHANGE_STEP 1 ACMS PROCEDURE_CALL 2 ACMS PROCEDURE_CALL 4
15.6. ACMS Database Relations
This section describes the event-data relations in the formatted database for the ACMS ALL collection class. This information is provided so that you can write customized reports based on data in the formatted database.
|
Column Name |
Data Type |
Domain |
|---|---|---|
|
COLLECTION_RECORD_ID |
SMALLINT |
COLLECTION_RECORD_ID_DOMAIN |
|
IMAGE_RECORD_ID |
INTEGER |
IMAGE_RECORD_ID_DOMAIN |
|
CONTEXT_NUMBER |
INTEGER |
CONTEXT_NUMBER_DOMAIN |
|
TIMESTAMP_START |
DATE VMS | |
|
TIMESTAMP_END |
DATE VMS | |
|
APPL_SPEC_START |
VARCHAR (39) | |
|
APPL_SPEC_START_STR_ID |
INTEGER |
STR_ID_DOMAIN |
|
TASK_NAME_START |
VARCHAR (31) | |
|
TASK_NAME_START_STR_ID |
INTEGER |
STR_ID_DOMAIN |
|
APL_USERNAME_START |
VARCHAR (12) | |
|
APL_USERNAME_START_STR_ID |
INTEGER |
STR_ID_DOMAIN |
|
SUB_USERNAME_START |
VARCHAR (12) | |
|
SUB_USERNAME_START_STR_ID |
INTEGER |
STR_ID_DOMAIN |
|
EXCH_STEP_NAME_START |
VARCHAR (31) | |
|
EXCH_STEP_NAME_START_STR_ID |
INTEGER |
STR_ID_DOMAIN |
|
CROSS_FAC_14_START |
INTEGER | |
|
CROSS_FAC_14_END |
INTEGER |
|
Column Name |
Data Type |
Domain |
|---|---|---|
|
STR_ID |
INTEGER |
STR_ID_DOMAIN |
|
SEGMENT_NUMBER |
SMALLINT |
SEGMENT_NUMBER_DOMAIN |
|
STR_SEGMENT |
VARCHAR(0) |
|
Column Name |
Data Type |
Domain |
|---|---|---|
|
COLLECTION_RECORD_ID |
SMALLINT |
COLLECTION_RECORD_ID_DOMAIN |
|
IMAGE_RECORD_ID |
INTEGER |
IMAGE_RECORD_ID_DOMAIN |
|
CONTEXT_NUMBER |
INTEGER |
CONTEXT_NUMBER_DOMAIN |
|
TIMESTAMP_POINT |
DATE VMS | |
|
ORIGINAL_SIZE |
INTEGER | |
|
COMPRESSED_SIZE |
INTEGER | |
|
COMPRESSN_RATIO |
INTEGER | |
|
MESSAGE_SRC |
VARCHAR(15) | |
|
MESSAGE_SRC_STR_ID |
INTEGER |
STR_ID_DOMAIN |
|
MESSAGE_DEST |
VARCHAR(15) | |
|
MESSAGE_DEST_STR_ID |
INTEGER |
STR_ID_DOMAIN |
|
Column Name |
Data Type |
Domain |
|---|---|---|
|
STR_ID |
INTEGER |
STR_ID_DOMAIN |
|
SEGMENT_NUMBER |
SMALLINT |
SEGMENT_NUMBER_DOMAIN |
|
STR_SEGMENT |
VARCHAR(0) |
|
Column Name |
Data Type |
Domain |
|---|---|---|
|
COLLECTION_RECORD_ID |
SMALLINT |
COLLECTION_RECORD_ID_DOMAIN |
|
IMAGE_RECORD_ID |
INTEGER |
IMAGE_RECORD_ID_DOMAIN |
|
CONTEXT_NUMBER |
INTEGER |
CONTEXT_NUMBER_DOMAIN |
|
TIMESTAMP_START |
DATE VMS | |
|
TIMESTAMP_END |
DATE VMS | |
|
APPL_SPEC_START |
VARCHAR (39) | |
|
APPL_SPEC_START_STR_ID |
INTEGER |
STR_ID_DOMAIN |
|
TASK_NAME_START |
VARCHAR (31) | |
|
TASK_NAME_START_STR_ID |
INTEGER |
STR_ID_DOMAIN |
|
APL_USERNAME_START |
VARCHAR (12) | |
|
APL_USERNAME_START_STR_ID |
INTEGER |
STR_ID_DOMAIN |
|
SUB_USERNAME_START |
VARCHAR (12) | |
|
SUB_USERNAME_START_STR_ID |
INTEGER |
STR_ID_DOMAIN |
|
STEP_NAME_START |
VARCHAR (31) | |
|
STEP_NAME_START_STR_ID |
INTEGER |
STR_ID_DOMAIN |
|
REQ_FORM_NAME_START |
VARCHAR (31) | |
|
REQ_FORM_NAME_START_STR_ID |
INTEGER |
STR_ID_DOMAIN |
|
DEVICE_NAME_START |
VARCHAR (8) | |
|
DEVICE_NAME_START_STR_ID |
INTEGER |
STR_ID_DOMAIN |
|
SEND_ID_START |
VARCHAR (31) | |
|
SEND_ID_START_STR_ID |
INTEGER |
STR_ID_DOMAIN |
|
RECEIVE_ID_START |
VARCHAR (31) | |
|
RECEIVE_ID_START_STR_ID |
INTEGER |
STR_ID_DOMAIN |
|
CROSS_FAC_14_START |
INTEGER | |
|
CROSS_FAC_14_END |
INTEGER |
|
Column Name |
Data Type |
Domain |
|---|---|---|
|
STR_ID |
INTEGER |
STR_ID_DOMAIN |
|
SEGMENT_NUMBER |
SMALLINT |
SEGMENT_NUMBER_DOMAIN |
|
STR_SEGMENT |
VARCHAR(0) |
|
Column Name |
Data Type |
Domain |
|---|---|---|
|
COLLECTION_RECORD_ID |
SMALLINT |
COLLECTION_RECORD_ID_DOMAIN |
|
IMAGE_RECORD_ID |
INTEGER |
IMAGE_RECORD_ID_DOMAIN |
|
CONTEXT_NUMBER |
INTEGER |
CONTEXT_NUMBER_DOMAIN |
|
TIMESTAMP_START |
DATE VMS | |
|
TIMESTAMP_END |
DATE VMS | |
|
APPL_SPEC_START |
VARCHAR (39) | |
|
APPL_SPEC_START_STR_ID |
INTEGER |
STR_ID_DOMAIN |
|
APPL_NODE_START |
VARCHAR (15) | |
|
APPL_NODE_START_STR_ID |
INTEGER |
STR_ID_DOMAIN |
|
SUB_USERNAME_START |
VARCHAR (12) | |
|
SUB_USERNAME_START_STR_ID |
INTEGER |
STR_ID_DOMAIN |
|
DEVICE_NAME_START |
VARCHAR (8) | |
|
DEVICE_NAME_START_STR_ID |
INTEGER |
STR_ID_DOMAIN |
|
REQ_FORM_NAME_START |
VARCHAR (31) | |
|
REQ_FORM_NAME_START_STR_ID |
INTEGER |
STR_ID_DOMAIN |
|
CROSS_FAC_14_START |
INTEGER | |
|
CROSS_FAC_14_END |
INTEGER |
|
Column Name |
Data Type |
Domain |
|---|---|---|
|
STR_ID |
INTEGER |
STR_ID_DOMAIN |
|
SEGMENT_NUMBER |
SMALLINT |
SEGMENT_NUMBER_DOMAIN |
|
STR_SEGMENT |
VARCHAR(0) |
|
Column Name |
Data Type |
Domain |
|---|---|---|
|
COLLECTION_RECORD_ID |
SMALLINT |
COLLECTION_RECORD_ID_DOMAIN |
|
IMAGE_RECORD_ID |
INTEGER |
IMAGE_RECORD_ID_DOMAIN |
|
CONTEXT_NUMBER |
INTEGER |
CONTEXT_NUMBER_DOMAIN |
|
TIMESTAMP_START |
DATE VMS | |
|
TIMESTAMP_END |
DATE VMS | |
|
APPL_SPEC_START |
VARCHAR (39) | |
|
APPL_SPEC_START_STR_ID |
INTEGER |
STR_ID_DOMAIN |
|
APPL_NODE_START |
VARCHAR (15) | |
|
APPL_NODE_START_STR_ID |
INTEGER |
STR_ID_DOMAIN |
|
SUB_USERNAME_START |
VARCHAR (12) | |
|
SUB_USERNAME_START_STR_ID |
INTEGER |
STR_ID_DOMAIN |
|
DEVICE_NAME_START |
VARCHAR (8) | |
|
DEVICE_NAME_START_STR_ID |
INTEGER |
STR_ID_DOMAIN |
|
TASK_NAME_START |
VARCHAR (31) | |
|
TASK_NAME_START_STR_ID |
INTEGER |
STR_ID_DOMAIN |
|
EXCH_STEP_NAME_START |
VARCHAR (31) | |
|
EXCH_STEP_NAME_START_STR_ID |
INTEGER |
STR_ID_DOMAIN |
|
REQ_FORM_NAME_START |
VARCHAR (31) | |
|
REQ_FORM_NAME_START_STR_ID |
INTEGER |
STR_ID_DOMAIN |
|
SEND_ID_START |
VARCHAR (31) | |
|
SEND_ID_START_STR_ID |
INTEGER |
STR_ID_DOMAIN |
|
RECEIVE_ID_START |
VARCHAR (31) | |
|
RECEIVE_ID_START_STR_ID |
INTEGER |
STR_ID_DOMAIN |
|
CROSS_FAC_14_START |
INTEGER | |
|
CROSS_FAC_14_END |
INTEGER |
|
Column Name |
Data Type |
Domain |
|---|---|---|
|
STR_ID |
INTEGER |
STR_ID_DOMAIN |
|
SEGMENT_NUMBER |
SMALLINT |
SEGMENT_NUMBER_DOMAIN |
|
STR_SEGMENT |
VARCHAR(0) |
|
Column Name |
Data Type |
Domain |
|---|---|---|
|
COLLECTION_RECORD_ID |
SMALLINT |
COLLECTION_RECORD_ID_DOMAIN |
|
IMAGE_RECORD_ID |
INTEGER |
IMAGE_RECORD_ID_DOMAIN |
|
CONTEXT_NUMBER |
INTEGER |
CONTEXT_NUMBER_DOMAIN |
|
TIMESTAMP_START |
DATE VMS | |
|
TIMESTAMP_END |
DATE VMS | |
|
APPL_SPEC_START |
VARCHAR (39) | |
|
APPL_SPEC_START_STR_ID |
INTEGER |
STR_ID_DOMAIN |
|
TASK_NAME_START |
VARCHAR (31) | |
|
TASK_NAME_START_STR_ID |
INTEGER |
STR_ID_DOMAIN |
|
APL_USERNAME_START |
VARCHAR (12) | |
|
APL_USERNAME_START_STR_ID |
INTEGER |
STR_ID_DOMAIN |
|
SUB_USERNAME_START |
VARCHAR (12) | |
|
SUB_USERNAME_START_STR_ID |
INTEGER |
STR_ID_DOMAIN |
|
STEP_NAME_START |
VARCHAR (31) | |
|
STEP_NAME_START_STR_ID |
INTEGER |
STR_ID_DOMAIN |
|
EXCH_STEP_NAME_START |
VARCHAR (31) | |
|
EXCH_STEP_NAME_START_STR_ID |
INTEGER |
STR_ID_DOMAIN |
|
TXN_ID_START |
VARCHAR (36) | |
|
TXN_ID_START_STR_ID |
INTEGER |
STR_ID_DOMAIN |
|
SERVER_NAME_START |
VARCHAR (31) | |
|
SERVER_NAME_START_STR_ID |
INTEGER |
STR_ID_DOMAIN |
|
PROCEDURE_NAME_START |
VARCHAR (31) | |
|
PROCEDURE_NAME_START_STR_ID |
INTEGER |
STR_ID_DOMAIN |
|
SERVER_INDEX_START |
INTEGER | |
|
PROCEDURE_INDEX_START |
INTEGER | |
|
BIO_START |
INTEGER | |
|
DIO_START |
INTEGER | |
|
PAGEFAULTS_START |
INTEGER | |
|
PAGEFAULT_IO_START |
INTEGER | |
|
CPU_START |
INTEGER | |
|
CURRENT_PRIO_START |
SMALLINT | |
|
VIRTUAL_SIZE_START |
INTEGER | |
|
WS_SIZE_START |
INTEGER | |
|
WS_PRIVATE_START |
INTEGER | |
|
WS_GLOBAL_START |
INTEGER | |
|
CROSS_FAC_2_START |
INTEGER | |
|
CROSS_FAC_7_START |
INTEGER | |
|
CROSS_FAC_14_START |
INTEGER | |
|
BIO_END |
INTEGER | |
|
DIO_END |
INTEGER | |
|
PAGEFAULTS_END |
INTEGER | |
|
PAGEFAULT_IO_END |
INTEGER | |
|
CPU_END |
INTEGER | |
|
CURRENT_PRIO_END |
SMALLINT | |
|
VIRTUAL_SIZE_END |
INTEGER | |
|
WS_SIZE_END |
INTEGER | |
|
WS_PRIVATE_END |
INTEGER | |
|
WS_GLOBAL_END |
INTEGER | |
|
CROSS_FAC_2_END |
INTEGER | |
|
CROSS_FAC_7_END |
INTEGER | |
|
CROSS_FAC_14_END |
INTEGER |
|
Column Name |
Data Type |
Domain |
|---|---|---|
|
STR_ID |
INTEGER |
STR_ID_DOMAIN |
|
SEGMENT_NUMBER |
SMALLINT |
SEGMENT_NUMBER_DOMAIN |
|
STR_SEGMENT |
VARCHAR(0) |
|
Column Name |
Data Type |
Domain |
|---|---|---|
|
COLLECTION_RECORD_ID |
SMALLINT |
COLLECTION_RECORD_ID_DOMAIN |
|
IMAGE_RECORD_ID |
INTEGER |
IMAGE_RECORD_ID_DOMAIN |
|
CONTEXT_NUMBER |
INTEGER |
CONTEXT_NUMBER_DOMAIN |
|
TIMESTAMP_START |
DATE VMS | |
|
TIMESTAMP_END |
DATE VMS | |
|
APPL_SPEC_START |
VARCHAR (39) | |
|
APPL_SPEC_START_STR_ID |
INTEGER |
STR_ID_DOMAIN |
|
TASK_NAME_START |
VARCHAR (31) | |
|
TASK_NAME_START_STR_ID |
INTEGER |
STR_ID_DOMAIN |
|
APL_USERNAME_START |
VARCHAR (12) | |
|
APL_USERNAME_START_STR_ID |
INTEGER |
STR_ID_DOMAIN |
|
SUB_USERNAME_START |
VARCHAR (12) | |
|
SUB_USERNAME_START_STR_ID |
INTEGER |
STR_ID_DOMAIN |
|
STEP_NAME_START |
VARCHAR (31) | |
|
STEP_NAME_START_STR_ID |
INTEGER |
STR_ID_DOMAIN |
|
EXCH_STEP_NAME_START |
VARCHAR (31) | |
|
EXCH_STEP_NAME_START_STR_ID |
INTEGER |
STR_ID_DOMAIN |
|
TXN_ID_START |
VARCHAR (36) | |
|
TXN_ID_START_STR_ID |
INTEGER |
STR_ID_DOMAIN |
|
PROC_STEP_TYPE_START |
VARCHAR (20) | |
|
PROC_STEP_TYPE_START_STR_ID |
INTEGER |
STR_ID_DOMAIN |
|
CROSS_FAC_14_START |
INTEGER | |
|
CROSS_FAC_14_END |
INTEGER |
|
Column Name |
Data Type |
Domain |
|---|---|---|
|
STR_ID |
INTEGER |
STR_ID_DOMAIN |
|
SEGMENT_NUMBER |
SMALLINT |
SEGMENT_NUMBER_DOMAIN |
|
STR_SEGMENT |
VARCHAR(0) |
|
Column Name |
Data Type |
Domain |
|---|---|---|
|
COLLECTION_RECORD_ID |
SMALLINT |
COLLECTION_RECORD_ID_DOMAIN |
|
IMAGE_RECORD_ID |
INTEGER |
IMAGE_RECORD_ID_DOMAIN |
|
CONTEXT_NUMBER |
INTEGER |
CONTEXT_NUMBER_DOMAIN |
|
TIMESTAMP_START |
DATE VMS | |
|
TIMESTAMP_END |
DATE VMS | |
|
APPL_SPEC_START |
VARCHAR (39) | |
|
APPL_SPEC_START_STR_ID |
INTEGER |
STR_ID_DOMAIN |
|
APPL_NODE_START |
VARCHAR (15) | |
|
APPL_NODE_START_STR_ID |
INTEGER |
STR_ID_DOMAIN |
|
SUB_USERNAME_START |
VARCHAR (12) | |
|
SUB_USERNAME_START_STR_ID |
INTEGER |
STR_ID_DOMAIN |
|
DEVICE_NAME_START |
VARCHAR (8) | |
|
DEVICE_NAME_START_STR_ID |
INTEGER |
STR_ID_DOMAIN |
|
TASK_NAME_START |
VARCHAR (31) | |
|
TASK_NAME_START_STR_ID |
INTEGER |
STR_ID_DOMAIN |
|
EXCH_STEP_NAME_START |
VARCHAR (31) | |
|
EXCH_STEP_NAME_START_STR_ID |
INTEGER |
STR_ID_DOMAIN |
|
REQ_FORM_NAME_START |
VARCHAR (31) | |
|
REQ_FORM_NAME_START_STR_ID |
INTEGER |
STR_ID_DOMAIN |
|
CROSS_FAC_14_START |
INTEGER | |
|
CROSS_FAC_14_END |
INTEGER |
|
Column Name |
Data Type |
Domain |
|---|---|---|
|
STR_ID |
INTEGER |
STR_ID_DOMAIN |
|
SEGMENT_NUMBER |
SMALLINT |
SEGMENT_NUMBER_DOMAIN |
|
STR_SEGMENT |
VARCHAR(0) |
|
Column Name |
Data Type |
Domain |
|---|---|---|
|
COLLECTION_RECORD_ID |
SMALLINT |
COLLECTION_RECORD_ID_DOMAIN |
|
IMAGE_RECORD_ID |
INTEGER |
IMAGE_RECORD_ID_DOMAIN |
|
CONTEXT_NUMBER |
INTEGER |
CONTEXT_NUMBER_DOMAIN |
|
TIMESTAMP_START |
DATE VMS | |
|
TIMESTAMP_END |
DATE VMS | |
|
APPL_SPEC_START |
VARCHAR (39) | |
|
APPL_SPEC_START_STR_ID |
INTEGER |
STR_ID_DOMAIN |
|
APPL_NODE_START |
VARCHAR (15) | |
|
APPL_NODE_START_STR_ID |
INTEGER |
STR_ID_DOMAIN |
|
SUB_USERNAME_START |
VARCHAR (12) | |
|
SUB_USERNAME_START_STR_ID |
INTEGER |
STR_ID_DOMAIN |
|
DEVICE_NAME_START |
VARCHAR (8) | |
|
DEVICE_NAME_START_STR_ID |
INTEGER |
STR_ID_DOMAIN |
|
TASK_NAME_START |
VARCHAR (31) | |
|
TASK_NAME_START_STR_ID |
INTEGER |
STR_ID_DOMAIN |
|
EXCH_STEP_NAME_START |
VARCHAR (31) | |
|
EXCH_STEP_NAME_START_STR_ID |
INTEGER |
STR_ID_DOMAIN |
|
CROSS_FAC_14_START |
INTEGER | |
|
NETWORK_TIME_END |
INTEGER | |
|
PROCESSING_TIME_END |
INTEGER | |
|
CROSS_FAC_14_END |
INTEGER |
|
Column Name |
Data Type |
Domain |
|---|---|---|
|
STR_ID |
INTEGER |
STR_ID_DOMAIN |
|
SEGMENT_NUMBER |
SMALLINT |
SEGMENT_NUMBER_DOMAIN |
|
STR_SEGMENT |
VARCHAR(0) |
|
Column Name |
Data Type |
Domain |
|---|---|---|
|
COLLECTION_RECORD_ID |
SMALLINT |
COLLECTION_RECORD_ID_DOMAIN |
|
IMAGE_RECORD_ID |
INTEGER |
IMAGE_RECORD_ID_DOMAIN |
|
CONTEXT_NUMBER |
INTEGER |
CONTEXT_NUMBER_DOMAIN |
|
TIMESTAMP_START |
DATE VMS | |
|
TIMESTAMP_END |
DATE VMS | |
|
APPL_SPEC_START |
VARCHAR (39) | |
|
APPL_SPEC_START_STR_ID |
INTEGER |
STR_ID_DOMAIN |
|
TASK_NAME_START |
VARCHAR (31) | |
|
TASK_NAME_START_STR_ID |
INTEGER |
STR_ID_DOMAIN |
|
APL_USERNAME_START |
VARCHAR (12) | |
|
APL_USERNAME_START_STR_ID |
INTEGER |
STR_ID_DOMAIN |
|
SUB_USERNAME_START |
VARCHAR (12) | |
|
SUB_USERNAME_START_STR_ID |
INTEGER |
STR_ID_DOMAIN |
|
STEP_NAME_START |
VARCHAR (31) | |
|
STEP_NAME_START_STR_ID |
INTEGER |
STR_ID_DOMAIN |
|
PARENT_TASK_START |
VARCHAR (31) | |
|
PARENT_TASK_START_STR_ID |
INTEGER |
STR_ID_DOMAIN |
|
CROSS_FAC_14_START |
INTEGER | |
|
CROSS_FAC_14_END |
INTEGER |
|
Column Name |
Data Type |
Domain |
|---|---|---|
|
STR_ID |
INTEGER |
STR_ID_DOMAIN |
|
SEGMENT_NUMBER |
SMALLINT |
SEGMENT_NUMBER_DOMAIN |
|
STR_SEGMENT |
VARCHAR(0) |
|
Column Name |
Data Type |
Domain |
|---|---|---|
|
COLLECTION_RECORD_ID |
SMALLINT |
COLLECTION_RECORD_ID_DOMAIN |
|
IMAGE_RECORD_ID |
INTEGER |
IMAGE_RECORD_ID_DOMAIN |
|
CONTEXT_NUMBER |
INTEGER |
CONTEXT_NUMBER_DOMAIN |
|
TIMESTAMP_START |
DATE VMS | |
|
TIMESTAMP_END |
DATE VMS | |
|
APPL_SPEC_START |
VARCHAR (39) | |
|
APPL_SPEC_START_STR_ID |
INTEGER |
STR_ID_DOMAIN |
|
TASK_NAME_START |
VARCHAR (31) | |
|
TASK_NAME_START_STR_ID |
INTEGER |
STR_ID_DOMAIN |
|
APL_USERNAME_START |
VARCHAR (12) | |
|
APL_USERNAME_START_STR_ID |
INTEGER |
STR_ID_DOMAIN |
|
SUB_USERNAME_START |
VARCHAR (12) | |
|
SUB_USERNAME_START_STR_ID |
INTEGER |
STR_ID_DOMAIN |
|
STEP_NAME_START |
VARCHAR (31) | |
|
STEP_NAME_START_STR_ID |
INTEGER |
STR_ID_DOMAIN |
|
EXCH_STEP_NAME_START |
VARCHAR (31) | |
|
EXCH_STEP_NAME_START_STR_ID |
INTEGER |
STR_ID_DOMAIN |
|
TXN_ID_START |
VARCHAR (36) | |
|
TXN_ID_START_STR_ID |
INTEGER |
STR_ID_DOMAIN |
|
SERVER_NAME_START |
VARCHAR (31) | |
|
SERVER_NAME_START_STR_ID |
INTEGER |
STR_ID_DOMAIN |
|
PROCEDURE_NAME_START |
VARCHAR (31) | |
|
PROCEDURE_NAME_START_STR_ID |
INTEGER |
STR_ID_DOMAIN |
|
CROSS_FAC_14_START |
INTEGER | |
|
CROSS_FAC_14_END |
INTEGER |
|
Column Name |
Data Type |
Domain |
|---|---|---|
|
STR_ID |
INTEGER |
STR_ID_DOMAIN |
|
SEGMENT_NUMBER |
SMALLINT |
SEGMENT_NUMBER_DOMAIN |
|
STR_SEGMENT |
VARCHAR(0) |
|
Column Name |
Data Type |
Domain |
|---|---|---|
|
COLLECTION_RECORD_ID |
SMALLINT |
COLLECTION_RECORD_ID_DOMAIN |
|
IMAGE_RECORD_ID |
INTEGER |
IMAGE_RECORD_ID_DOMAIN |
|
CONTEXT_NUMBER |
INTEGER |
CONTEXT_NUMBER_DOMAIN |
|
TIMESTAMP_START |
DATE VMS | |
|
TIMESTAMP_END |
DATE VMS | |
|
APPL_SPEC_START |
VARCHAR (39) | |
|
APPL_SPEC_START_STR_ID |
INTEGER |
STR_ID_DOMAIN |
|
TASK_NAME_START |
VARCHAR (31) | |
|
TASK_NAME_START_STR_ID |
INTEGER |
STR_ID_DOMAIN |
|
APL_USERNAME_START |
VARCHAR (12) | |
|
APL_USERNAME_START_STR_ID |
INTEGER |
STR_ID_DOMAIN |
|
SUB_USERNAME_START |
VARCHAR (12) | |
|
SUB_USERNAME_START_STR_ID |
INTEGER |
STR_ID_DOMAIN |
|
STEP_NAME_START |
VARCHAR (31) | |
|
STEP_NAME_START_STR_ID |
INTEGER |
STR_ID_DOMAIN |
|
EXCH_STEP_NAME_START |
VARCHAR (31) | |
|
EXCH_STEP_NAME_START_STR_ID |
INTEGER |
STR_ID_DOMAIN |
|
TXN_ID_START |
VARCHAR (36) | |
|
TXN_ID_START_STR_ID |
INTEGER |
STR_ID_DOMAIN |
|
CROSS_FAC_14_START |
INTEGER | |
|
TXN_STATUS_END |
VARCHAR (31) | |
|
TXN_STATUS_END_STR_ID |
INTEGER |
STR_ID_DOMAIN |
|
CROSS_FAC_14_END |
INTEGER |
|
Column Name |
Data Type |
Domain |
|---|---|---|
|
STR_ID |
INTEGER |
STR_ID_DOMAIN |
|
SEGMENT_NUMBER |
SMALLINT |
SEGMENT_NUMBER_DOMAIN |
|
STR_SEGMENT |
VARCHAR(0) |
Chapter 16. Managing ACMS Licensing
Concurrent-use licensing increases the number of licensing options available for ACMS run-time and remote-access systems. You can choose the more cost-effective licensing method for your ACMS system: concurrent-use or unlimited-use.
Concurrent-use licensing allows you to control access to ACMS run-time and remote-access systems, based on a predetermined number of users that can access ACMS at any one time. Concurrent-use licenses apply to both single node systems and to clusters.
For more information about licenses and kit options, see VSI ACMS Version 5.0 for OpenVMS Installation Guide.
16.1. Overview of ACMS Kits and Licensing Options
This section provides an overview of the ACMS kits and the functions provided by each kit, describes concurrent-use and unlimited-use licenses, and lists the license types that are available for each kit.
16.1.1. ACMS Kits
ACMS Development Kit
This kit provides all the features of ACMS. You can define, build, and debug multiple-step tasks, task groups, menus, and applications, as well as use the ACMS task queuing facilities. You can use DECforms or TDMS as standard presentation services, or use the Request Interface (RI) and Systems Interface (SI) to access other presentation services. You are provided with samples of ACMS applications using standard presentation services and the Request Interface.
The development kit also includes the features provided by the Run-Time and Remote-Access kits.
ACMS Run-Time Kit
This kit allows you to use existing applications or programs under the control of ACMS. It also allows you to define menus, applications, task groups, and single-step tasks that use DCL servers, if CDD is present when this kit is installed. It allows ACMS users to sign in and select tasks that are implemented on the local node as well as remote nodes. The run-time kit allows you to use the ACMS Queued Task Initiator (QTI) to submit tasks to run on the local node as well as remote nodes.
The run-time kit also includes the features provided by the remote-access kit.
ACMS Remote-Access Kit
This kit is suitable for installation on a network node that does not have any ACMS applications running on it, but requires access to ACMS applications running on another network node. The remote-access kit allows users to sign in to ACMS and select tasks on remote nodes, and handles the terminal I/O associated with those tasks. The remote-access kit allows you to use the ACMS Queued Task Initiator (QTI) to submit tasks to run on remote nodes.
16.1.2. ACMS License Types
Unlimited-use license
This type of license is also referred to as a capacity license. Unlimited-use licenses set no limit on the number of users who can access ACMS at any one time.
Concurrent-use license
Concurrent-use licenses limit the number of users who can access ACMS at any one time. For example, a concurrent-use license for four users gives a maximum of four users access to ACMS simultaneously.
Unlimited-use licenses are available for all ACMS kits. Concurrent-use licenses are available only for the ACMS run-time and remote-access kits; there is no concurrent-use license available for the ACMS development kit.
|
ACMS Kit |
Unlimited-Use |
Concurrent-Use |
|---|---|---|
|
Development |
ACMS |
Not available |
|
Run-time |
ACMS-RT |
ACMS-RT-USER |
|
Remote-access |
ACMS-REM |
ACMS-REM-USER |
Concurrent-use licenses are expressed in terms of units. 100 license units are required for each concurrent user; for example, a concurrent-use license of 500 units allows five users to access ACMS concurrently. Each group of 100 units is referred to as a set of license units.
Concurrent-use licenses of the same kit type, for instance, either the run-time kit or remote-access kit, are cumulative. If you have more than one concurrent-use license, add together the number of units on each license to determine the total number of users that can access ACMS.
Only one license type is in effect on an ACMS system at any one time. If you have more than one ACMS license loaded, ACMS chooses, at startup, the license with the least restrictive functionality.
ACMS (least restrictive)
ACMS–RT
ACMS–RT–USER
ACMS–REM
ACMS–REM–USER (most restrictive)
For more information on license management, refer to VSI ACMS Version 5.0 for OpenVMS Installation Guide and the License Management Facility (LMF) documentation in the OpenVMS documentation set.
16.2. License Unit Allocation
Interactive users signed in to the ACMS Command Process (CP)
Interactive users accessing ACMS using the ACMS Request Interface (RI) agent
Interactive users accessing ACMS from ALL–IN–1
Task submitters signed in to ACMS by the ACMS Queued Task Initiator (QTI)
Task submitters signed in to ACMS by a user-written agent
Task submitters signed in to ACMS by a detached task
ACMS allocates a set of license units to a user on each node on which the user is active.
For example, when a user signs in to ACMS on Node A, a set of license units is allocated to the user on Node A. If a user signs in to Node A and selects a task on Node B, a set of license units is allocated on both Node A (for the sign-in) and Node B (for the task selection).
If a user signs in to ACMS on Node A and Node B, a set of license units is allocated on each node.
A set of license units is allocated each time the user signs in.
For example, if a user signs in twice on Node A, two sets of license units are allocated on Node A.
Once a user is signed in to a node, the user can select ACMS tasks on that node without using additional license units.
For example, if a user on Node A selects a task in an application running on Node A, only one set of license units is allocated; no additional license units are required if the user selects an additional task in that application or a different application on Node A.
Likewise, if the user on Node A selects tasks on Node B, license units are allocated only for the first task selected on Node B; no additional license units are allocated if the user selects additional tasks on Node B.
License units allocated to a user remain allocated to that user until the user signs out of ACMS. At that time, all license units held by the user are released, including the license units allocated on the local node and any license units allocated to that user on remote nodes.
For example, if a user on Node A signs in and selects tasks in applications on Nodes B and C, license units on Nodes A, B, and C are released when the user signs out from Node A.
License units on a remote node allocated to a user who has selected a task in an application on that remote node are released, if the application is shut down, and the user has not selected tasks in another application on the remote node.
As a corollary to this rule, once a user on Node A selects a task in an application on Node B, that user continues to hold license units on Node B, even if the user selects no more tasks on Node B. In this situation, license units remain allocated to the user on Node B until the user signs out from Node A, the application on Node B runs down, or until the connection between Nodes A and B is broken.
During initialization, ACMS temporarily allocates a license unit and then releases it.
ACMS requires a valid loaded license to start the ACMS run-time system and the Application Definition Utility (ADU). With concurrent-use licenses, ACMS checks for the presence of a valid license by temporarily allocating a license unit. Once the set of license units is successfully allocated, the license units are immediately released and use of the system is granted.
In an OpenVMS Cluster network
With the QTI
With detached tasks
16.2.1. License Unit Allocation in OpenVMS Clusters
License units of a concurrent-use license for an OpenVMS Cluster are shared among all nodes in the cluster that have the license loaded. The rules for license unit allocation are the same whether a node is in a cluster or not. The only difference is that nodes of a cluster share the same pool of license units.
When a user is signed in on Node A of a cluster, a set of license units is allocated, even if the user is already signed in on Node B or C of the cluster. Therefore, it is possible for a user to hold a set of license units from the common license unit pool on every node of the cluster, if that user is signed in on every node.
For example, a cluster with a 50-user concurrent-use license has three nodes. A user on Node A is allocated one set of license units on Node A. If that user also selects tasks in applications on Node B and Node C, the user is allocated a set of license units on each of those nodes. The user's total license unit allocation corresponds to three user sign-ins. All license units are allocated out of the shared pool of license units corresponding to 50 users, leaving a total number of license units corresponding to 47 users.
16.2.2. Concurrent-Use Licenses with the QTI
The QTI is an ACMS System Interface (SI) agent program. As with all agent programs, the QTI uses the ACMS$SIGN_IN service to sign a submitter in before invoking a task on behalf of that submitter, thus allocating a set of license units.
When the QTI dequeues a queued task element, it checks the user name associated with the element. The first time the QTI dequeues an element with that user name, it signs the submitter in to ACMS but does not sign the submitter out of ACMS when that task ends. Instead, the QTI leaves the submitter signed in for at least the time specified in QTI_SUB_TIMEOUT. If another queued element with the same user name is dequeued prior to the time-out period, a submitter is already signed in for the user. This avoids the overhead of signing in and signing out the submitter.
If you have concurrent-use licenses for your ACMS system, a set of license units is allocated by the QTI for each submitter that the QTI signs in. The license units remain allocated until the QTI signs a submitter out.
Use the ACMSGEN parameter QTI_SUB_TIMEOUT to indicate how long a signed-in submitter can remain idle before the QTI signs the submitter out of ACMS.
16.2.3. Concurrent-Use Licenses with Detached Tasks
For every detached task started, the ACMS$SIGN_IN service signs in a task submitter. If you have concurrent-use licenses, a set of license units is allocated for each detached task that is started. These license units remain allocated until the task submitter signs out and the detached task stops.
See VSI ACMS for OpenVMS Writing Applications for more information about concurrent-use licenses with detached tasks.
16.3. Managing Systems with Concurrent-Use Licenses
ACMS/SHOW APPLICATION/CONNECTIONSThis command displays all the local and remote users who are connected to local applications.
A user is connected to an application when that user selects a task in the application for the first time. The connection remains until the user signs out of ACMS or the application is shut down.
ACMS/SHOW SYSTEMThis command displays information about both local and remote users.
ACMS/SHOW USERThis command displays the local and remote users accessing the ACMS system, and lists the local applications that users are connected to. It also displays the total number of users on the system. The total number of local and remote users corresponds to the total number of license units allocated.
Note
The scope of ACMS operator commands is limited to one node. Therefore, in VSI OpenVMS Cluster environments, you must execute the operator commands on each node of the cluster to obtain a total view of how license units are allocated in the cluster.
16.3.1. Releasing License Units
When a user is unable to sign in to an ACMS system, or unable to select a task on a remote node because the license units for the node have been exhausted, you may want to release license units to allow other higher-priority users access to the ACMS system.
ACMS/CANCEL USERACMS/STOP APPLICATION
Before executing either of these commands, use the ACMS/SHOW
USER command to identify local and remote users accessing the
system.
To release license units, issue the ACMS/CANCEL USER command on
the local node to cancel a local user. This forces the local user to sign out of the
ACMS system. To cancel a remote user, use the ACMS/CANCEL USER
command on the remote node on which the user was originally signed in. This releases
all the allocated license units. This command requires OPER privileges.
In an extreme case, you can release license units allocated to a remote user on an
ACMS system by shutting down all applications used by the remote user. The
ACMS/STOP APPLICATION command shuts down an application.
Stopping an application affects all users connected to that application.
Part II. Reference Section
This part of the manual contains reference information for each ACMS command. The following types of commands are described in this section:
Device Definition Utility (DDU)
User Definition Utility (UDU)
Application Authorization Utility (AAU)
Queue Manager (ACMSQUEMGR) Utility
Operator
ACMSGEN Utility
Audit Trail Report (ATR) Utility
Software Event Logger Utility Program (SWLUP)
The chapters in Part I,''Managing the ACMS System and ACMS Applications'' provide tutorial discussions of these commands and utilities.
Chapter 17. DDU Commands
This chapter provides reference information and examples for each ACMS Device Definition Utility (DDU) command. See Chapter 2, "Authorizing and Controlling Terminals" for a general description of DDU.
ADD Command (DDU>)
ADD Command (DDU>) — Authorizes and assigns sign-in characteristics to an ACMS terminal by creating a DDU definition and adding it to the device authorization file (ACMSDDF.DAT).
Format
| Command Qualifiers | Defaults |
|---|---|
| /[NO]AUTOLOGIN=username | From DEFAULT definition |
| /[NO]CONTROLLED | From DEFAULT definition |
|
| From DEFAULT definition |
Privileges Required
None.
Parameters
- device-name
The name of the device. The device name can be a logical name, a physical device name, or a group device name. Do not include a colon (:) when you specify a device name. See Table 2.1, ''DDU Group Device Names'' for a list of the DDU group device names.
Qualifiers
- /[NO]AUTOLOGIN=username
The
/AUTOLOGINqualifier enables automatic sign-ins for ACMS-controlled terminals. With automatic sign-in enabled, the user does not need to enter a user name to sign in to ACMS. If a password is required, the user receives the password prompt after pressing Return. If a password is not required, the user is signed in to ACMS as soon as Return is pressed on the terminal's keyboard.ACMS places the user name you specify with the
/AUTOLOGINqualifier in the device authorization file and uses that user name each time a user presses Return. The user name can contain 1 through 12 characters.The
/AUTOLOGINqualifier has no effect unless the terminal has the Controlled sign-in characteristic. You can assign a Controlled sign-in characteristic by specifying the/CONTROLLEDqualifier.Disable automatic sign-ins with the
/NOAUTOLOGINqualifier. The default for this qualifier is whatever is defined in theDEFAULTdefinition. See the description of the DDUDEFAULTcommand for information on theDEFAULTdefinition.- /[NO]CONTROLLED
The
/CONTROLLEDqualifier assigns the Controlled sign-in characteristic to a device. Users at application port terminals with the Controlled sign-in characteristic sign in directly to ACMS. Users at dedicated service port terminals sign in either directly to ACMS or not, depending on the node they connect to at the "Local>" prompt. See Section 2.11, ''Authorizing LAT Terminal Ports as Controlled Terminals'' for a description of application ports and dedicated service ports.The
/NOCONTROLLEDqualifier assigns the Not Controlled sign-in characteristic to a device. Users at terminals with the Not Controlled characteristic sign in directly to OpenVMS. For access to ACMS, you must enter theACMS/ENTERcommand.When you specify the/CONTROLLEDqualifier, you can specify only a physical device name or the group device names TT and LT. See Table 2.1, ''DDU Group Device Names'' for a description of the DDU group device names. The default for this qualifier is whatever is defined in theDEFAULTdefinition. See the description of the DDUDEFAULTcommand for information on theDEFAULTdefinition.Note
The ACMS Terminal Subsystem Controller (TSC) does not support dialup lines as ACMS-controlled terminals. Because the TSC keeps a channel to ACMS-controlled terminals even when the user signs out, the modem does not receive any hangup notification. If you operate a terminal using ACMS over dialup lines, you must first log in to OpenVMS, and then issue the
ACMS/ENTER/NORETURNcommand. The/NORETURNqualifier deletes the OpenVMS process after you enter ACMS.- /PRINTFILE=print-file-spec
/PRINTFILE=spooled-device-name The
/PRINTFILEqualifier assigns the Printfile characteristic to a device. The print response must appear in the form source IFDL file, and a print key must also be defined there. When the user presses the print key, the DECforms panel screens are automatically sent to the print file or spooled device specified after the/PRINTFILEqualifier.When you specify the
/PRINTFILEqualifier, you can specify only a spooled device name or a file name. The default for this qualifier is whatever is defined in the DEFAULT definition.
Notes
DDU writes the definition you are creating to the device authorization file in your current default directory, or to the file pointed to by the EXECUTIVE mode system logical name, ACMSDDF.
New definitions go into effect after you use the ACMS/RESET
TERMINALS command, the ACMS/START SYSTEM command,
or the ACMS/START TERMINALS command.
For more information about the DDU database authorization file (ACMSDDF.DAT) and the DDU in general, see Chapter 2, "Authorizing and Controlling Terminals".
Examples
DDU>ADD TTE6This command creates a device definition for the terminal TTE6, using the sign-in characteristics defined in the DDU DEFAULT definition.
DDU>ADD TTE6 /CONTROLLED/AUTOLOGIN=JUDGEThis command creates a device definition with the Controlled and Autologin sign-in characteristics for terminal TTE6. Users at terminal TTE6 sign in directly to ACMS without typing a user name. ACMS places the user name JUDGE in the device definition file and uses that user name whenever a user presses Return at terminal TTE6.
DDU>ADD $ALL/NOCONTROLLEDThis command adds a definition for the group device name $ALL, which authorizes all unauthorized terminals and assigns the terminals the Not Controlled sign-in characteristic.
DDU>ADD LT /NOCONTROLLEDThis command adds a definition for the group device name LT. The LT device name authorizes all unauthorized LAT terminals and assigns the terminals the Not Controlled sign-in characteristic.
COPY Command (DDU>)
COPY Command (DDU>) — Authorizes a terminal, using the sign-in characteristics from the DDU definition you specify.
Format
| Command Qualifiers | Defaults |
|---|---|
| /[NO]AUTOLOGIN=username | From source definition |
| /[NO]CONTROLLED | From source definition |
|
| From source definition |
Privileges Required
None.
Parameters
- source-device-name
The device name in the source definition. The source device name can be a logical name, a physical device name, or a group device name. Do not include a colon (:) when you specify a device name. See Table 2.1, ''DDU Group Device Names'' for a list of the DDU group device names.
- new-device-name
The device name in the definition you are creating. The new device name cannot already exist in the device authorization file. See source-device-name for syntax rules.
Qualifiers
- /[NO]AUTOLOGIN=user-name
The
/AUTOLOGINqualifier enables automatic sign-ins for ACMS-controlled terminals. With automatic sign-in enabled, the user does not need to enter a user name to sign in to ACMS. If a password is required, the user receives the password prompt after pressing Return. If a password is not required, the user is signed in to ACMS as soon as Return is pressed on the terminal's keyboard.ACMS places the user name you specify with the
/AUTOLOGINqualifier in the device authorization file and uses that user name each time a user presses Return at that terminal. A user name can contain 1 through 12 characters.The
/AUTOLOGINqualifier has no effect unless the terminal has the Controlled sign-in characteristic. Assign a Controlled sign-in characteristic by specifying the/CONTROLLEDqualifier. Disable automatic sign-ins with the/NOAUTOLOGINqualifier. The default for this qualifier is whatever is defined in the definition you are copying.- /[NO]CONTROLLED
The
/CONTROLLEDqualifier assigns the Controlled sign-in characteristic to a device. Users at application port terminals with the Controlled sign-in characteristic sign in directly to ACMS. Users at dedicated service port terminals sign in either directly to ACMS or not, depending on the node they connect to at the "Local>" prompt. See Section 2.11, ''Authorizing LAT Terminal Ports as Controlled Terminals'' for a description of application ports and dedicated service ports.The
/NOCONTROLLEDqualifier assigns the Not Controlled sign-in characteristic to a device. Users at terminals with the Not Controlled characteristic log in directly to OpenVMS. For access to ACMS, you must enter theACMS/ENTERcommand.When you use the/CONTROLLEDqualifier, you can specify only a physical device name or the group device names TT and LT. See Table 2.1, ''DDU Group Device Names'' for a description of the DDU group device names. The default for this qualifier is whatever is defined in the definition you are copying.Note
The ACMS Terminal Subsystem Controller (TSC) does not support dialup lines as ACMS-controlled terminals. Because the TSC keeps a channel to ACMS-controlled terminals even when the user signs out, the modem does not receive any hangup notification. If you operate a terminal using ACMS over dialup lines, you must first log in to OpenVMS, and then issue the
ACMS/ENTER/NORETURNcommand. The/NORETURNqualifier deletes the OpenVMS process after you enter ACMS.- /PRINTFILE=print-file-spec
/PRINTFILE=spooled-device-name The
/PRINTFILEqualifier assigns the Printfile characteristic to a device. The PRINT response must appear in the form source IFDL file, and a print key must also be defined there. When the user presses the print key, the DECforms panel screens automatically are sent to the print file or spooled device specified after the/PRINTFILEqualifier.When you specify the
/PRINTFILEqualifier, you can specify only a spooled device name or a file name. The default for this qualifier is The default for this qualifier is whatever is defined in the definition you are copying.
Notes
DDU writes the definition you are creating to the device authorization file in your current default directory, or to the file pointed to by the EXECUTIVE mode system logical name, ACMSDDF.
ACMS/RESET TERMINALSACMS/START TERMINALSACMS/START SYSTEM
Example
DDU>COPY TTE1 TTE2
This command authorizes terminal TTE2 using the sign-in characteristics defined for terminal TTE1.
DEFAULT Command (DDU>)
DEFAULT Command (DDU>) — Changes information in the DDU DEFAULT definition.
Format
| Command Qualifiers | Defaults |
|---|---|
| /[NO]AUTOLOGIN=username | From current DEFAULT definition |
| /[NO]CONTROLLED | From current DEFAULT definition |
|
| From current DEFAULT definition |
Privileges Required
None.
Qualifiers
- /[NO]AUTOLOGIN=user-name
The
/AUTOLOGINqualifier enables automatic sign-ins for ACMS-controlled terminals. With automatic login enabled, the user does not need to enter a user name to sign in to ACMS. If a password is required, the user receives the password prompt after pressing Return. If a password is not required, the user is signed in to ACMS as soon as Return is pressed on the terminal's keyboard.ACMS places the user name you specify with the
/AUTOLOGINqualifier in the device authorization file and uses that user name each time a user presses Return at that terminal. The user name can contain 1 through 12 characters.The
/AUTOLOGINqualifier has no effect unless the terminal has the Controlled sign-in characteristic. Assign a Controlled sign-in characteristic by specifying the/CONTROLLEDqualifier. Disable automatic sign-ins with the/NOAUTOLOGINqualifier. The default is whatever sign-in characteristics are currently defined in the DDU DEFAULT definition.- /[NO]CONTROLLED
The
/CONTROLLEDqualifier assigns the Controlled sign-in characteristic to a device. Users at application port terminals with the Controlled sign-in characteristic sign in directly to ACMS. Users at dedicated service port terminals sign in either directly to ACMS or not, depending on the node they connect to at the "Local>" prompt. See Section 2.11, ''Authorizing LAT Terminal Ports as Controlled Terminals'' for a description of application ports and dedicated service ports.The
/NOCONTROLLEDqualifier assigns the Not Controlled sign-in characteristic to a device. Users at terminals with the Not Controlled characteristic log in directly to OpenVMS. For access to ACMS, you must enter theACMS/ENTERcommand.When you specify the/CONTROLLEDqualifier, you can specify only a physical device name or the group device names TT and LT. See Table 2.1, ''DDU Group Device Names'' for a description of the DDU group device names. The default is whatever sign-in characteristics are currently defined in the DDU DEFAULT definition.Note
The ACMS Terminal Subsystem Controller (TSC) does not support dialup lines as ACMS-controlled terminals. Because the TSC keeps a channel to ACMS-controlled terminals even when the user signs out, the modem does not receive any hangup notification. If you operate a terminal using ACMS over dialup lines, you must first log in to OpenVMS, and then issue the
ACMS/ENTER/NORETURNcommand. The/NORETURNqualifier deletes the OpenVMS process after you enter ACMS.- /PRINTFILE=print-file-spec
/PRINTFILE=spooled-device-name The
/PRINTFILEqualifier assigns the Printfile characteristic to a device. The PRINT response must appear in the form source IFDL file, and a print key must also be defined there. When the user presses the print key, the DECforms panel screens automatically are sent to the print file or spooled device specified after the/PRINTFILEqualifier.When you specify the
/PRINTFILEqualifier, you can specify only a spooled device name or a file name. The default for this qualifier is whatever is defined in the default definition.
Notes
The ADD command is the only command affected by the
characteristics defined in the DDU DEFAULT definition. If you do not specify any
qualifiers when you use the ADD command to create a new DDU
definition, the definition takes the sign-in characteristics assigned in the DEFAULT
definition. You can use qualifiers with the ADD command to
override the characteristics defined with the DEFAULT
command.
ACMS creates a DEFAULT definition the first time you run DDU, or whenever you create a new device authorization file. By default, the DDU DEFAULT definition created by ACMS has the Not Controlled and No Autologin sign-in characteristics.
ACMS/RESET TERMINALSACMS/START TERMINALSACMS/START SYSTEM
Example
DDU>DEFAULT /NOCONTROLLED
This command specifies that the DEFAULT definition has the Not Controlled sign-in characteristic.
EXIT Command (DDU>)
EXIT Command (DDU>) — Ends the DDU session and returns you to the DCL prompt.
Format
Privileges Required
None.
Notes
You can also end a session by pressing Ctrl/Z. Pressing Ctrl/Z signals the end of the file for data entered from the terminal. EXIT is displayed when you press Ctrl/Z.
Example
DDU>EXIT$
This command causes you to exit from DDU and returns you to DCL.
HELP Command (DDU>)
HELP Command (DDU>) — Displays information about DDU commands and qualifiers.
Format
| Command Qualifiers | Defaults |
|---|---|
| /[NO]PROMPT | /PROMPT |
Privileges Required
None.
Parameters
- topic
The DDU command or topic you want to know about. If you do not specify a topic,
HELPprovides a list of topics to choose from.
Qualifiers
- /[NO]PROMPT
The
/PROMPTqualifier causes DDU help to display prompts with help information. If you use the/NOPROMPTqualifier, DDU help does not display prompts./PROMPTis the default.
Notes
None.
Example
DDU>HELP DEFAULTDEFAULTChanges the contents of the DEFAULT definition in the databaseFormat:DEFAULTFor example:DDU> DEFAULT /CONTROLLEDThe DEFAULT definition contains default characteristics for terminalsdefined with the ADD commandAdditional information available:Qualifiers/AUTOLOGIN /CONTROLLEDDEFAULT Subtopic?
This command displays help information about the DEFAULT
command.
LIST Command (DDU>)
LIST Command (DDU>) — Writes DDU definitions to ACMSDDU.LIS in your default directory, or to an output file you specify.
Format
| Command Qualifiers | Defaults |
|---|---|
| /BRIEF | Full DDU definitions |
| /OUTPUT[=file-spec] | /OUTPUT=ACMSDDU.LIS |
Privileges Required
None.
Parameters
- device-name
The name of the device. Do not include a colon (:) when you specify a device name. The device name can be a logical name, a physical device name, a group device name, or the wildcard character (*). See Table 2.1, ''DDU Group Device Names'' for a list of the DDU group device names. To write all definitions to an output file, use the wildcard character instead of a device name. You can use the wildcard character as a prefix, a suffix, or both to list device names with common characters (such as TT*, *TT, or *TT*).
Qualifiers
- /BRIEF
Lists only the device names in DDU definitions. The default is to list complete definitions.
- /OUTPUT[=file-spec]
Changes the file specification for the listing file. The default file specification is ACMSDDU.LIS, in your current default directory.
Notes
None.
Examples
DDU>LIST *This command writes the full definitions for all device names in the device authorization to the default output file ACMSDDU.LIS.
DDU>LIST VTThis command writes a definition for the group device name VT to the listing file ACMSDDU.LIS.
DDU>LIST /BRIEF *This command writes all the device names in the device authorization file to the file ACMSDDU.LIS.
DDU>LIST /OUTPUT=LOCAL.LIS *T*This command writes all device definitions containing the letter T to the output file LOCAL.LIS.
MODIFY Command (DDU>)
MODIFY Command (DDU>) — Changes the sign-in characteristics in a DDU definition.
Format
| Command Qualifiers | Defaults |
|---|---|
| /[NO]AUTOLOGIN=username | From current definition |
| /[NO]CONTROLLED | From current definition |
|
| From current definition |
Privileges Required
None.
Parameter
- device-name
The name of the device. Do not include a colon (:) when you specify a device name. The device name can be a logical name, a physical device name, or a group device name. See Table 2.1, ''DDU Group Device Names'' for a list of the DDU group device names.
Qualifiers
- /[NO]AUTOLOGIN=user-name
The
/AUTOLOGINqualifier enables automatic sign-ins for ACMS-controlled terminals. With automatic sign-in enabled, the user does not need to enter a user name to sign in to ACMS. If a password is required, the user receives the password prompt after pressing Return. If a password is not required, the user is signed in to ACMS as soon as Return is pressed on the terminal's keyboard.ACMS places the user name you specify with the
/AUTOLOGINqualifier in the device authorization file and uses that user name each time a user presses Return at that terminal. The user name can contain 1 through 12 characters.The
/AUTOLOGINqualifier has no effect unless the terminal has the Controlled sign-in characteristic. You can assign a Controlled sign-in characteristic by specifying the/CONTROLLEDqualifier. You can disable automatic sign-ins with the/NOAUTOLOGINqualifier. The default for this qualifier is whatever sign-in characteristics are currently defined in the definition you are modifying.- /[NO]CONTROLLED
The
/CONTROLLEDqualifier assigns the Controlled sign-in characteristic to a device. Users at application port terminals with the Controlled sign-in characteristic sign in directly to ACMS. Users at dedicated service port terminals sign in either directly to ACMS or not, depending on the node they connect to at the "Local>" prompt. See Section 2.11, ''Authorizing LAT Terminal Ports as Controlled Terminals'' for a description of application ports and dedicated service ports.The
/NOCONTROLLEDqualifier assigns the Not Controlled sign-in characteristic to a device. Users at terminals with the Not Controlled characteristic log in directly to OpenVMS. For access to ACMS, a user must enter theACMS/ENTERcommand.When you specify the/CONTROLLEDqualifier, you can specify only a physical device name or the group device names TT and LT. See Table 2.1, ''DDU Group Device Names'' for a description of the DDU group device names. The default for this qualifier is whatever is currently defined in the definition you are modifying.Note
The ACMS Terminal Subsystem Controller (TSC) does not support dialup lines as ACMS-controlled terminals. Because the TSC keeps a channel to ACMS-controlled terminals even when the user signs out, the modem does not receive any hangup notification. If you operate a terminal using ACMS over dialup lines, you must first log in to OpenVMS, and then issue the
ACMS/ENTER/NORETURNcommand. The/NORETURNqualifier deletes the OpenVMS process after you enter ACMS.- /PRINTFILE=print-file-spec
/PRINTFILE=spooled-device-name The
/PRINTFILEqualifier assigns the Printfile characteristic to a device. The PRINT response must appear in the form source IFDL file, and a print key must also be defined there. When the user presses the print key, the DECforms panel screens automatically are sent to the print file or spooled device specified after the/PRINTFILEqualifier.When you specify the
/PRINTFILEqualifier, you can specify only a spooled device name or a file name. The default for this qualifier is whatever sign-in characteristics are currently defined in the definition you are modifying.The DDU
MODIFYcommand does not invoke an editor.
Notes
ACMS/RESET TERMINALSACMS/START TERMINALSACMS/START SYSTEM
The DDU MODIFY command does not invoke an editor.
Examples
DDU>MODIFY TTE3 /NOCONTROLLEDThis command removes the Controlled characteristic from terminal TTE3. Users log in directly to OpenVMS at terminal TTE3.
DDU>MODIFY TTE4 /AUTOLOGIN=EVARD /CONTROLLEDThis command assigns the Autologin and Controlled characteristics to terminal TTE4. User EVARD signs in directly to ACMS at terminal TTE4 by pressing the Return and typing a password.
DDU>MODIFY TTE5 /PRINTFILE=SPOOLDEV::TXA0:This command assigns the Printfile characteristic to terminal TTE5 and specifies spooled device SPOOLDEV::TXA0: as the device for any DECforms panel screens to be printed when the user presses the Print key.
REMOVE Command (DDU>)
REMOVE Command (DDU>) — Removes a DDU definition from the device authorization file.
Format
Parameters
- device-name
The name of the device. Do not include a colon (:) when you specify a device name. The device name can be a logical name, a physical device name, or a group device name. See Table 2.1, ''DDU Group Device Names'' for a list of the DDU group device names.
Privileges Required
None.
Notes
To restrict a terminal to OpenVMS use only, delete the definition for the $ALL group device name (if the device authorization file contains one), and then delete the definition for the terminal.
You cannot remove the DEFAULT definition from the DDU device authorization file.
ACMS/RESET TERMINALSACMS/START TERMINALSACMS/START SYSTEM
Examples
DDU>REMOVE TTE5Device TTE5 has been removed from the databaseThis command deletes the device definition for TTE5. If the device authorization file does not contain a $ALL definition, this command removes terminal TTE5 for use with ACMS.
DDU>REMOVE $ALLDevice $ALL has been removed from the databaseThis command deletes the $ALL definition. The command deauthorizes all terminals that do not have individual device definitions.
RENAME Command (DDU>)
RENAME Command (DDU>) — Changes the device name in a DDU definition.
Format
| Command Qualifiers | Defaults |
|---|---|
| /[NO]AUTOLOGIN=username | From old definition |
| /[NO]CONTROLLED | From old definition |
|
| From old definition |
Privileges Required
None.
Parameters
- old-device-name
The device name in the definition you are changing. The device name can be a logical name, a physical device name, or a group device name. Do not include a colon (:) when you specify a device name. See Table 2.1, ''DDU Group Device Names'' for a list of the DDU group device names.
- new-device-name
The new name for the device. The new device name cannot already exist in the device authorization file. See the description of old-device-name for syntax rules.
Qualifiers
- /[NO]AUTOLOGIN=user-name
The
/AUTOLOGINqualifier enables automatic sign-ins for ACMS-controlled terminals. With automatic sign-in enabled, the user does not need to enter a user name to sign in to ACMS. If a password is required, the user receives the password prompt after pressing Return. If a password is not required, the user is signed in to ACMS as soon as Return is pressed on the terminal's keyboard.ACMS places the user name you specify with the
/AUTOLOGINqualifier in the device authorization file and uses that user name each time a user presses Return at that terminal. The user name can contain 1 through 12 characters.The
/AUTOLOGINqualifier has no effect unless the terminal has the Controlled sign-in characteristic. Assign a Controlled sign-in characteristic by specifying the/CONTROLLEDqualifier. Disable automatic sign-ins with the/NOAUTOLOGINqualifier. The default for this qualifier is whatever sign-in characteristics are defined in the original definition.- /[NO]CONTROLLED
The
/CONTROLLEDqualifier assigns the Controlled sign-in characteristic to a device. Users at application port terminals with the Controlled sign-in characteristic sign in directly to ACMS. Users at dedicated service port terminals sign in either directly to ACMS or not, depending on the node they connect to at the "Local>" prompt. See Section 2.11, ''Authorizing LAT Terminal Ports as Controlled Terminals'' for a description of application ports and dedicated service ports.The
/NOCONTROLLEDqualifier assigns the Not Controlled sign-in characteristic to a device. Users at terminals with the Not Controlled characteristic log in directly to OpenVMS. For access to ACMS, a user must enter theACMS/ENTERcommand.When you specify the/CONTROLLEDqualifier, you can specify only a physical device name or the group device names TT and LT. See Table 2.1, ''DDU Group Device Names'' for a description of the DDU group device names. The default for this qualifier is whatever sign-in characteristics are defined in the original definition.Note
The ACMS Terminal Subsystem Controller (TSC) does not support dialup lines as ACMS-controlled terminals. Because the TSC keeps a channel to ACMS-controlled terminals even when the user signs out, the modem does not receive any hangup notification. If you operate a terminal using ACMS over dialup lines, you must first log in to OpenVMS, and then issue the
ACMS/ENTER/NORETURNcommand. The/NORETURNqualifier deletes the OpenVMS process after you enter ACMS.- /PRINTFILE=print-file-spec
/PRINTFILE=spooled-device-name The
/PRINTFILEqualifier assigns the Printfile characteristic to a device. The PRINT response must appear in the form source IFDL file, and a print key must also be defined there. When the user presses the print key, the DECforms panel screens automatically are sent to the print file or spooled device specified after the/PRINTFILEqualifier.When you specify the
/PRINTFILEqualifier, you can specify only a spooled device name or a file name. The default for this qualifier is whatever sign-in characteristics are currently defined in the original definition.
Notes
You cannot rename the DEFAULT definition.
ACMS/RESET TERMINALSACMS/START TERMINALSACMS/START SYSTEM
Examples
DDU>RENAME TTE7 TTE6 /CONTROLLEDThis command changes the device name of terminal TTE7 to TTE6 and assigns the Controlled sign-in characteristic. Terminal TTE7 is no longer authorized.
DDU>RENAME TTE6 TTE7 /NOCONTROLLEDThis command changes the device name of terminal TTE6 to TTE7 and removes the Controlled characteristic from the definition. Users log in to OpenVMS from terminal TTE7 and enter ACMS using the
ACMS/ENTERcommand. Terminal TTE6 is no longer authorized.
SHOW Command (DDU>)
SHOW Command (DDU>) — Displays DDU definitions.
Format
| Command Qualifiers | Defaults |
|---|---|
| /BRIEF | Full definition |
Privileges Requires
None.
Parameters
- device-name
The name of the device. Do not include a colon (:) when you specify a device name. The device name can be a logical name, a physical device name, a group device name, or the wildcard character (*). See Table 2.1, ''DDU Group Device Names'' for a list of the DDU group device names. You can use the wildcard character as a prefix, a suffix, or both to specify a partial device name (such as TT*, *TT, or *TT*).
Qualifiers
- /BRIEF
Displays only device names. DDU displays complete definitions by default.
Notes
To display all definitions, use the wildcard character (*) as the parameter.
Examples
DDU>SHOW *Device Name: DEFAULT NOT CONTROLLEDNo AutologinPrintfile:Device Name: LT NOT CONTROLLEDNo AutologinPrintfile:Device Name: LTA902 CONTROLLEDAutologin Username: TURKLESPrintfile:Device Name: TT NOT CONTROLLEDNo AutologinPrintfile:Device Name: TTB5 NOT CONTROLLEDNo AutologinPrintfile:Device Name: VTA65 NOT CONTROLLEDNo AutologinPrintfile:This command displays the full device definitions for all devices authorized in the device authorization file.
DDU>SHOW * /BRIEFDevice Name: DEFAULTDevice Name: LTDevice Name: LTA901Device Name: LTA902Device Name: LTA903Device Name: LTA904Device Name: PTDevice Name: RTDevice Name: TTDevice Name: TTA9Device Name: TTB5Device Name: TTE5Device Name: VTDevice Name: VTA65This command displays just the device names for all devices authorized in the device authorization file.
DDU>SHOW TTE4Device Name: TTE4 CONTROLLEDAutologin Username: MILLERThis command displays the full device definition for terminal TTE4.
DDU>SHOW VTDevice Name: VT NOT CONTROLLEDNo AutologinThis command displays the device definition that authorizes virtual terminals to have access to your ACMS system.
DDU>SHOW *E*Device Name: DEFAULT NOT CONTROLLEDNo AutologinPrintfile:Device Name: TTE5 NOT CONTROLLEDNo AutologinPrintfile: SPOOLDEV::TXA0:Device Name: TTE6 NOT CONTROLLEDNo AutologinThis command displays all device definitions for terminals containing the letter E.
Chapter 18. UDU Commands
This chapter contains reference information and examples for the ACMS User Definition Utility (UDU) commands. See Chapter 3, "Authorizing Users" for more information on the UDU commands and their functions.
ADD Command (UDU>)
ADD Command (UDU>) — Authorizes and assigns sign-in characteristics to ACMS users by adding UDU definitions to the user authorization file (ACMSUDF.DAT). You can use qualifiers to assign sign-in characteristics or let new definitions receive information from the UDU DEFAULT definition.
Format
| Command Qualifiers | Defaults |
|---|---|
| /[NO]AGENT |
From DEFAULT definition |
| /[NO]DISPLAY_MENU |
From DEFAULT definition |
| /[NO]FINAL=(keyword[,...]) |
From DEFAULT definition |
| /[NO]INITIAL=(keyword[,...]) |
From DEFAULT definition |
| /LANGUAGE=language-name |
From DEFAULT definition |
| /MDB=menu-database-file |
From DEFAULT definition |
| /MENU[=menu-path-name] |
From DEFAULT definition |
|
|
From DEFAULT definition |
| /[NO]SKIPMENULANGUAGE |
From DEFAULT definition |
Privileges Required
None.
Parameters
- user-name
The OpenVMS user name in the definition you are creating. The user name can be $ALL.
Qualifiers
- /[NO]AGENT
Enables an agent to submit a task that has a user name different from the user name of the agent process. You must use the
/AGENTqualifier to authorize the Command Process (CP) and the Queued Task Initiator (QTI) as agents. If your system has other agent programs that submit tasks of this type, you must also authorize them with the/AGENTqualifier. You must use the/AGENTqualifier for any user name that a detached task runs under. Use the/NOAGENTqualifier when an agent program no longer submits tasks for processing that run under user names other than the submitting agent program. The default is taken from the DEFAULT definition.- /[NO]DISPLAY_MENU
Enables the menu display identified in the user's definition and the Selection: prompt once the user signs in. A menu is identified by a menu path name and a menu database file. If a user's definition has the NODISPLAY_MENU characteristic, ACMS displays only the Selection: prompt after the user signs in, without a full default menu. The
/NODISPLAY_MENUqualifier disables the menu display. The default is taken from the DEFAULT definition.- /[NO]FINAL=(keyword[,...])
Specifies a task that is run when the user exits from ACMS. The default is taken from the DEFAULT definition.
Specify one or more of the following keywords. If you specify more than one keyword, you must enclose the keywords in parentheses.APPLICATION=application-nameSpecifies the application in which the final task is run. When you specify the
APPLICATIONkeyword, you must also specify a task name with theTASKkeyword.[NO]IGNORE_ERRORSpecifies that errors in the final task are ignored. If an error occurs in the final task, ACMS does not display an error message or record information about the error in the audit trail log file.
[NO]SELECTION_STRING="string"Specifies a parameter required by the final task. For example, if the final task is an editor, "string" is the file specification of the file to be edited. Enclose the string in quotation marks.
TASK=task-nameSpecifies the name of the final task. When you specify the
TASKkeyword, you must also specify an application name with theAPPLICATIONkeyword.
- /[NO]INITIAL=(keyword[,...])
Specifies the task that is run when the user enters the ACMS environment. The default is taken from the DEFAULT definition.
Specify one or more of the following keywords. If you specify more than one keyword, you must enclose the keywords in parentheses.APPLICATION=application-nameSpecifies the application in which the initial task is run. When you specify the
APPLICATIONkeyword, you must also specify a task name with theTASKkeyword.[NO]IGNORE_ERRORSpecifies that errors in the initial task are ignored. By default, if an error occurs in an initial task, an error message is displayed on the user's terminal, the reason for the error is recorded in the audit trail log, and the user is signed out of ACMS.
[NO]SELECTION_STRING="string"Specifies a parameter required by the initial task. For example, if the initial task is an editor, "string" is the file specification of the file to be edited. Enclose the string in quotation marks.
TASK=task-nameSpecifies the name of the initial task. When you specify the
TASKkeyword, you must also specify an application name with theAPPLICATIONkeyword.
- /LANGUAGE=language-name
Assigns a language to a user in a UDU definition. ACMS matches the language assigned to a user with the language assigned to a DECforms form layout and displays panels in the selected language. The default is taken from the DEFAULT definition.
- /MDB=menu-database-file
Assigns a menu database file to a UDU definition. A menu database file is a file of run-time menu definitions created by the Application Definition Utility (ADU)
BUILDcommand. The ACMS run-time system assumes ACMS$DIRECTORY as the default directory and .MDB as the default file type for menu database files in UDU definitions. If you do not specify the/MDBqualifier, the name of the menu database file is taken from the DEFAULT definition.- /MENU[=menu-path-name]
Assigns a menu to a UDU definition. The menu path name is the location of a run-time menu definition in a menu database file. Users cannot see menus whose path names are higher in the menu tree than their default menu path names. Path names for all menus except the highest menu consist of strings of menu keywords. If you do not know the path name to include with the
/MENUqualifier, you can derive the menu path name from menu keywords, as explained in VSI ACMS for OpenVMS ADU Reference Manual.You can define menu entries that contain slashes in the menu definition; however, you cannot specify menu paths containing these slashes in the UDU.
For example, the following format is not allowed:UDU> MODIFY SMITH /MENU="TOP/V32.SUBMENU"
If you do not specify a menu path name, the user receives the path name defined in the DEFAULT definition. If there is no path name defined in the DEFAULT definition, a blank path name is assigned. When signing in with a blank path name assigned, the user receives the top menu in the menu database file.
- /PRINTFILE=print-file-spec
/PRINTFILE=spooled-device-name Use this qualifier to specify a file name or spooled device name for a user. When a form is enabled, ACMS uses the Printfile specification for a device assigned in DDU, if it is available. If it is not, ACMS uses the Printfile specification for the user.
To use the Printfile feature, you must also include a PRINT response step in the DECforms source IDFL file that contains the specifications of the panel that you want to print.
- /[NO]SKIPMENULANGUAGE
Use this qualifier with the
/LANGUAGEqualifier to specify that a language is to be assigned to a user for all DECforms forms except menu forms. For example, with the/SKIPMENULANGUAGEqualifier you can specify that DECforms display all panels in French except menu panels.
Notes
Create a user definition for the CP using the /AGENT qualifier. This action authorizes
the CP as an agent.
Specifying the $ALL user name authorizes and assigns sign-in characteristics to users who do not have separate definitions. If the user authorization file, ACMSUDF.DAT, does not contain a $ALL definition, each ACMS user needs a separate definition.
The menu database file, menu path names, and OpenVMS account must be created before a user can sign in. However, you can add a menu database file specification or default menu path name to a UDU definition before the menu database file or menu path name exists. You can create a definition for a user before the user has an OpenVMS account.
Examples
UDU>ADD CONNORThis command creates a new definition for the user name CONNOR. Because the command has no qualifiers, the new definition receives information from the DEFAULT definition.
UDU>ADD CMDPRCSS /AGENTThis command authorizes the CP as an agent. ACMS requires you to create a user definition for the CP and also for any other task submitting agent that processes tasks running under user names different from that of the Command Process. The user name of the Command Process (CMDPRCSS) is defined with the ACMSGEN Utility.
UDU>ADD $ALL /MENU=PERSONNELThis command creates a $ALL definition authorizing all OpenVMS users to sign in to ACMS. The
/MENUqualifier assigns the default menu path name PERSONNEL to the $ALL definition. The $ALL definition receives the remaining information from the DEFAULT definition. ACMS uses the $ALL definition for users who do not have separate user definitions.UDU>ADD CONNOR /MDB=WORKDISK$:[CONNOR]ACMS.MDB /MENU=PERSONNELThis command creates a new definition for CONNOR. The
/MDBand/MENUqualifiers assign to CONNOR the menu path name PERSONNEL and the menu database file WORKDISK$:[CONNOR]ACMS.MDB.UDU>ADD BELLOW /INITIAL=(APPLICATION=ACCOUNTING, -_UDU>TASK=LOGGING_PROG,SELECTION_STRING="LOG.DAT")This command creates a new definition for BELLOW. The
/INITIALqualifier specifies that the task LOGGING_PROG in application ACCOUNTING is run when BELLOW signs in. Task LOGGING_PROG displays the file LOG.DAT, which verifies BELLOW's booking information.
ADD /PROXY Command (UDU>)
ADD /PROXY Command (UDU>) — Adds a user proxy to the ACMS proxy file (ACMSPROXY.DAT). Before you can use the
ADD /PROXY command, you must have already created a proxy file using
the CREATE /PROXY command.
Format
Parameters
- remote-node
Specifies a remote node name (1 to 6 alphanumeric characters). If you substitute an asterisk, the specified <remote-user> on all nodes is authorized to submit tasks under the user name specified by the <local-user> parameter.
- remote-user
Specifies the user name of a user at a remote node. A valid user name is a string of 1 to 12 alphanumeric characters and can contain underscores and dollar signs. If you use an asterisk, all users on the specified <remote-node> are authorized to submit tasks under the user name specified by the <local-user> parameter.
- local-user
Specifies the user name of the user on the local application node. If you specify an asterisk, the local user name is the same as the remote user name. You can specify only one <local-user> for each <remote-node>::<remote-user> combination.
Notes
UDU does not check that the <local-user> name you enter is unique. Use the
SHOW /PROXY *::* command to obtain a list of <local-user>
names.
When you add a proxy, UDU interprets the <remote-node>::<remote-user> and <local-user> parameters as text strings, and each parameter is stored as specified, including any asterisks. However, at run time, ACMS interprets the asterisk as a wildcard.
You cannot partially wildcard any parameters with the ADD /PROXY
command. For example, if a user specifies <remote-node>::<remote-user> as
COMET::PERS*, UDU returns the error message, "Invalid remote user proxy
specification."
Before you create a proxy file, set default to the appropriate directory, such as SYS$SYSTEM, or define a logical for the proper directory location for the proxy file.
Examples
Note
The following examples assume that the proxy file is empty.
UDU>CREATE /PROXYUDU>ADD /PROXY COMET::PERSONNEL PERS_USERUDU>SHOW /PROXY *Remote User: COMET::PERSONNEL Local User: PERS_USERIn this example, the
ADDcommand adds a single proxy that allows the user on node COMET with user name PERSONNEL to select a task on the application node using the user name of PERS_USER.UDU>ADD /PROXY COMET::* RENTAL_AGENTUDU>SHOW /PROXY *Remote User: COMET::* Local User: RENTAL_AGENT Remote User: COMET::PERSONNEL Local User: PERS_USERIn this example, the
ADDcommand specifies that any remote user except PERSONNEL on node COMET can select a task on the application node using the user name RENTAL_AGENT. When user PERSONNEL on node COMET selects a task on the application node, the local user name is PERS_USER, because there is a specific proxy for COMET::PERSONNEL. The asterisk is interpreted as a literal in theADD /PROXYcommand.UDU>ADD /PROXY *::BICKFORD *UDU>SHOW /PROXY *Remote User: *::BICKFORD Local User:* Remote User: COMET::* Local User: RENTAL_AGENT Remote User: COMET::PERSONNEL Local User: PERS_USERIn this example, the
ADDcommand specifies that remote task submitters with the user name BICKFORD on any remote node can select a task on the application node using the same user name
COPY Command (UDU>)
COPY Command (UDU>) — Authorizes and assigns sign-in characteristics to ACMS users by creating new UDU definitions from existing UDU definitions. With qualifiers, you can assign different sign-in characteristics to the new definitions.
Format
| Command Qualifiers | Defaults |
|---|---|
| /[NO]AGENT |
From source definition |
| /[NO]DISPLAY_MENU |
From source definition |
| /[NO]FINAL=(keyword[,...]) |
From source definition |
| /[NO]INITIAL=(keyword[,...]) |
From source definition |
| /LANGUAGE=language-name |
From source definition |
| /MDB=menu-database-file |
From source definition |
| /MENU[=menu-path-name] |
From source definition |
|
|
From source definition |
| /[NO]SKIPMENULANGUAGE |
From source definition |
Privileges Required
None.
Parameters
- source-user-name
The OpenVMS user name in the source definition. The source user name can be $ALL.
- new-user-name
The OpenVMS user name for the new definition. The new user name can be $ALL.
Qualifiers
- /[NO]AGENT
The
/AGENTqualifier enables an agent to submit a task that has a user name different from the user name of the agent process. You must use the/AGENTqualifier to authorize the CP and the QTI as agents. If your system has other agent programs that submit tasks of this type, you must also authorize them with the/AGENTqualifier. You must use the/AGENTqualifier for any user name that a detached task runs under. Use the/NOAGENTqualifier when an agent program no longer submits tasks for processing that run under user names other than the submitting agent program. The default is whatever is defined in the source definition.- /[NO]DISPLAY_MENU
The
/DISPLAY_MENUqualifier enables the menu display identified in the user's definition and the Selection: prompt once the user signs in. A menu is identified by a menu path name and a menu database file. If a user's definition has theNODISPLAY_MENUcharacteristic, ACMS displays only the Selection: prompt after the user signs in, without a full default menu. The/NODISPLAY_MENUqualifier disables the menu display. The default is whatever is defined in the source definition.- /[NO]FINAL=(keyword[,...])
Specifies a task that is run when the user exits from ACMS. If you do not specify the
/[NO]FINALqualifier, the default is taken from the source definition.Specify one or more of the following keywords. If you specify more than one keyword, you must enclose the keywords in parentheses.APPLICATION=application-nameSpecifies the application in which the final task is run. When you specify the
APPLICATIONkeyword, you must also specify a task name with theTASKkeyword.[NO]IGNORE_ERRORSpecifies that errors in the final task are ignored. If an error occurs in the final task, ACMS does not display an error message or record information about the error in the audit trail log file.
[NO]SELECTION_STRING="string"Specifies a parameter required by the final task. For example, if the final task is an editor, "string" is the file specification of the file to be edited. Enclose the string in quotation marks.
TASK=task-nameSpecifies the name of the final task.
- /[NO]INITIAL=(keyword[,...])
Specifies the task that is run when the user enters the ACMS environment. The default is taken from the source definition.
Specify one or more of the following keywords. If you specify more than one keyword, you must enclose the keywords in parentheses.APPLICATION=application-nameSpecifies the application in which the initial task is run. When you specify the
APPLICATIONkeyword, you must also specify a task name with theTASKkeyword.[NO]IGNORE_ERRORSpecifies that errors in the initial task are ignored. By default, if an error occurs in an initial task, an error message is displayed on the user's terminal, the reason for the error is recorded in the audit trail log, and the user is signed out of ACMS.
[NO]SELECTION_STRING="string"Specifies a parameter required by the initial task. For example, if the initial task is an editor, "string" is the file specification of the file to be edited. Enclose the string in quotation marks.
TASK=task-nameSpecifies the name of the initial task.
- /LANGUAGE[=language-name]
Assigns a language to a user in a UDU definition. ACMS matches the language assigned to a user with the language assigned to a DECforms form layout and displays panels in the selected language. The default is taken from the source definition.
- /MDB=menu-database-file
Assigns a menu database file to a UDU definition. A menu database file is a file of run-time menu definitions created by the Application Definition Utility (ADU)
BUILDcommand. The ACMS run-time system assumes ACMS$DIRECTORY as the default directory and .MDB as the default file type for menu database files in UDU definitions. The default is whatever is defined in the source definition.- /MENU[=menu-path-name]
Assigns a menu to a UDU definition. The menu path name is the location of a run-time menu definition in a menu database file. Users cannot see menus whose path names are higher in the menu tree than their default menu path names. Path names for all menus except the highest menu consist of strings of menu keywords. If you do not know the path name to include with the
/MENUqualifier, you can derive the menu path name from menu keywords, as explained in VSI ACMS for OpenVMS ADU Reference Manual.You can define menu entries that contain slashes in the menu definition; however, you cannot specify menu paths containing these slashes in the UDU.
For example, the following format is not allowed:UDU> MODIFY SMITH /MENU="TOP/V32.SUBMENU"
If you do not specify a path name and there is no path name defined in the source definition, the user receives a blank path name. When a blank path name is defined, the user receives the top menu in the menu database file when signing in.
- /PRINTFILE=print-file-spec
/PRINTFILE=spooled-device-name Use this qualifier to specify a file name or spooled device name for a user. When a form is enabled, ACMS uses the Printfile specification for a device assigned in DDU, if it is available. If it is not, ACMS uses the Printfile specification for the user.
To use the Printfile feature, you must also include a PRINT response step in the DECforms source IDFL file that contains the specifications of the panel that you want to print.
- /[NO]SKIPMENULANGUAGE
Use this qualifier with the
/LANGUAGEqualifier to specify that a language is to be assigned to a user for all DECforms forms except menu forms. For example, with the/SKIPMENULANGUAGEqualifier you can specify that DECforms display all panels in French except menu panels.
Notes
None.
Examples
UDU>COPY COURTS WILSONThis command creates a user definition for WILSON, copying all the information from the definition for COURTS.
UDU>COPY TRACY MORRIS /MENU=EMPLOYEEThis command creates a user definition for MORRIS, copying information from the definition for TRACY. The
/MENUqualifier assigns MORRIS a different default menu path name, EMPLOYEE.UDU>COPY STEVENS SMITH /MENUThis command creates a user definition for SMITH, copying information from the definition for STEVENS. The
/MENUqualifier overrides the path name from the STEVENS definition, so the definition for SMITH receives a blank path name. After signing in, SMITH receives the top menu in the menu database file.
CREATE /PROXY Command (UDU>)
CREATE /PROXY Command (UDU>) — Creates an empty ACMS proxy file (ACMSPROXY.DAT).
Format
Note
Creates an empty ACMS proxy file, ACMSPROXY.DAT. If you define the ACMSPROXY logical
name and then enter the UDU CREATE /PROXY command, the empty proxy file
is created at the location defined by the ACMSPROXY logical name. If you do not define the
ACMSPROXY logical name, UDU creates ACMSPROXY.DAT in your current directory. If the proxy
file already exists, UDU returns an error message.
Example
UDU>CREATE /PROXY
This command creates an ACMS proxy file.
DEFAULT Command (UDU>)
DEFAULT Command (UDU>) — Changes information in the UDU DEFAULT definition. If you omit one or more
qualifiers from an ADD command, the resulting new definition receives
information from the existing DEFAULT definition.
Format
| Command Qualifiers | Defaults |
|---|---|
| /[NO]AGENT |
From existing DEFAULT definition |
| /[NO]DISPLAY_MENU |
From existing DEFAULT definition |
| /[NO]FINAL=(keyword[,...]) |
From existing DEFAULT definition |
| /[NO]INITIAL=(keyword[,...]) |
From existing DEFAULT definition |
| /LANGUAGE=language-name |
From existing DEFAULT definition |
| /MDB=menu-database-file |
From existing DEFAULT definition |
| /MENU[=menu-path-name] |
From existing DEFAULT definition |
|
|
From existing DEFAULT definition |
| /[NO]SKIPMENULANGUAGE |
From existing DEFAULT definition |
Privileges Required
None.
Qualifiers
- /[NO]AGENT
The
/AGENTqualifier enables an agent to submit a task that has a user name different from the user name of the agent process. You must use the/AGENTqualifier to authorize the CP and the QTI as agents. If your system has other agent programs that submit tasks of this type, you must also authorize them with the/AGENTqualifier. You must use the/AGENTqualifier for any user name that a detached task runs under. Use the/NOAGENTqualifier when an agent program no longer submits tasks for processing that run under user names other than the submitting agent program.- /[NO]DISPLAY_MENU
The
/DISPLAY_MENUqualifier enables the menu display identified in the user's definition and the Selection: prompt once the user signs in. A menu is identified by a menu path name and a menu database file. If a user's definition has the NODISPLAY_MENU characteristic, ACMS displays only the Selection: prompt after the user signs in, without a full default menu. The/NODISPLAY_MENUqualifier disables the menu display.- /[NO]FINAL=(keyword[,...])
Specifies a task that is run when the user exits from ACMS. If you do not specify the
/[NO]FINALqualifier, the default is taken from the current DEFAULT definition.Specify one or more of the following keywords. If you specify more than one keyword, you must enclose the keywords in parentheses.APPLICATION=application-nameSpecifies the application in which the final task is run. When you specify the
APPLICATIONkeyword, you must also specify a task name with theTASKkeyword.[NO]IGNORE_ERRORSpecifies that errors in the final task are ignored. If an error occurs in the final task, ACMS does not display an error message or record information about the error in the audit trail log file.
[NO]SELECTION_STRING="string"Specifies a parameter required by the final task. For example, if the final task is an editor, "string" is the file specification of the file to be edited. Enclose the string in quotation marks.
TASK=task-nameSpecifies the name of the final task.
- /[NO]INITIAL=(keyword[,...])
Specifies the task that is run when the user enters the ACMS environment. The default is taken from the current DEFAULT definition.
Specify one or more of the following keywords. If you specify more than one keyword, you must enclose the keywords in parentheses.APPLICATION=application-nameSpecifies the application in which the initial task is run. When you specify the
APPLICATIONkeyword, you must also specify a task name with theTASKkeyword.[NO]IGNORE_ERRORSpecifies that errors in the initial task are ignored. By default, if an error occurs in an initial task, an error message is displayed on the user's terminal, the reason for the error is recorded in the audit trail log, and the user is signed out of ACMS.
[NO]SELECTION_STRING="string"Specifies a parameter required by the initial task. For example, if the initial task is an editor, "string" is the file specification of the file to be edited. Enclose the string in quotation marks.
TASK=task-nameSpecifies the name of the initial task.
- /LANGUAGE[=language-name]
Assigns a language to a user in a UDU definition. ACMS matches the language assigned to a user with the language assigned to a DECforms form layout and displays panels in the selected language. The default is taken from the existing DEFAULT definition.
- /MDB=menu-database-file
Assigns a menu database file to a UDU definition. A menu database file is a file of run-time menu definitions created by the Application Definition Utility (ADU)
BUILDcommand. The ACMS run-time system assumes ACMS$DIRECTORY as the default directory and .MDB as the default file type for menu database files in UDU definitions.- /MENU[=menu-path-name]
Assigns a menu to a UDU definition. The menu path name is the location of a run-time menu definition in a menu database file. Users cannot see menus whose path names are higher in the menu tree than their default menu path names. Path names for all menus except the highest menu consist of strings of menu keywords. If you do not know the path name to include with the
/MENUqualifier, you can derive the menu path name from menu keywords, as explained in the VSI ACMS for OpenVMS ADU Reference Manual.You can define menu entries that contain slashes in the menu definition; however, you cannot specify menu paths containing these slashes in the UDU.
For example, the following format is not allowed:UDU> MODIFY SMITH /MENU="TOP/V32.SUBMENU"
If you do not specify a path name and there is no default path name defined in the existing DEFAULT definition, the user receives a blank path name. If a blank path name is defined, the user receives the top menu in the menu database file.
- /PRINTFILE=print-file-spec
/PRINTFILE=spooled-device-name Use this qualifier to specify a file name or spooled device name for a user. When a form is enabled, ACMS uses the Printfile specification for a device assigned in DDU, if it is available. If it is not, ACMS uses the Printfile specification for the user.
To use the Printfile feature, you must also include a PRINT response step in the DECforms source IDFL file that contains the specifications of the panel that you want to print.
- /[NO]SKIPMENULANGUAGE
Use this qualifier with the
/LANGUAGEqualifier to specify that a language is to be assigned to a user for all DECforms forms except menu forms. For example, with the/SKIPMENULANGUAGEqualifier you can specify that DECforms display all panels in French except menu panels.
Notes
ACMS creates a DEFAULT definition the first time you run UDU, or when you create a new user authorization file. ACMS assigns to the DEFAULT definition an initial display of the top-level menu and selection prompt, the menu database file specification ACMS$DIRECTORY:ACMS.MDB, and a blank menu path name.
The ADD command is the only command affected by the DEFAULT
definition. When you use the ADD command to create a new UDU definition,
the new definition takes the default information assigned in the DEFAULT definition. You can
use qualifiers with the ADD command to override information from the
DEFAULT definition.
Examples
UDU>DEFAULT /MENU=EMPLOYEEThis command assigns the default menu EMPLOYEE to the DEFAULT definition.
UDU>DEFAULT /MENUThis command assigns a blank menu path name to the DEFAULT definition. The user receives the top menu in the menu database file.
EXIT Command (UDU>)
EXIT Command (UDU>) — Ends the UDU session and returns you to DCL level.
Format
Privileges Required
None.
Note
You can also type Ctrl/Z to end a UDU session. Ctrl/Z
signals the end of the file for data entered from the terminal. Ctrl/Z is
displayed as EXIT.
Example
UDU>EXIT$
This command ends a UDU session and returns you to the DCL prompt.
HELP Command (UDU>)
HELP Command (UDU>) — Displays information about UDU commands and qualifiers.
Format
| Command Qualifiers | Defaults |
|---|---|
| /[NO]PROMPT | /PROMPT |
Privileges Required
None.
Parameters
- topic
The UDU topic you want information about. If you do not supply a topic,
HELPprovides you with a list of topics to choose from.
Qualifiers
- /[NO]PROMPT
Controls whether or not you receive prompts for topic and subtopic. The
/PROMPTqualifier displays help prompts. The default is/PROMPT. With the/NOPROMPTqualifier, theHELPcommand does not display prompts.
Notes
None.
Example
UDU>HELP LISTLISTWrites User Definition Utility definitions to an output file.Format:LIST user-nameFor example:UDU> LIST *Additional information available:Parameter Qualifiers/OUTPUT /BRIEFLIST Subtopic?Topic?
This command displays information about the UDU LIST command.
LIST Command (UDU>)
LIST Command (UDU>) — Writes UDU definitions to ACMSUDU.LIS in your default directory, or to an output file you specify.
Format
| Command Qualifiers | Defaults |
|---|---|
| /BRIEF |
Full definition |
| /OUTPUT[=file-spec] |
/OUTPUT[=file-spec] |
Privileges Required
None.
Parameters
- user-name
The OpenVMS user name of the definition you are listing. You can use the wildcard character (*), $ALL, or DEFAULT as the user name. You can use the wildcard character to represent a partial user name.
Qualifiers
- /BRIEF
Lists only the OpenVMS user names in definitions. The default is to list complete definitions.
- /OUTPUT[=file-spec]
Copies one or more user definitions to a file you name. If you do not include a file specification, UDU uses the ACMSUDU.LIS file by default and puts the list file in your current default directory.
Notes
To write all definitions to an output file, use the wildcard character (*) as the user name.
To print the listing file, use the DCL PRINT command after you have
finished your UDU session. To display the contents of an output file, use the DCL
TYPE command.
Examples
UDU>LIST CONNORThis command writes the definition for CONNOR to the ACMSUDU.LIS output file.
UDU>LIST * /BRIEFThis command writes the user names in all UDU definitions to the output file ACMSUDU.LIS.
UDU>LIST *The
LISTcommand with the wildcard character (*) writes all definitions in the user authorization file (ACMSUDF.DAT) to the output file ACMSUDU.LIS.UDU>LIST B*This command uses the wildcard character (*) to write the definitions for user names beginning with the letter B to an output file.
LIST /PROXY Command (UDU>)
LIST /PROXY Command (UDU>) — Writes all the proxies in the ACMS proxy file to the output file ACMSPROXY.LIS.
You can use the /OUTPUT qualifier to specify a different output file
name.
Format
| Command Qualifiers | Defaults |
|---|---|
| /OUTPUT[=file-spec] |
ACMSPROXY.LIS |
Qualifiers
- /OUTPUT=file-spec
Use this qualifier to specify a file name for the output listing file. Replace the parameter <file-spec> with the new output file name, which can be any valid OpenVMS file specification.
By default, the listing file is created in the current directory with the name ACMSPROXY.LIS.
Note
Creates a listing file of all the proxies in the ACMS proxy file. You can use the
optional /OUTPUT qualifier to override the default listing file
specification.
Examples
UDU>LIST /PROXYThis command creates a listing file of all the proxies in the ACMS proxy file. The listing file is created in the current directory and is named ACMSPROXY.LIS.
UDU>LIST /PROXY /OUTPUT=DISK1$:[DATA]ALL_REMOTE_USERS.LISThis command creates the listing file ALL_REMOTE_USERS.LIS in the DISK1$:[DATA] directory. The listing file contains all proxies in the ACMS proxy file.
MODIFY Command (UDU>)
MODIFY Command (UDU>) — Changes the user information by allowing you to change information in UDU definitions.
Format
| Command Qualifiers | Defaults |
|---|---|
| /[NO]AGENT |
From existing definition |
| /[NO]DISPLAY_MENU |
From existing definition |
| /[NO]FINAL=(keyword[,...]) |
From existing definition |
| /[NO]INITIAL=(keyword[,...]) |
From existing definition |
| /LANGUAGE=language-name |
From existing definition |
| /MDB=menu-database-file |
From existing definition |
| /MENU[=menu-path-name] |
From existing definition |
|
|
From existing definition |
| /[NO]SKIPMENULANGUAGE |
From existing definition |
Privileges Required
None.
Parameter
- user-name
The OpenVMS user name in the definition you are changing. The user name can be $ALL.
Qualifiers
- /[NO]AGENT
The
/AGENTqualifier enables an agent to submit a task that has a user name different from the user name of the agent process. You must use the/AGENTqualifier to authorize the CP and the QTI as agents. If your system has other agent programs that submit tasks of this type, you must also authorize them with the/AGENTqualifier. You must use the/AGENTqualifier for any user name that a detached task runs under. Use the/NOAGENTqualifier when an agent program no longer submits tasks for processing that run under user names other than the submitting agent program. The default is taken from the existing definition.- /[NO]DISPLAY_MENU
The
/DISPLAY_MENUqualifier enables the menu display identified in the user's definition and the Selection: prompt once the user signs in. A menu is identified by a menu path name and a menu database file. If a user's definition has the NODISPLAY_MENU characteristic, ACMS displays only the Selection: prompt after the user signs in, without a full default menu. The/NODISPLAY_MENUqualifier disables the menu display. The default is taken from the existing definition.- /[NO]FINAL=(keyword[,...])
Specifies a task that is run when the user exits from ACMS. The default is taken from the existing definition.
You can specify one or more of the following keywords. If you specify more than one keyword, you must enclose the keywords in parentheses.APPLICATION=application-nameSpecifies the application in which the final task is run. When you specify the
APPLICATIONkeyword, you must also specify a task name with theTASKkeyword.[NO]IGNORE_ERRORSpecifies that errors in the final task are ignored. If an error occurs in the final task, ACMS does not display an error message or record information about the error in the audit trail log file.
[NO]SELECTION_STRING= "string"Specifies a parameter required by the final task. For example, if the final task is an editor, "string" is the file specification of the file to be edited. Enclose the string in quotation marks.
TASK=task-nameSpecifies the name of the final task.
- /[NO]INITIAL=(keyword[,...])
Specifies the task that is run when the user enters the ACMS environment. The default is taken from the existing definition.
You can specify one or more of the following keywords. If you specify more than one keyword, you must enclose the keywords in parentheses.APPLICATION=application-nameSpecifies the application in which the initial task is run. When you specify the
APPLICATIONkeyword, you must also specify a task name with theTASKkeyword.[NO]IGNORE_ERRORSpecifies that errors in the initial task are ignored. By default, if an error occurs in an initial task, an error message is displayed on the user's terminal, the reason for the error is recorded in the audit trail log, and the user is signed out of ACMS.
[NO]SELECTION_STRING= "string"Specifies a parameter required by the initial task. For example, if the initial task is an editor, "string" is the file specification of the file to be edited. Enclose the string in quotation marks.
TASK=task-nameSpecifies the name of the initial task.
- /LANGUAGE[=language-name]
Assigns a language to a user in a UDU definition. ACMS matches the language assigned to a user with the language assigned to a DECforms form layout and displays panels in the selected language. The default is taken from the existing definition.
- /MDB=menu-database-file
Assigns a menu database file to a UDU definition. A menu database file is a file of run-time menu definitions created by the Application Definition Utility (ADU)
BUILDcommand. The ACMS run-time system assumes ACMS$DIRECTORY as the default directory and .MDB as the default file type for menu database files in UDU definitions. The default is taken from the existing definition.- /MENU[=menu-path-name]
Assigns a menu to a UDU definition. The menu path name is the location of a run-time menu definition in a menu database file. Users cannot see menus whose path names are higher in the menu tree than their default menu path names. Path names for all menus except the highest menu consist of strings of menu keywords. If you do not know the path name to include with the
/MENUqualifier, you can derive the menu path name from menu keywords, as explained in VSI ACMS for OpenVMS ADU Reference Manual.You can define menu entries that contain slashes in the menu definition; however, you cannot specify menu paths containing these slashes in the UDU.
For example, the following format is not allowed:UDU> MODIFY SMITH /MENU="TOP/V32.SUBMENU"
If you do not specify a menu path name, the user receives the path name defined in the existing definition. If there is no path name defined in the existing definition, a blank path name is assigned. When signing in with a blank path name assigned, the user receives the top menu in the menu database file.
- /PRINTFILE=print-file-spec
/PRINTFILE=spooled-device-name Use this qualifier to specify a file name or spooled device name for a user. When a form is enabled, ACMS uses the Printfile specification for a device assigned in DDU, if it is available. If it is not, ACMS uses the Printfile specification for the user.
To use the Printfile feature, you must also include a PRINT response step in the DECforms source IDFL file that contains the specifications of the panel that you want to print.
- /[NO]SKIPMENULANGUAGE
Use this qualifier with the
/LANGUAGEqualifier to specify that a language is to be assigned to a user for all DECforms forms except menu forms. For example, with the/SKIPMENULANGUAGEqualifier you can specify that DECforms display all panels in French except menu panels.
Notes
To change the $ALL definition, use $ALL as the user name.
The UDU MODIFY command does not invoke an editor, unlike the
MODIFY command of the ACMS Application Definition Utility (ADU).
Examples
UDU>MODIFY CONNOR /MENU=PERSONNELThis command assigns CONNOR the menu path name PERSONNEL, a menu below the highest menu in the menu database file.
UDU>MODIFY CONNOR /MDB=WORKDISK$:[CONNOR]ACMS.MDBThis command assigns CONNOR the menu database file ACMS.MDB on WORKDISK$:[CONNOR].
UDU>MODIFY ZEKE /INITIAL=(TASK=NEW_DATA_INFO)This command modifies the definition for ZEKE specifying NEW_DATA_INFO as the new initial task. The name of the application is taken from the existing definition.
UDU>MODIFY WINSTON /PRINTFILE=SPOOLDEV::TXA0:This command modifies the definition for WINSTON specifying SPOOLDEV::TXA0: as the spooled device on which any DECforms print files are to be printed.
REMOVE Command (UDU>)
REMOVE Command (UDU>) — Removes UDU definitions from the user authorization file.
Format
Privileges Required
None
Parameters
- user-name
The OpenVMS user name in the definition you are deleting. The user name can be $ALL.
Notes
To prevent a user from signing in to ACMS, remove the $ALL definition if the database contains one, or remove the definition for the user.
You cannot delete the DEFAULT definition.
Examples
UDU>REMOVE CONNORThis command deletes the user definition for CONNOR.
UDU>REMOVE $ALLThis command deletes the $ALL definition.
REMOVE /PROXY Command (UDU>)
REMOVE /PROXY Command (UDU>) — Removes the specified proxy from the ACMS proxy file (ACMSPROXY.DAT).
Format
Parameters
- remote-node
Specifies a remote node name (1 to 6 alphanumeric characters). Specify an asterisk to remove a proxy that contains an asterisk for the remote node.
- remote-user
Specifies the user name of a user at a remote node. A valid remote user name is a string of 1 to 12 alphanumeric characters and can contain underscores and dollar signs. Specify an asterisk to remove a proxy containing an asterisk for the remote user.
Notes
When you remove a proxy, UDU interprets the <remote-node>::<remote-user> and <local-user> parameters as text strings and removes the proxy as specified, including any asterisks. Specifying an asterisk for a parameter removes only a proxy that has an asterisk for that same parameter.
You cannot partially wildcard any parameters with the REMOVE /PROXY
command. For example, if a user specifies <remote-node>::<remote-user> as
COMET::PERS*, UDU returns the error message, "Invalid remote user proxy
specification."
If the specified user is not in the file, UDU displays an error message stating that the user does not exist.
Examples
UDU>SHOW /PROXY *::*Remote User: *::BICKFORD Local User: BICKFORD Remote User: COMET::* Local User: RENTAL_AGENT Remote User: COMET::BICKFORD Local User: SUPERVISOR Remote User: COMET::PERSONNEL Local User: PERSONNELUDU>REMOVE /PROXY COMET::PERSONNELUDU>SHOW /PROXY *::*Remote User: *::BICKFORD Local User: BICKFORD Remote User: COMET::* Local User: RENTAL_AGENT Remote User: COMET::BICKFORD Local User: SUPERVISORIn this example, the
REMOVEcommand removes the proxy for COMET::PERSONNEL from the ACMS proxy file. This deletion removes the specific ACMS proxy access for user PERSONNEL on node COMET.UDU>SHOW /PROXY *Remote User: *::BICKFORD Local User: BICKFORD Remote User: COMET::* Local User: RENTAL_AGENT Remote User: COMET::BICKFORD Local User: SUPERVISORUDU>REMOVE /PROXY COMET::*UDU>SHOW /PROXY *Remote User: *::BICKFORD Local User: BICKFORD Remote User: COMET::BICKFORD Local User: SUPERVISORIn this example, the
REMOVEcommand removes the proxy for COMET::*. This deletion removes ACMS proxy access for all users on node COMET except for the user name BICKFORD, who has a separate proxy. The proxy for *::BICKFORD is not removed, because the proxy is interpreted as a separate entity.UDU>SHOW /PROXY *Remote User: *::BICKFORD Local User: BICKFORD Remote User: COMET::BICKFORD Local User: SUPERVISORUDU>REMOVE /PROXY *::BICKFORDUDU>SHOW /PROXY *Remote User: COMET::BICKFORD Local User: SUPERVISORIn this example, the
REMOVEcommand removes the proxy for *::BICKFORD. This deletion removes ACMS proxy access for user BICKFORD on every node except COMET::BICKFORD, which is interpreted as a separate entity.
RENAME Command (UDU>)
RENAME Command (UDU>) — Changes the user names and, with qualifiers, other information in UDU definitions.
Format
| Command Qualifiers | Defaults |
|---|---|
| /[NO]AGENT |
From old definition |
| /[NO]DISPLAY_MENU |
From old definition |
| /[NO]FINAL=(keyword[,...]) |
From old definition |
| /[NO]INITIAL=(keyword[,...]) |
From old definition |
| /LANGUAGE=language-name |
From old definition |
| /MDB=menu-database-file |
From old definition |
| /MENU[=menu-path-name] |
From old definition |
|
|
From old definition |
| /[NO]SKIPMENULANGUAGE |
From old definition |
Privileges Required
None.
Parameters
- old-user-name
The OpenVMS user name in the definition you are changing. The old user name can be $ALL.
- new-user-name
The OpenVMS user name for the new definition. The new user name can be $ALL.
Qualifiers
- /[NO]AGENT
The
/AGENTqualifier enables an agent to submit a task that has a user name different from the user name of the agent process. You must use the/AGENTqualifier to authorize the CP and the QTI as agents. If your system has other agent programs that submit tasks of this type, you must also authorize them with the/AGENTqualifier. You must use the/AGENTqualifier for any user name that a detached task runs under. Use the/NOAGENTqualifier when an agent program no longer submits tasks for processing that run under user names other than the submitting agent program. The default is whatever is defined in the definition you are renaming.- /[NO]DISPLAY_MENU
The
/DISPLAY_MENUqualifier enables the menu display identified in the user's definition and the Selection: prompt once the user signs in. A menu is identified by a menu path name and a menu database file. If a user's definition has the NODISPLAY_MENU characteristic, ACMS displays only the Selection: prompt after the user signs in, without a full default menu. The/NODISPLAY_MENUqualifier disables the menu display. The default is whatever is defined in the definition you are renaming.- /[NO]FINAL=(keyword[,...])
Specifies a task that is run when the user exits from ACMS. If you do not specify the
/[NO]FINALqualifier, the default is taken from the definition you are renaming.You can specify one or more of the following keywords. If you specify more than one keyword, you must enclose the keywords in parentheses.APPLICATION=application-nameSpecifies the application in which the final task is run. When you specify the
APPLICATIONkeyword, you must also specify a task name with theTASKkeyword.[NO]IGNORE_ERRORSpecifies that errors in the final task are ignored. If an error occurs in the final task, ACMS does not display an error message or record information about the error in the audit trail log file.
[NO]SELECTION_STRING="string"Specifies a parameter required by the final task. For example, if the final task is an editor, "string" is the file specification of the file to be edited. Enclose the string in quotation marks.
TASK=task-nameSpecifies the name of the final task.
- /[NO]INITIAL=(keyword[,...])
Specifies a task that is run when the user enters the ACMS environment. The default is taken from the definition you are renaming.
You can specify one or more of the following keywords. If you specify more than one keyword, you must enclose the keywords in parentheses.APPLICATION=application-nameSpecifies the application in which the initial task is run. When you specify the
APPLICATIONkeyword, you must also specify a task name with theTASKkeyword.[NO]IGNORE_ERRORSpecifies that errors in the initial task are ignored. By default, if an error occurs in an initial task, an error message is displayed on the user's terminal, the reason for the error is recorded in the audit trail log, and the user is signed out of ACMS.
[NO]SELECTION_STRING="string"Specifies a parameter required by the initial task. For example, if the initial task is an editor, "string" is the file specification of the file to be edited. Enclose the string in quotation marks.
TASK=task-nameSpecifies the name of the initial task.
- /LANGUAGE[=language-name]
Assigns a language to a user in a UDU definition. ACMS matches the language assigned to a user with the language assigned to a DECforms form layout and displays panels in the selected language. The default is taken from the definition you are renaming.
- /MDB=menu-database-file
Assigns a menu database file to a UDU definition. A menu database file is a file of run-time menu definitions created by the ADU
BUILDcommand. The ACMS run-time system assumes ACMS$DIRECTORY as the default directory and .MDB as the default file type for menu database files in UDU definitions. The default is whatever is defined in the definition you are renaming.- /MENU[=menu-path-name]
Assigns a menu to a UDU definition. The menu path name is the location of a run-time menu definition in a menu database file. Users cannot see menus whose path names are higher in the menu tree than their default menu path names. Path names for all menus except the highest menu consist of strings of menu keywords. If you do not know the path name to include with the
/MENUqualifier, you can derive the menu path name from menu keywords, as explained in the VSI ACMS for OpenVMS ADU Reference Manual.You can define menu entries that contain slashes in the menu definition, however, you cannot specify menu paths containing these slashes in the UDU.
For example, the following format is not allowed:UDU> MODIFY SMITH /MENU="TOP/V32.SUBMENU"
If you do not specify a menu path name, UDU uses the path name defined in the definition you are renaming. If there is no path name already defined, the user receives a blank path name. When a blank path name is defined, the user receives the top menu in the menu database file when signing in.
- /PRINTFILE=print-file-spec
/PRINTFILE=spooled-device-name Use this qualifier to specify a file name or spooled device name for a user. When a form is enabled, ACMS uses the Printfile specification for a device assigned in DDU, if it is available. If it is not, ACMS uses the Printfile specification for the user.
To use the Printfile feature, you must also include a PRINT response step in the DECforms source IDFL file that contains the specifications of the panel that you want to print.
- /[NO]SKIPMENULANGUAGE
Use this qualifier with the
/LANGUAGEqualifier to specify that a language is to be assigned to a user for all DECforms forms except menu forms. For example, with the/SKIPMENULANGUAGEqualifier you can specify that DECforms display all panels in French except menu panels.
Notes
The new user name must be unique in the user authorization file. You cannot rename the DEFAULT definition.
Examples
UDU>RENAME SMITH JAMISONThis command changes the user name from SMITH to JAMISON.
UDU>RENAME SMITH JAMES /MENU=PERSONNELThis command changes the user name from SMITH to JAMES and changes the default menu path name in the definition to PERSONNEL.
SHOW Command (UDU>)
SHOW Command (UDU>) — Displays UDU definitions.
Format
| Command Qualifiers | Defaults |
|---|---|
| /BRIEF |
Full definition |
Privileges Required
None.
Parameters
- user-name
The OpenVMS user name of the definition you are displaying. Use the wildcard character (*), $ALL, or DEFAULT as the user name. Use the wildcard character to represent a partial user name.
Qualifiers
- /BRIEF
Displays only the user names in definitions. The default is to display full definitions.
Notes
To display all definitions, use the wildcard character (*) as the parameter.
Examples
UDU>SHOW *User Spec: *User Name: DEFAULT DISPLAY MENUDefault Menu:Default MDB: ACMS$DIRECTORY:ACMS.MDBInitial Task:Application:Task:Selection:Final Task:Application:Task:Selection:Language:Printfile:User Name: $ALL DISPLAY MENUDefault Menu:Default MDB: ACMS$DIRECTORY:ACMS.MDBInitial Task:Application:Task:Selection:Final Task:Application:Task:Selection:Language:Printfile:The
SHOWcommand with the wildcard character (*) displays all definitions in the user authorization file (ACMSUDF.DAT).UDU>SHOW * /BRIEFUser Spec: * User Name: $ALL User Name: DEFAULT User Name: CONNOR User Name: WINSTONThe
SHOW/BRIEFcommand with the wildcard character (*) displays all user names in UDU definitions.UDU>SHOW CONNORUser Name: CONNOR DISPLAY MENUDefault Menu: EMPLOYEEDefault MDB: ACMS$DIRECTORY:ACMS.MDBInitial Task: IGNORE ERRORApplication: EMP_ACCTTask: REGISTERYSelection: LOG_IN.DATFinal Task: IGNORE ERRORApplication: EMP_ACCTTask: DAILY_LOGSelection: DAYS_WORK.DATLanguage: ENGLISHPrintfile: SPOOLDEV::TXA0:The
SHOWcommand displays the definition for CONNOR.
SHOW /PROXY Command (UDU>)
SHOW /PROXY Command (UDU>) — Displays one or more proxies in the ACMS proxy file (ACMSPROXY.DAT).
Format
Parameters
- remote-node
Specifies a remote node name (1 to 6 alphanumeric characters).
- remote-user
Specifies the user name of a user at a remote node. A valid user name is a string of 1 to 12 alphanumeric characters and can contain underscores and dollar signs.
Notes
The SHOW /PROXY command interprets the asterisk as a wildcard
character. To display the proxy access for all users in the proxy file, specify either a
single asterisk (*) or *::* for <remote-user>::<remote-user>. If you use an
asterisk for <remote-node>, all user proxies that match the <remote-user>
specification are displayed. If you use an asterisk for <remote-user>, all proxies for
users on the specified <remote-node> are displayed.
You can also use the wildcard character with the SHOW /PROXY command
to represent a partial user proxy. You can use the asterisk as a prefix (for example,
*FORD), as a suffix (for example, BICK*), or as both (for example, *CKFOR*).
Examples
UDU>SHOW /PROXY *::*Remote User: *::BICKFORD Local User: BICKFORD Remote User: COMET::BICKFORD Local User: SUPERVISOR Remote User: COMET::BROWN Local User: BROWN Remote User: COMET::PERSONNEL Local User: PERS_USER Remote User: BRICK::* Local User: RENTAL_AGENTThis command displays all proxies in the ACMS proxy file. Note that the command
SHOW /PROXY *displays the same output.UDU>SHOW /PROXY COMET::PERSONNELRemote User: COMET::PERSONNEL Local User: PERS_USERThis command displays a single proxy.
UDU>SHOW /PROXY *::BICKFORDRemote User: *::BICKFORD Local User: BICKFORD Remote User: COMET::BICKFORD Local User: BICKFORDThis command displays proxies using a wildcard for the remote node.
UDU>SHOW /PROXY COMET::*Remote User: COMET::BICKFORD Local User: SUPERVISOR Remote User: COMET::BROWN Local User: BROWN Remote User: COMET::PERSONNEL Local User: PERS_USERThis command displays proxies using a wildcard for the remote user.
UDU>SHOW /PROXY COMET::B*Remote User: COMET::BICKFORD Local User: SUPERVISOR Remote User: COMET::BROWN Local User: BROWNThis command displays proxies using partial wildcarding for the remote user.
Chapter 19. AAU Commands
This chapter contains reference information and examples for the ACMS Application Authorization Utility (AAU) commands. See Chapter 4, "Authorizing Applications" for general information on AAU.
ADD Command (AAU>)
ADD Command (AAU>) — Authorizes one or more application names for installation in ACMS$DIRECTORY.
Format
| Command Qualifiers | Defaults |
|---|---|
| /ACL=(access-control-list[,...]) | From DEFAULT definition |
| /APPL_USERNAME=username | From DEFAULT definition |
| /[NO]DYNAMIC_USERNAMES | From DEFAULT definition |
| /SRV_USERNAMES[=(server-username[,...])] | From DEFAULT definition |
| /[NO]WILD_SUFFIX | From DEFAULT definition |
Privileges Required
None.
Parameters
- application-name
The name of the application you want to authorize. The name can be $ALL or a valid RMS file name of up to 39 characters.
Qualifiers
- /ACL=(access-control-list[,...])
The
/ACLqualifier authorizes a user to install an application database file in ACMS$DIRECTORY. When a user enters theACMS/INSTALLcommand, ACMS checks the AAU authorization to confirm that the Access Control List (ACL) entries used with the/ACLqualifier include that user name. If the user is not authorized, theACMS/INSTALLcommand does not install the application.The Access Control List identifies who can and who cannot install an application. The access control entries for the AAU follow the same format used for OpenVMS except for these restrictions:Only the keyword IDENTIFIER is valid.
ACE options are not supported.
Access-allowed-mask uses the ACCESS keyword followed by either the access action CONTROL or NONE.
Protection masks are not supported.
With these restrictions in mind, the general format for specifying an Access Control List is as follows:/ACL=((IDENTIFIER=identifier[...][,ACCESS=access-action])[,...])
For example:AAU>ADD PERSONNEL EMPLOYEE /ACL=(IDENTIFIER=[PAYUP,JONES], -_AAU>ACCESS=CONTROL)Each time you specify an identifier and optionally an access action code, you describe one access control entry. You can, however, specify a string of access control entries, separated by commas, as indicated by the ellipsis [,...]. Together, access control entries constitute the Access Control List for a particular application.
Refer to VSI OpenVMS DCL Dictionary: A–M for more information about Access Control Lists and entries.
- /APPL_USERNAME=user-name
Identifies the user name of an application. The
ACMS/INSTALLcommand does not install the application database file in ACMS$DIRECTORY unless the application user name in the application matches the one you specify with the/APPL_USERNAMEqualifier. If you specify the wildcard character (*) instead of a user name, the wildcard user name automatically matches any user name specified in the application the user tries to install.By default, AAU uses the setting assigned in the DEFAULT authorization. AAU assigns the default setting
/APPL_USERNAME=*when the ACMSAAF.DAT file is first created.- /[NO]DYNAMIC_USERNAMES
Allows a user to install an application database file if the setting you assign with the
/[NO]DYNAMIC_USERNAMESqualifier matches that in the application. For example, if you do not want an application installed that allows servers to use dynamic user names or "USERNAME OF SUBMITTER", use the/NODYNAMIC_USERNAMESqualifier. If you want an application installed that allows servers to use dynamic user names, use the/DYNAMIC_USERNAMESqualifier.By default, AAU uses the setting assigned in the DEFAULT authorization. AAU assigns
/NODYNAMIC_USERNAMESas the default setting when the ACMSAAF.DAT file is first created.- /SRV_USERNAMES[=(server-user-name[,...])]
Specifies one or more server user names that are associated with the application you are authorizing. The
ACMS/INSTALLcommand installs an application if the server user names that you specify with the/SRV_USERNAMESqualifier match those in the application database file. If you specify the wildcard character (*) for a server user name, the wildcard user name automatically matches all server user names specified in the application.If you do not want to authorize any server user names, include the/SRV_USERNAMESqualifier without any specifiers. For example:AAU>ADD INVESTMENT /SRV_USERNAMESBy default, AAU uses the setting assigned in the DEFAULT authorization. AAU assigns the default setting
/SRV_USERNAMES=*when the ACMSAAF.DAT file is first created.- /[NO]WILD_SUFFIX
- Allows a user to install or prevents a user from installing any application whose name begins with the letters of the application name you are authorizing. For example, the following command allows the user with UIC [PERSONNEL,RICHARD] to install any application name that starts with the letters INVAPPL:
AAU>ADD INVAPPL /ACL=(IDENTIFIER=[PERSONNEL,RICHARD], -_AAU>ACCESS=CONTROL) /WILD_SUFFIXOnce this command is in effect, user [PERSONNEL,RICHARD] can install applications with names such as INVAPPL, INVAPPL1, and INVAPPL2.
By default, AAU uses the setting assigned in the DEFAULT authorization. AAU assigns the default setting
/NOWILD_SUFFIXwhen the ACMSAAF.DAT file is first created.
Notes
To create an authorization for a single application, use the RMS name of that application as the application name. To create an authorization for all applications, use the keyword $ALL as the application name.
AAU then stores the authorizations you create in the ACMSAAF.DAT file in your
default directory. When a user enters the ACMS/INSTALL operator
command to install an application database file, however, ACMS looks for the
ACMSAAF.DAT file in SYS$SYSTEM. If you choose to locate
ACMSAAF.DAT in a directory other than SYS$SYSTEM, you must
define an EXEC mode logical, ACMSAAF, to point to that directory.
Example
AAU>ADD PERSONNELThis command authorizes the application named PERSONNEL to be installed in ACMS$DIRECTORY. Because the command has no qualifiers, the new authorization receives information from the DEFAULT authorization.
AAU>ADD $ALLThis command creates a $ALL authorization that lets any authorized user install any application. The $ALL authorization receives from the DEFAULT authorization any information you do not include with qualifiers.
AAU>ADD EMPLOYEE /APPL_USERNAME=GORDONThis command authorizes the application named EMPLOYEE and includes the application user name GORDON. The application database file for EMPLOYEE cannot be installed unless it has the application user name of GORDON. The rest of the information for the authorization comes from the DEFAULT authorization.
COPY Command (AAU>)
COPY Command (AAU>) — Makes a copy of an existing authorization.
Format
| Command Qualifiers | Defaults |
|---|---|
| /ACL=(access-control-list[,...]) | From source authorization |
| /APPL_USERNAME=username | From source authorization |
| /[NO]DYNAMIC_USERNAMES | From source authorization |
| /SRV_USERNAMES[=(server-username[,...])] | From source authorization |
| /[NO]WILD_SUFFIX | From source authorization |
Privileges Required
None.
Parameters
- source-application-name
The name of the application whose authorization you want to copy. It can be a valid file name of up to 39 characters, $ALL, or DEFAULT.
- new-application-name
The application name you give to the new version of the source authorization. It can be a valid RMS file name or $ALL.
Qualifiers
- /ACL=(access-control-list[,...])
The
/ACLqualifier authorizes a user to install an application database file in ACMS$DIRECTORY. The Access Control List identifies who can and who cannot install an application. See the description of the/ACLqualifier under theADDcommand for more information about the/ACLqualifier and rules for specifying Access Control Lists.- /APPL_USERNAME=user-name
Identifies the user name of an application. The
ACMS/INSTALLcommand does not install the application database file in ACMS$DIRECTORY unless the application user name in the application database file matches the one you specify with the/APPL_USERNAMEqualifier. If you specify the wildcard character (*) instead of a user name, the wildcard user name automatically matches any user name specified in the application that a user tries to install.By default, AAU uses the setting assigned in the DEFAULT authorization. AAU assigns the default setting
/APPL_USERNAME=*when the ACMSAAF.DAT file is first created.- /[NO]DYNAMIC_USERNAMES
Allows a user to install an application database file if the setting you assign with the
/[NO]DYNAMIC_USERNAMESqualifier matches that in the application. For example, if you do not want an application installed that allows servers to use dynamic user names or "USERNAME OF SUBMITTER", use the/NODYNAMIC_USERNAMESqualifier. If you want an application installed that allows servers to use dynamic user names, use the/DYNAMIC_USERNAMESqualifier.By default, AAU uses the setting assigned in the DEFAULT authorization. AAU assigns
/NODYNAMIC_USERNAMESas the default setting when the ACMSAAF.DAT file is first created.- /SRV_USERNAMES[=(server-user-name[,...])]
Specifies one or more server user names that are associated with the application you are authorizing. The
ACMS/INSTALLcommand installs an application if the server user names that you specify with the/SRV_USERNAMESqualifier match those in the application database file. If you specify the wildcard character (*) for a server user name, the wildcard user name automatically matches all server user names specified in the application.If you do not want to authorize any server user names, include the/SRV_USERNAMESqualifier without any specifiers. For example:AAU>COPY INVESTMENT /SRV_USERNAMESBy default, AAU uses the setting assigned in the DEFAULT authorization. AAU assigns the default setting
/SRV_USERNAMES=*when the ACMSAAF.DAT file is first created.- /[NO]WILD_SUFFIX
- Allows a user to install or prevents a user from installing any application whose name begins with the letters of the application name you are authorizing. For example, the following command allows the user with UIC [PERSONNEL,RICHARD] to copy any application name that starts with the letters INVAPPL:
AAU>COPY INVAPPL /ACL=(IDENTIFIER=[PERSONNEL,RICHARD], -_AAU>ACCESS=CONTROL)/WILD_SUFFIXOnce this command is in effect, user [PERSONNEL,RICHARD] can install applications with names such as INVAPPL, INVAPPL1, and INVAPPL2.
By default, AAU uses the setting assigned in the DEFAULT authorization. AAU assigns the default setting
/NOWILD_SUFFIXwhen the ACMSAAF.DAT file is first created.
Notes
None.
Examples
AAU>COPY PERSONNEL EMPLOYEEThis command creates the EMPLOYEE authorization, copying all information from the PERSONNEL authorization.
AAU>COPY PERSONNEL EMPLOYEE /SRV_USERNAMES=EMPLOYEE_SRVThis command creates the EMPLOYEE authorization, copying information from the PERSONNEL authorization. The
/SRV_USERNAMESqualifier assigns the EMPLOYEE_SRV server user name to the EMPLOYEE application authorization.AAU>COPY PERSONNEL EMPLOYEE /APPL_USERNAME=ACCOUNTThis command creates a new authorization with the name EMPLOYEE, copying information from the authorization for PERSONNEL. The
/APPL_USERNAMEqualifier overrides the application user name from the source authorization, so the authorization for EMPLOYEE receives an application user name of ACCOUNT.AAU>COPY PERSONNEL EMPLOYEE-AAU>_/ACL=(IDENTIFIER=[PAYUP,JONES], ACCESS=CONTROL)This command makes a copy of the PERSONNEL authorization and names it EMPLOYEE. The
/ACLqualifier gives the new EMPLOYEE authorization a new access control entry.
DEFAULT Command (AAU>)
DEFAULT Command (AAU>) — Changes information in the DEFAULT authorization.
Format
| Command Qualifiers | Defaults |
|---|---|
| /ACL=(access-control-list[,...]) | From existing authorization |
| /APPL_USERNAME=username | From existing authorization |
| /[NO]DYNAMIC_USERNAMES | From existing authorization |
| /SRV_USERNAMES[=(server-username[,...])] | From existing authorization |
| /[NO]WILD_SUFFIX | From existing authorization |
Privileges Required
None.
Qualifiers
- /ACL=(access-control-list[,...])
The
/ACLqualifier authorizes a user to install an application database file in ACMS$DIRECTORY. The Access Control List identifies who can and who cannot install an application. See the description of the/ACLqualifier under theADDcommand for more information about the/ACLqualifier and rules for specifying Access Control Lists.- /APPL_USERNAME=user-name
Identifies the default user name of an application in the application authorization file. The
ACMS/INSTALLcommand does not install the application database file in ACMS$DIRECTORY unless the application user name in the application database file matches the one you specify with the/APPL_USERNAMEqualifier, either in the default definition, or through the AAUADDor other commands. If you specify the wildcard character (*) instead of a user name, the wildcard user name automatically matches any user name specified in the application that a user tries to install.By default, AAU uses the setting assigned in the DEFAULT authorization. AAU assigns the default setting
/APPL_USERNAME=*when the ACMSAAF.DAT file is first created.- /[NO]DYNAMIC_USERNAMES
Allows a user to install an application database file if the setting you assign with the
/[NO]DYNAMIC_USERNAMESqualifier matches the setting in the application. For example, if you do not want an application installed that allows servers to use dynamic user names or "USERNAME OF SUBMITTER", use the/NODYNAMIC_USERNAMESqualifier. If you want an application installed that allows servers to use dynamic user names, use the/DYNAMIC_USERNAMESqualifier.By default, AAU uses the setting assigned in the DEFAULT authorization. AAU assigns
/NODYNAMIC_USERNAMESas the default setting when the ACMSAAF.DAT file is first created.- /SRV_USERNAMES[=(server-user-name[,...])]
Specifies one or more server user names that are associated with the default application authorization. The
ACMS/INSTALLcommand installs an application using the default server user names unless otherwise specified in the specific application authorization with the/SRV_USERNAMES. The server names specified, whether by default or not, must match those in the application database file. If you specify the wildcard character (*) for a server user name, the wildcard user name automatically matches all server user names specified in the application.If you do not want to authorize any default server user names, include the/SRV_USERNAMESqualifier without any specifiers. For example:AAU>DEFAULT/SRV_USERNAMESBy default, AAU uses the setting assigned in the DEFAULT authorization. AAU assigns the default setting
/SRV_USERNAMES=*when the ACMSAAF.DAT file is first created.- /[NO]WILD_SUFFIX
- Sets the wildcard attribute for the default authorization record. The
/[NO]WILD_SUFFIXallows a user to install or prevents a user from installing any application whose name begins with the letters of the application name you are authorizing. For example, the following command allows the user with UIC [PERSONNEL,RICHARD] to install by default any application with wildcards, unless otherwise specified by particular application authorizations.AAU>DEFAULT/ACL=(IDENTIFIER=[PERSONNEL,RICHARD], -_AAU>ACCESS=CONTROL)WILD_SUFFIXOnce this command is in effect, user [PERSONNEL,RICHARD] can install applications with names such as INVAPPL, INVAPPL1, and INVAPPL2.
By default, AAU uses the setting assigned in the DEFAULT authorization. AAU assigns the default setting
/NOWILD_SUFFIXwhen the ACMSAAF.DAT file is first created.
Notes
The ADD command is the only command affected by the DEFAULT authorization. When
you use the ADD command to create a new authorization, the new authorization takes
the default information assigned in the DEFAULT authorization. Use qualifiers with
the ADD command to override information from the DEFAULT authorization.
When you use the DEFAULT command, you do not need to include
DEFAULT as the application name.
AAU creates the ACMSAAF.DAT file and a DEFAULT authorization when you first run AAU.
If you omit one or more qualifiers from the DEFAULT command,
the new DEFAULT authorization retains the information that already exists.
Both the DEFAULT and the MODIFY commands let
you modify the DEFAULT authorization. The DEFAULT command,
however, lets you change the DEFAULT authorization only. The
MODIFY command serves a more general use and lets you modify
any authorization in the ACMSAAF.DAT database file.
The changes made with the DEFAULT command remain in effect
until you modify the DEFAULT authorization again. The original settings assigned to
the DEFAULT authorization are not restored at the end of the AAU session.
Examples
AAU>DEFAULT /APPL_USERNAME=EMPLOYEE /WILD_SUFFIXThis
DEFAULTcommand assigns the application user name EMPLOYEE and the wildcard characteristic to the DEFAULT authorization. Any time you add an authorization and do not specify either of these characteristics, theADDcommand includes the application user name and the wildcard characteristics you have assigned in this DEFAULT authorization to the new authorization.AAU>DEFAULT/ACL=(IDENTIFIER=[PAYUP,*], ACCESS=CONTROL)This command replaces the previously assigned access control entries with UIC [PAYUP,*], ACCESS=CONTROL.
EXIT Command (AAU>)
EXIT Command (AAU>) — Ends an AAU session and returns you to the DCL prompt.
Format
Privileges Required
None.
Note
You can also end an AAU session by pressing Ctrl/Z.
Ctrl/Z signals the end of the file for data entered from the
terminal. Ctrl/Z is displayed as EXIT.
Example
AAU>EXIT$
The EXIT command stops AAU and returns you to the DCL
prompt.
HELP Command (AAU>)
HELP Command (AAU>) — Displays information about AAU commands and qualifiers.
Format
| Command Qualifiers | Defaults |
|---|---|
| /[NO]PROMPT | /PROMPT |
Privileges Required
None.
Parameters
- topic
The AAU command or qualifier you want information about. If you do not specify a topic, AAU help provides you with a list of topics to choose from.
Qualifiers
- /[NO]PROMPT
Controls whether or not you receive prompts for topics and subtopics. The
/PROMPTqualifier displays help prompts and is the default. With the/NOPROMPTqualifier, theHELPcommand does not display prompts.
Notes
None.
Example
AAU>HELP ADDADDAdds an authorization record to the application authorizationdatabase file ACMSAAF.DAT. This authorizes one for more usersto install an application database file in ACMS$DIRECTORY.Format:ADD application-name [/qualifiers]For example:AAU> ADD PERSONNEL /APPL_USERNAME=FIDDLEYou can use qualifiers to assign authorization characteristics orlet new authorizations automatically receive information from theDEFAULT authorization.To create an authorization for a single application, use the name ofthat application as the application name. To create an authorizationfor all applications, use the keyword $ALL as the application name.Additional information available:Parameter QualifiersADD Subtopic?
This command displays help information about the ADD command.
LIST Command (AAU>)
LIST Command (AAU>) — Writes the contents of an authorization to ACMSAAU.LIS in your default directory or to an output file you specify.
Format
| Command Qualifiers | Defaults |
|---|---|
| /BRIEF | Full authorizations |
| /OUTPUT[=file-spec] | /OUTPUT=ACMSAAU.LIS |
Privileges Required
None.
Format
- application-name
The name of the application you want to list. The name can be $ALL, DEFAULT, the wildcard character (*), or a valid RMS file name of up to 39 characters. Use the wildcard character (*) as a prefix , as a suffix, or as a combination of prefix and suffix.
Qualifiers
- /BRIEF
Lists only the application authorization names. The default is to list the complete authorizations.
- /OUTPUT=[file-spec]
Copies one or more application authorizations to a file you name. If you do not include a file specification, AAU uses the ACMSAAU.LIS file by default and puts the list file in your current default directory.
Notes
To write all definitions to an output file, use the wildcard character (*) as the
user name. To print a listing file, use the DCL PRINT command
after you have finished your AAU session. To display the contents of an output file
on the terminal, use the DCL TYPE command.
Examples
AAU>LIST PERSONNEL *This command writes to an output file all information contained in the PERSONNEL authorization.
AAU>LIST * /BRIEFThis command writes to an output file a list of all authorized application names only.
AAU>LIST *This command writes all authorizations in the ACMSAAF.DAT authorization database file to the ACMSAAU.LIS file in your default directory.
AAU>LIST B*This command writes the authorizations for all application names beginning with the letter B to an output file.
MODIFY Command (AAU>)
MODIFY Command (AAU>) — Changes information in an application authorization.
Format
| Command Qualifiers | Defaults |
|---|---|
| /ACL=(access-control-list[,...]) | From existing authorization |
| /APPL_USERNAME=username | From existing authorization |
| /[NO]DYNAMIC_USERNAMES | From existing authorization |
| /SRV_USERNAMES[=(server-username[,...])] | From existing authorization |
| /[NO]WILD_SUFFIX | From existing authorization |
Privileges Required
None.
Format
- application-name
The application name for the authorization you are changing. The name can be a valid RMS file name of up to 39 characters, $ALL, or DEFAULT. Use the wildcard character (*) as a prefix, as a suffix , or as both.
Qualifiers
- /ACL=(access-control-list[,...])
The
/ACLqualifier authorizes a user to install an application database file in ACMS$DIRECTORY. The Access Control List identifies who can and who cannot install an application. See the description of the/ACLqualifier under theADDcommand for more information about the/ACLqualifier and rules for specifying Access Control Lists.- /APPL_USERNAME=user-name
Identifies the user name of an application. The
ACMS/INSTALLcommand does not install the application database file in ACMS$DIRECTORY unless the application user name in the application database file matches the one you specify with the/APPL_USERNAMEqualifier. If you specify the wildcard character (*) instead of a user name, the wildcard user name automatically matches any user name specified in the application that a user tries to install.By default, AAU uses the setting assigned in the DEFAULT authorization. AAU assigns the default setting
/APPL_USERNAME=*when the ACMSAAF.DAT file is first created.- /[NO]DYNAMIC_USERNAMES
Allows a user to install an application database file if the setting you assign with the
/[NO]DYNAMIC_USERNAMESqualifier matches that in the application. For example, if you do not want an application installed that allows servers to use dynamic user names or "USERNAME OF SUBMITTER", use the/NODYNAMIC_USERNAMESqualifier. If you want an application installed that allows servers to use dynamic user names, use the/DYNAMIC_USERNAMESqualifier.By default, AAU uses the setting assigned in the DEFAULT authorization. AAU assigns
/NODYNAMIC_USERNAMESas the default setting when the ACMSAAF.DAT file is first created.- /SRV_USERNAMES[=(server-user-name[,...])]
Specifies one or more server user names that are associated with the application you are authorizing. The
ACMS/INSTALLcommand installs an application if the server user names that you specify with the/SRV_USERNAMESqualifier match those in the application database file. If you specify the wildcard character (*) for a server user name, the wildcard user name automatically matches all server user names specified in the application.If you do not want to authorize any server user names, include the/SRV_USERNAMESqualifier without any specifiers. For example:AAU>MODIFY INVESTMENT /SRV_USERNAMESBy default, AAU uses the setting assigned in the DEFAULT authorization. AAU assigns the default setting
/SRV_USERNAMES=*when the ACMSAAF.DAT file is first created.- /[NO]WILD_SUFFIX
- Allows a user to install or prevents a user from installing any application whose name begins with the letters of the application name you are authorizing. For example, the following command allows the user with UIC [PERSONNEL,RICHARD] to install any application name that starts with the letters INVAPPL:
AAU>MODIFY INVAPPL /ACL=(IDENTIFIER=[PERSONNEL,RICHARD], -_AAU>ACCESS=CONTROL)/WILD_SUFFIXOnce this command is in effect, user [PERSONNEL,RICHARD] can install applications with names such as INVAPPL, INVAPPL1, and INVAPPL2.
By default, AAU uses the setting assigned in the DEFAULT authorization. AAU assigns the default setting
/NOWILD_SUFFIXwhen the ACMSAAF.DAT file is first created.
Notes
The AAU MODIFY command does not invoke an editor.
Both the DEFAULT and the MODIFY commands let
you modify the DEFAULT authorization. The DEFAULT command,
however, lets you change the DEFAULT authorization only. The
MODIFY command serves a more general use and lets you modify
any authorization in the ACMSAAF.DAT database file.
Examples
AAU>MODIFY PERSONNEL /APPL_USERNAME=ACCOUNT*This command assigns the application user name ACCOUNT to the PERSONNEL authorization. The new application user name replaces the old one.
AAU>MODIFY EMPLOYEE /SRV_USERNAMES=(TRAINING_SRV)This command replaces the old server user name with TRAINING_SRV.
AAU>MODIFY EMPLOYEE /WILD_SUFFIXThis command adds the wildcard characteristic to the EMPLOYEE authorization. Users authorized to install EMPLOYEE can also install any application that begins with the letters EMPLOYEE, such as EMPLOYEE1 or EMPLOYEE2.
REMOVE Command (AAU>)
REMOVE Command (AAU>) — Deletes an authorization from the ACMSAAF.DAT application authorization database file.
Format
Privileges Required
None.
Parameter
- application-name
The name of the application authorization you are deleting. It can be a valid RMS file name of up to 39 characters or $ALL. It cannot be DEFAULT because AAU does not allow you to delete the DEFAULT authorization.
Notes
None.
Examples
AAU>REMOVE PERSONNELThis command deletes the authorization that has the application name PERSONNEL.
AAU>REMOVE $ALLThis command deletes the $ALL authorization. As a result, you may need to create individual authorizations for applications that you want authorized users to install.
RENAME Command (AAU>)
RENAME Command (AAU>) — Gives an application authorization a new name.
Format
| Command Qualifiers | Defaults |
|---|---|
| /ACL=(access-control-list[,...]) | From old authorization |
| /APPL_USERNAME=username | From old authorization |
| /[NO]DYNAMIC_USERNAMES | From old authorization |
| /SRV_USERNAMES[=(server-username[,...])] | From old authorization |
| /[NO]WILD_SUFFIX | From old authorization |
Privileges Required
None.
Parameters
- old-application-name
The application name for the old authorization you are renaming. It can be a valid RMS file name of up to 39 characters or $ALL. It cannot be DEFAULT; AAU does not let you rename the DEFAULT authorization.
- new-application-name
The application name you give to the new authorization. The new application name can be a valid RMS file name of up to 39 characters or $ALL.
Qualifiers
- /ACL=(access-control-list[,...])
The
/ACLqualifier authorizes a user to install an application database file in ACMS$DIRECTORY. The Access Control List identifies who can and who cannot install an application. See the description of the/ACLqualifier under theADDcommand for more information about the/ACLqualifier and rules for specifying Access Control Lists.- /APPL_USERNAME=user-name
Identifies the user name of an application. The
ACMS/INSTALLcommand does not install the application database file in ACMS$DIRECTORY unless the application user name in the application database file matches the one you specify with the/APPL_USERNAMEqualifier. If you specify the wildcard character (*) instead of a user name, the wildcard user name automatically matches any user name specified in the application that a user tries to install.By default, AAU uses the setting assigned in the DEFAULT authorization. AAU assigns the default setting
/APPL_USERNAME=*when the ACMSAAF.DAT file is first created.- /[NO]DYNAMIC_USERNAMES
Allows a user to install an application database file if the setting you assign with the
/[NO]DYNAMIC_USERNAMESqualifier matches that in the application. For example, if you do not want an application installed that allows servers to use dynamic user names or "USERNAME OF SUBMITTER", use the/NODYNAMIC_USERNAMESqualifier. If you want an application installed that allows servers to use dynamic user names, use the/DYNAMIC_USERNAMESqualifier.By default, AAU uses the setting assigned in the DEFAULT authorization. AAU assigns
/NODYNAMIC_USERNAMESas the default setting when the ACMSAAF.DAT file is first created.- /SRV_USERNAMES[=(server-user-name[,...])]
Specifies one or more server user names that are associated with the application you are authorizing. The
ACMS/INSTALLcommand installs an application if the server user names that you specify with the/SRV_USERNAMESqualifier match those in the application database file. If you specify the wildcard character (*) for a server user name, the wildcard user name automatically matches all server user names specified in the application.If you do not want to authorize any server user names, include the/SRV_USERNAMESqualifier without any specifiers. For example:$AAU> RENAME INVESTMENT /SRV_USERNAMESBy default, AAU uses the setting assigned in the DEFAULT authorization. AAU assigns the default setting
/SRV_USERNAMES=*when the ACMSAAF.DAT file is first created.- /[NO]WILD_SUFFIX
- Allows a user to install or prevents a user from installing any application whose name begins with the letters of the application name you are authorizing. For example, the following command allows the user with UIC [PERSONNEL,RICHARD] to rename any application name that starts with the letters INVAPPL:
AAU>RENAME INVAPPL /ACL=(IDENTIFIER=[PERSONNEL,RICHARD], -_AAU>ACCESS=CONTROL)/WILD_SUFFIXOnce this command is in effect, user [PERSONNEL,RICHARD] can rename applications with names such as INVAPPL, INVAPPL1, and INVAPPL2.
By default, AAU uses the setting assigned in the DEFAULT authorization. AAU assigns the default setting
/NOWILD_SUFFIXwhen the ACMSAAF.DAT file is first created.
Note
The new application name must be unique in the ACMSAAF.DAT file.
Examples
AAU>RENAME PERSONNEL EMPLOYEE /ACL=(ID=[PERSONNEL,RICHARD], -_AAU>ACCESS=CONTROL)/APPL_USERNAME=MERCHANT /SRV_USERNAMES -_AAU>=MERCHANT_SRVThis command changes the application name from PERSONNEL to EMPLOYEE. The
/ACLqualifier replaces the old access control entry with UIC [PERSONNEL,RICHARD]. The/APPL_USERNAMEqualifier changes the application user name to MERCHANT. Finally, theSRV_USERNAMESqualifier replaces any previously assigned server user names with the user name MERCHANT_SRV. The hyphen (-) at the end of a command allows you to continue the command on a new line, and the AAU> prompt shows you when to enter the rest of your command.AAU>RENAME MEDICAL SURGICAL /WILD_SUFFIXThis command changes the application name in the authorization from MEDICAL to SURGICAL. It also gives the wildcard characteristic to the new authorization. Application names with this characteristic allow users to specify with the
ACMS/INSTALLoperator command any application name that begins with the letters of the word SURGICAL. For example, theACMS/INSTALLoperator command lets a user install application names, such as SURGICAL1, SURGICALTEAM, or SURGICAL2.
SHOW Command (AAU>)
SHOW Command (AAU>) — Displays information about application authorizations on your terminal screen.
Format
| Command Qualifiers | Defaults |
|---|---|
| /BRIEF | Displays full authorizations |
Privileges Required
None.
Parameters
- application-name
The name of an application authorization that you want to display on your terminal screen. The name can be a valid RMS file name of up to 39 characters, $ALL, DEFAULT, or the wildcard character (*). You can also use the wildcard character as a prefix, as a suffix, or as both.
Qualifiers
- /BRIEF
Displays only the application names of all authorizations in the ACMSAAF.DAT file. By default, the
SHOWcommand displays the contents of all authorizations in ACMSAAF.DAT.
Note
To display the contents of all authorizations in the ACMSAAF.DAT file, use the wildcard character (*) as the application name.
Examples
AAU>SHOW *With the wildcard character (*) as the application name, you can display the contents of all authorizations in the ACMSAAF.DAT file.
AAU>SHOW PERSONNEL*You list the contents of the authorization that has the application name PERSONNEL.
AAU>SHOW * /BRIEFThe
/BRIEFqualifier on theSHOWcommand lets you see all the application names in the ACMSAAF.DAT file, without having to list all information associated with each application name.AAU>SHOW B*The
SHOWcommand displays authorizations for all application names beginning with the letter B.
Chapter 20. ACMSQUEMGR Commands
This chapter contains reference information and examples for the ACMS Queue Manager (ACMSQUEMGR) Utility commands. ACMSQUEMGR commands allow you to create and manage ACMS task queues and the queued task elements in the queues. See Chapter 5, "Creating and Managing Queues" for general information about the ACMSQUEMGR Utility.
CREATE QUEUE Command (ACMSQUEMGR>)
CREATE QUEUE Command (ACMSQUEMGR>) — Creates a queue for queued task elements.
Format
| Command Qualifiers | Defaults |
|---|---|
| /DEQUEUE=keyword | /DEQUEUE=RESUMED |
| /ENQUEUE=keyword | /ENQUEUE=RESUMED |
| /FILE_SPECIFICATION=file-spec | SYS$SYSTEM:<queue-name>.DAT |
| /MAX_WORKSPACES_SIZE=n | /MAX_WORKSPACES_SIZE=256 |
Privileges Required
OpenVMS SYSPRV privilege or write access to SYS$SYSTEM.
Parameters
- queue-name
The name of the queue you want to create. A queue name can be any valid RMS file name containing 1 through 39 alphanumeric characters.
Qualifiers
- /DEQUEUE=keyword
- Allows or disallows the dequeuing of all queued task elements in the created queue. Specify one of the following keywords with the
/DEQUEUEqualifier:SUSPENDED
The
/DEQUEUE=SUSPENDEDqualifier prohibits the Queued Task Initiator (QTI) and ACMS$DEQUEUE_TASK service from processing queued task elements in the queue. This qualifier allows tasks to be queued to the created queue, but suspends them from being dequeued until you specify the/DEQUEUE=RESUMEDqualifier. The default is/DEQUEUE=RESUMED.RESUMED
The
/DEQUEUE=RESUMEDqualifier allows the QTI and ACMS$DEQUEUE_TASK service to dequeue queued task elements in the queue. Use this qualifier after you specify/DEQUEUE=SUSPENDEDto resume dequeuing. The default is/DEQUEUE=RESUMED.
- /ENQUEUE=keyword
- Enables or disables the queuing of queued task elements to the queue you create. You can specify one of the following keywords with the
/ENQUEUEqualifier:SUSPENDED
The
/ENQUEUE=SUSPENDEDqualifier prohibits the ACMS$QUEUE_TASK service from queuing queued task elements to the queue you create until the queue state is resumed. The default is/ENQUEUE=RESUMED.RESUMED
The
/ENQUEUE=RESUMEDqualifier allows ACMS$QUEUE_TASK service to queue queued task elements to the queue you create. The default is/ENQUEUE=RESUMED.
- /FILE_SPECIFICATION=file-spec
Specifies the file specification of the queue repository that stores the queued task elements. The file specification can be any valid RMS file specification or logical name. If you do not specify the
/FILE_SPECIFICATIONqualifier, the queue repository is SYS$SYSTEM: queue-name.DAT, where queue-name is the name of the created queue. If you do not specify a full file specification, the missing components are taken from the default file specification.- /MAX_WORKSPACES_SIZE=n
Specifies the maximum total size (in bytes) of workspaces allowed in a single queued task element for the queue you create. If you do not use the
/MAX_WORKSPACES_SIZEqualifier, the default is/MAX_WORKSPACES_SIZE=256. You can specify a value of 0 through 31,720. If a queued task element's workspace size on a call to the ACMS$QUEUE_TASK service exceeds the value specified with the/MAX_WORKSPACES_SIZEqualifier, you receive an error when you queue the task.Specify the largest workspace size needed for a single queued task element that is queued to the queue. Use the following formula to determine the workspace size for a single queued task element:2 * (n+1) + size (in bytes) of workspace 1 + size (in bytes) of workspace 2 . . . + size (in bytes) of workspace n (where n is the total number of workspaces)
The number of workspaces and size of the workspaces that can be passed to a task are displayed when you use the Application Definition Utility (ADU) command
DUMP GROUP.For the most efficient performance of the queue services and the QTI, specify the smallest possible value with the
/MAX_WORKSPACES_SIZEqualifier.
Notes
You must create a queue before the queue can be accessed by the ACMS queued task services or by the QTI run-time component.
The queue repository file is created with the owner UIC [1,4] and the protection (S:RWED,O:RWED,G,W).
ACMS stores queue information in the file SYS$SYSTEM:ACMSQDF.DAT.
Example
ACMSQUEMGR>CREATE QUEUE BIG_NUMBERS_QUEThis command creates the queue BIG_NUMBERS_QUEUE. The defaults are used for all qualifiers.
ACMSQUEMGR>CREATE QUEUE EMPLOYEE_QUEUE /MAX_WORKSPACES_SIZE=500This command creates queue EMPLOYEE_QUEUE, setting the maximum workspace size allowed for queued task elements at 500.
ACMSQUEMGR>CREATE QUEUE INVENTORY_QUE -_ACMSQUEMGR>/FILE_SPECIFICATION=MYDISK$:QUEUE.DAT -_ACMSQUEMGR>/ENQUEUE=SUSPENDEDThis command creates the queue INVENTORY_QUE. It names the queue repository file MYDISK$:QUEUE.DAT, and disallows queuing of queued task elements by the ACMS$QUEUE_TASK service.
DELETE ELEMENT Command (ACMSQUEMGR>)
DELETE ELEMENT Command (ACMSQUEMGR>) — Removes one or more queued task elements from the specified queue.
Format
| Command Qualifiers | Defaults |
|---|---|
| /[NO]CONFIRM | /NOCONFIRM |
| /EXCLUDE=(keyword[,...]) | None |
| /SELECT=(keyword[,...]) | None |
Privileges Required
Write access to the queue repository file. If the queue repository file has the
default protection from the CREATE QUEUE command, you need the
OpenVMS SYSPRV privilege or the UIC [1,4] to delete the queued task element.
Parameters
- element-id
The element identification of the queued task element you want to remove. Either specify the element ID of the task element or use the wildcard character (*). The element ID is returned by the ACMS$QUEUE_TASK service. Specify all or part of the element ID. If you specify only part of an element ID, all queued task elements whose IDs contain the specified characters are removed. For example, if MY_NODE is specified as the element ID, all elements queued from MY_NODE are removed from the queue. Display the element ID of a queued task element by using the
SHOW ELEMENTcommand with the/FULLqualifier. TheSHOW ELEMENTcommand is described in SHOW ELEMENT Command (ACMSQUEMGR>).If you use the wildcard character (*) in place of an element ID, all queued task elements are removed from the specified queue. When using the wildcard character, you can also use the
/SELECTqualifier or/EXCLUDEqualifier to choose a group of queued task elements to remove.- queue-name
The name of the queue containing the queued task element. A queue name can be any valid RMS file name containing 1 through 39 alphanumeric characters.
Qualifiers
- /[NO]CONFIRM
/CONFIRMdisplays each queued task element selected for removal and prompts you to confirm that you want the queued task element removed. Answer the prompt by entering one of the following:Yory– For yesNorn– For noQorq– For quit (exits the command without removing the queued task element).Aora– For always (removes all remaining queued task elements without displaying the confirmation prompt).To accept the default option, press Return.
The default is
/NOCONFIRM.- /EXCLUDE=(keyword[ ,...])
Allows you to exclude a queued task element or group of queued task elements from being removed. Specify exclusion criteria with keywords to the
/EXCLUDEqualifier. You can specify more than one keyword by separating the keywords with a comma and enclosing them in parentheses. You must use at least one keyword with the/EXCLUDEqualifier. You can use the/EXCLUDEqualifier to limit the scope of theDELETE ELEMENTcommand when you use a wildcard character (*) instead of an element ID.The
/EXCLUDEqualifier takes precedence over the/SELECTqualifier. Therefore, if a queued task element matches the selection criteria but is excluded by the exclusion criteria, that queued task element is not removed from the queue.Specify one or more of the following keywords:APPLICATION=(application-spec[,...])Excludes queued task elements containing the specified application. Specify more than one application specification by separating the specifications with a comma and enclosing them in parentheses.
BEFORE=timeExcludes queued task elements queued before the specified time. You can specify absolute time, combination time, or the keyword argument TODAY or YESTERDAY. See VSI OpenVMS User's Manual for more information about absolute and combination time.
PRIORITY=(n[,...])Excludes queued task elements having the specified priority. Valid priority values are 0 through 255. Specify more than one priority value by separating the values with a comma and enclosing them in parentheses.
SINCE=timeExcludes queued task elements queued since the specified time. You can specify absolute time, combination time, or the keyword argument TODAY or YESTERDAY. See VSI OpenVMS User's Manual for more information about absolute and combination time.
STATE=[NO]HOLDIf you specify
/EXCLUDE=STATE=HOLD, the ACMSQUEMGR excludes all queued task elements currently on hold. Queued task elements on hold cannot be removed from the queue. If you specify/EXCLUDE=STATE=NOHOLD, the ACMSQUEMGR excludes all queued task elements not on hold. Queued task elements that are not on hold can be dequeued.TASK=(task-name[,...])Excludes all queued task elements having the specified task name. Specify more than one task name by separating the task names with a comma and enclosing them in parentheses.
USERNAME=(enqueuer-user-name[,...])Excludes all queued task elements that have the specified enqueuer user name. The enqueuer user name is the user name explicitly or implicitly specified with the ACMS$QUEUE_TASK service. See VSI ACMS for OpenVMS Writing Applications for information about the ACMS$QUEUE_TASK service.
- /SELECT=(keyword[ ,...])
Limits the
DELETE ELEMENTcommand to queued task elements that match the selection criteria. Specify the selection criteria with keywords to the/SELECTqualifier. Specify more than one keyword by separating the keywords with a comma and enclosing them in parentheses. You must use at least one keyword with the/SELECTqualifier. You can use the/SELECTqualifier to limit the scope of theDELETE ELEMENTcommand when you use a wildcard character (*) instead of an element ID.Specify one or more of the following keywords:APPLICATION=(application-spec[,...])Removes only queued task elements containing the specified application. You can specify more than one application specification by separating the specifications with a comma and enclosing them in parentheses.
BEFORE=timeRemoves all queued task elements queued before the specified time. You can specify absolute time, combination time, or the keyword argument TODAY or YESTERDAY. See VSI OpenVMS User's Manual for more information about absolute and combination time.
PRIORITY=(n[,...])Removes all queued task elements having the specified priority. Valid priority values are 0 through 255. Specify more than one priority value by separating the values with a comma and enclosing them in parentheses.
SINCE=timeRemoves all queued task elements queued since the specified time. You can specify absolute time, combination time, or the keyword argument TODAY or YESTERDAY. See VSI OpenVMS User's Manual for more information about absolute and combination time.
STATE=[NO]HOLDIf you specify
/SELECT=STATE=HOLD, the ACMSQUEMGR removes all queued task elements currently on hold. If you specify/SELECT=STATE=NOHOLD, the ACMSQUEMGR removes all queued task elements not on hold.TASK=(task-name[,...])Removes all queued task elements having the specified task name. Specify more than one task name by separating the task names with a comma and enclosing them in parentheses.
USERNAME=(enqueuer-user-name[,...])Removes all queued task elements that have the specified enqueuer user name. The enqueuer user name is the user name explicitly or implicitly specified with the ACMS$QUEUE_TASK service. See VSI ACMS for OpenVMS Writing Applications for information about the ACMS$QUEUE_TASK service.
Notes
None.
Examples
ACMSQUEMGR>DELETE ELEMENT MY_NODE::28C0082-0000000A MY_QUEThis command deletes the queued task element identified by the element ID MY_NODE::28C0082-0000000A in queue MY_QUE.
ACMSQUEMGR>DELETE ELEMENT * YOUR_QUEThis command deletes all queued task elements in queue YOUR_QUE.
ACMSQUEMGR>DELETE ELEMENT * RACE_QUEUE /CONFIRMThis command causes ACMSQUEMGR to prompt you for confirmation before deleting each queued task element in queue RACE_QUEUE.
ACMSQUEMGR>DELETE ELEMENT * RESERVE_QUE -_ACMSQUEMGR>/EXCLUDE=TASK=(BIGTSK,BIGGERTSK)This command deletes all queued task elements in queue RESERVE_QUE except for the queued task elements having the names BIGTSK and BIGGERTSK.
ACMSQUEMGR>DELETE ELEMENT MY_NODE:: BOOK_QUE /SELECT=STATE=HOLDThis command deletes all queued task elements queued from node MY_NODE to queue BOOK_QUE that are currently on hold.
ACMSQUEMGR>DELETE ELEMENT * BOSCO_QUEUE -_ACMSQUEMGR>/SELECT=(APPLICATION=STATS,SINCE=TODAY)This command deletes all queued task elements on queue BOSCO_QUEUE that were queued today and contain the application STATS.
DELETE QUEUE Command (ACMSQUEMGR>)
DELETE QUEUE Command (ACMSQUEMGR>) — Deletes the queue you specify.
Format
| Command Qualifiers | Defaults |
|---|---|
| /[NO]PURGE | /NOPURGE |
Privileges Required
Delete access to the queue repository file. If the queue repository file has
default protection from the CREATE QUEUE command, you need
OpenVMS SYSPRV privilege or the UIC [1,4] to delete the queue.
Parameters
- queue-name
The name of the queue you want to delete. A queue name can be any valid RMS file name containing 1 through 39 alphanumeric characters.
Qualifiers
- /[NO]PURGE
If you use the
/PURGEqualifier, all queued task elements currently in the queue are deleted along with the queue. If you use the/NOPURGEqualifier, and queued task elements are in the queue, ACMSQUEMGR cannot delete the queue. ACMS displays an error message indicating that the queue is not empty. The default is/NOPURGE.
Notes
The DELETE QUEUE command requires exclusive access to the queue
repository file. If the queue is currently being processed by the QTI, the queue
must be stopped with the ACMS/STOP QUEUE command. If the queue
has been accessed by an image using the ACMS queue task services, the image must be
exited.
Examples
ACMSQUEMGR>DELETE QUEUE GROUP_QUEThis command deletes queue GROUP_QUE.
ACMSQUEMGR>DELETE QUEUE BOSS_QUE /PURGEThis command deletes queue BOSS_QUE and removes any queued task elements in the queue.
EXIT Command (ACMSQUEMGR>)
EXIT Command (ACMSQUEMGR>) — Ends the ACMSQUEMGR session and returns you to DCL level.
Format
Privileges Required
None.
Notes
You can also end a session by pressing Ctrl/Z.
Ctrl/Z signals the end of the file for data entered from the
terminal. Ctrl/Z is displayed as EXIT.
Example
ACMSQUEMGR>EXIT$
This command causes you to exit from ACMSQUEMGR and returns you to DCL level.
HELP Command (ACMSQUEMGR>)
HELP Command (ACMSQUEMGR>) — Displays information about ACMSQUEMGR commands and qualifiers.
Format
| Command Qualifiers | Defaults |
|---|---|
| /[NO]PROMPT | /PROMPT |
Privileges Required
None.
Parameters
- topic
The ACMSQUEMGR command or topic you want to know about. If you do not specify a topic,
HELPprovides a list of topics to choose from. Use the wildcard character (*) as a prefix or suffix to display information on a sequence of topics with common characters.
Qualifiers
- /[NO]PROMPT
Controls whether or not you receive prompts for the topic and subtopic. If you use the
/NOPROMPTqualifier, no prompts are displayed. If you use the/PROMPTqualifier, prompts are displayed along with the help information. The default is/PROMPT.
Notes
None.
Example
ACMSQUEMGR>HELP SET ELEMENTSETELEMENTSets the state or priority of one or more queued task elements.You must specify at least one qualifier or this command hasno effect.Format:SET ELEMENT element-id queue-name /qualifierYou can specify all or part of an element ID. Use thewildcard character (*) to set characteristics of all thequeued task elements in a queue. Use SHOW ELEMENT to displayelement IDs.For example:ACMSQUEMGR> SET ELEMENT * EILEEN_QUE /PRIORITY=200 -_ACMSQUEMGR> /SELECT=(TASK=URGENT)Additional information available:/CONFIRM /EXCLUDE /PRIORITY /SELECT /STATESET ELEMENT Subtopic?
This command displays help information about the SET ELEMENT
command.
MODIFY QUEUE Command (ACMSQUEMGR>)
MODIFY QUEUE Command (ACMSQUEMGR>) — With a qualifier, modifies the static characteristics of a task queue.
Format
| Command Qualifiers | Defaults |
|---|---|
| /FILE_SPECIFICATION=file-spec | Existing queue repository file |
| /MAX_WORKSPACES_SIZE=n | Existing definition specification |
Privileges Required
Write access to the queue repository file. If the queue repository file has the
default protection from the CREATE QUEUE command, you need
OpenVMS SYSPRV privilege or the UIC [1,4] to modify the queue.
Parameters
- queue-name
The name of the queue whose characteristics you want to modify. A queue name can be any valid RMS file name containing 1 through 39 alphanumeric characters.
Qualifiers
- /FILE_SPECIFICATION=file-spec
Specifies the file specification of a new queue repository file. The file specification can be any valid RMS file specification or logical name. If you do not use the
/FILE_SPECIFICATIONqualifier, the existing queue repository file is used. If you do not specify a full file specification, the missing components are taken from the default file specification, SYS$SYSTEM:queue-name.DAT, where queue-name is the name of the queue.- /MAX_WORKSPACES_SIZE=n
Specifies the maximum total size (in bytes) of workspaces allowed in a single queued task element for the queue you modify. If you do not use the
/MAX_WORKSPACES_SIZEqualifier, the default is/MAX_WORKSPACES_SIZE=256. You can specify a value of 0 through 31,720. If a queued task element's workspace size on a call to the ACMS$QUEUE_TASK service exceeds the value specified with the/MAX_WORKSPACES_SIZEqualifier, you receive an error when you queue the task.Specify the largest workspace size needed for a single queued task element that will be queued to the queue. Use the following formula to determine the workspace size for a single queued task element:2 * (n+1) + size (in bytes) of workspace 1 + size (in bytes) of workspace 2 . . . + size (in bytes) of workspace n (where n is the total number of workspaces)
The number of workspaces and size of the workspaces that can be passed to a task are displayed when you use the Application Definition Utility (ADU) command
DUMP GROUP.For the most efficient performance of the queue services and the QTI, specify the smallest possible value with the
/MAX_WORKSPACES_SIZEqualifier.
Notes
You must use either the /FILE_SPECIFICATION or
/MAX_WORKSPACES_SIZE qualifier with the MODIFY
QUEUE command.
The MODIFY QUEUE command requires exclusive access to the queue
repository file. If the queue is currently being processed by the QTI, the queue
must be stopped with the ACMS/STOP QUEUE command before you issue
this command. If the queue has been accessed by an image using the ACMS queue task
services, the image must be exited.
A queue is not available for any queue operations while it is being modified.
Examples
ACMSQUEMGR>MODIFY QUEUE DEVO_QUE /FILE_SPECIFICATION=DEVO.DATThis command modifies queue DEVO_QUE, naming DEVO.DAT as the queue repository file.
ACMSQUEMGR>MODIFY QUEUE DOCO_QUE /MAX_WORKSPACES_SIZE=500This command modifies queue DOCO_QUE, setting the maximum workspace size of tasks to 500.
SET ELEMENT Command (ACMSQUEMGR>)
SET ELEMENT Command (ACMSQUEMGR>) — With the /PRIORITY qualifier, sets the priority of one or
more queued task elements. With the /STATE qualifier, sets the
state of one or more queued task elements.
Format
| Command Qualifiers | Defaults |
|---|---|
| /[NO]CONFIRM | /NOCONFIRM |
| /EXCLUDE=(keyword[,...]) | None |
| /PRIORITY=n | None |
| /SELECT=(keyword[,...]) | None |
| /STATE=[NO]HOLD | None |
Privileges Required
Write access to the queue repository file. If the queue repository file has the
default protection from the CREATE QUEUE command, you need the
OpenVMS SYSPRV privilege or the UIC [1,4] to set characteristics.
Parameters
- element-id
The element identification of the queued task element whose characteristics you want to set. Either specify an element ID or use the wildcard character (*). The element ID for a task is returned by the ACMS$QUEUE_TASK service.
You can specify all or part of the element ID. If you specify only part of an element ID, the characteristics of all queued task elements whose IDs contain the specified characters are set. For example, if MY_NODE is specified as the element ID, all elements queued from node MY_NODE are set with the characteristics you specify. Display the element ID of a queued task element by using the
SHOW ELEMENTcommand with the/FULLqualifier. TheSHOW ELEMENTcommand is described in SHOW ELEMENT Command (ACMSQUEMGR>).If you use the wildcard character (*) in place of an element ID, the characteristics of all queued task elements are set. When using the wildcard character, you can also use the
/SELECTqualifier or the/EXCLUDEqualifier to choose a group of queued task elements for which to set characteristics. See VSI ACMS for OpenVMS Writing Applications for information about the ACMS$QUEUE_TASK service.- queue-name
The name of the queue that contains the queue task elements. A queue name can be any valid RMS file name containing 1 through 39 alphanumeric characters.
Qualifiers
- /[NO]CONFIRM
/CONFIRMdisplays each queued task element selected for modification and prompts you to confirm that you want the characteristics of the queued task element modified. Answer the prompt by entering one of the following:Yory– for yesNorn– for noQorq– for quit (exits the command without modifying the queued task element)Aora– for always (modifies all remaining queued task elements without displaying the confirmation prompt)To accept the default option, press Return.
The default is
/NOCONFIRM.- /EXCLUDE=(keyword[ ,...])
Allows you to exclude a queued task element or group of queued task elements from being modified by the
SET ELEMENTcommand. Specify the exclusion criteria with keywords to the/EXCLUDEqualifier. You must use at least one keyword with the/EXCLUDEqualifier. Specify more than one keyword by separating the keywords with a comma and enclosing them in parentheses. You can use the/EXCLUDEqualifier to limit the scope of theSET ELEMENTcommand when you specify a wildcard character (*) instead of an element ID.The
/EXCLUDEqualifier takes precedence over the/SELECTqualifier. Therefore, if a queued task element matches the selection criteria but is excluded by the exclusion criteria, the characteristics of the queued task elements are not modified.Specify one or more of the following keywords:APPLICATION=(application-spec[,...])Excludes queued task elements containing the specified application. Specify more than one application specification by separating the specifications with a comma and enclosing them in parentheses.
BEFORE=timeExcludes queued task elements queued before the specified time. You can specify absolute time, combination time, or the keyword argument TODAY or YESTERDAY. See VSI OpenVMS User's Manual for more information about absolute and combination time.
PRIORITY=(n[,...])Excludes queued task elements having the specified priority. Valid priority values are 0 through 255. Specify more than one priority value by separating the values with a comma and enclosing them in parentheses.
SINCE=timeExcludes queued task elements queued since the specified time. You can specify absolute time, combination time, or the keyword argument TODAY or YESTERDAY. See VSI OpenVMS User's Manual for more information about absolute and combination time.
STATE=[NO]HOLDIf you specify
/EXCLUDE=STATE=HOLD, the ACMSQUEMGR excludes queued task elements that are currently on hold. If you specify/EXCLUDE=STATE=NOHOLD, the ACMSQUEMGR excludes queued task elements that are not on hold.TASK=(task-name[,...])Excludes all queued task elements having the specified task name. Specify more than one task name by separating the task names with a comma and enclosing them in parentheses.
USERNAME=(enqueuer-user-name[,...])Excludes all queued task elements that have the specified enqueuer user name. The enqueuer user name is the user name explicitly or implicitly specified with the ACMS$QUEUE_TASK service. See VSI ACMS for OpenVMS Writing Applications for information about the ACMS$QUEUE_TASK service.
- /PRIORITY=n
Specifies the priority of the queued task element. You can specify a priority of 0 through 255. Tasks with the highest numerical priority are processed by the QTI first.
- /SELECT=(keyword[ ,...])
Limits the
SET ELEMENTcommand to queued task elements that match the selection criteria. Specify the selection criteria with keywords to the/SELECTqualifier. Specify more than one keyword by separating the keywords with a comma and enclosing them in parentheses. You must specify at least one keyword with the/SELECTqualifier. Use the/SELECTqualifier to limit the scope of theSET ELEMENTcommand when you specify a wildcard character (*) instead of an element ID.You can specify one or more of the following keywords:APPLICATION=(application-spec[,...])Sets the characteristics of queued task elements containing the specified application. Specify more than one application specification by separating the specifications with a comma and enclosing them in parentheses.
BEFORE=timeSets the characteristics of queued task elements queued before the specified time. You can specify absolute time, combination time, or the keyword argument TODAY or YESTERDAY. See VSI OpenVMS User's Manual for more information about absolute and combination time.
PRIORITY=(n[,...])Sets the characteristics of queued task elements having the specified priority. Valid priority values are 0 through 255. Specify more than one priority value by separating the values with a comma and enclosing them in parentheses.
SINCE=timeSets the characteristics of queued task elements queued since the specified time. You can specify absolute time, combination time, or the keyword argument TODAY or YESTERDAY. See VSI OpenVMS User's Manual for more information about absolute and combination time.
STATE=[NO]HOLDIf you use
/SELECT=STATE=HOLD, the ACMSQUEMGR sets only the characteristics of queued task elements currently on hold. If you use/SELECT=STATE=NOHOLD, the ACMSQUEMGR sets only the characteristics of queued task elements that are not on hold.TASK=(task-name[,...])Sets the characteristics of queued task elements that have the specified task name. Specify more than one task name by separating the task names with a comma and enclosing them in parentheses.
USERNAME=(enqueuer-user-name[,...])Sets the characteristics of queued task elements that have the specified enqueuer user name. The enqueuer user name is the user name explicitly or implicitly specified with the ACMS$QUEUE_TASK service. See VSI ACMS for OpenVMS Writing Applications for information about the ACMS$QUEUE_TASK service.
- /STATE=[NO]HOLD
The
/STATE=HOLDqualifier places the specified queued task element on hold. Queued task elements on hold cannot be dequeued. The/STATE=NOHOLDqualifier releases the specified queued task element from the hold state. If you do not include the qualifier, the hold state of the queued task element is unchanged.
Notes
You must use either the /PRIORITY qualifier or the
/STATE qualifier with the SET ELEMENT
command.
Examples
ACMSQUEMGR>SET ELEMENT MY_NODE:28C00082-0000000E -_ACMSQUEMGR>ACCT_QUEUE /PRIORITY=255This command sets the priority of the queued task element having the element ID MY_NODE:28C00082-0000000E to 255. Priority 255 is the highest priority you can assign a task.
ACMSQUEMGR>SET ELEMENT MY_NODE:: FAST_QUEUE -_ACMSQUEMGR>/STATE=HOLD/SELECT=APPLICATION=IN_STOCKThis command places all queued task elements containing the application IN_STOCK on hold, provided they were queued from node MY_NODE and are stored in queue FAST_QUEUE.
ACMSQUEMGR>SET ELEMENT MY_NODE: PAY_QUE -_ACMSQUEMGR>/EXCLUDE=APPLICATION=PAYROLL /STATE=HOLDThis command places all queued task elements queued from node MY_NODE in queue PAY_QUE on hold, excluding those queued task elements containing the application PAYROLL.
SET QUEUE Command (ACMSQUEMGR>)
SET QUEUE Command (ACMSQUEMGR>) — With a qualifier, dynamically sets the queue state. The changes to the queue state take effect immediately.
Format
| Command Qualifiers | Defaults |
|---|---|
| /DEQUEUE=keyword | Current queue state |
| /ENQUEUE=keyword | Current queue state |
Privileges Required
Write access to the queue repository file. If the queue repository file has the
default protection from the CREATE QUEUE command, you need the
OpenVMS SYSPRV privilege or the UIC [1,4] to modify the queue.
Parameters
- queue-name
The name of the queue whose state you want to set. A queue name can be any valid RMS file name containing 1 through 39 alphanumeric characters.
Qualifiers
- /DEQUEUE=keyword
- Allows or disallows the dequeuing of all queued task elements in the queue. Specify one of the following keywords with the
/DEQUEUEqualifier:SUSPENDED
The
/DEQUEUE=SUSPENDEDqualifier prohibits the QTI and ACMS$DEQUEUE_TASK service from dequeuing queued task elements in the queue until the queue state is resumed. The default is whatever is defined in the queue definition file (ACMSQDF.DAT) when the queue was created.RESUMED
The
/DEQUEUE=RESUMEDqualifier allows the QTI and ACMS$DEQUEUE_TASK service to resume dequeuing queued task elements in the queue. The default is whatever is defined in the queue definition file (ACMSQDF.DAT) when the queue was created.
- /ENQUEUE=keyword
- Enables or disables the queuing of queued task elements to a queue. Specify one of the following keywords with the
/ENQUEUEqualifier:SUSPENDED
The
/ENQUEUE=SUSPENDEDqualifier prohibits the ACMS$QUEUE_TASK service from queuing queued task elements to the queue until the queue is resumed. The default is whatever is currently defined in the queue definition file.RESUMED
The
/ENQUEUE=RESUMEDqualifier allows the ACMS$QUEUE_TASK service to resume queuing queued task elements to the queue. The default is whatever is currently defined in the queue definition file.
Notes
You must use either the /DEQUEUE qualifier or the
/ENQUEUE qualifier with the SET QUEUE
command. Otherwise, the SET QUEUE command has no effect and you
receive an error message.
Examples
ACMSQUEMGR>SET QUEUE MILL_QUE /ENQUEUE=SUSPENDEDThis command prevents the ACMS$QUEUE_TASK service from queuing tasks to queue MILL_QUE.
ACMSQUEMGR>SET QUEUE INVENTORY_QUE /DEQUEUE=SUSPENDEDThis command prevents the ACMS$DEQUEUE_TASK service and the QTI from dequeuing queued task elements in queue INVENTORY_QUE.
SHOW ELEMENT Command (ACMSQUEMGR>)
SHOW ELEMENT Command (ACMSQUEMGR>) — Displays information about one or more queued task elements in a queue.
Format
| Command Qualifiers | Defaults |
|---|---|
| /BRIEF | /BRIEF |
| /EXCLUDE=(keyword[,...]) | None |
| /FULL | /BRIEF |
| /OUTPUT[=file-spec] | /OUTPUT=SYS$OUTPUT |
| /SELECT=(keyword[,...]) | None |
| /TOTAL_ONLY | /BRIEF |
Privileges Required
Read access to the queue repository file. If the queue repository file has the
default protection from the CREATE QUEUE command, you need the
OpenVMS SYSPRV privilege or the UIC [1,4] to display information about the queued
task element.
Parameters
- element-id
The element ID of the queued task element you want to display information about, or the wildcard character (*). If you use the wildcard character, ACMSQUEMGR displays all queued task elements for a queue.
You can specify all or part of the element ID. If you specify only part of an element ID, the ACMSQUEMGR displays all queued task elements whose IDs contain the specified characters. The element ID for a task is returned by the ACMS$QUEUE_TASK service. Determine the element ID of a queued task element by specifying the
SHOW ELEMENTcommand with the/FULLqualifier.When using the wildcard character, you can also use the
/SELECTqualifier or/EXCLUDEqualifier to select a group of queued task elements to display.- queue-name
The name of the queue containing the queued task elements. A queue name can be any valid RMS file name containing 1 through 39 alphanumeric characters.
Qualifiers
- /BRIEF
Provides a brief display of queued task information.
/BRIEFis the default.- /EXCLUDE=(keyword[ ,...])
Allows you to exclude a queued task element or group of queued task elements from being displayed. Specify the exclusion criteria with keywords to the
/EXCLUDEqualifier. You must use at least one keyword with the/EXCLUDEqualifier. Specify more than one keyword by separating the keywords with a comma and enclosing them in parentheses. Use the/EXCLUDEqualifier to limit the scope of theSHOW ELEMENTcommand when you use the wildcard character (*) instead of an element ID.The
/EXCLUDEqualifier takes precedence over the/SELECTqualifier. Therefore, if a queued task element matches the selection criteria but is excluded by the exclusion criteria, that queued task element is not displayed.Specify one or more of the following keywords:APPLICATION=(application-spec[,...])Excludes queued task elements in the specified application from being displayed. Specify more than one application specification by separating the specifications with a comma and enclosing them in parentheses.
BEFORE=timeExcludes queued task elements queued before the specified time. You can specify absolute time, combination time, or the keyword argument TODAY or YESTERDAY. See VSI OpenVMS User's Manual for more information about absolute and combination time.
PRIORITY=(n[,...])Excludes queued task elements having the specified priority. Valid priority values are 0 through 255. Specify more than one priority value by separating the values with a comma and enclosing them in parentheses.
SINCE=timeExcludes queued task elements queued since the specified time. You can specify absolute time, combination time, or the keyword argument TODAY or YESTERDAY. See VSI OpenVMS User's Manual for more information about absolute and combination time.
STATE=[NO]HOLDIf you use
/EXCLUDE=STATE=HOLD, the ACMSQUEMGR excludes queued task elements that are currently on hold. If you use/EXCLUDE=STATE=NOHOLD, the ACMSQUEMGR excludes queued task elements that are not on hold.TASK=(task-name[,...])Excludes all queued task elements that have the specified task name. Specify more than one task name by separating the task names with a comma and enclosing them in parentheses.
USERNAME=(enqueuer-user-name[,...])Excludes all queued task elements that have the specified enqueuer user name. The enqueuer user name is the user name explicitly or implicitly specified with the ACMS$QUEUE_TASK service. See VSI OpenVMS User's Manual for information about the ACMS$QUEUE_TASK service.
- /FULL
Provides a full display of queued task element information. If you do not use the
/FULLqualifier, the ACMSQUEMGR displays only brief information. The default is/BRIEF.- /OUTPUT[=file-spec]
Specifies a file specification where you want to send the
SHOWoutput. Specify a full file specification, including device, directory, file name, and file type. If you specify an incomplete file specification, ACMSQUEMGR uses the file ACMSQUEMGR.LIS as the default output file. If you do not use the/OUTPUTqualifier, ACMSQUEMGR sends the output to the default device, SYS$OUTPUT.- /SELECT=(keyword[ ,...])
Limits the
SHOW ELEMENTcommand to queued task elements that match the selection criteria. Specify the selection criteria with keywords to the/SELECTqualifier. Specify more than one keyword by separating the keywords with a comma and enclosing them in parentheses. You must specify at least one keyword with the/SELECTqualifier. Use the/SELECTqualifier to limit the scope of theSHOW ELEMENTcommand when you use the wildcard character (*) instead of an element ID.You can specify one or more of the following keywords:APPLICATION=(application-spec[,...])Displays only queued task elements containing the specified application. Specify more than one application specification by separating the specifications with a comma and enclosing them in parentheses.
BEFORE=timeDisplays only queued task elements queued before the specified time. You can specify absolute time, combination time, or the keyword argument TODAY or YESTERDAY. See VSI OpenVMS User's Manual for more information about absolute and combination time.
PRIORITY=(n[,...])Displays only queued task elements having the specified priority. Valid priority values are 0 through 255. Specify more than one priority value by separating the values with a comma and enclosing them in parentheses.
SINCE=timeDisplays queued task elements queued since the specified time. You can specify absolute time, combination time, or the keyword argument TODAY or YESTERDAY. See VSI OpenVMS User's Manual for more information about absolute and combination time.
STATE=[NO]HOLDIf you use
/SELECT=STATE=HOLD, the ACMSQUEMGR displays only queued task elements currently on hold. If you use/SELECT=STATE=NOHOLD, the ACMSQUEMGR displays only queue task elements not on hold.TASK=(task-name[,...])Displays all queued task elements having the specified task name. Specify more than one task name by separating the task names with a comma and enclosing them in parentheses.
USERNAME=(enqueuer-user-name[,...])Displays all queued task elements having the specified enqueuer user name. The enqueuer user name is the user name explicitly or implicitly specified with the ACMS$QUEUE_TASK service. See VSI ACMS for OpenVMS Writing Applications for information about the ACMS$QUEUE_TASK service.
- /TOTAL_ONLY
Displays only the total number of queued task elements that meet the selection criteria specified with the
/SELECTqualifier.
Notes
The /BRIEF, /FULL, and
/TOTAL_ONLY qualifiers are mutually exclusive; you can
specify only one of these qualifiers on each SHOW ELEMENT
command.
Examples
ACMSQUEMGR>SHOW ELEMENT MY_NODE:: PAYROLL_QUEUE /FULLACMS Queued Tasks Current Date/Time: 1-MAY-1991 13:21:31.13Task: CHANGE_EMPLOYEE State: HOLDAppl: PAYROLL Priority: 5Username: NORTH Enq Time: 1-MAY-1991 10:13:17.71Queue Name: PAYROLL_QUEUEElement Id: MY_NODE::28C00082-0000000F-FDE272E0-0090AB3FError Cnt: 0Task: HIRE_EMPLOYEE State: NOHOLDAppl: PAYROLL Priority: 12Username: JONES Enq Time: 1-MAY-1991 10:13:16.85Queue Name: PAYROLL_QUEUEElement Id: MY_NODE::28C00082-0000000E-FD5F3920-0090AB3FError Cnt: 0Queued Task total for this display: 2This example displays full information about all queued task elements queued from node MY_NODE:: in queue PAYROLL_QUEUE.
ACMSQUEMGR>SHOW ELEMENT * YAK_QUE -_ACMSQUEMGR>/BRIEF /SELECT=(SINCE=TODAY,TASK=TASK1)Displays brief information about all queued task elements in queue YAK_QUE that were queued today and that contain task TASK1.
ACMSQUEMGR>SHOW ELEMENT * BANK_QUE /EXCLUDE=STATE=HOLDDisplays all queued task elements in queue BANK_QUE that are not currently on hold.
SHOW QUEUE Command (ACMSQUEMGR>)
SHOW QUEUE Command (ACMSQUEMGR>) — Displays the characteristics of the task queue you specify.
Format
| Command Qualifiers | Defaults |
|---|---|
| /OUTPUT[=file-spec] | /OUTPUT=SYS$OUTPUT |
Privileges Required
None.
Parameters
- queue-name
The name of the queue you want to display information about. A queue name can be any valid RMS file name containing 1 through 39 alphanumeric characters. To display all queues, use the wildcard character (*) in place of a queue name.
Qualifiers
- /OUTPUT[=file-spec]
Specifies the file specification where you want to send the
SHOWcommand output. Specify a full file specification, including device, directory, file name, and file type. If you specify an incomplete file specification, ACMSQUEMGR uses the file ACMSQUEMGR.LIS. If you do not use the/OUTPUTqualifier, ACMSQUEMGR sends the output to the default device, SYS$OUTPUT.
Notes
None.
Examples
ACMSQUEMGR>SHOW QUEUE FASTQUEUEQueue Name: FASTQUEUEEnqueues State: RESUMED Dequeues State: SUSPENDED Max Wsp Size: 200File Specification: DISK1:[FOSTER]SHOW_OUTPUT.LIS;1This command displays queue information for queue FASTQUEUE in your current default directory.
ACMSQUEMGR>SHOW QUEUE SLOWQUEUE /OUTPUT=SLOW_SHOW.LISThis command writes information about queue SLOWQUEUE to the file SLOW_SHOW.LIS.
Chapter 21. Operator Commands
ACMS/CANCEL TASK Command
ACMS/CANCEL TASK Command — Stops one or more task instances. With qualifiers, stops only the task instance you identify.
Format
| Command Qualifiers | Defaults |
|---|---|
| /APPLICATION=application-name | All applications |
| /[NO]CONFIRM | /CONFIRM |
| /DEVICE=device-name | All devices |
| /IDENTIFIER=task-id | All tasks |
| /[NO]LOG | /NOLOG |
| /SUBMITTER=submitter-id | All submitters |
| /USER=user-name | All user names |
Privileges Required
OpenVMS OPER privilege.
Parameters
- task-name
The name of the task you want to cancel. It is the name given to the task in the application definition. The task name you specify can exist in more than one application.
Qualifiers
- /APPLICATION=application-name
Cancels tasks in the specified application only. The application name is the file name of an application database for a started application. Do not include device, directory, or file type with the application name. When you specify the
/APPLICATIONqualifier, ACMS searches for the task name only in the application you specify. If you do not specify the/APPLICATIONqualifier, ACMS searches for the task name in all active applications on the system.If you specify an application name with the
/APPLICATIONqualifier, but do not specify a task name, ACMS cancels all currently active tasks for the specified application. Naming an application with the/APPLICATIONqualifier and naming a task causes ACMS to search for the task in that application only.- /[NO]CONFIRM
The
/CONFIRMqualifier causes ACMS to display the name of each task to be canceled and prompts you to indicate whether you still want to cancel the task. The/NOCONFIRMqualifier tells ACMS not to prompt you to confirm that you want to cancel a task. The default is/CONFIRM.- /DEVICE=device-name
Cancels tasks with the specified device name only. Device-name is the name of the terminal at which the task is running. You must end the device name with a colon (:). If you do not specify the
/DEVICEqualifier, ACMS cancels the identified task on all available devices.- /IDENTIFIER=task-id
Cancels tasks with the specified task ID only. ACMS assigns a unique task ID to each task and to each task called by another task. If you do not specify the
/IDENTIFIERqualifier, ACMS does not select tasks by ID to cancel. Refer to Chapter 12, "Auditing Applications with the Audit Trail Logger" for information about specifying a task ID.- /[NO]LOG
The
/LOGqualifier causes ACMS to display a message indicating that a task has been canceled. The default is/NOLOG.- /SUBMITTER=submitter-id
Cancels tasks with the specified submitter ID only. ACMS assigns a unique submitter ID to each user who signs in to ACMS. Refer to Chapter 12, "Auditing Applications with the Audit Trail Logger" for information about specifying a submitter ID.
If you do not specify the
/SUBMITTERqualifier, ACMS does not select tasks by submitter ID to cancel.- /USER=user-name
Cancels tasks having the specified user name only. There can be more than one user with the user name you specify. If you do not specify the
/USERqualifier, ACMS does not select tasks by user name.
Notes
Without any qualifiers, the ACMS/CANCEL TASK command cancels
all active tasks and prompts you to confirm each cancellation. If you use the
/NOCONFIRM qualifier, ACMS cancels all task instances without
prompting you.
In some situations, you can cancel more than one task instance with a single
qualifier. For example, you can use the /APPLICATION,
/IDENTIFIER, /SUBMITTER, or
/USER qualifier to cancel all active instances of a task that
have a particular application name, task ID, submitter ID, or user name.
Specifying more than one qualifier limits the scope of the command. For example,
specifying the /APPLICATION=AVERTZ and
/DEVICE=NL qualifiers on the same command line causes ACMS to
cancel only tasks in the application AVERTZ that have the null device type
(NL).
Examples
$ACMS/CANCEL TASK/NOCONFIRMTask Name: MON_TASKTask ID: ODE::0001000D-0000001Application: LAS_APPL User Name: TUTTLESubmitter ID: ODE::0001000D Device: RTA8:Called Task: MON_TASK_ATask ID: ODE::0001000D-0000001-00000002This command cancels each active task on the current node.
$ACMS/CANCEL TASK/DEVICE=TTH0:Task Name: DELETE_ALLTask ID: ALLDAY::0001000D-00000001Application: ACCOUNT User Name: COUNTSubmitter ID: ALLDAY::0001000D Device: TTH0:Task ID: ALLDAY::0001000D-00000001 (Y/[N]):YThis command displays information about the task active at device TTH0 and prompts you to confirm whether or not to cancel the task. Here, the user canceled the task by typing the letter
Y(for YES) in response to the(Y/[N]). If you do not want ACMS to prompt for confirmation, specify the/NOCONFIRMqualifier on the command line.$ACMS/CANCEL TASK/NOCONFIRM/USER=ADAMSThis command cancels all tasks on a node submitted by a user with the user name ADAMS. Because the
/NOCONFIRMqualifier was specified, ACMS does not prompt for confirmation before canceling the task.$ACMS/CANCEL TASK/NOCONFIRM/SUBMITTER=10016This command cancels all tasks submitted by a user whose ID is 10016.
$ACMS/CANCEL TASK/APPLICATION=MARKETThis command displays all active tasks that are a part of the application MARKET and prompts you to indicate whether or not you want to cancel each task.
$ACMS/CANCEL TASK/IDENTIFIER=WOW::00050012-00000003This command cancels the task with the task ID WOW::00050012-00000003. ACMS also cancels all tasks called by the identified task.
$ACMS/CANCEL TASK/IDENTIFIER=WOW::00050012-00000003-00000001This command cancels the task with the task ID WOW::00050012-00000003-00000001. Three fields in the task ID indicate that this task is a called task.
ACMS/CANCEL USER Command
ACMS/CANCEL USER Command — Cancels a user by stopping all of the user's outstanding tasks and by signing the user out of ACMS.
Format
| Command Qualifiers | Defaults |
|---|---|
| /[NO]CONFIRM | /CONFIRM |
| /DEVICE=device-name | All devices |
| /[NO]LOG | /NOLOG |
| /SUBMITTER=submitter-id | All submitters |
Privileges Required
OpenVMS OPER privilege.
Parameters
- user-name
The user name of one or more users that you want to cancel. If you include a user name, ACMS cancels the users who are signed in to ACMS under the user name you provide. If you do not include a user name or any qualifiers, ACMS cancels all active users.
Qualifiers
- /[NO]CONFIRM
The
/CONFIRMqualifier causes ACMS to display information about each user selected to be canceled and prompts you to indicate whether or not you still want to cancel the user. The/NOCONFIRMqualifier tells ACMS not to prompt you for confirmation. The default is/CONFIRM.- /DEVICE=device-name
Cancels one or more users identified by device name. Device-name is the name of the terminal at which the user is logged in. You must end the device name with a colon (:). If you do not specify the
/DEVICEqualifier, ACMS does not cancel users by device name.- /[NO]LOG
Controls whether or not ACMS displays a message after canceling a user. The
/NOLOGqualifier is the default.- /SUBMITTER=submitter-id
Cancels the user identified by the specified submitter ID. ACMS assigns a unique submitter ID to each user who signs in to ACMS. Refer to Chapter 12, "Auditing Applications with the Audit Trail Logger" for information about specifying a submitter ID.
If you do not specify the
/SUBMITTERqualifier, ACMS does not select users by submitter ID to cancel.
Notes
The ACMS/CANCEL USER command also cancels tasks called by other
tasks.
The ACMS/CANCEL USER command does not affect remote users. You
can use only the ACMS/CANCEL USER command to cancel users on your
current node. Use the ACMS/CANCEL TASK command to cancel tasks
owned by remote users.
To determine a user name, submitter ID, or device name, specify the
ACMS/SHOW USER command.
Examples
$ACMS/CANCEL USERUser Name: ZEKE Submitter ID: BILBO::0001000DAgent PID: 22000122 Device: TTB1:Submitter ID: BILBO::0001000D (Y/[N]):NUser Name: SIMONSAYS Submitter ID: BILBO::000200013Agent PID: 22000122 Device: TTH0:_Submitter ID: BILBO::000200013 (Y/[N]):NThis command displays information about all active users on the current node. Because the user responded by typing the letter
N(for NO) at the confirmation prompt, the users ZEKE and SIMONSAYS are not canceled.$ACMS/CANCEL USER ADAMSUser Name: ADAMS Submitter ID: ALLDAY::0001000DAgent PID: 00000055 Device ID: TTH0:Submitter ID: ALLDAY::0001000D (Y/[N]):This command displays information about a user ADAMS and prompts for confirmation before canceling. Type
Yin response to the confirmation prompt to cancel the user. After you typeY, ACMS can display information about another user ADAMS, if there is one.$ACMS/CANCEL USER/DEVICE=TTH0:User Name: ADAMS Submitter ID: ALLDAY::0001000DAgent PID: 00000055 Device ID: TTH0:Submitter ID: ALLDAY::0001000D (Y/[N]):Because the
/CONFIRMqualifier is the default, this command displays information about the user who is working at the TTH0 device and prompts you to confirm the cancellation. TypeYin response to the confirmation prompt to cancel user ADAMS.$ACMS/CANCEL USER/SUBMITTER=1000D /LOGUser Name: ADAMS Submitter ID: CARAT::0001000DAgent PID: 22000122 Device ID: TTC7:Submitter ID: CARAT::0001000D (Y/[N]):Y%ACMSOPR-I-USERCANED, User ADAMS canceledThis command displays information about the task instance active for a user whose submitter ID is 0001000D, and cancels the user after you type
Yat the confirmation prompt. The/LOGqualifier prints a message showing you that the cancellation attempt was successful. By default, you do not receive a cancellation message. Refer to Chapter 12, "Auditing Applications with the Audit Trail Logger" for a complete description of submitter IDs.
ACMS/DEBUG Command
ACMS/DEBUG Command — Starts the ACMS Task Debugger. This command allows you to test tasks and server procedures without building an entire ACMS application.
Format
| Command Qualifiers | Defaults |
|---|---|
| /AGENT_HANDLE | None |
| /PID | None |
| /SERVER | None |
| /TWS_POOLSIZE[=n] | 1600 pagelets (on Alpha and IA-64) |
| /TWSC_POOLSIZE[=n] | 50 pagelets (on Alpha and IA-64) |
| /WORKSPACE | None |
Qualifiers
- /AGENT_HANDLE
Allows you to submit calls to ACMS tasks from an agent program. The handle name for the agent program must be unique to the system on which you are debugging the task. To ensure that the agent handle is unique to the system, include the PID of the task debugger or the user name of the person doing the debugging in the
/AGENT_HANDLEname.- /PID
Identifies the process ID (PID) for the server process to be debugged.
- /SERVER
Allows you to debug procedure servers as they execute in the ACMS run-time environment. Using this command, you can observe the server process execution through the OpenVMS Debugger, and locate run-time programming or logic errors and other bugs.
- /TWS_POOLSIZE
Allows you to specify the sizes of the temporary pools that task workspaces use when a task is started. When you start a task, the group and user workspaces the task uses, as well as system and task workspaces, are copied into temporary workspaces for use by the task. At any given time, the sum of all group, user, system, and task workspaces for all active tasks cannot exceed this number. Valid sizes are from 129 to 65,535 pagelets (Alpha). The default value is 1600 pagelets (Alpha and IA-64).
- /TWSC_POOLSIZE
Controls the overall size of the pool used to store information needed to allocate the task instance workspaces stored in the TWS_POOLSIZE pool. Valid sizes are from 9 to 63 pagelets (Alpha). The default value is 50 pagelets (Alpha and IA-64).
- /WORKSPACE
Allows the examination of workspaces during exchange steps, the action part of processing steps, or at the beginning or end of a task. If it is not specified, workspaces can be examined only when a task is running a server.
Privileges Required
None.
Notes
If you specify a value between 0 and 129 for /TWS_POOLSIZE, or
a value for TWSC_POOLSIZE that is between 0 and 9, ACMS overrides the value and sets
them to the minimum required values (129 or 9, respectively). Then before starting
the task debugger, ACMS notifies the user that the change has been made. If you
specify a value less than 0 for either pool size, ACMS returns an error
message.
ACMS/DEBUG/SERVER using the process name for a
server process that has a UIC group number different from the invoking user's
process UIC group number, you receive the following
error:%ACMSOPR-E-DBGSERERR, Error during DEBUG/SERVER -ACMSOPS-W-NOSUCHSER, Specified server does not exist %ACMSOPR-E-ERROR, Some operations may not have been performed
To correct this problem, use the process PID to access the server process.
Examples
$ACMS/DEBUG VR_TASK_GROUP/WORKSPACEThis command instructs the ACMS Task Debugger to debug tasks in the task group database file VR_TASK_GROUP. The command also allows you to examine and deposit data in workspaces.
$ACMS/DEBUG/SERVER ACMS000SP001000This command starts the debugger for the server process name ACMS000SP001000.
$ACMS/DEBUG/TWSC_POOLSIZE=30/TWS_POOLSIZE=500 VR_TASK_GROUPThis command instructs the ACMS Task Debugger to debug tasks in the task group database file VR_TASK_GROUP. In addition, the command overrides the default values of TWSC_POOLSIZE and TWS_POOLSIZE for this session.
ACMS/ENTER Command
ACMS/ENTER Command — Allows a terminal that has logged in to OpenVMS to use the ACMS menu system.
Format
| Command Qualifiers | Defaults |
|---|---|
| /[NO]RETURN | /RETURN |
Privileges Required
None.
Qualifiers
- /[NO]RETURN
If you specify the
/RETURNqualifier, your DCL process waits until you exit from ACMS. When you exit from ACMS, you are returned to your DCL process.If you specify the /
NORETURNqualifier, your DCL process is deleted once you enter the ACMS menu system. Once you exit from ACMS, you are logged out. The default is/RETURN.
Notes
Both the ACMS system and the Terminal Subsystem Controller (TSC) must be started before a user can enter the ACMS menu system.
Your terminal must be authorized in the ACMS device definition file for you to enter the ACMS menu system. See Chapter 2, "Authorizing and Controlling Terminals" for information on authorizing devices with the Device Definition Utility (DDU).
You cannot issue an ACMS/ENTER command from a DCL server unless
the task was selected from a user-written agent. Doing so can cause parts of the
Terminal Subsystem Controller (TSC) to fail and can sign other users out of ACMS.
Components within the ACMS terminal subsystem maintain databases based on terminal
names. When you issue a second ACMS/ENTER command, various errors
can occur in the ACMS Command Process (CP) and TSC, including process
termination.
Examples
$ACMS/ENTERThis command places you in the ACMS menu system. When you exit from ACMS, you are returned to DCL command level.
$ACMS/ENTER/NORETURNThis command places you in the ACMS menu system. When you exit from ACMS, you are logged out.
ACMS/INSTALL Command
ACMS/INSTALL Command — Installs an application in ACMS$DIRECTORY or removes an application database file from ACMS$DIRECTORY.
Format
| Command Qualifiers | Defaults |
|---|---|
| /[NO]REMOVE | /NOREMOVE |
Privileges Required
Application Authorization Utility (AAU) authorization.
Parameters
- file-spec
The file specification of an application database file to be moved to or removed from ACMS$DIRECTORY. The application database file must have a file type of .ADB.
If the file is to be moved into ACMS$DIRECTORY, the file specification can be any valid RMS file specification or logical name. If it is a logical name that is a search list, only the first translation in the search list is used. When you omit the device and directory, ACMS looks for the application database file in your default directory. The default file type is .ADB.
If the file is to be removed from ACMS$DIRECTORY, specify the
/REMOVEqualifier and the file name of the application. Do not specify a node, device, directory, or file type, or you receive an error.
Qualifiers
- /[NO]REMOVE
The
/REMOVEqualifier indicates that you want to delete the specified application from ACMS$DIRECTORY. The default is/NOREMOVE.
Notes
You can install or delete only one application database file at a time. ACMS displays a message telling you when an application database file is successfully installed.
You do not need to install applications every time you start your ACMS system.
This differs from the way you use OpenVMS INSTALL and some other
ACMS operator commands.
The ACMS/INSTALL command does not support search lists.
Examples
$ACMS/INSTALL APPL$:EMPLAPP.ADBApplication Database File APPL$:EMPLAPP.ADB Installed -in ACMS$DIRECTORYThis command searches for the file EMPLAPP.ADB on the disk and directory identified by the logical name APPL$, checks the application database file against the application authorization in the ACMSAAF.DAT file, and installs the application database file in ACMS$DIRECTORY. ACMS displays a message when it has successfully installed the application database file.
$ACMS/INSTALL EMPLAPP /REMOVEApplication Database File EMPLAPP Removed from ACMS$DIRECTORYBecause it includes the
/REMOVEqualifier, this command deletes the application database file EMPLAPP from ACMS$DIRECTORY. Only the application file name is specified. ACMS displays a message when it has successfully deleted the application database file.$ACMS/INSTALL EMPLAPP.ADBApplication Database File APPL$:EMPLAPP.ADB Installed -in ACMS$DIRECTORYBecause this command does not include a device or directory with the file specification, the
ACMS/INSTALLcommand searches your default directory. ACMS displays a message when it has successfully located and installed the application database file.
ACMS/MODIFY APPLICATION Command
ACMS/MODIFY APPLICATION Command — Modifies the attributes of an active application.
Format
| Command Qualifiers | Defaults |
|---|---|
| /APPLICATION_ATTRIBUTES=(attribute[,...]) | None |
| /[NO]CONFIRM | /CONFIRM |
| /[NO]LOG | /NOLOG |
| /SERVER_ATTRIBUTES=(attribute[,...]) | None |
| /TASK_ATTRIBUTES=(attribute[,...]) | None |
Privileges Required
OpenVMS OPER privilege.
Parameters
- application-name
The name of the active application that you want to modify. If you do not supply an application name, all applications are modified with the attributes you specify. You can specify more than one application name by separating each name with a comma (,).
Qualifiers
- /APPLICATION_ATTRIBUTES=(attribute[ ,...])
Modifies an attribute of the active application. The attribute argument specifies the attribute you want to modify. Specify more than one attribute by separating the attributes with a comma (,) and enclosing them in parentheses.
You can specify one or more of the following attributes:[NO]AUDIT
Enables or disables application level auditing within the specified application.
MAX_INSTANCE=n
Specifies the maximum number of tasks that can execute simultaneously within the specified application. You can specify an integer from 0 through 65535.
MAX_PROCESS=n
Specifies the maximum number of server processes that can be active simultaneously within the specified application. You can specify an integer from 0 through 65535.
MONITOR_INTERVAL=n
Specifies the server process monitoring interval. The server process monitoring interval is the interval at which ACMS checks servers to see if new processes are needed, or extra processes need to be deleted. You can specify 0 through 65535 seconds
- /[NO]CONFIRM
This qualifier determines whether or not ACMS displays each application selected for modification and prompts you for confirmation before making the modifications. The default is
/CONFIRM.- /[NO]LOG
This qualifier determines whether or not ACMS displays information level status messages generated by the modify request. The default is
/NOLOG.- /SERVER_ATTRIBUTES=(attribute[ ,...])
Modifies an attribute of a server in the specified application. The attribute argument specifies the attribute you want to modify. Specify more than one attribute by separating the attributes with a comma (,) and enclosing them in parentheses.
The
/SERVER_ATTRIBUTESqualifier is a repeating qualifier. This means that you can specify the/SERVER_ATTRIBUTESqualifier more than once on the same command.You can specify one or more of the following attributes:NAME=(server-name[ ,...])
Identifies the server to be modified in the specified application. If you specify the
/SERVER_ATTRIBUTESqualifier but do not specify the NAME attribute, ACMS modifies all servers in the selected application. Specify more than one server name by separating the server names with a comma (,) and enclosing them in parentheses.[NO]AUDIT
Enables or disables server-level auditing within the specified application.
CREATION=DELAY=n
@@@@@@@@@@=INTERVAL=n
@@@@@@@@@@=(DELAY=n,INTERVAL=n)
Adjusts the creation delay time, the creation interval time, or both. Creation delay time is the amount of time ACMS waits for busy servers to become free before creating a new server to handle a demand. Once ACMS creates a new server, creation interval is the amount of time ACMS waits before creating another new server. You can specify 0 through 65535 seconds.
DELETION=DELAY=n
@@@@@@@@@@=INTERVAL=n
@@@@@@@@@@=(DELAY=n,INTERVAL=n)
Adjusts the deletion delay time, the deletion interval time, or both. Deletion delay time is the amount of time ACMS allows a server to be free before deleting a server. Deletion interval is the amount of time ACMS waits after deleting one free server before deleting another. You can specify 0 through 65535 seconds.
[NO]PROCESS_DUMPS
PROCESS_DUMPS dynamically enables server process dumping for servers within the specified application. NOPROCESS_DUMPS disables server process dumping.
MAX_PROCESS=n
Specifies the maximum number of server processes allowed for the specified server. You can specify an integer from 0 through 65535.
MIN_PROCESS=n
Specifies the minimum number of server processes required for the specified server. You can specify an integer from 0 through 65535.
- /TASK_ATTRIBUTES=(attribute[ ,...])
Modifies the attributes of the specified task. The attribute argument specifies the attribute you want to modify. Specify more than one attribute by separating the attributes with a comma (,) and enclosing them in parentheses.
The
/TASK_ATTRIBUTESqualifier is a repeating qualifier. This means you can specify the/TASK_ATTRIBUTESqualifier more than once on the same command.You can specify one or more of the following attributes:NAME=(task-name[ ,...])
Specifies the name of a task within the specified application whose attributes you want to modify. If you do not specify the NAME attribute, all tasks are modified within the selected application with whatever attributes you specify.
[NO]AUDIT
Enables or disables task-level auditing within the specified application.
ENABLE
Enables specific tasks within the specified application.
DISABLE
Disables specific tasks within the specified application.
TRANSACTION_TIMEOUT=(seconds)
Specifies a transaction timeout value for a task or tasks in the specified application.
NOTRANSACTION_TIMEOUT
Specifies that there be no transaction timeout value for a task or tasks in the specified application.
Notes
When you specify the ACMS/MODIFY APPLICATION command,
parameters are only modified within the current active application. If the
application is stopped and restarted, the parameters are reset to the values
specified in the application definition. If you want a modification to be permanent,
you must modify the application definition.
Examples
$ACMS/MODIFY APPLICATION TEST /APPLICATION_ATTRIBUTES=(NOAUDIT, -_$MAX_INSTANCE=3)Apply Modifications to Application TEST (Y/[N]):This command disables audit trail logging for the application and allows a maximum of three tasks to execute within the TEST application at any given time. ACMS displays the confirmation prompt before executing this command.
$ACMS/MODIFY APPLICATION DATADAT -_$/SERVER_ATTRIBUTES=(NAME=(SERVER_1880,SERVER_1776), -_$MAX_PROCESS=5,MIN_PROCESS=1) -_$/SERVER_ATTRIBUTES=(NAME=SERVER_ODCE, -_$MAX_PROCESS=10,MIN_PROCESS=3)Apply Modifications to Application DATADAT (Y/[N]):This command modifies the application DATADAT, setting the maximum processes allowed for servers SERVER_1880 and SERVER_1776 to 5 and the minimum processes required to 1. This command also modifies the attributes of server SERVER_ODCE, setting the maximum processes allowed to 10 and the minimum processes required to 3. Because
/CONFIRMis the default, ACMS prompts you before executing this command.$ACMS/MODIFY APPLICATION POST_REQ -_$/SERVER_ATTRIBUTES=(NAME=SERVER_10,CREATION= -_$(DELAY=10,INTERVAL=30))-_$/NOCONFIRMThis command modifies application POST_REQ, causing ACMS to wait 10 seconds for an instance of SERVER_10 to become free before creating a new server process. Once a new server is created, ACMS must wait 30 seconds before creating another new server.
$ACMS/MODIFY APPLICATION NEWAPPL -_$/TASK_ATTRIBUTES=(NAME=(DTSK,FTSK),DISABLE) -_$/TASK_ATTRIBUTES=(NAME=NEWTSK,ENABLE) /NOCONFIRMThis command modifies the application NEWAPPL, disabling the tasks DTSK and FTSK and enabling the task NEWTSK.
ACMS/REPLACE SERVER Command
ACMS/REPLACE SERVER Command — Replaces a server image with a new version of that image. All subsequent tasks use the new image.
Format
| Command Qualifiers | Defaults |
|---|---|
| /APPLICATION=application-name | All applications |
| /[NO]CONFIRM | /CONFIRM |
| /[NO]LOG | /NOLOG |
Privileges Required
OpenVMS OPER privilege.
Parameters
- server-name
The name of the server you want to replace. The server name is defined in the application definition. If you do not specify a server name, ACMS replaces all servers.
Qualifiers
- /APPLICATION=application-name
Causes ACMS to replace server images only in the application you specify. Specify the application file name only; do not include node, device, or directory.
When you specify an application name with the
/APPLICATIONqualifier, ACMS searches for the server name in the application you specify. If you specify the/APPLICATIONqualifier but do not specify a server name, ACMS searches for all servers in the application. If you do not specify the/APPLICATIONqualifier, ACMS searches for the server name in all applications on the node.- /[NO]CONFIRM
The
/CONFIRMqualifier causes ACMS to display each server selected for replacement and prompt you to indicate whether or not you want to replace the server. The/NOCONFIRMqualifier causes ACMS not to prompt you for confirmation. The default is/CONFIRM.- /[NO]LOG
Controls whether or not ACMS displays a message after replacing a server. The
/NOLOGqualifier is the default.
Notes
When the application controller receives the ACMS/REPLACE
SERVER command, it runs down all free server processes for the
specified server and requests all active servers to run down when they are free. A
server retaining context does not run down until the context has been released. New
server processes are created to meet the minimum and maximum server process
requirements of the application. If a server image is active or still executing,
ACMS replaces it with the new version once it stops executing or is aborted.
ACMS/SHOW SERVER to determine the server process ID. To stop
the server process, use one of the following:Use the DCL command
STOP/IDto cancel the server process. However,STOP/IDmay have adverse effects on the application. For example, if ACMS is using Rdb,STOP/IDcancels the server process without the database recovery associated with normal rundown.Use the OpenVMS FORCEX system service. This allows normal recovery of data. However, you must write a small program to use FORCEX.
Use the
ACMS/CANCEL TASKcommand to cancel the task that the server is running.Use the
ACMS/STOP APPLICATION/CANCELcommand. However, this command stops all occurrences of all servers in the application.
You cannot replace a DCL server because the image executed is supplied by VSI It is not customer modifiable.
See Chapter 9, "Installing and Managing Applications" for more information about this command.
ACMS/REPLACE SERVER command to replace a server
when an application is not fully started, then EXC logs the following error message
in
SWL:%ACMSI-E-BADSTATE, Internal Error: invalid state 00000006
Examples
$ACMS/REPLACE SERVER MYSERV/NOCONFIRMThis command replaces the server image for the server MYSERV with a new version of that image in all applications.
$ACMS/REPLACE SERVER MYSERV/APPLICATION=TESTALL/NOCONFIRMThis command replaces the server image for the server MYSERV in the application TESTALL with a new version of that image.
ACMS/REPROCESS APPLICATION_SPEC Command
ACMS/REPROCESS APPLICATION_SPEC Command — Causes ACMS to retranslate the application specification for an application and redirect all subsequent task selections to the application pointed to by the application specification.
Format
| Command Qualifiers | Defaults |
|---|---|
| /[NO]CONFIRM | /CONFIRM |
| /[NO]LOG | /NOLOG |
Privileges Required
OpenVMS OPER privilege.
Parameters
- application-spec
The application specification for an application. It can be a logical name or a search list of application database files. If the application specification is a search list, the first available application in the search list is used.
The search list can contain an application that resides on a remote node. If the file resides on a remote node, you must specify the remote node name in the search list. The following is an example of a search list defined as the logical name PAYROLL:$DEFINE/SYSTEM PAYROLL BIGAPPL::PAYROLL, FASTAPPL::PAYROLL, -_$BACKUP::PAYROLLYou cannot specify access control strings in an application specification. See Chapter 6, "Using Distributed Forms Processing" for more information on application specifications.
Qualifiers
- /[NO]CONFIRM
The
/CONFIRMqualifier causes ACMS to prompt you for confirmation before reprocessing the application specification. The/NOCONFIRMqualifier causes ACMS not to prompt you for confirmation before performing the reprocess. The default is/CONFIRM.- /[NO]LOG
Controls whether or not ACMS displays a message after translating the application specification. The
/NOLOGqualifier is the default.
Notes
The ACMS/REPROCESS APPLICATION_SPEC command can be used to
failover to applications. If a search list is used for an application specification,
automatic failover occurs in the event of a system failure. Use the
ACMS/REPROCESS APPLICATION_SPEC command to failover to the
original application when it becomes available.
The ACMS/REPROCESS APPLICATION_SPEC command is not supported
if, on a single submitter node, you have two application specification logical names
that point to two differently ordered search lists containing the same application
names.
Example
$ACMS/REPROCESS APPLICATION_SPEC PAYROLL
This example causes ACMS to retranslate the search list for the logical name PAYROLL. ACMS uses the first available application in the search list.
ACMS/RESET AUDIT Command
ACMS/RESET AUDIT Command — Resets the ACMS Audit Trail Logger, causing the ACMS audit trail log file to be closed and a new log file to be opened.
Format
Privileges Required
OpenVMS OPER privilege.
Notes
If the Audit Trail Logger process has stopped, the ACMS/RESET
AUDIT command restarts the process.
Starting ACMS creates a new version of the audit trail log file.
The logical name ACMS$AUDIT_LOG points to the ACMS audit
trail log file. ACMS$AUDIT_LOG is defined during system
startup with auditing enabled and when audit trail logging is enabled with the
ACMS/SET SYSTEM /AUDIT command.
If the logical name ACMS$AUDIT_LOG is already defined
when you execute the ACMS/RESET AUDIT command, ACMS creates a new
version of the file using its equivalence name string. If the logical
ACMS$AUDIT_LOG is not defined, ACMS creates the file
SYS$ERRORLOG:ACMSAUDIT.LOG. For more information about
the Audit Trail Logger and the audit trail log file, see Chapter 12, "Auditing Applications with the Audit Trail Logger".
Example
$ACMS/RESET AUDIT
This command creates a new version of the Audit Trail Logger.
ACMS/RESET TERMINALS Command
ACMS/RESET TERMINALS Command — Causes ACMS to read the DDU database file and authorize any new controlled terminals as well as release any terminals that are no longer authorized.
Format
Privileges Required
OpenVMS OPER privilege
Notes
The TSC must be started before you can use the ACMS/RESET
TERMINALS command. The ACMS/RESET TERMINALS command
only affects terminals controlled by the TSC. No current terminal user is
affected.
Issue the
ACMS/RESET TERMINALScommandIssue an
ACMS/START TERMINALScommand or anACMS/START SYSTEMcommand that starts the TSC
If a terminal that was previously assigned the NOT CONTROLLED characteristic is assigned the CONTROLLED characteristic, ACMS checks to see if that terminal is currently using the ACMS menu interface. If it is, ACMS designates the terminal as controlled so it is not released when the user signs out. If the terminal is not using the ACMS menu interface, the TSC allocates that terminal.
Conversely, if a terminal that was previously assigned the CONTROLLED characteristic is now assigned the NOT CONTROLLED characteristic, ACMS checks to see if that terminal is currently using the ACMS menu interface. If it is, ACMS designates the terminal as not controlled and releases the terminal when the user signs out. If the terminal is not using the ACMS menu interface, the TSC deallocates that terminal. Once deallocated, the terminal can be used to sign in normally.
For more information about sign-in characteristics for terminals, see Chapter 2, "Authorizing and Controlling Terminals".
Example
$ACMS/RESET TERMINALS
This command makes available to ACMS any terminals recently assigned the CONTROLLED characteristic. Terminals defined with the CONTROLLED characteristic sign directly in to ACMS when users type an OpenVMS login sequence.
ACMS/SET QUEUE Command
ACMS/SET QUEUE Command — Sets the processing characteristics of a started task queue. The processing characteristics are used by the Queued Task Initiator (QTI).
Format
| Command Qualifiers | Defaults |
|---|---|
| /TASK_THREADS=n | /TASK_THREADS=1 |
Privileges Required
OpenVMS OPER privilege.
Parameters
- queue-name
The name of the queue for which you want to set processing characteristics.
Qualifiers
- /TASK_THREADS=n
Specifies the number of concurrent outstanding tasks that the QTI processes for the specified queue. Here, n indicates a value from 1 through 255. Normally, a relatively low number (1 through 5) is sufficient to achieve maximum throughput of the queue.
The
/TASK_THREADSqualifier is a positional qualifier. If you position the/TASK_THREADSqualifier between theACMS/SET QUEUEcommand and the queue names, all queue names are affected. To have the/TASK_THREADSqualifier apply to an individual queue name in a list of queue names, place the qualifier directly after the queue name. See the examples section for examples of using this qualifier. The default is/TASK_THREADS=1.
Notes
None.
Examples
$ACMS/SET QUEUE NEWQThis command sets to one the maximum number of concurrent outstanding tasks for queue NEWQ.
$ACMS/SET/TASK_THREADS=5 QUEUE QUE1,QUE2This command limits the number of concurrent outstanding tasks to five for queues QUE1 and QUE2.
$ACMS/SET QUEUE/TASK_THREADS=5 QUE1,QUE3,QUE4, QUE2 /TASK_THREADS=3This command limits the number of concurrent outstanding tasks to five for queues QUE1, QUE3, and QUE4 and to three for queue QUE2.
ACMS/SET SYSTEM Command
ACMS/SET SYSTEM Command — Depending on the qualifiers used, enables or disables audit trail logging, or enables or disables ACMS operator terminals.
Format
| Command Qualifiers | Defaults |
|---|---|
| /[NO]AUDIT | Current setting |
| /[NO]OPERATOR | Current setting |
| /PROCESS | Current setting |
| /TERMINAL=device-name | Current setting |
Privileges Required
OpenVMS OPER privilege.
Qualifiers
- /[NO]AUDIT
The
/AUDITqualifier starts the Audit Trail Logger and enables systemwide auditing. The/NOAUDITqualifier stops systemwide auditing. If you do not specify this qualifier, systemwide auditing is not affected.- /[NO]OPERATOR
Enables or disables the terminals identified by the
/PROCESSqualifier or/TERMINALqualifier as ACMS operator terminals. When you specify the/OPERATORor/NOOPERATORqualifier, you must also specify either the/PROCESSor the/TERMINALqualifier. If you do not specify this qualifier, ACMS terminals are not affected.- /PROCESS
If you specify the
/OPERATORqualifier, the/PROCESSqualifier enables your terminal as an ACMS operator terminal for as long as your current process is active. If you specify the/NOOPERATORqualifier, the/PROCESSqualifier disables your terminal as an ACMS operator terminal.You must specify either the
/OPERATORor/NOOPERATORqualifier when you use the/PROCESSqualifier. If you do not specify this qualifier, ACMS terminals are not affected.- /TERMINAL=(device-name[ ,...])
If you specify the
/OPERATORqualifier, the/TERMINALqualifier identifies one or more terminals as an ACMS operator terminal (for as long as ACMS is active). If you specify the/NOOPERATORqualifier, the/TERMINALqualifier disables one or more terminals as an ACMS terminal. If you specify more than one device name, separate the device names with commas and enclose them in parentheses. A colon (:) in the device name is not required.You must specify either the
/OPERATORor/NOOPERATORqualifier with the/TERMINALqualifier. If you do not specify this qualifier, ACMS terminals are not affected.
Notes
If an application fails, or if the Audit Trail Logger or TSC stops abnormally, ACMS sends a message to ACMS operator terminals to inform you.
You cannot use the /[NO]PROCESS qualifier for a batch
job.
Examples
$ACMS/SET SYSTEM/PROCESS/OPERATORThis command enables your terminal as an ACMS operator terminal for the duration of your process or until ACMS stops.
$ACMS/SET SYSTEM/TERMINAL=(TTE2,TTE3)/OPERATORThis command enables terminals TTE2 and TTE3 as ACMS operator terminals for as long as ACMS is active.
$ACMS/SET SYSTEM/TERMINAL=TTE2/NOOPERATORThis command disables terminal TTE2 as an ACMS operator terminal.
$ACMS/SET SYSTEM/AUDITThis command enables the Audit Trail Logger. Use this command to re-enable the Audit Trail Logger after you have disabled it.
ACMS/SHOW APPLICATION Command
ACMS/SHOW APPLICATION Command — Displays information about one or more active ACMS applications in static
mode. See the ACMS/SHOW APPLICATION/CONTINUOUS command if you
want to display an application in continuous mode.
Format
| Command Qualifiers | Defaults |
|---|---|
| /CONNECTIONS | No connection information displayed |
| /DETACHED_TASKS | No detached task information displayed |
| /POOL | No pool information displayed |
| /SERVER_ATTRIBUTES | No server attributes displayed |
| /TASK_ATTRIBUTES | No task attributes displayed |
Privileges Required
None.
Parameters
- application-name
The file name of the application you want to display information about. Specify only the file name of the application; do not include device, directory, or file type. If you do not include an application name, ACMS displays information about all active applications. Specify more than one application name by separating the application names with a comma (,).
Qualifiers
- /CONNECTIONS
Displays the local and remote users who are connected to the application.
- /DETACHED_TASKS
Displays information about all detached tasks that are started and have not completed.
- /POOL
Displays information on pool size and available pool space for an application. If you do not specify the
/POOLqualifier, no pool information is displayed. If you specify the/POOLqualifier but do not supply an application name, pool information is displayed for all active applications.- /SERVER_ATTRIBUTES[=(server-name[ ,...])]
Displays the current settings of modifiable server attributes for the specified application. If you specify a server name, ACMS displays the current values of server attributes for the specified server only. Specify more than one server name by separating the server names with a comma (,) and enclosing them in parentheses. If you do not specify a server name, ACMS displays the server attributes for all servers in the specified application.
You can display the settings of the following server attributes:Whether server audit logging is enabled or disabled
The delay time for server creation and deletion
The interval time for server creation and deletion
The maximum number of server processes allowed
The minimum number of server processes allowed
Whether server process dumps are enabled or disabled
Modify server attributes with the
ACMS/MODIFY APPLICATION/SERVER_ATTRIBUTEScommand.- /TASK_ATTRIBUTES[=(task-name[ ,...])]
Displays the current settings of modifiable task attributes for the specified application. If you specify a task name, ACMS displays the task attributes for the specified task only. Specify more than one task name by separating the task names with a comma (,) and enclosing them in parentheses. If you do not specify a task name, ACMS displays task attributes for all tasks in the specified application.
You can display the settings of the following task attributes:Whether task-level audit logging is enabled or disabled
Whether a task is designated as enabled or disabled
Whether or not DECdtm transaction timeout is set for a task, and at what interval if set
Modify task attributes with the
ACMS/MODIFY APPLICATION/TASK_ATTRIBUTEScommand.
Notes
If you specify an application that is not active, ACMS returns an error.
The ACMS/SHOW APPLICATION command with no qualifiers displays
information that is useful in determining the optimal values for maximum server
processes and minimal server processes.
You can use the pool information displayed when you use the
/POOL qualifier to set the ACMSGEN workspace and control pool
sizes. See Chapter 11, "Changing ACMS Parameter Values with the ACMSGEN Utility" for more information on adjusting the pool
size for your system.
Examples
$ACMS/SHOW APPLICATIONACMS V4.0 CURRENT APPLICATIONS Time: 5-MAY-1994 13:34:56.41Application Name: TIME_TEST State: STARTEDObject Name: ACMS01EXC001000User Name: NOMIS PID: 22000123Max Task Count: 120 Max SP Count: 150Cur Task Count: 2 Cur SP Count: 1Auditing: OFF SP Mon. Interval: 5Server Name max SPs min SPs active free waitingSPs SPs tasksLAS_SRVR 1 0 1 0 1Application Name: SANDAPPL State: STARTEDObject Name: ACMS01EXC003000User Name: EDLOD PID: 2200047CMax Task Count: 65535 Max SP Count: 150Cur Task Count: 0 Cur SP Count: 0Auditing: OFF SP Mon Interval: 20Server Name max SPs min SPs active free waitingSPs SPs tasksSANDSRV 5 0 0 0 0This example displays server and task information for all applications started on the local node.
$ACMS/SHOW APPLICATION QUALITY/SERVER_ATTRIBUTES=(NAME=LAS_SRVR) -_$/TASK_ATTRIBUTESACMS V4.0 CURRENT APPLICATIONS Time: 5-MAY-1994 13:34:56.41Application Name: QUALITY State: STARTEDObject Name: ACMS01EXC001000User Name: NOMIS PID: 22000123Max Task Count: 123 Max SP Count: 150Cur Task Count: 1 Cur SP Count: 1Auditing: OFF SP Mon. Interval: 10---------------------- SERVER ATTRIBUTES ----------------------------Server Name: LAS_SRVRMax. SPs: 1 Min SPs: 0Creation Delay: 5 Creation Interval: 2Deletion Delay: 15 Deletion Interval: 5Auditing: ON Process Dumps: OFF------------------------ TASK ATTRIBUTES ----------------------------Task Name: LAS_TASK1Status: ENABLED Auditing: ONTransaction Timeout: NO TIME LIMITTask Name: LAS_TASK2Status: DISABLED Auditing: OFFTransaction Timeout: 30This example displays the modifiable server attributes for server LAS_SRVR in the application QUALITY. See Chapter 9, "Installing and Managing Applications" for a description of the fields in this display.
$ACMS/SHOW APPLICATION/POOL TESTACMS V4.0 CURRENT APPLICATIONS Time: 20-MAY-1994 11:21:04.50Application Name: TEST State: STARTEDObject Name: ACMS01EXC008000User Name: WAYNE PID: 25C01337Max Task Count: 65535 Max SP Count: 5Cur Task Count: 0 Cur SP Count: 2Auditing: ON SP Mon. Interval: 5Application Workspace and Control PoolsPool Pool Free (pct.) Largest Allocation Garbagetype size bytes block failures collectionsGroup/User workspace poolsControl pool 65536 64848 (98%) 32768 0 0Workspace pool 131072 130560 (99%) 65536 0 0TEST_GRP01Control pool 25600 25088 (98%) 16384 0 0Workspace pool 179200 178688 (99%) 65536 0 0TEST_GRP02Control pool 25600 25088 (98%) 16384 0 0Workspace pool 179200 178688 (99%) 65536 0 0DBMS_GRPControl pool 25600 25088 (98%) 16384 0 0Workspace pool 179200 178688 (99%) 65536 0 0TEST_GRP10Control pool 25600 25088 (98%) 16384 0 0Workspace pool 179200 178688 (99%) 65536 0 0TEST_GRP_LANGControl pool 25600 25088 (98%) 16384 0 0Workspace pool 179200 178688 (99%) 65536 0 0This example displays pool size information for the application TEST. See Chapter 9, "Installing and Managing Applications" for a description of the fields in this display.
$ACMS/SHOW APPLICATION/CONNECTIONSACMS V4.0 CURRENT APPLICATIONS Time: 23-APR-1994 10:50:42.95 Application Name: PACCARE_APPL State: STARTED User Name Submitter ID Agent PID Device SMITH MYNODE::00030035 22400104 TWA3: ACMS_TEST YRNODE::023B0004 (YRNODE::) LTA5006: ACMS_TEST YRNODE::00B60013 (YRNODE::) LTA5014: Application Name: EMPLOYEE_INFO_APPLICATION State: STARTED User Name Submitter ID Agent PID Device ACMS_TEST YRNODE::00B60013 (YRNODE::) LTA5014: ACMS_TEST YRNODE::023B0004 (YRNODE::) LTA5006: SMITH MYNODE::00030035 22400104 TWA3: Application Name: EMPLOYEE_INFO_APPL_RTS State: STARTED There are no users connected to this applicationThis command displays information about all users connected to applications PACCARE_APPL and EMPLOYEE_INFO_APPLICATION. There are no users connected to the application EMPLOYEE_INFO_APPL_RTS.
$ACMS/SHOW APPLICATION/DETACHED_TASKS DIST_APPLACMS V4.0 CURRENT APPLICATIONS Time: 23-APR-1994 09:58:20.65 Application Name: DIST_APPL State: STARTED Task Name: DEQUEUE_TASK Task State: Active Submitter ID: YRNODE::00020016 Username: JONES Retry Limit: 10 Retry Count: 2 Retry Wait Timer: 60 Task Name: UPDATE_CENTRAL_TASK Task State: Waiting to Retry Submitter ID: YRNODE::00020017 Username: SMITH Retry Limit: 10 Retry Count: 0 Retry Wait Timer: 60This example shows that the detached tasks DEQUEUE_TASK and UPDATE_CENTRAL_TASK in the application DIST_APPL are started. The task DEQUEUE_TASK is currently active and has retried two times. The task UPDATE_CENTRAL_TASK is waiting to retry. Both tasks wait 60 seconds before retrying, and both tasks have a retry limit of 10.
ACMS/SHOW APPLICATION/CONTINUOUS Command
ACMS/SHOW APPLICATION/CONTINUOUS Command — Displays information about an active ACMS application in continuous refresh mode.
Format
| Command Qualifiers | Defaults |
|---|---|
| /[NO]BEGINNING_TIME=time | /NOBEGINNING_TIME |
| /[NO]ENDING_TIME=time | /NOENDING_TIME |
| /[NO]INTERVAL[=seconds] | /NOINTERVAL |
| /[NO]OUTPUT[=file-spec] | /NOOUTPUT |
Required Privileges
None.
Parameters
- application-name
The file name of an application that you want to display information about. Specify only the file name of an application database file; do not include a device, directory, or file type. You can specify only one application name with each command.
Qualifiers
- /[NO]BEGINNING_TIME=time
Controls when the command starts displaying information on your terminal screen or when it begins to copy screen information to an output file (if you use
/OUTPUT). The/BEGINNING_TIMEqualifier is most useful in a command file. You can specify absolute time or a combination of absolute and delta times. See the VSI OpenVMS User's Manual for information about specifying time. The/NOBEGINNING_TIMEqualifier is the default.- /[NO]ENDING_TIME=time
Controls when the command stops displaying information on your terminal screen or when it stops copying screen information to an output file (if you use
/OUTPUT). The/ENDING_TIMEqualifier is most useful when used in a command file. You can specify absolute time or a combination of absolute and delta times. See the VSI OpenVMS User's Manual for information about specifying absolute and delta time. The/NOENDING_TIMEqualifier is the default.- /[NO]INTERVAL=seconds
Controls how often a terminal screen is refreshed or how often new information is copied to an output file (if you use
/OUTPUT). The default is/INTERVAL=30.- /[NO]OUTPUT [=file-spec]
Controls whether or not display output is sent to a file. If you enter
/OUTPUTwith a partial file specification, ACMSSHOW is the default file name, .LIS is the default file type, and your current default directory is the directory. The/NOOUTPUTqualifier is the default; output is sent to your terminal.
Notes
The ACMS/SHOW APPLICATION/CONTINUOUS command provides
information you can use to evaluate values in the application definition clause
MAXIMUM SERVER PROCESSES, and in the MAXIMUM SERVER PROCESSES and MINIMUM SERVER
PROCESSES subclauses.
Control the video display by using the control and arrow keys. Press Ctrl/C, Ctrl/Y, or Ctrl/Z to terminate the display. Press Ctrl/W to refresh the screen. Use the up arrow and down arrow keys to scroll the screen forward and backward.
There are cases when the values for average number of active servers, average number of free servers and average number of waiting tasks for a given server are displayed as 0. This can occur even when the displayed maximum values of these quantities are quite large.
The averages that are displayed with the ACMS/SHOW
APPLICATION/CONTINUOUS command are calculated as follows. Every time
that the screen display needs to be refreshed, EXC is polled for data about the
servers and a refresh counter is incremented by 1. The average is determined by
dividing the running total of the particular data point (i.e. Waiting Tasks) by the
number of times that the display has been refreshed. In the case of a data point
that has had a noticeable maximum peak over a short amount of time, the average can
be very close to zero as the number of refreshes gets very large. The decimal value
of the average is rounded down in all cases. So an average of 0.499(9) or less, is
rounded down to zero.
Example
$ACMS/SHOW APPLICATION/CONTINUOUS SANDAPPLACMS CONTINUOUS APPLICATION MONITOR28-MAY-1994 13:48:36.10Name: SANDAPPL State: STARTEDProcess: ACMS01EXC003000User: EDLOD PID: 2200047CMax Tasks: 65535 Max SPs: 5Cur Tasks: 0 Cur SPs: 0SERVER NAME Min SP/Max SP Current Average Minimum MaximumSANDSRV 0/5Active Servers 0 0 0 0Free Servers 0 1 1 1Waiting Tasks 0 0 0 0
This command shows the SANDAPPL application in continuous refresh mode. Because you did not name an interval, ACMS changes the screen every 30 seconds. See Chapter 9, "Installing and Managing Applications" for a description of each field in this display.
ACMS/SHOW QTI Command
ACMS/SHOW QTI Command — Displays the run-time characteristics of the QTI.
Format
Required Privileges
None.
Notes
None.
Example
$ACMS/SHOW QTIACMS V4.0 QTI - Queued Task Initiator Time: 14-MAY-1994 16:16:05.52State: STARTED User Name: SYSTEMPID: 11000211 Process Name: ACMS01QTI001000Queues: 2 Submitter Count: 5
This example displays the run-time characteristics of the QTI. See Chapter 8, "Controlling the ACMS System" for a description of the fields in this display.
ACMS/SHOW QUEUE Command
ACMS/SHOW QUEUE Command — Displays queue information.
Format
Privileges Required
None.
Parameters
- queue-name
The name of the queue that you want to display information about. Specify more than one queue name by separating the queue names with a comma (,). If you do not supply a queue name, ACMS displays information about all queues that are started on your node.
Notes
The queues displayed by the ACMS/SHOW QUEUE command are those
currently being processed by the Queued Task Initiator (QTI).
Example
$ACMS/SHOW QUEUE MECCAQUEUEACMS V4.0 QUEUED TASK QUEUES Time: 14-MAY-1994 16:16:05.52Task Queue: MECCAQUEUE State: STARTEDThreads: 4 Successful tasks invocations: 783Active Tasks: 2 Failed tasks invocations: 4Error Queue: MECCAERROR_QUEUETasks queued to error queue: 0
This example displays queue information about the queue MECCAQUEUE. See Chapter 8, "Controlling the ACMS System" for a description of the fields shown in this display.
ACMS/SHOW SERVER Command
ACMS/SHOW SERVER Command — Displays information about one or more servers running under a specified application.
Format
| Command Qualifiers | Defaults |
|---|---|
| /APPLICATION=application-name | All applications |
Required Privileges
None.
Parameters
- server-name
The name of the server you want to display. Specify more than one server name by separating the server names with a comma (,). If you do not supply a server name, ACMS displays information on all servers.
Qualifiers
- /APPLICATION=application-name
Specifies an application that contains the server or servers you want to display. Specify only the file name of the application database file; do not specify a device, directory, or file type. If you do not specify the
/APPLICATIONqualifier, all servers in all active applications are displayed.
Notes
None.
Examples
$ACMS/SHOW SERVER ACMS_TEST_SERVER/APPLICATION=ACMS_TEST_APPLACMS V4.0 CURRENT SERVERS Time: 8-MAY-1994 13:42:28.91Application Name: ACMS_TEST_APPL State: STARTEDServer Name: ACMS_TEST_SERVERProcess Name: ACMS007SP001001 State: ACTIVEUser Name: TEST_USER PID: 212004A6Image: TESTS::ACMS_TEST_SERVER.EXE;23Active Task: DEMO_TASKTask ID: NODE1::00010029-0000000FProcess Name: ACMS007SP001002 State: FREEUser Name: TEST_USER PID: 212004A9Image: ACMS_TEST_SERVER.EXE;23Active Task: NONETask ID: NONEThis example displays information about the server ACMS_TEST_SERVER running under the application ACMS_TEST_APPL.
$ACMS/SHOW SERVER ACMS_DCL_SERVER/APPLICATION_NAME=ACMS_TEST_APPLACMS V4.0 CURRENT SERVERS Time: 8-MAY-1994 13:42:28.91Application Name: ACMS_TEST_APPL State: STARTEDServer Name: ACMS_DCL_SERVERProcess Name: ACMS008SP001000 State: ACTIVEUser Name: DEMO_USER (DYNAMIC) PID: 2120073CImage: DCL SERVER PROCESSActive Task: DCL_TASKTask ID: NODE1::0001002F-00000017This example displays information about the server ACMS_DCL_SERVER running under the application ACMS_TEST_APPL.
ACMS/SHOW SYSTEM Command
ACMS/SHOW SYSTEM Command — Displays information about the ACMS run-time system, all local and remote users, and all local applications.
Format
| Command Qualifiers | Defaults |
|---|---|
| /POOL | No pool information displayed |
| /ALL | All processes using message-switch displayed |
Privileges Required
None.
Qualifiers
- /POOL
Displays information on pool size and available pool space for the system message switch pools for ACMS processes. No information on current users or applications is displayed when you specify the
/POOLqualifier. If you do not specify the/POOLqualifier, no pool information is displayed.- /ALL
Use the
/ALLqualifier with the/POOLqualifier to display information on pool size and available pool space for the system message switch pools for user-written agent processes, agents using the ACMSDEBUG Utility, and processes executing operator commands, in addition to information for ACMS processes.
Notes
You can use the pool information displayed when you use the
/POOL qualifier to set the ACMSGEN parameters MSS_POOLSIZE
and MSS_PROCESS_POOL. See Chapter 11, "Changing ACMS Parameter Values with the ACMSGEN Utility" for more information on
adjusting the pool size for your system.
Examples
$ACMS/SHOW SYSTEMACMS V4.0 Current System State: STARTED Time: 23-APR-1994 10:53:37.70 Terminal Subsystem State: STARTED Queued Task Initiator State: STOPPED System Auditing State: ENABLED Active ACMS Users User Name Submitter ID Agent PID Device SMITH MYNODE::00030035 22400104 TWA3: SMITH MYNODE::00030040 22400104 TWA4: ACMS_TEST YRNODE::00B60013 (YRNODE::) LTA5014: ACMS_TEST YRNODE::023B0004 (YRNODE::) LTA5006: Active Execution Controllers Application Name Process Name User Name Exc PID PACCARE_APPL ACMS01EXC002000 ACMS_TEST 224000CE EMPLOYEE_INFO_APPLICATION ACMS01EXC003000 SMITH 224000D7 EMPLOYEE_INFO_APPL_RTS ACMS01EXC004000 EMPLOYEE_EXC 224000D9This command displays information about ACMS. The display describes the current system state as STARTED and lists all ACMS users, active applications, and their Application Execution Controllers (EXC). See Chapter 8, "Controlling the ACMS System" for an itemized description of each field in this display.
$ACMS/SHOW SYSTEM/POOLACMS V4.0 Current System State: STARTED Time: 23-APR-1994 10:53:37.70 Terminal Subsystem State: STARTED Queued Task Initiator State: STOPPED System Auditing State: ENABLED ACMS System Message Switch Pools Process Pool Free (pct) Largest Allocation Garbage name size bytes block failures collections < Shared Pool > 262144 228056 (86%) 65536 0 0 ACMS01ACC001000 131072 121168 (92%) 65536 0 0 ACMS01ATL001000 131072 127024 (96%) 65536 0 0 ACMS01TSC001000 131072 126544 (96%) 65536 0 0 ACMS01CP001000 131072 123824 (94%) 65536 0 0 ACMS01EXC008000 131072 123312 (94%) 65536 0 0 ACMS008SP001000 131072 125552 (95%) 65536 0 0 ACMS008SP002013 131072 126704 (96%) 65536 0 0This example displays pool size information about the current ACMS system. The display shows the current active system processes, the amount of pool space they use, the number of free bytes of pool space available, the largest block of pool space currently used, the number of allocation failures (if any), and the number of attempts to use fragmented pool space. See Chapter 8, "Controlling the ACMS System" for an itemized description of each field in this display.
ACMS/SHOW TASK Command
ACMS/SHOW TASK Command — Displays information about one or more active ACMS tasks executing on the local node.
Format
| Command Qualifiers | Defaults |
|---|---|
| /APPLICATION=application-name | All applications |
| /DEVICE=device-name | All devices |
| /IDENTIFIER=task-id | All tasks |
| /SUBMITTER=submitter-id | All submitters |
| /USER=user-name | All users |
Required Privileges
None.
Parameters
- task-name
The name of the task assigned in the application definition. If you do not specify a task name, ACMS displays information about all active tasks. Specify more than one task name by separating the task names with a comma (,).
Qualifiers
- /APPLICATION=application-name
Names the application in which the task or tasks you want to display are defined. The application name is the file name of the application database file. Do not include device, directory, or file type (.ADB). If you omit this qualifier, ACMS searches all applications on the node for the tasks you specify. If you include an application name with the
/APPLICATIONqualifier, ACMS searches for the task name in that application only.- /DEVICE=device-name
Displays only those tasks that have the specified device name. Device name is the name of the terminal at which the task is running. You must end the device name with a colon (:). When you do not specify the
/DEVICEqualifier, ACMS does not select tasks by device name to display.- /IDENTIFIER=task-id
Displays only those tasks that have the specified ID. ACMS assigns a unique task ID to each task a user selects. You need not specify leading and trailing zeros when specifying a task ID. You can display information on tasks called by other tasks. Refer to Chapter 12, "Auditing Applications with the Audit Trail Logger" for information about specifying a task ID.
- /SUBMITTER=submitter-id
Displays only those tasks that have the specified user ID. ACMS assigns a unique user ID to each user who signs in. You need not specify leading and trailing zeros when specifying a submitter ID. Refer to Chapter 12, "Auditing Applications with the Audit Trail Logger" for information about specifying a submitter ID.
If you do not specify the
/SUBMITTERqualifier, ACMS does not select tasks by submitter ID to display.- /USER=user-name
Displays only those tasks that were submitted by the user with the specified user name
Notes
If you do not specify a qualifier, the ACMS/SHOW TASK command
displays information about all active tasks as well as all tasks called by other
tasks.
The ACMS/SHOW TASK command does not display the transaction ID
(TID) for a task that is executing a transaction step if that transaction step is a
single processing step. The ACMS/SHOW TASK command displays the
TID only for all composed tasks and for tasks where the transaction step is a block
step.
Example
$ACMS/SHOW TASKACMS V4.0 CURRENT TASKS Time: 28-MAY-1994 13:35:23.19Task Name: MON_TASKTask ID: WOW::0001000D-00000001Application: LAS_APPL User Name: CAMEOSubmitter ID: WOW::0001000D Device: TTB1:Task Name: OPR_TASKTask ID: WOW::00020013-00000003Application: LAS_APPL User Name: NOMISSubmitter ID: WOW::00020013 Device: TTH0:Called Task: OPR_TASK_ATask ID: WOW::00020013-00000003-00000001Called Task: OPR_TASK_BTask ID: WOW::00020013-00000003-00000002
This command displays information about all tasks active on the local node. See Chapter 9, "Installing and Managing Applications" for a description of each field shown in this display.
ACMS/SHOW USER Command
ACMS/SHOW USER Command — Displays information about ACMS users. With qualifiers, displays information about only those users you identify.
Format
| Command Qualifiers | Defaults |
|---|---|
| /ALL | /ALL |
| /APPLICATION | All applications |
| /DEVICE=device-name | All devices |
| /[NO]FULL | /NOFULL |
| /LOCAL | All submitters |
| /REMOTE | All submitters |
| /SUBMITTER=submitter-id | All submitters |
Privileges Required
None.
Parameters
- user-name
Specifies the name of the user that you want to display information about. If you do not specify a user name, the
ACMS/SHOW USERcommand displays information about all ACMS users. Specify more than one user name by separating each user name with a comma (,).
Qualifiers
- /ALL
Displays information for both local and remote users. Local users are those who sign in to ACMS on the local node. Remote users are those who select tasks from a remote node. In addition, the
/ALLqualifier displays the total number of users accessing the ACMS system.ACMS/SHOW USER/ALLis the default.You cannot specify the
/ALLqualifier with the/LOCALor/REMOTEqualifier.- /APPLICATION
Displays each local application that a user is connected to.
- /DEVICE=device-name
Displays information about ACMS users at the specified terminal. The device name is a terminal ID. You must end the device-name with a colon (:). If you do not specify the
/DEVICEqualifier, ACMS does not select users by device name to display information about.- /[NO]FULL
Displays task information for each user. The default is
/NOFULL.- /LOCAL
Displays information for local users only. Local users are those who sign in to ACMS on the local node. You cannot specify the
/LOCALqualifier with the/REMOTEor/ALLqualifier.- /REMOTE
Displays information only about remote users currently accessing applications on the local node. Remote users are those who selected tasks from a remote node. You cannot specify the
/REMOTEqualifier with the/LOCALor/ALLqualifier.- /SUBMITTER=submitter-id
Displays information only about users that have the specified submitter ID. ACMS assigns a unique submitter ID to each user who signs in. Refer to Chapter 12, "Auditing Applications with the Audit Trail Logger" for information about specifying a submitter ID.
If you do not specify the
/SUBMITTERqualifier, ACMS does not select users by submitter ID to display information about.
Notes
If you do not specify a user name or use any of the qualifiers, the
ACMS/SHOW USER command displays information about all
users.
If a user is signed in at more than one terminal, you can use the
/DEVICE qualifier to get information about the user's
activity at one of the terminals. This qualifier is valid only for local
users.
If you have the OPER privilege, you can cancel one or more local users by using
the ACMS/CANCEL USER command.
The ACMS/SHOW USER/FULL command does not display information
about called tasks. Use the ACMS/SHOW TASK command to display
information about called tasks.
Use the /LOCAL qualifier to display information about local
users.
Use the /REMOTE qualifier to display information about remote
users.
Use the /ALL qualifier (the default) to display information
about both local and remote users.
Use the /APPLICATION qualifier to see a list of local applications that the user
is connected to.
Examples
$ACMS/SHOW USER/ALLACMS V4.0 CURRENT USERS Time: 16-MAR-1994 16:32:14.93 User name: SMITH Submitter ID: VAXA::0001001E Agent PID: 22E000C0 Device: TWA2: User name: JONES Submitter ID: VAXA::0002001E Agent PID: 22E000C0 Device: RTA2: User name: TOWERS Submitter ID: VAXA::0004001E Agent PID: 22E000C0 Device: LTA2: User name: NEWMAN Submitter ID: VAXB::0006001E Agent PID: (VAXB::) Device: TWA2: User name: JACKSON Submitter ID: VAXB::0007001E Agent PID: (VAXB::) Device: LTA12: User name: SMITH_S Submitter ID: VAXC::0008001E Agent PID: (VAXB::) Device: LTA22: Total known active users: 6This command displays information about all local and remote users signed in to ACMS on the node. For nodes with concurrent-use licenses, the total number of active users represents the number of license units in use.
ACMS/SHOW USER/ALLis the default.$ACMS/SHOW USER/LOCALACMS V4.0 CURRENT USERS Time: 16-MAR-1994 16:32:14.93 User Name: SMITH Submitter ID: VAXA::0001001E Agent PID: 22E000C0 Device: TWA2: User name: JONES Submitter ID: VAXA::0002001E Agent PID: 22E000C0 Device: RTA2: User name: TOWERS Submitter ID: VAXA::0004001E Agent PID: 22E000C0 Device: LTA2:This command displays information about all local users signed in to ACMS.
$ACMS/SHOW USER/APPLICATIONACMS V4.0 CURRENT USERS Time: 23-APR-1994 10:45:19.14 User Name: SMITH Submitter ID: MYNODE::00030035 Agent PID: 22400104 Device: TWA3: Application: PACCARE_APPL Application: EMPLOYEE_INFO_APPLICATION User Name: SMITH Submitter ID: MYNODE::00030040 Agent PID: 22400104 Device: TWA4: This user is not connected to any applications User Name: ACMS_TEST Submitter ID: YRNODE::00B60013 Agent PID: (YRNODE::) Device: LTA5014: Application: EMPLOYEE_INFO_APPLICATION Application: PACCARE_APPL User Name: ACMS_TEST Submitter ID: YRNODE::023B0004 Agent PID: (YRNODE::) Device: LTA5006: Application: EMPLOYEE_INFO_APPLICATION Application: PACCARE_APPL Total known active users: 4This command displays information about all local and remote users signed in to ACMS on the node and lists the local applications that each user is connected to. For nodes with concurrent-use licenses, the total number of known active users represents the number of license units in use.
$ACMS/SHOW USER/APPLICATION/LOCALACMS V4.0 CURRENT USERS Time: 16-MAR-1994 16:32:14.93 User Name: SMITH Submitter ID: VAXA::0001001E Agent PID: 22E000C0 Device: TWA2: Application: EMPLOYEE_INFO_APPLICATION Application: PAYROLL_APPLICATION Application: ACCOUNTING_APPLICATION User Name: JONES Submitter ID: VAXA::0002001E Agent PID: 22E000C0 Device: RTA2: Application: PAYROLL_APPLICATION User name: JONES_J Submitter ID: VAXA::0003001E Agent PID: 22E000C0 Device: RTA3 This user is not connected to any application User name: TOWERS Submitter ID: VAXA::0004001E Agent PID: 22E000C0 Device: LTA2: Application: INVENTORY_APPLICATION Application: ORDER_ENTRY_APPLICATION Application: CREDIT_INQUIRY_APPLICATIONThis command displays information about all local users and lists the local applications that each user is connected to.
$ACMS/SHOW USER/DEVICE=RTA2:ACMS V4.0 CURRENT USERS Time: 16-MAR-1994 16:32:14.93 User Name: JONES Submitter ID: VAXA::0002001E Agent PID: 22E000C0 Device: RTA2:This command displays information about the user signed in to ACMS at terminal RTA2:.
$ACMS/SHOW USER/FULLACMS V4.0 CURRENT USERS Time: 16-MAR-1994 16:32:14.93 User Name: SMITH Submitter ID: VAXA::0001001E Agent PID: 22E000C0 Device: TWA2: Task Name: EMPLOYEE_INFO_UPDATE_TASK Task ID: VAXA::0001001E-00000001 Appl Name: EMPLOYEE_INFO_APPLICATION Appl Node: VAXA:: User Name: JONES Submitter ID: VAXA::0002001E Agent PID: 22E000C0 Device: RTA2: User JONES has no active tasks. User name: TOWERS Submitter ID: VAXA::0004001E Agent PID: 22E000C0 Device: LTA2: Task Name: ORDER_ADD Task ID: VAXA::0004001E-00000001 Appl Name: ORDER_ENTRY_APPLICATION Appl Node: VAXA::This command displays information about all local users and lists the tasks submitted by those users.
$ACMS/SHOW USER/REMOTEACMS V4.0 CURRENT USERS Time: 16-MAR-1994 16:32:14.93 User name: NEWMAN Submitter ID: VAXB::0006001E Agent PID: (VAXB::) Device: TWA2: User name: JACKSON Submitter ID: VAXB::0007001E Agent PID: (VAXB::) Device: LTA12: User name: SMITH_S Submitter ID: VAXC::0008001E Agent PID: (VAXC::) Device: LTA22:This command displays information about all remote users.
$ACMS/SHOW USER/REMOTE/APPLICATIONACMS V4.0 CURRENT USERS Time: 16-MAR-1994 16:32:14.93 User name: NEWMAN Submitter ID: VAXB::0006001E Agent PID: (VAXB::) Device: TWA2: Application: PAYROLL_APPLICATION Application: ACCOUNTING_APPLICATION User name: JACKSON Submitter ID: VAXB::0007001E Agent PID: (VAXB::) Device: LTA12: Application: EMPLOYEE_INFO_APPLICATION Application: PAYROLL_APPLICATION Application: ACCOUNTING_APPLICATION Application: INVENTORY_APPLICATION Application: ORDER_ENTRY_APPLICATION Application: CREDIT_INQUIRY_APPLICATION User name: SMITH_S Submitter ID: VAXC::0008001E Agent PID: (VAXC::) Device: LTA22: Application: PAYROLL_APPLICATION Application: CREDIT_INQUIRY_APPLICATIONThis command displays information about all remote users signed in to ACMS and lists the local applications that each user is connected to.
ACMS/START APPLICATION Command
ACMS/START APPLICATION Command — Starts one or more ACMS applications.
Format
Privileges Required
OpenVMS OPER privilege.
Parameters
- application-name
The file name of the application you want to start. Specify only the file name of the application database file; do not include device, directory, or file type. You must specify at least one application name. Specify more than one application name by separating each name with a comma (,).
Notes
The ACMS system must be started before you use the ACMS/START
APPLICATION command. Specify the ACMS/START SYSTEM
command to start ACMS.
Before you use the ACMS/START APPLICATION command,
ACMS$DIRECTORY must be defined in
SYS$MANAGER:SYSTARTUP_VMS.COM as a system logical name
pointing to the directory that contains the application database files. When you
start applications, application database files must reside in
ACMS$DIRECTORY.
ACMS/START APPLICATION command can stall when you start an
application if both of the following conditions are present:The application is defined with minimum server processes greater than zero.
A server cannot start. This usually indicates a problem in the initialization procedure, such as an infinite loop in the program.
%ACMSOPR-E-STRTAPLERR, Error while attempting to START APPLICATION application-name -ACMSOPS-W-TIMEOUT, Timed out waiting for reply from ACMS component %ACMSOPR-E-ERROR, Some operations may not have been performed
ACMS/SHOW SYSTEM command to find the process ID (PID)
for the Application Execution Controller or the PID of the hanging server process.
ACMS/SHOW SYSTEM displays the PID that you can use in the
following command to recover from the
error:$STOP/ID=<pid>
If the ACMS/START APPLICATION command fails and the Software
Event Log (SWL) report indicates an "exceeded quota " error for the
EXC, the quota for the buffered I/O byte count limit (BYTLM) is
probably not set properly. Increase this quota for the user name of the application,
and try the command again. Refer to Chapter 10, "Setting ACMS Quotas, Parameters, and Privileges" for information
about setting the proper quota limit for BYTLM.
Example
$ACMS/START APPLICATION PERSONNEL, DEPARTMENT
This command starts the PERSONNEL and DEPARTMENT applications.
ACMS/START QTI Command
ACMS/START QTI Command — Starts the QTI.
Format
Privileges Required
OpenVMS OPER privilege.
Notes
You must start ACMS before you can use the ACMS/START QTI
command.
You must start The QTI must be started before queues can be started. You can also
start the QTI by specifying the ACMS/START SYSTEM command with
the /QTI qualifier.
Stop the QTI by using the ACMS/STOP QTI command.
Example
$ACMS/START QTI
This example starts the QTI.
ACMS/START QUEUE Command
ACMS/START QUEUE Command — Starts the task queue you specify. Once you start a task queue, the QTI begins processing any queued task elements in the queue.
Format
| Command Qualifiers | Defaults |
|---|---|
| /ERROR_QUEUE=error-queue-name | No error queue |
| /TASK_THREADS=n | /TASK_THREADS=1 |
Required Privileges
OpenVMS OPER privilege.
Parameters
- queue-name
The name of a task queue created by the ACMS Queue Manager (ACMSQUEMGR). You must supply at least one queue name. Specify more than one queue name by separating each name with a comma (,).
Qualifiers
- /ERROR_QUEUE=error-queue-name
Specifies the error queue for a task queue. If you specify this qualifier, queued tasks that do not complete successfully are placed on the specified error queue. Any errors are recorded in the Audit Trail Logger.
The
/ERROR_QUEUEqualifier is a positional qualifier. If you specify the/ERROR_QUEUEqualifier between theACMS/START QUEUEcommand and the queue names, all queue names are affected. If you specify theACMS/START QUEUEcommand after a queue name, only that queue name is affected.If you do not specify the
/ERROR_QUEUEqualifier, no error queue is associated with the task queue. When an error occurs, the task is deleted from the queue.- /TASK_THREADS=n
Specifies the number of concurrent outstanding tasks that the QTI processes for a queue. Here, n indicates a value from 1 through 256.
The
/TASK_THREADSqualifier is a positional qualifier. If you position the/TASK_THREADSqualifier between theACMS/START QUEUEcommand and the queue names, all queue names are affected. To have the/TASK_THREADSqualifier apply to an individual queue name in a list of queue names, place the qualifier directly after the queue name. See the examples section.The default is
/TASK_THREADS=1.
Notes
The error queue you specify with the /ERROR_QUEUE qualifier
must exist. You create an error queue with the ACMSQUEMGR Utility. See Chapter 5, "Creating and Managing Queues" for information on the ACMSQUEMGR
You can queue tasks to a queue and remove tasks from a queue using ACMS Queued Task Services even though a queue is not started.
Examples
$ACMS/START QUEUE ACCTS_QUEThis example starts the ACMS task queue ACCTS_QUE.
$ACMS/START QUEUE MAWAH_QUE/ERROR_QUEUE=W_ERROR, MY_QUE -_$/ERROR_QUEUE=M_ERRORThis example starts the task queues MAHWAH_QUE and MY_QUE and any tasks in these queues. If any tasks in MAHWAH_QUE do not complete normally, they are placed on the error queue W_ERROR. If any tasks in MY_QUE do not complete normally, they are placed on the error queue M_ERROR.
$ACMS/START QUEUE PARTS_QUE, FAST_QUE /TASK_THREADS=5This example starts the task queues PARTS_QUE and FAST_QUE. The maximum number of concurrent outstanding tasks for PARTS_QUE is set to the default value. For FAST_QUE, the maximum number of concurrent outstanding tasks is set to 5.
ACMS/START SYSTEM Command
ACMS/START SYSTEM Command — Starts the ACMS system.
Format
| Command Qualifiers | Defaults |
|---|---|
| /[NO]AUDIT | /AUDIT |
| /[NO]QTI | /NOQTI |
| /[NO]TERMINALS | /TERMINALS |
Privileges Required
OpenVMS OPER privilege.
Qualifiers
- /[NO]AUDIT
The
/AUDITqualifier starts ACMS with audit trail logging enabled. The/AUDITqualifier is the default. After you start ACMS, you can control the Audit Trail Logger with theACMS/SET SYSTEMandACMS/RESET TERMINALScommands.- /[NO]QTI
The
/QTIqualifier starts the QTI when ACMS is started. Once the QTI is started, you can start one or more queues with theACMS/START QUEUEcommand. If you specify the/NOQTIqualifier, the QTI is not started with ACMS. The/NOQTIqualifier is the default.- /[NO]TERMINALS
The
/TERMINALSqualifier starts the TSC when ACMS is started. The/TERMINALSqualifier is the default. If you specify the/NOTERMINALSqualifier, the TSC is not started with ACMS. If you specify/NOTERMINALS, you can start the TSC at a later time with theACMS/START TERMINALScommand.
Notes
Include the ACMS/START SYSTEM and ACMS/START
APPLICATION commands in your OpenVMS site-specific startup file
(SYS$MANAGER:SYSTARTUP_VMS.COM) to start ACMS and ACMS
applications automatically when OpenVMS
starts.
When you start the TSC with the ACMS/START SYSTEM command,
recently assigned terminal sign-in characteristics defined by the DDU take
effect.
If you do not start the QTI when you start ACMS, you can specify the
ACMS/START QTI command to start the QTI at a later
time.
Examples
$ACMS/START SYSTEM/NOTERMINALS$ACMS/START APPLICATION PERSONNEL,DEPARTMENT$ACMS/START TERMINALSThe first command starts ACMS without starting the TSC. At this point, users cannot sign in to ACMS. The second command starts the PERSONNEL and DEPARTMENT applications. The third command starts the TSC so users can sign in to ACMS and select tasks in the PERSONNEL or DEPARTMENT applications.
$ACMS/START SYSTEM/QTI$ACMS/START APPLICATION PERSONNEL,DEPARTMENTThese commands are part of a command file for starting ACMS and ACMS applications. When you run the command file, the first command starts ACMS, the QTI, and the TSC. The second command starts the PERSONNEL and DEPARTMENT applications, so users can select tasks in those applications.
ACMS/START TASK Command
ACMS/START TASK Command — Starts a detached task in the specified application.
Format
Privileges Required
OpenVMS OPER and SYSPRV privileges.
Parameters
- task-name
The name of the task that you want to start as a detached task. The task must contain no exchange steps and you must define the task with the NO I/O phrase. The task name must exist in the application specified by the application-name parameter.
- application-name
Specifies the file name of the application in which the detached task executes. Specify only the file name of an application database file; do not include a device, directory, or file type.
Qualifiers
- /[NO]LOG
Controls whether or not ACMS displays a message after the detached task has been successfully started. The
/NOLOGqualifier is the default.- /[NO]RETRY_LIMIT[=n]
Specifies the maximum number of times ACMS retries the task after a failure. Specifying
/NORETRY_LIMITindicates that ACMS always retries after a failure. The/RETRY_LIMIT=0qualifier is the default, which directs ACMS to never retry the task after a failure.- /SELECTION_STRING=selection-string
Specifies the data to be passed to the ACMS$SELECTION_STRING system workspace in a task. The default is to pass a null string to the ACMS$SELECTION_STRING system workspace.
- /USERNAME=user-name
Specifies the submitter user name under which the detached task is signed in. The default is the OpenVMS user name under which the Application Execution Controller (EXC) executes. If you specify an OpenVMS user name that is different than the EXC user name, the user name must be identified as an agent in the ACMS user definition file.
- /WAIT_TIMER=n
Specifies the number of seconds ACMS waits before retrying the task after a task failure. The
/WAIT_TIMER=5is the default; the minimum value is 1 and the maximum value is 65,535 seconds.
Notes
The ACMS/START TASK operator command completes when the
detached task has started successfully, or if it fails to start. If the detached
task fails immediately after the task starts executing, the failure is not reported
by the ACMS/START TASK operator command, because the ACMS
Operator Utility does not wait for the task to complete.
Before starting a detached task, you must start the application associated with the task. A user is signed in when starting a detached task. As a result, a set of license units is consumed, if the ACMS system has a loaded concurrent-user license.
The submitter user name under which a detached task is signed in must have an
entry in the ACMSUDF.DAT file with the /AGENT qualifier. The user
name is either the user name specified with the /USERNAME
qualifier of the ACMS/START TASK operator command or the default
EXC user name of the application.
Example
$ACMS/START TASK dequeue_task dist_appl -_$/RETRY_LIMIT=10/WAIT_TIMER=30/USERNAME=SMITH
This command starts the detached task, called dequeue_task, in the application dist_appl. The task can be retried a maximum of 10 times after task failures, and ACMS waits 30 seconds before it retries the task. The task is submitted with the user name SMITH.
ACMS/START TERMINALS Command
ACMS/START TERMINALS Command — Starts the TSC when ACMS is running. This command enables terminal users to access ACMS menus
Format
Privileges Required
OpenVMS OPER privilege.
Notes
You cannot start the TSC unless ACMS is active. Users cannot sign in to ACMS unless the TSC is started.
Use this command to start the TSC after specifying the
/NOTERMINALS qualifier when you started ACMS, or to restart
the TSC after stopping it with the ACMS/STOP TERMINALS
command.
When you start the TSC, recently assigned terminal sign-in characteristics defined by the DDU take effect. Starting the TSC also authorizes any new terminals added since the last time the TSC was started and releases any that are no longer authorized.
The ACMS/START TERMINALS only allows terminal users on the
local system to access the ACMS menus. It does not affect whether or not remote
users can access applications on the local system or whether or not users using
other task submitting agents (such as ALL-IN-1) can select
ACMS tasks.
Examples
$ACMS/START TERMINALSThis command starts or restarts the TSC. Users can then sign in to ACMS.
$ACMS/START SYSTEM/QTI/NOTERMINALS$ACMS/START APPLICATION DEPARTMENT,PERSONNEL$ACMS/START TERMINALSThis series of commands starts ACMS and the QTI, starts ACMS applications, and starts the TSC, respectively. The
ACMS/START TERMINALScommand starts the TSC separately from ACMS so users cannot sign in until applications are active.
ACMS/STOP APPLICATION Command
ACMS/STOP APPLICATION Command — Stops one or more ACMS applications.
Format
| Command Qualifiers | Defaults |
|---|---|
| /[NO]CANCEL | /NOCANCEL |
Privileges Required
OpenVMS OPER privilege.
Parameters
- application-name
The name of the application that you want to stop. Specify only an application name; do not include device, directory, or file type. You must specify at least one application name. Specify more than one application name by separating each name with a comma (,).
Qualifiers
- /[NO]CANCEL
The
/CANCELqualifier cancels an active task in the application you are stopping. If you use the/NOCANCELqualifier, ACMS waits until all active tasks stop before stopping the application. The/NOCANCELqualifier is the default.
Notes
Once you specify the ACMS/STOP APPLICATION command, no new
tasks can be started.
The ACMS/STOP APPLICATION command executes only when there are
no tasks active in the application you specify. If there are active tasks in the
application you want to stop, use the DCL REPLY command to ask
users to halt or complete the tasks and then sign out. You can then use the
/CANCEL qualifier to stop any tasks that remain active.
Restart applications by specifying the ACMS/START APPLICATION
command.
See the VSI OpenVMS DCL Dictionary: N–Z for
information about the DCL REPLY command.
Examples
$ACMS/STOP APPLICATION DEPARTMENT/CANCELThis command cancels any active tasks in the application DEPARTMENT and stops the application. Terminal users cannot select and run tasks in the application DEPARTMENT.
$ACMS/STOP APPLICATION PERSONNEL,DEPARTMENT/CANCELThis command cancels any active tasks in the PERSONNEL and DEPARTMENT applications and stops the applications. Terminal users cannot select and run tasks in these applications.
ACMS/STOP QTI Command
ACMS/STOP QTI Command — Stops the QTI and all active task queues.
Format
| Command Qualifiers | Defaults |
|---|---|
| /[NO]CANCEL | /NOCANCEL |
Required Privileges
OpenVMS OPER privilege.
Qualifiers
- /[NO]CANCEL
The
/CANCELqualifier cancels all active tasks in all active queues. If you use the/NOCANCELqualifier, ACMS waits until all active tasks stop before stopping the QTI and task queues. The/NOCANCELqualifier is the default.
Notes
Restart a queue by using the ACMS/START QTI and
ACMS/START QUEUE commands.
Example
$ACMS/STOP QTI
This command stops the QTI and all active queues.
ACMS/STOP QUEUE Command
ACMS/STOP QUEUE Command — Stops the specified task queue.
Format
| Command Qualifiers | Defaults |
|---|---|
| /[NO]CANCEL | /NOCANCEL |
Required Privileges
OpenVMS OPER privilege.
Parameters
- queue-name
The name of the task queue you want to stop. You must specify at least one queue name. Stop more than one queue by separating the queue names with a comma (,).
Qualifiers
- /[NO]CANCEL
The
/CANCELqualifier cancels all active tasks in the queue you are stopping. If you use the/NOCANCELqualifier, ACMS waits until all active tasks complete before stopping the queue. The/NOCANCELqualifier is the default.
Notes
When you specify the ACMS/STOP QUEUE command, the specified
task queue is stopped by the QTI.
Even though a task queue is stopped, queued task elements can still be initiated to the queue.
Example
$ACMS/STOP QUEUE ALAS_QUE, ALACK_QUE
This command stops the task queues ALAS_QUE and ALACK_QUE.
ACMS/STOP SYSTEM Command
ACMS/STOP SYSTEM Command — Stops the ACMS system, the TSC, the QTI, and all applications.
Format
| Command Qualifiers | Defaults |
|---|---|
| /[NO]CANCEL | /NOCANCEL |
Privileges Required
OpenVMS OPER privilege.
Qualifiers
- /[NO]CANCEL
If you specify the
/CANCELqualifier, all active tasks are canceled immediately. If you specify/NOCANCEL, ACMS waits until all active tasks are either completed or halted before stopping the ACMS system. The default is/NOCANCEL.
Notes
Once you specify the ACMS/STOP SYSTEM command, no new tasks can
be started.
Include the ACMS/STOP SYSTEM/CANCEL command in your OpenVMS
site-specific shutdown file,
SYS$MANAGER:SYSHUTDWN.COM.
If the ACMS system stalls, you might not be able to use the ACMS/STOP
SYSTEM command to stop it. Use the STOP command
from DCL to stop the ACMS Central Controller (ACC) process. Stop the remaining ACMS
process using the ACMS/STOP SYSTEM command.
The ACMS/STOP SYSTEM command executes only when there are no
tasks active. If there are active tasks, ACMS waits for the tasks to complete before
executing the ACMS/STOP SYSTEM command, and also disables any new
tasks from starting. Use the DCL REPLY command to ask users to
halt or complete their tasks, and then sign out before issuing the
ACMS/STOP SYSTEM command. You can then use the
/CANCEL qualifier to stop any tasks that remain
active.
See the VSI OpenVMS DCL Dictionary: N–Z for
information about the DCL REPLY command.
To restart ACMS, use the ACMS/START SYSTEM command. To restart
applications, use the ACMS/START APPLICATION command after the
ACMS/START SYSTEM command. To restart a queue, specify the
ACMS/START SYSTEM command with the /QTI
qualifier or ACMS/START QUEUE command.
Example
$ACMS/STOP SYSTEM/CANCEL
This command cancels any active tasks and stops all applications, the TSC, the QTI, and the ACMS software.
ACMS/STOP TERMINALS Command
ACMS/STOP TERMINALS Command — Stops the TSC, thereby canceling the tasks of all ACMS menu users and signing out all current menu users.
Format
Privileges Required
OpenVMS OPER privilege.
Notes
Use the ACMS/STOP TERMINALS command to prevent users from
signing in or to stop all ACMS task activity.
Because the ACMS/STOP TERMINALS command cancels active tasks
and signs users out of ACMS, use the DCL REPLY command to ask
users to finish tasks before entering this command. See the VSI OpenVMS DCL Dictionary: N–Z for
information about the DCL REPLY command.
To restart the TSC, specify the ACMS/START TERMINALS
command
Example
$ACMS/STOP TERMINALS
This command cancels active tasks and stops the TSC. Users cannot sign in to ACMS.
Chapter 22. ACMSGEN Commands
This chapter contains reference information and examples for the ACMSGEN Utility commands. See Chapter 11, "Changing ACMS Parameter Values with the ACMSGEN Utility" for general information on the ACMSGEN Utility. It is recommended that you change ACMSGEN-generated parameters with the ACMSPARAM.COM command procedure. See Chapter 10, "Setting ACMS Quotas, Parameters, and Privileges" for information about the ACMSPARAM.COM command procedure.
EXIT Command (ACMSGEN>)
EXIT Command (ACMSGEN>) — Ends the ACMSGEN session and returns you to the DCL prompt.
Format
Privileges Required
None.
Notes
You can also end an ACMSGEN session by pressing Ctrl/Z.
Ctrl/Z signals the end of the file for data entered from the
terminal. Ctrl/Z is displayed as EXIT.
ACMSGEN does not automatically write your changes to the ACMSGEN work area when you exit.
Example
ACMSGEN>EXIT$
This command ends the ACMSGEN session and returns you to the DCL prompt.
HELP Command (ACMSGEN>)
HELP Command (ACMSGEN>) — Displays information about ACMSGEN commands and qualifiers.
Format
Privileges Required
None.
Parameters
- topic
The command or topic you want to know about. If you do not supply a topic,
HELPprovides a list of topics to choose from.
Notes
None.
Example
ACMSGEN>HELP USE_CURRENTUSE_CURRENTInitializes the work area with current values from the ACMSPAR.ACMfile.Format:USE CURRENTTopic?
This command displays help information about the USE CURRENT
command.
SET Command (ACMSGEN>)
SET Command (ACMSGEN>) — Changes parameter values in the ACMSGEN work area. The parameter changes are
not made to any real parameter set until you use the WRITE
command.
Format
Privileges Required
None.
Parameters
- parameter-name
The name of the ACMS parameter whose value you are changing. Display the names of parameters by using the
SHOWcommand.- value
The new value for the parameter. Enter integer values in decimal numbers. String values can be enclosed in quotation marks.
Notes
None.
Examples
ACMSGEN>SET CP_SLOTS 5ACMSGEN>SET MAX_LOGINS 25ACMSGEN>WRITE CURRENTThese commands increase the number of users who can sign in by increasing the values of the CP_SLOTS and MAX_LOGINS parameters. The first
SETcommand places 5 in the work area as the value for CP_SLOTS. The secondSETcommand places 25 in the work area as the value for MAX_LOGINS. TheWRITE CURRENTcommand writes values from the work area to the SYS$SYSTEM:ACMSPAR.ACM file.ACMSGEN>USE WORKACMSGEN>SET CP_USERNAME ACMS$CPACMSGEN>WRITE CURRENTThese commands change the current user name of the Command Process (CP) to ACMS$CP and update the current values for other parameters with values from the work file, WORK.ACM. The
USEcommand initializes the work area with values from the work file. TheSETcommand changes the value of CP_USERNAME toACMS$CP. TheWRITE ACTIVEcommand copies the values for current parameters from the work area to the global section for current values.
SHOW Command (ACMSGEN>)
SHOW Command (ACMSGEN>) — Displays the value in the work area, the default value, the minimum value, the maximum value, the unit of measure, and the dynamic/fixed status for ACMS system parameters.
Format
| Command Qualifiers | Defaults |
|---|---|
| /ACC | None |
| /ALL | None |
| /CP | None |
| /EXC | None |
| /MSS | None |
| /QTI | None |
| /TSC | None |
Privileges Required
None.
Parameters
- parameter-name
The name of a parameter that you want to display information about. You must supply a parameter name or you receive an error.
Qualifiers
- /ACC
Displays information only for the parameters that affect the ACMS Central Controller (ACC).
- /ALL
Displays information for all parameters values.
- /CP
Displays information only for the parameters that affect the ACMS Command Process.
- /EXC
Displays information only for the parameters that affect the ACMS Application Execution Controller.
- /MSS
Displays information only for the parameters that affect the ACMS message switch subsystem.
- /QTI
Displays information only for the parameter values that affect the ACMS Queued Task Initiator (QTI).
- /TSC
Displays information only for the parameters that affect the Terminal Subsystem Controller (TSC).
Notes
If you specify a qualifier, it overrides the parameter name.
The dynamic/fixed status indicates whether or not you can change the active value for a parameter. You can change the active or current values of dynamic parameters. You can change only the current values of fixed parameters.
Examples
ACMSGEN>SHOW MAX_TTS_CPMAX_TTS_CP 20 20 0 -1 teFor the MAX_TTS_CP parameter, this command displays:Value in the work area
Default value
Minimum value
Maximum value (–1 indicates infinity)
Unit of measure
Dynamic/fixed status
ACMSGEN>SHOW/TSCParameters in use: CURRENTParameter Name Current Default Minimum Maximum Unit Dynamic-------------- ------- ------- ------- ------- ---- -------MAX_LOGINS 60 60 0 -1 submitters DMAX_TTS_CP 20 20 0 -1 terminals DPERM_CPS 1 1 0 -1 command prcs DCP_SLOTS 3 3 0 -1 command prcs DMIN_CPIS 2 2 0 -1 CP threads DTSC_USERNAME ACMSSYSTEM SYSTEM VMS usernameTSC_PRIORITY 6 4 0 31 VMS priorityThis command displays information for parameters that affect the TSC, including the values now in the work area.
ACMSGEN>USE ACTIVEACMSGEN>SHOW/ALLThe
USE ACTIVEcommand places active values for all parameters into the work area. TheSHOWcommand displays information for all parameters, including the active values in the work area.ACMSGEN>USE WORKACMSGEN>SHOW/TSCThe
USEcommand initializes the work area with values from the file SYS$SYSTEM:WORK.ACM. TheSHOWcommand displays information about parameters affecting the TSC, including their work file values from the work area.
USE Command (ACMSGEN>)
USE Command (ACMSGEN>) — Initializes the ACMSGEN work area with values from a work file.
Format
Privileges Required
None.
Parameters
- file-spec
The file specification of the parameter file you created with the
WRITEcommand. SYS$SYSTEM is the default device and directory for the file. The default file type is .ACM.
Notes
If the work area does not contain work file values, initialize the work area with
the USE command before performing any operation (such as display
or update) with values from a work file.
Examples
ACMSGEN>USE WORKACMSGEN>WRITE ACTIVEThese commands update the active values for dynamic parameters with values from a work file, WORK.ACM. The
USEcommand initializes the work area with values from the work file. TheWRITE ACTIVEcommand copies values for dynamic parameters from the work area to the global section for active values.ACMSGEN>USE WORKACMSGEN>WRITE CURRENTThese commands update current values with values from the work file WORK.ACM. The WORK.ACM file contains values from an earlier ACMSGEN session. The
USEcommand initializes the work area with values from the WORK.ACM file. TheWRITE CURRENTcommand copies values from the ACMSGEN work area to the SYS$SYSTEM:ACMSPAR.ACM file.
USE ACTIVE Command (ACMSGEN>)
USE ACTIVE Command (ACMSGEN>) — Initializes the ACMSGEN work area with active values for all parameters from an ACMS system global section.
Format
Privileges Required
None.
Notes
When you use a
WRITE ACTIVEcommand, ACMS writes values from the work area to the global section.When you use an
ACMS START /SYSTEMcommand from the DCL prompt, ACMS copies values from the SYS$SYSTEM:ACMSPAR.ACM file to the global section.
If the work area does not contain active values, initialize the work area with the
USE ACTIVE command before performing any operation, such as
display or update, with active values.
If the ACMS system is inactive when you use the USE ACTIVE
command, you receive an error message. Values in the work area do not change.
Examples
ACMSGEN>USE ACTIVEACMSGEN>WRITE WORKThese commands place a copy of the active values for all parameters in the work file, SYS$SYSTEM:WORK.ACM. The
USE ACTIVEcommand initializes the work area with active values for all parameters. TheWRITEcommand copies all values in the work area to the work file.ACMSGEN>USE ACTIVEACMSGEN>SET MIN_CPIS 2ACMSGEN>WRITE ACTIVEThese commands change the active value for MIN_CPIS to 2. The
USE ACTIVEcommand initializes the work area with active values for all parameters. TheSETcommand places 2 in the work area as the value for MIN_CPIS. TheWRITE ACTIVEcommand copies the values for dynamic parameters from the work area to the global section for active values.ACMSGEN>USE ACTIVEACMSGEN>WRITE CURRENTThese commands use active values to update current values for dynamic parameters. The
USE ACTIVEcommand initializes the work area with active values for all parameters. TheWRITE CURRENTcommand copies the values from the work area to the SYS$SYSTEM:ACMSPAR.ACM file as new current values.
USE CURRENT Command (ACMSGEN>)
USE CURRENT Command (ACMSGEN>) — Initializes the ACMSGEN work area with current values for all parameters from the SYS$SYSTEM:ACMSPAR.ACM parameter file.
Format
Privileges Required
None.
Notes
Current values are the values used to initialize ACMS. By default, ACMSGEN initializes the ACMSGEN work area with current values. Often you can display or update current values without initializing the work area explicitly.
Examples
ACMSGEN>USE CURRENTACMSGEN>SET PERM_CPS 2ACMSGEN>WRITE CURRENTThese commands change the current value for PERM_CPS to 2. The
USE CURRENTcommand initializes the work area with current values. TheSETcommand places 2 in the work area as the value for PERM_CPS. TheWRITE CURRENTcommand updates the values in the SYS$SYSTEM:ACMSPAR.ACM file with values from the work area.ACMSGEN>USE CURRENTACMSGEN>WRITE WORKThe
USE CURRENTcommand initializes the work area with current values. TheWRITEcommand copies values from the work area to the work file, SYS$SYSTEM:WORK.ACM.ACMSGEN>USE CURRENTACMSGEN>WRITE ACTIVEThese commands use current values to update the active values of dynamic parameters. Recent changes to current values can take effect immediately for some parameters. The
USE CURRENTcommand initializes the work area with current values for all parameters. TheWRITE ACTIVEcommand copies values for dynamic parameters from the work area to the global section for active values.
USE DEFAULT Command (ACMSGEN>)
USE DEFAULT Command (ACMSGEN>) — Initializes the ACMSGEN work area with ACMS default values for all ACMS parameters.
Format
Privileges Required
None.
Notes
If the work area does not contain default values, initialize the work area with
the USE DEFAULT command before performing any operation, except
display, with ACMS default values. You cannot change values in the default
list.
For a list of the default values for ACMSGEN parameters, see Table 11.3, ''ACMSGEN Parameter Values''.
Examples
ACMSGEN>USE DEFAULTACMSGEN>WRITE ACTIVEThese commands reset the active values for dynamic parameters to ACMS default values. The
USE DEFAULTcommand initializes the work area with ACMS default values. TheWRITE ACTIVEcommand writes values for dynamic parameters from the work area to the global section for active values.ACMSGEN>USE DEFAULTACMSGEN>WRITE CURRENTThese commands reset current values to ACMS default values. The
USE DEFAULTcommand initializes the work area with ACMS default values. TheWRITE CURRENTcommand writes values from the work area to the SYS$SYSTEM:ACMSPAR.ACM file as current values for all ACMS parameters.
WRITE Command (ACMSGEN>)
WRITE Command (ACMSGEN>) — Writes values from the ACMSGEN work area to a work file, creating a new version of the file.
Format
Privileges Required
None.
Parameters
- file-spec
The file specification of the work file where you want ACMSGEN to write the parameter work area. The file specification cannot be an existing version of a file. SYS$SYSTEM is the default device and directory. The default file type is .ACM. There is no default file name.
Notes
Use the SHOW command to check that the work area contains the
appropriate values before using the WRITE command.
Example
ACMSGEN>WRITE WORKThis command writes values from the ACMSGEN work area to the work file SYS$SYSTEM:WORK.ACM, creating a new version of the file.
ACMSGEN>USE ACTIVEACMSGEN>WRITE WORKThese commands copy active values for dynamic parameters to a work file. The
USE ACTIVEcommand initializes the work area with active values for all parameters. TheWRITEcommand writes values from the work area to the WORK.ACM work file, creating a new version of the file.
WRITE ACTIVE Command (ACMSGEN>)
WRITE ACTIVE Command (ACMSGEN>) — Changes active values for dynamic parameters by writing values from the ACMSGEN work area to an ACMS system global section.
Format
Privileges Required
OpenVMS OPER privilege.
Notes
WRITE ACTIVE command updates active values for any of the
following parameters:MAX_LOGINS
MAX_TTS_CP
MIN_CPIS
MSS_NET_RETRY_TIMER
PERM_CPS
QTI_POLLING_TIMER
QTI_SUB_TIMEOUT
QTI_RETRY_TIMER
USERNAME_DEFAULT
For other parameters, you can change current values only.
Use the SHOW command to check that the work area contains the
appropriate values before using the WRITE ACTIVE command. New
active values last until the system stops or until you change them again. If the
system is inactive when you use the WRITE ACTIVE command, you
receive an error message, and no changes are made.
Examples
ACMSGEN>USE ACTIVEACMSGEN>SET PERM_CPS 2ACMSGEN>WRITE ACTIVEThese commands change the active values for PERM_CPS to 2. The
USE ACTIVEcommand initializes the work area with active values for all parameters. TheSETcommand places 2 in the work area as the value for PERM_CPS. TheWRITE ACTIVEcommand writes the values for dynamic parameters from the work area to the system global section containing values for the active system.ACMSGEN>USE DEFAULTACMSGEN>WRITE ACTIVEThese commands reset the active values for dynamic parameters to ACMS default values. The
USE DEFAULTcommand initializes the work area with default values for all parameters. TheWRITE ACTIVEcommand updates active values for dynamic parameters with values from the ACMSGEN work area.
WRITE CURRENT Command (ACMSGEN>)
WRITE CURRENT Command (ACMSGEN>) — Changes current values by writing values from the ACMSGEN work area to the SYS$SYSTEM:ACMSPAR.ACM file.
Format
Privileges Required
Write access to the SYS$SYSTEM directory. The OpenVMS privilege SYSPRV or a system UIC gives you write access to SYS$SYSTEM.
Notes
Use the SHOW command to check that the work area contains the
appropriate values before using the WRITE CURRENT command.
When you use an ACMS START /SYSTEM command, ACMS initializes
the global section for active values with values from the ACMSPAR.ACM file.
Examples
ACMSGEN>SET PERM_CPS 3ACMSGEN>WRITE CURRENTThese commands change the current value of PERM_CPS to 3. By default, the work area contains current values. The
SETcommand changes the value for PERM_CPS in the work area to 3. TheWRITE CURRENTcommand writes values from the work area to the SYS$SYSTEM:ACMSPAR.ACM file as new current values for ACMS.ACMSGEN>USE DEFAULTACMSGEN>WRITE CURRENTThese commands reset the current values of ACMS to defaults. The
USE DEFAULTcommand initializes the work area with default values. TheWRITE CURRENTcommand copies values from the work area to the SYS$SYSTEM:ACMSPAR.ACM file as new current values for ACMS.
Chapter 23. ATR Commands
This chapter contains reference information and examples for the ACMS Audit Trail Report (ATR) Utility commands. See Chapter 12, "Auditing Applications with the Audit Trail Logger" for general information about the ATR Utility.
EXIT Command (ATR>)
EXIT Command (ATR>) — Ends the ATR Utility session and returns you to the DCL prompt.
Format
Privileges Required
None.
Notes
You can also end an ATR session with a controlled exit by pressing
Ctrl/Z. Ctrl/Z signals the end of the file for
data entered from the terminal. Ctrl/Z is displayed as
EXIT.
Example
ATR>EXIT
This command ends an ATR Utility session and returns you to the DCL prompt.
HELP Command (ATR>)
HELP Command (ATR>) — Displays information about ATR Utility commands and their qualifiers.
Format
Privileges Required
None.
Parameters
- topic
The ATR topic you want to know about. If you do not specify a topic, ACMS displays a list of topics for you to choose from.
Notes
None.
Example
ATR>HELP ERRORSAudit/Trace Message FormatsAdditional information available:BYNAME ENDTOOSOON IDLOGGONE INVID NOTYPE REC_CORRUPTERRORS Subtopic?
This command displays help information about the audit trail error messages.
LIST Command (ATR>)
LIST Command (ATR>) — Produces a report about information in the audit trail log file. You can limit the amount of information in the report by using qualifiers.
Format
| Command Qualifiers | Defaults |
|---|---|
| /APPLICATION=application-name | All application names |
| /BEFORE[=time] | Full report |
| /BRIEF | Full report |
| /IDENTIFICATION=task-id | All task IDs |
| /OUTPUT=file-spec | /OUTPUT=SYS$OUTPUT |
| /SINCE[=time] | Full report |
| /SUBMITTER=submitter-id | All submitter IDs |
| /TASK=task-name | All task names |
| /TERMINAL=device-name | All device names |
| /TYPE=type | All types |
| /USERNAME=user-name | All user names |
Privileges Required
OpenVMS SYSPRV.
Parameters
- file-spec
The file specification of the audit trail log file that is used to generate the report. The file specification can be any version of the audit trail log or a concatenated file containing several audit trail log files. If you do not supply a file specification, the file defined as ACMS$AUDIT_LOG is used. If the ACMS$AUDIT_LOG logical is undefined and you omit the file specification, the default file specification SYS$ERRORLOG:ACMSAUDIT.LOG is used. If you supply only a partial file specification, missing parts are taken from SYS$ERRORLOG:ACMSAUDIT.LOG.
Qualifiers
- /APPLICATION=application-name
Limits the report to records involving the application you name. Application-name is the file name of an application database.
- /BEFORE[=time]
Limits the report to records logged before the time you specify. Specify time as an OpenVMS absolute time. If you specify the
/BEFOREqualifier without a time argument, the default is/BEFORE=TODAY. If you do not specify the/BEFOREqualifier, a full report is displayed. You can use the/SINCEqualifier with the/BEFOREqualifier.- /BRIEF
Limits the length of records in the report. Each record in a brief report contains the time of the entry in the audit trail log and the type of information in the entry. For a description of record types, see the description of the
/TYPEqualifier. If you do not use the/BRIEFqualifier, you get a full report.- /IDENTIFICATION=task-id
Limits the report to records generated by the specified task ID. The task ID is the unique identification code ACMS assigns to an active task. See Section 12.6.1, ''Selecting Records by Submitter and Task Identification Code'' for a description of the task ID format and how to specify a task ID.
- /OUTPUT=file-spec
Writes an ACMS Log Report to the output file you name. Output goes to SYS$OUTPUT by default.
- /SINCE[=time]
Limits the report to records logged after the time you specify. Specify the time as an OpenVMS absolute time. If you specify the
/SINCEqualifier without the time argument, the default is/SINCE=TODAY. If you do not specify the/SINCEqualifier, the default is a full report. You can use the/SINCEqualifier with the/BEFOREqualifier.- /SUBMITTER=submitter-id
Limits the report to records generated by the specified submitter ID. The submitter ID is the unique task submitter code ACMS assigns to an ACMS user at sign-in. The submitter ID begins with the name of the node on which the user signed in. You can omit leading zeros in the submitter ID. See Section 12.6.1, ''Selecting Records by Submitter and Task Identification Code'' in Chapter 12, "Auditing Applications with the Audit Trail Logger" for a description of the submitter ID format and of how to specify a submitter ID.
- /TASK=task-name
Limits the report to records that match the task name you specify. The task name is the name defined in the application definition.
- /TERMINAL=device-name
Limits the report to records of sign-ins and sign-outs from the specified terminal. Device-name is the name of a terminal that runs ACMS tasks. You must end the device name with a colon (:).
- /TYPE=type
- Limits the report to records of one type. The possible types of reports are:
ALL – generates a report on all records. ALL is the default.
COMMAND – generates a report on ACMS operator commands.
ERROR – generates a report on errors.
LOGIN – generates a report on all sign-ins and sign-outs.
OTHER – generates a report that tells you when the Audit Trail Logger is enabled or disabled, opened or closed, and logs each use of the
ACMS/RESET AUDITcommand.TASK – generates a report on task information, excluding errors.
- /USERNAME=user-name
Limits the report to records generated by the specified user name.
Notes
If you use the LIST command without qualifiers, the ATR report
includes all records in the input file.
Press the PF1 and PF2 keypad keys for access to a keypad of ATR commands. Press Ctrl/B to recall each ATR command you enter.
When you use ATR to read information from the latest version of the audit trail log while the Audit Trail Logger is active, audit trail information may be a few seconds behind ACMS activity. Records are forced out to the audit trail log file based on both the number of records that have been written since the last forced write, and the time elapsed since the last request was responded to.
Examples
ATR>LIST/SINCE=09-MAR-1994 9:00/BEFORE=09-MAR-1994 10:00This command displays all records written between 9 and 10 a.m. on March 9, 1994.
ATR>LIST/APPLICATION=TEST/OUTPUT=AUDITRPT.LISThis command writes records for the application TEST to the output file AUDITRPT.LIS.
ATR>LIST/BRIEFThis command displays partial records, including the time of each entry and the type of information recorded.
ATR>LIST/IDENTIFIER=-1This command lets you see the first task selection for each submitter. You specify only the sequence number on the
/IDENTIFIERqualifier. Because you omit the local ID field, you indicate that you are omitting that field by using a dash.ATR>LIST/TASK=UPDATE/OUTPUT=AUDITRPT.LISThis command writes records for the Update task to the listing file AUDITRPT.LIS.
ATR>LIST/TERMINAL=TTA5:This command displays all sign-ins and sign-outs from terminal TTA5.
ATR>LIST/TYPE=COMMANDThis command displays all instances of operator command usage.
ATR>LIST/TYPE=ERRORThis command displays records of errors.
ATR>LIST/TYPE=LOGINThis command displays sign-ins and sign-outs for all users on an ACMS system.
ATR>LIST/TYPE=TASKThis command displays all records involving tasks.
ATR>LIST/TYPE=OTHERThis command displays records of when the audit trail log is opened and closed, when the Audit Trail Logger is enabled and disabled, and when the audit trail log is renewed with the
ACMS/RESET AUDITcommand.ATR>LIST/USERNAME=CONNORThis command displays records for a user or users signed in under the user name CONNOR.
Chapter 24. SWLUP Commands
This chapter contains reference information and examples for the ACMS Software Event Log Utility Program (SWLUP) commands. See Chapter 13, "Logging Software Events" for general information about SWLUP.
@ (At sign) Command (SWLUP>)
@ (At sign) Command (SWLUP>) — Runs an indirect command file that contains SWLUP commands.
Format
Privileges Required
None.
Parameters
- file-spec
The name of a command file for SWLUP to run. Use a standard OpenVMS file specification. If you do not include the directory in the file specification, SWLUP searches your current directory by default. SWLUP uses SYS$DISK:[].COM as the default file type.
Notes
SWLUP runs all commands stored in the command file you specify. SWLUP sends your reports to the default output device SYS$OUTPUT.
You must use the SET VERIFY command before SWLUP can display
commands in the indirect command file. Errors are reported on
SYS$OUTPUT and on SYS$ERROR if
SYS$ERROR is different from
SYS$OUTPUT.
Example
SWLUP>@REPORT
SWLUP runs the file REPORT.COM, which contains the commands to list all today's events.
EDIT Command (SWLUP>)
EDIT Command (SWLUP>) — Lets you edit the last SWLUP command you entered and lets you create an edit buffer into which you can enter SWLUP commands.
Format
Privileges Required
None.
Notes
EDIT command in two ways:Within SWLUP, you can type the
EDITcommand after you type a SWLUP command (such asSET LOG,SET NOVERIFY). SWLUP places the command in the edit buffer. You can correct or change the SWLUP command using a text editor.You can type the
EDITcommand at the SWLUP> prompt. SWLUP then provides an edit file into which you can enter SWLUP commands with a text editor.
When you exit the editor, SWLUP runs the commands in the file and returns to the SWLUP> prompt. If you exit the editor without creating an output file, SWLUP prints the error message %SWLUP-E-ERREDIT, does not try to run the last command, and returns to the SWLUP> prompt.
The ACMS system startup file, ACMSTART.COM defines the system logical
SWLUP$EDIT to be ACMS$EDIT. As
system manager, you can define ACMS$EDIT to be TDMSEDIT.COM
(which runs the TDMS text editor), ACMSEDIT.COM (which runs the EDT text editor), or
a personal command procedure that invokes another text editor or a particular set of
editor startup commands. When you issue the EDIT command, ACMS executes the command
file pointed to by ACMS$EDIT.
Examples
SWLUP>EDITLIST /PROCESS_NAME=JACK_SMITHCtrl/ZDBA0:[SMITH]SWLUP_C20205018.COM;1 1 LINESWLUP>The
EDITcommand typed at the SWLUP> prompt displays an edit buffer into which you can enter the SWLUP commands.SWLUP>SET NOLOGSWLUP>SET VERIFYSWLUP>EDITSET VERIFYCtrl/ZDBA0:[SMITH]SWLUP_C_C20203098.COM;2 1 LINESWLUP>If you enter SWLUP commands and type the
EDITcommand at the SWLUP prompt, the last command you entered is placed in the edit buffer.
EXIT Command (SWLUP>)
EXIT Command (SWLUP>) — Causes SWLUP to exit or ends the execution of a command file.
Format
Privileges Required
None.
Notes
SWLUP exits from either the utility or a command file. You can also end a SWLUP
session by pressing Ctrl/Z. Ctrl/Z signals the end
of the file for data entered from the terminal. Ctrl/Z is displayed
as EXIT.
Examples
SWLUP>EXIT$The
EXITcommand ends the SWLUP session and returns control to the DCL prompt.SWLUP>@LISTITSET LOG !These lines are in the file LISTIT.COMSET VERIFYEXITThis command ends the processing of commands from an indirect command file and returns to the SWLUP> prompt.
HELP Command (SWLUP>)
HELP Command (SWLUP>) — Displays information about SWLUP commands and qualifiers.
Format
| Command Qualifiers | Defaults |
|---|---|
| /[NO]PROMPT | /PROMPT |
Privileges Required
None.
Parameters
- topic
The SWLUP command or topic that you want to display information about. If you use the
HELPcommand without a topic, help provides a list of topics to choose from.
Qualifiers
- /[NO]PROMPT
Determines whether or not SWLUP displays help information and then displays a prompt for a topic or subtopic. The
/PROMPTqualifier is the default.
Notes
None.
Example
SWLUP>HELP SETSETDetermines if commands are logged to a file or whether commands from anindirect command file are printed to the default output device.Format:SET [NO]LOGSET [NO]VERIFYAdditional information available:[NO]LOG [NO]VERIFYSET Subtopic?
Type HELP followed by the SET command to get
information about SET [NO]LOG and SET
[NO]VERIFY. If you type either [NO]LOG or
[NO]VERIFY at the SET Subtopic? prompt, SWLUP
displays information about the qualifier you requested.
LIST Command (SWLUP>)
LIST Command (SWLUP>) — Lists information selected by command qualifiers.
Format
| Command Qualifiers | Defaults |
|---|---|
| /BEFORE[=time] |
Full report |
| /EVENT_CODE=event-code[,...] |
All event codes |
| /FACILITY=facility-name[,...] |
All facilities |
| /IMAGE=image-name[,...] |
All images |
| /INPUT=file-spec | /INPUT=SYS$ERRORLOG:SWL.LOG |
| /OUTPUT=file-spec | /OUTPUT=SYS$OUTPUT |
|
Does not print | |
| /PROCESS_NAME=process-name[,...] |
All processes |
| /SEVERITY=severity-code[,...] |
All severity codes |
| /SINCE[=time] |
Full report |
| /USER=user-name[,...] |
All user names |
Privileges Required
None.
Qualifiers
- /BEFORE[=time]
Lists only those events dated before the time you name. This qualifier and the
/SINCEqualifier let you select a range of time. You need not use the qualifiers together. The format for date and time is dd-mmm-yyyy:hh:mm, which allows you to omit any of the trailing fields. You can also use the keywords TODAY or YESTERDAY to specify a time. The default is/BEFORE=TODAY. If you specify a date without a time, the time defaults to 00:00.00 for the date you specify.- /EVENT_CODE=event-code[,...]
Selects events by return status code. For example, you can list all ACMSI-F-BUGLOG errors by typing
/EVENT=BUGLOGor/EVENT=(BUGLOG). Logging all events to the current log file is the default.- /FACILITY=facility-name[,...]
Selects a list of events logged by one or more facility names you specify. The only facilities that log events in the Software Event Log are ACMS and SWL. ACMS software errors are logged under the name ACMSI. Logging all events to the current log file is the default.
- /IMAGE=image-name[,...]
Selects the events associated with one or more image names you specify. Logging all events to the current log file is the default. If you specify only part of an image name, SWLUP lists all images whose names contain the specified characters.
- /INPUT=file-spec
Names the input log file you want to read. If you do not use the
/INPUTqualifier, SWLUP uses SYS$ERRORLOG:SWL.LOG by default.- /OUTPUT=file-spec
Stores SWLUP output in a file you specify. If you do not use the
/OUTPUTqualifier, SWLUP sends output to the default output device SYS$OUTPUT.Prints a listing file on the system printer. If you do not use the
/OUTPUTqualifier with the/PRINTqualifier, SWLUP creates a temporary listing file (SWLUPLIS.LIS) and deletes it after the file is printed. If you do not specify the/PRINTqualifier, the file is not printed.- /PROCESS_NAME=process-name[,...]
Selects all events logged with one or more process names you specify. Logging all events to the current log file is the default.
- /SEVERITY=severity-code[,...]
- Selects the events for a SWLUP report by the OpenVMS severity code. You can use complete severity code names or abbreviate them to the first character:
Success
Informational
Warning
Error
Fatal
Logging all events to the current log file is the default.
- /SINCE[=time]
Identifies only those events dated after the date and time you specify. This qualifier and the
/BEFOREqualifier let you define a range of time for the events logged. The format for time is dd-mmm-yyyy:hh:mm. You can also specify the keywords TODAY or YESTERDAY. If you specify any part of the date, you must specify the full date. You can omit the time field. The default is/SINCE=TODAY.- /USER=user-name[,...]
Selects all events logged with one or more user names. Logging all events in the current log file is the default.
Notes
ACMS logs ACMS internal software errors and some SWL events of varying severity. For example, you might want to look at just the ACMS errors. By using this command, you can create a file of just those errors.
Examples
SWLUP>LIST/USER=RICHThis command lists all events in the log file associated with the user name RICH.
SWLUP>LIST EVENTS/FACILITY=TSS/SEVERITY=F/BEFORE=09-APR-1994This command lists all events in the log file that are ACMS events, with an F severity code, logged before April 9, 1994.
SWLUP>LIST/PROCESS_NAME=CPPROC/OUTPUT=SEPT21.LOGThis command lists all events in the log file associated with the process name CPPROC and places them in the output file SEPT21.LOG.
RENEW Command (SWLUP>)
RENEW Command (SWLUP>) — Starts a new systemwide SWL log file.
Format
Privileges Required
Write access to the new log file and the OpenVMS privileges TMPMBX and SYSPRV.
Notes
The RENEW command closes the current log file and creates a new version. The log
file is called SYS$ERRORLOG:SWL.LOG.
If an SWL log file is not already opened and you use the RENEW command, you
receive an error. You can determine whether SWL is currently logging information to
a log file by using the SHOW LOG command.
Example
SWLUP>RENEW
Creates a new version of SYS$ERRORLOG:SWL.LOG to log subsequent events.
SAVE Command (SWLUP>)
SAVE Command (SWLUP>) — Writes to a file the last command you typed.
Format
Privileges Required
None.
Parameters
- file-spec
The name of the file in which you want to save the last command. If you supply an incomplete file specification, the default disk is SYS$DISK; the default directory is your current directory; and the default file type is .SAV.
Notes
If the command you save is @file-spec, the contents of the file specification are also available in the target file.
Example
SWLUP>LIST/SEVERITY=SSWLUP>SAVESAVE TO FILE:KEEPITprevious command SAVEd to file DBA0:[SMITH]KEEPIT.SAVSWLUP>
Type or print the file KEEPIT.SAV to see the command you entered with the
SAVE command.
SET [NO]LOG Command (SWLUP>)
SET [NO]LOG Command (SWLUP>) — Enables or disables creation of a log file that records your SWLUP session.
Format
Privileges Required
None.
Parameters
- file-spec
The file specification of the log file. If you do not specify a file specification, SWLUP creates a new version of the current log file. If a current log file does not exist, SWLUP stores the information in the file SYS$DISK:[]SWLUPLOG.LOG.
Notes
If you do not specify a file specification and a file was previously activated by
the SET LOG command, SWLUP issues a warning message. If you
specify a file that contains a version number and that file already exists, SWLUP
stores all new information in that file.
The SET LOG and SET NOLOG commands are valid
only within the current session. Once you exit from SWLUP, all SET
[NO]LOG commands are deleted.
If you use SET NOLOG, SWLUP does not create a file.
Examples
SWLUP>SET LOGSWLUP automatically enables logging of all commands you enter in the session to the SWLUPLOG.LOG file or to the logical translation of SWLUPLOG.
SWLUP>SET LOG SEPT21.LOGThis command enables logging to the SEPT21.LOG file.
SET [NO]VERIFY Command (SWLUP>)
SET [NO]VERIFY Command (SWLUP>) — Enables or disables the printing of commands stored in an indirect command file. SWLUP sends output to the default output device SYS$OUTPUT.
Format
Privileges Required
None.
Note
The default is SET NOVERIFY. To display the commands from an
indirect command file to the default output device,
SYS$OUTPUT, use the SET VERIFY
command.
Examples
SWLUP>SET VERIFYSWLUP>@FIRSTLOGThis command places SWLUP in verify mode. When you pass the command file FIRSTLOG.COM to SWLUP, it displays the commands it runs from that file.
SWLUP>SET NOVERIFYSWLUP>@FIRSTLOGThis command places SWLUP in noverify mode. When you pass the command file FIRSTLOG.COM to SWLUP, it does not display the commands it runs from that file.
SHOW CURRENT Command (SWLUP>)
SHOW CURRENT Command (SWLUP>) — Displays the name of the current log file opened by the SWL detached process.
Format
Privileges Required
OpenVMS TMPMBX privilege.
Notes
SWLUP displays the name of the current log file on SYS$OUTPUT.
Example
SWLUP>SHOW CURRENT%ACMSSWL-S-CURLOGFIL, Current log file: SYS$ERRORLOG:SWL.LOG;1
This command displays the name of the current log file.
SHOW LOG Command (SWLUP>)
SHOW LOG Command (SWLUP>) — Displays whether or not you are currently logging SWLUP commands and the name of the log file.
Format
Privileges Required
None.
Notes
The current SWLUP mode: logging or not logging.
The name of the file to which SWLUP is logging or not logging information. The default is
NOLOG.
Example
SWLUP>SHOW LOGnot logging to file SWLUPLOG.LOG
The SHOW LOG command shows you that SWLUP is not logging to the default
file.
SHOW VERSION Command (SWLUP>)
SHOW VERSION Command (SWLUP>) — Displays the current version of SWLUP on the default output device SYS$OUTPUT.
Format
Privileges Required
None.
Notes
None.
Example
SWLUP>SHOW VERSIONACMS SWLUP V4.0
This command displays the SWLUP version number.
STOP Command (SWLUP>)
STOP Command (SWLUP>) — Stops the SWL detached process so that it can exit properly.
Format
Privileges Required
OpenVMS TMPMBX and SYSPRV privileges.
Notes
None.
Example
SWLUP>STOP
This command stops the SWL detached process.
Appendix A. Parameter and Quota Calculations
Parameter and quota values needed to run the ACMS software are set by default or by the use of the ACMSPARAM.COM and ACMEXCPAR.COM command procedures. In some instances, you may want to further tune your system by altering those calculations.
The formulas in this appendix show how these recommended minimum settings are derived, and how to alter these calculations to reflect your specific system. The values shown in this appendix are guidelines.
Note
ACMSPARAM.COM and ACMEXCPAR.COM do not support logical name search lists for the TDB file specifications.
OpenVMS SYSGEN parameters affected by ACMS
- Quotas for OpenVMS user names of ACMS processes, specifically:
OpenVMS user name under which the ACMS Central Controller (ACC) runs
OpenVMS user name under which the Terminal Subsystem Controller (TSC) runs
OpenVMS user name under which the Command Process (CP) runs
OpenVMS user name under which the Application Execution Controller (EXC) runs
OpenVMS user name under which the Queued Task Initiator (QTI) runs
Quotas and privileges required for ACMS server processes
Quotas required for users of ADU
Quotas required for users of the task debugger
- The following ACMSGEN parameters:
MAX_LOGINS
MSS_MAXOBJ
MSS_MAXBUF
MSS_POOLSIZE
MSS_PROCESS_POOL
PERM_CPS
TWS_POOLSIZE
TWSC_POOLSIZE
WS_POOLSIZE
WSC_POOLSIZE
The following sections contain the formula calculations used by ACMSPARAM.COM.
The formulas for SYSGEN parameters and for quotas needed for OpenVMS user names, ADU, and the task debugger use the variables discussed in Chapter 10, "Setting ACMS Quotas, Parameters, and Privileges". Refer to Table 10.3, ''Variables Required for ACMSPARAM.COM'' and Table 10.5, ''Variables Required for ACMEXCPAR.COM'' for descriptions of the variables. See Chapter 11, "Changing ACMS Parameter Values with the ACMSGEN Utility" for descriptions of the ACMSGEN parameters whose formula calculations are listed here.
A.1. Calculating OpenVMS SYSGEN Parameters Affected by ACMS
ACMSPARAM.COM calculates values for OpenVMS system parameters that are affected by ACMS. The following subsections show how ACMSPARAM.COM determines the values for those OpenVMS SYSGEN parameters. Any time you install additional images you must adjust the SYSGEN parameters. Refer to Table 10.3, ''Variables Required for ACMSPARAM.COM'' for descriptions of the variables shown in these calculations.
A.1.1. Calculating the Value of CHANNELCNT
CHANNELCNT = (MAX
20 + ((2 * CONTROLLED_TERMINAL_CNT) +
ENTERED_TERMINAL_CNT),
20 + (2 * REMOTE_SUB_CNT) +
TDB_CNT + RLB_CNT,
23 + (5 * TERMINALS_PER_CP) +
FORM_TRACE_FILE_CNT +
+ FORM_CNT + ESC_RTN_IMAGE_CNT +
REMOTE_RLB_CNT +
(2 * REMOTE_APPL_CNT)
)
Include 20% for expansion, and then round to next 10:
CHANNELCNT = (((CHANNELCNT + CHANNELCNT / 5) / 10) + 1) * 10A.1.2. Calculating the Value of GBLPAGES
GBLPAGES = BASE + ! GBLPAGES value without ACMS
1506
MSS_POOLSIZE +
(DEBUGGER_CNT * (TWS_POOLSIZE+TWSC_POOLSIZE)) +
DEBUG_TDB_BLKS +
(TDB_CNT * (TWS_POOLSIZE+TWSC_POOLSIZE)) +
TDB_BLKS +
ADB_BLKS +
MDB_BLKS
Include 20% for expansion, and then round to next 100 pages (VAX) or
100 pagelets (Alpha):
GBLPAGES = (((GBLPAGES + GBLPAGES/5) / 100 ) + 1) * 100A.1.3. Calculating the Value of GBLPAGFIL
GBLPAGFIL = BASE + ! GBLPAGFIL value without ACMS
4 +
MSS_POOLSIZE +
(DEBUGGER_CNT * (TWS_POOLSIZE+TWSC_POOLSIZE)) +
(TDB_CNT * (TWS_POOLSIZE+TWSC_POOLSIZE) )
Include 20% for expansion, and then round to next 100 pages (VAX) or
100 pagelets (Alpha):
GBLPAGFIL = (((GBLPAGFIL + GBLPAGFIL/5) / 100 ) + 1) * 100A.1.4. Calculating the Value of GBLSECTIONS
GBLSECTIONS = BASE + ! GBLSECTIONS value without ACMS
44 +
(DEBUGGER_CNT * 3) +
(TDB_CNT * 3) +
APPL_CNT + REMOTE_APPL_CNT +
MDB_CNT
Include 20% for expansion, and then round to next 10 sections:
GBLSECTIONS = (((GBLSECTIONS + GBLSECTIONS/5) / 10 ) + 1) * 10A.1.5. Calculating the Value of LOCKIDTBL
LOCKIDTBL = BASE + ! LOCKIDTBL value without ACMS
100 +
(CP_PROC_CNT * 4) +
(RLB_CNT * 4) +
(DYN_SP_CNT * 4) +
(QTI_QUEUES * 3) +
(QTI_TASK_THDS * 15)
Include 20% for expansion, and then round to next 10 table entries:
LOCKIDTBL = (((LOCKIDTBL + LOCKIDTBL/5) / 10 ) + 1) * 10
VIRTUALPAGECNT = (((PGFLQUOTA +
! Use the highest PGFLQUOTA
PGFLQUOTA/5) / 10) +1) * 10 ! from among CP, ACC, TSC,
! QTI, or EXC PGFLQUOTAsA.1.6. Task Debugger Parameters and Values
|
Parameter |
Value |
|---|---|
|
PQL_DASTLM |
20 |
|
PQL_DDIOLM |
20 |
|
PQL_DBIOLM |
12 |
|
PQL_DWSQUOTA |
Greater than or equal to the block size of the largest .TDB file |
|
PQL_DWSEXTENT |
Greater than or equal to the block size of the largest .TDB file |
|
PQL_MDIOLM |
20 |
A.2. Calculating Quotas for OpenVMS User Names of ACMS Processes
The following sections show how quotas are set for the various user names under which ACMS components run. VSI recommends you use the ACMSPARAM.COM procedure to set the quota values for the ACC, TSC, CP, and QTI. Use the formulas shown here for informational or fine-tuning purposes only.
The user name quotas for the ACC, TSC, CP, and QTI are defined from the values set by the ACMSPARAM.COM procedure. The user names can also be derived from the values set by the ACMSGEN Utility. The user names for the EXC and the server processes, discussed later in this chapter, are derived from the application definition using the ACMEXCPAR.COM procedure.
When updating the accounts for ACC, TSC, CP, EXC, and QTI, a quota is updated only if the calculated quota is larger than the current quota for the account. This is to prevent the possible introduction of quota problems should the account be used for purposes other than running ACMS. ACMSPARAM.COM and ACMEXCPAR.COM do not allow calculated quotas to be lower than VSI suggested default values. For several quotas ACMSPARAM.COM and ACMEXCPAR.COM do not create values. Instead, ACMS takes the quota values from the DEFAULT account in AUTHORIZE. If you lower any DEFAULT account quotas, be aware that problems can occur while starting or running ACMS.
Note
Keep in mind that ACMSPARAM.COM and ACMEXCPAR.COM calculate quotas specifically for the platform on which they are executing, and that appropriate quotas are often very different on different platforms.
A.2.1. User Name Setup for the ACC
The OpenVMS user name under which the ACC runs requires the privilege SETPRV.
The values shown in Table A.1, ''Minimum Quotas for the ACC User Name Process'' determine the minimum quotas necessary for the OpenVMS user name under which the ACC runs. To set this user name, use the ACC_USERNAME parameter with the ACMSPARAM.COM procedure or the ACMSGEN Utility.
|
Parameter |
Minimum Value (Alpha) |
Minimum Value (IA-64) |
|---|---|---|
|
ASTLM |
250 |
250 |
|
BIOLM |
150 |
150 |
|
BYTLM |
64000 |
64000 |
|
DIOLM |
150 |
150 |
|
ENQLM |
2000 |
2000 |
|
FILLM |
100 |
100 |
|
PGFLQUOTA |
50000 |
50000 |
|
TQELM |
10 |
10 |
|
WSDEFAULT |
2000 |
2000 |
|
WSEXTENT |
16384 |
16384 |
|
WSQUOTA |
4000 |
4000 |
WSEXTENT is usually higher than WSQUOTA to make the most of the OpenVMS dynamic working set size adjustment algorithms. To set reasonable figures, monitor the live system to determine the page fault rate of the ACC process.
Also, because the Audit Trail Logger process runs under the user name of the ACC, that user name must have write access to the audit trail log file.
If you have a large number of users signing in by user-written agents or the QTI, you may need to increase the working set quotas. See Section A.5.1, ''Calculating the Value of MAX_LOGINS''.
A.2.1.1. How ACMSPARAM.COM Calculates Values for the ACC
This section shows the formulas for how ACMSPARAM.COM calculates parameter values for the ACC. If the calculated values are below the minimum values shown in Table A.1, ''Minimum Quotas for the ACC User Name Process'', then ACMSPARAM.COM assigns the minimum values.
Refer to Table 10.3, ''Variables Required for ACMSPARAM.COM'' for descriptions of the variables shown in these calculations.
ASTLM
ASTLM = 28 + ! base
(4* remote_node_cnt) + ! DECnet channel i/o
remote_sub_cnt + ! for remote authentication
terminal_cnt + ! for local authentication
remote_appl_cnt + !
operator_cnt + !
agent_sub_cnt + !
qti_submitters ! for ACMS operator commandsBIOLM
BIOLM = 20 + ! base
(4 * REMOTE_NODE_CNT) ! MSS DECnet send/receive QIOsBYTLM
BYTLM = 20000 + ! base
(4 * REMOTE_NODE_CNT)
* MSS_MAXBUF ! MSS DECnet i/oENQLM
ENQLM = 100 + ! base
agent_sub_cnt + !
remote_sub_cnt + ! for remote authentication
terminal_cnt + ! for local authentication
qti_submitters !FILLM
FILLM = 20 + ! base
MDB_CNT + ! MDBs
APPL_CNT + ! local ADBs
REMOTE_APPL_CNT + ! remote ADBs
(2 * REMOTE_NODE_CNT) ! DECnet channelsPGFLQUOTA
PGFLQUOTA = 4096 + ! base
MSS_PROCESS_POOL + ! MSS pool
(MSS_MAXBUF + (154 *
(APPL_CNT + REMOTE_APPL_CNT)) +
(((2 * REMOTE_NODE_CNT / 8) + 1) * 8 * MSS_MAXBUF) +
512) / 512A.2.2. User Name Setup for the TSC
The OpenVMS user name under which the TSC runs, defined by the ACMSGEN parameter TSC_USERNAME, must have the privilege SETPRV.
|
Parameter |
Minimum Value (Alpha) |
Minimum Value (IA-64) |
|---|---|---|
|
ASTLM |
250 |
250 |
|
BIOLM |
150 |
150 |
|
BYTLM |
64000 |
64000 |
|
DIOLM |
150 |
150 |
|
ENQLM |
2000 |
2000 |
|
FILLM |
100 |
100 |
|
PGFLQUOTA |
50000 |
50000 |
|
TQELM |
– |
– |
|
WSDEFAULT |
2000 |
2000 |
|
WSEXTENT |
16384 |
16384 |
|
WSQUOTA |
4000 |
4000 |
WSEXTENT is usually higher than WSQUOTA to make the most of the OpenVMS dynamic working set size adjustment algorithms. To set reasonable figures, monitor the live system to determine the page fault rate of the TSC process.
A.2.2.1. How ACMSPARAM.COM Calculates Values for the TSC
This section shows the formulas for how ACMSPARAM.COM calculates parameter values for the TSC. If the calculated values are below the minimum values shown in Table A.2, ''Minimum Quotas for the TSC User Name Process'', then ACMSPARAM.COM assigns the minimum values.
Refer to Table 10.3, ''Variables Required for ACMSPARAM.COM'' for descriptions of the variables shown in these calculations.
ASTLM
ASTLM = 24 + ! base
(terminal_cnt * 2)BIOLM
BIOLM = 20 + TERMINAL_CNT ! base
BYTLM
BYTLM = 4096 + ! base
(1000 * TERMINAL_CNT)FILLM
FILLM = 20 + ! base
TERMINAL_CNT ! 1 channel for each terminalPGFLQUOTA
PGFLQUOTA = 2048 + ! base
(100 * TERMINAL_CNT) + ! for each TT overhead
MSS_PROCESS_POOL ! MSS poolTQELM
TQELM = CP_PROC_CNT + ENTERED_TERMINAL_CNT
A.2.3. User Name Setup for the CP
The OpenVMS user name under which the CP runs must have the SETPRV privilege.
|
Parameter |
Minimum Value (Alpha) |
Minimum Value (IA-64) |
|---|---|---|
|
ASTLM |
250 |
250 |
|
BIOLM |
150 |
150 |
|
BYTLM |
64000 |
64000 |
|
DIOLM |
150 |
150 |
|
ENQLM |
2000 |
2000 |
|
FILLM |
100 |
100 |
|
PGFLQUOTA |
50000 |
50000 |
|
TQELM |
– |
– |
|
WSDEFAULT |
– |
– |
|
WSEXTENT |
– |
– |
|
WSQUOTA |
– |
– |
WSEXTENT is usually higher than WSQUOTA to make the most of the OpenVMS dynamic working set size adjustment algorithms. To set reasonable figures, monitor the live system to determine the page fault rate of the CP process.
Remember, you must authorize the user name of the CP as an agent in the User Definition Utility (UDU) authorization file ACMSUDF.DAT. See Chapter 3, "Authorizing Users" and Chapter 18, "UDU Commands" for information about agent authorizations using UDU.
A.2.3.1. How ACMSPARAM.COM Calculates Values for the CP
This section shows the formulas for how ACMSPARAM.COM calculates parameter values for the CP. If the calculated values are below the minimum values shown in Table A.3, ''Minimum Quotas for the CP User Name Process'', then ACMSPARAM.COM assigns the minimum values.
Refer to Table 10.3, ''Variables Required for ACMSPARAM.COM'' for descriptions of the variables shown in these calculations.
Working Set on Alpha
WSDEFAULT = 2000 + (10*TERMINALS_PER_CP) ! Working set WSEXTENT = 16384 + (50*TERMINALS_PER_CP) ! sizes for WSQUOTA = 4000 + (50*TERMINALS_PER_CP) ! CP user name
Working Set on IA-64
WSDEFAULT = 2000 + (10*TERMINALS_PER_CP) ! Working set WSEXTENT = 16384 + (50*TERMINALS_PER_CP) ! sizes for WSQUOTA = 4000 + (50*TERMINALS_PER_CP) ! CP user name
ASTLM
ASTLM = 17 + ! base
(9 * TERMINALS_PER_CP) + ! DECnet sends
(2 * REMOTE_APPL_CNT) ! for DECnet receivesBIOLM
BIOLM = 28 + ! base
(TERMINALS_PER_CP * 2) + ! TDMS i/o or MSS DECnet link i/o
(2 * REMOTE_APPL_CNT) ! for MSS DECnet link receivesBYTLM
BYTLM = 18000 + ! base
(2000 * TERMINALS_PER_CP) + ! TDMS i/o
(((2 * REMOTE_APPL_CNT) + ! MSS sends
TERMINALS_PER_CP) * MSS_MAXBUF)DIOLM
DIOLM = 20 + (2 * TERMINALS_PER_CP)
ENQLM
ENQLM = 52 + (4 * TERMINALS_PER_CP)
FILLM
FILLM = 32 + ! base + 3 shareable DECforms images
(3 * TERMINALS_PER_CP) + ! cp opens 3 channels to each
(2 * REMOTE_APPL_CNT) + ! terminal. DECnet link channels
REMOTE_RLB_CNT + ! for remote rlbs
FORM_CNT + ESC_RTN_IMAGE_CNT ! for DECforms form filesPGFLQUOTA
PGFLQUOTA =
16384 + ! Base
MSS_PROCESS_POOL + ! MSS process pool
( 2 * MDB_BLK ) + ! Menu information
FORM_BLKS + ! Form files
REMOTE_RLB_BLKS + ! Remote TDMS .RLBs
( TERMINALS_PER_CP * 500 ) + ! Per-user overhead
TERMINALS_PER_CP * ! For each user:
( ( ( LARGEST_MESSAGE + 512 ) * 2 ) + ! Msg marshaling
( LARGEST_MESSAGE * FORM_CNT ) + ! DECform's data
LARGEST_MESSAGE ) / 512 ! TDMS dataNote
The current formula for calculating the PGFLQUOTA value of the CP account is liberal. The formula assumes that each exchange step involves the sending or receiving of the largest message (see the description of the LARGEST_MESSAGE variable in Table 10.3, ''Variables Required for ACMSPARAM.COM'').
After executing ACMSPARAM.COM, review the value of CP_PGFLQUOTA. If this value appears to be excessively large, then replace the LARGEST_MESSAGE variable with the average size of workspaces used in exchange steps, or with the size of the workspace most often used in exchange steps.
The formula for calculating the CP_PGFLQUOTA provides only a rough approximation of this quota. To fine-tune your system, calculate the quota for your particular system.
TQELM
TQELM = 8 + TERMINALS_PER_CP
A.2.4. User Name Setup for the QTI
The OpenVMS user name under which the QTI runs must have OpenVMS SYSPRV and SYSLCK privileges. Define this user name with the ACMSGEN parameter QTI_USERNAME. The user name must be authorized in the UDU authorization file as an agent.
|
Parameter |
Minimum Value (Alpha) |
Minimum Value (IA-64) |
|---|---|---|
|
ASTLM |
250 |
250 |
|
BIOLM |
150 |
150 |
|
BYTLM |
64000 |
64000 |
|
DIOLM |
150 |
150 |
|
ENQLM |
2000 |
2000 |
|
FILLM |
100 |
100 |
|
PGFLQUOTA |
50000 |
50000 |
|
TQELM |
– |
– |
|
WSDEFAULT |
– |
– |
|
WSEXTENT |
– |
– |
|
WSQUOTA |
– |
– |
WSEXTENT is usually higher than WSQUOTA to make the most of the OpenVMS dynamic working set size adjustment algorithms. To set reasonable figures, monitor the live system to determine the page fault rate of the QTI process.
A.2.4.1. How ACMSPARAM.COM Calculates Values for the QTI
This section shows the formulas for how ACMSPARAM.COM calculates parameter values for the QTI. If the calculated values are below the minimum values shown in Table A.4, ''Minimum Quotas for the QTI User Name Process'', then ACMSPARAM.COM assigns the minimum values.
Use these formulas for information or fine-tuning purposes only. VSI recommends that you use the ACMSPARAM.COM procedure, which is discussed in detail in Chapter 10, "Setting ACMS Quotas, Parameters, and Privileges", to perform these calculations to determine the QTI quota values.
Refer to Table 10.3, ''Variables Required for ACMSPARAM.COM'' for descriptions of the variables shown in these calculations.
Working Set on Alpha
WSDEFAULT = 2000 + (20*QTI_TASK_THDS) ! Working set WSEXTENT = 16384 + (50*QTI_TASK_THDS) ! sizes for WSQUOTA = 4000 + (50*QTI_TASK_THDS) ! QTI user name
Working Set on IA-64
WSDEFAULT = 2000 + (20*QTI_TASK_THDS) ! Working set WSEXTENT = 16384 + (50*QTI_TASK_THDS) ! sizes for WSQUOTA = 4000 + (50*QTI_TASK_THDS) ! QTI user name
ASTLM
ASTLM = 24 + ! base
(QTI_TASK_THDS * 2) + ! one AST for each thread
(2 * QTI_SUBMITTERS) + ! session receives and messages
(3 * QTI_QUEUES) ! RMS overheadBIOLM
BIOLM = 18 + ! base
QTI_TASK_THDS ! MSS DECnet i/oBYTLM
BYTLM = 8192 + ! base
(2 * REMOTE_APPL_CNT * ! 2 MSS buffers for each link
MSS_MAXBUF) + (2048 * QTI_QUEUES) + ! RMS overhead
(1024 * QTI_TASK_THDS)DIOLM
DIOLM = 18 + ! base
QTI_TASK_THDS ! disk i/oENQLM
ENQLM = 69 + ! base
(15 * QTI_TASK_THDS) + ! RMS
(QTI_QUEUES * 4) ! ASTs and lockingFILLM
FILLM = 20 + ! base
REMOTE_APPL_CNT + ! DECnet links
QTI_QUEUES ! 1 for each queue filePGFLQUOTA
PGFLQUOTA =
8192 + ! base
MSS_PROCESS_POOL + ! MSS pool
(5831 + ! buffer for each operator request
(QTI_TASK_THDS *
(16272 + QTI_MAX_WSP_SIZE)) + ! buffer for each task thread
(QTI_QUEUES * 792) + ! buffer for each task queue
(QTI_SUBMITTERS *
(MSS_MAXBUF + 2064)) + ! buffer for each submitter
512) / 512 Include 10% for expansion PGFLQUOTA = PGFLQUOTA + (PGFLQUOTA/10)TQELM
TQELM = 20 + ! base
(QTI_TASK_THDS * 2) ! one timer for each threadA.2.5. User Name Setup for the EXC
The OpenVMS user name under which the EXC runs must have OpenVMS SETPRV and SYSPRV privileges. Define this user name with the ADU application definition clause APPLICATION USERNAME.
|
Parameter |
Minimum Value (Alpha) |
Minimum Value (IA-64) |
|---|---|---|
|
ASTLM |
40 |
250 |
|
BIOLM |
40 |
150 |
|
BYTLM |
32768 |
64000 |
|
DIOLM |
40 |
150 |
|
ENQLM |
200 |
2000 |
|
FILLM |
100 |
100 |
|
PGFLQUOTA |
32768 |
50000 |
|
TQELM |
– |
– |
|
WSDEFAULT |
– |
– |
|
WSEXTENT |
– |
– |
|
WSQUOTA |
– |
– |
WSEXTENT is usually higher than WSQUOTA to make the most of the OpenVMS dynamic working set size adjustment algorithms. To set reasonable figures, monitor the live system to determine the page fault rate of the EXC process.
The EXC user name requires access to application databases (.ADB files), task group databases (.TDB files), message files, and request libraries.
A.2.5.1. How ACMEXCPAR.COM Calculates Values for the EXC
This section shows the formulas for how ACMEXCPAR.COM calculates parameter values for the CP. If the calculated values are below the minimum values shown in Table A.5, ''Minimum Quotas for the EXC User Name Process'', then ACMEXCPAR.COM assigns the minimum values.
Use these formulas for information or fine-tuning purposes only. VSI recommends that you use the ACMEXCPAR.COM procedure, which is described in Chapter 10, "Setting ACMS Quotas, Parameters, and Privileges", to perform these calculations to determine the EXC quota values.
Refer to Table 10.3, ''Variables Required for ACMSPARAM.COM'' for descriptions of the variables shown in these calculations.
Working Set on Alpha
WSDEFAULT 2000 + (20 * EXC_TK_INSTANCE_CNT) ! Working set quotas WSEXTENT 16384 + (50 * EXC_TK_INSTANCE_CNT) ! for the WSQUOTA 4000 + (20 * EXC_TK_INSTANCE_CNT) ! EXC user name
Working Set on IA-64
WSDEFAULT 2000 + (20 * EXC_TK_INSTANCE_CNT) ! Working set quotas WSEXTENT 16384 + (50 * EXC_TK_INSTANCE_CNT) ! for the WSQUOTA 4000 + (20 * EXC_TK_INSTANCE_CNT) ! EXC user name
ASTLM
ASTLM = 24 + ! base
(5 * EXC_TK_INSTANCE_CNT) + ! terminal i/o + DECnet sends
EXC_SP_CNT + ! max SP's for this appl
EXC_SERVER_CNT + ! num of servers defined for appl
(2 * AGENT_CNT) ! MSS receives from agentsBIOLM
BIOLM = 10 + ! base
EXC_TK_INSTANCE_CNT + ! TDMS i/o and MSS network sends
(2 * REMOTE_AGENT_CNT) ! DECnet receivesBYTLM
BYTLM = 8192 + ! base
(1000 * LOCAL_TDMS_TASK_CNT) + ! TDMS i/o
(((2 * REMOTE_AGENT_CNT) + ! MSS DECnet link receives
REMOTE_TK_INSTANCE_CNT)
* MSS_MAXBUF) + ! MSS DECnet link sends
(MAXPROCESSCNT * 84) ! SP termination notification
DIOLM
DIOLM = 20 + ! base
EXC_TK_INSTANCE_CNT ! rlb i/oENQLM
ENQLM = 20 + ! base
((EXC_RLB_CNT + EXC_MSG_CNT +
FORM_CNT +
EXC_TDB_CNT) * 4) ! rlb, tdb and msg file opens & I/OFILLM
FILLM = 20 + ! base
EXC_RLB_CNT + ! rlbs
FORM_CNT + ! DECforms forms
EXC_MSG_CNT + ! message files
EXC_TDB_CNT + ! tdbs
(2 * REMOTE_AGENT_CNT) ! DECnet channelsPGFLQUOTA
PGFLQUOTA = 7500 + ! base
(20 * EXC_TK_INSTANCE_CNT) + ! EXC's task context
((TWS_POOLSIZE + TWSC_POOLSIZE)
* EXC_TDB_CNT) + ! WKSP pools
(WS_POOLSIZE + WSC_POOLSIZE) + ! group/user wksp pools
MSS_PROCESS_POOL + ! MSS process pool
EXC_RLB_BLKS + ! rlb caching
(LOCAL_TDMS_TASK_CNT * 100) + ! Local TDMS tasks
EXC_ADB_BLKS + ! Size of ADB
EXC_TDB_BLKS ! Size of TDBsTQELM
TQELM = 1 + ! base
(2 * EXC_SERVER_CNT) + ! server management
EXC_TK_INSTANCE_CNT + ! ast for each task instance for i/o
EXC_SP_CNT ! server process communicationsA.2.6. Calculating Quotas for ACMS Server Processes
This section shows how to derive the minimum quotas required for the server processes. By increasing the base default value assigned to the AUTHORIZE quota by the amounts shown in Figure A.1, ''Minimum Quotas for Server Processes'', you can determine the minimum server process quota.
In Figure A.1, ''Minimum Quotas for Server Processes'', the number represented by BASE is the default value assigned to the AUTHORIZE quota. This number represents the base quota requirement for the processing being done in the server (not for the server process itself). The BASE amount varies for each ACMS system. Generally, the default BASE quota assigned for the process is sufficient. The number after BASE + indicates the minimum amount that should be added to bring the quota value up to the minimum required by the ACMS server process.
The only privilege ACMS requires server processes to have is TMPMBX. The quotas required by an ACMS server process are dependent on the type of processing the server performs.
ASTLM BASE + 2 ! for procedure servers
BASE + 4 ! for DCL servers
BIOLM BASE + 2 !for procedure servers
BASE + 4 !for DCL servers
BYTLM BASE + 2000
DIOLM BASE + 2
FILLM BASE + 10
PGFLQUOTA BASE + MSS_PROCESS_POOL + 200Check the DBMS and Rdb installation guides if your server code accesses these products. Additional resources required for using these products, such as ENQLM, are explained in the appropriate installation guides.
A.3. Calculating Quotas for Using the ADU Utility
Users who plan to use the ADU must set quotas equal to or greater than the minimum values shown in Figure A.2, ''Minimum Quotas for Using ADU''. Be sure to refer to documentation for related products, such as the CDD dictionary, for further quota limits that may be required.
ENQLM 100
FILLM 25 + (the number of files specified with the /OBJECT
qualifier to the BUILD GROUP command)
+ (the number of files specified with the
/USERLIBRARY qualifier to the BUILD GROUP
command)
+ 2 ! if STARTLET.OLB and IMAGELIB are
! searched when resolving
! global symbols PRCLM 1Amount of available memory
CPU processing power
Complexity of ACMS task groups
ADU typically requires higher quotas than those set by default for the working set and the PGFLQUOTA.
A.4. Calculating Quotas for Using the ACMS Task Debugger
Users who plan to run tasks under the task debugger must set quotas equal to or greater than those listed in Figure A.3, ''Minimum Quotas for Using the Task Debugger''. The only privilege ACMS requires server processes to have is TMPMBX.
ASTLM 10
BYTLM 50000
ENQLM 100
FILLM 96
PRCLM 1 + maximum number of servers that can
be started by the task debugger
TQELM 10Users might need a BYTLM value greater than 50,000 if they start the task debugger with the
/WORKSPACE_DEBUG qualifier and start more than one server during
a task debugging session. Also, the subprocess quota should be greater than 1 to allow
the task debugger to start subprocesses.
See VSI ACMS for OpenVMS Writing Server Procedures for complete information on the ACMSDEBUG Utility and the
associated ACMS/DEBUG commands.
A.5. Calculating Values for Certain ACMSGEN Parameters
ACMS provides values for ACMSGEN parameters as defaults or through ACMSPARAM.COM. These values normally suffice; however, for several ACMSGEN parameters you may want to calculate values independently to more accurately reflect your ACMS system. In such cases, include the new value as a variable in ACMVARINI.DAT that corresponds to the ACMSGEN parameter. Then run ACMSPARAM.COM. The command procedure uses the new variable value to generate a new ACMSGEN parameter.
The following sections describe the calculations for the ACMSGEN parameters whose values you may want to change from the values supplied by default or by ACMSPARAM.COM.
A.5.1. Calculating the Value of MAX_LOGINS
MAX_LOGINS limits the number of users who can sign in to ACMS.
The number of terminals one Command Process can service, the MAX_TTS_CP value
The maximum number of Command Processes that can run when ACMS is active, the CP_SLOTS value
The number of users who can sign in can never be greater than the product of the MAX_TTS_CP value and the CP_SLOTS value. Once the value you set for the MAX_LOGINS parameter reaches the product of the MAX_TTS_CP and CP_SLOTS parameters, merely increasing the value of the MAX_LOGINS parameter has no effect. To increase the number of users who can sign in, you must also increase the value of the MAX_TTS_CP or the CP_SLOTS parameter.
The ACMSGEN parameter MAX_LOGINS is only checked for task submitters signing in through the TSC. Any other sign-ins (from user-written agents, detached tasks, and the QTI) are not counted against the MAX_LOGINS value.
|
Parameter | Minimum Value (Alpha) |
Minimum Value (IA-64) |
|---|---|---|
|
WSDEFAULT |
2000 |
2000 |
|
WSEXTENT |
16384 |
16384 |
|
WSQUOTA |
4000 |
4000 |
The WSDEFAULT and WSEXTENT quotas may be low for the ACC user name if there are many sign-ins/sign-outs. WSEXTENT is usually higher than WSQUOTA to make the most of the OpenVMS dynamic working set size adjustment algorithms. To set reasonable figures, monitor the live system to determine the page fault rate of the ACC process and set the working set quotas appropriately.
A.5.2. Calculating the Value of MSS_MAXOBJ
MSS_MAXOBJ = 15 + (CP_PROC_CNT * (4 + TERMINALS_PER_CP))
+ (2 * OPR_ENTER_RETURN_CNT)
+ (6 * APPL_CNT)
+ (3 * TOTAL_SP_CNT)
+ QTI_SUBMITTERS
+ ((AGENT_CNT * 3) + AGENT_SUB_CNT)
+ (2 * OPERATOR_CNT)
+ (5 * DEBUGGER_CNT)
MSS_MAXOBJ = MSS_MAXOBJ + (.10 * MSS_MAXOBJ)A.5.3. Calculating the Value of MSS_MAXBUF
The ACMSGEN message switch parameter MSS_MAXBUF is the size of a buffer that the ACMS message switch uses to handle message traffic. If this buffer is not large enough to hold a message, the message is sent in blocks.
MSS_MAXBUF = 280
+ LARGEST_MESSAGE
+ (17 * LARGEST_MESSAGE_NUM_WKSP)
MSS_MAXBUF = MSS_MAXBUF + MSS_MAXBUF/10MAX_MAXBUF = 216
+ RECORD_REQUEST_NAMES
+ ( NUM_WSPS * 17 )
+ SUM_WSPS_LEN
MSS_MAXBUF = MSS_MAXBUF + MSS_MAXBUF/10In this formula 216 is the message overhead for DECforms request (use 144 as the message overhead for TDMS request). RECORD_REQUEST_NAMES is the length in bytes of the record ID or request name round to next higher longword. NUM_WSPS is the number of workspaces. Round the product to next higher longword. SUM_WSPS_LEN is the sum of lengths of workspaces, each rounded to next higher longword.
EXCHANGE
SEND EMPLOYEE_RECORD
SENDING EMPLOYEE_MAIN_DATA, EMPLOYEE_SUB_DATA;216 !Message overhead for DECforms request =216 + 16 ! Length of "employee_record" = 15 = 16 rounded + 36 ! 2 workspaces * 17 = 34 = 36 rounded +400 ! Length of employee_main_data workspace = 400 + 36 ! Length of employee_sub_data workspace = 35 = 36 rounded ----- 704 ! message length, in bytes + 70 ! 10% expansion _____ 774 ! total message length, in bytes
The minimum size of MSS_MAXBUF is 512.
There may be circumstances for which you are willing to incur message blocking. In such cases, you may not want to have ACMSPARAM.COM calculate the MSS_MAXBUF parameter. Instead, calculate MSS_MAXBUF as described in the following example, add the values as a variable in ACMVARINI.DAT, and then run ACMSPARAM.COM.
The value should be large enough to accommodate any frequently accessed exchange step.
Allow for enough space so that the message can be divided into approximately equal blocks, so that space is not wasted.
(Message_length - MSS_MAXBUF)
TOTAL_DATA_SEGMENTS = 1 + -----------------------------
(MSS_MAXBUF - 28) (Message_length - 28)
MSS_MAXBUF = --------------------- + 28
TOTAL_DATA_SEGMENTS 20000 - 28
MSS_MAXBUF = ---------- + 28
4
MSS_MAXBUF = 5021A.5.4. Calculating the Value of MSS_POOLSIZE
MSS_POOLSIZE = ( ( (56 * MSS_MAXOBJ)
+ (144 * MAXPROCESSCNT)
+ (MSS_MAXBUF * TOTAL_TK_INSTANCE_CNT)
+ (TERMINAL_CNT * 128)
+ (TOTAL_SP_CNT * 64)
+ (OPERATOR_CNT * 5120)
+ 567)
/ 512) + 32
MSS_POOLSIZE = MSS_POOLSIZE + (MSS_POOLSIZE/10)A.5.5. Calculating the Value of MSS_PROCESS_POOL
For an application node: MSS_PROCESS_POOL = ((MSS_MAXBUF * 2 * REMOTE_SUB_CNT) / 512) + 32 For a submitter node: MSS_PROCESS_POOL = (((MSS_MAXBUF * 2 * REMOTE_APPL_CNT) / 512) * 4) + 32
The value of MSS_PROCESS_POOL must be at least 256.
If the node is both an application node and a submitter node, the command procedure uses the higher of the two values calculated in the previous example.
A.5.6. Calculating the Value of PERM_CPS
PERM_CPS sets the number of permanently active Command Processes. The default value is 1.
To increase the effective value of PERM_CPS, you may also need to change the value of the parameter MAX_LOGINS or MAX_TTS_CP.
The value for the PERM_CPS parameter
The result of the MAX_LOGINS value divided by the MAX_TTS_CP value
At startup, when ACMS computes the maximum number of Command Processes the system might need, ACMS divides the value of MAX_LOGINS by the value of MAX_TTS_CP. For example, if you defined MAX_LOGINS as 60 and MAX_TTS_CP as 20, ACMS would never set up more than three Command Processes. In this case, if the PERM_CPS value is greater than 3, ACMS ignores the PERM_CPS value. ACMS does not start more command processes than all of your terminal users can use.
Once the value you set for the PERM_CPS parameter reaches the result of MAX_LOGINS divided by MAX_TTS_CP, merely increasing the value of the PERM_CPS parameter has no effect. To increase the effective value of PERM_CPS further, you must also increase the value of the MAX_LOGINS parameter or decrease the value of the MAX_TTS_CP parameter. This situation is unusual, however. There is no reason to increase the number of permanent Command Processes to more than you need to service all terminal users. In most cases, set the number of permanent Command Processes to a value adequate for handling your common number of users.
A.5.7. Calculating ACMS Workspace Pools
When you start an application, ACMS allocates a number of shared and private memory pools to hold the data and control structures associated with the workspaces used by the tasks in your application. Calculate the amount of space your application requires in these pools so that ACMS can allocate sufficient memory to hold the data and control information.
A.5.7.1. Types of Workspace Pools
|
Type | Default Value (Alpha) |
Default Value (IA-64) |
|---|---|---|
|
Task instance workspace control pool |
50 pagelets |
50 pagelets |
|
Task instance workspace pool |
1600 pagelets |
1600 pagelets |
|
Workspace pool |
256 pagelets |
256 pagelets |
|
Control pool |
128 pagelets |
128 pagelets |
ACMS allocates a task instance workspace pool and a task instance workspace control pool for each task group in your application. These pools are used to hold data and control information for active task instances in their respective groups and are shared by the EXC process and the server processes.
ACMS also allocates a workspace pool and a workspace control pool to hold workspace data and control information associated with the master copies of group and user workspaces. These two pools are used by all the task groups in the application and are allocated in the private memory of the EXC process.
A.5.7.2. Workspace Pool Allocation Failures
There is insufficient free space within the pool to satisfy the request
There is insufficient free contiguous space within the pool to satisfy the request. In this case, there may be sufficient total free space; however, there is no single free block that is large enough to accommodate the request.
A request is made to allocate a single block whose size exceeds 65,536 bytes. Since ACMS only allocates blocks of memory in powers of 2 up to and including 65,536 bytes long, redesign your task to use fewer or smaller workspaces.
A request is made to allocate a block that would cause the total amount of pool allocated to exceed the total size of the pool.
"Error allocating {number} bytes in TWSC pool {workspace-pool-name} for workspaces"See Chapter 12, "Auditing Applications with the Audit Trail Logger" for information about the audit trail record generated by this error.
Use the ACMS/SHOW APPLICATION/POOL command to determine the
amount of free space within the workspace pools that are being used by your
applications. This display also shows the size of the largest block that may be
allocated from the pool. If you find that there is sufficient free space to
satisfy a request, but that the free space is not contiguous, then this is an
indication that the free space inside the workspace pools has become fragmented.
Increasing the amount of memory allocated to the pool solves this problem and
allows ACMS to better manage the free space within the pool.
A.5.7.3. ACMS Workspace Pool Requirements
The following sections describe how to calculate the amount of space required in each of the four types of workspace pools.
ACMS reserves the first pagelet in each pool for pool control structures. Before allocating a block of memory from a pool, ACMS rounds the size of the requested block up to the next highest power of two. ACMS uses this allocation algorithm to reduce the possibility of pool fragmentation and to provide a fast pool-space allocation time. When calculating the amount of space required by a task, take this information into account.
For example, you calculate that a task requires a block of 956 bytes from the task instance pool for six task workspaces and three system workspaces. You then calculate that these nine workspaces require a block of 196 bytes (52 + ( 16 * 9) ) from the task instance control pool. Both these figures must then be rounded up to the next highest power of two. In this example, the task requires 1024 bytes from the task instance workspace pool and 256 bytes from the task instance workspace control pool.
A.5.7.3.1. Task Instance Workspace Pool Requirements
Each task instance requires a block of this pool equal to the sum of the sizes of the system workspaces (519 bytes) and the sum of the sizes of the task, user, and group workspaces used by the task.
A.5.7.3.2. Task Instance Control Pool Requirements
52 bytes of task workspace header information. This structure contains information needed by ACMS to identify the owner of the workspaces and to map the task instance workspace block in the task instance workspace pool.
16 bytes of control information for each task, user, group, and system workspace. ACMS uses these structures to locate each individual workspace owned by a task instance and to point to the master copies of any group and user workspaces referenced by a task instance.
ACMS allocates blocks from these two pools at the beginning of a task instance and frees the blocks at the end of the task instance.
Group and user workspaces require additional overhead information. Memory for this information is allocated from the workspace pool and the control pool. The amount of additional pool required depends on the type of workspace involved.
A.5.7.3.3. Group Workspace Pool Requirements
Because group workspaces can be shared among instances of different tasks within a task group, they require more control information to be kept.
The first time a group workspace is accessed within a task group, a 24-byte workspace descriptor is allocated from the control pool. Space must also be allocated from the workspace pool to contain the master copy of the workspace.
When a task that uses a particular group workspace is initiated, the master copy is moved into a local copy for the exclusive use of the task instance. When the task instance ends, the master copy of each group workspace that allows updating is updated from these local copies.
Therefore, the overhead for group workspaces is 32 bytes (24 bytes rounded up to the next power of two) from the control pool, plus an amount of workspace pool equal to the size of the group workspace. This value is rounded up to the next power of two.
Once allocated, the overhead pool for group workspaces is released only when the application is stopped. ACMS reserves an 8-byte block to hold a header for the queue of all the group workspaces in an application.
A.5.7.3.4. User Workspace Pool Requirements
User workspaces are maintained on a per-submitter basis, so master copies of user workspaces must be maintained for each submitter.
The first time a submitter accesses a user workspace, a 48-byte workspace submitter block must be allocated from the control pool. This block contains the header for the queue of master copies of user workspaces for this submitter. It also contains some submitter identification.
The first time a user workspace is used by a submitter, a 24-byte workspace descriptor is allocated from the control pool. Enough workspace pool must be allocated to contain the master copy of this user workspace. The workspace descriptor points to the master copy and is queued to the submitter block.
When the user workspace is referenced, the master copy is used to initialize a local copy that is provided to the task instance. When the task ends, the master copy of each user workspace is updated, if necessary, from the local copy.
One 64-byte block (48 bytes rounded) of control pool for each submitter
One 32-byte block (24 bytes rounded up to the next power of two) of control pool for each user workspace used for each submitter
Enough workspace pool to contain the master copy of each user workspace used, rounded up to the next power of two
This "overhead" pool is released when the submitter signs out.
ACMS reserves an 8-byte block to hold a header for the queue of all the group workspaces in an application.
A.5.7.4. Calculating Workspace Pool Sizes
TWS_POOLSIZE
TWSC_POOLSIZE
WS_POOLSIZE
WSC_POOLSIZE
This section also provides information about defining logical names to size the workspace pools to set values for these parameters on a per-application basis.
A.5.7.4.1. Calculating the Value of TWS_POOLSIZE and TWSC_POOLSIZE
Calculate for each TDB and use the highest value:
TWS_POOLSIZE = (Pagesize + (wksp_size_sum * TOTAL_TK_INSTANCE_CNT)) / 512 where:
wksp_size_sum = ((sum of group workspace sizes +
(sum of user workspace sizes +
(sum of task workspace sizes)
rounded to next power of 2)
Pagesize is the CPU-specific page size (in bytes) of the VAX or
Alpha system.Calculate for each TDB and use the highest value:
TWSC_POOLSIZE = (512 + (wksp_factor * TOTAL_TK_INSTANCE_CNT)) / 512
where wksp_factor = (52 + (16 * wksp_cnt_sum)) rounded up to the
next highest power of 2.
wksp_cnt_sum = (number of group workspaces in TDB)+
(number of user workspaces in TDB) +
(number of task workspaces in TDB)The ACMSPARAM.COM calculations are estimations. If you wish to determine more accurately the value of the TWS_POOLSIZE and TWSC_POOLSIZE parameters, calculate the amount of pool required by each task group in each application on your system, and select the highest value from each calculation.
To calculate the size of each pool required by each task group, you need to consider how many users will be simultaneously executing each task in the task group. After calculating the workspace pool requirements of each task, multiply these values by the number of users who will be running those tasks simultaneously.
(Pagesize ! pool control and management overhead
+ ( t-1 * s-1 )
+ ( t-2 * s-2 )
+ [...]
+ ( t-n * s-n ) )/512
where:
Pagesize is the CPU-specific page size (in bytes) of the VAX or
Alpha system.
t-n = (the greater of the following:
a) sum of sizes of workspaces used by task 'n' rounded up to
the next power of 2
b) the CPU-specific page size()
s-n = <number of submitters simultaneously executing task 'n'>(512 ! pool control and management overhead
+ ( c-1 * s-1 )
+ ( c-2 * s-2 )
+ [...]
+ ( c-n * s-n ) )/512
where:
c-n = ( 52 + ( 16 * <number of workspaces used by task 'n'> ) )
rounded up to the next power of 2
s-n = <number of submitters concurrently executing task 'n'>A.5.7.4.2. Calculating the Value of WS_POOLSIZE and WSC_POOLSIZE
Calculate for each application and use the highest value:
WS_POOLSIZE = (512 +
grp_wksp_size_sum +
(user_wksp_size_sum + TOTAL_TK_INSTANCE_CNT)) / 512
where grp_wksp_size_sum = sum of: each group workspace size
rounded up to the next highest power of 2
user_wksp_size_sum = sum of: each user workspace size
rounded up to the next highest power of 2Calculate for each application and use the highest value:
WSC_POOLSIZE = (512 +
(16 * (number of TDBs in application)) +
(32 * (number of group workspaces in all TDBs in application))+
(64 * TOTAL_TK_INSTANCE_CNT) +
(32 * TOTAL_TK_INSTANCE_CNT)) / 512The ACMSPARAM.COM calculations are estimations. If you wish to determine more accurately the value of the WS_POOLSIZE and WSC_POOLSIZE parameters, calculate the amount of pool required by each application on your system and select the highest value from each calculation.
To calculate the size of each pool required by each application, consider how many group and user workspaces are used concurrently in each application.
(512 ! pool control and management overhead
+ ( g-1 + g-2 + [...] + g-n )
+ ( u-1 * s-1 )
+ ( u-2 * s-2 )
+ [...]
+ ( u-n * s-n ) )/512
where:
g-n = <size of group workspace 'n'> rounded up to the next power of 2
u-n = <size of user workspace 'n'> rounded up to the next power of 2
s-n = <number of submitters accessing user workspace 'n'>(512 ! pool control and management overhead
+ ( 16 * < number of groups ! group workspace and submitter list control
in the application> ) ! structures
+ ( 32 * < sum of number of ! group workspace control blocks
group workspaces used in
each task group in the
application> )
+ ( 64 * < number of submitters ! submitter control blocks
accessing user workspaces
in the application> )
+ ( 32 * s-1 ) ! user workspace control blocks
+ ( 32 * s-2 ) ! user workspace control blocks
+ [...]
+ ( 32 * s-n ) )/512 ! user workspace control blocks
where:
s-n = number of submitters accessing user workspace 'n'A.5.7.4.3. Defining Logical Names for Workspace Pool Sizes
ACMS$EXC_WS_POOLSIZE
ACMS$EXC_WSC_POOLSIZE
ACMS$EXC_TWS_POOLSIZE
ACMS$EXC_TWSC_POOLSIZE
APPLICATION LOGICAL NAMES ARE
ACMS$EXC_TWS_POOLSIZE = "1750",
ACMS$EXC_TWSC_POOLSIZE = "75";In the Application Definition Utility (ADU):
APPLICATION LOGICAL NAMES ARE ACMS$EXC_TWS_POOLSIZE = "ACMS$EXC_<appl_name>_TWS_POOLSIZE";At DCL level:
$DEFINE/SYSTEM ACMS$EXC_<appl_name>_TWS_POOLSIZE "1750"
In the preceding examples of the additional logical name definitions, <appl_name> is the name of the application.
The logical name (or the translation of it) must contain a valid decimal number (in pagelets for Alpha).
ACMS uses the ACMSGEN parameters if the logical cannot be translated or the logical contains an invalid value or character.
As with any value specified by ACMSGEN, if the value contained in one or more of the logicals is too high, the application will not start.
The ACMSPARAM and ACMEXCPAR procedures will not have any knowledge of the changes made to the workspace pools by using these logicals. Any calculations done by these procedures will reflect the values in ACMSGEN.
Appendix B. Error Messages
This appendix contains file specifications for the ACMS error message files and information about how ACMS reports error messages generated by other products.
B.1. ACMS Error Messages
SYS$SYSROOT:[SYSHLP]ACMSAAU.MEM SYS$SYSROOT:[SYSHLP]ACMSATR.MEM SYS$SYSROOT:[SYSHLP]ACMSDDU.MEM SYS$SYSROOT:[SYSHLP]ACMSGEN.MEM SYS$SYSROOT:[SYSHLP]ACMSQUEMGR.MEM SYS$SYSROOT:[SYSHLP]ACMSRUN.MEM SYS$SYSROOT:[SYSHLP]ACMSSWL.MEM SYS$SYSROOT:[SYSHLP]ACMSUDU.MEM
SYS$SYSROOT:[SYSHLP]ACMSTU.MEM
SYS$SYSROOT:[SYSHLP]ACMSATL.MEM
B.2. Error Messages from Other Products
message number 000288664
SET MESSAGE command and specifying the name of the product's
error message file, for
example:$SET MESSAGE SYS$MESSAGE:DBMMSG.EXE
See documentation on the product you are interested in for the name of its error message file.
Appendix C. Requirements for Successful ACMS Sign-Ins
As system manager, you must understand the problems users can have when they try to sign in to ACMS. You have control over the tools that can prevent or allow successful sign-ins. This appendix lists a set of requirements to help ensure that users can access ACMS.
C.1. ACMS Sign-In Requirements
The ACMS software requires that certain files be present and certain entries be available in various databases before users can sign in to ACMS on ACMS-controlled or OpenVMS-controlled terminals. The requirements listed here can help you identify problems users encounter.
First, check the Software Event Log (SWL) and the Audit Trail Report (ATR) for additional details on the failure. If the SWL and audit information is not detailed enough to resolve the problem, then continue with the following checklist.
ACMS/ENTER, check the following items:The user must have a valid entry in the OpenVMS SYSUAF.DAT file. In cases in which the OpenVMS SYSUAF.DAT file has been modified (such as where cluster creation has required several SYSUAF.DAT files to be merged together), ACMS must be stopped and restarted to map the newly modified SYSUAF.DAT into memory.
The user doing the
ACMS/ENTERis listed specifically in the User Definition Utility (ACMSUDF.DAT) file, or $ALL is used.The terminal from where the
ACMS/ENTERwas keyed is listed specifically in the Device Definition Utility (ACMSDDF.DAT) file, or $ALL is used.The terminal type is supported by both ACMS and any forms product in use by ACMS (such as DECforms or TDMS).
The menu database file (.MDB) specified in the ACMSUDF.DAT database for the terminal user must be valid and exist in the correct disk directory. Beware of process logical names, because separate processes are involved. SYSTEM logicals are recommended.
The menu specified in the ACMSUDF.DAT database for the terminal user must be a menu that exists in the specified .MDB file.
The terminal user's user name matches that of the agent handling the user, or the agent's user name is authorized with the
/AGENTqualifier in the ACMSUDF.DAT database.The terminal user's user name must be less than or equal to 12 characters in length.
ACMS/ENTER, check these items:- The file SYS$COMMON:[SYSEXE]RIGHTSLIST.DAT must exist on the system. If it does not, add the file with AUTHORIZE by entering:
UAF>CREATE/RIGHTS The command menu .MDB file, ACMSCMD.MDB, must be valid and exist in the ACMS$DIRECTORY disk directory.
The ACMS menu request library file, ACMSREQ.RLB, must be valid and exist in the SYS$LIBRARY disk directory.
The user name used by the Command Process (CP) and the Queued Task Initiator (QTI) must have been added as an agent in the ACMSUDF.DAT database. By default, this user name is SYSTEM.
The application must be properly authorized for use in ACMS with the Application Authorization Utility (AAU).
- Check to be sure the .ADB file is valid by entering the following:
$RUN SYS$SYSTEM:ACMSADUADU>DUMP APPLICATION<ADB-filename>If this command generates an error, then rebuild the application to create a new .ADB file.
Check to see that the user name specified for the Terminal Subsystem Controller (TSC) has sufficient ASTLM quota.
This value is a guideline. Depending on the complexity of the DECforms IFDL, a smaller value might be more suitable. The value selected is application-dependent.
This value is Alpha-specific.
Asterisk (*) indicates all items associated with these events are collected.
* Indicates that all associated items are collected for this event.
* Indicates that all associated items are collected for this event.