VSI DECdfs for OpenVMS Management Guide
- Software Version:
- VSI DECdfs Version 2.4
- Operating System and Version:
- VSI OpenVMS IA-64 Version 8.4-1H1 or higher
VSI OpenVMS Alpha Version 8.4-2L1 or higher
Preface
This manual describes VSI DECdfs for OpenVMS management concepts and procedures and the functions of the management commands. It assumes a division of job responsibilities between the person who manages DECdfs on a network node and the person who manages the Digital Distributed Name Service (DECdns) for a network. Such a division of between the person who manages VSI DECdfs on a network node and the person who manages the Digital Distributed Name Service (DECdns) for a network. Such a division of responsibilities may not always exist. If you need information on DECdns, see the manuals entitled, VSI DECnet-Plus for OpenVMS DECdns Management Guide and DECnet/OSI DECdns Management.
1. About VSI
VMS Software, Inc. (VSI) is an independent software company licensed by Hewlett Packard Enterprise to develop and support the OpenVMS operating system.
2. Intended Audience
This manual is intended for the VSI DECdfs manager: anyone who sets up, controls, and tunes performance of a VSI DECdfs server, client, or both. Managers must have OpenVMS knowledge and experience to the system manager level and access to the OpenVMS documentation set and to the DECnet documentation set.
Users who need information only about VSI DECdfs commands can find it in the command dictionary in Chapter 4. The manual should be useful to these users, but it is not directed toward them.
3. Related Documents
The VSI DECdfs for OpenVMS documentation set consists of this manual, the VSI DECdfs for OpenVMS Installation Guide, and the VSI DECdfs for OpenVMS Release Notes.
Guide to OpenVMS File Applications
VSI OpenVMS Guide to System Security
VSI OpenVMS User's Manual
VSI OpenVMS System Manager's Manual
VSI OpenVMS I/O User's Reference Manual
VSI OpenVMS System Services Reference Manual
VSI OpenVMS DECnet Network Management Utilities
VSI OpenVMS DECnet Network Management Utilities
VSI DECnet-Plus for OpenVMS Network Control Language Reference Guide
DECnet/OSI Network Control Language Reference
VSI OpenVMS DECnet Networking Manual
VSI DECnet-Plus for OpenVMS DECdns Management Guide
DECnet/OSI DECdns Management
4. OpenVMS Documentation
The full VSI OpenVMS documentation set can be found on the VMS Software Documentation webpage at https://docs.vmssoftware.com.
5. VSI Encourages Your Comments
You may send comments or suggestions regarding this manual or any VSI document by sending electronic mail to the following Internet address: <docinfo@vmssoftware.com>. Users who have VSI OpenVMS support contracts through VSI can contact <support@vmssoftware.com> for help with this product.
6. Conventions
| Convention | Meaning |
|---|---|
|
Ctrl/ x |
A sequence such as Ctrl/ x indicates that you must hold down the key labeled Ctrl while you press another key or a pointing device button. |
|
PF1 x |
A sequence such as PF1 x indicates that you must first press and release the key labeled PF1 and then press and release another key or a pointing device button. |
|
Return |
In examples, a key name enclosed in a box indicates that you press a key on the keyboard. (In text, a key name is not enclosed in a box.) |
. . . |
A horizontal ellipsis in examples indicates one of the
following possibilities:
|
... |
A vertical ellipsis indicates the omission of items from a code example or command format; the items are omitted because they are not important to the topic being discussed. |
|
( ) |
In command format descriptions, parentheses indicate that you must enclose the options in parentheses if you choose more than one. |
|
[ ] |
In command format descriptions, brackets indicate optional choices. You can choose one or more items or no items. Do not type the brackets on the command line. However, you must include the brackets in the syntax for OpenVMS directory specifications and for a substring specification in an assignment statement. |
|
[ |] |
In command format descriptions, vertical bars separate choices within brackets or braces. Within brackets, the choices are options; within braces, at least one choice is required. Do not type the vertical bars on the command line. |
|
{ } |
In command format descriptions, braces indicate required choices; you must choose at least one of the items listed. Do not type the braces on the command line. |
|
bold text |
This typeface represents the introduction of a new term. It also represents the name of an argument, an attribute, or a reason. |
|
italic text |
Italic text indicates important information, complete titles of manuals, or variables. Variables include information that varies in system output (Internal error number), in command lines (/PRODUCER= name), and in command parameters in text (where dd represents the predefined code for the device type). |
|
UPPERCASE TEXT |
Uppercase text indicates a command, the name of a routine, the name of a file, or the abbreviation for a system privilege. |
|
|
Monospace type indicates code examples and interactive screen displays. In the C programming language, monospace type in text identifies the following elements: keywords, the names of independently compiled external functions and files, syntax summaries, and references to variables or identifiers introduced in an example. |
- |
A hyphen at the end of a command format description, command line, or code line indicates that the command or statement continues on the following line. |
|
numbers |
All numbers in text are assumed to be decimal unless otherwise noted. Nondecimal radixes—binary, octal, or hexadecimal—are explicitly indicated. |
Chapter 1. Introduction to DECdfs
Manageability: Centralizing file resources on one system simplifies management. With DECdfs, you do not have to maintain multiple accounts for multiple users on multiple systems across the network. You can move files without disturbing end-user applications or work patterns, and you can back up all of your data with a single backup operation.
Convenience: Even geographically dispersed users can easily access common files just as they access local files.
Timesaving: VSI DECdfs saves users the time spent copying files from remote nodes over the network.
Resource-Use Reduction: VSI DECdfs uses less CPU time and less disk space and requires less labor for maintenance. You can place commonly used files on a single VSI DECdfs server node and eliminate the redundancy of maintaining several copies on multiple nodes across the network.
Security: You can control user access to server files by using proxy access.
The DECdfs file access protocol works in any DECnet environment but performs especially well with high-speed LAN lines. This speed accounts for ease of access: users can access files on a remote server as quickly as on a local device.
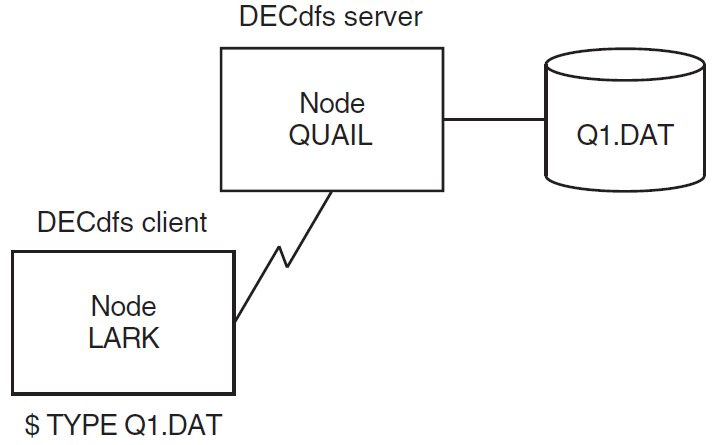
Figure 1.1, ''DECdfs Client-Server Relationship'' illustrates the client-server relationship between two systems running DECdfs. The figure shows the DCL TYPE command at the client system, which displays a file that resides on a disk at the server. Note that the command does not include a node name or access-control information, as would be necessary in an ordinary network operation.
DECdfs can play a special role in an environment where many users have systems with limited disk space. If you off-load files that require significant disk space to a single server, you free resources at each client. If you also move files that require frequent backup operations to the server, you lessen the time and cost of multiple backups.
OpenVMS Cluster environments allow multiple systems to share files. Like clusters, DECdfs provides file sharing, but in contrast to clusters, it allows client systems to be autonomous.
|
VSI DECdfs allows users to... |
But does not allow them to... |
|---|---|
|
Create and manipulate directories |
Perform logical and physical I/O |
|
Share a file for concurrent reading with other users |
Share a file when a user is writing to the file |
|
Use all file QIO function codes |
Use the shared-write option; DECdfs converts the shared-write option to the exclusive-write option. |
|
Use all Record Management Services (RMS) features or the QIO interface |
Install files as known images on the client if the files reside at a disk at the server |
|
Run applications at the client that use mapped sections on the server |
Use system page files or swap files on the server |
In any environment, a group can keep help files, such as the OpenVMS HELP library, on a single DECdfs server disk. In this way, individual systems avoid storing and maintaining their own help files and instead read the files from a shared disk.
In a computer-aided design (CAD) laboratory, designers use schematic capture systems that include extensive parts libraries. Each designer has a workstation running OpenVMS and needs access to all the parts in all the libraries. These libraries use large amounts of disk space and require frequent updates. With DECdfs, you can store the parts libraries on one system in the network. This reduces demands on disk space and facilitates keeping the libraries up to date.
In a development environment, many programmers share a code management system, such as DEC Code Management System (CMS). Storing the CMS libraries on a DECdfs server allows their considerable disk-space requirements to be centralized where available disks reside. Each developer checks out a particular source file and edits it on his or her own DECdfs client system. When compiling and linking at the client, however, the code compiles and links with the other source and object files, which remain on the server.
The remainder of this chapter describes the basic components of a DECdfs environment and the interface for managing DECdfs.
1.1. Components of a VSI DECdfs Environment
As described in the introduction to this chapter, DECdfs creates a client-server relationship among network nodes. A node can be a client, a server, or both. A client-and-server node can share one of its disks with other nodes while accessing files on another node's disks. This manual refers separately to the client and server functions at such nodes. When the manual refers to a client or a server, it refers to functions that can exist on the same node unless the reference is specifically to a remote client or remote server.
The following sections describe the components of a DECdfs environment.
1.1.1. Digital Distributed Name Service
Like DECdfs, the Digital Distributed Name Service (DECdns) implements a client-server relationship between the user of resources and the provider of resources. As a user of DECdns, each DECdfs node is a DECdns client. The DECdns system that provides information about the location of files is a DECdns server.
VAX and Alpha processors running DECnet Phase V
VAX processors running the OpenVMS operating system
DECdns is not available on OpenVMS Alpha systems unless the system is running DECnet Phase V. If a node does not provide DECdns software, DECdfs cannot access the DECdns registry of available resources. In this case, DECdfs requires users on nodes without DECdns to specify the node name where the resource is located. Using DECdfs on nodes without DECdns is described in Section 2.3.2.2, ''Systems Without DECdns''.
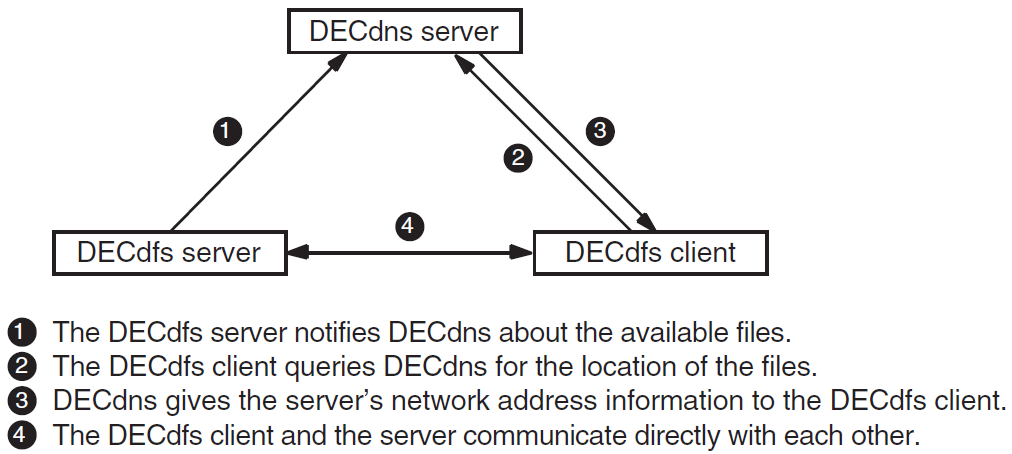
If DECdns is available, whenever a DECdfs server makes available a group of files, it notifies the DECdns server. DECdns records the global (networkwide) name of the files and address information needed to communicate with the DECdfs server. To use the DECdfs server, a DECdfs client queries the DECdns server for the DECdfs server's address information. The client then passes the node address to DECnet for setting up a network connection (link) between the DECdfs client node and the DECdfs server node. After the client receives the server address information from DECdns, it communicates directly with the server. Figure 1.2, ''Interaction Between VSI DECdfs and the DECdns Server'' illustrates how DECdfs interacts with DECdns.
If a DECdfs client wants to access a resource on a VSI DECdfs server but the client cannot access the DECdns server that has registered the resource, the client must specify the node name of the DECdfs server it wants to use. If a VSI DECdfs server cannot access the DECdns server, all VSI DECdfs clients that want to use the VSI DECdfs server's resource must specify that server's node name.
DECdns registers information about network resources in a namespace, which is the registry of network names managed by DECdns. Certain DFS$CONTROL commands listed in Section 1.4, ''The DFS$CONTROL Commands'' allow you to add and remove information from the DECdns namespace. If you need to move a DECdfs disk from one server to another, you can simply remove and reregister the DECdns information. The users at a client never need to know that the location of the files has changed. Users on nodes that are not running DECdns will need to know of a resource relocation because these users explicitly specify the name of the server where the resource resides.
Consult with the DECdns manager (a person responsible for managing DECdns) at your site before setting up DECdfs on your system. The DECdns manager needs to know how you plan to set up DECdfs, and you need information on how the DECdns manager has set up DECdns. For example, some DFS$CONTROL commands require that you specify names that conform to the DECdns naming conventions in your network. A DECdns manager can create a single-directory namespace or a hierarchical namespace. It is important to know which type of namespace your network is using so that you can use the DFS$CONTROL commands correctly. The DECdns manager must inform VSI DECdfs users of any access point changes that make access impossible.
1.1.2. Access Points
An access point represents the file resources that a server makes available to clients. It allows the server to name the available resources and allows the client to find the resources. An access point refers to a specific directory (usually the master file directory) on a specific device.
At a server, the DECdfs manager decides what directory on what device to make available to DECdfs client users. The access point gives access to that directory and all subdirectories. The master file directory is the default choice. The DECdfs manager gives the access point a name. Using the DFS$CONTROL command ADD ACCESS_POINT, the manager then registers the access point name with the local DECdfs server database (see Section 1.1.3.1, ''The Server '') and with DECdns. If DECdns is not available, the access point is recorded only in the server database. See Section 2.3.2.2 for information on adding access points on systems without DECdns.
Causes the client system to create a DECdfs client (DFSC) device.
The client device (called the DFSC device) is a pseudodevice, a forwarding mechanism through which a physical device can be reached. The system treats a pseudodevice as if it were a physical I/O device though it is not (hence the name).
Creates a correlation between the DFSC device and the server device and directory to which the access point refers.
When a user on a client system first mounts an access point, DECdfs queries DECdns to find out which node serves that access point. Systems not running DECdns must use the /NODE qualifier to specify the VSI DECdfs server name. If a DECdfs connection to the server does not already exist, the client sets up one. If a DECnet logical link does not already exist, the client also requests DECnet to provide one.
The DECdfs Communication Entity creates one connection for all communication between a server and a particular client. This single connection provides DECdfs service to any number of users at the client. The users can mount any number of access points on the server and open any number of files.
End users on the client can then use the mounted client device as if it were a local device. If you assign a logical name to the client device, access to the files can be simple. End users enter standard DCL file commands requesting directories of, or access to, files on the client device. DECdfs intervenes and interacts with DECnet software to redirect these requests across the network to the server of the actual device.
Figure 1.3, ''Correlation Between a Client Device and an Access Point'' illustrates the correlation between a client device and access point named HELP.

In Figure 1.3, ''Correlation Between a Client Device and an Access Point'', a correlation exists between client device DFSC1001: on node CARDNL and the access point that refers to DUA0:[000000] on node EIDER. A user at CARDNL can access files subordinate to DUA0:[000000] by specifying the device DFSC1001: with the file specification in DCL commands. If the DFSC1001: client device has the logical name HELP_LIBRARY, as in the previous example, the user can specify HELP_LIBRARY in the file specification.
1.1.3. DECdfs Management Components
DECdfs is comprised of three cooperating management components: the server, the client, and the Communication Entity. Each has a name, attributes describing it, and an interface supporting management operations. Sections 1.1.3.1, 1.1.3.2, and 1.1.3.3 describe the function of each component.
1.1.3.1. The Server
Adds and removes access points
Interacts with the OpenVMS operating system to verify user access rights and manipulate files
The server also contains the server database, which is the local registry of resources. Information in the server database usually matches information in DECdns namespace, if DECdns is available. Occasionally, however, the server database and DECdns information may differ (see Section 2.3.6, ''Maintaining Consistency with DECdns'').
DFS$SERVER_ACP.EXE, the server's ancillary control process (ACP). The server process name is DFS$00010001_1.
DFSSDRIVER.EXE, the server driver
The installation procedure places these files respectively in the SYS$SYSTEM and SYS$LOADABLE_IMAGES directories.
To manage a DECdfs server, you must prepare the system for the expected amount of use. You can display and set various parameters of the server to improve performance and control use. Chapter 2, "Managing a VSI DECdfs Server" describes the management tasks for servers.
1.1.3.2. The Client
Receives I/O sent to the client device and forwards it to the remote server, through the Communication Entity and the network.
Receives I/O from the remote server and forwards it to the end user.
The client is implemented by the SYS$LOADABLE_IMAGES:DFSCDRIVER.EXE file, which is the DECdfs client device driver.
Chapter 3, "Managing a DECdfs Client" describes the management tasks for a client.
1.1.3.3. The Communication Entity
The Communication Entity passes information between the server or client and the network software. The Communication Entity is automatically part of any DECdfs installation, whether the node is a client only or both a client and a server. Without the Communication Entity, the client and server would not be able to communicate across the network.
Creates DECdfs connections
Controls the flow of data
Interacts with the DECnet software to open logical links (transport connections)
Scans for and times out inactive links
Checks data integrity by performing checksums (if desired)
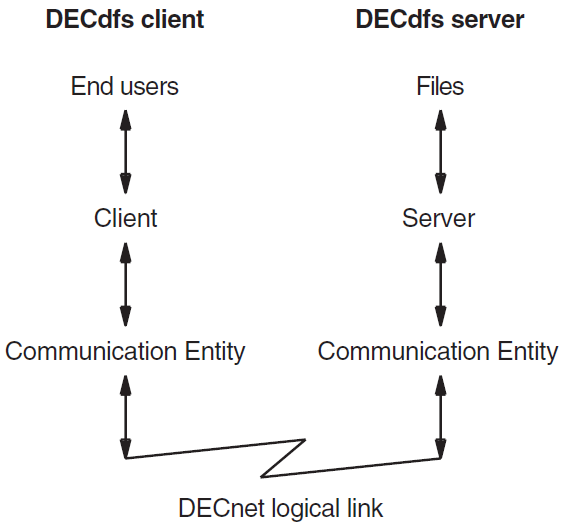
Figure 1.4, ''Server-Client Information Flow'' illustrates the flow of information between client and server as it passes through the Communication Entity and the DECnet software.
A DECdfs connection represents a relationship between a DECdfs server and client through the Communication Entity.
DFS>SHOW COMMUNICATION/CURRENT_CONNECTIONS
A DECdfs connection may or may not have an active DECnet link at a single point in time. When a client first mounts an access point, the Communication Entity requests a logical link from DECnet. All communication between the client and server passes through that link. When the Communication Entity finds that the link was not used during a specified timeout period, it disconnects the link, giving resources back to the server. However, DECdfs stores the server's network address information and maintains the DECdfs connection. The Communication Entity provides links for that connection as needed and times them out as appropriate, until the client device is dismounted.
Occasionally, DECdfs creates a connection between a client and server in another way. The DFS$CONTROL command SHOW ACCESS_POINT/FULL displays access point names (from DECdns) and status (from server databases). Entering this command causes DECdfs to create a connection between your node and each node from which you display server database information. Some commands, such as ADD ACCESS_POINT and REMOVE ACCESS_POINT, create DECdfs connections to the local server. You might see such connections when you display the connections on your system.
DFS$COM_ACP.EXE, the communication ACP
DFSRRDRIVER.EXE, the communication driver
The installation procedure places these files respectively in the SYS$SYSTEM and SYS$LOADABLE_IMAGES directories.
1.2. Client-Server Consistency Issues
This section contains information on system times and logical names on the client and server. See Section 2.2.2.3, ''User Names'' for information about consistency of user names on the client and server.
1.2.1. System Times on the Client and Server
Note
If the client and server are in the same time zone, a network time synchronization service can help eliminate problems caused by inconsistent system times. If the client and the server are not in the same time zone, you should set the time on both to Greenwich Mean Time, to avoid time problems caused by geographical differences.
DECdfs treats timestamps differently within files and in file headers. Timestamps recorded in records within files are based on the client system time. Timestamps recorded in file headers (and displayed with the DIRECTORY/DATE or DIRECTORY/FULL command) are usually based on the server system time. Exceptions do exist. For example, if you use the COPY command without specifying an output file name, the command sets the output file's creation date equal to the input file's creation date. The file's timestamp is whatever system time the input file originally had.
1.2.2. Logical Names on the Client and Server
Logical names are valid only on the local system. The client system does not have information about logical names defined on the server. If a user needs to use a logical name to access files on the server, you need to define that logical name on the client system. For example, if you use DECdfs to access a CMS library that users specify with a logical name, define the logical name on the client system to represent the library.
1.3. Comparison of Standard OpenVMS File Access and VSI DECdfs File Access
DECdfs divides standard OpenVMS file access functions between two cooperating nodes.
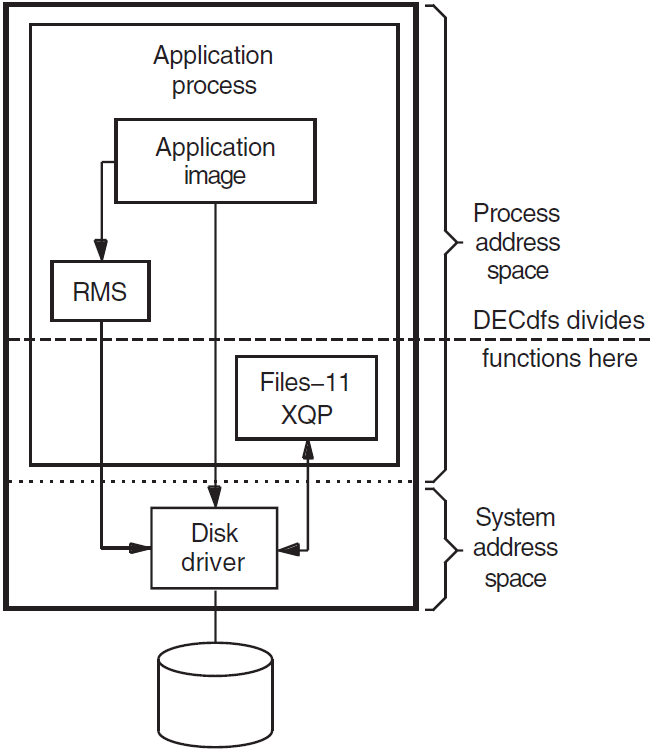
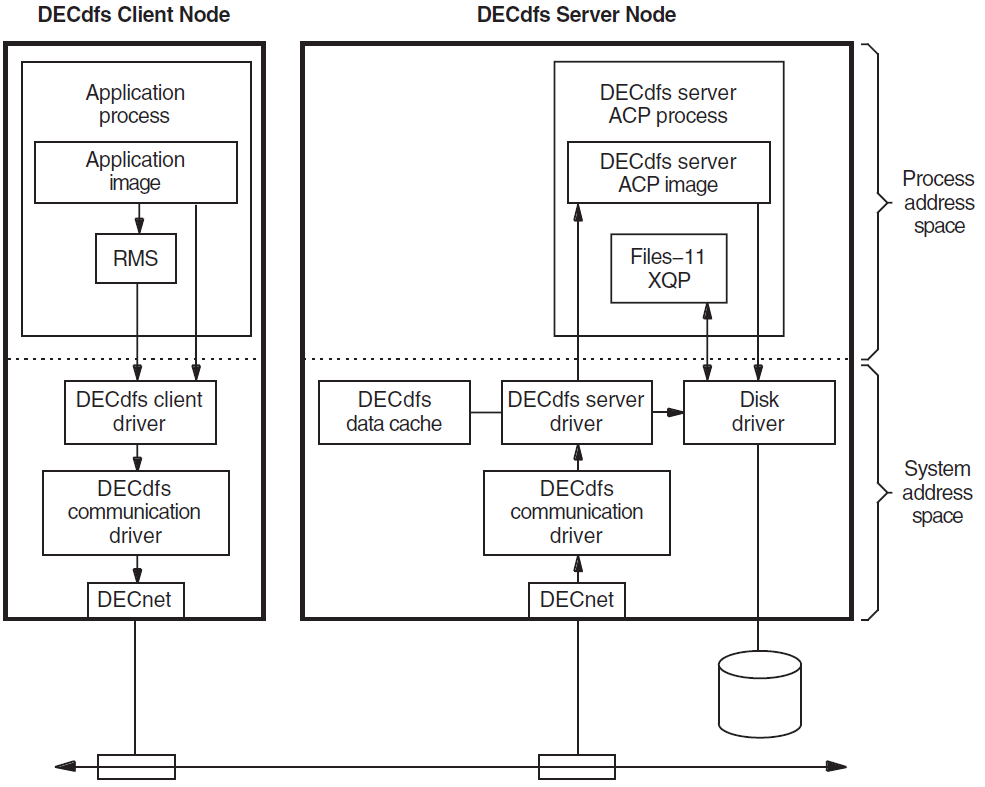
Figure 1.5, ''Standard OpenVMS File Access Functions'' illustrates the standard OpenVMS file access functions and shows where DECdfs divides the file access functions between the client and server. In the figure, an application requests access to a file by entering either a Record Management Services (RMS) call or a QIO directly to the disk driver. The Files-11 extended $QIO system service processor (XQP) opens and accesses the file through the disk driver.
Note
The direction of the arrows in Figure 1.5, ''Standard OpenVMS File Access Functions'' indicates the flow of control (not the flow of information, which exists in both directions).
Figure 1.6, ''DECdfs File Access Functions'' shows the same file access functions as those in Figure 1.5, ''Standard OpenVMS File Access Functions'' and illustrates how DECdfs divides the functions between the client and server nodes. The application and RMS remain on the client. To reach the disk driver and the Files-11 XQP, however, the application's request passes through the DECdfs drivers and over the network.
The application sends a request to access a device, either through RMS or by using direct QIO functions. Both access the device driver.
Because the request is sent to a DECdfs client device, the request goes to the DECdfs client driver instead of a standard local disk driver. The DECdfs client driver passes the request to the DECdfs Communication Entity driver.
The Communication Entity forwards the request to DECnet software for transmission over the network.
DECnet software receives the request and passes it to the DECdfs Communication Entity driver.
The communication driver passes the request to the DECdfs server driver.
If the request is a read or write request to an open file, the server driver accesses the disk driver directly.
- If the request is an XQP function, such as a request to open, close, or search a directory for a file, the server driver passes it to the DECdfs server ancillary control process (ACP).
- The server ACP interacts with OpenVMS to validate the user and to access the file.
- The server ACP then passes the request to the disk driver and to the Files-11 XQP for continued file I/O.
To expedite any repeated use of file blocks and to avoid needless disk access, the DECdfs server uses a file data cache. Section 2.7, ''Managing the Data Cache'' explains this cache in further detail.
1.4. The DFS$CONTROL Commands
DFS$CONTROL is a set of commands that you use to manage DECdfs. The commands allow you to set up, monitor, tune, and customize your DECdfs environment, particularly on a server. However, most parameters to the DECdfs software have default values that should provide a satisfactory balance between economical use of resources and good performance. Generally you need only use DFS$CONTROL to start the DECdfs client, server, and Communication Entity and to add access points on a server or mount them on a client.
|
Command |
Description |
|---|---|
|
Entered at Either a Server or Client | |
|
EXIT |
Terminates the DFS$CONTROL session. |
|
HELP |
Displays information on DFS$CONTROL commands. |
|
SET COMMUNICATION |
Sets parameters for the DECdfs Communication Entity. |
|
SHOW ACCESS_POINT |
Displays the names of access points stored by DECdns. |
|
SHOW COMMUNICATION |
Displays information about the DECdfs Communication Entity. |
|
SHOW VERSIONS |
Displays version information for DECdfs components. |
|
SHUTDOWN COMMUNICATION |
Stops DECdfs communication after completing file operations in progress. |
|
SNAPSHOT COMMUNICATION |
Records the current communication counters in DFS$CONTROL memory or in a specified file. |
|
START COMMUNICATION |
Starts the Communication Entity. |
|
STOP COMMUNICATION |
Stops DECdfs communication immediately. |
|
Entered at a Server Only | |
|
ADD ACCESS_POINT |
Makes an access point available by registering it in the server database and with DECdns. |
|
REMOVE ACCESS_POINT |
Removes an access point name from the server database and from DECdns. |
|
SET SERVER |
Sets parameters for the DECdfs server. |
|
SHOW SERVER |
Displays information about the DECdfs server. |
|
SNAPSHOT SERVER |
Records the current server counters in DFS$CONTROL memory or in a specified file. |
|
START SERVER |
Starts the DECdfs server. |
|
STOP SERVER |
Stops the DECdfs server. |
|
Entered at a Client Only | |
|
DISMOUNT |
Makes a DECdfs client device (and therefore an access point) unavailable to users. |
|
MOUNT |
Mounts an access point as a DECdfs client device. |
|
SHOW CLIENT |
Displays information about a DECdfs client device. |
|
SNAPSHOT CLIENT |
Records the current client counters in DFS$CONTROL memory or in a specified file. |
See Chapter 4, "DFS$CONTROL Commands" for a dictionary of DFS$CONTROL commands.
1.4.1. Using DFS$CONTROL Commands in DECdfs Command Files
|
File |
Comment |
|---|---|
|
DFS$STARTUP.COM |
Do not edit this file, but note that it executes DFS$CONFIG and DFS$SYSTARTUP, both of which you may edit. |
|
DFS$CONFIG.COM |
This file contains the SET commands that set parameters for the DECdfs server and Communication Entity. DFS$STARTUP executes this file before it starts the DECdfs processes. The commands have default values, so edit this file only if you want to change the parameter values. |
|
DFS$SYSTARTUP.COM |
This file contains commands that add access points at a server and mount access points at a client. On a server, keep this file up to date to add the access points each time DECdfs starts up. On a client, use this command file to mount access points for systemwide use. |
|
OpenVMS VAX Version 5.5-2 | |
|
SYSTARTUP_V5.COM |
Edit the system SYSTARTUP_V5 file so that it executes the SYS$STARTUP:DFS$STARTUP command file. DECnet startup must complete before DECdfs startup begins. SYSTARTUP_V5.COM is in the SYS$MANAGER directory. |
|
OpenVMS VAX Version 6. n OpenVMS Alpha Version 6. n OpenVMS Alpha Version 7. n | |
|
SYSTARTUP_VMS.COM |
Edit the system SYSTARTUP_VMS.COM file so that it executes the SYS$STARTUP:DFS$STARTUP command file. DECnet startup must complete before DECdfs startup begins. SYSTARTUP_VMS.COM is in the SYS$MANAGER directory. |
1.4.2. Using DFS$CONTROL Commands Interactively
- Preface the command with the string DFSCP as shown in the following example:
$DFSCP :== $DFS$CONTROL$DFSCP SHOW VERSIONS - Invoke the DFS$CONTROL program, invoke the DFS prompt, and enter commands as shown in the following example:
$RUN SYS$SYSTEM:DFS$CONTROLDFS>SHOW VERSIONS
You can use other commands either interactively or by executing the DFS$CONFIG or DFS$SYSTARTUP command files. If you choose to interactively enter a command that one of these files usually executes, edit the file to reflect any new values that you have set. This ensures that, for DFS$CONFIG, the next startup uses the most recent value or, for DFS$SYSTARTUP, your system adds or mounts all access points.
1.4.3. Getting Help with DECdfs
The DFS$CONTROL HELP command displays a list of topics on which you can obtain information. Entering HELP and a command name displays information on the specified command.
$HELP DFS
Chapter 2. Managing a VSI DECdfs Server
Managing a VSI DECdfs for OpenVMS server involves first preparing the system for use by DECdfs and then using DFS$CONTROL commands to create one or more access points and make them available. If you choose, you can also use DFS$CONTROL commands to tailor the operation of the server and the Communication Entity to enhance performance.
Setting system parameters
Setting up proxy accounts
Creating and managing access points
Protecting server files
Protecting individual files
Managing the persona cache
Managing the data cache
Using a cluster as a DECdfs server
Stopping and starting DECdfs on your system
Most of these tasks involve the use of DFS$CONTROL commands and qualifiers. For complete information on a command, see Chapter 4, "DFS$CONTROL Commands".
After you read this chapter, set the necessary system and network parameters and edit the DFS$CONFIG.COM and DFS$SYSTARTUP.COM files. You can then start DECdfs on your system by executing the SYS$STARTUP:DFS$STARTUP.COM file.
2.1. Setting System Parameters
Running DECdfs on an OpenVMS system requires that you adjust certain system generation (SYSGEN) parameters. Before installation, change the CHANNELCNT, NPAGEDYN, GBLPAGES, GLBSECTIONS, and INTSTKPAGES (VAX only) parameters as directed in the VSI DECdfs for OpenVMS Installation Guide . On OpenVMS VAX systems, increasing the INTSTKPAGES parameter is especially important. If the number of interrupt stack pages is not large enough, an interrupt stack overflow can cause your system to halt.
Sections 2.1.1, 2.1.2, and 2.1.3 describe DECdfs Communication Entity and server parameters that work with each other and with system and network parameters. These sections describe the parameters that limit the number of open files and the amount of DECdfs activity.
The parameters work together in a layered manner; that is, you can set parameters at the system level, network level, or application DECdfs level. Setting a low value at any one of those levels affects the server's operation, even if you set higher values at the other levels. For example, if you specify that the DECnet network should establish very few logical links to and from your system, the low number of links prevents DECdfs from establishing a high number of connections.
For information about limiting logical links at the network level, see Appendix C, "Adjusting DECnet and Client RMS Parameters to Enhance Performance".
2.1.1. Limiting the Number of Open Files
Your system's channel count parameter, CHANNELCNT, specifies the maximum number of files that any process on the system can open concurrently. Each file requires one channel, and the DECdfs server process opens all local files that users at DECdfs clients access. If the server is your system's most active file user, you may need to increase the channel count to accommodate the server.
$RUN SYS$SYSTEM:SYSGENSYSGEN>USE CURRENTSYSGEN>SHOW CHANNELCNT
Parameter Name Current Default Minimum Maximum Units Dynamic-------------- ------- ------- ------- ------- ----- -------CHANNELCNT 202 127 31 2047 Channels
MIN_CHANNELCNT = 265
$RUN SYS$SYSTEM:SYSGENSYSGEN>HELP PARAMETERS SPECIAL_PARAMS CHANNELCNT
2.1.2. Controlling DECdfs Activity
DFS>SET COMMUNICATION/REQUESTS_OUTSTANDING_MAXIMUM=value
If the number of requests arriving from client systems exceeds the Communication Entity's permitted number of outstanding requests, the Communication Entity stops accepting data from DECnet. The DECnet network layer buffers the requests until the requests reach the value specified by one of these parameters:
DECnet Phase IV: PIPELINE QUOTA parameter
DECnet Phase V: MAXIMUM WINDOW parameter
For more information on these parameters, see Appendix C, "Adjusting DECnet and Client RMS Parameters to Enhance Performance".
When the limit is reached, DECnet's flow control mechanism stops the client from sending data and returns an error message.
2.1.3. Limiting Inactive DECdfs DECnet Links
The DECdfs Communication Entity monitors the DECnet links, using the time interval specified by the SET COMMUNICATION/SCAN_TIME command. If the Communication Entity finds that a link is inactive on two successive scans, it disconnects the link. The link is reestablished when a user on that client next requests a file operation. The Communication Entity maintains the DECdfs connection even after it times out a link.
2.2. Setting Up Proxy Accounts
Client users must have OpenVMS proxy accounts in order to access the server. You use the Authorize Utility (AUTHORIZE) to create these accounts. The Authorize Utility modifies the network user authorization file, NETPROXY.DAT, so that users at DECdfs clients get the necessary rights and privileges at the server. For information on AUTHORIZE commands, see the VSI OpenVMS System Management Utilities Reference Manual.
Each remote user can be granted DECnet proxy access to multiple accounts. One of the accounts can be the default proxy account for that user. The DECdfs server recognizes only default proxy accounts.
$SET DEFAULT SYS$SYSTEM$RUN AUTHORIZEUAF>ADD/PROXY EGRET::CHRIS STAFF /DEFAULTUAF>EXIT
To give users access to the DECdfs server without giving them explicit proxy accounts, create a default DECdfs account (DFS$DEFAULT).
$SET DEFAULT SYS$SYSTEM$RUN AUTHORIZEUAF>ADD DFS$DEFAULT -/NOACCESS=(PRIMARY, SECONDARY) -/ASTLM=0 -/BIOLM=0 -/BYTLM=0 -/CLI=no_such_cli -/CLITABLES=no_such_tbl -/CPUTIME=::.01 -/DEFPRIVILEGES=NOALL -/DEVICE=NLA0: -/DIOLM=0 -/DIRECTORY=[no_such_directory] -/ENQLM=0 -/FILLM=0 -/FLAGS=(CAPTIVE, DEFCLI, DISCTLY, DISMAIL, DISNEWMAIL, DISRECONNECT, -DISWELCOME, LOCKPWD, PWD_EXPIRED, PWD2_EXPIRED, RESTRICTED) -/GENERATE_PASSWORD=BOTH -/JTQUOTA=0 -/LGICMD=no_such_file -/OWNER="Distributed File Service" -/PGFLQUOTA=0 -/PRCLM=0 -/PRIORITY=0 -/PRIVILEGES=NOALL -/PWDEXPIRED -/PWDLIFETIME=::.01 -/PWDMINIMUM=31 -/TQELM=0 -/UIC=[ggg,mmm] -/WSDEFAULT=0 -/WSEXTENT=0 -/WSQUOTA=0UAF>EXIT$
The example illustrates creating a well-protected default DECdfs account that is fully usable by DECdfs. See the VSI OpenVMS Guide to System Security for information on default network accounts. Use care in setting up the account to ensure that DECdfs users have the rights and privileges necessary to access the files they need. If you create a DFS$DEFAULT account, all users without explicit proxy accounts have the rights, privileges, and identity of DFS$DEFAULT.
The DFS$DEFAULT account in Example 2.1, ''Creating a DFS$DEFAULT Account'' can also serve as a model for an individual proxy account that gives DECdfs users access to the server while preventing other types of access. For detailed information about creating proxy accounts, see the VSI OpenVMS Guide to System Security, the VSI OpenVMS DECnet Network Management Utilities manual, and the VSI DECnet-Plus for OpenVMS Network Management Guide manual.
2.2.1. Setting Up Privileges
The privileges that affect file-access checking (BYPASS, GRPPRV, READALL, and SYSPRV) also control DECdfs access to files.
If the proxy account or DFS$DEFAULT account has any of these privileges as default privileges, the DECdfs server uses them to allow access to files.
Note
Dynamic enabling and disabling of privileges differs from ordinary DECnet file-access checking, which can use only the default privileges of the proxy or default account.
Allowing SETPRV as an authorized privilege for a DECdfs proxy account or the DFS$DEFAULT account is the same as allowing all privileges as authorized privileges.
2.2.2. Setting Up UICs, ACLs, and User Names
In some circumstances, the difference between the server environment and the client environment can become obvious to users. This section explains how user identification codes (UICs), access control lists (ACLs), and user names can cause operational discrepancies between the server and client.
2.2.2.1. User Identification Codes
The OpenVMS system on the server interprets a file's user identification code (UIC) according to its rights database (RIGHTSLIST.DAT). The OpenVMS system stores a file owner's UIC as a binary value, which it translates to ASCII according to the rights database when displaying the UIC to a user. When a user at a DECdfs client requests the UIC of a file, the server system passes the binary value to the client system.
If the file UIC and proxy account UIC are the same, DECdfs converts the file UIC to the client account UIC. Otherwise, when the client system translates the binary UIC according to the client system's rights database, the translation might seem incorrect to users at the client system.
BACKUP
DIRECTORY, with the /OWNER, /FULL, or /SECURITY qualifier
SET FILE, with the /OWNER_UIC qualifier
Note
Client users can avoid problems with the BACKUP command by using the /BY_OWNER=PARENT or /BY_OWNER=ORIGINAL qualifier as described in Section 3.4.2, ''User Identification Codes on Server Files''.
For more information about UICs, see Section 3.4.2.
2.2.2.2. Access Control Lists
The OpenVMS system on the server also interprets a file's access control lists (ACLs) according to its rights database. It propagates default access control entries (ACEs) for DECdfs users' files from the directory in which it creates those files. The OpenVMS system enforces ACEs on files at the server; you can log in to the server and set ACEs that control DECdfs access to files. However, users cannot set or display ACLs from a DECdfs client. For more information on ACLs and ACEs, see Section 2.5, ''Protecting Individual Files''.
2.2.2.3. User Names
With applications that require user names, a discrepancy can occur if a user has different user names on the client and the server. If the user sometimes accesses the application from a DECdfs client and, at other times, locally from the server, certain operations of the application can fail.
For example, DEC Code Management System (CMS) reserves and replaces software components according to user name. When a user reserves and removes a component, CMS stores that person's user name in its library data file. When the user attempts to replace the component, CMS compares the current user name with the stored name. If the names do not match, the user cannot replace the component. Suppose the CMS libraries are on a server, and a user reserves a library component when running CMS at a client. If the user later logs in to the server and tries to replace the component, CMS rejects the replacement operation unless the user names match.
2.2.3. Giving Cluster Clients Access to Server Files
If the client node is a cluster system, enable the cluster alias outgoing on the client node (see Section 3.8, ''Using a Cluster as a DECdfs Client'') and add a proxy on the server from the cluster's user to the local user account. This allows users to access DECdfs files regardless of which cluster member they log in to.
UAF>ADD/PROXY client-cluster-name::remote-user user-name /DEFAULT
UAF>ADD/PROXY NODE_A::B_WILLIAMS B_WILLIAMS /DEFAULTUAF>ADD/PROXY NODE_B::B_WILLIAMS B_WILLIAMS /DEFAULTUAF>ADD/PROXY NODE_C::B_WILLIAMS B_WILLIAMS /DEFAULT
2.2.4. Allowing Client Users to Print Server Files
To allow client users to print files from your server, you must create special proxy accounts. The OpenVMS print symbiont runs under the SYSTEM account. The client SYSTEM account therefore needs proxy access to your server in order to print files for users.
Giving another node's SYSTEM account proxy access to your node is an issue to resolve according to the security needs at your site.
UAF>ADD/PROXY client-node-name::SYSTEM user-name /DEFAULT
UAF>ADD/PROXY EAGLE::SYSTEM JULIE
Use the Authorize Utility to create a special proxy account for client printing. You can name this account DFS$PRINT.
Set up the account to resemble the DFS$DEFAULT account shown in Example 2.1, ''Creating a DFS$DEFAULT Account'', but replace the /DEFPRIV=NOALL qualifier with /DEFPRIV=READALL and use a different password for the /PASSWORD qualifier.
After creating the DFS$PRINT account, give the client time-sharing node's SYSTEM account proxy access to it.
However, this method might have a security weakness because it lets the system account at the client read any DECdfs-served file on the server.
Printing files that have the WORLD READ protection setting
Using the PRINT/DELETE command for files that have the WORLD DELETE protection setting
Note
If the client is a time-sharing system or a cluster, see Section 3.6, ''Printing Files from a Client Device'' for information about using the /DEVICE qualifier with the DFS$CONTROL command MOUNT.
UAF>ADD/PROXY client-node-name::SYSTEM SYSTEM /DEFAULT
Warning
In a large network, using a wildcard to give multiple SYSTEM accounts (*::SYSTEM) access to any nondefault account on your system can be a serious breach of your system's security. This is especially true of giving such access to your SYSTEM account.
2.3. Creating and Managing Access Points
Deciding where to place access points
Adding access points
Changing access points
Maintaining consistency between the server and DECdns
2.3.1. Deciding Where to Place Access Points
Each time you add an access point on a DECdfs server, you specify a device and directory to which the access point name refers. The DFS$CONTROL command ADD ACCESS_POINT requires a device name and gives you the option of supplying a directory. The default directory is the master file directory for the device ([000000]), but you can place the access point lower in the directory tree. This placement affects the user's perception of the directory structure.
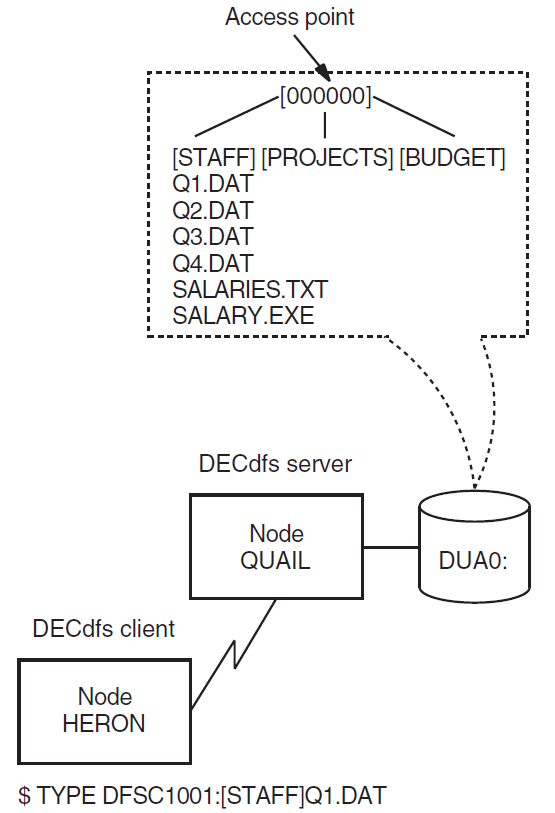
If you place the access point at the device's actual master file directory, end users can access files in the disk's directories as they normally would. Figure 2.1, ''Access Point at the Master File Directory'' illustrates this placement, with the access point at the master file directory. The user enters a command that accesses one of the first subdirectories.
If you place the access point at a subdirectory of the master file directory, that subdirectory appears on the client device as a master file directory. To perform file operations in that directory, end users would have to specify the directory as [000000] in their file specifications. Figure 2.2, ''Access Point at a Subdirectory'' illustrates this access point placement.
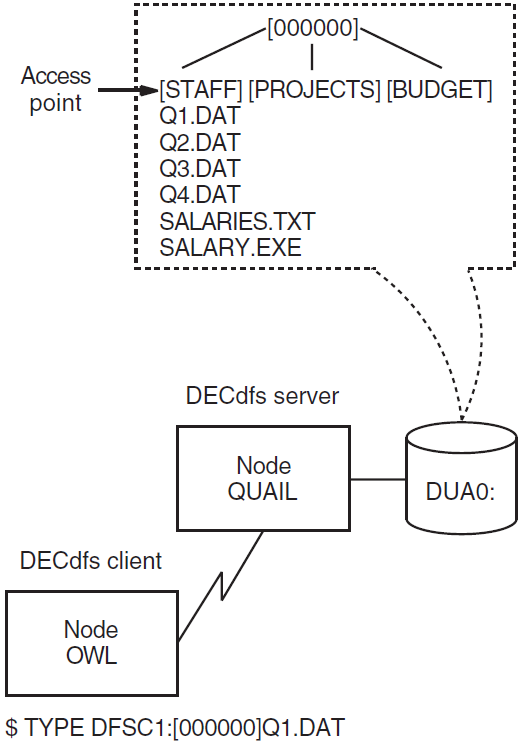
The figure shows that [000000] is the actual master file directory for the disk, as viewed from the server. The user command, however, uses [000000] to represent the master file directory for the client device, which is the server directory at which you placed the access point.
The user at a DECdfs client can create subdirectories to the usual OpenVMS depth limit of 8, starting with the master file directory of the client device. If the master file directory on the client device is a subdirectory at the server, the user can create subdirectories that are hidden from OpenVMS at the server. These DECdfs subdirectories can nest as many as eight additional directories at the server. Backing up the server disk includes these DECdfs subdirectories only if you use the /IMAGE or /PHYSICAL qualifier to the BACKUP command. This is similar to what happens when you create rooted-device logical names in OpenVMS (see the Guide to OpenVMS File Applications).
2.3.2. Adding Access Points
To add an access point, you use the DFS$CONTROL command ADD ACCESS_POINT on the VSI DECdfs server that contains the resource you want to make available. To make the access point available, you enter the DFS$CONTROL command MOUNT on a VSI DECdfs client. Refer to Chapter 4, "DFS$CONTROL Commands" for detailed information on all DFS$CONTROL commands.
The ADD ACCESS_POINT command requires that you specify a device and optionally allows you to specify the directory to which the access point refers. When you enter the command, DECdfs adds this information to your node's server database. DECdfs also sends the access point name and your DECnet address information to the Digital Distributed Name Service (DECdns) if this service is available on your system.
Each access point name can contain from 1 to 255 characters. The name can consist of alphanumeric characters and underscores (_); a name in a hierarchical DECdns namespace can also contain period (.) characters. The dollar sign ($) is reserved for use by VSI.
It is important to discuss access point names with your DECdns manager before you attempt to create any. Each access point name in a DECdns namespace must be unique, and the names that you create must follow the conventions for your namespace. The organization of the namespace as single-directory or hierarchical also affects the types of names that you create.
A client node typically has one or more remote access points that are mounted automatically during system startup. At the conclusion of VSI DECdfs startup, the startup procedure looks for the file SYS$STARTUP:DFS$SYSTARTUP.COM and runs it. The file typically contains a series of DFS mount commands to mount the usual access points. If you want to mount access points from clients that are not running DECdns (refer to Section 2.3.2.2, ''Systems Without DECdns''), you can edit DFS$SYSTARTUP.COM to include the appropriate /NODE qualifiers.
System managers responsible for a number of clients typically maintain a master DFS$SYSTARTUP.COM file which is distributed to the clients each time it is updated.
If you add an access point interactively, it is important to edit the DFS$SYSTARTUP command file. In this way, the server automatically adds the access point the next time that the DECdfs server starts up.
VSI recommends that you add access points that see an actual directory path, and not a directory alias. For example, on the OpenVMS system disk, the directory SYS$SYSDEVICE:[SYS0.SYSCOMMON] is an alias for the directory SYS$SYSDEVICE:[VMS$COMMON]. VSI recommends using SYS$SYSDEVICE:[VMS$COMMON] as the access point directory. DECdfs cannot properly derive a full file specification when translating a file identification (FID) whose directory backlinks point to a directory different than the access point directory. If the access point does see a directory alias, incorrect backlink translation affects the SHOW DEVICE/FILES and SHOW QUEUE/FULL commands.
2.3.2.1. Systems with DECdns
- The manager at DECdfs server node EIDER adds access point HELP, as follows:
DFS>ADD ACCESS_POINT HELP DUA0:[000000]The access point refers to the master file directory ([000000]) of device DUA0:.
- The manager at the client then mounts access point HELP, producing a client device with the logical name HELP_LIBRARY. The response to the MOUNT command displays the client device unit number as DFSC1001:.
DFS>MOUNT HELP HELP_LIBRARY%MOUNT-I-MOUNTED, .HELP mounted on _DFSC1001:DCL commands entered at the client, such as SET DEFAULT and DIRECTORY, operate on the DECdfs client device as on any other device.$SET DEFAULT HELP_LIBRARY:[000000]$DIR HELP_LIBRARY:M*.HLBDirectory HELP_LIBRARY:[000000]MAILHELP.HLB;2 217 29-JUL-1998 14:39:57.50 (RWED,RWED,RWED,RE)MNRHELP.HLB;2 37 29-JUL-1998 14:41:36.41 (RWED,RWED,RWED,RE)Total of 2 files, 254 blocks.$
2.3.2.2. Systems Without DECdns
The current version of VSI DECdfs has been modified to operate without using DECdns to accommodate OpenVMS Alpha systems running DECnet. If you have an OpenVMS Alpha system running DECnet Phase V, refer to Section 2.3.2.
DFS>ADD ACCESS_POINT DEC:.LKG.S.MYDISK DKA300:[000000]
DFS>MOUNT DEC:.LKG.S.MYDISK /NODE=SRVR MYDISK%MOUNT-I-MOUNTED, DEC:.LKG.S.MYDISK mounted on _DFSC1001:
%DFS-E-NAMSPMSNG, Namespace component of access point is missing
If the access point is served by a cluster system, the node name to be specified depends on the cluster configuration and how the access point is added. Refer to Section 2.8, ''Using a Cluster as a DECdfs Server'' for more information. If the access point is a cluster-wide access point, then the cluster alias can be used for the node name. Otherwise, the name of a specific cluster node, which is known to be serving the access point, must be used.
%SYSTEM-F-NOSUCHNODE, remote node is unknown
%IPC-E-UNKNOWNENTRY, name does not exist in name space
When the /NODE qualifier is specified, DECdns does not check or expand the access point name even if DECdns is present on the system. The /NODE qualifier must be used to mount an access point on a server that does not have DECdns even if the client does have DECdns.
$DEFINE /SYS DFS$DEFAULT_NAMESPACE DEC:$DFSCP MOUNT .LKG.S.DFSDEV.VTFOLK_DKA3 /NODE=VTFOLK
%DFS-E-NAMSPMSNG, Namespace component of access point is missing
2.3.2.3. Using the /LOCAL Qualifier
The ADD ACCESS_POINT and REMOVE ACCESS_POINT commands include a /LOCAL qualifier, which provides functionality similar to the /NODE qualifier described in Section 2.3.2.2, ''Systems Without DECdns''.
As with MOUNT/NODE, the /LOCAL qualifier prevents any use of DECdns even if it is present. This enables you to use VSI DECdfs without setting up a DECdns namespace and name server even on systems where DECdns is available.
$ DEFINE /SYS DFS$DEFAULT_NAMESPACE DEC:
DFS>ADD ACCESS_POINT .LKG.S.MYDISK /LOCALDFS>MOUNT .LKG.S.MYDISK /NODE=VTFOLK
%DFS-E-NAMSPMSNG, Namespace component of access point is missing
Refer to Chapter 4, "DFS$CONTROL Commands" for more information on DFSCP commands.
2.3.3. Determining Access Point Information
DFS>SHOW ACCESS /FULL access-point-name
DFS>SHOW ACCESS /FULL .LKG.S.DFSDSKDEC:.LKG.S.DFSDSK on BIGVAX::DUA30:[000000]
DFS>MOUNT DEC:.LKG.S.DFSDSK /NODE=BIGVAX
A logical name and other qualifiers may also be specified on the mount command line.
2.3.4. Changing Access Points
Caution
Use caution when removing or changing an access point, because doing so can disrupt the user environment on client systems.
To remove an access point name, enter the REMOVE ACCESS_POINT command. This command removes the name from the server database and from DECdns. However, it does not notify client systems that currently have the access point mounted. On these systems, any subsequent attempt to use the access point will fail except for operations on files that are currently open. Client users will receive an error code identifying the failure.
2.3.5. Removing Access Points Added with the /CLUSTER_ALIAS Qualifier
Removing access points from servers in a cluster sometimes requires extra steps. The original ADD ACCESS_POINT command registers the access point name in both the DECdns namespace and the local server database. The REMOVE ACCESS_POINT command attempts to remove the name from both the DECdns namespace and the local server database. However, if you registered the access point according to its server's cluster alias (that is, the ADD ACCESS_POINT command had the /CLUSTER_ALIAS qualifier), you must perform some extra procedures to remove the access point.
The REMOVE ACCESS_POINT command deletes the DECdns access point name entry. This command also removes the access point from the server's local database, but it does so only on the cluster member at which you enter the REMOVE command. An informational message reminds you of this.
To remove an access point that was registered by cluster alias, you must use the fully expanded access point name on all cluster members except the first server on which you entered the REMOVE ACCESS_POINT command.
DFS>SHOW ACCESS_POINT /LOCAL /FULL
Remove the access point on each server by entering the REMOVE ACCESS_POINT command with this fully expanded access point name and the exact punctuation. When you enter this command at the first DECdfs server, you remove the access point name from the DECdns database. Subsequent REMOVE ACCESS_POINT commands at the other DECdfs servers in the cluster generate warnings that the access point is not in the DECdns namespace, but this does not indicate a problem. When you enter the fully expanded name at each server, you remove the access point from the server's local database.
To continue serving the access point on other cluster members, you can reregister the access point by using the ADD ACCESS_POINT/CLUSTER_ALIAS command on one of the other nodes. This replaces the access point name in the DECdns namespace. Disable the incoming alias on the node (or nodes) from which you removed the access point.
For DECnet Phase IV:
NCP> SET OBJECT DFS$COM_ACP ALIAS INCOMING DISABLED
For DECnet Phase V:
NCL>SET SESSION CONTROL APPLICATION DFS$COM_ACP INCOMING ALIAS FALSE
To disable the incoming alias permanently, edit the NET$SESSION_STARTUP.NCL NCL script file.
2.3.6. Maintaining Consistency with DECdns
Your node or its server becomes unavailable.
You entered an access point interactively without adding it to the DFS$SYSTARTUP file, and then the server stopped and restarted.
In either case, DECdns continues to supply outdated information (the access point name and the server's DECnet address information). If a new client attempts to mount the access point, the client receives a message stating that the access point is unavailable. If a client that previously mounted the access point attempts to read or write to an open file, an error occurs and returns an SS$_INCVOLLABEL error code. If such a client attempts to open a new file or to search a directory on the client device, the client attempts mount verification (see Section 3.4.5, '' DECdfs Mount Verification''), which then fails.
While you cannot prevent the server from being unavailable occasionally, you can prevent the loss of access points by always adding new access points to the DFS$SYSTARTUP file. If you stop the server permanently, be sure to enter a REMOVE ACCESS_POINT command for each access point on your system.
2.4. Protecting Server Files
DECdfs handles security and file access according to OpenVMS conventions, but a few differences exist. DECdfs allows any user to enter a MOUNT command, regardless of volume-level protections. However, DECdfs performs access checking at the time of file access.
The server uses proxy access to verify a user's access to an account (see the VSI OpenVMS Guide to System Security). The server does not perform an actual proxy login, however, since DECdfs accesses a node through the DECdfs server process. The server process performs file operations on behalf of the user at the client, and it impersonates the user by performing these operations in the name of the user's proxy account. Files created on behalf of a client user are therefore owned by the user's proxy account, not by the server process's account. Section 2.2, ''Setting Up Proxy Accounts'' describes more fully how the DECdfs server validates user access.
2.5. Protecting Individual Files
DECdfs allows any user at any DECdfs client to mount an access point. On the server, however, standard OpenVMS file access protection applies to each file. The OpenVMS operating system uses a combination of user identification codes (UICs), privileges, protection settings, and access control lists (ACLs) to validate each file access according to the user's proxy account.
DFS$SERVICE
NETWORK
The DFS$SERVICE identifier applies only to users at DECdfs clients. The NETWORK identifier applies to users at DECdfs clients and all other network users.
You can explicitly place ACLs on DECdfs files only by logging in to the server system. The OpenVMS operating system recognizes the ACLs, so you can use them from the server to protect or grant access to the server files. However, DECdfs suppresses ACLs as seen from the client. A user with access to a DECdfs client device cannot create or view the ACLs on files residing at the server. Using the SET ACL/OBJECT_TYPE=FILE or EDIT/ACL command at a client to modify a server file displays an error message. Entering the DIRECTORY/SECURITY and DIRECTORY/FULL commands returns displays that omit the ACLs on any files in the directory listing.
2.6. Managing the Persona Cache
The server uses a persona cache, which contains information about individual client users. The server uses this information to determine whether a client user has permission to access individual files. This section explains how you control the operation of the persona cache.
When incoming user requests arrive at the server, the server process interacts with the OpenVMS operating system to create or access the requested files. To perform this operation on behalf of a particular user, the server builds a profile of that user. The server checks the NETPROXY.DAT file for the user's proxy account, the SYSUAF.DAT file for the user's privileges and UIC, and the RIGHTSLIST.DAT file for any identifiers granting additional rights.
The server places all of this information in a persona block. When creating or accessing a file on behalf of the user, the server process impersonates the user according to the persona block information. Although the server process itself is interacting with the OpenVMS file system, each file appears to be accessed by, and in accordance with the privileges of, the proxy account.
The persona cache helps to accelerate file access. After the server creates an individual persona block, the server reuses it each time that user accesses another file. This saves time because the server need not reread the NETPROXY.DAT, SYSUAF.DAT, and RIGHTSLIST.DAT files at each file access.
DECdfs automatically sets the size of the cache based on the number of users. As the number of users increases, DECdfs borrows from nonpaged pool to meet the demand. When the number of users decreases, DECdfs returns unused blocks to nonpaged pool.
2.6.1. Specifying the Lifetime of Persona Blocks
Persona blocks have a specified lifetime, which you can adjust by using the SET SERVER/PERSONA_CACHE=UPDATE_INTERVAL command. When the persona block for a user expires, the server validates the user's next access by reading the three authorization files and building a new block. This ensures that, at a specified interval, the DECdfs server automatically incorporates any changes that you make to any of the authorization files.
If DECdfs users at client systems complain that the response time for opening files is too long, consider lengthening the update interval.
2.6.2. Flushing the Cache
You can flush the persona cache by using the SET SERVER/INVALIDATE_PERSONA_CACHE command. This forces the server to build a completely new cache, validating each new user access from the authorization files. You can flush the persona cache after making changes to access rights or proxy accounts without waiting for the update interval to expire.
You need to restart the server if you have replaced the RIGHTSLIST.DAT file by copying the file or changing the file's logical name assignment. You do not need to restart the server if you have replaced or copied the NETPROXY.DAT file or SYSUAF.DAT file or if you have changed either of these two files' logical name assignments.
2.6.3. Displaying Cache Counters
DFS>SHOW SERVER/COUNTERS
|
Counter |
Description |
|---|---|
|
Persona Blocks Active |
The current number of simultaneously active persona blocks. |
|
Maximum Persona Blocks Active |
The highest number of simultaneously active persona blocks since the server started. |
|
Persona Cache Blocks Allocated |
The current number of allocated persona blocks. This includes a count of both currently active and inactive persona blocks. |
|
Maximum Persona Cache Blocks Allocated |
The highest number of allocated persona blocks since the server started. This tells how large the cache has been since the last startup. |
|
Persona Cache Hits |
The number of times the server was able to reuse an existing persona block to satisfy an incoming file request. |
|
Persona Cache Misses |
The number of times the server was forced to build a new persona block to satisfy a new file request. |
|
Persona Cache Threshold |
The number of preallocated persona blocks that the server maintains. |
2.7. Managing the Data Cache
Managing the data cache involves periodically using the server counters to monitor DECdfs performance, reassess server use, and tune the data cache parameters to maintain good performance.
The DECdfs server data cache improves performance by caching blocks of files to expedite the repeated use of files or parts of files. Many files on a system, such as command procedures or executable files, are used repeatedly. In addition, during access of a file, the same blocks in the file are often read and written many times. DECdfs stores file data in its data cache to eliminate unnecessary disk accesses. The caching takes place on both read and write requests.
To further improve performance, DECdfs prefetches subsequent blocks from files being accessed sequentially; that is, during sequential file access operations, DECdfs anticipates your needs, moving data from the disk to the cache so it is available when you actually request it.
The server's data cache is a write-through cache. It does not affect standard RMS caching, which occurs on the client system.
2.7.1. Specifying the Size of the Cache
DFS>SET SERVER/DATA_CACHE=COUNT_OF_BUFFERS
This command allocates a certain number of buffers from nonpaged pool to use in the data cache. The size of each buffer is fixed. Each buffer takes 8192 bytes of data plus 50 bytes of header information, for a total of 8242 bytes.
If you increase the count of buffers past the default value, increase the amount of nonpaged pool (the NPAGEDYN parameter) by a corresponding number of bytes. To do so, modify the SYS$SYSTEM:MODPARAMS.DAT file and rerun AUTOGEN (see the VSI OpenVMS System Manager's Manual).
2.7.2. Specifying the Per-File Quota
The quota prevents a large sequentially accessed file from taking all the cache buffers while other files are in use.
The server can ignore the quota when necessary. Then the server can better meet the needs of large and frequently accessed files when no or few other files are in use.
DFS>SET SERVER/DATA_CACHE=FILE_BUFFER_QUOTA
When a user makes an initial request for read access to a file, the server moves data from the disk to the cache. As the user continues to request read and write access to the same file, the server continues to allocate buffers to the file. Once the server reaches the quota, however, it reuses a file's buffers, beginning with the one least recently used. If that buffer is currently in use, the server ignores the quota and uses the least recently used available buffer in the cache. If no buffer is currently available in the cache, the file request waits.
If you choose to adjust the file buffer quota, consider what types of files you use with DECdfs. If users repeatedly access one large file, such as an executable file or a shared design template, a high file quota can be useful. Adjustments to this value should reflect the patterns of use at your site. To monitor the use and efficiency of the cache, use the SHOW SERVER/COUNTERS command.
2.7.3. Displaying Cache Counters
DFS>SHOW SERVER/COUNTERS
|
Counter |
Description |
|---|---|
|
Data Cache Full |
The number of times that the least recently used buffer was currently in use and a request had to wait for a buffer. |
|
Data Cache Hits |
The number of times that the server was able to satisfy a read request by finding a requested block in the cache. The server therefore avoided accessing the disk. |
|
Data Cache Misses |
The number of times that the server was unable to satisfy a read request by finding a requested block in the cache. The server was therefore forced to access the disk. |
|
Data Cache Quota Exceeded |
The number of times that a particular file used more buffers than its specified quota. |
|
Physical Writes |
The number of times that the server wrote a block to disk. |
|
Physical Reads |
The number of times that the server read a requested block from disk. |
Frequent high numbers for the Data Cache Full counter indicate that your server is very busy. When the cache is full and file requests wait for buffering, performance can degrade. Monitor this counter and consider raising the buffer count value if necessary.
Interpret the hits-to-misses ratio according to the application for which you use DECdfs. Sequential accesses should produce a high hits-to-misses ratio because of the prefetching DECdfs performs. Nonsequential accesses (or a very busy server with frequent reuse of cache blocks) can produce a low hits-to-misses ratio. To correct a consistently low hits-to-misses ratio, consider increasing the buffer count value by using the SET SERVER/DATA_CACHE=COUNT_OF_BUFFERS command.
The Physical Writes and Physical Reads counters indicate the number of times the server performed a disk I/O operation.
2.8. Using a Cluster as a DECdfs Server
You can make a device and directory available as an access point from a cluster system by using a cluster alias. A cluster alias serves a single access point from all cluster members when the incoming alias is enabled.
Sections 2.8.1 and 2.8.2 explain how to serve an access point from a cluster alias and from individual cluster members.
2.8.1. Serving an Access Point from a Cluster Alias
Install and start the DECdfs server on each node in the cluster for which the incoming alias is enabled.
Add the access point by using the /CLUSTER_ALIAS qualifier with the ADD ACCESS_POINT command. This supplies DECdns with the cluster alias instead of the node address as the access point's location.
Repeat the same ADD ACCESS_POINT command on each DECdfs server node in the cluster.
After you have completed these steps, a client system that mounts the access point connects to the cluster rather than to a specific node. DECnet software at the cluster chooses the node that will serve the client. The failure of one node does not prevent a DECdfs client from mounting an access point. If the server node involved in a DECdfs communication session becomes unavailable, another cluster member can respond when the DECdfs client tries to reestablish the connection. This allows the DECdfs session to proceed with minimal interruption to the user.
2.8.2. Serving an Access Point from Individual Cluster Members
If you do not enable the cluster alias, or if you have not installed the DECdfs server software on all members of the cluster, you can still serve the same device and directory from multiple nodes. The access point, however, must have a different name on each node. The access point name simply represents an alternative route to the same device and directory.
2.9. Stopping and Starting DECdfs on Your System
DFS>SHOW SERVER /USERS
You can determine whether DECdfs users are accessing a local client by entering the SHOW COMMUNICATION/CURRENT command and looking for active outbound connections. This procedure does not identify users by name. However, you can use the DCL REPLY command to notify those users before stopping the server.
SET SERVER/INVALIDATE_PERSONA_CACHE
SHOW SERVER/USERS
SHOW SERVER/ACTIVE
Note
For DECnet Phase IV:
NCP>SET EXECUTOR STATE OFF
For DECnet Phase V:
NCL>DISABLE NODE 0 ROUTINGNCL>DISABLE NODE 0 NSPNCL>DISABLE NODE 0 SESSION CONTROL
Note
Make sure DECnet is running before you restart DECdfs. Restarting DECnet or restarting the Communication Entity does not restart the DECdfs server; you must explicitly execute the DECdfs startup command file.
Chapter 3. Managing a DECdfs Client
Managing a VSI DECdfs for OpenVMS client involves coordinating the values of certain interrelated parameters on your system and then mounting DECdfs access points. This creates the client devices on your system.
Setting system parameters
Mounting access points
Displaying client device information
Using the client device
Performing checksum comparisons on DECdfs connections
Printing files from a client device
Using the Backup Utility with a client device
Using a cluster as a DECdfs client
Stopping and starting DECdfs on your system
Most of these tasks involve the use of DFS$CONTROL commands and qualifiers. For complete information on a specific command, see Chapter 4, "DFS$CONTROL Commands". For an overall perspective on DECdfs, read Chapter 2, "Managing a VSI DECdfs Server", even if you manage a client-only node. Certain topics covered in Chapter 2, "Managing a VSI DECdfs Server" affect both the client and server.
Note
A major difference between the server and client is as follows: the server resides in its own process on your system, whereas no explicit client process exists. The client resides in the DFSC device driver. Managing a client involves managing the client devices.
3.1. Setting System Parameters
Running DECdfs on a client system may require that you adjust the SYSGEN parameter NPAGEDYN. Adjust this before installation, as described in the VSI DECdfs for OpenVMS Installation Guide.
DECdfs provides excellent performance when your system uses the default network and RMS parameters. However, you might improve DECdfs client performance by setting these parameters as described in Appendix C, "Adjusting DECnet and Client RMS Parameters to Enhance Performance".
3.2. Mounting Access Points
To mount an access point, use the DFS$CONTROL command MOUNT. You can mount only access points that the server manager has added. How access points are added and mounted is described in Section 2.3.2, ''Adding Access Points''. For further information on the MOUNT command and its qualifiers, refer to Chapter 4, "DFS$CONTROL Commands".
To display a list of the available access points, use the SHOW ACCESS_POINT command. To simplify operation, place the MOUNT commands in the DFS$SYSTARTUP command file.
The MOUNT command mounts the client device to enable access by all users and jobs on the client system. That is, the DFSC device can be accessed by users other than the one who mounted it. However, access to files on the server is controlled based on the client user making the reference, not the user who mounted the device.
%MOUNT-VOLALRMNT, another volume of same label already mounted
If neither the /SYSTEM or /GROUP qualifier is specified, the mount command allocates a new DFSC unit even if another user already has the same access point mounted.
3.2.1. Assigning Device Unit Numbers
Mounting an access point creates a new client device on your system. DECdfs copies this device from the template device DFSC0:. DECdfs creates DFSC0: at startup, when it loads DFSCDRIVER.EXE, the client driver image. DECdfs then copies the I/O database data structures for each subsequent DFSC device from the template. As you mount access points, OpenVMS sequentially assigns a unit number to each new DFSC device, starting with unit number 1001. The first access point you mount creates DFSC1001:, the second access point creates DFSC1002:, and so on.
The MOUNT command has a /DEVICE qualifier that allows you to specify the device unit number. If you manage an OpenVMS Cluster system as a DECdfs client, this feature ensures that the same device number is mounted on all cluster members. Otherwise, DECdfs's default numbering could assign different device unit numbers to the same access point on different cluster members.
3.2.2. Assigning Logical Names
When you mount an access point, you can use the MOUNT command parameter local-logical-name to assign a logical name to the DFSC device. VSI recommends that you use logical names. Because the order in which DFSC devices are created can vary, their unit numbers can also vary. Referring to the devices by consistent logical names simplifies both management and use.
3.2.3. Specifying Volume Names
The MOUNT command's /VOLUME_NAME qualifier allows you to specify a volume name for the client device. This name identifies the device in the display from the DCL command SHOW DEVICE.
Note
Specifying a volume name for the client device does not affect the volume name on the actual device at the server.
3.2.4. Enabling Data Checking
Data checking causes the server to ensure the integrity of data between the disk and the OpenVMS system on the server. When you mount an access point, you can request a data check on read-only operations, write-only operations, or both read and write operations for the client device. To do so, include the /DATA_CHECK qualifier with the MOUNT command.
Data checking takes place at the server. You can request data checking on the client device whether or not the system manager at the server mounted the actual physical device with data checking enabled. If the physical device has data checking enabled, your request does not cause redundant data checking. If the device does not have data checking enabled, your request causes data checking only on your own client's use of the access point.
For a description of data checking on a disk, see the VSI OpenVMS I/O User's Reference Manual.
3.2.5. Mounting Alternative Access Points
An access point can be served by a cluster as well as by an individual node. If the server is a common-environment cluster, the DECdfs manager can register the cluster alias as the access point's location. This allows any node to process incoming requests for the access point. Consequently, the client has to mount only the cluster device. For more information on OpenVMS Cluster systems, see the VSI OpenVMS Cluster Systems Manual manual. For more information on cluster aliases, see the VSI OpenVMS DECnet Network Management Utilities manual or the VSI DECnet-Plus for OpenVMS Network Management Guide manual.
If the server manager does not want all nodes with incoming alias enabled to serve the access point, he or she can add the access point from more than one node, giving the access point a different, alternative name on each. The client manager can then choose an access point name and can also select another name later if problems arise with the first choice.
3.3. Displaying Client Device Information
$SHOW DEVICE DFSC1:Device Device Error Volume Free Trans MntName Status Count Label Blocks Count CntDFSC1: Mounted 0 HELP ***** 2 1
With the /FULL qualifier, the command displays the number 4294967295 in the Free Blocks field. This number is always the same and does not actually represent a count of free blocks.
DFS>SHOW CLIENT SATURNClient Device SATURN (Translates to _DFSC1001:) Status = Available Access Point = DEC:.LKG.S.TANTS.RANGER_SATURN Node = TOOTER Free blocks = 71358
|
Counter |
Description |
|---|---|
|
File Operations Performed |
The total number of all file (XQP) QIO functions issued to the device. |
|
Bytes Read |
The total number of bytes read from this device by user IO$_READVBLK function codes. |
|
Bytes Written |
The total number of bytes written to this device by user IO$_WRITEVBLK function codes. |
|
Files Opened |
The total number of files that this device has opened. |
|
Mount Verifications Tried |
The total number of times that this device attempted to recover from the unavailability of a server node, a server, the Communication Entity, or the DECnet network. |
Use these client counters to measure DECdfs use at your system. Some mount verifications probably will occur routinely. Once you know the normal frequency of mount verifications, you can monitor the Mount Verifications Tried counter to track potential DECdfs problems. For more information about mount verification, see Section 3.4.5, '' DECdfs Mount Verification''.
3.4. Using the Client Device
Printing server-based files on a client
User identification codes (UICs) on server files
Access control lists (ACLs) on server files
Reporting VSI DECdfs error conditions
DECdfs mount verification
Partially mounted devices
The following sections explain these differences in use.
3.4.1. Printing Server-Based Files on a Client
Before you can use the client device from your system, the DECdfs server manager must set up proxy accounts. Each user at your system who accesses files at the server does so through a proxy account or a default account.
Printing operations require special treatment in addition to the usual proxy and default accounts. To print files from the client device, your local SYSTEM account must have proxy access to the server node.
For print access to the server, ask the server manager to implement one of the suggestions in Section 2.2.4, ''Allowing Client Users to Print Server Files''.
3.4.2. User Identification Codes on Server Files
Files that are not owned by the user's proxy account are displayed with possibly misleading or confusing owner information.
Some operations, such as BACKUP, might fail if the target directory is not owned by the proxy account. You can correct this problem by using the /BY_OWNER=PARENT or /BY_OWNER=ORIGINAL qualifier to the BACKUP command.
For more information about UICs, see Section 2.2.2.1, ''User Identification Codes''.
3.4.3. Access Control Lists on Server Files
The displays for the DIRECTORY/SECURITY, DIRECTORY/ACL, and DIRECTORY/FULL commands omit the ACLs.
- The following commands return error messages:
- SET ACL/OBJECT_TYPE=FILE
- EDIT/ACL
- SET FILE/[NO]SEMANTICS
- SET FILE/[NO]STATISTICS
DECdfs provides limited support for Digital Data Interchange Format (DDIF) tagged files. You can create and read DDIF files on a DECdfs device when the DECdfs client node is running OpenVMS Version 5.1 or later versions. In this instance, the DDIF application creates the DDIF tag and applies it to the created files. You can also set DDIF tags manually by entering the DCL SET FILE/[NO]SEMANTICS COMMAND at the server.
Use the DIRECTORY /FULL command to determine whether a DDIF file on a DECdfs device is tagged. Note that the Backup Utility does not preserve the DDIF tag or the DDIF stored semantics for data files on a DECdfs device.
If you use MONITOR RMS to monitor file activity on a DECdfs client device, the MONITOR Utility returns activity information if the file ACEs have been set locally (on the server) using the DCL SET FILE/[NO]STATISTICS COMMAND.
|
Error Code |
Condition |
|---|---|
|
SS$_NOACLSUPPORT |
Occurs when you try to explicitly alter the ACL of a file on a DECdfs client device. |
|
SS$_NONLOCAL |
Occurs when you try to open a journaled file for write access or set a file as journaled or not journaled on a DECdfs client device. |
3.4.4. VSI DECdfs Error Conditions
A variety of conditions can arise on the client or server, or on the network, that affect the outcome of VSI DECdfs operations. When an operation is initiated by a command in DFS$CONTROL, VSI DECdfs is able to diagnose and report any exception conditions using the messages listed in Appendix A, "Status Messages". When operations are initiated by general system services, however, the full set of VSI DECdfs error condition codes are not available, and a less obvious, general message may be reported.
DFS>MOUNT DEC:.LKG.S.DFSDEV.OUTPOS_XX /NODE=OUTPOS OPX%MOUNT-MOUNTED, DEC:.LKG.S.DFSDEV.OUTPOS_XX mounted on _DFSC1003: %DFS-W-NOTSERVED, Access point is not presently being served
$DIR OPX:[JONES]%DIRECT-OPENIN, error opening OPX:[JONES]*.*;* as input -RMS-DNF, directory not found -SYSTEM-INCVOLLABEL, incorrect volume label
The most common of these messages are shown in Table 3.3, ''Mount Verification Error Codes''.
DFS>SHOW CLIENT OPXClient Device OPX (Translates to _DFSC1004:) Status = Available Access Point = DEC:.LKG.S.DFSDEV.OUTPOS_XX Node = OUTPOS Free blocks = -1 Access point is not presently being served
The last line of output gives the specific VSI DECdfs status of the access point, including any conditions that may make it inaccessible.
3.4.5. DECdfs Mount Verification
When a disk becomes unavailable on an OpenVMS system, the OpenVMS operating system performs mount verification. Mount verification is the process by which the OpenVMS operating system repeatedly attempts to recover from a disk failure or stoppage and to reestablish use of the disk. Similarly, when the client cannot satisfy certain user requests, it performs mount verification to recover from the failure and reestablish DECdfs service.
The DECnet network or the Communication Entity has stopped on the client.
The DECnet network, the Communication Entity, or the server software has stopped on the server.
The access point with which the client device is associated has been removed.
If I/O operations within open files fail for these reasons, DECdfs does not attempt mount verification. Instead, you must close and then reopen any open files. Any operation except CLOSE returns an SS$_ABORT error code. Even if opening a new file restores the link, you cannot use the old file without reopening it.
During the verification process, the client device repeatedly attempts the mount for a short time. If the mount succeeds during that time, mount verification succeeds. A successful mount verification, therefore, means that the original user request succeeds, perhaps with just a delay in response time. If the mount does not succeed during that time, mount verification times out and fails. For example, suppose the manager at the server enters the DFS$CONTROL STOP SERVER command but follows immediately with the START SERVER command. While the server is stopped, client requests fail and mount verification begins. When the server restarts and access points are added again, mount verification succeeds.
Canceling the user operation that triggered mount verification also cancels mount verification. For example, if mount verification starts in response to a DIRECTORY command, and the user presses Ctrl/Y, mount verification stops.
%%%%%%%%%%% OPCOM 8-JAN-1999 10:17:11.56 %%%%%%%%%%%Message from user DFS_CLIENTDFS server for access point FIN.MYSTRY_DUA1 is not runningDFS client mount verification in progress on device _DFSC1:
%%%%%%%%%%% OPCOM 8-JAN-1999 10:18:53.31 %%%%%%%%%%%Message from user DFS_CLIENTDFS client is verifying access point .REDHED.WATSONDFS client mount verification in progress on device _DFSC2:
|
Error Code |
Condition |
|---|---|
|
SS$_DEVNOTMOUNT |
DECnet or the Communication Entity is unavailable at the client. |
|
SS$_INCVOLLABEL |
The server is running, but the access point is invalid. |
|
SS$_INVLOGIN |
The Communication Entity is unavailable at the server. |
|
SS$_NOLISTENER |
The server is not running. |
|
SS$_UNREACHABLE |
DECnet is unavailable at the server. |
3.4.6. Partially Mounted Devices
DECdfs supports partially mounted devices so that you enter a MOUNT command only once for a client device, even if DECdfs does not complete the mount because the server is unavailable.
While the device is partially mounted, client requests trigger mount verification. After the server becomes available, the next mount verification succeeds, which completes the mount operation and the client request.
3.5. Performing Checksum Comparisons on DECdfs Connections
DECdfs can provide a layer of data integrity above the DECnet level by performing checksum comparisons. To request or stop checksumming, use the DFS$CONTROL command SET COMMUNICATION/[NO]CHECKSUM.
DECdfs checksum comparisons ensure the integrity of the DECnet link. Whenever DECdfs finds a checksum error, it determines that the DECnet link is unreliable and disconnects the logical link. You can enable and disable checksumming only from a client system; the actual checksum comparison occurs at both the client and server. DECdfs reports a checksum error to the node that detects the checksum error and the node that sent the faulty packet.
Networks usually provide sufficient error detection and correction at the network interface level.
Using VSI DECdfs checksumming increases CPU overhead.
If your network is prone to errors, you should enable the VSI DECdfs checksum option by changing the command in SYS$MANAGER:DFS$CONFIG.COM to SET COMMUNICATION/CHECKSUM. Then monitor OPCOM messages for checksum failures or use the SHOW COMMUNICATION/COUNTER command to check for a nonzero checksum error counter. Whenever you change the network configuration at your site (for example, when you add new network controller boards or Ethernet segments), you can enable checksumming for a short time to check the links again.
Both checksum comparisons and data checks (which you request with the MOUNT/DATA_CHECK command) test data integrity, but they are very different. A checksum comparison ensures the integrity of data traveling between the server and client. A data check ensures the integrity of data between the disk and the OpenVMS system on the server.
3.6. Printing Files from a Client Device
The MOUNT command entered at the client must include the /SYSTEM qualifier to ensure that the DECdfs device is available systemwide on the client.
If the client is a cluster, the MOUNT command entered at the client must also include the /DEVICE qualifier. This ensures that all nodes in the cluster use the same device name to see a particular client device. Using consistent device names on all cluster members is essential for successful printing functions. Consistent names allow the print symbiont to find a file regardless of the node at which the print command is entered. See Section 3.8, ''Using a Cluster as a DECdfs Client'' for more information about mounting DECdfs devices in a cluster.
3.7. Using the OpenVMS Backup Utility with a Client Device
Backing up files from a DFSC device does not save ACL information. Therefore, a subsequent restore of a saveset created this way will not restore the ACLs.
Restoring files to a DFSC device will not restore ACLs even if the saveset was made from a local device and does contain ACL information.
Performing a file copy operation with BACKUP does not copy ACLs if either source or destination is a DFSC device.
Also note that the BACKUP qualifiers /PHYSICAL, /IMAGE, and /FAST cannot be used with DFSC devices.
For more information on the Backup Utility, see the VSI OpenVMS System Management Utilities Reference Manual.
3.8. Using a Cluster as a DECdfs Client
To use a cluster as a DECdfs client, you must become familiar with the information in the following sections regarding cluster aliases and submitting print and batch jobs.
3.8.1. Using Cluster Aliases
Define the cluster alias on each node in the cluster.
If you have not already defined the cluster alias in your node's permanent database, enter the appropriate command, as follows:
For DECnet Phase IV:
NCP>DEFINE EXECUTOR ALIAS NODE cluster-alias-nameUse this command on each node in your cluster. Using SET instead of DEFINE in this command would affect your node's volatile database. See Appendix C, "Adjusting DECnet and Client RMS Parameters to Enhance Performance" for information on the differences between the NCP commands SET and DEFINE.
For DECnet Phase V:
NCP>CREATE [NODE node-id] ALIASNCP>CREATE [NODE node-id] ALIAS PORT port-name NODE IDNCP>SET [NODE node-id] ALIAS PORT port-name SELECTION WEIGHT integerNCP>ENABLE NODE ALIAS PORT port-nameReplace node-id with the name or address of the node on which you are entering the command and replace port-name with the DECdns full name of the cluster alias, such as .SITE.GROUP.CLUSTER_ALIAS. To define the cluster alias on all nodes in the cluster, enter these commands at each node. An alternate method of defining the cluster alias on each node is to run the command file NETCONFIGURE.COM in the SYS$MANAGER directory. For more information on NETCONFIGURE.COM, see the DECnet/OSI for OpenVMS Installation and Configuration manual.
Enable DECnet to send proxy information with outgoing logical link requests on behalf of the DECdfs Communication Entity. Add the appropriate command to the DFS$SYSTARTUP file, as follows:
For DECnet Phase IV:
MCR NCP SET OBJECT DFS$COM_ACP ALIAS OUTGOING ENABLED
For DECnet Phase V:
MCR NCL CREATE [NODE node-id] SESSION CONTROL APPLICATION DFS$COM_ACP
MCR NCL SET [NODE node-id] SESSION CONTROL DFS$COM_ACP OUTGOING
        ALIAS boolean
Replace node-id with the name or the address of the node. Replace boolean with TRUE. Enter these commands at each node in the cluster. To make the setting permanent, add these commands to the NET$APPLICATION_STARTUP.NCL script file in the SYS$MANAGER directory.
Outgoing requests from your client's Communication Entity then contain the cluster name instead of the individual node name.
3.8.2. Submitting Print and Batch Jobs
You mounted the access point using the /DEVICE qualifier to the MOUNT command.
The device specification was the same for all the cluster members.
3.9. Stopping and Starting DECdfs on Your System
It may become necessary to stop DECdfs on your system; for example, if security should be compromised and you need to stop all file access immediately.
Before you stop DECdfs, notify users of your intentions. You can determine whether users are active on a DECdfs client by entering the SHOW COMMUNICATION/CURRENT command and looking for active outbound connections. This procedure does not identify users by name, but you can use the DCL REPLY/ALL command to notify all users on each client.
To stop DECdfs on your system without aborting user file access, enter the DFS$CONTROL command SHUTDOWN COMMUNICATION. This allows existing communication sessions to complete but refuses new requests.
Note
Observe these cautions:
For DECnet Phase IV:
If you stop DECnet (by entering the NCP command SET EXECUTOR STATE OFF, for example), the DECdfs communication process also stops.
For DECnet Phase V:
If you stop DECnet (by disabling the data link, for example) all connections are lost. DECdfs will be unable to establish connections to disk drives until the network is started.
Note
Ensure that DECnet is running before you restart DECdfs. Restarting DECnet or restarting the Communication Entity does not restart DECdfs; you must explicitly execute the DECdfs startup command file.
Chapter 4. DFS$CONTROL Commands
COMMAND/QUALIFIER=(option,option) parameter
You can abbreviate DFS$CONTROL commands, qualifiers, and keywords. You can enter them in uppercase, lowercase, or any combination of uppercase and lowercase. If you specify only one option with a qualifier, you need not use the parentheses.
For more information on command syntax, see the VSI OpenVMS User's Manual.
$RUN SYS$SYSTEM:DFS$CONTROL
DFSCP == "$DFS$CONTROL"
$DFSCP SHOW COMMUNICATION$DFSCP MOUNT .DATA_DISK LCLNAME
$DFSCPDFS>
DFS>HELP
You can use standard command-line editing features from the DFS> prompt.
Note
The examples in this chapter illustrate the interactive use of commands, even for those that you typically enter from a command file.
You can use the Help Message utility to access explanations of messages returned in response to DFS$CONTROL commands. For information on using the Help Message utility, see the OpenVMS System Messages: Companion Guide for Help Message Users or enter HELP HELP/MESSAGE at the DCL prompt ($). Appendix A, "Status Messages" in this manual also provides descriptions of VSI DECdfs messages.
ADD ACCESS_POINT
ADD ACCESS_POINT — Registers an access point name in the DECdfs server database and the Digital Distributed Name Service (DECdns).
Format
ADD ACCESS_POINT ap-name directory-name
Parameters
ap-name
The access point name stored by the DECdfs server and DECdns.
directory-name
The device and directory to which the access point refers. The device name is required and must be followed by a colon (:). The directory name is optional; the default directory is the device's master file directory (MFD). For example, if you specify DUA3:, the access point refers to DUA3:[000000]. You can substitute a system-rooted logical for a device name.
Description
This command makes an access point available to DECdfs clients by adding its name to DECdns and to the local server database. Insert the command into the DFS$SYSTARTUP command file to register each access point at startup time. Each command line takes one access point name.
Entering this command interactively registers the access point with DECdns but keeps the server database entry alive only until the server stops. Once the server stops, the display for the SHOW ACCESS POINT command lists the access point but notes that it is unavailable. Editing the DFS$SYSTARTUP file each time you add an access point interactively will ensure that DECdns and your server database contain the same information.
You must have the SYSNAM and OPER privileges to use this command.
Qualifiers
- /CLUSTER_ALIAS
Gives the cluster alias, rather than the individual node's DECnet address information, to DECdns when registering the access point. To use this qualifier, you must use the identical command on each cluster member that has the incoming alias enabled.
- /LOCAL
Registers the access point with the local VSI DECdfs server database but not the DECdns server namespace. This is what happens by default when you add an access point on a system on which DECdns is not available. The /LOCAL qualifier makes this an option on systems where DECdns is available.
The access point name for an access point added with the /LOCAL qualifier must include the namespace name unless you have defined the logical name DFS$DEFAULT_NAMESPACE in the DFS$CONFIG.COM file.
Access points added with the /LOCAL qualifier must be mounted with the /NODE qualifier.
Examples
DFS>ADD ACCESS_POINT DEPARTMENT_FINANCE USER$34:DFS>This command adds the access point name DEPARTMENT_FINANCE. The access point refers to the directory USER$34:[000000].
DFS>ADD ACCESS_POINT BAKER_STREET.221B DISK$CASES:[MORIARTY]DFS>This command registers the access point BAKER_STREET.221B. The access point refers to the directory DISK$CASES:[MORIARTY].
DFS>ADD ACCESS_POINT BAKER_STREET.WATSON -_DFS>DISK$CASES:[WATSON]/CLUSTER_ALIASDFS>This command registers the access point BAKER_STREET.WATSON, whose registered location will be the cluster name.
DFS>ADD ACCESS_POINT DEC:.LKG.S.DEPARTMENT_FINANCE -_DFS>USER$34:[000000] /LOCALDFS>This command adds the access point to the local VSI DECdfs server database. Note that the access point name includes the namespace name (DEC:). The access point refers to the directory USER$34:[000000].
DISMOUNT
DISMOUNT — Renders a DECdfs client device unavailable to users.
Format
DISMOUNT local-device-name
Parameter
local-device-name
The name of the device to dismount. The value for local-device-name can be a logical name or the device name and unit number (DFSC n:).
Description
This command renders a DECdfs client device unavailable to users. If the device was mounted with the /GROUP or /SYSTEM qualifier, you must have the user privilege GRPNAM or SYSNAM, respectively, to dismount it.
Before dismounting a client device, you can display a list of the client devices on your node (but not their logical names) by entering the DCL command SHOW DEVICE DFSC. Alternatively, you can use the DCL DISMOUNT command to dismount the device.
Qualifier
- /ABORT
Cancels any outstanding I/O requests and terminates mount verification. This qualifier allows you to dismount a device regardless of who actually mounted it.
This qualifier is the same as the /ABORT qualifier to the DCL DISMOUNT command.
Example
DFS>DISMOUNT FINANCE%DFS-S-DISMNT_SUCCESS, Dismount was successfully performed.
This command dismounts the local device whose logical name is FINANCE.
EXIT
EXIT — Terminates the current DFS$CONTROL session and returns the DCL prompt.
Format
EXIT
Parameters
None.
Description
Use the Exit command when you want to end the current DFS$CONTROL session and return to the DCL prompt.
Qualifiers
None.
Example
DFS>EXIT$
This command terminates the DFS$CONTROL session.
HELP
HELP — Displays help information on DFS$CONTROL commands.
Format
HELP [command-name]
Parameter
command-name
The command on which you want information.
Description
The HELP command displays information on DFS$CONTROL. If you include the
command-name parameter, the HELP command displays information
about that command. If you omit the command-name parameter, the
HELP command displays a list of the topics for which information is
available.
Qualifiers
None.
Example
DFS>HELP SHOW VERSIONSThis command displays version numbers for VSI DECdfs softwarecomponents.When tracking down problems in communication between a VSI DECdfsserver and client, enter this command and compare the versionson the two nodes. Different versions of the VSI DECdfs software mightcause a number of errors. You also use this command to get versioninformation required for reporting problems to Compaq.Some version numbers are given as ranges, while others are singlenumbers. The range for the client protocol on the client node mustoverlap the server protocol on the server node. The communicationprotocol version must be the same on client and server.
This command displays information on the SHOW VERSIONS command.
MOUNT
MOUNT — Makes available a specified access point as a local DECdfs client device.
Format
MOUNT ap-name [local-logical-name]
Parameters
ap-name
Specifies an access point name on a DECdfs server. The name must already exist. That is, the server manager must have already registered it with the ADD ACCESS_POINT command.
local-logical-name
Designates a local logical name for the mounted device. The logical name is a string of 1 to 255 characters.
Description
This command allows your client system to use an access point located on a DECdfs server. When you mount an access point, DECdfs creates a pseudodevice of type DECdfs client (DFSC) on your system. The master file directory (MFD) for the mounted client device is the directory to which the access point refers. The device is mounted for sharing, as if you had used the DCL command MOUNT/SHARE.
The device name is DFSC n:. If you do not use the /DEVICE qualifier, DECdfs assigns sequential unit numbers beginning with DFSC1001. DFS displays this name in the command response and instructs the communication entity to create a connection to the server. The connection is now ready to process user requests.
You can supply a local logical name for the access point. This lets subsequent
DFS$CONTROL and user commands see the device by that name. The
local-logical-name parameter creates the logical name in the
job logical name table. However, if you specify the /SYSTEM or /GROUP qualifier, the
logical name is created in the system or group logical name table, respectively.
Dismounting the device removes the logical name.
%MOUNT-VOLALRMNT, another volume of same label already mounted
If the mount attempt does not specify /SYSTEM or /GROUP, and no /DEVICE qualifier is specified, then a new DFSC device is created and the mount attempt proceeds. Thus, different users who mount the same access point will use different DFSC devices, but file access interlocking is not compromised because it always takes place at the server.
Most command qualifiers are the same as those for the DCL MOUNT command. Note that the command qualifiers apply to the client device on your system, not to the actual physical device at the server.
Qualifiers
- /[NO]DATA_CHECK [= option]
Requests that the server perform a data check following all read requests, all write requests, or both read and write requests for the client device. The
optionvalue can be READ or WRITE or both.The default qualifier is /NODATA_CHECK. If you specify /DATA_CHECK without an option, the default option is WRITE.
- /DEVICE=DFSCn:
Specifies the DFSC unit on which the access point is to be mounted. If this qualifier is not supplied, the OpenVMS operating system automatically supplies the unit number starting at 1001. It is recommended that units numbered 1 to 1000 be reserved for system-mounted access points.
- /GROUP
Makes the mounted client device and its logical name available to other users whose UIC group code matches yours. To use this qualifier, you must have the GRPNAM privilege. You cannot use the /GROUP and /SYSTEM qualifiers together.
- /[NO]MESSAGE
Displays or suppresses the message that confirms a successful mount operation. The default qualifier is /MESSAGE.
- /NODE= node_name
In systems without DECdns, specifies the node that serves an access point. In such systems, a MOUNT command entered without the /NODE qualifier cannot determine where the specified access point is located because the DECdns namespace is not available.
The MOUNT command does not prompt for the node name specification but if it is not supplied, the command will fail with the following error message:%DFS-E-NODEMSNG, Server node not specified
Access point names are normally unique within the namespace. However, if DECdns is not used, there is no enforcement of uniqueness and the same access point name may be used on multiple nodes. This is recommended only for cluster nodes where the access point name refers to the same physical disk on all nodes. The MOUNT command expects access point names to be unique and does not implicitly qualify them with the node name. Therefore, an attempt to mount the same access point name on two different nodes is seen as an attempt to mount the same access point twice and is treated as described above.
- /SYSTEM
Makes the mounted client device and its logical name available to every user on the system. To use this qualifier, you must have the SYSNAM privilege. You cannot use the /SYSTEM and /GROUP qualifiers together.
- /VOLUME_NAME= string
Specifies a volume name of up to 12 characters for the client device. The volume name provides a way of identifying the device when you view the response to the DCL command SHOW DEVICE.
If you omit a volume name, the access point name is the default volume name if it has 12 or fewer characters. If the access point name has more than 12 characters, the default volume name consists of the first 5 characters of the access point name, 2 periods (..), and the last 5 characters of the access point name.
- /WINDOWS= n
Specifies the number of mapping pointers to allocate for file windows. Extra window pointers are allocated automatically as required. For information on the range or default for the n value, see the VSI OpenVMS System Management Utilities Reference Manual.
The DECdfs client device makes files appear to be contiguous even though they may not be contiguous at the server. Increasing this value, therefore, will not be useful for accessing fragmented files, as it would be with local file access. It might be useful, however, if you need to access very large files.
Example
DFS>MOUNT DEPARTMENT_FINANCE FINANCE%MOUNT-I-MOUNTED, .DEPARTMENT_FINANCE mounted on _$DFSC1004:
This command mounts the access point DEPARTMENT_FINANCE, giving it the logical name FINANCE. The response indicates that DEPARTMENT_FINANCE was mounted on the local node as DECdfs client device DFSC1004:. The access point name conforms to conventions for a single-directory DECdns namespace.
REMOVE ACCESS_POINT
REMOVE ACCESS_POINT — Removes a specified access point name from the DECdfs server database and from the Digital Distributed Name Service (DECdns) namespace.
Format
REMOVE ACCESS_POINT ap-name
Parameter
ap-name
Specifies the name of the access point to remove from the server database and from the DECdns namespace. If the server node does not have access to the DECdns namespace, or the server is not synchronized with the namespace, the access point must be fully qualified (namespace name and access point name).
Description
This command removes an access point name from both the server database and from the DECdns namespace. Entering this command does not affect operations on currently open files but does prevent new attempts to use the access point.
You must have the SYSNAM and OPER privileges to use this command.
Qualifier
- /LOCAL
Removes the access point from the local VSI DECdfs server database. The access point name must include the namespace name unless you have defined the logical name DFS$DEFAULT_NAMESPACE in the DFS$CONFIG.COM file.
Examples
DFS>REMOVE ACCESS_POINT DEPARTMENT_FINANCEDFS>This command removes the access point DEPARTMENT_FINANCE from the DECdfs server and the DECdns namespace. In this example, the access point name is from a single-directory DECdns namespace.
DFS>REMOVE ACCESS_POINT BAKER_STREET.221BDFS>This command removes the DECdfs access point name 221B from the DECdns directory BAKER_STREET and the server database. In this example, the access point name is from a hierarchical DECdns directory.
DFS>REMOVE ACCESS_POINT DEC:.LKG.S.DEPARTMENT_FINANCE /LOCALDFS>This command removes the access point from the local VSI DECdfs server database. Note that the access point name includes the namespace name (DEC:).
SET COMMUNICATION
SET COMMUNICATION — Sets parameters for the DECdfs Communication Entity.
Format
SET COMMUNICATION
Parameter
None.
Description
This command sets Communication Entity parameters that affect file buffering, limits on use, lifetimes of DECnet logical links, message reporting, and data integrity checks.
These communication parameters can be dynamic or static. Dynamic parameters take effect when you enter the command; static parameters take effect the next time you start the communication entity. The description of each qualifier notes whether it takes effect on a dynamic or static basis.
You must have the OPER privilege to use this command.
Qualifiers
- /BUFFER_SIZE=
n Sets the size (in bytes) of the DECdfs communication buffers for incoming and outgoing data. You need not set the same buffer size on client and server nodes; if the buffer sizes do not match, the DECnet software resolves the difference. The default buffer size is 2560 bytes; the range is from 560 to 9,216 bytes. If your system has enough memory, increasing the buffer size to 9,216 may improve DECdfs performance. This is a static parameter.
- /[NO]CHECKSUM
Enables or disables DECdfs checksumming for all subsequent connections. You can enable and disable checksumming only from a client node; at a server-only node, this qualifier is ignored. If checksumming is enabled and DECdfs detects a checksum error at either the client node or the server node, it disconnects the DECnet link. Checksumming checks the data integrity above the DECnet level. The default qualifier is /NOCHECKSUM.
This qualifier takes effect only when a new DECnet logical link is created. DECdfs then starts checksumming for that and all subsequently created links. If a SHOW COMMUNICATION/CURRENT_CONNECTIONS command shows that at least one connection has a link status of Inactive, the next user request on that connection will create a new link and checksumming will start. If all connections have a link status of Active, checksumming will not start until all user file operations on one connection stop, two successive scan times expire, and a new user request creates a new link. If you must start checksumming immediately, you can use NCP or NCL commands to disconnect a link, as follows:
For DECnet Phase IV:
NCP>DISCONNECT LINK link-componentReplace link-component with the number of the link or, if you wish to disconnect all links, with the parameter KNOWN LINKS.
For DECnet Phase V:
NCL>DELETE SESSION CONTROL PORT session-control-port-nameA session control port represents one end of a transport connection (logical link). To determine which port to delete, use the command SHOW SESSION CONTROL PORT * ALL. The output from this command is as follows:Node 0 Session Control Port SCL$PORT$12010015 at 1994-05-07-15:30:30.525-04:00I0.613 Identifiers Name = SCL$PORT$12010015 Status Client = <Default value> Local End User Address = UIC = [0,0]<dfs$comacp> Transport Port = NSP Port NSP$PORT_00002016 Direction = Outgoing Remote End User Address = name = DFS$COM_ACP Node Name Sent = DEC:.ZKP.LAURAC Version Sent = V3 Counters Creation Time = 1994-05-07-15:29:18.476-04:00I0.568 Node 0 Session Control Port SCL$PORT$12010016 at 1994-05-07-15:30:30.525-04:00I0.613 Identifiers Name = SCL$PORT$12010016 Status Client = <Default value> Local End User Address = name = DFS$COM_ACP Transport Port = NSP Port NSP$PORT_00002017 Direction = Incoming Remote End User Address = UIC = [0,0]<dfs$comacp> Node Name Sent = DEC:.ZKP.LAURAC Version Sent = V3 Counters Creation Time = 1994-05-07-15:29:18.626-04:00I0.568The name of the session control port in this example is SCL$PORT$12010003. Note that the display identifies the session control port further by providing the name of the NSP port.
- /READS_MAXIMUM=
n Sets the maximum number of concurrent read operations the Communication Entity can post to DECnet. Each read request requires one I/O request packet (called IRP in DECnet Phase IV and VCRP in DECnet Phase V) and one DECdfs communication buffer from nonpaged pool. The default value is 3; the range is from 1 to 20. This is a static parameter.
- /[NO]REPORTING [=
option] Enables or disables reporting of communication messages. DECdfs sends the reports that you enable to OPCOM as network class messages. Enable only the reports that you need, because the reports produce heavy output and can slow response time. This is a dynamic parameter. See Appendix B, "Troubleshooting the DECdfs Environment" for more information on the /REPORTING qualifier, including a figure.
Theoptionvalue can be one or more of the following:ALL
Enables or disables all reports.
NONE
Disables all reports.
[NO]ERRORS
Enables or disables reporting of DECdfs Communication Entity errors.
[NO]NETWORK_EVENTS
Enables or disables reporting of DECnet events about the DECdfs Communication Entity.
The default reporting option is ALL. Do not use a double negative, such as /NOREPORTING=NONE.
- /REQUESTS_OUTSTANDING_MAXIMUM=
n Specifies how many outstanding file I/O requests from clients a DECdfs server can have. The Communication Entity stops reading I/O from the network when outstanding requests exceed the specified maximum number. The default value is 20; the range is from 1 to 65,535. This is a dynamic parameter.
- /SCAN_TIME=
time Specifies the time interval between scans for inactive DECnet links. If the Communication Entity finds an inactive link on two successive scans, it disconnects the link. The link is reestablished the next time a user on the client requests a file operation on the server. The default scan time is 4 minutes (00:04:00.00); the maximum is just under 24 hours (23:59:59.99). This is a dynamic parameter. The qualifier is valid only on the client.
Example
DFS>SET COMMUNICATION/NOREPORTING=NETWORK_EVENTSDFS>
This command disables reporting of DECnet events about the DECdfs Communication Entity.
SET SERVER
SET SERVER — Sets parameters for the DECdfs server.
Format
SET SERVER
Parameters
None.
Description
This command sets server parameters that affect the creation of access points, the caching of file blocks, the caching of user access rights information, and the type of message reporting to use.
These server parameters can be dynamic or static. Dynamic parameters take effect when you enter the command; static parameters take effect the next time you start the server unless described otherwise below. The description of each qualifier notes whether the parameter is dynamic or static.
You must have the OPER privilege to use this command.
Qualifiers
- /ACCESS_POINTS_MAXIMUM=
n Sets the maximum number of access points in the server's database. The default value is 128; the range is from 64 to 65,535. This is a static parameter that takes effect when you enter the next START SERVER command.
- /DATA_CACHE=
option Sets values for the server's data cache. This is a static parameter. It takes effect the next time you reboot and restart DFS.
Theoptionvalue can be one or both of the following:COUNT_OF_BUFFERS=
nAllocates n buffers from nonpaged pool for use in DECdfs file data caching. Each buffer takes a total of 8242 bytes. The default n value is 16; the range is from 16 to 2048.
FILE_BUFFER_QUOTA=
nSpecifies how many cache buffers a single file usually uses. The default quota is 4; the range is from 2 to 512.
For normal use, insert the COUNT_OF_BUFFERS and FILE_BUFFER_QUOTA values into the DFS$CONFIG.COM command procedure.
- /INVALIDATE_PERSONA_CACHE
Immediately flushes the persona cache and closes and reopens the NETPROXY.DAT file.
- /PERSONA_CACHE=UPDATE_INTERVAL=
time Sets the lifetime of individual persona blocks for the server's persona cache. If a user whose persona block is outdated attempts a file access, the DECdfs server reads the NETPROXY.DAT, SYSUAF.DAT, and RIGHTSLIST.DAT files and updates the persona cache with that information. The default interval is 10 minutes (00:10:00.00); the maximum is just under 24 hours (23:59:59.99). This is a dynamic parameter.
- /[NO]REPORTING [=
option] Enables or disables reporting of server messages. Output goes to the log files specified with the START SERVER command's /ERROR and /OUTPUT qualifiers. This is a dynamic parameter.
Theoptionvalue can be one or both of the following:[NO]ERRORS
Enables or disables reporting of DECdfs server general errors.
[NO]OPCOM
Enables or disables reporting of any events as network class messages to OPCOM. The default is OPCOM.
Example
DFS>SET SERVER/ACCESS_POINTS_MAXIMUM=30DFS>This command sets the access point limit for a DECdfs server to 30.
DFS>SET SERVER/DATA_CACHE=(COUNT_OF_BUFFERS=17,-_DFS>FILE_BUFFER_QUOTA=5)DFS>This command sets two values for the server's data cache: the number of buffers in the cache, and the per-file buffer quota. The command concatenates the two /DATA_CACHE qualifier options by surrounding them in parentheses and separating them with a comma.
SHOW ACCESS_POINT
SHOW ACCESS_POINT — Displays access points stored by the Digital Distributed Name Service (DECdns) and by individual DECdfs server databases.
Format
SHOW ACCESS_POINT ap-name
Parameter
ap-name
Specifies the access point name to display.
If the DECdns namespace is a single-directory namespace, an asterisk (*) wildcard character operates as it does in DCL file specifications: it expands to the names of all access points. A question mark (?) in DECdfs operates as a percent sign (%) operates in DCL. The question mark expands to the names of access points that match in all characters except the one represented by the wildcard.
With a hierarchical DECdns namespace, an asterisk (*) wildcard character in the last segment of the name displays all access point names in the DECdns directory named by the previous segment. If the first segment is a logical name (defined in DNS$SYSTEM_TABLE), DECdns translates it and then adds the information that follows to the end of the equivalence string. If you want to prevent this translation, put a period (.) before the first segment.
Description
This command displays a list of access points and their node locations as registered with DECdns.
The default qualifiers are /BRIEF and /REMOTE.
Qualifiers
- /BRIEF
Shortens and quickens the command response by including just the DECdns information (access point name and node name) and omitting the server information (device and directory) and namespace name. The default qualifier is /BRIEF.
- /FULL
- Displays the following information for each access point:
The full name, starting with the namespace name
The node on which the server is located
The device and directory to which the access point refers
Status information on the availability of the server or the access point (when necessary)
The /FULL qualifier causes DECdfs to verify the DECdns information by querying each server for current information about the access points. The server information includes the device and directory to which the access point refers or gives current status information. For example, the command response might tell you that the server is currently unavailable or that the access point is not being served. The /FULL qualifier also adds the namespace name to each displayed access point name. Querying each remote server causes a slower command response with the /FULL qualifier.
Querying a remote server for information on access points and displaying that information at your node creates a DECdfs connection between your node and that server node. You sometimes see those connections in the response to a SHOW COMMUNICATION command.
- /LOCAL
Lists the access points in the local server database. /LOCAL is the default on systems without DECdns. You can use wildcard characters for any part of the access point name or for the entire name. You cannot use the /LOCAL qualifier with other qualifiers except /FULL.
- /NODE=
node-name Lists the access points located on just the specified node. The /NODE qualifier is valid only on systems that are running DECdns.
- /REMOTE
Lists the access points on remote nodes only. The /REMOTE qualifier is the default on systems running DECdns.
Qualifiers
DFS>SHOW ACCESS_POINT/LOCALDEC:.LKG.S.DEPARTMENT_FINANCE on SCOTER::USER$34:[000000]This command displays information about the access point DEPARTMENT_FINANCE, including the full namespace name. The command output shows that the access point refers to the master file directory of device USER$34.
DFS>SHOW ACCESS_POINT FIN.ADMIN.DIV.MYSTRY*FIN.ADMIN.DIV.MYSTRY on SCOTER::FIN.ADMIN.DIV.MYSTRY$VMS_SOURCE on SCOTER::FIN.ADMIN.DIV.MYSTRY_DUA0 on SCOTER::FIN.ADMIN.DIV.MYSTRY_USER on SCOTER::FIN.ADMIN.DIV.MYSTRY_VMS_SOURCE on SCOTER::This command illustrates the default brief display of access point names. It also illustrates how you can use a wildcard in the command with a hierarchical namespace. The display includes just the names of the access points and their server nodes.
DFS>SHOW ACCESS_POINT FIN.MYSTRY*/FULLCRANE_NS:.FIN.MYSTRY on SCOTER:: Access point is notpresently being servedCRANE_NS:.FIN.MYSTRY_DUA0 on JAY:: Server is presentlyunavailableCRANE_NS:.FIN.MYSTRY_USER on SCOTER::USER$1:[000000]CRANE_NS:.FIN.MYSTRY_VMS_SOURCE on WARBLR::DUA0:[VMS_SOURCE]This command illustrates a full display of access point names in the directory FIN.MYSTRY, which is part of the hierarchical namespace CRANE_NS. For each access point, the display includes the namespace name, the name, the server node name, and, when available, the device and directory.
Full information is not available for all of the access points in this display. One access point "is not presently being served." This indicates that the DECdns namespace contains an entry for the access point but the DECdfs server does not. For another access point, the "Server is presently unavailable." This indicates that the server on that node has stopped, and it is therefore not processing requests for information.
SHOW CLIENT
SHOW CLIENT — Displays information about a DECdfs client device.
Format
SHOW CLIENT local-device-name
Parameter
local-device-name
Specifies a local DECdfs client device. The value for local-device-name can be either a logical name that you assigned or the pseudodevice name that OpenVMS assigned (DFSC n:).
Description
For the device name that you specify, this command displays the name of its associated access point and access point's server node. You can also display the client counters.
If the device that you specify is unavailable (not mounted), the command returns an error message.
Qualifiers
- /ACCESS_POINT
Displays the name of the access point associated with the specified device.
- /ALL
Displays all client parameters and counters.
- /[NO]COUNTERS
Displays or suppresses information about the following DECdfs client counters: file operations performed, bytes read from the device, bytes written to the device, files opened by the device, and mount verifications tried.
The client counters reflect use from the time that you mounted the client device. They wrap when they exceed the maximum value of 64 bits (32 bits for the number of file operations). The display includes two sets of values: the current values, and the difference between the current values and those recorded by the last SNAPSHOT CLIENT command.
- /FREE_BLOCKS
Displays the number of free blocks currently available on the client device.
- /NODE
Displays the name of the DECdfs server node to which the client device gives access.
- /SNAPSHOT_FILE=
file-spec Specifies the file to which you previously sent a client snapshot (using the SNAPSHOT CLIENT/SNAPSHOT_FILE=
file-speccommand). The output for this command compares the current counters with the counters recorded in that file. You can use this qualifier with the /COUNTERS qualifier.
Examples
DFS>SHOW CLIENT DFSC1001Client Device DFSC1001 (Translates to _DFSC1001:)Status = AvailableAccess Point = DEC:.LKG.S.TANTS.RANGER_SATURNNode = RAINBOFree blocks = 61518This command displays all information on the client device represented by the name dfsc1001. The command output shows that the mounted device is available and is associated with the access point DEC:.LKG.S.TANTS.RANGER_SATURN on node RAINBO.
DFS>SHOW CLIENT DFS$DISK/COUNTERSClient Device DFS$DISK (Translates to _DFSC1:)DECdfs Client Counters (Snapshot from Startup)| | Change Since |Counter | Current Value | Snapshot |-----------------------------+-----------------+-----------------+| Operations Performed | 8090 | 8090 || Bytes Read | 4203520 | 4203520 |+ Bytes Written + 189440 + 189440 +| Files Opened | 796 | 796 || Mount Verifications Tried | 0 | 0 |-----------------------------+-----------------+-----------------+This is an example of the client counters display. Note that the display includes the actual device name for the logical device specified in the command. This command response shows that DECdfs compared the current counters with the initial zero values, since the current values and the "Change Since Snapshot" values are the same.
SHOW COMMUNICATION
SHOW COMMUNICATION — Displays information on the DECdfs Communication Entity.
Format
SHOW COMMUNICATION
Parameters
None.
Description
This command displays a variety of Communication Entity values and, optionally, counters.
Note that a previous SET COMMUNICATION command might have set some (static) communication values that will not take effect until you next restart DECdfs. In this instance, this command displays both the current (most recently set) value and the static value now in use.
Each qualifier is described in more detail in the SET COMMUNICATION command description.
Qualifiers
- /ALL
Displays all communication qualifier values and counters.
- /BUFFER_SIZE
Displays the message buffer size of the DECdfs Communication Entity.
- /CHECKSUM
On a client node, displays whether DECdfs is performing checksumming.
- /[NO]COUNTERS
Displays or suppresses information about the following DECdfs communication counters: bytes sent and received, bytes lost because of checksum errors, number of checksum errors, and communication errors. Communication errors are those that the DECnet network passes up to the Communication Entity, such as "Network partner task aborted the logical link," "Path to the network partner task node was lost," and so forth.
The display includes two sets of values: the current values, and the difference between the current values and those recorded by the last SNAPSHOT COMMUNICATION command. To use a particular snapshot file for the comparison, use this qualifier with the /SNAPSHOT_FILE qualifier.
- /CURRENT_CONNECTIONS
- Lists the current connections maintained by the Communication Entity. The command output displays the following information about each connection:
The name of the remote server node (for any outbound connections) or the remote client node (for any inbound connections). If the node name is a cluster alias, the cluster member name appears in parentheses.
The type of connection (inbound or outbound).
The state of the connection's DECnet logical link (active if DECdfs is currently using the link, inactive if DECdfs disconnected the link after the expiration of two successive scans).
The state of checksumming (enabled or disabled).
The number of active sessions (the number of open files).
In examining the command response, note that some inbound connections might occur because remote DECdfs users are displaying access point information, and not necessarily because remote users are performing file operations.
- /READS_MAXIMUM
Displays the current number of concurrent read operations the Communication Entity can post to DECnet.
- /REQUESTS_OUTSTANDING_MAXIMUM
Displays the number of outstanding I/O requests a node can have.
- /REPORTING
Displays the status of communication reporting to OPCOM.
- /SCAN_TIME
Displays the interval between scans for inactive DECnet links.
- /SNAPSHOT_FILE= file-spec
Specifies the file to which you previously sent a communication snapshot (using the SNAPSHOT COMMUNICATION/SNAPSHOT_FILE=
file-speccommand). The output for this command compares the current counters with the counters recorded in that file. Use this qualifier with the /COUNTERS qualifier.- /STATUS
- Displays the status of the DECdfs Communication Entity, as follows:
Running
Ready to process or is currently processing requests.
Shutdown
Responding to a SHUTDOWN COMMUNICATION command; that is, allowing existing file operations to complete but denying new requests.
Stopped
Stopped because of completion of shutdown status, response to a STOP COMMUNICATION command, or an unexpected error.
Examples
DFS> SHOW COMMUNICATION/ALL/NOCOUNTERS

                     |  Current  |  Minimum  |  Maximum  |   Static  |
Parameter            |   Value   |  Allowed  |  Allowed  |   Value   |
---------------------+-----------+-----------+-----------+-----------+
Communication Status | Running   |           |           |           |
Buffer Size          |       2560|        560|      65516|       2560|
Req. Outstanding Max.|         20|          1|      65535|           |
Reads Maximum        |          3|          1|         10|          3|
Scan Time            |00:04:00.00|00:00:00.00|23:59:59.99|           |
Report Errors        | Disabled  |           |           |           |
Report Network Events| Disabled  |           |           |           |
Checksum             | Disabled  |           |           |           |
---------------------+-----------+-----------+-----------+-----------+
This command displays the Communication Entity parameters. Note that, when appropriate, the display includes the range of values for the parameter.
DFS>SHOW COMMUNICATION/COUNTERS/SNAPSHOT_FILE=COMM_SNAP.DATCommunication Counters (Snapshot from 8-JAN-1999 08:31:18.22)Snapshot interval is 0 00:01:59.43Snapshot file = COMM_SNAP.DAT| | Change Since |Counter | Current Value | Snapshot |-----------------------------------+---------------+--------------+| Bytes Sent | 2248815 | 54689 || Bytes Received | 7220040 | 299510 || Bytes Lost from Checksum Errors | 0 | 0 |+ Number of Checksum Errors + 0 + 0 +| Communication Errors | 0 | 0 |-----------------------------------+---------------+--------------+This command displays the current communication counters and compares them with the counters in the file COMM_SNAP.DAT.
DFS>SHOW COMMUNICATION/CURRENT_CONNECTIONS<CENTER_LINE>(DFS/COM Connections at 08-JAN-1999 08:33:36.69)| | Link | | Active |Node | Type | State | Checksum | Sessions |-----------------+----------+-----------+----------+----------+LINNET | Inbound | Inactive | Disabled | 0 |(CHICKN) | | | | |VIREO | Inbound | Inactive | Disabled | 0 |PLOVER | Outbound | Active | Disabled | 0 |THRUSH | Outbound | Active | Disabled | 0 |SNIPE | Outbound | Inactive | Disabled | 0 |ROBIN | Outbound | Inactive | Disabled | 0 |VIREO | Outbound | Inactive | Disabled | 0 |PIPER | Outbound | Inactive | Disabled | 0 |HERON | Outbound | Inactive | Disabled | 0 |-----------------+----------+-----------+----------+----------+This command displays information about the Communication Entity's current connections. In this example, the node has both a DECdfs server and a DECdfs client. For the server on this node, the Communication Entity handled one or more requests from a client on node VIREO. The node name LINNET is a cluster alias. The following line ( (CHICKN) ) indicates that the cluster member CHICKN is the node handling the connection.
SHOW SERVER
SHOW SERVER — Displays information on the DECdfs server.
Format
SHOW SERVER
Parameters
None.
Description
This command displays a variety of server parameters and, optionally, counters.
Note that a previous SET SERVER command might have set some (static) server parameters that will not take effect until the next START SERVER command. For such parameters, this command displays two values: the current (most recently set) value and the static value now in use.
For more information on each server parameter, see the SET SERVER command description.
The default qualifiers are /ALL and /NOCOUNTERS.
Qualifiers
- /ACCESS_POINTS_MAXIMUM
Displays the maximum number of access points that can be stored in the DECdfs server database.
- /ACTIVE_FILES
For each file currently open for a DECdfs end user, displays the file specification and the name of the user.
- /ALL
Displays all server parameters and counters. For each parameter, the display includes the current value, the minimum and maximum allowed values, and the static value. The current and static values might be different for static parameters.
To display all server parameters without the counters, use the /ALL and /NOCOUNTERS qualifiers.
- /[NO]COUNTERS
Displays all DECdfs server counters. The display includes two sets of values: the current values, and the difference between the current values and those recorded by your last SNAPSHOT SERVER command. To use a particular snapshot file for the comparison, use the /SNAPSHOT_FILE=
file-specqualifier. The counters wrap when they reach their maximum value (64 bits). For a description of the persona cache counters, see Section 2.6.3, ''Displaying Cache Counters''. For a description of the data cache counters, see Section 2.7.3, ''Displaying Cache Counters''- /DATA_CACHE [=
option] - Displays information about the data cache. The
optionvalue can be one or both of the following:FILE_BUFFER_QUOTA
Displays the per-file quota for data cache buffers.
COUNT_OF_BUFFERS
Displays how many cache buffers a single file usually uses.
- /PERSONA_CACHE=UPDATE_INTERVAL
Displays the lifetime of individual blocks in the persona cache.
- /REPORTING
Displays the status of server message reporting.
- /SNAPSHOT_FILE= file-spec
Specifies the file to which you previously sent a server snapshot (using the SNAPSHOT SERVER/SNAPSHOT_FILE=
file-speccommand). The output for this command compares the current counters with the counters recorded in that file. Use this qualifier with the /COUNTERS qualifier.- /STATUS
- Displays the status of the DECdfs server, as follows:
Running
Ready to process or currently processing requests.
Stopped
Stopped in response to a STOP SERVER command.
Aborted
Stopped because of an unexpected error.
- /USERS
Displays information on client users that have recently accessed the server. The display contains information from the persona cache and includes the user name, node name, and proxy account name.
The display also shows the number of open files and the status of the persona block. Expired persona blocks are marked QUOTE(Inval). (See the SET SERVER /PERSONA_CACHE=UPDATE_INTERVAL command.) These blocks appear in the display if any currently open files are using them or if recently closed files were using them. When a client user of an invalid persona block has new activity, the server builds a new persona block.
Examples
DFS>SHOW SERVER/ALL/NOCOUNTERS|Most Recent| Minimum | Maximum | Static |Parameter | Setting | Allowed | Allowed | Value |----------------------+-----------+-----------+-----------+--------+Server Status | Running | | | |Access Points Maximum | 128| 64| 65535| 128|Report Errors | Disabled | | | |Report OPCOM Events | Disabled | | | |D. Cache Buffer Count | 16| 16| 512| 16|D. Cache Quota | 4| 1| 64| |P. Cache Update Intrvl|00:10:00.00|00:00:00.00|23:59:59.99| |----------------------+-----------+-----------+-----------+--------+This command displays all the DECdfs server parameters. Note that the display includes the minimum and maximum allowed values for each.
DFS>SHOW SERVER/COUNTERSDECdsf Server Counters (Snapshot from 10:38:16.01)Snapshot interval is 0 00:00:44.76| | Change Since |Counter | Current Value | Snapshot |---------------------------------+----------------+--------------+| P. Cache Blocks Active | 4 | 0 || Maximum P. Cache Blocks Active | 7 | |+ P. Cache Blocks Allocated + 30 + 0 +| Max. P. Cache Blocks Allocated | 30 | || P. Cache Hits | 796483 | 91 |+ P. Cache Misses + 1366 + 0 +| D. Cache Full | 0 | 0 || D. Cache Hits | 55656 | 8 |+ D. Cache Misses + 441831 + 47 +| D. Cache Quota Exceeded | 113 | 0 || RMS Directory Opens | 0 | 0 |+ Physical Reads + 191477 + 17 +| Physical Writes | 3770013 | 469 |---------------------------------+----------------+--------------+This command displays current server counters and compares them with counters recorded at the time of the last snapshot. The example shows a high ratio of persona cache hits to misses, indicating that the persona cache update interval is set high enough.
DFS>SHOW SERVER/USERS4 DECdfs Users at 08-JAN-1999 08:35:20.50| | Files | Persona |Remote User | Local User | Open | Block |----------------------------------+--------------+--------+---------+JULIE::CORENZWIT | DFS_JAC | 0 | Inval |LAURAP::CORENZWIT | CORENZWIT | 0 | Valid |QUANTZ::CORENZWIT | DFS_JAC | 1 | Valid |LAURAP::CORENZWIT | CORENZWIT | 1 | Inval |----------------------------------+--------------+--------+---------+This command displays the users that have current or recent activity on the server. Note that the command display shows only two users with open files: QUANTZ::CORENZWIT and LAURAP::CORENZWIT. LAURAP::CORENZWIT has an open file that is using a persona block that expired after the file was opened. After the persona block expired, LAURAP::CORENZWIT opened and closed another file, causing the building of another persona block. If you see apparent duplicate entries in this display, you should expect to see only one valid entry for any one client user.
JULIE::CORENZWIT also has an invalid entry in the display but has no files open. This can happen when a user keeps a file open for a longer period of time than the persona cache update interval and the display appears shortly after that user closes the file. User entries can appear in the display for about five to ten minutes after their last activity.
DFS>SHOW SERVER/ACTIVE_FILES3 VSI DECdfs Server Open Files at 08-JAN-1999 08:34:35.94Remote User | File----------------------+------------------------------------------FALCON::PFC | DISK$VAXVMSRL4:[USER.CODWELL]LOGIN.COM;4FALCON::PFC | DISK$VAXVMSRL4:[USER.CODWELL]ERRNO.MSG;1RAVEN::WICKLES | DISK$VAXVMSRL4:[CDC_SOURCE]RDERR.LOG;1----------------------+------------------------------------------This command shows that user PFC on node FALCON is currently accessing two files: LOGIN.COM and ERRNO.MSG. User WICKLES on node RAVEN is currently accessing the file RDERR.LOG.
SHOW VERSIONS
SHOW VERSIONS — Displays version information for DECdfs components.
Format
SHOW VERSIONS
Parameters
None.
Description
This command displays version numbers for DECdfs software components. Use this command to get version information required for reporting problems to VSI.
When you view the response to this command, note that the range for the client protocol on the client node must overlap with the range for the server protocol on the server node. Otherwise, the client and server cannot interoperate. The communication protocol is not a range; it must be the same on both the client and server.
Qualifiers
None.
Example
DFS>SHOW VERSIONSComponent | Version | Time Started -----------------------+------------+---------------------+ Communication Entity | V2.3-0 | 23-OCT-1998 13:56:26.61 Communication Protocol | 1.0-0 | Server Entity | V2.3-0 | 23-OCT-1998 13:56:28.96 Server Protocol | 1.0 - 1.5 | Client Entity | V2.3-0 | Client Protocol | 1.0 - 1.5 | DFS Control Program | V2.3-0 | -----------------------+------------+---------------------+
This command displays the version numbers of DECdfs components.
SHUTDOWN COMMUNICATION
SHUTDOWN COMMUNICATION — Stops DECdfs communication after existing file operations are complete.
Format
SHUTDOWN COMMUNICATION
Parameters
None.
Description
This command initiates a controlled shutdown of communication. It denies requests for new connections and waits for open files to be closed before stopping the Communication Entity. Entering the SHOW COMMUNICATION command displays the state of the Communication Entity, which is first "Shutdown" and then "Stopped." When the Communication Entity stops, it disconnects all DECnet links. To restart the entity, you should execute the SYS$STARTUP:DFS$STARTUP.COM file. In contrast, the STOP COMMUNICATION command aborts existing connections. Use SHUTDOWN COMMUNICATION whenever possible.
On a server, executing the SHUTDOWN COMMUNICATION command also stops the server when the Communication Entity stops.
You must have the CMKRNL and WORLD or GROUP privileges to use this command.
Qualifiers
None.
Example
DFS>SHUTDOWN COMMUNICATIONDFS>
This command causes the Communication Entity to refuse new requests and then to stop communication when all open files are closed.
SNAPSHOT CLIENT
SNAPSHOT CLIENT — Records the current DECdfs client counters for the specified client device.
Format
SNAPSHOT CLIENT local-device-name
Parameter
local-device-name
Specifies the client device to record in the snapshot.
Description
This command records the current client counters for later use in client tuning or troubleshooting. After entering the SNAPSHOT command, you can enter the SHOW CLIENT/COUNTERS command. The display will compare the current counters with the counters preserved by the SNAPSHOT command.
The information that you record with the SNAPSHOT command is usually stored in DFS$CONTROL memory. For a more permanent record, use the /SNAPSHOT_FILE qualifier.
Qualifier
- /SNAPSHOT_FILE= file-spec
Writes the current counter values to the specified file instead of to DFS$CONTROL memory. You cannot display this file using DCL commands such as TYPE; display the information in it by entering the SHOW CLIENT/SNAPSHOT_FILE=file-spec command.
Example
DFS>SNAPSHOT CLIENT DFSDISK/SNAPSHOT_FILE=DFSDISK:[LFS]SNAP_CLI.DATDFS>SHOW CLIENT DFSDISK/COUNTERS/SNAPSHOT_FILE=DFSDISK:-_DFS>[LFS]SNAP_CLI.DATClient Device DFSDISK (Translates to _DFSC1:)VSI DECdfs Client Counters (Snapshot from 11:18:56.78)Snapshot interval is 0 00:00:27.12! Current | Change Since |Counter ! Value | Snapshot |------------------------------+----------------+----------------+| Operations Performed | 72956 | 6 || Bytes Read | 24786944 | 0 |+ Bytes Written + 1931776 + 1024 +| Files Opened | 7366 | 1 || Mount Verifications Tried | 0 | 0 |------------------------------+----------------+----------------+
This example shows a sequence of commands. The first command records the client counters and writes them to the file SNAP_CLI.DAT. The SHOW CLIENT command then displays the current counters and compares them with the counters in the snapshot file.
SNAPSHOT COMMUNICATION
SNAPSHOT COMMUNICATION — Records the current DECdfs communication counters.
Format
SNAPSHOT COMMUNICATION
Parameters
None.
Description
This command records the current communication counters for later use in tuning or troubleshooting. After entering this SNAPSHOT command, you can enter the SHOW COMMUNICATION/COUNTERS command. The display will compare the current counters with the counters preserved by the SNAPSHOT command.
The information that you record with the SNAPSHOT command is usually stored in DFS$CONTROL memory. For a more permanent record, use the /SNAPSHOT_FILE qualifier.
Qualifier
- /SNAPSHOT_FILE= file-spec
Directs DFS$CONTROL to save the current counter values in the specified file instead of in DFS$CONTROL memory. You cannot display this file using DCL commands such as TYPE; display the information in it by entering the SHOW COMMUNICATION/SNAPSHOT_FILE=
file-speccommand.
Example
DFS>SNAPSHOT COMMUNICATION/SNAPSHOT_FILE=COMM_SNAP.DATDFS>
This command records the current communication counters, writing them to the file
COMM_SNAP.DAT. The SHOW COMMUNICATION/SNAPSHOT= file-spec command
then displays the current counters and compares them with the counters in the
snapshot file.
SNAPSHOT SERVER
SNAPSHOT SERVER — Records the current DECdfs server counters.
Format
SNAPSHOT SERVER
Parameters
None.
Description
This command records the current server counters for later use in tuning or troubleshooting. After entering the SNAPSHOT command, you can enter the SHOW SERVER/COUNTERS command. The resulting display compares the current counters with the counters preserved by the SNAPSHOT command.
The information that you record with the SNAPSHOT command is usually stored in DFS$CONTROL memory. For a more permanent record, use the /SNAPSHOT_FILE qualifier.
Qualifier
- /SNAPSHOT_FILE= file-spec
Writes the current counter values to the specified file instead of DFS$CONTROL memory. You cannot display this file using DCL commands like TYPE; display the information in it by entering the SHOW SERVER/SNAPSHOT_FILE=
file-speccommand.
Example
DFS>SNAPSHOT SERVER/SNAPSHOT_FILE=SERVER_SNAPSHOT.DATDFS>
This command records the current server counters in the file SERVER_SNAPSHOT.DAT.
You can then use the SHOW SERVER/SNAPSHOT=file-spec command to
display the current counters and compare them with the counters in the snapshot
file.
START COMMUNICATION
START COMMUNICATION — Starts the DECdfs Communication Entity.
Format
START COMMUNICATION [comm-file-spec]
Parameter
comm-file-spec
Specifies a DECdfs communication ancillary control process (ACP) that differs from the default file specification, which is SYS$SYSTEM:DFS$COM_ACP.EXE.
Description
This command starts executing the Communication Entity ACP, making it available for use by clients, or servers or both, and setting its counters to zero.
You usually enter this command from the DFS$STARTUP file. However, you can also enter it interactively to restart the Communication Entity after a STOP COMMUNICATION command or an unexpected abort.
You must have CMKRNL and PSWAPM privileges to use this command.
Qualifiers
- /ERROR=file-spec
Specifies the output destination to use for DECdfs communication ACP errors. The default destination is the log file.
- /OUTPUT=file-spec
Specifies the destination for communication ACP output. The default destination is SYS$MANAGER:DFS$ERROR.LOG
Note
Only certain errors that can occur during communication startup go to the destinations that the /ERROR and /OUTPUT qualifiers specify. All other communication errors go to OPCOM.
Example
DFS>START COMMUNICATIONDFS>
This command starts the DECdfs Communication Entity.
START SERVER
START SERVER — Starts the DECdfs server.
Format
START SERVER [server-file-spec]
Parameter
server-file-spec
Specifies a DECdfs server ancillary control process (ACP) that differs from the default file specification, which is SYS$SYSTEM:DFS$SERVER_ACP.EXE.
Description
This command starts executing the server ACP, making the server available for incoming client requests, and setting its counters to zero.
You usually enter this command from the DFS$STARTUP file. However, you can also enter it interactively to restart the server after a STOP SERVER command or an unexpected abort.
You must have CMKRNL, PSWAPM, OPER, and PHY_IO privileges to use this command.
Qualifiers
- /ERROR=
file-spec Specifies an output destination for the error messages from the DECdfs server ACP that differs from the default file specification, which is SYS$MANAGER:DFS$ERROR.LOG.
- /OUTPUT=
file-spec Specifies an output destination for the OPCOM messages from the DECdfs server ACP that differs from the default file specification, which is SYS$MANAGER:DFS$ERROR.LOG.
Example
DFS>START SERVER/ERROR=SYS$MANAGER:DFS$MESSAGE.LOGDFS>
This command starts the server and specifies that DECdfs writes error messages to the file SYS$MANAGER:DFS$MESSAGE.LOG.
STOP COMMUNICATION
STOP COMMUNICATION — Stops the DECdfs Communication Entity immediately, aborting existing connections.
Format
STOP COMMUNICATION
Parameters
None.
Description
This command immediately stops the Communication Entity ancillary control process (ACP) from executing. This disconnects DECnet links and aborts all incoming and outgoing communication. To restart the entity, you should execute the SYS$STARTUP:DFS$STARTUP.COM file.
On a server, executing this command also stops the server, as if you had entered the STOP SERVER command.
On a client, end users currently using DECdfs to access files get the SS$_ABORT error. The client then gives the Communication Entity several chances to restart. It tries to reestablish its relationship with the Communication Entity for a short time, while reporting a "Mount verification in progress" message to OPCOM. Unless you start the Communication Entity again during this period, the mount verification times out. End users who attempt a new file operation then get a "Device not ready, not mounted, or unavailable" message.
In contrast, the SHUTDOWN COMMUNICATION command initiates a controlled shutting down of services and does not abort user operations. Use the SHUTDOWN COMMUNICATION command whenever possible.
You must have the CMKRNL and WORLD or GROUP privileges to use this command.
Qualifiers
None.
Example
DFS>STOP COMMUNICATIONDFS>
This command immediately stops the DECdfs Communication Entity.
STOP SERVER
STOP SERVER — Stops the DECdfs server immediately.
Format
STOP SERVER
Parameters
None.
Description
This command stops the local DECdfs server process, making local access points unavailable to client users and closing open files on the server. The end user might not know immediately that the file is closed on the server, depending on the application being used. However, the user's next I/O request to the client device will return a "Device offline" error message.
You must have the CMKRNL, PHY_IO, and OPER privileges to use this command.
Qualifiers
None.
Example
DFS>STOP SERVERDFS>
This command stops the DECdfs server process and closes open files.
Appendix A. Status Messages
This appendix lists and explains the messages issued by VSI DECdfs for OpenVMS. Messages of all severity levels are merged together in alphabetical order. You can also view these messages using the Help Message utility. For more information on using this utility, refer to the OpenVMS System Messages: Companion Guide for Help Message Users.
Verify that the DECnet software is operational.
Verify the DECdfs installation.
To verify that the DECnet software is operational, check the executor state and then view the executor, line, and circuit counters. For information on network troubleshooting, refer to the following manuals:
VSI OpenVMS DECnet Network Management Utilities
VSI DECnet-Plus for OpenVMS Network Control Language Reference Guide
DECnet/OSI Network Control Language Reference
DECnet/OSI Network Management
To verify the DECdfs installation, make sure that the system and network parameters have been modified according to the suggestions in this manual and the installation guide. Also, examine the DECdfs command files to make sure they have been edited properly.
If you receive DECdns errors, consult with your DECdns manager.
If you need to report a DECdfs software problem, see the VSI DECdfs for OpenVMS Installation Guide for information on reporting problems.
ACCESS, Failure accessing kernel device
Explanation: An error occurred during initialization of the server process. This message has a severity level of Error.
User Action: One possible cause of this problem is that the Communication Entity is not currently running. Verify that it is running by using the VSI DECdfs command SHOW COMMUNICATIONS from within the DFS$CONTROL utility. Also verify the DECdfs installation (as described in the installation guide). If the problem persists, report it.
ACCPNTMAX_RANGE, The value given for the access point maximum is out of range
Explanation: The specified value for the maximum number of access points on the server is outside the valid range. This message has a severity level of Error.
User Action: Repeat the operation, using an appropriate value. To display the range of correct values, use the DFS$CONTROL command SHOW SERVER/ACCESS_POINTS_MAXIMUM.
ACCPT_CONFLICT, Access point exists for different device or directory.
Explanation: An access point of the same name has already been added on this node, but it is a different device or directory. This message has a severity level of Error.
User Action: Choose a different access point name or remove and re-add the access point. The DFS$CONTROL command SHOW ACCESS_POINT /LOCAL displays the device and directory information for the access point.
ACCPTNM, Quoted access point names are illegal.
Explanation: You cannot surround an access point name with quotation marks. This message has a severity level of Error.
User Action: Enter the ADD ACCESS_POINT command again, but do not use quotation marks. Access point names can consist of alphanumeric characters and underscores. A name in a hierarchical namespace can also contain period (.) characters. The dollar sign ($) is reserved for use by VSI.
ADDELE, Error formatting element
Explanation: An internal error occurred on the server. This message has a severity level of Warning.
User Action: Verify that the server is properly installed (as described in the installation guide). If the problem persists, report it.
ADDFUNC, Error formatting function identifier in server
Explanation: An internal error occurred on the server. This message has a severity level of Warning.
User Action: Verify that the server is properly installed (as described in the installation guide). If the problem persists, report it.
AGENTABRT, DFS/COM service agent aborted session
Explanation: The DECdfs server unexpectedly terminated communication. This message has a severity level of Error.
User Action: Verify that DECnet and the DECdfs server are operational. If they are, retry the operation. If the problem persists, report it.
ALIAS_REMOVE, Cluster alias access point name removed from DNS server and from DFS server on this node
Explanation: An access point name that was added (with the DFS$CONTROL command ADD /CLUSTER_ALIAS) has been removed from the Distributed Name Service and from the local DECdfs server access point database on this node. This message has a severity level of Information.
User Action: You should remove the access point from the local server access point databases on any other cluster members that had the access point name added (with the DFS$CONTROL command ADD /CLUSTER_ALIAS) or you should disable incoming alias on this node. To remove the access point from other cluster members, use the DFS$CONTROL command SHOW ACCESS_POINT /LOCAL /FULL. Then use the DFS$CONTROL command REMOVE ACCESS_POINT on each of the other nodes serving the access point. Use the fully expanded access point name as displayed by the SHOW command.
ALLOCFDB, Server unable to allocate file descriptor block
Explanation: An error occurred during the server's initial access of a file. The server was unable to obtain the necessary memory resources. This message has a severity level of Error.
User Action: Verify that the server is properly installed (as described in the installation guide). Check the setting for the SYSGEN parameter NPAGEDYN. If the problem persists, report the problem.
ALLOCSTK, Failure allocating special kernel stack
Explanation: There is not enough virtual memory to initialize a new server process. This message has a severity level of Error.
User Action: See the additional message that follows. Verify that the server is properly installed (as described in the installation guide). If the problem persists, report it.
APTFULL, Access point table full
Explanation: The server's access point table does not have enough space to add a new access point. This message has a severity level of Error.
User Action: Remove one or more access points, or increase the table size by increasing the maximum permitted number of access points. To increase the maximum number of access points, edit the DFS$CONFIG.COM file. Change the value specified by the SET SERVER/ACCESS_POINTS_MAXIMUM command, and then restart the server.
ASCTOID, Error in Rightslist File for identifier
Explanation: An error occurred when the server accessed the rightslist file. Additional information follows. This message has a severity level of Warning.
User Action: See the information following the error message.
ASIZE_INIT, Failure scheduling or rescheduling persona cache autosize routine
Explanation: A system service failure has occurred while attempting to schedule or reschedule the periodic persona cache autosize routine that automatically adjusts the size of the persona cache. The persona cache threshold will remain static until the server is stopped and restarted. An additional message follows giving information about the cause of the failure. This message has a severity level of Error.
User Action: If the threshold value at the time of the failure is acceptable for current and future usage, you may not have to do anything. Most likely, you will find it necessary to correct the cause of the problem and stop and restart the server process.
ASNCHAN, Failure assigning I/O channel to device
Explanation: An error occurred during initialization of the server process. This message has a severity level of Error.
User Action: Verify that the server is properly installed (as described in the installation guide). If the problem persists, report it.
BADCHKSNT, DFS/COM Invalid checksum detected
Explanation: The specified node detected an invalid checksum on a message sent by this node. This message has a severity level of Error.
User Action: Verify that the network hardware is working properly. Enter the DFS$CONTROL command SHOW VERSIONS on both this node and the specified node to see whether they are running compatible versions of the DECdfs components. If they are not, install the proper software and then retry the operation. For information on version compatibility, see the release notes.
BADCHKSUM, DFS/COM invalid checksum on message received
Explanation: The DECdfs Communication Entity detected an invalid checksum. This message has a severity level of Error.
User Action: Verify that the network hardware is working properly. Enter the DFS$CONTROL command SHOW VERSIONS on both the client and server systems to see whether they are running compatible versions of the DECdfs components. If they are not, install the proper software and then retry the operation. For information on version compatibility, see the release notes.
BUF_SIZ_RANGE, The value given for the buffer size is out of range
Explanation: The specified value for the Communication Entity buffer size is outside the valid range. This message has a severity level of Error.
User Action: Repeat the operation, using an appropriate value. To display the range of correct values, use the DFS$CONTROL command SHOW COMMUNICATION/BUFFER_SIZE.
CACHE_QUOTA_RANGE, The value given for the cache buffers file quota is out of range
Explanation: The specified value for the buffer quota per file in the data cache is outside the valid range. This message has a severity level of Error.
User Action: Repeat the operation, using an appropriate value. To display the range of correct values, use the DFS$CONTROL command SHOW SERVER/DATA_CACHE=FILE_BUFFER_QUOTA.
CKMEM, Ck_memory error in function
Explanation: The server was unable to obtain the necessary memory resources to process the request. This message has a severity level of Warning.
User Action: See the additional message that follows for more information. Verify that the server is properly installed (as described in the installation guide). Verify that the size allocated for nonpaged pool is adequate. If the problem persists, report it.
CLIENTDEV, A DFS client device may not be added as an access point
Explanation: An ADD ACCESS_POINT command attempted to add a DECdfs client device as an access point. DECdfs does not allow your system to serve an access point for which it is a client; each system can serve only its own access points. This message has a severity level of Error.
User Action: None.
COMMABORT, Communication Entity aborted operation
Explanation: A DECnet error caused the Communication Entity to abort an operation. This message has a severity level of Fatal.
User Action: Verify that DECnet is operational. If it is, retry the operation. If the problem persists, report it.
COMMCLOSE, Communication Entity closed the connection
Explanation: The DECdfs Communication Entity disconnected a DECnet logical link. This message has a severity level of Fatal.
User Action: Verify that DECnet is operational. If it is, retry the operation. If the problem persists, report it.
COMMSTOP, Communication Entity is currently stopped
Explanation: This message has a severity level of Fatal.
User Action: To start the Communication Entity, execute the SYS$STARTUP:DFS$STARTUP.COM file.
CONFLICT_DELETED, **name deleted from name service despite node conflict**
Explanation: The REMOVE ACCESS_POINT command removed an access point name from DECdns, although another node had originally added the access point. An associated message identifies the other node. This message has a severity level of Information.
User Action: If you removed the access point accidentally, notify the system manager of the other node so that he or she can add the access point again.
COPYVECT, Error copying vector in function
Explanation: An error occurred while the server was processing a request. This message has a severity level of Warning.
User Action: Verify that the server is properly installed (as described in the installation guide). If the problem persists, report it.
CRELNM, Failure creating logical name in table
Explanation: An error occurred during initialization of the server process. This message has a severity level of Error.
User Action: Verify that the server is properly installed (as described in the installation guide). If the problem persists, report it.
CRMPSC, Failure creating global section
Explanation: During initialization of the server process, the server was unable to obtain the necessary memory resources. This message has a severity level of Error.
User Action: Verify that the server is properly installed (as described in the installation guide). Verify the settings for the SYSGEN parameters GBLSECTIONS and GBLPAGES. If the problem persists, report it.
CVT_TO_DNS_NAME, Error converting access point name to name space name
Explanation: An attempt was made to mount an access point utilizing the DECdns namespace on a VSI DECdfs client system running DECnet Phase V. However, DECdns has not been defined as a directory service in the DECnet Phase V configuration. This message has a severity of Error.
User Action: Either use the /NODE qualifier to specify the VSI DECdfs server node in the MOUNT command or reconfigure DECnet Phase V to include DECdns as one of its directory services.
DASSGN, DASSGN system service error in function on channel
Explanation: An internal error occurred during a DECdfs attempt to deassign a channel. This message has a severity level of Warning.
User Action: Verify your DECdfs installation (as described in the installation guide). If the problem persists, report it.
DATAOVERUN, DFS/COM Data overrun returned from DECnet
Explanation: The DECdfs Communication Entity received a data overrun error from DECnet. This message has a severity level of Error.
User Action: Verify that DECnet is operational. If it is, retry the operation. If the problem persists, report it.
DFSC0, The DFSC0: device is a template and contains no client information
Explanation: The SHOW CLIENT DFSC0: command was attempted. The DFSC0: client device is a template and does not represent an access point. This message has a severity level of Error.
User Action: Try the command again, using a DFSC device unit number of 1 or higher.
DISMNT_SUCCESS, Dismount was successfully performed
Explanation: The DISMOUNT command was successfully performed. This message has a severity level of Success.
User Action: None.
DNS_INVADDRESS, Encountered address attribute which is not a set
Explanation: DECdfs encountered an error interpreting information obtained from DECdns. Additional information follows. This message has a severity level of Error.
User Action: Ask your DECdns manager to verify the integrity of the DECdns directory and to check that the DECdfs and DECdns versions are compatible.
DNS_NAME_CONFLICT, DNS object name in use by another node or application
Explanation: The access point name is already in use by another node or application. Additional information follows. This message has a severity level of Error.
User Action: Choose a different access point name or remove the conflicting name.
DNS_SETNOTPRESENT, Address attribute set not present
Explanation: DECdfs encountered an error interpreting information obtained from DECdns. Additional information follows. This message has a severity level of Error.
User Action: Ask your DECdns manager to verify the integrity of the DECdns directory and to check that the DECdfs and DECdns versions are compatible.
ERROREXIT, Server exiting due to severe error
Explanation: The server process encountered a system error. This message has a severity level of Fatal.
User Action: Verify that the server is properly installed (as described in the installation guide). If the problem persists, report it.
EVENTUNKNOWN, DFS/COM Unknown event type
Explanation: The DECdfs Communication Entity has encountered an unexpected event. Additional information follows. This message has a severity level of Warning.
User Action: Verify that VSI DECdfs for OpenVMS is properly installed (as described in the installation guide). If the problem persists, report it. Include the text of the system error messages that follow this message.
FAOGBLNAM, Failure formatting global section name
Explanation: An error occurred during initialization of the server process. This message has a severity level of Error.
User Action: Verify that the server is properly installed (as described in the installation guide). If the problem persists, report it.
FAOPRCNAM, Failure formatting new process name
Explanation: An error occurred during an attempt to initialize the server process. This message has a severity level of Error.
User Action: Verify that the server is properly installed (as described in the installation guide). If the problem persists, report it.
FB_GETDVIERR, GETDVI system service error in function
Explanation: A system service failure has occurred while attempting to find the number of free blocks on a DFS-served device. An additional message follows giving information about the cause of the failure. This message has a severity level of Warning.
User Action: Correct the cause of the failure.
FIL_TRUNC, Active file information display truncated, maximum buffer size limit exceeded
Explanation: The information buffer used to format the display of currently open files (SHOW SERVER /ACTIVE command) is large enough to contain information on approximately 500 files. The number of files currently open is more than that limit. The header line of the display shows the correct count of open files. This message has a severity level of Information.
User Action: None.
FIND_HELD, Error in rightslist file for UIC
Explanation: An error occurred during access of the rightslist file. This message has a severity level of Warning. Additional information follows.
User Action: See the information following the error message.
GENPROTOCOL, Protocol version mismatch detected
Explanation: A protocol version incompatibility has been detected. The incompatibility can be between the client and server, between DFS$CONTROL on this node and a remote server, or between the communication entities on this node and the remote node. This message has a severity level of Fatal.
User Action: Use the DFS$CONTROL command SHOW VERSIONS on both the server system and the client system, and compare the version numbers. If the versions are incompatible, install the proper software. For information on version compatibility, see the VSI DECdfs for OpenVMS release notes.
GETCTLINFO, Unable to obtain control information
Explanation: An error occurred during initialization of the server process. This message has a severity level of Error.
User Action: Verify that the server is properly installed (as described in the installation guide). If the problem persists, report it.
GETDVIW, Failure getting device information
Explanation: An error occurred during initialization of the server process. This message has a severity level of Error.
User Action: Verify that the server is properly installed (as described in the installation guide). If the problem persists, report it.
GETELE, Error decoding element
Explanation: The server received an incorrect internal request. This message has a severity level of Warning.
User Action: Verify that the server is properly installed (as described in the installation guide). If the problem persists, report it.
GETFUNC, Error decoding function identifier in server
Explanation: The server received an incorrect internal request. This message has a severity level of Warning.
User Action: Verify that the server is properly installed (as described in the installation guide). If the problem persists, report it.
GETSAID, Failure getting service agent identifier
Explanation: An error occurred during initialization of the server process. This message has a severity level of Error.
User Action: Verify that the server is properly installed (as described in the installation guide). If the problem persists, report it.
GETUAI, Error in User Authorization File for user
Explanation: An error occurred during access of the user authorization file. Additional information follows. This message has a severity level of Warning.
User Action: See the information following the error message.
ILLWQEFNC, DFS/COM Illegal work queue entry function
Explanation: The DECdfs Communication Entity detected an illegal internal function. This message has a severity level of Warning.
User Action: Verify that the server is properly installed (as described in the installation guide). If the problem persists, report it.
INACTIVE, DFS/COM connection deaccessed because inactive
Explanation: The Communication Entity disconnected an inactive link. This is a normal timeout function of the Communication Entity. This message has a severity level of Error.
User Action: None; the next operation for that connection will establish a new link. If you want to change the frequency of the timeouts, use the DFS$CONTROL command SET COMMUNICATION/SCAN_TIME.
INSFRES, DFS/COM insufficient server resources
Explanation: The DECdfs Communication Entity had insufficient system resources to satisfy a request. This message has a severity level of Error.
User Action: This is probably an OpenVMS resource problem. Check the nonpaged pool on your system, using the DCL command SHOW MEMORY/POOL; increase the value for the SYSGEN parameter NPAGEDYN if necessary. Verify that the server is properly installed (as described in the installation guide). If the problem persists, report it.
INSFRES_CONN, DFS/COM Insufficient connection resources
Explanation: The Communication Entity has insufficient resources to satisfy a request. This message has a severity level of Error.
User Action: This problem can occur when OpenVMS has insufficient nonpaged pool. Check the nonpaged pool on your system, using the DCL command SHOW MEMORY/POOL; increase the value for the SYSGEN parameter NPAGEDYN if necessary.
Check the maximum permitted DECnet logical links. To display the DECnet logical links maximum, use the appropriate command, as follows:
For DECnet Phase IV:: Use the NCP command SHOW EXECUTOR CHARACTERISTICS. To set maximum logical links, use the NCP commands SET EXECUTOR MAXIMUM LINKS and DEFINE EXECUTOR MAXIMUM LINKS.
DISABLE NODE [node-id] NSP
SET NODE [node-id] NSP MAXIMUM TRANSPORT CONNECTIONS
ENABLE NODE [node-id] NSP
Check your DECdfs installation, according to the instructions in the installation guide. If the problem persists, report it.
INSFRES_SESS, DFS/COM Insufficient session resources
Explanation: The DECdfs Communication Entity has insufficient resources to satisfy a request. This message has a severity level of Error.
User Action: First, check that OpenVMS has sufficient resources to meet the needs of VSI DECdfs for OpenVMS. Check the nonpaged pool on your system, using the DCL command SHOW MEMORY/POOL; increase the value for the SYSGEN parameter NPAGEDYN if necessary. Check the SYSGEN channel count parameter, CHANNELCNT.
Next, verify DECdfs values. Check the DECdfs process file limit, DFS$PQL_FILLM, which is defined in the DFS$CONFIG.COM file. Also check the system's maximums for DECnet logical links. To display the DECnet logical links maximum, use the appropriate command, as follows:
For DECnet Phase IV:: Use the NCP command SHOW EXECUTOR CHARACTERISTICS. To set maximum logical links, use the NCP commands SET EXECUTOR MAXIMUM LINKS and DEFINE EXECUTOR MAXIMUM LINKS.
DISABLE NODE [node-id] NSP
SET NODE [node-id] NSP MAXIMUM TRANSPORT CONNECTIONS integer
ENABLE NODE [node-id] NSP
Check your DECdfs installation, according to the instructions in the installation guide. If the problem persists, report it.
INSFRES_XACT, DFS/COM Insufficient transaction resources
Explanation: The DECdfs Communication Entity has insufficient resources to satisfy a request. This message has a severity level of Error.
User Action: This is probably an OpenVMS resource problem. Check the nonpaged pool on your system, using the DCL command SHOW MEMORY/POOL; increase the value for the SYSGEN parameter NPAGEDYN if necessary. Verify that the server is properly installed (as described in the installation guide). If the problem persists, report it.
INV_DNSADDRESS, Encountered access point incorrectly stored with DNS
Explanation: DECdfs encountered an error interpreting information obtained from DECdns. Additional information follows. This message has a severity level of Error.
User Action: Ask your DECdns manager to verify the integrity of the DECdns directory and to check that the DECdfs and DECdns versions are compatible.
INVAL_SUCCESS, The persona cache has been invalidated
Explanation: DECdfs successfully invalidated the persona cache. This message has a severity level of Success.
User Action: None.
INVCONN, DFS/COM Invalid or inactive connection ID
Explanation: An internal error occurred during an attempt to communicate with the remote system. This message has a severity level of Error.
User Action: Verify the DECdfs installation (as described in the installation guide). Next, check that the DECdfs Communication Entity is running by entering the DFS$CONTROL command SHOW COMMUNICATION/STATUS. If the problem persists, report it.
INVCONNID, Invalid connection identifier specified for operation
Explanation: An internal error occurred during an attempt to communicate with the remote system. This message has a severity level of Fatal.
User Action: Verify the DECdfs installation (as described in the installation guide). Next, check that the DECdfs Communication Entity is running by entering the DFS$CONTROL command SHOW COMMUNICATION/STATUS. If the problem persists, report it.
INVSESS, DFS/COM Invalid or inactive session ID
Explanation: An internal error occurred during an attempt to communicate with the DECdfs server. This message has a severity level of Error.
User Action: Verify the DECdfs installation (as described in the installation guide). Next, check that the DECdfs Communication Entity is running by entering the DFS$CONTROL command SHOW COMMUNICATION/STATUS. If the problem persists, report it.
INVSESSID, Invalid session identifier specified for operation
Explanation: An internal error occurred during an attempt to communicate with the DECdfs server. This message has a severity level of Fatal.
User Action: Verify the DECdfs installation (as described in the installation guide). Next, check that the DECdfs Communication Entity is running by entering the DFS$CONTROL command SHOW COMMUNICATION/STATUS. If the problem persists, report it.
INVSWBREQ, Server received invalid special request
Explanation: The server received an incorrect internal request. This message has a severity level of Fatal.
User Action: Verify the server installation (as described in the installation guide). Next, check that the DECdfs Communication Entity is running by entering the DFS$CONTROL command SHOW COMMUNICATION/STATUS. If the problem persists, report it.
INVTIMEVAL, Invalid time value
Explanation: DECdfs detected an invalid time value. This message has a severity level of Error.
User Action: Repeat the operation, using an appropriate value. To view the range of correct values, enter the DFS$CONTROL command SHOW COMMUNICATION/SCAN_TIME.
INVUSER, DFS/COM invalid remote user name
Explanation: The Communication Entity received a connect request from a remote process that was not another DECdfs Communication Entity. This message and the NOTREMOTECOM message are paired. This message has a severity level of Error.
User Action: DECdfs rejected this connect request. However, this message can indicate a break-in attempt and should be investigated.
INVWQE, DFS/COM Invalid work queue entry type
Explanation: The DECdfs Communication Entity detected an illegal internal function. This message has a severity level of Warning.
User Action: Verify that the server is properly installed (as described in the installation guide). If the problem persists, report it.
INVWRKREQ, Server received invalid work request
Explanation: The DECdfs server received an invalid internal request. This message has a severity level of Error.
User Action: Verify that the server is properly installed (as described in the installation guide). If the problem persists, report it.
IOACCESS, I/O failure accessing kernel device
Explanation: An error occurred during initialization of the server process. This message has a severity level of Error.
User Action: Verify that the server is properly installed (as described in the installation guide). If the problem persists, report it.
IOGETDVIW, I/O Failure getting device information
Explanation: An error occurred during initialization of the server process. This message has a severity level of Error.
User Action: Verify that the server is properly installed (as described in the installation guide). If the problem persists, report it.
IOGETSAID, I/O failure getting service agent identifier
Explanation: An error occurred during initialization of the server process. This message has a severity level of Error.
User Action: Verify that the server is properly installed (as described in the installation guide). If the problem persists, report it.
KERNEL_INVSTATE, DFS kernel detected inconsistent state
Explanation: The server has detected an error condition. This message has a severity level of Fatal.
User Action: Verify that the server is properly installed (as described in the installation guide). If the problem persists, report it.
KERNEL_STARTUP, server kernel version running
Explanation: The server process initialized successfully. This message has a severity level of Information.
User Action: None.
KNLCALLBACK, Server kernel callback error
Explanation: The server was unable to respond to a client request. This message has a severity level of Warning.
User Action: Verify that the server is properly installed (as described in the installation guide). If the problem persists, report it.
LKWSET, Failure locking code into working set
Explanation: An error occurred during creation of the server process. This message has a severity level of Error.
User Action: Verify that the server is properly installed (as described in the installation guide). Consider increasing the values for the DFS$PQL_WSQUOTA and/or DFS$PQL_WSEXTENT parameter in the DFS$CONFIG.COM file. If the problem persists, report it.
MBX_READ_ERR, DFS/COM Error reading network mailbox
Explanation: The DECdfs Communication Entity received an error. This message has a severity level of Error.
User Action: Verify that the server is properly installed (as described in the installation guide). Also verify that DECnet is operational. If the problem persists, report it.
MGBLSC, Failure mapping global section
Explanation: An error occurred during creation of the server process. This message has a severity level of Error.
User Action: Verify that the server is properly installed (as described in the installation guide). Verify that the SYSGEN parameters GBLSECTIONS and GBLPAGES are set properly. If the problem persists, report it.
NET_ABORT, DFS/COM network partner aborted link
Explanation: The Communication Entity received a DECnet message that the network partner disconnected the link. This message has a severity level of Information.
User Action: Verify that DECnet and the server are operational. If so, retry the operation. The Communication Entity will reestablish the network connection at the next file-access attempt. If the problem persists, report the problem.
NET_CONFIRM, DFS/COM network connect confirm
Explanation: DECnet has successfully established a logical link. This message has a severity level of Information.
User Action: None.
NET_CONNECT, DFS/COM network inbound connect initiate
Explanation: DECnet received a logical link request for DECdfs. This message has a severity level of Information.
User Action: None.
NET_DISCON, DFS/COM network partner disconnected
Explanation: The DECnet logical link has been disconnected because of problems with the network partner. This message has a severity level of Information.
User Action: Verify that DECnet and the server are operational. If so, retry the operation. If the problem persists, report it.
NET_EXIT, DFS/COM network partner exited prematurely
Explanation: The DECnet logical link has been disconnected because the network partner exited. This message has a severity level of Information.
User Action: Verify that DECnet and the server are operational. If so, retry the operation. If the problem persists, report it.
NET_INTMSG, DFS/COM network interrupt message (unsolicited data)
Explanation: DECnet received an unexpected network message. This message has a severity level of Information.
User Action: Verify that DECnet and the server are operational. If so, retry the operation. If the problem persists, report it.
NET_NETSHUT, DFS/COM network shutting down
Explanation: DECnet is shutting down. This message has a severity level of Information.
User Action: Terminate the current operations in an orderly manner.
NET_PATHLOST, DFS/COM path lost to network partner
Explanation: DECnet lost the path to the network partner. This message has a severity level of Information.
User Action: Verify that DECnet and DECdfs are operational. Also check that the remote server is still operational by entering the appropriate command, as follows:
For DECnet Phase IV:: Use the NCP command SHOW NODE node-id STATUS.
For DECnet Phase V:: Use the NCL command SHOW NODE node-id ALL STATUS.
Substitute the node name or address for node-id.
Retry the operation. If the problem persists, report it.
NET_PROTOCOL, DFS/COM network protocol error
Explanation: DECnet is reporting a network protocol error. This message has a severity level of Information.
User Action: Verify that DECnet and DECdfs are operational. If so, retry the operation. If the problem persists, report it.
NET_REJECT, DFS/COM rejected connection
Explanation: DECnet rejected a logical link request. This message has a severity level of Information.
User Action: Verify that DECnet and DECdfs are operational. If so, retry the operation. If the problem persists, report it.
NET_THIRDPARTY, DFS/COM network third party disconnect
Explanation: DECnet is reporting a third-party disconnect. This message has a severity level of Information.
User Action: Verify that DECnet and DECdfs are operational. Also check that the remote server is still operational by entering the appropriate command, as follows:
For DECnet Phase IV:: Use the NCP command SHOW NODE node-id STATUS.
For DECnet Phase V:: Use the NCL command SHOW NODE node-id ALL STATUS.
Substitute the node name or address for node-id.
Retry the operation. If the problem persists, report it.
NET_TIMEOUT, DFS/COM connection timed out
Explanation: An attempt to establish a DECnet logical link has timed out. This message has a severity level of Information.
User Action: Verify that DECnet and DECdfs are operational. If so, retry the operation. If the problem persists, report it.
NET_UNKNOWN, DFS/COM unknown network message received
Explanation: DECnet is reporting an invalid network message. This message has a severity level of Information.
User Action: Verify that DECnet and DECdfs are operational. If so, retry the operation. If the problem persists, report it.
NETADDRTONAME, DFS/COM error translating node address to node name
Explanation: The attempted operation required DECnet to translate a DECnet node address to a node name. This caused an error of severity level Error. A system service error message follows.
User Action: See Help Message or the VSI OpenVMS System Services Reference Manual for specific information about the system service message. Verify that DECnet and DECdfs are operational. If they are, and you know which node caused the error, verify that the DECnet database is up to date by entering the NCP or NCL command SHOW NODE node-id. Substitute the node name or address for node-id. Try the operation again. If the problem persists, report it.
NETADDRTONAMEIO, DFS/COM I/O error translating node address to node name
Explanation: The attempted operation required DECnet to translate a DECnet node address to a node name. This caused an error of severity level Error. A system service error message follows.
User Action: See Help Message or the VSI OpenVMS System Services Reference Manual for specific information about the system service message. Verify that DECnet and DECdfs are operational. If they are, and you know which node caused the error, verify that the DECnet database is up to date by entering the NCP or NCL command SHOW NODE node-id. Try the operation again. If the problem persists, report it.
NETASSIGN, DFS/COM error assigning network device
Explanation: An internal error (of severity level Error) occurred when the DECdfs Communication Entity attempted to assign a channel for DECnet use. A system service error message follows.
User Action: See Help Message or the VSI OpenVMS System Services Reference Manual for specific information about the system service message. Verify that DECnet and DECdfs are operational. If they are, try the operation again. If the problem persists, report it.
NETCONFIO, DFS/COM I/O error confirming connection
Explanation: An error occurred when DECnet tried to confirm a logical link that serves a DECdfs connection. This message has a severity level of Error. A system service error message follows.
User Action: See Help Message or the VSI OpenVMS System Services Reference Manual for specific information about the system service message. Verify that DECnet and DECdfs are operational. If they are, try the operation again. If the problem persists, report it.
NETCONFQIO, DFS/COM directive error confirming connection
Explanation: An error occurred when DECnet tried to confirm a logical link for DECdfs. This message has a severity level of Error. A system service error message follows.
User Action: See Help Message or the VSI OpenVMS System Services Reference Manual for specific information about the system service message. Verify that DECnet and the DECdfs entities are operational. If they are, retry the operation. If the problem persists, report it.
NETCONNIO, DFS/COM I/O error initiating connection to node
Explanation: An error occurred when DECnet tried to initiate a logical link for DECdfs. This message has a severity level of Error. A system service error message follows.
User Action: See Help Message or the VSI OpenVMS System Services Reference Manual for specific information about the system service message. Verify that DECnet and the DECdfs entities are operational. If they are, retry the operation. If the problem persists, report it.
NETCONNQIO, DFS/COM directive error initiating connection
Explanation: An error occurred when DECnet tried to initiate a logical link for DECdfs. A system service error message follows. This message has a severity level of Error.
User Action: See Help Message or the VSI OpenVMS System Services Reference Manual for specific information about the system service message. Verify that DECnet and DECdfs are operational. If they are, try the operation again. If the problem persists, report it.
NETDEACIO, DFS/COM I/O error deaccessing network link
Explanation: An error occurred when the Communication Entity tried to deaccess a DECnet link. This message has a severity level of Error. A system service error message follows.
User Action: See Help Message or the VSI OpenVMS System Services Reference Manual for specific information about the system service message. Verify that DECnet and DECdfs are operational. If they are, retry the operation. If the problem persists, report it.
NETDEACQIO, DFS/COM directive error deaccessing network link
Explanation: An error occurred when the Communication Entity attempted to deaccess a DECnet link. This message has a severity level of Error. A system service error message follows.
User Action: See Help Message or the VSI OpenVMS System Services Reference Manual for specific information about the system service message. Verify that DECnet and DECdfs are operational, and if so, retry the operation. If the problem persists, report it.
NETDEASSGN, DFS/COM error deassigning network device
Explanation: An error occurred when the Communication Entity attempted to deassign a channel assigned to DECnet. This message has a severity level of Error. A system service error message follows.
User Action: See Help Message or the VSI OpenVMS System Services Reference Manual for specific information about the system service message. Verify that DECnet and the DECdfs entities are operational. If they are, retry the operation. If the problem persists, report it.
NETDISCON, DFS/COM directive error disconnecting network link
Explanation: An error occurred when the DECdfs Communication Entity attempted to disconnect a DECnet link. A system service error message follows. This message has a severity level of Information.
User Action: See Help Message or the VSI OpenVMS System Services Reference Manual for specific information about the system service message. Verify that DECnet and DECdfs are operational. If they are, retry the operation. If the problem persists, report it.
NETDISCONIO, DFS/COM I/O error disconnecting network link
Explanation: An error occurred when the DECdfs Communication Entity attempted to disconnect a DECnet link. A system service error message follows. This message has a severity level of Error.
User Action: See Help Message or the VSI OpenVMS System Services Reference Manual for specific information about the system service message. Verify that DECnet and DECdfs are operational. If they are, retry the operation. If the problem persists, report it.
NETGETDVI, DFS/COM directive error getting network device information
Explanation: An error occurred when the DECdfs Communication Entity attempted to access DECnet. This message has a severity level of Error.
User Action: Verify that DECnet is operational. If it is, retry the operation. If the problem persists, report it.
NETGETDVIO, DFS/COM I/O error getting network device information
Explanation: An error occurred when the DECdfs Communication Entity attempted to access DECnet. This message has a severity level of Error.
User Action: Verify that DECnet is operational. If it is, retry the operation. If the problem persists, report it.
NETNAMETOADDR, DFS/COM error translating node name to node address
Explanation: An error occurred when DECnet attempted to translate a node name to a node address. This message has a severity level of Error.
User Action: Verify that DECnet is operational. If it is, retry the operation. If the problem persists, report it.
NETNAMETOADDRIO, DFS/COM I/O error translating node name to node address
Explanation: An error occurred when DECnet attempted to translate a node name to a node address. This message has a severity level of Error.
User Action: Verify that DECnet is operational. If it is, retry the operation. If the problem persists, report it.
NETPROXY_CLOSE, Failure to close netproxy file
Explanation: An RMS failure occurred while attempting to close the netproxy file during processing for the SET SERVER /INVALIDATE_PERSONA_CACHE command. The DECdfs server process continues to use the currently open netproxy file. This message has a severity level of Warning. One or more additional messages give information about the cause of the RMS failure.
User Action: If you were not attempting to replace the netproxy file, no action is needed. Otherwise, correct the cause of the RMS failure and try the SET SERVER /INVALIDATE_PERSONA_CACHE command again.
NETPROXY_CONN, Failure to connect netproxy file rab
Explanation: The DECdfs server encountered an error in accessing the proxy (NETPROXY) file. This message has a severity level of Error. Additional information follows.
User Action: See the information following the error message.
NETPROXY_OPEN, Failure to open netproxy file
Explanation: The DECdfs server encountered an error when it tried to access the proxy (NETPROXY) file. This message has a severity level of Warning. Additional information follows.
User Action: See the information following the error message.
NETPROXY_READ, Failure to read netproxy file record for user
Explanation: The DECdfs server encountered an error when it tried to access the proxy (NETPROXY) file. This message has a severity level of Warning. Additional information follows.
User Action: See the information following the error message.
NETREJECTERR, DFS/COM error rejecting connection
Explanation: An error occurred when DECnet attempted to reject a logical link request. This message has a severity level of Error.
User Action: Verify that DECnet is operational. If it is, retry the operation. If the problem persists, report it.
NOAPTREG, No access points registered
Explanation: There are no access points in the server database. This message has a severity level of Warning.
User Action: If you are at a client and you get this message about a remote server, contact the DECdfs manager of the server. If you are at a server and you get this message about the local server database, you can enter the DFS$CONTROL command ADD ACCESS_POINT to add access points.
NOCOMMLOAD, Communication Entity has not been loaded
Explanation: You may not have executed the procedure to load the DECdfs Communication Entity device driver and Ancillary Control Process (ACP). This message has a severity level of Fatal.
User Action: To determine if the Communication Entity is running, enter the DFS$CONTROL command SHOW COMMUNICATION/STATUS. If it is not, execute the SYS$STARTUP:DFS$STARTUP.COM file.
NOCONNMEM, Insufficient memory to create new connection
Explanation: An error occurred when the DECdfs Communication Entity attempted to create a connection. This message has a severity level of Fatal.
User Action: Verify that the server is properly installed (as described in the installation guide). If the problem persists, report it.
NODEVNAM, Device name missing
Explanation: A device name was missing or had improper syntax in the ADD ACCESS_POINT command. This message has a severity level of Error.
User Action: Retry the operation. Ensure that your device specification is valid and includes a colon (:).
NORQSTMEM, Insufficient memory to perform operation
Explanation: The DECdfs Communication Entity could not allocate sufficient memory to complete the request. This message has a severity level of Fatal.
User Action: Verify that DECdfs is installed properly (as described in the installation guide). Check the setting for the SYSGEN parameter NPAGEDYN. If the problem persists, report it.
NOSESSMEM, Insufficient memory to start new operation
Explanation: The DECdfs Communication Entity could not allocate sufficient memory to complete the request. This message has a severity level of Fatal.
User Action: Verify that the DECdfs is properly installed (as described in the installation guide). Check that you have set the SYSGEN parameter NPAGEDYN properly. If the problem persists, report it.
NOT_PRIVED, Insufficient privilege for this operation
Explanation: This command requires privileges that this process does not have. This message has a severity level of Error.
User Action: See the DFS$CONTROL command chapter in VSI DECdfs for OpenVMS Management Guide, which lists the required privileges in the command descriptions.
NOTREMOTECOM, DFS/COM connection attempted by non-DFS/COM module on node
Explanation: The Communication Entity received a connect request from a remote process that was not another DECdfs Communication Entity. This message and the INVUSER message are paired. This message has a severity level of Error.
User Action: DECdfs rejected this connect request. However, this message can indicate a break-in attempt and should be investigated.
NOTRUNNING, DFS/COM Remote DFS/COM module not running
Explanation: The DECdfs Communication Entity detected that the remote DFS$COM_ACP process is not functioning. This message has a severity level of Error.
User Action: Inform the DECdfs manager at the remote system.
NOTSERVED, Access point is not presently being served
Explanation: The DFS$CONTROL command MOUNT or SHOW ACCESS_POINT/FULL queried DECdns about the name of an access point and then created a connection to the relevant DECdfs server. Although the DECdns namespace contained the name of the access point, the server did not recognize the name. This can occur when the server stops and restarts without the name of the access point being re-added. This message has a severity level of Warning.
User Action: Wait a short time and then try the operation again. The server may be starting up and may recognize the name of the access point when startup completes. If it does not, notify the DECdfs manager at the server.
NSPERROR, DECnet error has been detected
Explanation: The DECdfs Communication Entity received an error from DECnet. This message has a severity level of Fatal.
User Action: Verify that DECnet is running properly and check DECnet event logs for unusual occurrences. If the problem persists, report it.
OLDCOMM, Communication Entity has been stopped and restarted
Explanation: The DECdfs Communication Entity has been stopped and restarted. This message has a severity level of Fatal.
User Action: None. The DECdfs client will retry the operation.
PERSCA_INIT, Insufficient non-paged pool to initialize persona cache
Explanation: An error occurred while starting the DECdfs server. The server was unable to obtain the necessary memory resources. This message has a severity level of Error.
User Action: Verify that the server is properly installed (as described in the installation guide). Check the setting for the SYSGEN parameter NPAGEDYN. If the problem persists, report it.
PERSONA_UPDATE_RANGE, The value given for the persona cache update interval is out of range
Explanation: The value specified for the lifetime of individual persona blocks is outside the valid range. This message has a severity level of Error.
User Action: Repeat the operation using a permitted value. To display the range of permitted values, use the DFS$CONTROL command SHOW SERVER/PERSONA_CACHE_UPDATE_INTERVAL.
PROTOCOL, DFS/COM protocol version mismatch
Explanation: The DECdfs Communication Entity detected a protocol version error between itself and the DECdfs Communication Entity at the other node. This message has a severity level of Error.
User Action: Use the DFS$CONTROL command SHOW VERSIONS to check the DECdfs component versions on both client and server, and then install the correct software if necessary. For information on version compatibility, see the release notes.
PROXYFMT, Incompatible netproxy record format
Explanation: This version of DECdfs cannot be run as a server under this version of OpenVMS. This message has a severity level of Warning.
User Action: Install compatible versions of DECdfs and OpenVMS. For information about the DECdfs operating system requirements, see the installation guide.
RCVDDATA, DFS/COM Received data from transport
Explanation: The DECdfs Communication Entity received network data. This message has a severity level of Information.
User Action: None.
REMCOMMSTOP, Remote communication entity is currently stopped
Explanation: The DECdfs Communication Entity detected that the remote DFS$COM_ACP process is not functioning. This message has a severity level of Fatal.
User Action: Ask the DECdfs manager on the remote server to correct the problem. If the problem persists, report it.
REMOTESHUT, DFS/COM remote node shutting down
Explanation: DECnet is shutting down on the remote node. This message has a severity level of Information.
User Action: None; this message is informational only. Note that since the DECdfs Communication Entity can have a DECnet connection between a local client and a local server, this message might also appear when DECnet shuts down on the local node.
REMREJECT, Communication entity rejected operation for an unknown reason
Explanation: The DECdfs Communication Entity returned an error. This message has a severity level of Error.
User Action: Verify that DECdfs is properly installed (as described in the installation guide). If the problem persists, report it.
REMRSRC, Server has insufficient resources to perform operation
Explanation: The DECdfs Communication Entity could not perform the requested operation because the server had insufficient resources. This message has a severity level of Error.
User Action: If you are at a DECdfs server, verify that DECdfs is properly installed (as described in the installation guide), paying particular attention to the values for the NPAGEDYN SYSGEN parameter and the following parameter:
For DECnet Phase IV:: NCP parameter MAXIMUM LINKS
For DECnet Phase V:: NCL parameter MAXIMUM TRANSPORTS CONNECTIONS
If you are at a DECdfs client, inform the DECdfs manager at the remote server.
REMWILDCARD, Wildcards may not be used to remove access points
Explanation: You can specify only one access point name at a time with the command REMOVE ACCESS_POINT. This message has a severity level of Error.
User Action: Use one command to remove each access point; specify an access point with each command.
RRABORT, DFS/COM aborted session
Explanation: The DECdfs Communication Entity encountered a fatal error and aborted the session. This occurs on a client when the remote server shuts down or otherwise aborts communication with the client. Additional information follows. This message has a severity level of Error.
User Action: See the additional information that follows the error message. Verify that DECnet is operational. Also check that the remote server is still operational by entering the NCP or NCL command SHOW NODE node-id STATUS. Retry the operation. If the problem persists, report it.
SANOTACTIVE, Specified service agent is not currently active
Explanation: The server is not running. This message has a severity level of Error.
User Action: Verify that DECnet is operational. If it is, restart the DECdfs entity by executing the command file SYS$STARTUP:DFS$STARTUP.COM. If the problem persists, report it.
SAUNKNWN, DFS/COM service agent unknown
Explanation: There is no server available to process the request. This message has a severity level of Error.
User Action: Verify that DECnet is operational. If it is, restart DECdfs by executing the command file SYS$STARTUP:DFS$STARTUP.COM. If the problem persists, report it.
SCAN_TIME_RANGE, The value given for the scan time is out of range
Explanation: The specified Communication Entity scan time was outside the permitted range. This message has a severity level of Error.
User Action: Repeat the operation, using an appropriate value. To display the permitted range of scan times, enter the DFS$CONTROL command SHOW COMMUNICATION/SCAN_TIME.
SESSERR, DFS/COM NSP session layer error occurred
Explanation: The DECdfs Communication Entity is reporting an error that involves local DECnet software. This message has a severity level of Error.
User Action: Verify that DECnet is operational. If it is, retry the operation. If the problem persists, report it.
SESSREADERR, DFS/COM error from session layer read operation
Explanation: The DECdfs Communication Entity encountered an error in communicating with local DECnet software. Additional information follows. This message has a severity level of Warning.
User Action: Verify that DECnet is operational. If it is, retry the operation. If the problem persists, report it.
SESSWRITEERR, DFS/COM Error from session layer write operation
Explanation: The DECdfs Communication Entity encountered an error in communicating with local DECnet software. Additional information follows. This message has a severity level of Warning.
User Action: Verify that DECnet is operational. If it is, retry the operation. If the problem persists, report it.
SETDDIR, Failure setting default directory
Explanation: While initializing, the server was unable to set the default directory for its process. Additional information follows. This message has a severity level of Error.
User Action: Verify that the server is properly installed (as described in the installation guide). If the problem persists, report it.
SETIMR, DFS/COM I/O error setting up connection scan timer
Explanation: The DECdfs Communication Entity received an error. Additional information follows. This message has a severity level of Warning.
User Action: Verify that the local system is properly installed (as described in the installation guide). If the problem persists, report it.
SETPRN, Failure setting new process name
Explanation: The DECdfs Communication Entity received an error while attempting to set the process name. Additional information follows. This message has a severity level of Error.
User Action: Verify that the local system is properly installed (as described in the installation guide). If the problem persists, report it.
SETPRT, Failure setting protection of special kernel stack guard page
Explanation: The DECdfs Communication Entity received an error. Additional information follows. This message has a severity level of Error.
User Action: Verify that the local system is properly installed (as described in the installation guide). If the problem persists, report it.
SNAP_BAD_VERSION, The snapshot file version is out of date
Explanation: The file specification entered with the /SNAPSHOT_FILE qualifier referred to a snapshot file that is older than the current version of the DFS$CONTROL program. The file format is incompatible with the current program. This message has a severity level of Error.
User Action: The old snapshot file is obsolete and cannot be used. Create a new snapshot file.
SNAP_NOT_COMM, Snapshot file does not contain communication entity counters
Explanation: The file specification entered with the /SNAPSHOT_FILE qualifier and specified for use with the SHOW COMMUNICATION/COUNTERS command referred to a file that does not contain communications counters. This message has a severity level of Error.
User Action: The file contains server or client counters. Use a snapshot file that contains communication counters.
SNAP_NOT_SERVER, Snapshot file does not contain server counters
Explanation: The file specification entered with the /SNAPSHOT_FILE qualifier and specified for use with the SHOW SERVER/COUNTERS command referred to a file that does not contain server counters. This message has a severity level of Error.
User Action: The file contains communication or client counters. Use a snapshot file that contains server counters.
SNAP_TOO_OLD, The snapshot file contains data from before the startup of the entity
Explanation: The snapshot file contains snapshot data that is older than the counters currently maintained by the specified entity. A comparison of the counters therefore would be meaningless or misleading. This message has a severity level of Error.
User Action: The old snapshot file is obsolete and cannot be used. Create a new snapshot file.
SOME_RANGE, A value given was out of range
Explanation: The specified value is outside the valid range. An additional message follows and specifies the incorrect value. This message has a severity level of Error.
User Action: Repeat the operation, using an appropriate value. To display the range of correct values, use one of the DFS$CONTROL SHOW commands.
SRVABORT, Server aborted operation
Explanation: The DECdfs Communication Entity could not complete a server operation. This message has a severity level of Fatal.
User Action: Verify that the server is properly installed (as described in the installation guide) and that the server is running. If the problem persists, report it.
SRVACTIVE, File server is already active
Explanation: The START SERVER command was entered but the server was already running. This message has a severity level of Warning.
User Action: None.
SRVEXIT, Server exiting
Explanation: The server process is terminating. This message has a severity level of Information.
User Action: None.
SRVNOTACT, The DFS Server is presently unavailable
Explanation: It is necessary to start the server before DECdfs can execute your request. This message has a severity level of Error.
- Check if the DECdfs server has been loaded by typing at the DCL prompt:
$ SHOW DEVICE DFSS0
If you receive the DCL error message "%SYSTEM-W-NOSUCHDEV, no such device available," perform Step 2. Otherwise, skip to Step 3.
- Load the DECdfs server using the OpenVMS SYSGEN Utility, as follows:
$ RUN SYS$SYSTEM:SYSGEN SYSGEN> CONNECT DFSS0/NOADAPTER/DRIVER=DFSSDRIVER
- Use the DECdfs DFS$CONTROL management program to start the server:
$ RUN SYS$SYSTEM:DFS$CONTROL DFSCP> START SERVER
SRVNOTLOAD, File service driver not loaded
Explanation: The server process has not been started. This message has a severity level of Error.
User Action: Invoke DFS$STARTUP to start the server.
SRVRUNNING, Server running
Explanation: The server process has initialized successfully and is running. This message has a severity level of Information.
User Action: None.
STKLKWSET, Failure locking special kernel stack into working set
Explanation: An error occurred during creation of the server process. This message has a severity level of Error.
User Action: Verify that the server is properly installed (as described in the installation guide). Consider increasing the values for the DFS$PQL_WSQUOTA or DFS$PQL_WSEXTENT parameter or both, in the DFS$CONFIG.COM file. If the problem persists, report it.
TRANSAPID, Error translating access point identifier
Explanation: The DECdfs server attempted to access an access point that is currently invalid. This message has a severity level of Warning.
User Action: Check that your DFS$SYSTARTUP command procedure adds all of the usual access points on the system each time the server starts up. You might have stopped and restarted the server without adding all of the access points. At the client, the DECdfs mount verification procedure will attempt to recover from this error.
TRANSAPNM, Error translating access point name
Explanation: The DECdfs server attempted to translate an invalid access point name in response to a client's mount request or mount verification attempt. This message has a severity level of Warning.
User Action: Use the DFS$CONTROL command SHOW ACCESS_POINT/LOCAL to verify the access point name. If the access point name is not displayed, try adding it by using the ADD ACCESS_POINT command. Check that your DFS$SYSTARTUP command procedure adds all of the usual access points on the system each time the server starts up.
UNKNOWN_ACCPT, Access point not known to name service
Explanation: The specified access point has not been added to the DECdns namespace by a DECdfs server. This message has a severity level of Error.
User Action: Check that you are entering the access point name correctly. Display the valid access point names, using the DFS$CONTROL command SHOW ACCESS_POINT. If the access point does not exist, contact the DECdfs manager at the server to resolve this problem.
UNSUPPFS, Unsupported file system structure
Explanation: An attempt was made to mount a VSI DECdfs access point for a disk volume containing a file structure that is not supported by the version of OpenVMS running on the client system. For example, an OpenVMS Version 7.2 system might be serving an access point for an ODS-5 disk volume. VSI DECdfs client systems running an earlier version of OpenVMS will fail to mount this access point due to lack of operating system support. This message has a severity level of Fatal.
User Action: None.
VFYCHAN, Failure verifying kernel channel
Explanation: An error occurred during initialization of the server process. This message has a severity level of Error.
User Action: Verify that the server is properly installed (as described in the installation guide). If the problem persists, report it.
XACT_OUT_RANGE, The value given for the transactions outstanding maximum is out of range
Explanation: The value specified for the maximum number of outstanding Communication Entity requests is outside the valid range. This message has a severity level of Error.
User Action: Repeat the operation, using an appropriate value. To display the range of correct values, use the DFS$CONTROL command SHOW COMMUNICATION/REQUESTS_OUTSTANDING_MAXIMUM.
Appendix B. Troubleshooting the DECdfs Environment
What to do first (see Section B.1, ''What to Do First'')
Controlling event and error messages (see Section B.2, ''Controlling Event and Error Messages'')
Using other DECdfs servers and clients to isolate problems (see Section B.3, ''Using Other DECdfs Servers and Clients to Isolate Problems'')
Solving common DECdfs problems (see Section B.4, ''Solving Common DECdfs Problems'')
B.1. What to Do First
Retry a procedure, reentering information if necessary, to eliminate possible mistakes in typing. Retrying a procedure may mean completely mounting a partially mounted device (see Section 3.4.6, ''Partially Mounted Devices'') or gaining access to a name server that has been updated more recently.
If you are unsure of an access point name, you can check the access points registered in the Digital Distributed Name Service (DECdns) name space by entering the command SHOW ACCESS_POINT. DECdfs lists access points read from a DECdns server and if the local node is a DECdfs server from the DECdfs server's local database.
Ensure that the DECdfs function you are trying to perform is not obsolete or restricted. Check the list of obsolete command parameters in Appendix D, "Obsolete Command Qualifiers and Configuration Logicals" and the list of restrictions in the release notes.
Ensure that you have the required privileges to perform the desired operation. Required privileges are listed with each applicable command described in Chapter 4, "DFS$CONTROL Commands".
Observe the status of the server or Communication Entity by entering a SHOW SERVER or SHOW COMMUNICATION command. One or both entities may have stopped. See Section 2.9, ''Stopping and Starting DECdfs on Your System'' for information about restarting the server and Communication Entity.
If you receive an error message in response to a DECdfs operation, look up the error message in Appendix A, "Status Messages" and perform any user action included with the message.
B.2. Controlling Event and Error Messages
You can set the DECdfs server and Communication Entity to report various event and error messages to OPCOM and to an error log, or you can disable reporting of event and error messages altogether.
Note
Some messages, including normal startup and shutdown messages, startup failure messages, and checksum error messages appear even if reporting is disabled.
Note
The server, Communication Entity, and client pass non- DECdfs error messages and the VSI DECdfs Control Program (DFSCP) error messages to the interactive user's terminal.
When you first install DECdfs software, the DECdfs server and Communication Entity report messages to OPCOM. OPCOM is enabled by default with output to the system console. All DECdfs messages (except some that are always enabled) are disabled.
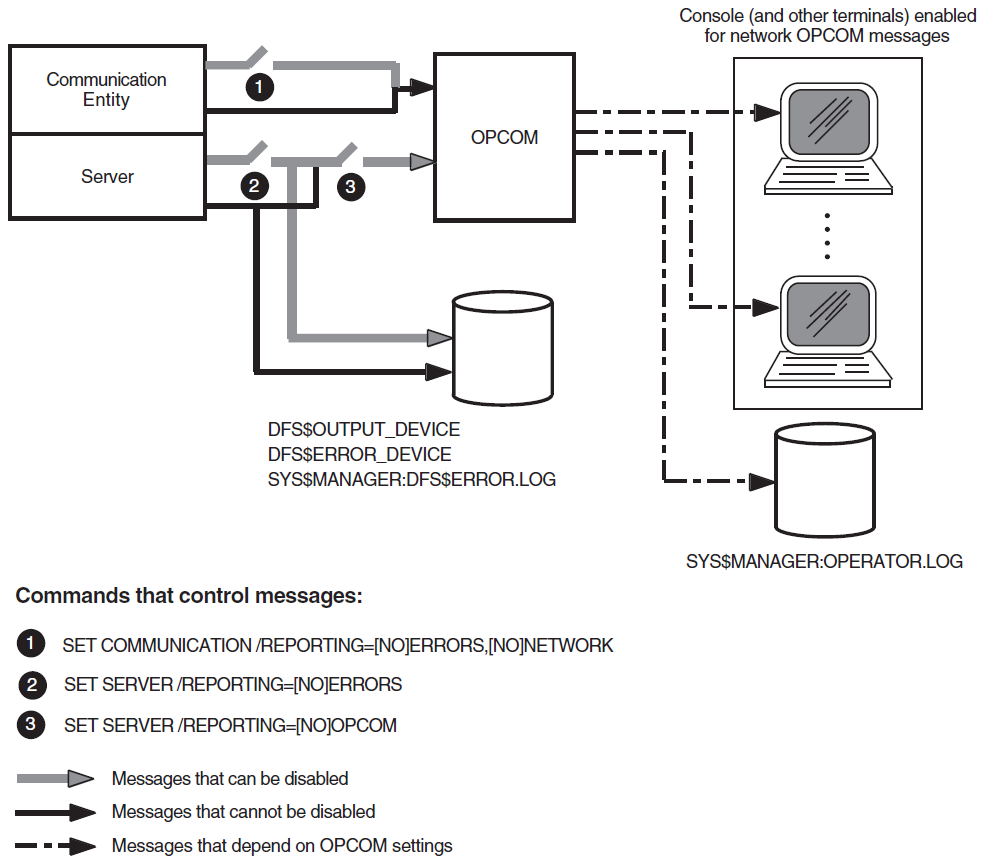
To permanently change the settings for DECdfs messages, edit the SYS$STARTUP:DFS$CONFIG.COM file. You can change the logical name assignments for DFS$OUTPUT_DEVICE and DFS$ERROR_DEVICE. You can also change the settings for the /REPORTING qualifier to the SET SERVER and SET COMMUNICATION commands.
B.3. Using Other DECdfs Servers and Clients to Isolate Problems
You can identify the source of some DECdfs problems by using other DECdfs devices. For example, if you are having trouble reading files from a server disk, try gaining DECdfs access to another disk on another DECdfs server. If that operation succeeds, suspect difficulty with the server you cannot reach.
If you cannot gain access to any other DECdfs devices, suspect problems with the DECdfs client. To confirm a client problem, try gaining access to the DECdfs server device from another DECdfs client. Successful access from a different client suggests a problem with the original client.
If you suspect that a DECdfs server disk is not available, enter some other command directly on the server node, such as the OpenVMS DCL command DIRECTORY, to check disk and file availability. You can also try reading from the DECdfs server disk locally (from the server) to determine that the server's disks are operating correctly.
B.4. Solving Common DECdfs Problems
This section suggests actions you can take to solve some common DECdfs problems. You may also wish to consult Appendix F, "Restrictions on Extended File Specifications Support" for information about restrictions on VSI DECdfs support for Extended File Specifications.
B.4.1. DECdfs Fails After Upgrading from an Earlier Version
If DECdfs fails after upgrading from an earlier DECdfs version, reboot the system. This causes the software to start using new versions of DECdfs drivers and shareable images.
B.4.2. Unexpected Error While Opening a File
|
Error Code |
Possible Cause |
|---|---|
|
RMS-E-DNR |
DECnet or the Communication Entity is unavailable at the client, or the Communication Entity is unavailable at the server. A SYSTEM-F-DEVNOTMOUNT error code may appear in place of the RMS-E-DNR error code. Restart DECnet or the Communication Entity or both at the client or server. |
|
SYSTEM-F-UNREACHABLE |
DECnet is unavailable at the server. Restart DECnet and DECdfs at the server. |
|
SYSTEM-F-NOLISTENER |
The server is not running. Restart the server. |
|
SS$_INCVOLLABEL |
The server is running but the access point is not in the server database. Add the access point at the server. |
B.4.3. Unexpected Error While Accessing an Open File
If you receive an error code or other unexpected response while reading from or writing to an open file, the link might have disconnected or the server node might have failed.
The system returns an SS$_ABORT error code when such problems occur. The application or utility being used might return its own error code with the SS$_ABORT error code.
When DECdfs detects the loss of the server, DECdfs enters the mount verification state (see Section 3.4.5, '' DECdfs Mount Verification'') and tries to reestablish the link. Reestablishing the link allows the next file-open operation to succeed.
B.4.4. Unexpected DECdns Errors when Performing Access Point Operations
To add access points, the DECdfs server manager account requires write access to the DECdns directory where you want to add access points.
To remove access points, the DECdfs server manager account must have write access to the DECdns directory where you want to remove access points and delete access to the DECdns object that represents the access point.
To mount or show access points, the DECdfs server manager account or DECdfs client user account requires read access to the appropriate DECdns directories and object.
Be certain you entered the access point name correctly. See the appropriate command examples in Chapter 4, "DFS$CONTROL Commands".
Note
In some instances, you might receive an error message saying "Requested entry does not exist," even though you are certain that the access point does exist. DECdns returns this message when you lack the necessary privileges to perform a requested operation. Check with the DECdns manager to ensure that you have the necessary privileges.
B.4.5. Problems Accessing Server Files
This section suggests ways to recover from problems in accessing server files.
B.4.5.1. New Client User Cannot Access Server Files
A new client user might not be able to access server files after proxy access is added at the server. Access attempts receive the "Insufficient privilege or file protection violation" error message.
Enter the SET SERVER /INVALIDATE_PERSONA_CACHE command on the server. This forces the persona cache to read fresh data from the NETPROXY.DAT, SYSUAF.DAT and RIGHTSLIST.DAT files without waiting for the persona cache update interval to expire.
B.4.5.2. Existing Client User Cannot Access Server Files
User attempts to access server files might result in an "Insufficient privilege or file protection violation" error message from the server.
- Enter the SHOW SERVER /USERS command on the server.
Note
To get useful information, you must enter the SHOW SERVER /USERS command within the persona cache update interval that follows the unsuccessful client access.
Look for the following possible problems:- If the client (remote node::user) is correct but the local user is DFS$DEFAULT when you expected the client to use an actual user account, be certain you added a default proxy by using the AUTHORIZE Utility's ADD/PROXY command:
$RUN SYS$SYSTEM:AUTHORIZEUAF>ADD /PROXY remote_node::remote_user local_user /DEFAULT - If the client's node is a cluster member and the local user is DFS$DEFAULT when you expected the client to use an actual user account, be certain you enabled the alias outgoing on the cluster and added a default proxy for the cluster alias by using the AUTHORIZE Utility's ADD/PROXY command:
UAF>ADD /PROXY cluster_alias::remote_user local_user /DEFAULTIf the outgoing cluster alias cannot be enabled for some reason, be certain you added a default proxy for each cluster member by using the AUTHORIZE Utility's ADD/PROXY command:UAF>ADD /PROXY cluster_member::remote_user local_user /DEFAULTNote
If a DECdfs client cannot find the target proxy account and the server does not have a DFS$DEFAULT account, the SHOW SERVER /USERS command will not produce information about the failed access. In this case, you can create a DFS$DEFAULT account on the server to aid in diagnosing the problem. Then retry step 1.
Enter the SHOW COMMUNICATION /CURRENT_CONNECTIONS command on the server.
Look for the following possible problems:The client node is a cluster member, and you see an incoming connection from the client node name, but the proxy is for the cluster alias.
To use the cluster alias in the proxy, add the following commands to the DFS$SYSTARTUP.COM file on the client node:
DECnet Phase IV:
$ MCR NCP SET OBJECT DFS$COM_ACP ALIAS OUTGOING ENABLED
DECnet Phase V:
$MCR NCL CREATE [NODE node-id] SESSION CONTROL APPLICATION DFS$COM_ACP$SET [NODE node-id] SESSION CONTROL DFS$COM_ACP OUTGOING ALIAS TRUEVSI assumes the executor alias node name is already defined on the client node. Otherwise, add proxies for the cluster member node names.
The client node is a cluster member, and you see an incoming connection from the client's cluster alias, but the proxy is for the client cluster member name.
Add a proxy for the cluster alias or disable the outgoing alias on the client node's DFS$COM_ACP object.
You see an incoming connection from the the client node, but it is displayed as a numeric DECnet address instead of the node name.
Make sure the client node is correctly defined in the server node's DECnet node database. If you load the node database in a batch job on the server, make sure DECdfs does not start on the server before all the client nodes are defined on the server.Note
If you add or modify any proxies, remember to enter the SET SERVER /INVALIDATE_PERSONA_CACHE command before using the new proxy information.
B.4.6. Problems Printing Server Files
You must use the /SYSTEM qualifier with the MOUNT command when you mount an access point. Otherwise, just as with non-- DECdfs disks, the print symbiont cannot access the device. See Section 3.6, ''Printing Files from a Client Device'' for information about using the /SYSTEM qualifier.
On clients that are clusters, you also must ensure that DECdfs device names are consistent on all cluster members. Use the /DEVICE qualifier to the MOUNT command to force the same device name onto each cluster member. See Section 3.6, ''Printing Files from a Client Device'' for information about using the /DEVICE qualifier.
The SYSTEM account on the client needs proxy access to the special printing account on the server (see Section 2.2.4, ''Allowing Client Users to Print Server Files'').
The SYSTEM account on the client needs proxy access to the user account on the server.
The file must be readable by the DFS$DEFAULT account on the server.
Note
When you add or modify a proxy, DECdfs might not recognize it until the persona cache updates. You can force the persona cache to read the new proxy immediately by entering the SET SERVER/INVALIDATE_PERSONA_CACHE command.
B.4.7. Problems Backing Up Server Files
If you experience difficulty in using DECdfs to back up files, make certain you are not using the /IMAGE, /PHYSICAL, or /FAST qualifiers with the BACKUP command.
Appendix C. Adjusting DECnet and Client RMS Parameters to Enhance Performance
VSI designed DECdfs software to provide excellent performance using the default DECnet parameters. For this reason, many DECdfs users do not need to change any DECnet parameters.
In some configurations, however, you can significantly improve performance by adjusting a few DECnet parameters (called tuning). For example, a programming environment in which each individual client user opens many files simultaneously could benefit from tuning. Such an environment uses more network resources than one in which each client user opens only one file at a time. The more network resources your configuration uses, the more likely it is to benefit from tuning. Another DECdfs environment in which tuning can improve performance is a server or client system that supports many DECdfs users. This appendix describes the DECnet parameters you can adjust to tune your VSI DECdfs configuration to suit your needs. For detailed information on DECnet parameters, see the DECnet Phase IV or DECnet Phase V documentation set, depending on the version of DECnet you are using.
C.1. Setting DECnet Network Parameters
To obtain the greatest benefit, adjust parameters that affect many users. Tune the server first and then clients with the highest number of DECdfs users. You can change a DECnet parameter both temporarily and permanently. It is useful to change it temporarily in order to evaluate the effect of the change. When you are satisfied with the change, you can make it permanent.
DECnet Phase IV:
Use the Network Control Program (NCP) SET command to modify DECnet network parameters temporarily. The SET command affects the volatile database. Parameters changed with SET take effect immediately but are lost when the system shuts down. The DEFINE command affects the permanent database. Parameters set with DEFINE do not take place until the system reboots but are permanent thereafter unless you change them. For more information about NCP commands, see VSI OpenVMS DECnet Network Management Utilities.
DECnet Phase V:
To change a parameter so that the new value takes effect immediately, enter the appropriate command at the prompt NCL>. Changes made by this method take effect immediately but are lost when the system shuts down. This method is useful in testing the immediate effect of various parameter settings.
To permanently change a DECnet Phase V parameter, edit the applicable NCL script file. The
names of NCL script files have the following format:
SYS$MANAGER:NET$entity-module_STARTUP.NCL. Changes entered in the NCL
script file do not take effect until the system reboots but are permanent thereafter
unless you change them. Use this method when you want to preserve your changes. See the
VSI DECnet-Plus for OpenVMS Network Management Guide, DECnet/OSI Network Management, VSI DECnet-Plus for OpenVMS Network Control Language Reference Guide, and the
DECnet/OSI Network Control Language Reference manuals for more information about setting DECnet Phase V
parameters.
The same procedure for setting network parameters applies to DECdfs servers and clients. The following sections describe how to adjust network parameters that affect the performance of DECdfs.
C.1.1. Line Receive Buffers/Station Buffers
Line receive buffers (called station buffers in DECnet Phase V) enable DECdfs to receive information from the network. DECdfs operates efficiently when enough buffers are available to accept incoming data. If the number of buffers available is not sufficient, incoming data is lost and the network must retransmit it, thus degrading performance. DECnet counts the number of times the network attempts to transmit information and finds that a buffer is unavailable. You can display the total as follows:
DECnet Phase IV:
NCP>SHOW LINE line-id COUNTERS
The number of times a buffer was unavailable is shown at the end of the display as User buffer unavailable.
DECnet Phase V:
NCL>SHOW [NODE node-id] CSMA-CD STATION station-name ALL COUNTERS
Replace node-id with the name or address of the node. The number of times a buffer was unavailable is shown at the end of the display as Station buffer unavailable. (To show the name of the station, use the command SHOW CSMA-CD STATION * ALL COUNTERS.)
You can increase the number of buffers, as follows:
DECnet Phase IV:
NCP>SET LINE line-id RECEIVE BUFFERS integer
Replace integer with a value from 1 to 32. The default value is 4.
NCP>SET LINE bna-0 RECEIVE BUFFERS 26NCP>DEFINE LINE bna-0 RECEIVE BUFFERS 26
DECnet Phase V:
NCL>SET NODE 0 CSMA-CD STATION station-name STATION BUFFERS integer
Replace integer with a value between 1 and 64. The default is 4.
NCL>DISABLE NODE 0 CSMA-CD STATION sva-0NCL>SET NODE 0 CSMA-CD STATION sva-0 STATION BUFFERS 23NCL>ENABLE NODE 0 CSMA-CD STATION sva-0
NCL>SET NODE 0 CSMA-CD STATION station-name STATION BUFFERS integer
C.1.2. Pipeline Quota (DECnet Phase IV Only)
The NCP PIPELINE QUOTA parameter specifies the number of bytes of nonpaged pool each DECnet logical link has available for buffering data between DECnet and DECdfs. DECdfs uses a single DECnet logical link between a client and server node. If a node has many concurrent users, this logical link may need more nonpaged pool than the default of 3000 bytes.
The client traffic between one node and the other node.
The server traffic between one node and the other node.
NCP>SET EXECUTOR PIPELINE QUOTA quota
For optimal system performance with moderate to heavy DECdfs workloads, replace quota with 32767. If many DECdfs users on one client access a server, replace quota with its maximum value of 65535.
C.1.3. Maximum Window (DECnet Phase V Only)
The MAXIMUM WINDOW parameter replaces the DECnet PIPELINE QUOTA parameter. MAXIMUM WINDOW is a Network Services Protocol (NSP) and Open Systems Interconnection (OSI) characteristic. It controls the number of data segments allowed to be transmitted over a transport connection before at least one acknowledgment must be returned from the destination system, such as DECdfs. If the number of data segments transmitted equals the MAXIMUM WINDOW value and no acknowledgments have been received, the transport stops sending data segments and waits for an acknowledgment message. For further information on MAXIMUM WINDOW, see the DECnet Phase V documentation set.
NCL>SHOW NSP ALL
NCL>DISABLE [NODE node-id] NSPNCL>SET [NODE node-id] NSP MAXIMUM WINDOW = integerNCL>ENABLE [NODE node-id] NSP
Replace node-id with the name or address of the node. Replace integer with a value between 1 to 2047. The default value is 32. VSI recommends a value of 60 for configurations with an average number of users, and up to 120 to 150 for configurations with a large number of users.
SYS$MANAGER:NET$transport-name_STARTUP.NCL.
Transport-name can be either NSP or OSI. DECnet nodes use NSP,
but both NSP and OSI reside on DECnet Phase V nodes. Edit the line with the
following format to specify the value for
integer.SET NODE 0 NSP MAXIMUM WINDOW = integer
C.1.4. Maximum Links/Transport Connections
The NCP MAXIMUM LINKS and NCL MAXIMUM TRANSPORT CONNECTIONS parameters specify how many connections a node can maintain with other nodes.
DECnet Phase IV:
MAXIMUM LINKS determines how many DECdfs connections a server accepts from DECdfs clients. Each communication connection between a client and a server requires a single DECnet logical link (transport connection). The DECdfs Communication Entity creates one connection for all communication between a server and a particular client. This single connection provides DECdfs service to any number of users at the client. The users can mount any number of access points on the server and open any number of files.
NCP>SET EXECUTOR MAXIMUM LINKS integer
The maximum value for integer is 960. This value is reduced to 512, however, if the ALIAS MAXIMUM LINKS parameter is also specified. The default value is 32. A workable range for many networks is 25 to 50.
The maximum should be high enough to accommodate both DECdfs and all other network users. You may need to raise this parameter on servers with incoming connections from many different clients and on clients with outgoing connections to many different servers.
NCP>SET EXECUTOR MAXIMUM LINKS 40NCP>DEFINE EXECUTOR MAXIMUM LINKS 40
DECnet Phase V:
NCL>SHOW NSP ALL
NCL>DISABLE NODE [node-id] NSPNCL>SET NODE [node-id] NSP MAXIMUM TRANSPORT CONNECTIONS integerNCL>ENABLE NODE [node-id] NSP
Replace node-id with the name or address of the node. Replace integer with a value between 0 and 65535. The value must be less than the current value of MAXIMUM REMOTE NSAPS. For further information on MAXIMUM REMOTE NSAPS, see the DECnet/OSI Network Control Language Reference manual or the VSI DECnet-Plus for OpenVMS Network Control Language Reference Guide manual.
NCL>DISABLE NODE 0 NSPNCL>SET NODE 0 NSP MAXIMUM TRANSPORT CONNECTIONS 1001NCL>ENABLE NODE 0 NSP
SET NODE 0 NSP MAXIMUM TRANSPORT CONNECTIONS integer
C.2. Setting Client RMS Default Parameters
If you use the file processing and management functions of VAX Record Management Services (RMS), you may need to adjust the RMS defaults. Note that RMS buffering occurs on the DECdfs client.
Section C.2.1, ''Sequential File Access'' describes how to set RMS parameters for sequential file access. Section C.2.2, ''Indexed Sequential File or Relative File Access'' suggests an RMS default for indexed sequential files or relative files that are heavily accessed. For more information about the SET RMS_DEFAULT command, see the VSI OpenVMS DCL Dictionary. For more information about optimizing access to RMS files, see Guide to OpenVMS File Applications.
C.2.1. Sequential File Access
To make the best use of DECdfs's quick file access, most applications benefit from default RMS multibuffer and multiblock values of 3 and 16, respectively, when accessing sequential files.
$SET RMS_DEFAULT/BUFFER_COUNT=3 /DISK
$SET RMS_DEFAULT/BLOCK_COUNT=16
To set these values for just your user process, you can include the commands in your LOGIN.COM file. To set them on a systemwide basis, you can add the /SYSTEM qualifier and include the commands in the DFS$SYSTARTUP file.
Note
If you prefer, you can set the RMS default multibuffer value by using the SYSGEN parameter RMS_DFMBF. You can set the RMS default multiblock value by using the SYSGEN parameter RMS_DFMBC.
C.2.2. Indexed Sequential File or Relative File Access
If you have indexed sequential files or relative files that are heavily accessed, you may set appropriate RMS defaults by using the /INDEXED or /RELATIVE qualifiers to the SET RMS_DEFAULT command.
This manual cannot recommend specific values for /INDEXED or /RELATIVE qualifiers to use with DECdfs because these values depend on file characteristics and file access patterns that can vary widely. For information about determining appropriate values for the /INDEXED or /RELATIVE qualifiers, see the Guide to OpenVMS File Applications.
Do not use the /INDEXED OR /RELATIVE qualifier if typical file access patterns from the client involve only a few record operations each time an indexed sequential or relative file is opened.
Note
If you prefer, you can set the RMS default multibuffer count for indexed sequential files value by using the SYSGEN parameter RMS_DFIDX. You can set the RMS default multibuffer count for relative files value by using the SYSGEN parameter RMS_DFREL.
Appendix D. Obsolete Command Qualifiers and Configuration Logicals
SET COMMUNICATION /SESSIONS_MAXIMUM
SET COMMUNICATION /CONNECTIONS_MAXIMUM
SET SERVER /FILES_MAXIMUM
SET SERVER /PERSONA_CACHE=blocks_threshold
Note
Removing the /SESSIONS_MAXIMUM and /CONNECTIONS_MAXIMUM command qualifiers eliminates limitations set by these qualifiers. However, the following DECnet commands limit the number of connections:
NCP>SET/DEFINE EXECUTOR MAXIMUM LINKS integer
NCL>SET NODE [node-id] NSP MAXIMUM TRANSPORT CONNECTIONS integer
DFS$PQL_FILLM
DFS$PQL_BYTLM
If you accidentally define these logicals, DECdfs ignores them.
Appendix E. Information for Programmers
The OpenVMS operating system includes functions that allow users and programs to determine whether a device is a DECdfs client device.
$RUN SYS$SYSTEM:DFS$CONTROLDFS>MOUNT .FIN.ADMIN.DIV.WILMER DFS_DISKDFS>EXIT$IS_IT_DFS_CLIENT = F$GETDVI ("DFS_DISK", "DFS_ACCESS")$SHOW SYMBOL IS_IT_DFS_CLIENTSYMBOL IS_IT_DFS_CLIENT == "TRUE"$
F$GETDVI ("DFSRR0","EXISTS")If this call returns False, neither the client nor the server is active. A similar call that specifies device DFSS0 will determine if the VSI DECdfs server driver has been loaded.
You can also write your own program code. If you need to identify a DECdfs client device in a program, you can use a similar $GETDVI macro call specifying DVI$_DFS_ACCESS as the item code.
/*
 * Example program to say if the specified device is a DFS-served device.
 * The first command line arg is checked.
 */
#include <stdio.h>
#include <stdlib.h>
#include <sdef.h>
#include <starlet.h>
#include <descrip.h>
#include <string.h>
#include <dvidef.h>

/* Item list structure definition.                                */
struct item_list {
    unsigned short int  length; /* Item buffer length             */
    unsigned short int  code;   /* Item code                      */
    void   *address;            /* Item buffer address            */
    long   *retlen;             /* length returned                */
    long    termin;             /* terminator                     */
};

long    device_stat;

int     main (int argc, char *argv[])
{
     long    status;                     /* system service return status */
     $DESCRIPTOR (devname, "");          /* descriptor for device name */
     struct item_list    ilist ={
         4,
         DVI$_DFS_ACCESS,                /* item list code */
         &device_stat,                   /* ptr to returned value */
         0,
         0
     };

     devname.dsc$a_pointer = argv[1];    /* descriptor points to first arg */
     devname.dsc$w_length = strlen (argv[1]);

     status = sys$getdviw (
             0,
             0,
             &devname,
             &ilist,
             0, 0, 0, 0);

     if (status != SS$_NORMAL)
         exit (status);                  /* unknown device, etc. */
     if (device_stat)
         printf ("true\n");
     else
         printf ("false\n");
     exit (1);
}Add:
#include <devdef.h>Change the item list code to:
DVI$_DEVCHAR2Change the test of the return value to:
if (device_stat &
                        DEV$M_DFS)
Appendix F. Restrictions on Extended File Specifications Support
A new, optional, volume structure, ODS-5, which provides support for names that are longer and have a greater range of legal characters than previous versions of OpenVMS
Support for deep directories
VSI DECdfs for OpenVMS Version 2.3 provides support for Extended File Specifications and ODS-5 volumes, with certain restrictions outlined in this appendix.
For more information on Extended File Specifications and ODS-5 volumes, refer to the VSI OpenVMS Guide to Extended File Specifications in the OpenVMS Version 7.2 documentation set.
F.1. Requirements for Mounting VSI DECdfs Access Points on an ODS-5 Volume
%DFS-F-UNSUPPFS, Unsupported file system structure
%SYSTEM-E-UNSUPPORTED, unsupported operation or function
On OpenVMS VAX Version 7.2 systems, you can mount VSI DECdfs access points on ODS-5 volumes, but you are limited to ODS-2-compliant file operations.
You can determine whether a mounted VSI DECdfs access point is associated with an ODS-5 volume by executing a SHOW DEVICE/FULL command and checking the ODS-5 characteristic in the resulting volume status display. From a DCL command procedure, the F$GETDVI lexical function returns the string F11V5 for the ACPTYPE argument. The $GETDVI system service returns the value DVI$C_ACP_F11V5 for the item code DVI$_ACPTYPE.
F.2. XQP Programming Considerations
VSI DECdfs functions as a layer between OpenVMS Record Management Services (RMS) and the OpenVMS XQP file system. VSI DECdfs accepts I/O requests from RMS on the client system and sends the I/O request information over a DECnet connection to the VSI DECdfs server. The server takes the request and builds an equivalent I/O request for the XQP file system on the server and returns the results.
Since the VSI DECdfs server and client systems can have different CPU architectures and may be running different versions of OpenVMS, compatibility issues can arise between the version of RMS on a VSI DECdfs client and the version of XQP on the VSI DECdfs server. One goal of VSI DECdfs is to transparently handle any differences between systems in order to provide the expected result.
When the VSI DECdfs client system is running an earlier version of OpenVMS than the VSI DECdfs server, there are few compatibility issues because the XQP has maintained excellent upward compatibility from one release to the next. However, when the VSI DECdfs client is running a later version of OpenVMS than the VSI DECdfs server, there are compatibility issues to consider. For example, the Extended File Specifications support introduced with OpenVMS Version 7.2 creates certain problems when a VSI DECdfs client running OpenVMS Version 7.2 accesses volumes served by a VSI DECdfs server running an earlier version of OpenVMS.
F.2.1. File Naming and Format Changes
VSI DECdfs Version 2.3 fully supports Extended File Specifications at the $QIO interface of the Files-11 XQP when both the client and server systems are running OpenVMS Version 7.2. This includes 8- and 16-bit character set formats.
When you access files on an ODS-5 volume from an OpenVMS VAX Version 7.2 system, no escaped file name forms are returned. For an ODS-2 or ISO Latin-1 file format, the name stored in the file header is returned. For a UCS-2 file format, a pseudoname is returned, followed by the file identifier in parentheses.
When the VSI DECdfs client system is running OpenVMS Version 7.2 and the VSI DECdfs server system is running an earlier version of OpenVMS, file names are limited to ODS-2-compatible formats and character sets.
F.2.2. Wildcards in File Specifications
Historically, OpenVMS has used the percent sign (%) as the single-character wildcard in file specifications. The OpenVMS Version 7.2 XQP also recognizes the question mark (?) as an additional single-character wildcard. VSI DECdfs Version 2.3 automatically replaces all question marks with percent signs if the access point being addressed is served by a pre-Version 7.2 system unless the FIB$V_PERCENT_LITERAL flag is set. In this case, a SS$_BADFILENAME error status will be returned.
F.2.3. Modified XQP Attributes
ATR$C_ASCNAME
The ATR$C_ASCNAME attribute allows the file specification stored in a file's primary file header to be read and written. In OpenVMS Version 7.2, the maximum buffer size that can be specified has been increased from 86 to 252. If the VSI DECdfs server system is running an older version of OpenVMS, the limit is still 86 bytes. In that case, a Version 7.2 client system can specify a larger buffer, but VSI DECdfs automatically truncates it to 86 bytes before sending the request to the server.
As stated in the VSI OpenVMS Guide to Extended File Specifications, the ability to write this attribute is provided solely to permit compatibility with existing applications. New and modified programs should not write this attribute. Changing its value can prevent a file from being permanently deleted.
ATR$C_FILE_SPEC
ATR$C_FILE_SPEC is a read-only attribute that returns the physical file specification. In OpenVMS Version 7.2, the largest permitted buffer that can be specified has increased from 512 to 4098 bytes. On ODS-2 volumes, the attribute is returned as always. If the VSI DECdfs server is running a version of OpenVMS prior to Version 7.2 and the client system is running OpenVMS Version 7.2, VSI DECdfs automatically truncates any buffer larger than 512 bytes.