Programming Concepts Manual, Volume I
- Operating System and Version:
- VSI OpenVMS IA-64 Version 8.4-1H1 or higher
VSI OpenVMS Alpha Version 8.4-2L1 or higher
VSI OpenVMS x86-64 Version 9.2-2 or higher
Preface
1. About VSI
VMS Software, Inc. (VSI) is an independent software company licensed by Hewlett Packard Enterprise to develop and support the OpenVMS operating system.
2. Intended Audience
This manual is intended for system and application programmers. It presumes that its readers have some familiarity with the VSI OpenVMS programming environment.
3. Document Structure
Part I,''Process and Synchronization'', Process and Synchronization
Part II,''Interrupts and Condition Handling'', Interrupts and Condition Handling
Part III,''Addressing and Memory Management'', Addressing and Memory Management
Part IV,''Appendixes: Macros and Examples of 64-Bit Programming'', Appendixes: Macros and Examples of 64-Bit Programming
Chapter 1, "Overview of Manuals and Introduction to Development on OpenVMS Systems" describes the structure of the two-volume manual, and offers an introduction to the OpenVMS operating system and to the tools that are available in the programming environment.
Chapter 2, "Process Creation" defines the two types of processes, and describes what constitutes the context of a process, and the modes of execution of a process. It also describes kernel threads and the kernel threads process structure.
Chapter 3, "Process Communication" describes communication within a process and between processes.
Chapter 4, "Process Control" describes how to use the creation and control of a process or kernel thread for programming tasks. It also describes how to gather information about a process or kernel thread and how to synchronize a program by using time.
Chapter 5, "Symmetric Multiprocessing (SMP) Systems" describes overview concepts of symmetric multiprocessing (SMP) systems.
Chapter 6, "Synchronizing Data Access and Program Operations" describes synchronization concepts and the differences between synchronization techniques on VAX systems, Alpha systems, and IA-64 systems. It presents methods of synchronization such as event flags, asynchronous system traps (ASTs), parallel processing RTLs, and process priorities, and the effects of kernel threads upon synchronization. It also describes how to use synchronous and asynchronous system services, and how to write applications in a multiprocessing environment.
Chapter 7, "Synchronizing Access to Resources" describes the use of the lock manager system services to synchronize access to shared resources. This chapter presents the concept of resources and locks; it also describes the use of the SYS$ENQ and SYS$DEQ system services to queue and dequeue locks.
Chapter 8, "Using Asynchronous System Traps" describes how to use asynchronous system traps (ASTs). It describes access modes and service routines for ASTs and how ASTs are declared and delivered. It also describes the effects of kernel threads on AST delivery.
Chapter 9, "Condition-Handling Routines and Services" describes the OpenVMS Condition Handling facility. It describes VAX system, Alpha system, and IA-64 system exceptions, arithmetic exceptions, and Alpha and IA-64 system unaligned access traps. It describes the condition value field, exception dispatcher, signaling, and the argument list passed to a condition handler. Additionally, types of condition handlers and various types of actions performed by them are presented. This chapter also describes how to write and debug a condition handler, and how to use an exit handler.
Chapter 10, "Overview of Alpha and I64 Virtual Address Space" describes the 32-bit and 64-bit use of virtual address space.
Chapter 11, "Support for 64-Bit Addressing (Alpha and I64 Only)" describes all the services, routines, tools, and programs that support 64-bit addressing.
Chapter 12, "Memory Management Services and Routines on OpenVMS Alpha and OpenVMS IA-64" describes system services and RTLs of Alpha and IA-64 systems to manage memory. It describes the page size and layout of virtual address space on Alpha and IA-64 systems. This chapter also describes how to add virtual address space, adjust working sets, control process swapping, and create and manage sections on Alpha and IA-64 systems.
Chapter 13, "Memory Management Services and Routines on OpenVMS VAX" describes the of system services and RTLs of VAX systems to manage memory. It describes the page size and layout of virtual address space on VAX systems. This chapter also describes how to add virtual address space, adjust working sets, control process swapping, and create and manage sections on VAX systems.
Chapter 14, "Using Run-Time Routines for Memory Allocation" describes how to use RTLs to allocate and free pages and blocks of memory, and how to use RTLs to create, manage, and debug virtual memory zones.
Chapter 15, "Alignment on VAX, Alpha, and IA-64 systems" describes the importance and techniques of instruction and data alignment.
- Chapter 16, "Memory Management with VLM Features" describes the VLM memory management features, such as the following:
- Memory-resident global sections
- Fast I/O and buffer objects for global sections
- Shared page tables
- Expandable global page table
- Reserved memory registry
Appendix A, "C Macros for 64-Bit Addressing" describes the C language macros for manipulating 64-bit addresses, for checking the sign extension of the low 32 bits of 64-bit values, and for checking descriptors for the 64-bit format.
Appendix B, "64-Bit Example Program" illustrates writing a program with a 64-bit region that was created and deleted by system services.
Appendix C, "VLM Example Program" demonstrates the memory management VLM features described in Chapter 16, "Memory Management with VLM Features".
4. Related Documents
For a detailed description of each run-time library and system service routine mentioned in this manual, see the OpenVMS Run-Time Library documentation and the VSI OpenVMS System Services Reference Manual.
VSI OpenVMS DCL Dictionary
VSI OpenVMS User's Manual
Guide to OpenVMS File Applications
VSI OpenVMS Guide to System Security
OpenVMS Record Management Services documentation
VSI OpenVMS Utility Routines Manual
VSI OpenVMS I/O User's Reference Manual
5. VSI Encourages Your Comments
You may send comments or suggestions regarding this manual or any VSI document by sending electronic mail to the following Internet address: <docinfo@vmssoftware.com>. Users who have VSI OpenVMS support contracts through VSI can contact <support@vmssoftware.com> for help with this product.
6. OpenVMS Documentation
The full VSI OpenVMS documentation set can be found on the VMS Software Documentation webpage at https://docs.vmssoftware.com.
7. Typographical Conventions
The following conventions are used in this manual:
| Convention | Meaning |
|---|---|
Ctrl/x | A sequence such as
Ctrl/x
indicates that you must hold down the key labeled Ctrl while you
press another key or a pointing device button. |
PF1
x | A sequence such as PF1
x indicates that you
must first press and release the key labeled PF1 and then press and
release another key (x)
or a pointing device button. |
| Enter | In examples, a key name in bold indicates that you press that key. |
… |
A horizontal ellipsis in examples indicates one of the
following possibilities:
|
. . . | A vertical ellipsis indicates the omission of items from a code example or command format; the items are omitted because they are not important to the topic being discussed. |
| ( ) | In command format descriptions, parentheses indicate that you must enclose choices in parentheses if you specify more than one. |
| [ ] | In command format descriptions, brackets indicate optional choices. You can choose one or more items or no items. Do not type the brackets on the command line. However, you must include the brackets in the syntax for directory specifications and for a substring specification in an assignment statement. |
| | | In command format descriptions, vertical bars separate choices within brackets or braces. Within brackets, the choices are optional; within braces, at least one choice is required. Do not type the vertical bars on the command line. |
| { } | In command format descriptions, braces indicate required choices; you must choose at least one of the items listed. Do not type the braces on the command line. |
| bold type | Bold type represents the name of an argument, an attribute, or a reason. In command and script examples, bold indicates user input. Bold type also represents the introduction of a new term. |
| italic type | Italic type indicates important information, complete titles of manuals, or variables. Variables include information that varies in system output (Internal error number), in command lines (/PRODUCER=name), and in command parameters in text (where dd represents the predefined code for the device type). |
| UPPERCASE TYPE | Uppercase type indicates a command, the name of a routine, the name of a file, or the abbreviation for a system privilege. |
Example |
This typeface indicates code examples, command examples, and interactive screen displays. In text, this type also identifies website addresses, UNIX commands and pathnames, PC-based commands and folders, and certain elements of the C programming language. |
| – | A hyphen at the end of a command format description, command line, or code line indicates that the command or statement continues on the following line. |
| numbers | All numbers in text are assumed to be decimal unless otherwise noted. Nondecimal radixes—binary, octal, or hexadecimal—are explicitly indicated. |
Chapter 1. Overview of Manuals and Introduction to Development on OpenVMS Systems
This chapter describes the structure of this two-volume manual. This chapter also provides an overview of the OpenVMS operating system, its components, and the tools in programming software.
1.1. Overview of the Manual
|
Volume |
Part |
Description |
|---|---|---|
|
Volume I | ||
|
Part I |
Process and Synchronization. Describes the creation, communication, and control of processes. It also describes symmetric multiprocessing (SMP), and the synchronizing of data access, programming operations, and access to resources. | |
|
Part II |
Interrupts and Condition Handling. Describes the use of asynchronous system traps (ASTs), and the use of routines and services for handling conditions. | |
|
Part III |
Addressing and Memory Management. Describes 32-bit and 64-bit address space, and the support offered for 64-addressing. It also provides guidelines for 64-bit application programming interfaces (APIs); and Alpha, I64, VAX, and VLM memory management with run-time routines for memory management, and alignment on OpenVMS Alpha, VAX, and IA-64 systems. | |
|
Part IV |
Appendixes: Macros and Examples of 64-Bit Programming. Describes the macros used in 64-bit programming, along with two examples of 64-bit programming. | |
|
Volume II | ||
|
Part I |
OpenVMS Programming Interfaces: Calling a System Routine. Describes the basic calling format for OpenVMS routines and system services. It also describes the STARLET structures and definitions for C programmers. | |
|
Part II |
I/O, System and Programming Routines. Describes the I/O operations, and the system and programming routines used by run-time libraries and system services. | |
|
Part III |
Generic Macros for Calling System Services. Describes in appendixes the generic macros used for calling system services, OpenVMS data types, and the distributed name services on OpenVMS VAX systems. | |
1.2. Overview of the OpenVMS Operating System
The OpenVMS operating system is a highly flexible, general-purpose, multiuser system that supports the full range of computing capabilities, providing the high integrity and dependability of commercial-strength systems along with the benefits of open, distributed client/server systems.
OpenVMS operating systems can be integrated with systems from different vendors in open systems computing environments. OpenVMS supports software that conforms to international standards for an open environment. These industry-accepted, open standards specify interfaces and services that permit applications and users to move between systems and allow applications on different systems to operate together.
The OpenVMS operating system configuration includes OpenVMS integrated software, services and routines, applications, and networks. The system supports all styles of computing, from time-sharing to real-time processing to transaction processing. OpenVMS systems configured with optional software support distributed computing capabilities and can function as servers in multivendor client/server configurations.
The OpenVMS operating system is designed to provide software compatibility across all the processors on which it runs.
The following sections describe the components of the OpenVMS operating system, give a general overview of the system software, and describe the various styles of computing that OpenVMS software supports. The sections also summarize the basic ways in which OpenVMS software can be configured and connected to other software, and the hardware platforms and processors on which the OpenVMS software runs.
1.3. Components of the OpenVMS Operating System
The OpenVMS operating system is a group of software programs (or images) that control computing operations. The base operating system is made up of core components and an array of services, routines, utilities, and related software. The OpenVMS operating system serves as the foundation from which all optional software products and applications operate. The services and utilities in the base OpenVMS operating system support functions such as system management, data management, and program development. Other integrated software that adds value to the system provides functions such as clustering and volume shadowing.
Optional software products, including application programs developed by OpenVMS programmers and other programmers, run on the core operating system. The OpenVMS system supports a powerful, integrated development environment with a wide selection of software development tools. Application programs written in multiple languages provide computational, data-processing, and transaction-processing capabilities.
Compatibility Between Software Versions
User-mode programs and applications created under earlier versions of OpenVMS VAX, OpenVMS Alpha, and OpenVMS IA-64 run under subsequent versions with no change.
Command procedures written under one version of OpenVMS continue to run under newer versions of the software.
Most user-mode OpenVMS VAX sources can be recompiled, relinked, and run on an OpenVMS Alpha and OpenVMS IA-64 system without modification. Code that explicitly relies on the VAX architecture requires modification.
Most OpenVMS Alpha images run under translation on OpenVMS IA-64.
Translation is available for OpenVMS VAX applications without sources or that you do not want to recompile.
1.3.1. OpenVMS Systems on Multiple Platforms
A complex instruction set computer (CISC) architecture based on the VAX architecture.
A reduced instruction set computer (RISC) architecture based on the Alpha architecture.
The explicitly parallel instruction computing (EPIC) architecture used by Itanium systems.
1.3.1.1. System Compatibility and Program Portability Across Platforms
The OpenVMS Alpha and OpenVMS IA-64 operating systems are compatible with OpenVMS VAX systems in terms of user, system manager, and programmer environments. For general users and system managers, OpenVMS Alpha and OpenVMS IA-64 have the same interfaces as OpenVMS VAX. Virtually all OpenVMS VAX system management utilities, command formats, and tasks are identical in the OpenVMS Alpha and OpenVMS IA-64 environments. Mixed-architecture and mixed-version clusters that contain both Alpha systems and VAX systems are supported.
1.3.2. OpenVMS Computing Environments
Open system capabilities
Distributed processing capabilities
Production system capabilities
System and network management capabilities
OpenVMS software capabilities include both the standardized features of open systems computing and the commercial-strength functionality of traditional OpenVMS systems. System and network management software provides for control of heterogeneous, integrated environments.
The following sections describe the capabilities supported in OpenVMS computing environments and summarize the software resources available in each kind of environment.
1.3.2.1. Open System Capabilities
OpenVMS offers the benefits of an open system environment, which permits both applications and users to move between systems. In addition, applications on different open systems can operate together.
The OpenVMS operating system makes available a set of services in an open domain, while still offering its traditional high-integrity computing services. Incorporation of open computing capabilities enhances the traditional feature-rich OpenVMS environment.
Software in the OpenVMS open systems environment enables the development and use of portable applications and consistent user interfaces and also permits systems to operate together. The keys to openness of OpenVMS systems are standard programming interfaces, standardized user interfaces, and standard protocols.
1.3.2.2. Application Portability
Applications can be written once and run on other open platforms that support the standards used in the applications.
Users can access the wide range of applications available on open platforms.
Applications can be supplied by different vendors.
Applications that are developed on the three supported platforms and conform to open standards can be easily ported to other systems that conform to the same standard interfaces. Applications written in ISO and ANSI languages are portable to other systems. In addition, the Open Group/Motif graphical user interface supports application portability.
1.3.2.2.1. Other Application Portability Features
Applications written in ISO/ANSI languages are easily portable to other platforms that support them. OpenVMS VAX, OpenVMS Alpha, and OpenVMS IA-64 provide support for such languages as C, COBOL, and Fortran.
1.3.3. Distributed Computing Capabilities
In a distributed computing environment, an application is distributed over two or more systems or processors, each of which has its own autonomous operating environment. A distributed application is composed of separate modules, running on different systems, that communicate with each other by passing data between modules or by sharing access to files or databases. A distributed application must be able to coordinate its activities over a dispersed operating environment.
The distributed computing environment can consist of software located either in a single box or a single room or can comprise a worldwide network of computers. The systems in the distributed configuration can be uniprocessor, multiprocessor, or OpenVMS Cluster systems; systems from different vendors can be included in the same configuration.
1.3.3.1. Client/Server Style of Computing
A server is any system that provides a service or resource to other systems.
The client is the system requesting the service.
This style of computing allows each portion of a distributed application to run in its own optimal environment. The whole application does not have to run on one centralized system (such as a mainframe system), but enterprisewide cohesiveness can still be maintained. For example, individuals or local offices, using their own computers and running software appropriate to their needs, can be linked to large computers or OpenVMS Cluster systems in a network. A distributed computing system can function as though it were a single system that connects all parts of an enterprise. The client can have transparent access to the integrated resources of the enterprise.
Any system can be a client or a server, and some systems may include both client software for certain applications and server software for other applications. Servers can be connected to many clients, and a client can be connected to more than one server at a time. (Client and server relationships may change frequently: at times it may not be possible to tell which is the client and which is the server.) In some cases, the application is stored on the server and run on the client, using the resources of the client. The user, who does not need to know what system is serving the application, can function in a familiar, local environment.
1.3.3.2. OpenVMS Client/Server Capabilities
OpenVMS systems support a wide variety of client/server configurations. Clients requiring resources can be personal computers, workstations, point-of-sale devices, OpenVMS systems, or systems from other vendors that are running the appropriate client software. Users on client systems can use character-cell terminals or windowing desktops.
Servers fulfilling clients' requests can be located on OpenVMS systems or other operating systems running appropriate server software. OpenVMS servers, for example, can provide file access, printing, application services, communication services, and computing power as application engines to clients on desktop devices or in laboratories or factories. Client/server configurations permit the commercial-strength capabilities of OpenVMS host systems to be integrated with the personal-computing capabilities of desktop systems.
Middleware, which runs on OpenVMS and other systems from multiple vendors, can be used to tie together clients and servers. Middleware integrates various client and server systems through application, communication, data interchange, and multivendor support. Complex information-sharing environments involving PC clients and operating system servers are supported.
An essential feature of the OpenVMS operating system is its support of a rich environment for developing software application programs. The programming software integrated in the OpenVMS system provides the tools required to effectively develop new software applications. You also have the option of using additional powerful tools to enhance the productivity of software development in the OpenVMS environment.
The following sections summarize the primary program development features available on all three supported platforms. The sections also introduce the OpenVMS programming environment and present brief functional descriptions of the OpenVMS programming tools.
1.4. The OpenVMS Programming Environment
The OpenVMS system supports a flexible programming environment that offers a wide range of tools and resources to support efficient program development. This robust OpenVMS programming environment permits the development of mixed-language application programs and portable programs, as well as application programs with distributed functions that run in client/server environments. This environment also provides tools that allow you to use the web and other information technologies.
Creating, controlling, and deleting processes
Communicating with other components
Sharing resources
Implementing input/output procedures
Using security features
Managing memory
Managing files
Synchronizing events
Providing for condition handling
Calling utility routines
Language compilers, interpreters, and assemblers
Linkers and debuggers
Text processors and other program development utilities
Callable system routines such as run-time routines, system services, and other utility routines
Record Management Services (RMS) routines and utilities
Optional software development tools that run on the OpenVMS system enhance programmer productivity, saving programming time and promoting the development of error-free code. OpenVMS supports optional integrated software products that enhance program development capabilities in an organization. These software development products can make use of middleware services that facilitate the development of applications for multivendor networks and for web-enabling tools to help develop client/server applications.
Provide web access to data
Provide web access to applications
Provide web tools for commercial web servers
Provide other web tools including freeware
Middleware products and capabilities include Distributed Computing Environment (DCE), COM for OpenVMS, and Reliable Transaction Router for OpenVMS. Web-enabling tools include DECforms Web Connector, and TP Web Connector.
1.4.1. Programming to Standards
Coding of programs for the OpenVMS environment and for other environments involves conforming to software development standards. OpenVMS standards that define modular programming techniques and procedure calling and condition handling practices pertain to applications specific to OpenVMS. IEEE and international standards apply to applications developed on OpenVMS that are designed to run on other systems as well as on OpenVMS.
1.4.1.1. Common Environment for Writing Code
OpenVMS software programmers can write code in a common environment, following standard OpenVMS modular programming practices. This standard approach establishes the minimum criteria necessary to ensure the correct interface at the procedure level between software written by different programmers. If all programmers coding OpenVMS applications follow this standard approach, modular procedures added to a procedure library will not conflict with other procedures in the library. Standard modular programming practices apply to OpenVMS programs that have a public entry point. For details of this standard approach, see the Guide to Creating OpenVMS Modular Procedures.
1.4.1.2. Common Language Environment
The OpenVMS system supports a common language environment, which permits using a mixture of languages in programming. A program written in any of the programming languages supported by OpenVMS can contain calls to procedures written in other supported languages. Mixed-language programming is possible because all supported languages adhere to the OpenVMS calling standard. This standard describes the techniques used by all supported languages for invoking routines and passing data between them. It also defines the mechanisms that ensure consistency in error and exception handling routines, regardless of the mix of programming languages. Information about the calling standard appears in the VSI OpenVMS Calling Standard, and descriptions of how to use the calling interface are given in VSI OpenVMS Programming Concepts Manual, Volume II.
1.5. OpenVMS Programming Software
This section describes the integrated programming tools available on the OpenVMS operating system to help implement software development.
The phases of a typical software development life cycle can include proposal of the concept; formulation of requirements and specifications for the software product; design, implementation, and testing of the software; and integration and maintenance of the product. Implementing the software product involves building and modifying source code modules and compiling, linking, and executing the resulting images. Testing involves refining code to optimize performance.
|
Type of Software |
OpenVMS Software Components |
|---|---|
|
Text processors |
|
|
Major programming utilities |
|
|
Other program development utilities |
|
|
Callable system routines |
|
The commands used to invoke some of the programming utilities (for example, linker, debugger, LIBRARIAN) vary slightly for the three supported platforms.
1.5.1. Creating Program Source Files
OpenVMS text-processing utilities can be used to create and modify program source files. The DEC Text Processing Utility (DECTPU) is a high-performance text processor that can be used to create text-editing interfaces such as EVE. DECTPU includes a high-level procedure language with its own compiler and interpreter, as well as the customizable EVE editing interface. DECTPU features multiple buffers, windows, and subprocesses, and provides for text processing in batch mode. The EDT editor is an interactive text editor that provides editing in keypad and line modes. EDT supports multiple buffers, startup command files, and journaling. In general, the EVE editing interface offers more capability than EDT for complex editing tasks.
The vi editor is a display-oriented interactive text editor used in the POSIX for OpenVMS environment. POSIX also supports the ed and ex editors.
Other optional tools for creating source files on OpenVMS systems are available separately or as part of the VSI software development environment. The Language-Sensitive Editor/Source Code Analyzer for OpenVMS (LSE/SCA) provides a multilanguage, multivendor editor for program development and maintenance and also supplies cross-referencing features and the capability to analyze source code.
1.5.2. Creating Object Files
OpenVMS supports a variety of optional language compilers, interpreters, and assemblers that translate source code to object code (in the form of object modules). These language implementations adhere to industry standards, including ISO, ANSI, and X/Open standards as well as U.S. Federal Information Processing Standards (FIPS) and Military Standards (MIL-STD), as applicable.
| Language | Characteristics |
|---|---|
|
VSI Ada |
Complete production-quality implementation of Ada language; fully conforms to ANSI and MIL-STD standards; has Ada validation. |
|
VAX APL |
Interpreter with built-in editor, debugger, file system, communication facility. |
|
VAX BASIC |
Either an interpreter or a compiler; fully supported by the OpenVMS debugger; fully reentrant code. |
|
VSI BASIC for OpenVMS |
An optimizing compiler; highly compatible with VAX BASIC; no environment or interpreter support; also available on IA-64. |
|
BLISS-32 for OpenVMS |
Advanced set of language features supporting development of modular software according to structured programming concepts; also available on IA-64. |
|
BLISS-64 for OpenVMS |
Development of modular software support for 64-bit programs; not available on VAX. |
|
VAX C |
Full implementation of C programming language with added features for performance enhancement in the OpenVMS environment. |
|
VSI C for OpenVMS Alpha and IA-64 systems |
Compliant with ANSI/ISO C International Standard with VSI extensions; includes standard-conformance checking and many optional code-quality and portability diagnostics; supports 64-bit virtual addressing; generates optimized and position-independent code. |
|
VSI C++ for OpenVMS Alpha and IA-64 systems |
Compliant with ANSI/ISO C++ International Standard with VSI extensions; supports the ARM, GNU, and MS dialects; supports 64-bit virtual addressing; generates highly optimized object code; facilitates object-oriented program design. |
|
VSI COBOL for OpenVMS |
Compliant with ANSI-standard COBOL; includes as enhancements screen-handling, file-sharing, and report-writing facilities; is supported on IA-64. |
|
VAX DIBOL |
For interactive data processing; includes a compiler, debugger, and utility programs for data handling, data storing, and interprogram communication. |
|
VSI Fortran 77 for OpenVMS VAX |
Extended implementation of full language FORTRAN-77, conforming to American National Standard FORTRAN, ANSI X3.9-1978. It includes optional support for programs conforming to ANSI X3.9-1966 (FORTRAN IV) and meets Federal Information Processing Standard Publication FIPS-69-1 and MIL-STD-1753. |
|
VSI Fortran for OpenVMS |
ANSI-standard Fortran 90 and Fortran 95 optimizing compiler; available on IA-64 and Alpha systems. |
|
VAX MACRO |
Assembly language for programming the VAX computer under the OpenVMS operating system; uses all OpenVMS resources; supports large instruction set enabling complex programming statements. |
|
MACRO-32 Compiler |
Available on OpenVMS IA-64 and Alpha systems to port existing VAX MACRO code to an Alpha or IA-64 system. |
|
MACRO-64 Assembler |
Available on OpenVMS Alpha systems; a RISC assembly language that provides precise control of instructions and data. |
|
VSI Pascal for OpenVMS |
ANSI-standard Pascal features and language extensions that go beyond the standard; available on VAX, Alpha, and I64. |
1.5.3. Creating Runnable Programs
After a program source file is coded, it must be compiled or assembled into object modules by a language processor and then linked. The OpenVMS Linker binds the object modules into an image that can be executed on the OpenVMS operating system.
The linker processes object modules and shareable image files, as well as symbol table files, library files, and options files (used to manage the linking operation and simplify the use of complex, repetitious linker operations). The most common output of the linker is an executable image of the program. The linker can also produce a shareable image, a system image, an image map, or a symbol table file to be used by other programs being linked. Certain linking tasks, such as creating shareable images, are performed differently on OpenVMS VAX than on OpenVMS Alpha and OpenVMS IA-64 systems.
The Librarian utility provides for efficient storage in central, easily accessible files of object modules, image files, macros, help text, or other record-oriented information.
1.5.4. Testing and Debugging Programs
The debugger allows users to trace program execution and to display and modify register contents using the same symbols as are in the source code.
The OpenVMS Debugger (debugger), which debugs user-mode code.
TheDelta/XDelta Debugger (DELTA/XDELTA), which debugs code in other modes as well as user mode. (The DELTA debugger has not yet been ported to the OpenVMS IA-64 operating system).
The OpenVMS symbolic debugger is more useful than DELTA/XDELTA for most programs: the symbolic commands entered using different interfaces (keypad, command line, or file of commands) display source code lines on the screen, have more descriptive error messages, and provide help information.
Control program execution on a line-by-line basis or at a user-specified breakpoint
Display breakpoints, tracepoints, watchpoints, active routine calls, stack contents, variables, symbols, source code, and source directory search list
Define symbols
Create key definitions
Change values in variables
Evaluate a language or address expression
Create or execute debugger command procedures
The OpenVMS symbolic debugger provides enhanced support for programs that have multiple threads of execution within an OpenVMS process, including any program that uses POSIX Threads Library for developing real-time applications.
The debugger has been modified to support debugging of programs that contain 64-bit data addresses.
An additional debugger utility is available only on an OpenVMS Alpha system: the OpenVMS Alpha System-Code Debugger, which can be used to debug non-pageable system code and device drivers. The system-code debugger is a symbolic debugger that lets the user employ the familiar OpenVMS Debugger interface to observe and manipulate system code interactively as it executes. The system-code debugger can display the source code where the software is executing and allows the user to advance by source line.
Control the system software's execution, stopping at points of interest, resuming execution, intercepting fatal exceptions, and so on
Trace the execution path of the system software
Monitor exception conditions
Examine and modify the value of variables
In some cases, test the effect of modifications without having to edit the source code, recompile, and relink
You can use the OpenVMS Alpha System-Code Debugger to debug code written in the following languages: C, BLISS, and MACRO. Information about using the system-code debugger and how it differs from the OpenVMS Debugger is given in Writing OpenVMS Alpha Device Drivers in C.
1.5.4.1. Special Modes of Operation for Debugging
MULTIPROCESSING
POOLCHECK
BUGCHECKFATAL
SYSTEM_CHECK
MULTIPROCESSING is useful for debugging privileged code that uses spinlocks, such as device driver code. POOLCHECK is useful for investigating frequent and inexplicable failures in a system. When POOLCHECK is enabled, pool-checking routines execute whenever pool is deallocated or allocated. BUGCHECKFATAL is useful for debugging the executive. SYSTEM_CHECK turns on the previous three system parameters and also activates other software that aids in detecting problems. It enables a number of run-time consistency checks on system operation and records some trace information.
If you are using one of these special modes, for example, to debug a device driver or other complex application, under certain conditions generally related to high I/O loads, it is possible to incur a CPUSPINWAIT bugcheck. To prevent a CPUSPINWAIT bugcheck, use either the system default settings for these system parameters, or reduce the loading of the system.
If you have reason to change the default settings, you can reduce the likelihood of encountering a problem by setting the SMP_LNGSPINWAIT system parameter to a value of 9000000.
1.5.5. Using Other Program Development Utilities
| Utility | Function |
|---|---|
|
Command Definition Utility (CDU) |
Enables an application developer to create commands with a syntax similar to DIGITAL Command Language (DCL) commands. |
|
Message utility |
Permits user to create application messages to supplement the OpenVMS system messages. |
|
Patch utility? |
Permits users to make changes (in the form of patches) to an image or data file. If the change was made to an image, the new version can then be run without recompiling or relinking. |
|
SUMSLP utility |
Supplies batch-oriented editor used to make several updates to a single source file; one update program can be applied to all versions of a file. |
|
National character set utility |
Permits users to define non-ASCII string collating sequences and to define conversion functions; allows an RMS indexed file to be collated using user-specified collating sequences. |
|
System Dump Analyzer utility |
Determines the cause of system failures; reads the crash dump file and formats and displays it; also used to diagnose root causes that lead to an error. |
1.5.6. Managing Software Development Tasks
VSI Code Management System (CMS) for OpenVMS provides an efficient method of storing project files (such as documents, object files, and other records) and tracking all changes to these files.
VSI Module Management System (MMS) for OpenVMS automates building of software applications.
1.6. Using Callable System Routines
OpenVMS provides extensive libraries of prewritten and debugged routines that can be accessed by programs. Libraries specific to the supported platforms supply commonly needed routines optimized for the OpenVMS environment; these libraries include run-time library routines, system services, utility routines, and RMS services. These libraries are described in this section.
1.6.1. Using the POSIX Threads Library Routines
OpenVMS includes a user-mode, multithreading capability called POSIX Threads Library. POSIX Threads Library provides a POSIX 1003.1-1996 standard style threads interface. Additionally, POSIX Threads Library provides an interface that is the OpenVMS implementation of Distributed Computing Environment (DCE) threads as defined by The Open Group.
POSIX Threads Library is a library of run-time routines that allows the user to create multiple threads of execution within a single address space. With POSIX Threads Library Kernel Threads features enabled, POSIX Threads Library provides for concurrent processing across all CPUs by allowing a multithreaded application to have a thread executing on every CPU (on both symmetric and asymmetric multiprocessor systems). Multithreading allows computation activity to overlap I/O activity. Synchronization elements, such as mutexes and condition variables, are provided to help ensure that shared resources are accessed correctly. For scheduling and prioritizing threads, POSIX Threads Library provides multiple scheduling policies. For debugging multithreaded applications, POSIX Threads Library is supported by the OpenVMS Debugger. POSIX Threads Library also provides Thread Independent Services (TIS), which assist in the development of threadsafe APIs.
On OpenVMS Alpha and OpenVMS IA-64 systems, POSIX threads provide support to accept 64-bit parameters.
General threads
Object attributes
Mutex
Condition variable
Thread context
Thread cancellation
Thread priority and scheduling
Debugging
For more information about threads, see the Guide to POSIX Threads Library.
1.6.2. Using OpenVMS Run-Time Library Routines
The OpenVMS Run-Time Library (RTL) is a set of language-independent procedures for programs to be run specifically in the OpenVMS environment. RTL routines establish a common run-time environment for application programs written in any language supported in the OpenVMS common language environment. RTL procedures adhere to the OpenVMS calling standard and can be called from any program or program module in a language supported by OpenVMS (see Section 1.5.2, ''Creating Object Files'').
|
Routine |
Description |
|---|---|
|
LIB$ routines |
Library routines that perform generally needed system functions such as resource allocation and common I/O procedures; provide support for 64-bit virtual addressing on Alpha and IA-64 systems. |
|
MTH$ routines? |
Math routines that perform arithmetic, algebraic, and trigonometric functions. |
|
DPML$ routines |
Portable Mathematics Library for OpenVMS Alpha and OpenVMS IA-64; a set of highly accurate mathematical functions. |
|
OTS$ routines |
Language-independent routines that perform tasks such as data conversion. |
|
SMG$ routines |
Screen management routines used in the design of complex images on a video screen. |
|
STR$ routines |
String manipulation routines. |
In addition, language-specific RTL routines support procedures in Ada, BASIC, C, COBOL, Fortran, Pascal, and PL/I (VAX only) as well as in POSIX C. VSI C RTL routines support 64-bit programming on OpenVMS Alpha and OpenVMS IA-64 systems.
CXML is a collection of mathematical routines optimized for Alpha systems. These subroutines perform numerically intensive operations that occur frequently in engineering and scientific computing, such as linear algebra and signal processing. CXML can help reduce the cost of computation, enhance portability, and improve productivity.
1.6.3. Using OpenVMS System Services
OpenVMS system services are procedures that control resources available to processes, provide for communication among processes, and perform basic operating system functions such as I/O coordination. Application programs can call OpenVMS system services to perform the same operations that the system services provide for the OpenVMS operating system (for example, creating a process or subprocess).
At run time, an application program calls a system service and passes control of the process to it. After execution of the system service, the service returns control to the program and also returns a condition value. The program analyzes the condition value, determines the success or failure of the system service call, and alters program execution flow as required.
| Service Group | Function |
|---|---|
|
Security |
Provides mechanisms to enhance and control system security |
|
Event flag |
Clears, sets, and reads event flags; places process in wait state until flags are set |
|
AST |
Controls handling of software interrupts called asynchronous system traps (ASTs) |
|
Logical names |
Provide a generalized logical name service |
|
Input/output |
Performs input and output operations directly at the device driver level, bypassing RMS |
|
Process control |
Creates, deletes, and controls the execution of processes (on a clusterwide basis); permits a process on one node to request creation of a detached process on another node |
|
Process information |
Provides information about processes |
|
Timer and time conversion |
Permits scheduling of program events at specific times or time intervals; supplies binary time values |
|
Condition handling |
Designates condition-handling procedures that gain control when an exception/condition occurs |
|
Memory management |
Permits control of an application program's virtual address space |
|
Change mode |
Changes the access mode of a process |
|
Lock management |
Permits cooperating processes to synchronize their access to shared resources |
|
DECdtm services |
Provide for complete and consistent execution of distributed transactions and for data integrity |
|
Cluster event notification? |
Requests notification when an OpenVMS Cluster configuration event occurs |
OpenVMS I/O system services perform logical, physical, and virtual I/O and network operations, and queue messages to system processes. The $QIO system service provides a direct interface to the operating system's I/O routines. These services are available from within most programming languages supported by OpenVMS and can be used to perform low-level I/O operations efficiently with a minimal amount of system overhead for time-critical applications.
On OpenVMS Alpha and OpenVMS IA-64 systems, new system services provide access to 64-bit virtual address space for process private use. Additionally, new system services are available to provide high CPU performance and improved symmetric multiprocessing (SMP) scaling of I/O operations. These services exhibit high-performance gains over the $QIO service.
DECdtm services ensure consistent execution of applications on the OpenVMS operating system. In transaction processing applications, many users may be simultaneously making inquiries and updating a database. The distributed transaction processing environment typically involves communication between networked systems at different locations. DECdtm services coordinate distributed transactions by using the two-phase commit protocol and implementing special logging and communication techniques. DECdtm services ensure that all parts of a transaction are completed or the transaction is aborted.
1.6.4. Using OpenVMS Utility Routines
|
Routine |
Utility/Facility |
|---|---|
|
ACL$ |
Access control list editor (ACL editor) |
|
CLI$ |
Command Definition Utility (CDU) |
|
CONV$ |
Convert and Convert/Reclaim utilities (CONVERT and CONVERT/RECLAIM) |
|
DCX$ |
Data Compression/Expansion facility (DCX) |
|
EDT$ |
EDT editor |
|
FDL$ |
File Definition Language utility (FDL) |
|
LBR$ |
Librarian utility (LIBRARIAN) |
|
LGI$ |
LOGINOUT routines |
|
MAIL$ |
Mail utility (MAIL) |
|
NCS$ |
National Character Set utility (NCS) |
|
PSM$ |
Print Symbiont Modification facility (PSM) |
|
SMB$ |
Symbiont/Job-Controller Interface facility (SMB) |
|
SOR$ |
Sort/Merge utility (SORT/MERGE) |
|
TPU$ |
DEC Text Processing Utility (DECTPU) |
You can use an optional, portable library of user-callable routines to perform high-performance sorting on OpenVMS Alpha systems. The high-performance sort supports a subset of the functionality present on the OpenVMS Sort/Merge utility, using the callable interface to the SOR$ routine. The high-performance sort/merge provides better performance for most sort and merge operations.
1.7. Programming User Interfaces
User interfaces to the OpenVMS VAX, OpenVMS Alpha, and OpenVMS IA-64 operating systems include the DCL interface and the optional DECwindows Motif for OpenVMS graphical user interface. Another user interface is through electronic forms.
You can use DCL commands to invoke program development software (compilers, editors, linkers) and to run and control execution of programs. You can use DCL command procedures to perform repetitious operations in software development.
The Command Definition Utility (CDU) enables application developers to create DCL-level commands with a syntax similar to OpenVMS DCL commands. Using CDU, the developer can create applications with user interfaces similar to those of operating system applications. The Message utility permits an application developer to create application messages to supplement the system messages supplied by the OpenVMS operating system.
The DECwindows Motif for OpenVMS software provides a consistent user interface for developing software applications and includes an extensive set of programming libraries and tools. DECwindows Motif for OpenVMS supports both the OSF/Motif standards-based graphical user interface and the X user interface (XUI) in a single run-time and development environment. DECwindows Motif requires a DECwindows X11 display server (device driver and fonts) that supports the portable compiled format (PCF), permitting use of vendor-independent fonts.
A user interface toolkit composed of graphical user interface objects (widgets and gadgets); widgets provide advanced programming capabilities that permit users to create graphic applications; gadgets, similar to widgets, require less memory to create labels, buttons, and separators
A user interface language to describe visual aspects of objects (menus, labels, forms) and to specify changes resulting from user interaction
The OSF/Motif Window Manager, which allows users to customize the interface
Standard X Window System libraries such as Xlib and the intrinsics
Libraries needed to support the current base of XUI applications
OSF/Motif toolkit support for developing applications using the Motif user interface style
VSI libraries that give users capabilities beyond the standards
1.8. Optional VSI Software Development Tools
VSI supplies optional software development tools for the OpenVMS environment, such as DECset. DECset is a set of tools that supports software coding, testing, and maintenance of applications and data. These tools can be used individually or as part of the optional VSI software development environment.
1.9. Managing Data
The basic OpenVMS tool for transparent, intuitive management of data is the Record Management Services (RMS) subsystem. RMS is a collection of routines that gives programmers a device-independent method for storing, retrieving, and modifying data for their application. RMS also provides extensive protection and reliability features to ensure data integrity.
RMS is a higher level interface to the file system and OpenVMS I/O subsystem. It is used by all products that run on OpenVMS VAX, OpenVMS Alpha, and OpenVMS IA-64 for file and record operations. A subset of RMS services permits network file operations that are generally transparent to the user.
On OpenVMS Alpha and OpenVMS IA-64 systems, RMS supports I/O operations to and from 64-bit addressable space.
1.9.1. RMS Files and Records
RMS supports a variety of file organizations, record formats, and record-access modes. RMS supports sequential, relative, and indexed disk file organizations, and fixed- and variable-length records. It supports a number of record-access modes: sequential, by key value, by relative record number, or by record file address. RMS is designed primarily for mass storage devices (disks and tapes), but also supports unit-record devices such as terminals or printers.
Creating new files, accessing existing files, extending disk space for files, closing files, and obtaining file characteristics
Getting, locating, inserting, updating, and deleting records in files
RMS promotes safe and efficient file sharing by providing multiple access modes, automatic record locking when applicable, and optional buffer sharing by multiple processes.
1.9.2. RMS Utilities
RMS file utilities allow users to analyze the internal structure of an RMS file and to determine the most appropriate set of parameters to tune an RMS file. RMS utilities can also be used to create, efficiently load, and reclaim space in an RMS file.
Analyze/RMS_File utility
File Definition Language utilities (Create/FDL and Edit/FDL)
Convert and Convert/Reclaim utilities
The Analyze/RMS_File utility allows the programmer to analyze the internal structure of an OpenVMS RMS file and generate a report on its structure and use, as well as interactively explore the file's structure. The utility can generate an FDL file from an RMS file for use with the Edit/FDL utility to optimize the data file.
File Definition Language (FDL) is a special-purpose language for specifying file characteristics; it is useful with higher level languages or for ensuring that files are properly tuned. FDL makes use of RMS control blocks: the file access block (FAB), the record access block (RAB), and the extended attribute block (XAB).
The Edit/FDL utility creates a new FDL file according to user specifications. The Create/FDL utility uses the specifications of an existing FDL file to create a new empty data file.
You can use the Convert utility to copy records from one file to another, while changing the record format and file organization, and to append records to an existing file. The Convert/Reclaim utility reclaims empty bucket space in an indexed file to allow new records to be written to it.
Part I. Process and Synchronization
This part describes the creation, communication, and control of processes. It also describes symmetric multiprocessing (SMP), and the synchronizing of data access, programming operations, and access to resources.
Chapter 2. Process Creation
This chapter describes process creation and the different types of processes. It also describes kernel threads and the kernel threads process structure.
2.1. Process Types
A process is the environment in which an image executes. Two types of processes can be created with the operating system: spawned subprocesses or detached processes.
A spawned subprocess is dependent on the process that created it (its parent), and receives a portion of its parent process's resource quotas. The system deletes the spawned subprocess when the parent process exits.
A detached process is independent of the process that created it. The process the system creates when you log in is, for example, a detached process. If you want a created process to continue after the parent exits, or not to share resources with the parent, use a detached process.
|
Characteristic |
Subprocess |
Detached Process |
|---|---|---|
|
Privileges |
Received from creating process. |
Specified by creating process. |
|
Quotas and limits |
Some shared with creating process. |
Specified by creating process, but not shared with creating process. |
|
User authorization file |
Used for information not given by creating process. |
Used for most information not given by creating process. |
|
User identification code |
Received from creating process. |
Specified by creating process. |
|
Restrictions |
Exist as long as creating process exists. |
None. |
|
How created |
SYS$CREPRC, or LIB$SPAWN from another process. |
SYS$CREPRC from another process. |
|
When deleted |
When creating process exits, or at image exit or logout, depending on whether a CLI is present. |
At image exit or logout, depending on whether a CLI is present. |
|
Command language interpreter (CLI) present |
Usually not if created with SYS$CREPRC; always yes if spawned. |
Usually present, but not necessarily. |
2.2. Execution Context of a Process
Image that the process is executing
Input and output streams for the image executing in the process
Disk and directory defaults for the process
System resource quotas and user privileges available to the process
When the system creates a detached process as the result of a login, it uses the system user authorization file (SYSUAF.DAT) to determine the process's execution context.
The process created for you executes the image LOGINOUT.
The terminal you are using is established as the input, output, and error stream device for images that the process executes.
Your disk and directory defaults are taken from the user authorization file.
The resource quotas and privileges you have been granted by the system manager are associated with the created process.
A command language interpreter (CLI) is mapped into the created process.
2.3. Modes of Execution of a Process
Interactive—Receives input from a record-oriented device, such as a terminal or mailbox
Batch—Is created by the job controller and is not interactive
Network—Is created by the network ancillary control program (ACP)
Other—Is not running in any of the other modes (for example, a spawned subprocess where input is received from a command procedure)
2.4. Creating a Subprocess
You can create a subprocess using the LIB$SPAWN run-time library routines, the SYS$CREPRC system service, or the C system() call. A subprocess created with LIB$SPAWN is called a spawned subprocess.
2.4.1. Naming a Spawned Subprocess
As of OpenVMS Version 7.3-1, the way OpenVMS names spawned
subprocesses was changed to improve performance. Prior to OpenVMS
Version 7.3-1, if no process name was supplied, the system
constructed a name by appending _n to the user
name, where n was the next available nonduplicate
integer for any process currently in the system. For example, the
first spawned process from the SYSTEM would be called SYSTEM_1, the
second, SYSTEM_2, and so on. The next available number was chosen as
soon as a gap was found.
With OpenVMS Version 7.3-1, the default-constructed process name for subprocesses was changed. Instead of searching incrementally for the next unique number, a random number is chosen to append to the user name. Therefore, the first processes that are spawned from user SYSTEM might be SYSTEM_154, SYSTEM_42, SYSTEM_87, and so on. This procedure results in a very high probability of finding a unique name on the first try, because it is unlikely that the same number is already in use. This procedure greatly reduces the cost of process creation, and applications that rely on spawned subprocesses might see a dramatic performance improvement with this change.
However, some applications might rely on the prior method of assigning subprocess names. The DCL_CTLFLAGS parameter, a bitmask used to alter default behavior for certain commands on a systemwide basis, is available to allow you to configure the system as necessary. The low bit of the bitmask is defined, and it controls the default process-name assignment for a subprocess created using the SPAWN command or LIB$SPAWN routine.
If the bit is clear, the new behavior (beginning with OpenVMS Version 7.3-1) is used. If you do not specify a process name, the system assigns the user name with a random number suffix. This is the default setting.
If the bit is set, the old behavior is used. If you do not specify a process name, the system assigns the user name with the next available number.
2.4.2. Using LIB$SPAWN to Create a Spawned Subprocess
The LIB$SPAWN routine enables you to create a subprocess and to set some context options for the new subprocess. LIB$SPAWN creates a subprocess with the same priority as the parent process (generally priority 4). The format for LIB$SPAWN is:
LIB$SPAWN
  ([command_string],[input_file],[output_file],[flags],[process-name],
   [process_id],[completion_status],[completion_efn],[completion_astadr],
   [completion_astarg],[prompt],[cli])
For complete information on using each argument, refer to the LIB$SPAWN routine in VSI OpenVMS RTL Library (LIB$) Manual.
Specifying a Command String
Use the command_string argument to specify a
single DCL command to execute once the subprocess is initiated. You
can also use this argument to execute a command procedure that, in
turn, executes several DCL commands
(@command_procedure_name).
Redefining SYS$INPUT and SYS$OUTPUT
Use the input_file and
output_file arguments to specify
alternate input and output devices for
SYS$INPUT and
SYS$OUTPUT. Using alternate values
for SYS$INPUT and
SYS$OUTPUT can be particularly
useful when you are synchronizing processes that are executing
concurrently.
Passing Parent Process Context Information to the Subprocess
Use the flags argument to specify which
characteristics of the parent process are to be passed on to the
subprocess. With this argument, you can reduce the time required to
create a subprocess by passing only a part of the parent's context.
You can also specify whether the parent process should continue to
execute (execute concurrently) or wait until the subprocess has
completed execution (execute in line).
After the Subprocess Completes Execution
Use the completion_status,
completion_efn, and
completion_astadr arguments to
specify the action to be taken when the subprocess completes
execution (send a completion status, set a local event flag, or
invoke an AST procedure). For more information about event flags and
ASTs, refer to Chapter 8, "Using Asynchronous System Traps".
The LIB$SPAWN routine and SPAWN command do not return a completion status code of 0 from a subprocess command procedure.
The LIB$SPAWN routine can fail in a detached process as well, because it is dependent upon and requires the presence of a command language interpreter (CLI), such as DCL. Without a CLI present in the current process, this call fails with a"NOCLI, no CLI present to perform function" error. Note that a detached process may not have a CLI present.
You can use SYS$CREPRC in place of LIB$SPAWN; though with SYS$CREPRC the context of the parent process (symbols and logical names) is not propagated into the subprocess.
When using LIB$SPAWN asynchronously (with CLI$M_NOWAIT), you have to synchronize completion. For if the parent process should exit, all subprocesses exit, potentially resulting in an unexpected series of failures of all subprocesses of the exiting parent process.
Specifying an Alternate Prompt String
Use the prompt argument to specify a prompt
string for the subprocess.
Specifying an Alternate Command Language Interpreter
Use the cli argument to specify a command
language interpreter for the subprocess.
Examples of Creating Subprocesses
! Declare status and library routine
INTEGER STATUS, LIB$SPAWN

STATUS = LIB$SPAWN ('@COMMANDS')
#include <descrip.h>
#include <lib$routines.h>
#include <ssdef.h>
#include <stsdef.h>
main()
  {
  int RetStat;
  $DESCRIPTOR( CmdDsc, "@COMMANDS" );
  RetStat = lib$spawn( &CmdDsc );
  if (!$VMS_STATUS_SUCCESS( RetStat ))
    return RetStat;
  return SS$_NORMAL;
  }
! Mask for LIB$SPAWN
INTEGER MASK
EXTERNAL CLI$M_NOCLISYM,
2        CLI$M_NOLOGNAM,
2        CLI$M_NOKEYPAD
! Declare status and library routine
INTEGER STATUS, LIB$SPAWN

! Set mask and call LIB$SPAWN
MASK = %LOC(CLI$M_NOCLISYM) .OR.
2      %LOC(CLI$M_NOLOGNAM) .OR.
2      %LOC(CLI$M_NOKEYPAD)

STATUS = LIB$SPAWN ('@COMMANDS.COM',
2                   ,,
2                   MASK)
#include <clidef.h>
#include <descrip.h>
#include <lib$routines.h>
#include <ssdef.h>
#include <stsdef.h>
main()
  {
  int RetStat;
  int FlagsMask = CLI$M_NOCLISYM | CLI$M_NOLOGNAM | CLI$M_NOKEYPAD;
  $DESCRIPTOR( CmdDsc, "@COMMANDS.COM" );
  RetStat = lib$spawn( &CmdDsc, 0, 0, &FlagsMask );
  if (!$VMS_STATUS_SUCCESS( RetStat ))
    return RetStat;
  return SS$_NORMAL;
  }
! Mask for LIB$SPAWN
EXTERNAL CLI$M_NOWAIT
! Declare status and library routine
INTEGER STATUS, LIB$SPAWN

STATUS = LIB$SPAWN ('RUN $DISK1:[USER.MATH]CALC', ! Image
2                   'DATA84.IN',                  ! Input
2                   'DATA84.RPT',                 ! Output
2                   %LOC(CLI$M_NOWAIT))           ! Concurrent
#include <clidef.h>
#include <descrip.h>
#include <lib$routines.h>
#include <ssdef.h>
#include <stsdef.h>
main()
  {
  int RetStat;
  int FlagsMask = CLI$M_NOWAIT;
  $DESCRIPTOR( CmdDsc, "RUN $DISK1:[USER.MATH]CALC" );
  $DESCRIPTOR( InpDsc, "DATA84.IN" );
  $DESCRIPTOR( OutDsc, "DATA84.RPT" );
  RetStat = lib$spawn( &CmdDsc, &InpDsc, &OutDsc, &FlagsMask );
  if (!$VMS_STATUS_SUCCESS( RetStat ))
    return RetStat;
  return SS$_NORMAL;
  }
2.4.3. Using the C system() Call
#include <ssdef.h>
#include <stdio.h>
#include <stdlib.h>
main()
  {
  printf("calling system() \n");
  system("show system");
  printf("done\n");
  return SS$_NORMAL;
  }
This example shows the use of the system() call to spawn a DCLSHOW SYSTEM command; it subsequently returns and the execution of the main() image continues.
2.4.4. Using SYS$CREPRC to Create a Subprocess
The Create Process (SYS$CREPRC) system
service creates both subprocesses and detached processes. This
section discusses creating a subprocess; Section 2.5, ''Creating a Detached Process'' describes creating a detached
process. When you call the SYS$CREPRC
system service to create a process, you define the context by
specifying arguments to the service. The number of subprocesses a
process can create is controlled by its
PQL$_PRCLM subprocess quota, an
individual quota description under the quota
argument.
Though SYS$CREPRC does not set many context values for the subprocess by default, it does allow you to set many more context values than LIB$SPAWN. For example, you cannot specify separate privileges for a subprocess with LIB$SPAWN directly, but you can with SYS$CREPRC.
By default, SYS$CREPRC creates a subprocess rather than a detached process. The format for SYS$CREPRC is as follows:
SYS$CREPRC
  ([pidadr] ,[image] ,[input] ,[output] ,[error] ,[prvadr] ,[quota],
   [prcnam] ,[baspri] ,[uic] ,[mbxunt] ,[stsflg] ,[itemlst] ,[node])
Ordinarily, when you create a subprocess, you need only assign it an image to execute and, optionally, the SYS$INPUT, SYS$OUTPUT, and SYS$ERROR devices. The system provides default values for the process's privileges, resource quotas, execution modes, and priority. In some cases, however, you may want to define these values specifically. The arguments to the SYS$CREPRC system service that control these characteristics follow. For details, see the descriptions of arguments to the SYS$CREPRC system service in the VSI OpenVMS System Services Reference Manual.
The default values passed into the subprocess might not be complete enough for your use. The following sections describe how to modify these default values with SYS$CREPRC.
Redefining SYS$INPUT, SYS$OUTPUT, and SYS$ERROR
Use the input, output,
and error arguments to specify alternate
input, output, and error devices for
SYS$INPUT,
SYS$OUTPUT, and
SYS$ERROR. Using alternate values
for SYS$INPUT,
SYS$OUTPUT, and
SYS$ERROR can be particularly
useful when you are synchronizing processes that are executing
concurrently. By providing alternate equivalence names for the
logical names SYS$INPUT,
SYS$OUTPUT, and
SYS$ERROR, you can place these
logical name/equivalence name pairs in the process logical name
table for the created process.
#include <descrip.h>
#include <ssdef.h>
#include <starlet.h>
#include <stdio.h>
#include <stsdef.h>
// Comment syntax here assumes compiler support
main()
{
int RetStat;
$DESCRIPTOR(input,"SUB_MAIL_BOX"); // Descriptor for input stream
$DESCRIPTOR(output,"COMPUTE_OUT"); // Descriptor for output and error
$DESCRIPTOR(image,"COMPUTE.EXE"); // Descriptor for image name
// Create the subprocess
RetStat = sys$creprc( 0, // process id
&image, // image
&input,  // input SYS$INPUT device
&output,
// input SYS$INPUT device
&output,  // output SYS$OUTPUT device
&output,
// output SYS$OUTPUT device
&output,  // error SYS$ERROR device
0,0,0,0,0,0,0);
if (!$VMS_STATUS_SUCCESS( RetStat ))
return RetStat;
return SS$_NORMAL;
}
}
// error SYS$ERROR device
0,0,0,0,0,0,0);
if (!$VMS_STATUS_SUCCESS( RetStat ))
return RetStat;
return SS$_NORMAL;
}
}
| The |
| The |
| The |
The SYS$CREPRC system service does not provide default equivalence names for the logical names SYS$INPUT, SYS$OUTPUT, and SYS$ERROR. If none are specified, any entries in the group or system logical name tables, if any, may provide equivalences. If, while the subprocess executes, it reads or writes to one of these logical devices and no equivalence name exists, an error condition results.
The SYS$CREPRC system service also does not provide default equivalence names for the logical names SYS$LOGIN, SYS$LOGIN_DEVICE, and SYS$SCRATCH. These logical names are available to the created process only when the specified image is LOGINOUT, and when the PRC$M_NOUAF flag is not set.
Use the Get Device/Volume Information (SYS$GETDVIW) system service to obtain the device name for the logical name SYS$INPUT, SYS$OUTPUT, or SYS$ERROR.
Specify the address of the descriptor returned by the SYS$GETDVIW service when you specify the
input,output, orerrorargument to the SYS$CREPRC system service.
#include <descrip.h>
#include <dvidef.h>
#include <efndef.h>
#include <lib$routines.h>
#include <ssdef.h>
#include <starlet.h>
#include <stdio.h>
#include <stsdef.h>
// Comment syntax used here assumes compiler support
main()
  {
#define MAXTERMLEN   64
#define MAXITMLST 3
  char TermName[MAXTERMLEN];
  int BasPri = 4;
  int RetStat;
  int TermLen;
  unsigned short int IOSB[4];


  // ItemList data structures used to acquire device name
  int i;
  struct
    {
    unsigned short int BufLen;
    unsigned short int ItmCod;
    void *BufAdr;
    void *BufRLA;
    } ItmLst[MAXITMLST];


  // Descriptors for sys$getdviw call
  $DESCRIPTOR( SysInput, "SYS$INPUT" );


  // Descriptors for sys$creprc call
  $DESCRIPTOR( ImageDesc,"SYS$SYSTEM:LOGINOUT.EXE");
  struct dsc$descriptor TermDesc =
    { MAXTERMLEN, DSC$K_DTYPE_T, DSC$K_CLASS_S, TermName };


  // Assign values to the item list
  i = 0;
  ItmLst[i].BufLen   = MAXTERMLEN;
  ItmLst[i].ItmCod   = DVI$_DEVNAM;
  ItmLst[i].BufAdr   = &TermName;
  ItmLst[i++].BufRLA = &TermLen;
  ItmLst[i].BufLen   = 0;
  ItmLst[i].ItmCod   = 0;
  ItmLst[i].BufAdr   = NULL;
  ItmLst[i++].BufRLA = NULL;


  // Acquire the terminal device name
  RetStat = sys$getdviw(
                     EFN$C_ENF,     // no event flag needed here
                     0,             // Channel (not needed here)
                     &SysInput,     // Device Name
                     ItmLst,        // item list
                     IOSB,          // Address of I/O Status Block
                     0,0,0);
  if (!$VMS_STATUS_SUCCESS( RetStat ))
    lib$signal( RetStat );
  if (!$VMS_STATUS_SUCCESS( IOSB[0] ))
    lib$signal( IOSB[0] );


  // Create the subprocess
  RetStat = sys$creprc(
                     0,
                     &ImageDesc,    // The image to be run
                     &TermDesc,     // Input (SYS$INPUT device)
                     &TermDesc,     // Output (SYS$OUTPUT device)
                     &TermDesc,     // Error (SYS$ERROR device)
                     0,0,0,
                     &BasPri,       // Process base priority
                     0,0,0);
  if (!$VMS_STATUS_SUCCESS( RetStat ))
    lib$signal( RetStat );


  return SS$_NORMAL;
  }
Use OpenVMS RMS to open the device for reading or writing, or both.
Use the Assign I/O Channel (SYS$ASSIGN) system service to assign an I/O channel to the device for input/output operations.
        int RetStat;
        unsigned short int IOchan;
        $DESCRIPTOR(DevNam,"SYS$OUTPUT");
   .
   .
   .
        RetStat = sys$assign( &DevNam,           /* Device name */
                             &IOchan,            /* Channel */
                             0, 0, 0);
        if ($!VMS_STATUS_SUCCESS( RetStat ))
           return RetStat;
For more information about channel assignment for I/O operations, see VSI OpenVMS Programming Concepts Manual, Volume II.
Setting Privileges
Set different privileges by defining the privilege list for the
subprocess using the prvadr argument. This is
particularly useful when you want to dedicate a subprocess to
execute privileged or sensitive code. If you do not specify this
argument, the privileges of the calling process are used. If you
specify the prvadr argument, only the
privileges specified in the bit mask are used; the privileges of the
calling process are not used. For example, a creating process has
the user privileges GROUP and TMPMBX. It creates a process,
specifying the user privilege TMPMBX. The created process receives
only the user privilege TMPMBX; it does not have the user privilege
GROUP.
If you need to create a process that has a privilege that is not one of the privileges of your current process, you must have the user privilege SETPRV.
unsigned int PrivQuad[2] = { (PRV$M_GRPNAM | PRV$M_GROUP), 0};
// could also use:  __int64 PrivQuad = PRV$M_GRPNAM | PRV$M_GROUP;
Setting Process Quotas
Set different process quotas by defining the quota list of system
resources for the subprocess using the quota
argument. This option can be useful when managing a subprocess to
limit use of system resources (such as AST usage, I/O, CPU time,
lock requests, and working set size and expansion). If you do not
specify this argument, the system defines default quotas for the
subprocess.
#pragma environment save
#pragma nomember_alignment
    struct
        {
        unsigned char pql_code;
        unsigned long int pql_value;
        } pql[] =
            {
            {   PQL$_ASTLM,        600      },
            {   PQL$_BIOLM,        100      },
            {   PQL$_BYTLM,        131072   },
            {   PQL$_CPULM,        0        },
            {   PQL$_DIOLM,        100      },
            {   PQL$_FILLM,        50       },
            {   PQL$_PGFLQUOTA,    40960    },
            {   PQL$_PRCLM,        16       },
            {   PQL$_TQELM,        600      },
            {   PQL$_WSDEFAULT,    512      },
            {   PQL$_WSQUOTA,      2048     },
            {   PQL$_ENQLM,        600      },
            {   PQL$_WSEXTENT,     4096     },
            {   PQL$_JTQUOTA,      4096     },
            {   PQL$_LISTEND,      0        }
            };
#pragma environment restore
For more information about process quotas and process quota lists, see Section 2.6, ''Process Quota Lists''.
Setting the Subprocess Priority
Set the subprocess priority by setting the base execution priority
with the baspri argument. If you do not set
the subprocess priority, the priority defaults to 2 for MACRO and
BLISS and to 0 for all other languages. If you want a subprocess to
have a higher priority than its creator, you must have the user
privilege ALTPRI to raise the priority level.
Specifying Additional Processing Options
Enable and disable parent and subprocess wait mode, control process
swapping, control process accounting, control process dump
information, control authorization checks, and control working set
adjustments using the stsflg argument. This
argument defines the status flag, a set of bits that controls some
execution characteristics of the created process, including resource
wait mode and process swap mode.
Defining an Image for a Subprocess to Execute
image argument to provide the process
with the name of an image to execute. For example, the following
lines of C create a subprocess to execute the image named
CARRIE.EXE:$DESCRIPTOR(image,"CARRIE"); . . . RetStat = sys$creprc(0, &image, ...);
In this example, only a file name is specified; the service uses current disk and directory defaults, performs logical name translation, uses the default file type .EXE, and locates the most recent version of the image file. When the subprocess completes execution of the image, the subprocess is deleted. Process deletion is described in Chapter 4, "Process Control".
2.4.4.1. Disk and Directory Defaults for Created Processes
When you use the SYS$CREPRC system service to create a process to execute an image, the system locates the image file in the default device and directory of the created process. Any created process inherits the current default device and directory of its creator.
If a created process runs an image that is not in its default directory, you must identify the directory and, if necessary, the device in the file specification of the image to be run.
There is no way to define a default device or directory for the created process that is different from that of the creating process in a call to SYS$CREPRC. The created process can, however, define an equivalence for the logical device SYS$DISK by calling the Create Logical Name ($CRELNM) system service.
If the process is a subprocess, you, in the creating process, can define an equivalence name in the group logical name table, job logical name table, or any logical name table shared by the creating process and the subprocess. The created process then uses this logical name translation as its default directory. The created process can also set its own default directory by calling the OpenVMS RMS default directory system service, SYS$SETDDIR.
Make a call to SYS$SETDDIR to change its own default directory.
Make a call to SYS$CREPRC to create the new process.
Make a call to SYS$SETDDIR to change its own default directory back to the default directory it had before the first call to SYS$SETDDIR.
The creating process now has its original default directory. The new process has the different default directory that the creating process had when it created the new process. If the default device is to change, you must also redefine the SYS$DISK logical name. For details on how to call SYS$SETDDIR, see the VSI OpenVMS System Services Reference Manual.
2.5. Creating a Detached Process
The creation of a detached process is primarily a task the operating system performs when you log in. In general, an application creates a detached process only when a program must continue executing after the parent process exits. To do this, you should use the SYS$CREPRC system service.
You can use the uic argument to the
SYS$CREPRC system service to define whether
a process is a subprocess or a detached process. The
uic argument provides the created process
with a user identification code (UIC). If you omit the
uic argument, the
SYS$CREPRC system service creates a
subprocess that executes under the UIC of the creating process. If you
specify a uic argument with the same UIC as the
creating process, the system service creates a detached process with the
same UIC as the creating process.
You can also create a detached process with the same UIC as the creating
process by specifying the detach flag in the stsflg
argument. You do not need the IMPERSONATE privilege to create a detached
process with the same UIC as the creating process. The IMPERSONATE privilege
controls the ability to create a detached process with a UIC that is
different from the UIC of the creating process.
Examples of Creating a Detached Process
EXTERNAL  PRC$M_DETACH

! Declare status and system routines
INTEGER STATUS,SYS$CREPRC
   .
   .
   .
STATUS = SYS$CREPRC (,
2                    'SYS$USER:[ACCOUNT]INCTAXES', ! Image
2                    'TAXES.DAT',                  ! SYS$INPUT
2                    'TAXES.RPT',                  ! SYS$OUTPUT
2                    ,,,,
2                    %VAL(4),                      ! Priority
2                    ,,
2                    %VAL(%LOC(PRC$M_DETACH)))     ! Detached
   .
   .
   .
STATUS = SYS$CREPRC (,
2                    'SYS$SYSTEM:LOGINOUT',        ! Image
2                    'SYS$USER:[TEST]COMMANDS.COM',! SYS$INPUT
2                    'SYS$USER:[TEST]OUTPUT.DAT',  ! SYS$OUTPUT
2                    ,,,,
2                    %VAL(4),                      ! Priority
2                    ,,
2                    %VAL(%LOC(PRC$M_DETACH)))     ! Detached
2.6. Process Quota Lists
The SYS$CREPRC system service uses the
quota argument to create a process quota list
(PQL). Individual quota items such as paging file quota (PQL_PGFLQUOTA) and
timer queue entry quota (PQL_TQELM) of the
SYS$CREPRC system service make up the PQL.
In allocating the PQL, SYS$CREPRC constructs a
default PQL for the process being created, assigning it the default values
for all individual quota items. Default values are SYSGEN parameters and so
can be changed from system to system. SYS$CREPRC
then reads the specified quota list, if any is indicated, and updates the
corresponding items in the default PQL. Any missing values are filled in
from the default items (PQL_D xxxxx) SYSGEN parameter,
where xxxxx are the characters of the quota name that follow
PQL$_ in the quota name. The PQL is then
complete.
The SYS$CREPRC service next reads the PQL, comparing
each value against the corresponding minimum (PQL_M
xxxxx) SYSGEN parameter. If the SYSGEN parameter is
greater than the resulting value, SYS$CREPRC
replaces it with the SYSGEN value. Thus no process on the system has a quota
value lower than the minimum (PQL_M xxxxx) SYSGEN
parameter.
The SYS$CREPRC service also determines what kind of
process is being created — whether batch, interactive, or detached. If
it is a batch or interactive process, the process derives all its quotas
from the user authorization file (UAF) and completely overwrites the PQL.
These quotas are unaffected by the default (PQL_D xxxxx)
SYSGEN parameters, but are affected by the minimum (PQL_M
xxxxx) values. If the process is a detached
process, it determines what items have been passed in the quota list and
only then overwrites these items in the PQL.
SYS$CREPRC makes sure the PQL values are
greater than the minimum (PQL_M xxxxx) values.
With subprocesses, some quotas are pooled, such as PQL_PGFLQUOTA and PQL_TQELM. SYS$CREPRC establishes pooled quotas when it creates a detached process, and they are shared by that process and all its descendant subprocesses. All the related processes report the same quota because they are accessing a common location in the job information block (JIB).
To determine the maximum virtual page count of the paging file quota of a process, use the JPI$_PGFLQUOTA item code of the SYS$GETJPI system service. The JPI$_PGFLQUOTA on VAX systems returns the longword integer value of the paging file quota in pages; on Alpha and IA-64 systems, it returns the longword integer value of the paging file quota in pagelets.
To determine the remaining paging file quota of the process, use the JPI$_PAGFILCNT item code of the SYS$GETJPI system service. The JPI$_PAGFILCNT on VAX systems returns the longword integer value of the paging file quota in pages; on Alpha and IA-64 systems, it returns the longword integer value of the paging file quota in pagelets.
For a complete description of quotas, refer to the VSI OpenVMS System Services Reference Manual: A–GETUAI.
2.7. Debugging a Subprocess or a Detached Process
Using the kept debugger configuration
Using DBG$ logical names
Using the workstation device (see Section 2.4.4, ''Using SYS$CREPRC to Create a Subprocess'')
Using a DECwindows DECterm display
See the VSI OpenVMS Debugger Manual for more details on debugging subprocesses and detached processes.
Kept Debugger
With the kept debugger configuration, you start the debugger user interface using the DCL command DEBUG/KEEP.
At the DBG> prompt, you then issue either the RUN or the CONNECT command, depending on whether or not the program you want to debug is already running.
If the program is not running, use the debugger's RUN command to start the program in a subprocess.
The detached process UIC must be in the same group as your process.
The detached process must have a CLI mapped.
$ RUN/DETACH/INPUT=xxx.com SYS$SYSTEM:LOGINOUTwhere xxx.com is a command procedure that starts the
program with /NODEBUG.
After you have started or connected to the program, the remainder of the debugging session is the same as a normal debugger session.
DBG$ Logical Names
You can allow a program to be debugged within a subprocess or a detached process by using DBG$INPUT and DBG$OUTPUT. To allow debug operations with DBG$INPUT and DBG$OUTPUT, equate the subprocess logical names DBG$INPUT and DBG$OUTPUT to the terminal. When the subprocess executes the program, which has been compiled and linked with the debugger, the debugger reads input from DBG$INPUT and writes output to DBG$OUTPUT.
If you are executing the subprocess concurrently, you should restrict debugging to the program in the subprocess. The debugger prompt DBG> should enable you to differentiate between input required by the parent process and input required by the subprocess. However, each time the debugger displays information, you must press the Return key to display the DBG> prompt. (By pressing the Return key, you actually write to the parent process, which has regained control of the terminal following the subprocess' writing to the terminal. Writing to the parent process allows the subprocess to regain control of the terminal).
DECwindows DECterm Display
#pragma module  CREATE_DECTERM

#include <descrip.h>
#include <lib$routines.h>
#include <pqldef.h>
#include <prcdef.h>
#include <ssdef.h>
#include <starlet.h>
#include <stsdef.h>


// To build and run:
//    $ cc CREATE_DECTERM
//    $ link CREATE_DECTERM,sys$input/option
//    sys$share:DECW$TERMINALSHR.EXE/share
//    $ run CREATE_DECTERM

// This routine is not declared in a currently-available library
extern int decw$term_port(void *,...);


main( void )
  {
  int RetStat;
  int StsFlg;
  int DbgTermLen = 0;
#define DBGTERMBUFLEN 50
  char DbgTermBuf[DBGTERMBUFLEN];
  $DESCRIPTOR( Customization,
"DECW$TERMINAL.iconName:\tDebugging Session\n\
DECW$TERMINAL.title:\tDebugging Session" );
  $DESCRIPTOR( Command, "SYS$SYSDEVICE:[HOFFMAN]DEBUG_IMAGE.EXE" );
  struct dsc$descriptor DbgTerm;

  DbgTerm.dsc$w_length  = DBGTERMBUFLEN;
  DbgTerm.dsc$b_dtype   = DSC$K_DTYPE_T;
  DbgTerm.dsc$b_class   = DSC$K_CLASS_S;
  DbgTerm.dsc$a_pointer = DbgTermBuf;

  // Request creation of a DECterm display
  RetStat = decw$term_port(
            0,              // display (use default)
            0,              // setup file (use default)
            &Customization, // customization
            &DbgTerm,       // resulting device name
            &DbgTermLen,    // resulting device name length
            0,              // controller (use default)
            0,              // char buffer (use default)
            0 );            // char change buffer (default)
  if ( !$VMS_STATUS_SUCCESS (RetStat ))
    lib$signal( RetStat );

  DbgTerm.dsc$w_length  = DbgTermLen;

  // Create the process as detached.
  StsFlg = PRC$M_DETACH;

  // Now create the process
  RetStat = sys$creprc(
            0,              // PID
            &Command,       // Image to invoke
            &DbgTerm,       // Input
            &DbgTerm,       // Output
            0, 0, 0, 0, 0, 0, 0,
            StsFlg );       // Process creation flags
  if ( !$VMS_STATUS_SUCCESS( RetStat ))
    lib$signal( RetStat );

  return SS$_NORMAL;
  }
2.8. Kernel Threads and the Kernel Threads Process Structure (Alpha and I64 Only)
Note
For information about the concepts and implementation of user threads with POSIX Threads Library, refer to the Guide to POSIX Threads Library.
2.8.1. Definition and Advantages of Kernel Threads
A thread is a single, sequential flow of execution within a process's address space. A single process contains an address space wherein either a single thread or multiple threads execute concurrently. Programs typically have a single flow of execution and therefore a single thread; whereas multithreaded programs have multiple points of execution at any one time.
More modular code design
Simpler application design and maintenance
The potential to run independent flows of execution in parallel on multiple CPUs
The potential to make better use of available CPU resources through parallel execution
2.8.2. Kernel Threads Features
Multiple execution contexts within a process
Efficient use of the OpenVMS and POSIX Threads Library schedulers
2.8.2.1. Multiple Execution Contexts Within a Process
Before the implementation of kernel threads, the scheduling model for the OpenVMS operating system was per process. The only scheduling context was the process itself, that is, only one execution context per process. Since a threaded application could create thousands of threads, many of these threads could potentially be executing at the same time. But because OpenVMS processes had only a single execution context, in effect, only one of those application threads was running at any one time. If this multithreaded application was running on a multiprocessor system, the application could not make use of more than a single CPU.
After the implementation of kernel threads, the scheduling model allows for multiple execution contexts within a process; that is, more than one application thread can be executing concurrently. These execution contexts are called kernel threads. Kernel threads allow a multithreaded application to have a thread executing on every CPU in a multiprocessor system. Therefore, kernel threads allow a threaded application to take advantage of multiple CPUs in a symmetric multiprocessing (SMP) system.
The maximum number of kernel threads that can be created in a process is 256.
2.8.2.2. Efficient Use of the OpenVMS and POSIX Threads Library Schedulers
The user mode thread manager schedules individual user mode application threads. On OpenVMS, POSIX Threads Library is the user mode threading package of choice. Before the implementation of kernel threads, POSIX Threads Library multiplexed user mode threads on the single OpenVMS execution context – the process. POSIX Threads Library implemented parts of its scheduling by using a periodic timer. When the AST executed and the thread manager gained control, the thread manager could then select a new application thread for execution. But because the thread manager could not detect that a thread had entered an OpenVMS wait state, the entire application blocked until that periodic AST was delivered. That resulted in a delay until the thread manager regained control and could schedule another thread. Once the thread manager gained control, it could schedule a previously preempted thread unaware that the thread was in a wait state. The lack of integration between the OpenVMS and POSIX Threads Library schedulers could result in wasted CPU resources.
After the implementation of kernel threads, the scheduling model provides for scheduler callbacks, which is not the default. A scheduler callback is an upcall from the OpenVMS scheduler to the thread manager whenever a thread changes state. This upcall allows the OpenVMS scheduler to inform the thread manager that the current thread is stalled and that another thread should be scheduled. Upcalls also inform the thread manager that an event a thread is waiting on has completed. The two schedulers are now better integrated, minimizing application thread scheduling delays.
2.8.2.3. Terminating a POSIX Threads Image
To avoid hangs or a disorderly shutdown of a multithreaded process, VSI recommends that you issue an upcall with an EXIT command at the DCL prompt ($). This procedure causes a normal termination of the image currently executing. If the image declared any exit-handling routines, for instance, they are then given control. The exit handlers are run in a separate thread, which allows them to be synchronized with activities in other threads. This allows them to block without danger of entering a self-deadlock due to the handler having been involved in a context which already held resources.
The effect of calling the EXIT command on the calling thread is the same as calling pthread_exit(): the caller's stack is unwound and the thread is terminated. This allows each frame on the stack to have an opportunity to be notified and to take action during the termination, so that it can then release any resource which it holds that might be required for an exit handler. By using upcalls, you have a way out of self-deadlock problems that can impede image rundown.
You can optionally perform a rundown by using the control y EXIT (Ctrl–Y/EXIT) command. By doing this and with upcalls enabled, you release the exit handler thread. All other threads continue to execute untouched. This removes the possibility of the self-deadlock problem which is common when you invoke exit handlers asynchronously in an existing context. However, by invoking exit handlers, you do not automatically initiate any kind of implicit shutdown of the threads in the process. Because of this, it is up to the application to request explicitly the shutdown of its threads from its exit handler and to ensure that their shutdown is complete before returning from the exit handler. By having the application do this, you ensure that subsequent exit handlers do not encounter adverse operating conditions, such as threads which access files after they have been closed, or the inability to close files because they are being accessed by threads.
Along with using control y EXIT (Ctrl–Y/EXIT) to perform shutdowns, you can issue a control y (Ctrl–Y/STOP) command. If you use a control y STOP (Ctrl–Y/STOP) command, it is recommended that you do this with upcalls. To use a control y STOP (Ctrl–Y/STOP) command, can cause a disorderly or unexpected outcome.
2.8.3. Kernel Threads Model and Design Features
This section presents the type of kernel threads model that OpenVMS Alpha and OpenVMS IA-64 implement, and some features of the operating system design that changed to implement the kernel thread model.
2.8.3.1. Kernel Threads Model
The OpenVMS kernel threads model is one that implements a few kernel threads to many user threads with integrated schedulers. With this model, there is a mapping of many user threads to only several execution contexts or kernel threads. The kernel threads have no knowledge of the individual threads within an application. The thread manager multiplexes those user threads on an execution context, though a single process can have multiple execution contexts. This model also integrates the user mode thread manager scheduler with the OpenVMS scheduler.
2.8.3.2. Kernel Threads Design Features
Process structure
Access to inner modes
Scheduling
ASTs
Event flags
Process control services
2.8.3.2.1. Process Structure
With the implementation of OpenVMS kernel threads, all processes are a threaded process with at least one kernel thread. Every kernel thread gets stacks for each access mode. Quotas and limits are maintained and enforced at the process level. The process virtual address space remains per process and is shared by all threads. The scheduling entity moves from the process to the kernel thread. In general, ASTs are delivered directly to the kernel threads. Event flags and locks remain per process. See Section 2.8.4, ''Kernel Threads Process Structure'' for more information.
2.8.3.2.2. Access to Inner Modes
With the implementation of kernel threads, a single threaded process continues to function exactly as it has in the past. A multithreaded process may have multiple threads executing in user mode or in user mode ASTs, as is also possible for supervisor mode. Except in cases where an activity in inner mode is considered thread safe, a multithreaded process may have only a single thread executing in an inner mode at any one time. Multithreaded processes retain the normal preemption of inner mode by more inner mode ASTs. A special inner mode semaphore serializes access to inner mode.
2.8.3.2.3. Scheduling
With the implementation of kernel threads, the OpenVMS scheduler concerns itself with kernel threads, and not processes. At certain points in the OpenVMS executive at which the scheduler could wait a kernel thread, it can instead transfer control to the thread manager. This transfer of control, known as a callback or upcall, allows the thread manager the chance to reschedule stalled application threads.
2.8.3.2.4. ASTs
With the implementation of kernel threads, ASTs are not delivered to the process. They are delivered to the kernel thread on which the event was initiated. Inner mode ASTs are generally delivered to the kernel thread already in inner mode. If no thread is in inner mode, the AST is delivered to the kernel thread that initiated the event.
2.8.3.2.5. Event Flags
With the implementation of kernel threads, event flags continue to function on a per-process basis, maintaining compatibility with existing application behavior.
2.8.3.2.6. Process Control Services
With the implementation of kernel threads, many process control services continue to function at the process level. SYS$SUSPEND and SYS$RESUME system services, for example, continue to change the scheduling state of the entire process, including all of its threads. Other services such as SYS$HIBER and SYS$SCHDWK act on individual kernel threads instead of the entire process.
2.8.4. Kernel Threads Process Structure
Process control block (PCB) and process header (PHD)
Kernel thread block (KTB)
Floating-point registers and execution data block (FRED)
Kernel threads region
Per-kernel thread stacks
Per-kernel thread data cells
Process status bits
Kernel thread priorities
2.8.4.1. Process Control Block (PCB) and Process Header (PHD)
Software process control block (PCB)
Process header (PHD)
The PCB contains fields that identify the process to the system. The PCB comprises contexts that pertain to quotas and limits, scheduling state, privileges, AST queues, and identifiers. In general, any information that is required to be resident at all times is in the PCB. Therefore, the PCB is allocated from nonpaged pool.
The PHD contains fields that pertain to a process's virtual address space. The PHD contains the process section table. The PHD also contains the hardware process control block (HWPCB) and a floating-point register save area. The HWPCB contains the hardware execution context of the process. The PHD is allocated as part of a balance set slot.
2.8.4.1.1. Effect of a Multithreaded Process on the PCB and PHD
With multiple execution contexts within the same process, the multiple threads of execution all share the same address space, but have some independent software and hardware context. This change to a multithreaded process results in an impact on the PCB and PHD structures, and on any code that references them.
Before the implementation of kernel threads, the PCB contained much context that was per-process. Now, with the introduction of multiple threads of execution, much context becomes per-thread. To accommodate per-thread context, a new data structure, the kernel thread block (KTB), is created, with the per-thread context removed from the PCB. However, the PCB continues to contain context common to all threads, such as quotas and limits. The new per-kernel thread structure contains the scheduling state, priority, and the AST queues.
The PHD contains the HWPCB that gives a process its single execution context. The HWPCB remains in the PHD; this HWPCB is used by a process when it is first created. This execution context is also called the initial thread. A single threaded process has only this one execution context. A new structure, the floating-point registers and execution data block (FRED), is created to contain the hardware context of the newly created kernel threads. Since all threads in a process share the same address space, the PHD and page tables continue to describe the entire virtual memory layout of the process.
2.8.4.2. Kernel Thread Block (KTB)
The kernel thread block (KTB) is a new per-kernel-thread data structure. The KTB contains all per-thread software context moved from the PCB. The KTB is the basic unit of scheduling, a role previously performed by the PCB, and is the data structure placed in the scheduling state queues.
Typically, the number of KTBs a multithreaded process has is the same as the number of CPUs on the system. Actually, the number of KTBs is limited by the value of the system parameter MULTITHREAD. If MULTITHREAD is zero, the OpenVMS kernel support is disabled. With kernel threads disabled, user-level threading is still possible with POSIX Threads Library. The environment is identical to the OpenVMS environment prior to the OpenVMS Version 7.0 release. If MULTITHREAD is nonzero, it represents the maximum number of execution contexts or kernel threads that a process can own, including the initial one.
The KTB, in reality, is not an independent structure from the PCB. Both the PCB and KTB are defined as sparse structures. The fields of the PCB that move to the KTB retain their original PCB offsets in the KTB. In the PCB, these fields are unused. In effect, if the two structures are overlaid, the result is the PCB as it currently exists with new fields appended at the end. The PCB and KTB for the initial thread occupy the same block of nonpaged pool; therefore, the KTB address for the initial thread is the same as for the PCB.
2.8.4.3. Floating-Point Registers and Execution Data Blocks (FREDs)
To allow for multiple execution contexts, not only are additional KTBs required to maintain the software context, but additional HWPCBs must be created to maintain the hardware context. Each HWPCB has allocated with it space for preserving the contents of the floating-point registers across context switches. Additional bytes are allocated for per-kernel thread data.
The combined structure that contains the HWPCB, floating-point register save area, and the per-kernel thread data is called the floating-point registers and execution data (FRED) block. Prior to Version 7.2, OpenVMS supported 16 kernel threads per process. As of Version 7.2, OpenVMS supports 256 kernel threads per process. Also, prior to Version 7.3-1, OpenVMS allocated the maximum number of FRED blocks for a given process when that process was created, even if the process did not become multithreaded. With Version 7.3-1 and higher, OpenVMS allocated all FRED blocks as needed.
2.8.4.4. Kernel Threads Region
Much process context resides in P1 space, taking the form of data cells and the process stacks. Some of these data cells need to be per kernel thread, as do the stacks. During initialization of the multithread environment, a kernel thread region in P1 space is initialized to contain the per-kernel-thread data cells and stacks. The region begins at the boundary between P0 and P1 space at address 40000000x, and it grows toward higher addresses and the initial thread's user stack. The region is divided into per-kernel-thread areas. Each area contains pages for data cells and the access mode stacks.
2.8.4.5. Per-Kernel Thread Stacks
A process is created with separate stacks in P1 space for the four access modes. On Alpha systems, each access mode has a memory stack. A memory stack is used for storing data local to a procedure, saving register contents temporarily, and recording nested procedure call information. On IA-64 systems, memory stacks are used for storing data local to a procedure and for saving register contents temporarily, but not for recording nested procedure call information.
To reduce procedure call overhead, the Intel ® Itanium ® architecture provides a large number of registers. Some, the so-called static registers, are shared by a caller and the procedure it calls; others, the dynamic or stacked registers, are not shared. When a procedure is called, it allocates as many dynamic general registers as it needs. On IA-64 systems, nested procedure call information is recorded in the dynamic registers.
The IA-64 systems manage the dynamic registers like a stack, keeping track of each procedure's allocation. Each procedure could, in fact, allocate all the dynamic registers for its own use. Whenever the dynamic register use by nested procedures cannot be accommodated by physical registers, the hardware saves the dynamic registers in an in-memory area established by OpenVMS called the register backing store or register stack. On IA-64 systems, OpenVMS creates a register stack whenever it creates a memory stack. Unlike memory stacks, register stacks grow from low addresses to high addresses.
Stack sizes are either fixed, determined by a SYSGEN parameter, or expandable. The parameter KSTACKPAGES controls the size of the kernel stack. Supervisor and executive mode stack sizes are fixed.
For the user stack, a more complex situation exists. OpenVMS allocates P1 space from high to lower addresses. The user stack is placed after the lowest P1 space address allocated. This allows the user stack to expand on demand toward P0 space. With the introduction of multiple sets of stacks, the locations of these stacks impose a limit on the size of each area in which they can reside. With the implementation of kernel threads, the user stack is no longer boundless. The initial user stack remains semi-boundless; it still grows toward P0 space, but the limit is the per-kernel thread region instead of P0 space. The default user stack in a process can expand on demand to be quite large, so single threaded applications do not typically run out of user stack.
When an application is written using POSIX Threads Library, however, each POSIX thread gets its own user stack, which is a fixed size. POSIX thread stacks are allocated from the P0 heap. Large stacks might cause the process to exceed its memory quotas. In an extreme case, the P0 region could fill completely, in which case the process might need to reduce the number of threads in use concurrently or make other changes to lessen the demand for P0 memory.
If the application developer underestimates the stack requirements, the application may fail due to a thread overflowing its stack. This failure is typically reported as an access violation and is very difficult to diagnose. To address this problem, yellow stack zones were introduced in OpenVMS Version 7.2 and are available to applications using POSIX Threads Library.
Yellow stack zones are a mechanism by which the stack overflow can be signaled back to the application. The application can then choose either to provide a stack overflow handler or do nothing. If the application does nothing, this mechanism helps pinpoint the failure for the application developer. Instead of an access violation being signaled, a stack overflow error is signaled.
2.8.4.6. Per-Kernel-Thread Data Cells
Several pages in P1 space contain process state in the form of data cells. A number of these cells must have a per-kernel-thread equivalent. These data cells do not all reside on pages with the same protection. Because of this, the per-kernel-thread area reserves two pages for these cells. Each page has a different page protection; one page protection is user read, user write (URUW); the other is user read, executive write (UREW).
2.8.4.7. Summary of Process Data Structures
Process creation results in a PCB/KTB, a PHD/FRED, and a set of stacks. All processes have a single kernel thread, the initial thread.
A multithreaded process always begins as a single threaded process. A multithreaded process contains a PCB/KTB pair and a PHD/FRED pair for the initial thread; for its other threads, it contains additional KTBs, additional FREDs, and additional sets of stacks. When the multithreaded application exits, the process returns to its single threaded state, and all additional KTBs, FREDs, and stacks are deleted.
2.8.4.8. Kernel Thread Priorities
The SYS$SETPRI system service and the SET PROCESS/PRIORITY DCL command both take a process identification value (PID) as an input and therefore affect only a single kernel thread at a time. If you want to change the base priorities of all kernel threads in a process, you must either make a separate call to SYS$SETPRI or invoke the SET PROCESS/PRIORITY command for each thread.
In addition, a value for the 'policy' parameter to the SYS$SETPRI system service was added. If JPI$K_ALL_THREADS is specified, the call to SYS$SETPRI changes the base priorities of all kernel threads in the target process.
The same support is provided by the ALL_THREADS qualifier to the SET PROCESS/PRIORITY DCL command.
2.9. THREADCP Command Not Supported on OpenVMS IA-64
The THREADCP command is not supported on OpenVMS IA-64. For OpenVMS IA-64, the SET
IMAGE and SHOW IMAGE commands can be used to check and modify the state of
threads-related image header bits, similar to the THREADCP command on
OpenVMS Alpha. For example, the THREADCP/SHOW image
command is analogous to the SHOW IMAGE image command. As
another example, the THREADCP/ENABLE= flags
image command is analogous to the SET IMAGE/LINKFLAGS=
flags
image command.
The SHOW IMAGE and SET IMAGE commands are documented in the VSI OpenVMS DCL Dictionary: N–Z.
2.10. KPS Services (Alpha and I64 Only)
As of OpenVMS Version 8.2, KPS services enable a thread of execution in one access mode to have multiple stacks. These services were initially developed to allow a device driver to create a fork process with a private stack on which to retain execution context across stalls and restarts. They have been extended to be usable by process context code running in any access mode.
Various OpenVMS components use KPS services to multithread their operations. RMS, for example, can have multiple asynchronous I/O operations in progress in response to process requests from multiple access modes. Each request is processed on a separate memory stack and, on IA-64, separate register stack as well.
Chapter 3. Process Communication
This chapter describes communication mechanisms used within a process and between processes. It also describes programming with intra-cluster communication (ICC).
Synchronize events
Share data
Obtain information about events important to the program you are executing
3.1. Communication Within a Process
Local event flags
Logical names (in supervisor mode)
Global symbols (command language interpreter symbols)
Common area
For passing information among chained images, you can use all four methods because the image reading the information executes immediately after the image that deposited it. Only the common area allows you to pass data reliably from one image to another in the event that another image's execution intervenes the two communicating images.
For communicating within a single image, you can use event flags, logical names, and symbols. For synchronizing events within a single image, use event flags. See Chapter 6, "Synchronizing Data Access and Program Operations", for more information about synchronizing events.
Because permanent mailboxes and permanent global sections are not deleted when the creating image exits, they also can be used to pass information from the current image to a later executing image. However, VSI recommends that you use the common area because it uses fewer system resources than the permanent structures and does not require privilege. (You need the PRMMBX privilege to create a permanent mailbox and the PRMGBL privilege to create a permanent global section).
You can also use symbols, but only between a parent and a spawned subprocess that has inherited the parent's symbols.
3.1.1. Using Local Event Flags
Event flags are status-posting bits maintained by the operating system for general programming use. Programs can set, clear, and read event flags. By setting and clearing event flags at specific points, one program component can signal when an event has occurred. Other program components can then check the event flag to determine when the event has been completed. For more information about using local and common event flags for synchronizing events, refer to Chapter 6, "Synchronizing Data Access and Program Operations".
3.1.2. Using Logical Names
Logical names can store up to 255 bytes of data. When you need to pass information from one program to another within a process, you can assign data to a logical name when you create the logical name; then, other programs can access the contents of the logical name. See VSI OpenVMS Programming Concepts Manual, Volume II for more information about logical name system services.
You can create a logical name under three access modes—user, supervisor, or executive. If you create a process logical name in user mode, it is deleted after the image exits. If you create a logical name in supervisor or executive mode, it is retained after the image exits. Therefore, to share data within the process from one image to the next, use supervisor-mode or executive-mode logical names. Creating an executive-mode logical name requires privilege.
3.1.2.1. Creating and Accessing Logical Names
Create the logical name and store data in it. Use LIB$SET_LOGICAL to create a supervisor logical name. No special privileges are required. You can also use the system service SYS$CRELNM. SYS$CRELNM also allows you to create a logical name for the system or group table and to create a logical name in any other mode, assuming you have appropriate privileges.
Access the logical name. Use the system service SYS$TRNLNM. SYS$TRNLNM searches for the logical name and returns information about it.
Once you have finished using the logical name, delete it. Use the routine LIB$DELETE_LOGICAL or SYS$DELLNM. LIB$DELETE_LOGICAL deletes the supervisor logical name without requiring any special privileges. SYS$DELLNM requires special privileges to delete logical names for privileged modes. However, you can also use this routine to delete either logical name tables or a logical name within a system or group table.
PROGRAM CALC

! Status variable and system routines
INTEGER*4 STATUS,
2         SYS$CRELNM,
2         LIB$GET_EF,
2         LIB$SPAWN
! Define itmlst structure
STRUCTURE /ITMLST/
 UNION
  MAP
   INTEGER*2 BUFLEN
   INTEGER*2 CODE
   INTEGER*4 BUFADR
   INTEGER*4 RETLENADR
  END MAP
  MAP
   INTEGER*4 END_LIST
  END MAP
 END UNION
END STRUCTURE
! Declare itmlst
RECORD /ITMLST/ LNMLIST(2)
! Number to pass to REPEAT.FOR
CHARACTER*3 REPETITIONS_STR
INTEGER REPETITIONS
! Symbols for LIB$SPAWN and SYS$CRELNM
! Include FORSYSDEF symbol definitions:
INCLUDE        '($LNMDEF)'
EXTERNAL CLI$M_NOLOGNAM,
2        CLI$M_NOCLISYM,
2        CLI$M_NOKEYPAD,
2        CLI$M_NOWAIT,
2        LNM$_STRING
                 .
                 . ! Set REPETITIONS_STR
                 .
! Set up and create logical name REP_NUMBER in job table
LNMLIST(1).BUFLEN     = 3
LNMLIST(1).CODE       = %LOC (LNM$_STRING)
LNMLIST(1).BUFADR     = %LOC(REPETITIONS_STR)
LNMLIST(1).RETLENADR  = 0
LNMLIST(2).END_LIST   = 0
STATUS = SYS$CRELNM (,
2                    'LNM$JOB',     ! Logical name table
2                    'REP_NUMBER',, ! Logical name
2                    LNMLIST)       ! List specifying
                                    ! equivalence string
IF (.NOT. STATUS) CALL LIB$SIGNAL (%VAL(STATUS))
! Execute REPEAT.FOR in a subprocess
MASK = %LOC (CLI$M_NOLOGNAM) .OR.
2      %LOC (CLI$M_NOCLISYM) .OR.
2      %LOC (CLI$M_NOKEYPAD) .OR.
2      %LOC (CLI$M_NOWAIT)
STATUS = LIB$GET_EF (FLAG)
IF (.NOT. STATUS) CALL LIB$SIGNAL (%VAL(STATUS))
STATUS = LIB$SPAWN ('RUN REPEAT',,,MASK,,,,FLAG)
IF (.NOT. STATUS) CALL LIB$SIGNAL (%VAL(STATUS))
   .
   .
   .
PROGRAM REPEAT
! Repeats a calculation REP_NUMBER of times,
! where REP_NUMBER is a logical name

! Status variables and system routines
INTEGER STATUS,
2       SYS$TRNLNM,
2       SYS$DELLNM

! Number of times to repeat
INTEGER*4   REITERATE,
2           REPEAT_STR_LEN
CHARACTER*3 REPEAT_STR
! Item list for SYS$TRNLNM
! Define itmlst structure
STRUCTURE /ITMLST/
 UNION
  MAP
   INTEGER*2 BUFLEN
   INTEGER*2 CODE
   INTEGER*4 BUFADR
   INTEGER*4 RETLENADR
  END MAP
  MAP
   INTEGER*4 END_LIST
  END MAP
 END UNION
END STRUCTURE
! Declare itmlst
RECORD /ITMLST/ LNMLIST (2)
! Define item code
EXTERNAL LNM$_STRING
! Set up and translate the logical name REP_NUMBER
LNMLIST(1).BUFLEN    = 3
LNMLIST(1).CODE      = LNM$_STRING
LNMLIST(1).BUFADR    = %LOC(REPEAT_STR)
LNMLIST(1).RETLENADR = %LOC(REPEAT_STR_LEN)
LNMLIST(2).END_LIST  = 0
STATUS = SYS$TRNLNM (,
2                    'LNM$JOB',     ! Logical name table
2                    'REP_NUMBER',, ! Logical name
2                    LNMLIST)       ! List requesting
                                    ! equivalence string
IF (.NOT. STATUS) CALL LIB$SIGNAL (%VAL(STATUS))
! Convert equivalence string to integer
! BN causes spaces to be ignored
READ (UNIT = REPEAT_STR (1:REPEAT_STR_LEN),
2     FMT = '(BN,I3)') REITERATE
! Calculations
DO I = 1, REITERATE
   .
   .
   .
END DO
! Delete logical name
STATUS = SYS$DELLNM ('LNM$JOB',     ! Logical name table
2                    'REP_NUMBER',) ! Logical name
IF (.NOT. STATUS) CALL LIB$SIGNAL (%VAL(STATUS))

END
3.1.3. Using Command Language Interpreter Symbols
The symbols you create and access for process communication are command language interpreter (CLI) symbols. These symbols are stored in symbol tables maintained for use within the context of DCL, the default command language interpreter. They can store up to 255 bytes of information. The use of these symbols is limited to processes using DCL. If the process is not using DCL, an error status is returned by the symbol routines.
3.1.3.1. Local and Global Symbols
Local – A local symbol is available to the command level that defined it, any command procedure executed from that command level, and lower command levels.
Global – A global symbol can be accessed from any command level, regardless of the level at which it was defined.
3.1.3.2. Creating and Using Global Symbols
If you need to pass information from one program to another within a process, you can assign data to a global symbol when you create the symbol. Then, other programs can access the contents of the global symbol. You should use global symbols so the value within the symbol can be accessed by other programs.
Create the symbol and assign data to it using the routine LIB$SET_SYMBOL. Make sure you specify that the symbol will be placed in the global symbol table in the tbl-ind argument. If you do not specify the global symbol table, the symbol will be a local symbol.
Access the symbol with the LIB$GET_SYMBOL routine. This routine uses DCL to return the value of the symbol as a string.
Once you have finished using the symbol, delete it with the LIB$DELETE_SYMBOL routine. If you created a global symbol, make sure you specify the global symbol table in the tbl-ind argument. By default, the system searches the local symbol table.
See the VSI OpenVMS RTL Library (LIB$) Manual for additional information.
3.1.4. Using the Common Area
Use the common area to store data from one image to the next. Such data is unlikely to be corrupted between the time one image deposits it in a common area and another image reads it from the area. The common area can store 252 bytes of data. The LIB$PUT_COMMON routine writes information to this common area; the LIB$GET_COMMON routine reads information from this common area.
3.1.4.1. Creating the Process Common Area
The common area for your process is automatically created for you; no special declaration is necessary. To pass more than 255 bytes of data, put the data into a file instead of in the common area and use the common area to pass the specification.
3.1.4.2. Common I/O Routines
[min(256, the length of the data in the common storage area) - 4]
This maximum length is normally 252.
In BASIC and Fortran, you can use these routines to allow a USEROPEN routine to pass information back to the routine that called it. A USEROPEN routine cannot write arguments. However, it can call LIB$PUT_COMMON to put information into the common area. The calling program can then use LIB$GET_COMMON to retrieve it.
You can also use these routines to pass information between images run successively, such as chained images run by LIB$RUN_PROGRAM.
3.1.4.3. Modifying or Deleting Data in the Common Block
You cannot modify or delete data in the process common area unless you invoke LIB$PUT_COMMON. Therefore, you can execute any number of images between one image and another, provided that you have not invoked LIB$PUT_COMMON. Each subsequent image reads the correct data. Invoking LIB$GET_COMMON to read the common block does not modify the data.
3.1.4.4. Specifying Other Types of Data
Although the descriptions of the LIB$PUT_COMMON and LIB$GET_COMMON routines in the VSI OpenVMS RTL Library (LIB$) Manual specify a character string for the argument containing the data written to or read from the common area, you can specify other types of data. However, you must pass both noncharacter and character data by descriptor.
   .
   .
   .
! Enter statistics
   .
   .
   .
! Put the name of the stats file into common
STATUS = LIB$PUT_COMMON (FILE_NAME (1:LEN))
   .
   .
. .
.
.
! Read the name of the stats file from common
STATUS = LIB$GET_COMMON (FILE_NAME,
2 LEN)
! Compile the report
.
.
.3.2. Communication Between Processes
Shared files
Common event flags
Logical names
Mailboxes
Global sections
Lock management system services
Each approach offers different possibilities in terms of the speed at which it communicates information and the amount of information it can communicate. For example, shared files offer the possibility of sharing an unlimited amount of information; however, this approach is the slowest because the disk must be accessed to share information.
Like shared files, global sections offer the possibility of sharing large amounts of information. Because sharing information through global sections requires only memory access, it is the fastest communication method.
Logical names and mailboxes can communicate moderate amounts of information. Because each method operates through a relatively complex system service, each is faster than files, but slower than the other communication methods.
The lock management services and common event flag cluster methods can communicate relatively small amounts of information. With the exception of global sections, they are the fastest of the interprocess communication methods.
Common event flags: Processes executing within the same group can use common event flags to signal the occurrence or completion of particular activities. For details about event flags, and an example of how cooperating processes in the same group use a common event flag, see Chapter 6, "Synchronizing Data Access and Program Operations".
Logical name tables: Processes executing in the same job can use the job logical name table to provide member processes with equivalence names for logical names. Processes executing in the same group can use the group logical name table. A process must have the GRPNAM or SYSPRV privilege to place names in the group logical name table. All processes in the system can use the system logical name table. A process must have the SYSNAM or SYSPRV privilege to place names in the system logical name table. Processes can also create and use user-defined logical name tables. For details about logical names and logical name tables, see VSI OpenVMS Programming Concepts Manual, Volume II.
Mailboxes: You can use mailboxes as virtual input/output devices to pass information, messages, or data among processes. For additional information on how to create and use mailboxes, see Section 3.2.2, ''Mailboxes''. Mailboxes may also be used to provide a creating process with a way to determine when and under what conditions a created subprocess was deleted. For an example of a termination mailbox, see Section 4.9.4.3, ''Terminating Mailboxes''.
Global sections: Global sections can be either disk files or page-file sections that contain shareable code or data. Through the use of memory management services, these files can be mapped to the virtual address space of more than one process. In the case of a data file on disk, cooperating processes can synchronize reading and writing the data in physical memory; as data is updated, system paging results in the updated data being written directly back into the disk file. Global page-file sections are useful for temporary storage of common data; they are not mapped to a disk file. Instead, they page only to the system default page file. Global sections are described in more detail in Chapter 13, "Memory Management Services and Routines on OpenVMS VAX" and Chapter 12, "Memory Management Services and Routines on OpenVMS Alpha and OpenVMS IA-64".
Lock management system services: Processes can use the lock management system services to control access to resources (any entity on the system that the process can read, write, or execute). In addition to controlling access, the lock management services provide a mechanism for passing information among processes that have access to a resource (lock value blocks). Blocking ASTs can be used to notify a process that other processes are waiting for a resource. Using lock value blocks is a practical technique for communicating in cluster environments. With lock value blocks, communication between two processes from node to node in a distributed environment is an effective way of implementing cluster communication. For more information about the lock management system services, see Chapter 7, "Synchronizing Access to Resources".
While common event flags and lock management services establish communication, they are most useful for synchronizing events and are discussed in Chapter 6, "Synchronizing Data Access and Program Operations". Global sections and shared files are best used for sharing data and are discussed in VSI OpenVMS Programming Concepts Manual, Volume II.
3.2.1. Using Logical Name Tables
If both processes are part of the same job, you can place the logical name in the process logical name table (LNM$PROCESS) or in the job logical name table (LNM$JOB). If a subprocess is prevented from inheriting the process logical name table, you must communicate using the job logical name table. If the processes are in the same group, place the logical name in the group logical name table LNM$GROUP (requires GRPNAM or SYSPRV privilege). If the processes are not in the same group, place the logical name in the system logical name table LNM$SYSTEM (requires SYSNAM or SYSPRV privilege).
3.2.2. Mailboxes
A mailbox is a virtual device used for communication among processes. You must call OpenVMS RMS services, language I/O statements, or I/O system services to perform actual data transfers.
3.2.2.1. Creating a Mailbox
To create a mailbox, use the SYS$CREMBX system service. SYS$CREMBX creates the mailbox and returns the number of the I/O channel assigned to the mailbox.
The format for the SYS$CREMBX system service is as follows:
SYS$CREMBX
  ([prmflg] ,chan ,[maxmsg] ,[bufquo] ,[promsk] ,[acmode] , [lognam],
[flags] ,[nullarg])Specify a variable to receive the I/O channel number using the
chanargument. This argument is required.Specify the logical name to be associated with the mailbox using the
lognamargument. The logical name identifies the mailbox for other processes and for input/output statements.
The SYS$CREMBX system service also allows you to specify the message size, buffer size, mailbox protection code, and access mode of the mailbox; however, the default values for these arguments are usually sufficient. For more information on SYS$CREMBX, refer to the VSI OpenVMS System Services Reference Manual.
3.2.2.2. Creating Temporary and Permanent Mailboxes
By default, a mailbox is deleted when no I/O channel is assigned to it. Such a
mailbox is called a temporary mailbox. If you have PRMMBX privilege, you can
create a permanent mailbox (specify the prmflg argument
as 1 when you invoke SYS$CREMBX). A permanent mailbox
is not deleted until it is marked for deletion with the
SYS$DELMBX system service (requires PRMMBX). Once a
permanent mailbox is marked for deletion, it is like a temporary mailbox; when
the last I/O channel to the mailbox is deassigned, the mailbox is
deleted.
! I/O channel
INTEGER*2 MBX_CHAN

! Mailbox name
CHARACTER*(*) MBX_NAME
PARAMETER (MBX_NAME = 'MAIL_BOX')

STATUS = SYS$CREMBX (,
2                    MBX_CHAN,  ! I/O channel
2                    ,,,,
2                    MBX_NAME)  ! Mailbox name
Note
If you use MAIL as the logical name for a mailbox, then the system will not execute the proper image in response to the DCL command MAIL.
INTEGER STATUS,
2       SYS$CREMBX
INTEGER*2 MBX_CHAN

! Create permanent mailbox
STATUS = SYS$CREMBX (%VAL(1),     ! Permanence flag
2                    MBX_CHAN,    ! Channel
2                    ,,,,
2                    'MAIL_BOX')  ! Logical name
IF (.NOT. STATUS) CALL LIB$SIGNAL (%VAL(STATUS))
! Create subprocess to delete it
STATUS = LIB$SPAWN ('RUN DELETE_MBX')
IF (.NOT. STATUS) CALL LIB$SIGNAL (%VAL(STATUS))

END
INTEGER STATUS,
2       SYS$DELMBX,
2       SYS$ASSIGN
INTEGER*2 MBX_CHAN

! Assign channel to mailbox
STATUS = SYS$ASSIGN ('MAIL_BOX',
2                    MBX_CHAN,,)
IF (.NOT. STATUS) CALL LIB$SIGNAL (%VAL(STATUS))
! Delete the mailbox
STATUS = SYS$DELMBX (%VAL(MBX_CHAN))
IF (.NOT. STATUS) CALL LIB$SIGNAL (%VAL(STATUS))

END
3.2.2.3. Assigning an I/O Channel Along with a Mailbox
A mailbox is a virtual device used for communication between processes. A channel is the communication path that a process uses to perform I/O operations to a particular device. The LIB$ASN_WTH_MBX routine assigns a channel to a device and associates a mailbox with the device.
Normally, a process calls the SYS$CREMBX system service to create a mailbox and assign a channel and logical name to it. In the case of a temporary mailbox, this service places the logical name corresponding to the mailbox in the job logical name table. This implies that any process running in the same job and using the same logical name uses the same mailbox.
Sometimes it is not desirable to have more than one process use the same mailbox. For example, when a program connects explicitly with another process across a network, the program uses a mailbox both to obtain the data confirming the connection and to store the asynchronous messages from the other process. If that mailbox is shared with other processes in the same group, there is no way to determine which messages are intended for which processes; the processes read each other's messages, and the original program does not receive the correct information from the cooperating process across the network link.
|
MB |
indicates that the device is a mailbox. |
|
c |
is the controller. |
|
u |
is the unit number. |
The routine returns this device name to the calling program, which then must pass the mailbox channel to the other programs with which it cooperates. In this way, the cooperating processes access the mailbox by its physical name instead of by its jobwide logical name.
The calling program passes the routine a device name, which specifies the
device to which the channel is to be assigned. For this argument (called
dev-nam), you can use a logical name. If you do so,
the routine attempts one level of logical name translation.
The privilege restrictions and process quotas required for using this routine are those required by the $GETDVI, $CREMBX, and $ASSIGN system services.
3.2.2.4. Reading and Writing Data to a Mailbox
Synchronous I/O—Reads or writes to a mailbox and then waits for the cooperating image to perform the other operation. Use I/O statements for your programming language. This is the recommended method of addressing a mailbox.
Immediate I/O—Queues a read or write operation to a mailbox and continues program execution after the operation completes. To do this, use the SYS$QIOW system service.
Asynchronous I/O—Queues a read or write operation to a mailbox and continues program execution while the request executes. To do this, use the SYS$QIO system service. When the read or write operation completes, the I/O status block (if specified) is filled, the event flag (if specified) is set, and the AST routine (if specified) is executed.
VSI OpenVMS Programming Concepts Manual, Volume II describes the SYS$QIO and SYS$QIOW system services and provides further discussion of mailbox I/O. See the VSI OpenVMS System Services Reference Manual for more information. VSI recommends that you supply the optional I/O status block parameter when you use these two system services. The contents of the status block varies depending on the QIO function code; refer to the function code descriptions in the VSI OpenVMS I/O User's Reference Manual for a description of the appropriate status block.
3.2.2.5. Using Synchronous Mailbox I/O
Use synchronous I/O when you read or write information to another image and cannot continue until that image responds.
! Status variable and values
INTEGER STATUS

! Logical unit and name for mailbox
INTEGER MBX_LUN
CHARACTER(*) MBX_NAME
PARAMETER (MBX_NAME = MAIL_BOX)
! Create mailbox
STATUS = SYS$CREMBX (,
2                    MBX_CHAN,  ! Channel
2                    ,,,,
2                    MBX_NAME)  ! Logical name
IF (.NOT. STATUS) CALL LIB$SIGNAL (%VAL(STATUS))

! Get logical unit for mailbox and open mailbox
STATUS = LIB$GET_LUN (MBX_LUN)
IF (.NOT. STATUS) CALL LIB$SIGNAL (%VAL(STATUS))
OPEN (UNIT = MBX_LUN,
2     FILE = MBX_NAME,
2     CARRIAGECONTROL = 'LIST',
2     STATUS = 'NEW')
! DEVICE.FOR

PROGRAM PROCESS_DEVICE

! Status variable
INTEGER STATUS

! Name and I/O channel for mailbox
CHARACTER*(*) MBX_NAME
PARAMETER (MBX_NAME = 'MAIL_BOX')
INTEGER*2 MBX_CHAN
! Logical unit number for FORTRAN I/O
INTEGER MBX_LUN
! Character string format
CHARACTER*(*) CHAR_FMT
PARAMETER (CHAR_FMT = '(A50)')
! Mailbox message
CHARACTER*50 MBX_MESSAGE
   .
   .
   .
! Create the mailbox
STATUS = SYS$CREMBX (,
2                    MBX_CHAN,   ! Channel
2                    ,,,,
2                    MBX_NAME)   ! Logical name
IF (.NOT. STATUS) CALL LIB$SIGNAL (%VAL(STATUS))
! Get logical unit for mailbox and open mailbox
STATUS = LIB$GET_LUN (MBX_LUN)
IF (.NOT. STATUS) CALL LIB$SIGNAL (%VAL(STATUS))
OPEN (UNIT = MBX_LUN,
2     FILE = MBX_NAME,
2     CARRIAGECONTROL = 'LIST',
2     STATUS = 'NEW')
! Create subprocess to execute GETDEVINF.EXE
STATUS = SYS$CREPRC (,
2                    'GETDEVINF',  ! Image
2                    ,,,,,
2                    'GET_DEVICE', ! Process name
2                    %VAL(4),,,)   ! Priority
IF (.NOT. STATUS) CALL LIB$SIGNAL (%VAL(STATUS))
! Pass device names to GETDEFINF
WRITE (UNIT=MBX_LUN,
2      FMT=CHAR_FMT) 'SYS$DRIVE0'
! Read device information from GETDEFINF
READ (UNIT=MBX_LUN,
2     FMT=CHAR_FMT) MBX_MESSAGE
   .
   .
   .
END
   .
   .
   .
! Create mailbox
STATUS = SYS$CREMBX (,
2                    MBX_CHAN,  ! I/O channel
2                    ,,,,
2                    MBX_NAME)  ! Mailbox name
IF (.NOT. STATUS) CALL LIB$SIGNAL (%VAL(STATUS))
! Get logical unit for mailbox and open mailbox
STATUS = LIB$GET_LUN (MBX_LUN)
IF (.NOT. STATUS) CALL LIB$SIGNAL (%VAL(STATUS))
OPEN (UNIT=MBX_LUN,
2     FILE=MBX_NAME,
2     CARRIAGECONTROL='LIST',
2     STATUS = 'OLD')
! Read device names from mailbox
READ (UNIT=MBX_LUN,
2     FMT=CHAR_FMT) MBX_MESSAGE
! Use SYS$GETJPI to find process and terminal
! Process name:  PROC_NAME (1:P_LEN)
! Terminal name: TERM (1:T_LEN)
   .
   .
   .
MBX_MESSAGE = MBX_MESSAGE//' '//
2             PROC_NAME(1:P_LEN)//' '//
2             TERM(1:T_LEN)
! Write device information to DEVICE
WRITE (UNIT=MBX_LUN,
2      FMT=CHAR_FMT) MBX_MESSAGE

END
3.2.2.6. Using Immediate Mailbox I/O
Use immediate I/O to send or receive a message from another process without waiting for a response from that process. To ensure that the other process receives the information that you write, either do not exit until the other process has a channel to the mailbox, or use a permanent mailbox.
Queueing an Immediate I/O Request
To queue an immediate I/O request, invoke the SYS$QIOW system service. See the VSI OpenVMS System Services Reference Manual for more information.
Reading Data from the Mailbox
Since immediate I/O is asynchronous, a mailbox may contain more than one message or no message when it is read. If the mailbox contains more than one message, the read operation retrieves the messages one at a time in the order in which they were written. If the mailbox contains no message, the read operation generates an end-of-file error.
To allow a cooperating program to differentiate between an empty mailbox and the end of the data being transferred, the process writing the messages should use the IO$_WRITEOF function code to write an end-of-file message to the mailbox as the last piece of data. When the cooperating program reads an empty mailbox, the end-of-file message is returned and the second longword of the I/O status block is 0. When the cooperating program reads an end-of-file message explicitly written to the mailbox, the end-of-file message is returned and the second longword of the I/O status block contains the process identification number of the process that wrote the message to the mailbox.
!SEND.FOR

   .
   .
   .

INTEGER*4 STATUS

! Name and channel number for mailbox
CHARACTER*(*) MBX_NAME
PARAMETER (MBX_NAME = 'MAIL_BOX')
INTEGER*2 MBX_CHAN
! Mailbox message
CHARACTER*80 MBX_MESSAGE
INTEGER LEN
CHARACTER*80 MESSAGES (255)
INTEGER MESSAGE_LEN (255)
INTEGER MAX_MESSAGE
PARAMETER (MAX_MESSAGE = 255)
! I/O function codes and status block
INCLUDE '($IODEF)'
INTEGER*4 WRITE_CODE
STRUCTURE /STATUS_BLOCK/
 INTEGER*2 IOSTAT,
2          MSG_LEN
 INTEGER*4 READER_PID
END STRUCTURE
RECORD /STATUS_BLOCK/ IOSTATUS
! System routines
INTEGER SYS$CREMBX,
2       SYS$ASCEFC,
2       SYS$WAITFR,
2       SYS$QIOW
! Create the mailbox
STATUS = SYS$CREMBX (,
2                    MBX_CHAN,
2                    ,,,,
2                    MBX_NAME)
IF (.NOT. STATUS) CALL LIB$SIGNAL (%VAL(STATUS))
! Fill MESSAGES array
   .
   .
   .
! Write the messages
DO I = 1, MAX_MESSAGE
  WRITE_CODE = IO$_WRITEVBLK .OR. IO$M_NOW
  MBX_MESSAGE = MESSAGES(I)
  LEN = MESSAGE_LEN(I)
  STATUS = SYS$QIOW (,
2                    %VAL(MBX_CHAN),     ! Channel
2                    %VAL(WRITE_CODE),   ! I/O code
2                    IOSTATUS,           ! Status block
2                    ,,
2                    %REF(MBX_MESSAGE),  ! P1
2                    %VAL(LEN),,,,)      ! P2
  IF (.NOT. STATUS) CALL LIB$SIGNAL (%VAL(STATUS))
  IF (.NOT. IOSTATUS.IOSTAT)
2      CALL LIB$SIGNAL (%VAL(IOSTATUS.STATUS))
END DO
! Write end-of-file
WRITE_CODE = IO$_WRITEOF .OR. IO$M_NOW
STATUS = SYS$QIOW (,
2                  %VAL(MBX_CHAN),     ! Channel
2                  %VAL(WRITE_CODE),   ! End-of-file code
2                  IOSTATUS,           ! Status block
2                  ,,,,,,,)
IF (.NOT. STATUS) CALL LIB$SIGNAL (%VAL(STATUS))
IF (.NOT. IOSTATUS.IOSTAT)
2    CALL LIB$SIGNAL (%VAL(IOSTATUS.IOSTAT))
   .
   .
   .
! Make sure cooperating process can read the information
! by waiting for it to assign a channel to the mailbox
STATUS = SYS$ASCEFC (%VAL(64),
2                    'CLUSTER',,)
IF (.NOT. STATUS) CALL LIB$SIGNAL (%VAL(STATUS))
STATUS = SYS$WAITFR (%VAL(64))
IF (.NOT. STATUS) CALL LIB$SIGNAL (%VAL(STATUS))

END
INTEGER STATUS

INCLUDE '($IODEF)'
INCLUDE '($SSDEF)'

! Name and channel number for mailbox
CHARACTER*(*) MBX_NAME
PARAMETER (MBX_NAME = 'MAIL_BOX')
INTEGER*2 MBX_CHAN
! QIO function code
INTEGER READ_CODE
! Mailbox message
CHARACTER*80 MBX_MESSAGE
INTEGER*4    LEN
! Message arrays
CHARACTER*80 MESSAGES (255)
INTEGER*4    MESSAGE_LEN (255)
! I/O status block
STRUCTURE /STATUS_BLOCK/
 INTEGER*2 IOSTAT,
2          MSG_LEN
 INTEGER*4 READER_PID
END STRUCTURE
RECORD /STATUS_BLOCK/ IOSTATUS
! System routines
INTEGER SYS$ASSIGN,
2       SYS$ASCEFC,
2       SYS$SETEF,
2       SYS$QIOW
! Create the mailbox and let the other process know
STATUS = SYS$ASSIGN (MBX_NAME,
2                    MBX_CHAN,,,)
IF (.NOT. STATUS) CALL LIB$SIGNAL (%VAL(STATUS))
STATUS = SYS$ASCEFC (%VAL(64),
2                    'CLUSTER',,)
IF (.NOT. STATUS) CALL LIB$SIGNAL (%VAL(STATUS))
STATUS = SYS$SETEF (%VAL(64))
IF (.NOT. STATUS) CALL LIB$SIGNAL (%VAL(STATUS))
! Read first message
READ_CODE = IO$_READVBLK .OR. IO$M_NOW
LEN = 80
STATUS = SYS$QIOW (,
2                  %VAL(MBX_CHAN),     ! Channel
2                  %VAL(READ_CODE),    ! Function code
2                  IOSTATUS,           ! Status block
2                  ,,
2                  %REF(MBX_MESSAGE),  ! P1
2                  %VAL(LEN),,,,)      ! P2
IF (.NOT. STATUS) CALL LIB$SIGNAL (%VAL(STATUS))
IF ((.NOT. IOSTATUS.IOSTAT) .AND.
2  (IOSTATUS.IOSTAT .NE. SS$_ENDOFFILE)) THEN
  CALL LIB$SIGNAL (%VAL(IOSTATUS.IOSTAT))
ELSE IF (IOSTATUS.IOSTAT .NE. SS$_ENDOFFILE) THEN
  I = 1
  MESSAGES(I) = MBX_MESSAGE
  MESSAGE_LEN(I) = IOSTATUS.MSG_LEN
END IF
! Read messages until cooperating process writes end-of-file
DO WHILE (.NOT. ((IOSTATUS.IOSTAT .EQ. SS$_ENDOFFILE) .AND.
2                (IOSTATUS.READER_PID .NE. 0)))

  STATUS = SYS$QIOW (,
2                    %VAL(MBX_CHAN),     ! Channel
2                    %VAL(READ_CODE),    ! Function code
2                    IOSTATUS,           ! Status block
2                    ,,
2                    %REF(MBX_MESSAGE),  ! P1
2                    %VAL(LEN),,,,)      ! P2
  IF (.NOT. STATUS) CALL LIB$SIGNAL (%VAL(STATUS))
  IF ((.NOT. IOSTATUS.IOSTAT) .AND.
2     (IOSTATUS.IOSTAT .NE. SS$_ENDOFFILE)) THEN
    CALL LIB$SIGNAL (%VAL(IOSTATUS.IOSTAT))
  ELSE IF (IOSTATUS.IOSTAT .NE. SS$_ENDOFFILE) THEN
    I = I + 1
    MESSAGES(I) = MBX_MESSAGE
    MESSAGE_LEN(I) = IOSTATUS.MSG_LEN
  END IF

END DO
   .
   .
   .
3.2.2.7. Using Asynchronous Mailbox I/O
Use asynchronous I/O to queue a read or write request to a mailbox. To ensure that the other process receives the information you write, either do not exit the other process until the other process has a channel to the mailbox, or use a permanent mailbox.
To queue an asynchronous I/O request, invoke the SYS$QIO system service; however, when specifying the function codes, do not specify the IO$M_NOW modifier. The SYS$QIO system service allows you to specify either an AST to be executed or an event flag to be set when the I/O operation completes.
Example 3.5, ''Asynchronous I/O Using a Mailbox'' calculates gross income and taxes and then uses the results to calculate net income. INCOME.FOR uses SYS$CREPRC, specifying a termination mailbox, to create a subprocess to calculate taxes (CALC_TAXES) while INCOME calculates gross income. INCOME issues an asynchronous read to the termination mailbox, specifying an event flag to be set when the read completes. (The read completes when CALC_TAXES completes, terminating the created process and causing the system to write to the termination mailbox.) After finishing its own gross income calculations, INCOME.FOR waits for the flag that indicates CALC_TAXES has completed and then figures net income.
!INSTALLED.FOR

! Installed common block to be linked with INCOME.FOR and
! CALC_TAXES.FOR.
! Unless the shareable image created from this file is
! in SYS$SHARE, you must define a group logical name
! INSTALLED and equivalence it to the full file specification
! of the shareable image.
INTEGER*4 INCOME (200),
2         TAXES (200),
2         NET (200)
COMMON /CALC/ INCOME,
2             TAXES,
2             NET

END
!INCOME.FOR ! Status and system routines . . . INCLUDE '($SSDEF)' INCLUDE '($IODEF)' INTEGER STATUS, 2 LIB$GET_LUN, 2 LIB$GET_EF, 2 SYS$CLREF, 2 SYS$CREMBX, 2 SYS$CREPRC, 2 SYS$GETDVIW, 2 SYS$QIO, 2 SYS$WAITFR ! Set up for SYS$GETDVI ! Define itmlst structure STRUCTURE /ITMLST/ UNION MAP INTEGER*2 BUFLEN INTEGER*2 CODE INTEGER*4 BUFADR INTEGER*4 RETLENADR END MAP MAP INTEGER*4 END_LIST END MAP END UNION END STRUCTURE ! Declare itmlst RECORD /ITMLST/ DVILIST (2) INTEGER*4 UNIT_BUF, 2 UNIT_LEN EXTERNAL DVI$_UNIT ! Name and I/O channel for mailbox CHARACTER*(*) MBX_NAME PARAMETER (MBX_NAME = 'MAIL_BOX') INTEGER*2 MBX_CHAN INTEGER*4 MBX_LUN ! Logical unit number for I/O CHARACTER*84 MBX_MESSAGE ! Mailbox message INTEGER*4 READ_CODE, 2 LENGTH ! I/O status block STRUCTURE /STATUS_BLOCK/ INTEGER*2 IOSTAT, 2 MSG_LEN INTEGER*4 READER_PID END STRUCTURE RECORD /STATUS_BLOCK/ IOSTATUS ! Declare calculation variables in installed common INTEGER*4 INCOME (200), 2 TAXES (200), 2 NET (200) COMMON /CALC/ INCOME, 2 TAXES, 2 NET ! Flag to indicate taxes calculated INTEGER*4 TAX_DONE ! Get and clear an event flag STATUS = LIB$GET_EF (TAX_DONE) IF (.NOT. STATUS) CALL LIB$SIGNAL(%VAL(STATUS)) STATUS = SYS$CLREF (%VAL(TAX_DONE)) IF (.NOT. STATUS) CALL LIB$SIGNAL(%VAL(STATUS)) ! Create the mailbox STATUS = SYS$CREMBX (, 2 MBX_CHAN, 2 ,,,, 2 MBX_NAME) IF (.NOT. STATUS) CALL LIB$SIGNAL(%VAL(STATUS)) ! Get unit number of the mailbox DVILIST(1).BUFLEN = 4 DVILIST(1).CODE = %LOC(DVI$_UNIT) DVILIST(1).BUFADR = %LOC(UNIT_BUF) DVILIST(1).RETLENADR = %LOC(UNIT_LEN) DVILIST(2).END_LIST = 0 STATUS = SYS$GETDVIW (, 2 %VAL(MBX_CHAN), ! Channel 2 MBX_NAME, ! Device 2 DVILIST, ! Item list 2 ,,,) IF (.NOT. STATUS) CALL LIB$SIGNAL(%VAL(STATUS)) ! Create subprocess to calculate taxes STATUS = SYS$CREPRC (, 2 'CALC_TAXES', ! Image 2 ,,,,, 2 'CALC_TAXES', ! Process name 2 %VAL(4), ! Priority 2 , 2 %VAL(UNIT_BUF),) IF (.NOT. STATUS) CALL LIB$SIGNAL(%VAL(STATUS)) ! Asynchronous read to termination mailbox ! sets flag when tax calculations complete READ_CODE = IO$_READVBLK LENGTH = 84 STATUS = SYS$QIO (%VAL(TAX_DONE), ! Indicates read complete 2 %VAL(MBX_CHAN), ! Channel 2 %VAL(READ_CODE), ! Function code 2 IOSTATUS,,, ! Status block 2 %REF(MBX_MESSAGE),! P1 2 %VAL(LENGTH),,,,) ! P2 IF (.NOT. STATUS) CALL LIB$SIGNAL (%VAL(STATUS)) ! Calculate incomes . . . ! Wait until taxes are calculated STATUS = SYS$WAITFR (%VAL(TAX_DONE)) IF (.NOT. STATUS) CALL LIB$SIGNAL(%VAL(STATUS)) ! Check mailbox I/O IF (.NOT. IOSTATUS.IOSTAT) 2 CALL LIB$SIGNAL (%VAL(IOSTATUS.IOSTAT)) ! Calculate net income after taxes . . . END
! Declare calculation variables in installed common
INTEGER*4 INCOME (200),
2         TAXES (200),
2         NET (200)
COMMON /CALC/ INCOME,
2             TAXES,
2             NET

! Calculate taxes
   .
   .
   .
END
3.3. Intracluster Communication
Intracluster communication (ICC), available through ICC system services, forms an application program interface (API) for process-to-process communications. For large data transfers, intracluster communication is the highest performance OpenVMS application communication mechanism, better than standard network transports and mailboxes.
Intracluster communication enables application program developers to create distributed applications with connections between different processes on a single system or between processes on different systems within a single OpenVMS Cluster system. Intracluster communication does not require a network product. It uses memory or System Communication Services (SCS).
Allow the creation of both client and server processes
Maintain a simple registry of servers and services
Manage security of the server process namespace and access to server processes
Establish connections between these processes and transmit data between these processes
Provide 64-bit buffer and address support
An easy-to-use conventional system service interface for interprocess communications within a cluster
An interface usable for communications between processes within a single, nonclustered node
An interface callable from all modes and from execlets as well as from images
An easy-to-use interface giving access to high-speed interconnects such as Memory Channel
An interface independent of the installation of any networking product
An interface usable for nonprivileged clients and authorized (but not necessarily privileged) servers
Open Association: SYS$ICC_OPEN_ASSOC
Close Association: SYS$ICC_CLOSE_ASSOC
Connect: SYS$ICC_CONNECT and SYS$ICC_CONNECTTW
Accept: SYS$ICC_ACCEPT
Reject: SYS$ICC_REJECT
Disconnect: SYS$ICC_DISCONNECT and SYS$ICC_DISCONNECTW
Transmit Data: SYS$ICC_TRANSMIT and SYS$ICC_TRANSMITW
Receive Data: SYS$ICC_RECEIVE and SYS$ICC_RECEIVEW
Transceive Data: SYS$ICC_TRANSCEIVE and SYS$ICC_TRANSCEIVEW
Reply: SYS$ICC_REPLY and SYS$ICC_REPLYW
See the VSI OpenVMS System Services Reference Manual: GETUTC–Z for additional information about the ICC system services.
3.3.1. Programming with Intracluster Communications
The following sections provide information on how to program with intracluster communications (ICC) using ICC system services.
3.3.1.1. ICC Concepts
The following terms and their definitions are central to creating and using intracluster communication.
An ASSOCIATION is a named link between an application and ICC. The association name, combined with the node name of the system on which the application is running, identifies this application to other applications that want to communicate within a node or cluster.
An ASSOCIATION NAME is a string that identifies an ASSOCIATION. Association Names are 1 to 31 characters in length and must be unique within a node. Association Names are case-sensitive. Associations are created by calling the SYS$ICC_OPEN_ASSOC service (or by the first call to SYS$ICC_CONNECT if OPEN was not previously called) and are identified by an Association Handle.
An ASSOCIATION HANDLE is an opaque identifier that represents an association to ICC. Association Handles are passed as unsigned longwords.
A NODE is either a standalone system or a member of an OpenVMS Cluster. It is identified by a one-to-six-character case-blind name that matches the SYSGEN parameter SCSNODE.
A CONNECTION is a link between two associations created by calling the SYS$ICC_CONNECT or SYS$ICC_ACCEPT service. An association may have multiple simultaneous connections at any given time. A connection is identified by a Connection Handle. A given application may choose to either only initiate connections, or initiate and accept connections as well. Connections support both synchronous and asynchronous communications.
A CONNECTION HANDLE is an opaque identifier that represents a connection to ICC. Connection Handles are passed as unsigned longwords.
In ICC terminology, a SERVER is an application that has declared to ICC that it is willing to accept connections. A server must call SYS$ICC_OPEN_ASSOC and supply the address of a connection routine. Upon receipt of a connection request AST, a server completes its side of the connection by calling the SYS$ICC_ACCEPT service. It may also choose not to accept the connection request by calling SYS$ICC_REJECT.
A CLIENT, in the ICC model, is an application that calls SYS$ICC_CONNECT to request a connection to a server. Note that a server may also be a client. A client need not call SYS$ICC_OPEN_ASSOC (although there are certain benefits to doing so) but may instead call SYS$ICC_CONNECT using the supplied constant Default Association Handle. An association opened in this manner is called the Default Association. Only one default association is permitted per process; however, any number of connections may be established even when there is only one association.
The ICC SIMPLE CLUSTERWIDE REGISTRY provides a method for servers to register their node and association names under a single logical name, thus eliminating the need for clients to determine on which node the server process is running. Multiple servers can register under the same logical name, and ICC will randomly select one from the list. The selection algorithm leads to load sharing, but not necessarily to load balancing.
3.3.1.2. Design Considerations
This section contains information about ICC design considerations.
3.3.1.2.1. Naming
An ICC server may have two visible names – the association name and, if the ICC registry is used, a registry name. The registry name may be the same as the association name.
If, however, you wish to run multiple copies of the server on a single node, the registry name should be the more general name, while the association name should reference a particular instance of the server.
3.3.1.2.2. Message Ordering
ICC guarantees that messages will be delivered in the order in which they were transmitted. There is no provision for out-of-order delivery.
3.3.1.2.3. Flow Control
ICC implements flow control on a per-association basis. You can change this value by specifying a value for the MAXFLOWBUFCNT parameter to the SYS$ICC_OPEN_ASSOC service.
In addition to flow control, ICC uses the value of MAXFLOWBUFCNT to determine preallocation of certain resources cached by the services for performance reasons. Increasing this value results in a larger charge against process quotas. The default value of MAXFLOWBUFCNT is 5.
Because all ICC connections within the association are subject to flow control, failure to receive data in a timely manner will eventually cause all connections in the association to stall.
3.3.1.2.4. Transfer Sizes and Receiving Data
ICC supports two models for receiving data. In the simple receive model, a SYS$ICC_RECEIVE call either completes immediately if data is present, or else the receive buffer is queued up to be filled when data arrives from the sender. SYS$ICC_RECEIVEW does not return to the caller until either data is present, or the connection has disconnected.
The major disadvantage to this method is that the buffer you supply to SYS$ICC_RECEIVE must be large enough to receive the largest message the sender might transmit. Receipt of a message larger than the queued buffer causes ICC to disconnect the link to preserve order. There is no provision within ICC to break a single message over multiple receive calls.
The second model is data event driven. In this method, the application provides SYS$ICC_OPEN_ASSOC (parameter recv_rtn) the address of a routine to be called whenever a connection established over this particular association is the target of a TRANSMIT. The data routine is called at AST level in the original mode of the caller and supplied with the size of the incoming transfer, the connection handle for this transfer, and a user-supplied context value. Once notified of incoming data, the application must then allocate a sufficiently large buffer and issue a SYS$ICC_RECEIVE call to obtain the data. The maximum transfer size using this method is 1 Mb.
The SYS$ICC_RECEIVE call does not have to be made from the data routine; however, a receive request cannot be made before receipt of a data event. Therefore, receive operations are never queued within ICC when you use a data event.
Because there is a single data routine per association, all connections on the association share the same data routine. To have some connections use both methods, at least two associations must be opened.
3.3.1.2.5. Transfer Sizes and Transceive
SYS$ICC_TRANSCEIVE is a single service that sends a message and completes when the other side responds with a call to SYS$ICC_REPLY. The maximum size of the return message is fixed by the size of the buffer the caller provides to the transceive service at the time the call is made. The maximum transmission size for both SYS$ICC_TRANSCEIVE and SYS$ICC_REPLY is 1 Mb. The minimum length of the reply transmission is zero bytes.
3.3.1.2.6. Disconnection
In a properly coded communications protocol, responsibility for disconnecting the connection should be left to the side of the protocol that last received data. This rule assures that there is no data in transit in which the state may be uncertain at the time the disconnect event occurs.
One side of the connection calls either SYS$ICC_DISCONNECT or SYS$ICC_CLOSE_ASSOC.
The client or server process in the connection is deleted.
The node on which one side of the connection is running is either shut down, crashes, or loses communication with the rest of the cluster.
An unrecoverable error within the ICC services occurs, and the only possible recovery by the service is to disconnect the link.
A pending receive buffer is too small to receive all the incoming data. To preserve message order, ICC will disconnect the link.
No matter what the cause of the disconnection, the application should be prepared to deal with disconnection other than that as an expected part of the application communication protocol.
3.3.1.2.7. Error Recovery
Whenever possible, ICC services attempt to return an appropriate status value to the caller, either as the routine status value or in the status fields of the IOSB or IOS_ICC structure. Sometimes the only recovery method available to ICC is to disconnect the connection. ICC disconnects only when it lacks sufficient context to return status to the calling application.
3.3.1.3. General Programming Considerations
The ICC public structures and constants are declared in the module $ICCDEF (MACRO), within STARLET.REQ for BLISS and ICCDEF.H in SYS$LIBRARY:SYS$STARLET_C.TLB for C. STARLET.H provides full system service prototypes for C.
3.3.1.4. Servers
|
Parameter |
Description |
|---|---|
|
assoc_handle |
Address to receive the association handle. (longword) Required. |
|
assoc_name |
Address of a string descriptor pointing to the desired association name. If you omit this argument, the ICC default association will be opened. Association names are case sensitive. This is also the name used in the ICC security object for this association. |
|
Address of string descriptors describing the logical name and logical table name for use by the ICC simple registry. The logical name table must exist at the time of the call, and the caller must have write access to the table. Unless your application requires a logical name table for exclusive use of the application, use of the default ICC$REGISTRY_TABLE is recommended. The logical name is case sensitive. Table names are always converted to uppercase. The logical name supplied here is the name by which the client using the registry will know the server. If either of these arguments is supplied, they must both be supplied. |
|
conn_event_rtn |
Address of a routine to be called whenever a client requests a connection to this server. A server may not omit this parameter. See the sections on connection and disconnection routines for more details about what actions a connection routine must take. |
|
disc_event_rtn |
Optional address of a routine to be called when a disconnect event occurs. This may be the same routine as the connection routine. See the section on connection and disconnection routines for more details about what actions a disconnection routine may take. |
|
recv_rtn |
Address of routine to be called whenever a connection receives data. Note that all connections on this association use the same routine. Please see the discussion on transfer sizes in Section 3.3.1.2.4, ''Transfer Sizes and Receiving Data'' for information on how having or not a having a data routine affects maximum receive size. Optional. |
|
maxflowbufcnt |
Pass by value the maximum number of inbound messages per connection that ICC will allow before initiating flow control on the connection. The default value for this parameter is 5. Optional. |
|
prot |
The default protection for this association. Refer to VSI OpenVMS Guide to System Security for information on the security attributes of ICC associations. This parameter is effective only if no Permanent Security Object has been created for this association. If prot is zero (0) or not specified, all users may connect to this association. If prot is one (1), only members of the same UIC group, or users with SYSPRV, may connect. If prot is two (2), only the owner or users with SYSPRV may connect. Object protection specified by a Permanent Security Object overrides this parameter. Additionally, if no Permanent Security Object exists, the value specified here may be overridden by the SET SECURITY command issued for the Temporary Security Object while the association is open. |
3.3.1.4.1. Connection Events
Once the association is opened, connection requests are delivered as asynchronous calls to the server's connection routine.
The connection routine (and disconnection routine, if supplied) are each called with seven arguments as described in the $ICC_OPEN_ASSOC system service, located in the VSI OpenVMS System Services Reference Manual: GETUTC–Z.
A single connection or disconnection routine may distinguish between the events based on the first argument (event_type), which will either be the code ICC$C_EV_CONNECT or ICC$C_EV_DISCONNECT.
A connection routine must either call SYS$ICC_ACCEPT to complete the connection or SYS$ICC_REJECT to reject the connection. The EPID and user name of the requesting process are supplied by ICC. Any additional information required by the application for verification either must be supplied by the client via the connection data parameter or must be obtainable by the server itself (for example, via SYS$GETJPI).
Failure to ACCEPT or REJECT the connection will stall all additional attempts to connect to this server.
3.3.1.4.2. Disconnection Events
A disconnection event signals that the partner application of the connection has requested a disconnect, the partner process has been deleted, or that the remote node has left the cluster. Upon receiving a disconnect event, the server should call SYS$ICC_DISCONNECT to clean up the server side of the connection. However, when the partner that received the disconnect event calls SYS$ICC_DISCONNECT, the connection has already been terminated and the link is already gone. The return status from this call to SYS$ICC_DISCONNECT should be SS$_NORMAL, but the completion status returned in the IOSB is SS$_LINKDISCON.
Failure to call DISCONNECT may leave resources allocated to the connection that are not released until the image terminates. In the case of inner mode associations, resources will be released at process termination.
3.3.1.5. Clients
A simple client need not call SYS$ICC_OPEN_ASSOC although there may be some benefits for even the simplest clients. For a client, the major benefit of calling OPEN is declaring a data receive routine.
In cases where a client may wish to connect to multiple servers, calling OPEN_ASSOC multiple times can help isolate the routines related to data receipt and disconnection.
|
Argument |
Description |
|---|---|
|
IOS_ICC |
Address of an IOS_ICC structure (defined in ICCDEF). |
|
Optional AST address and parameter. |
|
assoc_handle |
Either the value returned from the OPEN_ASSOC call or the constant ICC$DEFAULT_ASSOC if OPEN_ASSOC was not called. |
|
conn_handle |
Address of a longword to receive the connection handle for this connection. |
|
remote_assoc |
A string descriptor pointing to either the association name of the server or the registry name of the server if the server is using the ICC simple registry. Either use is case sensitive. |
|
remote_node |
If omitted, then the assoc_name argument will be treated as a name to look up in the ICC simple registry. A zero length or blank string represents the local node. Any other string will be converted to uppercase and must match the name of a node in the cluster. |
|
user_context |
A unique context value for this connection. This value will be passed to data event and disconnection routines. |
|
Address and length of any connection data. This could include additional authentication or protocol setup data required by the application. |
|
Address and length of a buffer to receive any data (accept or reject data) returned from the server. The buffer must be large enough to receive the maximum amount of data the server might return. The actual number of bytes will be written to retlen_addr. |
|
flags |
The only valid flag is ICC$M_SYNCH_MODE. If you select synch mode, the data transmission routines (TRANSMIT, REPLY, and RECEIVE – TRANSCEIVE can never complete synchronously) may return the alternate success status SS$_SYNCH and not call the AST completion routine. If you do not specify synch mode, the AST routine, if provided, will always be called. |
When the CONNECT call completes, the connection is established and useable only if success status was returned as both the return value of the service and in the status fields (ios_icc$w_status and ios_icc$l_remstat) of the IOS_ICC.
Chapter 4. Process Control
This chapter describes how to use operating system features to control a process or kernel thread.
4.1. Using Process Control for Programming Tasks
Modularize application programs so that each process or kernel thread of the application executes a single task
Perform parallel processing, in which one process or kernel thread executes one part of a program while another process or kernel thread executes another part
Implement application program control, in which one process manages and coordinates the activities of several other processes
Schedule program execution
Dedicate a process to execute DCL commands
- Isolate code for one or more of the following reasons:
To debug logic errors
To execute privileged code
To execute sensitive code
Obtaining process information
Obtaining kernel thread information
Setting process privileges
Setting process name
Setting process scheduling
Hibernating or suspending a process or kernel thread
Deleting a process
Synchronizing process execution
You can use system routines and DCL commands to accomplish these tasks. Table 4.1, ''Routines and Commands for Controlling Processes and Kernel Threads'' summarizes which routines and commands to use. You can use the DCL commands in a command procedure that is executed as soon as the subprocess (or detached process) is created.
|
Routine |
DCL Command |
Task |
|---|---|---|
|
SHOW PROCESS |
Return process or kernel thread information. SYS$GETJPI(W) can request process and thread information from a specific PID or PRCNAM. If no specific thread is identified, then the data represents the initial thread. |
|
SYS$SETPRV |
SET PROCESS |
Set process privileges. |
|
SYS$SETPRI |
SET PROCESS |
Set process or kernel thread priority. This service affects the base and current priority of a specified kernel thread and not the entire process. |
|
SYS$SETSWM |
SET PROCESS |
Control swapping of process. |
|
SET PROCESS |
Hibernate, suspend, and resume a process or kernel threads. These services hibernate, suspend, or resume all kernel threads associated with the specified process. |
|
SYS$SETPRN |
SET PROCESS |
Set process name. |
|
EXIT and STOP |
Initiate process and image rundown. All associated kernel threads of a specified process are run down and deleted. |
|
SYS$DELPRC |
EXIT and STOP |
Delete process. |
|
SYS$CANTIM |
CANCEL |
Cancel timer for process or kernel threads. This service finds and cancels all timers for all threads associated with the specified process. |
|
SYS$ADJSTK |
SET PROCESS |
Adjust or initialize a stack pointer. Stack adjustments are performed for the kernel thread requesting the service. |
|
SYS$PROCESS_SCAN |
SHOW PROCESS |
Scan for a process or kernel thread on the local system, or across the nodes in an OpenVMS Cluster system. |
|
SYS$SETSTK |
None available |
Allow the current process or kernel thread to change the size of its stacks. This service adjusts the size of the stacks of the kernel thread that invoked the service. |
By default, the routines and commands reference the current process or kernel thread. To reference another process, you must specify either the process identification (PID) number or the process name when you call the routine or a command qualifier when you enter commands. You must have the GROUP privilege to reference a process with the same group number and a different member number in its UIC, and WORLD privilege to reference a process with a different group number in its UIC.
The information presented in this section covers using the routines. If you want to use the DCL commands in a command procedure, refer to the VSI OpenVMS DCL Dictionary.
4.1.1. Determining Privileges for Process Creation and Control
Processes with the same UIC can always issue process control services for one another.
You need the GROUP privilege to issue process control services for other processes executing in the same group.
You need the WORLD privilege to issue process control services for any process in the system.
You need additional privileges to perform some specific functions; for example, raising the base priority of a process requires ALTPRI privilege.
4.1.2. Determining Process Identification
Process identification (PID) number
The system assigns this unique 32-bit number to a process when it is created. If you provide the
pidadrargument to the SYS$CREPRC system service, the system returns the process identification number at the location specified. You can then use the process identification number in subsequent process control services.Process name
There are two types of process names:Process name
A process name is a 1- to 15-character name string. Each process name must be unique within its group (processes in different groups can have the same name). You can assign a name to a process by specifying the
prcnamargument when you create it. You can then use this name to refer to the process in other system service calls. Note that you cannot use a process name to specify a process outside the caller's group; you must use a process identification (PID) number.Full process name
The full process name is unique for each process in the cluster. Full process name strings can be up to 23 characters long and are configured in the following way:- 1–6 characters for the node name
- 2 characters for the colons (::) that follow the node name
- 1–15 characters for the local process name
unsigned int orionid=0, status;
$DESCRIPTOR(orion,"ORION");
   .
   .
   .
status = SYS$CREPRC(&orionid,           /* pidadr (process id returned) */
                    &orion,             /* prcnam  - process name */
                ...);
The service returns the process identification in the longword at ORIONID. You can now use either the process name (ORION) or the PID (ORIONID) to refer to this process in other system service calls.
/* Descriptor for process name */
        $DESCRIPTOR(cygnus,"CYGNUS");

status = SYS$SETPRN( &cygnus ); /* prcnam - process name */prcnam or the
pidadr argument or both. However, you
should identify a process by its process identification number for
the following reasons: The service executes faster because it does not have to search a table of process names.
For a process not in your group, you must use the process identification number (see Section 4.1.3, ''Qualifying Process Naming Within Groups'').
If you specify the PID address, the service uses the PID address. If you specify the process name without a PID address, the service uses the process name. If you specify both – the process name and PID address – it uses the PID address unless the contents of the PID is 0. In that case, the service uses the process name. If you specify a PID address of 0 without a process name, then the service is performed for the calling process.
|
Process Name Specified? |
PID Address Specified? |
Contents of PID |
Resultant Action by Services |
|---|---|---|---|
|
No |
No |
– |
The process identification of the calling process is used, but is not returned. |
|
No |
Yes |
0 |
The process identification of the calling process is used and returned. |
|
No |
Yes |
PID |
The process identification is used and returned. |
|
Yes |
No |
– |
The process name is used. The process identification is not returned. |
|
Yes |
Yes |
0 |
The process name is used and the process identification is returned. |
|
Yes |
Yes |
PID |
The process identification is used and returned; the process name is ignored. |
4.1.3. Qualifying Process Naming Within Groups
Process names are always qualified by their group number. The system
maintains a table of all process names and the UIC associated with
each. When you use the prcnam argument in a
process control service, the table is searched for an entry that
contains the specified process name and the group number of the
calling process.
To use process control services on processes within its group, a calling process must have the GROUP user privilege; this privilege is not required when you specify a process with the same UIC as the caller.
The search for a process name fails if the specified process name does not have the same group number as the caller. The search fails even if the calling process has the WORLD user privilege. To execute a process control service for a process that is not in the caller's group, the requesting process must use a process identification and must have the WORLD user privilege.
4.2. Obtaining Process Information
The operating system's process information procedures enable you to gather information about processes and kernel threads. You can obtain information about either one process or a group of processes on either the local system or on remote nodes in an OpenVMS Cluster system. You can also obtain process lock information. DCL commands such as SHOW SYSTEM and SHOW PROCESS use the process information procedures to display information about processes. You can also use the process information procedures within your programs.
Get Job/Process Information (SYS$GETJPI(W))
Get Job/Process Information (LIB$GETJPI)
Process Scan (SYS$PROCESS_SCAN)
Get Lock Information (SYS$GETLKI)
The SYS$GETJPI(W) and SYS$PROCESS_SCAN system services can also be used to get kernel threads information. SYS$GETJPI(W) can request threads information from a particular process ID or process name. SYS$PROCESS_SCAN can request information about all threads in a process, or all threads for each multithreaded process on the system.
For more information about SYS$GETJPI, SYS$PROCESS_SCAN, and SYS$GETLKI, see the VSI OpenVMS System Services Reference Manual.
SYS$GETJPI operates asynchronously.
SYS$GETJPIW and LIB$GETJPI operate synchronously.
SYS$GETJPI and SYS$GETJPIW can obtain one or more pieces of information about a process or kernel thread in a single call.
LIB$GETJPI can obtain only one piece of information about a process or kernel thread in a single call.
SYS$GETJPI and SYS$GETJPIW can specify an AST to execute at the completion of the routine.
SYS$GETJPI and SYS$GETJPIW can use an I/O status block (IOSB) to test for completion of the routine.
LIB$GETJPI can return some items either as strings or as numbers. It is often the easiest to call from a high-level language because the caller is not required to construct an item list.
SYS$GETLKI returns information about the lock database.
4.2.1. Using the PID to Obtain Information
The process information procedures return information about processes
by using the process identification (PID) or the process name. The
PID is a 32-bit number that is unique for each process in the
cluster. Specify the PID by using the pidadr
argument. You must specify all the significant digits of a PID; you
can omit leading zeros.
With kernel threads, the PID continues to identify a process, but it can also identify a kernel thread within that process. In a multithreaded process each kernel thread has its own PID that is based on the initial threads PID.
4.2.2. Using the Process Name to Obtain Information
prcnam argument. Although a PID is unique
for each process in the cluster, a process name is unique (within a
UIC group) only for each process on a node. To locate information
about processes on the local node, specify a process name string of
1 to 15 characters. To locate information about a process on a
particular node, specify the full process name, which can be up to
23 characters long. The full process name is configured in the
following way: 1 to 6 characters for the node name
2 characters for the colons (::) that follow the node name
1 to 15 characters for the local process name
Note that a local process name can look like a remote process name. Therefore, if you specify ATHENS::SMITH, the system checks for a process named ATHENS::SMITH on the local node before checking node ATHENS for a process named SMITH.
VSI OpenVMS Programming Concepts Manual, Volume II and the VSI OpenVMS System Services Reference Manual describe these routines completely, listing all items of information that you can request. LIB$GETJPI, SYS$GETJPI, and SYS$GETJPIW share the same item codes with the following exception: LIB$K_ items can be accessed only by LIB$GETJPI.
! Define request codes
INCLUDE '($JPIDEF)'

! Variables for LIB$GETJPI
CHARACTER*9 UIC
INTEGER LEN

STATUS = LIB$GETJPI (JPI$_UIC,
2                    ,,,
2                    UIC,
2                    LEN)
   .
   .
   .
! PID of subprocess
INTEGER SUBPROCESS_PID

! Include the request codes
INCLUDE '($JPIDEF)'
! Define itmlst structure
STRUCTURE /ITMLST/
 UNION
  MAP
   INTEGER*2 BUFLEN
   INTEGER*2 CODE
   INTEGER*4 BUFADR
   INTEGER*4 RETLENADR
  END MAP
  MAP
   INTEGER*4 END_LIST
  END MAP
 END UNION
END STRUCTURE
! Declare GETJPI itmlst
RECORD /ITMLST/ JPI_LIST(3)
! Declare buffers for information
CHARACTER*15    PROCESS_NAME
CHARACTER*12    USER_NAME
INTEGER*4       PNAME_LEN,
2               UNAME_LEN
! Declare I/O status structure
STRUCTURE /IOSB/
 INTEGER*2 STATUS,
2          COUNT
 INTEGER*4 %FILL
END STRUCTURE
! Declare I/O status variable
RECORD /IOSB/ JPISTAT
! Declare status and routine
INTEGER*4       STATUS,
2               SYS$GETJPIW
                   .
                   . ! Define SUBPROCESS_PID
                   .
! Set up itmlst
JPI_LIST(1).BUFLEN    = 15
JPI_LIST(1).CODE      = JPI$_PRCNAM
JPI_LIST(1).BUFADR    = %LOC(PROCESS_NAME)
JPI_LIST(1).RETLENADR = %LOC(PNAME_LEN)
JPI_LIST(2).BUFLEN    = 12
JPI_LIST(2).CODE      = JPI$_USERNAME
JPI_LIST(2).BUFADR    = %LOC(USER_NAME)
JPI_LIST(2).RETLENADR = %LOC(UNAME_LEN)
JPI_LIST(3).END_LIST  = 0
! Request information and wait for it
STATUS = SYS$GETJPIW (,
2                     SUBPROCESS_PID,
2                     ,
2                     JPI_LIST,
2                     JPISTAT,
2                     ,)
IF (.NOT. STATUS) CALL LIB$SIGNAL (%VAL(STATUS))
! Check final return status
IF (.NOT. JPISTAT.STATUS) THEN
  CALL LIB$SIGNAL (%VAL(JPISTAT.STATUS))
END IF
   .
   .
   .
4.2.3. Using SYS$GETJPI and LIB$GETJPI
SYS$GETJPI uses the PID or the process name to obtain information about one process and the -1 wildcard as the pidadr to obtain information about all processes on the local system. If a PID or process name is not specified, SYS$GETJPI returns information about the calling process. SYS$GETJPI cannot perform a selective search – it can search for only one process at a time in the cluster or for all processes on the local system. If you want to perform a selective search for information or get information about processes across the cluster, use SYS$GETJPI with SYS$PROCESS_SCAN.
4.2.3.1. Requesting Information About a Single Process
! No process name or PID is specified; $GETJPI returns data on the
! calling process.

        PROGRAM CALLING_PROCESS

        IMPLICIT NONE                   ! Implicit none

        INCLUDE '($jpidef)   /nolist'   ! Definitions for $GETJPI

        INCLUDE '($ssdef)    /nolist'   ! System status codes

        STRUCTURE /JPIITMLST/           ! Structure declaration for
         UNION                          !  $GETJPI item lists
          MAP
           INTEGER*2 BUFLEN,
        2            CODE
           INTEGER*4 BUFADR,
        2            RETLENADR
          END MAP
          MAP                           ! A longword of 0 terminates
           INTEGER*4 END_LIST           !  an item list
          END MAP
         END UNION
        END STRUCTURE
        RECORD /JPIITMLST/              ! Declare the item list for
        2         JPILIST(3)            !  $GETJPI

        INTEGER*4 SYS$GETJPIW           ! System service entry points

        INTEGER*4 STATUS,               ! Status variable
        2         PID                   ! PID from $GETJPI

        INTEGER*2 IOSB(4)               ! I/O Status Block for $GETJPI

        CHARACTER*16
        2         PRCNAM                ! Process name from $GETJPI
        INTEGER*2 PRCNAM_LEN            ! Process name length
        ! Initialize $GETJPI item list

        JPILIST(1).BUFLEN    = 4
        JPILIST(1).CODE      = JPI$_PID
        JPILIST(1).BUFADR    = %LOC(PID)
        JPILIST(1).RETLENADR = 0
        JPILIST(2).BUFLEN    = LEN(PRCNAM)
        JPILIST(2).CODE      = JPI$_PRCNAM
        JPILIST(2).BUFADR    = %LOC(PRCNAM)
        JPILIST(2).RETLENADR = %LOC(PRCNAM_LEN)
        JPILIST(3).END_LIST  = 0
        ! Call $GETJPI to get data for this process

        STATUS = SYS$GETJPIW (
        2                    ,           ! No event flag
        2                    ,           ! No PID
        2                    ,           ! No process name
        2                    JPILIST,    ! Item list
        2                    IOSB,       ! Always use IOSB with $GETJPI!
        2                    ,           ! No AST
        2                    )           ! No AST arg
        ! Check the status in both STATUS and the IOSB, if
        ! STATUS is OK then copy IOSB(1) to STATUS

        IF (STATUS) STATUS = IOSB(1)

        ! If $GETJPI worked, display the process, if done then
        ! prepare to exit, otherwise signal an error

        IF (STATUS) THEN
                TYPE 1010, PID, PRCNAM(1:PRCNAM_LEN)
1010                FORMAT (' ',Z8.8,'  ',A)
        ELSE
                CALL LIB$SIGNAL(%VAL(STATUS))
        END IF

        END
   .
   .
   .
! Status variable and error codes
INTEGER STATUS,
2       STATUS_OK,
2       LIB$GET_LUN,
2       LIB$GETJPI
INCLUDE '($SSDEF)'
PARAMETER (STATUS_OK = 1)

! Logical unit number and file name
INTEGER*4 LUN
CHARACTER*(*) FILE_NAME
PARAMETER (FILE_NAME = 'PROCNAME.RPT')
! Define item codes for LIB$GETJPI
INCLUDE '($JPIDEF)'

! Process name
CHARACTER*15 NAME
INTEGER LEN
! Process identification
INTEGER PID /-1/
   .
   .
   .
! Get logical unit number and open the file
STATUS = LIB$GET_LUN (LUN)
OPEN (UNIT = LUN,
2     FILE = 'PROCNAME.RPT',
2     STATUS = 'NEW')
! Get information and write it to file
DO WHILE (STATUS)
  STATUS = LIB$GETJPI(JPI$_PRCNAM,
2                     PID,
2                     ,,
2                     NAME,
2                     LEN)
  ! Extra space in WRITE commands is for
  ! FORTRAN carriage control
  IF (STATUS) THEN
    WRITE (UNIT = LUN,
2          FMT = '(2A)') ' ', NAME(1:LEN)
    STATUS = STATUS_OK
  ELSE IF (STATUS .EQ. SS$_NOPRIV) THEN
    WRITE (UNIT = LUN,
2          FMT = '(2A)') ' ', 'NO PRIVILEGE'
    STATUS = STATUS_OK
  ELSE IF (STATUS .EQ. SS$_SUSPENDED) THEN
    WRITE (UNIT = LUN,
2          FMT = '(2A)') ' ', 'SUSPENDED'
    STATUS = STATUS_OK
  END IF

END DO
! Close file
IF (STATUS .EQ. SS$_NOMOREPROC)
2  CLOSE (UNIT = LUN)
   .
   .
   .
! To find information for a particular process by name,
! substitute this code, which includes a process name,
! to call $GETJPI ! in Example 4.2
! Call $GETJPI to get data for a named process

STATUS = SYS$GETJPIW (
2                    ,           ! No event flag
2                    ,           ! No PID
2                    'SMITH_1',  ! Process name
2                    JPILIST,    ! Item list
2                    IOSB,       ! Always use IOSB with $GETJPI!
2                    ,           ! No AST
2                    )           ! No AST arg
4.2.3.2. Requesting Information About All Processes on the Local System
You can use SYS$GETJPI to perform a
wildcard search on all processes on the local system. When
the initial pidadr argument is
specified as -1, SYS$GETJPI returns
requested information for each process that the program has
privilege to access. The requested information is returned
for one process per call to
SYS$GETJPI.
To perform a wildcard search, call SYS$GETJPI in a loop, testing the return status.
|
Status |
Explanation |
|---|---|
|
SS$_NOMOREPROC |
All processes have been returned. |
|
SS$_NOPRIV |
The caller lacks sufficient privilege to examine a process. |
|
SS$_SUSPENDED |
The target process is being deleted or is suspended and cannot return the information. |
#include <stdio.h>
#include <jpidef.h>
#include <stdlib.h>
#include <ssdef.h>

/* Item descriptor */

struct {
        unsigned short buflen, item_code;
        void *bufaddr;
        void *retlenaddr;
        unsigned int terminator;
}itm_lst;

/* I/O Status Block */

struct {
        unsigned short iostat;
        unsigned short iolen;
        unsigned int device_info;
}iosb;

main() {

        unsigned short len;
        unsigned int efn=1,pidadr = -1,status, usersize;
        char username[12];

/* Initialize the item list */

        itm_lst.buflen = 12;
        itm_lst.item_code = JPI$_USERNAME;
        itm_lst.bufaddr = username;
        itm_lst.retlenaddr = &usersize;
        itm_lst.terminator = 0;

        do{

        status = SYS$GETJPIW(0,              /* no event flag */
                             &pidadr,        /* process id */
                             0,              /* process name */
                             &itm_lst,       /* item list */
                             &iosb,          /* I/O status block */
                             0,              /* astadr (AST routine) */
                             0);             /* astprm (AST parameter) */
                 switch(status)
                 {
case SS$_NOPRIV:
                printf("\nError: No privileges for attempted operation");
                break;
case SS$_SUSPENDED:
                printf("\nError: Process is suspended");
                break;
case SS$_NORMAL:
                if (iosb.iostat == SS$_NORMAL)
                     printf("\nUsername: %s",username);
                else
                     printf("\nIOSB condition value  %d returned",iosb.iostat);
                        }

        }while(status != SS$_NOMOREPROC);

}
4.2.4. Using SYS$GETJPI with SYS$PROCESS_SCAN
Using the SYS$PROCESS_SCAN system service
greatly enhances the power of SYS$GETJPI.
With this combination, you can search for selected groups of
processes or kernel threads on the local system as well as for
processes or kernel threads on remote nodes or across the cluster.
When you use SYS$GETJPI alone, you specify
the pidadr or the
prcnam argument to locate information
about one process. When you use SYS$GETJPI
with SYS$PROCESS_SCAN, the
pidctx argument generated by
SYS$PROCESS_SCAN is used as the
pidadr argument to
SYS$GETJPI. This context allows
SYS$GETJPI to use the selection
criteria that are set up in the call to
SYS$PROCESS_SCAN.
When using SYS$GETJPI with a PRCNAM specified, SYS$GETJPI returns data for only the initial thread. This parallels the behavior of the DCL commands SHOW SYSTEM, SHOW PROCESS, and MONITOR PROCESS. If a valid PIDADR is specified, then the data returned describes only that specific kernel thread. If a PIDADR of zero is specified, then the data returned describes the calling kernel thread.
SYS$GETJPI has the flag, JPI$_THREAD, as part of the JPI$_GETJPI_CONTROL_FLAGS item code. The JPI$_THREAD flag designates that the service call is requesting data for all of the kernel threads in a multithreaded process. If the call is made with JPI$_THREAD set, then SYS$GETJPI begins with the initial thread, and SYS$GETJPI returns SS$_NORMAL. Subsequent calls to SYS$GETJPI with JPI$_THREAD specified returns data for the next thread until there are no more threads, at which time the service returns SS$_NOMORETHREAD.
If you specify a wildcard PIDADR -1 along with JPI$_THREAD, you cause SYS$GETJPI to return information for all threads for all processes on the system on subsequent calls. SYS$GETJPI returns the status SS$_NORMAL until there are no more processes, at which time it returns SS$_NOMOREPROC. If you specify a wildcard search, you must request either the JPI$_PROC_INDEX or the JPI$_INITIAL_THREAD_PID item code to distinguish the transition from the last thread of a multithreaded process to the next process. The PROC_INDEX and the INITIAL_THREAD_PID are different for each process on the system.
|
Item Code |
Meaning |
|---|---|
|
JPI$_INITIAL_THREAD_PID |
Returns the PID of the initial thread for the target process |
|
JPI$_KT_COUNT |
Returns the current count of kernel threads for the target process |
|
JPI$_MULTITHREAD |
Returns the maximum kernel thread count allowed for the target process |
|
JPI$_THREAD_INDEX |
Returns the kernel thread index for the target thread or process |
This wildcard search is initiated by invoking SYS$GETJPI with a -1 specified for the PID, and is available only on the local node. With kernel threads, a search for all threads in a single process is available, both on the local node and on another node on the cluster.
In a dual architecture or mixed-version cluster, one or more nodes in the cluster may not support kernel threads. To indicate this condition, a threads capability bit (CSB$M_CAP_THREADS) exists in the CSB$L_CAPABILITY cell in the cluster status block. If this bit is set for a node, it indicates that the node supports kernel threads. This information is passed around as part of the normal cluster management activity when a node is added to a cluster. If a SYS$GETJPI request that requires threads support needs to be passed to another node in the cluster, a check is made on whether the node supports kernel threads before the request is sent to that node. If the node supports kernel threads, the request is sent. If the node does not support kernel threads, the status SS$_INCOMPAT is returned to the caller, and the request is not sent to the other node.
You can use SYS$PROCESS_SCAN only with SYS$GETJPI; you cannot use it alone. The process context generated by SYS$PROCESS_SCAN is used like the -1 wildcard except that it is initialized by calling the SYS$PROCESS_SCAN service instead of by a simple assignment statement. However, the SYS$PROCESS_SCAN context is more powerful and more flexible than the -1 wildcard. SYS$PROCESS_SCAN uses an item list to specify selection criteria to be used in a search for processes and produces a context longword that describes a selective search for SYS$GETJPI.
Using SYS$GETJPI with SYS$PROCESS_SCAN to perform a selective search is a more efficient way to locate information because only information about the processes you have selected is returned. For example, you can specify a search for processes owned by one user name, and SYS$GETJPI returns only the processes that match the specified user name. You can specify a search for all batch processes, and SYS$GETJPI returns only information about processes running as batch jobs. You can specify a search for all batch processes owned by one user name and SYS$GETJPI returns only information about processes owned by that user name that are running as batch jobs.
By default, SYS$PROCESS_SCAN sets up a context for only the initial thread of a multithreaded process. However, if the value PSCAN$_THREAD is specified for the item code PSCAN$_PSCAN_CONTOL_FLAGS, then threads are included in the scan. The PSCAN$_THREAD flag takes precedence over the JPI$_THREAD flag in the SYS$GETJPI call. With PSCAN$_THREAD specified, threads are included in the entire scan. With PSCAN$_THREAD not specified, threads are included in the scan for a specific SYS$GETJPI call only if JPI$_THREAD is specified.
|
Item Code |
Meaning |
|---|---|
|
PSCAN$_KT_COUNT |
Uses the current count of kernel threads for the process as a selection criteria. The valid item-specific flags for this item code are EQL, GEQ, GTR, LEQ, LSS, NEQ, and OR. |
|
PSCAN$_MULTITHREAD |
Uses the maximum count of kernel threads for the process as a selection criteria. The valid item-specific flags for this item code are EQL, GEQ, GTR, LEQ, LSS, NEQ, and OR. |
4.2.4.1. Using SYS$PROCESS_SCAN Item List and Item-Specific Flags
SYS$PROCESS_SCAN uses an item list to specify the selection criteria for the SYS$GETJPI search.
The attribute of the process to be examined
The value of the attribute or a pointer to the value
Item-specific flags to control how to interpret the value
|
Item-Specific Flag |
Description |
|---|---|
|
PSCAN$M_OR |
Match this value or the next value |
|
PSCAN$M_EQL |
Match value exactly (the default) |
|
PSCAN$M_NEQ |
Match if value is not equal |
|
PSCAN$M_GEQ |
Match if value is greater than or equal to |
|
PSCAN$M_GTR |
Match if value is greater than |
|
PSCAN$M_LEQ |
Match if value is less than or equal to |
|
PSCAN$M_LSS |
Match if value is less than |
|
PSCAN$M_CASE_BLIND |
Match without regard to case of letters |
|
PSCAN$M_PREFIX_MATCH |
Match on the leading substring |
|
PSCAN$M_WILDCARD |
Match string is a wildcard pattern |
PSCANLIST(1).BUFLEN   = LEN('SMITH')
PSCANLIST(1).CODE     = PSCAN$_USERNAME
PSCANLIST(1).BUFADR   = %LOC('SMITH')
PSCANLIST(1).ITMFLAGS = PSCAN$M_OR
PSCANLIST(2).BUFLEN   = LEN('JONES')
PSCANLIST(2).CODE     = PSCAN$_USERNAME
PSCANLIST(2).BUFADR   = %LOC('JONES')
PSCANLIST(2).ITMFLAGS = PSCAN$M_OR
PSCANLIST(3).BUFLEN   = LEN('JOHNSON')
PSCANLIST(3).CODE     = PSCAN$_USERNAME
PSCANLIST(3).BUFADR   = %LOC('JOHNSON')
PSCANLIST(3).ITMFLAGS = 0
PSCANLIST(4).END_LIST = 0
Use the PSCAN$M_WILDCARD flag to specify that a character string is to be treated as a wildcard. For example, to find all process names that begin with the letter A and end with the string ER, use the string A*ER with the PSCAN$M_WILDCARD flag. If you do not specify the PSCAN$M_WILDCARD flag, the search looks for the 4-character process name A*ER.
The PSCAN$M_PREFIX_MATCH defines a wildcard search to match the initial characters of a string. For example, to find all process names that start with the letters AB, use the string AB with the PSCAN$M_PREFIX_MATCH flag. If you do not specify the PSCAN$M_PREFIX_MATCH flag, the search looks for a process with the 2-character process name AB.
4.2.4.2. Requesting Information About Processes That Match One Criterion
You can use SYS$GETJPI with SYS$PROCESS_SCAN to search for processes that match an item list with one criterion. For example, if you specify a search for processes owned by one user name, SYS$GETJPI returns only those processes that match the specified user name.
        PROGRAM PROCESS_SCAN

        IMPLICIT NONE                   ! Implicit none

        INCLUDE '($jpidef)   /nolist'   ! Definitions for $GETJPI
        INCLUDE '($pscandef) /nolist'   ! Definitions for $PROCESS_SCAN
        INCLUDE '($ssdef)    /nolist'   ! Definitions for SS$_NAMES

        STRUCTURE /JPIITMLST/           ! Structure declaration for
         UNION                          !  $GETJPI item lists
          MAP
           INTEGER*2 BUFLEN,
        2            CODE
           INTEGER*4 BUFADR,
        2            RETLENADR
          END MAP
          MAP                           ! A longword of 0 terminates
           INTEGER*4 END_LIST           !  an item list
          END MAP
         END UNION
        END STRUCTURE
        STRUCTURE /PSCANITMLST/         ! Structure declaration for
         UNION                          !  $PROCESS_SCAN item lists
          MAP
           INTEGER*2 BUFLEN,
        2            CODE
           INTEGER*4 BUFADR,
        2            ITMFLAGS
          END MAP
          MAP                           ! A longword of 0 terminates
           INTEGER*4 END_LIST           !  an item list
          END MAP
         END UNION
        END STRUCTURE
        RECORD /PSCANITMLST/            ! Declare the item list for
        2         PSCANLIST(12)         !  $PROCESS_SCAN

        RECORD /JPIITMLST/              ! Declare the item list for
        2         JPILIST(3)            !  $GETJPI

        INTEGER*4 SYS$GETJPIW,          ! System service entry points
        2         SYS$PROCESS_SCAN

        INTEGER*4 STATUS,               ! Status variable
        2         CONTEXT,              ! Context from $PROCESS_SCAN
        2         PID                   ! PID from $GETJPI

        INTEGER*2 IOSB(4)               ! I/O Status Block for $GETJPI

        CHARACTER*16
        2         PRCNAM                ! Process name from $GETJPI
        INTEGER*2 PRCNAM_LEN            ! Process name length

        LOGICAL*4 DONE                  ! Done with data loop

        !********************************************
        !*  Initialize item list for $PROCESS_SCAN  *
        !********************************************

        ! Look for processes owned by user SMITH

        PSCANLIST(1).BUFLEN   = LEN('SMITH')
        PSCANLIST(1).CODE     = PSCAN$_USERNAME
        PSCANLIST(1).BUFADR   = %LOC('SMITH')
        PSCANLIST(1).ITMFLAGS = 0
        PSCANLIST(2).END_LIST = 0
        !********************************************
        !*     End of item list initialization      *
        !********************************************


        STATUS = SYS$PROCESS_SCAN (        ! Set up the scan context
        2                        CONTEXT,
        2                        PSCANLIST)

        IF (.NOT. STATUS) CALL LIB$SIGNAL (%VAL(STATUS))

        ! Loop calling $GETJPI with the context

        DONE = .FALSE.
        DO WHILE (.NOT. DONE)

                ! Initialize $GETJPI item list

                JPILIST(1).BUFLEN    = 4
                JPILIST(1).CODE      = JPI$_PID
                JPILIST(1).BUFADR    = %LOC(PID)
                JPILIST(1).RETLENADR = 0
                JPILIST(2).BUFLEN    = LEN(PRCNAM)
                JPILIST(2).CODE      = JPI$_PRCNAM
                JPILIST(2).BUFADR    = %LOC(PRCNAM)
                JPILIST(2).RETLENADR = %LOC(PRCNAM_LEN)
                JPILIST(3).END_LIST  = 0
        ! Call $GETJPI to get the next SMITH process

                STATUS = SYS$GETJPIW (
        2                    ,           ! No event flag
        2                    CONTEXT,    ! Process context
        2                    ,           ! No process name
        2                    JPILIST,    ! Item list
        2                    IOSB,       ! Always use IOSB with $GETJPI!
        2                    ,           ! No AST
        2                    )           ! No AST arg

                ! Check the status in both STATUS and the IOSB, if
                ! STATUS is OK then copy IOSB(1) to STATUS

                IF (STATUS) STATUS = IOSB(1)

                ! If $GETJPI worked, display the process, if done then
                ! prepare to exit, otherwise signal an error
                IF (STATUS) THEN
                        TYPE 1010, PID, PRCNAM(1:PRCNAM_LEN)
1010                        FORMAT (' ',Z8.8,'  ',A)
                ELSE IF (STATUS .EQ. SS$_NOMOREPROC) THEN
                        DONE = .TRUE.
                ELSE
                        CALL LIB$SIGNAL(%VAL(STATUS))
                END IF

        END DO

        END
4.2.4.3. Requesting Information About Processes That Match Multiple Values for One Criterion
You can use SYS$PROCESS_SCAN to search for processes that match one of a number of values for a single criterion, such as processes owned by several specified users.
You must specify each value in a separate item list entry, and connect the item list entries with the PSCAN$M_OR item-specific flag. SYS$GETJPI selects each process that matches any of the item values.
!********************************************
!*  Initialize item list for $PROCESS_SCAN  *
!********************************************

! Look for users SMITH, JONES and JOHNSON

PSCANLIST(1).BUFLEN   = LEN('SMITH')
PSCANLIST(1).CODE     = PSCAN$_USERNAME
PSCANLIST(1).BUFADR   = %LOC('SMITH')
PSCANLIST(1).ITMFLAGS = PSCAN$M_OR
PSCANLIST(2).BUFLEN   = LEN('JONES')
PSCANLIST(2).CODE     = PSCAN$_USERNAME
PSCANLIST(2).BUFADR   = %LOC('JONES')
PSCANLIST(2).ITMFLAGS = PSCAN$M_OR
PSCANLIST(3).BUFLEN   = LEN('JOHNSON')
PSCANLIST(3).CODE     = PSCAN$_USERNAME
PSCANLIST(3).BUFADR   = %LOC('JOHNSON')
PSCANLIST(3).ITMFLAGS = 0
PSCANLIST(4).END_LIST = 0

!********************************************
!*     End of item list initialization      *
!********************************************
4.2.4.4. Requesting Information About Processes That Match Multiple Criteria
You can use SYS$PROCESS_SCAN to search for processes that match values for more than one criterion. When multiple criteria are used, a process must match at least one value for each specified criterion.
((username = "SMITH") OR (username = "JONES"))

                     AND

(MODE = JPI$K_BATCH)!******************************************** !* Initialize item list for $PROCESS_SCAN * !******************************************** ! Look for BATCH jobs owned by users SMITH and JONES PSCANLIST(1).BUFLEN = LEN('SMITH') PSCANLIST(1).CODE = PSCAN$_USERNAME PSCANLIST(1).BUFADR = %LOC('SMITH') PSCANLIST(1).ITMFLAGS = PSCAN$M_OR PSCANLIST(2).BUFLEN = LEN('JONES') PSCANLIST(2).CODE = PSCAN$_USERNAME PSCANLIST(2).BUFADR = %LOC('JONES') PSCANLIST(2).ITMFLAGS = 0 PSCANLIST(3).BUFLEN = 0 PSCANLIST(3).CODE = PSCAN$_MODE PSCANLIST(3).BUFADR = JPI$K_BATCH PSCANLIST(3).ITMFLAGS = 0 PSCANLIST(4).END_LIST = 0 !******************************************** !* End of item list initialization * !********************************************
See the VSI OpenVMS System Services Reference Manual for more information about SYS$PROCESS_SCAN item codes and flags.
4.2.5. Specifying a Node as Selection Criterion
Several SYS$PROCESS_SCAN item codes do not refer to attributes of a process, but to the VMScluster node on which the target process resides. When SYS$PROCESS_SCAN encounters an item code that refers to a node attribute, it creates an alphabetized list of node names. SYS$PROCESS_SCAN then directs SYS$GETJPI to compare the selection criteria against processes on these nodes.
SYS$PROCESS_SCAN ignores a node specification if it is running on a node that is not part of a VMScluster system. For example, if you request that SYS$PROCESS_SCAN select all nodes with the hardware model name VAX 6360, this search returns information about local processes on a nonclustered system, even if it is a MicroVAX system.
All remote SYS$GETJPI operations are asynchronous and must be synchronized properly. Many applications that are not correctly synchronized might seem to work on a single node because some SYS$GETJPI operations are actually synchronous; however, these applications fail if they attempt to examine processes on remote nodes. For more information on how to synchronize SYS$GETJPI operations, see Chapter 6, "Synchronizing Data Access and Program Operations".
The CLUSTER_SERVER process is always a current process, because it is executing on behalf of SYS$GETJPI.
Attempts by SYS$GETJPI to examine a node do not succeed during a brief period between the time a node joins the cluster and the time that the CLUSTER_SERVER process is started. Searches that occur during this period skip such a node. Searches that specify only such a booting node fail with a SYS$GETJPI status of SS$_UNREACHABLE.
SS$_NOMOREPROC is returned after all processes on all specified nodes have been scanned.
4.2.5.1. Checking All Nodes on the Cluster for Processes
!********************************************
!*  Initialize item list for $PROCESS_SCAN  *
!********************************************

! Search the cluster for jobs owned by SMITH

PSCANLIST(1).BUFLEN   = 0
PSCANLIST(1).CODE     = PSCAN$_NODE_CSID
PSCANLIST(1).BUFADR   = 0
PSCANLIST(1).ITMFLAGS = PSCAN$M_NEQ
PSCANLIST(2).BUFLEN   = LEN('SMITH')
PSCANLIST(2).CODE     = PSCAN$_USERNAME
PSCANLIST(2).BUFADR   = %LOC('SMITH')
PSCANLIST(2).ITMFLAGS = 0
PSCANLIST(3).END_LIST = 0

!********************************************
!*     End of item list initialization      *
!********************************************
4.2.5.2. Checking Specific Nodes on the Cluster for Processes
!********************************************
!*  Initialize item list for $PROCESS_SCAN  *
!********************************************

! Search for BATCH jobs on nodes TIGNES, VALTHO and 2ALPES

PSCANLIST(1).BUFLEN   = LEN('TIGNES')
PSCANLIST(1).CODE     = PSCAN$_NODENAME
PSCANLIST(1).BUFADR   = %LOC('TIGNES')
PSCANLIST(1).ITMFLAGS = PSCAN$M_OR
PSCANLIST(2).BUFLEN   = LEN('VALTHO')
PSCANLIST(2).CODE     = PSCAN$_NODENAME
PSCANLIST(2).BUFADR   = %LOC('VALTHO')
PSCANLIST(2).ITMFLAGS = PSCAN$M_OR
PSCANLIST(3).BUFLEN   = LEN('2ALPES')
PSCANLIST(3).CODE     = PSCAN$_NODENAME
PSCANLIST(3).BUFADR   = %LOC('2ALPES')
PSCANLIST(3).ITMFLAGS = 0
PSCANLIST(4).BUFLEN   = 0
PSCANLIST(4).CODE     = PSCAN$_MODE
PSCANLIST(4).BUFADR   = JPI$K_BATCH
PSCANLIST(4).ITMFLAGS = 0
PSCANLIST(5).END_LIST = 0

!********************************************
!*     End of item list initialization      *
!********************************************
4.2.5.3. Conducting Multiple Simultaneous Searches with SYS$PROCESS_SCAN
Only one asynchronous remote SYS$GETJPI request per SYS$PROCESS_SCAN context is permitted at a time. If you issue a second SYS$GETJPI request using a context before a previous remote request using the same context has completed, your process stalls in a resource wait until the previous remote SYS$GETJPI request completes. This stall in the RWAST state prevents your process from executing in user mode or receiving user-mode ASTs.
If you want to run remote searches in parallel, create multiple contexts by calling SYS$PROCESS_SCAN once for each context. For example, you can design a program that calls SYS$GETSYI in a loop to find the nodes in the VMScluster system and creates a separate SYS$PROCESS_SCAN context for each remote node. Each of these separate contexts can run in parallel. The DCL command SHOW USERS uses this technique to obtain user information more quickly.
Note
When you use SYS$GETJPI to reference remote processes, you must properly synchronize all SYS$GETJPI calls. Before the operating system's Version 5.2, if you did not follow these synchronization rules, your programs might have appeared to run correctly. However, if you attempt to run such improperly synchronized programs using SYS$GETJPI with SYS$PROCESS_SCAN with a remote process, your program might attempt to use the data before SYS$GETJPI has returned it.
To perform a synchronous search in which the program waits
until all requested information is available, use
SYS$GETJPIW with an
iosb argument.
See the VSI OpenVMS System Services Reference Manual for more information about process identification, SYS$GETJPI, and SYS$PROCESS_SCAN.
4.2.6. Programming with SYS$GETJPI
The following sections describe some important considerations for programming with SYS$GETJPI.
4.2.6.1. Using Item Lists Correctly
When SYS$GETJPI collects data, it makes multiple passes through the item list. If the item list is self-modifying – that is, if the addresses for the output buffers in the item list point back at the item list – SYS$GETJPI replaces the item list information with the returned data. Therefore, incorrect data might be read or unexpected errors might occur when SYS$GETJPI reads the item list again. To prevent confusing errors, VSI recommends that you do not use self-modifying item lists.
The number of passes that SYS$GETJPI needs depends on which item codes are referenced and the state of the target process. A program that appears to work normally might fail when a system has processes that are swapped out of memory, or when a process is on a remote node.
4.2.6.2. Improving Performance by Using Buffered $GETJPI Operations
To request information about a process located on a remote node, SYS$GETJPI must send a message to the remote node, wait for the response, and then extract the data from the message received. When you perform a search on a remote system, the program must repeat this sequence for each process that SYS$GETJPI locates.
To reduce the overhead of such a remote search, use SYS$PROCESS_SCAN with the PSCAN$_GETJPI_BUFFER_SIZE item code to specify a buffer size for SYS$GETJPI. When the buffer size is specified by SYS$PROCESS_SCAN, SYS$GETJPI packs information for several processes into one buffer and transmits them in a single message. This reduction in the number of messages improves performance.
For example, if the SYS$GETJPI item list requests 100 bytes of information, you might specify a PSCAN$_GETJPI_BUFFER_SIZE of 1000 bytes so that the service can place information for at least 10 processes in each message. (SYS$GETJPI does not send fill data in the message buffer; therefore, information for more than 10 processes can be packed into the buffer).
The SYS$GETJPI buffer must be large enough to hold the data for at least one process. If the buffer is too small, the error code SS$_IVBUFLEN is returned from the SYS$GETJPI call.
You do not have to allocate space for the SYS$GETJPI buffer; buffer space is allocated by SYS$PROCESS_SCAN as part of the search context that it creates. Because SYS$GETJPI buffering is transparent to the program that calls SYS$GETJPI, you do not have to modify the loop that calls SYS$GETJPI.
If you use PSCAN$_GETJPI_BUFFER_SIZE with SYS$PROCESS_SCAN, all calls to SYS$GETJPI using that context must request the same item code information. Because SYS$GETJPI collects information for more than one process at a time within its buffers, you cannot change the item codes or the lengths of the buffers in the SYS$GETJPI item list between calls. SYS$GETJPI returns the error SS$_BADPARAM if any item code or buffer length changes between SYS$GETJPI calls. However, you can change the buffer addresses in the SYS$GETJPI item list from call to call.
!********************************************
!*  Initialize item list for $PROCESS_SCAN  *
!********************************************

! Search for jobs owned by users SMITH and JONES
! across the cluster with $GETJPI buffering

PSCANLIST(1).BUFLEN   = 0
PSCANLIST(1).CODE     = PSCAN$_NODE_CSID
PSCANLIST(1).BUFADR   = 0
PSCANLIST(1).ITMFLAGS = PSCAN$M_NEQ
PSCANLIST(2).BUFLEN   = LEN('SMITH')
PSCANLIST(2).CODE     = PSCAN$_USERNAME
PSCANLIST(2).BUFADR   = %LOC('SMITH')
PSCANLIST(2).ITMFLAGS = PSCAN$M_OR
PSCANLIST(3).BUFLEN   = LEN('JONES')
PSCANLIST(3).CODE     = PSCAN$_USERNAME
PSCANLIST(3).BUFADR   = %LOC('JONES')
PSCANLIST(3).ITMFLAGS = 0
PSCANLIST(4).BUFLEN   = 0
PSCANLIST(4).CODE     = PSCAN$_GETJPI_BUFFER_SIZE
PSCANLIST(4).BUFADR   = 1000
PSCANLIST(4).ITMFLAGS = 0
PSCANLIST(5).END_LIST = 0

!********************************************
!*     End of item list initialization      *
!********************************************
4.2.6.3. Fulfilling Remote SYS$GETJPI Quota Requirements
- Add the following together:
The size of the SYS$PROCESS_SCAN item list
The total size of all reference buffers for SYS$PROCESS_SCAN (the sum of all buffer length fields in the item list)
The size of the SYS$GETJPI item list
The size of the SYS$GETJPI buffer
The size of the calling process RIGHTSLIST
Approximately 300 bytes for message overhead
Double this total.
The total is doubled because the messages consume system dynamic memory on both the sending node and the receiving node.
This formula for BYTLM quota applies to both buffered and nonbuffered SYS$GETJPI requests. For buffered requests, use the value specified in the SYS$PROCESS_SCAN item, PSCAN$_GETJPI_BUFFER_SIZE, as the size of the buffer. For nonbuffered requests, use the total length of all data buffers specified in the SYS$GETJPI item list as the size of the buffer.
If the BYTLM quota is insufficient, SYS$GETJPI (not SYS$PROCESS_SCAN) returns the error SS$_EXBYTLM.
4.2.6.4. Using the SYS$GETJPI Control Flags
The JPI$_GETJPI_CONTROL_FLAGS item code, which is specified in the SYS$GETJPI item list, provides additional control over SYS$GETJPI. Therefore, SYS$GETJPI may be unable to retrieve all the data requested in an item list because JPI$_GETJPI_CONTROL_FLAGS requests that SYS$GETJPI not perform certain actions that may be necessary to collect the data. For example, a SYS$GETJPI control flag may instruct the calling program not to retrieve a process that has been swapped out of the balance set.
If SYS$GETJPI is unable to retrieve any data item because of the restrictions imposed by the control flags, it returns the data length as 0. To verify that SYS$GETJPI received a data item, examine the data length to be sure that it is not 0. To make this verification possible, be sure to specify the return length for each item in the SYS$GETJPI item list when any of the JPI$_GETJPI_CONTROL_FLAGS flags is used.
Unlike other SYS$GETJPI item codes, the JPI$_GETJPI_CONTROL_FLAGS item is an input item. The item list entry should specify a longword buffer. The desired control flags should be set in this buffer.
Because the JPI$_GETJPI_CONTROL_FLAGS item code tells SYS$GETJPI how to interpret the item list, it must be the first entry in the SYS$GETJPI item list. The error code SS$_BADPARAM is returned if it is not the first item in the list.
The following are the SYS$GETJPI control flags.
JPI$M_NO_TARGET_INSWAP
When you specify JPI$M_NO_TARGET_INSWAP, SYS$GETJPI does not retrieve a process that has been swapped out of the balance set. Use JPI$M_NO_TARGET_INSWAP to avoid the additional load of swapping processes into a system. For example, use this flag with SHOW SYSTEM to avoid bringing processes into memory to display their accumulated CPU time.
Data stored in the virtual address space of the process is not accessible.
Data stored in the process header (PHD) may not be accessible.
Data stored in resident data structures, such as the process control block (PCB) or the job information block (JIB), is accessible.
You must examine the return length of an item to verify that the item was retrieved. The information may be located in a different data structure in another release of the operating system.
JPI$M_NO_TARGET_AST
When you specify JPI$M_NO_TARGET_AST, SYS$GETJPI does not deliver a kernel-mode AST to the target process. Use JPI$M_NO_TARGET_AST to avoid executing a target process in order to retrieve information.
Data stored in the virtual address space of the process is not accessible.
Data stored in system data structures, such as the process header (PHD), the process control block (PCB), or the job information block (JIB), is accessible.
You must examine the return length of an item to verify that the item was retrieved. The information may be located in a different data structure in another release of the operating system.
The use of the flag JPI$M_NO_TARGET_AST also implies that SYS$GETJPI does not swap in a process, because SYS$GETJPI would only bring a process into memory to deliver an AST to that process.
JPI$M_IGNORE_TARGET_STATUS
When you specify JPI$M_IGNORE_TARGET_STATUS, SYS$GETJPI attempts to retrieve as much information as possible, even if the process is suspended or being deleted. Use JPI$M_IGNORE_TARGET_STATUS to retrieve all possible information from a process. For example, use this flag with SHOW SYSTEM to display processes that are suspended, being deleted, or in miscellaneous wait states.
        PROGRAM CONTROL_FLAGS

        IMPLICIT NONE                   ! Implicit none

        INCLUDE '($jpidef)   /nolist'   ! Definitions for $GETJPI
        INCLUDE '($pscandef) /nolist'   ! Definitions for $PROCESS_SCAN
        INCLUDE '($ssdef)    /nolist'   ! Definitions for SS$_ names

        STRUCTURE /JPIITMLST/           ! Structure declaration for
         UNION                          !  $GETJPI item lists
          MAP
           INTEGER*2 BUFLEN,
        2            CODE
           INTEGER*4 BUFADR,
        2            RETLENADR
          END MAP
          MAP                           ! A longword of 0 terminates
           INTEGER*4 END_LIST           !  an item list
          END MAP
         END UNION
        END STRUCTURE
        STRUCTURE /PSCANITMLST/         ! Structure declaration for
         UNION                          !  $PROCESS_SCAN item lists
          MAP
           INTEGER*2 BUFLEN,
        2            CODE
           INTEGER*4 BUFADR,
        2            ITMFLAGS
          END MAP
          MAP                           ! A longword of 0 terminates
           INTEGER*4 END_LIST           !  an item list
          END MAP
         END UNION
        END STRUCTURE
        RECORD /PSCANITMLST/            ! Declare the item list for
        2         PSCANLIST(5)          !  $PROCESS_SCAN

        RECORD /JPIITMLST/              ! Declare the item list for
        2         JPILIST(6)            !  $GETJPI

        INTEGER*4 SYS$GETJPIW,          ! System service entry points
        2         SYS$PROCESS_SCAN

        INTEGER*4 STATUS,               ! Status variable
        2         CONTEXT,              ! Context from $PROCESS_SCAN
        2         PID,                  ! PID from $GETJPI
        2         JPIFLAGS              ! Flags for $GETJPI

        INTEGER*2 IOSB(4)               ! I/O Status Block for $GETJPI

        CHARACTER*16
        2         PRCNAM,               ! Process name from $GETJPI
        2         NODENAME              ! Node name from $GETJPI
        INTEGER*2 PRCNAM_LEN,           ! Process name length
        2         NODENAME_LEN          ! Node name length

        CHARACTER*80
        2         IMAGNAME              ! Image name from $GETJPI
        INTEGER*2 IMAGNAME_LEN          ! Image name length

        LOGICAL*4 DONE                  ! Done with data loop

        !********************************************
        !*  Initialize item list for $PROCESS_SCAN  *
        !********************************************

        ! Look for interactive and batch jobs across
        ! the cluster with $GETJPI buffering

        PSCANLIST(1).BUFLEN   = 0
        PSCANLIST(1).CODE     = PSCAN$_NODE_CSID
        PSCANLIST(1).BUFADR   = 0
        PSCANLIST(1).ITMFLAGS = PSCAN$M_NEQ
        PSCANLIST(2).BUFLEN   = 0
        PSCANLIST(2).CODE     = PSCAN$_MODE
        PSCANLIST(2).BUFADR   = JPI$K_INTERACTIVE
        PSCANLIST(2).ITMFLAGS = PSCAN$M_OR
        PSCANLIST(3).BUFLEN   = 0
        PSCANLIST(3).CODE     = PSCAN$_MODE
        PSCANLIST(3).BUFADR   = JPI$K_BATCH
        PSCANLIST(3).ITMFLAGS = 0
        PSCANLIST(4).BUFLEN   = 0
        PSCANLIST(4).CODE     = PSCAN$_GETJPI_BUFFER_SIZE
        PSCANLIST(4).BUFADR   = 1000
        PSCANLIST(4).ITMFLAGS = 0
        PSCANLIST(5).END_LIST = 0

        !********************************************
        !*     End of item list initialization      *
        !********************************************

        STATUS = SYS$PROCESS_SCAN (        ! Set up the scan context
        2                        CONTEXT,
        2                        PSCANLIST)

        IF (.NOT. STATUS) CALL LIB$SIGNAL (%VAL(STATUS))

        ! Initialize $GETJPI item list

        JPILIST(1).BUFLEN    = 4
        JPILIST(1).CODE      = IAND ('FFFF'X, JPI$_GETJPI_CONTROL_FLAGS)
        JPILIST(1).BUFADR    = %LOC(JPIFLAGS)
        JPILIST(1).RETLENADR = 0
        JPILIST(2).BUFLEN    = 4
        JPILIST(2).CODE      = JPI$_PID
        JPILIST(2).BUFADR    = %LOC(PID)
        JPILIST(2).RETLENADR = 0
        JPILIST(3).BUFLEN    = LEN(PRCNAM)
        JPILIST(3).CODE      = JPI$_PRCNAM
        JPILIST(3).BUFADR    = %LOC(PRCNAM)
        JPILIST(3).RETLENADR = %LOC(PRCNAM_LEN)
        JPILIST(4).BUFLEN    = LEN(IMAGNAME)
        JPILIST(4).CODE      = JPI$_IMAGNAME
        JPILIST(4).BUFADR    = %LOC(IMAGNAME)
        JPILIST(4).RETLENADR = %LOC(IMAGNAME_LEN)
        JPILIST(5).BUFLEN    = LEN(NODENAME)
        JPILIST(5).CODE      = JPI$_NODENAME
        JPILIST(5).BUFADR    = %LOC(NODENAME)
        JPILIST(5).RETLENADR = %LOC(NODENAME_LEN)
        JPILIST(6).END_LIST  = 0
        ! Loop calling $GETJPI with the context

        DONE = .FALSE.
        JPIFLAGS = IOR (JPI$M_NO_TARGET_INSWAP, JPI$M_IGNORE_TARGET_STATUS)
        DO WHILE (.NOT. DONE)

                ! Call $GETJPI to get the next process

                STATUS = SYS$GETJPIW (
        2                    ,           ! No event flag
        2                    CONTEXT,    ! Process context
        2                    ,           ! No process name
        2                    JPILIST,    ! Itemlist
        2                    IOSB,       ! Always use IOSB with $GETJPI!
        2                    ,           ! No AST
        2                    )           ! No AST arg
                ! Check the status in both STATUS and the IOSB, if
                ! STATUS is OK then copy IOSB(1) to STATUS

                IF (STATUS) STATUS = IOSB(1)

                ! If $GETJPI worked, display the process, if done then
                ! prepare to exit, otherwise signal an error

                IF (STATUS) THEN
                        IF (IMAGNAME_LEN .EQ. 0) THEN
                                TYPE 1010, PID, NODENAME, PRCNAM
                        ELSE
                                TYPE 1020, PID, NODENAME, PRCNAM,
        2                                  IMAGNAME(1:IMAGNAME_LEN)
                        END IF
                ELSE IF (STATUS .EQ. SS$_NOMOREPROC) THEN
                        DONE = .TRUE.
                ELSE
                        CALL LIB$SIGNAL(%VAL(STATUS))
                END IF

        END DO

1010    FORMAT (' ',Z8.8,'  ',A6,':: ',A,' (no image)')
1020    FORMAT (' ',Z8.8,'  ',A6,':: ',A,' ',A)

        END
4.2.7. Using SYS$GETLKI
#pragma nostandard
#ifdef  Alpha
#pragma module               LOCK_SCAN
#else              /* Alpha */
#module                      LOCK_SCAN
#endif            /* Alpha */
#pragma standard

#include        <ssdef.h>
#include        <lkidef.h>

#pragma nostandard
globalvalue
      ss$_normal, ss$_nomorelock;
#pragma standard

struct lock_item_list
                {
                short int       buffer_length;
                short int       item_code;
                void            *bufaddress;
                void            *retaddress;
                };

typedef struct lock_item_list lock_item_list_type;

unsigned long lock_id;
long int value_block[4];

#pragma nostandard
static  lock_item_list_type
  getlki_item_list[] = {
   {sizeof(value_block), LKI$_VALBLK,    &value_block,  0},
   {sizeof(lock_id),     LKI$_LOCKID,    &lock_id,      0},
   {0,0,0,0}
};
globalvalue ss$_normal, ss$_nomorelock;
#pragma standard

main()
{
  int status = ss$_normal;
  unsigned long lock_context = -1;   /* init for wild-card operation */

  while (status == ss$_normal) {
      status = sys$getlkiw( 1, &lock_context, getlki_item_list,0,0,0,0);
      /*                                                  */
      /* Dequeue the lock if the value block contains a 1 */
      /*                                                  */
      if ((status == ss$_normal) & (value_block[0] == 1)){
          status = sys$deq( lock_id, 0, 0, 0 );
      }
  }
  if (status != ss$_nomorelock){
      exit(status);
  }
}
4.2.8. Setting Process Privileges
Use the SYS$SETPRV system service to set process privileges. Setting process privileges allows you to limit executing privileged code to a specific process, to limit functions within a process, and to limit access from other processes. You can either enable or disable a set of privileges and assign privileges on a temporary or permanent basis. To use this service, the creating process must have the appropriate privileges.
4.3. Changing Process and Kernel Threads Scheduling
Prior to kernel threads, the OpenVMS scheduler selected a process to run. With kernel threads, the OpenVMS scheduler selects a kernel thread to run. All processes are thread-capable processes with at least one kernel thread. A process may have only one kernel thread, or a process may have a variable number of kernel threads. A single-threaded process is equivalent to a process before OpenVMS Version 7.0.
With kernel threads, all base and current priorities are per kernel thread. To alter a thread's scheduling, you can change the base priority of the thread with the SYS$SETPRI system service, which affects the specified kernel thread and not the entire process.
To alter a process's scheduling, you can lock the process into physical memory so that it is not swapped out. Processes that have been locked into physical memory are executed before processes that have been swapped out. For kernel threads, the thread with the highest priority level is executed first.
If you create a subprocess with the LIB$SPAWN routine, you can set the priority of the subprocess by executing the DCL command SET PROCESS/PRIORITY as the first command in a command procedure. You must have the ALTPRI privilege to increase the base priority above the base priority of the creating process.
If you create a subprocess with the LIB$SPAWN routine, you can inhibit swapping by executing the DCL command SET PROCESS/NOSWAP as the first command in a command procedure. Use the SYS$SETSWM system service to inhibit swapping for any process. A process must have the PSWAPM privilege to inhibit swapping.
Priority—Increasing a kernel thread's base priority gives that thread more processor time at the expense of threads that execute at lower priorities. VSI does not recommend this unless you have a program that must respond immediately to events (for example, a real-time program). If you must increase the base priority, return it to normal as soon as possible. If the entire image must execute at an increased priority, reset the base priority before exiting; image termination does not reset the base priority.
Swapping—Inhibiting swapping keeps your process in physical memory. VSI does not recommend inhibiting swapping unless the effective execution of your image depends on it (for example, if the image executing in the process is collecting statistics about processor performance).
4.4. Using Affinity and Capabilities in CPU Scheduling (Alpha and I64 Only)
Create and modify a set of user-defined process capabilities
Create and modify a set of user-defined CPU capabilities to match those in the process
Allow a process to apply the affinity mechanisms to a subset of the active CPU set in a symmetric multiprocessing (SMP) configuration
4.4.1. Defining Affinity and Capabilities
The affinity mechanism allows a process, or each of its kernel threads, to specify an exact set of CPUs on which it can execute. The capabilities mechanism allows a process to specify a set of resources that a CPU in the active set must have defined before it is allowed to contend for process execution. Presently, both of these mechanisms are present in the OpenVMS scheduling mechanism; both are used extensively internally and externally to implement parts of the I/O and timing subsystems. Now, however, the OpenVMS operating system provides user access to these mechanisms.
4.4.1.1. Using Affinity and Capabilities with Caution
It is important for users to understand that inappropriate and abusive use of the affinity and capabilities mechanisms can have a negative impact on the symmetric aspects of the current multi-CPU scheduling algorithm.
4.4.2. Types of Capabilities
|
Capability |
Description |
|---|---|
|
Primary |
Owned by only one CPU at a time, since the primary could possibly migrate from CPU to CPU in the configuration. For I/O and timekeeping functions, the system requires that the process run on the primary CPU. The process requiring this capability is allowed to run only on the processor that has it at the time. |
|
Run |
Controls the ability of a CPU to execute processes. Every process requires this resource; if the CPU does not have it, scheduling for that CPU comes to a halt in a recognized state. The command STOP/CPU uses this capability when it is trying to make the CPU quiescent, bringing it to a halted state. |
|
Quorum |
Used in a cluster environment when a node wants another node to come to a quiescent state until further notice. Like the Run capability, Quorum is a required resource for every process and every CPU in order for scheduling to occur. |
|
Vector |
Like the primary capability, it reflects a feature of the CPU; that is, that the CPU has a vector processing unit directly associated with it. Obsolete on OpenVMS Alpha and OpenVMS IA-64 systems but is retained as a compatibility feature with OpenVMS VAX. |
4.4.3. Looking at User Capabilities
Previously, the use of capabilities was restricted to system resources and control events. However, it is also valuable for user functions to be able to indicate a resource or special CPU function.
There are 16 user-defined capabilities added to both the process and the CPU structures. Unlike the static definitions of the current system capabilities, the user capabilities have meaning only in the context of the processes that define them. Through system service interfaces, processes or individual threads of a multithreaded process, can set specific bits in the capability masks of a CPU to give it a resource, and can set specific bits in the kernel thread's capability mask to require that resource as an execution criterion.
The user capability feature is a direct superset of the current capability functionality. All currently existing capabilities are placed into the system capability set; they are not available to the process through system service interfaces. These system service interfaces affect only the 16 bits specifically set aside for user definition.
The OpenVMS operating system has no direct knowledge of what the defined capability is that is being used. All responsibility for the correct definition, use, and management of these bits is determined by the processes that define them. The system controls the impact of these capabilities through privilege requirements; but, as with the priority adjustment services, abusive use of the capability bits could affect the scheduling dynamic and CPU loads in an SMP environment.
4.4.4. Using the Capabilities System Services
The SYS$CPU_CAPABILITIES and SYS$PROCESS_CAPABILITIES system services provide access to the capability features. By using the SYS$CPU_CAPABILITIES and SYS$PROCESS_CAPABILITIES services, you can assign user capabilities to a CPU and to a specific kernel thread. Assigning a user capability to a CPU lasts either for the life of the system or until another explicit change is made. This operation has no direct effect on the scheduling dynamics of the system; it only indicates that the specified CPU is capable of handling any process or thread that requires that resource. If a process does not indicate that it needs that resource, it ignores the CPU's additional capability and schedules the process on the basis of other process requirements.
Assigning a user capability requirement to a specific process or thread has a major impact on the scheduling state of that entity. For the process or thread to be scheduled on a CPU in the active set, that CPU must have the capability assigned prior to the scheduling attempt. If no CPU currently has the correct set of capability requirements, the process is placed into a wait state until a CPU with the right configuration becomes available. Like system capabilities, user process capabilities are additive; that is, for a CPU to schedule the process, the CPU must have the full complement of required capabilities.
These services reference both sets of 16-bit user capabilities by the common symbolic constant names of CAP$M_USER1 through CAP$M_USER16. These names reflect the corresponding bit position in the appropriate capability mask; they are nonzero and self-relative to themselves only.
Both services allow multiple bits to be set or cleared, or both, simultaneously. Each takes as parameters a select mask and a modify mask that define the operation set to be performed. The service callers are responsible for setting up the select mask to indicate the user capabilities bits affected by the current call. This select mask is a bit vector of the ORed bit symbolic names that, when set, states that the value in the modify mask is the new value of the bit. Both masks use the symbolic constants to indicate the same bit; alternatively, if appropriate, you can use the symbolic constant CAP$K_USER_ALL in the select mask to indicate that the entire set of capabilities is affected. Likewise, you can use the symbolic constant CAP$K_USER_ADD or CAP$K_USER_REMOVE in the modify mask to indicate that all capabilities specified in the select mask are to be either set or cleared.
For information about using the SYS$CPU_CAPABILITIES and SYS$PROCESS_CAPABILITIES system services, see the VSI OpenVMS System Services Reference Manual: A–GETUAI and VSI OpenVMS System Services Reference Manual: GETUTC–Z.
4.4.5. Types of Affinity
There are two types of affinity: implicit and explicit. This section describes both.
4.4.5.1. Implicit Affinity
Implicit affinity, sometimes known as soft affinity, is a variant form of the original affinity mechanism used in the OpenVMS scheduling mechanisms. Rather than require a process to stay on a specific CPU regardless of conditions, implicit affinity maximizes cache and translation buffer (TB) context by maintaining an association with the CPU that has the most information about a given process.
Currently, the OpenVMS scheduling mechanism already has a version of implicit affinity. It keeps track of the last CPU the process ran on and tries to schedule itself to that CPU, subject to a fairness algorithm. The fairness algorithm makes sure a process is not skipped too many times when it normally would have been scheduled elsewhere.
The Alpha architecture lends itself to maintaining cache and TB context that has significant potential for performance improvement at both the process and system level. Because this feature contradicts the normal highest-priority process-scheduling algorithms in an SMP configuration, implicit affinity cannot be a system default.
The SYS$SET_IMPLICIT_AFFINITY system
service provides implicit affinity support. This service
works on an explicitly specified process or kernel thread
block (KTB) through the pidadr and
prcnam arguments. The default
is the current process, but if the symbolic constant
CAP$K_PROCESS_DEFAULT is
specified in pidadr, the bit is set
in the global default cell
SCH$GL_DEFAULT_PROCESS_CAP.
Setting implicit affinity globally is similar to setting a
capability bit in the same mask, because every process
creation after the modification picks up the bit as a
default that stays in effect across all image
activations.
The protections required to invoke SYS$SET_IMPLICIT_AFFINITY depend on the process that is being affected. Because the addition of implicit affinity has the same potential as the SYS$ALTPRI service for affecting the priority scheduling of processes in the COM queue, ALTPRI protection is required as the base which all modification forms of the serve must have to invoke SYS$SET_IMPLICIT_AFFINITY. If the process is the current one, no other privilege is required. To affect processes in the same UIC group, the GROUP privilege is required. For any other processes in the system, the WORLD privilege is required.
4.4.5.2. Explicit Affinity
Even though capabilities and affinity overlap considerably in their functional behavior, they are nonetheless two discrete scheduling mechanisms. Affinity, the subsetting of the number of CPUs on which a process can execute, has precedence over the capability feature and provides an explicit binding operation between the process and CPU. It forces the scheduling algorithm to consider only the CPU set it requires, and then applies the capability tests to see whether any of them are appropriate.
Explicit affinity allows database and high-performance applications to segregate application functions to individual CPUs, providing improved cache and TB performance as well as reducing context switching and general scheduling overhead. During the IPL 8 scheduling pass, the process is investigated to see to which CPUs it is bound and whether the current CPU is one of those. If it passes that test, capabilities are also validated to allow the process to context switch. The number of CPUs that can be supported is 32.
The SYS$PROCESS_AFFINITY system
service provides access to the explicit affinity
functionality. SYS$PROCESS_AFFINITY
resolves to a specific process, defaulting to the current
one, through the pidadr and
prcnam arguments. Like the
other system services, the CPUs that are affected are
indicated through select_mask, and the binding state of each
CPU is specified in modify_mask.
Specific CPUs can be referenced in select_mask and modify_mask using the symbolic constants CAP$M_CPU0 through CAP$M_CPU31. These constants are defined to match the bit position of their associated CPU ID. Alternatively, specifying CAP$K_ALL_ACTIVE_CPUS in select_mask sets or clears explicit affinity for all CPUs in the current active set.
Explicit affinity, like capabilities, has a permanent process as well as current image copy. As each completed image is run down, the permanent explicit affinity values overwrite the running image set, superseding any changes that were made in the interim. Specifying CAP$M_FLAG_PERMANENT in the flags parameter indicates that both the current and permanent processes are to be modified simultaneously. As a result, unless explicitly changed again, this operation has a scope from the current image through the end of the process life.
For information about the SYS$SET_IMPLICIT_AFFINITY and SYS$PROCESS_AFFINITY system services, see the VSI OpenVMS System Services Reference Manual: A–GETUAI and VSI OpenVMS System Services Reference Manual: GETUTC–Z.
4.5. Using the Class Scheduler in CPU Scheduling
The class scheduler gives you the ability to limit the amount of CPU time that a system's users may receive by placing the users into scheduling classes. Each class is assigned a percentage of the overall system's CPU time. As the system runs, the combined set of users in a class are limited to the percentage of CPU execution time allocated to their class. The users may get some additional CPU time if the qualifier /WINDFALL is enabled for their scheduling class. Enabling the qualifier /WINDFALL allows the system to give a small amount of CPU time to a scheduling class when a CPU is idle and the scheduling class's allotted time has been depleted.
|
Subcommand |
Meaning |
|---|---|
|
Add |
Creates a new scheduling class |
|
Delete |
Deletes a scheduling class |
|
Modify |
Modifies the characteristics of a scheduling class |
|
Show |
Shows the characteristics of a scheduling class |
|
Suspend |
Suspends temporarily a scheduling class |
|
Resume |
Resumes a scheduling class |
4.5.1. Specifications for the Class_Schedule Command
The full specifications for Class_Schedule and its subcommands are as follows:
4.5.1.1. The Add Subcommand
SYSMAN>class_schedule add "class name"
/cpulimit = ([primary], [h1-h2=time%],[h1=time%],
                 [,...],[secondary],[h1-h2=time%],[h1=time%],[,...])
    [/primedays = ([no]day[,...])]
    [/username = (name1, name2,...name"n")]
    [/account = (name1, name2,...name"n")]
    [/uic = (uic1,uic2,...uic"n")]
    [/windfall]
The Class Name and Qualifiers
The class name is the name of the scheduling class. It must be specified and the maximum length for this name is 16 characters.
|
Qualifier |
Meaning |
|---|---|
|
/CPULIMIT |
Defines the maximum amount of CPU time that this scheduling class can receive for the specified days and hours. You must specify this qualifier when adding a class. The h1-h2=time% syntax allows you to specify a range of hours followed by the maximum amount of CPU time (expressed as a percentage) to be associated with this set of hours. The first set of hours after the keyword PRIMARY specifies hours on primary days; the set of hours after the keyword SECONDARY specifies hours on secondary days. The hours are inclusive; if you class schedule a given hour, access extends to the end of that hour. |
|
/PRIMEDAYS |
Allows you to define which days are primary days and which days are secondary days. You specify primary days as MON, TUE, WED, THU, FRI, SAT, and SUN. You specify secondary days as NOMON, NOTUE, NOWED, NOTHU, NOFRI, NOSAT, and NOSUN. The default is MON through FRI and NOSAT and NOSUN. Any days omitted from the list take their default value. You can use the DCL command, SET DAY, to override the class definition of primary and secondary days. |
|
/USERNAME |
Specifies which user is part of this scheduling class. This is part of a user's SYSUAF record. |
|
/ACCOUNT |
Specifies which user is part of this scheduling class. This is part of a user's SYSUAF record. |
|
/UIC |
Specifies which users are part of this scheduling class. This is part of a user's SYSUAF record. |
|
/WINDFALL |
Specifies that all processes in the scheduling class are eligible for windfall. By enabling windfall, you allow processes in the scheduling class to receive a "windfall," that is, a small percentage of CPU time, when the class' allotted CPU time has been depleted and a CPU is idle. Rather than let the CPU remain idle, you might decide that it is better to let these processes execute even if it means giving them more than their allotted time. The default value is for windfall to be disabled. |
4.5.1.2. The Delete Subcommand
SYSMAN>class_schedule delete "class name"
The Delete subcommand deletes the scheduling class from the class scheduler database file, and all processes that are members of this scheduling class are no longer class scheduled.
4.5.1.3. The Modify Subcommand
SYSMAN>class_schedule modify "class name"
/cpulimit = ([primary], [h1-h2=time%],[h1=time%],
                 [,...],[secondary],[h1-h2=time%],[h1=time%],[,...])
    [/primedays = ([no]day[,...])]
    [/username = (name1, name2,...name"n")]
    [/account = (name1, name2,...name"n")]
    [/uic = (uic1,uic2,...uic"n")]
    [/(no)windfall]
The Modify subcommand changes the characteristics of a scheduling class. The qualifiers are the same qualifiers as for the add subcommand. To remove a time restriction, specify a zero (0) for the time percentage associated with a particular range of hours.
To remove a name or uic value, you must specify a minus sign in front of each name or value.
4.5.1.4. The Show Subcommand
SYSMAN>class_schedule show [class name] [/all] [/full]
|
Qualifier |
Meaning |
|---|---|
|
/ALL |
Displays all scheduling classes. The qualifier must be specified if no class name is given. |
|
/FULL |
Displays all information about his scheduling class. |
Note
Name
Maximum CPU times for reach range of hours
Primary days and secondary days
Windfall settings
4.5.1.5. The Suspend Subcommand
SYSMAN>class_schedule suspend "class name"
The Suspend subcommand suspends the specified scheduling class. All processes that are part of this scheduling class remain as part of this scheduling class but are granted unlimited CPU time.
4.5.1.6. The Resume Subcommand
SYSMAN>class_schedule resume "class name"
The Resume subcommand complements the suspend command. You use this command to resume a scheduling class that is currently suspended.
4.5.2. The Class Scheduler Database
The class scheduler database is a permanent database that allows OpenVMS to class schedule processes automatically after a system has been booted and rebooted. This database resides on the system disk in SYS$SYSTEM:VMS$CLASS_SCHEDULE.DATA. SYSMAN creates this file as an RMS indexed file when the first scheduling class is created by the SYSMAN command, class_schedule add.
4.5.2.1. The Class Scheduler Database and Process Creation
By using a permanent class scheduler, a process is placed into a scheduling class, if appropriate, at process creation time. When a new process is created, it needs to be determined whether this process belongs to a scheduling class. Since to determine this relies upon data in the SYSUAF file, and the Loginout image already has the process' information from this file, Loginout class schedules the process if it determines that the process belongs to a scheduling class.
There are two other types of processes to consider during process creation: subprocess and detached process. A subprocess becomes part of the same scheduling class as the parent process, even though it may not match the class's criteria. That is, its user and account name and/or UIC may not be part of the class's record. A detached process only joins a scheduling class if it executes the Loginout image (Loginout.exe) during process creation.
Though a process can join a scheduling class at process creation time, you can change or modify its scheduling class during runtime with the SET PROCESS/SCHEDULING_CLASS command.
4.5.3. Determining If a Process Is Class Scheduled
The SHOW SYSTEM DCL command
The SYS$GETJPI system service
The Authorize utility
The SHOW SYSTEM DCL Command
The DCL command, SHOW SYSTEM, with the qualifier, /SCHEDULING_CLASS ="name", displays processes that belong to a specific scheduling class, or if no name is specified, it displays all class scheduled processes and the name of their scheduling class. The SHOW SYSTEM/FULL command shows the scheduling class name of all processes that are class scheduled.
For more information about the DCL command SHOW SYSTEM, see VSI OpenVMS DCL Dictionary: N–Z.
The SYS$GETJPI System Service
The SYS$GETJPI system service item code, JPI$_CLASS_NAME, returns the name of the scheduling class, as a character string, that this process belongs to. If the process is not class scheduled, then a return length of zero (0) is returned to the caller.
For more information about the SYS$GETJPI system service, see the VSI OpenVMS System Services Reference Manual: A–GETUAI.
The Authorize Utility
When a new user is added to the SYSUAF file, or when a user's record is modified. Authorize searches the class scheduler database file to determine if this user is a member of a scheduling class. If it is, then Authorize displays the following message: UAF-I-SCHEDCLASS, which indicates that the user is a member of a scheduling class.
4.5.4. The SYS$SCHED System Service
The SYS$SCHED system service allows you to create a temporary class scheduling database. The processes are class-scheduled by PID, after the process has been created. The SYSMAN interface creates a separate and permanent class scheduling database that schedules you at process creation time. A process cannot belong to both databases, the SYS$SCHED and SYSMAN database. Therefore, the SYS$SCHED system service checks to see if the process to be inserted into a scheduling class is already class scheduled before it attempts to place the specified process into a scheduling class. If it is already class scheduled, then the error message, SS$_INSCHEDCLASS, is returned from SYS$SCHED.
For more information about the SYS$SCHED system service, see the VSI OpenVMS System Services Reference Manual: GETUTC–Z.
4.6. Changing Process Name
Use the system service SYS$SETPRN to change the name of your process. SYS$SETPRN can be used only on the calling process. Changing process names might be useful when a lengthy image is being executed. You can change names at significant points in the program; then monitor program execution through the change in process names. You can obtain a process name by calling a SYS$GETJPI routine from within a controlling process, either by pressing the Ctrl/T key sequence if the image is currently executing in your process, or by entering the DCL command SHOW SYSTEM if the program is executing in a detached process.
   .
   .
   .
! Calculate approximate tax rates
STATUS = SYS$SETPRN ('INCTAXES')
IF (.NOT. STATUS) CALL LIB$SIGNAL(%VAL(STATUS))
STATUS = TAX_RATES (TOTAL_HOUSES,
2                   PERSONS_HOUSE,
2                   ADULTS_HOUSE,
2                   INCOME_HOUSE,
2                   TAX_PER_HOUSE)
IF (.NOT. STATUS) CALL LIB$SIGNAL(%VAL(STATUS))
! Sort
STATUS = SYS$SETPRN ('INCSORT')
IF (.NOT. STATUS) CALL LIB$SIGNAL(%VAL(STATUS))
STATUS = TAX_SORT (TOTAL_HOUSES,
2                  TAX_PER_HOUSE)
IF (.NOT. STATUS) CALL LIB$SIGNAL(%VAL(STATUS))

! Write report
STATUS = SYS$SETPRN ('INCREPORT')
IF (.NOT. STATUS) CALL LIB$SIGNAL(%VAL(STATUS))
   .
   .
   .
4.7. Accessing Another Process's Context
On OpenVMS VAX systems, a system programmer must sometimes develop code that performs various actions (such as performance monitoring) on behalf of a given process, executing in that process's context. To do so, a programmer typically creates a routine consisting of position-independent code and data, allocates sufficient space in nonpaged pool, and copies the routine to it. On OpenVMS VAX systems, such a routine can execute correctly no matter where it is loaded into memory.
On OpenVMS Alpha and IA-64 systems, the practice of moving code in memory is more difficult and complex. It is not enough to simply copy code from one memory location to another. On OpenVMS Alpha and IA-64 systems, you must relocate both the routine and its linkage section, being careful to maintain the relative distance between them, and then apply all appropriate fixups to the linkage section.
Code that must read from or write to another process's registers or address space can use the EXE$READ_PROCESS and EXE$WRITE_PROCESS system routines, as described in Section 4.7.1, ''Reading and Writing in the Address Space of Another Process (Alpha and I64 Only)''.
Code that must perform other operations in another process's context (for instance, to execute a system service to raise a target process's quotas) can be written as an OpenVMS Alpha or OpenVMS IA-64 executive image, as described in Section 4.7.2, ''Writing an Executive Image (Alpha and I64 Only)''.
4.7.1. Reading and Writing in the Address Space of Another Process (Alpha and I64 Only)
EXE$READ_PROCESS and EXE$WRITE_PROCESS are OpenVMS Alpha and OpenVMS IA-64 system routines in nonpaged system space. EXE$READ_PROCESS reads data from a target process's address space or registers and writes it to a buffer in the local process's address space. EXE$WRITE_PROCESS obtains data from a local process's address space and transfers it to the target process's context. Both routines must be called from kernel mode at IPL 0.
One of the arguments to these procedures specifies whether or not the procedure is to access memory and registers in the target process. Another argument specifies the memory address or register number. The contents of these arguments are symbolic names (beginning with the prefix EACB$) that are defined by the $PROCESS_READ_WRITE macro in SYS$LIBRARY:LIB.MLB. (They are also defined in LIB.REQ for BLISS programmers).
4.7.1.1. EXE$READ_PROCESS and EXE$WRITE_PROCESS
The following are descriptions of the callable interfaces to EXE$READ_PROCESS and EXE$WRITE_PROCESS.
EXE$READ_PROCESS
EXE$READ_PROCESS — Reads data from a target process's address space or registers and writes it to a buffer in the local process's address space.
Module
PROC_READ_WRITE
Format
status = EXE$READ_PROCESS
           (ipid, buffer_size, target_address, local_address,
            target_address_type, ast_counter_address)
Arguments
ipid | OpenVMS usage | ipid |
| type | longword (unsigned) |
| access | read only |
| mechanism | by value |
buffer_size | OpenVMS usage | longword_unsigned |
| type | longword (unsigned) |
| access | read only |
| mechanism | by value |
Number of bytes to transfer. If target_address_type is EACB$K_GENERAL_REGISTER, the values of target_address and buffer_size together determine how many 64-bit registers are written, in numeric order, to the buffer. A partial register is written for any value that is not a multiple of 8.
If you specify buffer_size to be larger than 8, more than one register is written from the buffer. Registers are written in numeric order, followed by the PC and PS, starting at the register indicated by target_address.
If target_address_type is EACB$K_GENERAL_REGISTER and the values of buffer_size and target_address would cause a target process read extending beyond the last available register (based on the value of EACB$K_GEN_REGS_LENGTH), EXE$READ_PROCESS returns SS$_ILLSER status.
target_address | OpenVMS usage | longword_unsigned |
| type | longword (unsigned) |
| access | read only |
| mechanism | by reference (if address); by value (if constant) |
If target_address_type is EACB$K_MEMORY, address in target process at which the transfer is to start.
If target_address_type is EACB$K_GENERAL_REGISTER, symbolic constant indicating at which general register the transfer should start. Possible constant values include EACB$K_R0 through EACB$K_R29, EACB$K_PC, and EACB$K_PS.
For I64, if target_address_type is EACB$K_GENERAL_REGISTER, register values extend from eacb$k_r0 through eacb$k_isr (see proc_read_write.h).
If target_address_type type is EACB$K_INVOCATION_CONTEXT, register values represent values in an INVOCATION_CONTEXT. See the VSI OpenVMS Calling Standard for the definition of invocation context.
local_address | OpenVMS usage | longword_unsigned |
| type | longword (unsigned) |
| access | read only |
| mechanism | by reference |
target_address_type | OpenVMS usage | integer |
| type | longword (unsigned) |
| access | read only |
| mechanism | by value |
Symbolic constant indicating whether the target_address argument is a memory address (EACB$K_MEMORY) or a general register (EACB$K_GENERAL_REGISTER). Floating-point registers are not supported as target addresses.
For I64, symbolic constant indicating whether the target_address argument is a memory address (eacb$k_memory), or a general register (eacb$k_general_register), or an invocation context (eacb$k_invocation_context). Floating point registers are not supported as target addresses.
ast_counter_address | OpenVMS usage | longword_unsigned |
| type | longword (unsigned) |
| access | read only |
| mechanism | by reference |
Returns
| OpenVMS usage | cond_value |
| type | longword (unsigned) |
| access | write only |
| mechanism | by value |
Return Values
| SS$_ACCVIO | Unable to write to the location indicated by local_address or ast_counter_address. |
| SS$_ILLSER | Routine was called with IPL greater than 0, or an illegal target_address_type was specified. If target_address_type is EACB$K_GENERAL_REGISTER, this status can indicate that the values of buffer_size and target_address would cause a target process read extending beyond the last available register (based on the value of EACB$K_GEN_REGS_LENGTH). |
| SS$_INSFMEM | Insufficient memory available for specified buffer. |
| SS$_NONEXPR | The ipid argument does not correspond to an existing process. |
| SS$_NORMAL | The interprocess read finished successfully. |
| SS$_TIMEOUT | The read operation did not finish within a few seconds. |
Context
The caller of EXE$READ_PROCESS must be executing in kernel mode at IPL 0. Kernel mode ASTs must be enabled.
Description
EXE$READ_PROCESS reads data from a target process's address space and writes it to a buffer in the local process's address space.
EXE$READ_PROCESS allocates nonpaged pool for an AST control block (ACB), an ACB extension, and a buffer of the specified size. It initializes the extended ACB with information describing the data transfer and then delivers an AST to the target process to perform the operation. The data is read in the context of the target process from its address space or registers into nonpaged pool. An AST is then queued to the requesting process to complete the read operation by copying the data from pool to the process's buffer.
EXE$READ_PROCESS does not return to its caller until the read is completed, an error is encountered, or it has timed out. (The current timeout value is 3 seconds).
EXE$WRITE_PROCESS
EXE$WRITE_PROCESS — Reads data from the local process’s address space and writes it either to a target process’s registers or a buffer in a target process’s address space.
Module
PROC_READ_WRITE
Format
status = EXE$WRITE_PROCESS
           (ipid, buffer_size, local_address, target_address,
            target_address_type, ast_counter_address)
Arguments
ipid | OpenVMS usage | idip |
| type | longword (unsigned) |
| access | read only |
| mechanism | by value |
buffer_size | OpenVMS usage | longword_unsigned |
| type | longword (unsigned) |
| access | read only |
| mechanism | by value |
Number of bytes to transfer. If target_address_type is EACB$K_GENERAL_REGISTER, the values of target_address and buffer_size together determine how many 64-bit registers are written, in numeric order, from the buffer. A partial register is written for any value that is not a multiple of 8.
If you specify buffer_size to be larger than 8, more than one register is written from the buffer. Registers are written in numeric order, followed by the PC and PS, starting at the register indicated by target_address.
If target_address_type is EACB$K_GENERAL_REGISTER and the values of buffer_size and target_address would cause a write extending beyond the last available register (based on the value of EACB$K_GEN_REGS_LENGTH), EXE$WRITE_PROCESS returns SS$_ILLSER status.
local_address | OpenVMS usage | longword_unsigned |
| type | longword (unsigned) |
| access | read only |
| mechanism | by reference |
target_address | OpenVMS usage | longword_unsigned |
| type | longword (unsigned) |
| access | read only |
| mechanism | by reference (if address) by value (if constant) |
If target_address_type is EACB$K_MEMORY, address in target process at which the transfer is to start.
If target_address_type is EACB$K_GENERAL_REGISTER, symbolic constant indicating at which general register the transfer should start. Possible constant values include EACB$K_R0 through EACB$K_R29, EACB$K_PC, and EACB$K_PS.
For I64, if target_address_type is EACB$K_GENERAL_REGISTER, register values extend from each$k_r0 through eacb$k_isr (see proc_read_write.h).
For Alpha and I64, target_address_type may not be set to EACB$K_INVOCATION_CONTEXT.
target_address_type | OpenVMS usage | longword_unsigned |
| type | longword (unsigned) |
| access | read only |
| mechanism | by value |
ast_counter_address | OpenVMS usage | longword_unsigned |
| type | longword (unsigned) |
| access | read only |
| mechanism | by reference |
Returns
| OpenVMS usage | cond_value |
| type | longword (unsigned) |
| access | write only |
| mechanism | by value |
Return Values
| SS$_ACCVIO | Unable to read from the location indicated by local_address or write to the location indicated by ast_counter_address. |
| SS$_ILLSER | Routine was called with IPL greater than 0, or an illegal target_address_type was specified. If target_address_type is EACB$K_GENERAL_REGISTER, this status can indicate that the values of buffer_size and target_address would cause a process write extending beyond the last available register (based on the value of EACB$K_GEN_REGS_LENGTH). |
| SS$_INSFMEM | Insufficient memory available for specified buffer. |
| SS$_NONEXPR | The ipid argument does not correspond to an existing process. |
| SS$_NORMAL | The interprocess write finished successfully. |
| SS$_TIMEOUT | The write operation did not finish within a few seconds. |
Context
The caller of EXE$WRITE_PROCESS must be executing in kernel mode at IPL 0. Kernel mode ASTs must be enabled.
Description
EXE$WRITE_PROCESS reads data from the local process's address space and writes it to a target process's registers or a buffer in a target process's address space.
EXE$WRITE_PROCESS allocates nonpaged pool for an AST control block (ACB), an ACB extension, and a buffer of the specified size. It initializes the extended ACB with information describing the data transfer, copies the data to be written to the target process into the buffer, and then delivers an AST to the target process to perform the operation.
The AST routine copies the data from pool into the target location and then queues an AST to the requesting process to complete the write operation.
EXE$WRITE_PROCESS does not return to its caller until the read is completed, an error is encountered, or it has timed out. (The current timeout value is 3 seconds).
4.7.2. Writing an Executive Image (Alpha and I64 Only)
An executive image is an image that is mapped into system space as part of the OpenVMS executive. It contains data, routines, and initialization code specific to an image's functions and features. An executive image is implemented as a form of shareable image. Like any shareable image, it has a global symbol table, image section descriptors, and an image activator fixup section. Unlike a shareable image, however, an executive image does not usually contain a symbol vector.
Universally available procedures and data cells in system-supplied executive images are accessed through entries provided by the symbol vectors in the system base images SYS$BASE_IMAGE.EXE and SYS$PUBLIC_VECTORS.EXE. References to an executive image are resolved through these symbol vectors, whether from an executive image or from a user executable or shareable image.
Unlike a system-supplied executive image, an executive image that you create cannot provide universally accessible entry points and symbols in this manner. Instead, it must establish its own vector of procedure descriptors for its callable routines and make the address of that vector available systemwide.
- On Alpha, an executive image can contain at most one image section of the following types and no others:
Nonpaged execute section (for code)
Nonpaged read/write section (for read-only and writable data, locations containing addresses that must be relocated at image activation, and the linkage section for nonpaged code)
Paged execute section (for code)
Paged read/write section (for read-only and writable data, locations containing addresses that must be relocated at image activation, and the linkage section for pageable code)
Initialization section (for initialization procedures and their associated linkage section and data)
Image activator fixup section
The modules of an executive image define program sections (PSECT) with distinct names. The named PSECT is necessary so that the program sections can be collected into clusters, by means of the COLLECT= linker option, during linking. A COLLECT= option specified in the linking of an executive image generates each of the first five image sections.
The linker creates the image activator fixup section to enable the image activator to finally resolve references to SYS$BASE_IMAGE.EXE and SYS$PUBLIC_VECTORS.EXE with addresses within the loaded executive image. Once the executive image has been initialized, the OpenVMS executive loader deallocates the memory for both the fixup section and the initialization section.
- on IA-64, an executive image can have any number of image sections of various types. Image sections are loaded using the actual image size, and a type-specific allocation granularity less than the page size. Having more than a minimum number of image sections has some impact on physical memory consumption, but much less than on Alpha. All image sections are loaded into non-pagable memory of the following types:
Nonpaged execute section (for code)
Nonpaged read/write section (for read-only and writable data, and locations containing addresses that must be relocated by the exec loader)
Initialization read/write section (for initialization procedures and their associated data)
Image activator fixup section (the 'dynamic' segment)
An executive image may have a symbol vector, which defines procedures and data that are to be accessed by other executive images. Most procedure and data references between executive images are resolved through the symbol vector in SYS$BASE_IMAGE, which reduces the dependencies between executive images.
Once the executive image has been initialized, the OpenVMS executive loader deallocates the memory for both the fixup section and the initialization section.
You link an executive image as a type of shareable image that can be loaded by the executive loader. When linking an executive image, VSI strongly recommends using the linker options file SYS$LIBRARY:VMS_EXECLET_LINK.OPT, which sets PSECT attributes on COLLECT options to link an executive image appropriately. The option file contents differ between Alpha and I64 for appropriate linking for each architecture.
Note that on OpenVMS Alpha and IA-64 systems the execute section cannot contain data. You must collect all data, whether read-only or writable, into one of the read/write sections.
On OpenVMS Alpha systems, VSI recommends linking executive images using the /SECTION_BINDING qualifier to the LINK command. The executive loader can then consolidate image sections into granularity hint regions. This process yields a tangible performance benefit. See the VSI OpenVMS Linker Utility Manual for more information about section binding.
On OpenVMS IA-64 systems, the executive loader may always consolidate image sections into granularity hint regions. No special linker qualifiers are required. However, for compatibility with Alpha, the I64 linker allows, but ignores, the /SECTION_BINDING qualifier.
See Section 4.7.2.2, ''Linking an Executive Image (Alpha or I64 Only)'' for a template of a LINK command and linker options file used to produce an executive image.
An executive image can contain one or more initialization procedures that are executed when the image is loaded. If the image is listed in SYS$LOADABLE_IMAGES:VMS$SYSTEM_IMAGES.DAT as created by means of System Management utility (SYSMAN) commands, initialization procedures can be run at various stages of system initialization.
An initialization routine performs a variety of functions, some specific to the features supported by the image and others required by many executive images. An executive image declares an initialization routine (see Section 4.7.2.1, ''INITIALIZATION_ROUTINE Macro (Alpha and I64 Only)'').
The initialization routine may return information to the caller of LDR$LOAD_IMAGE via a caller-supplied buffer.
4.7.2.1. INITIALIZATION_ROUTINE Macro (Alpha and I64 Only)
The following describes the invocation format of the INITIALIZATION_ROUTINE macro. An equivalent macro, $INITIALIZATION_ROUTINE is provided for BLISS programmers. For C programmers, INIT_RTN_SETUP.H in SYS$LIB_C.TLB is available.
INITIALIZATION_ROUTINE
INITIALIZATION_ROUTINE — Declares a routine to be an initialization routine.
Format
INITIALIZATION_ROUTINE name [,system_rtn=0] [,unload=0] [,priority=0]
Parameters
name Name of the initialization routine.
[system_rtn=0] Indicates whether the initialization routine is external to the module invoking the macro. The default value of 0, indicating that the initialization routine is part of the current module, is the only option supported.
[unload=0] Indicates whether the
name argument specifies an
unload routine. The default value of 0, indicating
that the argument specifies an initialization
routine, is the only option supported.
[priority=0] Indicates the PSECT in which the entry for
this initialization routine should be placed.
Routines that specify the
priority argument as 0 are
placed in the first PSECT
(EXEC$INIT_000); those
that specify a value of 1 are placed in the second
(EXEC$INIT_001). The
routines in the first PSECT are called before
those in the second.
Description
The INITIALIZATION_ROUTINE macro declares a routine to be an initialization routine.
4.7.2.2. Linking an Executive Image (Alpha or I64 Only)
Note
Use of the linker to create executive images (specifically the use of the /ATTRIBUTES switch on the COLLECT= option in SYS$LIBRARY:VMS_EXECLET_LINK.OPT) is not documented elsewhere and is not supported by VSI OpenVMS.
! Replace 'execlet' with your image name $ LINK /NATIVE_ONLY/BPAGES=14 - /REPLACE/SECTION/NOTRACEBACK- /SHARE=execlet- /MAP=execlet /FULL /CROSS - /SYMBOL=execlet - SYS$LIBRARY:VMS_EXECLET_LNK /OPTION, - SYS$INPUT/OPTION ! SYMBOL_TABLE=GLOBALS ! Creates .STB for System Dump Analyzer CLUSTER=execlet,,,-
| The CLUSTER= option creates the named cluster execlet, specifying the order in which the linker processes the listed modules. |
| The object module SYS$DOINIT (in STARLET.OLB) is explicitly linked into an executive image. This module declares the initialization routine table and provides routines to drive the actual initialization of an executive image. |
4.7.2.3. Loading an Executive Image (Alpha or I64 Only)
Calling LDR$LOAD_IMAGE to load the executive image at run time. This method lets you pass the address of a buffer to the image's initialization routine by which the caller and the initialization routine can exchange data. Section 4.7.2.4, ''LDR$LOAD_IMAGE (Alpha or I64 Only)'' describes LDR$LOAD_IMAGE. Note that you must link the code that calls LDR$LOAD_IMAGE against the system base image, using the /SYSEXE qualifier to the LINK command.
Using the SYSMAN SYS_LOADABLE ADD command and updating the OpenVMS system images file (SYS$LOADABLE_IMAGES:VMS$SYSTEM_IMAGES.DATA). This method causes the executive image to be loaded and initialized during the phases of system initialization.(See VMS for Alpha Platforms Internals and Data Structures for information about how an executive image's initialization routine is invoked during system initialization).
Copy the executive image to SYS$LOADABLE_IMAGES.
- Add an entry for the executive image in the data file SYS$UPDATE:VMS$SYSTEM_IMAGES.IDX, as follows:
SYSMAN SYS_LOADABLE ADD _LOCAL_ executive-image -
/LOAD_STEP = SYSINIT -
/SEVERITY  = WARNING -
/MESSAGE   = "failure to load executive-image"
Invoke the SYS$UPDATE:VMS$SYSTEM_IMAGES.COM command procedure to generate a new system image data file (file name SYS$LOADABLE_IMAGES:VMS$SYSTEM_IMAGES.DATA). During the bootstrap, the system uses this data file to load the appropriate images.
Reboot the system. This causes the new executive image to be loaded into the system.
4.7.2.4. LDR$LOAD_IMAGE (Alpha or I64 Only)
The following is a description of the callable interface to LDR$LOAD_IMAGE.
LDR$LOAD_IMAGE
LDR$LOAD_IMAGE — Loads an OpenVMS executive image into the system.
Module
SYSLDR_DYN
Format
LDR$LOAD_IMAGE filename ,flags ,ref_handle ,user_bufArguments
filename | OpenVMS usage | character string |
| type | character string |
| access | read only |
| mechanism | by descriptor |
flags | OpenVMS usage | flags |
| type | longword (unsigned) |
| access | read only |
| mechanism | value |
|
Bit Field |
Description |
|---|---|
|
LDR$V_PAG |
When set, indicates that the image should be loaded with its pageable sections resident. The flag is generally based on the value of the bit 0 in the S0_PAGING system parameter. This flag is ignored on IA-64, as all executive image sections are loaded resident (nonpaged). |
|
LDR$V_UNL |
When set, indicates that the image may be removed from memory. |
|
LDR$V_OVR |
When set, indicates that the image's read-only sections should not be overwritten during bugcheck processing. This flag is not used on OpenVMS Alpha or IA-64 systems. |
|
LDR$V_USER_BUF |
When set, indicates that the caller has passed the address of a buffer that should be passed to the initialization routine. |
|
LDR$V_NO_SLICE |
When set, indicates that the image's sections should not be loaded into a granularity hint region. This flag is ignored on IA-64, as all executive image sections may be loaded into a granularity hint region. |
ref_handle | OpenVMS usage | address |
| type | longword (signed) |
| access | write only |
| mechanism | by reference |
|
+00 |
Address of loaded image or zero if image was loaded sliced. |
|
+04 |
Address of loaded image data block (LDRIMG). See the $LDRIMGDEF macro definition in SYS$LIBRARY:LIB.MLB and VMS for Alpha Platforms Internals and Data Structures for a description of the LDRIMG structure. |
|
+08 |
Loaded image sequence number. |
user_buf | OpenVMS usage | address |
| type | longword (signed) |
| access | read only |
| mechanism | by reference |
Context
LDR$LOAD_IMAGE must be called in executive mode.
Returns
| OpenVMS usage | cond_value |
| type | longword (unsigned) |
| access | write only |
| mechanism | by value |
Return Values
| SS$_ACCVIO | Unable to read the character string descriptor containing the file name of the executive image to be loaded or to write the reference handle. |
| LOADER$_BAD_GSD | An executive image was loaded containing a global symbol that is not vectored through either the SYS$BASE_IMAGE or the SYS$PUBLIC_VECTORS image. |
| SS$_BADIMGHDR | Image header is larger than two blocks or was built with a version of the linker that is incompatible with LDR$LOAD_IMAGE. |
| LOADER$_BADIMGOFF | During a sliced image load request, a relocation or fixup operation was attempted on an image offset that has no resultant address within the image. |
| LOADER$_DZRO_ISD | A load request was made for an executive image that illegally contains demand zero sections. |
| SS$_INSFARG | Fewer than three arguments were passed to LDR$LOAD_IMAGE, or, with LDR$V_USER_BUF set in the flags longword, fewer than four arguments. |
| SS$_INSFMEM | Insufficient nonpaged pool for the LDRIMG structure or insufficient physical memory to load nonpageable portion of an executive image (that is, an image loaded as nonsliced). |
| SS$_INSFSPTS | Insufficient system page table entries (SPTEs) to describe the address space required for the executive image to be loaded as nonsliced. |
|
LOADER$_MULTIPLE_ |
A load request was made for an image that
was not linked correctly because it contains more
than one each of the following types of sections:
|
|
LOADER$_NO_PAGED_ | SYSBOOT failed to load the executive image because it contains either paged code or paged data sections. |
| SS$_NOPRIV | LDR$LOAD_IMAGE was called from user or supervisor mode. |
|
LOADER$_NO_SUCH_ | A load request was made for an executive image that was linked against a shareable image that is not loaded. The only legal shareable images for executive images are SYS$BASE_IMAGE and SYS$PUBLIC_VECTORS. |
| SS$_NORMAL | Normal, successful completion. |
|
LOADER$_PAGED_ | An executive image has more global symbols in the fixup data than can fit in the loader's internal tables. |
| LOADER$_PSB_FIXUPS | A load request was made for an executive image that contains LPPSB fixup because it was linked /NONATIVE_ONLY. Executive images must be linked /NATIVE_ONLY. |
| LOADER$_SPF_TOBIG | The loader's internal tables cannot accommodate all of the executive image fixups that must be postponed to later in the bootstrap operation. |
| SS$_SYSVERDIF | Image was linked with versions of executive categories incompatible with those of the running system. |
| LOADER$_VEC_TOBIG | An attempt to load an executive image failed because the image's symbol vector updates for SYS$BASE_IMAGE and SYS$PUBLC_VECTORS exceed the size of the loader's internal tables. |
| Other | Any RMS error status returned from $OPEN failures. Any I/O error status returned from $QIO failures. |
Description
LDR$LOAD_IMAGE loads an executive image into system space and calls its initialization routine. Optionally, LDR$LOAD_IMAGE returns information about the loaded image to its caller.
Address of loaded image data block (LDRIMG)
The flags longword
The longword address of a user buffer passed to the executive image's initialization routine (if LDR$V_USER_BUF is set in the flags longword)
4.7.2.5. LDR$UNLOAD_IMAGE (Alpha or I64 Only)
The following is a description of the callable interface to LDR$UNLOAD_IMAGE.
LDR$UNLOAD_IMAGE
LDR$UNLOAD_IMAGE — Unloads a removable executive image. This routine is called to unload an execlet. All resources are returned.
Module
SYSLDR_DYN
Format
LDR$UNLOAD_IMAGE filename ,ref_handleArguments
filename | OpenVMS usage | character string |
| type | character string |
| access | read only |
| mechanism | by descriptor |
ref_handle | OpenVMS usage | address |
| type | longword (signed) |
| access | read only |
| mechanism | by reference |
Context
LDR$UNLOAD_IMAGE must be called in kernel mode.
Returns
| OpenVMS usage | cond_value |
| type | longword (unsigned) |
| access | write only |
| mechanism | by value |
Return Values
| SS$_INSFARG | LDR$UNLOAD_IMAGE was not called with two parameters. |
| SS$_BADPARAMS | Reference handle data inconsistent with LDRIMG block that matches the name in the first argument. |
|
LOADER$_ | A call was made to the LDR$UNLOAD_IMAGE routine to unload a removable executive image that already has an outstanding unload request against it. |
| SS$_NOPRIV | LDR$UNLOAD_IMAGE was not called in kernel mode. |
| SS$_NORMAL | Executive image was successfully removed from the system. |
| LOADER$_NOT_UNL | A call was made to LDR$UNLOAD_IMAGE to unload an executive image that is not loaded or that was not loaded with the LDR$V_UNL flag bit set. |
| LOADER$_UNL_PEN | A call was made to LDR$UNLOAD_IMAGE to unload an executive image that is in use. The image is marked to be unloaded later. |
Description
LDR$UNLOAD_IMAGE removes an executive image from system space and returns all memory resources allocated when the image was loaded. Images can only be removed if they were originally loaded with the bit LDR$V_UNL set in the input flags to LDR$LOAD_IMAGE.
4.8. Synchronizing Programs by Specifying a Time for Program Execution
Executing a program at a specific time
Executing a program at timed intervals
4.8.1. Obtaining the System Time
The process control procedures that allow you to synchronize timed program execution require you to supply a system time value.
You can use either system services or RTL routines for obtaining and reading time. They are summarized in Table 4.10, ''Time Manipulation System Services and Routines''. With these routines, you can determine the system time, convert it to an external time, and pass a time back to the system. The system services use the operating system's default date format. With the RTL routines, you can use the default format or specify your own date format. However, if you are just using the time and date for program synchronization, using the operating system's default format is probably sufficient.
When using the RTL routines to change date/time formats, initialization routines are required. Refer to the VSI OpenVMS RTL Library (LIB$) Manual for more information.
|
Routine |
Description |
|---|---|
|
SYS$GETTIM |
Obtains the current date and time in 64-bit binary format |
|
SYS$NUMTIM |
Converts system date and time to numeric integer values |
|
SYS$ASCTIM |
Converts an absolute or delta time from 64-bit system time format to an ASCII string |
|
SYS$ASCUTC |
Converts an absolute time from 128-bit Coordinated Universal Time (UTC) format to an ASCII string |
|
LIB$SYS_ASCTIM |
Converts binary time to an ASCII string |
|
SYS$BINTIM |
Converts a date and time from ASCII to system format |
|
SYS$BINUTC |
Converts an ASCII string to an absolute time value in the 128-bit UTC format |
|
SYS$FAO |
Converts a binary value into an ASCII character string in decimal, hexadecimal, or octal notation and returns the character string in an output string |
|
SYS$GETUTC |
Returns the current time in 128-bit UTC format |
|
SYS$NUMUTC |
Converts an absolute 128-bit binary time into its numeric components. The numeric components are returned in local time |
|
SYS$TIMCON |
Converts 128-bit UTC to 64-bit system format or 64-bit system format to 128-bit UTC based on the value of the convert flag |
|
LIB$ADD_TIMES |
Adds two quadword times |
|
LIB$CONVERT_DATE_STRING |
Converts an input date/time string to an operating system internal time |
|
LIB$CVT_FROM_INTERNAL_TIME |
Converts internal time to external time |
|
LIB$CVTF_FROM_INTERNAL_ |
Converts internal time to external time (F-floating value) |
|
LIB$CVT_TO_INTERNAL_TIME |
Converts external time to internal time |
|
LIB$CVTF_TO_INTERNAL_TIME |
Converts external time to internal time (F-floating value) |
|
LIB$CVT_VECTIM |
Converts 7-word vector to internal time |
|
LIB$DAY |
Obtains offset to current day from base time, in number of days |
|
LIB$DATE_TIME |
Obtains the date and time in user-specified format |
|
LIB$FORMAT_DATE_TIME |
Formats a date and/or time for output |
|
LIB$FREE_DATE_TIME_CONTEXT |
Frees date/time context |
|
LIB$GET_DATE_FORMAT |
Returns the user's specified date/time input format |
|
LIB$GET_MAXIMUM_DATE_ |
Returns the maximum possible length of an output date/time string |
|
LIB$GET_USERS_LANGUAGE |
Returns the user's selected language |
|
LIB$INIT_DATE_TIME_CONTEXT |
Initializes the date/time context with a user-specified format |
|
LIB$SUB_TIMES |
Subtracts two quadword times |
4.8.1.1. Executing a Program at a Specified Time
To execute a program at a specified time, use LIB$SPAWN to create a process that executes a command procedure containing two commands—the DCL command WAIT and the command that invokes the desired program. Because you do not want the parent process to remain in hibernation until the process executes, execute the process concurrently.
You can also use the SYS$CREPRC system service to execute a program at a specified time. However, because a process created by SYS$CREPRC hibernates rather than terminates after executing the desired program, VSI recommends you use the LIB$SPAWN routine unless you need a detached process.
! Delta time
CHARACTER*17 TIME
INTEGER LEN
! Mask for LIB$SPAWN
INTEGER*4 MASK

! Declare status and library routine
INTEGER STATUS, LIB$SPAWN

! Get delta time
STATUS = LIB$GET_INPUT (TIME,
2                       'Time (delta): ',
2                       LEN)
IF (.NOT. STATUS) CALL LIB$SIGNAL (%VAL (STATUS))
! Equate symbol to TIME
STATUS = LIB$SET_SYMBOL ('EXECUTE_TIME',
2                        TIME(1:LEN))
IF (.NOT. STATUS) CALL LIB$SIGNAL (%VAL (STATUS))
! Set the mask and call LIB$SPAWN
MASK = IBSET (MASK,0)            ! Execute subprocess concurrently
STATUS = LIB$SPAWN('@LATER',
2                  'DATA84.IN',
2                  'DATA84.RPT',
2                  MASK)

END
$ WAIT 'EXECUTE_TIME'
$ RUN SYS$DRIVE0:[USER.MATH]CALC
$ DELETE/SYMBOL EXECUTE_TIME
4.8.1.2. Executing a Program at Timed Intervals
To execute a program at timed intervals, you can use either LIB$SPAWN or SYS$CREPRC.
Using LIB$SPAWN
Using LIB$SPAWN, you can create a subprocess that executes a command procedure containing three commands: the DCL command WAIT, the command that invokes the desired program, and a GOTO command that directs control back to the WAIT command. Because you do not want the parent process to remain in hibernation until the subprocess executes, execute the subprocess concurrently. See Section 4.8.1.1, ''Executing a Program at a Specified Time'' for an example of LIB$SPAWN.
Using SYS$CREPRC
Create and hibernate a process – Use SYS$CREPRC to create a process that executes the desired program. Set the PRC$V_HIBER bit of the
stsflgargument of the SYS$CREPRC system service to indicate that the created process should hibernate before executing the program.Schedule a wakeup call for the created subprocess – Use the SYS$SCHDWK system service to specify the time at which the system should wake up the subprocess, and a time interval at which the system should repeat the wakeup call.
! SYS$CREPRC options and values
INTEGER OPTIONS
EXTERNAL PRC$V_HIBER
! ID of created subprocess
INTEGER CR_ID
! Binary times
INTEGER TIME(2),
2       INTERVAL(2)
   .
   .
   .
! Set the PRC$V_HIBER bit in the OPTIONS mask and
! create the process
OPTIONS = IBSET (OPTIONS, %LOC(PRC$V_HIBER))
STATUS = SYS$CREPRC (CR_ID,         ! PID of created process
2                    'CHECK',       ! Image
2                    ,,,,,
2                    'SLEEP',       ! Process name
2                    %VAL(4),       ! Priority
2                    ,,
2                    %VAL(OPTIONS)) ! Hibernate
IF (.NOT. STATUS) CALL LIB$SIGNAL (%VAL(STATUS))
! Translate 6:00 a.m. (absolute time) to binary
STATUS = SYS$BINTIM ('23-- 06:00:00.00', ! 6:00 a.m.
2                    TIME)
IF (.NOT. STATUS) CALL LIB$SIGNAL (%VAL(STATUS))
! Translate 10 minutes (delta time) to binary
STATUS = SYS$BINTIM ('0 :10:00.00',      ! 10 minutes
2                    INTERVAL)
IF (.NOT. STATUS) CALL LIB$SIGNAL (%VAL(STATUS))
! Schedule wakeup calls
STATUS = SYS$SCHDWK (CR_ID,         ! ID of created process
2                    ,
2                    TIME,          ! Initial wakeup time
2                    INTERVAL)      ! Repeat wakeup time
IF (.NOT. STATUS) CALL LIB$SIGNAL (%VAL(STATUS))
   .
   .
   .
4.8.2. Placing Entries in the System Timer Queue
When you use the system timer queue, you use the timer expiration to signal when a routine is to be executed. It allows the caller to request a timer that will activate sometime in the future. The timer is requested for the calling kernel thread. When the timer activates, the event is reported to that thread. It does not affect any other thread in the process.
For the actual signal, you can use an event flag or AST. With this method, you do not need a separate process to control program execution. However, you do use up your process's quotas for ASTs and timer queue requests.
SYS$SETIMR ([efn] ,daytim ,[astadr] ,[reqidt] ,[flags])Specifying the Starting Time
Specify the absolute or delta time at which you want the program to
begin execution using the daytim argument.
Use the SYS$BINTIM system service to
convert an ASCII time to the binary system format required for this
argument.
Signaling Timer Expiration
Once the system has reached this time, the timer expires. To signal
timer expiration, set an event flag in the
efn argument or specify an AST
routine to be executed in the astadr
argument. Refer to Section 6.8, ''Using Event Flags'' and Chapter 8, "Using Asynchronous System Traps" for more information about using event
flags and ASTs.
How Timer Requests Are Identified
The reqidt argument identifies each system time
request uniquely. Then, if you need to cancel a request, you can
refer to each request separately.
To cancel a timer request, use the SYS$CANTIM system service.
4.9. Controlling Kernel Threads and Process Execution
Suspending a process – All kernel threads associated with the specified process are suspended.
Hibernating a process – Only the calling kernel thread is hibernated.
Stopping a process – All kernel threads associated with the specified process are stopped.
Resuming a process – All kernel threads associated with the specified process are resumed.
Exiting an image – All kernel threads associated with the specified process are exited.
Deleting a process – All kernel threads associated with the specified process are deleted, and then the process is deleted.
4.9.1. Process Hibernation and Suspension
Hibernation – Performed by the Hibernate (SYS$HIBER) system service, which affects the calling kernel thread.
Suspension – Performed by the Suspend Process (SYS$SUSPND) system service, which affects all of the kernel threads associated with the specified process.
The kernel thread can continue execution normally only after a corresponding Wake from Hibernation (SYS$WAKE) system service (if it is hibernating), or after a Resume Process (SYS$RESUME) system service, if it is suspended.
Suspending or hibernating a kernel thread puts it into a dormant state; the thread is not deleted.
| Hibernation | Suspension |
|---|---|
|
Can cause only self to hibernate. |
Can suspend self or another process, depending on privilege; suspends all threads associated with the specified process. |
|
Reversed by SYS$WAKE/SYS$SCHDWK system service. |
Reversed by SYS$RESUME system service. |
|
Interruptible; can receive ASTs. |
Noninterruptible; cannot receive ASTs?. |
|
Can wake self. |
Cannot cause self to resume. |
|
Can schedule wake up at an absolute time or at a fixed time interval. |
Cannot schedule resumption. |
|
Routine |
Function |
|---|---|
|
Hibernating Processes | |
|
SYS$HIBER |
Places the requesting kernel thread in the hibernation state. An AST can be delivered to the thread while it is hibernating. The service puts only the calling thread into HIB; no other thread is affected. |
|
SYS$WAKE |
Resumes execution of a kernel thread in hibernation. This service wakes all hibernating kernel threads in a process regardless of the caller. Any thread that is not hibernating when the service is called is marked wake pending. Because of the wake pending, the next call to SYS$HIBER completes immediately and the thread does not hibernate. Premature wakeups must be handled in the code. |
|
SYS$SCHDWK |
Resumes execution of a kernel thread in hibernation at a specified time. This service schedules a wakeup request for a thread that is about to call SYS$HIBER. The wakeup affects only the requesting thread; any other hibernating kernel threads are not affected. |
|
LIB$WAIT |
Uses the services SYS$SCHDWK and SYS$HIBER. |
|
SYS$CANWAK |
Cancels a scheduled wakeup issued by SYS$SCHDWK. Unless called with a specific timer request ID, this service cancels all timers for all threads in the process regardless of the calling thread. |
|
Suspended Kernel Threads and Processes | |
|
SYS$SUSPEND |
Puts in a suspended state all threads associated with the specified process. |
|
SYS$RESUME |
Puts in an execution state all threads of the specified process. |
4.9.1.1. Using Process Hibernation
The hibernate/wake mechanism provides an efficient way to prepare an image for execution and then to place it in a wait state until it is needed.
/* Process TAURUS */

#include <stdio.h>
#include <descrip.h>

main() {

        unsigned int status;
        $DESCRIPTOR(prcnam,"ORION");
        $DESCRIPTOR(image,"COMPUTE.EXE");

/* Create ORION */
        status = SYS$CREPRC(0,                     /* Process id */
                            &image,                 /* Image */
                            0, 0, 0, 0, 0,
                            &prcnam,                /* Process name */
                            0, 0, 0, 0);
        if ((status & 1) != 1)
                LIB$SIGNAL(status);
   .
   .
   .
/* Wake ORION */
        status = SYS$WAKE(0, &prcnam);
        if ((status & 1) != 1)
                LIB$SIGNAL(status);
   .
   .
   .
/* Wake ORION again */
        status = SYS$WAKE(0, &prcnam);
        if ((status & 1) != 1)
                LIB$SIGNAL(status);
   .
   .
   .
}

/* Process ORION and image COMPUTE */

#include <stdio.h>
#include <ssdef.h>
   .
   .
   .
sleep:
        status = SYS$HIBER();
        if ((status & 1) != 1)
                LIB$SIGNAL(status);
   .
   .
   .
        goto sleep;
}
| Process TAURUS creates the process ORION, specifying the descriptor for the image named COMPUTE. |
| At an appropriate time, TAURUS issues a SYS$WAKE request for ORION.ORION continues execution following the SYS$HIBER service call. When it finishes its job, ORION loops back to repeat the SYS$HIBER call and to wait for another wakeup. |
| The image COMPUTE is initialized, and ORION issues the SYS$HIBER system service. |
The Schedule Wakeup (SYS$SCHDWK) system service, a variation of the SYS$WAKE system service, schedules a wakeup for a hibernating process at a fixed time or at an elapsed (delta) time interval. Using the SYS$SCHDWK service, a process can schedule a wakeup for itself before issuing a SYS$HIBER call. For an example of how to use the SYS$SCHDWK system service, see VSI OpenVMS Programming Concepts Manual, Volume II.
Hibernating processes can be interrupted by asynchronous system traps (ASTs), as long as AST delivery is enabled. The process can call SYS$WAKE on its own behalf in the AST service routine, and continue execution following the execution of the AST service routine. For a description of ASTs and how to use them, see Chapter 8, "Using Asynchronous System Traps".
4.9.1.2. Using Alternative Methods of Hibernation
Specify the
stsflgargument for the SYS$CREPRC system service, setting the bit that requests SYS$CREPRC to place the created process in a state of hibernation as soon as it is initialized.Specify the /DELAY, /SCHEDULE, or /INTERVAL qualifier to the RUN command when you execute the image from the command stream.
When you use the SYS$CREPRC system service, the creating process can control when to wake the created process. When you use the RUN command, its qualifiers control when to wake the process.
If you use the /INTERVAL qualifier and the image to be executed does not call the SYS$HIBER system service, the image is placed in a state of hibernation whenever it issues a return instruction (RET). Each time the image is awakened, it begins executing at its entry point. If the image does call SYS$HIBER, each time it is awakened it begins executing at either the point following the call to SYS$HIBER or at its entry point (if it last issued a RET instruction).
If wakeup requests are scheduled at time intervals, the image can be terminated with the Delete Process (SYS$DELPRC) or Force Exit (SYS$FORCEX) system service, or from the command level with the STOP command. The SYS$DELPRC and SYS$FORCEX system services are described in Section 4.9.3.4, ''Initiating Image Rundown for Another Process'' and in Section 4.9.4, ''Deleting a Process''. The RUN and STOP commands are described in the VSI OpenVMS DCL Dictionary.
These methods allow you to write programs that can be executed once, on request, or cyclically. If an image is executed more than once in this manner, normal image activation and termination services are not performed on the second and subsequent calls to the image. Note that the program must ensure both the integrity of data areas that are modified during its execution and the status of opened files.
4.9.1.3. Using SYS$SUSPND
Using the Suspend Process (SYS$SUSPND) system service, a process can place itself or another process into a wait state similar to hibernation. Suspension, however, is a more pronounced state of hibernation. The operating system provides no system service to force a process to be swapped out, but the SYS$SUSPND system service can accomplish the task in the following way. Suspended processes are the first processes to be selected for swapping. A suspended process cannot be interrupted by ASTs, and it can resume execution only after another process calls a Resume Process (SYS$RESUME) system service on its behalf. If ASTs are queued for the process while it is suspended, they are delivered when the process resumes execution. This is an effective tool for blocking delivery of all ASTs.
At the DCL level, you can suspend a process by issuing the SET PROCESS command with the /SUSPEND qualifier. This command temporarily stops the process's activities. The process remains suspended until another process resumes or deletes it. To allow a suspended process to resume operation, use either the /NOSUSPEND or /RESUME qualifier.
4.9.2. Passing Control to Another Image
The RTL routines LIB$DO_COMMAND and LIB$RUN_PROGRAM allow you to invoke the next image from the current image. That is, they allow you to perform image rundown for the current image and pass control to the next image without returning to DCL command level. The routine you use depends on whether the next image is a command image or a noncommand image.
4.9.2.1. Invoking a Command Image
$ COPY DATA.TMP APRIL.DAT
   .
   .
   .
STATUS = LIB$DO_COMMAND ('COPY DATA.TMP APRIL.DAT')
IF (.NOT. STATUS) CALL LIB$SIGNAL (%VAL(STATUS))

END
   .
   .
   .
STATUS = LIB$DO_COMMAND ('@[STATS.TEMP]CLEANUP')
IF (.NOT. STATUS) CALL LIB$SIGNAL (%VAL(STATUS))END
4.9.2.2. Invoking a Noncommand Image
$ RUN [STATISTICS.TEMP]TEST
   .
   .
   .
STATUS = LIB$RUN_PROGRAM ('[STATISTICS.TEMP]TEST.EXE')
IF (.NOT. STATUS) CALL LIB$SIGNAL (%VAL(STATUS))

END
4.9.3. Performing Image Exit
When image execution completes normally, the operating system performs a variety of image rundown functions. If the image is executed by the command interpreter, image rundown prepares the process for the execution of another image. If the image is not executed by the command interpreter—for example, if it is executed by a subprocess—the process is deleted.
Main programs and main routines terminate by executing a return instruction (RET). This instruction returns control to the caller, which could have been LIB$INITIALIZE, the debugger, or the command interpreter. The completion code, SS$_NORMAL, which has the value 1, should be used to indicate normal successful completion.
Any other condition value can be used to indicate success or failure. The command language interpreter uses the condition value as the parameter to the Exit (SYS$EXIT) system service. If the severity field (STS$V_SEVERITY) is SEVERE or ERROR, the continuation of a batch job or command procedure is affected.
Specific error conditions caused by improper specifications when a process is created. For example, if an invalid device name is specified for the SYS$INPUT, SYS$OUTPUT, or SYS$ERROR logical name, or if an invalid or nonexistent image name is specified, the error condition is signaled in the created process.
An exception occurring during execution of the image. When an exception occurs, any user-specified condition handlers receive control to handle the exception. If there are no user-specified condition handlers, a system-declared condition handler receives control, and it initiates exit activities for the image. Condition handling is described in Chapter 9, "Condition-Handling Routines and Services".
A Force Exit (SYS$FORCEX) system service issued on behalf of the process by another process.
4.9.3.1. Performing Image Rundown
Any outstanding I/O requests on the I/O channels are canceled, and I/O channels are deassigned.
Memory pages occupied or allocated by the image are deleted, and the working set size limit of the process is readjusted to its default value.
All devices allocated to the process at user mode are deallocated (devices allocated from the command stream in supervisor mode are not deallocated).
Timer-scheduled requests, including wakeup requests, are canceled.
Common event flag clusters are disassociated.
Locks are dequeued as a part of rundown.
User mode ASTs that are queued but have not been delivered are deleted, and ASTs are enabled for user mode.
Exception vectors declared in user mode, compatibility mode handlers, and change mode to user handlers are reset.
System service failure exception mode is disabled.
All process private logical names and logical name tables created for user mode are deleted. Deletion of a logical name table causes all names in that table to be deleted. Note that names entered in shareable logical name tables, such as the job or group table, are not deleted at image rundown, regardless of the access mode for which they were created.
4.9.3.2. Initiating Rundown
To initiate the rundown activities described in Section 4.9.3.1, ''Performing Image Rundown'', the system calls the Exit (SYS$EXIT) system service on behalf of the process. In some cases, a process can call SYS$EXIT to terminate the image itself (for example, if an unrecoverable error occurs).
You should not call the SYS$EXIT system service directly from a main program. By not calling SYS$EXIT directly from a main program, you allow the main program to be more like ordinary modular routines and therefore usable by other programmers as callable routines.
The SYS$EXIT system service accepts a status code as an argument. If you use SYS$EXIT to terminate image execution, you can use this status code argument to pass information about the completion of the image. If an image returns without calling SYS$EXIT, the current value in R0 is passed as the status code when the system calls SYS$EXIT.
The command interpreter uses the status code to display optionally an error message when it receives control following image rundown.
If the image has declared an exit handler, the status code is written in the address specified in the exit control block.
If the process was created by another process, and the creator has specified a mailbox to receive a termination message, the status code is written into the termination mailbox when the process is deleted.
4.9.3.3. Performing Cleanup and Rundown Operations
Use exit handlers to perform image-specific cleanup or rundown operations. For example, if an image uses memory to buffer data, an exit handler can ensure that the data is not lost when the image exits as the result of an error condition.
To establish an exit-handling routine, you must set up an exit control block and specify the address of the control block in the call to the Declare Exit Handler (SYS$DCLEXH) system service. You can call an exit handler by using standard calling conventions; you can provide arguments to the exit handler in the exit control block. The first argument in the control block argument list must specify the address of a longword for the system to write the status code from SYS$EXIT.
If an image declares more than one exit handler, the control blocks are linked together on a last-in, first-out (LIFO) basis. After an exit handler is called and returns control, the control block is removed from the list. You can remove exit control blocks prior to image exit by using the Cancel Exit Handler (SYS$CANEXH) system service.
Exit handlers can be declared from system routines executing in supervisor or executive mode. These exit handlers are also linked together in other lists, and they receive control after exit handlers that are declared from user mode are executed.
Exit handlers are called as a part of the SYS$EXIT system service. While a call to the SYS$EXIT system service often precedes image rundown activities, the call is not a part of image rundown. There is no way to ensure that exit handlers will be called if an image terminates in a nonstandard way.
To see examples of exit handler programs, refer to Section 9.15.4, ''Example of Exit Handler''.
4.9.3.4. Initiating Image Rundown for Another Process
     $DESCRIPTOR(prcnam,"CYGNUS");
   .
   .
   .
     status = SYS$FORCEX(0,               /* pidadr - Process id */
                             &prcnam,     /* prcnam - Process name */
                     0);                  /* code - Completion code */
Because the SYS$FORCEX system service calls the SYS$EXIT system service, any exit handlers declared for the image are executed before image rundown. Thus, if the process is using the command interpreter, the process is not deleted and can run another image. Because the SYS$FORCEX system service uses the AST mechanism, an exit cannot be performed if the process being forced to exit has disabled the delivery of ASTs. AST delivery and how it is disabled and reenabled is described in Chapter 8, "Using Asynchronous System Traps".
The SYS$DCHEXH system service causes the target process to execute the exit handler. For additional information about exit handlers and examples, see Chapter 9, "Condition-Handling Routines and Services" and Section 9.15.4, ''Example of Exit Handler''.
4.9.4. Deleting a Process
The Delete Process (SYS$DELPRC) system service is called.
A process that created a subprocess is deleted.
An interactive process uses the DCL command LOGOUT.
A batch job reaches the end of its command file.
An interactive process uses the DCL command STOP/ID= pid or STOP username.
A process that contains a single image calls the Exit (SYS$EXIT) system service.
The Force Exit (SYS$FORCEX) system service forces image exit on a process that contains a single image.
When the system is called to delete a process as a result of any of these conditions, it first locates all subprocesses, and searches hierarchically. No process can be deleted until all the subprocesses it has created have been deleted.
The lowest subprocess in the hierarchy is a subprocess that has no descendant subprocesses of its own. When that subprocess is deleted, its parent subprocess becomes a subprocess that has no descendant subprocesses and it can be deleted as well. The topmost process in the hierarchy becomes the parent process of all the other subprocesses.
The image executing in the process is run down. The image rundown that occurs during process deletion is the same as that described in Section 4.9.3.1, ''Performing Image Rundown''. When a process is deleted, however, the rundown releases all system resources, including those acquired from access modes other than user mode.
Resource quotas are released to the creating process, if the process being deleted is a subprocess.
If the creating process specifies a termination mailbox, a message indicating that the process is being deleted is sent to the mailbox. For detached processes created by the system, the termination message is sent to the system job controller.
The control region of the process's virtual address space is deleted. (The control region consists of memory allocated and used by the system on behalf of the process).
All system-maintained information about the process is deleted.
Figure 4.1, ''Image Exit and Process Deletion'' illustrates the flow of events from image exit through process deletion.
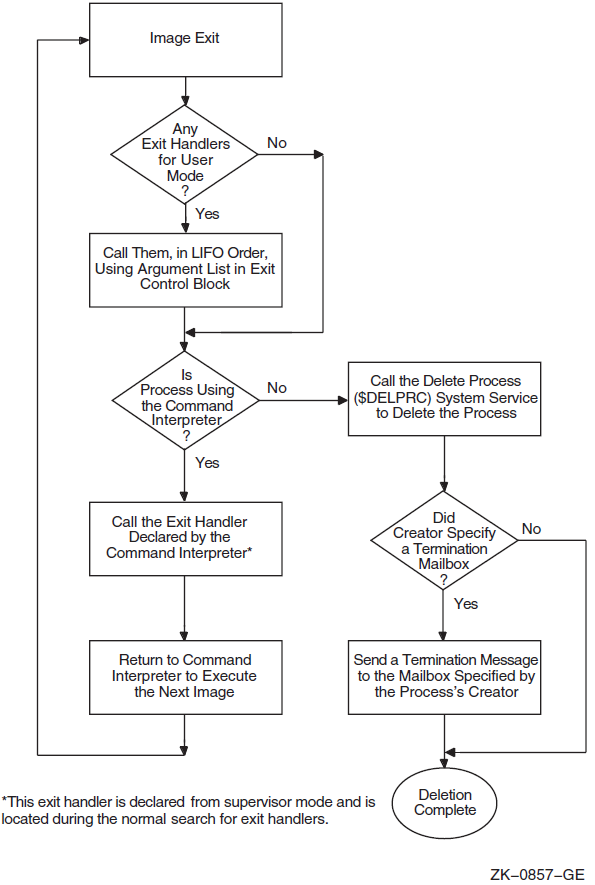
4.9.4.1. Deleting a Process By Using System Services
SYS$EXIT—Initiates normal exit in the current image. Control returns to the command language interpreter. If there is no command language interpreter, the process is terminated. This routine cannot be used to terminate an image in a detached process.
SYS$FORCEX—Initiates a normal exit on the image in the specified process. GROUP or WORLD privilege may be required, depending on the process specified. An AST is sent to the specified process. The AST calls on the SYS$EXIT routine to complete the image exit. Because an AST is used, you cannot use this routine on a suspended process. You can use this routine on a subprocess or detached process. See Section 4.9.3.4, ''Initiating Image Rundown for Another Process'' for an example.
- SYS$DELPRC—Deletes the specified process. GROUP or WORLD privilege may be required, depending on the process specified. A termination message is sent to the calling process's mailbox. You can use this routine on a subprocess, a detached process, or the current process. For example, if a process has created a subprocess named CYGNUS, it can delete CYGNUS, as follows:
$DESCRIPTOR(prcnam,"CYGNUS");
   .
   .
   .
status = SYS$DELPRC(0,                 /* Process id */
                    &prcnam);          /* Process name */
Because a subprocess is automatically deleted when the image it is executing terminates (or when the command stream for the command interpreter reaches end of file), you normally do not need to call the SYS$DELPRC system service explicitly.
4.9.4.2. $DELPRC System Service Can Invoke Exit Handlers (Alpha and I64 only)
As of OpenVMS Version 7.3-1, the system parameter DELPRC_EXIT provides the default system setting for whether an exit handler is called and at what access mode.
0= Do not enable the EXIT functionality with $DELPRC
4= Execute kernel mode exit handlers
5= Execute exec and more privileged mode exit handlers
6= Execute supervisor and more privileged mode exit handlers
7= Execute user and more privileged mode exit handlers
The system default is 5, which allows components with exec mode exit handlers to execute normal rundown activity, but prevents continued execution of user mode application code or command procedures. In particular, the RMS exec-mode exit handler completes file updates in progress. This prevents file inconsistencies or loss of some file updates made just prior to a process deletion.
As of OpenVMS Version 7.3-1, the $DELPRC system service can call exit handlers prior to final cleanup and deletion of a process. This allows you to override the system default setting determined by the system parameter DELPRC_EXIT.
The $DELPRC flags argument controls whether exit handlers are called by $DELPRC. You can use the flags argument to specify the least-privileged mode for which exit handling will be attempted, or to specify that no exit handling will be attempted.
|
Flag |
Description |
|---|---|
|
DELPRC$M_EXIT |
When set, exit handlers as specified by DELPRC$M_MODE are called. This flag is ignored for a hard suspended process. |
|
DELPRC$M_MODE |
2 bit field: values psl$c_kernel, psl$c_exec, psl$c_super, psl$c_user (from the $PSLDEF macro). |
|
DELPRC$M_NOEXIT |
Set to disable any exit handler execution. |
$DELPRC_S PIDADR = pid,-
FLAGS = #<DELPRC$M_EXIT!PSL$C_EXEC>
If the flags argument is not specified or is specified with a zero, the system parameter DELPRC_EXIT controls what exit handlers, if any, are called by $DELPRC.
As of OpenVMS Version 7.3-1 you can also use the DCL STOP command qualifier [NO]EXIT[=access-mode] to override the system default setting determined by the system parameter DELPRC_EXIT. If you specify an access mode of user_mode, supervisor_mode, executive_mode, or kernel_mode, the resulting $DELPRC flag argument is set accordingly.
If you use the DCL STOP command with the /EXIT qualifier but do not specify an access mode, executive_mode is used by default.
If you use the DCL STOP command without the /EXIT qualifier, the system parameter DELPRC_EXIT is used instead.
If you use the DCL STOP command without either the /IDENTIFICATION qualifier or the process-name parameter, then the currently executing image is terminated; the process is not deleted.
|
Version |
How Exit Handler Determined |
|---|---|
|
OpenVMS Alpha version 7.3-1 and later (local) to OpenVMS Alpha Version 7.3-1 and later (remote) |
Either through exit default in the system parameter DELPRC_EXIT on the remote system, or by setting in the flags argument on the local system and passed to the remote system. |
|
OpenVMS Alpha version prior to 7.3-1 or OpenVMS VAX (local) to OpenVMS Alpha Version 7.3-1 or later (remote) |
Exit default in the system parameter DELPRC_EXIT on the remote system. |
|
Any mix of OpenVMS Alpha prior to Version 7.3-1 or any OpenVMS VAX version |
No support for exit functionality in system service $DELPRC. |
Note
$DELPRC called from user mode could call supervisor mode exit handlers.
$DELPRC called from exec mode could only execute kernel mode exit handlers.
$DELPRC called from kernel mode cannot call exit handlers.
4.9.4.3. Terminating Mailboxes
A termination mailbox provides a process with a way of determining when, and under what conditions, a process that it has created was deleted. The Create Process (SYS$CREPRC) system service accepts the unit number of a mailbox as an argument. When the process is deleted, the mailbox receives a termination message.
The first word of the termination message contains the symbolic constant, MSG$_DELPROC, which indicates that it is a termination message. The second longword of the termination message contains the final status value of the image. The remainder of the message contains system accounting information used by the job controller and is identical to the first part of the accounting record sent to the system accounting log file. The description of the SYS$CREPRC system service in the VSI OpenVMS System Services Reference Manual provides the complete format of the termination message.
If necessary, the creating process can determine the process identification of the process being deleted from the I/O status block (IOSB) posted when the message is received in the mailbox. The second longword of the IOSB contains the process identification of the process being deleted.
A termination mailbox cannot be located in memory shared by multiple processors.
#include <stdio.h> #include <descrip.h> #include <ssdef.h> #include <msgdef.h> #include <dvidef.h> #include <iodef.h> #include <accdef.h> unsigned short unitnum; unsigned int pidadr; /* Create a buffer to store termination info */ struct accdef exitmsg; /* Define and initialize the item list for $GETDVI */ static struct {exchan, /* chan - channel number */ func, /* function modifier */ &mbxiosb, /* iosb - I/O status block */ &exitast, /* astadr - astadr AST routine */ 0, /* astprm - astprm AST parameter */ &exitmsg, /* p1 - buffer to receive message*/ ACC$K_TERMLEN, /* p2 - length of buffer */ 0,0,0,0); /* p3, p4, p5, p6 */ if ((status & 1 ) != 1) LIB$SIGNAL( status ); } void exitast(void) { if(mbxiosb.iostat == SS$_NORMAL)
{ printf("\nMailbox successfully written..."); if (exitmsg.acc$w_msgtyp == MSG$_DELPROC) { printf("\nProcess deleted..."); if (pidadr == mbxiosb.mbpid) { printf("\nPIDs are equal..."); if (exitmsg.acc$l_finalsts == SS$_NORMAL) printf("\nNormal termination..."); else printf("\nAbnormal termination status: %d", exitmsg.acc$l_finalsts); } else printf("\nPIDs are not equal"); } else printf("\nTermination message not received... status: %d", exitmsg.acc$w_msgtyp); } else printf("\nMailbox I/O status block: %d",mbxiosb.iostat); return; }
The Create Mailbox and Assign Channel (SYS$CREMBX), Get Device/Volume Information (SYS$GETDVI), and Queue I/O Request (SYS$QIO) system services are described in greater detail in VSI OpenVMS Programming Concepts Manual, Volume II.
Chapter 5. Symmetric Multiprocessing (SMP) Systems
5.1. Introduction to Symmetric Multiprocessing
OpenVMS Alpha and OpenVMS IA-64 support tightly coupled symmetric multiprocessing (SMP). This chapter presents a brief overview of symmetric multiprocessing terms and characteristics. For more information about SMP concepts and hardware configurations, refer to VMS for Alpha Platforms Internals and Data Structures.
A multiprocessing system consists of two or more CPUs that address common memory and that can execute instructions simultaneously. If all CPUs in the system execute the same copy of the operating system, the multiprocessing system is said to be tightly coupled. If all CPUs have equal access to memory, interrupts, and I/O devices, the system is said to be symmetric.
Initiate an I/O request
Service exceptions
Service software interrupts
Service hardware interrupts, such as interprocessor and interval timer interrupts
Execute process context code in any access mode
5.2. CPU Characteristics of an SMP System
The members of an SMP system are characterized in several ways. One important characteristic is that of primary CPU. During system operation the primary CPU has several unique responsibilities for system timekeeping, writing messages to the console terminal, and accessing any other I/O devices that are not accessible to all members. Although the hardware and software permit device interrupts to be serviced by any processor, in practice all device interrupts are serviced on the primary CPU. An SMP configuration may include some devices that are not accessible from all SMP members. The console terminal, for example, is accessible only from the primary processor.
5.2.1. Booting an SMP System
Booting the system is initiated on a CPU with full access to the console subsystem and terminal, called the BOOT CPU. The BOOT CPU controls the bootstrap sequence and boots the other available CPUs. On OpenVMS Alpha and OpenVMS IA-64 systems, the BOOT CPU and the primary CPU are always the same; the others are called secondary processors.
The booted primary and all currently booted secondary processors are called members of the active set. These processors actively participate in system operations and respond to interprocessor interrupts, which coordinate systemwide events.
5.2.2. Interrupt Requests on SMP System
When a current Kernel thread is preempted by a higher priority computable resident thread, the IPL 3 rescheduling interrupt service routine, running on that processor, takes the current thread out of execution and switches to the higher priority Kernel thread.
When a device driver completes an I/O request, an IPL 4 I/O post-processing interrupt is requested: some completed requests are queued to a CPU-specific post-processing queue and are serviced on that CPU; others are queued to a systemwide queue and serviced on the primary CPU.
When the current Kernel thread has used its quantum of CPU time, the software timer interrupt service routine, running on that CPU, performs quantum-end processing.
Software interrupts at IPLs 6 and 8 through 11 are requested to execute fork processes. Each processor services its own set of fork queues. A fork process generally executes on the same CPU from which it was requested. However, since many fork processes are requested from device interrupt service routines, which currently execute only on the primary CPU, more fork processes execute on the primary than on other processors.
5.3. Symmetric Multiprocessing Goals
One version of the operating system. As part of the standard OpenVMS Alpha and OpenVMS IA-64 product, SMP support does not require its own version. The synchronization methodology and the interface to synchronization routines are the same on all systems. However, as described in VMS for Alpha Platforms Internals and Data Structures, there are different versions of the synchronization routines themselves in different versions of the OpenVMS Alpha executive image that implement synchronization. Partly for that reason, SMP support imposes relatively little additional overhead on a uniprocessor system.
Parallelism in kernel mode. SMP support might have been implemented such that any single processor, but not more than one at a time, could execute kernel mode code. However, more parallelism was required for a solution that would support configurations with more CPUs. The members of an SMP system can be executing different portions of the Executive concurrently.
The executive has been divided into different critical regions, each with its own lock, called a spinlock. A spinlock is one type of system synchronization element that guarantees atomic access to the functional divisions of the Executive using instructions specifically designed for multi-processor configurations. Section 6.6, ''Synchronization Primitives'' and Section 6.7, ''Software-Level Synchronization'' describe both the underlying architecture and software elements that provide this level of SMP synchronization.
The spinlock is the heart of the SMP model, allowing system concurrency at all levels of the operating system. All components that want to benefit from multiple-CPU configurations must incorporate these elements to guarantee consistency and correctness. Device drivers, in particular, use a variant of the static system spinlock (a devicelock) to ensure its own degree of synchronization and ownership within the system.
Symmetric scheduling mechanisms. The standard, default behavior of the operating system is to impose as little binding between system executable entities and specific CPUs in the active set as possible. That is, in general, each CPU is equally able to execute any Kernel thread. The multi-processor scheduling algorithm is an extension of the single-CPU behavior, providing consistent preemption and real-time behavior in all cases.
However, there are circumstances when an executable Kernel thread needs system resources and services possessed only by certain CPUs in the configuration. In those non-symmetric cases, OpenVMS provides a series of privileged, system-level CPU scheduling routines that supersedes the standard scheduling mechanisms and binds a Kernel thread to one or more specific CPUs. System components that are tied to the primary CPU, such as system timekeeping and console processing, use these mechanisms to guarantee that their functions are performed in the correct context. Also, because the Alpha hardware architecture shows significant performance benefits for Kernel threads run on CPUs where the hardware context has been preserved from earlier execution, the CPU scheduling mechanisms have been introduced as a series of system services and user commands. Through the use of explicit CPU affinity and user capabilities, an application can be placed throughout the active set to take advantage of the hardware context. Section 4.4, ''Using Affinity and Capabilities in CPU Scheduling (Alpha and I64 Only)'' describes these features in greater detail.
Chapter 6. Synchronizing Data Access and Program Operations
This chapter describes the operating system's synchronization features. It focuses on referencing memory and the techniques used to synchronize memory access. These techniques are the basis for mechanisms OpenVMS itself uses and for mechanisms OpenVMS provides for applications to use.
6.1. Overview of Synchronization
Software synchronization refers to the coordination of events in such a way that only one event happens at a time. This kind of synchronization is a serialization or sequencing of events. Serialized events are assigned an order and processed one at a time in that order. While a serialized event is being processed, no other event in the series is allowed to disrupt it.
By imposing order on events, synchronization allows reading and writing of several data items indivisibly, or atomically, in order to obtain a consistent set of data. For example, all of process A's writes to shared data must happen before or after process B's writes or reads, but not during process B's writes or reads. In this case, all of process A's writes must happen indivisibly for the operation to be correct. This includes process A's updates – reading of a data item, modifying it, and writing it back (read-modify-write sequence). Other synchronization techniques are used to ensure the completion of an asynchronous system service before the caller tries to use the results of the service.
6.1.1. Threads of Execution
Mainline code in an image being executed by a kernel thread, or multiple threads
User-mode application threads managed and scheduled through the POSIX threads library thread manager
Asynchronous system traps (ASTs) that interrupt a kernel thread
Condition handlers established by the process, which run after exceptions occur
Inner access-mode threads of execution that run as a result of system service, OpenVMS Record Management Services (RMS), and command language interpreter (CLI) callback requests
Process-based threads of execution can share any data in the per-process address space and must synchronize access to any data they share. A thread of execution can incur an exception, which results in passing of control to a condition handler. Alternatively, the thread can receive an AST, which results in passing of control to an AST procedure. Further, an AST procedure can incur an exception, and a condition handler's execution can be interrupted by an AST delivery. If a thread of execution requests a system service or RMS service, control passes to an inner access-mode thread of execution. Code that executes in the inner mode can also incur exceptions, receive ASTs, and request services.
Multiple processes, each with its own set of threads of execution, can execute concurrently. Although each process has private address space, processes can share data in a global section mapped into each process's address spaces. You need to synchronize access to global section data because a thread of execution accessing the data in one process can be rescheduled, allowing a thread of execution in another process to access the same data before the first process completes its work. Although processes access the same system address space, the protection on system space pages usually prevents outer mode access. However, process-based code threads running in inner access modes can access data concurrently in system space and must synchronize access to it.
Interrupt service routines access only system space. They must synchronize access to shared system space data among themselves and with process-based threads of execution.
A CPU-based thread of execution and an I/O processor must synchronize access to shared data structures, such as structures that contain descriptions of I/O operations to be performed.
Multiprocessor execution increases synchronization requirements when the threads that must synchronize can run concurrently on different processors. Because a process with only one kernel thread executes on only one processor at a time, synchronization of threads of execution within such a process is unaffected by whether the process runs on a uniprocessor or on an SMP system. However, a process with multiple kernel threads can be executing on multiple processors at the same time on an SMP system. The threads of such a process must synchronize their access to writable per-process address space.
Also, multiple processes execute simultaneously on different processors. Because of this, processes sharing data in a global section can require additional synchronization for SMP system execution. Further, process-based inner mode and interrupt-based threads can execute simultaneously on different processors and can require synchronization of access to system space beyond what is sufficient on a uniprocessor.
6.1.2. Atomicity
Atomicity is a type of serialization that refers to the indivisibility of a small number of actions, such as those occurring during the execution of a single instruction or a small number of instructions. With more than one action, no single action can occur by itself. If one action occurs, then all the actions occur. Atomicity must be qualified by the viewpoint from which the actions appear indivisible: an operation that is atomic for threads running on the same processor can appear as multiple actions to a thread of execution running on a different processor.
An atomic memory reference results in one indivisible read or write of a data item in memory. No other access to any part of that data can occur during the course of the atomic reference. Atomic memory references are important for synchronizing access to a data item that is shared by multiple writers or by one writer and multiple readers. References need not be atomic to a data item that is not shared or to one that is shared but is only read.
6.2. Memory Read and Memory Write Operations for VAX and Alpha
This section presents the important concepts of alignment and granularity and how they affect the access of shared data on VAX and Alpha systems. It also discusses the importance of the order of reads and writes completed on VAX and Alpha systems, and how VAX and Alpha systems perform memory reads and writes.
6.2.1. Accessing Memory
The term alignment refers to the placement of a data item in memory. For a data item to be naturally aligned, its lowest-addressed byte must reside at an address that is a multiple of the size of the data item in bytes. For example, a naturally aligned longword has an address that is a multiple of 4. The term naturally aligned is usually shortened to "aligned".
On VAX systems, a thread on a VAX uniprocessor or multiprocessor can read and write aligned byte, word, and longword data atomically with respect to other threads of execution accessing the same data.
In contrast to the variety of memory accesses allowed on VAX systems, an Alpha processor may allow atomic access only to an aligned longword or an aligned quadword. Reading or writing an aligned longword or quadword of memory is atomic with respect to any other thread of execution on the same processor or on other processors. Newer Alpha processors with the byte-word extension also provide atomic access to bytes and aligned words.
VAX and Alpha systems differ in granularity of data access. The phrase granularity of data access refers to the size of neighboring units of memory that can be written independently and atomically by multiple processors. Regardless of the order in which the two units are written, the results must be identical.
VAX systems have byte granularity: individual adjacent or neighboring bytes within the same longword can be written by multiple threads of execution on one or more processors, as can aligned words and longwords.
VAX systems provide instructions that can manipulate byte-sized and aligned word-sized memory data in a single, noninterruptible operation. On VAX systems, a byte-sized or word-sized data item that is shared can be manipulated individually.
Alpha systems guarantee longword and quadword granularity. That is, adjacent aligned longwords or quadwords can be written independently. Because earlier Alpha systems support instructions that load or store only longword-sized and quadword-sized memory data, the manipulation of byte-sized and word-sized data on such Alpha systems may require that the entire longword or quadword containing the byte- or word-sized item be manipulated. Thus, simply because of its proximity to an explicitly shared data item, neighboring data might become shared unintentionally.
Fetch the longword or quadword that contains the byte or word
Mask the nontargeted bytes
Manipulate the target byte or word
Store the entire longword or quadword
On such Alpha systems, because this sequence is interruptible, operations on byte and word data are not atomic. Also, this change in the granularity of memory access can affect the determination of which data is actually shared when a byte or word is accessed.
On such Alpha systems, the absence of byte and word granularity has important implications for access to shared data. In effect, any memory write of a data item other than an aligned longword or quadword must be done as a multiple-instruction read-modify-write sequence. Also, because the amount of data read and written is an entire longword or quadword, programmers must ensure that all accesses to fields within the longword or quadword are synchronized with each other.
Alpha systems with the byte-word extension provide instructions that can read or write byte-size and aligned word-sized memory data in a single noninterruptible operation.
6.2.2. Ordering of Read and Write Operations
On VAX uniprocessor and multiprocessor systems, write operations and read operations appear to occur in the same order in which you specify them from the viewpoint of all types of external threads of execution. Alpha uniprocessor systems also guarantee that read and write operations appear ordered for multiple threads of execution running within a single process or within multiple processes running on a uniprocessor.
On Alpha multiprocessor systems, you must order reads and writes explicitly to ensure that they occur in a specific order from the viewpoint of threads of execution on other processors. To provide the necessary operating system primitives and compatibility with VAX systems, Alpha systems provide instructions that impose an order on read and write operations.
6.2.3. Memory Reads and Memory Writes
On VAX systems, most instructions that read or write memory are noninterruptible. A memory write done with a noninterruptible instruction is atomic from the viewpoint of other threads on the same CPU.
On VAX systems, on a uniprocessor system, reads and writes of bytes, words, longwords, and quadwords are atomic with respect to any thread on the processor. On a multiprocessor, not all of those accesses are atomic with respect to any thread on any processor; only reads and writes of bytes, aligned words, and aligned longwords are atomic. Accessing unaligned data can require multiple operations. As a result, even though an unaligned longword is written with a noninterruptible instruction, if it requires multiple memory accesses, a thread on another CPU might see memory in an intermediate state. VAX systems do not guarantee multiprocessor atomic access to quadwords.
On Alpha systems, there is no instruction that performs multiple memory accesses. Each load or store instruction performs a maximum of one load from or one store to memory. On an Alpha processor without the byte-word extension, a load can occur only from an aligned longword or quadword; a store can occur only to an aligned longword or quadword. On an Alpha processor with the byte-word extension, a load can also occur from a byte or an aligned word; a store can also occur to a byte or an aligned word.
On Alpha systems, although reads and writes from one thread appear to occur ordered from the viewpoint of other threads on the same processor, there is no implicit ordering of reads and writes as seen by threads on other processors.
6.3. Memory Read and Memory Write Operations for IA-64 systems
OpenVMS IA-64 systems provide memory access only through register load and store instructions and special semaphore instructions. This section describes how alignment and granularity affect the access of shared data on IA-64 systems. It also discusses the importance of the order of reads and writes completed on IA-64 systems, and how IA-64 systems perform memory reads and writes.
6.3.1. Atomic Semaphore Instructions on IA-64
on IA-64 systems, the semaphore instructions have implicit ordering. If there is a write, it always follows the read. In addition, the read and write are performed atomically with no intervening accesses to the same memory region.
6.3.2. Accessing Memory on IA-64
I64 integer store instructions can write either 1, 2, 4, or 8 bytes, and floating-point store instructions can write 4, 8, or 10 bytes. For example, a st4 instruction writes the low-order four bytes of an integer register to memory. In addition, semaphore instructions can read and write memory.
For highest performance, data should be aligned on natural boundaries; 10-byte floating-point data should be stored on 16-byte aligned boundaries.
If a load or store instruction accesses naturally aligned data, the reference is atomic with respect to the threads on the same CPU and on other SMP nodes. If the data is not naturally aligned, its access is not atomic with respect to threads on other SMP nodes.
I64 can load and store aligned bytes, words, longwords, quadwords, and 10-byte floating-point values that are aligned on 16-byte boundaries.
6.3.3. Ordering of Read and Write Operations for IA-64 systems
Release semantics — all previous memory accesses are made visible before a reference that imposes release semantics (st.rel, fetchadd.rel instructions).
Acquire semantics — the reference imposing acquire semantics is visible before any subsequent ones (ld.acq, ld.c.clr.acq, xchg, fetchadd.acq, cmpxchg.acq instructions).
Fence semantics — combines release and acquire semantics (mf instruction).
6.4. Memory Read-Modify-Write Operations for VAX and Alpha
A fundamental synchronization primitive for accessing shared data is an atomic read-modify-write operation. This operation consists of reading the contents of a memory location and replacing them with new contents based on the old. Any intermediate memory state is not visible to other threads. Both VAX systems and Alpha systems provide this synchronization primitive, but they implement it in significantly different ways.
6.4.1. Uniprocessor Operations
On VAX systems, many instructions are capable of performing a read-modify-write operation in a single, noninterruptible (atomic) sequence from the viewpoint of multiple application threads executing on a single processor.
If you code in VAX MACRO, you can code to guarantee an atomic read-modify-write operation. If you code in a high-level language, however, you must tell the compiler to generate an atomic update. For further information, refer to the documentation for your high-level language.
On Alpha systems, there is no single instruction that performs an atomic read-modify-write operation. As a result, even uniprocessing applications in which processes access shared data must provide explicit synchronization of these accesses, usually through compiler semantics.
Privileged architecture library (PALcode) routines perform queue insertions and removals.
Load-locked and store-conditional instructions create a sequence of instructions that implement an atomic update.
6.4.2. Multiprocessor Operations
On multiprocessor systems, you must use special methods to ensure that a read-modify-write sequence is atomic. On VAX systems, interlocked instructions provide synchronization; on Alpha systems, load-locked and store-conditional instructions provide synchronization.
On VAX systems, a number of uninterruptible instructions are provided that both read and write memory with one instruction. When used with an operand type that is accessible in a single memory operation, each instruction provides an atomic read-modify-write sequence. The sequence is atomic with respect to threads of execution on the same VAX processor, but it is not atomic to threads on other processors. For instance, when a VAX CPU executes the instruction INCL x, it issues two separate commands to memory: a read, followed by a write of the incremented value. Another thread of execution running concurrently on another processor could issue a command to memory that reads or writes location x between the INCL's read and write. Section 6.6.4, ''Interlocked Instructions (VAX Only)'' describes read-modify-write sequences that are atomic with respect to threads on all VAX CPUs in an SMP system.
On a VAX multiprocessor system, an atomic update requires an interlock at the level of the memory subsystem. To perform that interlock, the VAX architecture provides a set of interlocked instructions that include Add Aligned Word Interlocked (ADAWI), Remove from Queue Head Interlocked (REMQHI), and Branch on Bit Set and Set Interlocked (BBSSI).
If you code in MACRO-32, you use the assembler to generate whatever instructions you tell it. If you code in a high-level language, you cannot assume that the compiler will compile a particular language statement into a specific code sequence. That is, you must tell the compiler explicitly to generate an atomic update. For further information, see the documentation for your high-level language.
On Alpha systems, there is no single instruction that performs an atomic read-modify-write operation. An atomic read-modify-write operation is only possible through a sequence that includes load-locked and store-conditional instructions, (see Section 6.6.2, ''LD x_L and ST x_C Instructions (Alpha Only)''). Use of these instructions provides a read-modify-write operation on data within one aligned longword or quadword that is atomic with respect to threads on all Alpha CPUs in an SMP system.
6.5. Memory Read-Modify-Write Operations for IA-64 systems
This section summarizes information described in the Intel® Itanium® Architecture Software Developer's Manual. Refer to that manual for complete information.
on IA-64 systems, the semaphore instructions perform read-modify-write operations that are atomic with respect to threads in the same system and other SMP nodes.
Three types of atomic semaphore instructions are defined: exchange (xchg), compare and exchange (cmpxchg), and fetch and add (fetchadd).
xchg1, xchg2, xchg4, xchg8 to atomically fetch and store (swap) a byte, word, longword or quadword.
cmpxchg1, cmpxchg2, cmpxchg4, cmpxchg8 to atomically compare and store a byte, word, longword or quadword. Atomic bit set and clear, as well as the bit-test-and-set/clear operations can be implemented using the cmpxchg instruction.
fetchadd4, fetchadd8 to atomically increment or decrement a longword or quadword by 1, 4, 8 or 16 bytes.
Note that memory operands of the semaphore instructions must be on aligned boundaries. Unaligned access by a semaphore instruction results in a nonrecoverable unaligned data fault.
6.5.1. Preserving Atomicity with MACRO-32
On an OpenVMS VAX or I64 single-processor system, an atomic memory modification instruction is sufficient to provide synchronized access to shared data. However, such an instruction is not available on OpenVMS Alpha systems.
In the case of code written in MACRO-32, the compiler provides the /PRESERVE=ATOMICITY option to guarantee the integrity of read-modify-write operations for VAX instructions that have a memory modify operand. Alternatively, you can insert the .PRESERVE ATOMICITY and .NOPRESERVE ATOMICITY directives in sections of MACRO-32 source code as required to enable and disable atomicity.
INCL (R1)
ld4  r22  = [r9]
sxt4 r22  = r22
adds r22  = 1, r22
st4  [r9] = r22
Note that MACRO-32 R1 corresponds to I64 R9.
The problem with the I64 code sequence is that an interrupt can occur between any of the instructions. For example, if the interrupt causes an AST routine to execute or causes another process to be scheduled between the ld4 and the st4, and the AST or other process updates the data pointed to by R1, the STL will store the result (R9) based on stale data.
$L3: ld4    r23 = [r9]
     mov.m apccv = r23
     mov   r22 = r23
     sxt4  r23 = r23
     adds  r23 = 1, r23
     cmpxchg4.acq r23, [r9] = r23
     cmp.eq pr0, pr6 = r22, r23
     (pr6) br.cond.dpnt.few $L3
This code uses the compare-exchange instruction (cmpxchg) to implement the locked access. If another thread of execution has modified the location being modified here, this code loops back and retries the operation.
6.6. Synchronization Primitives
Atomic memory references
Noninterruptible instructions
Interrupt priority level (IPL)
Interlocked memory accesses
On VAX systems, many read-modify-write instructions, including queue manipulation instructions, are noninterruptible. These instructions provide an atomic update capability on a uniprocessor. A kernel-mode code thread can block interrupt and process-based threads of execution by raising the IPL. Hence, it can execute a sequence of instructions atomically with respect to the blocked threads on a uniprocessor. Threads of execution that run on multiple processors of an SMP system synchronize access to shared data with read-modify-write instructions that interlock memory.
On Alpha systems, some of these mechanisms are provided by hardware, while others have been implemented in PALcode routines.
Alpha processors provide several features to assist with synchronization. Even though all instructions that access memory are noninterruptible, no single one performs an atomic read-modify-write. A kernel-mode thread of execution can raise the IPL in order to block other threads on that processor while it performs a read-modify-write sequence or while it executes any other group of instructions. Code that runs in any access mode can execute a sequence of instructions that contains load-locked (LD x_L) and store-conditional (ST x_C) instructions to perform a read-modify-write sequence that appears atomic to other threads of execution. Memory barrier instructions order a CPU's memory reads and writes from the viewpoint of other CPUs and I/O processors. Other synchronization mechanisms are provided by PALcode routines.
on IA-64 systems, some of these mechanisms are provided by hardware, while others have been implemented in the OpenVMS executive.
IA-64 systems provide atomic semaphore instructions, as described in Section 6.3.1, ''Atomic Semaphore Instructions on IA-64'', acquire/release semantics on certain loads and stores, and the memory fence (MF) instruction, which is equivalent to the memory barrier (MB) on Alpha, to ensure correct memory ordering. Read-modify-write operations on an IA-64 system can be performed only by nonatomic, interruptible instruction sequences. IA-64 systems have hardware interrupt levels in maskable in groups of 16. On I634, most, but not all, Alpha PALcall builtins result in system service calls.
The sections that follow describe the features of interrupt priority level, load-locked (LD x_L), and store-conditional (ST x_C) instructions and their I64 equivalents, memory barriers and fences, interlocked instructions, and PALcode routines.
6.6.1. Interrupt Priority Level
The OpenVMS operating system in a uniprocessor system synchronizes access to systemwide data structures by requiring that all threads sharing data run at the IPL of the highest-priority interrupt that causes any of them to execute. Thus, a thread's accessing of data cannot be interrupted by any other thread that accesses the same data.
The IPL is a processor-specific mechanism. Raising the IPL on one processor has no effect on another processor. You must use a different synchronization technique on SMP systems where code threads run concurrently on different CPUs that must have synchronized access to shared system data.
On VAX systems, the code threads that run concurrently on different processors synchronize through instructions that interlock memory in addition to raising the IPL. Memory interlocks also synchronize access to data shared by an I/O processor and a code thread.
On Alpha systems, access to a data structure that is shared either by executive code running concurrently on different CPUs or by an I/O processor and a code thread must be synchronized through a load-locked/store-conditional sequence.
IA-64 systems have 256 hardware interrupt levels, which are maskable in groups of 16. On IA-64 systems, an OpenVMS executive component called software interrupt services (SWIS) handles I64 hardware interrupt masking and simulates IPL.
6.6.2. LD x_L and ST x_C Instructions (Alpha Only)
Because Alpha systems do not provide a single instruction that both reads and writes memory or mechanism to interlock memory against other interlocked accesses, you must use other synchronization techniques. Alpha systems provide the load-locked/store-conditional mechanism that allows a sequence of instructions to perform an atomic read-modify-write operation.
Load-locked (LD x_L) and store-conditional (ST x_C) instructions guarantee atomicity that is functionally equivalent to that of VAX systems. The LD x_L and ST x_C instructions can be used only on aligned longwords or aligned quadwords. The LD x_L and ST x_C instructions do not provide atomicity by blocking access to shared data by competing threads. Instead, when the LD x_L instruction executes, a CPU-specific lock bit is set. Before the data can be stored, the CPU uses the ST x_C instruction to check the lock bit. If another thread has accessed the data item in the time since the load operation began, the lock bit is cleared and the store is not performed. Clearing the lock bit signals the code thread to retry the load operation. That is, a load-locked/store-conditional sequence tests the lock bit to see whether the store succeeded. If it did not succeed, the sequence branches back to the beginning to start over. This loop repeats until the data is untouched by other threads during the operation.
By using the LD x_L and ST x_C instructions together, you can construct a code sequence that performs an atomic read-modify-write operation to an aligned longword or quadword. Rather than blocking other threads' modifications of the target memory, the code sequence determines whether the memory locked by the LD x_L instruction could have been written by another thread during the sequence. If it is written, the sequence is repeated. If it is not written, the store is performed. If the store succeeds, the sequence is atomic with respect to other threads on the same processor and on other processors. The LD x_L and ST x_C instructions can execute in any access mode.
Traditional VAX usage is for interlocked instructions to be used for multiprocessor synchronization. On Alpha systems, LD x_L and ST x_C instructions implement interlocks and can be used for uniprocessor synchronization. To achieve protection similar to the VAX interlock protection, you need to use memory barriers along with the load-locked and store-conditional instructions.
Some Alpha system compilers make the LD x_L and ST x_C instruction mechanism available as language built-in functions. For example, VSI C on Alpha systems includes a set of built-in functions that provides for atomic addition and for logical AND and OR operations. Also, Alpha system compilers make the mechanism available implicitly, because they use the LD x_L and ST x_C instructions to access declared data as requiring atomic accesses in a language-specific way.
6.6.3. Interlocking Memory References (Alpha Only)
The Alpha Architecture Reference Manual, Third Edition (AARM) describes strict rules for interlocking memory references. The Alpha 21264 (EV6) processor and all subsequent Alpha processors are more stringent than their predecessors in their requirement that these rules be followed. As a result, code that has worked in the past, despite noncompliance, could fail when executed on systems featuring the 21264 and subsequent processors. Occurrences of these noncompliant code sequences are believed to be rare. The Alpha 21264 processor was first supported by OpenVMS Alpha Version 7.1–2.
Noncompliant code can result in a loss of synchronization between processors when interprocessor locks are used, or can result in an infinite loop when an interlocked sequence always fails. Such behavior has occurred in some code sequences in programs compiled on old versions of the BLISS compiler, some versions of the MACRO–32 compiler and the MACRO–64 assembler, and in some VSI C and VSI C++ programs.
For recommended compiler versions, see Section 6.6.3.5, ''Compiler Versions''.
The affected code sequences use LDx_L/STx_C instructions, either directly in assembly language sources or in code generated by a compiler. Applications most likely to use interlocked instructions are complex, multithreaded applications or device drivers using highly optimized, hand-crafted locking and synchronization techniques.
6.6.3.1. Required Code Checks
OpenVMS recommends that code that will run on the 21264 and later processors be checked for these sequences. Particular attention should be paid to any code that does interprocess locking, multithreading, or interprocessor communication.
The SRM_CHECK tool (named after the System Reference Manual, which defines the Alpha architecture) has been developed to analyze Alpha executables for noncompliant code sequences. The tool detects sequences that might fail, reports any errors, and displays the machine code of the failing sequence.
6.6.3.2. Using the Code Analysis Tool
SYS$SYSTEM:SRM_CHECK.EXE$ define DCL$PATH []
$ srm_check myimage.exe$ srm_check [*...]* -log
$ srm_check 'file' -output check.dat
You can use the output from the tool to find the module that generated the sequence by looking in the image's MAP file. The addresses shown correspond directly to the addresses that can be found in the MAP file.
 ** Potential Alpha Architecture Violation(s) found in file...
 ** Found an unexpected ldq at 00003618
 0000360C   AD970130     ldq_l          R12, 0x130(R23)
 00003610   4596000A     and            R12, R22, R10
 00003614   F5400006     bne            R10, 00003630
 00003618   A54B0000     ldq            R10, (R11)
 Image Name:    SYSTEM_SYNCHRONIZATION
 Image Ident:   X-3
 Link Time:      5-NOV-1998 22:55:58.10
 Build Ident:   X6P7-SSB-0000
 Header Size:   584
 Image Section: 0, vbn: 3, va: 0x0, flags: RESIDENT EXE (0x880)
EXEC$NONPAGED_CODE       00000000 0000B317 0000B318 (      45848.) 2 **  5
SMPROUT         00000000 000047BB 000047BC (      18364.) 2 **  5
SMPINITIAL      000047C0 000061E7 00001A28 (       6696.) 2 **  5
The address 360C is in the SMPROUT module, which contains the addresses from 0-47BB. By looking at the machine code output from the module, you can locate the code and use the listing line number to identify the corresponding source code. If SMPROUT had a nonzero base, it would be necessary to subtract the base from the address (360C in this case) to find the relative address in the listing file.
Note that the tool reports potential violations in its output. Although SRM_CHECK can normally identify a code section in an image by the section's attributes, it is possible for OpenVMS images to contain data sections with those same attributes. As a result, SRM_CHECK may scan data as if it were code, and occasionally, a block of data may look like a noncompliant code sequence. This circumstance is rare and can be detected by examining the MAP and listing files.
6.6.3.3. Characteristics of Noncompliant Code
Some versions of OpenVMS compilers introduce noncompliant code sequences during an optimization called "loop rotation." This problem can only be triggered in C or C++ programs that use LDx_L/STx_C instructions in assembly language code that is embedded in the C/C++ source using the ASM function, or in assembly language written in MACRO–32 or MACRO–64. In some cases, a branch was introduced between the LDx_L and STx_C instructions.
This can be addressed by recompiling.
Some code compiled with very old BLISS, MACRO–32, or DEC Pascal compilers may contain noncompliant sequences. Early versions of these compilers contained a code scheduling bug where a load was incorrectly scheduled after a load_locked.
This can be addressed by recompiling.
In rare cases, the MACRO–32 compiler may generate a noncompliant code sequence for a BBSSI or BBCCI instruction where there are too few free registers.
This can be addressed by recompiling.
Errors may be generated by incorrectly coded MACRO–64 or MACRO–32 and incorrectly coded assembly language embedded in C or C++ source using the ASM function.
This requires source code changes. The new MACRO–32 compiler flags noncompliant code at compile time.
If the SRM_CHECK tool finds a violation in an image, the image should be modified if necessary and recompiled with the appropriate compiler (see Section 6.6.3.5, ''Compiler Versions''). After recompiling, the image should be analyzed again. If violations remain after recompiling, the source code must be examined to determine why the code scheduling violation exists. Modifications should then be made to the source code.
6.6.3.4. Coding Requirements
The Alpha Architecture Reference Manual describes how an atomic update of data between processors must be formed. The Third Edition, in particular, has much more information on this topic.
There cannot be a memory operation (load or store) between the LDx_L (load locked) and STx_C (store conditional) instructions in an interlocked sequence.
There cannot be a branch taken between an LDx_L and an STx_C instruction. Rather, execution must "fall through" from the LDx_L to the STx_C without taking a branch.
Any branch whose target is between an LDx_L and matching STx_C creates a noncompliant sequence. For instance, any branch to "label" in the following example would result in noncompliant code, regardless of whether the branch instruction itself was within or outside of the sequence:LDx_L Rx, n(Ry) ... label: ... STx_C Rx, n(Ry)
Any memory operation (LDx/STx) between an LDx_L and an STx_C
Any branch that has a destination between an LDx_L and an STx_C
STx_C instructions that do not have a preceding LDx_L instruction
This typically indicates that a backward branch is taken from an LDx_L to the STx_C. Note that hardware device drivers that do device mailbox writes are an exception. These drivers use the STx_C to write the mailbox. This condition is found only on early Alpha systems and not on PCI based systems.
Excessive instructions between an LDx_L and an STxC
The AARM recommends that no more than 40 instructions appear between an LDx_l and an STx_c. In theory, more than 40 instructions can cause hardware interrupts to keep the sequence from completing. However, there are no known occurrences of this.
        ** Found an unexpected ldq at 0008291C
        00082914   AC300000     ldq_l          R1, (R16)
        00082918   2284FFEC     lda            R20, 0xFFEC(R4)
0008291C A6A20038 ldq R21, 0x38(R2) ** Backward branch from 000405B0 to a STx_C sequence at 0004059C
00040598 C3E00003 br R31, 000405A8
0004059C 47F20400 bis R31, R18, R0
000405A0 B8100000 stl_c R0, (R16)
000405A4 F4000003 bne R0, 000405B4
000405A8 A8300000 ldl_l R1, (R16)
000405AC 40310DA0 cmple R1, R17, R0
000405B0 F41FFFFA bne R0, 0004059CNote
This branch backward from the LDx_L to the STx_C is characteristic of the noncompliant code introduced by the "loop rotation" optimization.
        getlck: evax_ldql  r0, lockdata(r8)  ; Get the lock data
                movl       index, r2         ; and the current index.
                tstl       r0                ; If the lock is zero,
                beql       is_clear          ; skip ahead to store.
                movl       r3, r2            ; Else, set special index.
        is_clear:
                incl       r0                ; Increment lock count
                evax_stqc  r0, lockdata(r8)  ; and store it.
                tstl       r0                ; Did store succeed?
beql getlck ; Retry if not. movl index, r2 ; Get the current index
getlck: evax_ldql r0, lockdata(r8) ; and then the lock data.
evax_cmoveq r0, r3, r2 ; If zero, use special index.
incl r0 ; Increment lock count
evax_stqc r0, lockdata(r8) ; and store it.
tstl r0 ; Did write succeed?
beql getlck ; Retry if not.6.6.3.5. Compiler Versions
This section contains information about versions of compilers that may generate noncompliant code sequences and the minimum recommended versions to use when recompiling.
|
Old Version |
Recommended Minimum Version |
|---|---|
|
BLISS V1.1 |
BLISS V1.3 |
|
DEC C V5.x |
HP C V6.0 |
|
DEC C++ V5.x |
HP C++ V6.0 |
|
DEC Pascal V5.0-2 |
HP Pascal V5.1-11 |
|
MACRO–32 V3.0 |
|
|
MACRO–64 V1.2 |
See below. |
Current versions of the MACRO–64 assembler may still encounter the loop rotation issue. However, MACRO–64 does not perform code optimization by default, and this problem occurs only when optimization is enabled. If SRM_CHECK indicates a noncompliant sequence in the MACRO–64 code, it should first be recompiled without optimization. If the sequence is still flagged when retested, the source code itself contains a noncompliant sequence that must be corrected.
6.6.3.6. Interlocked Memory Sequence Checking for the MACRO–32 Compiler
The MACRO–32 Compiler for OpenVMS Alpha Version 4.1 and later performs additional code checking and displays warning messages for noncompliant code sequences. The following warning messages can display under the circumstances described:
BRNDIRLOC, branch directive ignored in locked memory sequence
Explanation: The compiler found a .BRANCH_LIKELY directive within an LDx_L/STx_C sequence.
User Action: None. The compiler ignores the .BRANCH_LIKELY directive and, unless other coding guidelines are violated, the code works as written.
BRNTRGLOC, branch target within locked memory sequence in routine ’routine_name’
Explanation: A branch instruction has a target that is within an LDx_L/STx_C sequence.
User Action: To avoid this warning, rewrite the source code to avoid branches within or into LDx_L/STx_C sequences. Branches out of interlocked sequences are valid and are not flagged.
MEMACCLOC, memory access within locked memory sequence in routine ’routine_name ’
Explanation: A memory read or write occurs within an LDx_L/STx_C sequence. This can be either an explicit reference in the source code, such as "MOVL data, R0", or an implicit reference to memory. For example, fetching the address of a data label (for example, "MOVAB label, R0") is accomplished by a read from the linkage section, the data area that is used to resolve external references.
User Action: To avoid this warning, move all memory accesses outside the LDx_L/STx_C sequence.
RETFOLLOC, RET/RSB follows LDx_L instruction
Explanation: The compiler found a RET or RSB instruction after an LDx_L instruction and before finding an STx_C instruction. This indicates an ill-formed lock sequence.
User Action: Change the code so that the RET or RSB instruction does not fall between the LDx_L instruction and the STx_C instruction.
RTNCALLOC, routine call within locked memory sequence in routine ’routine_name’
Explanation: A routine call occurs within an LDx_L/STx_C sequence. This can be either an explicit CALL/JSB in the source code, such as "JSB subroutine", or an implicit call that occurs as a result of another instruction. For example, some instructions such as MOVC and EDIV generate calls to run-time libraries.
User Action: To avoid this warning, move the routine call or the instruction that generates it, as indicated by the compiler, outside the LDx_L/STx_C sequence.
STCMUSFOL, STx_C instruction must follow LDx_L instruction
Explanation: The compiler found an STx_C instruction before finding an LDx_L instruction. This indicates an ill-formed lock sequence.
User Action: Change the code so that the STx_C instruction follows the LDx_L instruction.
6.6.3.7. Recompiling Code with ALONONPAGED_INLINE or LAL_REMOVE_FIRST Macros
Note
Source modules that call the EXE$ALONONPAGED routine (or any of its variants) do not need to be recompiled. These modules transparently use the correct version of the routine that is included in this release.
6.6.4. Interlocked Instructions (VAX Only)
ADAWI – Add aligned word, interlocked
BBCCI – Branch on bit clear and clear, interlocked
BBSSI – Branch on bit set and set, interlocked
INSQHI – Insert entry into queue at head, interlocked
INSQTI – Insert entry into queue at tail, interlocked
REMQHI – Remove entry from queue at head, interlocked
REMQTI – Remove entry from queue at tail, interlocked
The VAX architecture interlock memory instructions are described in detail in the VAX Architecture Reference Manual.
The following description of the interlocked instruction mechanism assumes that the interlock is implemented by the memory controller and that the memory contents are fresh.
When a VAX CPU executes an interlocked instruction, it issues an interlock-read command to the memory controller. The memory controller sets an internal flag and responds with the requested data. While the flag is set, the memory controller stalls any subsequent interlock-read commands for the same aligned longword from other CPUs and I/O processors, even though it continues to process ordinary reads and writes. Because interlocked instructions are noninterruptible, they are atomic with respect to threads of execution on the same processor.
When the VAX processor that is executing the interlocked instruction issues a write-unlock command, the memory controller writes the modified data back and clears its internal flag. The memory interlock exists for the duration of only one instruction. Execution of an interlocked instruction includes paired interlock-read and write-unlock memory controller commands.
When you synchronize data with interlocks, you must make sure that all accessors of that data use them. This means that memory references of an interlocked instruction are atomic only with respect to other interlocked memory references.
On VAX systems, the granularity of the interlock depends on the type of VAX system. A given VAX implementation is free to implement a larger interlock granularity than that which is required by the set of interlocked instructions listed above. On some processors, for example, while an interlocked access to a location is in progress, interlocked access to any other location in memory is not allowed.
6.6.5. Memory Barriers (Alpha Only)
On Alpha systems, there are no implied memory barriers except those performed by the PALcode routines that emulate the interlocked queue instructions. Wherever necessary, you must insert explicit memory barriers into your code to impose an order on references to data shared with threads of execution that could be running on other members of an SMP system. Memory barriers are required to ensure both the order in which other members of an SMP system or an I/O processor see writes to shared data, and the order in which reads of shared data complete.
The MB instruction
The instruction memory barrier (IMB) PALcode routine
The MB instruction guarantees that all subsequent loads and stores do not access memory until after all previous loads and stores have accessed memory from the viewpoint of multiple threads of execution. Alpha compilers provide semantics for generating memory barriers when needed for specific operations on data items.
Code that modifies the instruction stream must be changed to synchronize the old and new instruction streams properly. Use of an REI instruction to accomplish this does not work on OpenVMS Alpha systems.
The instruction memory barrier (IMB) PALcode routine must be used after a modification to the instruction stream to flush prefetched instructions. In addition, it also provides the same ordering effects as the MB instruction.
If a kernel mode code sequence changes the expected instruction stream, it must issue an IMB instruction after changing the instruction stream and before the time the change is executed. For example, if a device driver stores an instruction sequence in an extension to the unit control block (UCB) and then transfers control there, it must issue an IMB instruction after storing the data in the UCB but before transferring control to the UCB data.
The MACRO-32 compiler for OpenVMS Alpha provides the EVAX_IMB built-in to insert explicitly an IMB instruction in the instruction stream.
6.6.6. Memory Fences (I64 Only)
The I64 memory fence (mf) instruction causes all memory operations before the mf instruction to complete before any memory operations after the mf instruction are allowed to begin. Fence instructions combine the release and acquire semantics into a bidirectional fence; that is, they guarantee that all previous orderable instructions are made visible prior to any subsequent orderable instruction being made visible.
6.6.7. PALcode Routines (Alpha Only)
Privileged architecture library (PALcode) routines include Alpha instructions that emulate VAX queue and interlocked queue instructions. PALcode executes in a special environment with interrupts blocked. This feature results in noninterruptible updates. A PALcode routine can perform the multiple memory reads and memory writes that insert or remove a queue element without interruption.
6.6.8. I64 Emulation of PALcode Built-ins
The VAX interlocked queue instructions work unchanged on OpenVMS IA-64 systems and result in the SYS$PAL_xxxx run-time routine PALcode equivalents being called, which incorporate the necessary interlocks and memory barriers.
Whenever possible, the OpenVMS IA-64BLISS, C, and MACRO compilers convert CALL_PAL macros to the equivalent OpenVMS-provided SYS$PAL_xxxx operating system calls for backward compatibility.
The BLISS compiler compiles each of the queue manipulation PALcode builtins into SYS$PAL_xxxx system service requests.
Refer to Porting Applications from VSI OpenVMS Alpha to VSI OpenVMS Industry Standard 64 for Integrity Servers for complete information on the BLISS implementation.
6.7. Software-Level Synchronization
The operating system uses the synchronization primitives provided by the hardware as the basis for several different synchronization techniques. The following sections summarize the operating system's synchronization techniques available to application software.
6.7.1. Synchronization Within a Process
On Alpha and IA-64 systems without kernel threads, only one thread of execution can execute within a process at a time, so synchronization of threads that execute simultaneously is not a concern. However, a delivery of an AST or the occurrence of an exception can intervene in a sequence of instructions in one thread of execution. Because these conditions can occur, application design must take into account the need for synchronization with condition handlers and AST procedures.
On Alpha systems without the byte-word extension, writing bytes or words or performing a read-modify-write operation requires a sequence of Alpha instructions. If the sequence incurs an exception or is interrupted by AST delivery or an exception, another process code thread can run. If that thread accesses the same data, it can read incompletely written data or cause data corruption. Aligning data on natural boundaries and unpacking word and byte data reduce this risk.
On Alpha and IA-64 systems, an application written in a language other than MACRO-32 must identify to the compiler data accessed by any combination of mainline code, AST procedures, and condition handlers to ensure that the compiler generates code that is atomic with respect to other threads. Also, data shared with other processes must be identified.
With process-private data accessed from both AST and non-AST threads of execution, the non-AST thread can block AST delivery by using the Set AST Enable (SYS$SETAST) system service. If the code is running in kernel mode, it can also raise IPL to block AST delivery. The Guide to Creating OpenVMS Modular Procedures describes the concept of AST reentrancy.
On a uniprocessor or in a symmetric multiprocessing (SMP) system, access to multiple locations with a read or write instruction or with a read-modify-write sequence is not atomic on OpenVMS systems. Additional synchronization methods are required to control access to the data. See Section 6.7.4, ''Synchronizing Multiprocess Applications'' and the sections following it, which describe the use of higher-level synchronization techniques.
6.7.2. Synchronization in Inner Mode (Alpha and I64 Only)
On Alpha and IA-64 systems with kernel threads, the system allows multiple execution contexts, or threads within a process, that all share the same address space to run simultaneously. The synchronization provided by spinlocks continues to allow thread safe access to process data structures such as the process control block (PCB). However, access to process address space and any structures currently not explicitly synchronized with spin locks are no longer guaranteed exclusive access solely by access mode. In the multithreaded environment, a new process level synchronization mechanism is required.
Because spin locks operate on a systemwide level and do not offer the process level granularity required for inner-mode access synchronization in a multithreaded environment, a process level semaphore is necessary to serialize inner mode (kernel and executive) access. User and supervisor mode threads are allowed to run without any required synchronization.
The process level semaphore for inner-mode synchronization is the inner mode (IM) semaphore. The IM semaphore is created in the first floating-point registers and execution data block (FRED) page in the balance set slot process for each process. In a multithreaded environment, a thread requiring inner mode access acquires ownership of the IM semaphore. That is, in general, two threads associated with the same process cannot execute in inner mode simultaneously. If the semaphore is owned by another thread, then the requesting thread spins until inner mode access becomes available, or until some specified timeout value has expired.
6.7.3. Synchronization Using Process Priority
In some applications (usually real-time applications), a number of processes perform a series of tasks. In such applications, the sequence in which a process executes can be controlled or synchronized by means of process priority. The basic method of synchronization by priority involves executing the process with the highest priority while preventing the other application processes from executing.
If you use process priority for synchronization, be aware that if the higher-priority process is blocked, either explicitly or implicitly (for example, when doing an I/O), the lower-priority processes can run, resulting in corruption on the data of the higher process's activities.
Because each processor in a multiprocessor system, when idle, schedules its own work load, it is impossible to prevent all other processes in the system from executing. Moreover, because the scheduler guarantees only that the highest-priority and computable process is scheduled at any given time, it is impossible to prevent another process in an application from executing.
Thus, application programs that synchronize by process priority must be modified to use a different serialization method to run correctly in a multiprocessor system.
6.7.4. Synchronizing Multiprocess Applications
Common event flags
Lock management system services
The operating system provides basic event synchronization through event flags. Common event flags can be shared among cooperating processes running on a uniprocessor or in an SMP system, though the processes must be in the same user identification code (UIC) group. Thus, if you have developed an application that requires the concurrent execution of several processes, you can use event flags to establish communication among them and to synchronize their activity. A shared, or common, event flag can represent any event that is detectable and agreed upon by the cooperating processes. See Section 6.8, ''Using Event Flags'' for information about using event flags.
The lock management system services – Enqueue Lock Request (SYS$ENQ), and Dequeue Lock Request (SYS$DEQ) – provide multiprocess synchronization tools that can be requested from all access modes. For details about using lock management system services, see Chapter 7, "Synchronizing Access to Resources".
Synchronization of access to shared data by a multiprocess application should be designed to support processes that execute concurrently on different members of an SMP system. Applications that share a global section can use MACRO-32 interlocked instructions or the equivalent in other languages to synchronize access to data in the global section. These applications can also use the lock management system services for synchronization.
Most application programs that run on an operating system in a uniprocessor system also run without modification in a multiprocessor system. However, applications that access writable global sections or that rely on process priority for synchronizing tasks should be reexamined and modified according to the information contained in this section.
In addition, some applications may execute more efficiently on a multiprocessor if they are specifically adapted to a multiprocessing environment. Application programmers may want to decompose an application into several processes and coordinate their activities by means of event flags or a shared region in memory.
6.7.5. Synchronization Using Locks
A spin lock is a device used by a processor to synchronize access to data that is shared by members of a symmetric multiprocessing (SMP) system. A spin lock enables a set of processors to serialize their access to shared data. The basic form of a spin lock is a bit that indicates the state of a particular set of shared data. When the bit is set, it shows that a processor is accessing the data. A bit is either tested and set or tested and cleared; it is atomic with respect to other threads of execution on the same or other processors.
A processor that needs access to some shared data tests and sets the spin lock associated with that data. To test and set the spin lock, the processor uses an interlocked bit-test-and-set instruction. If the bit is clear, the processor can have access to the data. This is called locking or acquiring the spin lock. If the bit is set, the processor must wait because another processor is already accessing the data.
Essentially, a waiting processor spins in a tight loop; it executes repeated bit test instructions to test the state of the spin lock. The term spin lock derives from this spinning. When the spin lock is in a loop, repeatedly testing the state of the spin lock, the spin lock is said to be in a state of busy wait. The busy wait ends when the processor accessing the data clears the bit with an interlocked operation to indicate that it is done. When the bit is cleared, the spin lock is said to be unlocked or released.
Spin locks are used by the operating system executive, along with the interrupt priority level (IPL), to control access to system data structures in a multiprocessor system.
6.7.6. Writable Global Sections
A writable global section is an area of memory that can be accessed (read and modified) by more than one process. On uniprocessor or SMP systems, access to a single global section with an appropriate read or write instruction is atomic on OpenVMS systems. Therefore, no other synchronization is required.
An appropriate read or write on VAX systems is an instruction that is a naturally aligned byte, word, or longword, such as a MOVx instruction, where x is a B for a byte, W for a word, or L for a longword. On Alpha systems, an appropriate read or write instruction is a naturally aligned longword or quadword, for instance, an LDx or write STx instruction where x is an L for an aligned longword or Q for an aligned quadword.
On multiprocessor systems, for a read-modify-write sequence on a multiprocessor system, two or more processes can execute concurrently, one on each processor. As a result, it is possible that concurrently executing processes can access the same locations simultaneously in a writable global section. If this happens, only partial updates may occur, or data could be corrupted or lost, because the operation is not atomic. Unless proper interlocked instructions are used on VAX systems or load-locked/store-conditional instructions are used on Alpha systems, invalid data may result. You must use interlocked or load-locked/store-conditional instructions, their high-level language equivalents, or other synchronizing techniques, such as locks or event flags.
On a uniprocessor or SMP system, access to multiple locations within a global section with read or write instructions or a read-modify-write sequence is not atomic. On a uniprocessor system, an interrupt can occur that causes process preemption, allowing another process to run and access the data before the first process completes its work. On a multiprocessor system, two processes can access the global section simultaneously on different processors. You must use a synchronization technique such as a spin lock or event flags to avoid these problems.
Check existing programs that use writable global sections to ensure that proper synchronization techniques are in place. Review the program code itself; do not rely on testing alone, because an instance of simultaneous access by more than one process to a location in a writable global section is rare.
If an application must use queue instructions to control access to writable global sections, ensure that it uses interlocked queue instructions.
6.8. Using Event Flags
Event flags are maintained by the operating system for general programming use in coordinating thread execution with asynchronous events. Programs can use event flags to perform a variety of signaling functions. Event flag services clear, set, and read event flags. They also place a thread in a wait state pending the setting of an event flag or flags.
|
Style |
Meaning |
|---|---|
|
Explicit |
Uses SET, CLEAR, and READ functions that are commonly used when one thread deals with multiple asynchronous events. |
|
Implicit |
Uses the SYS$SYNCH and wait form of system services when one or more threads wish to wait for a particular event. For multithreaded applications, only the implicit use of event flags is recommended. |
The wait form of system services is a variant of asynchronous services; there is a service request and then a wait for the completion of the request. For reliable operation in most applications, WAIT form services must specify a status block. The status prevents the service from completing prematurely and also provides status information.
6.8.1. General Guidelines for Using Event Flags
Allocate or choose local event flags or associate common event flags for your use.
Set or clear the event flag.
Read the event flag.
Suspend thread execution until an event flag is set.
Deallocate the local event flags or disassociate common event flags when they are no longer needed.
Implicit use of event flags may involve only step 4, or steps 1, 4, and 5.
|
Routine or Service |
Task |
|---|---|
|
LIB$FREE_EF |
Deallocate a local event flag. |
|
LIB$GET_EF |
Allocate any local event flag. |
|
LIB$RESERVE_EF |
Allocate a specific local event flag. |
|
SYS$ASCEFC |
Associate a common event flag cluster. |
|
SYS$CLREF |
Clear a local or common event flag. |
|
SYS$DACEFC |
Disassociate a common event flag cluster. |
|
SYS$DLCEFC |
Delete a common event flag cluster. |
|
SYS$READEF |
Read a local or common event flag. |
|
SYS$SETEF |
Set a local or common event flag. |
|
SYS$SYNCH |
Wait for a local or common event flag to be set and for nonzero status block – recommended to be used with threads. |
|
SYS$WAITFR |
Wait for a specific local or common event flag to be set – not recommended to be used with threads. |
|
SYS$WFLAND |
Wait for several local or common event flags to be set – logical AND of event flags. |
|
SYS$WFLOR |
Wait for one of several local or common event flags to be set – logical OR of event flags. |
Some system services set an event flag to indicate the completion or the occurrence of an event; the calling program can test the flag. Other system services use event flags to signal events to the calling process, such as SYS$ENQ(W), SYS$QIO(W), or SYS$SETIMR.
6.8.2. Introducing Local and Common Event Flag Numbers and Event Flag Clusters
Each event flag has a unique number; event flag arguments in system service calls refer to these numbers. For example, if you specify event flag 1 in a call to the SYS$QIO system service, then event flag 1 is set when the I/O operation completes.
To allow manipulation of groups of event flags, the flags are ordered in clusters of 32 numbers corresponding to bits 0 through 31 (<31:0>) in a longword. The clusters are also numbered from 0 to 4. The range of event flag numbers encompasses the flags in all clusters: event flag 0 is the first flag in cluster 0, event flag 32 is the first flag in cluster 1, and so on.
A local event flag cluster is process specific and is used to synchronize events within a process.
A common event flag cluster can be shared by cooperating processes in the same UIC group. A common event flag cluster is identified by name and is specific to a UIC group and VMScluster node. Before a process can use a common event flag cluster, it must explicitly "associate" with the cluster. (Association is described in Section 6.8.6, ''Using Common Event Flags''.) Use them to synchronize events among images executing in different processes.
A special local cluster 4 supports only EFN 128, symbolically EFN$C_ENF.EFN$C_ENF is intended for use with wait form services, such as SYS$QIOW and SYS$ENQW, or SYS$SYNCH system service. However, EFN 128 can also be used with ASTs and the SYS$QIO service. By using EFN 128 with ASTs, for example, you can avoid setting event flag zero (0), which eliminates possible event flag contention in processes. The EFN 128 allows you to bypass all event flag processing in system services. Using EFN 128 also allows for faster processing.
For more information, see Section 6.8.4, ''Using EFN$C_ENF Local Event Flag''.
Table 6.4, ''Event Flags'' summarizes the ranges of event flag numbers and the clusters to which they belong.
The same system services manipulate flags in either local and common event flag clusters. Because the event flag number implies the cluster number, you need not specify the cluster number when you call a system service that refers to an event flag.
|
Cluster Number |
Flag Number |
Type |
Usage |
|---|---|---|---|
|
0 |
0 |
Local |
Default flag used by system routines. |
|
0 |
1 to 23 |
Local |
May be used in system routines. When an event flag is requested, it is not returned unless it has been previously and specifically freed by calls to LIB$FREE_EF. |
|
0 |
24 to 31 |
Local |
Reserved for use only. |
|
1 |
32 to 63 |
Local |
Available for general use. |
|
2 |
64 to 95 |
Common |
Available for general use. |
|
3 |
96 to 127 |
Common |
Available for general use. |
|
4 |
128 |
Local |
Available for general use without explicit allocation. |
6.8.3. Using Event Flag Zero (0)
Event flag 0 is the default event flag. Whenever a process requests a system service with an event flag number argument, but does not specify a particular flag, event flag 0 is used. Therefore, event flag 0 is more likely than other event flags to be used incorrectly for multiple concurrent requests.
Code that uses any event flag should be able to tolerate spurious sets, assuming that the only real danger is a spurious clear that causes a thread to miss an event. Since any system service that uses an event flag clears the flag, there is a danger that an event which has occurred but has not been responded to is masked which can result in a hang. For further information, see the SYS$SYNCH system service in VSI OpenVMS System Services Reference Manual: GETUTC–Z.
6.8.4. Using EFN$C_ENF Local Event Flag
The combination of EFN$C_ENF and a status block should be used with the wait form of system services, or with SYS$SYNCH system service. EFN$C_ENF does not need to be initialized, nor does it need to be reserved or freed. Multiple threads of execution may concurrently use EFN$C_ENF without interference as long as they use a unique status block for each concurrent asynchronous service. When EFN$C_ENF is used with explicit event flag system services, it performs as if always set. You should use EFN$C_ENF to eliminate the chance for event flag overlap.
6.8.5. Using Local Event Flags
Local event flags are automatically available to each program. They are not automatically initialized. However, if an event flag is passed to a system service such as SYS$GETJPI, the service initializes the flag before using it.
To ensure that the event flag you are using is not accessed and changed by other uses within your process, allocate local event flags. The VSI OpenVMS RTL Library (LIB$) Manual describes routines you can use to allocate an arbitrary event flag (LIB$GET_EF), and to allocate a particular event flag (LIB$RESERVE_EF) from the processwide pool of available local event flags. Similar routines do not exist for common event flags.
The LIB$GET_EF routine by default allocates flags from event flag cluster 1 (event flags 32 through 63). Event flags 1 through 32 (in event flag cluster 0) can also optionally be allocated by calls to LIB$GET_EF. To maintain compatibility with older application software that used event flags 1 through 23 in an uncoordinated fashion, these event flags must be initially marked as free by application calls to the LIB$FREE_EF routine before these flags can be allocated by subsequent calls to the LIB$GET_EF routine.
Before using the event flag, initialize it using the SYS$CLREF system service, unless you pass the event flag to a routine that clears it for you.
When an event that is relevant to other program components is completed, set the event flag with the SYS$SETEF system service.
A program component can read the event flag to determine what has happened and act accordingly. Use the SYS$READEF system service to read the event flag.
The program components that evaluate event flag status can be placed in a wait state. Then, when the event flag is set, execution is resumed. Use the SYS$WAITFR, SYS$WFLOR, SYS$WFLAND, or SYS$SYNCH system service to accomplish this task.
When a local event flag is no longer required, free it by using the LIB$FREE_EF routine.
INTEGER FLAG,
2       STATUS,
2       LIB$GET_EF,
2       SYS$CLREF

STATUS = LIB$GET_EF (FLAG)
IF (.NOT. STATUS) CALL LIB$SIGNAL (%VAL(STATUS))
STATUS = SYS$CLREF (%VAL(FLAG))
IF (.NOT. STATUS) CALL LIB$SIGNAL (%VAL(STATUS))
6.8.5.1. Example of Event Flag Services
   .
   .
   .
main() {

        unsigned int status, daytim[1], efn=3;

/* Set the timer */
        status = SYS$SETIMR( efn,  /* efn - event flag */
                   &daytim,        /* daytim - expiration time */
                   0,              /* astadr - AST routine */
                   0,              /* reqidt - timer request id */
                   0);             /* flags */
        if ((status & 1) != 1)
                LIB$SIGNAL( status );
   .
   .
   .

/* Wait until timer expires */
        status = SYS$WAITFR( efn );
        if ((status & 1) != 1)
                LIB$SIGNAL( status );
   .
   .
   .
}
In this example, the daytim argument refers to a 64-bit
time value. For details about how to obtain a time value in the proper format
for input to this service, see VSI OpenVMS Programming Concepts Manual, Volume II.
6.8.6. Using Common Event Flags
Common event flags are manipulated like local event flags. However, before a process can use event flags in a common event flag cluster, the cluster must be created. The Associate Common Event Flag Cluster (SYS$ASCEFC) system service creates a named common event flag cluster. By calling SYS$ASCEFC, other processes in the same UIC group can establish their association with the cluster so they can access flags in it. Each process that associates with the cluster must use the same name to refer to it; the SYS$ASCEFC system service establishes correspondence between the cluster name and the cluster number that a process assigns to the cluster.
The first program to name a common event flag cluster creates it; all flags in a newly created cluster are clear. Other processes on the same OpenVMS cluster node that have the same UIC group number as the creator of the cluster can reference the cluster by invoking SYS$ASCEFC and specifying the cluster name.
Different processes may associate the same name with different common event flag numbers; as long as the name and UIC group are the same, the processes reference the same cluster.
Common event flags act as a communication mechanism between images executing in different processes in the same group on the same OpenVMS cluster node. Common event flags are often used as a synchronization tool for other, more complicated communication techniques, such as logical names and global sections. For more information about using event flags to synchronize communication between processes, see Chapter 3, "Process Communication".
If every cooperating process that is going to use a common event flag cluster has the necessary privilege or quota to create a cluster, the first process to call the SYS$ASCEFC system service creates the cluster.
   .
   .
   .
#include <descrip.h>
   .
   .
   .
        unsigned int status, efn=65;
        $DESCRIPTOR(name,"COMMON_CLUSTER"); /* Cluster name */
   .
   .
   .
/* Create cluster 2 */
        status = SYS$ASCEFC( efn, &name, 0, 0);
Other processes in the same group can now associate with this cluster. Those processes must use the same character string name to refer to the cluster; however, the cluster numbers they assign do not have to be the same.
6.8.6.1. Using the name Argument with SYS$ASCEFC
The name argument to the Associate Common Event Flag
Cluster (SYS$ASCEFC) system service identifies the
cluster that the process is creating or associating with. The
name argument specifies a descriptor pointing to a
character string.
name argument proceeds in the
following manner:CEF$ is prefixed to the current name string, and the result is subjected to logical name translation.
If the result is a logical name, step 1 is repeated until translation does not succeed or until the number of translations performed exceeds the number 10.
The CEF$ prefix is stripped from the current name string that could not be translated. This current string is the cluster name.
$ DEFINE CEF$CLUS_RT CLUS_RT_001#include <ssdef.h>
#include <descrip.h>
.
.
.
unsigned int status;
$DESCRIPTOR(name,"CLUS_RT"); /* Logical name of cluster */
.
.
.
status = SYS$ASCEFC(...,&name,...);CEF$ is prefixed to CLUS_RT.
CEF$CLUS_RT is translated to CLUS_RT_001. (Further translation is unsuccessful. When logical name translation fails, the string is passed to the service).
If the name string starts with an underscore (_), the operating system strips the underscore and considers the resultant string to be the actual name (that is, further translation is not performed).
If the name string is the result of a logical name translation, the name string is checked to see whether it has the terminal attribute. If it does, the operating system considers the resultant string to be the actual name (that is, further translation is not performed).
6.8.6.2. Temporary Common Event Flag Clusters
Common event flag clusters are either temporary or permanent. The
perm argument to the
SYS$ASCEFC system service defines whether the
cluster is temporary or permanent.
Temporary clusters require an element of the creating process's quota for timer queue entries (TQELM quota). They are deleted automatically when all processes associated with the cluster have disassociated. Disassociation can be performed explicitly with the Disassociate Common Event Flag Cluster (SYS$DACEFC) system service, or implicitly when the image that called SYS$ASCEFC exits.
6.8.6.3. Permanent Common Event Flag Clusters
If you have the PRMCEB privilege, you can create a permanent common event flag
cluster (set the perm argument to 1 when you invoke
SYS$ASCEFC). A permanent event flag cluster
continues to exist until it is marked explicitly for deletion with the Delete
Common Event Flag Cluster (SYS$DLCEFC) system service
(requires the PRMCEB privilege). Once a permanent cluster is marked for
deletion, it is like a temporary cluster; when the last process that associated
with the cluster disassociates from it, the cluster is deleted.
In the following examples, the first program segment associates common event flag cluster 3 with the name CLUSTER and then clears the second event flag in the cluster. The second program segment associates common event flag cluster 2 with the name CLUSTER and then sets the second event flag in the cluster (the flag cleared by the first program segment).
Example 1
STATUS = SYS$ASCEFC (%VAL(96),
2                   'CLUSTER',,)
STATUS = SYS$CLREF (%VAL(98))
Example 2
STATUS = SYS$ASCEFC (%VAL(64),
2                   'CLUSTER',,)
STATUS = SYS$SETEF (%VAL(66))
For clearer code, rather than using a specific event flag number, use one variable to contain the bit offset you need and one variable to contain the number of the first bit in the common event flag cluster that you are using. To reference the common event flag, add the offset to the number of the first bit. The following examples accomplish the same result as the preceding two examples:
Example 1
INTEGER*4 BASE,
2         OFFSET
PARAMETER (BASE = 96)

OFFSET=2
STATUS = SYS$ASCEFC (%VAL(BASE),
2                   'CLUSTER',,)
STATUS = SYS$CLREF (%VAL(BASE+OFFSET))
Example 2
INTEGER*4 BASE,
2         OFFSET
PARAMETER (BASE = 64)

OFFSET=2
STATUS = SYS$ASCEFC (%VAL(BASE),
2                   'CLUSTER',,)
STATUS = SYS$SETEF (%VAL(BASE+OFFSET))
INTEGER*4 BASE,
2         OFFSET
PARAMETER (BASE   = 64,
2          OFFSET = 0)
   .
   .
   .
! Associate common event flag cluster with name
STATUS = SYS$ASCEFC (%VAL(BASE),
2                    'CLUSTER',,)
IF (.NOT. STATUS) CALL LIB$SIGNAL (%VAL(STATUS))

! Create subprocess to execute concurrently
MASK = IBSET (MASK,0)
STATUS = LIB$SPAWN ('RUN REPORTSUB', ! Image
2                   'INPUT.DAT',     ! SYS$INPUT
2                   'OUTPUT.DAT',    ! SYS$OUTPUT
2                   MASK)
IF (.NOT. STATUS) CALL LIB$SIGNAL (%VAL(STATUS))

! Wait for response from subprocess
STATUS = SYS$WAITFR (%VAL(BASE+OFFSET))
IF (.NOT. STATUS) CALL LIB$SIGNAL (%VAL(STATUS))
   .
   .
   .
INTEGER*4 BASE,
2         OFFSET
PARAMETER (BASE   = 64,
2          OFFSET = 0)
   .
   .
   .
                     ! Do operations necessary for
                     ! continuation of parent process
   .
   .
   .
! Associate common event flag cluster with name
STATUS = SYS$ASCEFC (%VAL(BASE),
2                    'CLUSTER',,)
IF (.NOT. STATUS)
2  CALL LIB$SIGNAL (%VAL(STATUS))

! Set flag for parent process to resume
STATUS = SYS$SETEF (%VAL(BASE+OFFSET))
   .
   .
   .
6.8.7. Wait Form Services and SYS$SYNCH
A wait form system service is a variant of an asynchronous service in which there
is a service request and then a wait for the completion of the request. The
SYS$SYNCH system service checks the completion status
of a system service that completes asynchronously. For reliable operation in most
applications, the service whose completion status is to be checked must have been
called with the efn and iosb arguments
specified. The SYS$SYNCH service uses the event flag and
I/O status block of the service to be checked.
VSI recommends that only EFN$C_ENF be used for concurrent use of event flags.
6.8.8. Event Flag Waits
The Wait for Single Event Flag (SYS$WAITFR) system service places the process or thread in a wait state until a single flag has been set.
The Wait for Logical OR of Event Flags (SYS$WFLOR) system service places the process or thread in a wait state until any one of a specified group of event flags has been set.
The Wait for Logical AND of Event Flags (SYS$WFLAND) system service places the process or thread in a wait state until all of a specified group of event flags have been set.
. . . #include <lib$routines.h> #include <starlet.h> #include <stsdef.h> . . . unsigned int RetStat, Efn1=1, Efn2=2, EFMask;CallOneCompleted(); if ( IOSB2[0] ) CallTwoCompleted(); . . .
| The event flag argument is specified in each SYS$QIO request. Both of these event flags are explicitly declared in event flag cluster 0. These variables contain the event flag numbers, and not the event flag masks. |
| The I/O Status Blocks are declared. Ensure that the storage associated with these structures is valid over the lifetime of the asynchronous call. Ensure that these structures are not declared within the local context of a call frame of a function that can exit before the asynchronous call completes. Be sure that these calls are declared with static or external context, within the stack frame of a function that will either remain active, or was located within other non-volatile storage. The use of either LIB$GET_EF or EFN$C_ENF (defined in efndef.h) is strongly recommended over the static declaration of local event flags, because the consistent use of either of these techniques will avoid the unintended reuse of local event flags within different parts of the same program, and the intermittent problems that can ensue. Common event flags are somewhat less likely to encounter similar problems due to the requirement to associate with the cluster before use. But the use and switching of event flag clusters and the use of event flags within each cluster should still be carefully coordinated. |
| Set up the event flag mask. Since both of these event flags are located in the same event flag cluster, you can use a simple OR to create the bit mask. Since these event flags are in the same cluster, you can use them in the SYS$WSFLAND call. |
| After both I/O requests are queued successfully, the program calls the
SYS$WFLAND system service to wait until the
I/O operations complete. In this service call, the
You should specify a unique event flag and a unique I/O status block for each asynchronous call. |
| Note that the SYS$WFLAND system service (and the other wait system services) waits for the event flag to be set; it does not wait for the I/O operation to complete. If some other event were to set the required event flags, the wait for event flag would complete prematurely. Use of event flags must be coordinated carefully. |
| Use the I/O status block to determine which of the two calls have completed. The I/O status block is initialized to zero by the SYS$QIO call, and is set to a nonzero value when the call is completed. An event flag can be set spuriously – typically if there is unintended sharing or reuse of event flags – and thus you should check the I/O status block. For a mechanism that can check both the event flag and the IOSB and thus ensure that the call has completed, see the SYS$SYNCH system service call. |
6.8.9. Setting and Clearing Event Flags
System services that use event flags clear the event flag specified in the system service call before they queue the timer or I/O request. This ensures that the process knows the state of the event flag. If you are using event flags in local clusters for other purposes, be sure the flag's initial value is what you want before you use it.
$CLREF_S EFN=#32The SYS$SETEF and SYS$CLREF services return successful status codes that indicate whether the specified flag was set or cleared when the service was called. The caller can thus determine the previous state of the flag, if necessary. The codes returned are SS$_WASSET and SS$_WASCLR.
All event flags in a common event flag cluster are initially clear when the cluster is created. Section 6.8.10, ''Example of Using a Common Event Flag Cluster'' describes the creation of common event flag clusters.
6.8.10. Example of Using a Common Event Flag Cluster
/* **** Common Header File ****if (!$VMS_STATUS_SUCCESS(RetStat)) lib$signal(RetStat); // Set the event flag, and check for errors RetStat = sys$setef(Efn2+EFC3);
if (!$VMS_STATUS_SUCCESS(RetStat)) lib$signal(RetStat); . . . RetStat = sys$dacefc(EFC3); // **** Process ATLANTIS **** // // The image running within process ATLANTIS associates with the // specified event flag cluster, specifically associating it with // the common event flag cluster 2. // Associate the event flag cluster, using Cluster 2 RetStat = sys$ascefc(EFC2, &EFCname); if (!$VMS_STATUS_SUCCESS(RetStat)) lib$signal(RetStat); // Set the event flag, and check for errors RetStat = sys$setef(Efn2+EFC2); if (!$VMS_STATUS_SUCCESS(RetStat)) lib$signal(RetStat); . . . retstat = sys$dacefc(EFC2); // **** Process DISCOVERY ****
// The image running within process DISCOVERY associates with the // specified event flag cluster, specifically associating it with // the common event flag cluster 3. RetStat = sys$ascefc(EFC3, &EFCname); if (!$VMS_STATUS_SUCCESS(RetStat)) lib$signal(RetStat); // Wait for the flag, and check for errors RetStat = sys$waitfr(Efn2+EFC3); if (!$VMS_STATUS_SUCCESS(RetStat)) lib$signal(RetStat); // Set event flag 2, and check for errors RetStat = sys$setef(Efn2+EFC3); if (!$VMS_STATUS_SUCCESS(RetStat)) lib$signal(RetStat); . . . RetStat = sys$dacefc(EFC2);
| Set up some common definitions used by the various applications, including preprocessor defines for the event flag clusters, and some variables and values for particular event flags within the clusters. |
| Assume that COLUMBIA is the first process to issue the SYS$ASCEFC system service and therefore is the creator of the ENTERPRISE event flag cluster. Because this is a newly created common event flag cluster, all event flags in it are clear. COLUMBA then waits for the specified event flags, and then exits – the process will remain in a common event flag (CEF) wait state. |
| Use bit-shifts and an OR operation to create a bit mask from the bit numbers. |
| The SYS$ASCEFC call creates the relationship of the named event flag cluster, the specified range of common event flags, and the process. It also creates the event flag cluster, if necessary. |
| The SYS$DACEFC call disassociates the specified event flag cluster from the COLUMBIA process. |
| In process ENDEAVOUR, the argument |
| The continuation of process COLUMBIA depends on (unspecified) work done by processes ENDEAVOUR, ATLANTIS, and DISCOVERY. The SYS$WFLAND system service call specifies a mask indicating the event flags that must be set before process COLUMBIA can continue. The mask in this example (binary 1110) indicates that the second, third, and fourth flags in the cluster must be set. Process ENDEAVOUR sets the second event flag in the event flag cluster longword, using the SYS$SETEF system service call. |
| Process ATLANTIS associates with the cluster, but instead of referring to it as cluster 2, it refers to it as cluster 3 (with event flags in the range 96 through 127). Thus, when process ATLANTIS sets the event flag, it must bias the flag for the particular event flag cluster longword. |
| Process DISCOVERY associates with the cluster, waits for an event flag set by process ENDEAVOUR, and sets an event flag itself. |
6.8.11. Example of Using Event Flag Routines and Services
This section contains an example of how to use event flag services.
Common event flags are often used for communicating between a parent process and a created subprocess. In the following example, REPORT.FOR creates a subprocess to execute REPORTSUB.FOR, which performs a number of operations.
After REPORTSUB.FOR performs its first operation, the two processes can perform in parallel. REPORT.FOR and REPORTSUB.FOR use the common event flag cluster named JESSIER to communicate.
                         REPORT.FOR
.
.
.
! Associate common event flag cluster
STATUS = SYS$ASCEFC (%VAL(64),
2                    'JESSIER',,)
IF (.NOT. STATUS) CALL LIB$SIGNAL (%VAL(STATUS))

! Create subprocess to execute concurrently
MASK = IBSET (MASK,0)
STATUS = LIB$SPAWN ('RUN REPORTSUB', ! Image
2                   'INPUT.DAT',     ! SYS$INPUT
2                   'OUTPUT.DAT',    ! SYS$OUTPUT
2                   MASK
IF (.NOT. STATUS) CALL LIB$SIGNAL (%VAL(STATUS))

! Wait for response from subprocess.
STATUS = SYS$WAITFR (%VAL(64))
IF (.NOT. STATUS) CALL LIB$SIGNAL (%VAL(STATUS))
.
.
.

REPORTSUB.FOR
.
.
.
! Do operations necessary for
! continuation of parent process.
.
.
.
! Associate common event flag cluster
STATUS = SYS$ASCEFC (%VAL(64),
2                    'JESSIER',,)
IF (.NOT. STATUS)
2  CALL LIB$SIGNAL (%VAL(STATUS))

! Set flag for parent process to resume
STATUS = SYS$SETEF (%VAL(64))
.
.
.
6.9. Synchronizing System Services Operations
SYS$GETJPI and SYS$GETJPIW
SYS$QIO and SYS$QIOW
The W at the end of the system service name indicates the synchronous version of the service.
The asynchronous version of a system service queues a request and immediately returns control to your program pending the completion of the request. You can perform other operations while the system service executes. To avoid data corruptions, you should not attempt any read or write access to any of the buffers or itemlists referenced by the system service call prior to the completion of the asynchronous portion of the system service call. Further, no self-referential or self-modifying itemlists should be used.
Typically, you pass an event flag and a status block to an asynchronous system service. When the system service completes, it sets the event flag and places the final status of the request in the status block. Use the SYS$SYNCH system service to ensure that the system service has completed. You pass to SYS$SYNCH the event flag and status block that you passed to the asynchronous system service; SYS$SYNCH waits for the event flag to be set and then examines the status block to be sure that the system service rather than some other program set the event flag. If the status block is still zero, SYS$SYNCH waits until the status block is filled.
! Data structure for SYS$GETJPI
   .
   .
   .
INTEGER*4 STATUS,
2         FLAG,
2         PID_VALUE
! I/O status block
STRUCTURE /STATUS_BLOCK/
 INTEGER*2 JPISTATUS,
2          LEN
 INTEGER*4 ZERO /0/
END STRUCTURE
RECORD /STATUS_BLOCK/ IOSTATUS
   .
   .
   .
! Call SYS$GETJPI and wait for information
STATUS = LIB$GET_EF (FLAG)
IF (.NOT. STATUS) CALL LIB$SIGNAL (%VAL(STATUS))
STATUS = SYS$GETJPI (%VAL(FLAG),
2                    PID_VALUE,
2                    ,
2                    NAME_BUF_LEN,
2                    IOSTATUS,
2                    ,)
IF (.NOT. STATUS) CALL LIB$SIGNAL (%VAL(STATUS))
   .
   .
   .
STATUS = SYS$SYNCH (%VAL(FLAG),
2                   IOSTATUS)
IF (.NOT. IOSTATUS.JPISTATUS) THEN
  CALL LIB$SIGNAL (%VAL(IOSTATUS.JPISTATUS))
END IF

END
The synchronous version of a system service acts as if you had used the asynchronous
version followed immediately by a call to SYS$SYNCH; however,
it behaves this way only if you specify a status block. If you omit the status block,
the result is as though you called the asynchronous version followed by a call to
SYS$WAITFR. Regardless of whether you use the synchronous
or asynchronous version of a system service, if you omit the efn
argument, the service uses event flag 0.
Chapter 7. Synchronizing Access to Resources
This chapter describes the use of the lock manager to synchronize access to shared resources.
7.1. Synchronizing Operations with the Lock Manager
Note
The use of the term resource throughout this chapter means shared resource.
To synchronize access to resources, the lock management services provide a mechanism that allows processes to wait in a queue until a particular resource is available.
The resource must always be referred to by an agreed-upon name.
Access to the resource is always accomplished by queuing a lock request with the SYS$ENQ or SYS$ENQW system service.
All lock requests that are placed in a wait queue must wait for access to the resource.
A process can choose to lock a resource and then create a subprocess to operate on
this resource. In this case, the program that created the subprocess (the parent
program) should not exit until the subprocess has exited. To ensure that the parent
program does not exit before the subprocess, specify an event flag to be set when the
subprocess exits (use the completion-efn argument of
LIB$SPAWN). Before exiting from the parent program, use
SYS$WAITFR to ensure that the event flag is set. (You
can suppress the logout message from the subprocess by using the
SYS$DELPRC system service to delete the subprocess
instead of allowing the subprocess to exit).
|
Routine |
Description |
|---|---|
|
SYS$ENQ(W) |
Queues a new lock or lock conversion on a resource |
|
SYS$DEQ |
Releases locks and cancels lock requests |
|
SYS$GETLKI(W) |
Obtains information about the lock database |
7.2. Concepts of Resources and Locks
A resource can be any entity on the operating system (for example, files, data structures, databases, or executable routines). When two or more processes access the same resource, you often need to control their access to the resource. You do not want to have one process reading the resource while another process writes new data, because a writer can quickly invalidate anything being read by a reader. The lock management system services allow processes to associate a name with a resource and request access to that resource. Lock modes enable processes to indicate how they want to share access with other processes.
Resource name—The lock management services use the resource name to look for other lock requests that use the same name.
Lock mode to be associated with the requested lock—The lock mode indicates how the process wants to share the resource with other processes.
Address of a lock status block—The lock status block receives the completion status for a lock request and the lock identification. The lock identification refers to a lock request after it has been queued.
If no other process has a lock on the resource.
If another process has a lock on the resource and the mode of the new request is compatible with the existing lock.
If another process already has a lock on the resource and the mode of the new request is not compatible with the lock mode of the existing lock, the new request is placed in a queue, where it waits until the resource becomes available. When the resource becomes available, the process is notified that the lock has been granted.
Processes can also use the SYS$ENQ system service to change the lock mode of a lock. This is called a lock conversion.
7.2.1. Resource Granularity
Many resources can be divided into smaller parts. As long as a part of a resource can be identified by a resource name, the part can be locked. The term resource granularity describes the part of the resource being locked.
Figure 7.1, ''Model Database'' depicts a model of a database. The database is divided into areas, such as a file, which in turn are subdivided into records. The records are further divided into items.
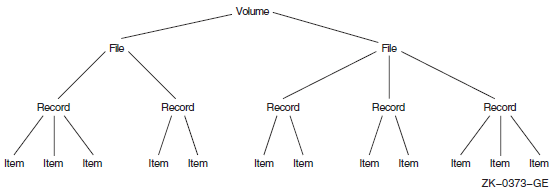
The processes that request locks on the database shown in Figure 7.1, ''Model Database'' may lock the whole database, an area in the database, a record, or a single item. Locking the entire database is considered locking at a coarse granularity; locking a single item is considered locking at a fine granularity.
In this example, overall access to the database can be represented by a root resource name. Access either to areas in the database or records within areas can be represented by sublocks.
Resource domain
Resource name
Access mode
Parent resource
Resource name
Access mode
7.2.2. Resource Domains
Because resource names are arbitrary names chosen by applications, one application may interfere (either intentionally or unintentionally) with another application. Unintentional interference can be easily avoided by careful design, such as by using a registered facility name as a prefix for all root resource names used by an application.
Intentional interference can be prevented by using resource domains. A resource domain is a namespace for root resource names and is identified by a number. Resource domain 0 is used as a system resource domain. Usually, other resource domains are used by the UIC group corresponding to the domain number.
By using the SYS$SET_RESOURCE_DOMAIN system service, a process can gain access to any resource domain subject to normal operating system access control. By default, each resource domain allows read, write, and lock access by members of the corresponding UIC group. See the VSI OpenVMS Guide to System Security for more information about access control.
7.2.3. Resource Names
A name specified by the caller
The caller's access mode
The caller's UIC group number (unless the resource is systemwide)
The identification of the lock's parent (optional)
For two resources to be considered the same, these four parts must be identical for each resource.
The name specified by the process represents the resource being locked. Other processes that need to access the resource must refer to it using the same name. The correlation between the name and the resource is a convention agreed upon by the cooperating processes.
The access mode is determined by the caller's access mode unless a less privileged mode is specified in the call to the SYS$ENQ system service. Access modes, their numeric values, and their symbolic names are discussed in the VSI OpenVMS Calling Standard.
The default resource domain is selected by the UIC group number for the process. You can access the system domain by setting the LCK$M_SYSTEM when you request a new root lock. Other domains can be accessed using the optional RSDM_ID parameter to SYS$ENQ. You need the SYSLCK user privilege to request systemwide locks from user or supervisor mode. No additional privilege is required to request systemwide locks from executive or kernel mode.
When a lock request is queued, it can specify the identification of a parent lock, at which point it becomes a sublock (see Section 7.4.8, ''Parent Locks''). However, the parent lock must be granted, or the lock request is not accepted. This enables a process to lock a resource at different degrees of granularity.
7.2.4. Choosing a Lock Mode
|
Mode Name |
Meaning |
|---|---|
|
LCK$K_NLMODE |
Null mode. This mode grants no access to the resource. The null mode is typically used either as an indicator of interest in the resource or as a placeholder for future lock conversions. |
|
LCK$K_CRMODE |
Concurrent read. This mode grants read access to the resource and allows sharing of the resource with other readers. The concurrent read mode is generally used either to perform additional locking at a finer granularity with sublocks or to read data from a resource in an "unprotected" fashion (allowing simultaneous writes to the resource). |
|
LCK$K_CWMODE |
Concurrent write. This mode grants write access to the resource and allows sharing of the resource with other writers. The concurrent write mode is typically used to perform additional locking at a finer granularity, or to write in an "unprotected" fashion. |
|
LCK$K_PRMODE |
Protected read. This mode grants read access to the resource and allows sharing of the resource with other readers. No writers are allowed access to the resource. This is the traditional "share lock." |
|
LCK$K_PWMODE |
Protected write. This mode grants write access to the resource and allows sharing of the resource with users at concurrent read mode. No other writers are allowed access to the resource. This is the traditional "update lock." |
|
LCK$K_EXMODE |
Exclusive. The exclusive mode grants write access to the resource and prevents the sharing of the resource with any other readers or writers. This is the traditional "exclusive lock." |
7.2.5. Levels of Locking and Compatibility
Null
Concurrent read
Concurrent write
Protected read
Protected write
Exclusive
Note that the concurrent write and protected read modes are considered to be of the same level.
|
Mode of Currently Granted Locks | ||||||
|---|---|---|---|---|---|---|
|
Mode of Requested Lock |
NL |
CR |
CW |
PR |
PW |
EX |
|
Key to Lock
Modes:
| ||||||
|
NL |
Yes |
Yes |
Yes |
Yes |
Yes |
Yes |
|
CR |
Yes |
Yes |
Yes |
Yes |
Yes |
No |
|
CW |
Yes |
Yes |
Yes |
No |
No |
No |
|
PR |
Yes |
Yes |
No |
Yes |
No |
No |
|
PW |
Yes |
Yes |
No |
No |
No |
No |
|
EX |
Yes |
No |
No |
No |
No |
No |
7.2.6. Lock Management Queues
Granted—The lock request has been granted.
Waiting—The lock request is waiting to be granted.
Conversion—The lock request has been granted at one mode and is waiting to be granted a high-level lock mode.
A queue is associated with each of the three states (see Figure 7.2, ''Three Lock Queues'').

When you request a new lock, the lock management services first determine whether the resource is currently known (that is, if any other processes have locks on that resource). If the resource is new (that is, if no other locks exist on the resource), the lock management services create an entry for the new resource and the requested lock. If the resource is already known, the lock management services determine whether any other locks are waiting in either the conversion or the waiting queue. If other locks are waiting in either queue, the new lock request is queued at the end of the waiting queue. If both the conversion and waiting queues are empty, the lock management services determine whether the new lock is compatible with the other granted locks. If the lock request is compatible, the lock is granted; if it is not compatible, it is placed in the waiting queue. You can use a flag bit to direct the lock management services not to queue a lock request if one cannot be granted immediately.
7.2.7. Concepts of Lock Conversion
Lock conversions allow processes to change the level of locks. For example, a process can maintain a low-level lock on a resource until it limits access to the resource. The process can then request a lock conversion.
You specify lock conversions by using a flag bit (see Section 7.4.6, ''Lock Conversions'') and a lock status block. The lock status block must contain the lock identification of the lock to be converted. If the new lock mode is compatible with the currently granted locks, the conversion request is granted immediately. If the new lock mode is incompatible with the existing locks in the granted queue, the request is placed in the conversion queue. The lock retains its old lock mode and does not receive its new lock mode until the request is granted.
When a lock is dequeued or is converted to a lower-level lock mode, the lock management services inspect the first conversion request on the conversion queue. The conversion request is granted if it is compatible with the locks currently granted. Any compatible conversion requests immediately following are also granted. If the conversion queue is empty, the waiting queue is checked. The first lock request on the waiting queue is granted if it is compatible with the locks currently granted. Any compatible lock requests immediately following are also granted.
7.2.8. Deadlock Detection
A deadlock occurs when any group of locks are waiting for each other in a circular fashion.
In Figure 7.3, ''Deadlock'', three processes have queued requests for resources that cannot be accessed until the current locks held are dequeued (or converted to a lower lock mode).
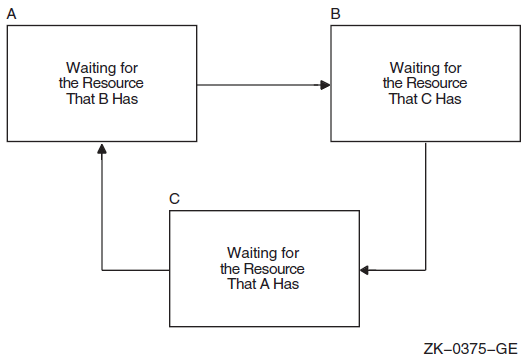
Note
Programmers must not make assumptions regarding which process is to be chosen to break a deadlock.
7.2.9. Lock Quotas and Limits
While most processes do not require very many locks simultaneously (typically fewer than 100), large scale database or server applications can easily exceed this threshold.
If you set an ENQLM value of 32767 in the SYSUAF, the operating system treats it as no limit and allows an application to own up to 16,776,959 locks, the architectural maximum of the OpenVMS lock manager. The following sections describe these features in more detail.
7.2.9.1. Enqueue Limit Quota (ENQLM)
An ENQLM value of 32767 in a user's SYSUAF record is treated as if there is no quota limit for that user. This means that the user is allowed to own up to 16,776,959 locks, the architectural maximum of the OpenVMS lock manager.
A SYSUAF ENQLM value of 32767 is not treated as a limit. Instead, when a process is created that reads ENQLM from the SYSUAF, if the value in the SYSUAF is 32767, it is automatically extended to the maximum. The Create Process (SYS$CREPRC) system service allows large quotas to be passed on to the target process. Therefore, a process can be created with an arbitrary ENQLM of any value up to the maximum if it is initialized from a process with the SYSUAF quota of 32767.
7.2.9.2. Subresources and Sublocks
Subresources and sublocks greater than 65535 are allowed. OpenVMS supports sub-resource and sub-lock counts up to the current architectural limits of the lock manager. The maximum number of locks on a single resource is limited to 65,535. If your program attempts to exceed this limit, SS$_EXDEPTH is returned.
In a mixed-version OpenVMS Cluster, only nodes running OpenVMS Version 7.1 or higher are able to handle these large lock trees. Large scale locking applications should be restricted to running on a subset of nodes running OpenVMS Version 7.1 or higher, or the entire cluster should be upgraded to OpenVMS Version 7.1 or higher to avoid unpredictable results.
7.2.9.3. Resource Hash Table
The resource hash table is an internal OpenVMS lock manager structure used to do quick lookups on resource names without a lengthy interactive search. Like all such tables, it results in a tradeoff of consuming memory in order to speed operation. A typical tuning goal is to have the resource hash table size (RESHASHTBL system parameter) about four times larger than the total number of resources in use on the system. Systems that have memory constraints or are not critically dependent on locking speed could set the table to a smaller size.
The maximum for the RESHASHTBL is 16,777,216 (224), which is the current architectural maximum for the total number of resources possible on the system.
Large memory systems that use very large resource namespaces can take advantage of this value to gain a performance advantage in many locking operations.
7.2.9.4. LOCKIDTBL System Parameter
The lock ID table is an internal OpenVMS lock manager structure used to find the relevant data structures for any given lock in the system. OpenVMS dynamically increases the lock ID table as usage requires and if sufficient physical memory is available. The default, minimum, and maximum values for the LOCKIDTBL system parameter allow large single tables for lock IDs. The maximum number of locks is regulated by the amount of available nonpaged pool.
7.3. Queuing Lock Requests
You use the SYS$ENQ or SYS$ENQW system service to queue lock requests. SYS$ENQ queues a lock request and returns; SYS$ENQW queues a lock request, waits until the lock is granted, and then returns. When you request new locks, the system service call must specify the lock mode, address of the lock status block, and resource name.
The format for SYS$ENQ and SYS$ENQW is as follows:
SYS$ENQ(W)
  ([efn] ,lkmode ,lksb ,[flags] ,[resnam] ,[parid] ,[astadr]
,[astprm] ,[blkast] ,[acmode] ,[rsdm_id] ,[nullarg])#include <stdio.h>
#include <descrip.h>
#include <lckdef.h>
/* Declare a lock status block */
struct lock_blk {
unsigned short condition,reserved;
unsigned int lock_id;
}lksb;
.
.
.
unsigned int status, lkmode=LCK$K_PRMODE;
$DESCRIPTOR(resource,"STRUCTURE_1");
/* Queue a request for protected read mode lock */
status = SYS$ENQW(0, /* efn - event flag */
lkmode, /* lkmode - lock mode requested */
&lksb, /* lksb - lock status block */
0, /* flags */
&resource, /* resnam - name of resource */
0, /* parid - parent lock id */
0, /* astadr - AST routine */
0, /* astprm - AST parameter */
0, /* blkast - blocking AST */
0, /* acmode - access mode */
0); /* rsdm_id - resource domain id */
}In this example, a number of processes access the STRUCTURE_1 data structure. Some processes read the data structure; others write to the structure. Readers must be protected from reading the structure while it is being updated by writers. The reader in the example queues a request for a protected read mode lock. Protected read mode is compatible with itself, so all readers can read the structure at the same time. A writer to the structure uses protected write or exclusive mode locks. Because protected write mode and exclusive mode are not compatible with protected read mode, no writers can write the data structure until the readers have released their locks, and no readers can read the data structure until the writers have released their locks.
Table 7.3, ''Compatibility of Lock Modes'' shows the compatibility of lock modes.
7.3.1. Example of Requesting a Null Lock
! Define lock modes
INCLUDE '($LCKDEF)'
! Define lock status block
STRUCTURE /STATUS_BLOCK/
 INTEGER*2 LOCK_STATUS,
2          NULL
 INTEGER*4 LOCK_ID
END STRUCTURE
RECORD /STATUS_BLOCK/ IOSTATUS
   .
   .
   .
! Request a null lock
STATUS = SYS$ENQW (,
2                  %VAL(LCK$K_NLMODE),
2                  IOSTATUS,
2                  ,
2                  'TERMINAL',
2                  ,,,,,)
IF (.NOT. STATUS) CALL LIB$SIGNAL (%VAL(STATUS))
IF (.NOT. IOSTATUS.LOCK_STATUS)
2    CALL LIB$SIGNAL (%VAL(IOSTATUS.LOCK_STATUS))
! Convert the lock to an exclusive lock
STATUS = SYS$ENQW (,
2                  %VAL(LCK$K_EXMODE),
2                  IOSTATUS,
2                  %VAL(LCK$M_CONVERT),
2                  'TERMINAL',
2                  ,,,,,)
IF (.NOT. STATUS) CALL LIB$SIGNAL (%VAL(STATUS))
IF (.NOT. IOSTATUS.LOCK_STATUS)
2    CALL LIB$SIGNAL (%VAL(IOSTATUS.LOCK_STATUS))
For more complete information on the use of SYS$ENQ, refer to the VSI OpenVMS System Services Reference Manual.
7.4. Advanced Locking Techniques
The previous sections discuss locking techniques and concepts that are useful to all applications. The following sections discuss specialized features of the lock manager.
7.4.1. Synchronizing Locks
Specify the number of an event flag to be set when the request is granted, and wait for the event flag.
Specify the address of an AST routine to be executed when the request is granted.
Poll the lock status block for a return status code that indicates that the request has been granted.
These methods of synchronization are identical to the synchronization techniques used with the SYS$QIO system services (described in VSI OpenVMS Programming Concepts Manual, Volume II).
The $ENQW macro performs synchronization by combining the functions of the SYS$ENQ system service and the Synchronize (SYS$SYNCH) system service. The $ENQW macro has the same arguments as the $ENQ macro. It queues the lock request and then places the program in an event flag wait state (LEF) until the lock request is granted.
7.4.2. Notification of Synchronous Completion
The lock management services provide a mechanism that allows processes to determine whether a lock request is granted synchronously, that is, if the lock is not placed on the conversion or waiting queue. This feature can be used to improve performance in applications where most locks are granted synchronously (as is normally the case).
If the flag bit LCK$M_SYNCSTS is set and a lock is granted synchronously, the status code SS$_SYNCH is returned in R0; no event flag is set, and no AST is delivered.
If the request is not completed synchronously, the success code SS$_NORMAL is returned; event flags or AST routines are handled normally (that is, the event flag is set, and the AST is delivered when the lock is granted).
7.4.3. Expediting Lock Requests
A request can be expedited (granted immediately) if its requested mode, when granted, does not block any currently queued requests from being granted. The LCK$M_EXPEDITE flag is specified in the SYS$ENQ operation to expedite a request. Currently, only NLMODE requests can be expedited. A request to expedite any other lock mode fails with SS$_UNSUPPORTED status.
7.4.4. Lock Status Block
The lock status block receives the final completion status and the lock identification, and optionally contains a lock value block (see Figure 7.4, ''Lock Status Block''). When a request is queued, the lock identification is stored in the lock status block even if the lock has not been granted. This allows a procedure to dequeue locks that have not been granted. For more information about the Dequeue Lock Request (SYS$DEQ) system service, see Section 7.5, ''Dequeuing Locks''.
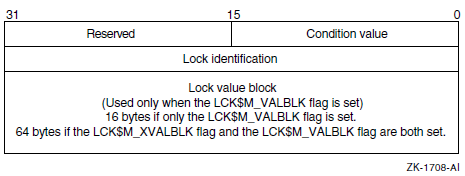
The status code is placed in the lock status block either when the lock is granted or when errors occur in granting the lock.
The uses of the lock value block are described in Section 7.6.1, ''Using the Lock Value Block''.
7.4.5. Blocking ASTs
In some applications that use the lock management services, a process must know whether it is preventing another process from locking a resource. The lock management services inform processes of this through the use of blocking ASTs. When the lock prevents another lock from being granted, the blocking routine is delivered as an AST to the process. Blocking ASTs are not delivered when the state of the lock is either Conversion or Waiting.
To enable blocking ASTs, the blkast argument of the
SYS$ENQ system service must contain the address of
a blocking AST service routine. The astprm argument
passes a parameter to the blocking AST. For more information about ASTs and AST
service routines, see Chapter 8, "Using Asynchronous System Traps". Some uses of blocking ASTs are
also described in that chapter.
7.4.6. Lock Conversions
Maintaining a low-level lock and converting it to a higher lock mode when necessary
Maintaining values stored in a resource lock value block (described in the following paragraphs)
Improving performance in some applications
A procedure normally needs an exclusive (or protected write) mode lock while writing data. The procedure should not keep the resource exclusively locked all the time, however, because writing might not always be necessary. Maintaining an exclusive or protected write mode lock prevents other processes from accessing the resource. Lock conversions allow a process to request a low-level lock at first and convert the lock to a high-level lock mode (protected write mode, for example) only when it needs to write data.
Some applications of locks require the use of the lock value block. If a version number or other data is maintained in the lock value block, you need to maintain at least one lock on the resource so that the value block is not lost. In this case, processes convert their locks to null locks, rather than dequeuing them when they have finished accessing the resource.
Note
If you specify the flag bit LCK$M_NOQUEUE on a lock conversion and the conversion fails, the new blocking AST address and parameter specified in the conversion request replace the blocking AST address and parameter specified in the previous SYS$ENQ request.
Queuing Lock Conversions
resnam, parid,
acmode, or prot argument. The
lock being converted is identified by the lock identification contained in the
lock status block. The following program shows a simple lock conversion. Note
that the lock must be granted before it can be
converted.#include <stdio.h>
#include <descrip.h>
#include <lckdef.h>
/* Declare a lock status block */
struct lock_blk {
unsigned short lkstat, reserved;
unsigned int lock_id;
}lksb;
.
.
.
unsigned int status, lkmode, flags;
$DESCRIPTOR(resource,"STRUCTURE_1");
.
.
.
lkmode = LCK$K_NLMODE;
/* Queue a request for protected read mode lock */
status = SYS$ENQW(0, /* efn - event flag */
lkmode, /* lkmode - lock mode */
&lksb, /* lksb - lock status block */
0, /* flags */
&resource, /* resnam - name of resource */
0, 0, 0, 0, 0, 0);
.
.
.
lkmode = LCK$K_PWMODE;
flags = LCK$M_CONVERT;
/* Queue a request for protected write mode lock */
status = SYS$ENQW(0, /* efn - event flag */
lkmode, /* lkmode - lock mode */
&lksb, /* lksb - lock status block */
flags, /* flags */
0, 0, 0, 0, 0, 0, 0);
.
.
.
}7.4.7. Forced Queuing of Conversions
It is possible to force certain conversions to be queued that would otherwise be granted. A conversion request with the LCK$M_QUECVT flag set is forced to wait behind any already queued conversions.
The conversion request is granted immediately if no conversions are already queued.
| Lock Mode to Which Lock Is Converted | ||||||
|---|---|---|---|---|---|---|
| Lock Mode at Which Lock Is Held | NL | CR | CW | PR | PW | EX |
|
Key to Lock
Modes:
| ||||||
| NL | No | Yes | Yes | Yes | Yes | Yes |
| CR | No | No | Yes | Yes | Yes | Yes |
| CW | No | No | No | Yes | Yes | Yes |
| PR | No | No | Yes | No | Yes | Yes |
| PW | No | No | No | No | No | Yes |
| EX | No | No | No | No | No | No |
7.4.8. Parent Locks
When a lock request is queued, you can declare a parent lock for the new lock.
A lock that has a parent is called a sublock. To specify
a parent lock, the lock identification of the parent lock is passed in the
parid argument to the
SYS$ENQ system service. A parent lock must be
granted before the sublocks belonging to the parent can be granted.
Low-level locks (concurrent read or concurrent write) such as files can be held at a coarse granularity; whereas high-level (protected write or exclusive mode) sublocks such as records or data items are held on resources of a finer granularity.
Resource names are unique with each parent; parent locks are part of the resource name.
The following paragraphs describe the use of parent locks.
Assume that a number of processes need to access a database. The database can be locked at two levels: the file and individual records. For updating all the records in a file, locking the whole file and updating the records without additional locking is faster and more efficient. But for updating selected records, locking each record as it is needed is preferable.
To use parent locks in this way, all processes request locks on the file. Processes that need to update all records must request protected write or exclusive mode locks on the file. Processes that need to update individual records request concurrent write mode locks on the file and then use sublocks to lock the individual records in protected write or exclusive mode.
In this way, the processes that need to access all records can do so by locking the file, while processes that share the file can lock individual records. A number of processes can share the file-level lock at concurrent write mode while their sublocks update selected records.
On VAX systems, the number of levels of sublocks is limited by the size of the interrupt stack. If the limit is exceeded, the error status SS$_EXDEPTH is returned. The size of the interrupt stack is controlled by the SYSGEN parameter INTSTKPAGES. The default value for INTSTKPAGES allows 32 levels of sublocks. For more information about SYSGEN and INTSTKPAGES, see the VSI OpenVMS System Manager's Manual.
On Alpha systems, the number of levels of sublocks is fixed at 127. If that limit is exceeded, the error status SS$_EXDEPTH is returned.
7.4.9. Lock Value Blocks
The lock value block is an optional, 16- or 64-byte extension of a lock status block. The first time a process associates a lock value block with a particular resource, the lock management services create a resource lock value block for that resource. The lock management services maintain the resource lock value block until there are no more locks on the resource.
To associate a lock value block with a resource, the process must set the flag
bit LCK$M_VALBLK in calls to the
SYS$ENQ system service. The lock status block
lksb argument must contain the address of the lock
status block for the resource. The LCK$M_XVALBLK flag,
which a process can use only in conjunction with the
LCK$M_VALBLK flag, specifies that a 64-byte lock
value block is to be used. Without this flag (which is not valid on VAX
systems), only the first 16 bytes of the value block are read or written.
When a process sets the flag bit LCK$M_VALBLK in a lock request (or conversion request) and the request (or conversion) is granted, the contents of the resource lock value block are written to the lock value block of the process.
When a process sets the flag bit LCK$M_VALBLK on a conversion from protected write or exclusive mode to an equal or lower mode, the contents of the process's lock value block are stored in the resource lock value block.
In this manner, processes can pass the value in the lock value block along with the ownership of a resource.
|
Lock Mode to Which Lock Is Converted | ||||||
|---|---|---|---|---|---|---|
|
Lock Mode at Which Lock Is Held |
NL |
CR |
CW |
PR |
PW |
EX |
|
Key to Lock
Modes:
Key to Effects:
| ||||||
|
NL |
Return |
Return |
Return |
Return |
Return |
Return |
|
CR |
Neither |
Return |
Return |
Return |
Return |
Return |
|
CW |
Neither |
Neither |
Return |
Return |
Return |
Return |
|
PR |
Neither |
Neither |
Neither |
Return |
Return |
Return |
|
PW |
Write |
Write |
Write |
Write |
Write |
Return |
|
EX |
Write |
Write |
Write |
Write |
Write |
Write |
Note that when protected write or exclusive mode locks are dequeued using the
Dequeue Lock Request (SYS$DEQ) system service and the
address of a lock value block is specified in the valblk
argument, the contents of that lock value block are written to the resource lock
value block.
7.4.10. Interoperation with 16-Byte and 64-Byte Value Blocks
Beginning with OpenVMS Version 8.2 on Alpha and IA-64 systems, the lock value block has been extended from 16 to 64 bytes. To use this feature, applications must explicitly specify both the LCK$M_XVALBLK flag and the LCK$M_VALBLK flag and provide a 64-byte buffer when reading and writing the value block.
Existing applications that use the 16-byte buffer and the LCK$M_VALBLK flag continue to operate without modifications, even when interacting with applications that use the 64-byte lock value block.
In your design of an application using the extended lock value block, you may or may not have to take interoperability into account. If your new application uses only completely new resource names in a completely new resource tree that is never referenced by an old application, from a version of OpenVMS prior to Version 8.2, or from a VAX node, then you need not worry about interoperability.
If a program updates the lock value block specifying only LCK$M_VALBLK without LCK$M_XVALBLK, only the first 16 bytes of the lock value block are written. As long as the resource is mastered on one of the newer Alpha or IA-64 systems, the remaining 48 bytes are unmodified. A future reader that specifies the LCK$M_XVALBLK flag in the $ENQ system service call is given all 64 bytes but receives the warning status SS$_XVALNOTVALID until a future writer writes to the value block specifying the LCK$M_XVALBLK flag.
In a cluster with VAX nodes or nodes running an OpenVMS version prior to Version 8.2, if a program running on one of the VAX or older version nodes writes to the value block, only the first 16 bytes of the lock value block will be written. As long as the resource is mastered on one of the newer Alpha or IA-64 systems, the remaining 48 bytes are unmodified. A future reader who specifies the LCK$M_XVALBLK flag in the $ENQ system service call is given all 64 bytes but receives the warning status SS$_XVALNOTVALID until a future writer writes to the value block specifying the LCK$M_XVALBLK flag.
The last 48 bytes of the value block are lost if a resource is mastered on or remastered to a VAX or older version node. In this case, a reader that specifies the LCK$M_XVALBLK flag in the $ENQ system service call is given the first 16 bytes followed by 48 bytes of zeroes and receives the warning status SS$_XVALNOTVALID until a future writer writes to the value block specifying the LCK$M_XVALBLK flag.
Remastering to another node is not under the control of the user or the system manager. It can occur if a node has an interest in the resource; that is, it holds a lock on some resource in the same tree. Simply referencing any resource in the tree from a VAX node or from an OpenVMS Alpha node running a version of OpenVMS prior to Version 8.2 makes it possible for the lock to be remastered to the old node.
The SS$_XVALNOTVALID condition value is a warning message, not an error message; therefore, the $ENQ service grants the requested lock and returns this warning on all subsequent calls to $ENQ until an application writes the value block with the LCK$M_XVALBLK flag set. SS$_XVALNOTVALID is fully described in the description of the $ENQ System Service in the VSI OpenVMS System Services Reference Manual: A–GETUAI manual.
If the entire lock status block is invalid, the SS$_VALNOTVALID status is returned and overrides SS$_XVALNOTVALID status.
7.5. Dequeuing Locks
When a process no longer needs a lock on a resource, you can dequeue the lock by using the Dequeue Lock Request (SYS$DEQ) system service. Dequeuing locks means that the specified lock request is removed from the queue it is in. Locks are dequeued from any queue: Granted, Waiting, or Conversion (see Section 7.2.6, ''Lock Management Queues''). When the last lock on a resource is dequeued, the lock management services delete the name of the resource from its data structures.
The four arguments to the SYS$DEQ macro
(lkid, valblk,
acmode, and flags) are optional.
The lkid argument allows the process to specify a particular
lock to be dequeued, using the lock identification returned in the lock status
block.
The valblk argument contains the address of a 16-byte lock
value block or, if LKC$M_XVALBLK is specified on Alpha or
IA-64 systems, the 64-byte lock value block. If the lock being dequeued is in protected
write or exclusive mode, the contents of the lock value block are stored in the lock
value block associated with the resource. If the lock being dequeued is in any other
mode, the lock value block is not used. The lock value block can be used only if a
specific lock is being dequeued. It may not be used when the
LCK$M_DEQALL flag is specified.
LCK$M_DEQALL—The LCK$M_DEQALL flag indicates that all locks of the access mode specified with the
acmodeargument and less privileged access modes are to be dequeued. The access mode is maximized with the access mode of the caller. If the flag LCK$M_DEQALL is specified, then thelkidargument must be 0 (or not specified).LCK$M_CANCEL—When LCK$M_CANCEL is specified, SYS$DEQ attempts to cancel a lock conversion request that was queued by SYS$ENQ. This attempt can succeed only if the lock request has not yet been granted, in which case the request is in the conversion queue. The LCK$M_CANCEL flag is ignored if the LCK$M_DEQALL flag is specified. For more information about the LCK$M_CANCEL flag, see the description of the SYS$DEQ service in the VSI OpenVMS System Services Reference Manual.
LCK$M_INVVALBLK—When LCK$M_INVVALBLK is specified, $DEQ marks the lock value block, which is maintained for the resource in the lock database, as invalid. See the descriptions of SYS$DEQ and SYS$ENQ in the VSI OpenVMS System Services Reference Manual for more information about the LCK$M_INVVALBLK flag.
#include <stdio.h>
#include <descrip.h>
#include <lckdef.h>

/* Declare a lock status block */

struct lock_blk {
                unsigned short lkstat ,reserved;
                unsigned int lock_id;
}lksb;

   .
   .
   .
        void read_updates();
        unsigned int status, lkmode=LCK$K_CRMODE, lkid;
        $DESCRIPTOR(resnam,"STRUCTURE_1"); /* resource */

/* Queue a request for concurrent read mode lock */
        status = SYS$ENQW(0,        /* efn - event flag */
                        lkmode,       /* lkmode - lock mode */
                        &lksb,        /* lksb - lock status block */
                        0,            /* flags */
                        &resnam,      /* resnam - name of resource */
                        0,            /* parid - lock id of parent */
                        &read_updates,/* astadr - AST routine */
                        0, 0, 0, 0);
        if((status & 1) != 1)
                LIB$SIGNAL(status);

   .
   .
   .
        lkid = lksb.lock_id;
        status = SYS$DEQ( lkid,    /* lkid - id of lock to be dequeued */
                       0, 0, 0);
        if((status & 1) != 1)
                LIB$SIGNAL(status);

}
User-mode locks are automatically dequeued when the image exits.
7.6. Local Buffer Caching with the Lock Management Services
The lock management services provide methods for applications to perform local buffer caching (also called distributed buffer management). Local buffer caching allows a number of processes to maintain copies of data (disk blocks, for example) in buffers local to each process and to be notified when the buffers contain invalid data because of modifications by another process. In applications where modifications are infrequent, substantial I/O can be saved by maintaining local copies of buffers. You can use either the lock value block or blocking ASTs (or both) to perform buffer caching.
7.6.1. Using the Lock Value Block
To support local buffer caching using the lock value block, each process maintaining a cache of buffers maintains a null mode lock on a resource that represents the current contents of each buffer. (For this discussion, assume that the buffers contain disk blocks.) The value block associated with each resource is used to contain a disk block "version number." The first time a lock is obtained on a particular disk block, the current version number of that disk block is returned in the lock value block of the process. If the contents of the buffer are cached, this version number is saved along with the buffer. To reuse the contents of the buffer, the null lock must be converted to protected read mode or exclusive mode, depending on whether the buffer is to be read or written. This conversion returns the latest version number of the disk block. The version number of the disk block is compared with the saved version number. If they are equal, the cached copy is valid. If they are not equal, a fresh copy of the disk block must be read from disk.
Whenever a procedure modifies a buffer, it writes the modified buffer to disk and then increments the version number before converting the corresponding lock to null mode. In this way, the next process that attempts to use its local copy of the same buffer finds a version number mismatch and must read the latest copy from disk rather than use its cached (now invalid) buffer.
7.6.2. Using Blocking ASTs
Blocking ASTs notify processes with granted locks that another process with an incompatible lock mode has been queued to access the same resource.
Blocking ASTs support local buffer caching in two ways. One technique involves deferred buffer writes; the other technique is an alternative method of local buffer caching without using value blocks.
7.6.2.1. Deferring Buffer Writes
When local buffer caching is being performed, a modified buffer must be written to disk before the exclusive mode lock can be released. If a large number of modifications are expected (particularly over a short period of time), you can reduce disk I/O by both maintaining the exclusive mode lock for the entire time that the modifications are being made and by writing the buffer once. However, this prevents other processes from using the same disk block during this interval. This problem can be avoided if the process holding the exclusive mode lock has a blocking AST. The AST notifies the process if another process needs to use the same disk block. The holder of the exclusive mode lock can then write the buffer to disk and convert its lock to null mode (thereby allowing the other process to access the disk block). However, if no other process needs the same disk block, the first process can modify it many times but write it only once.
7.6.2.2. Buffer Caching
To perform local buffer caching using blocking ASTs, processes do not convert their locks to null mode from protected read or exclusive mode when finished with the buffer. Instead, they receive blocking ASTs whenever another process attempts to lock the same resource in an incompatible mode. With this technique, processes are notified that their cached buffers are invalid as soon as a writer needs the buffer, rather than the next time the process tries to use the buffer.
7.6.3. Choosing a Buffer-Caching Technique
The choice between using either version numbers or blocking ASTs to perform local buffer caching depends on the characteristics of the application. An application that uses version numbers performs more lock conversions; whereas one that uses blocking ASTs delivers more ASTs. Note that these techniques are compatible; some processes can use one technique, and other processes can use the other at the same time. Generally, blocking ASTs are preferable in a low-contention environment; whereas version numbers are preferable in a high-contention environment. You can even invent combined or adaptive strategies.
In a combined strategy, the applications use specific techniques. If a process is expected to reuse the contents of a buffer in a short amount of time, the application uses blocking ASTs; if there is no reason to expect a quick reuse, the application uses version numbers.
In an adaptive strategy, an application makes evaluations based on the rate of blocking ASTs and conversions. If blocking ASTs arrive frequently, the application changes to using version numbers; if many conversions take place and the same cached copy remains valid, the application changes to using blocking ASTs.
For example, suppose one process continually displays the state of a database, while another occasionally updates it. If version numbers are used, the displaying process must always make sure that its copy of the database is valid (by performing a lock conversion); if blocking ASTs are used, the display process is informed every time the database is updated. On the other hand, if updates occur frequently, the use of version numbers is preferable to continually delivering blocking ASTs.
7.7. Example of Using Lock Management Services
! Define lock modes
INCLUDE '($LCKDEF)'
! Define lock status block
INTEGER*2 LOCK_STATUS,
2         NULL
INTEGER LOCK_ID
COMMON /LOCK_BLOCK/ LOCK_STATUS,
2                   NULL,
2                   LOCK_ID
              .
              .
              .
! Request a null lock
STATUS = SYS$ENQW (,
2                  %VAL(LCK$K_NLMODE),
2                  LOCK_STATUS,
2                  ,
2                  'TERMINAL',
2                  ,,,,,)
IF (.NOT. STATUS) CALL LIB$SIGNAL (%VAL(STATUS))
IF (.NOT. LOCK_STATUS) CALL LIB$SIGNAL (%VAL(LOCK_STATUS))

! Convert the lock to an exclusive lock
STATUS = SYS$ENQW (,
2                  %VAL(LCK$K_EXMODE),
2                  LOCK_STATUS,
2                  %VAL(LCK$M_CONVERT),
2                  'TERMINAL',
2                  ,,,,,)
IF (.NOT. STATUS) CALL LIB$SIGNAL (%VAL(STATUS))
IF (.NOT. LOCK_STATUS) CALL LIB$SIGNAL (%VAL(LOCK_STATUS))
To share a terminal between a parent process and a subprocess, each process requests a null lock on a shared resource name. Then, each time one of the processes wants to perform terminal I/O, it requests an exclusive lock, performs the I/O, and requests a null lock.
Because the lock manager is effective only between cooperating programs, the program that created the subprocess should not exit until the subprocess has exited. To ensure that the parent does not exit before the subprocess, specify an event flag to be set when the subprocess exits (the num argument of LIB$SPAWN). Before exiting from the parent program, use SYS$WAITFR to ensure that the event flag has been set. (You can suppress the logout message from the subprocess by using the SYS$DELPRC system service to delete the subprocess instead of allowing the subprocess to exit.)
After the parent process exits, a created process cannot synchronize access to the terminal and should use the SYS$BRKTHRU system service to write to the terminal.
Part II. Interrupts and Condition Handling
This part describes the use of asynchronous system traps (ASTs) and the use of condition-handling routines and services.
Chapter 8. Using Asynchronous System Traps
This chapter describes the use of asynchronous system traps (ASTs).
8.1. Overview of AST Routines
Asynchronous system traps (ASTs) are interrupts that occur asynchronously (out of sequence) with respect to the process's execution. ASTs are activated asynchronously to the mainline code in response to an event, usually either as a timer expiration or an I/O completion. An AST provides a transfer of control to a user-specified procedure that handles the event. For example, you can use ASTs to signal a program to execute a routine whenever a certain condition occurs.
The routine executed upon delivery of an AST is called an AST routine. AST routines are coded and referenced like any other routine; they are compiled and linked in the normal fashion. An AST routine's code must be reentrant. When the AST routine is finished, the routine that was interrupted resumes execution from the point of interruption.
ASTs provide a powerful programming technique. By using ASTs, you allow other processing to continue pending the occurrence of one or more events. Polling and blocking techniques, on the other hand, can use resources inefficiently. A polling technique employs a looping that polls for an event, which has to wait for an indication that an event has occurred. Therefore, depending on the frequency of the polling, polling techniques waste resources. If you use less frequent intervals, polling can then be slow to react to the occurrence of the event.
Blocking techniques force all processing to wait for the completion of a particular event. Blocking techniques can also be wasteful, for there could well be other activities the process could be performing while waiting for the occurrence of a specific event.
To deliver an AST, you use system services that specify the address of the AST routine. Then the system delivers the AST (that is, transfers control to your AST routine) at a particular time or in response to a particular event.
|
System Service |
Task Performed |
|---|---|
|
SYS$SETAST |
Enable or disable reception of AST requests |
|
SYS$DCLAST |
Declare AST |
The system services that use the AST mechanism accept as an argument the address of an AST service routine, that is, a routine to be given control when the event occurs.
|
System Service |
Task Performed |
|---|---|
|
SYS$DCLAST |
Declare AST |
|
SYS$ENQ |
Enqueue Lock Request |
|
SYS$GETDVI |
Get Device/Volume Information |
|
SYS$GETJPI |
Get Job/Process Information |
|
SYS$GETSYI |
Get Systemwide Information |
|
SYS$QIO |
Queue I/O Request |
|
SYS$SETIMR |
Set Timer |
|
SYS$SETPRA |
Set Power Recovery AST |
|
SYS$UPDSEC |
Update Section File on Disk |
The following sections describe in more detail how ASTs work and how to use them.
8.2. Declaring and Queuing ASTs
Most ASTs occur as the result of the completion of an asynchronous event that is initiated by a system service (for example, a SYS$QIO or SYS$SETIMR request) when the process requests notification by means of an AST.
The Declare AST (SYS$DCLAST) system service can be called to invoke a subroutine as an AST. With this service, a process can declare an AST only for the same or for a less privileged access mode.
You may find occasional use for the SYS$DCLAST system service in your programming applications; you may also find the SYS$DCLAST service useful when you want to test an AST service routine.
The following sections present programming information about declaring and using ASTs.
8.2.1. Reentrant Code and ASTs
Compiled code that is generated by VSI compilers is reentrant. Furthermore, VSI compilers normally generate AST routine local data that is reentrant. Data that is shared static, shared external data, Fortran COMMON, and group or system global section data are not inherently reentrant, and usually require explicit synchronization.
extern static routine malloc();
In some cases, a system service that queues an AST (for example, SYS$GETJPI) allows you to specify an argument for the AST routine. If you choose to pass the argument, the AST routine must be written to accept the argument.
8.2.1.1. The Call Frame
When a routine is active under OpenVMS, it has available to it temporary storage on a stack, in a construct known as a stack frame, or call frame. Each time a subroutine call is made, another call frame is pushed onto the stack and storage is made available to that subroutine. Each time a subroutine returns to its caller, the subroutine's call frame is pulled off the stack, and the storage is made available for reuse by other subroutines. Call frames therefore are nested. Outer call frames remain active longer, and the outermost call frame, the call frame associated with the main routine, is normally always available.
A primary exception to this call frame condition is when an exit handler runs. With an exit handler running, only static data is available. The exit handler effectively has its own call frame. Exit handlers are declared with the SYS$DCLEXH system service.
The use of call frames for storage means that all routine-local data is reentrant; that is, each subroutine has its own storage for the routine-local data.
The allocation of storage that is known to the AST must be in memory that is not volatile over the possible interval the AST might be pending. This means you must be familiar with how the compilers allocate routine-local storage using the stack pointer and the frame pointer. This storage is valid only while the stack frame is active. Should the routine that is associated with the stack frame return, the AST cannot write to this storage without having the potential for some severe application data corruptions.
8.2.2. Shared Data Access with Readers and Writers
Multiple readers with one writer
Multiple readers with multiple writers
If there is shared data access with multiple readers, your application must be able to tolerate having a stale counter that allows frequent looping back and picking up a new value from the code.
With multiple writers, often the AST is the writer, and the mainline code is the reader or updater. That is, the mainline processes all available work until it cannot dequeue any more requests, releasing each work request to the free queue as appropriate, and then hibernates when no more work is available. The AST then activates, pulls free blocks off the free queue, fills entries into the pending work queue, and then wakes the mainline code. In this situation, you should use a scheduled wakeup call for the mainline code in case work gets into the queue and no wakeup is pending.
Having multiple writers is possibly the most difficult to code, because you cannot always be sure where the mainline code is in its processing when the AST is activated. A suggestion is to use a work queue and a free queue at a known shared location, and to use entries in the queue to pass the work or data between the AST and the mainline code. Interlocked queue routines, such as LIB$INSQHI and LIB$REMQTI, are available in the Run-Time Library.
8.2.3. Shared Data Access and AST Synchronization
An AST routine might invoke subroutines that are also invoked by another routine. To prevent conflicts, a program unit can use the SYS$SETAST system service to disable AST interrupts before calling a routine that might be invoked by an AST. You use the SYS$SETAST service typically only if there are noninterlocked (nonreentrant) variables, or if the code itself is nonreentrant. Once the shared routine has executed, the program unit can use the same service to reenable AST interrupts. In general you should avoid using the SYS$SETAST call because of implications for application performance.
Implicit synchronization can be achieved for data that is shared for write by using only AST routines to write the data, since only one AST can be running at any one time. You can also use the SYS$DCLAST system service to call a subroutine in AST mode.
Explicit synchronization can be achieved through a lack of read-modify cells, in
cases of where there is one writer with one or more readers. However, if there are
multiple writers, you must consider explicit synchronization of access to the data
cells. This can be achieved using bitlocks (LIB$BBCCI),
hardware interlocked queues (LIB$INSQHI), interlocked add
and subtract (LIB$ADAWI) routines, or by other techniques.
These routines are available directly in assembler by language keywords in C and
other languages, and by OpenVMS RTL routines from all languages. On Alpha systems,
you can use PALcode calls such as load-locked (LD x_L) and
store-conditional (ST x_C) instructions to manage
synchronization.
The VAX interlocked queue instructions work unchanged on OpenVMS IA-64 systems and result in the SYS$PAL_xxxxx run-time routine PALcode equivalents being called, which incorporate the necessary interlocks and memory barriers.
Whenever possible, the OpenVMS IA-64 BLISS, C, and MACRO compilers convert CALL_PAL macros to the equivalent OpenVMS-provided SYS$PAL_ xxxx operating system calls for backward compatibility. The supported PAL operations vary among the several environments, although generally the user-mode PAL operations are the same. You can see which PAL calls have macros supplied by looking in module PAL_BUILTINS.H in the text library SYS$LIBRARY:SYS$STARLET_C.TLB.
For details of synchronization, see Chapter 6, "Synchronizing Data Access and Program Operations". Also see processor architecture manuals about the necessary synchronization techniques and for common synchronization considerations.
8.2.4. User ASTs and Asynchronous Completions
OpenVMS asynchronous completions usually activate an inner-mode, which is a privileged mode AST, to copy any results read into a user buffer, if this is a read operation, and to update the IO status block (IOSB) and set the event flag. If a use-mode AST has been specified, it is activated once all data is available and the event flag and IOSB, if requested, have been updated.
8.3. Common Mistakes in Asynchronous Programming
Allocating the IOSB in a routine's call frame and returning before completion of the asynchronous request that then exits. When the asynchronous operation completes, the IOSB is written, and if the call frame is no longer valid, then a data corruption of 8 bytes, the size of the IOSB, occurs.
Failure to specify both an event flag and an IOSB. These are, in essence, required arguments.
Failure to use SYS$SYNCH, or to check both for an event flag that has been set and for a nonzero IOSB. If both conditions do not hold, the operation is not yet complete.
Incorrect sharing of an IOSB among multiple operations that are pending in parallel, or the allocation of an IOSB in storage that is volatile while the operation is pending.
Failure to acquire and synchronize the use of event flags using one or more calls to the LIB$GET_EF and LIB$FREE_EF routines.
Attempting to access the terminal with language I/O statements using SYS$INPUT or SYS$OUTPUT may cause a redundant I/O error. You must establish another channel to the terminal by explicitly opening the terminal, or by using the SMG$ routines.
8.4. Using System Services for AST Event and Time Delivery
- Event—The following system routines allow you to specify an AST routine to be delivered when the system routine completes:
LIB$SPAWN—Signals when the subprocess has been created.
SYS$ENQ and SYS$ENQW—Signals when the resource lock is blocking a request from another process.
SYS$GETDVI and SYS$GETDVIW—Indicate that device information has been received.
SYS$GETJPI and SYS$GETJPIW—Indicate that process information has been received.
SYS$GETSYI and SYS$GETSYIW—Indicate that system information has been received.
SYS$QIO and SYS$QIOW—Signal when the requested I/O is completed.
SYS$UPDSEC—Signals when the section file has been updated.
SYS$ABORT_TRANS and SYS$ABORT_TRANSW—Signal when a transaction is aborted.
SYS$AUDIT_EVENT and SYS$AUDIT_EVENTW—Signal when an event message is appended to the system security audit log file or send an alarm to a security operator terminal.
SYS$BRKTHRU and SYS$BRKTHRU(W)—Signal when a message is sent to one or more terminals.
SYS$CHECK_PRIVILEGE and SYS$CHECK_PRIVILEGEW—Signal when the caller has the specified privileges or identifier.
SYS$DNS and SYS$DNSW—On VAX systems, signal when client applications are allowed to store resource names and addresses.
SYS$END_TRANS and SYS$END_TRANSW—Signal an end to a transaction by attempting to commit it.
SYS$GETQUI and SYS$GETQUIW—Signal when information is returned about queues and the jobs initiated from those queues.
SYS$START_TRANS and SYS$START_TRANSW—Signal the start of a new transaction.
SYS$SETCLUEVT and SYS$SETCLUEVTW—Signal a request for notification when a VMScluster configuration event occurs.
Event – The SYS$SETPRA system service allows you to specify an AST to be delivered when the system detects a power recovery.
Time – The SYS$SETIMR system service allows you to specify a time for the AST to be delivered.
Time – The SYS$DCLAST system service delivers a specified AST immediately. This makes it an ideal tool for debugging AST routines.
If a program queues an AST and then exits before the AST is delivered, the AST is deleted before execution. If a process is hibernating when an AST is delivered, the AST executes, and the process then resumes hibernating.
If the process was suspended from a SYS$SUSPEND call at supervisor mode, user-mode ASTs are executed as soon as the process is resumed. If more than one AST is delivered, they are executed in the order in which they were delivered. Supervisor-, executive-, and kernel-mode ASTs are executed upon delivery.
If the process was suspended from a SYS$SUSPEND call at kernel mode, all ASTs are blocked and are executed as soon as the process is resumed.
Generally, AST routines are used with the SYS$QIO or SYS$QIOW system service for handling Ctrl/C, Ctrl/Y, and unsolicited input.
8.5. Access Modes for AST Execution
Each request for an AST is associated with the access mode from which the AST is requested. Thus, if an image executing in user mode requests notification of an event by means of an AST, the AST service routine executes in user mode.
Because the ASTs you use almost always execute in user mode, you do not need to be concerned with access modes. However, you should be aware of some system considerations for AST delivery. These considerations are described in Section 8.7, ''Delivering ASTs''.
8.6. Calling an AST
This section shows the use of the Set Time (SYS$SETIMER) system service as an example of calling an AST. When you call the Set Timer (SYS$SETIMR) system service, you can specify the address of a routine to be executed when a time interval expires or at a particular time of day. The service schedules the execution of the routine and returns; the program image continues executing. When the requested timer event occurs, the system "delivers" an AST by interrupting the process and calling the specified routine.
#include <stdio.h>
#include <stdlib.h>
#include <ssdef.h>
#include <descrip.h>
#include <starlet.h>
#include <lib$routines.h>

struct {
        unsigned int lower, upper;
}daytim;

/* AST routine */
void time_ast(void);

main() {
        unsigned int status;
        $DESCRIPTOR(timbuf,"0 ::10.00");/* 10-second delta */

/* Convert ASCII format time to binary format */

        status = SYS$BINTIM(&timbuf,    /* buffer containing ASCII time */
                            &daytim);   /* timadr (buffer to receive  */
                                        /* binary time) */
        if ((status & 1) != 1)
                LIB$SIGNAL(status);
        else
                printf("Converting time to binary format...\n");

/* Set the timer */

        status = SYS$SETIMR(0,           /* efn (event flag) */
                            &daytim,     /* expiration time */
                            &time_ast,   /* astadr (AST routine) */
                            0,           /* reqidt (timer request id) */
                            0);          /* flags */
        if ((status & 1) != 1)
                LIB$SIGNAL(status);
        else
                printf("Setting the timer to expire in 10 secs...\n");

/* Hibernate the process until the timer expires */

        status = SYS$HIBER();
        if ((status & 1) != 1)
                LIB$SIGNAL(status);

}

void time_ast (void) {

        unsigned int status;

        status = SYS$WAKE(0,    /* process id */
                        0);     /* process name */

        if ((status & 1) != 1)
                LIB$SIGNAL(status);

        printf("Executing AST routine to perform wake up...\n");

        return;
}
| The call to the SYS$SETIMR system service requests an AST at 10 seconds from the current time. The daytim argument refers to the quadword, which must contain the time in system time (64-bit) format. For details on how this is accomplished, see VSI OpenVMS Programming Concepts Manual, Volume II. The astadr argument refers to TIME_AST, the address of the AST service routine. When the call to the system service completes, the process continues execution. |
| The timer expires in 10 seconds and notifies the system. The system interrupts execution of the process and gives control to the AST service routine. |
| The user routine TIME_AST handles the interrupt. When the AST routine completes, it issues a RET instruction to return control to the program. The program resumes execution at the point at which it was interrupted. |
8.7. Delivering ASTs
This section describes the AST service routine, some conditions affecting AST delivery, and the affect of kernel threads on AST delivery. The order of an AST delivery is not deterministic. The order the ASTs are entered into the AST queue for delivery to the process is not related to the order the particular operations that included AST notification requests were queued.
8.7.1. The AST Service Routine
An AST service routine must be a separate procedure. The AST must use the standard call procedure, and the routine must return using a RET instruction. If the service routine modifies any registers other than the standard scratch registers, it must preserve those registers.
Because you cannot know when the AST service routine will begin executing, you must take care that when you write the AST service routine it does not modify any data or instructions used by the main procedure (unless, of course, that is its function).
|
VAX |
Alpha |
IA-64 system Arguments |
x86-64 |
|---|---|---|---|
|
AST parameter |
AST parameter |
AST parameter |
AST parameter |
|
R0 |
R0 |
0 |
0 |
|
R1 |
R1 |
0 |
0 |
|
PC |
PC |
PC |
PC |
|
PSL |
PS |
Synthesized Alpha PS |
Synthesized Alpha PS |
Registers R0 and R1, the program counter (PC), and the processor status longword (PSL) on VAX systems, or processor status (PS) on 64-bit systems, and were saved when the process was interrupted by delivery of the AST.
The AST parameter is an argument passed to the AST service routine so that it can identify the event that caused the AST. When you call a system service requesting an AST, or when you call the SYS$DCLAST system service, you can supply a value for the AST parameter. If you do not specify a value, the parameter defaults to 0.
#include <stdio.h> #include <ssdef.h> #include <starlet.h> #include <lib$routines.h> /* Declare the AST routine */ void astrtn ( int ); main() { unsigned int status, value1=1, value2=2; status = SYS$DCLAST(&astrtn, /* astadr - AST routine */
| The program calls the SYS$DCLAST AST system service twice to queue ASTs. Both ASTs specify the AST service routine, ASTRTN. However, a different parameter is passed for each call. |
| The first action this AST routine takes is to check the AST parameter so that it can determine if the AST being delivered is the first or second one declared. The value of the AST parameter determines the flow of execution. |
8.7.2. Conditions Affecting AST Delivery
An AST service routine is currently executing at the same or at a more privileged access mode.
Because ASTs are implicitly disabled when an AST service routine executes, one AST routine cannot be interrupted by another AST routine declared for the same access mode. Only one AST can be running in any particular processor mode at anyone time. If an AST is active in any particular processor mode, it blocks all the same and less privileged ASTs. An AST can, however, be interrupted for an AST declared for a more privileged access mode.
AST delivery is explicitly disabled for the access mode.
A process can disable the delivery of AST interrupts with the Set AST Enable (SYS$SETAST) system service. This service may be useful when a program is executing a sequence of instructions that should not be interrupted for the execution of an AST routine.
SYS$SETAST is often used in a main program that shares data with an AST routine in order to block AST delivery while the program accesses the shared data.
The process is executing or waiting at an access mode more privileged than that for which the AST is declared.
For example, if a user-mode AST is declared as the result of a system service but the program is currently executing at a higher access mode (because of another system service call, for example), the AST is not delivered until the program is once again executing in user mode.
If an AST cannot be delivered when the interrupt occurs, the AST is queued until the conditions disabling delivery are removed. Queued ASTs are ordered by the access mode from which they were declared, with those declared from more privileged access modes at the front of the queue. If more than one AST is queued for an access mode, the ASTs are delivered in the order in which they are queued.
8.7.3. Kernel Threads AST Delivery (Alpha and I64)
On 64-bit systems with the kernel threads implementation, ASTs are associated with the kernel thread that initiates them, though it is not required that they execute on the thread that initiates them. The use of the kernel thread's PID in the asynchronous system trap control block (ACB) identifies the initiating thread. Associating an ACB with its initiating thread is required; the arrival of an AST is often the event that allows a thread, waiting on a flag or resource, to be made computable.
An AST, for example, may set a flag or make a resource available, and when the AST is completed, the thread continues its execution in non-AST mode and rechecks the wait condition. If the wait condition is satisfied, the thread continues; if not, the thread goes back into the wait queue.
On the other hand, if an AST executes on a kernel thread other than the one that initiated it, then when the AST completes, the kernel thread that initiated the AST must be made computable to ensure that it rechecks a waiting condition that may now be satisfied.
The queuing and delivery mechanisms of ASTs make a distinction between outer mode ASTs (user and supervisor modes), and inner mode ASTs (executive and kernel modes). This distinction is necessary because of the requirement to synchronize inner mode access.
With the kernel threads implementation, the standard process control block (PCB) AST queues now appear in the kernel thread block (KTB), so that each kernel thread may receive ASTs independently. These queues receive outer mode ASTs, which are delivered on the kernel thread that initiates them. The PCB has a new set of inner mode queues for inner mode ASTs that require the inner mode semaphore. With the creation of multiple kernel threads, inner mode ASTs are inserted in the PCB queues, and are delivered on whichever kernel thread holds the inner mode semaphore. Inner mode ASTs, which are explicitly declared as thread-safe, are inserted in the KTB queues, and are delivered on the kernel thread that initiates them.
If a thread manager declares a user AST callback, then user mode ASTs are delivered to the thread manager. The thread manager then is responsible for determining the context in which the AST should be executed.
There are significant programming considerations to be understood when mixing POSIX Threads Library with ASTs. For information about using POSIX Threads Library with ASTs, see the Guide to POSIX Threads Library.
8.7.3.1. Outer Mode (User and Supervisor) Nonserial Delivery of ASTs
It would be processed serially. It would not be interrupted or executed concurrently with any other AST of the same mode.
It would be processed without same-mode, non-AST level code executing concurrently.
Further, before kernel threads, user mode code could safely access data that it knows is only used by other user mode, non-AST level routines without needing any synchronization mechanisms. The underlying assumption is that only one thread of user mode execution exists. If the current code stream is accessing the data, then by implication no other code stream can be accessing it.
After kernel threads, this assumed behavior of AST routines and user mode code is no longer valid. Multiple user-mode, non-AST level code streams can be executing at the same time. The use of any data that can be accessed by multiple user-mode code streams must be modified to become synchronized using the load-locked (LDx_L) and store-conditional (STx_C) instructions, or by using some other synchronization mechanism.
Kernel threads assumes that multiple threads of execution can be active at one time and includes outer mode ASTs. Within any given kernel thread, outer mode ASTs will still be delivered serially. Also, the kernel thread model allows any combination of multiple outer mode threads, or multiple outer mode ASTs. However, outer-mode AST routines, as well as non-AST outer-mode code, has to be aware that any data structure that can be accessed concurrently by outer-mode code, or by any other outer-mode AST must be protected by some form of synchronization.
Before kernel threads, same-mode ASTs executed in the order that they were queued. After kernel threads and within a single kernel thread, that still is true. However, it is not true process-wide. If two ACBs are queued to two different KTBs, whichever is scheduled first, executes first. There is no attempt to schedule kernel threads in such a way to correctly order ASTs that have been queued to them. The ASTs execute in any order and can, in fact, execute concurrently.
8.7.3.2. Inner Mode (Executive and Kernel) AST Delivery
An executive mode AST can preempt non-AST executive mode processing.
A kernel mode AST can preempt non-AST kernel mode processing, or any executive mode processing.
A special kernel mode AST can preempt a normal kernel mode AST, non-AST kernel mode, or any executive mode.
No ASTs can be delivered when interrupt priority level (IPL) is raised to 2 or above. Special kernel mode ASTs execute entirely at IPL 2 or above, which is what prevents other kernel mode ASTs from executing while the special kernel mode AST is active.
After kernel threads, in contrast to the preceding list, kernel threads deliver any non thread-safe inner mode ASTs to the kernel thread that already owns the semaphore. If no thread currently owns the semaphore when the AST is queued, then the semaphore is acquired in SCH$QAST, and the owner is set to the target kernel thread for that AST. Subsequently queued ASTs see that thread as the semaphore owner and are delivered to that thread. This allows the PALcode and the hardware architecture to process all the AST preemption and ordering rules.
8.8. ASTs and Process Wait States
A process in a wait state can be interrupted for the delivery of an AST and the execution of an AST service routine. When the AST service routine completes execution, the process is returned to the wait state, if the condition that caused the wait is still in effect.
With the exception of suspended waits (SUSP) and suspended outswapped waits (SUSPO), any wait states can be interrupted.
8.8.1. Event Flag Waits
If a process is waiting for an event flag and is interrupted by an AST, the wait state is restored following execution of the AST service routine. If the flag is set at completion of the AST service routine (for example, by completion of an I/O operation), then the process continues execution when the AST service routine completes.
Event flags are described in Section 6.8, ''Using Event Flags''.
8.8.2. Hibernation
A process can place itself in a wait state with the Hibernate (SYS$HIBER) system service. This state can be interrupted for the delivery of an AST. When the AST service routine completes execution, the process continues hibernation. The process can, however, "wake" itself in the AST service routine or be awakened either by another process or as the result of a timer-scheduled wakeup request. Then, it continues execution when the AST service routine completes.
Process suspension is another form of wait; however, a suspended process cannot be interrupted by an AST. Process hibernation and suspension are described in Chapter 4, "Process Control".
8.8.3. Resource Waits and Page Faults
When a process is executing an image, the system can place the process in a wait state until a required resource becomes available, or until a page in its virtual address space is paged into memory. These waits, which are generally transparent to the process, can also be interrupted for the delivery of an AST.
8.9. Examples of Using AST Services
 PROGRAM DISK_DOWN
 ! Implicit none
 ! Status variable
 INTEGER STATUS
 STRUCTURE /ITMLST/
  UNION
   MAP
    INTEGER*2 BUFLEN,
 2            CODE
    INTEGER*4 BUFADR,
 2            RETLENADR
   END MAP
          MAP
    INTEGER*4 END_LIST
   END MAP
  END UNION
 END STRUCTURE
 RECORD /ITMLST/ DVILIST(2),
 2               JPILIST(2)
 ! Information for GETDVI call
 INTEGER PID_BUF,
 2       PID_LEN
 ! Information for GETJPI call
 CHARACTER*7 TERM_NAME
 INTEGER TERM_LEN
 EXTERNAL DVI$_PID,
 2        JPI$_TERMINAL
 ! AST routine and flag
 INTEGER AST_FLAG
 PARAMETER (AST_FLAG = 2)
 EXTERNAL NOTIFY_USER

 INTEGER SYS$GETDVIW,
 2       SYS$GETJPI,
 2       SYS$WAITFR

 ! Set up for SYS$GETDVI
 DVILIST(1).BUFLEN = 4
 DVILIST(1).CODE   = %LOC(DVI$_PID)
 DVILIST(1).BUFADR = %LOC(PID_BUF)
 DVILIST(1).RETLENADR = %LOC(PID_LEN)
 DVILIST(2).END_LIST = 0
 ! Find PID number of process using SYS$DRIVE0
 STATUS = SYS$GETDVIW (,
 2                     ,
 2                     '_MTA0:',       ! device
 2                     DVILIST,        ! item list
 2                     ,,,)
 IF (.NOT. STATUS) CALL LIB$SIGNAL (%VAL(STATUS))
 ! Get terminal name and fire AST
 JPILIST(1).CODE = %LOC(JPI$_TERMINAL)
 JPILIST(1).BUFLEN = 7
 JPILIST(1).BUFADR = %LOC(TERM_NAME)
 JPILIST(1).RETLENADR = %LOC(TERM_LEN)
 JPILIST(2).END_LIST = 0
 STATUS = SYS$GETJPI (,
 2                    PID_BUF,         !process id
 2                    ,
 2                    JPILIST,         !itemlist
 2                    ,
 2                    NOTIFY_USER,     !AST
 2                    TERM_NAME)       !AST arg
 IF (.NOT. STATUS) CALL LIB$SIGNAL(%VAL(STATUS))

 ! Ensure that AST was executed
 STATUS = SYS$WAITFR(%VAL(AST_FLAG))
 IF (.NOT. STATUS) CALL LIB$SIGNAL(%VAL(STATUS))
 END


 SUBROUTINE NOTIFY_USER (TERM_STR)
 ! AST routine that broadcasts a message to TERMINAL
 ! Dummy argument
 CHARACTER*(*) TERM_STR
 CHARACTER*8 TERMINAL
 INTEGER LENGTH
 ! Status variable
 INTEGER STATUS
 CHARACTER*(*) MESSAGE
 PARAMETER (MESSAGE =
 2             'SYS$TAPE going down in 10 minutes')
 ! Flag to indicate AST executed
 INTEGER AST_FLAG

 ! Declare system routines
 INTRINSIC LEN
 INTEGER  SYS$BRDCST,
 2        SYS$SETEF
 EXTERNAL SYS$BRDCST,
 2        SYS$SETEF,
 2        LIB$SIGNAL
 ! Add underscore to device name
 LENGTH = LEN (TERM_STR)
 TERMINAL(2:LENGTH+1) = TERM_STR
 TERMINAL(1:1) = '_'

 ! Send message
 STATUS = SYS$BRDCST(MESSAGE,
 2                   TERMINAL(1:LENGTH+1))
 IF (.NOT. STATUS) CALL LIB$SIGNAL(%VAL(STATUS))
 ! Set event flag
 STATUS = SYS$SETEF (%VAL(AST_FLAG))
 IF (.NOT. STATUS) CALL LIB$SIGNAL(%VAL(STATUS))
END#module SETAST "SRH X1.0-000" #pragma builtins /* **++ ** Facility: ** ** Examples ** ** Version: V1.0 ** ** Abstract: ** ** Example of working with the $SETAST call and ASTs. ** ** Author: ** Steve Hoffman ** ** Creation Date: 1-Jan-1990 ** ** Modification History: **-- */ /* * AST and $SETAST demo * raise the AST shields * request an AST, parameter is 1 * request an AST, parameter is 2 * lower the shields * <bing1><bing2> */ main() { int retstat = 0; int bogus(); int SYS$SETAST(); int SYS$DCLAST(); printf("\ndisabling\n"); /* * $SETAST() returns SS$_WASSET and SS$_WASCLR depending * on the previous setting of the AST shield. Watch out, * SS$_WASSET looks like a SUCCESSFUL SS$_ACCVIO. (ie: * a debug EXAMINE/COND shows SS$_WASSET as the error * %SYSTEM-S-ACCVIO. *Real* ACCVIO's never have the "-S-" * code!) */ retstat = SYS$SETAST( 0 ); printf("\n disable/ was: %d\n", retstat ); retstat = SYS$DCLAST( bogus, 1, 0 ); retstat = SYS$DCLAST( bogus, 2, 0 ); printf("\ndclast %x\n", retstat ); printf("\nenabling\n" ); retstat = SYS$SETAST( 1 ); /* * and, since we just lowered the shields, the ASTs should hit * in here somewhere.... */ printf("\n enable/ was: %d\n", retstat ); return( 1 ); }; /* * and, here's the entire, sophisticated, twisted AST code... */ bogus( astprm ) int astprm; { printf("\nAST tripped. ast parameter was 0x%x\n\n", astprm); return( 1 ); };
Chapter 9. Condition-Handling Routines and Services
This chapter describes the OpenVMS Condition Handling facility.
9.1. Overview of Run-Time Errors
System errors—for example, specifying an invalid argument to a system-defined procedure
Language-specific errors—for example, in Fortran, a data type conversion error during an I/O operation
Application-specific errors—for example, attempting to use invalid data
When an error occurs, the operating system either returns a condition code or value identifying the error to your program or signals the condition code. If the operating system signals the condition code, an error message is displayed and program execution continues or terminates, depending on the severity of the error. See Section 9.5, ''Condition Values'' for details about condition values.
When unexpected errors occur, your program should display a message identifying the error and then either continue or stop, depending on the severity of the error. If you know that certain run-time errors might occur, you should provide special actions in your program to handle those errors.
%SYSTEM-F-NOPRIV, no privilege for attempted operation
9.2. Overview of the OpenVMS Condition Handling Facility
The operating system provides a set of signaling and condition-handling routines and related system services to handle exception conditions. This set of services is called the OpenVMS Condition Handling facility (CHF). The OpenVMS Condition Handling Facility is a part of the common run-time environment of OpenVMS, which includes run-time library (RTL) routines and other components of the operating system.
The OpenVMS Condition Handling facility provides a single, unified method to enable condition handlers, signal conditions, print error messages, change the error behavior from the system default, and enable or disable detection of certain hardware errors. The RTL and all layered products of the operating system use the CHF for condition handling.
See the VSI OpenVMS Calling Standard for a detailed description of OpenVMS condition handling.
9.2.1. Condition-Handling Terminology
This section defines the terms used to describe condition handling.
exception
An event detected by the hardware or software that changes the normal flow of instruction execution. An exception is a synchronous event caused by the execution of an instruction and often means something generated by hardware. When an exception occurs, the processor transfers control by forcing a change in the flow of control from that explicitly indicated in the currently executing process.
Some exceptions are relevant primarily to the current process and normally invoke software in the context of the current process. An integer overflow exception detected by the hardware is an example of an event that is reported to the process. Other exceptions, such as page faults, are handled by the operating system and are transparent to the user.
An exception may also be signaled by a routine (software signaling) by calling the RTL routines LIB$SIGNAL or LIB$STOP.
condition
An informational state that exists when an exception occurs. Condition is a more general term than exception; a condition implies either a hardware exception or a software-raised condition. Often, the term condition is preferred because the term exception implies an error. Section 9.3.1, ''Conditions Caused by Exceptions'' further defines the differences between exceptions and conditions.
condition handling
When a condition is detected during the execution of a routine, a signal can be raised by the routine. The routine is then permitted to respond to the condition. The routine's response is called handling the condition.
On VAX systems, a non-zero address in the first longword of a procedure call frame or in an exception vector indicates that a condition handler exists for that call frame or vector.
On Alpha systems, the handler valid flag bit in the procedure descriptor is set to indicate that a condition handler exists.
on IA-64 systems, the handler present flag bit in the frame flags field of the invocation context block indicates the presence of a condition handler.
On x86-64 systems, a "P" in the augmentation string of a DWARF Common Information Entry (CIE) with a non-zero value in the personality_routine field of the CIE augmentation section or has the has_personality flag set in a compact unwind information entry, indicates the presence of a condition handler.
The condition handlers are themselves routines; they have their own call frames. Because they are routines, condition handlers can have condition handlers of their own. This allows condition handlers to field exceptions that might occur within themselves in a modular fashion.
On VAX systems, a routine can enable a condition handler by placing the address of the condition handler in the first longword of its stack frame.
On 64-bit systems, the association of a handler with a procedure is static and must be specified at the time a procedure is compiled (or assembled). Some languages that lack their own exception-handling syntax, however, may support emulation of dynamic specified handlers by means of built-in routines.
If you determine that a program needs to be informed of particular exceptions so it can take corrective action, you can write and specify a condition handler. This condition handler, which receives control when any exception occurs, can test for specific exceptions.
If an exception occurs and you have not specified a condition handler, the default condition handler established by the operating system is given control. If the exception is a fatal error, the default condition handler issues a descriptive message and causes the image that incurred the exception to exit.
Set Exception Vector (SYS$SETEXV)
Unwind from Condition Handler Frame (SYS$UNWIND)
Declare Change Mode or Compatibility Mode Handler (SYS$DCLCMH)
Parallel mechanisms exist for uniform dispatching of hardware and software exception conditions. Exceptions that are detected and signaled by hardware transfer control to an exception service routine in the executive. Software-detected exception conditions are generated by calling the run-time library routines LIB$SIGNAL or LIB$STOP. Hardware- and software-detected exceptions eventually execute the same exception dispatching code. Therefore, a condition handler may handle an exception condition generated by hardware or by software identically.
The Set Exception Vector (SYS$SETEXV) system service allows you to specify addresses for a primary exception handler, a secondary exception handler, and a last-chance exception handler. You can specify handlers for each access mode. The primary exception vector is reserved for the debugger. In general, you should avoid using these vectored handlers unless absolutely necessary. If you use a vectored handler, it must be prepared for all exceptions occurring in that access mode.
9.2.2. Functions of the Condition Handling Facility
Establish and call condition-handler routines
You can establish condition handlers to receive control in the event of an exception in one of the following ways:On VAX systems, by specifying the address of a condition handler in the first longword of a procedure call frame.
On 64-bit systems, the method for establishing a dynamic (that is, nonvectored) condition handler is specified by the language.
By establishing exception handlers with the Set Exception Vector (SYS$SETEXV) system service.
The first of these methods is the preferred way to specify a condition handler for a particular image. The use of dynamic handlers is also the most efficient way in terms of declaration. You should use vectored handlers for special purposes, such as writing debuggers.
The VAX MACRO programmer can use the following single-move address instruction to place the address of the condition handler in the longword pointed to by the current frame pointer (FP):MOVAB HANDLER,(FP)
You can associate a condition handler for the currently executing routine by specifying an address pointing to the handler, either in the routine's stack frame on VAX systems or in one of the exception vectors. (The MACRO-32 compilers for 64-bit systems generate the appropriate code from this VAX instruction to establish a dynamic condition handler).
On VAX systems, the high-level language programmer can call the common run-time library routine LIB$ESTABLISH (see the VSI OpenVMS RTL Library (LIB$) Manual), using the name of the handler as an argument. LIB$ESTABLISH returns as a function value either the address of the former handler established for the routine or 0 if no former handler existed.
On VAX systems, the new condition handler remains in effect for your routine until you call LIB$REVERT or control returns to the caller of the caller of LIB$ESTABLISH. Once this happens, you must call LIB$ESTABLISH again if the same (or a new) condition handler is to be associated with the caller of LIB$ESTABLISH.
On VAX systems, some languages provide access to condition handling as part of the language. You can use the ON ERROR GOTO statement in BASIC and the ON statement in PL/I to define condition handlers. If you are using a language that does provide access to condition handling, use its language mechanism rather than LIB$ESTABLISH. Each procedure can declare a condition handler.
When the routine signals an exception, the OpenVMS Condition Handling facility calls the condition handler associated with the routine. See Section 9.8, ''Signaling'' for more information about exception vectors. Figure 9.5, ''Sample Stack Scan for Condition Handlers (VAX Only)'' shows a sample stack scan for a condition handler.
The following VSI Fortran program segment establishes the condition handler ERRLOG. Because the condition handler is used as an actual argument, it must be declared in an EXTERNAL statement.INTEGER*4 OLD_HANDLER EXTERNAL ERRLOG . . . OLD_HANDLER = LIB$ESTABLISH (ERRLOG)LIB$ESTABLISH returns the address of the previous handler as its function value. If only part of a program unit requires a special condition handler, you can reestablish the original handler by invoking LIB$ESTABLISH and specifying the saved handler address as follows:CALL LIB$ESTABLISH (OLD_HANDLER)The run-time library provides several condition handlers and routines that a condition handler can call. These routines take care of several common exception conditions. Section 9.14, ''Run-Time Library Condition-Handling Routines''describes these routines.
On 64-bit systems, LIB$ESTABLISH and LIB$REVERT are not supported, though a high-level language may support them for compatibility. (Table 9.5, ''Run-Time Library Condition-Handling Support Routines'' lists other run-time library routines supported and not supported on Alpha systems).
On VAX systems, remove an established condition-handler routine
On VAX systems using LIB$REVERT, you can remove a condition handler from a routine's stack frame by setting the frame's handler address to 0. If your high-level language provides condition-handling statements, you should use them rather than LIB$REVERT.
On VAX systems, enable or disable the detection of arithmetic hardware exceptions
On VAX systems, using run-time library routines, you can enable or disable the signaling of floating point underflow, integer overflow, and decimal overflow, which are detected by the VAX hardware.
on IA-64 and x86-64 systems, access is allowed to the Floating Point Status Register, which contains dynamic control and status information for floating-point operations.
on IA-64 and x86-64 systems, the services SYS$IEEE_SET_FP_CONTROL, SYS$IEEE_SET_ROUNDING_MODE, and SYS$IEEE_SET_PRECISION_MODE provide the supported mechanisms to access and modify the Floating Point Status Register, and to modify the floating point rounding and precision modes respectively. Volume 1 of the Intel® Itanium® Architecture Software Developer's Manual contains a thorough description of the floating-point status register for Itanium, and Volume 1 of the Intel 64 and IA-32 Architectures Software Developer Manuals has a comparable description for x86-64.
Signal a condition
When the hardware detects an exception, such as an integer overflow, a signal is raised at that instruction. A routine may also raise a signal by calling LIB$SIGNAL or LIB$STOP. Signals raised by LIB$SIGNAL allow the condition handler either to terminate or to resume the normal flow of the routine. Signals raised by LIB$STOP require termination of the operation that raises the condition. The condition handler will not be allowed to continue from the point of call to LIB$STOP.
Display an informational message
The system establishes default condition handlers before it calls the main program. Because these default condition handlers provide access to the system's standard error messages, the standard method for displaying a message is by signaling the severity of the condition: informational, warning, or error. See Section 9.5, ''Condition Values'' for the definition of the severity field of a condition. The system default condition handlers resume execution of the instruction after displaying the messages associated with the signal. However, if the condition value indicates a severe condition, then the image exits after the message is displayed.
Display a stack traceback on errors
The default operations of the LINK and RUN commands provide a system-supplied handler (the traceback handler) to print a symbolic stack traceback. The traceback shows the state of the routine stack at the point where the condition occurred. The traceback information is displayed along with the messages associated with the signaled condition.
Compile customer-defined messages
The Message utility allows you to define your own exception conditions and the associated messages. Message source files contain the condition values and their associated messages. See Section 9.11.3, ''Using the Message Utility to Signal and Display User-Defined Messages'' for a complete description of how to define your own messages.
Unwind the stack
A condition handler can cause a signal to be dismissed and the stack to be unwound to the establisher or caller of the establisher of the condition handler when it returns control to the OpenVMS Condition Handling facility (CHF). During the unwinding operation, the CHF scans the stack. If a condition handler is associated with a frame, the system calls that handler before removing the frame. Calling the condition handlers during the unwind allows a routine to perform cleanup operations specific to a particular application, such as recovering from noncontinuable errors or deallocating resources that were allocated by the routine (such as virtual memory, event flags, and so forth). See Section 9.12.3, ''Unwinding the Call Stack'' for a description of the SYS$UNWIND system service.
Log error messages to a file
The Put Message (SYS$PUTMSG) system service permits any user-written handler to include a message in a listing file. Such message logging can be separate from the default messages the user receives. See Section 9.11, ''Displaying Messages'' for a detailed description of the SYS$PUTMSG system service.
64-bit systems, perform a nonlocal GOTO unwind.
A GOTO unwind operation is a transfer of control that leaves one procedure invocation and continues execution in a prior (currently active) procedure. This unified GOTO operation gives unterminated procedure invocations the opportunity to clean up in an orderly way.
9.3. Exception Conditions
Hardware
Software
Hardware-generated exceptions always result in conditions that require special action if program execution is to continue.
Software-generated exceptions may result in error or warning conditions. These conditions and their message descriptions are documented in the online Help Message utility and in the OpenVMS system messages documentation. To access online message descriptions, use the HELP/MESSAGE command.
More information on using the Help Message utility is available in OpenVMS System Messages: Companion Guide for Help Message Users. That document describes only those messages that occur when the system is not fully operational and you cannot access Help Message.
Arithmetic exception condition in a user-written program detected and signaled by hardware (for example, floating-point overflow)
Error in a user argument to a run-time library routine detected by software and signaled by calling LIB$STOP (for example, a negative square root)
Error in a run-time library language-support routine, such as an I/O error or an error in a data-type conversion
RMS success condition stating that the record is already locked
RMS success condition stating that the created file superseded an existing version
Return a completion code to the calling program using the function value mechanism
Most general-purpose run-time library routines indicate exception conditions by returning a condition value in R0 (R8 for I64,
%raxon x86-64). The calling program then tests bit 0 of R0 (R8 for I64,%raxon x86-64) for success or failure. This method allows better programming structure, because the flow of control can be changed explicitly after the return from each call.Signal the exception condition
A condition can be signaled by calling the RTL routine LIB$SIGNAL or LIB$STOP. Any condition handlers that were enabled are then called by the CHF. See Figure 9.5, ''Sample Stack Scan for Condition Handlers (VAX Only)'' for the order in which CHF invokes condition handlers.
Exception conditions raised by hardware or software are signaled to the routine identically.
For more details, see Section 9.8, ''Signaling'' and Section 9.8.1, ''Generating Signals with LIB$SIGNAL and LIB$STOP''.
9.3.1. Conditions Caused by Exceptions
Tables 9.1 and 9.2 summarize common conditions caused by exceptions. The condition names are listed in the first column. The second column explains each condition more fully by giving information about the type, meaning, and arguments relating to the condition. The condition type is either trap or fault. For more information about traps and faults, refer to the VAX Architecture Reference Manual, the Alpha Architecture Reference Manual, the Intel® Itanium® Architecture Software Developer's Manual, and the Intel 64 and IA-32 Architectures Software Developer Manuals, Volume 1, respectively. The meaning of the exception condition is a short description of each condition. The arguments for the condition handler are listed where applicable; they give specific information about the condition.
|
Condition Name |
Explanation | |
|---|---|---|
|
SS$_ACCVIO |
Type: |
Fault. |
|
Description: |
Access Violation. | |
|
Arguments: |
| |
|
SS$_ARTRES? | Type: |
Trap. |
| Description: |
Reserved arithmetic trap. | |
| Arguments: | None. | |
|
SS$_ASTFLT |
Type: |
Trap. |
|
Description: |
Stack invalid during attempt to deliver an AST. | |
|
Arguments: |
| |
|
SS$_BREAK | Type: |
Fault. |
| Description: |
Breakpoint instruction encountered. | |
| Arguments: | None. | |
|
SS$_CMODSUPR | Type: |
Trap. |
| Description: |
Change mode to supervisor instruction encountered.? | |
| Arguments: |
Change mode code. The possible values are –32,768 through 32,767. | |
|
SS$_CMODUSER | Type: |
Trap. |
| Description: |
Change mode to user instruction encountered.? | |
| Arguments: |
Change mode code. The possible values are –32,768 through 32,767. | |
|
SS$_COMPAT? |
Type: |
Fault. |
|
Description: |
Compatibility-mode exception. This exception condition can occur only when executing in compatibility mode.? | |
|
Arguments: |
Type of compatibility exception. The possible values are as follows:
| |
| Type: |
Trap. | |
| Description: |
Decimal overflow. | |
| Arguments: |
None. | |
| Type: |
Trap. | |
| Description: |
Floating/decimal divide-by-zero. | |
| Arguments: |
None. | |
|
SS$_FLTDIV_F? | Type: |
Fault. |
| Description: |
Floating divide-by-zero. | |
| Arguments: |
None. | |
|
SS$_FLTINE? | Type: |
Trap. |
| Description: |
Floating inexact result. | |
| Arguments: |
None. | |
|
SS$_FLTINE_F | Type: |
Trap. |
| Description: |
Floating inexact result fault. | |
| Arguments: |
None. | |
|
SS$_FLTINV? | Type: |
Trap. |
| Description: |
Floating invalid operation. | |
| Arguments: |
None. | |
|
SS$_FLTINV_F | Type: |
Trap. |
| Description: |
Floating invalid operation fault. | |
| Arguments: |
None. | |
| Type: |
Trap. | |
| Description: |
Floating-point overflow. | |
| Arguments: |
None. | |
|
SS$_FLTOVF_F? | Type: |
Fault. |
| Description: |
Floating-point overflow fault. | |
| Arguments: |
None. | |
| Type: |
Trap. | |
| Description: |
Floating-point underflow. | |
| Arguments: |
None. | |
|
SS$_FLTUND_F? | Type: |
Fault. |
| Description: |
Floating-point underflow fault. | |
| Arguments: |
None. | |
| Type: |
Trap. | |
| Description: |
Integer divide-by-zero. | |
| Arguments: |
None. | |
| Type: |
Trap. | |
| Description: |
Integer overflow. | |
| Arguments: |
None. | |
|
SS$_OPCCUS? | Type: |
Fault. |
| Description: |
Opcode reserved for customer fault. | |
| Arguments: | None. | |
|
SS$_OPCDEC | Type: |
Fault. |
| Description: |
Opcode reserved for OpenVMS fault. | |
| Arguments: |
None. | |
|
SS$_PAGRDERR |
Type: |
Fault. |
|
Description: |
Read error occurred during an attempt to read a faulted page from disk. | |
|
Arguments: |
| |
|
SS$_RADRMOD? | Type: |
Fault. |
| Description: |
Attempt to use a reserved addressing mode. | |
| Arguments: |
None. | |
|
SS$_ROPRAND | Type: |
Fault. |
| Description: |
Attempt to use a reserved operand. | |
| Arguments: |
None. | |
|
SS$_SSFAIL | Type: |
Fault. |
| Description: |
System service failure (when system service failure exception mode is enabled). Condition occurred as result of the use of the obsolete feature that was enabled by using $SETSFM service. | |
| Arguments: | Status return from system service (R0). (The same value is in R0 of the mechanism array). | |
| Type: |
Trap. | |
| Description: |
Subscript range trap. | |
| Arguments: |
None. | |
|
SS$_TBIT? | Type: |
Fault. |
| Description: |
Trace bit is pending following an instruction. | |
| Arguments: |
None. | |
|
Condition Name |
Explanation | |
|---|---|---|
|
SS$_NATFAULT |
Type: |
Fault. |
|
Description |
Register NaT consumption fault - A non-speculative operation, (load, store, control register access, instruction fetch, and so forth), read a NaT source register, NaTVal source register, or referenced a NaT Page. | |
|
Arguments: |
Reason mask:
| |
|
SS$_FLTDENORMAL |
Type: |
Fault. |
|
Description |
Normal/unnormal operand exception. | |
|
Arguments: |
None. | |
|
SS$_BREAK_SYS |
Type: |
Fault. |
|
Description |
An attempt was made to execute an Itanium break instruction. | |
|
Arguments: |
Break code is implementation specific. See the Intel® Itanium® Architecture Software Developer's Manual, Volume II. | |
|
SS$_BREAK_ARCH |
Type: |
Fault. |
|
Description |
An attempt was made to execute an Itanium break instruction. | |
|
Arguments: |
Break code is one of SS$_ROPRAND, SS$_INTDIV, SS$_INTOVF, SS$_SUBRNG, SS$_NULPTRERR, SS$_DECOVF, SS$_DECDIV, SS$_DECINV, or SS$_STKOVF. | |
|
SS$_BREAK_APPL |
Type: |
Fault. |
|
Description |
An attempt was made to execute an Itanium break instruction. | |
|
Arguments: |
Break code is one of SS$_ROPRAND, SS$_INTDIV, SS$_INTOVF, SS$_SUBRNG, SS$_NULPTRERR, SS$_DECOVF, SS$_DECDIV, SS$_DECINV, or SS$_STKOVF. | |
|
SS$_DEBUG_FAULT |
Type: |
Fault. |
|
Description |
Debug fault - Either the instruction address matches the parameters set up in the instruction debug registers, or the data address of a load, store, semaphore, or mandatory RSE fill or spill matches the parameters set up in the data debug registers. | |
|
Arguments: |
| |
Change-Mode and Compatibility-Mode Handlers
Traps caused by change-mode-to-user or change-mode-to-supervisor instructions
On VAX systems, compatibility mode faults
You can use the Declare Change Mode or Compatibility Mode Handler (SYS$DCLCMH) system service to establish procedures to receive control when one of these conditions occurs. The SYS$DCLCMH system service is described in the VSI OpenVMS System Services Reference Manual.
9.3.2. Exception Conditions
The full set of exception conditions, especially for hardware exceptions, varies from architecture to architecture.
| Exception Condition Code | Comment |
|---|---|
|
New Alpha Exceptions | |
|
SS$_HPARITH–High-performance arithmetic exception |
Generated for most Alpha arithmetic exceptions (see Section 9.3.3, ''Arithmetic Exceptions'') |
|
SS$_ALIGN–Data alignment trap |
No VAX equivalent |
|
VAX-Specific Hardware Exceptions | |
|
SS$_ARTRES–Reserved arithmetic trap |
No Alpha system equivalent |
|
SS$_COMPAT–Compatibility fault |
No Alpha system equivalent |
|
SS$_DECOVF–Decimal overflow? |
Replaced by SS$_HPARITH on Alpha (see Section 9.3.3, ''Arithmetic Exceptions'') |
|
SS$_FLTDIV–Float divide-by-zero (trap)? |
Replaced by SS$_HPARITH on Alpha (see Section 9.3.3, ''Arithmetic Exceptions'') |
|
SS$_FLTDIV_F–Float divide-by-zero (fault)? |
Replaced by SS$_HPARITH on Alpha (see Section 9.3.3, ''Arithmetic Exceptions'') |
|
SS$_FLTOVF–Float overflow (trap)? |
Replaced by SS$_HPARITH on Alpha (see Section 9.3.3, ''Arithmetic Exceptions'') |
|
SS$_FLTOVF_F–Float overflow (fault)? |
Replaced by SS$_HPARITH on Alpha (see Section 9.3.3, ''Arithmetic Exceptions'') |
|
SS$_FLTUND–Float underflow (trap)? |
Replaced by SS$_HPARITH on Alpha (see Section 9.3.3, ''Arithmetic Exceptions'') |
|
SS$_FLTUND_F–Float underflow (fault)? |
Replaced by SS$_HPARITH on Alpha (see Section 9.3.3, ''Arithmetic Exceptions'') |
|
SS$_INTDIV–Integer divide-by-zero? |
Replaced by SS$_HPARITH on Alpha (see Section 9.3.3, ''Arithmetic Exceptions'') |
|
SS$_INTOVF–Integer overflow? |
Replaced by SS$_HPARITH on Alpha (see Section 9.3.3, ''Arithmetic Exceptions'') |
|
SS$_TBIT–Trace pending? |
No Alpha equivalent |
|
SS$_OPCCUS–Opcode reserved to customer |
No Alpha equivalent |
|
SS$_RADMOD–Reserved addressing mode |
No Alpha equivalent |
|
SS$_SUBRNG–INDEX subscript range check |
No Alpha equivalent |
9.3.3. Arithmetic Exceptions
On VAX, I64, and x86-64 systems, the architecture ensures that arithmetic exceptions are reported synchronously; that is, an arithmetic instruction that causes an exception (such as an overflow) enters any exception handlers immediately, and subsequent instructions are not executed. The program counter (PC) reported to the exception handler is that of the failing arithmetic instruction. This allows application programs, for example, to resume the main sequence, with the failing operation being emulated or replaced by some equivalent or alternative set of operations.
On Alpha systems, arithmetic exceptions are reported asynchronously; that is, implementations of the architecture can allow a number of instructions (including branches and jumps) to execute beyond that which caused the exception. These instructions may overwrite the original operands used by the failing instruction, thus causing the loss of information that is integral to interpreting or rectifying the exception. The program counter (PC) reported to the exception handler is not that of the failing instruction, but rather is that of some subsequent instruction. When the exception is reported to an application's exception handler, it may be impossible for the handler to fix up the input data and restart the instruction.
Because of this fundamental difference in arithmetic exception reporting, Alpha systems define a new condition code, SS$_HPARITH, to indicate most arithmetic exceptions. Thus, if your application contains a condition-handling routine that performs processing when an integer overflow exception occurs, on VAX systems the application expects to receive the SS$_INTOVF condition code. On Alpha systems, this exception may be indicated by the condition code SS$_HPARITH. It is possible, however, that some higher level languages using RTL routines, for example, LIB$ routines, might convert the SS$_HPARITH into a more precise exception code such as SS$_INTOVF, or generate a precise exception code directly in an arithmetic emulation routine. If a SS$_HPARITH is received as the condition code, it indicates an imprecise Alpha system exception. If a precise integer overflow is received, SS$_INTOVF, it indicates either a VAX system condition or a precise Alpha system condition.
Figure 9.1, ''SS$_HPARITH Exception Signal Array'' shows the format of the SS$_HPARITH exception signal array.
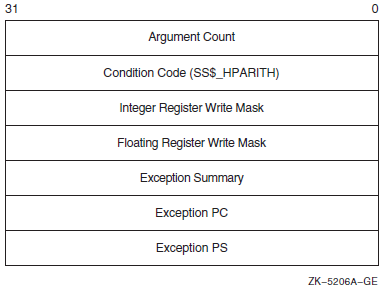
integer register
                    write mask
, floating register write mask, and
exception summary arguments of the exception
pc and exception ps. The integer
register write mask and floating register write
mask arguments indicate the registers that were targets of
instructions that set bits in the exception summary argument.
Each bit in the mask represents a register. The exception
summary argument indicates the type of exceptions that are being
signaled by setting flags in the first 7 bits. Table 9.4, ''Exception Summary Argument Fields''
lists the meaning of each of these bits when set.|
Bit |
Meaning When Set |
|---|---|
|
0 |
Software completion. |
|
1 |
Invalid floating arithmetic, conversion, or comparison operation. |
|
2 |
Invalid attempt to perform a floating divide operation with a divisor of zero. Note that integer divide-by-zero is not reported. |
|
3 |
Floating arithmetic or conversion operation overflowed the destination exponent. |
|
4 |
Floating arithmetic or conversion operation underflowed the destination exponent. |
|
5 |
Floating arithmetic or conversion operation gave a result that differed from the mathematically exact result. |
|
6 |
Integer arithmetic or conversion operation from floating point to integer overflowed the destination precision. |
For more information and recommendations about using arithmetic exceptions on Alpha systems, see Migrating to an OpenVMS AXP System: Recompiling and Relinking Applications.
9.3.4. Unaligned Access Traps (Alpha and I64)
On Alpha and IA-64 systems, an unaligned access trap is generated when an attempt is made to load or store a longword or quadword to or from a register using an address that does not have the natural alignment of the particular data reference and does not use an instruction that takes an unaligned address as an operand (for example, LDQ_U on Alpha systems). For more information about data alignment, see Section 9.4.2, ''System-Defined Arithmetic Condition Handlers''.
Aligning static data on natural boundaries by default. (This default behavior can be overridden by using a compiler qualifier).
Generating special inline code sequences for data that is known to be unnaturally aligned at compile time.
Note, however, that compilers cannot align dynamically defined data. Thus, alignment faults may be triggered.
An alignment exception is identified by the condition code SS$_ALIGN. Figure 9.2, ''SS$_ALIGN Exception Signal Array'' illustrates the elements of the signal array returned by the SS$_ALIGN exception.
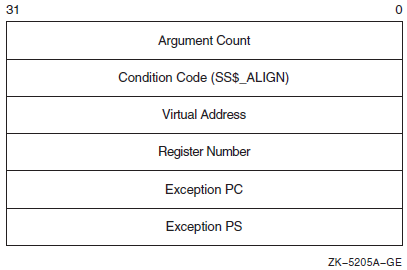
This signal array contains two arguments specific to the
SS$_ALIGN exception: the virtual
address argument and the register number (ISR
for I64) argument. The virtual address argument contains the
address of the unaligned data being accessed. The register
number (ISR for I64) argument identifies the target register of the
operation.
9.4. How Run-Time Library Routines Handle Exceptions
Most general-purpose run-time library routines handle errors by returning a status in
R0 (R8 for I64,
%rax for
x86-64). In some cases, however, exceptions that occur during the execution of a
run-time library routine are signaled. This section tells how run-time library routines
signal exception conditions.
Some calls to the run-time library do not or cannot specify an action to be taken. In this case, the run-time library signals the proper exception condition by using the operating system's signaling mechanism.
In order to maintain modularity, the run-time library does not use exception vectors, which are processwide data locations. Thus, the run-time library itself does not establish handlers by using the primary, secondary, or last-chance exception vectors.
9.4.1. Exception Conditions Signaled from Mathematics Routines (VAX Only)
On VAX systems, mathematics routines return function values in register R0 or registers R0 and R1, unless the return values are larger than 64 bits. For this reason, mathematics routines cannot use R0 to return a completion status and must signal all errors. In addition, all mathematics routines signal an error specific to the MTH$ facility rather than a general hardware error.
9.4.1.1. Integer Overflow and Floating-Point Overflow
Although the hardware normally detects integer overflow and floating-point overflow errors, run-time library mathematics routines are programmed with a software check to trap these conditions before the hardware signaling process can occur. This means that they call LIB$SIGNAL instead of allowing the hardware to initiate signaling.
The software check is needed because JSB routines cannot set up condition handlers. The check permits the JSB mathematics routines to add an extra stack frame so that the error message and stack traceback appear as if a CALL instruction had been performed. Because of the software check, JSB routines do not cause a hardware exception condition even when the calling program has enabled the detection of integer overflow. On the other hand, detection of floating-point overflow is always enabled and cannot be disabled.
If an integer or floating-point overflow occurs during a CALL or a JSB routine, the routine signals a mathematics-specific error such as MTH$_FLOOVEMAT (Floating Overflow in Math Library) by calling LIB$SIGNAL explicitly.
9.4.1.2. Floating-Point Underflow
If the immediate calling program (CALL or JSB) has enabled floating-point underflow traps, a mathematics-specific error condition is signaled.
Otherwise, the result is corrected to zero and execution continues with no error condition.
The user can enable or disable detection of floating-point underflow at runtime by calling the routine LIB$FLT_UNDER.
9.4.2. System-Defined Arithmetic Condition Handlers
LIB$DEC_OVER—Enables or disables the signaling of a decimal overflow. By default, signaling is disabled.
LIB$FLT_UNDER—Enables or disables the signaling of a floating-point underflow. By default, signaling is disabled.
LIB$INT_OVER—Enables or disables the signaling of an integer overflow. By default, signaling is enabled.
Invoke the appropriate handler as a function specifying the first argument as 1 to enable signaling.
Invoke the handler with command qualifiers when you compile your program. (Refer to your program language manuals).
You cannot disable the signaling of integer divide-by-zero, floating-point overflow, and floating-point or decimal divide-by-zero.
When the signaling of a hardware condition is enabled, the occurrence of the exception condition causes the operating system to signal the condition as a severe error. When the signaling of a hardware condition is disabled, the occurrence of the condition is ignored, and the processor executes the next instruction in the sequence.
The signaling of overflow and underflow detection is enabled independently for activation of each routine, because the call instruction saves the state of the calling program's hardware enable operations in the stack and then initializes the enable operations for the called routine. A return instruction restores the calling program's enable operations.
These run-time library routines are intended primarily for high-level languages, because you can achieve the same effect in MACRO with the single Bit Set PSW (BISPSW) or Bit Clear PSW (BICPSW) VAX instructions.
These routines allow you to enable and disable detection of decimal overflow, floating-point underflow, and integer overflow for a portion of your routine's execution. Note that the VSI BASIC for OpenVMS VAX Systems and VSI Fortran compilers provide a compile-time qualifier that permits you to enable or disable integer overflow for your entire routine.
|
Routine |
Availability on 64-bit Systems |
|---|---|
|
Arithmetic Exception Support Routines | |
|
LIB$DEC_OVER–Enables or disables signaling of decimal overflow |
Not supported |
|
LIB$FIXUP_FLT–Changes floating-point reserved operand to a specified value |
Not supported |
|
LIB$FLT_UNDER–Enables or disables signaling of floating-point underflow |
Not supported |
|
LIB$INT_OVER–Enables or disables signaling of integer overflow |
Not supported |
|
General Condition-Handling Support Routines | |
|
LIB$DECODE_FAULT—Analyzes instruction context for fault |
Not supported |
|
LIB$ESTABLISH—Establishes a condition handler |
Not supported (languages may support for compatibility) |
|
LIB$MATCH_COND—Matches condition value |
Supported |
|
LIB$REVERT–Deletes a condition handler |
Not supported (languages may support for compatibility) |
|
LIB$SIG_TO_STOP—Converts a signaled condition to a condition that cannot be continued |
Supported |
|
LIB$SIG_TO_RET—Converts a signal to a return status |
Supported |
|
LIB$SIM_TRAP—Simulates a floating-point trap |
Not supported |
|
LIB$SIGNAL—Signals an exception condition |
Supported |
|
LIB$STOP—Stops execution by using signaling |
Supported |
9.5. Condition Values
Error conditions are identified by integer values called condition codes or condition values. The operating system defines condition values to identify errors that might occur during execution of system-defined procedures. Each exception condition has associated with it a unique, 32-bit condition value that identifies the exception condition, and each condition value has a unique, systemwide symbol and an associated message. The condition value is used in both methods of indicating exception conditions, returning a status and signaling.
|
Field |
Bits |
Meaning |
|---|---|---|
|
FAC_NO |
<27:16> |
Indicates the system facility in which the condition occurred |
|
MSG_NO |
<15:3> |
Indicates the condition that occurred |
|
SEVERITY |
<2:0> |
Indicates whether the condition is a success (bit <0> = 1) or a failure (bit <0> = 0) as well as the severity of the error, if any |
Figure 9.3, ''Format of a Condition Value'' shows the format of a condition value.
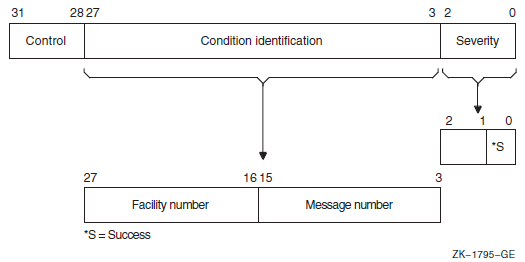
Condition Value Fields
severity
|
Value |
Symbol |
Severity |
Response |
|---|---|---|---|
|
0 |
STS$K_WARNING |
Warning |
Execution continues, unpredictable results |
|
1 |
STS$K_SUCCESS |
Success |
Execution continues, expected results |
|
2 |
STS$K_ERROR |
Error |
Execution continues, erroneous results |
|
3 |
STS$K_INFO |
Information |
Execution continues, informational message displayed |
|
4 |
STS$K_SEVERE |
Severe error |
Execution terminates, no output |
|
5 |
Reserved to OpenVMS | ||
|
6 |
Reserved to OpenVMS | ||
|
7 |
Reserved to OpenVMS |
condition identification
Identifies the condition uniquely on a systemwide basis.
control
Four control bits. Bit <28> inhibits the message associated with the condition value from being printed by the SYS$EXIT system service. After using the SYS$PUTMSG system service to display an error message, the system default handler sets this bit. It is also set in the condition value returned by a routine as a function value, if the routine has also signaled the condition, so that the condition has been either printed or suppressed. Bits <29:31> must be zero; they are reserved to OpenVMS.
When a software component completes execution, it returns a condition value in this format. When a severity value of warning, error, or severe error has been generated, the status value returned describes the nature of the problem. Your program can test this value to change the flow of control or to generate a message. Your program can also generate condition values to be examined by other routines and by the command language interpreter. Condition values defined by customers must set bits <27> and <15> so that these values do not conflict with values defined by VSI.
message number
The number identifying the message associated with the error condition. It is a status identification, that is, a description of the hardware exception condition that occurred or a software-defined value. Message numbers with bit <15> set are specific to a single facility. Message numbers with bit <15> clear are systemwide status values.
facility number
Identifies the software component generating the condition value. Bit <27> is set for user facilities and clear for VSI facilities.
9.5.1. Return Status Convention
Most system-defined procedures are functions of longwords, where the function value is equated to a condition value. In this capacity, the condition value is referred to as a return status. You can write your own routines to follow this convention. See Section 9.14.3, ''Changing a Signal to a Return Status'' for information about how to change a signal to a return status. Each routine description in the VSI OpenVMS System Services Reference Manual, VSI OpenVMS RTL Library (LIB$) Manual, VSI OpenVMS Record Management Utilities Reference Manual, and VSI OpenVMS Utility Routines Manual lists the condition values that can be returned by that procedure.
9.5.1.1. Testing Returned Condition Values
INTEGER*4 STATUS,
2         LIB$DATE_TIME
CHARACTER*23 DATE

STATUS = LIB$DATE_TIME (DATE)
IF (.NOT. STATUS) CALL LIB$SIGNAL (%VAL (STATUS))
INTEGER*4 STATUS,
2         LIB$DATE_TIME
CHARACTER*23 DATE

INCLUDE '($LIBDEF)'
   .
   .
   .
STATUS = LIB$DATE_TIME (DATE)
IF (STATUS .EQ. LIB$_STRTRU) THEN
   .
   .
   .
9.5.1.2. Using the $VMS_STATUS_SUCCESS Macro
You can use the $VMS_STATUS_SUCCESS macro, defined in stsdef.h, to test an OpenVMS condition value. $VMS_STATUS_SUCCESS depends on the documented format of an OpenVMS condition value, and particularly on the setting of the lowest bit in a condition value. If the lowest bit is set, the condition indicates a successful status, while the bit is clear for an unsuccessful status.
$VMS_STATUS_SUCCESS is used only with condition values that follow the OpenVMS condition status value format, and not with C standard library routines and return values that follow C native status value norms. For details on the OpenVMS condition status value structure, please see Chapter 9, "Condition-Handling Routines and Services". For information on the return values from the various C standard library routines, see the VSI C Run-Time Library Reference Manual for OpenVMS Systems.
RetStat = sys$dassgn( IOChan );
if (!$VMS_STATUS_SUCCESS( RetStat ))
  return RetStat;
9.5.1.3. Testing SS$_NOPRIV and SS$_EXQUOTA Condition Values
|
SS$_NOACNT |
SS$_NOALLSPOOL |
SS$_NOALTPRI |
|
SS$_NOBUGCHK |
SS$_NOBYPASS |
SS$_NOCMEXEC |
|
SS$_NOCMKRNL |
SS$_NODETACH |
SS$_NODIAGNOSE |
|
SS$_NODOWNGRADE |
SS$_NOEXQUOTA |
SS$_NOGROUP |
|
SS$_NOGRPNAM |
SS$_NOGRPPRV |
SS$_NOLOGIO |
|
SS$_NOMOUNT |
SS$_NONETMBX |
SS$_NOOPER |
|
SS$_NOPFNMAP |
SS$_NOPHYIO |
SS$_NOPRMCEB |
|
SS$_NOPRMGBL |
SS$_NOPRMMBX |
SS$_NOPSWAPM |
|
SS$_NOREADALL |
SS$_NOSECURITY |
SS$_NOSETPRV |
|
SS$_NOSHARE |
SS$_NOSHMEM |
SS$_NOSYSGBL |
|
SS$_NOSYSLCK |
SS$_NOSYSNAM |
SS$_NOSYSPRV |
|
SS$_NOTMPMBX |
SS$_NOUPGRADE |
SS$_NOVOLPRO |
|
SS$_NOWORLD |
|
SS$_EXASTLM |
SS$_EXBIOLM |
SS$_EXBYTLM |
|
SS$_EXDIOLM |
SS$_EXENQLM |
SS$_EXFILLM |
|
SS$_EXPGFLQUOTA |
SS$_EXPRCLM |
SS$_EXTQELM |
SS$_NOPRIVSTRT—First specific value for SS$_NOPRIV
SS$_NOPRIVEND—Last specific value for SS$_NOPRIV
SS$_NOQUOTASTRT—First specific value for SS$_EXQUOTA
SS$_NOQUOTAEND—Last specific value for SS$_EXQUOTA
   .
   .
   .
! Declare status and status values
INTEGER STATUS
INCLUDE '($SSDEF)'
   .
   .
   .
IF (.NOT. STATUS) THEN
  IF ((STATUS .EQ. SS$_NOPRIV) .OR.
2     ((STATUS .GE. SS$_NOPRIVSTRT) .AND.
2      (STATUS .LE. SS$_NOPRIVEND))) THEN
   .
   .
   .
  ELSE
   CALL LIB$SIGNAL (%VAL(STATUS))
  END IF
END IF
9.5.2. Modifying Condition Values
! Declare STS$K_ symbols
INCLUDE '($STSDEF)'
   .
   .
   .
! Change the severity of the condition code
! in SIGARGS(2) to informational
CALL MVBITS (STS$K_INFO,
2            0,
2            3,
2            SIGARGS(2),
2            0)
Once you modify the condition value, you can resignal the condition value and either let the default condition handler display the associated message or use the SYS$PUTMSG system service to display the message. If your condition handler displays the message, do not resignal the condition value, or the default condition handler will display the message a second time.
INTEGER FUNCTION SYMBOL (SIGARGS,
2                        MECHARGS)
! Changes LIB$_NOSUCHSYM to an informational message

! Declare dummy arguments
INTEGER*4 SIGARGS(*),
2         MECHARGS(*)
! Declare index variable for LIB$MATCH_COND
INTEGER INDEX
! Declare condition codes
INCLUDE '($LIBDEF)'
INCLUDE '($STSDEF)'
INCLUDE '($SSDEF)'
! Declare library procedures
INTEGER LIB$MATCH_COND
INDEX = LIB$MATCH_COND (SIGARGS(2),
2                       LIB$NO_SUCHSYM)
! If the signaled condition code is LIB$NO_SUCHSYM,
! change its severity to informational.
IF (INDEX .GT. 0)
2  CALL MVBITS (STS$K_INFO,
2               0,
2               3,
2               SIGARGS(2),
2               0)

SYMBOL = SS$_RESIGNAL

END
9.6. Exception Dispatcher
When an exception occurs, control is passed to the operating system's exception-dispatching routine. The exception dispatcher searches for a condition-handling routine invoking the first handler it finds and passes the information to the handler about the condition code and the state of the program when the condition code was signaled. If the handler resignals, the operating system searches for another handler; otherwise, the search for a condition handler ends.
Primary exception vectors—Four vectors (lists) of one or more condition handlers; each vector is associated with an access mode. By default, all of the primary exception vectors are empty. Exception vectors are used primarily for system programming, not application programming. The debugger uses the primary exception vector associated with user mode.
When an exception occurs, the operating system searches the primary exception associated with the access mode at which the exception occurred. To enter or cancel a condition handler in an exception vector, use the SYS$SETEXV system service. Condition handlers that are entered into the exception vectors associated with kernel, executive, and supervisor modes remain in effect either until they are canceled or until you log out. Condition handlers that are entered into the exception vector associated with user mode remain in effect either until they are canceled or until the image that entered them exits.
Secondary exception vectors—A set of exception vectors with the same structure as the primary exception vectors. Exception vectors are primarily used for system programming, not application programming. By default, all of the secondary exception vectors are empty.
Call frame condition handlers—Each program unit can establish one condition handler (the address of the handler is placed in the call frame of the program unit on VAX or specified in the associated exception handling information on 64-bit systems). The operating system searches for condition handlers established by your program, beginning with the current program unit. If the current program unit has not established a condition handler, the operating system searches for a handler that was established by the program unit that invoked the current program unit, and so on back to the main program.
Traceback handler—If you do not establish any condition handlers and link your program with the /TRACEBACK qualifier of the LINK command (the default), the operating system finds and invokes the traceback handler.
Catchall handler—If you do not establish any condition handlers and you link your program with the /NOTRACEBACK qualifier to the LINK command, the operating system finds and invokes the catchall handler. The catchall handler is at the bottom of the user stack and in the last-chance exception vector.
Last-chance exception vectors—A set of exception vectors with the same structure as the primary and secondary exception vectors. Exception vectors are used primarily for system programming, not application programming. By default, the user- and supervisor-mode last-chance exception vectors are empty. The executive- and kernel-mode last-chance exception vectors contain procedures that cause a bugcheck (a nonfatal bugcheck results in an error log entry; a fatal bugcheck results in a system shutdown). The debugger uses the user-mode last-chance exception vector, and DCL uses the supervisor-mode last-chance exception vector.
The search is terminated when the dispatcher finds a condition handler. If the dispatcher cannot find a user-specified condition handler, it calls the condition handler whose address is stored in the last-chance exception vector. If the image was activated by the command language interpreter, the last-chance vector points to the catchall condition handler. The catchall handler issues a message and either continues program execution or causes the image to exit, depending on whether the condition was a warning or an error condition, respectively.
You can call the catchall handler in two ways:
If the last-chance exception vector either returns to the dispatcher or is empty, then it calls the catchall condition handler and exits with the return status code SS$_NOHANDLER.
If the exception dispatcher detects an access violation, it calls the catchall condition handler and exits with the return status code SS$_ACCVIO.
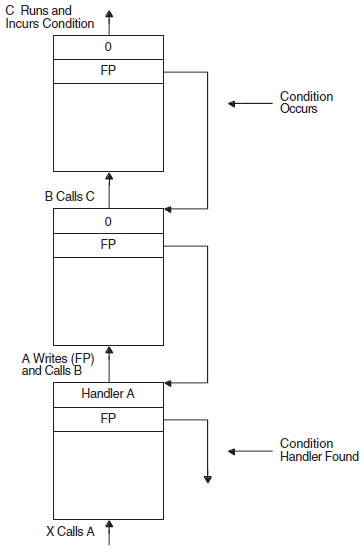

In cases where the default condition handling is insufficient, you can establish your own handler by one of the mechanisms described in Section 9.2.1, ''Condition-Handling Terminology''. Typically, you need condition handlers only if your program must perform one of the following operations:
Respond to condition values that are signaled rather than returned, such as an integer overflow error. (Section 9.14.3, ''Changing a Signal to a Return Status'' describes the system-defined handler LIB$SIG_TO_RET that allows you to treat signals as return values; Section 9.4.2, ''System-Defined Arithmetic Condition Handlers'' describes other useful system-defined handlers for arithmetic errors).
Modify part of a condition code, such as the severity. See Section 9.5.2, ''Modifying Condition Values'' for more information. If you want to change the severity of any condition code to a severe error, you can use the run-time library procedure LIB$STOP instead of writing your own condition handler.
Add messages to the one associated with the originally signaled condition code or log the messages associated with the originally signaled condition code.
9.7. Argument List Passed to a Condition Handler
On VAX systems, the argument list passed to the condition handler is constructed on the stack and consists of the addresses of two argument arrays, signal and mechanism, as illustrated in Section 9.8.2, ''Signal Argument Vector'' and Section 9.8.3, ''VAX Mechanism Argument Vector''.
On 64-bit systems, the arrays are set up on the stack, but any argument is passed in registers.
| Symbolic Name | Related Argument |
|---|---|
| CHF$L_SIGARGLST | Address of signal array |
| CHF$L_MCHARGLST | Address of mechanism array |
| CHF$L_SIG_ARGS | Number of signal arguments |
| CHF$L_SIG_NAME | Condition name |
| CHF$L_SIG_ARG1 | First signal-specific argument |
| CHF$L_MCH_ARGS | Number of mechanism arguments |
| CHF$L_MCH_FRAME | Establisher frame address |
| CHF$L_MCH_DEPTH | Frame depth of establisher |
| CHF$L_MCH_SAVR0 | Saved register R0 |
| CHF$L_MCH_SAVR1 | Saved register R1 |
| Symbolic Name | Related Argument |
|---|---|
| CHF$L_SIGARGLST | Address of signal array |
| CHF$L_MCHARGLST | Address of mechanism array |
| CHF$IS_SIG_ARGS | Number of signal arguments |
| CHF$IS_SIG_NAME | Condition name |
| CHF$IS_SIG_ARG1 | First signal-specific argument |
| CHF$IS_MCH_ARGS | Number of mechanism arguments |
| CHF$IS_MCH_FLAGS | Flag bits <63:0> for related argument mechanism information |
| CHF$PH_MCH_FRAME | Establisher frame address |
| CHF$IS_MCH_DEPTH | Frame depth of establisher |
| CHF$PH_MCH_DADDR | Address of the handler data quadword if the exception handler data field is present |
| CHF$PH_MCH_ESF_ADDR | Address of the exception stack frame |
| CHF$PH_MCH_SIG_ADDR | Address of the signal array |
| CHF$IH_MCH_SAVRnn | A copy of the saved integer registers at the time of the exception |
| CHF$FH_MCH_SAVFnn | A copy of the saved floating-point registers at the time of the exception |
9.8. Signaling
Signaling can be initiated when hardware or software detects an exception condition. In either case, the exception condition is said to be signaled by the routine in which it occurred. If hardware detects the error, it passes control to a condition dispatcher. If software detects the error, it calls one of the run-time library signal-generating routines: LIB$SIGNAL or LIB$STOP. The RTL signal-generating routines pass control to the same condition dispatcher. When LIB$STOP is called, the severity code is forced to severe, and control cannot return to the routine that signaled the condition. See Section 9.12.1, ''Continuing Execution'' for a description of how a signal can be dismissed and how normal execution from the point of the exception condition can be continued.
When a routine signals, it passes to the OpenVMS Condition Handling facility (CHF) the condition value associated with the exception condition, as well as optional arguments that can be passed to a condition handler. The CHF uses these arguments to build two data structures on the stack:
The signal argument vector. This vector contains the information describing the nature of the exception condition.
The mechanism argument vector. This vector describes the state of the process at the time the exception condition occurred.
These two vectors become the arguments that the CHF passes to condition handlers.
These argument vectors are described in detail in Section 9.8.2, ''Signal Argument Vector'' and Section 9.8.3, ''VAX Mechanism Argument Vector''.
After the signal and mechanism argument vectors are set up, the CHF searches for enabled condition handlers. A condition handler is a separate routine that has been associated with a routine in order to take a specific action when an exception condition occurs. The CHF searches for condition handlers to handle the exception condition, beginning with the primary exception vector of the access mode in which the exception condition occurred. If this vector contains the address of a handler, that handler is called. If the address is 0 or if the handler resignals, then the CHF repeats the process with the secondary exception vector. Enabling vectored handlers is discussed in detail in the VSI OpenVMS Calling Standard. Because the exception vectors are allocated in static storage, they are not generally used by modular routines.
If neither the primary nor secondary vectored handlers handle the exception condition by continuing program execution, then the CHF looks for stack frame condition handlers. It looks for the address of a condition handler in the first longword of the routine stack frame on VAX systems, in the procedure descriptor (in which the handler valid bit is set) for the routine stack frame on Alpha systems where the exception condition occurred, or in the unwind data on IA-64. At this point, several actions are possible, depending on the results of this search:
If this routine has not set up a condition handler, the CHF continues the stack scan by moving to the previous stack frame (that is, the stack frame of the calling routine).
If a condition handler is present, the CHF then calls this handler, which may resignal, continue, or unwind. See Section 9.10, ''Types of Actions Performed by Condition Handlers''
The OpenVMS Condition Handling facility searches for and calls condition handlers from each frame on the stack until the frame pointer is zero (indicating the end of the call sequence). At that point, the CHF calls the vectored catchall handler, which displays an error message and causes the program to exit. Note that, normally, the frame containing the stack catchall handler is at the end of the calling sequence or at the bottom of the stack. Section 9.9, ''Types of Condition Handlers'' explains the possible actions of default and user condition handlers in more detail.
Figure 9.5, ''Sample Stack Scan for Condition Handlers (VAX Only)'' illustrates a stack scan for condition handlers in which the main program calls procedure A, which then calls procedure B. A stack scan is initiated either when a hardware exception condition occurs or when a call is made to LIB$SIGNAL or LIB$STOP. While Figure 9.5 is specific to VAX systems, the search on 64-bit systems differs in detail but is logically equivalent in effect.
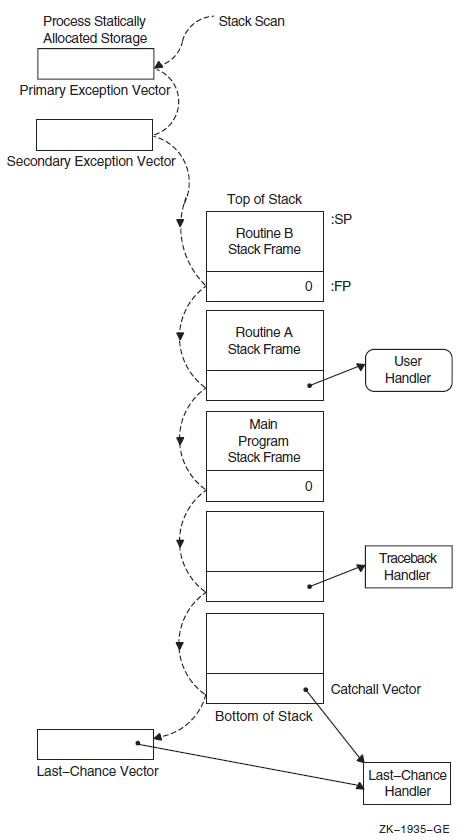
9.8.1. Generating Signals with LIB$SIGNAL and LIB$STOP
When software detects an exception condition, the software normally calls one of the run-time library signal-generating routines, LIB$SIGNAL or LIB$STOP, to initiate the signaling mechanism. This call indicates to the calling program that the exception condition has occurred. Your program can also call one of these routines explicitly to indicate an exception condition.
9.8.1.1. LIB$SIGNAL
CALL LIB$SIGNAL (%VAL(STATUS))When an error occurs in a subprogram, the subprogram can signal the appropriate condition code rather than return the condition code to the invoking program unit. In addition, some statements also signal condition codes; for example, an assignment statement that attempts to divide by zero signals the condition code SS$_INTDIV.
LIB$SIGNAL condition-value [,condition-argument...]
           [,condition-value-n [,condition-argument-n...]...]
Only the condition-value argument must be specified; other arguments are optional. A description of the arguments is as follows:
| OpenVMS usage: | cond_value |
| type: | longword (unsigned) |
| access: | read only |
| mechanism: | by value |
| OpenVMS usage: | varying_arg |
| type: | unspecified |
| access: | read only |
| mechanism: | by value |
| OpenVMS usage: | cond_value |
| type: | longword (unsigned) |
| access: | read only |
| mechanism: | by value |
| OpenVMS usage: | varying_arg |
| type: | unspecified |
| access: | read only |
| mechanism: | by value |
9.8.1.2. LIB$STOP
LIB$STOP condition-value [,number-of-arguments] [,FAO-argument...]Only the condition-value argument must be specified; other arguments are optional. The condition-value argument is an OpenVMS 32-bit condition value. The condition-value argument is an unsigned longword that contains this condition value.
The number-of-arguments argument, if specified, contains the number of FAO arguments that are associated with condition-value. The optional number-of-arguments argument is a signed longword integer that contains this number. If omitted or specified as zero, no FAO arguments follow.
The FAO-argument argument is an optional FAO (formatted ASCII output) argument that is associated with the specified condition value.
The condition-value argument indicates the condition that is being signaled. However, LIB$STOP always sets the severity of condition-value to SEVERE before proceeding with the stack-scanning operation.
The FAO arguments describe the details of the exception condition. These are the same arguments that are passed to the OpenVMS Condition Handling facility as part of the signal argument vector. The system default condition handlers pass them to SYS$PUTMSG, which uses them to issue a system message.
Unlike most routines, LIB$SIGNAL and LIB$STOP preserve all registers. Therefore, a call to LIB$SIGNAL allows the debugger to display the entire state of the process at the time of the exception condition. This is useful for debugging checks and gathering statistics.
The behavior of LIB$SIGNAL is the same as that of the exception dispatcher that performs the stack scan after hardware detects an exception condition. That is, the system scans the stack in the same way, and the same arguments are passed to each condition handler. This allows a user to write a single condition handler to detect both hardware and software conditions.
For more information about the RTL routines LIB$SIGNAL and LIB$STOP, see the VSI OpenVMS RTL Library (LIB$) Manual.
9.8.2. Signal Argument Vector
Signaling a condition value causes systems to pass control to a special subprogram called a condition handler. The operating system invokes a default condition handler unless you have established your own. The default condition handler displays the associated error message and continues or, if the error is a severe error, terminates program execution.
The signal argument vector contains information describing the nature of the hardware or software condition. Figure 9.6, ''Format of the Signal Argument Vector'' illustrates the open-ended structure of the signal argument vector, which can be from 3 to 257 longwords in length.
The format of the signal argument array and the data it returns is the same on VAX systems, Alpha systems, and IA-64 systems with the exception of the processor status (PS) returned on Alpha systems and I64 and the processor status longword (PSL) returned on VAX systems. On Alpha and IA-64 systems, it is the low-order 32 bits of the PS. Note that the PS in the signal arrays on IA-64 systems is fabricated.
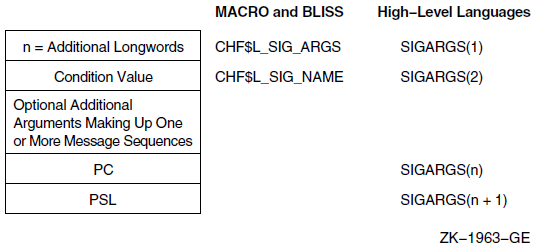
Fields of the Signal Argument Vector
SIGARGS(1)
An unsigned integer (n) designating the number of longwords that follow in the vector, not counting the first, including PC and PSL. (On Alpha systems, the value used for the PSL is the low-order half of the Alpha processor status [PS] register. For IA-64 systems the PS is also used, but the PS is fabricated.) For example, the first entry of a 4-longword vector would contain a 3.
SIGARGS(2)
The argument is a 32-bit condition code value that uniquely identifies a hardware or software exception condition. The format of the condition code is the same on all OpenVMS systems as described in Figure 9.3, ''Format of a Condition Value''.
If more than one message is associated with the error, this is the condition value of the first message. Handlers should always check whether the condition is the one that they expect by examining the STS$V_COND_ID field of the condition value (bits <27:3>). Bits <2:0> are the severity field. Bits <31:28> are control bits; they may have been changed by an intervening handler and so should not be included in the comparison. You can use the RTL routine LIB$MATCH_COND to match the correct fields. If the condition is not expected, the handler should resignal by returning false (bit <0> = 0). The possible exception conditions and their symbolic definitions are listed in Table 9.10, ''$CHFDEF Symbolic Names and Arguments on VAX Systems''.
SIGARGS(3 to n –1)
Optional arguments that provide additional information about the condition. These arguments consist of one or more message sequences. The format of the message description varies depending on the type of message being signaled. For more information, see the SYS$PUTMSG description in the VSI OpenVMS System Services Reference Manual. The format of a message sequence is described in Section 9.11, ''Displaying Messages''.
SIGARGS(n)
The program counter (PC) of the next instruction to be executed if any handler (including the system-supplied handlers) returns with the status SS$_CONTINUE. For hardware faults, the PC is that of the instruction that caused the fault. For hardware traps, the PC is that of the instruction following the one that caused the trap. The error generated by LIB$SIGNAL is a trap. For conditions signaled by calling LIB$SIGNAL or LIB$STOP, the PC is the location following the call instruction. See the relevant architecture or software developer's manual for a detailed description of faults and traps.
SIGARGS(n+1)
On VAX systems the processor status longword (PSL), or on 64-bit systems the processor status (PS) register (which is fabricated on IA-64 and x86-64), of the program at the time that the condition was signaled.
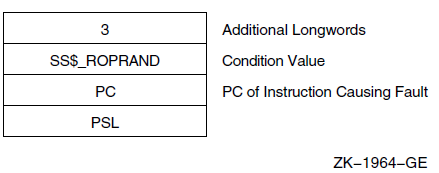
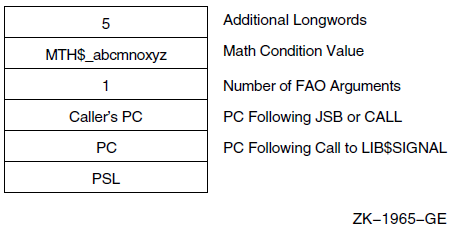
The caller's PC is the PC following the calling program's JSB or CALL to the mathematics routine that detected the error. The PC is that following the call to LIB$SIGNAL.
9.8.3. VAX Mechanism Argument Vector
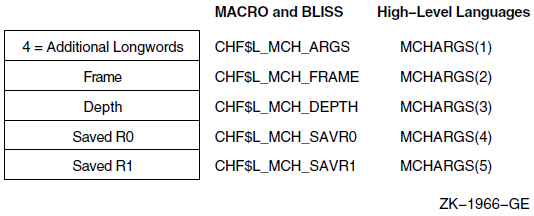
Fields of the VAX Mechanism Argument Vector
MCHARGS(1)
An unsigned integer indicating the number of longwords that follow, not counting the first, in the vector. Currently, this number is always 4.
MCHARGS(2)
The address of the stack frame of the routine that established the handler being called. You can use this address as a base from which to reference the local stack-allocated storage of the establisher, as long as the restrictions on the handler's use of storage are observed. For example, if the call stack is as shown in Figure 9.4, ''Searching the Stack for a Condition Handler (VAX Only)'', this argument points to the call frame for procedure A.
You can use this value to display local variables in the procedure that established the condition handler if the variables are at known offsets from the frame pointer (FP) of the procedure.
MCHARGS(3)
he stack depth, which is the number of stack frames between the establisher of the condition handler and the frame in which the condition was signaled. To ensure that calls to LIB$SIGNAL and LIB$STOP appear as similar as possible to hardware exception conditions, the call to LIB$SIGNAL or LIB$STOP is not included in the depth.
If the routine that contained the hardware exception condition or that called LIB$SIGNAL or LIB$STOP also handled the exception condition, then the depth is zero; if the exception condition occurred in a called routine and its caller handled the exception condition, then the depth is 1. If a system service signals an exception condition, a handler established by the immediate caller is also entered with a depth of 1.
| Depth | Meaning |
|---|---|
| -3 | Condition handler was established in the last-chance exception vector. |
| -2 | Condition handler was established in the primary exception vector. |
| -1 | Condition handler was established in the secondary exception vector. |
| 0 | Condition handler was established by the frame that was active when the exception occurred. |
| 1 | Condition handler was established by the caller of the frame that was active when the exception occurred. |
| 2 | Condition handler was established by the caller of the caller of the frame that was active when the exception occurred. |
| . | |
| . | |
| . |
For example, if the call stack is as shown in Figure 9.4, ''Searching the Stack for a Condition Handler (VAX Only)'', the depth argument passed to handler A would have a value of 2.
The condition handler can use this argument to determine whether to handle the condition. For example, the handler might not want to handle the condition if the exception that caused the condition did not occur in the establisher frame.
MCHARGS(4) and MCHARGS(5)
Copies of the contents of registers R0 and R1 at the time of the exception condition or the call to LIB$SIGNAL or LIB$STOP. When execution continues or a stack unwind occurs, these values are restored to R0 and R1. Thus, a handler can modify these values to change the function value returned to a caller.
9.8.4. Alpha Mechanism Argument Vector
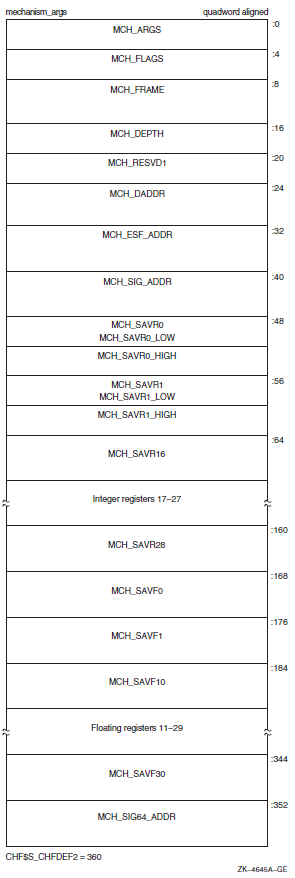
| Argument | Description |
|---|---|
| CHF$IS_MCH_ARGS | Represents the number of quadwords in the mechanism array, not counting the argument count quadword. (The value contained in this argument is always 43.) |
| CHF$IS_MCH_FLAGS |
Flag bits <63:0> for related argument mechanism information defined as follows for CHF$V_FPREGS: Bit <0>: When set, the process has already performed a floating-point operation and the floating-point registers stored in this structure are valid. If this bit is clear, the process has not yet performed any floating-point operations, and the values in the floating-point register slots in this structure are unpredictable. |
| CHF$PH_MCH_FRAME | The frame pointer (FP) in the procedure context of the establisher. |
| CHF$IS_MCH_DEPTH | Positive count of the number of procedure activation stack frames between the frame in which the exception occurred and the frame depth that established the handler being called. |
| CHF$PS_MCH_DADDR | Address of the handler data quadword if the exception handler data field is present (as indicated by PDSC.FLAGS.HANDLER_DATA_VALID); otherwise, contains zero. |
| CHF$PH_MCH_ESF_ADDR | Address of the exception stack frame (see the Alpha Architecture Reference Manual). |
| CHF$PH_MCH_SIG_ADDR | Address of the signal array. The signal array is a 32-bit (longword) array. |
| CHF$IH_MCH_SAVRnn | A copy of the saved integer registers at the time of the exception. The following registers are saved: R0, R1, and R16—R28. Registers R2—R15 are implicitly saved in the call chain. |
| CHF$FM_MCH_SAVFnn | A copy of the saved floating-point registers at the time of the exception or may have unpredictable data as described in CHF$IS_MCH_FLAGS. If the floating-point register fields are valid, the following registers are saved: F0, F1, and F10—F30. Registers F2—F9 are implicitly saved in the call chain. |
For more information and recommendations about using the mechanism argument vector on Alpha systems, see Migrating to an OpenVMS AXP System: Recompiling and Relinking Applications.
9.8.5. I64 Mechanism Vector Format
on IA-64 systems, the 64-bit-wide mechanism array is the argument mechanism in the handler call. The array is shown in Figure 9.11, ''I64 Mechanism Vector Format''.
The CHF$IH_MCH_RETVAL and CHF$FH_MCH_RETVAL2 quadwords save the state of registers R8 and R9 at the time of the call to LIB$SIGNAL or LIB$STOP. The CHF$FH_MCH_RETVAL_FLOAT, CHF$FH_MCH_RETVAL2_FLOAT, and CHF$FH_MCH_SAVFnn octawords save the state of the floating-point registers at the time of the call to LIB$SIGNAL or LIB$STOP. If not modified by a handler during CHF processing (as described below), these values will become the values of those registers after completion of CHF processing (either by continuation or by unwinding).
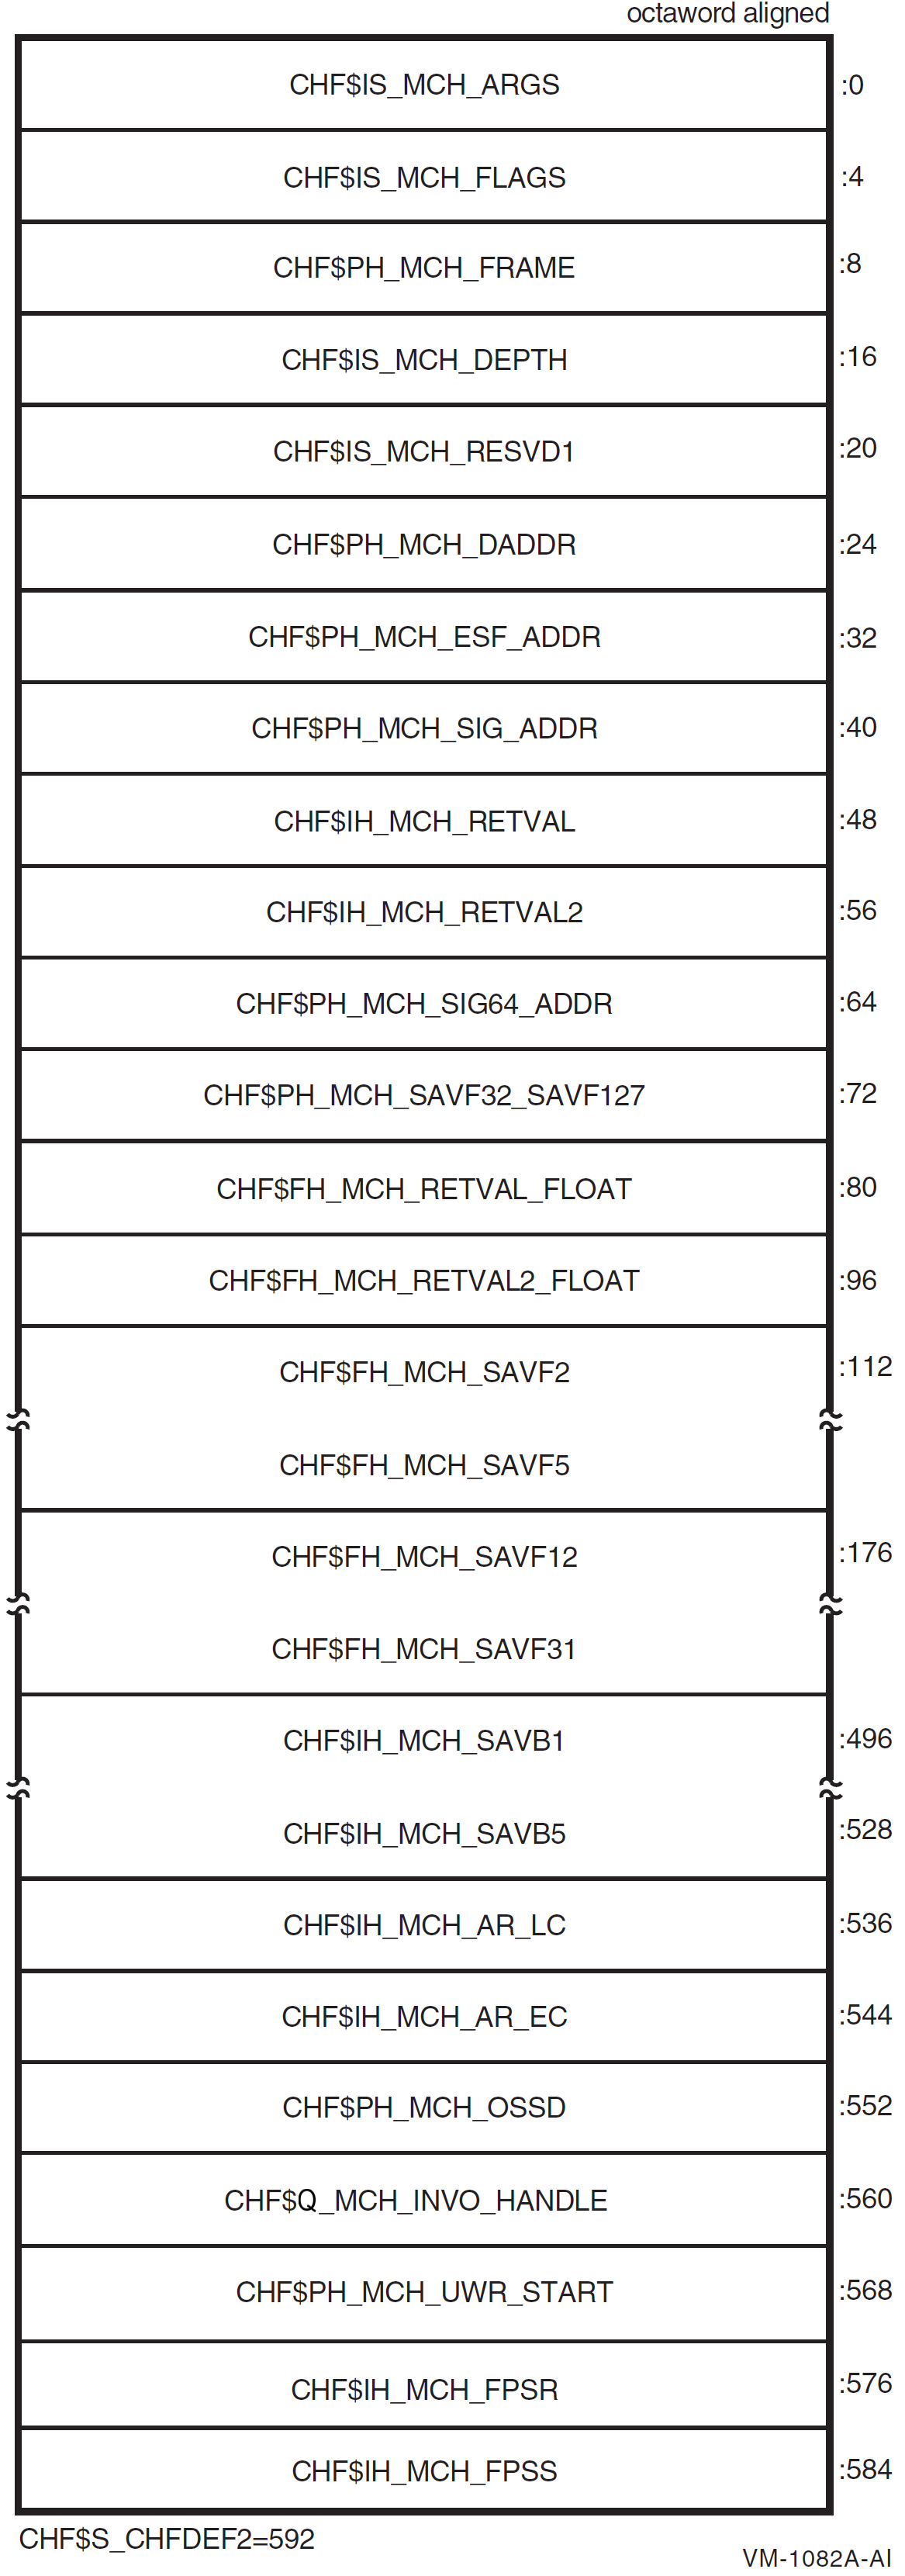
| Field Name | Contents | |
|---|---|---|
| CHF$IS_MCH_ARGS | Count of quadwords in this array starting from the next quadword, CHF$PH_MCH_FRAME (not counting the first quadword that contains this longword). This value is 71 if CHF$V_FPREGS_VALID is clear, and 263 if CHF$V_FPREGS_VALID is set. | |
| CHF$IS_MCH_FLAGS | Flag bits <31:0> for related argument-mechanism information defined as follows: | |
| CHF$V_FPREGS2_VALID |
Bit 0. When set, the process has already performed a floating-point operation in registers F2-F31 and the contents of the CHF$FH_MCH_SAVFnn fields of this structure are valid. When this bit is clear, the contents of the CHF$FH_MCH_SAVFnn fields are undefined. | |
| CHF$V_FPREGS2_VALID | Bit 1. When set, the process has already performed a floating-point operation in registers F32-F127 and the floating-point registers stored in the extension to this structure are valid. If this bit is clear, the process has not yet performed any floating-point operations in registers F32-F127, and the pointer to the extension area (CHF$FH_MCH_SAVF32_SAVF127) will be zero. | |
| CHF$PH_MCH_FRAME | Contains the previous stack pointer, or PSP (the value of the SP at procedure entry) for the procedure context of the establisher (see Section 4.5.1 in the VSI OpenVMS Calling Standard). | |
| CHF$IS_MCH_DEPTH | Positive count of the number of procedure activation stack frames between the frame in which the exception occurred and the frame depth that established the handler being called (see Section 9.5.1.3 in the VSI OpenVMS Calling Standard). | |
| CHF$IS_MCH_RESVD1 | Reserved to OpenVMS. | |
| CHF$PH_MCH_DADDR | Address of the handler data quadword (start of the Language Specific Data area, LSDA, see Sections A.4.1 and A.4.4 in the VSI OpenVMS Calling Standard) if the exception-handler data field is present in the unwind information block (as indicated by OSSD$V_HANDLER_DATA_VALID); otherwise, contains 0. | |
| CHF$PH_MCH_ESF_ADDR | Address of the exception stack frame. | |
| CHF$PH_MCH_SIG_ADDR | Address of the 32-bit form of signal array. This array is a 32-bit wide (longword) array. This is the same array that is passed to a handler as the signal argument vector. | |
| CHF$IS_MCH_RETVAL | Contains a copy of R8 at the time of the exception. | |
| CHF$IS_MCH_RETVAL2 | Contains a copy of R9 at the time of the exception. | |
|
CHF$PH_MCH_SIG64_ | Address of the 64-bit form of signal array. This array is a 64-bit wide (quadword) array. | |
|
CHF$FH_MCH_ | Address of the extension to the mechanism array that contains copies of F32-F127 at the time of the exception. | |
|
CHF$IS_MCH_RETVAL_ | Contains a copy of F8 at the time of the exception. | |
|
CHF$IS_MCH_RETVAL2_ | Contains a copy of F9 at the time of the exception. | |
| CHF$FH_MCH_SAVFnn | Contain copies of floating-point registers F2-F5 and F12-F31. Registers F6-F7 and F10-F11 are implicitly saved in the exception frame. | |
| CHF$FH_MCH_SAVBnn | Contains copies of branch registers B1-B5 at the time of the exception. | |
| CHF$FH_MCH_AR_LC | Contains a copy of the Loop Count Register (AR65) at the time of the exception. | |
| CHF$FH_MCH_AR_EC | Contains a copy of the Epilog Count Register (AR66) at the time of the exception. | |
| CHF$PH_MCH_OSSD | Address of the operating system-specific data area. | |
|
CHF$Q_MCH_INVO_ | Contains the invocation handle of the procedure context of the establisher (see VSI OpenVMS Calling Standard). | |
|
CHF$PH_MCH_UWR_ | Address of the unwind region. | |
|
CHF$IH_MCH_FPSR |
Contains a copy of the hardware floating-point status register (AR.FPSR) at the time of the exception. | |
|
CHF$IH_MCH_FPSS |
Contains a copy of the software floating-point status register (which supplements CHF$IH_MCH_FPSR) at the time of the exception. | |
9.8.6. x86-64 Mechanism Vector Format
On x86-64 systems, the 64-bit-wide mechanism array is the argument mechanism in the handler call. The array is shown in Figure 9.12, ''x86-64 Mechanism Vector Format''.
The CHF$IH_MCH_RETVAL and
CHF$FH_MCH_RETVAL2 quadwords save the state of
general-purpose registers %rax and %rdx,
respectively, at the time of the call to LIB$SIGNAL or
LIB$STOP. The
CHF$FH_MCH_RETVAL_FLOAT and
CHF$FH_MCH_RETVAL2_FLOAT quadwords save the state of
floating-point registers %xmm0 and %xmm1,
respectively, at the time of the call to LIB$SIGNAL or
LIB$STOP. If not modified by a handler during CHF
processing (as described below), the values of these registers will become the
values of those registers after completion of CHF processing (either by continuation
or by unwinding).
The only supported method for modifying return values in a procedure's invocation context (CHF$IH_MCH_RETVAL, CHF$IH_MCH_RETVAL2, CHF$FH_MCH_RETVAL_FLOAT, and CHF$FH_MCH_RETVAL2_FLOAT) is by using routine SYS$SET_RETURN_VALUE. The only supported method for modifying all other registers in a procedure invocation context is by using routine LIB$I64_PUT_INVO_REGISTERS (see Section 5.8.3.13 in the VSI OpenVMS Calling Standard).
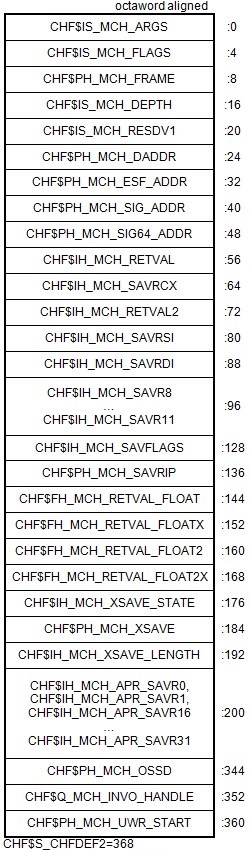
| Field Name | Contents | |
|---|---|---|
| CHF$IS_MCH_ARGS |
Count of quadwords in this array starting from the next quadword, CHF$PH_MCH_FRAME (not counting the first quadword that contains this longword). | |
| CHF$IS_MCH_FLAGS |
Flag bits <31:0> for related argument-mechanism information defined as follows: | |
| CHF$V_FPREGS_VALID |
Bit 0. When set, the process has already performed a floating-point operation in floating-point registers and the contents of the CHF$FH_MCH_XSAVE_STATE and CHF$PH_MCH_XSAVE fields of this structure are valid. When this bit is clear, the contents of the CHF$FH_MCH_XSAVE_STATE and CHF$PH_MCH_XSAVE fields are zero. | |
| CHF$PH_MCH_FRAME |
Contains the Previous Stack Pointer, PSP, (the value of the SP at procedure entry) for the procedure context of the establisher (see Section 5.4 in the VSI OpenVMS Calling Standard). | |
| CHF$IS_MCH_DEPTH |
Positive count of the number of procedure activation stack frames between the frame in which the exception occurred and the frame depth that established the handler being called (see Section 9.5.1.3 in the VSI OpenVMS Calling Standard). | |
| CHF$IS_MCH_RESVD1 |
Reserved to OpenVMS. | |
| CHF$PH_MCH_DADDR |
Address of the handler data quadword (start of the Language Specific Data area, LSDA, see Section B.3.2.3.1 in the VSI OpenVMS Calling Standard) if the exception handler data field is present in the unwind information block; otherwise, contains 0. | |
| CHF$PH_MCH_ESF_ADDR |
Address of the exception stack frame. | |
| CHF$PH_MCH_SIG_ADDR |
Address of the 32-bit form of signal array. This array is a 32-bit wide (longword) array. This is the same array that is passed to a handler as the signal argument vector. | |
|
CHF$PH_MCH_SIG64_ |
Address of the 64-bit form of signal array. This array is a 64-bit wide (quadword) array. | |
| CHF$IH_MCH_RETVAL | Contains a copy of
%rax at the time of the exception. | |
| CHF$IH_MCH_SAVRCX |
Contains a copy of | |
| CHF$IH_MCH_RETVAL2 |
Contains a copy of | |
|
CHF$IH_MCH_SAVRSI, CHF$IH_MCH_SAVRDI, CHF$IH_MCH_SAVR8, … CHF$IH_MCH_SAVR11 |
Contains a copy of the remaining (scratch) general-purpose registers at the time of the exception. | |
| CHF$IH_MCH_SAVRFLAGS |
Contains a copy of the processor flags register at the time of the exception. | |
| CHF$IH_MCH_SAVRIP |
Contains a copy of the instruction pointer at the time of the exception. | |
|
CHF$FH_MCH_RETVAL_ |
Contains a copy of | |
|
CHF$FH_MCH_RETVAL_ | Contains a copy of
%xmm0 bits <127:64> at the time of the
exception. | |
|
CHF$FH_MCH_RETVAL_ |
Contains a copy of | |
|
CHF$FH_MCH_RETVAL_ | Contains a copy of
%xmm1 bits <127:64> at the time of the
exception. | |
|
CHF$IH_MCH_XSAVE_ |
Contains a copy of the XSAVE state control value indicating what information is contained in the XSAVE area. This is the state-component bit map needed by the XRSTOR instruction to restore the floating-point state from the XSAVE area (0 if the CHF$PH_MCH_XSAVE pointer is null). | |
| CHF$PH_MCH_XSAVE |
Contains a pointer to the XSAVE area described by CHF$IH_MCH_XSAVE_STATE (0 if none). | |
|
CHF$IH_MCH_XSAVE_ | The number of bytes in the block pointed to by CHF$PH_MCH_XSAVE (0 if CHF$PH_MCH_XSAVE is null). | |
|
CHF$IH_MCH_APR_SAVR0, CHF$IH_MCH_APR_SAVR1, CHF$IH_MCH_APR_SAVR16, … CHF$IH_MCH_APR_SAVR31 |
Contains a copy of the Alpha pseudo-registers R0, R1 and R16 through R31 at the time of the exception. | |
| CHF$PH_MCH_OSSD |
Address of the operating system-specific data area. | |
|
CHF$Q_MCH_INVO_ |
Contains the invocation handle of the procedure context of the establisher (see Section 5.8.2.2 in the VSI OpenVMS Calling Standard). | |
|
CHF$PH_MCH_UWR_ |
Address of the unwind region (FDE). | |
9.8.7. Multiple Active Signals
A signal is said to be active until the routine that signaled regains control or until the stack is unwound or the image exits. A second signal can occur while a condition handler or a routine it has called is executing. This situation is called multiple active signals or multiple exception conditions. When this situation occurs, the stack scan is not performed in the usual way. Instead, the frames that were searched while processing all of the previous exception conditions are skipped when the current exception condition is processed. This is done in order to avoid recursively reentering a routine that is not reentrant. For example, Fortran code typically is not recursively reentrant. If a Fortran handler were called while another activation of that handler was still going, the results would be unpredictable.
A second exception may occur while a condition handler or a procedure that it has called is still executing. In this case, when the exception dispatcher searches for a condition handler, it skips the frames that were searched to locate the first handler.
The search for a second handler terminates in the same manner as the initial search, as described in Section 9.6, ''Exception Dispatcher''.
If the SYS$UNWIND system service is issued by the second active condition handler, the depth of the unwind is determined according to the same rules followed in the exception dispatcher's search of the stack: all frames that were searched for the first condition handler are skipped.
Primary and secondary vectored handlers, on the other hand, are always entered when an exception occurs.
If an exception occurs during the execution of a handler that was established in the primary or secondary exception vector, that handler must handle the additional condition. Failure to do so correctly might result in a recursive exception loop in which the vectored handler is repeatedly called until the user stack is exhausted.
The modified search routine is best illustrated with an example. Assume the following calling sequence:
Routine A calls routine B, which calls routine C.
Routine C signals an exception condition (signal S), and the handler for routine C (CH) resignals.
Control passes to BH, the handler for routine B. The call frame for handler BH is located on top of the signal and mechanism arrays for signal S. The saved frame pointer in the call frame for BH points to the frame for routine C.
BH calls routine X; routine X calls routine Y.
Routine Y signals a second exception condition (signal T).
Figure 9.13, ''Stack After Second Exception Condition Is Signaled'' illustrates the stack contents after the second exception condition is signaled.Figure 9.13. Stack After Second Exception Condition Is Signaled  Normally, the OpenVMS Condition Handling facility (CHF) searches all currently active frames for condition handlers, including B and C. If this happens, however, BH is called again. At this point, you skip the condition handlers that have already been called. Thus, the search for condition handlers should proceed in the following order:
- YH
- XH
- BHH (the handler for routine B’s handler)
- AH
The search now continues in its usual fashion. The CHF examines the primary and secondary exception vectors, then frames Y, X, and BH. Thus, handlers YH, XH, and BHH are called. Assume that these handlers resignal.
The CHF now skips the frames that have already been searched and resumes the search for condition handlers in routine A's frame. The depths that are passed to handlers as a result of this modified search are 0 for YH, 1 for XH, 2 for BHH, and 3 for AH.
Because of the possibility of multiple active signals, you should be careful if you use an exception vector to establish a condition handler. Vectored handlers are called, not skipped, each time an exception occurs.
9.9. Types of Condition Handlers
On VAX systems, when a routine is activated, the first longword in its stack frame is set to 0. This longword is reserved to contain an address pointing to another routine called the condition handler. If an exception condition is signaled during the execution of the routine, the OpenVMS Condition Handling Facility uses the address in the first longword of the frame to call the associated condition handler.
Each procedure, other than a null frame procedure, can have a condition handler potentially associated with it, which is identified by the HANDLER_VALID, STACK_HANDLER, or REG_HANDLER fields of the associated procedure descriptor in an Alpha system, or the handler field in the associated unwind information block on an I64 or x86-64 system. You establish a handler by including the procedure value of the handler procedure in that field. See the VSI OpenVMS Calling Standard for additional information.
The arguments passed to the condition-handling routine are the signal and mechanism argument vectors, described in Sections 9.8.2, 9.8.3, and 9.8.4.
Various types of condition handlers can be called for a given routine:
User-supplied condition handlers
You can write your own condition handler and set up its address in the stack frame of your routine using the run-time library routine LIB$ESTABLISH or the mechanism supplied by your language.
On Alpha and IA-64 systems, LIB$ESTABLISH is not supported, though high-level languages may support it for compatibility.
Language-supplied condition handlers
Many high-level languages provide a means for setting up handlers that are global to a single routine. If your language provides a condition-handling mechanism, you should always use it. If you also try to establish a condition handler using LIB$ESTABLISH, the two methods of handling exception conditions conflict, and the results are unpredictable.
System default condition handlers
The operating system provides a set of default condition handlers. These take over if there are no other condition handler addresses on the stack, or if all the previous condition handlers have passed on (resignaled) the indication of the exception condition.
9.9.1. Default Condition Handlers
The operating system establishes the following default condition handlers each time a new image is started. The default handlers are shown in the order they are encountered when the operating system processes a signal. These three handlers are the only handlers that output error messages.
Traceback handler
The traceback handler is established on the stack after the catchall handler. This enables the traceback handler to get control first. This handler performs three functions in the following order:Outputs an error message using the Put Message (SYS$PUTMSG) system service. SYS$PUTMSG formats the message using the Formatted ASCII Output (SYS$FAO) system service and sends the message to the devices identified by the logical names SYS$ERROR and SYS$OUTPUT (if it differs from SYS$ERROR). That is, it displays the message associated with the signaled condition code, the traceback message, the program unit name and line number of the statement that signaled the condition code, and the relative and absolute program counter values. (On a warning or error, the number of the next statement to be executed is displayed).
Issues a symbolic traceback, which shows the state of the routine stack at the time of the exception condition. That is, it displays the names of the program units in the calling hierarchy and the line numbers of the invocation statements.
- Decides whether to continue executing the image or to force an exit based on the severity field of the condition value:
Severity Error Type Action 1 Success Continue 3 Information Continue 0 Warning Continue 2 Error Continue 4 Severe Exit The traceback handler is in effect if you link your program with the /TRACEBACK qualifier of the LINK command (the default). Once you have completed program development, you generally link your program with the /NOTRACEBACK qualifier and use the catchall handler.
Catchall handler
The operating system establishes the catchall handler in the first stack frame and thus calls it last. This handler performs the same functions as the traceback handler except for the stack traceback. That is, it issues an error message and decides whether to continue execution. The catchall is called only if you link with the /NOTRACEBACK qualifier. It displays the message associated with the condition code and then continues program execution or, if the error is severe, terminates execution.
Last-chance handler
The operating system establishes the last-chance handler with a system exception vector. In most cases, this vector contains the address of the catchall handler, so that these two handlers are actually the same. The last-chance handler is called only if the stack is invalid or all the handlers on the stack have resignaled. If the debugger is present, the debugger's own last-chance handler replaces the system last-chance handler.
Displays the message associated with the condition code and then continues program execution or, if the error is severe, terminates execution. The catchall handler is not invoked if the traceback handler is enabled.
%INCOME-W-LINELOST, Statistics on last line lost due to CTRL/Z
%TRACE-W-TRACEBACK, symbolic stack dump follows
module name     routine name       line      rel PC    abs PC

GET_STATS       GET_STATS           497     00000306  00008DA2
INCOME          INCOME              148     0000015A  0000875A
                                            0000A5BC  0000A5BC
                                            00009BDB  00009BDB
                                            0000A599  0000A599
Because INCOME_LINELOST is a warning, the line number of the next statement to be executed (497), rather than the line number of the statement that signaled the condition code, is displayed. Line 148 of the program unit INCOME invoked GET_STATS.
9.9.2. Interaction Between Default and User-Supplied Handlers
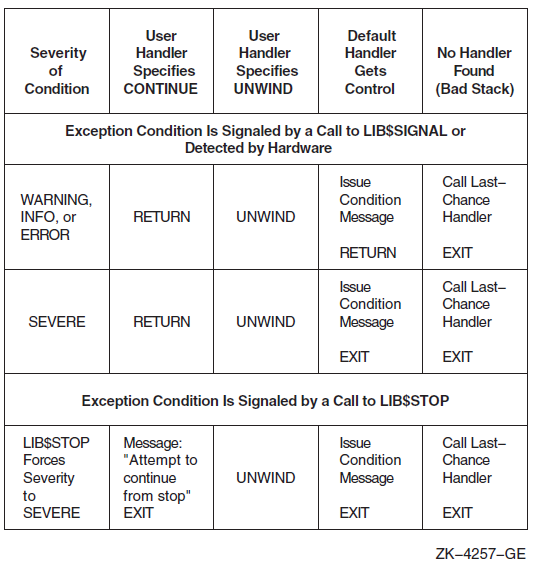
9.10. Types of Actions Performed by Condition Handlers
When a condition handler returns control to the OpenVMS Condition Handling facility (CHF), the facility takes one of the following types of actions, depending on the value returned by the condition handler:
Signal a condition
Signaling a condition initiates the search for an established condition handler.
Continue
The condition handler may or may not be able to fix the problem, but the program can attempt to continue execution. The handler places the return status value SS$_CONTINUE in R0 (R8 for I64) and issues a return instruction to return control to the dispatcher. If the exception was a fault, the instruction that caused it is reexecuted; if the exception was a trap, control is returned at the instruction following the one that caused it. A condition handler cannot continue if the exception condition was signaled by calling LIB$STOP.
Section 9.12.1, ''Continuing Execution'' contains more information about continuing.
Resignal
The handler cannot fix the problem, or this condition is one that it does not handle. It places the return status value SS$_RESIGNAL in R0 (R8 for I64,
%raxfor x86-64) and issues a return instruction to return control to the exception dispatcher. The dispatcher resumes its search for a condition handler. If it finds another condition handler, it passes control to that routine. A handler can alter the severity of the signal before resignaling.Section 9.12.2, ''Resignaling'' contains more information about resignaling.
Unwind
The condition handler cannot fix the problem, and execution cannot continue while using the current flow. The handler issues the Unwind Call Stack (SYS$UNWIND) system service to unwind the call stack. Call frames can then be removed from the stack and the flow of execution modified, depending on the arguments to the SYS$UNWIND service.
When a condition handler has already called SYS$UNWIND, any return status from the condition handler is ignored by the CHF. The CHF now unwinds the stack.
Unwinding the routine call stack first removes call frames, starting with the frame in which the condition occurred, and then returns control to an earlier routine in the calling sequence. You can unwind the stack whether the condition was detected by hardware or signaled using LIB$SIGNAL or LIB$STOP. Unwinding is the only way to continue execution after a call to LIB$STOP.
Section 9.12.3, ''Unwinding the Call Stack'' describes how to write a condition handler that unwinds the call stack.
Perform a nonlocal GOTO unwind
On Alpha and IA-64 systems, a GOTO unwind operation is a transfer of control that leaves one procedure invocation and continues execution in a prior (currently active) procedure. This unified GOTO operation gives unterminated procedure invocations the opportunity to clean up in an orderly way. See Section 9.10.2, ''GOTO Unwind Operations (64-bit Systems)'' for more information about GOTO unwind operations.
9.10.1. Unwinding the Call Stack
One type of action a condition handler can take is to unwind the procedure call stack. The unwind operation is complex and should be used only when control must be restored to an earlier procedure in the calling sequence. Moreover, use of the SYS$UNWIND system service requires the calling condition handler to be aware of the calling sequence and of the exact point to which control is to return.
SYS$UNWIND accepts two optional arguments:
The depth to which the unwind is to occur. If the depth is 1, the call stack is unwound to the caller of the procedure that incurred the exception. If the depth is 2, the call stack is unwound to the caller's caller, and so on. By specifying the depth in the mechanism array, the handler can unwind to the procedure that established the handler.
The address of a location to receive control when the unwind operation is complete, that is, a PC to replace the current PC in the call frame of the procedure that will receive control when all specified frames have been removed from the stack.
If no argument is supplied to SYS$UNWIND, the unwind is performed to the caller of the procedure that established the condition handler that is issuing the SYS$UNWIND service. Control is returned to the address specified in the return PC for that procedure. Note that this is the default and the normal case for unwinding.
Another common case of unwinding is to unwind to the procedure that declared the handler. On VAX systems, this is done by using the depth value from the exception mechanism array (CHF$L_MCH_DEPTH) as the depth argument to SYS$UNWIND. On 64-bit systems, this is done by using the depth value from the exception mechanism array (CHF$IS_MCH_DEPTH) as the depth argument to SYS$UNWIND.
Therefore, it follows that the default unwind (no depth specified) is equivalent to specifying CHF$L_MCH_DEPTH plus 1 on VAX systems. On Alpha and IA-64 systems, the default unwind (no depth specified) is equivalent to specifying CHF$IS_MCH_DEPTH plus 1. In certain instances of nested exceptions, however, this is not the case. VSI recommends that you omit the depth argument when unwinding to the caller of the routine that established the condition handler.
Figure 9.15, ''Unwinding the Call Stack'' illustrates an unwind situation and describes some of the possible results.
The unwind operation consists of two parts:
In the call to SYS$UNWIND, the return PCs saved in the stack are modified to point into a routine within the SYS$UNWIND service, but the entire stack remains present.
When the handler returns, control is directed to this routine by the modified PCs. It proceeds to return to itself, removing the modified stack frames, until the stack has been unwound to the proper depth.
For this reason, the stack is in an intermediate state directly after calling SYS$UNWIND. Handlers should, in general, return immediately after calling SYS$UNWIND.
During the actual unwinding of the call stack, the unwind routine examines each frame in the call stack to see whether a condition handler has been declared. If a handler has been declared, the unwind routine calls the handler with the status value SS$_UNWIND (indicating that the call stack is being unwound) in the condition name argument of the signal array. When a condition handler is called with this status value, it can perform any procedure-specific cleanup operations required. For example, the handler should deallocate any processwide resources that have been allocated. Then, the handler returns control to the OpenVMS Condition Handling facility. After the handler returns, the call frame is removed from the stack.
When a condition handler is called during the unwinding operation, the condition handler must not generate a new signal. A new signal would result in unpredictable behavior.
Thus, in Figure 9.15, ''Unwinding the Call Stack'', handler B can be called a second time, during the unwind operation. Note that handler B does not have to be able to interpret the SS$_UNWIND status value specifically; the return instruction merely returns control to the unwind procedure, which does not check any status values.
Handlers established by the primary, secondary, or last-chance vector are not called, because they are not removed during an unwind operation.
While it is unwinding the stack, the OpenVMS Condition Handling facility ignores any function value returned by a condition handler. For this reason, a handler cannot both resignal and unwind. Thus, the only way for a handler to both issue a message and perform an unwind is to call LIB$SIGNAL and then call $UNWIND. If your program calls $UNWIND before calling LIB$SIGNAL, the result is unpredictable.
When the OpenVMS Condition Handling facility calls the condition handler that was established for each frame during unwind, the call is of the standard form, described in Section 9.2, ''Overview of the OpenVMS Condition Handling Facility''. The arguments passed to the condition handler (the signal and mechanism argument vectors) are shown in Section 9.8.2, ''Signal Argument Vector'', Section 9.8.3, ''VAX Mechanism Argument Vector'', and Section 9.8.4, ''Alpha Mechanism Argument Vector''.
On VAX systems, if the handler is to specify the function value of the last function to be unwound, it should modify the saved copies of R0 and R1 (CHF$L_MCH_SAVR0 and CHF$L_MCH_SAVR1) in the mechanism argument vector.
On 64-bit systems, the handler can specify the function value of the last function to be unwound by calling SYS$SET_RETURN_VALUE, which is described in the VSI OpenVMS Calling Standard.
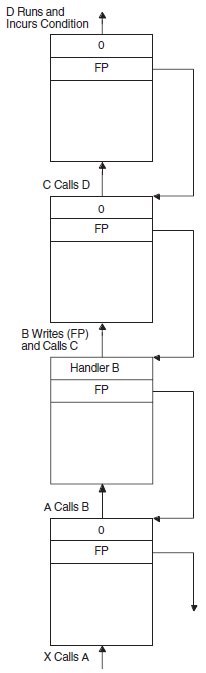
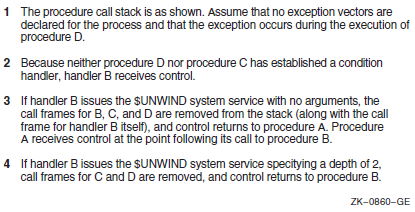
9.10.2. GOTO Unwind Operations (64-bit Systems)
On Alpha systems, a current procedure invocation is one in whose context the thread of execution is currently executing. At any instant, a thread of execution has exactly one current procedure. If code in the current procedure calls another procedure, then the called procedure becomes the current procedure. As each stack frame or register frame procedure is called, its invocation context is recorded in a procedure frame. The invocation context is mainly a snapshot of process registers at procedure invocation. It is used during return from the called procedure to restore the calling procedure's state. The chain of all procedure frames starting with the current procedure and going all the way back to the first procedure invocation for the thread is called the call chain. While a procedure is part of the call chain, it is called an active procedure.
When a current procedure returns to its calling procedure, the most recent procedure frame is removed from the call chain and used to restore the now current procedure's state. As each current procedure returns to its calling procedure, its associated procedure frame is removed from the call chain. This is the normal unwind process of a call chain.
You can bypass the normal return path by forcibly unwinding the call chain. The Unwind Call Chain (SYS$UNWIND) system service allows a condition handler to transfer control from a series of nested procedure invocations to a previous point of execution, bypassing the normal return path. The Goto Unwind (SYS$GOTO_UNWIND) system service allows any procedure to achieve the same effect. (on IA-64 systems SYS$GOTO_UNWIND does not exist, use SYS$GOTO_UNWIND_64.) SYS$GOTO_UNWIND (SYS$GOTO_UNWIND_64) restores saved register context for each nested procedure invocation, calling the condition handler, if any, for each procedure frame that it unwinds. Restoring saved register context from each procedure frame from the most recent one to the target procedure frame ensures that the register context is correct when the target procedure gains control. Also, each condition handler called during unwind can release any resources acquired by its establishing procedure.
For information about the GOTO unwind operations and how to use the SYS$GOTO_UNWIND (SYS$GOTO_UNWIND_64) system service, see the VSI OpenVMS Calling Standard and the VSI OpenVMS System Services Reference Manual.
9.11. Displaying Messages
%facility-l-ident, message-text
| facility | Abbreviated name of the software component that issued the message |
| l | Indicator showing the severity level of the exception condition that caused the message |
| ident | Symbol of up to nine characters representing the message |
| message-text | Brief definition of the cause of the message |
%TYPE-W-OPENIN, error opening _DB0:[FOSTER]AUTHOR.DAT; as input
For information about specifying FAO parameters, see Section 9.11.4.3, ''Specifying FAO Parameters''.
Signaling
Signaling provides a consistent and unified method for displaying messages. This section describes how the OpenVMS Condition Handling facility translates the original signal into intelligible messages.
Signaling is used to signal exception conditions generated by VSI software. When software detects an exception condition, it signals the exception condition to the user by calling LIB$SIGNAL or LIB$STOP. The signaling routine passes a signal argument list to these run-time library routines. This signal argument list is made up of the condition value and a set of optional arguments that provide information to condition handlers.
You can use the signaling mechanism to signal messages that are specific to your application. Further, you can chain your own message to a system message. For more information, see Section 9.11.3, ''Using the Message Utility to Signal and Display User-Defined Messages''.
LIB$SIGNAL and LIB$STOP copy the signal argument list and use it to create the signal argument vector. The signal argument vector serves as part of the input to the user-established handlers and the system default handlers.
If all intervening handlers have resignaled, the system default handlers take control. The system-supplied default handlers are the only handlers that should actually issue messages, whether the exception conditions are signaled by VSI software or your own programs. That is, a routine should signal exception conditions rather than issue its own messages. In this way, other applications can call the routine and override its signal in order to change the messages. Further, this technique decides formatting details, and it also keeps wording centralized and consistent.
The system default handlers pass the signal argument vector to the Put Message (SYS$PUTMSG) system service. SYS$PUTMSG formats and displays the information in the signal argument vector.
SYS$PUTMSG performs the following steps:
Interprets the signal argument vector as a series of one or more message sequences. Each message sequence starts with a 32-bit, systemwide condition value that identifies a message in the system message file. SYS$PUTMSG interprets the message sequences according to type defined by the facility of the condition.
Obtains the text of the message using the Get Message (SYS$GETMSG) system service. The message text definition is actually a SYS$FAO control string. It may contain embedded FAO directives. These directives determine how the FAO arguments in the signal argument vector are formatted. (For more information about SYS$FAO, see the VSI OpenVMS System Services Reference Manual).
Calls SYS$FAO to format the message, substituting the values from the signal argument list.
Issues the message on device SYS$OUTPUT. If SYS$ERROR is different from SYS$OUTPUT, and the severity field in the condition value is not success, $PUTMSG also issues the message on device SYS$ERROR.
You can use the signal array that the operating system passes to the condition handler as the first argument of the SYS$PUTMSG system service. The signal array contains the condition code, the number of required FAO arguments for each condition code, and the FAO arguments (see Figure 9.16, ''Formats of Message Sequences''). The VSI OpenVMS System Services Reference Manual contains complete specifications for SYS$PUTMSG.
See Section 9.11.2, ''Logging Error Messages to a File'' for information about how to create and suppress messages on a running log using SYS$PUTMSG.
The last two array elements, the PC and PSL, are not FAO arguments and should be deleted before the array is passed to SYS$PUTMSG. Because the first element of the signal array contains the number of longwords in the array, you can effectively delete the last two elements of the array by subtracting 2 from the value in the first element. Before exiting from the condition handler, you should restore the last two elements of the array by adding 2 to the first element in case other handlers reference the array.
INTEGER*4 FUNCTION SYMBOL (SIGARGS,
2                          MECHARGS)
   .
   .
   .
INDEX = LIB$MATCH_COND (SIGARGS(2),
2                       LIB$_NOSUCHSYM)
IF (INDEX .GT. 0) THEN
  ! If condition code is LIB$_NOSUCHSYM,
  ! change the severity to informational
  CALL MVBITS (STS$K_INFO,
2              0,
2              3,
2              SIGARGS(2),
2              0)

  ! Display the message
  SIGARGS(1) = SIGARGS(1) - 2   ! Subtract last two elements
  CALL SYS$PUTMSG (SIGARGS,,,)
  SIGARGS(1) = SIGARGS(1) + 2   ! Restore last two elements

  ! Continue program execution;
  SYMBOL = SS$_CONTINUE
ELSE
  ! Otherwise, resignal the condition
  SYMBOL = SS$_RESIGNAL
END IF

END
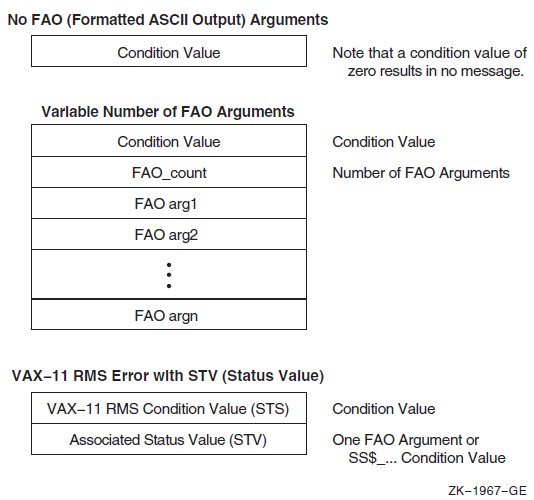
OpenVMS RMS system services return two related completion values: the completion code and the associated status value. The completion code is returned in R0 using the function value mechanism. The same value is also placed in the Completion Status Code field of the RMS file access block (FAB) or record access block (RAB) associated with the file (FAB$L_STS or RAB$L_STS). The status value is returned in the Status Value field of the same FAB or RAB (FAB$L_STV or RAB$L_STV). The meaning of this secondary value is based on the corresponding STS (Completion Status Code) value. Its meaning could be any of the following:
An operating system condition value of the form SS$_...
An RMS value, such as the size of a record that exceeds the buffer size
Zero
Rather than have each calling program determine the meaning of the STV value, SYS$PUTMSG performs the necessary processing. Therefore, this STV value must always be passed in place of the FAO argument count. In other words, an RMS message sequence always consists of two arguments (passed by immediate value): an STS value and an STV value.
9.11.1. Chaining Messages
You can use a condition handler to add condition values to an originally signaled condition code. For example, if your program calculates the standard deviation of a series of numbers and the user only enters one value, the operating system signals the condition code SS$_INTDIV when the program attempts to divide by zero. (In calculating the standard deviation, the divisor is the number of values entered minus 1.) You could use a condition handler to add a user-defined message to the original message to indicate that only one value was entered.
To display multiple messages, pass the condition values associated with the messages to the RTL routine LIB$SIGNAL. To display the message associated with an additional condition code, the handler must pass LIB$SIGNAL the condition code, the number of FAO arguments used, and the FAO arguments. To display the message associated with the originally signaled condition codes, the handler must pass LIB$SIGNAL each element of the signal array as a separate argument. Because the signal array is a variable-length array and LIB$SIGNAL cannot accept a variable number of arguments, when you write your handler you must pass LIB$SIGNAL more arguments than you think will be required. Then, during execution of the handler, zero the arguments that you do not need (LIB$SIGNAL ignores zero values), as described in the following steps:
- Declare an array with one element for each argument that you plan to pass LIB$SIGNAL. Fifteen elements are usually sufficient.
INTEGER*4 NEWSIGARGS(15)
Transfer the condition values and FAO information from the signal array to your new array. The first element and the last two elements of the signal array do not contain FAO information and should not be transferred.
Fill any remaining elements of your new array with zeros.
DO I = 1, 15

  IF (I .LE. SIGARGS(1) - 2) THEN
    NEWSIGARGS(I) = SIGARGS(I+1)  ! Start with SIGARGS(2)
    ELSE
    NEWSIGARGS(I) = 0             ! Pad with zeros
  END IF

END DO
Because the new array is a known-length array, you can specify each element as an argument to LIB$SIGNAL.
INTEGER FUNCTION HANDLER (SIGARGS,
2                         MECHARGS)

! Declare dummy arguments
INTEGER SIGARGS(*),
2       MECHARGS(*)
! Declare new array for SIGARGS
INTEGER NEWSIGARGS (15)
! Declare index variable for LIB$MATCH_COND
INTEGER INDEX
! Declare procedures
INTEGER LIB$MATCH_COND
! Declare condition codes
EXTERNAL ONE_VALUE
INCLUDE '($SSDEF)'
INDEX = LIB$MATCH_COND (SIGARGS(2),
2                       SS$_INTDIV)
IF (INDEX .GT. 0) THEN

  DO I=1,15
    IF (I .LE. SIGARGS(1) - 2) THEN
      NEWSIGARGS(I) = SIGARGS(I+1)  ! Start with SIGARGS(2)
    ELSE
      NEWSIGARGS(I) = 0             ! Pad with zeros
    END IF
  END DO

    ! Signal messages
  CALL LIB$SIGNAL (%VAL(NEWSIGARGS(1)),
2                  %VAL(NEWSIGARGS(2)),
2                  %VAL(NEWSIGARGS(3)),
2                  %VAL(NEWSIGARGS(4)),
2                  %VAL(NEWSIGARGS(5)),
2                  %VAL(NEWSIGARGS(6)),
2                  %VAL(NEWSIGARGS(7)),
2                  %VAL(NEWSIGARGS(8)),
2                  %VAL(NEWSIGARGS(9)),
2                  %VAL(NEWSIGARGS(10)),
2                  %VAL(NEWSIGARGS(11)),
2                  %VAL(NEWSIGARGS(12)),
2                  %VAL(NEWSIGARGS(13)),
2                  %VAL(NEWSIGARGS(14)),
2                  %VAL(NEWSIGARGS(15)),
2                  %VAL(%LOC(ONE_VALUE)),
2                  %VAL(0))

  HANDLER = SS$_CONTINUE
ELSE
  HANDLER = SS$_RESIGNAL

END IF

END
A signal argument list may contain one or more condition values and FAO arguments. Each condition value and its FAO arguments is "chained" to the next condition value and its FAO arguments. You can use chained messages to provide more specific information about the exception condition being signaled, along with a general message.
     .FACILITY     PROG,1 /PREFIX=PROG__

     .SEVERITY     FATAL
     .BASE     100

     FAIGETMEM   <failed to get !UL bytes of memory>/FAO_COUNT=1

     .END
This source file sets up the exception message as follows:
The .FACILITY directive specifies the facility, PROG, and its number, 1. It also adds the /PREFIX qualifier to determine the prefix to be used in the message.
The .SEVERITY directive specifies that PROG__FAIGETMEM is a fatal exception condition. That is, the SEVERITY field in the condition value for PROG__FAIGETMEM is set to severe (bits <0:3> = 4).
The BASE directive specifies that the condition identification numbers in the PROG facility will begin with 100.
FAIGETMEM is the symbol name. This name is combined with the prefix defined in the facility definition to make the message symbol. The message symbol becomes the symbolic name for the condition value.
The text in angle brackets is the message text. This is actually a SYS$FAO control string. When $PUTMSG calls the $FAO system service to format the message, $FAO includes the FAO argument from the signal argument vector and formats the argument according to the embedded FAO directive (!UL).
The .END statement terminates the list of messages for the PROG facility.
9.11.2. Logging Error Messages to a File
You can write a condition handler to obtain a copy of a system error message text and write the message into an auxiliary file, such as a listing file. In this way, you can receive identical messages at the terminal (or batch log file) and in the auxiliary file.
To log messages, you must write a condition handler and an action subroutine. Your handler calls the Put Message (SYS$PUTMSG) system service explicitly. The operation of SYS$PUTMSG is described in Section 9.11, ''Displaying Messages''. The handler passes to SYS$PUTMSG the signal argument vector and the address of the action subroutine. SYS$PUTMSG passes to the action subroutine the address of a string descriptor that contains the length and address of the formatted message. The action subroutine can scan the message or copy it into a log file, or both.
It is important to keep the display messages centralized and consistent. Thus, you should use only SYS$PUTMSG to display or log system error messages. Further, because the system default handlers call SYS$PUTMSG to display error messages, your handlers should avoid displaying the error messages. You can do this in two ways:
Your handler should not call SYS$PUTMSG directly to display an error message. Instead, your handler should resignal the error. This allows other calling routines either to change or suppress the message or to recover from the error. The system default condition handlers display the message.
If the action subroutine that you supply to SYS$PUTMSG returns a success code, SYS$PUTMSG displays the error message on SYS$OUTPUT or SYS$ERROR, or both. When a program executes interactively or from within a command procedure, the logical names SYS$OUTPUT and SYS$ERROR are both equated to the user's terminal by default. Thus, your action routine should process the message and then return a failure code so that SYS$PUTMSG does not display the message at this point.
To write the error messages displayed by your program to a file as well as to the terminal, equate SYS$ERROR to a file specification. When a program executes as a batch job, the logical names SYS$OUTPUT and SYS$ERROR are both equated to the batch log by default. To write error messages to the log file and a second file, equate SYS$ERROR to the second file.

9.11.2.1. Creating a Running Log of Messages Using SYS$PUTMSG
To keep a running log (that is, a log that is resumed each time your program is invoked) of the messages displayed by your program, use SYS$PUTMSG. Create a condition handler that invokes SYS$PUTMSG regardless of the signaled condition code. When you invoke SYS$PUTMSG, specify a function that writes the formatted message to your log file and then returns with a function value of 0. Have the condition handler resignal the condition code. One of the arguments of SYS$PUTMSG allows you to specify a user-defined function that SYS$PUTMSG invokes after formatting the message and before displaying the message. SYS$PUTMSG passes the formatted message to the specified function. If the function returns with a function value of 0, SYS$PUTMSG does not display the message; if the function returns with a value of 1, SYS$PUTMSG displays the message. The VSI OpenVMS System Services Reference Manual contains complete specifications for SYS$PUTMSG.
9.11.2.2. Suppressing the Display of Messages in the Running Log
To keep a running log of messages, you might have your main program open a file for the error log, write the date, and then establish a condition handler to write all signaled messages to the error log. Each time a condition is signaled, a condition handler like the one in the following example invokes SYS$PUTMSG and specifies a function that writes the message to the log file and returns with a function value of 0. SYS$PUTMSG writes the message to the log file but does not display the message. After SYS$PUTMSG writes the message to the log file, the condition handler resignals to continue program execution. (The condition handler uses LIB$GET_COMMON to read the unit number of the file from the per-process common block).
INTEGER FUNCTION ERRLOG (SIGARGS,
2                        MECHARGS)
! Writes the message to file opened on the
! logical unit named in the per-process common block
! Define the dummy arguments
INTEGER SIGARGS(*),
2       MECHARGS(*)
INCLUDE '($SSDEF)'

EXTERNAL PUT_LINE
INTEGER PUT_LINE
! Pass signal array and PUT_LINE routine to SYS$PUTMSG
SIGARGS(1) = SIGARGS(1) - 2   ! Subtract PC/PSL from signal array
CALL SYS$PUTMSG (SIGARGS,
2                PUT_LINE, )
SIGARGS(1) = SIGARGS(1) + 2   ! Replace PC/PSL

ERRLOG = SS$_RESIGNAL

END
INTEGER FUNCTION PUT_LINE (LINE)
! Writes the formatted message in LINE to
! the file opened on the logical unit named
! in the per-process common block
! Dummy argument
CHARACTER*(*) LINE
! Logical unit number
CHARACTER*4 LOGICAL_UNIT
INTEGER UNIT_NUM
! Indicates that SYS$PUTMSG is not to display the message
PUT_LINE = 0
! Get logical unit number and change to integer
STATUS = LIB$GET_COMMON (LOGICAL_UNIT)
READ (UNIT = LOGICAL_UNIT,
2     FMT = '(I4)') UNIT_NUMBER
! The main program opens the error log
WRITE (UNIT = UNIT_NUMBER,
2      FMT = '(A)') LINE

END
9.11.3. Using the Message Utility to Signal and Display User-Defined Messages
Section 9.11, ''Displaying Messages'' explains how the OpenVMS Condition Handling facility displays messages. The signal argument list passed to LIB$SIGNAL or LIB$STOP can be seen as one or more message sequences. Each message sequence consists of a condition value, an FAO count, which specifies the number of FAO arguments to come, and the FAO arguments themselves. (The FAO count is omitted in the case of system and RMS messages.) The message text definition itself is actually a SYS$FAO control string, which may contain embedded $FAO directives. The VSI OpenVMS System Services Reference Manual describes the Formatted ASCII Output (SYS$FAO) system service in detail.
The Message utility is provided for compiling message sequences specific to your application. When you have defined an exception condition and used the Message utility to associate a message with that exception condition, your program can call LIB$SIGNAL or LIB$STOP to signal the exception condition. You signal a message that is defined in a message source file by calling LIB$SIGNAL or LIB$STOP, as for any software-detected exception condition. Then the system default condition handlers display your error message in the standard operating system format.
To use the Message utility, follow these steps:
Create a source file that specifies the information used in messages, message codes, and message symbols.
Use the MESSAGE command to compile this source file.
Link the resulting object module, either by itself or with another object module containing a program.
Run your program so that the messages are accessed, either directly or through the use of pointers.
See also the description of the Message utility in the VSI OpenVMS Command Definition, Librarian, and Message Utilities Manual.
9.11.3.1. Creating the Message Source File
A message source file contains definition statements and directives. The following message source file defines the error messages generated by the sample INCOME program:
 .FACILITY INCOME, 1 /PREFIX=INCOME__

 .SEVERITY WARNING
     LINELOST   "Statistics on last line lost due to Ctrl/Z"

 .SEVERITY SEVERE
     BADFIXVAL  "Bad value on /FIX"
     CTRLZ      "Ctrl/Z entered on terminal"
     FORIOERR   "Fortran I/O error"
     INSFIXVAL  "Insufficient values on /FIX"
     MAXSTATS   "Maximum number of statistics already entered"
     NOACTION   "No action qualifier specified"
     NOHOUSE    "No such house number"
     NOSTATS    "No statistics to report"

 .END
The default file type of a message source file is .MSG. For a complete description of the Message utility, see the VSI OpenVMS Command Definition, Librarian, and Message Utilities Manual.
9.11.3.1.1. Specifying the Facility
.FACILITY INCOME, 1
In addition to identifying the program associated with the error messages, the .FACILITY directive specifies the facility prefix that is added to each condition name to create the symbolic name used to reference the message. By default, the prefix is the facility name followed by an underscore. For example, a condition name BADFIXVAL defined following the previous .FACILITY directive is referenced as INCOME_BADFIXVAL. You can specify a prefix other than the specified program name by specifying the /PREFIX qualifier of the .FACILITY directive.
.FACILITY INCOME, 1 /PREFIX=INCOME__
A condition name BADFIXVAL defined following this .FACILITY directive is referenced as INCOME__BADFIXVAL.
The facility number, which must be between 1 and 2047, is part of the condition code that identifies the error message. To prevent different programs from generating the same condition values, the facility number must be unique. A good way to ensure uniqueness is to have the system manager keep a list of programs and their facility numbers in a file.
All messages defined after a .FACILITY directive are associated with the specified program. Specify either an .END directive or another .FACILITY directive to end the list of messages for that program. VSI recommends that you have one .FACILITY directive per message file.
9.11.3.1.2. Specifying the Severity
- Success
- Informational
- Warning
- Error
- Severe or fatal
 .SEVERITY WARNING
      LINELOST  "Statistics on last line lost due to Ctrl/Z"

 .SEVERITY SEVERE
      BADFIXVAL "Bad value on /FIX"
      INSFIXVAL "Insufficient values on /FIX"

 .END
9.11.3.1.3. Specifying Condition Names and Messages
BADFIXVAL "Bad value on /FIX"
9.11.3.1.4. Specifying Variables in the Message Text
NONUMBER <No such house number: !UL. Try again.>/FAO_COUNT=1
NOFILE <No such file: !AS. Try again.>/FAO_COUNT=1
If the message text contains FAO directives, you must specify the appropriate variables when you signal the condition code (see Section 9.11.4, ''Signaling User-Defined Values and Messages with Global and Local Symbols'').
9.11.3.1.5. Compiling and Linking the Messages
$ MESSAGE INCMSG
To specify an object file name that is different from the source file name, use the /OBJECT qualifier of the MESSAGE command. To specify an object module name that is different from the source file name, use the .TITLE directive in the message source file.
9.11.3.1.6. Linking the Message Object Module
$ LIBRARY INCOME.OLB INCMSG.OBJ
9.11.3.1.7. Accessing the Message Object Module from Multiple Programs
Including the message module in the program's object library does not allow other programs-access to the module's condition values and messages. To allow several programs access to a message module, create a default message library as follows:
Create the message library—Create an object module library and enter all of the message object modules into it.
Make the message library a default library—Equate the complete file specification of the object module library with the logical name LNK$LIBRARY. (If LNK$LIBRARY is already assigned a library name, you can create LNK$LIBRARY_1, LNK$LIBRARY_2, and so on.) By default, the linker searches any libraries equated with the LNK$LIBRARY logical names.
$ LIBRARY/CREATE MESSAGLIB
$ LIBRARY/INSERT MESSAGLIB INCMSG
$ DEFINE LNK$LIBRARY SYS$DISK:MESSAGLIB
9.11.3.1.8. Modifying a Message Source Module
$ LIBRARY/REPLACE MESSAGLIB INCMSG
9.11.3.1.9. Accessing Modified Messages Without Relinking
To allow a program to access modified messages without relinking, create a message pointer file. Message pointer files are useful if you need either to provide messages in more than one language or frequently change the text of existing messages. See the description of the Message utility in the VSI OpenVMS Command Definition, Librarian, and Message Utilities Manual.
9.11.4. Signaling User-Defined Values and Messages with Global and Local Symbols
To signal a user-defined condition value, you use the symbol formed by the facility prefix and the condition name (for example, INCOME__BADFIXVAL). Typically, you reference a condition value as a global symbol; however, you can create an include file (similar to the modules in the system library SYS$LIBRARY:FORSTSDEF.TLB) to define the condition values as local symbols. If the message text contains FAO arguments, you must specify parameters for those arguments when you signal the condition value.
9.11.4.1. Signaling with Global Symbols
EXTERNAL INCOME__NOHOUSE
   .
   .
   .
IF ((FIX_HOUSE_NO .GT. TOTAL_HOUSES) .OR.
2    FIX_HOUSE_NO .LT. 1)) THEN
  CALL LIB$SIGNAL (%VAL (%LOC (INCOME__NOHOUSE)))
  END IF
9.11.4.2. Signaling with Local Symbols
- Create a listing file—Compile the message source file with the /LIST qualifier to the MESSAGE command. The /LIST qualifier produces a listing file with the same name as the source file and a file type of .LIS. The following line might appear in a listing file:
08018020 11 NOHOUSE "No such house number"
The hexadecimal value in the left column is the value of the condition value, the decimal number in the second column is the line number, the text in the third column is the condition name, and the text in quotation marks is the message text.
Edit the listing file—For each condition name, define the matching condition value as a longword variable, and use a language statement to equate the condition value to its hexadecimal condition value.
Assuming a prefix of INCOME__, editing the previous statement results in the following statements:INTEGER INCOME__NOHOUSE PARAMETER (INCOME__NOHOUSE = '08018020'X)
Rename the listing file—Name the edited listing file using the same name as the source file and a file type for your programming language (for example,.FOR for VSI Fortran).
! Specify the full file specification
INCLUDE '$DISK1:[DEV.INCOME]INCMSG.FOR'
   .
   .
   .
IF ((FIX_HOUSE_NO .GT. TOTAL_HOUSES) .OR.
2    FIX_HOUSE_NO .LT. 1)) THEN
  CALL LIB$SIGNAL (%VAL (INCOME__NOHOUSE))
END IF
9.11.4.3. Specifying FAO Parameters
EXTERNAL INCOME__NONUMBER
   .
   .
   .
IF ((FIX_HOUSE_NO .GT. TOTAL_HOUSES) .OR.
2    FIX_HOUSE_NO .LT. 1)) THEN
  CALL LIB$SIGNAL (%VAL (%LOC (INCOME__NONUMBER)),
2                  %VAL (1),
2                  %VAL (FIX_HOUSE_NO))
END IFEXTERNAL INCOME__NOFILE . . . IF (IOSTAT .EQ. FOR$IOS_FILNOTFOU) 2 CALL LIB$SIGNAL (%VAL (%LOC (INCOME__NOFILE)), 2 %VAL (1), 2 FILE_NAME)
Both of the previous examples use global symbols for the condition values. Alternatively, you could use local symbols, as described in Section 9.11.4.2, ''Signaling with Local Symbols''.
9.12. Writing a Condition Handler
Establish the handler in the stack frame of your routine.
Write a condition-handling routine, or choose one of the run-time library routines that handles exception conditions.
Include a call to a run-time library signal-generating routine.
Use the Message utility to define your own exception conditions.
Include a call to the SYS$PUTMSG system service to modify or log the system error message.
handler signal-args ,mechanism-args
signal-args The address of a vector of longwords indicating the nature of the condition. See Section 9.8.2, ''Signal Argument Vector'' fora detailed description.
mechanism-args The address of a vector of longwords that indicates the state of the process at the time of the signal. See Section 9.8.3, ''VAX Mechanism Argument Vector'' and Section 9.8.4, ''Alpha Mechanism Argument Vector'' for more details.
result A condition value. Success (bit <0> = 1) causes execution to continue at the PC; failure (bit <0> = 0) causes the condition to be resignaled. That is, the system resumes the search for other handlers. If the handler calls the Unwind (SYS$UNWIND) system service, the return value is ignored and the stack is unwound. (See Section 9.12.3, ''Unwinding the Call Stack'').
Handlers can modify the contents of either the signal-args
vector or the mechanism-args vector.
In order to protect compiler optimization, a condition handler and any routines that it calls can reference only arguments that are explicitly passed to handlers. They cannot reference COMMON or other external storage, and they cannot reference local storage in the routine that established the handler unless the compiler considers the storage to be volatile. Compilers that do not adhere to this rule must ensure that any variables referenced by the handler are always kept in memory, not in a register.
Continue execution
Resignal the exception condition and resume the stack scanning operation
Call SYS$UNWIND to unwind the call stack to an earlier frame
The sections that follow describe how to write condition handlers to perform these three operations.
9.12.1. Continuing Execution
To continue execution from the instruction following the signal, with no error messages or traceback, the handler returns with the function value SS$_CONTINUE (bit <0> = 1). If, however, the condition was signaled with a call to LIB$STOP, the SS$_CONTINUE return status causes an error message(Attempt To Continue From Stop), and the image exits. The only way to continue from a call to LIB$STOP is for the condition handler to request a stack unwind.
Note
On most VAX systems, hardware floating-point traps have been changed to hardware faults. If you still want floating-point exception conditions to be treated as traps, use LIB$SIM_TRAP to simulate the action of floating-point traps.
On Alpha and IA-64 systems, LIB$SIM_TRAP is not supported. Table 9.5, ''Run-Time Library Condition-Handling Support Routines''lists the run-time library routines that are supported and not supported on Alpha and IA-64 systems.
9.12.2. Resignaling
Condition handlers check for specific errors. If the signaled condition is not one of the expected errors, the handler resignals. That is, it returns control to the OpenVMS Condition Handling facility with the function value SS$_RESIGNAL (with bit <0> clear). To alter the severity of the signal, the handler modifies the low-order 3 bits of the condition value and resignals.
For an example of resignaling, see Section 9.8.7, ''Multiple Active Signals''.
9.12.3. Unwinding the Call Stack
A condition handler can dismiss the signal by calling the system service SYS$UNWIND. The stack unwind is initiated when a condition handler that has called SYS$UNWIND returns to OpenVMS Condition Handling facility. For an explanation of unwinding, see Section 9.10.1, ''Unwinding the Call Stack'';for an example of using SYS$UNWIND to return control to the program, see Section 9.12.4.5, ''Returning Control to the Program''.
9.12.4. Example of Writing a Condition Handler
INTEGER*4 FUNCTION HANDLER (SIGARGS,
2                           MECHARGS)

INTEGER*4 SIGARGS(*),
2         MECHARGS(*)
   .
   .
   .
9.12.4.1. Signal Array
The first dummy argument, the signal array, describes the signaled condition codes that indicate which error occurred and the state of the process when the condition code was signaled. For the structure of the signal array, see Section 9.8.2, ''Signal Argument Vector''.
9.12.4.2. Mechanism Array
The second dummy argument, the mechanism array, describes the state of the process when the condition code was signaled. Typically, a condition handler references only the call depth and the saved function value. Currently, the mechanism array contains exactly five elements except on Alpha and I64; however, because its length is subject to change, you should declare the dummy argument as a variable-length array. For the structure of the mechanism array, see Section 9.8.3, ''VAX Mechanism Argument Vector''.
Usually you write a condition handler in anticipation of a particular set of condition values. Because a handler is invoked in response to any signaled condition code, begin your handler by comparing the condition code passed to the handler (element 2 of the signal array) against the condition codes expected by the handler. If the signaled condition code is not one of the expected codes, resignal the condition code by equating the function value of the handler to the global symbol SS$_RESIGNAL.
9.12.4.3. Comparing the Signaled Condition with an Expected Condition
You can use the RTL routine LIB$MATCH_COND to compare the signaled condition code to a list of expected condition values. The first argument passed to LIB$MATCH_COND is the signaled condition code, the second element of the signal array. The rest of the arguments passed to LIB$MATCH_COND are the expected condition values. LIB$MATCH_COND compares the first argument with each of the remaining arguments and returns the number of the argument that matches the first one. For example, if the second argument matches the first argument, LIB$MATCH_COND returns a value of 1. If the first argument does not match any of the other arguments, LIB$MATCH_COND returns 0.
INTEGER FUNCTION HANDLER (SIGARGS,
2                         MECHARGS)

! Declare dummy arguments
INTEGER*4 SIGARGS(*),
2         MECHARGS(*)
INCLUDE '($FORDEF)'   ! Declare the FOR$_ symbols
INCLUDE '($SSDEF)'    ! Declare the SS$_ symbols
INTEGER INDEX
! Declare procedures
INTEGER LIB$MATCH_COND
INDEX = LIB$MATCH_COND (SIGARGS(2),
2                       FOR$_FILNOTFOU,
2                       FOR$_OPEFAI,
2                       FOR$_NO_SUCDEV,
2                       FOR$_FILNAMSPE)
IF (INDEX .EQ. 0) THEN
  ! Not an expected condition code, resignal
  HANDLER = SS$_RESIGNAL
ELSE IF (INDEX .GT. 0) THEN
  ! Expected condition code, handle it
   .
   .
   .
END IF

END
9.12.4.4. Exiting from the Condition Handler
Continue execution of the program—If you equate the function value of the condition handler to SS$_CONTINUE, the condition handler returns control to the program at the statement that signaled the condition (fault) or the statement following the one that signaled the condition (trap). The RTL routine LIB$SIGNAL generates a trap so that control is returned to the statement following the call to LIB$SIGNAL.
In the following example, if the condition code is one of the expected codes, the condition handler displays a message and then returns the value SS$_CONTINUE to resume program execution. ( Section 9.11, ''Displaying Messages'' describes how to display a message).INTEGER FUNCTION HANDLER (SIGARGS, 2 MECHARGS) ! Declare dummy arguments INTEGER*4 SIGARGS(*), 2 MECHARGS(*) INCLUDE '($FORDEF)' INCLUDE '($SSDEF)' INTEGER*4 INDEX, 2 LIB$MATCH_COND INDEX = LIB$MATCH_COND (SIGARGS(2), 2 FOR$_FILNOTFOU, 2 FOR$_OPEFAI, 2 FOR$_NO_SUCDEV, 2 FOR$_FILNAMSPE) IF (INDEX .GT. 0) THEN . . . ! Display the message . . . HANDLER = SS$_CONTINUE END IF
Resignal the condition code—If you equate the function value of the condition handler to SS$_RESIGNAL or do not specify a function value (function value of 0), the handler allows the operating system to execute the next condition handler. If you modify the signal array or mechanism array before resignaling, the modified arrays are passed to the next condition handler.
In the following example, if the condition code is not one of the expected codes, the handler resignals:INDEX = LIB$MATCH_COND (SIGARGS(2), 2 FOR$_FILNOTFOU, 2 FOR$_OPEFAI, 2 FOR$_NO_SUCDEV, 2 FOR$_FILNAMSPE) IF (INDEX .EQ. 0) THEN HANDLER = SS$_RESIGNAL END IF
Continue execution of the program at a previous location—If you call the SYS$UNWIND system service, the condition handler can return control to any point in the program unit that incurred the exception, the program unit that invoked the program unit that incurred the exception, and so on back to the program unit that established the condition handler.
9.12.4.5. Returning Control to the Program
Your handlers should return control either to the program unit that established the handler or to the program unit that invoked the program unit that established the handler.
! Declare dummy arguments
INTEGER*4 SIGARGS(*),
2         MECHARGS(*)
   .
   .
   .
CALL SYS$UNWIND (MECHARGS(3),)! Declare dummy arguments
INTEGER*4 SIGARGS(*),
2 MECHARGS(*)
.
.
.
CALL SYS$UNWIND (,)The first argument SYS$UNWIND specifies the number of program units to unwind (remove from the stack). If you specify this argument at all, you should do so as shown in the previous example. MECHARGS(3)(or the CHF$IS_MCH_DEPTH field for Alpha and I64) contains the number of program units that must be unwound to reach the program unit that established the handler that invoked SYS$UNWIND.) The second argument SYS$UNWIND contains the location of the next statement to be executed. Typically, you omit the second argument to indicate that the program should resume execution at the statement following the last statement executed in the program unit that is regaining control.
Each time SYS$UNWIND removes a program unit from the stack, it invokes any condition handler established by that program unit and passes the condition handler the SS$_UNWIND condition code. To prevent the condition handler from resignaling the SS$_UNWIND condition code (and so complicating the unwind operation), include SS$_UNWIND as an expected condition code when you invoke LIB$MATCH_COND. When the condition code is SS$_UNWIND, your condition handler might perform necessary cleanup operations or do nothing.
INTEGER FUNCTION HANDLER (SIGARGS,
2                         MECHARGS)

! Declare dummy arguments
INTEGER*4 SIGARGS(*),
2         MECHARGS(*)
INCLUDE '($FORDEF)'
INCLUDE '($SSDEF)'
INTEGER*4 INDEX,
2         LIB$MATCH_COND
INDEX = LIB$MATCH_COND (SIGARGS(2),
2                       SS$_UNWIND,
2                       FOR$_FILNOTFOU,
2                       FOR$_OPEFAI,
2                       FOR$_NO_SUCDEV,
2                       FOR$_FILNAMSPE)
IF (INDEX .EQ. 0) THEN
  ! Unexpected condition, resignal
  HANDLER = SS$_RESIGNAL
ELSE IF (INDEX .EQ. 1) THEN
  ! Unwinding, do nothing
ELSE IF (INDEX .GT. 1) THEN
   .
   .
   .
              ! Display the message
   .
   .
   .
  CALL SYS$UNWIND (,)
END IF
9.12.5. Example of Condition-Handling Routines
/* PGMA */

#include <stdio.h>
#include <ssdef.h>

unsigned int sigargs[],mechargs[];

main() {
        unsigned int status, vector=0, old_handler;

        old_handler = LIB$ESTABLISH( handlera );

        status = pgmb (arglst);
   .
   .
   .
}

/* PGMB */

#include <stdio.h>
#include <ssdef.h>

main() {

 old_handler = LIB$ESTABLISH( handlerb );
   .
   .
   .


}

/* Handler A */

int handlera( sigargs, mechargs ) {

/* Compare condition value signalled with expected value */

                        if (sigargs[1] != SS$_SSFAIL)
                                goto no_fail;
   .
   .
   .
/* Signal to continue */

                        return SS$_CONTINUE;

/* Signal to resignal */
no_fail:
                        return SS$_RESIGNAL;

}

/* Handler B */

int handlerb( sigargs, mechargs ) {

/* Compare condition value signalled with expected value */
                        if (sigargs[1] != SS$_BREAK)
                                goto no_fail;
   .
   .
   .
                        return SS$_CONTINUE;

no_fail:
                        return SS$_RESIGNAL;


}9.13. Debugging a Condition Handler
You can debug a condition handler as you would any subprogram, except that you cannot use the DEBUG command STEP/INTO to enter a condition handler. You must set a breakpoint in the handler and wait for the debugger to invoke the handler.
Typically, to trace execution of a condition handler, you set breakpoints at the statement in your program that should signal the condition code, at the statement following the one that should signal, and at the first executable statement in your condition handler.
The SET BREAK debugger command with the /HANDLER qualifier causes the debugger to scan the call stack and attempt to set a breakpoint on every established frame-based handler whenever the program being debugged has an exception. The debugger does not discriminate between standard RTL handlers and user-defined handlers.
9.14. Run-Time Library Condition-Handling Routines
The following sections present information about RTL jacket handlers, and RTL routines that can be either established as condition handlers or called from a condition handler to handle signaled exception conditions.
9.14.1. RTL Jacket Handlers (64-bit Systems)
Many RTLs establish a jacket RTL handler on a frame where the user program has defined its own handler. This RTL jacket does some setup and argument manipulation before actually calling the handler defined by the user. When processing the exception, the debugger sets the breakpoint on the jacket RTL jacket handler, because that is the address on the call stack. If the debugger suspends program execution at a jacket RTL handler, it is usually possible to reach the user-defined handler by entering a STEP/CALL command followed by a STEP/INTO command. Some cases might require that additional sequences of STEP/CALL and STEP/INTO commands be entered. For more information about frame-based handlers, see VSI OpenVMS Calling Standard.
$DEFINE LIBOTS SYS$SHARE:LIBOTS.EXE;
Note
In the previous example, the trailing semicolon (;) is required.
9.14.2. Converting a Floating-Point Fault to a Floating-Point Trap (VAX Only)
On VAX systems, a trap is an exception condition that is signaled after the instruction that caused it has finished executing. A fault is an exception condition that is signaled during the execution of the instruction. When a trap is signaled, the program counter (PC) in the signal argument vector points to the next instruction after the one that caused the exception condition. When a fault is signaled, the PC in the signal argument vector points to the instruction that caused the exception condition. See the VAX Architecture Reference Manual for more information about faults and traps.
LIB$SIM_TRAP can be established as a condition handler or be called from a condition handler to convert a floating-point fault to a floating-point trap. After LIB$SIM_TRAP is called, the PC points to the instruction after the one that caused the exception condition. Thus, your program can continue execution without fixing up the original condition. LIB$SIM_TRAP intercepts only floating-point overflow, floating-point underflow, and divide-by-zero faults.
9.14.3. Changing a Signal to a Return Status
Note
LIB$SIGTORET is the name of the routine for Alpha and I64.
When it is preferable to detect errors by signaling but the calling routine expects a returned status, LIB$SIG_TO_RET can be used by the routine that signals. For instance, if you expect a particular condition code to be signaled, you can prevent the operating system from invoking the default condition handler by establishing a different condition handler. LIB$SIG_TO_RET is a condition handler that converts any signaled condition to a return status. The status is returned to the caller of the routine that established LIB$SIG_TO_RET. You may establish LIB$SIG_TO_RET as a condition handler by specifying it in a call to LIB$ESTABLISH.
On Alpha and IA-64 systems, LIB$ESTABLISH is not supported, though high-level languages may support it for compatibility.
Places the signaled condition value in the image of R0 (R8 for I64) that is saved as part of the mechanism argument vector.
Calls the Unwind (SYS$UNWIND) system service with the default arguments. After returning from LIB$SIG_TO_RET (when it is established as a condition handler) or after returning from the condition handler that called LIB$SIG_TO_RET (when LIB$SIG_TO_RET is called from a condition handler), the stack unwinds to the caller of the routine that established the handler.
Your calling routine can now both test R0 (R8 for I64), as if the called routine had returned a status, and specify an error recovery action.
The following paragraphs describe how to establish and use the system-defined condition handler LIB$SIG_TO_RET, which changes a signal to a return status that your program can examine.
Declare LIB$SIG_TO_RET—Declare the condition handler LIB$SIG_TO_RET.
Establish LIB$SIG_TO_RET—Invoke the run-time library procedure LIB$ESTABLISH to establish a condition handler for the current program unit. Specify the name of the condition handler LIB$SIG_TO_RET as the only argument.
Initialize the function value—Initialize the function value to SS$_NORMAL so that, if no condition code is signaled, the function returns a success status to the invoking program unit.
Declare necessary dummy arguments—If any statement that might signal a condition code is a subprogram that requires dummy arguments, pass the necessary arguments to the function. In the function, declare each dummy argument exactly as it is declared in the subprogram that requires it and specify the dummy arguments in the subprogram invocation.
FUNCTION INTERCEPT_SIGNAL (STAT,
2                          ROW,
2                          COLUMN)

! Dummy arguments for GET_1_STAT
INTEGER STAT,
2       ROW,
2       COLUMN
! Declare SS$_NORMAL
INCLUDE '($SSDEF)'
! Declare condition handler
EXTERNAL LIB$SIG_TO_RET
! Declare user routine
INTEGER GET_1_STAT
! Establish LIB$SIG_TO_RET
CALL LIB$ESTABLISH (LIB$SIG_TO_RET)
! Set return status to success
INTERCEPT_SIGNAL = SS$_NORMAL
! Statements and/or subprograms that
! signal expected error condition codes
STAT = GET_1_STAT (ROW,
2                  COLUMN)

END
When the program unit that invoked INTERCEPT_SIGNAL regains control, it should check the return status (as shown in Section 9.5.1, ''Return Status Convention'') to determine which condition code, if any, was signaled during execution of INTERCEPT_SIGNAL.
9.14.4. Changing a Signal to a Stop
LIB$SIG_TO_STOP causes a signal to appear as though it had been signaled by a call to LIB$STOP.
LIB$SIG_TO_STOP can be enabled as a condition handler for a routine or be called from a condition handler. When a signal is generated by LIB$STOP, the severity code is forced to severe, and control cannot return to the routine that signaled the condition. See Section 9.12.1, ''Continuing Execution''for a description of continuing normal execution after a signal.
9.14.5. Matching Condition Values
LIB$MATCH_COND checks for a match between two condition values to allow a program to branch according to the condition found. If no match is found, the routine returns zero. The routine matches only the condition identification field (STS$V_COND_ID) of the condition value; it ignores the control bits and the severity field. If the facility-specific bit (STS$V_FAC_SP = bit <15>) is clear in cond-val (meaning that the condition value is systemwide), LIB$MATCH_COND ignores the facility code field (STS$V_FAC_NO = bits <27:17>) and compares only the STS$V_MSG_ID fields (bits <15:3>).
9.14.6. Correcting a Reserved Operand Condition (VAX Only)
On VAX systems, after a signal of SS$_ROPRAND during a floating-point instruction, LIB$FIXUP_FLT finds the operand and changes it from –0.0 to a new value or to +0.0.
9.14.7. Decoding the Instruction That Generated a Fault (VAX Only)
On VAX systems, LIB$DECODE_FAULT locates the operands for an instruction that caused a fault and passes the information to a user action routine. When called from a condition handler, LIB$DECODE_FAULT locates all the operands and calls an action routine that you supply. Your action routine performs the steps necessary to handle the exception condition and returns control to LIB$DECODE_FAULT. LIB$DECODE_FAULT then restores the operands and the environment, as modified by the action routine, and continues execution of the instruction.
9.15. Exit Handlers
Invokes any user-defined exit handlers.
Invokes the system-defined default exit handler, which closes any files that were left open by the program or by user-defined exit handlers.
- Executes a number of cleanup operations collectively known as image rundown. The following is a list of some of these cleanup operations:
Canceling outstanding ASTs and timer requests.
Deassigning any channel assigned by your program and not already deassigned by your program or the system.
Deallocating devices allocated by the program.
Disassociating common event flag clusters associated with the program.
Deleting user-mode logical names created by the program. (Unless you specify otherwise, logical names created by SYS$CRELNM are user-mode logical names).
Restoring internal storage (for example, stacks or mapped sections) to its original state.
If any exit handler exits using the EXIT (SYS$EXIT) system service, none of the remaining handlers is executed. In addition, if an image is aborted by the DCL command STOP (the user presses Ctrl/Y and then enters STOP), the system performs image rundown and does not invoke any exit handlers. Like the DCLSTOP/ID, SYS$DELPRC bypasses all exit handlers, except the rundown specified in the privileged library vector (PLV) privileged shareable images, and deletes the process. (The DCL command EXIT invokes the exit handlers before running down the image).
When a routine is active under OpenVMS, it has available to it temporary storage on a stack, in a construct known as a stack frame, or call frame. Each time a subroutine call is made, another call frame is pushed onto the stack and storage is made available to that subroutine. Each time a subroutine returns to its caller, the subroutine's call frame is pulled off the stack, and the storage is made available for reuse by other subroutines. Call frames therefore are nested. Outer call frames remain active longer, and the outermost call frame, the call frame associated with the main routine, is normally always available.
A primary exception to this call frame condition is when an exit handler runs. With an exit handler running, only static data is available. The exit handler effectively has its own call frame. Exit handlers are declared with the SYS$DCLEXH system service.
The use of call frames for storage means that all routine-local data is reentrant;that is, each subroutine has its own storage for the routine-local data.
The allocation of storage that is known to the exit handler must be in memory that is not volatile over the possible interval the exit handler might be pending. This means you must be familiar with how the compilers allocate routine-local storage using the stack pointer and the frame pointer. This storage is valid only while the stack frame is active. Should the routine that is associated with the stack frame return, the exit handler cannot write to this storage without having the potential for some severe application data corruptions.
A hang-up to a terminal line causes DCL to delete the master process's subprocesses. However, if the subprocesses exit handler is in a main image installed with privilege, then that exit handler is run even with the DCL command STOP. Also, if the subprocess was spawned NOWAIT, then the spawning process's exit handler is run as well.
Use exit handlers to perform any cleanup that your program requires in addition to the normal rundown operations performed by the operating system. In particular, if your program must perform some final action regardless of whether it exits normally or is aborted, you should write and establish an exit handler to perform that action.
9.15.1. Establishing an Exit Handler
To establish an exit handler, use the SYS$DCLEXH system service. The SYS$DCLEXH system service requires one argument—a variable-length data structure that describes the exit handler. Figure 9.18, ''Structure of an Exit Handler'' illustrates the structure of an exit handler.
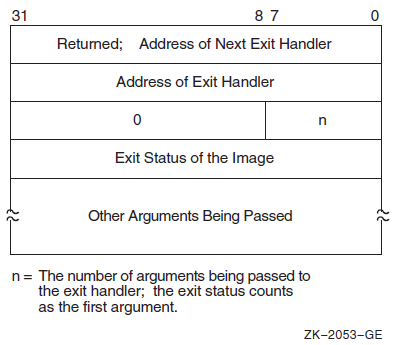
The first longword of the structure contains the address of the next handler. The operating system uses this argument to keep track of the established exit handlers;do not modify this value. The second longword of the structure contains the address of the exit handler being established. The low-order byte of the third longword contains the number of arguments to be passed to the exit handler. Each of the remaining longwords contains the address of an argument.
The first argument passed to an exit handler is an integer value containing the final status of the exiting program. The status argument is mandatory. However, do not supply the final status value; when the operating system invokes an exit handler, it passes the handler the final status value of the exiting program.
To pass an argument with a numeric data type, use programming language statements to assign the address of a numeric variable to one of the longwords in the exit-handler data structure. To pass an argument with a character data type, create a descriptor of the following form:

Use the language statements to assign the address of the descriptor to one of the longwords in the exit-handler data structure.
   .
   .
   .
! Arguments for exit handler
INTEGER EXIT_STATUS       ! Status
CHARACTER*12 STRING       ! String
STRUCTURE /DESCRIPTOR/
  INTEGER SIZE,
2         ADDRESS
END STRUCTURE
RECORD /DESCRIPTOR/ EXIT_STRING
! Setup for exit handler
STRUCTURE /EXIT_DESCRIPTOR/
 INTEGER LINK,
2        ADDR,
2        ARGS /2/,
2        STATUS_ADDR,
2        STRING_ADDR
END STRUCTURE
RECORD /EXIT_DESCRIPTOR/ HANDLER
! Exit handler
EXTERNAL EXIT_HANDLER
   .
   .
   .
! Set up descriptor
EXIT_STRING.SIZE = 12     ! Pass entire string
EXIT_STRING.ADDRESS = %LOC (STRING)
! Enter the handler and argument addresses
! into the exit handler description
HANDLER.ADDR = %LOC(EXIT_HANDLER)
HANDLER.STATUS_ADDR = %LOC(EXIT_STATUS)
HANDLER.STRING_ADDR = %LOC(EXIT_STRING)
! Establish the exit handler
CALL SYS$DCLEXH (HANDLER)
   .
   .
   .
An exit handler can be established at any time during your program and remains in effect until it is canceled (with SYS$CANEXH) or executed. If you establish more than one handler, the handlers are executed in reverse order:the handler established last is executed first; the handler established first is executed last.
9.15.2. Writing an Exit Handler
Write an exit handler as a subroutine, because no function value can be returned. The dummy arguments of the exit subroutine should agree in number, order, and data type with the arguments you specified in the call to SYS$DCLEXH.
In the following example, assume that two or more programs are cooperating with each other. To keep track of which programs are executing, each has been assigned a common event flag (the common event flag cluster is named ALIVE). When a program begins, it sets its flag; when the program terminates, it clears its flag. Because it is important that each program clear its flag before exiting, you create an exit handler to perform the action. The exit handler accepts two arguments, the final status of the program and the number of the event flag to be cleared. In this example, since the cleanup operation is to be performed regardless of whether the program completes successfully, the final status is not examined in the exit routine. (This subroutine would not be used with the exit handler declaration in the previous example).
CLEAR_FLAG.FOR
SUBROUTINE CLEAR_FLAG (EXIT_STATUS,
2                      FLAG)
! Exit handler clears the event flag

! Declare dummy argument
INTEGER EXIT_STATUS,
2       FLAG
! Declare status variable and system routine
INTEGER STATUS,
2       SYS$ASCEFC,
2       SYS$CLREF
! Associate with the common event flag
! cluster and clear the flag
STATUS = SYS$ASCEFC (%VAL(FLAG),
2                    'ALIVE',,)
IF (.NOT. STATUS) CALL LIB$SIGNAL (%VAL(STATUS))
STATUS = SYS$CLREF (%VAL(FLAG))
IF (.NOT. STATUS) CALL LIB$SIGNAL (%VAL (STATUS))

END
If for any reason you must perform terminal I/O from an exit handler, use appropriate RTL routines. Trying to access the terminal from an exit handler using language I/O statements may cause a redundant I/O error.
9.15.3. Debugging an Exit Handler
To debug an exit handler, you must set a breakpoint in the handler and wait for the operating system to invoke that handler; you cannot use the DEBUG command STEP/INTO to enter an exit handler. In addition, when the debugger is invoked, it establishes an exit handler that exits using the SYS$EXIT system service. If you invoke the debugger when you invoke your image, the debugger's exit handler does not affect your program's handlers because the debugger's handler is established first and so executes last. However, if you invoke the debugger after your program begins executing (the user presses Ctrl/Y and then types DEBUG), the debugger's handler may affect the execution of your program's exit handlers, because one or more of your handlers may have been established before the debugger's handler and so is not executed.
9.15.4. Example of Exit Handler
As in the example in Section 9.15.2, ''Writing an Exit Handler'', write the exit handler as a subroutine because no function value can be returned. The dummy arguments of the exit subroutine should agree in number, order, and data type with the arguments you specify in the call to SYS$DCLEXH.
In the following example, assume that two or more programs are cooperating. To keep track of which programs are executing, each has been assigned a common event flag (the common event flag cluster is named ALIVE). When a program begins, it sets its flag; when the program terminates, it clears its flag. Because each program must clear its flag before exiting, you create an exit handler to perform the action. The exit handler accepts two arguments: the final status of the program and the number of the event flag to be cleared.
! Arguments for exit handler
INTEGER*4 EXIT_STATUS       ! Status
INTEGER*4 FLAG /64/
! Setup for exit handler
STRUCTURE /EXIT_DESCRIPTOR/
 INTEGER LINK,
2        ADDR,
2        ARGS /2/,
2        STATUS_ADDR,
2        FLAG_ADDR
END STRUCTURE
RECORD /EXIT_DESCRIPTOR/ HANDLER

! Exit handler
EXTERNAL CLEAR_FLAG

INTEGER*4 STATUS,
2         SYS$ASCEFC,
2         SYS$SETEF

! Associate with the common event flag
! cluster and set the flag.
STATUS = SYS$ASCEFC (%VAL(FLAG),
2                    'ALIVE',,)
IF (.NOT. STATUS) CALL LIB$SIGNAL (%VAL(STATUS))
STATUS = SYS$SETEF (%VAL(FLAG))
IF (.NOT. STATUS) CALL LIB$SIGNAL (%VAL (STATUS))
! Do not exit until cooperating program has a chance to
! associate with the common event flag cluster.

! Enter the handler and argument addresses
! into the exit handler description.
HANDLER.ADDR = %LOC(CLEAR_FLAG)
HANDLER.STATUS_ADDR = %LOC(EXIT_STATUS)
HANDLER.FLAG_ADDR = %LOC(FLAG)
! Establish the exit handler.
CALL SYS$DCLEXH (HANDLER)

! Continue with program
               .
               .
               .
END

! Exit Subroutine

SUBROUTINE CLEAR_FLAG (EXIT_STATUS,
2                      FLAG)
! Exit handler clears the event flag

! Declare dummy argument
INTEGER EXIT_STATUS,
2       FLAG

! Declare status variable and system routine
INTEGER STATUS,
2       SYS$ASCEFC,
2       SYS$CLREF

! Associate with the common event flag
! cluster and clear the flag
STATUS = SYS$ASCEFC (%VAL(FLAG),
2                    'ALIVE',,)
2                    'ALIVE',,)
IF (.NOT. STATUS) CALL LIB$SIGNAL (%VAL(STATUS))
STATUS = SYS$CLREF (%VAL(FLAG))
IF (.NOT. STATUS) CALL LIB$SIGNAL (%VAL (STATUS))
Part III. Addressing and Memory Management
This part describes 32-bit and 64-bit address space, and the support offered for 64-bit addressing. It also gives guidelines for 64-bit application programming interfaces (APIs); OpenVMS Alpha, OpenVMS IA-64, OpenVMS VAX, and VLM memory management with run-time routines for memory management, and alignment on OpenVMS Alpha, OpenVMS VAX, and OpenVMS IA-64 systems.
Chapter 10. Overview of Alpha and I64 Virtual Address Space
The OpenVMS Alpha and OpenVMS IA-64 operating systems provide support for 64-bit virtual memory addressing. This capability makes the 64-bit virtual address space, defined by the Alpha and Intel Itanium architectures, available to the OpenVMS Alpha and OpenVMS IA-64 operating systems and to application programs. For information about Very Large Memory, see Chapter 16, "Memory Management with VLM Features".
10.1. Using 64-Bit Addresses
Many OpenVMS Alpha and OpenVMS IA-64 tools and languages (including the Debugger, run-time library routines, and VSI C) support 64-bit virtual addressing. Input and output operations can be performed directly to and from the 64-bit addressable space by means of RMS services, the $QIO system service, and most of the device drivers supplied with OpenVMS Alpha and OpenVMS IA-64 systems.
Underlying this are system services that allow an application to allocate and manage the 64-bit virtual address space, which is available for process-private use.
By using the OpenVMS Alpha and OpenVMS IA-64 tools and languages that support 64-bit addressing, programmers can create images that map and access data beyond the limits of 32-bit virtual addresses. The 64-bit virtual address space design ensures upward compatibility of programs, while providing a flexible framework that allows 64-bit addresses to be used in many different ways to solve new problems.
Nonprivileged programs can optionally be modified to take advantage of 64-bit addressing features. OpenVMS Alpha and OpenVMS IA-64 64-bit virtual addressing does not affect nonprivileged programs that are not explicitly modified to exploit 64-bit support. Binary and source compatibility of existing 32-bit nonprivileged programs is guaranteed.
By using 64-bit addressing capabilities, application programs can map large amounts of data into memory to provide high levels of performance and make use of very large memory (VLM) systems. In addition, 64-bit addressing allows for more efficient use of system resources, allowing for larger user processes, as well as higher numbers of users and client/server processes for virtually unlimited scalability.
This chapter describes the layout and components of the OpenVMS Alpha and OpenVMS IA-64 64-bit virtual memory address space.
For more information about the OpenVMS Alpha and OpenVMS IA-64 programming tools and languages that support 64-bit addressing and recommendations for enhancing applications to support 64-bit addressing and VLM, refer to the subsequent chapters in this guide.
10.2. Traditional OpenVMS 32-Bit Virtual Address Space Layout
In early versions of the OpenVMS Alpha operating system, the virtual address space layout was largely based upon the 32-bit virtual address space defined by the VAX architecture. Figure 10.1, ''32-Bit Virtual Address Space Layout'' illustrates the OpenVMS Alpha implementation of the OpenVMS VAX layout.
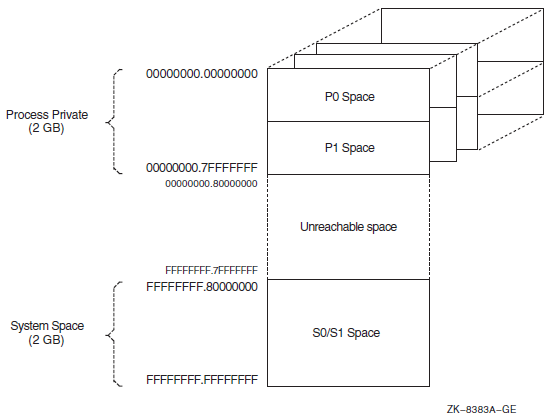
The lower half of the OpenVMS VAX virtual address space (addresses between 0 and 7FFFFFFF16) is called process-private space. This space is further divided into two equal pieces called P0 space and P1 space. Each space is 1 GB long. The P0 space range is from 0 to 3FFFFFFF16. P0 space starts at location 0 and expands toward increasing addresses. The P1 space range is from 4000000016 to 7FFFFFFF16. P1 space starts at location 7FFFFFFF16 and expands toward decreasing addresses.
The upper half of the VAX virtual address space is called system space. The lower half of system space (the addresses between 8000000016 and BFFFFFFF16) is called S0 space. S0 space begins at 8000000016 and expands toward increasing addresses.
The VAX architecture associates a page table with each region of virtual address space. The processor translates system space addresses using the system page table. Each process has its own P0 and P1 page tables. A VAX page table does not map the full virtual address space possible; instead, it maps only the part of its region that has been created.
10.3. OpenVMS Alpha and OpenVMS IA-64 64-Bit Virtual Address Space Layout
The OpenVMS Alpha and OpenVMS IA-64 64-bit address space layout is an extension of the traditional OpenVMS 32-bit address space layout.
Figure 10.2, ''64-Bit Virtual Address Space Layout'' illustrates the 64-bit virtual address space layout design.
Note
To reduce the complexity of the figure, Figure 10.2, ''64-Bit Virtual Address Space Layout'' oversimplifies the virtual address space layout. For OpenVMS Alpha, there is a gap in the middle of P2 space, as described in Section 10.3.4, ''Virtual Address Space Size''.
Itanium Region 0 is used for P0/P1, P2, and the process-private page table space.
Regions 1 through 6 are not used.
Itanium Region 7 is used for S0/S1, S2, and the shared page table space.
Only portions of Regions 0 and 7 are used in this release.
For both OpenVMS Alpha and OpenVMS IA-64, the OpenVMS memory management system services always return virtually contiguous address ranges.
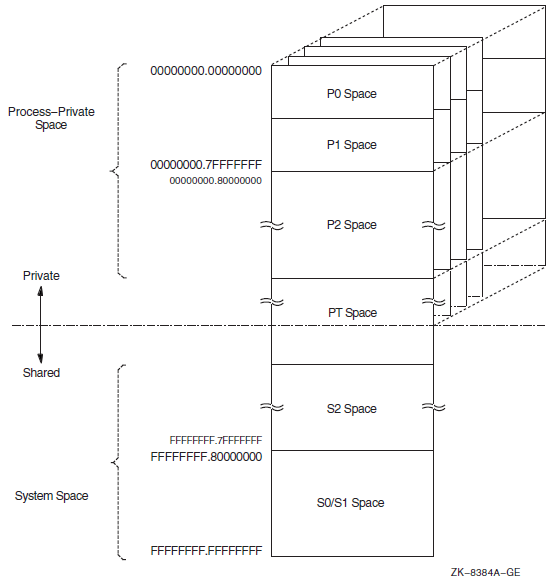
Process-private space
System space
Page table space
10.3.1. Process-Private Space
Supporting process-private address space is a focus of much of the memory management design within the OpenVMS operating system.
Process-private space, or process space, contains all virtual addresses below PT space. As shown in Figure 10.2, ''64-Bit Virtual Address Space Layout'', the layout of process space is further divided into the P0, P1, and P2 spaces. P0 space refers to the program region. P1 space refers to the control region. P2 space refers to the 64-bit program region.
The P0 and P1 spaces are defined to equate to the P0 and P1 regions defined by the VAX architecture. Together, they encompass the traditional 32-bit process-private region that ranges from 0.0000000016 to 0.7FFFFFFF16. P2 space encompasses all remaining process space that begins just above P1 space, 0.8000000016, and ends just below the lowest address of PT space.
OpenVMS IA-64 P2 process space is larger than that of OpenVMS Alpha: 8-TB (-2 GB for P0/P1) for OpenVMS IA-64, compared with 4-TB for OpenVMS Alpha.
10.3.2. System Space
64-bit system space refers to the portion of the entire 64-bit virtual address range that is higher than that which contains PT space. As shown in Figure 10.2, ''64-Bit Virtual Address Space Layout'', system space is further divided into the S0, S1, and S2 spaces.
The S0 and S1 spaces are defined to equate to the S0 and S1 regions defined by the VAX architecture. Together they encompass the traditional 32-bit system space region that ranges from FFFFFFFF.8000000016 to FFFFFFFF.FFFFFFFF16. S2 space encompasses al remaining system spaces between the highest address of PT space and the lowest address of the combined S0/S1 space.
OpenVMS IA-64 S2 process space is larger than that of OpenVMS Alpha: 8-TB (-2 GB for S0/S1) for OpenVMS IA-64, compared with 4-TB for OpenVMS Alpha.
S0, S1, and S2 are fully shared by all processes. S0/S1 space expands toward increasing virtual addresses. S2 space generally expands toward lower virtual addresses.
Addresses within system space can be created and deleted only from code that is executing in kernel mode. However, page protection for system space pages can be set up to allow any less privileged access mode read and write access.
System space base is controlled by the S2_SIZE system parameter. S2_SIZE is the number of megabytes to reserve for S2 space. The default value is based on the sizes required by expected consumers of 64-bit (S2) system space. Consumers set up by OpenVMS at boot time are the page frame number (PFN) database and the global page table. (For more information about setting system parameters with SYSGEN, see the VSI OpenVMS System Management Utilities Reference Manual, Volume II: M–Z.
The global page table, also known as the GPT, and the PFN database reside in the lowest-addressed portion of S2 space. By implementing the GPT and PFN database in S2 space, the size of these areas is not constrained to a small portion of S0/S1 space. This allows OpenVMS to support large physical memories and large global sections.
10.3.3. Page Table Space
Page tables are addressed primarily within 64-bit PT space. Page tables refer to this virtual address range; they are not in 32-bit shared system address space.
The dotted line in Figure 10.2, ''64-Bit Virtual Address Space Layout'' marks the boundary between process-private space and shared space. This boundary is in PT space and further serves as the boundary between the process-private page table entries and the shared page table entries. Together, these sets of entries map the entire address space available to a given process. PT space is mapped to the same virtual address for each process, typically a very high address such as FFFFFFFC.0000000016.
I64 has two page table spaces, one for process private in region 0 and one for system space in region 7. If you use only supported interfaces to manage page table entries, this distinction is not visible. However, any code that attempts to compute the page table entry address "by hand" for a given virtual address is not guaranteed to work.
10.3.4. Virtual Address Space Size
Both the Alpha and Intel Itanium architectures support 64-bit addresses.
The Alpha architecture requires that all implementations must use or check all 64 bits of a virtual address during the translation of a virtual address into a physical memory address. However, implementations of the Alpha architecture are allowed to materialize a subset of the virtual address space. Current Alpha hardware implementations support 43 significant bits within a 64-bit virtual address. This results in an 8-TB address space.
On current Alpha architecture implementations, bit 42 within a virtual address must be sign-extended or propagated through bit 63 (the least significant bit is numbered from 0). Virtual addresses where bits 42 through 63 are not all zeros or all ones result in an access violation when referenced. Therefore, the valid 8-TB address space is partitioned into two disjoint 4-TB ranges separated by a no access range in the middle.
The layout of the OpenVMS Alpha address space transparently places this no access range within P2 space. (The OpenVMS Alpha memory management system services always return virtually contiguous address ranges.) The result of the OpenVMS Alpha address space layout design is that valid addresses in P2 space can be positive or negative values when interpreted as signed 64-bit integers.
Current OpenVMS IA-64 implementations support 44 significant bits for up to 8-TB of process space and 8-TB of system space. However, bit 42 within a virtual address need not be sign-extended or propagated through bit 63, and there is no gap in the I64 P2 space.
The Intel Itanium 64-bit virtual address space is divided into eight virtual regions that are identified by region IDs (RIDs). (These regions are distinct from, and not related to, the OpenVMS virtual regions described in Section 10.4, ''Virtual Regions''). The 8-TB process space is in Region 0 and includes P0/P1, P2, and the process page table space. The 8-TB system space is in region 7 and includes S0/S1, S2, and the system page table space.
The Intel Itanium virtual address regions are not currently exposed to OpenVMS system services.
Note that to preserve 32-bit nonprivileged code compatibility, bit 31 in a valid 32-bit virtual address can still be used to distinguish an address in P0/P1 space from an address in S0/S1 space.
10.4. Virtual Regions
A virtual region is a reserved range of process-private virtual addresses. It may be either a user-definedvirtual region reserved by the user program at run time or a process-permanent virtual region reserved by the system on behalf of the process during process creation.
Program region (in P0 space)
Control region (in P1 space)
64-bit program region (in P2 space)
These three process-permanent virtual regions exist so that programmers do not have to create virtual regions if their application does not need to reserve additional ranges of address space.
Virtual regions promote modularity within applications by allowing different components of the application to manipulate data in different virtual regions. When a virtual region is created, the caller of the service is returned a region ID to identify that virtual region. The region ID is used when creating, manipulating, and deleting virtual addresses within that region. Different components within an application can create separate virtual regions so that their use of virtual memory does not conflict.
A virtual region is a light-weight object. That is, it does not consume pagefile quota or working set quota for the virtual addresses specified. Creating a user-defined virtual region by calling a new OpenVMS system service merely defines a virtual address range as a distinct address object within which address space can be created, manipulated, and deleted.
Virtual regions do not overlap. When creating address space within a virtual region, the programmer must specify a region ID to the OpenVMS system service. The programmer must specify the virtual region in which the address space is to be created.
The programmer cannot create, manipulate, or delete address space that does not lie entirely within the bounds of a defined virtual region.
Each user-defined virtual region's size is fixed at the time it is created. Given the large range of virtual addresses in P2 space and the light-weight nature of virtual regions, it is not costly to reserve more address space than the application component immediately needs within that virtual region.
Note the exception of process-permanent regions, which have no fixed size.
The 64-bit program virtual region is the only virtual region whose size is not fixed when it is created. At process creation, the 64-bit program region encompasses all of P2 space. When a user-defined virtual region is created in P2 space, OpenVMS memory management shrinks the 64-bit program region so that no two regions overlap. When a user-defined virtual region is deleted, the 64-bit program region expands to encompass the virtual addresses within the deleted virtual region if no other user-defined virtual region exists at lower virtual addresses.
Each virtual region has an owner mode and a create mode associated with it. Access modes that are less privileged than the owner of the virtual region cannot delete the virtual region. Access modes that are less privileged than the create mode set for the virtual region cannot create virtual addresses within the virtual region. Owner and create modes are set at the time the virtual region is created and cannot be changed. The create mode for a virtual region cannot be more privileged than the owner mode.
When virtual address space is created within a virtual region, allocation generally occurs within the virtual region in a densely expanding manner, as is done within the program (P0 space) and control (P1 space) regions. At the time it is created, each virtual region is set up for the virtual addresses within that virtual region to expand toward either increasing virtual addresses, like P0 space, or decreasing virtual addresses, like P1 space. Users can override this allocation algorithm by explicitly specifying starting addresses.
All user-defined virtual regions are deleted along with the pages created within each virtual region at image rundown.
10.4.1. Regions Within P0 Space and P1 Space
There is one process-permanent virtual region for all of P0 space that starts at virtual address 0 and ends at virtual address 0.3FFFFFFF16. This is called the program region. There is also one process-permanent region for all of P1 space that starts at virtual address 0.4000000016 and ends at virtual address 0.7FFFFFFF16. This is called the control region.
The program and control regions are considered to be owned by kernel mode and have a create mode of user, because user mode callers can create virtual address space within these virtual regions.
These program and control regions cannot be deleted. They are considered to be process-permanent.
10.4.2. 64-Bit Program Region
P2 space has a densely expandable virtual region starting at the lowest virtual address of P2 space, 0.8000000016. This region is called the 64-bit program region. Having a 64-bit program region in P2 space allows an application that does not need to take advantage of explicit virtual regions to avoid incurring the overhead of creating a virtual region in P2 space. This virtual region always exists, so addresses can be created within P2 space immediately.
As described in Section 10.4.3, ''User-Defined Virtual Regions'', a user can create a virtual region in otherwise unoccupied P2 space. If the user-defined virtual region is specified to start at the lowest address of the 64-bit program region, then any subsequent attempt to allocate virtual memory within the region will fail.
The region has a user create mode associated with it;that is, any access mode can create virtual address space within it.
The 64-bit program region cannot be deleted. It is considered to be process-permanent and survives image rundown. Note that all created address space within the 64-bit program region is deleted and the region is reset to encompass all of P2 space as a result of image rundown.
10.4.3. User-Defined Virtual Regions
A user-defined virtual region is a virtual region created by calling the new OpenVMS SYS$CREATE_REGION_64 system service. The location at which a user-defined virtual region is created is generally unpredictable. In order to maximize the expansion room for the 64-bit program region, OpenVMS memory management allocates virtual regions starting at the highest available virtual address in P2 space that is lower than any existing user-defined virtual region.
For maximum control of the process-private address space, the application programmer can specify the starting virtual address when creating a virtual region. This is useful in situations when it is imperative that the user be able to specify exact virtual memory layout.
Virtual regions can be created so that allocation occurs with either increasing addresses or decreasing virtual addresses. This allows applications with stack like structures to create virtual address space and expand naturally.
Virtual region creation gives OpenVMS subsystems and the application programmer the ability to reserve virtual address space for expansion. For example, an application can create a large virtual region and then create some virtual addresses within that virtual region. Later, when the application requires more virtual address space, it can expand within the virtual region and create more address space in a virtually contiguous manner to the previous addresses allocated within that virtual region.
Virtual regions can also be created within P0 and P1 space by specifying VA$M_P0_SPACE or VA$M_P1_SPACE in the flags argument to the SYS$CREATE_REGION_64 service.
If you do not explicitly delete a virtual region with the SYS$DELETE_REGION_64 system service, the user-defined virtual region along with all created address space is deleted when the image exits.
Chapter 11. Support for 64-Bit Addressing (Alpha and I64 Only)
System services, descriptors, and item lists
RMS interfaces
File systems
OpenVMS Alpha and OpenVMS IA-64 64-bit API guidelines
OpenVMS Alpha and OpenVMS IA-64 tools and utilities
Language and pointers
VSI C RTLs
For information about MACRO-32 programming support for 64-bit addressing, see VSI OpenVMS MACRO Compiler Porting and User's Guide.
11.1. System Services Support for 64-Bit Addressing
This chapter describes the OpenVMS Alpha and OpenVMS IA-64 system services that support 64-bit addressing and VLM. It explains the changes made to 32-bit services to support 64-bit addresses, and it lists the 64-bit system services.
To see examples of system services that support 64-bit addressing in an application program, refer to Appendix B, "64-Bit Example Program". For complete information about the OpenVMS system services listed in this chapter, see the VSI OpenVMS System Services Reference Manual: A–GETUAI and VSI OpenVMS System Services Reference Manual: GETUTC–Z.
11.1.1. System Services Terminology
The following system services definitions are used throughout this guide.
32-bit system service
A 32-bit system service is a system service that only supports 32-bit addresses on any of its arguments that specify addresses. If passed by value, on OpenVMS Alpha and OpenVMS IA-64 a 32-bit virtual address is actually a 64-bit address that is sign-extended from 32 bits.
64-bit friendly interface
A 64-bit friendly interface is an interface that can be called with all 64-bit addresses. A 32-bit system service interface is 64-bit friendly if it needs no modification to handle 64-bit addresses. The internal code that implements the system service might need modification, but the system service interface will not.
Examples of 64-bit friendly system services are $QIO, $SYNCH, $ENQ, and $FAO.
Examples of routines with 64-bit unfriendly interfaces are most of the memory management system services, such as $CRETVA, $DELTVA, and $CRMPSC. The INADR and RETADR argument arrays do not promote easily to hold 64-bit addresses.
64-bit system service
A 64-bit system service is a system service that is defined to accept all address arguments as 64-bit addresses (not necessarily 32-bit, sign-extended values). Also, a 64-bit system service uses the entire 64 bits of all virtual addresses passed to it.
The 64-bit system services include the _64 suffix for services that accept 64-bit addresses by reference. For promoted services, this distinguishes the 64-bit capable version from its 32-bit counterpart. For new services, it is a visible reminder that a 64-bit wide address cell will be read/written. This is also used when a structure is passed that contains an embedded 64-bit address, if the structure is not self-identifying as a 64-bit structure. Hence, a routine name need not include "_64" simply because it receives a 64-bit descriptor. Remember that passing an arbitrary value by reference does not mean the suffix is required; passing a 64-bit address by reference does.
11.1.2. Comparison of 32-Bit and 64-Bit Descriptors
This section describes 32-bit and 64-bit descriptors. Descriptors are a mechanism for passing parameters where the address of a descriptor is an entry in the argument list. Descriptors contain the address of the parameter, data type, size, and any additional information needed to describe the passed data.
One form for use with 32-bit addresses
One form for use with 64-bit addresses
The two forms are compatible, because they can be identified dynamically at run time, and except for the size and placement of fields, 32-bit and 64-bit descriptors are identical in content and interpretation.
OpenVMS VAX, OpenVMS Alpha, and OpenVMS IA-64 systems use 32-bit descriptors. When used on OpenVMS Alpha and OpenVMS IA-64 systems, 32-bit descriptors provide full compatibility with their use on OpenVMS VAX. The 64-bit descriptors are used only on OpenVMS Alpha and OpenVMS IA-64 systems. They have no counterparts and are not recognized on OpenVMS VAX systems.
Figure 11.1, ''General Format of a 32-Bit Descriptor'' shows the general descriptor format for a 32-bit descriptor.
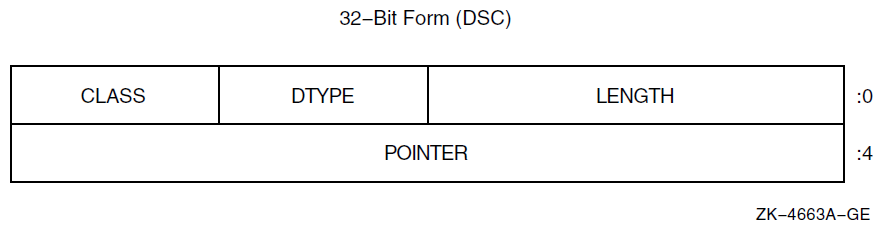
Figure 11.2, ''General Format of a 64-Bit Descriptor'' shows the general descriptor format for a 64-bit descriptor.
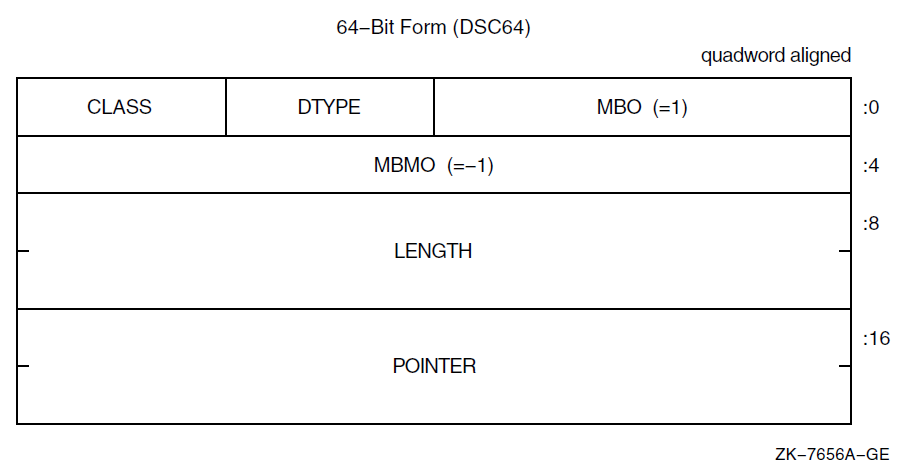
When 32-bit descriptors are used on OpenVMS Alpha and OpenVMS IA-64 systems, they have no required alignment for compatibility with OpenVMS VAX systems, even though longword alignment usually promotes better performance. The 64-bit descriptors on OpenVMS Alpha and OpenVMS IA-64 systems must be quadword aligned.
|
Field |
Description |
|---|---|
|
Length |
The data item length specific to the descriptor class. |
|
MBO |
In a 64-bit descriptor, this field must contain the value 1. This field overlays the length field of a 32-bit descriptor and the value 1 is necessary to distinguish correctly between the two forms. |
|
Dtype |
A data-type code. |
|
Class |
A descriptor class code that identifies the format and interpretation of the other fields of the descriptor. |
|
Pointer |
The address of the first byte of the data element described. |
|
MBMO |
In a 64-bit descriptor, this field must contain the value -1 (all 1 bits). This field overlays the pointer field of a 32-bit descriptor and the value-1 is necessary to distinguish correctly between the two forms. |
For extensive information about 32-bit and 64-bit descriptors, see VSI OpenVMS Programming Concepts Manual, Volume II. Section 11.4, ''OpenVMS Alpha and OpenVMS IA-64 64-Bit API Guidelines'' provides several recommendations and guidelines on implementing 64-bit descriptors.
It is recommended programming practice to use STR$ Run-Time Library routines when using descriptors. Using STR$ RTL procedures helps ensure correct operation of complex language features and enforces consistent operations on data access languages. For example, STR$ANALYZE_SDESC and STR$ANALYZE_SDESC_64 take as input a 32-bit or 64-bit descriptor argument and extract from the descriptor the length of the data and the address at which the data starts for a variety of string descriptor classes. For complete information on using STR$ routines, see the VSI OpenVMS RTL String Manipulation (STR$) Manual.
11.1.3. Comparison of 32-Bit and 64-Bit Item Lists
The following sections describe item lists and compare the 32-bit and 64-bit type of item lists. Item lists are a mechanism used in OpenVMS system services to pass a list of options and/or data descriptors to a service. Occasionally, item lists are used elsewhere, such as in a single routine in LIBRTL, but they are generally considered specific to the OpenVMS system programming interface. They are not in the OpenVMS Calling Standard.
Item lists that are of the 32-bit type are structures or arrays that consist of one or more item descriptors and the list of the item is terminated by a longword containing a zero. Each item descriptor is either a two or three longword structure that contains either three or four fields.
Like 32-bit item lists, 64-bit item lists are structures or arrays that consist of one or more item descriptors, but unlike the 32-bit item lists, the list of the item is terminated by a quadword containing a zero, instead of a longword.
Item List Chaining and Segments
An item list is an array structure that occupies contiguous memory. Some system services support item codes that allow item lists that are non-contiguous and scattered throughout memory to be chained or linked together. Chained item lists are distinct item lists because they are directly linked. For example, the NSA$_CHAIN item code of the $AUDIT_EVENT system service specifies the item list to process immediately after the current one. The buffer address field in the item descriptor specifies the address of the next item list to be processed. Similarly, the LNM$_CHAIN item code of $CRELNM and JPI$_CHAIN item code of $GETJPI system services, point to another item list that the respective system service is to process immediately after it has processed the current item list.
Item lists of 32-bits and 64-bits can be chained together.
Item list segments are the elements that get linked together to form item lists.
11.1.3.1. 32-Bit Item Lists
item_list_2
item_list_3
In both forms, an item code typically identifies the data item to be set or fetched, and a buffer length and address describe the buffer to be read from or written to. The item codes are specific to the facility being called.
Figure 11.3, ''Item_list_2 Format'' shows the format of the item_list_2 item list.
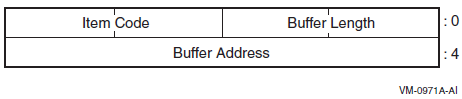
Figure 11.4, ''Item_list_3 Format'' shows the format of the item_list_3 item list.

|
Field |
Description |
|---|---|
|
Buffer length |
A word containing a user-supplied integer specifying the length (in bytes) of the buffer in which the service is to write the information. The length of the buffer needed depends on the item code specified in the item code field of the item descriptor. |
|
Item code |
A word containing a user-supplied symbolic code specifying the item of information that a service is to return. |
|
Buffer address |
A longword containing the user-supplied 32-bit address of the buffer in which a service is to write the information. |
|
Return length address |
A longword containing the user-supplied 32-bit address of a word in which a service writes the length (in bytes) of the information it actually returned. |
You typically use the item_list_3 format when the list describes a series of data items to be returned. This format includes a return length address longword, which is the address of a location in which to write the (word) length of data actually written to the buffer.
For item_list_3 entries, you can set the Return Length Address field to point to the Buffer Length field in the item list entry itself. As a result, the "descriptor-like"portion of the entry is updated by the routine returning the value.
11.1.3.2. 64-Bit Item Lists
To maintain a degree of compatibility with the 32-bit item lists, 64-bit item lists mirror the definition of 64-bit descriptors.
The names of 32-bit item lists (item_list_2 and item_list_3), which expose the number of longwords in the structure in the name itself, do not apply to 64-bit item lists. The 64-bit versions (item_list_64a and item_list_64b) do not include an element count.
Figure 11.5, ''Item_list_64a Format'' shows the format of the item_list_64a item list.
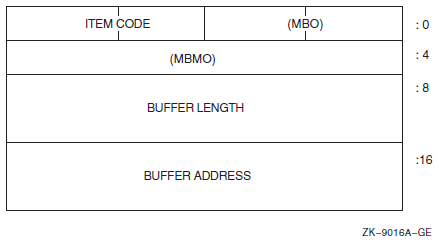
Figure 11.6, ''Item_list_64b Format'' shows the format of the item_list_64b item list.
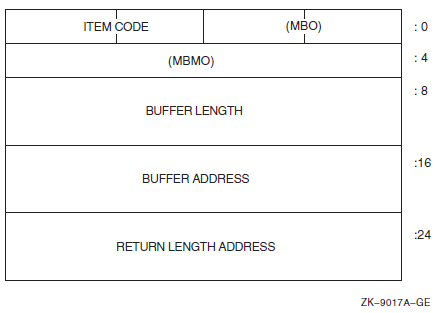
|
Field |
Description |
|---|---|
|
MBO |
The field must contain a 1. The MBO and MBMO fields are used to distinguish 32-bit and 64-bit item list entries. |
|
Item code |
A word containing a user-supplied symbolic code that describes the information in the buffer or the information to be returned to the buffer, pointed to by the buffer address field. |
|
MBMO |
The field must contain a -1. The MBMO and MBO fields are used to distinguish 32-bit and 64-bit item list entries. |
|
Buffer length |
A quadword containing a user-supplied integer specifying the length (in bytes) of the buffer in which a service is to write the information. The length of the buffer needed depends on the item code specified in the item code field of the item descriptor. |
|
Buffer address |
A quadword containing the user-supplied 64-bit address of the buffer in which a service is to write the information. |
|
Return length address |
A quadword containing the user-supplied 64-bit address of a word in which a service writes the length (in bytes) of the information it actually returned. |
Because they contain quadword entries, 64-bit item lists should be quadword aligned. If a misaligned list is specified, the called routine still functions properly, but a performance penalty results due to alignment faults.
The 64-bit form is easily distinguished from the 32-bit form by routines receiving themas arguments.
The item lists continue to demonstrate the behavior that if a 32-bit facility is incorrectly handed as a 64-bit item list, it fails predictably. The buffer address of -1 and the length field of 1 are guaranteed to result in an access violation. The same result comes from passing a 64-bit item list entry to a routine expecting a 32-bit string descriptor. Passing a 64-bit item list element to a routine expecting a 64-bit descriptor is as reliable as it is for their 32-bit counterparts.
Section 11.4, ''OpenVMS Alpha and OpenVMS IA-64 64-Bit API Guidelines'' provides several recommendations and guidelines on implementing 64-bit item lists.
11.1.4. System Services That Support 64-Bit Addresses
Table 11.2, ''64-Bit System Services''summarizes the OpenVMS Alpha and OpenVMS IA-64 system services that support 64-bit addresses.
| Service | Arguments |
|---|---|
|
Alignment System Services | |
|
$GET_ALIGN_FAULT_DATA |
buffer_64, buffer_size, return_size_64 |
|
$GET_SYS_ALIGN_FAULT_DATA |
buffer_64, buffer_size, return_size_64 |
|
$INIT_SYS_ALIGN_FAULT_REPORT |
match_table_64, buffer_size, flags |
|
AST System Service | |
|
$DCLAST |
astadr_64, astprm_64, acmode |
|
Condition Handling System Services | |
|
$FAO |
ctrstr_64, outlen_64, outbuf_64, p1_64...pn_64 |
|
$FAOL |
ctrstr_64, outlen_64, outbuf_64, long_prmlst_64 |
|
$FAOL_64 |
ctrstr_64, outlen_64, outbuf_64, quad_prmlst_64 |
|
$GETMSG |
msgid, msglen_64, bufadr_64, flags, outadr_64 |
|
$PUTMSG |
msgvec_64, actrtn_64, facnam_64, actprm_64 |
|
$SIGNAL_ARRAY_64 |
mcharg, sigarg_64 |
|
CPU Scheduling System Services | |
|
$CPU_CAPABILITIES |
cpu_id, select_mask, modify_mask, prev_mask, flags |
|
$CPU_TRANSITION(W) |
tran_code, cpu_id, nodename, node_id, flags, efn, iosb, astadr_64, astprm_64 |
|
$FREE_USER_CAPABILITY |
cap_num, prev_mask, flags |
|
$GET_USER_CAPABILITY |
cap_num, select_num, select_mask, prev_mask, flags |
|
$PROCESS_AFFINITY |
pidadr, prcnam, select_mask, modify_mask, prev_mask, flags |
|
$PROCESS_CAPABILITIES |
pidadr, prcnam, select_mask, modify_mask, prev_mask, flags |
|
$SET_IMPLICIT_AFFINITY |
pidadr, prcnam, state, cpu_id, prev_mask |
|
Event Flag System Service | |
|
$READEF |
efn, state_64 |
|
Fast-I/O System Services | |
|
$IO_CLEANUP |
fandle |
|
$IO_PERFORM |
fandle, chan, iosadr, bufadr, buflen, porint |
|
$IO_PERFORMW |
fandle, chan, iosadr, bufadr, buflen, porint |
|
$IO_SETUP |
func, bufobj, iosobj, astadr, flags, return_fandle |
|
Intra-Cluster Communications System Services | |
|
SYS$ICC_ACCEPT |
conn_handle, accept_buf, accept_len, user_context, flags |
|
SYS$ICC_CONNECT(W) |
ios_icc, astadr, astprm, assoc_handle, conn_handle, remote_assoc, remote_node, user_context, conn_buf, conn_buf_len, return_buf, return_buf_len, retlen_addr, flags |
|
SYS$ICC_DISCONNECT(W) |
conn_handle, iosb, astadr, astprm, disc_buf, disc_buf_len |
|
SYS$ICC_OPEN_ASSOC |
asoc_handle, assoc_name, logical_name, logical_table, conn_event_rtn, disc_event_rtn, recv_rtn, maxflowbufcut, prot |
|
SYS$ICC_RECEIVE(W) |
conn_handle, ios_icc, astadr, astprm, recv_buf, recv_buf_len |
|
SYS$ICC_REJECT |
conn_handle, reject_buf, reject_buf_len, reason |
|
SYS$ICC_REPLY(W) |
conn_handle, ios_icc, astadr, astprm, reply_buf, reply_len |
|
SYS$ICC_TRANSCEIVE(W) |
conn_handle, ios_icc, astadr, astprm, send_buf, send_len |
|
SYS$ICC_TRANSMIT(W) |
conn_handle, ios_icc, astadr, astprm, send_buf, send_len |
|
I/O System Services | |
|
$ASSIGN |
devnam, chan, acmode, mbxnam, flags |
|
$QIO(W)? |
efn, chan, func, iosb_64, astadr_64, astprm_64, p1_64, p2_64, p3_64, p4_64, p5_64, p6_64 |
|
$SYNCH |
efn, iosb_64 |
|
Locking System Services | |
|
$DEQ |
lkid, vablk_64, acmode, flags |
|
$ENQ(W) |
efn, lkmode, lksb_64, flags, resnam_64, parid, astadr_64, astprm_64, blkast_64, acmode |
|
Logical Name System Services | |
|
$CRELNM |
attr, tabnam, lognam, acmode, itmlst |
|
$CRELNT |
ttr, resnam, reslen, quota, promsk, tabnam, partab, acmode |
|
$DELLNM |
tabnam, lognam, acmode |
|
$TRNLNM |
attr, tabnam, lognam, acmode, itmlst |
|
Memory Management System Services | |
|
$ADJWSL |
pagcnt, wsetlm_64 |
|
$CREATE_BUFOBJ_64 |
start_va_64, length_64, acmode, flags, return_va_64, return_length_64, return_buffer_handle_64 |
|
$CREATE_GDZRO |
gsdnam_64, ident_64, prot, length_64, acmode, flags, ... |
|
$CRMPSC_GDZRO_64 |
gsdnam_64, ident_64, prot, length_64, region_id_64, section_offset_64, acmode, flags, return_va_64, return_length_64, ... |
|
$CREATE_GFILE |
gsdnam_64, ident_64, file_offset_64, length_64, chan, acmode, flags, return_length_64, ... |
|
$CREATE_GPFILE |
gsdnam_64, ident_64, prot, length_64, acmode, flags |
|
$CREATE_GPFN |
gsdnam_64, ident_64, prot, start_pfn, page_count, acmode, flags |
|
$CREATE_REGION_64 |
length_64, region_prot, flags, return_region_id_64, return_va_64, return_length_64, ... |
|
$CRETVA_64 |
region_id_64, start_va_64, length_64, acmode, flags, return_va_64, return_length_64 |
|
$CRMPSC_FILE_64 |
region_id_64, file_offset_64, length_64, chan, acmode, flags, return_va_64, return_length_64, ... |
|
$CRMPSC_GFILE_64 |
gsdnam_64, ident_64, file_offset_64, length_64, chan, region_id_64, section_offset, acmode, flags, return_va_64, return_length_64, ... |
|
$CRMPSC_GPFILE_64 |
gsdnam_64, ident_64, prot, length_64, region_id_64, section_offset_64, acmode, flags, return_va_64, return_length_64, ... |
|
$CRMPSC_GPFN_64 |
gsdnam_64, ident_64, prot, start_pfn, page_count, region_id_64, relative_page, acmode, flags, return_va_64, return_length_64, ... |
|
$CRMPSC_PFN_64 |
region_id_64, start_pfn, page_count, acmode, flags, return_va_64, return_length_64, ... |
|
$DELETE_BUFOBJ |
buffer_handle_64 |
|
$DELETE_REGION_64 |
region_id_64, acmode, return_va_64, return_length_64 |
|
$DELTVA_64 |
region_id_64, start_va_64, length_64, acmode, return_va_64, return_length_64 |
|
$DGBLSC |
flags, gsdnam_64, ident_64 |
|
$EXPREG_64 |
region_id_64, length_64, acmode, flags, return_va_64, return_length_64 |
|
$GET_REGION_INFO |
function_code, region_id_64, start_va_64, ,buffer_length, buffer_address_64, return_length_64 |
|
$LCKPAG_64 |
start_va_64, length_64, acmode, return_va_64, return_length_64 |
|
$LKWSET_64 |
start_va_64, length_64, acmode, return_va_64, return_length_64 |
|
$MGBLSC_64 |
gsdnam_64, ident_64, region_id_64, section_offset_64, length_64, acmode, flags, return_va_64, return_length_64, ... |
|
$MGBLSC_GPFN_64 |
gsdnam_64, ident_64, region_id_64, relative_page, page_count, acmode, flags, return_va_64, return_length_64, ... |
|
$PURGE_WS |
start_va_64, length_64 |
|
$SETPRT_64 |
start_va_64, length_64, acmode, prot, return_va_64, return_length_64, return_prot_64 |
|
$ULKPAG_64 |
start_va_64, length_64, acmode, return_va_64, return_length_64 |
|
$ULWSET_64 |
start_va_64, length_64, acmode, return_va_64, return_length_64 |
|
$UPDSEC_64(W) |
start_va_64, length_64, acmode, updflg, efn, iosa_64, return_va_64, return_length_64, ... |
|
Process Control System Services | |
|
$GETJPI(W) |
efn, pidadr, prcnam, itmlst, iosb, astadr, astprm |
|
$PROCESS_SCAN |
pidctx, itmlst |
|
$WAKE |
pidadr, prcnam |
|
Time System Services | |
|
$ASCTIM |
timlen, timbuf, timadr, cvtflg |
|
$ASCUTC |
timlen, timbuf, utcadr, cvtflg |
|
$BINTIM |
timbuf, timadr |
|
$BINUTC |
timbuf, utcadr |
|
$CANTIM |
reqidt_64, acmode |
|
$GETTIM |
timadr_64 |
|
$GETUTC |
utcadr |
|
$NUMTIM |
timbuf, timadr |
|
$NUMUTC |
timbuf, utcadr |
|
$SETIME |
timadr |
|
$SETIMR |
efn, daytim_64, astadr_64, reqidt_64, flags |
|
$TIMCON |
timadr, utcadr, cvtflg |
|
Other System Services | |
|
$ASCTOID |
name, id, attrib |
|
$CLEAR_UNWIND_TABLE |
code_base_va |
|
$CMEXEC_64 |
routine_64, quad_arglst_64 |
|
$CMKRNL_64 |
routine_64, quad_arglst_64 |
|
$FINISH_RDB |
context |
|
$GETSYI(W) |
efn, csidadr, nodename, itmlst, iosb, astadr, astprm |
|
$GET_UNWIND_ENTRY_INFO |
pc, get_ue_block, name |
|
$GOTO_UNWIND_64 |
target_invo, target_pc, [NewRetVal], [NewRetVal2] |
|
$IDTOASC |
id, namlen, nambuf, resid, attrib, contxt |
|
$SET_UNWIND_TABLE |
code_base_va, code_size, ut_base_va, ut_size, gp_value, unwind_info_base, name |
11.1.5. Sign-Extension Checking
OpenVMS system services not listed in Table 11.2, ''64-Bit System Services''and all user-written system services that are not explicitly enhanced to accept 64-bit addresses will receive sign-extension checking. Any argument passed to these services that is not properly sign-extended will cause the error status SS$_ARG_GTR_32_BITS to be returned.
11.1.6. Language Support for 64-Bit System Services
C function prototypes for system services are available in SYS$LIBRARY:SYS$STARLET_C.TLB (or STARLET).
No 64-bit MACRO-32 macros are available for system services. The MACRO-32 caller must use the AMACRO built-in EVAX_CALLG_64 or the $CALL64 macro. For more information about MACRO-32 programming support for 64-bit addressing, see VSI OpenVMS MACRO Compiler Porting and User's Guide.
11.2. RMS Interface Features for 64-Bit Addressing
This section summarizes features that support 64-bit addressing and enable you to use RMS to perform input and output operations to P2 or S2 space. You can take full advantage of these RMS features by making only minor modifications to existing RMS code.
For complete information about RMS support for 64-bit addressing, see the VSI OpenVMS Record Management Services Reference Manual.
UBF (user record buffer)
RBF (record buffer)
RHB (fixed-length record header buffer; fixed portion of VFC record format)
KBF (key buffer containing the key value for random access)
The prompt buffer pointed to by RAB$L_PBF is excluded because the terminal driver does not allow 64-bit addresses.
- Data buffers can be placed in P2 or S2 space for the following user I/O services:
Record I/O services: $GET, $FIND, $PUT, $UPDATE
Block I/O services: $READ, $WRITE
The RAB structure points to the record and data buffers used by these services.
An extension of the existing RAB structure is used to specify 64-bit buffer pointers and sizes.
- The buffer size maximum for RMS block I/O services ($READ and $WRITE) is 2 GB, with two exceptions:
For RMS journaling, a journaled $WRITE service is restricted to the current maximum (65535 minus 99 bytes of journaling overhead). An RSZ error is returned to RAB$L_STS if the maximum is exceeded.
Magnetic tape is still limited to 65535 bytes at the device driver level.
FAB, RAB, NAM, and XABs must still be allocated in 32-bit space.
Any descriptors or embedded pointers to file names, item lists, and so on, must continue to use 32-bit pointers.
Any arguments passed to the RMS system services remain 32-bit arguments. If you attempt to pass a 64-bit argument, the SS$_ARG_GTR_32_BITS error is returned.
11.2.1. RAB64 Data Structure
The RAB64, a RMS user interface structure, is an extended RAB that can accommodate 64-bit buffer addresses. The RAB64 data structure consists of a 32-bit RAB structure followed by a 64-bit extension.

|
This field... |
Is an extension of this field |
Description |
|---|---|---|
|
RAB64$Q_CTX |
RAB64$L_CTX |
User context. This field is not used by RMS but is available to the user. The CTX field is often used to contain a pointer. For asynchronous I/O, it provides the user with the equivalent of an AST parameter. |
|
RAB64$PQ_KBF |
RAB64$L_KBF |
Key buffer address containing the key value for random access (for $GET and $FIND). |
|
RAB64$PQ_RBF |
RAB64$L_RBF |
Record buffer address (for $PUT, $UPDATE, and $WRITE). |
|
RAB64$PQ_RHB |
RAB64$L_RHB |
Record header buffer address (fixed portion of VFC record format). |
|
RAB64$Q_RSZ |
RAB64$W_RSZ |
Record buffer size. |
|
RAB64$PQ_UBF |
RAB64$L_UBF |
User buffer address (for $GET and $READ). |
|
RAB64$Q_USZ |
RAB64$W_USZ |
User buffer size. |
Note that the fields with the PQ tag in their names can hold either a 64-bit address or a 32-bit address sign-extended to 64 bits. Therefore, you can use the fields in all applications whether or not you are using 64-bit addresses.
For most record I/O service requests, there is an RMS internal buffer between the device and the user's data buffer. The one exception occurs with the RMS service $PUT. If the device is a unit record device and it is not being accessed over the network, RMS passes the address of the user record buffer (RBF) to the $QIO system service. If you inappropriately specify a record buffer (RBF) allocated in 64-bit address space for a $PUT to a unit record device that does not support 64-bit address space (for example, a terminal), the $QIO service returns SS$_NOT64DEVFUNC. (See Writing OpenVMS Alpha Device Drivers in C and VSI OpenVMS Alpha Guide to Upgrading Privileged-Code Applications for more information about $QIO.) RMS returns the error status RMS$_SYS with SS$_NOT64DEVFUNC as the secondary status value in RAB64$L_STV.
RMS system services support the RAB structure as well as the RAB64 structure.
11.2.2. Using the 64-Bit RAB Extension
Only minimal source code changes are required for applications to use 64-bit RMS support.
RMS allows you to use the RAB64 wherever you can use a RAB. For example, you can use RAB64 in place of a RAB as the first argument passed to any of the RMS record or block I/O services.
The RAB64$B_BLN field has been initialized to RAB64$C_BLN64 to show that the extension is present.
The 32-bit address field in the 32-bit portion of the RAB contains -1.
While RMS allows you to use the RAB64 wherever you can use a RAB, some source languages may impose other restrictions. Consult the documentation for your source language for more information.
11.2.3. Macros to Support User RAB Structure
- MACRO-32 macros
$RAB64 (counterpart to $RAB)
$RAB64_STORE (counterpart to $RAB_STORE)
Using these macros has the following results:RAB$B_BLN is assigned the constant of RAB$C_BLN64.
The original longword I/O buffers are initialized to -1, and the USZ and RSZ word sizes are initialized to 0.
Values specified using the UBF, USZ, RBF, RSZ, RHB, or KBF keywords are moved into the quadword fields for these keywords. (In contrast, the $RAB and $RAB_STORE macros move these values into the longword [or word] fields for these keywords).
BLISS macros
The following BLISS macros are available only in the STARLET.R64 library because they use the QUAD keyword, which is available only to BLISS-64. Thus, any BLISS routines referencing them must be compiled using the BLISS-64 compiler.$RAB64 (counterpart to $RAB)
$RAB64_INIT (counterpart to $RAB_INIT)
$RAB64_DECL (counterpart to $RAB_DECL)
Using the first two macros has these results:RAB$B_BLN is assigned the constant of RAB$C_BLN64.
The original longword I/O buffers are initialized to -1, and the USZ and RSZ word sizes are initialized to 0.
Values assigned to the keywords UBF, USZ, RBF, RSZ, RHB, or KBF are moved into the quadword fields for these keywords. (In contrast, the $RAB and $RAB_INIT macros move these values into the longword [or word] fields for these keywords).
The third macro allocates a block structure of bytes with a length of RAB$C_BLN64.
11.3. File System Support for 64-Bit Addressing
The Extended QIO Processor (XQP) file system, which implements the Files-11 On-Disk Structure Level 2 (ODS-2), and the Magnetic Tape Ancillary Control Process (ACP) both provide support for the use of 64-bit buffer addresses for virtual read and write functions.
The XQP and ACP translate a virtual I/O request to a file into one or more logical I/O requests to a device. Because the buffer specified with the XQP or ACP request is passed on to the device driver, the support for buffers in P2 or S2 space is also dependent on the device driver used by the XQP and ACP.
All OpenVMS supplied disk and tape drivers support 64-bit addresses for data transfers to and from disk and tape devices on the virtual, logical, and physical read and write functions. Therefore, the XQP and Magnetic Tape ACP support buffers in P2 or S2 space on the virtual read and write functions.
The XQP and ACP do not support buffer addresses in P2 or S2 space on the control functions (IO$_ACCESS, IO$_DELETE, IO$_MODIFY, and so on).
For more information about device drivers that support 64-bit buffer addresses, see Writing OpenVMS Alpha Device Drivers in C.
11.4. OpenVMS Alpha and OpenVMS IA-64 64-Bit API Guidelines
This section describes the guidelines used to develop 64-bit interfaces to support OpenVMS Alpha and OpenVMS IA-64 64-bit virtual addressing. Application programmers who are developing their own 64-bit application programming interfaces (APIs) might find this information useful.
These recommendations are not hard and fast rules. Most are examples of good programming practices.
For more information about C pointer pragmas, see the VSI C User Manual.
11.4.1. Quadword/Longword Argument Pointer Guidelines
Because OpenVMS Alpha and OpenVMS IA-64 64-bit addressing support allows application programs to access data in 64-bit address spaces, pointers that are not 32-bit sign-extended values(64-bit pointers) will become more common within applications. Existing 32-bit APIs will continue to be supported, and the existence of 64-bit pointers creates some potential pitfalls that programmers must be aware of.
For example, 64-bit addresses may be inadvertently passed to a routine that can handle only a 32-bit address. Another dimension of this would be a new API that includes 64-bit pointers embedded in data structures. Such pointers might be restricted to point to 32-bit address spaces initially, residing within the new data structure as a sign-extended 32-bit value.
Routines should guard against programming errors where 64-bit addresses are being passed instead of 32-bit addresses. This type of checking is called sign-extension checking, which means that the address is checked to ensure that the upper 32 bits are all zeros or all ones, matching the value of bit 31. This checking can be performed at the routine interface that is imposing this restriction.
When defining a new routine interface, you should consider the ease of programming a call to the routine from a 32-bit source module. You should also consider calls written in all OpenVMS programming languages, not just those languages initially supporting 64-bit addressing. To avoid promoting awkward programming practices for the 32-bit caller of a new routine, you should accommodate 32-bit callers as well as 64-bit callers.
Arguments passed by reference that are restricted to reside in a 32-bit address space (P0/P1/S0/S1) should have their reference addresses sign-extension checked.
The OpenVMS Calling Standard requires that 32-bit values passed to a routine be sign-extended to 64-bits before the routine is called. Therefore, the called routine always receives 64-bit values. A 32-bit routine cannot tell if its caller correctly called the routine with a 32-bit address, unless the reference to the argument is checked for sign-extension.
This sign-extension checking would also apply to the reference to a descriptor when data is being passed to a routine by descriptor.
The called routine should return the error status SS$_ARG_GTR_32_BITS if the sign-extension check fails.
Alternately, if you want the called routine to accept the data being passed in a 64-bit location without error and if the sign-extension check fails, the data can be copied by the called routine to a 32-bit address space. The 32-bit address space to which the routine copies the data can be local routine storage (that is, the current stack). If the data is copied to a 32-bit location other than local storage, memory leaks and reentrancy issues must be considered.
When new routines are developed, pointers to code and all data pointers passed to the new routines should be accommodated in 64-bit address spaces where possible. This is desirable even if the data is a routine or is typically considered static data, which the programmer, compiler, or linker would not normally put in a 64-bit address space. When code and static data is supported in 64-bit address spaces, this routine should not need additional changes.
32-bit descriptor arguments should be validated to be 32-bit descriptors.
Routines that accept descriptors should test the fields that allow you to distinguish the 32-bit and 64-bit descriptor forms. If a 64-bit descriptor is received, the routine should return an error.
The 64-bit form of a descriptor contains an MBO (must be one) word at offset 0, where the 32-bit descriptor LENGTH is located, and
An MBMO (must be minus one) longword at offset 4, where the 32-bit descriptor's POINTER is located, as shown in the following figure:
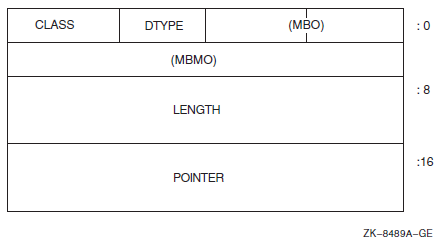
Routines that accept arguments passed by 64-bit descriptors should accommodate 32-bit descriptors as well as 64-bit descriptors.
New routines should accommodate 32-bit and 64-bit descriptors within the same routine. The same argument can point to either a 32-bit or 64-bit descriptor. The 64-bit descriptor MBO word at offset 0 should be tested for 1, and the 64-bit descriptor MBMO longword at offset 4 should be tested for a -1 to distinguish between a 64-bit and 32-bit descriptor.
Consider an existing 32-bit routine that is being converted to handle 64-bit as well as 32-bit descriptors. If the input descriptor is determined to be a 64-bit descriptor, the data being pointed to by the 64-bit descriptor can first be copied to a 32-bit memory location, then a 32-bit descriptor would be created in 32-bit memory. This new 32-bit descriptor can then be passed to the existing 32-bit code, so that no further modifications need to be made internally to the routine.
32-bit item list arguments should be validated to be 32-bit item lists.
Two forms of item lists are defined: item_list_2 and item_list_3. The item_list_2 form of an item list consists of two longwords with the first longword containing a length and item code fields, while the second longword typically contains a buffer address.
The item_list_3 form of an item list consists of three longwords with the first longword containing a length and item code fields, while the second and third longwords typically contain a buffer address and a return length address field.
Since two forms of 32-bit item lists exist, two forms of a 64-bit item list are defined. Dubbed item_list_64a and item_list_64b, these item list forms parallel their 32-bit counterparts. Both forms of item list contain the MBO and MBMO fields at offsets 0 and 4 respectively. They also each contain a word-sized item code field, a quadword-sized length field, and a quadword-sized buffer address field. The item_list_64b form of an item list contains an additional quadword for the return length address field. The returned length is 64-bits.
Routines that accept item lists should test the fields that allow you to distinguish the 32-bit and 64-bit item list forms. If a 64-bit item list is received, the routine should return an error.
The 64-bit form of an item list contains an MBO (must be one) word at offset 0, where the 32-bit item list LENGTH is located, and
An MBMO (must be minus one) longword at offset 4, where the 32-bit item list's BUFFER ADDRESS is located as shown in Figure 11.7, ''item_list_64a'' and Figure 11.8, ''item_list_64b''.
Routines that accept arguments passed by 64-bit item list arguments should accommodate 32-bit item lists as well as 64-bit item lists.
New routines should accommodate 32-bit and 64-bit item lists within the same routine. The same argument can point to either a 32-bit or 64-bit item list. The 64-bit item list MBO word at offset 0 should be tested for 1, and the 64-bit item list MBMO longword at offset 4 should be tested for a -1 to distinguish between a 64-bit and 32-bit item list.
Avoid passing pointers by reference.
If passing a pointer by reference is necessary, as with certain memory management routines, the pointer should be defined to be 64-bit wide.
Mixing 32-bit and 64-bit pointers can cause programming errors when the caller incorrectly passes a 32-bit wide pointer by reference when a 64-bit wide pointer is expected.
If the called routine reads a 64-bit wide pointer that was allocated only one longword by the programmer, the wrong address could be used by the routine.
If the called routine returns a 64-bit pointer, and therefore writes a 64-bit wide address into a longword allocated by the programmer, data corruption can occur.
Existing routines that are passed pointers by reference require new interfaces for 64-bit support. Old routine interfaces would still be passed the pointer in a 32-bit wide memory location and the new routine interface would require that the pointer be passed in a 64-bit wide memory location. Keeping the same interface and passing it 64-bit wide pointers would break existing programs.
Example: The return virtual address used in the SYS$CRETVA_64 service is an example of when it is acceptable to pass a pointer by reference. Virtual addresses created in P0 and P1 space are guaranteed to have only 32 bits of significance, however all 64 bits are returned. SYS$CRETVA_64 can also create address space in 64-bit space and thus return a 64-bit address. The value that is returned must always be 64 bits because a 64-bit address can be returned.
Memory allocation routines should return the pointer to the data allocated by value (that is, in R0), if possible. The C allocation routines, malloc, calloc, and realloc are examples of this.
New interfaces for routines that are not memory management routines should avoid defining output arguments to receive addresses. Problems will arise whenever a 64-bit subsystem allocates memory and then returns a pointer back to a 32-bit caller in an output argument. The caller may not be able to support or express a 64-bit pointer. Instead of returning a pointer to some data, the caller should provide a pointer to a buffer and the called routine should copy the data into the user's buffer.
A 64-bit pointer passed by reference should be defined by the programmer in such a way that a call to the routine can be written in a 64-bit language or a 32-bit language. It should be clearly indicated that a 64-bit pointer is required to be passed by all callers.
Routines must not return 64-bit addresses unless they are specifically requested.
It is extremely important that routines that allocate memory and return an address to their callers always allocate 32-bit addressable memory, unless it is known absolutely that the caller is capable of handling 64-bit addresses. This is true for both function return values and output parameters. This rule prevents 64-bit addresses from creeping in to applications that do not expect them. As a result, programmers developing callable libraries should be particularly careful to follow this rule.
Suppose an existing routine returns the address of memory it has allocated, such as the routine value. If the routine accepts an input parameter that in some way allows it to determine that the caller is 64-bit capable, it is safe to return a 64-bit address. Otherwise, it must continue to return a 32-bit, sign-extended address. In the latter case, a new version of the routine could be provided, which 64-bit callers could invoke instead of the existing version if they prefer that 64-bit memory be allocated.
Example: The routines in LIBRTL that manipulate string descriptors can be sure that a caller is 64-bit capable if the descriptor passed in is in the new 64-bit format. As a result, it is safe for them to allocate 64-bit memory for string data, in that case. Otherwise, they will continue to use only 32-bit addressable memory.
Avoid embedded pointers in data structures in public interfaces.
If embedded pointers are necessary for a new structure in a new interface, provide storage within the structure for a 64-bit pointer (quadword aligned).The called routine, which may have to read the pointer from the structure, simply reads all 64 bits.
If the pointer must be a 32-bit, sign-extended address (for example, because the pointer will be passed to a 32-bit routine) a sign-extension check should be performed on the 64-bit pointer at the entrance to the routine. If the sign-extension check fails, the error status SS$_ARG_GTR_32_BITS may be returned to the caller, or the data in a 64-bit address space may be copied to a 32-bit address space.
The new structure should be defined by the programmer in such a way that a 64-bit caller or a 32-bit caller does not contain awkward code. The structure should provide a quadword field for the 64-bit caller overlaid with two longword fields for the 32-bit caller. The first of these longwords is the 32-bit pointer field and the next is an MBSE (must be sign-extension) field. For most 32-bit callers, the MBSE field will be zero because the pointer will be a 32-bit process space address. The key here is to define the pointer as a 64-bit value and make it clear to the 32-bit caller that the full quadword must be filled in.
#pragma required_pointer_size save
#pragma required_pointer_size 32

typedef struct block {
    int blk_l_size;
    int blk_l_flags;
    union  {
#pragma required_pointer_size 64
        struct data *blk_pq_pointer;
#pragma required_pointer_size 32
        struct  {
            struct data *blk_ps_pointer;
            int blk_l_mbse;
            } blk_r_long_struct;
        } blk_r_pointer_union;
    } BLOCK;

#define blk_pq_pointer     blk_r_pointer_union.blk_pq_pointer
#define blk_r_long_struct  blk_r_pointer_union.blk_r_long_struct
#define blk_ps_pointer     blk_r_long_struct.blk_ps_pointer
#define blk_l_mbse         blk_r_long_struct.blk_l_mbse

/* Routine accepts 64-bit pointer to the "block" structure */
#pragma required_pointer_size 64
int routine(struct block*);

#pragma required_pointer_size restore
For an existing 32-bit routine specifying an input argument, which is a structure that embeds a pointer, you can use a different approach to preserve the existing 32-bit interface. You can develop a 64-bit form of the data structure that is distinguished from the 32-bit form of the structure at run time. Existing code that accepts only the 32-bit form of the structure should automatically fail when presented with the 64-bit form.
The structure definition for the new 64-bit structure should contain the 32-bit form of the structure. Including the 32-bit form of the structure allows the called routine to declare the input argument as a pointer to the 64-bit form of the structure and cleanly handle both cases.
Two different function prototypes can be provided for languages that provide type checking. The default function prototype should specify the argument as a pointer to the 32-bit form of the structure. The programmer can select the 64-bit form of the function prototype by defining a symbol, specified by documentation.
The 64-bit versus 32-bit descriptor is an example of how this can be done.
Example: In the following example, the state of
the symbol FOODEF64 selects the 64-bit form of the structure
along with the proper function prototype. If the symbol FOODEF64
is undefined, the old 32-bit structure is defined and the old 32-bit function
prototype is used.
foo_print would
define the symbol FOODEF64 and be able to handle calls from
32-bit and 64-bit callers. The 64-bit caller would set the field
foo64$l_mbmo to -1. The routine foo_print
would test the field foo64$l_mbmo for -1 to determine if the
caller used either the 64-bit form of the structure or the 32-bit form of the
structure.
#pragma required_pointer_size save
#pragma required_pointer_size 32

typedef struct foo {
    short int     foo$w_flags;
    short int     foo$w_type;
    struct data * foo$ps_pointer;
    } FOO;

#ifndef FOODEF64

/* Routine accepts 32-bit pointer to "foo" structure */
int foo_print(struct foo * foo_ptr);

#endif

#ifdef FOODEF64

typedef struct foo64 {
    union  {
        struct  {
            short int     foo64$w_flags;
            short int     foo64$w_type;
            int           foo64$l_mbmo;
#pragma required_pointer_size 64
            struct data * foo64$pq_pointer;
#pragma required_pointer_size 32
            } foo64$r_foo64_struct;
        FOO foo64$r_foo32;
        } foo64$r_foo_union;
    } FOO64;

#define foo64$w_flags    foo64$r_foo_union.foo64$r_foo64_struct.foo64$w_flags
#define foo64$w_type     foo64$r_foo_union.foo64$r_foo64_struct.foo64$w_type
#define foo64$l_mbmo     foo64$r_foo_union.foo64$r_foo64_struct.foo64$l_mbmo
#define foo64$pq_pointer foo64$r_foo_union.foo64$r_foo64_struct.foo64$pq_pointer
#define foo64$r_foo32    foo64$r_foo_union.foo64$r_foo32

/* Routine accepts 64-bit pointer to "foo64" structure */
#pragma required_pointer_size 64
int foo_print(struct foo64 * foo64_ptr);

#endif

#pragma required_pointer_size restorefoo and
foo64 will be used interchangeably within the same source
module, you can eliminate the symbol FOODEF64. The routine foo_print would then be
defined as
follows:int foo_print (void * foo_ptr);
Eliminating the FOODEF64 symbol allows 32-bit and 64-bit callers to use the same function prototype; however less strict type checking is then available during the C source compilation.
11.4.2. OpenVMS Alpha, OpenVMS VAX, and OpenVMS IA-64 Guidelines
The following sections provide guidelines about using arguments on OpenVMS Alpha, OpenVMS VAX, and OpenVMS IA-64 systems.
Only address, size, and length arguments should be passed as quadwords by value.
Arguments passed by value are restricted to longwords on VAX. To be compatible with VAX APIs, quadword arguments should be passed by reference instead of by value. However, addresses, sizes and lengths are examples of arguments which, because of the architecture, could logically be longwords on OpenVMS VAX and quadwords on OpenVMS Alpha and OpenVMS IA-64.
Even if the API will not be available on OpenVMS VAX, this guideline should still be followed for consistency across all APIs.
Avoid page size dependent units.
Arguments such as lengths and offsets should be represented in units that are page size independent, such as bytes.
A pagelet is an awkward unit. It was invented for compatibility with VAX and is used on OpenVMS Alpha and OpenVMS IA-64 within OpenVMS VAX compatible interfaces. A pagelet is equivalent in size to a VAX page and should not be considered a page size independent unit because it is often confused with a CPU-specific page on Alpha and OpenVMS IA-64.
Example: Length_64 argument in EXPREG_64 is passed as a quadword byte count by value.
Naturally align all data passed by reference.
The called routine should specify to the compiler that arguments are aligned, and the compiler can perform more efficient load and store sequences. If the data is not naturally aligned, users will experience performance penalties.
If the called routine can execute incorrectly because the data passed by reference is not naturally aligned, the called routine should do explicit checking and return an error if not aligned. For example, if a load/locked, store/conditional is being done internally in the routine on the data, and the data is not aligned, the load/locked, store/conditional will notwork properly.
11.4.3. Promoting an API from a 32-Bit API to a 64-Bit API
For ease of use, it is best to separate promoting an API from improving the 32-bit design or adding new functionality. Calling a routine within the new 64-bit API should be an easy programming task.
64-bit routines should accept 32-bit forms of structures as well as 64-bit forms.
To make it easy to modify calls to an API, the 32-bit form of a structure should be accepted by the interface as well as the 64-bit form.
Example: If the 32-bit API passed information by descriptor, the new interface should pass the same information by descriptor.
64-bit routines should provide the same functionality as the 32-bit routines.
An application currently calling the 32-bit API should be able to completely upgrade to calling the 64-bit API without having to preserve some of the old calls to the old 32-bit API just because the new 64-bit API is not a functional superset of the old API.
Example: SYS$EXPREG_64 works for P0, P1 and P2 process space. Callers can replace all calls to SYS$EXPREG since SYS$EXPREG_64 is a functional superset of $EXPREG.
Use the suffix "_64" when appropriate.
For system services, this suffix is used for routines that accept 64-bit addresses by reference. For promoted routines, this distinguishes the 64-bit capable version from its 32-bit counterpart. For new routines, it is a visible reminder that a 64-bit wide address cell will be read/written. This is also used when a structure is passed that contains an embedded 64-bit address, if the structure is not self-identifying as a 64-bit structure. Hence, a routine name need not include "_64" simply because it receives a 64-bit descriptor. Remember that passing an arbitrary value by reference does not mean the suffix is required, passing a 64-bit address by reference does.
This practice is recommended for other routines as well.
- SYS$EXPREG_64 (region_id_64, length_64, acmode, return_va_64, return_length_64)
- SYS$CMKRNL_64 (routine_64, quad_arglst_64)
11.4.4. Example of a 32-Bit Routine and a 64-Bit Routine
The following example illustrates a 32-bit routine interface that has been promoted to support 64-bit addressing. It handles several of the issues addressed in the guidelines.
#pragma required_pointer_size save
#pragma required_pointer_size 32
int sys$cretva (
        struct _va_range * inadr,
        struct _va_range * retadr,
        unsigned int       acmode);
#pragma required_pointer_size restore#pragma required_pointer_size save
#pragma required_pointer_size 64
int sys$cretva_64 (
struct _generic_64 * region_id_64,
void * start_va_64,
unsigned __int64 length_64,
unsigned int acmode,
void ** return_va_64,
unsigned __int64 * return_length_64);
#pragma required_pointer_size restoreThe new routine interface for SYS$CRETVA_64 corrects the embedded pointers within the
_va_range structure, passes the 64-bit
region_id_64 argument by reference and passes the 64-bit
length_64 argument by value.
11.5. OpenVMS Alpha and OpenVMS IA-64 Tools and Utilities That Support 64-Bit Addressing
OpenVMS Debugger
System-code debugger
XDELTA
LIB$ and CVT$ facilities of the OpenVMS Run-Time Library
Watchpoint utility (The Watchpoint utility has not been ported to OpenVMS IA-64).
SDA
11.5.1. OpenVMS Debugger
On OpenVMS Alpha and OpenVMS IA-64 systems, the Debugger can access the extended memory made available by 64-bit addressing support. You can examine and manipulate data in the complete 64-bit address space.
You can examine a variable as a quadword by using the option Quad, which is on the Typecast menu of both the Monitor pull-down menu and the Examine dialog box.
The default type for the debugger is longword, which is appropriate for debugging 32-bit applications. You should change the default type to quadword for debugging applications that use the 64-bit address space. To do this, use the SET TYPE QUADWORD command.
DBG> EVALUATE/ADDRESS/HEX %hex 000004A0
00000000000004A0
DBG>
The debugger supports 32-bit and 64-bit pointers.
For more information about using the OpenVMS Debugger, see the VSI OpenVMS Debugger Manual.
11.5.2. OpenVMS Alpha System-Code Debugger
The OpenVMS Alpha system-code debugger accepts 64-bit addresses and uses full 64-bit addresses to retrieve information.
11.5.3. Delta/XDelta
XDELTA supports 64-bit addressing on OpenVMS Alpha and OpenVMS IA-64. Quadword display mode displays full quadwords of information. 64-bit address display mode accepts and displays all addresses as 64-bit quantities.
XDELTA has predefined command strings for displaying the contents of the PFN database.
For more information about Delta/XDelta, see the VSI OpenVMS Delta/XDelta Debugger Manual.
11.5.4. LIB$ and CVT$ Facilities of the OpenVMS Run-Time Library
For more information about 64-bit addressing support for the LIB$ and CVT$ facilities of the OpenVMS RTL library, refer to the OpenVMS RTL Library (LIB$) Manual.
11.5.5. Watchpoint Utility
The Watchpoint utility is a debugging tool that maintains a history of modifications that are made to a particular location in shared system space by setting watchpoints on 64-bit addresses. It watches any system address, whether in S0, S1, or S2 space.
A $QIO interface to the Watchpoint utility supports 64-bit addresses. The WATCHPOINT command interpreter (WP) issues $QIO requests to the WATCHPOINT driver(WPDRIVER) from commands that follow the standard rules of DCL grammar.
$ RUN SYS$SYSTEM:SYSGEN
SYSGEN> SET MAXBUF 64000
SYSGEN> WRITE ACTIVE
SYSGEN> EXIT$ RUN SYS$SYSTEM:SYSMAN SYSMAN> IO CONNECT WPA0/DRIVER=SYS$WPDRIVER/NOADAPTER SYSMAN> EXIT
$ RUN SYS$SYSTEM:WPNow you can enter commands at the WATCHPOINT> prompt to set, delete, and obtain information from watchpoints.
$ SET TERM/WIDTH=132
11.5.6. SDA
SDA allows a user to specify 64-bit addresses and 64-bit values in expressions. It also displays full 64-bit values where appropriate.
EVALUATE
EXAMINE
FORMAT
READ
SET CPU
- SHOW
CALL_FRAME
CPU
CRASH
DEVICE
EXCEPTION_FRAME
EXECUTIVE
PAGE_TABLE
PARAMETER
PROCESS
SWIS
UNWIND
For more information about using SDA 64-bit addressing support, see the VSI OpenVMS System Analysis Tools Manual.
11.6. Language and Pointer Support for 64-Bit Addressing
Full support in VSI C and the VSI C Run-Time Library (RTL) for 64-bit addressing make C the preferred language for programming 64-bit applications, libraries, and system code for OpenVMS Alpha and OpenVMS IA-64. The 64-bit pointers can be seamlessly integrated into existing C code, and new 64-bit applications can be developed, with natural C coding styles, that take advantage of the 64-bit address space provided by OpenVMS Alpha and OpenVMS IA-64.
Support for all 32-bit pointer sizes (the default), all 64-bit pointer sizes, and the mixed 32-bit and 64-bit pointer size environment provide compatibility as well as flexibility for programming 64-bit OpenVMS applications in VSI C.
The ANSI-compliant, #pragma approach for supporting the mixed 32-bit and 64-bit pointer environment is common to Tru64 UNIX. Features of 64-bit C support include memory allocation routine name mapping (transparent support for _malloc64 and _malloc32) and C-type checking for 32-bit versus 64-bit pointer types.
The OpenVMS Calling Standard describes the techniques used by all OpenVMS languages for invoking routines and passing data between them. The standard also defines the mechanisms that ensure consistency in error and exception handling routines.
Called routines can start to use complete 64-bit addresses.
Callers can pass either 32-bit or 64-bit pointers.
Pointers passed by reference often require a new 64-bit variant of the original routine.
Self-identifying structures, such as those defined for descriptors and item lists, enable an existing API to be enhanced compatibly.
OpenVMS Alpha and OpenVMS IA-64 64-bit virtual address space layout that applies to all processes. (There are no special 64-bit processes or 32-bit processes).
64-bit pointer support for addressing the entire 64-bit OpenVMS Alpha and OpenVMS IA-64 address space layout including P0, P1, and P2 address spaces and S0/S1, S2, and page table address spaces.
32-bit pointer compatibility for addressing P0, P1, and S0/S1 address spaces.
64-bit system services that support P0, P1, and P2 space addresses.
32-bit sign-extension checking for all arguments passed to 32-bit, pointer- only system services.
C and MACRO-32 macros for handling 64-bit addresses.
11.7. VSI C RTL Support for 64-Bit Addressing
OpenVMS Alpha and I64 64-bit virtual addressing support makes the 64-bit virtual address space defined by the Alpha and Itanium architectures available to both the OpenVMS operating system and its users. It also allows per-process virtual addressing for accessing dynamically mapped data beyond traditional 32-bit limits.
Guaranteed binary and source compatibility of existing programs
No impact on applications that are not modified to exploit 64-bit support
Enhanced memory allocation routines that allocate 64-bit memory
Widened function parameters to accommodate 64-bit pointers
Dual implementations of functions that need to know the pointer size used by the caller
Information available to the VSI C compiler to seamlessly call the correct implementation
Ability to explicitly call either the 32-bit or 64-bit form of functions for applications that mix pointer sizes
A single shareable image for use by 32-bit and 64-bit applications
See the VSI C Run-Time Library Reference Manual for OpenVMS Systems for a description of the 64-bit addressing support provided by the VSI C Run-Time Library.
Chapter 12. Memory Management Services and Routines on OpenVMS Alpha and OpenVMS IA-64
This chapter describes the use of memory management system services and run-time routines on Alpha and IA-64 systems. Although the operating system's memory management concepts are much the same on VAX, Alpha, and IA-64 systems, details of the memory management system are different. These details may be critical to certain uses of the operating system's memory management system services and routines on an Alpha and IA-64 system.
12.1. Virtual Page Sizes
On Alpha systems, in order to facilitate memory protection and mapping, the virtual address space is subdivided into segments of 8 KB, 16 KB, 32 KB, or 64 KB sizes called CPU-specific pages. On VAX systems, the page sizes are 512 bytes. Intel Itanium processors support a range of page sizes to assist operating systems to virtually map system resources. All Intel Itanium processors support page sizes of 4 KB, 8 KB, 16 KB, 64 KB, 256 KB, 1 MB, 4 MB, 16 MB, 64 MB, and 256 MB. For compatibility with OpenVMS Alpha systems, OpenVMS IA-64 uses the 8 KB page size by default. (Larger default page sizes may be used in future versions of OpenVMS).
Wherever possible, the Alpha and IA-64 system's versions of the system services and run-time library routines that manipulate memory attempt to preserve compatibility with the VAX system's services and routines. The Alpha and IA-64 system's versions of the routines that accept page count values as arguments still interpret these arguments in 512-byte quantities, which are called pagelets to distinguish them from CPU-specific page sizes. The routines convert pagelet values into CPU-specific pages. The routines that return page count values convert from CPU-specific pages to pagelets, so that return values expected by applications are still measured in the same 512-byte units.
This difference in page size does not affect memory allocation using higher-level routines, such as run-time library routines that manipulate virtual memory zones or language-specific memory allocation routines such as the malloc and free routines in C.
To determine system page size, you make a call to the SYS$GETSYI system service, specifying the SYI$_PAGE_SIZE item code. See the description of SYS$GETSYI and SYI$_PAGE_SIZE in the VSI OpenVMS System Services Reference Manual for details.
12.2. Levels of Memory Allocation Routines
Sophisticated software systems must often create and manage complex data structures. In these systems, the size and number of elements are not always known in advance. You can tailor the memory allocation for these elements by using dynamic memory allocation. By managing the memory allocation, you can avoid allocating fixed tables that may be too large or too small for your program. Managing memory directly can improve program efficiency. By allowing you to allocate specific amounts of memory, the operating system provides a hierarchy of routines and services for memory management. Memory allocation and deallocation routines allow you to allocate and free storage within the virtual address space available to your process.
Memory management system services
The memory management system services comprise the lowest level of memory allocation routines. 64-bit services include, but are not limited to, the following:SYS$CREATE_BUFOBJ_64 (Creates a buffer object)
SYS$CRMPSC_GDZRO_64 (Create and Map to Global Demand-Zero Section)
SYS$CREATE_REGION_64 (Create Virtual Region)
SYS$CRETVA_64 (Create Virtual Address Space)
SYS$CRMPSC_FILE_64 (Create and Map Private Disk File Section)
SYS$CRMPSC_GFILE_64 (Create and Map Global Disk File Section)
SYS$CRMPSC_GPFILE_64 (Create and Map Global Page File Section)
SYS$CRMPSC_GPFN_64 (Create and Map Global Page Frame Section)
SYS$CRMPSC_PFN_64 (Create and Map Private Page Frame Section)
SYS$DELETE_REGION_64 (Delete a Virtual Region)
SYS$DELTVA_64 (Delete Virtual Address Space)
SYS$DGBLSC (Delete Global Section)
SYS$EXPREG_64 (Expand Virtual Address Space)
SYS$LCKPAG_64 (Lock Pages in Memory)
SYS$LKWSET_64 (Lock Pages in Working Set)
SYS$MGBLSC_64 (Map to Global Section)
SYS$MGBLSC_GPFN_64 (Map Global Page Frame Section)
SYS$PURGE_WS (Purge Working Set)
SYS$SETPRT_64 (Set Protection on Pages)
SYS$ULKPAG_64 (Unlock Pages from Memory)
SYS$ULWSET_64 (Unlock Pages from Working Set)
SYS$UPDSEC_64(W) (Update Global Section File on Disk)
32-bit services include, but are not limited to, the following:SYS$EXPREG (Expand Region)
SYS$CRETVA (Create Virtual Address Space)
SYS$DELTVA (Delete Virtual Address Space)
SYS$CRMPSC (Create and Map Section)
SYS$MGBLSC (Map Global Section)
For most cases in which a system service is used for memory allocation, the Expand Region (SYS$EXPREG or SYS$EXPREG_64) system service is used to create pages of virtual memory.
Because system services provide more control overallocation procedures than RTL routines, you must manage the allocation precisely. System services provide extensive control over address space allocation by allowing you to do the following types of tasks:Add or delete virtual address space to the process's program region (P0),control region (P1), 64-bit program region (P2), or user-created virtual region.
Add or delete virtual address space at a specific range of addresses
Define memory resident demand-zero sections and map them in to the virtual address space of a process.
Increase or decrease the number of pages in a program's working set
Lock or delete pages of a program's working set in memory
Lock the entire program's working set in memory (by disabling process swapping)
Define disk files containing data or shareable images and map the files into the virtual address space of a process
RTL page management routines
The RTL routines exist for creating, deleting, and accessing information about virtual address space. You can either allocate a specified number of contiguous pages or create a zone of virtual address space. A zone is a logical unit of the memory pool or subheap that you can control as an independent area. It can be any size required by your program. Refer to Chapter 14, "Using Run-Time Routines for Memory Allocation", for more information about zones.
The RTL page management routines LIB$GET_VM_PAGE, LIB$GET_VM_PAGE_64, LIB$FREE_VM_PAGE, and LIB$FREE_VM_PAGE_64 provide a convenient mechanism for allocating and freeing pages of memory.
These routines maintain a processwide pool of free pages. If unallocated pages are not available when LIB$GET_VM_PAGE is called, it calls SYS$EXPREG to create the required pages in the program region (P0 space). For LIB$GET_VM_PAGE_64, if there are not enough contiguous free pagelets to satisfy an allocation request, additional pagelets are created by calling the system service SYS$EXPREG_64.
RTL heap management routines
The RTL heap management routines LIB$GET_VM, LIB$GET_VM_64,LIB$FREE_VM, and LIB$FREE_VM_64 provide a mechanism for allocating and freeing blocks of memory of arbitrary size.
The following are heap management routines based on the concept of zones:- LIB$CREATE_VM_ZONE
- LIB$CREATE_VM_ZONE_64
- LIB$CREATE_USER_VM_ZONE
- LIB$CREATE_USER_VM_ZONE_64
- LIB$DELETE_VM_ZONE
- LIB$DELETE_VM_ZONE_64
- LIB$FIND_VM_ZONE
- LIB$FIND_VM_ZONE_64
- LIB$RESET_VM_ZONE
- LIB$RESET_VM_ZONE_64
- LIB$SHOW_VM_ZONE
- LIB$SHOW_VM_ZONE_64
- LIB$VERIFY_VM_ZONE
- LIB$VERIFY_VM_ZONE_64
- Memory that is allocated by an allocation routine at one level of the hierarchy must be freed by calling a deallocation routine at the same level of the hierarchy. For example, if you allocated a page of memory by calling LIB$GET_VM_PAGE, you can free it only by calling LIB$FREE_VM_PAGE.
For information about using memory management RTLs, see Chapter 14, "Using Run-Time Routines for Memory Allocation".
12.3. Using System Services for Memory Allocation
Increase and decrease virtual address space with 64-bit system services
Increase and decrease virtual address space with 32-bit system services
Input and return address arrays for the 64-bit system services
Input and return address arrays for the 32-bit system services
Control page ownership and protection
Control working set paging
Control process swapping
12.3.1. Increasing and Decreasing Virtual Address Space with 64-Bit System Services
To add address space at the end of P0, P1, P2 or a user created region, use the 64-bit Expand Region (SYS$EXPREG_64) system service. SYS$EXPREG_64 returns the range of virtual addresses for the new pages. To add address space in other portions of P0, P1, P2 or user created virtual regions, use SYS$CRETVA_64.
SYS$EXPREG_64
  region_id_64, length_64, acmode, flags, return_va_64, return_length_64
#define __NEW_STARTLET 1
#pragma pointer_size 64
#include <gen64def.h>
#include <stdio.h>
#include <ssdef.h>
#include <starlet.h>
#include <vadef.h>
int main (void) {
int status;
GENERIC_64 region_id = {VA$C_P2};
void * start_va;
unsigned __int64 length;
unsigned int pagcnt = 4;
/* Add 4 pagelets to P0 space */
status = sys$expreg_64 (®ion_id, pagcnt*512, 0, 0, &start_va, &length);
if (( status&1) != 1)
LIB$SIGNAL( status);
else
printf ("Starting address %016LX Length %016LX'n", start_va, length);
}The value VA$C_P2 is passed in the
region_id argument to specify that the pages are to be
added to the 64-bit program region. To add the same number of pages to the 32-bit
program region, you would specify VA$C_P0. To add pages to
the control region, you would specify VA$C_P1. To add pages
to a user created virtual region, you would specify the
region_id returned by the
SYS$CREATE_REGION_64 system service.
On Alpha and IA-64 systems the SYS$EXPREG_64 system service can add pagelets only in the direction of the growth of a particular region.
12.3.2. Increasing and Decreasing Virtual Address Space with 32-bit System Services
The system services allow you to add address space anywhere within the process's program region (P0) or control region (P1). To add address space at the end of P0 or P1, use the Expand Program/Control Region(SYS$EXPREG) system service. SYS$EXPREG optionally returns the range of virtual addresses for the new pages. To add address space in other portions of P0 or P1, use SYS$CRETVA.
SYS$EXPREG (pagcnt ,[retadr] ,[acmode] ,[region])Specifying the Number of Pages
Use the pagcnt argument to specify the number of pagelets
to add to the end of the region. The Alpha and IA-64 systems round the specified
pagelet value to the next integral number of pages for the system where it is
executing. To check the exact boundaries of the memory allocated by the system,
specify the optional retadrargument. The
retadr argument contains the start address and the end
address of the memory allocated by the system service.
Specifying the Access Mode
Use the acmode argument to specify the access to be
assigned to the newly created pages.
Specifying the Region
Use the region argument to specify whether to add the pages
to the end of the P0 or P1 region.
To deallocate pages allocated with SYS$EXPREG and SYS$CRETVA, use SYS$DELTVA.
#include <stdio.h>
#include <ssdef.h>


main() {
    unsigned int status, retadr[2],pagcnt=4, region=0;

/* Add 4 pages to P0 space */
    status = SYS$EXPREG( pagcnt, &retadr, 0, region);
    if (( status & 1) != 1)
        LIB$SIGNAL( status );
    else
        printf("Starting address: %d Ending address: %d\n",
               retadr[0],retadr[1];
}
The value 0 is passed in the region argument to specify
that the pages are to be added to the program region. To add the same number of
pages to the control region, you would specify REGION=1.
Note that the region argument to the
SYS$EXPREG service is optional;if it is not specified,
the pages are added to or deleted from the program region by default.
#include <stdio.h>
#include <ssdef.h>

struct {
    unsigned int lower, upper;
}retadr1, retadr2, retadr3;

main() {
    unsigned int status, pagcnt=4, region=0;

/* Add 4 pages to P0 space */
    status = SYS$EXPREG( pagcnt, &retadr1, 0, region);
    if (( status & 1) != 1)
        LIB$SIGNAL( status );
    else
        printf("Starting address: %d ending address: %d\n",
               retadr1.lower,retadr1.upper);

/* Add 3 more pages to P0 space */

    pagcnt = 3;
    status = SYS$EXPREG( pagcnt, &retadr2, 0, region);
    if (( status & 1) != 1)
        LIB$SIGNAL( status );
    else
        printf("Starting address: %d ending address: %d\n",
               retadr2.lower,retadr2.upper);

/* Delete original allocation */
    status = SYS$DELTVA( &retadr1, &retadr3, 0 );
    if (( status & 1) != 1)
        LIB$SIGNAL( status );
    else
        printf("Starting address: %d ending address: %d\n",
               retadr1.lower,retadr1.upper);

}Caution
Be aware that using SYS$CRETVA presents some risk because it can delete pages that already exist if those pages are not owned by a more privileged access mode. Further, if those pages are deleted, notification is not sent. Therefore, unless you have complete control over an entire system, use SYS$EXPREG or the RTL routines to allocate address space.
Section 12.3.5, ''Allocating Memory in Existing Virtual Address Space on Alpha and IA-64 systems Using the 32-Bit System Service'' mentions some other possible risks in using SYS$CRETVA for allocating memory.
12.3.3. Input Address Arrays and Return Address Arrays for the 64-Bit System Services
When the SYS$EXPREG_64 system service adds pages to a region, it adds them in the normal direction of growth for the region. The return address always indicates the lowest-addressed byte in the added address range. To calculate the highest-addressed byte in the added address range, add the returned length to the returned address and subtract 1.
|
Start_va |
Length |
Return_va |
Return_length |
Number of Pages |
|---|---|---|---|---|
|
1010 |
660 |
0 |
2000 |
1 |
|
2450 |
1 |
2000 |
2000 |
1 |
|
4200 |
6300 |
4000 |
8000 |
4 |
|
7FFEC010 |
90 |
7FFEC000 |
2000 |
1 |
|
08000A000 |
4000 |
08000A000 |
4000 |
2 |
12.3.4. Input Address Arrays and Return Address Arrays for the 32-Bit System Services
If the program region is expanded, the starting virtual address is smaller than the ending virtual address.
If the control region is expanded, the starting virtual address is larger than the ending virtual address.
The addresses returned indicate the first byte in the first page that was added or deleted and the last byte in the last page that was added or deleted, respectively.
When input address arrays are specified for the Create and Delete Virtual Address Space (SYS$CRETVA and SYS$DELTVA, respectively) system services, these services add or delete pages beginning with the address specified in the first longword and ending with the address specified in the second longword.
|
Page Size (Bytes) |
Byte Within Page (Bits) |
|---|---|
|
8K |
13 |
|
16K |
14 |
|
32K |
15 |
|
64K |
16 |
|
Input Array |
Output Array | ||||
|---|---|---|---|---|---|
|
Start |
End |
Region |
Start |
End |
Number of Pages |
|
1010 |
1670 |
P0 |
0 |
1FFF |
1 |
|
2450 |
2451 |
P0 |
2000 |
3FFF |
1 |
|
4200 |
A500 |
P0 |
4000 |
BFFF |
4 |
|
9450 |
9450 |
P0 |
8000 |
9FFF |
1 |
|
7FFEC010 |
7FFEC010 |
P1 |
7FFEDFFF |
7FFEC000 |
1 |
|
7FFEC010 |
7FFEBCA0 |
P1 |
7FFEDFFF |
7FFEA000 |
2 |
For SYS$CRETVA and SYS$DELTVA, note that if the input virtual addresses are the same, as in the fourth and fifth items in Table 12.3, ''Sample Virtual Address Arrays on Alpha and IA-64 systems'', a single page is added or deleted. The return address array indicates that the page was added or deleted in the normal direction of growth for the region.
Note that for SYS$CRMPSC and SYS$MGBLSC, which are discussed in Section 12.3.9, ''Sections'', the sample virtual address arrays in Table 12.3, ''Sample Virtual Address Arrays on Alpha and IA-64 systems'' do not apply. The reason is that the lower address value has to be an even multiple of the machine page size; that is, it must be rounded down to an even multiple page size. In addition, the higher address value must be one less than the even multiple page size, representing the last byte on the last page. That is, it must be rounded up to an even multiple page size, minus 1.
Obtain the page size in bytes.
Subtract 1 to obtain the byte-with-page mask.
Mask the low bits of lower virtual address, which is a round-down operation to round it to the next lower page boundary.
Perform a logical OR operation on the higher virtual address, which is a round-up operation to round it to the highest address in the last page.
12.3.5. Allocating Memory in Existing Virtual Address Space on Alpha and IA-64 systems Using the 32-Bit System Service
Note
On Alpha and IA-64 systems, SYS$CRETVA_64 adds a range of demand-zero allocation pages to a process's virtual address space for the execution of the current image. The new pages are added at the virtual address specified by the caller. SYS$CRETVA_64 is the preferred method of adding these pages.
If your application explicitly rounds the lower address specified in the
inadrargument to be a multiple of 512 in order to align on a page boundary, you need to modify the address. The Alpha and IA-64 system's version of the SYS$CRETVA system service rounds down the start address to a CPU-specific page boundary, which varies with different implementations. It also rounds up the end address to the last byte in a CPU-specific page boundary.The size of the reallocation, specified by the address range in the
inadrargument, may be larger on an Alpha and IA-64 system than on a VAX system because the request is rounded up to CPU-specific pages. This can cause the unintended destruction of neighboring data, which may also occur with single-page allocations. (When the start address and the end address specified in theinadrargument match, a single page is allocated).
To determine whether you must modify the address as specified in inadr,
specify the optional retadr argument to determine the exact
boundaries of the memory allocated by the call to SYS$CRETVA.
12.3.6. Page Ownership and Protection
Each page in the virtual address space of a process is owned by the access mode that created the page. For example, pages in the program region that initially provided for the execution of an image are owned by user mode. Pages that the image creates dynamically are also owned by user mode. Pages in the control region, except for the pages containing the user stack, are normally owned by more privileged access modes.
Only the owner access mode or a more privileged access mode can delete the page or otherwise affect it. The owner of a page can also indicate, by means of a protection code, the type of access that each access mode will be allowed.
The Set Protection on Pages (SYS$SETPRT or SYS$SETPRT_64) system service changes the protection assigned to a page or group of pages. The protection is expressed as a code that indicates the specific type of access (none, read-only, read/write) for each of the four access modes (kernel, executive, supervisor, user). Only the owner access mode or a more privileged access mode can change the protection for a page.
When an image attempts to access a page that is protected against the access attempted, a hardware exception called an access violation occurs. When an image calls a memory management system service, the service probes the pages to be used to determine whether an access violation would occur if the image attempts to read or write one of the pages. If an access violation occurs, the service exits with the status code SS$_ACCVIO.
Because the memory management services add, delete, or modify a single page at a
time, one or more pages can be successfully changed before an access violation is
detected. If the retadr argument is specified in the 32-bit
service call, the service returns the addresses of pages changed (added, deleted, or
modified) before the error. If no pages are affected, that is, if an access
violation occurs on the first page specified, the service returns a -1 in both
longwords of the return address array.
If the retadr argument is not specified, no information is
returned.
The 64-bit system services return the address range (return_va andreturn_length) of the addresses of the pages changed (added, deleted, or modified) before the error.
12.3.7. Working Set Paging
On Alpha and IA-64 systems, when a process is executing an image, a subset of its pages resides in physical memory; these pages are called the working set of the process. The working set includes pages in both the program region and the control region. The initial size of a process's working set is defined by the process's working set default (WSDEFAULT) quota, which is specified in pagelets. When ample physical memory is available, a process's working-set upper growth limit can be expanded to its working set extent (WSEXTENT).
When the image refers to a page that is not in memory, a page fault occurs, and the page is brought into memory, possibly replacing an existing page in the working set. If the page that is going to be replaced is modified during the execution of the image, that page is written into a paging file on disk. When this page is needed again, it is brought back into memory, again replacing a current page from the working set. This exchange of pages between physical memory and secondary storage is called paging.
The paging of a process's working set is transparent to the process. However, if a program is very large or if pages in the program image that are used often are being paged in and out frequently, the overhead required for paging may decrease the program's efficiency. The SYS$ADJWSL, SYS$PURGWS, SYS$LKWSET, and SYS$LKWSET_64 system services allow a process, within limits, to counteract these potential problems.
12.3.7.1. SYS$ADJWSL System Service
SYS$ADJWSL ([pagcnt],[wsetlm])Use the pagcnt argument to specify the number of
pagelets to add or subtract from the current working set size. The system rounds
the specified number of pagelets to a multiple of the system's page size. The
new working set size is returned in wsetlm in units of
pagelets.
12.3.7.2. SYS$PURGWS System Service
SYS$PURGWS inadrSYS$PURGE_WS start_va_64 ,length_6412.3.7.3. SYS$LKWSET and SYS$LKWSET_64 System Services
SYS$LKWSET (inadr ,[retadr] ,[acmode])SYS$LKWSET_64 start_va_64 ,length_64 ,acmode ,return_va_64 ,return_length_6412.3.7.4. Specifying a Range of Addresses
Locking a range of pages in the working set is problematic on IA-64 because the linker generates additional code that must also be locked and determining the address of that linker code is nontrivial.
The solution, applicable for both Alpha and I64, is to use the LIB$LOCK_IMAGE and LIB$UNLOCK_IMAGELIBRTL routines to lock the entire image in to the working set. You can specify an address of a byte within the image to be locked in the working set, or zero for the current image.
If your privileged program runs on Alpha and I64 and not on VAX, you can remove all the code that finds the code, data and linkage data and locks these areas in the working set. You can replace this code with calls to LIB$LOCK_IMAGE and LIB$UNLOCK_IMAGE. These routines are simpler to program correctly and make your code easier to understand and maintain.
LIB$LOCK_IMAGE and LIB$UNLOCK_IMAGE are preferable to SYS$LKWSET and SYS$ULKWSET for locking code and related data in the working set. For more information about locking images in the working set, refer to the VSI OpenVMS RTL Library (LIB$) Manual and to the descriptions of LIB$LOCK_IMAGE and LIB$UNLOCK_IMAGE in this manual.
12.3.7.5. Specifying a Range of Addresses In OpenVMS Version 8.1
Programs that enter kernel mode and increase IPL to higher than 2 must lock program code and data in the working set. Locking code and data is necessary to avoid crashing the system with a PGFIPLHI bugcheck.
On VAX systems, typically only the code and data explicitly referenced by the program need to be locked. On Alpha, the code, data and linkage data referenced by the program need to be locked. On IA-64 systems, code, data, short data, and linker generated code need to be locked. To make porting easier and because the addresses of short data and linker generated data cannot be easily found within an image, changes were made to the SYS$LKWSET and SYS$LKWSET_64 system services.
As of OpenVMS Alpha Version 8.1 and OpenVMS IA-64 Version 8.1, the SYS$LKWSET and SYS$LKWSET_64 system services test the first address passed in. If this address is within an image, these services attempt to lock the entire image in the working set. If a successful status code is returned, the program can increase IPL to higher than 2 without crashing the system with a PGFIPLHI bugcheck.
A counter is maintained within the internal OpenVMS image structures that counts the number of times the image has been successfully locked in the working set. The counter is incremented when locked and decremented when unlocked. When the counter becomes zero, the entire image is unlocked from the working set.
If the program's image is too large to be locked in the working set, the status SS$_LKWSETFUL is returned. If you encounter this status, you can increase the user's working set quota.
12.3.7.6. Specifying a Range of Addresses In OpenVMS Versions Prior to V8.1
For OpenVMS versions prior to OpenVMS Alpha Version 8.1, you can use the
inadr argument to specify the range of addresses to
be locked. SYS$LKWSET rounds the addresses to
CPU-specific page boundaries, if necessary. The range of addresses of the pages
actually locked are returned in the retadr argument.
However, because the Alpha system's instructions cannot contain full virtual addresses, the Alpha system's images must reference procedures and data indirectly through a pointer to a procedure descriptor. The procedure descriptor contains information about the procedure, including the actual code address. These pointers to procedure descriptors and data are collected into a program section called a linkage section. Therefore, it is not sufficient simply to lock a section of code into memory to improve performance. You must also lock the associated linkage section into the working set.
inadr argument to a call to
SYS$LKWSET. For more information about linking, see
Migrating to an OpenVMS AXP System: Recompiling and Relinking Applications.
Note that
this manual has been archived but is available on the OpenVMS Documentation Web
site at:
http://www.hp.com/go/openvms/doc
12.3.7.7. Specifying the Access Mode
If you use the SYS$LKWSET or
SYS$LKWSET_64 system service, use the
acmode argument to specify the access mode to be
associated with the pages you want locked.
12.3.8. Process Swapping
The operating system balances the needs of all the processes currently executing, providing each with the system resources it requires on an as-needed basis. The memory management routines balance the memory requirements of the process. Thus, the sum of the working sets for all processes currently in physical memory is called the balance set.
When a process whose working set is in memory becomes inactive—for example, to wait for an I/O request or to hibernate—the entire working set or part of it may be removed from memory to provide space for another process's working set to be brought in for execution. This removal from memory is called swapping.
Partially—Also called swapper trimming. Pages are removed from the working set of the target process so that the number of pages in the working set is fewer, but the working set is not swapped.
Entirely—Called swapping. All pages are swapped out of memory.
When a process is swapped out of the balance set, all the pages(both modified and unmodified) of its working set are swapped, including any pages that had been locked in the working set.
$SETSWM_S SWPFLG=#1This call to SYS$SETSWM disables process swap mode. You can also disable swap mode by setting the appropriate bit in the STSFLG argument to the Create Process (SYS$CREPRC) system service; however, you need the PSWAPM privilege to alter process swap mode.
A process can also lock particular pages in memory with the Lock Pages in Memory (SYS$LCKPAG or SYS$LCKPAG_64) system service. These pages are forced into the process's working set if they are not already there. When pages are locked in memory with these services, the pages remain in memory even when the remainder of the process's working set is swapped out of the balance set. These remaining pages stay in memory until they are unlocked with SYS$ULKPAG or SYS$ULKPAG_64. The SYS$LCKPAG and SYS$LCKPAG_64 system services can be useful in special circumstances, for example, for routines that perform I/O operations to devices without using the operating system's I/O system.
On Alpha and IA-64 systems, if you are attempting to lock executable code with $LCKPAG, you should examine if locking these pages in the working set is more correct. See the descriptions of $LKWSET and LIB$LOCK_IMAGE.
You need the PSWAPM privilege to issue the SYS$LCKPAG, SYS$LCKPAG_64, SYS$ULKPAG, or SYS$ULKPAG_64 system service.
12.3.9. Sections
A section is a disk file or a portion of a disk file containing data or instructions that can be brought into memory and made available to a process for manipulation and execution. A section can also be one or more consecutive page frames in physical memory or I/O space; such sections, which require you to specify page frame number (PFN) mapping, are discussed in Chapter 13, "Memory Management Services and Routines on OpenVMS VAX", Section 13.5.6.15, ''Page Frame Sections''.
Private sections are accessible only by the process that creates them. A process can define a disk data file as a section, map it into its virtual address space, and manipulate it.
Global sections can be shared by more than one process. One copy of the global section resides in physical memory, and each process sharing it refers to the same copy, except for copy-on-reference sections. For a copy-on-reference section, each process refers to the same global section, but each process gets its own copy of each page upon reference. A global section can contain shareable code or data that can be read, or read and written, by more than one process. Global sections are either temporary or permanent and can be defined for use within a group or on a systemwide basis. Global sections can be mapped to a disk file or created as a global page-file section, or they can be a PFN mapped section.
When modified pages in writable disk file sections are paged out of memory during image execution, they are written back into the section file rather than into the paging file, as is the normal case with files. (However, copy-on-reference sections are not written back into the section file).
The creation of a section defines a disk file as a section and informs the system what portions of the file contain the section.
The mapping of a section makes it available to a process and establishes the correspondence between virtual blocks in the file and specific addresses in the virtual address space of a process.
The Create and Map Section (SYS$CRMPSC) system service creates and maps a private section or a global section. Because a private section is used only by a single process, creation and mapping are simultaneous operations. In the case of a global section, one process can create a permanent global section and not map to it; other processes can map to it. A process can also create and map a global section in one operation.
The following sections describe the creation, mapping, and use of disk file sections. In each case, operations and requirements that are common to both private sections and global sections are described first, followed by additional notes and requirements for the use of global sections. Section 12.3.9.6, ''Global Page-File Sections with 32-Bit System Services'' discusses global page-file sections.
12.3.9.1. Creating Sections with 64-Bit System Services
$CRMPSC_FILE_64 — Allows a process to map a section of its address space to a specified portion of a file. This service maps a private disk file section.
$CRMPSC_GFILE_64 — Allows a process to create a global disk file section and to map a section of its address space to the global section.
$CRMPSC_GPFILE_64 — Allows a process to create a global page file section and to map a section of its address space to the global section.
$CRMPSC_GPFN_64 — Allows a process to create a permanent global page frame section and to map a section of its address space to the global page frame section.
$CRMPSC_PFN_64 — Allows a process to map a section of its address space to a specified physical address range represented by page frame numbers. This service creates and maps a private page frame section.
12.3.9.2. PFN-Mapped Sections
SYS$CRMPSC_PFN_64
SYS$CREATE_GPFN
SYS$CRMPSC_GPFN_64
In addition, the SYS$MGBLSC_GPFN_64 service accepts, but ignores the flag. The cached/uncached characteristic is stored as a section attribute, and the system uses this attribute when the section is mapped. On OpenVMS Alpha systems, all four services accept but ignore the SEC$M_UNCACHED flag. Note that the older services, SYS$CRMPSC and SYS$MGBLSC were not updated and do not accept the new flag.
See the Intel® Itanium® Architecture Software Developer's Manual for additional information regarding virtual-addressing memory attributes.
12.3.9.3. Creating Sections with 32-Bit System Services
Open or create the disk file containing the section.
Define which virtual blocks in the file comprise the section.
Define the characteristics of the section.
12.3.9.3.1. Opening the Disk File
SECFAB: $FAB    FNM=<SECTION.TST>, ; File access block
                FOP=UFO
                RTV= -1
         .
         .
         .
        $OPEN   FAB=SECFAB
        $CRMPSC_S -
                CHAN=SECFAB+FAB$L_STV,...
The file options parameter (FOP) indicates that the file is to be opened
for user I/O; this option is required so that OpenVMS RMS assigns the
channel using the access mode of the caller. OpenVMS RMS returns the channel
number on which the file is accessed; this channel number is specified as
input to the SYS$CRMPSC system service
(chan argument). The same channel number can be
used for multiple create and map section operations.
The option RTV= -1 tells the file system to keep all of the pointers to be mapped in memory at all times. If this option is omitted, the SYS$CRMPSC service requests the file system to expand the pointer areas if necessary. Storage for these pointers is charged to the BYTLM quota, which means that opening a badly fragmented file can fail with an EXBYTLM failure status. Too many fragmented sections may cause the byte limit to be exceeded.
The file may be a new file that is to be created while it is in use as a section. In this case, use the $CREATE macro to open the file. If you are creating a new file, the file access block (FAB) for the file must specify an allocation quantity (ALQ parameter).
GBLFAB: $FAB    FNM=<GLOBAL.TST>, -
                ALQ=4, -
                FAC=PUT,-
                FOP=<UFO,CIF,CBT>, -
                SHR=<PUT,UPI>
          .
          .
          .
        $CREATE FAB=GBLFAB
When the $CREATE macro is invoked, it creates the file GLOBAL.TST if the file does not currently exist. The CBT (contiguous best try) option requests that, if possible, the file be contiguous. Although section files are not required to be contiguous, better performance can result if they are.
12.3.9.3.2. Defining the Section Extents
pagcnt(page count). This argument indicates the number of pages (on VAX systems) or pagelets (on Alpha and IA-64 systems) in the section. Thepagcntargument is a longword containing this number.On Alpha and IA-64 systems, the smallest allocation is an Alpha or I64 page, which is 8192 bytes. When requesting pagelets, the size requested is a multiple of 512 bytes, but the actual allocation is rounded to 8192. For example, when requesting 17 pagelets, the allocation is for two Alpha or I64 pages, 16384 bytes.
On Alpha and IA-64 systems, if the SEC$M_PFNMAP flag bit is set, the
pagcntargument is interpreted as CPU-specific pages, not as pagelets. On Alpha or I64 and VAX systems, the specified page count is compared with the number of blocks in the section file; if they are different, the lower value is used. If you do not specify the page count or specify it as 0 (the default), the size of the section file is used. However, for physical page frame sections, this argument must not be 0.vbn(virtual block number). This argument is optional. It defines the number of the virtual block in the file that is the beginning of the section. If you do not specify this argument, the value 1 is passed(the first virtual block in the file is the beginning of the section). If you specified page frame number mapping (by setting the SEC$M_PFNMAP flag), thevbnargument specifies the CPU-specific page frame number where the section begins in memory.
12.3.9.3.3. Defining the Section Characteristics
flags argument to the
SYS$CRMPSC system service defines the following
section characteristics:Whether it is a private section or a global section. The default is to create a private section.
- How the pages of the section are to be treated when they are copied into physical memory or when a process refers to them. The pages in a section can be either or both of the following:
Read/write or read-only
Created as demand-zero pages or as copy-on-reference pages, depending on how the processes are going to use the section and whether the file contains any data (see Section 12.3.9.9, ''Section Paging Resulting from SYS$CRMPSC'')
Whether the section is to be mapped to a disk file or to specific physical page frames (see Section 12.3.9.15, ''Page Frame Sections'').
Global sections cannot be both demand-zero and copy-on-reference.
Demand-zero sections must be writable.
12.3.9.3.4. Defining Global Section Characteristics
If the section is a global section, you must assign a character string
name ( gsdnam argument) to it so that other processes
can identify it when they map it. The format of this character string name
is explained in Section 12.3.9.3.5, ''Global Section Name''.
flags argument specifies the following types of
global section:Group temporary (the default)
Group permanent
System temporary
System permanent
Group global sections can be shared only by processes executing with the same group number. The name of a group global section is implicitly qualified by the group number of the process that created it. When other processes map it, their group numbers must match.
A temporary global section is automatically deleted when no processes are mapped to it, but a permanent global section remains in existence even when no processes are mapped to it. A permanent global section must be explicitly marked for deletion with the Delete Global Section (SYS$DGBLSC) system service.
You need the user privileges PRMGBL and SYSGBL to create permanent group global sections or system global sections (temporary or permanent), respectively.
A system global section is available to all processes in the system.
Optionally, a process creating a global section can specify a protection
mask (prot argument) to restrict all access or a type
of access (read, write, execute, delete) to other processes.
12.3.9.3.5. Global Section Name
The gsdnam argument specifies a descriptor that
points to a character string.
gsdnam argument proceeds in the
following manner:The current name string is prefixed with GBL$ and the result is subject to logical name translation.
If the result is a logical name, step 1 is repeated until translation does not succeed or until the number of translations performed exceeds the number specified by the system parameter LNM$C_MAXDEPTH.
The GBL$ prefix is stripped from the current name string that could not be translated. This current string is the global section name.
$ DEFINE GBL$GSDATA GSDATA_001#include <descrip.h>
.
.
.
$DESCRIPTOR(gsdnam,"GSDATA");
.
.
.
status = sys$crmpsc(&gsdnam, ...);GBL$ is prefixed to GSDATA.
GBL$GSDATA is translated to GSDATA_001.(Further translation is not successful. When logical name translation fails, the string is passed to the service).
If the name string starts with an underscore (_), the operating system strips the underscore and considers the resultant string to be the actual name(that is, further translation is not performed).
If the name string is the result of a logical name translation, then the name string is checked to see if it has the terminalattribute. If the name string is marked with the terminal attribute, the operating system considers the resultant string to be the actual name (that is, further translation is not performed).
If the global section has a name in the format name_nnn, the operating system first strips the underscore and the digits (nnn), then translates the resultant name according to the sequence discussed in this section, and finally reappends the underscore and digits. The system uses this method in conjunction with known images and shared files installed by the system manager.
12.3.9.4. Mapping Sections with 32-Bit System Services
When you call the SYS$CRMPSC system service to create
or map a section, or both, you must provide the service with a range of virtual
addresses (inadr argument) into which the section is to
be mapped.
inadr argument specifies
the size and location of the section by its start and end addresses.
SYS$CRMPSC interprets the
inadr argument in the following ways:If both addresses specified in the
inadrargument are the same and the SEC$M_EXPREG bit is set in theflagsargument, SYS$CRMPSC allocates the memory in whichever program region the addresses fall but does not use the specified location.If both addresses are different, SYS$CRMPSC maps the section into memory using the boundaries specified.
    unsigned int maprange[1]; /* Assume page size = 8 KB */

    maprange[0] = 0x14000;    /* Address (hex) of page 10 */
maprange[1] = 0x27FFF; /* Address (hex) of page 19 */inadr argument range must
have a lower address on an even page boundary and a higher address exactly one
less than a page boundary. You do this to avoid programming errors that might
arise because of incorrect programming assumptions about page sizes. For
example, the range can be expressed as the following on an 8 KB page system:- 0 ----> 1FFF
- 2000 ----> 7FFF
- or
inadr[0] = first byte in rangeinadr[1] = last byte in range
If the range is not expressed in terms of page-inclusive boundaries, then an SS$_INVARG condition value is returned.
You do not need to know the explicit addresses to provide an input address
range. If you want the section mapped into the first available virtual address
range in the program region (P0) or control region (P1), you
can specify the SEC$M_EXPREG flag bit in the
flags argument. In this case, the addresses specified
by the inadr argument control whether the service finds
the first available space in the P0 or P1. The value specified or defaulted for
the pagcnt argument determines the amount of space
mapped.
On Alpha and IA-64 systems, the relpag argument specifies
the location in the section file at which you want mapping to begin.
On Alpha and IA-64 systems, the SYS$CRMPSC and SYS$MGBLSC system services map a minimum of one CPU-specific page. If the section file does not fill a single page, the remainder of the page is filled with zeros after faulting the page into memory. The extra space on the page should not be used by your application because only the data that fits into the section file will be written back to the disk.
    unsigned int status, inadr[1], retadr[1], flags;

/*
    This range used merely to indicate P0 space since SEC$M_EXPREG
       is specified
*/
    inadr[0]= 0x200; /* Any program (P0) region address */
    inadr[1]= 0x200; /* Any P0 address (can be same) */

   .
   .
   .
/* Address range returned in retadr */

    flags = SEC$M_EXPREG;
    status = sys$crmpsc(&inadr, &retadr, flags, ...);
The addresses specified do not have to be currently in the virtual address
space of the process. The SYS$CRMPSC system service
creates the required virtual address space during the mapping of the section. If
you specify the retadr argument, the service returns the
range of addresses actually mapped.
retadr address
should match inadr, plus relpag if
specified. The ending (higher) address will be limited by the lower of:The value of the
pagcntargumentThe actual remaining block count in the file starting with specified starting
vbn, orrelpagThe bound dictated by the
inadrargument
A base register or pointer and predefined symbolic offset names
Labels defining offsets of an absolute program section or structure
SECFAB: $FAB    FNM=<SECTION.TST>, -
                FOP=UFO, -
                FAC=PUT, -
                SHR=<GET,PUT,UPI>
;
MAPRANGE:
        .LONG   ^X14000                  ; First 8 KB page
        .LONG   ^X27FFF                  ; Last page
RETRANGE:
        .BLKL   1                       ; First page mapped
ENDRANGE:
        .BLKL   1                       ; Last page mapped
          .
          .
          .
        $OPEN   FAB=SECFAB              ; Open section file
        BLBS    R0,10$
        BSBW    ERROR

10$:    $CRMPSC_S -
                INADR=MAPRANGE,-        ; Input address array
                RETADR=RETRANGE,-       ; Output array
                PAGCNT=#4,-             ; Map four pagelets
                FLAGS=#SEC$M_WRT,-      ; Read/write section
                CHAN=SECFAB+FAB$L_STV   ; Channel number
        BLBS    R0,20$
        BSBW    ERROR
20$:    MOVL    RETRANGE,R6             ; Point to start of section
The OPEN macro opens the section file defined in the file access block SECFAB. (The FOP parameter to the $FAB macro must specify the UFO option).
The SYS$CRMPSC system service uses the addresses specified at MAPRANGE to specify an input range of addresses into which the section will be mapped. The
pagcntargument requests that only 4 pagelets of the file be mapped.The
flagsargument requests that the pages in the section have read/write access. The symbolic flag definitions for this argument are defined in the $SECDEF macro. Note that the file access field (FAC parameter) in the FAB also indicates that the file is to be opened for writing.When SYS$CRMPSC completes, the addresses of the 4 pagelets that were mapped are returned in the output address array at RETRANGE. The address of the beginning of the section is placed in register 6, which serves as a pointer to the section.
12.3.9.5. Mapping Global Sections with 32-Bit Services
Note
This section describes the use of the SYS$MGBLSC system service. However, the SYS$MGBLSC_64 system service is the preferred method for mapping global sections for Alpha and IA-64 systems.
A process that creates a global section can map that global section. Then other processes can map it by calling the Map Global Section (SYS$MGBLSC) system service.
A version identification (
identargument), indicating the version number of the global section (when multiple versions exist) and whether more recent versions are acceptable to the process.A relative pagelet number (
relpagargument), specifying the pagelet number, relative to the beginning of the section, to begin mapping the section. In this way, processes can use only portions of a section. Additionally, a process can map a piece of a section into a particular address range and subsequently map a different piece of the section into the same virtual address range.
On Alpha and IA-64 systems, you should specify the retadr
argument to determine the exact boundaries of the memory that was mapped by the
call. If your application specifies the relpagargument,
you must specify the retadr
argument. In this case, it is not an optional argument.
Cooperating processes can both issue a SYS$CRMPSC system service to create and map the same global section. The first process to call the service actually creates the global section; subsequent attempts to create and map the section result only in mapping the section for the caller. The successful return status code SS$_CREATED indicates that the section did not already exist when the SYS$CRMPSC system service was called. If the section did exist, the status code SS$_NORMAL is returned.
The example in Section 12.3.9.9, ''Section Paging Resulting from SYS$CRMPSC'' shows one process (ORION) creating a global section and a second process (CYGNUS) mapping the section.
12.3.9.6. Global Page-File Sections with 32-Bit System Services
Global page-file sections are used to store temporary data in a global section. A global page-file section is a section of virtual memory that is not mapped to a file. The section can be deleted when processes have finished with it. (Contrast this with demand-zero section file pages where no initialization is necessary, but the pages are saved in a file.) The system parameter GBLPAGFIL controls the total number of global page-file pages in the system.
To create a global page-file section, you must set the flag bits
SEC$M_GBL and SEC$M_PAGFIL
in the flags argument to the Create and Map
Section(SYS$CRMPSC) system service. The channel
(chan argument) must be 0.
You cannot specify the flag bit SEC$M_CRF with the flag bit SEC$M_PAGFIL.
12.3.9.7. Mapping into a Defined Address Range With 32-Bit System Services
The addresses specified as values in the
inadrargument must be aligned on CPU-specific page boundaries. On VAX systems, SYS$CRMPSC and the SYS$MGBLSC round these addresses to page boundaries for you. On Alpha and IA-64 systems, SYS$CRMPSC does not round the addresses you specify to page boundaries, because rounding to CPU-specific page boundaries on Alpha and IA-64 system affects a much larger portion of memory than it does on VAX systems, where page sizes are much smaller. Therefore, on Alpha and IA-64 systems, you must explicitly state where you want the virtual memory space mapped. If the addresses you specify are not aligned on CPU-specific page boundaries, SYS$CRMPSC returns an invalid arguments error (SS$_INVARG).In particular, the lower
inadraddress must be on a CPU-specific page boundary, and the higherinadraddress must be one less than a CPU-specific page; that is, it indicates the highest-addressed byte of theinadrrange.The addresses returned in the
retadrargument reflect only the usable portion of the actual memory mapped by the call, not the entire amount mapped. The usable amount is either the value specified in thepagcntargument (measured in pagelets) or the size of the section file, whichever is smaller. The actual amount mapped depends on how many CPU-specific pages are required to map the section file. If the section file does not fill a CPU-specific page, the remainder of the page is filled with zeros. The excess space on this page should not be used by your application. The end address specified in theretadrargument specifies the upper limit available to your application. Also note that, when therelpagargument is specified, theretadrargument must be included. It is not optional on Alpha and IA-64 systems.
12.3.9.8. Mapping from an Offset into a Section File With 32-Bit System Services
On Alpha and IA-64 systems, you can map a portion of a section file by
specifying the address at which to start the mapping as an offset from the
beginning of the section file. You specify this offset by supplying a value to
the relpag argument of
SYS$CRMPSC. The value of the
relpag argument specifies the pagelet number relative
to the beginning of the file at which the mapping should begin.
relpag argument in 512-byte units on VAX,
Alpha, and IA-64 systems. However, because the CPU-specific page size on the Alpha
and IA-64 system is larger than 512 bytes, the address specified by the offset in
the relpag argument probably does not fall on a
CPU-specific page boundary on an Alpha and IA-64 system.
SYS$CRMPSC can map virtual memory in CPU-specific
page increments only. Therefore, on Alpha and IA-64 systems, the mapping of the
section file will start at the beginning of the CPU-specific page that contains
the offset address, not at the address specified by the offset.Note
Even though the routine starts mapping at the beginning of the
CPU-specific page that contains the address specified by the offset, the
start address returned in the retadr argument is
the address specified by the offset, not the address at which mapping
actually starts.
If you map from an offset into a section file, you must still provide an
inadr argument that abides by the requirements
presented in Section 12.3.9.7, ''Mapping into a Defined Address Range With 32-Bit System Services'' when mapping into a
defined address range.
12.3.9.9. Section Paging Resulting from SYS$CRMPSC
The first time an image executing in a process refers to a page that was created during the mapping of a disk file section, the page is copied into physical memory. The address of the page in the virtual address space of a process is mapped to the physical page. During the execution of the image, normal paging can occur; however, pages in sections are not written into the page file when they are paged out, as is the normal case. Rather, if they have been modified, they are written back into the section file on disk. The next time a page fault occurs for the page, the page is brought back from the section file.
If the call to SYS$CRMPSC requested that pages in the section be treated as demand-zero pages, these pages are initialized to zeros when they are created in physical memory. If the file is either a new file being created as a section or a file being completely rewritten, demand-zero pages provide a convenient way of initializing the pages. The pages are paged back into the section file.
When the section is deleted, all unreferenced pages are written back to the file as zeros. This causes the file to be initialized, no matter how few pages were modified.
See Section 12.3.9.11, ''Releasing and Deleting Sections'' for details about deleting sections.
If the call to SYS$CRMPSC requested that pages in the section be copy-on-reference pages, each process that maps to the section receives its own copy of the section, on a page-by-page basis from the file, as it refers to them. These pages are never written back into the section file but are paged to the paging file as needed.
In the case of global sections, more than one process can be mapped to the same physical pages. If these pages need to be paged out or written back to the disk file defined as the section, these operations are done only when the pages are not in the working set of any process.
/* Process ORION */
#include <rms.h>
#include <rmsdef.h>
#include <literal>(<string.h>)
#include <secdef.h>
#include <descrip.h>
struct FAB gblfab;
main() {
unsigned short chan;
unsigned int status, flags, efn=65;
char *fn = "SECTION.TST";
$DESCRIPTOR(name, "FLAG_CLUSTER"); /* Common event flag cluster
name */
$DESCRIPTOR(gsdnam, "GLOBAL_SECTION"); /* Global section name */
status = SYS$ASCEFC(efn, &name, 0);
if ((status & 1) != 1)
LIB$SIGNAL( status );
/* Initialize FAB fields */
gblfab = cc$rms_fab;
gblfab.fab$l_alq = 4;
gblfab.fab$b_fac = FAB$M_PUT;
gblfab.fab$l_fnm = fn;
gblfab.fab$l_fop = FAB$M_CIF || FAB$M_CBT;
.
.
.
/* Create a file if none exists */
status = SYS$CREATE( &gblfab, 0, 0 );
if ((status & 1) != 1)
LIB$SIGNAL( status );
flags = SEC$M_GBL | SEC$M_WRT;
status = SYS$CRMPSC(0, 0, 0, flags, &gsdnam, ...);
if ((status & 1) != 1)
LIB$SIGNAL( status );
status = SYS$SETEF(efn);
if ((status & 1) != 1)
LIB$SIGNAL( status );
.
.
.
}
/* Process CYGNUS */
unsigned int status, efn=65;
$DESCRIPTOR(cluster,"FLAG_CLUSTER");
$DESCRIPTOR(section,"GLOBAL_SECTION");
.
.
.
status = SYS$ASCEFC(efn, &cluster, 0);
if ((status & 1) != 1)
LIB$SIGNAL( status );
status = SYS$WAITFR(efn);
if ((status & 1) != 1)
LIB$SIGNAL( status );
status = SYS$MGBLSC(&inadr, &retadr, 0, flags, §ion, 0, 0);
if ((status & 1) != 1)
LIB$SIGNAL( status );
}
| The processes ORION and CYGNUS are in the same group. Each process first associates with a common event flag cluster named FLAG_CLUSTER to use common event flags to synchronize its use of the section. |
| The process ORION creates the global section named GLOBAL_SECTION, specifying section flags that indicate that it is a global section (SEC$M_GBL) and has read/write access. Input and output address arrays, the page count parameter, and the channel number arguments are not shown; procedures for specifying them are the same, as shown in this example. |
| The process CYGNUS associates with the common event flag cluster and waits for the flag defined as FLGSET; ORION sets this flag when it has finished creating the section. To map the section, CYGNUS specifies the input and output address arrays, the flag indicating that it is a global section, and the global section name. The number of pages mapped is the same as that specified by the creator of the section. |
12.3.9.10. Reading and Writing Data Sections
Read/write sections provide a way for a process or cooperating processes to share data files in virtual memory.
The sharing of global sections may involve application-dependent synchronization techniques. For example, one process can create and map to a global section in read/write fashion; other processes can map to it in read-only fashion and interpret data written by the first process. Alternatively, two or more processes can write to the section concurrently. (In this case, the application must provide the necessary synchronization and protection).
After data in a process private section is modified, the process can release (or unmap) the section. The modified pages are then written back into the disk file defined as a section.
After data in a global section is modified, the process or processes can release (or unmap) the section. The modified pages are still maintained in memory until the section is deleted. The data s then written back into the disk file defined as a section. Applications relying on modified data to be in the file at a specific point in time must use the SYS$UPDSEC_64(W) or SYS$UPDSEC(W) system service to force the write action. See Section 12.3.9.12, ''Writing Back Sections''.
When the section is deleted, the revision number of the file is incremented, and the version number of the file remains unchanged. A full directory listing indicates the revision number of the file and the date and time that the file was last updated.
12.3.9.11. Releasing and Deleting Sections
For Alpha and IA-64 systems, the SYS$DELTVA_64 and SYS$UPDSEC(W)_64 system service are the preferred methods for deleting a range of virtual addresses from a process's virtual address space and for writing all pages (or only those pages modified by the current process) in an active private or global disk file section back into the section file on disk.
$DELTVA_S INADR=RETRANGEWhen a process unmaps a private section, the section is deleted; that is, all control information maintained by the system is deleted. A temporary global section is deleted when all processes that have mapped to it have unmapped it. Permanent global sections are not deleted until they are specifically marked for deletion with the Delete Global Section (SYS$DGBLSC)system service; they are then deleted when no more processes are mapped.
Note that deleting the pages occupied by a section does not delete the section file, but rather cancels the process's association with the file. Moreover, when a process deletes pages mapped to a process private read/write section, all modified pages are written back into the section file. For global sections, the system's modified page writer starts writing back modified pages when the section is deleted and all mapping processes have deleted their associated virtual address space. Applications relying on modified data to be in the file at a specific point in time must use the SYS$UPDSEC_64(W) or SYS$UPDSEC(W) system service to force the write action. See Section 12.3.9.12, ''Writing Back Sections''.
$DASSGN_S CHAN=GBLFAB+FAB$L_STV
For global sections, the channel is only used to identify the file to the system. The system then assigns a different channel to use for future paging I/O to the file. The used assigned channel can be deleted immediately after the global section is created.
12.3.9.12. Writing Back Sections
For Alpha and IA-64 systems, the SYS$UPDSEC(W)_64 system service is the preferred method for writing all pages (or only those pages modified by the current process) in an active private or global disk file section back into the section file on disk.
Because read/write sections are not normally updated on disk until either the physical pages they occupy are paged out, or until the section is deleted, a process should ensure that all modified pages are successfully written back into the section file at regular intervals.
The Update Section File on Disk (SYS$UPDSEC_64 or SYS$UPDSEC) system service writes the modified pages in a section into the disk file. The SYS$UPDSEC_64 and SYS$UPDSEC system services are described in the VSI OpenVMS System Services Reference Manual.
12.3.9.13. Memory-Resident Global Sections
Memory-resident global sections allow a database server to keep larger amounts of currently used data cached in physical memory. The database server then accesses the data directly from physical memory without performing I/O read operations from the database files on disk. With faster access to the data in physical memory, runtime performance increases dramatically.
Memory-resident global sections are non-file-backed global sections. Pages within a memory-resident global section are not backed by the page file or by any other file on disk. Thus, no page file quota is charged to any processor to the system. When a process maps to a memory-resident global section and references the pages, working set list entries are not created for the pages. No working set quota is charged to the process.
For further information about memory-resident global sections, see Chapter 16, "Memory Management with VLM Features".
12.3.9.14. Image Sections
The object module containing code to be shared is linked to produce a shareable image. The shareable image is not, in itself, executable. It contains a series of sections, called image sections.
You link private object modules with the shareable image to produce an executable image. No code or data from the shareable image is put into the executable image.
The system manager uses the INSTALL command to create a permanent global section from the shareable image file, making the image sections available for sharing.
When you run the executable image, the operating system automatically maps the global sections created by the INSTALL command into the virtual address space of your process.
For details on how to create and identify shareable images and how to link them with private object modules, see the VSI OpenVMS Linker Utility Manual.For information about how to install shareable images and make them available for sharing as global sections, see the VSI OpenVMS System Manager's Manual.
12.3.9.15. Page Frame Sections
A page frame section is one or more contiguous pages of physical memory or I/O space that have been mapped as a section. One use of page frame sections is to map to an I/O page, thus allowing a process to read device registers.
A page frame section differs from a disk file section in that it is not associated with a particular disk file and is not paged. However, it is similar to a disk file section in most other respects: you create, map, and define the extent and characteristics of a page frame section in essentially the same manner as you do for a disk file section.
For Alpha and IA-64 systems, the $CRMPSC_GPFN_64 and $CRMPSC_PFN_64 system services are the preferred method of creating and mapping global and private page frame sections. This section describes the use of the 32-bit SYS$CRMPSC system service.
To create a page frame section, you must specify page frame number (PFN)
mapping by setting the SEC$M_PFNMAP flag bit in the
flags argument to the Create and Map Section
(SYS$CRMPSC) system service. The
vbn argument is now used to specify that the first
page frame is to be mapped instead of the first virtual block. You must have the
user privilege PFNMAP to either create or delete a page frame section but not to
map to an existing one.
chan, and pfc arguments to
the SYS$CRMPSC service to create or map this type of
section. For the same reason, the SEC$M_CRF
(copy-on-reference) and SEC$M_DZRO (demand-zero) bit
settings in the flags argument do not apply. Pages in
page frame sections are not written back to any disk file (including the paging
file). The pagcnt and relpag
arguments are in units of CPU-specific pages for page frame sections.Caution
You must use caution when working with page frame sections. If you permit write access to the section, each process that writes to it does so at its own risk. Serious errors can occur if a process writes incorrect data or writes to the wrong page, especially if the page is also mapped by the system or by another process. Thus, any user who has the PFNMAP privilege can damage or violate the security of a system.
12.3.9.16. Partial Sections
On Alpha and IA-64 systems, a partial section is one where not all of the defined section, whether private or global, is entirely backed up by disk blocks. In other words, a partial section is where a disk file does not map completely onto an Alpha and IA-64 system page.
For example, suppose a file for which you wish to create a section consists of 17 virtual blocks on disk. To map this section, you would need two whole Alpha and I64 8-KB pages, the smallest size Alpha and I64 page available. The first Alpha and I64 page would map the first 16 blocks of the section, and the second Alpha and I64 page would map the 17th block of the section. (A block on disk is 512 bytes, same as on OpenVMS VAX.) This results in 15/16ths of the second Alpha and I64 page not being backed up by the section file. This is called a partial section because the second Alpha and I64 page of the section is only partially backed up.
When the partial page is faulted in, a disk read is issued for only as many blocks as actually back up that page, which in this case is 1. When that page is written back, only the one block is actually written.
If the upper portion of the second Alpha and I64 page is used, it is done so at some risk, because only the first block of that page is saved on a write-back operation. This upper portion of the second Alpha and I64 page is not really useful space to the programmer, because it is discarded during page faulting.
12.3.10. Example of Using 32-Bit Memory Management System Services
In the following example, two programs are communicating through a global section. The first program creates and maps a global section (by using SYS$CRMPSC) and then writes a device name to the section. This program also defines the device terminal and process names and sets the event flags that synchronize the processes.
The second program maps the section (by using SYS$MGBLSC) and then reads the device name and the process that allocated the device and any terminal allocated to that process. This program also writes the process named to the terminal global section where the process name can be read by the first program.
The example program uses the SYS$MGBLSC system service. However, the SYS$MGBLSC_64 system service is the preferred method for mapping global sections for Alpha and IA-64 systems.
The common event cluster is used to synchronize access to the global section. The first program sets REQ_FLAG to indicate that the device name is in the section. The second program sets INFO_FLAG to indicate that the process and terminal names are available.
Data in a section must be page aligned. The following is the option file used at link time that causes the data in the common area named DATA to be page aligned: PSECT_ATTR = DATA, PAGE
For high-level language usage, use the solitary attribute of the
linker. See the VSI OpenVMS Linker Utility Manual for an explanation of how to use the
solitary attribute. The address range requested for a
section must end on a page boundary, so SYS$GETSYI is used
to obtain the system page size.
!This is the program that creates the global section.

! Define global section flags
INCLUDE '($SECDEF)'
! Mask for section flags
INTEGER SEC_MASK

! Logical unit number for section file
INTEGER INFO_LUN
! Channel number for section file
! (returned from useropen routine)
INTEGER SEC_CHAN
COMMON /CHANNEL/ SEC_CHAN
! Length for the section file
INTEGER SEC_LEN
! Data for the section file
CHARACTER*12 DEVICE,
2            PROCESS
CHARACTER*6 TERMINAL
COMMON /DATA/ DEVICE,
2             PROCESS,
2             TERMINAL
! Location of data
INTEGER PASS_ADDR (2),
2       RET_ADDR (2)

! Two common event flags
INTEGER REQUEST_FLAG,
2       INFO_FLAG
DATA REQUEST_FLAG /70/
DATA INFO_FLAG /71/

! Data for SYS$GETSYI
INTEGER   PAGE_SIZE
INTEGER*2 BUFF_LEN, ITEM_CODE
INTEGER   BUFF_ADDR, LENGTH, TERMINATOR
EXTERNAL  SYI$_PAGE_SIZE
COMMON /GETSYI_ITEMLST/ BUFF_LEN,
2                       ITEM_CODE,
2                       BUFF_ADDR,
2                       LENGTH,
2                       TERMINATOR

! User-open routines
INTEGER UFO_CREATE
EXTERNAL UFO_CREATE
.
.
.
! Open the section file
STATUS = LIB$GET_LUN (INFO_LUN)
IF (.NOT. STATUS) CALL LIB$SIGNAL(%VAL(STATUS))
SEC_MASK = SEC$M_WRT .OR. SEC$M_DZRO .OR. SEC$M_GBL
! (Last element - first element + size of last element + 511)/512
SEC_LEN = ( (%LOC(TERMINAL) - %LOC(DEVICE) + 6 + 511)/512 )
OPEN (UNIT=INFO_LUN,
2     FILE='INFO.TMP',
2     STATUS='NEW',
2     INITIALSIZE = SEC_LEN,
2     USEROPEN = UFO_CREATE)
! Free logical unit number and map section
CLOSE (INFO_LUN)

! Get the system page size
BUFF_LEN = 4
ITEM_CODE = %LOC(SYI$_PAGE_SIZE)
BUFF_ADDR = %LOC(PAGE_SIZE)
LENGTH = 0
TERMINATOR = 0

STATUS = SYS$GETSYI(,,,BUFF_LEN,,,)

! Get location of data
PASS_ADDR (1) = %LOC (DEVICE)
PASS_ADDR (2) = PASS_ADDR(1) + PAGE_SIZE - 1

STATUS = SYS$CRMPSC (PASS_ADDR,   ! Address of section
2                    RET_ADDR,    ! Addresses mapped
2                    ,
2                    %VAL(SEC_MASK), ! Section mask
2                    'GLOBAL_SEC',   ! Section name
2                    ,,
2                    %VAL(SEC_CHAN), ! I/O channel
2                    ,,,)
IF (.NOT. STATUS) CALL LIB$SIGNAL(%VAL(STATUS))

! Create the subprocess
STATUS = SYS$CREPRC (,
2                    'GETDEVINF',  ! Image
2                    ,,,,,
2                    'GET_DEVICE', ! Process name
2                    %VAL(4),,,)   ! Priority
IF (.NOT. STATUS) CALL LIB$SIGNAL(%VAL(STATUS))

! Write data to section
DEVICE = '$DISK1'

! Get common event flag cluster and set flag
STATUS = SYS$ASCEFC (%VAL(REQUEST_FLAG),
2                    'CLUSTER',,)
IF (.NOT. STATUS) CALL LIB$SIGNAL(%VAL(STATUS))
STATUS = SYS$SETEF (%VAL(REQUEST_FLAG))
IF (.NOT. STATUS) CALL LIB$SIGNAL(%VAL(STATUS))

! When GETDEVINF has the information, INFO_FLAG is set
STATUS = SYS$WAITFR (%VAL(INFO_FLAG))
IF (.NOT. STATUS) CALL LIB$SIGNAL(%VAL(STATUS))
.
.
.

! This is the program that maps to the global section
! created by the previous program.

! Define section flags
INCLUDE '($SECDEF)'
! Mask for section flags
INTEGER SEC_MASK
! Data for the section file
CHARACTER*12 DEVICE,
2            PROCESS
CHARACTER*6  TERMINAL
COMMON /DATA/ DEVICE,
2             PROCESS,
2             TERMINAL

! Location of data
INTEGER PASS_ADDR (2),
2       RET_ADDR (2)

! Two common event flags
INTEGER REQUEST_FLAG,
2       INFO_FLAG
DATA REQUEST_FLAG /70/
DATA INFO_FLAG /71/

! Data for SYS$GETSYI
INTEGER   PAGE_SIZE
INTEGER*2 BUFF_LEN, ITEM_CODE
INTEGER   BUFF_ADDR, LENGTH, TERMINATOR
EXTERNAL  SYI$_PAGE_SIZE
COMMON /GETSYI_ITEMLST/ BUFF_LEN,
2                       ITEM_CODE,
2                       BUFF_ADDR,
2                       LENGTH,
2                       TERMINATOR
.
.
.
! Get the system page size
BUFF_LEN = 4
ITEM_CODE = %LOC(SYI$_PAGE_SIZE)
BUFF_ADDR = %LOC(PAGE_SIZE)
LENGTH = 0
TERMINATOR = 0

STATUS = SYS$GETSYI(,,,BUFF_LEN,,,)

! Get common event flag cluster and wait
! for GBL1.FOR to set REQUEST_FLAG
STATUS = SYS$ASCEFC (%VAL(REQUEST_FLAG),
2                    'CLUSTER',,)
IF (.NOT. STATUS) CALL LIB$SIGNAL (%VAL(STATUS))
STATUS = SYS$WAITFR (%VAL(REQUEST_FLAG))
IF (.NOT. STATUS) CALL LIB$SIGNAL (%VAL(STATUS))

! Get location of data
PASS_ADDR (1) = %LOC (DEVICE)
PASS_ADDR (2) = PASS_ADDR(1) + PAGE_SIZE - 1

! Set write flag
SEC_MASK = SEC$M_WRT

! Map the section
STATUS = SYS$MGBLSC (PASS_ADDR, ! Address of section
2                    RET_ADDR,  ! Address mapped
2                    ,
2                    %VAL(SEC_MASK), ! Section mask
2                    'GLOBAL_SEC',,) ! Section name
IF (.NOT. STATUS) CALL LIB$SIGNAL (%VAL(STATUS))

! Call GETDVI to get the process ID of the
! process that allocated the device, then
! call GETJPI to get the process name and terminal
! name associated with that process ID.
! Set PROCESS equal to the process name and
! set TERMINAL equal to the terminal name.
.
.
.
! After information is in GLOBAL_SEC
STATUS = SYS$SETEF (%VAL(INFO_FLAG))
IF (.NOT. STATUS) CALL LIB$SIGNAL (%VAL(STATUS))

END
12.4. Large Page-File Sections
Page-file sections are used to store temporary data in private or global (shared) sections of memory. Images that use 64-bit addressing can map and access an amount of dynamic virtual memory that is larger than the amount of physical memory available on the system.
With this design, if a process requires additional page-file space, page files can be allocated dynamically. Space is not longer reserved in a distinct page file, and pages are not bound to an initially assigned page file. Instead, if modified pages must be written back, they are written to the best available page file.
Each page or swap file can hold approximately 16 million pages (128 GB), and up to 254 page or swap files can be installed. Files larger than 128 GB are installed as multiple files.
- The SHOW MEMORY/FILES display reflects the nonreservable design. For example:
$ SHOW MEMORY/FILES

        System Memory Resources on 22-MAY-2000 19:04:19.67
Swap File Usage (8KB pages):                   Index  Free   Size

DISK$ALPHASYS:[SYS48.SYSEXE]SWAPFILE.SYS
                                                   1           904    904
DISK$SWAP:[SYS48.SYSEXE]SWAPFILE.SYS;1
                                                   2          1048   1048
  Total size of all swap files:                                      1952

Paging File Usage (8KB pages):                 Index  Free  Size

DISK$PAGE:[SYS48.SYSEXE]PAGEFILE.SYS;1
                                                 253          16888 16888
DISK$ALPHASYS:[SYS48.SYSEXE]PAGEFILE.SYS
                                                 254          16888 16888

  Total size of all paging files: 33776
  Total committed paging file usage:  1964
Number of swap files. Begins with an index value of 1 and increases in count.
Number of page files. Begins with an index value of 254 and decreases in count.
Total committed page file usage. As in previous releases, more pages can reside in page-file sections systemwide than would fit into installed page files.
- The SHOW MEMORY/FILES/FULL display no longer contains separate usage information for page and swap files. Because page-file information is no longer reserved, the system does not need to maintain the number of processes interested in a distinct page or swap file. For example:
$ SHOW MEMORY/FILES/FULL

        System Memory Resources on 22-MAY-2000 18:47:10.21
Swap File Usage (8KB pages):                   Index   Free  Size
DISK$ALPHASYS:[SYS48.SYSEXE]SWAPFILE.SYS
                                                   1    904   904
Paging File Usage (8KB pages):                 Index   Free  Size
DISK$ALPHASYS:[SYS48.SYSEXE]PAGEFILE.SYS
                                                 254  16888 16888
  Total committed paging file usage: 1960
Up to 254 page and swap files can be installed.
Chapter 13. Memory Management Services and Routines on OpenVMS VAX
This chapter describes the use of system services and run-time routines that VAX systems use to manage memory.
13.1. Virtual Page Size
To facilitate memory protection and mapping, the virtual address space on VAX systems is subdivided into segments of 512-byte sizes called pages. (On Alpha systems, memory page sizes are much larger and vary from system to system. See Chapter 12, "Memory Management Services and Routines on OpenVMS Alpha and OpenVMS IA-64", for information about Alpha page sizes). Versions of system services and run-time library routines that accept page-count values as arguments interpret these arguments in 512-byte quantities. Services and routines automatically round the specified addresses to page boundaries.
13.2. Virtual Address Space
Process program region (P0)
The process program region is also referred to as P0 space. P0 space contains the instructions and data for the current image.
Your program can dynamically allocate storage in the process program region by calling run-time library (RTL) dynamic memory allocation routines or system services.
Process control region (P1)
The process control region is also referred to as P1 space. P1 space contains system control information and the user-mode process stack. The user mode stack expands as necessary toward the lower-addressed end of P1 space.
Common system region (S0)
The common system region is also referred to as S0 space. S0 space contains the operating system. Your program cannot allocate or free memory within the common system region from the user access mode.
This common system region (S0) of system virtual address space can have appended to it additional virtual address space, known as a reserved region, or S1 space, that creates a single region of system space. As a result, the system virtual address space increases from 1 GB to 2 GB.
A summary of these regions appears in Figure 13.1, ''Virtual Address Overview on VAX Systems''.
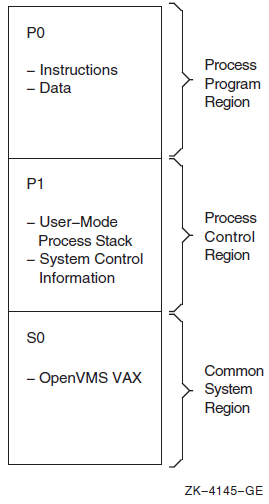
The memory management routines map and control the relationship between physical memory and the virtual address space of a process. These activities are, for the most part, transparent to you and your programs. In some cases, however, you can make a program more efficient by explicitly controlling its virtual memory usage.
The maximum size to which a process can increase its address space is controlled by the system parameter VIRTUALPAGECNT.
Using memory management system services, a process can add a specified number of pages to the end of either the program region or the control region. Adding pages to the program region provides the process with additional space for image execution, for example, for the dynamic creation of tables or data areas. Adding pages to the control region increases the size of the user stack. As new pages are referenced, the stack is automatically expanded, as shown in Figure 13.2, ''Layout of VAX Process Virtual Address Space''. (By using the STACK= option in a linker options file, you can also expand the user stack when you link the image).
Figure 13.2, ''Layout of VAX Process Virtual Address Space'' illustrates the layout of a process's virtual memory. The initial size of a process's virtual address space depends on the size of the image being executed.
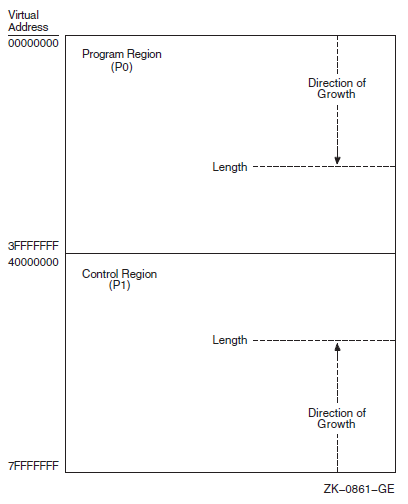
13.3. Extended Addressing Enhancements on Selected VAX Systems
Extended physical addressing (XPA)
Extended virtual addressing (XVA)
Extended physical addressing increases the size of a physical address from 30 bits to 32 bits. This increases the capacity for physical memory from 512 MB to 3.5 GB as shown in Figure 13.3, ''Physical Address Space for VAX Systems with XPA''. The 512 MB is still reserved for I/O and adapter space.
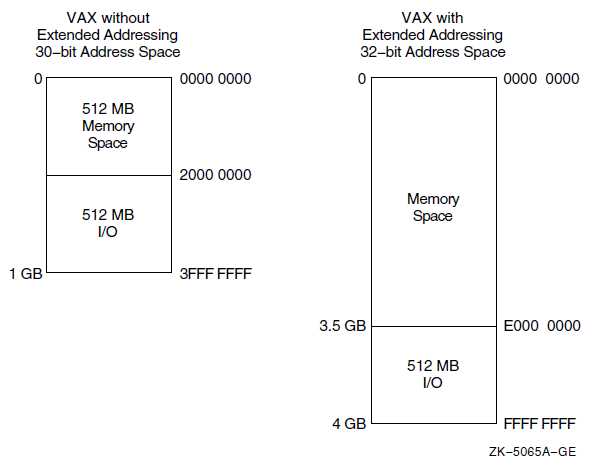
Extended virtual addressing (XVA) increases the size of the virtual page number field in the format of a system space address from 21 bits to 22 bits. The region of system virtual address space, known as the reserved region or S1 space, is appended to the existing region of system virtual address space known as S0 space, thereby creating a single region of system space. As a result, the system virtual address space increases from 1 GB to 2 GB as shown in Figure 13.4, ''Virtual Address Space for VAX Systems with XVA''.
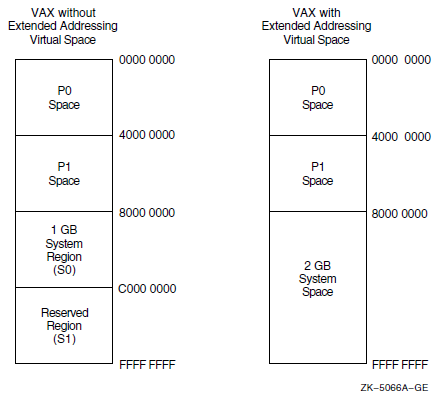
13.3.1. Page Table Entry for Extended Addresses on VAX Systems
As shown in Figure 13.3, ''Physical Address Space for VAX Systems with XPA'', extended addressing increases the maximum physical address space supported by VAX systems from 1 GB to 4 GB. This is accomplished by expanding the page frame number (PFN)field in a page table entry (PTE) from 21 bits to 23 bits, and implementing changes in the memory management arrays that are indexed by PFN. Both the process page table entry and system page table entry are changed.
13.4. Levels of Memory Allocation Routines
Sophisticated software systems must often create and manage complex data structures. In these systems, the size and number of elements are not always known in advance. You can tailor the memory allocation for these elements by using dynamic memory allocation. By managing the memory allocation, you can avoid allocating fixed tables that may be too large or too small for your program. Managing memory directly can improve program efficiency. By allowing you to allocate specific amounts of memory, the operating system provides a hierarchy of routines and services for memory management. Memory allocation and deallocation routines allow you to allocate and free storage within the virtual address space available to your process.
Memory management system services
The memory management system services comprise the lowest level of memory allocation routines. These services include, but are not limited to, the following:- SYS$EXPREG (Expand Region)
- SYS$CRETVA (Create Virtual Address Space)
- SYS$DELTVA (Delete Virtual Address Space)
- SYS$CRMPSC (Create and Map Section)
- SYS$MGBLSC (Map Global Section)
- SYS$DGBLSC (Delete Global Section)
For most cases in which a system service is used for memory allocation, the Expand Region (SYS$EXPREG) system service is used to create pages of virtual memory.
Because system services provide more control overallocation procedures than RTL routines, you must manage the allocation precisely. System services provide extensive control over address space allocation by allowing you to do the following types of tasks:Add or delete virtual address space to the process program region (P0) or process control region (P1)
Add or delete virtual address space at a specific range of addresses
Increase or decrease the number of pages in a program's working set
Lock or delete pages of a program's working set in memory
Lock the entire program's working set in memory (by disabling process swapping)
Define disk files containing data or shareable images and map the files into the virtual address space of a process
RTL page management routines
RTL routines are available for creating, deleting, and accessing information about virtual address space. You can either allocate a specified number of contiguous pages or create a zone of virtual address space. A zone is a logical unit of the memory pool or subheap that you can control as an independent area. It can be any size required by your program. Refer to Chapter 14, "Using Run-Time Routines for Memory Allocation", for more information about zones.
The RTL page management routines LIB$GET_VM_PAGE and LIB$FREE_VM_PAGE provide a convenient mechanism for allocating and freeing pages of memory.
These routines maintain a processwide pool of free pages. If unallocated pages are not available when LIB$GET_VM_PAGE is called, it calls SYS$EXPREG to create the required pages in the program region (P0 space).
RTL heap management routines
The RTL heap management routines LIB$GET_VM and LIB$FREE_VM provide a mechanism for allocating and freeing blocks of memory of arbitrary size.
The following are heap management routines based on the concept of zones:- LIB$CREATE_VM_ZONE
- LIB$CREATE_USER_VM_ZONE
- LIB$DELETE_VM_ZONE
- LIB$FIND_VM_ZONE
- LIB$RESET_VM_ZONE
- LIB$SHOW_VM_ZONE
- LIB$VERIFY_VM_ZONE
If an unallocated block is not available to satisfy a call to LIB$GET_VM, LIB$GET_VM calls LIB$GET_VM_PAGE to allocate additional pages.
- Memory that is allocated by an allocation routine at one level of the hierarchy must be freed by calling a deallocation routine at the same level of the hierarchy. For example, if you allocated a page of memory by calling LIB$GET_VM_PAGE, you can free it only by calling LIB$FREE_VM_PAGE.
Figure 13.5, ''Hierarchy of VAX Memory Management Routines'' shows the three levels of memory allocation routines.
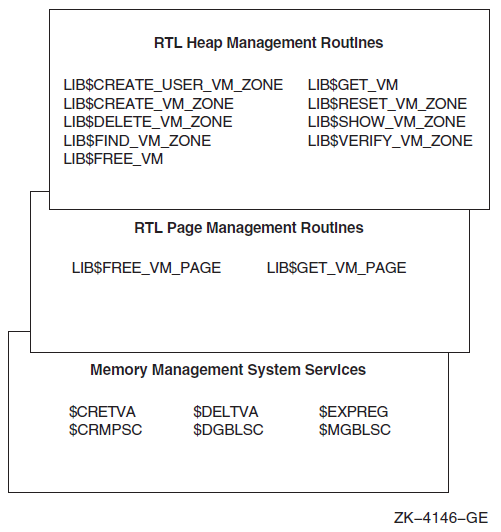
For information about using memory management RTLs, see Chapter 14, "Using Run-Time Routines for Memory Allocation".
13.5. Using System Services for Memory Allocation
Increase and decrease virtual address space
Input and return address arrays
Control page ownership and protection
Control working set paging
Control process swapping
13.5.1. Increasing and Decreasing Virtual Address Space
The system services allow you to add address space anywhere within the process's program region (P0) or control region (P1). To add address space at the end of P0 or P1, use the Expand Program/Control Region (SYS$EXPREG) system service. SYS$EXPREG optionally returns the range of virtual addresses for the new pages. To add address space in other portions of P0 or P1, use SYS$CRETVA.
SYS$EXPREG (pagcnt ,[retadr] ,[acmode] ,[region])Specifying the Number of Pages
Use the pagcnt argument to specify the number of pages to
add to the end of the region. The range of addresses where the new pages are added
is returned in retadr.
Specifying the Access Mode
Use the acmode argument to specify the access to be
assigned to the newly created pages.
Specifying the Region
Use the region argument to specify whether to add the pages
to the end of the P0 or P1 region. This argument is optional.
To deallocate pages allocated with SYS$EXPREG, use SYS$DELTVA.
#include <stdio.h>
#include <ssdef.h>


main() {
    unsigned int status, retadr[1],pagcnt=4, region=0;

/* Add 4 pages to P0 space */
    status = SYS$EXPREG( pagcnt, &retadr, 0, region);
    if (( status & 1) != 1)
        LIB$SIGNAL( status );
    else
        printf("Starting address: %d Ending address: %d\n",
               retadr.lower,retadr.upper);
}
The value 0 is passed in the region argument to specify
that the pages are to be added to the program region. To add the same number of
pages to the control region, you would specify REGION=#1.
Note that the region argument to
SYS$EXPREG is optional; if it is not specified, the
pages are added to or deleted from the program region by default.
#include <stdio.h>
#include <ssdef.h>

struct {
    unsigned int lower, upper;
}retadr1, retadr2, retadr3;

main() {
    unsigned int status, pagcnt=4, region=0;

/* Add 4 pages to P0 space */
    status = SYS$EXPREG( pagcnt, &retadr1, 0, region);
    if (( status & 1) != 1)
        LIB$SIGNAL( status );
    else
        printf("Starting address: %d ending address: %d\n",
               retadr1.lower,retadr1.upper);

/* Add 3 more pages to P0 space */

    pagcnt = 3;
    status = SYS$EXPREG( pagcnt, &retadr2, 0, region);
    if (( status & 1) != 1)
        LIB$SIGNAL( status );
    else
        printf("Starting address: %d ending address: %d\n",
               retadr2.lower,retadr2.upper);

/* Delete original allocation */
    status = SYS$DELTVA( &retadr1, &retadr3, 0 );
    if (( status & 1) != 1)
        LIB$SIGNAL( status );
    else
        printf("Starting address: %d ending address: %d\n",
               retadr1.lower,retadr1.upper);

}Caution
Be aware that using SYS$CRETVA presents some risk because it can delete pages that already exist if those pages are not owned by a more privileged access mode. Further, if those pages are deleted, no notification is sent. Therefore, unless you have complete control over an entire system, use SYS$EXPREG or the RTL routines to allocate address space.
13.5.2. Input Address Arrays and Return Address Arrays
If the program region is expanded, the starting virtual address is smaller than the ending virtual address.
If the control region is expanded, the starting virtual address is larger than the ending virtual address.
The addresses returned indicate the first byte in the first page that was added or deleted and the last byte in the last page that was added or deleted.
Note
The operating system always adjusts the starting and ending virtual addresses up or down to fit page boundaries.
The order in which the pages are added or deleted does not have to be in the normal direction of growth for the region. Moreover, because these services add or delete only whole pages, they ignore the low-order 9 bits of the specified virtual address (the low-order 9 bits contain the byte offset within the page). The virtual addresses returned indicate the byte offsets.
|
Input Array |
Output Array | ||||
|---|---|---|---|---|---|
|
Start |
End |
Region |
Start |
End |
Number of Pages |
|
1010 |
1670 |
P0 |
1000 |
17FF |
4 |
|
1450 |
1451 |
P0 |
1400 |
15FF |
1 |
|
1200 |
1000 |
P0 |
1000 |
13FF |
2 |
|
1450 |
1450 |
P0 |
1400 |
15FF |
1 |
|
7FFEC010 |
7FFEC010 |
P1 |
7FFEC1FF |
7FFEC000 |
1 |
|
7FFEC010 |
7FFEBCA0 |
P1 |
7FFEC1FF |
7FFEBC00 |
3 |
Note that if the input virtual addresses are the same, as in the fourth and fifth items in Table 13.1, ''Sample Virtual Address Arrays on VAX Systems'', a single page is added or deleted. The return address array indicates that the page was added or deleted in the normal direction of growth for the region.
13.5.3. Page Ownership and Protection
Each page in the virtual address space of a process is owned by the access mode that created the page. For example, pages in the program region that are initially provided for the execution of an image are owned by user mode. Pages that the image creates dynamically are also owned by user mode. Pages in the control region, except for the pages containing the user stack, are normally owned by more privileged access modes.
Only the owner access mode or a more privileged access mode can delete the page or otherwise affect it. The owner of a page can also indicate, by means of a protection code, the type of access that each access mode will be allowed.
The Set Protection on Pages (SYS$SETPRT) system service changes the protection assigned to a page or group of pages. The protection is expressed as a code that indicates the specific type of access (none, read-only, read/write) for each of the four access modes (kernel, executive, supervisor, user). Only the owner access mode or a more privileged access mode can change the protection for a page.
When an image attempts to access a page that is protected against the access attempted, a hardware exception called an access violation occurs. When an image calls a system service, the service probes the pages to be used to determine whether an access violation would occur if the image attempts to read or write one of the pages. If an access violation would occur, the service exits with the status code SS$_ACCVIO.
Because the memory management services add, delete, or modify a single page at a
time, one or more pages can be successfully changed before an access violation is
detected. If the retadr argument is specified in the service
call, the service returns the addresses of pages changed (added, deleted, or
modified) before the error. If no pages are affected, that is, if an access
violation would occur on the first page specified, the service returns a value of -1
in both longwords of the return address array.
If the retadr argument is not specified, no information is
returned.
13.5.4. Working Set Paging
When a process is executing an image, a subset of its pages resides in physical memory; these pages are called the working set of the process. The working set includes pages in both the program region and the control region. The initial size of a process's working set is usually defined by the process's working set default (WSDEFAULT) quota. The maximum size of a process's working set is normally defined by the process's working set quota (WSQUOTA).When ample memory is available, a process's working-set upper growth limit can be expanded by its working set extent (WSEXTENT).
When the image refers to a page that is not in memory, a page fault occurs and the page is brought into memory, replacing an existing page in the working set. If the page that is going to be replaced is modified during the execution of the image, that page is written into a paging file on disk. When this page is needed again, it is brought back into memory, again replacing a current page from the working set. This exchange of pages between physical memory and secondary storage is called paging.
The paging of a process's working set is transparent to the process. However, if a program is very large or if pages in the program image that are used often are being paged in and out frequently, the overhead required for paging may decrease the program's efficiency. The SYS$ADJWSL, SYS$PURGWS, and SYS$LKWSET system services allow a process, within limits, to counteract these potential problems.
SYS$ADJWSL System Service
SYS$ADJWSL ([pagcnt],[wsetlm])Use the pagcnt argument to specify the number of pages to
add or subtract from the current working set size. The new working set size is
returned in wsetlm.
SYS$PURGWS System Service
The Purge Working Set (SYS$PURGWS) system service removes one or more pages from the working set.
SYS$LKWSET System Service
SYS$LKWSET (inadr ,[retadr] ,[acmode])Specifying a Range of Addresses
Use the inadr argument to specify the range of addresses to
be locked. The range of addresses of the pages actually locked are returned in the
retadr argument.
Specifying the Access Mode
Use the acmode argument to specify the access mode to be
associated with the pages you want locked.
13.5.5. Process Swapping
The operating system balances the needs of all the processes currently executing, providing each with the system resources it requires on an as-needed basis. The memory management routines balance the memory requirements of the process. Thus, the sum of the working sets for all processes currently in physical memory is called the balance set.
When a process whose working set is in memory becomes inactive—for example, to wait for an I/O request or to hibernate—the entire working set or part of it may be removed from memory to provide space for another process's working set to be brought in for execution. This removal from memory is called swapping.
Partially—Also called swapper trimming. Pages are removed from the working set of the target process so that the number of pages in the working set is fewer, but the working set is not swapped.
Entirely—Called swapping. All pages are swapped out of memory.
When a process is swapped out of the balance set, all the pages (both modified and unmodified) of its working set are swapped, including any pages that had been locked in the working set.
$SETSWM_S SWPFLG=#1This call to SYS$SETSWM disables process swap mode. You can also disable swap mode by setting the appropriate bit in the STSFLG argument to the Create Process (SYS$CREPRC) system service; however, you need the PSWAPM privilege to alter process swap mode.
A process can also lock particular pages in memory with the Lock Pages in Memory (SYS$LCKPAG) system service. These pages are not part of the process's working set, but they are forced into the process's working set. When pages are locked in memory with this service, the pages remain in memory even when the remainder of the process's working set is swapped out of the balance set. These remaining pages stay in memory until they are unlocked with SYS$ULKPAG. SYS$LCKPAG can be useful in special circumstances, for example, for routines that perform I/O operations to devices without using the operating system's I/O system.
You need the PSWAPM privilege to issue SYS$LCKPAG or SYS$ULKPAG.
13.5.6. Sections
A section is a disk file or a portion of a disk file containing data or instructions that can be brought into memory and made available to a process for manipulation and execution. A section can also be one or more consecutive page frames in physical memory or I/O space; such sections, which require you to specify page frame number (PFN) mapping, are discussed in Section 13.5.6.15, ''Page Frame Sections''.
Private sections are accessible only by the process that creates them. A process can define a disk data file as a section, map it into its virtual address space, and manipulate it.
Global sections can be shared by more than one process. One copy of the global section resides in physical memory, and each process sharing it refers to the same copy. A global section can contain shareable code or data that can be read, or read and written, by more than one process. Global sections are either temporary or permanent and can be defined for use within a group or on a systemwide basis. Global sections can be either mapped to a disk file or created as a global page-file section.
When modified pages in writable disk file sections are paged out of memory during image execution, they are written back into the section file rather than into the paging file, as is the normal case with files. (However, copy-on-reference sections are not written back into the section file).
The creation of a section defines a disk file as a section and informs the system what portions of the file contain the section.
The mapping of a section makes it available to a process and establishes the correspondence between virtual blocks in the file and specific addresses in the virtual address space of a process.
The Create and Map Section (SYS$CRMPSC) system service creates and maps a private section or a global section. Because a private section is used only by a single process, creation and mapping are simultaneous operations. In the case of a global section, one process can create a permanent global section and notmap to it; other processes can map to it. A process can also create and map a global section in one operation.
The following sections describe the creation, mapping, and use of disk file sections. In each case, operations and requirements that are common to both private sections and global sections are described first, followed by additional notes and requirements for the use of global sections. Section 13.5.6.9, ''Global Page-File Sections'' discusses global page-file sections.
13.5.6.1. Creating Sections
Open or create the disk file containing the section.
Define which virtual blocks in the file constitute the section.
Define the characteristics of the section.
13.5.6.2. Opening the Disk File
#include <rms.h>
#include <rmsdef.h>
#include <string.h>
#include <secdef.h>

struct FAB secfab;

main() {
    unsigned short chan;
    unsigned int status, retadr[1], pagcnt=1, flags;
    char *fn = "SECTION.TST";

/* Initialize FAB fields */
    secfab = cc$rms_fab;
    secfab.fab$l_fna = fn;
    secfab.fab$b_fns = strlen(fn);
    secfab.fab$l_fop = FAB$M_CIF;
    secfab.fab$b_rtv = -1;

/* Create a file if none exists */
    status = SYS$CREATE( &secfab, 0, 0 );
    if ((status & 1) != 1)
        LIB$SIGNAL( status );

    flags = SEC$M_EXPREG;
    chan = secfab.fab$l_stv;
    status = SYS$CRMPSC(0, &retadr, 0, 0, 0, 0, flags, chan, pagcnt,
                        0, 0, 0);
    if ((status & 1) != 1)
        LIB$SIGNAL( status );

}
In this example, the file options parameter (FOP) indicates that the file is
to be opened for user I/O; this parameter is required so that OpenVMS RMS
assigns the channel using the access mode of the caller. OpenVMS RMS returns the
channel number on which the file is accessed; this channel number is specified
as input to SYS$CRMPSC (chan
argument). The same channel number can be used for multiple create and map
section operations.
The option RTV=–1 tells the file system to keep all of the pointers to be mapped in memory at all times. If this option is omitted, SYS$CRMPSC requests the file system to expand the pointer areas, if necessary. Storage for these pointers is charged to the BYTLM quota, which means that opening a badly fragmented file can fail with an EXBYTLM failure status. Too many fragmented sections may cause the byte limit to be exceeded.
The file may be a new file that is to be created while it is in use as a section. In this case, use the $CREATE macro to open the file. If you are creating a new file, the file access block (FAB) for the file must specify an allocation quantity (ALQ parameter).
GBLFAB: $FAB    FNM=<GLOBAL.TST>, -
                ALQ=4, -
                FAC=PUT,-
                FOP=<UFO,CIF,CBT>, -
                SHR=<PUT,UPI>
          .
          .
          .
        $CREATE FAB=GBLFAB
When the $CREATE macro is invoked, it creates the file GLOBAL.TST if the file does not currently exist. The CBT (contiguous best try) option requests that, if possible, the file be contiguous. Although section files are not required to be contiguous, better performance can result if they are.
13.5.6.3. Defining the Section Extents
pagcnt(page count). This argument is required. It indicates the number of virtual blocks that will be mapped. These blocks correspond to pages in the section.vbn(virtual block number). This argument is optional. It defines the number of the virtual block in the file that is the beginning of the section. If you do not specify this argument, the value 1 is passed(the first virtual block in the file is the beginning of the section). If you have specified physical page frame number (PFN) mapping, thevbnargument specifies the starting PFN. The system does not allow you to specify a virtual block number outside of the file.
13.5.6.4. Defining the Section Characteristics
flags argument to
SYS$CRMPSC defines the following section characteristics:Whether it is a private section or a global section. The default is to create a private section.
- How the pages of the section are to be treated when they are copied into physical memory or when a process refers to them. The pages in a section can be either or both of the following:
Read/write or read-only
Created as demand-zero pages or as copy-on-reference pages, depending on how the processes are going to use the section and whether the file contains any data (see Section 13.5.6.10, ''Section Paging'')
Whether the section is to be mapped to a disk file or to specific physical page frames (see Section 13.5.6.15, ''Page Frame Sections'').
|
Section to Be Created | |||||
|---|---|---|---|---|---|
|
Correct Flag Combinations |
Private |
Global |
PFN Private |
PFN Global |
Shared Memory |
|
SEC$M_GBL |
0 |
1 |
0 |
1 |
1 |
|
SEC$M_CRF |
Optional |
Optional |
0 |
0 |
0 |
|
SEC$M_DZRO |
Optional |
Optional |
0 |
0 |
Optional |
|
SEC$M_WRT |
Optional |
Optional |
Optional |
Optional |
Optional |
|
SEC$M_PERM |
Not used |
Optional |
Optional |
1 |
1 |
|
SEC$M_SYSGBL |
Not used |
Optional |
Not used |
Optional |
Optional |
|
SEC$M_PFNMAP |
0 |
0 |
1 |
1 |
0 |
|
SEC$M_EXPREG |
Optional |
Optional |
Optional |
Optional |
Optional |
|
SEC$M_PAGFIL |
0 |
Optional |
0 |
0 |
0 |
Global sections cannot be both demand-zero and copy-on-reference.
Demand-zero sections must be writable.
Shared memory private sections are not allowed.
13.5.6.5. Defining Global Section Characteristics
If the section is a global section, you must assign a character string name
(gsdnam argument) to it so that other processes can
identify it when they map it. The format of this character string name is
explained in Section 13.5.6.6, ''Global Section Name''.
flags argument specifies the following types of
global sections:Group temporary (the default)
Group permanent
System temporary
System permanent
Group global sections can be shared only by processes executing with the same group number. The name of a group global section is implicitly qualified by the group number of the process that created it. When other processes map it, their group numbers must match.
A temporary global section is automatically deleted when no processes are mapped to it, but a permanent global section remains in existence even when no processes are mapped to it. A permanent global section must be explicitly marked for deletion with the Delete Global Section (SYS$DGBLSC) system service.
You need the user privileges PRMGBL and SYSGBL to create permanent group global sections or system global sections (temporary or permanent), respectively.
A system global section is available to all processes in the system.
Optionally, a process creating a global section can specify a protection mask
(prot argument), restricting all access or a type of
access (read, write, execute, delete) to other processes.
13.5.6.6. Global Section Name
The gsdnam argument specifies a descriptor that points
to a character string.
gsdnam argument proceeds in the
following manner: The current name string is prefixed with GBL$ and the result is subject to logical name translation.
If the result is a logical name, step 1 is repeated until translation does not succeed or until the number of translations performed exceeds the number specified by the system parameter LNM$C_MAXDEPTH.
The GBL$ prefix is stripped from the current name string that could not be translated. This current string is the name of the global section.
$ DEFINE GBL$GSDATA GSDATA_001#include <descrip.h>
.
.
.
$DESCRIPTOR(gsdnam,"GSDATA");
.
.
.
status = sys$crmpsc(&gsdnam, ...);GBL$ is prefixed to GDSDATA.
GBL$GSDATA is translated to GSDATA_001.(Further translation is not successful. When logical name translation fails, the string is passed to the service)
If the name string starts with an underscore (_), the operating system strips the underscore and considers the resultant string to be the actual name(that is, further translation is not performed).
If the name string is the result of a logical name translation, then the name string is checked to see whether it has the terminalattribute. If the name string is marked with the terminal attribute, the operating system considers the resultant string to be the actual name (that is, further translation is not performed).
If the global section has a name in the format name_nnn, the operating system first strips the underscore and the digits (nnn), then translates the resultant name according to the sequence discussed in this section, and finally reappends the underscore and digits. The system uses this method in conjunction with known images and shared files installed by the system manager.
13.5.6.7. Mapping Sections
When you call SYS$CRMPSC to create or map a section,
or both, you must provide the service with a range of virtual addresses
(inadr argument) into which the section is to be
mapped.
unsigned int maprange[1];

maprange[0]= 0x1400; /* Address (hex) of page 10 */
maprange[1]= 0x2300; /* Address (hex) of page 19 */
flags argument. In this case, the addresses specified
by the inadr argument control whether the service finds
the first available space in P0 or P1. The value specified or defaulted for the
pagcnt argument determines the number of pages
mapped. The following example shows part of a program used to map a section at
the current end of the program
region: unsigned int status, inadr[1], retadr[1], flags;
inadr[0]= 0x200; /* Any program (P0) region address */
inadr[1]= 0x200; /* Any P0 address (can be same) */
.
.
.
/* Address range returned in retadr */
flags = SEC$M_EXPREG;
status = sys$crmpsc(&inadr, &retadr, flags, ...);The addresses specified do not have to be currently in the virtual address
space of the process. SYS$CRMPSC creates the required
virtual address space during the mapping of the section. If you specify the
retadr argument, the service returns the range of
addresses actually mapped.
A base register or pointer and predefined symbolic offset names
Labels defining offsets of an absolute program section or structure
#include <rms.h>
#include <rmsdef.h>
#include <string.h>
#include <secdef.h>

struct FAB secfab;

main() {
    unsigned short chan;
    unsigned int status, inadr[1], retadr[1], pagcnt=1, flags;
    char *fn = "SECTION.TST";

/* Initialize FAB fields */

    secfab = cc$rms_fab;
    secfab.fab$b_fac = FAB$M_PUT;
    secfab.fab$b_shr = FAB$M_SHRGET || FAB$V_SHRPUT || FAB$V_UPI;
    secfab.fab$l_fna = fn;
    secfab.fab$b_fns = strlen(fn);
    secfab.fab$l_fop = FAB$V_CIF;
    secfab.fab$b_rtv = -1;

/* Create a file if none exists */

    status = SYS$CREATE( &secfab, 0, 0 );
    if ((status & 1) != 1)
        LIB$SIGNAL( status );

    inadr[0] = X1400;
    inadr[1] = X2300;
    flags = SEC$M_WRT;
    chan = secfab.fab$l_stv;
    status = SYS$CRMPSC(&inadr, &retadr, 0, 0, 0, 0, flags, chan, pagcnt,
                        0, 0, 0);
    if ((status & 1) != 1)
        LIB$SIGNAL( status );

}The OPEN macro opens the section file defined in the file access block SECFAB. (The FOP parameter to the $FAB macro must specify the UFO option.)
SYS$CRMPSC uses the addresses specified at MAPRANGE to specify an input range of addresses into which the section will be mapped. The
pagcntargument requests that only 4 pages of the file be mapped.The
flagsargument requests that the pages in the section have read/write access. The symbolic flag definitions for this argument are defined in the $SECDEF macro. Note that the file access field(FAC parameter) in the FAB also indicates that the file is to be opened for writing.When SYS$CRMPSC completes, the addresses of the 4 pagesthat were mapped are returned in the output address array at RETRANGE. The address of the beginning of the section is placed in general register 6, which serves as a pointer to the section.
13.5.6.8. Mapping Global Sections
A process that creates a global section can map that global section. Then other processes can map it by calling the Map Global Section (SYS$MGBLSC)system service.
A version identification (
identargument), indicating the version number of the global section (when multiple versions exist) and whether more recent versions are acceptable to the process.A relative page number (
relpagargument) that specifies the page number relative to the beginning of the section to begin mapping the section. In this way, processes can use only portions of a section. Additionally, a process can map a piece of a section into a particular address range and subsequently map a different piece of the section into the same virtual address range.
To specify that the global section being mapped is located in physical memory
that is being shared by multiple processors, you can include the shared memory
name in the gsdnam argument character string (see Section 13.5.6.6, ''Global Section Name''). A demand-zero global section in memory shared by
multiple processors must be mapped when it is created.
Cooperating processes can issue a call to SYS$CRMPSC to create and map the same global section. The first process to call the service actually creates the global section; subsequent attempts to create and map the section result only in mapping the section for the caller. The successful return status code SS$_CREATED indicates that the section did not already exist when the SYS$CRMPSC system service was called. If the section did exist, the status code SS$_NORMAL is returned.
The example in Section 13.5.6.10, ''Section Paging'' shows one process (ORION) creating a global section and a second process (CYGNUS) mapping the section.
13.5.6.9. Global Page-File Sections
Global page-file sections are used to store temporary data in a global section. A global page-file section is a section of virtual memory that is not mapped to a file. The section can be deleted when processes have finished with it. (Contrast this to demand-zero pages, where initialization is not necessary but the pages are saved in a file). The system parameter GBLPAGFIL controls the total number of global page-file pages in the system.
To create a global page-file section, you must set the flag bits
SEC$M_GBL and SEC$M_PAGFIL
in the flags argument to the Create and Map Section
(SYS$CRMPSC) system service. The channel
(chan argument) must be 0.
You cannot specify the flag bit SEC$M_CRF with the flag bit SEC$M_PAGFIL.
13.5.6.10. Section Paging
The first time an image executing in a process refers to a page that was created during the mapping of a disk file section, the page is copied into physical memory. The address of the page in the virtual address space of a process is mapped to the physical page. During the execution of the image, normal paging can occur; however, pages in sections are not written into the page file when they are paged out, as is the normal case. Rather, if they have been modified, they are written back into the section file on disk. The next time a page fault occurs for the page, the page is brought back from the section file.
If the call to SYS$CRMPSC requested that pages in the section be treated as demand-zero pages, these pages are initialized to zero when they are created in physical memory. If the file is either a new file being created as a section or a file being completely rewritten, demand-zero pages provide a convenient way of initializing the pages. The pages are paged back into the section file.
When the virtual address space is deleted, all unreferenced pages are written back to the file as zeros. This causes the file to be initialized, no matter how few pages were modified.
If the call to SYS$CRMPSC requested that pages in the section be copy-on-reference pages, each process that maps to the section receives its own copy of the section, on a page-by-page basis from the file, as it refers to them. These pages are never written back into the section file but are paged to the paging file as needed.
In the case of global sections, more than one process can be mapped to the same physical pages. If these pages need to be paged out or written back to the disk file defined as the section, these operations are done only when the pages are not in the working set of any process.
/* Process ORION */
#include <rms.h>
#include <rmsdef.h>
#include <string.h>
#include <secdef.h>
#include <descrip.h>
struct FAB gblfab;
main() {
unsigned short chan;
unsigned int status, flags, efn=65;
char *fn = "SECTION.TST";
$DESCRIPTOR(name, "FLAG_CLUSTER"); /* Common event flag cluster
name */
$DESCRIPTOR(gsdnam, "GLOBAL_SECTION"); /* Global section name */
status = SYS$ASCEFC(efn, &name, 0);
if ((status & 1) != 1)
LIB$SIGNAL( status );
/* Initialize FAB fields */
gblfab = cc$rms_fab;
gblfab.fab$l_alq = 4;
gblfab.fab$b_fac = FAB$M_PUT;
gblfab.fab$l_fnm = fn;
gblfab.fab$l_fop = FAB$M_CIF | FABM$_CBT;
.
.
.
/* Create a file if none exists */
status = SYS$CREATE( &gblfab, 0, 0 );
if ((status & 1) != 1)
LIB$SIGNAL( status );
flags = SEC$M_GBL || SEC$M_WRT;
status = SYS$CRMPSC(0, 0, 0, flags, &gsdnam, ...);
if ((status & 1) != 1)
LIB$SIGNAL( status );
status = SYS$SETEF(efn);
if ((status & 1) != 1)
LIB$SIGNAL( status );
.
.
.
}
/* Process CYGNUS */
unsigned int status, efn=65;
$DESCRIPTOR(cluster,"FLAG_CLUSTER");
$DESCRIPTOR(section,"GLOBAL_SECTION");
.
.
.
status = SYS$ASCEFC(efn, &cluster, 0);
if ((status & 1) != 1)
LIB$SIGNAL( status );
status = SYS$WAITFR(efn);
if ((status & 1) != 1)
LIB$SIGNAL( status );
status = SYS$MGBLSC(&inadr, &retadr, 0, flags, §ion, 0, 0);
if ((status & 1) != 1)
LIB$SIGNAL( status );
}
| The processes ORION and CYGNUS are in the same group. Each process first associates with a common event flag cluster named FLAG_CLUSTER to use common event flags to synchronize its use of the section. |
| The process ORION creates the global section named GLOBAL_SECTION, specifying section flags that indicate that it is a global section (SEC$M_GBL) and has read/write access. Input and output address arrays, the page count parameter, and the channel number arguments are not shown; procedures for specifying them are the same, as shown in this example. |
| The process CYGNUS associates with the common event flag cluster and waits for the flag defined as FLGSET; ORION sets this flag when it has finished creating the section. To map the section, CYGNUS specifies the input and output address arrays, the flag indicating that it is a global section, and the global section name. The number of pages mapped is the same as that specified by the creator of the section. |
13.5.6.11. Reading and Writing Data Sections
Read/write sections provide a way for a process or cooperating processes to share data files in virtual memory.
The sharing of global sections may involve application-dependent synchronization techniques. For example, one process can create and map to a global section in read/write fashion; other processes can map to it in read-only fashion and interpret data written by the first process. Alternatively, two or more processes can write to the section concurrently. (In this case, the application must provide the necessary synchronization and protection).
After a file is updated, the process or processes can release (or unmap) the section. The modified pages are then written back into the disk file defined as a section.
When this is done, the revision number of the file is incremented, and the version number of the file remains unchanged. A full directory listing indicates the revision number of the file and the date and time that the file was last updated.
13.5.6.12. Releasing and Deleting Sections
$DELTVA_S INADR=RETRANGEWhen a process unmaps a private section, the section is deleted; that is, all control information maintained by the system is deleted. A temporary global section is deleted when all processes that have mapped to it have unmapped it. Permanent global sections are not deleted until they are specifically marked for deletion with the Delete Global Section (SYS$DGBLSC) system service; they are then deleted when no more processes are mapped.
Note that deleting the pages occupied by a section does not delete the section file but rather cancels the process's association with the file. Moreover, when a process deletes pages mapped to a read/write section and no other processes are mapped to it, all modified pages are written back into the section file.
$DASSGN_S CHAN=GBLFAB+FAB$L_STV
13.5.6.13. Writing Back Sections
Because read/write sections are not normally updated on disk until the physical pages they occupy are paged out or until all processes referring to the section have unmapped it, a process should ensure that all modified pages are successfully written back into the section file at regular intervals.
The Update Section File on Disk (SYS$UPDSEC) system service writes the modified pages in a section into the disk file. SYS$UPDSEC is described in the VSI OpenVMS System Services Reference Manual.
13.5.6.14. Image Sections
The object module containing code to be shared is linked to produce a shareable image. The shareable image is not, in itself, executable. It contains a series of sections called image sections.
You link private object modules with the shareable image to produce an executable image. No code or data from the shareable image is put into the executable image.
The system manager uses the INSTALL command to create a permanent global section from the shareable image file, making the image sections available for sharing.
When you run the executable image, the operating system automatically maps the global sections created by the INSTALL command into the virtual address space of your process.
For details about how to create and identify shareable images and how to link them with private object modules, see the VSI OpenVMS Linker Utility Manual. For information about how to install shareable images and make them available for sharing as global sections, see the VSI OpenVMS System Manager's Manual.
13.5.6.15. Page Frame Sections
A page frame section is one or more contiguous pages of physical memory or I/O space that have been mapped as a section. One use of page frame sections is to map to an I/O page, thus allowing a process to read device registers. A process mapped to an I/O page can also connect to a device interrupt vector.
A page frame section differs from a disk file section in that it is not associated with a particular disk file and is not paged. However, it is similar to a disk file section in most other respects: you create, map, and define the extent and characteristics of a page frame section in essentially the same manner as you do for a disk file section.
To create a page frame section, you must specify page frame number (PFN)
mapping by setting the SEC$M_PFNMAP flag bit in the
flags argument to the Create and Map Section
(SYS$CRMPSC) system service. The
vbn argument is now used to specify that the first
page frame is to be mapped instead of the first virtual block. You must have the
user privilege PFNMAP to either create or delete a page frame section but not to
map to an existing one.
relpag, chan, and
pfc arguments to the
SYS$CRMPSC service to create or map this type of
section. For the same reason, the SEC$M_CRF
(copy-on-reference) and SEC$M_DZRO (demand-zero) bit
settings in the flags argument do not apply. Pages in
page frame sections are not written back to any disk file (including the paging file).Caution
You must use caution when working with page frame sections. If you permit write access to the section, each process that writes to it does so at its own risk. Serious errors can occur if a process writes incorrect data or writes to the wrong page, especially if the page is also mapped by the system or by another process. Thus, any user who has the PFNMAP privilege can damage or violate the security of a system.
13.5.7. Example of Using Memory Management System Services
In the following example, two programs are communicating through a global section. The first program creates and maps a global section (by using SYS$CRMPSC) and then writes a device name to the section. This program also defines both the device terminal and process names and sets the event flags that synchronize the processes.
The second program maps the section (by using SYS$MGBLSC) and then reads the device name and the process that allocated the device and any terminal allocated to that process. This program also writes the process named to the terminal global section where the process name can be read by the first program.
The common event cluster is used to synchronize access to the global section. The first program sets REQ_FLAG to indicate that the device name is in the section. The second program sets INFO_FLAG to indicate that the process and terminal names are available.
Data in a section must be page aligned. The following is the option file used at link time that causes the data in the common area named DATA to be page aligned:
PSECT_ATTR = DATA, PAGE
For high-level language usage, use the solitary attribute of the linker. See the VSI OpenVMS Linker Utility Manual for an explanation of how to use the solitary attribute.
Before executing the first program, you need to write a user-open routine that sets the user open bit (FAB$V_UFO) of the FAB options longword (FAB$L_FOP). The user-open routine would then read the channel number that the file is opened on from the status longword (FAB$L_STV) and return that channel number to the main program by using a common block (CHANNEL in this example).
!This is the program that creates the global section.

! Define global section flags
INCLUDE '($SECDEF)'
! Mask for section flags
INTEGER SEC_MASK

! Logical unit number for section file
INTEGER INFO_LUN
! Channel number for section file
! (returned from useropen routine)
INTEGER SEC_CHAN
COMMON /CHANNEL/ SEC_CHAN
! Length for the section file
INTEGER SEC_LEN
! Data for the section file
CHARACTER*12 DEVICE,
2            PROCESS
CHARACTER*6 TERMINAL
COMMON /DATA/ DEVICE,
2             PROCESS,
2             TERMINAL
! Location of data
INTEGER PASS_ADDR (2),
2       RET_ADDR (2)

! Two common event flags
INTEGER REQUEST_FLAG,
2       INFO_FLAG
DATA REQUEST_FLAG /70/
DATA INFO_FLAG /71/

! User-open routines
INTEGER UFO_CREATE
EXTERNAL UFO_CREATE
.
.
.
! Open the section file
STATUS = LIB$GET_LUN (INFO_LUN)
IF (.NOT. STATUS) CALL LIB$SIGNAL(%VAL(STATUS))
SEC_MASK = SEC$M_WRT .OR. SEC$M_DZRO .OR. SEC$M_GBL
! (Last element - first element + size of last element + 511)/512
SEC_LEN = ( (%LOC(TERMINAL) - %LOC(DEVICE) + 6 + 511)/512 )
OPEN (UNIT=INFO_LUN,
2     FILE='INFO.TMP',
2     STATUS='NEW',
2     INITIALSIZE = SEC_LEN,
2     USEROPEN = UFO_CREATE)
! Free logical unit number and map section
CLOSE (INFO_LUN)

! Get location of data
PASS_ADDR (1) = %LOC (DEVICE)
PASS_ADDR (2) = %LOC (TERMINAL)

STATUS = SYS$CRMPSC (PASS_ADDR,   ! Address of section
2                    RET_ADDR,    ! Addresses mapped
2                    ,
2                    %VAL(SEC_MASK), ! Section mask
2                    'GLOBAL_SEC',   ! Section name
2                    ,,
2                    %VAL(SEC_CHAN), ! I/O channel
2                    ,,,)
IF (.NOT. STATUS) CALL LIB$SIGNAL(%VAL(STATUS))

! Create the subprocess
STATUS = SYS$CREPRC (,
2                    'GETDEVINF',  ! Image
2                    ,,,,,
2                    'GET_DEVICE', ! Process name
2                    %VAL(4),,,)   ! Priority
IF (.NOT. STATUS) CALL LIB$SIGNAL(%VAL(STATUS))

! Write data to section
DEVICE = '$FLOPPY1'

! Get common event flag cluster and set flag
STATUS = SYS$ASCEFC (%VAL(REQUEST_FLAG),
2                    'CLUSTER',,)
IF (.NOT. STATUS) CALL LIB$SIGNAL(%VAL(STATUS))
STATUS = SYS$SETEF (%VAL(REQUEST_FLAG))
IF (.NOT. STATUS) CALL LIB$SIGNAL(%VAL(STATUS))

! When GETDEVINF has the information, INFO_FLAG is set
STATUS = SYS$WAITFR (%VAL(INFO_FLAG))
IF (.NOT. STATUS) CALL LIB$SIGNAL(%VAL(STATUS))
.
.
.

! This is the program that maps to the global section
! created by the previous program.

! Define section flags
INCLUDE '($SECDEF)'
! Mask for section flags
INTEGER SEC_MASK
! Data for the section file
CHARACTER*12 DEVICE,
2            PROCESS
CHARACTER*6  TERMINAL
COMMON /DATA/ DEVICE,
2             PROCESS,
2             TERMINAL

! Location of data
INTEGER PASS_ADDR (2),
2       RET_ADDR (2)

! Two common event flags
INTEGER REQUEST_FLAG,
2       INFO_FLAG
DATA REQUEST_FLAG /70/
DATA INFO_FLAG /71/
.
.
.
! Get common event flag cluster and wait
! for GBL1.FOR to set REQUEST_FLAG
STATUS = SYS$ASCEFC (%VAL(REQUEST_FLAG),
2                    'CLUSTER',,)
IF (.NOT. STATUS) CALL LIB$SIGNAL (%VAL(STATUS))
STATUS = SYS$WAITFR (%VAL(REQUEST_FLAG))
IF (.NOT. STATUS) CALL LIB$SIGNAL (%VAL(STATUS))

! Get location of data
PASS_ADDR (1) = %LOC (DEVICE)
PASS_ADDR (2) = %LOC (TERMINAL)

! Set write flag
SEC_MASK = SEC$M_WRT

! Map the section
STATUS = SYS$MGBLSC (PASS_ADDR, ! Address of section
2                    RET_ADDR,  ! Address mapped
2                    ,
2                    %VAL(SEC_MASK), ! Section mask
2                    'GLOBAL_SEC',,) ! Section name
IF (.NOT. STATUS) CALL LIB$SIGNAL (%VAL(STATUS))

! Call GETDVI to get the process ID of the
! process that allocated the device, then
! call GETJPI to get the process name and terminal
! name associated with that process ID.
! Set PROCESS equal to the process name and
! set TERMINAL equal to the terminal name.
.
.
.
! After information is in GLOBAL_SEC
STATUS = SYS$SETEF (%VAL(INFO_FLAG))
IF (.NOT. STATUS) CALL LIB$SIGNAL (%VAL(STATUS))

END
Chapter 14. Using Run-Time Routines for Memory Allocation
This chapter describes the use of run-time routines (RTLs) to allocate and deallocate pages.
Note
In this chapter, all references to pages include both the 512-byte page size on VAX systems and the 512-byte pagelet size on Alpha and IA-64 systems. See Chapter 13, "Memory Management Services and Routines on OpenVMS VAX", and Chapter 12, "Memory Management Services and Routines on OpenVMS Alpha and OpenVMS IA-64", for a discussion of page sizes on VAX and Alpha and IA-64 systems.
14.1. Allocating and Freeing Pages
The run-time library page management routines LIB$GET_VM_PAGE and LIB$FREE_VM_PAGE provide a flexible mechanism for allocating and freeing pages (pagelets on Alpha and IA-64 systems) of memory. In general, modular routines should use these routines rather than direct system service calls to manage memory. The page or pagelet management routines maintain a processwide pool of free pages or pagelets and automatically reuse free pages or pagelets. If your program calls system services directly, it must do the bookkeeping to keep track of free memory.
LIB$GET_VM_PAGE and LIB$FREE_VM_PAGE are fully reentrant. They can be called by code running at AST level or in an Ada multitasking environment.
Memory space allocated by LIB$GET_VM_PAGE are created with user-mode read-write access, even if the call to LIB$GET_VM_PAGE is made from a more privileged access mode.
LIB$GET_VM_PAGE and LIB$FREE_VM_PAGE are designed for request sizes ranging from one page to a few hundred pages. If you are using very large request sizes of contiguous space in a single request, the bitmap allocation method that is used may cause fragmentation of your virtual address space because allocated pages are contiguous. For very large request sizes, use direct calls to SYS$EXPREG and do not use LIB$GET_VM_PAGE.
LIB$GET_VM_PAGE (number-of-pages ,base-address)With this routine, you need to specify only the number of pages you need in the
number-of-pages argument. The routine returns the base
address of the contiguous block of pages that have been allocated in the
base-address argument.
Any memory you free by calling LIB$FREE_VM_PAGE must have been allocated by a previous call to LIB$GET_VM_PAGE. You cannot allocate memory by calling either SYS$EXPREG or SYS$CRETVA and then free it using LIB$FREE_VM_PAGE.
All memory allocated by LIB$GET_VM_PAGE is page aligned; that is, the low-order 9 bits of the address are all zero. All memory freed by LIB$FREE_VM_PAGE must also be page aligned; an error status is returned if you attempt to free a block of memory that is not page aligned.
You can free a smaller group of pages than you allocated. That is, if you allocated a group of 4 contiguous pages by a single call to LIB$GET_VM_PAGE, you can free the memory by using several calls to LIB$FREE_VM_PAGE; for example, free 1 page, 2 pages, and 1 page.
You can combine contiguous groups of pages that were allocated by several calls to LIB$GET_VM_PAGE into one group of pages that are freed by a single call to LIB$FREE_VM_PAGE. Before doing this, however, you must compare the addresses to ensure that the pages you are combining are indeed contiguous. Of course, you must ensure that a routine frees only pages that it has previously allocated and still owns.
Be especially careful that you do not attempt to free a set of pages twice. You might free a set of pages in one routine and reallocate those same pages from another routine. If the first routine then deallocates those pages a second time, any information that the second routine stored in them is lost. Because the pages are still allocated to your program (even though to a different routine), this type of programming mistake does not generate an error.
The contents of memory allocated by LIB$GET_VM_PAGE are unpredictable. Your program must assign values to all locations that it uses.
You should try to minimize the number of request sizes your program uses to avoid fragmentation of the free page pool. This concept is shown in Figure 14.1, ''Memory Fragmentation''.
Figure 14.1. Memory Fragmentation 
The straight line running across Figure 14.1, ''Memory Fragmentation'' represents the memory allocated to your program. The blocks represent memory that has already been allocated. At this point, if you request 16 pages, memory will have to be allocated at the far right end of the memory line shown in this figure, even though there are 20 free pages before that point. You cannot use 16 of these 20 pages because the 20 free pages are "fragmented" into groups of 15, 3, and 2 pages.
Fragmentation is discussed further in Section 14.4.1, ''Zone Attributes''.
14.2. Interactions with Other Run-Time Library Routines
Memory management system services
Run-time library page management routines LIB$GET_VM_PAGE and LIB$FREE_VM_PAGE
Run-time library heap management routines LIB$GET_VM and LIB$FREE_VM
- The run-time library dynamic string package provides a set of routines for allocating and freeing dynamic strings. The set of routines includes the following:
- LIB$SGET1_DD, LIB$SFREE1_DD
- LIB$SFREEN_DD
- STR$GET1_DX, STR$FREE1_DX
VSI Ada provides allocators and the UNCHECKED_DEALLOCATION package for allocating and freeing memory.
VSI Pascal provides the NEW and DISPOSE routines for allocating and freeing memory.
VSI C provides malloc and free routines for allocating and freeing memory.
Note
To ensure correct operation, memory that is allocated by one of the higher-level allocators in the preceding list can be freed only by using the corresponding deallocation routine. That is, memory allocated by PASCAL NEW must be freed by calling PASCAL DISPOSE, and a dynamic string can be freed only by calling one of the string package deallocation routines.
14.3. Interactions with System Services
The run-time library page management and heap management routines are implemented as layers built on the memory management system services. In general, modular routines should use the run-time library routines rather than directly call memory management system services. However, in some situations you must use both. This section describes relationships between the run-time library and memory management. See the VSI OpenVMS System Services Reference Manual for descriptions of the memory management system services.
You can use the Expand Region (SYS$EXPREG) system service to create pages of virtual memory in the program region (P0 space) for your process. The operating system keeps track of the first free page address at the end of P0 space, and it updates this free page address whenever you call YS$EXPREG or SYS$CRETVA. The LIB$GET_VM_PAGE routine calls SYS$EXPREG to create pages, so there is no conflicting address assignments when you call SYS$EXPREG directly.
Avoid using the Create Virtual Address Space (SYS$CRETVA) system service, because you must specify the range of virtual addresses when it is called. If the address range you specify contains pages that already exist, SYS$CRETVA deletes those pages and recreates them as demand-zero pages. You may have difficulty avoiding conflicting address assignments if you use run-time library routines and SYS$CRETVA.
You must not use the Contract Region (SYS$CNTREG) system service, because other routines or the OpenVMS Record Management Services (RMS) may have allocated pages at the end of the program region.
You can change the protection on pages your program has allocated by calling the Set Protection (SYS$SETPRT) system service. All pages allocated by LIB$GET_VM_PAGE have user-mode read/write access. If you change protection on pages allocated by LIB$GET_VM_PAGE, you must reset the protection to user-mode read/write before calling LIB$FREE_VM_PAGE to free the pages.
You can use the Create and Map Section (SYS$CRMPSC) system service to map a file into your virtual address space. To map a file, you provide a range of virtual addresses for the file. One way to do this is to specify the Expand Region option (SEC$M_EXPREG) when you call SYS$CRMPSC. This method assigns addresses at the end of P0 space, similar to the SYS$EXPREG system service. Alternatively, you can provide a specific range of virtual addresses when you call SYS$CRMPSC; this is similar to allocating pages by calling SYS$CRETVA. If you assign a specific range of addresses, you must avoid conflicts with other routines. One way to do this is to allocate memory by calling LIB$GET_VM_PAGE and then use that memory to map the file.
Call LIB$GET_VM_PAGE to allocate a contiguous group of (n+1) pages. The first n pages are used to map the file; the last page serves as a guard page.
Call SYS$CRMPSC using the first n pages to map the file into your process address space.
Process the file.
Call SYS$DELTVA to delete the first n pages and unmap the file.
Call SYS$CRETVA to recreate the n pages of virtual address space as demand-zero pages.
Call LIB$FREE_VM_PAGE to free (n+1) pages of memory and return them to the processwide page pool.
This sequence is satisfactory when mapping small files of a few hundred pages, but it has severe limitations when mapping very large files. A discussed in Section 14.1, ''Allocating and Freeing Pages'', you should not use LIB$GET_VM_PAGE to allocate very large groups of contiguous pages in a single request. In addition, when you allocate memory by calling LIB$GET_VM_PAGE (and thus SYS$EXPREG),the pages are charged against your process page file quota. Your page file quota is not charged if you call SYS$CRMPSC with the SEC$M_EXPREG option.
At the beginning of your program, include code to call LIB$GET_VM_PAGE and allocate the estimated number of pages. You should not request a large number of pages in one call to LIB$GET_VM_PAGE, because this would require contiguous allocation of the pages.
Call LIB$FREE_VM_PAGE to free all the pages allocated in step 1; this establishes a pool of free pages for your program.
Open files that your program needs; note that RMS may allocate buffers in P0 space.
Call SYS$CRMPSC specifying SEC$M_EXPREG to map the file into your process address space at the end of P0 space.
Process the file.
Call SYS$DELTVA, specifying the address range to release the file. If additional pages were not created after you mapped the file, SYS$DELTVA contracts your address space. Your program can repeat the process of mapping a file without continually expanding its address space.
14.4. Zones
Store short-lived data structures that you can subsequently delete all at once
Store a program that does not reference a wide range of addresses
Specify a memory allocation algorithm specific to your program
Specify attributes, like block size and alignment, specific to your program
You create a zone with specified attributes by calling the routine LIB$CREATE_VM_ZONE. LIB$CREATE_VM_ZONE returns a zone identifier value that you can use in subsequent calls to the routines LIB$GET_VM and LIB$FREE_VM. When you no longer need the zone, you can delete the zone and free all the memory it controls by a single call to LIB$DELETE_VM_ZONE.
LIB$CREATE_VM_ZONE
  zone_id [,algorithm] [,algorithm_arg] [,flags] [,extend_size]
  [,initial_size] [,block_size] [,alignment] [,page_limit]
  [,smallest-block-size] [,zone-name] [,get-page] [,free-page]
For more information about LIB$CREATE_VM_ZONE, refer to the VSI OpenVMS RTL Library (LIB$) Manual.
Allocating Address Space
Use the algorithm argument to specify how much space should be
allocated—as a linked list of free blocks, as a set of lookaside list indexes by
request size, as a set of lookaside lists for some block sizes, or as a single queue of
free blocks.
Allocating Pages Within the Zone
Use the initial_size argument to allocate a specified number of
pages from the zone when it is created. After zone creation, you can use
LIB$GET_VM to allocate space.
Specifying the Block Size
Use the block_size argument to specify the block size in
bytes.
Specifying Block Alignment
Use the alignment argument to specify the alignment for each
block allocated in bytes.
Once a zone has been created and used, use LIB$DELETE_VM_ZONE to delete the zone and return the pages allocated to the processwide page pool. LIB$RESET_VM_ZONE frees pages for subsequent allocation but does not delete the zone or return the pages to the processwide page pool. Use LIB$SHOW_VM_ZONE to get information about a specific zone.
If you want a program to deal with each VM zone created during the invocation, including those created outside of the program, you can call LIB$FIND_VM_ZONE. At each call, LIB$FIND_VM_ZONE scans the heap management database and returns the zone identifier of the next valid zone.
LIB$SHOW_VM_ZONE returns formatted information about a specified zone, detailing such information as the zone's name, characteristics, and areas, and then passes the information to the specified or default action routine. LIB$VERIFY_VM_ZONE verifies the zone header and scans all of the queues and lists maintained in the zone header.
If you call LIB$GET_VM to allocate memory from a zone and the zone has no free memory to satisfy the request, LIB$GET_VM calls LIB$GET_VM_PAGE to allocate a block of contiguous pages for the zone. Each such block of contiguous pages is called an area. You control the number of pages in an area by specifying the area extension size attribute when you create the zone.
Structuring heap memory management
Data structures in your program may have different life spans or dynamic scopes. Some structures may continue to grow during the entire execution of your program, while others exist for a very short time and are then discarded by the program. You can create a separate zone in which you allocate a particular type of short-lived structure. When the program no longer needs any of those structures, you can delete all of them in a single operation by calling LIB$DELETE_VM_ZONE.
Program locality
Program locality is a characteristic of a program that indicates the distance between the references and virtual memory over a period of time. A program with a high degree of program locality does not refer to many widely scattered virtual addresses in a short period of time. Maintaining a high degree of program locality reduces the number of page faults and improves program performance.
It is important to minimize the number of page faults to obtain best performance in a virtual memory system such as VAX, Alpha, and IA-64 systems. For example, if your program creates and searches a symbol table, you can reduce the number of page faults incurred by the search operation by using as few pages as possible to hold all the symbol table entries. If you allocate symbol table entries and other items unrelated to the symbol table in the same zone, each page of the symbol table contains both symbol table entries and other items. Because of the extra unrelated entries, the symbol table takes up more pages than it actually needs. A search of the symbol table then accesses more pages, and performance is lower as a result. You may be able to reduce the number of page faults by creating a separate symbol table zone so that pages that contain symbol table entries do not contain any unrelated items.
Specialized allocation algorithms
No single memory allocation algorithm is ideal for all applications. Section 14.6, ''Allocation Algorithms'' describes the run-time library memory allocation algorithms and their performance characteristics so that you can select an appropriate algorithm for each zone that you create.
Performance tuning
You can specify a number of attributes that affect performance when you create a zone. The allocation algorithm you select can have a significant effect on performance. By specifying the allocation block size, you can improve performance and reduce fragmentation within the zone at the cost of some extra memory. You can also use boundary tags to improve the speed of LIB$FREE_VM at the cost of some extra memory. Boundary tags are further discussed in Section 14.4.1, ''Zone Attributes''.
14.4.1. Zone Attributes
You can specify a number of zone attributes when you call LIB$CREATE_VM_ZONE to create the zone. The attributes that you specify are permanent; that is, you cannot change the attribute values. They remain constant until you delete the zone. Each zone that you create can have a different set of attribute values. Thus, you can tailor each zone to optimize program locality, execution time, and memory usage.
This section describes each of the zone attributes, suggested values for the attribute, and the effects of the attribute on execution time and memory usage. If you do not specify a complete set of attribute values, LIB$CREATE_VM_ZONE provides defaults form any of the attributes. More detailed information about argument names and the encoding of arguments is given in the description of LIB$CREATE_VM_ZONE in the VSI OpenVMS RTL Library (LIB$) Manual.
Allocation algorithms
The run-time library heap management routines provide four algorithms to allocate and free memory and to manage blocks of free memory. The algorithms are listed here. (See Section 14.6, ''Allocation Algorithms'' for more details).The First Fit algorithm (LIB$K_VM_FIRST_FIT) maintains a linked list of free blocks, sorted in order of increasing memory address.
The Quick Fit algorithm (LIB$K_VM_QUICK_FIT) maintains a set of look aside lists indexed by request size for request sizes in a specified range. For request sizes that are not in the specified range, a First Fit list of free blocks is maintained by the heap management routines.
The Frequent Sizes algorithm (LIB$K_VM_FREQ_SIZES) is similar to Quick Fit in that it maintains a set of lookaside lists for some block sizes. You specify the number of lists when you create the zone; the sizes associated with those lists are determined by the actual sizes of blocks that are freed.
The Fixed Size algorithm (LIB$K_VM_FIXED) maintains a single queue of free blocks.
Boundary-tagged blocks
You can specify the use of boundary tags (LIB$M_VM_BOUNDARY_TAGS) with any of the algorithms that handle variable-sized blocks. The algorithms that handle variable-sized blocks are First Fit, Quick Fit, and Frequent Sizes.
If you specify boundary tags, LIB$GET_VM appends two additional longwords to each block that you allocate. LIB$FREE_VM uses these tags to speed up the process of merging adjacent free blocks on the First Fit free list. Using the standard First Fit insertion and merge, the execution time and number of page faults to free a block are proportional to the number of items on the list; freeing n blocks takes time proportional to n squared. When boundary tags are used, LIB$FREE_VM does not have to keep the free list in sorted order. This reduces the time and the number of page faults for freeing one block to a constant value that is independent of the number of free blocks. By using boundary tags, you can improve execution time at the cost of some additional memory for the tags.
The use of boundary tags can have a significant effect on execution time if all of the following three conditions are present:You are using the First Fit algorithm.
There are many calls to LIB$FREE_VM.
The free list is long.
Boundary tags do not improve execution time if you are using Quick Fit or Frequent Sizes and if all the blocks being freed use one of the lookaside lists. Merging or searching is not done for free blocks on a lookaside list.
The boundary tags specify the length of each block that is allocated, so you do not need to specify the length of a tagged block when you free it. This reduces the bookkeeping that your program must perform. Figure 14.2, ''Boundary Tags'' shows the placement of boundary tags.
Figure 14.2. Boundary Tags 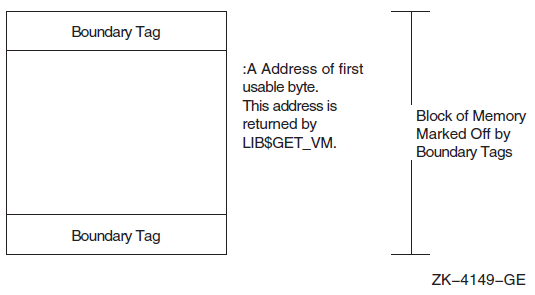
Boundary tags are not visible to the calling program. The request size you specify when calling LIB$GET_VM is the number of usable bytes your program needs. The address returned by LIB$GET_VM is the address of the first usable byte of the block, and this same address is used when you call LIB$FREE_VM.
Area extension size
Pages of memory are allocated to a zone in contiguous groups called areas. By specifying area extension parameters for the zone, you can tailor the zone to achieve a satisfactory balance between locality, memory usage, and execution time for allocating pages. If you specify a large area size, you improve locality for blocks in the zone, but you may waste a large amount of virtual memory. Pages can be allocated to an area of a zone, but the memory might never be used to satisfy a LIB$GET_VM allocation request. If you specify a small area extension size, you reduce the number of pages used, but you may reduce locality and you increase the amount of overhead for area control blocks.
You can specify two area extension size values: an initial size and an extend size. If you specify an initial area size, that number of pages is allocated to the zone when you create the zone. If you do not specify an initial size, no pages are allocated until the first call to LIB$GET_VM that references the zone. When an allocation request cannot be satisfied by blocks from the free list or from memory in any of the areas owned by the zone, a new area is added to the zone. The size of this area is the maximum of the area extend size and the current request size. The extend size does not limit the size of blocks you can allocate. If you do not specify extend size when you create the zone, a default of 16 pages is used.
Choose a few area extension sizes, and use them throughout your program. It is also desirable to choose extension sizes that are multiples of each other. Memory for areas is allocated by calling LIB$GET_VM_PAGE. You should choose the area extension sizes in order to minimize fragmentation. Software supplied by VSI uses extension sizes that are a power of 2.
Also consider the overhead for area control blocks when choosing the area extension parameters. Each area control block is 64 bytes long. Table 14.1, ''Overhead for Area Control Blocks'' shows the overhead for various extension sizes.Table 14.1. Overhead for Area Control Blocks Area Size (Pages)
Overhead Percentage
1
12.5%
2
6.3%
4
3.1%
16
0.8%
128
0.1%
You can also control the way in which zones are extended by using the LIB$M_VM_EXTEND_AREA attribute. This attribute specifies that when new pages are allocated for a zone, they should be appended to an existing area if the pages are adjacent to an existing area.
Block size
The block size attribute specifies the number of bytes in the basic allocation quantum for the zone.
All allocation requests are rounded up to a multiple of the block size.
The block size must be a power of 2 in the range of 8 to 512. Table 14.2, ''Possible Values for the Block Size Attribute'' lists the possible block sizes.Table 14.2. Possible Values for the Block Size Attribute Block Size
(Power of 2)Actual Block Size
23
8
24
16
25
32
26
64
27
128
28
256
29
512
By adjusting the block size, you can control the effects of internal fragmentation and external fragmentation. Internal fragmentation occurs when the request size is rounded up and more bytes are allocated than are required to satisfy the request. External fragmentation occurs when there are many small blocks on the free list, but none of them is large enough to satisfy an allocation request.
If you do not specify a value for block size, a default of 8 bytes is used.
Alignment
The alignment attribute specifies the required address boundary alignment for each block allocated. The alignment value must be a power of 2 in the range of 4 to 512.
The block size and alignment values are closely related. If you are not using boundary-tagged blocks, the larger value of block size and alignment controls both the block size and alignment. If you are using boundary-tagged blocks, you can minimize the overhead for the boundary tags by specifying a block size of 8 and an alignment of 4 (longword alignment).
On VAX systems, note that the VAX interlocked queue instructions require quadword alignment, so you should not specify longword alignment for blocks that will be inserted on an interlocked queue.
If you do not specify an alignment value, a default of 8 is used(alignment on a quadword boundary). For I64, the default is 16(alignment on an octaword boundary).
Page limit
You can specify the maximum number of pages that can be allocated to the zone. If you do not specify a limit, the only limit is the virtual address limit for the total process imposed by process quotas and system parameters.
Fill on allocate
If you do not specify the allocation fill attribute, LIB$GET_VM does not initialize the contents of the blocks of memory that it supplies. The contents of the memory are unpredictable, and you must assign a value to each location your program uses.
In many applications, it is convenient to initialize every byte of dynamically allocated memory to the value 0. You can request that LIB$GET_VM do this initialization by specifying the allocation fill attribute LIB$M_VM_GET_FILL0 when you create the zone.
If your program does not use the allocation fill attribute, it may be very difficult to locate bugs where the program does not properly initialize dynamically allocated memory. As a debugging aid, you can request that LIB$GET_VM initialize every byte to FF (hexadecimal) by specifying the allocation fill attribute LIB$M_VM_GET_FILL1 when you create the zone.
Fill on free
In complex programs using heap storage, it can be very difficult to locate bugs where the program frees a block of memory but continues to make references to that block of memory. As a debugging aid, you can request that LIB$FREE_VM write bytes containing 0 or FF (hexadecimal) into each block of memory when it is freed; specify one of the attributes LIB$M_VM_FREE_FILL0 or LIB$M_VM_FREE_FILL1.
14.4.2. Default Zone
The run-time library provides a default zone that is used if you do not specify a
zone-id argument when you call either
LIB$GET_VM or LIB$FREE_VM. The
default zone provides compatibility with earlier versions of
LIB$GET_VM and LIB$FREE_VM,
which did not support multiple zones.
Programs that do not place heavy demands on heap storage can simply use the
default zone for all heap storage allocation. They do not need to call
LIB$CREATE_VM_ZONE and
LIB$DELETE_VM_ZONE, and they can omit the
zone-id argument when calling
LIB$GET_VM and LIB$FREE_VM.
The zone-id for the default zone has the value 0.
|
Attribute |
Value |
|---|---|
|
Algorithm |
First Fit |
|
Area extension size |
128 pages |
|
Block size |
8 bytes |
|
Alignment |
Quadword boundary for Vax and Alpha; Octaword boundary for I64 |
|
Boundary tags |
No boundary tags |
|
Page limit |
No limit |
|
Fill on allocate |
No fill on allocate |
|
Fill on free |
No fill on free |
14.4.3. Zone Identification
A zone is a logically independent memory pool or subheap. You can create zones by
calling either LIB$CREATE_VM_ZONE or
LIB$CREATE_USER_VM_ZONE. These routines return as an
output argument a unique 32-bit zone identifier ( zone-id)
that is used in subsequent routine calls where a zone identification is
needed.
You can specify the zone-id argument as an optional
argument when you call LIB$GET_VM to allocate a block of
memory. If you do specify zone-id when you allocate memory,
you must specify the same zone-id value when you call
LIB$FREE_VM to free the memory.
LIB$FREE_VM returns an error status if you do not
provide the correct value for zone-id.
Each routine that allocates or frees heap storage has a
zone-idargument so the caller can specify the zone to be used.The modular routine package provides ALLOCATE and FREE routines for each type of dynamically allocated object. These routines keep track of zone identifications in an implicit argument, in static storage, or in the dynamically allocated objects. The caller need not be concerned with the details of zone identifications.
By convention, the set of modular routines could do all allocate and free operations in the default zone.
The zone identifier for the default zone has the value 0 (see Section 14.4.2, ''Default Zone'' for more information on the default zone).You
can allocate and free blocks of memory in the default zone by either specifying a
zone-id value of 0 or by omitting the
zone-id argument when you call
LIB$GET_VM and LIB$FREE_VM.
You cannot use LIB$DELETE_VM_ZONE or
LIB$RESET_VM_ZONE on the default zone; these routines
return an error status if the value for zone-id is 0.
14.4.4. Creating a Zone
The LIB$CREATE_VM_ZONE routine creates a new zone and
sets zone attributes according to arguments that you supply.
LIB$CREATE_VM_ZONE returns a
zone-id value for the new zone that you use in subsequent
calls to LIB$GET_VM, LIB$FREE_VM,
and LIB$DELETE_VM_ZONE.
14.4.5. Deleting a Zone
The LIB$DELETE_VM_ZONE routine deletes a zone and returns all pages owned by the zone to the processwide page pool managed by LIB$GET_VM_PAGE. Your program must not perform any more operations on the zone after you call LIB$DELETE_VM_ZONE.
It takes less execution time to free memory in a single operation by calling LIB$DELETE_VM_ZONE than to account individually for and free every block of memory that was allocated by calling LIB$GET_VM. Of course, you must be sure that your program is no longer using the zone or any of the memory in the zone before you call LIB$DELETE_VM_ZONE.
If you have specified deallocation filling, LIB$DELETE_VM_ZONE fills all of the allocated blocks that are freed.
14.4.6. Resetting a Zone
The LIB$RESET_VM_ZONE routine frees all the blocks of memory that were previously allocated from the zone. The memory becomes available to satisfy further allocation requests for the zone; the memory is not returned to the processwide page pool managed by LIB$GET_VM_PAGE. Your program can continue to use the zone after you call LIB$RESET_VM_ZONE.
It takes less execution time to free memory in a single operation by calling LIB$RESET_VM_ZONE than to account individually for and free every block of memory that was allocated by calling LIB$GET_VM. Of course, you must be sure that your program is no longer using any of the memory in the zone before you call LIB$RESET_VM_ZONE.
If you have specified deallocation filling, LIB$RESET_VM_ZONE fills all of the allocated blocks that are freed.
Because LIB$RESET_VM_ZONE does not return any pages to the processwide page pool, you should reset a zone only if you expect to reallocate almost all of the memory that is currently owned by the zone. If the next cycle of reallocation may use much less memory, it is better to delete the zone (with LIB$DELETE_VM_ZONE) and create it again (with LIB$CREATE_VM_ZONE).
14.5. Allocating and Freeing Blocks
The run-time library heap management routines LIB$GET_VM and LIB$FREE_VM provide the mechanism for allocating and freeing blocks of memory.
The LIB$GET_VM and LIB$FREE_VM routines are fully reentrant, so they can be called either by code running at AST level or in an Ada multitasking environment. Several threads of execution can be allocating or freeing memory simultaneously either in the same zone or in different zones.
All memory allocated by LIB$GET_VM has user-mode read/write access, even if the call to LIB$GET_VM is made from a more privileged access mode.
Any memory you free by calling LIB$FREE_VM must have been allocated by a previous call to LIB$GET_VM. You cannot allocate memory by calling SYS$EXPREG or SYS$CRETVA and then free it using LIB$FREE_VM.
When you free a block of memory by calling LIB$FREE_VM, you must use the same
zone-idvalue as when you called LIB$GET_VM to allocate the block. If the block was allocated from the default zone, you must either specify azone-idvalue of 0 or omit thezone-idargument when you call LIB$FREE_VM.You cannot free part of a block that was allocated by a call to LIB$GET_VM; the whole block must be freed by a single call to LIB$FREE_VM.
You cannot combine contiguous blocks of memory that were allocated by several calls to LIB$GET_VM into one larger block that is freed by a single call to LIB$FREE_VM.
All memory allocated by LIB$GET_VM is aligned according to the alignment attribute for the zone; all memory freed by LIB$FREE_VM must have the correct alignment for the zone. An error status is returned if you attempt to free a block that is not aligned properly.
14.6. Allocation Algorithms
|
Code |
Symbol |
Description |
|---|---|---|
|
1 |
LIB$K_VM_FIRST_FIT |
First Fit |
|
2 |
LIB$K_VM_QUICK_FIT |
Quick Fit (maintains lookaside list) |
|
3 |
LIB$K_VM_FREQ_SIZES |
Frequent Sizes (maintains lookaside list) |
|
4 |
LIB$K_VM_FIXED |
Fixed Size Blocks |
The Quick Fit and Frequent Sizes algorithms use lookaside lists to speed allocation and freeing for certain request sizes. A lookaside list is the software analog of a hardware cache. It takes less time to allocate or free a block that is on a lookaside list.
Tries to allocate a block from an appropriate lookaside list.
Scans the list of areas owned by the zone. For each area, it tries to allocate a block from the free list and then tries to allocate a block from the block of unallocated memory at the end of the area.
Adds a new area to the zone and allocates the block from that area.
Places the block on a lookaside list associated with the zone if there is an appropriate list.
Locates the area that contains the block. If the zone has boundary tags, the tags encode the area; otherwise, it scans the list of areas owned by the zone to find the correct area.
Inserts the block on the area free list and checks for merges with adjacent free blocks.
If the zone has boundary tags, LIB$FREE_VM checks the tags of adjacent blocks; if a merge does not occur, it inserts the block at the tail of the free list.
If the zone does not have boundary tags, LIB$FREE_VM scans the sorted free list to find the correct insertion point. It also checks the preceding and following blocks for merges.
14.6.1. First Fit Algorithm
The First Fit algorithm (LIB$K_VM_FIRST_FIT) maintains a linked list of free blocks. If the zone does not have boundary tags, the free list is kept sorted in order of increasing memory address. An allocation request is satisfied by the first block on the free list that is large enough; if the first free block is larger than the request size, it is split and the fragment is kept on the free list. When a block is freed, it is inserted in the free list at the appropriate point; adjacent free blocks are merged to form larger free blocks.
14.6.2. Quick Fit Algorithm
The Quick Fit algorithm (LIB$K_VM_QUICK_FIT) maintains a set of lookaside lists indexed by request size for request sizes in a specified range. For request sizes that are not in the specified range, a First Fit list of free blocks is maintained. An allocation request is satisfied by removing a block from the appropriate lookaside list; if the lookaside list is empty, a First Fit allocation is done. When a block is freed, it is placed on either a lookaside list or the First Fit list according to its size.
Free blocks that are placed on a lookaside list are neither merged with adjacent free blocks nor split to satisfy a request for a smaller block.
14.6.3. Frequent Sizes Algorithm
The Frequent Sizes algorithm (LIB$K_VM_FREQ_SIZES) is similar to the Quick Fit algorithm in that it maintains a set of lookaside lists for some block sizes. You specify the number of lookaside lists when you create the zone; the sizes associated with those lists are determined by the actual sizes of blocks that are freed. An allocation request is satisfied by searching the lookaside lists for a matching size; if no match is found, a First Fit allocation is done. When a block is freed, the block is placed on a lookaside list with a matching size, on an empty lookaside list, or on the First Fit list if no lookaside list is available. As with the Quick Fit algorithm, free blocks on lookaside lists are not merged or split.
14.6.4. Fixed Size Algorithm
The Fixed Size algorithm (LIB$K_VM_FIXED) maintains a single queue of free blocks. There is no First Fit free list, and splitting or merging of blocks does not occur.
14.7. User-Defined Zones
When you create a zone by calling LIB$CREATE_VM_ZONE, you must select an allocation algorithm from the fixed set provided by the run-time library. You can tailor the characteristics of the zone by specifying various zone attributes. User-defined zones provide additional flexibility and control by letting you supply routines for the allocation and deallocation algorithms.
Allocate a block of memory
Free a block of memory
Reset the zone
Delete the zone
Each time that one of the run-time library heap management routines (LIB$GET_VM, LIB$FREE_VM, LIB$RESET_VM_ZONE, LIB$DELETE_VM_ZONE) is called to perform an operation on a user-defined zone, the corresponding routine that you specified is called to perform the actual operation. You need not make any changes in the calling program to use user-defined zones; their use is transparent.
You do not need to provide routines for all four of the preceding operations if you know that your program will not perform certain operations. If you omit some of the operations and your program attempts to use them, an error status is returned.
You can provide your own specialized allocation algorithms. These algorithms can in turn invoke LIB$GET_VM, LIB$GET_VM_PAGE, SYS$EXPREG, or other system services.
You can use a user-defined zone to monitor memory allocation operations. Example 14.1, ''Monitoring Heap Operations with a User-Defined Zone'' shows a monitoring program that prints a record of each call to either allocate or free memory in a zone.
C+
C This is the main program that creates a zone and exercises it.
C
C Note that the main program simply calls LIB$GET_VM and LIB$FREE_VM.
C It contains no special coding for user-defined zones.
C-

        PROGRAM MAIN
        IMPLICIT INTEGER(A-Z)

        CALL MAKE_ZONE(ZONE)

        CALL LIB$GET_VM(10, I1, ZONE)
        CALL LIB$GET_VM(20, I2, ZONE)
        CALL LIB$FREE_VM(10, I1, ZONE)
        CALL LIB$RESET_VM_ZONE(ZONE)
        CALL LIB$DELETE_VM_ZONE(ZONE)
        END

C+
C This is the subroutine that creates a user-defined zone for monitoring.
C Each GET, FREE, or RESET prints a line of output on the terminal.
C Errors are signaled.
C-

        SUBROUTINE MAKE_ZONE(ZONE)
        IMPLICIT INTEGER (A-Z)
        EXTERNAL GET_RTN, FREE_RTN, RESET_RTN, LIB$DELETE_VM_ZONE

C+
C Create the primary zone.  The primary zone supports
C the actual allocation and freeing of memory.
C-

        STATUS = LIB$CREATE_VM_ZONE(REAL_ZONE)
        IF (.NOT. STATUS) CALL LIB$SIGNAL(%VAL(STATUS))

C+
C Create a user-defined zone that monitors operations on REAL_ZONE.
C-

        STATUS = LIB$CREATE_USER_VM_ZONE(USER_ZONE, REAL_ZONE,
        1       GET_RTN,
        1       FREE_RTN,
        1       RESET_RTN,
        1       LIB$DELETE_VM_ZONE)
        IF (.NOT. STATUS) CALL LIB$SIGNAL(%VAL(STATUS))

C+
C Return the zone-id of the user-defined zone to the caller to use.
C-

        ZONE = USER_ZONE
        END

C+
C GET routine for user-defined zone.
C-

        FUNCTION GET_RTN(SIZE, ADDR, ZONE)
        IMPLICIT INTEGER(A-Z)

        STATUS = LIB$GET_VM(SIZE, ADDR, ZONE)

        IF (.NOT. STATUS) THEN
                CALL LIB$SIGNAL(%VAL(STATUS))
        ELSE
                TYPE 10, SIZE, ADDR
10              FORMAT(' Allocated ',I4,' bytes at ',Z8)
        ENDIF
        GET_RTN = STATUS
        END

C+
C FREE routine for user-defined zone.
C-

        FUNCTION FREE_RTN(SIZE, ADDR, ZONE)
        IMPLICIT INTEGER(A-Z)

        STATUS = LIB$FREE_VM(SIZE, ADDR, ZONE)

        IF (.NOT. STATUS) THEN
                CALL LIB$SIGNAL(%VAL(STATUS))
        ELSE
                TYPE 20, SIZE, ADDR
20              FORMAT(' Freed ',I4,' bytes at ',Z8)
        ENDIF
        FREE_RTN = STATUS
        END

C+
C RESET routine for user-defined zone.
C-

        FUNCTION RESET_RTN(ZONE)
        IMPLICIT INTEGER(A-Z)

        STATUS = LIB$RESET_VM_ZONE(ZONE)
        IF (.NOT. STATUS) THEN
                CALL LIB$SIGNAL(%VAL(STATUS))
        ELSE
                TYPE 30, ZONE
30              FORMAT(' Reset zone at ', Z8)
        ENDIF

        RESET_RTN = STATUS
        END
14.8. Debugging Programs That Use Virtual Memory Zones
This section discusses some methods and aids for debugging programs that use virtual memory zones. Note that this information is implementation dependent and may change at anytime.
Run the program with both free-fill-zero and free-fill-one set. The results from both executions of the program should be the same. If the results differ, this could mean that you are referencing a zone that is already deallocated. It could also mean that, after deallocating a zone, you created a new zone at the same location, so that you now have two pointers pointing to the same zone.
Call LIB$FIND_VM_ZONE at image termination. If a virtual memory zone is not deleted, LIB$FIND_VM_ZONE returns its zone identifier.
Use LIB$SHOW_VM_ZONE and LIB$VERIFY_VM_ZONE to print zone information and check for errors in the internal data structures. LIB$SHOW_VM_ZONE allows you to determine whether any linkage pointers for the virtual memory zones are corrupted. LIB$VERIFY_VM_ZONE allows you to request verification of the contents of the free blocks, so that if you call LIB$VERIFY_VM_ZONE with free-fill set, you can determine whether you are writing to any deallocated zones.
For zones created with the Fixed Size, Quick Fit, or Frequent Size algorithms, some types of errors cannot be detected. For example, in a zone that implements the Fixed Size algorithm (or in a Quick Fit or Frequent Size algorithm when the block is cached on a lookaside list), freeing a block more than once returns SS$_NORMAL, but the internal data structures are invalid. In this case, change the algorithm to First Fit. The First Fit algorithm checks whether you are freeing a block that is already on the free list and, if so, returns the error LIB$_BADBLOADR.
Chapter 15. Alignment on VAX, Alpha, and IA-64 systems
This chapter describes the importance and techniques of alignment for OpenVMS VAX, OpenVMS Alpha?, and OpenVMS IA-64 systems.
15.1. Alignment
A byte is aligned at any address.
A word is aligned at any address that is a multiple of 2.
A longword is aligned at any address that is a multiple of 4.
A quadword is aligned at any address that is a multiple of 8.
Data that is not aligned is referred to as unaligned. Throughout this chapter, the term aligned is used instead of naturally aligned.
Table 15.1, ''Aligned Data Sizes'' shows examples of common data sizes, their alignment, the number of zero bits in an aligned address for that data, and a sample aligned address in hexadecimal.
| Data Size | Alignment | Zero Bits | Aligned Address Example |
|---|---|---|---|
|
Byte |
Byte |
0 |
10001, 10002, 10003, 10004 |
|
Word |
Word |
1 |
10002, 10004, 10006, 10008 |
|
Longword |
Longword |
2 |
10004, 10008, 1000C, 10010 |
|
Quadword |
Quadword |
4 |
10008, 10010, 10018, 10020 |
An aligned structure has all its members aligned. An unaligned structure has one or more unaligned members. Figure 15.1, ''Aligned and Unaligned Structures'' shows examples of aligned and unaligned structures.

15.1.1. Alignment and Performance
To achieve optimal performance, use aligned instruction sequence references and naturally aligned data. When unaligned data is referenced, more overhead is required than when referencing aligned data. This condition is true for OpenVMS VAX, OpenVMS Alpha, and OpenVMS IA-64 systems. Data need not be aligned to obtain correct processing results: alignment is a concern for performance, not program correctness. Because natural alignment is not always possible, OpenVMS VAX, OpenVMS Alpha, and OpenVMS IA-64 systems provide help to manage the impact of unaligned data references.
Although alignment is not required on VAX systems for stack, data, or instruction stream references, Alpha systems require that the stack and instructions be longword aligned.
15.1.1.1. Alignment on OpenVMS VAX (VAX Only)
On VAX systems, memory references that are not longword aligned result in a transparent performance degradation. The full effect of unaligned memory references is hidden by microcode, which detects the unaligned reference and generates a microtrap to handle the alignment correction. This fix of alignment is done entirely in microcode. Aligned references, on the other hand, avoid the microtraps to handle fixes. Even with this microcode fix, an unaligned reference can take up to four times longer than an aligned reference.
15.1.1.2. Alignment on OpenVMS Alpha and I64
For Alpha, allow privileged architecture library code (PALcode) to fix the alignment faults for you. For I64, allow the OpenVMS fault handler to fix the alignment faults for you.
Use directives to the compiler.
Fix the data yourself to make sure data is aligned.
Though Alpha systems do not use microcode to automatically handle unaligned references, PALcode traps the faults and corrects unaligned references as the data is processed. If you use the shorter load/store instruction sequences and your data in unaligned, then you incur an alignment fault PALcode fixup. The use of PALcode to correct alignment faults results in the slowest of the three ways to process your data.
By using directives to the compiler, you can tell your compiler to create a safe set of instructions. If it is unaligned, the compiler uses a set of unaligned load/store instructions. These unaligned load/store instructions are called safe sequences because they never generate unaligned data exceptions. Code sequences that use the unaligned load/store instructions are longer than the aligned load/store instruction sequences. By using unaligned load/store instructions and longer instruction sequences, you can obtain the desired results without incurring an alignment trap. This technique allows you to avoid the significant performance impact of a trap and subsequent data fixes.
If references to the data must be made atomic, then the data must be aligned. Otherwise, an unaligned fault causes a fatal reserved operand fault in this case.
If you fix alignment problems in public interfaces, then you could break existing programs.
To detect unaligned reference information, you can use utilities such as the OpenVMS Debugger and Performance and Coverage Analyzer (PCA). You can also use the OpenVMS Alpha handler to generate optional informational exceptions for process space references. This allows condition handlers to track unaligned references. Alignment fault system services allow you to enable and disable the delivery of these informational exceptions. Section 15.3.3, ''System Services (Alpha and I64 Only)'' discusses system services that you can use to report both image and systemwide alignment problems.
15.2. Using Compilers for Alignment (Alpha and I64 Only)
On Alpha and IA-64 systems, compilers automatically align data by default. If alignment problems are not resolved, they are at least flagged. The following sections present how the compilers for VSI C, BLISS, VSI Fortran, and MACRO-32 deal with alignment.
15.2.1. The VSI C Compiler (Alpha and I64 Only)
#pragma member_alignment save
| Saves the current alignment setting. |
| Sets nomember_alignment, c the structure mystruct. |
| Resets the alignment setting for the code that follows. |
The base alignment of a data structure is set to be the alignment of the largest member in the structure. If the largest element of a data structure is a longword, for example, then the base alignment of the data structure is longword alignment.
The malloc() function of the VSI C Run-Time Library retrieves pointers that are at least quadword aligned. Because it is the exception rather than the rule to encounter unaligned data in C programs, the compiler assumes most data references are aligned. Pointers, for example, are always assumed to be aligned; only data structures declared with the pragma nomember_alignment are assumed to contain unaligned data. If the VSI C compiler believes the data might be unaligned, it generates the safe instruction sequences; that is, it uses the unaligned load/store instructions. Also, you can use the /WARNING=ALIGNMENT compiler qualifier to turn on alignment checking by the compiler. This results in a compiler warning for unaligned data references.
On OpenVMS Alpha and OpenVMS IA-64 systems, dereferencing a pointer to a longword- or quadword-aligned object is more efficient than dereferencing a pointer to a byte- or word-aligned object. Therefore, the compiler can generate more optimized code if it makes the assumption that a pointer object of an aligned pointer type does point to an aligned object.
Because the compiler determines the alignment of the dereferenced object from the type of the pointer, and the program is allowed to compute a pointer that references an unaligned object (even though the pointer type indicates that it references an aligned object), the compiler must assume that the dereferenced object's alignment matches or exceeds the alignment indicated by the pointer type. Specifying /ASSUME=ALIGNED_OBJECTS (the default) allows the compiler to make such an assumption. With this assumption made, the compiler can generate more efficient code for pointer dereferences of aligned pointer types.
To prevent the compiler from assuming the pointer type's alignment for objects that it points to, use the /ASSUME=NOALIGNED_OBJECTS qualifier.
See the VSI C User Manual for additional information.
15.2.1.1. Compiler Example of Memory Structure of VAX C and VSI C
  struct
  {
    char  byte;
    short word;
    long  longword;
  }mystruct;
On VAX systems, when compiled using the VAX C compiler, the previous structure has a memory layout as shown in Figure 15.2, ''Alignment Using VAX C Compiler'', where each piece of data begins on the next byte boundary.

On Alpha and IA-64 systems, when compiled using the VSI C compiler, the structure is padded to achieve natural alignment, if needed, as shown in Figure 15.3, ''Alignment Using VSI C Compiler''.

On Alpha and IA-64 systems, note where VSI C places some padding to align naturally all the data structure elements. VSI C would also align the structure itself on a longword boundary. The VSI C compiler aligns the structure on a longword boundary because the largest element in the structure is a longword.
15.2.2. The BLISS Compiler
On Alpha and IA-64 systems, the BLISS compiler provides greater control over alignment than the VSI C compiler. The BLISS compiler also makes different assumptions about alignment.
The Alpha and I64 BLISS compilers, like the VAX BLISS compiler, allows explicit specification of program section (PSECT) alignment.
On Alpha and IA-64 systems, BLISS compilers align all explicitly declared data on naturally aligned boundaries.
OWNA:BYTE ALIGN(2)
On Alpha and IA-64 systems, when the BLISS compiler cannot determine the base alignment of a BLOCK, it assumes full word alignment, unless told otherwise by a command qualifier or switch declaration. Like the VSI C compiler, if the BLISS compilers believe that the data is unaligned, they generate safe instruction sequences. If you specify the qualifier /CHECK=ALIGNMENT in the BLISS command line, then warning information is provided when they detect unaligned memory references.
15.2.3. The VSI Fortran Compiler (Alpha and I64 Only)
Fortran 90 Version is supported on OpenVMS IA-64. Fortran 77 is not supported on OpenVMS IA-64. VSI Fortran for OpenVMS IA-64 Systems features the same command-line options and language features as VSI Fortran for OpenVMS Alpha Systems with a few exceptions, as described in Porting Applications from VSI OpenVMS Alpha to VSI OpenVMS Industry Standard 64 for Integrity Servers.
On Alpha and IA-64 systems, the defaults for the VSI Fortran compiler emphasize compatibility and standards conformance. Normal data declarations (data declared outside of COMMON block statements) are aligned on natural boundaries by default. COMMON block statement data is not aligned by default, which conforms to the FORTRAN-77 and FORTRAN-90 standards.
The qualifier /ALIGN=(COMMONS=STANDARD) causes COMMON block data to be longword aligned. This adheres with the FORTRAN-77 and FORTRAN-90 standards, which state that the compiler is not allowed to put padding between INTEGER*4 and REAL*8 data. This can cause REAL*8 data to be unaligned. To correct this, apply the NATURAL rule; for instance, apply /ALIGN=(COMMONS=NATURAL to get natural alignment up to quadwords and the best performance, though this does not conform to standards.
To pack COMMON block and RECORD statement data, specify/ALIGN=NONE. The qualifier /ALIGN=NONE is equivalent to /NOALIGN, /ALIGN=PACKED, or /ALIGN=(COMMON=PACKED, RECORD=PACKED. To pack just RECORD statement data, specify /ALIGN=(RECORD=PACKED).
Besides command line qualifiers, VSI Fortran provides two directives to control the alignment of RECORD statement data and COMMON block data. The CDEC$OPTIONS directive controls whether the VSI Fortran compiler naturally aligns fields in RECORD statements or data items in COMMON blocks for performance reasons, or whether the compiler packs those fields and data items together on arbitrary byte boundaries. The CDEC$OPTIONS directive, like the /ALIGN command qualifier, takes class and rule parameters. Also, the CDE$OPTIONS directive overrides the compiler option /ALIGN.
By default, the VSI Fortran compiler emits alignment warnings, but these can be turned off by using the qualifier /WARNINGS=NOALIGNMENT.
15.2.4. The MACRO-32 Compiler (Alpha and I64)
On Alpha and IA-64 systems, as with the C, BLISS, and VSI Fortran languages, unaligned data references in MACRO-32 code work correctly, though they perform slower than aligned references because the system must take an unaligned address fault to complete the unaligned reference. If it is known that a data reference is unaligned, the compiler can generate unaligned quadword loads and masks to manually extract the data. This is slower than an aligned load but much faster than taking an alignment fault. Global data labels that are not longword or quadword aligned are flagged with information-level messages. In addition, unaligned memory modification references cannot be made atomic with /PRESERVE=ATOMICITY or .PRESERVE ATOMICITY. If this is attempted, it will cause a fatal reserved operand fault.
The MACRO-32 language provides you with direct control over alignment. There is no implicit padding for alignment done by the MACRO-32 compiler; data remains at the alignment you specify.
The MACRO-32 compiler recognizes the alignment of all locally declared data and flags all references to declared data that is unaligned. By default, the MACRO-32 compiler assumes that addresses in registers used as base pointers are longword aligned at routine entry.
Although the MACRO-32 compilers attempt to track information about the values that may appear in registers as the program proceeds, they only attend to enough information to determine the likelihood of word and longword alignment. Because the atomicity of the MOVQ instruction can be preserved only if the address is quadword aligned, in generating code for MOVQ, the MACRO-32 compiler assumes quadword alignment of the address if it believes it to be longword aligned.
External data is data that is not contained in the current source being compiled. External data is assumed to be longword aligned by the MACRO-32 compiler. The compiler detects and flags unaligned global label references. This enables you to locate external data that is not aligned.
To preserve atomicity, the compiler assumes that the data is longword aligned. Unaligned data causes a trap and voids the atomicity. Therefore, you must ensure that such data is aligned.
To fix unaligned data references, the easiest way is for you to align the data, if possible. If you cannot align the data, the data address can be moved into a register and then the register declared as unaligned. When you compile with the /UNALIGNED qualifier to the MACRO/MIGRATION command, you tell the compiler to treat all data references as unaligned and to generate safe unaligned sequences. You can also use the .SET_REGISTERS directive, which affects data references only for the specified registers for a section of code.
.SET_REGISTERS allows you to specify whether a register points to aligned or unaligned data. You use this directive when the result of an operation is the opposite of what the compiler expects. Also, use the same directive to declare registers that the compiler would not otherwise detect as input or output registers.
For example, consider the DIVL instruction. After executing this instruction in the following example, the MACRO-32 compiler assumes that R1 is unaligned. A future attempt at using R1 as a base register will cause the compiler to generate an unaligned fetch sequence. However, suppose you know that R1 is always aligned after the DIVL instruction. You can then use the .SET_REGISTERS directive to inform the compiler of this. When the compiler sees the MOVL from 8(r1),it knows that it can use the shorter aligned fetch (LDL) to retrieve the data. At run time, however, if R1 is not really aligned, then this results in an alignment trap. The following example shows the setting of a register to be aligned:divl r0,r1 ;Compiler now thinks R1 unaligned .set_registers aligned=r1 movl 8(r1),r2 ;Compiler now treats R1 as aligned
.SYMBOL_ALIGNMENT allows you to specify the alignment of any memory reference that uses a symbolic offset. The .SYMBOL_ALIGNMENT directive associates an alignment attribute with a symbol definition used as a register offset; you can use it when you know the base register will be aligned for every use of the symbolic offset. This attribute guarantees to the compiler that the base register has that alignment, and this enables the compiler to generate optimal code.
In the example that follows, QUAD_OFF has a symbol alignment of QUAD, LONG_OFF, a symbol alignment of LONG, and NONE_OFF has no symbol alignment. In the first MOVL instruction, the compiler assumes that R0, since it is used as a base register with QUAD_OFF, is quadword aligned. Since QUAD_OFF has a value of 4, the compiler knows it can generate an aligned longword fetch. For the second MOVL, R0 is assumed to be longword aligned, but since LONG_OFF has a value of 5, the compiler realizes that offset+base is not longword aligned and would generate a safe unaligned fetch sequence. In the third MOVL, R0 is assumed to be unaligned, unless the compiler knows otherwise from other register tracking, and would generate a safe unaligned sequence. The .SYMBOL_ALIGNMENT alignment remains in effect until the next occurrence of the directive..symbol_alignment QUAD quad_off=4 .symbol_alignment LONG long_off=5 .symbol_alignment NONE none_off=6 movl quad_off(r0),r1 ;Assumes R0 quadword aligned movl long_off(r0),r2 ;Assumes R0 longword aligned movl none_off(r0),r3 ;No presumed alignment for R0
15.2.4.1. Precedence of Alignment Controls
.SYMBOL_ALIGNMENT directive
.SET_REGISTER directive
/UNALIGN qualifier
Built-in assumptions and tracking mechanisms
15.2.4.2. Recommendations for Aligning Data
If references to the data must be made atomic with /PRESERVE=ATOMICITY or .PRESERVE ATOMICITY, the data must be aligned.
For data in internal or privileged interfaces, do not automatically make changes to improve data alignment. You should consider the frequency with which the data structure is accessed, the amount of work involved in realigning the structure, and the risk that things might go wrong. In judging the amount of work involved, make sure you know all accesses to the data; do not merely guess. If you own all accesses in the code for which you are responsible and if you are making changes in the module (or modules)anyway, then it is safe to fix the alignment problem.
Do not routinely unpack byte and word data into longwords or quadwords. The time to do this is when you are fixing an alignment problem (word not on word boundary), subject to the aforementioned cautions and constraints, or if you know the data granularity is a problem.
If you do not own all the accesses to the data, there still may be circumstances under which fixing alignment is appropriate. If the data is frequently accessed, if performance is a real issue, and if you must unavoidably scramble the data structure anyway, it makes sense to align the structure at the same time.
It is important that you notify other programmers whose code may be affected. Do not assume in such cases that all related modules will recompile or that program documentation will help others detect errant data cell separation assumptions. Always assume that changes like this will reveal irregular programming practices and will not go smoothly.
15.2.5. The VAX Environment Software Translator – VEST (Alpha Only)
On Alpha systems, the DECmigrate for OpenVMS Alpha VAX Environment Software Translator (VEST) utility is a tool that translates binary OpenVMS VAX image files into OpenVMS Alpha image files. Image files are also called executable files. Though it is similar to compiler, VEST is for binaries instead of sources.
VEST deals with alignment in two different modes: pessimistic and optimistic. VEST is optimistic by default; but whether optimistic or pessimistic, the alignment of program counter (PC) relative data is known at translation time, and the appropriate instruction sequence can be generated.
In pessimistic mode, all non PC-relative references are treated as unaligned using the safe access sequences. In optimistic mode, the emulated VAX registers (R0–R14) are assumed to be quadword aligned upon entry to each basic block. Autoincrement and autodecrement changes to the base registers are tracked. The offset plus the base register alignment are used to determine the alignment and the appropriate access sequence is generated.
The /OPTIMIZE=NOALIGN qualifier on the VEST command tells VEST to be pessimistic; it assumes that base registers are not aligned, and should generate the safe instruction sequence. Doing this can slow execution speed by a factor of two or more, if there are no unaligned data references. On the other hand, it can result in a performance gain if there are a significant number of unaligned references, since safe sequences avoid any unaligned data traps.
Additional controls preserve atomicity in longword data that is not naturally aligned. Wherever possible, data should be aligned in the VAX source code and the image rebuilt before translating the image with DECmigrate. This results in better performance on both VAX and Alpha systems.
15.3. Using Tools for Finding Unaligned Data
Tools that aid the uncovering of unaligned data include the OpenVMS Debugger, Performance and Coverage Analyzer (PCA), and eight system services. These tools are discussed in the following sections.
15.3.1. The OpenVMS Debugger
#include <stdio.h>
#include <stdlib.h>


main( )
{
     char *p;
     long *lp;

          /* malloc returns at least quadword aligned printer */
     p = (char *)malloc( 32 );

          /* construct unaligned longword pointer and place into lp */
     lp = (long *)((char *)(p+1));

          /* load data into unaligned longword */
     lp[0] = 123456;

     printf( "data - %d\n", lp[0] );
     return;
}


------- Compile and Link commands -------
$ cc/debug debug_example
$ link/debug debug_example
$ run debug_example
------- DEBUG session using set output log -------
Go
! break at routine DEBUG_EXAMPLE\main
!     598:           p - (char *)malloc( 32 );
set break/unaligned_data
set break/exception
set radix hexadecimal
Go
!Unaligned data access: virtual address - 003CEEA1, PC - 00020048
!break on unaligned data trap preceding DEBUG_EXAMPLE\main\%LINE 602
!     602:           printf( "data - %d\n", lp[0] );
ex/inst 00020048-4
!DEBUG_EXAMPLE\main\%LINE 600+4:                 STL         R1,(R0)
ex r0
!DEBUG_EXAMPLE\main\%R0: 00000000 003CEEA1
15.3.2. The Performance and Coverage Analyzer – PCA
SET UNALIGNED_DATA
PLOT/UNALIGNED_DATA PROGRAM BY LINE
Also, PCA can display data according to the PC of the fault, or by the virtual address of the unaligned data.
15.3.3. System Services (Alpha and I64 Only)
On Alpha and IA-64 systems, there are eight system services to help locate unaligned
data. The first three system services establish temporary image reporting; the next
two provide process-permanent reporting, and the last three provide for system
alignment fault tracking. The symbols used in calling all eight of these system
services are located in $AFRDEF in the MACRO-32 library,
SYS$LIBRARY:STARLET.MLB. You can also call these system
services in C with #include <afrdef.h>.
- SYS$START_ALIGN_FAULT_REPORT. This service enables unaligned data exception for the current image. You can use either a buffered or an exception method of reporting, but you can enable only one method at a time.
Buffered method. This method requires that the buffer address and size be specified. You use the SYS$GET_ALIGN_FAULT_DATA service to retrieve buffered alignment data under program control.
Exception method. This method requires no buffer. Unaligned data exceptions are signaled to the image, at which point a user-written condition handler takes whatever action is desired. If no user-written handler is setup, then an informational exception message is broadcast for each unaligned data trap, and the program continues to execute.
SYS$STOP_ALIGN_FAULT_REPORT. This service cancels unaligned data exception reporting for the current image if it were previously enabled. If you do not explicitly call this routine, then reporting is disabled by the operating system's image rundown logic.
SYS$GET_ALIGN_FAULT_DATA. This service retrieves the accumulated, buffered alignment data when using the buffered collection method.
SYS$PERM_REPORT_ALIGN_FAULT. This service enables unaligned data exception reporting for the process. Once you enable this service, the reporting remains in effect for the process until you explicitly disable it. Once enabled, the SS$_ALIGN condition is signaled for all unaligned data exceptions while the process is active. By default, if no user-written exception handler handles the condition, this results in an information display message for each unaligned data exception.
This service provides a convenient way of running a number of images without modifying the code in each image, and also of recording the unaligned data exception behavior of each image.
SYS$PERM_DIS_ALIGN_FAULT_REPORT. This service disables unaligned data exception reporting for the process.
SYS$INIT_SYS_ALIGN_FAULT_REPORT. This service initializes system process alignment fault reporting.
SYS$STOP_SYS_ALIGN_FAULT_REPORT. This service disables systemwide alignment fault reporting.
SYS$GET_SYS_ALIGN_FAULT_DATA. This service obtains data from the system alignment fault buffer.
These services require CMKRNL privilege. Alignment faults for all modes and all addresses can be reported using these services. The user can also setup masks to report only certain types of alignment faults. For example, you can get reports on only kernel modes, only user PC, or only data in system space.
15.3.4. Alignment Fault Utility (Alpha and I64 Only)
You can use the Alignment Fault Utility (FLT) to find alignment faults. This utility can be started and stopped on the fly without the need for a system reboot. It records all alignment faults into a ring buffer, which can be sized when starting the alignment fault tracing. The summary screen displays the results sorted by the program counter (PC) that has incurred the most alignment faults. The detailed trace output also shows the process identification (PID) of the process that caused the alignment fault, along with the virtual address that triggered the fault. The following example shows sample summary output.
$ ANALYZE/SYSTEM
SDA> FLT LOAD
SDA> FLT START TRACE
SDA> FLT SHOW TRACE /SUMMARY
Fault Trace Information: (at 18-AUG-2004 04:49:58.61, trace time 00:00:45.229810)
---------------------------------------------------------------------------------

Exception PC               Count   Exception PC         Module        Offset
-----------------   ------------   ------------  ----------------------------------
FFFFFFFF.80B25621           1260   SECURITY+1B021       SECURITY      0001B021
FFFFFFFF.80B25641           1260   SECURITY+1B041       SECURITY      0001B041
FFFFFFFF.80B25660           1260   SECURITY+1B060       SECURITY      0001B060
FFFFFFFF.80B25671           1260   SECURITY+1B071       SECURITY      0001B071
FFFFFFFF.80B25691           1260   SECURITY+1B091       SECURITY      0001B091
FFFFFFFF.80B39330           1243   NSA$SIZE_NSAB_C+00920SECURITY      0002ED30
FFFFFFFF.807273A1           1144   LOCKING+271A1        LOCKING       000271A1
FFFFFFFF.807273D1           1144   LOCKING+271D1        LOCKING       000271D1
FFFFFFFF.80B25631           1131   SECURITY+1B031       SECURITY      0001B031
FFFFFFFF.80B25661           1131   SECURITY+1B061       SECURITY      0001B061
FFFFFFFF.80B25600           1131   SECURITY+1B000       SECURITY      0001B000
FFFFFFFF.80B25650           1131   SECURITY+1B050       SECURITY      0001B050
FFFFFFFF.80B25680           1131   SECURITY+1B080       SECURITY      0001B080
FFFFFFFF.84188930            999   LIBRTL+00158930      LIBRTL        00158930
FFFFFFFF.80A678E0            991   RMS+001D4EE0         RMS           001D4EE0
FFFFFFFF.841888A0            976   LIBRTL+001588A0      LIBRTL        001588A0
FFFFFFFF.80B25AE0            392   EXE$TLV_TO_PSB_C+003B0SECURITY     0001B4E0
FFFFFFFF.80B26870            392   SECURITY+1C270       SECURITY      0001C270
FFFFFFFF.80B256F0            360   SECURITY+1B0F0       SECURITY      0001B0F0
FFFFFFFF.80B25AC0            336   EXE$TLV_TO_PSB_C+00390SECURITY     0001B4C0
FFFFFFFF.80B25EF0            336   EXE$TLV_TO_PSB_C+007C0SECURITY     0001B8F0
FFFFFFFF.80B256E0            326   SECURITY+1B0E0        SECURITY     0001B0E0
[...............]

SDA>  FLT STOP TRACE
SDA>  FLT UNLOAD
Chapter 16. Memory Management with VLM Features
OpenVMS Alpha and OpenVMS IA-64 very large memory (VLM) features for memory management provide extended support for database, data warehouse, and other very large database (VLDB) products. The VLM features enable database products and data warehousing applications to realize increased capacity and performance gains.
By using the extended VLM features, application programs can create large, in-memory global data caches that do not require an increase in process quotas. These large memory-resident global sections can be mapped with shared global pages to dramatically reduce the system overhead required to map large amounts of memory.
Memory-resident global sections
Fast I/O and buffer objects for global sections
Shared page tables
Expandable global page table
Reserved memory registry
To see an example program that demonstrates many of these VLM features, refer to Appendix C, "VLM Example Program".
16.1. Overview of VLM Features
Memory-resident global sections allow a database server to keep larger amounts of hot data cached in physical memory. The database server then accesses the data directly from physical memory without performing I/O read operations from the database files on disk. With faster access to the data in physical memory, run-time performance increases dramatically.
Fast I/O reduces CPU costs per I/O request, which increases the performance of database operations. Fast I/O requires data to be locked in memory through buffer objects. Buffer objects can be created for global pages, including pages in memory-resident sections.
Shared page tables allow that same database server to reduce the amount of physical memory consumed within the system. Because multiple server processes share the same physical page tables that map the large database cache, an OpenVMS Alpha or OpenVMS IA-64 system can support more server processes. This increases overall system capacity and decreases response time to client requests.
Shared page tables dramatically reduce the database server startup time because server processes can map memory-resident global sections hundreds of times faster than traditional global sections. With a multiple gigabyte global database cache, the server startup performance gains can be significant.
The system parameters GBLPAGES and GBLPAGFIL are dynamic parameters. Users with the CMKRNL privilege can now change these parameter values on a running system. Increasing the value of the GBLPAGES parameter allows the global page table to expand, on demand, up to the new maximum size.
The Reserved Memory Registry supports memory-resident global sections and shared page tables. Through its interface within the SYSMAN utility, the Reserved Memory Registry allows an OpenVMS system to be configured with large amounts of memory set aside for use within memory-resident sections or other privileged code. The Reserved Memory Registry also allows an OpenVMS system to be properly tuned through AUTOGEN, thus accounting for the preallocated reserved memory. For information about using the reserved memory registry, see the VSI OpenVMS System Manager's Manual.
16.2. Memory-Resident Global Sections
Memory-resident global sections are non-file-backed global sections. This means that the pages within a memory-resident global section are not backed by the pagefile or by any other file on disk. Thus, no pagefile quota is charged to any process or charged to the system. When a process maps to a memory-resident global section and references the pages, working set list entries are not created for the pages. No working set quota is charged to the process.
Pages within a memory-resident global demand zero (DZRO) section initially have zero contents.
Creating a memory-resident global DZRO section is performed by calling either the SYS$CREATE_GDZRO system service or the SYS$CRMPSC_GDZRO_64 system service.
Mapping to a memory-resident global DZRO section is performed by calling either the SYS$CRMPSC_GDZRO_64 system service or the SYS$MGBLSC_64 system service.
To create a memory-resident global section, the process must have been granted the VMS$MEM_RESIDENT_USER rights identifier. Mapping to a memory-resident global section does not require this right identifier.
Fault option: allocate pages only when virtual addresses are referenced.
Allocate option: allocate all pages when section is created.
Fault option
To use the fault option, it is recommended, but not required that the pages within the memory-resident global section be deducted from the system's fluid page count through the Reserved Memory Registry.
Using the Reserved Memory Registry ensures that AUTOGEN tunes the system properly to exclude memory-resident global section pages in its calculation of the system's fluid page count. AUTOGEN sizes the system pagefile, number of processes, and working set maximum size based on the system's fluid page count.
If the memory-resident global section has not been registered through the Reserved Memory Registry, the system service call fails if there are not enough fluid pages left in the system to accommodate the memory-resident global section.
If the memory-resident global section has been registered through the Reserved Memory Registry, the system service call fails if the size of the global section exceeds the size of reserved memory and there are not enough fluid pages left in the system to accommodate the additional pages.
If memory has been reserved using the Reserved Memory Registry, that memory must be used for the global section named in the SYSMAN command. To return the memory to the system, SYSMAN can be run to free the reserved memory, thus returning the pages back into the system's count of fluid pages.
If the name of the memory-resident global section is not known at boot time, or if a large amount of memory is to be configured out of the system's pool of fluid memory, entries in the Reserved Memory Registry can be added and the system can be retuned with AUTOGEN. After the system re-boots, the reserved memory can be freed for use by any application in the system with the VMS$MEM_RESIDENT_USER rights identifier. This technique increases the availability of fluid memory for use within memory-resident global sections without committing to which applications or named global sections will receive the reserved memory.
Allocate option
To use the allocate option, the memory must be pre-allocated during system initialization to ensure that contiguous, aligned physical pages are available. OpenVMS attempts to allow granularity hints, so that in many or even most cases, preallocated resident memory sections are physically contiguous. However, for example on systems supporting resource affinity domains (RADs), OpenVMS intentionally tries to "stripe" memory across all RADs, unless told to use only a single RAD. Granularity hints can be used when mapping to the memory-resident global section if the virtual alignment of the mapping is on an even 8-page, 64-page, or 512-page boundary. (With a system page size of 8 KB, granularity hint virtual alignments are on 64-KB, 512-KB, and 4-MB boundaries). The maximum granularity hint on Alpha and I64 covers 512 pages. With 8-KB pages, this is 4 MB. If your selection is below this limit, there is an excellent chance that it will be contiguous. Currently, there is no guarantee of contiguousness for application software. OpenVMS chooses optimal virtual alignment to use granularity hints if the flag SEC$M_EXPREG is set on the call to one of the mapping system services, such as SYS$MGBLSC.
Sufficiently contiguous, aligned PFNs are reserved using the Reserved Memory Registry. These pages are allocated during system initialization, based on the description of the reserved memory. The memory-resident global section size must be less than or equal to the size of the reserved memory or an error is returned from the system service call.
If memory has been reserved using the Reserved Memory Registry, that memory must be used for the global section named in the SYSMAN command. To return the memory to the system, SYSMAN can be run to free the prereserved memory. Once the pre-reserved memory has been freed, the allocate option can no longer be used to create the memory-resident global section.
16.3. Fast I/O and Buffer Objects for Global Sections
Page file-backed global sections
Disk file-backed global sections
Memory-resident global sections
Buffer objects enable Fast I/O system services, which can be used to read and write very large amounts of shared data to and from I/O devices at an increased rate. By reducing the CPU cost per I/O request, Fast I/O increases performance for I/O operations.
Fast I/O improves the ability of VLM applications, such as database servers, to handle larger capacities and higher data throughput rates.
16.3.1. Comparison of $QIO and Fast I/O
The $QIO system service must ensure that a specified memory range exists and is accessible for the duration of each direct I/O request. Validating that the buffer exists and is accessible is done in an operation called probing. Making sure that the buffer cannot be deleted and that the access protection is not changed while the I/O is still active is achieved by locking the memory pages for I/O and by unlocking them at I/O completion.
The probing and locking/unlocking operations for I/O are costly operations. Having to do this work for each I/O can consume a significant percentage of CPU capacity. The advantage of Fast I/O is that memory is locked only for the duration of a single I/O and can otherwise be paged.
Fast I/O must still ensure that the buffer is available, but if many I/O requests are performed from the same memory cache, performance can increase if the cache is probed and locked only once—instead of for each I/O. OpenVMS must then ensure only that the memory access is unchanged between multiple I/Os. Fast I/O uses buffer objects to achieve this goal. Fast I/O gains additional performance advantages by pre-allocating some system resources and by streamlining the I/O flow in general.
16.3.2. Overview of Locking Buffers
Before the I/O subsystem can move any data into a user buffer, either by moving data from system space in a buffered I/O, or by allowing a direct I/O operation, it must ensure that the user buffer actually exists and is accessible.
For buffered I/O, this is usually achieved by assuming the context of the process requesting the I/O and probing the target buffer. For most QIO requests, this happens at IPL 2 (IPL$_ASTDEL), which ensures that no AST can execute between the buffer probing and the moving of the data. The buffer is not deleted until the whole operation has completed. IPL 2 also allows the normal paging mechanisms to work while the data is copied.
For direct I/O, this is usually achieved by locking the target pages for I/O. This makes the pages that make up the buffer ineligible for paging or swapping. From there on the I/O subsystem identifies the buffer by the page frame numbers, the byte offset within the first page, and the length of the I/O request.
This method allows for maximum flexibility because the process can continue to page and can even be swapped out of the balance set while the I/O is still outstanding or active. No pages need to be locked for buffered I/O, and for direct I/O, most of the process pages can still be paged or swapped. However, this flexibility comes at a price: all pages involved in an I/O must be probed or locked and unlocked for every single I/O. For applications with high I/O rates, the operating system can spend a significant amount of time on these time-consuming operations.
Buffer objects can help avoid much of this overhead.
16.3.3. Overview of Buffer Objects
A buffer object is a process entity that is associated with a virtual address range within a process. When the buffer object is created, all pages in this address range are locked in memory. These pages cannot be freed until the buffer object has been deleted. The Fast I/O environment uses this feature by locking the buffer object itself during $IO_SETUP. This prevents the buffer object and its associated pages from being deleted. The buffer object is unlocked during $IO_CLEANUP. This replaces the costly probe, lock, and unlock operations with simple checks validating that the I/O buffer does not exceed the buffer object. The trade-off is that the pages associated with the buffer object are permanently locked in memory. An application may need more physical memory but it can then execute faster.
To control this type of access to the system's memory, a user must hold the VMS$BUFFER_OBJECT_USER identifier, and the system allows only a certain number of pages locked for use in buffer objects. This number is controlled by the dynamic SYSGEN parameter MAXBOBMEM.
A second buffer object property allows Fast I/O to perform several I/O-related tasks entirely from system context at high IPL, without having to assume process context. When a buffer object is created, the system maps by default a section of system space (S2) to process pages associated with the buffer object. This system space window is protected to allow read and write access only from kernel mode. Because all of system space is equally accessible from within any context, it is now possible to avoid the still expensive context switch to assume the original user's process context.
The convenience of having system space access to buffer object pages comes at a price. For example, even though S2 space usually measures several gigabytes, this may still be insufficient if several gigabytes of database cache should be shared for Fast I/O by many processes. In such an environment all or most I/O to or from the cache buffers is direct I/O, and the system space mapping is not needed.
Physical pages are charged against MAXBOBMEM unless the page belongs to a memory-resident section, or the page is already associated with another buffer object.
By default, system space window pages are charged against MAXBOBS2. They are charged against MAXBOBS0S1 if CBO$_SVA_32 is specified.
If CBO$_NOSVA is set, no system space window is created, and only MAXBOBMEM is charged as appropriate.
For more information about using Fast I/O features, see the VSI OpenVMS I/O User's Reference Manual.
16.3.4. Creating and Using Buffer Objects
Buffer objects can be associated only with process space (P0, P1, or P2) pages.
PFN-mapped pages cannot be associated with buffer objects.
The special type of buffer object without associated system space can be used only to describe Fast /O data buffers. The IOSA must always be associated with a full buffer object with system space.
Some Fast I/O operations are not fully optimized if the data buffer is associated with a buffer object without system space. Copying of data at the completion of buffered I/O or disk-read I/O through the VIOC cache may happen at IPL 8 in system context for full buffer objects. However, it must happen in process context for buffer objects without system space. If your application implements its own caching, VSI recommends bypassing the VIOC for disk I/O by setting the IO$M_NOVCACHE function code modifier. Fast I/O recognizes this condition and uses the maximum level of optimization regardless of the type of buffer object.
The virtual I/O cache (VIOC) is not supported in I64.
16.4. Shared Page Tables
Shared page tables enable two or more processes to map to the same physical pages without each process incurring the overhead of page table construction, page file accounting, and working set quota accounting. Internally, shared page tables are treated as a special type of global section and are specifically used to map pages that are part of a memory-resident global section. The special global section that provides page table sharing is called a shared page table section. Shared page table sections themselves are memory resident.
Shared page tables are created and propagated to multiple processes by a cooperating set of system services. No special privileges or rights identifiers are required for a process or application to use shared page tables. The VMS$MEM_RESIDENT_USER rights identifier is required only to create a memory-resident global section. Processes that do not have this identifier can benefit from shared page tables (as long as certain mapping criteria prevail).
Similar to memory reserved for memory-resident global sections, memory for shared page tables must be deducted from the system's set of fluid pages. The Reserved Memory Registry allows for this deduction when a memory-resident global section is registered.
There are two types of shared page tables: those that allow write access and those that allow only read access. A given memory resident section can be associated with shared page tables that allow write access (the default for shared page tables), or the shared page tables can allow only read access. If most accessors need write access, the shared page tables should allow that. However, some applications might allow only write access to one process and have many reading processes. In that case, the shared page table should allow only read access and the writer can use private page tables. The flag SEC$M_READ_ONLY_SHPT can be set in $CREATE_GDZRO or $CRMPSC_GDZRO_64 to select shared page tables for read-only access.
16.4.1. Memory Requirements for Private Page Tables
Table 16.1, ''Page Table Size Requirements'' highlights the physical memory requirements for private page tables and shared page tables that map to various sizes of global sections by various numbers of processes. This table illustrates the amount of physical memory saved systemwide through the use of shared page tables. For example, when 100 processes map to a 1 GB global section, 99 MB of physical memory are saved by mapping to the global section with shared page tables.
|
Number of |
Size of Global Section | |||||||
|---|---|---|---|---|---|---|---|---|
|
Mapping |
8MB |
8MB |
1GB |
1GB |
8GB |
8GB |
1TB |
1TB |
|
Processes |
PPT |
SHPT |
PPT |
SHPT |
PPT |
SHPT |
PPT |
SHPT |
|
Key
| ||||||||
|
1 |
8KB |
8KB |
1MB |
1MB |
8MB |
8MB |
1GB |
1GB |
|
10 |
80KB |
8KB |
10MB |
1MB |
80MB |
8MB |
10GB |
1GB |
|
100 |
800KB |
8KB |
100MB |
1MB |
800MB |
8MB |
100GB |
1GB |
|
1000 |
8MB |
8KB |
1GB |
1MB |
8GB |
8MB |
1TB |
1GB |
16.4.2. Shared Page Tables and Private Data
To benefit from shared page tables, a process does not require any special privileges or rights identifiers. Only the creator of a memory-resident global section requires the rights identifier VMS$MEM_RESIDENT_USER. The creation of the memory-resident global section causes the creation of the shared page tables that map that global section unless the Reserved Memory Registry indicates that no shared page tables are required. At first glance, it may appear that there is a security risk inherent in allowing this greater level of data sharing. There is no security risk for the reasons described in this section.
Create a shared page table region by calling the system service SYS$CREATE_REGION_64.
The starting virtual address of the region is rounded down and the length is rounded up such that the region starts and ends on an even page table page boundary.
- Use either the SYS$CRMPSC_GDZRO_64 system service or the SYS$MGBLSC_64 system service to map to a memory-resident global section. These services enable the caller to use the shared page tables associated with the global section if the following conditions are met:
The caller specifies a read/write access mode with the mapping request that is exactly the same as the access mode associated with the global section to map.
The caller specifies proper virtual addressing alignments with the mapping request.
Note
Processes can specify a non-shared page table region for mapping to a memory-resident global section with shared page tables. In this case, process private page tables are used to map to the global section.
16.5. Expandable Global Page Table
The GBLPAGES system parameter defines the size of the global page table. The value stored in the parameter file is used at boot time to establish the initial size of the global page table.
The global page table has insufficient contiguous free space to allow the requested creation of a global section.
The current setting of the GBLPAGES parameter allows the global page table to expand.
There is sufficient unused virtual memory at the higher end of the global page table to expand into.
The system has sufficient fluid memory (pages not locked in memory) to allow the global page table to expand.
Because the global page table is mapped in 64-bit S2 space, which is a minimum of 6 GB on Alpha (S2 space on IA-64 is always 8 TB minus 2 GB), these conditions can be met by almost all systems. Only extremely memory-starved systems or systems with applications making extensive use of S2 virtual address space may make it impossible to grow the global page table on demand.
$ RUN SYS$SYSTEM:SYSGEN
SYSGEN> USE ACTIVE
SYSGEN> SET GBLPAGES  new_value
SYSGEN> WRITE ACTIVE
The WRITE ACTIVE command requires the CMKRNL privilege.
A global section is deleted, thus freeing up global page table entries.
The value of GBLPAGES indicates a smaller size of the global page table than the current size.
Unused entries exist at the high address end of the global page table that allow you to contract the structure.
Reducing the active value of GBLPAGES below the number of currently used global pages does not affect currently used global pages. It only prevents the creation of additional global pages.
Increasing the active value of the GBLPAGFIL parameter always succeeds, up to the maximum positive integer value. As with GBLPAGES, reducing the value of GBLPAGFIL below the number of global pages that may be paged against the system's pagefile has no effect on these pages. Doing so simply prevents the creation of additional global pagefile sections.
Note that an increase of GBLPAGFIL may also require that additional pagefile space be satisfied by installing an additional pagefile.
Part IV. Appendixes: Macros and Examples of 64-Bit Programming
This part describes macros used in 64-bit programming and presents two examples of 64-bit programming.
Appendix A. C Macros for 64-Bit Addressing
$DESCRIPTOR64
$is_desc64
$is_32bits
DESCRIPTOR64
DESCRIPTOR64 — Constructs a 64-bit string descriptor.
Format
$DESCRIPTOR64 name, string Description
- name is name of variable
- string is address of string
Example
        int status;
        $DESCRIPTOR64 (gblsec, "GBLSEC_NAME");

        ...

        /* Create global page file section */
        status = sys$create_gpfile (&gblsec, 0, 0, section_size, 0, 0);

        ...
This macro resides in descrip.h in SYS$LIBRARY:DECC$RTLDEF.TLB.
$is_desc64
$is_desc64 — Distinguishes a 64-bit descriptor.
Format
$is_desc64 desc Description
- desc is address of 32-bit or 64-bit descriptor
Returns
- 0 if descriptor is 32-bit descriptor
- 1 if descriptor is 64-bit descriptor
Example
#include <descrip.h>
#include <far_pointers.h>
...
        if ($is_desc64 (user_desc))
        {
                /* Get 64-bit address and 64-bit length from descriptor */
                ...
        }
        else
        {
               /* Get 32-bit address and 16-bit length from descriptor */
               ...
        }
This macro resides in descrip.h in SYS$LIBRARY:DECC$RTLDEF.TLB.
$is_32bits
$is_32bits — Tests if a quadword is 32-bit sign-extended.
Format
$is_32bits arg Description
Input: arg is 64-bit value
- 1 if arg is 32-bit sign-extended
- 0 if arg is not 32-bit sign-extended
Example
        #include <starlet_bigpage.h>
        ...
        if ($is_32bits(user_va))
                counter_32++;   /* Count number of 32-bit references */
        else
                counter_64++;  /* Count number of 64-bit references */
This macro resides in starlet_bigpage.h in SYS$LIBRARY:SYS$STARLET_C.TLB.
Appendix B. 64-Bit Example Program
/*
This program creates a region in P2 space using the region creation
service and then creates VAs within that region. The intent is to
demonstrate the use of the region services and how to allocate virtual
addresses within a region. The program also makes use of 64-bit
descriptors and uses them to format return values into messages with
the aid of SYS$GETMSG.
To build and run this program type:
$ CC/POINTER_SIZE=32/STANDARD=RELAXED/DEFINE=(__NEW_STARLET=1) -
REGIONS.C
$ LINK REGIONS.OBJ
$ RUN REGIONS.EXE
*/
#include <descrip.h> /* Descriptor Definitions */
#include <far_pointers.h> /* Long Pointer Definitions */
#include <gen64def.h> /* Generic 64-bit Data Type Definition */
#include <iledef.h> /* Item List Entry Definitions */
#include <ints.h> /* Various Integer Typedefs */
#include <iosbdef.h> /* I/O Status Block Definition */
#include <psldef.h> /* PSL$ Constants */
#include <ssdef.h> /* SS$_ Message Codes */
#include <starlet.h> /* System Service Prototypes */
#include <stdio.h> /* printf */
#include <stdlib.h> /* malloc, free */
#include <string.h> /* memset */
#include <syidef.h> /* $GETSYI Item Code Definitions */
#include <vadef.h> /* VA Creation Flags and Constants */
/* Module-wide constants and macros. */
#define BUFFER_SIZE 132
#define HW_NAME_LENGTH 32
#define PAGELET_SIZE 512
#define REGION_SIZE 128
#define good_status(code) ((code) & 1)
/* Module-wide Variables */
int
page_size;
$DESCRIPTOR64 (msgdsc, "");
/* Function Prototypes */
int get_page_size (void);
static void print_message (int code, char *string);
main (int argc, char **argv)
{
int
i,
status;
uint64
length_64,
master_length_64,
return_length_64;
GENERIC_64
region_id_64;
VOID_PQ
master_va_64,
return_va_64;
/* Get system page size, using SYS$GETSYI. */
status = get_page_size ();
if (!good_status (status))
return (status);
/* Get a buffer for the message descriptor. */
msgdsc.dsc64$pq_pointer = malloc (BUFFER_SIZE);
printf ("Message Buffer Address = %016LX\n\n", msgdsc.dsc64$pq_pointer);
/* Create a region in P2 space. */
length_64 = REGION_SIZE*page_size;
status = sys$create_region_64 (
length_64, /* Size of Region to Create */
VA$C_REGION_UCREATE_UOWN, /* Protection on Region */
0, /* Allocate in Region to Higher VAs */
®ion_id_64, /* Region ID */
&master_va_64, /* Starting VA in Region Created */
&master_length_64); /* Size of Region Created */
if (!good_status (status))
{
print_message (status, "SYS$CREATE_REGION_64");
return (status);
}
printf ("\nSYS$CREATE_REGION_64 Created this Region: %016LX - %016LX\n",
master_va_64,
(uint64) master_va_64 + master_length_64 - 1);
/* Create virtual address space within the region. */
for (i = 0; i < 3; ++i)
{
status = sys$expreg_64 (
®ion_id_64, /* Region to Create VAs In */
page_size, /* Number of Bytes to Create */
PSL$C_USER, /* Access Mode */
0, /* Creation Flags */
&return_va_64, /* Starting VA in Range Created */
&return_length_64); /* Number of Bytes Created */
if (!good_status (status))
{
print_message (status, "SYS$EXPREG_64");
return status;
}
printf ("Filling %016LX - %16LX with %0ds.\n",
return_va_64,
(uint64) return_va_64 + return_length_64 - 1,
i);
memset (return_va_64, i, page_size);
}
/* Return the virtual addresses created within the region, as well as
the region itself. */
printf ("\nReturning Master Region: %016LX - %016LX\n",
master_va_64,
(uint64) master_va_64 + master_length_64 - 1);
status = sys$delete_region_64 (
®ion_id_64, /* Region to Delete */
PSL$C_USER, /* Access Mode */
&return_va_64, /* VA Deleted */
&return_length_64); /* Length Deleted */
if (good_status (status))
printf ("SYS$DELETE_REGION_64 Deleted VAs Between: %016LX - %016LX\n",
return_va_64,
(uint64) return_va_64 + return_length_64 - 1);
else
{
print_message (status, "SYS$DELTE_REGION_64");
return (status);
}
/* Return message buffer. */
free (msgdsc.dsc64$pq_pointer);
}
/* This routine obtains the system page size using SYS$GETSYI.
The return value is recorded in the module-wide location,
page_size. */
int get_page_size ()
{
int
status;
IOSB
iosb;
ILE3
item_list [2];
/* Fill in SYI item list to retrieve the system page size. */
item_list[0].ile3$w_length = sizeof (int);
item_list[0].ile3$w_code = SYI$_PAGE_SIZE;
item_list[0].ile3$ps_bufaddr = &page_size;
item_list[0].ile3$ps_retlen_addr = 0;
item_list[1].ile3$w_length = 0;
item_list[1].ile3$w_code = 0;
/* Get the system page size. */
status = sys$getsyiw (
0, /* EFN */
0, /* CSI address */
0, /* Node name */
&item_list, /* Item list */
&iosb, /* I/O status block */
0, /* AST address */
0); /* AST parameter */
if (!good_status (status))
{
print_message (status, "SYS$GETJPIW");
return (status);
}
if (!good_status (iosb.iosb$w_status))
{
print_message (iosb.iosb$w_status, "SYS$GETJPIW IOSB");
return (iosb.iosb$w_status);
}
return SS$_NORMAL;
}
/* This routine takes the message code passed to the routine and then
uses SYS$GETMSG to obtain the associated message text. That
message is then printed to stdio along with a user-supplied
text string. */
#pragma inline (print_message)
static void print_message (int code, char *string)
{
msgdsc.dsc64$q_length = BUFFER_SIZE;
sys$getmsg (
code, /* Message Code */
(unsigned short *) &msgdsc.dsc64$q_length, /* Returned Length */
&msgdsc, /* Message Descriptor */
15, /* Message Flags */
0); /* Optional Parameter */
*(msgdsc.dsc64$pq_pointer+msgdsc.dsc64$q_length) = '\0';
printf ("Call to %s returned: %s\n",
string,
msgdsc.dsc64$pq_pointer);
}Appendix C. VLM Example Program
/*
This program creates and maps to a memory-resident global section using
shared page tables. The program requires a reserved memory entry
(named In_Memory_Database) in the Reserved Memory Registry.
The entry in the registry is created using SYSMAN as follows:
$ MCR SYSMAN
SYSMAN> RESERVED_MEMORY ADD "In_Memory_Database"/ALLOCATE/PAGE_TABLES -
/ZERO/SIZE=64/GROUP=100
The above command creates an entry named In_Memory_Database that is
64M bytes in size and requests that the physical memory be allocated
during system initialization. This enables the physical memory to
be mapped with granularity hints by the SYS$CRMPSC_GDZRO_64 system
service. It also requests that physical memory be allocated for
page tables for the named entry, requests the allocated memory be
zeroed, and requests that UIC group number 100 be associated with
the entry.
Once the entry has been created with SYSMAN, the system must be
re-tuned with AUTOGEN. Doing so allows AUTOGEN to re-calculate
values for SYSGEN parameters that are sensitive to changes in
physical memory sizes. (Recall that the Reserved Memory Registry
takes physical pages away from the system.) Once AUTOGEN has
been run, the system must be rebooted.
Use the following commands to compile and link this program:
$ CC/POINTER_SIZE=32 shared_page_tables_example
$ LINK shared_page_tables_example
Since 64-bit virtual addresses are used by this program,
a Version 5.2 HP C compiler or later is required to compile it. */
#define __NEW_STARLET 1
#include <DESCRIP>
#include <FAR_POINTERS>
#include <GEN64DEF>
#include <INTS>
#include <PSLDEF>
#include <SECDEF>
#include <SSDEF>
#include <STARLET>
#include <STDIO>
#include <STDLIB>
#include <STRING>
#include <VADEF>
#define bad_status(status) (((status) & 1) != 1)
#define ONE_MEGABYTE 0x100000
main ()
{
int
status;
$DESCRIPTOR (section_name, "In_Memory_Database");
uint32
region_flags = VA$M_SHARED_PTS, /* Shared PT region. */
section_flags = SEC$M_EXPREG;
uint64
mapped_length,
requested_size = 64*ONE_MEGABYTE,
section_length = 64*ONE_MEGABYTE,
region_length;
GENERIC_64
region_id;
VOID_PQ
mapped_va,
region_start_va;
printf ("Shared Page Table Region Creation Attempt: Size = %0Ld\n",
requested_size);
/* Create a shared page table region. */
status = sys$create_region_64 (
requested_size, /* Size in bytes of region */
VA$C_REGION_UCREATE_UOWN, /* Region VA creation and owner mode */
region_flags, /* Region Flags: shared page tables */
®ion_id, /* Region ID */
®ion_start_va, /* Starting VA for region */
®ion_length); /* Size of created region */
if (bad_status (status))
{
printf ("ERROR: Unable to create region of size %16Ld\n\n",
requested_size);
return;
}
printf ("Shared Page Table Region Created: VA = %016LX, Size
= %0Ld\n\n",
region_start_va,
region_length);
/* Create and map a memory-resident section with shared page tables
into the shared page table region. */
printf ("Create and map to section %s\n", section_name.dsc$a_pointer);
status = sys$crmpsc_gdzro_64 (
§ion_name, /* Section name */
0, /* Section Ident */
0, /* Section protection */
section_length, /* Length of Section */
®ion_id, /* RDE */
0, /* Section Offset; map entire section */
PSL$C_USER, /* Access Mode */
section_flags, /* Section Creation Flags */
&mapped_va, /* Return VA */
&mapped_length); /* Return Mapped Length */
if (bad_status (status))
printf ("ERROR: Unable to Create and Map Section %s, status =
%08x\n\n",
section_name.dsc$a_pointer,
status);
else
{
printf ("Section %s created, Section Length = %0Ld\n",
section_name.dsc$a_pointer,
section_length);
printf (" Mapped VA = %016LX, Mapped Length = %0Ld\n\n",
mapped_va,
mapped_length);
}
/* Delete the shared page table. This will cause the mapping to the
section and the section itself to be deleted. */
printf ("Delete the mapping to the memory-resident global section");
printf (" and the shared\n page table region.\n");
status = sys$delete_region_64 (
®ion_id,
PSL$C_USER,
®ion_start_va,
®ion_length);
if (bad_status (status))
printf ("ERROR: Unable to delete shared page table region,
status = %08x\n\n", status);
else
printf ("Region Deleted, Start VA = %016LX, Length = %016LX\n\n",
region_start_va,
region_length);
printf ("\n");
}Shared Page Table Region Creation Attempt: Size = 67108864
Shared Page Table Region Created: VA = FFFFFFFBFC000000, Size = 67108864
Create and map to section In_Memory_Database
Section In_Memory_Database created, Section Length = 67108864
Mapped VA = FFFFFFFBFC000000, Mapped Length = 67108864
Delete the mapping to the memory-resident global section and the shared
page table region.
Region Deleted, Start VA = FFFFFFFBFC000000, Length = 0000000004000000Alpha specific.
VAX specific.
PATCH/IMAGE is VAX only
VAX specific
Alpha and I64 specific
The created subprocess can include DCL by executing the system image SYS$SYSTEM:LOGINOUT.EXE.
Plus group job and system logical name tables.
Parent's is default, can also be specified.
If a process is suspended in kernel mode (a hard suspension), it cannot receive any ASTs. If a process is suspended at supervisor mode (a soft suspension), it can receive executive or kernel mode ASTs. See the description of SYS$SUSPND in the VSI OpenVMS System Services Reference Manual: GETUTC–Z.
On VAX systems, this condition is generated by hardware.
On Alpha systems, this condition is generated by software.
The PC and PSL (or PS) normally included in the signal array are not included in this argument list. The stack pointer of the access mode receiving this exception is reset to its initial value.
If a change mode handler has been declared for user or supervisor mode with the Declare Change Mode or Compatibility Mode Handler (SYS$DCLCMH) system service, that routine receives control when the associated trap occurs.
If a compatibility-mode handler has been declared with the Declare Change Mode or Compatibility Mode Handler (SYS$DCLCMH) system service, that routine receives control when this fault occurs.
on IA-64 systems, this condition is generated by hardware.
On Alpha systems, this condition may be generated by software.
on IA-64 systems, this condition may be generated by software.
For more information about the $QIO(W) arguments that support 64-bit addressing, see Writing OpenVMS Alpha Device Drivers in C, and VSI OpenVMS Alpha Guide to Upgrading Privileged-Code Applications.
This field can contain either a 64-bit address or a 32-bit address sign-extended to 64 bits.
Reprinted from an article in the March/April 1993 issue of Digital Systems Journal, Volume 15, Number 2, titled"Alpha AXP(TM) Migration: Understanding Data Alignment on OpenVMS AXP Systems" by Eric M. LaFranchi and Kathleen D. Morse. Copyright 1993 by Cardinal Business Media, Inc., 101 Witmer Road, Horsham, PA 19044.