VSI OpenVMS Record Management Utilities Reference Manual
- Operating System and Version:
- VSI OpenVMS IA-64 Version 8.4-1H1 or higher
VSI OpenVMS Alpha Version 8.4-2L1 or higher
Preface
1. About VSI
VMS Software, Inc. (VSI) is an independent software company licensed by Hewlett Packard Enterprise to develop and support the OpenVMS operating system.
2. Intended Audience
This manual is intended for all programmers who use OpenVMS RMS data files, including high-level language programmers who use only their language's input and output statements.
3. Document Structure
Description – Provides a full description of the Analyze/RMS_File utility.
- Usage Summary – Outlines the following ANALYZE/RMS_FILE information:
- –Invoking the utility
- –Exiting from the utility
- –Directing output
- –Copying and analyzing shared files
Qualifiers – Describes ANALYZE/RMS_FILE qualifiers, including format, parameters, and examples.
Commands – Describes ANALYZE/RMS_FILE commands, including format, parameters, and examples.
Examples – Provides additional ANALYZE/RMS_FILE examples.
Description – Provides a full description of the Convert utility.
- Usage Summary – Outlines the following CONVERT information:
- –Invoking the utility
- –Exiting from the utility
- –Directing output
- –Executing commands over a network
Qualifiers – Describes the CONVERT qualifiers, including format, parameters, and examples.
Examples – Provides additional CONVERT examples.
Description – Provides a full description of the Convert/Reclaim utility.
- Usage Summary – Outlines the following CONVERT/RECLAIM information:
- –Invoking the utility
- –Exiting from the utility
- –Directing output
- –Executing commands over a network
Qualifiers – Describes the CONVERT/RECLAIM qualifier, /STATISTICS.
Chapter 4, "File Definition Language Facility" describes in detail the File Definition Language facility (FDL). This chapter provides an overview and detailed descriptions about the File Definition Language. It describes in detail each file section and associated file attributes.
Description – Provides a description of the utility.
- Usage Summary – Outlines the following information:
- –Invoking the utility
- –Exiting from the utility
Qualifiers – Describes the sole CREATE/FDL qualifier, /STATISTICS.
Examples – Provides additional examples of implementing CREATE/FDL.
Description – Provides a description of the Edit/FDL utility.
- Usage Summary – Outlines the following EDIT/FDL information:
- –Invoking the utility
- –Exiting from the utility
Qualifiers – Describes the EDIT/FDL commands and qualifiers, together with related examples.
Examples – Provides additional examples of implementing EDIT/FDL.
4. Related Documents
VSI OpenVMS Record Management Services Reference Manual
RMS Journaling for OpenVMS Manual
5. VSI Encourages Your Comments
You may send comments or suggestions regarding this manual or any VSI document by sending electronic mail to the following Internet address: <docinfo@vmssoftware.com>. Users who have VSI OpenVMS support contracts through VSI can contact <support@vmssoftware.com> for help with this product.
6. OpenVMS Documentation
The full VSI OpenVMS documentation set can be found on the VMS Software Documentation webpage at https://docs.vmssoftware.com.
7. Conventions
| Convention | Meaning |
|---|---|
|
Ctrl/ x |
A sequence such as Ctrl/x indicates that you must hold down the key labeled Ctrl while you press another key or a pointing device button. |
|
PF1 x |
A sequence such as PF1 x indicates that you must first press and release the key labeled PF1 and then press and release another key or a pointing device button. |
|
Return |
In examples, a key name enclosed in a box indicates that you press a key on the keyboard. (In text, a key name is not enclosed in a box.) |
... |
A horizontal ellipsis in examples indicates one of the
following possibilities:
|
. . . |
A vertical ellipsis indicates the omission of items from a code example or command format; the items are omitted because they are not important to the topic being discussed. |
|
( ) |
In command format descriptions, parentheses indicate that you must enclose the options in parentheses if you choose more than one. |
|
[ ] |
In command format descriptions, brackets indicate optional choices. You can choose one or more items or no items. Do not type the brackets on the command line. However, you must include the brackets in the syntax for OpenVMS directory specifications and for a substring specification in an assignment statement. |
|
[ |] |
In command format descriptions, vertical bars separate choices within brackets or braces. Within brackets, the choices are options; within braces, at least one choice is required. Do not type the vertical bars on the command line. |
|
{ } |
In command format descriptions, braces indicate required choices; you must choose at least one of the items listed. Do not type the braces on the command line. |
|
bold text |
This typeface represents the introduction of a new term. It also represents the name of an argument, an attribute, or a reason. |
|
italic text |
Italic text indicates important information, complete titles of manuals, or variables. Variables include information that varies in system output (Internal error number), in command lines (/PRODUCER= name), and in command parameters in text (where dd represents the predefined code for the device type). |
|
UPPERCASE TEXT |
Uppercase text indicates a command, the name of a routine, the name of a file, or the abbreviation for a system privilege. |
|
|
Monospace type indicates code examples and interactive screen displays. In the C programming language, monospace type in text identifies the following elements: keywords, the names of independently compiled external functions and files, syntax summaries, and references to variables or identifiers introduced in an example. |
|
- |
A hyphen at the end of a command format description, command line, or code line indicates that the command or statement continues on the following line. |
|
numbers |
All numbers in text are assumed to be decimal unless otherwise noted. Nondecimal radixes—binary, octal, or hexadecimal—are explicitly indicated. |
Chapter 1. Analyze/RMS_File Utility
The Analyze/RMS_File utility (ANALYZE/RMS_FILE) allows you to examine, either with or without an interactive terminal dialogue, the internal structure of a Record Management Services (RMS) file. The Analyze/RMS_File utility can check the structure of the file for errors, generate a statistical report on the structure and use of the file, or generate a File Definition Language (FDL) file from a data file.
The Analyze/RMS_File utility also provides information about RMS Journaling for OpenVMS (RMS journaling) files marked for after-image journaling, before-image journaling, and, where applicable, information about the state of recovery units affecting RMS journaling files.
The Analyze/RMS_File utility provides a set of commands that you may use to analyze a file interactively.
FDL files created with the Analyze/RMS_File utility have special sections that contain statistics about the structure of the specified data file. You can use FDL files created with the Analyze/RMS_File utility in conjunction with other Record Management
Support a Files-11 volume structure, On-Disk Structure Level 5 (ODS-5), that provides a volume structure for creating and storing files with expanded file names
Support additional character sets for naming files from file names that use the 8-bit ISO Latin-1 character set to the 16-bit Unicode (UCS-2) character set
Support extended file names with file specifications exceeding the traditional 39.39 character limit up to a maximum of 255 characters
Support preserving the case of file specifications created with the ODS-5 attributes
Support deep, multilevel directory structures up to a maximum of 512 characters
1.1. Analyzing RMS File Structure Interactively
One of the most useful features of the Analyze/RMS_File utility is its interactive mode. You enter the interactive mode by specifying the /INTERACTIVE qualifier to the ANALYZE/RMS_FILE command; you then begin an interactive session, during which you can examine the structure of an RMS file. Enter the HELP command at the ANALYZE> prompt for help about the various commands available to you for traversing the file.
The Analyze/RMS_File utility treats the internal RMS file as a multilevel entity. All RMS files are identical, relative to the first two levels. Level 1 contains the file header and level 2 contains the file attributes.
Files marked for RMS journaling, level 2, include information relative to before-image journaling and after-image journaling, where applicable.
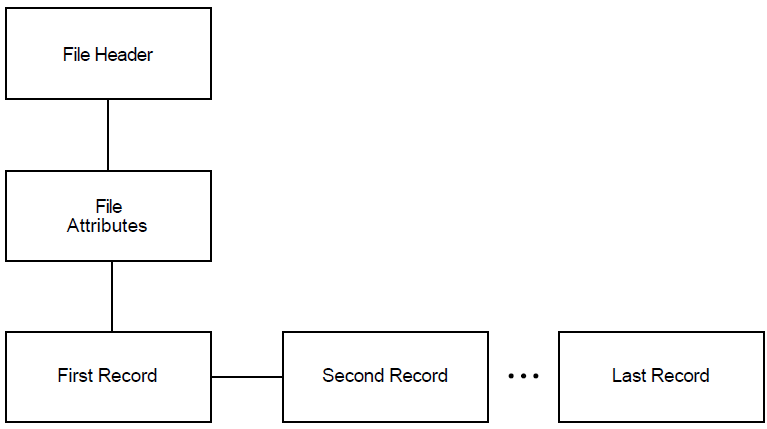
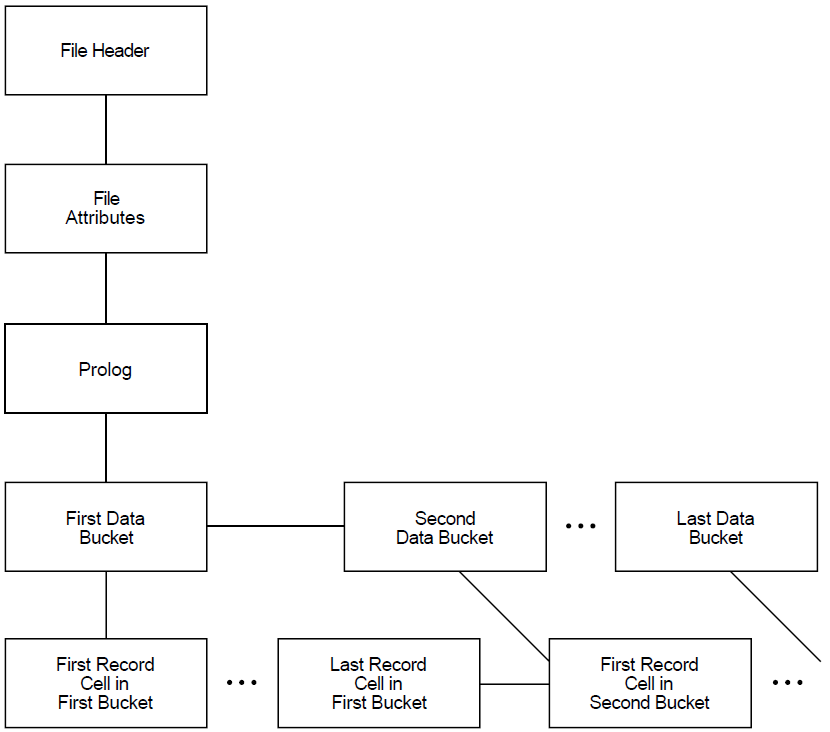
Some differentiation occurs at level 3. For sequential files, level 3 is the lowest level and it contains data records (see Figure 1.1, ''Structure of Sequential Files'') that ANALYZE/RMS_FILE can display individually. For relative files and indexed files, level 3 contains the file prolog.
For relative files, level 4 contains data buckets that are accessible individually (see Figure 1.2, ''Structure of Relative Files''). Using the Analyze/RMS_File utility, you can view the contents of each individual data bucket.
For indexed files, the Analyze/RMS_File utility presents you with two options at level 4: you can proceed down the path that begins with a level of area descriptors (see Figure 1.3, ''AREA DESCRIPTOR Path'') or you can choose the path that begins with a level of key descriptors (see Figure 1.4, ''KEY DESCRIPTOR Path'').

Level 5 is the final level in a relative file. This level contains the record cells that are accessible individually. For indexed files, the contents of level 5 depend on whether you have chosen the area descriptor path or the key descriptor path:
If you select the area descriptor path, level 5 is the lowest level and it contains reclaimed data records—that is, records that are effectively empty and are available for storing new data.
If you select the key descriptor path, the Analyze/RMS_File utility gives you the option of either viewing the index root bucket or the data bucket for the selected key, or traversing the level laterally and viewing another key.
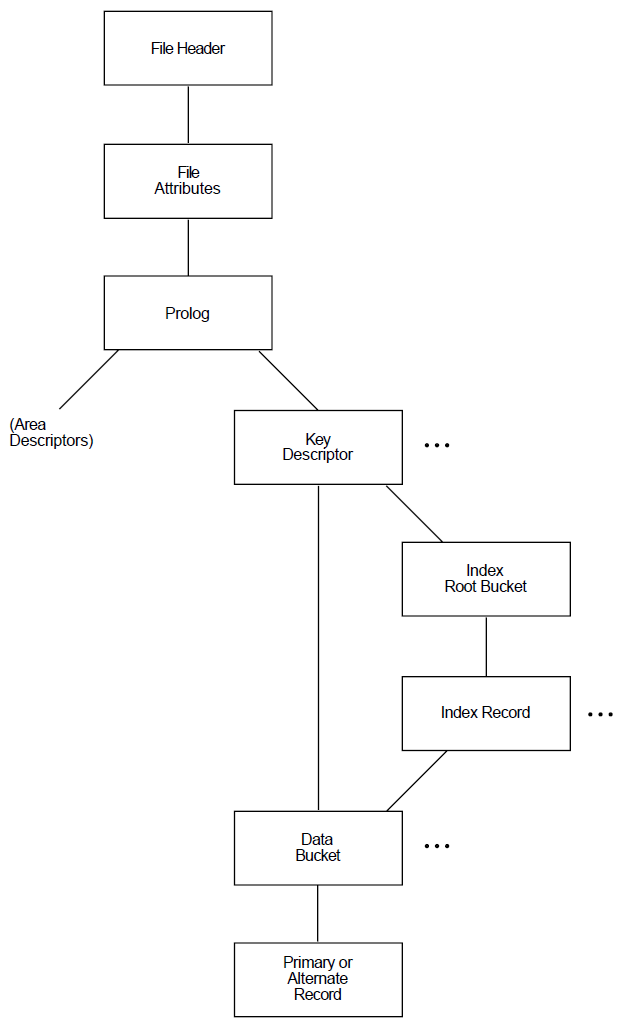
When you choose to view the index root bucket, the next level down contains the index record for the selected key. After you view the index record, the Analyze/RMS_File utility provides you with direct access to the first data bucket for the selected key.
At the data bucket level, you can either view the data record or traverse the data level laterally and select another data bucket for the selected key.
The structure of an indexed file is more complicated than that of sequential and relative files. From the PROLOG level, the structure branches to the AREA DESCRIPTORs and the KEY DESCRIPTORs. Each AREA DESCRIPTOR describes the attributes and the virtual block numbers for the different file areas. The KEY DESCRIPTOR path contains the primary index structures (and data records) as well as the alternate index structures.
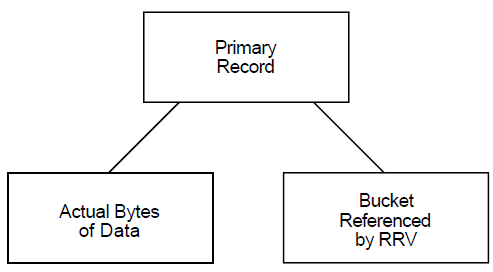
There are two types of record structures: primary records and alternate records. If you follow the primary index structure (key = 0), you find the primary record structures, which contain the actual data records (see Figure 1.5, ''Structure of Primary Records''). You can examine the actual bytes of data in the record. If the record has been moved to another bucket as a result of a bucket split, you can examine the bucket to which the record reference vector (RRV) points. An RRV is a forwarding pointer that a record leaves behind in its former bucket location when it moves to a new bucket.
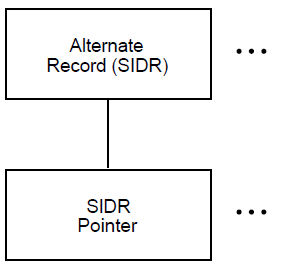
If you follow any of the alternate index structures, you find the alternate record structures, which contain the secondary index data records (SIDRs). A SIDR consists of an alternate key value and one or more pointers to the actual data records in the primary index structure (see Figure 1.6, ''Data Buckets in the Alternate Index Structures'').
1.2. Using the Analyze/RMS_File Utility with DECnet for OpenVMS
The ANALYZE/RMS_FILE command is supported only for the examination of files accessible to OpenVMS RMS or RMS–11.
You use the ANALYZE/RMS_FILE command over a network to analyze the internal structure of a remote file in exactly the same way that you use it to analyze the internal structure of a local file. For example, you can specify the /FDL qualifier to generate an FDL file from the data file. Using other qualifiers, you can check the file structure for errors, generate a statistical report on the file's structure and use, or enter interactive mode to explore the structure of the file. However, you can specify only one of these qualifiers in each command.
Note that you need the NETMBX privilege to execute the ANALYZE/RMS_FILE command over a network.
1.3. Handling Error Conditions
You handle the Analyze/RMS_File utility errors for two general error categories: nonjournaling errors and journaling errors. Even if you do not have RMS Journaling software, you may find that you have imported files marked for RMS Journaling from another system or from other nodes within an OpenVMS Cluster.
1.3.1. Nonjournaling Errors
If you receive any of the Analyze/RMS_File utility error messages while analyzing a file interactively, the file has been corrupted by a serious error. Note that the Analyze/RMS_File utility errors are not listed in the OpenVMS system messages documentation because in all cases the user response to errors signaled by the Analyze/RMS_File utility is identical, as described in the following paragraphs.
If the application program encounters errors during noninteractive analysis, the Analyze/RMS_File utility returns to the program, as exit status, the first occurrence of the most severe error it encounters. For example, if a warning (A) and two errors (B and C) are signaled, then the first error (B) is placed in the DCL symbol $STATUS at image exit.
If you have had a hardware problem (for example, a power or disk head failure), then the hardware most likely caused the corruption.
If you have no hardware problems, then a software error may have been introduced through either the user software or the system software. First, verify the user software and computer operations. Possibly, data files may have been corrupted by a process being stopped abnormally; for example, if a STOP/ID or DELETE/ENTRY occurs in the midst of data processing.
One test of whether the problem is in the system software is to note the situations where errors occur. For example, if a particular application uses an unusual I/O sequence that seems to result in file corruption, it may be that the problem is in the system software. In a situation like this, you should attempt to reproduce the problem and note precisely the I/O sequence. This information, together with appropriate supporting information, should be submitted with a Software Performance Report (SPR).
In either case, try to fix the problem with the Convert utility, using the same file specification for both the input file and the output file. If this procedure does not yield the result you want, use the Backup utility to restore a backup copy of the file.
1.3.2. Journaling Errors
If RMS Journaling software is not installed on your system and you attempt to write to a file marked for journaling, the system issues the following error message:
%RMS-F-JNS, operation not supported by RMS Journaling
If RMS Journaling software is installed and you receive this message, you attempted an operation that is not supported by RMS Journaling. For more information on handling RMS Journaling errors, see the RMS Journaling for OpenVMS Manual.
To turn off journaling in either case, use the following DCL command:
$ SET FILE/NOAI_JOURNAL/NOBI_JOURNAL/NORU_JOURNAL
Note that the SET FILE commands for turning off journaling are available to users who do not have RMS Journaling software as well as to users who do. Another error condition may occur if you import a file marked for recovery-unit journaling that has active recovery units. This can happen when a file is not recovered properly before the volume is moved to your system.
If you try to back up the file, RMS issues the following error message:
%BACKUP-E-OPENIN, error opening DISK$DATA:[USER]FILE.DAT;1 as input
-SYSTEM-F-RUCONFLICT, another facility has active recovery units on file
To turn off the active recovery units, use the following DCL command:
$SET FILE/RU_FACILITY=RMS/NORU_ACTIVE
Note that this may leave the file in an inconsistent state with respect to recovery units because active recovery units are not rolled back (aborted).
1.4. Using the ANALYZE/RMS_FILE Utility
ANALYZE/RMS_FILE Usage Summary
ANALYZE/RMS_FILE Usage Summary — The Analyze/RMS_File utility (ANALYZE/RMS_FILE) allows you to examine the internal structure of an RMS file by performing the following functions: checking the structure of a file for errors; generating a statistical report on the file's structure and use; entering an interactive mode through which you can explore a file's structure. This analysis can determine whether the file is properly designed for its application and can point out improvements to make in the file's File Definition Language (FDL) specification; generating an FDL file from a data file; generating a summary report on the file's structure and use; generating information related to the file's journaling status.
Format
ANALYZE/RMS_FILE filespec[,...]
- filespec[,...]
Specifies the data file to be analyzed. The default file type is .DAT. You can use multiple file specifications and wildcard characters with the /CHECK qualifier, the /RU_JOURNAL qualifier, the /STATISTICS qualifier, and the /SUMMARY qualifier, but not with the /FDL qualifier or the /INTERACTIVE qualifier.
Usage Summary
Invoke the utility by entering the ANALYZE/RMS_FILE command at the DCL command level. This command can perform only one of the utility functions at a time; in other words, you must enter a new ANALYZE/RMS_FILE command each time you choose a different function.
If you specify the /INTERACTIVE qualifier, exit the Analyze/RMS_File utility by entering the EXIT command. Otherwise, let the utility run to successful completion.
If the Analyze/RMS_File utility terminates with an error message, you should try converting the file and then running the utility again. If the error condition persists, verify the integrity of the hardware and software. If the hardware and software appear to be functioning properly, submit a Software Performance Report (SPR) about the condition.
You can control the Analyze/RMS_File utility output by using the /OUTPUT qualifier. For a more detailed explanation of the /OUTPUT qualifier, refer to the ANALYZE/RMS_FILE Qualifiers section.
During the time that you are using the Analyze/RMS_File utility to examine the system authorization file (SYSUAF.DAT), you prevent other users from logging in to the system. Similarly, while you are analyzing your mail file, you cannot receive mail. So if you need to analyze these or other shared files, you may want to make a copy of the file and analyze the copy to avoid this problem.
Note
If you want to analyze files over a network, you need the NETMBX privilege. If you want to analyze journal files using the /RU_JOURNAL qualifier, you must have CMEXEC privilege and you must have access to the [SYSJNL] directory.
ANALYZE/RMS_FILE Qualifiers
ANALYZE/RMS_FILE Qualifiers — This section describes the ANALYZE/RMS_FILE qualifiers and how you use them to select the utility functions. Unless otherwise noted, these qualifiers do not take a qualifier value.
/CHECK
/CHECK — Checks the integrity of the file and generates a report of any errors in its structure.
Format
/CHECK
Description
The report produced by the /CHECK qualifier includes a list of any errors and a summary of the file's structure. If you do not specify an output file, the report is written to the current SYS$OUTPUT device, which is generally your terminal. You can use wildcards and multiple file specifications. If you specify /NOOUTPUT, no report is generated; instead, you only get a message indicating whether the file has errors.
The check function is active by default when you use the ANALYZE/RMS_FILE command without any qualifiers. The /CHECK qualifier is not compatible with the /FDL qualifier, the /INTERACTIVE qualifier, the /STATISTICS qualifier, or the /SUMMARY qualifier. If /CHECK is used with any of the other qualifiers, /FDL takes precedence, next /INTERACTIVE, then /STATISTICS, and lastly /SUMMARY.
Example
$ANALYZE/RMS_FILE/CHECK CUSTFILE
This command checks the file CUSTFILE.DAT for errors and displays the report on the terminal.
/FDL
/FDL — Generates an FDL file describing the RMS data file being analyzed.
Format
/FDL
Description
By default, the /FDL qualifier creates a file with the file type .FDL and the same file name as the input data file. To assign a different type or name to the FDL file, use the /OUTPUT qualifier. If the data file is corrupted, the FDL file contains the Analyze/RMS_File utility error messages.
For indexed files, the FDL file contains special analysis sections you can use with the EDIT/FDL Optimize script to make better design decisions when you reorganize the file. For more information on these special analysis sections, see Chapter 4, "File Definition Language Facility".
You cannot use wildcards or multiple file specifications with the /FDL qualifier. The /FDL qualifier is not compatible with the /CHECK qualifier, the /INTERACTIVE qualifier, the /STATISTICS qualifier, the /SUMMARY qualifier, or the /UPDATE_HEADER qualifier. The /FDL qualifier takes precedence over all other qualifiers.
Example
$ANALYZE/RMS_FILE/FDL ADDRFILE
This command generates an FDL file named ADDRFILE.FDL from the data file ADDRFILE.DAT.
/INTERACTIVE
/INTERACTIVE — Begins an interactive examination of the file's structure. You cannot use wildcards or multiple file specifications. For help with the interactive commands, enter the HELP command at the ANALYZE> prompt. Do not use this qualifier with the /CHECK, /FDL, /STATISTICS, /SUMMARY, or /UPDATE_HEADER qualifiers. If used with the /FDL qualifier, the /FDL takes precedence; all other qualifiers are ignored when used with /INTERACTIVE. For a list of interactive commands, see the ANALYZE/RMS_FILE Commands section.
Format
/INTERACTIVE
Example
$ ANALYZE/RMS_FILE/INTERACTIVE SUPPLIERS.DAT
This command begins an interactive session during which you can examine the structure of the data file SUPPLIERS.DAT.
/OUTPUT
/OUTPUT — Identifies the destination file for the results of the analysis. The /NOOUTPUT qualifier specifies that no output file is to be created. In all cases, the Analyze/RMS_File utility displays a message indicating whether the data file has errors.
Format
/OUTPUT [=output-filespec]
/NOOUTPUT
Qualifier Value
output-filespec
Identifies the output file for the results of the analysis. The use of the output file depends on which of the other qualifiers you specify.
|
/CHECK |
Places the integrity report in the output file. The default file type is .ANL, and the default file name is ANALYZE. If you omit the output-filespec parameter, output is written to the current SYS$OUTPUT device, which is generally your terminal. |
|
/FDL |
Places the resulting FDL specification in the output file. The default file type is .FDL, and the default file name is that of the input file. |
|
/INTERACTIVE |
Places a transcript of the interactive session in the output file. The default file type is .ANL, and the default file name is ANALYZE. If you omit the output-filespec parameter, no transcript of your interactive session is produced. |
|
/RU_JOURNAL |
Places the recovery-unit journal information in the output file. The default file type is .ANL, and the default file name is ANALYZE. If you omit the output-filespec parameter, output is written to the current SYS$OUTPUT device, which is generally your terminal. |
|
/STATISTICS |
Places the statistics report in the output file. The default file type is .ANL, and the default file name is ANALYZE. If you omit the output-filespec parameter, output is written to the current SYS$OUTPUT device, which is generally your terminal. |
|
/SUMMARY |
Places the summary report in the output file. The default file type is .ANL, and the default file name is ANALYZE. If you omit the output-filespec parameter, output is written to the current SYS$OUTPUT device, which is generally your terminal. |
Examples
$ANALYZE/RMS_FILE/STATISTICS/OUTPUT=.TXT SEQ.ADDThis command generates a statistics report named ANALYZE.TXT from the data file SEQ.ADD.
$ANALYZE/RMS_FILE/NOOUTPUT/CHECK PARTS_INVENTORY.DATThis command checks the structure of the data file PARTS_INVENTORY.DAT. No output is produced except the message telling whether the data file contains errors.
/RU_JOURNAL
/RU_JOURNAL — Provides information about recovery-unit journaling where applicable.
Format
/RU_JOURNAL
Description
You can use the /RU_JOURNAL qualifier on any file, but it is inoperative on files not marked for recovery-unit journaling.
This qualifier provides the only way of accessing a file that would otherwise be inaccessible because of unresolved recovery units. This situation might be the result of an unavailable recovery-unit journal file or of unavailable data files that were included in the recovery unit.
To use the /RU_JOURNAL qualifier, your process must have both CMEXEC privilege and access to the [SYSJNL] directory (either SYSPRV privilege or access for UIC [1,4]).
This qualifier is compatible with all of the ANALYZE/RMS_FILE qualifiers, and you can use it with wildcards and multiple file specifications.
The journal file specification and the journal creation date
The recovery-unit identification, recovery-unit start time, cluster system identification number (CSID), and process identification (PID)
Information about the files involved in the recovery unit, including the file specification, the name of the volume where the file resides, the file identification, the date and time the file was created, and the current status of the file
The state of the recovery unit — active, none, started, committed, or not available (for more information, see the RMS Journaling for OpenVMS Manual)
An error statement
Example
$ANALYZE/RMS_FILE/RU_JOURNAL SAVINGS.DAT
This command generates information regarding the journaling status of the data file SAVINGS.DAT.
/STATISTICS
/STATISTICS — Specifies that a report is to be produced containing statistics about the file.
Format
/STATISTICS
Description
The /STATISTICS qualifier is used mainly on indexed files.
By default, if you do not specify an output file with the /OUTPUT qualifier, the statistics report is written to the current SYS$OUTPUT device, which is generally your terminal.
The /STATISTICS qualifier is not compatible with the /CHECK qualifier, the /FDL qualifier, the /INTERACTIVE qualifier, or the /SUMMARY qualifier. If /STATISTICS is used with any other qualifiers, /FDL takes precedence, and then /INTERACTIVE; all other qualifiers are ignored. The /STATISTICS qualifier does an implicit check.
Example
$ ANALYZE/RMS_FILE/STATISTICS SEQ.DAT
This command generates a statistics report from the data file SEQ.DAT and displays the report on the current SYS$OUTPUT device, which is generally your terminal.
/SUMMARY
/SUMMARY — Specifies that a summary report is to be produced containing information about the file's structure and use.
Format
/SUMMARY
Description
The /SUMMARY qualifier generates a summary report containing information about the file's structure and use.
If the file has no errors, the output generated from the /SUMMARY qualifier is identical to that produced by the /CHECK qualifier. Unlike the /CHECK qualifier, however, the /SUMMARY qualifier does not check the structure of your file, so output is generated more quickly.
Do not use this qualifier with the /CHECK qualifier, the /FDL qualifier, the /INTERACTIVE qualifier, the /STATISTICS qualifier, or the /UPDATE_HEADER qualifier. If /SUMMARY is used with any other qualifiers, /FDL takes precedence, next /INTERACTIVE, and then /STATISTICS.
Example
$ANALYZE/RMS_FILE/SUMMARY INVENTORY.DAT
This command generates a summary report from the data file INVENTORY.DAT and displays the report on the current SYS$OUTPUT device, which is generally your terminal.
/UPDATE_HEADER
/UPDATE_HEADER — Attempts to update the following attributes in the header of the file: longest record length (LRL) and/or file length hint attribute. You must use this qualifier in combination with either /STATISTICS or /CHECK (the default). This qualifier only applies to sequential file organizations and is ignored for any other file organization.
Format
/UPDATE_HEADER ALL is default if qualifier is specified with no
              values
/UPDATE_HEADER=ALL Both LRL and HINT
/UPDATE=([LRL],[HINT])
Description
The /UPDATE_HEADER qualifier attempts to update the LRL and/or file hint attribute in the file header if the calculated value(s) differ from the current value(s) in the file header. The /UPDATE_HEADER qualifier applies to:
An LRL request - if the file is sequential and has a record format other than undefined (UDF).
A HINT request - if the file is sequential, the record format is either variable (VAR) or variable with fixed control (VFC), and the file is located on an ODS-5 disk device.
It is not supported for remote accesses; requests are ignored.
The /UPDATE_HEADER qualifier requires either the STATISTICS or CHECK (default) functions since calculating new values for the LRL and/or file length hint presumes that all the records in the sequential file are processed. It is not compatible with the /FDL qualifier, the /INTERACTIVE qualifier, or the /SUMMARY qualifier.
Any errors returned by the file system when an attempt to update the file header fails are ignored. If the update succeeds, the updated values are displayed at the end of the report.
Example
$ ANALYZE/RMS_FILE/UPDATE_HEADER=HINT A.A
FILE HEADER

     File Spec: DISK$REGRES:[REGRES]A.A;3
     ...

   RMS FILE ATTRIBUTES

            File Organization: sequential
            Record Format: variable
            Record Attributes:  carriage-return
            Maximum Record Size: 0
            Longest Record: 52
            Blocks Allocated: 4, Default Extend Size: 0
            End-of-File VBN: 1, Offset: %X'008E'
            File Monitoring: disabled
            File Length Hint (Record Count):    6 (invalid)
            File Length Hint (Data Byte Count): 42 (invalid)
            Global Buffer Count: 0

       The analysis uncovered NO errors.

            UPDATED File Length Hint (Record Count) to:    10
            UPDATED File Length Hint (Data Byte Count) to: 118

 ANALYZE/RMS_FILE/UPDATE_HEADER=HINT A.A
ANALYZE/RMS_FILE Commands
ANALYZE/RMS_FILE Commands — This section describes the Analyze/RMS_File utility commands that you use in the interactive mode. Unless otherwise noted, these commands do not take parameters or qualifiers. In the interactive mode, you use various commands to move through the file structure, examining its various components. Interactive sessions always begin at the FILE HEADER level.
AGAIN
AGAIN — Redisplays the structure you are currently viewing.
Format
AGAIN
Example
FIXED PROLOGNumber of Areas: 8, VBN of First Descriptor: 3Prolog Version : 3ANALYZE>AGAINFIXED PROLOGNumber of Areas: 8, VBN of First Descriptor: 3Prolog Version : 3
This command redisplays the FIXED PROLOG structure.
BACK
BACK — Displays a previous structure at the current level, if one exists.
Format
BACK [n]
Parameter
n
Specifies the number of times that the structure pointer moves back.
Description
You can use the optional parameter n instead of entering multiple
BACK commands. For example, the command BACK 6 has the same effect as six BACK
commands.
Examples
ANALYZE>BACKThis command displays the previous structure at the current level. For example, if you are currently viewing the second key descriptor of the primary key, this command displays the primary key descriptor.
ANALYZE>BACK 3This command displays the third structure back at the current level.
DOWN
DOWN — Moves the structure pointer down to the next level. From the FILE HEADER level, the first command you enter is the DOWN command, which moves the structure pointer to the FILE ATTRIBUTE level.
Format
DOWN [branch]
Parameter
branch
Specifies the branch you want to follow when the current level has several branches. If there are several branches from the current level and you do not specify a value for the branch parameter, the Analyze/RMS_File utility prompts you by displaying a list of possible branches.
You can also use a question mark after the DOWN command to obtain a list of the possible branches.
Example
ANALYZE> DOWN ?
%ANLRMS-I-DOWNHELP, The following is a list of paths down from this structure:
%ANLRMS-I-DOWNPATH, AREAS          Area descriptors
%ANLRMS-I-DOWNPATH, KEYS           Key descriptors
This command displays the branches available to you from the current location in the file structure. In this case, you can specify the AREAS branch or the KEYS branch.
ANALYZE> DOWN AREAS
AREA DESCRIPTOR #0 (VBN 3, offset %X'0000')

        Bucket Size: 1
        Reclaimed Bucket VBN: 0
        Current Extent Start: 1, Blocks: 9, Used: 4, Next: 5
        Default Extend Quantity: 2
        Total Allocation: 9
This command displays information about the descriptor structure for the first area in the file.
DUMP
DUMP — Displays a hexadecimal dump of the specified virtual block.
Format
DUMP n
Parameter
n
Specifies the virtual block number from which you want a dump. The number can be decimal or hexadecimal. The format for a hexadecimal number is %X n.
Example
ANALYZE> DUMP 10
DUMP OF VIRTUAL BLOCK 10:
          7  6  5  4  3  2  1  0          01234567
        ------------------------          --------
         73 20 73 27 65 6C 69 66|  0000  |file's s|
         65 72 75 74 63 75 72 74|  0008  |tructure|
         20 75 6F 59 00 43 00 2E|  0010  |..C.You |
         20 65 73 75 20 6E 61 63|  0018  |can use |
         66 20 4C 44 46 20 6E 61|  0020  |an FDL f|
         64 6F 72 70 20 65 6C 69|  0028  |ile prod|
         20 79 62 20 64 65 63 75|  0030  |uced by |
         2F 45 5A 59 4C 41 4E 41|  0038  |ANALYZE/|
         45 4C 49 46 5F 53 4D 52|  0040  |RMS_FILE|
         74 6F 20 68 74 69 77 20|  0048  | with ot|
         20 53 4D 52 20 72 65 68|  0050  |her RMS |
         65 69 74 69 6C 69 74 75|  0058  |utilitie|
         20 20 20 20 20 20 00 73|  0060  |s.      |
This command shows the first part of a dump of virtual block number (VBN) 10. The left column shows the bytes of the block in hexadecimal, read from right to left. The middle column shows the byte offset in hexadecimal from the beginning of the blocks. In the right column, the character equivalents of each byte are displayed. Nonprintable characters are represented by a period (.).
EXIT
EXIT — Ends an interactive session.
Format
EXIT
Example
ANALYZE>EXIT$
This command terminates the interactive session and returns you to the DCL level.
FIRST
FIRST — Displays the first structure on the current level.
Format
FORMAT
Example
ANALYZE>FIRST
If you are examining the primary and alternate key descriptors, this command displays the first key descriptor.
HELP
HELP — Displays help information about the interactive commands.
Format
HELP [keyword...]
Parameter
keyword
Specifies the interactive command you want help with.
Examples
ANALYZE> HELP

  Information available:

  AGAIN    BACK     DOWN     DUMP     EXIT     File_Structure
  FIRST    HELP     New_features      NEXT     POSITION   Radix
  REST     TOP      UP
This command shows the available help topics.
Topic? AGAIN
AGAIN
  This command displays the current structure one more time.
Topic?
This command displays information about the AGAIN command.
NEXT
NEXT — Displays the next structure at the current level, if one exists. Because NEXT is the default command, pressing the Return key is equivalent to executing a NEXT command.
Format
NEXT [n]
Parameter
n
Specifies the number of times the structure pointer moves forward.
Description
You can use the optional parameter n instead of entering multiple
NEXT commands. For example, the command NEXT 6 has the same effect as six NEXT commands
(or pressing the Return key six times).
Examples
ANALYZE>NEXTThis command displays the next structure at the current level. For example, if you are viewing key descriptors, this command displays the next key descriptor.
ANALYZE>NEXT 3This command moves the location pointer forward three times. For example, if you are viewing the first structure at the current level, this command displays the fourth structure.
POSITION/BUCKET
POSITION/BUCKET — Directly positions the structure pointer to a specific bucket of an indexed file or a relative file.
Format
POSITION/BUCKET bucket_vbn [/INDEX=n]
Parameter
bucket_vbn
The virtual block number (VBN) of the selected bucket. If the bucket includes more than one block, specify the VBN of the first block.
Qualifier
- /INDEX=n
Specifies the relative key for the bucket of an indexed file. The /INDEX qualifier is necessary only when the index number information is unavailable in the bucket header. For example, you use this qualifier to analyze a Prolog 1 or Prolog 2 file (no bucket header) or a Prolog 3 file with a corrupted bucket header. You can also use this qualifier to override the index number in a Prolog 3 file bucket header.
The number you use specifies the key. For example, /INDEX=0 specifies that the bucket is a primary index or primary data bucket, and /INDEX=1 specifies that the bucket is found in the first alternate index structure.
Description
The POSITION/BUCKET command lets you position the structure pointer to a specific bucket of your file. You can use this command to bypass step-by-step positioning. You can also use it to position the structure pointer at a bucket that is inaccessible because of structural errors in the file.
When the structure pointer is positioned at the beginning of the bucket, you can step forward or down through the index structure using the NEXT or DOWN command. If you enter an UP command when the structure pointer is positioned at the beginning of the bucket, the Analyze/RMS_File utility positions the pointer to the bucket's key descriptor. If you enter a BACK command when the structure pointer is positioned at the beginning of the bucket, the Analyze/RMS_File utility displays an appropriate error message and the pointer remains stationary.
Using the POSITION/BUCKET command allows you to specify a particular bucket header from which key descriptor information and valid path information are derived. The Analyze/RMS_File utility does not verify that the specified VBN is at the beginning block of a bucket. If the Analyze/RMS_File utility displays a series of error messages when you enter the POSITION/BUCKET command, it may be that the structure pointer is not positioned at the beginning of the bucket, or it may be that you specified an incorrect index number with the /INDEX qualifier.
Example
ANALYZE> POSITION/BUCKET 4
BUCKET HEADER (VBN 4)

           Check Character: %X'93'
           Key of Reference: 0
           VBN Sample: 4
           Free Space Offset: %X'0055'
           Free Record ID: 24
           Next Bucket VBN: 36
           Level: 0
           Bucket Header Flags:
              (0)  BKT$V_LASTBKT    0
This command displays the information for the bucket that begins at VBN4. Because this is a Prolog 3 file, you do not have to specify the key using the /INDEX= n qualifier. In a Prolog 3 file, the key information is available in the bucket header (Key of Reference: 0).
POSITION/RECORD
POSITION/RECORD — Positions the pointer at a specific record in an indexed or relative file.
Format
POSITION/RECORD record-offset
Parameter
record-offset
The offset (in bytes) from the beginning of the bucket to the desired record. By default, the offset is a decimal number. If you want to use hexadecimal notation to specify the offset, use the format %Xn.
Description
Use this command to display a specific record in the bucket. When the structure pointer is positioned at the desired record, you can move it down and forward to display the various records in the bucket; you cannot display previous records.
The POSITION/RECORD command is valid only when you are positioned at a bucket header. The command positions the structure pointer at the specified byte offset. If the pointer is not positioned at the beginning of a valid record, a series of error messages is generated.
Example
ANALYZE> POSITION/RECORD %XE
PRIMARY DATA RECORD (VBN 4, offset %X'000E')

                Record Control Flags:
                        (2)  IRC$V_DELETED    0
                        (3)  IRC$V_RRV        0
                        (4)  IRC$V_NOPTRSZ    0
                        (5)  IRC$V_RU_DELETE  0
                        (6)  IRC$V_RU_UPDATE  0
                Record ID: 11
                RRV ID: 11, 4-Byte Bucket Pointer: 4
                Key:
                          7  6  5  4  3  2  1  0          01234567
                        ------------------------          --------
                         00 00 00 00 00 00 00 02|  0000  |........|
This command positions the pointer at byte offset %XE, which is the location of the beginning of a record. This command is valid because the pointer was positioned at a bucket header before the POSITION/RECORD %XE command was entered.
REST
REST — Sequentially displays structures at the current level.
Format
REST
Example
ANALYZE>REST
This command displays each structure at the current level. For example, if you are viewing the primary and alternate key descriptors, the REST command displays each key descriptor sequentially.
TOP
TOP — Displays the FILE HEADER level.
Format
TOP
Example
ANALYZE>TOPFILE HEADERFile Spec: DISK$:[JONES.PROGRAM]INVENTORY.DAT;6File ID: (6367,16,1)Owner UIC: [DOC,DOE]Protection: System: RWE, Owner: RWED, Group: R, World:Creation Date: 13-NOV-1993 09:10:29.83Revision Date: 16-DEC-1993 14:10:37:16, Number: 4Expiration Date: none specifiedBackup Date: none postedContiguity Options: nonePerformance Options: noneReliability Options: noneJournaling Enabled: none
This command displays the file header information for the file INVENTORY.DAT.
UP
UP — Displays the data structures at the next higher level.
Format
UP
Example
ANALYZE>UP
This command positions the pointer at the next higher level of the file's structure. For example, if you are currently examining the RMS FILE ATTRIBUTES level, entering the UP command positions you at the FILE HEADER level and displays that level.
ANALYZE/RMS_FILE Examples
ANALYZE/RMS_FILE Examples — See the examples below to get a better understanding of how to use the ANALYZE/RMS_FILE utility.
Examples
$ANALYZE/RMS_FILE/INTERACTIVE/OUTPUT=INVENTORY INVENTORY.DATThis command begins an interactive session during which you can examine the structure of the data file INVENTORY.DAT. A transcript of the session is placed in the output file INVENTORY.ANL.
$ANALYZE/RMS_FILE/NOOUTPUT *.*;*This command verifies the structural integrity of all files in the current default directory.
$ANALYZE/RMS_FILE/FDL PARTS.DATThis command produces the FDL file PARTS.FDL from the data file PARTS.DAT. Assuming that PARTS.DAT is an indexed file, the new FDL file contains two special sections that FDL files created with the Edit/FDL utility do not have: ANALYSIS_OF_AREA and ANALYSIS_OF_KEY. You can use these sections with the EDIT/FDL Optimize script to tune your original data file, PARTS.DAT. To complete the tuning cycle, enter the following DCL commands:
$EDIT/FDL/ANALYSIS=PARTS/SCRIPT=OPTIMIZE PARTS$CONVERT/FDL=PARTS PARTS.DAT *$ANALYZE/RMS_FILE DENVER::DB1:[PROD]RUN.DATThis command analyzes the structure of the file RUN.DAT residing at remote node DENVER.
$ANALYZE/RMS_FILE/FDL/OUTPUT=TEST.FDL$_File(s):DENVER::DB1:[PROD]RUN.DATThis command analyzes the structure of the file RUN.DAT at remote node DENVER and generates the FDL file TEST.FDL at the local node.
Chapter 2. Convert Utility
The Convert utility (CONVERT) can be used to reorganize files by copying records from one or more source files to an output file, while converting the records to be compatible with the output file's organization and record format.
You can also use the Convert utility to improve the efficiency of indexed files that have had many record deletions and insertions by reformatting the file. In this case, the input file and the output file use the same file name and have the same organization, but the output file's version number is one greater than the highest previous version of the input file. When it reorganizes an indexed file, the utility establishes new record file addresses (RFAs) and may reorder duplicate records along secondary keys.
You can use callable routines to perform the functions of the Convert utility from within a program. For more information, refer to the Convert utility routines in the VSI OpenVMS Utility Routines Manual.
Support a Files-11 volume structure, On-Disk Structure Level 5 (ODS-5), that provides a volume structure for creating and storing files with expanded file names
Support additional character sets for naming files from file names that use the 8-bit ISO Latin-1 character set to the 16-bit Unicode (UCS-2) character set
Support extended file names with file specifications exceeding the traditional 39.39 character limit up to a maximum of 255 characters
Support preserving the case of file specifications created with the ODS-5 attributes
Support deep, multilevel directory structures up to a maximum of 512 characters
For more information, see the VSI OpenVMS Guide to Extended File Specifications.
This chapter tells you how to use the Convert utility. Section 2.1, ''Output Files'' explains how to produce converted output files with the utility. Section 2.2, ''Converting Carriage Control Formats'' describes converting between carriage control formats. Section 2.3, ''Using the Convert Utility with DECnet for OpenVMS Operations'' discusses using the Convert utility with DECnet for OpenVMS operations. Section 2.4, ''Exception Conditions'' explains how to handle the Convert utility exception conditions.
2.1. Output Files
You can reorganize the input file to be organized like an existing output file.
You can reorganize the input file in a new file. If you want the new file to be organized differently from the input file, use a File Definition Language (FDL) file to specify the characteristics for the new file. If you want the new file to be organized the same as the input file, do not use an FDL file to create the new file.
Note
If you specify an input FDL file that uses a collating sequence from the local system's National character set (NCS) library, be sure that the collating sequence does not have the same name as the collating sequence from the input index file. If the two collating sequences have the same name, the output file might be sorted improperly.
Typically, this might happen when the input indexed file is created on one system and is later transported to another system that already has a collating sequence with the same name. Both NCS and RMS use collating sequences that are identified by a character string that is processed as part of the named collating sequence. You can avoid this problem by renaming collating sequences that have conflicting names.
For more information about NCS, see the OpenVMS National Character Set Utility Manual.
You can use an existing output file that has records or an output file that has no records. If the output file is sequential, specifying the /APPEND qualifier causes the converted records from the input file to be added sequentially to the end of the output file. Note that the /APPEND qualifier is ignored if the output file is formatted for direct access; that is, either a relative file or an indexed file. If the output file is indexed and contains records, you can use the /MERGE qualifier to insert the new records in their proper order.
Sorting the records from an input file can be costly in terms of processing time and disk space. If the records in the output file are to be ordered in the same manner as the input file records, use the /NOSORT qualifier to save processing time and space. For more information about sorting indexed files, see both the /FAST_LOAD and the /SORT qualifiers in the CONVERT Qualifiers section.
RMS appends records with duplicate key values to the end of a list of duplicate keys so that the records are retrieved in chronological order. However, the Convert utility does not preserve chronological order for secondary keys. Instead, records having duplicate secondary keys are reordered and retrieved by the collating value of the primary key. For example, assume that you have a file of names that uses the primary key (Key0) FIRST_NAME and a secondary key (Key1) LAST_NAME. Assume, too, that the application program inserts a group of records in the following order:
Key0         Key1
 .            .
John          Jones
Martin        Smith
David         Jones
Joseph        Brown
Gary          Adams
Adam          Jones
 .            .
When an application program accesses the records sequentially by the secondary key (Key1), the records are retrieved in the following order:
Key0          Key1
 .             .
Gary          Adams
Joseph        Brown
John          Jones
David         Jones
Adam          Jones
Martin        Smith
 .             .
When an application program accesses the records sequentially by the secondary key (Key1) after the file is converted, the records are retrieved in the following order:
Key0          Key1
 .             .
Gary          Adams
Joseph        Brown
Adam          Jones
David         Jones
John          Jones
Martin        Smith
 .             .
Note the revised order of retrieval for the people named Jones.
2.2. Converting Carriage Control Formats
A file can have one of four carriage control formats:
CARRIAGE_RETURN
FORTRAN
PRINT
NONE
These formats are all represented differently, so when you are converting a file from one carriage control format to another, the carriage control information has to be translated.
Translation is especially important when you are converting to or from a file with the FORTRAN format. Records with the FORTRAN format contain one byte of carriage control information at the beginning of each record.
For most conversions, the FORTRAN carriage control information is preserved as the first data byte of the record, and the printing characteristics are lost. However, certain conversions can preserve the printing characteristics of the FORTRAN carriage control information. When FORTRAN carriage control is converted to the equivalent PRINT carriage control, the information preceding each FORTRAN record is changed but not lost.
When PRINT carriage control is converted to FORTRAN carriage control, certain characters that supply carriage control information to the printer cannot be translated exactly. These untranslatable characters are represented as a single-spaced FORTRAN record.
When FORTRAN carriage control is converted to STREAM, control characters affecting carriage
returns (<CR>), line feeds (LF), and form feeds (
FF) are prefixed and appended to each FORTRAN record. These characters may
affect the STREAM output because they are considered record delimiters for stream files. As a
result, you may have a different number of records in the STREAM output file, and some of the
records may be null.
|
STREAM Format Equivalent | ||
|---|---|---|
|
FORTRAN Format |
Characters Prefixed |
Characters Appended |
|
1 |
FF |
|
|
0 |
LF LF |
|
|
space |
LF |
|
|
$ |
LF |
Nothing appended |
|
+ |
Nothing prefixed |
|
|
null |
Nothing prefixed |
Nothing appended |
All other conversions from FORTRAN preserve the carriage control information as data. All other conversions to FORTRAN prefix the converted records with the ASCII space character to obtain single spacing.
For more information about carriage control, see the description of the File Definition Language (FDL) in Chapter 4, "File Definition Language Facility".
2.3. Using the Convert Utility with DECnet for OpenVMS Operations
You can use the CONVERT command to transfer files to and from a remote node, either with or without modifying file attributes. If the output file exists, the Convert utility changes the organization and format of the input data file to that of the output file. If the output file does not exist, the utility creates it from the file attributes specified in an FDL file.
You can also use the Convert utility to copy files to or from a remote node without modifying file attributes. The Convert utility transfers the file record by record, just as it does on a single node. However, you must have NETMBX privilege to execute CONVERT commands over a network.
2.4. Exception Conditions
Certain conversions cause exception conditions. An exception condition occurs when a record from the input file cannot be placed in the output file because of some format incompatibility. The Convert utility sends a warning error message to SYS$ERROR upon encountering a record that causes an exception condition.
For example, an exception condition occurs when the length of the input records exceeds the length you specified for fixed-length output records. You can avoid this exception condition by specifying the /TRUNCATE qualifier. Converting short fixed-length records into longer fixed-length records also causes an exception. To avoid this exception condition, use the /PAD qualifier to fill in the output records. The /PAD qualifier allows you to specify your choice of pad character.
To keep a copy of the exception records, create an exceptions file with the /EXCEPTIONS_FILE qualifier. The exceptions file is a sequential file with variable-length records; it receives a copy of any record that cannot be placed in the output data file. Exceptions files have the file type .EXC, by default.
2.5. Using the CONVERT Utility
CONVERT Usage Summary
CONVERT Usage Summary — The Convert utility (CONVERT) copies records from one or more files to an output file, changing the record format and file organization to those of the output file.
Format
CONVERT input-filespec[,...] output-filespec
input-filespec [,...]
Specifies the file or files to be converted. You may specify multiple input files but wildcard characters are not allowed. Multiple input files are concatenated to form a single output file.
If your process open-file limit is reached, or if RMS runs out of dynamic memory, then the file conversion prematurely terminates with an appropriate message.
output-filespec
Specifies the output file for the converted records. If you omit the file type, the Convert utility assigns the output file the file type of the first input file. No wildcard characters are allowed.
Usage Summary
Invoke the Convert utility by entering the CONVERT command at the DCL level.
Exit the Convert utility by letting the utility run to successful completion.
Output from the Convert utility is directed to the file you indicate with the output-filespec parameter. For more information, see Section 2.1, ''Output Files''.
If you want to execute CONVERT commands over a network, you need NETMBX privilege.
2.6. CONVERT Qualifiers
This section describes the CONVERT command qualifiers used to select the organization and format of the output file.
/APPEND
/APPEND — Controls whether converted records from an input file are appended to an existing sequential file.
Format
/APPEND
/NOAPPEND (DEFAULT)
Description
The /APPEND qualifier is useful when you want to convert an existing file to the format of an existing output file and append the converted records to the existing output file.
If you specify the /APPEND qualifier and the /CREATE qualifier, /APPEND overrides the /CREATE.
You should use this option when you are loading records into a sequential file that already contains records, or when you are creating a new sequential file. When the output file is a direct access file (relative or indexed), the /APPEND qualifier is ignored.
Example
$CONVERT/APPEND N_Z_FILE.DAT A_M_FILE.DAT
This command causes the sequential input file N_Z_FILE.DAT to be attached to the end of the sequential file A_M_FILE.DAT.
/CREATE
/CREATE — Determines whether the Convert utility creates a file or uses an existing file for output.
Format
/CREATE (DEFAULT)
/NOCREATE
Description
The /CREATE qualifier causes the Convert utility to create an output file instead of using an existing file for output.
If the output file is to have different characteristics from the input file, you must also specify the /FDL qualifier. To create an output file with the same characteristics as the input file, omit the /FDL qualifier.
If you specify the /NOCREATE qualifier, the Convert utility uses an existing file for output. You would use this option, for instance, to load records into a data file that you created previously with the Create/FDL utility.
Examples
$CONVERT/CREATE OLDFILE.DAT NEWFILE.DATThis command creates the new output file NEWFILE.DAT and loads it with the records from OLDFILE.DAT.
$CONVERT/CREATE/FDL=UPDATE.FDL OLDFILE.DAT NEWFILE.DATThis command creates the new output file NEWFILE.DAT and loads it with the OLDFILE.DAT records that have been reformatted according to the characteristics in the FDL file UPDATE.
/EXCEPTIONS_FILE
/EXCEPTIONS_FILE — Specifies whether an exceptions file (file type .EXC) is to be generated during the conversion.
Format
/EXCEPTIONS_FILE [=filespec]
/NOEXCEPTIONS_FILE (DEFAULT)
Qualifier Value
filespec
Specifies the file in which the exception records are returned. If you specify /EXCEPTIONS_FILE but omit the filespec parameter, the exception records are displayed on the SYS$OUTPUT device.
Example
$CONVERT/EXCEPTIONS_FILE=EXFILE.EXC/FDL=NEWFILE.FDL OLDFILE.DAT NEWFILE.DAT
This command loads the records from OLDFILE.DAT into NEWFILE.DAT and writes any records that cause exceptions into the file EXFILE.EXC.
/EXIT
/EXIT — Controls whether the Convert utility exits when it encounters an exception record. By default, the Convert utility continues processing records when it encounters an exception record.
Format
/EXIT
/NOEXIT (DEFAULT)
Example
$ CONVERT/FDL=NEWFILE.FDL/EXIT OLDFILE.DAT NEWFILE
This command loads the records from OLDFILE.DAT into NEWFILE.DAT and causes the Convert utility to exit if an exception record is processed. Because no output file type is specified, the Convert utility assigns the output file the same file type as the input file.
/FAST_LOAD
/FAST_LOAD — Specifies whether the Convert utility uses a fast-loading algorithm for indexed files.
Format
/FAST_LOAD (DEFAULT)
/NOFAST_LOAD
Description
Note
By default, the Convert utility uses the fast-loading algorithm, but if CONVERT/FAST_LOAD is executed across a network, the Convert utility automatically changes from /FAST_LOAD to /NOFAST_LOAD.
The /FAST_LOAD qualifier and the /NOFAST_LOAD qualifier both sort primary keys, and both qualifiers require multiple scratch disk files.
Essentially, the difference between the /NOFAST_LOAD option and the /FAST_LOAD option is the way records are inserted into an indexed file. The /NOFAST_LOAD qualifier uses the normal RMS Put service to load each record; RMS updates the indexes of both the primary and secondary (alternate) keys as each record is inserted.
The main disadvantage of using the /NOFAST_LOAD option is the slower system performance that results from bucket splits and updates to the index. As each primary key is inserted, any secondary keys for that record are inserted in the order of the primary key. In other words, the secondary keys are not inserted in order of their own keys. These unsorted secondary keys may eventually cause bucket splits; as a result, the index structure for the secondary keys may be less efficient.
The advantage of the /NOFAST_LOAD option is that the Convert utility does not attempt to sort secondary keys. Conversely, if you specify the /FAST_LOAD option, the Convert utility sorts the primary and the secondary keys.
- The primary keys are sorted. If the input file is on magnetic tape or if you specify multiple input files, the sort work file contains the sorted records. If the input file is on a disk, however, the sort work file contains only pointers to the sorted records.
Note
If your input records are already ordered by the primary key or if the primary key of the input and output files is the same, you should specify /NOSORT. This qualifier ensures that the primary keys are not sorted again. For more information about sorting, see the description of the /SORT qualifier.
The Convert utility builds the primary data record level from the sorted output file. The utility completely fills a bucket with data before it creates the lowest primary index level (the level 1 index). When an index bucket is filled, the Convert utility creates an index record in the next highest index level. If there is at least one secondary key, the Convert utility sends the first secondary key's value along with a pointer to the new output record to the Sort utility using the record interface. If there are multiple secondary keys, Convert sends as many of those keys up to the value specified by the /SECONDARY qualifier to a temporary file along with a pointer to the new output record for later sorting. This is performed in parallel while the primary key's data structures are being loaded.
When the Convert utility is finished with the primary key, it updates the associated KEY DESCRIPTOR in the file's prolog, closes any input files, deletes any temporary files and closes any input files. At this point, the utility has created a valid output file with records ordered by the primary key. If you specified no alternate keys, the Convert utility terminates.
The Sort utility is then called to sort the first alternate key (if one has been specified). These records were passed to sort during the load of the primary key.
The Convert utility loads these sorted pointers into the secondary index data record (SIDR) level and adjusts them to point to the records in the primary data level. Again, the utility completely fills a bucket with data before it creates the lowest secondary index level. When an index bucket is filled, the Convert utility creates an index record in the next highest secondary index level.
When the Convert utility is finished with this secondary key, it updates the associated KEY DESCRIPTOR in the file's prolog. At this point, the Convert utility has created a valid output file, containing sorted primary keys and secondary keys. If you specified no alternate keys, the Convert utility terminates.
If there are additional secondary keys, the Convert utility calls the Sort utility to sort the temporary file on the next secondary key value. These records are then loaded to the output file as in steps 5 and 6 until all secondary keys have been processed.
The primary advantage of using the /FAST_LOAD option is that it is considerably faster than the RMS method used by the /NOFAST_LOAD option. In most cases, you can increase processing speed by a factor of 10. Even greater speed results when you load large files with many keys.
In addition, the index structure can be very efficient because each key is sorted before it is loaded. The only disadvantage is the large amount of disk space needed for the work files. However, you can control the amount of disk space by using the /WORK_FILES qualifier and by reassigning the work files to different devices. See the /WORK_FILES qualifier for more information.
Examples
$CONVERT/FAST_LOAD UPDATE.DAT MASTER.DATThis command loads the records from the file UPDATE.DAT into the output file MASTER.DAT using the /FAST_LOAD option. The Convert utility attains the added speed by building the indexes directly and then using RMS for block I/O only.
$CONVERT/NOFAST_LOAD UPDATE.DAT MASTER.DATThis command loads the records from the file UPDATE.DAT into the output file MASTER.DAT. In this case, the operation takes longer because the Convert utility uses RMS Put services to output each individual record.
Exit the convert utility by letting the utility run to successful completion.
Output from the Convert utility is directed to the file you indicate with the
output-filespec parameter. For more information, see Section 2.1, ''Output Files''.
If you want to execute Convert commands over a network, you need NETMBX privilege.
/FDL
/FDL — Indicates that an FDL file is to be used in creating the output file.
Format
/FDL=fdl-filespec
Qualifier Value
fdl-filespec
Specifies the FDL file to be used in creating the output file.
Description
The default file type for the FDL file is .FDL.
Example
$CONVERT/FDL=INDEXFILE CUSTSEQ.DAT CUSTIND.DAT
This command creates the new file CUSTIND.DAT according to the specifications in the FDL file INDEXFILE.FDL. Records are then loaded from CUSTSEQ.DAT into CUSTIND.DAT.
/FILL_BUCKETS
/FILL_BUCKETS — Controls whether to override the bucket fill percentage parameter associated with the output file.
Format
/FILL_BUCKETS
/NOFILL_BUCKETS (DEFAULT)
Description
If you specify /FILL_BUCKETS, the Convert utility fills the output file buckets with as many records as possible. This behavior is advantageous if you do not plan to do random file processing, because using fewer buckets saves disk space and processing time.
With /NOFILL_BUCKETS, however, the Convert utility does not fill the buckets completely. Therefore, you can add records at a later date without splitting buckets or extending the file.
This option is valid only for indexed output files.
Example
$CONVERT/FILL_BUCKETS SALES_DATA.DAT CUST_DATA.DAT
This command loads the records from the indexed file SALES_DATA.DAT into the indexed file CUST_DATA.DAT, filling the buckets of the output file with as many records as possible.
/FIXED_CONTROL
/FIXED_CONTROL — Controls file conversions between files having variable-length with fixed-length control field (VFC) records and files having other record formats.
Format
/FIXED_CONTROL
/NOFIXED_CONTROL (DEFAULT)
Description
This qualifier applies only to conversions where either the input or the output file, but not both, uses VFC records. This option is applicable only to sequential files.
When you use this qualifier, you must account for the size of the fixed-control area when you calculate the maximum size of the output record.
If you specify /FIXED_CONTROL and the input file uses VFC records but the output file does not, the fixed-length control field from the input record is inserted into the output record as data.
If you specify /FIXED_CONTROL and the output file has VFC records but the input file does not, the leading part of the input record is used to fill the fixed-length control part of the output record.
If you specify /NOFIXED_CONTROL and the input file uses VFC records but the output file does not, the fixed-length control field from the input record is not included as data in the output record.
If you specify /NOFIXED_CONTROL and the output file has VFC records but the input file does not, the control field attached to the output record is set to null.
Example
$CONVERT/FIXED_CONTROL VFC_FILE.DAT OUTFILE.DAT
This command loads the VFC records in the input file VFC_FILE.DAT into the output file OUTFILE.DAT.
/KEY
/KEY — Directs the Convert utility to read records from an indexed file using a specified key of reference, such as the primary key, the first alternate key, or the second alternate key.
Format
/KEY=n
Qualifier Value
n
A numeric value that specifies the key of reference that the Convert utility uses for reading records from the input indexed file. For example, you can specify the primary key as the key of reference by using the value 0 (/KEY=0), which is the default, or you can specify the first alternate key as the key of reference by using the value 1 (/KEY=1).
Description
The /KEY qualifier is valid for indexed input files only. If you use the /KEY qualifier, you must specify a key value (/KEY=0, /KEY=1, and so on). If you do not specify the /KEY qualifier, the default is the primary key (/KEY=0).
Example
$CONVERT/NOCREATE/KEY=1 CUST_INX.DAT CUST_SEQ.DAT
This command loads the records from the indexed input file CUST_INX.DAT into the sequential output file CUST_SEQ.DAT. The records in the output file are ordered by the first alternate key in the input file.
/MERGE
/MERGE — Specifies that records are to be inserted into their proper position in an existing indexed file.
Format
/MERGE
/NOMERGE (DEFAULT)
Description
The /MERGE qualifier is useful when your input records are not sorted and you do not want them to be sorted as they are loaded into an output file.
If you specify both /MERGE and /CREATE, /MERGE overrides the /CREATE qualifier.
Example
$CONVERT/MERGE ACCOUNTS.DAT MASTER_INX.DAT
This command loads the records from the input file ACCOUNTS.DAT into the existing indexed output file MASTER_INX.DAT according to primary key values.
/PAD
/PAD — Determines whether short records are to be padded.
Format
/PAD [=[%b]x]
/NOPAD (DEFAULT)
Qualifier Value
x
Specifies that the short records are to be padded with either ASCII characters (A through Z, a through z, or 0 through 9) or numeric values.
To specify x as a numeric value, you must specify the numeric base
using the percent symbol (%) followed by one of the following characters:
|
D |
Indicates that |
|
O |
Indicates that |
|
X |
Indicates that |
The numeric value can be any number from 0 to 255.
Description
The /PAD option is valid only for fixed-output record formats and is used to pad short records with ASCII characters or numeric values. A record is too short when it contains fewer bytes than the number of bytes specified for fixed-length records.
If you specify /PAD without a qualifier value, the default pad character is the ASCII null character (binary value 0).
Example
$CONVERT/NOCREATE/PAD=%X20 INFILE.DAT OUTFILEThis command specifies that any short records in the input file INFILE.DAT are to be padded with an ASCII space character before being loaded into the fixed-length output file OUTFILE.DAT.
$CONVERT/FDL=FIXED/PAD=X INFILE.VAR OUTFILE.FIXThis command creates the fixed format file OUTFILE.FIX and then loads it with records from the variable input file INFILE.VAR. Any short records from the input file are padded with ASCII X characters before they are loaded into the output file.
/PROLOG
/PROLOG — Specifies the prolog version number of the output indexed file.
Format
/PROLOG=n
Qualifier Value
Specifies the prolog number 1, 2, or 3.
If you specify 2 for n, the output file will be either a Prolog 1 or a
Prolog 2 file.
If you specify 3, the Convert utility creates a Prolog 3 file for output. Prolog 3 files accept multiple keys (or alternate keys), all data types, and segmented keys. The only restriction to using a Prolog 3 file applies to files containing overlapping key segments for the primary key. In this case, you would have to use a Prolog 2 file.
Description
If you do not specify the /PROLOG qualifier, the Convert utility uses the prolog version of the first input file. If the input file is not indexed, the utility uses the RMS default. To see what this default is on your system, enter the DCL command SHOW RMS_DEFAULT.
The /PROLOG qualifier overrides the value given with the FDL attribute KEY PROLOG.
Example
$CONVERT/PROLOG=3 INFILE_2 OUTFILE_3
This command loads the records from the Prolog 2 input file INFILE_2 into the Prolog 3 output file OUTFILE_3. Both the input and output file are indexed files.
/READ_CHECK
/READ_CHECK — Specifies whether each input record is to be read from the file a second time and compared to the record originally read.
Format
/READ_CHECK
/NOREAD_CHECK (DEFAULT)
Example
$CONVERT/READ_CHECK Q3_SALES.DAT YTD_SALES.DAT
This command specifies that the records from the input file Q3_SALES.DAT are to be read and checked by the file processor, and then loaded into the output file YTD_SALES.DAT.
/SHARE
/SHARE — Specifies whether the input file is to be opened for sharing with other processes during the conversion.
Format
/SHARE
/NOSHARE (DEFAULT)
Description
You can use the /SHARE option to generate a rough backup of a file that is always opened for sharing by some applications. However, another process can alter the records during the Convert utility operations. As a result, the consistency of the output file cannot be guaranteed.
Example
$CONVERT/SHARE SYSUAF.DAT BACKUP.DAT
This command indicates that the input file SYSUAF.DAT is open for sharing with other processes at the same time its records are being loaded into the output file BACKUP.DAT.
/SECONDARY
/SECONDARY — Increases the Convert utility's performance by reducing the number of required passes through the input data. This is accomplished by placing alternate key information into the CONVWORK file.
Format
/SECONDARY=n
Qualifier Value
Specifies the number of alternate keys that will be loaded to the CONVWORK file with each pass through the input data.
The default number of alternate keys written to the CONVWORK file is 1.
Description
This qualifier is valid when you are fast-loading a file with more than one alternate key. While the primary key is being loaded, the first alternate key of the file is passed to the Sort utility using the record interface. Additionally, a number of /SECONDARY number of alternate keys are extracted and placed into the CONVWORK file for subsequent Sort and Load operations.
Example
$CONVERT/SECONDARY=2 Q3_SALES.DAT YTD_SALES.DAT
This command causes the Convert utility to load the records from the input file Q3_SALES.DAT into the output file YTD_SALES.DAT. The 2nd and 3rd alternate keys are placed into the CONVWORK file while loading the primary key, reducing the need to read through the input data to process them.
/SORT
/SORT — Specifies whether the input file is to be sorted before being loaded into an indexed file. The sort is done according to the primary key of the output file.
Format
/SORT (DEFAULT)
/NOSORT
Description
Two procedures can improve the sort performance:
Increasing the size of the working set for the duration of the sort. The general rule is to use as large a working set as allowed by your working set quota. To set this value, use the DCL command SET WORKING_SET. To see what your authorized quota is, enter the SHOW WORKING_SET command.
Placing the input file, the output file, and the temporary work files on separate disk devices. The default operation is to place the work files on your default device, which could cause the Convert utility to run out of disk space. To specify the location of the work files, enter a command in the following form:
ASSIGN device-name: SORTWORKn
The
nrepresents the number of the work file, from 0 to 9. The colon is required after the device name. For example, the following two ASSIGN commands would place the work files on disks named TMPD and DEVD:$ ASSIGN TMPD: SORTWORK0 $ ASSIGN DEVD: SORTWORK1
Using more than two work files is not particularly advantageous unless you have to use many smaller ones in order to fit on crowded disks. You can control the number of work files with the /WORK_FILES qualifier.
For more information about using the Sort utility with the Convert utility, see the /FAST_LOAD qualifier.
Examples
$CONVERT/SORT IN_INX.DAT OUT_INX.DATThis command causes the records in the input indexed file IN_INX.DAT to be sorted according to the primary key values before being loaded into the output indexed file OUT_INX.DAT.
$CONVERT/NOSORT/FDL=REORG INX.DAT INX.DATThis command reorganizes the file INX.DAT according to the attributes specified in the FDL file REORG.FDL. The primary keys are not sorted because INX.DAT is already ordered by the primary key, and the primary key definition did not change.
/STATISTICS
/STATISTICS — Determines whether statistics about the file conversion are to be displayed.
Format
/STATISTICS [=keyword]
/NOSTATISTICS (DEFAULT)
Keywords
BRIEF
Displays a summary of the file conversion at the completion of the operation.
FULL
Displays summary information at the completion of each key load containing Sort and Load statistics for the key. A summary of the file conversion is also displayed at the completion of the operation.
Description
The statistics produced by the Convert utility upon completion are as follows:
Number of files processed
Total records processed
Total exception records
Total valid records
Elapsed time
Buffered I/O count
Direct I/O count
Page faults
CPU time
If you specify the /STATISTICS qualifier without specifying a keyword, CONVERT defaults to /STATISTICS=BRIEF.
Example
$CONVERT/STATISTICS=FULL Q3_SALES.DAT YTD_SALES.DAT
This command causes the Convert utility to load the records from the input file Q3_SALES.DAT into the output file YTD_SALES.DAT. Statistics about the Sort and Load of each key are displayed as each key is processed. At the completion of the file conversion, the set of summary statistics is displayed.
/TRUNCATE
/TRUNCATE — Specifies whether records that exceed the maximum record length for variable-length records, or records that exceed the specified record length for fixed-length records, are to be truncated.
Format
/TRUNCATE
/NOTRUNCATE (DEFAULT)
Description
If you specify /NOTRUNCATE and a long record is encountered, the record is not written to the output file. If you specify the /EXCEPTIONS_FILE qualifier, the entire record is written to the exceptions file.
Examples
$CONVERT/TRUNCATE INFILE.DAT OUTFILE.DATIn response to this command, CONVERT truncates input file records to conform to the specifications of the output file.
$CONVERT/NOTRUNCATE/EXCEPTIONS_FILE=EXFILE INFILE OUTFILEThis command causes the Convert utility to write input file records that exceed the size specifications of the output file to the exceptions file.
/WORK_FILES
/WORK_FILES — Specifies the number of temporary work files to be used during the sort process.
Format
/WORK_FILES=n
Qualifier Value
n
Specifies the number of work files you want. You can specify 0 or any value from 1 through 10.
The default number of work files used during a sort is 2.
Description
This qualifier is valid when you are fast-loading a file with multiple keys or when you specify the /SORT qualifier. For more information about sorting, see both the /SORT and the /FAST_LOAD qualifiers.
Example
$CONVERT/WORK_FILES=0 UPDATE.DAT MASTER.DAT
This command loads the records from the input file UPDATE.DAT into the output file MASTER.DAT without using any work files.
/WRITE_CHECK
/WRITE_CHECK — Specifies whether all writes are to be checked by comparing the new disk records with the original records in memory.
Format
/WRITE_CHECK
/NOWRITE_CHECK (DEFAULT)
Description
If you use this switch, each new record on the disk is read and then compared with the original record in memory.
Example
$CONVERT/WRITE_CHECK UPDATE.DAT MASTER.DAT
In response to this command, the Convert utility loads the records from the input file UPDATE.DAT into the output file MASTER.DAT, and then compares the output records with the input for accuracy.
Examples
$CONVERT/NOCREATE/TRUNCATE/EXCEPTIONS_FILE=EXFILE VARFILE.DAT FIXFILE.DATThis command causes the Convert utility to copy records from a file with variable-length records (VARFILE.DAT) to a file with fixed-length records (FIXFILE.DAT). Records longer than the fixed length are truncated, and short records are copied to the exceptions file EXFILE.EXC.
$CONVERT FILE.IDX FILE.IDXThis command creates the output file FILE.IDX with a version number one higher than that of the input file. The output file is a copy of the input file, but it is a clean copy without bucket splits, RRVs (record reference vectors), or pointers to deleted records. The performance of the output file is also improved.
Note that the Convert utility establishes new record file addresses (RFAs) during such reorganizations.
$CONVERT/FDL=TEST.FDL TRNTO::DBA1:[EXP]SUB.DAT OUT.DATThis command creates a new sequential file OUT.DAT with stream record format at the local node, according to the specification in the previously created FDL file TEST.FDL. The input file SUB.DAT at remote node TRNTO is sequential with variable-length record format. The Convert utility copies records from SUB.DAT to OUT.DAT, changing the format of the records.
The contents of the FDL file TEST.FDL are as follows:
SYSTEM SOURCE VAX/VMS FILE ORGANIZATION SEQUENTIAL RECORD BLOCK_SPAN YES CARRIAGE_CONTROL CARRIAGE_RETURN FORMAT STREAM SIZE 0$CONVERT MASTER.DAT DENVER::DB1:[PROD]MASTER.SAVThis command creates a new file called MASTER.SAV at remote node DENVER from the file MASTER.DAT at the local node. Because the /FDL qualifier is not used, the new file has the same file organization and record format as the original file. The action of this CONVERT command is similar to that performed by the COPY command. However, CONVERT transfers the file record by record and thus does not use block I/O.
$CONVERT/APPEND SALES.TMP KANSAS::[200,2]SALES.CMDThis command causes records from the file SALES.TMP at the local node to be added sequentially to the end of the output file SALES.CMD at remote node KANSAS. The file SALES.TMP is sequential with variable-length record format, and the file SALES.CMD is sequential with stream record format. When the Convert utility loads records from the input file to the output file, it changes the record format.
$CONVERT/FDL=FIXED/PAD=0/TRUNCATE INFILE.VAR OUTFILE.FIXThis command creates the fixed format file OUTFILE.FIX and then loads it with records from the variable input file INFILE.VAR. Before they are loaded, any short records from the input file are padded with an ASCII 0 character, and any long records are truncated.
$ CONVERT/FDL=SYS$INPUT FORT.DAT STREAM.DAT
FILE
        ORGANIZATION            SEQUENTIAL

RECORD
        CARRIAGE_CONTROL        CARRIAGE_RETURN
        FORMAT                  STREAM
[Ctrl/Z]
This command converts the FORTRAN carriage control file FORT.DAT to a stream file that prints or types identically. The number of records may differ, and the FORTRAN carriage control information is removed from the records.
$ CONVERT/FDL=SYS$INPUT FORT.DAT VAR.DAT
FILE
        ORGANIZATION            SEQUENTIAL

RECORD
        CARRIAGE_CONTROL        CARRIAGE_RETURN
        FORMAT                  VARIABLE
[Ctrl/Z]
This command converts the FORTRAN carriage control file FORT.DAT to a variable-length record file. The FORTRAN carriage control information is preserved as the first data byte, and the number of records in the output and input files is the same.
Chapter 3. Convert/Reclaim Utility
The Convert/Reclaim utility (CONVERT/RECLAIM) reclaims empty buckets in Prolog 3 indexed file on local and remote nodes. Using the /KEY qualifier, you can reclaim index buckets for specific keys. If you request statistics and specify a group of keys, the Convert/Reclaim utility returns statistics separately for each specified key.
Unlike the Convert utility, the Convert/Reclaim utility preserves the RFAs from the input file. In general, the Convert utility provides more efficient indexed files than the Convert/Reclaim utility.
You can use callable routines to perform Convert/Reclaim utility functions from within a program. For more information, refer to the CONVERT routines in the VSI OpenVMS Utility Routines Manual.
3.1. Using the Convert/Reclaim Utility
The Convert/Reclaim utility reclaims empty buckets in an existing Prolog 3 indexed file. The organization, record format, and key order of the file are not changed.
When you delete all the records in a bucket, it still retains its position within the database because it has a specified range of primary key values associated with it. When you write new records to the file, the records with primary key in the specified range are written to the bucket.
If your application has buckets with records that do not use a primary key left over from a deleted record, empty buckets cannot be reused unless you reclaim them. To reclaim a bucket, the Convert/Reclaim utility deletes the old pointers to it and puts it on a list of free buckets. When an application adds records and needs a bucket, RMS goes to the free bucket list and sets up pointers to a bucket from the free bucket list. By reclaiming buckets, you may avoid extending the file, thereby optimizing processing efficiency.
Another benefit in using the Convert/Reclaim utility is that the utility preserves RFA (record file address) access to the file.
You cannot use the Convert/Reclaim utility on Prolog 1 or Prolog 2 indexed files. To reclaim empty buckets in a Prolog 1 or Prolog 2 indexed file, you must first reorganize the file by using the Convert utility. This reorganization creates a new version of the file. Note however, that the Convert utility establishes new RFAs for the file records.
To invoke the Convert/Reclaim utility from within a program, use the callable CONV$RECLAIM routine. For more information, refer to the VSI OpenVMS Utility Routines Manual.
CONVERT/RECLAIM Usage Summary
CONVERT/RECLAIM Usage Summary — The Convert/Reclaim utility (CONVERT/RECLAIM) reclaims empty buckets in Prolog 3 indexed files so that new records can be written into the reclaimed buckets. The output file retains the same record format, file organization, and key order as the input file.
Format
CONVERT/RECLAIM filespec
filespec
Specifies the Prolog 3 indexed file in which you want to reclaim buckets. When you use the CONVERT/RECLAIM command, the file cannot be opened for shared access.
Usage Summary
Invoke the Convert/Reclaim utility by entering the CONVERT/RECLAIM command at the DCL level. Exit the Convert/Reclaim utility by letting the utility run to successful completion. The Convert/Reclaim utility produces an output file only if you specify the /STATISTICS command qualifier.
If you want to execute CONVERT/RECLAIM commands over a network, you need NETMBX privilege.
Qualifiers
Qualifiers — This section describes the CONVERT/RECLAIM command qualifiers. Using these qualifiers, you can reclaim index buckets by key and you can also request reclamation statistics.
/KEY
/KEY — The /KEY qualifier lets you reclaim index buckets for specified keys.
Format
/KEY=key_number[,...] filename
Qualifier Values
key_number
Specifies the key number for the buckets to be reclaimed.
filename
Specifies the name of the index file containing the buckets to be reclaimed.
Description
If you request statistics and specify the /KEY qualifier, the utility reports the statistics for each key separately. If you do not use the /KEY qualifier, the default is to reclaim all index buckets and to provide a single report.
/STATISTICS
/STATISTICS — Determines whether statistics about the completed conversion and reclamation are displayed. If you do not specify reclamation of index buckets by key, all buckets are reclaimed and a single statistics report is generated. If you specify reclamation of index buckets by key, a separate set of statistics is returned for each specified key.
Format
/STATISTICS
/NOSTATISTICS (DEFAULT)
Description
The Convert/Reclaim utility provides the following statistics:
Total buckets scanned
Data buckets reclaimed
Index buckets reclaimed
Total buckets reclaimed
Elapsed time
Buffered I/O
Direct I/O
Page faults
CPU time
Chapter 4. File Definition Language Facility
The File Definition Language facility includes the File Definition Language (FDL), the Create/FDL utility (see Chapter 5, "Create/FDL Utility"), and the Edit/FDL utility (see Chapter 6, "Edit/FDL Utility"). This chapter describes the File Definition Language.
4.1. Overview
The File Definition Language facility helps you design data files that can be processed efficiently by using a model file (FDL file) whose attributes (characteristics) are subsequently applied to the data file. This section provides an overview of an FDL file, briefly describing each of its primary attributes. Other sections expand on each of the primary attributes, presenting them in alphabetical order.
An FDL file is a collection of file sections, where each section describes a file attribute. The file sections appear in the following order:
TITLE
IDENT
SYSTEM
FILE
DATE
RECORD
ACCESS
NETWORK
SHARING
CONNECT
AREA
KEY
ANALYSIS_OF_AREA
ANALYSIS_OF_KEY
The TITLE, IDENT, AREA, KEY, ANALYSIS_OF_AREA, and ANALYSIS_OF_KEY sections take values. The SYSTEM, FILE, DATE, RECORD, ACCESS, SHARING, and CONNECT sections do not take values; instead, they serve as labels for the related sections. The ANALYSIS_OF_AREA and ANALYSIS_OF_KEY sections appear only in FDL files created with the Analyze/RMS_File utility (ANALYZE/RMS_FILE).
Each section may include a lower order of file characteristics called secondary attributes, and some secondary attributes have a third level of attributes called qualifiers. An FDL file consists of attribute keywords followed by their assigned values. Lowercase letters and uppercase letters are equivalent and can be used interchangeably. Secondary attributes can be either create-time attributes or run-time attributes. Create-time attribute values are established when the file is created. Run-time attributes are established just prior to an application's opening or connecting to an existing file by calling the FDL$PARSE routine and by passing the routine the applicable FDL file specification. See the VSI OpenVMS Utility Routines Manual for details about using the FDL$PARSE routine.
Attributes take one of the following value types:
|
Switch |
A logical value set to TRUE (YES) or FALSE (NO). TRUE or YES asserts the attribute; FALSE or NO negates it. You can abbreviate the logical values to T (TRUE), Y (YES), F (FALSE), and N (NO). |
|
Keyword |
One or more words that follow the attribute name. When you use multiple keywords with an attribute, you must enclose them in parentheses and separate them by commas. You can truncate a keyword to its unique leading character(s). |
|
String value |
A character string that follows the attribute name. You should enclose a string value in a pair of single or double quotation marks. The null string is a valid string value. |
|
Number |
A decimal number. |
The following sections describe primary and secondary attributes and contain cross-references to corresponding fields (parameters) in RMS control blocks. The term DECnet for OpenVMS operations refers to remote file access between two OpenVMS operating systems and, unless stated otherwise, attributes are supported for DECnet for OpenVMS operations.
4.2. ACCESS Section
The ACCESS primary attribute allows you to specify file-processing operations by assigning appropriate values to the secondary attributes. The ACCESS keyword takes no values; it serves only to define this section.
The following table lists the ACCESS secondary attributes and their default values. Note that all of the ACCESS secondary attributes are run-time attributes.
|
Secondary Attribute |
Default Value |
|---|---|
|
BLOCK_IO |
FALSE |
|
DELETE |
FALSE |
|
GET |
GET when performing an Open service |
|
PUT |
PUT when performing a Create service |
|
RECORD_IO |
FALSE |
|
TRUNCATE |
FALSE |
|
UPDATE |
FALSE |
BLOCK_IO
This switch specifies block I/O operations involving either the Read or the Write RMS service, depending on whether you have specified the GET (Read service) or the PUT (Write service) ACCESS secondary attributes. If you specify BLOCK_IO, no record I/O operations (such as DELETE, GET, PUT, TRUNCATE, or UPDATE) can be performed. The BLOCK_IO secondary attribute also permits you to use the Space service.
The BLOCK_IO attribute corresponds to the BIO option in the FAB$B_FAC field.
DELETE
This switch enables Delete operations. The DELETE attribute corresponds to the DEL option in the FAB$B_FAC field.
GET
No other ACCESS section secondary attribute is defined.
The DELETE or UPDATE secondary attributes in the SHARING section have been specified.
If you also specify the BLOCK_IO attribute, you can perform Read services. The GET attribute corresponds to the GET option in the FAB$B_FAC field.
PUT
This switch specifies the Put service or the Extend service. PUT is the default when you create a file. If you specify the PUT attribute and the BLOCK_IO attribute, you can perform Write services.
The PUT attribute corresponds to the PUT option in the FAB$B_FAC field.
RECORD_IO
This switch allows mixed record I/O and block I/O operations under certain circumstances (see the VSI OpenVMS Record Management Services Reference Manual for more information).
The RECORD_IO attribute corresponds to the BRO option in the FAB$B_FAC field.
TRUNCATE
This switch allows Truncate operations. The TRUNCATE attribute corresponds to the TRN option in the FAB$B_FAC field.
UPDATE
This switch selects either the Update service or the Extend service. The UPDATE attribute corresponds to the UPD option in the FAB$B_FAC field.
4.2.1. ANALYSIS_OF_AREA Section
The Analyze/RMS_File utility (ANALYZE/RMS_FILE) creates the ANALYSIS_OF_AREA section and supplies it with values. The ANALYSIS_OF_AREA section appears only in FDL files that describe indexed files.
This primary section has only one secondary attribute: the run-time attribute RECLAIMED_SPACE.
RECLAIMED_SPACE
ANALYZE/RMS_FILE supplies a number value for the RECLAIMED_SPACE secondary attribute that represents the number of blocks in the area reclaimed by the Convert utility (CONVERT) using the /RECLAIM qualifier. For more information about using CONVERT/RECLAIM, see Chapter 3, "Convert/Reclaim Utility".
4.3. ANALYSIS_OF_KEY Section
ANALYZE/RMS_FILE creates the ANALYSIS_OF_KEY section and supplies appropriate values. The Edit/FDL utility uses the ANALYSIS_OF_KEY section in its Optimize script for FDL files that define an indexed file.
The primary attribute ANALYSIS_OF_KEY has a numeric value that represents the key being analyzed (0 is the primary key).
|
Secondary Attribute |
Default Value |
|---|---|
|
DATA_FILL |
None |
|
DATA_KEY_COMPRESSION |
None |
|
DATA_RECORD_COMPRESSION |
None |
|
DATA_RECORD_COUNT |
None |
|
DATA_SPACE_OCCUPIED |
None |
|
DEPTH |
None |
|
DUPLICATES_PER_SIDR |
None |
|
INDEX_COMPRESSION |
None |
|
INDEX_FILL |
None |
|
INDEX_SPACE_OCCUPIED |
None |
|
LEVEL1_RECORD_COUNT |
None |
|
MEAN_DATA_LENGTH |
None |
|
MEAN_INDEX_LENGTH |
None |
DATA_FILL
This attribute shows the percentage of bytes per bucket in the data level that has been filled.
DATA_KEY_COMPRESSION
This attribute shows the percentage of compression achieved for the primary keys. For example, if the keys added up to 1000 bytes and compression reduced that figure to 600 bytes, the value shown in the DATA_KEY_COMPRESSION attribute would be 40 (representing 40 percent compression).
Negative compression might occur because of the overhead involved. If you see a negative value, you should disable that type of compression in the KEY section.
DATA_RECORD_COMPRESSION
This attribute shows the percentage of compression that has occurred in the level 0 data record. For example, if compression reduces the number of bytes in the data records added from 100,000 to 70,000, the value shown in the DATA_RECORD_COMPRESSION attribute would be 30 (representing 30 percent compression).
Negative compression might occur because of the overhead involved. If you see a negative value, you should disable that type of compression in the KEY section.
This attribute applies only to the primary key.
DATA_RECORD_COUNT
This attribute shows the number of data records in the file.
DATA_SPACE_OCCUPIED
This attribute shows the size, in blocks, of the level 0 of the index structure.
DEPTH
This attribute shows the number of index levels in the index structure. The value does not include the data level.
DUPLICATES_PER_SIDR
This attribute shows the average number of duplicate key values for the secondary index data records (SIDR); that is, the value is the total number of duplicates divided by the total number of SIDRs.
This attribute applies only to alternate keys.
INDEX_COMPRESSION
This attribute shows the percentage of compression that has occurred in the index records within the index levels. If the full indexes amounted to 10,000 bytes and compression reduced this value to 8000 bytes, the value shown in the INDEX_COMPRESSION attribute would be 20 (representing 20 percent).
INDEX_FILL
This attribute shows the percentage of bytes per bucket that have been filled in the index levels.
INDEX_SPACE_OCCUPIED
This attribute shows the size, in blocks, of the index levels (level 1 and greater).
LEVEL1_RECORD_COUNT
This attribute indicates the number of records in the level 1 index, which is the index level immediately above the data. When duplicate key values (for SIDRs) have been specified, even when SIDR overflow buckets exist, the tuning algorithm of EDIT/FDL is made more accurate.
Generally, every bucket on level 0 of an alternate key has a pointer record from level 1 of the alternate key. However, there are no pointers from level 1 to any overflow buckets. LEVEL1_RECORD_COUNT keeps track of how many records are in level 1, particularly when duplicate key values force overflow buckets to be created.
MEAN_DATA_LENGTH
This attribute shows the average length, in bytes, of the data records. This does not take compression into account.
MEAN_INDEX_LENGTH
This attribute shows the average length, in bytes, of the index records. This does not take compression into account.
4.4. AREA Section
The AREA section is an RMS-specific region of an indexed file that you cannot create or manipulate from a high-level programming language. RMS provides appropriate areas for you when you create an indexed file.
If you want to create or manipulate areas in an indexed file, you must include the AREA primary attribute in an FDL file. The AREA primary attribute acts as a header for a section in the FDL file that describes areas. It takes a numeric value in the range 0 to 254 that identifies the area. To define multiple areas for an indexed file, you must specify a separate AREA section for each area.
Most AREA secondary attributes (except for the EXACT_POSITIONING, POSITION, and VOLUME secondary attributes) have corresponding FILE secondary attributes. The values you specify for AREA secondary attributes override values you specify for corresponding secondary attributes in the FILE section.
The AREA primary attribute corresponds to the XAB$B_AID field in a XAB (extended attribute block).
|
Secondary Attribute |
Default Value |
|---|---|
|
ALLOCATION |
0 |
|
ASYNCHRONOUS |
FALSE |
|
BEST_TRY_CONTIGUOUS |
FALSE |
|
BUCKET_SIZE |
0 |
|
CONTIGUOUS |
FALSE |
|
EXACT_POSITIONING |
FALSE |
|
EXTENSION |
0 |
|
POSITION |
None |
|
VOLUME |
0 |
ALLOCATION
This numeric attribute establishes the initial number of blocks allocated to an area. Its value must be an integer in the range 0 to 4,294,967,295. If you take the default value of 0, the system allocates no space for the area.
The ALLOCATION attribute corresponds to the XAB$L_ALQ field in a XAB.
ASYNCHRONOUS
This switch specifies that the task is to be done asynchronously. This option is relevant only to file tasks that involve I/O operations. It is typically used with success/error ASTs, or in conjunction with the $WAIT service, to synchronize the program with task completion.
The ASYNCHRONOUS attribute corresponds to the FAB$V_ASY bit in the FAB$L_FOP field.
BEST_TRY_CONTIGUOUS
This switch controls whether an area is allocated contiguous space, assuming there is enough space for it. If you set the switch to YES and there is not enough space, the area is allocated noncontiguously.
If you take the default, NO, this attribute has no effect.
The BEST_TRY_CONTIGUOUS attribute corresponds to the CBT option in the XAB$B_AOP field.
BUCKET_SIZE
This numeric attribute establishes the number of blocks per bucket for this area. Its value must be an integer in the range 0 to 63. If you take the default value of 0, RMS calculates the smallest bucket size capable of holding the largest record. If RMS–11 is to process the file, the bucket size is limited to 32 blocks.
The BUCKET_SIZE attribute corresponds to the XAB$B_BKZ field.
CONTIGUOUS
This switch controls whether RMS allocates contiguous space for the file. If there is not enough contiguous space, RMS returns an error when you try to create the file.
When you take the default, NO, FDL ignores this attribute.
The CONTIGUOUS attribute corresponds to the CTG option in the XAB$B_AOP field.
EXACT_POSITIONING
This switch mandates that the area is allocated the precise location you specify with either the POSITION CYLINDER attribute or the POSITION LOGICAL attribute. If the location is not available, RMS returns an error. When you take the default (NO), RMS allocates the area nearest the specified location.
The EXACT_POSITIONING attribute corresponds to the HRD option in the XAB$B_AOP field.
EXTENSION
This numeric attribute establishes the area's default extension size, in blocks. The extension is the space added to the area when the allocated space is filled.
This value must be an integer in the range 0 to 65,535. If you take the default (0), the system determines the extension size.
The EXTENSION attribute corresponds to the XAB$W_DEQ field.
POSITION
|
ANY_CYLINDER |
This keyword begins the area on any cylinder boundary. |
|
CYLINDER |
This keyword begins the area on the specified cylinder boundary. |
|
FILE_ID |
This keyword positions the area as close to the specified file as possible.
You must use a value for an existing file that includes the file identification
number (FID), the file sequence number, and the relative volume number. The
FILE_ID attribute uses the following syntax, including
parentheses:
(FID-num,FID-seq,RVN) |
|
FILE_NAME |
This keyword positions the area as close to the specified file as possible; you must specify an existing file. The FILE_NAME attribute is not supported for DECnet for OpenVMS operations; use the keyword NONE. |
|
LOGICAL |
This keyword positions the start of the area at the specified logical block. |
|
|
This keyword is the default value; it means you do not want to control the placement of the area. |
|
VIRTUAL |
This keyword positions the start of the area at the specified virtual block. |
The POSITION attribute corresponds to the XAB$B_ALN, XAB$L_LOC, and XAB$W_RFI fields in a XAB. This attribute is not supported for DECnet for OpenVMS operations; use the keyword NONE.
VOLUME
This attribute specifies the area location by using the relative volume number in a Files-11 disk volume set.
You must specify an integer in the range 0 to 255. If you take the default, 0, it means that you do not want to control the area's placement on the volume set.
The VOLUME attribute corresponds to the XAB$W_VOL field.
4.5. CONNECT Section
|
Secondary Attribute |
Default Value |
|---|---|
|
ASYNCHRONOUS |
None |
|
BLOCK_IO |
None |
|
BUCKET_IO |
None |
|
CONTEXT |
None |
|
END_OF_FILE |
None |
|
FAST_DELETE |
None |
|
FILL_BUCKETS |
None |
|
KEY_GREATER_EQUAL |
None |
|
KEY_GREATER_THAN |
None |
|
KEY_LIMIT |
None |
|
KEY_OF_REFERENCE |
None |
|
LOCATE_MODE |
None |
|
LOCK_ON_READ |
None |
|
LOCK_ON_WRITE |
None |
|
MANUAL_UNLOCKING |
None |
|
MULTIBLOCK_COUNT |
None |
|
MULTIBUFFER_COUNT |
None |
|
NOLOCK |
None |
|
NONEXISTENT_RECORD |
None |
|
READ_AHEAD |
None |
|
READ_REGARDLESS |
None |
|
TIMEOUT_ENABLE |
None |
|
TIMEOUT_PERIOD |
None |
|
TRUNCATE_ON_PUT |
None |
|
TT_CANCEL_CONTROL_O |
None |
|
TT_PROMPT |
None |
|
TT_PURGE_TYPE_AHEAD |
None |
|
TT_READ_NOECHO |
None |
|
TT_READ_NOFILTER |
None |
|
TT_UPCASE_INPUT |
None |
|
UPDATE_IF |
None |
|
WAIT_FOR_RECORD |
None |
|
WRITE_BEHIND |
None |
ASYNCHRONOUS
This switch specifies asynchronous I/O operations. When you select this attribute, RMS returns control to your program as soon as an I/O operation begins. The switch is ignored for process-permanent files.
The ASYNCHRONOUS attribute corresponds to the ASY option in the RAB$L_ROP field.
BLOCK_IO
This switch determines whether block or record I/O operations are performed. If you set the switch to YES, only block operations are permitted. If you set the switch to NO, only record operations are allowed for relative and indexed files. However, if you specify the ACCESS section RECORD_IO attribute, mixed block and record operations may be performed on sequential files only.
The BLOCK_IO attribute corresponds to the BIO option in the RAB$L_ROP field.
BUCKET_IO
This numeric attribute specifies a relative record number or a numeric value representing the virtual block number to be accessed. You use this attribute with records in a relative file or when you want block I/O to be performed.
The BUCKET_IO attribute corresponds to the RAB$L_BKT field.
CONTEXT
You can use this attribute to specify any numeric value, up to 4 bytes in length. RMS does not use the CONTEXT attribute; it is provided exclusively for your use. For example, you could use it to communicate with a completion routine in your program.
The CONTEXT attribute corresponds to the RAB$L_CTX field.
END_OF_FILE
This switch directs RMS to connect to the end of the file.
The END_OF_FILE attribute corresponds to the EOF option in the RAB$L_ROP field.
FAST_DELETE
This switch directs RMS not to delete the alternate index pointers used for duplicate records when you delete a record. Instead, RMS deletes the pointers and generates an appropriate error message only when you subsequently attempt to access the deleted record. The FAST_DELETE attribute avoids the overhead usually involved with RMS record deletions—updating the data level, the primary index, and then the alternate indexes.
The FAST_DELETE attribute corresponds to the FDL option in the RAB$L_ROP field.
FILL_BUCKETS
This switch directs RMS to load buckets according to the fill size established at file-creation time. If you do not set the switch, RMS ignores the established bucket fill size and fills buckets completely.
The FILL_BUCKET attribute corresponds to the LOA option in the RAB$L_ROP field.
KEY_GREATER_EQUAL
When using an ascending data type, this switch directs RMS to access the first record in an indexed file containing a key of reference value greater than or equal to the value described by the RAB$L_KBF and RAB$B_KSZ fields. For a descending data type, RMS accesses the first record that contains a key of reference value less than or equal to the value described by the RAB$L_KBF and RAB$B_KSZ fields.
If you set neither this switch nor the KEY_GREATER_THAN switch, RMS accesses the first record that contains a key of reference value equal to the value described by the RAB$L_KBF and RAB$B_KSZ fields.
This attribute corresponds to the KGE option in the RAB$L_ROP field. For more information about the RAB$L_KBF and RAB$B_KSZ fields, refer to the VSI OpenVMS Record Management Services Reference Manual.
KEY_GREATER_THAN
When using an ascending data type, this switch directs RMS to access the first record in an indexed file containing a key of reference value greater than the value described by the RAB$L_KBF and RAB$B_KSZ fields. When using a descending data type, the switch directs RMS to access the first record that contains a key of reference value less than that specified in the RAB$L_KBF and RAB$B_KSZ fields.
If you set neither this switch nor the KEY_GREATER_EQUAL switch, RMS accesses the first record that contains a key of reference value equal to the value described by the RAB$L_KBF and RAB$B_KSZ fields.
The KEY_GREATER_THAN attribute corresponds to the KGT option in the RAB$L_ROP field. For more information about the RAB$L_KBF and RAB$B_KSZ fields, refer to the VSI OpenVMS Record Management Services Reference Manual.
KEY_LIMIT
This switch directs RMS to compare the key value described by the RAB$L_KBF and RAB$B_KSZ fields to the value in the record accessed in sequential mode. If you set this switch and the record's key value is greater than the limit key value, RMS returns the RMS$_OK_LIM status code.
This attribute corresponds to the LIM option in the RAB$L_ROP field.
KEY_OF_REFERENCE
This numeric attribute specifies the key or index (such as primary, or first alternate) by which you want to process records in a file. The default value, 0, indicates the primary key. Values 1 to 254 indicate alternate keys.
The KEY_OF_REFERENCE attribute applies only to indexed files and it corresponds to the RAB$B_KRF field.
LOCATE_MODE
This switch directs RMS to return records by supplying a pointer to the data rather than by copying the data to the user buffer.
The LOCATE_MODE attribute corresponds to the LOC option in the RAB$L_ROP field.
LOCK_ON_READ
This switch permits a process reading a record to prohibit other processes from modifying the record.
The LOCK_ON_WRITE attribute takes precedence over the LOCK_ON_READ attribute, and the NOLOCK attribute takes precedence over both.
The LOCK_ON_READ attribute corresponds to the REA option in the RAB$L_ROP field.
LOCK_ON_WRITE
This switch permits a process to allow other processes to read a record that it is modifying.
The LOCK_ON_WRITE attribute takes precedence over the LOCK_ON_READ attribute, and the NOLOCK attribute takes precedence over both.
The LOCK_ON_WRITE attribute corresponds to the RLK option in the RAB$L_ROP field.
MANUAL_UNLOCKING
This switch prohibits RMS from unlocking records automatically. Instead, after a record is locked by a Get, Find, or Put operation, RMS must use a Free or Release operation to explicitly unlock the record.
The NOLOCK attribute takes precedence over the MANUAL_UNLOCKING attribute and corresponds to the ULK option in the RAB$L_ROP field.
MULTIBLOCK_COUNT
This numeric attribute permits a process that is accessing a sequential disk file to specify the number of blocks, in the range 0 to 127, allocated to each I/O buffer.
The MULTIBLOCK_COUNT attribute optimizes data throughput for sequential operations, and it does not affect the structure of the file. It reduces the number of times you have to access the disk for record operations, thereby reducing execution time. However, the extra buffering increases memory requirements.
If you do not specify this attribute or if you specify the value 0, RMS uses the process default for the multiblock count. If the process default is 0, RMS uses the system default. If the system default is 0, the default size for each I/O buffer is one block. Use the DCL command SET RMS_DEFAULT to establish process or system defaults.
The MULTIBLOCK_COUNT attribute corresponds to the RAB$B_MBC field and is not supported for DECnet for OpenVMS operations.
MULTIBUFFER_COUNT
This numeric attribute specifies the number of buffers, in the range 0 to 127, to be allocated at connect time.
If you do not select this attribute or if you use the value 0, RMS uses the process default for the particular file organization and device type. If the process default is 0, the system default for the particular file organization and device type applies.
If the system default is likewise 0, one buffer is allocated. However, if you specify either the READ_AHEAD attribute or the WRITE_BEHIND attribute, RMS allocates at least two buffers. Similarly, RMS allocates a minimum of two buffers for an indexed sequential file or for a process-permanent file.
The MULTIBUFFER_COUNT attribute corresponds to the RAB$B_MBF field and is not supported for DECnet for OpenVMS operations.
NOLOCK
This switch specifies that the record accessed through a Get or Find operation is not to be locked. The NOLOCK attribute takes precedence over all other attributes that control record locking, such as MANUAL_UNLOCKING, LOCK_ON_READ, and LOCK_ON_WRITE.
The NOLOCK attribute corresponds to the NLK option in the RAB$L_ROP field.
NONEXISTENT_RECORD
This switch specifies that if a record randomly accessed with a Get or Find RMS operation does not exist (was never inserted into the file or was deleted), it is to be processed anyway, locking the record cell if necessary.
The NONEXISTENT_RECORD attribute does not apply to indexed files, and it corresponds to the NXR option in the RAB$L_ROP field.
READ_AHEAD
This switch is used with multiple buffers (see MULTIBUFFER_COUNT) to indicate read-ahead operations. It directs the system not to wait for I/O completion because input and computing can overlap. That is, when one buffer is filled, the next record is read into a second buffer while I/O operations take place in the first buffer.
If you specify READ_AHEAD when the multibuffer count is 0, two buffers are allocated to allow multibuffering. If you specify two or more buffers, multibuffering is allowed regardless. However, if you specify a buffer count of 1, multibuffering is disabled.
The READ_AHEAD attribute applies only to sequential file processing and is ignored for unit record device I/O. This attribute corresponds to the RAH option in the RAB$L_ROP field and is not supported for DECnet for OpenVMS operations.
READ_REGARDLESS
This switch permits you to read a record even if it is locked, allowing some control over access. If a record is locked against all access and you request a Find or Get RMS operation, RMS returns the record anyway.
The READ_REGARDLESS attribute corresponds to the RRL option in the RAB$L_ROP field.
TIMEOUT_ENABLE
This numeric attribute specifies the maximum time value, in seconds, allowed for a record input wait caused by a locked record when you specify the WAIT_FOR_RECORD attribute. This attribute also applies to the time allowed for a character to be received during terminal input. If the timeout period expires, RMS returns an error status.
The TIMEOUT_ENABLE attribute also serves a special purpose for mailbox devices. If you specify this attribute with a TIMEOUT_PERIOD of 0, Get and Put RMS operations to mailbox devices use the IO$M_NOW modifier. The operation then completes immediately instead of synchronizing with another cooperating writer or reader of the mailbox. See the VSI OpenVMS I/O User's Reference Manual for a further discussion of mailboxes.
The TIMEOUT_ENABLE attribute corresponds to the TMO option in the RAB$L_ROP field and is not supported for DECnet for OpenVMS operations.
TIMEOUT_PERIOD
This numeric attribute specifies the maximum duration, in seconds (0 to 255), of a Get operation. If the user specifies a Get operation from the terminal and the attribute value is 0, RMS does not return the current contents of the type-ahead buffer.
You can use this attribute only with the TIMEOUT_ENABLE attribute. It corresponds to the RAB$B_TMO field and is not supported for DECnet for OpenVMS operations.
TRUNCATE_ON_PUT
This switch permits a Put or Write operation at any point in a file, truncating the file at that point. A Write operation causes the end-of-file (EOF) mark to immediately follow the last byte written.
TRUNCATE_ON_PUT can only be used with sequential files. It corresponds to the TPT option in the RAB$L_ROP field.
TT_CANCEL_CONTROL_O
This switch ensures that terminal output is not discarded if you press Ctrl/O. It corresponds to the CCO option in the RAB$L_ROP field and is not supported for DECnet for OpenVMS operations.
TT_PROMPT
This switch specifies that the contents of the prompt buffer be used as a prompt on a terminal-read operation.
It corresponds to the PMT option in the RAB$L_ROP field and is not supported for DECnet for OpenVMS operations.
TT_PURGE_TYPE_AHEAD
This switch eliminates any information that might be in the type-ahead buffer on a terminal-read operation. The TT_PURGE_TYPE_AHEAD attribute corresponds to the PTA option in the RAB$L_ROP field and is not supported for DECnet for OpenVMS operations.
()TT_READ_NOECHO
This switch specifies that input data is not to be echoed (displayed) on the terminal as it is entered on the keyboard. The TT_READ_NOECHO attribute corresponds to the RNE option in the RAB$L_ROP field and is not supported for DECnet for OpenVMS operations.
TT_READ_NOFILTER
This switch specifies that the Ctrl/U, Ctrl/R, and Delete keys are not to be considered control commands from the terminal but are to be passed to the user program.
The TT_READ_NOFILTER attribute corresponds to the RNF option in the RAB$L_ROP field and is not supported for DECnet for OpenVMS operations.
TT_UPCASE_INPUT
This switch changes lowercase characters read from a terminal to uppercase. The TT_UPCASE_INPUT attribute corresponds to the CVT option in the RAB$L_ROP field and is not supported for DECnet for OpenVMS operations.
UPDATE_IF
This switch specifies that a Put operation for a record that already exists is converted to an Update operation. This attribute is necessary to overwrite (as opposed to update) an existing record in relative and indexed sequential files.
Indexed files using UPDATE_IF must not allow duplicates on the primary key.
The UPDATE_IF attribute corresponds to the UIF option in the RAB$L_ROP field.
WAIT_FOR_RECORD
This switch directs RMS to wait for a currently locked record until it becomes available. You can use this attribute with the TIMEOUT_ENABLE and TIMEOUT_PERIOD attributes to limit waiting periods to a specified time.
The WAIT_FOR_RECORD attribute corresponds to the WAT option in the RAB$L_ROP field.
WRITE_BEHIND
This switch is used with multiple buffers (see MULTIBUFFER_COUNT) to specify write-behind operations. It directs the system not to wait for I/O completion because computing and output can overlap. When one buffer is filled, the next record is written into a second buffer while the I/O operation takes place for the first buffer.
If you specify WRITE_BEHIND when the multibuffer count is 0, two buffers are allocated to allow multibuffering. If you specify two or more buffers, multibuffering is allowed regardless. However, if you specify a buffer count of 1, multibuffering is disabled.
The WRITE_BEHIND attribute applies to sequential file processing only and is ignored for unit record device I/O. This attribute is not supported for DECnet for OpenVMS operations.
This attribute corresponds to the WBH option in the RAB$L_ROP field.
4.6. DATE Section
|
Secondary Attribute |
Default Value |
|---|---|
|
BACKUP |
Null-string |
|
CREATION |
Null-string |
|
EXPIRATION |
Null-string |
|
REVISION |
Null-string |
In general, you should let the system specify values for the DATE secondary attributes. The only secondary attribute you can routinely specify is EXPIRATION.
BACKUP
dd-mmm-yyyy hh:mm:ss.cc.
The BACKUP attribute corresponds to the XAB$Q_BDT field.
CREATION
dd-mmm-yyyy hh:mm:ss.cc.
The CREATION attribute corresponds to the XAB$Q_CDT field.
EXPIRATION
dd-mmm-yyyy hh:mm:ss:cc.
The EXPIRATION attribute corresponds to the XAB$Q_EDT field.
REVISION
dd-mmm-yyyy hh:mm:ss.cc.
The REVISION attribute corresponds to the XAB$Q_RDT field.
4.7. FILE Section
The FILE section allows you to specify file processing and file-related characteristics for your file. The FILE keyword takes no values; it serves only to define this section.
FILE section attributes (ALLOCATION, BEST_TRY_CONTIGUOUS, BUCKET_SIZE, CONTIGUOUS, and EXTENSION) have corresponding AREA section attributes. Values you specify for these attributes in the AREA section override associated values that you specify in the FILE section.
|
Secondary Attribute |
Default Value |
Attribute Type |
|---|---|---|
|
ALLOCATION |
0 |
Create-time |
|
ASYNCHRONOUS |
NO |
Run-time |
|
BEST_TRY_CONTIGUOUS |
NO |
Create-time |
|
BUCKET_SIZE |
0 |
Create-time |
|
CLUSTER_SIZE ? |
See note |
See note |
|
CONTEXT |
0 |
Run-time |
|
CONTIGUOUS |
NO |
Create-time |
|
CREATE_IF |
NO |
Run-time |
|
DEFAULT_NAME |
Null-string |
Run-time |
|
DEFERRED_WRITE |
NO |
Run-time |
|
DELETE_ON_CLOSE |
NO |
Run-time |
|
DIRECTORY_ENTRY |
YES |
Run-time |
|
EXTENSION |
0 |
Create-time |
|
FILE_MONITORING |
NO |
Create-time |
|
GLOBAL_BUFFER_COUNT |
0 |
Create-time |
|
MAX_RECORD_NUMBER |
0 |
Create-time |
|
MAXIMIZE_VERSION |
YES |
Run-time |
|
MT_BLOCK_SIZE |
0 |
Create-time |
|
MT_CLOSE_REWIND |
NO |
Run-time |
|
MT_CURRENT_POSITION |
NO |
Run-time |
|
MT_NOT_EOF |
NO |
Run-time |
|
MT_OPEN_REWIND |
NO |
Run-time |
|
MT_PROTECTION |
Space character |
Create-time |
|
NAME |
Null-string |
Create-time |
|
NON_FILE_STRUCTURED |
NO |
Run-time |
|
ORGANIZATION |
SEQUENTIAL |
Create-time |
|
OUTPUT_FILE_PARSE |
NO |
Run-time |
|
OWNER |
System or process default |
Create-time |
|
PRINT_ON_CLOSE |
NO |
Run-time |
|
PROTECTION |
System or process default |
Create-time |
|
READ_CHECK |
NO |
Run-time |
|
REVISION |
0 |
Create-time |
|
SEQUENTIAL_ONLY |
NO |
Run-time |
|
STORED_SEMANTICS |
None |
Create-time |
|
SUBMIT_ON_CLOSE |
NO |
Run-time |
|
SUPERSEDE |
NO |
Run-time |
|
TEMPORARY |
NO |
Run-time |
|
TRUNCATE_ON_CLOSE |
NO |
Run-time |
|
USER_FILE_OPEN |
NO |
Run-time |
|
WINDOW_SIZE |
Volume default |
Run-time |
|
WRITE_CHECK |
NO |
Run-time |
ALLOCATION
This numeric attribute establishes the number initially allocated to the file. The value must be an integer in the range 0 to 4,294,967,295. If you take the default (0), the system allocates no initial space for the file.
The ALLOCATION attribute corresponds to the FAB$L_ALQ field.
ASYNCHRONOUS
This switch specifies asynchronous I/O operations. When you select this attribute, RMS returns control to your program as soon as an I/O operation begins. The switch is ignored for process-permanent files.
The ASYNCHRONOUS attribute corresponds to the ASY option in the RAB$L_ROP field.
BEST_TRY_CONTIGUOUS
This switch controls whether the file is to be allocated contiguously, assuming there is sufficient contiguous space for it. If you set the switch and there is not enough space, the system allocates the file noncontiguous space. If you take the default, no space is allocated.
The BEST_TRY_CONTIGUOUS attribute corresponds to the CBT option in the FAB$L_FOP field.
BUCKET_SIZE
This numeric attribute establishes the number of blocks per bucket. Its value must be an integer in the range 0 to 63. If you take the default (0), RMS computes the smallest bucket size capable of holding the largest record. Files processed by RMS–11 are limited to 32 blocks.
If you specify separate areas for the data level and the index levels, you must define separate bucket sizes for each file area; thus, the corresponding attribute in each AREA section overrides this related attribute in the FILE section.
The BUCKET_SIZE attribute corresponds to the FAB$B_BKS field.
CLUSTER_SIZE
This numeric attribute specifies the number of blocks allocated to a disk cluster. The disk cluster size can be established only when a disk volume is initialized.
The CLUSTER_SIZE attribute is output from the Analyze/RMS_File utility (ANALYZE/RMS_FILE), which returns the actual value of the disk cluster size to EDIT/FDL for use during an Optimize script.
CONTEXT
This numeric attribute contains a user-specified value 4 bytes long. RMS never uses the attribute for record management activities. It is intended solely for you to convey user information to a completion routine in your program.
The CONTEXT attribute corresponds to the FAB$L_CTX field.
CONTIGUOUS
This switch specifies that a file is allocated contiguous space.
If there is not enough contiguous space for the file's initial allocation, RMS returns an error.
If you take the default, the system allocates no space for the file.
This attribute corresponds to the CTG option in the FAB$L_FOP field.
CREATE_IF
This switch creates a file if the specified file does not already exist and, where applicable, RMS returns the alternate success status RMS$_CREATED to indicate that the file was created, not just opened. If the file exists, RMS opens it.
The CREATE_IF attribute is valid as input to the Create service only. It overrides the SUPERSEDE (supersede existing file) attribute and corresponds to the CIF option in the FAB$L_FOP field.
DEFAULT_NAME
This attribute takes a string value that defines portions of the file specification for the data file being created.
When a utility creates a data file from an FDL file, it first attempts to get the file specification from the calling process. If the call includes a full file specification, the utility ignores the DEFAULT_NAME and NAME attributes.
When a process supplies a partial file specification, the invoked utility tries to complete the file specification from the DEFAULT_NAME string. If the calling process does not specify a value for DEFAULT_NAME, the utility uses the RMS defaults.
If the calling process supplies a file specification by using the NAME attribute, the utility uses it. If the NAME attribute includes only a partial file specification, the utility uses it and examines the DEFAULT_NAME attribute for the rest of the file specification.
If the NAME and DEFAULT_NAME attributes together provide only a partial file specification, the utility uses RMS default values to complete the file specification.
For example, if you assign the value WRKD$:.KSM to DEFAULT_NAME, unless you specify otherwise, the created data file specification takes the device name WRKD$ and the file type .KSM.
The NAME and DEFAULT_NAME attributes correspond to the FAB$L_DNA and the FAB$B_DNS fields, respectively.
DEFERRED_WRITE
This switch specifies that the writing of modified I/O buffers to the file is deferred until that buffer is needed for other purposes. This attribute applies only to relative files, indexed files, and sequential files opened for shared access.
The DEFERRED_WRITE attribute corresponds to the DFW option in the FAB$L_FOP field. This attribute is not supported for DECnet for OpenVMS operations.
DELETE_ON_CLOSE
This switch specifies that the file is to be deleted after it is closed. If you select this attribute, you cannot create the file with either the Create/FDL utility or the FDL$CREATE routine because both open and then close the file. Therefore, the file will not exist long enough to be used. To create a file with the DELETE_ON_CLOSE attribute, you must use the FDL$PARSE routine.
The DELETE_ON_CLOSE attribute corresponds to the DLT option in the FAB$L_FOP field. The default is to ignore this attribute.
DIRECTORY_ENTRY
This switch specifies a temporary file created and retained with a directory entry. When you set this switch to NO, RMS retains the file but does not include it as a directory entry. To access the file, you must use its file identification number (FID).
The DIRECTORY_ENTRY attribute corresponds to the TMP option in the FAB$L_FOP field.
EXTENSION
This numeric attribute establishes the size, in blocks, of the file's default extension value. Each time the file is automatically extended, the specified number of blocks is added. The value for this attribute must be an integer in the range 0 to 65,535. When you take the default (0), the system determines the extension size.
The EXTENSION attribute corresponds to the FAB$W_DEQ field.
FILE_MONITORING
This switch enables RMS performance monitoring. It corresponds to the XABITM field XAB$_STAT_ENABLE and its default value is NO. Enabling this option applies an application ACE to the specified file. The ACE does not affect access control and is only meaningful to the application assigning it.
GLOBAL_BUFFER_COUNT
This numeric attribute specifies the number of global buffers allocated to the file. The value must be a number in the range 0 to 32,767; the default value is 0.
The GLOBAL_BUFFER_COUNT attribute corresponds to the FAB$W_GBC field. This attribute is not supported for DECnet for OpenVMS operations.
MAX_RECORD_NUMBER
This numeric attribute specifies the maximum number of records that can be placed in a relative file. The value must be an integer in the range 0 to 2,147,483,647. When you take the default value (0), you can place as many records as you want in the relative file, up to the maximum 2,147,483,647.
The MAX_RECORD_NUMBER attribute corresponds to the FAB$L_MRN field.
MAXIMIZE_VERSION
This switch specifies the file's version number. If you take the default, YES, the File Definition Language facility assigns the greater of two possible version numbers: either the number that was part of the file specification or a version number that is 1 higher than the highest existing version number.
When you set the switch to NO, assigning an explicit version number lower than an existing version results in creating a new data file with the lower version number. If you assign an explicit version number that matches an existing version, RMS returns an error.
The MAXIMUM_VERSION attribute corresponds to the MXV option in the FAB$L_FOP field.
MT_BLOCK_SIZE
This numeric attribute establishes the number of bytes in a magnetic tape file block. The value can be 0, an integer in the range 20 to 65,535 for ANSI-formatted tapes, or an integer in the range 14 to 65,532 for foreign tapes (tapes that are not in the standard ANSI format used by OpenVMS operating systems and that must be mounted by means of the DCL command MOUNT/FOREIGN). If you take the default value (0), RMS assigns the block size specified when the tape was mounted.
The MT_BLOCK_SIZE attribute corresponds to the FAB$W_BLS field.
MT_CLOSE_REWIND
This switch controls whether a magnetic tape volume is rewound when the file is closed. The magnetic tape volume does not rewind if you take the default (NO).
The MT_CLOSE_REWIND attribute corresponds to the RWC option in the FAB$L_FOP field.
MT_CURRENT_POSITION
This switch directs RMS to position the magnetic tape volume set immediately after the most recently closed file when it creates the next file. If you use this option when you invoke the $CREATE service, RMS overwrites all files located beyond the current tape position.
If you do not specify either of the position specifiers (MT_CURRENT_POSITION or MT_OPEN_REWIND), RMS creates the new file at the logical end of the tape. If you specify both position specifiers, the MT_OPEN_REWIND attribute overrides the MT_CURRENT_POSITION attribute.
The MT_CURRENT_POSITION attribute corresponds to the POS option in the FAB$B_FOP field.
MT_NOT_EOF
This switch prevents positioning the tape to the end of a file being opened with the PUT attribute specified.
This attribute corresponds to the NEF option in the FAB$L_FOP field.
MT_OPEN_REWIND
This switch specifies that the magnetic tape volume is to be rewound before the file is opened or created. If you use this option to create a tape file, RMS assumes that write operations are to take place at the beginning of the tape, rewinds the tape to the beginning, and proceeds to overwrite the tape data beginning with the first tape file.
Conversely, if you specify this attribute when you open an existing tape file, RMS rewinds to the beginning of the tape but then proceeds to find the specified file before doing any file operations.
Typically, a user specifies the MT_OPEN_REWIND option to improve efficiency in opening a tape file or to ensure access to the correct file when the tape contains files with duplicate names. ANSI tapes allow named files, but they have no directories and can contain repeated instances of files with the same name.
In the first case, assume the tape has 50 files, is positioned at the fortieth file, and the user wants to access the thirtieth file. If the user specifies MT_OPEN_REWIND to the Open service, RMS rewinds the tape to the first file and then winds the tape forward to the thirtieth file. If the user does not specify MT_OPEN_REWIND, RMS winds the tape forward to the end of the tape. Then, not having found the file, RMS rewinds the tape to the first file and proceeds to wind the tape forward to the thirtieth file.
In the second case, assume a tape has two files named X.DAT and is positioned between the two files. Assume further that the user wants to access the first file named X.DAT. If the user does not specify MT_OPEN_REWIND, RMS winds forward until it finds the second file and opens it, instead of opening the desired file. Conversely, if the user does specify MT_OPEN_REWIND, RMS rewinds the tape and then winds forward until it finds and opens the first file named X.DAT.
The MT_OPEN_REWIND option takes precedence over the MT_CURRENT_POSITION option and corresponds to the RWO option in the FAB$L_FOP field.
MT_PROTECTION
This single-character string attribute allows you to control access to a magnetic tape file. The default value is a space character that specifies access is not controlled. If the attribute is a non-space character, you can access the file only by specifying the /OVERRIDE=ACCESSIBILITY qualifier and option when you initialize or mount the volume.
This attribute corresponds to the XAB$B_MTACC field and is not supported for DECnet for OpenVMS operations.
NAME
This string attribute specifies the name of the data file to be created from this FDL file. If you supply a name for the data file, that name overrides the one specified here.
This attribute corresponds to the FAB$L_FNA and the FAB$B_FNS fields.
On Alpha systems, if you have implemented the on-disk-structure level 5 (ODS-5) volume structure of extended file specifications, you can name a file using the 8-bit ISO Latin-1 or 16-bit Unicode (UCS-2) character sets. You can also have a file name exceed the traditional 39.39 character limit to a maximum of 255 characters.
NON_FILE_STRUCTURED
This switch directs that the volume is to be processed in a manner that is not file structured. This attribute corresponds to the NFS option in the FAB$L_FOP field and is not supported for DECnet for OpenVMS operations.
ORGANIZATION
SEQUENTIAL
RELATIVE
INDEXED
The default is SEQUENTIAL.
This attribute corresponds to the FAB$B_ORG field.
OUTPUT_FILE_PARSE
This switch specifies that the resultant file specification string, if used, is to provide directory, file name, and file type defaults only.
This attribute corresponds to the OFP option in the FAB$L_FOP field.
OWNER
octal-group-number,octal-user-number
For example, OWNER [12,322] indicates that the person in group 12 with the user number 322 is the owner of the data file.
This attribute corresponds to the XAB$W_GRP and the XAB$W_MBM fields.
PRINT_ON_CLOSE
This switch controls whether the data file is to be spooled to the process default print queue when the file is closed, and applies to sequential files only. When you set the switch to YES, the data file is to be spooled to the process default print queue (SYS$PRINT) after the file is closed.
If you also set DELETE_ON_CLOSE to YES, the file is deleted after it is printed.
This attribute corresponds to the SPL option in the FAB$L_FOP field.
PROTECTION
This keyword attribute specifies file protection by defining the type of file access allowed for each of the four user classes:
System (S)
Owner (O)
Group (G)
World (W)
You define the access level for each user class by entering the appropriate access-level code as the argument for each user-class keyword. There are four access levels and you can assign one or more to each user class:
Read (R) access—lets the user read the file
Write (W) access—lets the user modify the file
Execute (E) access—lets the user run the file
Delete (D) access—lets the user delete the file
Each user class has a unique first letter (S, O, G, and W) and the same is true for each access level (R, W, E, and D). This lets you truncate the code for each user class if you prefer. Note that you must truncate the access level to the leading letter.
(SYSTEM=code,OWNER=code,GROUP=code,WORLD=code)
(SYSTEM:code,OWNER:code,GROUP:code,WORLD:code)
You must enclose the protection specification in parentheses and you have the option of using either the equal sign (=) or a colon (:) to separate each keyword from its associated code value.
By default, RMS assigns the file the default protection for the current process. To see the default protection for the current process, use the DCL command SHOW PROTECTION.
(System=RWED,Owner=RWED,Group=R)
This attribute corresponds to the XAB$W_PRO field.
READ_CHECK
This switch determines whether transfers from disk volumes are followed by read-compare operations.
When you activate the switch, transfers from disk volumes are followed by read-compare operations. This double check increases the likelihood that the system will catch data errors; however, it also increases disk overhead.
Activating this switch does not permanently mark the file for READ_CHECK; it merely selects a run-time option. To permanently mark the file for READ_CHECK, use the SET FILE/DATA_CHECK=READ command.
This attribute corresponds to the RCK option in the FAB$L_FOP field.
REVISION
This numeric attribute specifies the revision number of the data file as an integer in the range 0 to 65,535. Unless you want to change the revision number to some specific number, you should leave this value at its default of 0. When REVISION is set to 0, the file's revision number is incremented each time the file is opened for write access.
This attribute corresponds to the XAB$W_RVN field.
SEQUENTIAL_ONLY
This switch limits the file to sequential processing and related processing options. Any attempt at random access results in an error.
For DECnet for OpenVMS operations, this attribute enables file transfer mode, which is a data access protocol (DAP) feature that allows several records to be transferred in a single network operation. It maximizes throughput for single-direction, sequential-access file transfer.
This attribute corresponds to the SQO option in the FAB$L_FOP field.
STORED_SEMANTICS
Where applicable, this string attribute identifies the file semantics established when a file is created. The string is limited to 64 characters and the attribute corresponds to the XAB$_STORED_SEMANTICS field.
SUBMIT_ON_CLOSE
This switch submits the data file to the process default batch queue (SYS$BATCH) when the file is closed and is appropriate only for sequential command files.
If you also set DELETE_ON_CLOSE to YES, the file is deleted after the batch job completes.
This attribute corresponds to the SCF option in the FAB$L_FOP field and is not supported for DECnet for OpenVMS operations.
SUPERSEDE
This switch replaces the existing data file with a different file of the same name, type, and version.
If you successfully create a new file with the same name, type, and version as an existing file, the old file is deleted.
SUPERSEDE is overridden by the CREATE_IF attribute.
This attribute corresponds to the SCF option in the FAB$L_FOP field.
TEMPORARY
This creates a temporary file that is deleted when it is closed. No directory entry is created for a temporary file.
You cannot create a file that has this attribute by using the CREATE/FDL command or the FDL$CREATE routine, because these commands open and then close the data file before it can be used. You can only use the FDL$PARSE routine to create a file that has the TEMPORARY attribute.
This attribute corresponds to the TMD option in the FAB$L_FOP field.
TRUNCATE_ON_CLOSE
This switch deallocates unused space at the end of a sequential file when the file is closed.
This attribute corresponds to the TEF option in the FAB$L_FOP field.
USER_FILE_OPEN
This switch limits RMS operations to opening or creating a file. If you specify this option, you must also specify the SHARING USER_INTERLOCK attribute unless you have specified the SHARING PROHIBIT attribute.
This attribute corresponds to the UFO option in the FAB$L_FOP field and is not supported for DECnet for OpenVMS operations.
WINDOW_SIZE
This attribute specifies the number of retrieval windows (pointers) you want RMS to maintain in memory for your file. You can specify a numeric value in the range 0 to 127, or 255. A value of 0 indicates that RMS is to use the system default number of retrieval pointers. A value of 255 means to map the entire file, if possible. Values between 128 and 254, inclusive, are reserved for future use.
This attribute corresponds to the FAB$B_RTV field and is not supported for DECnet for OpenVMS operations.
WRITE_CHECK
This switch specifies that disk transfers are checked by a read-compare operation. Note, however, that this operation creates extra system overhead.
This switch does not permanently mark the file for WRITE_CHECK; it sets an RMS run-time option. You must use the SET FILE/DATA_CHECK=WRITE command to mark the file permanently.
This attribute corresponds to the WCK option in the FAB$L_FOP field.
4.8. KEY Section
The KEY primary attribute acts as a header for a section of the FDL file that describes keys. You must specify a separate KEY section for each key of an indexed file. The number of the key being described follows the word KEY (for example, KEY 0, KEY 1,
…KEY
n). The KEY value for the primary key must be 0. The KEY value for secondary keys can be numbered from 1 to 254.
The KEY primary attribute corresponds to the XAB$B_REF field.
|
Secondary Attribute |
Default Value |
|---|---|
|
CHANGES |
NO |
|
COLLATING_SEQUENCE |
None (only present for files with collated keys) |
|
DATA_AREA |
None |
|
DATA_FILL |
Same as bucket size |
|
DATA_KEY_COMPRESSION |
YES |
|
DATA_RECORD_COMPRESSION |
YES |
|
DUPLICATES |
NO for primary; YES for alternate |
|
INDEX_AREA |
None |
|
INDEX_COMPRESSION |
YES |
|
INDEX_FILL |
Same as bucket size |
|
LENGTH |
None |
|
LEVEL1_INDEX_AREA |
None |
|
NAME |
Null-string |
|
NULL_KEY |
NO |
|
NULL_VALUE |
ASCII null character |
|
POSITION |
None |
|
PROLOG |
System or process default |
|
SEGn_LENGTH |
None |
|
SEGn_POSITION |
None |
|
TYPE |
STRING |
CHANGES
This switch allows an RMS Update operation to change the value of the key. Such a change is not allowed for the primary key (regardless of this attribute), so the default setting for primary keys is NO. With alternate keys the default setting is also NO, but you can specify YES to allow changes to alternate key values.
This attribute corresponds to the CHG option in the XAB$B_FLG field.
COLLATING_SEQUENCE
The name of the NCS collating sequence that defines the sorting order of the characters for this key. The value is a string from 1 to 31 characters long. You must supply the value; there is no default.
This attribute corresponds to the XAB$L_COLNAM field.
DATA_AREA
This numeric attribute identifies the area where you place the data records in an indexed file with multiple areas. The value is an integer in the range 0 to 254, which must be the same number as that assigned to the area in an AREA section.
The DATA_AREA, LEVEL1_INDEX_AREA, and INDEX_AREA values are used when the data level and the index levels are placed in separate areas or when each key is placed in its own area.
This attribute corresponds to the XAB$B_DAN field.
DATA_FILL
This attribute establishes the percentage of bytes in each data bucket in the area you want populated initially. If you anticipate that many records will be inserted randomly into the file, this value should be less than 100 percent of the bytes. The default value is 100 percent, and the minimum value is 50 percent. The /FILL_BUCKETS qualifier to the CONVERT command overrides this attribute.
This attribute corresponds to the XAB$W_DFL field except that XAB$W_DFL contains a byte count, not a percentage.
DATA_KEY_COMPRESSION
This switch compresses leading and trailing repeating characters in the primary key and its default value is YES. For compression to occur, your indexed file must be defined as a Prolog 3 file with the FDL attribute KEY PROLOG. However, KEY PROLOG 3 is the default.
This attribute corresponds to the KEY_NCMPR option in the XAB$B_FLG field, and should be set for DECnet for OpenVMS operations.
DATA_RECORD_COMPRESSION
This switch controls whether repeating characters are compressed in the data records. The default is YES; however, for compression to occur, your indexed file must be defined as a Prolog 3 file.
This attribute corresponds to the DAT_NCMPR option in the XAB$B_FLG field and should be set for DECnet for OpenVMS operations.
DUPLICATES
This switch controls whether duplicate keys are allowed in the indexed files. For primary keys, the default setting is NO, but for alternate keys, the default setting is YES.
Duplicate alternate keys can be useful. For example, sorting a customer file on an alternate key of a postal code is a common application and one that requires duplicate keys.
When duplicate keys are not allowed, any attempt to write a record where the key would be a duplicate results in an error.
This attribute corresponds to the DUP option in the XAB$B_FLG field.
INDEX_AREA
This numeric attribute identifies the area where you place the index levels (other than level 1) in an indexed file with multiple areas. The value is an integer in the range 0 to 254, which must be the same number as that assigned to the area in an AREA section.
The INDEX_AREA, DATA_AREA, and LEVEL1_INDEX_AREA values are used when the data level and the index levels are placed in separate areas or when each key is placed in its own area.
This attribute corresponds to the XAB$B_IAN field.
INDEX_COMPRESSION
This switch controls whether leading repeating characters in the index are compressed. The default value is YES; however, for compression to occur, your indexed file must be defined as a Prolog 3 file.
This attribute corresponds to the IDX_NCMPR option in the XAB$B_FLG field and should be set for DECnet for OpenVMS operations.
INDEX_FILL
This attribute sets the percentage of bytes in each index level bucket to be populated initially. If you anticipate that many records will be inserted randomly into the file, this value should be less than 100 percent. The default value is 100 percent and the minimum value is 50 percent.
The /FILL_BUCKETS qualifier to the CONVERT command overrides this attribute.
This attribute corresponds to the XAB$W_IFL field except that the XAB$W_IFL field contains a byte count, not a percentage.
LENGTH
This numeric attribute sets the length of the key in bytes. This value, along with the POSITION and TYPE attributes, is used when the key is unsegmented.
This attribute corresponds to the XAB$B_SIZ0 field. Its value must be specified because there is no default.
LEVEL1_INDEX_AREA
This attribute identifies the area where you place the level 1 index in an indexed file with multiple areas. The value is an integer in the range 0 to 254, which must be the same number as that assigned to the area in an AREA section.
When the data level and the index levels are placed in separate areas, or when each key is placed in its own area, use the LEVEL1_INDEX_AREA, DATA_AREA, and INDEX_AREA values.
This attribute corresponds to the XAB$B_LAN field.
NAME
This string attribute can be used to assign a name to a key. The name string is limited to 32 bytes and is padded with ASCII null characters. The default value is no name (blank).
This attribute corresponds to the XAB$L_KNM field.
NULL_KEY
This switch controls whether null key values will be allowed in an alternate string key field. The default value, NO, requires that all records contain a valid value for this alternate key.
In some databases, such entries are not desirable; some records will not contain a value for a particular alternate key. By allowing null keys, by declaring a null field, and by writing the null field as the alternate key for a record, you can include the record in the database.
A null key value is specified with the KEY NULL_VALUE secondary attribute. If a record has the specified null value in its alternate key field, a pathway to that record will not be made in the alternate index structure.
This attribute corresponds to the NUL option in the XAB$B_FLG field.
NULL_VALUE
This attribute specifies the null value that instructs the system not to create an alternate index entry for the record that has the null value in every byte of the key field. All data types may be used to specify null key values.
Note
The string data-type keys include STRING, DSTRING, COLLATED, and DCOLLATED.
This attribute corresponds to the XAB$B_NUL field.
POSITION
This numeric attribute defines the byte position of the beginning of the key field, with the first position being 0. Primary keys work best if they start at byte 0. This attribute, along with the LENGTH and TYPE attributes, is used when the key is unsegmented.
This attribute corresponds to the XAB$W_POS0 field.
PROLOG
This numeric attribute defines the internal structure level of indexed files—PROLOG 1, PROLOG 2, and PROLOG 3.
Prolog 3 files accept multiple keys (or alternate keys) and all data types. They also give you the option of compressing your data, indexes, and keys. PROLOG 3 is the default.
On the other hand, Prolog 1 and 2 files do not allow these options. You should not specify Prolog 3 if the primary key is segmented and the segments overlap. If you want to use a Prolog 3 file in this case, consider defining the overlapping segmented key as an alternate key and then choosing a different key to be the primary key.
To specify a Prolog 3 file, assign the value 3 to this attribute. To specify a Prolog 1 or 2 file, assign the value 2. There is no perceivable difference between PROLOG 1 and PROLOG 2.
If you do not specify a value for this attribute, the utility that creates a data file from the FDL file uses the system or process default. To see these default values, enter the DCL command SHOW RMS_DEFAULT.
This attribute is not supported for DECnet for OpenVMS operations; the default prolog in effect at the remote node is used.
This attribute corresponds to the XAB$B_PROLOG field.
SEGn_LENGTH
This numeric attribute defines the length of the key segment in bytes and is used with the
SEGn_POSITION attribute when the key is segmented. The value n is the
number of the segment and may be 0 to 7. The first segment in the key must be numbered 0, and
each key may have up to eight segments. Segmented keys must be STRING type.
For Prolog 3 files, segments cannot overlap.
This attribute corresponds to the key size fields, XAB$B_SIZ0 to XAB$B_SIZ7.
SEGn_POSITION
This numeric attribute defines the starting byte for a segment in a string key. The first position is 0 and segments cannot overlap in Prolog 3 files.
This attribute corresponds to the positioning fields, XAB$W_POS0 to XAB$W_POS7.
TYPE
|
BIN2 |
An unsigned, 2-byte, binary number in the range 0 to 65,535 (2 16–1). |
|
BIN4 |
An unsigned, 4-byte, binary number in the range 0 to 4,294,967,295 (2 32–1). |
|
BIN8 |
An unsigned, 8-byte, binary value that ranges from 0 to 2 64–1. |
|
COLLATED |
A string of ASCII characters. If the key is to be sorted by an NCS collating sequence, then the key type must be declared as COLLATED or as DCOLLATED (descending collated – sort in reverse order according to the collating sequence for that particular key). The sort order is determined by the collating sequence for that particular key. |
|
DBIN2 |
An unsigned, 2-byte, binary value that ranges from 0 to 65,535 (2 16–1). In an indexed file, records are stored in descending order for this key of reference. |
|
DBIN4 |
An unsigned, 4-byte, binary value that ranges from 0 to 4,294,967,295 (2 32–1). In an indexed file, records are stored in descending order for this key of reference. |
|
DBIN8 |
An unsigned, 8-byte, binary value that ranges from 0 to 2 64–1. In an indexed file, records are stored in descending order for this key of reference. |
|
DCOLLATED |
A string of ASCII characters. If the key is to be sorted by an NCS collating sequence, then the key type must be declared as COLLATED or as DCOLLATED (descending collated – sort in reverse order according to the collating sequence for that particular key). |
|
DDECIMAL |
A packed-decimal value (that is, a continuous string of 1 to 16 bytes) accessed in descending sort order in an indexed file. The format of the DDECIMAL type is the same as for DECIMAL, described next (except that DECIMAL is accessed in ascending order). |
|
DECIMAL |
A packed-decimal value, which is a continuous string of 1 to 16 bytes. A DECIMAL value is specified by the address of the first byte of the string and by the number of decimal digits. Each byte in a DECIMAL value is divided into two 4-bit fields. Each of these fields contains the binary representation of one decimal digit, except for the first 4-bit field in the highest byte, which represents the sign of the DECIMAL value. Although 4 bits can represent values up to decimal 16 (a hexadecimal 10), values greater than 9 are not allowed in a DECIMAL 4-bit field, except for the sign field. The first byte contains the two beginning digits of the value. The high-order nibble contains either the most significant digit or a leading zero if it is needed to make the sign field appear in the correct 4-bit field. For example, a DECIMAL value of +123 has a length of 3 (for 3 digits) and requires 2 bytes of storage. A DECIMAL value of –5237 would have a length of 4 digits. It would need 3 bytes of storage. |
|
DINT2 |
A signed, 2-byte integer accessed in descending order in an indexed file. This data type can represent integers between –32,768 and +32,767. |
|
DINT4 |
A signed, 4-byte integer accessed in descending order in an indexed file. This data type can represent integers between –2,147,483,648 and +2,147,483,647. |
|
DINT8 |
A signed, 8-byte integer accessed in descending order in an indexed file. This data type can represent integers between –2 63 and +2 63–1. |
|
DSTRING |
A string of ASCII characters accessed in descending sort order in an indexed file. The maximum length of the string is 255 characters. |
|
INT2 |
A signed, 2-byte integer; this data type can represent integers between –32,768 and +32,767. |
|
INT4 |
A signed, 4-byte integer; this data type can represent integers between –2,147,483,648 and +2,147,483,647. |
|
INT8 |
A signed, 8-byte integer; this data type can represent integers between –2 63 and +2 63–1. |
|
STRING |
A string of ASCII characters. The longest length allowed is 255 characters. |
The default key data type is STRING.
This attribute corresponds to the XAB$B_DTP field.
4.9. NETWORK Section
|
Secondary Attribute |
Default Value |
|---|---|
|
BLOCK_COUNT |
Varies |
|
LINK_CACHE_ENABLE |
YES |
|
LINK_TIMEOUT |
30 |
|
NETWORK_DATA_CHECKING |
YES |
BLOCK_COUNT
A local node uses this numeric attribute to establish the size, in blocks, of a message buffer for messages between itself and a remote node. The value can be 0 to 127. By default, the local node uses the NETWORK BLOCK COUNT value for the process. If that value is 0, then the NETWORK BLOCK COUNT value for the system is used. Use the SHOW RMS command to see what the process and system values are for NETWORK BLOCK COUNT.
The BLOCK_COUNT attribute corresponds to the XABITM item code XAB$_NET_BLOCK_COUNT, the requested block count.
LINK_CACHE_ENABLE
This switch enables logical link caching. It corresponds to the XABITM item code XAB$_NET_LINK_CACHE_ENABLE.
LINK_TIMEOUT
This numeric attribute specifies the logical link timeout in seconds, from 0 to 65,535. It corresponds to the XABITM item code XAB$_NET_LINK_TIMEOUT.
NETWORK_DATA_CHECKING
This switch enables data access protocol (DAP) level cyclic redundancy check (CRC). It corresponds to the XABITM item code XAB$_NET_DATA_CRC_ENABLE.
4.10. RECORD Section
|
Secondary Attribute |
Default Value |
|---|---|
|
BLOCK_SPAN |
YES |
|
CARRIAGE_CONTROL |
CARRIAGE_RETURN |
|
CONTROL_FIELD |
2 |
|
FORMAT |
VARIABLE |
|
SIZE |
No default |
BLOCK_SPAN
This switch determines whether records can span block boundaries in a sequential file. It corresponds to the BLK option in the FAB$B_RAT field.
When the switch is set to NO, records cannot be larger than 512 bytes. When the space remaining in a block is insufficient to store the next record, RMS stores the next record in a new block.
CARRIAGE_CONTROL
|
CARRIAGE_RETURN |
Specifies that each record is preceded by a line feed and is followed by a carriage return when the record is written to a carriage control device, such as a line printer or a terminal. This is the default. | ||||
|
FORTRAN |
Specifies that the first byte (byte 0) of each record contains a FORTRAN (ASA) carriage control character. The following lists the byte 0 values, the ASCII representation of each byte and the carriage control interpretation. | ||||
|
Byte 0 Value |
ASCII |
Meaning | |||
|
0 |
Null |
Null carriage control. Sequence: print buffer contents. | |||
|
20 |
Space |
Single-space carriage control. Sequence: line feed, print buffer contents, carriage return. | |||
|
24 |
$ |
Prompt carriage control. Sequence: line feed, print buffer contents. | |||
|
28 |
+ |
Overprint carriage control. Sequence: print buffer contents, carriage return. Allows double printing for emphasis. | |||
|
30 |
0 |
Double-space carriage control. Sequence: line feed, line feed, print buffer contents, carriage return. | |||
|
31 |
1 |
Page eject carriage control. Sequence: form feed, print buffer contents, carriage return. | |||
|
All others |
Same as ASCII space character: single-space carriage control. | ||||
|
NONE |
Specifies that no carriage control is to be provided. | ||||
|
|
Specifies that the fixed control portion of VFC records contains carriage control information. The first byte of the control portion specifies the carriage control to be performed before printing. The second byte specifies the control to be performed after printing. The following table shows the encoding scheme for the control bytes when you specify the PRINT keyword. | ||||
| B7 | B6 | B5 | B4 | Meaning | |
|
0 |
0 |
0 |
0 |
To specify no carriage control (NULL), set bits 3 to 0 at 0. | |
|
0 |
x |
x |
x |
Use bits 6 to 0 to specify a count of new lines (line feed followed by carriage return). | |
|
1 |
0 |
0 |
x |
Output the ASCII C0 control character specified by the configuration of bits 4 to 0. | |
|
1 |
0 |
1 |
x |
Reserved. | |
|
1 |
1 |
0 |
0 |
Skip to the vertical format unit (VFU) channel (1-16) specified by bits 3 to 0. Devices that do not have hardware VFUs translate these codes as a 1-line advance. | |
|
1 |
1 |
0 |
1 |
Reserved. | |
|
1 |
1 |
1 |
0 |
Reserved. | |
CONTROL_FIELD
This attribute specifies the size, in bytes, of the fixed-length control portion of VFC records. Its value must be a number in the range 1 to 255. The default value is 2.
This attribute corresponds to the FAB$B_FSZ field.
FORMAT
|
FIXED |
Specifies fixed-length records. |
|
STREAM |
Specifies that the records are STREAM records; the record is viewed as a continuous stream of bytes, delimited by a special character. This format is compatible with RMS–11 stream files. This is valid for sequential files only. |
|
STREAM_CR |
Specifies that the records are STREAM records; the record is viewed as a continuous stream of bytes, delimited by a CR character. This is valid for sequential files only. |
|
STREAM_LF |
Specifies that the records are STREAM records; the record is viewed as a continuous stream of bytes, delimited by an LF character. This is valid for sequential files only. |
|
UNDEFINED |
Specifies undefined record format, which means that the record is a continuous stream of bytes with no specific terminator. This keyword is valid for sequential files only. |
|
VARIABLE |
Specifies variable-length records. This is the default setting. |
|
VFC |
Specifies variable-length records with fixed-length control fields (VFC). This is valid for sequential and relative files. |
This attribute corresponds to the FAB$B_RFM field.
SIZE
Sets the maximum record size in bytes.
When used with fixed-length records, this value is the length of every record in the file.
When used with variable-length records, this value is the longest record that can be placed in the file. With sequential or indexed files, you can specify 0 and the system will not impose a maximum record length. (Note, however, that records in an indexed or relative file cannot cross bucket boundaries.)
When used with relative files, the SIZE attribute is used with the BUCKET_SIZE attribute to set the size of the fixed-length cells.
With VFC records, do not include the fixed control portion of the record in the SIZE calculation; only the data portion is set by this attribute. The RECORD CONTROL_FIELD attribute sets the size of the fixed control portion.
The fixed area is the size, in bytes, of the fixed-control portion of VFC records. Regular VFC records have a control field size of 0.
This attribute corresponds to the FAB$W_MRS field.
Table 4.1, ''Maximum Record Size for File Organizations and Record Formats'' gives the maximum record sizes, in bytes, for the various file organizations and record formats.
File Organization | Record Format | Maximum Record Size |
|---|---|---|
Sequential | Fixed-length | 32,767 |
Sequential (disk) | Variable-length | 32,767 |
Sequential (disk) | VFC | 32,767 ? |
Sequential (disk) | Stream | 32,767 |
Sequential (disk) | Stream CR | 32,767 |
Sequential (disk) | Stream LF | 32,767 |
Sequential (ANSI Tape) | Variable-length | 9,995 |
Sequential (ANSI Tape) | VFC | 9,995 ? |
Relative | Fixed-length | 32,255 |
Relative | Variable-length | 32,253 |
Relative | VFC | 32,253-FSZ ? |
Indexed, Prolog 1 or 2 | Fixed-length | 32,234 |
Indexed, Prolog 1 or 2 | Variable-length | 32,232 |
Indexed, Prolog 3 | Fixed-length | 32,224 |
Indexed, Prolog 3 | Variable-length | 32,224 |
For DECnet for OpenVMS operations, the maximum record size is determined by the DCL command SET RMS/NETWORK_BLOCK_COUNT.
4.11. SHARING Section
The SHARING section allows you to specify whether you want to allow multiple readers or writers to access your file at the same time. The SHARING keyword takes no values; it serves only to define this section.
|
Secondary Attribute |
Default Value |
|---|---|
|
DELETE |
None |
|
GET |
GET, if ACCESS GET has also been specified |
|
MULTISTREAM |
None |
|
PROHIBIT |
None |
|
PUT |
None |
|
UPDATE |
None |
|
USER_INTERLOCK |
None |
DELETE
The process accessing a file uses this switch to permit other accessors to delete records from the file.
This attribute corresponds to the DEL option in the FAB$B_SHR field.
GET
The process accessing a file uses this switch to permit other accessors to allow other users to read the file (to perform Find or Get RMS services or the equivalent language statement that reads a record). SHARING GET is the default if you have also specified ACCESS GET.
This attribute corresponds to the Get option in the FAB$B_SHR field.
MULTISTREAM
This switch allows multistream access to a file and is relevant for record operations only. This attribute is not available for sequential files with other than 512-byte, fixed-length records.
This attribute is not supported for DECnet for OpenVMS operations; an error is returned if you try to use it.
This attribute corresponds to the MSE option in the FAB$B_SHR field.
PROHIBIT
The process accessing a file uses this switch to prohibit any type of file sharing by other accessors. The PROHIBIT attribute takes precedence over all other ACCESS secondary attributes; if you specify the DELETE, PUT, TRUNCATE, or UPDATE attribute in the ACCESS section, the PROHIBIT attribute defaults to YES.
This attribute corresponds to the NIL option in the FAB$B_SHR field.
PUT
The process accessing a file uses this switch to allow other users to write records to the file (to perform Put or Extend RMS services or the equivalent language statement that writes a record or extends the space allocated to a file).
This attribute corresponds to the PUT option in the FAB$B_SHR field.
UPDATE
The process accessing a file uses this switch to allow other users to update records currently existing in the file (to perform Update or Extend RMS services or the equivalent language statement that rewrites a record or extends the space allocated to a file).
This attribute corresponds to the UPD option in the FAB$B_SHR field.
USER_INTERLOCK
This switch allows one or more users to write to a sequential file or a shared file. Usually this attribute is used for a file that is open for block I/O and the user is responsible for any interlocking required. USER_INTERLOCK is specified with the DELETE, GET, PUT, and UPDATE attributes.
This attribute corresponds to the UPI option in the FAB$B_SHR field.
4.12. SYSTEM Section
The SYSTEM section consists of system identification information and can be used to help document your FDL file. The SYSTEM keyword takes no values; it serves only to define this section.
|
Secondary Attribute |
Default Value |
|---|---|
|
DEVICE |
Null-string |
|
SOURCE |
VMS |
|
TARGET |
VMS |
DEVICE
This string attribute is used for comment purposes only. The intended use is to name the model of the disk on which the data file will reside.
SOURCE
IAS
RSTS/E
RSX-11M
RSX-11M-PLUS
RT-11
VMS
TARGET
IAS
RSTS/E
RSX-11M
RSX-11M-PLUS
RT-11
VMS
4.13. TITLE and IDENT Attributes
If you use EDIT/FDL to create your FDL file, the utility prompts you for a title during the session. The title is a string that you can place at the beginning of the FDL file. The character string you supply is for comment purposes only. It can be up to 132 characters long, including the TITLE keyword.
When the Edit/FDL and Analyze/RMS_File utilities create an FDL file, they place a header called the IDENT section after the TITLE in the FDL file. The IDENT attribute specifies the date and time of the creation of the FDL file, and it specifies the name of the utility that created it (either EDIT/FDL or ANALYZE/RMS_FILE).
However, you can also specify the header in the IDENT section. The character string that you supply can be up to 132 characters long, including the IDENT keyword. can contain one or more index levels from one or more keys.
Chapter 5. Create/FDL Utility
This chapter describes the Create/FDL utility. You use the Create/FDL utility to create empty data files optimally structured for improving data processing performance.
Support a Files-11 volume structure, On-Disk Structure Level 5 (ODS-5), that provides a volume structure for creating and storing files with expanded file names
Support additional character sets for naming files from file names that use the 8-bit ISO Latin-1 character set to the 16-bit Unicode (UCS-2) character set
Support extended file names with file specifications exceeding the traditional 39.39 character limit up to a maximum of 255 characters
Support preserving the case of file specifications created with the ODS-5 attributes
Support deep, multilevel directory structures up to a maximum of 512 characters
For more information, see the VSI OpenVMS Guide to Extended File Specifications.
5.1. Creating FDL Files
The first step in applying the File Definition Language facility to improve the performance of your data files is the creation of FDL files. When you have created an FDL file, you can then use it with the Create/FDL utility to create empty data files modeled on the input FDL file.
5.2. Methods of Creating FDL Files
Using the Edit/FDL utility (EDIT/FDL). See Chapter 6, "Edit/FDL Utility".
Using the Analyze/RMS_File utility (ANALYZE/RMS_FILE). See Chapter 1, "Analyze/RMS_File Utility".
Using a text editor.
Using the DCL command CREATE.
You should use either the Analyze/RMS_File utility or the Edit/FDL utility to create FDL files. You can use a text editor or the DCL command CREATE to create text files containing FDL specifications. However, these methods are not recommended because you must make sure that you place the primary sections in the correct order and that you give valid values to the attributes. For more information on validity rules, refer to Section 6.1.1, ''Validity Rules''.
TITLE   Sequential organization, variable records up to 320 bytes

IDENT   25-SEP-1993 13:08:17    OpenVMS FDL Editor
SYSTEM
        SOURCE                  VMS
FILE
        ALLOCATION              5050
        BEST_TRY_CONTIGUOUS     yes
        EXTENSION               505
        ORGANIZATION            sequential

RECORD
        BLOCK_SPAN              yes
        CARRIAGE_CONTROL        carriage_return
        FORMAT                  variable
        SIZE                    320
5.3. Creating Data Files
Once you have created an FDL file, it can be used by the record management utilities and callable FDL routines to format data files according to your specifications.
The Create/FDL utility uses the specifications in an existing FDL file to create a new, empty data file. You can supply the Create/FDL utility with the file specification of the new data file, or the Create/FDL utility can use the specification given in the FDL file itself.
The Convert utility (CONVERT), on the other hand, uses the specifications in an FDL file to create an output data file and to load it with records from one or more input files.
Like the Convert utility, the callable Convert routines (CONV$CONVERT, CONV$PASS_FILES, and CONV$PASS_OPTIONS) use the specifications in FDL files to create output data files from within a program.
These data files can use the full set of RMS creation-time options and they can be used by all the native OpenVMS high-level languages. This capability gives the high-level language user a tool for creating efficient data files that use a minimum amount of system resources.
The FDL routines (FDL$CREATE, FDL$GENERATE, and FDL$PARSE) also use FDL files. FDL$CREATE invokes the functions of the Create/FDL utility (CREATE/FDL) to create a file from an FDL specification and then to close the file. FDL$GENERATE produces an FDL specification from the RMS control blocks your program supplies, and then writes it to either an FDL file or a character string. FDL$PARSE parses an FDL specification, allocates RMS control blocks (FABs, RABs, or XABs), and then fills in the relevant fields.
CREATE/FDL Usage Summary
CREATE/FDL Usage Summary — The Create/FDL utility uses the specifications in an existing FDL file to create a new, empty data file.
Format
CREATE/FDL=fdl-filespec [filespec]
fdl-filespec
Specifies the FDL file from which to create the data file.
filespec
Specifies an optional file specification for the created file. If you specify a complete file specification, it overrides any contained in the FDL file.
Usage Summary
To invoke the Create/FDL utility, enter the CREATE/FDL command at the DCL command level. The Create/FDL utility produces the empty data file specified by the CREATE/FDL command or by the FDL file. To exit the Create/FDL utility, let it run to successful completion.
CREATE/FDL Qualifier
CREATE/FDL Qualifier — The CREATE/FDL command has only one qualifier: the /LOG qualifier. It does not affect the execution of the utility; it only produces an informational message.
/LOG
/LOG — This qualifier controls whether the Create/FDL utility displays the file specification of the data file it has created. By default, the utility does not display the file specification.
Format
/LOG
/NOLOG
Examples
$CREATE/FDL=INVENTORY/LOG DISK$:[COMPANY.ORDERS]PARTS.DAT%FDL-I-CREATED, DISK$:[COMPANY.ORDERS]PARTS.DAT;1 CREATEDThis command produces the empty output file PARTS.DAT from the specifications in the FDL file INVENTORY.FDL. Because the /LOG qualifier is used in the command, the Create/FDL utility returns an informational message stating the file specification for the file that was created.
$CREATE/FDL=INVENTORY PARTS.DATThis command produces the empty output file PARTS.DAT from the specifications in the FDL file INVENTORY.FDL. Because the /LOG qualifier was not used with the CREATE/FDL command, no informational message is returned.
Chapter 6. Edit/FDL Utility
This chapter describes the Edit/FDL utility (EDIT/FDL).
Support a Files-11 volume structure, On-Disk Structure Level 5 (ODS-5), that provides a volume structure for creating and storing files with expanded file names
Support additional character sets for naming files from file names that use the 8-bit ISO Latin-1 character set to the 16-bit Unicode (UCS-2) character set
Support extended file names with file specifications exceeding the traditional 39.39 character limit up to a maximum of 255 characters
Support preserving the case of file specifications created with the ODS-5 attributes
Support deep, multilevel directory structures up to a maximum of 512 characters
6.1. Creating FDL Files with the Edit/FDL Utility
One way to create FDL files easily is with the Edit/FDL utility (also known as the FDL editor). You can use the EDIT/FDL command to design FDL files that define commonly needed data files and then to create the data files when they are needed. The Edit/FDL utility has some special features that simplify the process of creating an FDL file. It recognizes FDL syntax and informs you of syntax errors immediately. It also lets you model the data file to be created and change attribute values to find the most efficient design.
Alternatively, you can use the ANALYZE/RMS_FILE command to create an FDL file from an existing data file which can then be used with the Edit/FDL utility Optimize script to determine the optimum design of the data file.
6.1.1. Validity Rules
The primary sections must appear in the order listed in Section 4.1, ''Overview''. If you have two or more AREA primary sections, they must follow one another in numerical order (for example, AREA 1, AREA 2, …, AREA
n).If you have two or more KEY primary sections, they too must follow one another in numerical order (for example, KEY 0, KEY 1, …, KEY
n).Within a KEY section, any SEG
nsecondary attributes should follow one another in numerical order; the SEGnnumbers must be "dense," not "sparse." For example, if you use SEG3 to label a key segment, segments SEG0, SEG1, and SEG2 must also exist.Each source line can contain multiple attributes, each terminated by a semicolon (;) or by the end of the line.
Use the exclamation point (!) to begin a comment. Comments begin at the exclamation point and continue to the end of the line, or to the first semicolon (;) encountered.
FDL does not process files with comment lines containing semicolons. However, you can use a semicolon on a comment line if the line is enclosed within quotation marks. For example:!"This line is okay; there are quotes setting off the comment"
The Edit/FDL utility ignores leading or trailing blanks or tabs.
FDL string values are terminated by the comment character (!) or by the statement terminator (;). Strings must be enclosed in quotation marks ( " ").
You can truncate keywords, but take care to avoid ambiguities. EDIT/FDL and ANALYZE/RMS_FILE always write out the entire keyword.
Edit/FDL Usage Summary
Edit/FDL Usage Summary — The Edit/FDL utility (EDIT/FDL) can help you create FDL files. The Edit/FDL utility was developed especially to manipulate FDL files. It has special features designed to simplify the process of creating an FDL file and should be used in most cases.
Format
EDIT/FDL fdl-filespec
Use this parameter to specify the FDL file to be created, modified, or optimized during this session. If you specify an existing FDL file for modification or for optimization, the output file is the next higher version of the file being modified or optimized. In all cases, you have the option of using the /OUTPUT qualifier to specify the output FDL file. The default file type is .FDL.
Usage Summary
To invoke the Edit/FDL utility, enter the EDIT/FDL command at the DCL command level. The Edit/FDL utility produces a new version of the input file unless the /OUTPUT qualifier is used to direct the output to a different file. To exit the Edit/FDL utility, enter either the EXIT command or the QUIT command. (Pressing Ctrl/Z has the same effect as entering the EXIT command, and Ctrl/C has the same effect as the QUIT command.)
Note
When you enter the EDIT/FDL command, the system refers to a reserved logical name, EDF. Do not use this logical name.
EDIT/FDL Qualifiers
EDIT/FDL Qualifiers — The DCL command EDIT/FDL begins an interactive session during which you can create or modify an FDL file. You can give the editor file design decisions and it will supply values for the FDL attributes or you can assign values to the attributes yourself. This section describes the EDIT/FDL qualifiers and how you use them to select the utility functions. Unless otherwise noted, these qualifiers do not take a qualifier value.
/ANALYSIS
/ANALYSIS — This qualifier specifies an FDL file obtained from a file analysis. See Chapter 1, "Analyze/RMS_File Utility" for more information about analyzing files.
Format
/ANALYSIS fdl-filespec
Qualifier Value
fdl-filespec
Specifies the particular FDL file obtained from a file analysis that is to be used as an input to the Optimize script. The default is a null file specification.
Example
$EDIT/FDL/ANALYSIS=Q1_SALES Q2_SALES
This command begins an interactive session in which the analysis information in the file Q1_SALES.FDL is used, together with the input FDL file Q2_SALES.FDL, to obtain an optimized output file, which the system designates as the next higher version of Q2_SALES.FDL.
/CREATE
/CREATE — This qualifier allows you to create an output file without an existing input file.
Format
/CREATE
Description
Using the /CREATE qualifier, you can create an output file directly without the Edit/FDL utility notifying you that the file is to be created. The Edit/FDL utility does not attempt to open the specified file for input when you use the /CREATE qualifier. The Edit/FDL utility assumes that either the file does not exist or that you want the utility to ignore it.
You can select the Design or the Add Key scripts only when your input file does not already exist.
Example
$EDIT/FDL/CREATE SALES_DATA
This command begins a session in which SALES_DATA.FDL is created. The Edit/FDL utility does not issue the informational message stating that the new file SALES_DATA.FDL will be created.
/DISPLAY
/DISPLAY — This qualifier specifies the type of graph you want displayed.
Format
/DISPLAY graph-option
Parameter
graph-option
Specifies the type of graph you want displayed: LINE, FILL, KEY, RECORD, INIT, or ADD.
|
LINE |
Plots bucket size against index depth. |
|
FILL |
Plots bucket size by the percentage of load fill by index depth. |
|
KEY |
Plots bucket size by key length by index depth. |
|
RECORD |
Plots bucket size by record size by index depth. |
|
INIT |
Plots bucket size by initial load record count by index depth. |
|
ADD |
Plots bucket size by additional record count by index depth. |
The default is LINE.
Example
$EDIT/FDL/DISPLAY=KEY TEMP_DATA
This command begins an interactive session in which the default value for the type of graph to be displayed has been changed from LINE to KEY. TEMP_DATA is the name of the FDL file to be created.
/EMPHASIS
/EMPHASIS — This qualifier provides you with a choice between smaller buffers and flatter files. You can use /EMPHASIS with the /NOINTERACTIVE qualifier if you want EDIT/FDL to be executed without an interactive terminal dialogue.
Format
/EMPHASIS tuning-bias
Qualifier Value
Represents how you want to weight the default bucket size for your file.
|
FLATTER_FILES |
Generally increases bucket size. The bucket size, in turn, controls the number of levels in the index structure. If a larger bucket size eliminates one level, then you should use this option. At some point, however, the benefit of having fewer levels will be offset by the cost of scanning through the larger buckets. |
|
SMALLER_BUFFERS |
Generally decreases the amount of memory you have to use. |
The default is FLATTER_FILES and it should be used unless excessive paging or RMS CPU time occurs because of oversized buffers. However, if your system has little extra memory or if you are not sure which tuning bias will improve the performance of your program, try tuning your file using SMALLER_BUFFERS and then FLATTER_FILES.
Example
$EDIT/FDL/EMPHASIS=SMALLER_BUFFERS TEMP_DATA
This command begins an interactive session in which the default value for the bucket size emphasis has been changed from FLATTER_FILES to SMALLER_BUFFERS. TEMP_DATA is the name of the FDL file to be created.
/GRANULARITY
/GRANULARITY — This qualifier specifies the number of key-associated areas in an indexed file. A file can contain from 1 to 255 key-associated areas and each area can contain one or more index levels from one or more keys. Each key definition contains the following area designations: DATA_AREA, LEVEL1_INDEX_AREA, INDEX_AREA. During input processing, the optimization and redesign functions assign two areas per key, one for data and one for both indexes. During output processing, the area designators are adjusted according to the granularity specified. Checks are made to exclude areas that have no key indexes and to create new key indexed areas where none previously existed. To assign more than two areas per key (DOUBLE) or to assign nonstandard key and area associations, you must invoke an interactive session. With the granularity qualifier configured as GRANULARITY=DOUBLE, create new areas and set the corresponding area designators to reference the new areas on a per-key basis.
Format
/GRANULARITY n
Qualifier Value
n
The following table shows the relationship between granularity, key, and area for various values of granularity.
|
Granularity |
Key and Area Relationships |
|---|---|
|
1 |
All indexes for all keys are assigned to AREA 0. |
|
2 |
Primary KEY data to AREA 0, all other indexes for all other keys to AREA 1. |
|
3 |
Primary KEY data to AREA 0, Primary KEY indexes to AREA 1, all other indexes for all other keys to AREA 2. |
|
4 |
Primary KEY data to AREA 0, Primary KEY indexes to AREA 1, all other key data to AREA 2, all other key indexes to AREA 3. |
|
DOUBLE |
Primary KEY data to AREA 0, Primary KEY indexes to AREA 1, all other key data to AREA (key_number*2), all other key indexes to AREA ((key_number*2)+1). |
Example
$EDIT/FDL/GRANULARITY=2 TEMP_DATA.FDL
This command begins an interactive session in which the output granularity will be two (2). TEMP_DATA.FDL is the name of the FDL file being processed.
/NOINTERACTIVE
/NOINTERACTIVE — This qualifier causes the Edit/FDL utility to execute the Optimize script without a terminal dialogue.
Format
/NOINTERACTIVE
Description
The analysis sections contained in the analysis FDL file produced by ANALYZE/RMS_FILE/FDL and unique to an analysis FDL
The FDL definition sections contained in either the original FDL file or the analysis FDL file
If there is no analysis section in the FDL file specified for /ANALYSIS, the Edit/FDL utility exits without producing an output file.
Examples
$ANALYZE/RMS_FILE/FDL/OUTPUT=TEMP_DATA_ANAL.FDL TEMP_DATA.IDXThis command should precede a noninteractive Edit/FDL session. It generates an analysis FDL file TEMP_DATA_ANAL.FDL from the data file TEMP_DATA.IDX. If the /OUTPUT specification was not included, this command would have created the analysis FDL file with the default name TEMP_DATA.FDL.
$EDIT/FDL/ANALYSIS=TEMP_DATA_ANAL.FDL/NOINTERACTIVE -$_/OUTPUT=TEMP_DATA_OPT.FDL TEMP_DATA.FDLThis command initiates a noninteractive session in which a new optimized FDL file TEMP_DATA_OPT.FDL is created using the FDL parameter input file TEMP_DATA.FDL and the analysis FDL file TEMP_DATA_ANAL.FDL. If the /OUTPUT specification was not included, this command would have created a new version of TEMP_DATA.FDL; for example, TEMP_DATA.FDL;3 would be created, if the parameter input file was TEMP_DATA.FDL;2.
$EDIT/FDL/ANALYSIS=TEMP_DATA_ANAL.FDL/NOINTERACTIVE -$_/OUTPUT=TEMP_DATA_OPT.FDL TEMP_DATA_ANAL.FDLThis command initiates a noninteractive session in which a new optimized FDL file TEMP_DATA_OPT.FDL is generated from only the analysis FDL file. However, the analysis FDL file has to be specified in the command twice. The Edit/FDL utility will retrieve the data from the analysis sections using the /ANALYSIS file specification and the data from the FDL definition sections using the parameter input file specification. While the /ANALYSIS specification has to contain FDL analysis sections, the parameter specification does not have to, and if it does, they will be ignored.
/NUMBER_KEYS
/NUMBER_KEYS — This qualifier allows you to specify the number of keys in your indexed file.
Format
/NUMBER_KEYS n
Qualifier Value
n
Indicates how many keys you want to define for your indexed file. You can define up to 255 keys. The default is 1 key.
Example
$EDIT/FDL/NUMBER_KEYS=3 TEMP_DATA
This command begins an interactive session in which the default value for the number of keys in an indexed file is changed from 1 key to 3 keys. TEMP_DATA is the name of the FDL file to be created.
/OUTPUT
/OUTPUT — This qualifier specifies the FDL file in which to place the definition from the current session.
Format
/OUTPUT [=fdl-filespec]
Qualifier Value
fdl-filespec
Specifies the output FDL file.
Description
If you omit the /OUTPUT qualifier, the output FDL file will have the same name and file type as the input file, with a version number that is one higher than the highest existing version of the file.
The default file type is .FDL.
Example
$EDIT/FDL/OUTPUT=NEWINDEX INDEX
Begins a session in which the contents of INDEX.FDL are read into the FDL editor and can then be modified. NEWINDEX.FDL is created; INDEX.FDL is not changed.
/PROMPTING
/PROMPTING — Specifies the level of prompting to be used during the terminal session.
Format
/PROMPTING prompt-option
Qualifier Value
prompt-option
|
BRIEF |
Selects a terse level of prompting. |
|
FULL |
Provides more information about each menu question. |
By default, the Edit/FDL utility chooses either BRIEF or FULL, depending on the terminal type and the line speed. High-speed CRT terminals are set to FULL; nonscope terminals and terminals operating at less than 2400 baud are set to BRIEF.
If the Edit/FDL utility has to repeat a question, it repeats the FULL version of the question, with a BRIEF form of the HELP text. You can also type a question mark (?) for help on a particular question.
The extra line of HELP text is not given for menu questions.
Example
$EDIT/FDL/PROMPTING=BRIEF TEMP_DATA
This command begins an interactive session in which the value of the prompting level for the Edit/FDL utility menus is set to BRIEF.
/RESPONSES
/RESPONSES — This qualifier allows you to select how you want to respond to script questions.
Format
/RESPONSES response-option
Qualifier Value
response-option
|
AUTOMATIC |
Indicates that you want all script default responses to be used automatically. This option speeds the progress of the question and answer session. Once you have entered the design phase, you can modify most of the answers you took by default. |
|
MANUAL |
Indicates that you want to provide all script responses. |
If you use the SET RESPONSES command during the interactive session, the default is AUTOMATIC; otherwise the default is MANUAL.
Example
$EDIT/FDL/RESPONSES=MANUAL TEMP_DATA
This command begins an interactive session in which the type of script response is MANUAL.
/SCRIPT
/SCRIPT — This qualifier controls whether the Edit/FDL utility begins the session by asking a logically grouped sequence of questions to aid you in creating the FDL file.
Format
/SCRIPT script-title
Qualifier Value
|
ADD_KEY |
Allows you to model or add to the attributes of a new index. |
|
DELETE_KEY |
Allows you to remove attributes from the highest index of your file. |
|
INDEXED |
Begins a dialogue in which you are prompted for information about the indexed data file to be created from the FDL file. The Edit/FDL utility supplies values for certain attributes. |
|
OPTIMIZE |
Requires that you use the analysis information from an FDL file that was created with the Analyze/RMS_File utility (ANALYZE/RMS_FILE). The FDL file itself is one of the inputs to the Edit/FDL utility (EDIT/FDL). In other words, you can tune the parameters of all your indexes using the file statistics gathered from a file analysis. |
|
RELATIVE |
Begins a dialogue in which you are prompted for information about the relative data file to be created from the FDL file. The Edit/FDL utility supplies values for certain attributes. |
|
SEQUENTIAL |
Begins a dialogue in which you are prompted for information about the sequential data file to be created from the FDL file. The Edit/FDL utility supplies values for certain attributes. |
|
TOUCHUP |
Begins a dialogue in which you are prompted for information about the changes you want to make to an existing index. |
Description
The default is not to invoke a script automatically. Note that, if you specify /NOSCRIPT, you can still use the scripts by entering the INVOKE command in response to the main editor function prompt.
Example
$EDIT/FDL/SCRIPT=INDEXED TEMP_DATA
This command begins an interactive session in which both the main menu and the script menu are bypassed. Instead, the Indexed script is generated immediately.
EDIT/FDL Examples
$EDIT/FDL INDEXThis command begins an interactive session that will modify an FDL file named INDEX.FDL.
$EDIT/FDL/ANALYSIS=INDEXFILE/SCRIPT=OPTIMIZE MAKEINDEXThis command uses the analysis information in the file INDEXFILE.FDL to create a more efficient MAKEINDEX.FDL file. The sequence of events is as follows:The FDL file MAKEINDEX.FDL is created by the Edit/FDL utility.
INDEXFILE.DAT is created by the CREATE/FDL=MAKEINDEX command.
INDEXFILE.DAT is used in applications.
INDEXFILE.FDL is created with the ANALYZE/RMS_FILE/FDL command.
The following command uses INDEXFILE.FDL to optimize MAKEINDEX.FDL:
$CONVERT/FDL=MAKEINDEX INDEXFILE.DAT INDEXFILE.DAT
$EDIT/FDL/NOINT/A=INVENTORY/G=4File:SALES$This command creates the output FDL file SALES from the analysis FDL file INVENTORY without an interactive terminal dialogue. In addition, the Edit/FDL utility optimizes the input file, changing the granularity factor to 4 areas and the number of keys to 2. Otherwise, all the defaults supplied by the Edit/FDL utility are used.
EDIT/FDL Commands
EDIT/FDL Commands — The Edit/FDL utility commands are used during the interactive
session only. The Edit/FDL utility prompts for one of the following commands
at the start of your interactive session: ADD, DELETE, EXIT, HELP. INVOKE,
MODIFY, QUIT, SET, and VIEW. However, because the Edit/FDL utility is not
command oriented but menu oriented, the prompt may change during the
interactive session to fit the needs of the menu questions. In general, the
prompt consists of a short question, the type of required value or the range
of acceptable values (in parentheses), and the default answer (in brackets),
as follows: question (keyword or range)[default] : answer.
In addition, some prompts consist of a short question, a list or a range of
acceptable values (either in parentheses or in a table), the required type
of the value (in parentheses), and the default answer (in brackets), as
follows: question (list of values) (keyword or range)[default] :
answer. If no default is allowed, you see the symbol [-], in
which case you must supply an answer.
ADD
ADD — This command allows you to add one or more lines to the FDL file. If the line already exists, you can optionally replace it with the new line. After you insert a line, you can optionally continue to add lines under that particular primary section. If no primary section exists to hold the secondary attribute being added, one is automatically created.
Format
ADD
Example
Main Editor Function (Keyword)[Help] : ADD
This command allows you to add lines to your existing FDL file. When you enter the ADD command, the Edit/FDL utility prompts you with the following menu.
                       Legal Primary Attributes

   ACCESS    attributes set the run-time access mode of the file
   AREA x    attributes define the characteristics of file area x
   CONNECT   attributes set various RMS run-time options
   DATE      attributes set the date parameters of the file
   FILE      attributes affect the entire RMS data file
   JOURNAL   attributes set the journaling parameters of the file
   KEY y     attributes define the characteristics of key y
   RECORD    attributes set the non-key aspects of each record
   SHARING   attributes set the run-time sharing mode of the file
   SYSTEM    attributes document operating system-specific items
   TITLE     is the header line for the FDL file

   Enter desired primary     (Keyword)[FILE] :
After you enter the name of the primary attribute, the Edit/FDL utility provides another menu showing all the secondary attributes for the primary attribute and asks which secondary attribute value you want to change.
DELETE
DELETE — This command allows you to delete one or more lines from the FDL file. If the line is the only remaining secondary attribute in a primary section, the primary attribute is also removed. After you remove a line, you can optionally continue to delete lines under the affected primary section.
Format
DELETE
Example
Main Editor Function (Keyword)[Help] :DELETE
This command allows you to delete lines from your existing FDL file. When you enter the DELETE command, the Edit/FDL utility prompts you with a menu displaying the current primary attributes of your FDL file. After you enter the name of a primary attribute, the Edit/FDL utility prompts you with another menu displaying the current secondary attributes for the selected primary attribute and asks which secondary attribute value you want to change.
EXIT
EXIT — This command ends the Edit/FDL utility session. The EXIT command causes the new FDL file to be created. This command is equivalent to pressing Ctrl/Z. If the definition file is empty when you exit, no FDL file is created. Refer to the online help topic Operation for more information on the Edit/FDL utility's relationship to input and output files.
Format
EXIT
Example
Main Editor Function (Keyword)[Help] :EXIT
This command allows you to leave the Edit/FDL utility after creating or modifying your FDL file. It displays the file specification of the FDL file it has created or modified and then returns you to the DCL level.
HELP
HELP — Invokes an interactive help session, which describes the Edit/FDL utility commands and the File Definition Language. To exit help and return to the main level menu, press the Return key in response to the "Topic?" prompt.
Format
HELP
Example
Main Editor Function     (Keyword)[Help] : HELP


   Information available:

   Abstract   Add    Delete   Exit   Help   Invoke   Modify
   Operation  Quit   Set      View

   Topic?
This command allows you to request information about the Edit/FDL utility while you are editing your FDL file. It displays a menu of the various topics about which you can request help.
INVOKE
INVOKE — This command prompts you for a script and initiates your choice. The scripts guide you through the design and optimization of a data file to ensure that complex operations are completed in a logical fashion. If a script is aborted, script operations and calculations are discarded, except for clearing the previous definition. All scripts assume that the files you are designing reside on a Files–11 disk.
Format
INVOKE
Example
Main Editor Function     (Keyword)[Help] : INVOKE


                        Script Title Selection

   Add_key     modeling and addition of a new index's parameters
   Delete_key  removal of the highest index's parameters
   Indexed     modeling of parameters for an entire Indexed file
   Optimize    tuning of all indices' parameters using file
               statistics
   Relative    selection of parameters for a Relative file
   Sequential  selection of parameters for a Sequential file
   Touchup     remodeling of parameters for a particular index

   Editing Script Title     (Keyword)[-] :
This command allows you to select which script you want to help you design your FDL file. After you enter the INVOKE command, the Edit/FDL utility prompts you with another menu displaying the possible script choices.
MODIFY
MODIFY — This command allows you to change an existing line in the FDL definition.
Format
MODIFY
Example
Main Editor Function (Keyword)[Help] : MODIFY
This command allows you to modify lines in your existing FDL file. When you enter the MODIFY command, the Edit/FDL utility prompts you with a menu displaying the current primary attributes of your FDL file. After you select a primary attribute, the Edit/FDL utility prompts you with another menu displaying the secondary attributes for the selected primary attribute and asks which secondary attribute value you want to change.
QUIT
QUIT — This command causes an abrupt end to the Edit/FDL utility session. The new FDL file is not created. The QUIT command is equivalent to pressing Ctrl/C.
Format
QUIT
Example
Main Editor Function (Keyword)[Help] : QUIT
This command returns you to the DCL command level without creating or modifying an FDL file.
SET
SET — This command allows you to establish defaults or to select any of the FDL editor characteristics you forgot to specify on the command line.
Format
SET
Example
Main Editor Function     (Keyword)[Help] : SET


                    FDL Editor SET Function

ANALYSIS     filespec of FDL Analysis file
DISPLAY      type of graph to display
EMPHASIS     of default bucketsize calculations
GRANULARITY  number of areas in Indexed files
NUMBER_KEYS  number of keys in Indexed files
OUTPUT       filespec of FDL output file
PROMPTING    Full or Brief prompting of menus
RESPONSES    usage of default responses in scripts

Editor characteristic to set     (Keyword)[-] :
This command allows you to establish defaults and to reduce the number of questions you are asked by the scripts. After you enter the SET command, the Edit/FDL utility displays a menu of Edit/FDL utility characteristics.
VIEW
VIEW — This command displays the attributes contained in the current FDL definition. This offers a preview of what the contents of the FDL file would be if it were to be output at this time.
Format
VIEW
Example
Main Editor Function (Keyword)[Help] : VIEW
This command displays your current FDL file one screen at a time.
The bucket size attribute is available only following file analysis. The default value is the same as the disk cluster size of the analyzed file.
The maximum record size listed for the VFC record format is for the data portion of the record only. It does not include the number of bytes in the control area.